Embed Size (px)
Citation preview

30 July 2018 1
e - zaba Business Banking
NATIONAL PAYMENT TRANSACTIONS IN HRK
INSTRUCTIONS FOR USE
CONTENT 1. INTRODUCTION ................................................................................................................................................................................. 2 2. LOGIN to e - zaba BANKING ......................................................................................................................................................... 2 3. ACCOUNT BALANCE ........................................................................................................................................................................ 5 4. TRANSACTIONS ................................................................................................................................................................................. 6 5. OPTIONS IN THE PAYMENT OPERATIONS MENU ................................................................................................................. 8 6. LIST OF RECIPIENTS EXEMPT FROM ADDITIONAL ORDER CONFIRMATION ................................................................ 9
6.1 PROCEDURE WITH THE LIST OF RECIPIENTS FOR USERS WITH M-TOKENPS ................................................. 10 6.2 PROCEDURE WITH THE LIST OF RECIPIENTS FOR USERS WITHOUT M-TOKENPS ......................................... 11
7. ADDITIONAL ORDER CONFIRMATION VIA M-TOKENPS .................................................................................................. 13 7.1 ADDITIONAL ORDER CONFIRMATION BY USING THE QR CODE ............................................................................ 13 7.2 ADDITIONAL ORDER CONFIRMATION BY USING DFE (APPLI4) ............................................................................. 17
8. LIMITS FOR THE EXECUTION OF ORDERS THROUGH E-ZABA ....................................................................................... 19 8.1 LIMITS FOR TRANSACTION ACCOUNTS ......................................................................................................................... 19 8.2 LIMITS FOR AN INDIVIDUAL E-ZABA USER ................................................................................................................... 20
9. ENTRY OF A HRK PAYMENT ORDER ....................................................................................................................................... 20 9.1 ENTRY OF A CLEARING ORDER ......................................................................................................................................... 23 9.2 SAVING, SIGNING AND SUBMITTING AN ORDER FOR EXECUTION ...................................................................... 25
10. GROUP SIGNING OF INDIVIDUALLY ENTERED ORDERS ................................................................................................. 26 10.1 GROUP ORDER SIGNING USING THE QR CODE ........................................................................................................ 28 10.2 GROUP SIGNING OF ORDERS BY USING THE DFE (APPLI4) ................................................................................. 36 10.3 GROUP SIGNING OF ORDERS - TWO SIGNATORIES ................................................................................................ 43 10.4 RETRIEVAL OF GROUP SIGNED ORDERS ..................................................................................................................... 46
11. CHANGE IN PRIORITY AND ORDER REVOCATION ........................................................................................................... 48 11.1 CHANGE IN PRIORITY ........................................................................................................................................................ 49 11.2 ORDER REVOCATION ......................................................................................................................................................... 49
12. ORDER EXECUTION .................................................................................................................................................................... 50 13. RETRIEVAL OF E-ZABA PAYMENT ORDERS ....................................................................................................................... 50 14. RETRIEVAL OF ORDERS SUBMITTED FOR EXECUTION .................................................................................................. 52 15. ENTETING ORDERS FROM FILE .............................................................................................................................................. 52
15.1 ELECTRONIC SIGNING OF FILES WITH ORDERS........................................................................................................ 52 15.2 ENTERING XML (pain.001) FILE..................................................................................................................................... 53 15.3 SUBMITTING ORDERS FROM FILE FOR EXECUTION ............................................................................................... 55 15.3.1 SUBMITTING THE FILE FOR EXECUTION -1 SIGNATORY ................................................................................... 59 15.4 RETRIEVAL OF UPLOADED FILES WITH PAYMENT ORDERS ................................................................................. 61 15.5 RETRIEVAL OF UPLOADED FILES FOR THE PERSONAL INCOME PAYMENT .................................................... 62 15.6 ENTRY OF PERSONAL INCOME PAYMENT FILE (hub3 format) ........................................................................... 63 15.7 RETRIEVAL OF UPLOADED FILES FOR THE PERSONAL INCOME PAYMENT .................................................... 65
16. ORDER STATUS ........................................................................................................................................................................... 65 17. CONFIRMATION ON EXECUTED PAYMENT ORDER ........................................................................................................ 67 18. PAYEES ........................................................................................................................................................................................... 69 19. TEMPLATES .................................................................................................................................................................................. 70 20. ACCOUNT STATEMENT ............................................................................................................................................................ 70
20.1 GROUP DOWNLOAD OF PDF STATEMENTS .............................................................................................................. 72 20.2 GROUP DOWNLOAD OF FILES WITH STATEMENTS (REGULAR AND FROM ARCHIVE) ............................... 73 20.3 RETRIEVAL OF STATEMENTS FOR ALL SUBNUMBERS ........................................................................................... 74 20.4 RETRIEVAL OF STATEMENTS FROM ARCHIVE .......................................................................................................... 75 20.5 MONTHLY REPORT ON ACCOUNT BALANCE AND TRANSACTIONS .................................................................. 77
21. PAYMENT OPERATION FEES INVOICES ............................................................................................................................... 77 22. "MY SETTINGS" - ADJUST THE USE TO YOUR NEEDS .................................................................................................... 78

30 July 2018 2
22.1 MY QUICK MENU ................................................................................................................................................................ 78 22.2 MAIN MENU ......................................................................................................................................................................... 78 22.3 TRANSACTIONS SEQUENCE ON THE STATEMENT .................................................................................................. 80
23. SIGN OUT OF e - zaba ............................................................................................................................................................... 80
1. INTRODUCTION e-zaba Business Banking (hereinafter: e-zaba) is a service that enables you to perform financial
business over the internet.
e-zaba provides full control over financial business through a system of assigning different types
of authorization.
You can contract the following types of authorization for an individual e-zaba user:
entring and sending of a payment order (does not include authorization for signing the
order),
signing of a payment order (does not include authorization for entry and submission of the order),
receiving Account balance and turnover information on an account,
receiving Statements of account balance and changes and other documents and
notifications from the Bank and
granting and revocation of authorization assigned to e-zaba end users.
For an individual e-zaba user, you can contract one of the authorizations, a combination of
multiple types of authorization, or all offered types of authorization.
2. LOGIN to e - zaba BANKING Before you start using e-zaba, insert the e-zaba card into the reader or connect the USB Key to
the computer and on the Bank's web-site www.zaba.hr select and e-
zaba.

30 July 2018 3
figure 1 - Zagrebačka banka homepage
For the purpose of identification, go through the following steps:
choose your certificate
A window will appear on the screen to display OIBs (Croatian personal identification numbers)
for all people using e-zaba on that computer. Select your OIB (tick it as shown in Figure 2) and
click .
Figure 2 - Certificate Selection
PIN entry The PIN (Personal Identification Number ) entry window appears on the screen. The PIN is
the number you use to sign in to work with your e-zaba card/USB Key.

30 July 2018 4
You can change your PIN at any time, as described in e-zaba user guide.
e-zaba instructions are available at the Bank’s Internet address www.zaba.hr within the
Support menu, BUSINESS ENTITIES, e-zaba Business Banking, INSTRUCTIONS.
In carrying out the registration process, we recommend that you change the initial PIN
(activation key) assigned to you by the Bank.
After signing in with PIN, the message box appears:
If you are using a USB Key:
Important Warning - Prevent the Possibility of Abuse
If you do not use e-zaba at any time, you must remove the USB Key from your computer
and store it in a safe place!
More detailed information is available in the e-zaba user guide.
If you use an e-zaba card:
Important Warning - Prevent the Possibility of Abuse
If you do not use e-zaba at any time, you must remove the card from the reader and store
it in a safe place!
More detailed information is available in the e-zaba user guide.
The e-zaba home page appears on the screen or if you have contracted e-zaba for multiple
business entities, a screen appears where you select a legal entity.
The e-zaba home page shows the balance of the transaction account by currency, on the
page you can download transactions for the last 10 days, access the last 3 statements of the
transaction account, use the exchange rate list (Figure 3).
Figure 3 - e-zaba homepage

30 July 2018 5
3. ACCOUNT BALANCE By selecting the Balance and Turnover - Account Balance option, a window appears on which, from the drop-down menu, select the transaction account for which you want to see the balance.
Display of your account balance appears as in Figure 4.
Figure 4 - account balance
By selecting the Balance and Turnover - Balance in HRK option, a window appears (Figure 5) on
which, for each transaction account, additional information is available: initial account balance
(equal to the final account balance of the previous day), current account balance (deposit
balance reduced by amount of credit line used), the amount of inflows and outflows to/from the account at the moment of iniquiry, the amount of pending orders and the available account
balance (deposit balance increased by the amount of the unused part of the credit line and
reduced by the amount of orders pending for execution).
Figure 5 - Account balance in HRK
You can print and/or save the account balance in HRK as a PDF document and you can also
download the .xls file format.
By selecting Balance and Turnover - Balance in Foreign Currency option, a window (Figure 6)
appears with information on the transactional account balance in individual currency as well as
the aggregate (cumulative) amounts table in currencies on all transaction accounts.

30 July 2018 6
Figure 6 - Account balance in foreign currency
You can print and/or save the account balance in foreign currency as a PDF document and you
can also download the file in .xls format.
4. TRANSACTIONS By selecting the Balance and Transactions - Transactions option, a window (Figure 7) appears on which you select/enter the transactions retrieval requirements:
transaction account for which you want to download transactions,
transactions currency,
payee/payer name,
payee/payer account number,
payee/payer IBAN,
date/time period,
the amount of a transaction (for example, if you would like to retrieve all transactions above
HRK 1,000.00 in the initial amount field you will enter 1,000.00 and if you want to access all
transactions regardless of the amount in the initial amount field you will enter 0.00)
type of transactions (all, just debit or just credit).

30 July 2018 7
Figure 7 – Transactions
By selecting the desired requirements, you will get a transactions overview (Figure 8).
Figure 8 - Transactions overview
You can print and/or save the selected transaction/transactions as a PDF document and you can
download them as a file in .xls and .xml format.

30 July 2018 8
The maximum number of transactions you can download in one file is limited to 2,000 items.
Since it is possible to define how many transactions you want to print (20, 40, 60, 80 or 100) on
one page, if you do not want to print all transactions, just click the transaction/ transactions you
want to print/download on the selected line in a tabulation of transactions (Figure 9).
Figure 9 - Transaction Selection
After you have selected the transaction/transactions you want, select the “Only Marked
Transactions” option (Figure 10).
Figure 10 - selected turnover download
5. OPTIONS IN THE PAYMENT OPERATIONS MENU In the Payment Operations menu, the following options are available:
Domestic payments
Operations in Foreign Curency
Order files
Personal income payment files (hub3 format)
Retrieval of group signed orders
List of payees exempt from additional order confirmation.

30 July 2018 9
In the Payment Operations – Domestic payments menu, the following options are available: New HRK order
New clearing payment order
Retrieval of e-zaba payment order on requirement
Payment order status
Retrieval of all orders submitted for execution
Templates
Payees
In the Payment Operations - Order files menu, the following options are available:
File entry
Retrieval of uploaded files
Retrieval of uploaded files for personal income payment
Within the Payment Operations - Personal income payment files (hub3 format) menu, the
following options are available:
File entry
Retrieval of uploaded files
6. LIST OF RECIPIENTS EXEMPT FROM ADDITIONAL ORDER CONFIRMATION
For all users who have contracted 1 (one) signatory of the e-zaba payment order, the Bank has
created a List of payees exempt from additional order confirmation.
Before the order is executed, you must accept the payer from the List of payees created by the
Bank.
In the Payment Operations menu, select the List of payeess exempt from additional order
confirmation option to accept all or only certain payees from the Bank List (Figure 11).
Figure 11 - Payment Operations menu - select the List of payees option

30 July 2018 10
By accepting the payees from the Bank List you have created your Personal list of payees in
whose favor you shall be able to execute orders using e-zaba.
6.1 PROCEDURE WITH THE LIST OF RECIPIENTS FOR USERS WITH M-TOKENPS
Instructions for downloading the m-tokenPS application are available at the Bank’s Internet
address www.zaba.hr within the Support menu, BUSINESS SUBJECTS, e-zaba Business
Banking, INSTRUCTIONS.
After selecting the List of payees exempted from additional order confirmation option,a
notification text screen will open (Figure 12).
Figure 12 - Notification on the list of payees created by the Bank
In the notification text, click the link to open the screen with the list of payees created by the
Bank.Tick the checkbox in front of the payee you want to add to your own list and click Prepare
(Figure 13).
By ticking the checkbox after “Mark All” you have selected to accept all payees from the
Bank’s list.
Figure 13 - Selection of the payee from the Bank's list
By clicking on Prepare the confirmation screen for selected payees will appear (Figure 14).
You confirm the payee/payees via m-tokenPS. At m-tokenPS select MAC (APPLI2).

30 July 2018 11
A series of numbers displayed on the e-zaba interface in the “Enter the following series in m-
tokenPS” field in the m-tokenPS option MAC (APPLI2) in the “Enter default series” field and
select “Calculate”.
Enter the obtained series of numbers in the m-tokenPS into the e-zaba interface in the “Enter
MAC” field and click Save.
Figure 14 - Confirmation of selected payees from the Bank List
By clicking Save, payee/payees are saved in your (Personal) list.
You do not need an additional order confirmation by the m-tokenPS to execute the order in favor
of the payee from your Personal list.
By clicking Remove, you can delete payees from your Personal list (Figure 15).
Figure 15 - Removing payees from the List of payees
Adding a payees to your Personal list is described in Chapter 7 of this Instruction.
6.2 PROCEDURE WITH THE LIST OF RECIPIENTS FOR USERS WITHOUT M-TOKENPS
After selecting the List of payees exempt from additional order confirmation option, a
notification text screen will open (Figure 16).

30 July 2018 12
Figure 16 - Notification on the List of payees created by the Bank
In the Notification text, click the link to open the window with the list of payees prepared by the
Bank. Tick the checkbox in front of the payee you want to add to your own list and click
Prepare (Figure 17).
By ticking the checkbox after “Mark All” you have selected to accept all payees from the
Bank’s list.
Figure 17 - Selection of of payees from the Bank’s list
By clicking Save, the payee/payees are saved to your (Personal) list, which enables you to
execute orders via e-zaba in favor of those payees.
Figure 18 - removal of recipients from the Bank List

30 July 2018 13
By clicking Delete, you can delete payees from your Personal list (Figure 18).
You can add payees individually to Your own list if you contract m-tokenPS.
If you do not contract an m-tokenPS, you can add payees to Your own list by means of the form
Request to contract a list of payees exempted from additional order confirmation in the e-zaba
business banking that you submit to your business relationship manager.
7. ADDITIONAL ORDER CONFIRMATION VIA M-TOKENPS
E-zaba users who have contracted 1 (one) signatory of the e-zaba payment order, and to increase
the security of their work on their own computer, have contracted with the Bank additional order
confirmation via m-tokenPS. T
The additional order confirmation is executed by using the DFE option (QR CODE) or DFE (APPLI4)
on the m-tokenPS.
By using m-tokenPS, you additionally confirm only orders in favor of payees who are not on your
Personal List of payees.
7.1 ADDITIONAL ORDER CONFIRMATION BY USING THE QR CODE
For easier execution of the additional order confirmation to recipients who are not on your list of
recipients, and without having enter to set of numbers displayed on the e-zaba interface into the
m-tokenPS, select "DFE (QR CODE )“ option on your Apple, Android or Windows mobile device
and capture the QR code on the e-zaba interface with the camera of your mobile device.
After entering the order that needs additional confirmation, by clicking on Sign Order or Submit
Order (if you have a contracted e-zaba authorizations for "Signing a Payment Order" and "Entry
and Submission of a Payment Order"), you will receive a notification on the interface
After you scan the QR code from the e-zaba interface (Figure 19)

30 July 2018 14
Figure 19 - Scanning the QR Code from the e-zaba interface
m-tokenPS displays the following data: Payee’s IBAN/account number, payment amount and
payment currency (Figure 20).
Figure 20 - Data display in m-tokenPS
If the payee’s IBAN/account number and the amount of the payment match the payee’s
IBAN/account number and the amount indicated on the invoice you are paying, verify the
details in m-tokenPS. By confirming the details MAC is generated (Figures 21 and 22)

30 July 2018 15
Figure 21 - data confirmation on m-tokenPS Figure 22 - generating MAC
which you enter in the e-zaba order in the "Enter MAC" field (Figure 23).
Figure 23- MAC entry in the e-zaba order
If you cannot or do not want to capture a QR code, but continue to use the "DFE (APPLI4)" option
for additional order confirmation by clicking on the notification link (Figure 24).

30 July 2018 16
Figure 24- "Settings" menu selection
the screen interface for the user administration appears (Figure 25) where you can change the
QR Code option to the “DFE (APPLI4)” option in the “Settings", “Additional Order Confirmation”
sub-menu.
Figure 25 - Changing the Additional Order Verification Mode in the “Settings” menu
Save the change by clicking on "Save Changes".
By saving the changes, you defined that the QR code no longer appears for the orders that need
to additional confirmation through m-tokenPS, but DFE (APPLI4).
You can change the additional order confirmation mode in the Settings submenu at any time.
In addition to changes in the mentioned submenu, the selection of the additional order
confirmation mode, using the QR Code or DFE (APPLI4) option, can be executed on the screen
interface with the order that needs additional confirmation (Figure 26).
Figure 26 - Changing the mode of additional order confirmation of the screen interface with an order
By clicking on the link in the message (Figure 26) you can change the mode of additional order
confirmation - you change the QR code option to DFE (APPLI4) option.
In the next order that needs to be additionally confirmed via m-tokenPS, you will again be
presented with the QR Code, so if you want to change the mode of additional confirmation from
the QR code to DFE (APPLI4), please change it in the “Settings” submenu.

30 July 2018 17
If you want to add a recipient in whose favor you are executing the order to the List of payees
exempt from additional order confirmation through m-tokenPS, after entering the MAC, put a
check mark (√) in the checkbox before the notification "I want to add a recipient to the list of
recipients exempt from additional order confirmation” (Figure 27).
Figure 27- Entering the MAC and adding payees to the List
After adding the payee's account to the List of payees exempted from additional order
confirmation, you will no longer additionally confirm via m-tokenPS orders in favor of that
payee.
7.2 ADDITIONAL ORDER CONFIRMATION BY USING DFE (APPLI4)
After entering the order that needs additional confirmation, by clicking on Sign Order or Submit
Order (if you have a contracted e-zaba authorizations for "Signing a Payment Order" and "Entry
and Sending of a Payment Order"), you will receive a notification on the interface as in Figure 28.
Figure 28 - Additional order confirmation via m-tokenPS

30 July 2018 18
Enter the set of numbers displayed on the e-zaba interface in the "Enter the Following Set in m-
tokenPS" field into the "Enter Default Set" field of the m-tokenPS DFE (APPLI4) option.
m-tokenPS will show you a set of digits that should represent the last 8 digits of the payee’s
IBAN specified on the invoice you are paying.
If the 8-digit set displayed in m-tokenPS does not represent the last 8 digits of the payee's IBAN
specified on the invoice you are paying, select "No" in m-tokenPS and repeat the entry of the
default set of digits.
If the 8-digit set displayed in m-tokenPS represents the last 8 digits of the payee's IBAN specified
on the invoice you are paying, confirm by pressing "Yes” in m-tokenPS, and then enter the
amount you are paying into m-tokenPS. After entering the amount, m-tokenPS generates the
MAC you enter in the e-zaba screen interface with the order in the "Enter MAC" field (Figure 29).
Figure 29 - MAC entry and adding recipients to the List
If you want to add a payee in favor of which you execute the order on the List of payees
exempted from additional order confirmation via m-tokenPS, tick () the checkbox in front of
the message “I want to add a payee to the list of payees exempted from additional order
confirmation”.

30 July 2018 19
After adding the payee's account to the List of payees exempted from additional order
confirmation, you will no longer additionally confirm via m-tokenPS orders in favor of that payee.
8. LIMITS FOR THE EXECUTION OF ORDERS THROUGH E-ZABA You can set a limit for the execution of orders via e-zaba
- for a transaction account and/or
- for each individual e-zaba authorized person with an authorization for signing the payment order.
8.1 LIMITS FOR TRANSACTION ACCOUNTS
If you want to limit the amount of the order for execution via e-zaba, you need to set a limit 1 for
a transaction account that is contracted for the use of e-zaba.
The contracted amount of the limit applies to all e-zaba authorized persons with an
authorization for signing the payment order linked to the transaction account for which the
agreed limit is contracted.
The limit can be contracted in HRK, EUR and/or in HRK and EUR.
The limit contracted in HRK is applied to national payment transactions in the HRK currency.
The limit contracted in EUR is applied to cross-border and international payment transactions in
all currencies including the HRK currency and to national payment transactions in a currency
other than HRK.
For the purpose of applying the limit in the EUR currency, orders executed in a different currency, other than EUR, are recalculatd into the EUR currency by applying the middle exchange rate.
Information on the contracted amount of limit is available in the Balances and transactions -
Account Balance menu (Figure 30).
Figure 30 - information on the contracted limit amount
When signing an order that exceeds the amount of the contracted amount of limit, the order will
be rejected with the message “The amount of the order exceeds the agreed amount of limit per account.”
1 To contract the limit, please contact your business relations manager.

30 July 2018 20
8.2 LIMITS FOR AN INDIVIDUAL E-ZABA USER
The limit 2 can be contracted in HRK, in EUR and/or in HRK and EUR.
The limit contracted in HRK is applied to national payment transactions in the HRK currency.
The limit contracted in EUR is applied to cross-border and international payment transactions in
all currencies including the HRK currency and to national payment transactions in a currency other than HRK.
For the purpose of applying the limit in the EUR currency, orders executed in a different currency,
other than EUR, are recalculated into the EUR currency by applying the middle exchange rate.
Depending on the number of contracted e-zaba signatories of the order, the following rules apply
when signing an order:
↔ One (1) signatory of the e-zaba payment order is contracted
By contracting the limit, e-zaba signatory can sign an order with the amount less than (<) or
equal (=) to the agreed limit for that e-zaba signatory. In cases where the amount of the
order exceeds (>) the amount of the contracted limit, signing of the order is not allowed. The
order will be rejected with the message “The amount of the order exceeds the contracted
amount of limit per order.”
↔ Two (2) signatories of the e-zaba payment order is contracted
↔ limit is contracted for one subscriber
If the order amount is less than (<) or equal to (=) the contracted limit, and the e-zaba
authorized person with authorization for signing orders and a contracted limit is the first to
sign an order, the order is executed with one signature.
If the order amount is less than (<) or equal to (=) the contracted limit, and the e-zaba
authorized person with authorization for signing orders and no contracted limit is the first to
sign an order, 2 signatures are required for the execution of the order.
↔ limit is contracted for tvo subscribers
If the order amount exceeds (>) the contracted limit amount of one and the other e-zaba
subscriber, signing the order is not allowed. The order will be rejected with the notification
"The amount of the order exceeds the contracted limit amount on order.”
9. ENTRY OF A HRK PAYMENT ORDER Complete the payment order (Figure 31) as follows:
bay way of free data entry in the field on the screen interface with the order (except those
fields for which the free entry is not allowed), or
by selecting the payee from the record of payees, or
using templates.
2 To contract the limit, please contact your business relations manager.

30 July 2018 21
Figure 31 - Payment order
Complete the payment order in the manner described in the table below: FIELD NAME
COMPLETION MODE
PAYER IBAN (payer) Select from the drop-down menu, free entry is not allowed.
Payer’s reference number
Enter the payer’s reference number. Enter the model number in the prefield after the HR mark, and the reference number in the field. By selecting a payee from the record of payees, the payer’s reference number is completed automatically.
PAYMENT DETAILS
Amount and currency Enter the payment amount. The HRK payment currency is completed automatically and cannot be changed. Data required.
Purpose code
Complete by selecting from the drop-down menu. By clicking on
next to the field, a menu appears with purpose code names. The purpose code is selected from the menu, free entry is not allowed. Data is not required.
Priority Enter the priority that determines the payment execution priority. Choose a number ranging from 40 to 59 (the smaller the selected number, the order execution priority is greater).
Type of execution The default execution mode is NKS (Regular). If you want the order to be executed urgently, select HSVP (Urgent) from the drop-down menu.
Payment details Completing by free entry. Entry of up to 140 characters is allowed. Data required.
Execution date The current date is st up as default.
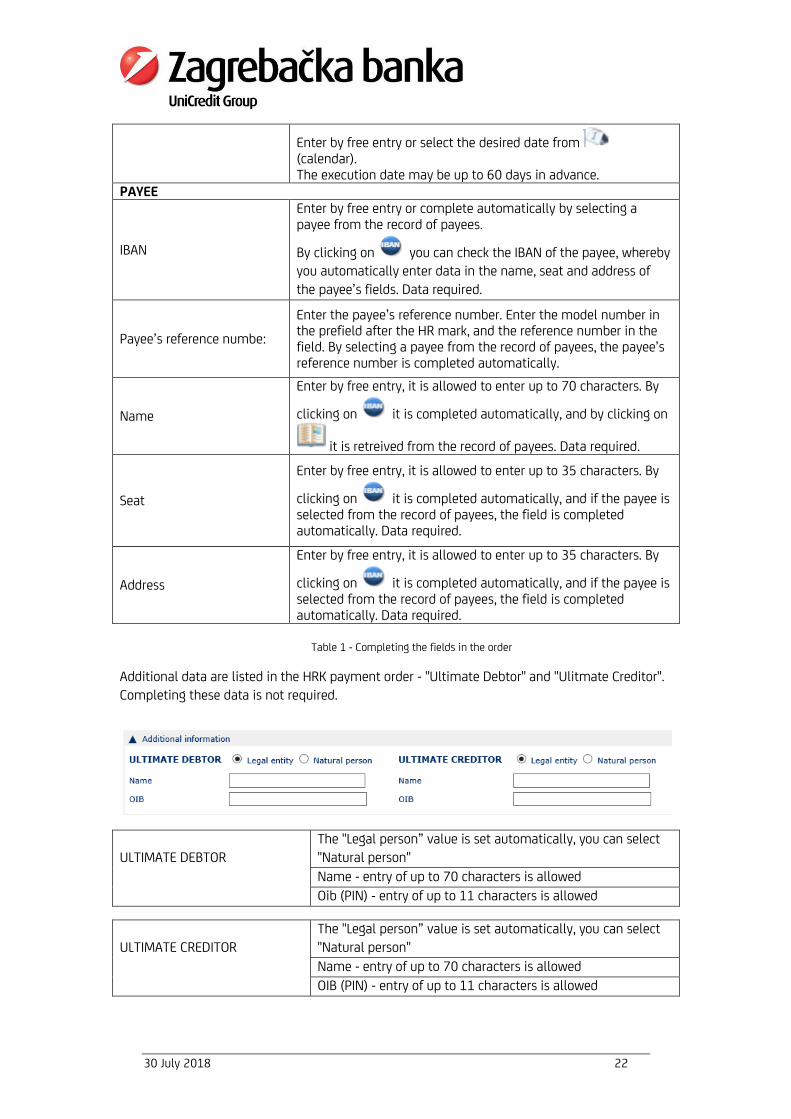
30 July 2018 22
Enter by free entry or select the desired date from (calendar). The execution date may be up to 60 days in advance.
PAYEE
IBAN
Enter by free entry or complete automatically by selecting a payee from the record of payees.
By clicking on you can check the IBAN of the payee, whereby you automatically enter data in the name, seat and address of
the payee’s fields. Data required.
Payee’s reference numbe:
Enter the payee’s reference number. Enter the model number in the prefield after the HR mark, and the reference number in the field. By selecting a payee from the record of payees, the payee’s reference number is completed automatically.
Name
Enter by free entry, it is allowed to enter up to 70 characters. By
clicking on it is completed automatically, and by clicking on
it is retreived from the record of payees. Data required.
Seat
Enter by free entry, it is allowed to enter up to 35 characters. By
clicking on it is completed automatically, and if the payee is selected from the record of payees, the field is completed automatically. Data required.
Address
Enter by free entry, it is allowed to enter up to 35 characters. By
clicking on it is completed automatically, and if the payee is selected from the record of payees, the field is completed automatically. Data required.
Table 1 - Completing the fields in the order
Additional data are listed in the HRK payment order - "Ultimate Debtor" and "Ulitmate Creditor".
Completing these data is not required.
ULTIMATE DEBTOR
The "Legal person” value is set automatically, you can select
"Natural person"
Name - entry of up to 70 characters is allowed
Oib (PIN) - entry of up to 11 characters is allowed
ULTIMATE CREDITOR
The "Legal person” value is set automatically, you can select
"Natural person"
Name - entry of up to 70 characters is allowed
OIB (PIN) - entry of up to 11 characters is allowed

30 July 2018 23
The most commonly used 3 purpose codes and their meaning are listed in the table below.
CODE NAME DESCRIPTION
ACCT Funds management - within the bank
Transfer of funds between two accounts of the same owner two accounts at the same bank
ADVA Advance Advance payment
CASH Cash management - outside the bank A general instruction for cash management
CDBL Payment of credit card bill
Payment of invoices for credit card incurred costs
ELEC Electricity bill Payment of electricity bills
FREX Buying and selling foreign currencies
Foreign exchange market affairs
GASB Gas bill Gas bill payment
GDSV Purchase and sale of goods and services
Buying and selling goods and service
GOVT Government payment Payment to or from a state body
INSM Installment Payment of rates/installments
INSU Insurance premium Payment of an insurance premium
OTHR Other Another type of payment
OTLC Other telecom related bill
Payment of bills for other telecommunication services
PHON Telephone bill Payment of telephone bills
PRCP Price payment Payment of costs
SALA Salary payment Payment of salaries
SUPP Supplier payment Supplier payment
TAXS Tax payment Tax payment
VATX Value added tax payment
Value added tax payment
WTER Water bill Payment of water bills
Table 2 - Purpose Codes
9.1 ENTRY OF A CLEARING ORDER A clearing order is shown in Figure 32.
3 All purpose codes are available on the web-site of the Bank www.zaba.hr

30 July 2018 24
Figure 32 - clearing order
Complete the order in the manner described in the table below: FIELD NAME
COMPLETION MODE
IBAN (payer) Select from the drop-down menu, free entry is not allowed.
Payer’s reference number Enter the payer’s reference number. Enter the model number in the prefield after the HR mark, and the reference number in the field.
Amount and currency Enter the payment amount. The HRK payment currency is completed automatically and cannot be changed. Data required.
IBAN (payee) Select from the drop-down menu, free entry is not allowed.
Payee’s reference number Enter the payer’s reference number. Enter the model number in the prefield after the HR mark, and the reference number in the field.
Purpose code
Complete by selecting from the drop-down menu. By clicking on
next to the field, a menu appears with purpose code description. The purpose code is selected from the menu, free entry is not allowed. Data is not required.
Payment details Automatically completed payment details can be supplemented.
Table 3 - Completing the fields in the clearing order
Additional data are listed in the clearing order - "Ultimate Debtor" and "Ultimate Creditor".
Completing these data is not required.

30 July 2018 25
ULTIMATE DEBTOR
The "Legal person” value is set automatically, you can select
"Natural person"
Name - entry of up to 70 characters is allowed
OIB (PIN) - entry of up to 11 characters is allowed
END USER
The "Legal person” value is set automatically, you can select
"Natural person"
Name - entry of up to 70 characters is allowed
OIB (PIN) - entry of up to 11 characters is allowed
9.2 SAVING, SIGNING AND SUBMITTING AN ORDER FOR EXECUTION Save the completed order by clicking on Prepare Order for Execution.
If the order is not completed or the entered data are incorrect, you cannot save the order.
In this case, an error description appears below the fields that are not completed properly.
The order is signed by clicking on the Sign Order and/or Order Control.
The process of signing an order depends on the number of contracted e-zaba order signatories.
- One (1) signatory of the e-zaba payment order is contracted
By clicking on Submit Order, the e-zaba signatory simultaneously signs and submits order for
execution if they have a contracted "Entry and Submission of a Payment Order" e-zaba
authorization. By clicking Sign order, the order is signed, but is NOT submitted for execution.
You can send the order for execution immediately upon signing or leave it for later execution.
If the payee in whose favor you wish to execute the order, is not on your (Personal) list of payees,
for signing order it is necessary: if you have contracted m-tokenPS, additional confirmation of
the order via m-tokenPS is requested (described in more detail in Chapter 7 of this Instruction) or
if you do not have contracted m-tokenPS, add the payee to the Personal list (described in more detail in Chapter 6 of this Instruction).
- Two (2) signatories of the e-zaba payment order is contracted
The first signatory signs the order by clicking on Sign Order. The other signatory login into e-zaba
with their card/USB Key, retrieves the order as described in Chapter 13 of this Instruction and
sign the order for the second time by clicking on Order Control. By clicking on Submit Order, the
order is sent for execution.
The executed order appears as in Figure 33.

30 July 2018 26
Figure 33 - Payment order with the EXECUTED status
A transaction number, reference and new order status is assigned to the order processed in the
Zagrebačka banka system. Transaction number and reference uniquely determine the order. Use
them in case of any complaints.
The different order status are described in Chapter 16 of this Instruction.
10. GROUP SIGNING OF INDIVIDUALLY ENTERED ORDERS
To simplify signing and submitting for execution individually entered orders, we have enabled
group signing of individually entered orders.
Group signing of orders is enabled for:
e-zaba users who have contracted one (1) signatory of the e-zaba order, and orders in favor of payees not on the List of payees are additionally confirmed via m-tokenPS and
e-zaba users who have contracted two (2) signatories of the e-zaba order.
Group signing of orders is not enabled for e-zaba users who use the Bank's List of payees, and
they update the List of payees using the form Request to contract a list of payees exempted
from additional order confirmation in the e-zaba business banking.
You can sign in groups orders of
1) national payment transactions in HRK,
2) national payment transactions in foreign currency and
3) cross-border/international payment transactions.

30 July 2018 27
The rules for group signing of orders are:
the maximum number of orders in the group you can sign at a time is ten (10). In the case
of marking more than 10 orders for signing, a warning message appears (Figure 31).
Figure 34 - Warning message
for group signing of orders, you can only choose orders in the same status - in status
“Received” when 1 signatory of the order was contracted or in the status “Signed”
(“Controlled”) when 2 signatories of the order were contracted.
If only orders in favor of the payee IBAN that are on your List of payees are in the order
group, no additional order confirmation via m-tokenPS is required. You sign the order
group with a certificate from the USB Key/e-zaba card.
If there are one or more orders in favor of payees IBAN/account numbers that are NOT on
your List of payees in the order group, additional order confirmation via m-tokenPS is
still necessary by using DFE (QR CODE) or DFE (APPLI4) option. Other orders in the order
group, for which no additional order confirmation is required, you sign in groups with a
certificate from the USB Key/e-zaba card.
If you use DFE (QR COD) option in m-tokenPS for additional order confirmation, orders that
do not require additional confirmation are signed as a group with a certificate from the
USB Key/e-zaba card. You still additionally confirm orders in favor of payees
IBAN/account numbers that are NOT on your List of payees with the use of the DFE (QR CODE) option, but you no longer need to confirm each order individually. Depending on
the number of orders selected for the group signing, which need to be additionally
confirmed via m-tokenPS, you can additionally confirm up to five (5) orders at a time by
scanning one QR code. After the QR code is scanned, data about the payee IBAN/account
number, payment amount and currency will be displayed for all orders in m-tokenPS. If
you confirm the correctness of the displayed data, one MAC is created for all orders,
which you enter in the e-zaba interface, meaning that by entering one MAC you
additionally confirmed more orders at once. If there are more than five (5) orders in the
order group that require additional order confirmation via m-tokenPS, the Bank will
create 2 QR codes.
If you use DFE (APPLI4) in m-tokenPS for additional order confirmation, orders that do not
require additional confirmation are signed as a group with a certificate from the USB
Key/e-zaba card. You still additionally confirm orders in favor of payees IBAN/account
numbers that are NOT on your List of payees individually with the use of the DFE (QR
CODE) option.

30 July 2018 28
10.1 GROUP ORDER SIGNING USING THE QR CODE
If you use the DFE (QR CODE) option in m-tokenPS for additional order confirmation, orders that
do not require additional confirmation are signed as a group with a certificate from the USB
Key/e-zaba card.
You still additionally confirm orders in favor of payees IBAN/account numbers that are NOT on
your List of payees with the use of the DFE (QR CODE) option, but you no longer need to confirm
each order individually.
Depending on the number of orders selected for the group signing, which need to be additionally
confirmed via m-tokenPS, you can additionally confirm up to five (5) orders at a time by
scanning one QR code.
After the QR code is scanned, data about the payee IBAN/account number, payment amount and
currency will be displayed for all orders in m-tokenPS. If you confirm the correctness of the
displayed data, one MAC is created for all orders, which you enter in the e-zaba interface,
meaning that by entering one MAC you additionally confirmed more orders at once.
If there are more than five (5) orders in the order group that require additional order
confirmation via m-tokenPS, the Bank will create 2 QR codes.
After entering the order, in the Payment Operations, Domestic paymens, Retrieval of e-zaba
payment order, retrieve the orders you want to sign (Figure 35).
Figure 35 - Retrieval of e-zaba orders

30 July 2018 29
By clicking on Retrieve, a tabular display of orders appears (Figure 36).
Figure 36 - tabular display of orders
Put a check mark ( ) in the checkbox in front the order you want to sign. By clicking the Check for signing (Figure 37)a group of orders that need to be signed is created.

30 July 2018 30
Figure 37 - Selecting orders for signing
By forming a group of orders, the following information is displayed in the lower left corner of
the screen (Figure 38)
- the total amount (in currencies) of the signing order,
- the total number of orders for signing and
- group order ID.
Figure 38 - Data on the total amount and number of orders in the group
Group orders in favor of payees which are NOT on your List of payees are additionally confirmed
by using the DFE (QR CODE) option in m-tokenPS.
Select the DFE (QR CODE) option in m-tokenPS and scan a QR code from the screen interface of
e-zaba (Figure 39).
The following data is displayed in m-tokenPS for all orders: Payee’s IBAN/account number,
payment amount and payment currency.

30 July 2018 31
If the data corresponds to the payee's IBAN and the amount specified on the invoices you are
paying, confirm the data in m-tokenPS by pressing “OK” after which a MAC is generated which
you enter in the e-zaba interface in the “Enter MAC” field (Figure 35).
By entering one MAC, you have additionally confirmed more orders at once.
Figure 39 - Additional confirmation of more than 5 orders

30 July 2018 32
Figure 40 - additional confirmation of more than 5 orders
Select the DFE (QR CODE) option in m-tokenPS and capture a QR Code from the e-zaba interface.
The following data are displayed in m-tokenPS: IBAN/Recipient account number, payment
amount and payment currency. If the data match the IBAN of the recipient and the amount
specified on the invoice you are paying, confirm the data in m-tokenPS by pressing "OK" and
then m-tokenPS generates the MAC (Figures 41 and 42)

30 July 2018 33
Figure 41 – data confirmation and Figure 42 – data confirmation and MAC generation MAC generation
which you enter in the e-zaba interface in the "Enter MAC" field (Figure 43). By entering one MAC you have additionally confirmed multiple orders at a time.

30 July 2018 34
Figure 43 - MAC entry
When two QR Codes are generated, you are required to enter both MACs before clicking on Sign a
group of orders.
If you want to add recipients in whose favor you are executing the orders to the List of recipients
exempt from additional order confirmation through m-tokenPS, after entering the MAC, put a
check mark (√) in the checkbox before the notification "I want to add a recipient to the list of
recipients exempt from additional order confirmation” (Figure 43).
After entering MAC, the group of orders is successfully signed by clicking on Sign a group of
orders (Figure 44).

30 July 2018 35
Figure 44 - A group of orders has been successfully signed
To submit orders for execution, put a check mark () in the checkbox in front the order you want
to submit for execution and click Submit (Figures 44 and 45).

30 July 2018 36
Figure 45 - A group of orders is submitted for execution
10.2 GROUP SIGNING OF ORDERS BY USING THE DFE (APPLI4) If you use the DFE (APPLI4) option in m-tokenPS for additional order confirmation, orders that do
not require additional confirmation are signed as a group with a certificate from the USB
Key/USB Key Secure Browser/Card.
You still additionally confirm orders in favor of payees IBAN/account numbers that are NOT on
your List of payees individually with the use of the DFE (QR CODE) option.
After entering the order, in the Payment Operations, Domestic payment, Retrieval of e-zaba
payment order, retrieve the orders you want to sign (Figure 46).

30 July 2018 37
Figure 46 - Retrieval of e-zaba orders
By clicking on Retrieve, a tabular display of orders appears.
Put a check mark () in the checkbox in front the order you want to sign (figure 47).

30 July 2018 38
Figure 47 - Selecting orders for signing
By clicking on Check for Signing a group of orders that need to be signed is created (Figure
48). You can only sign as a group orders in favor of payees on Your list of payees because you do
not need additional order confirmation for these orders.
Figure 48 - Group signing of orders with certificate

30 July 2018 39
After forming a group of orders, the following data below the last row of the order from the
group (Figure 49) is displayed
- the total amount (in currencies) of the signing order,
- the total number of orders for signing and
- group order ID.
Figure 49 - Data on the total amount and number of orders in the group
The group of orders is successfully signed by clicking on Sign a group of orders (Figure 50).
To submit orders for execution, put a check mark () in the checkbox before the order you want
to submit for execution and click Submit (Figures 50 and 51).
Figure 50 - Submitting a group of orders for execution

30 July 2018 40
Figure 51 - A group of orders is submitted for execution
If you have also checked for signing orders in favor of payees who are NOT in your List of payees,
every order in favor of the payee that is not on your List of payees is still additionally confirmed
by using DFE (APPLI4) option in m-tokenPS individually (Figure 52).

30 July 2018 41
Figure 52 - Notification on individual additional order confirmation through m-tokenPS
You can access orders that need to be additionally confirmed via m-tokenPS individually by
using the Accessing of orders by condition option by clicking on the order number in front of the
order in a tabulation or by ticking () the checkbox in front of the order (Figure 53)

30 July 2018 42
Figure 53 - Retrieval of orders for additional confirmation through m-tokenPS
which opens a screen interface with the details of the order you need to additionally confirm by
using the m-tokenPS (Figure 54).
Figure 54 - additional order confirmation through m-tokenPS
The additional order confirmation procedure using the DFE (APPLI4) option is described in
Chapter 7.2 of this Instruction.

30 July 2018 43
10.3 GROUP SIGNING OF ORDERS - TWO SIGNATORIES After entering the order, in the Payment Operations, Domestic Payments, Retrieval of e-zaba payment orders, retrieve the orders you want to sign (Figure 55).
First signatory
By clicking on Retrieve, a tabular display of orders appears. Put a check mark ( ) in the
checkbox in front the order you want to sign.
By clicking on Select for signing (Figure 55)
Figure 55 - Selecting orders for signing
a group of orders to be signed (Figure 6) is formed.
By forming a group of orders, the following information is displayed in the lower left corner of
the screen
- the total amount (in currencies) of the signing order,
- the total number of orders for signing and
- group order ID.
Figure 56 - Signing a group of orders
The group of orders is successfully signed by clicking on Sign a group of orders (Figure 57).

30 July 2018 44
Figure 57 - A group of orders has been signed by the first subscriber
Second signatory
Sign in e-zaba your Card/USB Key and retrieve the orders with the "Signed" status using the
Retrieval of e-zaba payment order option in the Payment Operations, Domestic Payments (Figure
35). Orders can also be retrieves by using the Retrieval of group signed orders option in the
Payment Operations menu as described in Chapter 10.4 of this Instruction.
Put a check mark ( ) in the checkbox in front the order you want to sign.
By clicking on Select for signing (Figure 58)
Figure 58 - Selecting orders for signing
a group of orders to be signed is formed (Figure 59).
By forming a group of orders, the following information is displayed in the lower left corner of
the screen
- the total amount (in currencies) of the signing order,
- the total number of orders for signing and
- group order ID.

30 July 2018 45
Figure 59 - Signing a group of orders
The group of orders is successfully signed by clicking on Sign a group of orders (Figure 60).
Figure 60 - A group of orders has been signed by the second subscriber
To submit orders for execution, retrieve the orders with a "Verified" status using the Retrieval of e-zaba payment order option in the Payment Operations, Domestic Payments (Figure 35).
Orders can also be retrieves using the Retrieval of group signed orders option in the Payment
Operations menu as described in Chapter 10.4 of this Instruction.
Put a check mark () in the checkbox in front the order you want to submit for execution and
click Submit.
Orders for execution may only be sent by an e-zaba user with the "Entry and Submission of a
Payment Order" e-zaba authorization.

30 July 2018 46
10.4 RETRIEVAL OF GROUP SIGNED ORDERS If you want to retrieve a group of orders, select the Retrieval of group signed orders option in the Payment Operations menu (Figure 61).
Figure 61 - Retrieval of group signed orders
By selecting the Retrieval of group signed orders option, all groups of orders are displayed
(Figure 62).
Figure 62 - Tabular display of groups of orders

30 July 2018 47
By selecting an individual group of orders and clicking on the row in the display, you will get a
tabular display of orders in the selected group of orders (Figure 63).
Figure 63 - Tabular display of orders in the group
By clicking on the ordinal number in front the order in the tabular display, a screen interface
appears with order details.
Group signed orders can be retrieved by using the Retrieval of e-zaba payment order option in
the Payment Operations, Domestic Paymaents menu (Figure 35).
Put a check mark () in the checkbox in front the Group of orders ID field and select a group of
orders, by clicking on next to the field in the drop-down menu (Figure 64).
Figure 64 - Selection of a group of orders from the menu
By using the Retrieval of e-zaba payment order option in the Payment Operations, Domestic
Payments menu, you can retrieve only groups of national payment orders in HRK (Figure 65).

30 July 2018 48
Figure 65 - Menu with groups of orders
In the event that two order signatories are defined in e-zaba but the second signatory does not
sign all orders in the group with the "Signed" status, the group of orders receives a new ID
number after the group is signed by the second signatory.
This group of orders is additionally indicated in a tabulation with a gray line and a mark
behind the order number meaning that the other signatory did not sign all orders in the group
(Figure 66).
Figure 66 - Additionally flagged group of orders in the display
11. CHANGE IN PRIORITY AND ORDER REVOCATION Order priority determines the sequence of order execution from the queue.
Orders may be in queue (order status - waiting for execution) in the following cases:
you have assigned orders for execution with the execution date in advance,
you currently do not have enough funds on the transaction account to execute order or
the account is blocked.
For the orders you have submitted via e-zaba, you can independently determine the execution
priority and thus determine the sequence of execution of the orders.
Orders relating to the execution of enforcement over monetary assets (writ of execution,
debenture, etc.), formed on the basis of FINA payment notifications, have priority (order priority
18) in relation to the execution of other payment orders.
You can not change the priority of these orders.

30 July 2018 49
11.1 CHANGE IN PRIORITY You can change the order execution priority that you specified when entering the order. Change in priority is possible when the payment order is in queue (order status - waiting for execution).
Change in priority is allowed only to e-zaba authorized persons with the "Signing a Payment
Order” authorization..
When two e-zaba order signatories have been contracted, both signatories must confirm the
change in order priority.
Execute the change in priority in the following manner:
retrieve the order in queue whose execution priority you want to change
you will receive an order display as shown in Figure 67.
Figure 67 - Change in order priority
from the drop-down menu in the Priority field, select the preferred order priority
click on Change Priority.
The ordered submitted by the Bank based on contractual authorities (e.g. interest payment
orders and fee orders) cannot be changed.
11.2 ORDER REVOCATION
You can revoke payment orders from the queue.
From the queue you can also revoke the orders you have submitted through another channel
(e.g. m-zabaPS, in the branch office of the Bank).

30 July 2018 50
Order revocation is allowed only to e-zaba authorized persons with the "Signing a Payment Order” authorization. When two e-zaba signatories have been contracted, both signatories must
confirm the order revocation.
Revoke the order in following manner:
retrieve the order you want to revoke in the manner described in Chapter 13 of this
Instruction.
you will receive a display of the selected order as shown in Figure 67.
by clicking Revoke Order, the order is revoked.
12. ORDER EXECUTION The payment order is sent for execution in the manner described in Chapter 9.2 of this
Instruction. The payment order submitted via e-zaba is not partially executed.
Orders relating to the execution of enforcement over monetary assets, formed on the basis of
FINA payment notifications, are executed partially from all accounts of the business entity at the
Bank.
Orders are executed in accordance with the General Terms and Conditions of Zagrebačka banka
d.d. Governing the Use of Transaction Acounts of Business Entities, the General Terms and
Conditions of Zagrebačka banka d.d. Governing the Use of Direct Channels by Business Entities
and the Execution Time Schedule. 4
13. RETRIEVAL OF E-ZABA PAYMENT ORDERS The retrieval of e-zaba orders is enabled according to different requirements (Figure 68).
4 General Terms and Conditions and Execution Time Schedule are available at www.zaba.hr .

30 July 2018 51
Figure 68 - Retrieval of orders
By clicking on Retrieve, all orders that meet the default requirements are displayed in tabular
form (Figure 69).
Figure 69 - Tabular display of retrieved orders
You can sort the orderes, in a descending or ascending manner, according to the following
requirements:
submission date,
execution date,
transaction number,
amount,
the payee's name,
IBAN/account of the payee,
reference and

30 July 2018 52
bank of the payee
By clicking on the PDF icon in the top right corner of the screen, a PDF document opens with a
group display of payment orders that you can save or print.
14. RETRIEVAL OF ORDERS SUBMITTED FOR EXECUTION By selecting the Retrieval of all orders submitted for execution option, you can retrieve the
orders you have submitted for execution through another channel (e.g. m-zaba, at the branch
office of the Bank).
The order retrieval is enabled for the date, period, recipient account, recipient IBAN or recipient
name.
15. ENTETING ORDERS FROM FILE In addition to an individual order entry, you can also load the file with payment orders to e-zaba.
Create a file with orders using the software your company uses in financial business
(independent of e-zaba). The file must be in a specific format with a particular data structure.
After the file has been created, it is necessary to:
electronic signature of the file with orders,
load (file-upload) the signed file with orders in e-zaba and
submit orders from the file for execution.
Thorugh e-zaba, the Bank receives and executes files with orders whose authenticity is verified in
one of the following ways:
↔ the file with orders is signed by two e-zaba authorized persons with the joint signing
authorization, or
↔ the file with orders is signed by an e-zaba authorized person with the authorization of
individual signing of the payment order in e-zaba, and the other e-zaba authorized person with
authorization to enter and submit the order has submitted the file for execution, or
↔ the file with the orders is signed by an e-zaba authorized person with the authorization of
individual signing of the payment order in e-zaba, who additionally confirms his or her identity
via m-tokenPS of submission of the file for execution.
The e-zaba authorized person with authorization to sign the payment order who has signed the
file without the use of the m-tokenPS cannot submit the signed file by e-zaba for execution.
15.1 ELECTRONIC SIGNING OF FILES WITH ORDERS The file order can only be signed by an e-zaba user with the authorization "Signing a Payment
Order". The file is signed offline (no need to have an Internet connection). Use the ASEBA
FileSecure application to sign the file.
With the same application, you can check the electronic signature of the Bank on electronically
signed documents sent by the Bank.

30 July 2018 53
More detailed instructions for using the ASEBA FileSecure application are available on the Bank's
website www.zaba.hr within the menu SUPPORT, BUSINESS ENTITIES, e-zaba business banking,
INSTRUCTIONS. 5
15.2 ENTERING XML (pain.001) FILE Once you have signed the file, you need to upload it to the e-zaba.
Uploading a file can be executed by an e-zaba user with the authorization "Entry and Submission
of a Payment Order" (when entering a file, it is checked whether this authorization is contracted
on the transaction account that is in the file as the payer's account).
Upload the file as follows:
login to e-zaba as described in Chapter 2
within the Payments menu - Files with orders select File Entry (Figure 70).
Figure 70 - File entry with orders
By using the "Files with Orders" option , you upload all XML files - and the files with payment
orders and the files for the payment of personal income.
Selecting the File Entry option, screen as shown in Figure 71 opens.
Figure 71 - Interface for uploading the order files
Click Browse to select the file you want to upload into the e-zaba (Figure 72).
5 Instructions for using a file signing application.

30 July 2018 54
Figure 72 - Selecting a file to upload
You can do the following with the selected file:
verify it for correctness (check the file structure in order to test its correctness prior to the
uploading of orders from the file in e-zaba) – Check or
upload into e-zaba (upload orders from file in e-zaba) – Upload
Uploading the order from the file
By selecting Upload a screen is displayed with the file information as shown in Figure 73.
Figure 73 - The file has been uploaded
After uploading, the orders from the file were not submitted to execution, but were only received
at the Zagrebačka banka, as well as when the orders were individually entered, signed and/or
monitored.
Checking file validity
Before uploading a file with the orders, you can check the file's validity (check the file structure)
in the e-zaba. For this purpose, instead of Upload, select Check (Figure 71). You will get a
message about the validity of the file or any possible errors in the file (Figure 74).

30 July 2018 55
Figure 74 - File with Invalid Orders
In the File entry menu, you can download an example of a file with the orders by clicking the
Download link.
15.3 SUBMITTING ORDERS FROM FILE FOR EXECUTION You can submit the uploaded orders from the file (Figure 73)
immediately for execution by clicking Submit for Execution or
view them in the table view and then submit them for execution.
The file can be uploaded and submit for execution by the authorized person with the
authorization "Entering and submitting payment orders".
Display of data on the uploaded file/orders
The table view contains all the orders that are part of the file (Figure 75).

30 July 2018 56
Figure 75 - Display of uploaded orders
By clicking on the ordinal number of the order (Figure 75) you will get a view of the selected
order (Figures 76 and 77) with all the data relating to the selected order.
Figure 76 - View the order from the file with the status EXECUTED

30 July 2018 57
Figure 77 - View the order from a file with the status DECLINED
If the orders from the uploaded file were not submitted for execution immediately after
uploading them to e-zaba, you can do that later by using the Retrieval of Uploaded Files (Chapter
15.4 of this Guide).
Batch booking is a functionality that allows debiting the account of the payer in one amount,
and crediting of the payees account in an individual amount.
You can use the batch booking option for all types of payment orders and multiple groups of
orders in the file.
The file can contain multiple groups of orders with the following characteristics: ↔ the group of orders for the batch booking of the account must have a "True" tag in the batch
booking field;
↔ the use of batch booking tag is possible for all types of orders;
↔ only one payment currency is allowed in one group of orders with a batch booking tag;
↔ if the control sum of group-level amounts is entered then all group orders must be valid;
↔ if no control sum of group-level amount is entered, the Bank will only execute the valid
orders and your transaction account will be debited for the total amount of the valid orders;
↔ a group of orders for the payment of personal income (TRUE + SALA) will be declined if any of
the orders in the order group is invalid;
↔ urgent foreign currency payments with batch booking tag are not possible;
↔ if there are orders in the order group that do not have the same execution time according to
the Execution Schedule, the Bank will execute all orders from that group in accordance with the
times when orders with the earliest time are executed (e.g. if a group with national payment
transactions in HRK for the benefit of the account at Zagrebačka banka and other banks in the

30 July 2018 58
Republic of Croatia is submitted at 16:00, the execution of all orders from that group will
commence with the date of the following working day, regardless of the fact that there are
orders in the group in favor of the recipient with the account in Zagrebačka banka d.d.).
In a file, a group of personal income payment can be formed and use it to pay contributions,
taxes and the like in the other group with or without the batch booking tag (debiting the payer's
account for each order).
An overview of all payment order files in the xml format (pain.001) is available by using the
option Retrieval of Uploaded Files.
By using the Retrieval of Uploaded Files for the Personal Income Payment option, you can
retrieve personal income payment files in xml format (pain.001) delivered to the Bank by
27 June 2017.
By submitting the file with a group of payment orders for personal income payment with a
batch booking instruction for execution, a single payment order is made for the entire amount
of payment regardless of whether the accounts of the recipients of natural persons are with
Zagrebačka banka or with other domestic banks (Figure 78).
Figure 78 - Personal income payment file and cover order
Clicking on Details displays a cover order.
If you want to revoke a group of batch booking orders, click Details.
A cover order opens where you select the Revoke option.
You can only revoke a cover order in the "Pending for execution" status (Figure 79).

30 July 2018 59
Figure 79 - Personal income payment file and cover order in the "Awaiting Execution" status
By revoking the cover order, you have also revoked all individual orders in the group. 15.3.1 SUBMITTING THE FILE FOR EXECUTION -1 SIGNATORY
In the case where 1 (one) signatory of the e-zaba order is contracted, a check is performed when
submitting the file for execution
↔ whether the file with the orders was signed by one e-zaba authorized person with the
authorization of individual signing of the payment order in e-zaba, and another e-zaba
authorized person with the authorization to enter and submit the order submits the file for
execution (different persons) or
↔ the file with the orders was signed by the e-zaba authorized person with the authorization of
the individual signing of the e-zaba payment order which also submits the file for execution
(same person).
In the case when the same e-zaba authorized person signs and submitss the file for
execution, when submitting the file for execution an additional identification of the sender
of the file is performed using the m-tokenPS.
Clicking Submit for Execution on the interface will display the notification "To submit the file for
execution please enter the OTP." (figure 80).

30 July 2018 60
Figure 80 - Identifying the sender of the file by m-tokenPS
If the same e-zaba authorized person who signed the file submits the file for execution, and
there is no contracted m-tokenPS, when submitting the file for execution (clicking Send for
Execution) displays the notification as shown in Figure 81.
Figure 81 - File sender identification without m-tokenPS
In m-tokenPS select the OTP (APPLI1) option and enter the generated OTP in the field "On the m-
tokenPS select OTP (APPLI1)" on the e-zaba screen interface (Figure 82).

30 July 2018 61
Figure 82 - OTP entry
Upon entering the OTP, by clicking Submit for Execution, orders from the file were submitted for
execution (Figure 83).
Figure 83 - File status with orders sent for execution
15.4 RETRIEVAL OF UPLOADED FILES WITH PAYMENT ORDERS
By selecting the Retrieval of Uploaded Files option from the "File with Orders" menu, you
retrieve the payment order files and the personal income payment files formatted in the
xml format uploaded on 27 June 2017 onwards.
All the files you have uploaded to e-zaba are displayed (Figure 84).

30 July 2018 62
Figure 84 - Retrieval of uploaded files with payment orders
By selecting an individual file, by clicking on the ordinal number in the tabular view, you will get
a tabular view of the orders that are its component (Figure 85).
Figure 85 - A tabular view of the order from the file
15.5 RETRIEVAL OF UPLOADED FILES FOR THE PERSONAL INCOME PAYMENT
By selecting the Retrieval of uploaded files for the personal income payment option in the "File
with Orders" menu, you retrieve the personal income payment payment file formed in the xml
format uploaded by 27 June 2017.

30 July 2018 63
All files for the personal income payment in the xml format that you have uploaded to your
e-zaba by 27 June 2017 are displayed. (figure 86).
Figure 86 - Retrieval of uploaded files with personal income payment orders
By selecting an individual file, by clicking on the ordinal number in the tabular view, you will get
an overview of the personal income payment file information and the accompanying cover order for the personal income payment to the account of the recipients within and/or outside the bank
(Figure 87).
Figure 87 - Overview of the data on the personal income payment file uploaded by 27 June 2017.
15.6 ENTRY OF PERSONAL INCOME PAYMENT FILE (hub3 format) Through e-zaba, the Bank receives and executes files that have been verified in one of the
following ways:
↔ the file with the orders has been signed by two e-zaba authorized persons with the
authorization of jointly signature of the payment order in e-zaba, or

30 July 2018 64
↔ the file with the orders has been signed by an e-zaba authorized person with the
authorization of individual signing of the payment order in e-zaba, and another e-zaba
authorized person with the authorization to enter and send the order has sent it for
execution, or
↔ the file with the orders was signed by an e-zaba authorized person with the authorization
of individual signing of the payment order in e-zaba, who additionally confirmed his identity
by m-tokenPS at the time when the file was being sent.
The e-zaba authorized person with the authorization of individual signing of the payment
order who has signed the file without using the m-tokenaPS cannot submit the signed file
by e-zaba for its execution.
Once you have signed the file, you need to file-upload it to the e-zaba.
Upload the file as follows:
login in e-zaba as described in Chapter 2
within the Payments, Personal Income Payments File menu select File entry (Figure 88).
The file can be uploaded and sent for execution by the e-zaba by the authorized person with the
authority "Entering and submitting payment orders".
Figure 88 - Interface for uploading the personal income payment file (hub3 format)
By using the "Personal income payment file (hub3 format)" option, you upload the personal
income payment files in hub3 format (specification, order type 4, execution method 1).
Selecting the File entry option opens as screen as shown in Figure 89.
Figure 89 - File entry for personal income payment

30 July 2018 65
Click Browse to select the file you want to upload into the e-zaba.
Further handling of the personal income file is the same as handling the payment order fiile
(described in chapters 15.2, 15.3 and 15.3.1 of these Instructions).
15.7 RETRIEVAL OF UPLOADED FILES FOR THE PERSONAL INCOME PAYMENT
By selecting option Retrieval of uploaded files in the "Personal income payment files (hub3
format)" menu, you retrieve the personal income payment files in the hub3 format.
All of the personal income payment files in the hub3 format that you have uploaded to e-zaba
are displayed (Figure 90).
Figure 90 - Retrieval of uploaded personal income payment files in the Hub3 format
16. ORDER STATUS You can retrieve the payment order status by number of the transaction using the Payment Order Status option.
The information contained in the order status information is shown in Figure 91.

30 July 2018 66
Figure 91 - Order status
Orders can have the following statuses: STATUS
DESCRIPTION
Received The order was entered and prepared for signing.
Signed One signatory has signed the order (in case two signatories of the order were contracted).
Verified All signatories have signed the order (one or two, depending on the number of contracted signatories of the order).
Executed
For orders of the payee with an account at the Bank, a payee’s account has been approved, and for of the payee outside the Bank, the order is sent through the interbank payment system to the bank in which the payee's account has been opened.
Revoked e-zaba user with the authority to sign the order has revoked the order. The revoked order will not be executed.
Waiting for execution Execution orders with a date of execution in advance, the orders for the execution of which there are not enough funds in the account, the account is blocked.
Declined The order has been declined, a new, valid order must be entered.
Queued Orders with a current execution date that were sent to execution after the Schedule-defined time of the execution of the order.
Revoked before sending e-zaba user with the authority to sign the order has revoked the order. The revoked order will not be executed.
Canceled e-zaba user with the authority to sign the order has

30 July 2018 67
canceled the order. If the execution of the order has not yet begun, the order in favor of the account of the payee in another bank of the Republic of Croatia can be cancelled.
Suspicious
We recommend that you check the transactions on the account to see if the order has been executed. If the order has been executed, by checking the status of the order, the order status will be updated into executed and if the order has been declined, a new order must be entered.
Table 4 - Order Status
17. CONFIRMATION ON EXECUTED PAYMENT ORDER
For orders that have been executed (order status Executed), you can request a Confirmation on
executed payment order.
By clicking Confirmation on the executed payment order (Figure 92), a screen interface opens
and you can choose whether you want to
download the confirmation via e-zaba by clicking Download or
send the confirmation by e-mail 6 to the preferred e-mail address using the Send to e-
mail address option.
Figure 92 - Downloading the confirmation on the execution of the payment order
The Confirmation on executed payment order is electronically signed by the Bank and the
payee should receive it in the electronic form - by e-mail or as a document stored on the
6 The Bank sends a confirmation from its official e-mail address: [email protected]

30 July 2018 68
external data carrier (CD, USB) because the Bank’s signature can only be verified on the
electronically presented document (Figure 93).
Figure 93 - Confirmation on the executed payment order
You can verify the Bank's signature by clicking on the text in the lower right corner of the
confirmation or by clicking on the icon
Each confirmation also contains a program-generated number that uniquely determines the
confirmation, and it consists of the channel tag, the year of issue, and the number of the
document (e.g. EZ-2014-000161).
You can submit to the Bank (the closest branch office, your business manager/entrepreneurial
banker) the payment order issued by e-zaba or the extract from the transaction account for
further certification.

30 July 2018 69
For a Confirmation on the executed payment order, the Bank shall calculate a fee in accordance
with the Bank’s Decision on Tariff of Charges.
18. PAYEES In the menu Payment Operations, Domestic Paymenst, Payees, you can store business
partners/suppliers information to the benefit of which you most often make payments.
The stored data on the payees is displayed in the tabular format of Recipients Overview. You
create a payment order for the selected payee by clicking on in the Order entry column with
the payee's name or by clicking on the payee's name (Figure 94).
Figure 94 - Payees overview
To add a new payee, use the Enter a New Payee option (Figure 95).
Figure 95 - Entering a new payee
If you want to check if the IBAN you entered is valid, click behind the IBAN field. After
entering, save the payee data by clicking Save the Payee.

30 July 2018 70
Remove a payee by using the Delete the Selected Payees option (Figure 94). Mark the payee you
want to remove by putting a √ in the checkbox in front the payee's name.
19. TEMPLATES You can fill out the payment order using a template.
In the Payment Operations, Domestic payments menu, click on the Templates option.
A tabular display of previously saved templates will open (Figure 96).
Figure 96 - Tabular display of templates
If you want to change the data in the template, by clicking on the template name, open the
template that you want to change.
The template you want to remove needs to be marked by putting the √ symbol in the checkbox
in front the name of the template and click on Delete selected templates.
You can create new templates from an order that is in the status received, signed, or executed by
using the Save option, with a previous entry of the template name.
20. ACCOUNT STATEMENT In the Statements menu, the following is available:
Account statements - Payment and Transactions
Retrieval of all available statements
Retrieval of statement for all the subnumber
Retrieval of the statement for the date
Retrieval of the statement by ordinal number and year
Retrieval of statements from archive
Retrieval of monthly reports on account balance and transactions
Account statements – Loans and investment
Retrieval of all available statements
Retrieval of the statement for the date
Retrieval of the statement by ordinal number and year
Invoices
Invocie for the HRK payment services
Invocie for the foreign payment services

30 July 2018 71
Invoice for loans and investment
Invoice card transactions - card acquiring
Overdraft interest rate sheet
Notice of maturity for credit and investment
Reports on card acquiring
Retrieval of group reports on card acquiring
Retrieval of analytic reports on card acquiring
Debiting/crediting notice - camt.054
By selecting Statements, Statemenst – Transaction Account or the Retreival of all available
statements option, a screen interface as shown in Figure 97 opens.
Figure 97 - Review of all available statements
The retrieved statements you can:
review on the screen interface (by clicking on No. xxx from dd.mm.gggg),
individually download and print or save (by clicking on PDF),
download (print and save) multiple individual PDF statements at once,

30 July 2018 72
download multiple statement files at once,
download all PDF statements for a specified period or according to selected statement numbers (collectively download and print or save all PDF statements),
download all statemetn files (in the format camt 053, XML and/or TXT) for a specified
period or according to selected statement numbers,
save it in a format that is suitable for further processing (by clicking on XML or TXT ).
20.1 GROUP DOWNLOAD OF PDF STATEMENTS With the Download statements for period option, you can simultaneously download (save and
print) all statements for a specific period by selecting from the drop-down menu a date in the
past 45 days (Figure 98) or
Figure 98 - Downloading statements for period
simultaneously download (save and print) all statements according to selected statement
numbers by selecting from the drop-down menu (Figure 99)
Figure 99 - Downloading statements according to numbers
in the form of a single document containing additional data in the header: the statement
numbers, the period for which the statements were request, the date and time of the document
issuance (Figure 100).
Figure 100 - Document header with additional data
If you have chosen a period or a statement number that is too great (Figure 101)
Figure 101 - The selected period or statement number is too great
it may happen that you will not be able to download the statement, due to a number of items
that is too great.

30 July 2018 73
In this case, a warning notification will appear as in Figure 102.
Figure 102 - Warning notification
If you want to download (save and print) multiple individual statements at one time, select
them in the tabular display by putting the √ symbol in the checkbox in front of the statement
number (Figure 103) and download using the "Download selected statements" option.
Figure 103 - Downloading individual statements at once by selecting from the tabular display
20.2 GROUP DOWNLOAD OF FILES WITH STATEMENTS (REGULAR AND FROM ARCHIVE) By selecting "Download statements for period" or "Download selected statements" and selecting
file formats from the drop-down menu behind the "Format" field (Figure 104)
Figure 104 - Selecting the format of the file with statement
you can download the ZIP file
which contains selected files with statement. An example of downloaded files in camt 053 format

30 July 2018 74
An example of downloaded files in XML format
An example of downloaded files in TXT firmat
20.3 RETRIEVAL OF STATEMENTS FOR ALL SUBNUMBERS This functionality is available to all e-zaba users who have contracted e-zaba on multiple
different subnumbers with the same registration number and have assigned
e-zaba authorization for downloading statements according to subnumbers.
By selecting the "Retrieve statements for all subheadings" option, you simultaneously
download in a ZIP file statements for all subnumbers which you have assigned e-zaba
authorization for downloading statements, regardless of the legal entity you chose to work
with e-zaba (Figure 106) .
Figure 106 - A screen interface for downloading statements fro all subheadings
By clicking on the icon in the column "Contained stetements" (Figure 104), information is
displayed regarding the statement number and for which subnumber will be in the ZIP file you
choose to download (Figure 107).

30 July 2018 75
Figure 107 - Information on statements in the ZIP file
In this manner you can download statements for all available formats (PDF, camt 053, TXT, XML). 20.4 RETRIEVAL OF STATEMENTS FROM ARCHIVE By selecting the Retrieve statements from archive option, statements on a transaction account
older than 45 days are available for the current and previous calendar year.
You can retrieve statements from archive by entering the date, period and/or ordinal number
and year of the statement (Figure 108).
If you are also a user of m-zaba Business Banking, you can order statements from archive
through m-zabaPS, and they will be available for download at e-zaba.
Figure 108 - Retreieval of statements from archive
At the same time, you can create up to 3 (three) requests under the enabled requirements.
Thereby, the Bank does not check whether any of the requests are completely identical or certain
time periods overlap.

30 July 2018 76
Statements will be available for you 45 days following the processing of the request after which
they are deleted and are no longer available to you. You can retrieve the same statements from
archive again. With the Download statements for period option, you can simultaneously
download (save and print) all statements for a specific period by selecting a date from the drop-
down menu (Figure 109) or
Figure 109 - Downloading statements for period
simultaneously download (save and print) all statements according to selected numbers by
selecting from the drop-down menu (Figure 110)
picture 110 - Downloading statements according to numbers
in the form of a single document containing additional data in the header: the statement
numbers, the period for which the statements were request, the date and time of the document
issuance.
If you want to download (save and print) multiple individual statements at one time, select
them in the tabular display by putting the √ symbol in the checkbox before the statement
number (Figure 111) and download using the "Download selected statements" option.
Figure 111 - Downloading individual statements at once by selecting from the tabular display

30 July 2018 77
20.5 MONTHLY REPORT ON ACCOUNT BALANCE AND TRANSACTIONS By selecting the Retrieval of monthly reports on account balance and transationsr option in the
Statements, Statements – Transaction Account, the monthly reports are available on account
balance and transactions for the current and previous calendar year.
To order a monthly report, you need to select the month and year and the transaction account
for which you want the monthly report. At the same time, you can create up to 3 (three) requests under the enabled requirements. Thereby, the Bank does not check whether any of the
requests are completely identical or certain time periods overlap.
If you are also a user of m-zaba Business Banking, you can order a monthly report through m-
zabaPS, and it will be available for download at e-zaba.
To download the monthly reports on account balance and transactions, the Bank charges a
fee in accordance with the Bank’s Decision on Fees for Bank Services.
21. PAYMENT OPERATION FEES INVOICES By selecting the Payment operation fees invoices option in the Statements menu, the following
invoices are available
fees for payment operation services in HRK (Figure 112) and
fees for payment operation services in foreign currency (Figure 113).
Figure 112 - Invoice of fees for payment operation services in HRK
Invoices of fees for payment operation services in HRK are available for 12 (twelve) months.
Figure 113 - Invoice of fees for payment services in foreign currency
Invoices of fees for payment services in foreign currency are available for 60 (sixty) days.

30 July 2018 78
22. "MY SETTINGS" - ADJUST THE USE TO YOUR NEEDS In the "My Settings" menu, you can adjust the use of e-zaba use according to your needs and
habits (Figure 114) by selecting
the links (functionalities) you want to include in the quick menu,
the main menu layout,
pre-set up account,
display mode for the list of legal entities,
transactions sequence on the statement (PDF),
recipient view mode and
mode of additional order confirmation through m-tokenPS - QR Code or DFE (APPLI4).
Figure 114 - "My Settings" menu
22.1 MY QUICK MENU
Choose the 10 most frequently used links (functionalities) and place them in the quick menu
located in the top left corner of the e-zaba homepage. 22.2 MAIN MENU You can tailor the main menu layout to your work needs and habits.
There are 4 main menu layount available:
1) CLASSIC MENU - horizontal layout (Figure 115). By clicking on a particular link, a page
opens with the requested unit submenu.
Figure 115 - Classic menu

30 July 2018 79
2) HORIZONTAL MENU - has submenus (Figure 116). By placing the mouse over a particular
link, a submenu opens. That way, you can get anywhere you want from the homepage.
Figure 116 - Horizontal menu
3) VERTICAL MENU - located on the left side of the screen under the quick menu (Figure
117). It has the same functionality as the horizontal menu. The advantage of this menu
layout is that it uses an empty space on the left side of the screen interface without
taking the space at the top of the page.
Figure 117 - Vertical menu
4) "TREE VIEW" MENU - located on the left side of the screen like the vertical menu. It differs
from the vertical menu by the way submenus drop below the link itself (Figure 118).
Figure 118 - "Tree view" menu

30 July 2018 80
22.3 TRANSACTIONS SEQUENCE ON THE STATEMENT
By using the "Arrange Turnover on the Statement (PDF)" option, you can choose mode in
which transactions will be displayed on a statement - in a row or on a new page for each
transaction account.
By selecting the "New page for each account" option, transactions on each transaction account (or currency, if the statament is made for only one account) will be located on a separate page.
23. SIGN OUT OF e - zaba Upon the completion of use, you must sign out of e-zaba by selecting the "Sign Out” option.
By clicking on this option, the following notification is displayed:
"After completing work in e-zaba, make sure the USB Key (e-zaba Card) is stored in a secure place."
After signing out of e-zaba, be sure to proceed according to the received notification and then
make sure to remove the USB Key from the computer or e-zaba Card from the reader and
store the USB Key/e-zaba Card in a secure place.
For the entire time of using e-zaba, please comply with the security rules.
Important note:
If you do not use e-zaba at any time during the day, you must sign out and you must remove
the USB Key from the computer or the e-zaba Card from the reader.
Do not leave the USB Key in your computer or the e-zaba Card in the reader if you do not require
to use e-zaba.