Embed Size (px)
Citation preview

Shenzhen SUNSKY Technology Limited
1
Digital Voice Recorder Operation Manual
Main Function:
● Music folder support playing MP3、WMA format music。
● LQ、SQ、HQ three recording mode to be select, Achieve high fidelity voice record and Line-in recording:
LQ:32Kbps MP3 format recording mode;
SQ:64Kbps MP3 format recording mode;
HQ:128Kbps MP3 format recording mode;
Line In:128Kbps MP3 format stereo recording mode。
● LINE IN recording; able to record telephone calls and stereo audio transcription function。
● Able to quickly achieve sub automatic recording function。
● Time recording: able to set recording beginning time , recording length , Recorder will automatically start to
record at the setting time。
● VOR function: Automatically record according to the voice signal。
● Recording time display,the remaining recording time display。
● Able to rewind or fast forward during playing status; able to set playing speed。
● LCD backlight; Multi-language display; Support lyric synchronal display。
● Multiple repeat mode、Multiple EQ mode、A-B segment repeat function。
● Automatically Power off: in standby status, If without any button operation within the sleeping setting time,
recorder will automatically power off。
● Multi-level digital volume control system。
● Low voltage indication, automatically save recording file function。
● USB-2.0(HS) jack communication,data transfer (read / write) speed above2M KB/seconds。
● Built-in mono microphone and support external microphone recording; Built-in High fidelity speaker。

Shenzhen SUNSKY Technology Limited
2
● Built-in rechargeable Lithium Ion battery; Built-in LED lighting。
● Password locking function, to prevent recording files be download or listened by others。
● Clock function.
● Support Window98/ME/2000/XP, Mac OS 10.X & Linux Kemel2.4.2 above(Window98 needs to install
driver)。
INDEX
1. Use Notice……………………………………………………
2. Appearance Diagram………………………………………………
3. Operation Instruction………………………………………………
3.1. Power On……………………………………………………………………
3.2.Working Mode and Playing folder………………………………………
3.3.Power Off.………………………………………………………………….
4. Recording…………………………………………………………
4.1.Record type……………………………………………………………
4.2.Microphone Recording…………………………………………………
4.3.Pause & Stop recording…………………………………………………………………
4.4.VOR function…………………………………………………………………
4.5.LINE-IN Stereo recording…………………………………………………
4.6.Telephone calls recording……………………………………………………

Shenzhen SUNSKY Technology Limited
3
4.7.Timing recording………………………………………………………………
4.8.Listen in setting……………………………………………………………
5. Play function………………………………………………………
5.1 Music folder & Voice folder…………………………………………………
5.1.1 Music folder……………………………………………………………
5.1.2 Voice folder……………………………………………………………
5.1.3 Pause Playing ……………………………………………………………
5.1.4 Volume adjustment……………………………………………………………
5.1.5 Enter into recording status when playing……………………………
5.2 Playing Effect……………………………………………………………………
5.2.1 Repeat mode…………………………………………………………………
5.2.2 Equalizer setting……………………………………………………………………
5.2.3 Tempo rate setting………………………………………………………………
5.2.4 A-B repeat mode…………………………………………………………
5.3 Lyric synchronal display………………………………………………………………
6. Delete……………………………………………………………
6.1 Delete file……………………………………………………………………
6.2 Delete all……………………………………………………………………
7. Backlight setting………………………………………………………
8. Language selection………………………………………………………
9. Power off setting………………………………………………………
10. Memory Info………………………………………………………

Shenzhen SUNSKY Technology Limited
4
11. Firmware version………………………………………………………
12. Set password and change password……………………………………
12.1.Set password .…………………………………………………………………
12.2.Input password.…………………………………………………………………
12.3.Change password ..…………………………………………………………………
13. Light setting ………………………………………………………
14. Clock function……………………………………………………………
15. Connect with computer……………………………………………
15.1.System requirement..…………………………………………………………
15.2.Data transmission..…………………………………………………………
16. Charging……………………………………
17. Question solution……………………………………………………………
18. Specification parameter…………………………………………………
1. Use Notice:
In order to maintain good performance, to avoid placing or use the machine in the following places。
1. Bathrooms or other areas exposed to moisture。
2. Sun exposure or near heating equipment, and other high-temperature environment.
3. Lower temperature places。
4. Dusty places。
Do not repair or change the machine by self, if the product in question please contact with the appointed
service center.
Please avoid dropping and violent collision. And do not press LCD screen forcibly, or may result in
damage or LCD display abnormal。
Please select the suitable volume, For using of headphones, the volume should not be too large if it is
tinnitus, change to small-volume or stop using

Shenzhen SUNSKY Technology Limited
5
Please read the menu carefully before operation, we are not responsible for the losses of recording
information caused by maintenance or function problem.
Do not use liquid or a wet cloth containing strong detergent to clean the machine。
To avoid degaussing, please keep the machine away from the magnetic material, such as floppy disk &
credit card。
The Company reserves the right to improve products, the product specifications and design are subject
to modification without notice!
2.Appearance Diagram
1 【 】 : Previous/Rewind
2 【 】: Play/Pause/Confirm/Power On/Power Off
3 【 】: Next/Fast forward
4 【REC】: Record/ Pause recording /A-B repeat.
5 【 】: External input /External Microphone jack
6 【 】 Stereo earphone Jack
7 【 MIC 】: Built-in Microphone
8 【MODE/STOP】: Repeat/Stop/Delete/ Lighting switch
9 【 USB 】: 2.0 USB Jack
10 【 VOL+ 】: Volume Increase
11 【 MENU 】: Menu button/Folder selection、Exit
12、【 VOL- 】: Volume Decrease
Shenzhen SUNSKY Technology Limited
6
13、【 RESET 】: Reset Button
14、【 】: String hole
15、【 】: Lighting
16、【 】 Speaker
17、【 】 LCD display
3. Operation instruction
3.1.Power On
Long press【 】button about 2 seconds, recorder power on and display logo then enter into time
display status。Short press 【 】button enter into main menu or long press【REC】button enter into recording
status,System will save the status before power off。
3.2.Working mode and Playing folder
In any status(except lyric synchronal display playing and recording status),long press【M】button enter
into main menu interface,Total include three working mode,they are music mode,voice mode,setting mode
(as below picture)。press【 】or【 】button to select different mode,short press【 】enter into the selected
mode。After enter into music mode or voice mode,short【 】button start to play。
Main menu interface as picture:
3.2.1 Music mode as picture ,In music mode able to play MP3 or WMA format music , can
not play the voice recording file of voice folder。
***When downloading music file,please place the music file in “MP3” folder***
3.2.2 Voice mode as picture ,in voice mode able to play this recorder voice file (LQ、SQ、HQ
voice recording file)。
3.2.3 Setting mode as picture ,in setting mode sub-menu able to set System time、Record
type、VOR setting、Listen in setting、Backlight、Light setting、Language、Power off、Memory info、Firmware
version、Set password、Change password、Exit function。
3.3. Power Off
In standby or playing status,Long press【 】button about 4 seconds turn to power off, LCD display BYE
BYE。

Shenzhen SUNSKY Technology Limited
7
***Able to set automatic power off time when in standby status, Please refer
power off setting instruction***
4.Recording
In standby or stop status, every time short press【REC】button LCD display Initializing.... then start to record,
Recording file length should be more than 1 seconds, then long press【REC】to save the recording file, otherwise
the saving recording file will be invalid。
In recording status ,short press【 】button to operate sub automatic recording. Or when recording short press
【MODE/STOP】button to stop and save the recording file.
***In recording stop status, short press【VOL+】button able to quickly set “VOR” On or Off ***
4.1.Record type
In standby status long press【M】button enter into main menu interface, Press【 】button to select
setting mode , short press【 】button enter into system setting sub-menu。press【 】or【 】button to
select record type,short press【 】button enter into record type selection.
LQ Record
SQ Record
HQ Record
Line In Record
*** Line In record file will save at HQ folder,files name as:LIN000; Line In record
able to record stereo voice, telephone calls and external audio sources;Recorder support external
microphone recording***
4.2.Microphone recording
LQ、SQ & HQ record type can not achieve stereo voice recording,select LQ、SQ & HQ record type can use
Built-in & External microphone recording。
o Built-in microphone recording
After set record type(LQ、SQ、HQ),short press【REC】button, LCD display ”Initializing”,
then start to record。Recording file saving method is long press【REC】button,LCD screen display
“Saving…”,then completely save the recording file。Or short press【REC】button to pause the

Shenzhen SUNSKY Technology Limited
8
recording ,LCD recording time pause and flashing,Re-short press 【REC】button to cancel the pausing
and continue recording。
Recording status as picture
:Indicate built-in microphone recording status;
Indicate the current recording time length is 3 minutes and 10 seconds;
Indicate the remaining recording time length 4 Hours 08 Minutes and 18 seconds;
REC087:Indicate the recording file name is REC087;
09/04/18:Indicate current recording date is April 18th,2009。
HQ Indicate current is HQ record type;
087 Indicate the current recording file serial number is 87 in the selected folder;
086 Indicate the total file of the folder is 86;
Indicate the current battery capacity is full。
● External Microphone Recording
Please use attached External Microphone connect recorder MIC input jack【 】 to achieve external
microphone recording(as below picture)。When use external microphone recording, the built-in microphone
function will automatically disable。Users can place the external microphone near collar to get better & clearly
voice recording。
As picture:
*****The green【 】jack is LINE IN and MIC input. The orange jack【 】 is earphone output.*****.
4.3. Pause & Stop recording:
Pause recording: In recording status,short press【REC】button to pause the recording,LCD recording
time will be pausing and flashing(as below picture:),then short press【REC】button to continue the recording。

Shenzhen SUNSKY Technology Limited
9
Stop recording: In recording status, short press【MODE】button to save the recording file and stop
recording, LCD will display a new recording file name (as below picture),short press 【REC】button to start a new
recording。Long press【REC】button to save the recording file and exit recording status.
Pause recording status Stop recording status
4.4. VOR function:
In standby status,long press【M】button enter into main menu interface, then press【 】or 【 】
button to select system setting icon 。short press【 】button enter into system setting sub-menu, select 【 】
or【 】button to select VOR setting,short press【 】button enter into sub-menu,then press【 】or【 】button
to select ”VOR ON” or “VOR OFF”,Short press【 】button to confirm the selection,then automatically return to
“VOR Setting” interface。Short press【 M 】button return to main menu interface, After set VOR On LCD will
display “VOR” when recording。
*****In recording stop status short press【VL+】button able to switch VOR “ON” or “OFF” *****.
4.5. LINE-IN stereo recording
Please use attached audio cable connect to recorder【 】input jack, insert audio cable another side
to external equipment output jack, select record type as Line-in Record(refer 4.1),short press【REC】button
start to record, recording method same as built-in microphone recording。
**In order to get the best recording effect, before recording please adjust the external equipment
output volume **
4.6. Telephone calls recording
Firstly connect telephone input line( or telephone handset line) with telephone adaptor,then use
attached telephone cable connect telephone and telephone adaptor,use attached audio cable connect
telephone adaptor and recorder【 】jack,select record type as Line-in Record(refer 4.1),short press 【REC】
button start to record, recording method same as built-in microphone recording。
Connect method as below picture:
**Please pay attention to different jack size of telephone adaptor,telephone calls recording
only working when in Line-in record type ***
4.7.Timing recording:

Shenzhen SUNSKY Technology Limited
10
Timing recording based on current system time, so please set the correct system time,then set the
recording beginning time,and record length(calculate by minutes and seconds);recording will automatically
start recording at the setting time,recorder will automatically save the recording file when achieve the record
length;If user want to save the recording file in the process of recording, long press【REC】button to save the
recording file。
Setting method:(please refer below 4.7.1/4.7.2/4.7.3)
*****Timing recording doesn’t work when in power off status, if want to operate timing recording
function please power on the recorder ;After start timing recording, the recording status interface will
display a clock icon in the back of the date, indicate timing recording now*****
4.7.1 Current Time
In standby status, long press【M】button enter into main menu interface, press【 】or【 】 button
to select system setting icon 。short press【 】button enter into system setting sub-menu, press【 】or【 】
button to select system time,short press【 】button enter into current time ,then short press【 】button enter into
date & time setting interface(as below picture),short press【VOL+】or【VOL-】 button to select Year-Month-Day
and Hour: Minutes: Seconds; the selected figure will be flashing, then press 【 】or【 】button adjust to correct
date and local time, short press【 】button to confirm the setting, then recorder will automatically return to current
time menu.
Current time setting interface:
2009-04-18 Indicate current date is: Apr 18th,2009;
14:40:06 Indicate current time is 14 o’clock,40 minutes and 6 seconds.
4.7.2 Record time
After 4.7.1 setting, when in current time menu, press【 】or【 】button select Record Time, short
press【 】button enter into record time adjustment interface(as below picture), short press【VOL+】or【VOL-】
button to select Year-Month-Day and Hour: Minutes: Seconds; the selected figure will be flashing, then press
【 】or【 】button adjust to required recording date and time, short press【 】button to confirm the setting, then
recorder will automatically return to record time menu.
Record time setting interface:
2009-04-18 Indicate recording beginning date is Apr 18th,2009;
14:45:06 Indicate recording beginning time is 14 o’clock,45 minutes and 6 seconds。
4.7.3 Record Length

Shenzhen SUNSKY Technology Limited
11
After 4.7.2 setting, when in Record time menu, press【 】or【 】button select Record length, short
press【 】button enter into record length adjustment interface(as below picture),short press【VOL+】
or【VOL-】button to select the figure; the selected figure will be flashing, then press【 】or【 】button
to adjust the record length (Record length calculate by minutes, able to set 9999MIN),short press【 】
button to confirm the setting, then recorder will automatically return to record length menu。 Long press
【M】button return to main menu interface。
Record Length setting interface:
0012 MIN: Indicate the record length is 12 minutes
4.8 Listen in setting
Use for listen in LINE-IN recording voice,then correctly sub automatic recording;before operate listen in
function, please set listen in function ”ON” and Line-in record type, otherwise Line-in function will doesn’t work。
Listen-in function only use for Line-in recording , can not use for other record type。
Operate method:In standby status long press【M】button enter into main menu interface, press【 】
or【 】button to select system setting icon 。short press【 】 button enter into system setting sub-menu, press
【 】or【 】button to select listen in setting,short press【 】button enter into the sub-menu,press【 】or
【 】button to set “Listen in On” or “Listen in Off”,short press【 】button to confirm the setting,and return to listen
in menu, short press【M】button return to main menu interface。
5、Play function
5.1 Music folder & Voice folder
After power on, recorder LCD will display date & time status,then short press 【 】button enter into main
menu interface。press【 】or【 】button to select music folder or voice folder , short press【 】button enter into
the selected folder,then short press【 】button start to play the music file or voice file。
*****in playing status, long press【MODE/STOP】button,able to switch playing repeat mode *****
5.1.1 Music folder
In music folder only support playing MP3/WMA format file,can not play the recording file of voice
folder, if want to play recording file please enter into voice folder,please pay attention to the selected folder when
playing。Please download the music file to appointed “MP3” music folder, after downloading please disconnect
the computer connection。Unplug the USB cable,recorder will automatically return to main menu interface,then
select Music folder icon ,short press【 】button enter into music folder,re-short press【 】button start playing。
As below picture:
Shenzhen SUNSKY Technology Limited
12
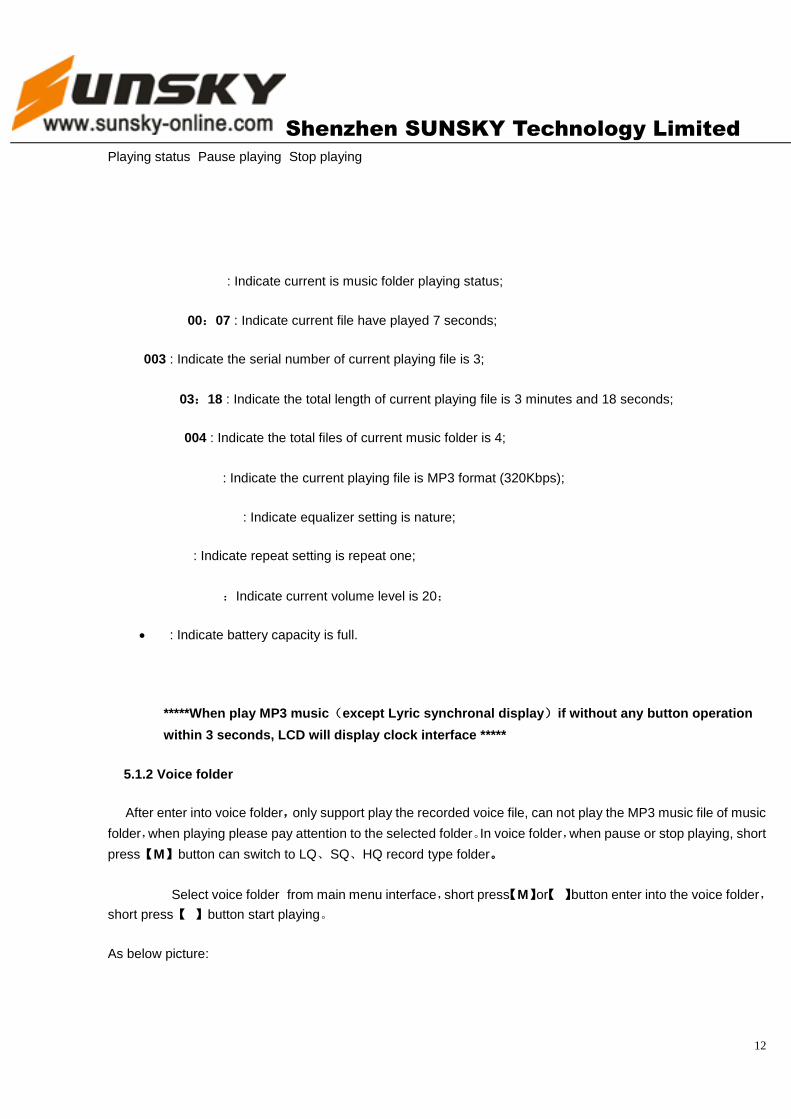
Playing status Pause playing Stop playing
: Indicate current is music folder playing status;
00:07 : Indicate current file have played 7 seconds;
003 : Indicate the serial number of current playing file is 3;
03:18 : Indicate the total length of current playing file is 3 minutes and 18 seconds;
004 : Indicate the total files of current music folder is 4;
: Indicate the current playing file is MP3 format (320Kbps);
: Indicate equalizer setting is nature;
: Indicate repeat setting is repeat one;
:Indicate current volume level is 20;
: Indicate battery capacity is full.
*****When play MP3 music(except Lyric synchronal display)if without any button operation
within 3 seconds, LCD will display clock interface *****
5.1.2 Voice folder
After enter into voice folder,only support play the recorded voice file, can not play the MP3 music file of music
folder,when playing please pay attention to the selected folder。In voice folder,when pause or stop playing, short
press【M】button can switch to LQ、SQ、HQ record type folder。
Select voice folder from main menu interface,short press【M】or【 】button enter into the voice folder,
short press【 】button start playing。
As below picture:

Shenzhen SUNSKY Technology Limited
13
Playing status Pause playing Stop playing
:Indicate current is music folder playing status;
000:03:10 : Indicate current voice file have played 3 minutes and 10 seconds;
REC007: Indicate the voice file name is REC007;
000:88:18: Indicate the total length of current voice file is 88 minutes and 18 seconds;
007 : Indicate the serial number of current playing file is 7;
086 : Indicate the total files of current voice folder is 86;
: Indicate current playing file is HQ record type;
: Indicate repeat setting is repeat one;
000:00:00: Indicate now is stop playing status;
:Indicate current volume level is 20;
: Indicate battery capacity is full.
5.1.3 Pause playing:
short press【 】button start to play,in playing status short press【 】button to pause the playing; then
re-press【 】button to continue the playing,in playing or pausing status short press【MODE/STOP】button to
stop playing, long press【 】button to power off。
Select file:In playing status short press【 】or【 】button to select the previous or next file; long press【 】
or【 】button able to fast forward or rewind current playing file。
5.1.4 Volume adjustment:
In playing status press【VOL+】/【VOL-】button able to adjust the volume level from 0- 31。
Shenzhen SUNSKY Technology Limited
14
Volume adjustment picture: :the volume level 20 able to be adjusted
5.1.5 Enter into recording status when playing:
In playing status,long press【REC】button change to record。
5.2 Playing Effect:
In music folder playing status short press【M】button able to set Repeat mode、Equalizer、Tempo
rate and exit setting;In voice folder playing status short press【M】button able to set Repeat mode、Tempo rate
and exit setting。
5.2.1 Repeat mode
In music folder playing status short press【M】enter into Repeat mode、Equalizer、Tempo rate and exit
setting menu。Short press【 】or【 】button to select Repeat then short press【M】enter into repeat mode setting,
press【 】or【 】 to select 5 different repeat mode(as below picture), after select the required repeat mode then
short press【M】button to confirm the setting.
Repeat mode picture: repeat one、 Normal、 Repeat All、 Random、 Intro
*****Repeat All, Random mode only work on the files of current music folder*****
5.2.2 Equalizer setting
In music folder playing status, short press【M】button enter into Repeat mode、Equalizer、Tempo
rate and exit setting menu。Short press【 】or【 】button to select Equalizer then short press【M】button enter
into Equalizer setting, short press【 】or【 】button to select 7 different Equalizer mode(as below picture), after
select the required Equalizer mode then short press【M】button to confirm the setting.
Equalizer mode picture: Natural Rock Pop Classic Soft Jazz DBB
***Voice folder do not have Equalizer function ***
5.2.3 Tempo rate setting

Shenzhen SUNSKY Technology Limited
15
In music folder playing status, short press【M】button enter into Repeat mode、Equalizer、Tempo rate
and exit setting menu。Short press【 】or【 】button to select Tempo rate then short press【M】button enter into
Tempo rate setting,short press【 】or【 】button to adjust Tempo rate level(-8—0—8);《from -1 to-8》is slow
rate,《from 1 to 8》is fast rate,《0》is normal rate。
As picture
***Tempo rate function only use for playing MP3 and recorder voice file,when play other format music
file tempo rate function will automatically be hidden ***
5.2.4 A-B repeat mode
When play MP3 music and recorder voice file,short press【REC】button to set repeat starting point
“A”,then LCD “B” will flashing,re-short press【REC】button to set repeat ending point “B”,recorder
will automatically repeat A-B segment。After repeat 5 times will automatically exit repeat function。
*****In repeat status, short press【REC】able to cancel the repeat function *****
5.3 Lyric synchronal display
In music folder playing status,support to play “*.LRC” Lyrics file,and able to play lyric and song in
synchronal。Please keep the lyrics file name and song name same。When the current playing song have matched
lyric file in the recorder,in music mode the music icon will display a ”T” as 。Then long press【M】button enter
into lyric interface。User able to see the lyric as below lyric display picture,short press【M】button to exit lyric
display(as below picture)。
Music mode playing status have matched lyric interface
lyric display picture
6. Delete
*** Please pay attention after this delete operation, recording file will
be deleted forever, can not be recover ***
6.1 Delete file
In stop playing status。Short press【MODE/STOP】button will display delete file interface ,user
can select “NO” to cancel delete or select “YES” to confirm delete。
Delete file picture

Shenzhen SUNSKY Technology Limited
16
Short press【 】or【 】button to select ,then short press【MODE/STOP】button to delete the selected file,
LCD will display “Delete…”, after “Delete…” disappear indicate the selected file delete completed。If do not want
delete the selected file, please select ,then short press 【MODE/STOP】button to exit delete function. In delete
interface after select but without any button operation within 10 seconds, recorder will automatically exit delete
function。
***After delete the single file, next time a new recording file serial number
will automatically insert into the serial number of last deleted file, so if need to search & play the
required recording file please pay attention to the file serial number***
6.2 Delete all
Delete all function only delete all the files of current playing folder, when delete please pay
attention to the selected folder(there are HQ/SQ/LQ 3 folder when in voice mode, MP3 folder in music mode);
and only delete the recorder support playing file,can not delete the recorder doesn’t support playing file。In stop
playing status, at the same time short press【MODE/STOP】and 【REC】button,after release LCD screen will
display delete all interface, able to select “NO”(cancel delete)or “YES”(confirm delete)。
Delete all picture
Short press【 】or【 】button to select ,then short press【MODE/STOP】button to delete all the
files of current playing folder, LCD will display “Delete…”, after “Delete…” disappear indicate all the
files of current folder delete completed(as above picture all the files of HQ folder was deleted)。If don’t
want to delete all the files of current playing folder, please select ,then short press【MODE/STOP】
button to exit delete all function。In delete interface after select but without any button operation within
10 seconds, recorder will automatically exit delete all function。
7. Backlight setting
Long press【M】button enter into main menu interface。short press【 】or【 】button to select system setting
icon ,short press【 】button enter into system setting sub-menu,press【 】or【 】button to select backlight
setting。Short press【 】button enter into backlight display time adjustment interface,then short press 【 】
or【 】button to adjust the backlight display time(as below picture)。Adjustable range is 0—30 seconds(0 indicate
no backlight;30 indicate the backlight display time is 30 seconds),each time press【 】button to increase 3
seconds/【 】button to decrease 3 seconds。
Backlight adjustment interface
8. Language selection

Shenzhen SUNSKY Technology Limited
17
Long press【M】button enter into main menu interface。Short press【 】or【 】button to select system setting
icon ,short press【 】button enter into system setting sub-menu,press【 】or【 】button to select language
setting。Short press【 】button enter into language sub-menu,short press【 】or【 】button to select different
language(simple Chinese/Traditional Chinese/Japanese/English),then short press【 】button to confirm the
selection,short press【M】button return to main menu interface。
9. Power off setting
Long press【M】button enter into main menu interface。Short press【 】or【 】button to select system setting
icon ,short press【 】button enter into system setting sub-menu,press【 】or【 】button to select power off
setting。Short press【 】button enter into automatically power off time adjustment interface,short press【 】
or【 】button to adjust the automatically power off time(as below picture)。After power on and in standby status,
if without any button operation recorder will automatically power off at the power off setting time。Power off time
setting range is 0----120 seconds(0 indicate no automatically power off function;120 indicate 120 seconds later
will automatically power off),each time short press【 】or【 】button to increase 20 seconds or decrease 20
seconds。
Power off setting interface
10. Memory Info
Long press【M】button enter into main menu interface。Short press【 】or【 】button to select system setting
icon ,short press【 】button enter into system setting sub-menu,press【 】or【 】button to select memory
info。Short press【 】button LCD display “please wait…”then enter into memory info interface。
Memory info interface
924M indicate the total memory space is 924MB;02% indicate current use up 2 percent of total
memory space(924MB x 02%=18.48MB)
11. Firmware version
Long press【M】button enter into main menu interface。Short press【 】or【 】button to select system setting
icon ,short press【 】button enter into system setting sub-menu,press【 】or【 】button to select firmware
version then short press【 】button enter into firmware version interface。
Firmware version interface
12. Set password and change password
Shenzhen SUNSKY Technology Limited
18
When set password “on”,able to protect recording files to be listened or deleted by
others ,recorder can not power on if don’t input a correct password。
12.1 Set password:
Long press【M】button enter into main menu interface。press【 】or 【 】button to select system setting
icon ,short press【 】button enter into system setting sub-menu,press【 】or【 】button to select ”set password”。
Short press【 】button enter into set password interface then press【 】or【 】button switch to Password “On”
or Password ”Off”,short press【 】button to confirm the setting and automatically return to set password
interface,then short press【M】button return to main menu interface。
12.2 Input password:
After set password on,each time press【 】button to power on or connect recorder with computer,
must input a passport(recorder default password is“0000”), If continue to enter the wrong password 3 times,
recorder will automatically power off;press 【VOL+】/ 【VOL-】button to select password figure,then press
【 】or【 】button to input the correct figure,after enter the correct password short press【 】or 【M】button
enter into working status。
12.3 Change password:
Long press【M】 button enter into main menu interface。press【 】or【 】button to select system setting icon ,
short press【 】button enter into system setting sub-menu,press【 】or【 】button to select “Change password”,
short press【 】button enter into change password interface,LCD display “input password”,(if input wrong old
password, LCD display ”Password Error” and return to “input password” interface) after input correct old
password then short press【 】button to confirm。2 seconds later LCD display “Input New password”, after input
a new password short press【 】button to confirm the new password setting,LCD display “Password changed”
and return to “change password “interface。
Special Attention:Please remember the new password, otherwise recorder will can not be power on or
connect with computer!!
*****After enter into change password interface, if don’t want to change password,short press【M】
button to exit and return to main menu interface*****
13. light Setting:
Long press【M】button enter into main menu interface。press【 】or【 】button to select system
setting icon ,short press【 】button enter into system setting sub-menu,press【 】or【 】button to select “light
setting”,short press【 】 button enter into light setting sub-menu, short press【 】or【 】button to select “Light
On” or Light Off”,then short press【 】button to confirm the light setting and return to light setting interface,if set
“Light On” after confirm LED will be light,short press 【M】button return to main menu interface。When power
off the recorder LED light will also turn off,restart the recorder LED light will automatically in turn off status。

Shenzhen SUNSKY Technology Limited
19
In main menu or current date/time interface(as below picture),Long press 【MODE】button also able to
switch “Light On” or “Light Off” ,no matter the system setting---light setting is “light On” or “Light Off”。
As picture:
14. Clock function
Long press【M】button enter into main menu interface。press【 】or【 】button to select system setting icon
,short press【 】button enter into system setting sub-menu,press【 】or【 】button to select “System Time”,
short press【 】button enter into system time sub-menu, press【 】or【 】button to select “Current Time”, then
short press【 】button enter into Date & Time interface。The clock setting method please refer 4.7.1 Current Time
setting。
If want long-term display clock interface ,After power on in Date & Time interface,main menu and
standby status,without any button operation about 3 seconds recorder will display clock interface as below
picture.
Clock interface picture:
15. Connect with computer
Please pay attention to following tips before using:
15.1 System requirements:
o Compatible IBM PC
o Pentium 166 MHz CPU or above
o Operating system:Windows 98(second edition)、2000、XP
o USB Jack
o System Memory: 32MB or above(64MB or above for Windows 2000,XP)
o Spare HD: 20MB or above
o 4 speed CD-ROM or higher
o Sound card(selective)
15.2 Data Transmission:
Please used attached USB cable to connect recorder with computer,then recorder LCD will display
pc connection (as below picture),and a connected icon will display in computer, user can find a new “Removable
Disk” from “My computer”, Indicates connection successfully . then users can upload or download recording files

Shenzhen SUNSKY Technology Limited
20
or other information ;to avoid damage the recorder please don’t disconnect the USB cable when downloading or
uploading。
Recorder LCD display Computer display
Double click “Removable Disk””,users will see four folder “HQ”、“SQ”、“LQ”、“MP3” (as below
picture:)
These folders was established by DVR system, users can do delete、copy、download operation,If
delete DVR system will rebuilt the deleted folder;Folder “HQ”、“SQ”、“LQ” use to save recording file;
HQ and LINE IN record type recording file will automatically save in “HQ” folder,SQ and LQ record type
recording file will automatically save in “SQ” and “LQ” folder。
Able to connect recorder with computer in a variety working status,If set password On must input the
correct password to connect computer,Charge the same。
16. Charging:
When battery icon is empty, indicate battery capacity is low, recorder will soon be power off; Please charge。
Charge Method: Firstly connect attached USB cable with charger, and plug the charger in an electric outlet;
then connect USB cable with recorder. When charging LCD battery icon will be flashing until battery capacity is
full.
17、Question Solution
● When power on,LCD display incomplete or can not power on
This is because the frequent operation or misuse leads the program error,it can be recovered after
format,you should uploading the useful files to computer before format,In format process all the recorder files
will be deleted。
● When power on, insensitive button operation
When power on,please press the button more than 2 seconds to fully activate the recorder, then to
operate the other button。

Shenzhen SUNSKY Technology Limited
21
● Power off after a few seconds
Battery power shortage,please charge the battery。
●When playing,without voice
The volume is too small,Press【 VOL+】 button to increase the volume, or the playing file itself is silent
information。
● Suddenly power off when recording, time display and playing files incorrect after restart
This is because there will be some errors when data recovery, especially when there are much scrap in
the memory ,the recorder may to regard some of the scrap as recording file。Please don’t power off when
recording,and format the memory regularly。
● Why less storage space
Because after long-term operation and deletion, the recorder will have much scrap in the memory,only
connect to computer and upload the useful documents ,then format the recorder,the memory will be released。
● Why the recorder total memory space display is different with the actual memory space
Because we need some memory space to save the program and the font library ; so you see the
memory space displayed is smaller than the actual memory space, it is normal。 total m
● It may cause the computer abnormal sometimes illegal interrupt the connection
It mainly because the user disconnect the USB plug when uploading or downloading the data,So to
avoid the abnormal we recommend the user don’t disconnect the recorder in the process of transfer data or
format 。
●Why the MP3 music can not be played normally, or the recorder can not power on
Strictly speaking,MP3 is the music file compressed by MPEG I Layer3 standard file, now most MP3
music is this format,
When you can not play the incompatible MP3 music format,you can delete the incompatible music
through computer,then recorder will be normally operated。
● Press ”REC” button but can not be recorded or recording in a sudden stop.
It means the memory space is full,please delete some documents,or connect with computer,copy the
documents to computer and format the recorder,then the recorder can be recording again。
Shenzhen SUNSKY Technology Limited
22
● Can not normally connect with computer
1. Wrong password input when password locking function is on;
2. Computer cable is not connected properly;
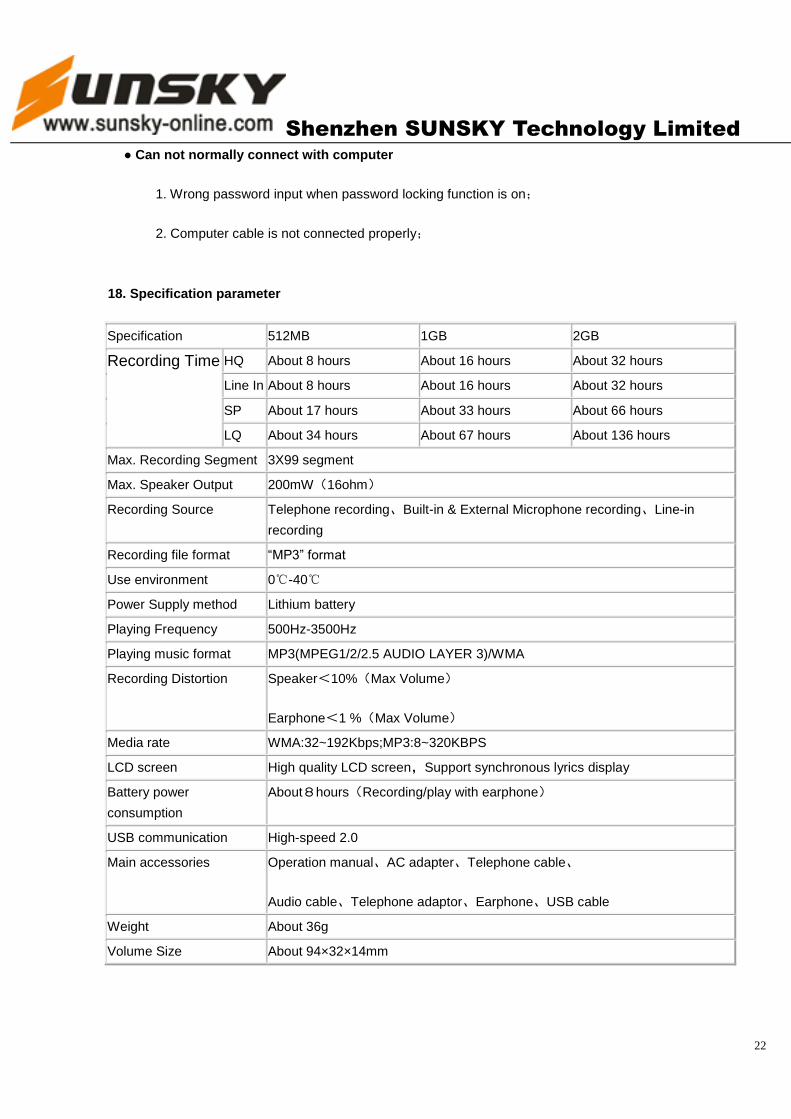
18. Specification parameter
Specification 512MB 1GB 2GB
Recording Time HQ About 8 hours About 16 hours About 32 hours
Line In About 8 hours About 16 hours About 32 hours
SP About 17 hours About 33 hours About 66 hours
LQ About 34 hours About 67 hours About 136 hours
Max. Recording Segment 3X99 segment
Max. Speaker Output 200mW(16ohm)
Recording Source Telephone recording、Built-in & External Microphone recording、Line-in
recording
Recording file format “MP3” format
Use environment 0℃-40℃
Power Supply method Lithium battery
Playing Frequency 500Hz-3500Hz
Playing music format MP3(MPEG1/2/2.5 AUDIO LAYER 3)/WMA
Recording Distortion Speaker<10%(Max Volume)
Earphone<1 %(Max Volume)
Media rate WMA:32~192Kbps;MP3:8~320KBPS
LCD screen High quality LCD screen,Support synchronous lyrics display
Battery power
consumption
About8hours(Recording/play with earphone)
USB communication High-speed 2.0
Main accessories Operation manual、AC adapter、Telephone cable、
Audio cable、Telephone adaptor、Earphone、USB cable
Weight About 36g
Volume Size About 94×32×14mm