Embed Size (px)
Citation preview
1
DIGITAL VOICERECORDER
W-10
Thank you for purchasing an OlympusDigital Voice Recorder.
Please read these instructions for informationabout using the product correctly and safely.
Keep the instructions handy for future reference.
To ensure successful audio/image recording,we recommend that you test the audio/image
recording functions before use.
INSTRUCTIONS
INSTRUCTIONS
MODE D’EMPLOIEN
FR
EN
2
For Safe andCorrect UsageBefore using your new recorder, read thismanual carefully to ensure that you knowhow to operate it safely and correctly.Keep this manual in an easily accessiblelocation for future reference.
• The warning symbols indicate important safetyrelated information. To protect yourself and othersfrom personal injury or damage to property, it isessential that you always heed the warnings andinformation provided.
General Precautions Do not leave the recorder in hot, humid
locations such as inside a closedautomobile under direct sunlight or onthe beach in the summer.
Do not store the recorder in placesexposed to excessive moisture or dust.
Do not use organic solvents such as alcoholand lacquer thinner to clean the unit.
Do not place the recorder on top of ornear electric appliances such as TVs orrefrigerators.
Avoid recording or playing back nearcellular phones or other wirelessequipment, as they may causeinterference and noise. If youexperience noise, move to anotherplace, or move the recorder further awayfrom such equipment.
Avoid sand or dirt. These can causeirreparable damage.
BatteriesWarning
• Batteries should never be exposed toflame, heated, short-circuited ordisassembled.
• Do not attempt to recharge alkaline,lithium or any other non-rechargeablebatteries.
• Never use any battery with a torn orcracked outer cover.
• Keep batteries out of the reach ofchildren.
• If you notice anything unusual whenusing this product such as abnormalnoise, heat, smoke, or a burning odor:
1 remove the batteries immediately whilebeing careful not to burn yourself, and;
2 call your dealer or local Olympusrepresentative for servicing.
Avoid strong vibrations or shocks. Do not disassemble, repair or modify
the unit yourself. Do not operate the unit while operating
a vehicle (such as a bicycle, motorcycle,or go-cart).
Keep the unit out of the reach ofchildren.
<Warning regarding data loss>Recorded content in memory may bedestroyed or erased by operating mistakes,unit malfunction, or during repair work.It is recommended to back up and saveimportant content to other media such asa computer hard disk or MO disc.
3
Table of Contents
Getting StartedMain Features ........................................... 4Identification of Parts ................................ 5Inserting Batteries .................................... 7
Recording ............................................... 10Recording Modes (MOdE) ...................... 11Microphone Sensitivity (MIC) ................. 12Using the Variable Control
Voice Actuator (VCVA) ........................ 13
Recording, Taking Pictures, and Playback
Setting Time/Date (TIME) ......................... 8Notes on the Folders ................................ 9
Other functionsMoving Files Between Folders (MOVE) ... 19Alarm Playback Function (ALARM) ....... 20Erasing .................................................... 23System Sounds (bEEP) .......................... 24Resetting the Recorder (CLEAR) ........... 25
Taking Pictures ....................................... 14Playing .................................................... 17
Managing Files on Your PCUsing OLYMPUS Voice Album Software .. 27Installing Software .................................. 29Starting Voice Album .............................. 30Window Names ...................................... 31
Using Online Help .................................. 32File Format ............................................. 33
Other InformationTroubleshooting ...................................... 34Specifications ......................................... 35
Technical Assistance and Support ......... 35
Hold ......................................................... 25Menu List ................................................ 26
4
Main Features The recorder stores highly compressed
WAVE and JPEG format in 16 MBintergrated flash memory.
The recorder supports three recordingmodes, HQ (High Quality) mode, SP(Standard Playback) mode and LP (LongPlayback) mode.• Continuous recording time is approximately 45
minutes in HQ mode, approximately 67 minutesin SP mode and approximately 180 minutes inLP mode.*
A and B voice folders can hold a maximumof 100 audio files each, and the (image)folder can hold a maximum of 250 imagefiles.
The recorder has a C-MOS solid-state300,000-pixel image sensor (true pixels).
Audio and image files are recorded to built-in flash memory. Data isn't lost duringbattery changes.
It's easy to operate with Jogdial and a cleardisplay.
You can take pictures while recordingaudio. If you transfer data to your computer,you can see linked images while listeningto recorded audio.
You can edit audio and image files usingthe special “OLYMPUS Voice Album”software included in the package.
Connect the included USB cable to yourcompurter for faster transmission speed.
Main
Featu
res
* Available recording time for one continuous file. Availablerecording time may be shorter if many short recordingsare made. (The displayed available recording time andrecorded time are approximate indications.)
..........................................................................Microsoft and Windows are registered trademarksof Microsoft Corporation.Intel and Pentium are registered trademarks of IntelCorporation.Other product and brand names mentioned hereinmay be the trademarks or registered trademarks oftheir respective owners.

5
1 Built-in microphone2 Record indicator lamp3 Display (LCD panel)4 REC (Record) button5 MENU/FOLDER button6 Shutter button7 Lens8 HOLD switch9 PC (USB) terminal0 ERASE button! VOLUME control@ STOP button
# –/0 (Rewind) button$ +/9 (Fast Forward) button% PLAY button^ Built-in speaker& Strap hole* Battery cover( Viewfinder) Shooting lamp- Earphone jack
Identification of Parts
1
6
5
4
3
27
8
9
0
!
@#
$%
^
-
)(
*&
Jogdial Iden
tification
of P
arts
6
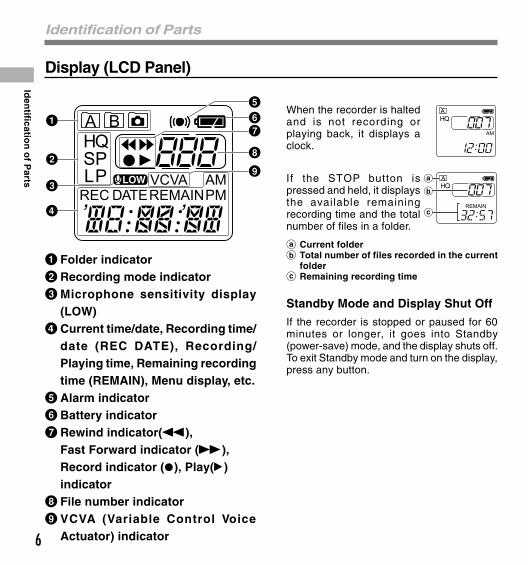
1 Folder indicator2 Recording mode indicator3 Microphone sensitivity display
(LOW)4 Current time/date, Recording time/
date (REC DATE), Recording/Playing time, Remaining recordingtime (REMAIN), Menu display, etc.
5 Alarm indicator6 Battery indicator7 Rewind indicator(7),
Fast Forward indicator (8),Record indicator (s), Play(`)indicator
8 File number indicator9 VCVA (Variable Control Voice
Actuator) indicator
Display (LCD Panel)
Iden
tification
of P
arts
1
2
4
3
5
67
8
9a
b
c
When the recorder is haltedand is not recording orplaying back, it displays aclock.
a Current folderb Total number of files recorded in the current
folderc Remaining recording time
Standby Mode and Display Shut Off
If the recorder is stopped or paused for 60minutes or longer, it goes into Standby(power-save) mode, and the display shuts off.To exit Standby mode and turn on the display,press any button.
Identification of Parts
If the STOP button ispressed and held, it displaysthe available remainingrecording time and the totalnumber of files in a folder.

7
Insertin
g B
atteriesInserting Batteries
1 Lightly press down on the arrow and slide thebattery cover open.
2 Insert two AAA alkaline batteries, observing thecorrect polarity.
3 Close the battery cover completely.The hour indicator flashes, indicating the start of the Time/Date setup process ( P.8).
1
2
3 Replacing batteries
When appears on the display, replace the batteries assoon as possible. When the batteries are depleted, flashes on the display, and the recorder shuts off. AAA alkalinebatteries are recommended.It is recommended to set the HOLD switch to the HOLD positionbefore you replace batteries to maintain the current settings(time/date, etc.). For your convenience,the recorder also logsthe current settings in nonvolatile memory at hourly intervals.
................................................................................................................................................................
Notes• Be sure to stop the recorder before replacing the batteries. Unloading the batteries while the recorder
is recording, erasing or otherwise accessing a audio file may corrupt the file. If you are recording into a fileand the batteries run out, you will lose your currently recorded file because the file header will not be ableto close. So, it is crucial to change the batteries once you see only one mark in the battery icon.
• Be sure to replace both batteries at the same time.• Never mix old and new batteries, or batteries of different types and/or brands.• Remove the batteries if you are not going to use the recorder for an extended period of time.
8
Setting Time/Date (TIME)
Changing the Time/Date
Settin
g Tim
e/Date (T
IME
)
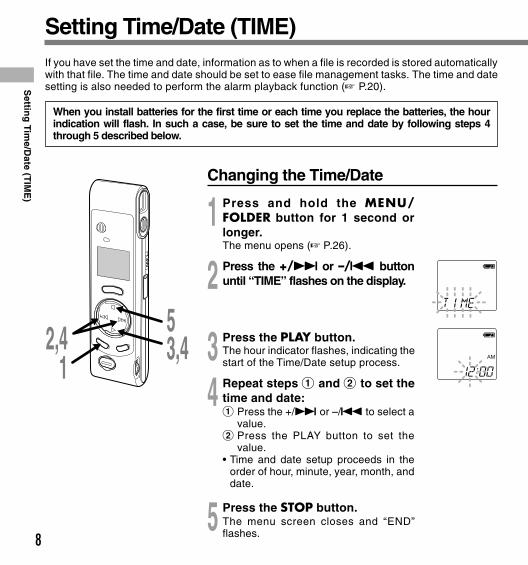
If you have set the time and date, information as to when a file is recorded is stored automaticallywith that file. The time and date should be set to ease file management tasks. The time and datesetting is also needed to perform the alarm playback function ( P.20).
When you install batteries for the first time or each time you replace the batteries, the hourindication will flash. In such a case, be sure to set the time and date by following steps 4through 5 described below.
2,4 3,45
1
1 Press and hold the MENU/FOLDER button for 1 second orlonger.The menu opens ( P.26).
2 Press the +/9 or –/0 buttonuntil “TIME” flashes on the display.
3 Press the PLAY button.The hour indicator flashes, indicating thestart of the Time/Date setup process.
4 Repeat steps 1 and 2 to set thetime and date:1 Press the +/9 or –/0 to select a
value.2 Press the PLAY button to set the
value.• Time and date setup proceeds in the
order of hour, minute, year, month, anddate.
5 Press the STOP button.The menu screen closes and “END”flashes.

9
Settin
g Tim
e/Date (T
IME
) / No
tes on
the F
old
ers
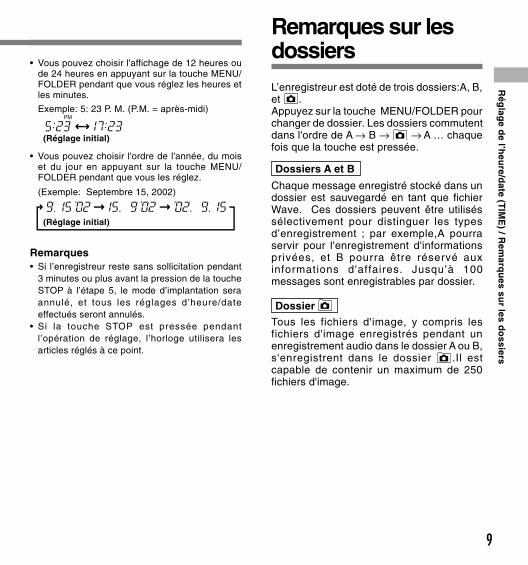
• You can choose between 12 and 24 hour displayby pressing the MENU/FOLDER button whilesetting the hour and minute.
(Example: 5:23 P.M.)
• You can choose the order of the year, month, dayby pressing the MENU/FOLDER button whilesetting them.
(Example: September 15, 2002)
Notes• If you leave the recorder untouched for 3 minutes
or longer before pressing the STOP button in step5, Setup mode will be canceled, and any time/date settings you made will be canceled.
• If you press the STOP button during the setupoperation, the clock will use the values that wereset to that point.
(Initial setting)
(Initial setting)
Notes on the FoldersThe recorder has three folders: A, B, and .Press the MENU/FOLDER button to changefolders. Folders toggle in the order of A → B→ → A … each time the button is pressed.
Folders A and B
Each recorded message stored in a folder issaved as a Wave file. These folders can beselectively used to distinguish the kind ofrecording; for example, A might be used tostore private information, while B might bededicated to holding business information. Upto 100 messages can be recorded per folder.
Folder
All image files, including image files recordedduring audio recording in A or B folder, willbe saved in the folder. It holds a maximumof 250 image files.
10
Reco
rdin
g
Recording
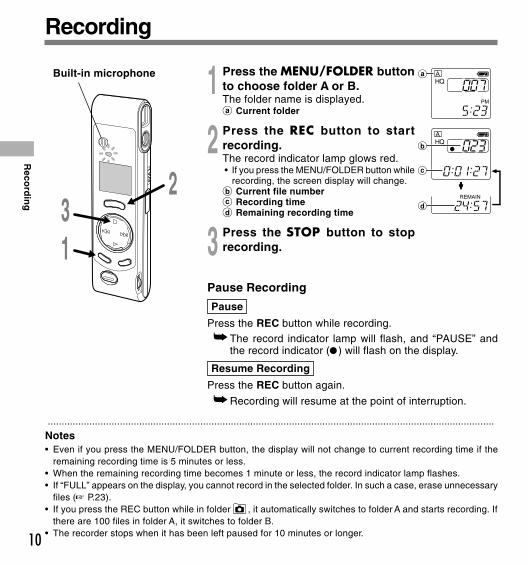
1 Press the MENU/FOLDER buttonto choose folder A or B.The folder name is displayed.a Current folder
2 Press the REC button to startrecording.The record indicator lamp glows red.• If you press the MENU/FOLDER button while
recording, the screen display will change.b Current file numberc Recording timed Remaining recording time
3 Press the STOP button to stoprecording.
a
b
c
d
.................................................................................................................................................................
Notes• Even if you press the MENU/FOLDER button, the display will not change to current recording time if the
remaining recording time is 5 minutes or less.• When the remaining recording time becomes 1 minute or less, the record indicator lamp flashes.• If “FULL” appears on the display, you cannot record in the selected folder. In such a case, erase unnecessary
files ( P.23).• If you press the REC button while in folder , it automatically switches to folder A and starts recording. If
there are 100 files in folder A, it switches to folder B.• The recorder stops when it has been left paused for 10 minutes or longer.
2
13
Built-in microphone
Pause Recording
Pause
Press the REC button while recording.The record indicator lamp will flash, and “PAUSE” and
the record indicator (s) will flash on the display.
Resume Recording
Press the REC button again.
Recording will resume at the point of interruption.
11
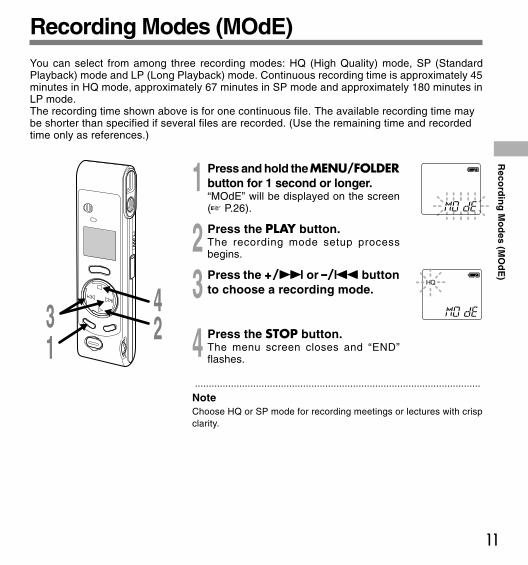
Recording Modes (MOdE)You can select from among three recording modes: HQ (High Quality) mode, SP (StandardPlayback) mode and LP (Long Playback) mode. Continuous recording time is approximately 45minutes in HQ mode, approximately 67 minutes in SP mode and approximately 180 minutes inLP mode.The recording time shown above is for one continuous file. The available recording time maybe shorter than specified if several files are recorded. (Use the remaining time and recordedtime only as references.)
1 Press and hold the MENU/FOLDERbutton for 1 second or longer.“MOdE” will be displayed on the screen( P.26).
2 Press the PLAY button.The recording mode setup processbegins.
3 Press the +/9 or –/0 buttonto choose a recording mode.
4 Press the STOP button.The menu screen closes and “END”flashes.
.......................................................................................................
NoteChoose HQ or SP mode for recording meetings or lectures with crispclarity.
41
23
Reco
rdin
g M
od
es (MO
dE
)
12
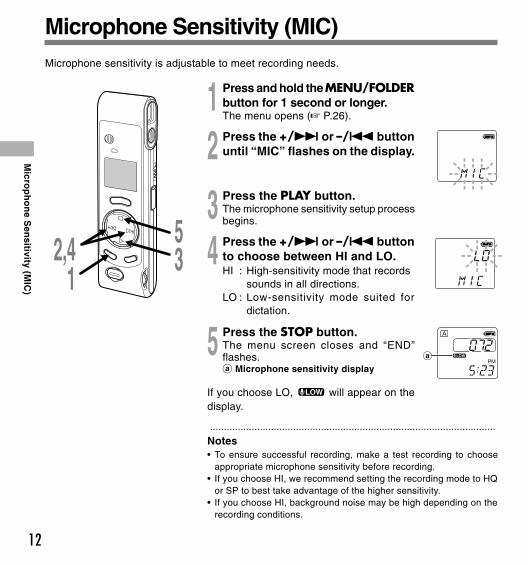
Microphone Sensitivity (MIC)Microphone sensitivity is adjustable to meet recording needs.
Micro
ph
on
e Sen
sitivity (MIC
)
1 Press and hold the MENU/FOLDERbutton for 1 second or longer.The menu opens ( P.26).
2 Press the +/9 or –/0 buttonuntil “MIC” flashes on the display.
3 Press the PLAY button.The microphone sensitivity setup processbegins.
4 Press the +/9 or –/0 buttonto choose between HI and LO.HI : High-sensitivity mode that records
sounds in all directions.LO : Low-sensitivity mode suited for
dictation.
5 Press the STOP button.The menu screen closes and “END”flashes.a Microphone sensitivity display
If you choose LO, will appear on thedisplay.
.......................................................................................................
Notes• To ensure successful recording, make a test recording to choose
appropriate microphone sensitivity before recording.• If you choose HI, we recommend setting the recording mode to HQ
or SP to best take advantage of the higher sensitivity.• If you choose HI, background noise may be high depending on the
recording conditions.
2,4 35
1
a
13
Usin
g th
e Variab
le Co
ntro
l Vo
ice Actu
ator (V
CV
A)
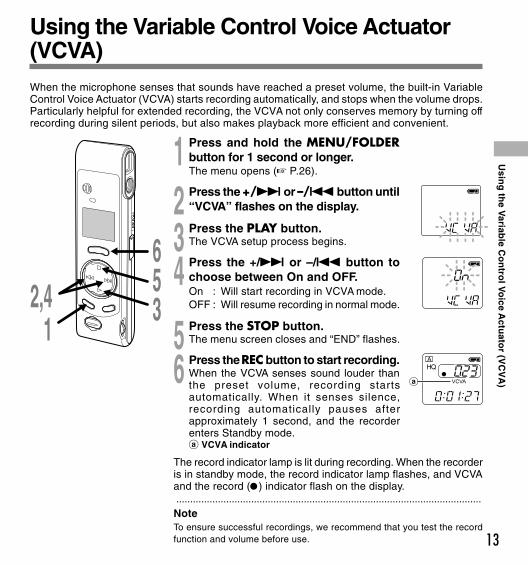
Using the Variable Control Voice Actuator(VCVA)When the microphone senses that sounds have reached a preset volume, the built-in VariableControl Voice Actuator (VCVA) starts recording automatically, and stops when the volume drops.Particularly helpful for extended recording, the VCVA not only conserves memory by turning offrecording during silent periods, but also makes playback more efficient and convenient.
1 Press and hold the MENU/FOLDERbutton for 1 second or longer.The menu opens ( P.26).
2 Press the +/9 or –/0 button until“VCVA” flashes on the display.
3 Press the PLAY button.The VCVA setup process begins.
4 Press the +/9 or –/0 button tochoose between On and OFF.On : Will start recording in VCVA mode.OFF : Will resume recording in normal mode.
5 Press the STOP button.The menu screen closes and “END” flashes.
6 Press the REC button to start recording.When the VCVA senses sound louder thanthe preset volume, recording startsautomatically. When it senses silence,recording automatically pauses afterapproximately 1 second, and the recorderenters Standby mode.a VCVA indicator
6532,4
1a
..............................................................................................................
NoteTo ensure successful recordings, we recommend that you test the recordfunction and volume before use.
The record indicator lamp is lit during recording. When the recorderis in standby mode, the record indicator lamp flashes, and VCVAand the record (s) indicator flash on the display.

14
Taking Pictures
Taking
Pictu
res
Holding the Camera (Recorder)Hold the recorder securely with both hands and keep yourelbows close to your body.Make sure you don’t block the lens with your finger or thecamera strap.
Good position
Bad position
*Adjusting time varies according to brightness.
Shooting Lamp SystemWhen the shooting lamp on the side of the finder is on or flashes in orange or green, thatindicates the recorder is in one of the following states:
Recorder Status (Shutter button)Adjusting exposure (Half-Press)*
Appropriate exposure (Half-Press)
Wrong exposure (Full-Press)
Maximum number of files recorded (Half-Press)
Insufficient memory remaining (Half-Press)
Photography completed (Full-Press)
Lamp StatusLit in orange
Lit in green
Flashing inorange
Flashing ingreen
Can/cannotYou cannot take a picture.Take a picture when the shooting lampis lit in green. If the lamp doesn'tchange to green, it's too bright or toodark to shoot. If the lamp is lit in orangefor 6 seconds or longer, change thebrightness before take a picture.
You can take a picture.
You cannot take a picture.
You can take another picture.

15
Taking
Pictu
res
Taking PicturesYou can choose any folder when taking pictures: A, B, or . All pictures will be saved in folder
.The shutter button has two stages. Exposure is adjusted during the first stage, and a picture istaken in the second stage.
1 Press the shutter button halfway(Half-press).The shooting lamp next to the finder turnsorange. When the lamp changes fromorange to green, it's ready for you to takea picture.
2 Keep the button gently pressed, andthen press it further (Full-press).The recorder takes a picture. When theshooting lamp flashes in green,photography is completed.If the lamp flashes in orange, that meansa picture wasn't taken, so try taking apicture again.• If you press the STOP button while in folder
, the total number of image files willappear. A maximum of 250 image files canbe stored.
a Current number of recorded files
You can take pictures while you are recordingaudio (recording pause)........................................................................................................
Notes• Always press the shutter button gently. If you press too hard, the
recorder may move and the image will be blurred.• You cannot see recorded images using the recorder's display.
Transfer image files to a computer and use the “OLYMPUS VoiceAlbum” software included in the package to view them ( P.30).
1,2
a
Viewfinder
Shootinglamp

16
Taking Pictures
If you cannot take a picture
The following are probable causes. Eliminate the problem and resume photography.
Taking
Pictu
res
MessageThe shooting lamp flashes in orange.The display flashes “FULL”.The display flashes the file number.The shooting lamp flashes in orange.The display flashes “FULL”.
The display flashes or .
The shooting lamp flashes in orange.
The shooting lamp flashes in orange.
The display flashes .
Probable causeMaximum number of imagefiles recorded (250 images)
Insufficient memory remaining
Insufficient battery powerremaining50 image files have alreadytaken while recording oneaudio file
The shutter button was pressed(full-press) while the shootinglamp was lit in orange
ActionErase unwanted image files.
Erase unwanted audio files orimage files.Replace with new batteries.
Press the STOP button to stoprecording, then press the RECbutton to start a new audio fileand record images.*Take a picture when the shootinglamp is green. If the lamp doesn'tchange to green, it's too bright ortoo dark to take a picture.
*The audio file will be recorded as two audio files.
17
Playing
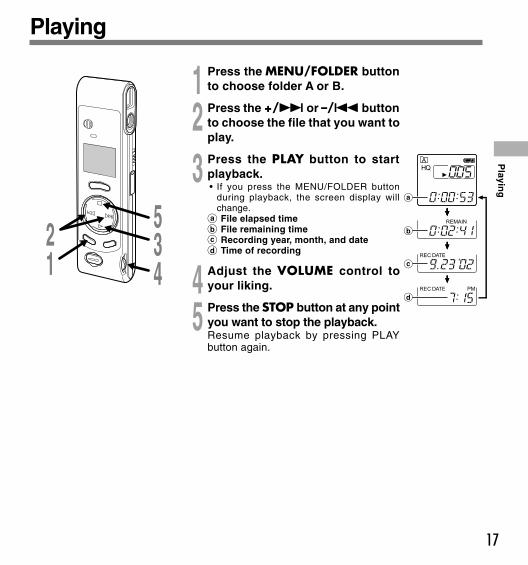
1 Press the MENU/FOLDER buttonto choose folder A or B.
2 Press the +/9 or –/0 buttonto choose the file that you want toplay.
3 Press the PLAY button to startplayback.• If you press the MENU/FOLDER button
during playback, the screen display willchange.
a File elapsed timeb File remaining timec Recording year, month, and dated Time of recording
4 Adjust the VOLUME control toyour liking.
5 Press the STOP button at any pointyou want to stop the playback.Resume playback by pressing PLAYbutton again.
2 34
51
a
b
c
d
Playin
g
18
Playin
g
Playing
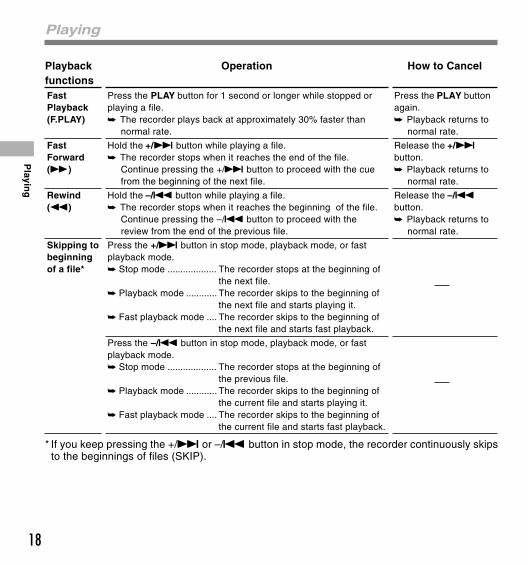
PlaybackfunctionsFastPlayback(F.PLAY)
FastForward(8)
Rewind(7)
Skipping tobeginningof a file*
Operation
Press the PLAY button for 1 second or longer while stopped orplaying a file. The recorder plays back at approximately 30% faster than
normal rate.
Hold the +/9 button while playing a file. The recorder stops when it reaches the end of the file.
Continue pressing the +/9 button to proceed with the cuefrom the beginning of the next file.
Hold the –/0 button while playing a file. The recorder stops when it reaches the beginning of the file.
Continue pressing the –/0 button to proceed with thereview from the end of the previous file.
Press the +/9 button in stop mode, playback mode, or fastplayback mode. Stop mode ................... The recorder stops at the beginning of
the next file. Playback mode ............ The recorder skips to the beginning of
the next file and starts playing it. Fast playback mode .... The recorder skips to the beginning of
the next file and starts fast playback.
Press the –/0 button in stop mode, playback mode, or fastplayback mode. Stop mode ................... The recorder stops at the beginning of
the previous file. Playback mode ............ The recorder skips to the beginning of
the current file and starts playing it. Fast playback mode .... The recorder skips to the beginning of
the current file and starts fast playback.
How to Cancel
Press the PLAY buttonagain. Playback returns to
normal rate.
Release the +/9button. Playback returns to
normal rate.
Release the –/0button. Playback returns to
normal rate.
* If you keep pressing the +/9 or –/0 button in stop mode, the recorder continuously skipsto the beginnings of files (SKIP).
19
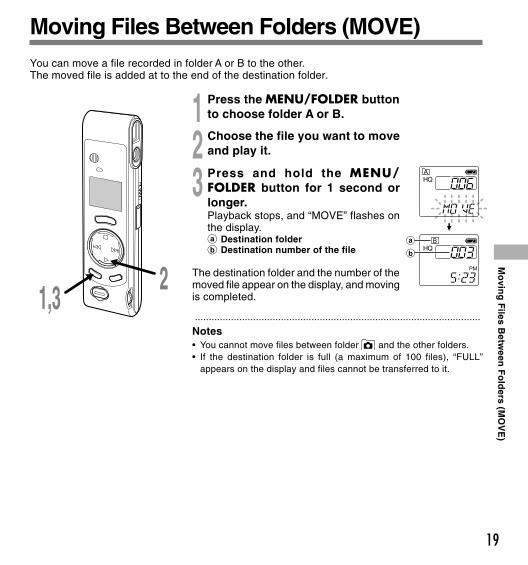
Moving Files Between Folders (MOVE)You can move a file recorded in folder A or B to the other.The moved file is added at to the end of the destination folder.
Mo
ving
Files B
etween
Fo
lders (M
OV
E)
1 Press the MENU/FOLDER buttonto choose folder A or B.
2 Choose the file you want to moveand play it.
3 Press and hold the MENU/FOLDER button for 1 second orlonger.Playback stops, and “MOVE” flashes onthe display.a Destination folderb Destination number of the file
The destination folder and the number of themoved file appear on the display, and movingis completed.
.......................................................................................................
Notes• You cannot move files between folder and the other folders.• If the destination folder is full (a maximum of 100 files), “FULL”
appears on the display and files cannot be transferred to it.
a
b
21,3
20
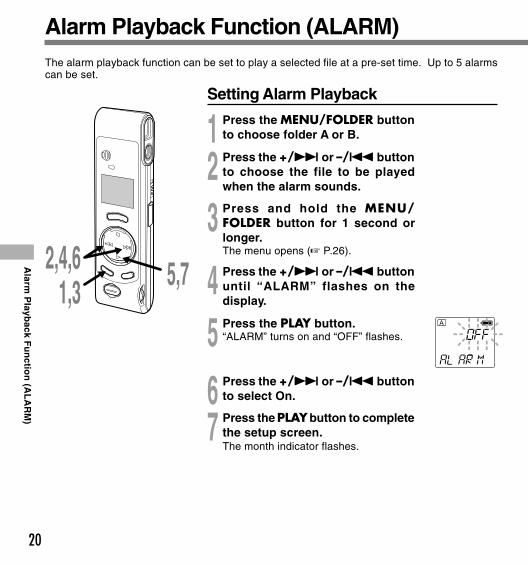
The alarm playback function can be set to play a selected file at a pre-set time. Up to 5 alarmscan be set.
Setting Alarm Playback
Alarm Playback Function (ALARM)
1 Press the MENU/FOLDER buttonto choose folder A or B.
2 Press the +/9 or –/0 buttonto choose the file to be playedwhen the alarm sounds.
3 Press and hold the MENU/FOLDER button for 1 second orlonger.The menu opens ( P.26).
4 Press the +/9 or –/0 buttonuntil “ALARM” flashes on thedisplay.
5 Press the PLAY button.“ALARM” turns on and “OFF” flashes.
6 Press the +/9 or –/0 buttonto select On.
7 Press the PLAY button to completethe setup screen.The month indicator flashes.
2,4,6 5,71,3
Alarm
Playb
ack Fu
nctio
n (A
LA
RM
)

21
8 Repeat steps 1 and 2 to set thetime and date:1 Press the +/9 or –/0 to select a
value.2 Press the PLAY button to set the
value.• Time and date setup proceeds in the
order of month, date, hour, and minute.
9 Press the STOP button.The menu screen closes and “END”flashes.a Alarm indicator
An alarm will sound at the scheduled timefor 5 minutes. Press the STOP button whilethe alarm is sounding to play back the fileyou associate with the alarm. Press theSTOP button again to stop file alarmplayback.
.......................................................................................................
Notes• The alarm tone stops automatically if no button is pressed within 5
minutes after the alarm starts. The file is not played back in thiscase.
• After alarm playback is over, the alarm playback function is canceledautomatically.
• You cannot set the alarm playback function for more than 5 files.Also, if no files are recorded in the selected folder, you cannot setthe alarm playback function.
• You cannot set the year of the file to be played.
98
a
Alarm
Playb
ack Fu
nctio
n (A
LA
RM
)
22
Alarm Playback Function (ALARM)
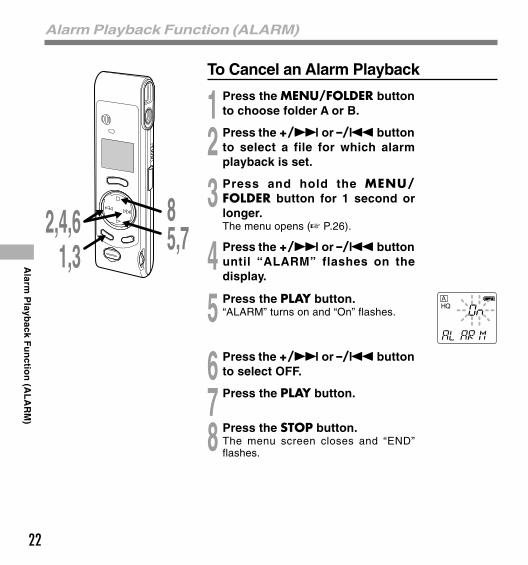
To Cancel an Alarm Playback
1 Press the MENU/FOLDER buttonto choose folder A or B.
2 Press the +/9 or –/0 buttonto select a file for which alarmplayback is set.
3 Press and hold the MENU/FOLDER button for 1 second orlonger.The menu opens ( P.26).
4 Press the +/9 or –/0 buttonuntil “ALARM” flashes on thedisplay.
5 Press the PLAY button.“ALARM” turns on and “On” flashes.
6 Press the +/9 or –/0 buttonto select OFF.
7 Press the PLAY button.
8 Press the STOP button.The menu screen closes and “END”flashes.
2,4,6 5,71,38
Alarm
Playb
ack Fu
nctio
n (A
LA
RM
)
23
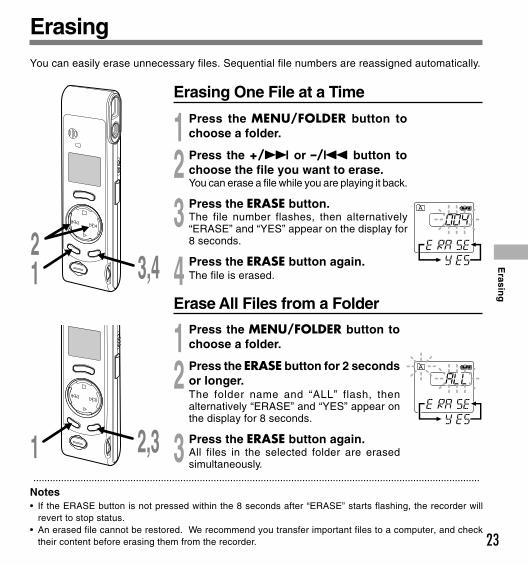
ErasingYou can easily erase unnecessary files. Sequential file numbers are reassigned automatically.
Erasing One File at a Time
1 Press the MENU/FOLDER button tochoose a folder.
2 Press the +/9 or –/0 button tochoose the file you want to erase.You can erase a file while you are playing it back.
3 Press the ERASE button.The file number flashes, then alternatively“ERASE” and “YES” appear on the display for8 seconds.
4 Press the ERASE button again.The file is erased.
Erase All Files from a Folder
1 Press the MENU/FOLDER button tochoose a folder.
2 Press the ERASE button for 2 secondsor longer.The folder name and “ALL” flash, thenalternatively “ERASE” and “YES” appear onthe display for 8 seconds.
3 Press the ERASE button again.All files in the selected folder are erasedsimultaneously.
.................................................................................................................................................................
Notes• If the ERASE button is not pressed within the 8 seconds after “ERASE” starts flashing, the recorder will
revert to stop status.• An erased file cannot be restored. We recommend you transfer important files to a computer, and check
their content before erasing them from the recorder.
23,41
2,31
Erasin
g
24
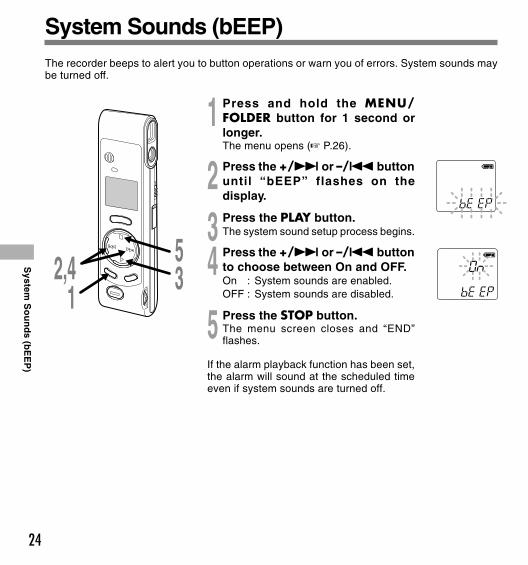
System Sounds (bEEP)The recorder beeps to alert you to button operations or warn you of errors. System sounds maybe turned off.
1 Press and hold the MENU/FOLDER button for 1 second orlonger.The menu opens ( P.26).
2 Press the +/9 or –/0 buttonuntil “bEEP” flashes on thedisplay.
3 Press the PLAY button.The system sound setup process begins.
4 Press the +/9 or –/0 buttonto choose between On and OFF.On : System sounds are enabled.OFF : System sounds are disabled.
5 Press the STOP button.The menu screen closes and “END”flashes.
If the alarm playback function has been set,the alarm will sound at the scheduled timeeven if system sounds are turned off.
2,4 35
1
System
So
un
ds (b
EE
P)
25
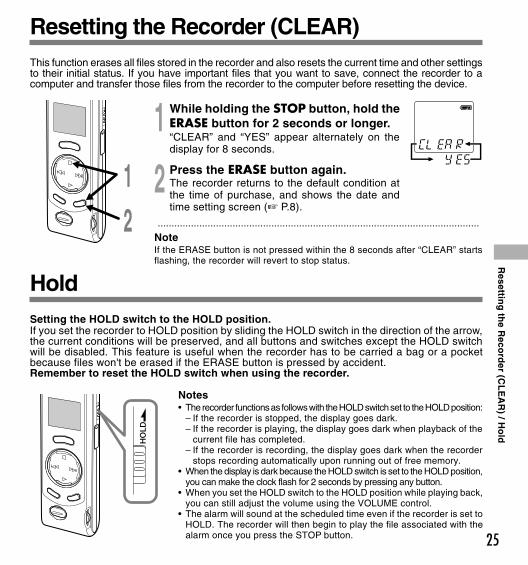
Resetting the Recorder (CLEAR)This function erases all files stored in the recorder and also resets the current time and other settingsto their initial status. If you have important files that you want to save, connect the recorder to acomputer and transfer those files from the recorder to the computer before resetting the device.
1 While holding the STOP button, hold theERASE button for 2 seconds or longer.“CLEAR” and “YES” appear alternately on thedisplay for 8 seconds.
2 Press the ERASE button again.The recorder returns to the default condition atthe time of purchase, and shows the date andtime setting screen ( P.8).
....................................................................................................................
NoteIf the ERASE button is not pressed within the 8 seconds after “CLEAR” startsflashing, the recorder will revert to stop status.
12
HoldSetting the HOLD switch to the HOLD position.If you set the recorder to HOLD position by sliding the HOLD switch in the direction of the arrow,the current conditions will be preserved, and all buttons and switches except the HOLD switchwill be disabled. This feature is useful when the recorder has to be carried a bag or a pocketbecause files won't be erased if the ERASE button is pressed by accident.Remember to reset the HOLD switch when using the recorder.
Notes• The recorder functions as follows with the HOLD switch set to the HOLD position:
– If the recorder is stopped, the display goes dark.– If the recorder is playing, the display goes dark when playback of the
current file has completed.– If the recorder is recording, the display goes dark when the recorder
stops recording automatically upon running out of free memory.• When the display is dark because the HOLD switch is set to the HOLD position,
you can make the clock flash for 2 seconds by pressing any button.• When you set the HOLD switch to the HOLD position while playing back,
you can still adjust the volume using the VOLUME control.• The alarm will sound at the scheduled time even if the recorder is set to
HOLD. The recorder will then begin to play the file associated with thealarm once you press the STOP button.
Resettin
g th
e Reco
rder (C
LE
AR
) / Ho
ld
26
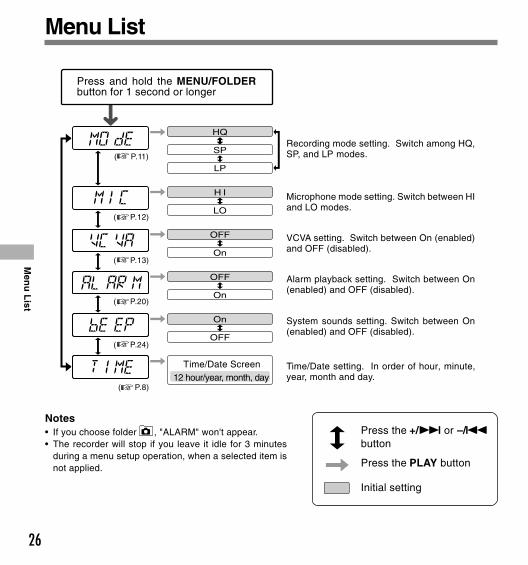
Menu List
Recording mode setting. Switch among HQ,SP, and LP modes.
Notes• If you choose folder , "ALARM" won't appear.• The recorder will stop if you leave it idle for 3 minutes
during a menu setup operation, when a selected item isnot applied.
Microphone mode setting. Switch between HIand LO modes.
VCVA setting. Switch between On (enabled)and OFF (disabled).
Alarm playback setting. Switch between On(enabled) and OFF (disabled).
System sounds setting. Switch between On(enabled) and OFF (disabled).
Press the +/9 or –/0button
Time/Date setting. In order of hour, minute,year, month and day.
Press the PLAY button
Initial settingM
enu
List
HQ
SP
LP
H I
LO
OFF
On
OFF
On
On
OFF
Time/Date Screen12 hour/year, month, day
( P.11)
( P.12)
( P.13)
( P.20)
( P.24)
( P.8)
Press and hold the MENU/FOLDERbutton for 1 second or longer
27
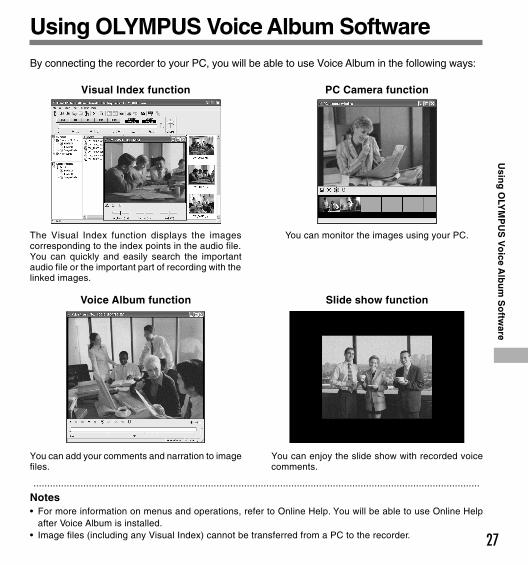
Using OLYMPUS Voice Album SoftwareBy connecting the recorder to your PC, you will be able to use Voice Album in the following ways:
Usin
g O
LYM
PU
S V
oice A
lbu
m S
oftw
are
.................................................................................................................................................................
Notes• For more information on menus and operations, refer to Online Help. You will be able to use Online Help
after Voice Album is installed.• Image files (including any Visual Index) cannot be transferred from a PC to the recorder.
Visual Index function PC Camera function
Voice Album function Slide show function
The Visual Index function displays the imagescorresponding to the index points in the audio file.You can quickly and easily search the importantaudio file or the important part of recording with thelinked images.
You can monitor the images using your PC.
You can add your comments and narration to imagefiles.
You can enjoy the slide show with recorded voicecomments.

28
Operating EnvironmentPC: IBM PC/AT compatible PCOperating System: Microsoft Windows 98/ 98SE/ Me/ 2000 Professional/ XP Professional,Home
Edition
CPU: Intel Pentium II class 233 MHz processor or better
RAM: 64 MB or moreHard drive space: 10 MB or more
Drive: 2x or faster CD-ROM drive
Sound card: Creative Labs Sound Blaster 16 or 100% compatible sound card
Browser: Microsoft Internet Explorer 4.01 or laterDisplay: 800 x 600 pixels or more, 256 colors or more
USB port: One free port
Audio I/O terminals: Earphone output or speakers
.................................................................................................................................................................
Notes• USB ports are not available on PCs running Windows 95 or that have been upgraded from Windows 95 to
any other OS.• Certain functions, such as remote and direct recording, do not work on PCs that don't have USB ports.• Voice Album is software specifically designed for this recorder. You cannot use it with any other recorder.• Voice Album isn't compatible with voice recognition software.
Using OLYMPUS Voice Album Software
Usin
g O
LYM
PU
S Vo
ice Alb
um
So
ftware
29
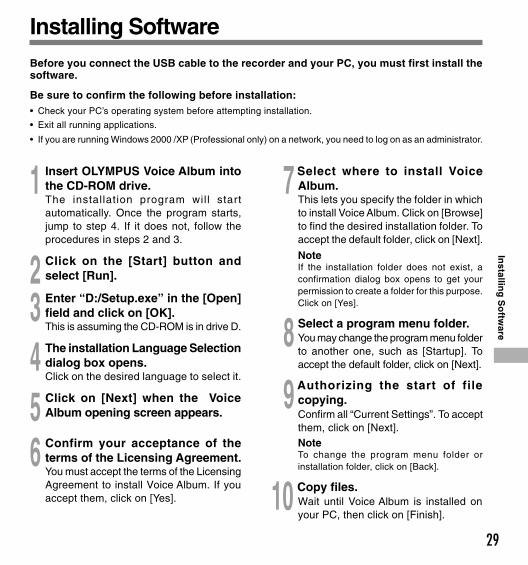
Installing SoftwareBefore you connect the USB cable to the recorder and your PC, you must first install thesoftware.
Be sure to confirm the following before installation:• Check your PC’s operating system before attempting installation.
• Exit all running applications.
• If you are running Windows 2000 /XP (Professional only) on a network, you need to log on as an administrator.
1 Insert OLYMPUS Voice Album intothe CD-ROM drive.The installation program will startautomatically. Once the program starts,jump to step 4. If it does not, follow theprocedures in steps 2 and 3.
2 Click on the [Start] button andselect [Run].
3 Enter “D:/Setup.exe” in the [Open]field and click on [OK].This is assuming the CD-ROM is in drive D.
4 The installation Language Selectiondialog box opens.Click on the desired language to select it.
5 Click on [Next] when the VoiceAlbum opening screen appears.
6 Confirm your acceptance of theterms of the Licensing Agreement.You must accept the terms of the LicensingAgreement to install Voice Album. If youaccept them, click on [Yes].
7 Select where to install VoiceAlbum.This lets you specify the folder in whichto install Voice Album. Click on [Browse]to find the desired installation folder. Toaccept the default folder, click on [Next].
NoteIf the installation folder does not exist, aconfirmation dialog box opens to get yourpermission to create a folder for this purpose.Click on [Yes].
8 Select a program menu folder.You may change the program menu folderto another one, such as [Startup]. Toaccept the default folder, click on [Next].
9 Authorizing the start of filecopying.Confirm all “Current Settings”. To acceptthem, click on [Next].NoteTo change the program menu folder orinstallation folder, click on [Back].
10 Copy files.Wait until Voice Album is installed onyour PC, then click on [Finish].
Installin
g S
oftw
are

30
Starting Voice Album
1 Insert end A of the USB cable toyour PC's USB port or USB hub.
2 Confirm that the recorder is not inuse before attaching end b of theUSB cable to the PC terminal portof the recorder.• Release the HOLD switch on the recorder
and make sure that the recorder is in stopmode before plugging in the USB cable.
When the recorder and the PC areconnected with the USB cable, therecorder display alternately flashes “PC”and “LINK”.
1
2
To use Voice Album without connecting the recorder to thePC, or if Voice Album does not start automatically when youconnect the recorder to the PC, click on the [Start] button,point to [All Programs], select [OLYMPUS Voice Album] thenclick on [OLYMPUS Voice Album].To exit Voice Album, click on the button on the window, orclick on [File], and then click on [Exit Voice Album].
......................................................................................................
Notes• When you start Voice Album for the first time by connecting the
recorder to the PC after installation, it may take a few minutes tostart.
• When the recorder is connected to the PC, the recorderaccommodates only Voice Album operations.
• Do NOT use any USB cable other than the one supplied.• Do NOT disconnect the USB cable before file transfer or recording
is completed.
Startin
g V
oice A
lbu
m

31
Window Names
1 2 4 53
67
1 Menu barYou can select various menu commands.
2 Tool barFrequently used menu commands areassigned to buttons.
3 Playback ControllerControl buttons to play and stop audio files.
4 File List ViewWill display the folders selected in 6 and7.
5 Visual Index ViewDisplays Visual Indexes (which are imageslinked to an audio file).
6 Recorder ViewDisplays folder structure of connectedrecorder.
7 Folder ViewDisplays folder structure in which filestransferred and saved in the PC.
Win
do
w N
ames
* All images have been inserted for display only, soactual appearance may be different.

32
Using Online HelpTo open Online Help, do either of the following:• Click on the [Start] button, select [All Programs], then [OLYMPUS Voice Album], then click on [Help].
• While Voice Album is running, choose [Contents] from the [Help] menu.
• While Voice Album is running, press [F1] on the keyboard.
Search by Contents
1 Once the Online Help screen appears,click on the Contents tab.
2 Double-click on the icon of thedesired topic heading.The title of the topic is displayed.
3 Double-click on the icon of thedesired topic.An explanation of the topic is displayed.
Search by Key word or Phrase
1 Once the Online Help screen appears,click on the Index tab or Search tab.
2 Enter text.If you select the keyword tab, searching startsautomatically.If you select the search tab and input a phrase,click [List Topics].
3 Choose a topic, then click on [Display].An explanation of the topic is displayed.
123
.................................................................................................................................................................
NoteFor more information on menus and operations, refer to Online Help. You will be able to use Online Help afterVoice Album is installed.
Usin
g O
nlin
e Help
123

33
File FormatTransferred audio files are recorded in WAVE format (.wav) and image files are recorded inJPEG format (.jpg).
When you transfer files, the filenames change as follows.
.................................................................................................................................................................
Notes• Transfer may take several minutes depending on the recording mode of the file to be transferred and the
PC operating environment.• If the file to be transferred already exists on the PC, it won't be transferred.
DW A0001.wav (jpg)A001
The file number of the transferred file isrenumbered automatically and will differfrom the original file on the recorder.
In the recorder
Folder name
On the PC
File numberPrefix added tothe file in the PC
Folder name
File number
Extension
File F
orm
at
Audio file Size of file Time for transfer*
HQ mode Approx. 3.2MB Approx. 1 minute
SP mode Approx. 1.6MB Approx. 30 seconds
LP mode Approx. 1.2MB Approx. 15 seconds
Image file 30 to 50KB 2 to 3 seconds
* Transfer time may vary depending on the performance and configuration of your PC.
Measure of size of file and time for transfer
(5 minutes of recording with the recorder)
(per image file)
34
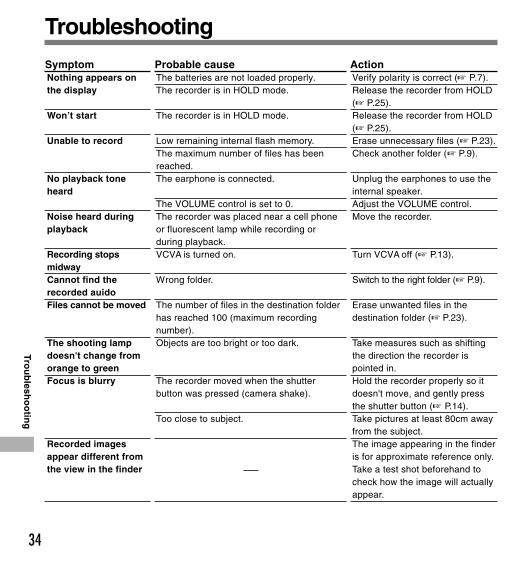
Troubleshooting
Probable causeThe batteries are not loaded properly.The recorder is in HOLD mode.
The recorder is in HOLD mode.
Low remaining internal flash memory.The maximum number of files has beenreached.The earphone is connected.
The VOLUME control is set to 0.The recorder was placed near a cell phoneor fluorescent lamp while recording orduring playback.VCVA is turned on.
Wrong folder.
The number of files in the destination folderhas reached 100 (maximum recordingnumber).Objects are too bright or too dark.
The recorder moved when the shutterbutton was pressed (camera shake).
Too close to subject.
SymptomNothing appears onthe display
Won’t start
Unable to record
No playback toneheard
Noise heard duringplayback
Recording stopsmidwayCannot find therecorded auidoFiles cannot be moved
The shooting lampdoesn't change fromorange to greenFocus is blurry
Recorded imagesappear different fromthe view in the finder
ActionVerify polarity is correct ( P.7).Release the recorder from HOLD( P.25).Release the recorder from HOLD( P.25).Erase unnecessary files ( P.23).Check another folder ( P.9).
Unplug the earphones to use theinternal speaker.Adjust the VOLUME control.Move the recorder.
Turn VCVA off ( P.13).
Switch to the right folder ( P.9).
Erase unwanted files in thedestination folder ( P.23).
Take measures such as shiftingthe direction the recorder ispointed in.Hold the recorder properly so itdoesn't move, and gently pressthe shutter button ( P.14).Take pictures at least 80cm awayfrom the subject.The image appearing in the finderis for approximate reference only.Take a test shot beforehand tocheck how the image will actuallyappear.Tro
ub
lesho
otin
g
35
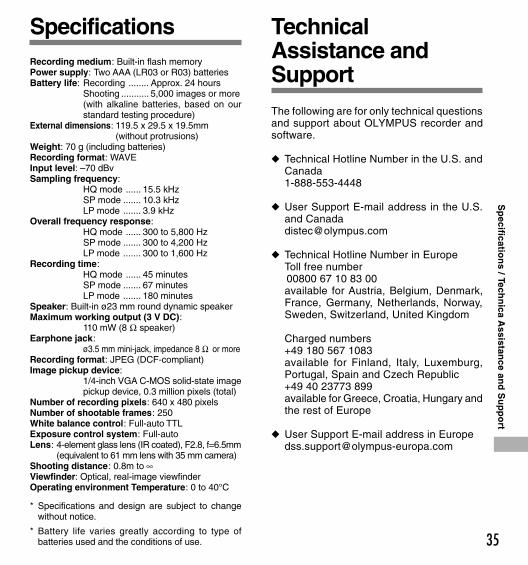
Recording medium: Built-in flash memoryPower supply: Two AAA (LR03 or R03) batteriesBattery life: Recording ........ Approx. 24 hours
Shooting ........... 5,000 images or more(with alkaline batteries, based on ourstandard testing procedure)
External dimensions: 119.5 x 29.5 x 19.5mm (without protrusions)
Weight: 70 g (including batteries)Recording format: WAVEInput level: –70 dBvSampling frequency:
HQ mode ...... 15.5 kHzSP mode ....... 10.3 kHzLP mode ....... 3.9 kHz
Overall frequency response:HQ mode ...... 300 to 5,800 HzSP mode ....... 300 to 4,200 HzLP mode ....... 300 to 1,600 Hz
Recording time:HQ mode ...... 45 minutesSP mode ....... 67 minutesLP mode ....... 180 minutes
Speaker: Built-in ø23 mm round dynamic speakerMaximum working output (3 V DC):
110 mW (8 Ω speaker)Earphone jack:
ø3.5 mm mini-jack, impedance 8 Ω or moreRecording format: JPEG (DCF-compliant)Image pickup device:
1/4-inch VGA C-MOS solid-state imagepickup device, 0.3 million pixels (total)
Number of recording pixels: 640 x 480 pixelsNumber of shootable frames: 250White balance control: Full-auto TTLExposure control system: Full-autoLens: 4-element glass lens (IR coated), F2.8, f=6.5mm
(equivalent to 61 mm lens with 35 mm camera)Shooting distance: 0.8m to ∞Viewfinder: Optical, real-image viewfinderOperating environment Temperature: 0 to 40°C
* Specifications and design are subject to changewithout notice.
* Battery life varies greatly according to type ofbatteries used and the conditions of use.
Specifications TechnicalAssistance andSupportThe following are for only technical questionsand support about OLYMPUS recorder andsoftware.
Technical Hotline Number in the U.S. andCanada1-888-553-4448
User Support E-mail address in the U.S.and [email protected]
Technical Hotline Number in EuropeToll free number00800 67 10 83 00available for Austria, Belgium, Denmark,France, Germany, Netherlands, Norway,Sweden, Switzerland, United Kingdom
Charged numbers+49 180 567 1083available for Finland, Italy, Luxemburg,Portugal, Spain and Czech Republic+49 40 23773 899available for Greece, Croatia, Hungary andthe rest of Europe
User Support E-mail address in [email protected]
Sp
ecification
s / Techn
ica Assistan
ce and
Su
pp
ort


1
DIGITAL VOICERECORDER
W-10Merci d’avoir porté votre choix sur cet
enregistreur vocal numérique.Lisez ce mode d’emploi pour les informations
concernant l’emploi correct et sûr de l’appareil.Conservez-le à portée de la main pour toute référence
ultérieure.
Pour garantir la réussite de vos enregistrementsaudio/image, nous vous recommandons de faire des
essais avec les fonctions d'enregistrement audio/image avant l'utilisation.
MODE D’EMPLOI
FR

2
Pour un emploi sûret correctAvant d’utiliser votre nouvel enregistreur,lisez attentivement ce manuel pour savoircomment l’utiliser de manière sûre etcorrecte. Conservez ce manuel à unendroit facilement accessible pour touteréférence ultérieure.• Les symboles Avertissement indiquent des
informations importantes liées à la sécurité. Pourvous protéger vous-même et les autres contre lesblessures ou contre les dégâts matériels, il estessentiel que vous preniez toujours en compteles avertissements et informations fournis.
Précautions générales Ne laissez pas le lecteur dans un endroit
chaud, humide comme dans une voiturefermée en plein soleil ou sur une plageen été.
Ne rangez pas l’enregistreur dans unendroit trop exposé à l’humidité ou à lapoussière.
N’utilisez pas de solvant organique, telqu’alcool ou diluant pour vernis, pournettoyer l’appareil.
Ne placez pas l’enregistreur sur ou prèsd’un autre appareil électrique tel quetéléviseur ou réfrigérateur.
Evitez d'effectuer un enregistrement ouune lecture près d'un téléphone cellulaireou de tout autre appareil sans fil, car ilsrisquent de provoquer des interférenceset des parasites. En cas de parasites,installez-vous ailleurs, ou éloignezdavantage l'enregistreur de ces appareils.
Evitez le sable ou la saleté. Ils peuventcauser des dommages irréparables.
Evitez les vibrations ou chocs violents. Ne démontez pas, ne réparez pas et ne
modifiez pas cet appareil vous-même.
PilesAvertissement
• Les piles ne doivent jamais êtreexposées à une flamme, chauffées,court-circuitées ou démontées.
• N’essayez pas de recharger des pilesalcalines, au lithium ou autres piles non-rechargeables.
• N’utilisez jamais une pile à couvercleextérieur éventré ou fissuré.
• Conservez les piles hors de portée desenfants.
• Si vous notez quelque chose d’inhabituelà l’utilisation de ce produit, par exempleun bruit anormal, de la chaleur, de lafumée ou une odeur de brûlé:
1 retirez immédiatement les piles enprenant garde de ne pas vous brûler, et
2 appelez votre revendeur ou lereprésentant Olympus local pour unerévision. Continuer à utiliser le produitdans de telles conditions pourraitengendrer une décharge électrique, lefeu ou des blessures.
N’utilisez pas cet appareil pendant laconduite d’un véhicule (tel quebicyclette, motocyclette ou poussette).
Conservez l’appareil hors de portée desenfants.
<Avertissement relatif aux pertes dedonnées>Les données enregistrées dans la mémoirerisquent d'être détruites ou effacées en casd'erreur de procédure, d'anomalie del'appareil, ou pendant des travaux deréparation. Nous vous recommandonsd'enregistrer et de sauvegarder toutes lesdonnées importantes sur un autre support,par exemple un disque dur ou un disque MO.
3
Table des matières
PréparatifsCaractéristiques principales ..................... 4Identification des éléments ....................... 5Insertion des piles .................................... 7
Enregistrement ....................................... 10Modes d’enregistrement (MOdE) ........... 11Sensibilité du microphone (MIC) ............ 12Utilisation d’un VCVA
(Variable Control Voice Actuator) ....... 13
Enregistrement, prise de vue et lecture
Réglage de l’heure/date (TIME) ............... 8Remarques sur les dossiers ..................... 9
Autres fonctionsTransfert de fichiers entre
les dossiers (MOVE) ........................... 19Fonction de lecture
d’alarme (ALARM) .............................. 20Effacement .............................................. 23
Prise de vues .......................................... 14Lecture .................................................... 17
Gestion des fichiers sur votre PCUtilisation du logiciel
OLYMPUS Voice Album...................... 27Installation du logiciel ............................. 29Démarrage de Voice Album ................... 30
Noms des fenêtres ................................. 31Utiliser l’aide en ligne ............................. 32Format des fichiers ................................. 33
Autres informationsDépannage ............................................. 34Spécifications ......................................... 35
Assistance technique et soutien ............ 35
Avertissements sonores (bEEP) ............ 24Remettre l’enregistreur dans
l’état initial (CLEAR) ........................... 25Maintien .................................................. 25Liste de menus ....................................... 26
4
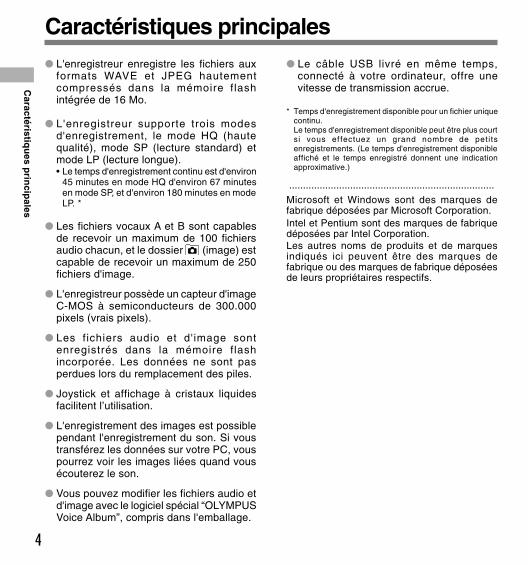
Caractéristiques principales L'enregistreur enregistre les fichiers aux
formats WAVE et JPEG hautementcompressés dans la mémoire flashintégrée de 16 Mo.
L'enregistreur supporte trois modesd'enregistrement, le mode HQ (hautequalité), mode SP (lecture standard) etmode LP (lecture longue).• Le temps d'enregistrement continu est d'environ
45 minutes en mode HQ d'environ 67 minutesen mode SP, et d'environ 180 minutes en modeLP. *
Les fichiers vocaux A et B sont capablesde recevoir un maximum de 100 fichiersaudio chacun, et le dossier (image) estcapable de recevoir un maximum de 250fichiers d'image.
L'enregistreur possède un capteur d'imageC-MOS à semiconducteurs de 300.000pixels (vrais pixels).
Les fichiers audio et d'image sontenregistrés dans la mémoire flashincorporée. Les données ne sont pasperdues lors du remplacement des piles.
Joystick et affichage à cristaux liquidesfacilitent l’utilisation.
L'enregistrement des images est possiblependant l'enregistrement du son. Si voustransférez les données sur votre PC, vouspourrez voir les images liées quand vousécouterez le son.
Vous pouvez modifier les fichiers audio etd'image avec le logiciel spécial “OLYMPUSVoice Album”, compris dans l'emballage.
Caractéristiq
ues p
rincip
ales
Le câble USB livré en même temps,connecté à votre ordinateur, offre unevitesse de transmission accrue.
* Temps d'enregistrement disponible pour un fichier uniquecontinu.Le temps d'enregistrement disponible peut être plus courtsi vous ef fectuez un grand nombre de petitsenregistrements. (Le temps d'enregistrement disponibleaffiché et le temps enregistré donnent une indicationapproximative.)
..........................................................................
Microsoft et Windows sont des marques defabrique déposées par Microsoft Corporation.Intel et Pentium sont des marques de fabriquedéposées par Intel Corporation.Les autres noms de produits et de marquesindiqués ici peuvent être des marques defabrique ou des marques de fabrique déposéesde leurs propriétaires respectifs.
5
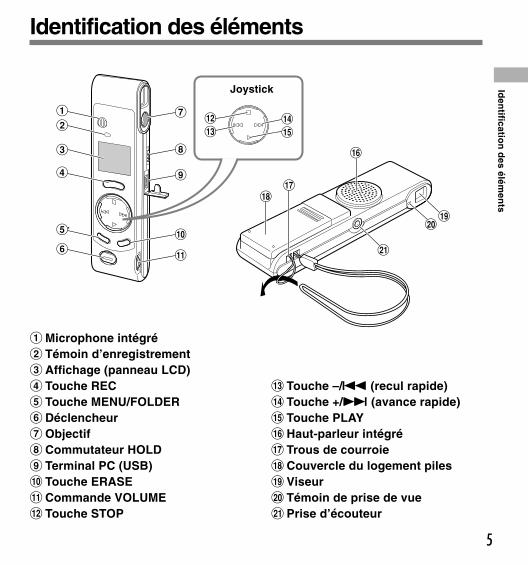
1 Microphone intégré2 Témoin d’enregistrement3 Affichage (panneau LCD)4 Touche REC5 Touche MENU/FOLDER6 Déclencheur7 Objectif8 Commutateur HOLD9 Terminal PC (USB)0 Touche ERASE! Commande VOLUME@ Touche STOP
# Touche –/0 (recul rapide)$ Touche +/9 (avance rapide)% Touche PLAY^ Haut-parleur intégré& Trous de courroie* Couvercle du logement piles( Viseur) Témoin de prise de vue- Prise d’écouteur
Identification des éléments
1
6
5
4
3
27
8
9
0
!
@#
$%
^
-
)(
*&
Joystick Iden
tification
des élém
ents

6
1 Indicateur de dossier2 Indicateur de mode d’enregistrement3 Indicateur de sensibilité du
microphone (LOW)4 Heure/date actuelle, heure/date
d’enregistrement (REC DATE), tempsd'enregistrement/lecture, tempsd’enregistrement restant (REMAIN),affichage de menu etc.
5 Témoin d’alarme6 Indicateur de capacité des piles7 Indicateur 7 (recul rapide),
Indicateur 8 (avance rapide),Indicateur s (enregistrement),Indicateur ` (lecture)
8 Indicateur de numéro de fichier9 Témoin VCVA
Affichage (panneau LCD)
Iden
tification
des élém
ents
1
2
4
3
5
67
8
9a
b
c
Quand l'enregistreur estarrêté et qu'il n'effectue nienregistrement ni lecture, ilaffiche une horloge.
a Dossier actuelb Nombre total de fichiers enregistrés dans le
dossier actuelc Temps d’enregistrement restant
Mode d’attente et coupure de l’affichage
Si l'enregistreur est mis à l'arrêt ou en pausependant 60 minutes ou plus, il passe en moded'attente (mode d'économie d'énergie), etl'affichage s'éteint. Appuyez sur une touchequelconque pour quitter le mode d’attente etactiver l’affichage.
Identification des éléments
Si vous maintenez la toucheSTOP pressée, l'appareil affichele temps d'enregistrementrestant et le nombre total defichiers dans un dossier.

7
Insertio
n d
es piles
Insertion des piles
1 Appuyez légèrement sur la flèche et faitescoulisser le couvercle des piles pour l’ouvrir.
2 Insérez deux piles alcalines AAA en respectantles polarités.
3 Refermez correctement le couvercle du logementpiles.
1
2
3
L’indication de l’heure clignote, indiquant le début de laprocédure de réglage de l’heure/date ( P.8).
Remplacement des piles
Quand s’affiche, remplacez les piles le plus tôt possible.Quand les piles sont usées, clignote et l’enregistreur secoupe. Des piles alcalines AAA sont recommandées.Il est recommandé de régler le commutateur HOLD sur HOLDavant de remplacer les piles pour maintenir les réglagesactuels (heure/date etc.). Pratique, cet enregistreursauvegarde aussi les réglages actuels dans une mémoire nonvolatile toutes les heures.
......................................................................................................................................................
Remarques• Vous devez arrêter l'enregistreur avant de remplacer les piles. Le fait de retirer les piles alors que
l'enregistreur est en train d'effectuer un enregistrement, un effacement ou toute autre opération d'accès àun fichier audio risque d'altérer les données. Si les piles sont épuisées pendant que vous enregistrez unfichier, vous perdrez votre fichier actuel parce que l'en-tête du fichier ne pourra pas se fermer. Il est donc detoute première importance que vous remplaciez les piles lorsqu'il ne reste plus qu'un repère dans l'icônedes piles.
• Remplacez les deux piles en même temps.• Ne mélangez jamais des piles neuves et anciennes, ou des piles de type et/ou marque différents.• Retirez les piles si l’enregistreur doit rester inutilisé pendant une période prolongée.
8
Réglage de l’heure/date (TIME)
Modifier l’heure/la date
Rég
lage d
e l’heu
re/date (T
IME
)
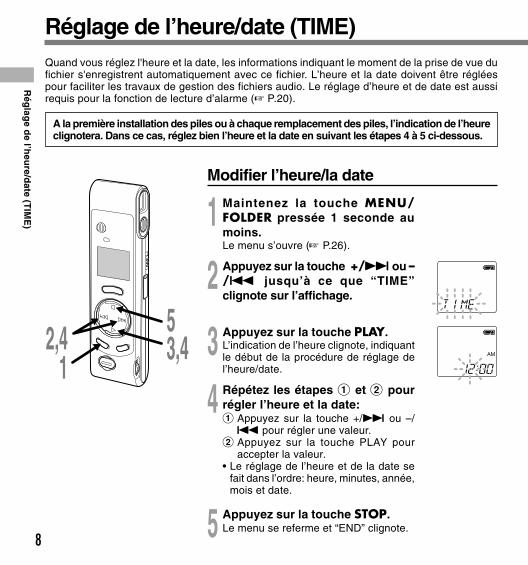
Quand vous réglez l'heure et la date, les informations indiquant le moment de la prise de vue dufichier s'enregistrent automatiquement avec ce fichier. L’heure et la date doivent être régléespour faciliter les travaux de gestion des fichiers audio. Le réglage d’heure et de date est aussirequis pour la fonction de lecture d’alarme ( P.20).
A la première installation des piles ou à chaque remplacement des piles, l’indication de l’heureclignotera. Dans ce cas, réglez bien l’heure et la date en suivant les étapes 4 à 5 ci-dessous.
2,4 3,45
1
1 Maintenez la touche MENU/FOLDER pressée 1 seconde aumoins.Le menu s’ouvre ( P.26).
2 Appuyez sur la touche +/9 ou –/0 jusqu’à ce que “TIME”clignote sur l’affichage.
3 Appuyez sur la touche PLAY.L’indication de l’heure clignote, indiquantle début de la procédure de réglage del’heure/date.
4 Répétez les étapes 1 et 2 pourrégler l’heure et la date:1 Appuyez sur la touche +/9 ou –/0 pour régler une valeur.
2 Appuyez sur la touche PLAY pouraccepter la valeur.
• Le réglage de l’heure et de la date sefait dans l’ordre: heure, minutes, année,mois et date.
5 Appuyez sur la touche STOP.Le menu se referme et “END” clignote.
9
Rég
lage d
e l’heu
re/date (T
IME
) / Rem
arqu
es sur les d
ossiers
• Vous pouvez choisir l'affichage de 12 heures oude 24 heures en appuyant sur la touche MENU/FOLDER pendant que vous réglez les heures etles minutes.
Exemple: 5: 23 P. M. (P.M. = après-midi)
• Vous pouvez choisir l'ordre de l'année, du moiset du jour en appuyant sur la touche MENU/FOLDER pendant que vous les réglez.
(Exemple: Septembre 15, 2002)
Remarques• Si l’enregistreur reste sans sollicitation pendant
3 minutes ou plus avant la pression de la toucheSTOP à l’étape 5, le mode d’implantation seraannulé, et tous les réglages d ’heure/dateeffectués seront annulés.
• Si la touche STOP est pressée pendantl’opération de réglage, l’horloge utilisera lesarticles réglés à ce point.
(Réglage initial)
(Réglage initial)
Remarques sur lesdossiersL’enregistreur est doté de trois dossiers:A, B,et .Appuyez sur la touche MENU/FOLDER pourchanger de dossier. Les dossiers commutentdans l'ordre de A → B → → A … chaquefois que la touche est pressée.
Dossiers A et B
Chaque message enregistré stocké dans undossier est sauvegardé en tant que fichierWave. Ces dossiers peuvent être utiliséssélectivement pour distinguer les typesd’enregistrement ; par exemple,A pourraservir pour l'enregistrement d'informationsprivées, et B pourra être réservé auxinformations d'affaires. Jusqu ’à 100messages sont enregistrables par dossier.
Dossier
Tous les fichiers d'image, y compris lesfichiers d'image enregistrés pendant unenregistrement audio dans le dossier A ou B,s'enregistrent dans le dossier .Il estcapable de contenir un maximum de 250fichiers d'image.
10
En
registrem
ent
Enregistrement
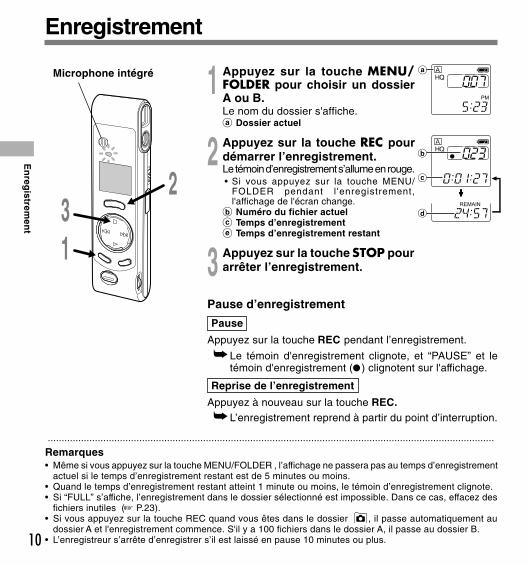
1 Appuyez sur la touche MENU/FOLDER pour choisir un dossierA ou B.Le nom du dossier s'affiche.a Dossier actuel
2 Appuyez sur la touche REC pourdémarrer l’enregistrement.Le témoin d’enregistrement s’allume en rouge.• Si vous appuyez sur la touche MENU/
FOLDER pendant l 'enregistrement,l'affichage de l'écran change.
b Numéro du fichier actuelc Temps d’enregistremente Temps d’enregistrement restant
3 Appuyez sur la touche STOP pourarrêter l’enregistrement.
a
b
c
d
.................................................................................................................................................................
Remarques• Même si vous appuyez sur la touche MENU/FOLDER , l’affichage ne passera pas au temps d’enregistrement
actuel si le temps d’enregistrement restant est de 5 minutes ou moins.• Quand le temps d’enregistrement restant atteint 1 minute ou moins, le témoin d’enregistrement clignote.• Si “FULL” s’affiche, l’enregistrement dans le dossier sélectionné est impossible. Dans ce cas, effacez des
fichiers inutiles ( P.23).• Si vous appuyez sur la touche REC quand vous êtes dans le dossier , il passe automatiquement au
dossier A et l'enregistrement commence. S'il y a 100 fichiers dans le dossier A, il passe au dossier B.• L’enregistreur s’arrête d’enregistrer s’il est laissé en pause 10 minutes ou plus.
2
13
Microphone intégré
Pause d’enregistrement
Pause
Appuyez sur la touche REC pendant l’enregistrement.
Le témoin d'enregistrement clignote, et “PAUSE” et letémoin d'enregistrement (s) clignotent sur l'affichage.
Reprise de l’enregistrement
Appuyez à nouveau sur la touche REC. L’enregistrement reprend à partir du point d’interruption.

11
Modes d’enregistrement (MOdE)Vous avez le choix entre trois modes d’enregistrement: mode HQ (haute qualité), mode SP (lecturestandard) et mode LP (lecture longue). Le temps d'enregistrement continu est d'environ 45 minutesen mode HQ, d'environ 67 minutes en mode SP, et d'environ 180 minutes en mode LP.Le temps d’enregistrement disponible indiqué ci-dessus est celui pour un fichier continu. Letemps d’enregistrement disponible peut être plus court que spécifié si plusieurs fichiers sontenregistrés. (Utilisez le temps restant et le temps d’enregistrement seulement à titre de référence.)
1 Maintenez la touche MENU/FOLDER pressée 1 seconde aumoins.“MOdE” est affiché à l’écran ( P.26).
2 Appuyez sur la touche PLAY.Le processus de réglage du moded’enregistrement commence.
3 Appuyez sur +/9 ou –/0 pourchoisir un mode d’enregistrement.
4 Appuyez sur la touche STOP.Le menu se referme et “END” clignote.
.......................................................................................................
RemarqueChoisissez le mode HQ ou SP pour enregistrer des réunions ou desconférences avec une grande netteté.
41
23
Mo
des d
’enreg
istremen
t (MO
dE
)

12
Sensibilité du microphone (MIC)La sensibilité du microphone est ajustable en fonction des besoins d’enregistrement.
Sen
sibilité d
u m
icrop
ho
ne (M
IC)
1 Maintenez la touche MENU/FOLDER pressée 1 seconde aumoins.Le menu s’ouvre ( P.26).
2 Appuyez sur la touche +/9 ou–/0 jusqu’à ce que “MIC”clignote sur l’affichage.
3 Appuyez sur la touche PLAY.La procédure de réglage de sensibilité dumicrophone démarre.
4 Appuyez sur la touche +/9 ou–/0 pour choisir HI ou LO.HI : Mode haute sensibil ité qui
enregistre les sons dans toutes lesdirections.
LO : Mode basse sensibilité adapté à ladictée.
5 Appuyez sur la touche STOP.Le menu se referme et “END” clignote.a Indicateur de sensibilité du microphone
Si vous choisissez LO, s’affichera.
................................................................................................
Remarques• Pour réussir l’enregistrement, faites un enregistrement d’essai pour
choisir la sensibilité correcte avant l’enregistrement.• Si vous choisissez HI, nous vous recommandons de régler le mode
d’enregistrement à HQ ou SP pour profiter au mieux de la sensibilitéaccrue.
• Si vous choisissez HI, les bruits de fond peuvent être importantsselon les conditions d’enregistrement.
2,4 35
1
a
13
Utilisatio
n d
’un
VC
VA (Variab
le Co
ntro
l Vo
ice Actu
ator)
Utilisation d’un VCVA (Variable Control Voice Actuator)Quand le microphone perçoit que les sons ont atteint le niveau préréglé, le VCVA (Variable Control VoiceActuator) intégré démarre automatiquement l’enregistrement , et s’arrête quand le volume baisse.Particulièrement utile pour l’enregistrement prolongé, le VCVA non seulement économise la mémoire en coupantl’enregistrement pendant les périodes de silence, mais rend aussi l’enregistrement plus efficace et commode.
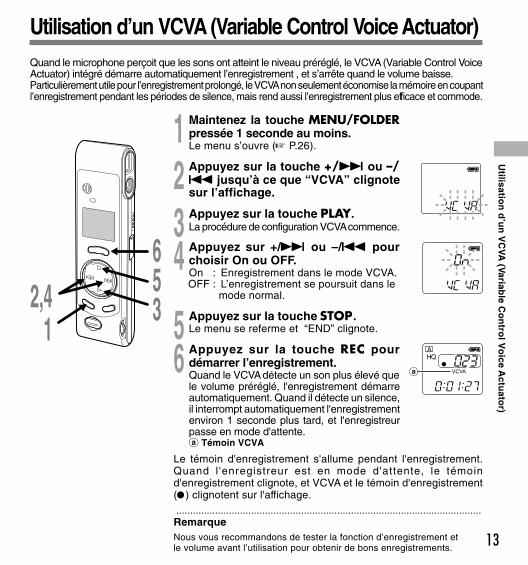
1 Maintenez la touche MENU/FOLDERpressée 1 seconde au moins.Le menu s’ouvre ( P.26).
2 Appuyez sur la touche +/9 ou –/0 jusqu’à ce que “VCVA” clignotesur l’affichage.
3 Appuyez sur la touche PLAY.La procédure de configuration VCVA commence.
4 Appuyez sur +/9 ou –/0 pourchoisir On ou OFF.On : Enregistrement dans le mode VCVA.OFF : L’enregistrement se poursuit dans le
mode normal.
5 Appuyez sur la touche STOP.Le menu se referme et “END” clignote.
6 Appuyez sur la touche REC pourdémarrer l’enregistrement.Quand le VCVA détecte un son plus élevé quele volume préréglé, l'enregistrement démarreautomatiquement. Quand il détecte un silence,il interrompt automatiquement l'enregistrementenviron 1 seconde plus tard, et l'enregistreurpasse en mode d'attente.a Témoin VCVA
6532,4
1a
..............................................................................................................RemarqueNous vous recommandons de tester la fonction d’enregistrement etle volume avant l’utilisation pour obtenir de bons enregistrements.
Le témoin d'enregistrement s'allume pendant l'enregistrement.Quand l 'enregistreur est en mode d'attente, le témoind'enregistrement clignote, et VCVA et le témoin d'enregistrement(s) clignotent sur l'affichage.
14
Prise de vues
Prise d
e vues
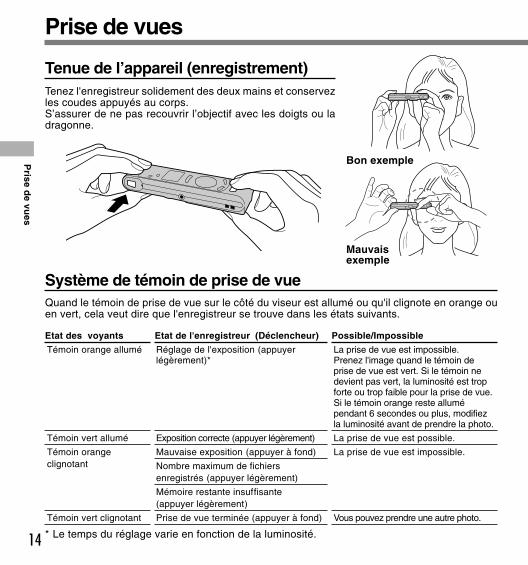
Tenue de l’appareil (enregistrement)Tenez l'enregistreur solidement des deux mains et conservezles coudes appuyés au corps.S’assurer de ne pas recouvrir l’objectif avec les doigts ou ladragonne.
Bon exemple
Mauvaisexemple
Système de témoin de prise de vueQuand le témoin de prise de vue sur le côté du viseur est allumé ou qu'il clignote en orange ouen vert, cela veut dire que l'enregistreur se trouve dans les états suivants.
Etat de l'enregistreur (Déclencheur)
Réglage de l'exposition (appuyerlégèrement)*
Exposition correcte (appuyer légèrement)
Mauvaise exposition (appuyer à fond)
Nombre maximum de fichiersenregistrés (appuyer légèrement)
Mémoire restante insuffisante(appuyer légèrement)
Prise de vue terminée (appuyer à fond)
Etat des voyants
Témoin orange allumé
Témoin vert allumé
Témoin orangeclignotant
Témoin vert clignotant
Possible/Impossible
La prise de vue est impossible.Prenez l'image quand le témoin deprise de vue est vert. Si le témoin nedevient pas vert, la luminosité est tropforte ou trop faible pour la prise de vue.Si le témoin orange reste allumépendant 6 secondes ou plus, modifiezla luminosité avant de prendre la photo.
La prise de vue est possible.
La prise de vue est impossible.
Vous pouvez prendre une autre photo.
* Le temps du réglage varie en fonction de la luminosité.
15
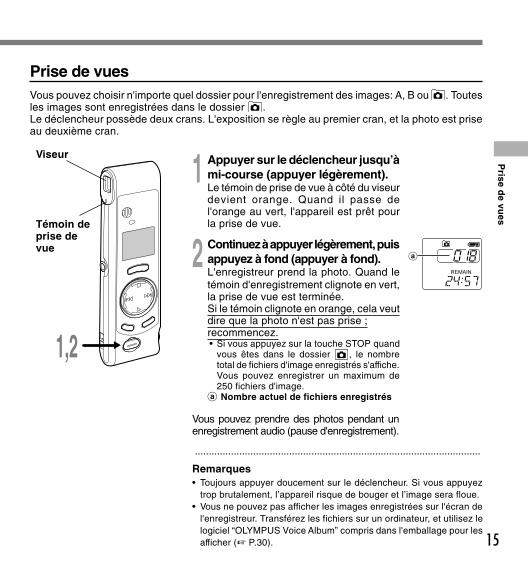
Prise d
e vues
Prise de vuesVous pouvez choisir n'importe quel dossier pour l'enregistrement des images: A, B ou . Toutesles images sont enregistrées dans le dossier .Le déclencheur possède deux crans. L'exposition se règle au premier cran, et la photo est priseau deuxième cran.
1 Appuyer sur le déclencheur jusqu’àmi-course (appuyer légèrement).Le témoin de prise de vue à côté du viseurdevient orange. Quand il passe del'orange au vert, l'appareil est prêt pourla prise de vue.
2 Continuez à appuyer légèrement, puisappuyez à fond (appuyer à fond).L'enregistreur prend la photo. Quand letémoin d'enregistrement clignote en vert,la prise de vue est terminée.Si le témoin clignote en orange, cela veutdire que la photo n'est pas prise ;recommencez.• Si vous appuyez sur la touche STOP quand
vous êtes dans le dossier , le nombretotal de fichiers d'image enregistrés s'affiche.Vous pouvez enregistrer un maximum de250 fichiers d'image.
a Nombre actuel de fichiers enregistrés
Vous pouvez prendre des photos pendant unenregistrement audio (pause d'enregistrement).
.......................................................................................................
Remarques• Toujours appuyer doucement sur le déclencheur. Si vous appuyez
trop brutalement, l’appareil risque de bouger et l’image sera floue.• Vous ne pouvez pas afficher les images enregistrées sur l'écran de
l'enregistreur. Transférez les fichiers sur un ordinateur, et utilisez lelogiciel “OLYMPUS Voice Album” compris dans l'emballage pour lesafficher ( P.30).
1,2
a
Viseur
Témoin deprise devue

16
Prise de vues
Si la prise de vue n'est pas possible
Il peut s'agir d'une des causes suivantes. Corrigez le problème et reprenez la prise de vue.
Prise d
e vues
MessageLe témoin de prise de vue clignote en orange.“FULL” clignote sur l'affichage.Le nombre de fichiers clignote sur l'affichage.Le témoin de prise de vue clignote en orange.“FULL” clignote sur l'affichage.
L'indicateur ou clignote surl'affichage.Le témoin de prise de vue clignote enorange.
Le témoin de prise de vue clignote enorange. clignote sur l'affichage.
Cause probableNombre maximum de fichiersenregistrés (250 fichiersd'image)Mémoire restanteinsuffisanteEnergie restante des pilesinsuffisante50 fichiers d'image ont déjàété pris quand vousenregistrez un fichier audio
Le déclencheur est pressé (àfond) alors que le témoin deprise de vue est orange
MesureEffacez les fichiers d'imageinutiles.
Effacez les fichiers audio oules fichiers d'image inutiles.Remplacez les par desneuves.Appuyez sur la touche STOPpour arrêter l'enregistrement,puis appuyez sur la toucheREC pour commencer unnouveau fichier audio etenregistrer les images.*Prenez l'image quand le témoinde prise de vue est vert. Si letémoin ne devient pas vert, laluminosité est trop forte ou tropfaible pour la prise de vue.
* Le fichier audio sera enregistré sous forme de deux fichiers audio.

17
Lecture
1 Appuyez sur la touche MENU/FOLDER pour choisir un dossierA ou B.
2 Appuyez sur la touche +/9 ou–/0 pour choisir le fichier quevous souhaitez lire.
3 Appuyez sur la touche PLAY pourdémarrer la lecture.• Si vous appuyez sur la touche MENU/
FOLDER pendant la lecture, l'affichage del'écran change.
a Temps de fichier écouléb Temps de fichier restantc Année, mois et date d'enregistrementd Heure de l'enregistrement.
4 Ajustez la commande VOLUMEselon vos préférences.
5 Appuyez sur la touche STOP aupoint où vous souhaitez arrêter lalecture.Reprenez la lecture en appuyant ànouveau sur la touche PLAY.
2 34
51
a
b
c
d
Lectu
re
18
Lectu
re
Lecture
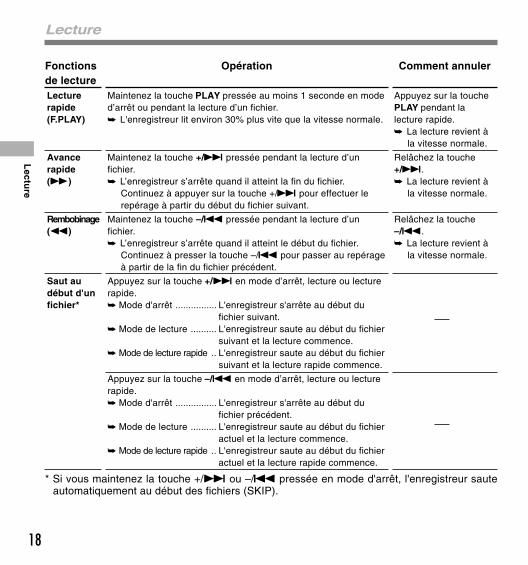
Fonctionsde lectureLecturerapide(F.PLAY)
Avancerapide(8)
Rembobinage(7)
Saut audébut d'unfichier*
Opération
Maintenez la touche PLAY pressée au moins 1 seconde en moded’arrêt ou pendant la lecture d’un fichier. L'enregistreur lit environ 30% plus vite que la vitesse normale.
Maintenez la touche +/9 pressée pendant la lecture d’unfichier. L’enregistreur s’arrête quand il atteint la fin du fichier.
Continuez à appuyer sur la touche +/9 pour effectuer lerepérage à partir du début du fichier suivant.
Maintenez la touche –/0 pressée pendant la lecture d’unfichier. L’enregistreur s’arrête quand il atteint le début du fichier.
Continuez à presser la touche –/0 pour passer au repérageà partir de la fin du fichier précédent.
Appuyez sur la touche +/9 en mode d’arrêt, lecture ou lecturerapide. Mode d'arrêt ................ L'enregistreur s'arrête au début du
fichier suivant. Mode de lecture .......... L'enregistreur saute au début du fichier
suivant et la lecture commence. Mode de lecture rapide .. L'enregistreur saute au début du fichier
suivant et la lecture rapide commence.
Appuyez sur la touche –/0 en mode d’arrêt, lecture ou lecturerapide. Mode d'arrêt ................ L'enregistreur s'arrête au début du
fichier précédent. Mode de lecture .......... L'enregistreur saute au début du fichier
actuel et la lecture commence. Mode de lecture rapide .. L'enregistreur saute au début du fichier
actuel et la lecture rapide commence.
Comment annuler
Appuyez sur la touchePLAY pendant lalecture rapide. La lecture revient à
la vitesse normale.
Relâchez la touche+/9. La lecture revient à
la vitesse normale.
Relâchez la touche–/0. La lecture revient à
la vitesse normale.
* Si vous maintenez la touche +/9 ou –/0 pressée en mode d'arrêt, l'enregistreur sauteautomatiquement au début des fichiers (SKIP).
19
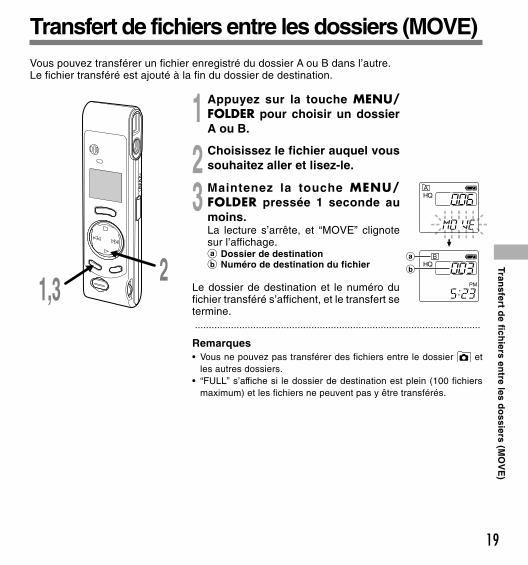
Transfert de fichiers entre les dossiers (MOVE)Vous pouvez transférer un fichier enregistré du dossier A ou B dans l’autre.Le fichier transféré est ajouté à la fin du dossier de destination.
Transfert d
e fichiers en
tre les do
ssiers (MO
VE
)
1 Appuyez sur la touche MENU/FOLDER pour choisir un dossierA ou B.
2 Choisissez le fichier auquel voussouhaitez aller et lisez-le.
3 Maintenez la touche MENU/FOLDER pressée 1 seconde aumoins.La lecture s’arrête, et “MOVE” clignotesur l’affichage.a Dossier de destinationb Numéro de destination du fichier
Le dossier de destination et le numéro dufichier transféré s’affichent, et le transfert setermine........................................................................................................
Remarques• Vous ne pouvez pas transférer des fichiers entre le dossier et
les autres dossiers.• “FULL” s’affiche si le dossier de destination est plein (100 fichiers
maximum) et les fichiers ne peuvent pas y être transférés.
21,3
a
b
20
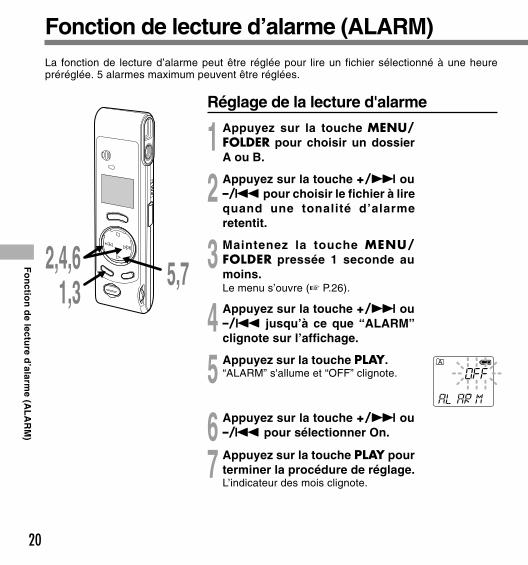
La fonction de lecture d’alarme peut être réglée pour lire un fichier sélectionné à une heurepréréglée. 5 alarmes maximum peuvent être réglées.
Réglage de la lecture d'alarme
Fonction de lecture d’alarme (ALARM)
1 Appuyez sur la touche MENU/FOLDER pour choisir un dossierA ou B.
2 Appuyez sur la touche +/9 ou–/0 pour choisir le fichier à lirequand une tonalité d’alarmeretentit.
3 Maintenez la touche MENU/FOLDER pressée 1 seconde aumoins.Le menu s’ouvre ( P.26).
4 Appuyez sur la touche +/9 ou–/0 jusqu’à ce que “ALARM”clignote sur l’affichage.
5 Appuyez sur la touche PLAY.“ALARM” s'allume et “OFF” clignote.
6 Appuyez sur la touche +/9 ou–/0 pour sélectionner On.
7 Appuyez sur la touche PLAY pourterminer la procédure de réglage.L’indicateur des mois clignote.
2,4,6 5,71,3
Fo
nctio
n d
e lecture d
’alarme (A
LA
RM
)

21
8 Répétez les étapes 1 et 2 pourrégler l’heure et la date:1 Appuyez sur la touche +/9 ou –/0 pour régler une valeur.
2 Appuyez sur la touche PLAY pouraccepter la valeur.
• Le réglage de l’heure et de la date sefait dans l’ordre: mois, date, heure etminutes.
9 Appuyez sur la touche STOP.Le menu se referme et “END” clignote.a Témoin d’alarme
Une alarme retentira pendant 5 minutes àl’heure programmée. L'alarme retentit àl'heure prévue pendant 5 minutes. Appuyezsur la touche STOP pendant que l'alarmeretentit pour lire le fichier associé à l'alarme.Appuyez à nouveau sur la touche STOPpour arrêter la lecture d'alarme du fichier.
.......................................................................................................
Remarques• La tonalité d’alarme s’arrête automatiquement si aucune touche n’est
pressée dans les 5 minutes après le démarrage de l’alarme. Le fichiern’est pas lu dans ce cas.
• Après la lecture d’alarme, la fonction de lecture d’alarme estautomatiquement annulée.
• Vous pouvez régler la fonction de lecture d’alarme seulement pour 5fichiers. Cette fonction ne peut pas être réglée si aucun fichier n’estenregistré dans le dossier sélectionné.
• Vous ne pouvez pas régler l’année du fichier à lire.
98
a
Fo
nctio
n d
e lecture d
’alarme (A
LA
RM
)
22
Fonction de lecture d’alarme (ALARM)
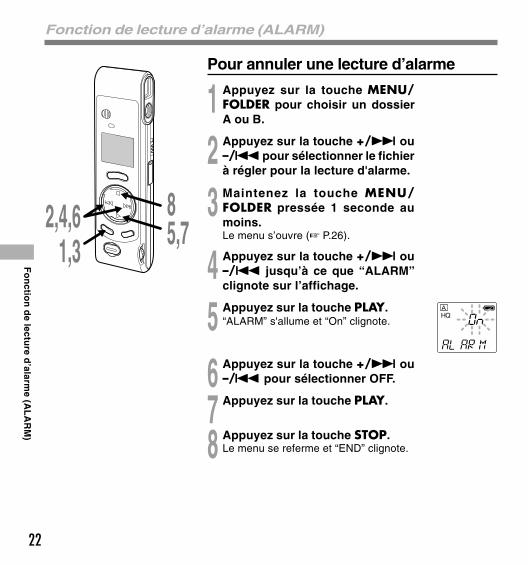
Pour annuler une lecture d’alarme
1 Appuyez sur la touche MENU/FOLDER pour choisir un dossierA ou B.
2 Appuyez sur la touche +/9 ou–/0 pour sélectionner le fichierà régler pour la lecture d'alarme.
3 Maintenez la touche MENU/FOLDER pressée 1 seconde aumoins.Le menu s’ouvre ( P.26).
4 Appuyez sur la touche +/9 ou–/0 jusqu’à ce que “ALARM”clignote sur l’affichage.
5 Appuyez sur la touche PLAY.“ALARM” s'allume et “On” clignote.
6 Appuyez sur la touche +/9 ou–/0 pour sélectionner OFF.
7 Appuyez sur la touche PLAY.
8 Appuyez sur la touche STOP.Le menu se referme et “END” clignote.
2,4,6 5,71,38
Fo
nctio
n d
e lecture d
’alarme (A
LA
RM
)

23
EffacementVous pouvez facilement effacer des fichiers inutiles. Les numéros de fichiers séquentiels serontautomatiquement réassignés.
Effacement d’un fichier à la fois
1 Appuyez sur la touche MENU/FOLDERpour choisir un dossier.
2 Appuyez sur la touche +/9 ou –/0 pour choisir le fichier à effacer.Vous pouvez effacer un fichier pendant sa lecture.
3 Appuyez sur la touche ERASE.Le numéro du fichier clignote, puis “ERASE” et “YES”s’affichent alternativement pendant 8 secondes.
4 Appuyez à nouveau sur la touche ERASE.Le fichier est effacé.
Effacement de tous les fichiers d’un dossier
1 Appuyez sur la touche MENU/FOLDERpour choisir un dossier.
2 Appuyez au moins 2 secondes sur latouche ERASE.Le nom du dossier et “ALL” clignotent, puis“ERASE” et “YES” s’affichent alternativementpendant 8 secondes.
3 Appuyez à nouveau sur la touche ERASE.Tous les fichiers du dossier sélectionné sonteffacés simultanément.
.................................................................................................................................................................
Remarques• Si vous n'appuyez pas sur la touche ERASE dans les 8 secondes à compter du clignotement de “ERASE”,
l'enregistreur revient au mode Arrêt.• Un fichier effacé ne peut être rétabli. Nous vous recommandons de transférer les fichiers d'image importants
sur un ordinateur, et de vérifier leur contenu avant de les effacer de l'enregistreur.
23,41
2,31
Effacem
ent

24
Avertissements sonores (bEEP)L’enregistreur émet des bips pour vous signaler les opérations de touche ou vous avertir en casd’erreur. Les avertissements sonores peuvent être coupés.
1 Maintenez la touche MENU/FOLDER pressée 1 seconde aumoins.Le menu s’ouvre ( P.26).
2 Appuyez sur la touche +/9 ou–/0 jusqu’à ce que “bEEP”clignote sur l’affichage.
3 Appuyez sur la touche PLAY.Le réglage des avertissements sonorescommence.
4 Appuyez sur +/9 ou –/0pour choisir On ou OFF.On : Les avertissements sonores sont
activés.OFF : Les avertissements sonores sont
désactivés.
5 Appuyez sur la touche STOP.Le menu se referme et “END” clignote.
Si une fonction de lecture d’alarme a étéréglée, l ’alarme retentira à l ’heureprogrammée même si les avertissementssonores ont été coupés.
2,4 35
1
Avertissem
ents so
no
res (bE
EP
)
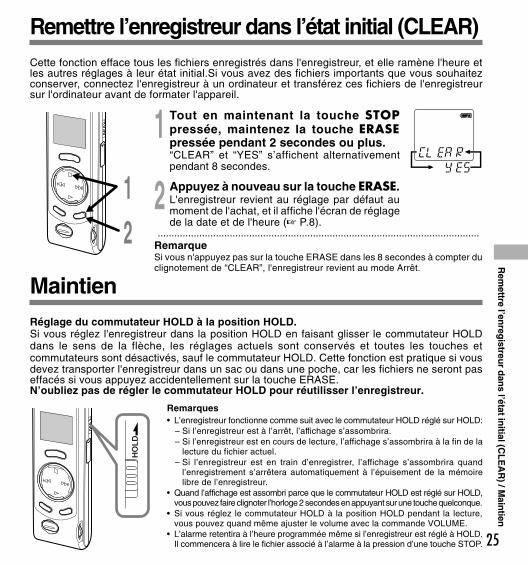
25
Remettre l’enregistreur dans l’état initial (CLEAR)Cette fonction efface tous les fichiers enregistrés dans l'enregistreur, et elle ramène l'heure etles autres réglages à leur état initial.Si vous avez des fichiers importants que vous souhaitezconserver, connectez l'enregistreur à un ordinateur et transférez ces fichiers de l'enregistreursur l'ordinateur avant de formater l'appareil.
1 Tout en maintenant la touche STOPpressée, maintenez la touche ERASEpressée pendant 2 secondes ou plus.“CLEAR” et “YES” s’affichent alternativementpendant 8 secondes.
2 Appuyez à nouveau sur la touche ERASE.L'enregistreur revient au réglage par défaut aumoment de l'achat, et il affiche l'écran de réglagede la date et de l'heure ( P.8).
....................................................................................................................RemarqueSi vous n'appuyez pas sur la touche ERASE dans les 8 secondes à compter duclignotement de “CLEAR”, l'enregistreur revient au mode Arrêt.
12
MaintienRéglage du commutateur HOLD à la position HOLD.Si vous réglez l'enregistreur dans la position HOLD en faisant glisser le commutateur HOLDdans le sens de la flèche, les réglages actuels sont conservés et toutes les touches etcommutateurs sont désactivés, sauf le commutateur HOLD. Cette fonction est pratique si vousdevez transporter l'enregistreur dans un sac ou dans une poche, car les fichiers ne seront paseffacés si vous appuyez accidentellement sur la touche ERASE.N’oubliez pas de régler le commutateur HOLD pour réutilisser l’enregistreur.
Remarques• L’enregistreur fonctionne comme suit avec le commutateur HOLD réglé sur HOLD:
– Si l’enregistreur est à l’arrêt, l’affichage s’assombrira.– Si l’enregistreur est en cours de lecture, l’affichage s’assombrira à la fin de la
lecture du fichier actuel.– Si l’enregistreur est en train d’enregistrer, l’affichage s’assombrira quand
l’enregistrement s’arrêtera automatiquement à l’épuisement de la mémoirelibre de l’enregistreur.
• Quand l’affichage est assombri parce que le commutateur HOLD est réglé sur HOLD,vous pouvez faire clignoter l’horloge 2 secondes en appuyant sur une touche quelconque.
• Si vous réglez le commutateur HOLD à la position HOLD pendant la lecture,vous pouvez quand même ajuster le volume avec la commande VOLUME.
• L’alarme retentira à l’heure programmée même si l’enregistreur est réglé à HOLD.Il commencera à lire le fichier associé à l’alarme à la pression d’une touche STOP.
Rem
ettre l’enreg
istreur d
ans l’état in
itial (CL
EA
R) / M
aintien

26
Liste de menus
Réglage du mode d'enregistrement.Commute entre les modes HQ, SP et LP.
Remarques• Si vous choisissez le dossier , “ALARM” ne s'affiche
pas.• L’enregistreur s’arrêtera si vous le laissez inactif pendant
3 minutes pendant une opération de réglage de menu,quand un article sélectionné n’est pas appliqué.
Réglage du mode microphone. Commutationentre HI et LO.
Réglage VCVA. Commutation entre On(activé) et OFF (désactivé).
Réglage de lecture d'alarme. Commutationentre On (activé) et OFF (désactivé).
Réglage des avertissements sonores.Commutation entre On (activé) et OFF(désactivé).
Appuyez sur la touche+/9 ou –/0
Réglage de la heure/date. Dans l'ordre desheures, minutes, année, mois et date.
Appuyez sur la touche PLAY
Réglage initialL
iste de m
enu
s
HQ
SP
LP
H I
LO
OFF
On
OFF
On
On
OFF
Ecran d’heure/date12 heures/année, mois, date
( P.11)
( P.12)
( P.13)
( P.20)
( P.24)
( P.8)
Maintenez la touche MENU/FOLDERpressée 1 seconde au moins
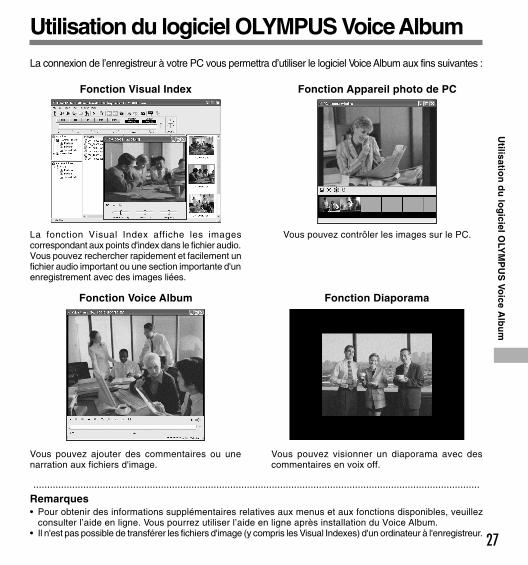
27
Utilisation du logiciel OLYMPUS Voice AlbumLa connexion de l’enregistreur à votre PC vous permettra d’utiliser le logiciel Voice Album aux fins suivantes :
Utilisatio
n d
u lo
giciel O
LYM
PU
S Vo
ice Alb
um
.................................................................................................................................................................
Remarques• Pour obtenir des informations supplémentaires relatives aux menus et aux fonctions disponibles, veuillez
consulter l’aide en ligne. Vous pourrez utiliser l’aide en ligne après installation du Voice Album.• Il n'est pas possible de transférer les fichiers d'image (y compris les Visual Indexes) d'un ordinateur à l'enregistreur.
Fonction Visual Index Fonction Appareil photo de PC
Fonction Voice Album Fonction Diaporama
La fonction Visual Index affiche les imagescorrespondant aux points d'index dans le fichier audio.Vous pouvez rechercher rapidement et facilement unfichier audio important ou une section importante d'unenregistrement avec des images liées.
Vous pouvez contrôler les images sur le PC.
Vous pouvez ajouter des commentaires ou unenarration aux fichiers d'image.
Vous pouvez visionner un diaporama avec descommentaires en voix off.

28
Environnement d’exploitationPC: PC compatible IBMSystèmed’exploitation: Microsoft Windows 98/ 98SE/ Me/ 2000 Professional/ XP Professional,Home
Edition
CPU: Processeur de classe Intel Pentium II 233MHz ou supérieur
RAM: 64 Mo ou plusEspace disque dur: 10 Mo ou plus
Lecteur: Lecteur de CD-ROM 2x ou plus rapide
Carte son: Creative Labs Sound Blaster 16 ou 100% compatible
Navigateur: Microsoft Internet Explorer 4.01 ou plus récentAffichage: 800 x 600 pixels ou plus, 256 couleurs ou plus
Port USB: un port libre
Terminaux audio E/S: sortie écouteur ou hauts-parleurs
.................................................................................................................................................................
Remarques• Les ports USB ne sont pas disponibles sur les ordinateurs sous Windows 95 ou équipés d’une mise à
niveau de Windows 95 sur un autre système d’exploitation.• Certaines fonctions, telles que l’enregistrement à distance et l’enregistrement direct, ne sont pas disponibles
sur des ordinateurs non équipés de ports USB.• Voice Album est un logiciel spécialement conçu pour cet enregistreur. Vous ne pouvez pas l'utiliser avec un
autre enregistreur.• Voice Album n'est pas compatible avec les logiciels de reconnaissance vocale.
Utilisation du logiciel OLYMPUS Voice Album
Utilisatio
n d
u lo
giciel O
LYM
PU
S Vo
ice Alb
um
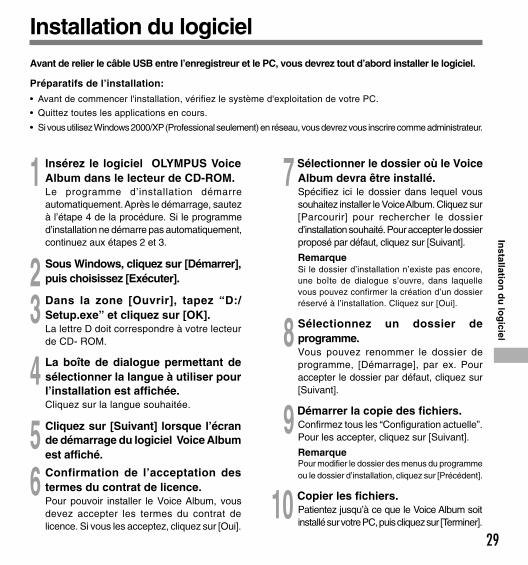
29
Installation du logicielAvant de relier le câble USB entre l’enregistreur et le PC, vous devrez tout d’abord installer le logiciel.
Préparatifs de l’installation:
• Avant de commencer l'installation, vérifiez le système d'exploitation de votre PC.
• Quittez toutes les applications en cours.
• Si vous utilisez Windows 2000/XP (Professional seulement) en réseau, vous devrez vous inscrire comme administrateur.
1 Insérez le logiciel OLYMPUS VoiceAlbum dans le lecteur de CD-ROM.Le programme d’installation démarreautomatiquement. Après le démarrage, sautezà l’étape 4 de la procédure. Si le programmed’installation ne démarre pas automatiquement,continuez aux étapes 2 et 3.
2 Sous Windows, cliquez sur [Démarrer],puis choisissez [Exécuter].
3 Dans la zone [Ouvrir], tapez “D:/Setup.exe” et cliquez sur [OK].La lettre D doit correspondre à votre lecteurde CD- ROM.
4 La boîte de dialogue permettant desélectionner la langue à utiliser pourl’installation est affichée.Cliquez sur la langue souhaitée.
5 Cliquez sur [Suivant] lorsque l’écrande démarrage du logiciel Voice Albumest affiché.
6 Confirmation de l’acceptation destermes du contrat de licence.Pour pouvoir installer le Voice Album, vousdevez accepter les termes du contrat delicence. Si vous les acceptez, cliquez sur [Oui].
7 Sélectionner le dossier où le VoiceAlbum devra être installé.Spécifiez ici le dossier dans lequel voussouhaitez installer le Voice Album. Cliquez sur[Parcourir] pour rechercher le dossierd’installation souhaité. Pour accepter le dossierproposé par défaut, cliquez sur [Suivant].
RemarqueSi le dossier d’installation n’existe pas encore,une boîte de dialogue s’ouvre, dans laquellevous pouvez confirmer la création d’un dossierréservé à l’installation. Cliquez sur [Oui].
8 Sélectionnez un dossier deprogramme.Vous pouvez renommer le dossier deprogramme, [Démarrage], par ex. Pouraccepter le dossier par défaut, cliquez sur[Suivant].
9 Démarrer la copie des fichiers.Confirmez tous les “Configuration actuelle”.Pour les accepter, cliquez sur [Suivant].
RemarquePour modifier le dossier des menus du programmeou le dossier d’installation, cliquez sur [Précédent].
10 Copier les fichiers.Patientez jusqu’à ce que le Voice Album soitinstallé sur votre PC, puis cliquez sur [Terminer].
Installatio
n d
u lo
giciel

30
Démarrage de Voice Album
1 Insérez l’extrémité A du câble USBdans le port USB de votre PC oudans le hub USB.
2 Assurez-vous que l’enregistreurn’est pas en marche, avant d’insérerl’extrémité b du câble USB dans leport PC de l’enregistreur.• Relâchez la touche HOLD de l'enregistreur
et vérifiez que l'enregistreur est en moded'arrêt avant de brancher le câble USB.
Si l'enregistreur et le PC sont tous deuxraccordés avec le câble USB, “PC” et“LINK” clignotent alternativement surl'écran de l'enregistreur.
1
2
Pour utiliser le Voice Album sans raccorder l’enregistreur auPC, ou si le Voice Album ne doit pas démarrerautomatiquement au raccordement de l’enregistreur au PC,cliquez sur le bouton [Démarrer], désignez [Tous lesProgrammes], sélectionnez [OLYMPUS Voice Album], puiscliquez sur [OLYMPUS Voice Album].Pour quitter le Voice Album, cliquez sur le bouton dans lafenêtre, ou sur [Fichier], puis sur [Quitter Voice Album].
......................................................................................................
Remarques• Le premier démarrage de le Voice Album en raccordant l’enregistreur
au PC après l’installation peut prendre quelques minutes.• Quand l'enregistreur est raccordé au PC, il n'accepte que les
opérations de Voice Album.• N’utilisez PAS d’autre câble USB que celui fourni.• Ne déconnectez PAS le câble USB avant la fin du transfert ou de
l’enregistrement du fichier.
Dém
arrage d
e Vo
ice Alb
um
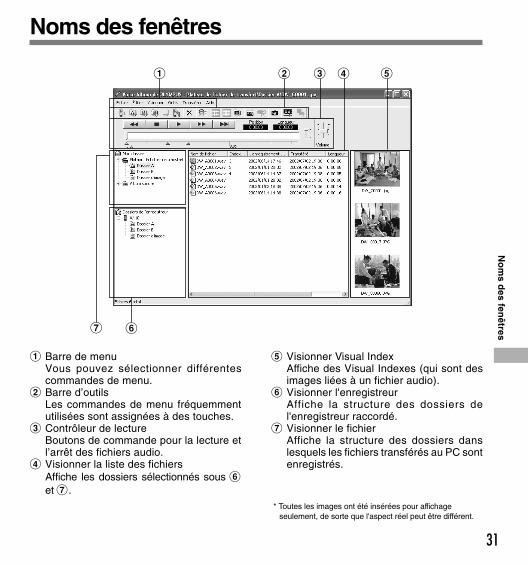
31
Noms des fenêtres
1 2 4 53
67
1 Barre de menuVous pouvez sélectionner différentescommandes de menu.
2 Barre d’outilsLes commandes de menu fréquemmentutilisées sont assignées à des touches.
3 Contrôleur de lectureBoutons de commande pour la lecture etl’arrêt des fichiers audio.
4 Visionner la liste des fichiersAffiche les dossiers sélectionnés sous 6et 7.
5 Visionner Visual IndexAffiche des Visual Indexes (qui sont desimages liées à un fichier audio).
6 Visionner l'enregistreurAffiche la structure des dossiers del'enregistreur raccordé.
7 Visionner le fichierAffiche la structure des dossiers danslesquels les fichiers transférés au PC sontenregistrés.
No
ms d
es fenêtres
* Toutes les images ont été insérées pour affichageseulement, de sorte que l'aspect réel peut être différent.
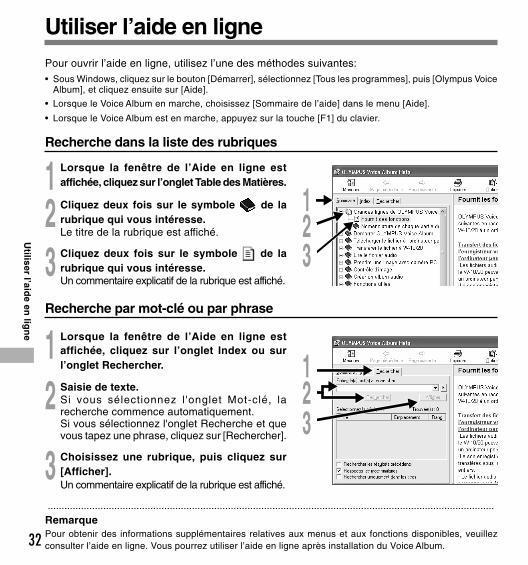
32
Utiliser l’aide en lignePour ouvrir l’aide en ligne, utilisez l’une des méthodes suivantes:• Sous Windows, cliquez sur le bouton [Démarrer], sélectionnez [Tous les programmes], puis [Olympus Voice
Album], et cliquez ensuite sur [Aide].
• Lorsque le Voice Album en marche, choisissez [Sommaire de l’aide] dans le menu [Aide].
• Lorsque le Voice Album est en marche, appuyez sur la touche [F1] du clavier.
Recherche dans la liste des rubriques
1 Lorsque la fenêtre de l’Aide en ligne estaffichée, cliquez sur l’onglet Table des Matières.
2 Cliquez deux fois sur le symbole de larubrique qui vous intéresse.Le titre de la rubrique est affiché.
3 Cliquez deux fois sur le symbole de larubrique qui vous intéresse.Un commentaire explicatif de la rubrique est affiché.
Recherche par mot-clé ou par phrase
1 Lorsque la fenêtre de l’Aide en ligne estaffichée, cliquez sur l’onglet Index ou surl’onglet Rechercher.
2 Saisie de texte.Si vous sé lectionnez l 'onglet Mot-clé, larecherche commence automatiquement.Si vous sélectionnez l'onglet Recherche et quevous tapez une phrase, cliquez sur [Rechercher].
3 Choisissez une rubrique, puis cliquez sur[Afficher].Un commentaire explicatif de la rubrique est affiché.
123
.................................................................................................................................................................
RemarquePour obtenir des informations supplémentaires relatives aux menus et aux fonctions disponibles, veuillezconsulter l’aide en ligne. Vous pourrez utiliser l’aide en ligne après installation du Voice Album.
Utiliser l’aid
e en lig
ne
123
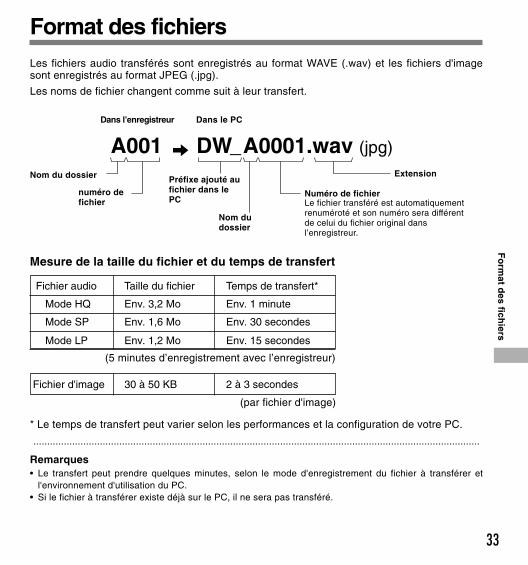
33
Format des fichiersLes fichiers audio transférés sont enregistrés au format WAVE (.wav) et les fichiers d'imagesont enregistrés au format JPEG (.jpg).
Les noms de fichier changent comme suit à leur transfert.
.................................................................................................................................................................
Remarques• Le transfert peut prendre quelques minutes, selon le mode d'enregistrement du fichier à transférer et
l'environnement d'utilisation du PC.• Si le fichier à transférer existe déjà sur le PC, il ne sera pas transféré.
DW A0001.wav (jpg)A001
* Le temps de transfert peut varier selon les performances et la configuration de votre PC.
Le fichier transféré est automatiquementrenuméroté et son numéro sera différentde celui du fichier original dansl’enregistreur.
Dans l’enregistreur
Nom du dossier
Dans le PC
numéro defichier
Préfixe ajouté aufichier dans lePC
Nom dudossier
Numéro de fichier
Extension
Fo
rmat d
es fichiers
Fichier audio Taille du fichier Temps de transfert*
Mode HQ Env. 3,2 Mo Env. 1 minute
Mode SP Env. 1,6 Mo Env. 30 secondes
Mode LP Env. 1,2 Mo Env. 15 secondes
Fichier d'image 30 à 50 KB 2 à 3 secondes
Mesure de la taille du fichier et du temps de transfert
(5 minutes d’enregistrement avec l’enregistreur)
(par fichier d'image)

34
Dépannage
Cause probableLes piles sont mal insérées.L’enregistreur est en mode HOLD.L’enregistreur est en mode HOLD.La mémoire flash interne est presque saturée.Le nombre maximum de fichiers a été atteint.L’écouteur est raccordé.
La commande VOLUME est réglée à 0.L’enregistreur a été placé près d’un téléphonecellulaire ou d’une lampe fluorescentependant l’enregistrement ou la lecture.La fonction VCVA est activée.
Dossier erroné.
Le nombre maximum de fichiers (100) dudossier de destination est atteint (nombred'enregistrements maximum).Les objets sont trop lumineux ou tropsombres.
L'enregistreur a bougé quand vous avezappuyé sur le déclencheur (bougé decaméra).
Le sujet est trop près.
SymptômeRien n’apparaît surl’affichageNe démarre pasEnregistrementimpossiblePas de tonalité delecture
Bruit audible pendantla lecture
L'enregistrements'arrête à mi-courseImpossible de trouverla voix enregistréeImpossible detransférer les fichiers
Le témoin de prise devue ne passe pas del'orange au vertLa mise au point estfloue
Les imagesenregistrées sontdifférentes de cellesaffichées dans leviseur
MesureVérifiez les polarités ( P.7).Libérez HOLD ( P.25).Libérez HOLD ( P.25).Effacez les fichiers inutiles ( P.23).Vérifiez un autre dossier ( P.9).Débranchez le casque afin d’utiliserles hauts-parleurs internes.Ajustez la commande VOLUME.Déplacez l’enregistreur.
Désactivez le VCVA ( P.13).
Passez au dossier qui convient( P.9).Effacez les fichiers inutiles dudossier de destination ( P.23).
Corrigez la situation, par exempleen décalant le sens dans lequell'enregistreur est orienté.Tenez l'enregistreur correctementpour qu'il ne bouge pas, etappuyez délicatement sur ledéclencheur ( P.14).Prenez les vues à au moins 80cm du sujet.L'image qui apparaît dans leviseur n'est qu'une référenceapproximative. Faites un essai deprise de vue au préalable pourvoir comment l'image apparaîtréellement.
Dép
ann
age
35
Support d’enregistrement:Mémoire flash incorporéeSource d’alimentation: Deux piles AAA (LR03 ou R03)Autonomie de la pile:
Enregistrement ... Env. 24 hPrise de vue ........ 5.000 images ou plus(avec piles alcalines, basé sur notreprocédure d’essai standard)
Dimensions extérieures:119,5 x 29,5 x 19,5mm (protubérancesexclues)
Poidst: 70 g (piles incluses)Format d’enregistrement: WAVENiveau d’entrée: –70 dBvFréquence d’échantillonnage:
Mode HQ ...... 15,5 kHzMode SP ....... 10,3 kHzMode LP ....... 3,9 kHz
Réponse en fréquence générale:Mode HQ ...... 300 à 5.800 HzMode SP ....... 300 à 4.200 HzMode LP ....... 300 à 1.600 Hz
Temps d’enregistrement:Mode HQ ...... 45 minutesMode SP ....... 67 minutesMode LP ....... 180 minutes
Haut-parleur: Dynamique rond ø23 mm intégréPuissance de travail max. (3 V c.c.) :
110 mW (haut-parleur 8 Ω )Prise d’écouteur:
miniprise ø3,5 mm, impédance 8 Ω ou plusFormat d’enregistrement: JPEG (conforme DCF)Capteur d’image:
Capteur VGA C-MOC de 1/4 pouce, 0,3million de pixels (brut)
Nombre de pixels: 640 x 480 pixelsNombre de vues enregistrables: 250Commande de balance des blancs:
TTL entièrement automatiqueCommande d’exposition: automatiqueObjectif: Lentille de verre à 4 éléments (revêtement
IR), F2,8, f=6,5mm(équivalant à un objectifde 61mm surun appareil de 35 mm)
Limites de prise de vues: 0,8m à ∞Viseur: Optique, viseur à image réelleConditions de fonctionnement Température: 0 à 40°C
Spécifications
Assistancetechnique et soutienLes informations suivantes concernentseulement les questions techniques et lesoutien pour l'enregistreur OLYMPUS et sonlogiciel.
Numéro de ligne directe aux Etats-Unis etau Canada1-888-553-4448
Adresse électronique de soutien aux Etats-Unis et au [email protected]
Numéro de ligne directe en EuropeNuméro d’appel gratuit00800 67 10 83 00disponible en Allemagne, Autriche,Belgique, Danemark, France, Norvège,Pays-Bas, Royaume-Uni, Suède, Suisse
Numéros taxés+49 180 567 1083disponible en Finlande, Italie,Luxembourg, Portugal, Espagne etRépublique tchèque+49 40 23773 899disponible en Grèce, Croatie, Hongrie etle reste de l’Europe
Adresse électronique de soutien en [email protected]
Sp
écification
s/Assistan
ce techn
iqu
e et sou
tien* Les spécifications et la conception sont sujettes à
modification sans préavis.
* L’autonomie des piles varie selon le type de piles etles conditions d’utilisation.

E2-2899-01
“CE” mark indicates that thisproduct complies with theEuropean requirements forsafety, health, enviroment andcustomer protection.
L’indication “CE” signifie que ceproduit est conforme auxexigences concernant la sécurité,la santé, l’environnement et laprotection du consommateur.
Das „CE“ Zeichen bestätigt dieübereinstimmug mit denEuropäischen Bestimmungenfür Betriebssicherheit undUmweltschutz.
Il marchio “CE” indica che questoprodotto è conforme alle normedella comunità europea perquanto riguarda la sicurezza, lasalute, l’ambiente e la protezionedel consumatore.
El distintivo “CE” indica que esteproducto cumple las exigenciaseuropeas en materia deseguridad, salud, medio ambientey protección al consumidor.
Declaration of ConformityModel Number: W-10Trade Name: DIGITAL VOICE RECORDERResponsible Party: OLYMPUS AMERICA INC.Address: 2 Corporate Center Drive, Melville, NY 11747-3157, U.S.A.Telephone Number: 800-622-6372
This device Complies with Part 15 of the FCC Rules. Operation is subject to the following twoconditions: (1) This device may not cause harmful interference, and (2) this device must acceptany interference received, including interference that may cause undesired operation.
Tested To ComplyWith FCC Standards
FOR HOME OR OFFICE USECanadian RFIThis digital apparatus does not exceed the Class B limits for radio noise emissions from digital apparatusas set out in the Radio Interference Regulations of the Canadian Department of Communications.
Cet apparail numerique ne depasse pas limits de Categorie B pour les emissions de gruit radio emanantd’appareils numeriques, tel que prevu dans les Reglements sur l’Interference Radio du DepartmentCanadian des Communications.
San-Ei Building, 22-2, Nishi Shinjuku 1-chome, Shinjuku-ku, Tokyo, Japan. Tel. 03-3340-2211
Two Corporate Center Drive, Melville, NY 11747-3157, U.S.A. Tel. 1-800-622-6372
(Premises/Goods delivery) Wendenstrasse 14-18, 20097 Hamburg, Germany. Tel. 040-237730(Letters) Postfach 10 49 08. 20034 Hamburg. Germany.
2-8 Honduras Street, London EC1Y 0TX, United Kingdom, Tel. 020-7253-2772http://www.olympus.com


![VOICE RECORDER NOTE CORDER DP-211 - Farnell … · · 2013-10-05VOICE RECORDER NOTE CORDER DP-211 ... Thank you for purchasing an Olympus Digital Voice Recorder. ... [ ] and [Battery](https://img.dokumen.tips/doc/110x75/5ad22a927f8b9a86158cce47/voice-recorder-note-corder-dp-211-farnell-recorder-note-corder-dp-211-.jpg)