Embed Size (px)
Citation preview

Deployment Guide
Deploying the BIG-IP System v11 with Microsoft Exchange 2010 and 2013 Client Access ServersWelcome to the F5 and Microsoft® Exchange® 2010 and 2013 Client Access Server deployment guide. Use this document for guidance on configuring the BIG-IP system version 11 and later to provide additional security, performance and availability for Exchange Server 2010 and Exchange Server 2013 Client Access Servers.
When configured using this guide, whether using an iApp template or manually, the BIG-IP system performs as a reverse proxy for Exchange CAS servers, and also perform functions such as load balancing, compression, encryption, caching, and pre-authentication.
Why F5?F5 offers a complete suite of application delivery technologies designed to provide a highly scalable, secure, and responsive Exchange deployment.
• Terminating HTTPS connections at the BIG-IP LTM reduces CPU and memory load on Client Access Servers, and simplifies TLS/SSL certificate management for Exchange 2010 and Exchange 2013 SP1.
• The BIG-IP LTM can balance load and ensure high-availability across multiple Client Access servers using a variety of load-balancing methods and priority rules.
• The BIG-IP LTM TCP Express feature set ensures optimal network performance for all clients and servers, regardless of operating system and version.
• The LTM provides content compression features which improve client performance.
• The BIG-IP Access Policy Manager (APM), F5's high-performance access and security solution, can provide pre-authentication and secure remote access to Exchange HTTP-based Client Access services.
Products and versions
Product Version
Microsoft Exchange Server 2010, 2010 SP1, SP2, and SP3; 2013, 2013 CU1-CU5, 2013 SP1
BIG-IP system 11.0, 11.0.1, 11.1, 11.2.x, 11.3, 11.4, 11.4.1, 11.5, 11.5.1, 11.6
BIG-IP iApp template
f5.microsoft_exchange_2010_2013_cas.v1.3.0 (F5 supported download)
Important: v1.4.0rc1 has been released and available on downloads.f5.com, and v1.4.0rc2 has been released on DevCentral. Except for the troubleshooting section, this deployment guide will no longer be updated.
See http://www.f5.com/pdf/deployment-guides/microsoft-exchange-iapp-dg.pdf or the guide on DevCentral.
Deployment Guide version 1.7 (see Document Revision History on page 119)

2
DEPLOYMENT GUIDE Exchange Server 2010 and 2013
Contents
Introduction 3
What is F5 iApp? 3
Prerequisites and configuration notes 3
Deployment Scenarios 6
This BIG-IP LTM will load balance and optimize Client Access Server traffic 6
This BIG-IP LTM will receive HTTP-based Client Access traffic forwarded by a BIG-IP APM 6
This BIG-IP APM will provide secure remote access to CAS 7
Preparation worksheets 8
Upgrading from a previous version of the iApp template 10
Configuring the BIG-IP iApp for Microsoft Exchange Server 2010 and 2013 11
Getting started with the Exchange iApp template 11
Configuring the BIG-IP LTM to load balance and optimize Client Access Server traffic 13
Configuring the LTM to receive HTTP-based Client Access traffic forwarded by a BIG-IP APM 32
Configuring the BIG-IP APM to provide secure remote access to Client Access Servers 44
Optional: Configuring the BIG-IP system to support MAPI over HTTP in Exchange 2013 SP1 51
Next steps 55
Troubleshooting 57
Appendix A: Configuring additional BIG-IP settings 66
Appendix B: Using X-Forwarded-For to log the client IP address 68
Appendix C: Manual configuration tables 70
Appendix D: Technical Notes 110
Appendix E: Active Directory and Exchange Server configuration for NTLM 112
BIG-IP APM/LTM without DNS lookups 116
Document Revision History 119

3
DEPLOYMENT GUIDE Exchange Server 2010 and 2013
IntroductionThis document provides guidance for using the updated, downloadable BIG-IP iApp Template to configure the Client Access server role of Microsoft Exchange Server, as well as instructions on how to configure the BIG-IP system manually. This iApp template was developed for use with both Exchange Server 2013 and 2010.
By using the iApp template, you can configure the BIG-IP system to support any combination of the following services supported by Client Access servers: Outlook Web App (which includes the HTTP resources for Exchange Control Panel), Exchange Web Services, Outlook Anywhere (RPC over HTTP, including the Offline Address Book), ActiveSync, Autodiscover, RPC Client Access (MAPI) for Exchange 2010 only, POP3 and IMAP4. This guide also contains manual configuration instructions for users familiar with F5 devices.
For more information on the Client Access Server role, see
• 2010: http://technet.microsoft.com/en-us/library/bb124915%28EXCHG.140%29.aspx• 2013: http://technet.microsoft.com/en-us/library/bb124558%28v=exchg.150%29.aspx
For more information on the F5 devices in this guide, see http://www.f5.com/products/big-ip/.
You can also visit the Microsoft page of F5’s online developer community, DevCentral, for Microsoft forums, solutions, blogs and more: http://devcentral.f5.com/Microsoft/.
Important: Make sure you are using the most recent version of this deployment guide, available at http://www.f5.com/pdf/deployment-guides/microsoft-exchange-iapp-v1_3-dg.pdf
To provide feedback on this deployment guide or other F5 solution documents, contact us at [email protected].
What is F5 iApp?New to BIG-IP version 11, F5 iApp is a powerful set of features in the BIG-IP system that provides a new way to architect application delivery in the data center. iApp includes a holistic, application-centric view of how applications are managed and delivered inside, outside, and beyond the data center. The iApp template for Microsoft Exchange Server acts as the single-point interface for building, managing, and monitoring the Exchange 2010 and 2013 Client Access role.
For more information on iApp, see the White Paper F5 iApp: Moving Application Delivery Beyond the Network: http://www.f5.com/pdf/white-papers/f5-iapp-wp.pdf.
Skip ahead Advanced
If you are already familiar with the Exchange iApp, you can skip directly to the relevant section after reading the prerequisites:
• Configuring the BIG-IP iApp for Microsoft Exchange Server 2010 and 2013 on page 11 if using the iApp template, or• Appendix C: Manual configuration tables on page 70 if configuring the BIG-IP system manually.
Prerequisites and configuration notesThe following are prerequisites and configuration notes for the Client Access Role. Items added since the last revision are marked New .
h Important: v1.4.0rc1 of the iApp template has been published as a Release Candidate on downloads.f5.com and is fully supported. See http://www.f5.com/pdf/deployment-guides/microsoft-exchange-iapp-dg.pdf. This guide will no longer be updated.
h This document provides guidance on using the downloadable iApp for Microsoft Exchange 2010 and 2013 available via http://support.f5.com/kb/en-us/solutions/public/13000/400/sol13497.html, and not the iApp found by default in BIG-IP version 11. You must use this downloadable iApp for BIG-IP versions 11.0 and later (we strongly recommend version 11.3 or later) as it contains a number of fixes and enhancements not found in the default iApp, or other downloadable versions.
Note that the way we are versioning the downloadable iApp templates has changed. Previous versions of the downloadable templates included the date (04_06 and 06_08). Beginning with this version of the template, we are using a numbering system (this version is v1.2.0). The first number represents a major version, the second number a minor version, and the third number is used for important fixes to a previous version.

4
DEPLOYMENT GUIDE Exchange Server 2010 and 2013
For users familiar with the BIG-IP system, there are manual configuration tables at the end of this guide. Because of the complexity of this configuration, we strongly recommend using the iApp to configure the BIG-IP system.
h If you have an existing Exchange application service from a previous version of the downloadable iApp, see Upgrading from a previous version of the iApp template on page 10 for instructions on how to upgrade the configuration.
h The overwhelming majority of the configuration guidance in this document is performed on F5 devices. We provide a summary of Exchange configuration steps for reference only; for complete information on how to deploy or configure the components of Microsoft Exchange Server, consult the appropriate Microsoft documentation. F5 cannot provide support for Microsoft products.
h For this deployment guide, the BIG-IP LTM system must be running version 11.0 or later. If you are using a previous version of the BIG-IP LTM, see the Deployment Guide index on F5.com. The configuration in this guide does not apply to previous versions.
! Warning
To run the Microsoft Exchange iApp template, you must be logged into the BIG-IP system as a user that is assigned the admin role. For more information on roles on the BIG-IP system, see the BIG-IP User Accounts chapter of the BIG-IP TMOS: Concepts guide.
h If you are using the BIG-IP system to offload SSL (Exchange 2010 and Exchange 2013 SP1 and later only) or for SSL Bridging, we assume you have already obtained an SSL certificate and key, and it is installed on the BIG-IP LTM system. To configure your Client Access servers to support SSL offloading, you must first follow the Microsoft documentation. See http://social.technet.microsoft.com/wiki/contents/articles/how-to-configure-ssl-offloading-in-exchange-2010.aspx.
Make sure you follow the correct steps for the version of Exchange Server that you are using.
h New While SSL offload was not supported in the RTM version of Exchange Server 2013, it is now supported in 2013 SP1 (http://social.technet.microsoft.com/wiki/contents/articles/15946.how-to-configure-ssl-offloading-in-exchange-2013.aspx). If you using Exchange 2013 and are not yet on SP1, you must change the default setting for Outlook Anywhere on each Client Access Server so that SSL offloading is not configured.
h New Exchange 2013 SP1 introduces the MAPI over HTTP transport protocol (http://technet.microsoft.com/en-us/library/dn635177(v=exchg.150).aspx). The iApp template does not yet support this new protocol. See Optional: Configuring the BIG-IP system to support MAPI over HTTP in Exchange 2013 SP1 on page 51 for instructions on configuring the BIG-IP system for MAPI over HTTP.
h If deploying BIG-IP APM features, including Edge Gateway, you must fully license and provision APM before starting the iApp template. For the remainder of this guide, we refer to BIG-IP APM and Edge Gateway collectively as BIG-IP APM.
h For Exchange Server 2010 and 2013 SP1 only: We generally recommend that you do not re-encrypt traffic between your BIG-IP APM and BIG-IP LTM because both BIG-IP systems must process the SSL transactions. However, if you choose to re-encrypt, we strongly recommend you use a valid certificate (usually SAN-enabled) rather than the default, self-signed certificate for the Client SSL profile on your BIG-IP LTM system. If not re-encrypting traffic, you do not need a certificate on your BIG-IP LTM.
h This template currently only supports the use of a single DNS name and corresponding certificate and key for all services, or multiple DNS names using a SAN-enabled certificate and key. Support for multiple names, each with separate corresponding certificates and keys, will be in a future release.
h If you have existing, manually created Node objects on the BIG-IP system and given these nodes a name, you cannot use the IP addresses for those nodes when configuring the iApp. You must first manually delete those nodes and re-add them without a name, or delete the nodes and let the iApp automatically create them.
h If using a single virtual server for all HTTP-based Client Access services as recommended, you must obtain the Subject Alternative Name (SAN) certificate (or wildcard certificate, see the next paragraph) and key from a 3rd party certificate authority that supports SAN certificates, and then import it onto the BIG-IP system. In versions prior to 11.1, the BIG-IP system does not display SAN values in the web-based Configuration utility, but uses these certificates correctly. New While the BIG-IP system supports using a wildcard certificate to secure Exchange CAS deployments using multiple
FQDNs, for increased security, F5 recommends using SAN certificate(s) where possible. Additionally, some older mobile devices are incompatible with wildcard certificates. Consult your issuing Certificate Authority for compatibility information
Note
For more information on SAN certificates, see Subject Alternative Name (SAN) SSL Certificates on page 110.

5
DEPLOYMENT GUIDE Exchange Server 2010 and 2013
h F5’s advanced monitors for Autodiscover, Exchange Web Services, and Outlook Anywhere support Basic and NTLMv1 authentication only. See Troubleshooting on page 57 for more information.
h If using BIG-IP APM, the following table shows the Exchange Server (Client Access Server) settings:
Role Out-of-the-box setting Your Setting Notes
SSL Offload for all HTTP services1 Not enabled EnabledExchange 2010 and 2013 SP1 only. Optional but strongly recommended
Client Access Array Not configured Enabled Exchange 2010 only: Required
OWA Authentication1 Forms2 Forms (default)2 Required
Autodiscover Authentication1 Negotiate Negotiate (default) Required
ActiveSync Authentication1 Basic Basic (default) Required
Outlook Anywhere Authentication1,3 2010: Basic 2013: Negotiate Basic (default) Required
1 Exchange Server 2010 and 2013 SP1 and later only. See the following link for more information on default authentication methods for Exchange Server 2010: http://technet.microsoft.com/en-us/library/bb331973.aspx
2 You must change the default Forms logon format from Domain\username to just username. More information is available later in this guide.3 Outlook Anywhere is disabled by default in Exchange 2010; you must enable it before you can use it. You can optionally configure BIG-IP APM v11.3 and later for NTLM
authentication for Outlook Anywhere. See page 50.
In our example, we use the following conventions. In your configuration, you may have the same FQDN for Outlook Anywhere, OWA, and RPC Client Access (Exchange 2010 only), and/or use split DNS to direct internal and external clients to different virtual servers:
outlook.example.com FQDN for Outlook Anywhere
owa.example.com FQDN for all other HTTP services
mapi.example.com FQDN for Client Access Array
192.0.2.0/24 Network configured for external use on the BIG-IP APM
10.0.0.0/24 Network configured for use on the BIG-IP LTM
Your network topology may differ considerably from the example shown.
Note
You may choose to use separate names for all four HTTP services and the RPC Client Access service (Client Access Array - Exchange 2010 only)
DNS SettingsThis table contains information on DNS settings (and our example settings) for this deployment.
Record External DNS Internal DNS
A Records owa.example.com: 192.0.2.10 outlook.example.com: 192.0.2.11
If the SRV record listed below is not used, you must also have at least one of these, set to the same IP as your OWA FQDN:
example.com: 192.0.2.10 autodiscover.example.com: 192.0.2.10
owa.example.com: 192.0.2.10 mapi.example.com1: 10.0.0.10
If the SRV record listed below is not used and you don’t want to use the SCP, you must also have at least one of these, set to the same IP as your OWA FQDN:
example.com: 192.0.2.10 autodiscover.example.com: 192.0.2.10
To prevent internal users from receiving a password prompt, internal DNS must not have an A record for the FQDN for Outlook Anywhere.
SRV Records _autodiscover._tcp.example.com: port 443, host ‘owa.example.com’_autodiscover._tcp.example.com: port 443, host ‘owa.example.com’ (optional; Outlook can use SCP instead. See note above and Further Reading below)
1 Exchange Server 2010 only. Exchange 2013 does not use RPC.
Further reading:• Summary of SRV records on Wikipedia: http://en.wikipedia.org/wiki/SRV_record• Specification for SRV records (RFC2782): http://tools.ietf.org/html/rfc2782• Microsoft KB article on SRV records and the Autodiscover service: http://support.microsoft.com/kb/940881• ‘Understanding the Autodiscover Service’ (including SCP information): http://technet.microsoft.com/en-us/library/bb124251.aspx

6
DEPLOYMENT GUIDE Exchange Server 2010 and 2013
Deployment ScenariosThe iApp greatly simplifies configuring the BIG-IP system for Microsoft Exchange 2010 and 2013 Client Access Server roles. Before beginning the Application template, you must make a decision about the scenario in which you are using BIG-IP system for this deployment. The iApp presents the following three deployment options. You will choose one of these options when you begin configuring the iApp.
This BIG-IP LTM will load balance and optimize Client Access Server trafficYou can select this scenario to manage, secure, and optimize client-generated Client Access Server traffic using the BIG-IP system. This is the traditional role of the BIG-IP LTM and should be used in scenarios where you are not deploying BIG-IP Access Policy Manager (APM) on a separate BIG-IP system. In this scenario, you have the option of configuring the BIG-IP APM to secure HTTP-based virtual servers on this system.
You would not select this option if you intend to deploy a separate BIG-IP APM that will provide secure remote access to Exchange CAS HTTP services.
ClientsBIG-IP Local Traffic Manager
1
2
3
BIG-IP Access Policy Manager(optional module)
Exchange 2010/2013Client Access Servers
1. All Exchange Client Access traffic goes to the BIG-IP system.
2. You can optionally use the BIG-IP APM module to provide secure access and proxied authentication (pre-authentication) for HTTP-based Client Access services: Outlook Web App, Outlook Anywhere, ActiveSync, and Autodiscover). The BIG-IP APM presents a login page to end users that takes the place of the forms-based login page normally presented by Outlook Web App. Users provide credentials through the BIG-IP APM form; the BIG-IP APM then authenticates the user to Active Directory.
3. The BIG-IP LTM load balances and optimizes the traffic to the Client Access Servers, including the services which are not HTTP-based: RPC Client Access (MAPI), POP3, and IMAP4.
This BIG-IP LTM will receive HTTP-based Client Access traffic forwarded by a BIG-IP APMYou can select this scenario to configure BIG-IP LTM with a single virtual server that receives Exchange Client Access HTTP-based traffic that has been forwarded by a separate BIG-IP APM. The virtual server can also accommodate direct traffic, e.g. internal clients that do not use the BIG-IP APM, and non-HTTP traffic that is not handled by BIG-IP APM such as POP3 and IMAP4.
This scenario would be used together with the following scenario, in which you configure a separate BIG-IP APM to send traffic to this BIG-IP LTM device.
ClientsBIG-IP Local Traffic Manager
1 2
3
BIG-IP Access Policy Manager
Internal clients
4
Exchange 2010/2013Client Access Servers
2. The BIG-IP LTM receives HTTP-based Client Access traffic from a separate BIG-IP APM, or directly received the non HTTP-based
traffic.
3. If you have internal Exchange clients, all Client Access Server traffic from the internal clients goes directly to the BIG-IP LTM.
4. The BIG-IP LTM load balances and optimizes the traffic to the Client Access Servers, including the services which are not HTTP-based: RPC Client Access (MAPI), POP3, and IMAP4.

7
DEPLOYMENT GUIDE Exchange Server 2010 and 2013
Note
While this scenario can accommodate internal clients, we do not recommend using this virtual server in that way. We strongly recommend creating a second instance of the iApp on this BIG-IP LTM for the direct traffic/internal users. You must use a unique virtual server IP address; all of the other settings can be identical. Once both iApps have been created, you would configure Split DNS (use the same domain name, but different zones and IP addresses for internal and external clients). For more information about Split DNS, refer to your DNS documentation.
This BIG-IP APM will provide secure remote access to CASYou can select this scenario to configure the BIG-IP system as a BIG-IP APM that will use a single virtual server to provide proxy authentication (pre-authentication) and secure remote access to Exchange HTTP-based Client Access services without requiring the use of an F5 Edge Client. When you select this deployment scenario, the BIG-IP APM presents a login page to end users that takes the place of the forms-based login page normally presented by Outlook Web App. Users provide credentials through the BIG-IP APM form; the BIG-IP APM then authenticates the user to Active Directory. The BIG-IP system will only forward connections after a user has authenticated successfully. The traffic is then sent to another BIG-IP running LTM which provides advanced load balancing, persistence, monitoring and optimizations for HTTP-based Client Access services.
This scenario would be used together with the previous scenario, in which you configure a separate BIG-IP LTM to receive traffic from this BIG-IP APM device.
ClientsBIG-IP Local Traffic Manager
1 2
3Exchange 2010/2013Client Access Servers
BIG-IP Access Policy Manager
Internal clients
4
1. HTTP-based Client Access traffic goes to the BIG-IP APM, which provides proxy authentication and secure remote access.
Note
If you want to allow RPC Client Access, POP3 or IMAP4 access from external users, you must separately configure your BIG-IP system by re-running the iApp, selecting the first scenario ("This BIG-IP LTM will load balance and optimize Client Access Server traffic"), choosing which of those protocols you wish to allow, and then configuring your Client Access servers as pool members.
2. After authentication, the BIG-IP APM sends the traffic to a separate BIG-IP LTM for intelligent traffic management.
Guidance specific to each deployment scenario is contained later in this document.

8
DEPLOYMENT GUIDE Exchange Server 2010 and 2013
Preparation worksheetsFor each section of the iApp Template, you need to gather some information, such as Client Access server IP addresses and domain information. The worksheets do not contain every question in the template, but rather include the information that is helpful to have in advance. Use the worksheet(s) applicable to your configuration. More information on specific template questions can be found on the individual pages. You might find it useful to print these tables and then enter the information.
BIG-IP LTM Preparation worksheet
Traffic arriving to this BIG-IP system is:
Encrypted Unencrypted
SSL Certificate:
Key:
If re-encrypting traffic to the Client Access Servers and not using the BIG-IP default certificate and key for the Server SSL profile: Certificate:
Key:
If encrypting traffic to the Client Access Servers and not using the BIG-IP default certificate and key:
Certificate:
Key:
BIG-IP virtual servers and Client Access Servers will be on:
Same Subnet Different Subnets
If the maximum number of expected concurrent users per Client Access Server is more than 6,000, you need one IP address for each 6,000 users or fraction thereof:
If the Client Access Servers are a different subnet from the BIG-IP virtual servers, and do not use the BIG-IP as their default gateway: If the maximum number of expected concurrent users per Client Access Server is more than 6,000, you need one IP address for each 6,000 users or fraction thereof:
Single virtual IP address for all Client Access Services or multiple addresses
Single virtual IP address Different virtual IP addresses for different services
IP address for the BIG-IP virtual server: You need a unique IP address for each of the Client Access services you are deploying:
Outlook Web App:
Outlook Anywhere:
ActiveSync:
Autodiscover:
RPC Client Access (MAPI) - 2010 only:
POP3:
IMAP4:
All Client Access services handled by the same set of servers, or different Servers for different services
Same set of Client Access Servers for all services Different Client Access Servers for different services
IP addresses of the Client Access Servers: IP addresses for Client Access Servers for each service:
Outlook Web App: ActiveSync: RPC Client Access (MAPI) Exchange 2010 only: IMAP4:
Outlook Anywhere: Autodiscover: POP3:
Outlook Web App URI If you are deploying Outlook Web App, what is the URI for reaching OWA if different than the default (http(s)://<fqdn>/owa/):
RPC Client Access ports (Exchange 2010 only)
If you are deploying RPC Client Access (MAPI), and do not want to use the default Dynamic port range, specify a port for: MAPI:
Address Book:

9
DEPLOYMENT GUIDE Exchange Server 2010 and 2013
BIG-IP LTM Preparation Worksheet (continued): Server health monitor configuration
Advanced Monitor configuration
If you want the iApp to configure advanced health monitors which perform logins to HTTP-based, POP3, and IMAP4 Client Access services (as opposed to simple monitors which only check network connectivity), you need the following information:
If deploying Autodiscover, email address for monitoring:
Mailbox account name in Active Directory for the monitors:
Associated password:
Domain name (can be FQDN or NETBIOS) of the user account used for monitors:
Important: Advanced monitors for Autodiscover, EWS, and Outlook Anywhere support Basic and NTLMv1 authentication only.
Second mailbox for monitoring (recommended): If deploying Autodiscover, 2nd email address for monitoring:
2nd mailbox account name in Active Directory for the monitors:
Associated password for this account:
2nd domain name (can be FQDN or NetBIOS) of the user account used for monitors:
Outlook Web App authentication method
If deploying Outlook Web App, which authentication method have you configured:
Forms-Based Authentication (default) Important: If you are deploying BIG-IP APM, you must use Forms-Based.
Basic or Windows Integrated authentication
Same FQDN for all HTTP-based Client Access services or different FQDNs
Same FQDN Different FQDNs
FQDN for all HTTP-based Client Access services: You need a FQDN for each HTTP-based Client Access services you are deploying:
Outlook Web App:
Outlook Anywhere:
ActiveSync:
Autodiscover:
BIG-IP Access Policy Manager Preparation Worksheet
Outlook Web App FQDN If you are deploying BIG-IP APM and Outlook Web App, you need the FQDN this is used to access OWA (such as owa.example.com):
Active Directory FQDNs and IP addresses that the BIG-iP system can contact
What are the Active Directory FQDNs and IP address that this BIG-IP system can contact (use FQDN and not NETBIOS name):1. 2.3. 4.5. 6.
Active Directory Domain name for Exchange users
What is the Active Directory Domain name (must be in FQDN format):
Active Directory Anonymous binding
If Anonymous Binding is not allowed in your Active Directory implementation, you need an Active Directory account with administrative permissions: User name:
Password:
If deploying the "BIG-IP APM will provide secure remote access to CAS" scenario
BIG-IP APM virtual server What is the IP address you want to use for your BIG-IP APM virtual server:
SSL Certificate and KeySSL Certificate:
Key:
Re-encrypt the traffic to the BIG-IP virtual server
You must know if the remote BIG-IP LTM that will receive traffic from this BIG-IP APM is using a self-signed/default certificate and key or a certificate signed by a Certificate Authority.
Remote LTM virtual serverWhat is the virtual server address on the remote BIG-IP LTM to which this BIG-IP APM will forward traffic:
10
DEPLOYMENT GUIDE Exchange Server 2010 and 2013
Downloading and importing the new iAppThe first task is to download and import the new Exchange Server Client Access Server iApp template.
To download and import the iApp
1. Open a web browser and go to http://support.f5.com/kb/en-us/solutions/public/13000/400/sol13497.html.
2. Follow the instructions to download the Microsoft Exchange iApp to a location accessible from your BIG-IP system.
i Important
You must download the file, and not copy and paste the contents. F5 has discovered the copy paste operation does not work reliably.
2. Extract (unzip) the f5.microsoft_exchange_2010_2013_cas.tmpl file.
3. Log on to the BIG-IP system web-based Configuration utility.
4. On the Main tab, expand iApp, and then click Templates.
5. Click the Import button on the right side of the screen.
6. Click a check in the Overwrite Existing Templates box.
7. Click the Browse button, and then browse to the location you saved the iApp file.
8. Click the Upload button. The iApp is now available for use.
Upgrading from a previous version of the iApp templateIf you configured your BIG-IP system using a previous version of the downloadable iApp template (either f5.microsoft_exchange_2010_cas.2012_04_06, f5.microsoft_exchange_2010_cas.2012_06_08, or f5.microsoft_exchange_2010_cas.v1.2.0), we strongly recommend you upgrade the iApp template to this current version. You cannot upgrade an application service that was based on the f5.microsoft.exchange_2010 template; you can only upgrade if you used one of the downloadable iApp templates.
When you upgrade the template, you simply change the parent template on the application service you previously created, and then make any necessary modifications to take advantage of new functionality.
To upgrade an existing application service to the new iApp template
1. From the Main tab of the BIG-IP Configuration utility, expand iApp and then click Application Services.
2. Click the name of your existing Microsoft Exchange application service from the list.
3. On the Menu bar, click Reconfigure.
4. At the top of the page, in the Template row, click the Change button to the right of the list.
5. From the Template list, select f5.microsoft_exchange_2010_2013_cas.v1.3.0.
6. Review the questions in the new template, making any necessary modifications. Use the iApp walkthrough section of this guide for information on specific questions.
If you used a previous version of the iApp to deploy BIG-IP APM, you must add the FQDN and IP address for each Active Directory server in your domain that the BIG-IP system can contact. The iApp now creates a pool for the Active Directory servers (even for only one server), where in previous versions of the template you could only specify a single Active Directory server.
7. Click Finished.

11
DEPLOYMENT GUIDE Exchange Server 2010 and 2013
Configuring the BIG-IP iApp for Microsoft Exchange Server 2010 and 2013Use the following guidance to configure the BIG-IP system for Microsoft Exchange Server Client Access Role using the iApp template.
Getting started with the Exchange iApp templateTo begin the Exchange iApp Template, use the following procedure.
To start the iApp template
1. Log on to the BIG-IP system.
2. On the Main tab, expand iApp, and then click Application Services.
3. Click Create. The Template Selection page opens.
4. In the Name box, type a name. In our example, we use Exchange-2013_.
5. From the Template list, select f5.microsoft_exchange_2010_2013_cas.v1.3.0. The new Microsoft Exchange template opens.
Advanced optionsIf you select Advanced from the Template Selection list at the very top of the template, you see Device and Traffic Group options for the application. This feature, new to v11, is a part of the Device Management configuration. This functionality extends the existing High Availability infrastructure and allows for clustering, granular control of configuration synchronization and granular control of failover. To use the Device and Traffic Group features, you must have already configured Device and Traffic Groups before running the iApp. For more information on Device Management, see the product documentation.
1. Device GroupTo select a specific Device Group, clear the Device Group check box and then select the appropriate Device Group from the list.
2. Traffic GroupTo select a specific Traffic Group, clear the Traffic Group check box and then select the appropriate Traffic Group from the list.
Inline helpAt the bottom of the Welcome section, the iApp template asks about inline help text.
1. Do you want to see inline help? Select whether you want to see informational and help messages inline throughout the template, or if you would rather hide this inline help. If you are unsure, we recommend having the iApp display all inline help. Important and critical notes are always shown, no matter which selection you make.
f Yes, show inline help textSelect this option to see all available inline help text.
f No, do not show inline helpIf you are familiar with this iApp template, or with the BIG-IP system in general, select this option to hide the inline help text.
Deployment ScenarioChoose the option that best describes how you plan to use the BIG-IP system you are currently configuring. The scenario you select from the list determines the questions that appear in the rest of the iApp. The scenarios were described in Deployment Scenarios on page 6.
1. Which scenario describes how you will use the BIG-IP system?Choose the scenario that best describes the way you plan to use this BIG-IP system. Guidance for each scenario is contained in a separate section of this deployment guide. Click the link to go to the relevant section of the guide for the scenario you plan to deploy.

12
DEPLOYMENT GUIDE Exchange Server 2010 and 2013
f BIG-IP LTM will load balance and optimize CAS trafficSelect this scenario to manage, secure, and optimize client-generated Client Access Server traffic using the BIG-IP system. This is the traditional role of the BIG-IP LTM and should be used when you are not deploying APM on a separate BIG-IP system.
In this scenario, if you have fully licensed and provisioned BIG-IP APM you have the option of configuring it to provide proxy authentication for HTTP-based services on this system.
Do not select this option if you intend to deploy a separate BIG-IP APM that will provide secure remote access to Exchange CAS HTTP-based services.
For this role, go to Configuring the BIG-IP LTM to load balance and optimize Client Access Server traffic on page 13.
f BIG-IP LTM will receive HTTP-based CAS traffic forwarded by a BIG-IP APMSelect this scenario to configure BIG-IP LTM with a single virtual server that receives Exchange Client Access HTTP-based traffic that has been forwarded by an BIG-IP APM. The virtual server can also accommodate direct traffic, for example internal clients that do not use the BIG-IP APM, and non-HTTP traffic that is not handled by BIG-IP APM such as POP3 and IMAP4.
For this role, go to Configuring the LTM to receive HTTP-based Client Access traffic forwarded by a BIG-IP APM on page 32.
f BIG-IP APM will provide secure remote access to CASSelect this role to configure the BIG-IP system as a BIG-IP APM that will use a single HTTPS (port 443) virtual server to provide proxy authentication and secure remote access to Exchange HTTP-based Client Access services without requiring the use of an F5 Edge Client. The traffic will be forwarded to another BIG-IP running LTM which will provide advanced load balancing, persistence, monitoring and optimizations for those services.
For this role, go to Configuring the BIG-IP APM to provide secure remote access to Client Access Servers on page 44.
2. Which version of Exchange are you using?Choose the version of Microsoft Exchange Server you are using. Some features of the iApp are available only to a particular version.
f Exchange Server 2010Select this option if you are deploying the BIG-IP system for Microsoft Exchange 2010.
f Exchange Server 2013Select this option if you are deploying the BIG-IP system for Microsoft Exchange 2013.

13
DEPLOYMENT GUIDE Exchange Server 2010 and 2013
Configuring the BIG-IP LTM to load balance and optimize Client Access Server trafficIf you chose the first scenario, LTM will load balance and optimize CAS traffic, use this section for guidance on configuring the iApp. Again, do not chose this option if you will deploy a separate BIG-IP APM to provide secure remote access to HTTP-based Client Access services.
AnalyticsThis section of the template asks questions about Analytics. The Application Visibility Reporting (AVR) module allows you to view statistics specific to your Microsoft Exchange implementation. AVR is available on all BIG-IP systems v11 and later, however you must have the AVR provisioned for this option to appear. Note that this is only for application visibility reporting, you can view object-level statistics from the BIG-IP without provisioning AVR.
i Important
Enabling Analytics may adversely affect overall system performance. If you choose to enable Analytics, we recommend gathering statistics for a set time period, such as one week, and then re-entering this template and disabling Analytics while you process the data.
If you plan on using AVR for analytics, we recommend creating a custom Analytics profile. To create a new profile, from the Main tab, select Profiles and then click Analytics. Click New and then configure the profile as applicable for your configuration. See the online help or product documentation for specific instructions. To select the new profile, you need to restart or reconfigure the iApp template.
1. Do you want to enable Analytics for application statistics?Select whether you want to enable AVR for Analytics for HTTP-based services. Note that Analytics does not always properly report the HTTP methods of Outlook Anywhere.
f No, do not enable AnalyticsIf you do not want to enable Analytics, leave this list set to No, and continue with the next section.
f Yes, enable Analytics using AVRIf you choose to enable Analytics, select Yes from the list, and then answer the following questions.
a. Use the default Analytics profile or select a custom profile?If you decide to use AVR, you must decide whether to use the default Analytics profile, or create a new one. As mentioned previously, we recommend creating a new profile to get the most flexibility and functionality out of AVR. If you have already started the iApp template configuration and then decide to create a new Analytics profile, you must exit the iApp, create the profile, and then restart the iApp template.
` Select a custom Analytics profileSelect this option if you have already created a custom Analytics profile for Exchange Server.
i). Which Analytics profile do you want to use?From the list, select the appropriate Analytics profile.
` Use default profileSelect this option if you have not yet created a custom Analytics profile for Microsoft Exchange. We do not recommend using the default profile.
BIG-IP Access Policy ManagerThe section in this scenario asks about BIG-IP APM. To use APM, it must be fully licensed and provisioned before starting the template. If you are not deploying BIG-IP APM, continue with the next section. As mentioned in the prerequisites, if you are deploying APM, you must have configured the BIG-IP system for DNS and NTP; see Configuring DNS and NTP settings on page 66 for instructions.
1. Provide secure authentication to CAS HTTP-based services with BIG-IP Access Policy Manager?Specify whether you want to deploy BIG-IP APM to provide proxy authentication and secure remote access for HTTP-based Client Access services.
f No, do not provide secure authentication using BIG-IP APMSelect this option if you do not want to use the BIG-IP APM at this time. You can always reconfigure the iApp template at a later date should you decide to add BIG-IP APM functionality.

14
DEPLOYMENT GUIDE Exchange Server 2010 and 2013
f Yes, provide secure authentication using BIG-IP APMSelect this option if you want the APM to provide proxy authentication and secure remote access for your Exchange deployment.
a. Would you like to create a new Access Profile, or use an existing Access Profile?Choose whether you want the system to create a new BIG-IP APM Access Profile, or if you have already created a custom Access Profile outside the template. If you are unsure, select Create a new Access Profile.
` Select the Access profile you created from the listIf you have previously created an Access profile for your Exchange implementation, select the existing profile you created from the list. Continue with the next section. Important: The iApp template supports deploying APM for pre-authentication to Microsoft Exchange Server 2010 and 2013. APM Portal and Network Access modes are not supported; if you are using a custom Access Profile, it must not require a connectivity or rewrite profile.
` Create a new Access profileSelect this option if you have not created a custom Access profile, and want the system to create one.
i). Would you like to create a new AAA server, or use an existing AAA server?Choose whether you want the system to create a new BIG-IP APM AAA Server object, or if you have already created a custom AAA Server outside the template. The AAA server contains information about your Active Directory implementation. If you are unsure, select Create a new AAA Server.
• Select the AAA Server you created from the listIf you have previously created an AAA Server for your Exchange implementation, select the existing object you created from the list.
1). What is the FQDN of your Active Directory domain for your Exchange users? Specify the FQDN of the Active Directory deployment for your Exchange users. This is the FQDN for your entire domain, such as example.com, rather than the FQDN for any specific host. Continue with the What text should appear in the user access logon prompt question on the following page.
• Create a new AAA ServerSelect this option if you have not created a custom AAA Server, and want the system to create one.
1). What is the FQDN of your Active Directory domain for your Exchange users? Specify the FQDN of the Active Directory deployment for your Exchange users. This is the FQDN for your entire domain, such as example.com, rather than the FQDN for any specific host.
2). Which Active Directory servers in your domain can this BIG-IP system contact? Specify both the FQDN and IP address of each Active Directory server you want the BIG-IP APM to use for servicing authentication requests. Click Add to include additional servers.
3). Does your Active Directory domain allow anonymous binding? Select whether anonymous binding is allowed in your Active Directory environment.
� Yes, anonymous binding is allowed Select this option if anonymous binding is allowed. No further information is required.
� No, credentials are required for binding If credentials are required for binding, you must specify an Active Directory user name and password for use in the AAA Server.
i). Which Active Directory user with administrative permissions do you want to use? Type a user name with administrative permissions.
ii). What is the password associated with that account? Type the associated password.
4). How do you want to handle health monitoring for this pool? Specify whether you want the template to create a new LDAP monitor or a new ICMP monitor, or if you select an existing monitor. For more accurate monitoring, we recommend using an LDAP monitor.
� Select an existing monitor for the Active Directory pool Select this option if you have already created a health monitor (only monitors with a Type of LDAP or External can be used) for the Active Directory pool that will be created by the template. If you want to create a health monitor, but have not already done so, you must exit the template and create the object before it becomes available from the list.

15
DEPLOYMENT GUIDE Exchange Server 2010 and 2013
The iApp allows you to select monitors that are a part of another iApp Application Service. If you select a monitor that is a part of another Application Service, be aware that any changes you make to the monitor in the other Application Service will apply to this Application Service as well.
i). Which monitor do you want to use? From the list, select the LDAP or External monitor you created to perform health checks for the Active Directory pool created by the template. Only monitors that have a Type value of LDAP or External appear in this list. Continue with the "What text should appear in the user access logon prompt" question on this page.
� Use a simple ICMP monitor for the Active Directory pool Select this option if you only want a simple ICMP monitor for the Active Directory pool. This monitor sends a ping to the servers and marks the server UP if the ping is successful. Continue with the "What text should appear in the user access logon prompt" question on this page.
� Create a new LDAP monitor for the Active Directory pool Select this option if you want the template to create a new LDAP monitor for the Active Directory pool. You must answer the following questions: Important: Y ou must see Modifying the iApp configuration if you configured the iApp to create a new
LDAP monitor for the AD pool on page 54 for a required modification to this monitor.
i). Which Active Directory user name should the monitor use? Specify an Active Directory user name for the monitor to use when attempting to log on as a part of the health check. This should be a user account created specifically for this health monitor, and must be set to never expire.
ii). What is the associated password? Specify the password associated with the Active Directory user name.
iii). What is the LDAP tree for this user account? Specify the LDAP tree for the user account. As noted in the inline help, ADSI editor, an tool for Active Directory LDAP administration, is useful for determining the correct LDAP tree value. For example, if the user name is ‘user1’ which is in the organizational unit ‘Exchange Users’ and is in the domain ‘exchange.example.com’, the LDAP tree would be: ou=Exchange Users, dc=Exchange, dc=example, dc=com.
iv). Does your Active Directory domain require a secure protocol for communication? Specify whether your Active Directory implementation requires SSL or TLS for communication, or does not require a secure protocol. This determines the port the health monitor uses.
• No, a secure protocol is not required Select this option if your Active Directory domain does not require a secure protocol.
• Yes, SSL communication is required Select this option if your Active Directory domain requires SSL communication. The health check uses port 636 as the Alias Service Port.
• Yes, TLS communication is required Select this option if your Active Directory domain requires TLS communication. The health check uses port 389 as the Alias Service Port.
v). How many seconds between Active Directory health checks? Specify how many seconds the system should use as the health check Interval for the Active Directory servers. We recommend the default of 10 seconds.
ii). What text should appear in the user access logon prompt? Type the text you want users to see above the user name and password prompts when logging on to the BIG-IP APM. By default, this includes the HTML <br> tag to insert a line break between 'Secure Logon' and 'for F5 Networks'.
Tell us about your deploymentIn this section, the iApp gathers general information about your Client Access Server deployment. Remember, you must import an SSL certificate and key that correspond to all fully-qualified DNS names that you are using for OWA, Outlook Anywhere, Autodiscover,

16
DEPLOYMENT GUIDE Exchange Server 2010 and 2013
ActiveSync, POP3, or IMAP4 traffic. Any certificate that you obtain with multiple names must be in SAN (Subject Alternative Name) or wildcard format, not SNI (Server Name Indication) format.
1. Will incoming traffic arrive at this BIG-IP system encrypted or unencrypted?This question does not appear if you chose to deploy APM in the previous section. If you selected to deploy APM, continue with the re-encrypt question (a) under Encrypted.
Select whether any of the HTTP-based, POP3 and IMAP4 traffic will be encrypted or not when it arrives on this system. In nearly all cases for this deployment scenario, it will be encrypted (it would not be encrypted, for example, if you selected one of the other scenarios/roles for this iApp, and elected to offload SSL/TLS traffic at a separate BIG-IP APM).
Note that the BIG-IP system does not offload the encryption used for RPC; the answer to this question should be based on the other Client Access protocols you intend to deploy.
f EncryptedIf you chose Encrypted in the previous question, additional questions appear.
a. Do you want to re-encrypt this traffic to your Client Access Servers?If you are using Exchange 2010 or Exchange 2013 SP1 and later, and want the BIG-IP system to offload SSL processing from the Client Access Servers, select Do not re-encrypt (SSL Offload) from the list. Offloading SSL on the BIG-IP system can extend Exchange Server server capacity.
i Important
If you are deploying Exchange Server 2013 and have not installed SP1 or later, you must choose Re-encrypt (SSL Bridging).
` Do not re-encrypt (SSL Offload)Select this option if you want to offload SSL processing onto the BIG-IP system. If you choose SSL Offload, you must have followed the instructions described in the prerequisites for configuring the Exchange Server: http://social.technet.microsoft.com/wiki/contents/articles/how-to-configure-ssl-offloading-in-exchange-2010.aspx.
i). Which Client SSL profile do you want to use? The iApp can create a new Client SSL profile, or if you have created a Client SSL profile which contains the appropriate SSL certificate and key for your Exchange implementation, you can select it from the list.
• Select the Client SSL profile you created from the listIf you manually created a Client SSL profile, select it from the list, and then continue with #2.
• Create a new Client SSL profileSelect this option if you want the iApp to create a new Client SSL profile.
1). Which SSL certificate do you want to use? Select the SSL certificate you imported onto the BIG-IP system for decrypting client connections. If you have not yet imported a certificate, you can leave the default selections and reconfigure this iApp after obtaining the certificates. The deployment will not function correctly until you have selected the correct certificates here. Note
Any certificate that you obtain with multiple names must be in SAN (Subject Alternative Name) format, not SNI (Server Name Indication) format. For more information on SAN certificates, see Subject Alternative Name (SAN) SSL Certificates on page 110.
2). Which SSL key do you want to use? Select the associated key from the list.
` Re-encrypt (SSL Bridging)Select this option if your implementation requires encrypted traffic to the Client Access Servers, or you are using Exchange 2013. The BIG-IP system unencrypts, then re-encrypts the traffic headed for the Client Access Servers.

17
DEPLOYMENT GUIDE Exchange Server 2010 and 2013
i). Which Client SSL profile do you want to use? The iApp can create a new Client SSL profile, or if you have created a Client SSL profile which contains the appropriate SSL certificate and key for your Exchange implementation, you can select it from the list.
• Select the Client SSL profile you created from the listIf you manually created a Client SSL profile, select it from the list, and then continue with #2.
• Create a new Client SSL profileSelect this option if you want the iApp to create a new Client SSL profile.
1). Which SSL certificate do you want to use? Select the SSL certificate you imported onto the BIG-IP system for decrypting client connections. If you have not yet imported a certificate, you can leave the default selections and reconfigure this iApp after obtaining the certificates. The deployment will not function correctly until you have selected the correct certificates here.
Note
Any certificate that you obtain with multiple names must be in SAN (Subject Alternative Name) format, not SNI (Server Name Indication) format. For more information on SAN certificates, see Subject Alternative Name (SAN) SSL Certificates on page 110.
2). Which SSL key do you want to use? Select the associated key from the list.
ii). Which Server SSL profile do you want to use? Select whether you want the iApp to create an F5 recommended Server SSL profile, or if you want to choose a Server SSL profile you already created.
• Select the Server SSL profile you created from the listIf you have previously created a Server SSL profile for your Exchange implementation, from the list, select the existing Server SSL profile you created.
• Create a new Server SSL profileSelect this option if you want the iApp to create a new Server SSL profile.
The default, F5 recommended Server SSL profile uses the serverssl parent profile. For information about the ciphers used in the Server SSL profile, see http://support.f5.com/kb/en-us/solutions/public/8000/800/sol8802.html.
f UnencryptedSelect this option if Client Access traffic is arriving at this BIG-IP system unencrypted (typically because you configured to offload SSL/TLS traffic at the BIG-IP APM that is sending Client Access traffic to this device).
a. Do you want to encrypt the traffic to your Client Access Servers?If you are using Exchange 2010 and want the BIG-IP system to offload SSL processing from the Client Access Servers, select Do not re-encrypt (SSL Offload) from the list. Offloading SSL on the BIG-IP system can extend Exchange Server 2010 server capacity.
i Important
If you are deploying Exchange Server 2013, you must choose Encrypt (SSL Bridging).
` Do not encrypt (SSL Offload), Select this option if you do not want the BIG-IP system to encrypt the traffic destined for the Client Access servers. The BIG-IP system does not modify the traffic, and you can continue with the next question.
` Encrypt (SSL Bridging)Select this option if your implementation requires encrypted traffic to the Client Access Servers, or you are using Exchange 2013. The BIG-IP system unencrypts, then re-encrypts the traffic headed for the Client Access Servers.

18
DEPLOYMENT GUIDE Exchange Server 2010 and 2013
i). Which Server SSL profile do you want to use? Select whether you want the iApp to create an F5 recommended Server SSL profile, or if you want to choose a Server SSL profile you already created.
• Select the Server SSL profile you created from the listIf you have previously created a Server SSL profile for your Exchange implementation, select the existing Server SSL profile you created from the list.
• Create a new Server SSL profileSelect this option if you want the iApp to create a new Server SSL profile.
The default, F5 recommended Server SSL profile uses the serverssl parent profile. For information about the ciphers used in the Server SSL profile, see http://support.f5.com/kb/en-us/solutions/public/8000/800/sol8802.html.
2. Will clients be connecting to this BIG-IP virtual server primarily over a LAN or a WAN?Select whether most clients are connecting over a WAN or LAN. The iApp uses your selection to configure the proper TCP optimization settings.
f WANSelect this option if most Exchange server clients are coming into your Exchange environment over a Wide Area Network.
f LANSelect this option if most Exchange server clients are coming into your Exchange environment over a Local Area Network.
3. Where will your BIG-IP virtual servers be in relation to your Client Access Servers? Select whether your BIG-IP virtual servers are on the same subnet as your Client Access Servers, or on different subnets. This setting is used to determine the SNAT (secure NAT) and routing configuration.
f Same subnet for BIG-IP virtual servers and Client Access ServersSelect this option if the BIG-IP virtual servers and the Client Access Servers are on the same subnet. In this case SNAT is configured on the BIG-IP virtual server and you must specify the number of concurrent connections.
a. What is the maximum number of concurrent users you expect per Client Access Server?Select whether you expect more or fewer than 6,000 concurrent users to each Client Access Server. This answer is used to determine what type of SNAT (secure network address translation) that system uses. A SNAT is an object that maps the source client IP address in a request to a translation address defined on the BIG-IP device.
Note
For specific information on SNAT Pools, including why we chose 6,000 concurrent users per Client Access Server, see Maximum number of concurrent users: SNAT Pool guidance on page 110.
` Fewer than 6000Select this option if you expect fewer than 6,000 concurrent users per Client Access Server. With this option, the system applies SNAT Auto Map, which doesn’t require any additional IP addresses, as the system uses an existing self IP address for translation.
` More than 6000Select this option if you expect more than 6,000 users at one time to each server. With this option, the iApp creates a SNAT Pool (or you can choose one you created), for which you need one IP address for each 6,000 users you expect.
i). Create a new SNAT pool or use an existing one?Select whether you want the system to create a new SNAT Pool, or if you have already created a SNAT pool for this implementation.
• Select the SNAT pool you created from the list If you have previously created a SNAT Pool for your Exchange implementation, select it from the list.
• Create a new SNAT pool If you have not created a custom SNAT pool, select this option for the iApp to create a new one.

19
DEPLOYMENT GUIDE Exchange Server 2010 and 2013
1). Which IP addresses do you want to use for the SNAT pool? Specify one otherwise unused IP address for every 6,000 concurrent connections, or fraction thereof. Click Add for additional rows.
i Important
If you choose more than 6,000 users, but do not specify enough SNAT pool addresses, after the maximum connection limit of 6,000 concurrent users per server is reached, new requests fail.
f Different subnet for BIG-IP virtual servers and Client Access ServersIf the BIG-IP virtual servers and Web Interface servers are on different subnets, the following question appears asking how routing is configured.
a. How have you configured routing on your Client Access Servers?Select whether the Client Access Servers use this BIG-IP system’s Self IP address as their default gateway.
` Client Access Servers do NOT use BIG-IP as their default gatewaySelect this option if the Client Access Servers do not use the BIG-IP system as their default gateway. If the Client Access Servers do not use the BIG-IP as their default gateway, SNAT is configured on the BIG-IP virtual server and you must select the expected number of concurrent users in the next question.
i). What is the maximum number of concurrent users you expect per Client Access Server?Select whether you expect more or fewer than 6,000 concurrent users to each Client Access Server. This answer is used to determine what type of SNAT that system uses. A SNAT is an object that maps the source client IP address in a request to a translation address defined on the BIG-IP device.
Note
For specific information on SNAT Pools, including why we chose 6,000 concurrent users per Client Access Server, see Maximum number of concurrent users: SNAT Pool guidance on page 110.
• Fewer than 6000Select this option if you expect fewer than 6,000 concurrent users per Client Access Server. With this option, the system applies SNAT Auto Map, which doesn’t require any additional IP addresses, as the system uses an existing self IP address for translation.
• More than 6000 Select this option if you expect more than 6,000 users at one time to each server. With this option, the iApp creates a SNAT Pool (or you can choose one you created), for which you need one IP address for each 6,000 users you expect.
1). Create a new SNAT pool or use an existing one? Select whether you want the system to create a new SNAT Pool, or if you have already created a SNAT pool for this implementation.
� Select the SNAT pool you created from the list If you have previously created a SNAT Pool for your Exchange implementation, select it from the list.
� Create a new SNAT pool If you have not created a custom SNAT pool, select this option for the iApp to create a new one.
i). Which IP addresses do you want to use for the SNAT pool? Specify one otherwise unused IP address for every 6,000 concurrent connections, or fraction thereof. Click Add for additional rows.
i Important
If you choose more than 6,000 users, but do not specify enough SNAT pool addresses, after the maximum connection limit of 6,000 concurrent users per server is reached, new requests fail.

20
DEPLOYMENT GUIDE Exchange Server 2010 and 2013
` Client Access Servers use the BIG-IP as their default gatewaySelect this option if the Client Access Servers use the BIG-IP system as their default gateway. In this scenario, no additional configuration is necessary to ensure correct server response handling.
4. Will you use a single IP address for all CAS connections, or will you have separate IP addresses?Select whether you want to use a single IP address for all Client Access connections, or separate IP addresses for the different services. If you chose a single IP address, the iApp creates a single virtual server for all of the Client Access services. If you choose different addresses, the BIG-IP creates individual virtual servers for each service. There are advantages to each method:
f Single IP address With a single IP address, you can combine multiple functions on the same virtual server; for instance, you may wish to have a single fully-qualified domain name (FQDN) and associated SSL certificate for all HTTP-based Client Access methods. You only need to provision a single IP address for the virtual server. If you want the services to have unique DNS names despite sharing an IP address, you need to obtain an SSL certificate that supports Subject Alternative Names or a wildcard certificate. For detailed information on SAN certificates, see Subject Alternative Name (SAN) SSL Certificates on page 110.
f Different IP addresses for different servicesBy maintaining a separate virtual server for each component, you can manage each service independently from one another. For instance, you may wish to have different pool membership, load balancing methods, or custom monitors for Outlook Web App and Outlook Anywhere. If each of those services are associated with a different virtual server, granular management becomes easier. You need to provision an available IP address for each virtual server, and obtain a valid SSL certificate with a unique subject name for each service.
5. How are you distributing the CAS protocols between servers?Select whether all your Client Access services are handled by the same Client Access Servers, or if each service is handled by a unique set of Client Access Servers.
This iApp creates separate pools and monitors for each service regardless of this setting. However, if you use the same set of servers for all services, you only have to specify the server IP addresses once.
f All services will be handled by the same set of Client Access ServersChoose this option if you are using the same Client Access Servers for all of your Exchange Client Access services.
f Each service will be handled by a unique set of Client Access ServersChoose this option if you are using different sets of Client Access Servers for each Client Access service.
Tell us about which services you are deployingIn this section, the iApp gathers information about which Client Access services you are deploying. Some questions only appear depending on your answers to previous questions. These contingencies are noted at the beginning of the question description.
1. Do you want to customize the server pool settings?Select whether you want to customize the BIG-IP load balancing pools for Client Access services, or use the F5 recommended settings.
f Use settings recommended by F5If you don't have a specific reason to customize the pool settings, leave this question set to this setting and continue with #2.
f Customize pool settingsIf you need to modify individual pool options, select Customize pool settings and answer the following options that appear:
a. Which load balancing method do you want to use?Select the load balancing method you want to use. We recommend the default, Least Connections (member). See the BIG-IP documentation for a description of each method. If you chose a node-based load balancing method, such as Ratio (Node), and use a Ratio or Connection Limit (both optional), you must see Adding Ratio or Connection Limit information to the nodes if using a node-based load balancing method on page 56 after completing the template.
b. Do you want to give priority to specific groups of servers?Select whether you want to enable Priority Group Activation to send traffic first to groups of servers you specify. The BIG-IP system load balances traffic according to the priority number you assign to each server.
21
DEPLOYMENT GUIDE Exchange Server 2010 and 2013
` Do not use Priority Group ActivationSelect this option if you do not want to enable Priority Group Activation.
` Use Priority Group ActivationSelect this option if you want to enable Priority Group Activation. You will need to add a priority number in the Priority box to each server . A higher number indicates higher priority. Traffic is only sent to the servers with the highest priority, unless the number of available servers in that priority group falls below the value you specify as the minimum in the following question. The BIG-IP system then sends traffic to the group of servers with the next highest priority, and so on. See the BIG-IP documentation for more details.
i). What is the minimum number of active members in a group?Specify the minimum number of servers that must be active to continue sending traffic to the priority group. If the number of active servers falls below this minimum, traffic will be sent to the group of servers with the next highest priority group number.
c. Do you want the BIG-IP system to queue TCP requests?Select whether you want the BIG-IP system to queue TCP requests. TCP request queuing provides the ability to queue connection requests that exceed the capacity of connections for a pool, as determined by the connection limit. Consequently, instead of dropping connection requests that exceed the capacity of a pool, TCP request queuing enables those connection requests to reside within a queue according to defined conditions until capacity becomes available. For more information on TCP Request Queuing, see the Preventing TCP Connection Requests From Being Dropped chapter in the BIG-IP Local Traffic Manager: Implementations guide, available on AskF5.
i Important
TCP Request Queuing is an advanced feature and should be used only if you understand how it will affect your deployment, including application behavior and BIG-IP performance. If you enable TCP Request Queuing, you must have a Connection Limit set on at least one of the nodes when configuring the Address/Port for the Client Access Server nodes.
` Do not queue TCP requestsSelect this option if you do not want the BIG-IP system to queue TCP requests.
` Queue TCP requestsSelect this option if you want to enable TCP request queuing on the BIG-IP system.
i). What is the maximum number of TCP requests for the queue?Type the maximum number of requests you want to queue. We do not recommend using 0, which means unlimited and is only constrained by available memory.
ii). How many milliseconds should requests remain in the queue?Type a number of milliseconds for the TCP request timeout value.
2. What IP address do you want to use for your virtual servers?This question appears only if you selected Single IP address for all CAS connections in the previous section.
Specify a valid IP address to use for the BIG-IP virtual server. This virtual server address is used for all Client Access services. The BIG-IP system intelligently directs traffic to the appropriate service using an iRule created by the template.
3. Do you want to add any iRules to this combined virtual server?If you chose to customize pool settings, you have the option of adding existing iRules to the virtual server. iRules allow an administrator to instruct the system to intercept, inspect, transform, direct and track inbound or outbound application traffic. For more information on iRules, see https://devcentral.f5.com/HotTopics/iRules/tabid/1082202/Default.aspx.
i Important
Improper use or misconfiguration of an iRule can result in unwanted application behavior and poor performance of your BIG-IP system. We recommended you verify the impact of an iRule prior to deployment in a production environment.
22
DEPLOYMENT GUIDE Exchange Server 2010 and 2013
If you want to add iRules, from the Options box, select the iRule(s) you want to include, and then click the Add (<<) button.
4. Are you deploying Outlook Web App (includes ECP)?Select whether you are deploying Outlook Web App at this time. This includes the Exchange Control Panel (ECP).
f NoSelect this option if you are not deploying OWA at this time. You can always reconfigure the template later to add OWA.
f YesSelect this option if you are deploying OWA at this time.
a. Do you want to restrict Exchange Administration Center access by IP address or network? Exchange 2013 onlyThis question only appears if you selected Exchange 2013 as your version of Exchange.
Select whether you want the BIG-IP LTM to restrict Exchange Administration Center (EAC) access by IP address or network. In Microsoft Exchange Server 2013, Exchange administration is now performed via the EAC, a web-based console. You configure the iApp to control access to the EAC, allowing connections only from approved IP addresses or networks.
` No, allow EAC access from all client IP addressesSelect this option to allow EAC access from all client IP addresses and networks. In this case, the system does not restrict EAC access to specific IP addresses or networks, however, if you are deploying BIG-IP APM, you can still restrict access to EAC by Organizational Management group in question b.
` Yes, restrict EAC access to specific client IP addresses or networksSelect this option if you want to restrict EAC access to specific client IP addresses or networks. This adds an extra layer of security to your Exchange deployment. The system creates a data group with the IP addresses or networks you specify, and then uses an iRule to enforce the restrictions.
i). What IP or network addresses should be allowed EAC access?Specify the IP addresses or networks should be allowed access to EAC. Click Add to include additional addresses or networks.
i Important
If you are not deploying BIG-IP APM, the iApp currently does not attach the proper data group and iRule. See Creating the Data Group and iRule for securing EAC access if not using BIG-IP APM on page 61 for information on how to configure these objects.
b. Should BIG-IP APM restrict EAC access to members of the Exchange Organization Management Security Group? Exchange 2013 onlyThis question only appears if you selected Exchange 2013 as your version of Exchange and selected to provide secure authentication with BIG-IP APM.
Select whether you want the BIG-IP APM to restrict Exchange Administration Center (EAC) access to members of Exchange 2013's Organizational Management group. The BIG-IP APM module queries Active Directory group membership for the user making the request to EAC. If the user is not a member of the Organization Management group, the BIG-IP APM policy denies access.
` No, do not restrict EAC access by group membershipSelect this option and the BIG-IP APM will not restrict access to the EAC by group membership.
` Yes, restrict EAC access by group membershipSelect this option if you want to restrict EAC access to the Organization Management group. This adds an additional layer of security to your Exchange deployment, as the system denies access to the EAC from anyone who is not a member of the Organization Management group.
c. What IP address do you want to use for the OWA virtual server?This question only appears if you selected Different IP addresses for different services in the previous section.
Specify the IP address the system will use for the Outlook Web App virtual server. Clients will use this IP address to access Outlook Web App.

23
DEPLOYMENT GUIDE Exchange Server 2010 and 2013
d. Do you want to add custom iRules to this virtual server?This question only appears if you selected Different IP addresses for different services in the previous section.
If you chose to customize pool settings, you have the option of adding existing iRules to this OWA virtual server. iRules allow an administrator to instruct the system to intercept, inspect, transform, direct and track inbound or outbound application traffic. For more information on iRules, see https://devcentral.f5.com/HotTopics/iRules/tabid/1082202/Default.aspx.
If you want to add iRules, from the Options box, select the iRule(s) you want to include, and then click the Add (<<) button. Improper use or misconfiguration of an iRule can result in unwanted application behavior and poor performance of your BIG-IP system. We recommended you verify the impact of an iRule prior to deployment in a production environment.
e. What are the IP addresses of your OWA servers?This question only appears if you selected Each service will be handled by a unique set of Client Access Servers in the previous section.
Specify the IP addresses of your Outlook Web App servers. Click Add to include additional servers. If you chose to have the BIG-IP system queue TCP requests, you must specify a Connection Limit. If you chose to enable Priority Group Activation, you must specify a Priority.
2. Are you deploying Outlook Anywhere, EWS and OAB (or EWS only)?Select whether you are deploying Outlook Anywhere, Exchange Web Services (EWS), and Offline Address Book (OAB), or EWS only at this time.
f No, not deploying Outlook Anywhere, EWS, or OABSelect this option if you are not deploying Outlook Anywhere at this time. You can always reconfigure the template at another time to add Outlook Anywhere to the configuration.
f Yes, deploying EWS onlySelect this option if you are only deploying Exchange Web Services at this time, and not Outlook Anywhere or Offline Address Book. In this case, the BIG-IP system sends any Offline Address Book traffic to the Exchange Web Services pool.
a. What IP address do you want to use for the Exchange Web Services virtual server?This question only appears if you selected Different IP addresses for different services in the previous section.
Specify the IP address the system will use for the Exchange Web Services virtual server.
b. Do you want to add custom iRules to this virtual server?This question only appears if you selected Different IP addresses for different services in the previous section.
If you chose to customize pool settings, you have the option of adding existing iRules to this Exchange Web Services virtual server. iRules allow an administrator to instruct the system to intercept, inspect, transform, direct and track inbound or outbound application traffic. For more information on iRules, see https://devcentral.f5.com/HotTopics/iRules/tabid/1082202/Default.aspx.
If you want to add iRules, from the Options box, select the iRule(s) you want to include, and then click the Add (<<) button. Improper use or misconfiguration of an iRule can result in unwanted application behavior and poor performance of your BIG-IP system. We recommended you verify the impact of an iRule prior to deployment in a production environment.
c. What are the IP addresses of your EWS servers?This question only appears if you selected Each service will be handled by a unique set of Client Access Servers in the previous section.
Specify the IP addresses of your Exchange Web Services servers. Click Add to include additional servers. If you chose to have the BIG-IP system queue TCP requests, you must specify a Connection Limit. If you chose to enable Priority Group Activation, you must specify a Priority.
f Yes, deploying Outlook Anywhere, EWS, and OABSelect this option if you are deploying Outlook Anywhere, EWS, and OAB at this time.
24
DEPLOYMENT GUIDE Exchange Server 2010 and 2013
i Important
In Microsoft Exchange 2010, you must enable Outlook Anywhere on each of your Exchange Client Access Servers before that service will be available. Outlook Anywhere is not enabled by default on Exchange Client Access Servers. See the Microsoft documentation for specific instructions.
To prevent internal users from receiving a password prompt, your internal DNS must not have an 'A' record for the FQDN for Outlook Anywhere.
a. What IP address do you want to use for the Outlook Anywhere virtual server?This question only appears if you selected Different IP addresses for different services in the previous section.
Specify the IP address the system will use for the Outlook Anywhere virtual server.
b. Do you want to add custom iRules to this virtual server?This question only appears if you selected Different IP addresses for different services in the previous section.
If you chose to customize pool settings, you have the option of adding existing iRules to this Outlook Anywhere virtual server. iRules allow an administrator to instruct the system to intercept, inspect, transform, direct and track inbound or outbound application traffic. For more information on iRules, see https://devcentral.f5.com/HotTopics/iRules/tabid/1082202/Default.aspx.
If you want to add iRules, from the Options box, select the iRule(s) you want to include, and then click the Add (<<) button. Improper use or misconfiguration of an iRule can result in unwanted application behavior and poor performance of your BIG-IP system. We recommended you verify the impact of an iRule prior to deployment in a production environment.
c. What are the IP addresses of your Outlook Anywhere servers?This question only appears if you selected Each service will be handled by a unique set of Client Access Servers in the previous section.
Specify the IP addresses of your Outlook Anywhere servers. Click Add to include additional servers. If you chose to have the BIG-IP system queue TCP requests, you must specify a Connection Limit. If you chose to enable Priority Group Activation, you must specify a Priority.
d. Which type of authentication do Outlook Anywhere clients use?This question only appears if you chose to deploy BIG-IP APM and are using BIG-IP version 11.3 or later.
Choose whether your Outlook Anywhere clients use Basic or NTLM authentication. Beginning in BIG-IP version 11.3, the iApp supports using NTLM authentication for Outlook Anywhere.
` Outlook Anywhere clients use Basic AuthenticationSelect this option if your Outlook Anywhere clients use Basic Authentication. No further information is required, and you can continue with #6.
` Outlook Anywhere clients use NTLM authenticationSelect this option if your Outlook Anywhere clients use NTLM information. You must answer the following questions about your Active Directory implementation. Also see Appendix E: Active Directory and Exchange Server configuration for NTLM on page 112, and Experiencing authentication issues when deploying the iApp using BIG-IP APM for client-side NTLM for Outlook Anywhere on page 62 for important information and modifications for NTLM.
i Important
Before completing this section, you must create a user account in the same domain that has been properly configured for Kerberos delegation. You must create an NTLM Machine Account object on the BIG-IP system to join this system to the Active Directory domain. See Creating an NTLM Machine Account on page 67.
i). Which NTLM machine account should be used for Kerberos delegation?Select the NTLM Machine Account you created to join the BIG-IP system to the Active Directory domain. If you have not already created an NTLM Machine Account on the BIG-IP system, see Creating an NTLM Machine Account on page 67. You must either exit the template now and start over once you have created the NTLM

25
DEPLOYMENT GUIDE Exchange Server 2010 and 2013
Machine Account, or choose Outlook Anywhere Clients use Basic Authentication from the previous question, and then re-enter the template at a later time.
ii). What is the Kerberos Key Distribution Center IP or FQDN?Specify the IP address or fully qualified domain name of the Kerberos Key Distribution Center (KDC). If you type an FQDN, the BIG-IP system must be able to resolve the address. Otherwise, use the IP address.
ii). What is the name of the Kerberos Realm?Specify the name of the Kerberos Realm. While this name should be in all capital letters, the iApp automatically turns any lower case letters to capital.
ii). What is the user name for the Active Directory delegation account you created?Specify the user name for the Active Directory delegation account you created. This account must be correctly configured in Active Directory for Kerberos delegation. See Appendix E: Active Directory and Exchange Server configuration for NTLM on page 112 details.
ii). What is the associated password?Specify the password associated with the account.
ii). How do you want to construct the Kerberos ticket request?Select whether you want to use DNS reverse lookups or the Outlook Anywhere Host header to construct the ticket request.
• Use DNS reverse lookupsSelect this option to use DNS reverse lookups to build the Kerberos ticket request. Note that you must configure a reverse lookup zone containing a PTR record for each Client Access Server on a DNS server that is accessible from this BIG-IP system. Consult your DNS documentation for specific instructions.
• Use the Outlook Anywhere host headerSelect this option to use the Outlook Anywhere Host header to construct the ticket request. To use the host header value, you must configure IIS Application Pools for Outlook Anywhere, Autodiscover, and Exchange Web Services to run using the previously created Active Directory user account for Kerberos delegation. See Appendix E: Active Directory and Exchange Server configuration for NTLM on page 112.
6. Are you deploying ActiveSync?Select whether you are deploying ActiveSync at this time.
f NoSelect this option if you are not deploying ActiveSync at this time. You can always reconfigure the template at another time to add ActiveSync to the configuration.
f YesSelect this option if you are deploying ActiveSync at this time. See iPhones and other iOS devices are displaying invalid certificate messages after deploying the iApp for ActiveSync on page 62 for important information.
a. What IP address do you want to use for the ActiveSync virtual server?This question only appears if you selected Different IP addresses for different services in the previous section.
Specify the IP address the system will use for the ActiveSync virtual server. Be sure to see ActiveSync and/or Autodiscover aren't working after deploying the iApp for separate virtual servers and using APM on page 59
b. Do you want to add custom iRules to this virtual server?This question only appears if you selected Different IP addresses for different services in the previous section.
If you chose to customize pool settings, you have the option of adding existing iRules to this ActiveSync virtual server. iRules allow an administrator to instruct the system to intercept, inspect, transform, direct and track inbound or outbound application traffic. For information on iRules, see https://devcentral.f5.com/HotTopics/iRules/tabid/1082202/Default.aspx.
If you want to add iRules, from the Options box, select the iRule(s) you want to include, and then click the Add (<<) button. Improper use or misconfiguration of an iRule can result in unwanted application behavior and poor performance of your BIG-IP system. We recommended you verify the impact of an iRule prior to deployment in a production environment.
c. What are the IP addresses of your ActiveSync servers?This question only appears if you selected Each service will be handled by a unique set of Client Access Servers in the previous section.
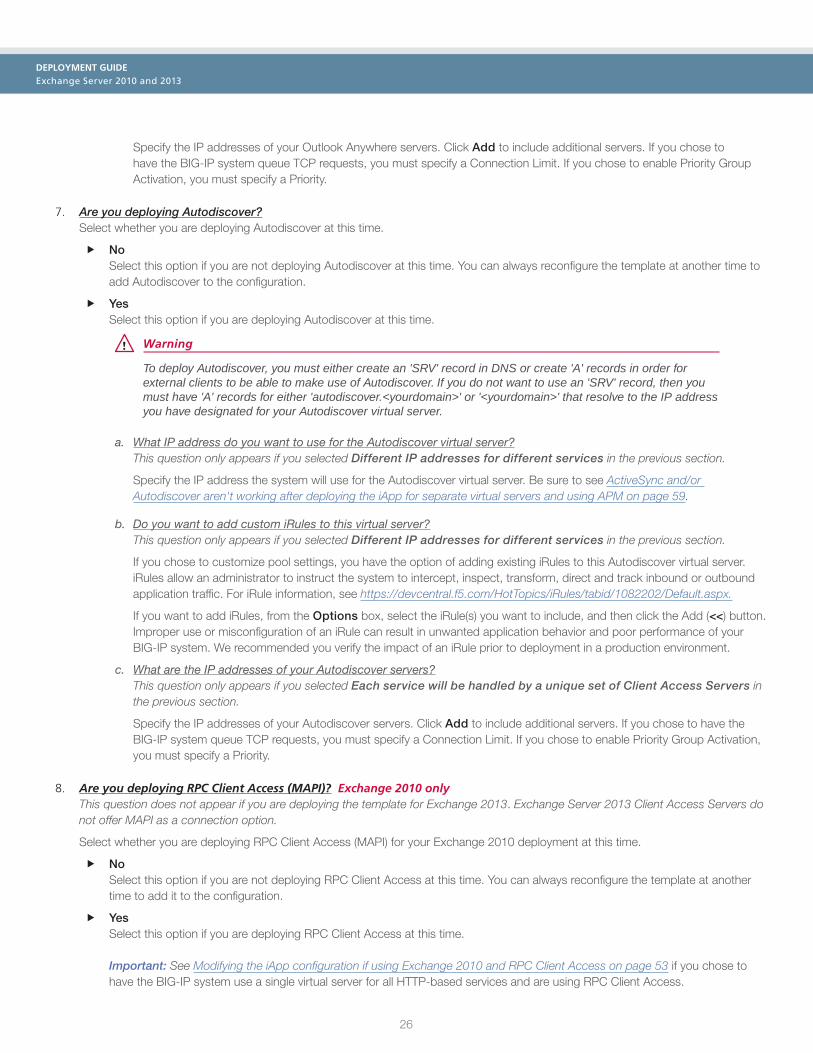
26
DEPLOYMENT GUIDE Exchange Server 2010 and 2013
Specify the IP addresses of your Outlook Anywhere servers. Click Add to include additional servers. If you chose to have the BIG-IP system queue TCP requests, you must specify a Connection Limit. If you chose to enable Priority Group Activation, you must specify a Priority.
7. Are you deploying Autodiscover?Select whether you are deploying Autodiscover at this time.
f NoSelect this option if you are not deploying Autodiscover at this time. You can always reconfigure the template at another time to add Autodiscover to the configuration.
f YesSelect this option if you are deploying Autodiscover at this time.
! Warning
To deploy Autodiscover, you must either create an 'SRV' record in DNS or create 'A' records in order for external clients to be able to make use of Autodiscover. If you do not want to use an 'SRV' record, then you must have 'A' records for either 'autodiscover.<yourdomain>' or '<yourdomain>' that resolve to the IP address you have designated for your Autodiscover virtual server.
a. What IP address do you want to use for the Autodiscover virtual server?This question only appears if you selected Different IP addresses for different services in the previous section.
Specify the IP address the system will use for the Autodiscover virtual server. Be sure to see ActiveSync and/or Autodiscover aren't working after deploying the iApp for separate virtual servers and using APM on page 59.
b. Do you want to add custom iRules to this virtual server?This question only appears if you selected Different IP addresses for different services in the previous section.
If you chose to customize pool settings, you have the option of adding existing iRules to this Autodiscover virtual server. iRules allow an administrator to instruct the system to intercept, inspect, transform, direct and track inbound or outbound application traffic. For iRule information, see https://devcentral.f5.com/HotTopics/iRules/tabid/1082202/Default.aspx.
If you want to add iRules, from the Options box, select the iRule(s) you want to include, and then click the Add (<<) button. Improper use or misconfiguration of an iRule can result in unwanted application behavior and poor performance of your BIG-IP system. We recommended you verify the impact of an iRule prior to deployment in a production environment.
c. What are the IP addresses of your Autodiscover servers?This question only appears if you selected Each service will be handled by a unique set of Client Access Servers in the previous section.
Specify the IP addresses of your Autodiscover servers. Click Add to include additional servers. If you chose to have the BIG-IP system queue TCP requests, you must specify a Connection Limit. If you chose to enable Priority Group Activation, you must specify a Priority.
8. Are you deploying RPC Client Access (MAPI)? Exchange 2010 onlyThis question does not appear if you are deploying the template for Exchange 2013. Exchange Server 2013 Client Access Servers do not offer MAPI as a connection option.
Select whether you are deploying RPC Client Access (MAPI) for your Exchange 2010 deployment at this time.
f NoSelect this option if you are not deploying RPC Client Access at this time. You can always reconfigure the template at another time to add it to the configuration.
f YesSelect this option if you are deploying RPC Client Access at this time. Important: See Modifying the iApp configuration if using Exchange 2010 and RPC Client Access on page 53 if you chose to have the BIG-IP system use a single virtual server for all HTTP-based services and are using RPC Client Access.

27
DEPLOYMENT GUIDE Exchange Server 2010 and 2013
! Warning
You must enable and configure a Client Access Array in your Exchange Server site before RPC Client Access will function. See Creating a new Client Access Array on page 111 for more information. If deploying RPC Client Access, you must also deploy Outlook Anywhere, to properly handle EWS (Exchange Web Services) traffic.
a. Use the default dynamic range of ports for RPC Client Access traffic or set static ports?Select whether you want to use the default dynamic range of ports for RPC Client Access, or if you have configured your Client Access servers to use specific ports outside the default range.
` Use the default dynamic port rangeSelect this option to configure the iApp to use the default port range. If you choose the default dynamic range of ports, no additional information is necessary, continue with the next question.
` Set static portsSelect this option if you want to set static ports for RPC Client Access.
i Important
You must make sure each of your Client Access Servers is configured to use the static ports you specified here. See http://social.technet.microsoft.com/wiki/contents/articles/configure-static-rpc-ports-on-an-exchange-2010-client-access-server.aspx for more information.
i). Which port will you use for MAPI?Specify the port you want to set for MAPI.
ii). Which port will you use for the Address Book?Specify the port you want to use for the Address book.
b. What IP address do you want to use for the RPC Client Access virtual server?This question only appears if you selected Different IP addresses for different services in the previous section.
Specify the IP address the system will use for the RPC Client Access virtual server.
c. What are the IP addresses of your RPC Client Access servers?This question only appears if you selected Each service will be handled by a unique set of Client Access Servers in the previous section.
Specify the IP addresses of your RPC Client Access servers. Click Add to include additional servers. If you chose to have the BIG-IP system queue TCP requests, you must specify a Connection Limit. If you chose to enable Priority Group Activation, you must specify a Priority.
9. Are you deploying POP3?Select whether you are deploying POP3 at this time.
f NoSelect this option if you are not deploying POP3 at this time. You can always reconfigure the template at another time to add POP3 to the configuration.
f YesSelect this option if you are deploying POP3 at this time.
i Important
You must enable POP3 on each of your Exchange Client Access Servers before that service will be available. POP3 is not enabled by default on Exchange Client Access Servers.
If you are offloading SSL, you must configure the Authentication properties for POP3 on each of your Exchange Client Access Servers to allow logins using plain text. By default, POP3 is configured to only allow secure (encrypted) logins.
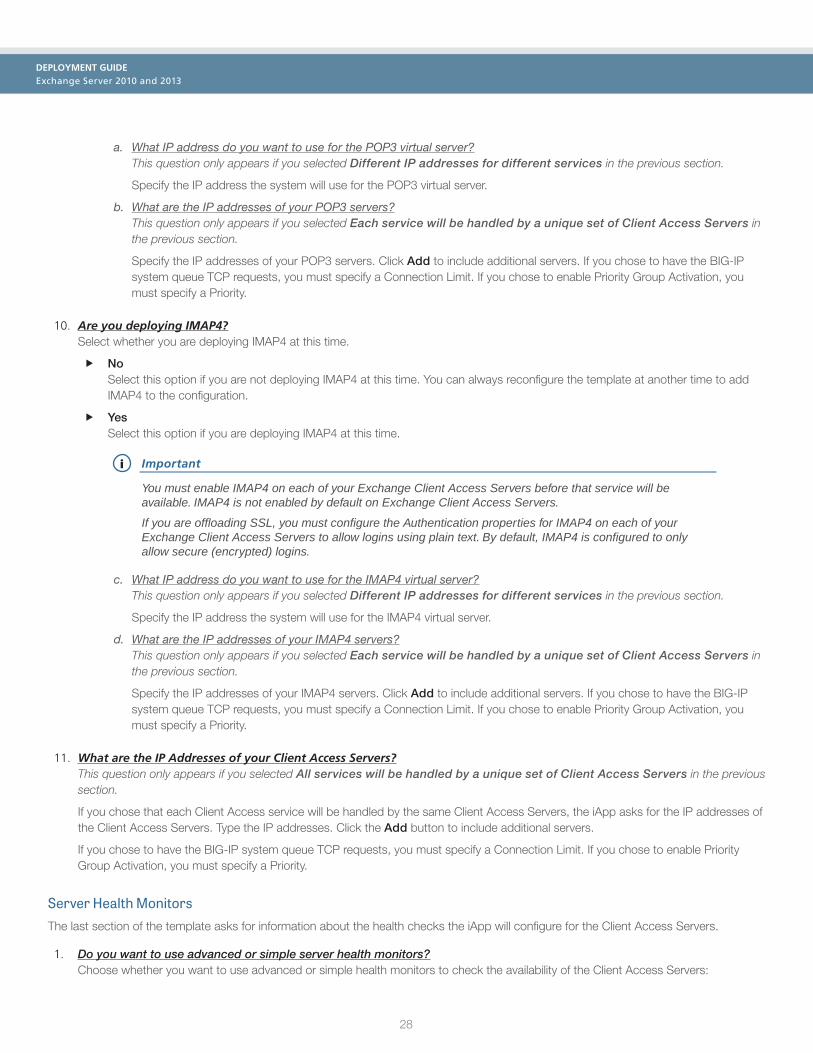
28
DEPLOYMENT GUIDE Exchange Server 2010 and 2013
a. What IP address do you want to use for the POP3 virtual server?This question only appears if you selected Different IP addresses for different services in the previous section.
Specify the IP address the system will use for the POP3 virtual server.
b. What are the IP addresses of your POP3 servers?This question only appears if you selected Each service will be handled by a unique set of Client Access Servers in the previous section.
Specify the IP addresses of your POP3 servers. Click Add to include additional servers. If you chose to have the BIG-IP system queue TCP requests, you must specify a Connection Limit. If you chose to enable Priority Group Activation, you must specify a Priority.
10. Are you deploying IMAP4?Select whether you are deploying IMAP4 at this time.
f NoSelect this option if you are not deploying IMAP4 at this time. You can always reconfigure the template at another time to add IMAP4 to the configuration.
f YesSelect this option if you are deploying IMAP4 at this time.
i Important
You must enable IMAP4 on each of your Exchange Client Access Servers before that service will be available. IMAP4 is not enabled by default on Exchange Client Access Servers.
If you are offloading SSL, you must configure the Authentication properties for IMAP4 on each of your Exchange Client Access Servers to allow logins using plain text. By default, IMAP4 is configured to only allow secure (encrypted) logins.
c. What IP address do you want to use for the IMAP4 virtual server?This question only appears if you selected Different IP addresses for different services in the previous section.
Specify the IP address the system will use for the IMAP4 virtual server.
d. What are the IP addresses of your IMAP4 servers?This question only appears if you selected Each service will be handled by a unique set of Client Access Servers in the previous section.
Specify the IP addresses of your IMAP4 servers. Click Add to include additional servers. If you chose to have the BIG-IP system queue TCP requests, you must specify a Connection Limit. If you chose to enable Priority Group Activation, you must specify a Priority.
11. What are the IP Addresses of your Client Access Servers?This question only appears if you selected All services will be handled by a unique set of Client Access Servers in the previous section.
If you chose that each Client Access service will be handled by the same Client Access Servers, the iApp asks for the IP addresses of the Client Access Servers. Type the IP addresses. Click the Add button to include additional servers.
If you chose to have the BIG-IP system queue TCP requests, you must specify a Connection Limit. If you chose to enable Priority Group Activation, you must specify a Priority.
Server Health MonitorsThe last section of the template asks for information about the health checks the iApp will configure for the Client Access Servers.
1. Do you want to use advanced or simple server health monitors?Choose whether you want to use advanced or simple health monitors to check the availability of the Client Access Servers:

29
DEPLOYMENT GUIDE Exchange Server 2010 and 2013
f Use simple monitorsSimple monitors check network connectivity but do not perform actual logins. If you use simple monitors, the BIG-IP LTM may not be able to completely determine status of Client Access services. In this case, the monitor interval is set to 10 seconds automatically, no matter what number is in the previous question.
f Use advanced monitorsIf you choose advanced monitors, the BIG-IP system performs logins to most of the Client Access services (all except RPC/MAPI in Exchange 2010 and Forms-based Outlook Web App) and checks for valid content in the response. Because these monitors attempt to access a specific mailbox, they can more accurately determine the actual health of Client Access services. However, account maintenance and Mailbox status must become a part of your monitoring strategy. For example, if an account used for monitoring is locked or deleted, the monitor will mark the services down for all users.
i Important
F5’s advanced monitors for Autodiscover, Exchange Web Services, and Outlook Anywhere support Basic and NTLMv1 authentication only. See Advanced monitors for Autodiscover, EWS, and Outlook Anywhere only support Basic and NTLMv1 authentication on page 60 for more information.
We strongly recommend creating a mailbox account(s) specifically for use in the monitor(s). The accounts for those mailboxes should have no other privileges in the domain and should be configured with passwords that do not expire.
a. What email address do you want to use for the advanced monitors?This question only appears if you specified you are deploying Autodiscover and/or Exchange Web Services .
Type the email address associated with the account you are going to monitor (and that you specify in the following question).
b. Which mailbox account should be used for the monitors?Type a mailbox account for use in the advanced monitors. This name corresponds to the account name field in Active Directory (rather than the email address).
c. What is the password for that mailbox account?Type the associated password.
d. What is the domain name of the user account for the monitors?Type the Domain name for the user account. This domain can be entered in either FQDN (mydomain.example.com) or NetBIOS (MYDOMAIN) format.
e. Do you want to monitor a second mailbox?Choose whether you want to monitor a second mailbox. We strongly recommend configuring a second mailbox account to be used by a second set of monitors, using a mailbox that is configured to reside on a different Mailbox server. The BIG-IP LTM will only mark a Client Access service on a specific server down if both sets of credentials fail. This provides resiliency to accommodate configuration errors with a single account, mailbox, or Mailbox server.
` Monitor only one mailboxSelect this option if you do not want the BIG-IP system to monitor a second mailbox. Continue with #3.
` Monitor a second mailbox (recommended)Select this option if you want the BIG-IP system to monitor a second mailbox. You must answer the following:
i). Which email address do you want to use for the second advanced monitor?This question only appears if you specified you are deploying Autodiscover and/or Exchange Web Services .
Type the email address associated with the account you are going to monitor (and that you specify in the following question).
ii). Which mailbox account should be used for the second monitor?Type a mailbox account for use in the second monitors. Again, this name corresponds to the account name field in Active Directory (rather than the email address).
ii). What is the password for that mailbox account?Type the associated password.

30
DEPLOYMENT GUIDE Exchange Server 2010 and 2013
ii). What is the domain name of the user account for the second monitors?Type the Domain name for the second user account. This domain can be entered in either FQDN (mydomain.example.com) or NetBIOS (MYDOMAIN) format.
2. Which authentication method have you configured for OWA?This question only appears if you specified you are deploying Outlook Web App.
If you configured the iApp to deploy Outlook Web App at this time, choose the authentication method you have configured for Outlook Web App. The health monitors will be customized to accommodate the authentication method you are using.
i Important
If you are using APM in this scenario, you must choose Forms-Based. If you are using Forms-Based authentication for OWA, you must change the credential format required for OWA on each Exchange Client Access Server from the default domain\username format to just username.
f OWA uses the default Forms-Based authenticationSelect this option if you are using Forms-based authentication.
If you chose Forms-based authentication, the BIG-IP system does not perform an actual login to the service, but checks the availability of the forms-based authentication page.
f OWA uses Basic or Windows Integrated authenticationSelect this option if you are using Basic/Windows Integrated authentication.
3. How many seconds should pass between health checks?Specifies how often the system checks the health of the servers. We recommend the default of 30 seconds. The maximum value for the interval is 28,799 seconds.
4. Are you using the same FQDN for all HTTP-based services?This question only appears if you specified you are using a single IP address for all CAS connections. If you selected Different IP addresses for different services, continue with #5.
Select whether you are using one FQDN for all HTTP-based services or separate FQDNs for each service. These values are used for HTTP 1.1-based health monitors.
f One FQDN for all HTTP servicesSelect this option if you are using a single FQDN for all HTTP-based Client Access services.
a. What is the FQDN that you use for your HTTP-based services?Specify the fully qualified domain name you are using for all of the HTTP-based CAS services.
f Different FQDNs for each HTTP serviceSelect this option if you are using separate FQDNs for each HTTP-based CAS service. Additional questions appear. When you are finished adding the FQDNs, continue with Additional Steps.
a. What FQDN do you use for the OWA service?This question only appears if you specified you are deploying Outlook Web App.Specify the fully qualified domain name you use for your Outlook Web App service.
b. What FQDN do you use for the Outlook Anywhere service?This question only appears if you specified you are deploying Outlook Anywhere.Specify the fully qualified domain name you use for your Outlook Anywhere service.
c. What FQDN do you use for the ActiveSync service?This question only appears if you specified you are deploying ActiveSync.Specify the fully qualified domain name you use for your ActiveSync service.
d. What FQDN do you use for the Autodiscover service?This question only appears if you specified you are deploying Autodiscover.Specify the fully qualified domain name you use for your Autodiscover service.

31
DEPLOYMENT GUIDE Exchange Server 2010 and 2013
5. What FQDN do you use for the OWA service?This question only appears if you specified you are using different IP addresses for different services.
Specify the fully qualified domain name you use for your Outlook Web App service.
6. What FQDN do you use for the Outlook Anywhere service?This question only appears if you specified you are using different IP addresses for different services.
Specify the fully qualified domain name you use for your Outlook Anywhere service.
7. What FQDN do you use for the ActiveSync service?This question only appears if you specified you are using different IP addresses for different services.
Specify the fully qualified domain name you use for your ActiveSync service.
8. What FQDN do you use for the Autodiscover service?This question only appears if you specified you are using different IP addresses for different services.
Specify the fully qualified domain name you use for your Autodiscover service.
Additional StepsReview the information in the Additional steps section, and take appropriate action if necessary. All of the notes in Additional Steps are found in the relevant section of this deployment guide.
FinishedReview your answers to the questions. When you are satisfied, click the Finished button. The BIG-IP system creates the relevant objects.
Continue with Next steps on page 55.

32
DEPLOYMENT GUIDE Exchange Server 2010 and 2013
Configuring the LTM to receive HTTP-based Client Access traffic forwarded by a BIG-IP APMIf you chose the second scenario, LTM will receive HTTP-based CAS traffic forwarded by a BIG-IP APM, use this section for guidance on configuring the iApp. This selection configures BIG-IP LTM with a single virtual server that receives Exchange Client Access HTTP-based traffic that has been forwarded by a separate BIG-IP APM. The BIG-IP system can also accommodate non-HTTP traffic that is not handled by BIG-IP APM such as POP3 and IMAP4.
While this virtual server can be used for direct traffic (for example, internal clients that do not use the BIG-IP APM), we do not recommend using this virtual server in that way. For direct traffic, we strongly recommend creating a second instance of the iApp on this BIG-IP LTM for the direct traffic/internal users. You must use a unique virtual server IP address, all of the other settings can be identical. Once both iApps have been created, you would configure Split DNS (use the same domain name, but different zones and IP addresses for internal and external clients). For more information about Split DNS, refer to your DNS documentation.
AnalyticsThis section of the template asks questions about Analytics. The Application Visibility Reporting (AVR) module allows you to view statistics specific to your Microsoft Exchange implementation. AVR is available on all BIG-IP systems v11 and later, however you must have the AVR provisioned for this option to appear. Note that this is only for application visibility reporting, you can view object-level statistics from the BIG-IP without provisioning AVR.
i Important
Enabling Analytics may adversely affect overall system performance. If you choose to enable Analytics, we recommend gathering statistics for a set time period, such as one week, and then re-entering this template and disabling Analytics while you process the data.
If you plan on using AVR for analytics, we recommend creating a custom Analytics profile. To create a new profile, from the Main tab, select Profiles and then click Analytics. Click New and then configure the profile as applicable for your configuration. See the online help or product documentation for specific instructions. To select the new profile, you need to restart or reconfigure the iApp template.
1. Do you want to enable Analytics for application statistics?Choose whether you want to enable AVR for Analytics.
f No, do not enable AnalyticsIf you do not want to enable Analytics, leave this list set to No, and continue with the next section.
f Yes, enable Analytics using AVRIf you choose to enable Analytics, select Yes from the list, and then answer the following questions.
a. Use the default Analytics profile or select a custom profile?If you decide to use AVR, you must decide whether to use the default Analytics profile, or create a new one. As mentioned previously, we recommend creating a new profile to get the most flexibility and functionality out of AVR. If you have already started the iApp template configuration and then decide to create a new Analytics profile, you must exit the iApp, create the profile, and then restart the iApp template.
` Select a custom Analytics profileSelect this option if you have already created a custom Analytics profile for Exchange Server.
i). Which Analytics profile do you want to use?From the list, select the appropriate Analytics profile.
` Use default profileSelect this option if you have not yet created a custom Analytics profile for Microsoft Exchange. We do not recommend using the default profile.
Tell us about your deploymentIn this section, the iApp gathers general information about your Client Access Server deployment.

33
DEPLOYMENT GUIDE Exchange Server 2010 and 2013
1. Will incoming traffic arrive at this BIG-IP system encrypted or unencrypted?Select whether any of the HTTP-based, POP3 and IMAP4 traffic will be encrypted or not when it arrives on this system. Because you may have configured to offload SSL/TLS traffic at the BIG-IP APM that is sending Client Access traffic to this device, the traffic may be arriving at this system unencrypted.
Note that the BIG-IP system does not offload the encryption used for RPC; the answer to this question should be based on the other Client Access protocols you intend to deploy.
f EncryptedIf you chose Encrypted in the previous question, additional questions appear.
a. Do you want to re-encrypt this traffic to your Client Access Servers?If you are using Exchange 2010 or Exchange 2013 SP1 and later, and want the BIG-IP system to offload SSL processing from the Client Access Servers, select Do not re-encrypt (SSL Offload) from the list. Offloading SSL on the BIG-IP system can extend Exchange Server server capacity.
i Important
If you are deploying Exchange Server 2013 and have not installed SP1 or later, you must choose Re-encrypt (SSL Bridging).
` Do not re-encrypt (SSL Offload)Select this option if you want to offload SSL processing onto the BIG-IP system. If you choose SSL Offload, you must have followed the instructions described in the prerequisites for configuring the Exchange Server: http://social.technet.microsoft.com/wiki/contents/articles/how-to-configure-ssl-offloading-in-exchange-2010.aspx.
i). Which Client SSL profile do you want to use? The iApp can create a new Client SSL profile, or if you have created a Client SSL profile which contains the appropriate SSL certificate and key for your Exchange implementation, you can select it from the list.
• Select the Client SSL profile you created from the listIf you manually created a Client SSL profile, select it from the list, and then continue with #2.
• Create a new Client SSL profileSelect this option if you want the iApp to create a new Client SSL profile.
1). Which SSL certificate do you want to use? Select the SSL certificate you imported onto the BIG-IP system for decrypting client connections. If you have not yet imported a certificate, you can leave the default selections and reconfigure this iApp after obtaining the certificates. The deployment will not function correctly until you have selected the correct certificates here. Note
Any certificate that you obtain with multiple names must be in SAN (Subject Alternative Name) format, not SNI (Server Name Indication) format. For more information on SAN certificates, see Subject Alternative Name (SAN) SSL Certificates on page 110.
2). Which SSL key do you want to use? Select the associated key from the list.
` Re-encrypt (SSL Bridging)Select this option if your implementation requires encrypted traffic to the Client Access Servers, or you are using Exchange 2013. The BIG-IP system unencrypts, and then re-encrypts the traffic headed for the Client Access Servers.
i). Which Client SSL profile do you want to use? The iApp can create a new Client SSL profile, or if you have created a Client SSL profile which contains the appropriate SSL certificate and key for your Exchange implementation, you can select it from the list.

34
DEPLOYMENT GUIDE Exchange Server 2010 and 2013
• Select the Client SSL profile you created from the listIf you manually created a Client SSL profile, select it from the list, and then continue with #2.
• Create a new Client SSL profileSelect this option if you want the iApp to create a new Client SSL profile.
1). Which SSL certificate do you want to use? Select the SSL certificate you imported onto the BIG-IP system for decrypting client connections. If you have not yet imported a certificate, you can leave the default selections and reconfigure this iApp after obtaining the certificates. The deployment will not function correctly until you have selected the correct certificates here.
Note
Any certificate that you obtain with multiple names must be in SAN (Subject Alternative Name) format, not SNI (Server Name Indication) format. For more information on SAN certificates, see Subject Alternative Name (SAN) SSL Certificates on page 110.
2). Which SSL key do you want to use? Select the associated key from the list.
ii). Which Server SSL profile do you want to use? Select whether you want the iApp to create an F5 recommended Server SSL profile, or if you want to choose a Server SSL profile you already created.
• Select the Server SSL profile you created from the listIf you have previously created a Server SSL profile for your Exchange implementation, from the list, select the existing Server SSL profile you created.
• Create a new Server SSL profileSelect this option if you want the iApp to create a new Server SSL profile.
The default, F5 recommended Server SSL profile uses the serverssl parent profile. For information about the ciphers used in the Server SSL profile, see http://support.f5.com/kb/en-us/solutions/public/8000/800/sol8802.html.
f UnencryptedSelect this option if Client Access traffic is arriving at this BIG-IP system unencrypted (typically because you configured to offload SSL/TLS traffic at the BIG-IP APM that is sending Client Access traffic to this device).
a. Do you want to encrypt the traffic to your Client Access Servers?If you are using Exchange 2010 or Exchange 2013 SP1 and later, and want the BIG-IP system to offload SSL processing from the Client Access Servers, select Do not re-encrypt (SSL Offload) from the list. Offloading SSL on the BIG-IP system can extend Exchange Server server capacity.
i Important
If you are deploying Exchange Server 2013 and have not installed SP1 or later, you must choose Re-encrypt (SSL Bridging).
` Do not encrypt (SSL Offload), Select this option if you do not want the BIG-IP system to encrypt the traffic destined for the Client Access servers. The BIG-IP system does not modify the traffic, and you can continue with the next question.
` Encrypt (SSL Bridging)Select this option if your implementation requires encrypted traffic to the Client Access Servers, or you are using Exchange 2013. The BIG-IP system unencrypts, then re-encrypts the traffic headed for the Client Access Servers.
i). Which Server SSL profile do you want to use? Select whether you want the iApp to create an F5 recommended Server SSL profile, or if you want to choose a Server SSL profile you already created.

35
DEPLOYMENT GUIDE Exchange Server 2010 and 2013
• Select the Server SSL profile you created from the listIf you have previously created a Server SSL profile for your Exchange implementation, from the list, select the existing Server SSL profile you created.
• Create a new Server SSL profileSelect this option if you want the iApp to create a new Server SSL profile.
The default, F5 recommended Server SSL profile uses the serverssl parent profile. For information about the ciphers used in the Server SSL profile, see http://support.f5.com/kb/en-us/solutions/public/8000/800/sol8802.html.
2. Where will your BIG-IP virtual servers be in relation to your Client Access Servers? Select whether your BIG-IP virtual servers are on the same subnet as your Client Access Servers, or on different subnets. This setting is used to determine the SNAT (secure NAT) and routing configuration.
f Same subnet for BIG-IP virtual servers and Client Access ServersSelect this option if the BIG-IP virtual servers and the Client Access Servers are on the same subnet. In this case SNAT is configured on the BIG-IP virtual server and you must specify the number of concurrent connections.
a. What is the maximum number of concurrent users you expect per Client Access Server?Select whether you expect more or fewer than 6,000 concurrent users to each Client Access Server. This answer is used to determine what type of SNAT that system uses. A SNAT is an object that maps the source client IP address in a request to a translation address defined on the BIG-IP device.
Note
For specific information on SNAT Pools, including why we chose 6,000 concurrent users per Client Access Server, see Maximum number of concurrent users: SNAT Pool guidance on page 110.
` Fewer than 6000Select this option if you expect fewer than 6000 concurrent users per Client Access Server. With this option, the system applies SNAT Auto Map, which doesn’t require any additional IP addresses, as the system uses an existing self IP address for translation.
` More than 6000Select this option if you expect more than 6,000 users at one time to each server. With this option, the iApp creates a SNAT Pool (or you can choose one you created), for which you need one IP address for each 6,000 users you expect.
i). Create a new SNAT pool or use an existing one?Select whether you want the system to create a new SNAT Pool, or if you have already created a SNAT pool for this implementation.
• Select the SNAT pool you created from the list If you have previously created a SNAT Pool for your Exchange implementation, select it from the list.
• Create a new SNAT pool If you have not created a custom SNAT pool, select this option for the iApp to create a new one.
1). Which IP addresses do you want to use for the SNAT pool? Specify one otherwise unused IP address for every 6,000 concurrent connections, or fraction thereof. Click Add for additional rows.
i Important
If you choose more than 6000 users, but do not specify enough SNAT pool addresses, after the maximum connection limit of 6000 concurrent users per server is reached, new requests fail.
f Different subnet for BIG-IP virtual servers and Client Access ServersIf the BIG-IP virtual servers and Web Interface servers are on different subnets, the following question appears asking how routing is configured.

36
DEPLOYMENT GUIDE Exchange Server 2010 and 2013
a. How have you configured routing on your Client Access Servers?Select whether the Client Access Servers use this BIG-IP system’s Self IP address as their default gateway.
` Client Access Servers do NOT use BIG-IP as their default gatewaySelect this option if the Client Access Servers do not use the BIG-IP system as their default gateway. If the Client Access Servers do not use the BIG-IP as their default gateway, SNAT is configured on the BIG-IP virtual server and you must select the expected number of concurrent users in the next question.
i). What is the maximum number of concurrent users you expect per Client Access Server?Select whether you expect more or fewer than 6,000 concurrent users to each Client Access Server. This answer is used to determine what type of SNAT that system uses. A SNAT is an object that maps the source client IP address in a request to a translation address defined on the BIG-IP device.
Note
For specific information on SNAT Pools, including why we chose 6,000 concurrent users per Client Access Server, see Maximum number of concurrent users: SNAT Pool guidance on page 110.
• Fewer than 6000Select this option if you expect fewer than 6000 concurrent users per Client Access Server. With this option, the system applies SNAT Auto Map, which doesn’t require any additional IP addresses, as the system uses an existing self IP address for translation.
• More than 6000 Select this option if you expect more than 6,000 users at one time to each server. With this option, the iApp creates a SNAT Pool (or you can choose one you created), for which you need one IP address for each 6,000 users you expect.
1). Create a new SNAT pool or use an existing one? Select whether you want the system to create a new SNAT Pool, or if you have already created a SNAT pool for this implementation.
� Select the SNAT pool you created from the list If you have previously created a SNAT Pool for your Exchange implementation, select it from the list.
� Create a new SNAT pool If you have not created a custom SNAT pool, select this option for the iApp to create a new one.
i). Which IP addresses do you want to use for the SNAT pool? Specify one otherwise unused IP address for every 6,000 concurrent connections, or fraction thereof. Click Add for additional rows.
i Important
If you choose more than 6000 users, but do not specify enough SNAT pool addresses, after the maximum connection limit of 6000 concurrent users per server is reached, new requests fail.
` Client Access Servers use the BIG-IP as their default gatewaySelect this option if the Client Access Servers use the BIG-IP system as their default gateway. In this scenario, no additional configuration is necessary to ensure correct server response handling.
3. How are you distributing the CAS protocols between servers?Select whether all your Client Access services are handled by the same Client Access Servers, or if each service is handled by a unique set of Client Access Servers.
This iApp creates separate pools and monitors for each service regardless of this setting. However, if you use the same set of servers for all services, you only have to specify the server IP addresses once.

37
DEPLOYMENT GUIDE Exchange Server 2010 and 2013
f All services will be handled by the same set of Client Access ServersChoose this option if you are using the same Client Access Servers for all of your Exchange Client Access services.
f Each service will be handled by a unique set of Client Access ServersChoose this option if you are using different sets of Client Access Servers for each Client Access service.
Tell us about which services you are deployingIn this section, the iApp gathers information about which Client Access services you are deploying.
1. Would you like to customize the server pool settings?Select whether you want to customize the BIG-IP load balancing pools for Client Access services, or use the F5 recommended settings.
f Use settings recommended by F5If you don't have a specific reason to customize the pool settings, leave this question at Use settings recommended by F5 and continue with #2.
f Customize pool settingsIf you have need to modify individual pool options, select Customize pool settings and answer the following options:
a. Which load balancing method do you want to use?Select the load balancing method you want to use. We recommend the default, Least Connections (member). See the BIG-IP documentation for a description of each method. If you chose a node-based load balancing method (such as Ratio (node)), and use a Ratio or Connection Limit (both optional), you must see Adding Ratio or Connection Limit information to the nodes if using a node-based load balancing method on page 56 after completing the template.
b. Do you want to give priority to specific groups of servers?Select whether you want to enable Priority Group Activation to send traffic first to groups of servers you specify. The BIG-IP system load balances traffic according to the priority number you assign to each server.
` Do not use Priority Group ActivationSelect this option if you do not want to enable Priority Group Activation.
` Use Priority Group ActivationSelect this option if you want to enable Priority Group Activation. You will need to add a priority number in the Priority box to each server . A higher number indicates higher priority. Traffic is only sent to the servers with the highest priority, unless the number of available servers in that priority group falls below the value you specify as the minimum in the following question. The BIG-IP system then sends traffic to the group of servers with the next highest priority, and so on. See the BIG-IP documentation for more details.
i). What is the minimum number of active members in a group?Specify the minimum number of servers that must be active to continue sending traffic to the priority group. If the number of active servers falls below this minimum, traffic will be sent to the group of servers with the next-highest priority group number.
c. Do you want the BIG-IP system to queue TCP requests?Select whether you want the BIG-IP system to queue TCP requests. TCP request queuing provides the ability to queue connection requests that exceed the capacity of connections for a pool, as determined by the connection limit. Consequently, instead of dropping connection requests that exceed the capacity of a pool, TCP request queuing enables those connection requests to reside within a queue according to defined conditions until capacity becomes available. For more information on TCP Request Queuing, see the Preventing TCP Connection Requests From Being Dropped chapter in the BIG-IP Local Traffic Manager: Implementations guide, available on AskF5.
i Important
TCP Request Queuing is an advanced feature and should be used only if you understand how it will affect your deployment, including application behavior and BIG-IP performance. If you enable TCP Request Queuing, you must have a Connection Limit set on at least one of the nodes when configuring the Address/Port for the Client Access Server nodes.

38
DEPLOYMENT GUIDE Exchange Server 2010 and 2013
` Do not queue TCP requestsSelect this option if you do not want the BIG-IP system to queue TCP requests.
` Queue TCP requestsSelect this option if you want to enable TCP request queuing on the BIG-IP system.
i). What is the maximum number of TCP requests for the queue?Type the maximum number of requests you want to queue. We do not recommend using 0, which means unlimited and is only constrained by available memory.
ii). How many milliseconds should requests remain in the queue?Type a number of milliseconds for the TCP request timeout value.
2. What IP address do you want to use for your virtual servers?This question appears only if you selected Single IP address for all CAS connections in the previous section.
Specify a valid IP address to use for the BIG-IP virtual server. This virtual server address is used for all Client Access services. The BIG-IP system intelligently directs traffic to the appropriate service using an iRule created by the template.
3. Do you want to add any iRules to this combined virtual server?If you chose to customize pool settings, you have the option of adding existing iRules to the virtual server. iRules allow an administrator to instruct the system to intercept, inspect, transform, direct and track inbound or outbound application traffic. For more information on iRules, see https://devcentral.f5.com/HotTopics/iRules/tabid/1082202/Default.aspx.
i Important
Improper use or misconfiguration of an iRule can result in unwanted application behavior and poor performance of your BIG-IP system. We recommended you verify the impact of an iRule prior to deployment in a production environment.
If you want to add iRules, from the Options box, select the iRule(s) you want to include, and then click the Add (<<) button.
4. Are you deploying Outlook Web App (includes ECP)?Select whether you are deploying Outlook Web App at this time. This includes the Exchange Control Panel (ECP).
f NoSelect this option if you are not deploying OWA at this time. You can reconfigure the template at another time to add OWA.
f YesSelect this option if you are deploying Outlook Web Access at this time.
a. What are the IP addresses of your OWA servers?This question only appears if you selected Each service will be handled by a unique set of Client Access Servers in the previous section.
Specify the IP addresses of your Outlook Web App servers. Click Add to include additional servers. If you chose to have the BIG-IP system queue TCP requests, you must specify a Connection Limit. If you chose to enable Priority Group Activation, you must specify a Priority.
5. Are you deploying Outlook Anywhere, EWS and OAB (or EWS only)?Select whether you are deploying Outlook Anywhere, Exchange Web Services (EWS), Offline Address Book (OAB), or EWS only.
f No, not deploying Outlook Anywhere, EWS, or OABSelect this option if you are not deploying Outlook Anywhere at this time. You can always reconfigure the template at another time to add Outlook Anywhere to the configuration.
f Yes, deploying EWS onlySelect this option if you are only deploying Exchange Web Services at this time, and not Outlook Anywhere or Offline Address Book. In this case, the BIG-IP system sends any Offline Address Book traffic to the Exchange Web Services pool.
a. What are the IP addresses of your EWS servers?This question only appears if you selected Each service will be handled by a unique set of Client Access Servers in the previous section.

39
DEPLOYMENT GUIDE Exchange Server 2010 and 2013
Specify the IP addresses of your Exchange Web Services servers. Click Add to include additional servers. If you chose to have the BIG-IP system queue TCP requests, you must specify a Connection Limit. If you chose to enable Priority Group Activation, you must specify a Priority.
f Yes, deploying Outlook Anywhere, EWS, and OABSelect this option if you are deploying Outlook Anywhere, EWS, and OAB at this time.
i Important
You must enable Outlook Anywhere on each of your Exchange Client Access Servers before that service will be available. Outlook Anywhere is not enabled by default on Exchange Client Access Servers. See the Microsoft documentation for specific instructions.
To prevent internal users from receiving a password prompt, your internal DNS must not have an 'A' record for the FQDN for Outlook Anywhere.
a. What are the IP addresses of your Outlook Anywhere servers?This question only appears if you selected Each service will be handled by a unique set of Client Access Servers in the previous section.
Specify the IP addresses of your Outlook Anywhere servers. Click Add to include additional servers. If you chose to have the BIG-IP system queue TCP requests, you must specify a Connection Limit. If you chose to enable Priority Group Activation, you must specify a Priority.
6. Are you deploying ActiveSync?Select whether you are deploying ActiveSync at this time.
f NoSelect this option if you are not deploying ActiveSync at this time. You can always reconfigure the template at another time to add ActiveSync to the configuration.
f YesSelect this option if you are deploying ActiveSync at this time. Be sure to see ActiveSync and/or Autodiscover aren't working after deploying the iApp for separate virtual servers and using APM on page 59, and iPhones and other iOS devices are displaying invalid certificate messages after deploying the iApp for ActiveSync on page 62 for important information.
a. What are the IP addresses of your ActiveSync servers?This question only appears if you selected Each service will be handled by a unique set of Client Access Servers in the previous section.
Specify the IP addresses of your Outlook Anywhere servers. Click Add to include additional servers. If you chose to have the BIG-IP system queue TCP requests, you must specify a Connection Limit. If you chose to enable Priority Group Activation, you must specify a Priority.
7. Are you deploying Autodiscover?Select whether you are deploying Autodiscover at this time.
f NoSelect this option if you are not deploying Autodiscover at this time. You can always reconfigure the template at another time to add Autodiscover to the configuration.
f YesSelect this option if you are deploying Autodiscover at this time. Be sure to see ActiveSync and/or Autodiscover aren't working after deploying the iApp for separate virtual servers and using APM on page 59.
! Warning
To deploy Autodiscover, you must either create an 'SRV' record in DNS or create 'A' records in order for external clients to be able to make use of Autodiscover. If you do not want to use an 'SRV' record, then you must have 'A' records for either 'autodiscover.<yourdomain>' or '<yourdomain>' that resolve to the IP address you have designated for your Autodiscover virtual server.

40
DEPLOYMENT GUIDE Exchange Server 2010 and 2013
a. What are the IP addresses of your Autodiscover servers?This question only appears if you selected Each service will be handled by a unique set of Client Access Servers in the previous section.
Specify the IP addresses of your Autodiscover servers. Click Add to include additional servers. If you chose to have the BIG-IP system queue TCP requests, you must specify a Connection Limit.
8. Are you deploying RPC Client Access (MAPI)? Exchange 2010 onlyThis question does not appear if you are deploying the template for Exchange 2013. Exchange Server 2013 Client Access Servers do not offer MAPI as a connection option.
Select whether you are deploying RPC Client Access (MAPI) for your Exchange 2010 deployment at this time.
f NoSelect this option if you are not deploying RPC Client Access at this time. You can always reconfigure the template at another time to add it to the configuration.
f YesSelect this option if you are deploying RPC Client Access at this time. Important: See Modifying the iApp configuration if using Exchange 2010 and RPC Client Access on page 53 if you chose to have the BIG-IP system use a single virtual server for all HTTP-based services and are using RPC Client Access.
! Warning
You must enable and configure a Client Access Array in your Exchange Server site before RPC Client Access will function. See Creating a new Client Access Array on page 111 for more information. If deploying RPC Client Access, you must also deploy Outlook Anywhere, to properly handle EWS (Exchange Web Services) traffic.
a. Use the default dynamic range of ports for RPC Client Access traffic or set static ports?Select whether you want to use the default dynamic range of ports for RPC Client Access, or if you have configured your Client Access servers to use specific ports outside the default range.
` Use the default dynamic port rangeSelect this option to configure the iApp to use the default port range. If you choose the default dynamic range of ports, no additional information is necessary, continue with the next question.
` Set static portsSelect this option if you want to set static ports for RPC Client Access.
i Important
You must make sure each of your Client Access Servers is configured to use the static ports you specified here. See http://social.technet.microsoft.com/wiki/contents/articles/configure-static-rpc-ports-on-an-exchange-2010-client-access-server.aspx for more information.
i). Which port will you use for MAPI?Specify the port you want to set for MAPI.
ii). Which port will you use for the Address Book?Specify the port you want to use for the Address book.
b. What are the IP addresses of your RPC Client Access servers?This question only appears if you selected Each service will be handled by a unique set of Client Access Servers in the previous section.
Specify the IP addresses of your RPC Client Access servers. Click Add to include additional servers. If you chose to have the BIG-IP system queue TCP requests, you must specify a Connection Limit. If you chose to enable Priority Group Activation, you must specify a Priority.
9. Are you deploying POP3?Select whether you are deploying POP3 at this time.

41
DEPLOYMENT GUIDE Exchange Server 2010 and 2013
f NoSelect this option if you are not deploying POP3 at this time. You can always reconfigure the template at another time to add POP3 to the configuration.
f YesSelect this option if you are deploying POP3 at this time.
i Important
You must enable POP3 on each of your Exchange Client Access Servers before that service will be available. POP3 is not enabled by default on Exchange Client Access Servers.
If you are offloading SSL, you must configure the Authentication properties for POP3 on each of your Exchange Client Access Servers to allow logins using plain text. By default, POP3 is configured to only allow secure (encrypted) logins.
a. What are the IP addresses of your POP3 servers?This question only appears if you selected Each service will be handled by a unique set of Client Access Servers in the previous section.
Specify the IP addresses of your POP3 servers. Click Add to include additional servers. If you chose to have the BIG-IP system queue TCP requests, you must specify a Connection Limit. If you chose to enable Priority Group Activation, you must specify a Priority.
10. Are you deploying IMAP4?Select whether you are deploying IMAP4 at this time.
f NoSelect this option if you are not deploying IMAP4 at this time. You can always reconfigure the template at another time to add IMAP4 to the configuration.
f YesSelect this option if you are deploying IMAP4 at this time.
i Important
You must enable IMAP4 on each of your Exchange Client Access Servers before that service will be available. IMAP4 is not enabled by default on Exchange Client Access Servers.
If you are offloading SSL, you must configure the Authentication properties for IMAP4 on each of your Exchange Client Access Servers to allow logins using plain text. By default, IMAP4 is configured to only allow secure (encrypted) logins.
a. What are the IP addresses of your IMAP4 servers?This question only appears if you selected Each service will be handled by a unique set of Client Access Servers in the previous section.
Specify the IP addresses of your IMAP4 servers. Click Add to include additional servers. If you chose to have the BIG-IP system queue TCP requests, you must specify a Connection Limit. If you chose to enable Priority Group Activation, you must specify a Priority.
11. What are the IP Addresses of your Client Access Servers?This question only appears if you selected All services will be handled by a unique set of Client Access Servers in the previous section.
If you chose that each Client Access service will be handled by the same Client Access Servers, the iApp asks for the IP addresses of the Client Access Servers. Type the IP addresses. Click the Add button to include additional servers.
If you chose to have the BIG-IP system queue TCP requests, you must specify a Connection Limit. If you chose to enable Priority Group Activation, you must specify a Priority.

42
DEPLOYMENT GUIDE Exchange Server 2010 and 2013
Server Health MonitorsThe last section of the template asks for information about the health checks the iApp will configure for the Client Access Servers.
1. Do you want to use advanced or simple server health monitors?Choose whether you want to use advanced or simple health monitors:
f Use simple monitorsSimple monitors check network connectivity but do not perform actual logins. If you use simple monitors, the BIG-IP LTM may not be able to completely determine status of Client Access services. In this case, the monitor interval is set to 10 seconds automatically, no matter what number is in the previous question.
f Use advanced monitorsIf you choose advanced monitors, the BIG-IP system performs logins to most of the Client Access services (all except RPC/MAPI in Exchange 2010, and Forms-based Outlook Web App) and checks for valid content in the response. Because these monitors attempt to access a specific mailbox, they can more accurately determine the actual health of Client Access services. However, account maintenance and Mailbox status must become a part of your monitoring strategy. For example, if an account used for monitoring is locked or deleted, the monitor will mark the services down for all users.
i Important
F5’s advanced monitors for Autodiscover, Exchange Web Services, and Outlook Anywhere support Basic and NTLMv1 authentication only. See Advanced monitors for Autodiscover, EWS, and Outlook Anywhere only support Basic and NTLMv1 authentication on page 60.
We strongly recommend creating a mailbox account(s) specifically for use in the monitor(s). The accounts for those mailboxes should have no other privileges in the domain and should be configured with passwords that do not expire.
a. What email address do you want to use for the advanced monitors?This question only appears if you specified you are deploying Autodiscover and/or Exchange Web Services .
Type the email address associated with the account you are going to monitor (that you specify in the following question).
b. Which mailbox account should be used for the monitors?Type a mailbox account for use in the advanced monitors. This name corresponds to the account name field in Active Directory (rather than the email address).
c. What is the password for that mailbox account?Type the associated password. Note that credentials are stored in plain text on this BIG-IP system.
d. What is the domain name of the user account for the monitors?Type the Domain name for the user account. This domain can be entered in either FQDN (mydomain.example.com) or NetBIOS (MYDOMAIN) format.
e. Do you want to monitor a second mailbox?Choose whether you want to monitor a second mailbox. We strongly recommend configuring a second mailbox account to be used by a second set of monitors, using a mailbox that is configured to reside on a different Mailbox server. The BIG-IP LTM will only mark a Client Access service on a specific server down if both sets of credentials fail. This provides resiliency to accommodate configuration errors with a single account, mailbox, or Mailbox server.
` NoSelect this option if you do not want the BIG-IP system to monitor a second mailbox. Continue with #2.
` YesSelect this option if you want the BIG-IP system to monitor a second mailbox.
i). What email address do you want to use for the advanced monitors?This question only appears if you specified you are deploying Autodiscover and/or Exchange Web Services .
Type the email address associated with the account you are going to monitor (and that you specify in the following question).
ii). Which mailbox account should be used for the second monitor?Type a mailbox account for use in the second monitors. Again, this name corresponds to the account name field in Active Directory (rather than the email address).

43
DEPLOYMENT GUIDE Exchange Server 2010 and 2013
ii). What is the password for that mailbox account?Type the associated password.
ii). What is the domain name of the user account for the second monitors?Type the Domain name for the second user account. This domain can be entered in either FQDN (mydomain.example.com) or NetBIOS (MYDOMAIN) format.
2. Which authentication method have you configured for OWA?This question only appears if you specified you are deploying Outlook Web App.
If you configured the iApp to deploy Outlook Web App at this time, choose the authentication method you have configured for Outlook Web App. The health monitors will be customized to accommodate the authentication method you are using.
i Important
If you are using APM in this scenario, you must choose Forms-Based. If you are using Forms-Based authentication for OWA, you must change the credential format required for OWA on each Exchange Client Access Server from the default domain\username format to just username.
f OWA uses the default Forms-Based authenticationSelect this option if you are using Forms-based authentication, which is the default authentication mechanism for OWA.
If you chose Forms-based authentication, the BIG-IP system does not perform an actual login to the service, but checks the availability of the forms-based authentication page.
f OWA uses Basic or Windows Integrated authenticationSelect this option if you are using Basic/Windows Integrated authentication.
3. How many seconds should pass between health checks?Specifies how often the system checks the health of the servers. We recommend the default of 30 seconds. The maximum value for the interval is 28,799 seconds.
4. What FQDN do you use for the OWA service?Specify the fully qualified domain name you use for your Outlook Web App service.
5. What FQDN do you use for the Outlook Anywhere service?Specify the fully qualified domain name you use for your Outlook Anywhere service.
6. What FQDN do you use for the ActiveSync service?Specify the fully qualified domain name you use for your ActiveSync service.
7. What FQDN do you use for the Autodiscover service?Specify the fully qualified domain name you use for your Autodiscover service.
Additional StepsReview the information in the Additional steps section, and take appropriate action if necessary. All of the notes in Additional Steps are found in the relevant section of this deployment guide.
FinishedReview your answers to the questions. When you are satisfied, click the Finished button. The BIG-IP system creates the relevant objects.
Continue with Next steps on page 55.

44
DEPLOYMENT GUIDE Exchange Server 2010 and 2013
Configuring the BIG-IP APM to provide secure remote access to Client Access ServersIf you chose BIG-IP APM will provide secure remote access to CAS, use this section for guidance on configuring the iApp. In this scenario, the BIG-IP will be configured as a BIG-IP APM that will use a single virtual server to provide proxy authentication and secure remote access to all Exchange HTTP-based Client Access services (Outlook Web App (including ECP), Outlook Anywhere (including EWS and OAB), ActiveSync, and Autodiscover) without requiring the use of the F5 Edge Client. The traffic will be forwarded to separate BIG-IP running LTM which will provide advanced load balancing, persistence, monitoring and optimizations for those services.
As mentioned in the prerequisites, because you are deploying BIG-IP APM, you must have configured the BIG-IP system for DNS and NTP. See Configuring DNS and NTP settings on page 66 for instructions.
AnalyticsThis section of the template asks questions about Analytics. The Application Visibility Reporting (AVR) module allows you to view statistics specific to your Microsoft Exchange implementation. AVR is available on all BIG-IP systems v11 and later, however you must have the AVR provisioned for this option to appear. Note that this is only for application visibility reporting, you can view object-level statistics from the BIG-IP without provisioning AVR.
i Important
Enabling Analytics may adversely affect overall system performance. If you choose to enable Analytics, we recommend gathering statistics for a set time period, such as one week, and then re-entering this template and disabling Analytics while you process the data.
If you plan on using AVR for analytics, we recommend creating a custom Analytics profile. To create a new profile, from the Main tab, select Profiles and then click Analytics. Click New and then configure the profile as applicable for your configuration. See the online help or product documentation for specific instructions. To select the new profile, you need to restart or reconfigure the iApp template.
1. Do you want to enable Analytics for application statistics?Choose whether you want to enable AVR for Analytics.
f No, do not enable AnalyticsIf you do not want to enable Analytics, leave this list set to No, and continue with the next section.
f Yes, enable Analytics using AVRIf you choose to enable Analytics, select Yes from the list, and then answer the following questions.
a. Use the default Analytics profile or select a custom profile?If you decide to use AVR, you must decide whether to use the default Analytics profile, or create a new one. As mentioned previously, we recommend creating a new profile to get the most flexibility and functionality out of AVR. If you have already started the iApp template configuration and then decide to create a new Analytics profile, you must exit the iApp, create the profile, and then restart the iApp template.
` Select a custom Analytics profileSelect this option if you have already created a custom Analytics profile for Exchange Server.
i). Which Analytics profile do you want to use?From the list, select the appropriate Analytics profile.
` Use default profileSelect this option if you have not yet created a custom Analytics profile for Microsoft Exchange. We do not recommend using the default profile.
BIG-IP Access Policy ManagerThe first section of the iApp in this scenario asks about the BIG-IP Access Policy Manager. You must have APM fully licensed and provisioned to use APM. For more information on BIG-IP APM, see http://www.f5.com/products/big-ip/access-policy-manager.html.
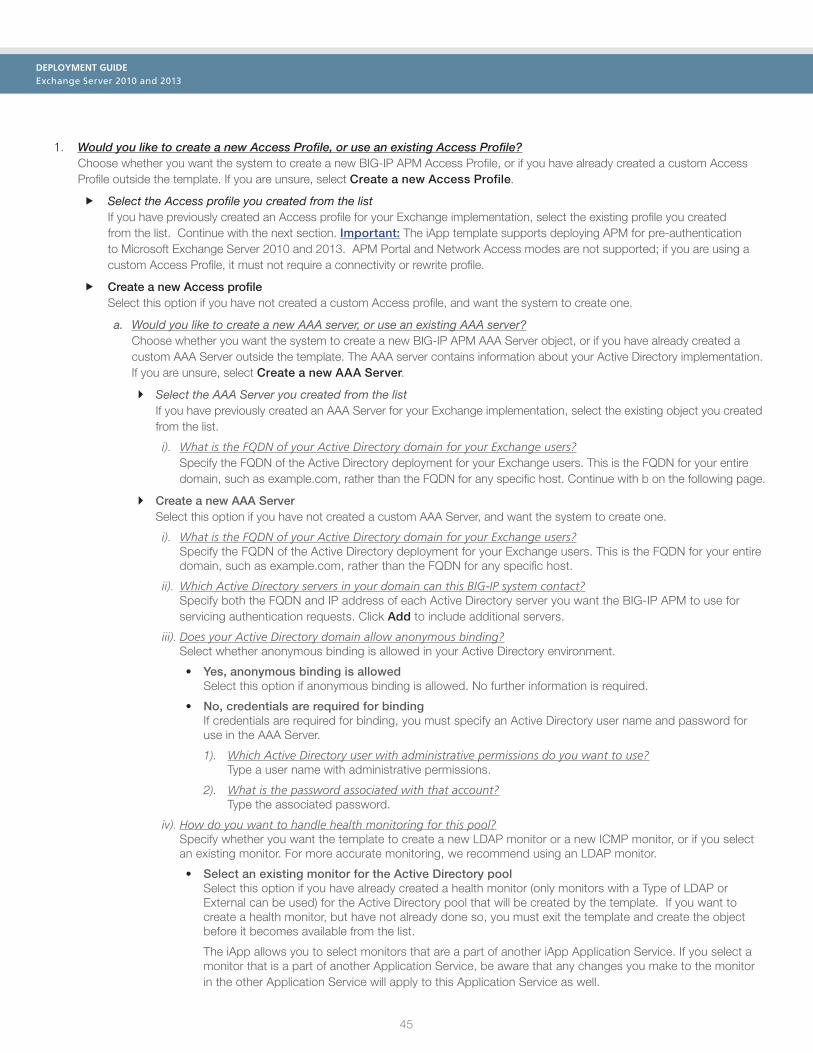
45
DEPLOYMENT GUIDE Exchange Server 2010 and 2013
1. Would you like to create a new Access Profile, or use an existing Access Profile?Choose whether you want the system to create a new BIG-IP APM Access Profile, or if you have already created a custom Access Profile outside the template. If you are unsure, select Create a new Access Profile.
f Select the Access profile you created from the listIf you have previously created an Access profile for your Exchange implementation, select the existing profile you created from the list. Continue with the next section. Important: The iApp template supports deploying APM for pre-authentication to Microsoft Exchange Server 2010 and 2013. APM Portal and Network Access modes are not supported; if you are using a custom Access Profile, it must not require a connectivity or rewrite profile.
f Create a new Access profileSelect this option if you have not created a custom Access profile, and want the system to create one.
a. Would you like to create a new AAA server, or use an existing AAA server?Choose whether you want the system to create a new BIG-IP APM AAA Server object, or if you have already created a custom AAA Server outside the template. The AAA server contains information about your Active Directory implementation. If you are unsure, select Create a new AAA Server.
` Select the AAA Server you created from the listIf you have previously created an AAA Server for your Exchange implementation, select the existing object you created from the list.
i). What is the FQDN of your Active Directory domain for your Exchange users?Specify the FQDN of the Active Directory deployment for your Exchange users. This is the FQDN for your entire domain, such as example.com, rather than the FQDN for any specific host. Continue with b on the following page.
` Create a new AAA ServerSelect this option if you have not created a custom AAA Server, and want the system to create one.
i). What is the FQDN of your Active Directory domain for your Exchange users?Specify the FQDN of the Active Directory deployment for your Exchange users. This is the FQDN for your entire domain, such as example.com, rather than the FQDN for any specific host.
ii). Which Active Directory servers in your domain can this BIG-IP system contact?Specify both the FQDN and IP address of each Active Directory server you want the BIG-IP APM to use for servicing authentication requests. Click Add to include additional servers.
iii). Does your Active Directory domain allow anonymous binding?Select whether anonymous binding is allowed in your Active Directory environment.
• Yes, anonymous binding is allowedSelect this option if anonymous binding is allowed. No further information is required.
• No, credentials are required for bindingIf credentials are required for binding, you must specify an Active Directory user name and password for use in the AAA Server.
1). Which Active Directory user with administrative permissions do you want to use? Type a user name with administrative permissions.
2). What is the password associated with that account? Type the associated password.
iv). How do you want to handle health monitoring for this pool?Specify whether you want the template to create a new LDAP monitor or a new ICMP monitor, or if you select an existing monitor. For more accurate monitoring, we recommend using an LDAP monitor.
• Select an existing monitor for the Active Directory poolSelect this option if you have already created a health monitor (only monitors with a Type of LDAP or External can be used) for the Active Directory pool that will be created by the template. If you want to create a health monitor, but have not already done so, you must exit the template and create the object before it becomes available from the list.
The iApp allows you to select monitors that are a part of another iApp Application Service. If you select a monitor that is a part of another Application Service, be aware that any changes you make to the monitor in the other Application Service will apply to this Application Service as well.

46
DEPLOYMENT GUIDE Exchange Server 2010 and 2013
1). Which monitor do you want to use? From the list, select the LDAP or External monitor you created to perform health checks for the Active Directory pool created by the template. Only monitors that have a Type value of LDAP or External appear in this list. Continue with b.
• Use a simple ICMP monitor for the Active Directory pool Select this option if you only want a simple ICMP monitor for the Active Directory pool. This monitor sends a ping to the servers and marks the server UP if the ping is successful. Continue with b.
• Create a new LDAP monitor for the Active Directory pool Select this option if you want the template to create a new LDAP monitor for the Active Directory pool. You must answer the following questions: Important: Y ou must see Modifying the iApp configuration if you configured the iApp to create a new LDAP
monitor for the AD pool on page 54 for a required modification to this monitor.
1). Which Active Directory user name should the monitor use? Specify an Active Directory user name for the monitor to use when attempting to log on as a part of the health check. This should be a user account created specifically for this health monitor, and must be set to never expire.
2). What is the associated password? Specify the password associated with the Active Directory user name.
3). What is the LDAP tree for this user account? Specify the LDAP tree for the user account. As noted in the inline help, ADSI editor, an tool for Active Directory LDAP administration, is useful for determining the correct LDAP tree value. For example, if the user name is ‘user1’ which is in the organizational unit ‘Exchange Users’ and is in the domain ‘exchange.example.com’, the LDAP tree would be: ou=Exchange Users, dc=Exchange, dc=example, dc=com.
4). Does your Active Directory domain require a secure protocol for communication? Specify whether your Active Directory implementation requires SSL or TLS for communication, or does not require a secure protocol. This determines the port the health monitor uses.
� No, a secure protocol is not required Select this option if your Active Directory domain does not require a secure protocol.
� Yes, SSL communication is required Select this option if your Active Directory domain requires SSL communication. The health check uses port 636 as the Alias Service Port.
� Yes, TLS communication is required Select this option if your Active Directory domain requires TLS communication. The health check uses port 389 as the Alias Service Port.
5). How many seconds between Active Directory health checks? Specify how many seconds the system should use as the health check Interval for the Active Directory servers. We recommend the default of 10 seconds.
b. What text should appear in the user access logon prompt? Type the text you want users to see above the user name and password prompts when logging on to the BIG-IP APM. By default, this includes the HTML <br> tag to insert a line break between 'Secure Logon' and 'for F5 Networks'.
Tell us about your Access Policy Manager deploymentThis section of the iApp asks about your BIG-IP Access Policy Manager deployment.
1. What IP address do you want to use for the BIG-IP APM virtual server?Specify the IP address you want to use for the BIG-IP Access Policy Manager virtual server. This is the address clients will use to access the HTTP-based Client Access services.
2. Do you want to re-encrypt the traffic that will be forwarded to your BIG-IP LTM?Select whether you want the system to re-encrypt traffic that will be sent from this BIG-IP APM to the BIG-IP LTM.
We generally recommend you do not re-encrypt traffic between your BIG-IP APM and BIG-IP LTM because both BIG-IP systems must process the SSL transactions. However, if you do choose to re-encrypt, we strongly recommend you use a valid certificate

47
DEPLOYMENT GUIDE Exchange Server 2010 and 2013
(usually SAN-enabled) rather than the default, self-signed certificate for the Client SSL profile on your BIG-IP LTM system. If not re-encrypting traffic, you do not need a certificate on your BIG-IP LTM.
f Re-encrypt (SSL Bridging)Select this option if your implementation requires encrypted traffic to the Client Access Servers, or you are using Exchange 2013 and do not have SP1 or later. The BIG-IP system unencrypts, then re-encrypts the traffic headed for the Client Access Servers.
a. Which Client SSL profile do you want to use? The iApp can create a new Client SSL profile, or if you have created a Client SSL profile which contains the appropriate SSL certificate and key for your Exchange implementation, you can select it from the list.
` Select the Client SSL profile you created from the listIf you manually created a Client SSL profile, select it from the list, and then continue with #2.
` Create a new Client SSL profileSelect this option if you want the iApp to create a new Client SSL profile.
i). Which SSL certificate do you want to use?Select the SSL certificate you imported onto the BIG-IP system for decrypting client connections. If you have not yet imported a certificate, you can leave the default selections and reconfigure this iApp after obtaining the certificates. The deployment will not function correctly until you have selected the correct certificates here.
Note
Any certificate that you obtain with multiple names must be in SAN (Subject Alternative Name) format, not SNI (Server Name Indication) format. For more information on SAN certificates, see Subject Alternative Name (SAN) SSL Certificates on page 110.
2). Which SSL key do you want to use? Select the associated key from the list.
ii). Which Server SSL profile do you want to use? Select whether you want the iApp to create an F5 recommended Server SSL profile, or if you want to choose a Server SSL profile you already created.
• Select the Server SSL profile you created from the listIf you have previously created a Server SSL profile for your Exchange implementation, from the list, select the existing Server SSL profile you created.
• Create a new Server SSL profileSelect this option if you want the iApp to create a new Server SSL profile.
The default, F5 recommended Server SSL profile uses the serverssl parent profile. For information about the ciphers used in the Server SSL profile, see http://support.f5.com/kb/en-us/solutions/public/8000/800/sol8802.html.
ii). Is the remote BIG-IP LTM receiving this traffic using a self-signed or default certificate for decryption, or is the certificate signed by a CA?Select whether the remote BIG-IP LTM receiving the traffic is using a self-signed (or default) certificate for decrypting the traffic from this system, or if the certificate is signed by a Certificate Authority. Your answer determines the Secure Renegotiation setting on the Server SSL profile. This BIG-IP system will not trust the remote BIG-IP default or a self-signed certificate unless specifically configured to do so in this question.
i Important
This question pertains to the certificate used by the remote BIG-IP LTM, NOT the certificates present and assigned on the local BIG-IP system you are configuring.
• Certificate Authority-provided certificate and keySelect this option if the remote BIG-IP LTM is using a certificate from a Certificate Authority.
• Self-signed or default certificate and keySelect this option if the remote BIG-IP LTM is using a self-signed or default certificate.

48
DEPLOYMENT GUIDE Exchange Server 2010 and 2013
f Do not re-encrypt (SSL Offload)Select this option if you do not want the system to re-encrypt traffic to the BIG-IP LTM virtual server. We recommend not re-encrypting unless you have a requirement for SSL for the entire transaction. In this case, the system is offloading the BIG-IP LTM from also having to process the SSL transaction.
a. Which Client SSL profile do you want to use? The iApp can create a new Client SSL profile, or if you have created a Client SSL profile which contains the appropriate SSL certificate and key for your Exchange implementation, you can select it from the list.
` Select the Client SSL profile you created from the listIf you manually created a Client SSL profile, select it from the list, and then continue with #2.
` Create a new Client SSL profileSelect this option if you want the iApp to create a new Client SSL profile.
i). Which SSL certificate do you want to use?Select the SSL certificate you imported onto the BIG-IP system for decrypting client connections. If you have not yet imported a certificate, you can leave the default selections and reconfigure this iApp after obtaining the certificates. The deployment will not function correctly until you have selected the correct certificates here.
Note
Any certificate that you obtain with multiple names must be in SAN (Subject Alternative Name) format, not SNI (Server Name Indication) format. For more information on SAN certificates, see Subject Alternative Name (SAN) SSL Certificates on page 110.
ii). Which SSL key do you want to use?Select the associated key from the list.
3. What is the virtual IP address on the remote BIG-IP system to which you will forward traffic?Type the IP address of the virtual server on the remote BIG-IP LTM to which you will be forwarding Client Access traffic from this BIG-IP device. This BIG-IP APM sends traffic to this address after performing authentication.
4. Will clients be connecting to this BIG-IP virtual server primarily over a LAN or a WAN?Select whether most clients are connecting over a WAN or LAN. The system uses your selection to configure the proper TCP optimization settings.
f WANSelect this option if most clients are coming over a WAN.
f LANSelect this option if most clients are coming over a LAN.
5. Do you want to restrict Exchange Administration Center access by IP address or network? Exchange 2013 onlyThis question only appears if you selected Exchange 2013 as your version of Exchange.
Select whether you want the BIG-IP LTM to restrict Exchange Administration Center (EAC) access by IP address or network. In Microsoft Exchange Server 2013, Exchange administration is now performed via the EAC, a web-based console. You configure the iApp to control access to the EAC, allowing connections only from approved IP addresses or networks.
f No, allow EAC access from all client IP addressesSelect this option to allow EAC access from all client IP addresses and networks. In this case, the system does not restrict EAC access to specific IP addresses or networks, however, if you are deploying BIG-IP APM, you can still restrict access to EAC by Organizational Management group in question b.
f Yes, restrict EAC access to specific client IP addresses or networksSelect this option if you want to restrict EAC access to specific client IP addresses or networks. This adds an extra layer of security to your Exchange deployment. The system creates a data group with the IP addresses or networks you specify, and then uses an iRule to enforce the restrictions.

49
DEPLOYMENT GUIDE Exchange Server 2010 and 2013
a. What IP or network addresses should be allowed EAC access?Specify the IP addresses or networks should be allowed access to EAC. Click Add to include additional addresses or networks.
i Important
If you are not deploying BIG-IP APM, the iApp currently does not attach the proper data group and iRule. See Creating the Data Group and iRule for securing EAC access if not using BIG-IP APM on page 61 for information on how to configure these objects.
2. Should BIG-IP APM restrict EAC access to members of the Exchange Organization Management Security Group? Exchange 2013 onlyThis question only appears if you selected Exchange 2013 as your version of Exchange and selected to provide secure authentication with BIG-IP APM.
Select whether you want the BIG-IP APM to restrict Exchange Administration Center (EAC) access to members of Exchange 2013's Organizational Management group. The BIG-IP APM module queries Active Directory group membership for the user making the request to EAC. If the user is not a member of the Organization Management group, the BIG-IP APM policy denies access.
f No, do not restrict EAC access by group membershipSelect this option and the BIG-IP APM will not restrict access to the EAC by group membership.
f Yes, restrict EAC access by group membershipSelect this option if you want to restrict EAC access to the Organization Management group. This adds an additional layer of security to your Exchange deployment, as the system denies access to the EAC from anyone who is not a member of the Organization Management group.
3. Which type of authentication do Outlook Anywhere clients use?Choose whether your Outlook Anywhere clients use Basic or NTLM authentication. Beginning in BIG-IP version 11.3, the iApp supports using NTLM authentication for Outlook Anywhere.
f Outlook Anywhere clients use Basic AuthenticationSelect this option if your Outlook Anywhere clients use Basic Authentication. No further information is required, and you can continue with #5.
f Outlook Anywhere clients use NTLM authenticationSelect this option if your Outlook Anywhere clients use NTLM information. You must answer the following questions about your Active Directory implementation. Also see Appendix E: Active Directory and Exchange Server configuration for NTLM on page 112 and Experiencing authentication issues when deploying the iApp using BIG-IP APM for client-side NTLM for Outlook Anywhere on page 62 for important information and modifications for NTLM.
i Important
Before completing this section, you must create a user account in the same domain that has been properly configured for NTLM delegation. You must create an NTLM Machine Account object on the BIG-IP system to join this system to the Active Directory domain. See Creating an NTLM Machine Account on page 67.
a. Which NTLM machine account should be used for Kerberos delegation?Select the NTLM Machine Account you created to join the BIG-IP system to the Active Directory domain. If you have not already created an NTLM Machine Account on the BIG-IP system, see Creating an NTLM Machine Account on page 67. You must either exit the template now and start over once you have created the NTLM Machine Account, or choose Outlook Anywhere Clients use Basic Authentication from the previous question, and then re-enter the template later.
b. What is the Kerberos Key Distribution Center IP or FQDN?Specify the IP address or fully qualified domain name of the Kerberos Key Distribution Center (KDC). If you type an FQDN, the BIG-IP system must be able to resolve the address. Otherwise, use the IP address.
c. What is the name of the Kerberos Realm?Specify the name of the Kerberos Realm. While this name should be in all capital letters, the iApp automatically turns any lower case letters to capital.

50
DEPLOYMENT GUIDE Exchange Server 2010 and 2013
d. What is the user name for the Active Directory delegation account you created?Specify the user name for the Active Directory delegation account you created. This account must be correctly configured in Active Directory for Kerberos delegation. See Appendix E: Active Directory and Exchange Server configuration for NTLM on page 112 details.
e. What is the associated password?Specify the password associated with the account.
8. Do you want to add any iRules to this configuration?You have the option of adding existing iRules to the virtual server. iRules allow an administrator to instruct the system to intercept, inspect, transform, direct and track inbound or outbound application traffic. For more information on iRules, see https://devcentral.f5.com/HotTopics/iRules/tabid/1082202/Default.aspx.
i Important
Improper use or misconfiguration of an iRule can result in unwanted application behavior and poor performance of your BIG-IP system. We recommended you verify the impact of an iRule prior to deployment in production.
If you want to add iRules, from the Options box, select the iRule(s) you want to include, and then click the Add (<<) button.
Additional StepsReview the information in the Additional steps section, and take appropriate action if necessary. All of the notes in Additional Steps are found in the relevant section of this deployment guide.
FinishedReview your answers to the questions. When you are satisfied, click the Finished button. The BIG-IP system creates the relevant objects.

51
DEPLOYMENT GUIDE Exchange Server 2010 and 2013
Optional: Configuring the BIG-IP system to support MAPI over HTTP in Exchange 2013 SP1Introduced in Exchange 2013 SP1, the new MAPI over HTTP transport protocol is for Outlook clients running Office 2013 SP1 and later (only). This new service is not yet included in the iApp template, so you must manually configure the BIG-IP system to support it.
If you are using Microsoft Exchange 2013 SP1 or later and using the new MAPI over HTTP transport protocol, use the following guidance to create the objects necessary to support MAPI over HTTP. If you configured the iApp template to use a combined virtual server, you create a health monitor, pool, and an iRule.
i Important
Because BIG-IP APM is not yet supported for MAPI over HTTP, the iRule in the following table includes a line (commented out by default) to disable Access Policy processing for this new protocol only. If you configured the iApp to use separate virtual servers, you create the monitor, pool, and a virtual server. The iRule is not necessary at all in this case.
Use the following table to create the objects on the BIG-IP LTM. Unless otherwise specified, settings not mentioned in the table can be configured as applicable for your configuration. For instructions on configuring individual objects, see the online help or product manuals.
BIG-IP LTM Object Non-default settings/Notes
Health Monitors (Main tab-->Local Traffic-->Monitors)
Simple Monitor
Name Type a unique name
Type HTTP (if using SSL offload) or HTTPS (if using SSL bridging)
Interval 30 (recommended)
Timeout 91 (recommended)
Send String GET /mapi/healthcheck.htm HTTP/1.1\r\nHost: mapi.example.local\r\nConnection: Close\r\n\r\n
Receive String 200 OK
Advanced Monitor
The advanced monitor for MAPI over HTTP uses the same monitor as the advanced monitor for the EWS service. You simply add the EWS monitor to the pool in the next section and set the Availability Requirement to All as described.
Pools (Main tab-->Local Traffic -->Pools)
Name Type a unique name
Health Monitor Select the monitor you created above. If you are using the advanced monitor, add both the advanced and simple monitor you created.
Availability Requirement If using the advanced monitor (only), select All
Load Balancing Method Least Connections (Member)
Address Type the IP Address of your server
Service Port 80 (if using SSL offload) or 443 (if using SSL bridging) Click Add to repeat Address and Service Port for all nodes
Profiles (Main tab-->Local Traffic -->Profiles)
HTTPParent Profile http
Redirect Rewrite Matching
TCP WAN2 Parent Profile tcp-wan-optimized
TCP LAN2 Parent Profile tcp-lan-optimized
Client SSLParent Profile clientssl
Certificate/Key Select the Certificate and Key you imported
Server SSL3 Parent Profile serverssl
OneConnectParent Profile oneconnect
Source Mask 255.255.255.255
NTLM Parent Profile ntlm
iRules (Main tab-->Local Traffic -->iRules)
iRule for the combined virtual server scenario only
Name Type a unique name
Definition See the following section for the iRule definition and for instructions on attaching the iRule to the virtual server using the iApp template.
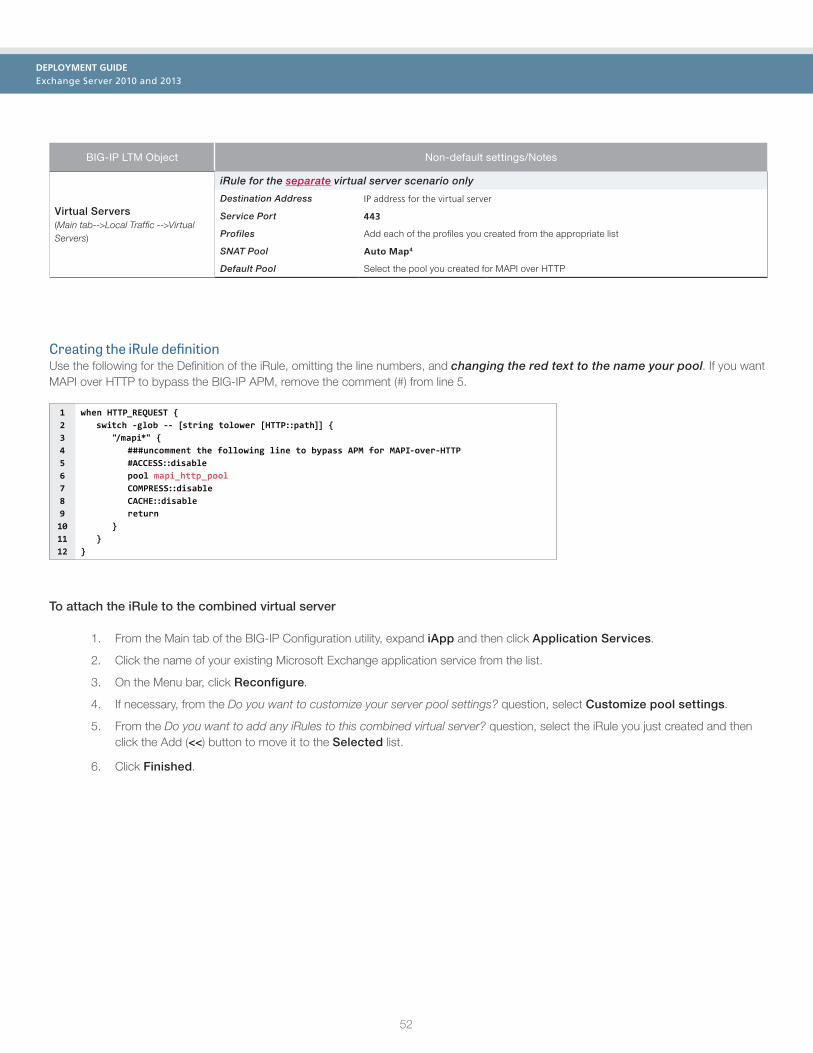
52
DEPLOYMENT GUIDE Exchange Server 2010 and 2013
BIG-IP LTM Object Non-default settings/Notes
Virtual Servers (Main tab-->Local Traffic -->Virtual Servers)
iRule for the separate virtual server scenario only
Destination Address IP address for the virtual server
Service Port 443
Profiles Add each of the profiles you created from the appropriate list
SNAT Pool Auto Map4
Default Pool Select the pool you created for MAPI over HTTP
Creating the iRule definitionUse the following for the Definition of the iRule, omitting the line numbers, and changing the red text to the name your pool. If you want MAPI over HTTP to bypass the BIG-IP APM, remove the comment (#) from line 5.
123456789101112
when HTTP_REQUEST { switch -glob -- [string tolower [HTTP::path]] { "/mapi*" { ###uncomment the following line to bypass APM for MAPI-over-HTTP #ACCESS::disable pool mapi_http_pool COMPRESS::disable CACHE::disable return } }}
To attach the iRule to the combined virtual server
1. From the Main tab of the BIG-IP Configuration utility, expand iApp and then click Application Services.
2. Click the name of your existing Microsoft Exchange application service from the list.
3. On the Menu bar, click Reconfigure.
4. If necessary, from the Do you want to customize your server pool settings? question, select Customize pool settings.
5. From the Do you want to add any iRules to this combined virtual server? question, select the iRule you just created and then click the Add (<<) button to move it to the Selected list.
6. Click Finished.

53
DEPLOYMENT GUIDE Exchange Server 2010 and 2013
Modifying the iApp template configuration
This section contains modifications to the iApp configuration you may have to make depending on how you configured the iApp template.
Modifying the iApp configuration if using Exchange 2010 and RPC Client AccessIf you deployed the iApp template for Exchange 2010 and chose to deploy RPC Client Access, and chose to use a combined virtual server for the HTTP-based services, you must modify the configuration produced by the iApp in two places using the following guidance.
This is only necessary if you deployed for Exchange 2010, used a combined virtual server, and deployed RPC Client Access.
i Important
The procedure in this section requires access to the TMSH command line on the BIG-IP system.
Modifying the virtual server to attach a persistence profileThe iApp currently assigns a default and fallback persistence profile to the combined HTTPS virtual server. F5 has discovered that this configuration can result in uneven distribution of client connections. To correct this behavior, you must assign the source address profile as the non-default persistence on the virtual server, instead of as a fallback persistence profile. This must be performed from the tmsh command line.
To modify the virtual server
1. Before you can modify the configuration, you must disable the Strict Updates feature. See To disable Strict Updates on page 60.
2. Log into the BIG-IP system from the command line.
3. From the prompt, type tmsh
4. From the tmsh prompt, type the following command, replacing <iapp-name> with the name you gave your Exchange iApp:
modify ltm virtual <iapp-name>.app/<iapp-name>_combined_https persist replace-all-with { <iapp-name>.
app/<iapp-name>_cookie_persistence_profile { default yes } <iapp-name>.app/<iapp-name>_source_address_
persistence_profile { default no } }
Modifying the persistence iRuleThe final task is to modify the persistence iRule created by the iApp template to add source address persistence to the Offline Address Book (OAB) to ensure that OAB requests from RPC MAPI clients are persisted to the same pool member.
To modify the iRule
1. Ensure the Strict Updates setting is disabled (see To disable Strict Updates on page 60).
2. On the Main tab, expand Local Traffic and then click iRules.
3. From the list, locate the name of the iRule produced by the iApp. The name begins with the name you gave the iApp template, followed by _combined_persist_irule<a random number>.
4. In the Definition section, find the section that begins with "/oab*" {.
5. Modify the persist line of the iRule the OAB section from persist none to persist source_addr. When you are finished, the OAB section should look like the following:
"/oab*" {
## Offline Address Book. Persistence is not required for OAB, but
pool exchange2010_test_oa_pool7
persist source_addr
return
}
6. Click Update.

54
DEPLOYMENT GUIDE Exchange Server 2010 and 2013
Modifying the iApp configuration if you configured the iApp to create a new LDAP monitor for the AD poolIf you configured the iApp template to use BIG-IP APM and selected to have template create a new LDAP monitor for the Active Directory pool, you must manually modify the User Name field in the monitor to use the full Active Directory common name. This is only necessary if both conditions are met.
To resolve this issue, you have three options.
• Reconfigure your Exchange iApp Application Service to use the new v1.4.0rc3 version of the template, available from https://devcentral.f5.com/wiki/iApp.Microsoft-Exchange-2010-and-2013-iApp-Template.ashx. After you download and import the template, click Application Services > name of your exchange iApp service. Click Reconfigure. From the Template list, click the Change button, and then select f5.microsoft_exchange_2010_2013_cas.v1.4.0rc3 from the list. Click Update.
• Create a new monitor and select it using the iApp template. To create the monitor, go to Main tab > Local Traffic > Monitors > Create. Select LDAP as the parent, and then enter all of the relevant information. Make sure to use the full Active Directory common name in the user name field. After clicking Finished, use the Reconfigure feature on the Application Service to re-enter the template and then select the new monitor from the APM section of iApp template.
• Modify the existing monitor to correct the user name (requires disabling Strict Updates). Use the following procedures to modify the template configuration.
Modifying the existing monitorIf you do not want to create a new monitor, you can modify the existing configuration produced by the iApp. This requires first disabling the Strict Updates feature.
To disable Strict Updates
1. On the Main tab, expand iApp and then click Application Services.
2. Click the name of your Exchange Application Service from the list.
3. From the Application Service menu, select Advanced.
4. In the Strict Updates row, clear the checkbox to disable Strict Updates.
5. Click Update.
To modify the LDAP monitor
1. On the Main tab, expand Local Traffic and then click Monitors.
2. From the list, click the LDAP monitor created by the template. This name starts with the name you gave the iApp, followed by _ldap.
3. In the User Name field, type the full Active Directory common name.
4. Click Update.
55
DEPLOYMENT GUIDE Exchange Server 2010 and 2013
Next stepsAfter completing the iApp Template, the BIG-IP Application Services page opens for the Exchange application service you just created. To see the list of all the configuration objects created to support Microsoft Exchange, on the Menu bar, click Components. The complete list of all Exchange related objects opens. You can click individual objects to see the settings.
Once the objects have been created, you are ready to use the new deployment.
Modifying DNS settings to use the BIG-IP virtual server addressBefore sending traffic to the BIG-IP system, your DNS administrator may need to modify any DNS entries for the Exchange implementation to point to the BIG-IP system’s virtual server address.
Modifying the iApp configurationThe iApp application service you just created can be quickly and easily modified if you find it necessary to make changes to the configuration. The Strict Updates feature of the iApp prevents users from manually modifying the iApp configuration (Strict Updates can be disabled, but use extreme caution). iApp allows you to re-enter the template, make changes, and then update the template. The modifications are automatically made to any of the associated objects.
To modify the configuration
1. On the Main tab, expand iApp and then click Application Services.
2. Click the name of your Exchange Application service from the list.
3. On the Menu bar, click Reconfigure.
4. Make the necessary modifications to the template.
5. Click the Finished button.
Restarting bigd in BIG-IP versions prior to 11.2 after a manual changeIf you perform any modification that requires disabling Strict Updates feature on the Application Service, you must restart the bigd daemon from the BIG-IP command line if you are using a v11 version prior to 11.2. We recommend restarting bigd during a maintenance window or other scheduled downtime.
i Important
This is only necessary if using a version prior to 11.2.
To restart bigd
1. From the command line, log into the BIG-IP system.
2. From the prompt, run the following command:bigstart restart bigd
3. Exit the command line interface.
Viewing statisticsYou can easily view a number of different statistics on the BIG-IP system related to the Exchange configuration objects created by the iApp template. You can get statistics specific to the Application Service if you have provisioned AVR. Otherwise, you can always get object-level statistics.
56
DEPLOYMENT GUIDE Exchange Server 2010 and 2013
AVR statisticsIf you have provisioned AVR, you can get application-level statistics for your Exchange application service.
To view AVR statistics
1. On the Main tab, expand iApp and then click Application Services.
2. From the Application Service List, click the Exchange 2010 service you just created.
3. On the Menu bar, click Analytics.
4. Use the tabs and the Menu bar to view different statistics for your Exchange iApp.
Object-level statisticsIf you haven’t provisioned AVR, or want to view object-level statistics, use the following procedure.
To view object-level statics
1. On the Main tab, expand Overview, and then click Statistics.
2. From the Statistics Type menu, you can select Virtual Servers to see statistics related to the virtual servers.
3. You can also choose Pools or Nodes to get a closer look at the traffic.
4. To see networking statistics in a graphical format, click Dashboard.
For more information on viewing statistics on the BIG-IP system, see the online help or product documentation.
Adding Ratio or Connection Limit information to the nodes if using a node-based load balancing methodIf you chose to customize the server pool settings, changed the load balancing method from the default to a node-based method (such as Ratio (node) or Least Connections (node)), and configured a Ratio or Connection Limit, the iApp applies the ratio or connection limit to the load balancing pool member, and not to the node itself. In this case, you must manually modify each node to include any Ratio or Connection Limit settings you want to configure.
To modify the nodes to include Ratio or Connection Limit settings
1. On the Main tab, expand Local Traffic and then click Nodes.
2. From the Node table, click a Client Access Server node you entered in the iApp template.
3. In the Ratio box, type the appropriate ratio, if applicable.
4. In the Connection Limit box, type the appropriate connection limit, if applicable.
5. Click Update.
6. Repeat this procedure for each node that is a part of your Exchange deployment.

57
DEPLOYMENT GUIDE Exchange Server 2010 and 2013
TroubleshootingThis section contains common issues and troubleshooting steps
h Advanced health checks are fail when using Windows Integrated Authentication (NTLM provider)
If you are using Windows Integrated Authentication (NTLM provider) only, the BIG-IP health checks using a valid account may fail, as the BIG-IP system fails to correctly form the authentication request headers.
If you are using Windows Authentication with NTLM and you have disabled Basic authentication for the Exchange service you are monitoring, you must manually delete the \r\n at the end of the Send String, and the <domain>\ information from the User Name field.
i Important
F5 monitors support NTLMv1 authentication. You must ensure that the LmCompatibilityLevel setting in Group Policy for the domain used by the monitor credential is configured to support NTLMv1
.
h Modifying the IIS authentication token timeout value
The iApp template configures most Exchange monitors to check service health every 30 seconds. However, to reduce traffic between the Exchange server and domain controllers, IIS virtual directories configured to use Basic authentication cache authentication tokens for up to 15 minutes before re-authenticating the user with Active Directory. This may result in the BIG-IP pool members for these services being marked UP incorrectly while Basic authentication tokens are cached.
You can decrease the length of or disable this token caching period by editing the registry on the Exchange server. The length of time configured for the token cache combined with the timeout value of the monitor will determine how long it will take until a resource is marked down. For example, setting a token cache period of 60 seconds, combined with a monitor using a timeout value of 91 seconds, will result in a resource being marked down after 151 seconds.
For instructions on modifying the registry, see the following Microsoft article (while this article says IIS 6.0, we tested it on IIS 7.5 with no modifications):
Critical: Use extreme caution any time you are editing the registry. Contact Microsoft for specific instructions and/or help editing the registry values. http://www.microsoft.com/technet/prodtechnol/WindowsServer2003/Library/IIS/6b2e7fcd-5fad-4ac8-ac0a-dcfbe771e9e1.mspx
h Microsoft Exchange Remote Connectivity Analyzer fails to successfully run the FolderSync command
If you deployed the BIG-IP system for ActiveSync, either using the iApp template or manually, and attempt to run the Microsoft Exchange Remote Connectivity Analyzer (ExRCA) against an Exchange mailbox, you may receive the following error:
This behavior affects versions of BIG-IP earlier than 11.4.0. To work around this error, you must create an iRule, and then use the iApp template to apply the iRule to the combined Exchange BIG-IP virtual server (or attach the iRule manually if you used the manual configuration tables).
To create the iRule
1. On the Main tab, expand Local Traffic, click iRules, and then click the Create button.
2. In the Name box, give the iRule a unique name.
3. In the Definition section, copy and paste one of the following iRules, omitting the line numbers, depending on whether you configured the system for a combined virtual server, or a separate virtual server for ActiveSync. Only use the definition applicable to your configuration.
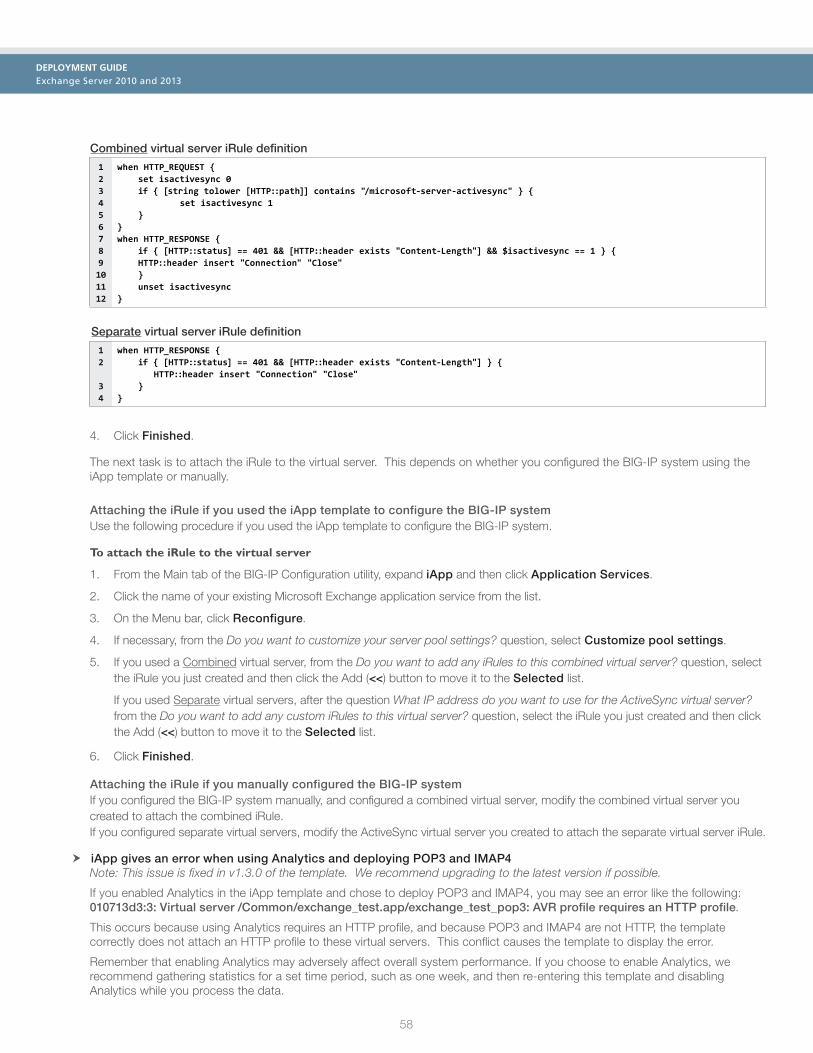
58
DEPLOYMENT GUIDE Exchange Server 2010 and 2013
Combined virtual server iRule definition
123456789101112
when HTTP_REQUEST { set isactivesync 0 if { [string tolower [HTTP::path]] contains "/microsoft-server-activesync" } { set isactivesync 1 }}when HTTP_RESPONSE { if { [HTTP::status] == 401 && [HTTP::header exists "Content-Length"] && $isactivesync == 1 } { HTTP::header insert "Connection" "Close" } unset isactivesync}
Separate virtual server iRule definition
12
34
when HTTP_RESPONSE { if { [HTTP::status] == 401 && [HTTP::header exists "Content-Length"] } { HTTP::header insert "Connection" "Close" }}
4. Click Finished.
The next task is to attach the iRule to the virtual server. This depends on whether you configured the BIG-IP system using the iApp template or manually.
Attaching the iRule if you used the iApp template to configure the BIG-IP systemUse the following procedure if you used the iApp template to configure the BIG-IP system.
To attach the iRule to the virtual server
1. From the Main tab of the BIG-IP Configuration utility, expand iApp and then click Application Services.
2. Click the name of your existing Microsoft Exchange application service from the list.
3. On the Menu bar, click Reconfigure.
4. If necessary, from the Do you want to customize your server pool settings? question, select Customize pool settings.
5. If you used a Combined virtual server, from the Do you want to add any iRules to this combined virtual server? question, select the iRule you just created and then click the Add (<<) button to move it to the Selected list.
If you used Separate virtual servers, after the question What IP address do you want to use for the ActiveSync virtual server? from the Do you want to add any custom iRules to this virtual server? question, select the iRule you just created and then click the Add (<<) button to move it to the Selected list.
6. Click Finished.
Attaching the iRule if you manually configured the BIG-IP systemIf you configured the BIG-IP system manually, and configured a combined virtual server, modify the combined virtual server you created to attach the combined iRule. If you configured separate virtual servers, modify the ActiveSync virtual server you created to attach the separate virtual server iRule.
h iApp gives an error when using Analytics and deploying POP3 and IMAP4Note: This issue is fixed in v1.3.0 of the template. We recommend upgrading to the latest version if possible.
If you enabled Analytics in the iApp template and chose to deploy POP3 and IMAP4, you may see an error like the following: 010713d3:3: Virtual server /Common/exchange_test.app/exchange_test_pop3: AVR profile requires an HTTP profile.
This occurs because using Analytics requires an HTTP profile, and because POP3 and IMAP4 are not HTTP, the template correctly does not attach an HTTP profile to these virtual servers. This conflict causes the template to display the error.
Remember that enabling Analytics may adversely affect overall system performance. If you choose to enable Analytics, we recommend gathering statistics for a set time period, such as one week, and then re-entering this template and disabling Analytics while you process the data.

59
DEPLOYMENT GUIDE Exchange Server 2010 and 2013
Use the following guidance to work around this error if you cannot yet upgrade to v1.3.0 of the iApp template: Run a separate instance of the iApp template for POP3 and IMAP4 only The first time you run the Exchange iApp template, complete the iApp as applicable for your environment, however select No to the questions asking if you are deploying POP3 and IMAP4. After completing the first instance of the iApp template, run the template again selecting No to the Analytics question, as well as all of the questions about deploying Exchange services. Select Yes to one or both of the questions for POP3 and IMAP4. Answer the other questions as applicable for your configuration. After completing the second instance of the iApp, the configuration will then function as designed.
h ActiveSync and/or Autodiscover aren't working after deploying the iApp for separate virtual servers and using APMNote: This issue is fixed in v1.3.0 of the template. We recommend upgrading to the latest version if possible.
If you are having trouble with ActiveSync and/or Autodiscover after running the template, and the all of the following conditions are true:
» You are using a BIG-IP version between 11.0 and 11.3.x and, » You chose "Use different IP address for the difference [CAS] services" when configuring the iApp and, » You chose to deploy the iApp template for ActiveSync and/or Autodiscover and, » You chose to deploy BIG-IP APM
You may be receiving error messages in your log files due to the template attaching a legacy iRule to the ActiveSync virtual server. Use the following guidance to work around this issue if you cannot upgrade to v1.3.0 of the iApp template:
Modifying the existing iApp template configuration
1. Re-enter the iApp template (on the Main tab, click iApp > Application Services > [name of your Exchange application service] and then from the Menu bar, click Reconfigure).
2. If you also deployed the iApp for Autodiscover: In the Tell us which services you are deploying section, from the "Do you want to customize your server pool settings" question, select Customize pool settings. Under the Autodiscover IP address question, from the "Do you want to add any custom iRules to this virtual server?" question, enable either the built-in _sys_APM_ExchangeSupport_OA_BasicAuth or sys_APM_ExchangeSupport_OA_NTLMAuth Rule as depending on your auth method.
3. From the "Are you deploying ActiveSync?" question, select No.
4. Click Finished.
Run a separate instance of the iApp template for ActiveSync only After modifying the initial instance of the iApp template, run the Exchange iApp template again. Use all of the same settings with the following exceptions:
» For the "Do you want to use a single IP address for all Client Access Server connections?" question, you must answer Use a single IP address for all connections. This ensures the proper iRules are assigned to the ActiveSync virtual server.
» Answer No to each of the questions asking which Client Access services you are deploying, only answering Yes to ActiveSync. After you submit the template, you should experience this issue.
h Clients receiving error message when using BIG-IP APM with OWA 2013 and IE10 or Google Chrome
If you are using BIG-IP APM and Outlook Web App 2013, and have clients using Internet Explorer 10 or Google Chrome, clients may receive the following error message from the BIG-IP APM: Access policy evaluation is already in progress for your current session. If clients are receiving this error, you must apply the an iRule to the virtual server(s) used for OWA 2013.
To create the iRule and add it to the OWA 2013 virtual server
1. On the Main tab, expand Local Traffic and then click iRules.
2. Click Create.
3. In the Name box, type a unique name for this iRule.
4. In the Definition section, copy and paste the following iRule, omitting the line numbers.

60
DEPLOYMENT GUIDE Exchange Server 2010 and 2013
12345
when HTTP_REQUEST { if { [HTTP::cookie exists "IsClientAppCacheEnabled"] } { HTTP::cookie "IsClientAppCacheEnabled" False }}
5. Click the Finished button.
6. Re-enter the iApp template (on the Main tab, click iApp > Application Services > [name of your Exchange application service] and then from the Menu bar, click Reconfigure).
7. In the Tell us which services you are deploying section, from the "Do you want to customize your server pool settings" question, select Customize pool settings. Either in the "Do you want to add any custom iRules to this combined virtual server?" (if you used a single IP address) or in the "Do you want to add any custom iRules to this virtual server?" question under the IP address for OWA question (if you used different IP addresses), enable the iRule you just created.
8. Click Update.
If you have Outlook Web App clients connecting to a BIG-IP APM virtual server externally, and the same clients connect to a non-APM virtual server internally, you must apply the iRule to both virtual servers.
If clients are still receiving this error after adding the iRule, you should request they delete Temporary Internet Files (IE10), or go to chrome://appcache-internals and remove the application cache for Outlook Web Access (Chrome).
h Experiencing issues with iOS devices and ActiveSync when the BIG-IP system is behind a device performing NATNote: This issue is fixed in v1.3.0 of the template. We recommend upgrading to the latest version if possible.
If the BIG-IP system is located behind a device that performs network address translation (NAT), and you are experiencing issues with iOS devices and ActiveSync, we recommend you modify the appropriate persistence iRule to include a wildcard character.
If you deployed BIG-IP APM and a combined virtual server, this iRule is [name of your Exchange application service]_apm_combined_pool_irule[random number]. If you deployed APM and separate IP addresses for separate services, the iRule is [name of your Exchange application service]_combined_persist_irule[random number]. If you did not deploy BIG-IP APM, the iRule is [name of your Exchange application service]_oa_persist_irule for both combined and separate IP addresses.
To disable Strict Updates
1. On the Main tab, expand iApp and then click Application Services.
2. Click the name of your Exchange Application service from the list.
3. From the Application Service menu, select Advanced.
4. In the Strict Updates row, clear the checkbox to disable Strict Updates.
5. Click Update.
To modify the iRule
1. On the Main tab, expand Local Traffic and then click iRules.
2. From the list, locate the name of the iRule produced by the iApp. See the preceding paragraph for a description of the names.
3. In the Definition section, find the section that looks like "/microsoft-server-activesync" and/or "/rpc/rpcproxy.dll"
4. Add an asterisk after each inside the quote marks, so they look like: "/microsoft-server-activesync*" and/or "/rpc/rpcproxy.dll*"
5. Click Update.
h Advanced monitors for Autodiscover, EWS, and Outlook Anywhere only support Basic and NTLMv1 authentication
The advanced monitors for Autodiscover, Exchange Web Services, and Outlook Anywhere support Basic and NTLMv1 authentication only. If you have configured your domain to use NTLMv2 only, you must modify the health monitors to remove the --ntlm option from the curl statement used in the Autodiscover, EWS, and Outlook Anywhere external monitors (if you deployed the template for these services) using the guidance in this section.
Additionally, you will need to enable Basic authentication for the EWS virtual directory using the IIS Manager snap-in on each Exchange Client Access Server. Consult the Microsoft documentation for instructions.

61
DEPLOYMENT GUIDE Exchange Server 2010 and 2013
i Important
This is only necessary if you have configured your domain to use NTLMv2.
To modify the health monitors
a. On the Main tab, click System > File Management > External Monitor Program File List.
b. Depending on which services you deployed, click either autodiscover_eav, oa_eav, or ews_eav. The file name for Autodiscover is always autodiscover_eav and the file name for Outlook Anywhere is always oa_eav. If you deployed EWS without Outlook Anywhere, the file name is ews_eav. Unless you have multiple instances of the iApp, you should never have both an oa_eav and ews_eav. Note: If you have multiple instances of the iApp template, make sure you click the file name in the applicable Partition/Path
on the far right of the table. The file names are always the same.
c. Locate the line that begins with curl and remove the --ntlm portion only. When you are finished, this line should look similar to the following: curl -g -s -k -X POST -H 'Content-Type: text/xml; charset=utf-8' -d "${XMLFULL}" -u
${DOMAIN}\\${USER}:${PASSWORD} https://${NODE}${ADSURI} | grep -i "${RECV}" 2>&1 > /dev/null
d. Click Update.
e. If you deployed other applicable services, repeat steps b - e for any to remove --ntlm from that file.
Important: If you re-enter the iApp template and modify the configuration using the Reconfigure option, you must make these changes again, as the iApp will overwrite the modifications.
h Creating the Data Group and iRule for securing EAC access if not using BIG-IP APM Note: The feature for securing EAC access if not using APM was deprecated in v1.4.0rc2 of the template, as it did not function reliably. We recommend you do not use this feature, or upgrade the iApp template if possible.
The iApp template currently does not attach the necessary Data Group and iRule to the configuration if you are not deploying BIG-IP APM. In order for this feature to function as designed, you must manually create these objects. This is only necessary if you are not deploying APM.
To create the Data Group and iRule and attach the iRule to the virtual server
a. To configure the Data Group and iRule, see the procedures in Optional: Securing Access to the Exchange 2013 Administration Center on page 99, and then return to this section for instructions on attaching the iRule.
b. Re-enter the iApp template (on the Main tab, click iApp > Application Services > [name of your Exchange application service] and then from the Menu bar, click Reconfigure).
c. In the Tell us which services you are deploying section, from the "Do you want to customize your server pool settings" question, select Customize pool settings.
d. Either in the "Do you want to add any custom iRules to this combined virtual server?" (if you used a single IP address) or in the "Do you want to add any custom iRules to this virtual server?" question under the IP address for OWA question (if you used different IP addresses), enable the iRule you just created.
e. Click Update.
h Guest accounts on the BIG-IP system can view the persistence table
Since the Exchange iApp uses the Basic authorization header for ActiveSync and Outlook Anywhere session persistence, BIG-IP guest accounts that have been explicitly granted access to the Traffic Management Shell (tmsh) are able to view encoded user credential and password information. It is possible an attacker logging in to BIG-IP as a guest could decode these credentials. F5 recommends disabling tmsh access for any BIG-IP guest accounts by clicking System>Users>User List>Terminal Access>Disabled>Finished. Alternately, you may edit the iRule(s) created by the iApp template to obfuscate the encoded credentials. These changes are not necessary if you have used the iApp template to deploy F5’s Access Policy Manager module. Replace all instances of:

62
DEPLOYMENT GUIDE Exchange Server 2010 and 2013
persist uie [HTTP::header "Authorization"] 7200 with:
set <service>_key [sha256 [HTTP::header "Authorization"]]
persist uie $<service>_key 7200
Where <service> indicates either ActiveSync or Outlook Anywhere. For example:
set oa_key [sha256 [HTTP::header "Authorization"]]
persist uie $oa_key 7200
h Experiencing authentication issues when deploying the iApp using BIG-IP APM for client-side NTLM for Outlook Anywhere Note: This issue is fixed in v1.3.0 of the template. We recommend upgrading to the latest version if possible.
If you deployed the template to use BIG-IP APM, and selected Outlook Anywhere clients use NTLM authentication, you may experience authentication issues because the iApp creates an improperly configured Exchange profile.
To work around this issue, you must modify the Autodiscover, EWS, and OAB Front End Authentication type. Additionally, If you deployed the template for separate IP addresses for the Client Access services, you must change the Exchange profile’s default NTLM configuration.
To modify Front End Authentication
1. If you have not already disabled Strict Updates, see To disable Strict Updates on page 60.
2. On the Main tab, expand Access Policy, and then click Application Access > Microsoft Exchange.
3. From the list, locate the appropriate Exchange NTLM profile, named exchange_ntlm_exchange. Check the associated box, and then click Edit. Note that if you have multiple copies of the iApp template, you may see multiple profiles with the same name. You'll have to check each and click Edit to find the proper one, which will have the name you gave the iApp template in the Exchange Name at the top of the box that appears.
4. In the left pane, under Service Settings, click Autodiscover. From the Front End Authentication list, select Basic-NTLM.
5. In the left pane, under Service Settings, click Exchange Web Services. From the Front End Authentication list, select Basic-NTLM.
6. In the left pane, under Service Settings, click Offline Address Book. From the Front End Authentication list, select Basic-NTLM.
7. Click the OK button.
Modifying NTLM Configuration
If you deployed the template for separate IP addresses for the Client Access services, deployed BIG-IP APM, and selected Outlook Anywhere clients use NTLM authentication, you must modify the Exchange profile’s default NTLM configuration.
To modify the NTLM configuration setting
1. Follow steps 1-3 above to locate the appropriate Exchange profile. Check the associated box, and then click Edit.
2. Click the NTLM Configuration box, and from the list, select the NTLM profile that begins with exch_ntlm_<name you gave the iApp> and ends in _oa_https.
3. Click the OK button.
h iPhones and other iOS devices are displaying invalid certificate messages after deploying the iApp for ActiveSync
If you deployed the iApp template for ActiveSync (or manually configured the BIG-IP system) and iOS devices started showing invalid certificate messages even though the certificates were issued by an appropriate authority, you must manually create an Client SSL profile that uses a Chain certificate. Intermediate certificates, also called intermediate certificate chains or chain certificates, are used to help systems which depend on SSL certificates for peer identification.
Use the guidance in this solution to create a Client SSL profile that uses an intermediate certificate chain: http://support.f5.com/kb/en-us/solutions/public/13000/300/sol13302.html. Be sure Secure Renegotiation is set to Require (the default) on the Client SSL profile.
63
DEPLOYMENT GUIDE Exchange Server 2010 and 2013
If you manually configured the system, add the Client SSL profile to your virtual server.
If you used the iApp, use this procedure:
a. Re-enter the iApp template (on the Main tab, click iApp > Application Services > [name of your Exchange application service] and then from the Menu bar, click Reconfigure).
b. In the Tell us about your deployment section, from the " Do you want to create a new client SSL profile or use and existing one?" question, select the profile you just created that uses the Chain certificate.
c. Click Update.
h Users experiencing slow response times when using calender functionality or reduced responsiveness when using RPC client Access in Exchange 2010 Note: This issue was fixed in v1.4.0rc1 of the template. We recommend upgrading to the latest version if possible.
This slowness or reduced responsiveness can be caused by a setting in the WAN-optimized TCP profile. You may experience this issue if:
» You configured the BIG-IP system using the iApp template, and - You specified most clients are connecting to the BIG-IP virtual server primarily over a WAN, and - You are deploying Outlook Anywhere and/or RPC Client Access
» You configured the system manually, and - You used a TCP profile based on the default tcp-wan-optimized parent for the combined virtual server, Outlook
Anywhere and/or RPC Client Access (2010 only).
This issue can be solved by either assigning a TCP profile to the virtual server that does not use Nagle's algorithm (such as tcp-lan-optimized, or the default tcp profile), or disabling Nagle's algorithm on the TCP profile. Use the appropriate procedure, depending on whether you used the iApp template to configure the BIG-IP system, or configured the BIG-IP system manually.
Modifying the configuration if you used the iApp templateIf you used the iApp template to configure the iApp template, use the following guidance.
1. If you have not already disabled Strict Updates, see To disable Strict Updates on page 60.
2. On the Main tab, click Local Traffic > Profiles > Protocols > TCP.
3. From the TCP Profile list, click the appropriate profile created by the iApp.
- If you deployed the iApp for a combined virtual server or a separate virtual server for Outlook Anywhere, click <name you gave the iApp>_wan-optimized_tcp_profile.
- If you deployed the iApp for RPC Client Access, click <name you gave the iApp>_rpc_wan-optimized_tcp_profile (you may need to repeat this procedure for RPC Client Access if you deployed the iApp for either of the options above).
4. In the Nagle's Algorithm row, click the Custom box on the right if necessary, and then clear the check from the Enabled box to disable Nagle's Algorithm.
5. Click the Update button. Repeat for RPC Client Access if necessary.
Remember, if you use the Reconfigure option to make changes to the iApp, you need to make these manual changes again.
Modifying the configuration if you configured the BIG-IP system manuallyIf you configured the BIG-IP system manually, use the following guidance.
1. On the Main tab, click Local Traffic > Profiles > Protocols > TCP.
2. From the TCP profile list, click the TCP profile you created for either the combined virtual server, or the profile you created for Outlook Anywhere or RPC Client Access.
3. In the Nagle's Algorithm row, click the Custom box on the right if necessary, and then clear the check from the Enabled box to disable Nagle's Algorithm.
4. Click the Update button. Repeat for RPC Client Access if necessary.

64
DEPLOYMENT GUIDE Exchange Server 2010 and 2013
h After deploying the iApp for Exchange 2010 behind a NATing device and using RPC Client Access, all clients are sent to a single pool member Note: This issue was fixed in v1.4.0rc1 of the template. We recommend upgrading to the latest version if possible.
If you deployed the iApp template for Exchange Server 2010, your BIG-IP system is behind a NATing device (or other source IP aggregator), and you are using RPC Client Access, the fallback persistence method can cause all clients to be "clumped" to a single server/pool member.
If your Exchange 2010 environment requires using RPC Client Access (RPC Client Access (MAPI) was deprecated in Exchange 2013), we recommend configuring two separate instances of the iApp template; one that includes only your HTTP-based services (Autodiscover, OWA, Outlook Anywhere, ActiveSync, and EWS), and the second (which must use a different IP address for the virtual server), that includes only RPC Client Access (MAPI), EWS (and OAB) services.
When you configure the template for the HTTP-based services, for the question asking if you are deploying RPC Client Access, select No.
When you configure the template for RPC Client Access, for the question asking if you are deploying RPC Client Access, select Yes. For the question asking if you are deploying Outlook Anywhere, EWS and OAB, select Yes, deploying Outlook Anywhere, EWS, and OAB.
Because the second instance of the iApp template requires using a unique IP address, you can use host entries, or the internal URLs on the Client Access Servers, to point the internal RPC clients to the second virtual server address for access to EWS and OAB services.
h After deploying the iApp using BIG-IP APM, the system is creating multiple sessions for one client IP address, which can consume all available licenses, causing users to be denied access Note: This issue was fixed in v1.4.0rc1 of the template. We recommend upgrading to the latest version if possible.
Websites that use a Favorite Icon (favicon) may establish multiple sessions with BIG-IP Access Policy Manager (APM). You may notice APM licenses are being exhausted for no apparent reason, or the Favorite icon may not be displayed in the browser.
This issue occurs when using BIG-IP APM with a web browser that does not send the MRHSession cookie with the request for the favorite icon. This issue is known to affect Google Chrome 25 and Internet Explorer 10, but may also affect other browsers.
To work around this issue, you can add an iRule to check for a favicon.ico request.
Note
This only works with websites that use the favicon.ico file. The workaround does not work if the icon is defined by a different name.
To create the iRule and add it to the combined virtual server or the separate OWA virtual server
1. On the Main tab, expand Local Traffic and then click iRules.
2. Click Create.
3. In the Name box, type a unique name for this iRule.
4. In the Definition section, copy and paste the following iRule, omitting the line numbers.
12345
when HTTP_REQUEST { if { [string tolower [HTTP::path]] ends_with "favicon.ico" and [HTTP::cookie "MRHSession"] eq "" } { ACCESS::disable }}
5. Click the Finished button.
6. Re-enter the iApp template (on the Main tab, click iApp > Application Services > [name of your Exchange application service] and then from the Menu bar, click Reconfigure).
7. In the Tell us which services you are deploying section, from the "Do you want to customize your server pool settings" question, select Customize pool settings. Either in the "Do you want to add any custom iRules to this combined virtual server?" (if you used a single IP address) or in the "Do you want to add any custom iRules to this virtual server?" question under the IP address for OWA question (if you used different IP addresses), enable the iRule you just created.
8. Click Update.

65
DEPLOYMENT GUIDE Exchange Server 2010 and 2013
h When using SSL Bridging and BIG-IP version 11.4.x, pool members may be marked down or you may experience connection resets and TLS errors logged to the Client Access servers
This issue only occurs when using SSL Bridging and BIG-IP versions 11.4.x. Pool members may be marked down when using simple monitors, or you may experience connection resets and TLS errors logged to the Client Access servers because the SSL ciphers used in the Server SSL profile in 11.4.x are not compatible with those in some versions of Microsoft IIS.
There are two ways you can resolve this issue:
1. Upgrade your BIG-IP system to version 11.5 or later.
2. Create a custom Server SSL profile and associate it with the virtual server, either using the iApp template or manually.
To create the Server SSL profile
a. On the Main tab, click Local Traffic > Profiles > SSL > Server.
b. Click Create.
c. In the Name box, type a unique name for this profile.
d. In the Options row, click the Custom box.
e. From the Available Options list, select No TLSv1.2, and then click the Enable button.
f. Click the Finished button.
g. Attach the new Server SSL profile to the virtual server either using the iApp or manually.
•ToattachtheprofiletothevirtualserverusingtheiApptemplate:
i) Re-enter the iApp template (on the Main tab, click iApp > Application Services > [name of your Exchange application service] and then from the Menu bar, click Reconfigure).
ii) In the Tell us which services you are deploying section, from the "Which Server SSL profile do you want to use" question, select the Server SSL profile you just created.
iii) Click Update.
•Toattachtheprofiletothevirtualservermanually:
i) Select the Exchange virtual server you created.
ii) From the SSL Profile (Server) area, enable the Server SSL profile you just created.
iii) Click Update.
iv) If you used separate virtual servers for each Exchange service, add the profile to each virtual server.
If you manually configured the BIG-IP system, enable No TLSv1.2 on your SSL profiles if applicable.
h OWA 2013 clients are experiencing issues with BIG-IP APM Single Sign-On
When deploying the iApp template for OWA 2013 with APM, Single Sign-On may fail. To correct this behavior, you must either reconfigure your Exchange Application service to use an updated version of the iApp, or manually reconfigure the Forms Client-Initiated SSO object to use the correct OWA cookie for successful logon detection. This is only necessary if using Exchange 2013, OWA, and Forms-based authentication. To solve this issue, use one of the following two solutions.
Upgrade the template (strongly recommended)To reconfigure the Application Service to use the new v1.4.0rc3 version of the template, download and import the new iApp: https://devcentral.f5.com/wiki/iApp.Microsoft-Exchange-2010-and-2013-iApp-Template.ashx. After you download and import the template, click Application Services > name of your exchange iApp service. Click Reconfigure. From the Template list, click the Change button, and then select f5.microsoft_exchange_2010_2013_cas.v1.4.0rc3 from the list. Click Update.
Modify the SSO Configuration objectIf you cannot upgrade the Application Service, you can modify the SSO Configuration object manually. From the Main tab, click Access Policy > SSO Configurations > Forms - Client Initiated. From the list, check the box for exch_form_basedv2_sso. In the Forms table, check the box for owa, and then click Edit. From the left pane of the box that opens, click Logon Detection. In the Cookie Name field, type cadata, and then click Ok.
Important: After making this change, if you make any modification to your Exchange Application Service using the Reconfigure option, you have to make this change again.

66
DEPLOYMENT GUIDE Exchange Server 2010 and 2013
Appendix A: Configuring additional BIG-IP settingsThis section contains information on configuring the BIG-IP system for objects or settings that are required, but not part of the template.
Configuring DNS and NTP settings If you are configuring the iApp to use BIG-IP APM, you must configure DNS and NTP settings on the BIG-IP system before beginning the iApp.
Configuring the DNS settingsIn this section, you configure the DNS settings on the BIG-IP system to point to a DNS server that can resolve your Active Directory server or servers. In many cases, this IP address will be that of your Active Directory servers themselves.
Note
DNS lookups go out over one of the interfaces configured on the BIG-IP system, not the management interface. The management interface has its own, separate DNS settings.
i Important
The BIG-IP system must have a self IP address in the same local subnet and VLAN as the DNS server, or a route to the DNS server if located on a different subnet. The route configuration is found on the Main tab by expanding Network and then clicking Routes. For specific instructions on configuring a route on the BIG-IP system, see the online help or the product documentation.
To configure DNS settings
1. On the Main tab, expand System, and then click Configuration.
2. On the Menu bar, from the Device menu, click DNS.
3. In the DNS Lookup Server List row, complete the following:
a. In the Address box, type the IP address of a DNS server that can resolve the Active Directory server.
b. Click the Add button.
4. Click Update.
Configuring the NTP settingsThe next task is to configure the NTP settings on the BIG-IP system for authentication to work properly.
To configure NTP settings
1. On the Main tab, expand System, and then click Configuration.
2. On the Menu bar, from the Device menu, click NTP.
3. In the Address box, type the fully-qualified domain name (or the IP address) of the time server that you want to add to the Address List.
4. Click the Add button.
5. Click Update.
To verify the NTP setting configuration, you can use the ntpq utility. From the command line, run ntpq -np.
See http://support.f5.com/kb/en-us/solutions/public/10000/200/sol10240.html for more information on this command.

67
DEPLOYMENT GUIDE Exchange Server 2010 and 2013
Creating an NTLM Machine AccountIf you are using BIG-IP APM to provide secure authentication and configuring the BIG-IP system for Outlook Anywhere clients using NTLM authentication, you must have an NTLM Machine Account object configured before you can successfully complete the template. Use the following procedure to create the NTLM Machine Account.
To create the NTLM Machine Account
1. On the Main tab, expand Access Policy, and then click Access Profiles.
2. On the Menu bar, from the NTLM menu, click Machine Account List.
3. Click the Create button.
4. In the Name box, type a name for the BIG-IP Machine Account object.
5. In the Machine Account Name box, type the name of the computer account that will be created in the domain after clicking Join.
6. In the Domain FQDN box, type the fully qualified domain name of the domain that you want the machine account to join.
7. In the Domain Controller FQDN box, if the machine account should have access to one domain only, type the FQDN for the domain controller for that domain.
8. In the Admin User box, type the name of a user with administrative privileges.
9. In the Password box, type the associated password.
10. Click the Join button.
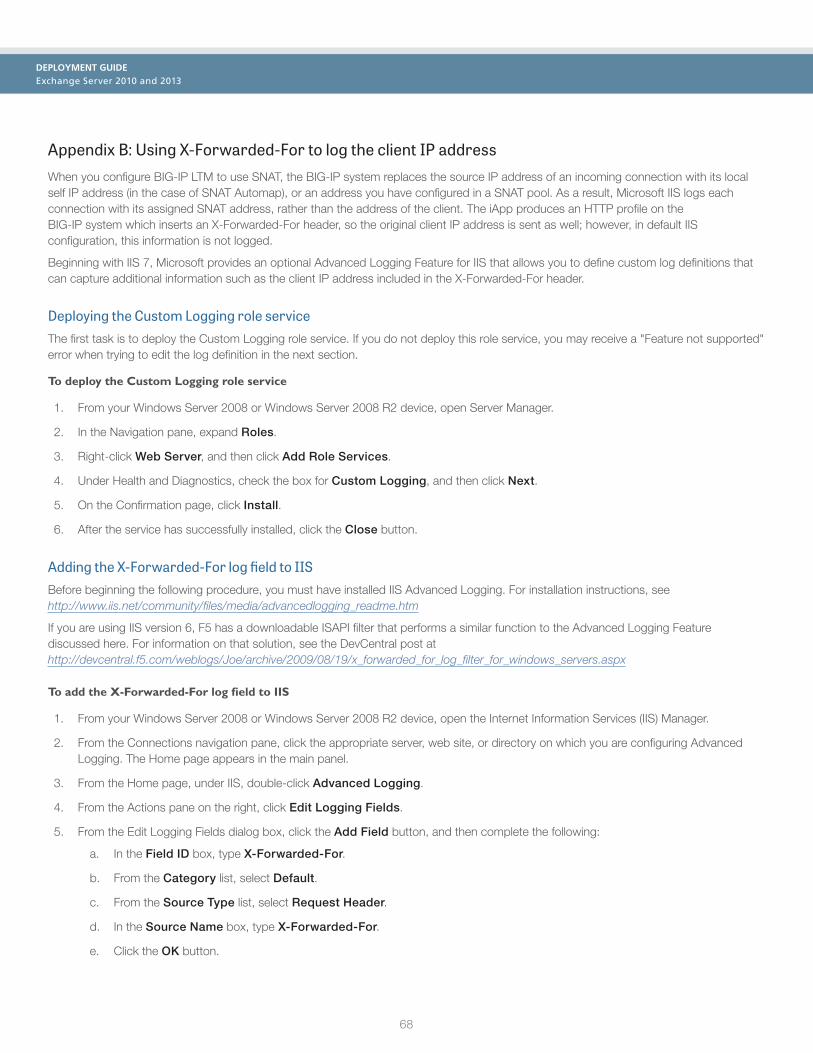
68
DEPLOYMENT GUIDE Exchange Server 2010 and 2013
Appendix B: Using X-Forwarded-For to log the client IP addressWhen you configure BIG-IP LTM to use SNAT, the BIG-IP system replaces the source IP address of an incoming connection with its local self IP address (in the case of SNAT Automap), or an address you have configured in a SNAT pool. As a result, Microsoft IIS logs each connection with its assigned SNAT address, rather than the address of the client. The iApp produces an HTTP profile on the BIG-IP system which inserts an X-Forwarded-For header, so the original client IP address is sent as well; however, in default IIS configuration, this information is not logged.
Beginning with IIS 7, Microsoft provides an optional Advanced Logging Feature for IIS that allows you to define custom log definitions that can capture additional information such as the client IP address included in the X-Forwarded-For header.
Deploying the Custom Logging role serviceThe first task is to deploy the Custom Logging role service. If you do not deploy this role service, you may receive a "Feature not supported" error when trying to edit the log definition in the next section.
To deploy the Custom Logging role service
1. From your Windows Server 2008 or Windows Server 2008 R2 device, open Server Manager.
2. In the Navigation pane, expand Roles.
3. Right-click Web Server, and then click Add Role Services.
4. Under Health and Diagnostics, check the box for Custom Logging, and then click Next.
5. On the Confirmation page, click Install.
6. After the service has successfully installed, click the Close button.
Adding the X-Forwarded-For log field to IISBefore beginning the following procedure, you must have installed IIS Advanced Logging. For installation instructions, see http://www.iis.net/community/files/media/advancedlogging_readme.htm
If you are using IIS version 6, F5 has a downloadable ISAPI filter that performs a similar function to the Advanced Logging Feature discussed here. For information on that solution, see the DevCentral post at http://devcentral.f5.com/weblogs/Joe/archive/2009/08/19/x_forwarded_for_log_filter_for_windows_servers.aspx
To add the X-Forwarded-For log field to IIS
1. From your Windows Server 2008 or Windows Server 2008 R2 device, open the Internet Information Services (IIS) Manager.
2. From the Connections navigation pane, click the appropriate server, web site, or directory on which you are configuring Advanced Logging. The Home page appears in the main panel.
3. From the Home page, under IIS, double-click Advanced Logging.
4. From the Actions pane on the right, click Edit Logging Fields.
5. From the Edit Logging Fields dialog box, click the Add Field button, and then complete the following:
a. In the Field ID box, type X-Forwarded-For.
b. From the Category list, select Default.
c. From the Source Type list, select Request Header.
d. In the Source Name box, type X-Forwarded-For.
e. Click the OK button.
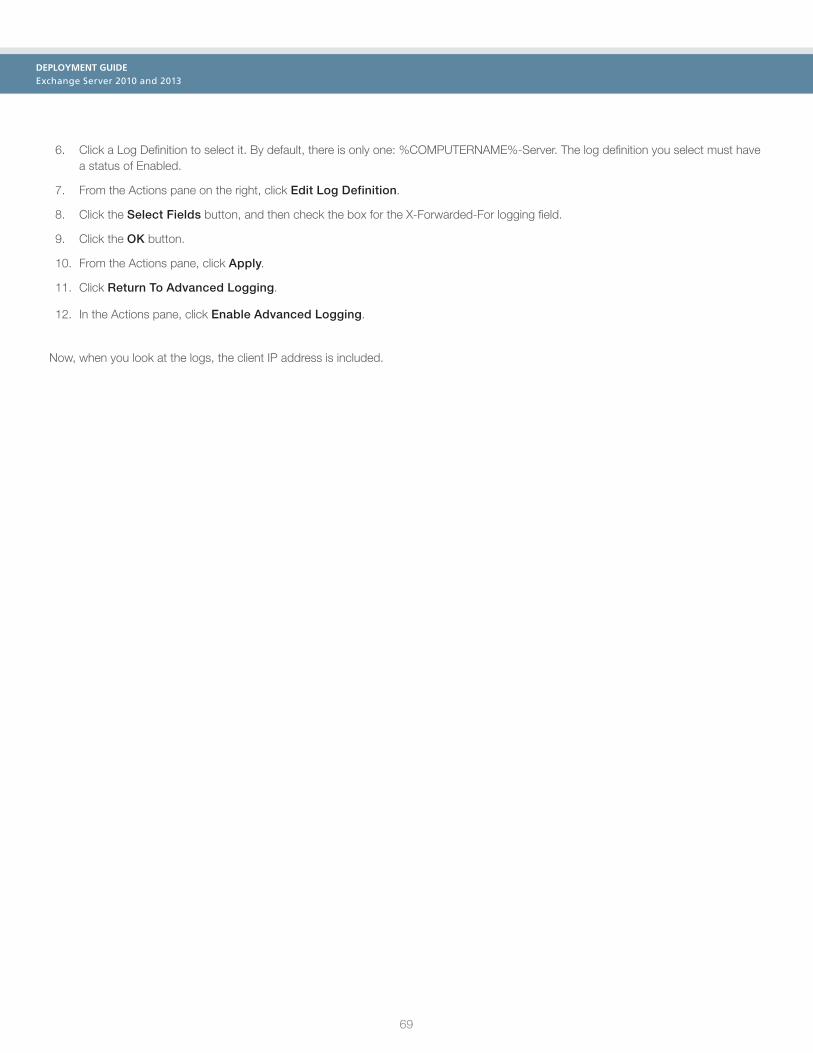
69
DEPLOYMENT GUIDE Exchange Server 2010 and 2013
6. Click a Log Definition to select it. By default, there is only one: %COMPUTERNAME%-Server. The log definition you select must have a status of Enabled.
7. From the Actions pane on the right, click Edit Log Definition.
8. Click the Select Fields button, and then check the box for the X-Forwarded-For logging field.
9. Click the OK button.
10. From the Actions pane, click Apply.
11. Click Return To Advanced Logging.
12. In the Actions pane, click Enable Advanced Logging.
Now, when you look at the logs, the client IP address is included.

70
DEPLOYMENT GUIDE Exchange Server 2010 and 2013
Appendix C: Manual configuration tablesThis table contains the BIG-IP configuration objects in this deployment and any non-default settings for advanced users. See the BIG-IP APM tables for additional APM configuration. Give each BIG-IP object a unique name in the Name field. Because of the complexity of this configuration, we strongly recommend using the iApp to configure Microsoft Exchange Server. For the new MAPI over HTTP service in Exchange 2013 SP1, see Optional: Configuring the BIG-IP system to support MAPI over HTTP in Exchange 2013 SP1 on page 51.
Configuration table if using a single virtual server for Exchange HTTP-based servicesImportant: See Modifying the virtual server to attach a persistence profile on page 53 if you are using 2010 and RPC Client Access.
BIG-IP object Non-default settings/Notes
Health Monitors (Local Traffic-->Monitors)
NOTE: We recommend
using this section to create second monitors for each service, using
a second mailbox account.
Outlook Web App (includes ECP)
Type HTTP (SSL offload), HTTPS (SSL Bridging). If using Exchange 2013, you must use HTTPS.
Interval 30 (recommended)
Timeout 91 (recommended)
Send String 1 If using the default forms-based authentication for OWA
GET /owa/auth/logon.aspx?url=https://mail.example.com/owa/&reason=0 HTTP/1.1\r\
nUser-Agent: Mozilla/4.0\r\nHost: mail.example.com\r\n
If using Basic or Basic and WIndows Integrated Authentication for OWA
GET /owa/ HTTP/1.1\r\nUser-Agent: Mozilla/4.0\r\nHost: mail.example.com\r\n
Receive String 2 Exchange Server 2010: OutlookSession= Exchange Server 2013: 200 OK
User Name Type the appropriate user name of a valid mailbox account.
Password Type the associated password
ActiveSync (includes ECP)
Type HTTP (SSL offload), HTTPS (SSL Bridging). If using Exchange 2013, you must use HTTPS.
Interval 30 (recommended)
Timeout 91 (recommended)
Send String 1 OPTIONS /Microsoft-Server-ActiveSync/ HTTP/1.1\r\nHost: mail.example.com\r\n
Receive String MS-ASProtocolCommands: Sync,SendMail,SmartForward,SmartReply,GetAttachment,GetHierarchy,CreateCollection,DeleteCollection,MoveCollection,FolderSync
User Name Type the appropriate user name of a valid mailbox account.
Password Type the associated password
Outlook Anywhere (includes EWS)
Type External
Interval 30 (recommended)
Timeout 91 (recommended)
External Program See Importing the monitor script files on page 80 for the EAV script
Variables Name Value
USER PASSWORD DOMAIN EMAIL
The account name associated with a mailbox. The password for the account The Windows domain for the account The email address for the user mailbox (such as [email protected])
Autodiscover
Type External
Interval 30 (recommended)
Timeout 91 (recommended)
External Program See Importing the monitor script files on page 80 for the EAV script
Variables Name Value
USER PASSWORD DOMAIN EMAIL
The account name associated with a mailbox. The password for the account The Windows domain for the account The email address for the user mailbox (such as [email protected])
1 For Advanced Monitors only. Simple monitors only require the Type, Interval, and Timeout. Replace red text with your FQDN. It must be on a single line. 2 This response string is part of a Cookie header that OWA returns. Although you may elect to use another string on the page, it must be on the first 5,120 bytes of the received
data (including headers and payload). Strings found near the end of the HTTP response from OWA will not be properly detected. See http://support.f5.com/kb/en-us/solutions/public/3000/400/sol3451.html for more details.
3 You must only include a single \r\n at the end of the string.
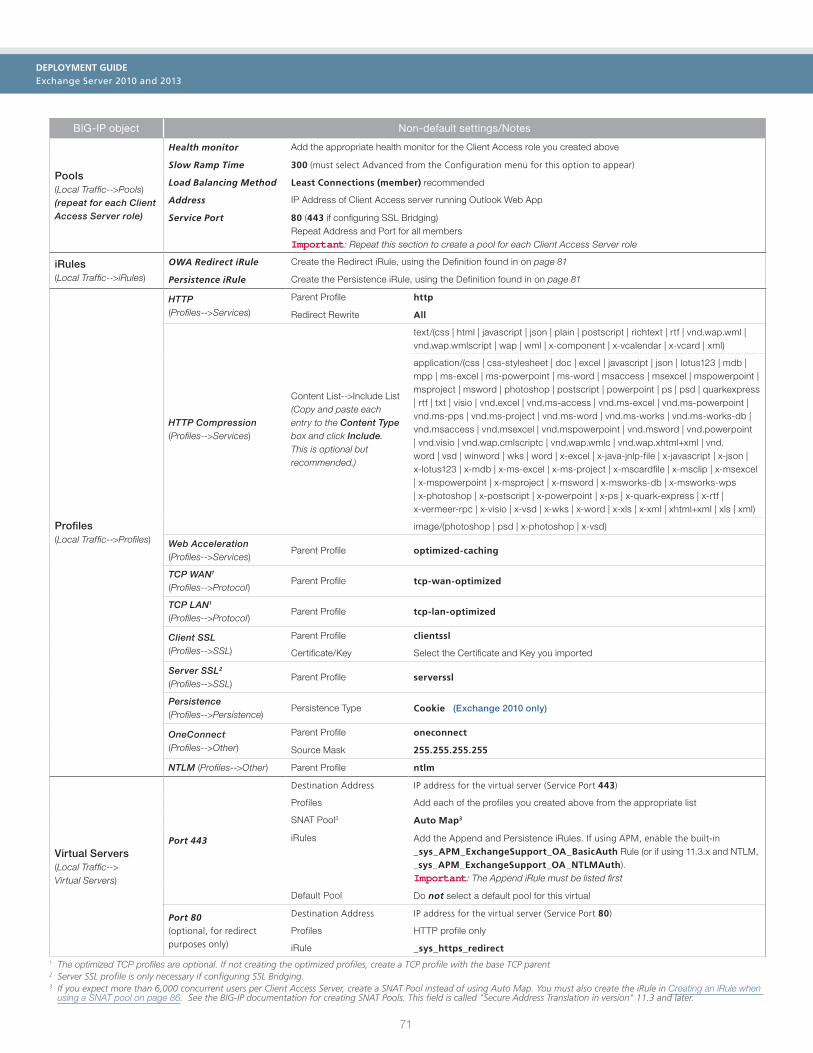
71
DEPLOYMENT GUIDE Exchange Server 2010 and 2013
BIG-IP object Non-default settings/Notes
Pools (Local Traffic-->Pools) (repeat for each Client Access Server role)
Health monitor Add the appropriate health monitor for the Client Access role you created above
Slow Ramp Time 300 (must select Advanced from the Configuration menu for this option to appear)
Load Balancing Method Least Connections (member) recommended
Address IP Address of Client Access server running Outlook Web App
Service Port 80 (443 if configuring SSL Bridging) Repeat Address and Port for all members Important: Repeat this section to create a pool for each Client Access Server role
iRules (Local Traffic-->iRules)
OWA Redirect iRule Create the Redirect iRule, using the Definition found in on page 81
Persistence iRule Create the Persistence iRule, using the Definition found in on page 81
Profiles (Local Traffic-->Profiles)
HTTP (Profiles-->Services)
Parent Profile http
Redirect Rewrite All
HTTP Compression (Profiles-->Services)
Content List-->Include List (Copy and paste each entry to the Content Type box and click Include. This is optional but recommended.)
text/(css | html | javascript | json | plain | postscript | richtext | rtf | vnd.wap.wml | vnd.wap.wmlscript | wap | wml | x-component | x-vcalendar | x-vcard | xml)
application/(css | css-stylesheet | doc | excel | javascript | json | lotus123 | mdb | mpp | ms-excel | ms-powerpoint | ms-word | msaccess | msexcel | mspowerpoint | msproject | msword | photoshop | postscript | powerpoint | ps | psd | quarkexpress | rtf | txt | visio | vnd.excel | vnd.ms-access | vnd.ms-excel | vnd.ms-powerpoint | vnd.ms-pps | vnd.ms-project | vnd.ms-word | vnd.ms-works | vnd.ms-works-db | vnd.msaccess | vnd.msexcel | vnd.mspowerpoint | vnd.msword | vnd.powerpoint | vnd.visio | vnd.wap.cmlscriptc | vnd.wap.wmlc | vnd.wap.xhtml+xml | vnd.word | vsd | winword | wks | word | x-excel | x-java-jnlp-file | x-javascript | x-json | x-lotus123 | x-mdb | x-ms-excel | x-ms-project | x-mscardfile | x-msclip | x-msexcel | x-mspowerpoint | x-msproject | x-msword | x-msworks-db | x-msworks-wps | x-photoshop | x-postscript | x-powerpoint | x-ps | x-quark-express | x-rtf | x-vermeer-rpc | x-visio | x-vsd | x-wks | x-word | x-xls | x-xml | xhtml+xml | xls | xml)
image/(photoshop | psd | x-photoshop | x-vsd)
Web Acceleration (Profiles-->Services)
Parent Profile optimized-caching
TCP WAN1
(Profiles-->Protocol)Parent Profile tcp-wan-optimized
TCP LAN1
(Profiles-->Protocol)Parent Profile tcp-lan-optimized
Client SSL (Profiles-->SSL)
Parent Profile clientssl
Certificate/Key Select the Certificate and Key you imported
Server SSL2
(Profiles-->SSL)Parent Profile serverssl
Persistence
(Profiles-->Persistence)Persistence Type Cookie (Exchange 2010 only)
OneConnect (Profiles-->Other)
Parent Profile oneconnect
Source Mask 255.255.255.255
NTLM (Profiles-->Other) Parent Profile ntlm
Virtual Servers (Local Traffic--> Virtual Servers)
Port 443
Destination Address IP address for the virtual server (Service Port 443)
Profiles Add each of the profiles you created above from the appropriate list
SNAT Pool3 Auto Map3
iRules Add the Append and Persistence iRules. If using APM, enable the built-in _sys_APM_ExchangeSupport_OA_BasicAuth Rule (or if using 11.3.x and NTLM, _sys_APM_ExchangeSupport_OA_NTLMAuth). Important: The Append iRule must be listed first
Default Pool Do not select a default pool for this virtual
Port 80 (optional, for redirect purposes only)
Destination Address IP address for the virtual server (Service Port 80)
Profiles HTTP profile only
iRule _sys_https_redirect1 The optimized TCP profiles are optional. If not creating the optimized profiles, create a TCP profile with the base TCP parent 2 Server SSL profile is only necessary if configuring SSL Bridging. 3 If you expect more than 6,000 concurrent users per Client Access Server, create a SNAT Pool instead of using Auto Map. You must also create the iRule in Creating an iRule when
using a SNAT pool on page 86. See the BIG-IP documentation for creating SNAT Pools. This field is called "Secure Address Translation in version" 11.3 and later.

72
DEPLOYMENT GUIDE Exchange Server 2010 and 2013
Configuration table if using separate virtual servers for Exchange HTTP-based services
Outlook Web App configuration table - includes the Exchange Control Panel (ECP)
BIG-IP object Non-default settings/Notes
Health Monitor (Local Traffic-->Monitors)
Type HTTP (SSL offload), HTTPS (SSL Bridging). If using Exchange 2013, you must use HTTPS.
Interval 30 (recommended)
Timeout 91 (recommended)
Send String 1 If using the default forms-based authentication for OWA
GET /owa/auth/logon.aspx?url=https://mail.example.com/owa/&reason=0 HTTP/1.1\r\
nUser-Agent: Mozilla/4.0\r\nHost: mail.example.com\r\n
If using Basic or Basic and WIndows Integrated Authentication for OWA
GET /owa/ HTTP/1.1\r\nUser-Agent: Mozilla/4.0\r\nHost: mail.example.com\r\n
Receive String 2 Exchange Server 2010: OutlookSession= Exchange Server 2013: 200 OK
User Name Type the appropriate user name of a valid mailbox account.
Password Type the associated password
Pool (Local Traffic-->Pools)
Health monitor Add the health monitor you created above
Slow Ramp Time 300 (must select Advanced from the Configuration menu for this option to appear)
Load Balancing Method Least Connections (member) recommended
Address IP Address of Client Access server running Outlook Web App
Service Port 80 (443 if configuring SSL Bridging) Repeat Address and Port for all members
iRules (Local Traffic-->iRules)
OWA Redirect iRule Create the Redirect iRule, using the Definition found on page 81
Persistence iRule Create the Persistence iRule, using the Definition found on page 81
Profiles (Local Traffic-->Profiles)
HTTP (Profiles-->Services)
Parent Profile http
Redirect Rewrite All
HTTP Compression (Profiles-->Services)
Content List-->Include List (Copy and paste each entry to the Content Type box and click Include. This is optional but recommended.)
text/(css | html | javascript | json | plain | postscript | richtext | rtf | vnd.wap.wml | vnd.wap.wmlscript | wap | wml | x-component | x-vcalendar | x-vcard | xml)
application/(css | css-stylesheet | doc | excel | javascript | json | lotus123 | mdb | mpp | ms-excel | ms-powerpoint | ms-word | msaccess | msexcel | mspowerpoint | msproject | msword | photoshop | postscript | powerpoint | ps | psd | quarkexpress | rtf | txt | visio | vnd.excel | vnd.ms-access | vnd.ms-excel | vnd.ms-powerpoint | vnd.ms-pps | vnd.ms-project | vnd.ms-word | vnd.ms-works | vnd.ms-works-db | vnd.msaccess | vnd.msexcel | vnd.mspowerpoint | vnd.msword | vnd.powerpoint | vnd.visio | vnd.wap.cmlscriptc | vnd.wap.wmlc | vnd.wap.xhtml+xml | vnd.word | vsd | winword | wks | word | x-excel | x-java-jnlp-file | x-javascript | x-json | x-lotus123 | x-mdb | x-ms-excel | x-ms-project | x-mscardfile | x-msclip | x-msexcel | x-mspowerpoint | x-msproject | x-msword | x-msworks-db | x-msworks-wps | x-photoshop | x-postscript | x-powerpoint | x-ps | x-quark-express | x-rtf | x-vermeer-rpc | x-visio | x-vsd | x-wks | x-word | x-xls | x-xml | xhtml+xml | xls | xml)
image/(photoshop | psd | x-photoshop | x-vsd)
Web Acceleration (Profiles-->Services)
Parent Profile optimized-caching
URI List Add the following to the Exclude list: /owa/ev.owa and uglobal.js
TCP WAN3
(Profiles-->Protocol)Parent Profile tcp-wan-optimized
TCP LAN3
(Profiles-->Protocol)Parent Profile tcp-lan-optimized
Client SSL (Profiles-->SSL)
Parent Profile clientssl
Certificate/Key Select the Certificate and Key you imported
Server SSL4
(Profiles-->SSL)Parent Profile serverssl
1 For Advanced Monitors only. Simple monitors only require the Type, Interval, and Timeout. Replace red text with your FQDN. It must be on a single line with a slingle \r\n. 2 This response string is part of a Cookie header that OWA returns. Although you may elect to use another string on the page, it must be on the first 5,120 bytes of the received
data (including headers and payload). Strings found near the end of the HTTP response from OWA will not be properly detected. See http://support.f5.com/kb/en-us/solutions/public/3000/400/sol3451.html for more details.
3 The optimized TCP profiles are optional. If not creating the optimized profiles, create a TCP profile with the base TCP parent 4 Server SSL profile is only necessary if configuring SSL Bridging

73
DEPLOYMENT GUIDE Exchange Server 2010 and 2013
BIG-IP object Non-default settings/Notes
Profiles (Local Traffic-->Profiles)
Persistence
(Profiles-->Persistence)Persistence Type Cookie (Exchange 2010 only)
OneConnect (Profiles-->Other)
Parent Profile oneconnect
Source Mask 255.255.255.255
NTLM (Profiles-->Other) Parent Profile ntlm
Virtual Servers (Local Traffic--> Virtual Servers)
Port 443
Destination Address IP address for the virtual server (Service Port 443)
Profiles Add each of the profiles you created above from the appropriate list
SNAT Pool3 Auto Map3
iRules Append, Persistence (the Append iRule must be listed first)
Default Pool Select the pool you created for Outlook Web App above
Port 80 (optional, for redirect purposes only)
Destination Address IP address for the virtual server (Service Port 80)
Profiles HTTP profile only
iRule _sys_https_redirect
3 If you expect more than 6,000 concurrent users per Client Access Server, create a SNAT Pool instead of using Auto Map. You must also create the iRule in Creating an iRule when using a SNAT pool on page 86. See the BIG-IP documentation for creating SNAT Pools. This field is called "Secure Address Translation in version" 11.3 and later.
Outlook Anywhere configuration table (for separate virtual servers) - includes EWS (Exchange Web Services) and OAB (Offline Address Book)
BIG-IP object Non-default settings/Notes
Health Monitors (Local Traffic--> Monitors)
Type External
Interval 30 (recommended)
Timeout 91 (recommended)
External Program 1 See Importing the monitor script files on page 80 for the EAV script
Variables 1Name Value
USER PASSWORD DOMAIN EMAIL
The account name associated with a mailbox. The password for the account The Windows domain for the account The email address for the user mailbox (such as [email protected])
Pool (Local Traffic-->Pools)
Health monitor Add health monitor above
Slow Ramp Time 300
Load Balancing Method Least Connections (member) recommended
Address IP Address of Client Access server running Outlook Anywhere
Service Port 80 (443 if configuring SSL Bridging) Repeat Address and Port for all members
iRules (Local Traffic-->iRules)
OA PersistIf using Exchange 2010, create the Persistence iRule for Outlook Anywhere, using the Definition found on page 85. You must create this iRule before creating the Persistence profile.
Profiles (Local Traffic-->Profiles)
HTTPParent Profile http
Redirect Rewrite Matching
TCP WAN2Parent Profile tcp-wan-optimized
Nagle's Algorithm Disabled (clear the Enabled check box)
TCP LAN2 Parent Profile tcp-lan-optimized
Client SSLParent Profile clientssl
Certificate/Key Select the Certificate and Key you imported
Server SSL3 Parent Profile serverssl
OneConnectParent Profile oneconnect
Source Mask 255.255.255.255
NTLM Parent Profile ntlm
Persistence (Exchange 2010 only)
Persistence Type Universal
iRule Select the OA Persist iRule you created above
1 For Advanced Monitors only. Simple monitors only require the Type, Interval, and Timeout.2 The optimized TCP profiles are optional. If not creating the optimized profiles, create a TCP profile with the base TCP parent 3 Server SSL profile is only necessary if configuring SSL Bridging.

74
DEPLOYMENT GUIDE Exchange Server 2010 and 2013
BIG-IP object Non-default settings/Notes
Virtual Servers (Local Traffic--> Virtual Servers)
Port 443
Destination Address IP address for the virtual server (Service Port 443)
Profiles Add each of the profiles you created above from the appropriate list
SNAT Pool Auto Map4
iRules If using APM, enable the built-in _sys_APM_ExchangeSupport_OA_BasicAuth rule (or if using 11.3.x and NTLM, _sys_APM_ExchangeSupport_OA_NTLMAuth).
Default Pool Select the pool you created for Outlook Anywhere above
Port 80 (optional, for redirect purposes only)
Destination Address IP address for the virtual server (Service Port 80)
Profiles HTTP profile only
iRule _sys_https_redirect
Active Sync manual configuration table (for separate virtual server configuration)
BIG-IP object Non-default settings/Notes
Health Monitors (Local Traffic--> Monitors)
Type HTTP (SSL offload), HTTPS (SSL Bridging). If using Exchange 2013, you must use HTTPS.
Interval 30 (recommended)
Timeout 91 (recommended)
Send String 1 OPTIONS /Microsoft-Server-ActiveSync/ HTTP/1.1\r\nHost: mail.example.com\r\n
Receive String MS-ASProtocolCommands: Sync,SendMail,SmartForward,SmartReply,GetAttachment,GetHierar
chy,CreateCollection,DeleteCollection,MoveCollection,FolderSync
User Name Type the appropriate user name of a valid mailbox account.
Password Type the associated password
Pool (Local Traffic--> Pools)
Health monitor Add health monitor above
Slow Ramp Time 300
Load Balancing Method Least Connections (member) recommended
Address IP Address of Client Access server running ActiveSync
Service Port 80 (443 if configuring SSL Bridging) Repeat Address and Port for all members
Profiles (Local Traffic-->Profiles)
HTTP Parent Profile http
TCP WAN2 Parent Profile tcp-wan-optimized
TCP LAN2 Parent Profile tcp-lan-optimized
Client SSLParent Profile clientssl
Certificate/Key Select the Certificate and Key you imported
Server SSL3 Parent Profile serverssl
Persistence Persistence Type Source Address Affinity (Exchange 2010 only)
iRules (Local Traffic-->iRules)
ActiveSync PersistIf you are using Exchange 2010, create the Persistence iRule for ActiveSync, using the Definition found on page 81. This iRule is optional.
Virtual Servers (Local Traffic--> Virtual Servers)
Port 443
Destination Address IP address for the virtual server (Service Port 443)
Profiles Add each of the profiles you created above from the appropriate list
SNAT Pool4 Auto Map4
iRules Enable the ActiveSync Persist iRule you created. If using APM, enable the built-in _sys_APM_ExchangeSupport_OA_BasicAuth rule (or if using 11.3.x and NTLM, _sys_APM_ExchangeSupport_OA_NTLMAuth).
Default Pool Select the pool you created for ActiveSync above
Port 80 (optional, for redirect purposes only)
Destination Address IP address for the virtual server (Service Port 80)
Profiles HTTP profile only
iRule _sys_https_redirect
1 For Advanced Monitors only. Simple monitors only require the Type, Interval, and Timeout. Replace red text with your FQDN. It must be on a single line with a slingle \r\n. 2 The optimized TCP profiles are optional. If not creating the optimized profiles, create a TCP profile with the base TCP parent 3 Server SSL profile is only necessary if configuring SSL Bridging.4 If you expect more than 6,000 concurrent users per Client Access Server, create a SNAT Pool instead of using Auto Map. You must also create the iRule in Creating an iRule when
using a SNAT pool on page 86. See the BIG-IP documentation for creating SNAT Pools. This field is called "Secure Address Translation in version" 11.3 and later.

75
DEPLOYMENT GUIDE Exchange Server 2010 and 2013
Autodiscover manual configuration table (for separate virtual server configuration)
BIG-IP object Non-default settings/Notes
Health Monitors (Local Traffic--> Monitors)
Type External
Interval 30 (recommended)
Timeout 91 (recommended)
External Program1 See Importing the monitor script files on page 80 for the EAV script
Variables1
Name Value
USER PASSWORD DOMAIN EMAIL
The account name associated with a mailbox. The password for the account The Windows domain for the account The email address for the user mailbox (such as [email protected])
Pool (Local Traffic--> Pools)
Health monitor Add health monitor above
Slow Ramp Time 300
Load Balancing Method Least Connections (member) recommended
Address IP Address of Client Access server running Autodiscover
Service Port 80 (443 if configuring SSL Bridging) Repeat Address and Port for all members
Profiles (Local Traffic-->Profiles)
HTTP Parent Profile http
TCP WAN2 Parent Profile tcp-wan-optimized
TCP LAN2 Parent Profile tcp-lan-optimized
Client SSLParent Profile clientssl
Certificate/Key Select the Certificate and Key you imported
Server SSL3 Parent Profile serverssl
Virtual Servers (Local Traffic--> Virtual Servers)
Port 443
Destination Address IP address for the virtual server (Service Port 443)
Profiles Add each of the profiles you created above from the appropriate list
SNAT Pool4 Auto Map4
iRules If using APM, enable the built-in _sys_APM_ExchangeSupport_OA_BasicAuth rule (or if using 11.3.x and NTLM, _sys_APM_ExchangeSupport_OA_NTLMAuth)
Default Pool Select the pool you created for Autodiscover above
Port 80 (optional, for redirect purposes only)
Destination Address IP address for the virtual server (Service Port 80)
Profiles HTTP profile only
iRule _sys_https_redirect 1 For Advanced Monitors only. Simple monitors only require the Type, Interval, and Timeout. 2 The optimized TCP profiles are optional. If not creating the optimized profiles, create a TCP profile with the base TCP parent 3 Server SSL profile is only necessary if configuring SSL Bridging. 4 If you expect more than 6,000 concurrent users per Client Access Server, create a SNAT Pool instead of using Auto Map. You must also create the iRule in Creating an iRule when
using a SNAT pool on page 86. See the BIG-IP documentation for creating SNAT Pools. This field is called "Secure Address Translation in version" 11.3 and later.

76
DEPLOYMENT GUIDE Exchange Server 2010 and 2013
Configuration tables for RPC Client Access, POP3, and IMAP4Use the following tables for RPC Client Access, POP3, and IMAP4, no matter which HTTP-based configuration you chose in the tables on the previous pages. For RPC Client Access, you must decide whether you will use static ports or the default dynamic port range for RPC Client Access traffic. Use the table appropriate for your configuration.
If deploying RPC Client Access, you must also deploy Outlook Anywhere, to properly handle EWS (Exchange Web Services) traffic.
i Important
Exchange Server 2013 Client Access Servers do not offer MAPI as a connection option. If you are deploying Exchange Server 2013, do NOT configure the BIG-IP system for RPC Client Access.
RPC Client Access1 dynamic port range manual configuration table
BIG-IP Object Non-default settings/Notes
Health Monitor (Local Traffic--> Monitors)
Type TCP
Interval 30 (recommended)
Timeout 91 (recommended)
Alias Service Port 135
Pool (Local Traffic--> Pools)
Health monitor Add health monitor above.
Action on Service Down2 Reject
Slow Ramp Time2 300
Load Balancing Method Least Connections (member) recommended
Address IP Address of Client Access server running RPC Client Access
Service Port * All Services (repeat Address and Port for all members)
Profiles (Local Traffic-->Profiles)
Persistence (Exchange 2010 only)
Parent Profile Source Address Affinity
Timeout 7200
Match Across Services Click a check in the Match Across Services box
Match Across Virtual Servers Click a check in the Match Across Virtual Servers box
TCP WAN3
Parent Profile tcp-wan-optimized
Idle Timeout 7200
Nagle's Algorithm Disabled (clear the Enabled check box)
TCP LAN3Parent Profile tcp-lan-optimized
Idle Timeout 7200
Virtual Servers (Local Traffic--> Virtual Servers)
Port 135
Destination Address IP address for the virtual server
Service Port 135
Profiles Add each of the profiles you created above from the appropriate list
SNAT Pool Auto Map4
Default Pool Select the pool you created for RPC Client Access above
All Ports
Destination Address Same IP address used above (make sure you use a unique name)
Service Port *All Ports
Profiles Add each of the profiles you created above from the appropriate list
SNAT Pool Auto Map4
Default Pool Select the pool you created for RPC Client Access above
Additional steps
After completing this virtual server, you must modify either the Single virtual server you created for the HTTP-based CAS services, or the separate virtual server you created for Outlook Anywhere to use the persistence profile you created in this section as a Fallback persistence profile. From the Fallback Persistence Profile list of the Single virtual, or the Outlook Anywhere separate virtual, select the profile you created in this section, and then click the Update button.
1 In Exchange Server 2010, you must configure a Client Access Array for your site to use the FQDN you have set to resolve to the IP address of the BIG-IP LTM virtual server, and you must update the existing mailbox database attributes to use that array.2 You must select Advanced from the Configuration list for this option to appear3 The optimized TCP profiles are optional. If not creating the optimized profiles, create a TCP profile with the base TCP parent, but you must have an Idle Timeout of 7200. 4 If you expect more than 6,000 concurrent users per Client Access Server, create a SNAT Pool instead of using Auto Map. You must also create the iRule in Creating an iRule
when using a SNAT pool on page 86. See the BIG-IP documentation for creating SNAT Pools.

77
DEPLOYMENT GUIDE Exchange Server 2010 and 2013
RPC Client Access1 static ports configuration table
BIG-IP Object Non-default settings/Notes
Health Monitors (Local Traffic--> Monitors)
RPC Monitor
Type TCP
Interval 30 (recommended)
Timeout 91 (recommended)
MAPI Monitor
Type TCP
Interval 30 (recommended)
Timeout 91 (recommended)
Alias Service Port2 59532 Modify this port to match the RPC Client Access static port for MAPI on your Client Access Servers.
Address Book Monitor
Type TCP
Interval 30 (recommended)
Timeout 91 (recommended)
Alias Service Port2 59533 Modify this port to match the RPC Client Access static port for Address Book on your CAS Servers.
Pools (Local Traffic--> Pools)
Health monitor Add all three health monitors above.
Availability Requirement All
Action on Service Down2 Reject
Slow Ramp Time2 300
Load Balancing Method Least Connections (member) recommended
Address IP Address of Client Access server running RPC Client Access
Service Port 135 (repeat Address and Port for all members)
Create two additional pools, one for MAPI and one for Address Book Service, using the settings above; only the Name, Health Monitor and Service Port are different. Apply the associated Health Monitor you created. The Service Port depends on your configuration.
Profiles (Local Traffic-->Profiles)
Persistence (Exchange 2010 only)
Parent Profile Source Address Affinity
Timeout 7200
Match Across Services Click a check in the Match Across Services box
Match Across Virtual Servers
Click a check in the Match Across Virtual Servers box
TCP WAN3Parent Profile tcp-wan-optimized
Idle Timeout 7200
TCP LAN3Parent Profile tcp-lan-optimized
Idle Timeout 7200
Virtual Servers (Local Traffic--> Virtual Servers)
Destination Address IP address for the virtual server
Service Port 135
Profiles Add each of the profiles you created above from the appropriate list
SNAT Pool Auto Map4
Default Pool Select the pool with members using Service Port 135 you created for RPC Client Access above
Create two additional virtual servers, one for MAPI and one for Address Book Service, using the settings above; only the Name, Service Port and Pool are different: The Service Port depends on your configuration. Use the associated pool you created.
Additional steps
After completing this virtual server, you must modify either the Single virtual server you created for the HTTP-based CAS services, or the separate virtual server you created for Outlook Anywhere to use the persistence profile you created in this section as a Fallback persistence profile. From the Fallback Persistence Profile list of the Single virtual, or the Outlook Anywhere separate virtual, select the profile you created in this section, and then click the Update button.
1 In Exchange Server 2010, you must configure a Client Access Array for your site to use the FQDN you have set to resolve to the IP address of the BIG-IP LTM virtual server, and you must update the existing mailbox database attributes to use that array.
2 You must select Advanced from the Configuration list for this option to appear3 The optimized TCP profiles are optional. If not creating the optimized profiles, create a TCP profile with the base TCP parent 4 If you expect more than 6,000 concurrent users per Client Access Server, create a SNAT Pool instead of using Auto Map. You must also create the iRule in Creating an iRule
when using a SNAT pool on page 86. See the BIG-IP documentation for creating SNAT Pools.

78
DEPLOYMENT GUIDE Exchange Server 2010 and 2013
POP3 manual configuration table
BIG-IP Object Non-default settings/Notes
Health Monitors (Local Traffic--> Monitors)
Type POP3
Interval 30 (recommended)
Timeout 91 (recommended)
User Name If offloading SSL, type a user name of a POP3 account
Password If offloading SSL, type the associated password
Advanced monitor for POP3S (only necessary if using SSL Bridging)
Type External
Interval 30 (recommended)
Timeout 91 (recommended)
External Program See Importing the monitor script files on page 80 for the EAV script
Variables Name Value
USER PASSWORD DOMAIN EMAIL
The account name associated with a mailbox. The password for the account The Windows domain for the account The email address for the user mailbox (such as [email protected])
Pool (Local Traffic--> Pools)
Health monitor Add health monitor above
Slow Ramp Time1 300
Load Balancing Method Least Connections (member) recommended
Address IP Address of Client Access server running POP3
Service Port If offloading SSL (POP3): 110 If using SSL Bridging (POP3S): 995 (repeat Address and Port for all members)
Profiles (Local Traffic-->Profiles)
Client SSLParent Profile clientssl
Certificate/Key Select the Certificate and Key you imported
Server SSL3 Parent Profile serverssl
TCP WAN2 Parent Profile tcp-wan-optimized
TCP LAN2 Parent Profile tcp-lan-optimized
Virtual Server (Local Traffic--> Virtual Servers)
Destination Address IP address for the virtual server
Service Port If offloading SSL (POP3): 110 If using SSL Bridging (POP3S): 995
Profiles Add each of the profiles you created above from the appropriate list
SNAT Pool Auto Map4
Default Pool Select the pool you created for POP3 above
1 You must select Advanced from the Configuration list for this option to appear 2 The optimized TCP profiles are optional. If not creating the optimized profiles, create a TCP profile with the base TCP parent 3 Server SSL profile is only necessary if configuring SSL Bridging. 4 If you expect more than 6,000 concurrent users per Client Access Server, create a SNAT Pool instead of using Auto Map. You must also create the iRule in Creating an iRule
when using a SNAT pool on page 86. See the BIG-IP documentation for creating SNAT Pools.

79
DEPLOYMENT GUIDE Exchange Server 2010 and 2013
IMAP4 manual configuration table
BIG-IP Object Non-default settings/Notes
Health Monitors (Local Traffic--> Monitors)
Type IMAP4
Interval 30 (recommended)
Timeout 91 (recommended)
User Name If offloading SSL, type a user name of a IMAP4 account
Password If offloading SSL, type the associated password
Advanced monitor for IMAP4S (only necessary if using SSL Bridging)
Type External
Interval 30 (recommended)
Timeout 91 (recommended)
External Program See Importing the monitor script files on page 80 for the EAV script
Variables Name Value
USER PASSWORD DOMAIN EMAIL
The account name associated with a mailbox. The password for the account The Windows domain for the account The email address for the user mailbox (such as [email protected])
Pool (Local Traffic--> Pools)
Health monitor Add health monitor above
Slow Ramp Time1 300
Load Balancing Method Least Connections (member) recommended
Address IP Address of Client Access server running IMAP4
Service Port If offloading SSL (IMAP4): 143 If using SSL Bridging (IMAP4S): 993 (repeat Address and Port for all members)
Profiles (Local Traffic-->Profiles)
Client SSLParent Profile clientssl
Certificate/Key Select the Certificate and Key you imported
Server SSL3 Parent Profile serverssl
TCP WAN2 Parent Profile tcp-wan-optimized
TCP LAN2 Parent Profile tcp-lan-optimized
Virtual Server (Local Traffic--> Virtual Servers)
Destination Address IP address for the virtual server
Service Port If offloading SSL (IMAP4): 143 If using SSL Bridging (IMAP4S): 993
Profiles Add select each of the profiles you created above from the appropriate list
SNAT Pool Auto Map4
Default Pool Select the pool you created for IMAP4 above
1 You must select Advanced from the Configuration list for this option to appear 2 The optimized TCP profiles are optional. If not creating the optimized profiles, create a TCP profile with the base TCP parent 3 Server SSL profile is only necessary if configuring SSL Bridging. 4 If you expect more than 6,000 concurrent users per Client Access Server, create a SNAT Pool instead of using Auto Map. You must also create the iRule in Creating an iRule when
using a SNAT pool on page 86. See the BIG-IP documentation for creating SNAT Pools.

80
DEPLOYMENT GUIDE Exchange Server 2010 and 2013
iRules and monitor scriptsThis section contains the EAV script and iRule code referred to from the manual configuration table. The line numbers are provided for reference. Create a new iRule and copy the code, omitting the line numbers. You may need to modify pool names according to your configuration.
Importing the monitor script filesBefore you can create the advanced monitors for ActiveSync, Autodiscover, POP3S, and/or IMAP4Syou must download and import the applicable monitor files onto the BIG-IP system.
Note
If you are using a redundant BIG-IP system, you need to make sure any modifications to the script EAVs are manually copied between BIG-IP LTMs, and given the required permissions when configuration is synchronized.
If you are going to use two instances of the health check to monitor two mail boxes, you must use a unique user name and password for each monitor.
To download and install the script
1. Download the appropriate script:
• Outlook Anywhere (including EWS)
» If you configured SSL Offload: http://www.f5.com/pdf/deployment-guides/outlookanywhere-eav-offload.zip
» If you configured SSL Bridging http://www.f5.com/pdf/deployment-guides/outlookanywhere-eav-ssl-bridging.zip
• Autodiscover
» If you configured SSL Offload: http://www.f5.com/pdf/deployment-guides/autodiscover-eav-offload.zip
» If you configured SSL Bridging http://www.f5.com/pdf/deployment-guides/autodiscover-eav-ssl-bridging.zip
• POP3S (only necessary if using SSL Bridging and you want to use advanced monitors for POP3S.
» http://www.f5.com/pdf/deployment-guides/pop3s-eav.zip
• IMAP4S (only necessary if using SSL Bridging and you want to use advanced monitors for IMAP4S.
» http://www.f5.com/pdf/deployment-guides/imap4s-eav.zip
2. Extract the appropriate file(s) to a location accessible by the BIG-IP system.
3. From the Main tab of the BIG-IP Configuration utility, expand System, and then click File Management.
4. On the Menu bar, click External Monitor Program File List.
5. Click the Import button.
6. In the File Name row, click Browse, and then locate the appropriate file.
7. In the Name box, type a name for the file related to the script you are using.
8. Click the Import button.
Now when you create the advanced monitors, you can select the name of the file you imported from the External Program list.
iRulesThis section contains the iRules referenced from the manual configuration tables. To create an iRule, from the Main tab, expand Local Traffic, and then click iRules. Click Create, give the iRule a unique name, and then copy and paste the iRule code into the Definition section (omitting the line numbers). If specified, you must replace any parts of the code in red text with the names of the appropriate BIG-IP object.

81
DEPLOYMENT GUIDE Exchange Server 2010 and 2013
OWA Redirect iRule (formerly referred to as the Append iRule)
12345
when HTTP_REQUEST { if { ([HTTP::uri] == "/") } { HTTP::redirect https://[HTTP::host]/owa/ }}
This iRule should appear at the top of the iRule list in the virtual server and come before any persistence iRules you might use.
ActiveSync persist iRule If you are deploying ActiveSync on a BIG-IP behind a NAT or other address aggregating device, use this iRule to ensure even distribution of client connections.
If you are using Exchange 2013, do NOT create this iRule.
12345678
when HTTP_REQUEST { if { [HTTP::header exists "Authorization"] } { set as_key [sha256 [HTTP::header "Authorization"]] persist uie $as_key 7200 } else { persist source_addr }}
Persistence iRule if using a single virtual server for all HTTP-based services For this configuration, you must create an additional iRule which changes persistence methods based on the service being accessed. When using a single virtual server for OWA, Outlook Anywhere, ActiveSync, and Autodiscover, you need to use an iRule to separate the traffic that supports cookie persistence (Outlook Web App and ActiveSync) from that which does not (Outlook Anywhere) and assign appropriate persistence methods. This example creates a persistence iRule that uses correct persistence methods for each access type. This iRule assumes the use of separate pools for the services as configured by the template.
! Critical
You must change the pool names in the following iRules (shown in red) to match the names of the pools in your configuration.
Because of the length of this iRule, you can use the following text file to make the copy paste operation easier: http://www.f5.com/pdf/deployment-guides/exchange-persist.zip.
However, if you download the zip file, you must still modify the iRule to match the name of the pools in your configuration.
If you are using Exchange 2013, you must use the iRule in Exchange 2013 only: Persistence iRule if using a single virtual server for all HTTP-based services on page 84
i Important
If you are using Exchange 2010 and RPC Client Access/MAPI, you must uncomment line 69 in the following iRule, as described in line 68.
Important
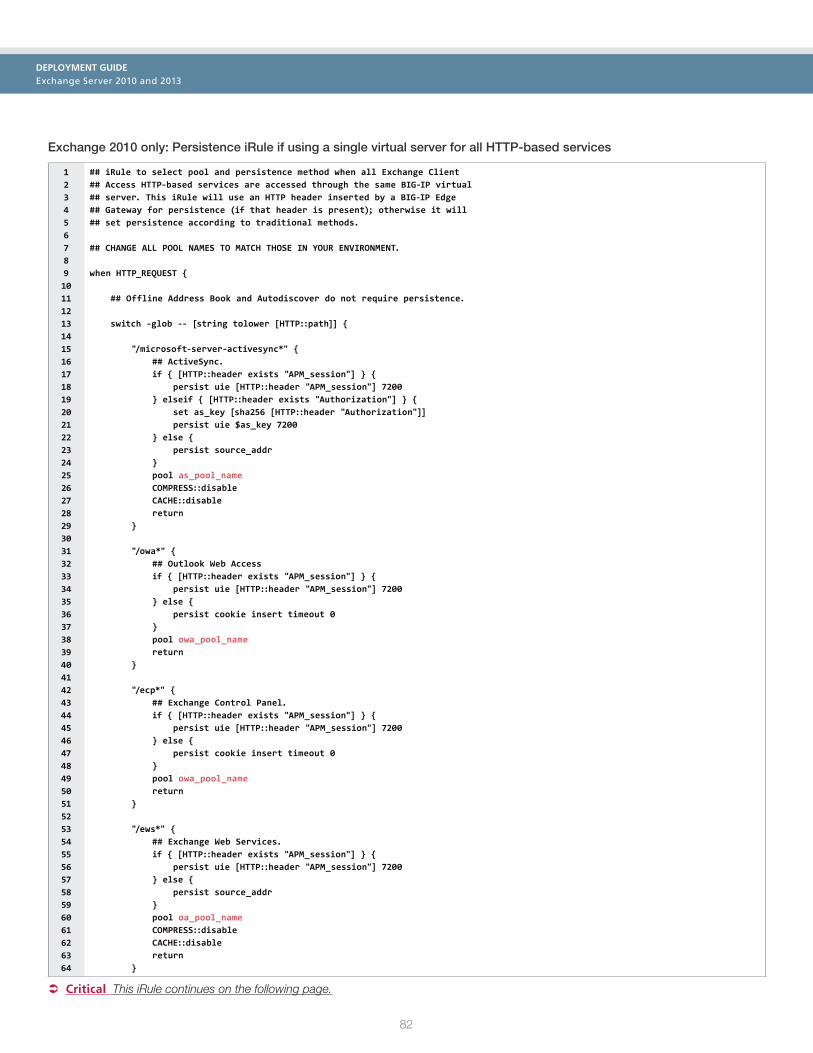
82
DEPLOYMENT GUIDE Exchange Server 2010 and 2013
Exchange 2010 only: Persistence iRule if using a single virtual server for all HTTP-based services
12345678910111213141516171819202122232425262728293031323334353637383940414243444546474849505152535455565758596061626364
## iRule to select pool and persistence method when all Exchange Client## Access HTTP-based services are accessed through the same BIG-IP virtual## server. This iRule will use an HTTP header inserted by a BIG-IP Edge## Gateway for persistence (if that header is present); otherwise it will## set persistence according to traditional methods.
## CHANGE ALL POOL NAMES TO MATCH THOSE IN YOUR ENVIRONMENT.
when HTTP_REQUEST {
## Offline Address Book and Autodiscover do not require persistence.
switch -glob -- [string tolower [HTTP::path]] {
"/microsoft-server-activesync*" { ## ActiveSync. if { [HTTP::header exists "APM_session"] } { persist uie [HTTP::header "APM_session"] 7200 } elseif { [HTTP::header exists "Authorization"] } { set as_key [sha256 [HTTP::header "Authorization"]] persist uie $as_key 7200 } else { persist source_addr } pool as_pool_name COMPRESS::disable CACHE::disable return }
"/owa*" { ## Outlook Web Access if { [HTTP::header exists "APM_session"] } { persist uie [HTTP::header "APM_session"] 7200 } else { persist cookie insert timeout 0 } pool owa_pool_name return }
"/ecp*" { ## Exchange Control Panel. if { [HTTP::header exists "APM_session"] } { persist uie [HTTP::header "APM_session"] 7200 } else { persist cookie insert timeout 0 } pool owa_pool_name return }
"/ews*" { ## Exchange Web Services. if { [HTTP::header exists "APM_session"] } { persist uie [HTTP::header "APM_session"] 7200 } else { persist source_addr } pool oa_pool_name COMPRESS::disable CACHE::disable return }
 Critical This iRule continues on the following page.

83
DEPLOYMENT GUIDE Exchange Server 2010 and 2013
 Critical This iRule is a continuation of the iRule from the previous page.
6566676869707172737475767778798081828384858687888990919293949596979899100101102103104105106107108109110111112113114115116117118
"/oab*" { ## Offline Address Book. pool oa_pool_name ## uncomment the following line if using RPC Client Access - MAPI # persist source_addr return }
"/rpc/rpcproxy.dll*" { ## Outlook Anywhere. if { [HTTP::header exists "APM_session"] } { persist uie [HTTP::header "APM_session"] 7200 } elseif { [string tolower [HTTP::header "Authorization"]] starts_with "basic" } { set oa_key [sha256 [HTTP::header "Authorization"]] persist uie $oa_key 7200 } else { persist source_addr } pool oa_pool_name COMPRESS::disable CACHE::disable return }
"/autodiscover*" { ## Autodiscover. pool ad_pool_name return }
default { ## This final section takes all traffic that has not otherwise ## been accounted for and sends it to the pool for Outlook Web App if { [HTTP::header exists "APM_session"] } { persist uie [HTTP::header "APM_session"] 7200 } else { persist source_addr } pool owa_pool_name } }}
when HTTP_RESPONSE { if { [string tolower [HTTP::header values "WWW-Authenticate"]] contains "negotiate"} { ONECONNECT::reuse disable ONECONNECT::detach disable ## this command disables NTLM conn pool for connections where OneConnect has been disabled NTLM::disable } ## this command rechunks encoded responses if {[HTTP::header exists "Transfer-Encoding"]} { HTTP::payload rechunk } }

84
DEPLOYMENT GUIDE Exchange Server 2010 and 2013
Exchange 2013 only: Persistence iRule if using a single virtual server for all HTTP-based services
1234567891011121314151617181920212223242526272829303132333435363738394041424344454647484950515253545556575859606162636465666768
## iRule to select pool when all Exchange Client Access HTTP-based services are## accessed through the same BIG-IP virtual server. This iRule is for users who## do not require any persistence.## CHANGE ALL POOL NAMES TO MATCH THOSE IN YOUR ENVIRONMENT.
when HTTP_REQUEST { switch -glob -- [string tolower [HTTP::path]] { "/microsoft-server-activesync*" { ## ActiveSync. pool as_pool_name COMPRESS::disable CACHE::disable return } "/owa*" { ## Outlook Web Access pool owa_pool_name return } "/ecp*" { ## Exchange Control Panel. pool owa_pool_name return } "/ews*" { ## Exchange Web Services. pool oa_pool_name COMPRESS::disable CACHE::disable return } "/oab*" { ## Offline Address Book. pool oa_pool_name return } "/rpc/rpcproxy.dll*" { ## Outlook Anywhere. pool oa_pool_name COMPRESS::disable CACHE::disable return } "/autodiscover*" { ## Autodiscover. pool ad_pool_name return } default { ## This final section takes all traffic that has not otherwise ## been accounted for and sends it to the pool for Outlook Web App pool owa_pool_name } }}when HTTP_RESPONSE { if { [string tolower [HTTP::header values "WWW-Authenticate"]] contains "negotiate"} { ONECONNECT::reuse disable ONECONNECT::detach disable ## this command disables NTLM conn pool for connections where OneConnect ## has been disabled NTLM::disable } ## this command rechunks encoded responses if {[HTTP::header exists "Transfer-Encoding"]} { HTTP::payload rechunk } }
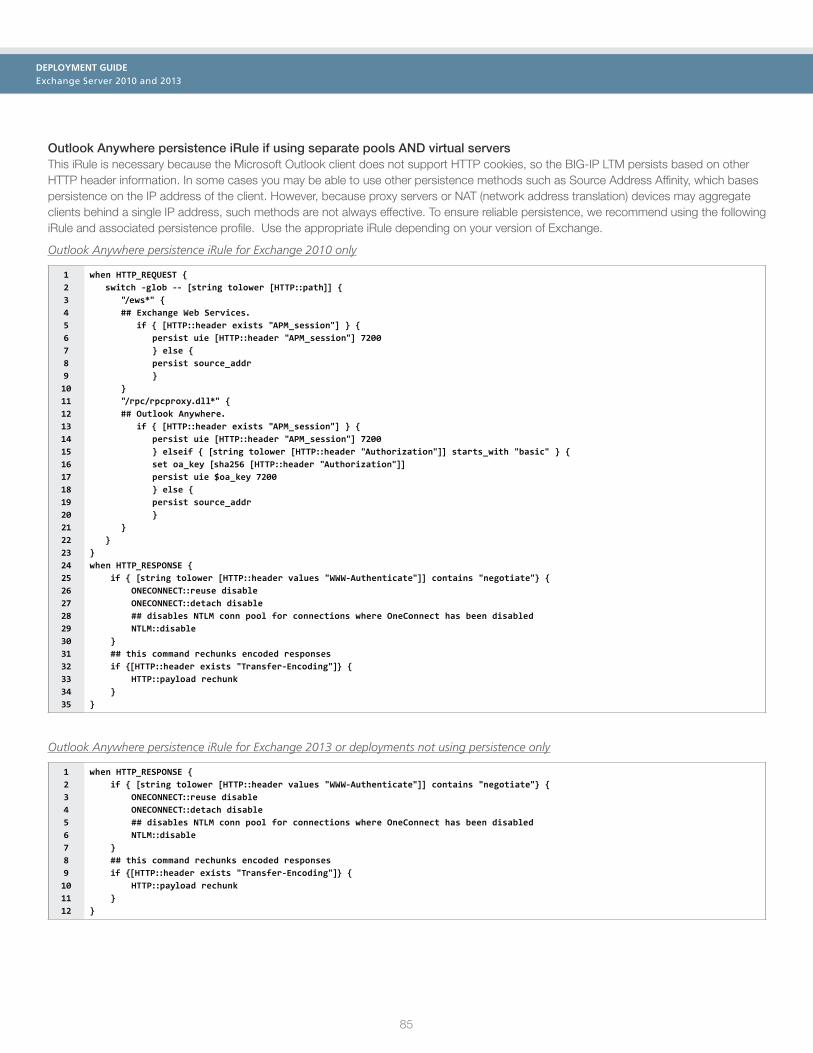
85
DEPLOYMENT GUIDE Exchange Server 2010 and 2013
Outlook Anywhere persistence iRule if using separate pools AND virtual serversThis iRule is necessary because the Microsoft Outlook client does not support HTTP cookies, so the BIG-IP LTM persists based on other HTTP header information. In some cases you may be able to use other persistence methods such as Source Address Affinity, which bases persistence on the IP address of the client. However, because proxy servers or NAT (network address translation) devices may aggregate clients behind a single IP address, such methods are not always effective. To ensure reliable persistence, we recommend using the following iRule and associated persistence profile. Use the appropriate iRule depending on your version of Exchange.
Outlook Anywhere persistence iRule for Exchange 2010 only
1234567891011121314151617181920212223242526272829303132333435
when HTTP_REQUEST { switch -glob -- [string tolower [HTTP::path]] { "/ews*" { ## Exchange Web Services. if { [HTTP::header exists "APM_session"] } { persist uie [HTTP::header "APM_session"] 7200 } else { persist source_addr } } "/rpc/rpcproxy.dll*" { ## Outlook Anywhere. if { [HTTP::header exists "APM_session"] } { persist uie [HTTP::header "APM_session"] 7200 } elseif { [string tolower [HTTP::header "Authorization"]] starts_with "basic" } { set oa_key [sha256 [HTTP::header "Authorization"]] persist uie $oa_key 7200 } else { persist source_addr } } }}when HTTP_RESPONSE { if { [string tolower [HTTP::header values "WWW-Authenticate"]] contains "negotiate"} { ONECONNECT::reuse disable ONECONNECT::detach disable ## disables NTLM conn pool for connections where OneConnect has been disabled NTLM::disable } ## this command rechunks encoded responses if {[HTTP::header exists "Transfer-Encoding"]} { HTTP::payload rechunk } }
Outlook Anywhere persistence iRule for Exchange 2013 or deployments not using persistence only
123456789101112
when HTTP_RESPONSE { if { [string tolower [HTTP::header values "WWW-Authenticate"]] contains "negotiate"} { ONECONNECT::reuse disable ONECONNECT::detach disable ## disables NTLM conn pool for connections where OneConnect has been disabled NTLM::disable } ## this command rechunks encoded responses if {[HTTP::header exists "Transfer-Encoding"]} { HTTP::payload rechunk } }

86
DEPLOYMENT GUIDE Exchange Server 2010 and 2013
Creating an iRule when using a SNAT pool If using a SNAT Pool, multiple connections from a single client are split between multiple source IP addresses by default. As a result, some services, such as the Outlook Client and Blackberry® Enterprise Server that use multiple connections to the RPC Client Access service, may not function properly without the following iRule.
To create the iRule, from the BIG-IP Configuration utility, expand Local Traffic, and then click iRules. Click the Create button, give the iRule a name, and then use the following code (omitting the line numbers) in the Definition section. You need one IP address for each 6,000 concurrent users you expect to each Client Access Server. Modify the IP addresses in the following example to your SNAT Pool IP addresses, adding or removing lines as necessary.
Make sure to attach the iRule to the virtual servers where you are using a SNAT pool.
1 2 3 4 5 6 7 8 9 10 11 12 13 14 15 16 17 18 19 20
when RULE_INIT { # Use a local array to configure SNAT addresses. # These addresses must be defined in a SNAT pool. # In this example, we use three addresses. Replace # these with the IP addresses used in your SNAT Pool. # Follow the pattern of the existing addresses to add more than three. set static::snat_ips(0) 10.0.0.1 set static::snat_ips(1) 10.0.0.2 set static::snat_ips(2) 10.0.0.3 } when CLIENT_ACCEPTED { # Calculate the crc32 checksum of the client IP. # Use the modulo of the checksum and the number of SNAT IPs in the array # to select a SNAT IP address. snat $static::snat_ips([expr {[crc32 [IP::client_addr]] % [array size static::snat_ips]}]) }
Note
If you are configuring multiple Exchange deployments on the same BIG-IP device and are using SNAT pools, you must change the variable names (snat_ips) in the iRule for each separate deployment.

87
DEPLOYMENT GUIDE Exchange Server 2010 and 2013
BIG-IP APM manual configuration
This section covers the following scenarios for BIG-IP APM:
1. A BIG-IP APM deployment on a separate BIG-IP than that providing your Exchange traffic management. There are two options in this scenario:
a. SSL (HTTPS, port 443) connections will be terminated at the BIG-IP APM and forwarded to the BIG-IP LTM and then to your Exchange Client Access servers on HTTP port 80.
Proxy AuthClients
HTTPS HTTP BIG-IP LTM(SSL Offload)
BIG-IP APM(SSL Offload)
Client AccessServers
(SSL Offload enabled)
ActiveDirectory
HTTP
Figure 1: BIG-IP APM with SSL Offload configuration example
b. Both the BIG-IP APM and the BIG-IP LTM will perform SSL Bridging; they will decrypt SSL traffic in order to process it, then re-encrypt the traffic before placing it back on the network.
Proxy AuthClients
HTTPS HTTPS HTTPSBIG-IP LTM(SSL Bridging)
BIG-IP APM(SSL Bridging)
Client AccessServers
ActiveDirectory
Figure 2: BIG-IP APM with SSL Offload configuration example
2. A single BIG-IP configured with both APM and LTM modules. There are two options in this scenario:
a. The BIG-IP will terminate SSL connections and forward traffic to your Exchange Client Access servers on HTTP port 80.
Proxy AuthClients
HTTPS BIG-IP APM and LTM
(SSL Offload) Client AccessServers
(SSL Offload enabled)
ActiveDirectory
HTTP
Figure 3: BIG-IP APM with SSL Bridging configuration example
b. The BIG-IP will perform SSL bridging; SSL will be decrypted on the BIG-IP but re-encrypted before it is placed back on the network.
Proxy AuthClients
HTTPS BIG-IP APM and LTM
(SSL Bridging) Client AccessServers
ActiveDirectory
HTTPS
Figure 4: BIG-IP APM with SSL Bridging configuration example

88
DEPLOYMENT GUIDE Exchange Server 2010 and 2013
BIG-IP APM Configuration No matter which of the scenarios you are deploying, use the following table to create the BIG-IP APM configuration (scenario-specific configuration begins after this section). The tables in this section provide guidance on configuring the individual BIG-IP objects. For specific instructions on configuring individual objects, see the online help or product documentation.
Be sure to see Clients receiving error message when using BIG-IP APM with OWA 2013 and IE10 or Google Chrome on page 59 to the troubleshooting section if applicable.
BIG-IP Object Non-default settings/Notes
DNS and NTP See Configuring DNS and NTP settings on page 66 for instructions.
Health Monitor (Main tab-->Local Traffic-->Monitors)
Configuration Select Advanced from the Configuration list (if necessary).
Name Type a unique name, such as AD_LDAP_monitor.
Type LDAP
Interval 10 (recommended)
Timeout 31 (recommended)
User Name Type a user name with administrative permissions
Password Type the associated password
Base Specify your LDAP base tree. For example, CN=Exchange Users,DC=example,DC=com
Filter Specify the filter. We type cn=user1, using the example above: user1 in OU group “Exchange Users” and domain “example.com”
Security Select a Security option (either None, SSL, or TLS)
Chase Referrals Yes
Alias Address *All Addresses
Alias Address Port 389 (for None or TLS) or 636 (for SSL)
AAA Server (Main tab-->Access Policy-->AAA Servers)
Name Type a unique name. We use exchange-aaa-server.
Type Active Directory
Domain Name Type the FQDN of the Windows Domain name
Server Connection Click Use Pool if necessary.
Domain Controller Pool Name Type a unique name
Domain Controllers IP Address: Type the IP address of a domain controller Hostname: Type the FQDN of the domain controller Click Add. Repeat for each domain controller in this configuration.
Server Pool Monitor Select the monitor you created above.
Admin Name1 Type the Administrator name
Admin Password1 Type the associated password
1 Optional; Admin Name and Password are only required if anonymous binding to Active Directory is not allowed in your environment

89
DEPLOYMENT GUIDE Exchange Server 2010 and 2013
BIG-IP Object Non-default settings/Notes
SSO Configuration2 (Main tab-->Access Policy-->SSO Configurations)
Forms based SSO Configuration
SSO Configurations By Type Forms-Client Initiated
SSO Configuration Name Type a unique name. We use Exchange-SSOv2
In the left pane of the box, click Form Settings, and then click Create.
Form Name Type a unique name. We use Exchange-Form
In the left pane of the box, click Form Parameters, and then click Create
Form ParametersForm Parameter Name Select Username from the list.
Username Parameter Value %{session.sso.token.last.username}
Click Ok, and then click Create again in the Forms Parameters box.
Password Parameter Name password
Password Parameter Value %{session.sso.token.last.password}
Secure Yes
Form Detection In the left page of the Create New Form Definition box, click Form Detection.
Detect Form by URI
Request URI /owa/auth/logon.aspx .
Logon Detection In the left page of the Create New Form Definition box, click Logon Detection.
Detect Logon by Presence of Cookie
Cookie Name cadata Click Ok twice to complete the SSO Configuration.
NTLM SSO Configuration
Name Type a unique name. We use exchange-ntlm-sso.
SSO Method NTLMv1
Username Conversion Enable
NTLM Domain The NTLM domain name where the user accounts are located
11.4 only: Exchange Profile3 (Main tab-->Access Policy-->Secure Connectivity--> Application Access--> Microsoft Exchange)
Name Type a unique name.
Parent Profile /Common/exchange
In the left pane of the box, click Autodiscover
SSO Configuration From the Autodiscover SSO Configuration list, select the NTLM SSO Configuration you created above.
In the left pane of the box, click Exchange Web Service
SSO Configuration From the EWS SSO Configuration list, select the NTLM SSO Configuration you created above.
In the left pane of the box, click Offline Address Book
SSO Configuration From the OAB SSO Configuration list, select the NTLM SSO Configuration you created above.
Access Profile (Main tab-->Access Policy-->Access Profiles)
Name Type a unique name. We use exchange-access.
Microsoft Exchange4 If you created the Exchange profile, select the profile you created from the list.
SSO Configuration Select name of NTLM SSO configuration you created above
Access Policy (See procedure below)
EditEdit the Access Profile you just created using the Visual Policy Editor Continue now with configuring the Access policy below.
2 If you are using BIG-IP version 11.3, you can optionally create a Kerberos SSO configuration for Outlook Anywhere. See Optional: Configuring the BIG-IP Access Policy Manager for Outlook Anywhere with NTLM Authentication - BIG-IP version 11.3 or later only on page 104
3 If using the Exchange profile in 11.4 and later, you must remove any _sys_APM irules from the virtual server4 Optional, only available in 11.4 and later, and only applicable if you created the Exchange profile.
Configuring the Access PolicyAfter creating the objects in the table above, use the following procedure to edit the Access Policy on the BIG-IP APM using the Visual Policy Editor (VPE). The Policy shown in the following procedure is just an example, you can use this Access Policy or create one of your own.

90
DEPLOYMENT GUIDE Exchange Server 2010 and 2013
To configure the Access Policy
1. On the Main tab, expand Access Policy, and click Access Profiles.
2. Locate the Access Profile you created using the table above, and then, in the Access Policy column, click Edit.
3. Click the + symbol between Start and Deny. A box opens with options for different actions.
a. Click the Logon Page option button, and then the Add Item button at the bottom.
b. From the Split domain from full Username list, select Yes.
c. Configure the rest of the Logon Page properties as applicable, and then click Save.
4. Click the + symbol between Logon Page and Deny.
a. In the Authentication section, click the AD Auth option button, and click Add Item.
b. In the Active Directory properties box, from the Server list, select the AAA server you created using the table above. The rest of the settings are optional. Click Save.
5. On the Successful path between AD Auth and Deny, click the + symbol.
a. Click the SSO Credential Mapping option button, and then click Add Item.
b. Configure the Properties as applicable for your configuration; we leave the settings at the defaults. Click the Save button.
6. On the fallback path between SSO Credential Mapping and Deny, click the Deny box. Click the Allow option button, and then click Save. See screenshot below.
7. Click the yellow Apply Access Policy link in the upper left part of the window. You must apply an access policy before it takes effect.
Creating the iRule that chooses the SSO ConfigurationThe next task is to create an iRule that selects the appropriate SSO Configuration to support forms-based authentication of OWA.
To create the iRule
1. On the Main tab, expand Local Traffic, click iRules, and then click the Create button.2. In the Name box, give the iRule a unique name. We use select_SSO_irule.
3. In the Definition section, copy and paste the following iRule, omitting the line numbers. If you used a different name for your forms-based SSO Configuration when creating it based on the table above, use that name in line 4. If you are in a partition other than /Common, replace /Common with the name of your partition.
1234567
when ACCESS_ACL_ALLOWED { set req_uri [HTTP::uri] if { $req_uri contains "/owa/auth" } { WEBSSO::select [set foo /Common/Exchange-SSOv2] } unset req_uri}
Exchange 2013 only If using Exchange 2013, line 3 is: if { $req_uri contains "/owa" } {
4. Click the Finished button.
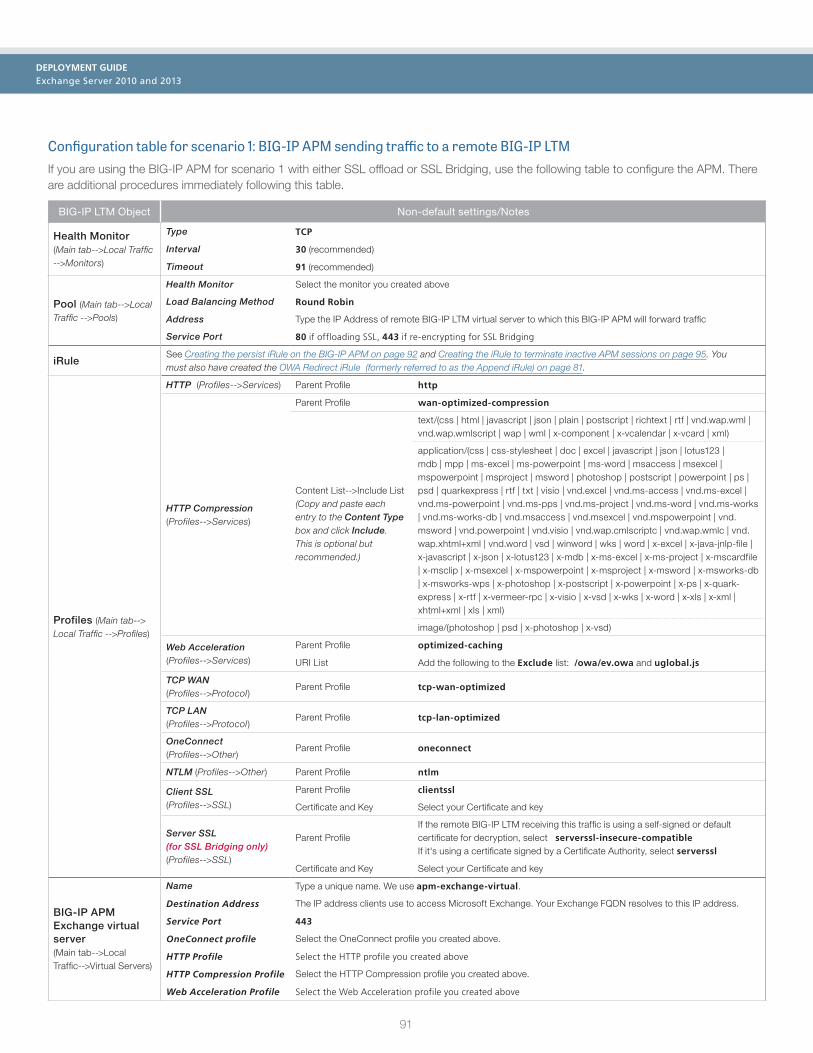
91
DEPLOYMENT GUIDE Exchange Server 2010 and 2013
Configuration table for scenario 1: BIG-IP APM sending traffic to a remote BIG-IP LTMIf you are using the BIG-IP APM for scenario 1 with either SSL offload or SSL Bridging, use the following table to configure the APM. There are additional procedures immediately following this table.
BIG-IP LTM Object Non-default settings/Notes
Health Monitor (Main tab-->Local Traffic -->Monitors)
Type TCP
Interval 30 (recommended)
Timeout 91 (recommended)
Pool (Main tab-->Local Traffic -->Pools)
Health Monitor Select the monitor you created above
Load Balancing Method Round Robin
Address Type the IP Address of remote BIG-IP LTM virtual server to which this BIG-IP APM will forward traffic
Service Port 80 if offloading SSL, 443 if re-encrypting for SSL Bridging
iRuleSee Creating the persist iRule on the BIG-IP APM on page 92 and Creating the iRule to terminate inactive APM sessions on page 95. You must also have created the OWA Redirect iRule (formerly referred to as the Append iRule) on page 81.
Profiles (Main tab--> Local Traffic -->Profiles)
HTTP (Profiles-->Services) Parent Profile http
HTTP Compression (Profiles-->Services)
Parent Profile wan-optimized-compression
Content List-->Include List (Copy and paste each entry to the Content Type box and click Include. This is optional but recommended.)
text/(css | html | javascript | json | plain | postscript | richtext | rtf | vnd.wap.wml | vnd.wap.wmlscript | wap | wml | x-component | x-vcalendar | x-vcard | xml)
application/(css | css-stylesheet | doc | excel | javascript | json | lotus123 | mdb | mpp | ms-excel | ms-powerpoint | ms-word | msaccess | msexcel | mspowerpoint | msproject | msword | photoshop | postscript | powerpoint | ps | psd | quarkexpress | rtf | txt | visio | vnd.excel | vnd.ms-access | vnd.ms-excel | vnd.ms-powerpoint | vnd.ms-pps | vnd.ms-project | vnd.ms-word | vnd.ms-works | vnd.ms-works-db | vnd.msaccess | vnd.msexcel | vnd.mspowerpoint | vnd.msword | vnd.powerpoint | vnd.visio | vnd.wap.cmlscriptc | vnd.wap.wmlc | vnd.wap.xhtml+xml | vnd.word | vsd | winword | wks | word | x-excel | x-java-jnlp-file | x-javascript | x-json | x-lotus123 | x-mdb | x-ms-excel | x-ms-project | x-mscardfile | x-msclip | x-msexcel | x-mspowerpoint | x-msproject | x-msword | x-msworks-db | x-msworks-wps | x-photoshop | x-postscript | x-powerpoint | x-ps | x-quark-express | x-rtf | x-vermeer-rpc | x-visio | x-vsd | x-wks | x-word | x-xls | x-xml | xhtml+xml | xls | xml)
image/(photoshop | psd | x-photoshop | x-vsd)
Web Acceleration (Profiles-->Services)
Parent Profile optimized-caching
URI List Add the following to the Exclude list: /owa/ev.owa and uglobal.js
TCP WAN (Profiles-->Protocol)
Parent Profile tcp-wan-optimized
TCP LAN (Profiles-->Protocol)
Parent Profile tcp-lan-optimized
OneConnect (Profiles-->Other)
Parent Profile oneconnect
NTLM (Profiles-->Other) Parent Profile ntlm
Client SSL (Profiles-->SSL)
Parent Profile clientssl
Certificate and Key Select your Certificate and key
Server SSL (for SSL Bridging only) (Profiles-->SSL)
Parent ProfileIf the remote BIG-IP LTM receiving this traffic is using a self-signed or default certificate for decryption, select serverssl-insecure-compatible If it's using a certificate signed by a Certificate Authority, select serverssl
Certificate and Key Select your Certificate and key
BIG-IP APM Exchange virtual server (Main tab-->Local Traffic-->Virtual Servers)
Name Type a unique name. We use apm-exchange-virtual.
Destination Address The IP address clients use to access Microsoft Exchange. Your Exchange FQDN resolves to this IP address.
Service Port 443
OneConnect profile Select the OneConnect profile you created above.
HTTP Profile Select the HTTP profile you created above
HTTP Compression Profile Select the HTTP Compression profile you created above.
Web Acceleration Profile Select the Web Acceleration profile you created above
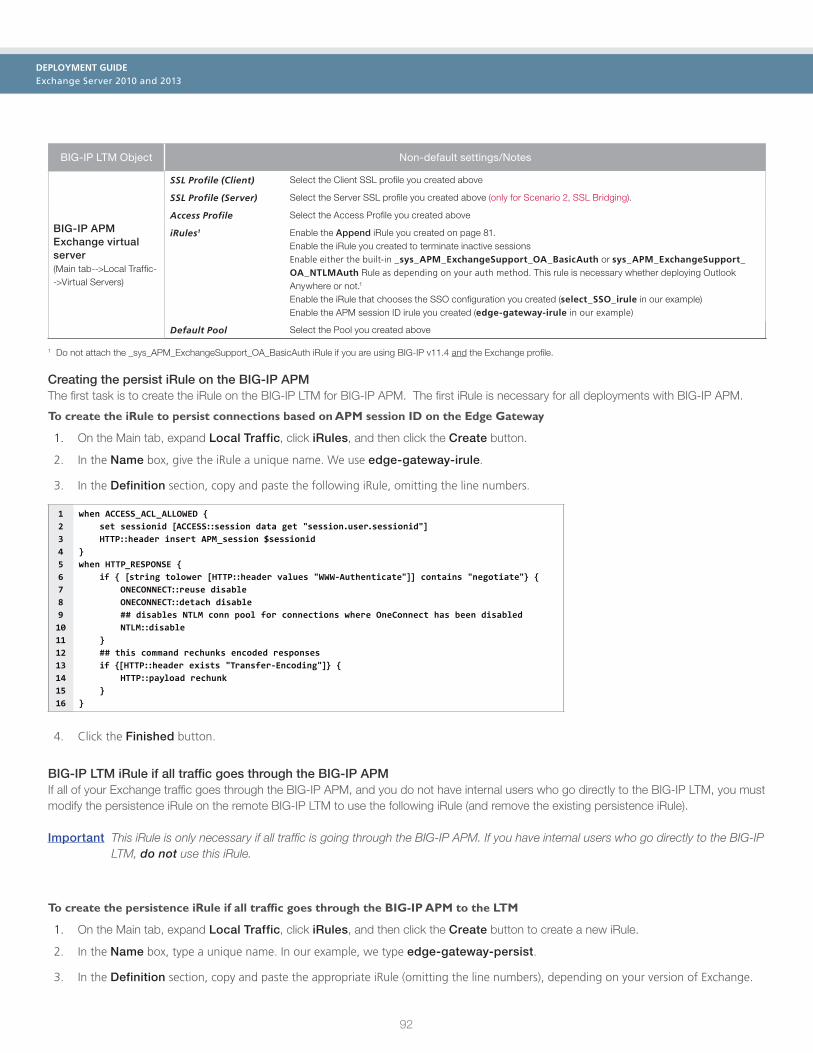
92
DEPLOYMENT GUIDE Exchange Server 2010 and 2013
BIG-IP LTM Object Non-default settings/Notes
BIG-IP APM Exchange virtual server (Main tab-->Local Traffic-->Virtual Servers)
SSL Profile (Client) Select the Client SSL profile you created above
SSL Profile (Server) Select the Server SSL profile you created above (only for Scenario 2, SSL Bridging).
Access Profile Select the Access Profile you created above
iRules1 Enable the Append iRule you created on page 81. Enable the iRule you created to terminate inactive sessions Enable either the built-in _sys_APM_ExchangeSupport_OA_BasicAuth or sys_APM_ExchangeSupport_OA_NTLMAuth Rule as depending on your auth method. This rule is necessary whether deploying Outlook Anywhere or not.1 Enable the iRule that chooses the SSO configuration you created (select_SSO_irule in our example) Enable the APM session ID irule you created (edge-gateway-irule in our example)
Default Pool Select the Pool you created above
1 Do not attach the _sys_APM_ExchangeSupport_OA_BasicAuth iRule if you are using BIG-IP v11.4 and the Exchange profile.
Creating the persist iRule on the BIG-IP APMThe first task is to create the iRule on the BIG-IP LTM for BIG-IP APM. The first iRule is necessary for all deployments with BIG-IP APM.
To create the iRule to persist connections based on APM session ID on the Edge Gateway
1. On the Main tab, expand Local Traffic, click iRules, and then click the Create button.
2. In the Name box, give the iRule a unique name. We use edge-gateway-irule.
3. In the Definition section, copy and paste the following iRule, omitting the line numbers.
12345678910111213141516
when ACCESS_ACL_ALLOWED { set sessionid [ACCESS::session data get "session.user.sessionid"] HTTP::header insert APM_session $sessionid}when HTTP_RESPONSE { if { [string tolower [HTTP::header values "WWW-Authenticate"]] contains "negotiate"} { ONECONNECT::reuse disable ONECONNECT::detach disable ## disables NTLM conn pool for connections where OneConnect has been disabled NTLM::disable } ## this command rechunks encoded responses if {[HTTP::header exists "Transfer-Encoding"]} { HTTP::payload rechunk } }
4. Click the Finished button.
BIG-IP LTM iRule if all traffic goes through the BIG-IP APMIf all of your Exchange traffic goes through the BIG-IP APM, and you do not have internal users who go directly to the BIG-IP LTM, you must modify the persistence iRule on the remote BIG-IP LTM to use the following iRule (and remove the existing persistence iRule).
Important This iRule is only necessary if all traffic is going through the BIG-IP APM. If you have internal users who go directly to the BIG-IP LTM, do not use this iRule.
To create the persistence iRule if all traffic goes through the BIG-IP APM to the LTM
1. On the Main tab, expand Local Traffic, click iRules, and then click the Create button to create a new iRule.
2. In the Name box, type a unique name. In our example, we type edge-gateway-persist.
3. In the Definition section, copy and paste the appropriate iRule (omitting the line numbers), depending on your version of Exchange.

93
DEPLOYMENT GUIDE Exchange Server 2010 and 2013
BIG-IP APM iRule for Exchange 2010 only
1234567891011121314151617181920212223242526272829303132333435363738394041424344454647484950515253545556575859606162
when HTTP_REQUEST {
## CHANGE ALL POOL NAMES TO MATCH THOSE IN YOUR ENVIRONMENT.## OAB and Autodiscover do not require persistence.
switch -glob -- [string tolower [HTTP::path]] { "/microsoft-server-activesync*" { pool my_Exchange_2010__single_as_pool COMPRESS::disable CACHE::disable persist uie [HTTP::header "APM_session"] 7200 return } "/ews*" { pool my_Exchange_2010__single_oa_pool COMPRESS::disable CACHE::disable persist uie [HTTP::header "APM_session"] 7200 return } "/ecp*" { pool my_Exchange_2010__single_owa_pool persist uie [HTTP::header "APM_session"] 7200 return } "/oab*" { pool my_Exchange_2010__single_oa_pool return } "/rpc/rpcproxy.dll*" { pool my_Exchange_2010__single_oa_pool COMPRESS::disable CACHE::disable persist uie [HTTP::header "APM_session"] 7200 return } "/autodiscover*" { pool my_Exchange_2010__single_ad_pool return } default { ## This final section takes all traffic that has not otherwise ## been accounted for and sends it to the pool for Outlook Web ## App pool my_Exchange_2010__single_owa_pool persist uie [HTTP::header "APM_session"] 7200 } }}when HTTP_RESPONSE { if { [string tolower [HTTP::header values "WWW-Authenticate"]] contains "negotiate"} { ONECONNECT::reuse disable ONECONNECT::detach disable ## disables NTLM conn pool for connections where OneConnect has been disabled NTLM::disable } ## this command rechunks encoded responses if {[HTTP::header exists "Transfer-Encoding"]} { HTTP::payload rechunk } }
4. Click the Finished button.

94
DEPLOYMENT GUIDE Exchange Server 2010 and 2013
BIG-IP APM iRule for Exchange 2013 only
1234567891011121314151617181920212223242526272829303132333435363738394041424344454647484950515253545556
when HTTP_REQUEST {
## CHANGE ALL POOL NAMES TO MATCH THOSE IN YOUR ENVIRONMENT.
switch -glob -- [string tolower [HTTP::path]] { "/microsoft-server-activesync*" { pool my_Exchange_2010__single_as_pool COMPRESS::disable CACHE::disable return } "/ews*" { pool my_Exchange_2010__single_oa_pool COMPRESS::disable CACHE::disable return } "/ecp*" { pool my_Exchange_2010__single_owa_pool return } "/oab*" { pool my_Exchange_2010__single_oa_pool return } "/rpc/rpcproxy.dll*" { pool my_Exchange_2010__single_oa_pool COMPRESS::disable CACHE::disable return } "/autodiscover*" { pool my_Exchange_2010__single_ad_pool return } default { ## This final section takes all traffic that has not otherwise ## been accounted for and sends it to the pool for Outlook Web ## App pool my_Exchange_2010__single_owa_pool } }}when HTTP_RESPONSE { if { [string tolower [HTTP::header values "WWW-Authenticate"]] contains "negotiate"} { ONECONNECT::reuse disable ONECONNECT::detach disable ## disables NTLM conn pool for connections where OneConnect has been disabled NTLM::disable } ## this command rechunks encoded responses if {[HTTP::header exists "Transfer-Encoding"]} { HTTP::payload rechunk } }
Modifying the virtual server to use the new persistence iRuleIf you just created the new persistence iRule on the BIG-IP LTM (BIG-IP LTM iRule if all traffic goes through the BIG-IP APM on page 92), and have an existing BIG-IP LTM configuration, you must modify the BIG-IP LTM virtual server to use the new persistence iRule and remove any existing persistence iRules.
This completes the BIG-IP APM configuration for scenario 1.

95
DEPLOYMENT GUIDE Exchange Server 2010 and 2013
Creating the iRule to terminate inactive APM sessionsWhen using APM to secure Outlook Web Access, APM sessions can remain active after users have either manually logged out of OWA or the OWA session has timed out due to user inactivity. The following iRule checks the OWA session status and terminates the associated APM session if applicable.
Note: This iRule is only effective if you are using Forms-based authentication for OWA.
To add the APM session check iRule
1. On the Main tab, expand Local Traffic and then click iRules.
2. Click the Create button.
3. In the Name box, type a unique name such as apm-owa-session-irule.
4. In the Definition section, copy and paste the following iRule:
1234567891011121314151617181920212223242526272829303132333435363738394041
when RULE_INIT { set static::cookie_sessionid [format "sessionid=null; path=/; Expires=Thurs, 01-Jan-1970 00:00:00 GMT;"] set static::cookie_cadata [format "cadata=null; path=/; Expires=Thurs, 01-Jan-1970 00:00:00 GMT;"]}
when ACCESS_SESSION_STARTED { if { [HTTP::uri] contains "UA=0" } { ACCESS::session remove }}
when ACCESS_ACL_ALLOWED { set apm_mrhsession [HTTP::cookie value "MRHSession"] if { [table lookup $apm_mrhsession] == "EXCHANGE_LOGOUT" } { ACCESS::session remove table delete $apm_mrhsession }}
when HTTP_REQUEST { set isset 0 if {[string tolower [HTTP::uri]] starts_with "/owa" } { if {[string tolower [HTTP::uri]] contains "logoff" } { ACCESS::session remove HTTP::respond 302 Location "https://[HTTP::host]/vdesk/hangup.php3" "Set-Cookie" $static::cookie_sessionid "Set-Cookie" $static::cookie_cadata } else { if { [HTTP::uri] contains "UA=0" } { set mrhsession [HTTP::cookie value "MRHSession"] set isset 1 } } }}when HTTP_RESPONSE { if { $isset == 1 } { if { $mrhsession != "" && [HTTP::status] == 440 } { table set $apm_mrhsession "EXCHANGE_LOGOUT" return } }}
5. Click Finished.
6. On the Main tab, click Virtual Servers.
7. From the Virtual Server list, click the name of the appropriate virtual server (either the BIG-IP APM virtual server, the combined virtual server, or the separate OWA virtual server, depending on how you configured the BIG-IP system.
8. On the Menu bar, click Resources.
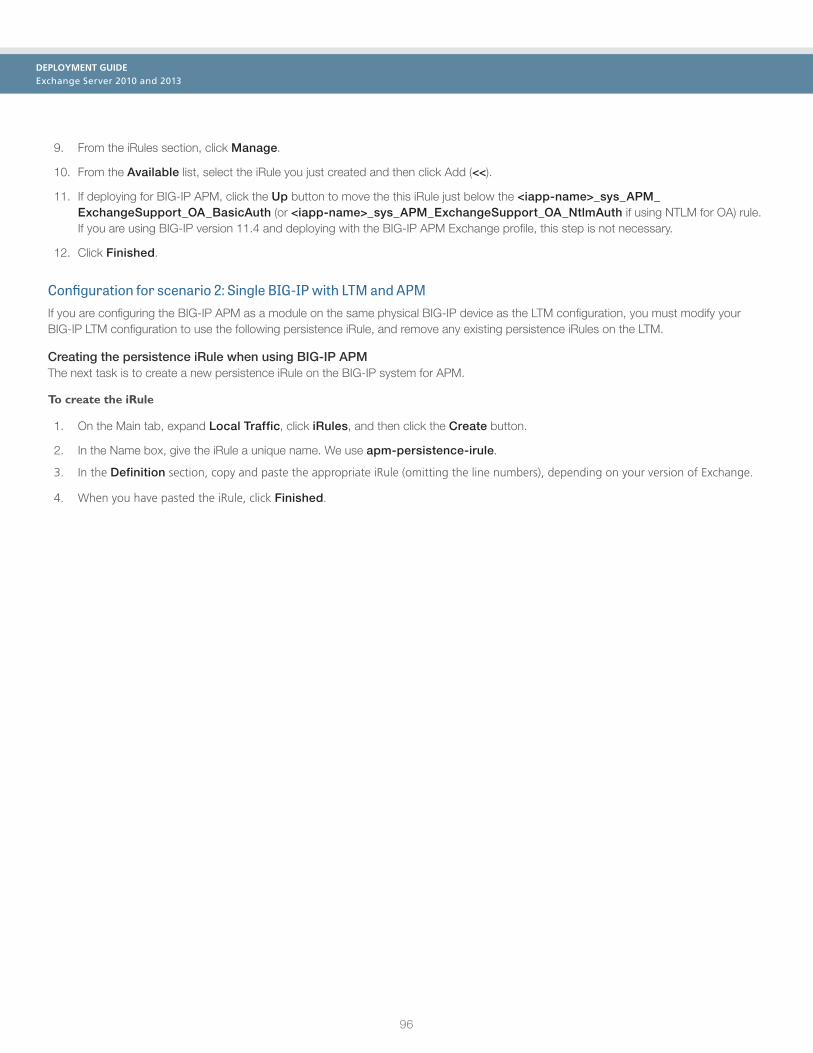
96
DEPLOYMENT GUIDE Exchange Server 2010 and 2013
9. From the iRules section, click Manage.
10. From the Available list, select the iRule you just created and then click Add (<<).
11. If deploying for BIG-IP APM, click the Up button to move the this iRule just below the <iapp-name>_sys_APM_ExchangeSupport_OA_BasicAuth (or <iapp-name>_sys_APM_ExchangeSupport_OA_NtlmAuth if using NTLM for OA) rule. If you are using BIG-IP version 11.4 and deploying with the BIG-IP APM Exchange profile, this step is not necessary.
12. Click Finished.
Configuration for scenario 2: Single BIG-IP with LTM and APM If you are configuring the BIG-IP APM as a module on the same physical BIG-IP device as the LTM configuration, you must modify your BIG-IP LTM configuration to use the following persistence iRule, and remove any existing persistence iRules on the LTM.
Creating the persistence iRule when using BIG-IP APMThe next task is to create a new persistence iRule on the BIG-IP system for APM.
To create the iRule
1. On the Main tab, expand Local Traffic, click iRules, and then click the Create button.
2. In the Name box, give the iRule a unique name. We use apm-persistence-irule.
3. In the Definition section, copy and paste the appropriate iRule (omitting the line numbers), depending on your version of Exchange.
4. When you have pasted the iRule, click Finished.

97
DEPLOYMENT GUIDE Exchange Server 2010 and 2013
BIG-IP APM iRule for Exchange 2010 only
12345678910111213141516171819202122232425262728293031323334353637383940414243444546474849505152535455565758596061626364
## CHANGE ALL POOL NAMES TO MATCH THOSE IN YOUR ENVIRONMENT.## OAB and Autodiscover do not require persistence.
when ACCESS_ACL_ALLOWED { set sessionid [ACCESS::session data get "session.user.sessionid"]
switch -glob -- [string tolower [HTTP::path]] {
"/microsoft-server-activesync*" { pool my_Exchange_2010__single_as_pool COMPRESS::disable CACHE::disable persist uie $sessionid 7200 return } "/ews*" { pool my_Exchange_2010__single_oa_pool COMPRESS::disable CACHE::disable persist uie $sessionid 7200 return } "/ecp*" { pool my_Exchange_2010__single_owa_pool persist uie $sessionid 7200 return } "/oab*" { pool my_Exchange_2010__single_oa_pool return } "/rpc/rpcproxy.dll*" { pool my_Exchange_2010__single_oa_pool COMPRESS::disable CACHE::disable persist uie $sessionid 7200 return } "/autodiscover*" { pool my_Exchange_2010__single_ad_pool return }
default { ## This final section takes all traffic that has not otherwise ## been accounted for and sends it to the pool for Outlook Web ## App pool my_Exchange_2010__single_owa_pool persist uie $sessionid 7200 } }}when HTTP_RESPONSE { if { [string tolower [HTTP::header values "WWW-Authenticate"]] contains "negotiate"} { ONECONNECT::reuse disable ONECONNECT::detach disable ## disables NTLM conn pool for connections where OneConnect has been disabled NTLM::disable } ## this command rechunks encoded responses if {[HTTP::header exists "Transfer-Encoding"]} { HTTP::payload rechunk } }

98
DEPLOYMENT GUIDE Exchange Server 2010 and 2013
BIG-IP APM iRule for Exchange 2013 only
1234567891011121314151617181920212223242526272829303132333435363738394041424344454647484950515253545556
## CHANGE ALL POOL NAMES TO MATCH THOSE IN YOUR ENVIRONMENT.
when ACCESS_ACL_ALLOWED { set sessionid [ACCESS::session data get "session.user.sessionid"]
switch -glob -- [string tolower [HTTP::path]] { "/microsoft-server-activesync*" { pool my_Exchange_2010__single_as_pool COMPRESS::disable CACHE::disable return } "/ews*" { pool my_Exchange_2010__single_oa_pool COMPRESS::disable CACHE::disable return } "/ecp*" { pool my_Exchange_2010__single_owa_pool return } "/oab*" { pool my_Exchange_2010__single_oa_pool return } "/rpc/rpcproxy.dll*" { pool my_Exchange_2010__single_oa_pool COMPRESS::disable CACHE::disable return } "/autodiscover*" { pool my_Exchange_2010__single_ad_pool return } default { ## This final section takes all traffic that has not otherwise ## been accounted for and sends it to the pool for Outlook Web ## App pool my_Exchange_2010__single_owa_pool } }}when HTTP_RESPONSE { if { [string tolower [HTTP::header values "WWW-Authenticate"]] contains "negotiate"} { ONECONNECT::reuse disable ONECONNECT::detach disable ## disables NTLM conn pool for connections where OneConnect has been disabled NTLM::disable } ## this command rechunks encoded responses if {[HTTP::header exists "Transfer-Encoding"]} { HTTP::payload rechunk } }
Modifying the virtual server to use the iRules and Access ProfileThe final task is to modify the BIG-IP LTM virtual server(s) to use the new persistence iRule (and remove any existing persistence iRules) , the terminate inactive sessions iRule, and add the Access Profile you created on BIG-IP APM.
If you created separate virtual servers, you must add the persistence iRule and Access Profile to all BIG-IP LTM virtual server for the HTTP-based Client Access Services (Outlook Web App, Outlook Anywhere, ActiveSync, and Autodiscover). The terminate inactive sessions iRule only needs to be assigned to the OWA virtual server.

99
DEPLOYMENT GUIDE Exchange Server 2010 and 2013
Optional: Securing Access to the Exchange 2013 Administration CenterIn Microsoft Exchange Server 2013, Exchange administration is now performed via a web-based console, the Exchange Administration Center (EAC). You can use iRules and Access Policy Manager to control access to the EAC, thus allowing connections only from approved users and/or IP addresses. You can apply both the iRule and APM Access Policy to the combined virtual server or a the separate OWA virtual server.
Creating the Data GroupIn this procedure, you create a Data Group of trusted IP addresses. The iRule you will create uses this list to make access decisions. Use the following table for guidance on creating the Data Group. For specific instructions, see the online help or product documentation.
BIG-IP APM Object Non-default settings/Notes
Data Group (Main tab-->Local Traffic--> iRules-->Data Group List)
Name Type a unique name.
Type Address
Address Records Type: Host Address: Type a trusted IP AddressClick Add and repeat for all trusted IP addresses.
Creating the EAC access iRuleThe following iRule limits access to the EAC based on the contents of the data group you created. The rule attempts to match the source IP address of the request with IP addresses contained in the Data Group, and rejects the connection if there is not a match. The following example assumes you are sending EAC requests to the OWA LTM pool.
Change trustedAddresses to match the name of the Data Group you created. Change the name of the pool in lines 7 and 10 to match the name of your OWA pool. You can also modify the response HTML code in line 3, which must be entered as a single line.
12
3
5678910111213141516
when HTTP_REQUEST { if { [HTTP::uri] contains "/ecp" } {
set response "<html><head><title>EAC Access Denied</title></head><body>We are sorry, but access to the Exchange Administration Center is restricted to approved client IP addresses. Your IP address, [IP::client_addr], is not approved.</body></html>"
if { [HTTP::header exists "Referer"] } { if { [HTTP::header "Referer"] contains "rfr=owa" } { pool my_iapp_2013_owa_pool } } elseif { [class match [IP::client_addr] equals "trustedAddresses"]} { pool my_iapp_2013_owa_pool } else { HTTP::respond 200 content $response } unset response }}
Securing EAC with Access Policy ManagerIn addition to the iRule, you can use F5’s APM module to query Active Directory group membership for the user making the request to EAC. If the user is not a member of the Organization Management group, the APM policy denies access.
Creating the Access profileThis configuration requires creating a new APM Access Profile object. If you have previously deployed Exchange 2010 CAS servers with APM using the iApp template, the simplest way is to create the profile is to copy the existing policy created by the template.
Copying the Access Policy created by the iApp templateTo copy the Access Policy created by iApp, use the following procedure.
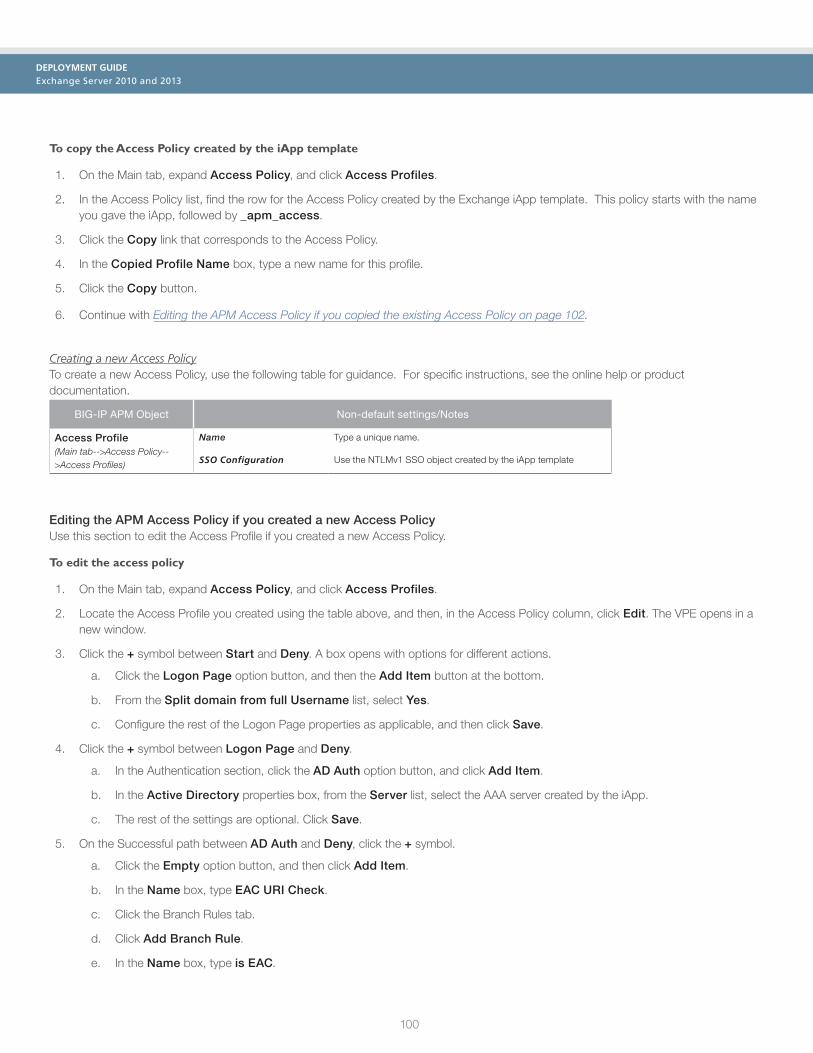
100
DEPLOYMENT GUIDE Exchange Server 2010 and 2013
To copy the Access Policy created by the iApp template
1. On the Main tab, expand Access Policy, and click Access Profiles.
2. In the Access Policy list, find the row for the Access Policy created by the Exchange iApp template. This policy starts with the name you gave the iApp, followed by _apm_access.
3. Click the Copy link that corresponds to the Access Policy.
4. In the Copied Profile Name box, type a new name for this profile.
5. Click the Copy button.
6. Continue with Editing the APM Access Policy if you copied the existing Access Policy on page 102.
Creating a new Access PolicyTo create a new Access Policy, use the following table for guidance. For specific instructions, see the online help or product documentation.
BIG-IP APM Object Non-default settings/Notes
Access Profile (Main tab-->Access Policy-->Access Profiles)
Name Type a unique name.
SSO Configuration Use the NTLMv1 SSO object created by the iApp template
Editing the APM Access Policy if you created a new Access PolicyUse this section to edit the Access Profile if you created a new Access Policy.
To edit the access policy
1. On the Main tab, expand Access Policy, and click Access Profiles.
2. Locate the Access Profile you created using the table above, and then, in the Access Policy column, click Edit. The VPE opens in a new window.
3. Click the + symbol between Start and Deny. A box opens with options for different actions.
a. Click the Logon Page option button, and then the Add Item button at the bottom.
b. From the Split domain from full Username list, select Yes.
c. Configure the rest of the Logon Page properties as applicable, and then click Save.
4. Click the + symbol between Logon Page and Deny.
a. In the Authentication section, click the AD Auth option button, and click Add Item.
b. In the Active Directory properties box, from the Server list, select the AAA server created by the iApp.
c. The rest of the settings are optional. Click Save.
5. On the Successful path between AD Auth and Deny, click the + symbol.
a. Click the Empty option button, and then click Add Item.
b. In the Name box, type EAC URI Check.
c. Click the Branch Rules tab.
d. Click Add Branch Rule.
e. In the Name box, type is EAC.

101
DEPLOYMENT GUIDE Exchange Server 2010 and 2013
f. In the Expression row, click the change link.
g. Click Add Expression.
h. From the Agent Sel list, select Landing URI.
i. In the Landing URI is box, type /ecp/default.aspx.
j. Click Add Expression.
k. Click the Finished button.
l. Click the Save button.
6. On the is EAC path (if you did not modify the name, this is Branch Rule 1) between EAC URI Check and Deny click the + symbol.
a. Click AD Query, and then click Add Item.
b. In the Name box, type EAC AD Query.
c. From the Server list, select the AAA server created by the iApp.
d. In the Search Filter box, type sAMAccountName=%{session.logon.last.username}.
e. Click the Branch Rules tab.
f. In the Name box, delete any existing text, and then type Organization Management.
g. In the Expression row, click the change link.
h. Click the Delete (x) button to the right of the User's Primary Group ID is box.
i. Click Add Expression.
j. From the Agent Sel list, select AD Query.
k. From the Condition list, select User is a Member of.
l. In the User is a member of box, type CN=Organization Management,OU=Microsoft Exchange Security Groups,DC=example,DC=com.
m. Click Add Expression.
n. Click the Finished button.
o. Click the Save button.
7. On the fallback path between EAC URI Check and Deny, click the + symbol.
a. Click SSO Credential Mapping, and then click Add Item.
b. Configure the settings as applicable. We leave the settings at the defaults.
c. Click Save.
d. On the fallback path between SSO Credential Mapping and Deny, click the Deny box/link.
e. Click the Allow option button, and then click Save.
8. On the Organization Management path, between EAC AD Query and Deny click +.
a. Click SSO Credential Mapping, and then click Add Item.
b. Configure the settings as applicable. We leave the settings at the defaults.
c. Click Save.
d. On the fallback path between SSO Credential Mapping and Deny, click the Deny box/link.
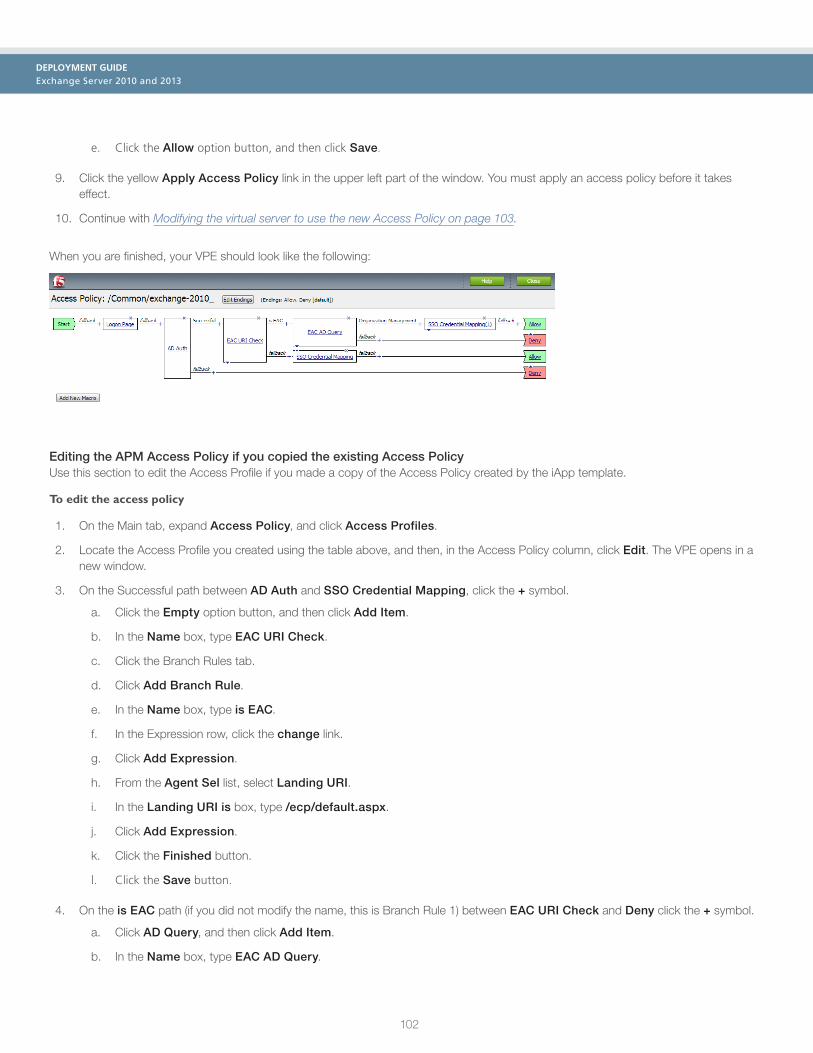
102
DEPLOYMENT GUIDE Exchange Server 2010 and 2013
e. Click the Allow option button, and then click Save.
9. Click the yellow Apply Access Policy link in the upper left part of the window. You must apply an access policy before it takes effect.
10. Continue with Modifying the virtual server to use the new Access Policy on page 103.
When you are finished, your VPE should look like the following:
Editing the APM Access Policy if you copied the existing Access PolicyUse this section to edit the Access Profile if you made a copy of the Access Policy created by the iApp template.
To edit the access policy
1. On the Main tab, expand Access Policy, and click Access Profiles.
2. Locate the Access Profile you created using the table above, and then, in the Access Policy column, click Edit. The VPE opens in a new window.
3. On the Successful path between AD Auth and SSO Credential Mapping, click the + symbol.
a. Click the Empty option button, and then click Add Item.
b. In the Name box, type EAC URI Check.
c. Click the Branch Rules tab.
d. Click Add Branch Rule.
e. In the Name box, type is EAC.
f. In the Expression row, click the change link.
g. Click Add Expression.
h. From the Agent Sel list, select Landing URI.
i. In the Landing URI is box, type /ecp/default.aspx.
j. Click Add Expression.
k. Click the Finished button.
l. Click the Save button.
4. On the is EAC path (if you did not modify the name, this is Branch Rule 1) between EAC URI Check and Deny click the + symbol.
a. Click AD Query, and then click Add Item.
b. In the Name box, type EAC AD Query.

103
DEPLOYMENT GUIDE Exchange Server 2010 and 2013
c. From the Server list, select the AAA Server created by the iApp.
d. In the Search Filter box, type sAMAccountName=%{session.logon.last.username}.
e. Click the Branch Rules tab.
f. In the Name box, delete any existing text, and then type Organization Management.
g. In the Expression row, click the change link.
h. Click the Delete (x) button to the right of the User's Primary Group ID is box.
i. Click Add Expression.
j. From the Agent Sel list, select AD Query.
k. From the Condition list, select User is a Member of.
l. In the User is a member of box, type CN=Organization Management,OU=Microsoft Exchange Security Groups,DC=example,DC=com.
m. Click Add Expression.
n. Click the Finished button.
o. Click the Save button.
5. On the Organization Management path, between EAC AD Query and Deny click the + symbol.
a. Click SSO Credential Mapping, and then click Add Item.
b. Configure the settings as applicable. We leave the settings at the defaults.
c. Click Save.
d. On the fallback path between SSO Credential Mapping and Deny, click the Deny box/link.
e. Click the Allow option button, and then click Save.
6. Click the yellow Apply Access Policy link in the upper left part of the window. You must apply an access policy before it takes effect.
7. Use the following procedure to add the Access Policy to the virtual server.
Modifying the virtual server to use the new Access PolicyThe final task is to add the new Access Policy to the virtual server.
To modify the virtual server to use the Access Policy
1. On the Main tab, expand Local Traffic and then click Virtual Servers.
2. Click the name of the appropriate virtual server. This is either the single virtual server for all HTTP-based CAS services or the separate virtual server for OWA.
3. In the Access Policy section, from the Access Profile list, select the Access profile you just modified.
4. Click Update.
This completes the EAC configuration.

104
DEPLOYMENT GUIDE Exchange Server 2010 and 2013
Optional: Configuring the BIG-IP Access Policy Manager for Outlook Anywhere with NTLM Authentication - BIG-IP version 11.3 or later onlyF5’s Access Policy Manager (APM) module supports NTLM authentication for Outlook clients using the RPC-over-HTTP protocol (Outlook Anywhere) in version 11.3 and later.
Before configuring BIG-IP system, you must perform prerequisite configuration steps on the Exchange Server(s) and Active Directory servers. See Appendix E: Active Directory and Exchange Server configuration for NTLM on page 112.
Use the following table for guidance on configuring the BIG-IP APM.
BIG-IP Object Non-default settings/Notes
AAA Server (Access Policy-->AAA Servers)
Name Type a unique name. We use exchange-aaa-server.
Type Active Directory
Domain Controller Type the IP address or FQDN name of an Active Directory Domain Controller
Domain Name Type the Active Directory domain name
Admin Name1 Type the AD user name with administrative permissions (optional)
Admin Password1 Type the associated password (optional). Type it again in the Verify Password box
SSO Configuration (Access Policy-->SSO Configurations)
Name Type a unique name. We use exchange_kerberos_sso
SSO Method Kerberos
Kerberos Realm Type the Kerberos Realm. This must be uppercase, such as MYDOMAIN.COM
KDC1 IP address of the Kerberos Key Distribution Center. If you leave this field blank, the BIG-IP system uses DNS to find the address of the Key Distribution Center.
Account Name The account name of the Active Directory user account to which logon rights have been delegated; this must begin with host/, for example, host/bigip_user_acct.mydomain.local
Account Password Type the associated password
SPN Pattern1 2 Specify a custom SPN pattern to create the ticket request using the host name from the HTTP request2.
NTLM Machine Account (Access Policy-->Access Profiles-->NTLM)
Name Type a unique name. We use exchange-ntlm-ma.
Machine Account Name The name of the account which will be joined to the Active Directory domain. This must be different than the account name specified in Kerberos SSO Configuration (such as bigip_machine_acct).
Domain FQDN Type the FQDN for Active Directory (such as mydomain.com)
Admin User Type the user name of a user with permissions to join a computer account to the Active Directory domain.
Admin Password1 Type the associated password.
NTLM Auth Configuration 3 (Access Policy--> Access Profiles-->NTLM)
Name Use following syntax: exch_ntlm_<vs-name>, i.e. exch_ntlm_my_exchange_iapp_combined_https
Machine Account Name Select the NTLM Machine Account you created above
Domain Controller FQDN List Type the fully qualified name of your Active Directory domain controller and then click Add.
11.4 only: Exchange Profile4 (Main tab-->Access Policy-->Secure Connectivity--> Application Access--> Microsoft Exchange)
Name Type a unique name.
Parent Profile /Common/exchange
NTLM Configuration Select the NTLM Auth configuration you created.
In the left pane of the box, click Autodiscover
SSO Configuration From the Autodiscover SSO Configuration list, select the Kerberos SSO Configuration you created above.
In the left pane of the box, click Exchange Web Service
SSO Configuration From the EWS SSO Configuration list, select the Kerberos SSO Configuration you created above.
In the left pane of the box, click Offline Address Book
SSO Configuration From the OAB SSO Configuration list, select the Kerberos SSO Configuration you created above.
1 Optional2 By default, the SSO will attempt to use reverse DNS lookups of the pool member IP address to construct the Kerberos ticket request. If you do not wish to use DNS to
find the host name to be used in the ticket request, you can specify a custom SPN pattern to create the ticket request using the host name from the HTTP request. The correct SPN pattern is: HTTP/%[email protected], where REALM.com is replaced with your fully-qualified Active Directory domain name. This configuration also requires that the DefaultAppPool, MSExchangeAutodiscoverAppPool, and MSExchangeServicesAppPool IIS application pools are configured to run under the user account specified for Kerberos Delegation, and that an SPN has been created for the hostname used to access Outlook Anywhere and Autodiscover
3 You must create this object in the same partition and folder location as the virtual server to which the Access Profile is applied. if you are manually reconfiguring the BIG-IP system from a previous iApp deployment, you will need to create this object from the tmsh command line. See the following procedure.
4 If using the Exchange profile in 11.4 and later, you must remove any _sys_APM irules from the virtual server
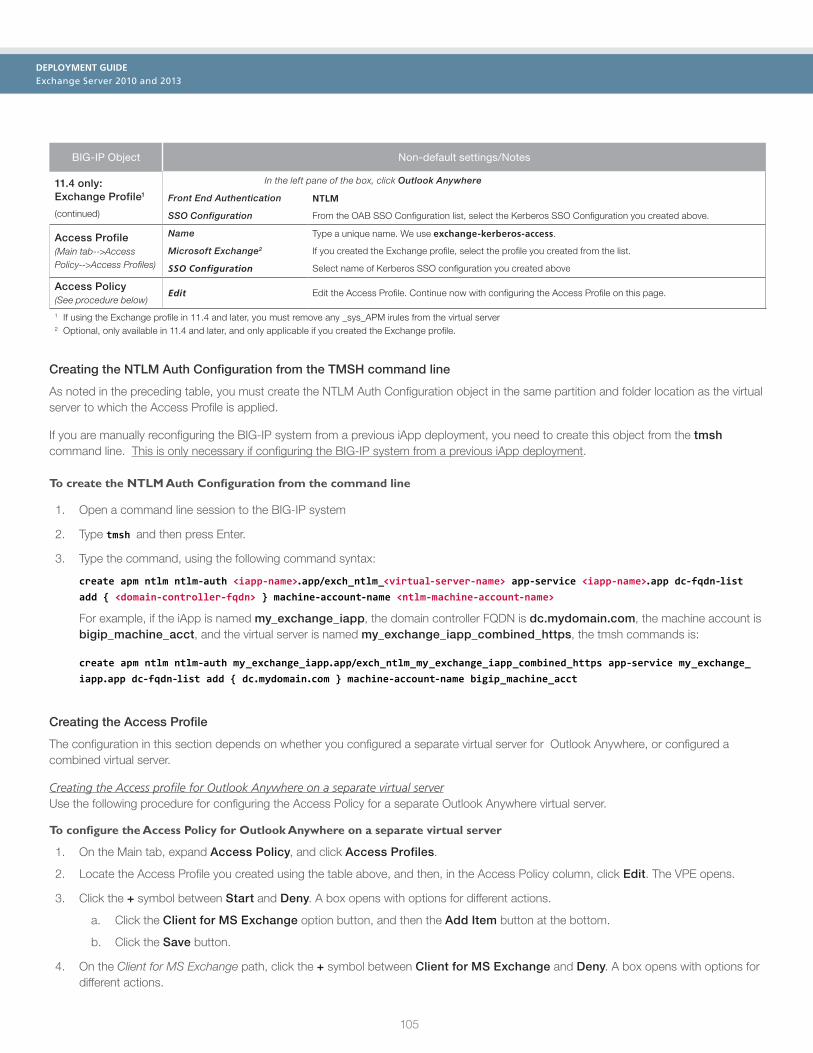
105
DEPLOYMENT GUIDE Exchange Server 2010 and 2013
BIG-IP Object Non-default settings/Notes
11.4 only: Exchange Profile1
(continued)
In the left pane of the box, click Outlook Anywhere
Front End Authentication NTLM
SSO Configuration From the OAB SSO Configuration list, select the Kerberos SSO Configuration you created above.
Access Profile (Main tab-->Access Policy-->Access Profiles)
Name Type a unique name. We use exchange-kerberos-access.
Microsoft Exchange2 If you created the Exchange profile, select the profile you created from the list.
SSO Configuration Select name of Kerberos SSO configuration you created above
Access Policy (See procedure below)
Edit Edit the Access Profile. Continue now with configuring the Access Profile on this page.
1 If using the Exchange profile in 11.4 and later, you must remove any _sys_APM irules from the virtual server2 Optional, only available in 11.4 and later, and only applicable if you created the Exchange profile.
Creating the NTLM Auth Configuration from the TMSH command line
As noted in the preceding table, you must create the NTLM Auth Configuration object in the same partition and folder location as the virtual server to which the Access Profile is applied.
If you are manually reconfiguring the BIG-IP system from a previous iApp deployment, you need to create this object from the tmsh command line. This is only necessary if configuring the BIG-IP system from a previous iApp deployment.
To create the NTLM Auth Configuration from the command line
1. Open a command line session to the BIG-IP system
2. Type tmsh and then press Enter.
3. Type the command, using the following command syntax:
create apm ntlm ntlm-auth <iapp-name>.app/exch_ntlm_<virtual-server-name> app-service <iapp-name>.app dc-fqdn-list add { <domain-controller-fqdn> } machine-account-name <ntlm-machine-account-name>
For example, if the iApp is named my_exchange_iapp, the domain controller FQDN is dc.mydomain.com, the machine account is bigip_machine_acct, and the virtual server is named my_exchange_iapp_combined_https, the tmsh commands is:
create apm ntlm ntlm-auth my_exchange_iapp.app/exch_ntlm_my_exchange_iapp_combined_https app-service my_exchange_iapp.app dc-fqdn-list add { dc.mydomain.com } machine-account-name bigip_machine_acct
Creating the Access Profile
The configuration in this section depends on whether you configured a separate virtual server for Outlook Anywhere, or configured a combined virtual server.
Creating the Access profile for Outlook Anywhere on a separate virtual serverUse the following procedure for configuring the Access Policy for a separate Outlook Anywhere virtual server.
To configure the Access Policy for Outlook Anywhere on a separate virtual server
1. On the Main tab, expand Access Policy, and click Access Profiles.
2. Locate the Access Profile you created using the table above, and then, in the Access Policy column, click Edit. The VPE opens.
3. Click the + symbol between Start and Deny. A box opens with options for different actions.
a. Click the Client for MS Exchange option button, and then the Add Item button at the bottom.
b. Click the Save button.
4. On the Client for MS Exchange path, click the + symbol between Client for MS Exchange and Deny. A box opens with options for different actions.

106
DEPLOYMENT GUIDE Exchange Server 2010 and 2013
a. Click the NTLM Auth Result Check option button, and then the Add Item button at the bottom.
b. Click the Save button.
5. On the Successful path between NTLM Auth Result Check and Deny, click the + symbol.
a. Click the SSO Credential Mapping option button, and then click Add Item.
b. Configure the Properties as applicable for your configuration. In our example, we leave the settings at the defaults. Click the Save button.
6. On the fallback path between SSO Credential Mapping and Deny, click the Deny box. Click the Allow option button, and then click Save.
7. On the Fallback path between NTLM Auth Result Check and Deny, click the + symbol.
a. Click the Logon Page option button, and then the Add Item button at the bottom.
b. From the Split domain from full Username list, select Yes.
c. Configure the rest of the Logon Page properties as applicable, and then click Save.
8. On the Fallback path between Logon Page and Deny, click the + symbol.
a. In the Authentication section, click the AD Auth option button, and click Add Item.
b. In the Active Directory properties box, from the Server list, select the AAA Server you created using the table above. The rest of the settings are optional.
c. Click Save.
9. On the Successful path between AD Auth and Deny, click the + symbol.
a. Click the SSO Credential Mapping option button, and then click Add Item.
b. Configure the Properties as applicable for your configuration. In our example, we leave the settings at the defaults. Click the Save button.
10. On the fallback path between SSO Credential Mapping and Deny, click the Deny box. Click the Allow option button, and then click Save.
11. Click the yellow Apply Access Policy link in the upper left part of the window. You must apply an access policy before it takes effect. Your VPE should look like the following example.
This completes the Access Policy for the separate virtual server scenario. Continue with Enabling the ECA Profile on Outlook Anywhere Virtual Server on page 108.
Creating the Access profile for Outlook Anywhere on a combined virtual serverUse the following procedure for configuring the Access Policy if you configured Outlook Anywhere as a part of a combined virtual server.

107
DEPLOYMENT GUIDE Exchange Server 2010 and 2013
To configure the Access Policy for Outlook Anywhere on a combined virtual server
1. On the Main tab, expand Access Policy, and click Access Profiles.
2. Locate the Access Profile you created using the table above, and then, in the Access Policy column, click Edit. The VPE opens in a new window.
3. Click the + symbol between Start and Deny. A box opens with options for different actions.
a. Click the Client for MS Exchange option button, and then the Add Item button at the bottom.
b. Click the Save button.
4. On the Client for MS Exchange path, click the + symbol between Client for MS Exchange and Deny. A box opens with options for different actions.
a. Click the NTLM Auth Result Check option button, and then the Add Item button at the bottom.
b. Click the Save button.
5. On the Successful path between NTLM Auth Result Check and Deny, click the + symbol.
a. Click the SSO Credential Mapping option button, and then click Add Item.
b. Configure the Properties as applicable for your configuration. In our example, we leave the settings at the defaults. Click the Save button.
6. On the fallback path between SSO Credential Mapping and Deny, click the Deny box. Click the Allow option button, and then click Save.
7. On the Fallback path between NTLM Auth Result Check and Deny, click the + symbol.
a. Click the Logon Page option button, and then the Add Item button at the bottom.
b. From the Split domain from full Username list, select Yes.
c. Configure the rest of the Logon Page properties as applicable, and then click Save.
8. On the Fallback path between Logon Page and Deny, click the + symbol.
a. In the Authentication section, click the AD Auth option button, and click Add Item.
b. In the Active Directory properties box, from the Server list, select the AAA Server you created using the table above. The rest of the settings are optional.
c. Click Save.
9. On the Successful path between AD Auth and Deny, click the + symbol.
a. Click the SSO Credential Mapping option button, and then click Add Item.
b. Configure the Properties as applicable for your configuration. In our example, we leave the settings at the defaults. Click the Save button.
10. On the fallback path between SSO Credential Mapping and Deny, click the Deny box. Click the Allow option button, and then click Save.
11. On the Fallback path between Client for MS Exchange (the first box of the VPE) and Deny, click the + symbol.
a. Click the Logon Page option button, and then the Add Item button at the bottom.
b. From the Split domain from full Username list, select Yes.
c. Configure the rest of the Logon Page properties as applicable, and then click Save.
12. On the bottom Fallback path between the new Logon Page and Deny, click the + symbol.

108
DEPLOYMENT GUIDE Exchange Server 2010 and 2013
a. In the Authentication section, click the AD Auth option button, and click Add Item.
b. In the Active Directory properties box, from the Server list, select the AAA Server you created using the table above. The rest of the settings are optional.
c. Click Save.
13. On the Successful path between AD Auth and Deny, click the + symbol.
a. Click the SSO Credential Mapping option button, and then click Add Item.
b. Configure the Properties as applicable for your configuration. In our example, we leave the settings at the defaults. Click the Save button.
14. On the fallback path between SSO Credential Mapping and Deny, click the Deny box. Click the Allow option button, and then click Save.
15. Click the yellow Apply Access Policy link in the upper left part of the window. You must apply an access policy before it takes effect. Your VPE should look like the following example.
This completes the Access Policy for the combined virtual server.
Enabling the ECA Profile on Outlook Anywhere Virtual ServerThe next task is to enable the ECA profile on the Outlook Anywhere virtual server. This profile allows the APM to manage NTLM authentication for Outlook Anywhere clients. In BIG-IP version 11.3, you must attach the ECA profile via the tmsh command line. Do NOT enable this profile if using BIG-IP version 11.4 and the Exchange Profile.
To attach the ECA profile to the virtual server from the command line
1. Open a command line session to the BIG-IP system
2. Type tmsh
3. Type the command, using the following command syntax:
modify ltm virtual <iapp-name>.app/<virtual-server-name> profiles add { eca }
For example:
modify ltm virtual my_exchange_iapp.app/my_exchange_iapp_combined_https profiles add { eca }
i Important
You must have enabled the ECA profile on the Outlook Anywhere virtual server as described above before applying the system iRule in the next step. Do NOT enable this profile or attach the system iRule if using BIG-IP version 11.4 and the Exchange Profile.

109
DEPLOYMENT GUIDE Exchange Server 2010 and 2013
Applying the System iRule to Outlook Anywhere virtual serverBefore attempting a connection via BIG-IP APM with Outlook Anywhere, you must apply the system iRule that manages NTLM authentication to either the separate Outlook Anywhere virtual server, or the combined virtual server.
To apply the system iRule to the virtual server
1. On the Main tab, expand Local Traffic and then click Virtual Servers.
2. Click the name of either the combined virtual server or the separate Outlook Anywhere virtual server.
3. Click the Resources tab.
4. In the iRules section, click the Manage button.
5. From the Available list, select _sys_APM_ExchangeSupport_OA_NtlmAuth, and then click the Add (<<) button.
6. If necessary, use the Up and Down buttons to ensure the iRules are in the following order when deployed on a single, combined virtual server:
• OWA Append iRule (for combined virtual only)
• _sys_APM_ExchangeSupport_OA_NtlmAuth
• Select SSO iRule
• Combined Virtual Server Persist iRule
7. Click Finished.
Setting the Default Pool on a combined virtual server
If you have configured the BIG-IP system use a single, combined virtual server for Exchange, the final task is to set the BIG-IP LTM pool for Outlook Anywhere as the default pool for the virtual server.
To set the default pool on the combined virtual server
1. On the Main tab, expand Local Traffic and then click Virtual Servers.
2. Click the HTTPS virtual server (port 443) virtual server.
3. Click the Resources tab.
4. In the Load Balancing section, from the Default Pool list, select the Outlook Anywhere pool
5. Click Update.
This completes the configuration for NTLM and Outlook Anywhere.
Access Policy example when using both EAC restricted access and NTLM for Outlook AnywhereUsing both EAC restricted access and NTLM for Outlook Anywhere in a single Access Policy is an acceptable configuration, although the step by step procedure is outside the scope of this document (use the iApp for this scenario if you need the walkthrough). The following screenshot shows what the VPE should look like with both EAC restricted access and NTLM for Outlook Anywhere.

110
DEPLOYMENT GUIDE Exchange Server 2010 and 2013
Appendix D: Technical NotesThe following contains additional information that may be helpful when configuring the BIG-IP system for Microsoft Exchange Server 2010 and 2013.
Slow Ramp TimeWhen you configure a Slow Ramp time, BIG-IP will not immediately send a full proportional share of incoming traffic to a pool member that has just come online. Instead, the BIG-IP will increase the proportion of traffic gradually over the time specified. This ensures that a newly-booted or newly-added server is not overwhelmed with incoming traffic, especially when you have selected a Least Connections load-balancing method.
Although advanced monitors that perform logins will prevent any traffic being sent to a Client Access server until at least those functions are enabled, other background services may not be fully ready to service connections. As such, we strongly recommend Slow Ramp even with advanced monitors. If you are not using advanced monitors but have only enabled simple TCP checks or HTTP queries that do not actually check for full client functionality, a Slow Ramp time is essential.
F5 testing has shown that 300 seconds (5 minutes) is generally sufficient to allow a rebooted Exchange Client Access server to fully start all services and be ready to handle a full load of traffic, but that time is highly dependent on local conditions. You may want to adjust the time period up or down in your environment based on your server capacity and load.
Subject Alternative Name (SAN) SSL CertificatesThis template currently only supports the use of a single DNS name and corresponding certificate and key for all services, or multiple DNS names using a SAN-enabled certificate and key or wildcard certificate. Support for multiple names, each with separate corresponding certificates and keys, will be in a future release.
An SSL certificate that supports the Subject Alternative Name (SAN) extension allows more than one valid FQDN per certificate, without having to resort to a “wildcard” certificate for a domain. When used in conjunction with Exchange Server, SAN certificates make it simple to combine multiple services into a single virtual server while retaining the flexibility of separate FQDNs. Some examples of using SAN certificates with Exchange 2010 are shown here: http://technet.microsoft.com/en-us/library/aa995942%28EXCHG.140%29.aspx
When you request a SAN certificate from a certification authority, you must define all desired FQDNs in the Subject Alternative Name field; clients will ignore the Common Name in the certificate Subject.
In BIG-IP versions prior to 11.1, the BIG-IP web-based Configuration utility does not display the Subject Alternative Name values of imported certificates, however, the use of SAN certificates is otherwise supported.
The BIG-IP system supports using a wildcard certificate to secure Exchange CAS deployments using multiple FQDNs. However, for increased security, F5 recommends using SAN certificate(s) where possible. Additionally, some older mobile devices are incompatible with wildcard certificates. Consult your issuing Certificate Authority for compatibility information.
Maximum number of concurrent users: SNAT Pool guidanceIf you expect fewer than 6,000 concurrent users per Client Access Server, the iApp configures SNAT Automap. If you expect more than 6,000 users, the iApp configures a SNAT Pool. This section describes how F5 chose 6,000 users as a rule of thumb, and contains additional information if you want to more precisely calculate the number of concurrent users for your SNAT Pool configuration.
The BIG-IP system can create roughly 64,000 connections per SNAT address (ephemeral or source ports used by connections from the BIG-IP range from 1024 to 65,535, or an absolute maximum 64,511 effective concurrent connections). Each user connected to a Client Access server can have about 10 concurrent connections (for example, if a user has Outlook on a PC, a mobile phone, and Lync running simultaneously). Therefore, you would need a SNAT address for each 6,000 concurrent users you expect. For example, if you have 12,000 users, you need two SNAT pool IP addresses; if you have 15,000 users, you need three addresses. The IP address(es) you specify must not be self IP addresses on this BIG-IP system.
Outlook Client ConfigurationExchange administrators will typically use Autodiscover to configure Outlook clients. If manual configuration is required, the following table provides the recommended settings to match the deployment scenarios described in this guide.
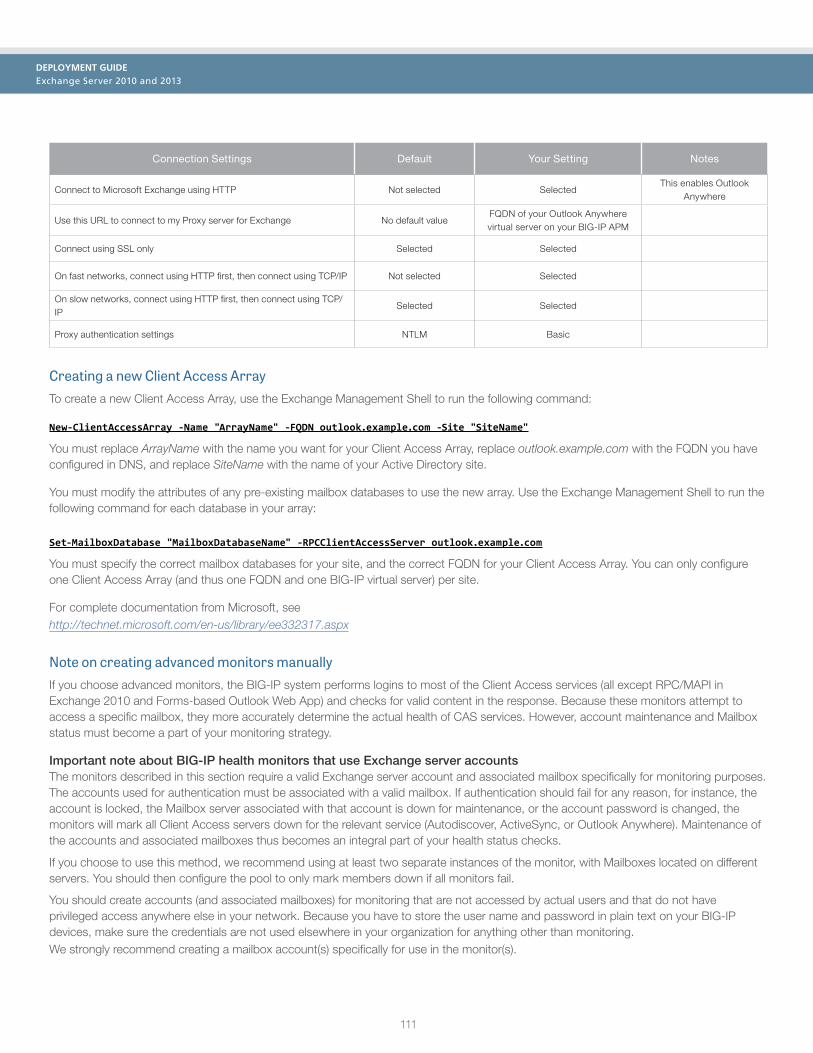
111
DEPLOYMENT GUIDE Exchange Server 2010 and 2013
Connection Settings Default Your Setting Notes
Connect to Microsoft Exchange using HTTP Not selected SelectedThis enables Outlook
Anywhere
Use this URL to connect to my Proxy server for Exchange No default valueFQDN of your Outlook Anywhere virtual server on your BIG-IP APM
Connect using SSL only Selected Selected
On fast networks, connect using HTTP first, then connect using TCP/IP Not selected Selected
On slow networks, connect using HTTP first, then connect using TCP/IP
Selected Selected
Proxy authentication settings NTLM Basic
Creating a new Client Access ArrayTo create a new Client Access Array, use the Exchange Management Shell to run the following command:
New-ClientAccessArray -Name "ArrayName" -FQDN outlook.example.com -Site "SiteName"
You must replace ArrayName with the name you want for your Client Access Array, replace outlook.example.com with the FQDN you have configured in DNS, and replace SiteName with the name of your Active Directory site.
You must modify the attributes of any pre-existing mailbox databases to use the new array. Use the Exchange Management Shell to run the following command for each database in your array:
Set-MailboxDatabase "MailboxDatabaseName" -RPCClientAccessServer outlook.example.com
You must specify the correct mailbox databases for your site, and the correct FQDN for your Client Access Array. You can only configure one Client Access Array (and thus one FQDN and one BIG-IP virtual server) per site.
For complete documentation from Microsoft, see http://technet.microsoft.com/en-us/library/ee332317.aspx
Note on creating advanced monitors manuallyIf you choose advanced monitors, the BIG-IP system performs logins to most of the Client Access services (all except RPC/MAPI in Exchange 2010 and Forms-based Outlook Web App) and checks for valid content in the response. Because these monitors attempt to access a specific mailbox, they more accurately determine the actual health of CAS services. However, account maintenance and Mailbox status must become a part of your monitoring strategy.
Important note about BIG-IP health monitors that use Exchange server accountsThe monitors described in this section require a valid Exchange server account and associated mailbox specifically for monitoring purposes. The accounts used for authentication must be associated with a valid mailbox. If authentication should fail for any reason, for instance, the account is locked, the Mailbox server associated with that account is down for maintenance, or the account password is changed, the monitors will mark all Client Access servers down for the relevant service (Autodiscover, ActiveSync, or Outlook Anywhere). Maintenance of the accounts and associated mailboxes thus becomes an integral part of your health status checks.
If you choose to use this method, we recommend using at least two separate instances of the monitor, with Mailboxes located on different servers. You should then configure the pool to only mark members down if all monitors fail.
You should create accounts (and associated mailboxes) for monitoring that are not accessed by actual users and that do not have privileged access anywhere else in your network. Because you have to store the user name and password in plain text on your BIG-IP devices, make sure the credentials are not used elsewhere in your organization for anything other than monitoring. We strongly recommend creating a mailbox account(s) specifically for use in the monitor(s).
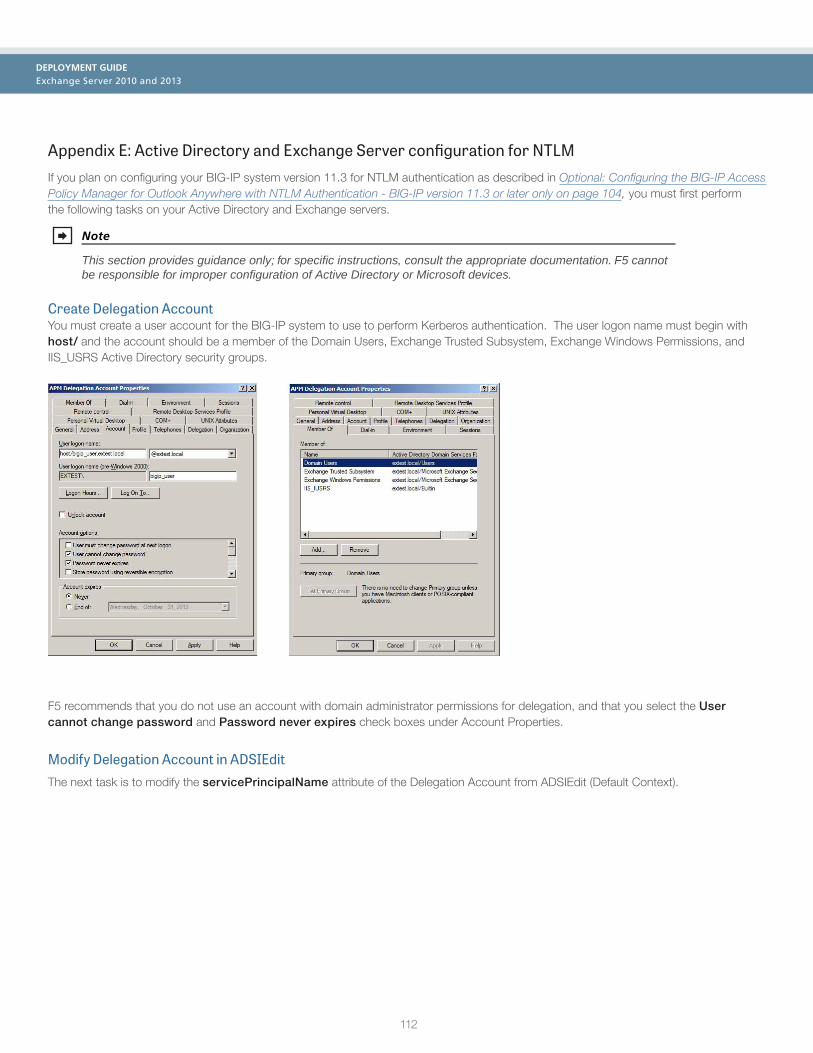
112
DEPLOYMENT GUIDE Exchange Server 2010 and 2013
Appendix E: Active Directory and Exchange Server configuration for NTLMIf you plan on configuring your BIG-IP system version 11.3 for NTLM authentication as described in Optional: Configuring the BIG-IP Access Policy Manager for Outlook Anywhere with NTLM Authentication - BIG-IP version 11.3 or later only on page 104, you must first perform the following tasks on your Active Directory and Exchange servers.
Note
This section provides guidance only; for specific instructions, consult the appropriate documentation. F5 cannot be responsible for improper configuration of Active Directory or Microsoft devices.
Create Delegation AccountYou must create a user account for the BIG-IP system to use to perform Kerberos authentication. The user logon name must begin with host/ and the account should be a member of the Domain Users, Exchange Trusted Subsystem, Exchange Windows Permissions, and IIS_USRS Active Directory security groups.
F5 recommends that you do not use an account with domain administrator permissions for delegation, and that you select the User cannot change password and Password never expires check boxes under Account Properties.
Modify Delegation Account in ADSIEditThe next task is to modify the servicePrincipalName attribute of the Delegation Account from ADSIEdit (Default Context).

113
DEPLOYMENT GUIDE Exchange Server 2010 and 2013
The servicePrincipalName value should match the user logon name of the delegation account.
Enabling Delegation for AccountAfter configuring the servicePrincipalName attribute, the Delegation tab appears under the properties of the user account. Select Trust the user for delegation to specified services only, and then select Use any authentication method. Click Add to add a service for which this account can authenticate, and then add the HTTP service type for each Client Access Server.

114
DEPLOYMENT GUIDE Exchange Server 2010 and 2013
Configure Outlook Anywhere for NTLM Client AuthenticationFrom the Exchange Management Console or Exchange Administration Center, enable NTLM authentication for Outlook Anywhere.
Enabling Kerberos Authentication for RPC IIS Virtual DirectoryEnable the Negotiate:Kerberos authentication provider on the RPC virtual directory in IIS Manager.

115
DEPLOYMENT GUIDE Exchange Server 2010 and 2013
DNS Reverse LookupsIf the Outlook Anywhere IIS Application Pool is running under the LocalSystem or ApplicationPoolIdentity account, you must ensure that APM can successfully perform reverse DNS lookups against the IP address of the Outlook Anywhere pool member(s). These DNS lookups must return the host name of the Exchange CAS server (APM+LTM scenario):
DNS reverse zone configured for EDGE to LTM scenario (10.133.90.63 is the IP address of internal LTM virtual server, returning the host name matching the SPN created in the next section):

116
DEPLOYMENT GUIDE Exchange Server 2010 and 2013
BIG-IP APM/LTM without DNS lookups If you have deployed BIG-IP APM to forward Outlook Anywhere traffic to a virtual server on an internal BIG-IP LTM, or you are deploying on a BIG-IP system running both LTM and APM and would like to eliminate the need for reverse DNS lookups, you must perform the following configuration steps in Active Directory and from the IIS Management Console on the Client Access Servers.
The first task in this section is to create a Service Principal Name for the Outlook Anywhere FQDN to allow authentication by the delegation user account (example: HTTP/oa.extest.local extest\solar00):
Perform this step for every host name that you will be accessing using NTLM client authentication, which includes Autodiscover by default. The command to set an SPN for Autodiscover is setspn HTTP/autodiscover.mydomain.com where you substitute your Autodiscover DNS name for autodiscover.mydomain.com. Also, you must ensure that the previously created delegation account is allowed to log on for all of the SPNs you just created (see Enabling Delegation for Account on page 113).
Based on reverse DNS lookups or the SPN pattern specified in the Kerberos SSO configuration on page 104, APM will construct a Kerberos ticket request to the Active Directory domain controller for the SPN HTTP/oa.extest.local. You must allow Kerberos constrained delegation for HTTP/oa.extest.local via the Delegation tab within the properties of the previously created user account:
Finally, you must change the Application Pool Identity for the Application Pool used by Outlook Anywhere, Autodiscover, and Exchange Web Services to use the previously created delegation user account.
Begin by opening IIS Manager and selecting Application Pools > DefaultAppPool > Advanced Settings.

117
DEPLOYMENT GUIDE Exchange Server 2010 and 2013
Under Process Model, click Advanced Settings and then click ... to the right of Identity.
Enter the credentials of the previously created user account for delegation, in DOMAIN\user format:

118
DEPLOYMENT GUIDE Exchange Server 2010 and 2013
Repeat this process for the MSExchangeAutodiscoverAppPool and MSExchangeServicesAppPool. You need to restart Internet Information Services for these changes to take effect.
Troubleshooting NTLM Authentication You can increase the logging level for Access Policy Manager to assist in troubleshooting issues with NTLM client authentication. Click System > Logs > Configuration > Options. Under Access Policy Logging, select Debug log level for either the Access Policy, SSO, or both. The debug setting causes BIG-IP to log all APM-related messages to this file: /var/log/apm.
These logs can be useful in diagnosing problems with NTLM auth/Kerberos SSO functionality.
If you have followed these steps and are receiving Kerberos errors in the APM log, you can clear any previously cached Kerberos tickets by restarting the websso service on the EDGE/APM BIG-IP system:
[root@ms-ve-v11-x2010-EDGE:Active:Standalone] config # bigstart restart websso

DEPLOYMENT GUIDE Exchange Server 2010 and 2013
119
F5 Networks, Inc.Corporate [email protected]
F5 Networks, Inc. 401 Elliott Avenue West, Seattle, WA 98119 888-882-4447 www.f5.com
F5 Networks Ltd.Europe/Middle-East/[email protected]
F5 NetworksJapan [email protected]
©2014 F5 Networks, Inc. All rights reserved. F5, F5 Networks, the F5 logo, and IT agility. Your way., are trademarks of F5 Networks, Inc. in the U.S. and in certain other countries. Other F5 trademarks are identified at f5.com. Any other products, services, or company names referenced herein may be trademarks of their respective owners with no endorsement or affiliation, express or implied, claimed by F5. 0412
Document Revision History
Version Description Date
1.0 New deployment guide for the f5.microsoft_exchange_2010_2013_cas.v1.3.0 iApp template. 04-18-2014
1.1Added the following entry to the Troubleshooting section: After deploying the iApp for Exchange 2010 behind a NATing device and using RPC Client Access, all clients are sent to a single pool member on page 64.
04-21-2014
1.2
- Added the following entry to the Troubleshooting section: After deploying the iApp using BIG-IP APM, the system is creating multiple sessions for one client IP address, which can consume all available licenses, causing users to be denied access on page 64.
- Added multiple notes about wildcard certificates being a valid alternative to SAN certificates (but for increased security, F5 still recommends using SAN certificates where possible).
05-02-2014
1.3
In the Manual Configuration section, updated the following iRules to match the configuration produced by the iApp (there are no changes to the iApp template configuration in this revision):
- Creating the iRule that chooses the SSO Configuration on page 90
- ActiveSync persist iRule on page 81 (Exchange 2010 only)
- Exchange 2010 only: Persistence iRule if using a single virtual server for all HTTP-based services on page 82
06-24-2014
1.4
- Corrected the iRule referenced in the Troubleshooting section: After deploying the iApp using BIG-IP APM, the system is creating multiple sessions for one client IP address, which can consume all available licenses, causing users to be denied access on page 64.
- Added support for Exchange 2013 CU4 and CU5.
- Added the section Modifying the iApp configuration if using Exchange 2010 and RPC Client Access on page 53 with mandatory updates to the configuration produced by the iApp. Made the same changes to the manual configuration section.
- Made the statement about BIG-IP APM not yet supporting MAPI over HTTP an Important note in Optional: Configuring the BIG-IP system to support MAPI over HTTP in Exchange 2013 SP1 on page 51
06-26-2014
1.5- Noted that v1.4.0rc1 of the iApp template for Exchange has been released in the Product and Version matrix on page one,
and in the prerequisites. See http://www.f5.com/pdf/deployment-guides/microsoft-exchange-iapp-dg.pdf. Except for the troubleshooting section, this guide will no longer be updated.
07-16-2014
1.6
- Added a new troubleshooting entry: When using SSL Bridging and BIG-IP version 11.4.x, pool members may be marked down or you may experience connection resets and TLS errors logged to the Client Access servers on page 65. Updated the manual configuration tables with a new setting for the Server SSL profile.
- Added a note that APM Portal and Network Access modes are not supported; if you are using BIG-IP APM and want to use a custom Access Profile, it must not require a connectivity or rewrite profile.
- Added support for BIG-IP version 11.6.
- Added support for Exchange 2013 CU6.
- Noted that v1.4.0rc2 has been released on DevCentral.
09-02-2014
1.7
- Added a new troubleshooting entry: OWA 2013 clients are experiencing issues with BIG-IP APM Single Sign-On on page 65. Updated the BIG-IP APM manual configuration table with a new setting for the SSO Configuration object.
- Added the new section Modifying the iApp configuration if you configured the iApp to create a new LDAP monitor for the AD pool on page 54 with a required change to the LDAP monitor configuration.
- Updated the advanced monitor script files for the manual configuration to remove Windows style line endings. This was not an issue with the iApp template. Also removed the steps for modifying permissions on the files as they were not necessary.
- Noted that f5.microsoft_exchange_2010_2013_cas.v1.4.0rc3 is now available on DevCentral as a release candidate.
09-24-2014