Embed Size (px)
Citation preview
Deployment Guide
Deploying F5 with Microsoft Dynamics CRM 2011 and 2013Welcome to the F5 deployment guide for configuring the BIG-IP Local Traffic Manager (LTM) and Access Policy Manager (APM) with Microsoft® Dynamics CRM. This document provides guidance on configuring the BIG-IP system for Dynamics CRM 2011 or 2013 deployments. Dynamics CRM is a full customer relationship management suite with marketing, sales, and service capabilities that are fast, familiar, and flexible, helping businesses of all sizes to find, win, and grow profitable customer relationships.
For more information on Microsoft Dynamics CRM, see http://crm.dynamics.com/en-us/home For more information on the BIG-IP system, see http://www.f5.com/products/bigip/
Why F5?F5 offers a complete suite of application delivery technologies designed to provide a highly scalable, secure, and responsive Dynamics CRM deployment.
• Terminating HTTPS connections at the BIG-IP LTM reduces CPU and memory load on CRM front end servers, and simplifies TLS/SSL certificate management.
• The BIG-IP LTM can balance load and ensure high-availability across multiple CRM servers using a variety of load balancing methods and priority rules.
• The BIG-IP LTM TCP Express feature set ensures optimal network performance for all clients and servers, regardless of operating system and version.
• The LTM provides content compression features which improve client performance.
• The BIG-IP Access Policy Manager (APM), F5's high-performance access and security solution, can provide pre-authentication and secure remote access to your Dynamics CRM environment.
Products and versions
Product Version
BIG-IP LTM and APM 11.2, 11.3, 11.4, 11.4.1, 11.5, 11.5.1, 11.6
Microsoft Dynamics CRM 2011 (Update Rollup 15), 2013, 2013 SP1
Deployment guide version 2.5 (Document Revision History on page 20)
Important: Make sure you are using the most recent version of this deployment guide, available at http://www.f5.com/pdf/deployment-guides/dynamics-crm-2011-dg.pdf
To provide feedback on this deployment guide or other F5 solution documents, contact us at [email protected].
2
DEPLOYMENT GUIDE
Microsoft Dynamics CRM
ContentsWhy F5? 1
Prerequisites and configuration notes 3
Configuration example 3
Guidance on configuring email with server-side synchronization for Dynamics 2013 4
Configuring the BIG-IP LTM for Dynamics CRM 2011 and 2013 4
Configuring the BIG-IP system for ADFS 2.0 to support Claims-based authentication/IFD 7
Configuring the BIG-IP system for load balancing ADFS 7
Configuring BIG-IP Access Policy Manager for Dynamics CRM 2011 and 2013 8
Troubleshooting 12
Appendix A: Configuring the BIG-IP system for server-to-server traffic if there is a NATing device
between the BIG-IP system and the servers 13
Configuring the BIG-IP system for Dynamics CRM server-to-server traffic 14
Appendix B: Using X-Forwarded-For to log the client IP address in IIS 7.0, 7.5, and 8 (optional) 16
Deploying the Custom Logging role service 16
Adding the X-Forwarded-For log field to IIS 16
Appendix C: Configuring WMI monitoring for IIS Servers (optional) 18
Installing the F5 WMI handler 18
Creating the WMI Monitor on the BIG-IP LTM 19
Apply the monitor on the BIG-IP LTM devices 19
Modifying the pool to use the Dynamic Ratio load balancing method 19
Appendix D: Configuring DNS and NTP on the BIG-IP system 20
Configuring the DNS settings 20
Configuring the NTP settings 20
Document Revision History 21
3
DEPLOYMENT GUIDE
Microsoft Dynamics CRM
You can also visit the Microsoft page of F5’s online developer community, DevCentral, for Microsoft forums, solutions, blogs and more: http://devcentral.f5.com/Microsoft/
Prerequisites and configuration notesThe following are general prerequisites for this deployment; each section contains specific prerequisites:
h All of the configuration procedures in this document are performed on F5 devices. For information on how to deploy or configure Microsoft Dynamics CRM, consult the appropriate Microsoft documentation.
h If using Dynamics 2011, we recommend running Microsoft Dynamics CRM Server 2011 edition, with Update Rollup 15 (http://support.microsoft.com/kb/2555051) or later. While the BIG-IP LTM procedures in this guide may work for previous versions of Dynamics CRM, this document was written for Dynamics CRM 2011 and updated for 2013.
h You must be on BIG-IP LTM version 11.0 or later. We recommend version 11.4 or later.
h The configuration in this document was performed on an on-premises deployment of Microsoft Dynamics CRM, and was configured according to the preferred practices guidelines as documented in the CRM implementation guide(s). For more information, see the Microsoft documentation.
h The BIG-IP system supports deploying Dynamics CRM in both Internet-facing (IFD) and non-Internet-facing configurations. With IFD deployments, clients accessing the CRM site are redirected to a Microsoft ADFS 2.0 or ADFS 2.0 Proxy for authentication. Configuring the BIG-IP system for ADFS 2.0 to support Claims-based authentication/IFD on page 7 describes how to configure the BIG-IP system to load balance these ADFS requests. For non-IFD deployments, you may secure CRM using F5’s APM by following the guidance in Configuring BIG-IP Access Policy Manager for Dynamics CRM 2011 and 2013 on page 8.
h You must have already installed the F5 device(s) in your network and performed the initial configuration tasks, such as creating Self IP addresses and VLANs. For more information, refer to the appropriate BIG-IP LTM manual, available at http://support.f5.com/kb/en-us.html.
h SSL Offloading and Microsoft Dynamics CRM for Microsoft Outlook Currently, SSL offloading is not supported for the Microsoft Dynamics CRM for the Outlook client. If you are deploying CRM for Microsoft Outlook, you must configure the BIG-IP system for either unencrypted HTTP client/server traffic, or SSL decryption/re-encryption (SSL bridging). Also note that SSL offload is not supported for IFD deployments. SSL bridging is mandatory for IFD.
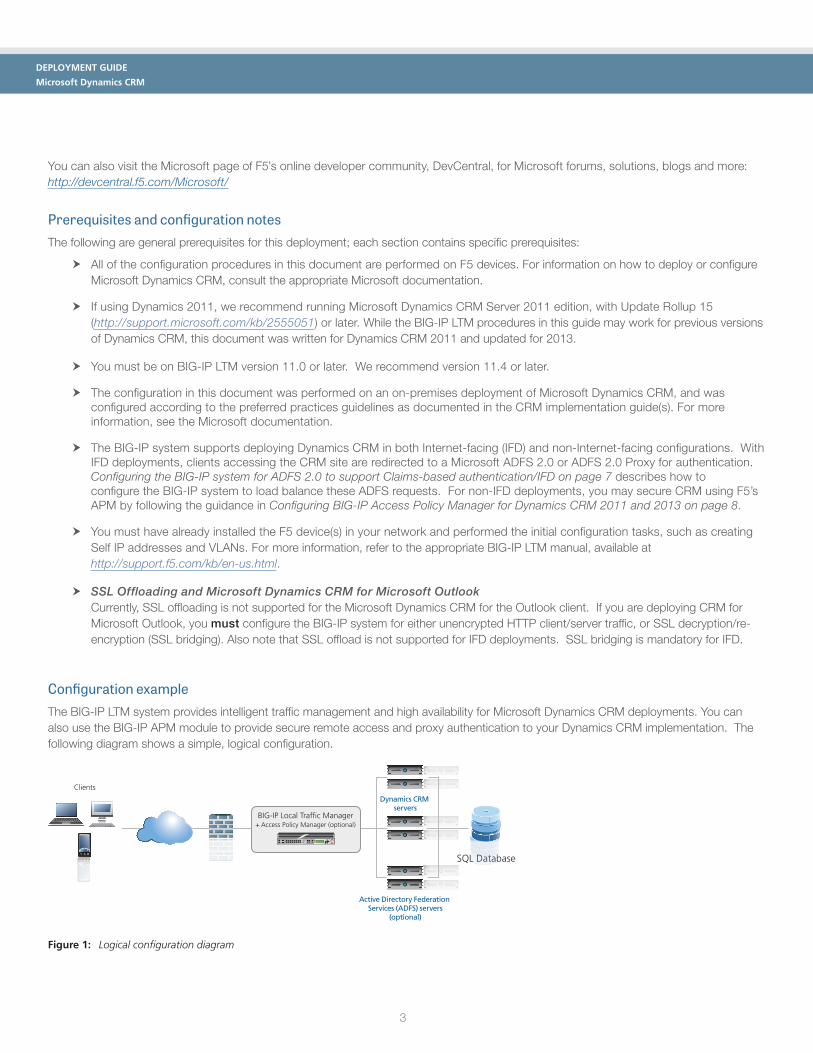
Configuration exampleThe BIG-IP LTM system provides intelligent traffic management and high availability for Microsoft Dynamics CRM deployments. You can also use the BIG-IP APM module to provide secure remote access and proxy authentication to your Dynamics CRM implementation. The following diagram shows a simple, logical configuration.
Clients
BIG-IP Local Traffic Manager + Access Policy Manager (optional)
Dynamics CRM servers
SQL Database
Active Directory Federation Services (ADFS) servers
(optional)
Figure 1: Logical configuration diagram
4
DEPLOYMENT GUIDE
Microsoft Dynamics CRM
Guidance for configuring email with server-side synchronization for Dynamics 2013If you are using Dynamics CRM 2013 for email routing, we recommend using server-side synchronization, Microsoft's recommended method for Dynamics 2013. Server-side synchronization has been validated while protecting both CRM 2013 and Exchange 2010/2013 with BIG-IP APM. We recommend using server-side synchronization (and not the CRM plug-in for Outlook) for CRM 2013 because SSL offload and using the BIG-IP APM are both supported for server-side synchronization, but are not supported when using the plug-in. For specific instructions on configuring the BIG-IP system for Microsoft Exchange Server, see http://www.f5.com/pdf/deployment-guides/microsoft-exchange-2010-2013-iapp-dg.pdf. For information on setting up email through server-side synchronization in Dynamics CRM 2013, see http://www.microsoft.com/en-us/dynamics/crm-customer-center/set-up-email-through-server-side-synchronization.aspx.
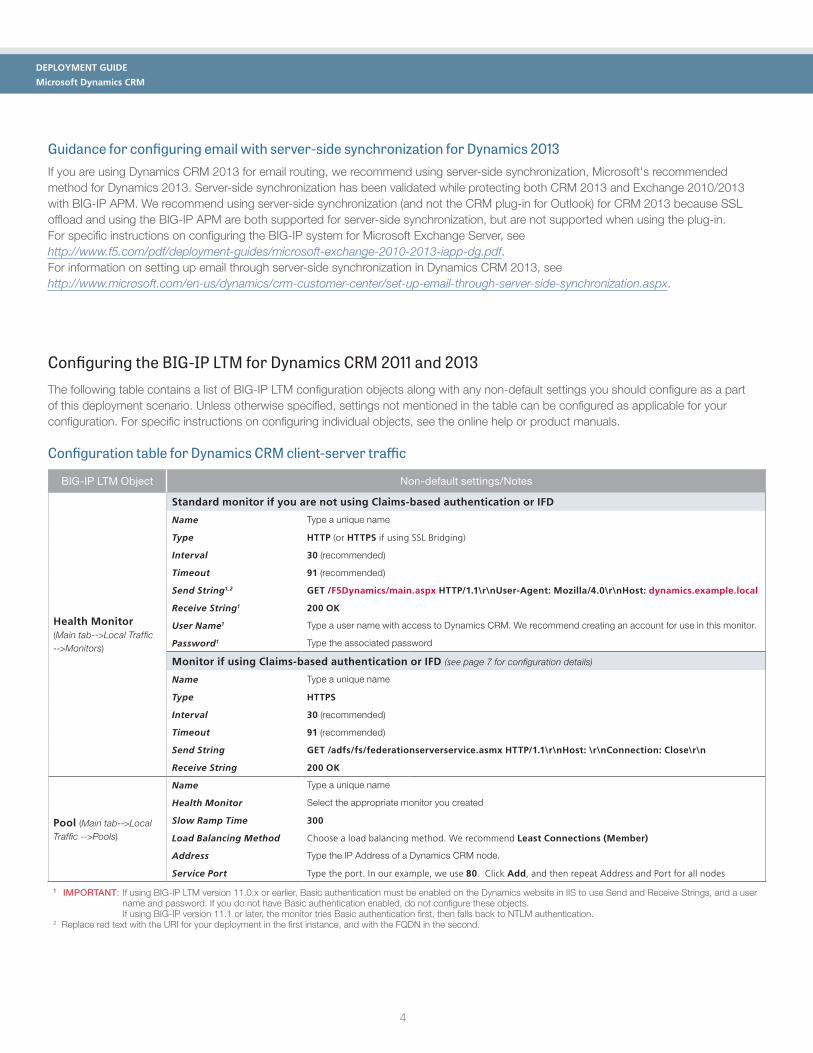
Configuring the BIG-IP LTM for Dynamics CRM 2011 and 2013The following table contains a list of BIG-IP LTM configuration objects along with any non-default settings you should configure as a part of this deployment scenario. Unless otherwise specified, settings not mentioned in the table can be configured as applicable for your configuration. For specific instructions on configuring individual objects, see the online help or product manuals.
Configuration table for Dynamics CRM client-server traffic
BIG-IP LTM Object Non-default settings/Notes
Health Monitor (Main tab-->Local Traffic -->Monitors)
Standard monitor if you are not using Claims-based authentication or IFD
Name Type a unique name
Type HTTP (or HTTPS if using SSL Bridging)
Interval 30 (recommended)
Timeout 91 (recommended)
Send String1,2 GET /F5Dynamics/main.aspx HTTP/1.1\r\nUser-Agent: Mozilla/4.0\r\nHost: dynamics.example.local
Receive String1 200 OK
User Name1 Type a user name with access to Dynamics CRM. We recommend creating an account for use in this monitor.
Password1 Type the associated password
Monitor if using Claims-based authentication or IFD (see page 7 for configuration details)
Name Type a unique name
Type HTTPS
Interval 30 (recommended)
Timeout 91 (recommended)
Send String GET /adfs/fs/federationserverservice.asmx HTTP/1.1\r\nHost: \r\nConnection: Close\r\n
Receive String 200 OK
Pool (Main tab-->Local Traffic -->Pools)
Name Type a unique name
Health Monitor Select the appropriate monitor you created
Slow Ramp Time 300
Load Balancing Method Choose a load balancing method. We recommend Least Connections (Member)
Address Type the IP Address of a Dynamics CRM node.
Service Port Type the port. In our example, we use 80. Click Add, and then repeat Address and Port for all nodes
1 IMPORTANT: If using BIG-IP LTM version 11.0.x or earlier, Basic authentication must be enabled on the Dynamics website in IIS to use Send and Receive Strings, and a user name and password. If you do not have Basic authentication enabled, do not configure these objects. If using BIG-IP version 11.1 or later, the monitor tries Basic authentication first, then falls back to NTLM authentication.
2 Replace red text with the URI for your deployment in the first instance, and with the FQDN in the second.
5
DEPLOYMENT GUIDE
Microsoft Dynamics CRM
BIG-IP LTM Object Non-default settings/Notes
Profiles (Main tab-->Local Traffic -->Profiles)
TCP WAN (Profiles-->Protocol)
Name Type a unique name
Parent Profile Use tcp-wan-optimized
TCP LAN (Profiles-->Protocol)
Name Type a unique name
Parent Profile Use tcp-lan-optimized
HTTP (Profiles-->Services)
Name Type a unique name
Parent Profile http
Redirect Rewrite3 All
Insert X-Forwarded-For Enabled (see page 13 for adding the X-Forwarded-For log field to IIS)
Request Header Insert3 FRONT-END-HTTPS:on 3 (Do not configure this option if not offloading SSL)
HTTP Compression (Profiles-->Services)
Name Type a unique name
Parent Profile wan-optimized-compression
Keep Accept Encoding Enabled
Web Acceleration (Profiles-->Services)
Name Type a unique name
Parent Profile webacceleration
Persistence (Profiles-->Persistence)
Name Type a unique name
Persistence Type Cookie
OneConnect (Profiles-->Other)
Name Type a unique name
Parent Profile oneconnect
Source Mask 255.255.255.255
NTLM (Profiles-->Other)
Name Type a unique name
Parent Profile NTLM
Client SSL3 (Profiles-->SSL)
Name Type a unique name
Parent Profile clientssl
Certificate and Key Select the Certificate and Key you imported from the associated list
Server SSL4 (Profiles-->SSL)
Name Type a unique name
Parent Profile serverssl
Virtual Servers (Main tab-->Local Traffic -->Virtual Servers)
HTTP
Name Type a unique name.
Address Type the IP Address for the virtual server
Service Port 80
Protocol Profile (Client)1,2 Select the WAN optimized TCP profile you created
Protocol Profile (Server)1,2 Select the LAN optimized TCP profile you created
HTTP Profile2 Select the HTTP profile you created
Web Acceleration profile2 Select the Web Acceleration profile you created
HTTP Compression profile2 Select the HTTP Compression profile you created
OneConnect profile2 Select the OneConnect profile you created
SNAT Pool 3 Auto Map (optional; see footnote 3)
Default Pool2 Select the pool you created
Persistence Profile2 Select the Persistence profile you created
iRule4 If configuring SSL offload or SSL bridging: Enable the built-in _sys_https_redirect irule
1 You must select Advanced from the Configuration list for these options to appear2 Do not enable these objects on the HTTP virtual server if offloading SSL. The HTTP virtual server is only used for redirecting users to the HTTPS virtual server, and only requires a
name, IP address, Port, and the redirect iRule.3 In version 11.3 and later, this field is Source Address Translation. If you want to use SNAT, and you have a large deployment expecting more than 64,000 simultaneous
connections, you must configure a SNAT Pool with an IP address for each 64,000 simultaneous connections you expect. See the BIG-IP documentation specific information.4 Only enable this iRule if offloading SSL 5 Only create this virtual server if offloading SSL or SSL Bridging 6 Only necessary if configuring SSL Bridging
6
DEPLOYMENT GUIDE
Microsoft Dynamics CRM
BIG-IP LTM Object Non-default settings/Notes
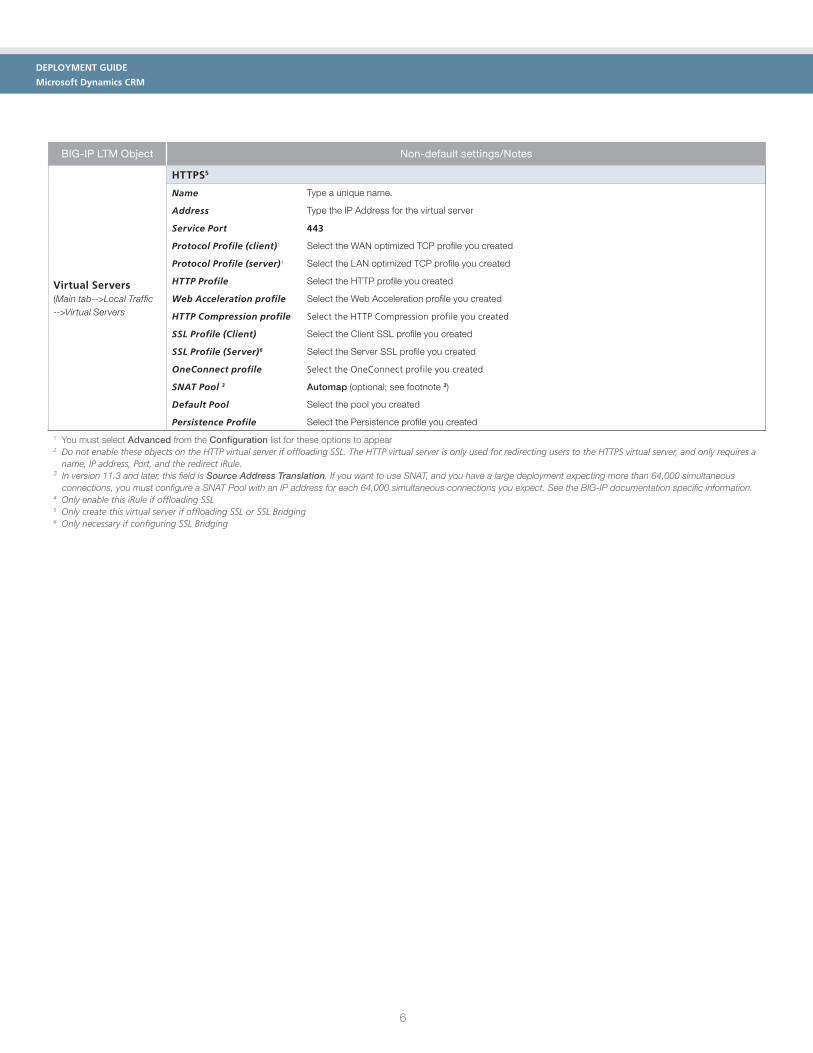
Virtual Servers (Main tab-->Local Traffic -->Virtual Servers
HTTPS5
Name Type a unique name.
Address Type the IP Address for the virtual server
Service Port 443
Protocol Profile (client)1 Select the WAN optimized TCP profile you created
Protocol Profile (server)1 Select the LAN optimized TCP profile you created
HTTP Profile Select the HTTP profile you created
Web Acceleration profile Select the Web Acceleration profile you created
HTTP Compression profile Select the HTTP Compression profile you created
SSL Profile (Client) Select the Client SSL profile you created
SSL Profile (Server)6 Select the Server SSL profile you created
OneConnect profile Select the OneConnect profile you created
SNAT Pool 3 Automap (optional; see footnote 3)
Default Pool Select the pool you created
Persistence Profile Select the Persistence profile you created
1 You must select Advanced from the Configuration list for these options to appear 2 Do not enable these objects on the HTTP virtual server if offloading SSL. The HTTP virtual server is only used for redirecting users to the HTTPS virtual server, and only requires a
name, IP address, Port, and the redirect iRule.3 In version 11.3 and later, this field is Source Address Translation. If you want to use SNAT, and you have a large deployment expecting more than 64,000 simultaneous
connections, you must configure a SNAT Pool with an IP address for each 64,000 simultaneous connections you expect. See the BIG-IP documentation specific information.4 Only enable this iRule if offloading SSL 5 Only create this virtual server if offloading SSL or SSL Bridging 6 Only necessary if configuring SSL Bridging
7
DEPLOYMENT GUIDE
Microsoft Dynamics CRM
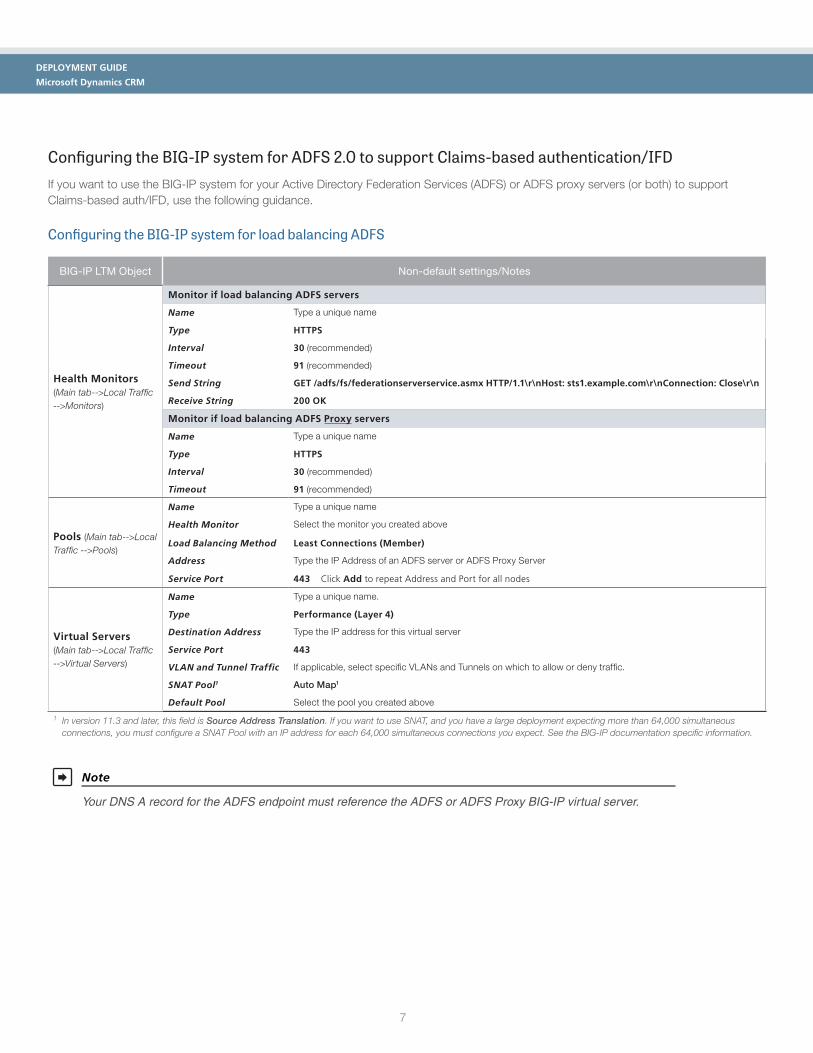
Configuring the BIG-IP system for ADFS 2.0 to support Claims-based authentication/IFDIf you want to use the BIG-IP system for your Active Directory Federation Services (ADFS) or ADFS proxy servers (or both) to support Claims-based auth/IFD, use the following guidance.
Configuring the BIG-IP system for load balancing ADFS
BIG-IP LTM Object Non-default settings/Notes
Health Monitors (Main tab-->Local Traffic -->Monitors)
Monitor if load balancing ADFS servers
Name Type a unique name
Type HTTPS
Interval 30 (recommended)
Timeout 91 (recommended)
Send String GET /adfs/fs/federationserverservice.asmx HTTP/1.1\r\nHost: sts1.example.com\r\nConnection: Close\r\n
Receive String 200 OK
Monitor if load balancing ADFS Proxy servers
Name Type a unique name
Type HTTPS
Interval 30 (recommended)
Timeout 91 (recommended)
Pools (Main tab-->Local Traffic -->Pools)
Name Type a unique name
Health Monitor Select the monitor you created above
Load Balancing Method Least Connections (Member)
Address Type the IP Address of an ADFS server or ADFS Proxy Server
Service Port 443 Click Add to repeat Address and Port for all nodes
Virtual Servers (Main tab-->Local Traffic -->Virtual Servers)
Name Type a unique name.
Type Performance (Layer 4)
Destination Address Type the IP address for this virtual server
Service Port 443
VLAN and Tunnel Traffic If applicable, select specific VLANs and Tunnels on which to allow or deny traffic.
SNAT Pool1 Auto Map1
Default Pool Select the pool you created above
1 In version 11.3 and later, this field is Source Address Translation. If you want to use SNAT, and you have a large deployment expecting more than 64,000 simultaneous connections, you must configure a SNAT Pool with an IP address for each 64,000 simultaneous connections you expect. See the BIG-IP documentation specific information.
Note
Your DNS A record for the ADFS endpoint must reference the ADFS or ADFS Proxy BIG-IP virtual server.
8
DEPLOYMENT GUIDE
Microsoft Dynamics CRM
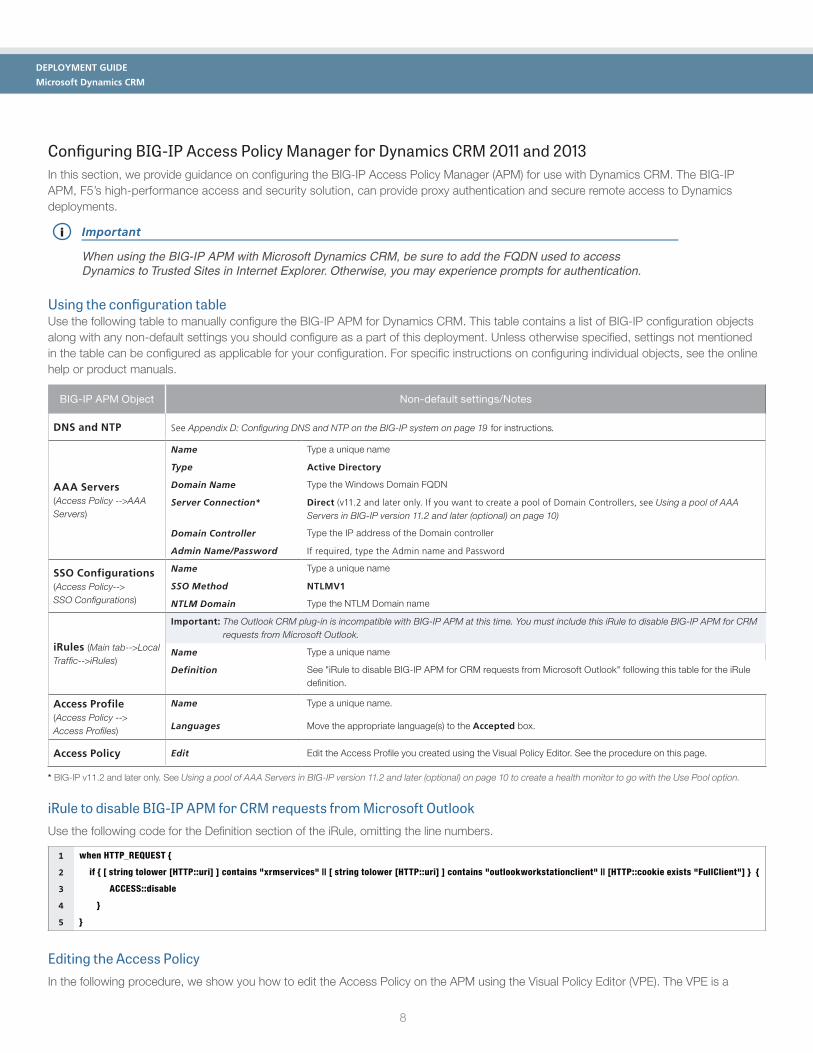
Configuring BIG-IP Access Policy Manager for Dynamics CRM 2011 and 2013In this section, we provide guidance on configuring the BIG-IP Access Policy Manager (APM) for use with Dynamics CRM. The BIG-IP APM, F5’s high-performance access and security solution, can provide proxy authentication and secure remote access to Dynamics deployments.
i Important
When using the BIG-IP APM with Microsoft Dynamics CRM, be sure to add the FQDN used to access Dynamics to Trusted Sites in Internet Explorer. Otherwise, you may experience prompts for authentication.
Using the configuration tableUse the following table to manually configure the BIG-IP APM for Dynamics CRM. This table contains a list of BIG-IP configuration objects along with any non-default settings you should configure as a part of this deployment. Unless otherwise specified, settings not mentioned in the table can be configured as applicable for your configuration. For specific instructions on configuring individual objects, see the online help or product manuals.
BIG-IP APM Object Non-default settings/Notes
DNS and NTP See Appendix D: Configuring DNS and NTP on the BIG-IP system on page 19 for instructions.
AAA Servers (Access Policy -->AAA Servers)
Name Type a unique name
Type Active Directory
Domain Name Type the Windows Domain FQDN
Server Connection* Direct (v11.2 and later only. If you want to create a pool of Domain Controllers, see Using a pool of AAA Servers in BIG-IP version 11.2 and later (optional) on page 10)
Domain Controller Type the IP address of the Domain controller
Admin Name/Password If required, type the Admin name and Password
SSO Configurations (Access Policy--> SSO Configurations)
Name Type a unique name
SSO Method NTLMV1
NTLM Domain Type the NTLM Domain name
iRules (Main tab-->Local Traffic-->iRules)
Important: The Outlook CRM plug-in is incompatible with BIG-IP APM at this time. You must include this iRule to disable BIG-IP APM for CRM requests from Microsoft Outlook.
Name Type a unique name
Definition See "iRule to disable BIG-IP APM for CRM requests from Microsoft Outlook" following this table for the iRule definition.
Access Profile (Access Policy --> Access Profiles)
Name Type a unique name.
Languages Move the appropriate language(s) to the Accepted box.
Access Policy Edit Edit the Access Profile you created using the Visual Policy Editor. See the procedure on this page.
* BIG-IP v11.2 and later only. See Using a pool of AAA Servers in BIG-IP version 11.2 and later (optional) on page 10 to create a health monitor to go with the Use Pool option.
iRule to disable BIG-IP APM for CRM requests from Microsoft OutlookUse the following code for the Definition section of the iRule, omitting the line numbers.
1
2
3
4
5
when HTTP_REQUEST {
if { [ string tolower [HTTP::uri] ] contains "xrmservices" || [ string tolower [HTTP::uri] ] contains "outlookworkstationclient" || [HTTP::cookie exists "FullClient"] } {
ACCESS::disable
}
}
Editing the Access PolicyIn the following procedure, we show you how to edit the Access Policy on the APM using the Visual Policy Editor (VPE). The VPE is a
9
DEPLOYMENT GUIDE
Microsoft Dynamics CRM
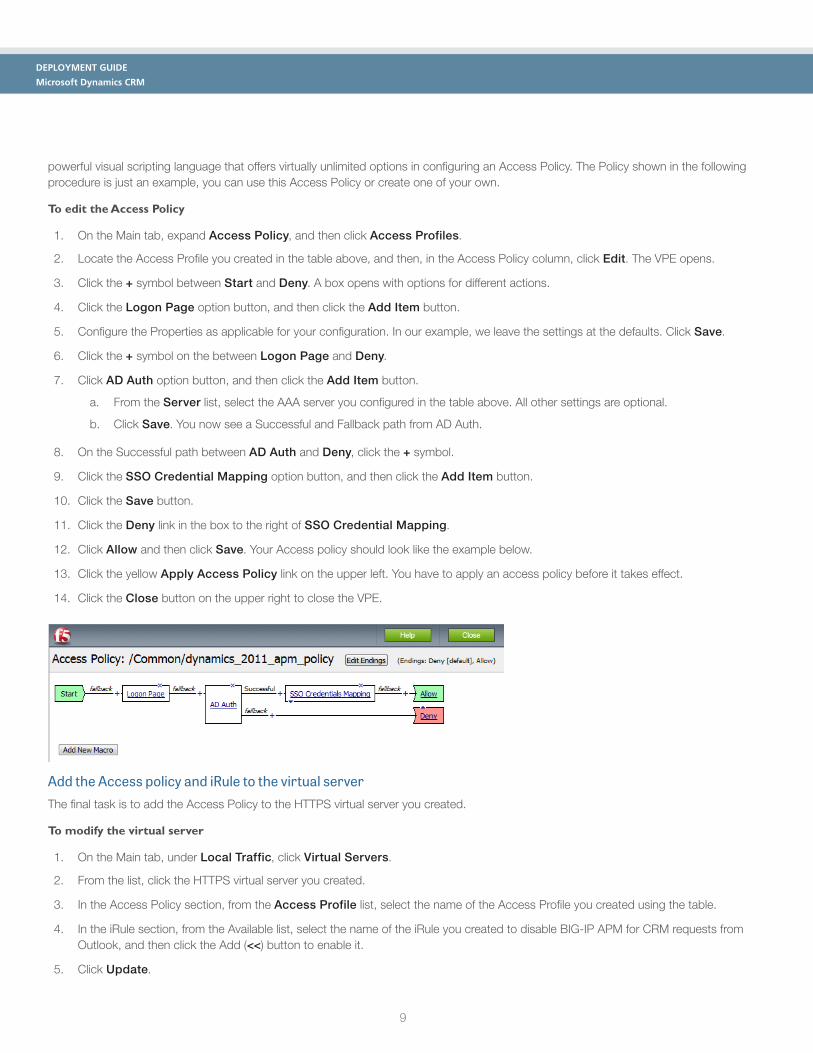
powerful visual scripting language that offers virtually unlimited options in configuring an Access Policy. The Policy shown in the following procedure is just an example, you can use this Access Policy or create one of your own.
To edit the Access Policy
1. On the Main tab, expand Access Policy, and then click Access Profiles.
2. Locate the Access Profile you created in the table above, and then, in the Access Policy column, click Edit. The VPE opens.
3. Click the + symbol between Start and Deny. A box opens with options for different actions.
4. Click the Logon Page option button, and then click the Add Item button.
5. Configure the Properties as applicable for your configuration. In our example, we leave the settings at the defaults. Click Save.
6. Click the + symbol on the between Logon Page and Deny.
7. Click AD Auth option button, and then click the Add Item button.
a. From the Server list, select the AAA server you configured in the table above. All other settings are optional.
b. Click Save. You now see a Successful and Fallback path from AD Auth.
8. On the Successful path between AD Auth and Deny, click the + symbol.
9. Click the SSO Credential Mapping option button, and then click the Add Item button.
10. Click the Save button.
11. Click the Deny link in the box to the right of SSO Credential Mapping.
12. Click Allow and then click Save. Your Access policy should look like the example below.
13. Click the yellow Apply Access Policy link on the upper left. You have to apply an access policy before it takes effect.
14. Click the Close button on the upper right to close the VPE.
Add the Access policy and iRule to the virtual serverThe final task is to add the Access Policy to the HTTPS virtual server you created.
To modify the virtual server
1. On the Main tab, under Local Traffic, click Virtual Servers.
2. From the list, click the HTTPS virtual server you created.
3. In the Access Policy section, from the Access Profile list, select the name of the Access Profile you created using the table.
4. In the iRule section, from the Available list, select the name of the iRule you created to disable BIG-IP APM for CRM requests from Outlook, and then click the Add (<<) button to enable it.
5. Click Update.
10
DEPLOYMENT GUIDE
Microsoft Dynamics CRM
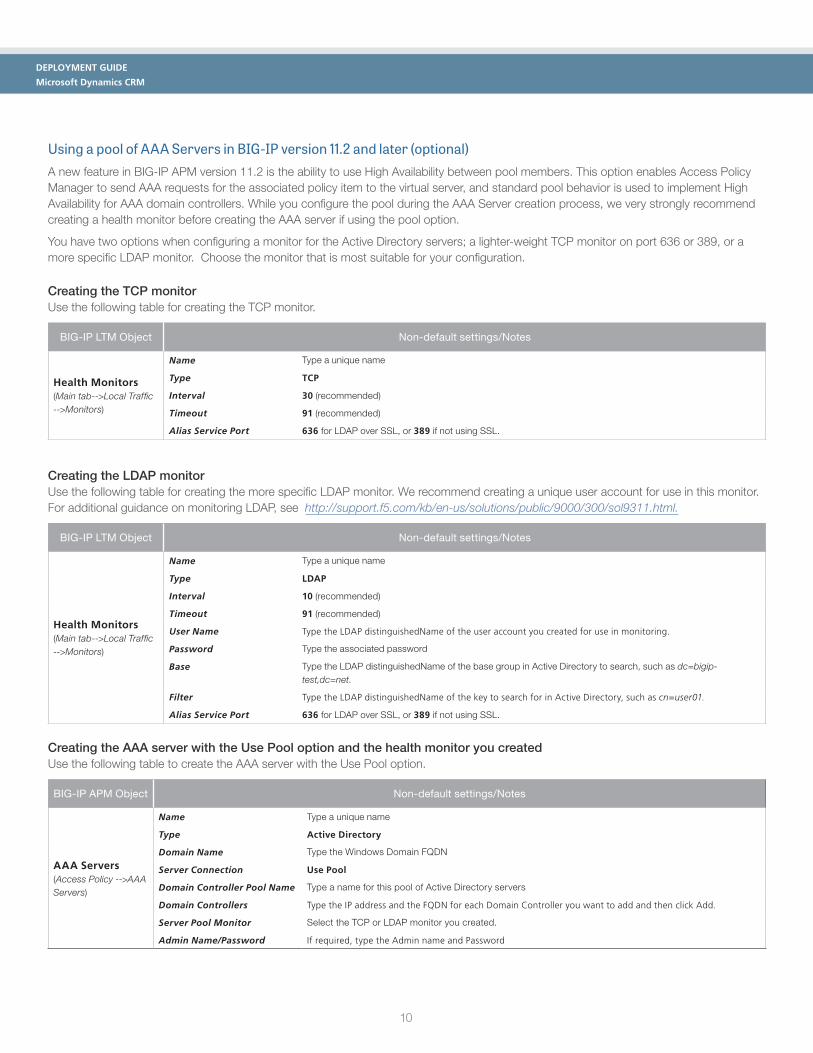
Using a pool of AAA Servers in BIG-IP version 11.2 and later (optional)A new feature in BIG-IP APM version 11.2 is the ability to use High Availability between pool members. This option enables Access Policy Manager to send AAA requests for the associated policy item to the virtual server, and standard pool behavior is used to implement High Availability for AAA domain controllers. While you configure the pool during the AAA Server creation process, we very strongly recommend creating a health monitor before creating the AAA server if using the pool option.
You have two options when configuring a monitor for the Active Directory servers; a lighter-weight TCP monitor on port 636 or 389, or a more specific LDAP monitor. Choose the monitor that is most suitable for your configuration.
Creating the TCP monitorUse the following table for creating the TCP monitor.
BIG-IP LTM Object Non-default settings/Notes
Health Monitors (Main tab-->Local Traffic -->Monitors)
Name Type a unique name
Type TCP
Interval 30 (recommended)
Timeout 91 (recommended)
Alias Service Port 636 for LDAP over SSL, or 389 if not using SSL.
Creating the LDAP monitorUse the following table for creating the more specific LDAP monitor. We recommend creating a unique user account for use in this monitor. For additional guidance on monitoring LDAP, see http://support.f5.com/kb/en-us/solutions/public/9000/300/sol9311.html.
BIG-IP LTM Object Non-default settings/Notes
Health Monitors (Main tab-->Local Traffic -->Monitors)
Name Type a unique name
Type LDAP
Interval 10 (recommended)
Timeout 91 (recommended)
User Name Type the LDAP distinguishedName of the user account you created for use in monitoring.
Password Type the associated password
Base Type the LDAP distinguishedName of the base group in Active Directory to search, such as dc=bigip-test,dc=net.
Filter Type the LDAP distinguishedName of the key to search for in Active Directory, such as cn=user01.
Alias Service Port 636 for LDAP over SSL, or 389 if not using SSL.
Creating the AAA server with the Use Pool option and the health monitor you createdUse the following table to create the AAA server with the Use Pool option.
BIG-IP APM Object Non-default settings/Notes
AAA Servers (Access Policy -->AAA Servers)
Name Type a unique name
Type Active Directory
Domain Name Type the Windows Domain FQDN
Server Connection Use Pool
Domain Controller Pool Name Type a name for this pool of Active Directory servers
Domain Controllers Type the IP address and the FQDN for each Domain Controller you want to add and then click Add.
Server Pool Monitor Select the TCP or LDAP monitor you created.
Admin Name/Password If required, type the Admin name and Password
11
DEPLOYMENT GUIDE
Microsoft Dynamics CRM
TroubleshootingQ: Why isn't the Dynamics UI displaying page objects from the /help directory?
A: Upgrading to Dynamics CRM 2011 Update Rollup 15 solves this issue. If you cannot upgrade to Rollup 15, use the following guidance. If your Dynamics CRM user interface is not correctly displaying page objects located in the /help directory, you may need to configure a Stream profile on the BIG-IP system to ensure the correct FQDN for your Dynamics deployment is returned to the client browser. The stream profile Target field should be comprised of one or more pairs of values, separated by the @ symbol. The first value corresponds to the NetBIOS name of a server in your deployment, and the second value is the fully qualified domain name (FQDN) that clients use to access Dynamics CRM. For example, if you have two servers in your Dynamics 2011 CRM deployment named server01 and server02, and the FQDN of the deployment is dynamics.mycompany.com, the Stream profile Target field would be: @[email protected]@[email protected]@
Use the following procedure to create the Stream profile and attach it to the virtual server.
To create the Stream profile
1. On the Main tab, expand Local Traffic and then click Profiles.
2. On the Menu bar, from the Other menu, click Stream.
3. In the Name box, type a unique name.
4. In the Target box, type the appropriate value, using the guidance in the paragraph above.
5. Click Finished.
6. On the Main tab, click Virtual Servers.
7. Click the name of the external HTTPS virtual server you created. The properties page opens.
8. If necessary, from the Configuration list, select Advanced.
9. From the Stream Profile list, select the profile you just created.
10. Click Update.
Q: Why are users getting a "Generic Error" when browsing pages after deploying the BIG-IP system?
A: If your users are seeing a "Generic Error", check the BIG-IP HTTP profile. If you are not using the BIG-IP system to offload SSL, you should NOT have the Request Header Insert field set to FRONT-END-HTTPS:on. This field should be left at the default (no value) if not using the BIG-IP system to offload SSL.
Q: Why are client connections unresponsive or seem to hang when using the OneConnect feature?
A: If you have configured the BIG-IP LTM to use OneConnect (part of F5's recommended configuration), and users are experiencing slow performance or the need to refresh pages, Microsoft IIS may be failing to reset the TCP connection after the default timeout period of 120 seconds.
To work around this issue, modify the server-side TCP profile you created to set the Idle Timeout value to less that 120 seconds. To modify the Idle Timeout setting, open the TCP profile you created, check the Custom box for Idle Timeout, and then in the Seconds box, type a number less than 120, such as 110. Click Update.
12
DEPLOYMENT GUIDE
Microsoft Dynamics CRM
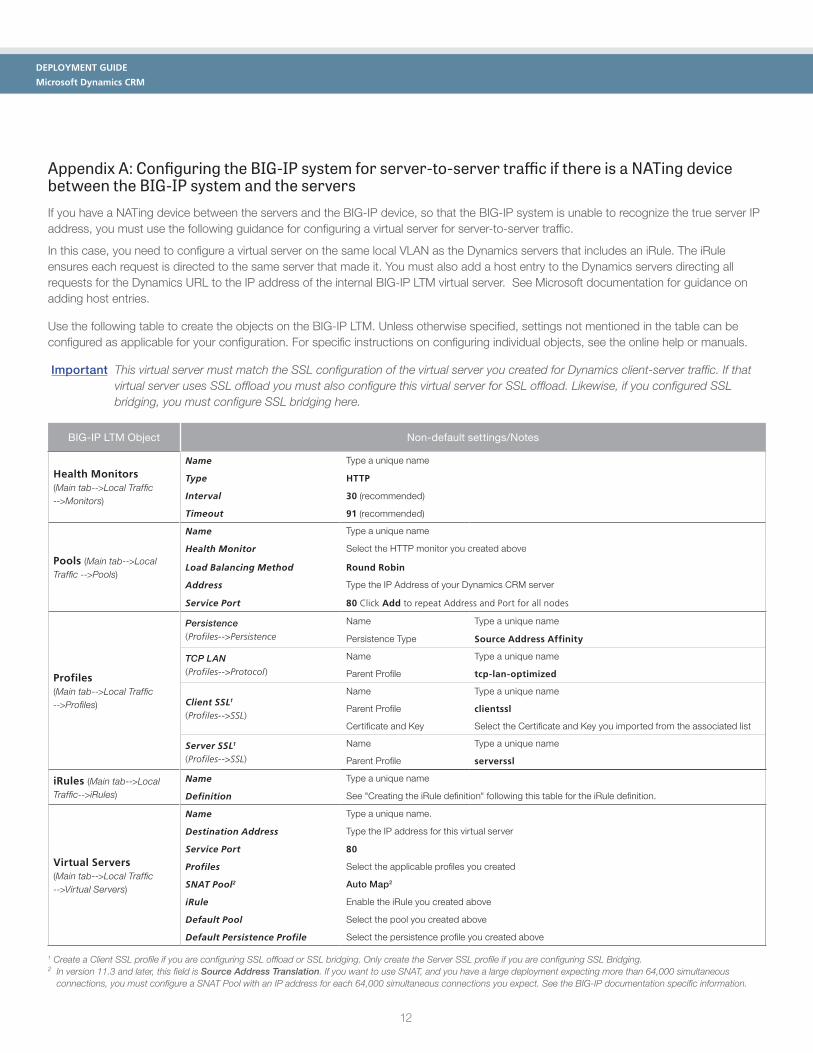
Appendix A: Configuring the BIG-IP system for server-to-server traffic if there is a NATing device between the BIG-IP system and the serversIf you have a NATing device between the servers and the BIG-IP device, so that the BIG-IP system is unable to recognize the true server IP address, you must use the following guidance for configuring a virtual server for server-to-server traffic.
In this case, you need to configure a virtual server on the same local VLAN as the Dynamics servers that includes an iRule. The iRule ensures each request is directed to the same server that made it. You must also add a host entry to the Dynamics servers directing all requests for the Dynamics URL to the IP address of the internal BIG-IP LTM virtual server. See Microsoft documentation for guidance on adding host entries.
Use the following table to create the objects on the BIG-IP LTM. Unless otherwise specified, settings not mentioned in the table can be configured as applicable for your configuration. For specific instructions on configuring individual objects, see the online help or manuals.
Important This virtual server must match the SSL configuration of the virtual server you created for Dynamics client-server traffic. If that virtual server uses SSL offload you must also configure this virtual server for SSL offload. Likewise, if you configured SSL bridging, you must configure SSL bridging here.
BIG-IP LTM Object Non-default settings/Notes
Health Monitors (Main tab-->Local Traffic -->Monitors)
Name Type a unique name
Type HTTP
Interval 30 (recommended)
Timeout 91 (recommended)
Pools (Main tab-->Local Traffic -->Pools)
Name Type a unique name
Health Monitor Select the HTTP monitor you created above
Load Balancing Method Round Robin
Address Type the IP Address of your Dynamics CRM server
Service Port 80 Click Add to repeat Address and Port for all nodes
Profiles (Main tab-->Local Traffic -->Profiles)
Persistence (Profiles-->Persistence
Name Type a unique name
Persistence Type Source Address Affinity
TCP LAN (Profiles-->Protocol)
Name Type a unique name
Parent Profile tcp-lan-optimized
Client SSL1 (Profiles-->SSL)
Name Type a unique name
Parent Profile clientssl
Certificate and Key Select the Certificate and Key you imported from the associated list
Server SSL1 (Profiles-->SSL)
Name Type a unique name
Parent Profile serverssl
iRules (Main tab-->Local Traffic-->iRules)
Name Type a unique name
Definition See "Creating the iRule definition" following this table for the iRule definition.
Virtual Servers (Main tab-->Local Traffic -->Virtual Servers)
Name Type a unique name.
Destination Address Type the IP address for this virtual server
Service Port 80
Profiles Select the applicable profiles you created
SNAT Pool2 Auto Map2
iRule Enable the iRule you created above
Default Pool Select the pool you created above
Default Persistence Profile Select the persistence profile you created above
1 Create a Client SSL profile if you are configuring SSL offload or SSL bridging. Only create the Server SSL profile if you are configuring SSL Bridging.2 In version 11.3 and later, this field is Source Address Translation. If you want to use SNAT, and you have a large deployment expecting more than 64,000 simultaneous
connections, you must configure a SNAT Pool with an IP address for each 64,000 simultaneous connections you expect. See the BIG-IP documentation specific information.

13
DEPLOYMENT GUIDE
Microsoft Dynamics CRM
Creating the iRule definitionUse the following code for the Definition section of the iRule, omitting the line numbers.
Critical Be sure to change the red text below to the name of the pool you created in the table.
123456789101112
when CLIENT_ACCEPTED { set pm_selected 0 foreach { pm } [members -list internal-dynamics-pool-name] { if { $pm equals “[IP::remote_addr] 80” } { set pm_selected 1 pool internal-dynamics-pool-name member [IP::remote_addr] }}if { $pm_selected equals 0 } { pool internal-dynamics-pool-name }}
Configuring the BIG-IP system for Dynamics CRM server-to-server trafficIf you are not using split DNS, and requests from the Dynamics servers to the Dynamics URL are routed through the external Dynamics virtual server on the BIG-IP LTM you may see problems when a request from the Dynamics server is load balanced to another server rather than to itself.
There are two ways to configure this functionality, depending on whether you have a device performing NAT between the servers and the BIG-IP system.
Configuring the BIG-IP system for server-to-server traffic if the BIG-IP system can see server IP addressesIf you do not have a device (such as a NATing device) between the servers and the BIG-IP system that prevents the BIG-IP system from seeing the real server IP addresses, you must attach an iRule to the virtual server you just created. There are multiple versions of the iRule in this section; choose the one applicable to your configuration.
iRule if you do not plan on deploying BIG-IP APMUse the following iRule definition if you do not plan on using the BIG-IP Access Policy Manager as a part of this deployment.
Critical Be sure to change the red text below to the name of the pool (and the port the pool members are using) you created in the table.
1234567
when CLIENT_ACCEPTED { foreach { pm } [members -list example_dynamics_pool] { if { $pm equals "[IP::remote_addr] <443 or 80>" } { pool example_dynamics_pool member [IP::remote_addr] } }}
Rule if you plan on deploying BIG-IP APMUse the following iRule definition if you plan on using the BIG-IP Access Policy Manager as a part of this deployment. If you are using the CRM plug-in for Microsoft Outlook, do not use this iRule, but use the next one.
Critical Be sure to change the red text below to the name of the pool you created in the table.

14
DEPLOYMENT GUIDE
Microsoft Dynamics CRM
123456789101112131415
when CLIENT_ACCEPTED { set is_crm 0 foreach { pm } [members -list example_dynamics_pool] { if { $pm equals "[IP::remote_addr] <443 or 80>" } { set is_crm 1 pool example_dynamics_pool member [IP::remote_addr] } }}
when HTTP_REQUEST { if { $is_crm == 1 } { ACCESS::disable }}
Rule if you plan on deploying BIG-IP APM and are deploying the CRM plug-in for Microsoft OutlookUse the following iRule definition if you plan on using the BIG-IP Access Policy Manager as a part of this deployment, and are using the CRM plug-in for Microsoft Outlook.
Critical Be sure to change the red text below to the name of the pool you created in the table. Enter line 12 on a single line.
123456789101112
131415
when CLIENT_ACCEPTED { set is_crm 0 foreach { pm } [members -list example_dynamics_pool] { if { $pm equals "[IP::remote_addr] 443" } { set is_crm 1 pool example_dynamics_pool member [IP::remote_addr] } }}
when HTTP_REQUEST { if { $is_crm == 1 || [string tolower [HTTP::uri]] contains "xrmservices" || [string tolower [HTTP::uri]] contains
"outlookworkstationclient" || [HTTP::cookie exists "FullClient"]} { ACCESS::disable }}
After creating the appropriate iRule, attach it to the virtual server you created using the table on the previous page.

15
DEPLOYMENT GUIDE
Microsoft Dynamics CRM
Appendix B: Using X-Forwarded-For to log the client IP address in IIS 7.0, 7.5, and 8 (optional)When you configure BIG-IP LTM to use SNAT, the BIG-IP system replaces the source IP address of an incoming connection with its local self IP address (in the case of SNAT Automap), or an address you have configured in a SNAT pool. As a result, Microsoft IIS logs each connection with its assigned SNAT address, rather than the address of the client. The iApp produces an HTTP profile on the BIG-IP system which inserts an X-Forwarded-For header, so the original client IP address is sent as well; however, in default IIS configuration, this information is not logged.
Beginning with IIS 7, Microsoft provides an optional Advanced Logging Feature for IIS that allows you to define custom log definitions that can capture additional information such as the client IP address included in the X-Forwarded-For header.
Deploying the Custom Logging role serviceThe first task is to deploy the Custom Logging role service. If you do not deploy this role service, you may receive a “Feature not supported” error when trying to edit the log definition in the next section. If you receive this error, ensure that you are editing the log definition at the server level in IIS Manager.
The configuration is slightly different depending on which version of IIS you are running. Use the procedure applicable to your version of IIS.
To deploy the Custom Logging role service for IIS 7.0 and 7.5 (Windows Server 2008)
1. From your Windows Server 2008 or Windows Server 2008 R2 device, open Server Manager.
2. In the Navigation pane, expand Roles.
3. Right-click Web Server, and then click Add Role Services.
4. Under Health and Diagnostics, check the box for Custom Logging, and then click Next.
5. On the Confirmation page, click Install.
6. After the service has successfully installed, click the Close button.
To deploy the Custom Logging role service for IIS 8.0 (Windows Server 2012)
1. From your Windows Server 2012 device, open Server Manager.
2. Click Manage and then Add Roles and Features.
3. Select Role-based or feature-based installation.
4. On the Roles screen, expand Web Server (IIS) and Health and Diagnostics and then check the box for Custom Logging.
5. Click Next and then on the Features screen, click Next again.
6. Click Install.
7. After the service has successfully installed, click the Close button.
Adding the X-Forwarded-For log field to IISBefore beginning the following procedure, you must have installed IIS Advanced Logging. For installation instructions, see http://www.iis.net/community/files/media/advancedlogging_readme.htm
If you are using IIS version 6, F5 has a downloadable ISAPI filter that performs a similar function to the Advanced Logging Feature discussed here. For information on that solution, see the DevCentral post at http://devcentral.f5.com/weblogs/Joe/archive/2009/08/19/x_forwarded_for_log_filter_for_windows_servers.aspx
The following procedure is the same for IIS versions 7.0, 7.5, and 8.0.
16
DEPLOYMENT GUIDE
Microsoft Dynamics CRM
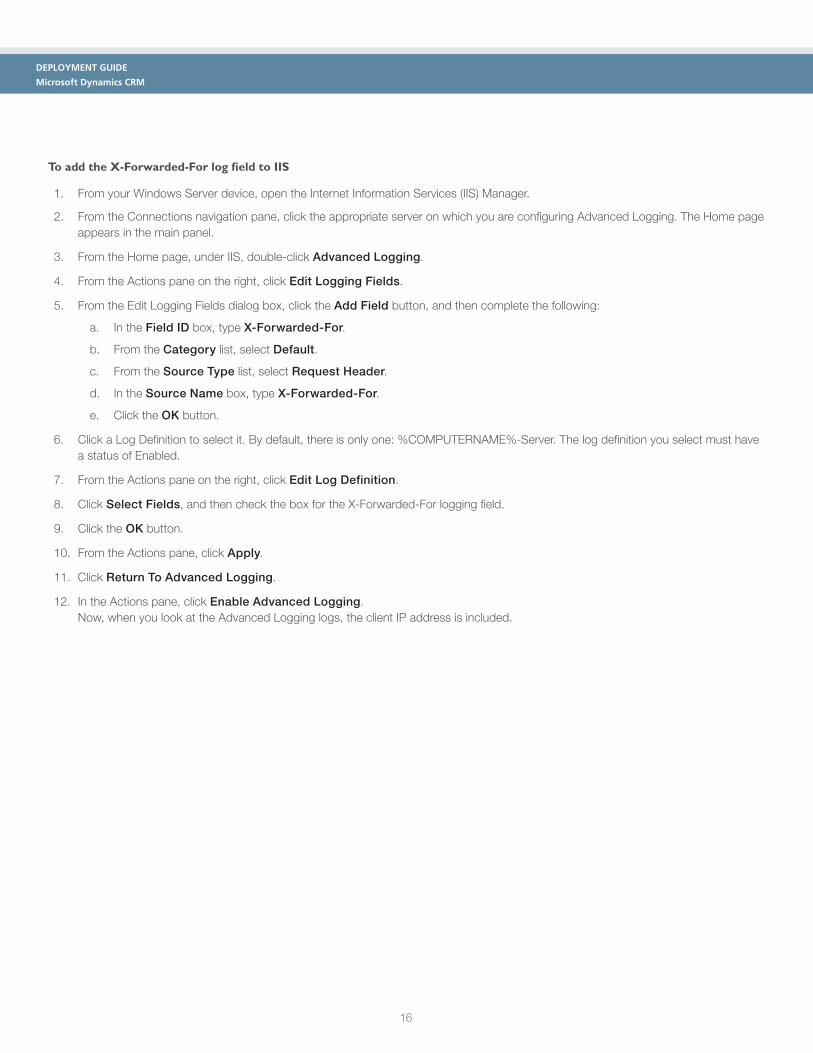
To add the X-Forwarded-For log field to IIS
1. From your Windows Server device, open the Internet Information Services (IIS) Manager.
2. From the Connections navigation pane, click the appropriate server on which you are configuring Advanced Logging. The Home page appears in the main panel.
3. From the Home page, under IIS, double-click Advanced Logging.
4. From the Actions pane on the right, click Edit Logging Fields.
5. From the Edit Logging Fields dialog box, click the Add Field button, and then complete the following:
a. In the Field ID box, type X-Forwarded-For.
b. From the Category list, select Default.
c. From the Source Type list, select Request Header.
d. In the Source Name box, type X-Forwarded-For.
e. Click the OK button.
6. Click a Log Definition to select it. By default, there is only one: %COMPUTERNAME%-Server. The log definition you select must have a status of Enabled.
7. From the Actions pane on the right, click Edit Log Definition.
8. Click Select Fields, and then check the box for the X-Forwarded-For logging field.
9. Click the OK button.
10. From the Actions pane, click Apply.
11. Click Return To Advanced Logging.
12. In the Actions pane, click Enable Advanced Logging. Now, when you look at the Advanced Logging logs, the client IP address is included.
17
DEPLOYMENT GUIDE
Microsoft Dynamics CRM
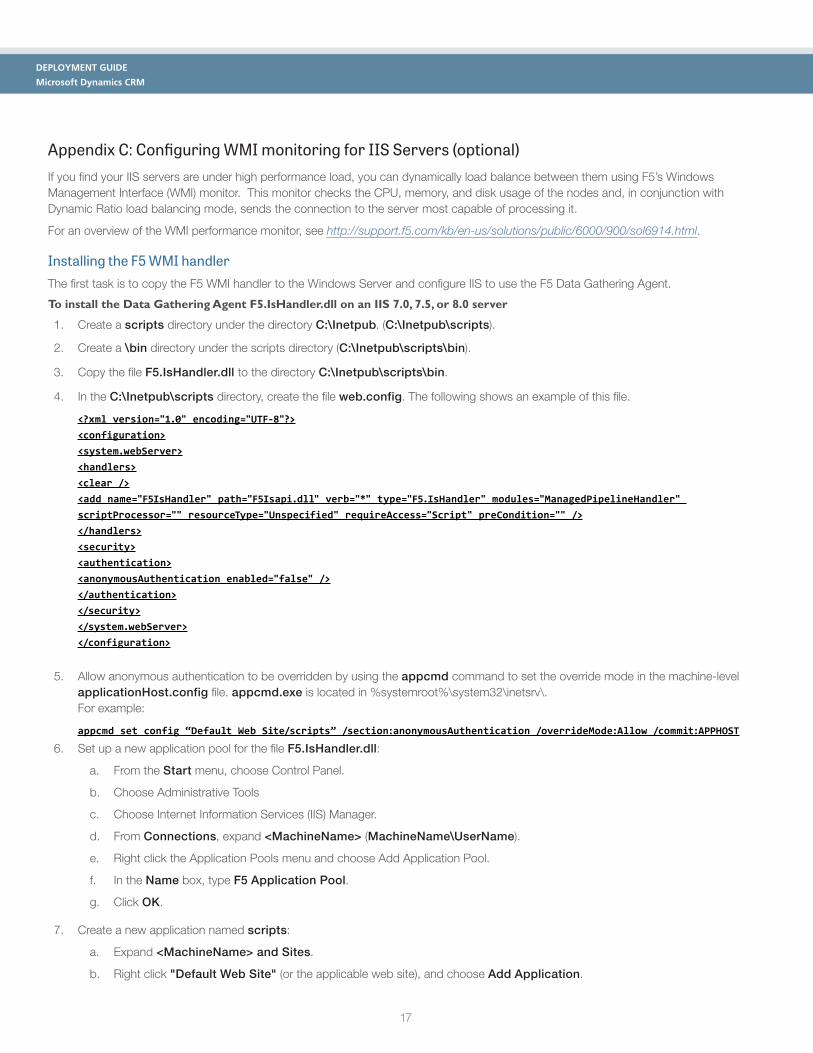
Appendix C: Configuring WMI monitoring for IIS Servers (optional)If you find your IIS servers are under high performance load, you can dynamically load balance between them using F5’s Windows Management Interface (WMI) monitor. This monitor checks the CPU, memory, and disk usage of the nodes and, in conjunction with Dynamic Ratio load balancing mode, sends the connection to the server most capable of processing it.
For an overview of the WMI performance monitor, see http://support.f5.com/kb/en-us/solutions/public/6000/900/sol6914.html.
Installing the F5 WMI handlerThe first task is to copy the F5 WMI handler to the Windows Server and configure IIS to use the F5 Data Gathering Agent.
To install the Data Gathering Agent F5.IsHandler.dll on an IIS 7.0, 7.5, or 8.0 server
1. Create a scripts directory under the directory C:\Inetpub. (C:\Inetpub\scripts).
2. Create a \bin directory under the scripts directory (C:\Inetpub\scripts\bin).
3. Copy the file F5.IsHandler.dll to the directory C:\Inetpub\scripts\bin.
4. In the C:\Inetpub\scripts directory, create the file web.config. The following shows an example of this file.
<?xml version="1.0" encoding="UTF-8"?><configuration><system.webServer><handlers><clear /><add name="F5IsHandler" path="F5Isapi.dll" verb="*" type="F5.IsHandler" modules="ManagedPipelineHandler" scriptProcessor="" resourceType="Unspecified" requireAccess="Script" preCondition="" /></handlers><security><authentication><anonymousAuthentication enabled="false" /></authentication></security></system.webServer></configuration>
5. Allow anonymous authentication to be overridden by using the appcmd command to set the override mode in the machine-level applicationHost.config file. appcmd.exe is located in %systemroot%\system32\inetsrv\. For example:
appcmd set config “Default Web Site/scripts” /section:anonymousAuthentication /overrideMode:Allow /commit:APPHOST
6. Set up a new application pool for the file F5.IsHandler.dll:
a. From the Start menu, choose Control Panel.
b. Choose Administrative Tools
c. Choose Internet Information Services (IIS) Manager.
d. From Connections, expand <MachineName> (MachineName\UserName).
e. Right click the Application Pools menu and choose Add Application Pool.
f. In the Name box, type F5 Application Pool.
g. Click OK.
7. Create a new application named scripts:
a. Expand <MachineName> and Sites.
b. Right click "Default Web Site" (or the applicable web site), and choose Add Application.
18
DEPLOYMENT GUIDE
Microsoft Dynamics CRM
c. In the Alias box, type scripts.
d. To change the application pool, click Select.
e. For the physical path, type the directory you created in step 1 (C:\Inetpub\scripts\).
f. Click OK.
8. Change the Authentication setting to Basic Authentication:
a. Select scripts.
b. In the center pane, double click Authentication.
c. Verify that the status of all items under Authentication is Disabled, except for the Basic Authentication item. To enable or disable an authentication item, right click the name and choose Enable or Disable.
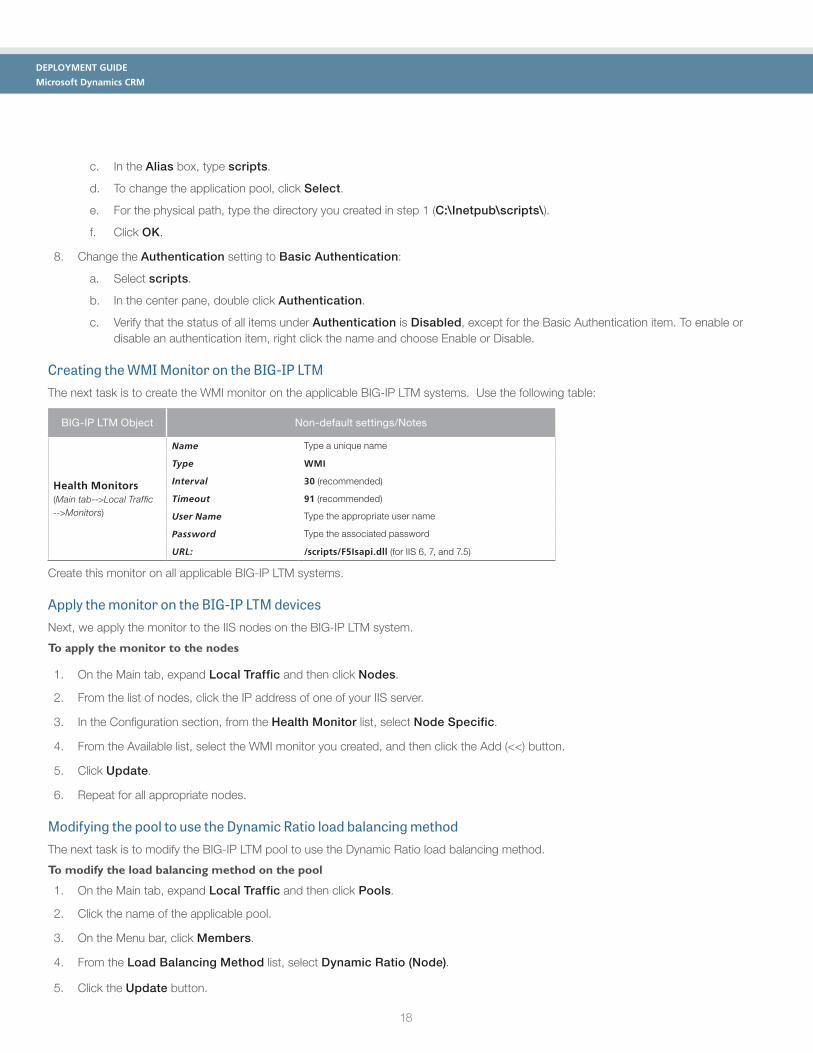
Creating the WMI Monitor on the BIG-IP LTMThe next task is to create the WMI monitor on the applicable BIG-IP LTM systems. Use the following table:
BIG-IP LTM Object Non-default settings/Notes
Health Monitors (Main tab-->Local Traffic -->Monitors)
Name Type a unique name
Type WMI
Interval 30 (recommended)
Timeout 91 (recommended)
User Name Type the appropriate user name
Password Type the associated password
URL: /scripts/F5Isapi.dll (for IIS 6, 7, and 7.5)
Create this monitor on all applicable BIG-IP LTM systems.
Apply the monitor on the BIG-IP LTM devicesNext, we apply the monitor to the IIS nodes on the BIG-IP LTM system.
To apply the monitor to the nodes
1. On the Main tab, expand Local Traffic and then click Nodes.
2. From the list of nodes, click the IP address of one of your IIS server.
3. In the Configuration section, from the Health Monitor list, select Node Specific.
4. From the Available list, select the WMI monitor you created, and then click the Add (<<) button.
5. Click Update.
6. Repeat for all appropriate nodes.
Modifying the pool to use the Dynamic Ratio load balancing methodThe next task is to modify the BIG-IP LTM pool to use the Dynamic Ratio load balancing method.
To modify the load balancing method on the pool
1. On the Main tab, expand Local Traffic and then click Pools.
2. Click the name of the applicable pool.
3. On the Menu bar, click Members.
4. From the Load Balancing Method list, select Dynamic Ratio (Node).
5. Click the Update button.
19
DEPLOYMENT GUIDE
Microsoft Dynamics CRM
Appendix D: Configuring DNS and NTP on the BIG-IP systemIf you are using the BIG-IP APM, you must have DNS and NTP settings configured on the BIG-IP system. If you do not, use the following procedures.
Configuring the DNS settingsIn this section, you configure the DNS settings on the BIG-IP system to point to the Active Directory server.
 Note: DNS lookups go out over one of the interfaces configured on the BIG-IP system, not the management interface. The management interface has its own, separate DNS settings.
 Important: The BIG-IP system must have a Route to the Active Directory server. The Route configuration is found on the Main tab by expanding Network and then clicking Routes. For specific instructions on configuring a Route on the BIG-IP system, see the online help or the product documentation.
To configure DNS settings
1. On the Main tab, expand System, and then click Configuration.
2. On the Menu bar, from the Device menu, click DNS.
3. In the DNS Lookup Server List row, complete the following:
a. In the Address box, type the IP address of a DNS server that can resolve the Active Directory server.
b. Click the Add button.
4. Click Update.
Configuring the NTP settingsThe next task is to configure the NTP settings on the BIG-IP system for authentication to work properly.
To configure NTP settings
1. On the Main tab, expand System, and then click Configuration.
2. On the Menu bar, from the Device menu, click NTP.
3. In the Address box, type the fully-qualified domain name (or the IP address) of the time server that you want to add to the Address List.
4. Click the Add button.
5. Click Update.
To verify the NTP setting configuration, you can use the ntpq utility. From the BIG-IP command line, run ntpq -np.
See http://support.f5.com/kb/en-us/solutions/public/10000/200/sol10240.html for more information on this command.
DEPLOYMENT GUIDE
Microsoft Dynamics CRM
20
©2014 F5 Networks, Inc. All rights reserved. F5, F5 Networks, the F5 logo, and IT agility. Your way., are trademarks of F5 Networks, Inc. in the U.S. and in certain other countries. Other F5 trademarks are identified at f5.com. Any other products, services, or company names referenced herein may be trademarks of their respective owners with no endorsement or affiliation, express or implied, claimed by F5.
F5 Networks, Inc.Corporate Headquarters
F5 Networks, Inc. 401 Elliott Avenue West, Seattle, WA 98119 888-882-4447 www.f5.com
F5 NetworksAsia-Pacific
F5 Networks Ltd.Europe/Middle-East/Africa
F5 NetworksJapan K.K.
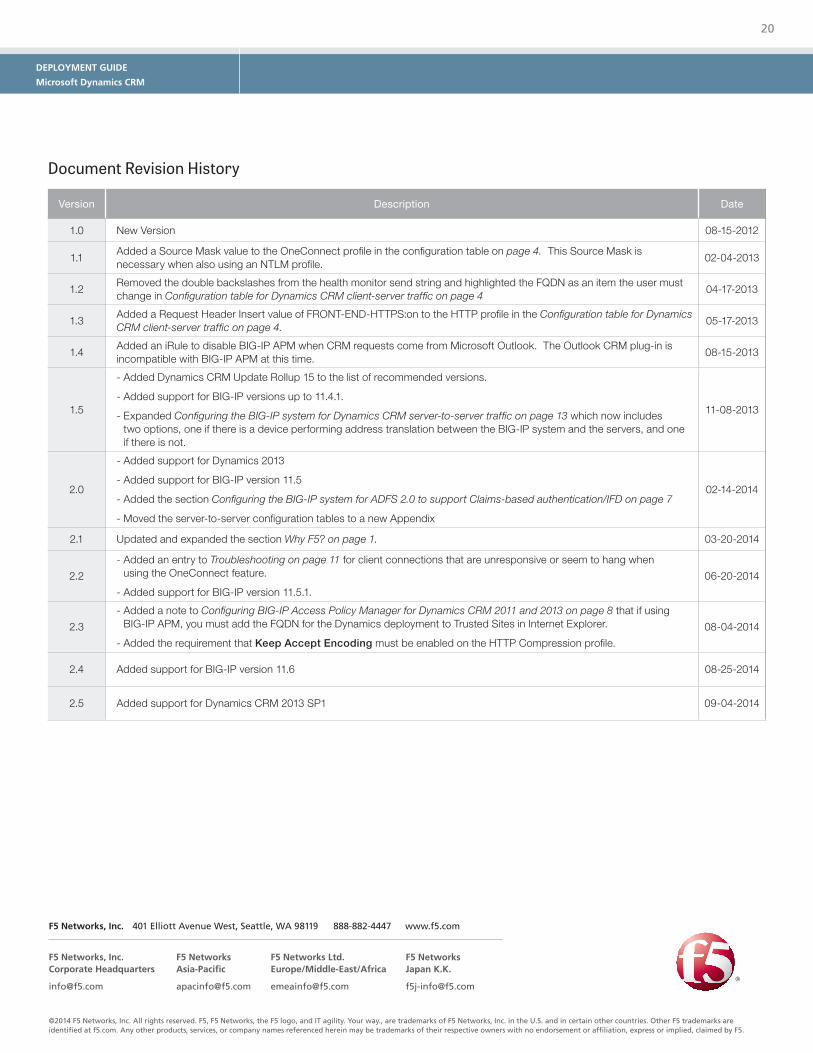
Document Revision History
Version Description Date
1.0 New Version 08-15-2012
1.1 Added a Source Mask value to the OneConnect profile in the configuration table on page 4. This Source Mask is
necessary when also using an NTLM profile.02-04-2013
1.2 Removed the double backslashes from the health monitor send string and highlighted the FQDN as an item the user must
change in Configuration table for Dynamics CRM client-server traffic on page 404-17-2013
1.3 Added a Request Header Insert value of FRONT-END-HTTPS:on to the HTTP profile in the Configuration table for Dynamics
CRM client-server traffic on page 4.05-17-2013
1.4 Added an iRule to disable BIG-IP APM when CRM requests come from Microsoft Outlook. The Outlook CRM plug-in is
incompatible with BIG-IP APM at this time.08-15-2013
1.5
- Added Dynamics CRM Update Rollup 15 to the list of recommended versions.
- Added support for BIG-IP versions up to 11.4.1.
- Expanded Configuring the BIG-IP system for Dynamics CRM server-to-server traffic on page 13 which now includes two options, one if there is a device performing address translation between the BIG-IP system and the servers, and one if there is not.
11-08-2013
2.0
- Added support for Dynamics 2013
- Added support for BIG-IP version 11.5
- Added the section Configuring the BIG-IP system for ADFS 2.0 to support Claims-based authentication/IFD on page 7
- Moved the server-to-server configuration tables to a new Appendix
02-14-2014
2.1 Updated and expanded the section Why F5? on page 1. 03-20-2014
2.2
- Added an entry to Troubleshooting on page 11 for client connections that are unresponsive or seem to hang when using the OneConnect feature.
- Added support for BIG-IP version 11.5.1.
06-20-2014
2.3
- Added a note to Configuring BIG-IP Access Policy Manager for Dynamics CRM 2011 and 2013 on page 8 that if using BIG-IP APM, you must add the FQDN for the Dynamics deployment to Trusted Sites in Internet Explorer.
- Added the requirement that Keep Accept Encoding must be enabled on the HTTP Compression profile.
08-04-2014
2.4 Added support for BIG-IP version 11.6 08-25-2014
2.5 Added support for Dynamics CRM 2013 SP1 09-04-2014