Embed Size (px)
Citation preview

Deployment Guide
Deploying the BIG-IP System v11 with Apache TomcatWelcome to the F5® and Apache Tomcat deployment guide. Use this guide to configure the BIG-IP® system version 11 and later for use with Apache Tomcat, with emphasis on providing security, performance, and availability.
This document provides guidance both on complementing Apache functionality, and on moving functionality from Apache servers to a BIG-IP system. The BIG-IP system can assume the role of reverse proxy, and can also perform functions such as compression, encryption, caching, security, and URL rewriting that would otherwise need to be performed by Apache modules. As a result, you can simplify and improve the security of your Apache deployment while simultaneously providing higher performance.
Products and applicable versions
Product Version
BIG-IP system11.0.x - 11.4.x, 11.5, 11.5.1, 11.6 (manual configuration) 11.4.x, 11.5, 11.5.1, 11.6 (using the HTTP iApp template)
Apache Tomcat 6.x, 7.x, 8.x
Deployment guide version 1.0 (see Document Revision History on page 47)
Important: Make sure you are using the most recent version of this deployment guide, available at http://www.f5.com/pdf/deployment-guides/f5-tomcat-dg.pdf.
To provide feedback on this deployment guide or other F5 solution documents, contact us at [email protected].

2
DEPLOYMENT GUIDE Apache Tomcat
ContentsWhy F5? 3
Prerequisites and configuration notes 3
Optional Modules 4
Deployment scenarios 4
Preparing to use the iApp 8
Configuring the HTTP iApp for Apache Tomcat servers 9
Template Options 9
Network 10
SSL Encryption 12
Virtual Server and Pools 15
Delivery Optimization 18
Server offload 20
Application Health 22
iRules 23
Statistics and Logging 23
Modifying the configuration produced by the iApp template if using BIG-IP v11.4 - 11.5.x 25
Next steps 26
Using the BIG-IP system to replace Apache web servers in an Apache Tomcat deployment 27
Manually configuring the BIG-IP APM for Apache Servers 32
Manual configuration table for BIG-IP LTM and AAM 35
Manually configuring the BIG-IP Advanced Firewall Module to secure your Tomcat deployment 37
Appendix: Configuring additional BIG-IP settings 42
Glossary 44
Document Revision History 47

3
DEPLOYMENT GUIDE Apache Tomcat
Why F5?
• F5 offers a complete suite of application delivery technologies designed to provide a highly scalable, secure, and responsive Apache Tomcat deployment.
• Terminating HTTPS connections at the BIG-IP LTM reduces CPU and memory load on Apache Tomcat servers, obviates the need for mod_ssl in many cases, and simplifies TLS/SSL certificate management.
• The BIG-IP LTM can balance load and ensure high-availability across multiple Apache Tomcat servers using a variety of load balancing methods and priority rules.
• Modules such as mod_cache and mod_deflate can be removed from the Apache Tomcat configuration, reducing the total memory footprint for each Apache instance. See Modules on page 27 for more information.
• The BIG-IP system’s TCP Express feature set ensures optimal network performance for all clients and servers, regardless of operating system and version, and reduces the processing power required from each Apache Tomcat server, enabling the servers to dedicate more resources to performing the tasks for which they were designed.
• The BIG-IP Access Policy Manager or Edge Gateway, F5's high-performance access and security solutions, can provide proxy authentication and secure remote access to Apache Tomcat servers and associated applications.
• By centralizing reverse proxy configuration onto the BIG-IP system, you obviate the need to manage and tune many aspects of each Apache Tomcat instance.
• The BIG-IP system provides a centralized point for web log generation.
What is F5 iApp?Introduced in BIG-IP version 11, F5 iApp™ is a powerful new set of features in the BIG-IP system that provides a new way to architect application delivery in the data center, and it includes a holistic, application-centric view of how applications are managed and delivered inside, outside, and beyond the data center. You can use the "HTTP" iApp template for Apache Tomcat, enabling the system to act as the single point interface for building, managing, and monitoring these servers.
For more information on iApp, see the White Paper F5 iApp: Moving Application Delivery Beyond the Network: http://www.f5.com/pdf/white-papers/f5-iapp-wp.pdf.
Prerequisites and configuration notesThe following are general prerequisites and configuration notes for this guide:
h Important: Although every effort has been made to provide accurate guidance concerning the use and configuration of Apache Tomcat servers, F5 Networks cannot support third-party software. If information specific to Apache Tomcat servers differs in this guide from that in official Apache project documentation, the Apache project documentation should be considered authoritative.
h This document contains an extensive section with information and guidance for configuring and tuning your Apache Tomcat servers for use with the BIG-IP system. See Using the BIG-IP system to replace Apache web servers in an Apache Tomcat deployment on page 27.
h This document provides instructions for using the HTTP iApp template, found in BIG-IP version 11.4 and later, for Apache Tomcat servers, as well as instructions on how to configure the BIG-IP system manually for Apache Tomcat. Where applicable, we show you how to tune or otherwise configure your Apache Tomcat servers for optimal use in conjunction with a BIG-IP system.
h The HTTP iApp template for use with Apache as described in this document is only available in BIG-IP version 11.4 and later. If you are using a BIG-IP system running version 11-11.3.x, you should not use the HTTP iApp template included with the system, but instead should manually configure the BIG-IP according to the configuration tables presented at the end of this document.
h If you are using the BIG-IP system to offload SSL or for SSL Bridging, we assume you have already obtained the appropriate SSL certificate and key, and it is installed on the BIG-IP system.
h If you are using the BIG-IP Application Acceleration Manager (AAM) for Symmetric optimization between two BIG-IP systems (optional), you must have pre-configured the BIG-IP AAM for Symmetric Optimization using the Quick Start wizard or manually

4
DEPLOYMENT GUIDE Apache Tomcat
configured the necessary objects. See the BIG-IP AAM documentation (http://support.f5.com/kb/en-us/products/big-ip-aam.html) for specific instructions on configuring BIG-IP AAM for Symmetric Optimization.
h If you plan to deploy the BIG-IP Access Policy Manager (APM), you must configure APM manually, as BIG-IP APM is not a part of the HTTP iApp template.
Optional Modules This HTTP iApp allows you to use the following optional modules on the BIG-IP system: Application Visibility Reporting (AVR) and Application Acceleration Manager (AAM). This guide also provides instructions for manually configuring BIG-IP APM for Apache Tomcat servers. To take advantage of these modules, they must be licensed and provisioned before starting the iApp template. For more information on licensing modules, contact your sales representative.
• BIG-IP AAMBIG-IP AAM (formerly BIG-IP WAN Optimization Manager and WebAccelerator) provides application, network, and front-end optimizations to ensure consistently fast performance for today’s dynamic web applications, mobile devices, and wide area networks. With sophisticated execution of caching, compression, and image optimization, BIG-IP AAM decreases page download times. You also have the option of using BIG-IP AAM for symmetric optimization between two BIG-IP systems. For more information on BIG-IP Application Acceleration Manager, see http://www.f5.com/products/big-ip/big-ip-application-acceleration-manager/overview/.
• BIG-IP APM BIG-IP Access Policy Manager (APM) is a flexible, high-performance access and security solution that provides unified global access to your business-critical applications and networks. By consolidating remote access, web access management, VDI, and other resources in a single policy control point—and providing easy-to-manage access policies—BIG-IP APM helps you free up valuable IT resources and scale cost-effectively. See http://www.f5.com/products/big-ip/big-ip-access-policy-manager/overview/.
• BIG-IP AFM BIG-IP Advanced Firewall Manager (AFM) is a high-performance, stateful, full-proxy network firewall designed to guard data centers against incoming threats that enter the network on the most widely deployed protocols—including HTTP/S, SMTP, DNS, and FTP. By aligning firewall policies with the applications they protect, BIG-IP AFM streamlines application deployment, security, and monitoring. For more information on BIG-IP AFM, see https://f5.com/products/modules/advanced-firewall-manager.
• Application Visibility and Reporting F5 Analytics (also known as Application Visibility and Reporting or AVR) is a module on the BIG-IP system that lets customers view and analyze metrics gathered about the network and servers as well as the applications themselves. Making this information available from a dashboard-type display, F5 Analytics provides customized diagnostics and reports that can be used to optimize application performance and to avert potential issues. The tool provides tailored feedback and recommendations for resolving problems. Note that AVR is licensed on all systems, but must be provisioned before beginning the iApp template.
Deployment scenarios Apache Tomcat servers are typically deployed as a combined web an application tier in a 3-tier architecture (the other tier being database), or as an application tier behind one or more Apache Web Servers which act as reverse proxies and load balancing devices.
A BIG-IP system can take the place of the Apache Web Server tier entirely, or offload many HTTP-related functions from an Apache Tomcat combined web/application deployment.
Configuring the BIG-IP system as reverse (or inbound) proxyIn its traditional role, the BIG-IP system is a reverse proxy. The system is placed in the network between the clients and the Apache Tomcat servers. Incoming requests are handled by the BIG-IP system, which interacts on behalf of the client with the desired server or service on the server. This allows the BIG-IP system to provide scalability, availability, server offload, and much more, all completely transparent to the client.

5
DEPLOYMENT GUIDE Apache Tomcat
Internet or WAN
Apache TomcatServers
Clients
AAMLTM
BIG-IP Platform
Figure 1: Using the BIG-IP system as a reverse proxy
Accelerating application traffic over the WANThe iApp enables you to use the BIG-IP system's Application Acceleration Manager module to optimize and secure your Tomcat traffic over the WAN (wide area network). The iApp uses the default iSession profile to create a secure tunnel between BIG-IP systems to accelerate and optimize the traffic.
In this scenario, you must have a symmetric BIG-IP deployment (as shown in Figure 2), with a BIG-IP system between your clients and the WAN, and another between the WAN and your Apache Tomcat servers. You run the iApp template on each of the BIG-IP systems, using the settings found in the following table.
Internet or WAN
iSession tunnel
BIG-IP Platform
AAMLTM
Clients
AAMLTM
BIG-IP PlatformApache Tomcat
Servers
Figure 2: Using an iSession tunnel to secure and optimize traffic between two BIG-IP systems
To configure this scenario
If you select this option, you must have already configured the BIG-IP AAM for Symmetric Optimization as mentioned in the prerequisites. See the BIG-IP AAM documentation available on Ask F5 (http://support.f5.com/kb/en-us/products/big-ip-aam.html) for specific instructions on configuring BIG-IP AAM for Symmetric Optimization.
To configure the system for this scenario, at a minimum you must answer the following questions with the appropriate answers in the iApp template as shown in the following table.
The table assumes you are configuring the BIG-IP system on the client side of the WAN.
iApp template question Your answer
On the BIG-IP system between clients and the WAN
What type of network connects clients to the BIG-IP system? (on page 10) LAN or WAN as appropriate
What type of network connects servers to the BIG-IP system? (on page 10) WAN through another BIG-IP system
Do you want to create a new pool or use an existing one?Typically you would leave this at the default for this scenario (Do not use a pool), however you could create a pool of local servers to use as a fallback in case the WAN becomes unavailable.
On the BIG-IP system between servers and the WAN
What type of network connects clients to the BIG-IP system? (on page 10) WAN through another BIG-IP system
What type of network connects servers to the BIG-IP system? (on page 10) LAN or WAN as appropriate (Typically LAN)

6
DEPLOYMENT GUIDE Apache Tomcat
Using the BIG-IP system with SSL trafficThe HTTP iApp template for use with Apache Tomcat servers provides three different options for dealing with encrypted traffic: SSL Offload, SSL Bridging, and encrypting previously unencrypted traffic to the servers. There is also an option if you do not need the BIG-IP system to process SSL traffic.
• SSL Offload When performing SSL offload, the BIG-IP system accepts incoming encrypted traffic, decrypts (or terminates) it, and then sends the traffic to the servers unencrypted. By saving the servers from having to perform the decryption duties, F5 improves server efficiency and frees server resources for other tasks. SSL certificates and keys are stored on the BIG-IP system.
• SSL Bridging With SSL Bridging, also known as SSL re-encryption, the BIG-IP system accepts incoming encrypted traffic, decrypts it for processing, and then re-encrypts the traffic before sending it back to the servers. This is useful for organizations that have requirements for the entire transaction to be SSL encrypted. In this case, SSL certificates and keys must be are stored and maintained on the BIG-IP system and the web servers.
• SSL pass-through With SSL pass-through, the BIG-IP system does not process the encrypted traffic at all, just sends it on to the servers.
• No SSL (plaintext) In this scenario, the BIG-IP system does not perform any SSL processing, as all traffic is only plaintext.
• Server-side encryption In this scenario, the BIG-IP system accepts unencrypted traffic and then encrypts is before sending it to the servers. While more uncommon than offload or bridging, this can be useful for organizations that require all traffic behind the system to be encrypted.
Internet or WANClients
BIG-IP Platform
SSL of�oad
SSL bridging
No SSL
Server-side encryption
SSL pass-through
Apache TomcatServers
Figure 3: SSL options
To configure these scenarios
For SSL offload or SSL bridging, you must have imported a valid SSL certificate and key onto the BIG-IP system. Importing certificates and keys is not a part of the template, see System > File Management > SSL Certificate List, and then click Import.
iApp template question Your answer
How should the BIG-IP system handle SSL traffic (on page 12)
Select the appropriate option for your configuration:
SSL Offload: SSL Bridging: SSL Pass-ThroughNo SSL: Server-side encryption:
Encrypt to clients, plaintext to serversTerminate SSL from clients, re-encrypt to serversEncrypted traffic is forwarded without decryptionPlaintext to clients and serversPlaintext to clients, encrypt to servers

7
DEPLOYMENT GUIDE Apache Tomcat
Using this guideThis deployment guide is intended to help users deploy web-based applications using the BIG-IP system. This document contains guidance configuring the BIG-IP system using the iApp template, as well as manually configuring the BIG-IP system.
Using this guide to configure the iApp templateWe recommend using the iApp template to configure the BIG-IP system for your Apache implementation. The majority of this guide describes the iApp template and the different options the template provides for configuring the system for Apache Tomcat.
The iApp template configuration portion of this guide walks you through the entire iApp, giving detailed information not found in the iApp or inline help. The questions in the UI for the iApp template itself are all displayed in a table and at the same level. In this guide, we have grouped related questions and answers in a series of lists. Questions are part of an ordered list and are underlined and in italics or bold italics. Options or answers are part of a bulleted list, and in bold. Questions with dependencies on other questions are shown nested under the top level question, as shown in the following example:
1. Top-level question found in the iApp template
f Select an object you already created from the list (such as a profile or pool; not present on all questions. Shown in bold italic)
f Choice #1 (in a drop-down list)
f Choice #2 (in the list)
a. Second level question dependent on selecting choice #2
` Sub choice #1
` Sub choice #2
i). Third level question dependent on sub choice #2
• Sub-sub choice
• Sub-sub #2
1). Fourth level question (rare)
Advanced options/questions in the template are marked with the Advanced icon: Advanced . These questions only appear if you select the Advanced configuration mode.
Manually configuring the BIG-IP systemUsers already familiar with the BIG-IP system can use the manual configuration tables to configure the BIG-IP system for the Apache implementation. These configuration tables only show the configuration objects and any non-default settings recommended by F5, and do not contain procedures on specifically how to configure those options in the Configuration utility. See Manual configuration table for BIG-IP LTM and AAM on page 35 for BIG-IP LTM and AAM configuration. For BIG-IP APM configuration, see Manually configuring the BIG-IP APM for Apache Servers on page 32.
Configuring Apache Tomcat servers for use with the BIG-IP systemThis document contains an extensive section with information and guidance for configuring and tuning your Apache servers for use with the BIG-IP system. See Using the BIG-IP system to replace Apache web servers in an Apache Tomcat deployment on page 27 for details.

8
DEPLOYMENT GUIDE Apache Tomcat
Preparing to use the iAppIn order to use the iApp for Apache applications, it is helpful to have some information, such as server IP addresses and domain information before you begin. Use the following table for information you may need to complete the template. The table does not contain every question in the template, but rather includes information helpful to have in advance. More information on specific template questions can be found on the individual pages. Also see Using the BIG-IP system to replace Apache web servers in an Apache Tomcat deployment on page 27.
BIG-IP system Preparation Table
Basic/Advanced mode
In the iApp, you can configure the system for your Apache servers with F5 recommended settings (Basic mode) which are a result of extensive testing and tuning. Advanced mode allows configuring the BIG-IP system on a much more granular level, configuring specific options, or using your own pre-built profiles or iRules. Basic/Advanced "configuration mode" is independent from the Basic/Advanced list at the very top of the template which only toggles the Device and Traffic Group options (see page 9)
Network
Type of network between clients and BIG-IP Type of network between servers and BIG-IP
LAN | WAN | WAN through another BIG-IP system LAN | WAN | WAN through another BIG-IP system
If WAN through another BIG-IP system, you must have BIG-IP AAM pre-configured for Symmetric Optimization.
Where are BIG-IP virtual servers in relation to the servers Expected number of concurrent connections per server
Same subnet | Different subnet More than 64k concurrent | Fewer than 64k concurrent
If they are on different subnets, you need to know if the Apache web servers have a route through the BIG-IP system. If there is not a route, you need to know the number of concurrent connections.
If more than 64k per server, you need an available IP address for each 64k connections you expect for the SNAT Pool
SSL Encryption
SSL Offload or SSL Bridging Re-encryption (Bridging and server-side encryption)
If configuring the system for SSL Offload or SSL Bridging, you must have imported a valid SSL certificate and key onto the BIG-IP system. You have the option of also using an Intermediate (chain) certificate as well if required in your implementation.
Certificate:
Key:
Intermediate Certificate (optional):
When the BIG-IP system encrypts traffic to the servers, it is acting as an SSL client and by default we assume the servers do not expect the system to present its client certificate on behalf of clients traversing the virtual server. If your servers expect the BIG-IP system to present a client certificate, you must create a custom Server SSL profile outside of the template with the appropriate certificate and key.
Virtual Server and Pools
Virtual Server Apache Tomcat server pool
The virtual server is the address clients use to access the servers. The load balancing pool is the LTM object that contains the servers.
IP address for the virtual server:
Associated service port:
FQDN clients will use to access the Apache Tomcat servers:
IP addresses of the servers:2:4:6:8:
1:3:5:7:9:
Profiles
For each of the following profiles, the iApp will create a profile using the F5 recommended settings (or you can choose ‘do not use’ many of these profiles). While we recommend using the profiles created by the iApp, you have the option of creating your own custom profile outside the iApp and selecting it from the list. The iApp gives the option of selecting our the following profiles (some only in Advanced mode). Any profiles must be present on the system before you can select them in the iApp
HTTP | Persistence | HTTP Compression | TCP LAN | TCP WAN | OneConnect | Web Acceleration | NTLM | iSession
Health monitor
HTTP Request User Account
In Advanced mode, you have the option of selecting the type of HTTP request the health monitor uses: GET or POST.You can also specify Send and Receive strings to more accurately determine server health.
Send string (the URI sent to the servers):
Receive string (what the system expects in return):
POST Body (only if using POST):
Also in advanced mode, the monitor can attempt to authenticate to the Apache Tomcat servers as a part of the health check. If you want the monitor to require credentials, create a user account specifically for this monitor that has no additional permissions and is set to never expire. Account maintenance becomes a part of the health monitor, as if the account is deleted or otherwise changed, the monitor will fail and the servers will be marked down.
BIG-IP Application Acceleration Manager
You can optionally use the BIG-IP Application Acceleration Manager (AAM) module to help accelerate your Apache traffic. To use BIG-IP AAM, it must be fully licensed and provisioned on your BIG-IP system. Consult your F5 sales representative for details. If you are using BIG-IP AAM, and want to use a custom Web Acceleration policy, it must have an Acceleration policy attached.
iRulesIn Advanced mode, you have the option of attaching iRules you create to the virtual server created by the iApp. For more information on iRules, see https://devcentral.f5.com/irules. Any iRules you want to attach must be present on the system at the time you are running the iApp.

9
DEPLOYMENT GUIDE Apache Tomcat
Configuring the HTTP iApp for Apache Tomcat serversUse the following guidance to help configure the BIG-IP system for Apache Tomcat servers using the BIG-IP HTTP iApp template. Be sure to also see Using the BIG-IP system to replace Apache web servers in an Apache Tomcat deployment on page 27 for Apache Tomcat server configuration and tuning.
Getting Started with the HTTP iApp for Apache Tomcat serversTo begin the HTTP iApp template for use with Apache Tomcat servers, use the following procedure.
1. Log on to the BIG-IP system.
2. On the Main tab, expand iApp, and then click Application Services.
3. Click Create. The Template Selection page opens.
4. In the Name box, type a name. In our example, we use tomcat-iapp_.
5. From the Template list, select f5.http. The HTTP template opens.
Advanced optionsIf you select Advanced from the Template Selection list at the top of the page, you see Device and Traffic Group options for the application. This feature, introduced in v11.0, is a part of the Device Management configuration. This functionality extends the existing High Availability infrastructure and allows for clustering, granular control of configuration synchronization and granular control of failover. To use the Device and Traffic Group features, you must have already configured Device and Traffic Groups before running the iApp. For more information on Device Management, see the product documentation.
1. Device GroupTo select a specific Device Group, clear the Device Group check box and then select the appropriate Device Group from the list.
2. Traffic GroupTo select a specific Traffic Group, clear the Traffic Group check box and then select the appropriate Traffic Group from the list.
Template OptionsThis section contains general questions about the way you configure the iApp template.
1. Do you want to see inline help?Choose whether you want to see informational and help messages inline throughout the template, or if you would rather hide this inline help. If you are unsure, we recommend having the iApp display the inline help. Important and critical notes are always shown, no matter which selection you make.
f Yes, show inline help textSelect this option to see all available inline help text.
f No, do not show inline help textIf you are familiar with this iApp template, or with the BIG-IP system in general, select this option to hide the inline help text.
2. Which configuration mode do you want to use?Select whether you want to use F5 recommended settings, or have more granular, advanced options presented.
f Basic - Use F5’s recommended settingsIn basic configuration mode, options like load balancing method and parent profiles are all set automatically. The F5 recommended settings come as a result of extensive testing with web applications, so if you are unsure, choose Basic.
f Advanced - Configure advanced optionsIn advanced configuration mode, you have more control over individual settings and objects, such as server-side optimizations and advanced options like Slow Ramp Time and Priority Group Activation. You can also choose to attach iRules you have previously created to the Application Service. The Advanced option provides more flexibility for experienced users.

10
DEPLOYMENT GUIDE Apache Tomcat
As mentioned, advanced options in the template are marked with the Advanced icon: Advanced . If you are using Basic/F5 recommended settings, you can skip the questions with the Advanced icon.
NetworkThis section contains questions about your networking configuration.
1. What type of network connects clients to the BIG-IP system? Choose the type of network that connects your clients to the BIG-IP system. If you choose WAN or LAN, the BIG-IP system uses this information to determine the appropriate TCP optimizations. If you choose WAN through another BIG-IP system, the system uses a secure an optimized tunnel (called an iSession tunnel) for traffic between BIG-IP systems on opposite sides of the WAN. Only choose this option if you have another BIG-IP system across the WAN that will be a part of this implementation.
f Local area network (LAN)Select this option if most clients are connecting to the BIG-IP system on a LAN. This field is used to determine the appropriate TCP profile which is optimized for LAN clients. In this case, the iApp creates a TCP profile using the tcp-lan-optimized parent with no additional modifications.
f Wide area networkSelect this option if most clients are connecting to the BIG-IP system over a WAN. This field is used to determine the appropriate TCP profile which is optimized for WAN clients. In this case, the iApp creates a TCP profile using the tcp-wan-optimized parent with no additional modifications.
f WAN through another BIG-IP systemSelect this option if client traffic is coming to this BIG-IP system from a remote BIG-IP system across a WAN. As mentioned in the introduction to this question, the iApp creates an iSession tunnel between this BIG-IP system and the BIG-IP system you will configure (or already have configured) on the other side of the WAN.
If you select this option, you must have already initially configured the BIG-IP AAM for Symmetric Optimization. See the BIG-IP AAM documentation available on Ask F5 for specific instructions on configuring BIG-IP AAM for Symmetric Optimization.
2. Which VLANs transport client traffic? Advanced
The BIG-IP system allows you to restrict client traffic to specific BIG-IP VLANs, which can provide an additional layer of security, as only traffic from the VLANs you select are allowed to the servers. By default, all VLANs configured on the system are enabled. Select which of your BIG-IP VLANs are transporting client traffic. If you want the BIG-IP system to only accept client traffic from specific VLANs, from the Selected list, select the appropriate VLAN(s) from which you do not want the system to accept traffic, and then click the Remove (>>) button to move the VLAN to the Option box.
Note
If you choose to allow traffic from certain VLANs, when additional VLANs are added to the BIG-IP system at a later time, this iApp configuration will deny traffic from these VLANs by default. To accept traffic from these VLANs, you must re-enter the template and add the VLAN(s).
3. What type of network connects servers to the BIG-IP system? Choose the type of network that connects your servers to the BIG-IP system. Similar to the question about clients connecting to the BIG-IP system, if you choose WAN or LAN, the system uses this information to determine the appropriate TCP optimizations. If you choose WAN through another BIG-IP system, the system uses a secure an optimized tunnel (called an iSession tunnel) for traffic between BIG-IP systems on opposite sides of the WAN. Only choose this option if you have another BIG-IP system across the WAN that will be a part of this Apache implementation.
f Local area network (LAN)Select this option if the servers connect to the BIG-IP system on a LAN. This field is used to determine the appropriate TCP profile. In this case, the iApp creates a TCP profile using the tcp-lan-optimized parent with no additional modifications.

11
DEPLOYMENT GUIDE Apache Tomcat
f Wide area networkSelect this option if the servers connect to the BIG-IP system over a WAN. This field is used to determine the appropriate TCP profile. In this case, the iApp creates a TCP profile using the tcp-wan-optimized parent with no additional modifications.
f WAN through another BIG-IP systemSelect this option if servers are across a WAN behind another BIG-IP system. As mentioned in the introduction to this question, the iApp creates an iSession tunnel between this BIG-IP system and the BIG-IP system you will configure (or already have configured) on the other side of the WAN.
If you select this option, you must have already initially configured the BIG-IP AAM for Symmetric Optimization. See the BIG-IP AAM documentation available on Ask F5 for specific instructions on configuring BIG-IP AAM for Symmetric Optimization.
4. Where will your BIG-IP virtual servers be in relation to the web servers?Select whether your BIG-IP virtual servers are on the same subnet as your Apache Tomcat servers, or on different subnets. This setting is used to determine the SNAT (secure NAT) and routing configuration.
f BIG-IP virtual server IP and web servers are on the same subnetIf the BIG-IP virtual servers and Apache Tomcat servers are on the same subnet, SNAT is configured on the BIG-IP virtual server and you must specify the number of concurrent connections.
a. How many connections to you expect to each web server?Select whether you expect more or fewer than 64,000 concurrent connections to each server. This answer is used to determine what type of SNAT that system uses. A SNAT is an object that maps the source client IP address in a request to a translation address defined on the BIG-IP device. The system configures SNAT Auto Map (fewer than 64,000) or a SNAT pool (more than 64,000).
` Fewer than 64,000 concurrent connectionsSelect this option if you expect fewer than 64,000 concurrent connections per Apache Tomcat server. With this option, the system applies SNAT Auto Map, doesn’t require any additional IP addresses, as an existing self IP address is used for translation. Continue with Virtual Server and Pools on page 15.
` More than 64,000 concurrent connectionsSelect this option if you have a very large deployment and expect more than 64,000 connections at one time. The iApp creates a SNAT Pool, for which you need one IP address for each 64,000 connections you expect.
i). Create a new SNAT pool or use an existing one?If you have already created a SNAT pool on the BIG-IP system, you can select it from the list. Otherwise, the system creates a new SNAT pool with the addresses you specify.
• Create a new SNAT poolSelect this option (the default) to enable the system to create a new SNAT pool. You must specify the appropriate number of IP addresses in the next question.
1). Which IP addresses do you want to use for the SNAT pool? Specify one otherwise unused IP address for every 64,000 concurrent connections you expect to each server, or fraction thereof. Click Add for additional rows. Do not use any self IP addresses on the BIG-IP system.
• Select a SNAT poolSelect the SNAT pool you created for this deployment from the list.
i Important
If you choose more than 64,000 connections, but do not specify enough SNAT pool address(es), after the maximum connection limit of 64,000 concurrent connections per web server is reached, new requests fail.
f BIG-IP virtual servers and web servers are on different subnetsIf the BIG-IP virtual servers and servers are on different subnets, the following question appears.

12
DEPLOYMENT GUIDE Apache Tomcat
a. How have you configured routing on your web servers?If you chose different subnets, this question appears asking whether the Apache Tomcat servers use this BIG-IP system’s self IP address as their default gateway. Select the appropriate answer.
` Servers have a route to clients through the BIG-IP systemChoose this option if the servers use the BIG-IP system as their default gateway. In this case, no configuration is needed to support your environment to ensure correct server response handling. Continue with the next section.
` Servers do not have a route to clients through the BIG-IP systemIf the Apache Tomcat servers do not use the BIG-IP system as their default gateway, SNAT is configured on the BIG-IP virtual server and you must select the expected number of concurrent connections in the next question.
i). How many connections to you expect to each web server?Select whether you expect more or fewer than 64,000 concurrent connections to each server. This answer is used to determine what type of SNAT that system uses. A SNAT is an object that maps the source client IP address in a request to a translation address defined on the BIG-IP device. The system configures SNAT Auto Map (fewer than 64,000) or a SNAT pool (more than 64,000).
• Fewer than 64,000 concurrent connectionsSelect this option if you expect fewer than 64,000 concurrent connections per Apache Tomcat server. With this option, the system applies SNAT Auto Map, doesn’t require any additional IP addresses, as an existing self IP address is used for translation. Continue with the SSL Encryption section.
• More than 64,000 concurrent connectionsSelect this option if you have a very large deployment and expect more than 64,000 connections at one time. The iApp creates a SNAT Pool, for which you need one IP address for each 64,000 connections you expect.
1). Create a new SNAT pool or use an existing one? If you have already created a SNAT pool on the BIG-IP system, you can select it from the list. Otherwise, the system creates a new SNAT pool with the addresses you specify.
* Create a new SNAT pool Select this option (the default) to enable the system to create a new SNAT pool. You must specify the appropriate number of IP addresses in the next question.
a). Which IP addresses do you want to use for the SNAT pool? Specify one otherwise unused IP address for every 64,000 concurrent connections you expect, or fraction thereof. Click Add for additional rows. Do not use any self IP addresses on the BIG-IP system.
• Select a SNAT pool Select the SNAT pool you created for this deployment from the list.
i Important
If you choose more than 64,000 connections, but do not specify enough SNAT pool address(es), after the maximum connection limit of 64,000 concurrent connections per web server is reached, new requests fail.
SSL Encryption Before running the template you should have already imported a certificate and key onto the BIG-IP system. While the BIG-IP system does include a self-signed SSL certificate that can be used internally or for testing, we strongly recommend importing a certificate and key issued from a trusted Certificate Authority for processing client-side SSL.
For information on SSL certificates on the BIG-IP system, see the online help or the Managing SSL Certificates for Local Traffic chapter in the Configuration Guide for BIG-IP Local Traffic Manager available at http://support.f5.com/kb/en-us.html.
1. How should the BIG-IP system handle SSL traffic?There are four options for configuring the BIG-IP system for SSL traffic. Select the appropriate mode for your configuration.

13
DEPLOYMENT GUIDE Apache Tomcat
f Encrypt to clients, plain text to servers (SSL Offload)Choose this method if you want the BIG-IP system to offload SSL processing from the servers. You need a valid SSL certificate and key for this method.
a. Which Client SSL profile do you want to use? Advanced
Select whether you want the iApp to create a new Client SSL profile, or if you have already created a Client SSL profile which contains the appropriate SSL certificate and key.
Unless you have requirements for configuring specific Client SSL settings, we recommend allowing the iApp to create a new profile. To select a profile from the list, it must already be present on the BIG-IP system. Creating a custom profile is not a part of this template; see Local Traffic >> Profiles : SSL : Client to create a Client SSL profile. To select any new profiles you create, you need to restart or reconfigure this template.
` Select an existing Client SSL profileIf you created a Client SSL profile for this implementation, select it from the list. If you select an existing Client SSL profile, the rest of the questions in this section disappear. Continue with the next section.
` Create a new Client SSL profileSelect this option for the iApp to create a new Client SSL profile.
i). Which SSL certificate do you want to use?Select the SSL certificate you imported for this implementation.
ii). Which SSL private key do you want to use?Select the associated SSL private key.
iii). Which intermediate certificate do you want to use? Advanced
If your deployment requires an intermediate or chain certificate, select the appropriate certificate from the list. Immediate certificates are intended to create a chain of trust between the CA that signed the certificate and the CA that is already trusted by the recipient of the certificate. This allows the recipient to verify the validity of the certificates presented, even when the signing CA is unknown.
f Terminate SSL from clients, re-encrypt to servers (SSL Bridging)Choose this method if you want the BIG-IP system to terminate SSL to process it, and then re-encrypt the traffic to the servers (SSL Bridging). You need a valid SSL certificate and key for the client-side, and optionally for the server-side (see #b).
a. Which Client SSL profile do you want to use? Advanced
Select whether you want the iApp to create a new Client SSL profile, or if you have already created a Client SSL profile which contains the appropriate SSL certificate and key.
Unless you have requirements for configuring specific Client SSL settings, we recommend allowing the iApp to create a new profile. To select a profile from the list, it must already be present on the BIG-IP system. Creating a custom profile is not a part of this template; see Local Traffic >> Profiles : SSL : Client to create a Client SSL profile. To select any new profiles you create, you need to restart or reconfigure this template.
` Select an existing Client SSL profileIf you created a Client SSL profile for this implementation select it from the list. If you select an existing Client SSL profile, the rest of the questions in this section disappear. Continue with the next section.
` Create a new Client SSL profileSelect this option for the iApp to create a new Client SSL profile
i). Which SSL certificate do you want to use?Select the SSL certificate you imported for this implementation.
ii). Which SSL private key do you want to use?Select the associated SSL private key.
iii). Which intermediate certificate do you want to use? Advanced If your implementation requires an intermediate or chain certificate, select the appropriate certificate from the list. Immediate certificates are intended to create a chain of trust between the CA that signed the certificate and the CA that is already trusted by the recipient of the certificate. This allows the recipient to verify the validity of the certificates presented, even when the signing CA is unknown.

14
DEPLOYMENT GUIDE Apache Tomcat
b. Which Server SSL profile do you want to use?Select whether you want the iApp to create the F5 recommended Server SSL profile, or if you want to choose a Server SSL profile you already created. In this scenario, the BIG-IP system is acting as an SSL client and by default, we assume the servers do not expect the BIG-IP system to present its client certificate on behalf of clients traversing the virtual server. If your servers expect the BIG-IP system to present a client certificate, you must create a custom Server SSL profile with the appropriate certificate and key.
The default, F5 recommended Server SSL profile uses the serverssl parent profile. For information about the ciphers used in the Server SSL profile, see http://support.f5.com/kb/en-us/solutions/public/8000/800/sol8802.html.
f Plain text to clients, encrypt to serversChoose this method if you want the BIG-IP system to accept plain text from the clients and then encrypt it before sending it to the servers.
Unless you have requirements for configuring specific Server SSL settings, we recommend allowing the iApp to create a new profile. To select a profile from the list, it must already be present on the BIG-IP system. Creating a custom profile is not a part of this template; see Local Traffic >> Profiles : SSL : Server to create a Server SSL profile. To select any new profiles you create, you need to restart or reconfigure this template.
The default, F5 recommended Server SSL profile uses the serverssl parent profile. For information about the ciphers used in the Server SSL profile, see http://support.f5.com/kb/en-us/solutions/public/8000/800/sol8802.html.
f Plain text to both clients and serversChoose this method if the BIG-IP system is not sending or receiving any SSL traffic in this implementation.
Application Firewall Manager (BIG-IP AFM) The option for deploying BIG-IP AFM only appears in BIG-IP version 11.6 and later.
This section gathers information about BIG-IP Advanced Firewall Manager if you want to use it to protect the Apache Tomcat deployment. This section only appears if you have fully licensed and provisioned BIG-IP AFM. Contact your F5 sales representative for details. For information on configuring BIG-IP AFM, see http://support.f5.com/kb/en-us/products/big-ip-afm.html, and then select your version.
1. Do you want to use BIG-IP AFM to protect your application?Choose whether you want to use BIG-IP AFM, F5's network firewall, to secure this Apache Tomcat deployment. If you choose to use BIG-IP AFM, you can restrict access to the Apache Tomcat virtual server to a specific network or IP address. See the BIG-IP AFM documentation for specific details on configuring AFM.
f No, do not use Application Firewall ManagerSelect this option if you do not want to enable BIG-IP AFM at this time. You can always re-enter the template at a later date to enable BIG-IP AFM. Continue with the next section.
f Select an existing AFM policy from the listIf you already created a BIG-IP AFM policy for this implementation, select it from the list. Continue with c.
f Yes, use F5's recommended AFM configurationSelect this option if you want to enable BIG-IP AFM using F5's recommended configuration.
a. Do you want to restrict access to your application by network or IP address?Choose whether you want to restrict access to the Apache Tomcat implementation via the BIG-IP virtual server.
` No, do not restrict source addresses (allow all sources)By default, the iApp configures the Advanced Firewall module to accept traffic destined for the Apache Tomcat virtual server from all sources. If you do not have a need to restrict access to the virtual server, leave this option selected and then continue with b.
` Restrict source addressesSelect this option if you want to restrict access to the Apache Tomcat virtual server by IP address or network address.
i). What IP or network addresses should be allowed to access your application?Specify the IP address or network access that should be allowed access to the Apache Tomcat virtual server. You can specify a single IP address, a list of IP addresses separated by spaces (not commas or other

15
DEPLOYMENT GUIDE Apache Tomcat
punctuation), a range of IP addresses separated by a dash (for example 192.0.2.10-192.0.2.100), or a single network address, such as 192.0.2.200/24.
b. How do you want to control access to your application from sources with a low reputation score?The BIG-IP AFM uses an IP intelligence database to categorize IP addresses coming into the system. Choose what you want the system to do for sources that are attempting to access the Apache Tomcat virtual server with a low reputation score. For more information, see the BIG-IP AFM documentation.
` Allow all sources regardless of reputationSelect this option to allow all sources, without taking into consideration the reputation score.
` Reject access from sources with a low reputationSelect this option to reject access to the Apache Tomcat virtual server from any source with a low reputation score.
` Allow but log access from sources with a low reputationSelect this option to allow access to the Apache Tomcat virtual server from sources with a low reputation score, but add an entry for it in the logs.
c. Would you like to stage a policy for testing purposes?Choose whether you want to stage a firewall policy for testing purposes. A staged policy allows you to evaluate the effect a policy has on traffic by analyzing the system logs, without actually modifying traffic based on the firewall rules. You must already have a policy on the system in order to select it.
` Do not apply a staging policySelect this option if you do not want to apply a logging profile at this time. You can always re-enter the template at a later date to add a logging profile. Continue with the next question.
` Select an existing policy from the listIf you have already created a firewall policy for this implementation, select it from the list. Only policies that already exist on the system appear in the list. To create a new policy, on the Main tab, click Security > Network Firewall > Policies. Specific instructions for creating a firewall policy is outside the scope of this iApp and deployment guide.
d. Which logging profile would you like to use?Choose whether you or not you want to use a logging profile for this AFM implementation. You can configure the BIG-IP system to log detailed information about BIG-IP system Network Firewall events and store those logs on the BIG-IP system or a remote logging server (supports syslog and Splunk). The list only contains profiles with Network Firewall enabled. To create a logging profile, on the Main tab, click Security > Event Logs > Logging Profiles. Specific instructions for creating a logging profile is outside the scope of this iApp and deployment guide. See the online help or the About Local Logging with the Network Firewall chapter of the BIG-IP Network Firewall: Policies and Implementations guide for more information.
` Do not apply a logging profileSelect this option if you do not want to apply a logging profile at this time. You can always re-enter the template at a later date to add a logging profile. Continue with the next question.
` Select an existing logging profile from the listIf you have already created a logging profile for this implementation, select it from the list. You must create a profile before it is available in the list.
Virtual Server and PoolsThis section gathers information about your Apache deployment that will be used in the BIG-IP virtual server and load balancing pool.
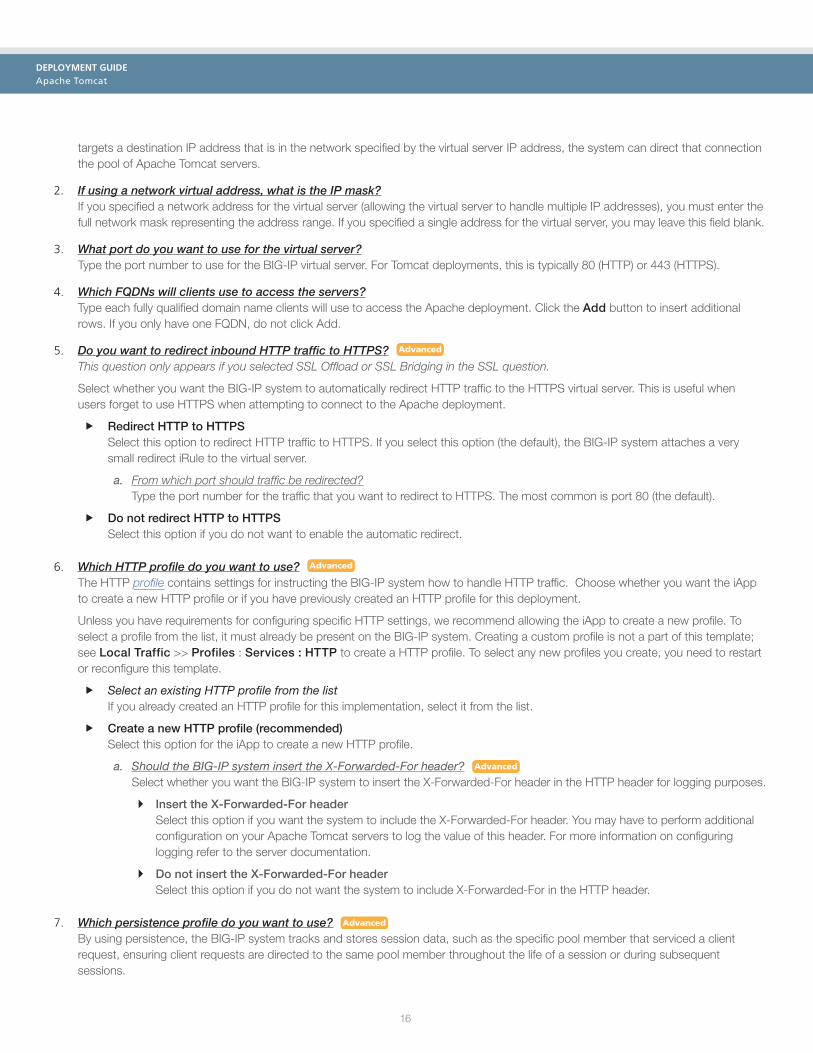
1. What IP address do you want to use for the virtual server?Type the IP address you want to use for the BIG-IP virtual server. This is the address clients use (or a DNS entry resolves to this address) to access the Apache deployment via the BIG-IP system.
If necessary for your configuration, this can be a network address to create a network virtual server (you must specify an IP mask in the following question for a network virtual server). A network virtual server is a virtual server whose IP address has no bits set in the host portion of the IP address (that is, the host portion of its IP address is 0), allowing the BIG-IP system to direct client connections that are destined for an entire range of IP addresses, rather than for a single destination IP address. Thus, when any client connection
16
DEPLOYMENT GUIDE Apache Tomcat
targets a destination IP address that is in the network specified by the virtual server IP address, the system can direct that connection the pool of Apache Tomcat servers.
2. If using a network virtual address, what is the IP mask?If you specified a network address for the virtual server (allowing the virtual server to handle multiple IP addresses), you must enter the full network mask representing the address range. If you specified a single address for the virtual server, you may leave this field blank.
3. What port do you want to use for the virtual server?Type the port number to use for the BIG-IP virtual server. For Tomcat deployments, this is typically 80 (HTTP) or 443 (HTTPS).
4. Which FQDNs will clients use to access the servers?Type each fully qualified domain name clients will use to access the Apache deployment. Click the Add button to insert additional rows. If you only have one FQDN, do not click Add.
5. Do you want to redirect inbound HTTP traffic to HTTPS? Advanced
This question only appears if you selected SSL Offload or SSL Bridging in the SSL question.
Select whether you want the BIG-IP system to automatically redirect HTTP traffic to the HTTPS virtual server. This is useful when users forget to use HTTPS when attempting to connect to the Apache deployment.
f Redirect HTTP to HTTPSSelect this option to redirect HTTP traffic to HTTPS. If you select this option (the default), the BIG-IP system attaches a very small redirect iRule to the virtual server.
a. From which port should traffic be redirected?Type the port number for the traffic that you want to redirect to HTTPS. The most common is port 80 (the default).
f Do not redirect HTTP to HTTPSSelect this option if you do not want to enable the automatic redirect.
6. Which HTTP profile do you want to use? Advanced
The HTTP profile contains settings for instructing the BIG-IP system how to handle HTTP traffic. Choose whether you want the iApp to create a new HTTP profile or if you have previously created an HTTP profile for this deployment.
Unless you have requirements for configuring specific HTTP settings, we recommend allowing the iApp to create a new profile. To select a profile from the list, it must already be present on the BIG-IP system. Creating a custom profile is not a part of this template; see Local Traffic >> Profiles : Services : HTTP to create a HTTP profile. To select any new profiles you create, you need to restart or reconfigure this template.
f Select an existing HTTP profile from the listIf you already created an HTTP profile for this implementation, select it from the list.
f Create a new HTTP profile (recommended)Select this option for the iApp to create a new HTTP profile.
a. Should the BIG-IP system insert the X-Forwarded-For header? Advanced Select whether you want the BIG-IP system to insert the X-Forwarded-For header in the HTTP header for logging purposes.
` Insert the X-Forwarded-For headerSelect this option if you want the system to include the X-Forwarded-For header. You may have to perform additional configuration on your Apache Tomcat servers to log the value of this header. For more information on configuring logging refer to the server documentation.
` Do not insert the X-Forwarded-For headerSelect this option if you do not want the system to include X-Forwarded-For in the HTTP header.
7. Which persistence profile do you want to use? Advanced
By using persistence, the BIG-IP system tracks and stores session data, such as the specific pool member that serviced a client request, ensuring client requests are directed to the same pool member throughout the life of a session or during subsequent sessions.

17
DEPLOYMENT GUIDE Apache Tomcat
Unless you have requirements for configuring specific persistence settings, we recommend allowing the iApp to create a new profile. Creating a custom profile is not a part of this template; see Local Traffic >> Profiles : Persistence to create a persistence profile. To select any new profiles you create, you need to restart or reconfigure this template.
Select one of the following persistence options:
f Use Cookie Persistence (recommended)Leave this default option to have the BIG-IP system create a new cookie persistence profile (cookie insert mode). With Cookie persistence, the BIG-IP system uses an HTTP cookie stored on the client’s computer to allow the client to reconnect to the same server previously visited.
f Source IP Address persistenceSelect this option if you want to use the Source IP address (also known as simple) persistence. With this mode, the BIG-IP system assigns the built-in Source Address Affinity persistence type, and directs session requests to the same server based only on the source IP address.
f Do not use persistenceIf your implementation does not require persistent connections, select this option.
f Select an existing persistence profileIf you have previously created a persistence profile, you have the option of selecting it instead of allowing the iApp to create a new one. From the list, select an existing persistence profile. We recommend using a persistence profile that uses Cookie persistence, Insert mode.
8. Do you want to create a new pool or use an existing one?A load balancing pool is a logical set of servers, grouped together to receive and process traffic. When clients attempt to access the application via the BIG-IP virtual server, the BIG-IP system distributes requests to any of the servers that are members of that pool.
f Select an existing poolIf you have already created a pool for your Apache Tomcat servers, you can select it from the list. If you do select an existing pool, all of the rest of the questions in this section disappear.
f Do not use a poolIf you are deploying this iApp in such a way that you do not need a pool of Apache Tomcat servers, select this option. If you specified that the servers are connected to the BIG-IP system over the WAN through another BIG-IP system, this is the default option, as the system is sending the traffic across the iSession tunnel to the other BIG-IP system to be distributed to the servers.
f Create a new poolLeave this default option to create a new load balancing pool and configure specific options.
a. Which load balancing method do you want to use? Advanced
Specify the load balancing method you want to use for this Apache Tomcat server pool. We recommend the default, Least Connections (member).
b. Do you want to give priority to specific groups of servers? Advanced
Select whether you want to use Priority Group Activation. Priority Group Activation allows you to segment your servers into priority groups. With Priority Group Activation, the BIG-IP system load balances traffic according to the priority number you assign to the pool members. A higher number indicates higher priority. Traffic is only sent to the servers with the highest priority, unless the number of available servers in that priority group falls below the value you specify as the minimum. The BIG-IP then sends traffic to the group of servers with the next highest priority, and so on. See the BIG-IP documentation for more details.
` Do not use Priority Group Activation (recommended)Select this option if you do not want to enable Priority Group Activation.
` Use Priority Group ActivationSelect this option if you want to enable Priority Group Activation. You must add a priority to each server in the Priority box described in #c.

18
DEPLOYMENT GUIDE Apache Tomcat
i). What is the minimum number of active members for each priority group?Specify the minimum number of servers that must be active to continue sending traffic to the priority group. If the number of active servers falls below this minimum, traffic will be sent to the group of servers with the next highest priority group number.
c. Which web servers should be included in this pool?Specify the IP address(es) of your Apache Tomcat servers. If you have existing nodes on this BIG-IP system, you can select them from the list, otherwise type the addresses. You can optionally add a Connection Limit. If you enabled Priority Group Activation, you must also specify a Priority for each device. Click Add to include additional servers.
Delivery OptimizationIn this section, you answer questions about how you want the BIG-IP system to optimize the delivery of your Apache traffic.
1. Use the BIG-IP Application Acceleration Manager?Choose whether you want to use the BIG-IP Application Acceleration Manager (formerly known as WebAccelerator). BIG-IP Application Acceleration Manager helps accelerate your Apache traffic.
f Yes, use BIG-IP AAM (recommended)Select this option to enable BIG-IP AAM.
f No, do not use BIG-IP AAMSelect this option if you do not want to enable BIG-IP AAM at this time.
2. Which Web Acceleration profile do you want to use for caching? Advanced
Select whether you want the system to create a new Web Acceleration profile, or if you have already created a Web Acceleration profile for use in this deployment. The Web Acceleration profile contains the caching settings for this implementation.
Unless you have requirements for configuring specific acceleration settings (such as specific allowing/denying specific URIs), we recommend allowing the iApp to create a new profile. Creating a custom profile is not a part of this template; see Local Traffic >> Profiles : Services : Web Acceleration to create an acceleration profile. To select any new profiles you create, you need to restart or reconfigure this template.
Note if using BIG-IP AAM: If you are using BIG-IP AAM, and want to select a custom Web Acceleration profile for caching you have already created, it must have an AAM application enabled, otherwise it does not appear in the list of caching profiles. If you want access to all Web Acceleration profiles on the box, then you must choose No to the use BIG-IP AAM question. Use a custom Web Acceleration profile only if you need to define specific URIs that should or should not be cached.
Note if not using BIG-IP AAM: If you are not using BIG-IP AAM, we recommend you only use a custom Web Acceleration profile if you need to define specific URIs which should or should not be cached.
f Create a profile based on optimized-caching (recommended)Leave this default option to create a new Web Acceleration profile for caching.
f Do not use cachingThis question does not appear if you chose to enable BIG-IP AAM Select this option if you do not want to enable caching on the BIG-IP system for this implementation.
f Select an existing Web Acceleration profileIf you have already created a Web Acceleration profile for your Apache Tomcat servers, you can select it from the list.
3. Do you want to insert the X-WA-Info header? Advanced
This question only appears if you chose to enable BIG-IP AAM
The BIG-IP system can optionally insert an X-WA-Info response header that includes specific codes describing the properties and history of the object. The X-WA-Info response header is for informational and debugging purposes only and provides a way for you to assess the effectiveness of your acceleration policy rules.

19
DEPLOYMENT GUIDE Apache Tomcat
By default, the AAM X-WA-info header is not included in the response from the BIG-IP system. If you choose to enable this header, you have two options, Standard and Debug. In Standard mode, the BIG-IP system inserts an HTTP header that includes numeric codes which indicate if and how each object was cached. In Debug mode, the BIG-IP system includes additional information which may help for extended troubleshooting.
f Do not insert the header (recommended)Select this option if you do not want to insert the X-WA-Info header. Typically F5 recommends not inserting the header unless instructed to do so by an F5 Technical Support Engineer.
f Insert the Standard headerSelect this option if you want to insert the Standard header. For detailed information on the numeric codes used by the header, see http://support.f5.com/kb/en-us/solutions/public/13000/700/sol13798.html
f Insert the Debug headerSelect this option if you want to insert the Debug header for extended troubleshooting.
4. Do you want to use the legacy AAM performance monitor? Advanced
This question only appears if you chose to enable BIG-IP AAM
Enabling the legacy AAM performance monitor can adversely affect system performance. This monitor is primarily used for legacy AAM performance monitoring and debugging purposes, and can adversely affect system performance. The BIG-IP Dashboard provides performance graphs and statistics related to AAM.
f Do not enable the legacy performance monitor (recommended)Select this option if you do not want to enable the legacy monitor.
f Enable the legacy performance monitorSelect this option if you want to enable the legacy performance monitor. Remember enabling this legacy monitor can impact overall system performance.
a. For how many days should the BIG-IP system retain the data?Specify the number of days the BIG-IP system should retain the legacy performance data.
5. Which acceleration policy do you want to use? Advanced
This question only appears if you chose to enable BIG-IP AAM
Select one of the following predefined acceleration policies from the list. We recommend Generic Policy - Complete for Apache.
f Generic Policy - CompleteThis predefined acceleration policy is ideal for Apache HTTP servers, Microsoft Internet Information Services (IIS) web servers, WebLogic application servers, and IBM Websphere Application Servers. HTML pages are cached and Intelligent Browser Referencing is enabled.
f Generic Policy - EnhancedThis predefined acceleration policy is ideal for Apache HTTP servers, Internet Information Services (IIS) web servers, WebLogic application servers, and IBM Websphere Application Servers. HTML pages are cached and Intelligent Browser Referencing is enabled for includes.
f Generic Policy - Extension Based.This predefined acceleration policy is ideal for High Performance policy for E-commerce applications that uses File Extensions instead of mime-types. This application policy is ideal if response-based matching is not required.
f Generic Policy - Fundamental.This predefined acceleration policy is ideal for Apache HTTP servers, Internet Information Services (IIS) web servers, WebLogic application servers, and IBM WebSphere Application Servers. HTML pages are always proxied and Intelligent Browser Referencing is disabled.
6. Which compression profile do you want to use?Compression improves performance and end user experience for Web applications that suffer from WAN latency and throughput bottlenecks. Compression reduces the amount of traffic sent to the client to complete a transaction.

20
DEPLOYMENT GUIDE Apache Tomcat
i Important
If using BIG-IP version 11.4 - 11.5.x, see Modifying the configuration produced by the iApp template if using BIG-IP v11.4 - 11.5.x on page 25 for important information about the F5 recommended HTTP Compression profile.
2. How do you want to optimize client-side connections? Advanced
The client-side TCP profile optimizes the communication between the BIG-IP system and the client by controlling the behavior of the traffic which results in higher transfer rates, improved connection reliability and increased bandwidth efficiency.
Unless you have requirements for configuring specific TCP optimization settings, we recommend allowing the iApp to create a new profile. Creating a custom profile is not a part of this template; see Local Traffic >> Profiles : Protocol : TCP to create a TCP profile. To select any new profiles you create, you need to restart or reconfigure this template.
f Create the appropriate tcp-optimized profile (recommended)Select this option to have the system create the recommended TCP profile. The parent profile (either WAN or LAN optimized) is determined by your selection to the “What type of network connects clients to the BIG-IP system” question.
f Select the TCP profile you created from the listIf you created a custom TCP profile for the Apache Tomcat servers, select it from the list.
Server offloadIn this section, you configure the options for offloading tasks from the servers. This section only appears if you selected Advanced mode.
1. Which OneConnect profile do you want to use? Advanced
OneConnect (connection pooling or multiplexing) improves server scalability by reducing load associated with concurrent connections and connection rate to Apache Tomcat servers. When enabled, the BIG-IP system maintains one connection to each Apache server which is used to send requests from multiple clients.
Unless you have requirements for configuring specific settings, we recommend allowing the iApp to create a new profile. F5 recommends the default profile which is optimized for most HTTP servers. Creating a custom profile is not a part of this template; see Local Traffic >> Profiles : Other : OneConnect to create a OneConnect profile. To select any new profiles you create, you need to restart or reconfigure this template.
f Create a profile based on the oneconnect parent (recommended)Select this option to have the system create the recommended OneConnect profile. The system uses the oneconnect parent profile with a Source Mask setting of 255.255.255.255.
f Do not use a OneConnect profileSelect this option if you do not require the BIG-IP system to perform connection pooling using a OneConnect profile.
f Select the OneConnect profile you created from the listIf you created a custom OneConnect profile for the Apache Tomcat servers, select it from the list.
2. Which NTLM profile do you want to use? Advanced
The NTLM profile optimizes network performance when the system is processing NTLM traffic. When both an NTLM profile and a OneConnect profile are enabled, the system can take advantage of server-side connection pooling for NTLM connections.
If your environment uses NTLM, we recommend allowing the iApp to create a new profile unless you have requirements for configuring specific settings. Creating a custom profile is not a part of this template; see Local Traffic >> Profiles : Other : NTLM to create a NTLM profile. To select any new profiles you create, you need to restart or reconfigure this template.
f Use F5’s recommended NTLM profileSelect this option to have the system create the recommended NTLM profile. The system uses the ntlm parent profile.
f Do not use NTLM (recommended)Select this option if you do not use NTLM authentication in your Apache implementation.
f Select the NTLM profile you created from the listIf you created a custom NTLM profile for the Apache Tomcat servers, select it from the list.

21
DEPLOYMENT GUIDE Apache Tomcat
3. How do you want to optimize server-side connections? Advanced
The server-side TCP profile optimizes the communication between the BIG-IP system and the server by controlling the behavior of the traffic which results in higher transfer rates, improved connection reliability and increased bandwidth efficiency.
Unless you have requirements for configuring specific TCP optimization settings, we recommend allowing the iApp to create a new profile. Creating a custom profile is not a part of this template; see Local Traffic >> Profiles : Protocol : TCP to create a TCP profile. To select any new profiles you create, you need to restart or reconfigure this template.
f Create the appropriate tcp-optimized profile (recommended)Select this option to have the system create the recommended TCP profile. The parent profile (either WAN or LAN optimized) is determined by your selection to the “What type of network connects servers to the BIG-IP system” question.
f Select the TCP profile you created from the listIf you created a custom TCP profile for the Apache Tomcat servers, select it from the list.
4. Do you want the BIG-IP system to queue TCP requests?Select whether you want the BIG-IP system to queue TCP requests. TCP request queuing provides the ability to queue connection requests that exceed the capacity of connections for a pool, as determined by the connection limit. Consequently, instead of dropping connection requests that exceed the capacity of a pool, TCP request queuing enables those connection requests to reside within a queue according to defined conditions until capacity becomes available. For more information on TCP Request Queuing, see the Preventing TCP Connection Requests From Being Dropped chapter in the BIG-IP Local Traffic Manager: Implementations guide, available on AskF5.
i Important
TCP Request Queuing is an advanced feature and should be used only if you understand how it will affect your deployment, including application behavior and BIG-IP performance. If you enable TCP Request Queuing, you must have a Connection Limit set on at least one of the nodes when configuring the Address/Port for the nodes.
f No, do not enable TCP request queuing (recommended)Select this option if you do not want the BIG-IP system to queue TCP requests.
f Yes, enable TCP request queuingSelect this option if you want to enable TCP request queuing on the BIG-IP system.
a. What is the maximum number of TCP requests for the queue?Type the maximum number of requests you want to queue. We do not recommend using 0, which means unlimited and is only constrained by available memory.
b. How many milliseconds should requests remain in the queue?Type a number of milliseconds for the TCP request timeout value.
5. Use a Slow Ramp time for newly added servers? Advanced
With Slow Ramp, the BIG-IP system gradually adds connections to a newly-enabled or newly-added Apache server over a time period you specify, rather than sending a full proportion of the traffic immediately. Slow Ramp is essential when using the Least Connections load balancing method (our recommended method for Apache Tomcat servers), as the BIG-IP system would otherwise send all new connections to a new server immediately, potentially overwhelming that server. Select whether you want to use a Slow Ramp time.
f Use Slow RampSelect this option for the system to implement Slow Ramp time for this pool.
a. How many seconds should Slow Ramp time last?Specify a duration in seconds, for Slow Ramp. The time period you select for Slow Ramp is highly dependent on the speed of your server hardware and the behavior of your web services. The default setting of 300 seconds (5 minutes) is very conservative in most cases.
f Do not use Slow RampSelect this option if you do not want to use Slow Ramp. If you select this option, we recommend you do not use the Least Connections load balancing method.

22
DEPLOYMENT GUIDE Apache Tomcat
Application HealthIn this section, you answer questions about how you want to implement application health monitoring on the BIG-IP system.
1. Create a new health monitor or use an existing one?Application health monitors are used to verify the content that is returned by an HTTP request. The system uses these monitors to ensure traffic is only sent to available Apache Tomcat servers.
Unless you have requirements for configuring other options not in the following list of questions, we recommend allowing the iApp to create a new monitor. Creating a custom health monitor is not a part of this template; see Local Traffic >> Monitors. To select any new monitors you create, you need to restart or reconfigure this template.
f Select the monitor you created from the listIf you manually created the health monitor, select it from the list. Continue with iRules on page 23.
f Create a new health monitorIf you want the iApp to create a new monitor, continue with the following.
a. How many seconds should pass between health checks?Specify how long the system should wait between each health check. This is used as the Interval setting for the monitor. We recommend the default of 30 seconds.
b. What type of HTTP request should be sent to the servers?Select whether you want the system to send an HTTP GET or POST request. The GET method requests data from the server, the POST submits data to be processed by the server.
` GETSelect this option if you want the system to use a GET request. The system uses the URI you specify in the next question to request content from the Apache server.
` POSTSelect this option if you want the system to use a POST request. The system uses the URI you specify in the next question, along with the HTTP POST body you will specify to form the request.
c. What HTTP URI should be sent to the servers?The HTTP URI is used to specify the resource on the Apache Tomcat server for a given request. This parameter can be customized to request a specific part of your application, which can indicate the application-health on a granular level.
i Important
When you install and configure Apache Tomcat, each Tomcat context, or application, has a distinct URI path (for example, /book_store and /healthcare_store) These values are unique to your web applications. When specifying the URI, make sure you include the full, correct path to the application/context and resource you want to monitor.
d. What HTTP version do your servers expect clients to use?Choose the HTTP version which you expect most of your clients to be using. This allows the system to detect failures more accurately. The vast majority of modern clients use HTTP/1.1 for communication. Typical modern Apache Tomcat deployments use HTTP/1.1 rather than 1.0.
` HTTP/1.0Choose this option if you expect your clients to use HTTP/1.0.
` HTTP/1.1Choose this option if you expect your clients to use HTTP/1.1.
e. What HTTP POST body do you want to use for this monitor?This question only appears if you selected a POST request.
If you selected a POST request, you must specify the message body for the POST.

23
DEPLOYMENT GUIDE Apache Tomcat
f. What is the expected response to the HTTP request?Specify the response you expect returned from the request. The system checks the response from the server against the response you enter here to determine server health.
g. Should the health monitor require credentials?Choose whether you want the system to attempt to authenticate to this deployment as a part of the health check.
` No, allow anonymous accessSelect this option if you do not want the monitor to attempt authentication.
` Yes, require credentialsSelect this option if you want to attempt authentication as a part of the health monitor. To require credentials, you should have a user account specifically for this health monitor which has no other privileges, and has a password set to never expire.
i). What user name should the monitor use?Type the user name for the account you created for the health monitor.
ii). What is the associated password?Type the password for the account.
iRulesIn this section, you can add custom iRules to the Apache deployment. This entire section is available only if you selected Advanced mode.
iRules are a scripting language that allows an administrator to instruct the system to intercept, inspect, transform, direct and track inbound or outbound application traffic. An iRule contains the set of instructions the system uses to process data flowing through it, either in the header or payload of a packet.
1. Do you want to add any custom iRules to the configuration? Advanced
Select if have preexisting iRules you want to add to your Apache implementation.
! Warning
While iRules can provide additional functionality not present in the iApp, iRules are an advanced feature and should be used only if you understand how each iRule will affect your deployment, including application behavior and BIG-IP system performance.
If you do not want to add any iRules to the configuration, continue with the following section.
If you have iRules you want to attach to the virtual server the iApp creates for your Apache Tomcat servers, from the Options box, click the name of the applicable iRule(s) and then click the Add (<<) button to move them to the Selected box.
Statistics and LoggingIn this section, you answer questions about optional logging and statistics. This section is available only if you selected Advanced mode.
1. Do you want to enable Analytics for application statistics?The Application Visibility Reporting (AVR) module for analytics allows you to view statistics specific to your application implementation. AVR is included and available on all BIG-IP systems v11 and later, however you must have the AVR provisioned for this option to appear. Note that this provisioning requirement is only for AVR, you can view object-level statistics from the BIG-IP system without provisioning AVR.
i Important
Enabling Analytics may adversely affect overall system performance. If you choose to enable Analytics, we recommend gathering statistics for a set time period, such as one week, and then re-entering this template and disabling Analytics while you process the data.

24
DEPLOYMENT GUIDE Apache Tomcat
If you plan on using AVR for analytics, we recommend creating a custom Analytics profile. To create a new profile, from the Main tab, select Profiles and then click Analytics. Click New and then configure the profile as applicable for your configuration. See the online help or product documentation for specific instructions. To select the new profile, you need to restart or reconfigure the iApp.
f Do not enable Application Visibility ReportingIf you do not want to enable Analytics, leave this list set to No, and continue with the next section.
f Select the Analytics profile you created from the listIf you choose to enable Analytics, select the Analytics profile you want to use for this implementation from the list.
2. Which HTTP request logging profile do you want to use?HTTP request logging enables customizable log messages to be sent to a syslog server for each HTTP request processed by your application. You can choose to enable HTTP request logging by selecting a logging profile you already created from the list. We strongly recommend you thoroughly test the performance impact of using this feature in a staging environment prior to enabling on a production deployment
Creating a request logging profile is not a part of this template. See Local Traffic>>Profiles: Other: Request Logging. To select any new profiles you create, you need to restart or reconfigure this template.
f Do not enable HTTP request loggingIf you do not want to enable HTTP request logging, leave this list set to No, and continue with the next section.
f Select the HTTP request logging profile you created from the listIf you choose to enable HTTP request logging, select the profile you want to use for this implementation from the list.
FinishedReview the answers to your questions. When you are satisfied, click the Finished button. The BIG-IP system creates the relevant objects for the Apache Tomcat servers.

25
DEPLOYMENT GUIDE Apache Tomcat
Modifying the configuration produced by the iApp template if using BIG-IP v11.4 - 11.5.xF5 has discovered that the HTTP compression profile produced by the iApp in versions 11.4 - 11.5 contains an improperly formatted Content Include string, and the omission of this string can lead to poor application performance or unusually high memory consumption on the BIG-IP system.
You must manually create a new HTTP Compression profile and attach it to the virtual server using the iApp, or upgrade to 11.6 or later and update your application service to use the new template.
BIG-IP LTM Object Non-default settings/Notes
HTTP Compression(Local Traffic > Profiles > Services)
Name Type a unique name
Parent Profile wan-optimized-compression
Content List--> Include List (Copy and paste each entry to the Content Type box and click Include.)
text/(css|html|javascript|json|plain|postscript|richtext|rtf|vnd\.wap\.wml|vnd\.wap\.wmlscript|wap|wml|x-component|x-vcalendar|x-vcard|xml)
application/(css|css-stylesheet|doc|excel|javascript|json|lotus123|mdb|mpp|ms-excel|ms-powerpoint|ms-word|msaccess|msexcel|mspowerpoint|msproject|msword|photoshop|postscript|powerpoint|ps|psd|quarkexpress|rtf|txt|visio|vnd\.excel|vnd.\ms-access|vnd\.ms-excel|vnd\.ms-powerpoint|vnd\.ms-pps|vnd\.ms-project|vnd\.ms-word|vnd\.ms-works|vnd\.ms-works-db|vnd\.msaccess|vnd\.msexcel|vnd\.mspowerpoint|vnd\.msword|vnd\.powerpoint|vnd\.visio|vnd\.wap\.cmlscriptc|vnd\.wap\.wmlc|vnd\.wap\.xhtml\+xml|vnd\.word|vsd|winword|wks|word|x-excel|x-java-jnlp-file|x-javascript|x-json|x-lotus123|x-mdb|x-ms-excel|x-ms-project|x-mscardfile|x-msclip|x-msexcel|x-mspowerpoint|x-msproject|x-msword|x-msworks-db|x-msworks-wps|x-photoshop|x-postscript|x-powerpoint|x-ps|x-quark-express|x-rtf|x-vermeer-rpc|x-visio|x-vsd|x-wks|x-word|x-xls|x-xml|xhtml+xml|xls|xml)
image/(photoshop|psd|x-photoshop|x-vsd)
Adding the profile to the virtual serverThe final task is to add the profile to the iApp configuration. If you manually configured the system, simply attach the profile to the virtual server. If you used the iApp, use the following procedure.
To add the iRule to the virtual server
1. On the Main tab, expand iApp and then click Application Services.
2. Click the name of your Apache Application service from the list.
3. On the Menu bar, click Reconfigure.
4. In the Delivery Optimization section, from the Which compression profile do you want to use? question, select the profile you just created.
5. Click the Finished button.

26
DEPLOYMENT GUIDE Apache Tomcat
Next stepsAfter completing the iApp Template, the BIG-IP Application Services page opens. To see the list of all the configuration objects created to support the HTTP application, on the Menu bar, click Components. The complete list of all related objects opens. You can click individual objects to see the settings. Once the objects have been created, you are ready to use the new deployment.
Configuring Apache for use with the BIG-IP systemSee Using the BIG-IP system to replace Apache web servers in an Apache Tomcat deployment on page 27 for instructions on configuring the BIG-IP system to replace the need for Apache web servers.
Manually configuring the BIG-IP Access Policy ManagerIf you want to use BIG-IP APM for your Apache deployment, see Manually configuring the BIG-IP APM for Apache Servers on page 32.
Modifying DNS settings to use the BIG-IP virtual server addressBefore sending traffic to the BIG-IP system, your DNS administrator may need to modify any DNS entries for the HTTP implementation to point to the BIG-IP system’s virtual server address.
Modifying the iApp configurationThe iApp Application Service you just created can be quickly and easily modified if you find it necessary to make changes to the configuration. The Strict Updates feature of the iApp prevents users from manually modifying the iApp configuration (Strict Updates can be turned off, but use extreme caution). iApp allows you to re-enter the template, make changes, and then update the template.
To modify the configuration
1. On the Main tab, expand iApp and then click Application Services.
2. Click the name of your HTTP Application Service from the list.
3. On the Menu bar, click Reconfigure.
4. Make the necessary modifications to the template.
5. Click the Finished button.
Viewing statisticsYou can easily view a number of different statistics on the BIG-IP system related to the configuration objects created by the iApp template. You can get statistics specific to the Application Service if you have provisioned AVR. Otherwise, you can always get object-level statistics.
AVR statisticsIf you have provisioned AVR, you can get application-level statistics for your HTTP Application Service.
To view AVR statistics
1. On the Main tab, expand iApp and then click Application Services.
2. From the Application Service List, click the HTTP service you just created.
3. On the Menu bar, click Analytics. Use the tabs and the Menu bar to view different statistics for your iApp.
Object-level statisticsIf you haven’t provisioned AVR, or want to view object-level statistics, use the following procedure.
To view object-level statics
1. On the Main tab, expand Overview, and then click Statistics.
2. From the Statistics Type menu, you can select Virtual Servers to see statistics related to the virtual servers.
3. You can choose Pools or Nodes to get a closer look at traffic. To see networking statistics in a graphical format, click Dashboard.
For more information on viewing statistics on the BIG-IP system, see the online help or product documentation.

27
DEPLOYMENT GUIDE Apache Tomcat
Using the BIG-IP system to replace Apache web servers in an Apache Tomcat deploymentUse this section for guidance on replacing your Apache web server tier with equivalent or improved functionality offered by the BIG-IP system.
Apache configuration filesUse this section for guidance on modifying the Apache configuration files to take full advantage of the functionality offered by the BIG-IP system.
Run-time confirmationMost Apache runtime configuration is set by way of a series of “directives”, or named parameters with values, in text files. To reconfigure Apache, modify the relevant portions of the configuration file or files and restart Apache.
The primary configuration file is most often called httpd.conf; this may be located in a variety of locations, depending on your platform, but is typically in /etc/httpd/conf/, /usr/local/etc/apache22/, /etc/apache2/2.2/, or something similar, with variation according to specific operating system, Apache distribution, or Apache version.
Some distributions split out portions of the configuration into a different file. As an example, your platform might have an extras/ subdirectory that contains the file httpd-mpm.conf with options specific to the MPM (multi-processing modules) used by Apache httpd.
More information about Apache configuration files and their syntax can be found at http://httpd.apache.org/docs/current/configuring.html.
ModulesThe Apache web server uses “modules” to extend its core functionality. If you are deploying Apache in conjunction with a BIG-IP system, many of the functions normally provided by Apache modules can be performed by the BIG-IP system instead. In many cases, BIG-IP functionality is more flexible, higher performing, or more feature-rich than the Apache module counterpart. In other cases, you may wish to simplify your Apache configuration by consolidating functionality such as encryption, compression, or caching on your BIG-IP system instead of your Apache web server nodes. By reducing the number of modules on each web server, you reduce your overall memory and CPU footprint, and also decrease the complexity of your environment. With a simpler configuration, your management and maintenance becomes simpler, and you reduce the number of potential security attack vectors
The following list shows which Apache web server modules correspond to various BIG-IP features. This list is not meant to be comprehensive or to accommodate all possible deployments and topologies. For instance, a BIG-IP LTM system can decrypt SSL/TLS traffic using a Client SSL profile, which may obviate the need for mod_ssl. However, if your network security policies require all traffic to be encrypted over network connections, you may still need mod_ssl on your Apache server, as well as a Server SSL profile on the BIG-IP LTM.
This section contains the following modules:
• Mod_rewrite on page 28
• Mod_proxy on page 28
• mod_proxy_balancer on page 28
• Mod_gzip on page 29
• Mod_deflate on page 29
• Mod_cache on page 30
• Mod_expires on page 30
• Mod_headers on page 30
• Mod_ssl on page 30
• Mod_substitute on page 31

28
DEPLOYMENT GUIDE Apache Tomcat
Mod_rewriteMod_rewrite rewrites requested URIs (for modifying response bodies, see mod_substitute below).
On a BIG-IP system, you can automatically rewrite a URI to accommodate HTTPS to HTTP conversion (sometimes known as “SSL Offload”) using the Rewrite property on an HTTP profile.
The BIG-IP system can perform flexible condition-based URI rewriting using an HTTP profile and an iRule that uses with the HTTP::uri or HTTP::header commands.
For more information, seehttps://devcentral.f5.com/wiki/iRules.HTTP__uri.ashxhttps://devcentral.f5.com/wiki/iRules.HTTP__header.ashxhttps://devcentral.f5.com/wiki/iRules.ProxyPass.ashx
Mod_proxyThe mod_proxy module is used to configure Apache as either a forward proxy or a reverse proxy.
You can use your BIG-IP system to perform reverse-proxy functions instead of using mod_proxy; specifically, your BIG-IP system can provide the following functions otherwise associated with mod_proxy and various sub-modules:
• SSL/TLS session termination (see mod_ssl)
• Load balancing, also known as load distribution
• Content caching (see mod_cache)
• Content compression (see mod_deflate)
The ProxyPass directive is used to enable Apache as a reverse proxy. The BIG-IP system is inherently a reverse proxy when a virtual server is configured to forward requests to one or more pool members.
When the ProxyPass directive is enabled, Apache automatically adds several headers to the forwarded requests. The default behavior of the BIG-IP system is different than Apache’s, though a BIG-IP system can be configured to behave identically if so desired.
The headers inserted by Apache, and corresponding BIG-IP behavior:
X-Forwarded-For Selectable in an HTTP profile; disabled by default
X-Forwarded-HostThe BIG-IP system always substitutes the originally requested host into the Host header, equivalent to setting Apache’s ProxyPreserveHost directive to On; this behavior can be overridden via an iRule using the HTTP::header command, and an X-Forwarded-Host could be inserted via an iRule using the HTTP::header command
X-Forwarded-Server The BIG-IP system can insert any additional information, including this header, using an iRule and the HTTP::header command
mod_proxy_balancerOnce mod_proxy is enabled, Apache can use mod_proxy_balancer to direct traffic to more than one remote server using a variety of load balancing methods.
The BIG-IP system can perform load balancing instead, offering a much more flexible and higher performing platform. The BIG-IP system, for instance, offers a larger number of load balancing scheduling algorithms than does the mod_proxy_balancer module. Additionally, BIG-IP can load balance traffic of any sort; Apache mod_proxy_babalncer is limited to HTTP, FTP and AJP13.
An Apache BalancerMember is equivalent to a BIG-IP Pool Member, defining not only the IP address of the remote server (a BIG-IP “node”), but the port as well.
Mod_proxy_balancer has several load balancing methods available, configured via directives in Apache 2.2-2.3 and by individual modules in 2.4. The table below shows the equivalent functionality in the BIG-IP system:

29
DEPLOYMENT GUIDE Apache Tomcat
Mod_lbmethod_byrequests Ratio
Mod_lbmethod_bybusyness Least Connections (member or node; see the following section)
Mod_lbmethod_byheartbeat No direct comparison, but Dynamic Ratio offers similar functionality; see the following section
The BIG-IP system offers several load balancing methods not offered by Apache mod_proxy_balancer, such as Priority Group, Observed, Predictive, and more.
mod_lbmethod_byrequestsVery similar to the Ratio load balancing method, this method assigns relative weights to each remote server (pool or node member). On a BIG-IP system, ratios may be defined either on the node level, or the pool member level. Apache mod_lbmethod_byrequests is the equivalent to defining member-level ratios.
For more information, see the Pools chapter of the BIG-IP Local Traffic Manager: Concepts guide for your version, available at http://support.f5.com.
mod_lbmethod_bybusynessThe BIG-IP Least Connections load balancing algorithm behaves similarly to mod_lbmethod_bybusyness.
On a BIG-IP system, Least Connections may be defined either on the node level, or the pool member level. Apache mod_lbmethod_bybusyness is the equivalent to defining Least Connections (member). If you expect significant traffic other than HTTP to be forwarded by the BIG-IP system to the same remote servers, you may want to configure the BIG-IP system to use Least Connections (node) instead, which looks at total connections to each node regardless of protocol.
mod_lbmethod_heartbeatThe mod_lbmethod_byheartbeat method uses a module called mod_heartbeat, running on a remote Apache server, to send information to a local mod_heartmonitor. Traffic is then sent to the remote server with the most idle capacity.
The BIG-IP system has similar functionality called Dynamic Ratio, but the external dependencies are different. From the BIG-IP manual on configuring load balancing pools:
The Dynamic Ratio method is used specifically for load balancing traffic to RealNetworks® RealSystem® Server platforms, Windows® platforms equipped with Windows Management Instrumentation (WMI), or any server equipped with an SNMP agent such as the UC Davis SNMP agent or Windows 2000 Server SNMP agent. To implement Dynamic Ratio load balancing, you must first install and configure the necessary server software for these systems, and then install the appropriate performance monitor.
See the Dynamic Ratio Load Balancing chapter of the BIG-IP Local Traffic Manager: Concepts guide for your version, available at http://support.f5.com for more information.
Mod_gzipMod_gzip is a module specific to Apache 1.3.x. Similar functionality is supported in Apache 2.x using mod_deflate.
Mod_deflateMod_deflate compresses content before it is sent to the client. If your BIG-IP system is on a LAN connection with your Apache httpd servers, you might wish to remove mod_deflate and have the BIG-IP system perform all compression operations.
The following directives correspond to HTTP Compression settings on your BIG-IP system:
Apache setting BIG-IP setting
SetOutpuFilter DEFLATE
(set in the container(s) where you wish to enable compression)
Add an HTTP Compression profile to your virtual server. You may define a URI list
in the profile to enable compression in specific directories
AddOutputFilterByType ContentList Include
DeflateBufferSize Compression Buffer Size

30
DEPLOYMENT GUIDE Apache Tomcat
Apache setting BIG-IP setting
DeflateCompressionLevel gzip Compression Level
DeflateMemLevelDirective
A value from 1 to 9
Gzip Memory Level A value from 1 to 256, in kilobytes, in exponential steps
(1, 2, 4, 8, 16, 32, etc.)
DeflateWindowSizeDirective
A value from 1 to 15
Gzip Window Size A value from 1 to 128, in kilobytes, in exponential steps
(1, 2, 4, 8, 16, 32, etc.)
Mod_cacheMod_cache defines whether, and according to which conditions, Apache will perform content caching.
The BIG-IP system can perform content caching in place of that done by Apache, using a Web Acceleration profile attached to a virtual server. The following directives to mod_cache correspond to BIG-IP settings:
Apache setting BIG-IP setting
Parent location(s) in httpd.conf URI List
CacheMinFileSize Minimum Object Size
CacheMaxFileSize Maximum Object Size
CacheMaxExpire Maximum Age
More features, including fine-tuning of caching control, can be done using the Application Acceleration Manager (AAM) module on BIG-IP. See the AAM documentation for detailed examples.
Mod_expiresMod_expires manipulates the value of the Expires HTTP header, as well as the max-age value of the Cache-Control header. A BIG-IP Web Acceleration profile can be configured to ignore the max-age value of the Cache-Control header.
Use the BIG-IP AAM module for more advanced functionality. For more information on the BIG-IP AAM, see BIG-IP AAM on page 4, and http://www.f5.com/products/big-ip/big-ip-application-acceleration-manager/overview/
Mod_headersMod_headers manipulates the request and response headers in HTTP traffic.
Using BIG-IP iRules and the HTTP::header command, you have complete control over HTTP headers. See https://devcentral.f5.com/wiki/iRules.HTTP__header.ashx for more information.
Mod_sslA BIG-IP system can offload SSL/TLS processing from Apache web servers using SSL profiles. A BIG-IP system can also re-encrypt traffic before forwarding it to your Apache or application server nodes, optionally using different options such as a reduced key length or self-signed certificate, if you require all network traffic to be encrypted. The following mod_ssl directives correspond to ssl profile settings on your BIG-IP system:
Apache setting BIG-IP setting
SSLCertificateFile Location of the PEM-encoded certificate file, and
the corresponding key if contained in the same fileClientssl profile, Certificate Specify the certificate only
SSLCertificateKeyFile
The PEM-encoded key file, when not stored with the certificate
If encrypted, the passphrase is requested at startup time
Clientssl profile, Key
If encrypted, the passphrase is required at time of key import into the BIG-IP system
SSLCipherSuite Ciphers

31
DEPLOYMENT GUIDE Apache Tomcat
Apache setting BIG-IP setting
SSLCryptoDevice Not needed; BIG-IP will use cryptographic accelerators if present on the system
SSLInsecureRenegotiation Secure Renegotiation
SSLSessionCacheTimeout Cache Timeout
SSLCertificateChainFile SSLCACertificatePath Chain
Mod_substituteMod_substitute allows substitutions on the body (rather than headers) of HTTP responses sent by Apache to the clients, controlled by the Substitute directive. A Substitute directive can contain either a fixed string, or regular expressions. More than one Substitute directive may be used.
A BIG-IP Stream profile provides equivalent functionality, using a Source and Target definition to define the text to be matched and substituted, respectively. Only one stream profile may be applied to each virtual server; to match multiple strings, you must use a regular expression in the Source field, or use an iRule to specify conditions and substitution rules.
See the following for more information:https://devcentral.f5.com/tech-tips/articles/ltm-stream-profile-multiple-replacements-regular-expressions#.UWWw4cpW-RUhttps://devcentral.f5.com/wiki/irules.STREAM__expression.ashx

32
DEPLOYMENT GUIDE Apache Tomcat
Manually configuring the BIG-IP APM for Apache ServersUse the following table to manually configure the BIG-IP APM for Apache. This table contains a list of BIG-IP configuration objects along with any non-default settings you should configure as a part of this deployment. Unless otherwise specified, settings not mentioned in the table can be configured as applicable for your configuration. For specific instructions on configuring individual objects, see the online help or product manuals. We recommend performing the BIG-IP APM configuration before creating the BIG-IP LTM virtual server.
BIG-IP Object Non-default settings/Notes
DNS and NTP See Appendix: Configuring additional BIG-IP settings on page 37 for instructions on configuring DNS and NTP on the BIG-IP system.
Health Monitor1 (Local Traffic--> Monitors) Note: Only necessary if creating a pool of Active Directory servers
Configuration Select Advanced from the Configuration list (if necessary).
Name Type a unique name, such as AD_LDAP_monitor.
Type LDAP
Interval 10 (recommended)
Timeout 31 (recommended)
User Name Type a user name with administrative permissions
Password Type the associated password
Base Specify your LDAP base tree. For example, CN=Apache Users,DC=example,DC=com
Filter Specify the filter. We type cn=user1, using the example above: user1 in OU group “Apache Users” and domain “example.com”
Security Select a Security option (either None, SSL, or TLS)
Chase Referrals Yes
Alias Address *All Addresses
Alias Address Port 389 (for None or TLS) or 686 (for SSL)
AAA Server (Access Policy-->AAA Servers)
If you are using a single Active Directory Server
Name Type a unique name.
Type Active Directory
Domain Controller Type the IP address or FQDN name of an Active Directory Domain Controller
Domain Name Type the Active Directory domain name
Admin Name1 Type the AD user name with administrative permissions (optional)
Admin Password1 Type the associated password (optional). Type it again in the Verify Password box
If you are using a pool of Active Directory Servers
Name Type a unique name.
Type Active Directory
Domain Name Type the FQDN of the Windows Domain name
Server Connection Click Use Pool if necessary.
Domain Controller Pool Name Type a unique name
Domain Controllers IP Address: Type the IP address of the first domain controller Hostname: Type the FQDN of the domain controller Click Add. Repeat for each domain controller in this configuration.
Server Pool Monitor Select the monitor you created above.
Admin Name2 Type the Administrator name
Admin Password2 Type the associated password
SSO Configurations (Access Policy-->SSO Configurations)
Name Type a unique name.
SSO Method NTLMv1
NTLM Domain The NTLM domain name where the user accounts are located
1 Only necessary if using a pool of Active Directory servers2 Optional; Admin Name and Password are only required if anonymous binding to Active Directory is not allowed in your environment

33
DEPLOYMENT GUIDE Apache Tomcat
BIG-IP Object Non-default settings/Notes
Access Profile (Access Policy--> Access Profiles)
Name Type a unique name.
Restrict to Single Client IP1 Enable this feature for additional security when using the Persistent cookie setting.
Cookie Options Click a check in the Persistent Cookie box
SSO Configuration Select the SSO Configuration you created.
Languages Move the appropriate language(s) to the Accepted box.
Access Policy (See procedure below)
EditEdit the Access Profile you just created using the Visual Policy Editor Continue now with configuring the Access policy below.
Virtual ServerIf you used the HTTP iApp template to configure your Apache servers, see Modifying the virtual server created by the iApp to use the Access profile on page 34. If you are configuring the BIG-IP LTM manually, you can simply add the Access profile to the virtual server as described in the Manual Configuration table for BIG-IP LTM and AAM.
1 Optional. Checking this box restricts each APM session to a single source IP address. When a client’s source IP address changes, it will be required to reauthenticate to APM. Because persistent cookies are more easily compromised than browser session cookies, F5 recommends enabling this setting when using persistent APM cookies.
Editing the Access PolicyThe next step is to edit the Access Policy on the APM using the Visual Policy Editor (VPE). The VPE is a powerful visual scripting language that offers virtually unlimited options in configuring an Access Policy. This policy is just an example, you can use it or create one of your own.
To edit the Access Policy
1. On the Main tab, expand Access Policy, and then click Access Profiles.
2. Locate the Access Profile you created, and then, in the Access Policy column, click Edit. The VPE opens in a new window.
3. Click the + symbol between Start and Deny. A box opens with options for different actions.
4. Click the Logon Page option button, and then click the Add Item button.
5. Configure the Properties as applicable for your configuration. In our example, we leave the settings at the defaults. Click Save.
6. Click the + symbol on the between Logon Page and Deny.
7. Click AD Auth option button, and then click the Add Item button.
a. From the Server list, select the AAA server you configured in the table above.
b. All other settings are optional.
c. Click Save. You now see a Successful and Fallback path from AD Auth.
8. On the Successful path between AD Auth and Deny, click the + symbol.
9. Click the SSO Credential Mapping option button, and then click the Add Item button.
10. Click the Save button.
11. Click the Deny link in the box to the right of SSO Credential Mapping.
12. Click Allow and then click Save. Your Access policy should look like the example below.
13. Click the yellow Apply Access Policy link in the upper left part of the window.
14. Click the Close button on the upper right to close the VPE.

34
DEPLOYMENT GUIDE Apache Tomcat
Modifying the virtual server created by the iApp to use the Access profileIf you used the iApp template to configure Apache, you must modify the virtual server created by the iApp to use the Access profile you just created. This requires disabling Strict Updates.
Disabling Strict UpdatesBefore you can attach the Access Profile to the virtual server, you must disable Strict Updates. Once you disable Strict Updates, if you re-enter the iApp template to modify the configuration, all changes you made manually are wiped out, and you must make the manual modifications again.
To disable the Strict Updates feature
1. On the Main tab, expand iApp and then click Application Services.
2. Click the name of your Apache Application Service from the list.
3. From the Application Service menu, select Advanced.
4. In the Strict Updates row, clear the checkbox to disable Strict Updates.
5. Click Update.
Adding the Access Profile to the virtual serverThe final task is to modify the virtual server created by the iApp to use the Access Profile you created in this section.
To modify the virtual server
1. On the Main tab, under Local Traffic, click Virtual Servers.
2. From the list, locate the main Apache virtual server created by the iApp. This is prefaced by the name you gave the iApp, followed by either _http_vs (if you are not offloading SSL) or _https_vs (if you are offloading SSL).
3. In the Access Policy section, from the Access Profile list, select the name of the Access Profile you created using the table.
4. Click Update.
After adding the profile to the virtual server, we recommend re-enabling Strict Updates using the procedure above and re-checking the Strict Updates box.
This completes the BIG-IP APM configuration.

35
DEPLOYMENT GUIDE Apache Tomcat
Manual configuration table for BIG-IP LTM and AAMWe recommend using the iApp template to configure the BIG-IP system for Apache Tomcat servers. Users familiar with the BIG-IP system can use the following table to manually configure the system. The table contains a list of configuration objects along with any non-default settings you should configure as a part of this deployment. Settings not mentioned in the table can be configured as applicable for your configuration. For specific instructions on configuring individual objects, see the online help or product manuals.
BIG-IP LTM Object Non-default settings/Notes
Health Monitor(Local Traffic > Monitors)
Name Type a unique name
Type HTTP
Interval 30 (recommended)
Timeout 91 (recommended)
Send String1Ensure the Send String include the full, correct path to the application/context and resource you want to monitor For example: GET /index.html HTTP/1.1\r\nHost: www.example.com\r\nConnection: Close\r\n\r\n
Receive String1 Type the string the BIG-IP system should expect as a response to the Send String.
Pool(Local Traffic > Pools)
Name Type a unique name
Health Monitor Select the monitor you created above
Slow Ramp Time2 300 (recommended)
Load Balancing Method Choose a load balancing method. We recommend Least Connections (Member)
Address Type the IP Address of the nodes
Service Port Specify the Port; 80 is the most common HTTP port. Click Add to repeat Address and Service Port for all nodes.
Optional: AAM Application2
( Acceleration > Web Application)
Application Name Type a unique name
Policy Generic Policy - Enhanced
Requested Host Type the Fully Qualified Domain Name (FQDN) of your application. Click Add Host to include additional hosts.
Profiles (Local Traffic > Profiles)
HTTP (Profiles > Services)
Name Type a unique name
Parent Profile http
Rewrite Redirect1 Matching
TCP WAN(Profiles > Protocol)
Name Type a unique name
Parent Profile tcp-wan-optimized
TCP LAN(Profiles > Protocol)
Name Type a unique name
Parent Profile tcp-lan-optimized
Persistence(Profiles > Persistence)
Name Type a unique name
Persistence Type Cookie
OneConnect(Profiles > Other)
Name Type a unique name
Parent Profile oneconnect
Client SSL3
(Profiles > SSL)
Name Type a unique name
Parent Profile clientssl
Certificate and Key Select the Certificate and Key you imported from the associated list
Server SSL4
(Profiles > Other)
Name Type a unique name
Parent Profile serverssl
Web Acceleration(Profiles > Services)
Name Type a unique name
Parent Profile optimized-caching
WA Applications1 Enable the AAM Application you created
iSession5
(Profiles > Services)
Name Type a unique name
Parent Profile isession
HTTP Compression(Profiles > Services)
Name Type a unique name
Parent Profile wan-optimized-compression
1 Optional2 You must select Advanced from the Configuration list for these options to appear.3 Only required if using the BIG-IP system for SSL Offload or SSL Bridging4 Only necessary if using the BIG-IP system for SSL Bridging or server-side encryption5 Only necessary if using the BIG-IP AAM to provide symmetric optimization

36
DEPLOYMENT GUIDE Apache Tomcat
BIG-IP LTM Object Non-default settings/Notes
Profiles (Local Traffic > Profiles)
HTTP Compression (Cont.)(Profiles > Services)
Content List--> Include List(Add each entry to the Content Type box and then click Include)
text/(css|html|javascript|json|plain|postscript|richtext|rtf|vnd\.wap\.wml|vnd\.wap\.wmlscript|wap|wml|x-component|x-vcalendar|x-vcard|xml)
application/(css|css-stylesheet|doc|excel|javascript|json|lotus123|mdb|mpp|ms-excel|ms-powerpoint|ms-word|msaccess|msexcel|mspowerpoint|msproject|msword|photoshop|postscript|powerpoint|ps|psd|quarkexpress|rtf|txt|visio|vnd\.excel|vnd.\ms-access|vnd\.ms-excel|vnd\.ms-powerpoint|vnd\.ms-pps|vnd\.ms-project|vnd\.ms-word|vnd\.ms-works|vnd\.ms-works-db|vnd\.msaccess|vnd\.msexcel|vnd\.mspowerpoint|vnd\.msword|vnd\.powerpoint|vnd\.visio|vnd\.wap\.cmlscriptc|vnd\.wap\.wmlc|vnd\.wap\.xhtml\+xml|vnd\.word|vsd|winword|wks|word|x-excel|x-java-jnlp-file|x-javascript|x-json|x-lotus123|x-mdb|x-ms-excel|x-ms-project|x-mscardfile|x-msclip|x-msexcel|x-mspowerpoint|x-msproject|x-msword|x-msworks-db|x-msworks-wps|x-photoshop|x-postscript|x-powerpoint|x-ps|x-quark-express|x-rtf|x-vermeer-rpc|x-visio|x--vsd|x-wks|x-word|x-xls|x-xml|xhtml+xml|xls|xml)
image/(photoshop|psd|x-photoshop|x-vsd)
Virtual Servers (Local Traffic > Virtual Servers)
HTTP
Name Type a unique name.
Address Type the IP Address for the virtual server
Service Port 80
Protocol Profile (client)1,2 Select the WAN optimized TCP profile you created above
Protocol Profile (server)1,2 Select the LAN optimized TCP profile you created above
HTTP Profile2 Select the HTTP profile you created above
Web Acceleration profile2 Select the Web Acceleration profile you created above
HTTP Compression profile2 Select the HTTP Compression profile you created above
OneConnect2 Select the OneConnect profile you created above
Source Address Translation 3 Auto Map (optional; see footnote 3)
Access Profile2 If using BIG-IP APM as described on page 32, select the Access profile you created.
iSession profile5 If using BIG-IP AAM for symmetric optimization between systems, select the iSession profile you created.
Default Pool2 Select the pool you created above
Persistence Profile2 Select the Persistence profile you created
iRule4 If offloading SSL only: Enable the built-in _sys_https_redirect irule
HTTPS4
Name Type a unique name.
Address Type the IP Address for the virtual server
Service Port 443
Protocol Profile (client)1 Select the WAN optimized TCP profile you created above
Protocol Profile (server)1 Select the LAN optimized TCP profile you created above
HTTP Profile Select the HTTP profile you created above
Web Acceleration profile Select the Web Acceleration profile you created above
HTTP Compression profile Select the HTTP Compression profile you created above
OneConnect Select the OneConnect profile you created above
SSL Profile (Client) Select the Client SSL profile you created above
SSL Profile (Server)6 If you created a Server SSL profile, select it from the list
Source Address Translation 3 Auto Map (optional; see footnote 3)
Access Profile If using BIG-IP APM as described on page 32, select the Access profile you created.
iSession profile5 If using BIG-IP AAM for symmetric optimization between systems, select the iSession profile you created.
Default Pool Select the pool you created above
Persistence Profile Select the Persistence profile you created
1 You must select Advanced from the Configuration list for these options to appear 2 Do not enable these objects on the HTTP virtual server if offloading SSL. The HTTP virtual server is only used for redirecting users to the HTTPS virtual server.3 If using SNAT and expecting more than 64,000 simultaneous connections, you must configure a SNAT Pool with an IP address for each 64,000 simultaneous connections you
expect. See the BIG-IP documentation on configuring SNAT Pools.4 Only necessary if offloading SSL or SSL Bridging5 Only necessary if using the BIG-IP AAM to provide symmetric optimization. Do not create/use this profile if you are deploying the BIG-IP system on the server side of the WAN6 Only necessary if using the BIG-IP system for SSL Bridging or server-side encryption
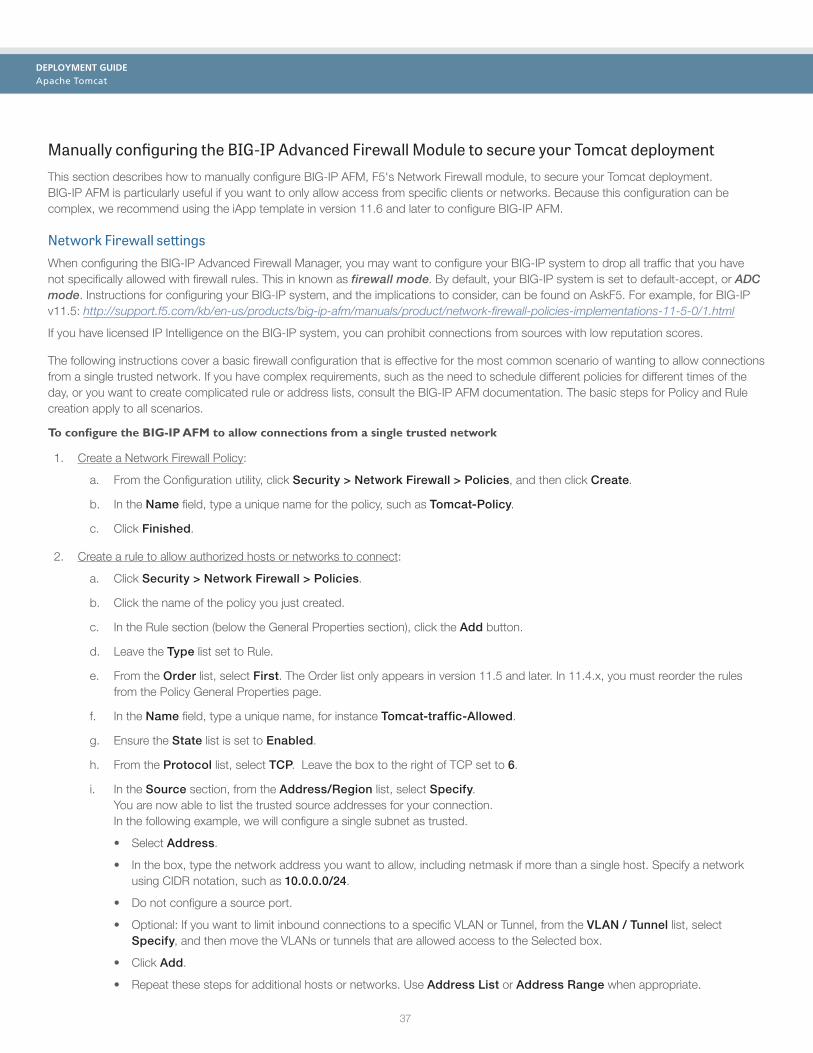
37
DEPLOYMENT GUIDE Apache Tomcat
Manually configuring the BIG-IP Advanced Firewall Module to secure your Tomcat deploymentThis section describes how to manually configure BIG-IP AFM, F5's Network Firewall module, to secure your Tomcat deployment. BIG-IP AFM is particularly useful if you want to only allow access from specific clients or networks. Because this configuration can be complex, we recommend using the iApp template in version 11.6 and later to configure BIG-IP AFM.
Network Firewall settingsWhen configuring the BIG-IP Advanced Firewall Manager, you may want to configure your BIG-IP system to drop all traffic that you have not specifically allowed with firewall rules. This in known as firewall mode. By default, your BIG-IP system is set to default-accept, or ADC mode. Instructions for configuring your BIG-IP system, and the implications to consider, can be found on AskF5. For example, for BIG-IP v11.5: http://support.f5.com/kb/en-us/products/big-ip-afm/manuals/product/network-firewall-policies-implementations-11-5-0/1.html
If you have licensed IP Intelligence on the BIG-IP system, you can prohibit connections from sources with low reputation scores.
The following instructions cover a basic firewall configuration that is effective for the most common scenario of wanting to allow connections from a single trusted network. If you have complex requirements, such as the need to schedule different policies for different times of the day, or you want to create complicated rule or address lists, consult the BIG-IP AFM documentation. The basic steps for Policy and Rule creation apply to all scenarios.
To configure the BIG-IP AFM to allow connections from a single trusted network
1. Create a Network Firewall Policy:
a. From the Configuration utility, click Security > Network Firewall > Policies, and then click Create.
b. In the Name field, type a unique name for the policy, such as Tomcat-Policy.
c. Click Finished.
2. Create a rule to allow authorized hosts or networks to connect:
a. Click Security > Network Firewall > Policies.
b. Click the name of the policy you just created.
c. In the Rule section (below the General Properties section), click the Add button.
d. Leave the Type list set to Rule.
e. From the Order list, select First. The Order list only appears in version 11.5 and later. In 11.4.x, you must reorder the rules from the Policy General Properties page.
f. In the Name field, type a unique name, for instance Tomcat-traffic-Allowed.
g. Ensure the State list is set to Enabled.
h. From the Protocol list, select TCP. Leave the box to the right of TCP set to 6.
i. In the Source section, from the Address/Region list, select Specify. You are now able to list the trusted source addresses for your connection. In the following example, we will configure a single subnet as trusted.
• Select Address.
• In the box, type the network address you want to allow, including netmask if more than a single host. Specify a network using CIDR notation, such as 10.0.0.0/24.
• Do not configure a source port.
• Optional: If you want to limit inbound connections to a specific VLAN or Tunnel, from the VLAN / Tunnel list, select Specify, and then move the VLANs or tunnels that are allowed access to the Selected box.
• Click Add.
• Repeat these steps for additional hosts or networks. Use Address List or Address Range when appropriate.

38
DEPLOYMENT GUIDE Apache Tomcat
j. In the Destination section, leave the Address/Region and Port set to Any. Because you will be applying your policy to a virtual server that listens only on a single desired address and port, do not specify that information here.
k. If necessary, from the Action list, select Accept.
l. Optional: If you have configured a logging profile and want to log connections, from the Logging list, select Enabled. Typically, allowed connections do not need to be logged.
m. Click Finished.
3. Creating a firewall rule to block all other traffic The next task is to create a firewall rule to block all other traffic that you have not allowed. Although this is not a required step if your BIG-IP system is set to default deny (Firewall mode), it is required in default-accept (ADC mode), and is a good practice to always configure such a rule.
a. Click Security > Network Firewall > Policies.
b. Click the name of the policy you created in step 1.
c. In the Rule section (below the General Properties section), click the Add button.
d. Leave the Type list set to Rule.
e. Leave the Order list, select Last.
f. In the Name field, type a unique name, for example Tomcat-traffic-Prohibited.
g. Ensure the State list is set to Enabled.
h. From the Protocol list, select TCP. Leave the box to the right of TCP set to 6.
i. In the Source section, leave all the lists set to Any
j. From the Action list, select either Drop (to silently discard incoming connections) or Reject (to send a Destination Unreachable message to the sender).
k. If you configured a logging profile as described in Optional: Configuring the BIG-IP system to log network firewall events on page 39, from the Logging list, select Enabled.
l. Click Finished. You return to the Policy Properties page.
m. On the Policy Properties page, in the Rules section, ensure the rule with the Action of Accept comes before the Drop or Reject rule you just created. If it does not, use the Reorder button and drag the rules into the correct order.
4. Apply Your Firewall Policy to your Virtual Server
a. Click Security > Network Firewall > Active Rules.
b. In the Rule section (below the General Properties section), click the Add button.
c. From the Context list, select Virtual Server, and then select the virtual server you created for your Tomcat traffic.
d. From the Type list, select Policy, and then select the firewall policy you created.
e. From the Policy Type list, select Enforced.
f. Click Finished.
Optional: Assigning an IP Intelligence Policy to your Tomcat virtual serverIf you want to restrict access to your Tomcat virtual server based on the reputation of the remote sender, you can enable and assign an IP Intelligence policy. This requires an IP intelligence license; contact your F5 Sales representative for more information.

39
DEPLOYMENT GUIDE Apache Tomcat
It is outside the scope of this document to provide instructions on configuring an IP Intelligence Policy. Full documentation on enabling and configuring the IP Intelligence feature can be found on AskF5. For example, the manual for BIG-IP AFM v11.5 is: https://support.f5.com/kb/en-us/products/big-ip-afm/manuals/product/network-firewall-policies-implementations-11-5-0/5.html
After you have enabled and configured an IP Intelligence policy, use the following steps to assign the policy to your Tomcat virtual server:
To assign the IP intelligence policy to the Tomcat virtual server
1. On the Main tab, click Local Traffic > Virtual Servers. The Virtual Server List screen opens.
2. Click the name of your Tomcat virtual server.
3. From the Security menu, choose Policies.
4. Next to IP Intelligence, select Enabled, then select the IP intelligence policy to apply to traffic on the virtual server.
5. Click Update. The list screen and the updated item are displayed. The IP Intelligence policy is applied to traffic on the virtual server.
Optional: Configuring the BIG-IP system to log network firewall eventsIf you are using BIG-IP AFM, you have the option of logging network firewall events to one or more remote syslog servers (recommended) or to log events locally. You can either use an iApp template to create the logging profile, or create the logging profile manually.
For specific information on logging on the BIG-IP system, see the appropriate guide for your version. For example, for 11.5.0:
• Remote High-Speed Logging: https://support.f5.com/kb/en-us/products/big-ip_ltm/manuals/product/tmos-implementations-11-5-0/22.html
• Local logging: https://support.f5.com/kb/en-us/products/big-ip_ltm/manuals/product/tmos-concepts-11-5-0/11.html
Creating the logging profile using the iApp templateUse this section to create the logging profile using the logging profile iApp template. If you have not already downloaded the iApp template, see https://devcentral.f5.com/wiki/iApp.F5-Remote-Logging-iApp.ashx.
To configure the logging profile iApp
1. Log on to the BIG-IP system.
2. On the Main tab, click iApp > Application Services.
3. Click Create. The Template Selection page opens.
4. In the Name box, type a name. In our example, we use logging-iapp_.
5. From the Template list, select f5.remote_logging.v<latest-version>. The template opens
6. Use the following table for guidance on configuring the iApp template. Questions not mentioned in the table can be configured as applicable for your implementation.
Question Your selection
Do you want to create a new pool of remote logging servers, or use an existing one?
Unless you have already created a pool on the BIG-IP system for your remote logging servers, select Create a new pool.
Which servers should be included in this pool? Specify the IP addresses of your logging servers. Click Add to include more servers.
What port do the pool members use? Specify the port used by your logging servers, typically 514.
Do the pool members expect UDP or TCP connections? TCP
Do you want to create a new monitor for this pool, or use an existing one?
Unless you have already created a health monitor for your pool of logging servers, select Use a simple ICMP (ping) monitor.
Do your log pool members require a specific log format? If your logging servers require a specific format, select the appropriate format from the list.

40
DEPLOYMENT GUIDE Apache Tomcat
7. Click Finished.
8. On the Main tab, click Local Traffic > Virtual Servers. The Virtual Server List screen opens.
9. Click the name of your Tomcat virtual server.
10. From the Security menu, choose Policies.
11. Next to Log Profile, select Enabled, then select the Logging profile you created.
12. Click Update. The list screen and the updated item are displayed.
Note
The iApp template creates a log publisher and attaches it to the logging profile. If the publisher does not appear in the BIG-IP Configuration utility (GUI), you can verify the configuration by running the following command from the Traffic Management shell (tmsh): list security log profile <your profile name>.
Creating logging profile manually
If you do not want to use the iApp template to create a logging profile, use this section for guidance on configuring the logging profile manually. You must have access to the tmsh command line to use this method.
To manually configure a logging profile
1. Use the following guidance for configuring a health monitor and load balancing pool for the logging servers.
BIG-IP LTM Object Non-default settings/Notes
Health Monitor (Local Traffic -->Monitors)
Name Type a unique name
Type ICMP
Interval 30 (recommended)
Timeout 91 (recommended)
Pool (Local Traffic -->Pools)
Name Type a unique name
Health Monitor Select the appropriate monitor you created
Slow Ramp Time 300
Load Balancing Method Choose a load balancing method. We recommend Least Connections (Member)
Address Type the IP Address of a server.
Service Port Type the appropriate port, such as UDP port 514, the port on which logging typically occurs. Click Add, and then repeat Address and Port for all nodes
2. Log into the BIG-IP system using the command line. Enter the tmsh shell, by typing tmsh from the prompt.
3. Create a Remote High Speed Log (HSL) destination:
(tmos)# create / sys log-config destination remote-high-speed-log [name] pool-name [specified pool] protocol [udp or tcp]
4. If you have a specific log format requirement, create a format-specific log destination, and forward that to the previously-created HSL destination:
(tmos)# create / sys log-config destination [splunk|arcsight|remote-high-speed-log] [name] forward-to [HSL name]
5. Create a log publisher:
(tmos)# create / sys log-config publisher [name] destinations add { [logdestination name] }

41
DEPLOYMENT GUIDE Apache Tomcat
6. Create the logging profile to tie everything together. If you chose to log allowed connections, include the green text (as in step 2 substep l in To configure the BIG-IP AFM to allow connections from a single trusted network on page 37). If you set the rule to drop incoming connections, include the text in blue. If you chose to log IP intelligence events, include the text in red to add the parameter that sets the log publisher.
(tmos)# create / security log profile [name] network add { [name] { filter { log-acl-match-accept enabled log-acl-match-drop enabled log-acl-match-reject enabled } format { field-list { date_time action drop_reason protocol src_ip src_port dest_ip dest_port } type field-list } publisher [logpublisher name] } } ip-intelligence { log-publisher [logpublisher name] }
Assigning the logging profile to the virtual serverThe final task is to assign the logging profile to the virtual server.
To assign the logging profile to the Tomcat virtual server
1. On the Main tab, click Local Traffic > Virtual Servers. The Virtual Server List screen opens.
2. Click the name of your Tomcat virtual server.
3. From the Security menu, choose Policies.
4. Next to Log Profile, select Enabled, then select the Logging profile you created.
5. Click Update. The list screen and the updated item are displayed.

42
DEPLOYMENT GUIDE Apache Tomcat
Appendix: Configuring additional BIG-IP settingsThis section contains information on configuring the BIG-IP system for objects or settings that are required, but not part of the template.
Configuring DNS and NTP settings If you are configuring the iApp to use BIG-IP APM, you must configure DNS and NTP settings on the BIG-IP system before beginning the iApp.
Configuring the DNS settingsIn this section, you configure the DNS settings on the BIG-IP system to point to a DNS server that can resolve your Active Directory server or servers. In many cases, this IP address will be that of your Active Directory servers themselves.
Note
DNS lookups go out over one of the interfaces configured on the BIG-IP system, not the management interface. The management interface has its own, separate DNS settings.
i Important
The BIG-IP system must have a self IP address in the same local subnet and VLAN as the DNS server, or a route to the DNS server if located on a different subnet. The route configuration is found on the Main tab by expanding Network and then clicking Routes. For specific instructions on configuring a route on the BIG-IP system, see the online help or the product documentation.
To configure DNS settings
1. On the Main tab, expand System, and then click Configuration.
2. On the Menu bar, from the Device menu, click DNS.
3. In the DNS Lookup Server List row, complete the following:
a. In the Address box, type the IP address of a DNS server that can resolve the Active Directory server.
b. Click the Add button.
4. Click Update.
Configuring the NTP settingsThe next task is to configure the NTP settings on the BIG-IP system for authentication to work properly.
To configure NTP settings
1. On the Main tab, expand System, and then click Configuration.
2. On the Menu bar, from the Device menu, click NTP.
3. In the Address box, type the fully-qualified domain name (or the IP address) of the time server that you want to add to the Address List.
4. Click the Add button.
5. Click Update.
To verify the NTP setting configuration, you can use the ntpq utility. From the command line, run ntpq -np.

43
DEPLOYMENT GUIDE Apache Tomcat
See http://support.f5.com/kb/en-us/solutions/public/10000/200/sol10240.html for more information on this command.

44
DEPLOYMENT GUIDE Apache Tomcat
Glossary
application serviceiApps Application Services use an iApp Template to guide users through configuring new BIG-IP® system configurations. An Application Service lets an authorized user easily and consistently deploy complex BIG-IP® system configurations just by completing the information required by the associated template. Every Application Service is attached to a specific configuration and cannot be copied the way that iApps templates can.
iApp TemplateiApps templates create configuration-specific forms used by Application Services to guide authorized users through complex system configurations. The templates provide programmatic, visual layout and help information. Each new Application Service uses one of the templates to create a screen with fields and help that guide the user through the configuration process and creates the configuration when finished.
iApps templates allow users to customize by either modifying an existing template or creating one from scratch. Users can create scratch-built templates using either the iApps Templates screen or any text-editing software.
configuration utilityThe Configuration utility is the browser-based application that you use to configure the BIG-IP system.
custom profileA custom profile is a profile that you create. A custom profile can inherit its default settings from a parent profile that you specify. See also parent profile.
health monitorA health monitor checks a node to see if it is up and functioning for a given service. If the node fails the check, it is marked down. Different monitors exist for checking different services.
iRuleAn iRule is a user-written script that controls the behavior of a connection passing through the BIG-IP system. iRules™ are an F5 Networks feature and are frequently used to direct certain connections to a non-default load balancing pool. However, iRules can perform other tasks, such as implementing secure network address translation and enabling session persistence. You can attach iRules you created to your HTTP Application Service in the advanced configuration mode.
iSession
An iSession is an optimized connection between two BIG-IP systems.
iSession profile
An iSession profile defines the optimization parameters. WAN optimization requires an iSession profile, which specifies the optimization settings, such as compression and data deduplication. The iApp template uses the default isession profile.
load balancing methodA load balancing method or algorithm is a particular method of determining how to distribute connections across a load balancing pool. There are several different load balancing methods on the BIG-IP system. If you are working with servers that differ significantly in processing speed and memory, you might want to use a method such as Ratio or Weighted Least Connections.
Load balancing calculations can be localized to each pool (member-based calculation) or they may apply to all pools of which a server is a member (node-based calculation). For detailed information, see the product documentation.
See the table on the following page for a description of most load balancing methods.

45
DEPLOYMENT GUIDE Apache Tomcat
Method Description When to use
Round RobinRound Robin mode passes each new connection request to the next server in line, eventually distributing connections evenly across the array of machines being load balanced.
Round Robin mode works well in most configurations, especially if the equipment that you are load balancing is roughly equal in processing speed and memory.
Ratio (member) Ratio (node)
The LTM distributes connections among pool members in a static rotation according to ratio weights you define. The number of connections each system receives over time is proportionate to the ratio weight you defined for each pool member. You set a ratio weight when you add each pool member in the iApp.
These are static load balancing methods, basing distribution on user-specified ratio weights that are proportional to the capacity of the servers.
Dynamic Ratio (member) Dynamic Ratio (node)
The Dynamic Ratio methods select a server based on various aspects of real-time server performance analysis. These methods are similar to the Ratio methods, except the ratio weights are system-generated, and the values of the ratio weights are not static. These methods are based on continuous monitoring of the servers, and the ratio weights are therefore continually changing.
The Dynamic Ratio methods are used specifically for load balancing traffic to RealNetworks® RealSystem® Server platforms, Windows® platforms equipped with Windows Management Instrumentation (WMI), or any server equipped with an SNMP agent such as the UC Davis SNMP agent or Windows 2000 Server SNMP agent.
Note: To implement Dynamic Ratio load balancing, you must first install and configure the necessary server software for these systems, and then install the appropriate performance monitor.
Fastest (node) Fastest (application)
The Fastest load balancing mode load balances based upon the number of outstanding Layer 7 requests to a pool member and the number of open L4 connections.
The Fastest methods are useful in environments where nodes are distributed across separate logical networks.
Least Connections (member) Least Connections (node)
The Least Connections load balancing mode is a dynamic load balancing algorithm that distributes connections to the server that is currently managing the fewest open connections at the time the new connection request is received.
The Least Connections methods function best in environments where the servers have similar capabilities. Otherwise, some amount of latency can occur.
If you have servers with varying capacities, consider using the Weighted Least Connections methods instead.
Weighted Least Connections (member)
Weighted Least Connections (node)
Specifies that the system passes a new connection to the pool member that is handling the lowest percentage of the specified maximum number of concurrent connections allowed.
This mode requires that you specify a value for the connection-limit option for all members of the pool.
This mode works best in environments where the servers or other equipment you are load balancing have different but quantified capability limits.
Observed (member) Observed (node)
With the Observed methods, nodes are ranked based on the number of connections. The Observed methods track the number of Layer 4 connections to each node over time and create a ratio for load balancing
The need for the Observed methods is rare, and they are not recommended for large pools.
Predictive (member) Predictive (node)
The Predictive methods use the ranking methods used by the Observed methods. However, with the Predictive methods, LTM analyzes the trend of the ranking over time, determining whether a nodes performance is currently improving or declining. The servers with performance rankings that are currently improving receive a higher proportion of the connections.
The need for the Predictive methods is rare, and they are not recommended for large pools.
Least Sessions
The Least Sessions method selects the server that currently has the least number of entries in the persistence table. Use of this load balancing method requires that the virtual server reference a type of profile that tracks persistence connections, such as the Source Address Affinity or Universal profile type.
Note: The Least Sessions methods are incompatible with cookie persistence.
The Least Sessions method works best in environments where the servers or other equipment that you are load balancing have similar capabilities.
load balancing poolA load balancing pool is a logical set of devices, such as web servers, that you group together to receive and process traffic. Instead of sending client traffic to the destination IP address specified in the client request, Local Traffic Manager sends the request to any of the servers that are members of that pool. This helps to efficiently distribute the load on your server resources.
local endpointThe local endpoint is the BIG-IP system on which you are currently working. The systems must be set up symmetrically, so that a local endpoint connects to one or more remote endpoints.

46
DEPLOYMENT GUIDE Apache Tomcat
network virtual serverA network virtual server is a virtual server whose IP address has no bits set in the host portion of the IP address (that is, the host portion of its IP address is 0, such as 192.168.1.0). This allows you to direct client traffic based on a range of destination IP addresses.
profileProfiles are a configuration tool that you can use to affect the behavior of certain types of network traffic. More specifically, a profile is an object that contains settings with values, for controlling the behavior of a particular type of network traffic, such as HTTP connections. Profiles also provide a way for you to enable connection and session persistence, and to manage client application authentication.
self IP addressSelf IP addresses are the IP addresses owned by the BIG-IP system that you use to access the internal and external VLANs.
SNATA SNAT (Secure Network Address Translation) is a feature that defines a routable alias IP address that one or more nodes can use as a source IP address when making connections to hosts on the external network.
SNAT poolA SNAT pool is a pool of translation addresses that you can map to one or more original IP addresses. Translation addresses in a SNAT pool are not self IP addresses.
virtual serverA virtual server is a traffic-management object on the BIG-IP system that is represented by an IP address and a service port. This is the address clients use to connect to the web servers (or a FQDN resolves to this address). The BIG-IP intercepts the client request, and then directs the traffic according to your configuration instructions.
VLANA VLAN is a logical grouping of interfaces connected to network devices. You can use a VLAN to logically group devices that are on differentnetwork segments. Devices within a VLAN use Layer 2 networking to communicate and define a broadcast domain.

DEPLOYMENT GUIDE Apache Tomcat
47
F5 Networks, Inc.Corporate [email protected]
F5 Networks, Inc. 401 Elliott Avenue West, Seattle, WA 98119 888-882-4447 www.f5.com
F5 Networks Ltd.Europe/Middle-East/[email protected]
F5 NetworksJapan [email protected]
©2014 F5 Networks, Inc. All rights reserved. F5, F5 Networks, the F5 logo, and IT agility. Your way., are trademarks of F5 Networks, Inc. in the U.S. and in certain other countries. Other F5 trademarks are identified at f5.com. Any other products, services, or company names referenced herein may be trademarks of their respective owners with no endorsement or affiliation, express or implied, claimed by F5. 0412
Document Revision History
Version Description Date
1.0 New Deployment Guide for v11.0 and later 08-26-2014