Embed Size (px)
Citation preview

A Dell EMC Deployment and Configuration Guide
Dell EMC SC Series Storage and SMI-S Integration with Microsoft SCVMM Dell EMC Engineering February 2017

2 Dell EMC SC Series Storage and SMI-S Integration with Microsoft SCVMM | CML1003 | Version 5
Revisions
Date Description
May 2012 Initial release of SCVMM 2012 for Microsoft® Windows Server® 2008 R2
February 2013 Updated for Windows Server 2012 and SCVMM 2012 SP1
December 2013 Updated for SCVMM 2012 R2
November 2016 Updated for SCVMM 2016
February 2017 Updated for DSM 2016 R3 and SCOS 7.2
Acknowledgements
This document was authored by Marty Glaser, a member of the Dell EMC Storage Applications
Engineering team.
Feedback
We welcome your feedback along with any recommendations for improving this document. Send
comments to [email protected].
The information in this publication is provided “as is.” Dell Inc. makes no representations or warranties of any kind with respect to the
information in this publication, and specifically disclaims implied warranties of merchantability or fitness for a particular purpose.
Use, copying, and distribution of any software described in this publication requires an applicable software license.
Copyright © 2012–2017 Dell Inc. or its subsidiaries. All Rights Reserved. Dell, EMC, and other trademarks are trademarks of Dell Inc. or its
subsidiaries. Other trademarks may be the property of their respective owners. Published in the USA. [2/21/2017] [Deployment and
Configuration Guide] [CML1003]
Dell believes the information in this document is accurate as of its publication date. The information is subject to change without notice.

3 Dell EMC SC Series Storage and SMI-S Integration with Microsoft SCVMM | CML1003 | Version 5
Table of contents 1 Introduction ....................................................................................................................................................... 6
1.1 Audience ................................................................................................................................................. 6
2 Overview ........................................................................................................................................................... 7
2.1 SC Series storage................................................................................................................................... 7
2.1.1 Supported SCOS versions ..................................................................................................................... 7
2.2 Dell Storage Manager and SMI-S provider ............................................................................................ 7
2.2.1 Supported DSM versions ........................................................................................................................ 8
2.3 Microsoft System Center Virtual Machine Manager ............................................................................... 8
2.3.1 SCVMM components .............................................................................................................................. 8
2.3.2 SCVMM fabric ......................................................................................................................................... 8
2.4 Microsoft Hyper-V ................................................................................................................................... 9
3 Prerequisite steps checklist ............................................................................................................................ 10
4 Enable SMI-S on the DSM Data Collector ..................................................................................................... 11
5 Create SMI-S user accounts .......................................................................................................................... 13
5.1 Create SMI-S user in DSM ................................................................................................................... 13
5.2 Create SMI-S Run As account in SCVMM ........................................................................................... 16
6 Discover SC Series storage in SCVMM ......................................................................................................... 18
6.1 Discover additional SC Series arrays ................................................................................................... 22
7 Configure other SCVMM fabric components .................................................................................................. 23
7.1 Define a host group structure ............................................................................................................... 23
7.2 Configure a library server ..................................................................................................................... 23
7.2.1 Copy resources to a library server........................................................................................................ 24
7.2.2 Assign a library server to a host group ................................................................................................. 26
7.3 Add physical Hyper-V host servers to SCVMM .................................................................................... 26
7.3.1 Verify consistent and intuitive naming for host server virtual switches ................................................ 26
7.3.2 Add Hyper-V hosts and clusters to SCVMM ........................................................................................ 26
7.3.3 Configure networking in SCVMM ......................................................................................................... 27
7.4 Allocate a storage pool to a host group ................................................................................................ 28
8 SCVMM profiles and templates ...................................................................................................................... 29
8.1 Profiles .................................................................................................................................................. 29
8.2 Templates ............................................................................................................................................. 29
8.3 Network copy and SAN copy-capable templates ................................................................................. 29

4 Dell EMC SC Series Storage and SMI-S Integration with Microsoft SCVMM | CML1003 | Version 5
8.3.1 Network copy templates ....................................................................................................................... 29
8.3.2 SAN copy-capable templates ............................................................................................................... 30
9 Create a SAN copy-capable template from a gold image .............................................................................. 31
9.1 Choose a method for creating a SAN copy-capable template ............................................................. 31
9.2 Create a logical unit and assign it to a Hyper-V host ........................................................................... 31
9.3 Create a new virtual machine on the new volume ................................................................................ 35
9.4 Verify correct firmware boot order for generation-2 guests .................................................................. 40
9.5 Create a clone of the guest VM ............................................................................................................ 41
9.6 Create a SAN copy-capable template from a guest VM....................................................................... 43
10 Rapid provisioning with SAN copy-capable templates ................................................................................... 48
10.1 Create new VM with rapid provisioning ................................................................................................ 48
10.2 SAN space saved with rapid provisioning ............................................................................................ 51
10.3 Maintain balanced SC Series array controllers with rapid provisioning ............................................... 52
11 Migrate guest VMs with SAN transfer ............................................................................................................ 54
12 Modify volume mappings ................................................................................................................................ 55
A Create OpenPegasus and local SMI-S users with PowerShell ...................................................................... 57
A.1 PowerShell script overview ................................................................................................................... 57
A.2 Create the local Windows SMI-S user account manually .................................................................... 58
A.3 Run the PowerShell script .................................................................................................................... 59
B Troubleshoot SMI-S and SC array discovery issues...................................................................................... 63
C Technical support and resources ................................................................................................................... 66
C.1 Supplemental documentation ............................................................................................................... 66

5 Dell EMC SC Series Storage and SMI-S Integration with Microsoft SCVMM | CML1003 | Version 5
Executive summary
This document provides step-by step guidance for the following:
Enable the Dell EMC™ SC Series SMI-S provider and configure Microsoft® System Center
Virtual Machine Manager (SCVMM) to manage SC Series storage
Use SCVMM to discover, classify, and manage SC Series storage
Configure the SCVMM fabric
Create SAN copy-capable templates to facilitate rapid provisioning of Microsoft Hyper-V®
guest VMs on SC Series storage
Leverage SMI-S for SAN transfers when migrating guest VMs

6 Dell EMC SC Series Storage and SMI-S Integration with Microsoft SCVMM | CML1003 | Version 5
1 Introduction SC Series storage has supported SMI-S integration with SCVMM since the release of Dell Storage
Center OS (SCOS) 6.3.1 and SCVMM 2012. With each subsequent release of SCVMM (2012 SP1
and 2012 R2), this guide was updated. This document features SCVMM 2016, along with Dell
Storage Manager (DSM) 2016 R3 and SCOS 7.2.
1.1 Audience This document is for technology professionals interested in learning more about how to configure
SMI-S to manage SC Series storage and create SAN copy-capable templates for rapid provisioning
of new guest VMs. Readers should have working knowledge of SCVMM and SC Series storage.

7 Dell EMC SC Series Storage and SMI-S Integration with Microsoft SCVMM | CML1003 | Version 5
2 Overview This section provides a brief overview of the major components required to configure the
environment.
2.1 SC Series storage SC Series storage solutions provide many robust features such as true flash optimization, thin
provisioning, data optimization, data reduction (deduplication and compression), automated sub-LUN
tiering, sub-disk RAID levels, synchronous replication with automatic failover, and intelligent read and
write data placement. SC Series arrays provide a unified platform for the ultimate experience in
performance, adaptability, and efficiency.
In addition to raw capacity and I/O performance, other important factors such as monitoring,
reporting, trending, protection of the data (backups, snapshots, and replication), and the ability to
recover in case of a disaster are equally important. The SC Series array is well suited to provide solid,
proven solutions to Hyper-V and SCVMM environments to meet these business needs. To learn more
about SC Series storage arrays, visit the SC Series Storage page.
2.1.1 Supported SCOS versions SCOS version 7.1 or newer is required to support Windows Server 2016. SCOS version 7.2 is
required to support SCVMM 2016. For older versions of SCVMM (2012, 2012 SP1, 2012 R2), SCOS
6.3.1 or newer is required.
2.2 Dell Storage Manager and SMI-S provider The Storage Management Initiative Specification (SMI-S) is an industry-standard protocol developed
by the Storage Networking Industry Association (SNIA) that allows third-party applications to interface
directly with SAN storage. In the case of SC Series arrays, SMI-S integration enables SCVMM users
to perform a subset of SAN operations from within SCVMM, such as provisioning new LUNs.
Although it might be possible to configure other third-party applications to integrate with SC Series
storage through SMI-S, this integration is officially supported with SCVMM 2012 and newer versions
only.
The SC Series SMI-S provider comes bundled at no additional cost with the DSM Data Collector.
Note: Enterprise Manager (EM) was rebranded as DSM upon release of DSM 2016 R1. This guide
features DSM 2016 R3.
SMI-S can be enabled and configured at the time DSM or EM is installed, or anytime thereafter.
For more information, see the Administrator’s Guide, Installation Guide, and Release Notes for your
version of DSM or EM on the Dell Support site.

8 Dell EMC SC Series Storage and SMI-S Integration with Microsoft SCVMM | CML1003 | Version 5
2.2.1 Supported DSM versions SCVMM 2016 requires DSM 2016 R3 or newer. For prior versions of SCVMM (2012, 2012 SP1, 2012
R2) DSM 2016 R1 or newer is recommended, however, older versions of Enterprise Manager (EM)
back to 6.3.1 are supported. Using the latest version of DSM is highly recommended to take
advantage of the latest enhancements and bug fixes.
2.3 Microsoft System Center Virtual Machine Manager Microsoft System Center is a cloud and data center management suite that provides a common
toolset for public and private cloud services.
SC Series arrays support SMI-S integration with SCVMM 2012 and newer. The figures and examples
in this guide feature SCVMM 2016.
SCVMM is a component of the System Center suite and allows administrators to:
Deliver Infrastructure as a Service (IaaS). Data center resources such as processing,
networking, and storage can be pooled and virtualized and made available through self-
service, role-based user access.
Virtualize applications and services to be managed independently from the underlying
infrastructure.
Optimize and manage multi-hypervisor environments such as Hyper-V, Citrix® XenServer®,
and VMware®.
Dynamic optimization of data center resources based on workload demands.
2.3.1 SCVMM components A typical deployment of SCVMM includes the following components, which may be installed on the
same server in smaller environments, or different servers in larger environments:
SCVMM server (the SQL Server® database component)
SCVMM Administrator Console (the management GUI)
SCVMM library server
SCVMM command shell
2.3.2 SCVMM fabric Central to the functionality of SCVMM is the configuration of the SCVMM fabric. In SCVMM, the fabric
includes all the underlying hardware components and other resources that are required for
administrators and self-service role users to create and manage physical hosts and guest VMs.

9 Dell EMC SC Series Storage and SMI-S Integration with Microsoft SCVMM | CML1003 | Version 5
Configuring the basic elements of the fabric is necessary before deploying guests or creating a
private cloud. The following components are part of a basic fabric configuration:
Storage: In this guide, an SC Series array is discovered through SMI-S and used for storage. This
requires SCVMM 2012 or newer, with SCVMM 2016 featured in this guide.
Host group: This is a logical grouping of one or more clustered or standalone physical hypervisors
that serve as targets for resources such as deployed guest VMs. Hyper-V is featured in this guide.
Library server: This contains a catalog of files, scripts, installers, ISOs, virtual hard disks, hardware
profiles, OS profiles, and templates used for deploying hosts and guest VMs.
Physical hypervisor hosts: VMware ESX®, XenServer (SCVMM 2012 versions only), and Hyper-V
are supported. This guide features Hyper-V.
Networking components: These include logical IP networks, static IP pools, MAC address pools,
load balancers, and so forth.
To learn more about SCVMM, including tools, videos, blogs, and the feature enhancements that have
been made available with each new release of SCVMM, visit the Microsoft TechNet Library.
2.4 Microsoft Hyper-V The Windows Server platform leverages Hyper-V for virtualization technology. Initially offered with
Windows Server 2008, Hyper-V has matured with each release to include many new features and
enhancements. With the release of Windows Server 2016, Hyper-V is also supported on Nano Server
in addition to Server Core and Server with Desktop Experience.
Microsoft Hyper-V has evolved to become a mature, robust, proven virtualization platform. At a basic
level, it is a layer of software that presents the physical host server hardware resources in an
optimized and virtualized manner to one or more guest virtual machines (VMs). Hyper-V hosts (also
referred to as nodes when clustered) can greatly enhance host server hardware utilization (including
processors, memory, NICs, and power) by allowing many VMs to share these resources at the same
time. Hyper-V Manager and related management tools (such as Failover Cluster Manager, Virtual
Machine Manager, and PowerShell) offer administrators great control and flexibility for managing host
and VM resources, VM mobility, SAN storage, balancing workloads, provisioning systems, and
ensuring quick recovery.
To learn more about Hyper-V, including tools, videos, blogs, and the feature enhancements that have
been made available with each new release of Hyper-V, visit the Microsoft TechNet Library.
In addition to this document, the SC Series Technical Documents page at Dell TechCenter contains
deployment guides, demo videos, and reference architectures in support of single and heterogeneous
application workloads running on Hyper-V and SC Series arrays, including Microsoft Exchange,
Microsoft SQL Server, and VDI.

10 Dell EMC SC Series Storage and SMI-S Integration with Microsoft SCVMM | CML1003 | Version 5
3 Prerequisite steps checklist Complete the steps in Table 1 before proceeding with the rest of this guide. Refer to the
Administrator’s Guide for your version of DSM or EM for guidance with these steps.
Prerequisites
Step Details
1 Install and configure the Dell Storage Manager (DSM) Data Collector on a host server or VM. If using SCVMM 2016, DSM 2016 R3 (featured in this document) is recommended. For SCVMM 2012, DSM 2016 R1 is strongly recommended, but Enterprise Manager (EM) version 6.3.1 or newer is also supported. Install the DSM client on the same or a different server or workstation.
2 Complete the SMI-S configuration steps in the DSM or EM Administrator’s Guide to verify software, firewall, and registry settings on the DSM, EM, and SCVMM servers.
3 Make sure the DSM/EM Data Collector and SCVMM are installed on separate physical or virtual servers which use their own unique database instances.
4 Ensure the DSM/EM Data Collector and SCVMM servers are members of the same Active Directory domain.
5 Verify that Microsoft SCVMM is installed according to Microsoft best practices. This includes configuration of the SCVMM library server. SCVMM 2012 is the minimum supported version. SCVMM 2016 is featured in this guide.
6 Create SAN copy-capable VM templates for rapid-provisioning of VMs by installing the library role on a physical host server that has access to the managed SC Series storage array and has the Hyper-V role installed. This configuration is used in this guide.
7 Make sure at least one physical Hyper-V host server (besides the library server) is available to SCVMM for placement of VMs.
8 Configure all components in the environment to use a single common transport (Fibre Channel or iSCSI). SCVMM SMI-S integration with a SAN does not support using mixed transports. In the examples shown in this guide, the SCVMM server, library server, Hyper-V hosts, and SC Series arrays are all configured to use Fibre Channel with MPIO.
9 Ensure that Dell SC Series arrays managed by SCVMM are running SCOS version 6.3.1 or newer (for Windows Server 2012/R2 and SCVMM 2012/SP1/R2). SCOS 7.2 is required to support SCVMM 2016, which is featured in this guide. For all versions of Windows Server and SCVMM, upgrading to SCOS 7.2 is recommended to take advantage of the latest enhancements and bug fixes.

11 Dell EMC SC Series Storage and SMI-S Integration with Microsoft SCVMM | CML1003 | Version 5
4 Enable SMI-S on the DSM Data Collector Refer to the Dell Storage Manager Administrator’s Guide to complete the following steps to enable
SMI-S on the DSM Data Collector.
Note: The following steps feature DSM 2016 R3, which is required for SCVMM 2016. DSM 2016 R1
and newer come with version 1.6 of the SC Series SMI-S provider (based on JWBEM). Data
Collector versions prior to DSM 2016 R1 come with version 1.5 of the SMI-S provider (based on
OpenPegasus) and require extra configuration steps (automated with PowerShell) to create an
OpenPegasus user and a local Windows user account on the Data Collector server. See appendix B
for details.
Note: For best results with SMI-S integration, upgrade DSM to version 2016 R1 or newer. SCVMM
2016 requires DSM 2016 R3 or newer.
1. Log in to the DSM Data Collector (not the DSM client) as an administrator.

12 Dell EMC SC Series Storage and SMI-S Integration with Microsoft SCVMM | CML1003 | Version 5
2. In the left navigation pane, click SMI-S and enable SMI-S Server. For versions of DSM prior
to 2016 R3 (see the following example on the right), also enable HTTPS. If storage discovery
fails, enabling SLP (optional) may aid with storage discovery. If the default ports are
changed, configure the local server firewall to allow them.
3. When finished, click Apply Changes. If prompted, click Yes to restart the Data Collector
service.

13 Dell EMC SC Series Storage and SMI-S Integration with Microsoft SCVMM | CML1003 | Version 5
5 Create SMI-S user accounts Before SCVMM can discover and manage SC Series storage, an SMI-S user account must be
created in two places: on the Data Collector and also in SCVMM (as a Run As account).
In this guide, the both user instances are intuitively named as smis. The user name is case sensitive
and the passwords must be consistent.
Note: DSM 2016 R3 is featured in this guide. Data Collector versions prior to DSM 2016 R1 require
extra configuration steps (automated with PowerShell). See appendix B for details.
5.1 Create SMI-S user in DSM 1. Log in to the DSM Data Collector (not the DSM client) as an administrator.
2. In the left navigation pane, click Users and User Groups, and click Create User.
3. Provide a user name and password. In this example, the user is named smis (user name is
case sensitive). Set the privilege level to Administrator. When finished, click Next.
4. Verify that the new user is listed with administrator privileges.

14 Dell EMC SC Series Storage and SMI-S Integration with Microsoft SCVMM | CML1003 | Version 5
5. Launch the DSM client, and under Available Client Actions, select Log in to a Storage
Center or Data Collector.
6. Enter the smis user credentials and the host name or IP address of the server hosting the
Data Collector.

15 Dell EMC SC Series Storage and SMI-S Integration with Microsoft SCVMM | CML1003 | Version 5
7. As a newly created user, the smis user will not have access to any SC Series arrays, so at
least one array needs to be added that can be discovered and managed by SCVMM. An SC
Series array named SC17 is used in this example.
8. Under the Summary tab, click Add Storage Center.
9. Provide the hostname (or IP address), user name, and password for the desired SC Series
array. The SC Series user account must have administrator rights to the SC Series array.
Note: Add one SC Series array at a time for best results with SC Series discovery in SCVMM.

16 Dell EMC SC Series Storage and SMI-S Integration with Microsoft SCVMM | CML1003 | Version 5
10. After adding the SC Series array, close the DSM client and return to the DSM Data Collector.
Under Users & User Groups, click Refresh. The SC Series array should now be listed
under Storage Centers for the smis user.
11. Close the DSM Data Collector when finished.
5.2 Create SMI-S Run As account in SCVMM A matching SMI-S Run As account must be configured on the SCVMM server in order to do storage
discovery. To be consistent, the Run As account is named smis and uses the same password as the
smis user configured on the Data Collector.
1. Log on to the SCVMM Administrator Console as an administrator user.
2. In the left navigation pane, click Settings > Run As Accounts to see a current list.
3. Click Create Run As Account on the ribbon bar.

17 Dell EMC SC Series Storage and SMI-S Integration with Microsoft SCVMM | CML1003 | Version 5
4. Provide a name, description, user name (smis in this example), and password, and click
Finish.

18 Dell EMC SC Series Storage and SMI-S Integration with Microsoft SCVMM | CML1003 | Version 5
6 Discover SC Series storage in SCVMM In this section, SCVMM is used to discover and manage an SC Series array named SC17. The steps
in the preceding sections must be completed before attempting discovery.
1. Log in to the SCVMM Administrator Console as an administrator user.
2. In the left navigation pane, click the Fabric workspace.
3. Expand Storage, right-click Providers, and click Add Storage Devices to start the Add
Storage Devices Wizard.
4. For the provider type, select SAN and NAS devices discovered and managed by a SMI-S
provider and click Next.
5. For the discovery scope, set the Protocol to SMI-S CIMXML, provide the IP address of the
Data Collector server (not the SC Series array), enable SSL, click Browse, select the SMI-S
Run As account, and click Next.

19 Dell EMC SC Series Storage and SMI-S Integration with Microsoft SCVMM | CML1003 | Version 5
6. The wizard displays a storage discovery progress bar as it discovers the SC Series array
associated with the smis user configured on the Data Collector server. This may require a
few minutes to complete.
Note: If storage discovery fails, see appendix B for troubleshooting guidance.
7. If prompted to import a security certificate, click Import and allow the discovery to continue.

20 Dell EMC SC Series Storage and SMI-S Integration with Microsoft SCVMM | CML1003 | Version 5
8. Once the discovery completes, a storage device is displayed. In this example, SC17 is the
discovered storage device. Click Next to continue.
9. Under Select Storage Devices, click the Create classification button and create a
classification for the SC Series array if the desired classification does not already exist. A
classification is a means for providing descriptive information about the array, such as
location, purpose, or capacity. In this example, the classification name is set to SC17, the
same as the array name.
10. After creating a classification, select the storage array by enabling the checkbox. Under the
Classification column, click the down arrow to select the desired classification for the SC
Series array. Under the Host Group column, click the drop-down arrow and choose the
desired SCVMM host group. Click Next.
11. Review the settings on the Summary screen and click Finish.
12. Monitor the status of the Sets Storage Provider job in SCVMM until it completes.
21 Dell EMC SC Series Storage and SMI-S Integration with Microsoft SCVMM | CML1003 | Version 5
13. In the SCVMM fabric, each of these locations under Storage should now display information
about the SC Series array, with a status of Responding:
- Arrays
- Providers
- Classifications and Pools
14. Optionally, click Classifications and Pools, and change the name for the storage pool from
Assigned so that it matches the array name and classification name. In this example, the
name of the storage pool is changed to SC17 so that the name for the array, the
classification, and storage pool are consistent. This is helpful if additional SC Series arrays
are to be managed by the same instance of SCVMM.

22 Dell EMC SC Series Storage and SMI-S Integration with Microsoft SCVMM | CML1003 | Version 5
15. Expand the Storage Pool tree. Any existing volumes on the SC Series array (identified as
logical units in SCVMM) are displayed below the storage pool.
16. Storage discovery in SCVMM is now complete.
17. To add additional SC Series arrays to SCVMM, see section 6.1.
6.1 Discover additional SC Series arrays For best results, discover SC Series arrays with SCVMM one at a time. After successfully adding an
SC Series array, to add additional arrays, complete the following steps:
1. Log in to the DSM client as the smis user and assign an additional SC Series array to this
user (see section 5).
2. Under Fabric > Storage > Providers in SCVMM, right-click the storage provider (listed by IP
address in this example) and select Rescan.
3. Monitor the Reads Storage Provider job until it completes successfully. This may take
several minutes.
4. Once the additional SC Series array has been discovered, it is listed under Fabric > Storage
> Arrays. Right-click the new SC Series array and select Properties > Storage Pools.
5. Under the Storage Pools tab, click the Create Classification button to create a new
classification for the SC Series array. If the desired classification already exists, choose it
from the Classification drop-down list. Assign a Host Group and click OK.
6. Under the Jobs workspace, verify that the Sets Storage Array job completes successfully.
7. Once the job completes, go to Fabric > Storage > Classifications and Pools. The newly
discovered SC Series array should now be listed with a storage pool below it.
8. If desired, change the storage pool name from Assigned to something more descriptive. This
is recommended if managing more than one SC Series array.

23 Dell EMC SC Series Storage and SMI-S Integration with Microsoft SCVMM | CML1003 | Version 5
7 Configure other SCVMM fabric components For purposes of this guide, a basic SCVMM fabric is configured that will support SAN copy-capable
templates for rapid provisioning, along with other basic SAN management functions.
The preceding sections show how to configure the SAN storage component of the SCVMM fabric.
Other fabric components must also be configured and each is briefly described in this section. For
more information on how to configure SCVMM, visit the Microsoft TechNet Library.
Note: It is often necessary to perform extra steps to assign rights and permissions to new objects in
SCVMM to avoid access denied errors and job failures.
7.1 Define a host group structure A host group allows administrators to group physical host servers logically according to identifiers as
location, level of redundancy, type of hosted application, type of hypervisor, or business unit.
In this document, a host group named Host Group 1 is configured in SCVMM.
7.2 Configure a library server A library server provides a way to define a catalog of resources that are available for deploying and
configuring both host and guest VM servers. Many kinds of common file types (as well as custom
install packages) and templates can be added to a library server.
Library server resources
Types of library server resources Details
File-based
Automatically indexed file types: files which are indexed and added automatically during library server refreshes in SCVMM
Includes many common file types such as virtual hard disks, ISOs, PowerShell scripts, and driver files
Custom file types (folders with .CR extension) Might include a custom installation package
Non-file-based Templates and profiles (stored in the SCVMM database) that are used to automate host and guest deployments
As shown in Table 2, many types of resources can be added to a library server. By default, the
SCVMM server installation creates a local instance of a library server on that same server. For larger

24 Dell EMC SC Series Storage and SMI-S Integration with Microsoft SCVMM | CML1003 | Version 5
environments, this can be changed so that the library server is on a separate server. SCVMM also
supports multiple library server instances.
The default location for the library server resources (which is a shared folder) is:
C:\ProgramData\Virtual Machine Manager Library Files
It is a best practice to change this path to a data volume during SCVMM installation so that the library
server share it is not located on the same volume as the OS. In the examples shown in this
document, the path is changed to a data volume assigned to the host server as the D:\ drive.
7.2.1 Copy resources to a library server If the default share path is chosen during the library server installation, because the C:\ProgramData
folder is a hidden folder by default, it is not possible to use Windows Explorer to navigate directly to
the share location without first removing the hidden attribute on the ProgramData folder (not
recommended). The suggested way to copy resources to the library server share is to access the
folder by its share name.
1. On the server where the library server role is installed, open a Run window and in the Open
field, type the following path:
\\localhost\MSSCVMMLibrary [enter]
Note: To access the library server share from another computer, instead of localhost, use the library
server’s host name or IP address. For example:
\\172.16.23.30\MSSCVMMLibrary [enter]

25 Dell EMC SC Series Storage and SMI-S Integration with Microsoft SCVMM | CML1003 | Version 5
2. Files and other resources must be copied to the library server’s share manually outside of
SCVMM. To do this, use Windows Explorer to create one more subfolders to logically group
similar file types, such as ISOs or virtual hard disks under this share. Then, copy the desired
file resources to these subfolders. In this document, folders named ISOs and VHDs are
created as locations for ISO and virtual hard disks files for deploying new VMs.
3. Once resources have been copied to subfolders under the library server’s share, return to the
SCVMM console, and manually refresh the library server to view the new folders and files. To
manually refresh the library server, right-click the library server object in SCVMM and select
Refresh (automatic refreshes occur hourly by default).
4. After the manual refresh job completes (monitor the status under the Jobs view), expand the
Library Servers tree to verify that the added folders files and resources are now available.

26 Dell EMC SC Series Storage and SMI-S Integration with Microsoft SCVMM | CML1003 | Version 5
7.2.2 Assign a library server to a host group After a library server has been configured, it needs to be assigned to a server host group. This will
allow the physical Hyper-V host servers that are currently assigned to that host group (or that will be
assigned to that host group later on) to access to the library server’s resources.
1. To assign a library server to a host group, right-click the library server and select Properties.
2. Under the General tab, make sure that a host group is assigned. In this example, the library
server is assigned to the host group named Host Group 1.
7.3 Add physical Hyper-V host servers to SCVMM In this guide, several Hyper-V servers with Fibre Channel access to SC17 are added to SCVMM as
targets for VM placement. These servers also serve as eligible targets for rapidly provisioned guest
VMs.
7.3.1 Verify consistent and intuitive naming for host server virtual switches Before adding existing physical Hyper-V hosts or clusters to SCVMM, it is a best practice to ensure
that consistent and intuitive naming is in place for the virtual switch and cluster network components
on each host. This will:
Make management easier due to intuitive naming
Ensure that Hyper-V network components for failover clusters are classified as highly
available by SCVMM
Make it easier to add a standalone Hyper-V server to a cluster using SCVMM
7.3.2 Add Hyper-V hosts and clusters to SCVMM In this guide, SCVMM is configured to manage four Hyper-V servers. All four servers are assigned to
Host Group 1:
TSSRV210: Windows Server 2016 with Desktop Experience (SCVMM 2016, library server,
Hyper-V 2016)
TSSRV211: Windows Server 2012 R2 Hyper-V (standalone host)
TSSRV212 and TSSRV213: Windows Server 2012 R2 Hyper-V (two-node cluster)

27 Dell EMC SC Series Storage and SMI-S Integration with Microsoft SCVMM | CML1003 | Version 5
Note: In order to support rapid provisioning, the library server must be installed on a physical Hyper-
V host that is (1) managed by SCVMM and (2) has access to the managed SC Series array used for
rapid provisioning. In this example, the server TSSRV210 hosts all three roles: Hyper-V, SCVMM,
and library server.
In this example, all servers are members of the same AD domain.
Tip: Create a Run As account in SCVMM to manage domain-joined Hyper-V servers.
After adding Hyper-V servers to SCVMM, verify the placement paths for VMs by viewing the host
properties. Placement paths should avoid using the OS volume on standalone Hyper-V hosts. The
placement path on Hyper-V clusters should default to a cluster storage location automatically.
7.3.3 Configure networking in SCVMM SCVMM global network configuration settings are configured by default to automatically create and
assign logical networks and network sites to new server hosts and guests when they are managed by
SCVMM. This ensures basic functionality out of the box when DHCP is in place and dynamically
assigned IPs are used for Hyper-V hosts or guests.

28 Dell EMC SC Series Storage and SMI-S Integration with Microsoft SCVMM | CML1003 | Version 5
If desired, these default global networking configuration settings can be modified as needed, for
example, to specify a smaller block of static IPs within a subnet as a designated pool for SCVMM to
draw from when new IPs are assigned to new guest VMs.
When existing Hyper-V hosts are added to SCVMM for management, the network configuration
information for these hosts is also discovered and added to SCVMM.
In this example, because the time was taken in advance to ensure that the virtual switches on each
host were all named consistently before adding the hosts to SCVMM, there are two common virtual
switches (logical networks) for all hosts listed in SCVMM.
If IP pools are desired, they can be easily defined and associated with each logical network. To
create and assign an IP pool to a logical network, click the desired logical network to highlight it, and
from the ribbon, select Create IP Pool to launch the Create Static IP Address Wizard. IP pools are
not used in the configuration examples shown in this guide.
Note: For more information on how to configure and manage networking and IP address pools, visit
the Microsoft TechNet Library.
7.4 Allocate a storage pool to a host group Verify that the SC Series array (defined as a storage pool in SCVMM) is assigned to the desired
SCVMM host group. If a host group was specified at the time the SC Series array was discovered,
this storage allocation should already be in place.
1. In SCVMM, go to Fabric > Storage and on the ribbon, click Allocate Capacity.
2. Verify that the SC Series array is allocated to the desired host group. If not, then assign it. In
this example, SC17 is assigned to Host Group 1.

29 Dell EMC SC Series Storage and SMI-S Integration with Microsoft SCVMM | CML1003 | Version 5
8 SCVMM profiles and templates Leveraging predefined profiles and templates is a convenient way to ensure consistent VM
deployments, including rapid provisioning.
8.1 Profiles To create hardware and OS provides in SCVMM, go to Library > Profiles. Right-click the desired
profile option and select Create to launch the wizard. Create as many different hardware and OS
profiles as needed to support the types of guest VMs that will be deployed.
In this example, basic hardware and guest OS profiles are used for demonstrating basic SCVMM
functionality and rapid provisioning.
8.2 Templates Profiles become the building blocks to create VM deployment templates. A VM template consists of a
hardware profile and a guest OS profile that together provide the necessary parameters to automate
and streamline the process of provisioning a new guest VM.
8.3 Network copy and SAN copy-capable templates With SCVMM, two types of VM templates can be created: network copy templates and SAN copy-
capable templates.
8.3.1 Network copy templates With a network copy VM template, full copies of the source files (including the virtual hard disks) are
deployed from the library server to the target host each time a new VM guest provisioned. There are
a few considerations to be aware of when using network copy VM templates:
By default, SCVMM will attempt to use offloaded data transfer (ODX) to perform a fast copy
assuming that all of the components in the environment support ODX. For example, SCOS
must be 6.3.1 or newer, and the source and destination volumes must be NTFS volumes.
Leveraging ODX can shorten the copy time for large source files significantly.
Note: See the Windows Server Best Practices Guide on Dell TechCenter for more information on
ODX.
If for any reason SCVMM is unable to perform an ODX transfer, SCVMM will default to a
regular Windows file copy to deploy the files needed for the VM over the network. Copying
virtual hard disk files over the network may require significantly more time than an ODX copy
and may negatively impact available network bandwidth. These considerations may limit
when and where new VMs can be deployed, especially if there is a low-bandwidth connection
between the library server and the target host.

30 Dell EMC SC Series Storage and SMI-S Integration with Microsoft SCVMM | CML1003 | Version 5
Regardless of the data transfer method (ODX or non-ODX), no space savings are realized on
the SAN because duplicate copies of files needed are copied from the library server to the
target server each time a new VM is deployed.
8.3.2 SAN copy-capable templates With SAN copy-capable VM templates, SCVMM leverages the SC Series SMI-S provider to deploy
new guest VMs from a gold image volume on the SAN. This is known as rapid provisioning and
provides the following benefits:
There is minimal impact to network bandwidth because full copies of virtual hard disks do not
need to be copied over the network when deploying a new guest VM.
Deployment of new guest VMs is much quicker due to not having to wait for large virtual hard
disk files to transfer from the library server to the target host.
Due to leveraging a gold image source, no SAN space is wasted due to deployment of
duplicate virtual hard disk files for each new guest VM deployed. Because many new guest
VMs can be provisioned from the same gold image source volume, this results in significant
space savings on the SAN.
Note: Factors such as the I/O demand of the workload will determine the functional limit of the
number of guest VMs that can be deployed from the same gold image.

31 Dell EMC SC Series Storage and SMI-S Integration with Microsoft SCVMM | CML1003 | Version 5
9 Create a SAN copy-capable template from a gold image Creating a SAN copy-capable template for rapid provisioning of new guest VMs is similar to creating
a network copy template. A few extra steps are required.
9.1 Choose a method for creating a SAN copy-capable template There are a couple of options for selecting a source guest VM when creating a SAN copy-capable
template. This assumes that the perquisites are in place to support this feature as described
previously. For example, the SCVMM library server must be installed on a physical host that has the
Hyper-V role installed.
Option 1: Create a template from a new guest VM that is built from scratch using a blank virtual hard
disk and is patched, customized, powered down, cloned, and then imported into the library server.
The import process destroys the source guest, and it is sysprepped it as part of creating the template.
Cloning the guest VM beforehand preserves the original guest image for later use.
Option 2: Create a template from an existing guest VM on a managed Hyper-V host. This process is
also destructive to the source guest VM, so it should be cloned first if the original image will be
needed later.
In the following example, the step-by step instructions are shown for configuring a SAN copy-capable
template for rapid provisioning using option 1.
9.2 Create a logical unit and assign it to a Hyper-V host 1. Decide which Hyper-V host server to use for staging the new guest VM. This Hyper-V server
must have access to the SC Series array managed by SCVMM. In this example, the
standalone Hyper-V host TSSRV211 is used.

32 Dell EMC SC Series Storage and SMI-S Integration with Microsoft SCVMM | CML1003 | Version 5
2. Create and assign a new SAN volume (logical unit) to this host server by completing the
following steps:
a. In SCVMM under Fabric > Servers > All Hosts, locate the desired Hyper-V host server.
b. Right-click the host (TSSRV211 in this example) and select Properties.
c. Click the Storage tab.
d. Click Add and select Add Disk (the transport used is Fibre Channel in this example).
e. Click Create Logical Unit.

33 Dell EMC SC Series Storage and SMI-S Integration with Microsoft SCVMM | CML1003 | Version 5
f. Select the desired storage pool from the drop-down list if not already selected (SC17 in
this example), provide a descriptive name (special characters not supported), and specify
a LUN size in GB. Click OK.
Note: Specify a LUN size with enough capacity for the new virtual hard disk file and the ISO file that
will be used to stage the OS. In this example, a 100 GB LUN will allow for an 80 GB virtual hard disk
and a 5 GB ISO with some room left over.
34 Dell EMC SC Series Storage and SMI-S Integration with Microsoft SCVMM | CML1003 | Version 5
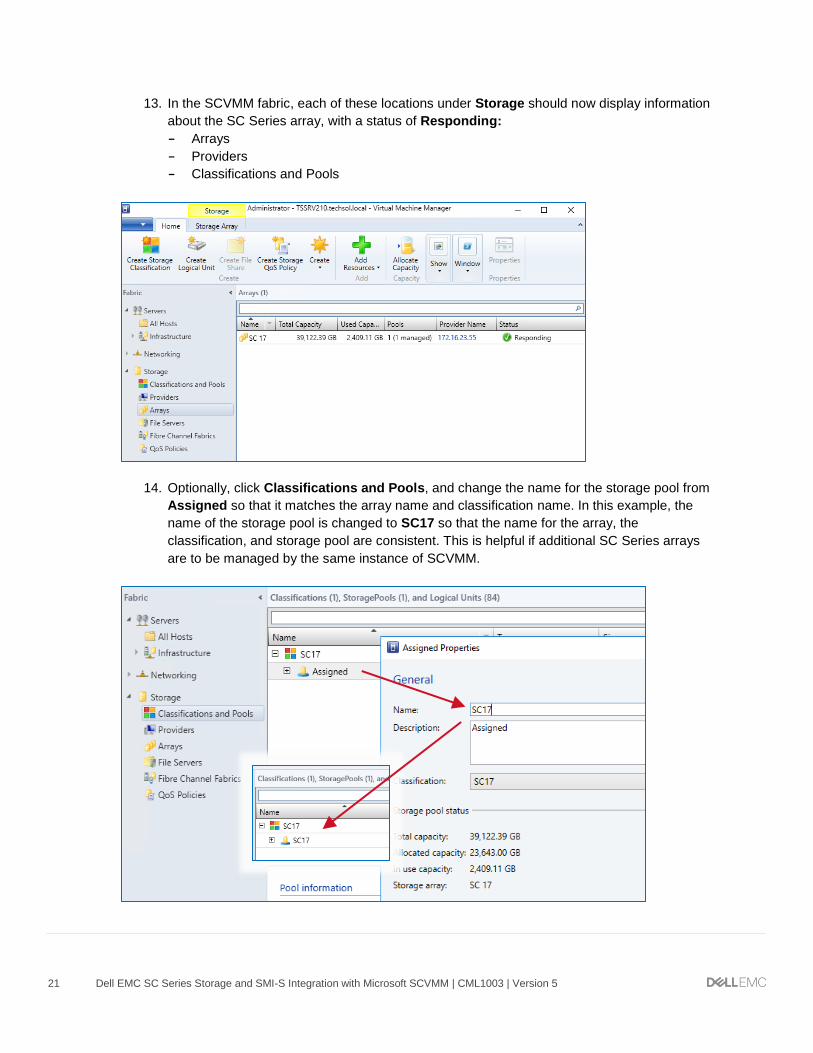
3. Format the new LUN with the following settings:
a. Format the volume as NTFS (the default).
b. Provide a descriptive volume label (recommended).
c. Assign a free drive letter to the volume (mount points are not supported when creating a
SAN copy capable template). The G:\ drive is used in this example.
d. Click OK.
4. In the Jobs workspace, monitor the Change Properties of virtual machine host job until it
completes. This job creates the new logical unit, maps it to the target Hyper-V host (using
Fibre Channel mappings in this example), formats the volume, and assigns it a drive letter of
G:\.

35 Dell EMC SC Series Storage and SMI-S Integration with Microsoft SCVMM | CML1003 | Version 5
9.3 Create a new virtual machine on the new volume Now that the new volume is formatted and mapped to the target host as the G:\ drive, a Hyper-V
guest VM can be staged to a new virtual hard disk file at this location. The steps to do this are as
follows:
1. From the VMs and Services workspace, on the ribbon (under the Home tab), click Create
Virtual Machine to launch the Create Virtual Machine Wizard.
2. Under Select Source, choose Create the new virtual machine with a blank virtual hard
disk, and click Next.
3. Provide a descriptive VM name, description (if desired), and specify the generation. Since
this guest will serve as gold source for rapid provisioning new guest VMs, adding gold
source to the name is recommended. Click Next.

36 Dell EMC SC Series Storage and SMI-S Integration with Microsoft SCVMM | CML1003 | Version 5
4. Under Configure Hardware, provide the desired hardware configuration for the VM such as
cloud compatibility (set to Hyper-V), processor, memory, and network configuration.
a. Under Bus Configuration, select the boot virtual hard disk.
b. Select Create a new virtual hard disk.
c. Set the size in GB (80 GB in this example). Set the size large enough so that any VMs
provisioned from this template will not use up the virtual hard disk space.
d. The default virtual hard disk type is Dynamic. Change this to Fixed if desired.
e. Adjust the virtual hard disk file name if desired. In this example, _boot is added to the
name of the file to make identifying its purpose more intuitive later on.
f. Under Bus Configuration, click the virtual DVD drive.
g. Under Media, select the option to use an Existing ISO image file.
h. Click Browse and select (from the library server) an ISO to stage the OS (Windows
Server 2012 R2 in this example).
i. Leave the Share image file instead of copying it option deselected.

37 Dell EMC SC Series Storage and SMI-S Integration with Microsoft SCVMM | CML1003 | Version 5
Note: Although sharing the ISO is possible (the OS would then be installed over the network),
setting up the share requires extra configuration. It is generally preferable to perform a new server
OS install from an ISO file (or other media) that is local to the host server. The LUN on the host
server is configured with enough extra space so this ISO file can be copied locally on a temporary
basis for the duration of the OS install. The ISO file will be deleted from the LUN after the new guest
VM has been staged, and before the guest VM is converted to a SAN copy-capable template.
j. Click Next when finished with the Configure Hardware tab.
5. Under Select Destination, choose Place the virtual machine on a host and choose the
desired host group from the drop-down list where the target host is located. Click Next.
6. Under Select Host, choose the host with the new LUN mapped as the G:\ drive (TSSRV211
in this example) and click Next.
7. Under Configure Settings, set the following parameters:
a. Click Browse and change the virtual machine path to the root of the G:\ drive. The VM
must be installed at the root of this drive to support rapid provisioning.
b. Verify that the wizard indicates that the drive is SAN Migration Capable.
c. Under Machine Resources, click Virtual hard disk and verify that Create a blank
virtual hard disk is selected.

38 Dell EMC SC Series Storage and SMI-S Integration with Microsoft SCVMM | CML1003 | Version 5
d. Click Browse and set the path to the root of the G:\ drive. Click Next.
8. Under Add Properties, configure the settings as desired, including selecting the operating
system that will be installed on the guest VM, and click Next.
9. Under the Summary tab, review the settings and click Create to launch the Create virtual
Machine job.
10. Monitor the progress of the Create virtual machine job. One of the job steps is to copy the
ISO file from the library server to the G:\ drive on the target host server. Fast File Copy
indicates ODX is supported. This ISO file, used for staging only, will be deleted after the
guest VM has been staged, and before it is converted to a template.

39 Dell EMC SC Series Storage and SMI-S Integration with Microsoft SCVMM | CML1003 | Version 5
11. Once the Create virtual machine job completes, verify that the new guest VM is displayed
under the target host in the VMs and Services workspace. In this example, the new guest is
listed under the host server TSSRV211.
12. Power on the new guest and complete the following steps:
a. Boot to the installation media (the ISO file) and install the OS.
b. Install and configure any desired roles, features, or applications.
c. Customize any settings.
d. Patch to desired levels.
e. Make any other desired customizations.
f. After the new guest has been fully staged, power it off.
Note: Do not run sysprep on this guest VM before powering it down. It will render the guest
unusable as a source for the SAN copy-capable template. SCVMM will run sysprep on the guest
automatically before it is imported to the library server as a template.

40 Dell EMC SC Series Storage and SMI-S Integration with Microsoft SCVMM | CML1003 | Version 5
13. Remove the ISO image file that was used to stage the server OS, unless making the ISO part
of the gold image is desired. If the ISO is not removed, it will become part of the gold image
template.
a. Go to VMs and Services > All Hosts, right-click the new guest VM, and select
Properties. In this example, the guest VM is located on the host TSSRV211.
b. Under Hardware Configuration, go to Bus Configuration and click Virtual DVD drive.
c. Select the option No Media and click OK.
d. SCVMM deletes the ISO file from the LUN on the host server (from the G:\ drive in this
example) to recover the disk space.
9.4 Verify correct firmware boot order for generation-2 guests If the guest VM is configured as a generation-2 guest (as in this example), adjust the boot order for
the VM so Hard Drive is listed as the first boot device. This must be done before cloning the VM or
converting it to a template.
Note: Failure to adjust the boot order on a generation-2 guest VM before converting it to a SAN
copy-capable template may render any guest VMs deployed from the template unbootable.
1. On the physical host server that was used to stage the guest VM (TSSRV211 in this
example), launch Hyper-V Manager.
2. Right-click the guest VM and choose Settings.

41 Dell EMC SC Series Storage and SMI-S Integration with Microsoft SCVMM | CML1003 | Version 5
3. Under Hardware > Firmware, change the boot order so that Hard Drive is listed first. The
boot order for the remaining boot entries is a matter of personal preference.
4. Click OK to save the changes, and close Hyper-V Manager.
9.5 Create a clone of the guest VM Creating a SAN copy-capable template from a guest VM destroys the VM when it is imported to the
library server. If desired (recommended), create a clone of the VM before importing it. The clone can
be used later to create new templates without having to stage a new VM from scratch.
To create a clone of the guest VM, complete the following steps:
1. Power off the guest VM.
2. In SCVMM, right-click the guest VM and select Create > Clone to launch the Create Virtual
Machine Wizard.

42 Dell EMC SC Series Storage and SMI-S Integration with Microsoft SCVMM | CML1003 | Version 5
3. Under the Identity tab, provide a descriptive name for this clone. In this example, _Clone is
added to the default name. Click Next.
4. Under Configure Hardware, click Next.
5. Under Select Destination, choose Store the virtual machine in the library and click Next.
6. Under Select Library Server, select the desired library server (TSSRV211 in this example),
and click Next.
7. Under Select Path, click Browse and select a location on the library server for the clone. If
desired (optional) pause here to create a dedicated folder (named Clones in this example)
under the library server share as a destination for cloned VMs. Click Next.
8. Under Summary, review the settings and click Create. Monitor the Create virtual machine
job until it completes.
9. To view the clone, go to the Stored Virtual Machines and Services folder on the library
server.

43 Dell EMC SC Series Storage and SMI-S Integration with Microsoft SCVMM | CML1003 | Version 5
9.6 Create a SAN copy-capable template from a guest VM Now that the guest VM has been staged, configured, and cloned, it is now ready to be imported to the
library server as a SAN copy-capable template. Once imported, this template can be used to rapid
provision new guest VMs. The steps are as follows:
1. In SCVMM, go to Library > Templates > VM Templates and on the ribbon (under the Home
tab), click Create VM Template to launch the Create VM Template wizard.
2. Under Select Source, select the option From an existing virtual machine that is deployed
on a host.
3. Click Browse to display a list of available VMs. In this example, the VM named WS12DCR2-
RapidProvision_GoldSource01 is selected. Click Next.
4. Review the warning message and click Yes to continue.

44 Dell EMC SC Series Storage and SMI-S Integration with Microsoft SCVMM | CML1003 | Version 5
5. Under Identity, provide a name for the VM template. Click Next.
6. Under Configure Hardware, review and adjust any setting, or choose a hardware profile
from the drop-down list. Click Next.
7. Under Configure Operating System, review and adjust any settings, or choose a guest OS
profile from the drop-down list. Click Next.
Tip: In this example, the Computer Name is set to MG-VMM2016-VM## where MG-VMM2016-VM
is the base name for new VMs and ## represents a placeholder for automatic incremental VM
numbering. The first VM deployed from the template is named MG-VMM2016-VM01, the second is
named MG-VMM2016-VM02, and so forth.
8. Under Select Library Server, select the desired library server. In this example, TSSRV210 is
selected. Click Next.
Note: The Transfer Type column must indicate SAN (not network) in order for this template to
support rapid provisioning.

45 Dell EMC SC Series Storage and SMI-S Integration with Microsoft SCVMM | CML1003 | Version 5
9. Under Select Path, click Browse and choose a destination on the library server for the rapid
provisioning guest VM template. If desired, pause here to create a specific folder on the
library server for rapid provisioning templates as shown in the following example. Click Next.
10. Verify that the Transfer over network even if a SAN transfer is available option is
deselected (the default). Click Next.
11. Review the Summary screen and click Create. This launches the Create template job in
SCVMM.

46 Dell EMC SC Series Storage and SMI-S Integration with Microsoft SCVMM | CML1003 | Version 5
12. Monitor the progress in the Create template job until it completes. One of the steps in the job
is to sysprep the VM before it is imported to the library server as a template.
13. Once the job has finished, go to Library > Templates > VM Templates and verify that the
new rapid-provision VM template is SAN Copy Capable. If this column is not listed, right-
click the column header row and select this option from the drop-down list.
14. Right-click the template and under Properties > Access, grant access to any self-service
users or roles if desired.
15. Under Hardware Configuration > Bus Configuration, click the boot virtual hard disk. From
the drop-down list, select the desired storage classification for the SC Series array managed
by SCVMM (SC17 in this example). Click OK to save the changes and exit.

47 Dell EMC SC Series Storage and SMI-S Integration with Microsoft SCVMM | CML1003 | Version 5
16. The SAN volume that hosts the template is placed at the root of the Volumes in DSM when it is imported to the library server.
17. As a recommendation, move this volume to a subfolder rather than leaving it at the root of the
Volumes folder. Moving the volume will not impact SCVMM functionality.
18. The template can now be used for rapid provisioning of new guest VMs as shown in section 10.

48 Dell EMC SC Series Storage and SMI-S Integration with Microsoft SCVMM | CML1003 | Version 5
10 Rapid provisioning with SAN copy-capable templates The SAN copy-capable template created previously can now serve as a gold image for rapid
provisioning of new guest VMs, leveraging SC Series array snapshots. Follow the steps in this
section to deploy guest VMs from this template and gain a more in-depth understanding of how this
integration works.
10.1 Create new VM with rapid provisioning 1. In the SCVMM console, go to VMs and Services and on the ribbon (under the Home tab),
click Create Virtual Machine.
2. Under Select Source, select Use an existing virtual machine. Click the Browse button,
and select the desired rapid provisioning template. Click Next.
3. Under the Identity tab, provide a name, or allow the wizard to assign a name. Click Next.
4. Under Configure Hardware, modify the options if desired and click Next.
5. Under Configure Operating System, modify the options if desired and click Next.
6. Under Select Destination, choose to deploy the VM to a private cloud or a host and click
Next.
7. Under Select Host, choose a target server for the VM deployment. In this example, the VM is
deployed to a Hyper-V host named TSSRV211. Make sure the Transfer Type column for this
server indicates support for SAN.
8. Under Configure Settings, review the VM settings and click Next.
9. Under Add Properties, click Next.
10. On the Summary screen, click Create.
11. Monitor the status of the Create Virtual Machine job in SCVMM until it completes
successfully.

49 Dell EMC SC Series Storage and SMI-S Integration with Microsoft SCVMM | CML1003 | Version 5
One of the incremental steps associated with rapid provisioning is the creation of a new
storage LUN from a snapshot of the gold source on the SC Series array.
12. To view the new LUN (optional), use DSM. Under Storage > Volume tree, click the gold
image source volume and click the Snapshots tab. Change Select View to Tree View to see
the relationship between the gold image source LUN, snapshots, and new thinly provisioned
LUNs.
Gold image
source LUN
Snapshot
Thinly provisioned LUN from snapshot for first new VM

50 Dell EMC SC Series Storage and SMI-S Integration with Microsoft SCVMM | CML1003 | Version 5
Each additional VM that is rapidly provisioned from the SAN copy-capable template will result
in the creation of another thinly provisioned LUN from a snapshot of the source volume that
serves as the gold image. These thinly provisioned LUNs consume no space initially. VMs
access existing data from the gold source volume. New data is written to the thinly
provisioned LUNs.
13. When a new LUN is mapped to a target host or cluster, it is presented as a mount point so no
drive letters are consumed. Click the Mappings tab to view the mappings for a new LUN.
Fibre Channel mappings are used in this example.
Thinly provisioned LUN for second new VM

51 Dell EMC SC Series Storage and SMI-S Integration with Microsoft SCVMM | CML1003 | Version 5
10.2 SAN space saved with rapid provisioning SAN space savings is significant when using rapid provisioning. In the example shown in Table 3,
when five Windows Server 2102 R2 VMs are deployed using a network copy template as compared
to a SAN copy-capable template, 67.5 GB of space is saved on the SAN.
SAN space usage comparison
Network copy template SAN copy-capable template
Space consumed on the SAN for the template (virtual hard disk and configuration files)
15 GB 15 GB
New guest VM 1 15 GB 1.5 GB
New guest VM 2 15 GB 1.5 GB
New guest VM 3 15 GB 1.5 GB
New guest VM 4 15 GB 1.5 GB
New guest VM 5 15 GB 1.5 GB
Total SAN space consumed by new guest VMs
75 GB (5 x 15 GB) 7.5 GB (5 x 1.5 GB)
Total SAN space saved 0 GB 67.5 GB
With a network copy template, a full copy of the source data is transferred to the target host or cluster
for each new VM deployed so no space savings are realized on the SAN.
With a SAN copy-capable template, a thinly provisioned copy of the source LUN is created and
mapped to the target host or cluster as a mount point, which initially consumes no SAN space.
Because the VM looks to the gold source for existing data, only new or changed data is written to the
new LUN. In this example, each new VM creates about 1.5 GB of new data upon first boot because
the gold source represents a generalized VM image (using sysprep). Upon first boot, about 1.5 GB of
new data is created as the VM sets up a user profile.
While the SC Series array will not impose any restriction on the number of guest VMs that can be
deployed from a SAN copy-capable template, factors such as I/O demand may result in eventually
reaching a functional limit as more and more guest VMs are deployed from the same template.
Monitoring is required to ensure that performance stays at an acceptable level as more VMs are
deployed. Create and use additional SAN copy-capable templates as a way to ensure balanced
controllers and acceptable performance if a large number of VMs will be deployed with rapid
provisioning.

52 Dell EMC SC Series Storage and SMI-S Integration with Microsoft SCVMM | CML1003 | Version 5
10.3 Maintain balanced SC Series array controllers with rapid
provisioning An SC Series array is typically comprised of two controllers. By default, each new volume created on
the SC Series array is assigned to one controller or the other in a round robin fashion. This helps
keep the I/O load on each controller balanced.
However, when using a SAN copy-capable template to deploy VMs, new LUNs will always be owned
by the same controller as the gold image source LUN specified in the template. This can lead to
unbalanced controllers if a large number of VMs are provisioned from the same SAN copy-capable
template.
To help keep the SC Series array controllers balanced, an administrator can create an additional SAN
copy-capable template where the source LUN is owned by the other controller.
To verify which SC Series controller owns a volume, use DSM to view the properties for the volume.
In this example, the gold image source volume is owned by controller 66384 which is the bottom
controller in the pair.
In SCVMM, edit the properties for the SAN copy-capable template, and under General, provide a
description to indicate which SC Series controller owns the gold image volume.

53 Dell EMC SC Series Storage and SMI-S Integration with Microsoft SCVMM | CML1003 | Version 5
When deploying a large number of VMs, alternate between different SAN copy-capable templates to
help keep the SC Series controllers balanced.

54 Dell EMC SC Series Storage and SMI-S Integration with Microsoft SCVMM | CML1003 | Version 5
11 Migrate guest VMs with SAN transfer Another feature that SMI-S integration provides with SCVMM and SC Series storage is SAN transfer.
With SAN transfer, VMs are quickly migrated from one standalone Hyper-V host to another by
unmapping and remapping SAN volumes on the hosts instead of copying data over the network or
using Windows Offloaded Data Transfer (ODX). This is beneficial when a guest VM has a large
amount of data that would take a significant amount of time to copy.
However, there are scenarios in which using SAN transfer may not be desirable, possible, or
preventable, such as the following:
When the Migrate VM Wizard detects that SAN transfer is supported, SCVMM will use SAN
transfer as the default means for migrating a guest VM.
If preserving the SAN volume mappings on the source server is desired, perform a network
copy. In the Migrate VM Wizard, enable the option, Transfer over the network even if a
SAN transfer is available. For a network copy, ODX is leveraged if enabled and supported.
If the source volume contains more than one guest VM, SAN transfer is not supported.
Hyper-V clusters do not support SAN transfer between nodes of the same cluster. Traditional
VM live migration is leveraged instead.
When the Migrate VM Wizard detects that SAN transfer is supported, SAN transfer will
always be used when a guest VM is migrated from a from a standalone Hyper-V host to a
Hyper-V cluster. If using SAN transfer is not desired in this situation, migrate the VM using an
alternate method outside of SCVMM.

55 Dell EMC SC Series Storage and SMI-S Integration with Microsoft SCVMM | CML1003 | Version 5
12 Modify volume mappings When SCVMM leverages SMI-S to present a SAN volume to a Hyper-V cluster (either as a new
volume, or as part of a guest VM migration using SAN transfer), the volume is mapped to each node
of the cluster individually on the SC Series array, not to a cluster server object on the SC Series
array, if a cluster object exists.
While modifying the volume mappings is not required, there are some advantages from a best
practices/management standpoint to have a cluster volume mapped to a cluster server object on the
SC Series array instead of to individual cluster nodes. For example, if an administrator adds a new
node to an existing cluster server object using DSM, all of the volumes mapped to the cluster server
object are automatically mapped to the new node using consistent LUN numbers. This avoids having
to manually and individually map existing cluster volumes to the new node, which can be time
consuming and error prone.
Note: Modifying volume mappings may interrupt I/O. If necessary, perform changes during a
maintenance window.
In this example, a new LUN was mapped individually to two Hyper-V cluster nodes, TSSRV212 and
TSSRV313, when SCVMM was used to rapidly provision a new VM using a SAN copy-capable
template.
1. To convert the mappings from individual nodes to an SC Series cluster server object, use
DSM. Under the Mappings tab for the desired volume, click Promote to Cluster.
56 Dell EMC SC Series Storage and SMI-S Integration with Microsoft SCVMM | CML1003 | Version 5
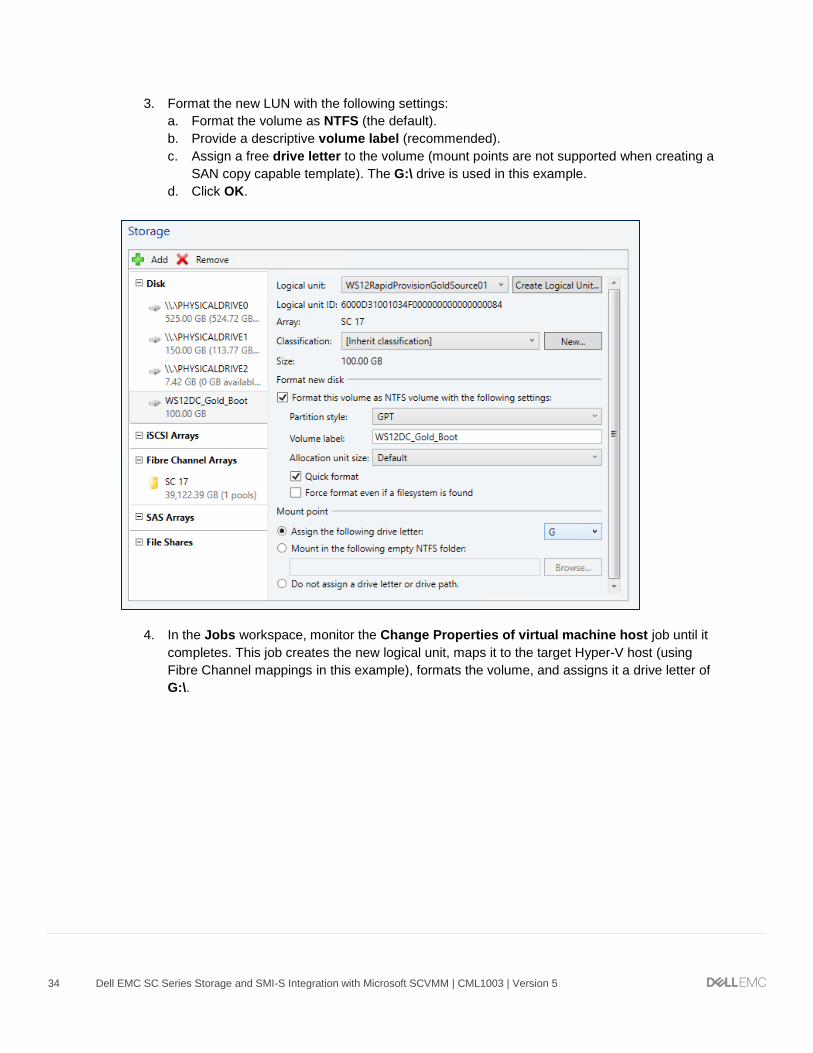
2. Review the message and click OK.
3. After the wizard completes, the volume is now mapped to the SC Series cluster server object
that contains TSSRV212 and TSSRV213 as member nodes.

57 Dell EMC SC Series Storage and SMI-S Integration with Microsoft SCVMM | CML1003 | Version 5
A Create OpenPegasus and local SMI-S users with
PowerShell
For environments with EM Data Collector, it is necessary to run a PowerShell script (accessible from
the EM program group) that automates the creation of an OpenPegasus SMI-S user and a local
Windows Server user account.
This is not necessary with DSM 2016 R1 or newer, which uses version 1.6 of the SMI-S provider
(based on JWBEM). It is only necessary for EM versions that use 1.5 of the SMI-S provider (based on
OpenPegasus).
A.1 PowerShell script overview
The Launch SMIS User Configuration Script via PowerShell script does two things:
Creates the OpenPegasus SMIS user
Automates the process of creating a matching local Windows SMI-S user account on the
Data Collector server, adding it to the local administrators group, and assigning it the Log on
as a service right.
Note: If preferred, the local Windows SMI-S user account can be created manually on the Data
Collector server. Perform this before running the PowerShell script.

58 Dell EMC SC Series Storage and SMI-S Integration with Microsoft SCVMM | CML1003 | Version 5
A.2 Create the local Windows SMI-S user account manually
If manually creating the local Windows SMI-S user account, verify that the user has local
administrator rights and has the Log on as a service right assigned as shown in the following
figures.
If creating the local Windows SMI-S user account by using the PowerShell script, see section A.3.

59 Dell EMC SC Series Storage and SMI-S Integration with Microsoft SCVMM | CML1003 | Version 5
A.3 Run the PowerShell script
1. Log on to the server that is hosting the EM Data Collector as the local administrator user.
Logging on as the local administrator user will help ensure that the PowerShell script
completes successfully.
2. On the Data Collector server, go to Start > All programs > Dell Compellent and select
Launch SMIS User Configuration Script via PowerShell.
Note: If the PowerShell script fails to launch, set the PowerShell Local Machine Execution Policy
to Unrestricted temporarily.

60 Dell EMC SC Series Storage and SMI-S Integration with Microsoft SCVMM | CML1003 | Version 5
3. Depending on the Local Machine Execution Policy for PowerShell on the Data Collector
server, a security prompt may appear as shown in the following. If so, type R or A and press
Enter to continue.
Note: If .Net v3.5 is not installed on the server, a .Net v3.5 warning message will appear. If this
occurs, exit the script, install .Net 3.5, and restart the PowerShell script.
4. The PowerShell script main menu is displayed.
61 Dell EMC SC Series Storage and SMI-S Integration with Microsoft SCVMM | CML1003 | Version 5
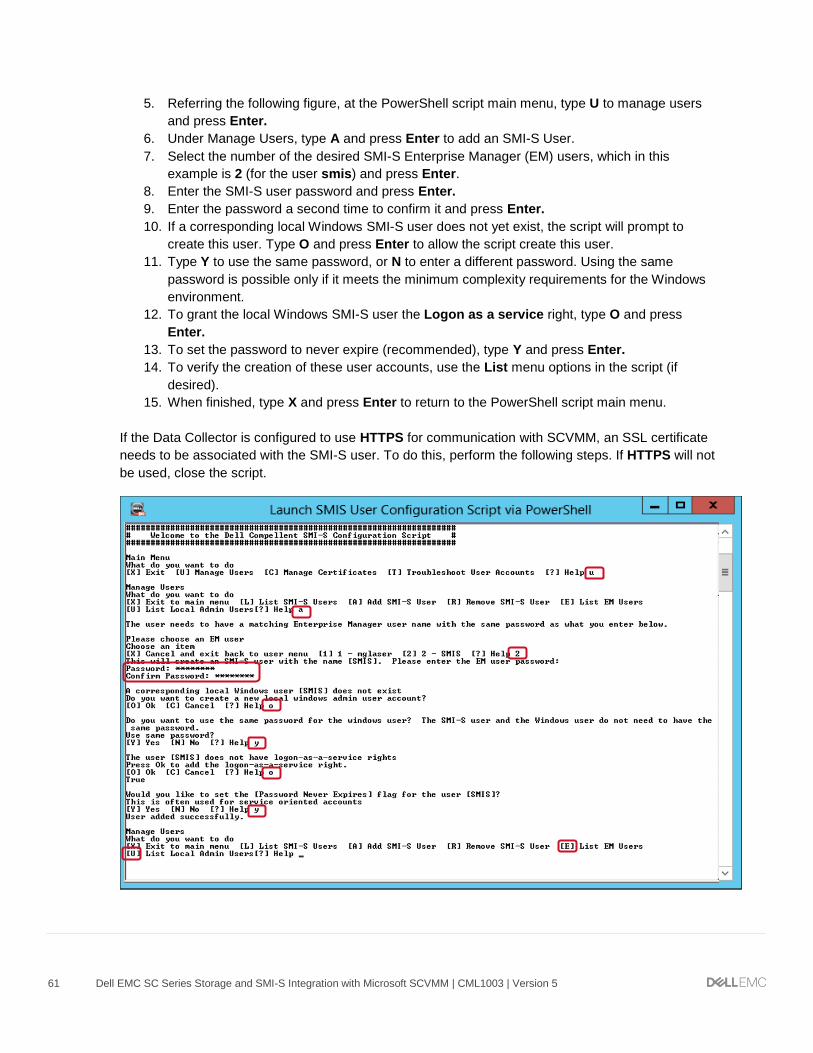
5. Referring the following figure, at the PowerShell script main menu, type U to manage users
and press Enter.
6. Under Manage Users, type A and press Enter to add an SMI-S User.
7. Select the number of the desired SMI-S Enterprise Manager (EM) users, which in this
example is 2 (for the user smis) and press Enter.
8. Enter the SMI-S user password and press Enter.
9. Enter the password a second time to confirm it and press Enter.
10. If a corresponding local Windows SMI-S user does not yet exist, the script will prompt to
create this user. Type O and press Enter to allow the script create this user.
11. Type Y to use the same password, or N to enter a different password. Using the same
password is possible only if it meets the minimum complexity requirements for the Windows
environment.
12. To grant the local Windows SMI-S user the Logon as a service right, type O and press
Enter.
13. To set the password to never expire (recommended), type Y and press Enter.
14. To verify the creation of these user accounts, use the List menu options in the script (if
desired).
15. When finished, type X and press Enter to return to the PowerShell script main menu.
If the Data Collector is configured to use HTTPS for communication with SCVMM, an SSL certificate
needs to be associated with the SMI-S user. To do this, perform the following steps. If HTTPS will not
be used, close the script.

62 Dell EMC SC Series Storage and SMI-S Integration with Microsoft SCVMM | CML1003 | Version 5
16. Referring to the following figure, to add an SSL certificate and associate it with the SMI-S
user, from the PowerShell Script main menu, type c and press Enter to manage certificates.
17. From the Manage Certificates menu, type a and press Enter to add an SSL certificate to the
SMI-S trust store.
18. When prompted to associate a user, select the desired SMI-S user (the user smis in this
example). Type the number for that user and press Enter to select it.
19. The PowerShell script returns the result Certificate Added Successfully and returns to the
Manage Certificates menu.
20. Type l and press Enter to verify the presence of the certificate and view its details.
21. Type x and press Enter to return to the main menu.
22. Type x and press Enter twice to close the PowerShell command window.

63 Dell EMC SC Series Storage and SMI-S Integration with Microsoft SCVMM | CML1003 | Version 5
B Troubleshoot SMI-S and SC array discovery issues
On occasion, attempting to discover storage using SMI-S may fail. If any error messages are
encountered when attempting to discover storage, follow the steps in this section to help resolve the
problem. If assistance is needed, contact Dell Support.
If errors are encountered, review the following troubleshooting steps:
1. Revisit the prerequisite steps checklist in Table 1, particularly making sure the required TCP
ports are allowed through the Windows Server firewall.
2. Temporarily disable the firewalls on both the Data Collector and SCVMM servers to simplify
the environment, and re-attempt storage discovery. If storage discovery works with the
firewalls disabled, revisit the firewall settings.
3. Verify that there are no network rules or policies in place on routers, firewalls, switches, or
gateways on the local network that are blocking the necessary TCP ports between the Data
Collector server and the SCVMM server. These servers should ideally be on the same subnet
or VLAN.
4. Re-verify that necessary registry settings have been made on the SCVMM server for your
version of SCVMM (SCVMM 2012 versions in particular).
5. Upgrade to the current release of DSM Data Collector and client to take advantage of the
latest bug fixes if your version is outdated.
6. Stop and restart the Data Collector service on Data Collector server.
7. Reboot the server that hosts the Data Collector server/service.
8. Attempt storage discovery in SCVMM with SSL disabled in the discovery wizard (for
troubleshooting purposes only). If storage discovery works with SSL disabled, revisit the
registry changes associated with your version of SCVMM (SCVMM 2012 and 2012 R2 in
particular).
9. Dell EM (prior to DSM 2016 R1) leverages OpenPegasus as the SMI-S provider. On rare
occasion, a corruption issue may be encountered with OpenPegasus which will interfere with
storage discovery. This can be resolved by following these steps:
a. On the Data Collector server, open a command prompt with elevated (administrator)
privileges and type the following command to change to the Pegasus\bin directory:
cd C:\Program Files (x86)\Compellent Technologies\Compellent
Enterprise Manager\msaservice\Pegasus\bin [enter]
b. Type the following command from the bin directory:
cimprovider –l –s [enter]

64 Dell EMC SC Series Storage and SMI-S Integration with Microsoft SCVMM | CML1003 | Version 5
c. Check the status of the OpenPegasus provider modules. They should report a status of
OK.
d. If any of the modules report an Error state, close the command prompt window and stop
the Enterprise Manager Data Collector service on the Data Collector server.
e. Once stopped, use Windows Explorer to delete the entire Pegasus directory:
C:\Program Files (x86)\Compellent Technologies\Compellent
Enterprise Manager\msaservice\Pegasus

65 Dell EMC SC Series Storage and SMI-S Integration with Microsoft SCVMM | CML1003 | Version 5
f. Once the Pegasus directory has been deleted, start the EM Data Collector service. This
will create a fresh instance of the Pegasus directory and its contents, and reregister the
provider modules.
g. Repeat substeps a through c of step 9 to rerun the cimprovider –l –s command.
The modules should now be listed with a status of OK. Rerun the PowerShell script to
verify that the SMI-S user and SSL certificate are configured correctly, then reattempt
storage discovery using SMI-S.
h. If the previous troubleshooting steps are unsuccessful, completely uninstall, reinstall, and
reconfigure EM. Run the cimprovider –l –s command to verify module health before
re-attempting to discover storage.
i. Another way to check for possible Pegasus/SMI-S issues is to examine the logs in the
following directory:
C:\Program Files (x86)\Compellent Technologies\Compellent
Enterprise Manager\msaservice\Pegasus\logs
Note: For additional troubleshooting assistance with SMI-S and storage discovery, contact Dell
Support.

66 Dell EMC SC Series Storage and SMI-S Integration with Microsoft SCVMM | CML1003 | Version 5
C Technical support and resources
Dell.com/support is focused on meeting customer needs with proven services and support.
Dell TechCenter is an online technical community where IT professionals have access to numerous
resources for Dell software, hardware and services.
Storage Solutions Technical Documents on Dell TechCenter provide expertise that helps to ensure
customer success on Dell Storage platforms.
C.1 Supplemental documentation
Referenced or recommended Dell publications:
Dell EMC SC Series Storage Products
Dell SCv2000 and SC4020 Arrays with SAS Front-end support for Microsoft
Dell Storage Center Microsoft Multipath I/O Best Practices Guide
Dell SC Series Virtual Fibre Channel for Hyper-V Demo Video
Dell SC Series Replay Manager 7 and Hyper-V Best Practices Guide
Dell SC Series Replay Manager 7 and Hyper-V Demo Video
Microsoft Windows Server Best Practices Guide for Dell SC Series
Dell SCOS 7.0 Data Reduction with Deduplication and Compression Guide
Dell SC Series Synchronous Replication and Live Volume Solutions Guide
Dell SC Series Live Volume with Auto Failover Support for Microsoft Demo Video
Dell SC Series DR Plan for Hyper-V Demo Video
Dell SC Series PowerShell SDK Cookbook
Dell SC Series and Microsoft SCVMM Best Practices Guide
Dell SC Series and Microsoft SCVMM Rapid Provisioning Demo Video
Referenced or recommended Microsoft publications:
Microsoft TechNet Library
Microsoft PowerShell Developer Network (MSDN)