Embed Size (px)
Citation preview

Dayforce HCM Employee Access Employee Guide Contents Employee Tasks ...................................................................................................................... 2 Dayforce HCM Login ........................................................................................................... 2 Tool Bar Buttons ................................................................................................................. 3 Time Entry ……………………………………………………………………………………………………………………… 4 Time Clock Entry ………………………………………………………………………………………………………………4 Hours Entry ……………………………………………………………………………………………………………………..6 Time In/Out Manually Entered ………………………………………………………………………………………..7 Salaried Manager …………………………………………………………………………………………………………….8 Salaried Non-Manager …………………………………………………………………………………………………….9 Authorize the Timesheet ………………………………………………………………………………………………..10 Personal Information ...................................................................................................... 10 The Me Feature .................................................................................................................. 10 Employee Profile ................................................................................................................ 10 Details ................................................................................................................................ 11 Forms .................................................................................................................................. 12 User Preferences ................................................................................................................ 12 My Earnings ........................................................................................................................ 13 Earnings .............................................................................................................................. 13 Time Away from Work Requests ........................................................................................ 14 Balances ….......................................................................................................................... 15 Request Time Away from Work ……………………………………………………………………………………… 16 Request Statuses ……………………………………………………………………………………………………………. 17 Request a Partial Day Away from Work ............................................................................. 18 Change a Time Away Request ............................................................................................ 19 Cancel a Pending Time Away Request ............................................................................... 19 Edit a Pending Time Away Request ....................................................................................19 Cancel an Approved Time Away Request .......................................................................... 20
Dayforce HCM Employee Access Guide
Page 2
Log into Dayforce
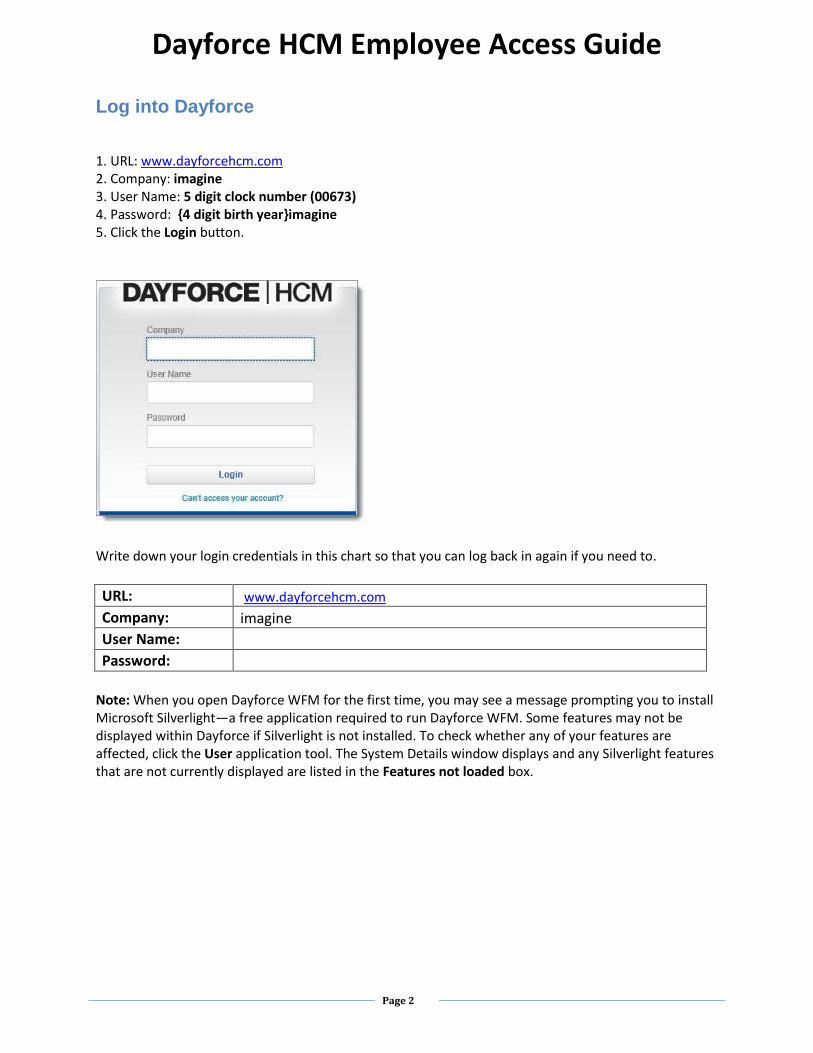
1. URL: www.dayforcehcm.com 2. Company: imagine 3. User Name: 5 digit clock number (00673) 4. Password: {4 digit birth year}imagine 5. Click the Login button.
Write down your login credentials in this chart so that you can log back in again if you need to.
URL: www.dayforcehcm.com
Company: imagine
User Name:
Password:
Note: When you open Dayforce WFM for the first time, you may see a message prompting you to install Microsoft Silverlight—a free application required to run Dayforce WFM. Some features may not be displayed within Dayforce if Silverlight is not installed. To check whether any of your features are affected, click the User application tool. The System Details window displays and any Silverlight features that are not currently displayed are listed in the Features not loaded box.
Dayforce HCM Employee Access Guide
Page 3
Dayforce HCM Employee Access Guide
Page 4
Imagine! Uses several different methods of Time Entry, please refer to the appropriate method:
1. Time Clock 2. Hours Entry (total hours entered for each day) 3. Time In/Out Manually Entered 4. Salary Manager (hours pre-populate automatically) 5. Salary Non-Manager (hours pre-populate automatically)
Below are instructions for each, please refer to the appropriate method.
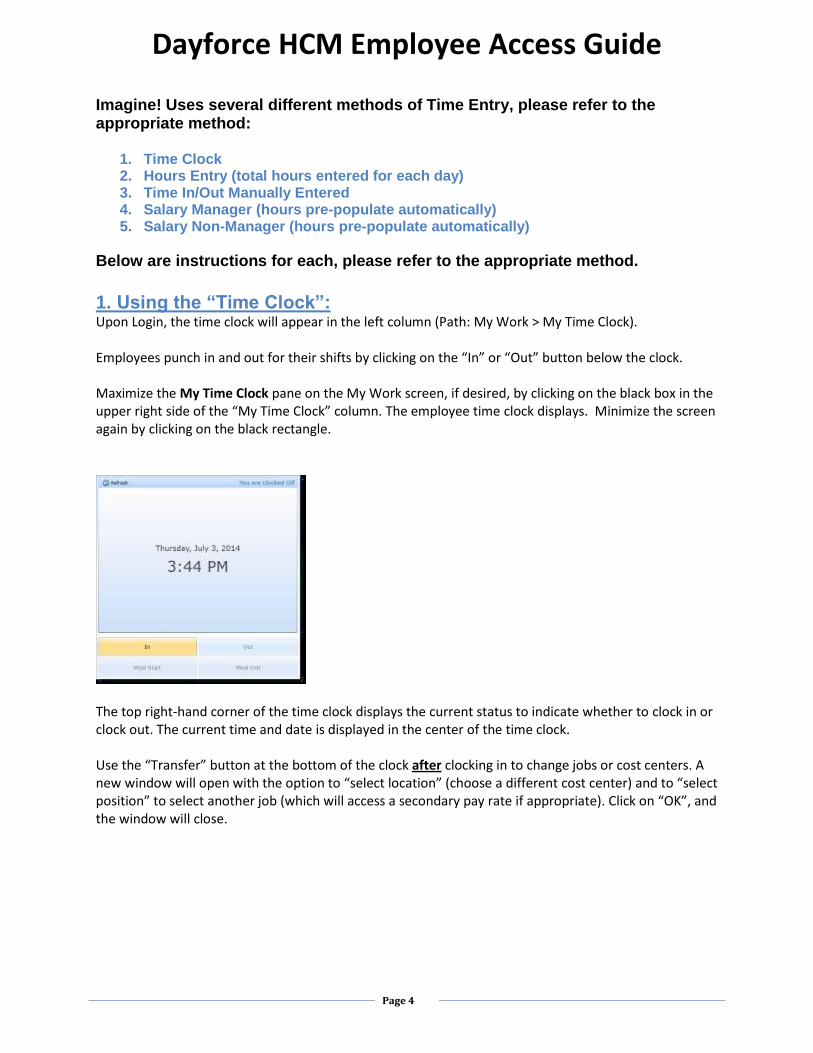
1. Using the “Time Clock”: Upon Login, the time clock will appear in the left column (Path: My Work > My Time Clock). Employees punch in and out for their shifts by clicking on the “In” or “Out” button below the clock. Maximize the My Time Clock pane on the My Work screen, if desired, by clicking on the black box in the upper right side of the “My Time Clock” column. The employee time clock displays. Minimize the screen again by clicking on the black rectangle.
The top right-hand corner of the time clock displays the current status to indicate whether to clock in or clock out. The current time and date is displayed in the center of the time clock. Use the “Transfer” button at the bottom of the clock after clocking in to change jobs or cost centers. A new window will open with the option to “select location” (choose a different cost center) and to “select position” to select another job (which will access a secondary pay rate if appropriate). Click on “OK”, and the window will close.
Dayforce HCM Employee Access Guide
Page 5
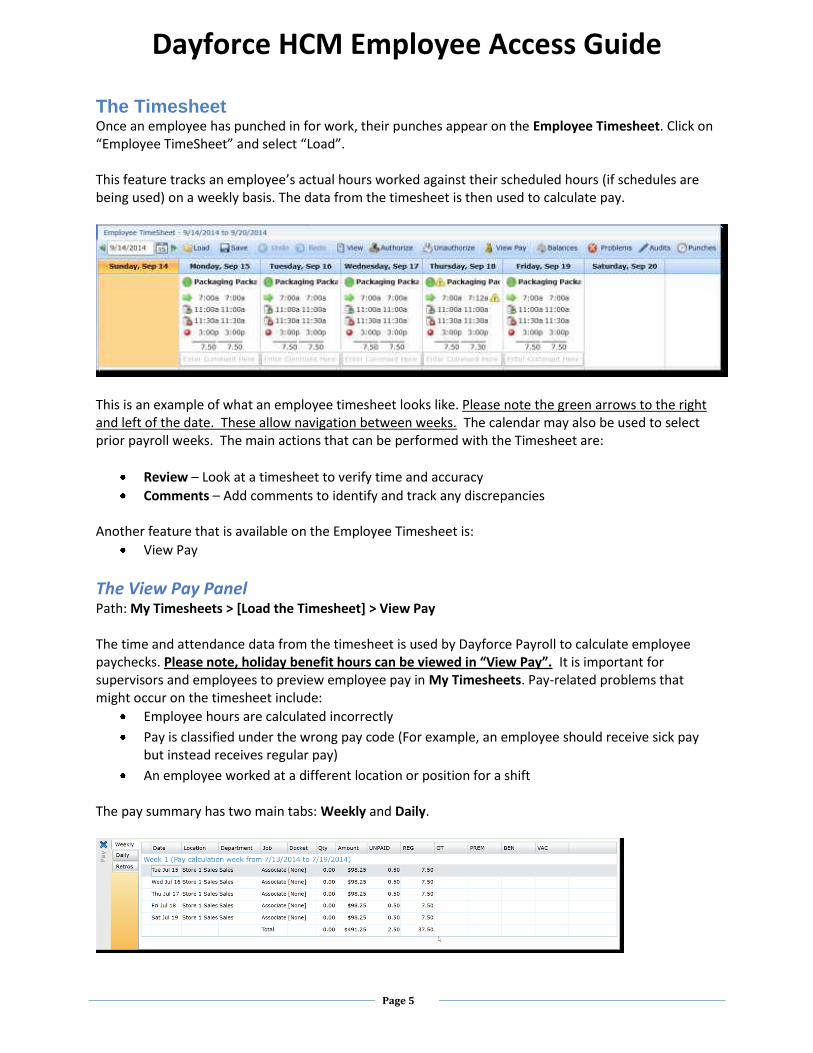
The Timesheet Once an employee has punched in for work, their punches appear on the Employee Timesheet. Click on “Employee TimeSheet” and select “Load”. This feature tracks an employee’s actual hours worked against their scheduled hours (if schedules are being used) on a weekly basis. The data from the timesheet is then used to calculate pay.
This is an example of what an employee timesheet looks like. Please note the green arrows to the right and left of the date. These allow navigation between weeks. The calendar may also be used to select prior payroll weeks. The main actions that can be performed with the Timesheet are:
Review – Look at a timesheet to verify time and accuracy
Comments – Add comments to identify and track any discrepancies Another feature that is available on the Employee Timesheet is:
View Pay
The View Pay Panel Path: My Timesheets > [Load the Timesheet] > View Pay The time and attendance data from the timesheet is used by Dayforce Payroll to calculate employee paychecks. Please note, holiday benefit hours can be viewed in “View Pay”. It is important for supervisors and employees to preview employee pay in My Timesheets. Pay-related problems that might occur on the timesheet include:
Employee hours are calculated incorrectly
Pay is classified under the wrong pay code (For example, an employee should receive sick pay but instead receives regular pay)
An employee worked at a different location or position for a shift The pay summary has two main tabs: Weekly and Daily.
Dayforce HCM Employee Access Guide
Page 6
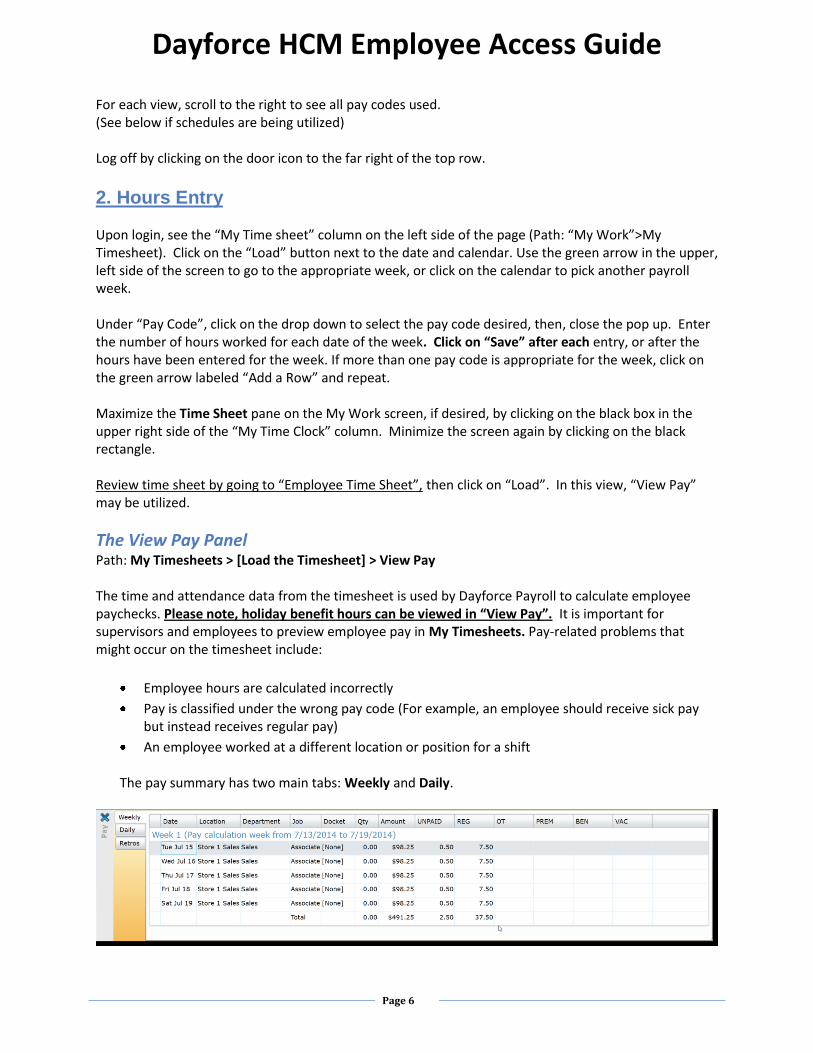
For each view, scroll to the right to see all pay codes used. (See below if schedules are being utilized) Log off by clicking on the door icon to the far right of the top row.
2. Hours Entry
Upon login, see the “My Time sheet” column on the left side of the page (Path: “My Work”>My Timesheet). Click on the “Load” button next to the date and calendar. Use the green arrow in the upper, left side of the screen to go to the appropriate week, or click on the calendar to pick another payroll week. Under “Pay Code”, click on the drop down to select the pay code desired, then, close the pop up. Enter the number of hours worked for each date of the week. Click on “Save” after each entry, or after the hours have been entered for the week. If more than one pay code is appropriate for the week, click on the green arrow labeled “Add a Row” and repeat. Maximize the Time Sheet pane on the My Work screen, if desired, by clicking on the black box in the upper right side of the “My Time Clock” column. Minimize the screen again by clicking on the black rectangle. Review time sheet by going to “Employee Time Sheet”, then click on “Load”. In this view, “View Pay” may be utilized.
The View Pay Panel Path: My Timesheets > [Load the Timesheet] > View Pay The time and attendance data from the timesheet is used by Dayforce Payroll to calculate employee paychecks. Please note, holiday benefit hours can be viewed in “View Pay”. It is important for supervisors and employees to preview employee pay in My Timesheets. Pay-related problems that might occur on the timesheet include:
Employee hours are calculated incorrectly
Pay is classified under the wrong pay code (For example, an employee should receive sick pay but instead receives regular pay)
An employee worked at a different location or position for a shift The pay summary has two main tabs: Weekly and Daily.
Dayforce HCM Employee Access Guide
Page 7
For each view, scroll to the right to see all pay codes used.
Authorize the Timesheet Path: My TimeSheet > Authorize Some managers may require the employee to approve their time sheet. If so, select (highlight the week by clicking on Monday and drag across the week and click Authorize. Please note, each week of the pay period must be authorized, so use the green arrows at the top/left of the time sheet to navigate to the second week of the pay period. Log off by clicking on the door icon to the far right of the top row.
3. Time In/Out Manually Entered Upon login, click on the “Employee TimeSheet” option on the top of the page. Click on the “Load button next to the date and calendar. Use the green arrow to go to the appropriate week, or click on the calendar to pick another payroll week. Click on the date, and a green plus sign will appear. Click on the green plus sign and “add a shift”. The first drop down will allow a change of cost center, if appropriate; otherwise the employee’s default cost center will be used. The second drop down will allow a change of jobs (and different pay rates will automatically be applied if appropriate). The third drop down will offer pay type, i.e. “work”, “sick”, etc., select the applicable code. The next two fields allow for the times in and out to be entered. If additional shifts are to be added to the same date, click on the green arrow at the bottom of the information already entered. Save information added by clicking on the “Save” button at the top of the screen. It is advisable to save after each entry.
The View Pay Panel Path: My Timesheets > [Load the Timesheet] > View Pay The time and attendance data from the timesheet is used by Dayforce Payroll to calculate employee paychecks. Please note, holiday benefit hours can be viewed in “View Pay”. It is important for supervisors and employees to preview employee pay in My Timesheets. Pay-related problems that might occur on the timesheet include:
Employee hours are calculated incorrectly

Dayforce HCM Employee Access Guide
Page 8
Pay is classified under the wrong pay code (For example, an employee should receive sick pay but instead receives regular pay)
An employee worked at a different location or position for a shift The pay summary has two main tabs: Weekly and Daily.
For each view, scroll to the right to see all pay codes used. Log off by clicking on the door icon to the far right of the top row.
4. Salary (Manager) Hours Entry Upon login, go to the (non-labeled) arrow drop down to the far right of the top row. From the drop down, select “Employee TimeSheet” (this is the salaried manager’s own time sheet vs. their employees time sheets which are found under “My TimeSheets”) Click on the “Load” button next to the date and calendar. Use the green arrow in the upper, left side of the screen to go to the appropriate week, or click on the calendar to pick another payroll week. As a salaried employee, time has already been set up in the time sheet to default as “hours worked”. If any dates in the pay period should be recorded as anything other than “hours worked”, such as sick, vacation, jury duty or bereavement, the optimal way to accomplished this is via the “Time Away” request form, which may be used for dates in the past, but the manager’s supervisor must approve it in order for it to be updated on the time sheet. Please see “Use Time Off Request” below. If any vacation or sick hours are entered without using the “Time Away” request form: Under “Pay Code”, click on the drop down to select the pay code desired, then, close the pop up. Enter the number of hours worked for each date of the week. Click on “Save” after each entry, or after the hours have been entered for the week. If more than one pay code is appropriate for the week, click on the green arrow labeled “Add a Row” and repeat.
YOU MAY NOTE When adding alternate pay (i.e. “sick” or “vacation”), the “regular” hours do not reduce, and you will see the total number of hours increased for the week, at the bottom, right side of the screen. THIS IS OK. The system will automatically reduce the normal hours by the number of alternate pay hours entered. You may confirm this by clicking on the “view pay” button in the top row. The pay summary has two main tabs: Weekly and Daily. To confirm that hours will calculate at the correct number for the week in
Dayforce HCM Employee Access Guide
Page 9
payroll, you may either select the date the alternate hours were inserted and go to “view pay” and click on the “daily” tab. Or, select the “weekly” tab to see all hours being paid for the week. Use Time Off Request: Salary Managers can find their own “Time Away” request form under “My Work”. Go to the drop down arrow at the top, right side of the screen. The drop down list will offer the “My Work” option. Select the green arrow to add a new request. Complete the form (note the vacation and sick balances at the bottom) and click on the “save” icon (computer disk) at the bottom of the screen. (Please note, the “Time Off Request Manager” option on the first screen “My Day” is for the manager to submit and approve a time off request for one of their employees.)
Authorize the Timesheet Salaried employee time sheets no longer have to be self-approved. PLEASE NOTE: the pre-populated “schedules” for salaried employees will be automatically loaded for the coming two week period each Sunday night. So, salaried employees will see their time sheets prepopulated two weeks in advance.
5. Salary (non-Manager) Hours Entry
Upon login, select “Employee TimeSheet”. Click on the “Load” button next to the date and calendar. Use the green arrow in the upper, left side of the screen to go to the appropriate week, or click on the calendar to pick another payroll week. As a salaried employee, time has already been set up in the time sheet to default as “hours worked”. If any dates in the pay period should be recorded as anything other than “hours worked”, such as sick, vacation, jury duty or bereavement, the optimal way to accomplished this is via the “Time Away” request form, which may be used for dates in the past, but the manager’s supervisor must approve it in order for it to be updated on the time sheet. Please see below. If any vacation or sick hours are entered without using the “Time Away” request form: Go to “Under “Pay Code”, click on the drop down to select the pay code desired, then close the pop up. Enter the number of hours worked for each date of the week. Click on “Save” after each entry, or after the hours have been entered for the week. If more than one pay code is appropriate for the week, click on the green arrow labeled “Add a Row” and repeat. YOU MAY NOTE When adding alternate pay (i.e. “sick” or “vacation”), the “regular” hours do not reduce, and you will see the total number of hours increased for the week, at the bottom, right side of the screen. THIS IS OK. The system will automatically reduce the normal hours by the number of alternate pay hours entered. You may confirm this be clicking on “view pay” button in the top row. The pay summary has two main tabs: Weekly and Daily. To confirm that hours will calculate at the correct number for the week in payroll, you may either select the date the alternate hours were inserted and go to “view pay” and click on the “daily” tab. Or, select the “weekly” tab to see all hours being paid for the week.
Dayforce HCM Employee Access Guide
Page 10
Use Time Off Request: If any dates in the pay period should be recorded as anything other than “hours worked”, such as sick, vacation, jury duty or bereavement, the optimal way to accomplished this is via the “Time Away” request form, which may be used for dates in the past, but the supervisor must approve it in order for it to be updated on the time sheet. Find the “Time Away” request form on the login page (or navigate there by clicking on “My Work” at the top of the page) in the pane on the right side of the screen. Select the green arrow to add a new request. Complete the form (note the vacation and sick balances at the bottom) and click on the “save” icon (computer disk) at the bottom of the screen.
Authorize the Timesheet Salaried employee time sheets no longer have to be self-approved. PLEASE NOTE: the pre-populated “schedules” for salaried employees will be automatically loaded for the coming two week period each Sunday night. So, salaried employees will see their time sheets prepopulated two weeks in advance.
Personal Information Every employee has an HR record created for them within Dayforce. This record contains all information associated with the employee, from their mailing address to the rules that govern how they are paid. Employees don’t see the majority of the HR record; it is managed by an administrator. However, employees are able to update and manage certain types of personal information.
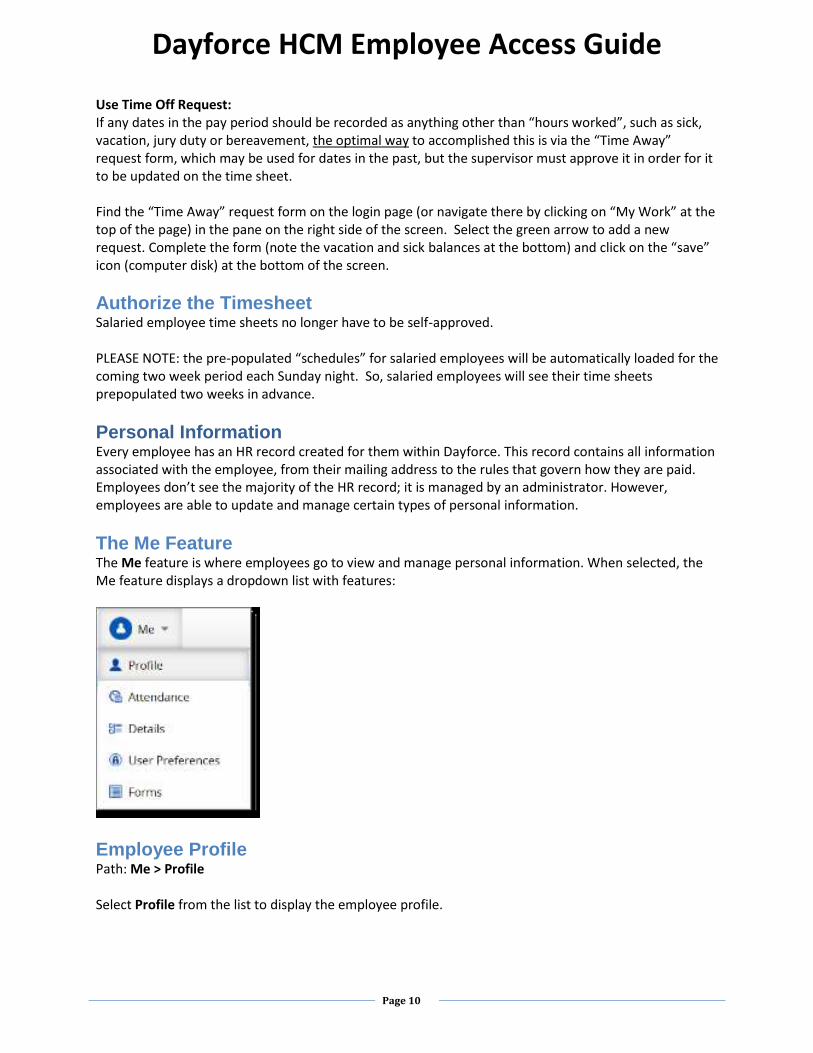
The Me Feature The Me feature is where employees go to view and manage personal information. When selected, the Me feature displays a dropdown list with features:
Employee Profile Path: Me > Profile Select Profile from the list to display the employee profile.
Dayforce HCM Employee Access Guide
Page 11
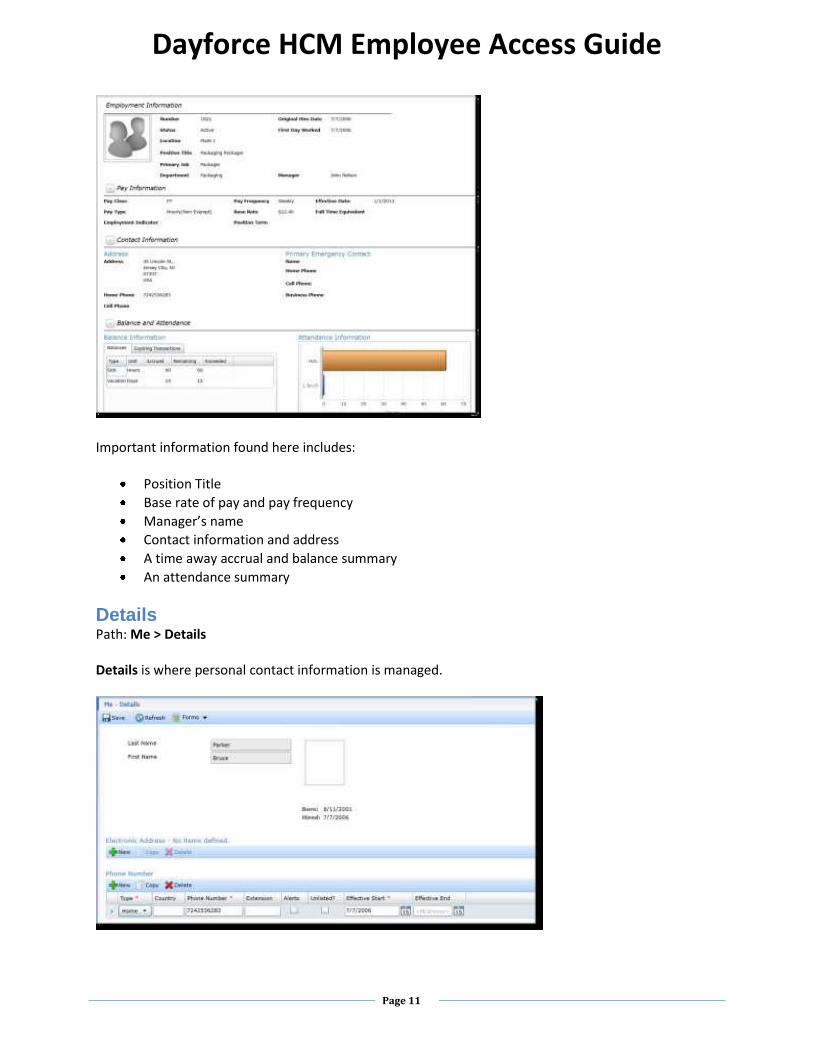
Important information found here includes:
Position Title
Base rate of pay and pay frequency
Manager’s name
Contact information and address
A time away accrual and balance summary
An attendance summary
Details Path: Me > Details Details is where personal contact information is managed.

Dayforce HCM Employee Access Guide
Page 12
Click New on the Electronic Address field to add electronic contact information, such as email addresses or social media contact information. Click New on the Phone Number field to add a phone number. Mobile, landline and fax numbers may be added.
Forms Path: Me > Profile > Forms Address and contact information changes require employees to update the personal information on their HR record. Since this information cannot be updated directly, a Form is submitted to make these changes.
User Preferences User Preferences is where the password used to log into Dayforce is changed.

Dayforce HCM Employee Access Guide
Page 13
My Earnings My Earnings is where employees to track their gross pay, net pay, and deductions over time by viewing their earning statements. Each time payroll is processed a new earning statement is generated here.
Earnings Path: My Earnings > Earnings Earnings displays an employee’s earning statements. An earnings statement is a record of one payment. It displays:
Gross pay - regular earnings and any special rates of pay, such as sick pay or overtime.
Other Earnings – items such reimbursements, 401(k) match, or taxable benefits.
Deductions – items such as insurance premiums and 401(k) contributions.
Taxes paid
Net pay – total take-home pay for the employee.
Dayforce HCM Employee Access Guide
Page 14
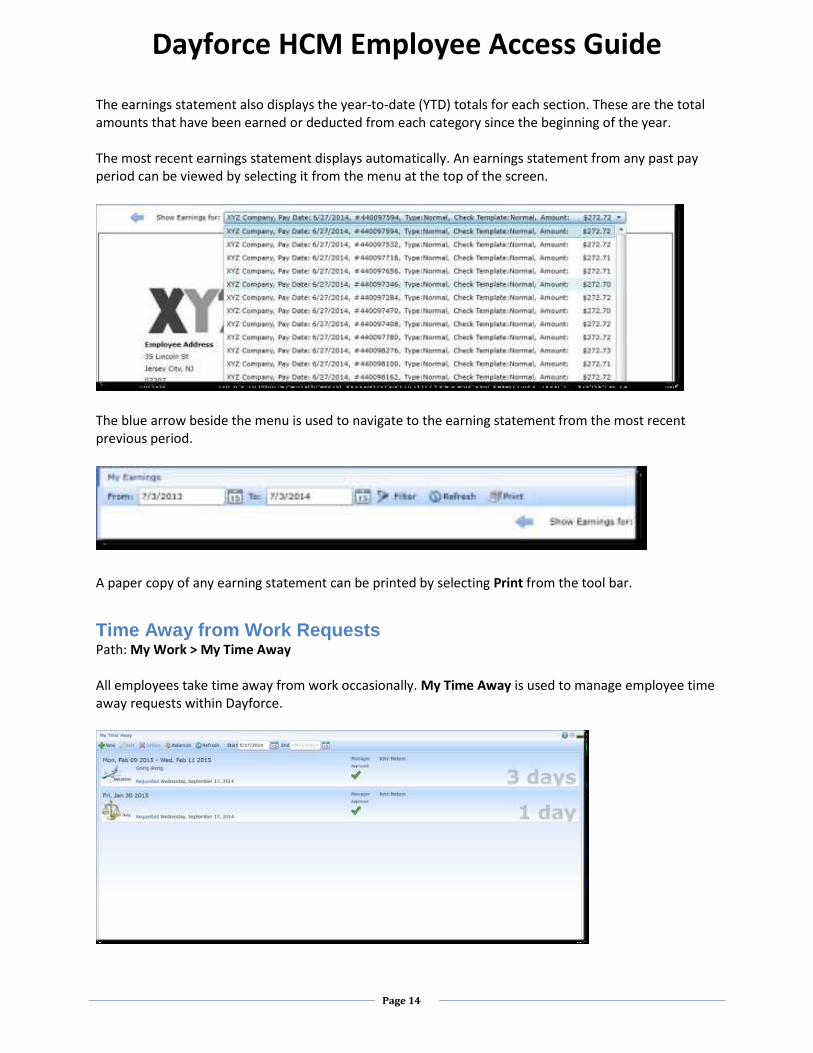
The earnings statement also displays the year-to-date (YTD) totals for each section. These are the total amounts that have been earned or deducted from each category since the beginning of the year. The most recent earnings statement displays automatically. An earnings statement from any past pay period can be viewed by selecting it from the menu at the top of the screen.
The blue arrow beside the menu is used to navigate to the earning statement from the most recent previous period.
A paper copy of any earning statement can be printed by selecting Print from the tool bar.
Time Away from Work Requests Path: My Work > My Time Away All employees take time away from work occasionally. My Time Away is used to manage employee time away requests within Dayforce.
Dayforce HCM Employee Access Guide
Page 15
From the workspace in this feature you can:
Create a request for time away from work
Change a pending time away request
View approved and denied requests
Check remaining accrual balances
Balances Balances displays the amount of time off that an employee has remaining. For example, if you have accrued twelve vacation days per year and have used two days so far, the remaining vacation day balance would be ten. Employees can review their remaining balance prior to submitting a time away request. You cannot submit a request if there is an insufficient balance for the amount of requested time.
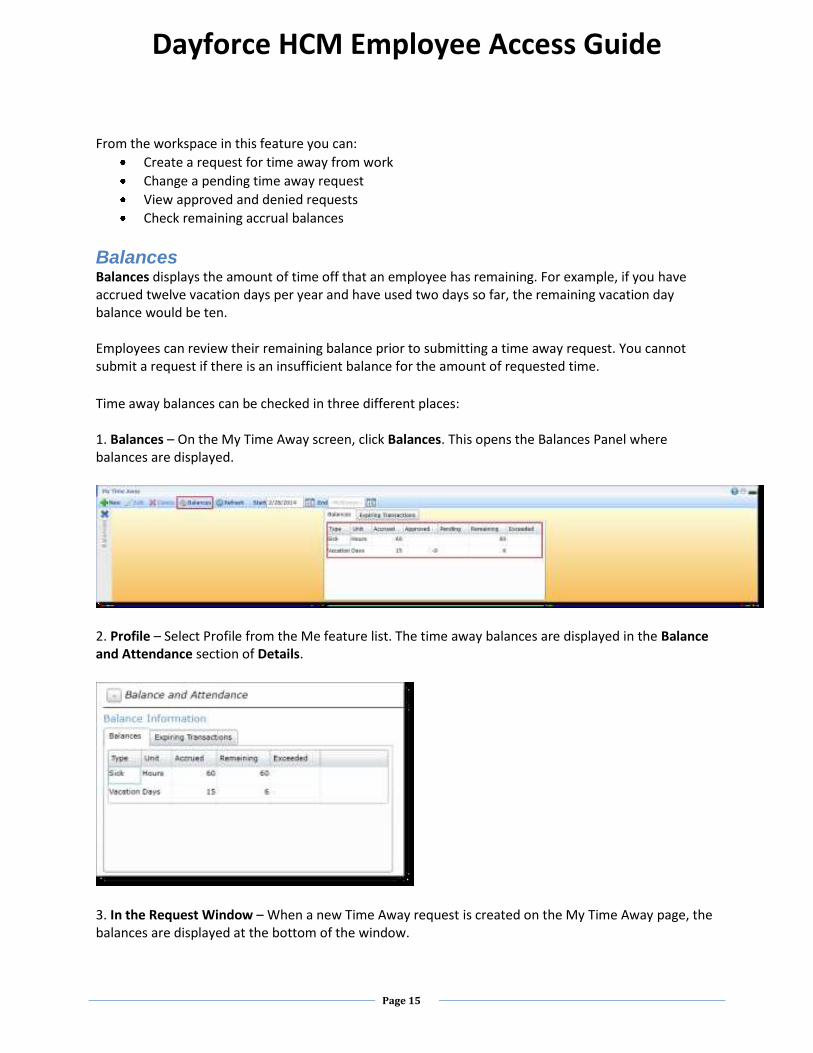
Time away balances can be checked in three different places: 1. Balances – On the My Time Away screen, click Balances. This opens the Balances Panel where balances are displayed.
2. Profile – Select Profile from the Me feature list. The time away balances are displayed in the Balance and Attendance section of Details.
3. In the Request Window – When a new Time Away request is created on the My Time Away page, the balances are displayed at the bottom of the window.
Dayforce HCM Employee Access Guide
Page 16
Request Time Away from Work Path: My Work > My Time Away
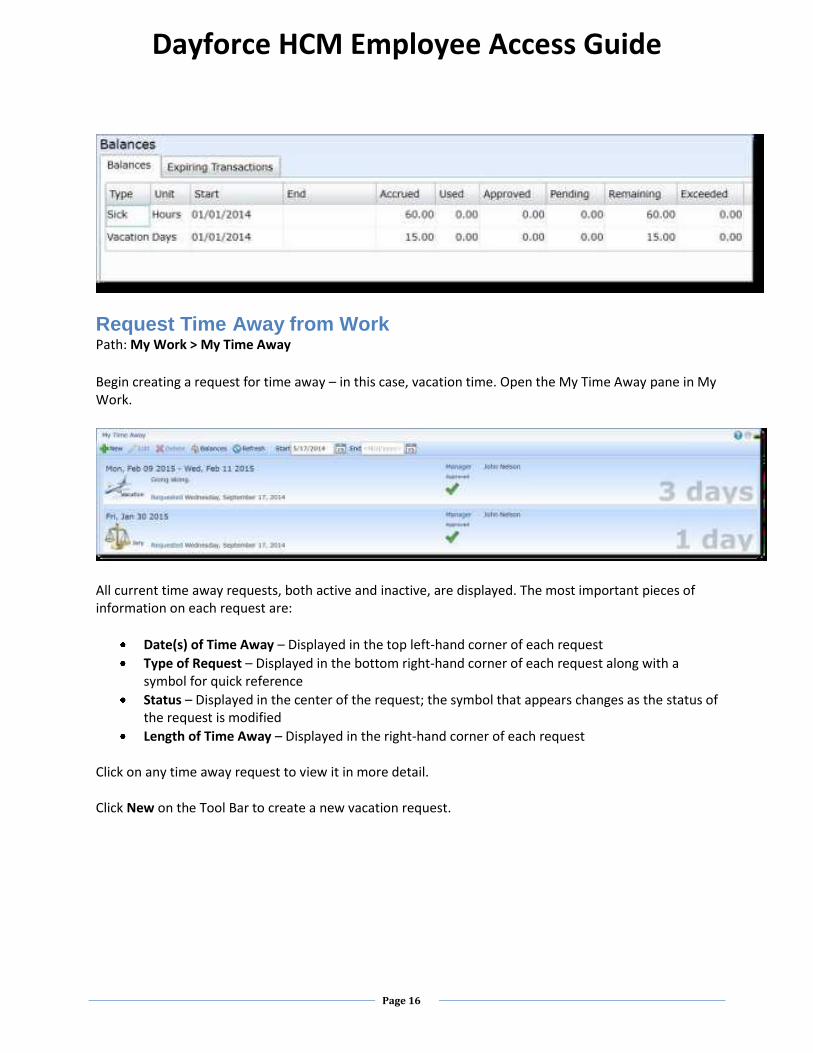
Begin creating a request for time away – in this case, vacation time. Open the My Time Away pane in My Work.
All current time away requests, both active and inactive, are displayed. The most important pieces of information on each request are:
Date(s) of Time Away – Displayed in the top left-hand corner of each request
Type of Request – Displayed in the bottom right-hand corner of each request along with a symbol for quick reference
Status – Displayed in the center of the request; the symbol that appears changes as the status of the request is modified
Length of Time Away – Displayed in the right-hand corner of each request
Click on any time away request to view it in more detail. Click New on the Tool Bar to create a new vacation request.
Dayforce HCM Employee Access Guide
Page 17
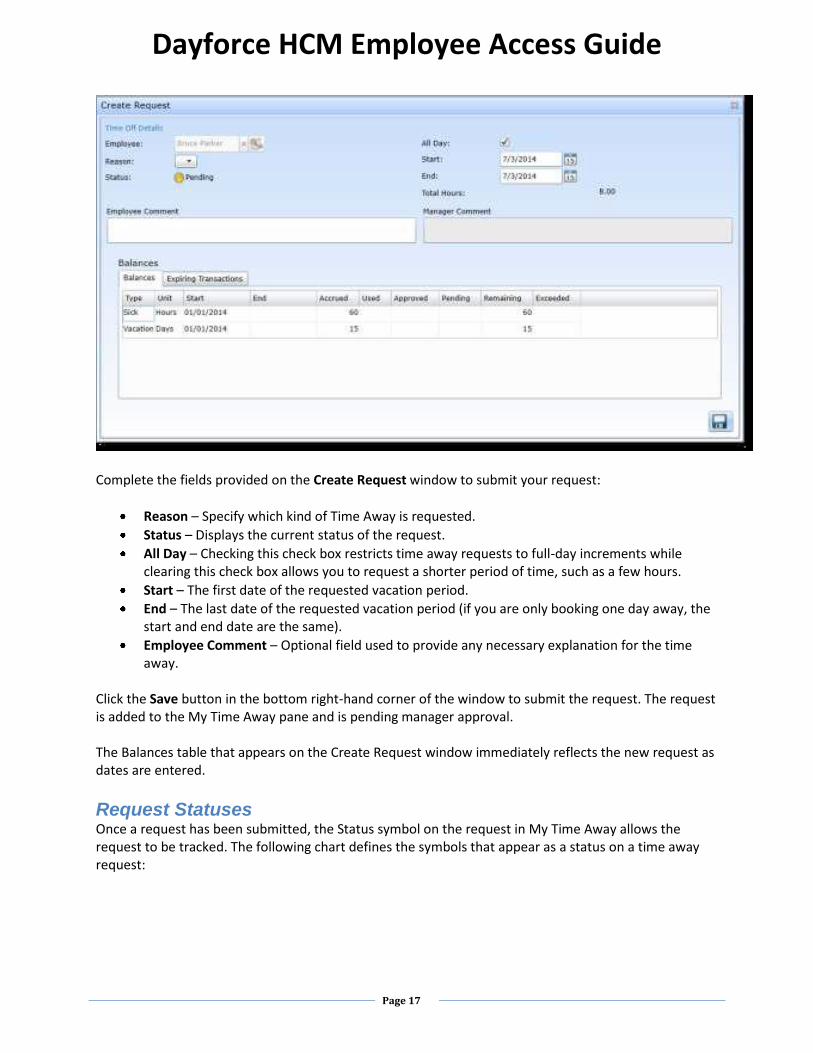
Complete the fields provided on the Create Request window to submit your request:
Reason – Specify which kind of Time Away is requested.
Status – Displays the current status of the request.
All Day – Checking this check box restricts time away requests to full-day increments while clearing this check box allows you to request a shorter period of time, such as a few hours.
Start – The first date of the requested vacation period.
End – The last date of the requested vacation period (if you are only booking one day away, the start and end date are the same).
Employee Comment – Optional field used to provide any necessary explanation for the time away.
Click the Save button in the bottom right-hand corner of the window to submit the request. The request is added to the My Time Away pane and is pending manager approval. The Balances table that appears on the Create Request window immediately reflects the new request as dates are entered.
Request Statuses Once a request has been submitted, the Status symbol on the request in My Time Away allows the request to be tracked. The following chart defines the symbols that appear as a status on a time away request:

Dayforce HCM Employee Access Guide
Page 18
Request a Partial Day Away from Work Path: My Work > My Time Away In some cases, employees may only need a few hours away from work for things like doctor’s appointments or family commitments. Rather than using a full day away, employees can request a partial day away from work for these types of situations. Click the New to create a new time away request.
When the All Day box is cleared, clocks appear beside the Start and End fields. Use the clocks to set which portion of the day you would like to take away from work.
Dayforce HCM Employee Access Guide
Page 19
Select the Save button in the bottom right-hand corner of the window to submit the request when finished. The request is added to the My Time Away pane and is pending manager approval.
Change a Time Away Request A time away from work request can be changed or cancelled while it is pending approval by a manager. Once the manager has made a decision about the request, an additional approval process is required to cancel it.
Cancel a Pending Time Away Request Path: My Time Away > select request > Delete All time away requests submitted by an employee are subject to manager approval. When a request is pending manager approval it can be cancelled. Select the pending time away request and click Delete. The pending request is immediately deleted and disappears from both My Time Away and the manager’s approval list.
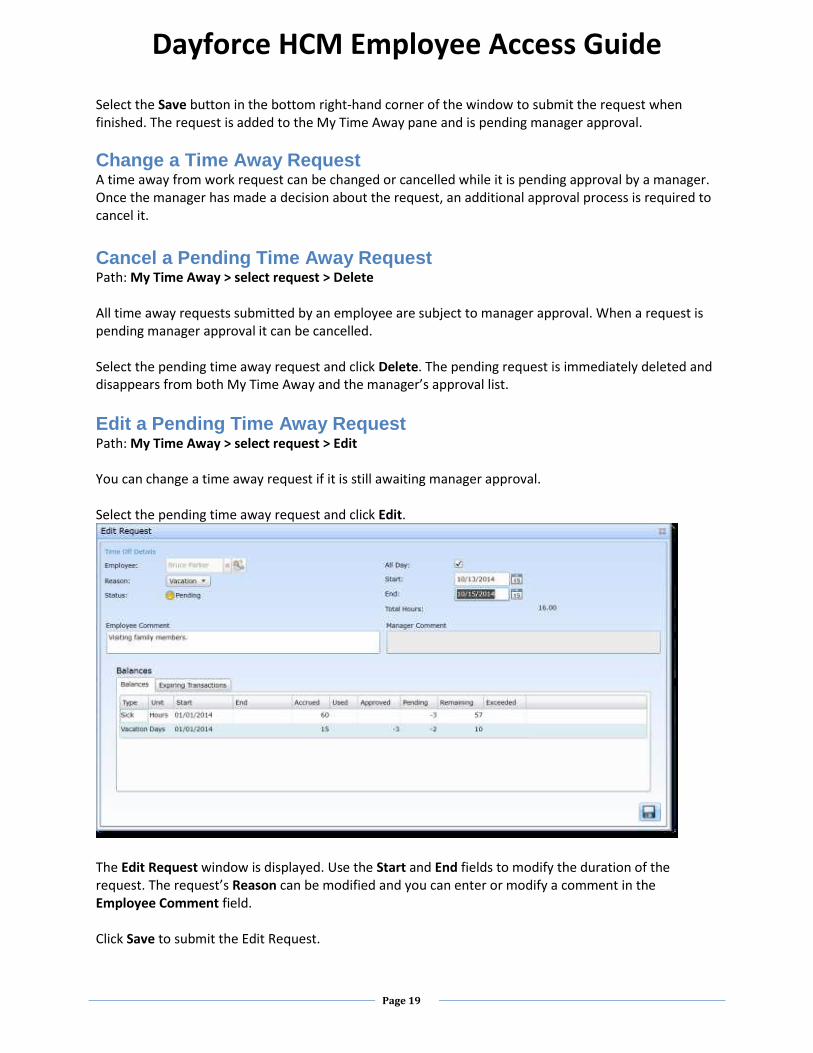
Edit a Pending Time Away Request Path: My Time Away > select request > Edit You can change a time away request if it is still awaiting manager approval. Select the pending time away request and click Edit.
The Edit Request window is displayed. Use the Start and End fields to modify the duration of the request. The request’s Reason can be modified and you can enter or modify a comment in the Employee Comment field. Click Save to submit the Edit Request.

Dayforce HCM Employee Access Guide
Page 20
Cancel an Approved Time Away Request Path: My Time Away > select request > Delete Cancelling a time away request that has already been approved by the manager requires an additional approval process. Select the Approved time away request that you wish to cancel. Once it is selected, click Delete.
The Cancel Request window is displayed. Review the details of the request and click Save to submit the cancellation request.
Once submitted, the request appears with the Cancellation Pending status.
When the manager has approved the cancellation request, the status is changed to Canceled.