Embed Size (px)
Citation preview

Cover Page
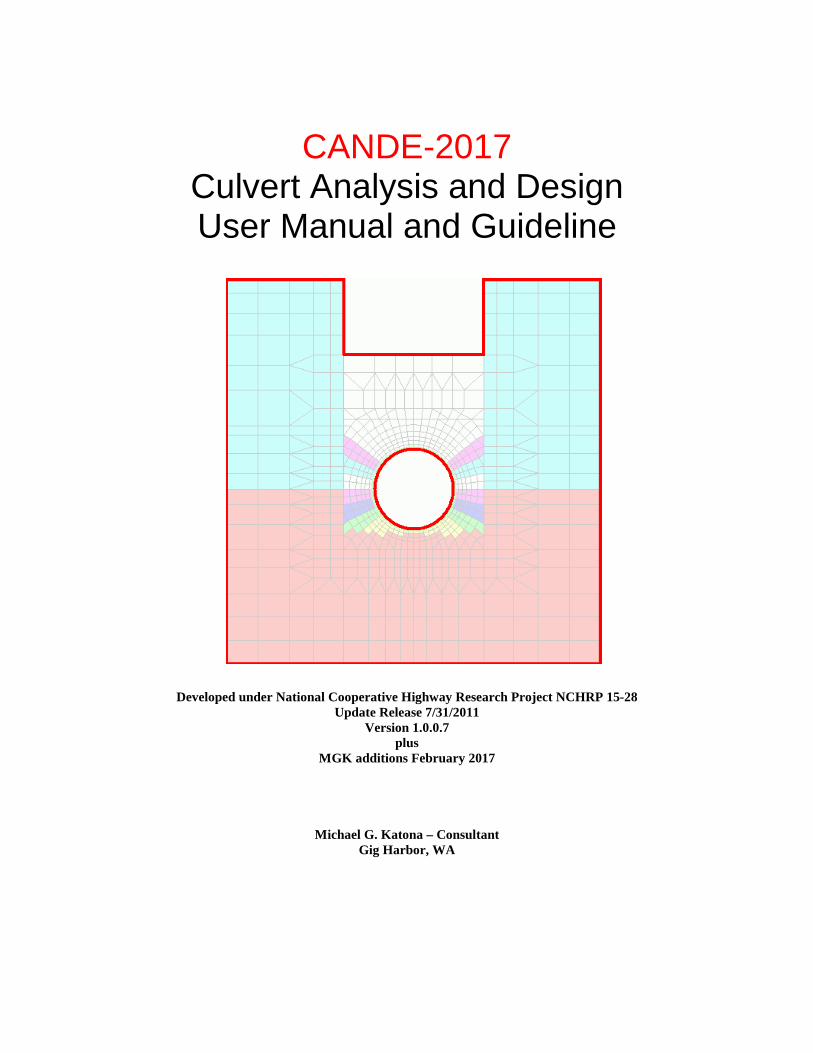
CANDE-2017 Culvert Analysis and Design User Manual and Guideline
Developed under National Cooperative Highway Research Project NCHRP 15-28
Updated MGK version with new capabilities February 2017
CANDE-2017 Culvert Analysis and Design User Manual and Guideline
Developed under National Cooperative Highway Research Project NCHRP 15-28 Update Release 7/31/2011
Version 1.0.0.7 plus
MGK additions February 2017
Michael G. Katona – Consultant
Gig Harbor, WA
i
Table of Contents Cover Page ...................................................................................................................................................... i Table of Contents ............................................................................................................................................ i CANDE-2017 User Manual Updates .......................................................................................................... viii 1 INTRODUCTION ............................................................................................................................. 1-1
1.1 Purpose of CANDE ....................................................................................................................... 1-1 1.2 History of CANDE ........................................................................................................................ 1-1 1.3 Why Use CANDE? ....................................................................................................................... 1-3 1.4 How to use this manual ................................................................................................................. 1-3
2 GENERAL OVERVIEW AND OPTIONS ....................................................................................... 2-1 2.1 Scope and Architecture ................................................................................................................. 2-1 2.2 Execution mode ............................................................................................................................. 2-1 2.3 Evaluation methodology ............................................................................................................... 2-2 2.4 Solution levels ............................................................................................................................... 2-3
2.4.1 Level 1 – Elasticity Solution ................................................................................................ 2-3 2.4.2 Level 2 – Automated FEM Solution .................................................................................... 2-4 2.4.3 Level 3 – User Defined FEM ............................................................................................... 2-4
2.5 Pipe groups and pipe types ............................................................................................................ 2-5 2.5.1 Corrugated aluminum - (Aluminum pipe type) ................................................................... 2-5 2.5.2 Reinforced concrete – (Concrete pipe type) ........................................................................ 2-5 2.5.3 Thermoplastic pipe – (Plastic pipe type) ............................................................................. 2-6 2.5.4 Corrugated steel – (Steel pipe type) ..................................................................................... 2-6 2.5.5 Basic pipe type..................................................................................................................... 2-6 2.5.6 Conrib pipe type .................................................................................................................. 2-7 2.5.7 Contube pipe type ................................................................................................................ 2-7
2.6 System Choices ............................................................................................................................. 2-7 3 GETTING STARTED ....................................................................................................................... 3-1
3.1 System requirements ..................................................................................................................... 3-1 3.2 Installation guide ........................................................................................................................... 3-1 3.3 Launching and running CANDE ................................................................................................... 3-1
3.3.1 Locate and save example input problem .............................................................................. 3-2 3.3.2 Test run an existing example problem ................................................................................. 3-3 3.3.3 Example problems and tutorial ............................................................................................ 3-5
3.4 Updating to CANDE-2017 ............................................................................................................ 3-5 4 GRAPHICAL USER INTERFACE ................................................................................................... 4-1
4.1 Overview ....................................................................................................................................... 4-1 4.2 Input Options ................................................................................................................................. 4-2
4.2.1 Creating a new CANDE input data file with Wizard........................................................... 4-2 4.2.1.1 CANDE Input Wizard- Control Information ............................................................. 4-8 4.2.1.2 CANDE Input Wizard – Level 3 items .................................................................... 4-12 4.2.1.3 CANDE Input Wizard – Pipe Material .................................................................... 4-14
4.2.2 Opening an Existing CANDE Input Document with File->Open ..................................... 4-17 4.2.3 Opening an Existing CANDE Input Document with File->Open Text Input .................... 4-18 4.2.4 CANDE Input Menus ........................................................................................................ 4-19
4.2.4.1 Menu input overview ............................................................................................... 4-19 4.2.4.2 Viewing help for the input menus ............................................................................ 4-20 4.2.4.3 ‘Show Help’ checkbox ............................................................................................. 4-20 4.2.4.4 ‘Show Input’ checkbox ............................................................................................ 4-21 4.2.4.5 Input range violations ............................................................................................... 4-22 4.2.4.6 Input errors and undefined input .............................................................................. 4-23 4.2.4.7 Menu input tree icons ............................................................................................... 4-24
4.2.5 Changing an existing CANDE input document to create a new data file .......................... 4-25 4.2.5.1 Create new CANDE input document from existing document with Input Menu..... 4-25

ii
4.2.5.2 Create new CANDE input document from existing document with text editor ....... 4-25 4.2.6 Create a CANDE input document using the CANDE input text editor ............................. 4-27
4.3 Running CANDE ........................................................................................................................ 4-28 4.3.1 Successful execution .......................................................................................................... 4-29 4.3.2 Unsuccessful execution ..................................................................................................... 4-29 4.3.3 CANDE input consistency checking ................................................................................. 4-29 4.3.4 Convergence and Nonconvergence of load steps .............................................................. 4-30 4.3.5 CANDE Analysis error messages ...................................................................................... 4-32
4.4 Output data and viewing options ................................................................................................. 4-34 4.4.1 CANDE Output Report...................................................................................................... 4-34
4.4.1.1 Master control and pipe type data ............................................................................ 4-37 4.4.1.2 Review of system input data .................................................................................... 4-37 4.4.1.3 Design solution (if applicable) ................................................................................. 4-38 4.4.1.4 Solution/analysis output results ................................................................................ 4-38
4.4.2 CANDE log file ................................................................................................................. 4-39 4.4.3 Mesh Plot ........................................................................................................................... 4-41
4.4.3.1 Using window area to zoom in on mesh .................................................................. 4-42 4.4.3.2 Increasing/Decreasing the element/node font size ................................................... 4-43 4.4.3.3 CANDE mesh viewer options button ....................................................................... 4-44 4.4.3.4 Viewing element information................................................................................... 4-45 4.4.3.4 Viewing Deformed Shapes ...................................................................................... 4-46 4.4.3.5 Viewing soil stress/strain contours ........................................................................... 4-47 4.4.3.6 Coincidental boundary conditions ............................................................................ 4-48
4.4.4 CANDE Graphs for beam elements ................................................................................... 4-49 4.4.4.1 Over view of CANDE Graph Selections .................................................................. 4-50 4.4.4.2 View of pipe-group shape and properties ................................................................. 4-51 4.4.4.3 Graph Options .......................................................................................................... 4-52
4.4.5 Results generator ............................................................................................................... 4-54 4.5 Using GUI with New Capabilities in CANDE-2017................................................................... 4-56
4.5.1 Creating Input Files (pre-processing) ................................................................................ 4-56 4.5.2 Viewing Output Files (post-processing) ............................................................................ 4-57
4.5.2.1 Output report (CANDE) ........................................................................................... 4-57 4.5.2.2 Mesh plots ................................................................................................................ 4-57 4.5.2.3 Graphs ...................................................................................................................... 4-58
5 DETAILED CANDE INPUT ............................................................................................................ 5-1 5.1 Input flow charts ........................................................................................................................... 5-1
5.1.1 CANDE level 1 input flowchart .......................................................................................... 5-2 5.1.2 CANDE level 2 input flowchart .......................................................................................... 5-3 5.1.3 CANDE level 3 input flowchart .......................................................................................... 5-4
5.2 CANDE input instructions ............................................................................................................ 5-5 5.3 Part A - Control Commands .......................................................................................................... 5-6
5.3.1 A-1 – Master Control Input Data ......................................................................................... 5-6 5.3.2 A-2 –Pipe Selection ............................................................................................................. 5-9
5.4 Part B- Pipe Materials ................................................................................................................. 5-12 5.4.1 Aluminum Pipe Type ......................................................................................................... 5-13
5.4.1.1 B-1 – Aluminum – Material and Control Parameters .............................................. 5-13 5.4.1.2 B-2 – Aluminum – Analysis Section Properties....................................................... 5-16 5.4.1.3 B-2 – Aluminum – Design Safety Factors and Deflection Control .......................... 5-18 5.4.1.4 B-2 – Aluminum – Design Weights for LRFD ........................................................ 5-20 5.4.1.5 B-3 – Aluminum – Resistance Factors for LRFD .................................................... 5-22
5.4.2 Basic Pipe Type ................................................................................................................. 5-24 5.4.2.1 B-1 – Basic – Sequence Intervals and Properties ..................................................... 5-24 5.4.2.2 B-2 – Basic – Large Deformation Control ............................................................... 5-26
5.4.3 Reinforced Concrete Pipe Type ......................................................................................... 5-27 5.4.3.1 B-1 – Concrete – Concrete Material Properties ....................................................... 5-27 5.4.3.2 B-2 – Concrete – Concrete Material Properties-2 .................................................... 5-30

iii
5.4.3.3 B-3 – Concrete – Reinforcement Steel Placement and Properties ........................... 5-32 5.4.3.4 B-4 – Concrete-Case 1– Wall Thickness and Reinforcement Properties ................. 5-35 5.4.3.5 B-4 – Concrete – Case 2 – Arbitrary Specified Wall Thickness .............................. 5-38 5.4.3.6 B-4 – Concrete – Case 3 – ASTM Box Wall Thicknesses and Haunches................ 5-40 5.4.3.7 B-4b – Concrete – Case 3 – ASTM Steel Placement for Boxes ............................... 5-42 5.4.3.8 B-4 – Concrete – Case 4 – Specified Wall Thickness and Working Stress SF ........ 5-45 5.4.3.9 B-4 – Concrete – Case 5 – Specified Wall Thickness/LRFD Design Weights ........ 5-47 5.4.3.10 B-5 – Concrete – Resistance Factors for LRFD ....................................................... 5-49
5.4.4 Plastic Pipe Types .............................................................................................................. 5-51 5.4.4.1 B-1 – Plastic – Plastic Load Controls ....................................................................... 5-51 5.4.4.2 B-2 – Plastic – Material Properties for Plastic ......................................................... 5-52 5.4.4.3 B-3 – Plastic – Cross Sectional Properties for Smooth or General .......................... 5-54 5.4.4.4 B-3 – Plastic – Profile Wall Cross Sectional Properties-1 ....................................... 5-55 5.4.4.5 B-3b – Plastic – Profile Wall Cross Sectional Properties-2 ..................................... 5-58 5.4.4.6 B-3 – Plastic – Safety Factors for Working Stress Design ....................................... 5-60 5.4.4.7 B-3 – Plastic – Design Weights for LRFD ............................................................... 5-62 5.4.4.8 B-4 – Plastic – Resistance Factors for LRFD ........................................................... 5-64
5.4.5 Steel Pipe Type .................................................................................................................. 5-66 5.4.5.1 B-1 – Steel – Material Properties and Control ......................................................... 5-66 5.4.5.2 B-2 – Steel – Section Properties ............................................................................... 5-69 5.4.5.3 B-2 – Steel – Design Safety Factors for Working Stress ......................................... 5-71 5.4.5.4 B-2 – Steel – Design Weights for LRFD ................................................................. 5-73 5.4.5.5 B-2b – Steel – Joint Properties ................................................................................. 5-75 5.4.5.6 B-2c – Steel – Joint Locations and Properties .......................................................... 5-78 5.4.5.7 B-2d – Steel – Joint Locations and Properties (2) .................................................... 5-80 5.4.5.8 B-3 – Steel – Resistance Factors for LRFD ............................................................. 5-82
5.4.6 Conrib Pipe Type ............................................................................................................... 5-84 5.4.6.1 B-1 - Concrete properties ......................................................................................... 5-84 5.4.6.2 B-2 - Concrete strain parameters and models........................................................... 5-86 5.4.6.3 B-3 - Steel material properties ................................................................................. 5-88 5.4.6.4 B-4 - Input sequence node numbers ........................................................................ 5-89 5.4.6.5 B-5 - Concrete wall geometry ................................................................................. 5-90 5.4.6.6 B-6 - Steel area and placement ................................................................................ 5-92 5.4.6.7 B-7 - Resistance factors for LRFD evaluation ........................................................ 5-94
5.4.7 Contube Pipe Type ............................................................................................................ 5-95 5.4.7.1 B-1 - Concrete size and strength properties ............................................................. 5-95 5.4.7.2 B-2 – Concrete strain parameters and models .......................................................... 5-97 5.4.7.3 B-3 - Tube material properties and spacing ............................................................ 5-98 5.4.7.4 B-4 - Resistance factors for LRFD evaluation ...................................................... 5-100
5.5 Part C - Solution Levels ............................................................................................................ 5-101 5.5.1 Solution Level 1............................................................................................................... 5-102
5.5.1.1 C-1 – Level 1 – Major Input Parameters ................................................................ 5-102 5.5.1.2 C-2 – Level 1 – Fill Heights and Soil Parameters .................................................. 5-104 5.5.1.3 C-3 – Level 1 – Load Factors for LRFD ................................................................ 5-106
5.5.2 Solution Level 2 – Pipe Mesh .......................................................................................... 5-107 5.5.2.1 C-1 – Level 2 – Pipe Mesh – Control Commands and Title .................................. 5-107 5.5.2.2 C-2 – Level 2 – Pipe Mesh – Major Geometry and Loading Parameters ............... 5-110 5.5.2.3 C-3 – Level 2 – Pipe Mesh – Control Variables .................................................... 5-112 5.5.2.4 C-4 – Level 2 – Pipe Mesh – Embankment/Trench Mesh Dimensions ................. 5-114
5.5.3 Solution Level 2 – Box Mesh .......................................................................................... 5-122 5.5.3.1 C-1 – Level 2 – Box Mesh – Control Commands and Title ................................... 5-122 5.5.3.2 C-2 – Level 2 – Box Mesh – Control Variables/Installation Dimensions .............. 5-124
5.5.4 Solution Level 2 – Arch Mesh ......................................................................................... 5-131 5.5.4.1 C-1 – Level 2 – Arch Mesh – Control Commands and Title ................................. 5-131 5.5.4.2 C-2 – Level 2 – Arch Mesh – Plot and Print Control ............................................. 5-133 5.5.4.3 C-3 – Level 2 – Arch Mesh – Arch and Footing Dimensions ................................ 5-136
iv
5.5.4.4 C-4 – Level 2 – Arch Mesh – Arch and Footing Dimensions ................................ 5-138 5.5.5 Extended Level 2 ............................................................................................................. 5-148
5.5.5.1 CX-1 – Level 2 Extended – Nodes, Elements and Boundary Condition Changes . 5-148 5.5.5.2 CX-2 – Level 2 Extended – Nodal Point Number and Changed Coordinates ........ 5-149 5.5.5.3 CX-3 – Level 2 Extended – Element Number and Property Array ........................ 5-150 5.5.5.4 CX-4 – Level 2 Extended – Nodal Loads and/or Displacements to be applied ..... 5-152
5.5.6 Solution Level 3............................................................................................................... 5-154 5.5.6.1 C-1 – Level 3 – Prep word and Title ...................................................................... 5-154 5.5.6.2 C-2 – Level 3 – Key Control Variables .................................................................. 5-155 5.5.6.3 C-2b – Level 3 – Continuous Load Spreading for Live Loads .............................. 5-158 5.5.6.4 C-3 – Level 3 – Node Input .................................................................................... 5-160 5.5.6.5 C-4 – Level 3 – Element Input ............................................................................... 5-165 5.5.6.6 C-5 – Level 3 – Boundary Condition Input ............................................................ 5-173
5.5.7 Part D- Soil and/or Interface Property Input .................................................................... 5-177 5.5.8 D-1 – Material Control Parameters for All Models ......................................................... 5-178 5.5.9 D-2 – Isotropic Linear Elastic – Elastic Parameters ........................................................ 5-184 5.5.10 D-2 – Orthotropic Linear Elastic – Elastic Parameters ................................................ 5-185 5.5.11 D-2 - Duncan and Duncan/Selig Model Types ............................................................ 5-187
5.5.11.1 D-2 – Duncan – Fundamental Controls and Modified Option ............................... 5-187 5.5.11.2 D-3 – Duncan/Duncan Selig – Parameters for Tangent Young’s Modulus ........... 5-191 5.5.11.3 D-4 – Duncan/Duncan Selig – Parameters for Tangent Bulk Modulus ................. 5-193
5.5.12 D-2– Overburden Dependent–User Defined Elastic Prop. vs. Overburden Pressure .. 5-195 5.5.13 D-2 – Extended Hardin Soil Model ............................................................................. 5-198
5.5.13.1 D-2 – Hardin Soil Model Input for Special MATNAM ......................................... 5-198 5.5.13.2 D-3 – Hardin Soil Model Input for MATNAM = USER ....................................... 5-200
5.5.14 D-2 – Interface Element – Angle, Friction, Tensile Force and Gap Distance ............. 5-202 5.5.15 D-2 – Composite Link Element – Beam groups and composite fraction ................... 5-205 5.5.15 D-2 – Mohr Coulomb Plasticity Model – Elastic Parameters and Failure Surface ...... 5-206
5.6 Part E- Net LRFD Load Factors ................................................................................................ 5-209 5.6.1 E-1 – LRFD – Net Load Factor per Load step ................................................................. 5-209
6 LIST OF REFERENCES ................................................................................................................... 6-1 6.1 Background Documents ................................................................................................................ 6-1 6.2 Companion Documents ................................................................................................................. 6-1
7 APPENDICIES .................................................................................................................................. 7-1 7.1 CANDE Output Files .................................................................................................................... 7-1
7.1.1 XML Mesh Geometry Format ............................................................................................. 7-3 7.1.2 Mesh results format ............................................................................................................. 7-7 7.1.3 Beam results format ........................................................................................................... 7-11 7.1.4 NCHRP Process 12-50 Results .......................................................................................... 7-14 7.1.5 CANDE-2007 Output Files for Plotting ............................................................................ 7-16
7.1.5.1 Contents of PLOT1.DAT ......................................................................................... 7-16 7.1.5.2 Contents of PLOT2.dat ............................................................................................ 7-18
7.2 CANDE NASTRAN Import Format ........................................................................................... 7-21 7.2.1 NASTRAN Input Data Card- GRID- Point ....................................................................... 7-22 7.2.2 NASTRAN Input Data Card-CBAR Simple Beam Element ............................................. 7-23 7.2.3 NASTRAN Input Data Card-CTRIA3-Triangular Plate Element ..................................... 7-24 7.2.4 NASTRAN Input Data Card-CQUAD4-Quadrilateral Plate Element ............................... 7-25 7.2.5 NASTRAN Input Data Card-CGAP-Gap Element Connection ........................................ 7-27 7.2.6 NASTRAN Input Data Card-SPC-Single Point Constraint ............................................... 7-28 7.2.7 NASTRAN Input Data Card-FORCE-Static Load ............................................................ 7-29

v
List of Tables Table 3.3-1 – File-tab menu options for input data files.............................................................................. 3-2 Table 5.3-1 – Reference data on culvert elements used in canned meshes................................................ 5-11 Table 5.4-1 - Aluminum-1. Section Properties for Standard Aluminum Corrugation ............................... 5-17 Table 5.4-2 - Aluminum -2. Section Properties for 9 x 2 ½ Aluminum Corrugation ................................ 5-17 Table 5.4-3 – Plastic: Typical range of plastic properties from AASHTO LRFD Specification ............... 5-53 Table 5.4-4 – Steel 1: Section Properties for Standard Steel Corrugation Sizes ....................................... 5-70 Table 5.4-5 – Steel 2 – Section Properties for 6”x 2” Structural Plate ...................................................... 5-70 Table 5.5-1 – Level 1 – Conservative values for Young’s soil modulus and Poisson’s ratio .................. 5-105 Table 5.5-2 – Level 2 Pipe– Node renumbering scheme for pipe-soil interface elements. ..................... 5-120 Table 5.5-3 – Level 2 Pipe – Node renumbering scheme interface elements along trench wall. ............ 5-121 Table 5.5-4 – Level 2 Arch – Values for basic arch parameters as a function of height cover. .............. 5-145 Table 5.5-5 – Level 2 Arch – Identification of arch and soil nodes for interface elements. .................... 5-146 Table 5.5-6 - Level 2 Arch – Identification of interface element numbers versus cover height. ............. 5-147 Table 5.5-7 – Classification of IIFLG Boundary Code numbers ............................................................. 5-176 Table 5.6-1 – Summary of special material names (MATNAM) ............................................................ 5-181 Table 5.6-2 – Material numbers for predefined level 2 material zones ................................................... 5-182 Table 5.6-3 – Material numbers for predefined Level 2 interface numbers ............................................ 5-182 Table 5.6-4 – Material names (MATNAM) and values for Duncan model (IBULK=0) ......................... 5-189 Table 5.6-5 – Material names (MATNAM) and values for Duncan/Selig model (IBULK=1) ............... 5-189 Table 5.6-6 – Material names (MATNAM) and values for Overburden Dependent Model ................... 5-197 Table 5.7-1 – Guidance on selecting the net load factor (FACTOR) ...................................................... 5-210 Table 7.1-1 – NCHRP Tag format ............................................................................................................. 7-14 Table 7.1-2 – NCHRP Process 12-50 Report ID table .............................................................................. 7-15 Table 7.2-1 – NASTRAN commands support by CANDE import............................................................ 7-21

vi
Table of Figures Figure 2.2-1 – Major options to define the top-level input data for CANDE-2007 ..................................... 2-2 Figure 3.3-1 – Starting CANDE .................................................................................................................. 3-1 Figure 3.3-2 - CANDE-2007 Startup Window ............................................................................................ 3-2 Figure 3.3-3 – Sample Level 1 CANDE input file ...................................................................................... 3-3 Figure 3.3-4 – Opening a CANDE input file ............................................................................................... 3-3 Figure 3.3-5 – CANDE input file using “open” option. .............................................................................. 3-4 Figure 3.3-6 – Successful completion of CANDE analysis ......................................................................... 3-4 Figure 3.3-7 – Accessing the CANDE tutorials .......................................................................................... 3-5 Figure 4.1-1 – CANDE GUI overview ........................................................................................................ 4-1 Figure 4.2-1 - Creating a new CANDE input document ............................................................................. 4-2 Figure 4.2-2 – CANDE Input Wizard startup screen ................................................................................... 4-3 Figure 4.2-3 – CANDE Input Wizard Level 3 Information ......................................................................... 4-3 Figure 4.2-4- CANDE Input Wizard: Pipe Material screen ........................................................................ 4-4 Figure 4.2-5 – CANDE Input Wizard Final Screen ..................................................................................... 4-5 Figure 4.2-6 – Saving a CANDE input file ................................................................................................. 4-5 Figure 4.2-7 – CANDE Interface after new CANDE input document is created ........................................ 4-6 Figure 4.2-8 - CANDE menu with ‘undefined’ input .................................................................................. 4-7 Figure 4.2-9 – CANDE import dialog box ................................................................................................ 4-13 Figure 4.2-10 – Import log window ........................................................................................................... 4-13 Figure 4.2-11 – Opening an existing CANDE input document ................................................................. 4-17 Figure 4.2-12 – Opening an existing CANDE input document in the CANDE input text editor .............. 4-18 Figure 4.2-13 - CANDE input menu overview.......................................................................................... 4-19 Figure 4.2-14 – Activating CANDE input menu persistent help ............................................................... 4-20 Figure 4.2-15 – Activating CANDE input menu ‘Show Input’ ................................................................. 4-21 Figure 4.2-16 – CANDE input menus range violation .............................................................................. 4-22 Figure 4.2-17 – Error in CANDE input menus with an invalid character ................................................. 4-23 Figure 4.2-18 – Opening an existing CANDE input document using the CANDE input text editor ........ 4-25 Figure 4.2-19 – Summary of CANDE input text editor............................................................................. 4-26 Figure 4.3-1 – Running CANDE-2007 analysis ........................................................................................ 4-28 Figure 4.3-2 – View of CANDE Analysis while running .......................................................................... 4-28 Figure 4.4-1 – CANDE output view options ............................................................................................. 4-34 Figure 4.4-2 – Viewing the CANDE output report ................................................................................... 4-35 Figure 4.4-3 – CANDE Output Viewer ..................................................................................................... 4-36 Figure 4.4-4 – Viewing the CANDE log file ............................................................................................. 4-39 Figure 4.4-5 – Viewing the CANDE log file ............................................................................................. 4-39 Figure 4.4-6 – CANDE mesh plot options ................................................................................................ 4-41 Figure 4.4-7 – Zooming in on a mesh using Window-Area ...................................................................... 4-42 Figure 4.4-8 – Increasing/Decreasing font size in Mesh Plot viewer ........................................................ 4-43 Figure 4.4-9 – Mesh viewer options .......................................................................................................... 4-44 Figure 4.4-10 – Displaying element information in the mesh viewer ....................................................... 4-45 Figure 4.4-11 – Plotting deflections using the mesh viewer ...................................................................... 4-46 Figure 4.4-12 – Sample plot of Horizontal Stress ..................................................................................... 4-47 Figure 4.4-13 – Coincidental boundary conditions offset in mesh viewer ................................................ 4-48 Figure 4.4-14 – CANDE Graph of bending moment ................................................................................. 4-49 Figure 4.4-15 – Overview of CANDE Graphs .......................................................................................... 4-50 Figure 4.4-16 – CANDE Graphs window – Pipe Mesh Button ................................................................. 4-51 Figure 4.4-17 – CANDE Graphs window with local node numbering mesh ............................................ 4-51 Figure 4.4-18 – Beam graph options ......................................................................................................... 4-52 Figure 4.4-19 – Plotting multiple load steps with CANDE Beam Graph .................................................. 4-53 Figure 4.4-20 – CANDE results generator – Generate Mesh Output tab .................................................. 4-54 Figure 4.4-21 – CANDE results generator – Beam Output tab ................................................................ 4-55 Figure 4.4-22 – CANDE results generator – Report Preview tab .............................................................. 4-56 Figure 4.4-23 – CANDE output results browser ....................................................................................... 4-56 Figure 5.4-1 – Aluminum-1: Bilinear stress-strain parameters ................................................................. 5-15 Figure 5.4-2 – Concrete Stress-Strain model and parameters .................................................................... 5-28
vii
Figure 5.4-3 – Cross sections for RSHAPE = STAND or ELLIP ............................................................. 5-37 Figure 5.4-4 – ASTM geometry and steel placement for box culverts with 2 ft cover or more. .............. 5-44 Figure 5.4-5 - Plastic – Elastic stress-strain model in tension and compression, all durations. ................. 5-53 Figure 5.4-6 – Example Profile Shapes that can be constructed in CANDE ............................................. 5-57 Figure 5.4-7 – Steel-1: Bilinear stress-strain parameters ........................................................................... 5-68 Figure 5.4-8 – Steel-2 – Pseudo stress-strain model for slotted joints ....................................................... 5-77 Figure 5.5-1 – Level 1 – Illustration of Level 1 boundary value problem ............................................... 5-103 Figure 5.5-2 – Level 2-Pipe-Embankment/Homogeneous mesh with load steps and materials .............. 5-116 Figure 5.5-3 – Level 2-Pipe-Trench mesh with load steps and material zones ....................................... 5-117 Figure 5.5-4 – Element numbering scheme for Level 2 pipe mesh (CAN1) ........................................... 5-118 Figure 5.5-5 – Nodal numbering scheme for Level 2 Pipe Mesh, (embankment and trench) ................. 5-119 Figure 5.5-6 – Level 2 Box – Embankment mesh with load steps and material zones. ........................... 5-127 Figure 5.5-7 – Level 2 Box – Trench mesh with construction increments and material zones. .............. 5-128 Figure 5.5-8 – Level 2 Box – Element numbering scheme for box mesh for embankment and trench ... 5-129 Figure 5.5-9 – Level 2 Box – Nodal numbering scheme for box mesh for embankment and trench ...... 5-130 Figure 5.5-10 – Level 2 Arch – Embankment mesh configuration with load steps and material zones. . 5-140 Figure 5.5-11 – Level 2 Arch – Trench mesh configuration with load steps and material zones, ........... 5-140 Figure 5.5-12 - Level 2 Arch - Parameters for 3-segment and 2-segment arch with curved segments. .. 5-141 Figure 5.5-13 – Level 2 Arch –Parameters for 3-segment and 2-segment arch with straight segments. . 5-142 Figure 5.5-14 – Level 2 Arch – Soil element numbering scheme for elements remote from arch. ......... 5-143 Figure 5.5-15 – Level 2 Arch – Soil element numbering scheme for elements close to arch.................. 5-143 Figure 5.5-16 – Level 2 Arch – Nodal numbering scheme for soil nodes remote from arch. ................. 5-144 Figure 5.5-17 – Level 2 Arch – Nodal numbering scheme for soil nodes close to arch. ......................... 5-144 Figure 7.1-1 – Sample NCHRP Process 12-50 results .............................................................................. 7-14

viii
CANDE-2017 User Manual Updates This CANDE-2017 user manual includes the description of all new capabilities and enhancements that are not described in the original CANDE-2007 User Manual, which is downloadable from the TRB/NCHRP website. Most of the new capabilities have been sponsored by corporations while other capabilities have recently evolved as the author strives to continuously improve the CANDE program. The new capabilities and enhancements are listed below along with a short description. These new capabilities are the cumulative additions to the AASHTO sponsored CANDE-2007/2011 maintained by TRB.
1. CONRIB pipe type. A concrete pipe type called CONRIB has been added to CANDE’s pipe-type library that provides the capability of modeling rib-shaped reinforced/concrete cross-sections as well as standard rectangular cross sections. Moreover, the concrete constitutive model has been extended to include the simulation of fiber reinforced concrete, thereby providing the option of replacing discrete steel reinforcement with a uniform mix of fiber reinforced concrete. (Industry sponsor Con/Span Bridge Systems.)
2. CONTUBE pipe type. This special pipe type provides the capability of modeling circular shaped concrete cross sections encased in fiber-reinforced plastic (FRP) tubes spaced at uniform distances. The concrete is modeled without internal reinforcement but has enhanced tensile ductility due to confinement of the FRP tubes. The concrete-filled tubes form a set of arches that are the backbone of the soil-bridge system. (Industry sponsor Advanced Infrastructures Technology, LLC.)
3. Link element with death option. Link elements are a new addition to the stable of available elements for Level 3 modeling. Like interface elements, link elements impose constraints between two nodes. Two simple options are, (1) connect any two nodes with a pinned connection; or, (2) connect two beam nodes with a fixed-moment connection. The link element death option is an extremely useful capability allowing the removal of any link element and its forces at any specified load step. This allows simulating removal of temporary supports or soil excavation or void creation. Other link-element options include joining two parallel beam groups into a single composite. (Industry sponsors Contech Construction Products and MGK Consulting)
4. Deeply corrugated steel structures. Recently, AASHTO adopted a new combined moment-thrust
design criterion that applies to deeply corrugated steel structures with corrugation heights greater than 5 inches. The combined thrust-moment design criterion (AASHTO Equation 12.8.9.5-1) incorporates the plastic moment of the corrugated section as a resistance measure in addition to the thrust yield stress. Also, AASHTO introduced a new equation to predict the global buckling resistance of deeply corrugated structures (Equation 12.8.9.6-1). These new design criteria are programmed into CANDE-2017 Steel pipe type and may be activated at the user’s discretion. (Industry sponsors Atlantic Industries and Contech Construction Products)
5. Plastic pipe type variable profile properties. Typically, the section properties of plastic profile pipe are uniform around the pipe’s periphery; hence, previous versions of CANDE were restricted to uniform section properties per pipe group. However, arch-shaped storm water chambers and other structures often employ changes in the plastic profile geometry around the periphery of the structure. CANDE-2017 has been revised to allow variable profile geometries around the structure. This applies to all types of plastic including HDPE, PVC, and PP. (Industry sponsors Advanced Pipe Services and Prinsco)
6. Mohr/Coulomb elastoplastic soil model. The classical Mohr/Coulomb elastic-perfectly plastic model is now included in the suite of available constitutive models that may be assigned to continuum elements to describe soil behavior. Six material parameters define the model, two elastic parameters (Young’s modulus and Poisson ratio), two plasticity parameters defining the failure surface (Cohesion intercept and angle of internal friction), a surface angle for plastic if a non-associative flow rule is desired, and a stress limit to define tension cut off. Motivation for installing

ix
the Mohr/Coulomb model is to facilitate comparing CANDE predictions with other finite element programs that exclusively rely on this model to simulate soil behavior. As a side comment, the author has shown that the original Duncan/Selig model is superior to the Mohr/Coulomb model under loading conditions (Reference 9). (Industry sponsors MGK Consulting and Contech Engineered Solutions, LLC).
7. Modified Duncan/Selig soil model for unloading/reloading. Although the original Duncan/Selig is excellent in tracking the nonlinear behavior of soils in all loading environments, it retraces the same stress-strain path upon unloading. Consequently, the original model does not predict residual deformation, which is invariably observed in laboratory soil specimens following a load-unload cycle. The new modified Duncan/Selig model produces permanent deformations upon unloading similar to advanced plasticity models. No new material parameters are introduced into the new formulation; thus, the large existing data base of Duncan/Selig parameters remains valid for the modified formulation. Most importantly, the modifications to the Duncan/Selig model are shown to satisfy all thermodynamic restrictions and continuity requirements and correlate well with experimental unloading data (Reference 10). The user may choose the original or modified Duncan/Selig model with a simple input command. (Industry sponsors MGK Consulting and Contech Engineered Solutions, LLC).
8. Continuous Load Scaling (CLS). CLS is a revolutionary new procedure to simulate longitudinal load spreading from live loads that allows 2D plane-strain solutions like CANDE’s to mimic longitudinal load spreading similar to 3D finite element solutions. CLS offers a superior alternative to the traditional Reduced Surface Load (RSL) procedure wherein the effects of longitudinal load spreading are approximated by reducing the vehicle’s surface load so that the soil stress is corrected at one soil depth, typically the soil depth at the culvert crown. In contrast, the CLS procedure corrects the soil stress at all soil depths by continuously increasing each element’s out-of-plane thickness with the soil depth in accordance with the selected load spreading theory. Detailed developments and comparative solutions of the CLS procedure are to be published Transportation Research Record later this year. For the present, the detailed developments and comparative performance are presented in Chapter 8 of CANDE’s 2017 Formulations and Solution Manual. (Industry sponsors MGK Consulting and Contech Engineered Solutions, LLC).
In addition to the new user-controlled capabilities listed above, numerous programming changes have been made that are transparent to the user. Programming changes were made to improve performance, increase the speed of convergence and correct to errors. This revised user manual for CANDE-2017 is comprehensive and supercedes all previous user manuals. The table below lists the new capabilities contained in the CANDE-2017 computer program. Each capability has input instructions defined in Chapter 5 of this manual, whose page numbers are identified in center column. For those new capabilities that required theoretical developments, the last column refers to the page numbers in the updated CANDE-2017 Solution Methods and Formulation Manual that is included in the CANDE-2017 download documents.

x
Table i. CANDE-2017 Reference Documentation for New Capabilities since CANDE-2007/11
Description of new capability in CANDE-2017
User Manual input, Chapter 5, Section number and (line tag)
Solution and Formulation Manual, Section number
CONRIB pipe type. CONRIB has been added to CANDE’s pipe-type library that provides the capability of modeling rib-shaped reinforced/concrete cross-sections as well as standard rectangular cross sections. Moreover, the concrete constitutive model has been extended to include the simulation of fiber reinforced concrete.
5.3.2 (A-2)
and 5.4.5 (B-1 to B-6)
2.6
CONTUBE pipe type. This special pipe type provides the capability of modeling circular shaped concrete cross sections encased in fiber-reinforced plastic (FRP) tubes spaced at uniform distances.
5.3.2 (A-2)
and 5.4.6 (B-1 to B-6)
2.7
Link elements with death option. Two simple options are, (1) connect any two nodes with a pinned connection; or, (2) connect two beam nodes with a fixed-moment connection. The link-element death option is an extremely useful capability allowing the removal of link elements and attached elements at any specified load step. Also, a special composite joining option for beam groups.
5.5.6.4 (C-4)
and if composite 5.6.8 (D-2)
4.11 to 4.15
Deeply corrugated steel structures. Updated steel pipe type to accommodate the recently adopted AASHTO requirement for a combined moment-thrust design criterion that applies to deeply corrugated steel structures as well a new AASHTO equation to predict the global buckling resistance. These new design criteria may be activated at the user’s discretion.
5.5.4.1 (B-1)
and 5.5.42 (B-2)
2.2.2
Plastic pipe type variable profile properties. The plastic pipe subroutine has been revised to allow variable profile geometries around the structure. This applies to all types of plastic including HDPE, PVC, and PP. Useful for analyzing storm-water chambers.
5.4.3.4 (B-3, B3b)
2.4.3
Mohr/Coulomb plasticity model. The classical Mohr/Coulomb elastic-perfectly plastic model is now included in the suite of available constitutive models that may be assigned to continuum elements to describe soil behavior. Six material parameters are used to define the model.
5.6.9 (D-2)
3.7 (3.8)
Modified Duncan/Selig soil model. The new modified Duncan/Selig model produces permanent deformations upon unloading similar to advanced plasticity models. No new material parameters are introduced into the new formulation; thus, the large existing data base of Duncan/Selig parameters remains valid for the modified formulation.
5.6.4.1 (D-2)
3.58 to 3.59 (3.8)
mContinuous Load Scaling (CLS). A new improved procedure for simulating live loads to produce results like 3D analysis. Replaces the traditional method or reducing Live Load due to longtudinal load shedding.
5.5.6.6 (C-6)
8.1.1 to 8.1.4
The Graphical User Interface (GUI) is not fully operational with all the new capabilities. Chapter 4, Section 4.5 provides some work-around solutions for the GUI. It is generally recommended to use the “batch input” mode when exercising the new capabilities.
.

Chapter 1 – Introduction CANDE-2017 User Manual and Guideline
1-1
1 INTRODUCTION This user manual is for the CANDE-2017 computer program, which is the most recent in the series of CANDE programs. This user manual contains all the input instructions that are found in the standard CANDE-2007/2011 user manuals plus more. The additional information includes input instructions for special modeling capabilities that were recently developed under sponsorship of various industries and the author. See previous page for a synopsis of these special capabilities as well as the CANDE history below. Unlike the CANDE-2007/2011 program, the CANDE-2015 program and manuals are not currently available through the TRB website. However, executable copies of the program and manuals may be obtained by visiting CandeForCulverts.com or contacting Dr. Michael G Katona, [email protected] .
1.1 Purpose of CANDE CANDE-2017 is a computer program developed for the structural design and analysis of buried culverts; hence, the acronym CANDE stands for Culvert ANalysis and DEsign. CANDE’s finite-element methodology is based on a two-dimensional slice of the culvert installation so that both the culvert structure and soil mass are modeled as a combined soil-structure system subjected to an incremental loading schedule. Buried culverts of any shape, size and material, including corrugated metal, reinforced concrete and thermoplastic, may be analyzed and designed to withstand dead weight, incremental soil-layer loading, temporary construction loads and surface loads due to vehicular traffic. A particularly unique feature of CANDE’s output is the automatic evaluation of the structural design in terms of safety measures against all failure modes (design criteria) associated with the structural material. Because of the generality offered by the finite-element solution methodology, CANDE is also applicable to the design and analysis of other soil-structure interaction problems such as underground storage facilities, storm water runoff chambers, retaining walls, tunnel liners, and protective structures. Thus in the following discussion, the words “culvert” or “pipe” can generally be regarded to represent a general underground structure. This manual describes the CANDE-2017 version, which is the latest version in a 37-year history of usage and development of the CANDE series of programs. This documentation provides a complete description of all the capabilities and limitations so that the user need not refer to any other manuals or publications to confidently run the program and interpret the output. CANDE users range from designers to researchers including state DOT bridge engineers, design consultants, manufacturers and suppliers, and university investigators. State DOT designers and their consultants use CANDE when they are confronted with designing large or specialized installations and to choose among alternative designs such as a reinforced concrete arch versus a corrugated metal long span. Culvert suppliers and manufacturers use CANDE to design their products for both routine and specialized installations as well as for investigating new innovations and product improvements. University researchers use CANDE as an analytical tool to interpret experimental tests as well as to test out new modeling theories within the program. CANDE-2017 is intended to meet all of these users’ needs.
1.2 History of CANDE CANDE-1976. The first version of CANDE was released in 1976 (References 1 & 2) under the sponsorship of Federal Highway Administration (FHWA). The development work, a three-year research program, was conducted at the Naval Civil Engineering Laboratory in Port Hueneme California. The original release of the CANDE program contained the following options and features (to be described more fully in later chapters):
• Execution mode choice: Analysis or Design.

Chapter 1 – Introduction CANDE-2017 User Manual and Guideline
1-2
• Solution level choice: Level 1, 2 or 3. Level 1is a modified elasticity solution, Level 2 is a finite element solutions with an automated mesh for circular culverts, and Level 3 is a finite element solution with a user-defined mesh.
• Pipe type choice: Corrugated aluminum, basic, reinforced concrete, plastic, and corrugated steel. • Soil model choice: Linear elastic, overburden dependent, and nonlinear hyperbolic model by Hardin • Interface choice: Bonded, frictionless, or friction at soil-structure interface.
CANDE-1980. In 1979 FHWA awarded the University of Notre Dame (Reference 3) a research contract to extend the CANDE program by adding an automated Level-2 finite element mesh for reinforced concrete box culverts along with an improved concrete constitutive model. Also, this contract included installing the Duncan hyperbolic soil model originally developed at University of California at Berkeley. Later in 1982, FHWA extended the University of Notre Dame contract to develop a special model for corrugated metal culverts to simulate the behavior of slotted joints. This study demonstrated that slotted joints, which allow slippage and circumferential shortening of the culvert, are very effective in reducing the thrust stress in the culvert wall. CANDE-1989. Lastly in 1987, FWHA awarded a “CANDE maintenance contract” to Syro Steel Company, a company at the time using CANDE on a daily basis to design long-span arch culverts. The main purpose of this contract was to produce a unified user manual, which incorporated all the previous upgrades to CANDE and to ensure that the input/output programming was compatible with personal computers (Reference 4). In addition, a new Level-2 capability for arch culverts was developed along with a revised form of the hyperbolic soil model, referred to as the Duncan/Selig model based on research at the University of Massachusetts, Amherst. The final result of the FHWA sponsorship is CANDE-89, a public domain program available at a nominal cost through McTrans. Excluding the AASHTO sponsorship discussed next, no additional FHWA sponsored improvements have been made on CANDE since 1989. However, there have been numerous improvements made by individuals and private companies for their specific use. One private company has extensively modified CANDE-89 and is marketing the revised program as CandeCAD. However, there is absolutely no collaboration between this privately marketed program and later versions of CANDE. CANDE-2007. In May 2005, TRB/NCHRP negotiated a contract with Michael Baker Jr. Inc., and co-investigators to modernize and upgrade CANDE-89 under the sponsorship of AASHTO. The 3-year project was designated as NCHRP 15-28 and targeted the following three areas for enhancement: Pre- and Post-processing with modern computer technology (GUI). Previous versions of CANDE operated in a batch input mode without dedicated graphical software to aid the user in data preparation and output interpretation. CANDE 2007 is now equipped with a Windows®- based, menu-driven format for interactive data input and real-time control of data output along with a context-sensitive help system and numerous graphical plotting options. Improved analysis capabilities and architecture. The new architecture installed in CANDE-2007 allows the use of multiple pipe groups, thereby allowing an analysis of several culverts placed side-by-side pipe, or a retrofit design, say a plastic pipe inserted inside a corrugated steel pipe. Also, an updated Lagrange formulation has been incorporated into CANDE-2007 that provides an accurate and robust algorithm for predicting large deformations along with a methodology for predicting buckling capacity at the end of each load step. Also, the architecture was expanded to include an automated bandwidth minimizer. Improved design criteria for all culvert types, including LRFD methodology. A complete and AASHTO-compatible set of design criteria, applicable to both working-stress and LRFD methodologies, was identified for common culvert materials; corrugated metal, reinforced concrete, and thermoplastic pipe. These design criteria are used to evaluate the structural responses of each pipe type used in CANDE-2007 program. More importantly, the user now has the option to choose either service load (working-stress evaluation of the design criteria) or factored loading with factored resistance (LRFD evaluation of the design criteria.)

Chapter 1 – Introduction CANDE-2017 User Manual and Guideline
1-3
CANDE 2011. During the summer of 2011, TRB funded the NCHRP 15-28 project team to modify the CANDE-2007 program so that it would be compatible with new 64-bit operating systems like Windows 7. In addition, the project team inserted several corrections and minor improvements into the original CANDE-2007 program. Improvements included a new capability to specify initial gap distances for interface elements, a more general capability to prescribe displacement boundary conditions in sequential load steps, and faster convergence algorithms for the Duncan/Selig soil model and the reinforced concrete model. The CANDE- 2011 program is a complete replacement for the original CANDE-2007 program. It is operable in both 32-bit and 64-bit architecture and works on all standard operating systems including Windows 7. CANDE-2011 is latest official version of CANDE that is available at TRB website (link via CandeForCulverts.com).
CANDE-2017. This program is maintained by Michael G Katona and is available to the public via the CANDE website, CandeForCulverts.com. It contains all the new capabilities that were developed since the TRB release of CANDE-2007/2011 in April 2011.
1.3 Why Use CANDE? The popularity of CANDE is, in part, due to the rigorous adherence to the principle of good mechanics and to the trustworthiness of the program, earned over 35 years of testing and improvement. Early on in the development of CANDE, an independent study at Purdue University rated CANDE as the best program among a suite of computer programs developed for soil-structure interaction (Reference 5). Equally important to CANDE’s popularity is that, unlike most commercial software, CANDE is available with its source coding language and documentation of the programming structure. From the beginning, CANDE’s programming architecture was designed with the forethought that future additions and modifications would always continue. Accessibility to the source program is an extremely important feature for researchers who often want to test new theories and models as part of their research program. Successful research studies on new modeling techniques benefit the entire community. The question of whether or not to use CANDE should not be a question of choosing one computer program over another. After all, since CANDE is virtually free (public-domain), acquiring and using CANDE does not preclude one from also buying and using a commercial program. There are several commercial finite element programs that are well suited for soil-structure analysis, for example PLAXIS, ABACUS and ADINA are well-trusted programs, and they also have been successfully cross-tested against CANDE-2007. Certainly, there are times when a 3-D analysis is necessary in order to understand the behavior of some soil-structure systems. For culverts, however, the 2-D representation is generally quite adequate particularly when the soil load is dominant. For live loads with shallow cover, the 2-D representation generally gives a conservative evaluation of the culvert performance. What makes CANDE a special purpose program that differs from the general-purpose programs mentioned above is the automatic evaluation of the culvert performance in terms of well-accepted design criteria. That is CANDE sorts through the mechanistic responses of deformations, stresses, strains, thrust, moments and shears and summarizes the pipe performance in terms of safety factors or LRFD demand-to-capacity ratios.
1.4 How to use this manual This CANDE-2017 user manual is a standalone document that contains all the information in the original CANDE-2007/2011 manual plus information on all new and unadvertised capabilities in the CANDE-2017 program. This manual is intended to give the reader ample information to understand the overall program architecture and assumptions, to define and select input data, to run the program using the graphical unit interface (GUI) or in batch mode, and to navigate, plot and interpret the output data.
Chapter 1 – Introduction CANDE-2017 User Manual and Guideline
1-4
Chapter 2 provides the reader with the overall architecture, capabilities and major input options, Chapter 3 provides the basic instructions to get started using the CANDE program, and Chapter 4 describes how to use the GUI for inputting data, executing the program, and viewing the output. Since the GUI has not been updated since 2007, the last section of Chapter 4 addresses the problem of how to work around the GUI with regard to the new capabilities. Chapter 5 is the detailed user manual that provides stand-alone instructions for batch-mode input as an alternative to input via the GUI. Thus, Chapter 5 serves as the main reference manual for GUI and batch-mode input, and it contains a wealth of information on culvert design and analysis practices as well as new input instructions for all the new capabilities. A companion document, CANDE-2017 Solution Methods and Formulations, describes the various theoretical formulations and nonlinear models that are contained in the program including the new capabilities. A second companion document, CANDE-2007 Tutorials for Applications, provides examples of applying CANDE to a variety of real-world culvert applications. To date, this document has not been updated to include any of the new capabilities or obtain new solutions.

Chapter 2 – General Overview and Major Options CANDE-2017 User Manual and Guideline
2-1
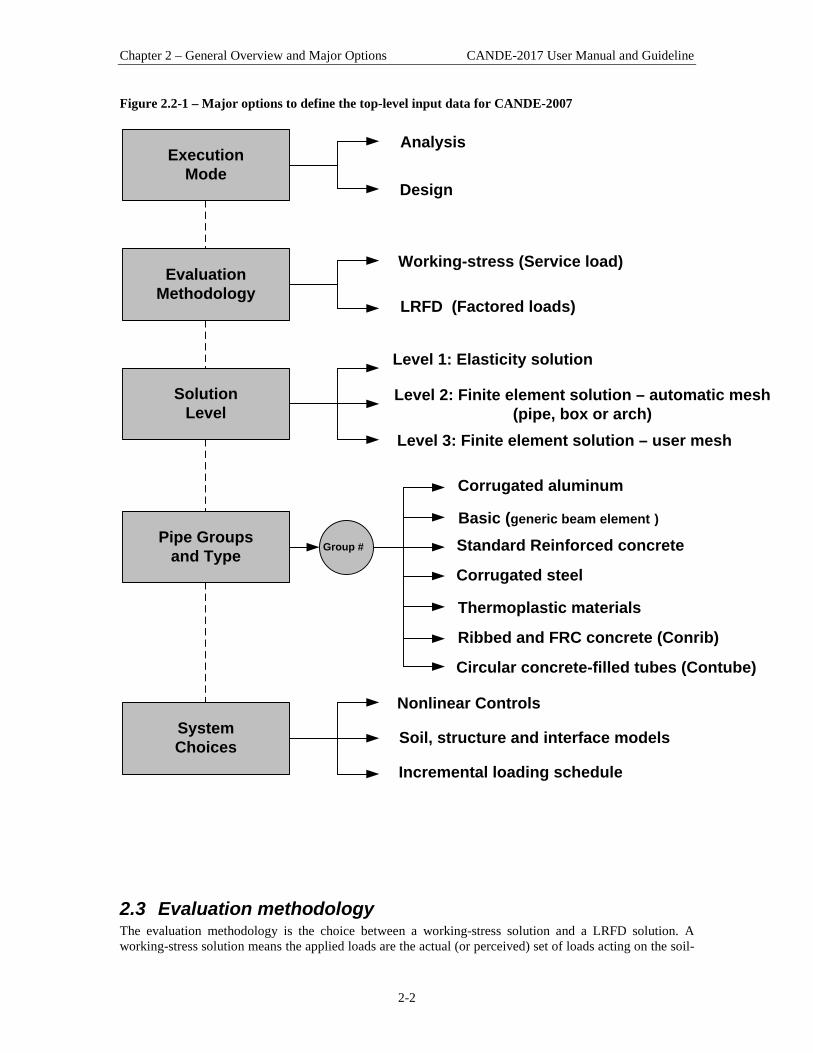
2 GENERAL OVERVIEW AND OPTIONS 2.1 Scope and Architecture CANDE’s scope is limited to a two-dimensional framework, called plane-strain, and to real-time independence, implying pseudo-static loading. Thus, three-dimensional problems, or dynamic analysis or the analysis of viscid materials is it outside the scope of the formulation. However, CANDE’s scope does include a pseudo-time analysis capability, called incremental construction. This capability allows, not only specified load forces, but also structural-system components, to be added to the system in a predefined series of load steps. Although CANDE’s scope is not limited to culvert installations, the following discussion is keyed to culvert installations. The easiest way to understand CANDE’s overall architecture is to view it from the perspective of a user who is using CANDE to solve a particular soil-culvert problem. To initiate a CANDE solution, the user begins by making several top-level choices that best captures the character of problem to be solved. Figure 2-1 shows these top-level selection categories in shaded boxes designated as; Execution Mode, Evaluation Methodology, Solution Level, Pipe Groups and Type, and System Choices. To the right of the shaded boxes are the various choices that may be selected for each top-level category; only one choice is selected for each category in any particular problem. The particular set of choices for the top-level categories dictates the subsequent stream of input data. It also controls the solution flow path through the program as well as characterizing the nature of the output. Each top-level category is discussed below
2.2 Execution mode Execution mode is the choice between design and analysis. By analysis it is meant that a particular culvert and soil system are defined in terms of geometry, material properties and loading conditions and solved by the chosen solution level. The solution output provides an evaluation of the culvert in terms of its safety for all potential modes of failure associated with the structural material and shape of the culvert. The evaluation of the culvert’s safety is reported either in terms of safety factors or in ratios of factored demand-to-factored capacity depending on the user’s choice of the Evaluation Methodology. The analysis mode is generally the most useful and commonly used choice for the execution mode. The alternative execution mode, called design, implies that the culvert shape, materials and loading conditions are defined exactly like the analysis case. However, the culvert’s cross-sectional properties are not defined, but rather, the desired safety factors or the desired LRFD design weights are specified. CANDE achieves a design solution through an iterative series of analysis solutions. That is, an initial trial cross-section is devised by the program and successively modified after each analysis until the design criteria are satisfied in an optimum manner. The design output lists the required cross-sectional properties of the culvert, which, of course, depend on the culvert type. For example, design solutions for corrugated metal culverts are given in the required corrugation size and gage thickness while reinforced concrete is given in the required area of reinforcement steel for one or two cages. Automated design solutions are limited to certain classes of standard soil-culvert systems.
Chapter 2 – General Overview and Major Options CANDE-2017 User Manual and Guideline
2-2
Figure 2.2-1 – Major options to define the top-level input data for CANDE-2007
Execution Mode
EvaluationMethodology
SolutionLevel
Pipe Groupsand Type Group #
Analysis
Design
Working-stress (Service load)
LRFD (Factored loads)
Level 1: Elasticity solution
Level 2: Finite element solution – automatic mesh (pipe, box or arch)
Level 3: Finite element solution – user mesh
Corrugated aluminum
Basic (generic beam element )Standard Reinforced concrete
Corrugated steel
Thermoplastic materials
SystemChoices
Nonlinear Controls
Soil, structure and interface models
Incremental loading schedule
Ribbed and FRC concrete (Conrib)
Circular concrete-filled tubes (Contube)
2.3 Evaluation methodology The evaluation methodology is the choice between a working-stress solution and a LRFD solution. A working-stress solution means the applied loads are the actual (or perceived) set of loads acting on the soil-

Chapter 2 – General Overview and Major Options CANDE-2017 User Manual and Guideline
2-3
structure system, referred to as the service-loading schedule. Thus, the service-loading schedule represents the actual dead weight of the structure, the actual weight density of the various soil zones, and the actual pressures and forces from construction equipment and live loads. Evaluation of the culvert’s performance under the working stress option is reported in terms of safety factors for each design criterion associated with the selected culvert type. A safety factor is defined as a ratio of the actual capacity-to-actual demand. For example, the safety factor for the design criterion based on thrust stress is the material yield stress divided by the maximum computed thrust stress. A LRFD solution means the service-loading schedule is increased by individualized load factors. The user begins by defining the service-loading schedule in exactly the same manner as for working-stress methodology. Later in the input stream, the user selects appropriate load factors to be applied to each load step so that the dead loads, earth loads, and live loads may be assigned individual factors as required by AASHTO LRFD specifications. Evaluation of the culvert’s performance under the LRFD option is provided in terms of ratios of factored demand-to-factored capacities for each design criterion associated with the selected culvert type. An evaluation ratio should be less than 1.0 in order for a given design criterion to be considered safe. Since the fundamental design criteria (potential failure modes) are identical for working-stress and LRFD methodologies, one could use the LRFD methodology to get a working-stress solution by setting all load factors and resistance factors equal to 1.0. In this case, the reported LRFD ratios would be the inverse of the working-stress safety factors. The AASHTO LRFD specifications include restrictions on service loading performance in addition to the factored strength limit states discussed above. Typical examples for service load performance criteria are maximum allowable deflection for flexible culverts and maximum allowable crack width for concrete culverts. One way to satisfy the AASHTO specifications is to run a given problem twice, once with LRFD methodology to assess the strength design criteria, and once with working-stress methodology to assess the service load performance criteria. However, the LRFD methodology programmed into CANDE also provides an estimate of the service load responses associated with the performance criteria. This is achieved by dividing the incremental response from the factored load step by the current load factor and maintaining a running total of the response. This approach provides the exact service load response if the system is entirely linear. However, since the system is generally nonlinear at factored load levels, the predicted response is approximate but conservative. Thus, if the service load performance criteria are safe, a separate working stress solution is not necessary.
2.4 Solution levels The selection of a Solution Level (1, 2, or 3) provides a choice that corresponds to successively increased levels of analytical sophistication. The solution level concept permits the user to choose a degree of rigor and modeling fidelity commensurate with the details and knowledge of the culvert-soil system under investigation. For example, Level 1 is useful for screening and comparing various circular-shaped culverts in deep burial. Level 2, considered the “work-horse” of CANDE, is applicable to many common culvert shapes including circular, elliptical, box and arch installations, but limited to center-line symmetry for loading and geometry. Level 3 is virtually unlimited in modeling the structure shape, soil system and loading conditions. Level 2 and Level 3 share a common finite element solution methodology and only differ in the manner of input data: automatic versus user defined.
2.4.1 Level 1 – Elasticity Solution Level 1 is based on the well-known Burns and Richard elasticity solution (Reference 7) and is suitable for circular culverts deeply buried in homogenous soil subjected to gravity loading. Although the elasticity solution is based on material linearity and uniform pipe stiffness properties, Level 1 approximates the pipe’s nonlinear behavior by averaging the effective stiffness properties in the following manner. After each load step, the elasticity solution provides a prediction of the structural responses including the moment, thrust and

Chapter 2 – General Overview and Major Options CANDE-2017 User Manual and Guideline
2-4
shear distribution around the pipe periphery. Next, the selected pipe-type subroutine processes the structural responses to determine the current level of structural distress at discrete points around the periphery including the effective bending and hoop stiffness. The current stiffness values around the pipe are averaged to provide effective uniform stiffness properties to be used in the next load step. The method works reasonably well as long as the structural distress is not too localized. Overall, Level 1 is useful as a learning tool on the comparative behavior of culvert types and soil stiffness.
2.4.2 Level 2 – Automated FEM Solution Known as the automatic finite element option, Level 2 relieves the user from the burden of generating and debugging a finite element mesh, i.e., defining node numbers and coordinates and element connectivity arrays. Rather, Level 2 automatically constructs the finite element mesh based on a few physical input parameters. Level 2 offers three fundamental choices for culvert shape, referred to as pipe-mesh, box-mesh and arch-mesh options. The pipe-mesh option is for round- or elliptical-shaped culverts, the box-mesh option is for rectangular-shaped culverts, and the arch-mesh option is for two- or three-segmented arches including straight leg segments. Each of these “canned mesh shapes” are specialized by a set of physical input parameters such as the culvert dimensions, the installation type (embankment or trench), bedding dimensions, height of cover, and the number of incremental construction layers. A special feature, called Level 2 – extended, allows the user to change nodal coordinates, element properties, and/or boundary conditions on any of the canned meshes. This feature is particular useful for prescribing live loads representing construction equipment or design truck vehicles for any load step in the loading schedule. The major shortcoming of all Level 2 canned meshes is the assumption of symmetry about the vertical centerline of the culvert (i.e., only one-half the system is modeled). Thus, asymmetric loading or different soil conditions on either of the culvert are not appropriate for Level 2.
2.4.3 Level 3 – User Defined FEM Level 3 brings the full power of the finite element method to solve complicated and/or important soil-structure systems that are outside the scope of Level 2. In this case the finite element mesh topology must be devised and input by the user. CANDE-2007 has many helpful techniques to expedite the generation of finite element meshes; however, they require some learning on the part of the user. Whether using Level 2 or Level 3, CANDE-2007 offers the user many features that are especially useful for realistically modeling soil-structure problems. Some key features are listed below:
• Incremental construction – the capability to simulate the physical process of placing and compacting soil layers, one lift at a time, below, alongside and above the culvert as the installation is constructed.
• Interface elements – the ability to simulate the frictional sliding, separation and re-bonding of two bodies originally in contact. Typically, these elements are used between the culvert and soil and between trench soil and in situ soil.
• Soil elements and models – soil elements are high-order continuum elements with a suite of soil models ranging from linear elastic to highly nonlinear. The so-called Duncan and Duncan/Selig soil models are very representative of the nonlinear soil behavior in most culvert installations.
• Large deformation and buckling – an updated Lagrange formulation that has the ability to accurately track culvert deformations up to and beyond its buckling capacity.
• Pipe elements and models – beam-column elements that may be used to model culvert structures and other structures such support braces. Special nonlinear material models are available for corrugated metal, reinforced concrete and thermoplastic.
• Link elements with death option – link elements allow the user to join any two nodes in a pinned connection or fixed connection, and the element may be assigned a birth load step and death load step. With this feature, temporary construction supports may be introduced into the construction
Chapter 2 – General Overview and Major Options CANDE-2017 User Manual and Guideline
2-5
schedule and then subsequently removed. Also, link elements may be used to simulate removal of predefined soil zones or the creation of soil voids during the construction schedule.
2.5 Pipe groups and pipe types A single “pipe group” is defined as a connected series of beam-column elements that are identified with only one pipe-type name; aluminum, basic, concrete, plastic, steel, conrib, or contube. For example, all the “canned meshes” in Level 2 are composed of a single pipe group whose beam-column elements trace a continuous path around the culvert’s periphery through the wall centroid that defines the overall structural shape. Selection of the pipe-type name along with the associated wall-section and material properties completes the information required to compute the initial structural stiffness of the overall culvert. The top-level choice for the “number of pipe groups” is only available for Level 3, because Level 1 and Level 2 are predefined configurations with only one pipe group. With the ability to choose a virtually unlimited number of pipe groups, Level 3 provides the user with a great deal of modeling power. For example, two groups may be assigned independent node numbers (no nodes in common) so that they represent independent structures. Alternatively, element groups may be arbitrarily joined together at common nodes to model cell-like structures or composite structures such as a corrugated metal arch roof placed on a reinforced concrete U-shaped base. Indeed, the multi-group option provides virtually unlimited modeling capabilities to define any configuration within CANDE’s two-dimensional framework. Each pipe-type name is associated with a corresponding pipe-type subroutine, which form the heart of CANDE-2007 architecture. All pipe-type subroutines perform three main functions:
(1) Process input data along with stored data to generate initial pipe stiffness. (2) Modify pipe element stiffness properties during nonlinear iterations. (3) Evaluate the pipe’s design criteria at the end of each converged load step.
In the design mode, there is a 4th function, which is to resize the pipe wall properties after each trial design repetition until the design criteria are satisfied. The assumptions behind these four functions are noted for each pipe-type name in the following paragraphs wherein default material properties built into the CANDE program relieve the user of defining most input data.
2.5.1 Corrugated aluminum - (Aluminum pipe type) Wall properties of corrugated aluminum are characterized by cross-sectional area, moment of inertia and section modulus, which represent the geometry of the corrugation’s waveform per unit length. The aluminum pipe-type subroutine has built-in tables for commercially available corrugation sizes as well as realistic default values for all linear and nonlinear material properties. Aluminum’s material behavior is simulated with a bilinear stress-strain model with an initial elastic response up to yield stress followed a hardening plastic response, identical in tension and compression. All unloading is assumed linear elastic. Design criteria for corrugated aluminum include strength limits for thrust stress against material yielding in hoop compression, global buckling and seam strength rupture. A new strength criterion is a limit on the amount of plastic penetration through the cross section. Here a recommended default value of 85% penetration is considered tantamount to failure. Finally, a performance limit on the allowable defection, typically taken as 5% of the total rise, completes the set of design criteria.
2.5.2 Reinforced concrete – (Concrete pipe type) Wall sections for reinforced concrete culverts are defined by the concrete wall thickness with up to two rows of reinforcing steel, typically placed near the inner and outer surface with specified cover depths. In tension, concrete behavior is characterized by cracking when tension stress levels exceed the tensile strain limit. When this occurs, the pre-existing tensile stresses are redistributed to the uncracked section, and the cracked

Chapter 2 – General Overview and Major Options CANDE-2017 User Manual and Guideline
2-6
location is assumed not to heal for any subsequent tensile loading. In compression, concrete is simulated with a tri-linear stress-strain curve. Initially, the concrete response is linear up to a specified strain level after which the concrete exhibits plastic-hardening behavior. When the compressive stress reaches the ultimate strength limit (fc’), the stress-strain response becomes perfectly plastic with no increase in stress as compressive strain increases. Reinforcing steel behavior is characterized by an elastic-plastic stress-strain model, which becomes perfectly plastic when the steel yield stress is reached in tension or compression. Design criteria for reinforced concrete culverts include strength limits for yielding of steel reinforcement, crushing of concrete in compression, diagonal cracking due to shear failure, and radial cracking due to curved tension steel (also called bowstringing). Finally, a performance limit on the allowable flexure crack width, typically taken as 0.01 inches, completes the set of design criteria.
2.5.3 Thermoplastic pipe – (Plastic pipe type) CANDE-2007 provides three options to characterize the wall sections for thermoplastic pipe; smooth, profile or general. Smooth refers to a uniform wall (gun barrel) whose cross-section properties are completely defined by the wall thickness. Profile refers to the majority of manufactured plastic pipe whose wall section properties may be characterized by the geometry of sub-elements such as web, valley, crest, liner and links. General refers to an arbitrary property described generically by the wall’s area and moment of inertia per unit length. The profile option allows the user to change geometry of wall section within the pipe group. Material properties are assumed linear elastic with default values provided for high-density polyethylene, polyvinyl chloride and polypropylene for both short-term and long-term loading conditions. A nonlinear local buckling algorithm is provided for the profile option wherein the profile’s section properties are reduced in proportion to the amount of compressive strain computed in the sub elements. Also, the input values for the profile wall’s geometric properties may vary from node to node within the group. Design criteria for thermoplastic pipes include strength limits for thrust stress against material yielding in hoop compression and global buckling. Another strength state is a limit on the maximum outer fiber combined strain (hoop plus bending strain). Performance limit states include allowable vertical deflection and maximum allowable tensile strain, dependent on type of plastic. The automated design mode is only applicable to smooth wall pipe.
2.5.4 Corrugated steel – (Steel pipe type) Like corrugated aluminum, the wall properties of corrugated steel are characterized by cross-sectional area, moment of inertia and section modulus, which represent the geometry of the corrugation’s waveform per unit length. The steel pipe-type subroutine has built-in tables for commercially available corrugation sizes as well as realistic default values for all linear and nonlinear material properties. Steel’s material behavior is simulated with a bilinear stress-strain model with an initial elastic response up to yield stress followed a hardening plastic response, identical in tension and compression. All unloading is assumed linear elastic. Design criteria for corrugated steel include strength limits for thrust stress against material yielding in hoop compression, global buckling and seam strength rupture. A new strength criterion is a limit on the amount of plastic penetration through the cross section. Here a recommended default value of 90% penetration is considered tantamount to failure. Finally, a performance limit on the allowable defection, typically taken as 5% of the total rise, completes the set of standard design criteria. A special design criterion for deeply corrugated structures has recently been added to satisfy the new AASHTO LRFD Bridge Specifications 12.8.9.5 and 12.8.9.6.
2.5.5 Basic pipe type The so-called “basic” pipe-type is not associated with any particular wall geometry or material. Therefore, it is not associated with any design criteria and is only applicable to the analysis execution mode. Further, the basic pipe-type model is limited to linear elastic properties.
Chapter 2 – General Overview and Major Options CANDE-2017 User Manual and Guideline
2-7
One unique feature of the basic pipe type is that each individual beam-column element in the ‘basic pipe-type group” may be assigned individual section properties and material properties. Perhaps, the most useful function of the basic pipe type is in Level 3 applications to serve as special structural components in addition to the culvert structures such as struts or temporary bracing. Lastly, if it is desired to use CANDE’s continuum elements, interface elements and/or link elements without any pipe-type elements in the mesh, then the user should declare one group of basic pipe-type elements with zero elements in the group.
2.5.6 Conrib pipe type The so-called CONRIB pipe type has two modeling options for reinforced concrete structures that are not available in the standard CONCRETE pipe-type, (1) the ability to model rib- or tee-shaped cross sections, and (2) the ability to simulate the behavior of fiber reinforced concrete. These special options may be used separately or together. One application for rib-shaped cross-sections is to stiffen pier walls that support precast concrete arches. Like the CONCRETE pipe type, the CONRIB pipe type may be assigned up to two rows of discrete reinforcing steel. On the other hand, CONRIB’s constitutive model for concrete is capable of simulating concrete mixed with pin-sized reinforcing fibers (FRC) in which case discrete reinforcing steel may not be necessary. Design criteria are selectively patterned after the criteria for standard reinforced concrete depending on whether or not discrete reinforcing steel is used in the cross section. The Conrib pipe type is not operable in the automated design mode.
2.5.7 Contube pipe type This pipe type has a circular cross section composed of concrete encased in a thin-walled fiber-reinforced plastic (FRP) tube. In practice, these concrete-filled tubes are arch shaped and placed side by side with a uniform spacing to form the backbone of a soil bridge. The concrete is modeled as a nonlinear material with tensile cracking but has enhanced tensile ductility due to confinement of the FRP tubes. The FRP tube is modeled as a linear elastic material in tension and compression for all levels of stress. However, specified stress-strength limits are used in the CANDE program to assess whether or not the maximum tube stress is beyond safety limits. Thus, the design criteria include concrete crushing, combined concrete and tube shear failure, and excessive tube stress. The Contube pipe type is not operable in the automated design mode.
2.6 System Choices CANDE offers a suite of soil models to choose from including the popular hyperbolic forms of Duncan, Duncan and Selig, and Hardin as well as the standard linear forms for isotropic elastic, orthotropic elastic, and overburden dependent. Predefined model parameters are installed in the program for simulating crushed rock, sands, silts and clays under a range of compaction conditions. In 2015 a classical Mohr-Coulomb elastoplastic model was added to the suite of soil model choices. Also, the Duncan and Duncan/Selig soil models were modified to provide the option for plastic-like behavior.

Chapter 2 – General Overview and Major Options CANDE-2017 User Manual and Guideline
2-8
Another system choice is the interface condition between the soil and culvert. The user may select a bonded interface or a friction interface that permits frictional sliding and separation during the loading schedule. Interface elements may also be used between the backfill soil and in situ soil wall for trench installations. Link elements can be used to simulate the insertion of temporary bracing struts and later removed from the system using the link element depth option. The same technique may be used to investigate the effect of trenching (soil removal) adjacent to an existing culvert installation. Still another system choice is the option to include large deformation analysis. This is particularly useful for investigating large, flexible culverts under heavy loading. Associated with the large deformation analysis is the capability to predict the global buckling capacity the soil-structure system, which provides a direct factor of safety against collapse. In summary, this chapter has provided an overview of the capabilities in CANDE-2017 and how the various modeling choices can be used to solve difficult soil-structure problems. For more technical depth, the reader is referred to the companion document, CANDE-2017 Solution Methods and Formulations. For example, applications of the CANDE program, the reader is referred to the older companion document, CANDE-2007 Tutorial and Applications Manual.
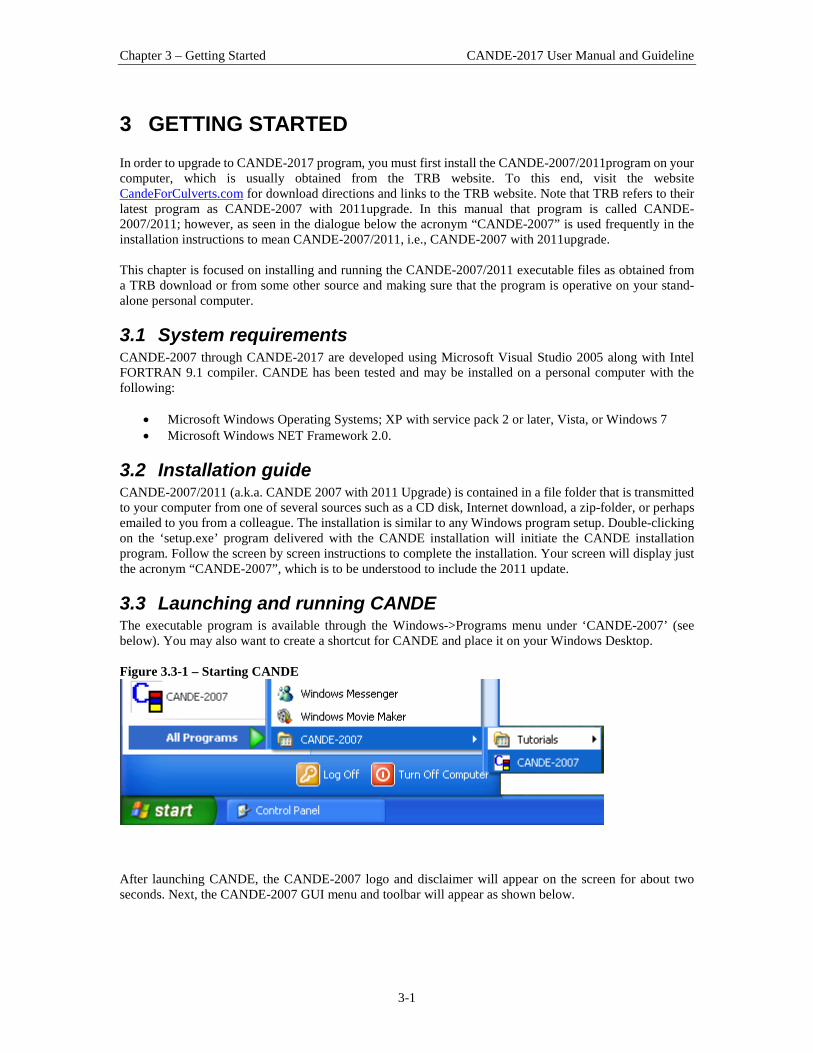
Chapter 3 – Getting Started CANDE-2017 User Manual and Guideline
3-1
3 GETTING STARTED In order to upgrade to CANDE-2017 program, you must first install the CANDE-2007/2011program on your computer, which is usually obtained from the TRB website. To this end, visit the website CandeForCulverts.com for download directions and links to the TRB website. Note that TRB refers to their latest program as CANDE-2007 with 2011upgrade. In this manual that program is called CANDE-2007/2011; however, as seen in the dialogue below the acronym “CANDE-2007” is used frequently in the installation instructions to mean CANDE-2007/2011, i.e., CANDE-2007 with 2011upgrade. This chapter is focused on installing and running the CANDE-2007/2011 executable files as obtained from a TRB download or from some other source and making sure that the program is operative on your stand-alone personal computer.
3.1 System requirements CANDE-2007 through CANDE-2017 are developed using Microsoft Visual Studio 2005 along with Intel FORTRAN 9.1 compiler. CANDE has been tested and may be installed on a personal computer with the following:
• Microsoft Windows Operating Systems; XP with service pack 2 or later, Vista, or Windows 7 • Microsoft Windows NET Framework 2.0.
3.2 Installation guide CANDE-2007/2011 (a.k.a. CANDE 2007 with 2011 Upgrade) is contained in a file folder that is transmitted to your computer from one of several sources such as a CD disk, Internet download, a zip-folder, or perhaps emailed to you from a colleague. The installation is similar to any Windows program setup. Double-clicking on the ‘setup.exe’ program delivered with the CANDE installation will initiate the CANDE installation program. Follow the screen by screen instructions to complete the installation. Your screen will display just the acronym “CANDE-2007”, which is to be understood to include the 2011 update.
3.3 Launching and running CANDE The executable program is available through the Windows->Programs menu under ‘CANDE-2007’ (see below). You may also want to create a shortcut for CANDE and place it on your Windows Desktop. Figure 3.3-1 – Starting CANDE
After launching CANDE, the CANDE-2007 logo and disclaimer will appear on the screen for about two seconds. Next, the CANDE-2007 GUI menu and toolbar will appear as shown below.
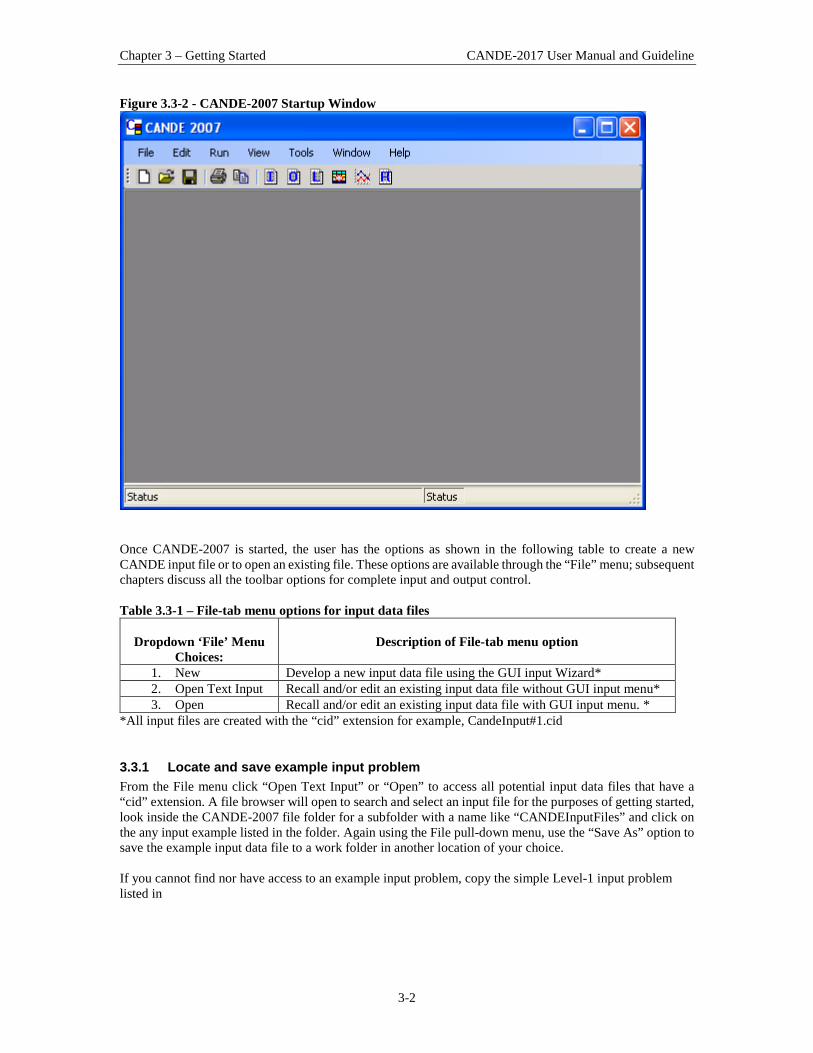
Chapter 3 – Getting Started CANDE-2017 User Manual and Guideline
3-2
Figure 3.3-2 - CANDE-2007 Startup Window
Once CANDE-2007 is started, the user has the options as shown in the following table to create a new CANDE input file or to open an existing file. These options are available through the “File” menu; subsequent chapters discuss all the toolbar options for complete input and output control. Table 3.3-1 – File-tab menu options for input data files
Dropdown ‘File’ Menu
Choices:
Description of File-tab menu option
1. New Develop a new input data file using the GUI input Wizard* 2. Open Text Input Recall and/or edit an existing input data file without GUI input menu* 3. Open Recall and/or edit an existing input data file with GUI input menu. *
*All input files are created with the “cid” extension for example, CandeInput#1.cid
3.3.1 Locate and save example input problem From the File menu click “Open Text Input” or “Open” to access all potential input data files that have a “cid” extension. A file browser will open to search and select an input file for the purposes of getting started, look inside the CANDE-2007 file folder for a subfolder with a name like “CANDEInputFiles” and click on the any input example listed in the folder. Again using the File pull-down menu, use the “Save As” option to save the example input data file to a work folder in another location of your choice. If you cannot find nor have access to an example input problem, copy the simple Level-1 input problem listed in
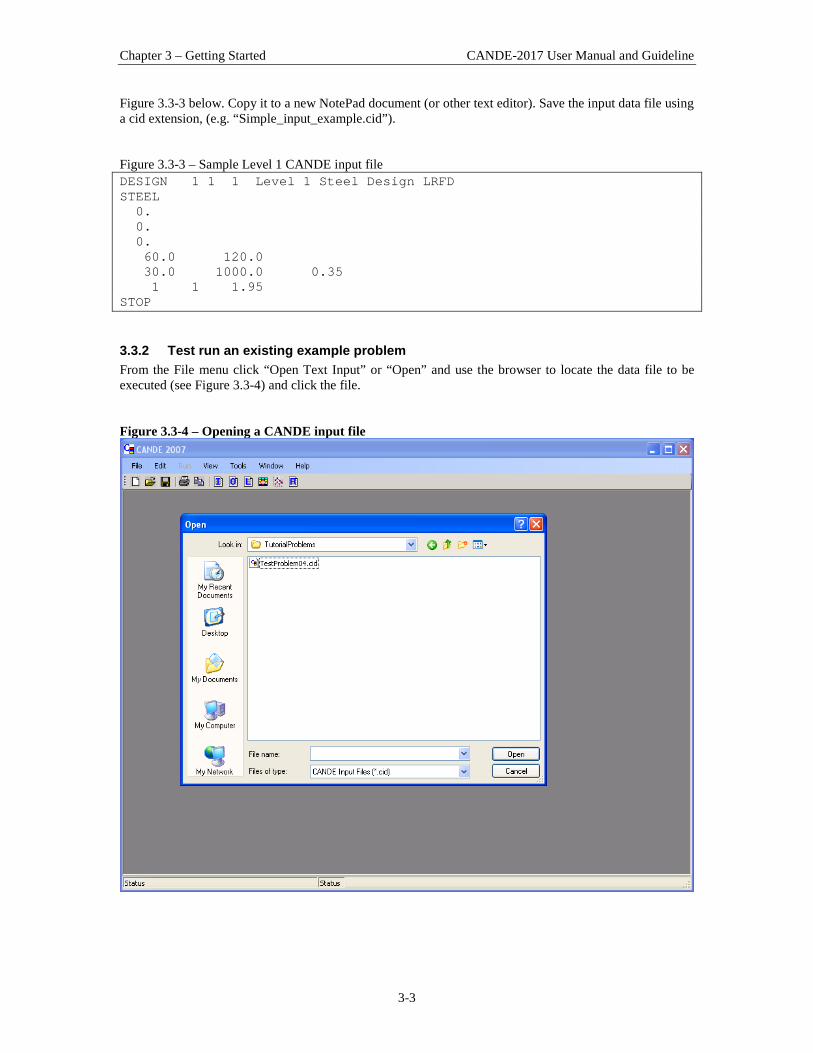
Chapter 3 – Getting Started CANDE-2017 User Manual and Guideline
3-3
Figure 3.3-3 below. Copy it to a new NotePad document (or other text editor). Save the input data file using a cid extension, (e.g. “Simple_input_example.cid”). Figure 3.3-3 – Sample Level 1 CANDE input file DESIGN 1 1 1 Level 1 Steel Design LRFD STEEL 0. 0. 0. 60.0 120.0 30.0 1000.0 0.35 1 1 1.95 STOP
3.3.2 Test run an existing example problem From the File menu click “Open Text Input” or “Open” and use the browser to locate the data file to be executed (see Figure 3.3-4) and click the file. Figure 3.3-4 – Opening a CANDE input file

Chapter 3 – Getting Started CANDE-2017 User Manual and Guideline
3-4
If you chose “Open text input” you will see the actual formatted input file that you may directly edit (batch mode). Alternatively, if you chose “open” you will see a screen similar to Figure 3.3-5, which is the GUI interface to the input file. Figure 3.3-5 – CANDE input file using “open” option.
Lastly, click the “Run – CANDE-2007” tab on the toolbar. The CANDE input screen will disappear and information will appear providing a top-level summary of the problem input, a log of the solution as it progresses through the load steps, and finally a message “NORMAL EXIT FROM CANDE”. This last message means the problem ran successfully and that CANDE-2007 is successfully working on your computer (see Figure 3.3-6). Figure 3.3-6 – Successful completion of CANDE analysis

Chapter 3 – Getting Started CANDE-2017 User Manual and Guideline
3-5
In summary, the steps to run an existing example problem:
• Launch CANDE-2007 through the ‘Start->All Programs->CANDE-2007’ menu • Click “Open Text Input” or “Open” from File Menu • Use file browser to locate existing input file (“cid” extension) • Click “Run -- CANDE-2007” on toolbar • Observe message “Normal Exit from CANDE” • Click View tab to see data and plots of output.
Chapter 4 describes the GUI input and output options and Chapter 5 provides detailed input instructions. As a preview to the output options discussed in Chapter 4, click on the “View” tab and look at the CANDE Output Report.
3.3.3 Example problems and tutorial The CANDE documentation includes a stand-alone tutorial manual containing many example problems. The tutorial defines each problem to be solved followed by a step-by-step illustration of using the GUI to develop the input and view output. It is highly recommended that the user examines the tutorial prior to undertaking the development of a new input data file. The tutorial can be accessed from the Help tab on the CANDE-2007 tool bar (see Figure 3.3-7). Figure 3.3-7 – Accessing the CANDE tutorials
3.4 Updating to CANDE-2017 Once CANDE-2007/2011 is installed on your computer, it is a straight forward process to upgrade to the CANDE-2017 program by going to CandeForCulverts.com website and following download instructions. Alternatively, you may initiate the two-step process as stated below: 1. Email M. G. Katona at [email protected] requesting the latest executable copy of the CANDE program. 2. You will receive by return email an executable dynamic link file, called Cande.dll, with simple directions on how to paste this file into your existing “CANDE-2007/2011” program folder thereby replacing your old “Cande Engine” with newest Cande Engine. The procedure is as simple as that. As discussed in the next chapter, the graphical user interface (GUI) has not been updated for the new capabilities programmed into the CANDE-2017 program. Accordingly, some work-around procedures are outlined if you want to use the GUI with the new capabilities.

Chapter 4 – Graphical user interface (GUI) CANDE-2017 User Manual and Guideline
4-1
4 GRAPHICAL USER INTERFACE The new modeling capabilities available in CANDE-2017 (Cande Engine) have not, as yet, been incorporated into Cande’s GUI – in fact, the current GUI coding has not been changed since the original release of CANDE-2007. Therefore, Section 4.5 has been added to this chapter to discuss how to utilize the GUI to define input for all new capabilities since 2007 and how to display the results. Alternatively, if you bypass the GUI using “Open text input” and use Chapter 5 to directly enter the input data, then there is no need to concern yourself with Section 4.5. Section 4.1 provides a brief overview of the GUI followed by Section 4.2 on data entry, Section 4.3 on running CANDE, and Section 4.4 on displaying output.
4.1 Overview CANDE-2007 provides a graphical user interface (GUI) that provides features to ease the task of creating CANDE input documents and also to view the CANDE output results graphically. This chapter provides a discussion of GUI input options, directions for running CANDE, and viewing the output reports, plots and graphs. CANDE’s main interface is a multi-document interface (MDI). This means that multiple CANDE documents can be opened at one time. The only exception to this rule is that only one CANDE input file may be opened at a time (see Figure 4.1-1). CANDE uses the input file prefix as an indicator to open other CANDE view windows: Figure 4.1-1 – CANDE GUI overview
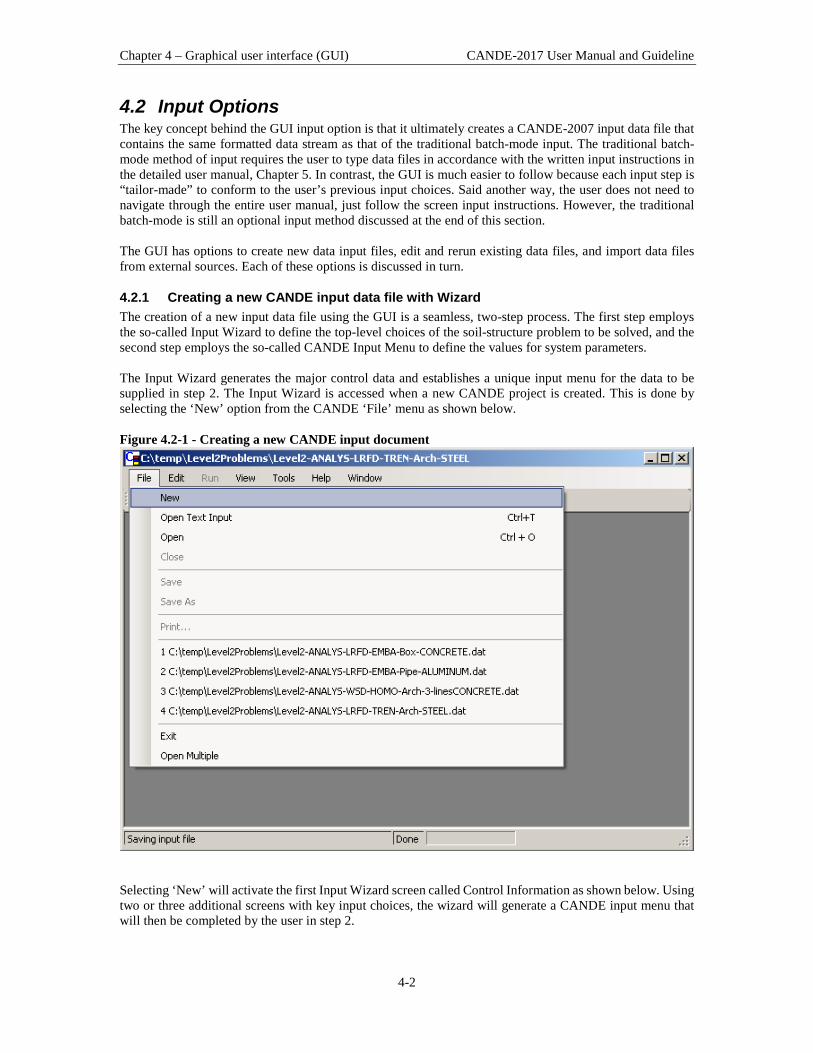
Chapter 4 – Graphical user interface (GUI) CANDE-2017 User Manual and Guideline
4-2
4.2 Input Options The key concept behind the GUI input option is that it ultimately creates a CANDE-2007 input data file that contains the same formatted data stream as that of the traditional batch-mode input. The traditional batch-mode method of input requires the user to type data files in accordance with the written input instructions in the detailed user manual, Chapter 5. In contrast, the GUI is much easier to follow because each input step is “tailor-made” to conform to the user’s previous input choices. Said another way, the user does not need to navigate through the entire user manual, just follow the screen input instructions. However, the traditional batch-mode is still an optional input method discussed at the end of this section. The GUI has options to create new data input files, edit and rerun existing data files, and import data files from external sources. Each of these options is discussed in turn.
4.2.1 Creating a new CANDE input data file with Wizard The creation of a new input data file using the GUI is a seamless, two-step process. The first step employs the so-called Input Wizard to define the top-level choices of the soil-structure problem to be solved, and the second step employs the so-called CANDE Input Menu to define the values for system parameters. The Input Wizard generates the major control data and establishes a unique input menu for the data to be supplied in step 2. The Input Wizard is accessed when a new CANDE project is created. This is done by selecting the ‘New’ option from the CANDE ‘File’ menu as shown below. Figure 4.2-1 - Creating a new CANDE input document
Selecting ‘New’ will activate the first Input Wizard screen called Control Information as shown below. Using two or three additional screens with key input choices, the wizard will generate a CANDE input menu that will then be completed by the user in step 2.
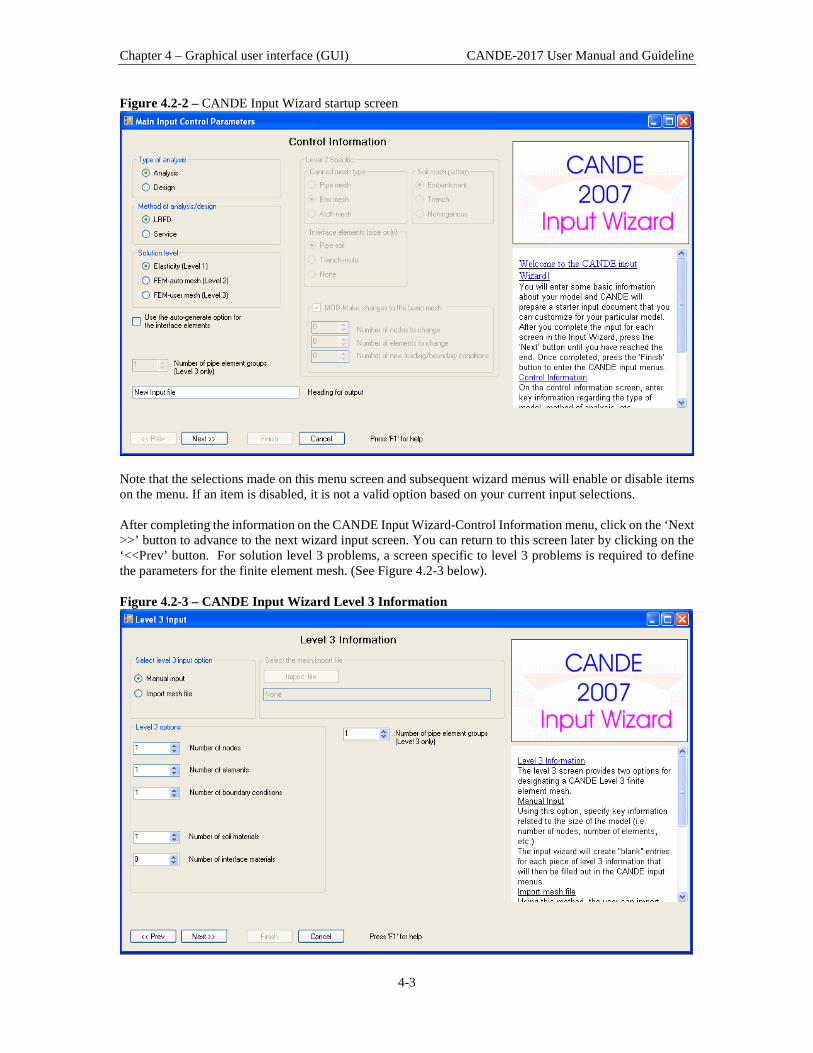
Chapter 4 – Graphical user interface (GUI) CANDE-2017 User Manual and Guideline
4-3
Figure 4.2-2 – CANDE Input Wizard startup screen
Note that the selections made on this menu screen and subsequent wizard menus will enable or disable items on the menu. If an item is disabled, it is not a valid option based on your current input selections. After completing the information on the CANDE Input Wizard-Control Information menu, click on the ‘Next >>’ button to advance to the next wizard input screen. You can return to this screen later by clicking on the ‘<<Prev’ button. For solution level 3 problems, a screen specific to level 3 problems is required to define the parameters for the finite element mesh. (See Figure 4.2-3 below). Figure 4.2-3 – CANDE Input Wizard Level 3 Information
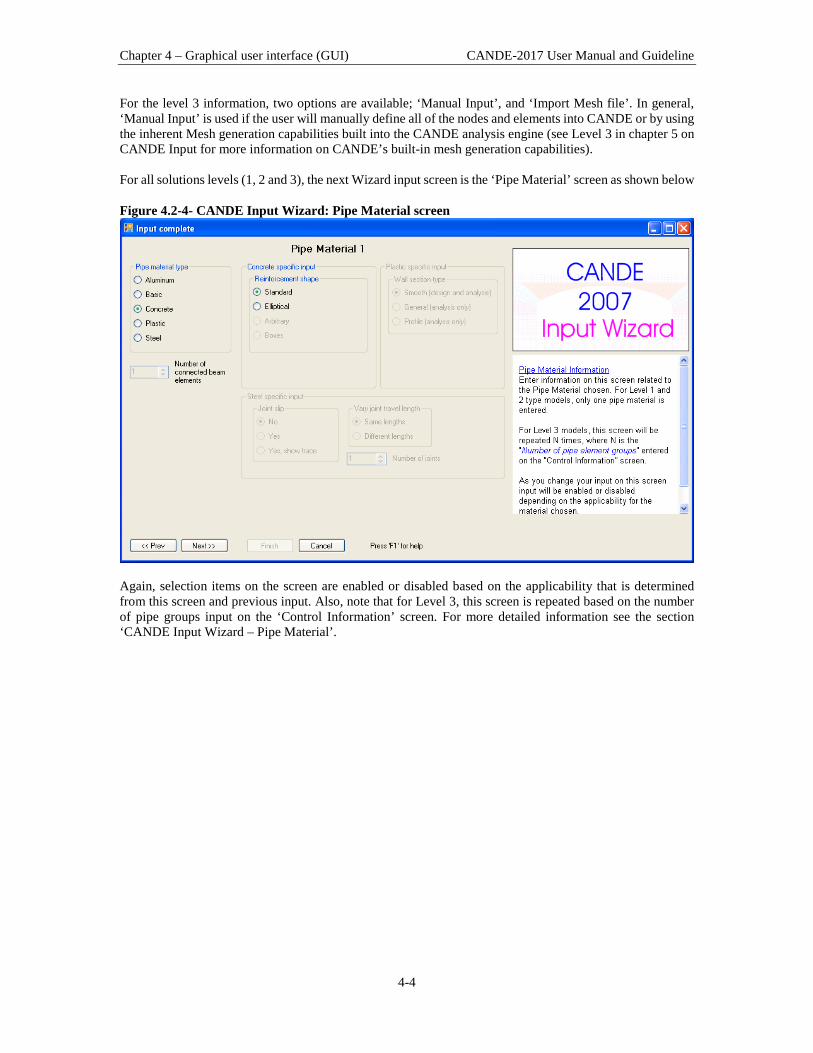
Chapter 4 – Graphical user interface (GUI) CANDE-2017 User Manual and Guideline
4-4
For the level 3 information, two options are available; ‘Manual Input’, and ‘Import Mesh file’. In general, ‘Manual Input’ is used if the user will manually define all of the nodes and elements into CANDE or by using the inherent Mesh generation capabilities built into the CANDE analysis engine (see Level 3 in chapter 5 on CANDE Input for more information on CANDE’s built-in mesh generation capabilities). For all solutions levels (1, 2 and 3), the next Wizard input screen is the ‘Pipe Material’ screen as shown below Figure 4.2-4- CANDE Input Wizard: Pipe Material screen
Again, selection items on the screen are enabled or disabled based on the applicability that is determined from this screen and previous input. Also, note that for Level 3, this screen is repeated based on the number of pipe groups input on the ‘Control Information’ screen. For more detailed information see the section ‘CANDE Input Wizard – Pipe Material’.

Chapter 4 – Graphical user interface (GUI) CANDE-2017 User Manual and Guideline
4-5
Once completed with all of the input screens, the final CANDE Input Wizard Menu will be as shown below: Figure 4.2-5 – CANDE Input Wizard Final Screen
Click on the ‘Finish’ button and you will be prompted to save your input file (see below). Figure 4.2-6 – Saving a CANDE input file

Chapter 4 – Graphical user interface (GUI) CANDE-2017 User Manual and Guideline
4-6
CANDE provides a default name for the file based on some user input values, but the name can be changed at this time. Two things of importance:
• The extension of the file must be ‘.cid’. • CANDE will prompt you if the name of the file selected already exists.
Once a new file is created, the CANDE interface will look similar to the figure shown below: Figure 4.2-7 – CANDE Interface after new CANDE input document is created
Note the red ‘X’ items on the left side. In general, these CANDE input screens contain ‘undefined’ input information. This input is required but does not have a CANDE default value supplied. All of these menus must be resolved before CANDE will permit the running of the CANDE analysis engine. A sample of a menu with ‘undefined’ input is shown below.
Menu with undefined value(s).
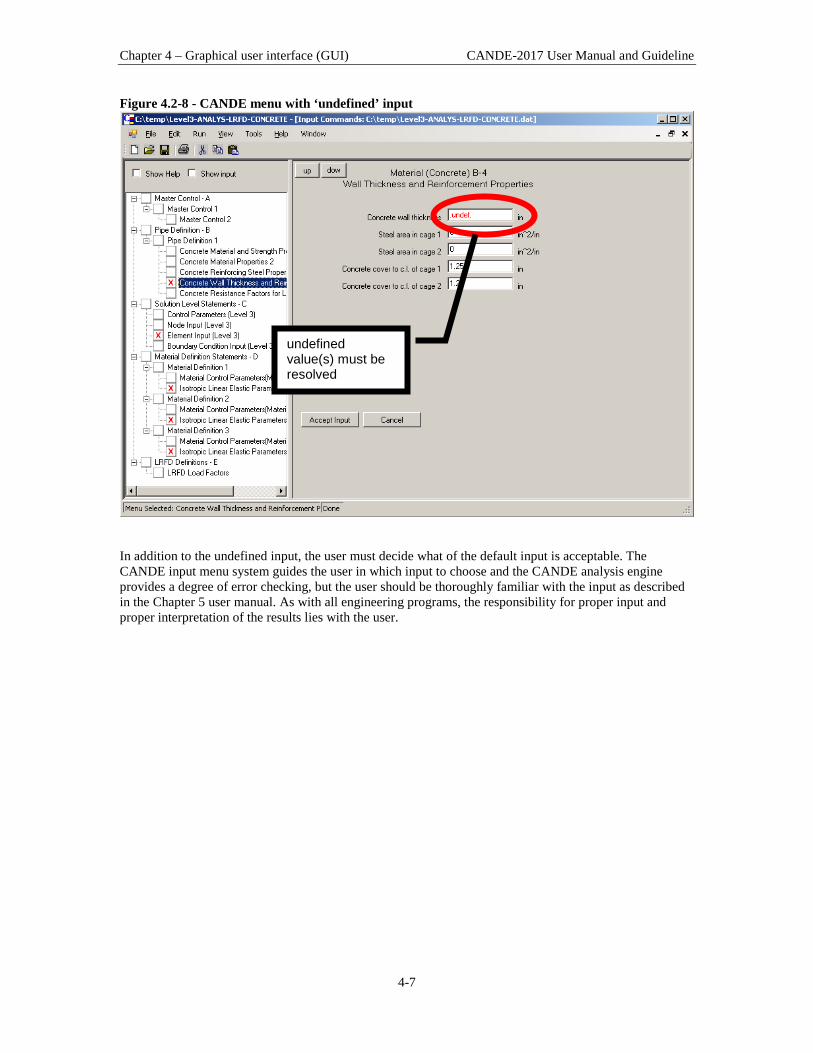
Chapter 4 – Graphical user interface (GUI) CANDE-2017 User Manual and Guideline
4-7
Figure 4.2-8 - CANDE menu with ‘undefined’ input
In addition to the undefined input, the user must decide what of the default input is acceptable. The CANDE input menu system guides the user in which input to choose and the CANDE analysis engine provides a degree of error checking, but the user should be thoroughly familiar with the input as described in the Chapter 5 user manual. As with all engineering programs, the responsibility for proper input and proper interpretation of the results lies with the user.
undefined value(s) must be resolved

Chapter 4 – Graphical user interface (GUI) CANDE-2017 User Manual and Guideline
4-8
4.2.1.1 CANDE Input Wizard- Control Information The Control Information of the CANDE input wizard provides key information related to the entire CANDE model. The following is a description of the items provided on this dialog box. Of course, these are the same descriptions as listed in Chapter 5 for the batch-mode detailed input.
Parameter Input options Description Type of Analysis (XMODE)
‘Analysis’ or ‘Design’
Specifying the variable XMODE controls the decision of design or analysis. Analysis implies all system and pipe properties are known and the objective is to evaluate pipe performance. Design means the pipe wall section properties are unknown, and that they will be determined in an iterative analysis process.
Method of analysis/design
(0, service, = 1, LRFD)
Choice of Working Stress (service) or Load Resistance Factor Design (LRFD) methodology for analysis and design. Working Stress uses actual loading conditions, whereas LRFD increases the actual load with specified load factors.
Solution Level = 1, Elasticity = 2, FEM with canned mesh = 3, FEM with user mesh
Level 2 is considered the workhorse of CANDE and provides a finite element solution methodology using an internally developed mesh based on a few physical parameters specified by the user in part C. Canned meshes are available for round, elliptical, box and arch-shaped culverts. Loading includes live loads as well as incremental layers of soil. Level 2’s major limitation is the assumption of symmetry about the vertical centerline of a specified pipe type. Level 3 provides the full power of the finite element method to characterize any soil-structure system. This includes multiple structural shapes and/or multiple structural materials (pipe types). Level 3 requires that the user develop the finite element mesh including element connectivity arrays, coordinates and boundary conditions. Although CANDE has many helpful mesh generation features, use of Level 3 requires some familiarity with the finite element method for proper modeling of the soil-structure system.
Use the auto-generate option for the interface elements
Check ‘ON’ or ‘OFF’ If this input is checked ‘ON’, CANDE will assume that the user is going to take advantage of the ‘Short-cut’ method for entering input ‘D-2.Interface Elements’. The input wizard will generate a beginning and ending set of D-1/D-2 commands to define the interface elements.

Chapter 4 – Graphical user interface (GUI) CANDE-2017 User Manual and Guideline
4-9
Parameter Input options Description Number of pipe element groups (level 3 only)
= number of groups (Maximum = 30)
For Level 1 and 2 the number of pipe groups is inherently defined = 1. For level 3, however, more than one pipe group may be specified if it is desired to model more than one pipe material or more than one sequence of connected pipe elements. Specifically, a pipe group is defined by a pipe material type (STEEL for example) and the number of pipe elements in that group (1 or more). The pipe elements in any group must be connected in an ordered sequence head-to-toe tracing a curvilinear path representing the mid depth of the structural segment. Pipe groups (or structural segments) may be connected to one another in any fashion or be disconnected. For example, one pipe group could represent a concrete box culvert and another group could represent an arch-shaped steel culvert that is not directly connected because they share no nodes in common. Or, two concrete culvert groups could represent the left and right footings connected to a group representing an arch-shaped steel culvert.
Heading for output text up to 60 characters long
This text will be placed in the heading of the CANDE output file.
LEVEL 2 Specific The following input is only applicable for the Level 2 type Solution Level.
Chapter 4 – Graphical user interface (GUI) CANDE-2017 User Manual and Guideline
4-10
Parameter Input options Description Canned Mesh Type (NPCAN)
Pipe mesh Box mesh Arch mesh
Under level 2, NPCAN allows the user to select the type of canned mesh to be used in this problem. For level 1 the NPCAN variable is not used, and for level 3 this variable is renamed NPMATX and defined differently as discussed subsequently. The “Pipe mesh” creates a circular or elliptical culvert cross-section assuming vertical centerline symmetry. Options for trench and embankment installations, interface elements, and incremental construction. (a.k.a CAN1 mesh) The “Box mesh” creates a rectangular, closed-cell culvert cross-section assuming vertical centerline symmetry. Options for trench and embankment installations, bedding depth and incremental construction. (a.k.a. CANBOX mesh) The “Arch mesh” creates a two or three segment arch resting on footings assuming vertical centerline symmetry. Options for trench and embankment installations with built-in interface elements. (a.k.a. CANAR1 mesh)
Soil Mesh Pattern Embankment Trench Homogeneous
The values available are dependent on the ‘Canned Mesh Type (NPCAN)’ entered: Pipe – (Embankment, Trench, Homogeneous) Box – (Embankment, Trench) Arch – (Embankment, Trench, Homogeneous)
Interface Elements (for pipes, only) Pipe-soil (SLIP) Trench-insitu (SLPT) None
WORD1 provides options for including frictional interfaces between pipe and soil or between trench soil and in-situ soil. Default (blank) means no interface elements are added. For WORD1 = SLIP, the mesh is automatically altered to include eleven interface elements at the common nodes between the pipe and soil. This feature allows for frictional slippage, separation and re-bonding of the pipe-soil interface during the loading schedule. The user must subsequently input interface material properties for each of the eleven interface elements as described in Part D. For WORD = SLPT, the trench mesh option is automatically altered to include seven interface elements at the common nodes between the trench wall and in-situ soil starting from the spring line to the top of the trench. This feature

Chapter 4 – Graphical user interface (GUI) CANDE-2017 User Manual and Guideline
4-11
Parameter Input options Description allows the trench soil to slip along the vertical during the backfilling loading schedule. The user must subsequently input interface material properties for each of the eleven interface elements as described in Part D
MOD-Make changes to the basic mesh
Checked if the user is going to change the basic Level 2 mesh.
If this item is checked, the user may change the basic mesh in terms of nodal locations, element properties and prescribed loads. This is accomplished by supplying additional data in lines CX-1 through CX-4 after the basic C-1 through C-4 data is complete. Motivations for changing the basic mesh include: add a live load(s), simulate voids or rocks in the soil system, and to change shapes such as the bedding. The default case (no modifications) applies to many basic problems without the need for modifications.
Chapter 4 – Graphical user interface (GUI) CANDE-2017 User Manual and Guideline
4-12
4.2.1.2 CANDE Input Wizard – Level 3 items This menu of the input wizard defines information related specifically to level 3 models.
Parameter Input options Description Select level 3 input option
Manual input Import mesh file
Two options are available in the Input Wizard for generating level 3 input documents. The manual input method requires that the user provide general level 3 information (i.e. number of nodes, number of elements, etc.). After the generation of the input file, the user will manually enter the coordinates, element connectivity, etc. in the blank input cells. The Import mesh file option, permits the input of a mesh file that has be created using the CANDE Mesh geometry XML format (see appendix section on XML Mesh Geometry).
Select the mesh import file
Click on the button with the (…). File name expected is *MeshGeom.xml. or a NASTRAN or CANDE-89 P1 file
CANDE has three options for importing: CANDE-MeshGeom.xml The file may have been generated by a previous CANDE run (for a Level 2 model that is now being imported as a level 3 model), or may have been generated externally. For the proper format of the Mesh Geometry file (see section in Appendix on XML Mesh Geometry format) NASTRAN – Limited NASTRAN input file import (see below and Appendix for more details). CANDE-89 P1 –This permits the import of P1 plot files generated by previous versions of CANDE.
Level 3 options The following only apply for the ‘Manual Input’ option. They are filled in automatically for the ‘Import mesh file’ option.
Number of nodes Input the number of nodes for this model. The nodal geometry will be entered once the input document is generated.
Number of elements Input the number of elements for this model. The element connectivity will be entered once the input document is generated.
Number of boundary conditions
Input the number of boundary conditions. The details of the boundary conditions will be entered once the input document is generated.
Number of load steps Input the number of load steps for this model. Number of soil materials
Enter the total number of soil materials for the model.
Number of interface elements.
Enter the number of interface elements for this model. If no interface elements, enter zero (‘0”).

Chapter 4 – Graphical user interface (GUI) CANDE-2017 User Manual and Guideline
4-13
CANDE Import options CANDE has the capability to import meshes for the following three formats:
• CANDE XML Mesh files (see) • CANDE-89 Plot files • NASTRAN
When the user clicks on the ‘Import File’ button in the ‘Level 3 Information’ window of the CANDE Input Wizard’, an import dialog box appears as shown in Figure 4.2-9. Figure 4.2-9 – CANDE import dialog box
The user clicks on the file format and then the ‘Import’ button. Once the import has concluded, the OK button will be enabled. Clicking;’OK’ finishes the import and returns the user to the CANDE Input Wizard. When importing NASTRAN or CANDE-89 files, a log file window will appear to display the progress of the import as shown in Figure 4.2-10 .Once the import is completed, the import log file can be reviewed by clicking on the ‘Review Import Log’ button. The log file will display any problems that CANDE had while performing the import. Figure 4.2-10 – Import log window
The formats for the available CANDE import files are in the Appendices
Chapter 4 – Graphical user interface (GUI) CANDE-2017 User Manual and Guideline
4-14
4.2.1.3 CANDE Input Wizard – Pipe Material This menu defines the pipe materials for this model. For levels 1 and 2, only one pipe material is permitted. NOTE: For Level 3, this menu is repeated for the number of pipe element groups entered on
the ‘Control Information’ screen Parameter Input options Description
Pipe material type (PTYPE)
Aluminum Basic Concrete Plastic Steel
Choosing PTYPE means the selection of the pipe material to be analyzed or designed. For level 1 or 2 only one pipe type can be selected per problem. For level 3 the user will select a PTYPE for each pipe group (NPGRPS times). Input for each PTYPE consists of Line A-2 followed by the set of lines in Part B, which defines the pipe-type properties. Corrugated aluminum cross-section with material options for elastic-plastic behavior. General cross-sectional properties with elastic material. Reinforced concrete smooth wall section with nonlinear material models for concrete and rebar. Smooth wall plastic pipe with linear material properties. (To be upgraded to profile wall with local buckling) Corrugated steel cross-section with elastic-plastic material behavior. Also, has option for slotted joint behavior.
Number of connected beam elements
Number of connected beam elements in this group, for level 3 only. Maximum = 999
The number (quantity) of beam elements in any group may range from 1 to 999. It is to be understood that elements in any group form a continuous sequence, connected head to toe tracing the centerline path of the structure or a segment of the structure. The group number identifier, 1 to NPGRPS, is automatically assigned in the sequential order of input. That is, the first data set (Line A2 plus set B) becomes group # 1; the second data set becomes group # 2, and so on until all NPGRPS groups are input. The linkage between the group numbers established here and the finite element mesh established in input set C is by means of the element’s material identification number called IX(5). In data set C, the user must assign the appropriate group number to each beam element’s material identification number.

Chapter 4 – Graphical user interface (GUI) CANDE-2017 User Manual and Guideline
4-15
Parameter Input options Description Concrete specific input The following input only applies for concrete
pipe materials. Reinforcement shape (RSHAPE)
Standard Elliptical Arbitrary Boxes
RSHAPE allows selection of how the reinforcement will be shaped and placed relative to the concrete inner and outer wall surfaces. Standard placement for two rows of reinforcement cages, which parallel the inner and outer wall surfaces. The concrete wall thickness is uniform and concrete cover-depths and properties are uniform in each individual cage. (Applicable to levels 1, 2, or 3; and design or analysis) Elliptical placement of a single reinforcement cage sometimes used in circular pipe. The cage starts at a specified cover-depth from the outer wall surface of the crown, transitions to the inner wall surface at the spring line, and transitions back to the outer wall at the invert. (Applicable to levels 1, 2, or 3; and design or analysis) Arbitrary placement of two rows of reinforcement. The concrete wall thickness, the reinforcements’ concrete cover-depth, and reinforcement steel areas may be specified at each node along the pipe-group path. (Applicable to levels 2 or 3 for analysis only) Boxes - Special placement of two rows of reinforcement conforming to ASTM box culvert specifications. (Intended to be used in conjunction with level 2 – Box mesh for analysis only)
Plastic specific input The following input only applies for plastic pipe materials.
Wall section type Smooth (design and analysis) General (analysis only) Profile (analysis only)
SMOOTH refers to uniform smooth wall (gun barrel) whose only independent cross section property is the wall thickness. Applies to design & analysis. GENERAL refers to arbitrary cross-section properties for area and moment of inertia without local buckling consideration. Applies only to analysis. PROFILE refers to a spectrum of profile shapes such as corrugated with or without liners, ribbed walls, etc. Profile shapes require additional geometry input and include local buckling analysis. Applies only to analysis.
Steel specific input The following input only applies for steel pipe materials.

Chapter 4 – Graphical user interface (GUI) CANDE-2017 User Manual and Guideline
4-16
Parameter Input options Description Joint slip No
Yes Yes, show trace
This option allows the representation of slipping joint behavior like the so-called “key-hole slot”, wherein joint slippage is intended to reduce thrust stress. Further input is required.
Vary joint travel length Same lengths Different lengths
This option applies to solution levels 2 & 3. One main utility of this option is to model “half joints”. This occurs in level 2 meshes when the axis of symmetry cuts through a joint at the crown or invert, which produces a half-joint with the same properties as a full joint except the slot length, is one-half its full value.
Number of joints Enter the number of joints if ‘Joint Slip’ has been entered as ‘Yes’ (Maximum =15)
This is the actual number of joints (longitudinal seams) in the pipe-group model. The model for Level 1 is the whole circular pipe, whereas Level 2 is modeled using a symmetric half shape.

Chapter 4 – Graphical user interface (GUI) CANDE-2017 User Manual and Guideline
4-17
4.2.2 Opening an Existing CANDE Input Document with File->Open Existing CANDE input documents may be opened using the File→Open menu (see below). Figure 4.2-11 – Opening an existing CANDE input document
CANDE input files must have a .CID extension. CANDE uses the prefix to name all other files in a CANDE project. For example, the CANDE input file title ‘EX1.cid’ will produce the following CANDE files when the analysis is run:
EX1.ctc CANDE output table of contents. EX1.out CANDE output files EX1.log CANDE analysis log file EX1_BeamResults.xml Generated by the CANDE analysis run and used for graphic of the beam
analysis results. EX1_MeshGeom.xml Generated by the CANDE analysis run and used for plotting of the FEM
mesh. EX1_MeshResults.xml Generated by the CANDE analysis run and used for plotting of the mesh
results for the FEM mesh. For further description of these files and others generated by CANDE, see the Appendix of this User Manual.

Chapter 4 – Graphical user interface (GUI) CANDE-2017 User Manual and Guideline
4-18
4.2.3 Opening an Existing CANDE Input Document with File->Open Text Input To open an existing CANDE input documents with the CANDE text editor, use the File→Open menu (see below). This option may be used in lieu of the CANDE input menu interface and is generally for users who are very familiar with the CANDE data file input format. A detailed description of the CANDE input text editor is provided in a subsequent section. Figure 4.2-12 – Opening an existing CANDE input document in the CANDE input text editor
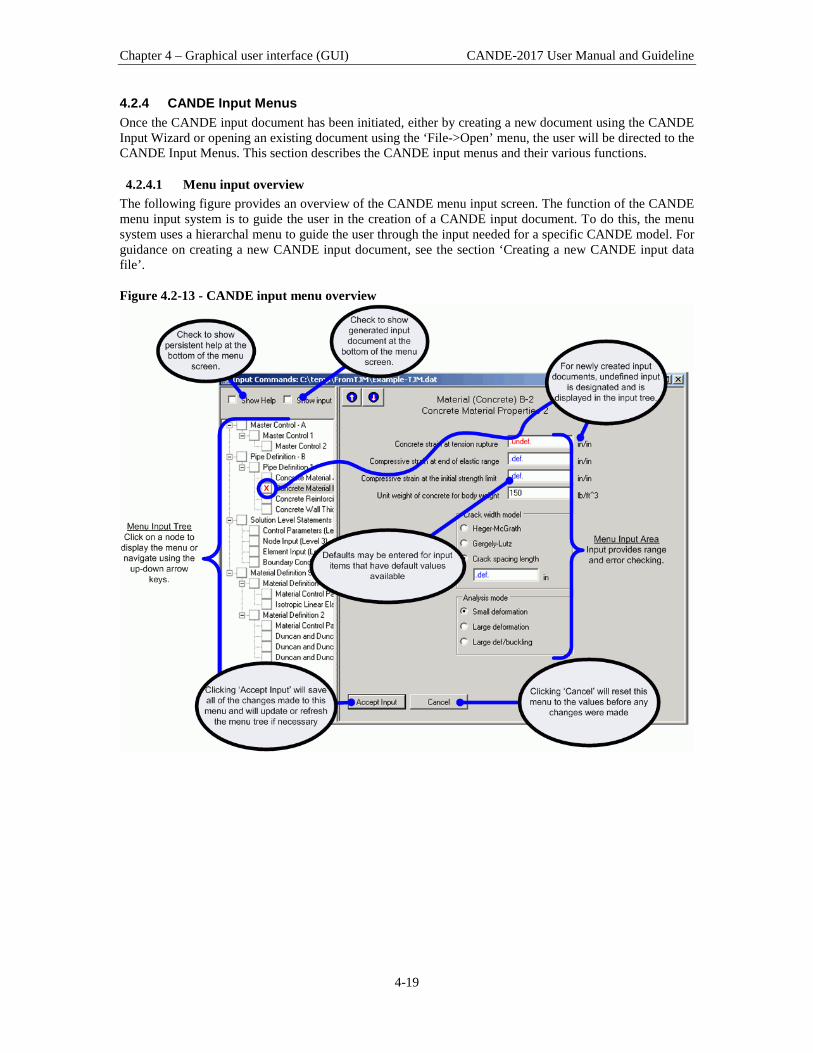
Chapter 4 – Graphical user interface (GUI) CANDE-2017 User Manual and Guideline
4-19
4.2.4 CANDE Input Menus Once the CANDE input document has been initiated, either by creating a new document using the CANDE Input Wizard or opening an existing document using the ‘File->Open’ menu, the user will be directed to the CANDE Input Menus. This section describes the CANDE input menus and their various functions.
4.2.4.1 Menu input overview The following figure provides an overview of the CANDE menu input screen. The function of the CANDE menu input system is to guide the user in the creation of a CANDE input document. To do this, the menu system uses a hierarchal menu to guide the user through the input needed for a specific CANDE model. For guidance on creating a new CANDE input document, see the section ‘Creating a new CANDE input data file’. Figure 4.2-13 - CANDE input menu overview
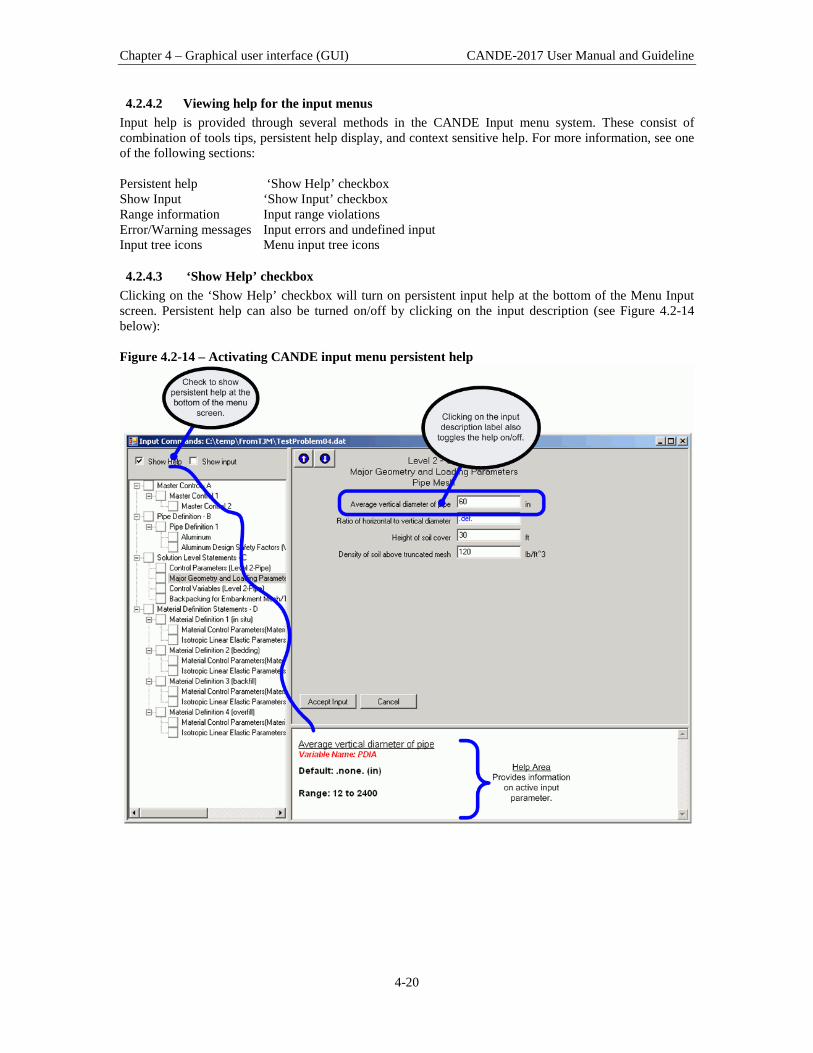
Chapter 4 – Graphical user interface (GUI) CANDE-2017 User Manual and Guideline
4-20
4.2.4.2 Viewing help for the input menus Input help is provided through several methods in the CANDE Input menu system. These consist of combination of tools tips, persistent help display, and context sensitive help. For more information, see one of the following sections: Persistent help ‘Show Help’ checkbox Show Input ‘Show Input’ checkbox Range information Input range violations Error/Warning messages Input errors and undefined input Input tree icons Menu input tree icons
4.2.4.3 ‘Show Help’ checkbox Clicking on the ‘Show Help’ checkbox will turn on persistent input help at the bottom of the Menu Input screen. Persistent help can also be turned on/off by clicking on the input description (see Figure 4.2-14 below): Figure 4.2-14 – Activating CANDE input menu persistent help

Chapter 4 – Graphical user interface (GUI) CANDE-2017 User Manual and Guideline
4-21
4.2.4.4 ‘Show Input’ checkbox Clicking on the ‘Show Input’ checkbox will turn on CANDE input document display at the bottom of the Menu Input screen (see Figure 4.2-15 below). This input is NOT modifiable through this screen, but provides a view of the input document for those familiar with the format. Figure 4.2-15 – Activating CANDE input menu ‘Show Input’

Chapter 4 – Graphical user interface (GUI) CANDE-2017 User Manual and Guideline
4-22
4.2.4.5 Input range violations If a user enters a value below the lower range or above the upper range, the text is turned to red and a warning message is displayed when the user enters that input field as shown in Figure 4.2-16 below. Figure 4.2-16 – CANDE input menus range violation
While the user is warned of range violations, CANDE will permit the user to run the analysis. For input errors that are not range violations, CANDE will NOT permit running the analysis.

Chapter 4 – Graphical user interface (GUI) CANDE-2017 User Manual and Guideline
4-23
4.2.4.6 Input errors and undefined input In addition to checking upper and lower limit ranges, the CANDE menu input system will check for input typos and for new input documents will highlight ‘undefined’ input that must be provided before a CANDE analysis may be run. A sample of an input typo is shown in Figure 4.2-17 where a character is entered where a numeric is expected. Figure 4.2-17 – Error in CANDE input menus with an invalid character
For this type of error CANDE will not run until the error is corrected. An error is also provided if user attempts to click on ‘Accept Input’ without changing the value. Undefined input Similar messages are provided when input is marked as undefined (‘.undef.’). Input is typically marked as undefined for new CANDE input documents or when the input tree changes because of a revised input command (e.g. when the soil model is changed in the Part D commands, new input menus are added to the input tree that contain undefined values). If any item on the input menu is marked as undefined, the menu tree will display a red ‘X’ for that menu. The CANDE analysis may not be run until all undefined quantities have been resolved.

Chapter 4 – Graphical user interface (GUI) CANDE-2017 User Manual and Guideline
4-24
4.2.4.7 Menu input tree icons The CANDE menu input tree provides different icons to display the status of all the menus at a glance. An example is shown below.
The following table provides a summary of the different icon states.
Icon Description - Clear icon
Input for this menu does not contain any errors or ‘undefined’ values. The user however is responsible for checking the input to ensure that it is correct with respect to the current model being considered.
- Error icon
The input for this menu contains one or more errors and/or ‘undefined’ values. All of these values must be resolved before the CANDE analysis may be run.
- Input Change
One or more input item for this menu has changed. If the user attempts to leave them menu before ‘Accept Input’ is clicked, a warning message will appear asking the user to save the input.
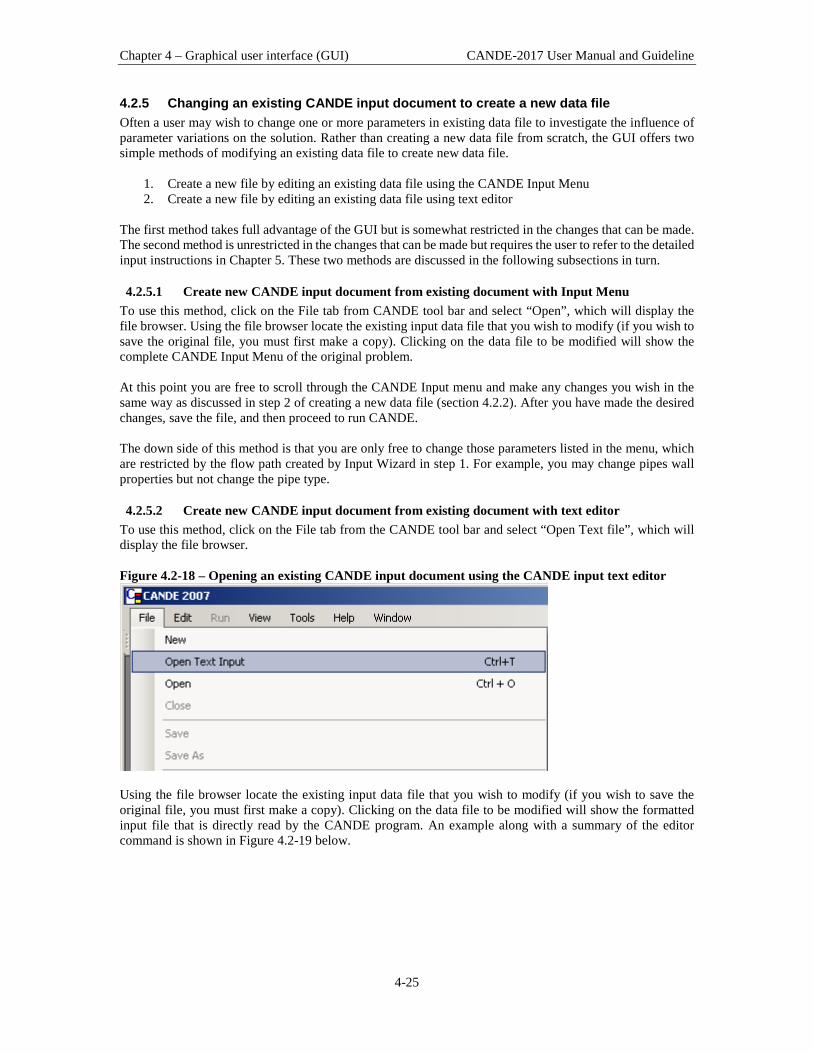
Chapter 4 – Graphical user interface (GUI) CANDE-2017 User Manual and Guideline
4-25
4.2.5 Changing an existing CANDE input document to create a new data file Often a user may wish to change one or more parameters in existing data file to investigate the influence of parameter variations on the solution. Rather than creating a new data file from scratch, the GUI offers two simple methods of modifying an existing data file to create new data file.
1. Create a new file by editing an existing data file using the CANDE Input Menu 2. Create a new file by editing an existing data file using text editor
The first method takes full advantage of the GUI but is somewhat restricted in the changes that can be made. The second method is unrestricted in the changes that can be made but requires the user to refer to the detailed input instructions in Chapter 5. These two methods are discussed in the following subsections in turn.
4.2.5.1 Create new CANDE input document from existing document with Input Menu To use this method, click on the File tab from CANDE tool bar and select “Open”, which will display the file browser. Using the file browser locate the existing input data file that you wish to modify (if you wish to save the original file, you must first make a copy). Clicking on the data file to be modified will show the complete CANDE Input Menu of the original problem. At this point you are free to scroll through the CANDE Input menu and make any changes you wish in the same way as discussed in step 2 of creating a new data file (section 4.2.2). After you have made the desired changes, save the file, and then proceed to run CANDE. The down side of this method is that you are only free to change those parameters listed in the menu, which are restricted by the flow path created by Input Wizard in step 1. For example, you may change pipes wall properties but not change the pipe type.
4.2.5.2 Create new CANDE input document from existing document with text editor To use this method, click on the File tab from the CANDE tool bar and select “Open Text file”, which will display the file browser. Figure 4.2-18 – Opening an existing CANDE input document using the CANDE input text editor
Using the file browser locate the existing input data file that you wish to modify (if you wish to save the original file, you must first make a copy). Clicking on the data file to be modified will show the formatted input file that is directly read by the CANDE program. An example along with a summary of the editor command is shown in Figure 4.2-19 below.
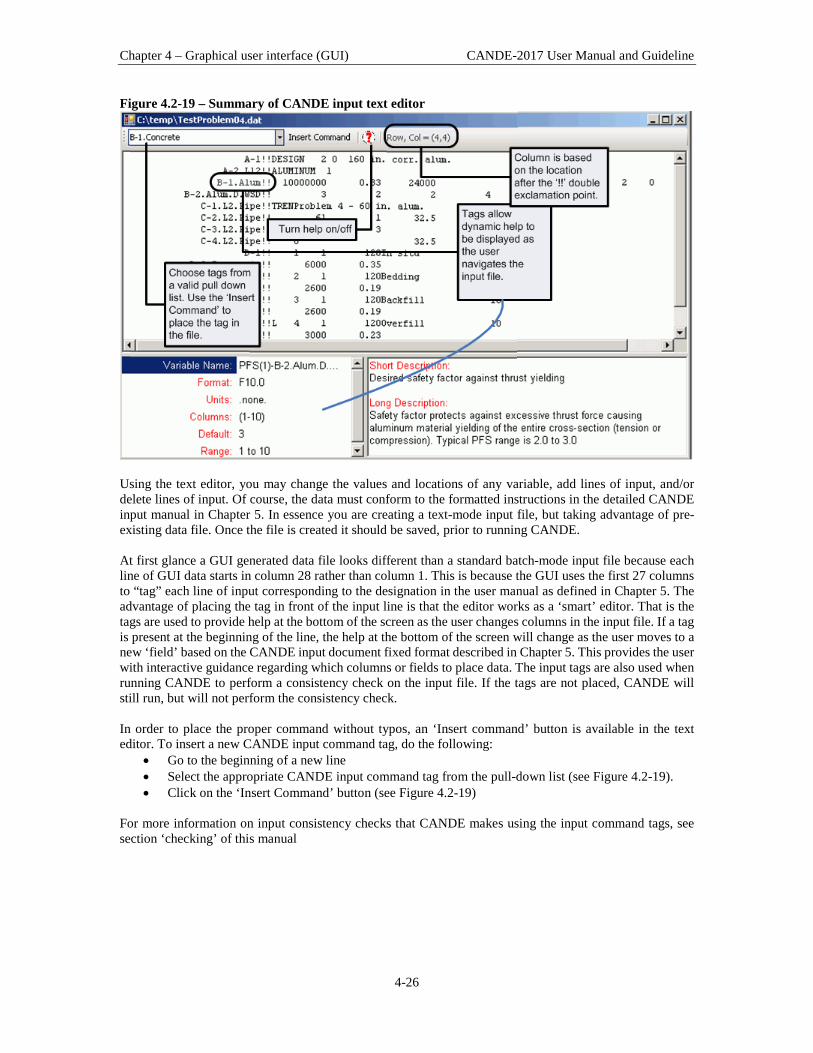
Chapter 4 – Graphical user interface (GUI) CANDE-2017 User Manual and Guideline
4-26
Figure 4.2-19 – Summary of CANDE input text editor
Using the text editor, you may change the values and locations of any variable, add lines of input, and/or delete lines of input. Of course, the data must conform to the formatted instructions in the detailed CANDE input manual in Chapter 5. In essence you are creating a text-mode input file, but taking advantage of pre-existing data file. Once the file is created it should be saved, prior to running CANDE. At first glance a GUI generated data file looks different than a standard batch-mode input file because each line of GUI data starts in column 28 rather than column 1. This is because the GUI uses the first 27 columns to “tag” each line of input corresponding to the designation in the user manual as defined in Chapter 5. The advantage of placing the tag in front of the input line is that the editor works as a ‘smart’ editor. That is the tags are used to provide help at the bottom of the screen as the user changes columns in the input file. If a tag is present at the beginning of the line, the help at the bottom of the screen will change as the user moves to a new ‘field’ based on the CANDE input document fixed format described in Chapter 5. This provides the user with interactive guidance regarding which columns or fields to place data. The input tags are also used when running CANDE to perform a consistency check on the input file. If the tags are not placed, CANDE will still run, but will not perform the consistency check. In order to place the proper command without typos, an ‘Insert command’ button is available in the text editor. To insert a new CANDE input command tag, do the following:
• Go to the beginning of a new line • Select the appropriate CANDE input command tag from the pull-down list (see Figure 4.2-19). • Click on the ‘Insert Command’ button (see Figure 4.2-19)
For more information on input consistency checks that CANDE makes using the input command tags, see section ‘checking’ of this manual
Chapter 4 – Graphical user interface (GUI) CANDE-2017 User Manual and Guideline
4-27
4.2.6 Create a CANDE input document using the CANDE input text editor If desired, an input file (CANDE input document) may be developed externally using other software or by hand typing line-by-line the formatted input data as prescribed by the input instructions in Chapter 5. The only prerequisite is that data input files must have a .cid extension along with any prefix name you choose. After the data file is created and saved, launch the CANDE-2007 program, click on the File tab, and select Open Text Input. Using the file browser locate the CANDE input document to be executed and click on Run CANDE 2007. CANDE uses the name you choose as a prefix to name all other files that are generated as result of running your input file. These generated files will be saved in the same folder as the CANDE input document. While it is not necessary to use “input command tags” on the input lines like those provided by the GUI, however, providing the input tags provides a level of consistency checking that will not occur if the tags are not present. For a description of why the tags are useful, see ‘CANDE input consistency checking’. Recall that name tags are used by the GUI to identify the input line according to the instruction manual section letter and line number such ‘A-1!!’ for the first input line followed by a double exclamation mark (!!).

Chapter 4 – Graphical user interface (GUI) CANDE-2017 User Manual and Guideline
4-28
4.3 Running CANDE If the data file to be run is already open such as when creating a new data file, simply click Run CANDE-2007 to execute the program. To run any existing CANDE input data file, click the File tab and choose:
• “Open” to open data file in CANDE Input Menu format • Or, “Open Text Input” to open data file as a batch-mode data list.
Using the file browser select the data file to be run. Regardless of how the data file was created, it be opened in either of the above two modes and executed. Figure 4.3-1 – Running CANDE-2007 analysis
Once started, the CANDE interface will be hidden and the CANDE analysis log file will appear (see Figure 4.3-2 below). No other operations in CANDE can be performed while the analysis is running. The first line of the log file as well as the output report prints out the CANDE version that is being run so that you can check if you are running the CANDE-2017 program or some earlier version. Figure 4.3-2 – View of CANDE Analysis while running
When the analysis is completed, the ‘Close’ button will be activated. Click the ‘Close’ to return to the CANDE interface. NOTE: The information that CANDE prints to the screen is available back in the CANDE interface by selecting the ‘View->CANDE Log File' option from the menu.
Chapter 4 – Graphical user interface (GUI) CANDE-2017 User Manual and Guideline
4-29
4.3.1 Successful execution The successful execution of any CANDE run is observed by the appearance of the last output line on the monitor screen and the CANDE Log File, saying: **** NORMAL EXIT FROM CANDE **** This message means that all the input data has been read without input errors and that all the specified load steps have been processed without execution errors. However, it does not guarantee the input data is correctly defined; only the user can make this determination by reviewing the CANDE output report. Moreover, when nonlinear models are included the problem, the above message does not imply that every load step converged within acceptable limits. When any load step does not converge, a separate message is printed on the monitor screen and in the CANDE Log File identifying the load step number that did not converge along with the iteration limit.
4.3.2 Unsuccessful execution An unsuccessful execution of any CANDE run is observed when the program stops prior to completion without the “normal exit from CANDE” message. When this occurs, diagnostic messages are printed on the screen and saved in the CANDE Log File as well as printed in the CANDE Output Report. The most common error is a data input error. In many cases CANDE will detect these errors with internal programming that checks the data makes physical sense. In such cases, the printed diagnostics will state the nature of the error and the suspected input line number where the error occurred along with an error number. Typically, the user will be able to discover the cause of the error based on the diagnostic information and then make the necessary corrections. A second type error is the so-called execution error, the cause of which can be more difficult to determine. As opposed to a message from CANDE, this type error is identified by a system error message such as exceeding the dimension of a particular variable, division by zero and other similar system error messages. Very often these types of errors can be traced back to incorrect input data as opposed to a bug in the CANDE program. In such cases the user should carefully review the input data as listed in the CANDE Output Report, not the input data file. The CANDE Output Report lists all the input data as interpreted and/or generated by CANDE in an easy to understand format. As a last resort, the user may contact the CANDE program developers to help determine the source of the error.
4.3.3 CANDE input consistency checking CANDE input documents that are generated by the input menus contain input tags at the beginning of each input line. These tags serve several purposes:
• They provide a quick description of the input line if a user is reviewing a CANDE input document in a text editor.
• In the CANDE input text editor, they facilitate the use of the ‘smart’ help used by the CANDE text editor by providing help as the user moves to a new input column.
• When the CANDE analysis engine is running, a consistency check is performed as the input document is read that checks the ‘expected’ input line and compares it with the ‘actual’ input line. If the two don’t match, a warning is provided to the user. CANDE will continue to read the input file, but messages will be provided to guide the user if an input line is missing or out of place.
This consistency check can be particularly useful if the user is generating a CANDE input fie by using the CANDE input text editor rather than using the Input Menus. The menus automatically generate the input document, but using the text editor, the user is in charge of the input document creation. Using the input tags provides the user with an additional level of checking. An example of an input file consistency check error and an input check message is shown below. The following is a snippet of a valid CANDE input document.
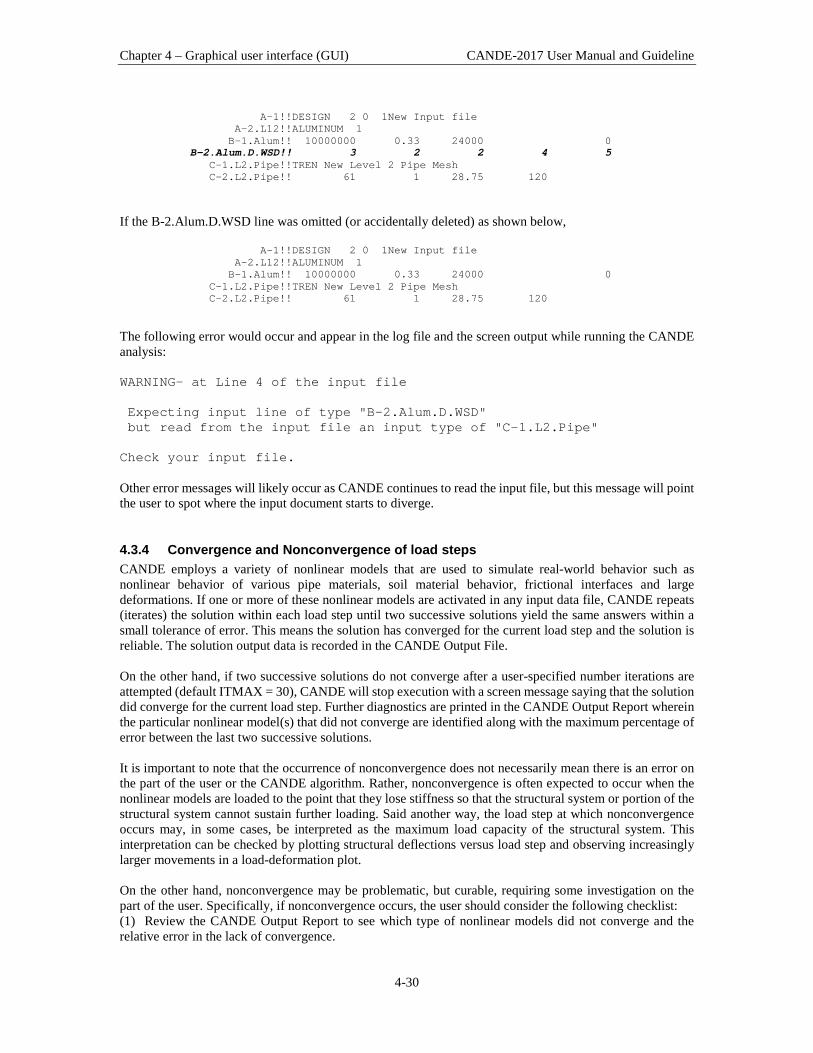
Chapter 4 – Graphical user interface (GUI) CANDE-2017 User Manual and Guideline
4-30
A-1!!DESIGN 2 0 1New Input file A-2.L12!!ALUMINUM 1 B-1.Alum!! 10000000 0.33 24000 0 B-2.Alum.D.WSD!! 3 2 2 4 5 C-1.L2.Pipe!!TREN New Level 2 Pipe Mesh C-2.L2.Pipe!! 61 1 28.75 120 If the B-2.Alum.D.WSD line was omitted (or accidentally deleted) as shown below, A-1!!DESIGN 2 0 1New Input file A-2.L12!!ALUMINUM 1 B-1.Alum!! 10000000 0.33 24000 0 C-1.L2.Pipe!!TREN New Level 2 Pipe Mesh C-2.L2.Pipe!! 61 1 28.75 120 The following error would occur and appear in the log file and the screen output while running the CANDE analysis: WARNING- at Line 4 of the input file Expecting input line of type "B-2.Alum.D.WSD" but read from the input file an input type of "C-1.L2.Pipe" Check your input file. Other error messages will likely occur as CANDE continues to read the input file, but this message will point the user to spot where the input document starts to diverge.
4.3.4 Convergence and Nonconvergence of load steps CANDE employs a variety of nonlinear models that are used to simulate real-world behavior such as nonlinear behavior of various pipe materials, soil material behavior, frictional interfaces and large deformations. If one or more of these nonlinear models are activated in any input data file, CANDE repeats (iterates) the solution within each load step until two successive solutions yield the same answers within a small tolerance of error. This means the solution has converged for the current load step and the solution is reliable. The solution output data is recorded in the CANDE Output File. On the other hand, if two successive solutions do not converge after a user-specified number iterations are attempted (default ITMAX = 30), CANDE will stop execution with a screen message saying that the solution did converge for the current load step. Further diagnostics are printed in the CANDE Output Report wherein the particular nonlinear model(s) that did not converge are identified along with the maximum percentage of error between the last two successive solutions. It is important to note that the occurrence of nonconvergence does not necessarily mean there is an error on the part of the user or the CANDE algorithm. Rather, nonconvergence is often expected to occur when the nonlinear models are loaded to the point that they lose stiffness so that the structural system or portion of the structural system cannot sustain further loading. Said another way, the load step at which nonconvergence occurs may, in some cases, be interpreted as the maximum load capacity of the structural system. This interpretation can be checked by plotting structural deflections versus load step and observing increasingly larger movements in a load-deformation plot. On the other hand, nonconvergence may be problematic, but curable, requiring some investigation on the part of the user. Specifically, if nonconvergence occurs, the user should consider the following checklist: (1) Review the CANDE Output Report to see which type of nonlinear models did not converge and the relative error in the lack of convergence.

Chapter 4 – Graphical user interface (GUI) CANDE-2017 User Manual and Guideline
4-31
(2) Examine the input parameters of the nonlinear models that did not converge and make sure that the parameters are correct and reasonable. For example, a common input error for interface elements is that they are assigned incorrect interface angles in input line D-2 (3) Try reducing the load magnitude assigned to each load step. That is, use more load steps to define thinner soil layers for gravity loads and/or smaller force increments for boundary conditions. (4) Try increasing the maximum number of iterations, ITMAX on input line A-1. Typically, the default value is sufficient, but some cases have required 50 or more iterations to achieve convergence. If convergence has not been obtained in 100 iterations, it is probably fruitless to try more iterations. (5) Try reducing the number of different nonlinear models to isolate the problem. For example, turn off the large deformation option, or inactivate the interface elements by assigning large numbers to the friction coefficient and tension strength, or increase the strength parameters on the pipe models. As a last resort, CANDE offers the option to continue the execution after nonconvergence occurs. This is achieved by specifying the iteration limit as a negative number (e.g., ITMAX = -30). In this case all the load steps are solved and those load steps that did not converge are identified. However, all solutions beyond the load step where nonconvergence first occurred must be viewed with suspicion. In this case the user must exercise engineering judgment to carefully examine the output data and the diagnostics to see if the final solution is meaningful.

Chapter 4 – Graphical user interface (GUI) CANDE-2017 User Manual and Guideline
4-32
4.3.5 CANDE Analysis error messages The following table provides a summary of the CANDE input errors that may be reported when creating a CANDE input document.
Input Error Number Text
9001 Input: Aluminum: Some Pipe Section Properties are zero. 9002 Input: Basic: Beam sequence numbers are out of bounds 9003 Input: CAN1: Incorrect command for CAN1 mesh. 9004 Input: CAN1: Number of load steps exceeds maximum. 9005 Input: CAN1: Pipe diameter ratio is beyond limit for CAN1 mesh 9006 Input: CAN1: FATAL-Height of cover must be within allowable limits. 9007 Input: CAN1: Thickness of backpacking is not within allowable limits 9008 Input: CAN1: Trench is too narrow in CAN1 mesh to accommodate backpacking 9009 Input: CAN1: Trench is too narrow in CAN1 mesh. 9010 Input: CAN1: Trench is too wide in CAN1 mesh. 9011 Input: CAN1: Trench is too shallow for CAN1 mesh. 9012 Input: CAN1: Hgt. Trench+Hgt. of cover must be greater than 1.3 * Pipe Diameter. 9013 Input:CANAR1:Incorrect mesh pattern for CANAR1 mesh. 9014 Input:CANAR1:Incorrect "modify" command for CANAR1 mesh 9015 Input:CANAR1: Number of Construction Increments must be within limits. 9016 Input:CANAR1: Half-span must be a positive number. 9017 Input:CANAR1: Side-Rise must be non-negative. 9018 Input:CANAR1: Radius must be non-negative. 9019 Input:CANAR1: Trench width must be within limits. 9020 Input:CANAR1: Trench depth must be within limits. 9021 Input:CANAR1: Trench slope must be within limits. 9022 Input:CANAR1: Outer footing width must be within limits. 9023 Input:CANAR1: Outer footing width must be within limits. 9024 Input:CANAR1: Inner footing width must be within limits. 9025 Input:CANAR1: Footing depth must be within limits. 9026 Input:CANAR1: Number of "NTN" nodal points must be within limits 9027 Input:CANAR1: Number of "NCN" nodal points must be within limits 9028 Input:CANAR1: Number of "NTN" nodal points must be within limits 9029 Input:CANAR1: Number of "NCN" nodal points must be within limits 9030 Input:CANAR1: Arch geometry is not self consistent. 9031 Input:CANAR1: Arch geometry is not self consistent. 9032 Input:CANBOX:Incorrect mesh pattern for CANBOX 9033 Input:CANBOX:The cover height must be >= 0.0 9034 Input:CONCRE: Must use Level 2 for RSHAPE=BOXES 9035 Input:CANDE_DLL:Invalid Design/Analysis Input = 9036 Input:CANDE_DLL:Invalid Level Number = 9037 Input:CANDE_DLL: Error for Pipe-Type = 9038 Input:CANDE_DLL: Error for LEVEL = 9039 Input:CANDE_DLL: *** STOP, INVALID PIPE-TYPE NAME = 9040 Input:CANDE_DLL: *** STOP, INVALID CANNED MESH NUMBER =
9041 Input:CANDE_DLL: *** STOP, END OF FILE ENCOUNTERED ON FIRST INPUT'
9042 Input:CANDE_DLL: Element number "NE" is out of bounds.
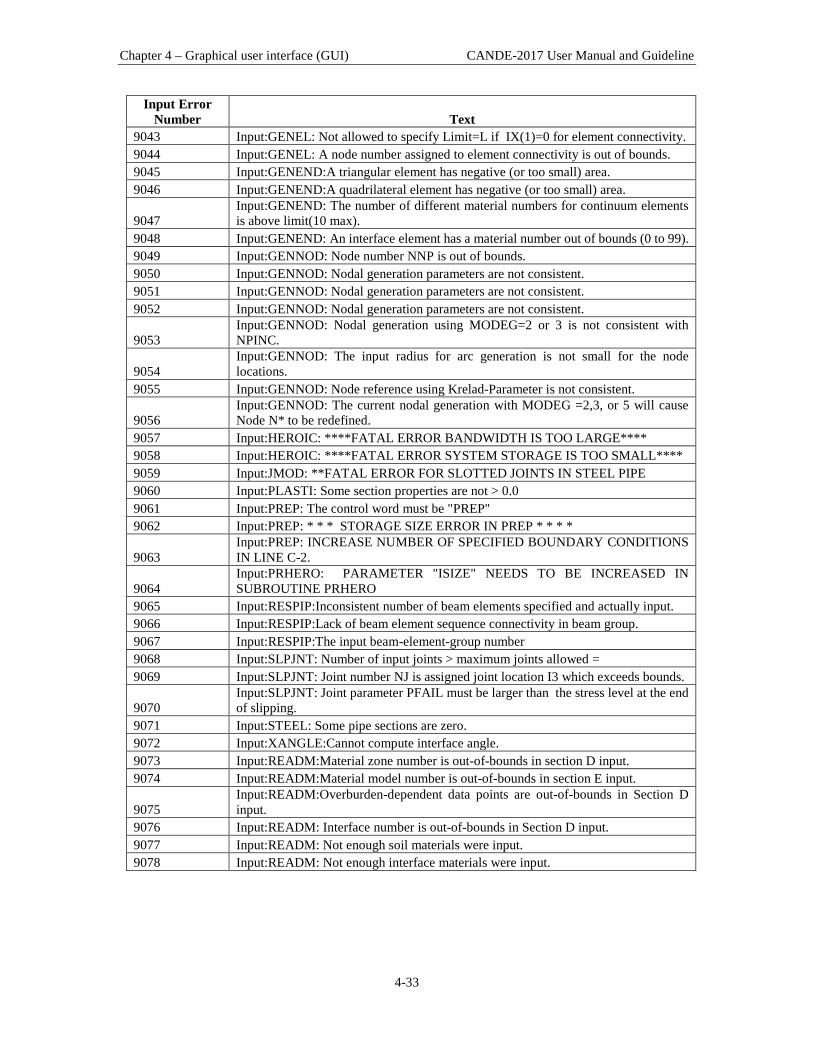
Chapter 4 – Graphical user interface (GUI) CANDE-2017 User Manual and Guideline
4-33
Input Error Number Text
9043 Input:GENEL: Not allowed to specify Limit=L if IX(1)=0 for element connectivity. 9044 Input:GENEL: A node number assigned to element connectivity is out of bounds. 9045 Input:GENEND:A triangular element has negative (or too small) area. 9046 Input:GENEND:A quadrilateral element has negative (or too small) area.
9047 Input:GENEND: The number of different material numbers for continuum elements is above limit(10 max).
9048 Input:GENEND: An interface element has a material number out of bounds (0 to 99). 9049 Input:GENNOD: Node number NNP is out of bounds. 9050 Input:GENNOD: Nodal generation parameters are not consistent. 9051 Input:GENNOD: Nodal generation parameters are not consistent. 9052 Input:GENNOD: Nodal generation parameters are not consistent.
9053 Input:GENNOD: Nodal generation using MODEG=2 or 3 is not consistent with NPINC.
9054 Input:GENNOD: The input radius for arc generation is not small for the node locations.
9055 Input:GENNOD: Node reference using Krelad-Parameter is not consistent.
9056 Input:GENNOD: The current nodal generation with MODEG =2,3, or 5 will cause Node N* to be redefined.
9057 Input:HEROIC: ****FATAL ERROR BANDWIDTH IS TOO LARGE**** 9058 Input:HEROIC: ****FATAL ERROR SYSTEM STORAGE IS TOO SMALL**** 9059 Input:JMOD: **FATAL ERROR FOR SLOTTED JOINTS IN STEEL PIPE 9060 Input:PLASTI: Some section properties are not > 0.0 9061 Input:PREP: The control word must be "PREP" 9062 Input:PREP: * * * STORAGE SIZE ERROR IN PREP * * * *
9063 Input:PREP: INCREASE NUMBER OF SPECIFIED BOUNDARY CONDITIONS IN LINE C-2.
9064 Input:PRHERO: PARAMETER "ISIZE" NEEDS TO BE INCREASED IN SUBROUTINE PRHERO
9065 Input:RESPIP:Inconsistent number of beam elements specified and actually input. 9066 Input:RESPIP:Lack of beam element sequence connectivity in beam group. 9067 Input:RESPIP:The input beam-element-group number 9068 Input:SLPJNT: Number of input joints > maximum joints allowed = 9069 Input:SLPJNT: Joint number NJ is assigned joint location I3 which exceeds bounds.
9070 Input:SLPJNT: Joint parameter PFAIL must be larger than the stress level at the end of slipping.
9071 Input:STEEL: Some pipe sections are zero. 9072 Input:XANGLE:Cannot compute interface angle. 9073 Input:READM:Material zone number is out-of-bounds in section D input. 9074 Input:READM:Material model number is out-of-bounds in section E input.
9075 Input:READM:Overburden-dependent data points are out-of-bounds in Section D input.
9076 Input:READM: Interface number is out-of-bounds in Section D input. 9077 Input:READM: Not enough soil materials were input. 9078 Input:READM: Not enough interface materials were input.

Chapter 4 – Graphical user interface (GUI) CANDE-2017 User Manual and Guideline
4-34
4.4 Output data and viewing options To view any output data that has been created from a previously run input file, click “File” on the CANDE tool bar and choose either “Open text input” or “Open” from the drop down menu. A browser window is displayed from which the user selects the name of the input file whose output is to be viewed and plotted. Next, click on “View” from the CANDE tool bar the drop down menu offers five viewing choices for output consisting of three text files and two interactive graphic tools, which are also accessible from individual icons on the tool bar. The five choices are shown below. Figure 4.4-1 – CANDE output view options
Short descriptions of the five choices are provided below, followed by more detailed discussion in subsequent sections.
• CANDE Output Report. This is the most comprehensive output file and contains text and tables for all the input selections as well as the complete set of structural response data for each load step. The Output Report has an interactive table of contents that allows the user to quickly locate output data of interest. Most notably the evaluation of the pipe type is given in last subsection.
• CANDE Log File. The log file is a short file that is displayed on the monitor screen during execution.
It contains the master input selections along with a history list of each load step analyzed and a trace of iterations required to solve each load step. If the solution is unsuccessful the log file also provides error messages and, when possible, guidance to correct the error.
• Mesh Plot. The mesh plot is an interactive plotting tool for creating and viewing the finite element
mesh topology (Level 2 and 3) including element numbering, nodal connectivity, material zones, load steps, and boundary conditions. Likewise, the tool is used to create and plot solution output such as deformed shapes and color contours of soil stresses and strains.
• Graphs. This is an interactive plotting tool for creating and viewing the structural response of beam
element groups, i.e., pipe types. Structural responses are plotted contiguously over the pipe shape for any load step or sets of load steps. Structural responses include moments, thrusts and shears as well as responses specific to the pipe type such as plastic penetration for corrugated metal and crack depth for reinforced concrete.
• Results Generator. This is an interactive text writing tool allowing the user to easily reformat the
CANDE output data into in a tailor-made report. Options are available for tabularizing soil responses and pipe group responses as a function of load step.
4.4.1 CANDE Output Report The CANDE output report that is generated during a CANDE analysis is being run may be viewed in the GUI by selecting the View-> Output Report (CANDE) from the main menu (see below).

Chapter 4 – Graphical user interface (GUI) CANDE-2017 User Manual and Guideline
4-35
Figure 4.4-2 – Viewing the CANDE output report
The CANDE Output Report is the primary reference document that defines values for all the input variables as well as the complete tabularized output of soil responses, interface responses and structural responses for each pipe group including safety evaluations of the culvert’s structural performance in terms of appropriate design criteria. The report’s bottom line is a safety evaluation of each pipe group given at the end of the report. The Output Report reviewer is equipped with an interactive table of contents that allows the user to quickly locate data of interest. To go directly to a location in the output file, simply click on a node in the interactive ‘Output Table of Contents’ shown on the left side of the screen. A ‘Find’ and ‘Find Next’ button are also available to search for known strings in the output file (such as ‘Error’). The 1st -level headings are organized into three major categories;
(1) Master control and pipe-type data, (2) Review system input data, (3) Solution output results.
If the user selected the design mode, a fourth major heading called design solution is also included in the table of contents. An example of an Output Report is shown in the output report viewer below highlighting the nodal displacements for the 3rd load step.

Chapter 4 – Graphical user interface (GUI) CANDE-2017 User Manual and Guideline
4-36
Figure 4.4-3 – CANDE Output Viewer

Chapter 4 – Graphical user interface (GUI) CANDE-2017 User Manual and Guideline
4-37
4.4.1.1 Master control and pipe type data The master control heading contains the high-level input choices defining the problem and is the first entry in the table of contents with the information shown below: Master Control
• Title of problem • Execution mode • Solution level • Methodology (LFRD or service) • Number of pipe groups • Iteration control
Pipe data is reported by pipe-group number in sequence. Within each pipe group the input data (specified and defaulted) is displayed as illustrated below. Pipe-Type Properties for Group # x
• Type of pipe material • Number of pipe elements in group • Tables of pipe cross-section properties • Tables of pipe material properties • Design factors if applicable • Selection of large deformation/buckling
4.4.1.2 Review of system input data The second heading level contains a review of system input data describing the geometry and loading of the culvert installation. The table’s contents are dependent upon the Solution Level (Level 1, 2 or 3) as illustrated in the following table of content headings. Level 1 System Properties
• Pipe diameter • Soil density • Number of load increments • Slip or bonded pipe-soil interface assumption • Table of soil stiffness properties versus fill height • Table of LRFD load factors per load step, if applicable
Level 2 Data for Canned Meshes
• Canned mesh type (pipe, box or arch) • Type of installation (embankment, trench or other) • Number of load steps • Geometry, shape and dimensions of culvert • Soil height and density • Material zones and dimensions • Interface element options
Level 2 and 3 Finite Element Input Controls and Input data
• Print and plot control numbers • Key numbers describing mesh topology • Listing of all input nodes • X and Y coordinates and node generation codes • Listing of all element numbers, node connectivity material numbers and load step • List of all nodes and coordinates including Laplace generated nodes

Chapter 4 – Graphical user interface (GUI) CANDE-2017 User Manual and Guideline
4-38
• Listing of all nodes where boundary conditions are specified • Listing of local pipe node sequence number related to mesh nodes • Soil model type and properties for each continuum material number • Interface element properties for each interface material number • Listing of load factors for each load step (if applicable)
4.4.1.3 Design solution (if applicable) The next major heading provides the design solution (if applicable), which is dependent on pipe type as shown below. Corrugated Metal Design Solution
• Design iteration count • Required moment of inertia and section area • Available corrugation sizes and thicknesses • Optimum design solution and prelude to final analysis
Plastic Pipe Design Solutions
• Design iteration count • Required wall thickness • Safety evaluation • Prelude to final analysis
Reinforced Concrete Design Solutions
• Design iteration count • Required reinforcement steel area • Safety evaluation • Diagnostics and prelude to final analysis
4.4.1.4 Solution/analysis output results The last major heading contains the complete solution and analysis of the culvert-soil system that was analyzed or designed. The contents depend on the whether the solution is closed form (Level 1) or finite element (Solution Level 2 and 3). The output subheadings for the finite element solutions are shown below, the Level-1 subheadings are similar. Finite Element Output for Load Step #1 Finite Element Output for Load Step #2 + + + Finite Element Output for Load Step #last Within each load-step, the finite element solution contains the following 3rd level subheadings Finite Element Output for Load Step # n
• All nodal displacements for soil and structure • All beam element internal forces • All continuum element stresses and strains • All interface element internal forces and movement • Pipe type evaluation for pipe-group # 1 • Pipe type evaluation for pipe-group # 2
+ +
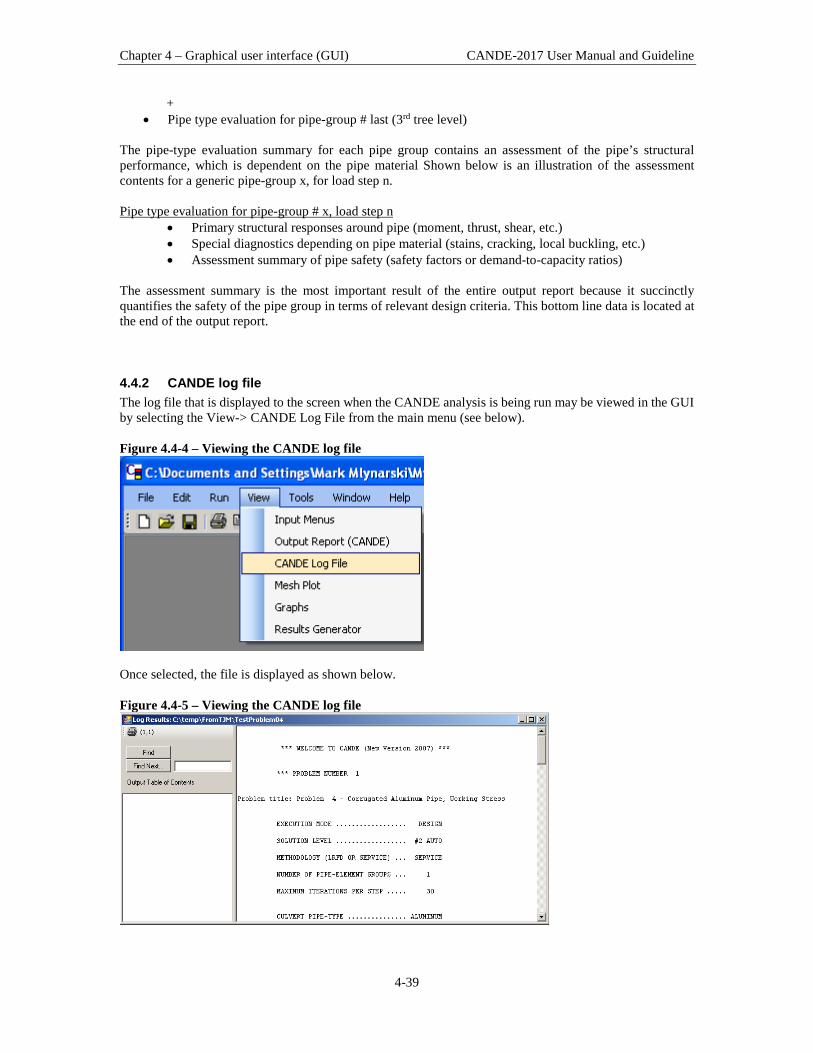
Chapter 4 – Graphical user interface (GUI) CANDE-2017 User Manual and Guideline
4-39
+ • Pipe type evaluation for pipe-group # last (3rd tree level)
The pipe-type evaluation summary for each pipe group contains an assessment of the pipe’s structural performance, which is dependent on the pipe material Shown below is an illustration of the assessment contents for a generic pipe-group x, for load step n. Pipe type evaluation for pipe-group # x, load step n
• Primary structural responses around pipe (moment, thrust, shear, etc.) • Special diagnostics depending on pipe material (stains, cracking, local buckling, etc.) • Assessment summary of pipe safety (safety factors or demand-to-capacity ratios)
The assessment summary is the most important result of the entire output report because it succinctly quantifies the safety of the pipe group in terms of relevant design criteria. This bottom line data is located at the end of the output report.
4.4.2 CANDE log file The log file that is displayed to the screen when the CANDE analysis is being run may be viewed in the GUI by selecting the View-> CANDE Log File from the main menu (see below). Figure 4.4-4 – Viewing the CANDE log file
Once selected, the file is displayed as shown below. Figure 4.4-5 – Viewing the CANDE log file

Chapter 4 – Graphical user interface (GUI) CANDE-2017 User Manual and Guideline
4-40
The log file contains a top-level summary of the input choices that identify the problem being run. It also contains any error messages that may occur during the solution process as well as guidance for fixing the problem. As illustrated below, the log file also contains a tabular listing of the solution progress to let the user know the real-time status of solving the problem. TRACK SOLUTION PROCESS LOAD-STEP EXIT-CODE ITERATION 1 0 1 2 -1 1 2 -1 2 2 -1 3 2 0 4 3 -1 1 3 0 2 4 -1 1 4 -1 2 4 0 3 5 -1 1 5 1 2 The first column lists the current load step being solved. The second column is a code number that signals whether or not the solution has converged; -1 means the solution has not yet converged so that the load step is repeated again, 0 means the load step has converged and we advance to the next load step, 1 means solution has converged and all load steps are completed (exit program). Another exit code, -2, which only applies to the design mode means the trial design wall section did not converge. When this occurs, all load steps are repeated with a new trial design. The right-hand column keeps track of the number of iterations per load step. In the above example, we see that the first load step converged in one pass whereas load step two required 4 iterations, load step three required 2 iterations and so on. In the presence of material nonlinearity, interface nonlinearity and large-deformation nonlinearity it is not unusual to require up to 30 iterations to achieve convergence. A successful CANDE run is recorded in the Log File with the words “NORMAL EXIT FROM CANDE” in the last line.
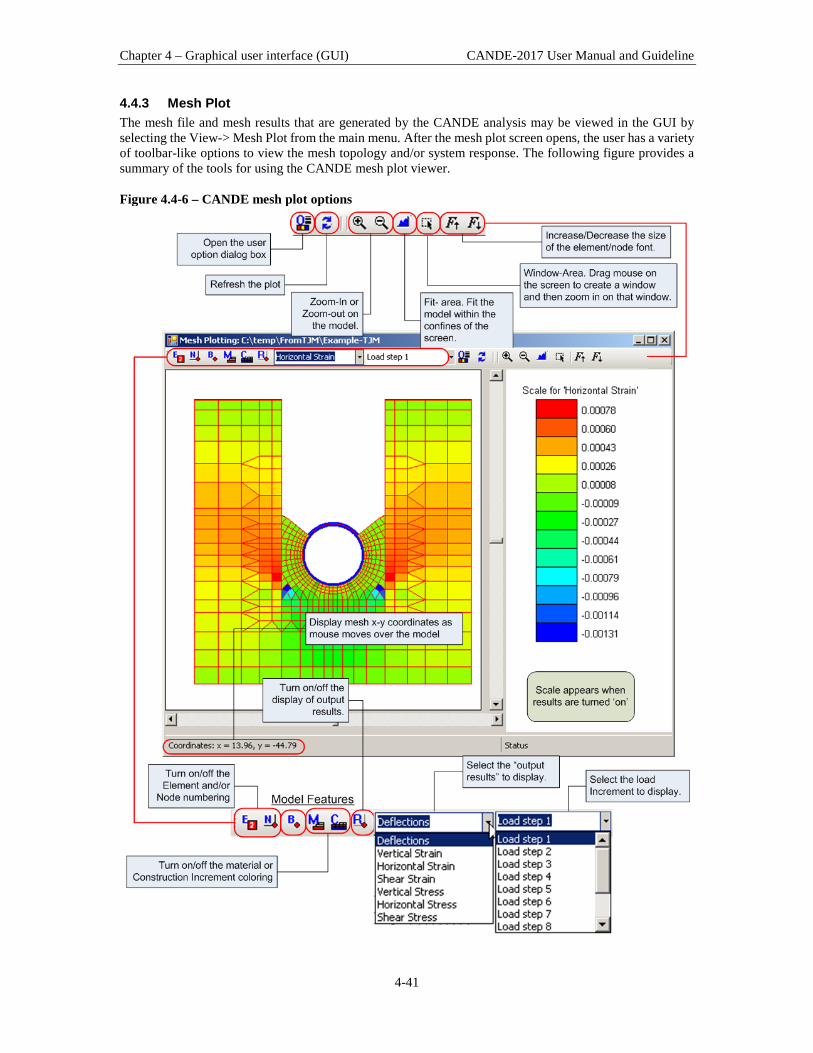
Chapter 4 – Graphical user interface (GUI) CANDE-2017 User Manual and Guideline
4-41
4.4.3 Mesh Plot The mesh file and mesh results that are generated by the CANDE analysis may be viewed in the GUI by selecting the View-> Mesh Plot from the main menu. After the mesh plot screen opens, the user has a variety of toolbar-like options to view the mesh topology and/or system response. The following figure provides a summary of the tools for using the CANDE mesh plot viewer. Figure 4.4-6 – CANDE mesh plot options

Chapter 4 – Graphical user interface (GUI) CANDE-2017 User Manual and Guideline
4-42
4.4.3.1 Using window area to zoom in on mesh Zooming in a part of the mesh can be accomplished by using the ‘Window-Area’ icon in the CANDE Mesh Viewer (see Figure 4.2-7 below). Figure 4.4-7 – Zooming in on a mesh using Window-Area
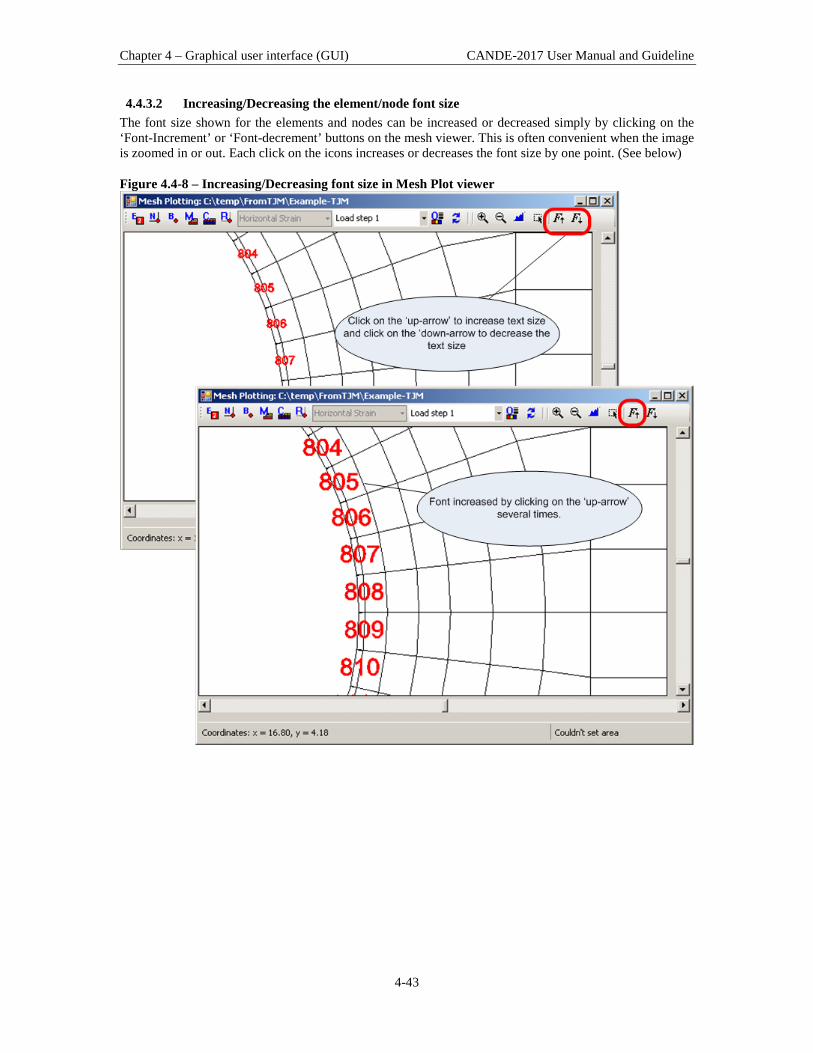
Chapter 4 – Graphical user interface (GUI) CANDE-2017 User Manual and Guideline
4-43
4.4.3.2 Increasing/Decreasing the element/node font size The font size shown for the elements and nodes can be increased or decreased simply by clicking on the ‘Font-Increment’ or ‘Font-decrement’ buttons on the mesh viewer. This is often convenient when the image is zoomed in or out. Each click on the icons increases or decreases the font size by one point. (See below) Figure 4.4-8 – Increasing/Decreasing font size in Mesh Plot viewer
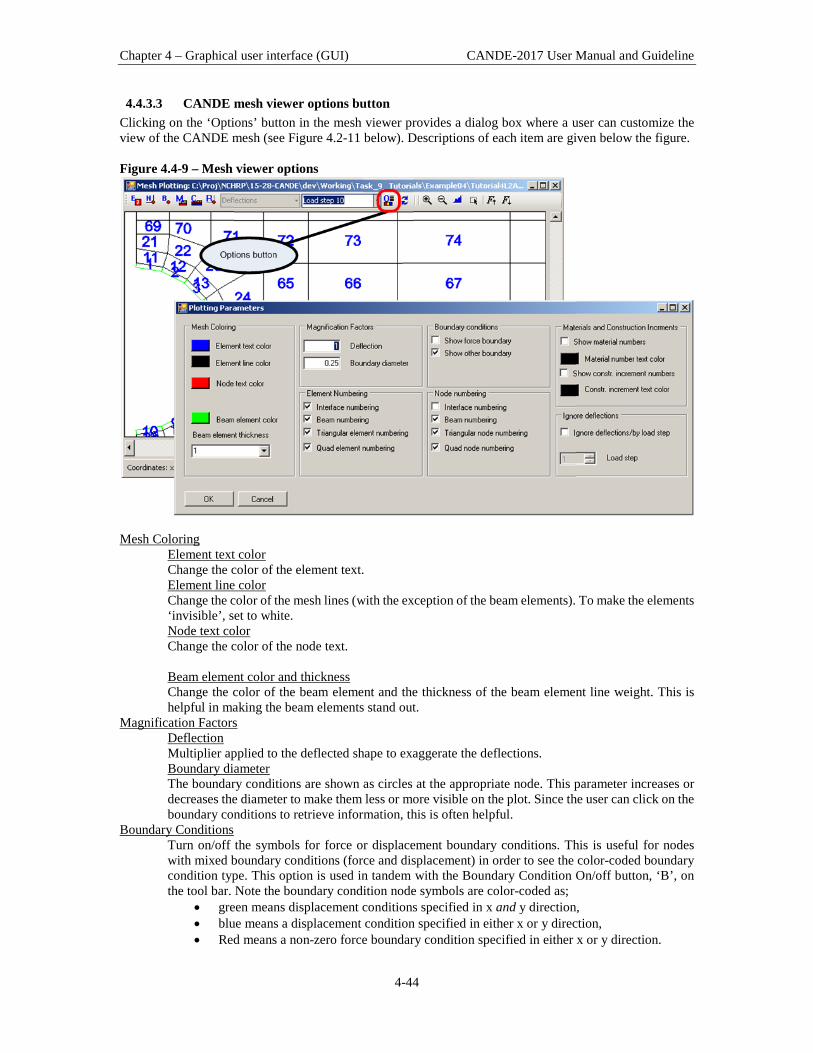
Chapter 4 – Graphical user interface (GUI) CANDE-2017 User Manual and Guideline
4-44
4.4.3.3 CANDE mesh viewer options button Clicking on the ‘Options’ button in the mesh viewer provides a dialog box where a user can customize the view of the CANDE mesh (see Figure 4.2-11 below). Descriptions of each item are given below the figure. Figure 4.4-9 – Mesh viewer options
Mesh Coloring
Element text color Change the color of the element text. Element line color Change the color of the mesh lines (with the exception of the beam elements). To make the elements ‘invisible’, set to white. Node text color Change the color of the node text. Beam element color and thickness Change the color of the beam element and the thickness of the beam element line weight. This is helpful in making the beam elements stand out.
Magnification Factors Deflection Multiplier applied to the deflected shape to exaggerate the deflections. Boundary diameter The boundary conditions are shown as circles at the appropriate node. This parameter increases or decreases the diameter to make them less or more visible on the plot. Since the user can click on the boundary conditions to retrieve information, this is often helpful.
Boundary Conditions Turn on/off the symbols for force or displacement boundary conditions. This is useful for nodes with mixed boundary conditions (force and displacement) in order to see the color-coded boundary condition type. This option is used in tandem with the Boundary Condition On/off button, ‘B’, on the tool bar. Note the boundary condition node symbols are color-coded as;
• green means displacement conditions specified in x and y direction, • blue means a displacement condition specified in either x or y direction, • Red means a non-zero force boundary condition specified in either x or y direction.

Chapter 4 – Graphical user interface (GUI) CANDE-2017 User Manual and Guideline
4-45
Element numbering Turn on/off the element numbering for the four primary CANDE elements (interface, beam, triangular or quadrilateral). This option is used in tandem with the Element On/off button.
Node numbering Turn on/off the node numbering for the four primary CANDE elements (interface, beam, triangular or quadrilateral). This option is used in tandem with the Node On/off button.
Materials and Load steps By default, the materials and load steps are delineated by color. These options permit the user to view them by number.
Ignore Deflections By default, deflections and other results are plotted as the total accumulated values from the first load increment to the current load increment number. If this button is checked, the response values associated with the load step number entered in the next item (‘Load Increment’) are subtracted from the current load increment. Thus, the observed displacements are relative to the specified load increment number.
Load Step Load step to start ignoring deflections.
4.4.3.4 Viewing element information Element information (node coordinates, element number, element type and current results information) can be viewed in the mesh viewer by selecting the ‘Refresh Plot’ button and clicking on an element. of interest. The example shown below happens to be for a beam element number 801. Figure 4.4-10 – Displaying element information in the mesh viewer

Chapter 4 – Graphical user interface (GUI) CANDE-2017 User Manual and Guideline
4-46
4.4.3.4 Viewing Deformed Shapes Viewing a deformed shape in the mesh viewer is achieved by clicking the response button, “R” on the tool bar and choosing the response “Deflections” from the associated drop-down menu. Next, select the desired load increment number from the drop-down menu, and the monitor screen will show the undeformed mesh topology overlain with the deformed mesh due to accumulated deflections at the specified load step. Recall that the deflection magnification factor is specified by the user in the Option Dialogue Box, which is accessed through the “O” button on the tool bar. A sample deflection plot is shown below. Figure 4.4-11 – Plotting deflections using the mesh viewer
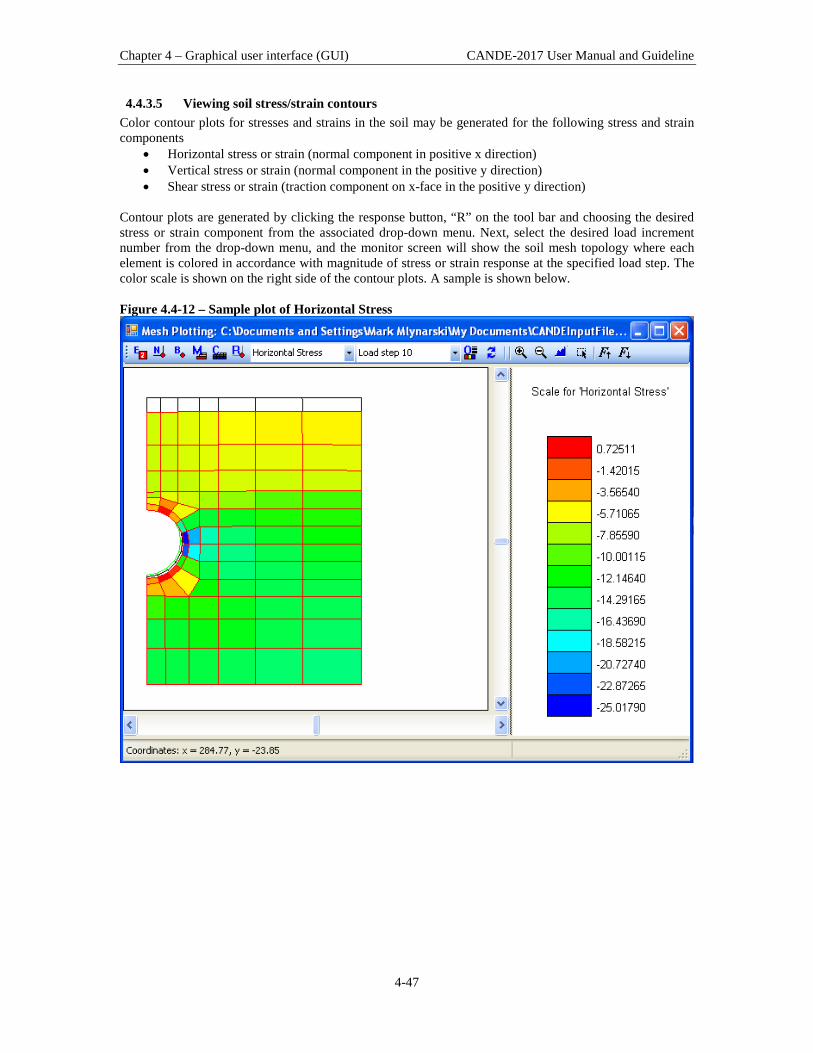
Chapter 4 – Graphical user interface (GUI) CANDE-2017 User Manual and Guideline
4-47
4.4.3.5 Viewing soil stress/strain contours Color contour plots for stresses and strains in the soil may be generated for the following stress and strain components
• Horizontal stress or strain (normal component in positive x direction) • Vertical stress or strain (normal component in the positive y direction) • Shear stress or strain (traction component on x-face in the positive y direction)
Contour plots are generated by clicking the response button, “R” on the tool bar and choosing the desired stress or strain component from the associated drop-down menu. Next, select the desired load increment number from the drop-down menu, and the monitor screen will show the soil mesh topology where each element is colored in accordance with magnitude of stress or strain response at the specified load step. The color scale is shown on the right side of the contour plots. A sample is shown below. Figure 4.4-12 – Sample plot of Horizontal Stress

Chapter 4 – Graphical user interface (GUI) CANDE-2017 User Manual and Guideline
4-48
4.4.3.6 Coincidental boundary conditions When more than one boundary condition occurs at a single node, CANDE will offset the boundary conditions when displaying them in the mesh viewer. An example is shown in Figure 4.4-13 below, where 3 boundary conditions exist at node 1436. The purpose of the offset is to display the boundary conditions in a way that the user may click on each one individually to obtain information. Note: the offset of the boundary conditions is in the mesh viewer only. The analysis places the boundary condition at its proper location. Figure 4.4-13 – Coincidental boundary conditions offset in mesh viewer

Chapter 4 – Graphical user interface (GUI) CANDE-2017 User Manual and Guideline
4-49
4.4.4 CANDE Graphs for beam elements The beam element responses that are generated by the CANDE analysis may be viewed in the GUI by selecting the View-> Graphs from the main menu. This tool allows the user to plot beam-element responses for an entire pipe group. The opening screen is similar to that shown Figure 4.4-14 below wherein the bending moment distribution is shown at load step 4. Figure 4.4-14 – CANDE Graph of bending moment

Chapter 4 – Graphical user interface (GUI) CANDE-2017 User Manual and Guideline
4-50
4.4.4.1 Over view of CANDE Graph Selections Three drop down menus at the top of the Graph screen, offer the user the following basic choices.
• Selection of load step number to be plotted • Selection of pipe group number to be plotted • Selection of the structural response to be plotted
The above selections are illustrated in Figure 4.2-16 below. Figure 4.4-15 – Overview of CANDE Graphs
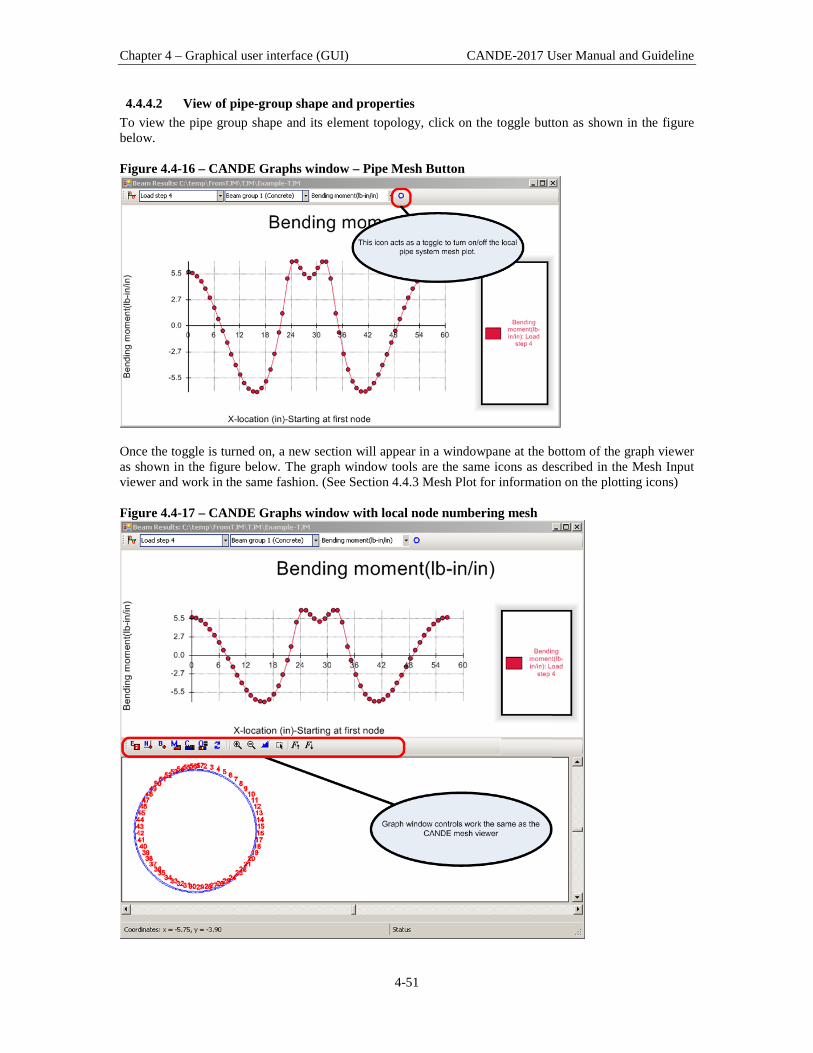
Chapter 4 – Graphical user interface (GUI) CANDE-2017 User Manual and Guideline
4-51
4.4.4.2 View of pipe-group shape and properties To view the pipe group shape and its element topology, click on the toggle button as shown in the figure below. Figure 4.4-16 – CANDE Graphs window – Pipe Mesh Button
Once the toggle is turned on, a new section will appear in a windowpane at the bottom of the graph viewer as shown in the figure below. The graph window tools are the same icons as described in the Mesh Input viewer and work in the same fashion. (See Section 4.4.3 Mesh Plot for information on the plotting icons) Figure 4.4-17 – CANDE Graphs window with local node numbering mesh
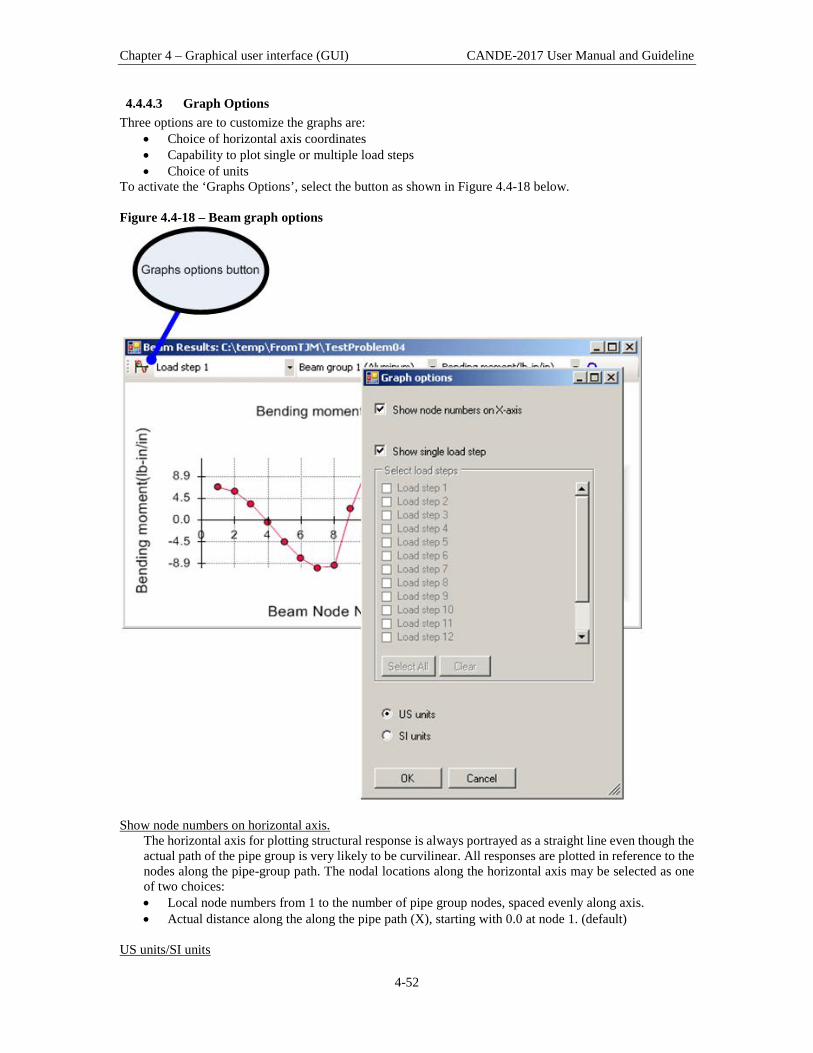
Chapter 4 – Graphical user interface (GUI) CANDE-2017 User Manual and Guideline
4-52
4.4.4.3 Graph Options Three options are to customize the graphs are:
• Choice of horizontal axis coordinates • Capability to plot single or multiple load steps • Choice of units
To activate the ‘Graphs Options’, select the button as shown in Figure 4.4-18 below. Figure 4.4-18 – Beam graph options
Show node numbers on horizontal axis.
The horizontal axis for plotting structural response is always portrayed as a straight line even though the actual path of the pipe group is very likely to be curvilinear. All responses are plotted in reference to the nodes along the pipe-group path. The nodal locations along the horizontal axis may be selected as one of two choices: • Local node numbers from 1 to the number of pipe group nodes, spaced evenly along axis. • Actual distance along the along the pipe path (X), starting with 0.0 at node 1. (default)
US units/SI units

Chapter 4 – Graphical user interface (GUI) CANDE-2017 User Manual and Guideline
4-53
Selects either US customary units or SI units to use to display the graph.
Show single load step If this box is checked, only one load step will be shown per graph. For this case, the user chooses the load step from the combination box on the graph viewer. If this is not checked, the user selects which load steps will be shown on the same graph.
Plot multiple load steps An example of plotting multiple load steps is shown below. To do this, turn the check off of the ‘Show single load step’ on the menu. Select the desired load steps to graph. Return to the Graphs window. (See Figure 4.4-19 below)
Figure 4.4-19 – Plotting multiple load steps with CANDE Beam Graph
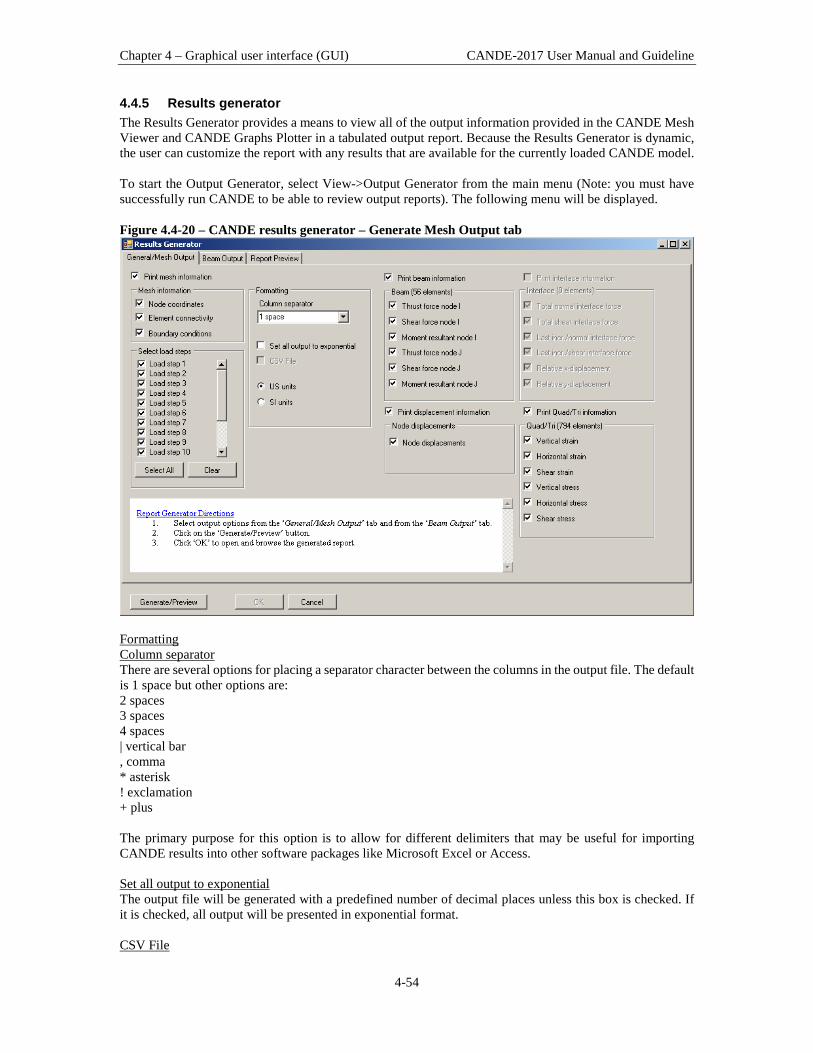
Chapter 4 – Graphical user interface (GUI) CANDE-2017 User Manual and Guideline
4-54
4.4.5 Results generator The Results Generator provides a means to view all of the output information provided in the CANDE Mesh Viewer and CANDE Graphs Plotter in a tabulated output report. Because the Results Generator is dynamic, the user can customize the report with any results that are available for the currently loaded CANDE model. To start the Output Generator, select View->Output Generator from the main menu (Note: you must have successfully run CANDE to be able to review output reports). The following menu will be displayed. Figure 4.4-20 – CANDE results generator – Generate Mesh Output tab
Formatting Column separator There are several options for placing a separator character between the columns in the output file. The default is 1 space but other options are: 2 spaces 3 spaces 4 spaces | vertical bar , comma * asterisk ! exclamation + plus The primary purpose for this option is to allow for different delimiters that may be useful for importing CANDE results into other software packages like Microsoft Excel or Access. Set all output to exponential The output file will be generated with a predefined number of decimal places unless this box is checked. If it is checked, all output will be presented in exponential format. CSV File

Chapter 4 – Graphical user interface (GUI) CANDE-2017 User Manual and Guideline
4-55
Checking this box and setting the column separator character to ‘comma’ will generate a comma delimited file CSV which can be opened directly in spread sheet applications like Microsoft Excel. US units/SI units Display the output file in the selected units. The remainder of the General/Mesh Output tab provides check-box selections for the user to choose the mesh input data and solution output data to be written to report. In addition, the following beam results are available on the ‘Beam Output’ Tab. Figure 4.4-21 – CANDE results generator – Beam Output tab
In general, the items shown grouped together will appear in the same table in the output. If an item is unchecked, the next checked item in the list will ‘slide’ to the left in the table. If an item is ‘disabled’ or grayed-out, it is not available for display in the output report. After all of the items have been selected, click on the ‘Generate Preview’ button. This will generate and display the output file on the ‘Report Preview’ tab. (see below).
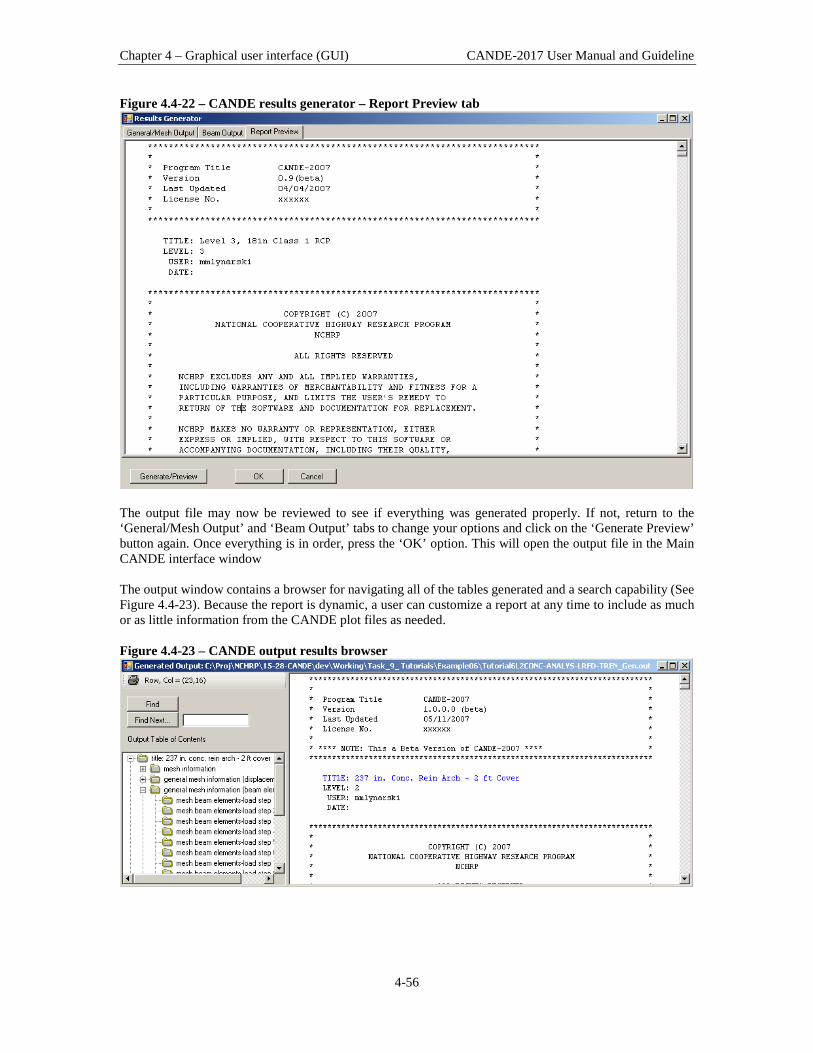
Chapter 4 – Graphical user interface (GUI) CANDE-2017 User Manual and Guideline
4-56
Figure 4.4-22 – CANDE results generator – Report Preview tab
The output file may now be reviewed to see if everything was generated properly. If not, return to the ‘General/Mesh Output’ and ‘Beam Output’ tabs to change your options and click on the ‘Generate Preview’ button again. Once everything is in order, press the ‘OK’ option. This will open the output file in the Main CANDE interface window The output window contains a browser for navigating all of the tables generated and a search capability (See Figure 4.4-23). Because the report is dynamic, a user can customize a report at any time to include as much or as little information from the CANDE plot files as needed. Figure 4.4-23 – CANDE output results browser

Chapter 4 – Graphical user interface (GUI) CANDE-2017 User Manual and Guideline
4-56
4.5 Using GUI with New Capabilities in CANDE-2017 The graphical user interface (GUI) works with CANDE-2017 in exactly the same manner as it works with the original CANDE-2007/2011 program except for utilizing the new capabilities developed after 2007. When dealing with any of the following new capabilities;
• CONRIB Pipe Type • CONTUBE Pipe Type • Link elements • Deep corrugation design criteria for Steel Pipe Type • Variable Profile geometry for Plastic Pipe Type • Mohr-Coulomb elastoplastic soil model • Modified Duncan & Duncan/Selig soil model • Continuous load scaling longitudinal spreading of live loads.
It must be understood that the GUI is unaware of these options so that special procedures must be employed as described below. Simply said, you must activate these capabilities by direct batch-mode input. That is, from the File menu on CANDE screen select “Open text input” and refer directly to the input instructions in Chapter 5 to enter the required data for the new capability. The GUI has two facets, pre-processing and post processing. Pre-processing is concerned with creating input data files, and post-processing deals with viewing the output files and graphically plotting the finite element mesh and structural responses. Both facets are discussed in turn with regard to how they interact with the new capabilities listed above.
4.5.1 Creating Input Files (pre-processing) The GUI interface menu offers two basic modes for creating an input data file as listed below.
1. Traditional batch input (choose File → Open Text Input) 2. Menu-driven input (choose File → New)
Mixing these two input methods is the easiest way to generate an input file that incorporates any of the new capabilities. For example, suppose you want to create an input file utilizing the CONRIB pipe type. The Menu-driven input screen does not have a selection choice for the CONRIB pipe type; however, we can choose the CONCRETE pipe type as a temporary surrogate. After the remaining menu-driven input data is complete and the entire data file has been saved and stored, reopen the data file with “Open Text Input”. For the surrogate pipe data, replace the word CONCRETE in line A-2 with the word CONRIB and replace the corresponding set of CONCRETE B-lines with the desired set of CONRIB B-lines using the input instructions in the Chapter 5. Said another way, this second step is a mini-batch-mode input process, only changing a few lines of input. Note, you do not need “line tags” for new input lines. Rather, start the formatted data entry counting from column 1 just like standard batch mode data input. As another example, consider creating an input file incorporating link elements. Using the Menu-driven input screens we ascertain from Chapter 5 that link element connectivity is defined just like an interface element in the Menu-driven screens, except that input parameter IX(7) is assigned a different code number depending on the desired link connection. On the other hand, the link element death option can only be activated through the mini-batch-mode process because the GUI screen does not have a data entry for element death.
Chapter 4 – Graphical user interface (GUI) CANDE-2017 User Manual and Guideline
4-57
In summary, this two-step process of generating menu-driven input data followed by a mini-batch-mode correction is a very effective way of creating input files for all the new capabilities.
4.5.2 Viewing Output Files (post-processing) After a successful CANDE run, the View tab on the GUI tool bar includes the viewing options listed below.
• Output Report (CANDE) • Mesh Plot • Graphs
As discussed next, these viewing options have different implications with regard to displaying the output from the new capabilities.
4.5.2.1 Output report (CANDE) The Output Report, which is the most important document, is a complete print file generated by CANDE-2017 program and is navigable by means of an interactive table of contents. Since the table of contents and the printed output is generated directly from the CANDE-2017 Engine, there is no loss of data or ambiguity with regard to the new capabilities. For example, the table of contents identifies these capabilities by name, such as “CONRIB”, CONTUBE” and “Link”, just as it does with all other pipe types and element types. Also, the Mohr/Coulomb and the Modified Duncan/Selig soil models are appropriately defined and summarized in the material section. Therefore, the new capabilities are displayed perfectly and seamlessly with regard to viewing the Output Report.
4.5.2.2 Mesh plots The GUI mesh plot viewing option, which allows plotting finite element mesh topology as well as displacements, and soil stress/strain contours, is fed by a XML plot file developed especially for the GUI. Until the GUI is upgraded to incorporate the new capabilities, the words “CONRIB”, “CONTUBE”, “Link” and “Mohr/Coulomb” do not appear in the input or output screens for selecting data to be plotted. Instead the generated XML plot files have been assigned alias names as follows;
1. Each CONRIB pipe-type group number is labeled as a CONCRETE group number. 2. Each CONTUBE pipe-type group number is labeled as a CONCRETE group number. 3. Each “link” element is labeled as an “interface” element with its unique element number. 4. Each “Mohr Coulomb” continuum element is identified as a “Extended Hardin” model.
Although the alias names may be an annoyance until the GUI is fully updated, there is no ambiguity among the alias names because of unique group and material numbers. For example, if CONRIB and CONCRETE pipe groups are employed in the same finite element mesh, the pipe group numbers are unique even though the GUI shows the name “Concrete” for both groups. With the above understanding, the new pipe types, link elements and soil models have full access to the GUI plotting capabilities. If there is more than one pipe group, the user identifies the pipe type by its unique group number. Similarly, the user identifies link elements (versus interface elements) by the unique element number, and soil-element models by their unique material number.

Chapter 4 – Graphical user interface (GUI) CANDE-2017 User Manual and Guideline
4-58
4.5.2.3 Graphs The GUI graph plotting option is dedicated to viewing structural responses of any pipe-type group wherein the plot data is obtained from another XML plot file developed for the GUI. Using the same alias names noted above, each CONRIB and CONTUBE pipe-type group number is labeled as a CONCRETE. Therefore, using the CONCRETE label with unique pipe group numbers, the CONRIB and CONTUBE structural responses may be plotted just like any other pipe type. Until the time comes when the GUI is fully updated, the above workaround instructions and tricks are needed to exercise the new capabilities. The main point to remember is to use “open text input” to run CANDE-2017 for your modified input file (Chapter 5). If you use the “open” command, your modified input file is overwritten by the GUI in accordance with the older 2007/11 version of CANDE and the new options will not work.

Chapter 5 – Detailed CANDE input CANDE-2017 User Manual and Guideline
5-1
5 DETAILED CANDE INPUT CANDE’s Graphical User Interface (GUI) offers two methods for generating input data for CANDE-2007. One method is the “batch mode”, which means the user prepares a data file (or CANDE input document) in accordance with the formatted input instructions in this chapter using a text editor such as the CANDE input text editor or Notepad. A CANDE input document is simply a data file or text file that contains the entire formatted input stream, line by line, as prescribed in the detailed input instructions. The user may assign any descriptive name to the data file followed by the file extension “.cid”, for example “My problem.cid.” The other method of input is called the Input menu mode (see Chapter 4), which leads the user through the input options and choices one step at a time. An advantage of the screen mode is that each input step (monitor screen image) is “tailor-made” to conform to the user’s previous input choices. Said another way, the user does not need to navigate through the user manual to determine which commands are needed, just follow the screen input instructions. The two input methods are identical when it comes to executing the program, that is, exactly the same formatted input file is created whether by batch mode or by screen mode. The formatted input file, which is read by the CANDE Engine, consists of lines of input data wherein each line may contain several numerical values to define a set of variables and/or word commands to initiate desired actions. CANDE employs a rigid format to read the input file so that the placement of numerical values and words on each input data line must follow the input instructions in this chapter. The input flow charts in the next section summarize the type of input data that is required for Solution Levels 1, 2 and 3, respectively. Input data for Level 1 and 2 does not usually require very much preparation time on the part of the user beyond knowing the type and shape of culvert, depth of burial and class of soils. CANDE’s internal library provides default values for most material properties of culvert and soil. With the aid of the screen-mode input, even a novice user can generate an input data file in a few minutes. In contrast to the above, Solution Level 3 does require the user to spend some time in preparing a plan for the finite element mesh topology. Although CANDE contains many helpful mesh generation features, the user’s preparation time for Level 3 is considerably longer than for Level 1 or 2. The new capabilities associated with CANDE-2017 are shown in red ink throughout this user manual including Chapter 5. As explained in Section 4.5, the new capabilities are not fully integrated with GUI so that if the user wishes to use any of the new capabilities the input file should be opened and executed with the “Open Text Input” option. A summary table of the new options is provided in Table i on the first page of this manual.
5.1 Input flow charts As illustrated in the following charts, the input data is structured into the five parts (A, B, C, D and E) as listed below.
• Part A – Master control selections • Part B – Pipe type material properties and options • Part C – System input data (Solution Level 1, 2 or 3) • Part D – Soil model material properties (Levels 2 and 3) • Part E – Load factors for LRFD analysis/design (Levels 2 and 3)

Chapter 5 – Detailed CANDE input CANDE-2017 User Manual and Guideline
5-2
5.1.1 CANDE level 1 input flowchart
Conrib and Contube included

Chapter 5 – Detailed CANDE input CANDE-2017 User Manual and Guideline
5-3
5.1.2 CANDE level 2 input flowchart
Conrib and Contube included
Mohr/Coulomb included
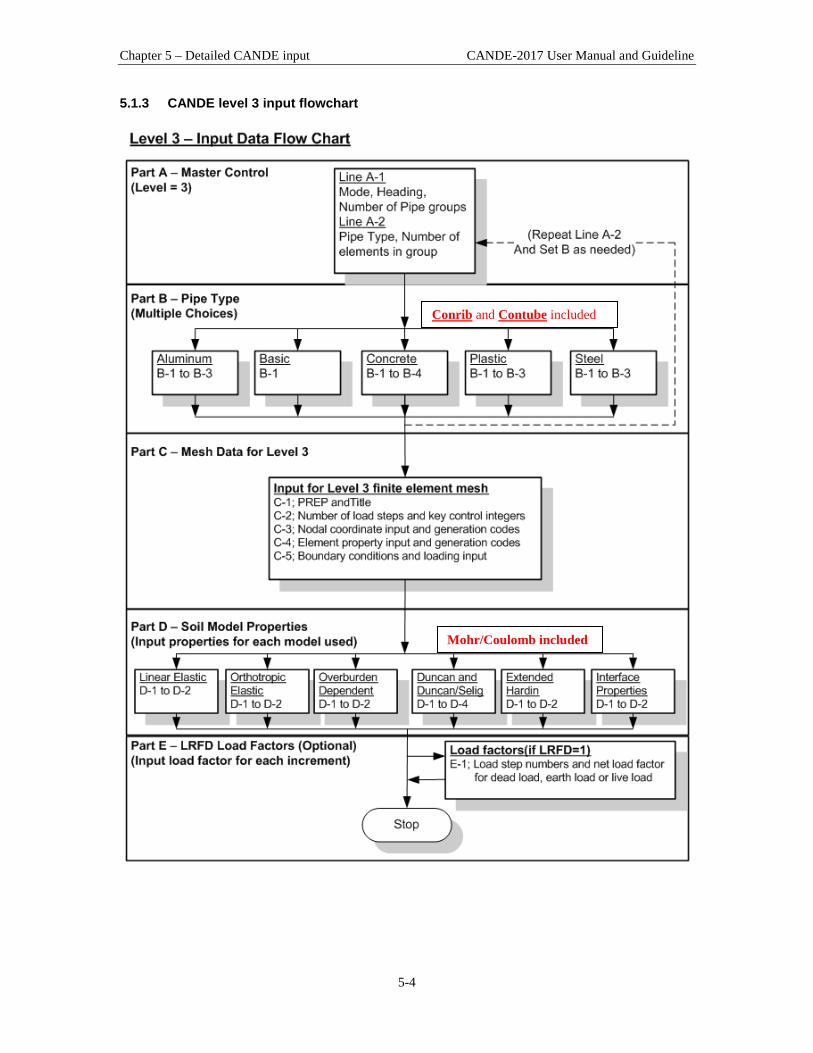
Chapter 5 – Detailed CANDE input CANDE-2017 User Manual and Guideline
5-4
5.1.3 CANDE level 3 input flowchart
Conrib and Contube included
Mohr/Coulomb included

Chapter 5 – Detailed CANDE input CANDE-2017 User Manual and Guideline
5-5
5.2 CANDE input instructions This section provides a guideline for the format of the input instructions provided in the following sections. Each line of input is identified by the capital letter A, B, C, D, or E followed by a number. The capital letter identifies the Data-Part to which the input lines belong, and the trailing number is a count of the formatted lines associated with the Data-Part. For example, A-1 and A-2 are the required two lines of input to complete the input for Part A (Master Control). Input instructions for each line of input are shown in a 3-column table with the headings; Parameter, Input Options and Description. The Parameter column provides a name of the variable or word command along with its short FORTRAN name in parenthesis. In addition, three important pieces of information are given for each parameter:
• (columns) = Range of column numbers on data line where parameter is placed. Each data line has a maximum of 80 columns to place parameter values. For example, (21-25) means that the data defining the parameter is to be entered within columns 21 through 25.
• (format) = Symbols A, I and F. A is for a word, I is for an integer number and F is for floating
point variable. The number “n” following each symbol is the number of column spaces allotted to the input data. All integer and floating-point variables are right justified in the absence of a decimal point.
• (units) = Physical units are identified for floating point parameters in US Customary units.
Input Options, shown in the center of the input instruction table, provides a short description of each parameter along with optional choices and default values if appropriate. The last segment of the input instruction table provides a longer description of the parameter along with recommendations to the user. Since many of the CANDE input instruction tables are dependent on previously entered input, tabularized information is provided at the beginning of each data input line to alert the user to the applicability of that input. For example, if the user selected the “ANALYS” mode on data line A-1, then the tabularized information reminds user he should ignore input lines dealing with the “DESIGN” mode.

Chapter 5 – Detailed CANDE input CANDE-2017 User Manual and Guideline
5-6
5.3 Part A - Control Commands 5.3.1 A-1 – Master Control Input Data A-1 Master Control Input Data
Use if Comments
Always This input starts each new problem
Parameter (columns) (format) (units)
Input Options Description
Design/Analysis Parameter (XMODE) (01-08) (A8) (character)
Word defining problem mode: = ANALYS = DESIGN = STOP (No default)
Specifying the variable XMODE controls the decision of design or analysis. Analysis implies all system and pipe properties are known and the objective is to evaluate pipe performance. Design means the pipe wall section properties are unknown, and that they will be determined in an iterative analysis process. CANDE will continue to execute new problems, back-to-back, until XMODE = STOP is encountered.
Solution Level (LEVEL) (09-10) (I2) (integer)
Defines Solution Level to be used: = 1, Elasticity = 2, FEM with canned mesh = 3, FEM with user mesh (No default)
Level 1 is based on the closed form elasticity solution of Burns and Richards. It is applicable to round pipes deeply buried in homogenous soil installations (no live loads). Level 2 is considered the workhorse of CANDE and provides a finite element solution methodology using an internally developed mesh based on a few physical parameters specified by the user in part C. Canned meshes are available for round, elliptical, box and arch-shaped culverts. Loading includes live loads as well as incremental layers of soil. Level 2’s major limitation is the assumption of symmetry about the vertical centerline of a specified pipe type. Level 3 provides the full power of the finite element method to characterize any soil-structure system. This includes multiple structural shapes and/or multiple structural materials (pipe types). Level 3 requires that the user develop the finite element mesh including element connectivity arrays, coordinates and boundary conditions. Although CANDE has many helpful mesh generation features, use of Level 3 requires
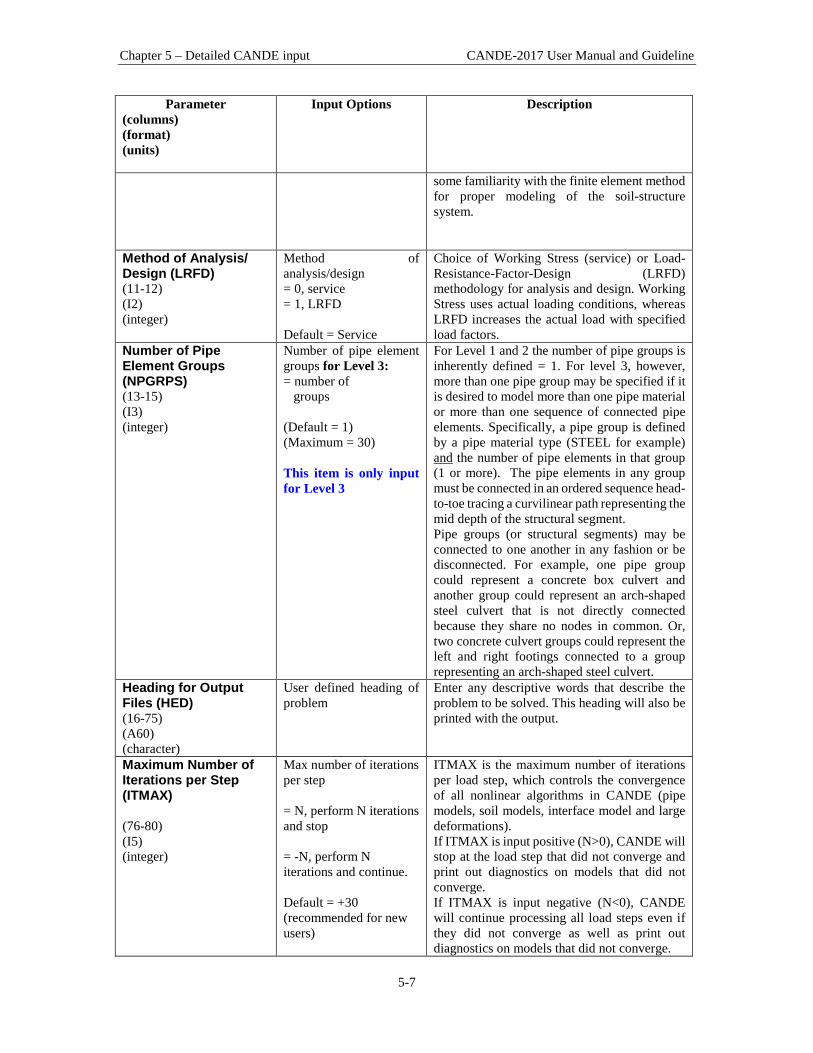
Chapter 5 – Detailed CANDE input CANDE-2017 User Manual and Guideline
5-7
Parameter (columns) (format) (units)
Input Options Description
some familiarity with the finite element method for proper modeling of the soil-structure system.
Method of Analysis/ Design (LRFD) (11-12) (I2) (integer)
Method of analysis/design = 0, service = 1, LRFD Default = Service
Choice of Working Stress (service) or Load-Resistance-Factor-Design (LRFD) methodology for analysis and design. Working Stress uses actual loading conditions, whereas LRFD increases the actual load with specified load factors.
Number of Pipe Element Groups (NPGRPS) (13-15) (I3) (integer)
Number of pipe element groups for Level 3: = number of groups (Default = 1) (Maximum = 30) This item is only input for Level 3
For Level 1 and 2 the number of pipe groups is inherently defined = 1. For level 3, however, more than one pipe group may be specified if it is desired to model more than one pipe material or more than one sequence of connected pipe elements. Specifically, a pipe group is defined by a pipe material type (STEEL for example) and the number of pipe elements in that group (1 or more). The pipe elements in any group must be connected in an ordered sequence head-to-toe tracing a curvilinear path representing the mid depth of the structural segment. Pipe groups (or structural segments) may be connected to one another in any fashion or be disconnected. For example, one pipe group could represent a concrete box culvert and another group could represent an arch-shaped steel culvert that is not directly connected because they share no nodes in common. Or, two concrete culvert groups could represent the left and right footings connected to a group representing an arch-shaped steel culvert.
Heading for Output Files (HED) (16-75) (A60) (character)
User defined heading of problem
Enter any descriptive words that describe the problem to be solved. This heading will also be printed with the output.
Maximum Number of Iterations per Step (ITMAX) (76-80) (I5) (integer)
Max number of iterations per step = N, perform N iterations and stop = -N, perform N iterations and continue. Default = +30 (recommended for new users)
ITMAX is the maximum number of iterations per load step, which controls the convergence of all nonlinear algorithms in CANDE (pipe models, soil models, interface model and large deformations). If ITMAX is input positive (N>0), CANDE will stop at the load step that did not converge and print out diagnostics on models that did not converge. If ITMAX is input negative (N<0), CANDE will continue processing all load steps even if they did not converge as well as print out diagnostics on models that did not converge.

Chapter 5 – Detailed CANDE input CANDE-2017 User Manual and Guideline
5-8
Parameter (columns) (format) (units)
Input Options Description
Culvert ID (CULVERTID) (81-85) (I5) (integer)
Culvert ID number. Default = 0
This value is only used as an identifier for the culvert of buried structure if NCHRP Process 12-50 results are desired. The value is only used in the printing of the 12-50 results. If this value is not input, the NCHRP Process 12-50 results will not be produced. The output format for the Process 12-50 results are provided in the appendix of this User Manual.
Process ID (PROCESSID) (86-90) (I5) (integer)
Process ID number. Default = 0
This value is only used as a unique identifier for this version of CANDE. The value is only used in the printing of the 12-50 results. The output format for the Process 12-50 results are provided in the appendix of this User Manual.
Subdomain ID (SUBDID) (91-95) (I5) (integer)
Subdomain ID number. Default = 0
This value is only used as a unique identifier for this version of CANDE. The value is only used in the printing of the 12-50 results. The output format for the Process 12-50 results are provided in the appendix of this User Manual.
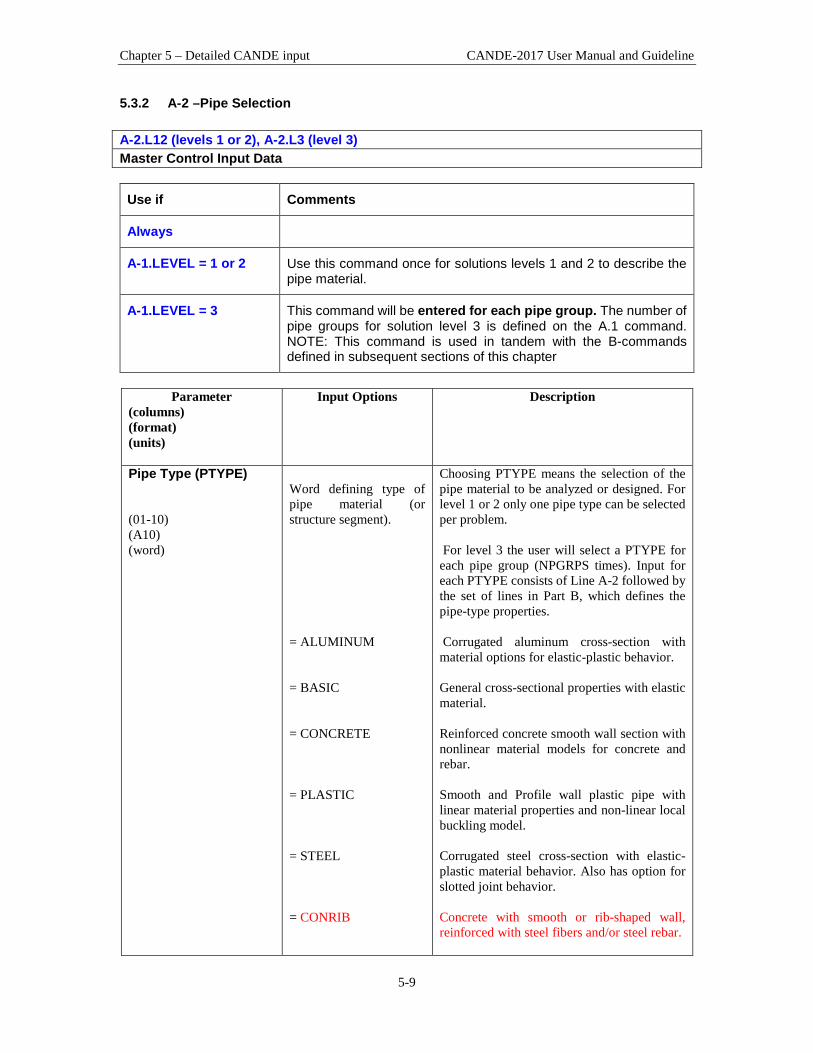
Chapter 5 – Detailed CANDE input CANDE-2017 User Manual and Guideline
5-9
5.3.2 A-2 –Pipe Selection A-2.L12 (levels 1 or 2), A-2.L3 (level 3) Master Control Input Data
Use if Comments
Always
A-1.LEVEL = 1 or 2 Use this command once for solutions levels 1 and 2 to describe the pipe material.
A-1.LEVEL = 3 This command will be entered for each pipe group. The number of pipe groups for solution level 3 is defined on the A.1 command. NOTE: This command is used in tandem with the B-commands defined in subsequent sections of this chapter
Parameter
(columns) (format) (units)
Input Options Description
Pipe Type (PTYPE) (01-10) (A10) (word)
Word defining type of pipe material (or structure segment). = ALUMINUM = BASIC = CONCRETE = PLASTIC = STEEL = CONRIB
Choosing PTYPE means the selection of the pipe material to be analyzed or designed. For level 1 or 2 only one pipe type can be selected per problem. For level 3 the user will select a PTYPE for each pipe group (NPGRPS times). Input for each PTYPE consists of Line A-2 followed by the set of lines in Part B, which defines the pipe-type properties. Corrugated aluminum cross-section with material options for elastic-plastic behavior. General cross-sectional properties with elastic material. Reinforced concrete smooth wall section with nonlinear material models for concrete and rebar. Smooth and Profile wall plastic pipe with linear material properties and non-linear local buckling model. Corrugated steel cross-section with elastic-plastic material behavior. Also has option for slotted joint behavior. Concrete with smooth or rib-shaped wall, reinforced with steel fibers and/or steel rebar.

Chapter 5 – Detailed CANDE input CANDE-2017 User Manual and Guideline
5-10
Parameter (columns) (format) (units)
Input Options Description
= CONTUBE (No default)
Circular concrete cross-section encased in a thin-walled tube. There is no default for “no pipe type”. To use CANDE without pipe elements select: LEVEL = 3, PTYPE = BASIC, and NPMATX = 0. Skip part B input.
Canned Mesh Code (NPCAN) (Level 2 only) (11-15) (I5) (integer)
Canned mesh code used only for LEVEL = 2. = 1, Pipe mesh circular
or elliptical opening)
= 2, Box mesh
(rectangular opening)
= 3, Arch mesh (arch-
shaped or 3-sided box opening)
Under level 2, NPCAN allows the user to select the type of canned mesh to be used in this problem. (see Table 5.3-1 for increments) For level 1 the NPCAN variable is not used, and for level 3 this variable is renamed NPMATX and defined differently as discussed subsequently. The “Pipe mesh” creates a circular or elliptical culvert cross-section assuming vertical centerline symmetry. Options for trench and embankment installations, interface elements, and incremental construction. (a.k.a CAN1 mesh) The “Box mesh” creates a rectangular, closed-cell culvert cross-section assuming vertical centerline symmetry. Options for trench and embankment installations, bedding depth and incremental construction. (a.k.a. CANBOX mesh) The “Arch mesh” creates a two or three segment arch or box resting on footings assuming vertical centerline symmetry. Options for trench and embankment installations with built-in interface elements. (a.k.a. CANAR1 mesh)
For Level 1 or 2, Part A is complete, Proceed to Part B. For Level 3 see next page.

Chapter 5 – Detailed CANDE input CANDE-2017 User Manual and Guideline
5-11
Parameter (columns) (format) (units)
Input Options Description
Number of Connected Beam Elements (NPMATX) (Level 3 only) (11-15) (I5) (integer)
Number of connected beam elements in this group, for level 3 only, (No Default value) (Maximum = 999)
The number (quantity) of beam elements in any group may range from 1 to 999. It is to be understood that elements in any group form a continuous sequence, connected head to toe tracing the centerline path of the structure or a segment of the structure. The group number identifier, 1 to NPGRPS, is automatically assigned in the sequential order of input. That is, the first data set (Line A2 plus set B) becomes group # 1, the second data set becomes group # 2, and so on until all NPGRPS groups are input. The linkage between the group numbers established here and the finite element mesh established in input set C is by means of the element’s material identification number called IX(5). In data set C, the user must assign the appropriate group number to each beam element’s material identification number.
Proceed to Part B to define pipe properties for the Pipe-Type Selected. After set B is complete, return to Line A-2 to select next pipe-type if NPGRPS > 1. Table 5.3-1 – Reference data on culvert elements used in canned meshes
Pipe element statistics (1-group)
Pipe Mesh (NPCAN = 1)
Box Mesh (NPCAN = 2)
Arch Mesh (NPCAN = 3)
Number of pipe elements, NPMAT=
10
14
19
Number of sequence pipe nodes, NPPT=
11
15
20

Chapter 5 – Detailed CANDE input CANDE-2017 User Manual and Guideline
5-12
5.4 Part B- Pipe Materials This section provides the description of the input data related to Pipe Materials. CANDE provides the modeling of the following pipe materials:
• Corrugated Aluminum • Basic • Reinforced Concrete • Thermoplastic • Corrugated Steel • Conrib • Contube
Proceed to the desired pipe material.
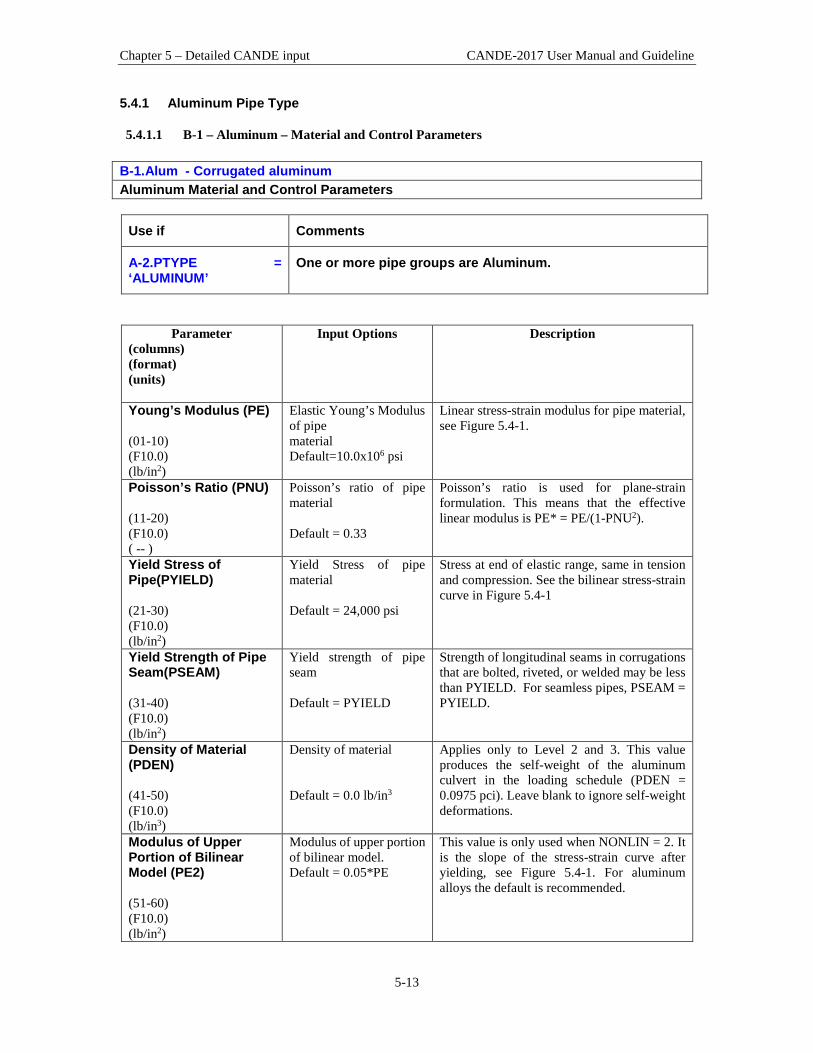
Chapter 5 – Detailed CANDE input CANDE-2017 User Manual and Guideline
5-13
5.4.1 Aluminum Pipe Type
5.4.1.1 B-1 – Aluminum – Material and Control Parameters B-1.Alum - Corrugated aluminum Aluminum Material and Control Parameters
Use if Comments
A-2.PTYPE = ‘ALUMINUM’
One or more pipe groups are Aluminum.
Parameter (columns) (format) (units)
Input Options Description
Young’s Modulus (PE) (01-10) (F10.0) (lb/in2)
Elastic Young’s Modulus of pipe material Default=10.0x10⁶ psi
Linear stress-strain modulus for pipe material, see Figure 5.4-1.
Poisson’s Ratio (PNU) (11-20) (F10.0) ( -- )
Poisson’s ratio of pipe material Default = 0.33
Poisson’s ratio is used for plane-strain formulation. This means that the effective linear modulus is PE* = PE/(1-PNU2).
Yield Stress of Pipe(PYIELD) (21-30) (F10.0) (lb/in2)
Yield Stress of pipe material Default = 24,000 psi
Stress at end of elastic range, same in tension and compression. See the bilinear stress-strain curve in Figure 5.4-1
Yield Strength of Pipe Seam(PSEAM) (31-40) (F10.0) (lb/in2)
Yield strength of pipe seam Default = PYIELD
Strength of longitudinal seams in corrugations that are bolted, riveted, or welded may be less than PYIELD. For seamless pipes, PSEAM = PYIELD.
Density of Material (PDEN) (41-50) (F10.0) (lb/in3)
Density of material Default = 0.0 lb/in3
Applies only to Level 2 and 3. This value produces the self-weight of the aluminum culvert in the loading schedule (PDEN = 0.0975 pci). Leave blank to ignore self-weight deformations.
Modulus of Upper Portion of Bilinear Model (PE2) (51-60) (F10.0) (lb/in2)
Modulus of upper portion of bilinear model. Default = 0.05*PE
This value is only used when NONLIN = 2. It is the slope of the stress-strain curve after yielding, see Figure 5.4-1. For aluminum alloys the default is recommended.
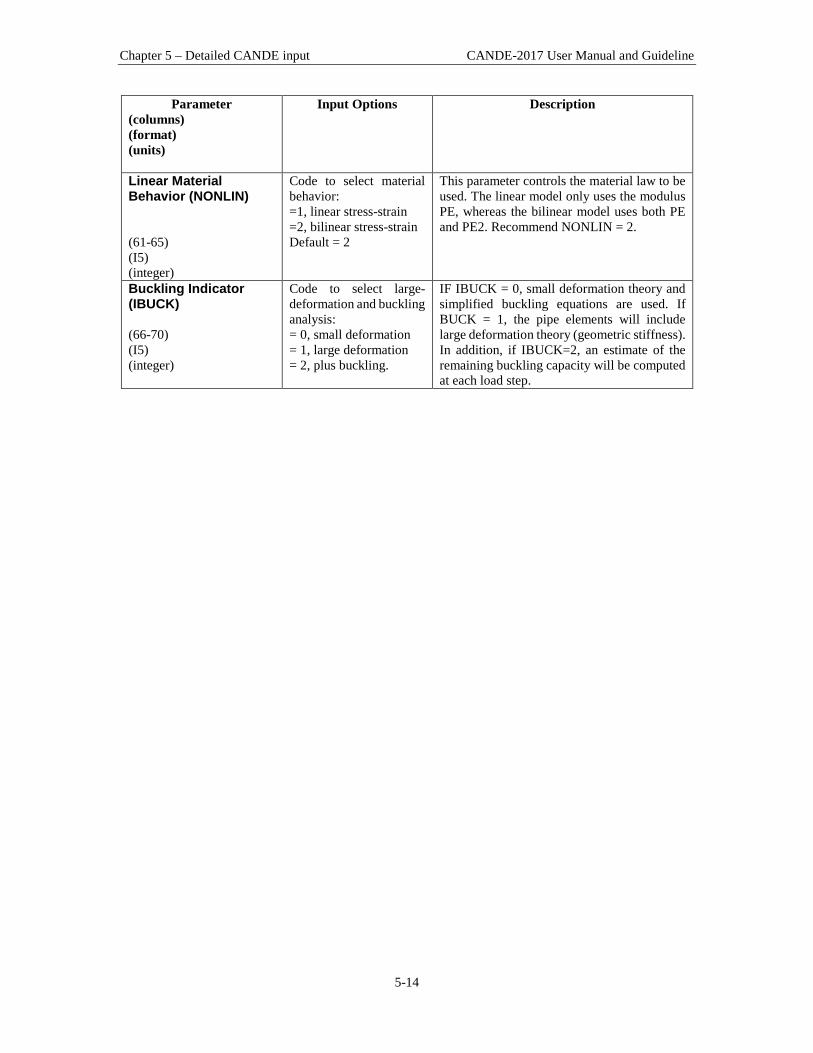
Chapter 5 – Detailed CANDE input CANDE-2017 User Manual and Guideline
5-14
Parameter (columns) (format) (units)
Input Options Description
Linear Material Behavior (NONLIN) (61-65) (I5) (integer)
Code to select material behavior: =1, linear stress-strain =2, bilinear stress-strain Default = 2
This parameter controls the material law to be used. The linear model only uses the modulus PE, whereas the bilinear model uses both PE and PE2. Recommend NONLIN = 2.
Buckling Indicator (IBUCK) (66-70) (I5) (integer)
Code to select large-deformation and buckling analysis: = 0, small deformation = 1, large deformation = 2, plus buckling.
IF IBUCK = 0, small deformation theory and simplified buckling equations are used. If BUCK = 1, the pipe elements will include large deformation theory (geometric stiffness). In addition, if IBUCK=2, an estimate of the remaining buckling capacity will be computed at each load step.
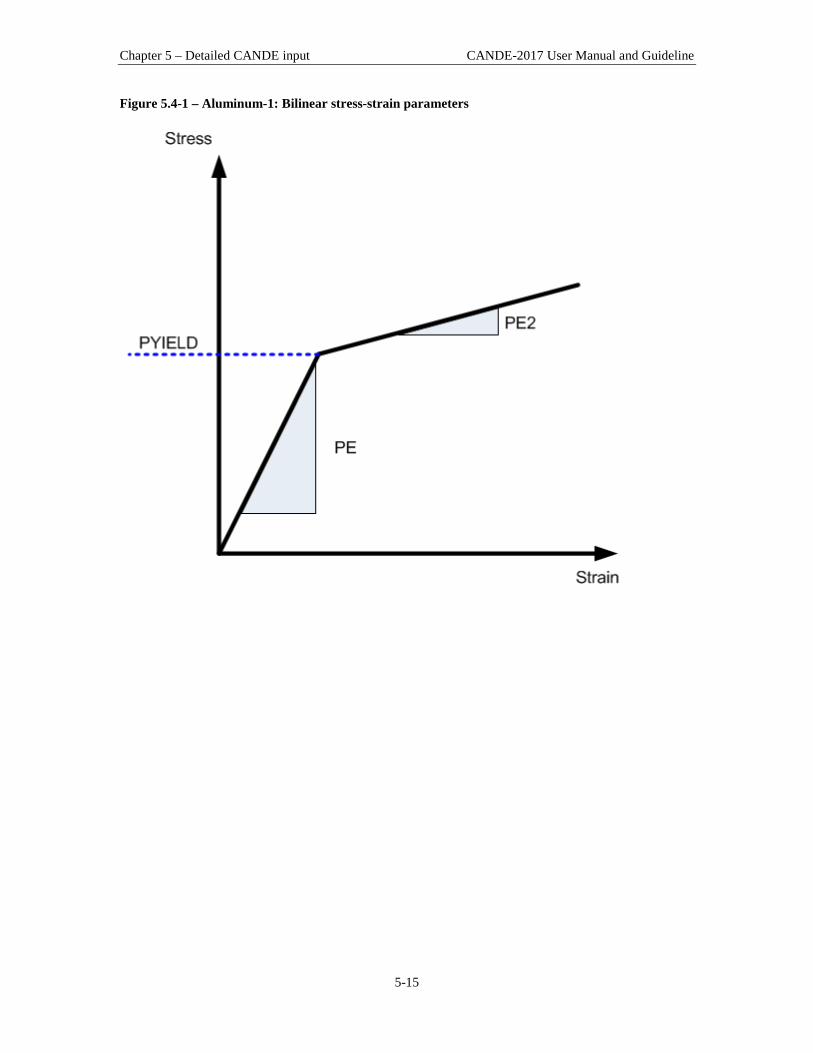
Chapter 5 – Detailed CANDE input CANDE-2017 User Manual and Guideline
5-15
Figure 5.4-1 – Aluminum-1: Bilinear stress-strain parameters
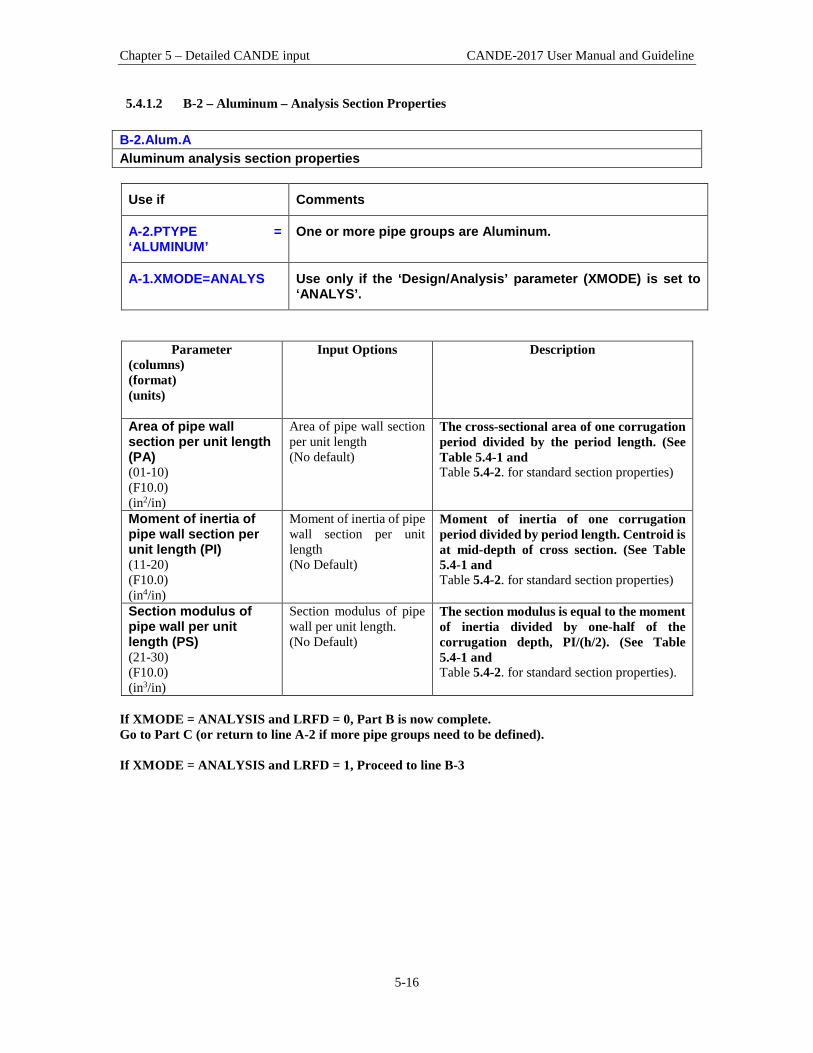
Chapter 5 – Detailed CANDE input CANDE-2017 User Manual and Guideline
5-16
5.4.1.2 B-2 – Aluminum – Analysis Section Properties B-2.Alum.A Aluminum analysis section properties
Use if Comments
A-2.PTYPE = ‘ALUMINUM’
One or more pipe groups are Aluminum.
A-1.XMODE=ANALYS Use only if the ‘Design/Analysis’ parameter (XMODE) is set to ‘ANALYS’.
Parameter (columns) (format) (units)
Input Options Description
Area of pipe wall section per unit length (PA) (01-10) (F10.0) (in2/in)
Area of pipe wall section per unit length (No default)
The cross-sectional area of one corrugation period divided by the period length. (See Table 5.4-1 and Table 5.4-2. for standard section properties)
Moment of inertia of pipe wall section per unit length (PI) (11-20) (F10.0) (in4/in)
Moment of inertia of pipe wall section per unit length (No Default)
Moment of inertia of one corrugation period divided by period length. Centroid is at mid-depth of cross section. (See Table 5.4-1 and Table 5.4-2. for standard section properties)
Section modulus of pipe wall per unit length (PS) (21-30) (F10.0) (in3/in)
Section modulus of pipe wall per unit length. (No Default)
The section modulus is equal to the moment of inertia divided by one-half of the corrugation depth, PI/(h/2). (See Table 5.4-1 and Table 5.4-2. for standard section properties).
If XMODE = ANALYSIS and LRFD = 0, Part B is now complete. Go to Part C (or return to line A-2 if more pipe groups need to be defined). If XMODE = ANALYSIS and LRFD = 1, Proceed to line B-3

Chapter 5 – Detailed CANDE input CANDE-2017 User Manual and Guideline
5-17
Table 5.4-1 - Aluminum-1. Section Properties for Standard Aluminum Corrugation
Table 5.4-2 - Aluminum -2. Section Properties for 9 x 2 ½ Aluminum Corrugation
Section Properties
9 x 2-1/2 Corrugation thickness -- inches 0.100 0.125 0.150 0.175 0.200 0.225 0.250
PA in2/in 0.11700 0.14583 0.17500 0.20408 0.23325 0.26242 0.29175
PI in4/in 0.08310 0.10400 0.12490 0.14590 0.16700 0.18820 0.20940
PS in3/in 0.06392 0.07924 0.09426 0.10908 0.12370 0.13813 0.15229 Thickness = Specified thickness of metal gage in inches Corrugation size = nominal height x pitch measured in inches. Nominal height = Inside valley to corrugation crest (i.e., actual height minus thickness) Actual height = nominal height plus thickness PA = Cross-sectional area per unit inch PI = Moment of Inertia per unit inch PS = Section modulus per unit inch (PI divided by one-half of actual height)
Corrugation Profile
Section Properties
Corrugation thickness -- inches 0.048 0.060 0.075 0.105 0.135 0.164
PA in2/in 0.05070 0.06342 0 0 0 0
1-1/2 x 1/4 PI in4/in 0.00034 0.00035 0 0 0 0
PS in3/in 0.00228 0.00226 0 0 0 0
PA in2/in 0 0.06458 0.08067 0.11300 0.14533 0.17775
2-2/3 x 1/2 PI in4/in 0 0.00189 0.00239 0.00342 0.00453 0.00573
PS in3/in 0 0.00675 0.00831 0.01131 0.01427 0.01726
PA in2/in 0 0.07416 0.09317 0.1300 0.17400 0.20483
3 x 1 PI in4/in 0 0.00866 0.01088 0.01545 0.02017 0.02508
PS in3/in 0 0.01634 0.02024 0.02796 0.03554 0.04309
PA in2/in 0 0.0646 0.08067 0.11300 0.14533 0.17775
6 x 1 PI in4/in 0 0.00850 0.01060 0.01490 0.01910 0.02340
PS in3/in 0 0.01604 0.01972 0.02697 0.03366 0.04021

Chapter 5 – Detailed CANDE input CANDE-2017 User Manual and Guideline
5-18
5.4.1.3 B-2 – Aluminum – Design Safety Factors and Deflection Control B-2.Alum.D.WSD Aluminum Material and Control Parameters
Use if Comments
A-2.PTYPE = ‘ALUMINUM’
One or more pipe groups are Aluminum.
A-1.LRFD = 0 This instruction is only applicable for Service Load design.
A-1.XMODE=’DESIGN’ This command is only applicable if the ‘Design/Analysis’ parameter is set to ‘DESIGN’
Parameter (columns) (format) (units)
Input Options Description
Desired safety factor against thrust yielding (PFS(1)) (01-10) (F10.0) (--)
Desired safety factor against thrust yielding; (Default = 3.0)
Safety factor protects against excessive thrust force causing aluminum material yielding of the entire cross-section (tension or compression). Typical PFS range is 2.0 to 3.0
Desired safety factor against global buckle (PFS(2)) (11-20) (F10.0) (--)
Desired safety factor against global buckling. (Default = 2.0)
Safety factor protects against excessive thrust force causing global buckling of the pipe’s walls in soil-structure system. Typical PFS range is 2.0 to 3.0
Desired safety factor against seam failure due to thrust stress (PFS(3)) (21-30) (F10.0) (--)
Desired safety factor against seam failure due to thrust stress (Default = 2.0)
Safety factor protects against excessive thrust force causing seam failure. For seamless pipe this is equal to material yielding, PFS = 2.0. For structural plate, recommend PFS = 3.0
Desired safety factor against full plastic hinge penetration (PFS(4)) (31-40) (F10.0) (--)
Desired safety factor against full plastic hinge penetration (Default = 4.0)
Safety factor protects against excessive plastic hinge penetration from thrust and bending. PFS = (100% depth)/(% allowable depth). Thus, for 25% allowable penetration, PFS= 4.0

Chapter 5 – Detailed CANDE input CANDE-2017 User Manual and Guideline
5-19
Parameter (columns) (format) (units)
Input Options Description
Maximum allowable vertical deflection percentage (ADISP) (41-50) (F10.0) (%)
Maximum allowable vertical deflection percentage (Default = 5.0)
ADISP is the maximum allowable percentage of vertical deflection with respect to the vertical height. For pipes and pipe arches, 5% of the vertical height is typical. For long-span structures, 2% of total rise is typical
The working–stress design output provides a list of corrugation sizes along with the required metal thickness to meet the above design criteria. CANDE determines the design output by performing a series of analyses beginning with a trial cross-section and successively modifying it after each analysis until the specified safety factors are satisfied in an optimum manner. CANDE selects the least weight corrugation for a final analysis and evaluation. If the ‘Design/Analysis’ XMODE = Design and the ‘Method of Analysis’ parameter LRFD = 0, Part B is now complete. Go to Part C (or return to line A-2 if more pipe groups need to be defined).

Chapter 5 – Detailed CANDE input CANDE-2017 User Manual and Guideline
5-20
5.4.1.4 B-2 – Aluminum – Design Weights for LRFD B-2.Alum.D.LRFD Aluminum Material and Control Parameters The specification of the WLRFD design weights has the following consequences:
• WLRFD = 1.0, Standard LRFD (factored resistance = factored loads) • WLRFD > 1.0 More conservative (factored resistance > factored loads) • WLRFD < 1.0 Less conservative (factored resistance < factored loads) • WLRFD = -1.0 Exclude the corresponding design criterion
Use if Comments
A-2.PTYPE = ‘ALUMINUM’
One or more pipe groups are Aluminum.
A-1.LRFD = 1 This instruction is only applicable for LRFD design.
Design/Analysis parameter is ‘DESIGN’
This command is only applicable if the ‘Design/Analysis’ parameter is set to ‘DESIGN’
Parameter (columns) (format) (units)
Input Options Description
Wall area failure due to maximum thrust stress (WLRFD(1)) (01-10) (F10.0) (--)
Wall area failure due to maximum thrust stress (Default weight = 1)
The design goal is to determine the corrugated wall area so that the weighted-factored-thrust-stress is just less than the factored-yield-strength-resistance of aluminum
Global buckling due to thrust stress (WLRFD(2)) (11-20) (F10.0) (--)
Global buckling due to thrust stress (Default weight = 1)
The design goal is to determine the corrugated wall moment of inertia so that the weighted-factored-thrust-stress is just less than the factored-thrust-resistance for global buckling.
Seam failure due to thrust stress (WLRFD(3)) (21-30) (F10.0) (--)
Seam failure due to thrust stress (Default weight = 1)
The design goal is to determine the corrugated wall area so that the weighted-factored-thrust-stress is just less than the factored-yield-strength-of longitudinal seams
Cross-section failure due to plastic penetration (WLRFD(4)) (31-40) (F10.0) (--)
Cross-section failure due to plastic penetration. (Default weight = 1)
The design goal is to determine the corrugated wall moment of inertia so that the weighted-factored-plastic-penetration due to thrust and bending is less than the factored-complete-plastic wall penetration. **
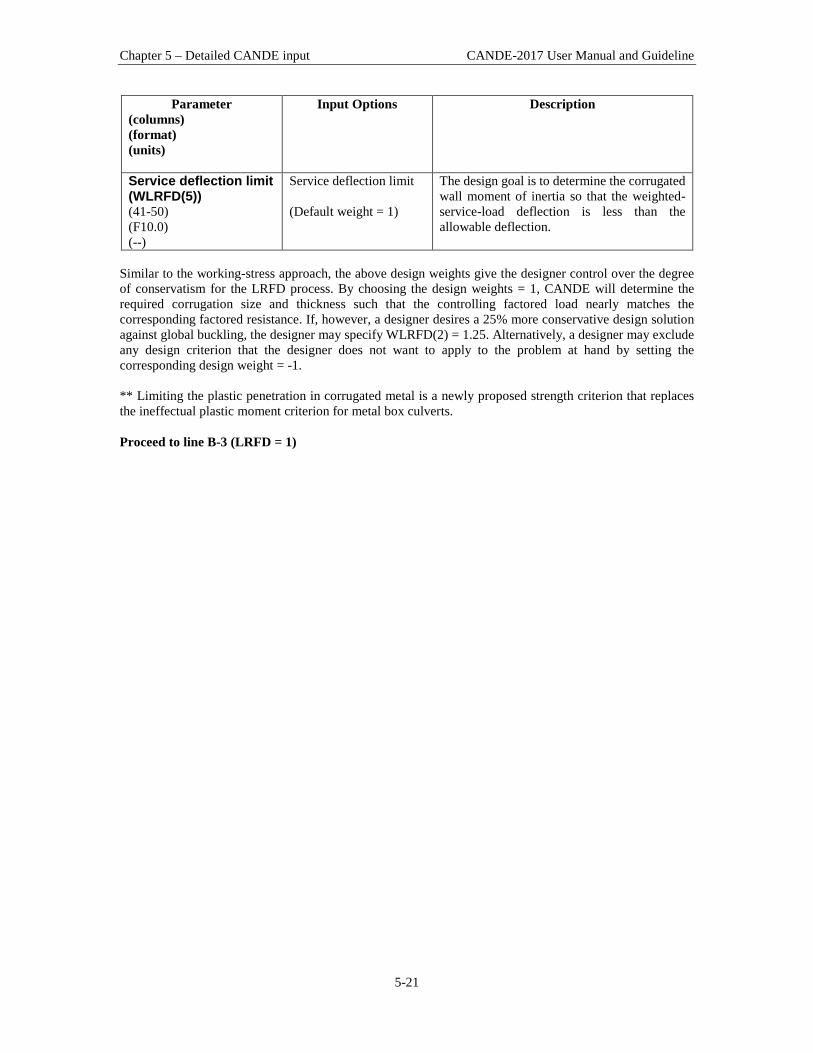
Chapter 5 – Detailed CANDE input CANDE-2017 User Manual and Guideline
5-21
Parameter (columns) (format) (units)
Input Options Description
Service deflection limit (WLRFD(5)) (41-50) (F10.0) (--)
Service deflection limit (Default weight = 1)
The design goal is to determine the corrugated wall moment of inertia so that the weighted-service-load deflection is less than the allowable deflection.
Similar to the working-stress approach, the above design weights give the designer control over the degree of conservatism for the LRFD process. By choosing the design weights = 1, CANDE will determine the required corrugation size and thickness such that the controlling factored load nearly matches the corresponding factored resistance. If, however, a designer desires a 25% more conservative design solution against global buckling, the designer may specify WLRFD(2) = 1.25. Alternatively, a designer may exclude any design criterion that the designer does not want to apply to the problem at hand by setting the corresponding design weight = -1. ** Limiting the plastic penetration in corrugated metal is a newly proposed strength criterion that replaces the ineffectual plastic moment criterion for metal box culverts. Proceed to line B-3 (LRFD = 1)

Chapter 5 – Detailed CANDE input CANDE-2017 User Manual and Guideline
5-22
5.4.1.5 B-3 – Aluminum – Resistance Factors for LRFD B-3.Alum.AD.LRFD Resistance factors for LRFD limit states
Use if Comments
A-2.PTYPE = ‘ALUMINUM’
One or more pipe groups are Aluminum.
A-1.LRFD = 1 This instruction is only applicable for LRFD design.
A-1.XMODE = ‘ANALYS’ or ‘DESIGN’
This command is only applicable if the ‘Design/Analysis’ parameter is set to ‘DESIGN’ or ‘ANALYS’
Parameter (columns) (format) (units)
Input Options Description
Resistance factor for wall area yielding due to thrust stress (PHI(1)) (01-10) (F10.0) (--)
Resistance factor for wall area yielding due to thrust stress (Default = 1.0)
Factored thrust stress resistance = PHI(1) x PYIELD. Choosing PFS(1) = 1 is generally recommended and consistent with current LRFD specifications.
Resistance factor for global buckling due to thrust stress (PHI (2)) (11-20) (F10.0) (--)
Resistance factor for global buckling due to thrust stress (Default = 1.0)
Factored global buckling resistance = PHI(2) x Buckling-Capacity. Buckling capacity is determined by large deformation theory in CANDE if IBUCK = 2. Otherwise simplified buckling equations are used.
Resistance factor for seam strength due to thrust stress (PHI (3)) (21-30) (F10.0) (--)
Resistance factor for seam strength due to thrust stress (Default = 0.67)
Factored seam strength resistance = PHI(3) x PSEAM. The default value applies to metal structures with longitudinal seams, for seamless structures set PHI(3) = 1.
Resistance factor for cross-section capacity for plastic-penetration (PHI (4)) (31-40) (F10.0) (--)
Resistance factor for cross-section capacity for plastic-penetration (Default = 0.85)
Factored cross-section capacity resistance = PHI(4) x 100% of cross-section depth. This criterion applies to the percentage of cross-section that becomes plastic due to both thrust and bending stresses.**
Allowable deflection at service load (DISP) (41-50) (F10.0) (%)
Allowable deflection at service load (Default = 5%)
Allowable deflection is the relative vertical deflection, typically taken as 5% of vertical diameter. For long-span structures, allowable deflection is 2% total rise. The service loading criterion is approximated by reducing predicted displacements by the load factors.

Chapter 5 – Detailed CANDE input CANDE-2017 User Manual and Guideline
5-23
Comment: The above resistance factors are used for both the design and analysis modes. In the analysis mode CANDE will show the five numerical values of the above factored resistances along with the corresponding factored responses. In the design mode, the designer is given additional control on the previous page to design with more or less conservatism and to permit turning on or off any of the criterion to fit the problem at hand. ** Limiting the plastic penetration in corrugated metal is a newly proposed strength criterion that replaces the ineffectual plastic moment criterion for metal box culverts. We suggest that designers evoke this criterion for all metal culverts. This completes the current B-set input. Go to Part C (or return to line A-2 if more pipe groups need to be defined).

Chapter 5 – Detailed CANDE input CANDE-2017 User Manual and Guideline
5-24
5.4.2 Basic Pipe Type
5.4.2.1 B-1 – Basic – Sequence Intervals and Properties B-1.Basic Sequence intervals and properties: Repeat line B-1 to define all sequences of pipe properties in this group.
Use if Comments
A-2.PTYPE = ‘BASIC’ One or more pipe groups are Basic.
A-1.XMODE = ‘ANALYS’ This command is only applicable if the ‘Design/Analysis’ parameter is set to ‘ANALYS’ NOTE: This input is not valid for ‘DESIGN’
Parameter
(columns) (format) (units)
Input Options Description
First pipe-element number in this sequence (ISEQ1) (01-05) (I5) (integer)
First pipe-element number in this sequence ` (No Default)
ISEQ1 is the beginning local element sequence numbers within this pipe group that shares the same material properties up to and including ISEQ2. This feature allows changing the material properties within the pipe group. (See example in Note #2)
Last pipe-element number in this sequence (ISEQ2) (06-10) (I5) (integer)
Last pipe-element number in this sequence (Default = ISEQ1)
ISEQ2 is the ending local element sequence number within this pipe group that shares the same material properties with all elements in the sequence ISEQ1 to ISEQ2. (See example in Note #2)
Young’s modulus for this sequence of pipe material. (PE) (11-20) (F10.0) (lb/in2)
Young’s modulus for this sequence of pipe material. (No Default)
The BASIC element is not associated with any particular material (hence no default values or design option). A linear stress-strain model is the only option, characterized by PE.
Poisson’s ratio for this sequence of pipe material. (PNU) (21-30) (F10.0) (--)
Poisson’s ratio for this sequence of pipe material. (No Default)
Poisson’s ratio is used for plane-strain formulation. This means that the effective modulus is PE* = PE/(1-PNU2).
Area of pipe wall-section per unit length, for sequence (PA) (31-40) (F10.0) (in2/in)
Area of pipe wall-section per unit length, for sequence (No Default)
This is the pipe’s wall cross-sectional area per unit length of pipe, which provides resistance to hoop (or column) compression or tension

Chapter 5 – Detailed CANDE input CANDE-2017 User Manual and Guideline
5-25
Parameter (columns) (format) (units)
Input Options Description
Moment of inertia of wall section per unit length, for sequence (PI) (41-50) (F10.0) (in4/in)
Moment of inertia of wall section per unit length, for sequence (No Default)
This is the pipe’s wall moment inertia per unit length of pipe, which provides resistance to ovaling (or bending) deformation
Line-load of pipe element, for sequence (PDENL) (51-60) (F10.0) (lb/in)
Line-load of pipe element, for sequence (No Default)
The element’s line-load is the gravity force per inch along the element’s length in the x-y plane. To represent dead weight of material, set PDENL = PA * density(pci). This only applies to Levels 2 and 3.
Note #1. The BASIC pipe type only applies to the analysis mode. The material model is linear elastic and allows changing the material and geometric properties from element to element. Note # 2. Example of using ISEQ1 and ISEQ2. If there are 10 elements in this pipe group with a change of material properties after the first five elements, then we would set ISEQ1 = 1 and ISEQ2 = 5, thereby assigning the first sequence material properties to the first five elements. Then, the B-1 instructions would be repeated with ISEQ1 = 6 and ISEQ2 = 10 to define the second set of material properties. If all the group elements happen to have the same material properties, we would set ISEQ1 = 1 and ISEQ2 = Number of elements in the group. After all B-1 subsequences are defined Proceed to Line B-2.
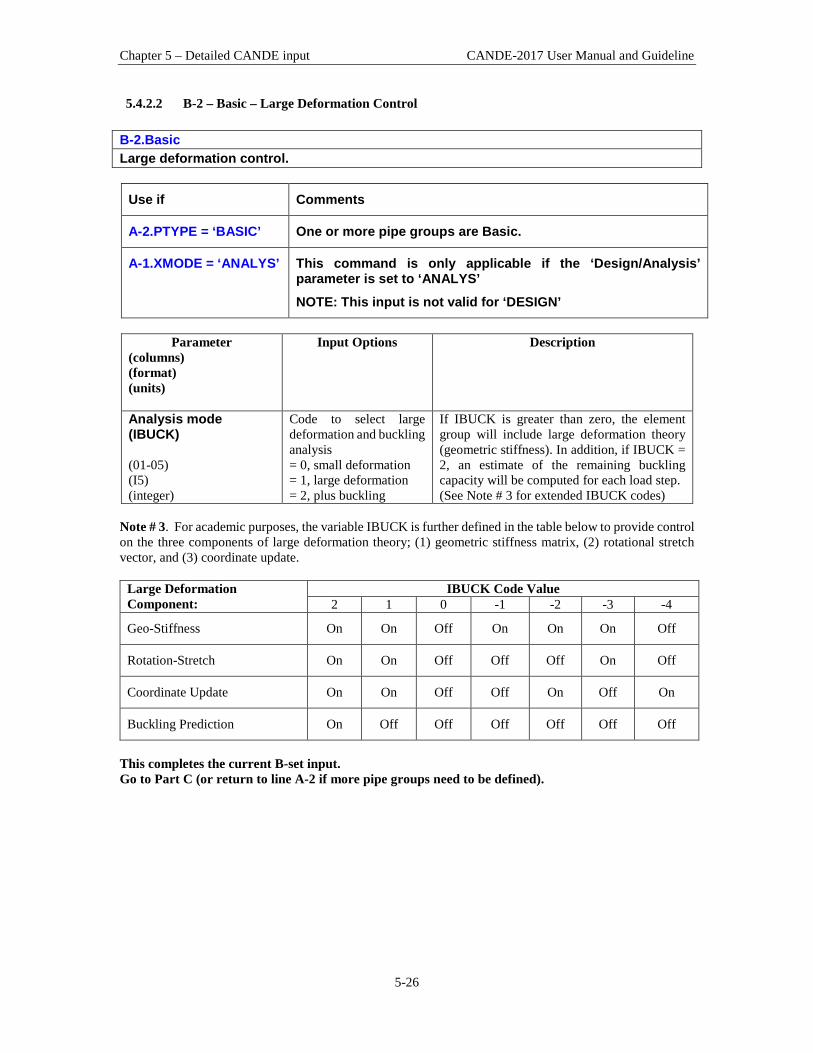
Chapter 5 – Detailed CANDE input CANDE-2017 User Manual and Guideline
5-26
5.4.2.2 B-2 – Basic – Large Deformation Control B-2.Basic Large deformation control.
Use if Comments
A-2.PTYPE = ‘BASIC’ One or more pipe groups are Basic.
A-1.XMODE = ‘ANALYS’ This command is only applicable if the ‘Design/Analysis’ parameter is set to ‘ANALYS’ NOTE: This input is not valid for ‘DESIGN’
Parameter
(columns) (format) (units)
Input Options Description
Analysis mode (IBUCK) (01-05) (I5) (integer)
Code to select large deformation and buckling analysis = 0, small deformation = 1, large deformation = 2, plus buckling
If IBUCK is greater than zero, the element group will include large deformation theory (geometric stiffness). In addition, if IBUCK = 2, an estimate of the remaining buckling capacity will be computed for each load step. (See Note # 3 for extended IBUCK codes)
Note # 3. For academic purposes, the variable IBUCK is further defined in the table below to provide control on the three components of large deformation theory; (1) geometric stiffness matrix, (2) rotational stretch vector, and (3) coordinate update.
Large Deformation Component:
IBUCK Code Value 2 1 0 -1 -2 -3 -4
Geo-Stiffness On On Off On On On Off
Rotation-Stretch On On Off Off Off On Off
Coordinate Update On On Off Off On Off On
Buckling Prediction On Off Off Off Off Off Off
This completes the current B-set input. Go to Part C (or return to line A-2 if more pipe groups need to be defined).

Chapter 5 – Detailed CANDE input CANDE-2017 User Manual and Guideline
5-27
5.4.3 Reinforced Concrete Pipe Type
5.4.3.1 B-1 – Concrete – Concrete Material Properties B-1.Concrete – Standard reinforced concrete rectangular cross section with steel Concrete material properties
Use if Comments
A-2.PTYPE = ‘CONCRETE’
One or more pipe groups are Concrete.
Parameter
(columns) (format) (units)
Input Options Description
Compressive strength of concrete (f c ’) (PFPC) (01-10) (F10.0) (lb/in2)
Compressive strength of concrete (f c ’) Default = 4000 psi
Uni-axial compressive stress of concrete in standard cylinder compression test or core specimen from pre-cast pipe. See Figure 5.4-2.
Young’s modulus of concrete for elastic (PCE) (11-20) (F10.0) (lb/in2)
Young’s modulus of concrete for elastic Default = 33*(density)1.5(f c ’)0.5
Slope of stress-strain curve of concrete in initial compression prior to nonlinear yielding. See Figure 5.4-2.
Poisson’s ratio of concrete material (PNU) (21-30) (F10.0) ( -- )
Poisson’s ratio of concrete material Default = 0.17
Poisson’s ratio is used for plane-strain formulation
Multiplying factor to compute nominal shear strength (VFACTOR) (31-40) (F10.0) (--)
A multiplying factor to compute nominal shear strength = VFACTOR x (f c ’)1/2
Default = (traditional method not used)
By specifying VFACTOR > 0.0 (e.g. 2.0), the traditional method of specifying concrete shear strength is used instead of the newer methods offered next. For plain concrete without any steel reinforcement, VFACTOR = 2 is recommended. Shear strength is only used in CANDE for design/analysis evaluations. (See comments next page)
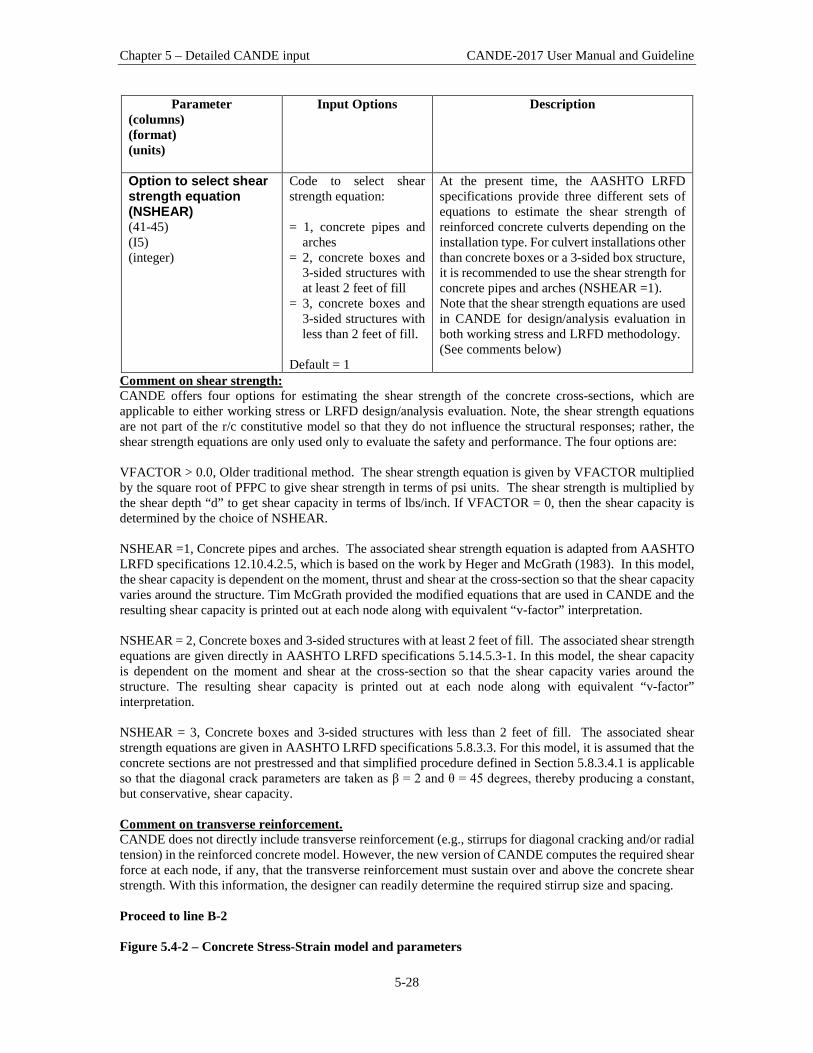
Chapter 5 – Detailed CANDE input CANDE-2017 User Manual and Guideline
5-28
Parameter (columns) (format) (units)
Input Options Description
Option to select shear strength equation (NSHEAR) (41-45) (I5) (integer)
Code to select shear strength equation: = 1, concrete pipes and
arches = 2, concrete boxes and
3-sided structures with at least 2 feet of fill
= 3, concrete boxes and 3-sided structures with less than 2 feet of fill.
Default = 1
At the present time, the AASHTO LRFD specifications provide three different sets of equations to estimate the shear strength of reinforced concrete culverts depending on the installation type. For culvert installations other than concrete boxes or a 3-sided box structure, it is recommended to use the shear strength for concrete pipes and arches (NSHEAR =1). Note that the shear strength equations are used in CANDE for design/analysis evaluation in both working stress and LRFD methodology. (See comments below)
Comment on shear strength: CANDE offers four options for estimating the shear strength of the concrete cross-sections, which are applicable to either working stress or LRFD design/analysis evaluation. Note, the shear strength equations are not part of the r/c constitutive model so that they do not influence the structural responses; rather, the shear strength equations are only used only to evaluate the safety and performance. The four options are: VFACTOR > 0.0, Older traditional method. The shear strength equation is given by VFACTOR multiplied by the square root of PFPC to give shear strength in terms of psi units. The shear strength is multiplied by the shear depth “d” to get shear capacity in terms of lbs/inch. If VFACTOR = 0, then the shear capacity is determined by the choice of NSHEAR. NSHEAR =1, Concrete pipes and arches. The associated shear strength equation is adapted from AASHTO LRFD specifications 12.10.4.2.5, which is based on the work by Heger and McGrath (1983). In this model, the shear capacity is dependent on the moment, thrust and shear at the cross-section so that the shear capacity varies around the structure. Tim McGrath provided the modified equations that are used in CANDE and the resulting shear capacity is printed out at each node along with equivalent “v-factor” interpretation. NSHEAR = 2, Concrete boxes and 3-sided structures with at least 2 feet of fill. The associated shear strength equations are given directly in AASHTO LRFD specifications 5.14.5.3-1. In this model, the shear capacity is dependent on the moment and shear at the cross-section so that the shear capacity varies around the structure. The resulting shear capacity is printed out at each node along with equivalent “v-factor” interpretation. NSHEAR = 3, Concrete boxes and 3-sided structures with less than 2 feet of fill. The associated shear strength equations are given in AASHTO LRFD specifications 5.8.3.3. For this model, it is assumed that the concrete sections are not prestressed and that simplified procedure defined in Section 5.8.3.4.1 is applicable so that the diagonal crack parameters are taken as β = 2 and θ = 45 degrees, thereby producing a constant, but conservative, shear capacity. Comment on transverse reinforcement. CANDE does not directly include transverse reinforcement (e.g., stirrups for diagonal cracking and/or radial tension) in the reinforced concrete model. However, the new version of CANDE computes the required shear force at each node, if any, that the transverse reinforcement must sustain over and above the concrete shear strength. With this information, the designer can readily determine the required stirrup size and spacing. Proceed to line B-2 Figure 5.4-2 – Concrete Stress-Strain model and parameters

Chapter 5 – Detailed CANDE input CANDE-2017 User Manual and Guideline
5-29
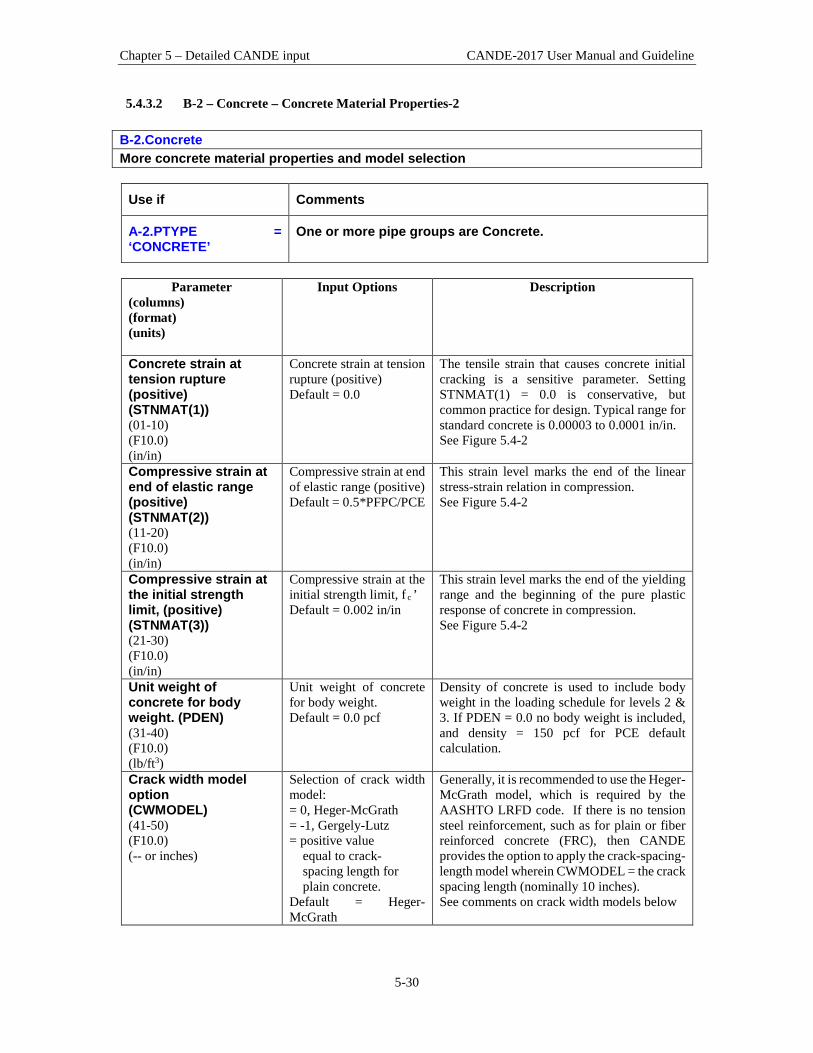
Chapter 5 – Detailed CANDE input CANDE-2017 User Manual and Guideline
5-30
5.4.3.2 B-2 – Concrete – Concrete Material Properties-2 B-2.Concrete More concrete material properties and model selection
Use if Comments
A-2.PTYPE = ‘CONCRETE’
One or more pipe groups are Concrete.
Parameter
(columns) (format) (units)
Input Options Description
Concrete strain at tension rupture (positive) (STNMAT(1)) (01-10) (F10.0) (in/in)
Concrete strain at tension rupture (positive) Default = 0.0
The tensile strain that causes concrete initial cracking is a sensitive parameter. Setting STNMAT(1) = 0.0 is conservative, but common practice for design. Typical range for standard concrete is 0.00003 to 0.0001 in/in. See Figure 5.4-2
Compressive strain at end of elastic range (positive) (STNMAT(2)) (11-20) (F10.0) (in/in)
Compressive strain at end of elastic range (positive) Default = 0.5*PFPC/PCE
This strain level marks the end of the linear stress-strain relation in compression. See Figure 5.4-2
Compressive strain at the initial strength limit, (positive) (STNMAT(3)) (21-30) (F10.0) (in/in)
Compressive strain at the initial strength limit, f c ’ Default = 0.002 in/in
This strain level marks the end of the yielding range and the beginning of the pure plastic response of concrete in compression. See Figure 5.4-2
Unit weight of concrete for body weight. (PDEN) (31-40) (F10.0) (lb/ft3)
Unit weight of concrete for body weight. Default = 0.0 pcf
Density of concrete is used to include body weight in the loading schedule for levels 2 & 3. If PDEN = 0.0 no body weight is included, and density = 150 pcf for PCE default calculation.
Crack width model option (CWMODEL) (41-50) (F10.0) (-- or inches)
Selection of crack width model: = 0, Heger-McGrath = -1, Gergely-Lutz = positive value equal to crack- spacing length for plain concrete. Default = Heger-McGrath
Generally, it is recommended to use the Heger-McGrath model, which is required by the AASHTO LRFD code. If there is no tension steel reinforcement, such as for plain or fiber reinforced concrete (FRC), then CANDE provides the option to apply the crack-spacing-length model wherein CWMODEL = the crack spacing length (nominally 10 inches). See comments on crack width models below

Chapter 5 – Detailed CANDE input CANDE-2017 User Manual and Guideline
5-31
Parameter (columns) (format) (units)
Input Options Description
Analysis mode (IBUCK) (51-55) (I5) (integer)
Code to select large-deformation and buckling analysis: = 0, small deformation = 1, large deformation = 2, plus buckling.
If this value is greater than zero, the pipe elements will include large deformation theory (geometric stiffness). Also, if IBUCK=2, an estimate of the remaining buckling capacity will be computed at each load step. Typically, large deformations and buckling is not a concern for reinforced concrete structures, but may be useful in some special cases.
Comment on Crack Widths. CANDE uses empirical formulas to predict crack width based on the magnitude of tension steel stress determined from CANDE’s reinforced concrete model. CANDE output always gives the predicted crack width at service load level regardless of whether LRFD = 0 or 1. The Heger-McGrath crack-width equation is adapted from the AASHTO LRFD code (12.10.4.2.4d) and is expressed with stresses (f s and f c ’) in ksi units as: CW = (1/3000) (t b s l / 2n)1/3{f s – 0.0316C 1 (h/d)2√f c ’/ρ} (inches) The older Gergely-Lutz empirical formula for crack width with f s in ksi units is: CW = (0.000122) (2t b
2s l )1/3{f s – 5.0} (inches) When there is no reinforcement steel such as for plain concrete, CANDE provides the option to predict crack width based on the concrete tension strain in excess of the concrete cracking strain multiplied by the crack spacing length (nominally = 10 in): CW = crack-spacing-length *(ε tension – ε cracking ) (inches)
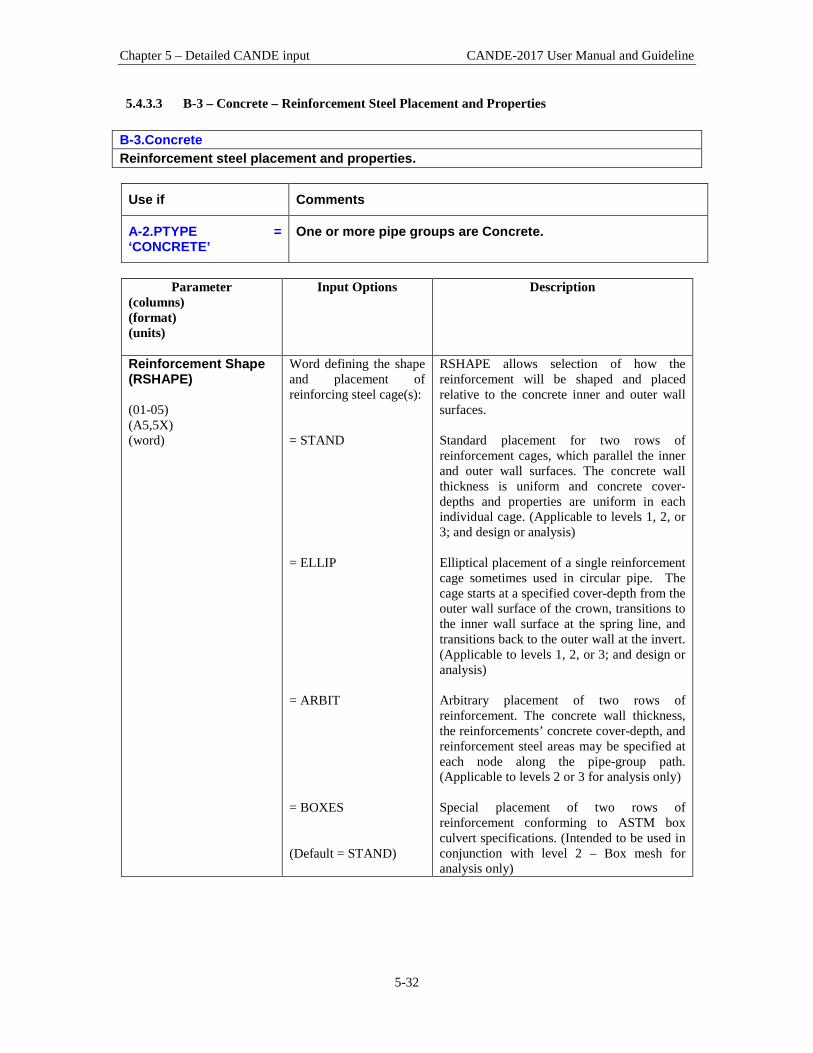
Chapter 5 – Detailed CANDE input CANDE-2017 User Manual and Guideline
5-32
5.4.3.3 B-3 – Concrete – Reinforcement Steel Placement and Properties B-3.Concrete Reinforcement steel placement and properties.
Use if Comments
A-2.PTYPE = ‘CONCRETE’
One or more pipe groups are Concrete.
Parameter
(columns) (format) (units)
Input Options Description
Reinforcement Shape (RSHAPE) (01-05) (A5,5X) (word)
Word defining the shape and placement of reinforcing steel cage(s): = STAND = ELLIP = ARBIT = BOXES (Default = STAND)
RSHAPE allows selection of how the reinforcement will be shaped and placed relative to the concrete inner and outer wall surfaces. Standard placement for two rows of reinforcement cages, which parallel the inner and outer wall surfaces. The concrete wall thickness is uniform and concrete cover-depths and properties are uniform in each individual cage. (Applicable to levels 1, 2, or 3; and design or analysis) Elliptical placement of a single reinforcement cage sometimes used in circular pipe. The cage starts at a specified cover-depth from the outer wall surface of the crown, transitions to the inner wall surface at the spring line, and transitions back to the outer wall at the invert. (Applicable to levels 1, 2, or 3; and design or analysis) Arbitrary placement of two rows of reinforcement. The concrete wall thickness, the reinforcements’ concrete cover-depth, and reinforcement steel areas may be specified at each node along the pipe-group path. (Applicable to levels 2 or 3 for analysis only) Special placement of two rows of reinforcement conforming to ASTM box culvert specifications. (Intended to be used in conjunction with level 2 – Box mesh for analysis only)

Chapter 5 – Detailed CANDE input CANDE-2017 User Manual and Guideline
5-33
Parameter (columns) (format) (units)
Input Options Description
Yield stress of reinforcing steel (PFSY) (11-20) (F10.0) (lb/in2)
Yield stress of reinforcing steel Default = 60,000 psi
Reinforcement is modeled as elastic-perfectly plastic where PFSY represents the maximum stress attainable
Young’s modulus of reinforcing steel (PSE) (21-30) (F10.0) (lb/in2)
Young’s modulus of reinforcing steel Default = 29 x 106 psi
Slope of steel’s stress-strain curve in linear range. Behavior is assumed identical in tension and compression.
Poisson’s ratio (PSNU) (31-40) (F10.0) ( -- )
Poisson’s ratio of reinforcing steel Default = 0.3
Poisson’s ratio is used for plane-strain formulation
Inner surface spacing between rows of reinforcement (SLI) (41-50) (F10.0) (inches)
Spacing between rows of rebar on inner surface (Default = 2.0 in)
CANDE uses the SLI parameter only for predicting crack-width in the Gergely-Lutz formula and the Heger-McGrath formula.
Outer surface spacing between rows of reinforcement (SLO) (51-60) (F10.0) (inches)
Spacing between rows of rebar on outer surface (Default = 2.0 in)
CANDE uses the SLO parameter only for predicting crack-width in the Gergely-Lutz formula and the Heger-McGrath formula.
Number of inner cage layers of reinforcement (NI) (61-65) (I5) (integer)
Number of layers of reinforcement to form inner cage steel area. (Default = 1)
CANDE uses the NI parameter only for predicting crack-width using the Heger-McGrath formula. (Note, a maximum value of NI = 2 is used in formula for n, see comment following line B-2)
Number of outer cage layers of reinforcement (NO) (66-70) (I5) (integer)
Number of layers of reinforcement to form outer cage steel area. (Default = 1)
CANDE uses the NO parameter only for predicting crack-width using the Heger-McGrath formula. (Note, a maximum value of NO = 2 is used in formula for n, see comment following line B-2)

Chapter 5 – Detailed CANDE input CANDE-2017 User Manual and Guideline
5-34
Parameter (columns) (format) (units)
Input Options Description
Type of Reinforcement (NC1) (71-75) (I5) (integer)
Code number for type of reinforcement: =1, Smooth wire or plain bars. =2, Welded or deformed wire. =3, Deformed bars or with stirrups. (Default = 2)
CANDE uses the NC1 parameter only for predicting crack-width using the Heger-McGrath formula. The code value, NC1 = 1, 2, or 3 corresponds to the Heger-McGrath variable C 1 set to 1.0, 1.5 or 1.9, respectively. See Heger-McGrath crack-width equation following line B-2.
Nonlinear behavior selection (NONLIN) (76-80) (I5) (integer)
Code to select level of nonlinear behavior: =1, cracking only =2, add concrete plastic behavior =3, also include steel yielding behavior Default = 3
As a general rule, concrete cracking and nonlinear compressive behavior along with steel yielding should be used for all real-world problems (NONLIN = 3). Lesser degrees of nonlinearity may be useful for comparative studies.
Guide for next lines of input The next lines of input starting with Line B-4, depends upon the previous choices of XMODE, LRFD and RSHAPE as shown in table below
Case #
Pre-selected Input Go to line B-4 with the description that matches the pre-selected input:
XMODE LRFD RSHAPE
1 Analysis 0 or 1 Standard or Ellipse
B4 – Analysis with uniform walls and circular or elliptical reinforcement (Level 1, 2 or 3)
2 Analysis 0 or 1 Arbitrary B4 – Analysis with arbitrary walls and placement of reinforcement (Level 2 or 3)
3 Analysis 0 or 1 Boxes B4, B4b – Analysis for ASTM box culvert walls and rebar placement (used with Level 2-Box)
4 Design 0 Standard or Ellipse
B4 -- Design for uniform walls and circular or elliptical rebar (working stress Level 1, 2 or 3)
5 Design 1 Standard or Ellipse
B4, B5 -- Design for uniform walls and circular or elliptical rebar (LRFD Level 1, 2 or 3)
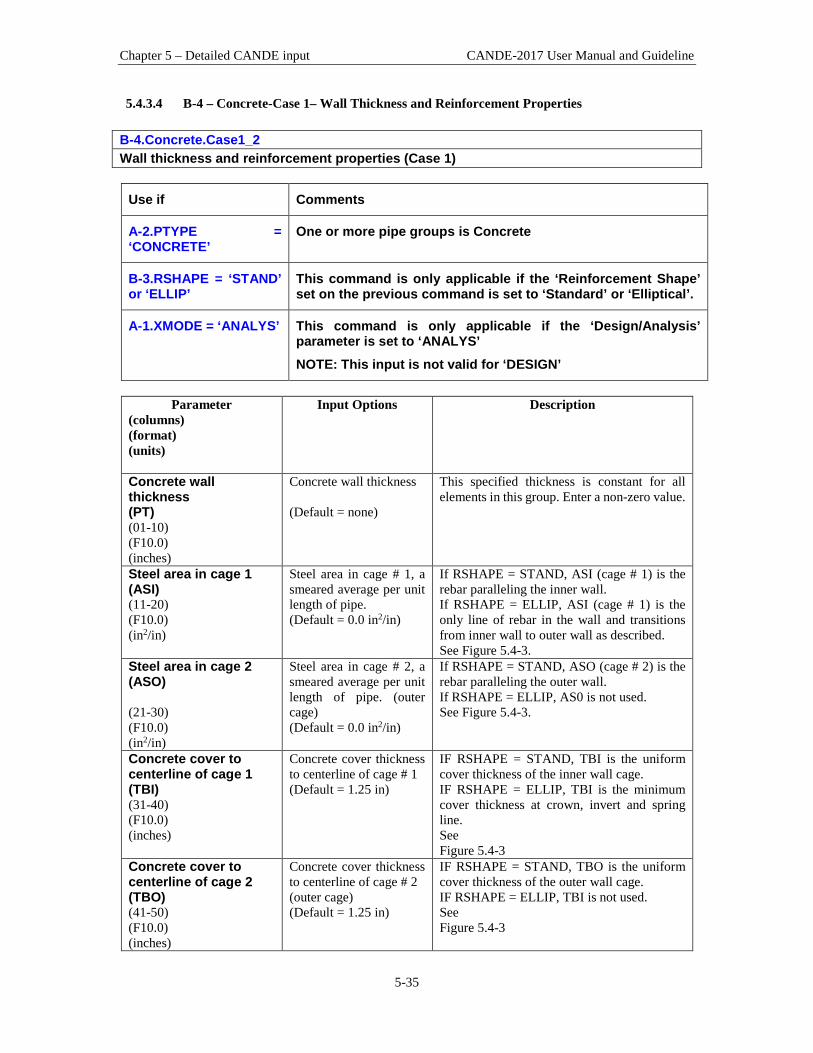
Chapter 5 – Detailed CANDE input CANDE-2017 User Manual and Guideline
5-35
5.4.3.4 B-4 – Concrete-Case 1– Wall Thickness and Reinforcement Properties B-4.Concrete.Case1_2 Wall thickness and reinforcement properties (Case 1)
Use if Comments
A-2.PTYPE = ‘CONCRETE’
One or more pipe groups is Concrete
B-3.RSHAPE = ‘STAND’ or ‘ELLIP’
This command is only applicable if the ‘Reinforcement Shape’ set on the previous command is set to ‘Standard’ or ‘Elliptical’.
A-1.XMODE = ‘ANALYS’ This command is only applicable if the ‘Design/Analysis’ parameter is set to ‘ANALYS’ NOTE: This input is not valid for ‘DESIGN’
Parameter
(columns) (format) (units)
Input Options Description
Concrete wall thickness (PT) (01-10) (F10.0) (inches)
Concrete wall thickness (Default = none)
This specified thickness is constant for all elements in this group. Enter a non-zero value.
Steel area in cage 1 (ASI) (11-20) (F10.0) (in2/in)
Steel area in cage # 1, a smeared average per unit length of pipe. (Default = 0.0 in2/in)
If RSHAPE = STAND, ASI (cage # 1) is the rebar paralleling the inner wall. If RSHAPE = ELLIP, ASI (cage # 1) is the only line of rebar in the wall and transitions from inner wall to outer wall as described. See Figure 5.4-3.
Steel area in cage 2 (ASO) (21-30) (F10.0) (in2/in)
Steel area in cage # 2, a smeared average per unit length of pipe. (outer cage) (Default = 0.0 in2/in)
If RSHAPE = STAND, ASO (cage # 2) is the rebar paralleling the outer wall. If RSHAPE = ELLIP, AS0 is not used. See Figure 5.4-3.
Concrete cover to centerline of cage 1 (TBI) (31-40) (F10.0) (inches)
Concrete cover thickness to centerline of cage # 1 (Default = 1.25 in)
IF RSHAPE = STAND, TBI is the uniform cover thickness of the inner wall cage. IF RSHAPE = ELLIP, TBI is the minimum cover thickness at crown, invert and spring line. See Figure 5.4-3
Concrete cover to centerline of cage 2 (TBO) (41-50) (F10.0) (inches)
Concrete cover thickness to centerline of cage # 2 (outer cage) (Default = 1.25 in)
IF RSHAPE = STAND, TBO is the uniform cover thickness of the outer wall cage. IF RSHAPE = ELLIP, TBI is not used. See Figure 5.4-3

Chapter 5 – Detailed CANDE input CANDE-2017 User Manual and Guideline
5-36
If XMODE = ANALYSIS and LRFD = 0, Part B is now complete. Go to Part C (or return to line A-2 if more pipe groups need to be defined). If XMODE = ANALYSIS and LRFD = 1, Proceed to line B-5

Chapter 5 – Detailed CANDE input CANDE-2017 User Manual and Guideline
5-37
Figure 5.4-3 – Cross sections for RSHAPE = STAND or ELLIP
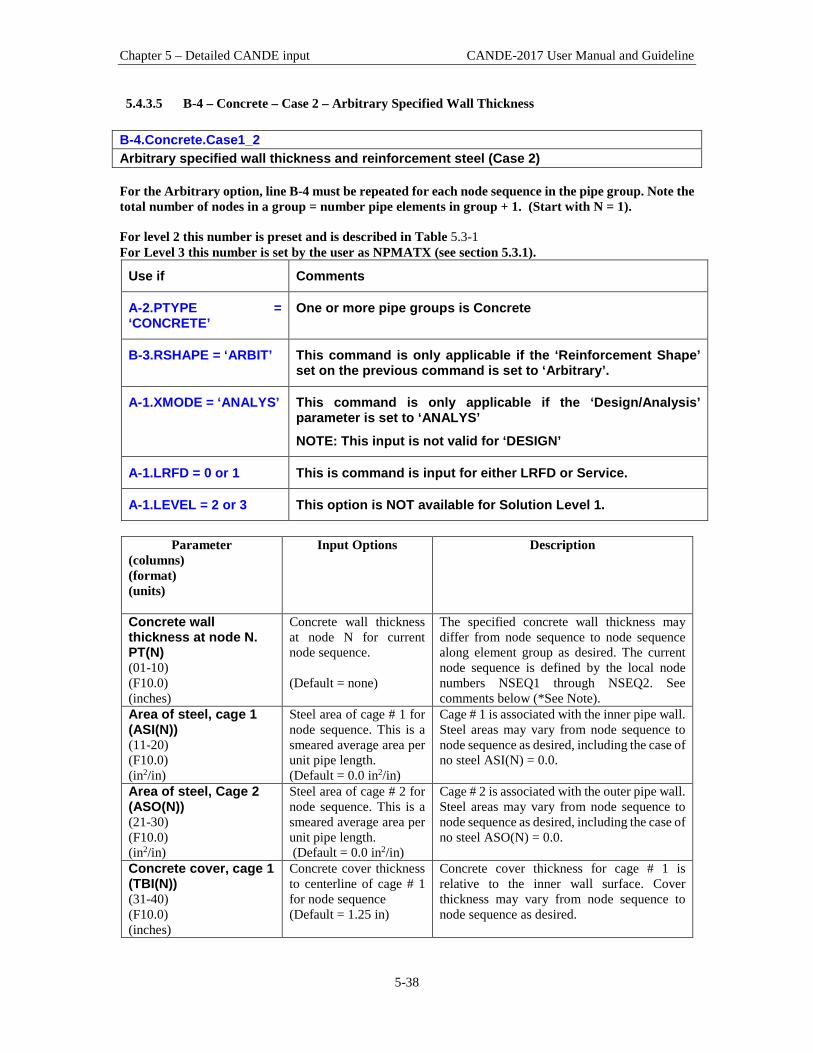
Chapter 5 – Detailed CANDE input CANDE-2017 User Manual and Guideline
5-38
5.4.3.5 B-4 – Concrete – Case 2 – Arbitrary Specified Wall Thickness B-4.Concrete.Case1_2 Arbitrary specified wall thickness and reinforcement steel (Case 2) For the Arbitrary option, line B-4 must be repeated for each node sequence in the pipe group. Note the total number of nodes in a group = number pipe elements in group + 1. (Start with N = 1). For level 2 this number is preset and is described in Table 5.3-1 For Level 3 this number is set by the user as NPMATX (see section 5.3.1).
Use if Comments
A-2.PTYPE = ‘CONCRETE’
One or more pipe groups is Concrete
B-3.RSHAPE = ‘ARBIT’ This command is only applicable if the ‘Reinforcement Shape’ set on the previous command is set to ‘Arbitrary’.
A-1.XMODE = ‘ANALYS’ This command is only applicable if the ‘Design/Analysis’ parameter is set to ‘ANALYS’ NOTE: This input is not valid for ‘DESIGN’
A-1.LRFD = 0 or 1 This is command is input for either LRFD or Service.
A-1.LEVEL = 2 or 3 This option is NOT available for Solution Level 1.
Parameter
(columns) (format) (units)
Input Options Description
Concrete wall thickness at node N. PT(N) (01-10) (F10.0) (inches)
Concrete wall thickness at node N for current node sequence. (Default = none)
The specified concrete wall thickness may differ from node sequence to node sequence along element group as desired. The current node sequence is defined by the local node numbers NSEQ1 through NSEQ2. See comments below (*See Note).
Area of steel, cage 1 (ASI(N)) (11-20) (F10.0) (in2/in)
Steel area of cage # 1 for node sequence. This is a smeared average area per unit pipe length. (Default = 0.0 in2/in)
Cage # 1 is associated with the inner pipe wall. Steel areas may vary from node sequence to node sequence as desired, including the case of no steel ASI(N) = 0.0.
Area of steel, Cage 2 (ASO(N)) (21-30) (F10.0) (in2/in)
Steel area of cage # 2 for node sequence. This is a smeared average area per unit pipe length. (Default = 0.0 in2/in)
Cage # 2 is associated with the outer pipe wall. Steel areas may vary from node sequence to node sequence as desired, including the case of no steel ASO(N) = 0.0.
Concrete cover, cage 1 (TBI(N)) (31-40) (F10.0) (inches)
Concrete cover thickness to centerline of cage # 1 for node sequence (Default = 1.25 in)
Concrete cover thickness for cage # 1 is relative to the inner wall surface. Cover thickness may vary from node sequence to node sequence as desired.

Chapter 5 – Detailed CANDE input CANDE-2017 User Manual and Guideline
5-39
Parameter (columns) (format) (units)
Input Options Description
Concrete cover, cage 2 (TBO(N)) (41-50) (F10.0) (inches)
Concrete cover thickness to centerline of cage # 2 for node sequence (outer cage) (Default = 1.25 in)
Concrete cover thickness for cage # 2 is relative to the outer wall surface. Cover thickness may vary from node sequence to node sequence as desired
Node sequence start (NSEQ1) * (51-55) (I5) (integer)
First local node number in a sequence of nodes with common properties (see *Note) Default = none
NSEQ1 is the first local node number in a consecutive set of node numbers that share the same geometric properties for the concrete cross section and reinforcing steel as defined above. See *NOTE and comment below
Node sequence end (NSEQ2) * (56-60) (I5) (integer)
Last local node number in a sequence of nodes with common properties (see *Note) Default = none
NSEQ2 is the last local node number in a consecutive set of node numbers that share the same geometric properties for the concrete cross section and reinforcing steel as defined above. See *NOTE and comment below.
*NOTE: The node sequencing is not implemented in the ‘Input Menus’ (i.e. GUI Input). A row must be entered for each node. To facilitate the entry of these values, a ‘Copy Row’ button is available in the input menus. With this command, the user may input one row of section properties and then copy those values to a group of rows (i.e. a group of nodes). Comment. In the simplest case, if all beam nodes in this group have the same section properties, set NSEQ1 = 1 and NSEQ2 = NPMAT + 1, and all geometric section properties are defined with one input line for B-4. More generally, the above input feature allows the user to change the section properties within this pipe group using multiple input lines for B-4. Note however, the material properties are fixed for this group. To change material properties, such as the strength of the concrete or steel, the user would need to define a separate pipe group. As an example of changing section properties, suppose that the current pipe group is defined with 24 pipe elements (25 nodes). Suppose further that the first 10 elements have the same set of section properties, element 11 is a transition element, and the remaining 13 elements have another set of common section properties. In this case, we would input the first node sequence as NSEQ1 = 1 and NSEQ2 = 11 to define common section properties to the first 10 elements. Next, we would input the second node sequence as NSEQ1 = 12 and NSEQ2 = 25 to define common section properties for elements 12 to 24. Note that the transition element, bounded by nodes 11 and 12, would be implicitly defined by the average of the two sets of geometric properties. Note for the last sequence we must always have, NSEQ2 = NPMAT + 1. In the most general case if each node has a different section property, then line B-4 must be repeated for each node so that the node sequences would be defined as: (NSEQ1, NSEQ2) = (1,1), (2,2), (3,3) … (NPMAT+1,NPMAT+1). For this most general case, CANDE will automatically compute the paired values for NSEQ1 and NSEQ2 if they are all left blank in the input stream If XMODE = ANALYSIS and LRFD = 0, Part B is now complete. Go to Part C (or return to line A-2 if more pipe groups need to be defined). If XMODE = ANALYSIS and LRFD = 1, Proceed to line B-5
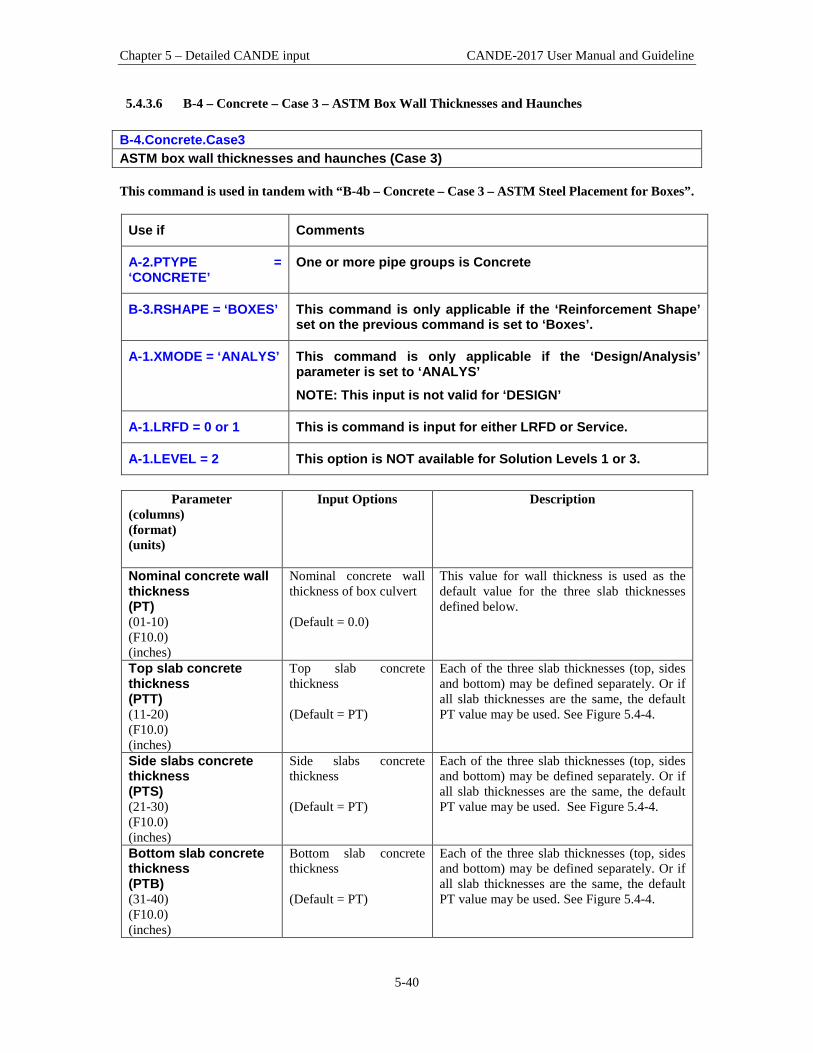
Chapter 5 – Detailed CANDE input CANDE-2017 User Manual and Guideline
5-40
5.4.3.6 B-4 – Concrete – Case 3 – ASTM Box Wall Thicknesses and Haunches B-4.Concrete.Case3 ASTM box wall thicknesses and haunches (Case 3) This command is used in tandem with “B-4b – Concrete – Case 3 – ASTM Steel Placement for Boxes”.
Use if Comments
A-2.PTYPE = ‘CONCRETE’
One or more pipe groups is Concrete
B-3.RSHAPE = ‘BOXES’ This command is only applicable if the ‘Reinforcement Shape’ set on the previous command is set to ‘Boxes’.
A-1.XMODE = ‘ANALYS’ This command is only applicable if the ‘Design/Analysis’ parameter is set to ‘ANALYS’ NOTE: This input is not valid for ‘DESIGN’
A-1.LRFD = 0 or 1 This is command is input for either LRFD or Service.
A-1.LEVEL = 2 This option is NOT available for Solution Levels 1 or 3.
Parameter
(columns) (format) (units)
Input Options Description
Nominal concrete wall thickness (PT) (01-10) (F10.0) (inches)
Nominal concrete wall thickness of box culvert (Default = 0.0)
This value for wall thickness is used as the default value for the three slab thicknesses defined below.
Top slab concrete thickness (PTT) (11-20) (F10.0) (inches)
Top slab concrete thickness (Default = PT)
Each of the three slab thicknesses (top, sides and bottom) may be defined separately. Or if all slab thicknesses are the same, the default PT value may be used. See Figure 5.4-4.
Side slabs concrete thickness (PTS) (21-30) (F10.0) (inches)
Side slabs concrete thickness (Default = PT)
Each of the three slab thicknesses (top, sides and bottom) may be defined separately. Or if all slab thicknesses are the same, the default PT value may be used. See Figure 5.4-4.
Bottom slab concrete thickness (PTB) (31-40) (F10.0) (inches)
Bottom slab concrete thickness (Default = PT)
Each of the three slab thicknesses (top, sides and bottom) may be defined separately. Or if all slab thicknesses are the same, the default PT value may be used. See Figure 5.4-4.

Chapter 5 – Detailed CANDE input CANDE-2017 User Manual and Guideline
5-41
Parameter (columns) (format) (units)
Input Options Description
Horizontal haunch dimension (HH) (41-50) (F10.0) (inches)
Horizontal haunch dimension (Default = 0.0)
Horizontal haunch thickness at interior corners. See Figure 5.4-4. CANDE increases the wall thickness at the corner nodes in accordance with the specified haunch dimensions.
Vertical haunch dimension (HV) (51-60) (F10.0) (inches)
Vertical haunch dimension (Default = 0.0)
Vertical haunch thickness at interior corners. See Figure 5.4-4 . CANDE increases the wall thickness at the corner nodes in accordance with the specified haunch dimensions.
Proceed to line B-4b to complete ASTM box input data

Chapter 5 – Detailed CANDE input CANDE-2017 User Manual and Guideline
5-42
5.4.3.7 B-4b – Concrete – Case 3 – ASTM Steel Placement for Boxes B-4b.Concrete.Case3 ASTM box wall thicknesses and haunches(Case 3) This command should be preceded by “B-4 – Concrete – Case 3 – ASTM Box Wall Thicknesses and Haunches”.
Use if Comments
A-2.PTYPE = ‘CONCRETE’
One or more pipe groups is Concrete
B-3.RSHAPE = ‘BOXES’ This command is only applicable if the ‘Reinforcement Shape’ set on the previous command is set to ‘Boxes’.
A-1.XMODE = ‘ANALYS’ This command is only applicable if the ‘Design/Analysis’ parameter is set to ‘ANALYS’ NOTE: This input is not valid for ‘DESIGN’
A-1.LRFD = 0 or 1 This is command is input for either LRFD or Service.
A-1.LEVEL = 2 This option is NOT available for Solution Levels 1 or 3.
Parameter
(columns) (format) (units)
Input Options Description
Steel area for outer sidewalls and connecting slabs. (AS1) (01-10) (F10.0) (in2/in)
Steel area for outer sidewalls and connecting slabs. Default = 0.0 in2/in
See Figure 5.4-4 for placement of AS1 rebar. As always steel area is input as area per unit length of pipe.
Steel area for inner wall of top slab. (AS2) (11-20) (F10.0) (in2/in)
Steel area for inner wall of top slab. Default = 0.0 in2/in
See Figure 5.4-4 for placement of AS2 rebar. As always steel area is input as area per unit length of pipe.
Steel area for inner wall of bottom slab. (AS3) (21-30) (F10.0) (in2/in)
Steel area for inner wall of bottom slab. Default = 0.0 in2/in
See Figure 5.4-4 for placement of AS3 rebar. As always steel area is input as area per unit length of pipe.
Steel area for inner wall of side slabs. (AS4) (31-40) (F10.0) (in2/in)
Steel area for inner wall of side slabs. Default = 0.0 in2/in
See Figure 5.4-4 for placement of AS4 rebar. As always steel area is input as area per unit length of pipe.

Chapter 5 – Detailed CANDE input CANDE-2017 User Manual and Guideline
5-43
Parameter (columns) (format) (units)
Input Options Description
Ratio of length of AS1 in steel in top and bottom slabs. (XL1) (41-50) (F10.0) (--)
Ratio of length of AS1 in steel in top and bottom slabs. Default = 0.0
This ratio is the steel length (L1) to one-half span length (R1) as shown in Figure 5.4-4.
Uniform concrete cover thickness to all steel centers. (TC) (51-60) (F10.0) (inches)
Uniform concrete cover thickness to all steel centers. (Default = 1.25 in)
All steel cages, inner walls and outer walls, are assigned the same concrete cover thickness specified with TC. See Figure 5.4-4.
If XMODE = ANALYSIS and LRFD = 0, Part B is now complete. Go to Part C (or return to line A-2 if more pipe groups need to be defined). If XMODE = ANALYSIS and LRFD = 1, Proceed to line B-5

Chapter 5 – Detailed CANDE input CANDE-2017 User Manual and Guideline
5-44
Figure 5.4-4 – ASTM geometry and steel placement for box culverts with 2 ft cover or more.
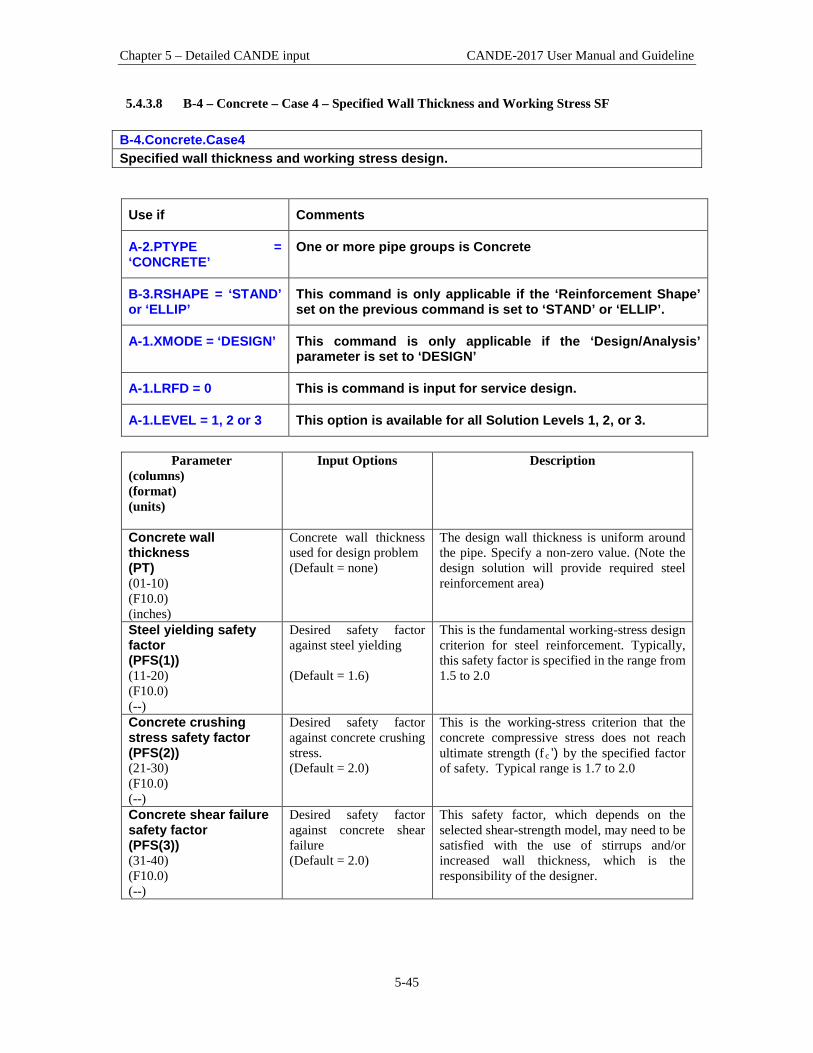
Chapter 5 – Detailed CANDE input CANDE-2017 User Manual and Guideline
5-45
5.4.3.8 B-4 – Concrete – Case 4 – Specified Wall Thickness and Working Stress SF B-4.Concrete.Case4 Specified wall thickness and working stress design.
Use if Comments
A-2.PTYPE = ‘CONCRETE’
One or more pipe groups is Concrete
B-3.RSHAPE = ‘STAND’ or ‘ELLIP’
This command is only applicable if the ‘Reinforcement Shape’ set on the previous command is set to ‘STAND’ or ‘ELLIP’.
A-1.XMODE = ‘DESIGN’ This command is only applicable if the ‘Design/Analysis’ parameter is set to ‘DESIGN’
A-1.LRFD = 0 This is command is input for service design.
A-1.LEVEL = 1, 2 or 3 This option is available for all Solution Levels 1, 2, or 3.
Parameter
(columns) (format) (units)
Input Options Description
Concrete wall thickness (PT) (01-10) (F10.0) (inches)
Concrete wall thickness used for design problem (Default = none)
The design wall thickness is uniform around the pipe. Specify a non-zero value. (Note the design solution will provide required steel reinforcement area)
Steel yielding safety factor (PFS(1)) (11-20) (F10.0) (--)
Desired safety factor against steel yielding (Default = 1.6)
This is the fundamental working-stress design criterion for steel reinforcement. Typically, this safety factor is specified in the range from 1.5 to 2.0
Concrete crushing stress safety factor (PFS(2)) (21-30) (F10.0) (--)
Desired safety factor against concrete crushing stress. (Default = 2.0)
This is the working-stress criterion that the concrete compressive stress does not reach ultimate strength (f c ’) by the specified factor of safety. Typical range is 1.7 to 2.0
Concrete shear failure safety factor (PFS(3)) (31-40) (F10.0) (--)
Desired safety factor against concrete shear failure (Default = 2.0)
This safety factor, which depends on the selected shear-strength model, may need to be satisfied with the use of stirrups and/or increased wall thickness, which is the responsibility of the designer.
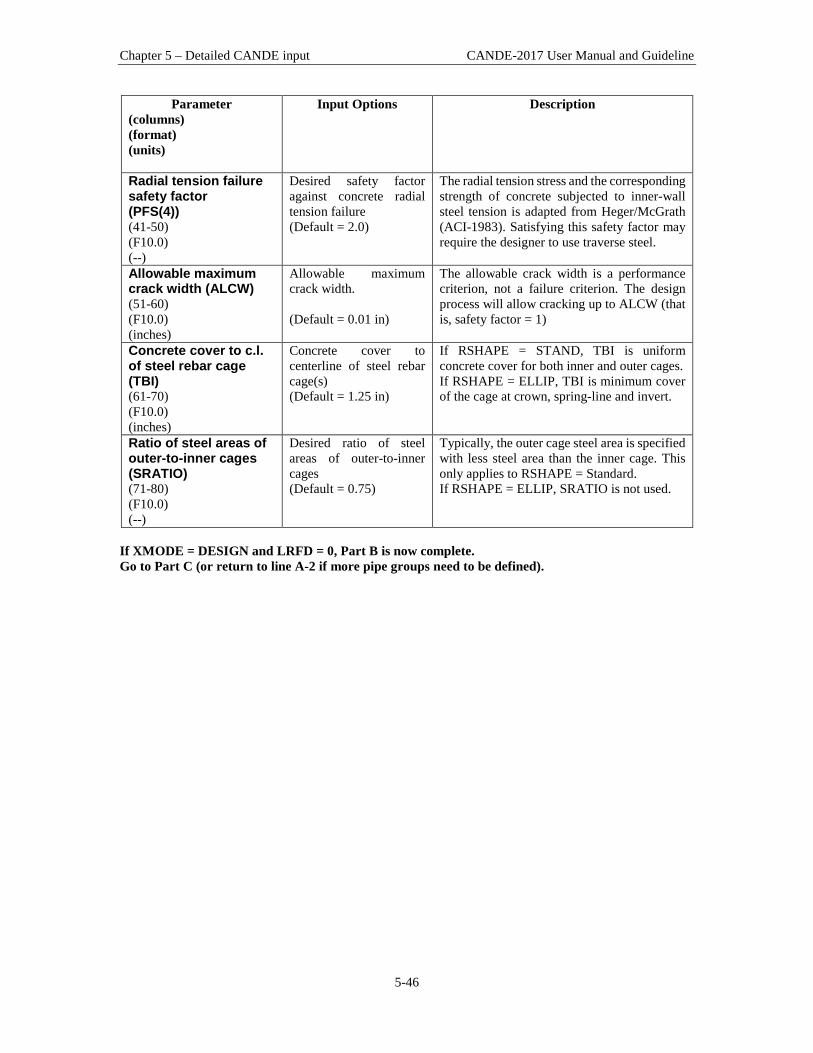
Chapter 5 – Detailed CANDE input CANDE-2017 User Manual and Guideline
5-46
Parameter (columns) (format) (units)
Input Options Description
Radial tension failure safety factor (PFS(4)) (41-50) (F10.0) (--)
Desired safety factor against concrete radial tension failure (Default = 2.0)
The radial tension stress and the corresponding strength of concrete subjected to inner-wall steel tension is adapted from Heger/McGrath (ACI-1983). Satisfying this safety factor may require the designer to use traverse steel.
Allowable maximum crack width (ALCW) (51-60) (F10.0) (inches)
Allowable maximum crack width. (Default = 0.01 in)
The allowable crack width is a performance criterion, not a failure criterion. The design process will allow cracking up to ALCW (that is, safety factor = 1)
Concrete cover to c.l. of steel rebar cage (TBI) (61-70) (F10.0) (inches)
Concrete cover to centerline of steel rebar cage(s) (Default = 1.25 in)
If RSHAPE = STAND, TBI is uniform concrete cover for both inner and outer cages. If RSHAPE = ELLIP, TBI is minimum cover of the cage at crown, spring-line and invert.
Ratio of steel areas of outer-to-inner cages (SRATIO) (71-80) (F10.0) (--)
Desired ratio of steel areas of outer-to-inner cages (Default = 0.75)
Typically, the outer cage steel area is specified with less steel area than the inner cage. This only applies to RSHAPE = Standard. If RSHAPE = ELLIP, SRATIO is not used.
If XMODE = DESIGN and LRFD = 0, Part B is now complete. Go to Part C (or return to line A-2 if more pipe groups need to be defined).

Chapter 5 – Detailed CANDE input CANDE-2017 User Manual and Guideline
5-47
5.4.3.9 B-4 – Concrete – Case 5 – Specified Wall Thickness/LRFD Design Weights B-4.Concrete.Case5 Specified wall thickness and design weights for LRFD. The specification of the WLRFD design weights has the following consequences:
• WLRFD = 1.0, Standard LRFD (factored resistance = factored loads) • WLRFD > 1.0 More conservative (factored resistance > factored loads) • WLRFD < 1.0 Less conservative (factored resistance < factored loads)
WLRFD = -1.0 Exclude the corresponding design criterion
Use if Comments
A-2.PTYPE = ‘CONCRETE’
One or more pipe groups is Concrete
B-3.RSHAPE = ‘STAND’ or ‘ELLIP’
This command is only applicable if the ‘Reinforcement Shape’ set on the previous command is set to ‘STAND’ or ‘ELLIP’.
A-1.XMODE = ‘DESIGN’ This command is only applicable if the ‘Design/Analysis’ parameter is set to ‘DESIGN’
A-1.LRFD = 1 This is command is input for LRFD.
A-1.LEVEL = 1, 2 or 3 This option is available for all Solution Levels 1, 2, or 3.
Parameter
(columns) (format) (units)
Input Options Description
Concrete wall thickness (PT) (01-10) (F10.0) (inches)
Concrete wall thickness (Default = none)
The design wall thickness is uniform around the pipe. Specify a non-zero value. Note the CANDE design solution will provide required steel reinforcement area(s).
Steel tension failure due to yielding (WLRFD(1)) (11-20) (F10.0) (--)
Weight for steel tension yielding. (Default weight = 1)
The design goal is to determine the steel area so that the weighted-factored-tension-steel-stress is just less than factored-yield-strength resistance.
Concrete crushing failure at outer fibers (WLRFD(2)) (21-30) (F10.0) (--)
Weight for concrete crushing failure (Default weight = 1)
The design goal is to determine the steel area (or, new wall thickness) so that the weighted-factored-concrete compressive-stress is just less than the factored-compressive-resistance.

Chapter 5 – Detailed CANDE input CANDE-2017 User Manual and Guideline
5-48
Parameter (columns) (format) (units)
Input Options Description
Concrete shear failure (w/o shear steel) (WLRFD(3)) (31-40) (F10.0) (--)
Weight for concrete shear failure (without shear steel) (Default weight = 1)
The design goal is to maintain the weighted-factored-shear-force to be less than the factored-shear-capacity. If needed, the excess shear force to be carried by stirrups.
Concrete failure due to radial tension from curved rebar (WLRFD(4)) (41-50) (F10.0) (--)
Weight for concrete radial tension failure from curved rebar (Default weight = 1)
The design goal is to maintain the weighted-factored-radial-tension-stress to be less than the factored-radial-tension-resistance. If needed, excess load to be carried by stirrups.
Service load allowable crack width (WLRFD(5)) (51-60) (F10.0) (--)
Service load allowable crack width (Default weight = 1)
The design goal is to determine the steel area so that the weighted-service-load-crack-width is less than the allowable-crack-width.
Concrete cover to c.l. of steel rebar cage (TBI) (61-70) (F10.0) (inches)
Concrete cover to centerline of steel rebar cage(s) (Default = 1.25 in)
If RSHAPE = STAND, TBI is uniform concrete cover for both inner and outer cages. If RSHAPE = ELLIP, TBI is minimum cover of the cage at crown, spring-line and invert.
Ratio of steel areas of outer-to-inner cages (SRATIO) (71-80) (F10.0) (--)
Desired ratio of steel areas of outer-to-inner cages (Default = 0.75)
Typically, the outer cage steel area is specified with less steel area than the inner cage. This only applies to RSHAPE = Standard. If RSHAPE = ELLIP, SRATIO is not used.
Proceed to line B-5 (LRFD = 1)

Chapter 5 – Detailed CANDE input CANDE-2017 User Manual and Guideline
5-49
5.4.3.10 B-5 – Concrete – Resistance Factors for LRFD B-5.Concrete Resistance factors for LRFD limit states.
Use if Comments
A-2.PTYPE = ‘CONCRETE’
One or more pipe groups is Concrete
A-1.XMODE = ‘DESIGN’ or ‘ANALYS’
This command is applicable if the ‘Design/Analysis’ parameter is set to ‘DESIGN’ or ‘ANALYS’
A-1.LRFD = 1 This command is input for LRFD.
A-1.LEVEL = 1, 2 or 3 This option is available for all Solution Levels 1, 2, or 3.
Parameter
(columns) (format) (units)
Input Options Description
Resistance factor for steel rebar yielding due to tension stress (PHI(1)) (01-10) (F10.0) (--)
Resistance factor for steel rebar yielding due to tension stress (Default = 0.9)
Factored steel stress resistance = PHI(1) x PFSY (f y )
Resistance factor for concrete crushing (PHI (2)) (11-20) (F10.0) (--)
Resistance factor for concrete crushing due to thrust and moment (Default = 0.75)
Factored concrete crushing stress resistance = PHI(2) x PFPC (f c ’)
Resistance factor for concrete shear failure (PHI(3)) (21-30) (F10.0) (--)
Resistance factor for concrete shear failure (Default = 0.9)
Factored shear strength resistance = PHI(3) x Selected shear strength option.
Resistance factor for radial concrete tension (PHI (4)) (31-40) (F10.0) (--)
Resistance factor for radial concrete tension (Default = 0.9)
Factored radial tension resistance = PHI(4) x concrete tension stress limit as proposed by Heger/McGrath (ACI-1983)
Allowable crack width for service load (ACW) (41-50) (F10.0) (inches)
Allowable crack width for service load (Default = 0.01inch)
Allowable crack width for service limit loading. CANDE approximates the crack width at service loading by dividing steel stress in crack width formulas by load factors.

Chapter 5 – Detailed CANDE input CANDE-2017 User Manual and Guideline
5-50
Comment: The above resistance factors are used for both the design and analysis modes. In the analysis mode, CANDE will show the five numerical values of the above factored resistances along with the corresponding factored demands. In the design mode, the designer is given additional control on the previous page to design with more or less conservatism and to permit turning on or off any of the criterion to fit the problem at hand. This completes the current B-set input. Go to Part C (or return to line A-2 if more pipe groups need to be defined).

Chapter 5 – Detailed CANDE input CANDE-2017 User Manual and Guideline
5-51
5.4.4 Plastic Pipe Types
5.4.4.1 B-1 – Plastic – Plastic Load Controls B-1.Plastic – Smooth, general or profile thermoplastic cross section. Plastic load controls.
Use if Comments
A-2.PTYPE = ‘PLASTIC’ One or more pipe groups are Plastic.
Parameter
(columns) (format) (units)
Input Options Description
Wall section type (WTYPE) (01-10) (A7,3X) (word)
A word selecting the type of wall section. = SMOOTH = GENERAL = PROFILE (Now with variable geometry option) Default = GENERAL
SMOOTH refers to uniform smooth wall (gun barrel) whose only independent cross section property is the wall thickness. Applies to design & analysis. GENERAL refers to arbitrary cross-section properties for area and moment of inertia without local buckling consideration. Applies only to analysis. PROFILE refers to a spectrum of profile shapes such as corrugated with or without liners, ribbed walls, etc. Profile shapes require additional geometry input and include local buckling analysis. Applies only to analysis.
Type of plastic (PTYPE) (11-20) (A5,5X) (word)
A word selecting the type of plastic. = HDPE = PVC = PP = OTHER Default = HDPE
PTYPE is used to provide default material properties for HDPE (high density polyethylene), PVC (Polyvinyl Chloride), or PP (Polypropylene) as shown in Table B-Plastic-1. Setting PTYPE = OTHER means all material properties will be defined by the user.
Load duration (LOADT) (21-25) (I5) (integer)
Code number to select load duration: = 1, Short term = 2, long term Default = short term
Plastic material properties depend on load duration, short term is appropriate for live loads and long term is appropriate for earth loads. If need be, the problem can be run twice, once with short duration properties and once with long duration properties to bracket the responses of each load step.
Analysis mode (IBUCK) (26-30) (I5) (integer)
Code to select large-deformation and buckling analysis: = 0, small deformation = 1, large deformation = 2, plus buckling. Default = small deform.
IF IBUCK = 0, small deformation theory and simplified buckling equations are used. If BUCK = 1, the pipe elements will include large deformation theory (geometric stiffness). In addition, if IBUCK=2, an estimate of the remaining buckling capacity will be computed at each load step.
Proceed to Line B-2
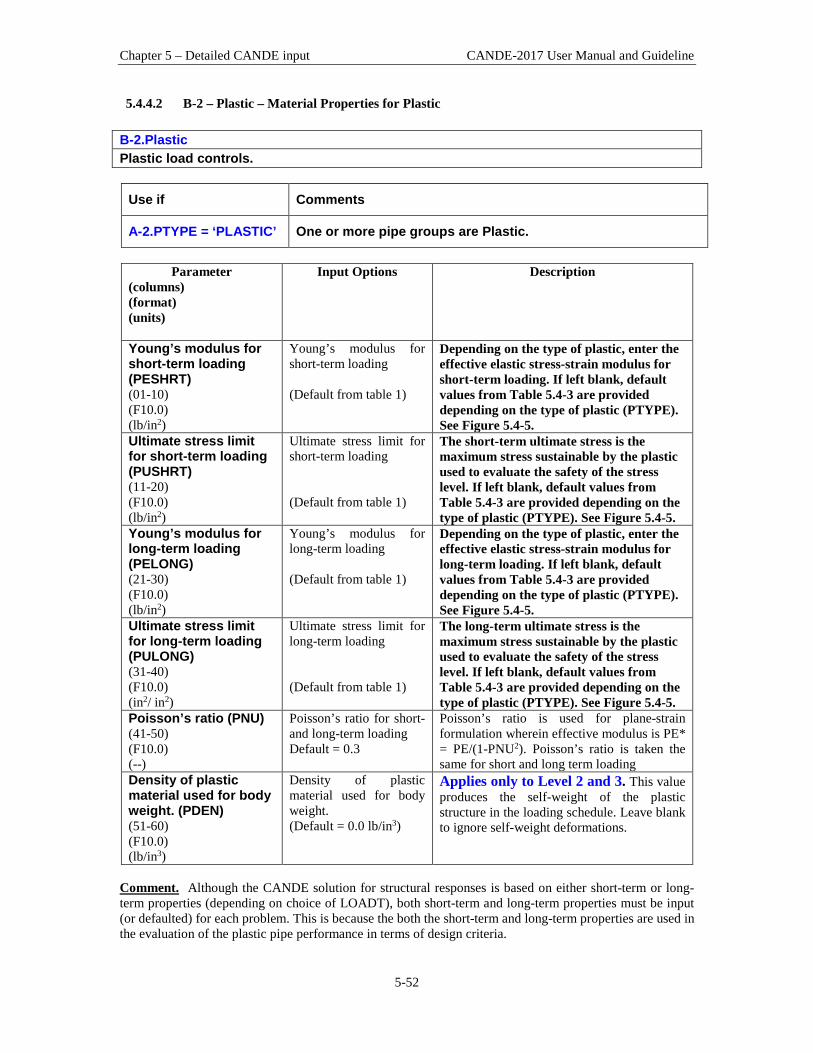
Chapter 5 – Detailed CANDE input CANDE-2017 User Manual and Guideline
5-52
5.4.4.2 B-2 – Plastic – Material Properties for Plastic B-2.Plastic Plastic load controls.
Use if Comments
A-2.PTYPE = ‘PLASTIC’ One or more pipe groups are Plastic.
Parameter
(columns) (format) (units)
Input Options Description
Young’s modulus for short-term loading (PESHRT) (01-10) (F10.0) (lb/in2)
Young’s modulus for short-term loading (Default from table 1)
Depending on the type of plastic, enter the effective elastic stress-strain modulus for short-term loading. If left blank, default values from Table 5.4-3 are provided depending on the type of plastic (PTYPE). See Figure 5.4-5.
Ultimate stress limit for short-term loading (PUSHRT) (11-20) (F10.0) (lb/in2)
Ultimate stress limit for short-term loading (Default from table 1)
The short-term ultimate stress is the maximum stress sustainable by the plastic used to evaluate the safety of the stress level. If left blank, default values from Table 5.4-3 are provided depending on the type of plastic (PTYPE). See Figure 5.4-5.
Young’s modulus for long-term loading (PELONG) (21-30) (F10.0) (lb/in2)
Young’s modulus for long-term loading (Default from table 1)
Depending on the type of plastic, enter the effective elastic stress-strain modulus for long-term loading. If left blank, default values from Table 5.4-3 are provided depending on the type of plastic (PTYPE). See Figure 5.4-5.
Ultimate stress limit for long-term loading (PULONG) (31-40) (F10.0) (in2/ in2)
Ultimate stress limit for long-term loading (Default from table 1)
The long-term ultimate stress is the maximum stress sustainable by the plastic used to evaluate the safety of the stress level. If left blank, default values from Table 5.4-3 are provided depending on the type of plastic (PTYPE). See Figure 5.4-5.
Poisson’s ratio (PNU) (41-50) (F10.0) (--)
Poisson’s ratio for short- and long-term loading Default = 0.3
Poisson’s ratio is used for plane-strain formulation wherein effective modulus is PE* = PE/(1-PNU2). Poisson’s ratio is taken the same for short and long term loading
Density of plastic material used for body weight. (PDEN) (51-60) (F10.0) (lb/in3)
Density of plastic material used for body weight. (Default = 0.0 lb/in3)
Applies only to Level 2 and 3. This value produces the self-weight of the plastic structure in the loading schedule. Leave blank to ignore self-weight deformations.
Comment. Although the CANDE solution for structural responses is based on either short-term or long-term properties (depending on choice of LOADT), both short-term and long-term properties must be input (or defaulted) for each problem. This is because the both the short-term and long-term properties are used in the evaluation of the plastic pipe performance in terms of design criteria.

Chapter 5 – Detailed CANDE input CANDE-2017 User Manual and Guideline
5-53
Although most plastics exhibit significant time-dependent stress-strain response, it is customary to treat them as elastic materials with a modulus dependent on load duration. Short-term properties are appropriate for shallow burial situations wherein live loads dominate. Long-term properties are suitable to deep burial conditions wherein design life for soil weight is on the order of 50 years. The table below shows the range of short-term and long-term properties for three common types of plastics used as culverts and storm chambers. Default values are in parenthesis. Sometimes it is wise to run the same problem twice, once with short term and once with long-term properties. Proceed to B-3 Analysis or B-3 Design Table 5.4-3 – Plastic: Typical range of plastic properties from AASHTO LRFD Specification
Type of plastic Effective Young’s Modulus (PE) (see
Figure 5.4-5)
Ultimate strength (PU) (see
Figure 5.4-5) Short-term
(ksi) Long-term
(ksi) Short-term
(ksi) Long-term
(ksi) HDPE – High Density Polyethylene
80.0 -112.0
(110.0)
22.0
(22.0)
3.00
(3.00)
0.85 – 1.44
(0.90) PVC – Polyvinyl Chloride
400.0
(400.0)
135.0 – 158.0
(140.0)
6.00 – 7.00
(6.00)
2.60 – 3.70
(2.60) PP – Polypropylene
125.0 – 145.0
(135.0)
31.0
(31.0)
3.10
(3.10)
0.95-1.05
(1.00) Figure 5.4-5 - Plastic – Elastic stress-strain model in tension and compression, all durations.
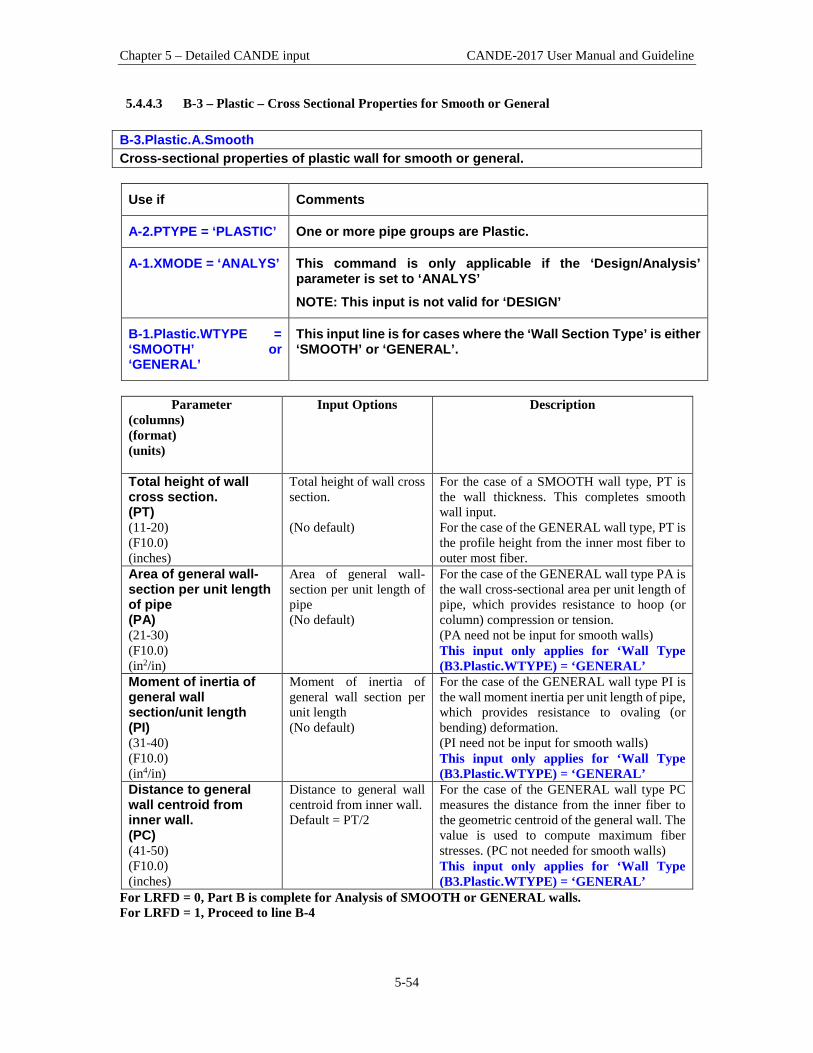
Chapter 5 – Detailed CANDE input CANDE-2017 User Manual and Guideline
5-54
5.4.4.3 B-3 – Plastic – Cross Sectional Properties for Smooth or General B-3.Plastic.A.Smooth Cross-sectional properties of plastic wall for smooth or general.
Use if Comments
A-2.PTYPE = ‘PLASTIC’ One or more pipe groups are Plastic.
A-1.XMODE = ‘ANALYS’ This command is only applicable if the ‘Design/Analysis’ parameter is set to ‘ANALYS’ NOTE: This input is not valid for ‘DESIGN’
B-1.Plastic.WTYPE = ‘SMOOTH’ or ‘GENERAL’
This input line is for cases where the ‘Wall Section Type’ is either ‘SMOOTH’ or ‘GENERAL’.
Parameter
(columns) (format) (units)
Input Options Description
Total height of wall cross section. (PT) (11-20) (F10.0) (inches)
Total height of wall cross section. (No default)
For the case of a SMOOTH wall type, PT is the wall thickness. This completes smooth wall input. For the case of the GENERAL wall type, PT is the profile height from the inner most fiber to outer most fiber.
Area of general wall-section per unit length of pipe (PA) (21-30) (F10.0) (in2/in)
Area of general wall-section per unit length of pipe (No default)
For the case of the GENERAL wall type PA is the wall cross-sectional area per unit length of pipe, which provides resistance to hoop (or column) compression or tension. (PA need not be input for smooth walls) This input only applies for ‘Wall Type (B3.Plastic.WTYPE) = ‘GENERAL’
Moment of inertia of general wall section/unit length (PI) (31-40) (F10.0) (in4/in)
Moment of inertia of general wall section per unit length (No default)
For the case of the GENERAL wall type PI is the wall moment inertia per unit length of pipe, which provides resistance to ovaling (or bending) deformation. (PI need not be input for smooth walls) This input only applies for ‘Wall Type (B3.Plastic.WTYPE) = ‘GENERAL’
Distance to general wall centroid from inner wall. (PC) (41-50) (F10.0) (inches)
Distance to general wall centroid from inner wall. Default = PT/2
For the case of the GENERAL wall type PC measures the distance from the inner fiber to the geometric centroid of the general wall. The value is used to compute maximum fiber stresses. (PC not needed for smooth walls) This input only applies for ‘Wall Type (B3.Plastic.WTYPE) = ‘GENERAL’
For LRFD = 0, Part B is complete for Analysis of SMOOTH or GENERAL walls. For LRFD = 1, Proceed to line B-4

Chapter 5 – Detailed CANDE input CANDE-2017 User Manual and Guideline
5-55
5.4.4.4 B-3 – Plastic – Profile Wall Cross Sectional Properties-1 B-3.Plastic.A.Profile Cross-sectional properties for Profile wall type with variable wall geometry
Use if Comments
A-2.PTYPE = ‘PLASTIC’ One or more pipe groups are Plastic.
A-1.XMODE = ‘ANALYS’ This command is only applicable if the ‘Design/Analysis’ parameter is set to ‘ANALYS’ NOTE: This input is not valid for ‘DESIGN’
B-1.Plastic.WTYPE = ‘PROFILE’
This input line is for cases where the ‘Wall Section Type’ is ‘PROFILE’.
Parameter
(columns) (format) (units)
Input Options Description
Length of profile period (PERIOD) (01-10) (F10.0) (inches)
Length of generic Profile period. Default = none
PERIOD = horizontal distance of the repeating profile shape along the pipe’s length as shown in Figure 5.4-6. The repeating profile shape always includes two web elements.
Total height of profile section (HEIGHT) (11-20) (F10.0) (inches)
Total height of profile section. Default = none
HEIGHT is the distance from the inner most fiber to the outer most fiber. See Figure 5.4-6.
Web angle with the horizontal (WEBANG) (21-30) (F10.0) (degrees)
Web angle measured from the horizontal. Default = 90 degrees
The orientation of the two web elements are mirror symmetric with their inclination defined by the web angle, measured from the horizontal. See Figure 5.4-6. By themselves, the two webs may be used to form a saw-tooth profile.
Web thickness (WEBT) (31-40) (F10.0) (inches)
Web Thickness Default = none
Web thickness is measured normal to web surface (web thickness is independent of the web angle).
Web “k” value for edge support coefficient (WEBK) (41-50) (F10.0) (dimensionless)
The web “k” value for the edge support coefficient. Default = 4.0
The web’s k-value is used for local buckling computations. The k-value may be taken as 4.0 for elements with both edges supported by other elements. For a freestanding element with only one edge supported, the k-value is 0.43.

Chapter 5 – Detailed CANDE input CANDE-2017 User Manual and Guideline
5-56
Parameter (columns) (format) (units)
Input Options Description
Number of horizontal elements in profile (NHEL) (51-55) (I5) (integer)
Number of horizontal elements that are to be included in profile Minimum = 0 Maximum = 4 Default = 0
Various profile shapes may be constructed by including up to four horizontal elements (or element pairs) attached to the web. For example, set NHEL = 2 to form a straight rib or unlined corrugated profile; NHEL = 3 for a T-rib or lined profile; NHEL = 4 for a box-like or trapezoidal-shaped profile.
Include local buckling calculations (LOCALB) (56-60) (I5) (integer)
Code for local buckling = 1, include local buckling calculations. = -1, ignore local buckling calculations. Default = 1
If local buckling is activated (LOCALB=1), the cross-sectional properties are reduced for each beam element that experiences thrust strain above the threshold value that causes local buckling. If LOCALB = -1, local buckling is not activated and cross-section properties remain constant.
First node in set of common properties (NSEQ1) (61-65) (I5) (integer)
1st Node number in a sequence of nodes sharing the same geometric properties Default =1
For the first sequence, set NSEQ1 = 1. For subsequent sets of common properties NSEQ1 should equal NSEQ2*+1 where NSEQ2* is the ending node of the previous set.
Second node in set of common properties (NSEQ2) (66-70) (I5) (integer)
2nd Node number in a sequence of nodes sharing the same geometric properties Default =NPMAT + 1
The total number of nodes in a group is the number of beam elements plus 1, i.e., NPMAT +1. You must continue to supply data for lines B-3 and B-3b until you terminate with NSEQ2 = NPMAT+1.
• NSEQ1 and NSEQ2 allow the user to change the profile’s geometric properties within the group.
The default values (NSEQ1 =1 and NSEQ2 = NPMAT+1) means the entire group is assigned the same geometrical properties. At the other extreme, the user may supply lines B-3 and B-3b for each individual node in the group by specifying NSEQ1 and NSEQ2 as (1,1), (2,2), (3,3) … (NPMAT+1,NPMAT+1) wherein each node may be assigned individual geometric properties on lines B-3 and B-3b. As another example, if a group of twelve elements is composed of two sets of geometric properties divided in equal halves, then we supply data on lines B3 and B3-b for NSEQ1 = 1 and NSEQ2 = 7 representing the first half, followed by another set of data on lines B3 and B3-b for NSEQ1 = 8 and NSEQ2 = 13 representing the second half.
• If NHEL > 0, Proceed to Line B-3b to define all horizontal elements • If NHEL = 0 and NSEQ2 < NPMAT+1, Repeat line B-3 • If LRFD = 1, Proceed to Line B-4 after all B-3 and B3-b lines are complete. • Otherwise, if LRFD = 0, set B is complete after all B-3 and B3-b lines are complete.

Chapter 5 – Detailed CANDE input CANDE-2017 User Manual and Guideline
5-57
Figure 5.4-6 – Example Profile Shapes that can be constructed in CANDE
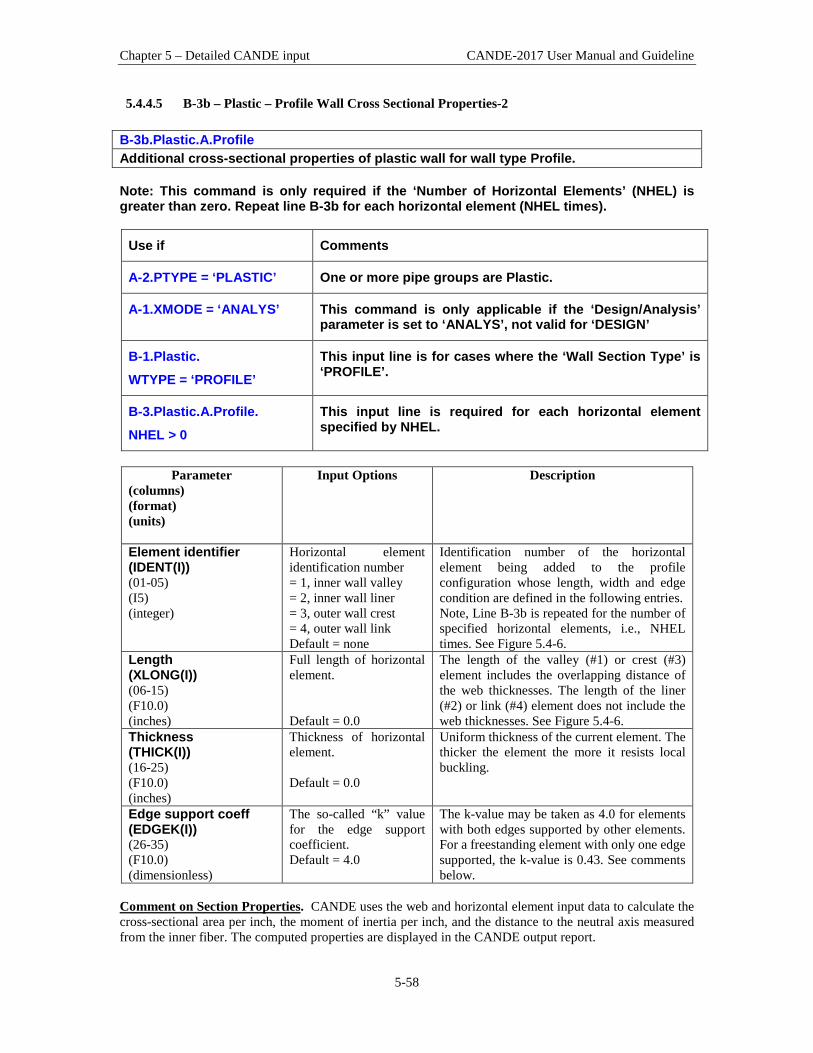
Chapter 5 – Detailed CANDE input CANDE-2017 User Manual and Guideline
5-58
5.4.4.5 B-3b – Plastic – Profile Wall Cross Sectional Properties-2 B-3b.Plastic.A.Profile Additional cross-sectional properties of plastic wall for wall type Profile. Note: This command is only required if the ‘Number of Horizontal Elements’ (NHEL) is greater than zero. Repeat line B-3b for each horizontal element (NHEL times).
Use if Comments
A-2.PTYPE = ‘PLASTIC’ One or more pipe groups are Plastic.
A-1.XMODE = ‘ANALYS’ This command is only applicable if the ‘Design/Analysis’ parameter is set to ‘ANALYS’, not valid for ‘DESIGN’
B-1.Plastic. WTYPE = ‘PROFILE’
This input line is for cases where the ‘Wall Section Type’ is ‘PROFILE’.
B-3.Plastic.A.Profile. NHEL > 0
This input line is required for each horizontal element specified by NHEL.
Parameter
(columns) (format) (units)
Input Options Description
Element identifier (IDENT(I)) (01-05) (I5) (integer)
Horizontal element identification number = 1, inner wall valley = 2, inner wall liner = 3, outer wall crest = 4, outer wall link Default = none
Identification number of the horizontal element being added to the profile configuration whose length, width and edge condition are defined in the following entries. Note, Line B-3b is repeated for the number of specified horizontal elements, i.e., NHEL times. See Figure 5.4-6.
Length (XLONG(I)) (06-15) (F10.0) (inches)
Full length of horizontal element. Default = 0.0
The length of the valley (#1) or crest (#3) element includes the overlapping distance of the web thicknesses. The length of the liner (#2) or link (#4) element does not include the web thicknesses. See Figure 5.4-6.
Thickness (THICK(I)) (16-25) (F10.0) (inches)
Thickness of horizontal element. Default = 0.0
Uniform thickness of the current element. The thicker the element the more it resists local buckling.
Edge support coeff (EDGEK(I)) (26-35) (F10.0) (dimensionless)
The so-called “k” value for the edge support coefficient. Default = 4.0
The k-value may be taken as 4.0 for elements with both edges supported by other elements. For a freestanding element with only one edge supported, the k-value is 0.43. See comments below.
Comment on Section Properties. CANDE uses the web and horizontal element input data to calculate the cross-sectional area per inch, the moment of inertia per inch, and the distance to the neutral axis measured from the inner fiber. The computed properties are displayed in the CANDE output report.

Chapter 5 – Detailed CANDE input CANDE-2017 User Manual and Guideline
5-59
Comment on Local Buckling. CANDE uses AASHTO Equations 12.12.3.5.3c to determine if the thrust strain induces local buckling in the web and/or horizontal profile elements. If so, the cross-sectional properties are appropriately reduced, which results in increased stresses due to loss of effective area. Subsequent load steps utilize the reduced section properties, which in turn can lead to an increased rate of local buckling. Every element of the pipe group is examined to determine its individual state of local buckling. If NSEQ2 < NPMAT+1, Return to line B-2 for another set of profile geometry. If LRFD = 1, Proceed to Line 4B. Otherwise, Set B is complete

Chapter 5 – Detailed CANDE input CANDE-2017 User Manual and Guideline
5-60
5.4.4.6 B-3 – Plastic – Safety Factors for Working Stress Design B-3.Plastic.D.WSD Working Stress safety factors and performance requirements.
Use if Comments
A-2.PTYPE = ‘PLASTIC’ One or more pipe groups is Plastic
A-1.XMODE = ‘DESIGN’ This command is only applicable if the ‘Design/Analysis’ parameter is set to ‘DESIGN’
B-1.Plastic.WTYPE = ‘SMOOTH’
This input line is for cases where the ‘Wall Section Type’ is ‘SMOOTH’.
A-1.LRFD = 0 This is command is input for service design (WSD).
Parameter
(columns) (format) (units)
Input Options Description
Safety factor – maximum thrust stress (PFS(1)) (01-10) (F10) (--)
Desired safety factor against maximum thrust stress (PULT) Default = 2.0
Maximum thrust stress is the average stress over the cross section (not extreme fiber stress). This safety factor guards against material failure of entire cross section. The default safety factor is typically used.
Safety factor – global buckling (PFS(2)) (11-20) (F10) (--)
Desired safety factor against global buckling. Default = 3.0
This safety factor guards against the thrust stress exceeding global buckling capacity. If IBUCK = 2, Buckling capacity is determined by large deformation theory in CANDE. Otherwise buckling capacity is determined by the simplified AASHTO equation.
Safety factor – excessive outer fiber straining (PFS(3)) (21-30) (F10) (--)
Desired safety factor against excessive outer fiber straining Default = 2.0
This safety factor protects against excessive straining in outer fibers (tension or compression) wherein excessive strain is defined as the minimum of 1.5(PULT/PE) or 5%. Typical PFS range is 1.5 to 2.5
Allowable percent deflection (ADISP) (31-40) (F10.0) (%)
Allowable percent deflection (Default = 5%)
Allowable deflection is measured as percent of the average vertical diameter, typically taken as 5%. For automated design, the allowable displacement is used as a performance limit.
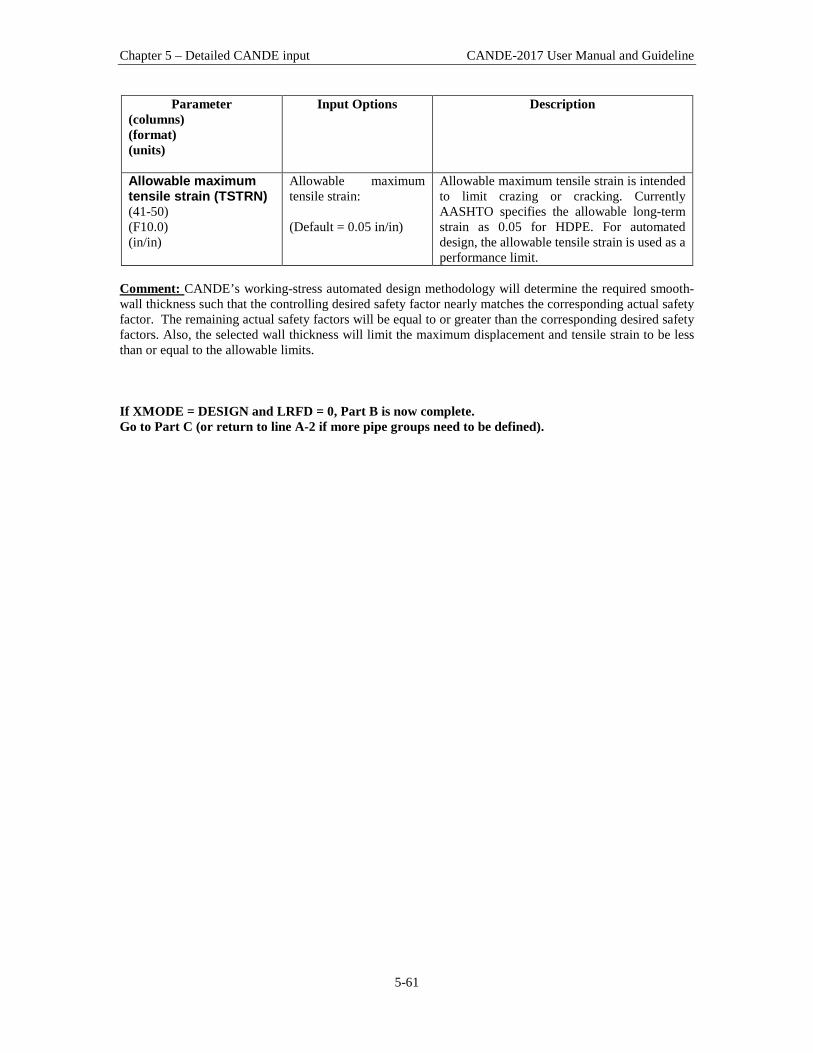
Chapter 5 – Detailed CANDE input CANDE-2017 User Manual and Guideline
5-61
Parameter (columns) (format) (units)
Input Options Description
Allowable maximum tensile strain (TSTRN) (41-50) (F10.0) (in/in)
Allowable maximum tensile strain: (Default = 0.05 in/in)
Allowable maximum tensile strain is intended to limit crazing or cracking. Currently AASHTO specifies the allowable long-term strain as 0.05 for HDPE. For automated design, the allowable tensile strain is used as a performance limit.
Comment: CANDE’s working-stress automated design methodology will determine the required smooth-wall thickness such that the controlling desired safety factor nearly matches the corresponding actual safety factor. The remaining actual safety factors will be equal to or greater than the corresponding desired safety factors. Also, the selected wall thickness will limit the maximum displacement and tensile strain to be less than or equal to the allowable limits. If XMODE = DESIGN and LRFD = 0, Part B is now complete. Go to Part C (or return to line A-2 if more pipe groups need to be defined).

Chapter 5 – Detailed CANDE input CANDE-2017 User Manual and Guideline
5-62
5.4.4.7 B-3 – Plastic – Design Weights for LRFD B-3.Plastic.D.LRFD Design weights for LRFD – Smooth wall. The specification of the WLRFD design weights has the following consequences:
• WLRFD = 1.0, Standard LRFD (factored resistance = factored loads) • WLRFD > 1.0 More conservative (factored resistance > factored loads) • WLRFD < 1.0 Less conservative (factored resistance < factored loads) • WLRFD = -1.0 Exclude the corresponding design criterion
Use if Comments
A-2.PTYPE = ‘PLASTIC’ One or more pipe groups is Plastic
A-1.XMODE = ‘DESIGN’ This command is only applicable if the ‘Design/Analysis’ parameter is set to ‘DESIGN’
B-1.Plastic.WTYPE = ‘SMOOTH’
This input line is for cases where the ‘Wall Section Type’ is ‘SMOOTH’.
A-1.LRFD = 1 This is command is input for LRFD design.
Parameter
(columns) (format) (units)
Input Options Description
Wall area failure due to maximum thrust (WLRFD(1)) (01-10) (F10.0) (--)
Wall area failure due to maximum thrust stress (Default weight = 1)
Controls the factored thrust stress loading to be less than the factored-material-strength resistance times this weight. Typically, this weight is always 1 for plastic structures. See comment below.
Global buckling due to thrust stress (WLRFD(2)) (11-20) (F10.0) (--)
Global buckling due to thrust stress (Default weight = 1)
Controls the factored thrust stress loading to be less than the factored-global-buckling resistance times this weight. Typically, this weight is always 1 for plastic structures.
Combined strain limit on outer surfaces (WLRFD(3)) (21-30) (F10.0) (--)
Combined strain limit on outer surfaces (Default weight = 1)
Controls the maximum wall-surface strain from thrust and bending due to factored loads to be less than the factored limiting strain resistance.
Service deflection limit (WLRFD(4)) (31-40) (F10.0) (--)
Service deflection limit (Default weight = 1)
Controls the service load vertical deflection to be less than the allowable limit. Typically, this weight = 1 when used with 5%, allowable deflection.

Chapter 5 – Detailed CANDE input CANDE-2017 User Manual and Guideline
5-63
Parameter (columns) (format) (units)
Input Options Description
Service tensile stain limit (WLRFD(5)) (41-50) (F10.0) (--)
Service tensile stain limit (Default weight = 1)
Controls the maximum tensile strain to be less than the allowable limit under service load. Typically, this weight = 1.
Comment: The above design weights give the designer control over the degree of conservatism for the LRFD process. By choosing the design weights = 1, CANDE will determine the required smooth-wall thickness such that the controlling factored load nearly matches the corresponding factored resistance. If, however, a designer desires a 25% more conservative design solution against, say for global buckling, the designer may specify WLRFD(2) = 1.25. Any design criterion is excluded by setting the weight = -1. Proceed to line B-4 (LRFD = 1)

Chapter 5 – Detailed CANDE input CANDE-2017 User Manual and Guideline
5-64
5.4.4.8 B-4 – Plastic – Resistance Factors for LRFD B-4.Plastic Specified resistance factors for LRFD
Use if Comments
A-2.PTYPE = ‘PLASTIC’ One or more pipe groups is Plastic
A-1.XMODE = ‘DESIGN’ or ‘ANALYS’
This command is applicable if the ‘Design/Analysis’ parameter is set to either ‘DESIGN’ or ‘ANALYS’
A-1.LRFD = 1 This command is input for LRFD evaluation.
Parameter
(columns) (format) (units)
Input Options Description
Resistance factor for thrust stress yielding (PHI(1)) (01-10) (F10.0) (--)
Resistance factor for wall area yielding due to thrust stress (Default = 1.0)
Factored thrust stress resistance = PHI(1) x PYIELD.
Resistance factor for global buckling (PHI(2)) (11-20) (F10.0) (--)
Resistance factor for global buckling due to thrust stress (Default = 1.0)
Factored global buckling resistance = PHI(2) x Buckling-Capacity. If IBUCK = 2, Buckling capacity is determined by large deformation theory in CANDE. Otherwise buckling capacity is determined by the simplified AASHTO equation.
Resistance factor for limiting stain (PHI(3)) (21-30) (F10.0) (--)
Resistance factor for limiting stain (Default = 1.0)
Factored limiting strain resistance = PHI(3) x 1.5 x ( PULT/PE)
Allowable percent deflection under service load (ADISP) (31-40) (F10.0) (%)
Allowable percent deflection under service load. (Default = 5%)
Allowable vertical deflection is percent of average diameter, typically taken as 5%. CANDE estimates the service load deflections by dividing by the specified load factors.
Allowable maximum tensile strain under service load (TSTRN) (41-50) (F10.0) (in/in)
Allowable maximum tensile strain under service load conditions. (Default = 0.05 in/in)
Allowable maximum tensile strain is specified by AASHTO as 0.05 for HDPE. CANDE estimates the service load strains by dividing by the specified load factors.

Chapter 5 – Detailed CANDE input CANDE-2017 User Manual and Guideline
5-65
Comment: The above resistance factors and service limits are used for both the design and analysis modes. In the analysis mode CANDE will show the numerical values of the above factored resistances along with the corresponding factored responses as well as the service limits along with the corresponding service responses. In the design mode, the designer is given additional control on the previous page to design with more or less conservatism and to permit turning on or off any of the criterion to fit the problem at hand. This completes the current B-set input for PLASTIC. Go to Part C (or return to line A-2 if more pipe groups need to be defined).

Chapter 5 – Detailed CANDE input CANDE-2017 User Manual and Guideline
5-66
5.4.5 Steel Pipe Type
5.4.5.1 B-1 – Steel – Material Properties and Control B-1.Steel – Corrugated steel with options for slipping joints. Material properties and control
Use if Comments
A-2.PTYPE = ‘STEEL’ One or more pipe groups are Steel.
A-1.XMODE = ‘DESIGN’ or ‘ANALYS’
This command is applicable if the ‘Design/Analysis’ parameter is set to either ‘DESIGN’ or ‘ANALYS’
Parameter
(columns) (format) (units)
Input Options Description
Young’s modulus for steel (PE) (01-10) (F10.0) (lb/in2)
Elastic Young’s modulus of steel pipe material Default = 29x106 psi
Linear stress-strain modulus for pipe material, see Figure 5.4-7
Poisson’s ratio (PNU) (11-20) (F10.0) ( -- )
Poisson’s ratio of pipe material Default = 0.3
Poisson’s ratio is used for plane-strain formulation. This means that the effective linear modulus is PE* = PE/(1-PNU2).
Yield stress of pipe (PYIELD) (21-30) (F10.0) (lb/in2)
Yield Stress of pipe material Default = 33,000 psi
Stress at end of elastic range, same in tension and compression. See the bilinear stress-strain curve in Figure 5.4-7.
Yield stress of pipe seam (PSEAM) (31-40) (F10.0) (lb/in2)
Yield strength of pipe seam Default = PYIELD
Strength of longitudinal seams in corrugations that are bolted, riveted, or welded may be less than PYIELD. For seamless pipes, PSEAM = PYIELD.
Density of steel (PDEN) (41-50) (F10.0) (lb/in3)
Density of material Density = 0.0 lb/in3
Applies only to Level 2 and 3. This value produces the self-weight of the steel structure in the loading schedule, (for steel, PDEN = 0.282 pci). Leave blank to ignore self-weight.
Modulus of upper bilinear model (PE2) (51-60) (F10.0) (lb/in2)
Modulus of upper portion of bilinear model. Default = 0.0 psi
This value is only used when NONLIN = 2. It is the slope of the stress-strain curve after yielding. See Figure 5.4-7. For structural grade steel, PE2 = 0.0 is recommended.

Chapter 5 – Detailed CANDE input CANDE-2017 User Manual and Guideline
5-67
Parameter (columns) (format) (units)
Input Options Description
Joint slip (JOINT) (61-65) (I5) (integer)
Joint slip option: = 0, no joint slippage =1, yes joint slippage =2, yes with print trace Default = 0
This option allows the representation of slipping joint behavior like the so-called “key-hole slot”, wherein joint slippage is intended to reduce thrust stress. Further input is required.
Material behavior (NONLIN) (66-70) (I5) (integer)
Code to select material behavior: =1, linear stress-strain =2, bilinear stress-strain Default = 2
This parameter controls the material law to be used. The linear model only uses the modulus PE, whereas the bilinear model uses both PE and PE2. Recommend NONLIN = 2.
Large deformation and buckling mode (IBUCK) (71-75) (I5) (integer)
Code to select large-deformation and buckling analysis: = 0, small deformation + AASHTO #1 buckle.* = 1, large deformation + AASHTO #1 buckle.* = 2, large deformation + CANDE buckle. = 3, small deformation + AASHTO #2 buckle.** = 4, large deformation + AASHTO #2 buckle.** Default = 0
Two options are wrapped into the variable called IBUCK. Option 1 is the choice of CANDE’s large versus small deformation analysis, and option 2 is the choice predicting buckling capacity. Theoretically, the most accurate option is IBUCK = 2, which means CANDE performs large deformation analysis followed by a realistic prediction of the remaining buckling capacity. At the other extreme IBUCK = 0, means CANDE performs small deformation analysis and buckling capacity is predicted by the simplified but conservative AASHT0 equation 12.7.2.4 for corrugations heights less than or equal 2.0”. The choices of BUCK = 3 or 4 corresponds exactly to the choices of IBUCK = 0 or 1 except that the buckling capacity is computed by AASHTO formula 12.8.9.6 intended for corrugation depths ≥ 5.0”.
*AASHTO #1 is buckling capacity equation 12.7.2.4 recommended for pipes, pipe arches and long spans. **AASHTO #2 is buckling capacity equation 12.8.9.6 recommended for deep corrugations. Proceed to line B-2

Chapter 5 – Detailed CANDE input CANDE-2017 User Manual and Guideline
5-68
Figure 5.4-7 – Steel-1: Bilinear stress-strain parameters
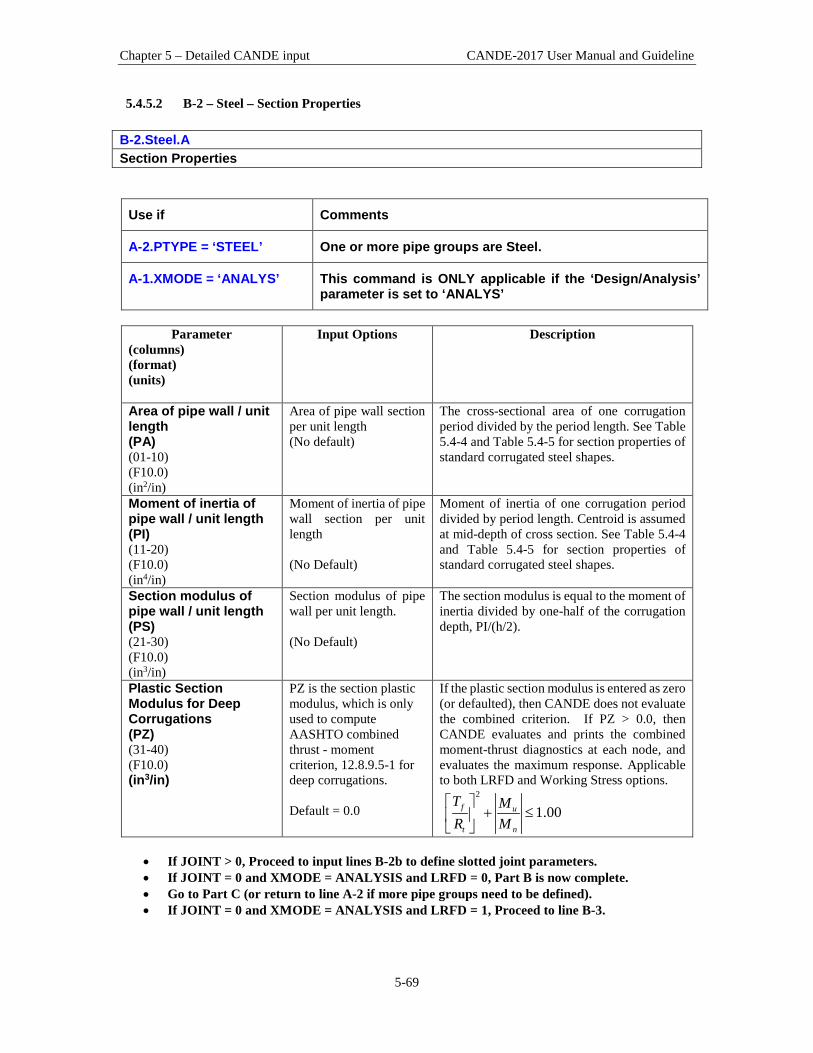
Chapter 5 – Detailed CANDE input CANDE-2017 User Manual and Guideline
5-69
5.4.5.2 B-2 – Steel – Section Properties B-2.Steel.A Section Properties
Use if Comments
A-2.PTYPE = ‘STEEL’ One or more pipe groups are Steel.
A-1.XMODE = ‘ANALYS’ This command is ONLY applicable if the ‘Design/Analysis’ parameter is set to ‘ANALYS’
Parameter
(columns) (format) (units)
Input Options Description
Area of pipe wall / unit length (PA) (01-10) (F10.0) (in2/in)
Area of pipe wall section per unit length (No default)
The cross-sectional area of one corrugation period divided by the period length. See Table 5.4-4 and Table 5.4-5 for section properties of standard corrugated steel shapes.
Moment of inertia of pipe wall / unit length (PI) (11-20) (F10.0) (in4/in)
Moment of inertia of pipe wall section per unit length (No Default)
Moment of inertia of one corrugation period divided by period length. Centroid is assumed at mid-depth of cross section. See Table 5.4-4 and Table 5.4-5 for section properties of standard corrugated steel shapes.
Section modulus of pipe wall / unit length (PS) (21-30) (F10.0) (in3/in)
Section modulus of pipe wall per unit length. (No Default)
The section modulus is equal to the moment of inertia divided by one-half of the corrugation depth, PI/(h/2).
Plastic Section Modulus for Deep Corrugations (PZ) (31-40) (F10.0) (in3/in)
PZ is the section plastic modulus, which is only used to compute AASHTO combined thrust - moment criterion, 12.8.9.5-1 for deep corrugations. Default = 0.0
If the plastic section modulus is entered as zero (or defaulted), then CANDE does not evaluate the combined criterion. If PZ > 0.0, then CANDE evaluates and prints the combined moment-thrust diagnostics at each node, and evaluates the maximum response. Applicable to both LRFD and Working Stress options.
2
1.00f u
t n
T MR M
+ ≤
• If JOINT > 0, Proceed to input lines B-2b to define slotted joint parameters. • If JOINT = 0 and XMODE = ANALYSIS and LRFD = 0, Part B is now complete. • Go to Part C (or return to line A-2 if more pipe groups need to be defined). • If JOINT = 0 and XMODE = ANALYSIS and LRFD = 1, Proceed to line B-3.

Chapter 5 – Detailed CANDE input CANDE-2017 User Manual and Guideline
5-70
Table 5.4-4 – Steel 1: Section Properties for Standard Steel Corrugation Sizes
Corrugation Profile
Section Properties
Corrugation thickness -- inches 0.040 0.052 0.064 0.079 0.109 0.138 0.168
PA in2/in 0.03800 0.05070 0.06340 0.07920 0.11090 0.14270 0.17480
1-1/2 x 1/4 PI in4/in 0.00025 0.00034 0.00044 0.00057 0.00086 0.00121 0.00164
PS in3/in 0.00172 0.00225 0.00280 0.00347 0.00479 0.00624 0.00785
PA in2/in 0.03880 0.05160 0.06460 0.08070 0.11300 0.14530 0.17780
2-2/3 x 1/2 PI in4/in 0.00112 0.00150 0.00189 0.00239 0.00342 0.00453 0.00573
PS in3/in 0.00415 0.00543 0.00670 0.00826 0.01123 0.01420 0.01716
PA in2/in 0.04450 0.05930 0.07420 0.09280 0.13000 0.16730 0.20480
3 x 1 PI in4/in 0.00515 0.00689 0.00866 0.01088 0.01546 0.02018 0.02509
PS in3/in 0.00990 0.01310 0.01628 0.02017 0.02788 0.03547 0.04296
PA in2/in 0.00000 0.00000 0.06620 0.82670 0.11580 0.14900 0.18220
5 x 1 PI in4/in 0.00000 0.00000 0.00885 0.01109 0.01565 0.02032 0.02509
PS in3/in 0.00000 0.00000 0.01664 0.02056 0.02822 0.03571 0.04296 Table 5.4-5 – Steel 2 – Section Properties for 6”x 2” Structural Plate
Nomenclature Thickness = Specified thickness of metal gage in inches Corrugation size = nominal height x pitch measured in inches. Nominal height = Inside valley to corrugation crest (i.e., actual height minus thickness) Actual height = nominal height plus thickness PA = Cross-sectional area per unit inch PI = Moment of Inertia per unit inch PS = Section modulus per unit inch (PI divided by one-half of actual height)
Section Properties
Corrugation thickness -- inches 0.110 0.140 0.170 0.188 0.218 0.249 0.280 0.318 0.380
PA in2/in 0.12970 0.16690 0.20410 0.22830 0.26660 0.30420 0.34330 0.38930 0.46780
PI in4/in 0.06041 0.07816 0.09616 0.10800 0.12691 0.14616 0.16583 0.19000 0.23200
PS in3/in 0.05726 0.07305 0.08863 0.09872 0.11444 0.12998 0.14546 0.16393 0.19496
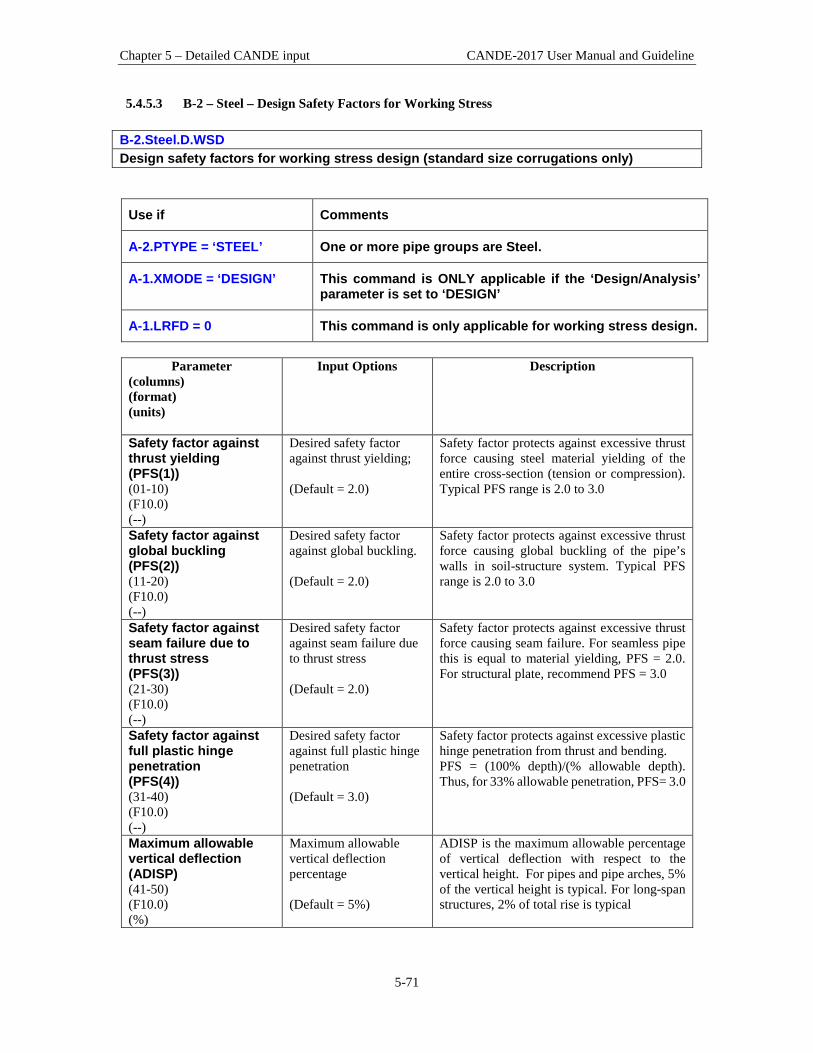
Chapter 5 – Detailed CANDE input CANDE-2017 User Manual and Guideline
5-71
5.4.5.3 B-2 – Steel – Design Safety Factors for Working Stress B-2.Steel.D.WSD Design safety factors for working stress design (standard size corrugations only)
Use if Comments
A-2.PTYPE = ‘STEEL’ One or more pipe groups are Steel.
A-1.XMODE = ‘DESIGN’ This command is ONLY applicable if the ‘Design/Analysis’ parameter is set to ‘DESIGN’
A-1.LRFD = 0 This command is only applicable for working stress design.
Parameter
(columns) (format) (units)
Input Options Description
Safety factor against thrust yielding (PFS(1)) (01-10) (F10.0) (--)
Desired safety factor against thrust yielding; (Default = 2.0)
Safety factor protects against excessive thrust force causing steel material yielding of the entire cross-section (tension or compression). Typical PFS range is 2.0 to 3.0
Safety factor against global buckling (PFS(2)) (11-20) (F10.0) (--)
Desired safety factor against global buckling. (Default = 2.0)
Safety factor protects against excessive thrust force causing global buckling of the pipe’s walls in soil-structure system. Typical PFS range is 2.0 to 3.0
Safety factor against seam failure due to thrust stress (PFS(3)) (21-30) (F10.0) (--)
Desired safety factor against seam failure due to thrust stress (Default = 2.0)
Safety factor protects against excessive thrust force causing seam failure. For seamless pipe this is equal to material yielding, PFS = 2.0. For structural plate, recommend PFS = 3.0
Safety factor against full plastic hinge penetration (PFS(4)) (31-40) (F10.0) (--)
Desired safety factor against full plastic hinge penetration (Default = 3.0)
Safety factor protects against excessive plastic hinge penetration from thrust and bending. PFS = (100% depth)/(% allowable depth). Thus, for 33% allowable penetration, PFS= 3.0
Maximum allowable vertical deflection (ADISP) (41-50) (F10.0) (%)
Maximum allowable vertical deflection percentage (Default = 5%)
ADISP is the maximum allowable percentage of vertical deflection with respect to the vertical height. For pipes and pipe arches, 5% of the vertical height is typical. For long-span structures, 2% of total rise is typical

Chapter 5 – Detailed CANDE input CANDE-2017 User Manual and Guideline
5-72
Comment: The working–stress design output provides a list of corrugation sizes along with the required metal thickness to meet the above design criteria. CANDE determines the design output by performing a series of analyses beginning with a trial cross-section and successively modifying it after each analysis until the specified safety factors are satisfied in an optimum manner. CANDE selects the least weight corrugation for a final analysis and evaluation. If JOINT > 0, Proceed to input lines B-2b to define slotted joint parameters. If JOINT = 0 and XMODE = DESIGN and LRFD = 0, Part B is now complete. Go to Part C (or return to line A-2 if more pipe groups need to be defined). If JOINT = 0 and XMODE = DESIGN and LRFD = 1, Proceed to line B-2 (next)
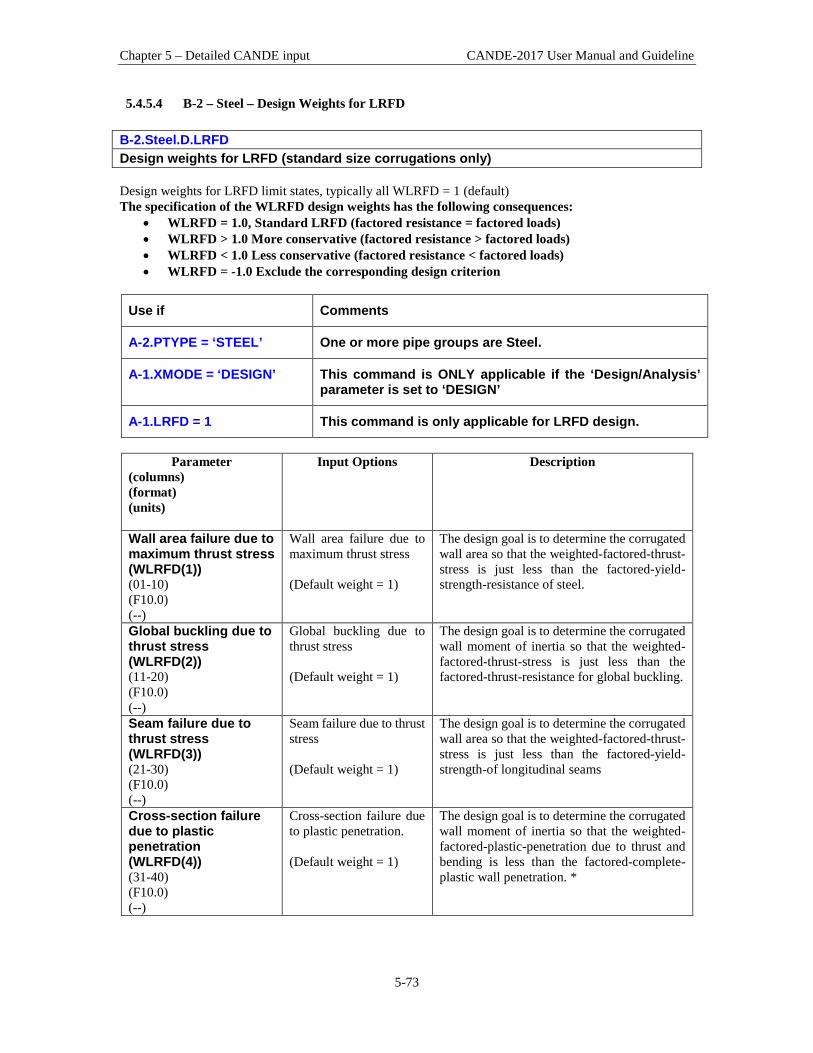
Chapter 5 – Detailed CANDE input CANDE-2017 User Manual and Guideline
5-73
5.4.5.4 B-2 – Steel – Design Weights for LRFD B-2.Steel.D.LRFD Design weights for LRFD (standard size corrugations only) Design weights for LRFD limit states, typically all WLRFD = 1 (default) The specification of the WLRFD design weights has the following consequences:
• WLRFD = 1.0, Standard LRFD (factored resistance = factored loads) • WLRFD > 1.0 More conservative (factored resistance > factored loads) • WLRFD < 1.0 Less conservative (factored resistance < factored loads) • WLRFD = -1.0 Exclude the corresponding design criterion
Use if Comments
A-2.PTYPE = ‘STEEL’ One or more pipe groups are Steel.
A-1.XMODE = ‘DESIGN’ This command is ONLY applicable if the ‘Design/Analysis’ parameter is set to ‘DESIGN’
A-1.LRFD = 1 This command is only applicable for LRFD design.
Parameter
(columns) (format) (units)
Input Options Description
Wall area failure due to maximum thrust stress (WLRFD(1)) (01-10) (F10.0) (--)
Wall area failure due to maximum thrust stress (Default weight = 1)
The design goal is to determine the corrugated wall area so that the weighted-factored-thrust-stress is just less than the factored-yield-strength-resistance of steel.
Global buckling due to thrust stress (WLRFD(2)) (11-20) (F10.0) (--)
Global buckling due to thrust stress (Default weight = 1)
The design goal is to determine the corrugated wall moment of inertia so that the weighted-factored-thrust-stress is just less than the factored-thrust-resistance for global buckling.
Seam failure due to thrust stress (WLRFD(3)) (21-30) (F10.0) (--)
Seam failure due to thrust stress (Default weight = 1)
The design goal is to determine the corrugated wall area so that the weighted-factored-thrust-stress is just less than the factored-yield-strength-of longitudinal seams
Cross-section failure due to plastic penetration (WLRFD(4)) (31-40) (F10.0) (--)
Cross-section failure due to plastic penetration. (Default weight = 1)
The design goal is to determine the corrugated wall moment of inertia so that the weighted-factored-plastic-penetration due to thrust and bending is less than the factored-complete-plastic wall penetration. *

Chapter 5 – Detailed CANDE input CANDE-2017 User Manual and Guideline
5-74
Parameter (columns) (format) (units)
Input Options Description
Service deflection limit (WLRFD(5)) (41-50) (F10.0) (--)
Service deflection limit (Default weight = 1)
The design goal is to determine the corrugated wall moment of inertia so that the weighted-service-load deflection is less than or equal to the allowable deflection.
Comment: Similar to the working-stress approach, the above design weights give the designer control over the degree of conservatism for the LRFD process. By choosing the design weights = 1, CANDE will determine the required corrugation size and thickness such that the controlling factored load nearly matches the corresponding factored resistance. If, however, a designer desires a 25% more conservative design solution against global buckling, the designer may specify WLRFD(2) = 1.25. Alternatively, a designer may exclude any design criterion that does not apply to the problem at hand by setting the corresponding design weight = -1. * Limiting the plastic penetration in corrugated metal is a newly proposed strength criterion that replaces the ineffectual plastic moment criterion for metal box culverts If JOINT > 0, Proceed to input lines B-2b to define slotted joint parameters. Otherwise, proceed to line B-3 (LRFD = 1)
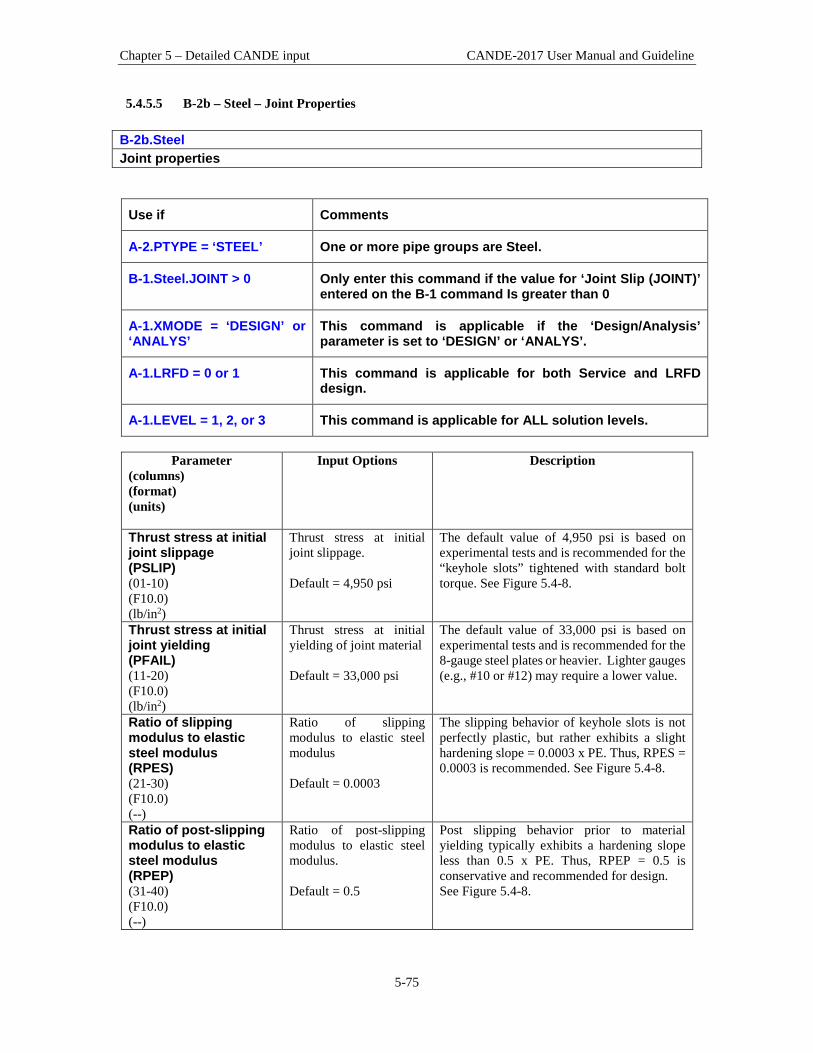
Chapter 5 – Detailed CANDE input CANDE-2017 User Manual and Guideline
5-75
5.4.5.5 B-2b – Steel – Joint Properties B-2b.Steel Joint properties
Use if Comments
A-2.PTYPE = ‘STEEL’ One or more pipe groups are Steel.
B-1.Steel.JOINT > 0 Only enter this command if the value for ‘Joint Slip (JOINT)’ entered on the B-1 command Is greater than 0
A-1.XMODE = ‘DESIGN’ or ‘ANALYS’
This command is applicable if the ‘Design/Analysis’ parameter is set to ‘DESIGN’ or ‘ANALYS’.
A-1.LRFD = 0 or 1 This command is applicable for both Service and LRFD design.
A-1.LEVEL = 1, 2, or 3 This command is applicable for ALL solution levels.
Parameter
(columns) (format) (units)
Input Options Description
Thrust stress at initial joint slippage (PSLIP) (01-10) (F10.0) (lb/in2)
Thrust stress at initial joint slippage. Default = 4,950 psi
The default value of 4,950 psi is based on experimental tests and is recommended for the “keyhole slots” tightened with standard bolt torque. See Figure 5.4-8.
Thrust stress at initial joint yielding (PFAIL) (11-20) (F10.0) (lb/in2)
Thrust stress at initial yielding of joint material Default = 33,000 psi
The default value of 33,000 psi is based on experimental tests and is recommended for the 8-gauge steel plates or heavier. Lighter gauges (e.g., #10 or #12) may require a lower value.
Ratio of slipping modulus to elastic steel modulus (RPES) (21-30) (F10.0) (--)
Ratio of slipping modulus to elastic steel modulus Default = 0.0003
The slipping behavior of keyhole slots is not perfectly plastic, but rather exhibits a slight hardening slope = 0.0003 x PE. Thus, RPES = 0.0003 is recommended. See Figure 5.4-8.
Ratio of post-slipping modulus to elastic steel modulus (RPEP) (31-40) (F10.0) (--)
Ratio of post-slipping modulus to elastic steel modulus. Default = 0.5
Post slipping behavior prior to material yielding typically exhibits a hardening slope less than 0.5 x PE. Thus, RPEP = 0.5 is conservative and recommended for design. See Figure 5.4-8.

Chapter 5 – Detailed CANDE input CANDE-2017 User Manual and Guideline
5-76
Parameter (columns) (format) (units)
Input Options Description
Ratio of yielding zone modulus to elastic steel modulus (RPEF) (41-50) (F10.0) (--)
Ratio of yielding zone modulus to elastic steel modulus Default = 0.0
When the joint thrust stress reaches yield, the joint typically behaves perfectly plastic so that RPEP = 0.0 is recommended. See Figure 5.4-8.
Slot travel length (SLOTL) (51-60) (F10.0) (inches)
Slot travel length Default = 1.0 in
This is the net distance the two plates can slip relative to each other prior to slot closure. For standard keyhole slots, a travel length of 1.0 inch is recommended.
Number of joints in this pipe group (NUMJ) (61-65) (I5) (integer)
Total number of joints in this pipe group. Max = 15. Default = 1
This is the actual number of joints (longitudinal seams) in the pipe-group model. The model for Level 1 is the whole circular pipe, whereas Level 2 is modeled using a symmetric half shape. For Level 1, NUMJ is the number of joints around the full circumference. See comment for Level 2.
Vary joint travel length (JSLTLR) (66-70) (I5) (integer)
Option to vary joint travel length around the pipe periphery. = 0, same lengths = 1, different lengths
This option applies to solution levels 2 & 3. One main utility of this option is to model “half joints”. This occurs in level 2 meshes when the axis of symmetry cuts through a joint at the crown or invert, which produces a half-joint with the same properties as a full joint except the slot length is one-half its full value.
If Level = 1 and LRFD = 0, B-input data is complete. For Level 2 & 3, complete lines B-2c and B-2d on the next page.

Chapter 5 – Detailed CANDE input CANDE-2017 User Manual and Guideline
5-77
Figure 5.4-8 – Steel-2 – Pseudo stress-strain model for slotted joints
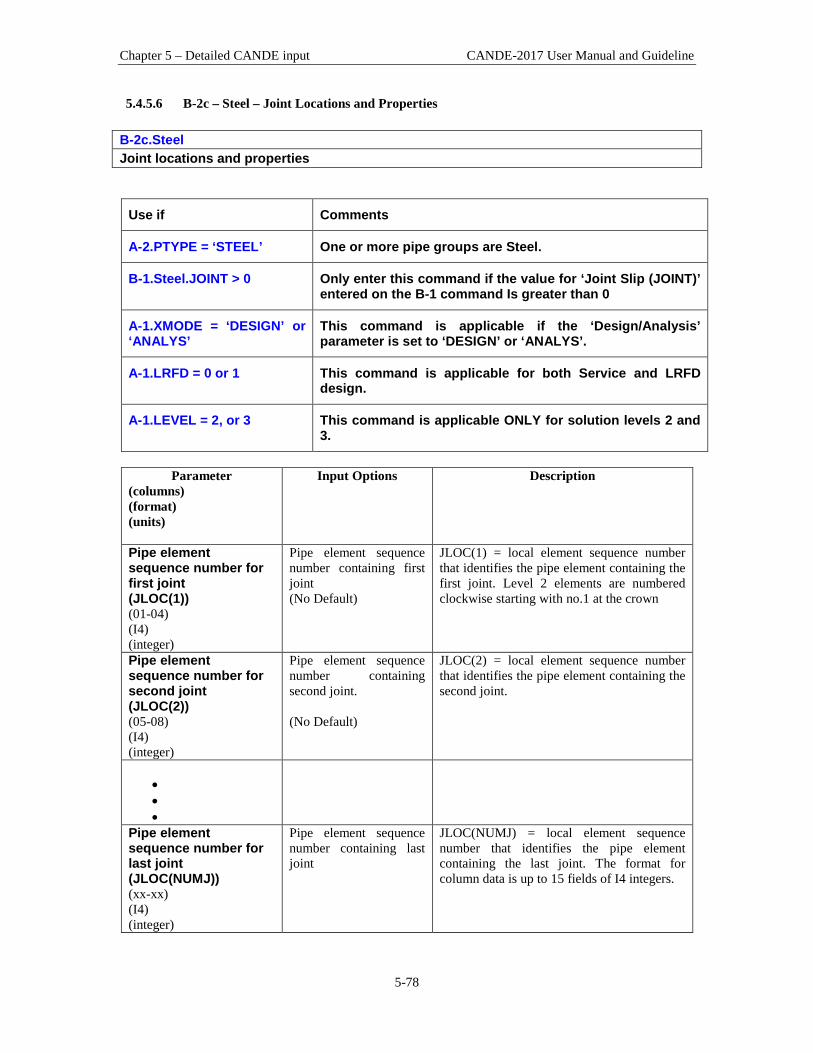
Chapter 5 – Detailed CANDE input CANDE-2017 User Manual and Guideline
5-78
5.4.5.6 B-2c – Steel – Joint Locations and Properties B-2c.Steel Joint locations and properties
Use if Comments
A-2.PTYPE = ‘STEEL’ One or more pipe groups are Steel.
B-1.Steel.JOINT > 0 Only enter this command if the value for ‘Joint Slip (JOINT)’ entered on the B-1 command Is greater than 0
A-1.XMODE = ‘DESIGN’ or ‘ANALYS’
This command is applicable if the ‘Design/Analysis’ parameter is set to ‘DESIGN’ or ‘ANALYS’.
A-1.LRFD = 0 or 1 This command is applicable for both Service and LRFD design.
A-1.LEVEL = 2, or 3 This command is applicable ONLY for solution levels 2 and 3.
Parameter
(columns) (format) (units)
Input Options Description
Pipe element sequence number for first joint (JLOC(1)) (01-04) (I4) (integer)
Pipe element sequence number containing first joint (No Default)
JLOC(1) = local element sequence number that identifies the pipe element containing the first joint. Level 2 elements are numbered clockwise starting with no.1 at the crown
Pipe element sequence number for second joint (JLOC(2)) (05-08) (I4) (integer)
Pipe element sequence number containing second joint. (No Default)
JLOC(2) = local element sequence number that identifies the pipe element containing the second joint.
• • •
Pipe element sequence number for last joint (JLOC(NUMJ)) (xx-xx) (I4) (integer)
Pipe element sequence number containing last joint
JLOC(NUMJ) = local element sequence number that identifies the pipe element containing the last joint. The format for column data is up to 15 fields of I4 integers.

Chapter 5 – Detailed CANDE input CANDE-2017 User Manual and Guideline
5-79
Comment: The above local element numbers locate where the slipping joints are located in the pipe’s circumference. Consider, for example, a circular pipe with a total of four slipping joints that are located near the crown, invert and each spring line. If we simulate this system with the Level 2 – Pipe mesh, which is a 10 element half-pipe mesh, then we would set NUMJ = 3 representing the sum of one spring line joint plus one crown half joint plus one invert half joint (mirror symmetric system). Accordingly, we would set JLOC(1) = 1 (representing crown joint), JLOC(2) = 5 or 6 (representing spring line joint) and JLOC(3) = 10 (representing invert joint). As a side note, Level 1 is not sensitive to the location of the joints only the total joint travel path, which is NUMJ*SLOTL. For Level 1, NUMJ is the number of joints around the full circumference. If half joints are to be modeled (JSLTLR = 1) complete line B-2d. Otherwise input is complete unless LRFD = 1 wherein you proceed to line B-3.

Chapter 5 – Detailed CANDE input CANDE-2017 User Manual and Guideline
5-80
5.4.5.7 B-2d – Steel – Joint Locations and Properties (2) B-2d.Steel Joint locations and properties (2)
Use if Comments
A-2.PTYPE = ‘STEEL’ One or more pipe groups are Steel.
B-1.Steel.JOINT > 0 Only enter this command if the value for ‘Joint Slip (JOINT)’ entered on the B-1 command Is greater than 0
B-2b.Steel.JSLTLR = 1, different lengths
Only enter this command if the ‘Vary joint travel length’ parameter is equal to ‘different lengths’ (1).
A-1.XMODE = ‘DESIGN’ or ‘ANALYS’
This command is applicable if the ‘Design/Analysis’ parameter is set to ‘DESIGN’ or ‘ANALYS’.
A-1.LRFD = 0 or 1 This command is applicable for both Service and LRFD design.
A-1.LEVEL = 2, or 3 This command is applicable ONLY for solution levels 2 and 3.
Parameter
(columns) (format) (units)
Input Options Description
Ratio of joint/ standard length # 1 (SLOTLR(1)) (01-04) (F4.0) (--)
Ratio of joint # 1 slot length to standard length (Default = 1.0)
This ratio redefines the slot length of joint 1 = SLOTLR(1) x SLOTL. This is useful for correctly defining joints that are on lines of symmetry whose slot length is ½ of standard.
Ratio of joint/ standard length # 2 (SLOTLR(2)) (05-08) (F4.0) (--)
Ratio of joint # 2 slot length to standard length (Default = 1.0)
This ratio redefines the slot length of joint 2 = SLOTLR(2) x SLOTL
• • •
Ratio of joint/ standard length # NUMJ (SLOTLR(NUMJ)) (xx-xx) (F4.0) (--)
Ratio of joint # NUMJ slot length to standard length (Default = 1.0)
This ratio redefines the slot length of joint NUMJ = SLOTLR(NUMJ) x SLOTL. The format for column data is up to 15 fields of F4 floating point numbers.
Comment: The above slot lengths correspond to the specific element numbers defined for each joint in line B-2c. Following the same example defined on the previous page with NUMJ = 3 for a Level 2 – Pipe mesh

Chapter 5 – Detailed CANDE input CANDE-2017 User Manual and Guideline
5-81
with joints that are located near the crown, invert and each spring line, we would set SLOTLR(1) = 0.5 (representing crown’s half-joint length), SLOTLR(2) = 1.0 (representing the standard length spring line joint) and SLOTLR(3) = 0.5 (representing invert half-joint length). If LRFD = 0, input is complete for Steel. If LRFD = 1, proceed to line B-3
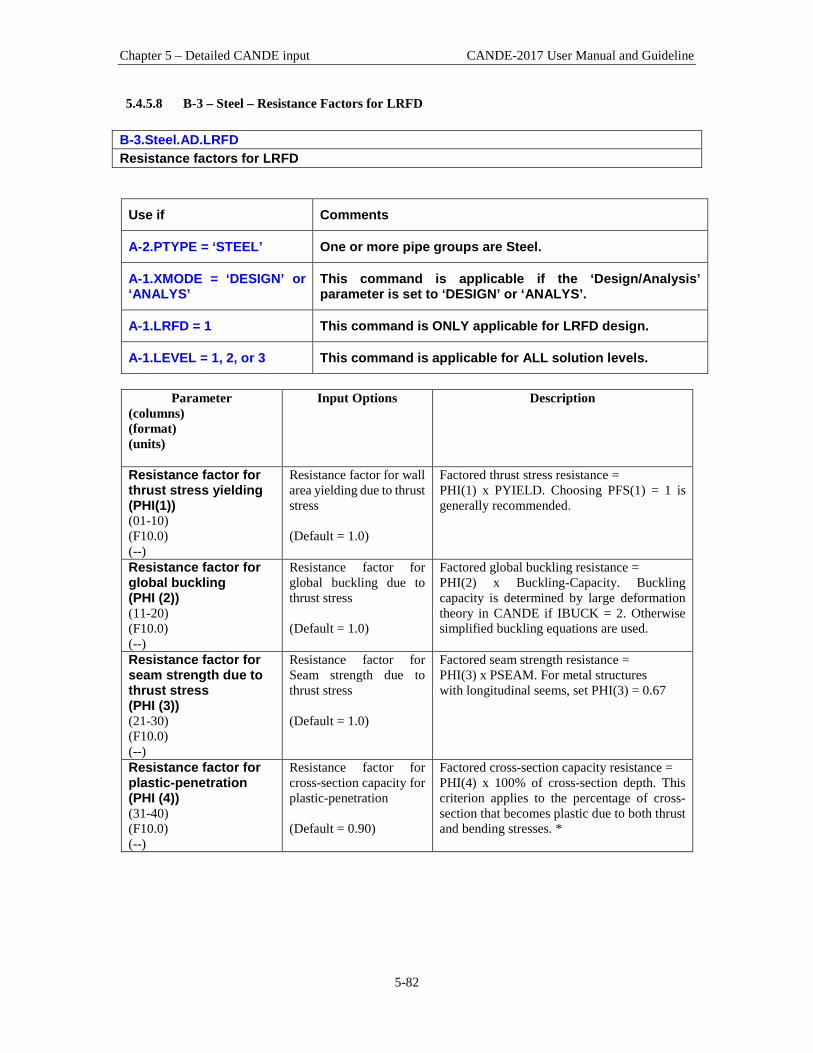
Chapter 5 – Detailed CANDE input CANDE-2017 User Manual and Guideline
5-82
5.4.5.8 B-3 – Steel – Resistance Factors for LRFD B-3.Steel.AD.LRFD Resistance factors for LRFD
Use if Comments
A-2.PTYPE = ‘STEEL’ One or more pipe groups are Steel.
A-1.XMODE = ‘DESIGN’ or ‘ANALYS’
This command is applicable if the ‘Design/Analysis’ parameter is set to ‘DESIGN’ or ‘ANALYS’.
A-1.LRFD = 1 This command is ONLY applicable for LRFD design.
A-1.LEVEL = 1, 2, or 3 This command is applicable for ALL solution levels.
Parameter
(columns) (format) (units)
Input Options Description
Resistance factor for thrust stress yielding (PHI(1)) (01-10) (F10.0) (--)
Resistance factor for wall area yielding due to thrust stress (Default = 1.0)
Factored thrust stress resistance = PHI(1) x PYIELD. Choosing PFS(1) = 1 is generally recommended.
Resistance factor for global buckling (PHI (2)) (11-20) (F10.0) (--)
Resistance factor for global buckling due to thrust stress (Default = 1.0)
Factored global buckling resistance = PHI(2) x Buckling-Capacity. Buckling capacity is determined by large deformation theory in CANDE if IBUCK = 2. Otherwise simplified buckling equations are used.
Resistance factor for seam strength due to thrust stress (PHI (3)) (21-30) (F10.0) (--)
Resistance factor for Seam strength due to thrust stress (Default = 1.0)
Factored seam strength resistance = PHI(3) x PSEAM. For metal structures with longitudinal seems, set PHI(3) = 0.67
Resistance factor for plastic-penetration (PHI (4)) (31-40) (F10.0) (--)
Resistance factor for cross-section capacity for plastic-penetration (Default = 0.90)
Factored cross-section capacity resistance = PHI(4) x 100% of cross-section depth. This criterion applies to the percentage of cross-section that becomes plastic due to both thrust and bending stresses. *

Chapter 5 – Detailed CANDE input CANDE-2017 User Manual and Guideline
5-83
Parameter (columns) (format) (units)
Input Options Description
Allowable deflection at service load (DISP) (41-50) (F10.0) (%)
Allowable deflection at service load (Default = 5%)
Allowable deflection is the relative vertical deflection, typically taken as 5% of vertical diameter or rise. For long-span structures, allowable deflection is 2% total rise. The criterion applies to service loading conditions, which is approximated by reducing the predicted displacements by the load factors.
Resistance factor for AASHTO combined moment & thrust criterion for deep corrugations**. (PHI (5)) (51-60) (F10.0) (--)
Resistance factor for new AASHTO thrust and moment criterion for deep corrugations which are 5-inch or more in height. (Default = 0.90)
The combined thrust and moment resistance factor is applied to the plastic thrust capacity R t and to the plastic moment capacity M n in the AASHTO combined equation 12.8.9.5-1,
2
1.00f u
t n
T MR M
+ ≤
This criterion only comes in to play if the user inputs a non-zero value for plastic modulus, PZ defined on line B-2 analysis.
Comment: The above resistance factors are used for both the design and analysis modes. In the analysis mode CANDE will show the five numerical values of the above factored resistances along with the corresponding factored responses. In the design mode, the designer is given additional control on line B-2 to design with more or less conservatism or turn off any of the criterion to fit the problem at hand. * Limiting the plastic penetration in corrugated metal is a newly proposed strength criterion that replaces the ineffectual plastic moment criterion for metal box culverts. It is suggested that designers evoke this criterion for all metal culverts. ** Generally, the user can ignore this AASHTO criterion as it only applies to special corrugations with corrugation heights ≥ 5 inches. All standard 6x2-inch corrugated plates used in long-span structures is exempt as is standard corrugation sizes for steel pipe. This completes the current B-set input for STEEL. Go to Part C (or return to line A-2 if more pipe groups need to be defined).

Chapter 5 – Detailed CANDE input CANDE-2017 User Manual and Guideline
5-84
5.4.6 Conrib Pipe Type
5.4.6.1 B-1 - Concrete properties B-1.Conrib – Concrete rib and T-sections, plus fiber reinforced concrete. Concrete properties and large deformation controls
Use if
Comments
A-2.PTYPE = ‘CONRIB’
• One or more of the declared pipe groups is CONRIB. • Operates in the analysis mode for Levels 1, 2 and 3
Parameter (columns) (format) (units)
Input Options (Default)
Description
Compressive strength (f c ’) PFPC (01-10) (F10.0) (lb/in2)
Compressive strength of concrete (f c ’) Default = 4000 psi
Uniaxial compressive stress of concrete in standard cylinder compression test or core specimen from pre-cast structure. See figure 5.4.6-1
Young’s modulus PCE (11-20) (F10.0) (lb/in2)
Young’s modulus of concrete in elastic range. Default =
( ) ( )1.5 0.5
c33 density f '
Slope of stress-strain curve of concrete in initial compression prior to nonlinear yielding. See figure 5.4.6-1.
Poisson ratio PNU (21-30) (F10.0) ( -- )
Poisson’s ratio of concrete material Default = 0.17
Poisson’s ratio is used for plane-strain formulation
PDEN (31-40) (F10.0) (lb/ft3)
Unit weight of concrete for body weight. Default = 0.0 pcf
Density of concrete is used to include body weight in the loading schedule for levels 2 & 3. If PDEN = 0.0 no body weight is included, and density = 150 pcf for PCE default calculation.
IBUCK (41-45) (I5) (integer)
Code to select large-deformation and buckling analysis: = 0, small deformation = 1, large deformation = 2, plus buckling.
If this value is greater than zero, the pipe elements will include large deformation theory (geometric stiffness). In addition, if IBUCK=2, an estimate of the remaining buckling capacity will be computed at each load step. Typically, large deformations and buckling is not a concern for reinforced concrete structures, but may be useful in some special cases like wall stability.
Comment. The CONRIB pipe-type differs from the CONCRETE pipe-type in that it is does not operate in the automated Design mode. However, CONRIB has the capability to model concrete walls with ribs, and more significantly, CONRIB has an enhanced and more accurate constitutive model that permits modeling fiber reinforced concrete (FRC) in addition to standard steel bar reinforcement.

Chapter 5 – Detailed CANDE input CANDE-2017 User Manual and Guideline
5-85
Figure 5.4.6-1 Concrete stress-strain model and parameters
Comment. The CONRIB model has an additional parameter, STNMAT (4), as compared to the stress-strain model in the CONCRETE pipe type. This new parameter is the ultimate tensile rupture strain, which allows the modeling of tensile softening ductility, an observed characteristic of fiber reinforced concrete. Depending on the percentage of fiber reinforcement, the value of STNMAT (4) may be 4 to 100 times the value STNMAT(1), the initial tensile cracking strain. If it is desired to model plain concrete without fiber reinforcement, set STNMAT(4) = STNMAT(1), which simulates abrupt loss of all tensile stress once the cracking strain is reached. Proceed to Line B-2
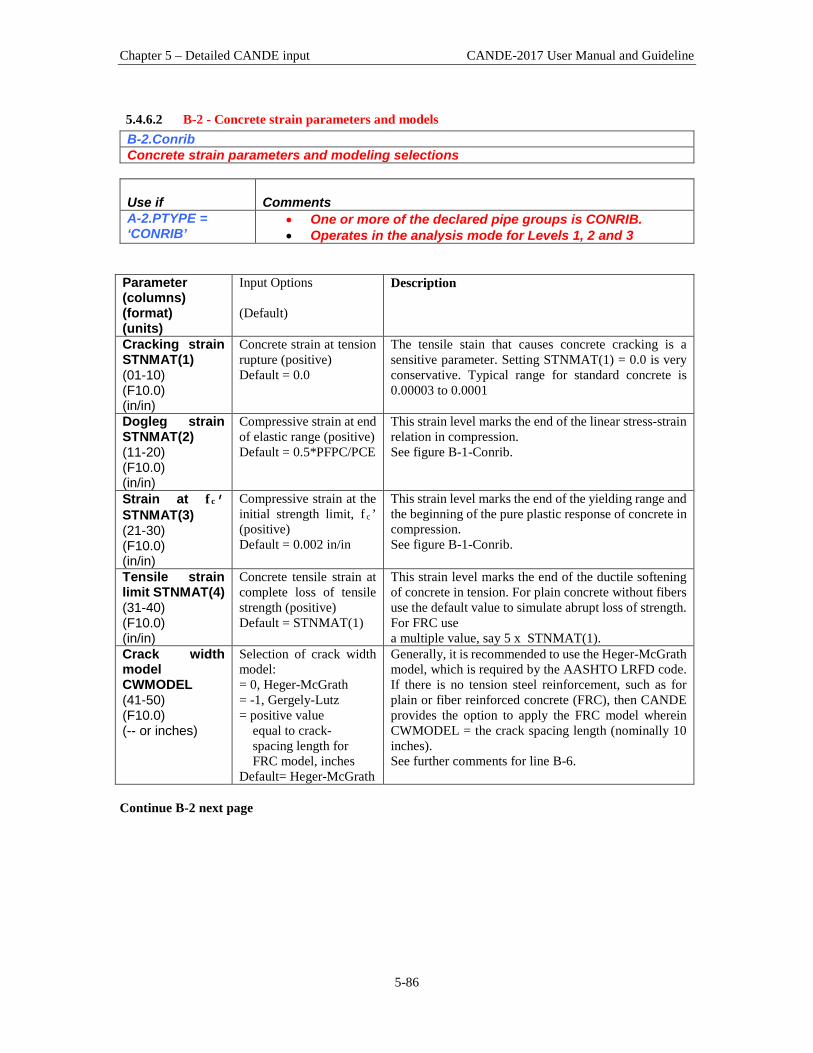
Chapter 5 – Detailed CANDE input CANDE-2017 User Manual and Guideline
5-86
5.4.6.2 B-2 - Concrete strain parameters and models B-2.Conrib Concrete strain parameters and modeling selections
Use if
Comments
A-2.PTYPE = ‘CONRIB’
• One or more of the declared pipe groups is CONRIB. • Operates in the analysis mode for Levels 1, 2 and 3
Parameter (columns) (format) (units)
Input Options (Default)
Description
Cracking strain STNMAT(1) (01-10) (F10.0) (in/in)
Concrete strain at tension rupture (positive) Default = 0.0
The tensile stain that causes concrete cracking is a sensitive parameter. Setting STNMAT(1) = 0.0 is very conservative. Typical range for standard concrete is 0.00003 to 0.0001
Dogleg strain STNMAT(2) (11-20) (F10.0) (in/in)
Compressive strain at end of elastic range (positive) Default = 0.5*PFPC/PCE
This strain level marks the end of the linear stress-strain relation in compression. See figure B-1-Conrib.
Strain at f c’ STNMAT(3) (21-30) (F10.0) (in/in)
Compressive strain at the initial strength limit, f c ’ (positive) Default = 0.002 in/in
This strain level marks the end of the yielding range and the beginning of the pure plastic response of concrete in compression. See figure B-1-Conrib.
Tensile strain limit STNMAT(4) (31-40) (F10.0) (in/in)
Concrete tensile strain at complete loss of tensile strength (positive) Default = STNMAT(1)
This strain level marks the end of the ductile softening of concrete in tension. For plain concrete without fibers use the default value to simulate abrupt loss of strength. For FRC use a multiple value, say 5 x STNMAT(1).
Crack width model CWMODEL (41-50) (F10.0) (-- or inches)
Selection of crack width model: = 0, Heger-McGrath = -1, Gergely-Lutz = positive value equal to crack- spacing length for FRC model, inches Default= Heger-McGrath
Generally, it is recommended to use the Heger-McGrath model, which is required by the AASHTO LRFD code. If there is no tension steel reinforcement, such as for plain or fiber reinforced concrete (FRC), then CANDE provides the option to apply the FRC model wherein CWMODEL = the crack spacing length (nominally 10 inches). See further comments for line B-6.
Continue B-2 next page

Chapter 5 – Detailed CANDE input CANDE-2017 User Manual and Guideline
5-87
B-2 Continued Parameter (columns) (format) (units)
Input Options (Default)
Description
Shear factor VFACTOR (51-60) (F10.0) (--)
A multiplying factor to compute nominal shear strength=VFACTOR
'cf
Default = (traditional method not used)
By specifying VFACTOR > 0.0 (e.g. 2.0), the traditional method of specifying concrete shear strength is used instead of the newer methods offered next. For plain concrete the VFACTOR = 2 is recommended. For FRC the shear strength may be enhanced by a factor greater than 2.0. Shear strength is only used in CANDE for safety factor calculations.
Shear strength model NSHEAR (61-65) (I5) (integer)
Code to select shear strength equation: = 1, concrete pipes and arches = 2, concrete boxes and 3-sided structures with at least 2 feet of fill = 3, concrete boxes and 3-sided structures with less than 2 feet of fill. Default = 1
At the present time, the AASHTO LRFD specifications provide three different sets of equations to estimate the shear strength of reinforced concrete culverts depending on the installation type. For culvert installations other than concrete boxes or a 3-sided box structure, it is recommended to use the shear strength for concrete pipes and arches (NSHEAR =1). See comments below. Note that the shear strength equations are used in CANDE for design/analysis evaluation in both working stress and LRFD methodology. However, the equations are not used in CANDE’s r/c constitutive model.
Comment on shear strength: (1) Concrete pipes and arches, NSHEAR =1. The associated shear strength equations are adapted from AASHTO LRFD specifications 12.10.4.2.5, which is based on the work by Heger and McGrath (Ref. 6). (2) Concrete boxes and 3-sided structures with at least 2 feet of fill, NSHEAR = 2. The associated shear strength equations are given directly in AASHTO LRFD specifications 5.14.5.3-1 (Ref. 5). (3) Concrete boxes and 3-sided structures with less than 2 feet of fill, NSHEAR = 3. The associated shear strength equations are given in AASHTO LRFD specifications 5.8.3.3. It is assumed that the concrete sections are not prestressed and that simplified procedure defined in 5.8.3.4.1 is applicable so that the diagonal crack parameters are taken as β = 2 and θ = 45 degrees. Proceed to line B-3

Chapter 5 – Detailed CANDE input CANDE-2017 User Manual and Guideline
5-88
5.4.6.3 B-3 - Steel material properties B-3.Conrib Steel material properties
Use if
Comments
A-2.PTYPE = ‘CONRIB’
Line B-3 must be input (at least defaulted) for all cases even if there is no reinforcing steel assigned to the concrete matrix.
Parameter (columns) (format) (units)
Input Options (Default)
Description
Yield stress PFSY (01-10) (F10.0) (lb/in2)
Yield stress of reinforcing steel Default = 60,000 psi
Reinforcing steel is modeled as elastic-perfectly plastic where PFSY represents the maximum stress attainable
Young’s mod. PSE (11-20) (F10.0) (lb/in2)
Young’s modulus of reinforcing steel Default = 29 x 106 psi
Slope of steel’s stress-strain curve in linear range. Behavior is assumed identical in tension and compression.
Poisson ratio PSNU (21-30) (F10.0) ( -- )
Poisson’s ratio of reinforcing steel Default = 0.3
Poisson’s ratio is used for plane-strain formulation.
Print code NONLIN (31-35) (I5) (integer)
Special code to print out an iteration trace of nonlinear model: = 0, No action. > 0, An iteration trace of key variables will be printed on output file. Default = 0
As a general rule, it is recommended to use the default option, NONLIN =0. Choosing NONLIN > 0 is useful if it is observed that the CONRIB model does not converge. This will produce a trace printout of the key beam properties for each iteration of each load step. By inspecting the key properties (PA = current area, PI = current moment of inertia, and YBAR = current neutral axis) one can deduce which elements are not converging and to what degree. Note: the user can control the number of iterations and stopping with the input parameter ITMAX on Line A1.
Proceed to line B-4

Chapter 5 – Detailed CANDE input CANDE-2017 User Manual and Guideline
5-89
5.4.6.4 B-4 - Input sequence node numbers B-4.Conrib First and last nodal sequence numbers for a subset of common geometric properties
Use if
Comments
A-2.PTYPE = ‘CONRIB’
Repeat lines B-4, B-5, B-6 until the geometric properties of the Conrib pipe group have been defined for all nodes.
Parameter (columns) (format) (units)
Input Options
(Default)
Description
First local Node NSEQ1 (01-05) (I5) (integer)
First local node number in a sequence of nodes with common properties Default = none
NSEQ1 is the first local node number in a consecutive set of node numbers that share the same geometric properties for the concrete cross section and reinforcing steel
Last local Node NSEQ2 (06-10) (I5) (integer)
Last local node number in a sequence of nodes with common properties Default = none
NSEQ2 is the last local node number in a consecutive set of node numbers that share the same geometric properties for the concrete cross section and reinforcing steel
Comment. In the simplest case, if all beam elements in this group have the same geometric properties, set NSEQ1 = 1 and NSEQ2 = NPMAT + 1, and specify the concrete geometry in line B-5 and the rebar geometry in line B-6. This would complete the input for concrete and steel geometric properties. More generally, the above input feature allows the user to change the geometry properties within this pipe group. Note however, the material properties are fixed for this group. To change material properties, such as the strength of the concrete or steel, the user would need to define a separate pipe group. As an example of changing geometric properties, suppose that the current pipe group is defined with 24 pipe elements. Suppose further that the first 10 elements have the same set of geometric properties, element 11 is a transition element, and the remaining 13 elements have a different set of geometric properties. In this case, we would begin with the node range NSEQ1 = 1 and NSEQ2 = 11 followed by the first set’s geometry description in lines B-5 and B-6. Next, we would identify the node range NSEQ1 = 12 and NSEQ2 = 25 followed by the second geometry description in lines B-5 and B-6. Note that the transition element, bounded by nodes 11 and 12, would be implicitly defined by the average of the two sets of geometric properties. Proceed to Line B-5

Chapter 5 – Detailed CANDE input CANDE-2017 User Manual and Guideline
5-90
5.4.6.5 B-5 - Concrete wall geometry B-5.Conrib Specification of smooth wall or ribbed wall geometry for concrete
Use if
Comments
A-2.PTYPE = ‘CONRIB’
• Repeat lines B-4, B-5, and B-6 to define all nodes. • Smooth walls only require defining total thickness
Parameter (columns) (format) (units)
Input Options (Default)
Description
Total thickness PTV (01-10) (F10.0) (inches)
Total thickness of concrete section (Default = none)
This defines the overall depth of the concrete section including the rib depth. If there is no rib, then PTV is the smooth wall depth. See figure 5.4.6-2.
Rib depth RDT (11-20) (F10.0) (inches)
Depth of rib portion attached to slab Default = 0.0
Rib depth is shown in Figure 5.4.6-2. If there are no ribs, set RDT = 0.0 (default) and ignore the remaining input on line B-5. We define slab depth = PTV - RDT
Rib spacing RWS (21-30) (F10.0) (inches)
Spacing of ribs on centers Default = 0.0
Distance between ribs measured from rib centerline to rib centerline. RWS should be greater than either RWK or RWJ.
Rib width at end RWK (31-40) (F10.0) (inches)
Width of rib at extreme fiber Default = 0.0
The width of rib furthest removed from the slab. See Figure 5.4.6-2
Rib width at slab RWJ (41-50) (F10.0) (inches)
Width of rib at junction with slab Default = 0.0
The width of rib where it is joined to the slab. The parameters RWJ and RWK allow a trapezoidal-shaped rib. If the rib is rectangular (T-section), then set RWJ =RWK.
Effective slab width SWE (51-60) (F10.0) (inches)
Effective slab width relative to rib spacing Default = RWJ+16(PTV-RDT)
According to ACI-318 specifications the effective slab width should not exceed the default formula. The user may over-ride this by specifying SWE = RWS.
Orientation OUTIN (61-70) (F10.0) (inches)
Code for indicating orientation of rib: = 0.0, interior rib = 1.0, exterior rib Default = 0.0
If the rib is interior to the culvert slab choose OUTIN = 0.0. Alternatively, if the rib is on the exterior (soil side) set OUTIN = 1.0. See Figure 5.4.6-2
Proceed to line B-6.
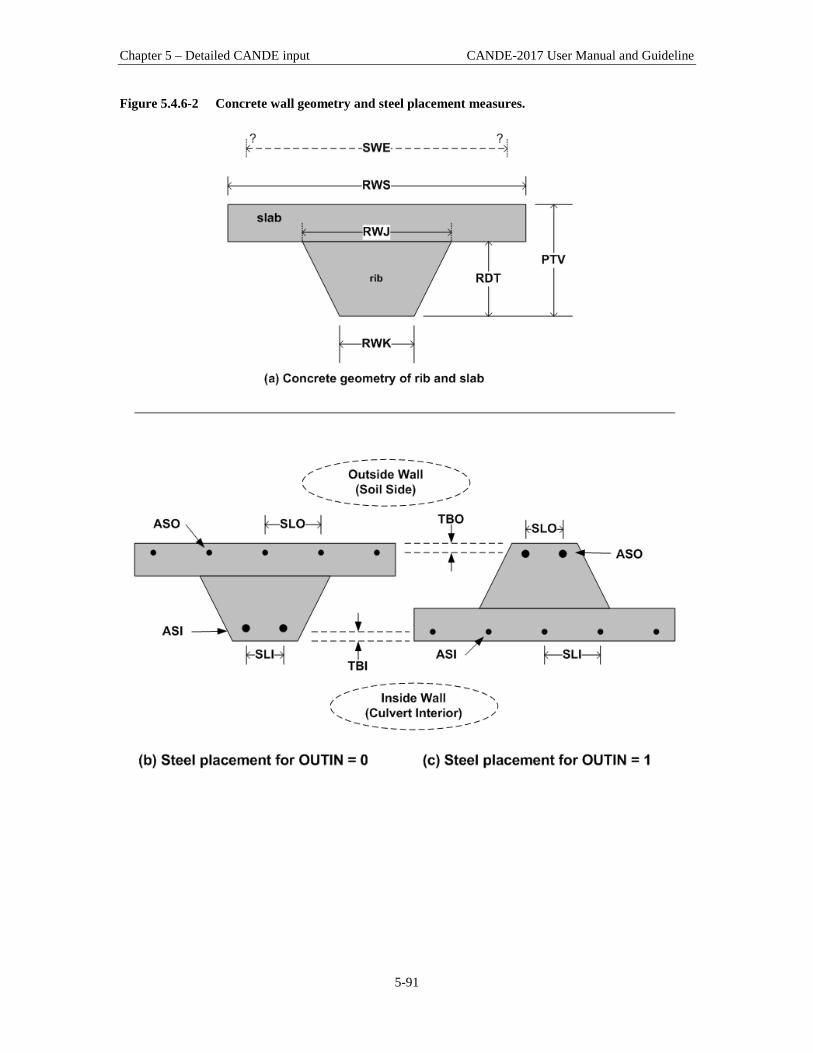
Chapter 5 – Detailed CANDE input CANDE-2017 User Manual and Guideline
5-91
Figure 5.4.6-2 Concrete wall geometry and steel placement measures.
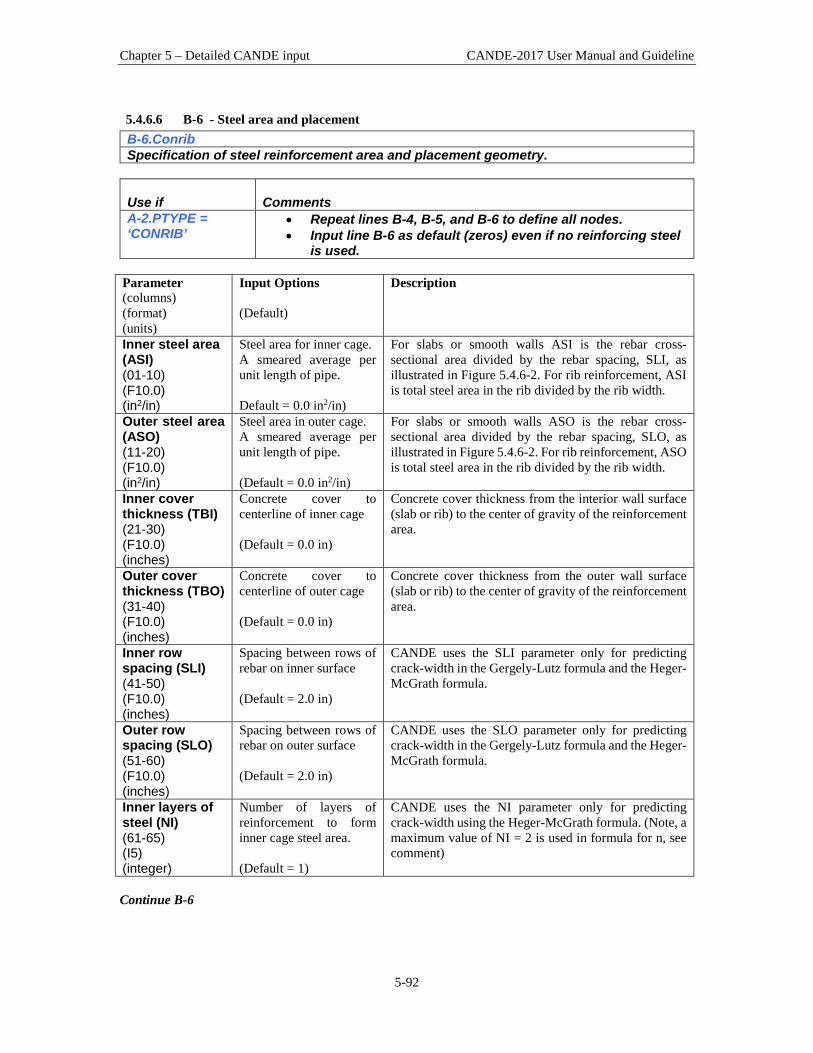
Chapter 5 – Detailed CANDE input CANDE-2017 User Manual and Guideline
5-92
5.4.6.6 B-6 - Steel area and placement B-6.Conrib Specification of steel reinforcement area and placement geometry.
Use if
Comments
A-2.PTYPE = ‘CONRIB’
• Repeat lines B-4, B-5, and B-6 to define all nodes. • Input line B-6 as default (zeros) even if no reinforcing steel
is used. Parameter (columns) (format) (units)
Input Options (Default)
Description
Inner steel area (ASI) (01-10) (F10.0) (in2/in)
Steel area for inner cage. A smeared average per unit length of pipe. Default = 0.0 in2/in)
For slabs or smooth walls ASI is the rebar cross-sectional area divided by the rebar spacing, SLI, as illustrated in Figure 5.4.6-2. For rib reinforcement, ASI is total steel area in the rib divided by the rib width.
Outer steel area (ASO) (11-20) (F10.0) (in2/in)
Steel area in outer cage. A smeared average per unit length of pipe. (Default = 0.0 in2/in)
For slabs or smooth walls ASO is the rebar cross-sectional area divided by the rebar spacing, SLO, as illustrated in Figure 5.4.6-2. For rib reinforcement, ASO is total steel area in the rib divided by the rib width.
Inner cover thickness (TBI) (21-30) (F10.0) (inches)
Concrete cover to centerline of inner cage (Default = 0.0 in)
Concrete cover thickness from the interior wall surface (slab or rib) to the center of gravity of the reinforcement area.
Outer cover thickness (TBO) (31-40) (F10.0) (inches)
Concrete cover to centerline of outer cage (Default = 0.0 in)
Concrete cover thickness from the outer wall surface (slab or rib) to the center of gravity of the reinforcement area.
Inner row spacing (SLI) (41-50) (F10.0) (inches)
Spacing between rows of rebar on inner surface (Default = 2.0 in)
CANDE uses the SLI parameter only for predicting crack-width in the Gergely-Lutz formula and the Heger-McGrath formula.
Outer row spacing (SLO) (51-60) (F10.0) (inches)
Spacing between rows of rebar on outer surface (Default = 2.0 in)
CANDE uses the SLO parameter only for predicting crack-width in the Gergely-Lutz formula and the Heger-McGrath formula.
Inner layers of steel (NI) (61-65) (I5) (integer)
Number of layers of reinforcement to form inner cage steel area. (Default = 1)
CANDE uses the NI parameter only for predicting crack-width using the Heger-McGrath formula. (Note, a maximum value of NI = 2 is used in formula for n, see comment)
Continue B-6

Chapter 5 – Detailed CANDE input CANDE-2017 User Manual and Guideline
5-93
Continue B-6 Outer layers of steel (NO) (66-70) (I5) (integer)
Number of layers of reinforcement to form outer cage steel area. (Default = 1)
CANDE uses the NO parameter only for predicting crack-width using the Heger-McGrath formula. (Note, a maximum value of NO = 2 is used in formula for n, see comment)
Code number (NC1) (71-75) (I5) (integer)
Code number for type of reinforcement: =1, Smooth wire or plain bars. =2, Welded or deformed wire. =3, Deformed bars or any reinforcement with stirrups. (Default = 2)
CANDE uses the NC1 parameter only for predicting crack-width using the Heger-McGrath formula. The code value, NC1 = 1, 2, or 3 corresponds to the Heger-McGrath variable C 1 set to 1.0, 1.5 or 1.9, respectively. See Heger-McGrath crack-width equation below.
Comment on Steel Areas. For a smooth wall (no ribs) or for the slab portion of a ribbed wall, ASI and ASO is the reinforcement area divided by the corresponding spacing between reinforcement lines. For reinforcement in the ribbed portion of the wall, ASI and ASO refer to the average steel area per unit length of rib, that is, the total steel area in the rib divided by the rib width at the rebar level. Note the CANDE program will automatically adjust the steel areas in the ribs to account for the reduced area due to periodic spacing. Comment on Crack widths. CANDE uses empirical formulas to predict crack width based on the magnitude of tension steel stress determined from CANDE’s reinforced concrete model. CANDE output always gives the predicted crack width at service load level regardless of whether LRFD = 0 or 1. The Heger-McGrath crack-width equation is adapted from the AASHTO LRFD code (12.10.4.2.4d and Ref. 7) and is expressed with stresses (f s and f c ’) in ksi units as: CW = (1/3000) (t bs l /2n)1/3{f s – 0.0316C 1(h/d)2√f c ’/ρ} (inches) The older Gergely-Lutz empirical formula for crack width with f s in ksi units is (Ref 8): CW = (0.000122) (2t b
2s l )1/3{f s – 5.0} (inches) When there is no reinforcement steel such as for FRC or plain concrete, CANDE provides the option to predict crack width based on the concrete tension strain in excess of the concrete cracking strain multiplied by the crack spacing length (nominally = 10 in): CW = crack-spacing-length (ε tension – ε cracking ) (inches) If LRFD = 0 and subsequences B-4, B-5 & B-6 are finished, then B-data is complete. If LRFD = 1 and subsequences B-4, B-5 & B-6 are finished, proceed to line B-7

Chapter 5 – Detailed CANDE input CANDE-2017 User Manual and Guideline
5-94
5.4.6.7 B-7 - Resistance factors for LRFD evaluation B-7.Conrib Resistance factors for LRFD limit states.
Use if
Comments
A-2.PTYPE = ‘CONRIB’ and A-1.LRFD = 1
• Line B-7 is only input if LRFD is set to 1 on line A-1. • If LRFD = 0, skip line B-7. • Default resistance factors are consistent with AASHTO.
Parameter (columns) (format) (units)
Input Options (Default)
Description
Steel yield factor PHI(1) (01-10) (F10.0) (--)
Resistance factor for steel rebar yielding due tension stress (Default = 0.9)
Factored steel stress resistance = PHI(1) x PFSY (f y )
Concrete crush factor PHI(2) (11-20) (F10.0) (--)
Resistance factor for concrete crushing due to thrust and moment (Default = 0.75)
Factored concrete crushing stress resistance = PHI(2) x PFPC (f c ’)
Shear failure factor PHI(3) (21-30) (F10.0) (--)
Resistance factor for concrete shear failure (Default = 0.9)
Factored shear strength resistance = PHI(3) x Selected shear strength option.
Radial splitting factor PHI(4) (31-40) (F10.0) (--)
Resistance factor for radial concrete tension (Default = 0.9)
Factored radial tension resistance = PHI(4) x concrete radial tension stress limit as proposed by Heger/McGrath (ACI-1983)
Allowable crack width ALCW (41-50) (F10.0) (inches)
Allowable crack width for service load (Default = 0.01inch)
Allowable crack width for service limit loading. CANDE will approximate the crack width at service loading by dividing each increment of steel stress by the load factor.
Comment. The above resistance factors are multiplied by the corresponding resistances (capacities) and are printed out by CANDE along with the corresponding factored responses (demands), and the ratios of factored-demand divided factored-capacity. The ratios should be less than 1.0 for safe performance. If LRFD = 0, line B-7 is not input, however, the working stress evaluation follows the same design criteria listed above in terms of safety factors. This completes the current B-set input. Go to Part C (or return to line A-2 if more pipe groups need to be defined).
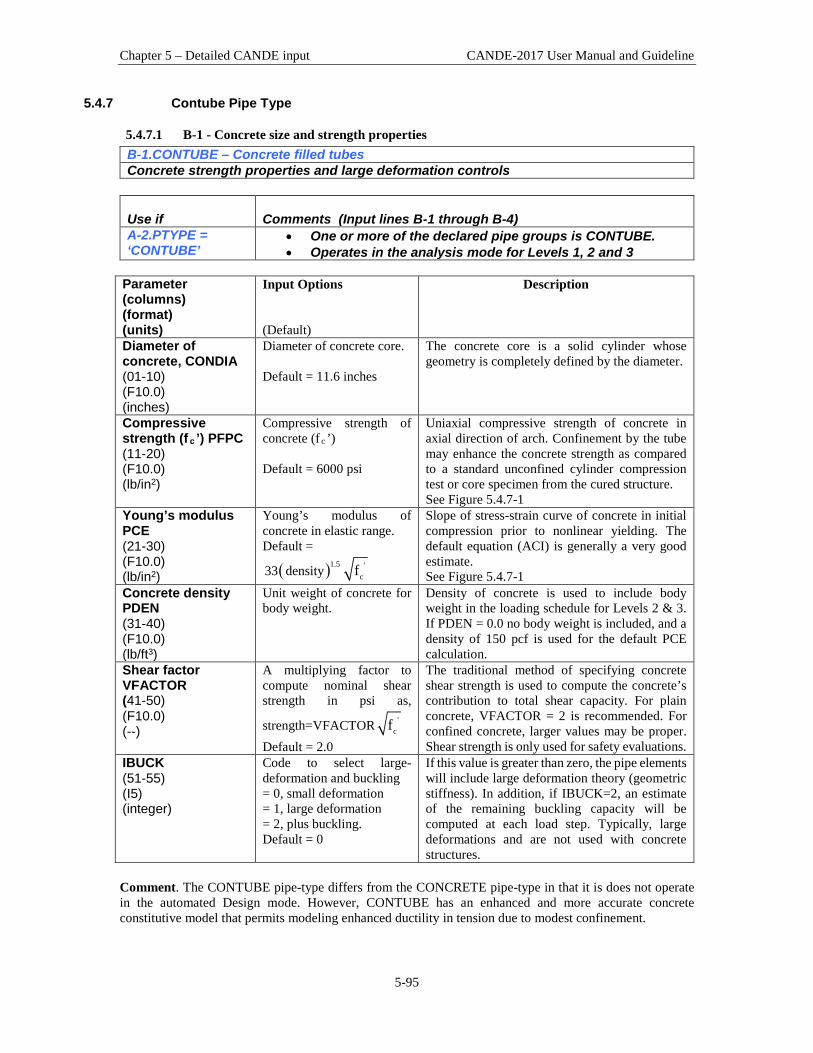
Chapter 5 – Detailed CANDE input CANDE-2017 User Manual and Guideline
5-95
5.4.7 Contube Pipe Type
5.4.7.1 B-1 - Concrete size and strength properties B-1.CONTUBE – Concrete filled tubes Concrete strength properties and large deformation controls
Use if
Comments (Input lines B-1 through B-4)
A-2.PTYPE = ‘CONTUBE’
• One or more of the declared pipe groups is CONTUBE. • Operates in the analysis mode for Levels 1, 2 and 3
Parameter (columns) (format) (units)
Input Options (Default)
Description
Diameter of concrete, CONDIA (01-10) (F10.0) (inches)
Diameter of concrete core. Default = 11.6 inches
The concrete core is a solid cylinder whose geometry is completely defined by the diameter.
Compressive strength (f c ’) PFPC (11-20) (F10.0) (lb/in2)
Compressive strength of concrete (f c ’) Default = 6000 psi
Uniaxial compressive strength of concrete in axial direction of arch. Confinement by the tube may enhance the concrete strength as compared to a standard unconfined cylinder compression test or core specimen from the cured structure. See Figure 5.4.7-1
Young’s modulus PCE (21-30) (F10.0) (lb/in2)
Young’s modulus of concrete in elastic range. Default =
( )1.5 'c33 density f
Slope of stress-strain curve of concrete in initial compression prior to nonlinear yielding. The default equation (ACI) is generally a very good estimate. See Figure 5.4.7-1
Concrete density PDEN (31-40) (F10.0) (lb/ft3)
Unit weight of concrete for body weight.
Density of concrete is used to include body weight in the loading schedule for Levels 2 & 3. If PDEN = 0.0 no body weight is included, and a density of 150 pcf is used for the default PCE calculation.
Shear factor VFACTOR (41-50) (F10.0) (--)
A multiplying factor to compute nominal shear strength in psi as,
strength=VFACTOR 'cf
Default = 2.0
The traditional method of specifying concrete shear strength is used to compute the concrete’s contribution to total shear capacity. For plain concrete, VFACTOR = 2 is recommended. For confined concrete, larger values may be proper. Shear strength is only used for safety evaluations.
IBUCK (51-55) (I5) (integer)
Code to select large-deformation and buckling = 0, small deformation = 1, large deformation = 2, plus buckling. Default = 0
If this value is greater than zero, the pipe elements will include large deformation theory (geometric stiffness). In addition, if IBUCK=2, an estimate of the remaining buckling capacity will be computed at each load step. Typically, large deformations and are not used with concrete structures.
Comment. The CONTUBE pipe-type differs from the CONCRETE pipe-type in that it is does not operate in the automated Design mode. However, CONTUBE has an enhanced and more accurate concrete constitutive model that permits modeling enhanced ductility in tension due to modest confinement.

Chapter 5 – Detailed CANDE input CANDE-2017 User Manual and Guideline
5-96
Figure 5.4.7-1 Concrete stress-strain model and parameters
Comment. The CONTUBE model has an additional parameter, STNMAT (4), as compared to the stress-strain model in the CONCRETE pipe type. This new parameter is the ultimate tensile rupture strain, which allows the modeling of tensile softening ductility, an observed characteristic of confined concrete. If it is desired to model plain concrete without confinement, set STNMAT(4) = STNMAT(1), which simulates abrupt loss of all tensile stress once the cracking strain is reached. However, for confined concrete the default value, STNMAT(4) = 10*STNMAT(1), appears very reasonable. Proceed to Line B-2

Chapter 5 – Detailed CANDE input CANDE-2017 User Manual and Guideline
5-97
5.4.7.2 B-2 – Concrete strain parameters and models B-2.CONTUBE Concrete strain parameters and modeling selections
Use if
Comments
A-2.PTYPE = ‘CONTUBE’
• One or more of the declared pipe groups is CONTUBE. • Operates in the analysis mode for Levels 1, 2 and 3
Parameter (columns) (format) (units)
Input Options (Default)
Description See Figure 5.4.7-1
Cracking strain STNMAT(1) (01-10) (F10.0) (in/in)
Concrete strain at tension cracking (positive) Default = 0.0001
The tensile strain that causes concrete cracking is a sensitive parameter. Setting STNMAT(1) = 0.0 is very conservative. Typical range for standard concrete is 0.00003 to 0.0001. If the concrete is confined, higher values are possible such as the 0.0003.
Dogleg strain STNMAT(2) (11-20) (F10.0) (in/in)
Compressive strain at end of elastic range (positive) Default = 0.5*PFPC/PCE
This strain level marks the end of the linear stress-strain relation in compression. The default value is usually a good estimate. See Figure 5.4.7-1
Strain at f c’ STNMAT(3) (21-30) (F10.0) (in/in)
Compressive strain at the initial strength limit, f c ’ (positive) Default = 0.002 in/in
This strain level marks the end of the yielding range and the beginning of the pure plastic response of concrete in compression. Default value is good for plain concrete; it may be higher for confined concrete. See Figure 5.4.7-1
Tensile strain limit STNMAT(4) (31-40) (F10.0) (in/in)
Concrete tensile strain at complete loss of tensile strength (positive) Default = 10*STNMAT(1)
This strain level marks the end of the ductile tension softening and compete loss of stress. For brittle concrete set STNMAT(4) = STNMAT(1) to simulate abrupt loss of strength. However, for confined concrete, the default value is a reasonable estimate.
Crack spacing length CSLENGTH (41-50) (F10.0) (inches)
Crack spacing length, which is used for crack width predictions. Default = 10.0 inches
The crack spacing length is used as an empirical measure to predict the crack width at the outer periphery of the concrete core. See the comment below*.
*Crack width prediction. CANDE predicts the concrete crack width at the outer tension fibers based on the concrete tension strain in excess of the concrete cracking strain multiplied by the crack spacing length (nominally = 10 in). Specifically, the crack width in inches (CW) is estimated by; CW = crack-spacing-length (ε tension – ε cracking ). Under service loading, the maximum allowable crack width is generally specified as 0.01”; however, significantly higher values may be appropriate for confined concrete. Proceed to line B-3.

Chapter 5 – Detailed CANDE input CANDE-2017 User Manual and Guideline
5-98
5.4.7.3 B-3 - Tube material properties and spacing B-3.CONTUBE Tube material properties
Use if
Comments
A-2.PTYPE = ‘CONTUBE’
Line B-3 must be input.
Parameter (columns) (format) (units)
Input Options (Default)
Description
Tube thickness PTHICK (01--10) (F10.0) (inches)
Thickness of tube material Default = 0.094 inches
Uniform thickness of the tube surrounding the concrete. It is inherently assumed that the inside diameter of the tube is equal to the diameter of the concrete core. See Figure 5.4.7-3.
Tube axial strength PTFY (11-20) (F10.0) (lb/in2)
Nominal failure stress of tube in direction of arch axis Default = 150,000 psi
The nominal failure stress is used only for safety evaluation of the stresses in the tube’s outer fibers. The tube remains linear elastic even if the tube’s stress exceeds PTFY. See Figure 5.4.7-2
Tube shear strength PTFV (21-30) (F10.0) (lb/in2)
Nominal shear strength of tube’s cross section. Default = 13,000 psi
The tube’s nominal shear strength is used only for safety evaluation of the combined shear strength design criterion. The tube’s contribution to the combined shear capacity is PTFV*(tube’s section area). The tube remains linear elastic irrespective of the value of PTFV.
Tube Young’s modulus PTE (31-40) (F10.0) (lb/in2)
Young’s modulus of tube material Default = 8.8 x 10⁶ psi
Slope of tube’s linear stress-strain curve in axial loading. Behavior is assumed identical in tension and compression. See Figure 5.4.7-2
Tube spacing distance TSD (41-50) (F10.0) (inches)
Spacing distance between tubes, center line to centerline. Default = 48.0 in.
The centerline spacing distance is used to reduce the effective axial stiffnesses and bending stiffness of the combined concrete and tube cross section. See Figure 5.4.7-2
Print code NONLIN (51-55) (I5) (integer)
Special code to print out an iteration trace of the combined CONTUBE model: = 0, No action. = 1, An iteration trace of key variables is output. Default = 0
As a general rule, it is recommended to use the default option, NONLIN =0. Choosing NONLIN = 1 is useful if the CONTUBE model does not converge. This will produce a trace printout of the combined concrete and tube cross-section properties for each iteration of each load step. By inspecting the key properties (PA* = current area, PI* = current moment of inertia, and y* = current neutral axis) one can deduce which elements are not converging and to what degree.
If LRFD = 0, the B-lines are complete for this group. Go to C-1 or A-2 for another group. Otherwise if LRFD = 1, proceed to line B4

Chapter 5 – Detailed CANDE input CANDE-2017 User Manual and Guideline
5-99
Figure 5.4.7-2 Tube linear stress-strain model with Young’s modulus PTE
Figure 5.4.7-3 Spacing distance between concrete-filled tubes.
Stress
Strain
PTE
-PTFY
PTFY

Chapter 5 – Detailed CANDE input CANDE-2017 User Manual and Guideline
5-100
5.4.7.4 B-4 - Resistance factors for LRFD evaluation B-4. CONTUBE Resistance factors for LRFD limit states.
Use if
Comments
A-2.PTYPE = ‘CONTUBE’ and A-1.LRFD = 1
• Line B-4 is only input if LRFD is set to 1 on line A-1. • If LRFD = 0, skip line B-4. • Default resistance factors are consistent with AASHTO.
Parameter (columns) (format) (units)
Input Options (Default)
Description
Tube failure factor PHI(1) (01-10) (F10.0) (--)
Resistance factor for tube axial strength (Default = 0.9)
Factored tube stress capacity = PHI(1) x PTFY (f y )
Concrete crush factor PHI (2) (11-20) (F10.0) (--)
Resistance factor for concrete crushing strength (Default = 0.75)
Factored concrete crushing stress resistance = PHI(2) x PFPC (f c ’)
Shear failure factor PHI (3) (21-30) (F10.0) (--)
Resistance factor for combined concrete and tube shear strength (Default = 0.75)
Factored shear strength resistance =
PHI(3) x {VFACTOR* cf ' )*(Area of uncracked Concrete) + PTFV*(Area of tube)}
Allowable crack width ALCW (31-40) (F10.0) (inches)
Allowable crack width for service load (Default = 0.01inch)
Allowable crack width for service limit loading. CANDE will approximate the crack width at service loading by dividing each increment of maximum tensile strain by the load factor.
Comment. The above resistance factors are multiplied by the corresponding resistances (capacities) and are printed out by CANDE along with the corresponding factored responses (demands), along with the ratios of factored-demand divided factored-capacity. The ratios should be less than 1.0 for safe performance. If LRFD = 0, line B-4 is not input, however, the working stress evaluation follows the same design criteria listed above in terms of safety factors. This completes the current B-set input. Go to Part C (or return to line A-2 if more pipe groups need to be defined). End of CONTUBE input instructions
Chapter 5 – Detailed CANDE input CANDE-2017 User Manual and Guideline
5-101
5.5 Part C - Solution Levels This section provides input instructions for the chosen solution level. The solution level input is specified in command A-1 (see Section 5.3.1 A-1 – Master Control Input Data) with further selection for level 2 options specified in command A-2 (see 5.3.2 A-2 –Pipe Selection). Based on this input, go to one of the following sections:
• Solution Level 1 • Solution Level 2 – Pipe • Solution Level 2 – Box • Solution Level 2 – Arch • Solution Level 3

Chapter 5 – Detailed CANDE input CANDE-2017 User Manual and Guideline
5-102
5.5.1 Solution Level 1
5.5.1.1 C-1 – Level 1 – Major Input Parameters C-1.L1 Major input parameters
Use if Comments
A-1.LEVEL = 1 Use ONLY if the ‘Solution Level’ is set to 1.
Parameter
(columns) (format) (units)
Input Options Description
Average diameter of pipe (PDIA) (01-10) (F10.0) (inches)
Average diameter of pipe No Default
PDIA = (OD + ID)/2, average diameter from mid wall to mid wall. This applies to all circular pipe types in deep burial installations. See Figure 5.5-1 as a conceptual illustration of the boundary value problem.
Soil density of backfill material (SDEN) (11-20) (F10.0) (lb/ft3)
Soil density of backfill material No default
Average density of soil placed over the pipe. A typical range of soil density is 100 to 140 pcf. CANDE uses soil density to assign increments of overburden pressure to the pipe-soil system.
Number of load steps (NINC) (21-25) (I5) (integer)
Number of soil lifts (load steps) Default = 1
NINC permits the placement of up to 10 intermediate layers of soil up to the final soil cover height above the crown. This, in turn, will permit the change of soil stiffness properties as a function of the current fill height in line C-2.
Pipe-soil interface (ISLIP) (26-30) (I5) (integer)
Code to specify the pipe-soil interface bonding = 0, fully bonded (no slip) =1, frictionless (full slip) Default = 0
Level 1, based on the Burns and Richard elasticity solutions, permits the selection of two pipe-soil interface conditions. For ISLIP = 0, the interface is fully bonded so that both normal and shear forces are transmitted across the interface. For ISLIP = 1, the interface is frictionless so that only normal forces are transmitted across the interface. It is generally recommended to use ISLIP = 0 to be conservative in assessing pipe distress.
Comment: Level 1 is based on the Burns and Richard elasticity solution for a deeply buried circular pipe in an ideal homogenous soil system wherein the fill height above the crown is at least 2 pipe diameters. See

Chapter 5 – Detailed CANDE input CANDE-2017 User Manual and Guideline
5-103
Figure 5.5-1 as a conceptual illustration of the boundary value problem. Level 1 is not appropriate for shallow covers or simulating concentrated live loads. Although the Burns and Richards solution is based on linear elasticity, CANDE provides a pseudo nonlinear representation in two ways. First, the soil stiffness may change with each load step to reflect the fact that soil tends to get stiffer as the overburden pressure increases. Second, CANDE uses an average of pipe stiffness values around the pipe, which may change from load step to load step, as determined from the nonlinear pipe-type models. Proceed to line C-2 Figure 5.5-1 – Level 1 – Illustration of Level 1 boundary value problem
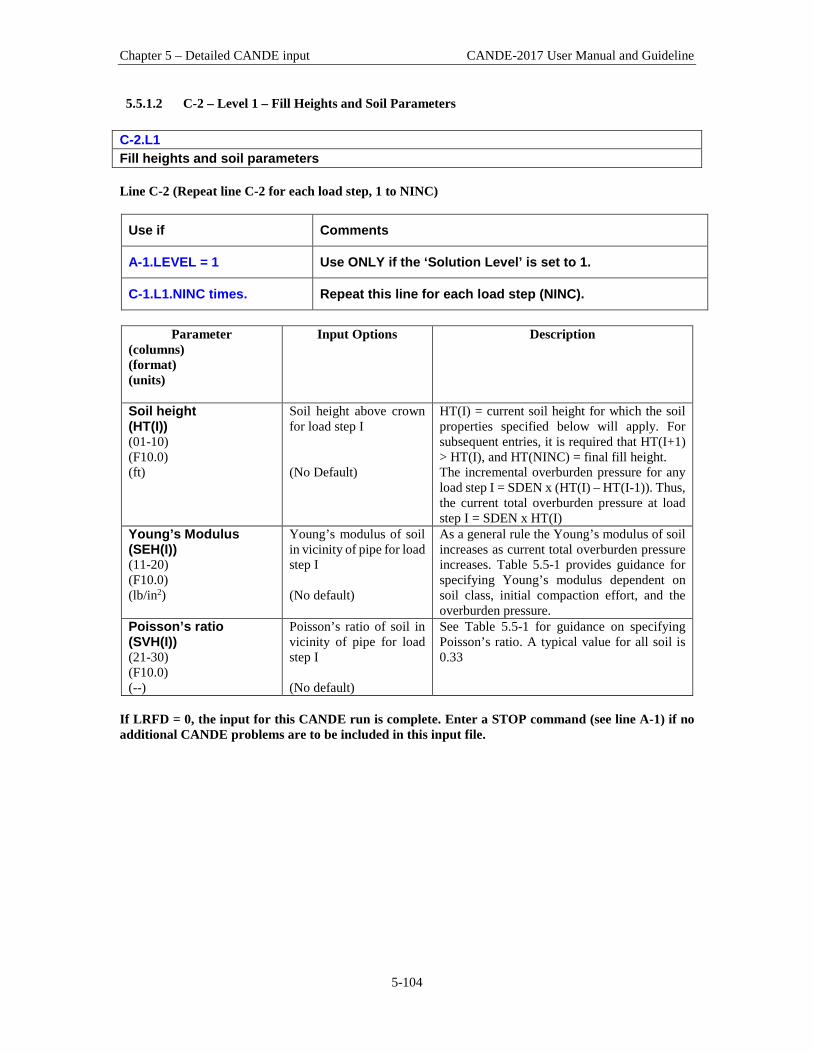
Chapter 5 – Detailed CANDE input CANDE-2017 User Manual and Guideline
5-104
5.5.1.2 C-2 – Level 1 – Fill Heights and Soil Parameters C-2.L1 Fill heights and soil parameters Line C-2 (Repeat line C-2 for each load step, 1 to NINC)
Use if Comments
A-1.LEVEL = 1 Use ONLY if the ‘Solution Level’ is set to 1.
C-1.L1.NINC times. Repeat this line for each load step (NINC).
Parameter
(columns) (format) (units)
Input Options Description
Soil height (HT(I)) (01-10) (F10.0) (ft)
Soil height above crown for load step I (No Default)
HT(I) = current soil height for which the soil properties specified below will apply. For subsequent entries, it is required that HT(I+1) > HT(I), and HT(NINC) = final fill height. The incremental overburden pressure for any load step I = SDEN x (HT(I) – HT(I-1)). Thus, the current total overburden pressure at load step I = SDEN x HT(I)
Young’s Modulus (SEH(I)) (11-20) (F10.0) (lb/in2)
Young’s modulus of soil in vicinity of pipe for load step I (No default)
As a general rule the Young’s modulus of soil increases as current total overburden pressure increases. Table 5.5-1 provides guidance for specifying Young’s modulus dependent on soil class, initial compaction effort, and the overburden pressure.
Poisson’s ratio (SVH(I)) (21-30) (F10.0) (--)
Poisson’s ratio of soil in vicinity of pipe for load step I (No default)
See Table 5.5-1 for guidance on specifying Poisson’s ratio. A typical value for all soil is 0.33
If LRFD = 0, the input for this CANDE run is complete. Enter a STOP command (see line A-1) if no additional CANDE problems are to be included in this input file.

Chapter 5 – Detailed CANDE input CANDE-2017 User Manual and Guideline
5-105
Table 5.5-1 – Level 1 – Conservative values for Young’s soil modulus and Poisson’s ratio Soil Class→ Compaction→
Granular Mixed Cohesive Good Fair Good Fair Good Fair
Overburden Pressure
psi
Young’s Modulus
psi
Young’s Modulus
psi
Young’s Modulus
psi
Young’s Modulus
psi
Young’s Modulus
psi
Young’s Modulus
psi 5 1,100 550 600 400 250 150 10 1,300 750 850 550 325 200 15 1,500 850 1,000 600 375 225 20 1,650 1,000 1,100 700 375 250 25 1,800 1,100 1,200 750 400 250 30 1,900 1,150 1,250 800 400 250 40 2,100 1,300 1,350 900 400 250
50 & above 2,250 1,400 1,450 900 400 250 Poisson’s Ratio (all overburden)
0.30
0.35
0.30
0.38
0.33
0.40
Example use of Table. A pipe is buried under 30 feet of fill, which is classified as a Good Mixed soil weighing 144 lbs/ft3. If this fill height is applied in one load step, then for line C-2 we set HT(1) = 30 feet and compute the overburden as 30x144 = 4320 lbs/ft2 or 30 psi. From the above table, we find Young’s modulus, SEH(1) = 1,250 psi. Thus, we obtain a solution using one load step. Alternatively if applied the fill height in three load steps, we would determine the following input values: Step 1: HT(1) = 10 feet, overburden pressure 10 psi, and SEH(1) = 850 psi. Step 2: HT(2) = 20 feet, overburden pressure 20 psi, and SEH(2) = 1,100 psi. Step 3: HT(3) = 30 feet, overburden pressure 30 psi, and SEH(3) = 1,250 psi. In all cases Poisson’s ratio remains constant for each load step SVH (I) = 0.3

Chapter 5 – Detailed CANDE input CANDE-2017 User Manual and Guideline
5-106
5.5.1.3 C-3 – Level 1 – Load Factors for LRFD C-3.L1 Load factors for LRFD: Repeat line C-3 as needed
Use if Comments
A-1.LEVEL = 1 Use ONLY if the ‘Solution Level’ is set to 1.
C-1.L1.NINC This line must be repeated until load factors for all load steps are defined.
Parameter
(columns) (format) (units)
Input Options Description
Starting load step (INCRS) (01–05) (I5) (integer)
Starting load step number to apply the same load factor Default = 1
INCRS is the load step at which the load factor below will be applied. The first C-3 input must specify INCRS = 1. Subsequent C-3 inputs for INCRS, if needed, must specify INCRS = INCRL(previous) + 1.
Ending load step (INCRL) (06–10) (I5) (integer)
Last load step number to apply the same load factor Default = INCRS
INCRL is the last load step in this sequence of load steps that share the same load factor specified below. When INCRL = NINC, the input of C-3 data is complete.
LRFD load factor (FACTOR) (11–20) (F10.0) (dimensionless)
LRFD load factor applied to the load steps INCRS through INCRL, inclusive Default = 1.00
Based on 2004 AASHTO LRFD specifications maximum load factors for vertical earth pressure on buried pipes are: Rigid pipe (concrete) = 1.30 Flexible pipe (corrugated metal and plastic) = 1.95 Level 1 is not suited for live load simulation.
Comment (COMMENT) (21–60) (A40) (words)
User supplied comments to explain load factor value Default = none
The comment, which can be up to 40 characters in length, is printed out with value FACTOR for each load step. The purpose of the comment is to document the rationale for the load factor value including load modifiers, etc.
Comment: If all load steps are assigned the same load factor, then the C-3 data need only be entered once with INCRS = 1, INCRL = NINC, and the specified FACTOR common to each increment. At the other extreme, if each load step is assigned a different load factor (for whatever reason), then the C-3 would be repeated NINC times. In this case, the first C-3 entry would be INCRS = 1, INCRL = default, and the specified FACTOR for the first load step. The second C-3 entry would be INCRS = 2, INCRL = default, and the specified FACTOR for the second load step, and so on through the last C-3 entry, which would be INCRS = NINC, INCRL = default, and the specified FACTOR for the last load step. Level 1 is only suited for load factors associated with earth loads. See Part E for a discussion on load factors. The input for this CANDE Level 1run is now complete. Enter a STOP command (see line A-1)

Chapter 5 – Detailed CANDE input CANDE-2017 User Manual and Guideline
5-107
5.5.2 Solution Level 2 – Pipe Mesh
5.5.2.1 C-1 – Level 2 – Pipe Mesh – Control Commands and Title C-1.L2.Pipe Control commands and title
Use if Comments
A-1.LEVEL = 2 Use ONLY if the ‘Solution Level’ is set to 2.
A-2.NPCAN = 1 (Pipe Mesh) Use ONLY if the ‘Canned Mesh Code’ is set to 1 (‘Pipe Mesh’).
Parameter
(columns) (format) (units)
Input Options Description
Mesh pattern (WORD) (01-04) (A4) (word)
Name to select mesh pattern for soil = EMBA (embankment) = TREN (trench) = HOMO (homogenous)
Level 2 – Pipe Mesh provides an automatic finite element mesh for a circular or elliptical shaped pipe. The type of soil construction is controlled by the choice for WORD. For WORD = EMBA, an embankment mesh is generated as illustrated in Figure C-Level 2-1. The in-situ soil surface is at pipe’s invert and backfill soil is placed in lifts around and above the pipe. The fill soil’s lateral extent is assumed indefinitely wide. For WORD = TREN, a trench mesh is generated as illustrated in Figure C-Level 2-2. Any trench depth may be specified, measured from the in-situ soil surface to the pipe invert. Similarly, any trench width may be specified. Backfill soil is placed in lifts to fill the trench plus overfill. For WORD = HOMO, an embankment-like mesh is generated, similar to Figure C-Level 2-1, except that all the soil zones (bedding, in-situ soil, fill soil, etc.) are all assigned a common material model. That is, the entire soil system is one homogenous material to be defined by the user. This produces an idealized system similar to Level 1.
Title (TITLE) (05-72) (17A4) (words)
User description of mesh to be printed with output
TITLE is a descriptive phrase up to 68 characters that will be printed with the output to describe the mesh options selected by the user.
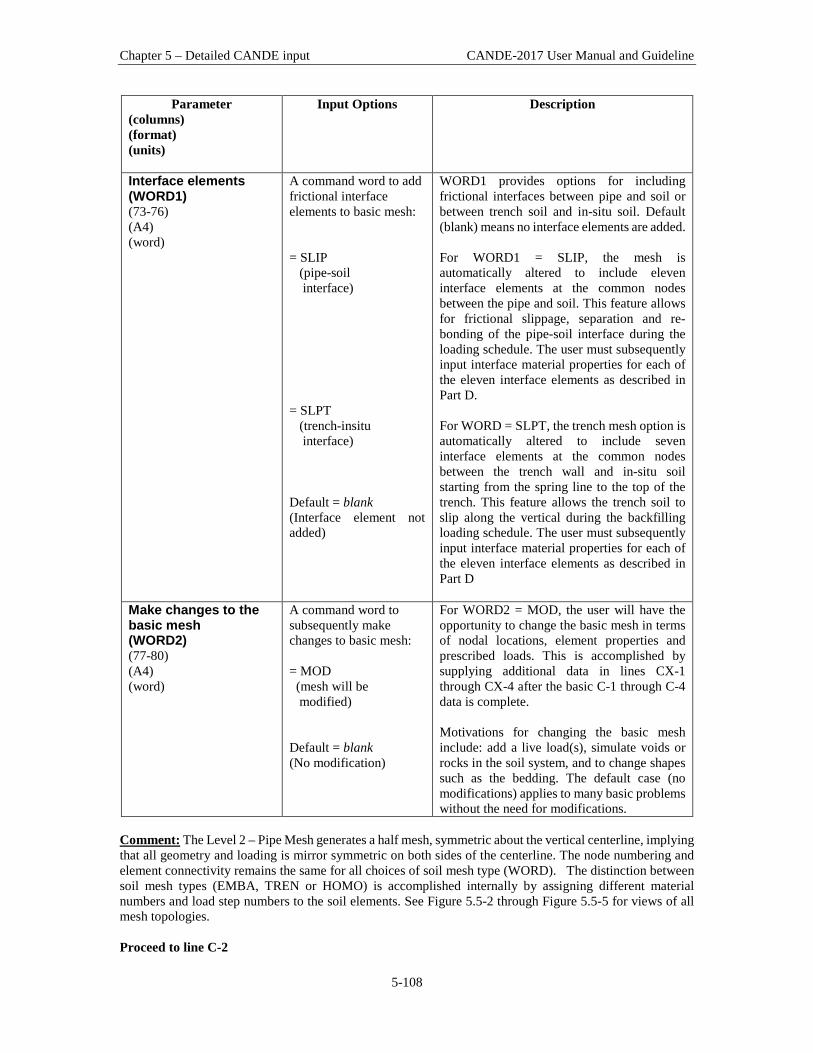
Chapter 5 – Detailed CANDE input CANDE-2017 User Manual and Guideline
5-108
Parameter (columns) (format) (units)
Input Options Description
Interface elements (WORD1) (73-76) (A4) (word)
A command word to add frictional interface elements to basic mesh: = SLIP (pipe-soil interface) = SLPT (trench-insitu interface) Default = blank (Interface element not added)
WORD1 provides options for including frictional interfaces between pipe and soil or between trench soil and in-situ soil. Default (blank) means no interface elements are added. For WORD1 = SLIP, the mesh is automatically altered to include eleven interface elements at the common nodes between the pipe and soil. This feature allows for frictional slippage, separation and re-bonding of the pipe-soil interface during the loading schedule. The user must subsequently input interface material properties for each of the eleven interface elements as described in Part D. For WORD = SLPT, the trench mesh option is automatically altered to include seven interface elements at the common nodes between the trench wall and in-situ soil starting from the spring line to the top of the trench. This feature allows the trench soil to slip along the vertical during the backfilling loading schedule. The user must subsequently input interface material properties for each of the eleven interface elements as described in Part D
Make changes to the basic mesh (WORD2) (77-80) (A4) (word)
A command word to subsequently make changes to basic mesh: = MOD (mesh will be modified) Default = blank (No modification)
For WORD2 = MOD, the user will have the opportunity to change the basic mesh in terms of nodal locations, element properties and prescribed loads. This is accomplished by supplying additional data in lines CX-1 through CX-4 after the basic C-1 through C-4 data is complete. Motivations for changing the basic mesh include: add a live load(s), simulate voids or rocks in the soil system, and to change shapes such as the bedding. The default case (no modifications) applies to many basic problems without the need for modifications.
Comment: The Level 2 – Pipe Mesh generates a half mesh, symmetric about the vertical centerline, implying that all geometry and loading is mirror symmetric on both sides of the centerline. The node numbering and element connectivity remains the same for all choices of soil mesh type (WORD). The distinction between soil mesh types (EMBA, TREN or HOMO) is accomplished internally by assigning different material numbers and load step numbers to the soil elements. See Figure 5.5-2 through Figure 5.5-5 for views of all mesh topologies. Proceed to line C-2

Chapter 5 – Detailed CANDE input CANDE-2017 User Manual and Guideline
5-109

Chapter 5 – Detailed CANDE input CANDE-2017 User Manual and Guideline
5-110
5.5.2.2 C-2 – Level 2 – Pipe Mesh – Major Geometry and Loading Parameters C-2.L2.Pipe Major geometry and loading parameters
Use if Comments
A-1.LEVEL = 2 Use ONLY if the ‘Solution Level’ is set to 2.
A-2.NPCAN = 1 (Pipe Mesh) Use ONLY if the ‘Canned Mesh Code’ is set to 1 (‘Pipe Mesh’).
Parameter
(columns) (format) (units)
Input Options Description
Average vertical diameter of pipe (PDIA) (01-10) (F10.0) (inches)
Average vertical diameter of pipe No Default
PDIA = is the average diameter from mid wall of crown to mid wall of invert. This measure is also used to compute % vertical deflection.
Ratio of horizontal -to- vertical diameter (RDIA) (11-20) (F10.0) (--)
Ratio of horizontal -to- vertical diameter: = 1.0, circle > 1.0, h-ellipse < 1.0, v-ellipse Default = 1.0
The default value, RDIA = 1.0, defines a perfect circle with mid-depth diameter = PDIA. The horizontal distance from mid-wall spring line to mid-wall spring line = RDIA*PDIA. This produces a horizontal ellipse if RDIA > 1 or a vertical ellipse if RDIA< 1.

Chapter 5 – Detailed CANDE input CANDE-2017 User Manual and Guideline
5-111
Parameter (columns) (format) (units)
Input Options Description
Height of soil cover (HTCOVR) (21-30) (F10.0) (feet)
Height of soil cover as measured from: (1) Spring line for embankment mesh, or (2) From top of trench for trench mesh
HTCOVR is defined differently for the embankment mesh (WORD1 = EMBA or HOMO) than it is for the trench mesh (WORD1 = TREN). For the embankment mesh, HTCOVR is the total fill height above the spring line level of the pipe in which the default minimum is HTCOVR= 0.5*PDIA + 3.0*TPAC. The default minimum coincides with the mesh’s minimum uniform surface height. At the other extreme, if HTCOVR > 2.0*PDIA, the mesh surface will be truncated at the surface height of 2.0*PDIA and the remaining soil weight will be automatically applied as increments of overburden pressure for the remaining load steps. For the trench mesh, HTCOVR is the additional height of over-fill soil above the top of the trench. In this case the default minimum = 0.0 ft. On the other hand, if the combined trench height plus over-fill height is > 2.0*PDIA, the mesh surface will be truncated at the surface height of 2.0*PDIA and the remaining soil weight will be applied as increments of overburden pressure for the remaining load steps.
Density of soil above truncated mesh (DENSTY) (31-40) (F10.0) (lb/ft3)
DENSTY of soil above truncated mesh. Default = 0.0 pcf
When the mesh is truncated at 2*PDIA above the spring line, the subsequent soil loading is simulated by increments of overburden pressure = (height-increment)*DENSTY. Typically, the user should set DENSTY = soil density defined in Part D.
Comment: See Figure 5.5-2 through Figure 5.5-5 for view of all mesh topologies and illustration of soil height definitions for embankment and trench meshes. When interface elements are added to the mesh see Table 5.5-2 and Table 5.5-3 to see the changes in the nodal numbering scheme. Proceed to line C-3
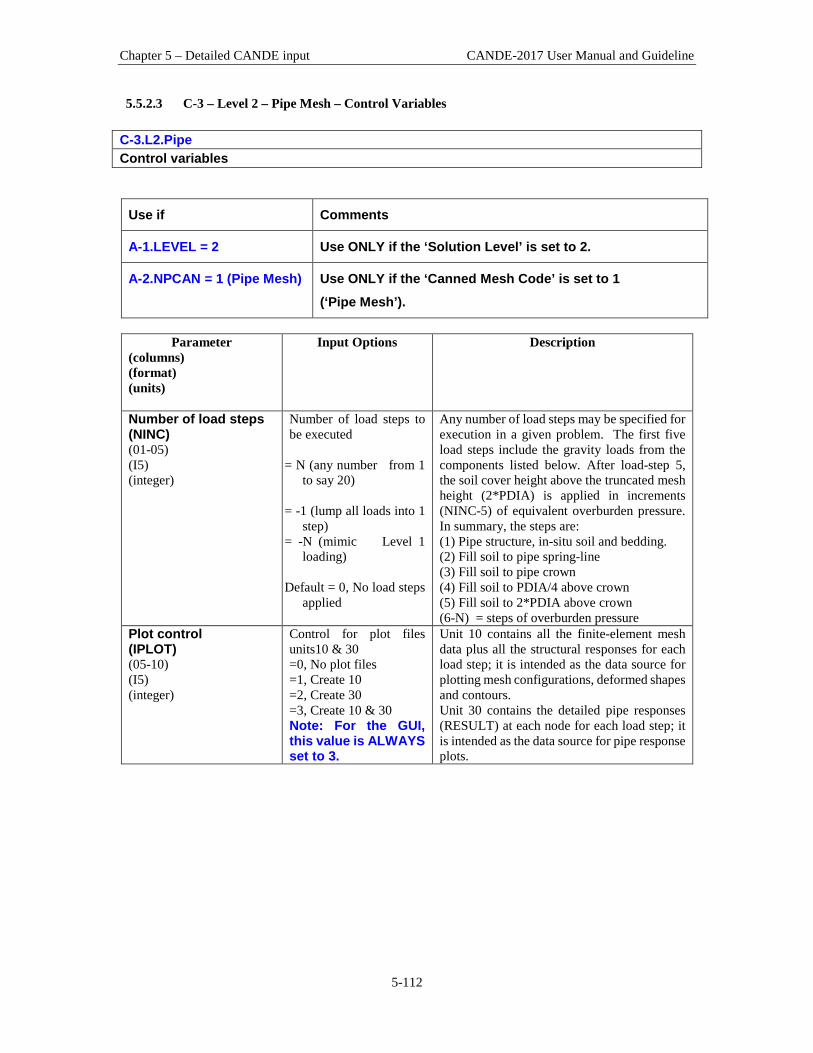
Chapter 5 – Detailed CANDE input CANDE-2017 User Manual and Guideline
5-112
5.5.2.3 C-3 – Level 2 – Pipe Mesh – Control Variables C-3.L2.Pipe Control variables
Use if Comments
A-1.LEVEL = 2 Use ONLY if the ‘Solution Level’ is set to 2.
A-2.NPCAN = 1 (Pipe Mesh) Use ONLY if the ‘Canned Mesh Code’ is set to 1 (‘Pipe Mesh’).
Parameter
(columns) (format) (units)
Input Options Description
Number of load steps (NINC) (01-05) (I5) (integer)
Number of load steps to be executed
= N (any number from 1 to say 20)
= -1 (lump all loads into 1
step) = -N (mimic Level 1
loading) Default = 0, No load steps
applied
Any number of load steps may be specified for execution in a given problem. The first five load steps include the gravity loads from the components listed below. After load-step 5, the soil cover height above the truncated mesh height (2*PDIA) is applied in increments (NINC-5) of equivalent overburden pressure. In summary, the steps are: (1) Pipe structure, in-situ soil and bedding. (2) Fill soil to pipe spring-line (3) Fill soil to pipe crown (4) Fill soil to PDIA/4 above crown (5) Fill soil to 2*PDIA above crown (6-N) = steps of overburden pressure
Plot control (IPLOT) (05-10) (I5) (integer)
Control for plot files units10 & 30 =0, No plot files =1, Create 10 =2, Create 30 =3, Create 10 & 30 Note: For the GUI, this value is ALWAYS set to 3.
Unit 10 contains all the finite-element mesh data plus all the structural responses for each load step; it is intended as the data source for plotting mesh configurations, deformed shapes and contours. Unit 30 contains the detailed pipe responses (RESULT) at each node for each load step; it is intended as the data source for pipe response plots.
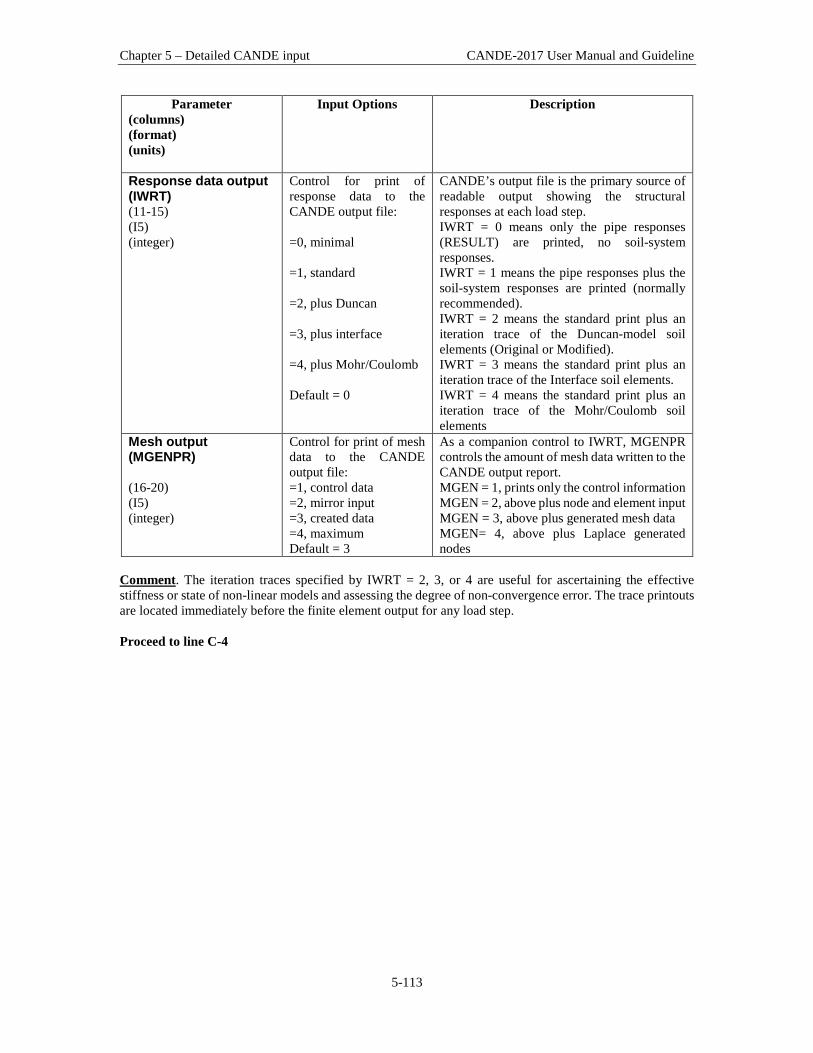
Chapter 5 – Detailed CANDE input CANDE-2017 User Manual and Guideline
5-113
Parameter (columns) (format) (units)
Input Options Description
Response data output (IWRT) (11-15) (I5) (integer)
Control for print of response data to the CANDE output file: =0, minimal =1, standard =2, plus Duncan =3, plus interface =4, plus Mohr/Coulomb Default = 0
CANDE’s output file is the primary source of readable output showing the structural responses at each load step. IWRT = 0 means only the pipe responses (RESULT) are printed, no soil-system responses. IWRT = 1 means the pipe responses plus the soil-system responses are printed (normally recommended). IWRT = 2 means the standard print plus an iteration trace of the Duncan-model soil elements (Original or Modified). IWRT = 3 means the standard print plus an iteration trace of the Interface soil elements. IWRT = 4 means the standard print plus an iteration trace of the Mohr/Coulomb soil elements
Mesh output (MGENPR) (16-20) (I5) (integer)
Control for print of mesh data to the CANDE output file: =1, control data =2, mirror input =3, created data =4, maximum Default = 3
As a companion control to IWRT, MGENPR controls the amount of mesh data written to the CANDE output report. MGEN = 1, prints only the control information MGEN = 2, above plus node and element input MGEN = 3, above plus generated mesh data MGEN= 4, above plus Laplace generated nodes
Comment. The iteration traces specified by IWRT = 2, 3, or 4 are useful for ascertaining the effective stiffness or state of non-linear models and assessing the degree of non-convergence error. The trace printouts are located immediately before the finite element output for any load step. Proceed to line C-4

Chapter 5 – Detailed CANDE input CANDE-2017 User Manual and Guideline
5-114
5.5.2.4 C-4 – Level 2 – Pipe Mesh – Embankment/Trench Mesh Dimensions C-4.L2.Pipe Embankment/Trench mesh dimensions
Use if Comments
A-1.LEVEL = 2 Use ONLY if the ‘Solution Level’ is set to 2.
A-2.NPCAN = 1 (Pipe Mesh) Use ONLY if the ‘Canned Mesh Code’ is set to 1 (‘Pipe Mesh’).
Parameter
(columns) (format) (units)
Input Options Description
Number of backpacking elements (NUMPEL) (01-05) (I5,5X) (integer)
Number of backpacking elements: = N, choose up to 10 elements (N = 1 to 10) This feature only applies for the embankment mesh (WORD = EMBA). Default = 0
Backpacking is a soft material like polystyrene foam placed over the pipe’s periphery, starting at the crown, to induce positive soil arching. If N = 1, then first soil element immediately above the crown (an 18-degree segment on either side of crown) will be assigned to backpacking material instead of fill soil. Similarly, if N= 2, then two sequential elements will be assigned backpacking properties, and so on until N = 10 which means a complete backpacking ring surrounds the pipe. Default implies no backpacking will be used.
Thickness of backpacking (TPAC) (11-20) (F10.0) (inches)
Thickness of backpacking This feature only applies for the embankment mesh (WORD = EMBA) and NUMPEL>0. Default = PDIA/12 inches
All NUMPEL backpacking elements will be assigned the same thickness. Minimum thickness is TPAC = PDIA/16 and maximum thickness is TPAC = 3*PDIA/16.
Trench depth (TRNDEP) (21-30) (F10.0) (feet)
Trench depth This entry only applies to the trench mesh (WORD = TREN). Default = PDIA/4 feet
The trench depth, specified in feet, is the distance from the pipe invert to the trench surface. The trench depth is automatically scaled up to the nearest quarter diameter depth. Thus, the actual mesh trench depths are 0.25, 0.50. 0.75, 1.00, 1.25 times the diameter. For trench depths above 1.25 diameters, the additional trench fill soil (material zone 4) is modeled as equivalent overburden pressure applied to the truncated mesh.
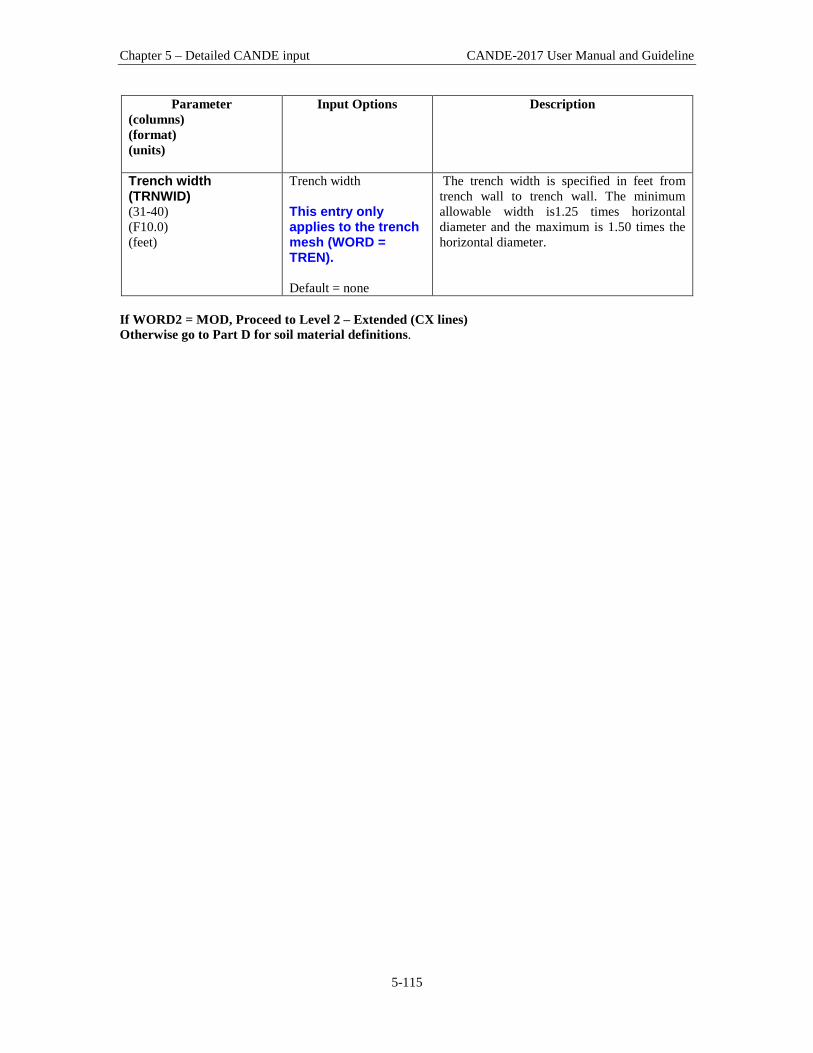
Chapter 5 – Detailed CANDE input CANDE-2017 User Manual and Guideline
5-115
Parameter (columns) (format) (units)
Input Options Description
Trench width (TRNWID) (31-40) (F10.0) (feet)
Trench width This entry only applies to the trench mesh (WORD = TREN). Default = none
The trench width is specified in feet from trench wall to trench wall. The minimum allowable width is1.25 times horizontal diameter and the maximum is 1.50 times the horizontal diameter.
If WORD2 = MOD, Proceed to Level 2 – Extended (CX lines) Otherwise go to Part D for soil material definitions.

Chapter 5 – Detailed CANDE input CANDE-2017 User Manual and Guideline
5-116
Figure 5.5-2 – Level 2-Pipe-Embankment/Homogeneous mesh with load steps and materials

Chapter 5 – Detailed CANDE input CANDE-2017 User Manual and Guideline
5-117
Figure 5.5-3 – Level 2-Pipe-Trench mesh with load steps and material zones
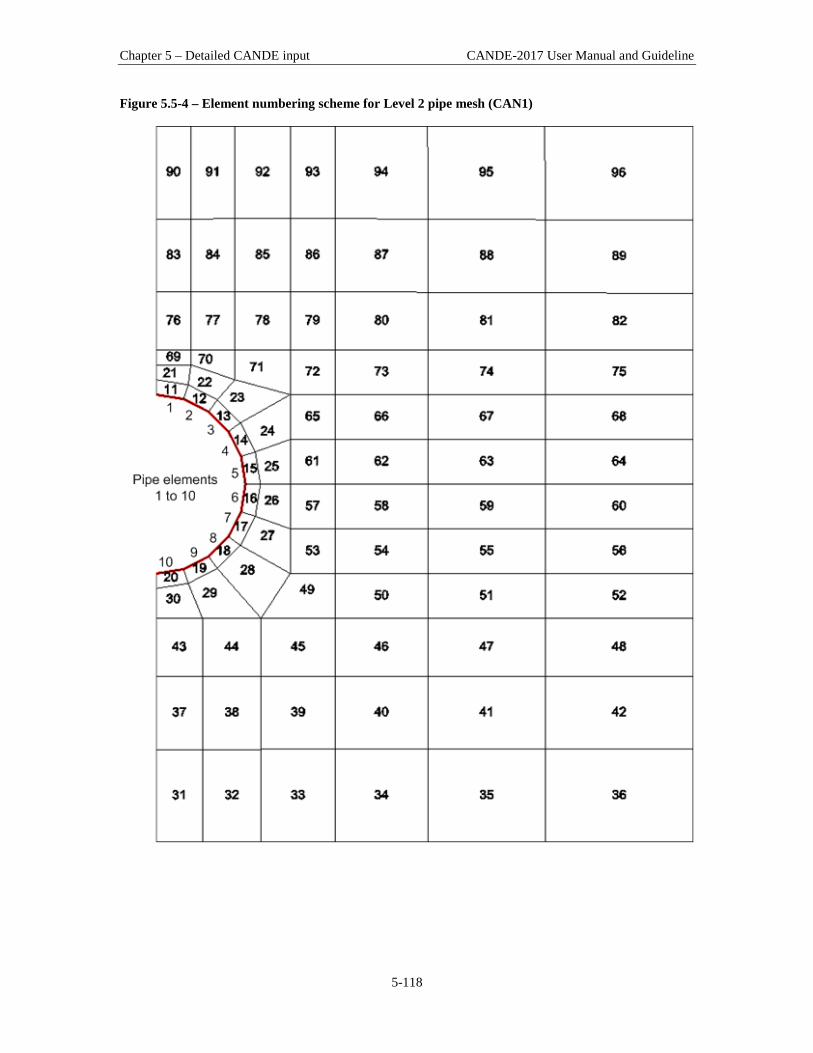
Chapter 5 – Detailed CANDE input CANDE-2017 User Manual and Guideline
5-118
Figure 5.5-4 – Element numbering scheme for Level 2 pipe mesh (CAN1)

Chapter 5 – Detailed CANDE input CANDE-2017 User Manual and Guideline
5-119
Figure 5.5-5 – Nodal numbering scheme for Level 2 Pipe Mesh, (embankment and trench)

Chapter 5 – Detailed CANDE input CANDE-2017 User Manual and Guideline
5-120
Table 5.5-2 – Level 2 Pipe– Node renumbering scheme for pipe-soil interface elements.
Basic Scheme Nodes(2)
Pipe & Soil
Scheme Node(1)
Basic
Scheme Nodes(2)
Pipe & Soil
Scheme Nodes(1)
1 1 50 62
2 2 51 63
. . . .
. . . .
37 37 55 67
38 38, 40, 39 56 68, 70, 69
39 41, 43, 42 57 71, 73, 72
40 44, 46, 45 58 74, 76, 75
41 47, 49, 49 59 77, 79, 78
42 50, 52, 51 60 80, 82, 81
43 53 61 83
44 54 62 84
. . . .
. . . .
48 58 . .
49 59, 61, 60 110 132
Notes:
(1) Instead of one node at the pipe-soil interface locations, three nodes are defined at the same location to from the interface element. For every node triplet above (a, b, c),
a = pipe node IX(1) b = soil node IX(2) c = “free node” IX(3)
(2) The eleven interface elements are numbered 97 through 107, beginning at the invert and continuing counterclockwise to the crown.

Chapter 5 – Detailed CANDE input CANDE-2017 User Manual and Guideline
5-121
Table 5.5-3 – Level 2 Pipe – Node renumbering scheme interface elements along trench wall.
Basic Scheme Nodes(2)
Trench Wall Slip
Scheme Node(1)
Basic
Scheme Nodes(2)
Trench Wall Slip
Scheme Nodes(1)
1 1 89 97
2 2 90 98,100,99
. . 91 101
50 50 . .
51 51,53,52 97 107
52 54 98 108,110,109
. . 99 111
61 63 . .
62 64,66,65 105 117
63 67 106 118,120,119
. . 107 121
70 74 108 122
71 75,77,76 109 123
72 78 110 124
. . .
81 87
82 88,90,89
83 91
Notes:
(1) Instead of one node at the trench wall interface, three nodes are defined at seven locations on the trench wall to form seven interface elements. For every node triplet above (a, b, c),
a = pipe node IX(1) b = soil node IX(2) c = “free node” IX(3)
(2) The seven interface elements are numbered 97 through 103, beginning near the trench bottom and increasing to the trench top.

Chapter 5 – Detailed CANDE input CANDE-2017 User Manual and Guideline
5-122
5.5.3 Solution Level 2 – Box Mesh
5.5.3.1 C-1 – Level 2 – Box Mesh – Control Commands and Title C-1.L2.Box Control commands and title
Use if Comments
A-1.LEVEL = 2 Use ONLY if the ‘Solution Level’ is set to 2.
A-2.NPCAN = 2 (Box Mesh) Use ONLY if the ‘Canned Mesh Code’ is set to 2 (‘Box Mesh’).
Parameter
(columns) (format) (units)
Input Options Description
Mesh Pattern (WORD) (01-04) (A4) (word)
Name to select mesh pattern for soil = EMBA (embankment) = TREN (trench)
Level 2 – Box Mesh provides an automatic finite element mesh for a rectangular shaped culvert. The type of soil construction is controlled by the choice for WORD. For WORD = EMBA, an embankment mesh is generated as illustrated in Figure 5.5-6. The in-situ soil surface is at pipe’s invert and backfill soil is placed in lifts alongside and above the culvert. The fill soil’s lateral extent is assumed indefinitely wide. For WORD = TREN, a trench mesh is generated as illustrated in Figure 5.5-7. Any trench depth may be specified, measured from the in-situ soil surface to the box invert. Similarly, any trench width may be specified. Backfill soil is placed in lifts to fill the trench plus overfill.
Title (TITLE) (05-72) (17A4) (words)
User description of mesh printed with output
TITLE is a descriptive phrase up to 68 characters that will be printed with the output to describe the mesh options selected by the user.
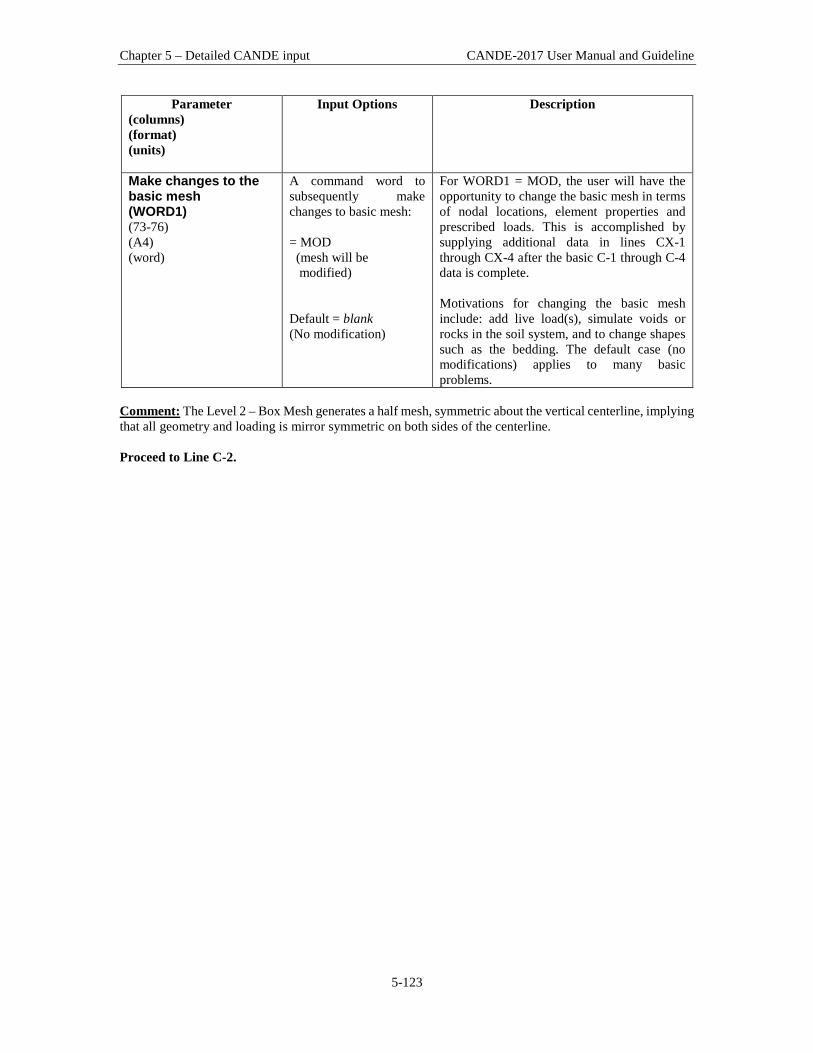
Chapter 5 – Detailed CANDE input CANDE-2017 User Manual and Guideline
5-123
Parameter (columns) (format) (units)
Input Options Description
Make changes to the basic mesh (WORD1) (73-76) (A4) (word)
A command word to subsequently make changes to basic mesh: = MOD (mesh will be modified) Default = blank (No modification)
For WORD1 = MOD, the user will have the opportunity to change the basic mesh in terms of nodal locations, element properties and prescribed loads. This is accomplished by supplying additional data in lines CX-1 through CX-4 after the basic C-1 through C-4 data is complete. Motivations for changing the basic mesh include: add live load(s), simulate voids or rocks in the soil system, and to change shapes such as the bedding. The default case (no modifications) applies to many basic problems.
Comment: The Level 2 – Box Mesh generates a half mesh, symmetric about the vertical centerline, implying that all geometry and loading is mirror symmetric on both sides of the centerline. Proceed to Line C-2.

Chapter 5 – Detailed CANDE input CANDE-2017 User Manual and Guideline
5-124
5.5.3.2 C-2 – Level 2 – Box Mesh – Control Variables/Installation Dimensions C-2.L2.Box Control variables/installation dimensions
Use if Comments
A-1.LEVEL = 2 Use ONLY if the ‘Solution Level’ is set to 2.
A-2.NPCAN = 2 (Box Mesh) Use ONLY if the ‘Canned Mesh Code’ is set to 2 (‘Box Mesh’).
Parameter
(columns) (format) (units)
Input Options Description
Plot control (IPLOT) (01-05) (I5) (integer)
Control for plot files units10 & 30 =0, No plot files =1, Create 10 =2, Create 30 =3, Create 10 & 30 Note: For the GUI, this value is ALWAYS set to 3.
Unit 10 contains all the finite-element mesh data plus all the structural responses for each load step; it is intended as the data source for plotting mesh configurations, deformed shapes and contours. Unit 30 contains the detailed pipe responses (RESULT) at each node for each load step; it is intended as the data source for pipe response plots.
Response data output (IWRT) (06-10) (I5) (integer)
Control for print of response data to the CANDE output file: =0, minimal =1, standard =2, plus Duncan =3, plus interface =4, Mohr/Coulomb
CANDE’s output file is the primary source of readable output showing the structural responses at each load step. IWRT = 0 means only the pipe responses (RESULT) are printed, no soil-system responses. IWRT = 1 means the pipe responses plus the soil-system responses are printed (recommended). IWRT = 2 means the standard print plus an iteration trace of the Duncan-model soil elements. IWRT = 3 means the standard print plus an iteration trace of the Interface soil elements. IWRT = 4 means the standard print plus an iteration trace of the Mohr/Coulomb elements
Mesh output (MGENPR) (11-15) (I5) (integer)
Control for print of mesh data to the CANDE output file: =1, control data =2, mirror input =3, created data =4, maximum Default = 3
As a companion control to IWRT, MGENPR controls the amount of mesh data written to the CANDE output file. MGEN = 1, prints only the control information MGEN = 2, above plus node and element input MGEN = 3, above plus generated mesh data MGEN= 4, above plus Laplace generated nodes

Chapter 5 – Detailed CANDE input CANDE-2017 User Manual and Guideline
5-125
Parameter (columns) (format) (units)
Input Options Description
Number of load steps (NINC) (16-20) (I5) (integer)
Number of load steps to be executed = N (positive number) = -1 (signal to lump all loads into one step) = 0, No load steps are processed. Default = none
Any number load steps may be specified for execution in a given problem. The first nine load steps include the gravity loads from the components listed below followed by increments of overburden pressure for soil height increments above 3*R2. In summary the load steps are: (1) Box structure, in-situ soil and bedding. (2) Fill soil to 1/3 of box rise (3) Fill soil to 2/3 of box rise (4) Fill soil to level of box height (5-9) Cover soil increments up to 3*R2 (10-N) Increments of overburden pressure
One half of horizontal span (R1) (21-30) (F10.0) (inches)
One half of horizontal span Default = none
R1 is the box dimension in the horizontal direction from the centerline of the box to the mid-depth of the sidewall. See Figure 5.5-6.
One half of vertical rise (R2) (31-40) (F10.0) (inches)
One half of vertical rise Default = none
R2 is the one-half the vertical distance from the mid-depth of the bottom slab to mid-depth of the top slab. See Figure 5.5-6.
Height of soil cover above box. (HTCOVR) (41-50) (F10.0) (feet)
Height of soil cover above box. Default = none
HTCOVR is the actual height of soil placed on top of the box; it is defined the same for trench and embankment installations. If HTCOVR is specified greater than 3*R2, the mesh’s top boundary is truncated at 3*R2 and the remaining fill soil is placed in equivalent increments of overburden pressure.
Density of soil above truncated mesh (DENSTY) (51-60) (F10.0) (lb/ft3)
Density of soil above truncated mesh. Default = 0.0 pcf
When the soil mesh is truncated at 3*R2 above the box surface, the subsequent soil loading is simulated by increments of overburden pressure = (height-increment)*DENSTY. Typically, the user should set DENSTY = soil density in Part D.
Trench Gap (TRWID) (61-70) (F10.0) (feet)
Trench gap Note: This is only required if the ‘Mesh Pattern (WORD) = TREN’ Default = none
This entry only applies to the trench mesh (WORD = TREN). TRWID is the distance in feet from mid-depth of the box’s sidewall to trench wall. The minimum allowable gap width is 0.1*R1. If TRWID is greater than 4.0*R1 the trench installation becomes an embankment installation.

Chapter 5 – Detailed CANDE input CANDE-2017 User Manual and Guideline
5-126
Parameter (columns) (format) (units)
Input Options Description
Bedding depth (BDEPTH) (71-80) (F10.0) (inches)
Bedding depth Default = 12 inch
This entry applies to both the embankment and trench mesh. BDEPTH is the thickness of the bedding placed uniformly beneath the bottom slab and extending 0.25*R1 beyond the sidewalls.
Comment. The iteration traces specified by IWRT = 2, 3, or 4 are useful for ascertaining the effective stiffness or state of non-linear models and assessing the degree of non-convergence error. If WORD1 = MOD, Proceed to Level 2 – Extended (CX lines) Otherwise go to Part D for soil material definitions.

Chapter 5 – Detailed CANDE input CANDE-2017 User Manual and Guideline
5-127
Figure 5.5-6 – Level 2 Box – Embankment mesh with load steps and material zones.

Chapter 5 – Detailed CANDE input CANDE-2017 User Manual and Guideline
5-128
Figure 5.5-7 – Level 2 Box – Trench mesh with construction increments and material zones.

Chapter 5 – Detailed CANDE input CANDE-2017 User Manual and Guideline
5-129
Figure 5.5-8 – Level 2 Box – Element numbering scheme for box mesh for embankment and trench

Chapter 5 – Detailed CANDE input CANDE-2017 User Manual and Guideline
5-130
Figure 5.5-9 – Level 2 Box – Nodal numbering scheme for box mesh for embankment and trench

Chapter 5 – Detailed CANDE input CANDE-2017 User Manual and Guideline
5-131
5.5.4 Solution Level 2 – Arch Mesh
5.5.4.1 C-1 – Level 2 – Arch Mesh – Control Commands and Title C-1.L2.Arch Control commands and title
Use if Comments
A-1.LEVEL = 2 Use ONLY if the ‘Solution Level’ is set to 2.
A-2.NPCAN = 3 (Arch Mesh) Use ONLY if the ‘Canned Mesh Code’ is set to 3 (‘Arch Mesh’).
Parameter
(columns) (format) (units)
Input Options Description
Mesh Pattern (WORD) (01-04) (A4) (word)
Name to select mesh pattern for soil = EMBA (embankment) = TREN (trench) = HOMO (homogenous)
Level 2 – Arch Mesh provides an automatic finite element mesh for arch-shaped or 3-sided box culverts. Shapes are defined with 2 or 3 curved (or straight) segments defining half of the symmetrical arch or box. The type of soil construction is controlled by the choice for WORD: For WORD = EMBA, an embankment mesh is generated as illustrated in Figure 5.5-10. The in-situ soil surface is level with arch footing and backfill soil is placed in lifts around and above the arch. The fill soil’s lateral extent is assumed indefinitely wide. For WORD = TREN, a trench mesh is generated as illustrated in Figure 5.5-11. Any trench depth may be specified, measured from the in-situ soil surface to the arch footing. Similarly, any trench width may be specified. Backfill soil is placed in lifts to fill the trench plus overfill. For WORD = HOMO, an embankment-like mesh is generated, similar to the embankment mesh, except that all the soil zones (footing, fill soil, etc.) are all assigned a common material model. That is, the entire soil system is one homogenous material to be defined by the user.
Title (TITLE) (05-72) (17A4) (words)
User description of mesh to be printed with output
TITLE is a descriptive phrase up to 68 characters that will be printed with the output to describe the mesh options selected by the user.

Chapter 5 – Detailed CANDE input CANDE-2017 User Manual and Guideline
5-132
Parameter (columns) (format) (units)
Input Options Description
Make changes to the basic mesh (WORD2) (73-76) (A4) (word)
A command word to subsequently make changes to basic mesh: = MOD (mesh will be modified) Default = blank (No modification)
For WORD2 = MOD, the user will have the opportunity to change the basic mesh in terms of nodal locations, element properties and prescribed loads. This is accomplished by supplying additional data in lines CX-1 through CX-4 after the basic C-1 through C-4 data is complete. Motivations for changing the basic mesh include: add a live load(s), simulate voids or rocks in the soil system, and to change shapes such as the bedding. The default case (no modifications) applies to many basic problems without the need for modifications.
Comments: Like all Level 2 options, the arch mesh is assumed symmetrical about the vertical centerline so that only one half of the system is modeled with finite elements. The automated subroutine generates all nodal points and elements to define the arch, in-situ soil, footing, backfill soil and interface elements between the arch and backfill soil. The number of elements used to define the soil over the arch is dependent on the specified soil cover height above the crown. A maximum number of elements (269 total) are used for soil cover heights greater or equal to the arch rise. For cover heights greater than 1.5 times the arch rise, the mesh surface is truncated at this level and equivalent increments of overburden pressure are applied to account for the remaining cover height, if any. Interface elements are always generated with the arch mesh so that the user must define the interface properties in Part D. There are 19 interface elements starting at the crown node and proceeding clockwise around the arch to node 19, the second to the last node before the connection to the footing. The last arch node, number 20, connected to the footing is not assigned an interface element since relative slippage is restrained by the footing. To simulate a fully bonded condition between the arch and backfill soil, the user may prescribe arbitrarily large values for the coefficient of friction and tensile breaking force in Part D or assign frictional properties as desired. See Table 5.5-4 and Table 5.5-5 for a listing of interface elements. Proceed to line C-2
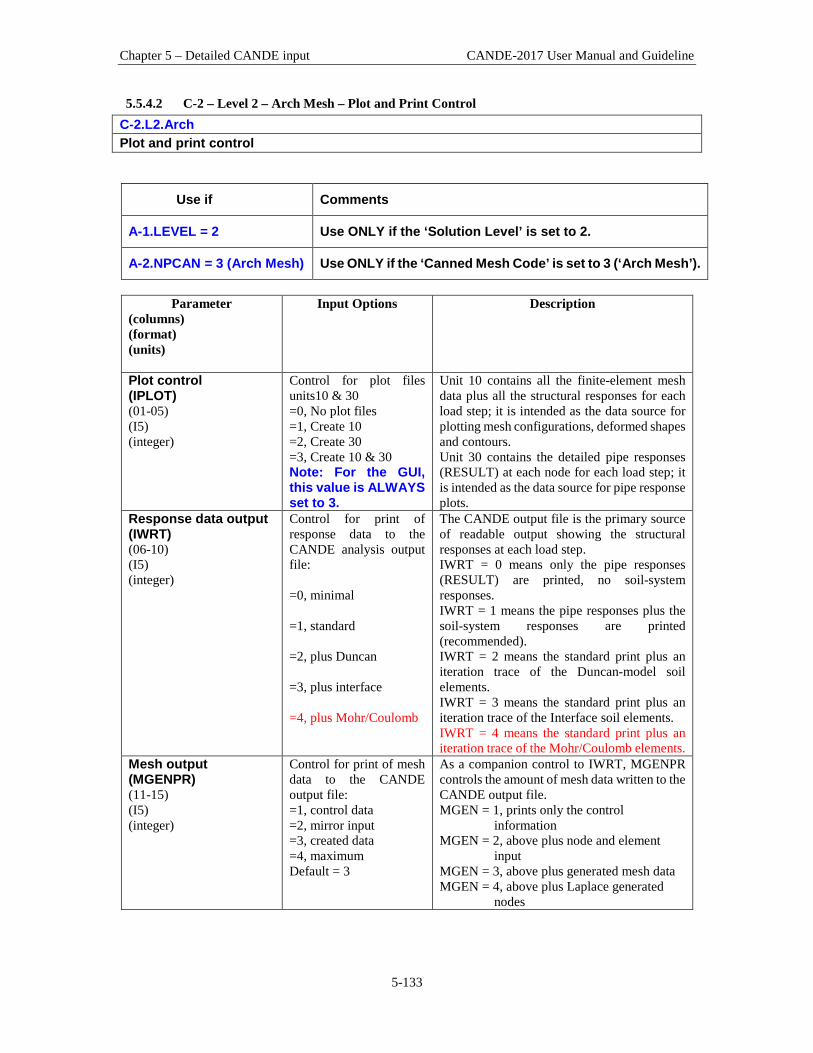
Chapter 5 – Detailed CANDE input CANDE-2017 User Manual and Guideline
5-133
5.5.4.2 C-2 – Level 2 – Arch Mesh – Plot and Print Control C-2.L2.Arch Plot and print control
Use if Comments
A-1.LEVEL = 2 Use ONLY if the ‘Solution Level’ is set to 2.
A-2.NPCAN = 3 (Arch Mesh) Use ONLY if the ‘Canned Mesh Code’ is set to 3 (‘Arch Mesh’).
Parameter
(columns) (format) (units)
Input Options Description
Plot control (IPLOT) (01-05) (I5) (integer)
Control for plot files units10 & 30 =0, No plot files =1, Create 10 =2, Create 30 =3, Create 10 & 30 Note: For the GUI, this value is ALWAYS set to 3.
Unit 10 contains all the finite-element mesh data plus all the structural responses for each load step; it is intended as the data source for plotting mesh configurations, deformed shapes and contours. Unit 30 contains the detailed pipe responses (RESULT) at each node for each load step; it is intended as the data source for pipe response plots.
Response data output (IWRT) (06-10) (I5) (integer)
Control for print of response data to the CANDE analysis output file: =0, minimal =1, standard =2, plus Duncan =3, plus interface =4, plus Mohr/Coulomb
The CANDE output file is the primary source of readable output showing the structural responses at each load step. IWRT = 0 means only the pipe responses (RESULT) are printed, no soil-system responses. IWRT = 1 means the pipe responses plus the soil-system responses are printed (recommended). IWRT = 2 means the standard print plus an iteration trace of the Duncan-model soil elements. IWRT = 3 means the standard print plus an iteration trace of the Interface soil elements. IWRT = 4 means the standard print plus an iteration trace of the Mohr/Coulomb elements.
Mesh output (MGENPR) (11-15) (I5) (integer)
Control for print of mesh data to the CANDE output file: =1, control data =2, mirror input =3, created data =4, maximum Default = 3
As a companion control to IWRT, MGENPR controls the amount of mesh data written to the CANDE output file. MGEN = 1, prints only the control
information MGEN = 2, above plus node and element
input MGEN = 3, above plus generated mesh data MGEN = 4, above plus Laplace generated
nodes
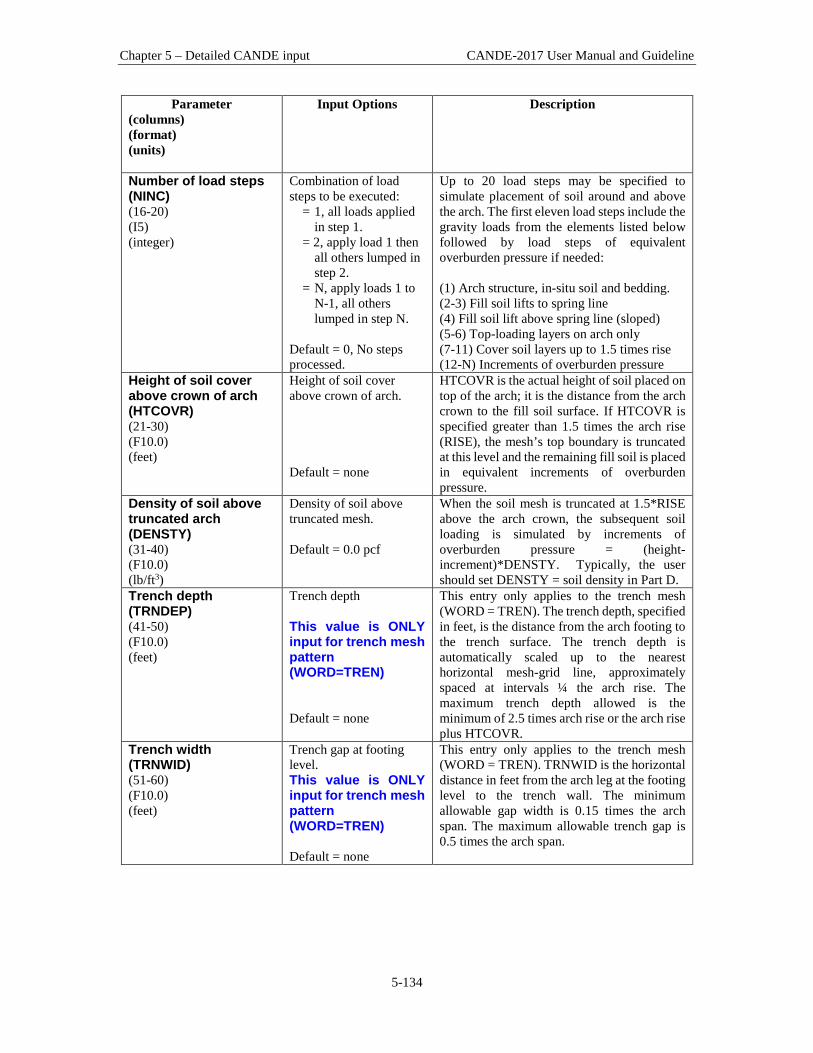
Chapter 5 – Detailed CANDE input CANDE-2017 User Manual and Guideline
5-134
Parameter (columns) (format) (units)
Input Options Description
Number of load steps (NINC) (16-20) (I5) (integer)
Combination of load steps to be executed:
= 1, all loads applied in step 1.
= 2, apply load 1 then all others lumped in step 2.
= N, apply loads 1 to N-1, all others lumped in step N.
Default = 0, No steps processed.
Up to 20 load steps may be specified to simulate placement of soil around and above the arch. The first eleven load steps include the gravity loads from the elements listed below followed by load steps of equivalent overburden pressure if needed: (1) Arch structure, in-situ soil and bedding. (2-3) Fill soil lifts to spring line (4) Fill soil lift above spring line (sloped) (5-6) Top-loading layers on arch only (7-11) Cover soil layers up to 1.5 times rise (12-N) Increments of overburden pressure
Height of soil cover above crown of arch (HTCOVR) (21-30) (F10.0) (feet)
Height of soil cover above crown of arch. Default = none
HTCOVR is the actual height of soil placed on top of the arch; it is the distance from the arch crown to the fill soil surface. If HTCOVR is specified greater than 1.5 times the arch rise (RISE), the mesh’s top boundary is truncated at this level and the remaining fill soil is placed in equivalent increments of overburden pressure.
Density of soil above truncated arch (DENSTY) (31-40) (F10.0) (lb/ft3)
Density of soil above truncated mesh. Default = 0.0 pcf
When the soil mesh is truncated at 1.5*RISE above the arch crown, the subsequent soil loading is simulated by increments of overburden pressure = (height-increment)*DENSTY. Typically, the user should set DENSTY = soil density in Part D.
Trench depth (TRNDEP) (41-50) (F10.0) (feet)
Trench depth This value is ONLY input for trench mesh pattern (WORD=TREN) Default = none
This entry only applies to the trench mesh (WORD = TREN). The trench depth, specified in feet, is the distance from the arch footing to the trench surface. The trench depth is automatically scaled up to the nearest horizontal mesh-grid line, approximately spaced at intervals ¼ the arch rise. The maximum trench depth allowed is the minimum of 2.5 times arch rise or the arch rise plus HTCOVR.
Trench width (TRNWID) (51-60) (F10.0) (feet)
Trench gap at footing level. This value is ONLY input for trench mesh pattern (WORD=TREN) Default = none
This entry only applies to the trench mesh (WORD = TREN). TRNWID is the horizontal distance in feet from the arch leg at the footing level to the trench wall. The minimum allowable gap width is 0.15 times the arch span. The maximum allowable trench gap is 0.5 times the arch span.
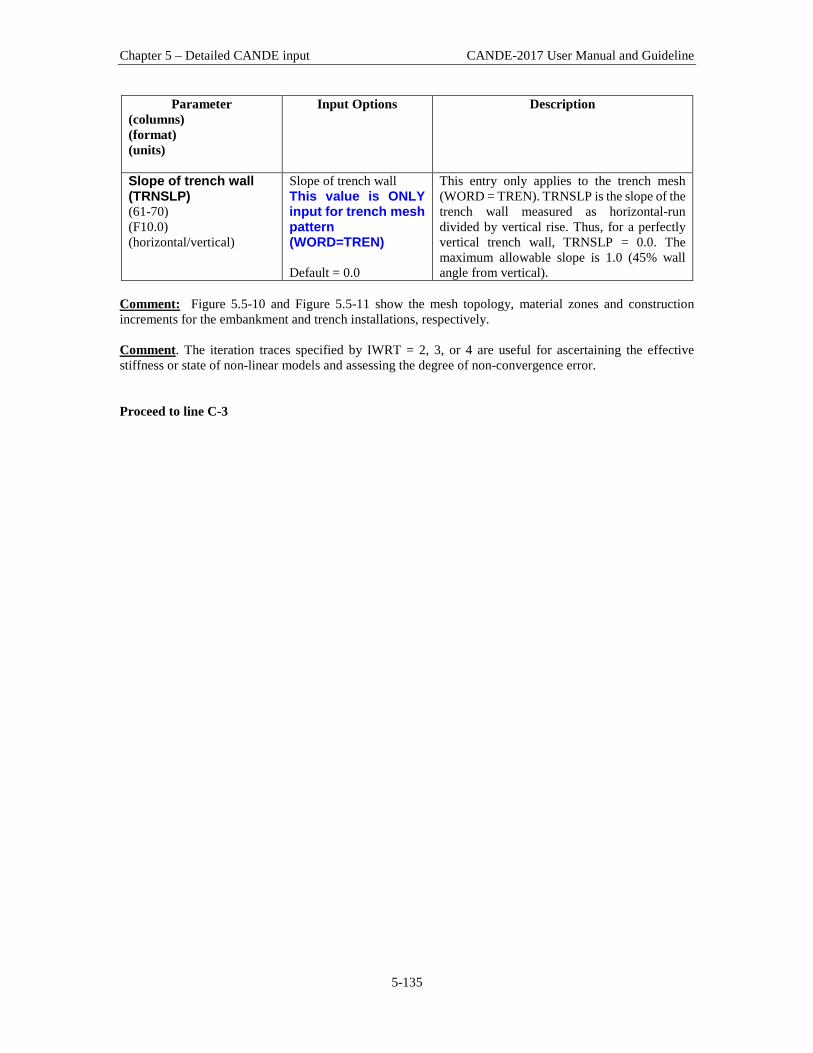
Chapter 5 – Detailed CANDE input CANDE-2017 User Manual and Guideline
5-135
Parameter (columns) (format) (units)
Input Options Description
Slope of trench wall (TRNSLP) (61-70) (F10.0) (horizontal/vertical)
Slope of trench wall This value is ONLY input for trench mesh pattern (WORD=TREN) Default = 0.0
This entry only applies to the trench mesh (WORD = TREN). TRNSLP is the slope of the trench wall measured as horizontal-run divided by vertical rise. Thus, for a perfectly vertical trench wall, TRNSLP = 0.0. The maximum allowable slope is 1.0 (45% wall angle from vertical).
Comment: Figure 5.5-10 and Figure 5.5-11 show the mesh topology, material zones and construction increments for the embankment and trench installations, respectively. Comment. The iteration traces specified by IWRT = 2, 3, or 4 are useful for ascertaining the effective stiffness or state of non-linear models and assessing the degree of non-convergence error. Proceed to line C-3

Chapter 5 – Detailed CANDE input CANDE-2017 User Manual and Guideline
5-136
5.5.4.3 C-3 – Level 2 – Arch Mesh – Arch and Footing Dimensions C-3.L2.Arch Arch and footing dimensions
Use if Comments
A-1.LEVEL = 2 Use ONLY if the ‘Solution Level’ is set to 2.
A-2.NPCAN = 3 (Arch Mesh) Use ONLY if the ‘Canned Mesh Code’ is set to 3 (‘Arch Mesh’).
Parameter
(columns) (format) (units)
Input Options Description
Total rise of arch structure (RISE) (01-10) (F10.0) (inches)
Total rise of arch structure Default = none
RISE is the vertical distance in inches from the footing level to the crown location. This applies to all arch shapes (including 2- and 3-segment arches with curved or straight line segments)
One-half of arch span at footing level (HFSPAN) (11-20) (F10.0) (inches)
One-half of arch span at footing level Default = none
HFSPAN is the horizontal distance in inches from the arch centerline to the arch leg connection at the footing. This applies to all arch shapes.
Vertical rise of side segment (SDRISE) (21-30) (F10.0) (inches)
Vertical rise of side segment. (3rd segment) Default = 0.0 (2-segments)
A non-zero entry means a 3-segment arch will be generated wherein SDRISE = vertical distance from the footing to the junction point of the side (3rd) segment with the corner (2nd) segment. If SDRISE = 0.0, a 2-segment arch will be constructed. See Figure 5.5-10 through Figure 5.5-13.
Footing depth (FTDEP) (31-40) (F10.0) (inches)
Footing depth (thickness) Default = none
The footing depth is the vertical thickness of concrete slab supporting the arch leg. In order to control the aspect ratio of the footing elements, the minimum and maximum values are: FTDEP(minimum) = 0.05*RISE FTDEP(maximum) = 0.30*RISE
Outside footing width (FTWIDO) (41-50) (F10.0) (inches)
Outside footing width Default = none
FTWIDO is the horizontal length that the footing extends beyond the arch connection point on the exterior side. In order to control the aspect ratio of the mesh elements, the minimum and maximum values are: FTWIDO(minimum)= 0.1*(RISE+HFSPAN) FTWIDO(maximum)= 0.25*(RISE+HFSPAN)
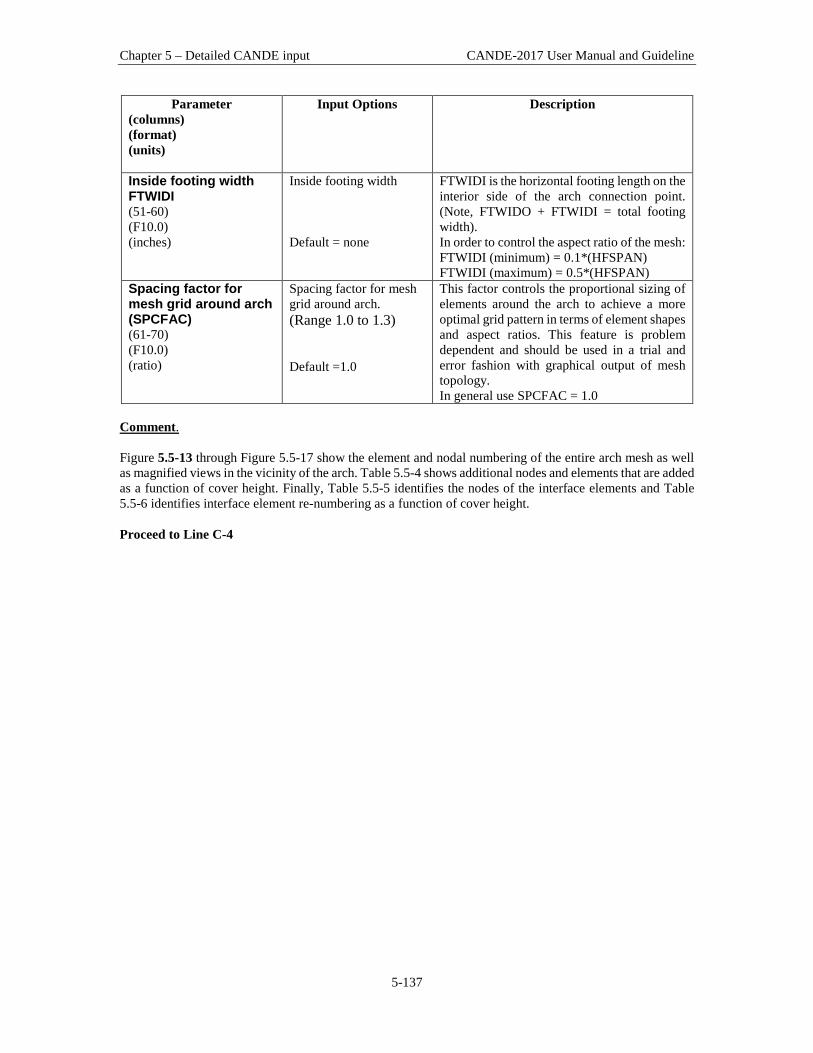
Chapter 5 – Detailed CANDE input CANDE-2017 User Manual and Guideline
5-137
Parameter (columns) (format) (units)
Input Options Description
Inside footing width FTWIDI (51-60) (F10.0) (inches)
Inside footing width Default = none
FTWIDI is the horizontal footing length on the interior side of the arch connection point. (Note, FTWIDO + FTWIDI = total footing width). In order to control the aspect ratio of the mesh: FTWIDI (minimum) = 0.1*(HFSPAN) FTWIDI (maximum) = 0.5*(HFSPAN)
Spacing factor for mesh grid around arch (SPCFAC) (61-70) (F10.0) (ratio)
Spacing factor for mesh grid around arch. (Range 1.0 to 1.3) Default =1.0
This factor controls the proportional sizing of elements around the arch to achieve a more optimal grid pattern in terms of element shapes and aspect ratios. This feature is problem dependent and should be used in a trial and error fashion with graphical output of mesh topology. In general use SPCFAC = 1.0
Comment. Figure 5.5-13 through Figure 5.5-17 show the element and nodal numbering of the entire arch mesh as well as magnified views in the vicinity of the arch. Table 5.5-4 shows additional nodes and elements that are added as a function of cover height. Finally, Table 5.5-5 identifies the nodes of the interface elements and Table 5.5-6 identifies interface element re-numbering as a function of cover height. Proceed to Line C-4
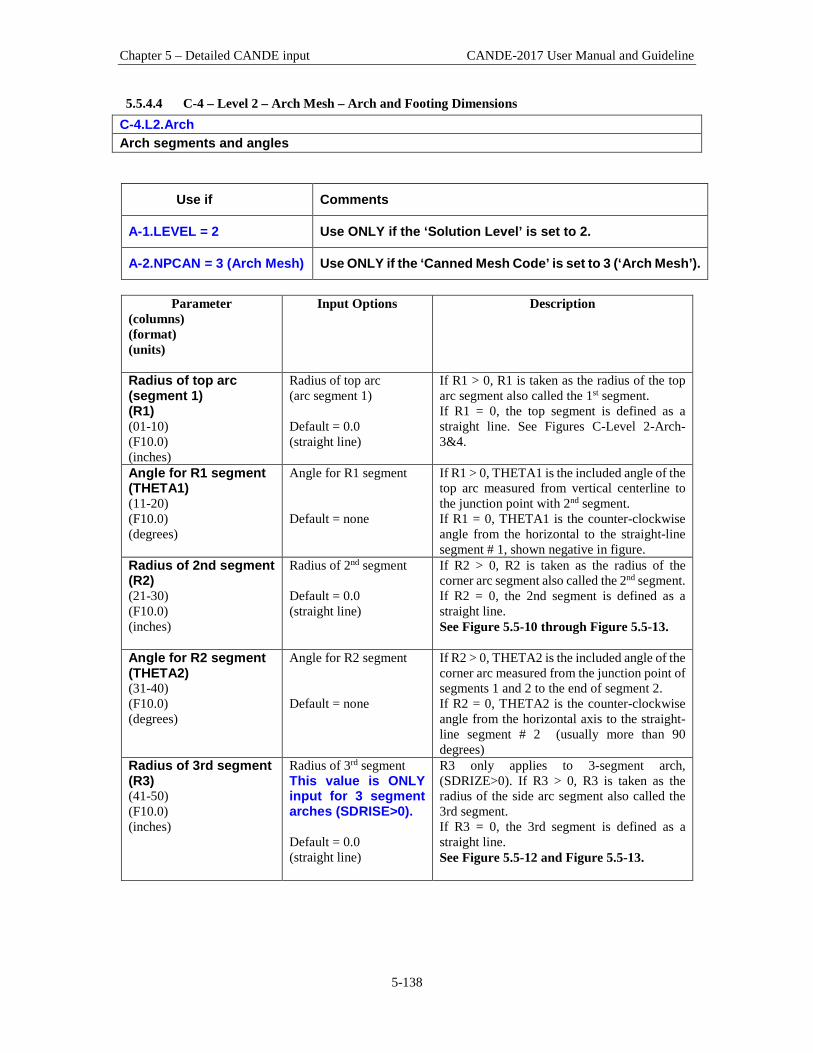
Chapter 5 – Detailed CANDE input CANDE-2017 User Manual and Guideline
5-138
5.5.4.4 C-4 – Level 2 – Arch Mesh – Arch and Footing Dimensions C-4.L2.Arch Arch segments and angles
Use if Comments
A-1.LEVEL = 2 Use ONLY if the ‘Solution Level’ is set to 2.
A-2.NPCAN = 3 (Arch Mesh) Use ONLY if the ‘Canned Mesh Code’ is set to 3 (‘Arch Mesh’).
Parameter
(columns) (format) (units)
Input Options Description
Radius of top arc (segment 1) (R1) (01-10) (F10.0) (inches)
Radius of top arc (arc segment 1) Default = 0.0 (straight line)
If R1 > 0, R1 is taken as the radius of the top arc segment also called the 1st segment. If R1 = 0, the top segment is defined as a straight line. See Figures C-Level 2-Arch- 3&4.
Angle for R1 segment (THETA1) (11-20) (F10.0) (degrees)
Angle for R1 segment Default = none
If R1 > 0, THETA1 is the included angle of the top arc measured from vertical centerline to the junction point with 2nd segment. If R1 = 0, THETA1 is the counter-clockwise angle from the horizontal to the straight-line segment # 1, shown negative in figure.
Radius of 2nd segment (R2) (21-30) (F10.0) (inches)
Radius of 2nd segment Default = 0.0 (straight line)
If R2 > 0, R2 is taken as the radius of the corner arc segment also called the 2nd segment. If R2 = 0, the 2nd segment is defined as a straight line. See Figure 5.5-10 through Figure 5.5-13.
Angle for R2 segment (THETA2) (31-40) (F10.0) (degrees)
Angle for R2 segment Default = none
If R2 > 0, THETA2 is the included angle of the corner arc measured from the junction point of segments 1 and 2 to the end of segment 2. If R2 = 0, THETA2 is the counter-clockwise angle from the horizontal axis to the straight-line segment # 2 (usually more than 90 degrees)
Radius of 3rd segment (R3) (41-50) (F10.0) (inches)
Radius of 3rd segment This value is ONLY input for 3 segment arches (SDRISE>0). Default = 0.0 (straight line)
R3 only applies to 3-segment arch, (SDRIZE>0). If R3 > 0, R3 is taken as the radius of the side arc segment also called the 3rd segment. If R3 = 0, the 3rd segment is defined as a straight line. See Figure 5.5-12 and Figure 5.5-13.

Chapter 5 – Detailed CANDE input CANDE-2017 User Manual and Guideline
5-139
Parameter (columns) (format) (units)
Input Options Description
Angle for R3 segment (THETA3) (51-60) (F10.0) (degrees)
Angle for R3 segment This value is ONLY input for 3 segment arches (SDRISE>0). Default = blank
This only applies to 3-segment arch, SDRIZE>0. If R3 > 0, THETA3 is the included angle of the side arc measured from the junction point of segments 2 and 3 to the end of segment 3. If R3 = 0, THETA3 is the counter-clockwise angle from the horizontal axis to the straight-line segment # 3 (usually at least 90 degrees)
Base angle of R3 segment (THETA4) (61-70) (F10.0) (degrees)
Base angle of R3 segment This value is ONLY input for 3 segment arches (SDRISE>0). Default = blank
This only applies to 3-segment arch (SDRIZE>0) and curved segments (R3 > 0). THETA4 is the base angle defined by the line perpendicular to the end of the 3rd segment and the horizontal footing line. THETA4 may be positive or negative wherein the positive direction is measured counter clockwise from the horizontal. (Note THETA4 is negative for a re-entrant arch such as shown in the figures.)
Nodes assigned to segment 1 (NTN) (71-75) (I5) (integer)
Nodes assigned to segment #1 (top segment) Default = 10 (3-segment arch) Default = 13 (2-segment arch)
The automated Arch Mesh uses a total of 20 Nodes to define all arch shapes and sizes. Node 1 is located at the crown and node numbering proceeds clockwise around the arch with Node 20 assigned to the footing connection. The Arch Mesh assigns 10 or 13 nodes (default values) to the first arc segment depending on whether it is a 3-segment or 2-segment arch, respectively. NTN allows the user to prescribe a better distribution of nodes to the top arch to fit the problem at hand. In general, the goal is to define the distribution of the nodes between the segments to achieve equal uniform lengths between all nodes.
Nodes assigned to segment 2 plus segment 1 (NCN) (76-80) (I5) (integer)
Nodes assigned to segment #2 plus segment #1 (top and corner segments) This value is ONLY input for 3 segment arches (SDRISE>0). Default = 16 (3-segment arch) Default = blank (2-segment arch)
NCN only applies to 3-segment arch, (SDRIZE>0). (Note, the nodal assignment for 2-segment arch is already complete, that is, segment 1 = NTN nodes and segment 2 = 20-NTN nodes). The Arch Mesh assigns NCN =16 nodes (default value) to the first and second arc segments, which means segment 2 is assigned NCN-NTN nodes beyond the common node. NCN allows the user to prescribe a better distribution of nodes to the corner arch segment in order to fit the problem at hand with uniform lengths between nodes. The remaining number of nodes assigned to the 3rd segment is 20-NCN beyond the common node.
If WORD2 = MOD, Proceed to Level 2 – Extended (CX lines) Otherwise proceed to Part D

Chapter 5 – Detailed CANDE input CANDE-2017 User Manual and Guideline
5-140
Figure 5.5-10 – Level 2 Arch – Embankment mesh configuration with load steps and material zones.
Figure 5.5-11 – Level 2 Arch – Trench mesh configuration with load steps and material zones,
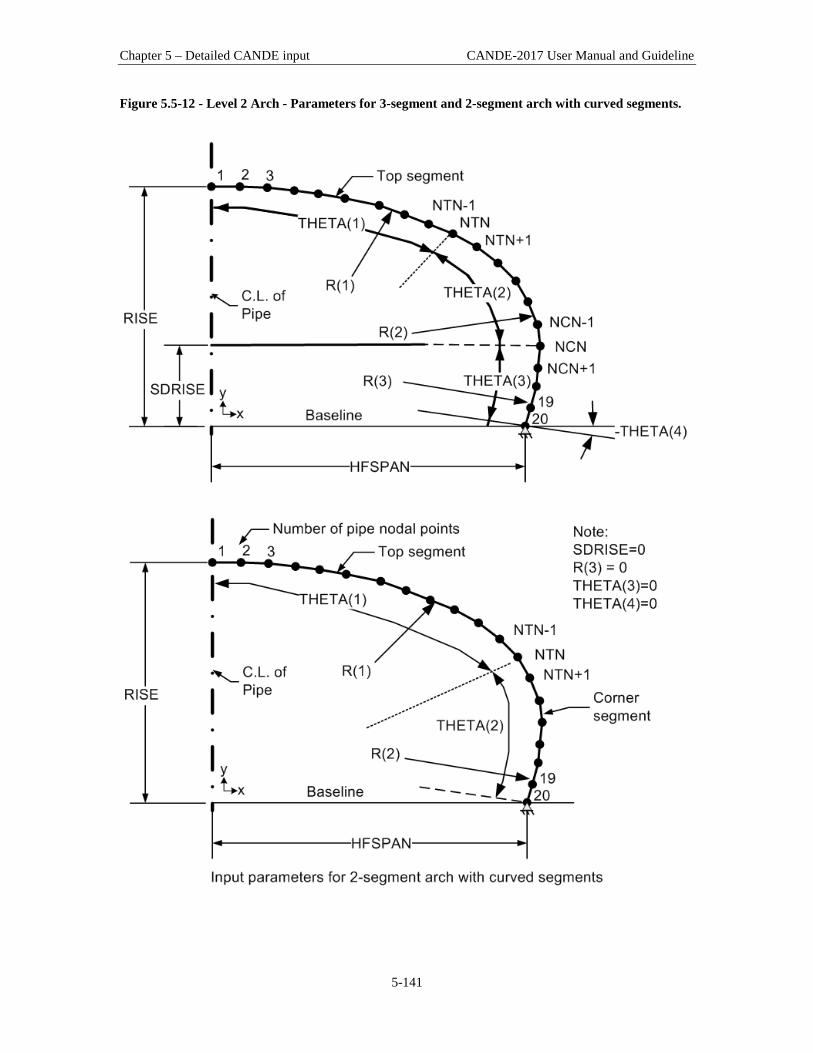
Chapter 5 – Detailed CANDE input CANDE-2017 User Manual and Guideline
5-141
Figure 5.5-12 - Level 2 Arch - Parameters for 3-segment and 2-segment arch with curved segments.

Chapter 5 – Detailed CANDE input CANDE-2017 User Manual and Guideline
5-142
Figure 5.5-13 – Level 2 Arch –Parameters for 3-segment and 2-segment arch with straight segments.

Chapter 5 – Detailed CANDE input CANDE-2017 User Manual and Guideline
5-143
Figure 5.5-14 – Level 2 Arch – Soil element numbering scheme for elements remote from arch.
Figure 5.5-15 – Level 2 Arch – Soil element numbering scheme for elements close to arch.

Chapter 5 – Detailed CANDE input CANDE-2017 User Manual and Guideline
5-144
Figure 5.5-16 – Level 2 Arch – Nodal numbering scheme for soil nodes remote from arch.
Figure 5.5-17 – Level 2 Arch – Nodal numbering scheme for soil nodes close to arch.

Chapter 5 – Detailed CANDE input CANDE-2017 User Manual and Guideline
5-145
Table 5.5-4 – Level 2 Arch – Values for basic arch parameters as a function of height cover. Basic values vs. Height of Cover
(Range of HTCOVR)
Item
≤ 0.4 (rise)
≥ 0.1 (rise)
KCOVER = 0
≤ 0.7 (rise)
> 0.4 (rise)
KCOVER = 1
≤ 1.0 (rise)
> 0.7 (rise)
KCOVER = 2
≤ 1.5 (rise)(1)
> 1.0 (rise)
KCOVER = 3
Basic no. load steps (2)
8
9
10
11
Total nodes (NPT)
244 265 286 307
Total elements (NELEM)
209 229 249 269
Basic no. boundary conditions (NBPTC) (3)
35
37
39
41
Notes:
(1) For HTCOVR > 1.5 (rise) the mesh is truncated at 1.5” (rise) above crown and the remaining soil weigh is added in increments of overburden pressure. The number of increments employed to place overburden pressure = NINC-11.
(2) The total number of load steps. NINC, is user specified where: 1 ≤ NINC ≤ 20.
(3) Increments of overburden pressure increase the total number of boundary conditions to the sum of the basic number plus 21 * (NINC-11).

Chapter 5 – Detailed CANDE input CANDE-2017 User Manual and Guideline
5-146
Table 5.5-5 – Level 2 Arch – Identification of arch and soil nodes for interface elements.
Identification of interface element nodal connectivity
Number of Nodes from
Crown
Pipe-soil Interface Nodes(1)
Number of Nodes from
Crown
Pipe-soil Interface Nodes(1)
1 198,200,199 11 132,143,133
2 194,196,195 12 130,144,131
3 190,192,191 13 128,145,129
4 167,169,168 14 118,120,119
5 164,166,165 15 115,117,116
5 164,166,165 15 115,117,116
.
6 161,163,162 16 109,111,110
7 158,160,159 17 103,105,104
8 138,140,139 18 97,99,98
9 136,141,137 19 91,93,92
10 134,142,135 20 (2)
Notes:
(1) Three nodes define the pipe-soil interface at each pipe node around the arch. For every node triplet above (a, b, c),
a = pipe node IX(1) b = soil node IX(2) c = “free node” IX(3)
(2) Note that position #20, the arch connection into the footing, is not assigned an interface element because it is assumed it cannot slip.

Chapter 5 – Detailed CANDE input CANDE-2017 User Manual and Guideline
5-147
Table 5.5-6 - Level 2 Arch – Identification of interface element numbers versus cover height.
Interface Element Numbers
See Table 5.5-4 for KCOVER definition
Number of Nodes from
Crown
KCOVER=0
KCOVER=1
KCOVER=2
KCOVER=3
1 191 211 231 251
2 192 212 232 252
3 193 213 233 253
4 194 214 234 254
5 195 215 235 255
6 196 216 236 256
7 197 217 237 257
8 198 218 238 258
9 199 219 239 259
10 200 220 240 260
11 201 221 241 261
12 202 222 242 262
13 203 223 243 263
14 204 224 244 264
15 205 225 245 265
16 206 226 246 266
17 207 227 247 267
18 208 228 248 268
19 209 229 249 269
20 . . .
Note: KCOVER is an integer code representing certain ranges of fill height as defined in Table 5.5-4.

Chapter 5 – Detailed CANDE input CANDE-2017 User Manual and Guideline
5-148
5.5.5 Extended Level 2
5.5.5.1 CX-1 – Level 2 Extended – Nodes, Elements and Boundary Condition Changes CX-1 Nodes, elements and boundary condition changes Extended Level 2 allows selective modifications to any Level 2 mesh configurations in order to specify changes in nodal coordinates, changes in element properties, and changes in loading conditions. To effectively use this feature, the user must refer to the relevant Level 2 mesh configuration, which are shown in previous figures, to identify nodes, elements and/or boundary conditions to be changed. Data for Extended Level 2 may only be input if the control word “MOD” was specified on command C-1
Use if Comments
A-1.LEVEL = 2 Use ONLY if the ‘Solution Level’ is set to 2.
C-1.WORD1 = MOD (All three mesh options Pipe, Box or Arch)
Use ONLY if the ‘Make changes to the basic mesh’ parameter is set to MOD.
Parameter
(columns) (format) (units)
Input Options Description
Number of nodes to be changed with new coordinates (NEWXY) (01-05) (I5) (integer)
Number of nodes to be changed with new coordinates Default = 0
Any number of nodes may be chosen to specify new x and y coordinates. Example reasons to change coordinates include modeling variations in the culvert shape (perhaps an imperfection), changing the dimensions of the bedding or footing elements, or altering the location of a live load on the soil surface. Nodes to be changed are defined on line CX-2, which is repeated NEWXY times.
Number of elements to be changed with new properties (NEWEL) (05-10) (I5) (integer)
Number of elements to be changed with new properties Default = 0
Any number of elements may be chosen to specify new element properties. Example motivations to change element properties include changing the load step number and/or changing the material properties of an element or group of elements. Elements to be changed are defined on line CX-3, which is repeated NEWEL times.
Number of new loading/boundary conditions to be added (NEWBD) (11-15) (I5) (integer)
Number of new loading/boundary conditions to be added Default = 0
Any number of new boundary conditions may be added into the loading schedule. The standard Level 2 loading is limited to gravity loads and uniform surface pressure loads. A prime reason for the NEWBD parameter is to permit the user is to add live loads into the loading schedule at any desired location and load step. Loading conditions to be added are defined on line CX-4, which is repeated NEWBD times.
Proceed to line CX-2

Chapter 5 – Detailed CANDE input CANDE-2017 User Manual and Guideline
5-149
5.5.5.2 CX-2 – Level 2 Extended – Nodal Point Number and Changed Coordinates CX-2 Nodal point number and changed coordinates
Use if Comments
A-1.LEVEL = 2 Use ONLY if the ‘Solution Level’ is set to 2.
C-1.WORD1 = MOD (All three mesh options Pipe, Box or Arch)
Use ONLY if the ‘Make changes to the basic mesh’ parameter is set to MOD.
CX-1.NEWXY > 0 Repeat this command for each node that is to be changed with new coordinates. Skip if NEWXY = 0
Parameter
(columns) (format) (units)
Input Options Description
Node number (NP) (01-05) (I5, 5X) (integer)
Node whose coordinates are to be changed Default = none
NP is a node number in one of the automated Level 2 canned meshes that is to be redefined here with new coordinates. The user should identify NP by referring to the figures and charts associated with particular Level 2 mesh configuration that is being revised.
X-Coordinate (XCOORD) (11-20) (F10.0) (inches)
X-coordinate location of node NP Default = none
XCOORD is the x-coordinate value for the node number NP (new or old position). Note that the automatic mesh checking routines in CANDE are by-passed in extended level 2 operations. Therefore, the user must exercise diligence in assigning new coordinates to avoid producing elements that are “badly shaped” or “inside out”.
Y-Coordinate (YCOORD) (21-30) (F10.0) (inches)
Y-coordinate location of node NP Default = none
YCOORD is the y-coordinate value for the node number NP (new or old position). Note that the automatic mesh checking routines in CANDE are by-passed in extended level 2 operations. Therefore, the user must exercise diligence in assigning new coordinates to avoid producing elements that are “badly shaped” or “inside out”.
Comment: The altered node coordinates are recorded in the CANDE output report under the heading Level 2 Extended, after the unaltered canned mesh nodes are printed. Proceed to line CX-3.

Chapter 5 – Detailed CANDE input CANDE-2017 User Manual and Guideline
5-150
5.5.5.3 CX-3 – Level 2 Extended – Element Number and Property Array CX-3 Element number and property array
Use if Comments
A-1.LEVEL = 2 Use ONLY if the ‘Solution Level’ is set to 2.
C-1.WORD1 = MOD (All three mesh options Pipe, Box or Arch)
Use ONLY if the ‘Make changes to the basic mesh’ parameter is set to MOD.
CX-1.NEWEL > 0 Repeat this command for each element that is to be changed with new properties. Skip if NEWEL = 0.
Parameter
(columns) (format) (units)
Input Options Description
Modified element (NE) (01-05) (I5) (integer)
Element whose properties are to be changed Default = none
NE is an element number from an automated Level 2 canned mesh whose property array (integer codes) is to be redefined. Of the six property array integers, the first four are the nodal connectivity, which are rarely revised. The last two property array integers, the material ID number and the load step number are well suited for revision.
Node I (NP(1)) (06-10) (I5) (integer)
Node I of NE’s connectivity Default = blank (no change)
There is little motivation for the user to change the nodal connectivity array of any element. Nonetheless, the option is provided here for expert users wishing to use this option in special circumstances. In general, leave this entry blank.
Node J (NP(2)) (11-15) (I5) (integer)
Node J of NE’s connectivity Default = blank (no change)
There is little motivation for the user to change the nodal connectivity array of any element. Nonetheless, the option is provided here for expert users wishing to use this option in special circumstances. In general, leave this entry blank.
Node K (NP(3)) (16-20) (I5) (integer)
Node K of NE’s connectivity Default = blank (no change)
There is little motivation for the user to change the nodal connectivity array of any element. Nonetheless, the option is provided here for expert users wishing to use this option in special circumstances. In general, leave this entry blank.
Node L (NP(4)) (21-25) (I5) (integer)
Node L of NE’s connectivity Default = blank (no change)
There is little motivation for the user to change the nodal connectivity array of any element. Nonetheless, the option is provided here for expert users wishing to use this option in special circumstances. In general, leave this entry blank.

Chapter 5 – Detailed CANDE input CANDE-2017 User Manual and Guideline
5-151
Parameter (columns) (format) (units)
Input Options Description
Material (NP(5)) (26-30) (I5) (integer)
New material ID number Default = blank (no change)
The material identification number for soil elements may be changed by setting NP(5) equal to any material ID number subsequently defined in Part D. To retain the material ID number assigned in Level 2, leave this entry blank.
Load step (NP(6)) (31-35) (I5) (integer)
New load step number Default = blank (no change)
The load step number (or load step number) of any element may be changed by setting NP(6) equal to the new desired load step number. To retain the original load step, leave blank
Comment: The altered element properties are recorded in the CANDE output report under the heading Level 2 Extended, after the unaltered canned mesh element properties are printed. Proceed to line CX-4

Chapter 5 – Detailed CANDE input CANDE-2017 User Manual and Guideline
5-152
5.5.5.4 CX-4 – Level 2 Extended – Nodal Loads and/or Displacements to be applied CX-4 Nodal loads or displacements to be applied
Use if Comments
A-1.LEVEL = 2 Use ONLY if the ‘Solution Level’ is set to 2.
C-1.WORD1 = MOD (All three mesh options Pipe, Box or Arch)
Use ONLY if the ‘Make changes to the basic mesh’ parameter is set to MOD.
CX-1.NEWBD > 0 Repeat this command for each element that is to be changed with new properties. Skip if NEWBD = 0.
Parameter
(columns) (format) (units)
Input Options Description
Node (NU) (01-05) (I5) (integer)
Node where new loads/displacements are to be applied Default = none
NU is a node number from an automated Level 2 canned mesh whose boundary condition in terms of loads or displacements is to be revised. Note, since Level 2 is based on symmetry any load applied to the right-hand mesh is automatically applied to the mirror side of the mesh. Thus, when applying a vertical point load on the system centerline, the actual load is twice the value of the specified load.
X-Condition (IFLAG(1)) (06-10) (I5) (integer)
Code for x-loading condition: = 0, force specified = 1, disp. specified Default = 0
IFLAG(1) distinguishes whether the loading value in the x-direction (BV(1) next entry) is interpreted as a prescribed force in lbs/inch or a prescribed displacement in inches.
X-Value (BV(1)) (11-20) (F10.0) (lb/inch or inch)
Value of x-loading or x-displacement. Default = 0.0
Depending on IFLAG(1), BV(1) is the x-force that will be applied in load step IA. Or, BV(1) is the x-displacement that will be specified in load step IA.
Y-Condition (IFLAG(2)) (21-25) (I5) (integer)
Code for y-loading condition: = 0, force specified = 1, disp. specified Default = 0
IFLAG(2) distinguishes whether the loading value in the y-direction (BV(2) next entry) is interpreted as a prescribed force in lbs/inch or a prescribed displacement in inches.
Y-Value (BV(2)) (26-35) (F10.0) (lb/inch or inch)
Value of y-loading or y-displacement. Default = 0.0
Depending on IFLAG(2), BV(2) is the y-force that will be applied in load step IA. Or, BV(2) is the y-displacement that will be specified in load step IA. Note that positive values are in the upward direction.
Chapter 5 – Detailed CANDE input CANDE-2017 User Manual and Guideline
5-153
Parameter (columns) (format) (units)
Input Options Description
Angle for skewed boundary input (BV(3)) (36-45) (F10.0) (degrees)
Angle for skewed boundary input. Default = 0.0 deg.
The x and y boundary conditions specified above are re-interpreted to a rotated coordinate system x’ and y’. BV(3) is the counter-clockwise angle from the x-axis to the x’ axis.
Load step (IA) (46-50) (I5) (integer)
Load step number for above loading Default = 1
Force loading conditions are applied only in load step number IA. Displacement loading conditions are applied in load step number IA and remain in effect for all subsequent increments.
Comment: The new boundary conditions are recorded in the CANDE output report under the heading Level 2 Extended, after the original canned mesh boundary conditions are printed. Proceed to Part D

Chapter 5 – Detailed CANDE input CANDE-2017 User Manual and Guideline
5-154
5.5.6 Solution Level 3 Level 3 is the traditional method of defining mesh data for input into a finite element program. Accordingly, the user must prepare finite element mesh data representative of the soil-structure system to be designed or analyzed. Input line C-1 contains words and line C-2 contains control integers that are easily determined and entered into the input stream. Command C-3 is used repeatedly to define all nodal coordinates. Similarly, command C-4 is used repeatedly to define all element properties, and finally command C-5 is used as needed to define all displacement and force boundary conditions. To assist the user, CANDE is equipped with many advanced mesh generation features that can greatly reduce the amount of labor in defining the input data. These features are discussed as they arise in commands C-3 and C-4.
5.5.6.1 C-1 – Level 3 – Prep word and Title C-1.L3 Element number and property array
Use if Comments line C-1
A-1.LEVEL = 3 Use ONLY if the ‘Solution Level’ is set to 3.
Parameter
(columns) (format) (units)
Input Options Description
Preparation (WORD) (01-04) (A4,1X) (word)
A word to denote user defined mesh: = PREP, continue ≠ PREP, stop Default none
The control word PREP is a required word to continue inputting mesh data; otherwise CANDE will stop. For batch input files the word PREP distinguishes the beginning of Level 3 mesh input data. (Note the GUI automatically supplies this word without prompt by the user.)
Title (TITLE) (06-73) (17A4) (17 words)
User description of the mesh to build.
TITLE is printed out with mesh data as an aid to the user. TITLE may be any phrasing up to 68 characters.
Proceed to Line C-2

Chapter 5 – Detailed CANDE input CANDE-2017 User Manual and Guideline
5-155
5.5.6.2 C-2 – Level 3 – Key Control Variables C-2 - Key control variables C-2.L3 Element number and property array
Use if Comments
A-1.LEVEL = 3 Use ONLY if the ‘Solution Level’ is set to 3.
Parameter
(columns) (format) (units)
Input Options Description
Number of load steps (NINC) (01-05) (I5) (integer)
Number of load steps to be executed. Default = 1
Any number of load steps may be specified for execution in a given problem. Typically, the value of NINC matches the highest load step number defined in the element or loading schedule. However, NINC may be less than this number if desired.
Mesh output (MGENPR) (06-10) (I5) (integer)
Control for print of mesh data to the CANDE output file: =1, control data =2, input data =3, created data =4, maximum Default = 3
MGENPR controls the amount of mesh data written to the CANDE output file. MGEN = 1, prints only the control information MGEN = 2, above plus node and element input MGEN = 3, above plus generated mesh data MGEN= 4, above plus Laplace generated nodes
Data check control (NPUTCK) (11-15) (I5) (integer)
Control for data check only or run: = 0, run solution =1, data check only and stop Default = 0
During the course of processing input data, CANDE performs many checks on the validity of the input data. Some errors may be fatal such as an inside-out element other errors may just be a warning such as “skinny” elements. If the user desires to check the validity of the mesh without running the solution, set NPUTCK = 1
Plot file control (IPLOT) (16-20) (I5) (integer)
Control for plot files units10 & 30 =0, No plot files =1, Create 10 =2, Create 30 =3, Create 10 & 30 Note: For the GUI, this value is ALWAYS set to 3.
Unit 10 contains all the finite-element mesh data plus all the structural responses for each load step; it is intended as the data source for plotting mesh configurations, deformed shapes and contours. Unit 30 contains the detailed pipe responses (RESULT) at each node for each load step; it is intended as the data source for pipe response plots.

Chapter 5 – Detailed CANDE input CANDE-2017 User Manual and Guideline
5-156
Parameter (columns) (format) (units)
Input Options Description
Response data output (IWRT) (21-25) (I5) (integer)
Control for print of response data to the CANDE output file: =0, minimal =1, standard =2, plus Duncan =3, plus interface =4, plus Mohr/Coulomb Default = 0 (See Comment #1)
CANDE’s output file is the primary source of readable output showing the structural responses at each load step. IWRT = 0 means only the pipe responses (RESULT) are printed, no soil-system responses. IWRT = 1 means the pipe responses plus the soil-system responses are printed (recommended if no convergence problems). IWRT = 2 means the standard print plus an iteration trace of the Duncan-model soil elements. IWRT = 3 means the standard print plus an iteration trace of the Interface elements. IWRT = 4 means the standard print plus an iteration trace of the Mohr/Coulomb elements.
Total number of nodes (NPT) (26-30) (I5) (integer)
Total number of nodes defined in mesh. Default = none
NPT should correspond to the highest numbered nodal point used in the entire mesh. Note, it is permissible to skip node numbers so that not all sequential numbers correspond to a node used in the mesh. In this case set NPT = highest node number, not the actual node count.
Total number of elements (NELEM) (31-35) (I5) (integer)
Total number of elements defined in mesh. Default = none
NELEM is the sum of all actual elements used in the mesh including beam elements (pipe), continuum elements (soil) and interface elements. Unlike nodes, the element count (NELEM) must exactly match the number of elements actually used in the mesh.
Total number of boundary conditions (NBPTC) (36-40) (I5) (integer)
Total number of boundary conditions for this problem. Default = none
The actual count of boundary conditions is determined from the data in the C-5 input lines. NBPTC may be larger (but not smaller) than the actual number of conditions. Typically, it is recommended to specify NBPTC as some sufficiently large number, say 200. If this number is insufficient, CANDE will provide a message.
Total number of soil materials (NSMAT) (41-45) (I5) (integer)
Total number of soil materials Default = none
NSMAT is the total number of different soil material numbers to be identified in line C-4 with variable IX(5) for quadrilateral and triangular elements. This entry is only used by the GUI for Part D; it may be ignored for batch input.
Total number of interface materials (NXMAT) (46-50) (I5) - integer
Total number of interface materials Default = none
NXMAT is the total number of different interface materials numbers to be identified in line C-4 with variable IX(7) for interface elements. This entry is only used by the GUI for Part D; it may be ignored for batch input.
Chapter 5 – Detailed CANDE input CANDE-2017 User Manual and Guideline
5-157
Parameter (columns) (format) (units)
Input Options Description
Code to minimize bandwidth (MINBW) (51-55) (I5) (integer)
Code for band-width minimizer: = 0, no action = 1, minimize = 2, min and print Default = 0
By setting MINBW > 0, CANDE will internally rearrange the user’s node numbering scheme to minimize the bandwidth of the stiffness matrix. In all cases the output is displayed in the user’s node numbering scheme. If MINBW = 2, the internal renumbering scheme is also displayed.
Command to choose continuous load scaling (Iscale) (56-60) (I5) (integer)
Code for utilizing continuous load scaling: = 0, no action = 1, CLS-EBM = 2, CLS-AAM Default = 0 (See Comment #2)
By setting Iscale = 1 or 2, CANDE will utilize Continuous Load Scaling (CLS) to account for longitudinal load spreading for live loads. It is recommended to select Iscale = 1 which is the Elasticity Based Method (most accurate). Additional input data is required on the new input line C-2b.
Comment #1. The iteration traces specified by IWRT = 2, 3, or 4 are useful for ascertaining the effective stiffness or state of nonlinear models and assessing the degree of non-convergence error. The trace printouts are located immediately before the finite element output for any load step. Comment #2. Katona’s continuous load scaling (CLS) method for live loads is an alternative approach to the traditional method of reducing the applied wheel load to account for load spreading in the out-of-plane direction. CLS is much more accurate than traditional methods. It is recommended to use CLS in conjunction with the Elasticity Based method (CLS-EBM) as it performs better than the Ad hoc AASHTO method (CLS-AAM). All methods are described in detail in CANDE’s Solution Methods and Formulations Manual. When utilizing Katona’s continuous scaling method, the actual wheel service load (or pressure) is input for the boundary conditions on line C-5, and additional information is required on input line C-2b. If Iscale equal 1 or 2, provide additional input for line C-2b. Otherwise, Proceed to line C-3.

Chapter 5 – Detailed CANDE input CANDE-2017 User Manual and Guideline
5-158
5.5.6.3 C-2b – Level 3 – Continuous Load Spreading (CLS) for Live Loads C-2b.L3 Level 3 Continuous longitudinal load spreading of live loads (If Iscale = 1 or 2) Line C-2b is one line of input. (no repeats)
Use if Input data – Information required for Kalona’s continuous load scaling method.
A-1. LEVEL = 3, and
C-2. Iscale = 1 or 2 • Use ONLY if the ‘Solution Level’ is set to 3, and
Iscale = 1 or 2 on line C-2
Parameter (columns) (format) (units)
Input Options Description
Starting Load Step (LSstart) (01-05) (I5) (integer)
Load step number when live loads start. Default = last load step (See Comment #1)
After dead loads and earth loads are applied, identify the load step number that starts the live load increments for continuous load scaling. Note this may include multiple wheels such as HL-93 3-axle trucks.
Ending Load Step (LSstop) (06-10) (I5) (integer)
Load step number when live load ends. Default = LSstart
Identify the ending load step in a sequence of steps defining the live load. If only one live-load step is being used, then LSstop = LSstart. Longer load-step sequences may occur when the truck is moving over the culvert, or the static truck weight is applied in step-wise fashion.
Wheel Length (XLONG) (11-20) (F10.0) (inches)
Wheel footprint length in X-direction, inches Default = 10” (See Comment #2)
XLONG is the tire footprint length in the in-plane x-direction, typically 10 inches for HS trucks. This measurement is used to determine the scaling factor based on an elasticity solution.
Wheel Width (ZWIDE) (21-30) (F10.0) (inches)
Wheel footprint length in Z-direction, inches Default = 20”
ZWIDE is the tire footprint length in the out-of-plane z-direction, typically 20 inches for HS trucks. This measurement is used to determine the scaling factor based on an elasticity solution.
Axle Wheel Spacing (SPACING) (31-40) (F10.0) (inches)
Wheel spacing along axle Default = 72”
SPACING is the distance between the centerline of wheel pods on each side of the axle. This measurement is used to activate two-wheel interaction at depths below the AASHTO interaction depth. To model a single wheel, set SPACING = large number (e.g., 10,000 inches)
Surface Node Number NDsurf (41-45) (I5) (integer)
Node number on surface of vehicle travel. Default = Highest node (See Comment #3 & #4)
NDsurf is a reference node number used to define the elevation of the horizontal surface on which the vehicle is traveling. The elevation is used to determine each node’s soil depth for continuous scaling.
Chapter 5 – Detailed CANDE input CANDE-2017 User Manual and Guideline
5-159
Comment #1. The CANDE input file must be organized such that live-loads are applied in a sequence of load steps without at the same time adding in dead loads or earth loads. Accordingly, the user is required to identity the starting and ending load step numbers that corresponds to the live load forces or pressures as defined in the boundary condition input in C-5 lines. The forces and/or pressures specified in the C-5 input lines should represent the full-service load of the truck wheel being considered without reduction as in the traditional AASHTO method. Comment #2. The input variable XLONG (wheel length) is only used to compute the continuous scaling function based on the Polous and Davis elasticity solution. It is not necessary for the CANDE model to explicitly represent the actual wheel footprint length (XLONG); rather, it is only necessary to preserve the total wheel service weight per longitudinal inch. Thus, options range from applying the service-wheel line load at a single node to distributing the total line load (pressure) over two or more nodes whose intervening distance nearly match the footprint length (XLONG). Comment #3. Typically, the live-load surface (soil or pavement) corresponds to the nodes with the highest elevation (y-coordinates) so that the default option (NDsurf = 0) will produce the correct surface elevation. However, if there are mesh nodes above the live-load surface, then the user must identify the live-load surface by referencing a node number NDsurf that is located on the live-load surface. Comment #4. Any number of axles may be modeled in the x-y plane by defining separate wheel loads on the horizontal surface nodes via the boundary condition input lines C-5. Each wheel load may differ in magnitude; however, all of the above input parameters on line C-2b are assumed to be the same for all axles. Final Comment: Complete development and details of Katona’s continuous scaling method is provided in Chapter 8 of CANDE’s Solution Methods and Formulation Manual. Proceed to line C-3

Chapter 5 – Detailed CANDE input CANDE-2017 User Manual and Guideline
5-160
5.5.6.4 C-3 – Level 3 – Node Input C-3.L3 Level 3 node input Repeat as necessary to define all nodes. The options provided by input variables KRELAD and LGTYPE (see description below) activate the so-called advanced nodal generation methods provided by CANDE. For users who find these advanced options confusing or prefer to use just the basic node generation features, the KRELAD and LGTYPE variables may be completely ignored. That is, by defaulting the input for these two variables results in no action. The standard basic nodal generation is governed by the MODEG variable presented next. Note, nodal numbers on line C-3 (NNP) may be input in any sequence, backward or forward. All nodes left undefined from the C-3 input but appear in C-4 element nodal-connectivity arrays will have their coordinates automatically determined by an averaging technique called Laplace generation. The same applies to those nodes identified with an LGTYPE =1 or 2
Use if Comments
A-1.LEVEL = 3 Use ONLY if the ‘Solution Level’ is set to 3.
Parameter
(columns) (format) (units)
Input Options Description
Limit (LIMIT) (01-01) (A1) (letter)
Signal to indicate this is last node to be input: ≠ L, more C-3 lines to come. = L, this is last C-3 line. Default = blank
If LIMIT is a blank entry, then the program expects to read another line of C-3 nodal input. If LIMIT = L, this signals the program that this is the last nodal C-3 line to be processed after which the program advances to read element data in line C-4.
Node (NNP) (02-05) (I4) (integer)
Node number to be defined or referenced for node generation. Default = none
NNP may be a node number that is to be specified with x and y coordinates. Or, NNP may be a node number that has been previously defined and will be used as a beginning point to generate a sequence of nodes using data from the following line of C-3 data input. NNP may be any node number in the range of 1 to NPT.
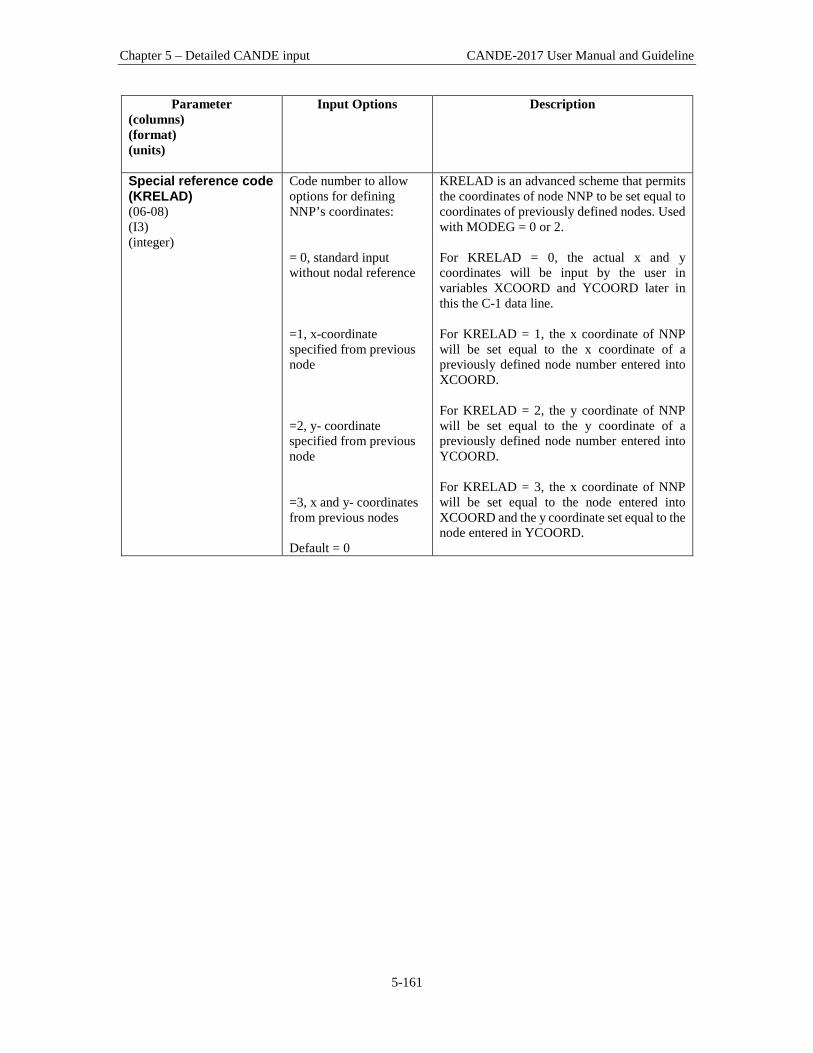
Chapter 5 – Detailed CANDE input CANDE-2017 User Manual and Guideline
5-161
Parameter (columns) (format) (units)
Input Options Description
Special reference code (KRELAD) (06-08) (I3) (integer)
Code number to allow options for defining NNP’s coordinates: = 0, standard input without nodal reference =1, x-coordinate specified from previous node =2, y- coordinate specified from previous node =3, x and y- coordinates from previous nodes Default = 0
KRELAD is an advanced scheme that permits the coordinates of node NNP to be set equal to coordinates of previously defined nodes. Used with MODEG = 0 or 2. For KRELAD = 0, the actual x and y coordinates will be input by the user in variables XCOORD and YCOORD later in this the C-1 data line. For KRELAD = 1, the x coordinate of NNP will be set equal to the x coordinate of a previously defined node number entered into XCOORD. For KRELAD = 2, the y coordinate of NNP will be set equal to the y coordinate of a previously defined node number entered into YCOORD. For KRELAD = 3, the x coordinate of NNP will be set equal to the node entered into XCOORD and the y coordinate set equal to the node entered in YCOORD.
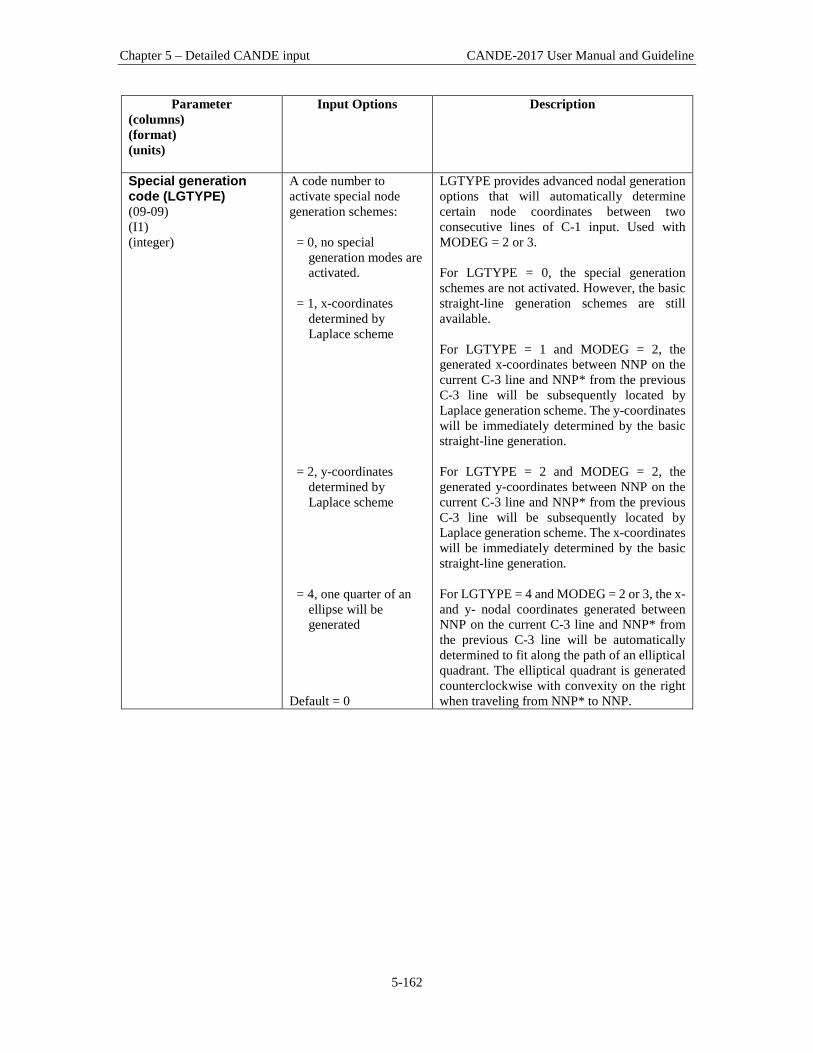
Chapter 5 – Detailed CANDE input CANDE-2017 User Manual and Guideline
5-162
Parameter (columns) (format) (units)
Input Options Description
Special generation code (LGTYPE) (09-09) (I1) (integer)
A code number to activate special node generation schemes:
= 0, no special generation modes are activated.
= 1, x-coordinates
determined by Laplace scheme
= 2, y-coordinates
determined by Laplace scheme
= 4, one quarter of an
ellipse will be generated
Default = 0
LGTYPE provides advanced nodal generation options that will automatically determine certain node coordinates between two consecutive lines of C-1 input. Used with MODEG = 2 or 3. For LGTYPE = 0, the special generation schemes are not activated. However, the basic straight-line generation schemes are still available. For LGTYPE = 1 and MODEG = 2, the generated x-coordinates between NNP on the current C-3 line and NNP* from the previous C-3 line will be subsequently located by Laplace generation scheme. The y-coordinates will be immediately determined by the basic straight-line generation. For LGTYPE = 2 and MODEG = 2, the generated y-coordinates between NNP on the current C-3 line and NNP* from the previous C-3 line will be subsequently located by Laplace generation scheme. The x-coordinates will be immediately determined by the basic straight-line generation. For LGTYPE = 4 and MODEG = 2 or 3, the x- and y- nodal coordinates generated between NNP on the current C-3 line and NNP* from the previous C-3 line will be automatically determined to fit along the path of an elliptical quadrant. The elliptical quadrant is generated counterclockwise with convexity on the right when traveling from NNP* to NNP.
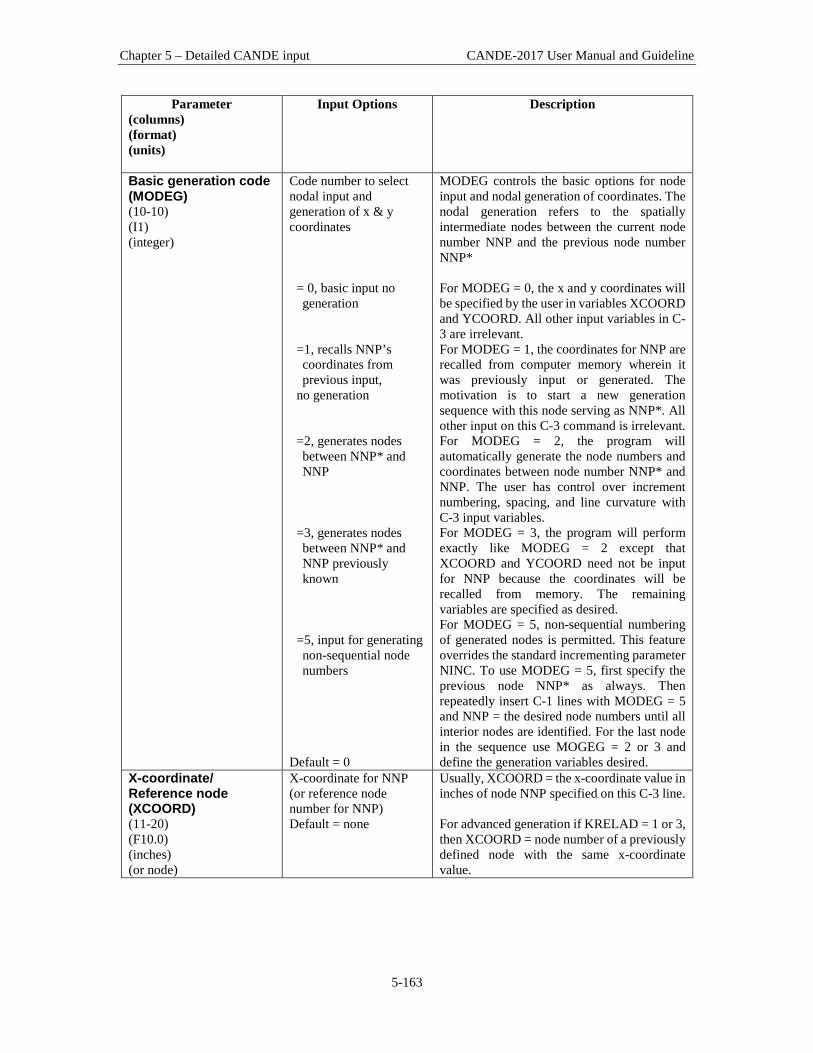
Chapter 5 – Detailed CANDE input CANDE-2017 User Manual and Guideline
5-163
Parameter (columns) (format) (units)
Input Options Description
Basic generation code (MODEG) (10-10) (I1) (integer)
Code number to select nodal input and generation of x & y coordinates
= 0, basic input no generation
=1, recalls NNP’s coordinates from previous input,
no generation =2, generates nodes between NNP* and NNP
=3, generates nodes between NNP* and NNP previously known
=5, input for generating non-sequential node numbers
Default = 0
MODEG controls the basic options for node input and nodal generation of coordinates. The nodal generation refers to the spatially intermediate nodes between the current node number NNP and the previous node number NNP* For MODEG = 0, the x and y coordinates will be specified by the user in variables XCOORD and YCOORD. All other input variables in C-3 are irrelevant. For MODEG = 1, the coordinates for NNP are recalled from computer memory wherein it was previously input or generated. The motivation is to start a new generation sequence with this node serving as NNP*. All other input on this C-3 command is irrelevant. For MODEG = 2, the program will automatically generate the node numbers and coordinates between node number NNP* and NNP. The user has control over increment numbering, spacing, and line curvature with C-3 input variables. For MODEG = 3, the program will perform exactly like MODEG = 2 except that XCOORD and YCOORD need not be input for NNP because the coordinates will be recalled from memory. The remaining variables are specified as desired. For MODEG = 5, non-sequential numbering of generated nodes is permitted. This feature overrides the standard incrementing parameter NINC. To use MODEG = 5, first specify the previous node NNP* as always. Then repeatedly insert C-1 lines with MODEG = 5 and NNP = the desired node numbers until all interior nodes are identified. For the last node in the sequence use MOGEG = 2 or 3 and define the generation variables desired.
X-coordinate/ Reference node (XCOORD) (11-20) (F10.0) (inches) (or node)
X-coordinate for NNP (or reference node number for NNP) Default = none
Usually, XCOORD = the x-coordinate value in inches of node NNP specified on this C-3 line. For advanced generation if KRELAD = 1 or 3, then XCOORD = node number of a previously defined node with the same x-coordinate value.

Chapter 5 – Detailed CANDE input CANDE-2017 User Manual and Guideline
5-164
Parameter (columns) (format) (units)
Input Options Description
Y-coordinate/ Reference node (YCOORD) (21-30) (F10.0) (inches) (or node)
Y-coordinate for NNP (or reference node number for NNP) Default = none
Usually, YCOORD = the y-coordinate value in inches of node NNP specified on this C-3 line. For advanced generation if KRELAD = 1 or 3, then YCOORD = node number of a previously defined node with the same y-coordinate value.
Increment (NPINC) (31-35) (I5,5X) (integer)
Increment added to generated nodes between NNP* and NNP (positive) Default = 1
When using MODEG = 2 or 3, NPINC is the increment “added” to each generated node between NNP* and NNP. Thus, the number of generated nodes =NNP-NNP* /NPINC and the last node is always numbered NNP as input. Incrementing will go in the negative direction if NNP* is greater than NNP, however NPINC must always be input as a positive integer.
Spacing (SPACNG) (41-50) (F10.0) (ratio)
Spacing ratio for generated node lengths Default = 1.0
When using MODEG = 2 or 3, the spacing ratio controls the distance between successive nodes. If SPACNG = 1, all nodes generated between NNP* and NNP will be evenly spaced. If SPACNG > 1 (or < 1), the successive distance between generated nodes will grow (or shrink) by the spacing ratio, respectively.
Radius (RADIUS) (51-60) (F10.0) (inches)
Path for node generation between NNP* and NNP: = 0.0, straight line ≠ 0.0, radius of circular arc. Default = 0.0
When using MODEG = 2 or 3, RADIUS controls the path along which the nodes are generated. If RADIUS = 0.0, the path is straight line between NNP* and NNP. If RADIUS is positive, then the path is a circular arc whose radius = RADIUS with convexity on the right in traveling from NNP* to NNP. Opposite curvature is obtained if RADIUS = negative value.
Proceed to line C-4.
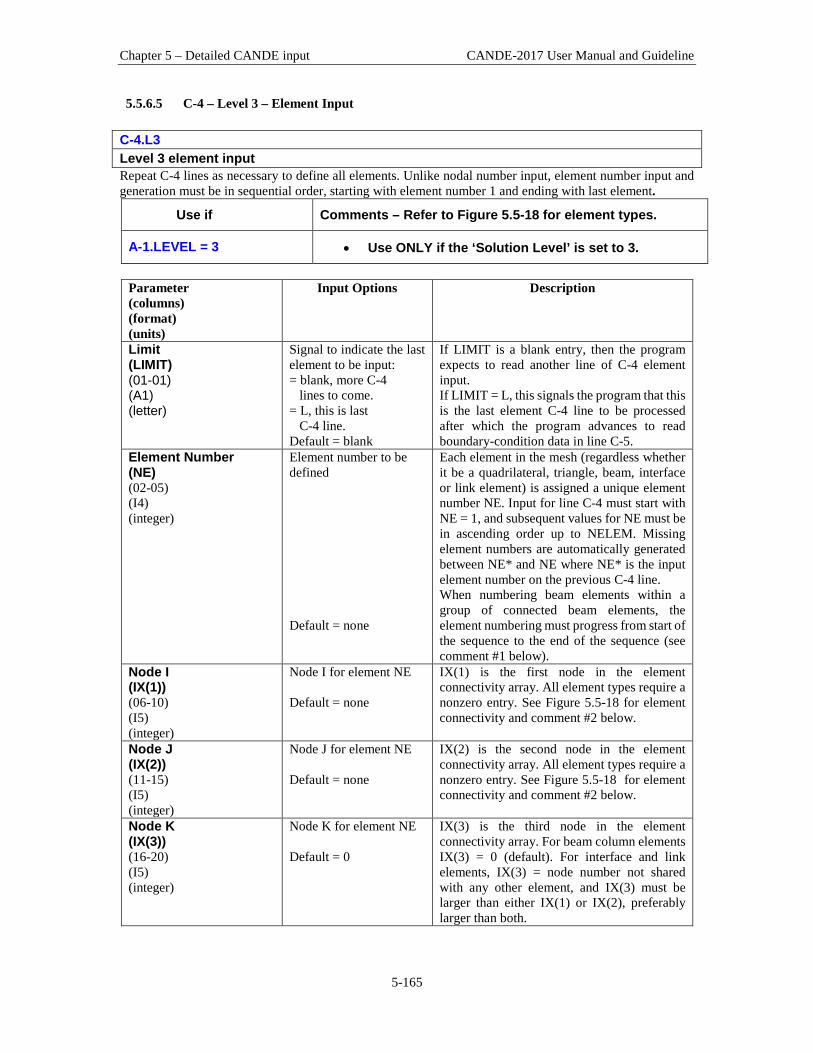
Chapter 5 – Detailed CANDE input CANDE-2017 User Manual and Guideline
5-165
5.5.6.5 C-4 – Level 3 – Element Input C-4.L3 Level 3 element input Repeat C-4 lines as necessary to define all elements. Unlike nodal number input, element number input and generation must be in sequential order, starting with element number 1 and ending with last element.
Use if Comments – Refer to Figure 5.5-18 for element types.
A-1.LEVEL = 3 • Use ONLY if the ‘Solution Level’ is set to 3.
Parameter (columns) (format) (units)
Input Options Description
Limit (LIMIT) (01-01) (A1) (letter)
Signal to indicate the last element to be input: = blank, more C-4 lines to come. = L, this is last C-4 line. Default = blank
If LIMIT is a blank entry, then the program expects to read another line of C-4 element input. If LIMIT = L, this signals the program that this is the last element C-4 line to be processed after which the program advances to read boundary-condition data in line C-5.
Element Number (NE) (02-05) (I4) (integer)
Element number to be defined Default = none
Each element in the mesh (regardless whether it be a quadrilateral, triangle, beam, interface or link element) is assigned a unique element number NE. Input for line C-4 must start with NE = 1, and subsequent values for NE must be in ascending order up to NELEM. Missing element numbers are automatically generated between NE* and NE where NE* is the input element number on the previous C-4 line. When numbering beam elements within a group of connected beam elements, the element numbering must progress from start of the sequence to the end of the sequence (see comment #1 below).
Node I (IX(1)) (06-10) (I5) (integer)
Node I for element NE Default = none
IX(1) is the first node in the element connectivity array. All element types require a nonzero entry. See Figure 5.5-18 for element connectivity and comment #2 below.
Node J (IX(2)) (11-15) (I5) (integer)
Node J for element NE Default = none
IX(2) is the second node in the element connectivity array. All element types require a nonzero entry. See Figure 5.5-18 for element connectivity and comment #2 below.
Node K (IX(3)) (16-20) (I5) (integer)
Node K for element NE Default = 0
IX(3) is the third node in the element connectivity array. For beam column elements IX(3) = 0 (default). For interface and link elements, IX(3) = node number not shared with any other element, and IX(3) must be larger than either IX(1) or IX(2), preferably larger than both.

Chapter 5 – Detailed CANDE input CANDE-2017 User Manual and Guideline
5-166
Parameter (columns) (format) (units)
Input Options Description
Node L (IX(4)) (21-25) (I5) (integer)
Node L for element NE Default = 0
IX(4) is the fourth node in the element connectivity array. This only applies to quadrilateral elements. For all other element types set IX(4) = 0 (default)
Material Number (IX(5)) (26-30) (I5) (integer)
Material identification number for element NE Default = none
Material identification numbers are associated with element types: Quadrilaterals and triangles, IX(5) = a material identification number ranging from 1 to 100. The soil model type and parameters of the soil model associated with IX(5) are defined by the user in Part D. Beam-Columns, IX(5) = a group number ranging from 1 to 30. The group numbers have already been established in Part A and B by defining one or more pipe types. If there is only one pipe group, then set IX(5) = 1 for all beam-column elements. Interfaces, IX(5) = an interface property number ranging from 1 to 99. Two interface elements have the same property number if the friction coefficient, tension resistance and the angle of the interface are the same. Note that interfaces along curved surfaces have different interface angles at each element and, therefore, should be assigned a separate material property number. To be completed in Part D. Links, For rigid and pinned link elements (code 8 or 9), the material number is not used so any material number may be inserted, say IX(5) = blank. (For the special case of composite link elements (code 10 or 11), see Comment #3.)
Birth Load step (IX(6)) (31-35) (I5) (integer)
Load step number for element NE Default = 1
The load step number defines the load step at which the element NE enters the system. Once the element enters the system it remains for all time (except for link elements). Typically, the in-situ soil zones and the culvert structure are assigned to the first load step, IX(6) = 1. The elements representing the first layer of fill soil are assigned IX(6) = 2, and so on.
Interface and link (IX(7))
(36-40) (I5) (integer)
Special code for interface and link element: = 1, for interface element = 8, for link element with fixed connection. = 9, for link element with pinned connection. =0, for all other elements Default = 0
CANDE distinguishes one element type from the other by reading the number of nonzero entries in the nodal connectivity array, IX(1)…IX(4). In order to distinguish the interface element from triangle element and the link element, set IX(7) = 1 to identify NE as an interface element. Similarly, to distinguish among the simple link elements, set IX(7) = 8, to “weld” two beam nodes into a fixed connection, otherwise set IX(7) = 9, for a pinned connection between any two nodes.

Chapter 5 – Detailed CANDE input CANDE-2017 User Manual and Guideline
5-167
Parameter (columns) (format) (units)
Input Options Description
Node increment added (INTRAL) (41-45) (I5) (integer)
Node increment added to compute node connectivity of a generated sequence of elements. Default = 1
Element numbers that are missing between NE and NE* (where NE* is the element number input on the previous C-4 line) are automatically generated with element numbers NE*+1, NE*+2, … NE-1. The nodal connectivity of the generated elements is automatically computed by adding the value INTRAL to the node numbers (I, J, K, and L) of the previous element. The material number IX(5) and the load step IX(6) of the generated elements remain as specified on NE*. If it is desired to change the material number and/or load step in the generated sequence of elements, insert an intervening C-4 line specifying only the element number NE’ where the change occurs along with the new values for IX(5) and IX(6). Do not input the nodal connectivity. Repeat as needed. See Comment #4 below.
Number rows added (NUMLAY) (46-50) (I5) (integer)
Number of element rows to be generated Default = 1
The automated computation of nodal connectivity for the generated elements may be extended over any number of rows by setting NUMLAY equal to the number of generated element rows. This option is used in conjunction the next variable INTERL, which specifies the “jump” in nodal numbering between rows.
Node increment between rows (INTERL) (51-55) (I5) (integer)
Node number increment (jump) between element rows. No default
When the element generation spans more than one row, the element nodal connectivity numbering of the new row has a “jump’ value compared to the previous row. Set INTERL equal to the jump value. Typically, the jump value is the number of elements in the row + 1. See Figure 5.5-21 for an example of the element generation variables.
Death load step for link elements (IX(8)) (56-60) (I5) (integer)
Load step number that link element is removed from the system. Default = 100
Only link elements have the death option. Set IX(8) = load step number at which the link element is removed. Element death means the nodal connecting forces and moments are removed and the nodes are allowed to move independently of each other. Naturally, IX(8) must be greater than IX(6), i.e., death after birth. The default value effectively means no death for most loading schedules where NINC < 100.
Comment #1: Generally, the only purpose of numbering the elements is to identify them by their numbered name. For beam-column elements, however, the sequence of element numbering is also important because it establishes the local group numbering for the connected path of elements within the group. Beam-column elements are assigned to a group number by the input variable IX(5). The lowest numbered mesh-element

Chapter 5 – Detailed CANDE input CANDE-2017 User Manual and Guideline
5-168
number assigned to a beam-element group becomes element number 1of the group’s local numbering system. The second lowest mesh-element number assigned to the group becomes element number 2 of the group’s local numbering system, and so on. CANDE performs internal checks to make sure the beam-column elements that are assigned to a group do indeed form a sequence of elements, connected head-to-tail along some curvilinear path. If this is not the case, the user is notified of the input error. The local numbering system for each group of beam-column elements is used to output data in sequential order for each group so that the user can plot spatially-connected structural responses such as moment, thrust and shear diagrams. Comment #2: There are five element types available in the CANDE program; the quadrilateral and triangle elements for representing soil (plane-strain solids), beam-column elements for representing culvert or structure, interface elements for simulating sliding friction interfaces between structure and soil, and link elements to form various types of connections. Figure 5.5-18 illustrates these elements and the nodal connectivity convention. As listed below, the nodal data in the so-called element connectivity array (IX(1), IX(2), IX(3), and IX(4)) are used to define each element type and distinguish one element type from another.
(1) Quadrilateral: Input the four node numbers IX(1), IX(2), IX(3), and IX(4) connected to element NE in counterclockwise order.
(2) Triangle: Input the three node numbers IX(1), IX(2), and IX(3) connected to element NE in counterclockwise order. Set IX(4) = 0 (default)
(3) Beam-column: Input the two node numbers IX(1) and IX(2) connected to the ends of beam-element NE such that IX(1) is the “head node” advancing along the path of the connected beam-column elements, and IX(2) is the “tail node”, which trails behind the head node.
Set IX(3) = IX(4) = 0 (default)
(4) Interface: Input two separate node numbers IX(1) and IX(2) representing two separate bodies on either side of a common interface usually sharing the same x and y coordinates. Set IX(3) = to a node number not associated with any other element (node IX(3) will contain interface forces). Leave IX(4) = 0 (default). Lastly, set IX(7) = 1, which is how CANDE distinguishes the interface element from the triangle element since both have three non-zero nodal entries. Note in Part D, the interface element has the option to specify an initial gap distance that must close under the loading schedule before the interface mechanics is triggered.
(5) Link. Input two separate node numbers IX(1) and IX(2) representing two nodes attached to different
elements, the nodes may or may not reside at the same location. Set IX(3) = to a node number not associated with any other element (node IX(3) will contain constraint forces and moments). Leave IX(4) = 0, and set IX(7) = 8 for a rigid beam-to-beam connection, = 9 for a pinned connection (beam to beam, beam to soil, or soil to soil). Only the link has the element death option, which is activated by setting IX(8) = death load step. Note, you may effectively simulate the death of other types of elements by surrounding these elements with link elements.
Node IX(3) for the interface and link elements must be assigned a node number that is larger than IX(1) or IX(2), preferably larger than both. This strange requirement is to avoid problems with the Gauss-elimination equation solver, which needs to process the stiffness degrees of freedom prior to pivoting on the unknown constraint forces.
Comment #3 Although not discussed in the above input instructions, there is another type of link element available in the CANDE program which was developed to link two parallel beam groups into composite action. The formulation is given in the updated Solution Methods and Formulation Manual and the coding is currently working in CANDE but has not yet been thoroughly vetted. The input is just like the simple link
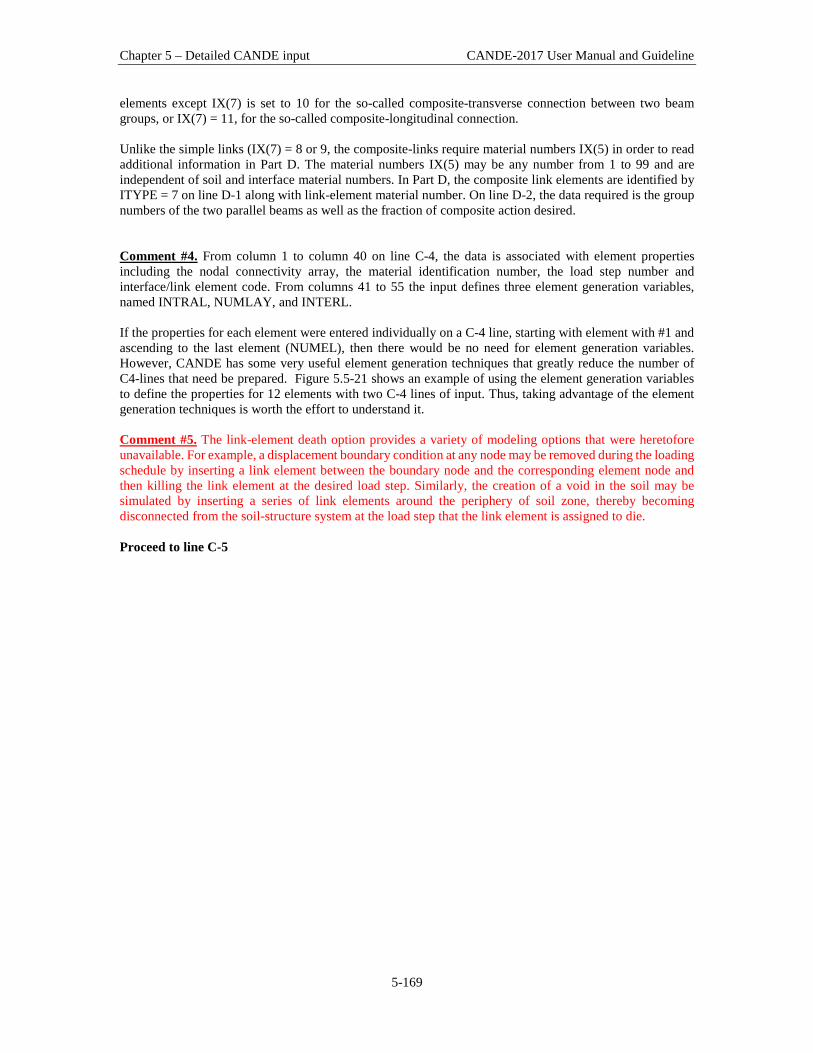
Chapter 5 – Detailed CANDE input CANDE-2017 User Manual and Guideline
5-169
elements except IX(7) is set to 10 for the so-called composite-transverse connection between two beam groups, or IX(7) = 11, for the so-called composite-longitudinal connection. Unlike the simple links (IX(7) = 8 or 9, the composite-links require material numbers IX(5) in order to read additional information in Part D. The material numbers IX(5) may be any number from 1 to 99 and are independent of soil and interface material numbers. In Part D, the composite link elements are identified by ITYPE = 7 on line D-1 along with link-element material number. On line D-2, the data required is the group numbers of the two parallel beams as well as the fraction of composite action desired. Comment #4. From column 1 to column 40 on line C-4, the data is associated with element properties including the nodal connectivity array, the material identification number, the load step number and interface/link element code. From columns 41 to 55 the input defines three element generation variables, named INTRAL, NUMLAY, and INTERL. If the properties for each element were entered individually on a C-4 line, starting with element with #1 and ascending to the last element (NUMEL), then there would be no need for element generation variables. However, CANDE has some very useful element generation techniques that greatly reduce the number of C4-lines that need be prepared. Figure 5.5-21 shows an example of using the element generation variables to define the properties for 12 elements with two C-4 lines of input. Thus, taking advantage of the element generation techniques is worth the effort to understand it. Comment #5. The link-element death option provides a variety of modeling options that were heretofore unavailable. For example, a displacement boundary condition at any node may be removed during the loading schedule by inserting a link element between the boundary node and the corresponding element node and then killing the link element at the desired load step. Similarly, the creation of a void in the soil may be simulated by inserting a series of link elements around the periphery of soil zone, thereby becoming disconnected from the soil-structure system at the load step that the link element is assigned to die. Proceed to line C-5
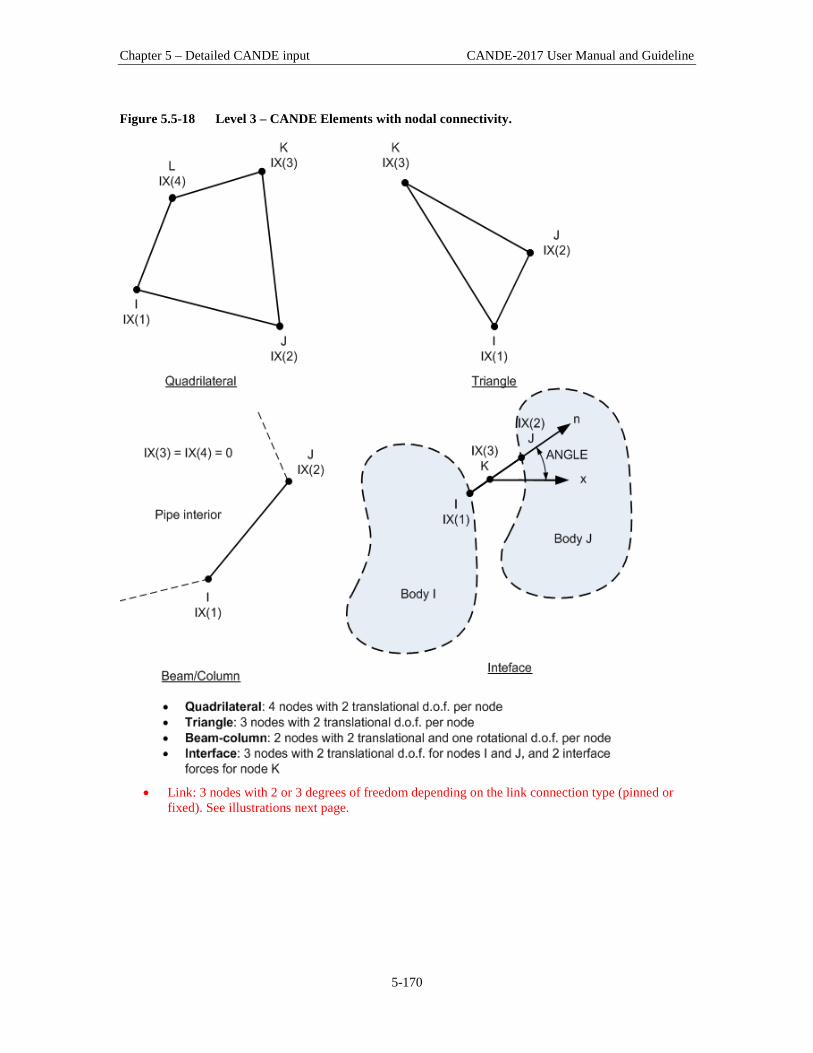
Chapter 5 – Detailed CANDE input CANDE-2017 User Manual and Guideline
5-170
Figure 5.5-18 Level 3 – CANDE Elements with nodal connectivity.
• Link: 3 nodes with 2 or 3 degrees of freedom depending on the link connection type (pinned or
fixed). See illustrations next page.
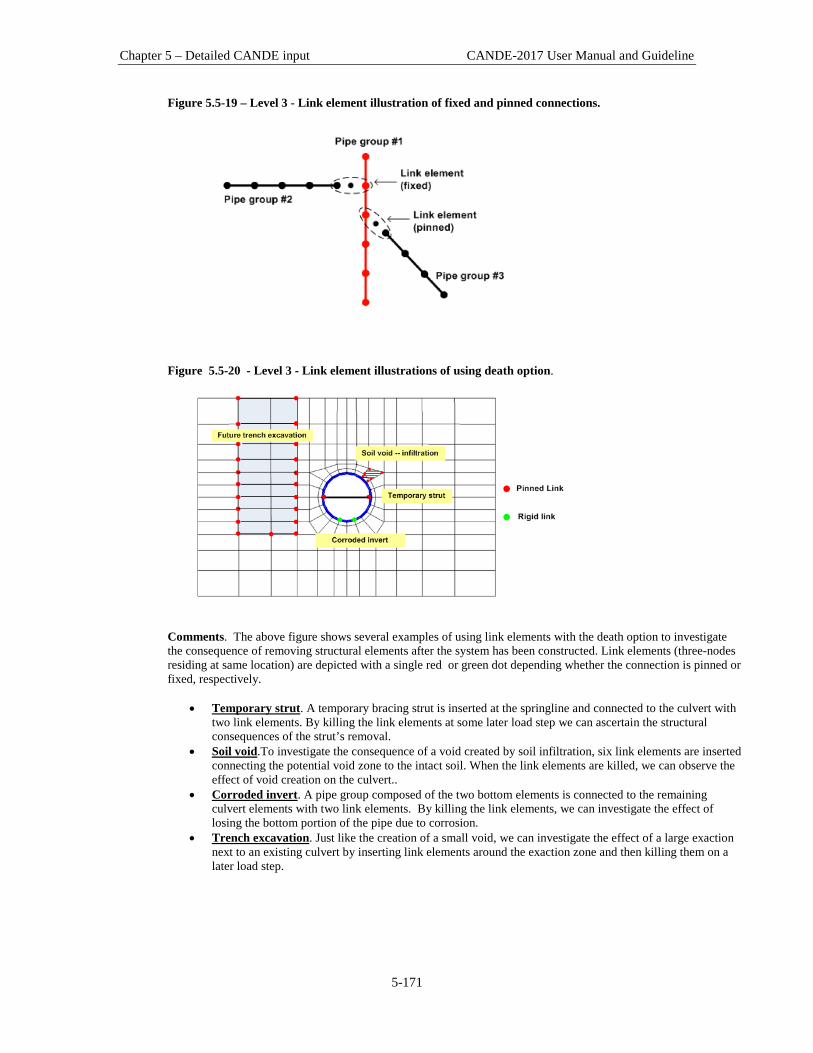
Chapter 5 – Detailed CANDE input CANDE-2017 User Manual and Guideline
5-171
Figure 5.5-19 – Level 3 - Link element illustration of fixed and pinned connections.
Figure 5.5-20 - Level 3 - Link element illustrations of using death option.
Comments. The above figure shows several examples of using link elements with the death option to investigate the consequence of removing structural elements after the system has been constructed. Link elements (three-nodes residing at same location) are depicted with a single red or green dot depending whether the connection is pinned or fixed, respectively.
• Temporary strut. A temporary bracing strut is inserted at the springline and connected to the culvert with two link elements. By killing the link elements at some later load step we can ascertain the structural consequences of the strut’s removal.
• Soil void.To investigate the consequence of a void created by soil infiltration, six link elements are inserted connecting the potential void zone to the intact soil. When the link elements are killed, we can observe the effect of void creation on the culvert..
• Corroded invert. A pipe group composed of the two bottom elements is connected to the remaining culvert elements with two link elements. By killing the link elements, we can investigate the effect of losing the bottom portion of the pipe due to corrosion.
• Trench excavation. Just like the creation of a small void, we can investigate the effect of a large exaction next to an existing culvert by inserting link elements around the exaction zone and then killing them on a later load step.
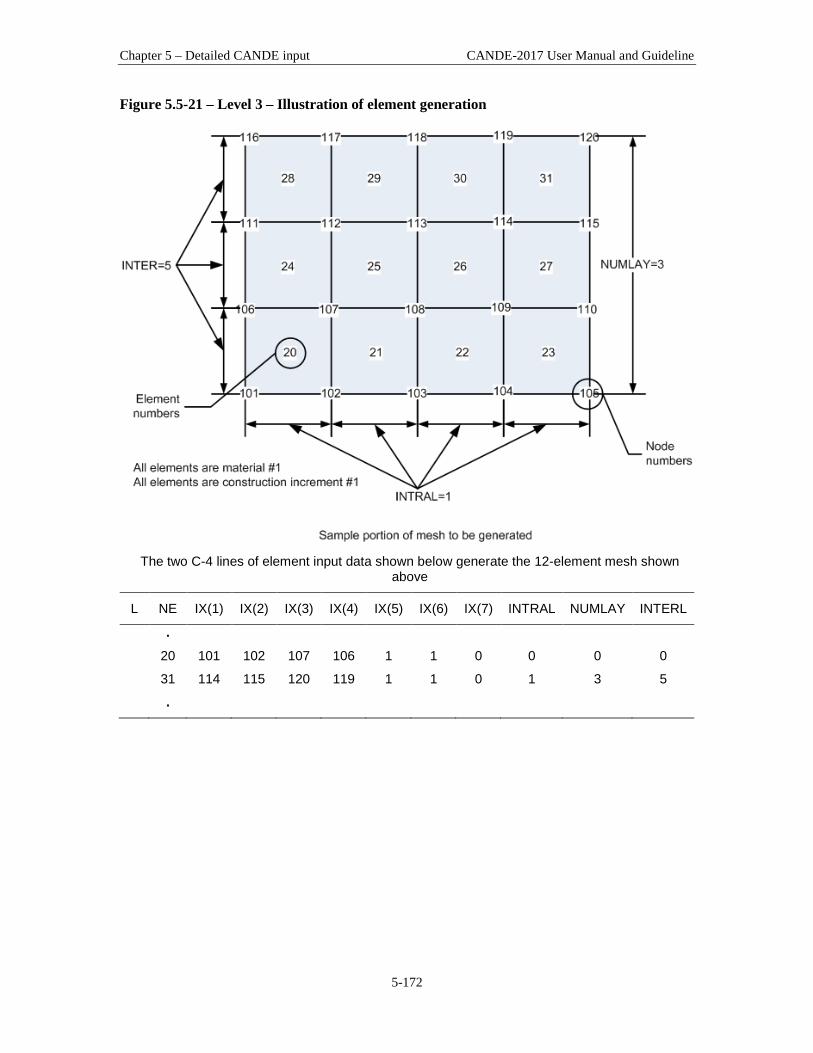
Chapter 5 – Detailed CANDE input CANDE-2017 User Manual and Guideline
5-172
Figure 5.5-21 – Level 3 – Illustration of element generation
The two C-4 lines of element input data shown below generate the 12-element mesh shown
above
L NE IX(1) IX(2) IX(3) IX(4) IX(5) IX(6) IX(7) INTRAL NUMLAY INTERL
.
20 101 102 107 106 1 1 0 0 0 0
31 114 115 120 119 1 1 0 1 3 5
.
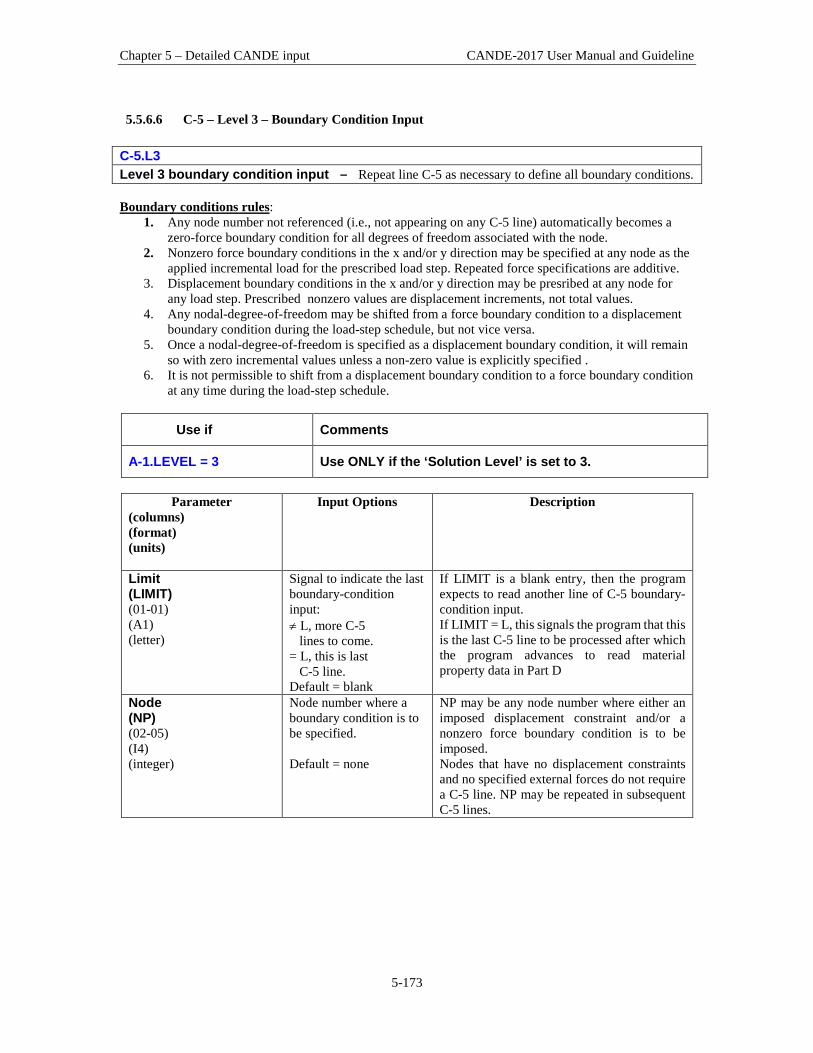
Chapter 5 – Detailed CANDE input CANDE-2017 User Manual and Guideline
5-173
5.5.6.6 C-5 – Level 3 – Boundary Condition Input C-5.L3 Level 3 boundary condition input – Repeat line C-5 as necessary to define all boundary conditions. Boundary conditions rules:
1. Any node number not referenced (i.e., not appearing on any C-5 line) automatically becomes a zero-force boundary condition for all degrees of freedom associated with the node.
2. Nonzero force boundary conditions in the x and/or y direction may be specified at any node as the applied incremental load for the prescribed load step. Repeated force specifications are additive.
3. Displacement boundary conditions in the x and/or y direction may be presribed at any node for any load step. Prescribed nonzero values are displacement increments, not total values.
4. Any nodal-degree-of-freedom may be shifted from a force boundary condition to a displacement boundary condition during the load-step schedule, but not vice versa.
5. Once a nodal-degree-of-freedom is specified as a displacement boundary condition, it will remain so with zero incremental values unless a non-zero value is explicitly specified .
6. It is not permissible to shift from a displacement boundary condition to a force boundary condition at any time during the load-step schedule.
Use if Comments
A-1.LEVEL = 3 Use ONLY if the ‘Solution Level’ is set to 3.
Parameter
(columns) (format) (units)
Input Options Description
Limit (LIMIT) (01-01) (A1) (letter)
Signal to indicate the last boundary-condition input: ≠ L, more C-5 lines to come. = L, this is last C-5 line. Default = blank
If LIMIT is a blank entry, then the program expects to read another line of C-5 boundary-condition input. If LIMIT = L, this signals the program that this is the last C-5 line to be processed after which the program advances to read material property data in Part D
Node (NP) (02-05) (I4) (integer)
Node number where a boundary condition is to be specified. Default = none
NP may be any node number where either an imposed displacement constraint and/or a nonzero force boundary condition is to be imposed. Nodes that have no displacement constraints and no specified external forces do not require a C-5 line. NP may be repeated in subsequent C-5 lines.

Chapter 5 – Detailed CANDE input CANDE-2017 User Manual and Guideline
5-174
Parameter (columns) (format) (units)
Input Options Description
X-Code (IIFLG(1)) (06-10) (I5) (integer)
Boundary code for X-coordinate: = 0, x-force input (rotation free) = 1, x-disp. input (rotation fix) = 2, x-disp. input (rotation free) = 3, x-force input (rotation fix) Default = 0
If NP is only attached to continuum elements use IIFLG = 0 or 1 as needed. However, if NP is also attached to a beam element (which includes rotational d.o.f.) use IIFLG = 0, 1, 2, or 3. Set IIFLG = 0 to specify an applied force in the x-direction. (rotational degree of freedom is free). Set IIFLG = 1 to specify a displacement in the x-direction. (rotational degree of freedom is fixed). Set IIFLG = 2 to specify a displacement in the x-direction. (rotational degree of freedom is free). Set IIFLG = 3 to specify an applied force in the x-direction. (rotational degree of freedom is fixed). See Table 5.5-7 for further understanding and summary of boundary condition codes.
X-Value (BIVD(1)) (11-20) (F10.0) (lb/in or inch)
Value of specified x-force or, x-displacement. Default = 0.0
If IIFLG(1) = 0 or 3, set BIVD(1) equal to the value of prescribed force in the x-direction, where the default is 0.0 lbs/inch. If IIFLG(1) = 1 or 2, set BIVD(1) equal to the value of displacement in the x-direction, where the default is 0.0 inches (fixed against x-motion)
Y-code (IIFLG(2)) (21-25) (I5) (integer)
Boundary code for Y-coordinate: = 0, y-force input (rotation free) = 1, y-disp. input (rotation fix) = 2, y-disp. input (rotation free) = 3, y-force input (rotation fix) Default = 0
If NP is only attached to continuum elements use IIFLG = 0 or 1 as needed. However, if NP is also attached to a beam element (which includes rotational freedom) use IIFLG = 0, 1, 2, or 3. Set IIFLG = 0 to specify an applied force in the y-direction. (rotational degree of freedom is free). Set IIFLG = 1 to specify a displacement in the y-direction. (rotational degree of freedom is fixed). Set IIFLG = 2 to specify a displacement in the y-direction. (rotational degree of freedom is free). Set IIFLG = 3 to specify an applied force in the y-direction. (rotational degree of freedom is fixed). See Table 5.5-7 for further understanding and summary of boundary condition codes.
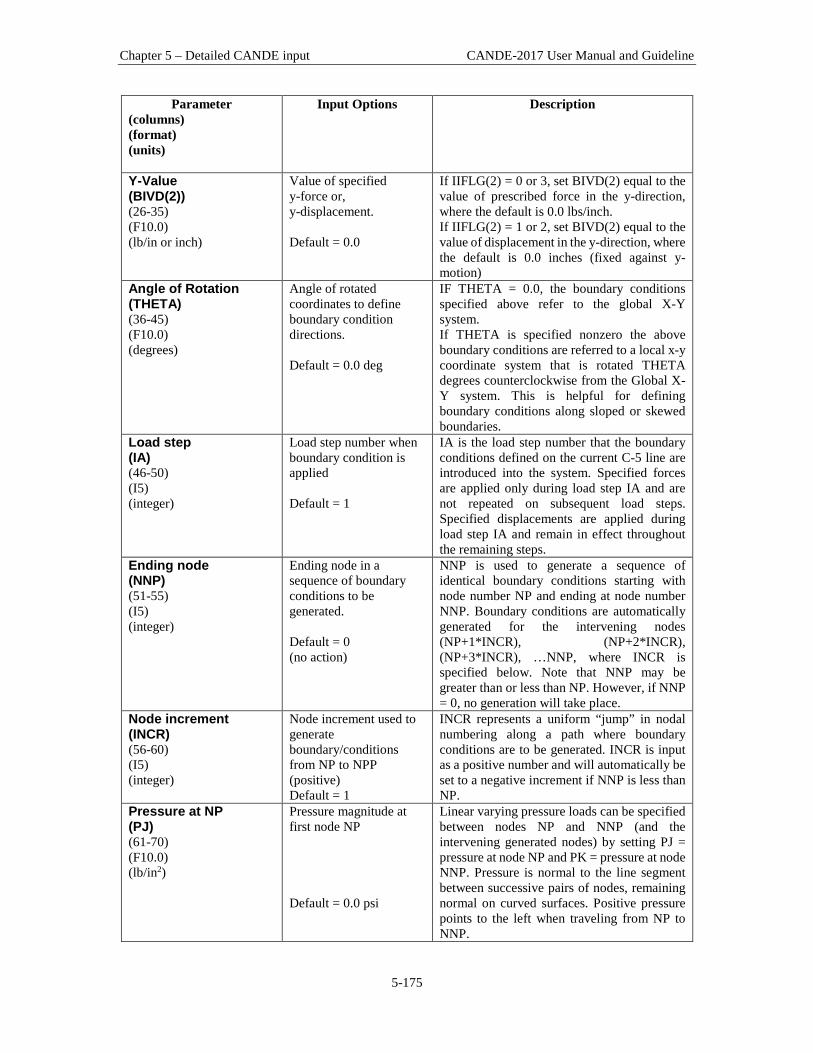
Chapter 5 – Detailed CANDE input CANDE-2017 User Manual and Guideline
5-175
Parameter (columns) (format) (units)
Input Options Description
Y-Value (BIVD(2)) (26-35) (F10.0) (lb/in or inch)
Value of specified y-force or, y-displacement. Default = 0.0
If IIFLG(2) = 0 or 3, set BIVD(2) equal to the value of prescribed force in the y-direction, where the default is 0.0 lbs/inch. If IIFLG(2) = 1 or 2, set BIVD(2) equal to the value of displacement in the y-direction, where the default is 0.0 inches (fixed against y-motion)
Angle of Rotation (THETA) (36-45) (F10.0) (degrees)
Angle of rotated coordinates to define boundary condition directions. Default = 0.0 deg
IF THETA = 0.0, the boundary conditions specified above refer to the global X-Y system. If THETA is specified nonzero the above boundary conditions are referred to a local x-y coordinate system that is rotated THETA degrees counterclockwise from the Global X-Y system. This is helpful for defining boundary conditions along sloped or skewed boundaries.
Load step (IA) (46-50) (I5) (integer)
Load step number when boundary condition is applied Default = 1
IA is the load step number that the boundary conditions defined on the current C-5 line are introduced into the system. Specified forces are applied only during load step IA and are not repeated on subsequent load steps. Specified displacements are applied during load step IA and remain in effect throughout the remaining steps.
Ending node (NNP) (51-55) (I5) (integer)
Ending node in a sequence of boundary conditions to be generated. Default = 0 (no action)
NNP is used to generate a sequence of identical boundary conditions starting with node number NP and ending at node number NNP. Boundary conditions are automatically generated for the intervening nodes (NP+1*INCR), (NP+2*INCR), (NP+3*INCR), …NNP, where INCR is specified below. Note that NNP may be greater than or less than NP. However, if NNP = 0, no generation will take place.
Node increment (INCR) (56-60) (I5) (integer)
Node increment used to generate boundary/conditions from NP to NPP (positive) Default = 1
INCR represents a uniform “jump” in nodal numbering along a path where boundary conditions are to be generated. INCR is input as a positive number and will automatically be set to a negative increment if NNP is less than NP.
Pressure at NP (PJ) (61-70) (F10.0) (lb/in2)
Pressure magnitude at first node NP Default = 0.0 psi
Linear varying pressure loads can be specified between nodes NP and NNP (and the intervening generated nodes) by setting PJ = pressure at node NP and PK = pressure at node NNP. Pressure is normal to the line segment between successive pairs of nodes, remaining normal on curved surfaces. Positive pressure points to the left when traveling from NP to NNP.

Chapter 5 – Detailed CANDE input CANDE-2017 User Manual and Guideline
5-176
Parameter (columns) (format) (units)
Input Options Description
Pressure at NNP (PK) (71-80) (F10.0) (lb/in2)
Pressure magnitude at second node NNP Default = 0.0 psi
If PK = PJ the pressure will be uniform over the surface from NP to NNP. Otherwise the pressure will vary linearly from the value PI at NP to the value PK at NNP. To use the pressure option, set IIFLG(1) = 0, and IIFLG(2) = 0
Comments: 1. Any node that is not specified (or generated) on line C-5 is automatically assigned the force boundary
code IIFLG (1) = IIFLG(2) = 0, and the specified external forces are set equal to zero, BIVD(1) = BIVD(2) = 0.
2. For nodes that do not have beam elements attached (i.e., only quadrilaterals, triangles, and interface elements), there is no rotational degree of freedom associated with the node. Therefore, the first four rows in Table 5.5-7 provide the complete set of boundary condition options for specifying x and y forces and/or displacements.
3. For nodes that do have a beam element attached, the user has the option to select a fixed rotation (clamped boundary) or free rotation (within the constraint of surrounding elements). The second set of rows in Table 5.5-7 allow the user to select the alternative rotational specification that was not provided in the first set. Note that rotational degree of freedom is automatically specified with either zero rotation or zero external moment. There is no provision in CANDE for specifying nonzero rotational boundary conditions.
Table 5.5-7 – Classification of IIFLG Boundary Code numbers
Input Code for node NP
Resulting implication for the variable BIVD and rotational degree of freedom
X-direction IIFLG(1)
Y-direction IIFLG(2)
X-direction BIVD(1)
Y-direction BIVD(2)
Rotation (beam only)
0 0 Force Force (Free) 1 0 Disp. Force (Fixed) 0 1 Force Disp. (Fixed) 1 1 Disp. Disp. (Fixed)
3 3 Force Force (Fixed) 2 0 Disp. Force (Free) 0 2 Force Disp. (Free) 2 2 Disp. Disp. (Free)
Proceed to Part D

Chapter 5 – Detailed CANDE input CANDE-2017 User Manual and Guideline
5-177
5.5.7 Part D- Soil and/or Interface Property Input This section provides input instructions for the soil and interface properties. NOTE: This input is required for the following:
Use if Comments
A-1.LEVEL = 2 or 3 Use ONLY if the ‘Solution Level’ is set to 2 or 3. For Solution Level 2, the number of soil and interface elements is predetermined. The following sections provide descriptions on how many soil and interface materials are defined for each Level 2 mesh type. For Solution Level 3, the number of soil and interface materials is defined on line C-2 (section 5.5.6.1) and material numbers assigned to each element are defined on lines C-3 (section 5.5.6.4).
This input is NOT required for Solution Level 1 or if there are only beam elements in the mesh.
INPUT OVERVIEW (1) Start at line D-1 to identify model type and identification data. (2) Proceed to line D-2 for the selected model type and complete input
• Linear Elastic • Orthotropic Elastic • Duncan and Duncan/Selig (Original or Modified) • Overburden Dependent • Extended Hardin • Interface properties • Composite link element • Mohr/Coulomb classical elastoplastic
(3) Repeat steps 1 and 2 until all models are defined with input.

Chapter 5 – Detailed CANDE input CANDE-2017 User Manual and Guideline
5-178
5.5.8 D-1 – Material Control Parameters for All Models D-1 Material control parameters
Use if Comments
A-1.LEVEL = 2 or 3 Use ONLY if the ‘Solution Level’ is set to 2 or 3.
Parameter
(columns) (format) (units)
Input Options Description
Limit (LIMIT) (01-01) (A1) (letter)
Signal to indicate the last material data input: ≠ L, more D-1 lines to come. = L, this is last D-1 line.
If LIMIT is a blank entry, then the program expects to read another line of D-1 material input. If LIMIT = L, it signals the program that this is the last D-set of material data to be processed.
Material ID number (I) (02-05) (I4) (integer)
Material Zone identification number I No Default
Set I = material zone number to be characterized in this set of D lines. In Part C, the continuum elements (quadrilaterals and triangles) have been assigned a material zone number ranging from 1 up to 100, and interface elements have been assigned a material number ranging from 1 to 999. For Level 2, material zone numbers were automatically assigned and are summarized in Table 5.6-2 and Table 5.6-3.
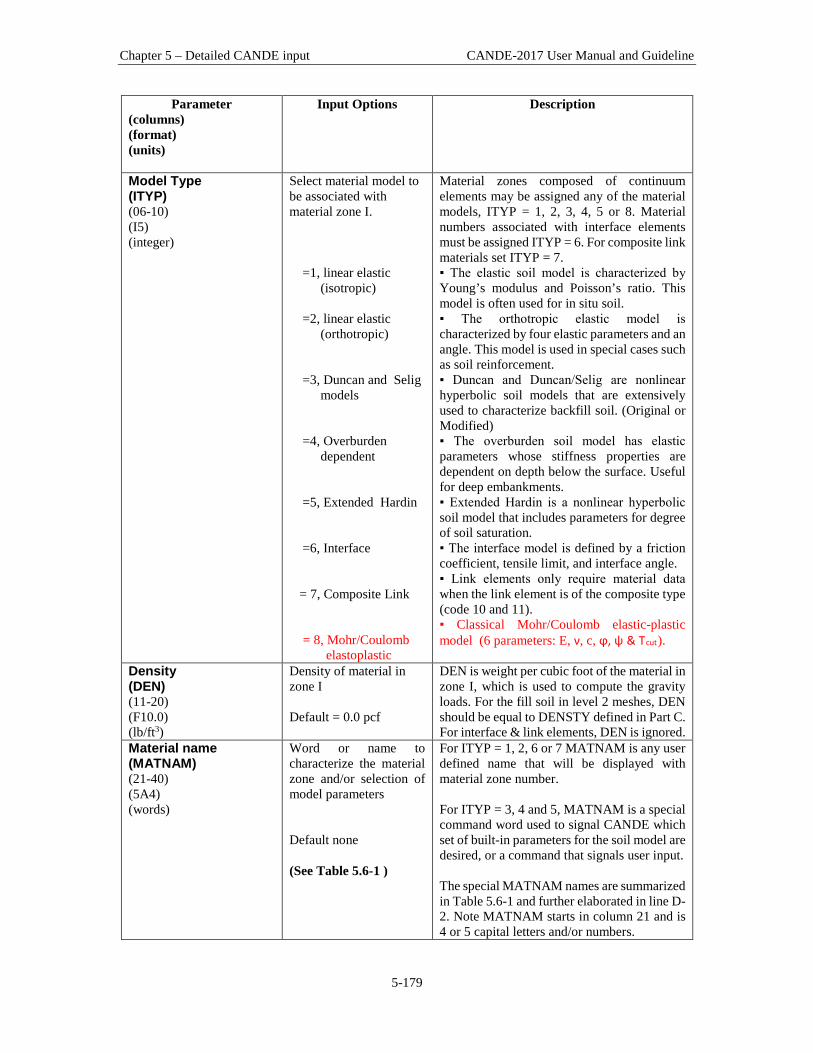
Chapter 5 – Detailed CANDE input CANDE-2017 User Manual and Guideline
5-179
Parameter (columns) (format) (units)
Input Options Description
Model Type (ITYP) (06-10) (I5) (integer)
Select material model to be associated with material zone I.
=1, linear elastic
(isotropic) =2, linear elastic
(orthotropic) =3, Duncan and Selig
models =4, Overburden
dependent =5, Extended Hardin =6, Interface
= 7, Composite Link = 8, Mohr/Coulomb elastoplastic
Material zones composed of continuum elements may be assigned any of the material models, ITYP = 1, 2, 3, 4, 5 or 8. Material numbers associated with interface elements must be assigned ITYP = 6. For composite link materials set ITYP = 7. ▪ The elastic soil model is characterized by Young’s modulus and Poisson’s ratio. This model is often used for in situ soil. ▪ The orthotropic elastic model is characterized by four elastic parameters and an angle. This model is used in special cases such as soil reinforcement. ▪ Duncan and Duncan/Selig are nonlinear hyperbolic soil models that are extensively used to characterize backfill soil. (Original or Modified) ▪ The overburden soil model has elastic parameters whose stiffness properties are dependent on depth below the surface. Useful for deep embankments. ▪ Extended Hardin is a nonlinear hyperbolic soil model that includes parameters for degree of soil saturation. ▪ The interface model is defined by a friction coefficient, tensile limit, and interface angle. ▪ Link elements only require material data when the link element is of the composite type (code 10 and 11). ▪ Classical Mohr/Coulomb elastic-plastic model (6 parameters: E, ν, c, ϕ, ψ & Tcut).
Density (DEN) (11-20) (F10.0) (lb/ft3)
Density of material in zone I Default = 0.0 pcf
DEN is weight per cubic foot of the material in zone I, which is used to compute the gravity loads. For the fill soil in level 2 meshes, DEN should be equal to DENSTY defined in Part C. For interface & link elements, DEN is ignored.
Material name (MATNAM) (21-40) (5A4) (words)
Word or name to characterize the material zone and/or selection of model parameters Default none (See Table 5.6-1 )
For ITYP = 1, 2, 6 or 7 MATNAM is any user defined name that will be displayed with material zone number. For ITYP = 3, 4 and 5, MATNAM is a special command word used to signal CANDE which set of built-in parameters for the soil model are desired, or a command that signals user input. The special MATNAM names are summarized in Table 5.6-1 and further elaborated in line D-2. Note MATNAM starts in column 21 and is 4 or 5 capital letters and/or numbers.
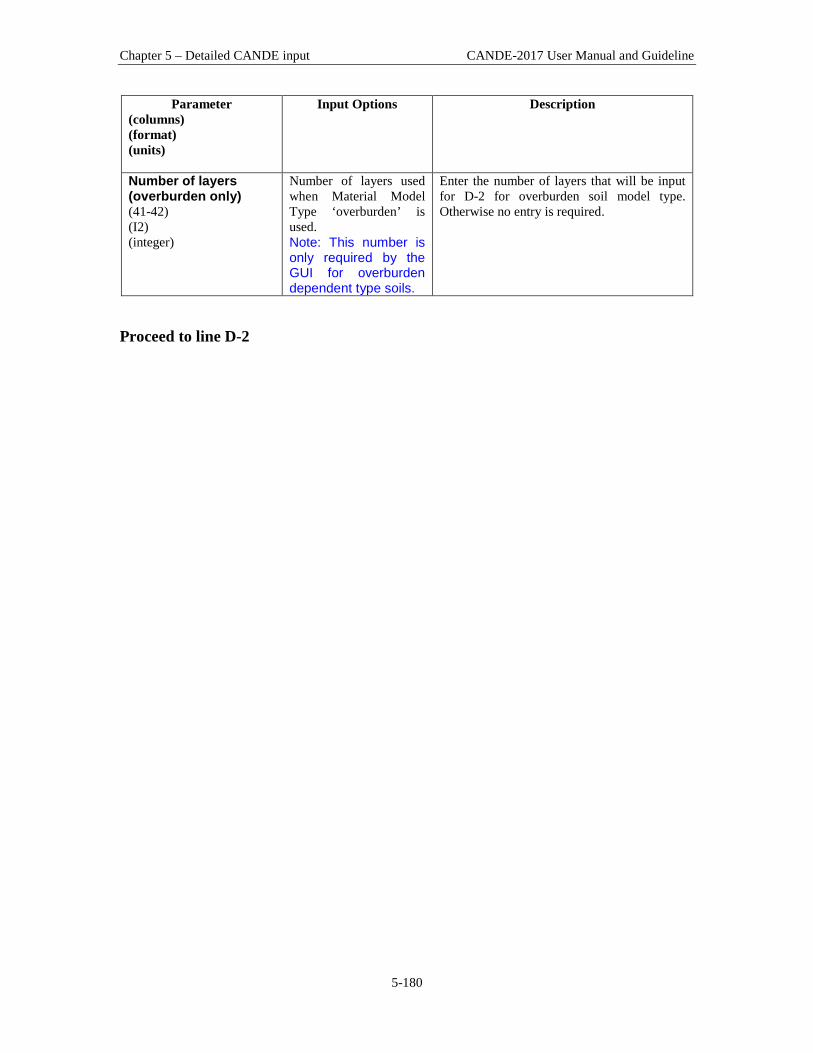
Chapter 5 – Detailed CANDE input CANDE-2017 User Manual and Guideline
5-180
Parameter (columns) (format) (units)
Input Options Description
Number of layers (overburden only) (41-42) (I2) (integer)
Number of layers used when Material Model Type ‘overburden’ is used. Note: This number is only required by the GUI for overburden dependent type soils.
Enter the number of layers that will be input for D-2 for overburden soil model type. Otherwise no entry is required.
Proceed to line D-2

Chapter 5 – Detailed CANDE input CANDE-2017 User Manual and Guideline
5-181
Table 5.6-8 – Summary of special material names (MATNAM) Material ITYP MATNAM
to signal user input of model
parameters
Special MATNAMs to select built-in parameters for various soil types and compaction levels
Description of special MATNAMS
ITYP = 3 ●Duncan (1980)
USER
CA105, CA95, CA90 SM100, SM90, SM85 SC100, SC90, SC85 CL100, CL90, CL85
CA=Coarse aggregates SM=Silty sands SC=Silty clayey sand CL=Silty clay (Number = % compaction T-99)
ITYP = 3 ●Duncan/Selig (Original or Modified)
USER
SW100, SW95, SW90, SW85, SW80, ML95, ML90, ML85, ML80, ML50 CL95, CL90, CL85, CL80
SW=Gravelly sand ML=Sandy silt CL=Silty clay (Number = % compaction T-99)
ITYP = 4 ●Overburden- dependent
USER
GGOOD, GFAIR MGOOD, MFAIR CGOOD, CFAIR
G=Granular soil M=Mixed soil C=Cohesive soil
ITYP = 5 ●Extended Hardin
USER
GRAN MIXED COHE
Granular soil Mixed soil Cohesive soil
ITYP = 1, 2, or 8 No canned models, data must be input.
Comments on MATNAM:
1. Detailed information on the “built-in” soil model parameters are provided in the D-2 section associated with each model type and material name (MATNAM).
2. For ITYP = 3, the user distinguishes the Duncan-1980 model names from the Duncan-Selig model
names by the parameter IBULK defined in line D2. There is no distinction in MATNAM between the original formulations and the modified formulations because no new model parameters are required in the modified formulation to achieve plastic-like behavior for unload/reload conditions.
3. For ITYP = 4, input line D-2 is not required unless the user selected MATNAM = USER. The built-
in parameters for the special MATNAMS are shown in Table 5.6-1.
4. For ITYP = 5, input line D-2 depends on whether MATMAM is a special name or MATNAM is defined as USER.

Chapter 5 – Detailed CANDE input CANDE-2017 User Manual and Guideline
5-182
Table 5.6-9 – ID Material numbers for predefined Level 2 material zones Mesh Type In situ soil
material zone number
Bedding material zone
number
Backfill soil material zone
number
Special zone numbers
PIPE (NPCAN=1) • Homogenous •Embankment •Trench
1 1 1
1 2 2
1 3 3
-
4 (Backpack) 4 (Overfill)
BOX (NPCAN=2) •Embankment •Trench
1 1
2 2
3 3
- -
ARCH (NPCAN=3) • Homogenous •Embankment •Trench
1 1 1
- - -
1 3 3
-
2 (Footing) 2 (Footing)
Comments on Material Number (ID) for Level 2 Soil Zones.
• CANDE automatically assigns a material number (ID) to the elements in the Level 2 material zones as identified in the above table.
• The user is required to enter the ID number Table 5.6-10 – Material numbers for predefined Level 2 interface numbers
Mesh Type (Selected in Part C)
Material number range
Description of interface material numbers
PIPE (NPCAN=1) • SLIP • SLPT
1 to 11 1 to 7
The SLIP command inserts 11 interface elements between soil and pipe. Interface material # 1 starts at the invert and progresses to # 11 at the crown; each element has a unique normal angle. The SLPT command inserts 7 interface elements between the trench wall and backfill soil. Interface material # 1 starts at the spring line and progresses to # 7 at the top of the trench, each material number requires input data.
BOX (NPCAN=2) None NOTE: For level 2 Box mesh, no interface elements are generated. Therefore, interface materials are not required for the Box mesh type.
ARCH (NPCAN=3) (interface is always included in mesh)
1 to 19
The Arch mesh automatically includes interface elements between the arch and surrounding soil for all mesh options. Interface material # 1 starts at the crown and proceeds down and around the arch to material # 19 located one node above the footing. Each element has a unique normal angle. If it is desired to simulate a bonded condition between the soil and the structure, insert large values for the tension resistance and friction coefficient (say, 1000.0)

Chapter 5 – Detailed CANDE input CANDE-2017 User Manual and Guideline
5-183
Comment on soil resistance factor for LRFD = 1:. The LRFD specifications states that soil stiffness values should be reduced by a resistance factor, φ soil = 0.9. However, all the canned and tabularized soil parameters in this manual and in the CANDE-2007 program are conservative approximations of the actual soil being represented. Thus, further reduction of the canned or tabularized soil parameters by a resistance factor is not recommended since it may be assumed the resistance factor is already built in the model. If the user wishes to reduce the soil stiffness by a soil resistance factor, then the user must input the key soil parameter with a value reduced by the factor φ soil . For line D2 the key soil parameters for the five soil models are listed below:
• For ITYP = 1; input E = φ soil * E actual • For ITYP = 2 ; input CP(i,j) = φ soil * CP(i,j) actual , for all i and j, 1 to 3 • For ITYP = 3; input ZK = φ soil * ZK actual • For ITYP = 4; input E(n) = φ soil * EN(n) actual , for n = 1,2,3 … • For ITYP = 5; input S1 = φ soil * S1 actual • For ITYP = 8; input E = φ soil * E actual
The above equations show the user the primary stiffness parameter for each soil model. If desired, the user may input a reduced value of the primary stiffness parameter to account for a soil resistance factor.
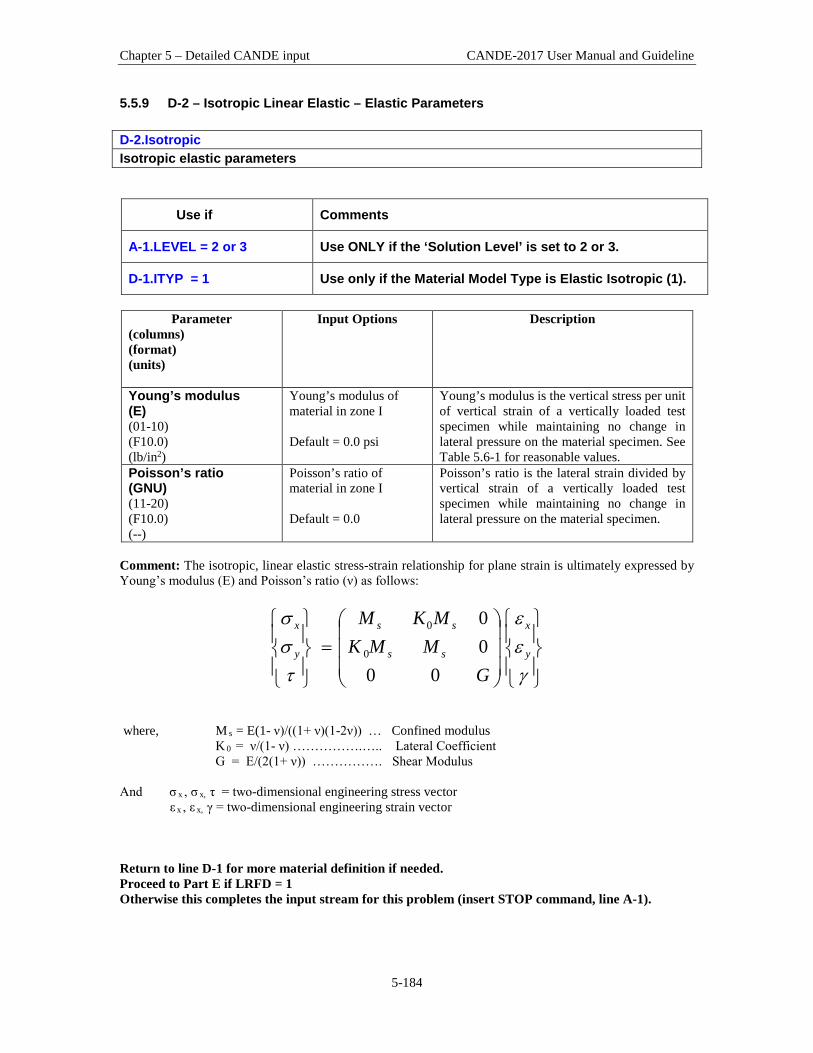
Chapter 5 – Detailed CANDE input CANDE-2017 User Manual and Guideline
5-184
5.5.9 D-2 – Isotropic Linear Elastic – Elastic Parameters D-2.Isotropic Isotropic elastic parameters
Use if Comments
A-1.LEVEL = 2 or 3 Use ONLY if the ‘Solution Level’ is set to 2 or 3.
D-1.ITYP = 1 Use only if the Material Model Type is Elastic Isotropic (1).
Parameter
(columns) (format) (units)
Input Options Description
Young’s modulus (E) (01-10) (F10.0) (lb/in2)
Young’s modulus of material in zone I Default = 0.0 psi
Young’s modulus is the vertical stress per unit of vertical strain of a vertically loaded test specimen while maintaining no change in lateral pressure on the material specimen. See Table 5.6-1 for reasonable values.
Poisson’s ratio (GNU) (11-20) (F10.0) (--)
Poisson’s ratio of material in zone I Default = 0.0
Poisson’s ratio is the lateral strain divided by vertical strain of a vertically loaded test specimen while maintaining no change in lateral pressure on the material specimen.
Comment: The isotropic, linear elastic stress-strain relationship for plane strain is ultimately expressed by Young’s modulus (E) and Poisson’s ratio (ν) as follows:
=
γεε
τσσ
y
x
ss
ss
y
x
GMMK
MKM
0000
0
0
where, M s = E(1- ν)/((1+ ν)(1-2ν)) … Confined modulus
K 0 = ν/(1- ν) …………….….. Lateral Coefficient G = E/(2(1+ ν)) ……………. Shear Modulus
And σ x , σ x, τ = two-dimensional engineering stress vector ε x , ε x, γ = two-dimensional engineering strain vector Return to line D-1 for more material definition if needed. Proceed to Part E if LRFD = 1 Otherwise this completes the input stream for this problem (insert STOP command, line A-1).

Chapter 5 – Detailed CANDE input CANDE-2017 User Manual and Guideline
5-185
5.5.10 D-2 – Orthotropic Linear Elastic – Elastic Parameters D-2.Orthotropic Orthotropic elastic parameters
Use if Comments
A-1.LEVEL = 2 or 3 Use ONLY if the ‘Solution Level’ is set to 2 or 3.
D-1.ITYP = 2 Use only if the Material Model Type is Orthotropic (2).
Parameter
(columns) (format) (units)
Input Options Description
Elastic parameter at position (1,1) (CP(1,1)) (01-10) (F10.0) (lb/in2)
Elastic parameter at matrix position (1,1) Default = 0.0 psi
Confined modulus in x-direction (lateral). See constitutive relationship in matrix below.
Elastic parameter at position (1,2) (CP(1,2)) (11-20) (F10.0) (lb/in2)
Elastic parameter at matrix position (1,2) Default = 0.0 psi
Orthogonal x-y stiffness modulus. See constitutive relationship in matrix below.
Elastic parameter at position (2,2) (CP(2,2)) (21-30) (F10.0) (lb/in2)
Elastic parameter at matrix position (2,2) Default = 0.0 psi
Confined modulus in y-direction (vertical). See constitutive relationship in matrix below.
Elastic parameter at position (3,3) (CP(3,3)) CP(3,3) (31-40) (F10.0) (lb/in2)
Elastic parameter at matrix position (3,3) Default = 0.0 psi
Shear modulus. See constitutive relationship in matrix below
Angle of material axis (THETA) (41-50) (F10.0) (lb/in2)
Angle of material axis. Default = 0.0 deg
Theta = the angle that material axis makes with the global x-y axis. Typically, the material axis is aligned the global axis so that the default value is appropriate.
Comment: Orthotropic elastic properties are useful when the stiffness in the vertical direction differs from the stiffness is the lateral direction such as when reinforced earth is used to stiffen the soil in the lateral direction. The matrix is symmetric.

Chapter 5 – Detailed CANDE input CANDE-2017 User Manual and Guideline
5-186
=
γεε
τσσ
y
x
y
x
CPCPCPCPCP
)3,3(000)2,2()2,1(0)2,1()1,1(
And σ x , σ x, τ = two-dimensional engineering stress vector ε x , ε x, γ = two-dimensional engineering strain vector
Return to line D-1 for more material definition if needed. Proceed to Part E if LRFD = 1 Otherwise this completes the input stream for this problem, insert STOP command.
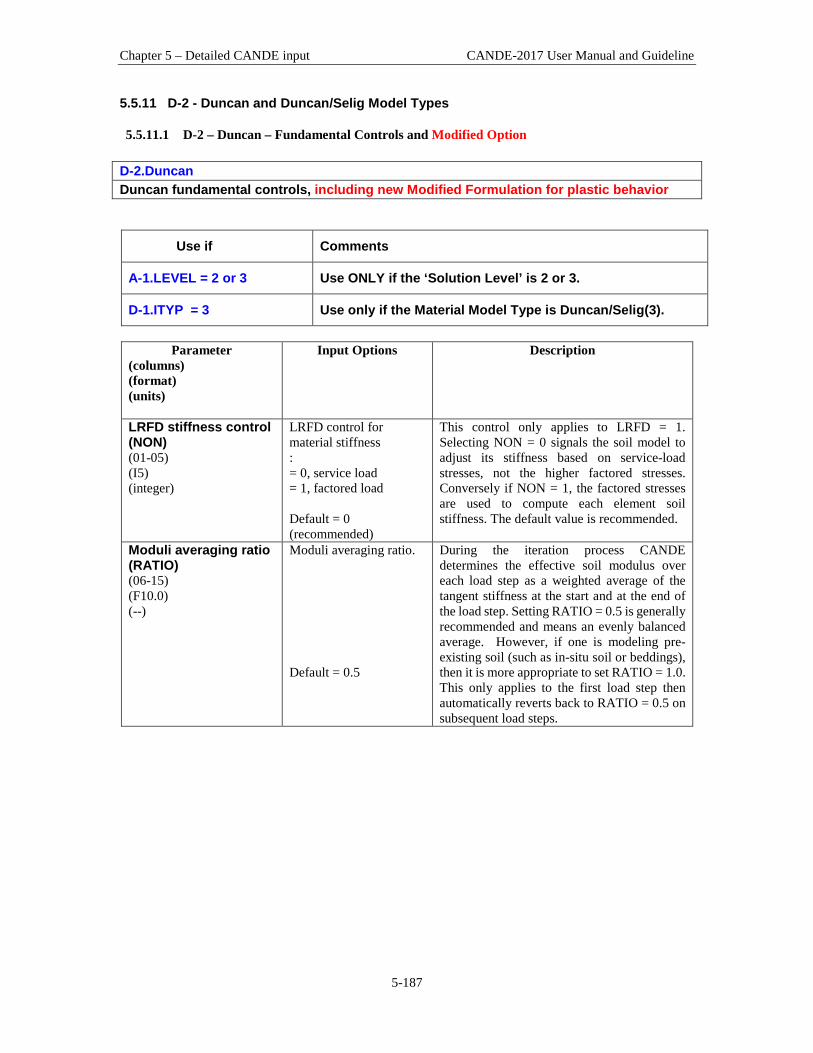
Chapter 5 – Detailed CANDE input CANDE-2017 User Manual and Guideline
5-187
5.5.11 D-2 - Duncan and Duncan/Selig Model Types
5.5.11.1 D-2 – Duncan – Fundamental Controls and Modified Option D-2.Duncan Duncan fundamental controls, including new Modified Formulation for plastic behavior
Use if Comments
A-1.LEVEL = 2 or 3 Use ONLY if the ‘Solution Level’ is 2 or 3.
D-1.ITYP = 3 Use only if the Material Model Type is Duncan/Selig(3).
Parameter
(columns) (format) (units)
Input Options Description
LRFD stiffness control (NON) (01-05) (I5) (integer)
LRFD control for material stiffness : = 0, service load = 1, factored load Default = 0 (recommended)
This control only applies to LRFD = 1. Selecting NON = 0 signals the soil model to adjust its stiffness based on service-load stresses, not the higher factored stresses. Conversely if NON = 1, the factored stresses are used to compute each element soil stiffness. The default value is recommended.
Moduli averaging ratio (RATIO) (06-15) (F10.0) (--)
Moduli averaging ratio. Default = 0.5
During the iteration process CANDE determines the effective soil modulus over each load step as a weighted average of the tangent stiffness at the start and at the end of the load step. Setting RATIO = 0.5 is generally recommended and means an evenly balanced average. However, if one is modeling pre-existing soil (such as in-situ soil or beddings), then it is more appropriate to set RATIO = 1.0. This only applies to the first load step then automatically reverts back to RATIO = 0.5 on subsequent load steps.
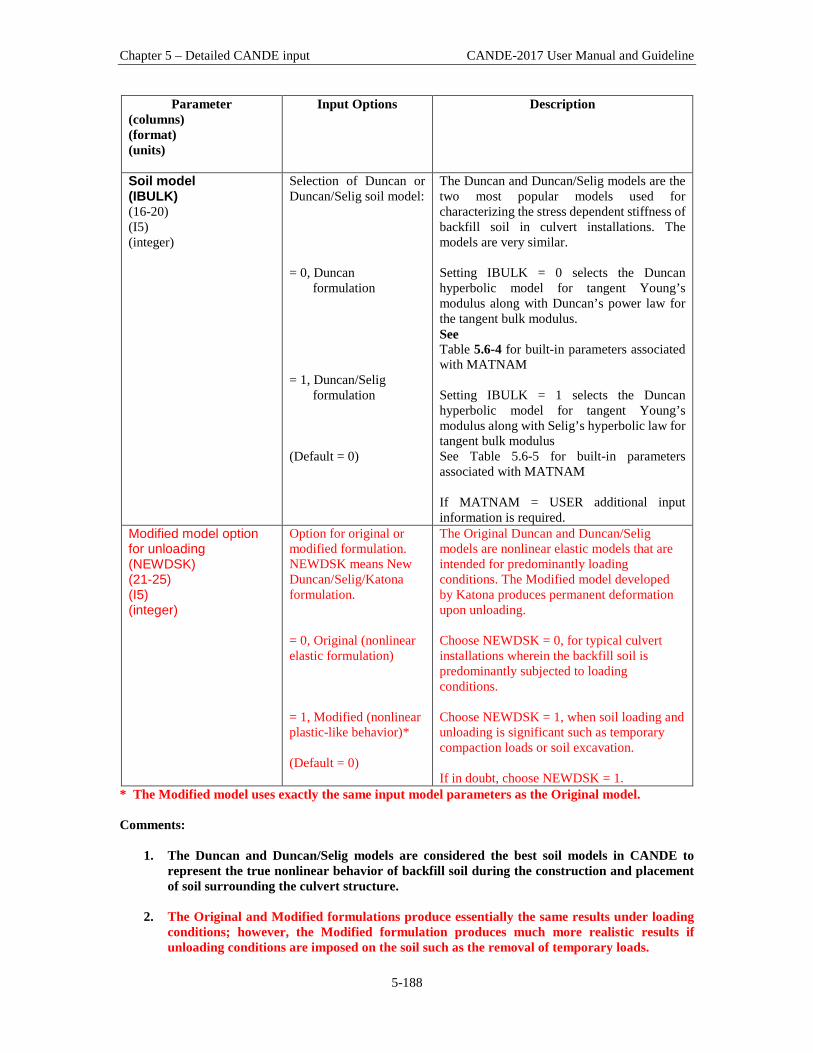
Chapter 5 – Detailed CANDE input CANDE-2017 User Manual and Guideline
5-188
Parameter (columns) (format) (units)
Input Options Description
Soil model (IBULK) (16-20) (I5) (integer)
Selection of Duncan or Duncan/Selig soil model: = 0, Duncan formulation = 1, Duncan/Selig formulation (Default = 0)
The Duncan and Duncan/Selig models are the two most popular models used for characterizing the stress dependent stiffness of backfill soil in culvert installations. The models are very similar. Setting IBULK = 0 selects the Duncan hyperbolic model for tangent Young’s modulus along with Duncan’s power law for the tangent bulk modulus. See Table 5.6-4 for built-in parameters associated with MATNAM Setting IBULK = 1 selects the Duncan hyperbolic model for tangent Young’s modulus along with Selig’s hyperbolic law for tangent bulk modulus See Table 5.6-5 for built-in parameters associated with MATNAM If MATNAM = USER additional input information is required.
Modified model option for unloading (NEWDSK) (21-25) (I5) (integer)
Option for original or modified formulation. NEWDSK means New Duncan/Selig/Katona formulation. = 0, Original (nonlinear elastic formulation) = 1, Modified (nonlinear plastic-like behavior)* (Default = 0)
The Original Duncan and Duncan/Selig models are nonlinear elastic models that are intended for predominantly loading conditions. The Modified model developed by Katona produces permanent deformation upon unloading. Choose NEWDSK = 0, for typical culvert installations wherein the backfill soil is predominantly subjected to loading conditions. Choose NEWDSK = 1, when soil loading and unloading is significant such as temporary compaction loads or soil excavation. If in doubt, choose NEWDSK = 1.
* The Modified model uses exactly the same input model parameters as the Original model. Comments:
1. The Duncan and Duncan/Selig models are considered the best soil models in CANDE to represent the true nonlinear behavior of backfill soil during the construction and placement of soil surrounding the culvert structure.
2. The Original and Modified formulations produce essentially the same results under loading
conditions; however, the Modified formulation produces much more realistic results if unloading conditions are imposed on the soil such as the removal of temporary loads.

Chapter 5 – Detailed CANDE input CANDE-2017 User Manual and Guideline
5-189
If MATNAM = USER, proceed to lines D-3 and D-4 Otherwise input is complete for this material, next step options:
• Return to line D-1 for more material input, or • If LRFD= 1, Proceed to Part E, otherwise • Input is complete, insert STOP command (line A-1)
Table 5.6-11 – Material names (MATNAM) and values for Duncan model (IBULK=0)
MATNAM
(word)*
Young’s Tangent Modulus Parameters Bulk Parameters Density reference
(lb/ft3) K n C φ 0 Δφ R f K b m
(--) (--) (psi) (deg) (deg) (--) (--) (--) CA105 600 0.40 0.0 42 9 0.7 175 0.2 150 CA95 300 0.40 0.0 36 5 0.7 75 0.2 140 CA90 200 0.40 0.0 33 3 0.7 50 0.2 135 SM100 600 0.25 0.0 36 8 0.7 450 0.0 135 SM90 300 0.25 0.0 32 4 0.7 250 0.0 125 SM85 150 0.25 0.0 30 2 0.7 150 0.0 120 SC100 400 0.60 3.5 33 0 0.7 200 0.5 135 SC90 150 0.60 2.1 33 0 0.7 75 0.5 125 SC85 100 0.60 1.4 33 0 0.7 50 0.5 120 CL100 150 0.45 2.8 30 0 0.7 140 0.2 135 CL90 90 0.45 1.4 30 0 0.7 80 0.2 125 CL85 60 0.45 0.7 30 0 0.7 50 0.2 120
*MATNAM is composed of two letters and a number defined as follows: CA = Course Aggregates, SM = Silty Sand, SC = Silty-Clayey Sand and CL = Silty Clay Number = percent relative compaction, per AASHTO T-99 Table 5.6-12 – Material names (MATNAM) and values for Duncan/Selig model (IBULK=1)
MATNAM
(word)**
Young’s Tangent Modulus Parameters Bulk Parameters***
Density reference
(lb/ft3) K n C φ 0 Δφ R f B i / P a ε u (--) (--) (psi) (deg) (deg) (--) (--) (--)
SW100 1300 0.90 0.0 54 15 0.65 108.8 0.01 148 SW95 950 0.60 0.0 48 8.0 0.70 74.8 0.02 145 SW90 640 0.43 0.0 42 4.0 0.75 40.8 0.05 140 SW85 450 0.35 0.0 38 2.0 0.80 12.7 0.08 130 SW80 320 0.35 0.0 36 1.0 0.90 6.1 0.11 120 ML95 440 0.40 4.0 34 0.0 0.95 48.3 0.06 135 ML90 200 0.26 3.5 32 0.0 0.89 18.4 0.10 130 ML85 110 0.25 3.0 30 0.0 0.85 9.5 0.14 122 ML80 75 0.25 2.5 28 0.0 0.80 5.1 0.19 115 ML50 16 0.95 0.0 23 0.0 0.55 1.3 0.43 66 CL95 120 0.45 9.0 15 4.0 1.00 21.2 0.13 130 CL90 75 0.54 7.0 17 7.0 0.94 10.2 0.17 125 CL85 50 0.60 6.0 18 8.0 0.90 5.2 0.21 120 CL80 35 0.66 5.0 19 8.5 0.87 3.5 0.25 112
**MATNAM is composed of two letters and a number defined as follows: SW = Gravelly Sand, ML = Sandy Silt, and CL = Silty Clay Number = percent relative compaction, per AASHTO T-99

Chapter 5 – Detailed CANDE input CANDE-2017 User Manual and Guideline
5-190
*** Selig’s bulk parameters are the original “hydrostatic” values based directly on test hydrostatic test data. These parameter values are more generally accepted than his subsequent set of “modified” values which were uniformly changed to provide a stiffer bulk modulus. Many investigators believe that the original hydrostatic values are better than the modified values because they are based on actual measurements and are more conservative. The distinction between the behavior of original Duncan/Selig model and the Katona modification for plastic-like behavior upon unloading is shown in the two sets of figures below, The first set of figures shows that upon unloading the original model retraces the same stress-strain path as the loading path, which is illustrated for tri-axial and the hydrostatic response behavior.
σavg
εvolBinitial
σ1
ε1
Einitial
Tri-axial load/unload response Hydrostatic load/unload response
The second set of figures shows that upon unloading and reloading the modified model exhibits plastic like behavior that is representative of actual soil behavior. Unloading and reloading from a tri-axial loading path follows a linear-elastic path whose Young’s modulus is equal to the initial modulus. Unloading and reloading from a hydrostatic loading path follows a linear-elastic path whose bulk modulus is the tangent bulk modulus at the stress level of departure.
σavg
εvol
● Btangent
σ1
ε1
Einitial ●
Tri-axial load/unload response Hydrostatic load/unload response
Additional detail is provided in the CANDE-2017 Solution Methods and Formulations Manual including the development of history variables used to track the boundaries between linear and nonlinear stress space.
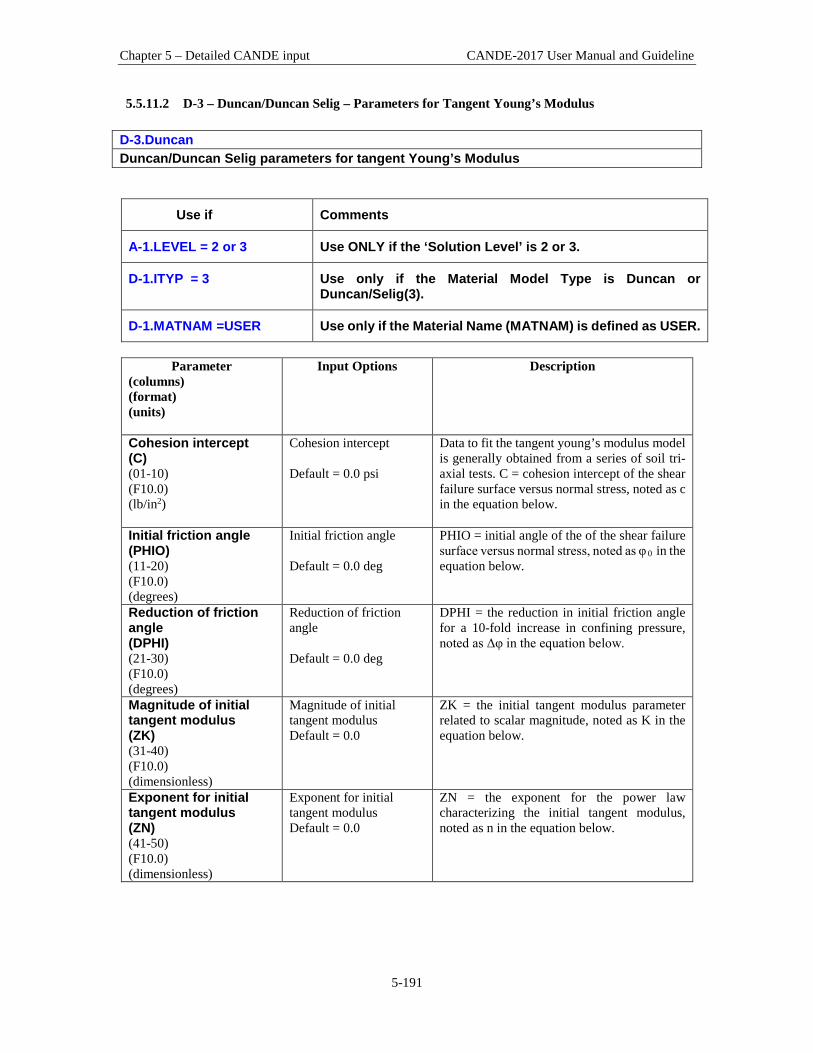
Chapter 5 – Detailed CANDE input CANDE-2017 User Manual and Guideline
5-191
5.5.11.2 D-3 – Duncan/Duncan Selig – Parameters for Tangent Young’s Modulus D-3.Duncan Duncan/Duncan Selig parameters for tangent Young’s Modulus
Use if Comments
A-1.LEVEL = 2 or 3 Use ONLY if the ‘Solution Level’ is 2 or 3.
D-1.ITYP = 3 Use only if the Material Model Type is Duncan or Duncan/Selig(3).
D-1.MATNAM =USER Use only if the Material Name (MATNAM) is defined as USER.
Parameter
(columns) (format) (units)
Input Options Description
Cohesion intercept (C) (01-10) (F10.0) (lb/in2)
Cohesion intercept Default = 0.0 psi
Data to fit the tangent young’s modulus model is generally obtained from a series of soil tri-axial tests. C = cohesion intercept of the shear failure surface versus normal stress, noted as c in the equation below.
Initial friction angle (PHIO) (11-20) (F10.0) (degrees)
Initial friction angle Default = 0.0 deg
PHIO = initial angle of the of the shear failure surface versus normal stress, noted as φ 0 in the equation below.
Reduction of friction angle (DPHI) (21-30) (F10.0) (degrees)
Reduction of friction angle Default = 0.0 deg
DPHI = the reduction in initial friction angle for a 10-fold increase in confining pressure, noted as Δφ in the equation below.
Magnitude of initial tangent modulus (ZK) (31-40) (F10.0) (dimensionless)
Magnitude of initial tangent modulus Default = 0.0
ZK = the initial tangent modulus parameter related to scalar magnitude, noted as K in the equation below.
Exponent for initial tangent modulus (ZN) (41-50) (F10.0) (dimensionless)
Exponent for initial tangent modulus Default = 0.0
ZN = the exponent for the power law characterizing the initial tangent modulus, noted as n in the equation below.

Chapter 5 – Detailed CANDE input CANDE-2017 User Manual and Guideline
5-192
Parameter (columns) (format) (units)
Input Options Description
Ratio of actual failure stress to model’s ultimate (RF) (51-60) (F10.0) (dimensionless)
Ratio of actual failure stress to model’s ultimate stress limit
RF = ratio of observed failure stress to the ultimate asymptotic failure stress that characterizes the model, noted as R f in the equation below.
Comment on Modification to basic tangent Young’s modulus function for plastic-like behavior.
• Tangent modulus: E t = E i (1 – β(σ d /σ d(MC) )2 • Initial modulus: E i = KP a (σ 3 /P a )n • Mohr-Coulomb failure: σ d(MC) = 2(Ccosφ + σ 3 sinφ)/(Rf(1- sinφ)) • Friction angle (rads): φ = φ 0 – Δφ log 10 (σ 3 /P a )
Where σ 1 and σ 3 are principal stresses, σ d = σ 1 - σ 3 is deviatoric stress, and P a is atmospheric pressure (14.7 psi). The variable β is new. For the Original formulation, β ≡ 1, and for the Modified formulation β is a function shown below such that 0 ≤ β ≤ 1. The beta function satisfies the continuity requirement in transforming from loading to unloading stiffness. See the CANDE-2017 Solutions and Formulations Manual or Reference 10 for complete details.
Proceed to line D-4
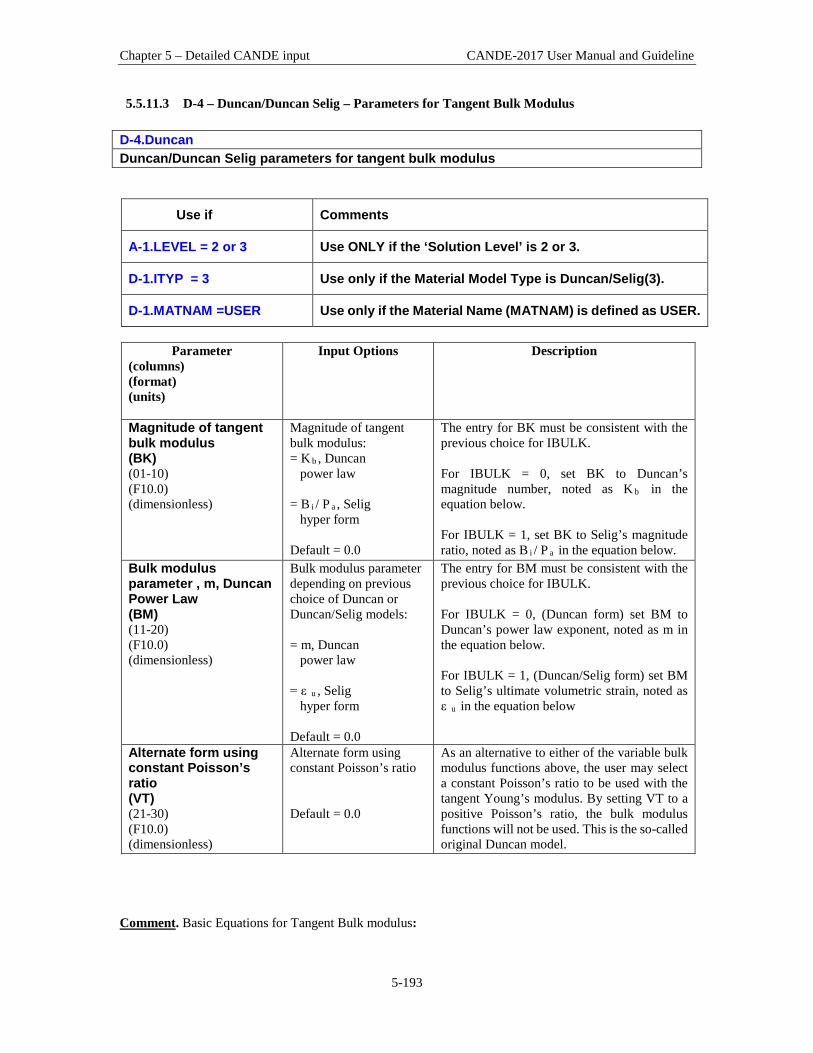
Chapter 5 – Detailed CANDE input CANDE-2017 User Manual and Guideline
5-193
5.5.11.3 D-4 – Duncan/Duncan Selig – Parameters for Tangent Bulk Modulus D-4.Duncan Duncan/Duncan Selig parameters for tangent bulk modulus
Use if Comments
A-1.LEVEL = 2 or 3 Use ONLY if the ‘Solution Level’ is 2 or 3.
D-1.ITYP = 3 Use only if the Material Model Type is Duncan/Selig(3).
D-1.MATNAM =USER Use only if the Material Name (MATNAM) is defined as USER.
Parameter
(columns) (format) (units)
Input Options Description
Magnitude of tangent bulk modulus (BK) (01-10) (F10.0) (dimensionless)
Magnitude of tangent bulk modulus: = K b , Duncan power law = B i / P a , Selig hyper form Default = 0.0
The entry for BK must be consistent with the previous choice for IBULK. For IBULK = 0, set BK to Duncan’s magnitude number, noted as K b in the equation below. For IBULK = 1, set BK to Selig’s magnitude ratio, noted as B i / P a in the equation below.
Bulk modulus parameter , m, Duncan Power Law (BM) (11-20) (F10.0) (dimensionless)
Bulk modulus parameter depending on previous choice of Duncan or Duncan/Selig models: = m, Duncan power law = ε u , Selig hyper form Default = 0.0
The entry for BM must be consistent with the previous choice for IBULK. For IBULK = 0, (Duncan form) set BM to Duncan’s power law exponent, noted as m in the equation below. For IBULK = 1, (Duncan/Selig form) set BM to Selig’s ultimate volumetric strain, noted as ε u in the equation below
Alternate form using constant Poisson’s ratio (VT) (21-30) (F10.0) (dimensionless)
Alternate form using constant Poisson’s ratio Default = 0.0
As an alternative to either of the variable bulk modulus functions above, the user may select a constant Poisson’s ratio to be used with the tangent Young’s modulus. By setting VT to a positive Poisson’s ratio, the bulk modulus functions will not be used. This is the so-called original Duncan model.
Comment. Basic Equations for Tangent Bulk modulus:

Chapter 5 – Detailed CANDE input CANDE-2017 User Manual and Guideline
5-194
• Power law (Duncan): B t = P a K b (σ 3 /P a )m, where σ 3 is minimum principal stress.
• Hyperbolic form (Selig): B t = Pa(B i / P a ) (1+ σ m /( B i ε u ))2, where σ m is average stress.
• The parameters of Selig’s hyperbolic model are easily characterized with hydrostatic test data, and the hyperbolic model is considered to be more realistic than the power law model.
• The user may choose either the hyperbolic bulk modulus function, and bulk are operable in original and the
Return to line D-1 for more material definition if needed. Proceed to Part E if LRFD = 1 Otherwise, this completes the input stream for this problem – insert STOP command.
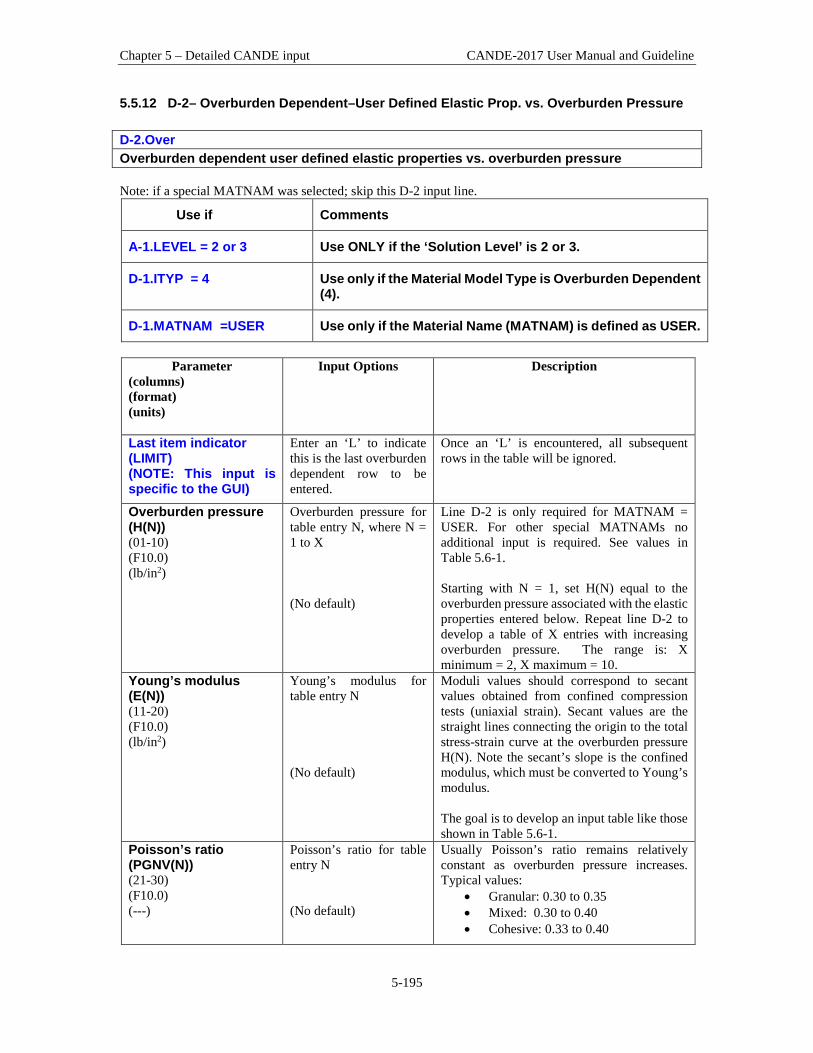
Chapter 5 – Detailed CANDE input CANDE-2017 User Manual and Guideline
5-195
5.5.12 D-2– Overburden Dependent–User Defined Elastic Prop. vs. Overburden Pressure D-2.Over Overburden dependent user defined elastic properties vs. overburden pressure Note: if a special MATNAM was selected; skip this D-2 input line.
Use if Comments
A-1.LEVEL = 2 or 3 Use ONLY if the ‘Solution Level’ is 2 or 3.
D-1.ITYP = 4 Use only if the Material Model Type is Overburden Dependent (4).
D-1.MATNAM =USER Use only if the Material Name (MATNAM) is defined as USER.
Parameter
(columns) (format) (units)
Input Options Description
Last item indicator (LIMIT) (NOTE: This input is specific to the GUI)
Enter an ‘L’ to indicate this is the last overburden dependent row to be entered.
Once an ‘L’ is encountered, all subsequent rows in the table will be ignored.
Overburden pressure (H(N)) (01-10) (F10.0) (lb/in2)
Overburden pressure for table entry N, where N = 1 to X (No default)
Line D-2 is only required for MATNAM = USER. For other special MATNAMs no additional input is required. See values in Table 5.6-1. Starting with N = 1, set H(N) equal to the overburden pressure associated with the elastic properties entered below. Repeat line D-2 to develop a table of X entries with increasing overburden pressure. The range is: X minimum = 2, X maximum = 10.
Young’s modulus (E(N)) (11-20) (F10.0) (lb/in2)
Young’s modulus for table entry N (No default)
Moduli values should correspond to secant values obtained from confined compression tests (uniaxial strain). Secant values are the straight lines connecting the origin to the total stress-strain curve at the overburden pressure H(N). Note the secant’s slope is the confined modulus, which must be converted to Young’s modulus. The goal is to develop an input table like those shown in Table 5.6-1.
Poisson’s ratio (PGNV(N)) (21-30) (F10.0) (---)
Poisson’s ratio for table entry N (No default)
Usually Poisson’s ratio remains relatively constant as overburden pressure increases. Typical values:
• Granular: 0.30 to 0.35 • Mixed: 0.30 to 0.40 • Cohesive: 0.33 to 0.40

Chapter 5 – Detailed CANDE input CANDE-2017 User Manual and Guideline
5-196
Parameter (columns) (format) (units)
Input Options Description
Last Table Entry (XEND) (31-33) (A3) (word)
Last table entry = END, end D-2. = blank, continue to read D-2 lines
Line D-2 will continue to be read by the program until the word “END” is encountered in columns 31 to 33. (NOTE: The GUI automatically inserts the value based if an ‘L’ input in the first parameter (LIMIT).
Comment: The overburden dependent model is only valid in soil zones that are essentially experiencing one-dimensional compression (uniaxial strain) such as an embankment soil zone that is outside the influence of soil structure interaction. The advantage of the overburden dependent model is that iterations are not required to advance the load step because the overburden stress acting on each element is assumed to be statically determinate based the current height of soil cover above each element. Accordingly, the appropriate incremental elastic properties are interpolated directly from the input table of properties. Return to line D-1 for more material definition if needed. Proceed to Part E if LRFD = 1 Otherwise, this completes the input stream for this problem.

Chapter 5 – Detailed CANDE input CANDE-2017 User Manual and Guideline
5-197
Table 5.6-13 – Material names (MATNAM) and values for Overburden Dependent Model Soil Class→
Compaction→ MATNAM→
Granular Mixed Cohesive Good Fair Good Fair Good Fair
GGOOD GFAIR MGOOD MFAIR CGOOD CFAIR Overburden
Pressure psi
Young’s Modulus
psi
Young’s Modulus
psi
Young’s Modulus
psi
Young’s Modulus
psi
Young’s Modulus
psi
Young’s Modulus
psi 5
1,100 550 600 400 250 150
10
1,300 750 850 550 325 200
15
1,500 850 1,000 600 375 225
20
1,650 1,000 1,100 700 375 250
25
1,800 1,100 1,200 750 400 250
30
1,900 1,150 1,250 800 400 250
40
2,100 1,300 1,350 900 400 250
50
2,250 1,400 1,450 900 400 250
Comments
• Three soil classes are identified as Granular, Mixed, and Cohesive and each soil class is characterized with two broad levels of compaction Good and Fair. The intent is to provide a set of conservative soil properties for design if there is not specific soil data to develop a user defined table.
• The first letter in the special MATNAM names represents the soil class and the remaining four letters represent the compaction level.
• The entries in Table 5.6-1 are the secant values of Young’s modulus for soils in a state of confined compression (uniaxial strain). In CANDE the secant values are converted to chord values for incremental stress-strain relationships.
• In all cases Poisson’s ratio is assumed constant with overburden pressure and set equal to 0.33 • For the case MATNAM = USER, then the user completes a set of D-2 cards that provides input
information similar to one of the MATNAM columns in the above table.

Chapter 5 – Detailed CANDE input CANDE-2017 User Manual and Guideline
5-198
5.5.13 D-2 – Extended Hardin Soil Model If MATNAM is defined with a “Special Name” use line D-2 entitled, “Hardin Soil Model Input for Special MATNAM”, listed directly below. Otherwise, if MATNAM is defined as USER proceed to line D-2 entitled, “Hardin Soil Model Input for MATNAM = USER”.
5.5.13.1 D-2 – Hardin Soil Model Input for Special MATNAM D-2.Hardin Extended Hardin Poisson’s ratio parameters and physical soil property input
Use if Comments
A-1.LEVEL = 2 or 3 Use ONLY if the ‘Solution Level’ is 2 or 3.
D-1.ITYP = 5 Use only if the Material Model Type is Extended Hardin (5).
D-1.MATNAM =GRAN, MIXE or COHE
Use only if the Material Name (MATNAM) is defined as ‘granular soil’ (GRAN), ‘mixed soil’ (MIXE) or ‘cohesive soil’ (COHE).
Parameter
(columns) (format) (units)
Input Options Description
Poisson’s ratio for low shear strain. (XNUMIN) (01-10) (F10.0) (dimensionless)
Poisson’s ratio for low shear strain. Default = 0.01 for GRAN, MIXE, and COHE
XNUMIN is a parameter for the hyperbolic Poisson ratio function representing the minimum value of Poisson’s ratio at low shear strain. The default value was calibrated for sand (MATNAM=GRAN), but may be used for mixed and cohesive soils.
Poisson’s ratio for high shear strain (XNUMAX) (11-20) (F10.0) (dimensionless)
Poisson’s ratio for high shear strain. Default = 0.49 for GRAN, MIXE, and COHE
XNUMAX is a parameter for the hyperbolic Poisson ratio function representing the maximum value of Poisson’s ratio at high shear strain. The default value was calibrated for sand (MATNAM=GRAN), but may be used for mixed and cohesive soils.
Shape parameter for Poisson ratio function (XQ) (21-30) (F10.0) (dimensionless)
Shape parameter for Poisson ratio function. Default = 0.26 for GRAN, MIXE, and COHE
XQ is a shape parameter for the hyperbolic Poisson ratio function, which increases the rate of the Poisson value between the low and high limits. The default value was calibrated for sand (MATNAM=GRAN), but may be used for mixed and cohesive soils.
Void ratio of soil (VOIDR) (31-40) (F10.0) (dimensionless)
Void ratio of soil. Default values: = 0.60 GRAN = 0.50 MIXE = 1.00 COHE
Void ratio is the ratio of void space per unit volume divided solid space per unit volume. Values for VOIDR may range is from 0.1 to 3.0. Increased values of VOIDR result in decreased values of the secant shear stiffness.
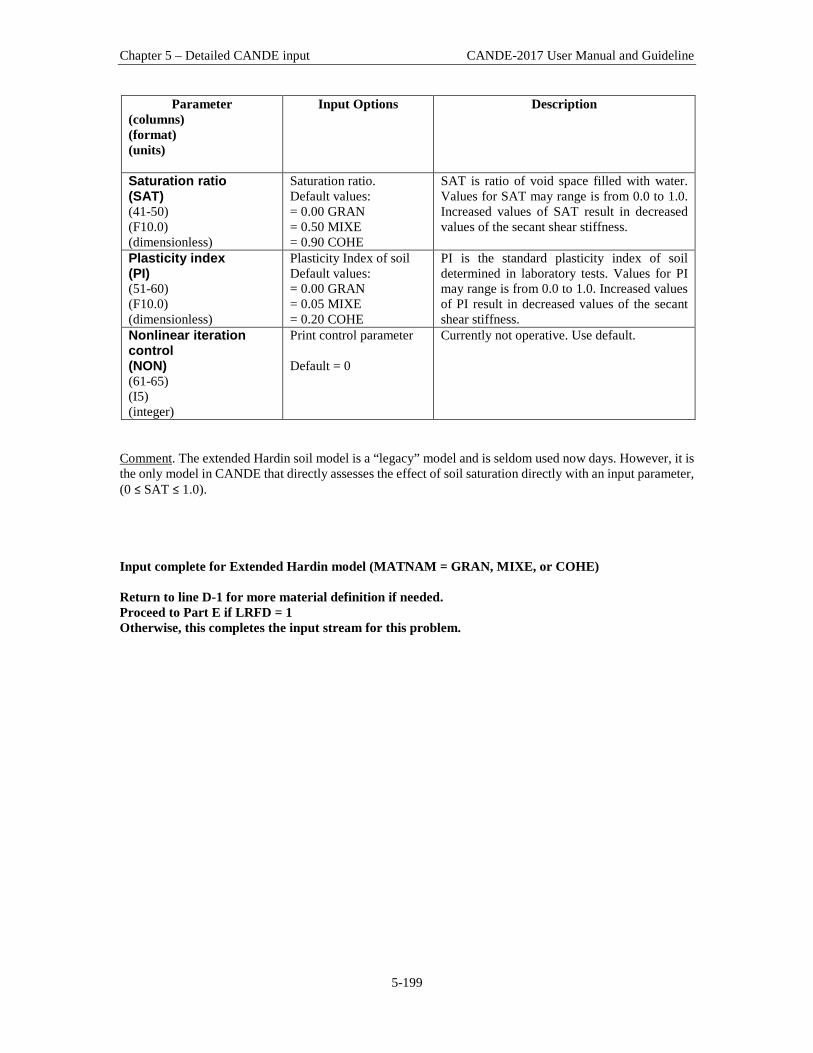
Chapter 5 – Detailed CANDE input CANDE-2017 User Manual and Guideline
5-199
Parameter (columns) (format) (units)
Input Options Description
Saturation ratio (SAT) (41-50) (F10.0) (dimensionless)
Saturation ratio. Default values: = 0.00 GRAN = 0.50 MIXE = 0.90 COHE
SAT is ratio of void space filled with water. Values for SAT may range is from 0.0 to 1.0. Increased values of SAT result in decreased values of the secant shear stiffness.
Plasticity index (PI) (51-60) (F10.0) (dimensionless)
Plasticity Index of soil Default values: = 0.00 GRAN = 0.05 MIXE = 0.20 COHE
PI is the standard plasticity index of soil determined in laboratory tests. Values for PI may range is from 0.0 to 1.0. Increased values of PI result in decreased values of the secant shear stiffness.
Nonlinear iteration control (NON) (61-65) (I5) (integer)
Print control parameter Default = 0
Currently not operative. Use default.
Comment. The extended Hardin soil model is a “legacy” model and is seldom used now days. However, it is the only model in CANDE that directly assesses the effect of soil saturation directly with an input parameter, (0 ≤ SAT ≤ 1.0). Input complete for Extended Hardin model (MATNAM = GRAN, MIXE, or COHE) Return to line D-1 for more material definition if needed. Proceed to Part E if LRFD = 1 Otherwise, this completes the input stream for this problem.
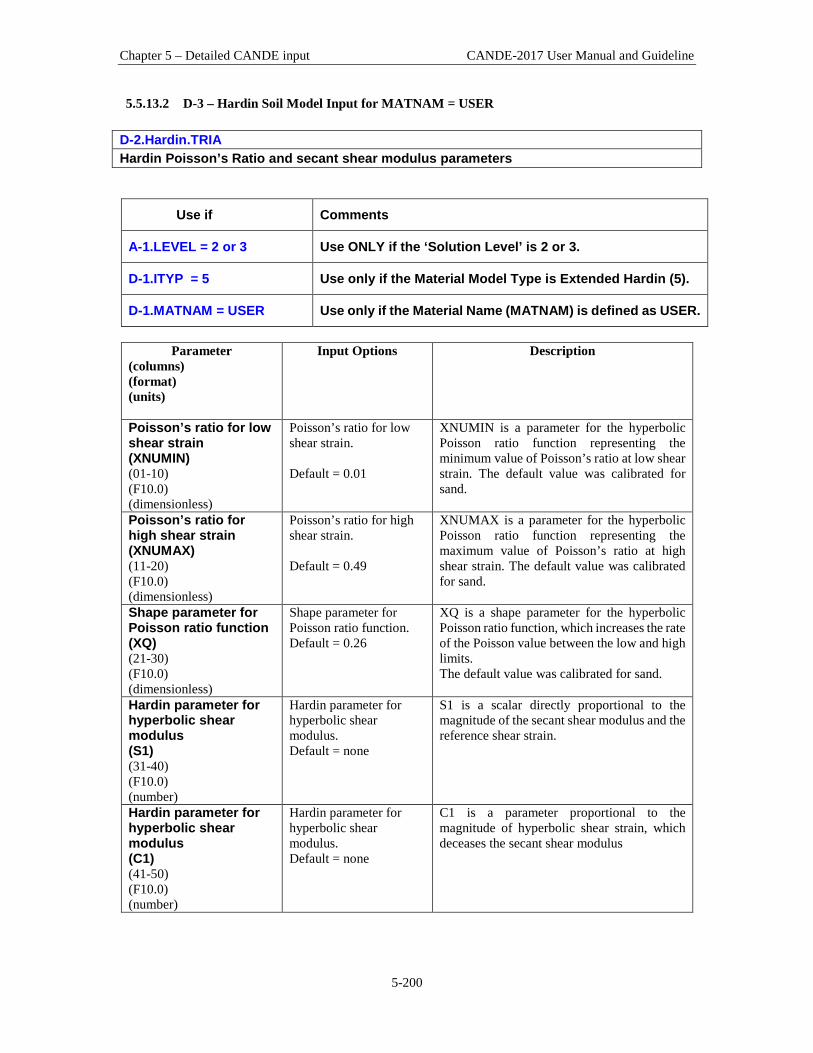
Chapter 5 – Detailed CANDE input CANDE-2017 User Manual and Guideline
5-200
5.5.13.2 D-3 – Hardin Soil Model Input for MATNAM = USER D-2.Hardin.TRIA Hardin Poisson’s Ratio and secant shear modulus parameters
Use if Comments
A-1.LEVEL = 2 or 3 Use ONLY if the ‘Solution Level’ is 2 or 3.
D-1.ITYP = 5 Use only if the Material Model Type is Extended Hardin (5).
D-1.MATNAM = USER Use only if the Material Name (MATNAM) is defined as USER.
Parameter
(columns) (format) (units)
Input Options Description
Poisson’s ratio for low shear strain (XNUMIN) (01-10) (F10.0) (dimensionless)
Poisson’s ratio for low shear strain. Default = 0.01
XNUMIN is a parameter for the hyperbolic Poisson ratio function representing the minimum value of Poisson’s ratio at low shear strain. The default value was calibrated for sand.
Poisson’s ratio for high shear strain (XNUMAX) (11-20) (F10.0) (dimensionless)
Poisson’s ratio for high shear strain. Default = 0.49
XNUMAX is a parameter for the hyperbolic Poisson ratio function representing the maximum value of Poisson’s ratio at high shear strain. The default value was calibrated for sand.
Shape parameter for Poisson ratio function (XQ) (21-30) (F10.0) (dimensionless)
Shape parameter for Poisson ratio function. Default = 0.26
XQ is a shape parameter for the hyperbolic Poisson ratio function, which increases the rate of the Poisson value between the low and high limits. The default value was calibrated for sand.
Hardin parameter for hyperbolic shear modulus (S1) (31-40) (F10.0) (number)
Hardin parameter for hyperbolic shear modulus. Default = none
S1 is a scalar directly proportional to the magnitude of the secant shear modulus and the reference shear strain.
Hardin parameter for hyperbolic shear modulus (C1) (41-50) (F10.0) (number)
Hardin parameter for hyperbolic shear modulus. Default = none
C1 is a parameter proportional to the magnitude of hyperbolic shear strain, which deceases the secant shear modulus

Chapter 5 – Detailed CANDE input CANDE-2017 User Manual and Guideline
5-201
Parameter (columns) (format) (units)
Input Options Description
Hardin parameter for hyperbolic shear modulus (A) (51-60) (F10.0) (dimensionless)
Hardin parameter for hyperbolic shear modulus. Default = none
A is parameter associated with the increase of hyperbolic shear strain, which deceases the secant shear modulus
Nonlinear iteration control (NON) (61-65) (I5) (integer)
Print control parameter Default = 0
Currently not operative. Use default.
Comment: This form of the Extended HARDIN soil model is intended be used in conjunction with tri-axial soil test data (MATNAM = USER). See CANDE-2017 Formulations and Solution Methods for curve fitting procedures for Hardin parameters. Return to line D-1 for more material definition if needed. Proceed to Part E if LRFD = 1 Otherwise, this completes the input stream for this problem.
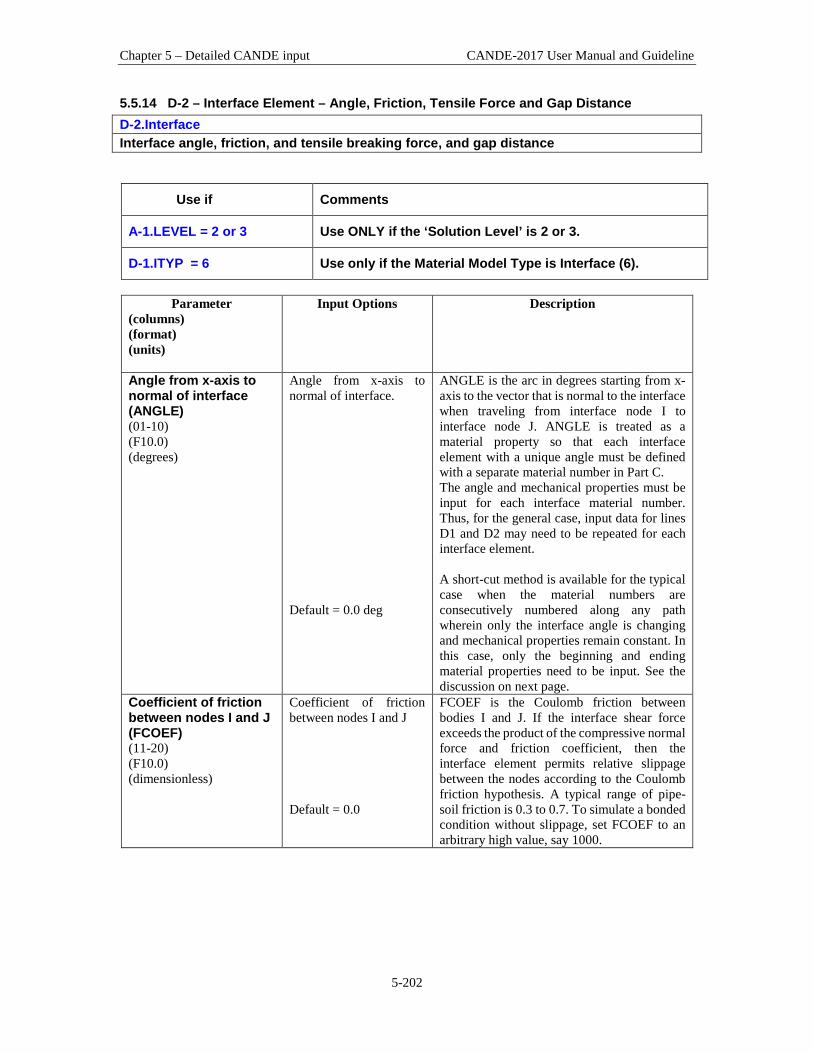
Chapter 5 – Detailed CANDE input CANDE-2017 User Manual and Guideline
5-202
5.5.14 D-2 – Interface Element – Angle, Friction, Tensile Force and Gap Distance D-2.Interface Interface angle, friction, and tensile breaking force, and gap distance
Use if Comments
A-1.LEVEL = 2 or 3 Use ONLY if the ‘Solution Level’ is 2 or 3.
D-1.ITYP = 6 Use only if the Material Model Type is Interface (6).
Parameter
(columns) (format) (units)
Input Options Description
Angle from x-axis to normal of interface (ANGLE) (01-10) (F10.0) (degrees)
Angle from x-axis to normal of interface. Default = 0.0 deg
ANGLE is the arc in degrees starting from x-axis to the vector that is normal to the interface when traveling from interface node I to interface node J. ANGLE is treated as a material property so that each interface element with a unique angle must be defined with a separate material number in Part C. The angle and mechanical properties must be input for each interface material number. Thus, for the general case, input data for lines D1 and D2 may need to be repeated for each interface element. A short-cut method is available for the typical case when the material numbers are consecutively numbered along any path wherein only the interface angle is changing and mechanical properties remain constant. In this case, only the beginning and ending material properties need to be input. See the discussion on next page.
Coefficient of friction between nodes I and J (FCOEF) (11-20) (F10.0) (dimensionless)
Coefficient of friction between nodes I and J Default = 0.0
FCOEF is the Coulomb friction between bodies I and J. If the interface shear force exceeds the product of the compressive normal force and friction coefficient, then the interface element permits relative slippage between the nodes according to the Coulomb friction hypothesis. A typical range of pipe-soil friction is 0.3 to 0.7. To simulate a bonded condition without slippage, set FCOEF to an arbitrary high value, say 1000.

Chapter 5 – Detailed CANDE input CANDE-2017 User Manual and Guideline
5-203
Parameter (columns) (format) (units)
Input Options Description
Tensile breaking force of contact nodes (TENSIL) (21-30) (F10.0) (lbs/in)
Tensile breaking force of contact nodes I and J. Default = 1.0 lb/in
TENSIL is the force per unit length required to break the bond between nodes I and J. Should the interface normal force exceed the tensile breaking limit (TENSIL), the contact surfaces will separate from each other and only re-bond if subsequent loading brings them back together. To simulate a bonded condition without tensile rupture, set TENSIL to an arbitrary high value, say 10,000.
Gap distance in normal direction (XNGAP) (31-40) (F10.0) (inches)
Initial normal gap distance between two nodes (positive value) Default = 0.0
XNGAP is the initial gap distance in the direction of the interface angle between two bodies containing nodes I and J. If the gap distance is specified to be zero (default), then the interface behaves as expected (i.e., as described in Solution Methods and Formulations Manual). However, if XNGAP is defined greater than zero, the two nodes I and J respond independently from each other until the normal gap becomes closed. Once the normal gap is closed the interface behavior follows the original formulation.
Discussion of Short-Cut method of input for interface element properties. The so-called short cut method of input is a reduction in the number of repetitions of lines D1&D2. This short cut is applicable to many common interface situations, and in particular, it is applicable to all interface options associated with Level 2. The short cut method requires that the interface material numbers are consecutively numbered along the interface path and that the mechanical properties (friction coefficient and tension resistance) remain the same along the path but not necessarily the interface angle. The short-cut method only requires input for the first and last material number in the sequence, that is, input is required for input lines D1and D2 for the first material number and input lines D1 and D2 for the last material number. Each intervening interface element material number is automatically assigned an interface angle determined by constructing a local circle through three points which include its own point’s coordinates and the point coordinates of two neighboring interface elements on either side of its own point. The angle assigned to the interface element is the angle that the radius vector makes with the x-axis. The mechanical properties assigned to each of these intervening interface materials are the same as prescribed for the first material number. In the way of an example, consider the case “Level 2-Pipe” with WORD1 = SLIP wherein there are 11 interface the interface materials starting with number 1 at the invert and proceeding counterclockwise to number 11 at the crown. (See Table 5.6-3). The corresponding angles for a circular pipe are: -90, -72, -54, -36, -18, 0, 18, 36, 54, 72, and 90. Thus the long way to input these angles would be to repeat lines D1 and D2 eleven times. The short-cut method would set I = 1 in line D1 and ANGLE = -90 in line D2 followed by one more set with I = 11 in D1 and ANGLE = +90 in D2. For the case WORD1 = SLPT, the first interface material number starts at the node above the trench floor up to number 7 at the top of the trench. For a vertical trench wall, ANGLE = 0 deg for all seven interface

Chapter 5 – Detailed CANDE input CANDE-2017 User Manual and Guideline
5-204
elements. Again, this could be established with the short-cut method with I = 1 in line D1 and ANGLE = 0 in line D2 followed by one more set with I = 7 in D1 and ANGLE = 0 in D2. In this case the straight line is converted into very large local circles to produce an interface angle equal to 0 degrees at intervening points. For the Level 2 –Arch mesh, interface material numbering starts with number 1 at the crown (ANGLE = 90 degrees) and terminates with number 19 slightly above the footing wherein (ANGLE is about 0 degrees but varies depending on arch input options). The short-cut method would set I = 1 in line D1 and ANGLE = +90 in line D2 followed by one more set with I = 19 in D1 and ANGLE = about 0 degrees in D2. Return to line D-1 for more material definition if needed. Proceed to Part E if LRFD = 1 Otherwise, this completes the input stream for this problem.

Chapter 5 – Detailed CANDE input CANDE-2017 User Manual and Guideline
5-205
5.5.15 D-2 – Composite Link Element – Beam groups and composite fraction D-2. Composite link Input beam groups and fraction of composite action
Use if Comments
A-1.LEVEL = 2 or 3 Use ONLY if the ‘Solution Level’ is set to 2 or 3.
D-1.ITYP = 7 Use only if the Material Model Type is Composite Link Element (ITYP=7)
Parameter
(columns) (format) (units)
Input Options Description
First beam group # (LNKGRP1) (01-05) (I5) (Integer)
Group number of 1st beam sequence being connected Default = 1
Input the group number of the first beam sequence (e.g., group number of bottom row) that is to be connected in composite action with the second beam sequence.
Second beam group # (LNKGRP1) (06-10) (I5) (Integer)
Group number of 2nd beam sequence being connected Default = 2
Input the group number of the second beam sequence (e.g., group number of top row) that is to be connected in composite action with the first beam sequence.
Fraction full composite (XFCOMP) (11-20) (F10.0) (dimensionless)
Specified fraction of full composite action in bending. Default = 0.0 (no composite action)
Set XFCOMP = 1.0 to specify full composite bending stiffness between the two beam groups where links are inserted. If XFCOMP < 1.0, say XFCOMP = 0 .5, then composite action is reduced proportionally. In the limit with XFCOMP = 0, there is no composite action, and the two beams behave in tandem (i.e., no shear connection along the interface)
Comments
1. The user should refer to the CANDE-2017 Solutions and Formulations Manual to better understand the subtleties of the link codes 10 and 11.
2. Typically, only one material number is assigned to connect a pair of beam groups. However additional material numbers could be assigned if it was desired to change the amount of composite action (XFCOMP) along the connected surface.
Return to line D-1 for more material definition if needed. Proceed to Part E if LRFD = 1 Otherwise, this completes the input stream for this problem.

Chapter 5 – Detailed CANDE input CANDE-2017 User Manual and Guideline
5-206
5.5.16 D-2 – Mohr Coulomb Plasticity Model – Parameters D-2.MohrCoulomb Classical elastic perfectly plastic model with tension cut-off
Use if Comments
A-1.LEVEL = 2 or 3 Use ONLY if the ‘Solution Level’ is set to 2 or 3.
D-1.ITYP = 8 Use only if the Material Model Type is Mohr-Coulomb Plasticity Model, (ITYP =8).
Parameter
(columns) (format) (units)
Input Options Description
Young’s modulus (E) (01-10) (F10.0) (lb/in2)
Young’s modulus of material in zone I Default = 0.0 psi
Young’s modulus is the vertical stress per unit of vertical strain of a vertically loaded test specimen while maintaining no change in lateral pressure on the material specimen. See Table 5.6-1 for reasonable values.
Poisson’s ratio (GNU) (11-20) (F10.0) (--)
Poisson’s ratio of material in zone I Default = 0.0
Poisson’s ratio is the lateral strain divided by vertical strain of a vertically loaded test specimen while maintaining no change in lateral pressure on the material specimen.
Cohesion intercept (C) (21-30) (F10.0) (lb/in2)
Cohesion (shear stress resistance) on Mohr-Coulomb failure surface. Default = 0.0
Cohesion intercept may be determined by plotting a straight line through two tri-axial tests at failure plotted as Mohr circles on a normal-stress versus shear-stress axis. See figure below and Table 5.6-7.
Angle internal friction (PHI) (31-40) (F10.0) (degrees)
Angle ϕ of internal friction defining slope of Mohr-Coulomb failure surface. Default = 0.0
Angle of internal friction may be determined by plotting a straight line through two tri-axial tests at failure plotted as Mohr circles on a normal-stress versus shear-stress axis. See figure below and Table 5.6-7.
Angle for flow rule (PSI) (41-50) (F10.0) (degrees)
Angle ψ defining a surface whose normal defines direction of plastic strain. Default, PSI = PHI Associative flow rule.
A non-zero entry permits the use of a non-associative flow rule. That is, a surface different from the failure surface, whose normal defines the direction of plastic straining. Many investigators use the so-called dilatancy angle to define ψ.
Tension cut-off (Tcut) (41-50) (F10.0) (lbs/in2)
Tcut is the maximum average tensile stress that the material can sustain. Default, Tcut = ( ½)Ccosϕ
Tension cutoff may be specified in the range; 0 < Tcut ≤ Ccosϕ. The upper limit is at the intersection of failure surface with the normal stress axis. Generally, the default value is recommended.

Chapter 5 – Detailed CANDE input CANDE-2017 User Manual and Guideline
5-207
Comments on Mohr-Coulomb elastoplastic model.
1. The Mohr-Coulomb model, which is developed in detail in the CANDE Solution Methods and Formulations Manual, is an elastic-perfectly plastic formulation with the failure surface defined by c and ф as shown in the figure below.
2. The user may choose an associative or non-associative flow rule that dictates the direction of plastic straining. An associative flow rule uses the direction normal to the failure surface, whereas the non-associative flow rule uses the direction normal to a surface defined by the user with the angle ψ.
3. The tension cut-off algorithm is a special plastic-like formulation that limits the maximum average tensile stress to Tcut. If imposed tensile stresses exceed Tcut, then large volumetric strains will result, simulating failure.
4. Although popular with some investigators, the Mohr-Coulomb model does not have the fidelity and
flexibility of the 8-parameter Duncan/Selig soil model in representing the behavior of backfill soil in loading conditions. See Reference 9.
5. If convergence issues are encountered refer to Section 3.7.6 in CANDE Solution Methods and Formulations Manual.
The sloped line in the above figure illustrates the non-hardening failure surface of the elastic-perfectly plastic Mohr-Coulomb model, and the vertical dashed line illustrates the tension cut-off limit. A thorough development of the Mohr-Coulomb formulation is given in CANDE-2017 Solution Methods and Formulations Manual. Mohr-Coulomb Parameters. Conservative values for the elastic parameters (E and μ) were given previously in Table 5.6-6 in conjunction with the Overburden Dependent soil model. Conservative values for the Mohr-Coulomb plasticity parameters (c, ф, ψ and Tcut) are provided in the table below for the same three classes of soil and two levels of compaction. For example, the conservative recommendation for a mixed soil with a good level of compaction is c = 3.5 psi, ф = 33 degrees, ψ = 20 degrees and Tcut = 1.75 psi. Of course, it is always best to conduct tri-axial tests on the soil and determine the parameters directly. The above figure illustrates a minimum of two triaxial tests are required to define the failure surface, and the associated dilation angle may be used for the flow rule angle.
Shear Stress τ
Normal stress σnc ϕ
τmax = c - σntanϕ
(σn,τ)2 ..
..
(σn,τ)1
0 Ccotϕ
Tcut
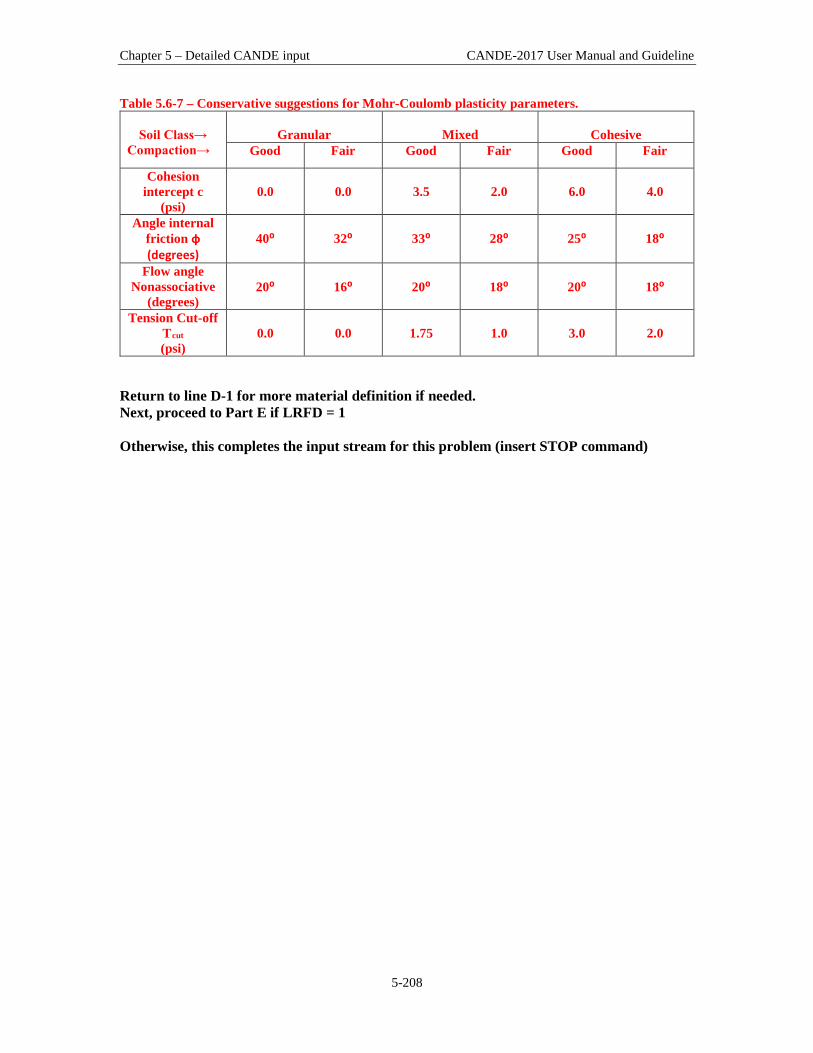
Chapter 5 – Detailed CANDE input CANDE-2017 User Manual and Guideline
5-208
Table 5.6-7 – Conservative suggestions for Mohr-Coulomb plasticity parameters.
Soil Class→ Compaction→
Granular
Mixed
Cohesive
Good Fair Good Fair Good Fair
Cohesion intercept c
(psi)
0.0
0.0
3.5
2.0
6.0
4.0
Angle internal friction ф (degrees)
40⁰
32⁰
33⁰
28⁰
25⁰
18⁰
Flow angle Nonassociative
(degrees)
20⁰
16⁰
20⁰
18⁰
20⁰
18⁰
Tension Cut-off Tcut (psi)
0.0
0.0
1.75
1.0
3.0
2.0
Return to line D-1 for more material definition if needed. Next, proceed to Part E if LRFD = 1 Otherwise, this completes the input stream for this problem (insert STOP command)

Chapter 5 – Detailed CANDE input CANDE-2017 User Manual and Guideline
5-209
5.6 Part E- Net LRFD Load Factors This section provides a description of the LRFD Load Factors. One unique net load factor must be assigned to each load step.
5.6.1 E-1 – LRFD – Net Load Factor per Load step E-1 LRFD net load factor per load step
Use if Comments
A-1.LEVEL = 2 or 3 Use ONLY if the ‘Solution Level’ is 2 or 3.
A-1.LRFD = 1 Use only if the ‘Method of Analysis’ is set to LRFD = 1.
Parameter
(columns) (format) (units)
Input Options Description
Starting load step (INCRS) (01–05) (I5) (integer)
Starting load step number to apply the same load factor Default = 1
INCRS is the load step at which the load factor below will be applied. The first E-1 input must specify INCRS = 1. Subsequent E-1 inputs for INCRS, if needed, must specify INCRS = INCRL(previous) + 1.
Last load step (INCRL) (06–10) (I5) (integer)
Last load step number to apply the same load factor Default = INCRS
INCRL is the last load step in this sequence of load steps that share the same load factor specified below. When INCRL = NINC, the input of E-1 data is complete. (NINC = total number of load steps specified in Part C)
Load factor (FACTOR) (11–20) (F10.0) (dimensionless)
LRFD load factor applied to the load steps INCRS through INCRL. Default = 1.00 See Table 5.7-1.
FACTOR is the net load factor applied to the load steps INCRS to INCRL (inclusive). It is the user’s responsibility to determine the appropriate value of FACTOR that correlates to each load step. Table 5.7-1 provides information on load factors based on the AASHTO LRFD Specification.
Comment (COMMENT) (21–60) (A40) (words)
User supplied comments to explain load factor value Default = none
The comment, which can be up to 40 characters in length, is printed out with value FACTOR for each load step. The purpose of the comment is to document the rationale for the load factor value including load modifiers, etc.
Comment: If all load steps are assigned the same load factor, then the E-1 data line need only be entered once with INCRS = 1 and INCRL = NINC and the specified FACTOR common to each increment. At the other extreme, if each load step is assigned a different load factor (for whatever reason), then line E-1 would be repeated NINC times. In this case, the first E-1 entry would be INCRS = 1, INCRL = default, and the specified FACTOR for the first load step. The second E-1 entry would be INCRS = 2, INCRL = default, and

Chapter 5 – Detailed CANDE input CANDE-2017 User Manual and Guideline
5-210
the specified FACTOR for the second load step, and so on through the last entry INCRS = NINC, INCRL = default, and the specified FACTOR for the last load step. The input for this CANDE run is now complete. Enter a STOP command (see line A-1) if no additional CANDE problems are to be included in this input file. END INPUT. Table 5.7-1 – Guidance on selecting the net load factor (FACTOR)
Culvert Type Dead Load Culvert (DC)
Earth fill Loading (EB)
Vehicle Loading (LL)
γ max γ min η DC γ max γ min η EB γ max m η LL Reinforced
Concrete pipe 1.25 0.9 ≥0.95 1.3 0.9 ≥0.95 1.75 1.0-
1.2 ≥0.95
Reinforced Concrete box
1.25 0.9 ≥0.95 1.3 0.9 ≥0.95 1.75 1.0-1.2
≥0.95
Reinforced Concrete arch
1.25 0.9 ≥0.95 1.3 0.9 ≥0.95 1.75 1.0-1.2
≥0.95
Corrugated metal pipe or arch
1.25 0.9 ≥0.95 1.95 0.9 ≥0.95 1.75 1.0-1.2
≥0.95
Corrugated metal box
1.25 0.9 ≥0.95 1.50 0.9 ≥0.95 1.75 1.0-1.2
≥0.95
Plastic pipe (HDPE or PVC)
1.25 0.9 ≥0.95 1.95 0.9 ≥0.95 1.75 1.0-1.2
≥0.95
Symbols: γ max = maximum standard load factor dependent on load case and culvert type. γ min = minimum standard load factor dependent on load case and culvert type. η DC = composite load modifier for DC load case = {(ductility)(redundancy)(importance)} η EB = composite load modifier for EB load case = {(ductility)(redundancy)(importance)} η LL = composite load modifier for LL load case = {(ductility)(redundancy)(importance)} m = multiple presence factor for LL load case IM = impact percentage for LL load case = 33%{1.0 – (Cover depth in feet)/8.0} The AASHTO LRFD specifications identify three load cases that generally pertain to buried structures; Dead load of Culvert (DC), Earth loading from Backfill operations (EB), and Live Loading of vehicles on the surface (LL). The user should define the CANDE model such that only one case of loading (DC, EB or LL) is applied to a particular load step. In this way the incremental responses from each load step can be attributed to the appropriate loading case. DC Load Case. The culvert’s dead load is often applied in the first load step if the existing in-situ soil is assumed elastic with zero body weight, or DC may be applied in the second load step if the first load step is used to characterize the deformation of the in-situ soil under its own body weight. In either event the net input value for the DC load case would generally be computed as FACTOR = γ max η DC . Here, the maximum value of the load factor is used because it is anticipated the DC load case will add to the overall culvert distress resulting from the net contribution of the remaining load steps. The combined load modifier, η DC, is a product of three factors related to ductility, redundancy and operational importance. Typically, the factors associated with ductility and operational importance are assumed to be unity, whereas the LRFD specification says that redundancy factor should be 1.05 for buried structures under dead loads. Thus, a typical net value for a DC load step is FACTOR = (1.25){(1.00) (1.05)(1.00)}= 1.31 .
Chapter 5 – Detailed CANDE input CANDE-2017 User Manual and Guideline
5-211
EB Load Case. Earth backfill loads are usually applied in ten or so incremental load steps after the DC load step. Typically, the first few EB load steps are layers of soil that are compacted along the sides of the culvert, which often creates moments in the culvert that are opposite in sign to those of the DC load step and also opposite in sign to the moments that will be added into the culvert when subsequent EB load steps of soil are placed on top of the culvert. Thus in the spirit of seeking the worst case LFRD loading scenario, it may be reasonable to use γ min for the standard load factor for those EB load steps placed along the sides of the culvert so that FACTOR = γ min η EB. Accordingly for the EB load steps representing soil layers being placed over the top of the culvert, it is reasonable to use γ max for the standard load factor so that FACTOR = γ max η EB. Similar to the DC load case, the combined load modifier, η EB, is a product of three factors related to ductility, redundancy and operational importance. Typically the factors associated with ductility and operational importance are assumed to be unity, whereas the LRFD specification says that redundancy factor should be 1.05 for buried structures under earth loads. Thus, a typical value for η EB is 1.05, which is the product of {(1.00) (1.05)(1.00)}. LL Load Case. Live loads, which are typically represented by surface pressures related to the design truck tires, are usually the last load steps to be applied for shallow burial installations. The first step is to compute the service live load, which is the static wheel pressure multiplied by m and then by (1.00 + IM/100) where m is the multiple presence factor and IM is the impact percentage. The multiple presence factor, m, ranges from 1.0 to 1.2 for buried culverts and may be interpreted as the likelihood that another design truck is sufficiently close to the design truck being analyzed such that the load on the culvert is further increased. Thus, choosing m = 1.2 is a conservative approach. The impact percentage, IM, varies linearly from 33% to 0% as the minimum cover depth varies from 0.0 to 8.0 feet. The resulting service live load is applied as specified forces in Part C of this manual. The second step is to compute the LRFD factor for the live load as FACTOR = γ max η LL. Here, the LRFD specifications only provide a maximum value of the LL load factor, γ max = 1.75. Live loads typically produce moments whose signs are consistent with, and add to, the DC load case and the EB load case for soil layers above the culvert. The combined load modifier, η LL, is a product of three factors related to ductility, redundancy and operational importance. Typically these three factors are assumed to be unity so that η LL = 1. Closing Comment. The above illustrations are not a recipe for all culvert problems because worst loading scenario depends on the pipe type, installation, and the governing limit state. However, the beauty of CANDE is that it easy to re-run the same problem with another set of FACTORs to find the worst loading condition.
Chapter 6 – List of References CANDE-2017 User Manual and Guideline
6-1
6 LIST OF REFERENCES
6.1 Background Documents
1. Katona, M.G., Smith, J.M., Odello, R.S., Allgood, J.R., CANDE: A Modern Approach for the Structural Design and Analysis of Buried Culverts, Federal Highway Administration Report No. FHWA-RD-77-5, (October 1976).
2. Katona, M.G., Smith, J.M., CANDE User and System Manuals, Federal Highway Administration Report No. FHWA-RD-77-6, October 1976.
3. Katona, M.G., Vittes, P.D., Lee, C.H., Ho, H.T., “CANDE-1980: Box Culverts and Soil Models”, Federal Highway Administration, Report No. FHWA-RD-172, (May 1981).
4. Musser, S.C., Katona M.G., Selig E.T., CANDE-89: Culvert Analysis and Design computer program – User Manual, Federal Highway Administration Report No. FHWA-RD-89-169, (June 1989).
5. Leonards, G.A, Wu, T.H., Juang, C.H., “Predicting Performance of Buried Conduits”, Report No. FHWA/IN/JHRP-81/3, Joint Federal Highway Administration and Indiana State Highway Commission, (June 1982).
6. AASHTO LRFD Bridge Design Specifications, Third Edition, American Association of State Highway and Transportation Officials, Washington, D.C., (2004)
7. Burns, J. Q., and R. M. Richard, “Attenuation of Stresses for Buried Cylinders”, Symposium on Soil-Structure Interaction, University of Arizona Engineering Research Laboratory, Tucson, Arizona, Proceedings (1964) pp. 378-392.
8. Mlynarski, M., Puckett, J.A., Clancy, C.M., Thompson, P.D., NCHRP Report 485 – Bridge Software – Validation Guidelines and Examples, Transportation Research Board, Washington, DC, (2003)
9. Katona, M.G., Influence of Soil Models on Performance of Buried Culverts, Paper presented at TRB 2015 annual meeting Session 614, January 13, 2015. Paper in TRB online Compendium; http://AMOnline.TRB.org
10. Katona, M.G., Modifying Duncan/Selig Soil Model for Plastic-like behavior, Paper presented at TRB 2015 annual meeting Session 614, January 13, 2015. Paper is in online Compendium and to be published in TRR.
6.2 Companion Documents
1. CANDE-2017 Solution Methods and Formulations contains the mathematical developments that describe the various theoretical formulations and nonlinear models that are contained in original program plus the new capabilities in CANDE-2017 program.
2. CANDE-2007 Tutorials for Applications: Contains a series of examples for using that demonstrate the use of CANDE-2007.

Chapter 7 – Appendix CANDE-2007 User Manual and Guideline
7-1
7 APPENDICIES 7.1 CANDE Output Files CANDE produces a variety of files as it processes the input and runs the CANDE analysis. The following table provides a synopsis of those file a long with a brief description. A detailed description of the plot files is provided in subsequent sections of this Appendix.
File name Description <prefix>.cid The <prefix> is provided by the user upon creation of saving of the CANDE input document.
CANDE input document – this file stores the CANDE input instructions as described in Chapter 4.5 of this User Manual. The <prefix> of this document is used in naming other CANDE documents associated with this input document. This file may be generated manually, but is produced automatically with the CANDE input wizard and every time the user clicks on the ‘Accept Input’ within the CANDE Input Menus
<prefix>.bakNN CANDE input document Backup files – These files are produced every time a CANDE input document is saved every time the user clicks on the ‘Accept Input’ button within the CANDE Input Menus. If a file is saved accidentally or a change was made that cannot be reversed using the CANDE input menus, the user can return to a previous version of the input document by copying the appropriate backup file to a new CANDE input document.
<prefix>.out CANDE Output file(readable text format) This is the file that is generated when the CANDE analysis engine executes. It contains all of the pertinent analysis results.
<prefix>_Gen.out CANDE results generator output (readable text format) CANDE output from results generator – This output file is produced by the CANDE results generator and is customizable. This file is produced after the CANDE analysis is completed as a post-processing event.
<prefix>_MeshGeom.xml Mesh geometry file (XML format) This file is produced by the CANDE analysis engine and is used to plot the mesh geometry with the CANDE mesh viewer. This file will be produced for level 2 and 3 models.
<prefix>_MeshResults.xml Mesh results file (XML format) This file is produced by the CANDE analysis engine and is used to plot the mesh results (i.e. deflections, stresses, strains, etc.) with the CANDE mesh viewer. If the ‘data check’ mode is ‘on’, or if the analysis did not successfully complete, this file may not be available. Often in these cases, the user will still be able to view the mesh geometry without the analysis results. This file will be produced for level 2 and 3 models.
<prefix>_BeamResults.xml Beam results file (XML format) This file is produced by the CANDE analysis engine and is used to plot the beam graphing mesh results (i.e. bending moments, shear, thrust, etc.) in the local beam coordinate system. If the ‘data check’ mode is ‘on’, or if the analysis did not successfully complete, this file may not be available. Often in these cases, the user will still be able to view the mesh geometry without the analysis results. This file will be produced for Level 1, 2, and 3 models.

Chapter 7 – Appendix CANDE-2007 User Manual and Guideline
7-2
File name Description <prefix>_Process_1250.csv NCHRP Process 12-50 comma delimited file
This file contains the Process 12-50 data as described in this appendix and in “NCHRP Report 485 – Bridge Software – Validation Guidelines and Examples” This file is only produced if the value for CULVERTID on the A-1 command (see section 5.3.1 A-1 – Master Control Input Data) is greater than zero.
PLOT1.dat CANDE Plot1 file This contains finite element mesh data followed by finite element response data records for each load step. This file is automatically created in the same folder that the input file is stored with the extension PLOT1.dat. This is a legacy file that dates to CANDE-89 and has been updated for CANDE-2007.
PLOT2.dat CANDE Plot2 file This contains pipe element mesh data followed by detailed pipe-element nodal response data records for each load step. This file is automatically created in the same folder that the input file is stored with the name PLOT2.dat. This is a legacy file that dates to CANDE-89 and has been updated for CANDE-2007.

Chapter 7 – Appendix CANDE-2007 User Manual and Guideline
7-3
7.1.1 XML Mesh Geometry Format The following is the XML mesh geometry format that is used by CANDE for plotting and graphing purposes. This file is automatically generated by CANDE for Levels 2 and 3. It is also used for importing external meshes into CANDE during the creation of new CANDE input documents using the CANDE input wizard. The definition of the XML tags are provided in tables at the end of this section. <?xml version="1.0" encoding="UTF-8"?> <CANDEMeshGeom> <Control> <numNodes> 789</numNodes> <numElements> 850</numElements> <numSoilMaterials> 3</numSoilMaterials> <numInterfaceMaterials> 0</numInterfaceMaterials> <inputCheck> 0</inputCheck> <numBoundCond> 55</numBoundCond> <numConstIncr> 15</numConstIncr> <meshTitle>MESH </meshTitle> </Control> <nodeData> <nodeCoord> <nodeNumber> 1</nodeNumber> <nodeXCoord> -0.4019E+02</nodeXCoord> <nodeYCoord> -0.3741E+02</nodeYCoord> </nodeCoord> <nodeCoord> <nodeNumber> 2</nodeNumber> <nodeXCoord> -0.3328E+02</nodeXCoord> <nodeYCoord> -0.3741E+02</nodeYCoord> </nodeCoord> . . </nodeData> <elementData> <elemConn> <elemNumber> 1</elemNumber> <elemNode1> 423</elemNode1> <elemNode2> 454</elemNode2> <elemNode3> 453</elemNode3> <elemNode4> 453</elemNode4> <elemMatNum> 2</elemMatNum> <elemConstrIncr> 12</elemConstrIncr> <elemType>TRIA</elemType> </elemConn> <elemConn> <elemNumber> 2</elemNumber> <elemNode1> 423</elemNode1> <elemNode2> 451</elemNode2> <elemNode3> 454</elemNode3> <elemNode4> 454</elemNode4> <elemMatNum> 2</elemMatNum> <elemConstrIncr> 12</elemConstrIncr> <elemType>TRIA</elemType> </elemConn> <elemConn> <elemNumber> 3</elemNumber> <elemNode1> 682</elemNode1>

Chapter 7 – Appendix CANDE-2007 User Manual and Guideline
7-4
<elemNode2> 699</elemNode2> <elemNode3> 684</elemNode3> <elemNode4> 683</elemNode4> <elemMatNum> 2</elemMatNum> <elemConstrIncr> 12</elemConstrIncr> <elemType>QUAD</elemType> </elemConn> . . </elementData> <boundaryData> <boundary> <boundNumber> 1</boundNumber> <boundNode> 21</boundNode> <boundConstrIncr> 1</boundConstrIncr> <boundXCode> 1</boundXCode> <boundYCode> 0</boundYCode> <boundXForce> 0.0000E+00</boundXForce> <boundYForce> 0.0000E+00</boundYForce> <boundRotAngle> 0.0000E+00</boundRotAngle> </boundary> <boundary> <boundNumber> 2</boundNumber> <boundNode> 432</boundNode> <boundConstrIncr> 1</boundConstrIncr> <boundXCode> 1</boundXCode> <boundYCode> 0</boundYCode> <boundXForce> 0.0000E+00</boundXForce> <boundYForce> 0.0000E+00</boundYForce> <boundRotAngle> 0.0000E+00</boundRotAngle> </boundary> . . </boundaryData> <soilData> <soil> <matID> 1</matID> <iTYP> 1</iTYP> <density> 0.6944444E-01</density> <matName>in situ</matName> </soil> . . </soilData> <interfaceData> <interface> <matID> 1</matID> <matName> Inter # 1</matName> <angle> 0.9000000E+02</angle> <coeffFriction> 0.3000000E+00</coeffFriction> <tensileForce> 0.1000000E+02</tensileForce> </interface> . . </interfaceData> </CANDEMeshGeom>
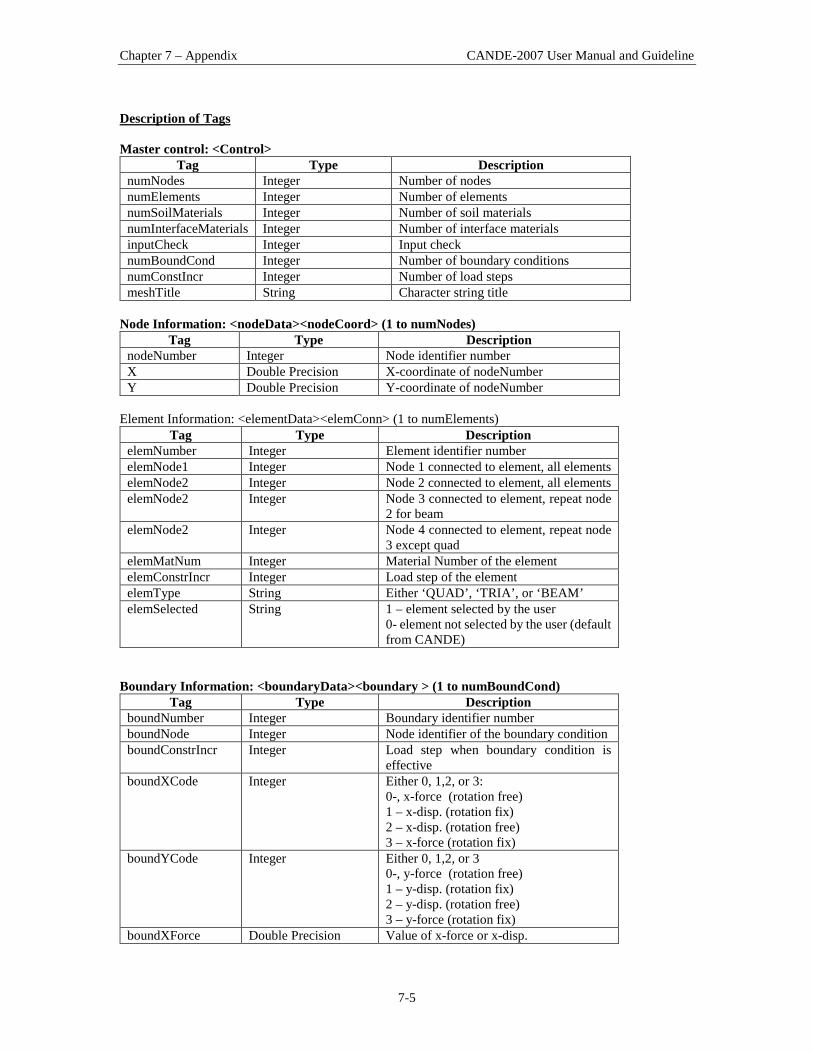
Chapter 7 – Appendix CANDE-2007 User Manual and Guideline
7-5
Description of Tags Master control: <Control>
Tag Type Description numNodes Integer Number of nodes numElements Integer Number of elements numSoilMaterials Integer Number of soil materials numInterfaceMaterials Integer Number of interface materials inputCheck Integer Input check numBoundCond Integer Number of boundary conditions numConstIncr Integer Number of load steps meshTitle String Character string title
Node Information: <nodeData><nodeCoord> (1 to numNodes)
Tag Type Description nodeNumber Integer Node identifier number X Double Precision X-coordinate of nodeNumber Y Double Precision Y-coordinate of nodeNumber
Element Information: <elementData><elemConn> (1 to numElements)
Tag Type Description elemNumber Integer Element identifier number elemNode1 Integer Node 1 connected to element, all elements elemNode2 Integer Node 2 connected to element, all elements elemNode2 Integer Node 3 connected to element, repeat node
2 for beam elemNode2 Integer Node 4 connected to element, repeat node
3 except quad elemMatNum Integer Material Number of the element elemConstrIncr Integer Load step of the element elemType String Either ‘QUAD’, ‘TRIA’, or ‘BEAM’ elemSelected String 1 – element selected by the user
0- element not selected by the user (default from CANDE)
Boundary Information: <boundaryData><boundary > (1 to numBoundCond)
Tag Type Description boundNumber Integer Boundary identifier number boundNode Integer Node identifier of the boundary condition boundConstrIncr Integer Load step when boundary condition is
effective boundXCode Integer Either 0, 1,2, or 3:
0-, x-force (rotation free) 1 – x-disp. (rotation fix) 2 – x-disp. (rotation free) 3 – x-force (rotation fix)
boundYCode Integer Either 0, 1,2, or 3 0-, y-force (rotation free) 1 – y-disp. (rotation fix) 2 – y-disp. (rotation free) 3 – y-force (rotation fix)
boundXForce Double Precision Value of x-force or x-disp.

Chapter 7 – Appendix CANDE-2007 User Manual and Guideline
7-6
boundYForce Double Precision Value of y-force or y-disp. boundRotAngle Double Precision Angle of rotated coordinates to define
boundary conditions. Soil Information: <soilData><soil> (1 to numSoilMaterials)
Tag Type Description matID Integer Soil material identifier iTYP Integer CANDE soil material type. density double precision Soil density matName String Specifies either a CANDE predefined soil
name or user provided description. Interface Information: <interfaceData><interface> (1 to numInterfaceMaterials)
Tag Type Description matID Integer Interface material identifier matName String String to describe the material. angle double precision Angle from x-axis to normal of interface. coeffFriction double precision Coefficient of friction between nodes I and
J tensileForce double precision Tensile breaking force of contact nodes I
and J.

Chapter 7 – Appendix CANDE-2007 User Manual and Guideline
7-7
7.1.2 Mesh results format The following is the XML mesh results format that is used by CANDE for the plotting of the mesh results using the CANDE mesh viewer. This file is automatically generated by CANDE for Levels 2 and 3. The definition of the XML tags is provided in tables at the end of this section. <CANDEMeshResults> <Control> <numNodes> 265</numNodes> <numElements> 229</numElements> <numConstIncr> 13</numConstIncr> <LevelNum>3</LevelNum> <Heading>217 Corr. Steel Pipe </Heading> </Control> <elemOutputDesc> <st1BEAM>Thrust force at node I</st1BEAM> <st2BEAM>Shear force at node I</st2BEAM> <st3BEAM>Moment resultant at node I</st3BEAM> <st4BEAM>Thrust force at node J</st4BEAM> <st5BEAM>Shear force at node J</st5BEAM> <st6BEAM>Moment resultant at node J</st6BEAM> <st1TRIA>Vertical strain at element center</st1TRIA> <st2TRIA>Horizontal strain at element center</st2TRIA> <st3TRIA>Shear strain at element center</st3TRIA> <st4TRIA>Vertical stress at element center</st4TRIA> <st5TRIA>Horizontal stress at element center</st5TRIA> <st6TRIA>Shear stress at element center</st6TRIA> <st1QUAD>Vertical strain at element center</st1QUAD> <st2QUAD>Horizontal strain at element center</st2QUAD> <st3QUAD>Shear strain at element center</st3QUAD> <st4QUAD>Vertical stress at element center</st4QUAD> <st5QUAD>Horizontal stress at element center</st5QUAD> <st6QUAD>Shear stress at element center</st6QUAD> <st1INTF>Total normal interface force</st1INTF> <st2INTF>Total shear interface force</st2INTF> <st3INTF>Last increment of normal interface force</st3INTF> <st4INTF>Last increment of shear interface force</st4INTF> <st5INTF>Relative x-displacement inc. DU(J)-DU(I)</st5INTF> <st6INTF>Relative y-displacement inc. DV(J)-DV(I)</st6INTF> </elemOutputDesc> <displacementData> <dispConstIncr> 1</dispConstIncr> <nodeDispData> <nodeDisp> <nodeDispNumber> 1</nodeDispNumber> <nodeXDisp> 0.000000E+00</nodeXDisp> <nodeYDisp> 0.000000E+00</nodeYDisp> </nodeDisp> <nodeDisp> <nodeDispNumber> 2</nodeDispNumber> <nodeXDisp> 0.000000E+00</nodeXDisp> <nodeYDisp> 0.000000E+00</nodeYDisp>

Chapter 7 – Appendix CANDE-2007 User Manual and Guideline
7-8
</nodeDisp> . . <elemDispData> <elemDisp> <elemDispNumber> 1</elemDispNumber> <elemDispType>BEAM</elemDispType> <st1> -0.562661E+03</st1> <st2> 0.144582E+02</st2> <st3> 0.195709E+04</st3> <st4> -0.562661E+03</st4> <st5> 0.144582E+02</st5> <st6> 0.208510E+04</st6> </elemDisp> <elemDisp> <elemDispNumber> 2</elemDispNumber> <elemDispType>BEAM</elemDispType> <st1> -0.580803E+03</st1> <st2> 0.389251E+02</st2> <st3> 0.162513E+04</st3> <st4> -0.580803E+03</st4> <st5> 0.389251E+02</st5> <st6> 0.195709E+04</st6> </elemDisp> . . </displacementData> . . <displacementData> </displacementData> Master control: <CANDEMeshResults> <Control>
Tag Type Description numNodes Integer Number of nodes numElements Integer Number of elements numConstIncr Integer Number of construction increments LevelNum Integer CANDE model level Heading string user input title
Element output descriptions: CANDEMeshResults.elemOutputDesc Defines the definitions of ST1-ST6 (Defined inelemDispData.elemDisp>) based on the element type (<elemDispType>).
Tag Type Description st1BEAM String Description of beam ST1 st2BEAM String Description of beam ST2 st3BEAM String Description of beam ST3 st4BEAM String Description of beam ST4 st5BEAM String Description of beam ST5 st6BEAM String Description of beam ST6 st1TRIA String Description of TRIA ST1 st2TRIA String Description of TRIA ST2 st3TRIA String Description of TRIA ST3 st4TRIA String Description of TRIA ST4

Chapter 7 – Appendix CANDE-2007 User Manual and Guideline
7-9
Tag Type Description st5TRIA String Description of TRIA ST5 st6TRIA String Description of TRIA ST6 st1QUAD String Description of QUAD ST1 st2QUAD String Description of QUAD ST2 st3QUAD String Description of QUAD ST3 st4QUAD String Description of QUAD ST4 st5QUAD String Description of QUAD ST5 st6QUAD String Description of QUAD ST6 st1INTF String Description of INTF ST1 st2INTF String Description of INTF ST2 st3INTF String Description of INTF ST3 st4INTF String Description of INTF ST4 st5INTF String Description of INTF ST5 st6INTF String Description of INTF ST6
Element/Node results data: <CANDEMeshResults><displacementData> A set of this data is produced for each construction increment; i.e. There will be CANDEMeshResults.Control.numConstIncr sets of this data. Construction increment: <dispConstIncr> 1</dispConstIncr>
Tag Type Description dispConstIncr Integer Construction increment #
Node results data: <CANDEMeshResults><displacementData> <nodeDispData> <nodeDisp> One result for each node CANDEMeshResults.Control.numNodes
Tag Type Description nodeDispNumber Integer Node identifier number nodeXDisp Double Precision X-Displacement of the node coordinate for
this construction increment NodeYDisp Double Precision Y-Displacement of the node coordinate for
this construction increment Element results data: <CANDEMeshResults><displacementData> <elemDispData> <elemDisp> One result for each node CANDEMeshResults.Control.numElements
Tag Type Description elemDispNumber Integer Element identifier number elemDispType String Element type: Type is either BEAM,
TRIA, INTF, QUAD and can be used to extract the ‘output description for each ‘st*’ value shown below.
st1 Double Precision Dependent on element type. Description comes from CANDEMeshResults.elemOutputDesc
st2 Double Precision Dependent on element type. Description comes from CANDEMeshResults.elemOutputDesc
st3 Double Precision Dependent on element type. Description comes from CANDEMeshResults.elemOutputDesc

Chapter 7 – Appendix CANDE-2007 User Manual and Guideline
7-10
Tag Type Description st4 Double Precision Dependent on element type. Description
comes from CANDEMeshResults.elemOutputDesc
st5 Double Precision Dependent on element type. Description comes from CANDEMeshResults.elemOutputDesc
st6 Double Precision Dependent on element type. Description comes from CANDEMeshResults.elemOutputDesc

Chapter 7 – Appendix CANDE-2007 User Manual and Guideline
7-11
7.1.3 Beam results format The following is the XML beam results format that is used by CANDE for the plotting of the beam results using the CANDE Graphs viewer. This file is automatically generated by CANDE for Levels 1, 2 and 3. The definition of the XML tags is provided in tables at the end of this section. <CANDEBeamResults> <Control> <numConstIncr> 13</numConstIncr> <numPipeElements> 19</numPipeElements> <numPipeNodes> 20</numPipeNodes> <Level>3</Level> <Heading>217 Corr. Steel Pipe </Heading> <meshTitle>Imported from 'C:\Documents and Settings\bpstrohman\Desktop\Tutoria </meshTitle> </Control> <beamData> <numBeamGroups> 1</numBeamGroups> <beamGroup> <!--1- Steel, 2-Aluminum,3-Concrete,4-Plastic,5-Basic,6-Special (Routine added by the user) --> <pipeCode> 1</pipeCode> <!-- Number of beam elem. in this group --> <numBeamElem> 19</numBeamElem> <startBeamElem> 1</startBeamElem> <endBeamElem> 19</endBeamElem> <startNode> 1</startNode> <endNode> 20</endNode> </beamGroup> </beamData> <beamResults> <constIncrement> 1</constIncrement> <resultsData> <resultId> 1</resultId> <nodeNumber> 1</nodeNumber> <!-- elem to right of node: 99999 if end --> <elementNumber> 1</elementNumber> <beamGroupNumber> 1</beamGroupNumber> <pipeType> 1</pipeType> <xCoord> 0.000000E+00</xCoord> <yCoord> 0.823800E+02</yCoord> <xDisp> 0.000000E+00</xDisp> <yDisp> -0.794825E+00</yDisp> <bendingMoment> 0.899943E+02</bendingMoment> <thrustForce> -0.466842E+01</thrustForce> <shearForce> 0.102312E-01</shearForce> <normalPressure> -0.979715E-06</normalPressure> <tangPressure> 0.989320E-09</tangPressure> <!-- Results 10-20 dependent on pipe type--> <result10> -0.800044E+03</result10> <result11> -0.174847E+02</result11> <result12> 0.383193E-01</result12> <result13> 0.000000E+00</result13> <result14> 0.267000E+001</result14> <result15> 0.127000E+00</result15> <result16> 0.110435E+01</result16>

Chapter 7 – Appendix CANDE-2007 User Manual and Guideline
7-12
<result17> 0.000000E+00</result17> <result18> 0.242438E-01</result18> <momentIncrement> 0.240075E-04</momentIncrement> <thrustIncrement> -0.251048E-04</thrustIncrement> </resultsData> <resultsData> . . </resultsData> . . </beamResults> <beamResults> <constIncrement> 2</constIncrement> . . </beamResults> . . </CANDEBeamResults> Master control: <CANDEBeamResults> <Control>
Tag Type Description numConstIncr Integer Number of construction increments numPipeElements Integer Total number of pipe elements numPipeNodes Integer Total number of pipe nodes LevelNum Integer CANDE model level Heading string user input title
Beam Data: <CANDEBeamResults> <beamData> <beamGroup> Number of Beam Groups: <numBeamGroups> 4</numBeamGroups> Beam Group: <CANDEBeamResults><beamData><beamGroup> Set of this data is produced for each beam group
Tag Type Description pipeCode Integer code for the pipe type: 1- Steel, 2-
Aluminum,3-Concrete,4-Plastic,5-Basic,6-Special (Routine added by the user)
numBeamElem Integer Number of beam elements in the group startBeamElem Integer Starting element sequence number in the
group endBeamElem Integer Ending element sequence number in the
group startNode Integer Starting node sequence number in the
group endNode Integer Ending node sequence number in the
group Beam Results: <CANDEBeamResults><beamResults> Construction increment: <constIncrement> 1</constIncrement> Results Data: <CANDEBeamResults><beamResults><resultsData> Set of this data is produced for each element in this beam group; i.e. CANDEBeamResults.beamData.beamGroup.numBeamElem>
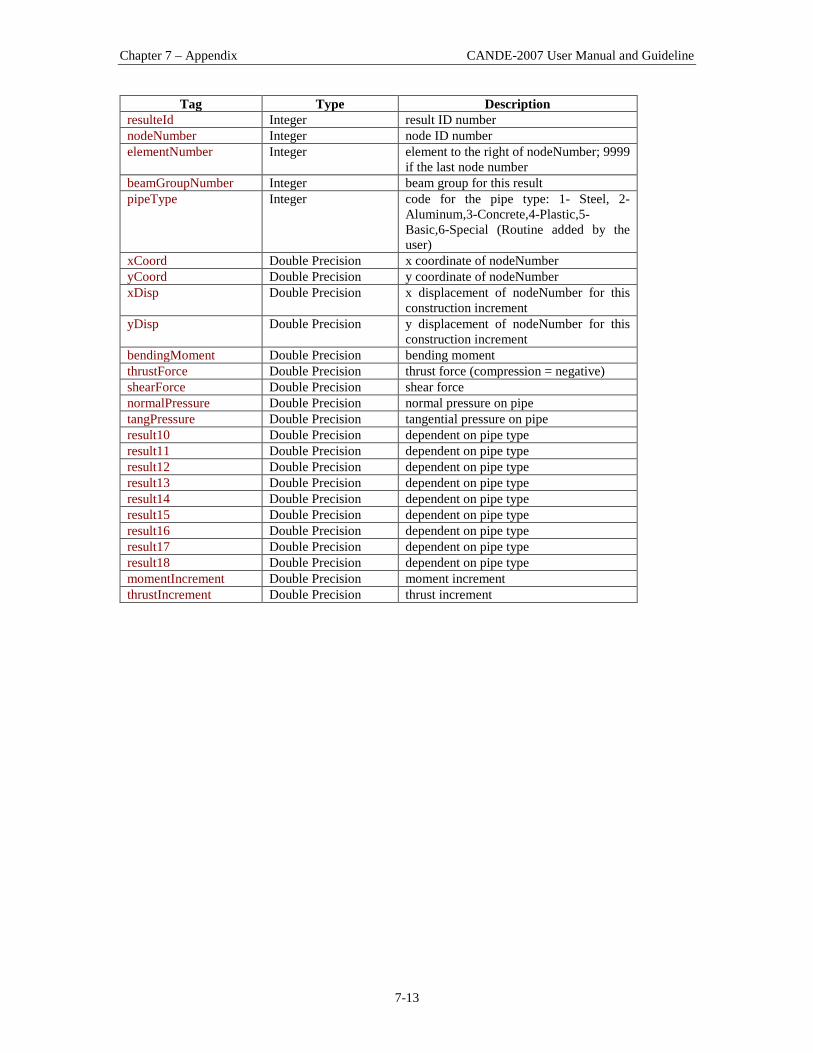
Chapter 7 – Appendix CANDE-2007 User Manual and Guideline
7-13
Tag Type Description resulteId Integer result ID number nodeNumber Integer node ID number elementNumber Integer element to the right of nodeNumber; 9999
if the last node number beamGroupNumber Integer beam group for this result pipeType Integer code for the pipe type: 1- Steel, 2-
Aluminum,3-Concrete,4-Plastic,5-Basic,6-Special (Routine added by the user)
xCoord Double Precision x coordinate of nodeNumber yCoord Double Precision y coordinate of nodeNumber xDisp Double Precision x displacement of nodeNumber for this
construction increment yDisp Double Precision y displacement of nodeNumber for this
construction increment bendingMoment Double Precision bending moment thrustForce Double Precision thrust force (compression = negative) shearForce Double Precision shear force normalPressure Double Precision normal pressure on pipe tangPressure Double Precision tangential pressure on pipe result10 Double Precision dependent on pipe type result11 Double Precision dependent on pipe type result12 Double Precision dependent on pipe type result13 Double Precision dependent on pipe type result14 Double Precision dependent on pipe type result15 Double Precision dependent on pipe type result16 Double Precision dependent on pipe type result17 Double Precision dependent on pipe type result18 Double Precision dependent on pipe type momentIncrement Double Precision moment increment thrustIncrement Double Precision thrust increment

Chapter 7 – Appendix CANDE-2007 User Manual and Guideline
7-14
7.1.4 NCHRP Process 12-50 Results For the purposes of regression testing of future versions of CANDE, the NCHRP Process 12-50 results have been included in this version of CANDE. Process 12-50 is described in detail in NCHRP Report 485 – Bridge Software – Validation Guidelines and Examples. This file is only produced if the value for CULVERTID on the A-1 command (see section 5.3.1 A-1 – Master Control Input Data) is greater than zero. For CANDE, the 12-50 file format is a comma-delimited ASCII text format and has been modified slightly to account for the two dimensions (i.e. X and Y coordinates). The format is as shown in the following table. This file is suitable for importing into a relational database. A sample of the Process 12-50 output is shown in Figure 7.1-1. Table 7.1-1 – NCHRP Tag format
Tag Description CulvertID Unique integer to define this input file (user input on A-1 command) ProcessID Unique integer to define the process ID (user input on A-1
command). ReportID Unique integer to uniquely define each CANDE beam result (see
Table 7.1-2 for definitions) X-location X-coordinate location of beam node Y.location Y-coordinate location of beam node Value Value for the specific ReportID Subdomain Unique integer to define the subdomain ID (user input on A-1
command). Subdomains can define things such as culvert type. Location ID CANDE Beam group ID AuxID CANDE local element ID
Figure 7.1-1 – Sample NCHRP Process 12-50 results 12, 2, 80003, 0.000000E+00, 0.823800E+02, 0.000000E+00, 1, 1, 1 12, 2, 80004, 0.000000E+00, 0.823800E+02, -0.794825E+00, 1, 1, 1 12, 2, 80005, 0.000000E+00, 0.823800E+02, 0.899943E+02, 1, 1, 1 12, 2, 80006, 0.000000E+00, 0.823800E+02, -0.466842E+01, 1, 1, 1 12, 2, 80007, 0.000000E+00, 0.823800E+02, 0.102312E-01, 1, 1, 1 12, 2, 80008, 0.000000E+00, 0.823800E+02, -0.979715E-06, 1, 1, 1 12, 2, 80009, 0.000000E+00, 0.823800E+02, 0.989320E-09, 1, 1, 1 12, 2, 80010, 0.000000E+00, 0.823800E+02, -0.800044E+03, 1, 1, 1 12, 2, 80011, 0.000000E+00, 0.823800E+02, -0.174847E+02, 1, 1, 1 12, 2, 80012, 0.000000E+00, 0.823800E+02, 0.383193E-01, 1, 1, 1 12, 2, 80013, 0.000000E+00, 0.823800E+02, 0.000000E+00, 1, 1, 1 12, 2, 80014, 0.000000E+00, 0.823800E+02, 0.267000E+00, 1, 1, 1 12, 2, 80015, 0.000000E+00, 0.823800E+02, 0.127000E+00, 1, 1, 1

Chapter 7 – Appendix CANDE-2007 User Manual and Guideline
7-15
Table 7.1-2 – NCHRP Process 12-50 Report ID table Report
ID Description
80003 x – displacement (inc) 80004 y – displacement (inch) 80005 Bending moment – positive in fiber tension (in-lb/ inch) 80006 Thrust Force – compression negative (lb/inch) 80007 Shear Force – outward positive (lb/inch) 80008 Normal Pressure on pipe – compression is negative (psi) 80009 Tangential pressure on pipe – positive is clockwise (psi)
Report ID
Aluminum Basic Concrete Plastic Steel
80010 Maximum fiber stress
(psi)
0 Inner cage steel stress
(psi)
Max Bending stress (psi)
Maximum fiber stress (psi)
80011 Thrust Stress (psi)
0 Outer cage steel stress
(psi)
Thrust Stress (psi)
Thrust Stress (psi)
80012 Shear Stress (psi)
0 Max concrete compression
(psi)
Shear Stress (psi)
Shear Stress (psi)
80013 Fraction of wall yielded
(ratio)
0 Effective shear stress (psi)
Maximum tensile strain
(in/in)
Fraction of wall yielded (ratio)
80014 Modified area (PA*) (in2/in)
0 Effective Area (PA*) (in2/in)
Effective Area (PA*) (in2/in)
Modified area (PA*) (in2/in)
80015 Modified M-of-I (PI*)
(in4/in)
0 Effective M-of-I (PI*)
(in4/in)
Effective M-of-I (PI*)
(in4/in)
Modified M-of-I (PI*)
(in2/in) 80016 Distance to N-
A (y-bar) (in)
0 Distance to N-A (y-bar)
(in)
Distance to N-A (y-bar)
(in)
Distance to N-A (y-bar) (in)
80017 Bend-stress above yield (psi)
0 Crack Width (inch)
Maximum combined
strain (in/in)
Bend-stress above yield (psi)
80018 Strain ratio: max/yield
(ratio)
0 Crack Depth (inch)
Percent of remaining area
(%)
Strain ratio: max/yield
(ratio)
Report ID
Description
80019 Moment increment – current inner strain during iteration (in-lb/inch) 80020 Thrust increment – current outer strain during iteration (lb/inch)
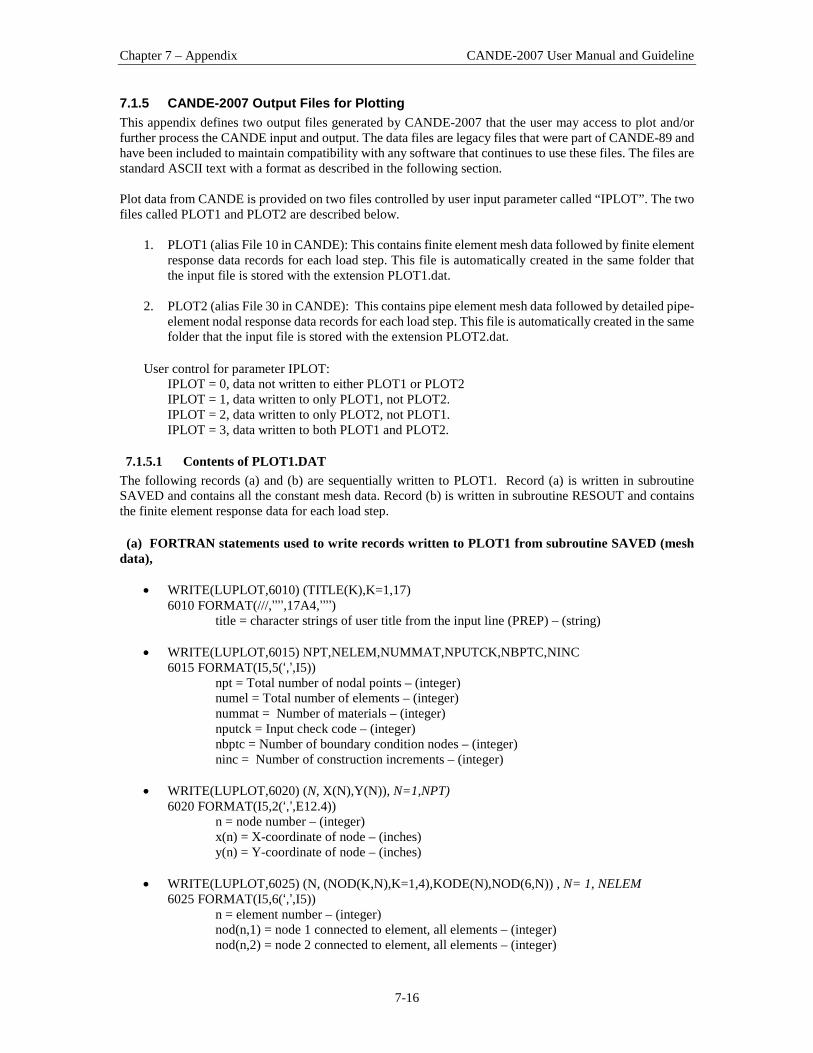
Chapter 7 – Appendix CANDE-2007 User Manual and Guideline
7-16
7.1.5 CANDE-2007 Output Files for Plotting This appendix defines two output files generated by CANDE-2007 that the user may access to plot and/or further process the CANDE input and output. The data files are legacy files that were part of CANDE-89 and have been included to maintain compatibility with any software that continues to use these files. The files are standard ASCII text with a format as described in the following section. Plot data from CANDE is provided on two files controlled by user input parameter called “IPLOT”. The two files called PLOT1 and PLOT2 are described below.
1. PLOT1 (alias File 10 in CANDE): This contains finite element mesh data followed by finite element response data records for each load step. This file is automatically created in the same folder that the input file is stored with the extension PLOT1.dat.
2. PLOT2 (alias File 30 in CANDE): This contains pipe element mesh data followed by detailed pipe-
element nodal response data records for each load step. This file is automatically created in the same folder that the input file is stored with the extension PLOT2.dat.
User control for parameter IPLOT: IPLOT = 0, data not written to either PLOT1 or PLOT2 IPLOT = 1, data written to only PLOT1, not PLOT2. IPLOT = 2, data written to only PLOT2, not PLOT1. IPLOT = 3, data written to both PLOT1 and PLOT2.
7.1.5.1 Contents of PLOT1.DAT The following records (a) and (b) are sequentially written to PLOT1. Record (a) is written in subroutine SAVED and contains all the constant mesh data. Record (b) is written in subroutine RESOUT and contains the finite element response data for each load step. (a) FORTRAN statements used to write records written to PLOT1 from subroutine SAVED (mesh data),
• WRITE(LUPLOT,6010) (TITLE(K),K=1,17) 6010 FORMAT(///,’’’’,17A4,’’’’) title = character strings of user title from the input line (PREP) – (string)
• WRITE(LUPLOT,6015) NPT,NELEM,NUMMAT,NPUTCK,NBPTC,NINC 6015 FORMAT(I5,5(‘,’,I5))
npt = Total number of nodal points – (integer) numel = Total number of elements – (integer) nummat = Number of materials – (integer) nputck = Input check code – (integer) nbptc = Number of boundary condition nodes – (integer) ninc = Number of construction increments – (integer)
• WRITE(LUPLOT,6020) (N, X(N),Y(N)), N=1,NPT)
6020 FORMAT(I5,2(‘,’,E12.4)) n = node number – (integer) x(n) = X-coordinate of node – (inches) y(n) = Y-coordinate of node – (inches)
• WRITE(LUPLOT,6025) (N, (NOD(K,N),K=1,4),KODE(N),NOD(6,N)) , N= 1, NELEM 6025 FORMAT(I5,6(‘,’,I5)) n = element number – (integer)
nod(n,1) = node 1 connected to element, all elements – (integer) nod(n,2) = node 2 connected to element, all elements – (integer)

Chapter 7 – Appendix CANDE-2007 User Manual and Guideline
7-17
nod(n,3) = node 3 connected to element, repeat node 2 for beam – (integer) nod(n,4) = node 4 connected to element, repeat node 3 except quad, – (integer) kode(n) = material number of soil element, for beam and interface =11 – (integer) nod(n,6) = construction increment number of element – (integer)
• WRITE(LUPLOT,6035) N,NDB,IA,IFLAGX,IFLAGY,(BIV(K,N), K=1,3)
6035 FORMAT(I5,4(‘,’,I5),3(‘,’,E12.4)) n = number of a specified boundary condition – (integer) ndb = node with imposed boundary condition – (integer)
ia = construction increment when boundary condition is effective – (integer) Iflagx = X-boundary code (0,1,2, or 3) see CANDE manual – (integer) Iflagy = Y-boundary code (0,1,2, or 3) see CANDE manual – (integer) biv(1,n) = Specified x-direction force or displacement – (lbs/inch or inch) biv(2,n) = Specified y-direction force or displacement – (lbs/inch or inch) biv(3,n) = Angle of rotated boundary coordinate system -- (radians)
(b) Records written to PLOT1 from RESOUT. These records sequentially follow the above record (a), wherein record (b) is repeated for each load step from ia = 1 to ninc.
• WRITE(LUPLOT,1000) IA 1000 FORMAT(I5)
ia = current construction increment number or load step quad – (integer)
• WRITE(LUPLOT,1010) (U(N),V(N)), N = 1, NPT) 1010 FORMAT(E12.4, ‘,’,E12.4)
n = node number – (integer) u(n) = Total current displacement in x direction – (inch) v(n) = Total current displacement in y direction – (inch)
• WRITE(LUPLOT,1020) (ST(J,N), J=1,6), N=1,NELEM) 1020 FORMAT(E12.4, 5(‘,’,E12.4))
n = element number – (integer) st(array) depends on element type as shown below:
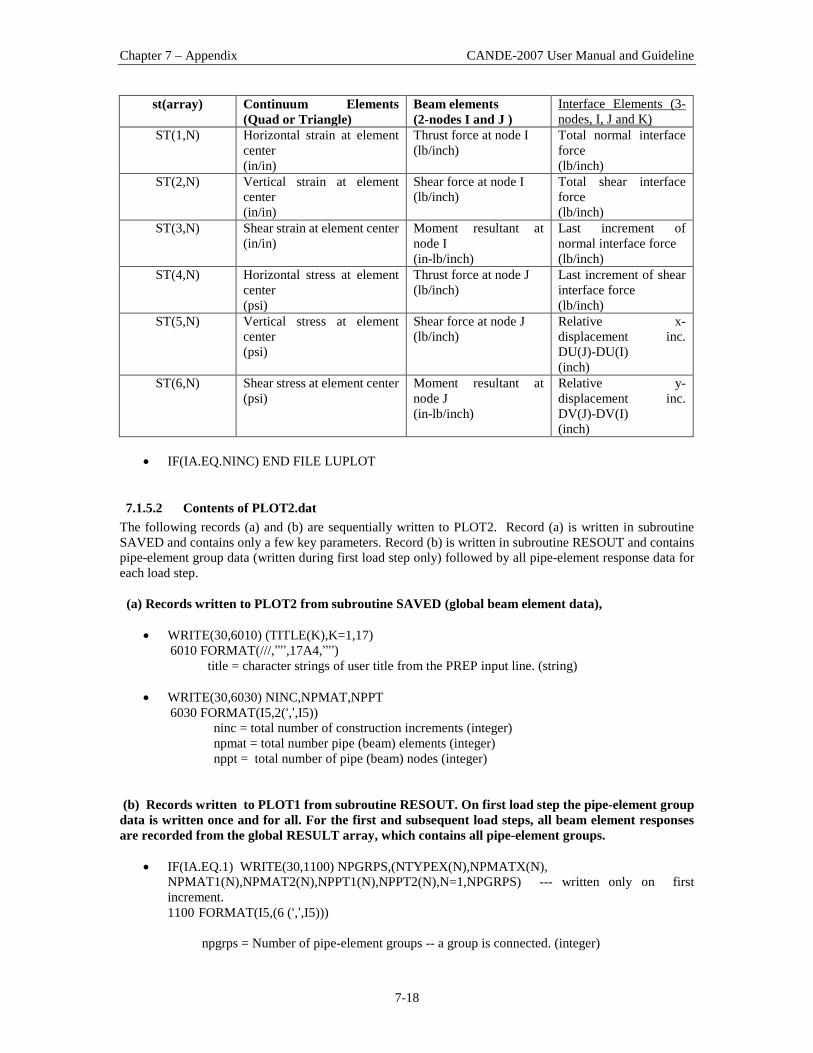
Chapter 7 – Appendix CANDE-2007 User Manual and Guideline
7-18
st(array) Continuum Elements (Quad or Triangle)
Beam elements (2-nodes I and J )
Interface Elements (3-nodes, I, J and K)
ST(1,N) Horizontal strain at element center (in/in)
Thrust force at node I (lb/inch)
Total normal interface force (lb/inch)
ST(2,N) Vertical strain at element center (in/in)
Shear force at node I (lb/inch)
Total shear interface force (lb/inch)
ST(3,N) Shear strain at element center (in/in)
Moment resultant at node I (in-lb/inch)
Last increment of normal interface force (lb/inch)
ST(4,N) Horizontal stress at element center (psi)
Thrust force at node J (lb/inch)
Last increment of shear interface force (lb/inch)
ST(5,N) Vertical stress at element center (psi)
Shear force at node J (lb/inch)
Relative x-displacement inc. DU(J)-DU(I) (inch)
ST(6,N) Shear stress at element center (psi)
Moment resultant at node J (in-lb/inch)
Relative y-displacement inc. DV(J)-DV(I) (inch)
• IF(IA.EQ.NINC) END FILE LUPLOT
7.1.5.2 Contents of PLOT2.dat The following records (a) and (b) are sequentially written to PLOT2. Record (a) is written in subroutine SAVED and contains only a few key parameters. Record (b) is written in subroutine RESOUT and contains pipe-element group data (written during first load step only) followed by all pipe-element response data for each load step. (a) Records written to PLOT2 from subroutine SAVED (global beam element data),
• WRITE(30,6010) (TITLE(K),K=1,17) 6010 FORMAT(///,’’’’,17A4,’’’’)
title = character strings of user title from the PREP input line. (string) • WRITE(30,6030) NINC,NPMAT,NPPT 6030 FORMAT(I5,2(‘,’,I5)) ninc = total number of construction increments (integer) npmat = total number pipe (beam) elements (integer) nppt = total number of pipe (beam) nodes (integer)
(b) Records written to PLOT1 from subroutine RESOUT. On first load step the pipe-element group data is written once and for all. For the first and subsequent load steps, all beam element responses are recorded from the global RESULT array, which contains all pipe-element groups.
• IF(IA.EQ.1) WRITE(30,1100) NPGRPS,(NTYPEX(N),NPMATX(N), NPMAT1(N),NPMAT2(N),NPPT1(N),NPPT2(N),N=1,NPGRPS) --- written only on first increment. 1100 FORMAT(I5,(6 (‘,’,I5)))
npgrps = Number of pipe-element groups -- a group is connected. (integer)

Chapter 7 – Appendix CANDE-2007 User Manual and Guideline
7-19
ntypex(n) = Pipe-type code number (1,2,3,4,5 or 6) for group n. (integer) npmatx(n) = Number of beam elements in group -- local count. (integer) npmat1(n) = Starting element sequence number in group -- global count. (integer) npmat2(n) = Ending element sequence number in group -- global count. (integer) nppt1(n) = Starting node sequence number in group -- global count. (integer) nppt2(n) = Ending node sequence number in group -- global count. (integer) npmat = Total number of beam elements -- global sum of all groups. (integer) nppt = Total number of beam nodes -- global sum of all groups. (integer)
• WRITE(30,1000) IA --- written every increment
1000 FORMAT(I5) ia = construction increment number or load step. (integer)
• WRITE(30,1110) (RESULT(J,N),J=1,20) , N=1,NPPT) 1110 FORMAT(E12.4,19(‘,’,E12.4))
(Note: RESULT(1,N) to RESULT(9,N) and RESULT(19,N) and RESULT(20,N) are common for all pipe types)
RESULT(1,N) = X-COORDINATE (inch) RESULT(2,N) = Y-COORDINATE (inch) RESULT(3,N) = X-DISPLACEMENT (inch) RESULT(4,N) = Y-DISPLACEMENT (inch) RESULT(5,N) = BENDING MOMENT -- positive in fiber tension. (in-lb/ inch) RESULT(6,N) = THRUST FORCE -- compression negative (lb/inch) RESULT(7,N) = SHEAR FORCE – outward positive. (lb/inch) RESULT(8,N) = NORMAL PRESSURE ON PIPE – compression is negative. (psi)
RESULT(9,N) = TANGENTIAL PRESSURE ON PIPE -- positive is clockwise. (psi) RESULT(10,N) through RESULT(18,N) are dependent on pipe-type as shown below:
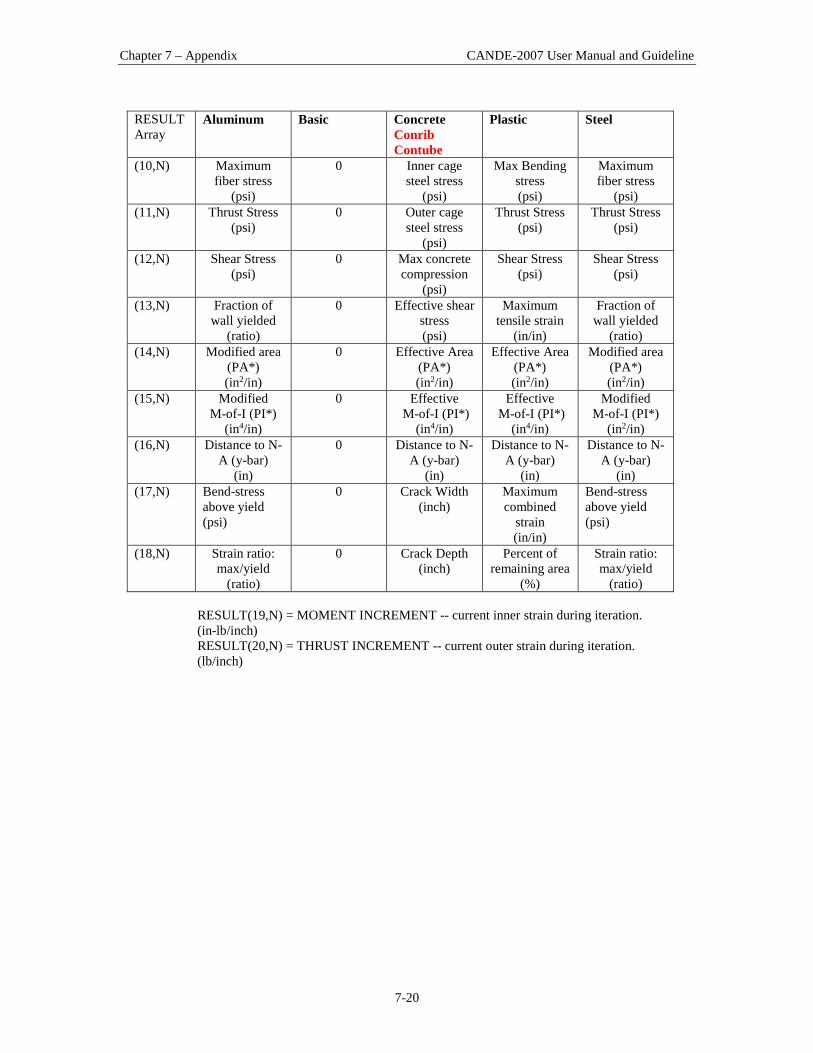
Chapter 7 – Appendix CANDE-2007 User Manual and Guideline
7-20
RESULT Array
Aluminum Basic Concrete Conrib Contube
Plastic Steel
(10,N) Maximum fiber stress
(psi)
0 Inner cage steel stress
(psi)
Max Bending stress (psi)
Maximum fiber stress
(psi) (11,N) Thrust Stress
(psi) 0 Outer cage
steel stress (psi)
Thrust Stress (psi)
Thrust Stress (psi)
(12,N) Shear Stress (psi)
0 Max concrete compression
(psi)
Shear Stress (psi)
Shear Stress (psi)
(13,N) Fraction of wall yielded
(ratio)
0 Effective shear stress (psi)
Maximum tensile strain
(in/in)
Fraction of wall yielded
(ratio) (14,N) Modified area
(PA*) (in2/in)
0 Effective Area (PA*) (in2/in)
Effective Area (PA*) (in2/in)
Modified area (PA*) (in2/in)
(15,N) Modified M-of-I (PI*)
(in4/in)
0 Effective M-of-I (PI*)
(in4/in)
Effective M-of-I (PI*)
(in4/in)
Modified M-of-I (PI*)
(in2/in) (16,N) Distance to N-
A (y-bar) (in)
0 Distance to N-A (y-bar)
(in)
Distance to N-A (y-bar)
(in)
Distance to N-A (y-bar)
(in) (17,N) Bend-stress
above yield (psi)
0 Crack Width (inch)
Maximum combined
strain (in/in)
Bend-stress above yield (psi)
(18,N) Strain ratio: max/yield
(ratio)
0 Crack Depth (inch)
Percent of remaining area
(%)
Strain ratio: max/yield
(ratio)
RESULT(19,N) = MOMENT INCREMENT -- current inner strain during iteration. (in-lb/inch) RESULT(20,N) = THRUST INCREMENT -- current outer strain during iteration. (lb/inch)

Chapter 7 – Appendix CANDE-2007 User Manual and Guideline
7-21
7.2 CANDE NASTRAN Import Format CANDE supports a limited import of NASTRAN files based on the information based in this section. The NASTRAN import is available for Level 3 models when creating a new CANDE input document using the CANDE Input Wizard (see section “4.2.1.2 CANDE Input Wizard – Level 3 items”). The NASTRAN commands supported by the NASTRAN import option are shown in . CANDE’s implementation of these commands is documented in this section. Table 7.2-1 – NASTRAN commands support by CANDE import
NASTRAN Command
NASTRAN Description CANDE Use
GRID Defines the location of a geometric grid point of the structural model and its permanent single point constraints.
Defines level 3 node numbers.
CBAR Defines a simple beam element (BAR) of the structural model.
Defines a CANDE beam-column element.
CTRIA3 Defines an isoparametric triangular plate element.
Defines a CANDE triangle element.
CQUAD4 Defines an isoparametric quadrilateral plate element
Defines a CANDE quadrilateral element.
PSHELL Defines the membrane, bending, transverse shear, and coupling properties of thin shell elements.
CANDE interprets this as a soil material. Material properties are not stored, but the PSHELL commands are counted to determine the number of soil materials CANDE defines.
CGAP Defines a gap or friction element. CANDE uses the CGAP command to define interface elements.
SPC Defines the location of a geometric grid point of the structural model and its permanent single point constraints.
CANDE uses the SPC command to define boundary conditions.
FORCE Defines a static load at a grid point by specifying a vector.
CANDE uses the FORCE command to define boundary conditions as point forces.
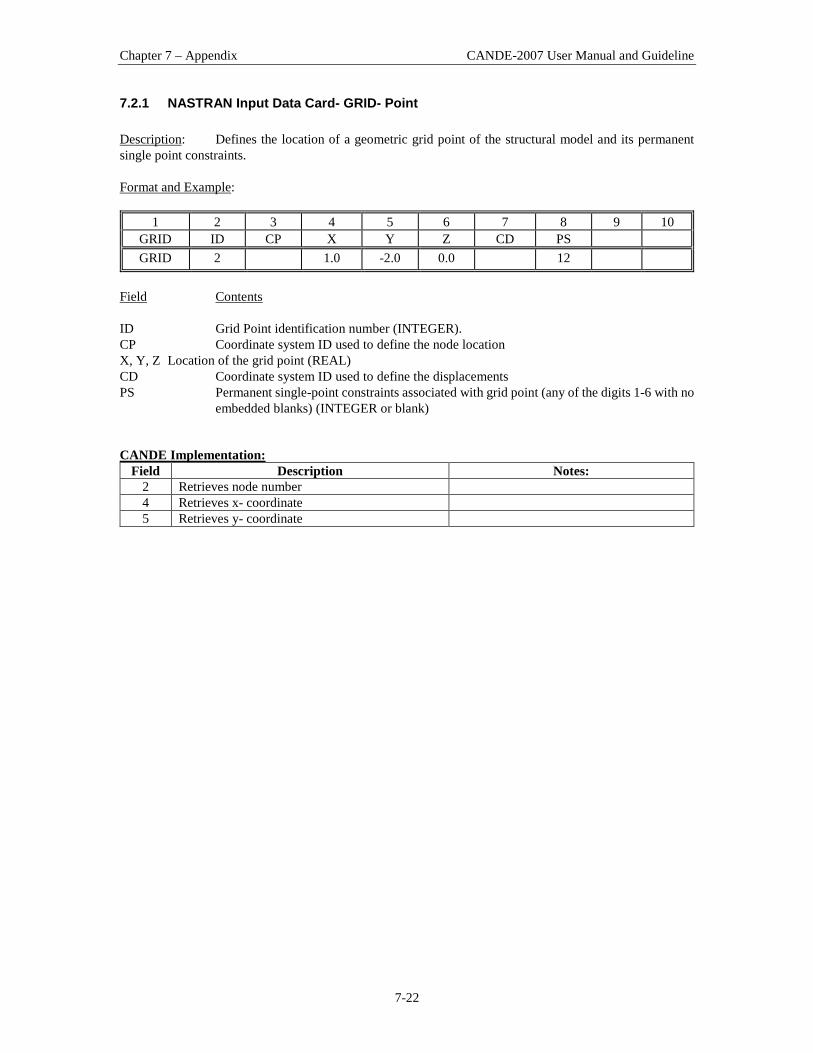
Chapter 7 – Appendix CANDE-2007 User Manual and Guideline
7-22
7.2.1 NASTRAN Input Data Card- GRID- Point Description: Defines the location of a geometric grid point of the structural model and its permanent single point constraints. Format and Example:
1 2 3 4 5 6 7 8 9 10 GRID ID CP X Y Z CD PS GRID 2 1.0 -2.0 0.0 12
Field Contents ID Grid Point identification number (INTEGER). CP Coordinate system ID used to define the node location X, Y, Z Location of the grid point (REAL) CD Coordinate system ID used to define the displacements PS Permanent single-point constraints associated with grid point (any of the digits 1-6 with no
embedded blanks) (INTEGER or blank) CANDE Implementation:
Field Description Notes: 2 Retrieves node number 4 Retrieves x- coordinate 5 Retrieves y- coordinate
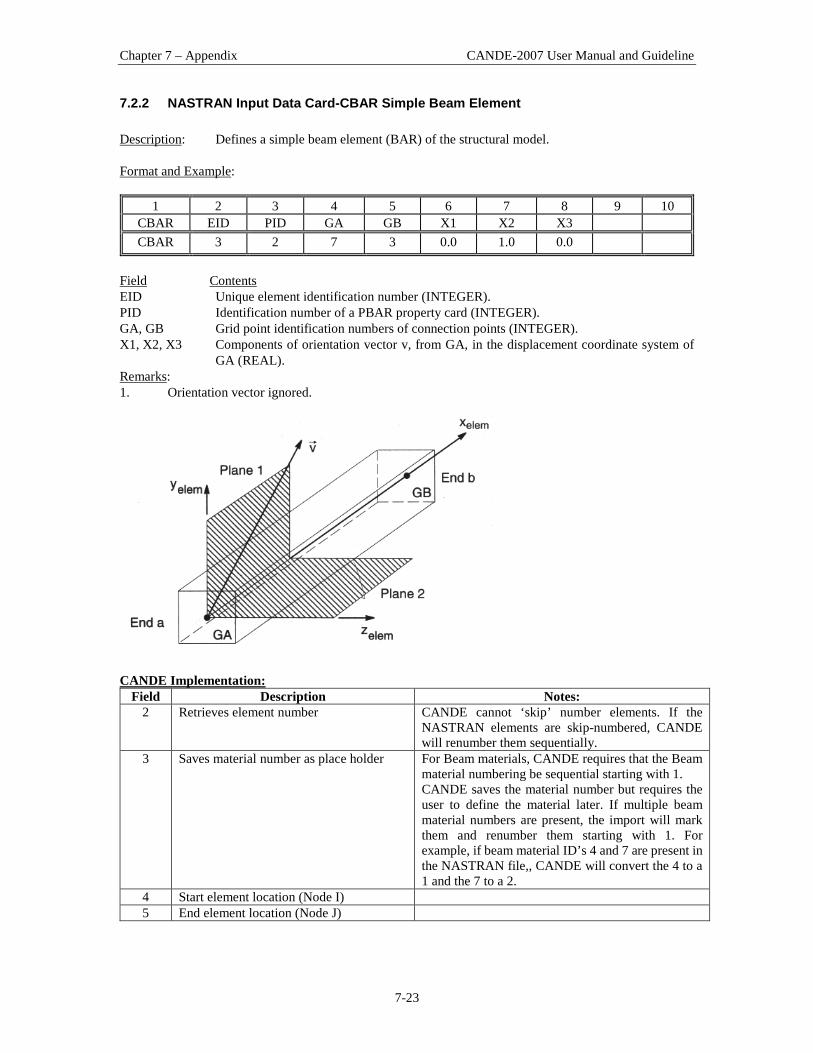
Chapter 7 – Appendix CANDE-2007 User Manual and Guideline
7-23
7.2.2 NASTRAN Input Data Card-CBAR Simple Beam Element Description: Defines a simple beam element (BAR) of the structural model. Format and Example:
1 2 3 4 5 6 7 8 9 10 CBAR EID PID GA GB X1 X2 X3 CBAR 3 2 7 3 0.0 1.0 0.0
Field Contents EID Unique element identification number (INTEGER). PID Identification number of a PBAR property card (INTEGER). GA, GB Grid point identification numbers of connection points (INTEGER). X1, X2, X3 Components of orientation vector v, from GA, in the displacement coordinate system of
GA (REAL). Remarks: 1. Orientation vector ignored.
CANDE Implementation:
Field Description Notes: 2 Retrieves element number CANDE cannot ‘skip’ number elements. If the
NASTRAN elements are skip-numbered, CANDE will renumber them sequentially.
3 Saves material number as place holder For Beam materials, CANDE requires that the Beam material numbering be sequential starting with 1. CANDE saves the material number but requires the user to define the material later. If multiple beam material numbers are present, the import will mark them and renumber them starting with 1. For example, if beam material ID’s 4 and 7 are present in the NASTRAN file,, CANDE will convert the 4 to a 1 and the 7 to a 2.
4 Start element location (Node I) 5 End element location (Node J)

Chapter 7 – Appendix CANDE-2007 User Manual and Guideline
7-24
7.2.3 NASTRAN Input Data Card-CTRIA3-Triangular Plate Element Description: Defines an isoparametric triangular plate element. Format and Example:
1 2 3 4 5 6 7 8 9 10 CTRIA3 EID PID G1 G2 G3 CTRIA3 3 2 7 3 12
Field Contents EID Unique element identification number (INTEGER). PID Identification number of a PSHELL property card (INTEGER). G1, G1, G3 Grid point identification numbers of connection points (INTEGER). CANDE Implementation:
Field Description Notes: 2 Retrieves element number CANDE cannot ‘skip’ number elements. If
the NASTRAN elements are skip-numbered, CANDE will renumber them sequentially.
3 Saves material number as place holder CANDE saves the material number but requires the user to define the material number later
4 Node location (Node I) 5 Node location (Node J) 6 Node location (Node K)
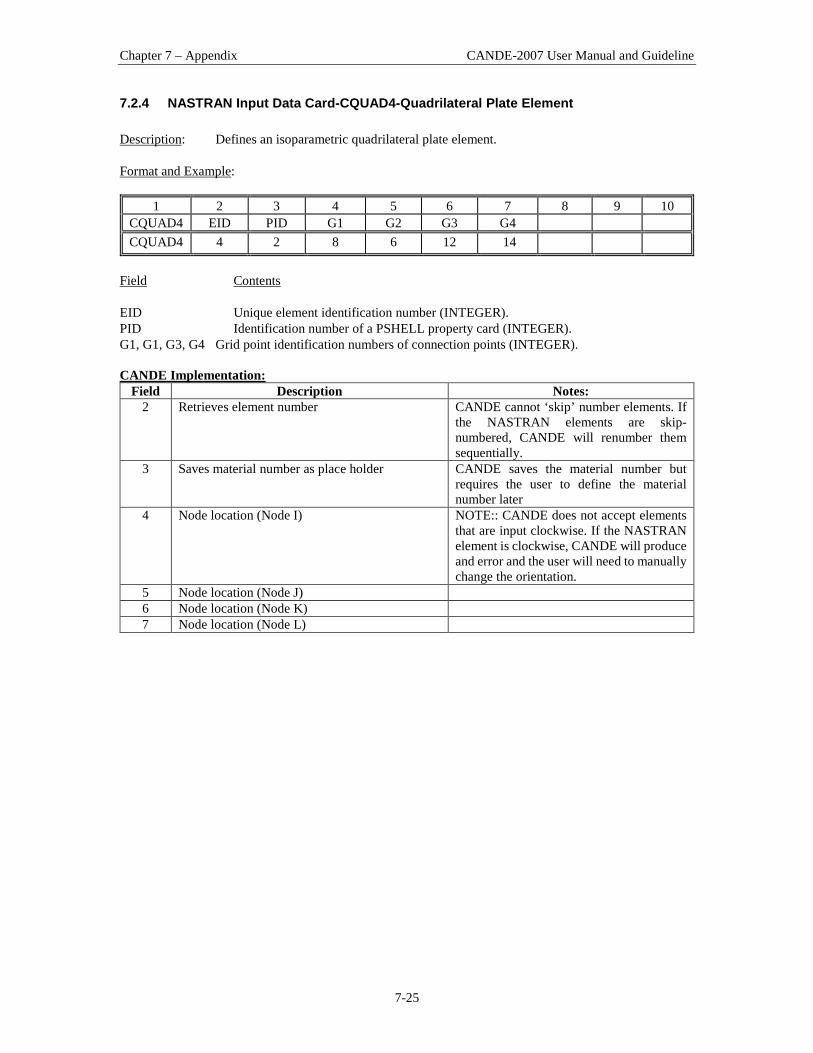
Chapter 7 – Appendix CANDE-2007 User Manual and Guideline
7-25
7.2.4 NASTRAN Input Data Card-CQUAD4-Quadrilateral Plate Element Description: Defines an isoparametric quadrilateral plate element.
Format and Example:
1 2 3 4 5 6 7 8 9 10 CQUAD4 EID PID G1 G2 G3 G4 CQUAD4 4 2 8 6 12 14
Field Contents EID Unique element identification number (INTEGER). PID Identification number of a PSHELL property card (INTEGER). G1, G1, G3, G4 Grid point identification numbers of connection points (INTEGER). CANDE Implementation:
Field Description Notes: 2 Retrieves element number CANDE cannot ‘skip’ number elements. If
the NASTRAN elements are skip-numbered, CANDE will renumber them sequentially.
3 Saves material number as place holder CANDE saves the material number but requires the user to define the material number later
4 Node location (Node I) NOTE:: CANDE does not accept elements that are input clockwise. If the NASTRAN element is clockwise, CANDE will produce and error and the user will need to manually change the orientation.
5 Node location (Node J) 6 Node location (Node K) 7 Node location (Node L)
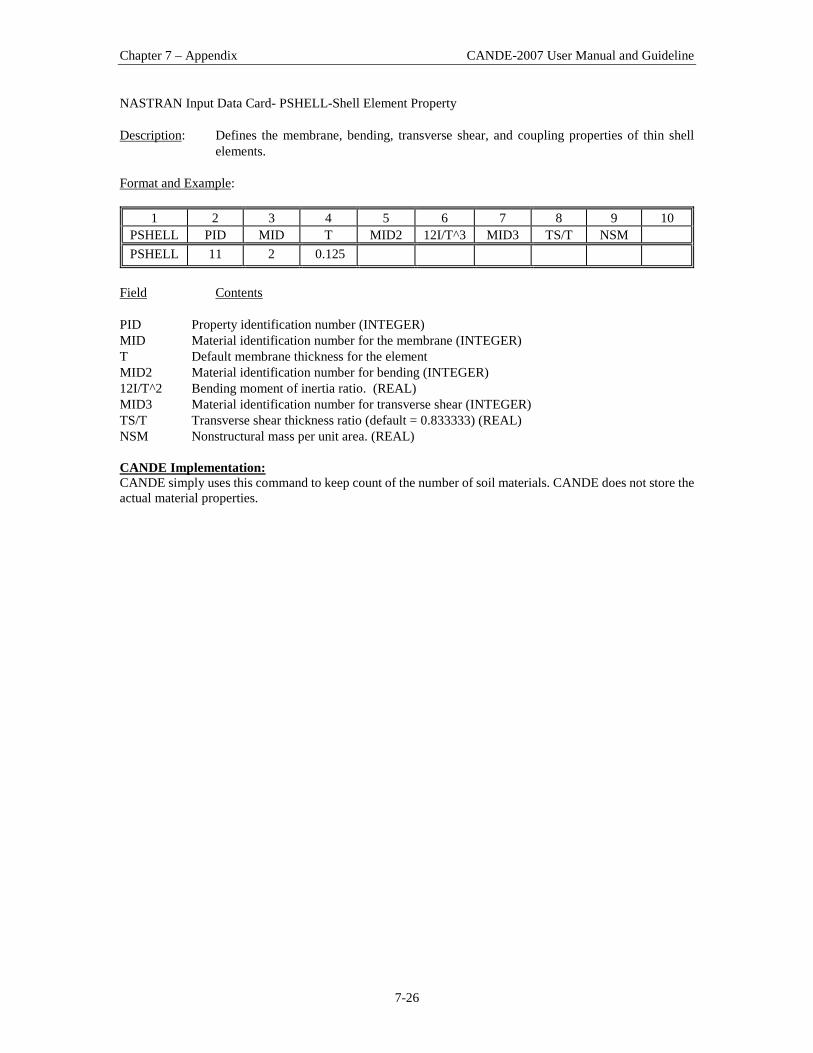
Chapter 7 – Appendix CANDE-2007 User Manual and Guideline
7-26
NASTRAN Input Data Card- PSHELL-Shell Element Property Description: Defines the membrane, bending, transverse shear, and coupling properties of thin shell
elements. Format and Example:
1 2 3 4 5 6 7 8 9 10 PSHELL PID MID T MID2 12I/T^3 MID3 TS/T NSM PSHELL 11 2 0.125
Field Contents PID Property identification number (INTEGER) MID Material identification number for the membrane (INTEGER) T Default membrane thickness for the element MID2 Material identification number for bending (INTEGER) 12I/T^2 Bending moment of inertia ratio. (REAL) MID3 Material identification number for transverse shear (INTEGER) TS/T Transverse shear thickness ratio (default = 0.833333) (REAL) NSM Nonstructural mass per unit area. (REAL) CANDE Implementation: CANDE simply uses this command to keep count of the number of soil materials. CANDE does not store the actual material properties.
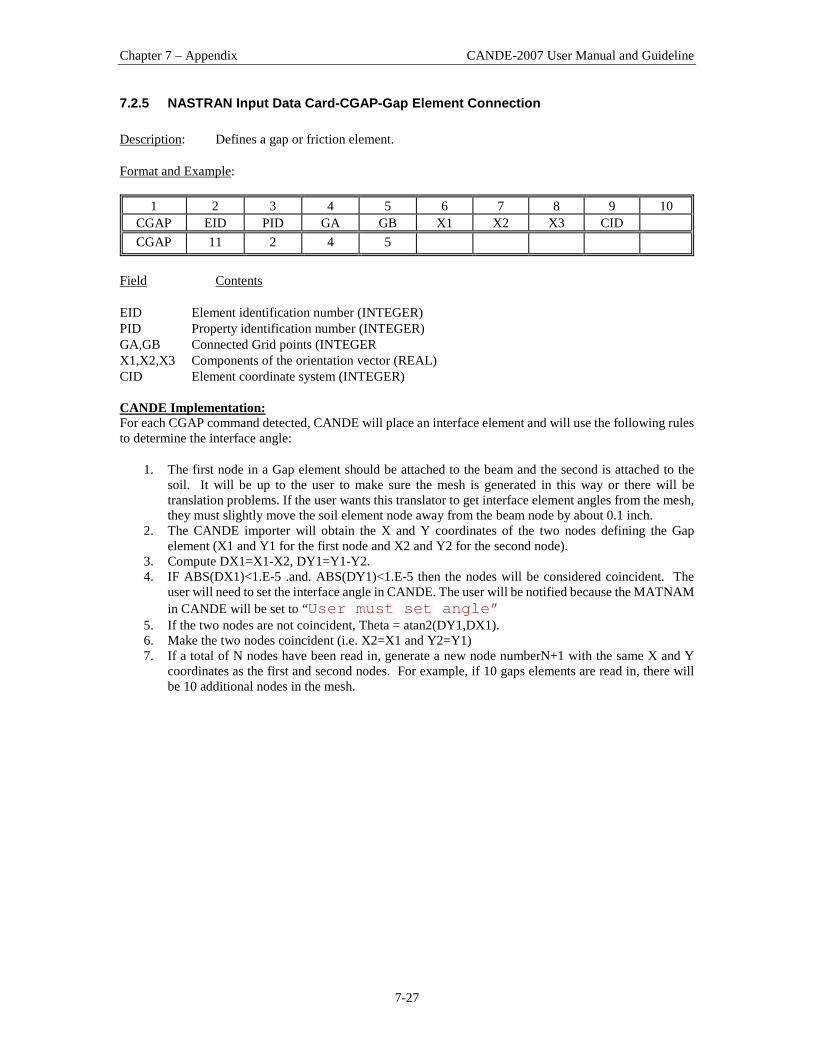
Chapter 7 – Appendix CANDE-2007 User Manual and Guideline
7-27
7.2.5 NASTRAN Input Data Card-CGAP-Gap Element Connection Description: Defines a gap or friction element. Format and Example:
1 2 3 4 5 6 7 8 9 10 CGAP EID PID GA GB X1 X2 X3 CID CGAP 11 2 4 5
Field Contents EID Element identification number (INTEGER) PID Property identification number (INTEGER) GA,GB Connected Grid points (INTEGER X1,X2,X3 Components of the orientation vector (REAL) CID Element coordinate system (INTEGER) CANDE Implementation: For each CGAP command detected, CANDE will place an interface element and will use the following rules to determine the interface angle:
1. The first node in a Gap element should be attached to the beam and the second is attached to the soil. It will be up to the user to make sure the mesh is generated in this way or there will be translation problems. If the user wants this translator to get interface element angles from the mesh, they must slightly move the soil element node away from the beam node by about 0.1 inch.
2. The CANDE importer will obtain the X and Y coordinates of the two nodes defining the Gap element (X1 and Y1 for the first node and X2 and Y2 for the second node).
3. Compute DX1=X1-X2, DY1=Y1-Y2. 4. IF ABS(DX1)<1.E-5 .and. ABS(DY1)<1.E-5 then the nodes will be considered coincident. The
user will need to set the interface angle in CANDE. The user will be notified because the MATNAM in CANDE will be set to “User must set angle”
5. If the two nodes are not coincident, Theta = atan2(DY1,DX1). 6. Make the two nodes coincident (i.e. X2=X1 and Y2=Y1) 7. If a total of N nodes have been read in, generate a new node numberN+1 with the same X and Y
coordinates as the first and second nodes. For example, if 10 gaps elements are read in, there will be 10 additional nodes in the mesh.
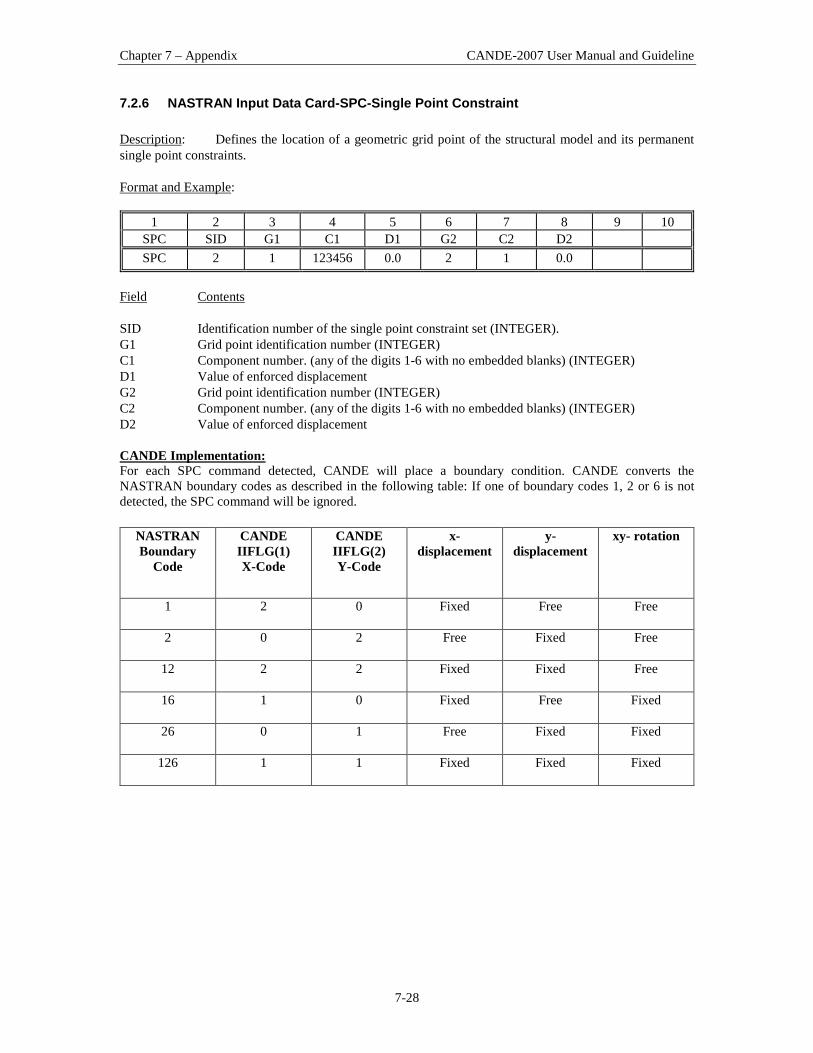
Chapter 7 – Appendix CANDE-2007 User Manual and Guideline
7-28
7.2.6 NASTRAN Input Data Card-SPC-Single Point Constraint Description: Defines the location of a geometric grid point of the structural model and its permanent single point constraints. Format and Example:
1 2 3 4 5 6 7 8 9 10 SPC SID G1 C1 D1 G2 C2 D2 SPC 2 1 123456 0.0 2 1 0.0
Field Contents SID Identification number of the single point constraint set (INTEGER). G1 Grid point identification number (INTEGER) C1 Component number. (any of the digits 1-6 with no embedded blanks) (INTEGER) D1 Value of enforced displacement G2 Grid point identification number (INTEGER) C2 Component number. (any of the digits 1-6 with no embedded blanks) (INTEGER) D2 Value of enforced displacement CANDE Implementation: For each SPC command detected, CANDE will place a boundary condition. CANDE converts the NASTRAN boundary codes as described in the following table: If one of boundary codes 1, 2 or 6 is not detected, the SPC command will be ignored.
NASTRAN Boundary
Code
CANDE IIFLG(1) X-Code
CANDE IIFLG(2) Y-Code
x-displacement
y-displacement
xy- rotation
1 2 0 Fixed Free Free
2 0 2 Free Fixed Free
12 2 2
Fixed Fixed Free
16 1 0 Fixed Free Fixed
26 0 1 Free Fixed Fixed
126 1 1 Fixed Fixed Fixed

Chapter 7 – Appendix CANDE-2007 User Manual and Guideline
7-29
7.2.7 NASTRAN Input Data Card-FORCE-Static Load Description: Defines a static load at a grid point by specifying a vector. Format and Example:
1 2 3 4 5 6 7 8 9 10 FORCE SID G CID F N1 N2 N3 FORCE 1 1 1 200. 1. 0.5 0.0
Field Contents SID Load set identification number (INTEGER) G Grid point identification number where load is applied (INTEGER). CID Coordinate system identification number (INTEGER) F Scale factor (Real). N1 X component of the force (REAL) N2 Y component of the force (REAL) N3 Z component of the force (REAL) CANDE Implementation: For each FORCE command detected, CANDE will place a boundary condition at the specified Grid Point ID (G). The boundary conditions will be placed as follows:
CANDE IIFLG(1) X-Code
CANDE IIFLG(2) Y-Code
x- Value
y- Value
Construction Increment
0 0 F * N1 F*N2 1

Chapter 7 – Appendix CANDE-2007 User Manual and Guideline
7-30
End
(This page intentionally left blank)


![2012 IJR Candidate Questionnaire [Cande Lucero Dente]](https://img.dokumen.tips/doc/110x75/568c37c71a28ab02359cc6e8/2012-ijr-candidate-questionnaire-cande-lucero-dente.jpg)