Embed Size (px)
Citation preview
Configuring a D-Link Router
DIR-816 Basic Configuration Steps
Configuring Your Router
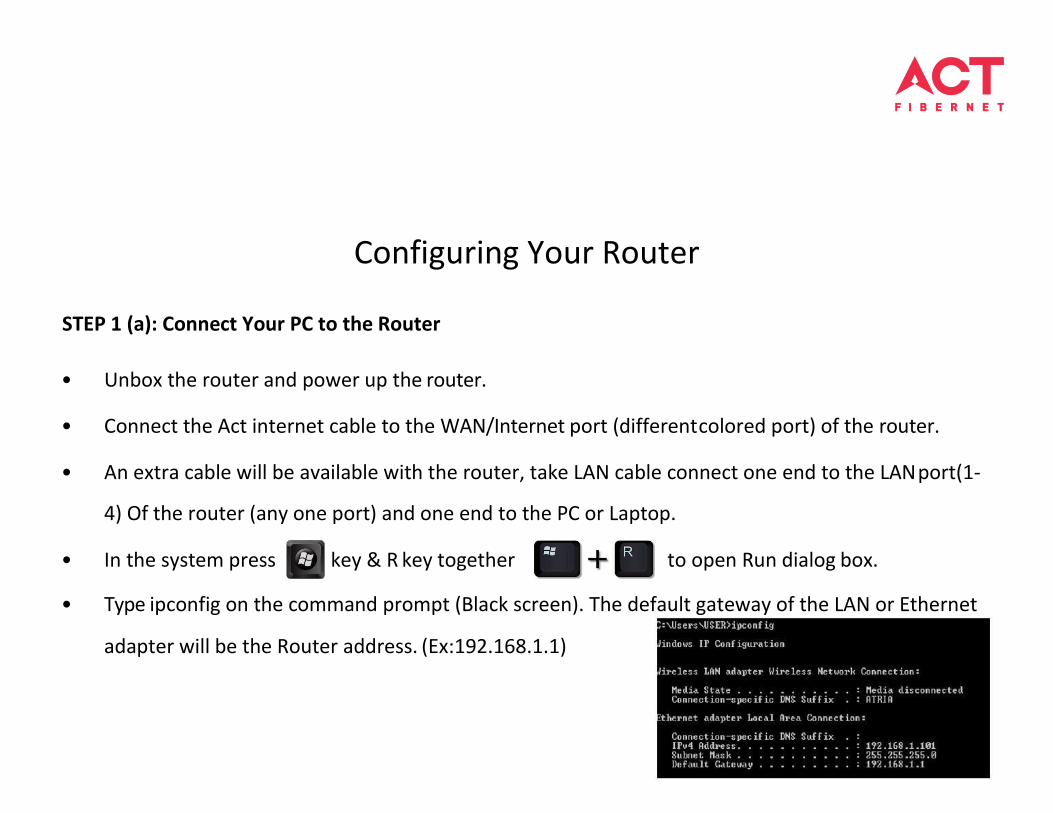
STEP 1 (a): Connect Your PC to the Router
• Unbox the router and power up the router.
• Connect the Act internet cable to the WAN/Internet port (different colored port) of the router.
• An extra cable will be available with the router, take LAN cable connect one end to the LAN port(1-
4) Of the router (any one port) and one end to the PC or Laptop.
• In the system press key & R key together to open Run dialog box.
• Type ipconfig on the command prompt (Black screen). The default gateway of the LAN or Ethernet
adapter will be the Router address. (Ex:192.168.1.1)

STEP 1 (b): Connect Your Mobile
• Switch on the router and connect ACT internet cable to the WAN/Internet port of the router
• Go to setting in the Mobile, turn on Wi-Fi and wait until the mobile detects router name
press the router name to connect.
• If the router is already configured and the Wi-Fi password is known then go to settings in
the Mobile
• Under “Wireless and Networks”, press Wi-Fi make sure "Wi-Fi" is turned on.
• Wait until the mobile detects router name press the router name if prompted enter the
Wi-Fi password and press Connect.
NOTE
• Every Router Configuration has two parts
– Configuring the Internet Part, where we tell the Router how to connect to the internet.
– Configuring the Wi-Fi Part, where we decide the name and password with which we connect to the Router
• Internet Configuration shown here will guide to configure the Router in PPPoE.
– This will enable you to browse internet directly, every time you connect to the router. No need to login again
and again.
• Wi-Fi Configuration has also been given, in order to ease the process of you connecting to the Router
– SSID and Password Creation have been explained\
– Few high end routers have two bands to work on – 2.4 GHz and 5 GHz
– 2.4 GHz band provides higher range, but lesser speed.
– 5 GHz band provides lower range, but higher speed.

STEP 2: Logging into the Router
• Open a browser Enter the below IP Address in the Address Bar. A login page appears. The
usual usernames and passwords are given in the table below.
Router Name IP Address Username Password
Cisco or Linksys 192.168.1.1 admin admin
D-Link 192.168.0.1 admin (blank)
TP-Link 192.168.0.1 admin admin
Net gear 192.168.1.1 admin password Belkin 192.168.2.1 Click on Login in Home (blank)
Tenda 192.168.0.1 admin admin
i-Ball Baton 192.168.1.1 admin admin
Digisol 192.168.2.1 admin 1234 or admin
Asus 192.168.1.1 admin admin
• If all the above credentials do not work, please check the back of the router where
the username and password will be mentioned.
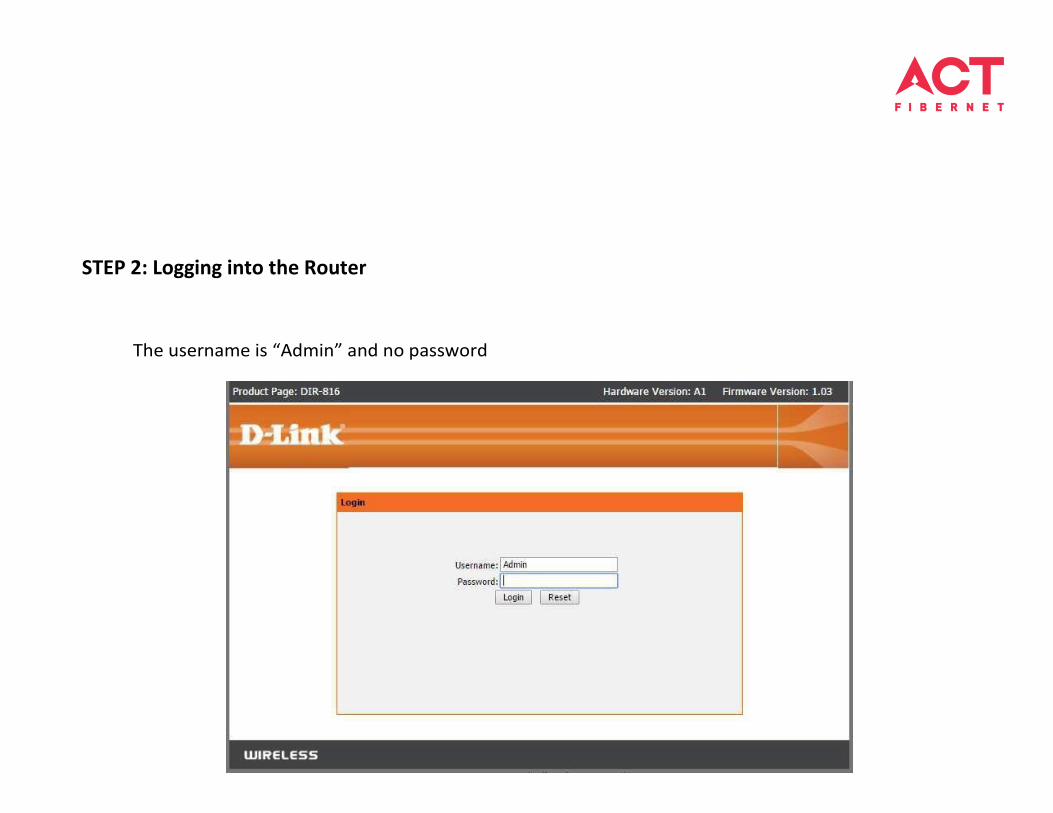
STEP 2: Logging into the Router
The username is “Admin” and no password
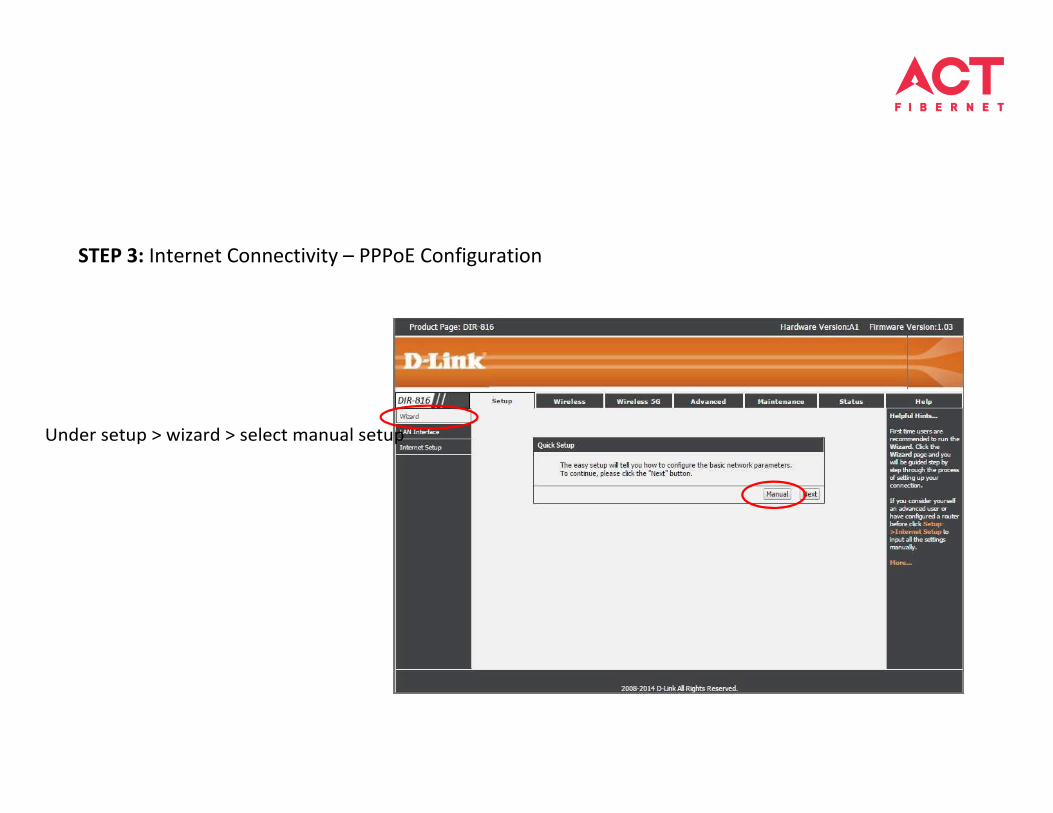
STEP 3: Internet Connectivity – PPPoE Configuration
Under setup > wizard > select manual setup
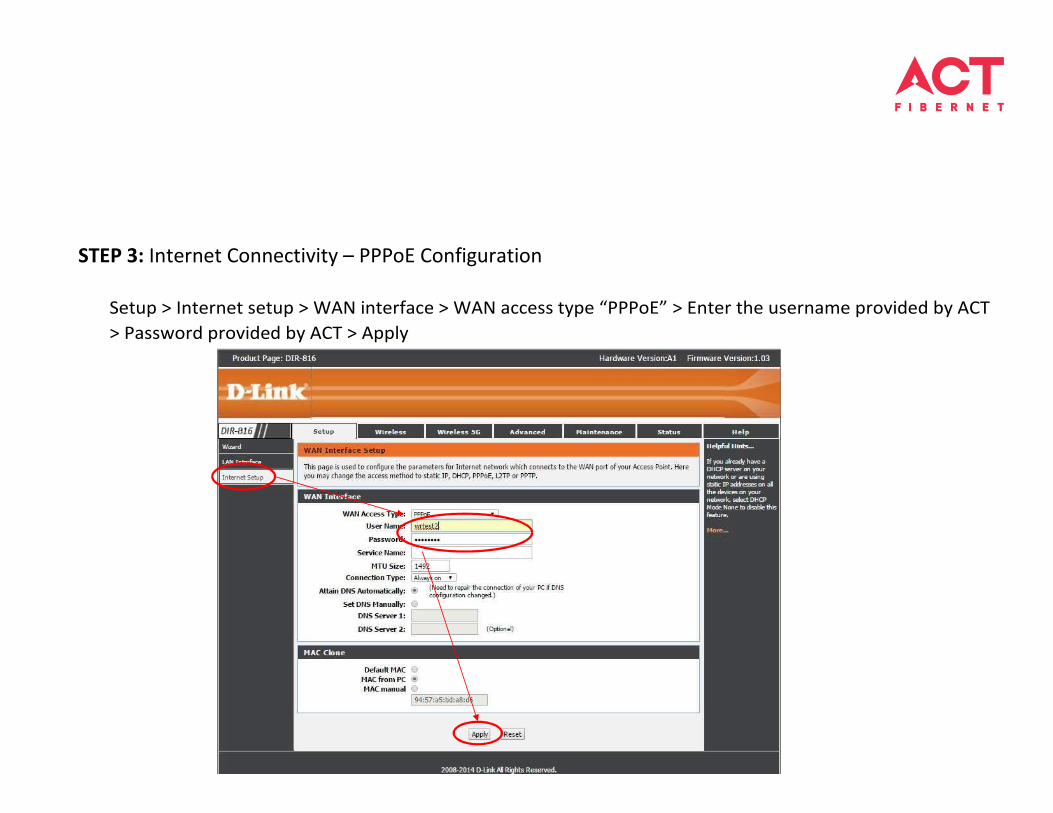
STEP 3: Internet Connectivity – PPPoE Configuration
Setup > Internet setup > WAN interface > WAN access type “PPPoE” > Enter the username provided by ACT
> Password provided by ACT > Apply
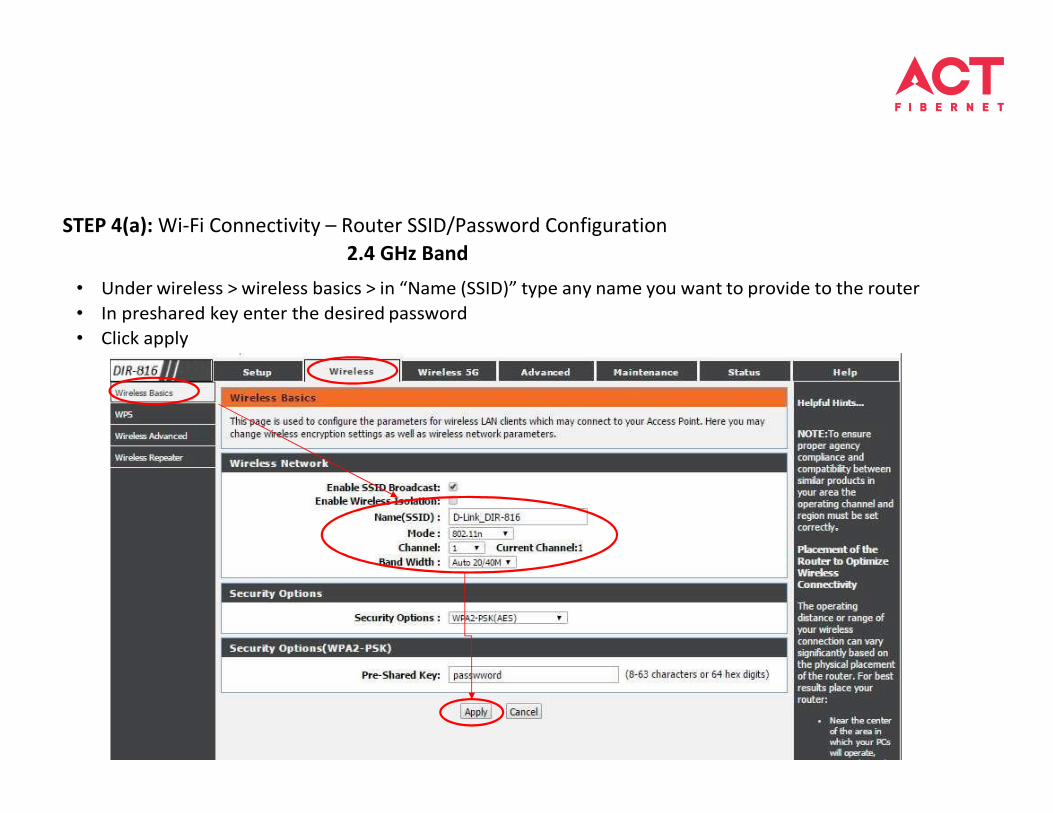
STEP 4(a): Wi-Fi Connectivity – Router SSID/Password Configuration
2.4 GHz Band
• Under wireless > wireless basics > in “Name (SSID)” type any name you want to provide to the router
• In preshared key enter the desired password
• Click apply
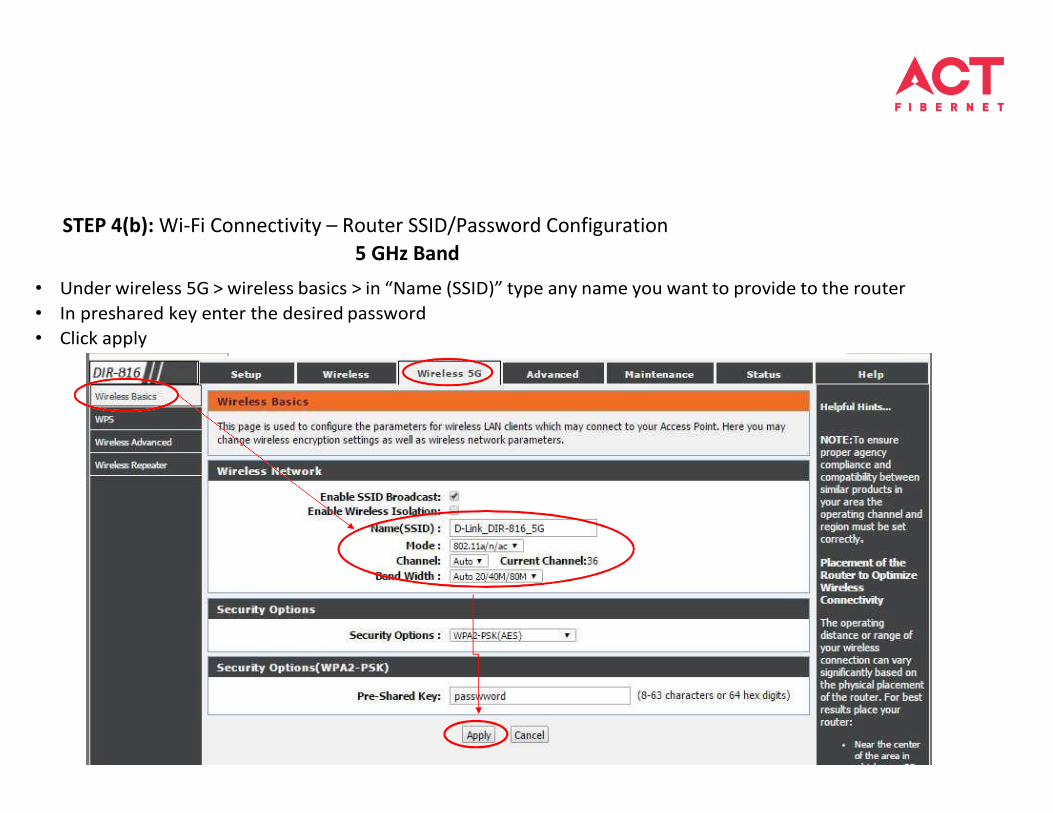
STEP 4(b): Wi-Fi Connectivity – Router SSID/Password Configuration
5 GHz Band
• Under wireless 5G > wireless basics > in “Name (SSID)” type any name you want to provide to the router
• In preshared key enter the desired password
• Click apply
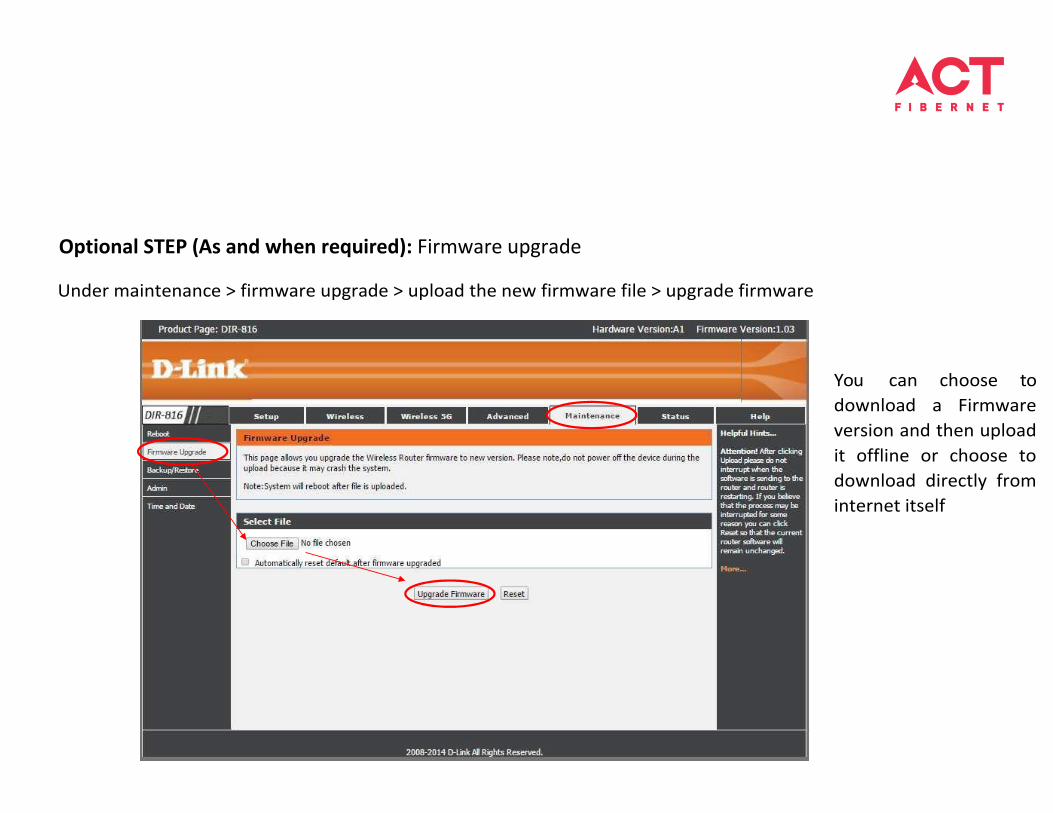
Optional STEP (As and when required): Firmware upgrade
Under maintenance > firmware upgrade > upload the new firmware file > upgrade firmware
You can choose to
download a Firmware
version and then upload
it offline or choose to
download directly from
internet itself
Changes to be made after Configuration
• If the Wi-Fi password is changed, we need to update the password in all the devices to get
connected to the Internet.
• Changes in PC
– Windows 7: Click on Windows button click on Control Panel click on Network and Internet click on
Network and Sharing Centre.
– In the Tasks pane(Left side of screen), click Manage wireless networks
– Right-click the router name click Remove network click on OK.
– Click on Network icon (right bottom corner next to system Time), click on Router name and enter the new Wi-Fi
password and Connect.
• Changes in PC
– Win 8, 8.1: Click on Network icon (right bottom corner next to system Time), Right click on
Router name click on “Forget this network”. Again click on Router name, enter the new Wi-Fi
password and Connect.
– Win 10: Click on Network icon(right bottom corner next to system Time), click on Network
settings under Wi-Fi click on Manage known Networks Click on your Router name and Click
on Forget, and again click on Network icon click on Router name enter the new Wi-Fi
password and Connect
• Mobile or Tablet
– Go to ‘Settings’ in Mobile, turn on Wi-Fi and long press on your Router name and press “Forget
network”. Again press the router name. You will be prompted to enter the Wi-Fi password.
Enter the Password and Connect.