Embed Size (px)
Citation preview


COBB Grandparent Management Guide
IntrOduCtIOn
Cobb’s commitment to genetic improvement of our family of products continues to increase the performance potential in all areas of broiler and broiler breeder production. However, to attain both genetic potential and consistent flock production, it is important that the flock manager has a good management program in place. The success of the Cobb broiler breeder worldwide has provided considerable experience of the breed in a wide range of situations, such as hot and cold climates, controlled environment and open housing. This management guide is designed to assist you in building your management program.Management must not only meet the basic needs of the stock but must also be finely tuned to benefit fully from the breed’s potential. Some of the guidelines may need to be adapted locally according to your own experience, and our technical teams will assist with this. This Cobb Grandparent Management Guide highlights critical factors that are most likely to influence flock performance and is part of our technical information service, which includes the Cobb Breeder, Hatchery, Broiler and Vaccination Management Guides, Technical Bulletins and a full range of performance charts. Our recommendations are based on current scientific knowledge and practical experience around the world. You should be aware of local legislation, which may influence the management practice that you choose to adopt.This Cobb Grandparent Management Guide is intended as a reference and supplement to your own flock management skills so that you can apply your knowledge and judgment to obtain consistently good results with the Cobb family of products.
Revised 2011
©2011 Cobb-Vantress, Inc.COBB

COBB Grandparent Management Guide
COBB
COntents Page
1. Identifying Lines And Crosses 1-3
1.1 A-B-C-d Concept explained 11.2 toe Identification 21.3 sex errors and Id Mistakes 31.4 Identifying Fast and slow Feathering Lines 3
2. Biosecurity 4-112.1 setting up the new Grandparent Facility 42.2 Grand Parent Breeder Farm disinfection schedule 52.3 Fumigation 72.4 Fumigation Methods 72.5 Vaccination 82.6 Medication 92.7 Water 92.8 rodent Control 11
3. Calculating GP Package Placement numbers by Line 12
4. Bird densities in rearing and Production 13
5. Feeder space, Grills, and Feeding Programs in rearing 14-245.1 Grills and their Openings 145.2 Feeding Programs 145.3 Feeder and Feeding Concepts 20
6. Water Management 25-26 6.1 drinkers 256.2 Water Management in rearing and Production 25
7. selection Procedures 27-327.1 Value of Performing Male selection Properly 277.2 Male selection at 5-6 Weeks of Age 287.3 details of the selection Procedure 297.4 selection Worksheet 32
8. Male Management 33-38 8.1 Feeding of the Males 338.2 Male Bodyweight Curve After selection 34 9. Female Management 39-41
10. Lighting 42-43 11. nest types and Concepts 44-4711.1 Manual egg Gathering 4411.2 Mechanical nest systems 4511.3 egg Collection Criteria 47
12. notes 48

COBB Grandparent Management Guide
COBB1
1. IdentIFyInG LInes And CrOsses
At the GP level, there are 4 different lines of birds, 2 male and 2 female lines. To make it easier to understand and to avoid confusion, these 4 lines are identified as A-B-C-D. This identification system will be followed throughout this manual.
• The A line is the male of the male line.• The B line is the female of the male line.• The C line is the male of the female line.• The D line is the female of the female line.
The A x B cross will produce the AB —The Parent Stock (PS) male.The C x D cross will produce the CD —The Parent Stock (PS) female.
Four commercial female PS lines are available:1. Cobb 500 (Fast Feather)2. Cobb 500 (Slow Feather)3. Cobb Avian484. Cobb 700
Two commercial male PS lines are available:1. Cobb 500 male2. Cobb MX male Each of the commercial PS crosses represents a different female and male line combination with different characteristics. For details of the lines used in each product see the appropriate Grandparent Management Supplement.
Knowing the body weight curve of each line, along with how to interpret the frame size and fleshing condition, is crucial for optimizing egg production and fertility. Each line of males and females is different. This manual should give you some insights into the expected behavior and conditioning of the lines.
1.1 A-B-C-d COnCePt exPLAIned
GP
PS
Broiler
A x B
AB
ABCD
C x D
CD

COBB Grandparent Management Guide
COBB 2
In order to avoid mixing of the lines a double door is always required between the pens of different lines when they are placed in the same house.
FiGure 1: Double door between pens ofdifferent lines to avoid mixing.
Figure 2: Toe identification and back toenails (dewclaws or rudimentary toes). Toes 4 and 5 are always trimmed in the males at any level (GP and PS).
The dewclaws or rudimentary toes (number 4 & 5) are always trimmed in the A and C males to reduce damage to the backs and thighs of the females during the mating process. Toe-trimming of toes 4 & 5 therefore offers a net welfare benefit. It is essential that toe-trimming is only conducted on day-old chicks by skilled, fully trained hatchery personnel.
For further identification of the lines as a check to correct unintentional mixing of flocks, the A and B line receive an additional toe trim. Each line has its specific toe trim. When several lines are present in the same housing complex, the C and D lines are also ID toe-trimmed to avoid any possible mix up of the lines.
(Note: Toe trimming for purposes of line identification is not ideal from a welfare perspective and Cobb continues to seek better alternatives to this process. It should only be conducted when allowed by local legislation and should always be conducted in the hatchery on day-old chicks by trained personnel.)
1.2 tOe IdentIFICAtIOn
In FiGure 2 the toe identification is explained and how to look at and number the toes.
500 maleMX male
AxB Lines at all FarmsA
1-4-53-4-5
B13
C500sfC500ff C700sf
CxD Lines Multi Line FarmsC
4-5-84-5
4-5-6
D8
None
COBB Grandparent Management Guide
COBB3
Sex errors need to be taken out at any time during the rearing period when positively identified. The flock needs to be checked closely again during the individual vaccination at 18-19 weeks of age and at the time of transfer from rearing to laying housing. Even with this procedure, some males could show up later in the production period. For that reason it is recommended that before hatching eggs are sent to the hatchery (or at around 25 weeks of age) to re-examine the whole house again with at least 3 persons. If slats are used, have someone walk on either side of the slats and one walk in the litter area to spot the potential presence of sex errors.
At 18 weeks of age also check the toe ID of the females to be sure no mixing has happened in the rearing period, especially when multiple lines are raised in the same house.
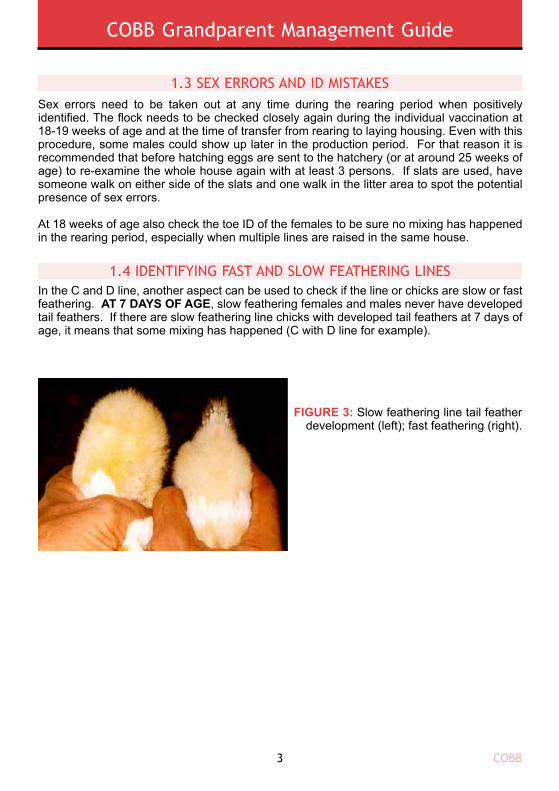
In the C and D line, another aspect can be used to check if the line or chicks are slow or fast feathering. AT 7 DAYS OF AGe, slow feathering females and males never have developed tail feathers. If there are slow feathering line chicks with developed tail feathers at 7 days of age, it means that some mixing has happened (C with D line for example).
1.3 sex errOrs And Id MIstAKes
1.4 IdentIFyInG FAst And sLOW FeAtHerInG LInes
FiGure 3: Slow feathering line tail feather development (left); fast feathering (right).

COBB Grandparent Management Guide
COBB 4
2. BIOseCurIty
Good biosecurity must encompass all the operations carried out by a producer of breeding stock. Procedures to prevent the introduction and spread of disease or contamination must be put in place for feed production, farm operations, hatchery, general maintenance and personnel. A breakdown in any single area will endanger the whole biosecurity program.
At the GP level and higher up the genetic ladder (GGP and Pedigree), more stringent measures must be implemented to avoid the possible entrance of harmful pathogens to the farm complex. Some locations have high disease challenges and may be in areas where many people have back-yard poultry, with farm people having contact with these chickens at home. A quarantine period of 3 days without any bird contact before having access to GP flocks should be implemented.
Upon entering a GP farm, proper attention to details should be observed, such as:
Being constantly aware and responsible of what one is doing all the time is the best way to keep the flocks clean and healthy for maximum flock performance and the production of good quality parent stock offspring.
The following basic items outline the biosecurity measures that must be implemented at farm level:
2.1 settInG uP tHe neW GrAndPArent FACILIty
Entry log to confirm the personal data for each visitor and their compliance with biosecurity requirements prior to farm entry.Procedures to ensure that no personal items enter the farm. Rinsing the throat with an anti-bacterial product (like Listerine™) before entering the showers. When in the showers, having a control (visual) to be sure that every person follows basic showering rules (full body & hair wash with soap, use of nail brushes to scrub hands and nails, etc).
•
••
•
Choose an isolated site when developing new grandparent facilities and check governmental rules that assures that nobody can build another farm within close proximity to the poultry buildings or entry road. If this is not guaranteed more land should be purchased to have a minimum distance of 500 m to the fence line of the property.Farms should contain flocks of a single age. As a general rule, the distance between flocks of different ages should be no less than 600 meters (2000 ft.).Each farm must have a perimeter fence to prevent unauthorized entry of people, vehicles and animals.All houses must have concrete floors.Feed delivery vehicles should not enter the farm, but should fill feed bins from outside the perimeter fence. Feed bonding should take place in feed bins or feed silos at a secure location or at the entrance of the farm. Bonding means that the feed is kept in the silo for 3 to 7 days before being used. This waiting period allows the laboratory to test the feed for freedom from Salmonella before it is delivered to the chickens for consumption. During the waiting period, a red warning shield or sign should be used to indicate that this feed cannot yet be used in the farm. In addition to testing for pathogen freedom, the
1.
2.
3.
4.5.

COBB Grandparent Management Guide
COBB5
bonding period also allows any antibacterial treatment applied during the manufacturing process to have more time to function before the feed is utilized. Any vehicle that must enter the farm must be washed and disinfected prior to entry to the farm, with attention to the interior, pedals and flooring of the cab.Have a separate clean and dirty road system on the farm. The dirty road system should be used to transport spent hens at the end of the production cycle and any equipment used when the houses are cleaned out (litter, etc). The clean road should be used for delivery of shavings, pullets, feed, etc.All farm workers and any other personnel who need to enter the farm must completely shower with soap and change into a clean and designated uniform. Shower facilities can be a biosecurity risk within themselves – they must be kept clean!No other poultry, livestock or domestic pets of any kind may be allowed on grandparent farms.All buildings must be vermin and wild bird proof.A vermin control program should be practiced at all times. It is important to maintain a clean, well groomed environment. Rotate brands of bait frequently to prevent vermin developing reluctance to consume the bait. Any spilled feed should be cleaned up immediately.
6.
7.
8.
9.
10.11.
It is recommended that all dead birds be disposed of by incinerating on the farm.Brush or wash the dust down so that it can be removed with the litter.All portable equipment should be removed from the house and cleaned with a pressure washer, using a detergent solution. The equipment should then be disinfected using an officially approved disinfectant at the correct dilution as recommended by the manufacturer.Remove the litter from the house and away from the site on covered transport.Pressure wash suitable surfaces of the house with a detergent solution, paying particular attention to air inlets, fan housings and concrete floors.Use the pressure washer on the outside of the fan housings and air inlets. It is advisable to wash off the dust that accumulates on the roofs and gutters (if present). If left, this is not only a source of contamination but can cause the roof to deteriorate.Do not use high pressure when washing aluminum or plastic shutters. They can be damaged and will not function properly.At the end of the flock, collect any remaining feed and remove from the site. The bins should then be thoroughly cleaned out and fumigated by the most appropriate method, according to the age and design of the bins.When the interior is clean, pressure wash the entire house using an approved disinfectant. Again, it is advisable to disinfect the areas of the roof surrounding the fan shafts and gutters.It will normally be necessary to treat the house with an approved insecticide. Follow the manufacturer’s instructions and introduce the application into the disinfection schedule as recommended by the insecticide manufacturer.
1.2.3.
4.5.
6.
7.
8.
9.
10.
2.2 GrAnd PArent Breeder FArM dIsInFeCtIOn sCHeduLe

COBB Grandparent Management Guide
COBB 6
Drain the entire water system. Then add 3% concentration of hydrogen peroxide (or other approved water cleaning product) directly to the nipple lines, maintaining this solution for 3 days in the system. Activate all nipples with a brush or by hand to be sure they are not stuck. After 3 days flush the entire water system with enough pressure to remove any scale, biofilm and debris. Again activate all the nipples. Finally, disinfect the whole system with a sanitizing solution (most often used is chlorine at 5 ppm), leaving this in the system for several hours. Then flush this solution from the system and replace with clean water. Make sure that all traces of disinfectant are removed as this can impair the future use of vaccines as well as discourage the birds from drinking. A last flushing can be done 24 hours before arrival of the birds to be sure the water is fresh and at the right temperature.When the floor is dry, spray the floor and the sidewalls with a disinfectant. It is advisable to spray an area of 6 meters (20 feet) around the exterior walls and base of the house with the disinfectant solution for additional biosecurity of the environment.When the house interior is dry, re-bed with new material and set up the equipment. Then close and warm the house to 21ºC (70ºF) and fumigate/fog with formaldehyde gas (see sections 2.3 and 2.4 for details concerning fumigation). This procedure should be carried out at least 48 hours before restocking.After 24 hours, neutralize the gas, open the house inlets and fully ventilate. It is essential that ventilation is adequate to clear all formaldehyde gas residues before allowing people to return to work in the poultry house. Formaldehyde gas can be neutralized by ammonia if needed.Include the egg room, feed storage, showers and changing rooms in the cleaning and disinfection process.Keep a record of all visitors.
reMeMBer:Hygiene is your insurance policy.Organic material left in the house will dramatically reduce the effectiveness of any disinfectant. All waste matter must be removed before applying disinfectant.It is impossible to sterilize a house but it is possible to reduce the number of pathogens to an insignificant level.Maintain a rigorous vermin control policy.Keep the doors shut at all times to prevent re-introduction of vermin and other contaminants.
11.
12.
13.
14.
15.
16.
Disinfection: Step by stepEmpty house of all poultryClean out all organic matter and remove far off siteRemove all portable equipment for cleaning and disinfecting outside buildingWash down all the inside surfaces with heavy-duty detergent, under pressure if possibleApply disinfectant with guaranteed activity against viruses and bacteria that can infect poultryUse an insecticide and rodenticideFumigate with formaldehyde or other approved product.Replace equipment, put down new bedding material and preferably fumigate again before house is re-stocked
•••••
•••
COBB Grandparent Management Guide
COBB7
Increase the relative humidity to 70-80 %.Heat house to 21º C (70º F) as formaldehyde gas has a high temperature coefficient.Wash down all surfaces or place pans of water in the house to increase the relative humidity and gain the maximum benefit from both the gaseous actions of formaldehyde and its condensation into a polymerized form.The house should be sealed and left to cool for 24 hours after fumigation, thus promoting uniform condensation.
Formaldehyde has been used for many years as an effective fumigant. The environment during fumigation is critical to its efficiency, and these are the points to follow:
Formalin and Potassium PermanganateThis method is not recommended on the basis of Health and Safety concerns as it produces a violent chemical reaction that generates considerable heat and releases formaldehyde gas. Use 1 liter per 25 m3 (40 fluid ounces/1000 ft3) formalin in the ratio of three parts formalin to two parts of potassium permanganate. Because of the violent chemical reaction, never use more than 1.2 liters (2 pints) of formalin in any one container. The container should have deep sides (at least 3 times the depth of the chemicals, with a diameter equal to the height) to prevent the mixture from bubbling over. The formalin must be placed on concrete or metal, and not on shavings or any other flammable material.
In practice, first calculate the cubic capacity of the house; i.e., 55 meters (180 ft.) in length x 10 meters (32 ft.) in width x 3.1 meters (10 ft.) in average height = 1075 m3 (60,210 ft3).
This would require:• 43 liters (11.3 gallons) of formalin• 36 containers• 29 kg (64 lbs.) of potassium permanganate
Place 760 g (27 ounces) of potassium permanganate into each container, preferably with two operators for safety. Start at the far end of the house, placing as quickly as possible 1.2 liters (2 pints) of formalin into each container. Operators should wear a respirator, eye protection, gloves and other personal protection equipment throughout the entire procedure.
Heating Solid ParaformaldehydeThis is probably the most convenient method of producing formaldehyde gas. Paraformaldehyde prills are heated to a temperature of 218ºC (425ºF). Generally 1 kg (2.2 lbs) of prills will be sufficient for 300 m3 (1 lb of prills for 5000 ft3). If the heating device is fitted with a time switch, this system can be fully automatic. Always follow the manufacturer’s instructions.
1.2.3.
4.
2.3 FuMIGAtIOn
2.4 FuMIGAtIOn MetHOds
COBB Grandparent Management Guide
COBB
Only vaccinate healthy birds.Minimize stress following vaccination by careful flock management.Read the label and follow the manufacturer’s instructions for vaccine reconstitution, dilution and administration.Vaccine refrigerator should be located in a clean and secure area.Keep vaccines refrigerated at the manufacturer’s recommended temperature, avoiding heat and exposure to direct sunlight.Do not use vaccines that are out of date.Use the full dosage, do not dilute the vaccines.Do not save opened bottles for use at a later date.All used and opened vaccine containers should be disposed of in a correct manner following each vaccination to prevent the accidental spread of the virus.Shake the vaccine solution well both prior to administration and regularly during the operation.Change needles every 500 doses to ensure that needles are kept sharp and to reduce possible infection due to contaminations.One member of the vaccinating team should be responsible for supervising the procedure to check that the vaccine is administered correctly. Any birds that do not receive the full dose should be revaccinated.
Formalin VaporA mixture of equal parts of water and formalin dispersed as an aerosol is a very efficient method. Use 28 ml (5 oz) of formalin with 28 ml (5oz) of water for every 60 m3 (1000 ft3). This should be generated as an aerosol using the necessary equipment. In each house it may be necessary to use more than one generator or employ some system of removing the generator and refilling. There are companies providing such a service to the poultry industry.
The main purpose of a vaccination program is to prevent losses from a specific disease. The usual method is to provide immunity by exposure with a disease agent of lesser pathogenicity than the field strains of the disease. The scheduling of a vaccination program should be such that it allows the infection to occur at an age in the flock’s life that will cause the least economic loss. Vaccination is a necessary stress placed on the birds; therefore, pay particular attention to these flocks to reduce this stress.
It is not practical to recommend a specific vaccination program for poultry in all areas of the world. Consult your local poultry veterinarian for a program that meets the disease challenge and vaccine availability in your geographical area.
•••
••
••••
•
•
•
2.5 VACCInAtIOn
Precaution Formalin solution and formaldehyde gas both represent a hazard to human and animal life. Operators must be provided with and wear suitable protective clothing, full face respirators, eye shields and gloves and should be aware of current legislation affecting these products.
8

COBB Grandparent Management Guide
COBB9
The number of doses administered by the end of the day should be checked against the number of doses taken to the farm.One qualified person should be responsible for cleaning and sterilizing the equipment at the end of each job.To determine the quality of the vaccine administration, the flock should be monitored at 10 to 14 days post vaccination for neck sores, twisted heads and mortality or leg damage, depending on the site of the administration.Monitor the health and antibody status of the flock on a routine basis.Monitoring SalmonellaEnvironmental samples shall be collected from each GP flock every week and examined bacteriologically for Salmonella.Monitoring MycoplasmaUnvaccinated GP flocks should be serologically tested for Mycoplasma gallisepticum (Mg) and Mycoplasma Synoviae (Ms) every 3 weeks. Collect 30 blood samples from each separate growing area, making sure samples are taken randomly throughout the house.Testing Spiking MalesIt is also advisable to test spiking males by PCR for MG/MS/LT within 7 days prior to moving them to hen houses. Take tracheal or cleft palate swabs out of 30 males/air space and make a pool for PCR testing. Do not move the males until test results come back negative.
•
•
•
•
Prevention is by far the most economical and best method of disease control. Prevention is best achieved by the implementation of an effective biosecurity program, including appropriate vaccination. Diseases can, however, overcome these precautions and when they do, it is important to obtain qualified advice as quickly as possible.
Drugs and antibiotics are not only expensive, but they can confuse the characteristics of a disease, clouding a correct diagnosis. The use of the correct medication and the timing of treatment can be crucial in combating a disease problem.
The preferred choice of a drug or antibiotic for some diseases may be ineffective if used for the treatment of a different disease. For certain diseases there may not be an effective treatment or it may not be economically feasible to treat. Therefore, always submit 6 to 8 birds to a laboratory, so that sensitivity tests can be conducted to identify medication that will be effective against the disease agent involved.
Water should be kept clean, cool, and free from pathogens. The total dissolved solids (or salinity) in the water should not exceed 1,000 ppm (500 ppm maximum when used for human consumption). It is recommended that the calcium and magnesium salts (hardness) should be less than 20 ppm for Ca and less than 5 ppm for magnesium.
Chlorination may be used to sanitize a water supply. It helps to control bacteria and also helps to prevent slime and algae build-up in water lines. A chlorine level of 3 ppm at the last drinker level is recommended with a water pH below 7 to have all the chlorine in active free form.
2.6 MedICAtIOn
2.7 WAter

COBB Grandparent Management Guide
COBB 10
Around 70% of the well and drinking water worldwide is alkaline with a pH between 7.5 and 8.2. In the graph it indicates that the higher the pH the lower the efficiency of the chlorination process. With a pH of 8 only 30% of the chlorine level is in a free active form. For this reason based on the pH water needs to be acidified before chlorine treatment is done.
In practice this would mean installing a system first to reduce pH and then a second system to add the chlorine to the water. With this procedure the level of chlorine added to the water system can be maximum 3 ppm without losing efficiency.
Water analysis, at 3-month intervals, is good practice to determine the need for treatment.
effect of pH on Chlorine Sanitation
ph Level
4 5 6 7 8 9 10 11
100
75
50
25
0
100 99 95
75
30
4 1 0
% C
hlo
rin
e A
ctiv
e

COBB Grandparent Management Guide
COBB11
2.8 rOdent COntrOL
An effective rodent control program involves several measures that restrict shelter, food and water from the rodents. Actions that need to be taken are as follows:
Eliminate hiding places by removing all the rubbish from around the buildings.All vegetation needs to be kept trimmed.Make the entrance to the buildings as rodent proof as possible.Dispose of dead birds properly and promptly.Keep feed spillage to a minimum. Clean up feed spills immediately.Keep feed storage areas clean and store feed properly. Keep feed bags on pallets off the floor.Maintain permanent bait stations with a fresh supply of rodenticides on a year-round basis.Rotate the use of different baits on a regular program.Use traps where practical.An anti rodent barrier can be placed around the houses or around the perimeter of the unit. They have shown to be very effective in keeping rodents out of the houses and control several diseases like Salmonellas and Cholera.
••••••
•
•••

COBB Grandparent Management Guide
COBB 12
3. CALCuLAtInG GP PACKAGe PLACeMent nuMBers By LIne1 GP unit is comprised of 1000 D line females and all the other 3 corresponding lines to complete the package. The B line numbers are based on the production capacity of the D line. If the D line is a line that is capable of higher production, then there will be a need for more B line females to avoid a shortage of PS male numbers.
*Lower amounts of males can be kept in A and C lines at selection time if the operation feels comfortable with the lower numbers.
*Lower amounts of males can be kept in A and C lines at selection time if the operation feels comfortable with the lower numbers.
Standard Cobb 500/700 package per 1 UNIT (Fast or Slow Feathering)Line
DCBA
Totals
1000442290290
2022
5%5%5%5%
100%*29%100%*14%
95012427539
1388
5%
5%
9009026226
1278
Numberof Chicks
%Mortality
Pointof Lay-24 wks.
NumberDay OldChicks
% Mortality+ Culling
Selection %kept at
6 weeks
Standard Cobb 48 package per 1 UNIT (Slow Feathering)Line
DCBA
Totals
1000442340340
2122
5%5%5%5%
100%*29%100%*14%
95012432345
1442
5%
5%
9009030731
1328
Numberof Chicks
%Mortality
Pointof Lay-24 wks.
NumberDay OldChicks
% Mortality+ Culling
Selection %kept at
6 weeks

COBB Grandparent Management Guide
COBB13
4. BIrd densItIes In reArInG And PrOduCtIOnHousing space needs are determined by 4 parameters: Floor Space, Feeder space, litter quality and air quality.
Both the A and C line males are housed normally at 10 males/m2 (1.0 ft2/bird) for the first 35 to 42 days during broilerization (ad lib feeding for maximum growth rate). After the males have gone through the selection process, the density will drop to below 3.5 males/m2 (3.0 ft2/bird) to give them enough space to develop properly and become a sufficiently dominant male by the end of the rearing period.
During the rearing period, the B line females are normally placed between 4-5 females/m2
(2.1-2.6 ft2/bird) while the D line is housed between 5 and 7 females/m2 (1.5-2.1 ft2/bird).
In production, the B line is housed at 4-5 females /m2 (2.1-2.6 ft2/bird) and the D line between 5 and 6 females/m2 (1.5-1.75 ft2/bird).
COBB Grandparent Management Guide
COBB 14
5.1 GrILLs And tHeIr OPenInGs
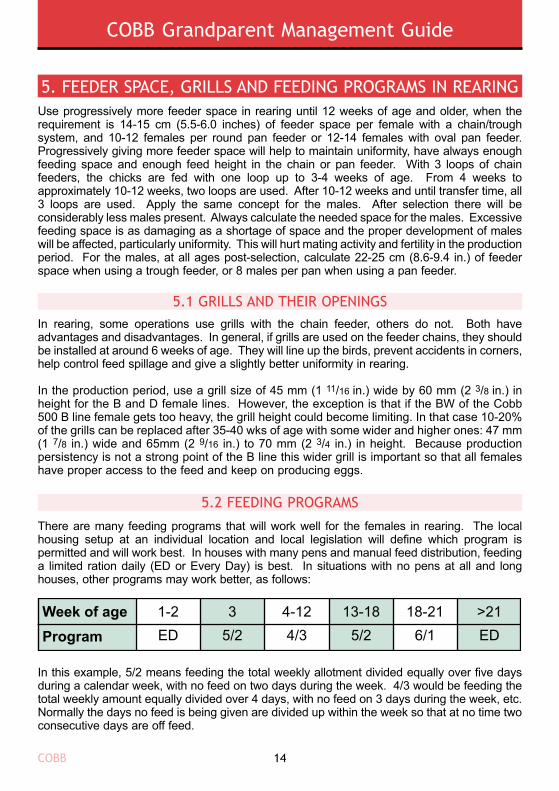
5. Feeder sPACe, GrILLs And FeedInG PrOGrAMs In reArInGUse progressively more feeder space in rearing until 12 weeks of age and older, when the requirement is 14-15 cm (5.5-6.0 inches) of feeder space per female with a chain/trough system, and 10-12 females per round pan feeder or 12-14 females with oval pan feeder. Progressively giving more feeder space will help to maintain uniformity, have always enough feeding space and enough feed height in the chain or pan feeder. With 3 loops of chain feeders, the chicks are fed with one loop up to 3-4 weeks of age. From 4 weeks to approximately 10-12 weeks, two loops are used. After 10-12 weeks and until transfer time, all 3 loops are used. Apply the same concept for the males. After selection there will be considerably less males present. Always calculate the needed space for the males. Excessive feeding space is as damaging as a shortage of space and the proper development of males will be affected, particularly uniformity. This will hurt mating activity and fertility in the production period. For the males, at all ages post-selection, calculate 22-25 cm (8.6-9.4 in.) of feeder space when using a trough feeder, or 8 males per pan when using a pan feeder.
In rearing, some operations use grills with the chain feeder, others do not. Both have advantages and disadvantages. In general, if grills are used on the feeder chains, they should be installed at around 6 weeks of age. They will line up the birds, prevent accidents in corners, help control feed spillage and give a slightly better uniformity in rearing.
In the production period, use a grill size of 45 mm (1 11/16 in.) wide by 60 mm (2 3/8 in.) in height for the B and D female lines. However, the exception is that if the BW of the Cobb 500 B line female gets too heavy, the grill height could become limiting. In that case 10-20% of the grills can be replaced after 35-40 wks of age with some wider and higher ones: 47 mm (1 7/8 in.) wide and 65mm (2 9/16 in.) to 70 mm (2 3/4 in.) in height. Because production persistency is not a strong point of the B line this wider grill is important so that all females have proper access to the feed and keep on producing eggs.
There are many feeding programs that will work well for the females in rearing. The local housing setup at an individual location and local legislation will define which program is permitted and will work best. In houses with many pens and manual feed distribution, feeding a limited ration daily (ED or Every Day) is best. In situations with no pens at all and long houses, other programs may work better, as follows:
In this example, 5/2 means feeding the total weekly allotment divided equally over five days during a calendar week, with no feed on two days during the week. 4/3 would be feeding the total weekly amount equally divided over 4 days, with no feed on 3 days during the week, etc. Normally the days no feed is being given are divided up within the week so that at no time two consecutive days are off feed.
Week of ageProgram
1-2ED
35/2
4-124/3
13-185/2
18-216/1
>21ED
5.2 FeedInG PrOGrAMs

COBB Grandparent Management Guide
COBB15
everyday Feeding exampleExample: week 3Female Daily Feed allowance: 36 Grams (7.93 lbs/100 birds)
every Other Day (eOD) Feeding example Example: week 5-6Female Daily Feed allowance: 43 Grams (9.5 lbs/100 birds)On each fed day, double the daily amount86 grams per feed day (19.0 lbs./100 birds)
Feeding allowances increase either weekly or on regular feeding intervals (every 3 feedings or every 4 feedings).Feeding pattern repeats on a 2-week cycle
Sunday 36 grams (7.93 lbs/100 birds)
Monday 36 grams (7.93 lbs/100 birds)
Tuesday 36 grams (7.93 lbs/100 birds)
Wednesday 36 grams (7.93 lbs/100 birds)
Thursday 36 grams (7.93 lbs/100 birds)
Friday 36 grams (7.93 lbs/100 birds)
Saturday 36 grams (7.93 lbs/100 birds)
Sunday 86 grams (19.0 lbs/100 birds)
Monday NO FEED
Tuesday 86 grams (19.0 lbs/100 birds)
Wednesday NO FEED
Thursday 86 grams (19.0 lbs/100 birds)
Friday NO FEED
Saturday 86 grams (19.0 lbs/100 birds)
Sunday NO FEED
Monday 92 grams (20.25 lbs/100 birds)
Tuesday NO FEED
Wednesday 92 grams (20.25 lbs/100 birds)
Thursday NO FEED
Friday 92 grams (20.25 lbs/100 birds)
Saturday NO FEED

COBB Grandparent Management Guide
COBB 16
4/3 Feeding exampleExample: week 5-6Female Daily Feed allowance: 43 Grams (9.5 lbs/100 birds)43 grams x 7 days / 4 days fed = 75 grams per feed day (16.5 lbs./100 birds)
Feeding allowances increase either weekly or on regular feeding intervals (i.e., 4/3 feeding pattern is more consistent than an EOD feeding program).
5/2 Feeding exampleExample: week 15Female Daily Feed allowance: 70 Grams (15.42 lbs/100 birds)70 grams x 7 days / 5 days fed = 98 grams per feed day (21.6 lbs./100 birds)
Feed allowance increases the next week but follows the same feeding pattern
Sunday 75 grams (16.5 lbs/100 birds)
Monday 75 grams (16.5 lbs/100 birds
Tuesday NO FEED
Wednesday 75 grams (16.5 lbs/100 birds)
Thursday NO FEED
Friday 75 grams (16.5 lbs/100 birds)
Saturday NO FEED
Sunday 79 grams (17.4 lbs/100 birds)
Monday 79 grams (17.4 lbs/100 birds)
Tuesday NO FEED
Wednesday 79 grams (17.4 lbs/100 birds)
Thursday NO FEED
Friday 79 grams (17.4 lbs/100 birds)
Saturday NO FEED
Sunday 98 grams (21.6 lbs/100 birds)
Monday 98 grams (21.6 lbs/100 birds)
Tuesday NO FEED
Wednesday 98 grams (21.6 lbs/100 birds)
Thursday 98 grams (21.6 lbs/100 birds)
Friday NO FEED
Saturday 98 grams (21.6 lbs/100 birds)

COBB Grandparent Management Guide
COBB17
6/1 Feeding exampleExample: week 19Female Daily Feed allowance: 92 Grams (20.26 lbs/100 birds)92 grams x 7 days / 6 days fed = 107 grams per feed day (23.6 lbs./100 birds)
Feed allowance increases the next week but follows the same feeding pattern
Many variations are possible with above feed program suggestions. Common sense is the general rule when finding the best program. Observe the birds and determine from the flock activity and temperament what would be best for them. In situations with very low feed volumes in the second half of the rearing period, the 4/3 or 5/2 feeding program can be continued for more time even up to 22-23 weeks of age.
In instances where water availability is temporarily limited, a good practice is to give the birds in rearing 30 minutes of water and then start the feeding process. This will help reduce the instances of early feed shock. Enough water intake before feeding will also mean that the feeding program in use can be continued for a longer time.
Efforts during the rearing period to get good uniformity can be destroyed very quickly if there are issues with feeding space or a too fast feed clean up time between 20 and 25 weeks of age. In general, the flock should have a feed cleanup time of not less than 45 minutes to one hour. Feed cleanup time under 30 minutes will induce aggressive bird behavior, overcrowding at the feeders (especially from where the feed is entering the house in case chain feeders are used), give more feather damage and cause more skin tears and scratches at the thighs. It will also affect production persistency of the flocks and increase culling rates in females. Many females could be damaged by other females during the frenzy of the feeding process. Very fast feed clean up time is more likely with crumbled (and pelleted) feed compared to mash feed. To extend feed cleanup time, never use pellets. Mash feed is the preferred choice for GP and PS for rearing and production.
However to avoid possible salmonella and other bacterial contamination through the feed, an intensive control of the chemical and bacterial quality of the ingredients should be implemented. Additives with active Salmonella-inhibitory factors should be added to the pre-manufacturing and actual feed milling processes to eliminate or at least reduce any possible source of contamination in the raw ingredients and in the finished feed.
Sunday 92 grams (23.6 lbs/100 birds)
Monday 92 grams (23.6 lbs/100 birds)
Tuesday NO FEED
Wednesday 92 grams (23.6 lbs/100 birds)
Thursday 92 grams (23.6 lbs/100 birds)
Friday 92 grams (23.6 lbs/100 birds)
Saturday 92 grams (23.6 lbs/100 birds)

COBB Grandparent Management Guide
COBB 18
Feeding curve from 1-24 weeks of age in females:
Standard & Alternative feeding program going to peak production
Daily EggProduction
5%15%25%35%45%55%65%
120126132138144150165
366666
15
120123126132140150165
3336810
Standardg/female
Increasein Feed (g)
Aternativeg/female
Increasein Feed (g)
15
Feeding curve from 24-30 weeks of age:
The feeding curve is based on the BW development following the standards.The actual BW at 21-22 weeks of age is important, but it is more important to know how to attain that particular BW. In general, avoid a convex BW curve in rearing. For specifics, please refer to feeding and weight supplements particular to each line.The lower the protein/energy content of the feed in pre-breeder or production-1 feed, the more weekly feed increase can be allowed between 20-25 wks of age.Higher weekly feed increase from 16 wks of age to light stimulation, and continuous feed increases to onset of production (5%) will help to improve peak production in flocks with lower uniformity, however BW must be maintained close to the standard.
Many females tend to get too heavy after production start due to a too aggressive feeding pattern. There are 2 programs of feeding to peak in the table below.The tendency is to use the alternative feeding program in GP and PS going to peak production which means slower feed increases up to 35% daily production and then increasing faster.This is especially true when higher protein levels are used (above 15.5%) and energy levels above 2800 kcal/kg (1270 kcal/lb) and female BW becomes excessive going to peak production.The use of crumbled (pelleted) feed will only reinforce this concept. Slowing down feed increases in order to give peak feed at peak production is another option and is used when feed amounts at the onset of production (around 5%) are below 120 g per female per day.
••
•
•
•
•
•
••

COBB Grandparent Management Guide
COBB19
Another practical feeding program is shown below for D and B lines
D lines
B lines
Production1-20%
21-40%>40%
1g/3% production1g/2% production1g/1% production
Increase in feed 2x per wk
Production
1-15%
16-30%
>30%
1g/3% production
1g/2% production
1g/1% production
Increase in feed 2x per wk
Feeding curve after peak production:Many feed reduction programs are acceptable, based on experience. It is important to realize that if feed is to be withdrawn, the withdrawal must be initiated within 2 weeks after peak, especially if BW has the tendency to increase fast after peak. Often females will gain 200 g. extra BW in the 4 weeks after peak. Each 200 g in BW requires around 4 g extra in feed for maintenance.
Reducing the amount fed just after peak production could be based on:1. BW gain up to peak and at peak production.2. Actual peak production percent and egg weight.3. Breast conformation and fat reserves (palpate females).4. Feed clean up time (based on mash or crumbled feed).5. Temperature fluctuations.
•
•

COBB Grandparent Management Guide
COBB 20
There are presently 3 types of feeders used in the rearing and 2 types in the production period. Every system has advantages and disadvantages. It is important to learn how to work with the equipment so it does the best job. In the rearing period we have:1. Traditional chain feeders2. Round or oval pan feeders3. Spin feeders
The traditional chain feeders must be managed by using dark out feeding, signal light feeding or by distributing oats, wheat or broken corn in the litter 15 minutes before the feeding starts. It is crucial for the house to be light proof so that all the birds are well distributed over the whole house or pens, and stay in place when the lights go off and the feed is being distributed. With fast feed cleanup times, quick bird distribution over the whole length of the chain feeder will guarantee more uniform feed intake and maintain uniformity. With chain feeders, calculate or observe how much feed is distributed over the chain length and then adjust the height of the feed opening at the hopper so that the feed is evenly distributed over the complete length of the feeder.
The round or oval pan feeders are less affected by the birds migrating to certain parts of the house if the feed line is charged with feed that drops into each pan immediately when the feeder first begins to run. However, feeding the first fill in the dark will enhance better feed distribution over the whole length of the system, especially when low feed amounts are being used.
The spin feeder is probably a more complex feeding system. Because the feed is distributed over a large area on the floor, the litter must always be in a good condition and the pellet must be hard enough in order not to fall apart during the delivery process. With spin feeders dark out feeding will also help, but when the lights come on a minimum of 10 lux must be used for the birds to see or find the small pellets in the litter. Try to keep the litter low enough so that birds can search for and find the pellets. This activity will help keep the litter loose and in good quality. If hawk (elongated and pointed) beaks develop during rearing when using plastic pan feeders or spin feeders, a beak adjustment must be considered before the birds go into production. This is especially important for the males.
5.3 Feeder And FeedInG COnCePts

COBB Grandparent Management Guide
COBB21
Lysine
Methionine
M + C
Tryptophan
Threonine
Arginine
Valine
Isoleucine
Leucine
Histidine
Phenylalanine
P + T
100
47
86
25
75
90
80
76
112
34
66
120
100
50
90
29
93
100
75
83
120
35
65
120
Recommended digestible amino acid levelsbased on amino acid/lysine ratios
Grower/Pre-Breeder29-1545-22
Pre-Starter/Starter0-280-4
PhaseAge (days)
(weeks)
Breeder155+23+
Male155+23+
100
45
85
25
83
100
75
83
130
33
65
120
100
44
75
22
70
105
67
70
118
32
65
115
COBB Grandparent Management Guide
COBB 22
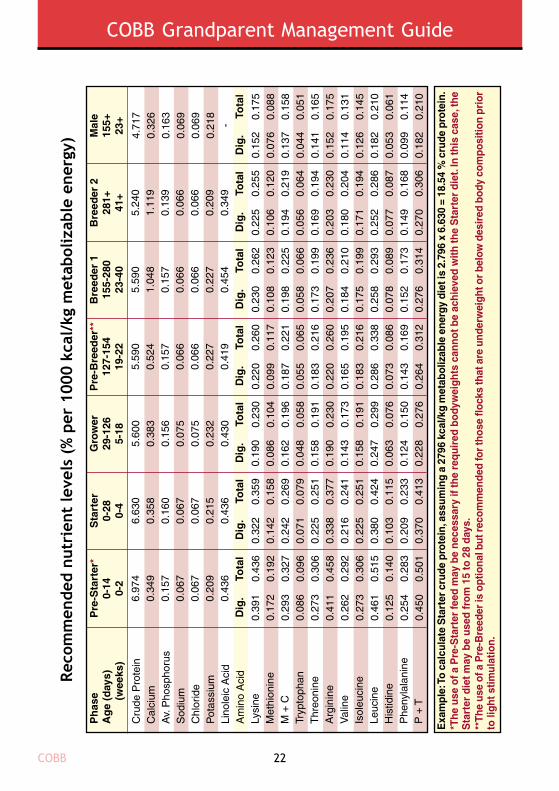
Reco
mmen
dednu
trient
leve
ls(%
per10
00kc
al/kgmetab
olizab
leen
ergy
)
Ph
ase
Ag
e(d
ays)
(wee
ks)
5.60
00.
383
0.15
60.
075
0.07
50.
232
0.43
0 0.23
00.
104
0.19
60.
058
0.19
10.
230
0.17
30.
191
0.29
90.
076
0.15
00.
276
0.22
00.
099
0.18
70.
055
0.18
30.
220
0.16
50.
183
0.28
60.
073
0.14
30.
264
0.26
00.
117
0.22
10.
065
0.21
60.
260
0.19
50.
216
0.33
80.
086
0.16
90.
312
Bre
eder
115
5-28
023
-40
0.23
00.
108
0.19
80.
058
0.17
30.
207
0.18
40.
175
0.25
80.
078
0.15
20.
276
0.22
50.
106
0.19
40.
056
0.16
90.
203
0.18
00.
171
0.25
20.
077
0.14
90.
270
0.25
50.
120
0.21
90.
064
0.19
40.
230
0.20
40.
194
0.28
60.
087
0.16
80.
306
5.59
00.
524
0.15
70.
066
0.06
60.
227
0.41
9
5.59
01.
048
0.15
70.
066
0.06
60.
227
0.45
4
5.24
01.
119
0.13
90.
066
0.06
60.
209
0.34
9
0.19
00.
086
0.16
20.
048
0.15
80.
190
0.14
30.
158
0.24
70.
063
0.12
40.
228
Sta
rter
0-28
0-4
Pre
-Sta
rter
*0-
140-
2
Gro
wer
29-1
265-
18
Exa
mpl
e:To
calc
ulat
eS
tart
ercr
ude
prot
ein,
assu
min
ga
2796
kcal
/kg
met
abol
izab
leen
ergy
diet
is2.
796
x6.
630
=18
.54
%cr
ude
prot
ein.
*The
use
ofa
Pre
-Sta
rter
feed
may
bene
cess
ary
ifth
ere
quir
edbo
dyw
eigh
tsca
nnot
beac
hiev
edw
ithth
eS
tart
erdi
et.I
nth
isca
se,t
heS
tart
erdi
etm
aybe
used
from
15to
28da
ys.
**Th
eus
eof
aP
re-B
reed
eris
optio
nalb
utre
com
men
ded
for
thos
eflo
cks
that
are
unde
rwei
ghto
rbe
low
desi
red
body
com
posi
tion
prio
rto
light
stim
ulat
ion.
4.71
70.
326
0.16
30.
069
0.06
90.
218
-
0.17
50.
088
0.15
80.
051
0.16
50.
175
0.13
10.
145
0.21
00.
061
0.11
40.
210
0.15
20.
076
0.13
70.
044
0.14
10.
152
0.11
40.
126
0.18
20.
053
0.09
90.
182M
ale
155+
23+
Bre
eder
228
1+41
+
Dig
.To
tal
Dig
.To
tal
Dig
.To
tal
Dig
.To
tal
Dig
.To
tal
Dig
.To
tal
Dig
.To
tal
0.26
20.
123
0.22
50.
066
0.19
90.
236
0.21
00.
199
0.29
30.
089
0.17
30.
314
0.32
20.
142
0.24
20.
071
0.22
50.
338
0.21
60.
225
0.38
00.
103
0.20
90.
370
0.35
90.
158
0.26
90.
079
0.25
10.
377
0.24
10.
251
0.42
40.
115
0.23
30.
413
0.39
10.
172
0.29
30.
086
0.27
30.
411
0.26
20.
273
0.46
10.
125
0.25
40.
450
0.43
60.
192
0.32
70.
096
0.30
60.
458
0.29
20.
306
0.51
50.
140
0.28
30.
501
6.63
00.
358
0.16
00.
067
0.06
70.
215
0.43
6
6.97
40.
349
0.15
70.
067
0.06
70.
209
0.43
6
Cru
deP
rote
inC
alci
umA
v.P
hosp
horu
sS
odiu
mC
hlor
ide
Pot
assi
umLi
nole
icA
cid
Am
ino
Aci
dLy
sine
Met
hion
ine
M+
CTr
ypto
phan
Thr
eoni
neA
rgin
ine
Val
ine
Isol
euci
neLe
ucin
eH
istid
ine
Phe
nyla
lani
neP
+T
Pre
-Bre
eder
**12
7-15
419
-22

COBB Grandparent Management Guide
COBB23
Exam
pleforaBr
eede
rfeed
ingpr
ogram
base
don
reco
mmen
dednu
trient
leve
ls
Ph
ase
Ag
e(d
ays)
(wee
ks)
Bre
eder
115
5-28
023
-40
Sta
rter
0-28
0-4
Pre
-Sta
rter
*0-
140-
2
Gro
wer
29-1
265-
18
*Th
eu
seo
fa
Pre
-Sta
rter
feed
may
be
nec
essa
ryif
the
req
uir
edb
ody
wei
gh
tsca
nn
ot
be
ach
ieve
dw
ith
the
Sta
rter
die
t.In
this
case
,th
eS
tart
erd
iet
may
be
use
dfr
om
15to
28d
ays.
**T
he
use
ofa
Pre
-Bre
eder
iso
pti
on
albu
trec
om
men
ded
for
tho
sefl
ock
sth
atar
eu
nd
erw
eig
hto
rb
elow
des
ired
bo
dyco
mp
osi
tio
np
rio
rto
ligh
tst
imu
lati
on
.**
*Th
eco
nce
ntr
atio
ns
may
nee
dto
be
adju
sted
dep
end
ing
on
ind
ivid
ual
exp
erie
nce
san
dlo
calc
limat
e.
Un
itM
ale
155+
23+
Bre
eder
228
1+41
+
Pre
-Bre
eder
**12
7-15
419
-22
11.5
027
4912
4712
.97
0.90
0.45
0.15
-0.2
00.
15-0
.24
0.60 -
0.42
0.21
0.38
0.12
0.39
0.42
0.31
0.35
0.50
0.15
0.27
0.50
Dig
.To
tal
0.48
0.24
0.43
0.14
0.45
0.48
0.36
0.40
0.58
0.17
0.31
0.58
11.5
027
4912
4714
.40
3.08
0.38
0.15
-0.2
00.
15-0
.24
0.57
0.96
0.70
0.33
0.60
0.18
0.53
0.63
0.56
0.53
0.79
0.24
0.46
0.84
Tota
lD
ig.
0.62
0.29
0.53
0.15
0.46
0.56
0.49
0.47
0.69
0.21
0.41
0.74
Tota
l
11.5
527
6112
5215
.43
2.89
0.43
0.15
-0.2
00.
15-0
.24
0.63
1.25
0.72
0.34
0.62
0.18
0.55
0.65
0.58
0.55
0.81
0.25
0.48
0.87
0.64
0.30
0.55
0.16
0.48
0.57
0.51
0.48
0.71
0.22
0.42
0.76
Dig
.
11.5
527
6112
5215
.43
1.45
0.43
0.15
-0.2
00.
15-0
.24
0.63
1.16
Tota
lD
ig.
0.72
0.32
0.61
0.18
0.60
0.72
0.54
0.60
0.93
0.24
0.47
0.86
0.61
0.27
0.52
0.15
0.51
0.61
0.46
0.51
0.79
0.20
0.39
0.73
0.59
0.27
0.51
0.15
0.49
0.59
0.45
0.49
0.77
0.20
0.39
0.71
0.49
0.22
0.42
0.12
0.41
0.49
0.37
0.41
0.64
0.16
0.32
0.59
Dig
.To
tal
10.8
025
8111
7114
.45
0.99
0.40
0.18
-0.2
00.
18-0
.24
0.60
1.11
11.7
027
9612
6818
.54
1.00
0.45
0.18
-0.2
00.
18-0
.24
0.60
1.22
Tota
lD
ig.
0.90
0.40
0.68
0.20
0.63
0.95
0.60
0.63
1.06
0.29
0.58
1.03
1.00
0.44
0.75
0.22
0.70
1.05
0.67
0.70
1.19
0.32
0.65
1.15
1.25
0.55
0.94
0.28
0.88
1.31
0.84
0.88
1.48
0.40
0.81
1.44
Tota
lD
ig.
1.12
0.49
0.84
0.25
0.78
1.18
0.75
0.78
1.32
0.36
0.73
1.29
12.0
028
6813
0120
.00
1.00
0.45
0.18
-0.2
00.
18-0
.24
0.60
1.25
MJ/
kgkc
al/k
gkc
al/lb
% % % % % % % % % % % % % % % % % % %
Met
abol
izab
leE
nerg
y
Cru
deP
rote
inC
alci
umA
v.P
hosp
horu
sS
odiu
m**
*C
hlor
ide*
**P
otas
sium
Lino
leic
Aci
dA
min
oA
cid
Lysi
neM
ethi
onin
eM
+C
Tryp
toph
anT
hreo
nine
Arg
inin
eVa
line
Isol
euci
neLe
ucin
eH
istid
ine
Phe
nyla
lani
neP
+T
COBB Grandparent Management Guide
COBB 24
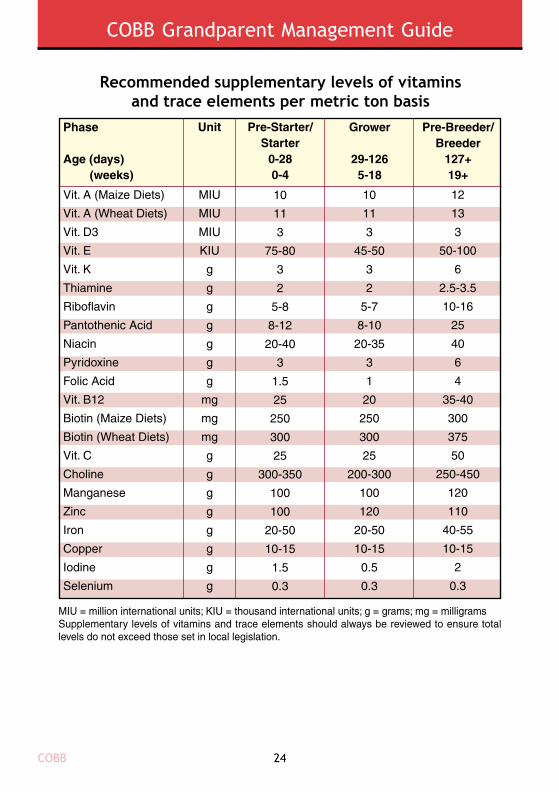
Recommended supplementary levels of vitaminsand trace elements per metric ton basis
Vit. A (Maize Diets)
Vit. A (Wheat Diets)
Vit. D3
Vit. E
Vit. K
Thiamine
Riboflavin
Pantothenic Acid
Niacin
Pyridoxine
Folic Acid
Vit. B12
Biotin (Maize Diets)
Biotin (Wheat Diets)
Vit. C
Choline
Manganese
Zinc
Iron
Copper
Iodine
Selenium
Phase
Age (days)(weeks)
Pre-Breeder/Breeder
127+19+
12
13
3
50-100
6
2.5-3.5
10-16
25
40
6
4
35-40
300
375
50
250-450
120
110
40-55
10-15
2
0.3
Unit
MIU = million international units; KIU = thousand international units; g = grams; mg = milligramsSupplementary levels of vitamins and trace elements should always be reviewed to ensure totallevels do not exceed those set in local legislation.
Pre-Starter/Starter
0-280-4
MIU
MIU
MIU
KIU
g
g
g
g
g
g
g
mg
mg
mg
g
g
g
g
g
g
g
g
Grower
29-1265-18
10
11
3
45-50
3
2
5-7
8-10
20-35
3
1
20
250
300
25
200-300
100
120
20-50
10-15
0.5
0.3
10
11
3
75-80
3
2
5-8
8-12
20-40
3
1.5
25
250
300
25
300-350
100
100
20-50
10-15
1.5
0.3

COBB Grandparent Management Guide
COBB25
6. WAter MAnAGeMentWater is an essential nutrient that impacts virtually all physiological functions. Water comprises 65-78% of the body composition of a bird depending on age. Factors including temperature, relative humidity, diet composition and rate of body weight gain influence water intake. Good water quality is vital to efficient GP production. Measurements of mineral and bacteriological water quality are essential and need to be done on a yearly basis. The pH of the water influences a lot of processes including the efficiencies of detergents and disinfectants.
In rearing and production there should be a maximum of 70 birds per round drinker or 8 to 9 birds per nipple with a water volume of 100 cc per minute (pressure at 30-40 cm [11.8 – 15.75 inches] water column). Insufficient water pressure and water volume could affect uniformity in rearing and production as well as production percent and egg weight uniformity.
The water level in the round drinkers should be at 1 cm (0.4 in.) in depth. The lip of the drinker should be even with the backs of the females. Nipple lines should have a height that permits the females to drink with a 45º angle.
The height of the drinkers in rearing normally does not need to be adjusted upwards after 12 weeks of age, as 80 to 90% of the frame size is normally attained by this age. In low uniformity flocks the height must be based on the smaller birds in the flock. Many new nipple drinker designs do not use an electric wire to prevent birds perching on the line but use 2 or 3 non-electrified wires. In case of using electrical wires, use them on a limited program (especially in rearing) and be sure the system is properly grounded so that stray current is eliminated.
Water management is an integral part of the rearing and production management. The male lines are more prone to consume water and induce humid or wet litter conditions. Please refer to the Cobb Breeder Management Guide for information on water management programs; however bear in mind that good controls must be in place. Normally in rearing, a water management program is put in place in most operations to keep the litter in good condition and to help reduce any foot pad lesions that may occur with moist litter.
In the rearing period:
In the production period many operations prefer not to water restrict because no good controls can be put in place. A normal water to feed ratio (in weight) should fall within the following ranges for flocks in production: In the production period:
6.1 drInKers
6.2 WAter MAnAGeMent In reArInG And PrOduCtIOn
With water mangementWater/Feed ratioWater Volume
Male Lines1.8
60 cc/min
Female Lines1.8-2.0
60 cc/min
Ad lib water supplyWater/Feed ratioWater Volume
Male Lines3.2- 3.8
80-100 cc/min
Female Lines2.2-2.8
80-100 cc/min

COBB Grandparent Management Guide
COBB 26
It is up to the farm management to define if a too high water to feed ratio is affecting litter and egg shell quality and if a water management program should be implemented. In open sided production houses more water is consumed and male and female lines could operate close to the higher ratios noted above. In solid side wall houses with good ventilation, the ratios will be more towards the lower values. In the male lines, these ratios can still be too high and a water management program should be followed. It is up to each company to define how the water management should be conducted to keep the birds hydrated and the litter in good condition. In general, ratios below 1.6 will result in reduced egg production performance. As a practical means of checking if the water volume is not being too limited, always check if all the females have soft crops 4-5 hours after feed has been consumed. If a number of the females checked still have hard crops, the water management program is not programmed properly and could hurt production potential by as much as 3% in peak production. Calculating the water/feed ration at the end of the day is not the only parameter of importance and can even be misleading. More important is that there is enough water available for all the birds directly after feeding and that the crops are soft enough so that feed can be properly digested.

COBB Grandparent Management Guide
COBB27
7. seLeCtIOn PrOCedures
The Cobb R&D geneticists strongly suggest that the males should be selected at 2.3 kg (5.1 lb) body weight to maximize the genetic progress of the males. In many GP operations the selection weights are below the recommended weights, hurting broiler performance in BW, FCR and especially physiological problems (leg issues for example). Below an idea of the broiler growth potential that can be expected when using proper GP male selection weights.
This can give an added value of $346,000 / year in an operation with 1 million broilers / week.
Genetic BW improvement in broilers based on selection weight
BW in grams
Broiler BW improvement in grams% Genetic Maximum
30
23
15
8
0
110
96
83
69
55
BW
Impr
ovem
ent
1870 1960 2050 2140 2230 2320 2410 2500
15
59 6470
82
94
100
17 1820
21 2325 26
76
88
7.1 VALue OF PerFOrMInG MALe seLeCtIOn PrOPerLy
Value of GP selections at an average of 2.3 kg live weight at broiler level.Increase in body weight in the broiler of 22 g at the same age.Improvement in feed conversion of 0.004 feed/kg gain which equals an improved weight of ± 12 g. (30 g x 0.4). Increases in breast meat yield and eviscerated yield of 0.08% with improved weight.
••
•

COBB Grandparent Management Guide
COBB 28
7.2 MALe seLeCtIOn At 5-6 WeeKs OF AGeAt 5-6 weeks do a visual selection in the B and D-Lines first because the number of females kept is the base figure used in calculating male numbers. Remove only obvious culls in this female selection. Examples might be: very slow feathering birds, sex errors, very small birds, crossed beaks, cripples, or birds with any other type of deformity. The selection of males is very subjective and every selection is phenotypically a bit different. These living animals receive a lot of outside influences affecting their rate of weight gain, feathering, skeletal growth rate, etc., between each flock that we select. For that reason use a few tools to concentrate on the selection like:
FiGure 4: Selection pen with small stools. Birds to be selected on the right side. Scales for weighing. In the back is the pen for the approved selected males.
FiGureS 5a and 5b: Separation of the small selection pens done with coops. The males that have the proper body weight are placed in the pen and are picked up by the selectors.
Reduced talking during the selection for better concentration.Sit down if possible. Getting tired after a few hours will affect the selection.Work independently from the weighing group.Have the selected birds walking in the small pen so you can observe their gait and see if there are any curled toes present or use a small table where the selected males are placed for observation.Record all the defects so a history is made of the reasons why males are being eliminated.
••••
•
COBB Grandparent Management Guide
COBB29
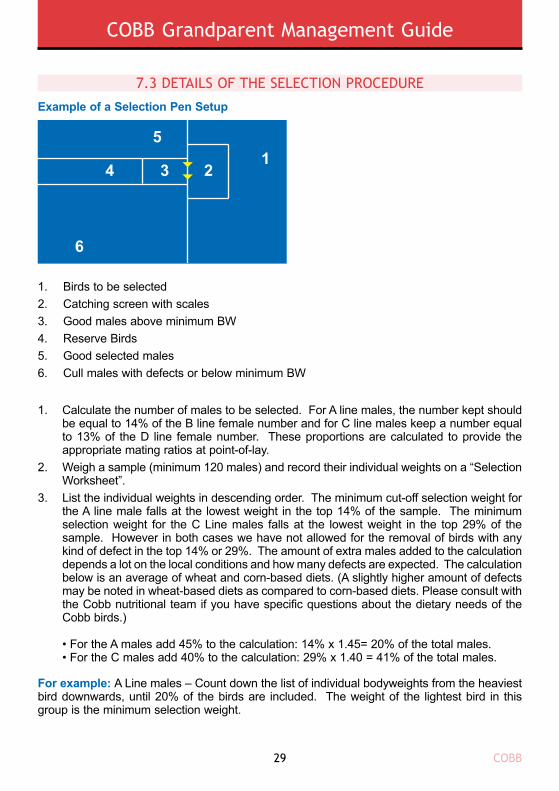
7.3 detAILs OF tHe seLeCtIOn PrOCedure
example of a Selection Pen Setup
5
6
3 21
4
Calculate the number of males to be selected. For A line males, the number kept should be equal to 14% of the B line female number and for C line males keep a number equal to 13% of the D line female number. These proportions are calculated to provide the appropriate mating ratios at point-of-lay.Weigh a sample (minimum 120 males) and record their individual weights on a “Selection Worksheet”. List the individual weights in descending order. The minimum cut-off selection weight for the A line male falls at the lowest weight in the top 14% of the sample. The minimum selection weight for the C Line males falls at the lowest weight in the top 29% of the sample. However in both cases we have not allowed for the removal of birds with any kind of defect in the top 14% or 29%. The amount of extra males added to the calculation depends a lot on the local conditions and how many defects are expected. The calculation below is an average of wheat and corn-based diets. (A slightly higher amount of defects may be noted in wheat-based diets as compared to corn-based diets. Please consult with the Cobb nutritional team if you have specific questions about the dietary needs of the Cobb birds.)
• For the A males add 45% to the calculation: 14% x 1.45= 20% of the total males.• For the C males add 40% to the calculation: 29% x 1.40 = 41% of the total males.
1.
2.
3.
1. Birds to be selected2. Catching screen with scales3. Good males above minimum BW4. Reserve Birds5. Good selected males6. Cull males with defects or below minimum BW
For example: A Line males – Count down the list of individual bodyweights from the heaviest bird downwards, until 20% of the birds are included. The weight of the lightest bird in this group is the minimum selection weight.

COBB Grandparent Management Guide
COBB 30
Assemble 3 pens, one for the low body weight males (culls), one for selected males and one for males that fall below the main selection weight group down to 40g (0.9 lb.) below the minimum selection weight. These birds can be used if the required number of birds cannot be selected from the main selection weight group.Weigh each bird individually. Every bird that is at or above the minimum selection weight must then be evaluated by hand to ensure that it is in good condition, well fleshed, healthy and free from defects. There are several ways to analyze a male. Normally look at toes first. Then, in sequence, comes head and eyes, feathering, breast conformation, back and at last the legs.Examine the legs of each bird at or above the selection weight. The bird’s legs should be held at the hock joint so that the hock can move freely. Hold the legs at the natural width for the frame size of each individual animal. Holding the legs either too far apart or too close together will make them appear crooked. Select only birds that have straight legs and toes. Birds with leg defects will not be able to mate effectively. Other leg defects that are unacceptable include discolored shanks, feathers on the shanks or toes, and short thick shanks. Do not select birds that show any of these defects. Have a close look at the selection report to have an idea what kind of defects to look for.
FiGure 6: Good straight legs with no toe deformities. Observe that toe 1 is cut to ID A line.
FiGure 8: Varus leg defect (Bow or “O” legs). Legs are turning inwards.
FiGure 7: Valgus leg defect (Knock kneed or “X” legs). Legs are turning outwards.
FiGure 9: Twisted toe in left leg in which the central toe starts curling sharply inwards.
4.
5.
6.

COBB Grandparent Management Guide
COBB31
There are many smaller defects in legs and toes that can be observed. Anything that is out of the normal must be culled or at least put in the reserve pen to be evaluated again if additional birds are needed. Examine the breast of every bird that is free of leg defects. The birds must be well fleshed with a straight keel. Breast defects that are unacceptable include breast blisters, short breast, crooked keel bone, protruding keel bone and unbalanced breast amounts between both sides of the keel bone.Look at feathering of the males, in particular the slow feathering lines. If the final market weight of the broilers is small at commercial level it is important to take feathering into account during the selection process. Normally, any bare-backed feathered males should be removed.
FiGure 10: A curled toe is one of the defects that can be seen in males. They can involve only the inside toe, central toe or outside toe or it can be a combination of all of them. Normally with good feed quality ingredients the percentage should not be more than 5-6% of all the males. Considerably higher amounts can be found in certain conditions that must be taken into account when doing the selection.
7.
8.

COBB Grandparent Management Guide
COBB 32
7.4 seLeCtIOn WOrKsHeet
Below is a selection report that is recommended for use at each selection. All the defects in the birds that are handled by the selection crew should be noted and the percent of total calculated. This is important to form a history of male defects observed. This information can then be sent to the geneticists at CVI.
Faults Observed During GPSMale Selection Line B=
Line D=
Line A=
Line C=Toes Internal Central Twisted External Total• Bow legs (Varus)• Knock Kneed (Valgus)• Bad Feathering• Scoliosis• Colored shanks• Colored feathers• Hernia• Cross beak• Thick hocks• Cianotic• TD• Sex errors• Short-thick legs• Split Wing• Foot path lesions• Bad breast• Pendulous crop• Any other obs.Total amount of birds handledBW of the Male
BW - Line ABW - Line CGPD-A lineGPD-C line
Lines
Line A
< Selection
%
% Unif.
%
% Unif.
DateSelected:
Age:#C select.
Line C
>Selection
Flock:Farm:House:
dd/mm/yyyy dd/mm/yyyy

COBB Grandparent Management Guide
COBB33
8. MALe MAnAGeMent
The Line A and Line C males are fed without any feed restriction (ad libitum) to a pre determined selection body weight. This ad lib feeding program should promote the fastest growth rate possible in order to select the best males under local feed and environmental management conditions. The high growth rate (>57 g/d) will help express any potential defects when present in the males and these males are removed from the flock during the male selection process between 35 and 42 days of age. An exception to the high growth rate is the C700sf male (roaster type). It will need 3 to 4 additional days to obtain the 2.3 kg average weight before selection. This male is slower growing in the first few weeks. However this male must also be pushed up in Grams per Day the best possible.
In order for the males to increase their weight as fast as possible, they need to have:• Broiler type feed diets.• Ad libitum feed at all time.• Crumble and pelleted feed to maximize feed intake.• A minimum of 16 hours of total light per day.• A minimum of 20 lux light intensity to enhance activity of drinking and eating.
Other factors must be considered to obtain the proper growth:
A broiler type feed that can be formulated based on the local conditions or based on following parameters:
FeedPeriod
Kcal - M.E./Kg (MJ/kg)% Crude Protein
Lysine %Methionine%
M + C%Calcium
Av. Phosphorus %Sodium %
Linoleic Acid %
Starter0-3 weeks3050 (12.7)
22.01.280.560.950.900.450.201.25
Finisher4-6 weeks
3150 (13.2)20.01.10.530.900.900.450.171.25
8.1 FeedInG OF tHe MALes
No beak conditioning at 5 days of age.Apply any individual vaccination before selection in the water or by spray to induce less stress. Be aware that the coccidiosis vaccination at day old will reduce the growth in the early weeks (immunity buildup). Coccidiostats in the feed for the first 5-6 weeks may be an option.
••
•

COBB Grandparent Management Guide
COBB 34
The average body weight before selection should be 2.3 kg (5.1 lbs.) for the A and C lines for all crosses. Even when the broilers in the local market are higher in BW, normally it is not recommended to go much higher than these weights in order not to affect the reproduction performance of the males. The final selection weight is important for the males but an even more important factor is the fast growth rate of the males. The fast growth rate is the main driver why some males present defects that are taken out during the selection process. Since the heaviest males are retained after selection, the average body weight of the A line males remaining will increase about 200 g (0.44 lb) and be around 2.5 kg (5.5 lbs). The C line males should increase with about 100 g (0.22 lb) and be around 2.4 kg (5.3 lbs).
Because the males are fed ad libitum feed until the moment of selection, they can be consuming up to 180-200 g of feed per day. After the selection, the selected males will go immediately on the female grower feed with the amount reduced to maintain the recommended weight profile during the grow-out period of rearing The idea is to slow the fast growth rate of the males and have a more controlled growth to 20 weeks of age. Most of the fat and part of the breast muscle must be metabolized in this period in order to have males in the proper fleshing condition at mating time. If there has been some feed spillage during the grow out and the males stay in the same pen, the BW increase can still be considerable in the week after the selection due to males finding feed in the litter.
After selection of the males a new body weight target needs to be made based on the average weight from the selected males. Because the BW of the selected males is fairly high at selection a progressive BW curve must be followed to have the males in the proper condition at 20-22 weeks of age.
example of the bodyweight and feeding curve for A and C males in rearing:
4000375035003250300027502500225020001750150012501000 750 500 250
0
250
200
150
100
50
01 2 3 4 5 6 7 8 9 10 11 12 13 14 15 16 17 18 19 20* 21 22
Week
Growth/wk
7 8 9 10 11 12 13 14 15 16 17 18 19 20
50 50 60 60 60 60 70 70 80 80 90 90 100 110
8.2 MALe BOdy WeIGHt CurVe AFter seLeCtIOn
COBB Grandparent Management Guide
COBB35
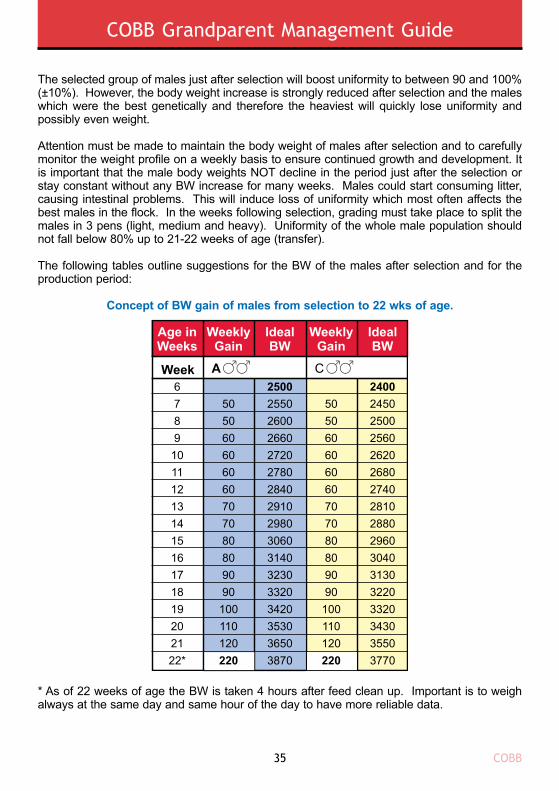
The selected group of males just after selection will boost uniformity to between 90 and 100% (±10%). However, the body weight increase is strongly reduced after selection and the males which were the best genetically and therefore the heaviest will quickly lose uniformity and possibly even weight.
Attention must be made to maintain the body weight of males after selection and to carefully monitor the weight profile on a weekly basis to ensure continued growth and development. It is important that the male body weights NOT decline in the period just after the selection or stay constant without any BW increase for many weeks. Males could start consuming litter, causing intestinal problems. This will induce loss of uniformity which most often affects the best males in the flock. In the weeks following selection, grading must take place to split the males in 3 pens (light, medium and heavy). Uniformity of the whole male population should not fall below 80% up to 21-22 weeks of age (transfer).
The following tables outline suggestions for the BW of the males after selection and for the production period:
Concept of BW gain of males from selection to 22 wks of age.
* As of 22 weeks of age the BW is taken 4 hours after feed clean up. Important is to weigh always at the same day and same hour of the day to have more reliable data.
6789
10111213141516171819202122*
25002550260026602720278028402910298030603140323033203420353036503870
24002450250025602620268027402810288029603040313032203320343035503770
IdealBW
IdealBW
WeeklyGain
WeeklyGain
Age inWeeks
Week A C
505060606060707080809090
100110120220
505060606060707080809090100110120220

COBB Grandparent Management Guide
COBB 36
Comparing BW curve Standards in rearing A and C Males4,500
4,000
3,500
3,000
2,500
2,000
1,500
1,000
500
01 2 3 4 5 6 7 8 9 10 11 12 13 14 15 16 17 18 19 20 21 22 23 24 25
Std A Curve with 2500 g > selection
Std C Curve with 2400 g > selection
WeeklyGain
IdealBW
WeeklyGain
IdealBW
2324252627282930313233343536373839404142434445464748495051525354555657585960
100100100100100100100100806040202020202020202020202020202020202020202020202020202020
39704070417042704370447045704670475048104850487048904910493049504970499050105030505050705090511051305150517051905210523052505270529053105330535053705390
1001001009070706050301515151515151515151515151515151515151515151515151515151515
38703970407041604230430043604410444044554470448545004515453045454560457545904605462046354650466546804695471047254740475547704785480048154830484548604875
A C
Table with BW gain of the males in the production period
These BW’s are suggestions and can change based on dietary conditions
Progressive BW curve of weight gain
The “A” BW standard is based on the A500 male. The A-MX male can be
kept 150 g below this BW.
All weights are taken 4 hours after feed clean up time

COBB Grandparent Management Guide
COBB37
These BW standards are only guide lines and not absolute numbers. It is important to define at around 28 weeks of age the condition of the males and keep them on a more restrictive feeding program when condition is good and wing resistance is strong. Maintaining male uniformity is important for fertility persistency. The fertility of the C-line males tends to go down more rapidly when their body weight exceeds 4800 grams.
The A500 and C500sf males need additional attention related to the light program. These males can be light stimulated 3 to 4 weeks earlier than the females to have them more sexually mature. The earlier light stimulation will stop further physical growth and start the sexual development. This will control the BW size of the male in the production period. Males that have been broilerized in rearing can be similar physically to PS males in peak production due to this earlier light stimulation. This will have an effect on the BW curve of the males in production, which can now be lower.
Period between 6 and 20 wks: Based on the selection weight at 6 weeks of age the males need to gain a certain amount of growth per week in order to reduce the excess breast muscle and to have the proper body condition at 20-21 weeks of age.
The most important part of feeding the males is to maintain uniformity with enough condition (breast muscle) while still controlling the body weight. Some male lines are more prone to lose fast BW after selection due to the strong feed restriction. Take especially care with the C500ff male.
There are also considerable feed amount differences between the male lines in the production period as can be seen in the following table, showing approximate feed amounts at 30 weeks of age.
Good beak and good deep red coloring of the comb, wattles and around the eyes. This is a good sign that the male is normally in good condition and sexually active.

COBB Grandparent Management Guide
COBB 38
example of feed amount differences between the A and C lines in the production period
Age A500 & A-MX C500ff C500sf & C700sf30
Kcal150-165420-462
140-145392-406
125-130350-364
If no spiking is done and fertility needs to be improved, one could separate the males that have lost condition or are losing condition and give them 200-250 g of feed or more for 2-4 days in order for these males to recover. After 2-4 days these males need to be checked and if the comb color has come back, they can be returned to the females. Only males that are still sexually active but have lost condition should be recovered in this way.
In C500ff males look at breast condition in particular. The breast needs to be in a good V-shape to rounded condition and no keel bone should be easily felt. The cloaca is not necessarily red but needs to be moist. This male can be very forceful towards females in the production period. A good beak conditioning after the selection at 5-6 weeks of age is important to reduce this active behavior.In C500sf males a dark red comb color in combination with rounded breast conformation is important for active males. In this male, avoid V-shaped breast conformation. A reddened cloaca will indicate constant activity. This male is not forceful towards female hens but can be aggressive towards workers or visitors entering the house. A good beak conditioning after the selection at 5-6 weeks of age is important to avoid hawk beaks and resulting mating problems after 45 weeks of age.In A500 males, comb color and breast conformation is also important. All A500 males need a rounded breast for maximum fertility and a red and humid cloaca.
•
•
•

COBB Grandparent Management Guide
COBB39
9. FeMALe MAnAGeMentThe B and D line females are managed similar to the parent stock females in the rearing and production period. Every line has a particular body weight curve but the curves are fairly similar and feeding is done based on body weight development. What shows a larger difference is how the females flesh out in the rearing period. This fact is important to bear in mind. The management of females in rearing has only one objective, to have uniform sexual development at 24 weeks of age. This will give maximum peak production and good production persistency. For good sexual development the females need to integrate three basic factors:1. Frame size and body weight2. Age3. Breast and body reserves (fat)
The frame size plays an all-important role as 80 to 90% of the frame is developed in the first 12 weeks of the rearing period. For that reason any grading of females should be concentrated in the first 12 weeks. The earlier the females can be graded the better the frame uniformity will be. Starting grading on frame size at 12 weeks of age is too late, as the frame size has been established. Another reason to start as early as possible is the fact that often GP flocks are composed of several GGP flocks so uniformity is in general lower at day old compared to PS flocks. Good frame and weight uniformity at 12 weeks of age will make managing the second part of the rearing period much easier and often no or only a minimum additional grading is needed. Fast feed distribution, adequate feeder space and avoiding excessive restriction will maintain uniformity until the end of the rearing period.
At 12-16 and again at 20 weeks of age, it is important to evaluate the general condition of the females. In the model here, 5 ranges are given but this can be increased to 7 ranges based on the local need. The idea is that at each of the ages, more than 95% of the females should be represented in their ideal fleshing condition. This condition will be different between the different females lines at the same age. This fleshing condition can be evaluated when the females are being weighed.
Condition needed by the females (>95%)4 weeks format 3
12 weeks format 2-3 16 weeks format 2-320 weeks format 3-425-30 weeks format 4
1 2 3 4 5
Format and Fleshing Conditions

COBB Grandparent Management Guide
COBB 40
The BW curve is more or less a straight line from 1 to 25 weeks of age. However, the feeding curve is a clear concave or sigmoid curve or convex up to 5 weeks of age and concave from 6 to 20 weeks of age. It is essential for maximizing peak egg production and post-peak egg persistency that the female bodyweight gain increases are adequate during the critical time between 16 and 20 weeks of age. With the high breast meat yield characteristics of the Cobb breeding hen, the female’s body composition at lighting is as important as the bird’s actual bodyweight. This means that the hen must have adequate reserve and fleshing at the point of light stimulation. Fleshing is gained quite easily during this time, but this is not the case with building a fat reserve.
In order to obtain an adequate amount of fat deposition, the hen must have sufficient weight gains (at least 34%) in this critical 16-20 week period.
Uniformity must preferably stay above 75% for consistently good production results. Normally the flocks are graded by weight at 4 and 8 weeks and an additional grading at 12 weeks if needed. A grading by fleshing could follow at 16 weeks of age. Important is to fine tune the feeding program to get the smaller females close to the average body weight in a 4 week recovery period.
#1 Flock with too many females in fleshing score #2 (12% of the flock). The females are only in 88% prepared to receive the first light stimulation. Flock #2 has 99% in fleshing score 2+3 and is thus capable to give a higher peak production and better production persistency. Fleshing evaluation should be done at 16 and 20-21 weeks of age and be related to peak production performance.
#1 Flock at 21 weeksFleshing Score
1234
Total Score3+4
% Hens0122365
88%
#2 Flock at 21 weeksFleshing Score
1234
Total Score3+4
% Hens012475
99%
4000375035003250300027502500225020001750150012501000 750 500 250
01 2 3 4 5 6 7 8 9 10 11 12 13 14 15 16 17 18 19 20 21 22 23 24 25
120
100
80
60
40
20
0
STD Dry BWStd Feed intake

COBB Grandparent Management Guide
COBB41
Wk123456789
101112
183323334212
183391108100
Pre-StarterStarterStarterStarterGrowerGrowerGrowerGrowerGrowerGrowerGrowerGrower
203841444649525559616264
203841445354555563646464
Normal BW Low BWType
The advantage of this program is that the smaller females eat at 8 and then again at 12 weeks of age the same amount of feed as the average females, and that after 12 weeks of age the feed stimulation can be very similar between the 2 groups.
A procedure done in many companies is to use starter feed after the selection at 4 weeks of age for the smaller birds for 2 weeks so they can recover without the need to eat a higher volume of feed.
At 8 weeks of age both pens have the same feed amounts and a new grading delivers again a pen with small birds. Now the process can repeat itself by projecting the feed amount at 12 weeks of age, as this is the amount that the smaller birds will need to eat after the grading to recover on time. This type of program can be fine tuned but will guarantee that the small birds are recovering and not staying behind or gaining above the standard if too much feed is given. One aspect to take in consideration is the fact that the smaller birds are eating slower in general than the middle or high end BW birds. This can be up to 45 minutes longer or more. For this reason many companies grade these smaller birds into separate pens and leave the recovered birds in these pens after 12 weeks of age so they do not drop in BW again due to competition with the more aggressive birds.
If no grading is done in the rearing period and the uniformity is very low (<60%) at 14 weeks of age, a grading by fleshing is recommended. All birds that are under-conditioned should be separated and fed more feed so that recovery is obtained by 20 weeks of age when the light program starts. In general a late recovery means a delay in the onset of lay and lower peak production.
A general fleshing of the flock at 16 weeks of age, separating and recovering the under-fleshed birds up to 20 weeks of age is an important tool in any flock with less than 90% of the females in the ideal fleshing condition.
There are many feeding programs that work well to recover females on time and guarantee a good frame size at 12 weeks of age. This table shows one of these programs in which at 4 weeks the grading produced a low BW pen. At 5 weeks of age, the birds are being fed close to the amount that the normal birds will be eating at 8 weeks of age. This means that the pen with the smaller birds has enough time and additional feed to recover in body weight.

COBB Grandparent Management Guide
COBB 42
10. LIGHtInG
There are many light programs possible for the GP. General recommendations are contained in the Cobb PS manual. Some additional comments:
Average all dry body weight of females at start of the light program (21-22 weeks of age).
*Light stimulation in the B-MXF line starts between 22-23 weeks (154-161 days) of age.
Dry BW-g Dry BW-lb
2400-25005.29-5.51
2380-25005.24-5.51
2540-26305.60-5.80
2550-27005.60-5.95
B-MXFB500D48Line D500
The light program should start when the females are ready, normally between 21 and 22 weeks of age. Being ready means the appropriate body weight, age and body reserves.The following body weight table is a general suggestion for the female bodyweights when the light program should start.
Always measure the amount of double yolks and prolapse cases in the first 4 weeks of production to evaluate if there is any over stimulation of the females. For a normal flock the amount of double yolks should peak in the third or fourth week of the production period and be less than 3.5%. Line D48 will lay the most double yolk eggs when being over stimulated and is considered the most susceptible line for excess light stimulation.If there is any over stimulation it can be due to a too high body weight, too strong feed stimulation after 20 weeks of age and/or too much increase in daylength or light intensity.There is no need for the light intensity to go higher than 100 lux in the production period and ideally the light distribution should be uniform with a maximum variation of 20-30%. This means have enough light sources available between 2 to 4 rows, depending on house setup conditions, in a 12-14 m (40-46 ft) wide house to have good uniform light distribution. Do not try to solve floor egg issues with increasing light intensity. It can reduce the problem a bit but never solve it.
1.
2.
3.
4.
5.

COBB Grandparent Management Guide
COBB43
Lighting programs that work well at GP level.(All examples are for solid side or black curtain walls in production period)
Combinations of above programs are also possible. The response of the birds will indicate if the program is working for you. In open sided or transparent curtain production houses, the first light stimulation at transfer is to use natural day length for one week. Thereafter, one hour day length is added each week to a maximum of 15 hours, or more as needed, depending on the maximum natural day length. There is a clear tendency to use maximum 15 hours of total light. In some operations 14 hours of total light can even work very well. The 16 hours of total light are used more in transparent curtain houses or in open sided houses with more than 15 hours of natural light in part of the year.
The light program for the males is similar to the females but some male lines need greater light stimulation in order to show enough sexual maturity at housing with the females. These lines are the A500 and the C500sf male. Maintain a proper breast conformation during rearing for proper response to light stimulation, as the required weight control during this period could delay sexual maturity. Both male lines are normally light stimulated 3-4 weeks before the females. The light intensity is increased from 5-10 lux up to 40-60 lux, but the males stay on 8 hours of total light in their dark out housing facilities. The time of light stimulation can be adjusted based on the BW curve attained in rearing. All the other males do not need any earlier light stimulation and can follow the same lighting program as the females. In some locations, males are raised in open-sided houses while the females are in dark-out facilities. This can be done when adequate ventilation in the male house becomes a problem in hot weather.
140
147
154
161
168
175
182
189
196
203
210
8
11
12
13
14
14
15
Maximum 15 hrs
15
15
15
8
14
14
15
15
16
16
Maximum 16 hrs
16
16
16
8
12
12
12
14
14
14
15
15
15
15
21st
22nd
23rd
24th
25th
26th
27th
28th
29th
30th
31st
Days Week Program 1 Program 2 Program 3

COBB Grandparent Management Guide
COBB 44
11.1 MAnuAL eGG GAtHerInG
11. nest tyPes And COnCePtsThere are 3 types of nests being used presently:1. Hand gathering nest (calculate 4 hens per nest entrance).2. Mechanical individual nest (calculate 5.5 hens per nest entrance).3. Mechanical community nest (calculate 58-66 hens per nest entrance).
For manual hand gathering nests there are some important key points to have a minimum amount of floor eggs. These are:
Have a large enough nest (30x30 cm or 12x12 inches) so that even heavy hens or the B line females have no problem getting into the nests. If most females are sitting down in the nest looking inwards, the nest is not considered ideal by the hens and there could be more floor eggs. Hens enter the nest head first but will turn around and then sit down. The nest units with 30 cm wide openings come with 5 openings on each side of the nests, 2 stories high.On the bottom nest row, supply 3 perches for easy access and on the top row have 2 perches. Have a minimum of 15 cm (6 inches) vertical deepness in the nest so that the hen is sitting comfortable in the nest. Hens seem to prefer a deeper nest to a more shallow one.Add only sufficient nest material so that the nest is for 1/3 filled. Never overfill the nests. The hens will kick the litter out or simply do not want to go into the nests.Make the concave shape in the litter material when adding litter so that the hens are attracted to the nests.Place the nest units on a wooden or metal frame, blocks or stones low to the floor or litter so hens will find the nest easily and floor eggs are controlled to a minimum. Keep the nests low up to peak production and then raise the nests gradually.Close nests at night to reduce birds sleeping in the nest units and to reduce dirty eggs and dirty litter in the nest boxes.
•
•
•
•
•
•
•
FiGure 11: Wide and deep enough nest with concave nest material.
FiGure 12: Deep nest with hens feeling comfortable inside.
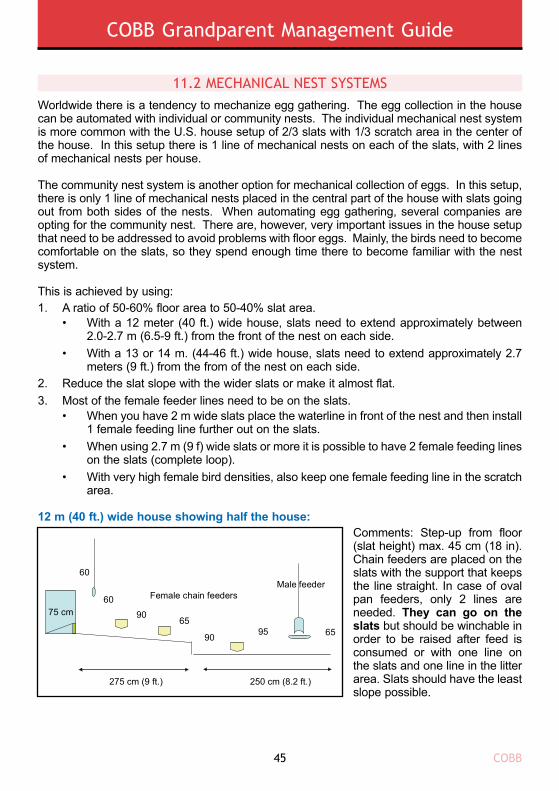
COBB Grandparent Management Guide
COBB45
11.2 MeCHAnICAL nest systeMsWorldwide there is a tendency to mechanize egg gathering. The egg collection in the house can be automated with individual or community nests. The individual mechanical nest system is more common with the U.S. house setup of 2/3 slats with 1/3 scratch area in the center of the house. In this setup there is 1 line of mechanical nests on each of the slats, with 2 lines of mechanical nests per house.
The community nest system is another option for mechanical collection of eggs. In this setup, there is only 1 line of mechanical nests placed in the central part of the house with slats going out from both sides of the nests. When automating egg gathering, several companies are opting for the community nest. There are, however, very important issues in the house setup that need to be addressed to avoid problems with floor eggs. Mainly, the birds need to become comfortable on the slats, so they spend enough time there to become familiar with the nest system.
This is achieved by using:
12 m (40 ft.) wide house showing half the house:Comments: Step-up from floor (slat height) max. 45 cm (18 in). Chain feeders are placed on the slats with the support that keeps the line straight. In case of oval pan feeders, only 2 lines are needed. They can go on the slats but should be winchable in order to be raised after feed is consumed or with one line on the slats and one line in the litter area. Slats should have the least slope possible.
90
90 9565
275 cm (9 ft.) 250 cm (8.2 ft.)
A ratio of 50-60% floor area to 50-40% slat area.
Reduce the slat slope with the wider slats or make it almost flat.Most of the female feeder lines need to be on the slats.
With a 12 meter (40 ft.) wide house, slats need to extend approximately between 2.0-2.7 m (6.5-9 ft.) from the front of the nest on each side.With a 13 or 14 m. (44-46 ft.) wide house, slats need to extend approximately 2.7 meters (9 ft.) from the from of the nest on each side.
When you have 2 m wide slats place the waterline in front of the nest and then install 1 female feeding line further out on the slats. When using 2.7 m (9 f) wide slats or more it is possible to have 2 female feeding lines on the slats (complete loop).With very high female bird densities, also keep one female feeding line in the scratch area.
1.
2.3.
•
•
•
•
•

COBB Grandparent Management Guide
COBB 46
Never put waterlines in the scratch area. Recommended distances from the nest are: nest to water line, 40-70 cm (16-28 inches); water line to feeder line, 60-70 cm (24-28 inches).Lights should be placed just outside the slat area (above the scratch area) so that they do not give a shadow of the slats in the scratch area.
No air should go through the nest and cause drafts (important when using cross ventilation).
With the 40-41 cm deep nest, calculate ± 230 females per nest unit (4 holes) or 58 females per hole or 96 females per meter house length (48 females on each side of the nest per 1 m house length).With the 45-46 cm deep nest calculate ±265 females per nest unit (4 holes) or 66 females per hole or 110 females per meter house length (55 females on each side of the nest per 1 m house length). This deeper nest system can be used with wider houses.Use the collection belts in the first week of production in the afternoon and then slowly bring the collection time to the morning.
The scratch area should have enough light intensity (70-100 lux), with uniform light distribution.The lights should be located to allow 2-4 lux to reach the back of the nest at the nest opening.No extra lights inside or directly above the nest are needed.
4.
5.
6.
•
•
•
•
•
•
FiGure 13: Community nest with front cover opened to inspect the hens.
FiGure 14: 17 m (55 ft.) wide house with 6.7 females/m2 (1.6 ft2/hen). Average floor egg = <1%.
When using the mechanical community nest, the following guidelines are recommended:There are 2 nest types in general use; 40-41 cm (16 inches) deep or 45-46 cm (18 inches) deep by 240 cm (95 inches) long. Each nest unit has 4 entrance holes, 2 on each side.
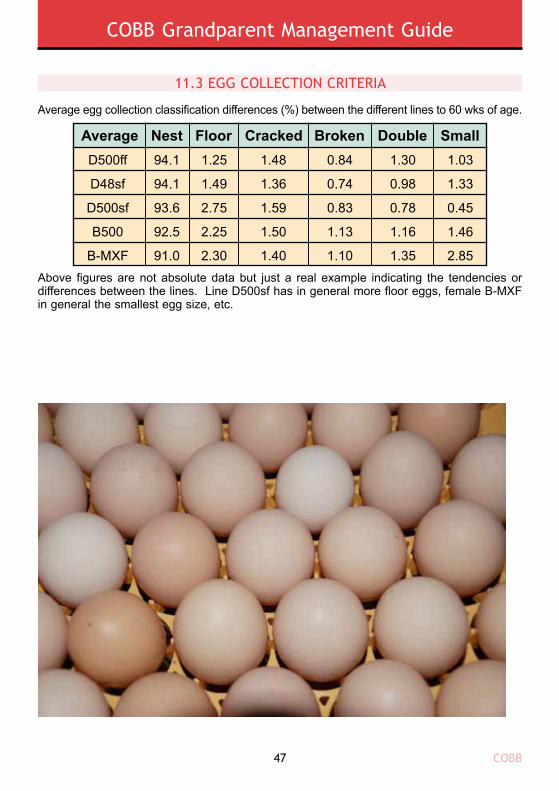
COBB Grandparent Management Guide
COBB47
Average egg collection classification differences (%) between the different lines to 60 wks of age.
Above figures are not absolute data but just a real example indicating the tendencies or differences between the lines. Line D500sf has in general more floor eggs, female B-MXF in general the smallest egg size, etc.
Average Nest Floor Cracked Broken Double SmallD500ff
D48sf
D500sf
B500
B-MXF
94.1
94.1
93.6
92.5
91.0
1.25
1.49
2.75
2.25
2.30
1.48
1.36
1.59
1.50
1.40
0.84
0.74
0.83
1.13
1.10
1.30
0.98
0.78
1.16
1.35
1.03
1.33
0.45
1.46
2.85
11.3 eGG COLLeCtIOn CrIterIA

COBB Grandparent Management Guide
COBB 48
12. nOtes

COBB Grandparent Management Guide
COBB49
nOtes

COBB Grandparent Management Guide
COBB 50
nOtes

L-1080-04 February 1, 2014
cobb-vantress.com