Embed Size (px)
Citation preview

Cash Management User “How To” Guide
Page 1
The Guide below is to help assist Users in navigating our Cash Management Online Banking
If you have questions please call or email our Cash Management Support Team at 1-844-213-5198 or [email protected]
Link to Cash Management Portal: https://online.my100bank.com/CM/bankonline
TABLE OF CONTENTS
Section 1 – Navigating to the Cash Management Login Screen
Section 2 – Logging in as a User
Section 3 – Accounts & Reporting Reporting, Transaction History, Downloadable Reports, Stop Payments, Check Image Viewing, Managing Positive Pay Exceptions, Quicken®, QuickBooks® or Mint®,
Section 4 – Transfer Funds One time and scheduled internal transfers
Section 5 – Documents E-Statements and Notices
Section 6 – ACH & View ACH Participants, Templates, ACH Batch Processing, Batch History, Returns and NOC’s
Section 7 – Wires Wire processing (International & Domestic), Viewing Wire (Incoming & Outgoing)
Section 8 – Services Bill Pay and Quick Links to outside websites
Section 9 – Profile Edit Profile, Enroll in e-Statements, Verify Email Address, Change Password and Account Alerts
Section 10 – Support File Transfer (Positive Pay File Uploads) and Messages
Section 11 – Frequently Asked Questions
DISCLAIMER *The How To Guide encompasses all options/services available in the Cash Management Online Banking.
Not all companies and not all users are entitled to all options/services*

Cash Management User “How To” Guide
Page 2
SECTION 1 – NAVIGATING TO THE CASH MANAGEMENT LOGIN SCREEN
Go to: www.my100bank.com Hover over Business Banking Click on Cash Management
Click on Cash Management Login
Fill in Login Information

Cash Management User “How To” Guide
SECTION 2 – LOGGING IN AS A USER
STEP 1: Login as a User to process daily reconcilement: (all fields are case-sensitive)
Company ID: Issued by the Cash Management Group.
User ID: Issued by your Superuser
Password: Issued by your Superuser
o You will be required to changepassword
** If prompted, enter the authentication number from your security token**
STEP 2: Setup Access Authorization Q&A’s for User’s profile:
Three character minimum
Answers ARE case-sensitive
No two questions can be the same
No two answers can be the same
Click drop down box for additional questions
STEP 3: Change User Password
Current Field: password issued by Superuser/Administrator New Field: (8 to 13 characters long, must contain at least 1 numerical value, one capital letter) Verify Field: (same as above, must match “New Password” field)
Click “Change Password”
The Menu Bar across the top of the screen will assist you in navigating the Cash Management Online Banking
Page 3

Page 4
ACCOUNTS – The Accounts tab will allow you to view information regarding your accounts.
Click on the word “Accounts” Click on the blue highlighted account number for transaction history, stop payments, pending ACH and viewing of cleared checks. Black Diamonds will allow you to sort by Account Name, Account Number, Ledger Balance, Collected Balance and Available Balance
Navigating your account information
o A – Balance Informationo B – Add Stop Payments (no forms needed)o C – View Current Stop Payments
Cash Management User “How To” Guide
SECTION 3 – ACCOUNTS

Page 5
Cash Management User “How To” Guide
o D – Current day’s pending ACH transactionso E – Current day’s bank processed transactionso F – Completed transactions as of last business day
• Transactions are sortable via Sort Field, Sort Order, Query Field, Start Date, End Date and Items Per Page
o G – View copies of cleared checks (front and back) and view deposit slips (front and back)
*NOTE* for copies of checks in posted deposits contact your local branch*

Page 6
Cash Management User “How To” Guide
Downloading Transactions (Internet Explorer is the preferred web browser for this task)
Step 1 - Select the account you wish to download transactions Step 2 - Click “Download”
Step 3 - Choose File Format Step 4 - Select desired range of dates Step 5 - Click “Download”
Step 6 - Click on “Quicken®” or “QuickBooks®”
“Cash Management – User How to Guide” is an independent publication and is neither affiliated with, nor authorized, sponsored, or approved by Microsoft Corporation

Page7
ash Managem entUser “How To” Guid e
Step 7 - Choose "Save" and select the desired file path and name
Open QuickBooks® or Quicken® and import your file
Adding Direct Connect (Internet Explorer is the preferred web browser for this task)
Step 1 – Go to the profile tab and go to the section labeled External Financial Services Access
Step 2 – Copy the Direct Connect User ID
Step 3 – Log into your Quicken®, QuickBooks® or Mint®, and search by the website www.my100bank.com to add your accounts
Step 4 – When prompted for your User ID paste the Direct Connect User ID that was copied from the profile tab and enter in your password in the next box that will be labeled as Password or Pin. The password will be for the Cash Management site.
Once all these steps are completed you are directly connected between the sites. You will need to sync or refresh the accounts once they are linked to get the new transactions to merge over to Quicken®, QuickBooks® or Mint®.

Page8
ash Managem entUser “How To” Guid e d e
Viewing Positive Pay Exceptions
Click on Positive Pay
A. Available Positive Pay Accounts - Use the dropdown box to select the account you wish to view for Positive Pay items.
B. Payment Decisions – This section will be used to make exception decisions, pay orreturn. The decision must be made by 10:00 am CT, 11:00 am ET. If no decisionsare manually decided by time indicated, the item will default to pay or return based on the parameters within the Positive Pay Agreement. Click the image on icon to view the item. To make a decision on an item,select Pay or Return then click “Update Decisions”.If the item needs to be returned, click the return option, select the reason from thedropdown list, and then click “Update Decisions”. No decisions can be made after thedeadline times. If no decision is made, the default will be as marked.Should there be discrepancies with the item such as an incorrect check number or theamount paid is incorrect, please email [email protected] for corrections.
C. Add A Single Issue Item – This section is designed to issue / void a single check.Enter the check number, Description (Payee), date of the issued item (MM/DD/YYYY),the amount, then select if the item is issue or void, and then click the orange plussign. This will add the item to your Positive Pay issue.
D. Upload an Issue Item File – This section is designed to upload an acceptable formatted issue file.Select browse, choose the proper file for the positive pay account and then select Upload File.A message will appear to confirm the count and amount of the file. If the file has anyrejects, the messages will prompt you to “View Report”.
Please note - Large files may take longer to upload. Do not click upload multiple times.
A
B
C
D
E

Page 9
ash Managem entUser “How To” Guid e d e
• Once the file has uploaded, you will receive a message stating that the file wasuploaded successfully or there were errors in your file. View the report to verifythe items uploaded match the submitted file or to see what errors need to becorrected prior to re-uploading the file. If there are any errors they will need tobe corrected and the file uploaded again to receive a successful uploadmessage and report.
E. At the bottom of your main Positive Pay screen you can view the audit trail of whatactivity has taken place in Positive Pay. Click View All and you will be able to change thedates to view the current date audit trail or select a previous date to view the audittrail activity. Once you are done click the Back button and return to the main PositivePay screen.

Page10
ash Managem entUser “How To” Guid e
REPORTS – The Reports tab will allow you to pull a Daily Account Report of all transactions that can be viewed via text, PDF or by Download.
Retrieving Reports Step 1 - Hover over the word Accounts and click on “Reports” Step 2 – Select the date for transactions (transactions will start from the beginning of the calendar month) Step 3 - Click “Select Date”
• Example Report Below
Step 4 – Select Text File, PDF File or Download

Page 11
TRANSFER FUNDS – Transfer Funds tab allows you to transfer monies internally between user enabled accounts/loans (if applicable).
Step 1 - Click on “Transfer Funds” Step 2 - Select the “From” account (account you want the money to come from) Step 3 - Select the “To” account (account you want money to go to) Step 4 - Select the Frequency (certain frequencies will require dates for reoccurring transfers) Step 5 - Optional Description (52 characters of space) Step 6 - Amount of Transfer XX,XXX.XX Step 7 - Click “Transfer Funds”
*Non-Revolving Loan – no transfer capability**Revolving Loan or Line of Credit – transfer capabilities, special rules apply, contact a Treasury Representative
Current cycle transfer cutoff is 7 PM CT, 8PM ET
If a Scheduled Transfer is setup up you will see it listed below the Transfer Funds box. To Delete a transfer at any time click the trash can to delete. Transfers cannot be edited, you must delete the incorrect transfer and re-input.
Cash Management User “How To” Guide
SECTION 4 – TRANSFER FUNDS

Page 12
DOCUMENTS - Documents tab allows you to view previous Statements for each account enrolled in electronic statements. Notices are information regarding returned checks or items that have overdrawn your account.
E-STATEMENTS
NOTICES
To view a statement select the date of the statement you wish to view and click on the blue paper icon under the View column
o Once you are authorized by your Superuser to enroll your accounts in E-Statements you will be ableto view those statements online going forward. Statements before the enrollment to E-Statementsare not available online. Contact your local branch for previous statements.
E-S tatements open in a new web browser tab, you can save or print from here
To view a notice select the date of the notice you wish to view and click on the blue paper icon under the View column
o Notice of Chargeback – Information regarding a check you deposited that has been returned to your account. See Example below.
o You will still receive a notice in the mail and a legal copy of the returned checko Notices open in a new web browser tab, you can save or print from here
Cash Management User “How To” Guide
SECTION 5 – DOCUMENTS

Page 13
Cash Management User “How To” Guide
SECTION 6 – ACH & VIEW ACH
ACH – Allows companies to credit or debit bank accounts electronically via routing and account numbers. Click on ACH to create and store participants (people or companies you credit or debit money), create templates for batches, add recurring templates and initiate batches.
Participant Management – Your participants are the people or companies you debit or credit money to/from
Step 1 - scroll down to Participant Management (items in red are required information) A – Name: Name of Participant B – Description - Description of what ACH transaction is for C – ABA - Routing Number of account to debit or credit D – Account Number E – Account Type – Checking or Savings F – Add Participant
G – Review Participant information for errors. If there are any errors correct and select Change Participant H – Once correct click Back
If necessary repeat steps 1 through 3 for additional participants
Step 2 – Enter your Security Token Authentication when prompted.
Step 3 – Edit Participant

Cash Management User “How To” Guide
Batch Template Management – Non-Recurring – Templates are the groups of participants you credit or debit. Step 1 – Scroll down to Batch Template Management (items in red are required information)
A – Template Name – Ex: Payroll B – Entry Description – Ex: Payroll C – SEC Code
CCD – Commercial Accounts in this Template Only PPD – Personal Accounts in this Template Only
D – Offset Account – Centennial account you want the money to debit or credit from depending on template type E – Add Template
Step 2 – Edit Template – Add Participants to this template A – Select a participant from the drop down box B – Select Withdrawal (Debit) or Deposit (Credit) C – Add dollar amount (if dollar amount will vary with each ACH transaction, you can leave the “Amount” field blank) D – Click plus sign to add this participant to this template E – Click Update F – Click Back to navigate back to the ACH Origination screen
Repeat A – E to add additional participants to this Template
page 14

Cash Management User “How To” Guide
page 15
Batch Template Management to Schedule Recurring ACH Batches – Create a batch to reoccur with a start date and max count OR start and end date. Contact your Treasury Representative to be setup with this service.
Step 1 – Scroll down to Batch Template Management (items in red are required information) A – Template Name – Ex: HumanSociety Donation B – Entry Description – Ex: HS Donation C - SEC Code
CCD – Commercial Accounts in this Template Only PPD – Personal Accounts in this Template Only
D – Offset Account – Centennial account you want the money to debit or credit from depending on template type E – Add Template

Cash Management User “How To” Guide
page 16
Step 2 – Edit Template to Recur and add Participants F – Select “Yes” from the drop down box G – Choose Frequency with which you want the batch to recur H – Select a Start Date (must be at least 4 business days in advance of current date) I – Max Counts - Enter the number of times for the Batch to recur
**OR** J - Select an End Date K – Batch Type – Credit or Debit L – Update to Save Changes M – Select your participant to be added to this batch N – Add dollar amount to recur O – Click the circled arrows to update participant information P – Approval – Depending on your User access this option may require a different user approval Q – Click Back

Cash Management User “How To” Guide
page 17
Approving a Recurring Batch – the User who approves the recurring batch must review all information regarding the batch and click Yes or No to approve.
Note:- If a user approves a recurring batch and then is deleted as a user from your Cash Management, the recurring batch will need to re-approved for it to continue to occur.
Recurring Batches – View the listing of batches that are set to recur. Select your batch and click View Batch
*Note: Changes made to schedules, participants and established templates will terminate all future batches**

Cash Management User “How To” Guide
page 18
View Audit Trail – will show you the activity for the selected batch
View All – will allow you to view all recurring batches audit trails

Cash Management User “How To” Guide
ACH Files/Single Batches – Create single batches for approval to initiate an ACH transaction
Step 1 – Go to ACH Files/Single Batches A – Select the requested template for processing an ACH transaction B – Click Add a Batch
Step 2 – You will receive a notification that your batch has been successfully added and given the option to “View Report” or go “Back. This report is not a confirmation of a completed ACH transaction. (The referenced report on this screen is also available in the Reports feature of “ACH” in the Menu Bar)
o Click View Report or click Back
Step 3 – Return to the ACH Files/Single Batches and you will see your newly created batch waiting to be edited.
C – Click the Pencil to edit the newly created batch as needed
page 19

Cash Management User “How To” Guide
page 20
Step 4 – Edit newly created batch
D – Review Effective Date – Date you want the money to credit or debit these accounts Credits may be sent 2 business days prior to effective date, and no later than 1 business day prior Debits may be sent 1 business day prior to effective date
E – Add dollar amount to credit or debit for each participant F – Add addenda information e.g. Payroll WE 4/21/2017 G – If you don’t want to send money to a participant delete them from this batch (this will not delete them from your template, just this batch) H – Update Batch after changes I – Click Back for Marking and Verification of batch (you will be taken back to the ACH Files/Single Batches screen)
Step 5 – Mark the Batch J – After verifying the offset information (Date, Account, Amount DR/CR) click the Blue Ribbon to “Mark” the batch. Marking the batch means you have no other changes to make and the batch is ready to be verified.

Cash Management User “How To” Guide
page 21
Step 6 – Verification of Batch
K – Verify the offset information as the Verifier. (Date, Account, Amount, DR/CR) L – Once the batch has been marked, you (or a secondary User if Dual Controls are enforced) must verify the batch before the ACH Origination cut off time of 4:00pm CT/5:00pm ET to ensure the ACH transaction(s) process.
Once the batch has been verified the status will change to Verified and then Processed once the bank has pulled the ACH batch in for processing.
**NOTE: when originating ACH Credits, the status will appear in orange (Verified) if there are not sufficient funds in the offset account to process the batch**

Cash Management User “How To” Guide
page 22
View ACH – Allows you to view current and previous ACH item originated, EDI information and Return & NOC information. Hover over ACH and click on View ACH.
ACH Type: History – ACH transactions originated prior to today’s date o Search dates are not required, but can assist in finding information faster. Click Search at the
bottom of screeno Scroll down and click the icon under the Actions tab to view information
ACH Type: Current – ACH transactions originated on today’s business day o No need to enter dates, click Search at the bottom of the screeno Scroll down and click the icon under the Actions tab to view information
ACH Type: EDI (Electronic Data Interchange) – the electronic interchange of business information from one company to another sent electronically rather than with paper.
o Search dates are not required, but can assist in finding information quickly. Click Search at thebottom of the screen
o Scroll down and click the icon under the Actions tab to view information

Cash Management User “How To” Guide
page 23
ACH Type: Returns & NOC’s o Returns – Items returned to your account for various reasons (Insufficient Funds, Stop Payment, etc.)o NOC’s (Notices of Change) – Banks will send you notices about routing number changes or account
number changes for participants. The funds have been accepted by the receiving bank.o Enter search dates and click Search at the bottom of the screeno Scroll down and click the icon under the Actions tab to view information
A – Participant's Name
B – Transaction Code / Description
C – Transaction Amount
D – Return Code / Reason for Return
E – Change Code / Corrected Data
Example Return
Example NOC

Add a Beneficiary
Step 1 – Scroll down to Add a Beneficiary (all items in red are required information)
A – Nickname – Nickname for Beneficiary of funds B – Name – Name of Beneficiary of funds C – Address Line 1, City, State, Zip – Address of Beneficiary D – Beneficiary Account – Account number of beneficiary receiving money E – Amount – If this Beneficiary is reoccurring and the dollar amount varies leave amount box at zero. F – Beneficiary Financial Institution Information – Discretionary information: For Further/Final Credit to
(not typical for most domestic wires) G – Offset Account – The account money will be debited from to fund the wire H – Receiving FI Routing Number – Receiving Financial Institutions (Bank) Routing or ABA number I – DBA Company – If you have wire access from multiple entities, select the company name that corresponds to the offset account number.
J – Add Beneficiary or choose One-Time ONLY WIRE
Step 2 – Enter your Security Token Authentication number when prompted.
Cash Management User “How To” Guide
SECTION 7 – WIRES
WIRES– Electronically send money to a person or entity for same day credit
page 24

Cash Management User “How To” Guide
page 25
Step 3 – “Edit Beneficiary” K – Review all Beneficiary information for accuracy L – If changes are made click Save Changes to Beneficiary M – Click Back once completed

Cash Management User “How To” Guide
page 26
Create a Wire for Processing
Step 1 - Select Beneficiary to create wire transfer
A – Lookup the desired Beneficiary OR B – Search for the Beneficiary by using arrows to scroll, select Beneficiary C – Click Add Transfer

Cash Management User “How To” Guide
page 27
Step 2 – Edit Wire Transfer
D – Add dollar amount of wire as necessary E – Select release date (if desired processing date is NOT current day) F – Discretionary information: For Further/Final Credit to (not typical for most domestic wires) for this wire only (e.g. invoice number etc.)
G – If changes are made click Save Changes to Wire Transfer H – Click the “Verify Wire Transfer” button to process the wire, (if Dual Controls are enforced, see step I ) I – Click Back for Dual Control Approval
Cash Management User “How To” Guide
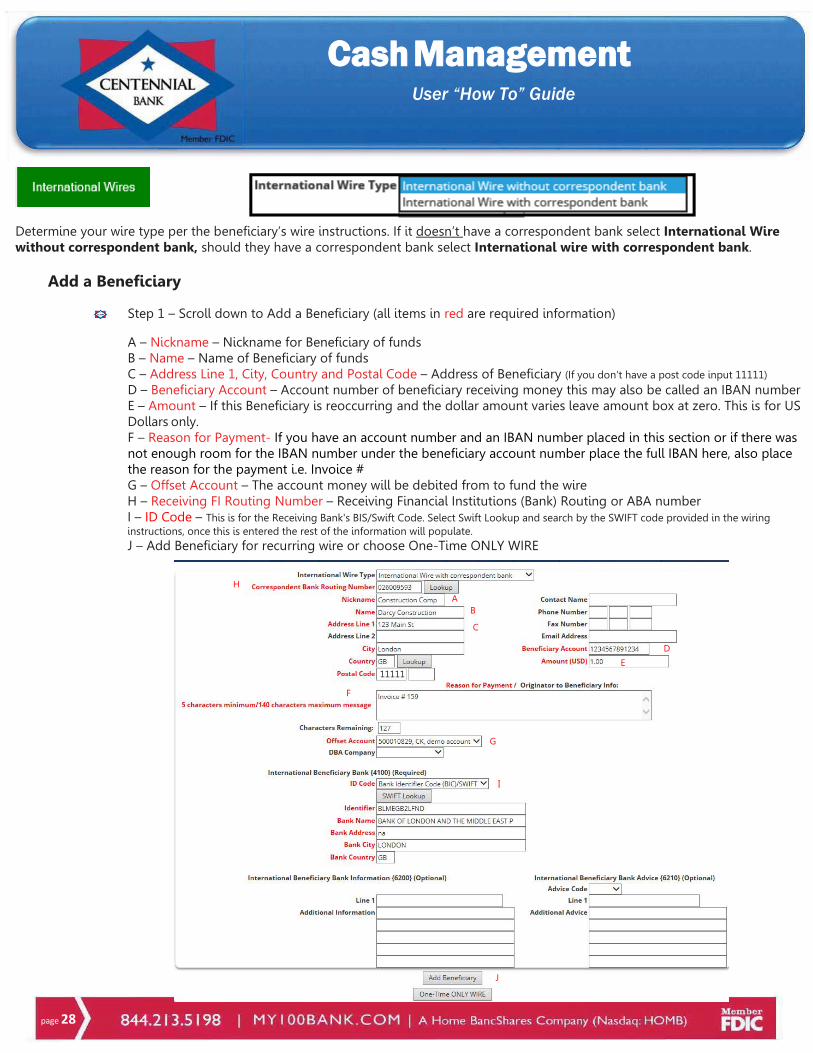
Determine your wire type per the beneficiary’s wire instructions. If it doesn’t have a correspondent bank select International Wire without correspondent bank, should they have a correspondent bank select International wire with correspondent bank.
Add a Beneficiary
Step 1 – Scroll down to Add a Beneficiary (all items in red are required information)
A – Nickname – Nickname for Beneficiary of funds B – Name – Name of Beneficiary of funds C – Address Line 1, City, Country and Postal Code – Address of Beneficiary (If you don’t have a post code input 11111)
D – Beneficiary Account – Account number of beneficiary receiving money this may also be called an IBAN number E – Amount – If this Beneficiary is reoccurring and the dollar amount varies leave amount box at zero. This is for US Dollars only. F – Reason for Payment- If you have an account number and an IBAN number placed in this section or if there was not enough room for the IBAN number under the beneficiary account number place the full IBAN here, also place the reason for the payment i.e. Invoice # G – Offset Account – The account money will be debited from to fund the wire H – Receiving FI Routing Number – Receiving Financial Institutions (Bank) Routing or ABA number I – ID Code – This is for the Receiving Bank's BIS/Swift Code. Select Swift Lookup and search by the SWIFT code provided in the wiring instructions, once this is entered the rest of the information will populate. J – Add Beneficiary for recurring wire or choose One-Time ONLY WIRE
page 28
11111
H
AB
C
D
E
F
G
I
J

page 29
Be sure wire is verified before the cut off time of 4pm CT (5pm ET) for same day processing.
Cash Management User “How To” Guide
Verify/Delete/Edit Wire Transfers
Step 1 – Scroll down to Verify/Delete/Edit Wire Transfer section A – Status shows this wire is “To be Verified” B – Action Items – See Key
Click the to verify the wire forprocessing

page 30
Cash Management User “How To” Guide
Incoming Wires – View information regarding wires that have come into the account
Step 1 – Hover over Wires and click on Incoming Wires A – Enter date range or any selected search information B – Click Search C – Select the wire you want to see information for by click on icon under theActions
D – Originator/Sender information with detail

Cash Management User “How To” Guide
page 31
Outgoing Wire - View information regarding wires that have been sent out of your accounts
Hover over Wires and click on Outgoing
Step 1 –Wires Type Determines your search type
Step 2 – A – Enter search dates or any selected search information
B – Click Search C - Select the wire you want to see information for by click on the icon under Actions

page 32
SERVICES – Services tab includes Order Checks, Tax Payments and Billpay. Order Checks and Tax Payments are quick-links to websites outside of the Centennial Bank website. You are required to log back into the Centennial Bank website when you return. Billpay allows you to pay bills to vendors via a check or electronic payment.
ORDER CHECKS
TAX PAYMENTS
Billpay continued on next page.
Cash Management User “How To” Guide
SECTION 8 - SERVICES

page 33
Cash Management User “How To” Guide
BILL PAY
Hover over Services and click on Bill Pay Options in the left hand column will help you navigate the bill pay system. Payments Outbox will show you payments that are In-Process
The Help option at the bottom of the column can help you navigate the bill pay system with “How Do I”, “Glossary”, or “Frequently Asked Questions” links.

page 34
Cash Management User “How To” Guide
SECTION 9 – PROFILE
PROFILE – The Profile tab allows users to manage their user profile. Users can Edit Profile, Change Password or manage Account Alerts if they have been given access to do so.
EDIT PROFILE User Information: User’s ID, first and last name, next password change and last log in
Account Nicknames: Lists current nicknames for accounts user has access to. Changing them here will change Nicknames for ALL users.
User can “Click to Enroll for Estatements/Notices.” Speak to your Superuser before enrolling.
Email Address Change or Verification: Email address can be verified or changed here, click circled arrows to have a verification code emailed to this email address. Once you receive the email type in the 6 digit verification code and press enter. (Emails could take a few minutes to be received). Your email address must be verified to enroll in Alerts, E-statements, and Recurring batches.
Access Authorization Questions: Click the circled arrows to change security control questions.
User Application Behavior Options: Click the box and click update to have user managed alerts sent as one email, not multiple emails.

Cash Management User “How To” Guide
CHANGE PASSWORD
Current Password New Password (case sensitive, must contain at least 1 number and has to be 8 characters long) Verify Password Click Change Password
If you click Reset it will clear all of the information in the password boxes.
ACCOUNT ALERTS – Account alerts are managed by each user. The User can only select an alert to an account they have been given access to by their Superuser.
To set an alert Decide which alert type you as the user would like to receive Select the account from the drop down box of your desired alert Click the Red Flag that corresponds to that Alert Type
Once you set your alert(s) you will see them listed under the Current Alerts section. You can delete this alert by clicking on the D or Trash Can icon if you no longer wish to receive this alert
page 35

page 36
Cash Management User “How To” Guide
SECTION 10 - SUPPORT
SUPPORT – Support tab allows users to send messages to bank personnel (emails are preferred). File Transfer Function allows users to upload Positive Pay files to the Cash Management Support Group for processing.
MESSAGE CENTER Emails are the preferred method of communication with Centennial Bank personnel.
FILE TRANSFER – (POSITIVE PAY)
Create your Positive Pay file. Click Browse and search for your Positive Pay file. Select your file and click Upload File. Once your file has been uploaded you will see it listed under the “Uploaded Files” Section. The Cash Management Group will process it from here.
Contact Centennial’s Cash Management Group or your Treasury Representative for Positive Pay formats and questions.

page 37
Cash Management User “How To” Guide
SECTION 11 – FREQUENTLY ASKED QUESTIONS
How do I place a Stop Payment? See Section 3 Accounts – Navigating your Account Information
How do I view Positive Pay Exceptions? See Section 3 Accounts – Managing Positive Pay Exceptions
What downloadable file types does Centennial Cash Management system provide? See Section 3 Accounts – Downloading Transactions to an accounting file format
How do I setup a recurring transfer between my accounts? See Section 4 Transfer Funds
How do I see previous E-Statements? See Section 5 Documents
How do I create a new Participant to credit/debit money via ACH? See Section 6 ACH & View ACH – Participant Management
How do I process an ACH transaction? See Section 6 ACH & View ACH – ACH Files/Single Batches
I have a returned ACH on my transaction history that I originated, where can I find information regarding the return?
See Section 6 ACH & View ACH
How do I add a new wire beneficiary? See Section 7 Wires – Add a Beneficiary
How do I process a wire to be sent out? See Section 7 Wires – Create a Wire for Processing
Where can I see wire information regarding incoming wires to my account? See Section 7 Wires – Incoming Wires
Where can I see and process Bill Pay? See Section 8 Services – Bill Pay
How do I verify my email address? See Section 9 Profile – Email Address Change or Verification

page 38
Cash Management User “How To” Guide
Where do I set up Alerts for my accounts? See Section 9 Profile – Account Alerts
Where do I upload Positive Pay files? See Section 10 Support – File Transfer (Positive Pay)
End of User Guide
Thank you for banking with Centennial Bank. Please contact our Cash Management Group for questions 1-844-213-5198 or [email protected]