Embed Size (px)
Citation preview

Cisco Connected Grid Ethernet Switch Module OL-23422-03
A
P P E N D I X B Cisco IOS File System, Configuration Files, and Software ImagesThis appendix describes how to manipulate the CGR 2010 ESM flash file system, how to copy configuration files, and how to archive (upload and download) software images to a switch module.
Note For complete syntax and usage information for the commands used in this chapter, see the switch module command reference for this release and the Cisco IOS Configuration Fundamentals Command Reference, Release 12.2.
This appendix contains the following sections:
• Working with the Flash File System, page B-1
• Working with Configuration Files, page B-8
• Working with Software Images, page B-24
Working with the Flash File SystemThe flash file system is a single flash device on which you can store files. It also provides several commands to help you manage software image and configuration files. The default flash file system on the switch module is named flash:.
Unlike the Cisco CGS 2520 switch, the switch module does not have a removable SD flash memory card. The switch module stores images and configuration files in the internal flash. The internal flash is 64 MB, which is sufficient for holding several IOS images and all the necessary configuration files.
You can replace and upgrade the switch module without reconfiguring it. Use the show flash: privileged EXEC command to display the compact flash file settings. For more information about the command, go to this URL:
http://www.cisco.com/en/US/docs/ios/12_2/configfun/command/reference/frf009.html#wp1018357
• Displaying Available File Systems, page B-2
• Setting the Default File System, page B-3
• Displaying Information about Files on a File System, page B-3
• Creating and Removing Directories, page B-4
• Copying Files, page B-5
B-1Software Interface Card Configuration Guide
Appendix B Cisco IOS File System, Configuration Files, and Software Images Working with the Flash File System
• Deleting Files, page B-6
• Creating, Displaying, and Extracting tar Files, page B-6
• Displaying the Contents of a File, page B-8
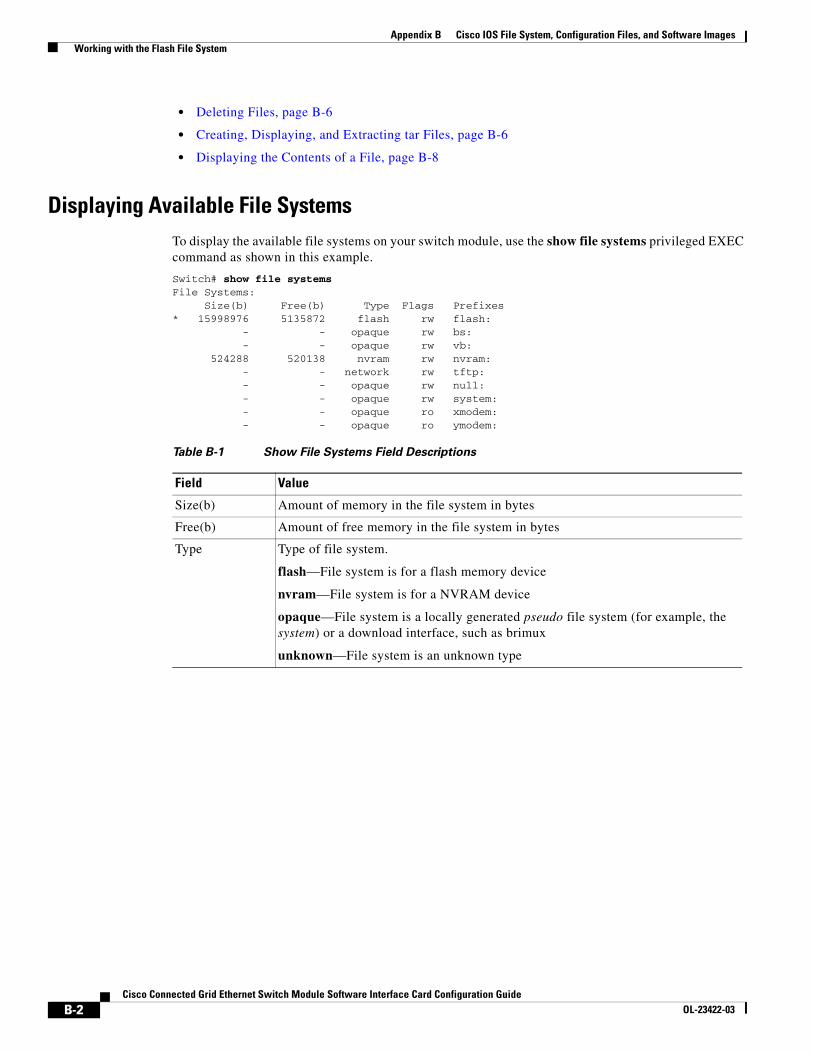
Displaying Available File SystemsTo display the available file systems on your switch module, use the show file systems privileged EXEC command as shown in this example.
Switch# show file systemsFile Systems:
Size(b) Free(b) Type Flags Prefixes* 15998976 5135872 flash rw flash: - - opaque rw bs: - - opaque rw vb: 524288 520138 nvram rw nvram: - - network rw tftp: - - opaque rw null: - - opaque rw system: - - opaque ro xmodem: - - opaque ro ymodem:
Table B-1 Show File Systems Field Descriptions
Field Value
Size(b) Amount of memory in the file system in bytes
Free(b) Amount of free memory in the file system in bytes
Type Type of file system.
flash—File system is for a flash memory device
nvram—File system is for a NVRAM device
opaque—File system is a locally generated pseudo file system (for example, the system) or a download interface, such as brimux
unknown—File system is an unknown type
B-2Cisco Connected Grid Ethernet Switch Module Software Interface Card Configuration Guide
OL-23422-03
Appendix B Cisco IOS File System, Configuration Files, and Software Images Working with the Flash File System
Setting the Default File SystemYou can specify the file system or directory that the system uses as the default file system by using the cd filesystem: privileged EXEC command. You can set the default file system to omit the filesystem: argument from related commands. For example, for all privileged EXEC commands that have the optional filesystem: argument, the system uses the file system specified by the cd command.
By default, the default file system is flash:.
You can display the current default file system as specified by the cd command by using the pwd privileged EXEC command.
Displaying Information about Files on a File SystemYou can view a list of the contents of a file system before manipulating its contents. For example, before copying a new configuration file to flash memory, you might want to verify that the file system does not already contain a configuration file with the same name. Similarly, before copying a flash configuration file to another location, you might want to verify its filename for use in another command.
To display information about files on a file system, use one of the privileged EXEC commands in Table B-2:
Flags Permission for file system.
ro—read-only
rw—read/write
wo—write-only
Prefixes Alias for file system.
flash:—Flash file system
nvram:—NVRAM
null:—Null destination for copies; you can copy a remote file to null to find its size
rcp:—Remote Copy Protocol (RCP) network server
system:—Contains the system memory, including the running configuration
tftp:—TFTP network server
xmodem:—Obtain the file from a network machine by using the Xmodem protocol
ymodem:—Obtain the file from a network machine by using the Ymodem protocol
Table B-1 Show File Systems Field Descriptions (continued)
Field Value
Table B-2 Commands for Displaying Information about Files
Command Description
dir [/all] [filesystem:][filename] Display a list of files on a file system.
show file systems Display more information about each of the files on a file system.
B-3Cisco Connected Grid Ethernet Switch Module Software Interface Card Configuration Guide
OL-23422-03

Appendix B Cisco IOS File System, Configuration Files, and Software Images Working with the Flash File System
Changing Directories and Displaying the Working DirectoryBeginning in privileged EXEC mode, follow these steps to change directories and display the working directory.
Creating and Removing DirectoriesBeginning in privileged EXEC mode, follow these steps to create and remove a directory:
show file information file-url Display information about a specific file.
show file descriptors Display a list of open file descriptors. File descriptors are the internal representations of open files. You can use this command to see if another user has a file open.
Table B-2 Commands for Displaying Information about Files (continued)
Command Description
Step Command
Step 1 Display the directories on the specified file system.
For filesystem:, use flash: for the system board flash device.
dir filesystem:
Step 2 Change to the directory of interest.
The command example shows how to change to the directory named new_configs.
cd new_configs
Step 3 Display the working directory. pwd
Step Command
Step 1 Display the directories on the specified file system.
For filesystem:, use flash: for the system board flash device.
dir filesystem:
Step 2 Create a new directory.
The command example shows how to create the directory named old_configs.
Directory names are case sensitive.
Directory names are limited to 45 characters between the slashes (/); the name cannot contain control characters, spaces, deletes, slashes, quotes, semicolons, or colons.
mkdir old_configs
Step 3 Verify your entry. dir filesystem:
B-4Cisco Connected Grid Ethernet Switch Module Software Interface Card Configuration Guide
OL-23422-03

Appendix B Cisco IOS File System, Configuration Files, and Software Images Working with the Flash File System
To delete a directory with all its files and subdirectories, use the delete /force /recursive filesystem:/file-url privileged EXEC command.
Use the /recursive keyword to delete the named directory and all subdirectories and the files contained in it. Use the /force keyword to suppress the prompting that confirms a deletion of each file in the directory. You are prompted only once at the beginning of this deletion process. Use the /force and /recursive keywords for deleting old software images that were installed by using the archive download-sw command but are no longer needed.
For filesystem, use flash: for the system board flash device. For file-url, enter the name of the directory to be deleted. All the files in the directory and the directory are removed.
Caution When files and directories are deleted, their contents cannot be recovered.
Copying FilesTo copy a file from a source to a destination, use the copy source-url destination-url privileged EXEC command. For the source and destination URLs, you can use running-config and startup-config keyword shortcuts. For example, the copy running-config startup-config command saves the currently running configuration file to the NVRAM section of flash memory to be used as the configuration during system initialization.
You can also copy from special file systems (xmodem:, ymodem:) as the source for the file from a network machine that uses the Xmodem or Ymodem protocol.
Network file system URLs include ftp:, rcp:, and tftp: and have these syntaxes:
• FTP—ftp:[[//username [:password]@location]/directory]/filename
• RCP—rcp:[[//username@location]/directory]/filename
• TFTP—tftp:[[//location]/directory]/filename
In addition, the Secure Copy Protocol (SCP) provides a secure and authenticated method for copying switch module configurations or switch module image files. SCP relies on Secure Shell (SSH), an application and a protocol that provides a secure replacement for the Berkeley r-tools.
Note For more information on how to configure and verify SCP, see the “Secure Copy Protocol” chapter of the Cisco IOS New Features, Cisco IOS Release 12.2T, at this URL: http://www.cisco.com/en/US/docs/ios/12_2t/12_2t2/feature/guide/ftscp.html
Local writable file systems include flash:.
Some invalid combinations of source and destination exist. Specifically, you cannot copy these combinations:
• From a running configuration to a running configuration
• From a startup configuration to a startup configuration
• From a device to the same device (for example, the copy flash: flash: command is invalid)
For specific examples of using the copy command with configuration files, see the “Working with Configuration Files” section on page B-8.
B-5Cisco Connected Grid Ethernet Switch Module Software Interface Card Configuration Guide
OL-23422-03

Appendix B Cisco IOS File System, Configuration Files, and Software Images Working with the Flash File System
To copy software images either by downloading a new version or by uploading the existing one, use the archive download-sw or the archive upload-sw privileged EXEC command. For more information, see the “Working with Software Images” section on page B-24.
Deleting FilesWhen you no longer need a file on a flash memory device, you can permanently delete it. To delete a file or directory from a specified flash device, use the delete [/force] [/recursive] [filesystem:]/file-url privileged EXEC command.
Use the /recursive keyword for deleting a directory and all subdirectories and the files contained in it. Use the /force keyword to suppress the prompting that confirms a deletion of each file in the directory. You are prompted only once at the beginning of this deletion process. Use the /force and /recursive keywords for deleting old software images that were installed by using the archive download-sw command but are no longer needed.
If you omit the filesystem: option, the switch module uses the default device specified by the cd command. For file-url, you specify the path (directory) and the name of the file to be deleted.
When you attempt to delete any files, the system prompts you to confirm the deletion.
Caution When files are deleted, their contents cannot be recovered.
This example shows how to delete the file myconfig from the default flash memory device:
Switch# delete myconfig
Creating, Displaying, and Extracting tar FilesYou can create a tar file and write files into it, list the files in a tar file, and extract the files from a tar file as described in the next sections.
Note Instead of using the copy privileged EXEC command or the archive tar privileged EXEC command, we recommend using the archive download-sw and archive upload-sw privileged EXEC commands to download and upload software image files.
Creating a Tar File
To create a tar file and write files into it, use this privileged EXEC command:
archive tar /create destination-url flash:/file-url
For destination-url, specify the destination URL alias for the local or network file system and the name of the tar file to create. These options are supported:
• For the local flash file system, the syntax isflash:
• For the FTP, the syntax isftp:[[//username[:password]@location]/directory]/tar-filename.tar
• For the RCP, the syntax is rcp:[[//username@location]/directory]/tar-filename.tar
B-6Cisco Connected Grid Ethernet Switch Module Software Interface Card Configuration Guide
OL-23422-03
Appendix B Cisco IOS File System, Configuration Files, and Software Images Working with the Flash File System
• For the TFTP, the syntax istftp:[[//location]/directory]/tar-filename.tar
The tar-filename.tar is the tar file to be created.
For flash:/file-url, specify the location on the local flash file system from which the new tar file is created. You can also specify an optional list of files or directories within the source directory to write to the new tar file. If none are specified, all files and directories at this level are written to the newly created tar file.
This example shows how to create a tar file. This command writes the contents of the new-configs directory on the local flash device to a file named saved.tar on the TFTP server at 172.20.10.30:
Switch# archive tar /create tftp:172.20.10.30/saved.tar flash:/new-configs
Displaying the Contents of a tar File
To display the contents of a tar file on the screen, use this privileged EXEC command:
archive tar /table source-url
For source-url, specify the source URL alias for the local or network file system. These options are supported:
• For the local flash file system, the syntax isflash:
• For the FTP, the syntax isftp:[[//username[:password]@location]/directory]/tar-filename.tar
• For the RCP, the syntax isrcp:[[//username@location]/directory]/tar-filename.tar
• For the TFTP, the syntax is tftp:[[//location]/directory]/tar-filename.tar
The tar-filename.tar is the tar file to display.
This example shows how to display the contents of a switch module tar file that is in flash memory:
Switch# archive tar /table flash:image-name.tarinfo (219 bytes)image-name/ (directory)image-name/html/ (directory)image-name/html/foo.html (0 bytes)image-name/image-name.bin (4527884 bytes)image-name/info (346 bytes)info (110 bytes)
Extracting a Tar File
To extract a tar file into a directory on the flash file system, use this privileged EXEC command:
archive tar /xtract source-url flash:/file-url [dir/file...]
For source-url, specify the source URL alias for the local file system. These options are supported:
• For the local flash file system, the syntax isflash:
• For the FTP, the syntax is ftp:[[//username[:password]@location]/directory]/tar-filename.tar
B-7Cisco Connected Grid Ethernet Switch Module Software Interface Card Configuration Guide
OL-23422-03
Appendix B Cisco IOS File System, Configuration Files, and Software Images Working with Configuration Files
• For the RCP, the syntax is rcp:[[//username@location]/directory]/tar-filename.tar
• For the TFTP, the syntax is tftp:[[//location]/directory]/tar-filename.tar
The tar-filename.tar is the tar file from which to extract files.
For flash:/file-url [dir/file...], specify the location on the local flash file system into which the tar file is extracted. Use the dir/file... option to specify an optional list of files or directories within the tar file to be extracted. If none are specified, all files and directories are extracted.
This example shows how to extract the contents of a tar file located on the TFTP server at 172.20.10.30. This command extracts just the new-configs directory into the root directory on the local flash file system. The remaining files in the saved.tar file are ignored.
Switch# archive tar /xtract tftp://172.20.10.30/saved.tar flash:/new-configs
Displaying the Contents of a FileTo display the contents of any readable file, including a file on a remote file system, use the more [/ascii | /binary | /ebcdic] file-url privileged EXEC command:.
This example shows how to display the contents of a configuration file on a TFTP server:
Switch# more tftp://serverA/hampton/savedconfig !! Saved configuration on server!version 11.3service timestamps log datetime localtimeservice linenumberservice udp-small-serversservice pt-vty-logging!<output truncated>
Working with Configuration FilesThis section describes how to create, load, and maintain configuration files.
Configuration files contain commands entered to customize the function of the Cisco IOS software. A way to create a basic configuration file is to use the setup program or to enter the setup privileged EXEC command.
You can copy (download) configuration files from a TFTP, FTP, or RCP server to the running configuration or startup configuration of the switch module. You might want to perform this for one of these reasons:
• To restore a backed-up configuration file.
• To use the configuration file for another switch module. For example, you might add another switch module to your network and want it to have a configuration similar to the original switch module. By copying the file to the new switch module, you can change the relevant parts rather than recreating the whole file.
• To load the same configuration commands on all the switches in your network so that all the switches have similar configurations.
B-8Cisco Connected Grid Ethernet Switch Module Software Interface Card Configuration Guide
OL-23422-03
Appendix B Cisco IOS File System, Configuration Files, and Software Images Working with Configuration Files
You can copy (upload) configuration files from the switch module to a file server by using TFTP, FTP, or RCP. You might perform this task to back up a current configuration file to a server before changing its contents so that you can later restore the original configuration file from the server.
The protocol you use depends on which type of server you are using. The FTP and RCP transport mechanisms provide faster performance and more reliable delivery of data than TFTP. These improvements are possible because FTP and RCP are built on and use the TCP/IP stack, which is connection-oriented.
These sections contain this configuration information:
• Guidelines for Creating and Using Configuration Files, page B-9
• Configuration File Types and Location, page B-10
• Creating a Configuration File By Using a Text Editor, page B-10
• Copying Configuration Files By Using TFTP, page B-10
• Copying Configuration Files By Using FTP, page B-12
• Copying Configuration Files By Using RCP, page B-16
• Clearing Configuration Information, page B-19
• Replacing and Rolling Back Configurations, page B-19
Guidelines for Creating and Using Configuration FilesCreating configuration files can aid in your switch module configuration. Configuration files can contain some or all of the commands needed to configure one or more switches. For example, you might want to download the same configuration file to several switches that have the same hardware configuration.
Use these guidelines when creating a configuration file:
• We recommend that you connect through the host router’s console port for the initial configuration of the switch module. If you are accessing the switch module through a network connection instead of through a connection to the router’s console port, keep in mind that some configuration changes (such as changing the switch module IP address or disabling ports) can cause a loss of connectivity to the switch module. For details, see Chapter 3, “Accessing the Switch Module from the Host Router.”
• If no password has been set on the switch module, we recommend that you set one by using the enable secret secret-password global configuration command.
Note The copy {ftp: | rcp: | tftp:} system:running-config privileged EXEC command loads the configuration files on the switch module as if you were entering the commands at the command line. The switch module does not erase the existing running configuration before adding the commands. If a command in the copied configuration file replaces a command in the existing configuration file, the existing command is erased.
For example, if the copied configuration file contains a different IP address in a particular command than the existing configuration, the IP address in the copied configuration is used. However, some commands in the existing configuration might not be replaced or negated. In this case, the resulting configuration file is a mixture of the existing configuration file and the copied configuration file, with the copied configuration file having precedence.
B-9Cisco Connected Grid Ethernet Switch Module Software Interface Card Configuration Guide
OL-23422-03
Appendix B Cisco IOS File System, Configuration Files, and Software Images Working with Configuration Files
To restore a configuration file to an exact copy of a file stored on a server, copy the configuration file directly to the startup configuration (by using the copy {ftp: | rcp: | tftp:} nvram:startup-config privileged EXEC command), and reload the switch module.
Configuration File Types and LocationStartup configuration files are used during system startup to configure the software. Running configuration files contain the current configuration of the software. The two configuration files can be different. For example, you might want to change the configuration for a short time period rather than permanently. In this case, you would change the running configuration but not save the configuration by using the copy running-config startup-config privileged EXEC command.
The running configuration is saved in DRAM; the startup configuration is stored in the NVRAM section of flash memory.
Creating a Configuration File By Using a Text EditorWhen creating a configuration file, you must list commands logically so that the system can respond appropriately. This is one method of creating a configuration file:
Step 1 Copy an existing configuration from a switch module to a server.
For more information, see the “Downloading the Configuration File By Using TFTP” section on page B-11, the “Downloading a Configuration File By Using FTP” section on page B-13, or the “Downloading a Configuration File By Using RCP” section on page B-17.
Step 2 Open the configuration file in a text editor, such as vi or emacs on UNIX or Notepad on a PC.
Step 3 Extract the portion of the configuration file with the desired commands, and save it in a new file.
Step 4 Copy the configuration file to the appropriate server location. For example, copy the file to the TFTP directory on the workstation (usually /tftpboot on a UNIX workstation).
Step 5 Make sure the permissions on the file are set to world-read.
Copying Configuration Files By Using TFTPYou can configure the switch module by using configuration files you create, download from another switch module, or download from a TFTP server. You can copy (upload) configuration files to a TFTP server for storage.
These sections contain this configuration information:
• Preparing to Download or Upload a Configuration File By Using TFTP, page B-11
• Downloading the Configuration File By Using TFTP, page B-11
• Uploading the Configuration File By Using TFTP, page B-12
B-10Cisco Connected Grid Ethernet Switch Module Software Interface Card Configuration Guide
OL-23422-03
Appendix B Cisco IOS File System, Configuration Files, and Software Images Working with Configuration Files
Preparing to Download or Upload a Configuration File By Using TFTP
Before you begin downloading or uploading a configuration file by using TFTP, do these tasks:
• Ensure that the workstation acting as the TFTP server is properly configured. On a Sun workstation, make sure that the /etc/inetd.conf file contains this line:
tftp dgram udp wait root /usr/etc/in.tftpd in.tftpd -p -s /tftpboot
Make sure that the /etc/services file contains this line:
tftp 69/udp
Note You must restart the inetd daemon after modifying the /etc/inetd.conf and /etc/services files. To restart the daemon, either stop the inetd process and restart it, or enter a fastboot command (on the SunOS 4.x) or a reboot command (on Solaris 2.x or SunOS 5.x). For more information on the TFTP daemon, see the documentation for your workstation.
• Ensure that the switch module has a route to the TFTP server. The switch module and the TFTP server must be in the same subnetwork if you do not have a router to route traffic between subnets. Check connectivity to the TFTP server by using the ping command.
• Ensure that the configuration file to be downloaded is in the correct directory on the TFTP server (usually /tftpboot on a UNIX workstation).
• For download operations, ensure that the permissions on the file are set correctly. The permission on the file should be world-read.
• Before uploading the configuration file, you might need to create an empty file on the TFTP server. To create an empty file, enter the touch filename command, where filename is the name of the file you will use when uploading it to the server.
• During upload operations, if you are overwriting an existing file (including an empty file, if you had to create one) on the server, ensure that the permissions on the file are set correctly. Permissions on the file should be world-write.
Downloading the Configuration File By Using TFTP
To configure the switch module by using a configuration file downloaded from a TFTP server, follow these steps:
Step 1 Copy the configuration file to the appropriate TFTP directory on the workstation.
Step 2 Verify that the TFTP server is properly configured by referring to the “Preparing to Download or Upload a Configuration File By Using TFTP” section on page B-11.
Step 3 Log into the switch module through the host router’s console port or a Telnet session (for details, see Chapter 3, “Accessing the Switch Module from the Host Router.”
Step 4 Download the configuration file from the TFTP server to configure the switch module.
Specify the IP address or hostname of the TFTP server and the name of the file to download.
Use one of these privileged EXEC commands:
• copy tftp:[[[//location]/directory]/filename] system:running-config
• copy tftp:[[[//location]/directory]/filename] nvram:startup-config
B-11Cisco Connected Grid Ethernet Switch Module Software Interface Card Configuration Guide
OL-23422-03
Appendix B Cisco IOS File System, Configuration Files, and Software Images Working with Configuration Files
The configuration file downloads, and the commands are executed as the file is parsed line-by-line.
This example shows how to configure the software from the file tokyo-confg at IP address 172.16.2.155:
Switch# copy tftp://172.16.2.155/tokyo-confg system:running-configConfigure using tokyo-confg from 172.16.2.155? [confirm] yBooting tokyo-confg from 172.16.2.155:!!! [OK - 874/16000 bytes]
Uploading the Configuration File By Using TFTP
To upload a configuration file from a switch module to a TFTP server for storage, follow these steps:
Step 1 Verify that the TFTP server is properly configured by referring to the “Preparing to Download or Upload a Configuration File By Using TFTP” section on page B-11.
Step 2 Log into the switch module through the host router’s console port or a Telnet session (for details, see “Access the Switch Module from the Host Router”).
Step 3 Upload the switch module configuration to the TFTP server. Specify the IP address or hostname of the TFTP server and the destination filename.
Use one of these privileged EXEC commands:
• copy system:running-config tftp:[[[//location]/directory]/filename]
• copy nvram:startup-config tftp:[[[//location]/directory]/filename]
The file is uploaded to the TFTP server.
This example shows how to upload a configuration file from a switch module to a TFTP server:
Switch# copy system:running-config tftp://172.16.2.155/tokyo-confgWrite file tokyo-confg on host 172.16.2.155? [confirm] y#Writing tokyo-confg!!! [OK]
Copying Configuration Files By Using FTPYou can copy configuration files to or from an FTP server.
The FTP protocol requires a client to send a remote username and password on each FTP request to a server.
When you copy a configuration file from the switch module to a server by using FTP, the Cisco IOS software sends the first valid username in this list:
• The username specified in the copy command if a username is specified.
• The username set by the ip ftp username username global configuration command if the command is configured.
• Anonymous.
The switch module sends the first valid password in this list:
• The password specified in the copy command if a password is specified.
B-12Cisco Connected Grid Ethernet Switch Module Software Interface Card Configuration Guide
OL-23422-03
Appendix B Cisco IOS File System, Configuration Files, and Software Images Working with Configuration Files
• The password set by the ip ftp password password global configuration command if the command is configured.
• The switch module forms a password named [email protected]. The variable username is the username associated with the current session, switchname is the configured hostname, and domain is the domain of the switch module.
The username and password must be associated with an account on the FTP server. If you are writing to the server, the FTP server must be properly configured to accept your FTP write request.
Use the ip ftp username and ip ftp password commands to specify a username and password for all copies. Include the username in the copy command if you want to specify only a username for that copy operation.
If the server has a directory structure, the configuration file is written to or copied from the directory associated with the username on the server. For example, if the configuration file resides in the home directory of a user on the server, specify that user's name as the remote username.
For more information, see the documentation for your FTP server.
These sections contain this configuration information:
• Preparing to Download or Upload a Configuration File By Using FTP, page B-13
• Downloading a Configuration File By Using FTP, page B-13
• Uploading a Configuration File By Using FTP, page B-15
Preparing to Download or Upload a Configuration File By Using FTP
Before you begin downloading or uploading a configuration file by using FTP, do these tasks:
• Ensure that the switch module has a route to the FTP server. The switch module and the FTP server must be in the same subnetwork if you do not have a router to route traffic between subnets. Check connectivity to the FTP server by using the ping command.
• If you are accessing the switch module through the host router’s console or a Telnet session and you do not have a valid username, make sure that the current FTP username is the one that you want to use for the FTP download. To view the valid username, you can enter the show users privileged EXEC command. If you do not want to use this username, create a new FTP username by using the ip ftp username username global configuration command during all copy operations. The new username is stored in NVRAM.
If you are accessing the switch module through a Telnet session and you have a valid username, this username is used, and you do not need to set the FTP username. Include the username in the copy command if you want to specify a username for only that copy operation.
• When you upload a configuration file to the FTP server, it must be properly configured to accept the write request from the user on the switch module.
For more information, see the documentation for your FTP server.
Downloading a Configuration File By Using FTP
Beginning in privileged EXEC mode, follow these steps to download a configuration file by using FTP:
B-13Cisco Connected Grid Ethernet Switch Module Software Interface Card Configuration Guide
OL-23422-03
Appendix B Cisco IOS File System, Configuration Files, and Software Images Working with Configuration Files
This example shows how to copy a configuration file named host1-confg from the netadmin1 directory on the remote server with an IP address of 172.16.101.101 and to load and run those commands on the switch module:
Switch# copy ftp://netadmin1:[email protected]/host1-confg system:running-config Configure using host1-confg from 172.16.101.101? [confirm]Connected to 172.16.101.101Loading 1112 byte file host1-confg:![OK]Switch#%SYS-5-CONFIG: Configured from host1-config by ftp from 172.16.101.101
This example shows how to specify a remote username of netadmin1. The software copies the configuration file host2-confg from the netadmin1 directory on the remote server with an IP address of 172.16.101.101 to the switch module startup configuration.
Switch# configure terminalSwitch(config)# ip ftp username netadmin1Switch(config)# ip ftp password mypassSwitch(config)# endSwitch# copy ftp: nvram:startup-config Address of remote host [255.255.255.255]? 172.16.101.101Name of configuration file[rtr2-confg]? host2-confgConfigure using host2-confg from 172.16.101.101?[confirm]Connected to 172.16.101.101Loading 1112 byte file host2-confg:![OK][OK]Switch#
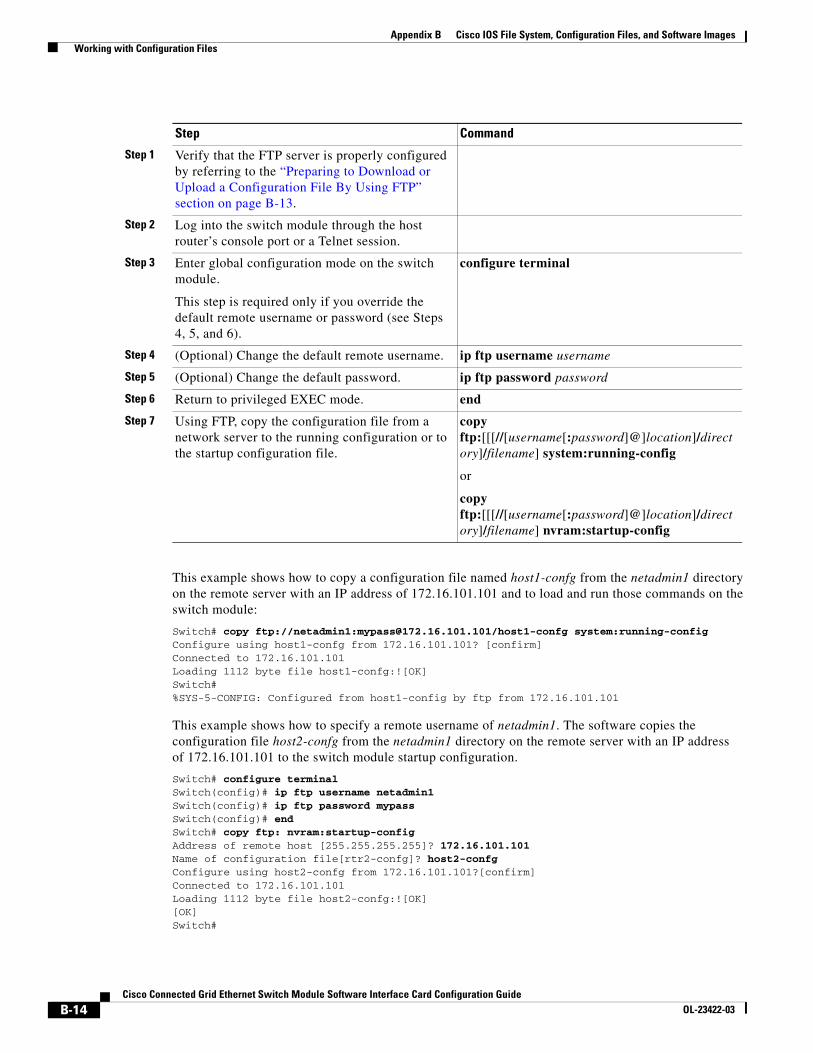
Step Command
Step 1 Verify that the FTP server is properly configured by referring to the “Preparing to Download or Upload a Configuration File By Using FTP” section on page B-13.
Step 2 Log into the switch module through the host router’s console port or a Telnet session.
Step 3 Enter global configuration mode on the switch module.
This step is required only if you override the default remote username or password (see Steps 4, 5, and 6).
configure terminal
Step 4 (Optional) Change the default remote username. ip ftp username username
Step 5 (Optional) Change the default password. ip ftp password password
Step 6 Return to privileged EXEC mode. end
Step 7 Using FTP, copy the configuration file from a network server to the running configuration or to the startup configuration file.
copy ftp:[[[//[username[:password]@]location]/directory]/filename] system:running-config
or
copy ftp:[[[//[username[:password]@]location]/directory]/filename] nvram:startup-config
B-14Cisco Connected Grid Ethernet Switch Module Software Interface Card Configuration Guide
OL-23422-03
Appendix B Cisco IOS File System, Configuration Files, and Software Images Working with Configuration Files
%SYS-5-CONFIG_NV:Non-volatile store configured from host2-config by ftp from 172.16.101.101
Uploading a Configuration File By Using FTP
Beginning in privileged EXEC mode, follow these steps to upload a configuration file by using FTP:
This example shows how to copy the running configuration file named switch2-confg to the netadmin1 directory on the remote host with an IP address of 172.16.101.101:
Switch# copy system:running-config ftp://netadmin1:[email protected]/switch2-confgWrite file switch2-confg on host 172.16.101.101?[confirm]Building configuration...[OK]Connected to 172.16.101.101Switch#
This example shows how to store a startup configuration file on a server by using FTP to copy the file:
Switch# configure terminalSwitch(config)# ip ftp username netadmin2Switch(config)# ip ftp password mypassSwitch(config)# endSwitch# copy nvram:startup-config ftp:Remote host[]? 172.16.101.101Name of configuration file to write [switch2-confg]?Write file switch2-confg on host 172.16.101.101?[confirm]![OK]
Step Command
Step 1 Verify that the FTP server is properly configured by referring to the “Preparing to Download or Upload a Configuration File By Using FTP” section on page B-13.
Step 2 Log into the switch module through the host router’s console port or a Telnet session.
Step 3 Enter global configuration mode.
This step is required only if you override the default remote username or password (see Steps 4, 5, and 6).
configure terminal
Step 4 (Optional) Change the default remote username. ip ftp username username
Step 5 (Optional) Change the default password. ip ftp password password
Step 6 Return to privileged EXEC mode. end
Step 7 Using FTP, store the switch module running or startup configuration file to the specified location.
copy system:running-config ftp:[[[//[username[:password]@]location]/directory]/filename]
or
copy nvram:startup-config ftp:[[[//[username[:password]@]location]/directory]/filename]
B-15Cisco Connected Grid Ethernet Switch Module Software Interface Card Configuration Guide
OL-23422-03
Appendix B Cisco IOS File System, Configuration Files, and Software Images Working with Configuration Files
Copying Configuration Files By Using RCPThe Remote Copy Protocol (RCP) provides another method of downloading, uploading, and copying configuration files between remote hosts and the switch module. Unlike TFTP, which uses User Datagram Protocol (UDP), a connectionless protocol, RCP uses TCP, which is connection-oriented.
To use RCP to copy files, the server from or to which you will be copying files must support RCP. The RCP copy commands rely on the rsh server (or daemon) on the remote system. To copy files by using RCP, you do not need to create a server for file distribution as you do with TFTP. You only need to have access to a server that supports the remote shell (rsh). (Most UNIX systems support rsh.) Because you are copying a file from one place to another, you must have read permission on the source file and write permission on the destination file. If the destination file does not exist, RCP creates it for you.
The RCP requires a client to send a remote username with each RCP request to a server. When you copy a configuration file from the switch module to a server, the Cisco IOS software sends the first valid username in this list:
• The username specified in the copy command if a username is specified.
• The username set by the ip rcmd remote-username username global configuration command if the command is configured.
• The remote username associated with the current TTY (terminal) process. For example, if the user is connected to the router through Telnet and was authenticated through the username command, the switch module software sends the Telnet username as the remote username.
• The switch module hostname.
For a successful RCP copy request, you must define an account on the network server for the remote username. If the server has a directory structure, the configuration file is written to or copied from the directory associated with the remote username on the server. For example, if the configuration file is in the home directory of a user on the server, specify that user's name as the remote username.
These sections contain this configuration information:
• Preparing to Download or Upload a Configuration File By Using RCP, page B-16
• Downloading a Configuration File By Using RCP, page B-17
• Uploading a Configuration File By Using RCP, page B-18
Preparing to Download or Upload a Configuration File By Using RCP
Before you begin downloading or uploading a configuration file by using RCP, do these tasks:
• Ensure that the workstation acting as the RCP server supports the remote shell (rsh).
• Ensure that the switch module has a route to the RCP server. The switch module and the server must be in the same subnetwork if you do not have a router to route traffic between subnets. Check connectivity to the RCP server by using the ping command.
• If you are accessing the switch module through the host router’s console or a Telnet session and you do not have a valid username, make sure that the current RCP username is the one that you want to use for the RCP download.
• To view the valid username, you can enter the show users privileged EXEC command. If you do not want to use this username, create a new RCP username by using the ip rcmd remote-username username global configuration command to be used during all copy operations. The new username is stored in NVRAM.
B-16Cisco Connected Grid Ethernet Switch Module Software Interface Card Configuration Guide
OL-23422-03

Appendix B Cisco IOS File System, Configuration Files, and Software Images Working with Configuration Files
• If you are accessing the switch module through a Telnet session and you have a valid username, this username is used, and you do not need to set the RCP username. Include the username in the copy command if you want to specify a username for only that copy operation.
• When you upload a file to the RCP server, it must be properly configured to accept the RCP write request from the user on the switch module. For UNIX systems, you must add an entry to the .rhosts file for the remote user on the RCP server. For example, suppose that the switch module contains these configuration lines:
hostname Switch1ip rcmd remote-username User0
If the switch module IP address translates to Switch1.company.com, the .rhosts file for User0 on the RCP server should contain this line:
Switch1.company.com Switch1
For more information, see the documentation for your RCP server.
Downloading a Configuration File By Using RCP
Beginning in privileged EXEC mode, follow these steps to download a configuration file by using RCP:
This example shows how to copy a configuration file named host1-confg from the netadmin1 directory on the remote server with an IP address of 172.16.101.101 and load and run those commands on the switch module:
Switch# copy rcp://[email protected]/host1-confg system:running-config Configure using host1-confg from 172.16.101.101? [confirm]Connected to 172.16.101.101Loading 1112 byte file host1-confg:![OK]
Step Command
Step 1 Verify that the RCP server is properly configured by referring to the “Preparing to Download or Upload a Configuration File By Using RCP” section on page B-16.
Step 2 Log into the switch module through the host router’s console port or a Telnet session.
Step 3 Enter global configuration mode.
This step is required only if you override the default remote username (see Steps 4 and 5).
configure terminal
Step 4 (Optional) Specify the remote username. ip rcmd remote-username username
Step 5 Return to privileged EXEC mode. end
Step 6 Using RCP, copy the configuration file from a network server to the running configuration or to the startup configuration file.
copy rcp:[[[//[username@]location]/directory]/filename] system:running-config
or
copy rcp:[[[//[username@]location]/directory]/filename] nvram:startup-config
B-17Cisco Connected Grid Ethernet Switch Module Software Interface Card Configuration Guide
OL-23422-03
Appendix B Cisco IOS File System, Configuration Files, and Software Images Working with Configuration Files
Switch#%SYS-5-CONFIG: Configured from host1-config by rcp from 172.16.101.101
This example shows how to specify a remote username of netadmin1. Then it copies the configuration file host2-confg from the netadmin1 directory on the remote server with an IP address of 172.16.101.101 to the startup configuration:
Switch# configure terminalSwitch(config)# ip rcmd remote-username netadmin1Switch(config)# endSwitch# copy rcp: nvram:startup-config Address of remote host [255.255.255.255]? 172.16.101.101Name of configuration file[rtr2-confg]? host2-confgConfigure using host2-confg from 172.16.101.101?[confirm]Connected to 172.16.101.101Loading 1112 byte file host2-confg:![OK][OK]Switch#%SYS-5-CONFIG_NV:Non-volatile store configured from host2-config by rcp from 172.16.101.101
Uploading a Configuration File By Using RCP
Beginning in privileged EXEC mode, follow these steps to upload a configuration file by using RCP:
This example shows how to copy the running configuration file named switch2-confg to the netadmin1 directory on the remote host with an IP address of 172.16.101.101:
Switch# copy system:running-config rcp://[email protected]/switch2-confgWrite file switch-confg on host 172.16.101.101?[confirm]Building configuration...[OK]Connected to 172.16.101.101Switch#
Step Command
Step 1 Verify that the RCP server is properly configured by referring to the “Preparing to Download or Upload a Configuration File By Using RCP” section on page B-16.
Step 2 Log into the switch module through the host router’s console port or a Telnet session.
Step 3 Enter global configuration mode.
This step is required only if you override the default remote username (see Steps 4 and 5).
configure terminal
Step 4 (Optional) Specify the remote username. ip rcmd remote-username username
Step 5 Return to privileged EXEC mode. end
Step 6 Using RCP, copy the configuration file from a switch module running or startup configuration file to a network server.
copy system:running-config rcp:[[[//[username@]location]/directory]/filename] or copy nvram:startup-config rcp:[[[//[username@]location]/directory]/filename]
B-18Cisco Connected Grid Ethernet Switch Module Software Interface Card Configuration Guide
OL-23422-03

Appendix B Cisco IOS File System, Configuration Files, and Software Images Working with Configuration Files
This example shows how to store a startup configuration file on a server:
Switch# configure terminalSwitch(config)# ip rcmd remote-username netadmin2Switch(config)# endSwitch# copy nvram:startup-config rcp:Remote host[]? 172.16.101.101Name of configuration file to write [switch2-confg]?Write file switch2-confg on host 172.16.101.101?[confirm]![OK]
Clearing Configuration InformationYou can clear the configuration information from the startup configuration. If you reboot the switch module with no startup configuration, the switch module enters the setup program so that you can reconfigure the switch module with all new settings.
Clearing the Startup Configuration File
To clear the contents of your startup configuration, use the erase nvram: or the erase startup-config privileged EXEC command.
Caution You cannot restore the startup configuration file after it has been deleted.
Deleting a Stored Configuration File
To delete a saved configuration from flash memory, use the delete flash:filename privileged EXEC command. Depending on the setting of the file prompt global configuration command, you might be prompted for confirmation before you delete a file. By default, the switch module prompts for confirmation on destructive file operations. For more information about the file prompt command, see the Cisco IOS Command Reference for Release 12.2.
Caution You cannot restore a file after it has been deleted.
Replacing and Rolling Back ConfigurationsThe configuration replacement and rollback feature replaces the running configuration with any saved Cisco IOS configuration file. You can use the rollback function to roll back to a previous configuration.
These sections contain this information:
• Understanding Configuration Replacement and Rollback, page B-20
• Configuration Replacement and Rollback Guidelines, page B-21
• Configuring the Configuration Archive, page B-21
• Performing a Configuration Replacement or Rollback Operation, page B-22
B-19Cisco Connected Grid Ethernet Switch Module Software Interface Card Configuration Guide
OL-23422-03

Appendix B Cisco IOS File System, Configuration Files, and Software Images Working with Configuration Files
Understanding Configuration Replacement and Rollback
• Archiving a Configuration, page B-20
• Replacing a Configuration, page B-20
• Rolling Back a Configuration, page B-21
Archiving a Configuration
The configuration archive provides a mechanism to store, organize, and manage an archive of configuration files. The configure replace privileged EXEC command increases the configuration rollback capability. As an alternative, you can save copies of the running configuration by using the copy running-config destination-url privileged EXEC command, storing the replacement file either locally or remotely. However, this method lacks any automated file management. The configuration replacement and rollback feature can automatically save copies of the running configuration to the configuration archive.
You use the archive config privileged EXEC command to save configurations in the configuration archive by using a standard location and filename prefix that is automatically appended with an incremental version number (and optional timestamp) as each consecutive file is saved. You can specify how many versions of the running configuration are kept in the archive. After the maximum number of files are saved, the oldest file is automatically deleted when the next, most recent file is saved. The show archive privileged EXEC command displays information for all the configuration files saved in the configuration archive.
The Cisco IOS configuration archive, in which the configuration files are stored and available for use with the configure replace command, is in any of these file systems: FTP, HTTP, RCP, TFTP.
Replacing a Configuration
The configure replace privileged EXEC command replaces the running configuration with any saved configuration file. When you enter the configure replace command, the running configuration is compared with the specified replacement configuration, and a set of configuration differences is generated. The resulting differences are used to replace the configuration. The configuration replacement operation is usually completed in no more than three passes. To prevent looping behavior no more than five passes are performed.
You can use the copy source-url running-config privileged EXEC command to copy a stored configuration file to the running configuration. When using this command as an alternative to the configure replace target-url privileged EXEC command, note these major differences:
• The copy source-url running-config command is a merge operation and preserves all the commands from both the source file and the running configuration. This command does not remove commands from the running configuration that are not present in the source file. In contrast, the configure replace target-url command removes commands from the running configuration that are not present in the replacement file and adds commands to the running configuration that are not present.
• You can use a partial configuration file as the source file for the copy source-url running-config command. You must use a complete configuration file as the replacement file for the configure replace target-url command.
B-20Cisco Connected Grid Ethernet Switch Module Software Interface Card Configuration Guide
OL-23422-03
Appendix B Cisco IOS File System, Configuration Files, and Software Images Working with Configuration Files
Rolling Back a Configuration
You can also use the configure replace command to roll back changes that were made since the previous configuration was saved. Instead of basing the rollback operation on a specific set of changes that were applied, the configuration rollback capability reverts to a specific configuration based on a saved configuration file.
If you want the configuration rollback capability, you must first save the running configuration before making any configuration changes. Then, after entering configuration changes, you can use that saved configuration file to roll back the changes by using the configure replace target-url command.
You can specify any saved configuration file as the rollback configuration. You are not limited to a fixed number of rollbacks, as is the case in some rollback models.
Configuration Replacement and Rollback Guidelines
• Make sure that the switch module has free memory larger than the combined size of the two configuration files (the running configuration and the saved replacement configuration). Otherwise, the configuration replacement operation fails.
• Make sure that the switch module also has sufficient free memory to execute the configuration replacement or rollback configuration commands.
• Certain configuration commands, such as those pertaining to physical components of a networking device (for example, physical interfaces), cannot be added or removed from the running configuration.
– A configuration replacement operation cannot remove the interface interface-id command line from the running configuration if that interface is physically present on the device.
– The interface interface-id command line cannot be added to the running configuration if no such interface is physically present on the device.
• When using the configure replace command, you must specify a saved configuration as the replacement configuration file for the running configuration. The replacement file must be a complete configuration generated by a Cisco IOS device (for example, a configuration generated by the copy running-config destination-url command).
Note If you generate the replacement configuration file externally, it must comply with the format of files generated by Cisco IOS devices.
Configuring the Configuration Archive
Using the configure replace command with the configuration archive and with the archive config command is optional but offers significant benefit for configuration rollback scenarios. Before using the archive config command, you must first configure the configuration archive. Starting in privileged EXEC mode, follow these steps to configure the configuration archive:
Step Command
Step 1 Enter global configuration mode. configure terminal
Step 2 Enter archive configuration mode. archive
Step 3 Specify the location and filename prefix for the files in the configuration archive.
path url
B-21Cisco Connected Grid Ethernet Switch Module Software Interface Card Configuration Guide
OL-23422-03

Appendix B Cisco IOS File System, Configuration Files, and Software Images Working with Configuration Files
Performing a Configuration Replacement or Rollback Operation
Beginning in privileged EXEC mode, follow these steps to replace the running configuration file with a saved configuration file:
Step 4 (Optional) Set the maximum number of archive files of the running configuration to be saved in the configuration archive.
number—Maximum files of the running configuration file in the configuration archive. Valid values are from 1 to 14. The default is 10.
Note Before using this command, you must first enter the path archive configuration command to specify the location and filename prefix for the files in the configuration archive.
maximum number
Step 5 (Optional) Set the time increment for automatically saving an archive file of the running configuration in the configuration archive.
minutes—Specify how often, in minutes, to automatically save an archive file of the running configuration in the configuration archive.
time-period minutes
Step 6 Return to privileged EXEC mode. end
Step 7 Verify the configuration. show running-config
Step 8 (Optional) Save your entries in the configuration file.
copy running-config startup-config
Step Command
Step Command
Step 1 (Optional) Save the running configuration file to the configuration archive.
Note Enter the path archive configuration command before using this command.
archive config
Step 2 Enter global configuration mode. configure terminal
Step 3 Make necessary changes to the running configuration.
Step 4 Return to privileged EXEC mode. exit
B-22Cisco Connected Grid Ethernet Switch Module Software Interface Card Configuration Guide
OL-23422-03

Appendix B Cisco IOS File System, Configuration Files, and Software Images Working with Configuration Files
Step 5 Replace the running configuration file with a saved configuration file.
target-url—URL (accessible by the file system) of the saved configuration file that is to replace the running configuration, such as the configuration file created in Step 2 by using the archive config privileged EXEC command.
list—Display a list of the command entries applied by the software parser during each pass of the configuration replacement operation. The total number of passes also appears.
force— Replace the running configuration file with the specified saved configuration file without prompting you for confirmation.
time seconds—Specify the time (in seconds) within which you must enter the configure confirm command to confirm replacement of the running configuration file. If you do not enter the configure confirm command within the specified time limit, the configuration replacement operation is automatically stopped. (In other words, the running configuration file is restored to the configuration that existed before you entered the configure replace command).
Note You must first enable the configuration archive before you can use the time seconds command line option.
nolock—Disable the locking of the running configuration file that prevents other users from changing the running configuration during a configuration replacement operation.
configure replace target-url [list] [force] [time seconds] [nolock]
Step 6 (Optional) Confirm replacement of the running configuration with a saved configuration file.
Note Use this command only if the time seconds keyword and argument of the configure replace command are specified.
configure confirm
Step 7 (Optional) Save your entries in the configuration file.
copy running-config startup-config
Step Command
B-23Cisco Connected Grid Ethernet Switch Module Software Interface Card Configuration Guide
OL-23422-03
Appendix B Cisco IOS File System, Configuration Files, and Software Images Working with Software Images
Working with Software ImagesThis section describes how to archive (download and upload) software image files, which contain the system software, the Cisco IOS code, and the embedded device manager software.
Note Instead of using the copy privileged EXEC command or the archive tar privileged EXEC command, we recommend using the archive download-sw and archive upload-sw privileged EXEC commands to download and upload software image files.
You can download a switch module image file from a TFTP, FTP, or RCP server to upgrade the switch module software.
You can replace the current image with the new one or keep the current image in flash memory after a download.
You upload a switch module image file to a TFTP, FTP, or RCP server for backup purposes. You can use this uploaded image for future downloads to the same switch module or to another of the same type.
The protocol that you use depends on which type of server you are using. The FTP and RCP transport mechanisms provide faster performance and more reliable delivery of data than TFTP. These improvements are possible because FTP and RCP are built on and use the TCP/IP stack, which is connection-oriented.
These sections contain this configuration information:
• Image Location on the Switch Module, page B-24
• Tar File Format of Images on a Server or Cisco.com, page B-25
• Copying Image Files By Using TFTP, page B-26
• Copying Image Files By Using FTP, page B-29
• Copying Image Files By Using RCP, page B-34
Note For a list of software images and the supported upgrade paths, see the release notes for your switch module.
Image Location on the Switch Module The Cisco IOS image is stored as a .bin file in a directory that shows the version number. A subdirectory contains the files needed for web management. The image is stored on the system board flash memory (flash:).
You can use the show version privileged EXEC command to see the software version that is currently running on your switch module. In the display, check the line that begins with System image file is... . It shows the directory name in flash memory where the image is stored.
You can also use the dir filesystem: privileged EXEC command to see the directory names of other software images that you might have stored in flash memory.
B-24Cisco Connected Grid Ethernet Switch Module Software Interface Card Configuration Guide
OL-23422-03
Appendix B Cisco IOS File System, Configuration Files, and Software Images Working with Software Images
Tar File Format of Images on a Server or Cisco.comSoftware images located on a server or downloaded from Cisco.com are provided in a tar file format, which contains these files:
• An info file, which serves as a table of contents for the tar file
• One or more subdirectories containing other images and files, such as Cisco IOS images
This example shows some of the information contained in the info file. Table B-3 provides additional details about this information:
version_suffix: image-name version_directory: image-name image_system_type_id: 0x00000000 image_name: image-name .bin ios_image_file_size: 4526592 total_image_file_size: 4526592 image_feature: LAYER_2|MIN_DRAM_MEG=64 image_family: familystacking_number: 1.11 board_ids: 0x00000029 info_end:
Note Disregard the stacking_number field. It does not apply to the switch module.
Table B-3 Info File Descriptions
Field Description
version_suffix Specifies the Cisco IOS image version string suffix
version_directory Specifies the directory where the Cisco IOS image and the HTML subdirectory are installed
image_name Specifies the name of the Cisco IOS image within the tar file
ios_image_file_size Specifies the Cisco IOS image size in the tar file, which is an approximate measure of how much flash memory is required to hold just the Cisco IOS image
total_image_file_size Specifies the size of all the images (the Cisco IOS image and the web management files) in the tar file, which is an approximate measure of how much flash memory is required to hold them
image_feature Describes the core functionality of the image
image_min_dram Specifies the minimum amount of DRAM needed to run this image
image_family Describes the family of products on which the software can be installed
B-25Cisco Connected Grid Ethernet Switch Module Software Interface Card Configuration Guide
OL-23422-03
Appendix B Cisco IOS File System, Configuration Files, and Software Images Working with Software Images
Copying Image Files By Using TFTPYou can download a switch module image from a TFTP server or upload the image from the switch module to a TFTP server.
You download a switch module image file from a server to upgrade the switch module software. You can overwrite the current image with the new one or keep the current image after a download.
You upload a switch module image file to a server for backup purposes; this uploaded image can be used for future downloads to the same or another switch module of the same type.
Note Instead of using the copy privileged EXEC command or the archive tar privileged EXEC command, we recommend using the archive download-sw and archive upload-sw privileged EXEC commands to download and upload software image files.
These sections contain this configuration information:
• Preparing to Download or Upload an Image File By Using TFTP, page B-26
• Downloading an Image File By Using TFTP, page B-27
• Uploading an Image File By Using TFTP, page B-28
Preparing to Download or Upload an Image File By Using TFTP
Before you begin downloading or uploading an image file by using TFTP, do these tasks:
• Ensure that the workstation acting as the TFTP server is properly configured. On a Sun workstation, make sure that the /etc/inetd.conf file contains this line:
tftp dgram udp wait root /usr/etc/in.tftpd in.tftpd -p -s /tftpboot
Make sure that the /etc/services file contains this line:
tftp 69/udp
Note You must restart the inetd daemon after modifying the /etc/inetd.conf and /etc/services files. To restart the daemon, either stop the inetd process and restart it, or enter a fastboot command (on the SunOS 4.x) or a reboot command (on Solaris 2.x or SunOS 5.x). For more information on the TFTP daemon, see the documentation for your workstation.
• Ensure that the switch module has a route to the TFTP server. The switch module and the TFTP server must be in the same subnetwork if you do not have a router to route traffic between subnets. Check connectivity to the TFTP server by using the ping command.
• Ensure that the image to be downloaded is in the correct directory on the TFTP server (usually /tftpboot on a UNIX workstation).
• For download operations, ensure that the permissions on the file are set correctly. The permission on the file should be world-read.
• Before uploading the image file, you might need to create an empty file on the TFTP server. To create an empty file, enter the touch filename command, where filename is the name of the file you will use when uploading the image to the server.
B-26Cisco Connected Grid Ethernet Switch Module Software Interface Card Configuration Guide
OL-23422-03
Appendix B Cisco IOS File System, Configuration Files, and Software Images Working with Software Images
• During upload operations, if you are overwriting an existing file (including an empty file, if you had to create one) on the server, ensure that the permissions on the file are set correctly. Permissions on the file should be world-write.
Downloading an Image File By Using TFTP
You can download a new image file and replace the current image or keep the current image.
Beginning in privileged EXEC mode, follow Steps 1 through 3 to download a new image from a TFTP server and overwrite the existing image. To keep the current image, go to Step 4.
The archive download-sw command untars/unzips the file. The system prompts you when it completes successfully. The download algorithm verifies that the image is appropriate for the switch module model and that enough DRAM is present, or it aborts the process and reports an error. If you specify the /overwrite option, the download algorithm removes the existing image on the flash device whether or not it is the same as the new one and downloads the new image.
Step Command
Step 1 Copy the image to the appropriate TFTP directory on the workstation. Make sure the TFTP server is properly configured; see the “Preparing to Download or Upload an Image File By Using TFTP” section on page B-26.
Step 2 Log into the switch module through the host router’s console port or a Telnet session.
Step 3 Download the image file from the TFTP server to the switch module, and overwrite the current image.
• The /overwrite option overwrites the software image in flash memory with the downloaded image.
• For //location, specify the IP address of the TFTP server.
• For /directory/image-name.tar, specify the directory and the image to download. Directory and image names are case sensitive.
archive download-sw /overwrite tftp: //location/directory/image-name.tar
Step 4 Download the image file from the TFTP server to the switch module, and keep the current image.
• The /leave-old-sw option keeps the old software version after a download.
• For //location, specify the IP address of the TFTP server.
• For /directory/image-name.tar, specify the directory and the image to download. Directory and image names are case sensitive.
archive download-sw /leave-old-sw tftp://location/directory/image-name.tar
Step 5 After the download and untarring are completed, power cycle the CGR2010.
B-27Cisco Connected Grid Ethernet Switch Module Software Interface Card Configuration Guide
OL-23422-03

Appendix B Cisco IOS File System, Configuration Files, and Software Images Working with Software Images
If you specify the command without the /overwrite option, the download algorithm verifies that the new image is not the same as the one on the switch Flash device. If the images are the same, the download does not occur. If the images are different, the old image is deleted, and the new one is downloaded. If there is not enough space to install the new image and keep the current running image, the download process stops, and an error message is displayed.
Note If the flash device has sufficient space to hold two images and you want to overwrite one of these images with the same version, you must specify the /overwrite option.
If you specify the /leave-old-sw, the existing files are not removed. If there is not enough space to install the new image and keep the current running image, the download process stops, and an error message is displayed.
The algorithm installs the downloaded image on the system board flash device (flash:). The image is placed into a new directory named with the software version string, and the BOOT environment variable is updated to point to the newly installed image.
If you kept the old image during the download process (you specified the /leave-old-sw keyword), you can remove it by entering the delete /force /recursive filesystem:/file-url privileged EXEC command. For filesystem, use flash: for the system board flash device. For file-url, enter the directory name of the old image. All the files in the directory and the directory are removed.
Caution For the download and upload algorithms to operate properly, do not rename image names.
Uploading an Image File By Using TFTP
You can upload an image from the switch module to a TFTP server. You can later download this image to the switch module or to another switch module of the same type.
Use the upload feature only if the web management pages associated with the embedded device manager have been installed with the existing image.
Beginning in privileged EXEC mode, follow these steps to upload an image to a TFTP server:
Step Command
Step 1 Make sure the TFTP server is properly configured; see the “Preparing to Download or Upload an Image File By Using TFTP” section on page B-26.
B-28Cisco Connected Grid Ethernet Switch Module Software Interface Card Configuration Guide
OL-23422-03

Appendix B Cisco IOS File System, Configuration Files, and Software Images Working with Software Images
The archive upload-sw privileged EXEC command builds an image file on the server by uploading these files in order: info, the Cisco IOS image, and the web management files. After these files are uploaded, the upload algorithm creates the tar file format.
Caution For the download and upload algorithms to operate properly, do not rename image names.
Copying Image Files By Using FTPYou can download a switch module image from an FTP server or upload the image from the switch module to an FTP server.
You download a switch module image file from a server to upgrade the switch module software. You can overwrite the current image with the new one or keep the current image after a download.
You upload a switch module image file to a server for backup purposes. You can use this uploaded image for future downloads to the switch module or another switch module of the same type.
Note Instead of using the copy privileged EXEC command or the archive tar privileged EXEC command, we recommend using the archive download-sw and archive upload-sw privileged EXEC commands to download and upload software image files.
These sections contain this configuration information:
• Preparing to Download or Upload an Image File By Using FTP, page B-29
• Downloading an Image File By Using FTP, page B-31
• Uploading an Image File By Using FTP, page B-33
Preparing to Download or Upload an Image File By Using FTP
You can copy images files to or from an FTP server.
Step 2 Log into the switch module through the host router’s console port or a Telnet session.
Step 3 Upload the currently running switch module image to the TFTP server.
• For //location, specify the IP address of the TFTP server.
• For /directory/image-name.tar, specify the directory and the name of the software image to be uploaded. Directory and image names are case sensitive. The image-name.tar is the name of the software image to be stored on the server.
archive upload-sw tftp://location/directory/image-name.tar
Step Command
B-29Cisco Connected Grid Ethernet Switch Module Software Interface Card Configuration Guide
OL-23422-03

Appendix B Cisco IOS File System, Configuration Files, and Software Images Working with Software Images
The FTP protocol requires a client to send a remote username and password on each FTP request to a server. When you copy an image file from the switch module to a server by using FTP, the Cisco IOS software sends the first valid username in this list:
• Username specified in the archive download-sw or archive upload-sw privileged EXEC command if a username is specified
• Username set by the ip ftp username username global configuration command if the command is configured
• Anonymous
The switch module sends the first valid password in this list:
• Password specified in the archive download-sw or archive upload-sw privileged EXEC command if a password is specified
• Password set by the ip ftp password password global configuration command if the command is configured
• Switch module forms a password named [email protected]. The variable username is the username associated with the current session, switchname is the configured hostname, and domain is the domain of the switch module.
The username and password must be associated with an account on the FTP server. If you are writing to the server, the FTP server must be properly configured to accept the FTP write request from you.
Use the ip ftp username and ip ftp password commands to specify a username and password for all copies. Include the username in the archive download-sw or archive upload-sw privileged EXEC command if you want to specify a username only for that operation.
If the server has a directory structure, the image file is written to or copied from the directory associated with the username on the server. For example, if the image file resides in the home directory of a user on the server, specify that user's name as the remote username.
Before you begin downloading or uploading an image file by using FTP, do these tasks:
• Ensure that the switch module has a route to the FTP server. The switch module and the FTP server must be in the same subnetwork if you do not have a router to route traffic between subnets. Check connectivity to the FTP server by using the ping command.
• If you are accessing the switch module through the host router’s console or a Telnet session and you do not have a valid username, make sure that the current FTP username is the one that you want to use for the FTP download.
• To view the valid username, you can enter the show users privileged EXEC command. If you do not want to use this username, create a new FTP username by using the ip ftp username username global configuration command. This new name will be used during all archive operations. The new username is stored in NVRAM. If you are accessing the switch module through a Telnet session and you have a valid username, this username is used, and you do not need to set the FTP username. Include the username in the archive download-sw or archive upload-sw privileged EXEC command if you want to specify a username for that operation only.
• When you upload an image file to the FTP server, it must be properly configured to accept the write request from the user on the switch module.
For more information, see the documentation for your FTP server.
B-30Cisco Connected Grid Ethernet Switch Module Software Interface Card Configuration Guide
OL-23422-03

Appendix B Cisco IOS File System, Configuration Files, and Software Images Working with Software Images
Downloading an Image File By Using FTP
You can download a new image file and overwrite the current image or keep the current image.
Beginning in privileged EXEC mode, follow Steps 1 through 7 to download a new image from an FTP server and overwrite the existing image. To keep the current image, go to Step 8.
Step Command
Step 1 Verify that the FTP server is properly configured by referring to the “Preparing to Download or Upload an Image File By Using FTP” section on page B-29.
Step 2 Log into the switch module through the host router’s console port or a Telnet session.
Step 3 Enter global configuration mode.
This step is required only if you override the default remote username or password (see Steps 4, 5, and 6).
configure terminal
Step 4 (Optional) Change the default remote username. ip ftp username username
Step 5 (Optional) Change the default password. ip ftp password password
Step 6 Return to privileged EXEC mode. end
Step 7 Download the image file from the FTP server to the switch module, and overwrite the current image.
• The /overwrite option overwrites the software image in flash memory with the downloaded image.
• For //username:password, specify the username and password; these must be associated with an account on the FTP server. For more information, see the “Preparing to Download or Upload an Image File By Using FTP” section on page B-29.
• For @location, specify the IP address of the FTP server
• For directory/image-name.tar, specify the directory and the image to download. Directory and image names are case sensitive.
archive download-sw /overwrite ftp: //username:password@location/directory/ image-name.tar
B-31Cisco Connected Grid Ethernet Switch Module Software Interface Card Configuration Guide
OL-23422-03

Appendix B Cisco IOS File System, Configuration Files, and Software Images Working with Software Images
The archive download-sw command untars/unzips the file. The system prompts you when it completes successfully. The download algorithm verifies that the image is appropriate for the switch module model and that enough DRAM is present, or it aborts the process and reports an error. If you specify the /overwrite option, the download algorithm removes the existing image on the flash device whether or not it is the same as the new one and downloads the new image.
If you specify the command without the /overwrite option, the download algorithm verifies that the new image is not the same as the one on the switch Flash device. If the images are the same, the download does not occur. If the images are different, the old image is deleted, and the new one is downloaded. If there is not enough space to install the new image and keep the current running image, the download process stops, and the system displays an error message.
Note If the flash device has sufficient space to hold two images and you want to overwrite one of these images with the same version, you must specify the /overwrite option.
If you specify the /leave-old-sw, the existing files are not removed. If there is not enough space to install the new image and keep the running image, the download process stops, and an error message is displayed.
The algorithm installs the downloaded image onto the system board flash device (flash:). The image is placed into a new directory named with the software version string, and the BOOT environment variable is updated to point to the newly installed image.
If you kept the old image during the download process (you specified the /leave-old-sw keyword), you can remove it by entering the delete /force /recursive filesystem:/file-url privileged EXEC command. For filesystem, use flash: for the system board flash device. For file-url, enter the directory name of the old software image. All the files in the directory and the directory are removed.
Caution For the download and upload algorithms to operate properly, do not rename image names.
Step 8 Download the image file from the FTP server to the switch module, and keep the current image.
• The /leave-old-sw option keeps the old software version after a download.
• For //username:password, specify the username and password. These must be associated with an account on the FTP server. For more information, see the “Preparing to Download or Upload an Image File By Using FTP” section on page B-29.
• For @location, specify the IP address of the FTP server.
• For directory/image-name.tar, specify the directory and the image to download. Directory and image names are case sensitive.
archive download-sw /leave-old-sw ftp://username:password@location/directory/image-name.tar
Step 9 After the download and untarring complete, power cycle the CGR2010.
Step Command
B-32Cisco Connected Grid Ethernet Switch Module Software Interface Card Configuration Guide
OL-23422-03

Appendix B Cisco IOS File System, Configuration Files, and Software Images Working with Software Images
Uploading an Image File By Using FTP
You can upload an image from the switch module to an FTP server. You can later download this image to the same switch module or to another switch module of the same type.
Use the upload feature only if the web management pages associated with the embedded device manager have been installed with the existing image.
Beginning in privileged EXEC mode, follow these steps to upload an image to an FTP server:
The archive upload-sw command builds an image file on the server by uploading these files in order: info, the Cisco IOS image, and the web management files. After these files are uploaded, the upload algorithm creates the tar file format.
Caution For the download and upload algorithms to operate properly, do not rename image names.
Step Command
Step 1 Verify that the FTP server is properly configured by referring to the “Preparing to Download or Upload a Configuration File By Using FTP” section on page B-13.
Step 2 Log into the switch module through the host router’s console port or a Telnet session.
Step 3 Enter global configuration mode.
This step is required only if you override the default remote username or password (see Steps 4, 5, and 6).
configure terminal
Step 4 (Optional) Change the default remote username. ip ftp username username
Step 5 (Optional) Change the default password. ip ftp password password
Step 6 Return to privileged EXEC mode. end
Step 7 Upload the currently running switch module image to the FTP server.
• For //username:password, specify the username and password. These must be associated with an account on the FTP server. For more information, see the “Preparing to Download or Upload an Image File By Using FTP” section on page B-29.
• For @location, specify the IP address of the FTP server.
• For /directory/image-name.tar, specify the directory and the name of the software image to be uploaded. Directory and image names are case sensitive. The image-name.tar is the name of the software image to be stored on the server.
archive upload-sw ftp://username:password@location/directory/image-name.tar
B-33Cisco Connected Grid Ethernet Switch Module Software Interface Card Configuration Guide
OL-23422-03

Appendix B Cisco IOS File System, Configuration Files, and Software Images Working with Software Images
Copying Image Files By Using RCPYou can download a switch module image from an RCP server or upload the image from the switch module to an RCP server.
You download a switch module image file from a server to upgrade the switch module software. You can overwrite the current image with the new one or keep the current image after a download.
You upload a switch module image file to a server for backup purposes. You can use this uploaded image for future downloads to the same switch module or another of the same type.
Note Instead of using the copy privileged EXEC command or the archive tar privileged EXEC command, we recommend using the archive download-sw and archive upload-sw privileged EXEC commands to download and upload software image files.
These sections contain this configuration information:
• Preparing to Download or Upload an Image File By Using RCP, page B-34
• Downloading an Image File By Using RCP, page B-35
• Uploading an Image File By Using RCP, page B-37
Preparing to Download or Upload an Image File By Using RCP
RCP provides another method of downloading and uploading image files between remote hosts and the switch module. Unlike TFTP, which uses User Datagram Protocol (UDP), a connectionless protocol, RCP uses TCP, which is connection-oriented.
To use RCP to copy files, the server from or to which you will be copying files must support RCP. The RCP copy commands rely on the rsh server (or daemon) on the remote system. To copy files by using RCP, you do not need to create a server for file distribution as you do with TFTP. You only need to have access to a server that supports the remote shell (rsh). (Most UNIX systems support rsh.) Because you are copying a file from one place to another, you must have read permission on the source file and write permission on the destination file. If the destination file does not exist, RCP creates it for you.
RCP requires a client to send a remote username on each RCP request to a server. When you copy an image from the switch module to a server by using RCP, the Cisco IOS software sends the first valid username in this list:
• Username specified in the archive download-sw or archive upload-sw privileged EXEC command if a username is specified
• Username set by the ip rcmd remote-username username global configuration command if the command is entered
• Remote username associated with the current TTY (terminal) process. For example, if the user is connected to the router through Telnet and was authenticated through the username command, the switch module software sends the Telnet username as the remote username.
• Switch module hostname
For the RCP copy request to execute successfully, an account must be defined on the network server for the remote username. If the server has a directory structure, the image file is written to or copied from the directory associated with the remote username on the server. For example, if the image file resides in the home directory of a user on the server, specify that user’s name as the remote username.
B-34Cisco Connected Grid Ethernet Switch Module Software Interface Card Configuration Guide
OL-23422-03
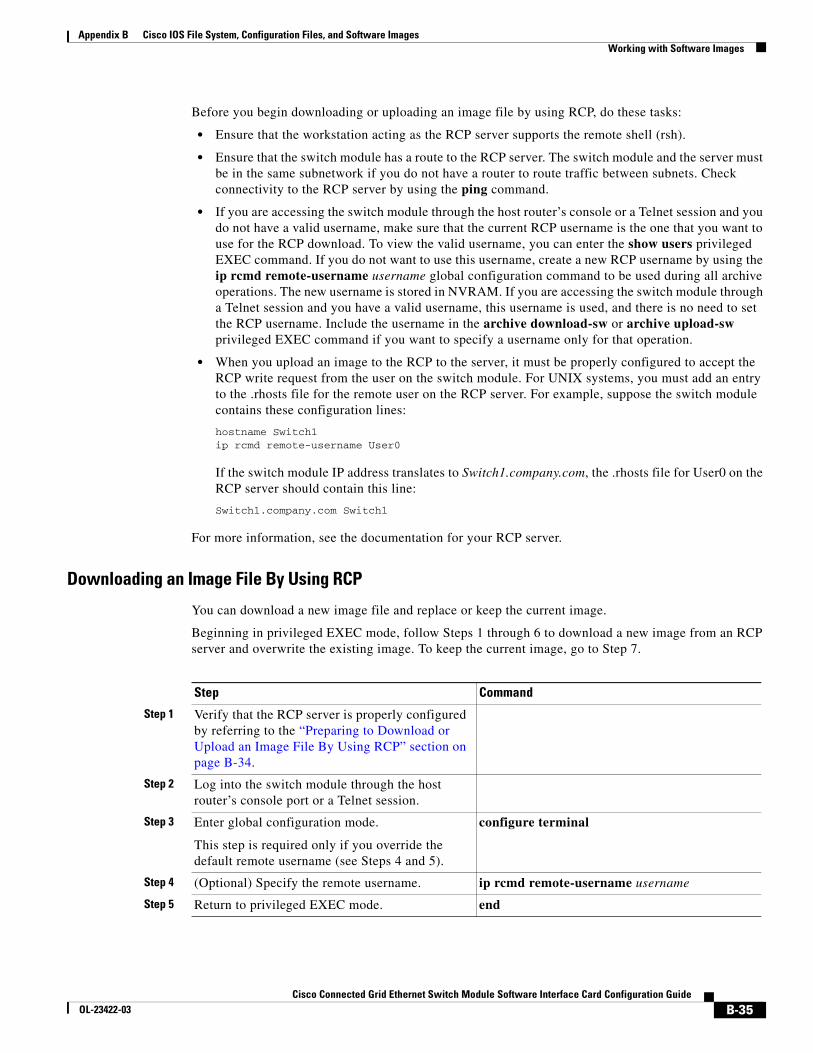
Appendix B Cisco IOS File System, Configuration Files, and Software Images Working with Software Images
Before you begin downloading or uploading an image file by using RCP, do these tasks:
• Ensure that the workstation acting as the RCP server supports the remote shell (rsh).
• Ensure that the switch module has a route to the RCP server. The switch module and the server must be in the same subnetwork if you do not have a router to route traffic between subnets. Check connectivity to the RCP server by using the ping command.
• If you are accessing the switch module through the host router’s console or a Telnet session and you do not have a valid username, make sure that the current RCP username is the one that you want to use for the RCP download. To view the valid username, you can enter the show users privileged EXEC command. If you do not want to use this username, create a new RCP username by using the ip rcmd remote-username username global configuration command to be used during all archive operations. The new username is stored in NVRAM. If you are accessing the switch module through a Telnet session and you have a valid username, this username is used, and there is no need to set the RCP username. Include the username in the archive download-sw or archive upload-sw privileged EXEC command if you want to specify a username only for that operation.
• When you upload an image to the RCP to the server, it must be properly configured to accept the RCP write request from the user on the switch module. For UNIX systems, you must add an entry to the .rhosts file for the remote user on the RCP server. For example, suppose the switch module contains these configuration lines:
hostname Switch1ip rcmd remote-username User0
If the switch module IP address translates to Switch1.company.com, the .rhosts file for User0 on the RCP server should contain this line:
Switch1.company.com Switch1
For more information, see the documentation for your RCP server.
Downloading an Image File By Using RCP
You can download a new image file and replace or keep the current image.
Beginning in privileged EXEC mode, follow Steps 1 through 6 to download a new image from an RCP server and overwrite the existing image. To keep the current image, go to Step 7.
Step Command
Step 1 Verify that the RCP server is properly configured by referring to the “Preparing to Download or Upload an Image File By Using RCP” section on page B-34.
Step 2 Log into the switch module through the host router’s console port or a Telnet session.
Step 3 Enter global configuration mode.
This step is required only if you override the default remote username (see Steps 4 and 5).
configure terminal
Step 4 (Optional) Specify the remote username. ip rcmd remote-username username
Step 5 Return to privileged EXEC mode. end
B-35Cisco Connected Grid Ethernet Switch Module Software Interface Card Configuration Guide
OL-23422-03
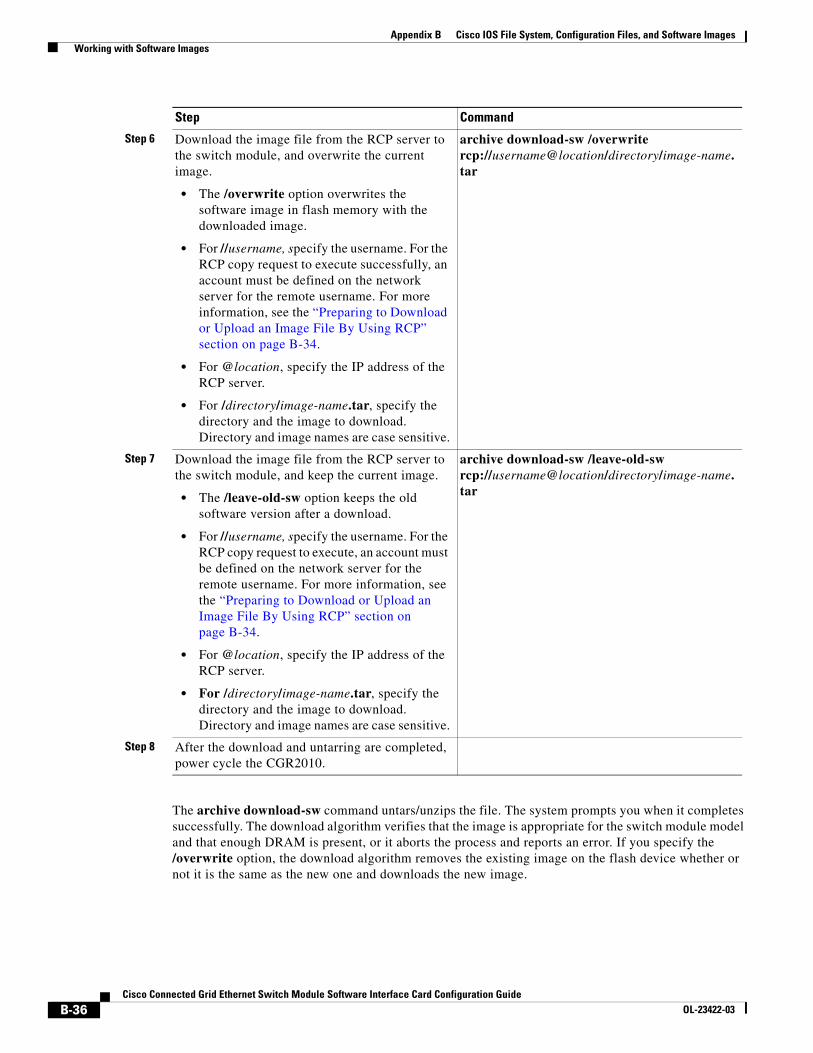
Appendix B Cisco IOS File System, Configuration Files, and Software Images Working with Software Images
The archive download-sw command untars/unzips the file. The system prompts you when it completes successfully. The download algorithm verifies that the image is appropriate for the switch module model and that enough DRAM is present, or it aborts the process and reports an error. If you specify the /overwrite option, the download algorithm removes the existing image on the flash device whether or not it is the same as the new one and downloads the new image.
Step 6 Download the image file from the RCP server to the switch module, and overwrite the current image.
• The /overwrite option overwrites the software image in flash memory with the downloaded image.
• For //username, specify the username. For the RCP copy request to execute successfully, an account must be defined on the network server for the remote username. For more information, see the “Preparing to Download or Upload an Image File By Using RCP” section on page B-34.
• For @location, specify the IP address of the RCP server.
• For /directory/image-name.tar, specify the directory and the image to download. Directory and image names are case sensitive.
archive download-sw /overwrite rcp://username@location/directory/image-name.tar
Step 7 Download the image file from the RCP server to the switch module, and keep the current image.
• The /leave-old-sw option keeps the old software version after a download.
• For //username, specify the username. For the RCP copy request to execute, an account must be defined on the network server for the remote username. For more information, see the “Preparing to Download or Upload an Image File By Using RCP” section on page B-34.
• For @location, specify the IP address of the RCP server.
• For /directory/image-name.tar, specify the directory and the image to download. Directory and image names are case sensitive.
archive download-sw /leave-old-sw rcp://username@location/directory/image-name.tar
Step 8 After the download and untarring are completed, power cycle the CGR2010.
Step Command
B-36Cisco Connected Grid Ethernet Switch Module Software Interface Card Configuration Guide
OL-23422-03

Appendix B Cisco IOS File System, Configuration Files, and Software Images Working with Software Images
If you specify the command without the /overwrite option, the download algorithm verifies that the new image is not the same as the one on the switch Flash device. If the images are the same, the download does not occur. If the images are different, the old image is deleted, and the new one is downloaded. If there is not enough space to install the new image and keep the current running image, the download process stops, and an error message is displayed.
Note If the flash device has sufficient space to hold two images and you want to overwrite one of these images with the same version, you must specify the /overwrite option.
If you specify the /leave-old-sw, the existing files are not removed. If there is not enough room to install the new image an keep the running image, the download process stops, and an error message is displayed.
The algorithm installs the downloaded image onto the system board flash device (flash:). The image is placed into a new directory named with the software version string, and the BOOT environment variable is updated to point to the newly installed image.
If you kept the old software during the download process (you specified the /leave-old-sw keyword), you can remove it by entering the delete /force /recursive filesystem:/file-url privileged EXEC command. For filesystem, use flash: for the system board flash device. For file-url, enter the directory name of the old software image. All the files in the directory and the directory are removed.
Caution For the download and upload algorithms to operate properly, do not rename image names.
Uploading an Image File By Using RCP
You can upload an image from the switch module to an RCP server. You can later download this image to the same switch module or to another switch module of the same type.
The upload feature should be used only if the web management pages associated with the embedded device manager have been installed with the existing image.
Beginning in privileged EXEC mode, follow these steps to upload an image to an RCP server:
Step Command
Step 1 Verify that the RCP server is properly configured by referring to the “Preparing to Download or Upload an Image File By Using RCP” section on page B-34.
Step 2 Log into the switch module through the host router’s console port or a Telnet session.
Step 3 Enter global configuration mode.
This step is required only if you override the default remote username (see Steps 4 and 5).
configure terminal
Step 4 (Optional) Specify the remote username. ip rcmd remote-username username
B-37Cisco Connected Grid Ethernet Switch Module Software Interface Card Configuration Guide
OL-23422-03

Appendix B Cisco IOS File System, Configuration Files, and Software Images Working with Software Images
The archive upload-sw privileged EXEC command builds an image file on the server by uploading these files in order: info, the Cisco IOS image, and the web management files. After these files are uploaded, the upload algorithm creates the tar file format.
Caution For the download and upload algorithms to operate properly, do not rename image names.
Step 5 Return to privileged EXEC mode. end
Step 6 Upload the currently running switch module image to the RCP server.
• For //username, specify the username; for the RCP copy request to execute, an account must be defined on the network server for the remote username. For more information, see the “Preparing to Download or Upload an Image File By Using RCP” section on page B-34.
• For @location, specify the IP address of the RCP server.
• For /directory/image-name.tar, specify the directory and the name of the software image to be uploaded. Directory and image names are case sensitive.
• The image-name.tar is the name of software image to be stored on the server.
archive upload-sw rcp://username@location/directory/image-name.tar
Step Command
B-38Cisco Connected Grid Ethernet Switch Module Software Interface Card Configuration Guide
OL-23422-03