Embed Size (px)
Citation preview

CENTER-TBI
ICU High Resolution data acquisition
Standard of Procedures (SOP) for ICM+
13 May 2015
Manuel Cabeleira ([email protected])
Dr Peter Smielewski ([email protected])

2
SOP-CENTRE-TBI ICU High Resolution Data collection
Table of Contents CENTER-TBI HR ICU Prerequisites ............................................................................. 3
Summary of the HR ICU data flow ................................................................................ 4
Locking and unlocking ICM+ ......................................................................................... 5
Starting a new data collection session .......................................................................... 6
Annotating clinical events ........................................................................................... 10
Creating and uploading Data Snapshots ..................................................................... 11
Terminating the data collection session and uploading the data ................................. 13
Restoring a closed data collection session .................................................................. 16
Manual packaging and uploading of data files ............................................................ 17
Appendix 1: Configuring ICM+ for CENTER-TBI ......................................................... 18
Appendix 2: ICM+ configuration folders and files ........................................................ 23
Appendix 3: Editing ICM+ Projects .............................................................................. 25
Appendix 4: Registering ICM+ .................................................................................... 28
Appendix 5: Configuring the computer’s network interface .......................................... 31
Appendix 6: Description of connectors to selected patient monitors ............................ 35
Appendix 7: Preconfigured users and passwords ....................................................... 37
Appendix 8: Configuring Moberg network ................................................................... 38
3
SOP-CENTRE-TBI ICU High Resolution Data collection
CENTER-TBI HR ICU Prerequisites
1. A laptop (or a PC) with ICM+ mounted by the bed-side for a convenient,
constant, access by the nursing stuff. The positioning is essential to facilitate
thorough clinical events annotation.
2. Where applicable, Moberg CNSMonitor, connected to the ICM+ laptop using a
network interface
3. Active internet connection. If neither Ethernet (cable) or wireless connection is
not available in the ICU a 3G (or 4G) dongle needs to be acquired. The amount of
data transmitted during the data collection session is relatively small ( a few Mb per
data shapshot plus a short text message per each event) so a standard the 3G
network data allowance of 1GB (or even 500MB), in a contract or a pay-as-you-go
connection, should be all that is needed.
4. Appropriate cables for connections between the monitors, Moberg CNS monitor
(if relevant) and the ICM+ latop.

4
SOP-CENTRE-TBI ICU High Resolution Data collection
Summary of the HR ICU data flow
At admission, enrol the patient to the study and acquire GUPI or a temporary Patient
Identifier from the CENTER-TBI intranet. Then:
1. Connect the medical devices to Moberg CNSMonitor, or directly to ICM+ laptop,
whichever applicable, using appropriate cables. Consult appendix ‘Monitors
Connectors’ for more details about which cables to use for each medical device.
2,3. If applicable, start data collection on the CNSMonitor (as per CNSMonitor manual)
and connect it to the ICM+ laptop using a network cable (LAN1 on CNSMonitor).
4 Start ICM+ session Refer to chapter ‘Creation of a new session’ for more
information about how to create a new monitoring session in the CENTER-TBI
context.
During the data collection:
5 Ensure that all the clinical events are annotated as they occur through the Event
Form. Refer to chapter ‘Using the events form’ for more information about how to
use the event form.
6 At 1-4 hours after the start of the data collection session take a data snapshot in
ICM+ and transmit it to Cambridge Refer to chapter ‘Creating Data Snapshots’ for
more information about how to use the snapshot form.
Repeat the same process at 12, 24, 48 and 72 hours.
At the discharge (from the study):
7 Stop the data analysis on ICM+, package the data and send it to the Cambridge
Server. Refer to chapter ‘Terminating a monitoring session and uploading the data’
for more information about how to terminate the data acquisition.
Later, in due course, in Cambridge:
8 The data is verified and uploaded/registered with the INCF central data base

5
SOP-CENTRE-TBI ICU High Resolution Data collection
Locking and unlocking ICM+
ICM+ includes a simple system of user based permissions, which allows it to be used
safely in a clinical environment, also by people with minimal training, ensuring that the
vital data collection process is not inadvertently interrupted or disturbed.
If your ICM+ is correctly configured when the program is run it will automatically
initialize with the default user ‘Nurse’. There are three other users already configured in
ICM+, the Administrator, the Manager and the Operator. The users have been
configured with progressively decreasing operational rights.
The Nurse is the user with the fewest rights in the software, effectively only being able
to insert clinical events, browse the charts and starting new sessions, without any
possibility to disrupt the data collection procedure. Please refer to the ‘How to use the
events form’ for more details. After 3 minutes of inactivity, ICM+ automatically logs in
as a Nurse.
The Administrator is the user that will have full access to the full features of the
application.
The Manager will have the same privileges but will not be able to manage user
accounts.
The Operator will only be capable of starting new Recording sessions with available
profiles, browsing data, inserting clinical information and display configuration.
Login (change users) form is accessible via a button on the tool bar/main menu bar.
When the Login button is pressed, the User login form will appear.
In this form you will find:
1. A button to the Default user and
a button to lock the application so that
nothing but the login button is
accessible.
2. A key pad to insert the
Password for a given user

6
SOP-CENTRE-TBI ICU High Resolution Data collection
3. And a Drop-Down menu to select the user to Login as
Starting a new data collection session
To create a new data acquisition session hit New Patient button.
This will bring up a new form:

7
SOP-CENTRE-TBI ICU High Resolution Data collection
1. You can insert the Patient information manually by using the fields presented in
this form, or if you have already inserted these values on the bed-side monitor
you can just import those using the button ‘Retrieve Demographics from...’ to
use this button you will need to have already selected the profile you will be
using in this data acquisition session. Please note that only the anonymised ID,
age and data of admission and ictus will be transferred to the CENTER-TBI
servers. All the rest of the patient details will only be kept locally and encrypted
inside the file.
2. This is the only field of the Patient Demographics that you will always have to
insert. This is the anonymised ID that you will get from the CENTER-TBI
website. If you don’t have the GUPI (Global Unique Patient Identifier) use a
unique temporary identifier, either supplied by CENTER-TBI or of your own
choosing. Unless you insert this number you will not be able to start a new
session. Please make sure to change the temporary ID to GUPI when it
becomes available. To do that when the session is already in progress you
need to click on the Clinical Notebook tab and then on the Demographics
button.
3. This button will open the folder where you have all the profiles that you can use
for this data acquisition session. The pane just beside this button will provide a
faster way to select the most used profiles.
4. Before starting a new session please ensure that the project is set to CENTER-
TBI.
5. It is very important that you fill in the Date of Birth, Date of Ictus and the Date of
Admission (if possible the hour and minutes too). The Date of Birth does not
need, of course, to be that specific, unless this is a paediatric patient.
If for any chance you need to tweak the profiles, please don’t overwrite the ones
provided. If you don’t have experience with creating or altering profiles please contact
us and we will be happy to help you. These profiles should only be used for the
CENTER-TBI project.
As you are aware there is a minimum set of signals that we will be requiring from every
patient on the study:
ICP waveforms at a sampling rate of at least 100 Hz,
ABP waveforms at a sampling rate of at least 100 Hz,
ECG waveforms at a sampling rate of at least 200 Hz,
SpO2
And if possible also EtCO2 and body temperature
If you are also monitoring other desired modalities (like Licox or Microdialysis) those
can also be added to the profile.
This version of ICM+ is compatible with the profiles of the older versions.

8
SOP-CENTRE-TBI ICU High Resolution Data collection
After the OK button is clicked, the Devices check dialogue is presented.
This dialogue is used to test the communication between the ICM+ and the monitor
(the ‘Test connections’ button). If the test is successful the OK button can be pressed.
This menu can also be used to select the right connection, whether it is a serial
connection (like the one presented in the picture) or an IP address. In the case of a
serial port connection, the button auto allocate ports can be pressed and the
application will search for the right port.
In the case of an IP address, the keyboard button can be pressed and the IP Address
can be inserted.
Just before the session starts, the user is prompted to insert some additional
information about the patient via the Project Specific data dialogue. This form is also
accessible from the Patient Notebook tab but it is highly recommended that it is filled in,
as much as possible and practical to do, at the start of the session.
After this dialogue, ICM+ main display is presented and the session begins recording
automatically.

9
SOP-CENTRE-TBI ICU High Resolution Data collection
If ICM+ shuts down during a recording session the next time it is run, the previous
session is automatically restored, but here the user must first verify that all the signals
are being received correctly in the Monitor button. After this the Start button must be
pressed and the session resumes recording.

10
SOP-CENTRE-TBI ICU High Resolution Data collection
Annotating clinical events
As soon as the acquisition of data starts the main menu tool bar will get minimised and
in its place a small, ‘data acquisition essentials’, tool bar will open, as below.
Clicking the ‘Doctor/Nurse’ button will bring up a form called Event Window.
This form is composed of 9 buttons, each
representing a different event that can occur
during the data acquisition process. This form
is meant to be used by the clinical staff at the
bed-side to document all the listed events as
they occur.
Pressing one of these buttons will open an
Event Confirmation dialog:
This form will present the nurse with a summary of the selected
event and if everything is correct the confirm button needs to be
pressed in order to store the event. This from will allow the user to
edit the time of the occurrence if something prevented the nurse
press the button immediately after the event occurred. It is also
possible to add a comment to the event if needed.
If the event is not confirmed during a given time window it will
automatically close, but this should be avoided as much as
possible as the event will be stored as ‘unconfirmed’.
After the confirmation or cancelation of an event this window will
close and the Event Window will come up again.
The event window can always be closed if, for example, the doctor
needs to browse through the application to browse through the
charts and clinical notes.

11
SOP-CENTRE-TBI ICU High Resolution Data collection
Creating and uploading Data Snapshots
During the data acquisition process, data snapshots should be taken periodically and
uploaded to our servers for confirmation of the validity of the acquired data. These
snapshots should be taken after the first hour of acquisition, again after 12 and 24
hours and at least once every day afterwards. The software will also be configured to
pop up reminder messages at those specific times to make sure the snapshots are
being taken. The Data Snapshot button can be found on the Data tab on the control
panel section.
After the button is pressed the complete data set covering the past 1 our of recording
will be packaged into one compressed format file (HDF5 based format) and the logs of
this process will be shown in a new form (as below). Once finished and the button ok
should be clicked

12
SOP-CENTRE-TBI ICU High Resolution Data collection
After confirming that the file is to be uploaded a new form is presented:
In the dropdown menu called destination, the option CENTER TBI must be selected.
After this the button upload can be pressed and the file is uploaded to our servers.

13
SOP-CENTRE-TBI ICU High Resolution Data collection
Terminating the data collection session and
uploading the data
When the data acquisition process is finished the recording session can be closed
using the Close button present in the ICM+ button. This will initialize a cascade of
forms that will eventually lead to the sealing of the file and subsequent upload of the
generated HDF5 file to Cambridge servers.
Closing a session is different from closing the program. To close the ICM+ application
you need to press the red cross present on the upside corner of the right side of the
screen. If ICM+ is closed (Exited) using this button or if the computer shuts down, the
next time it is run, the recording session will be resumed with the same configurations it
had at the moment of shutdown.
When this button is pressed a dialogue is presented prompting the user to confirm the
closure of the recording session:
After confirming the end of the recording session another dialogue is presented
prompting the user to package the data into a single file:

14
SOP-CENTRE-TBI ICU High Resolution Data collection
After confirming this dialogue the Data Packaging Form is presented, here the user
must confirm the names of the files to be used in the creation of the HDF5 file. The
user should confirm the monitor type used in the unit in the highlighted drop-down
menu and tick the Unidentify checkbox.
After confirming another window will be presented showing all the steps of the creation
of the HDF5 file:
15
SOP-CENTRE-TBI ICU High Resolution Data collection
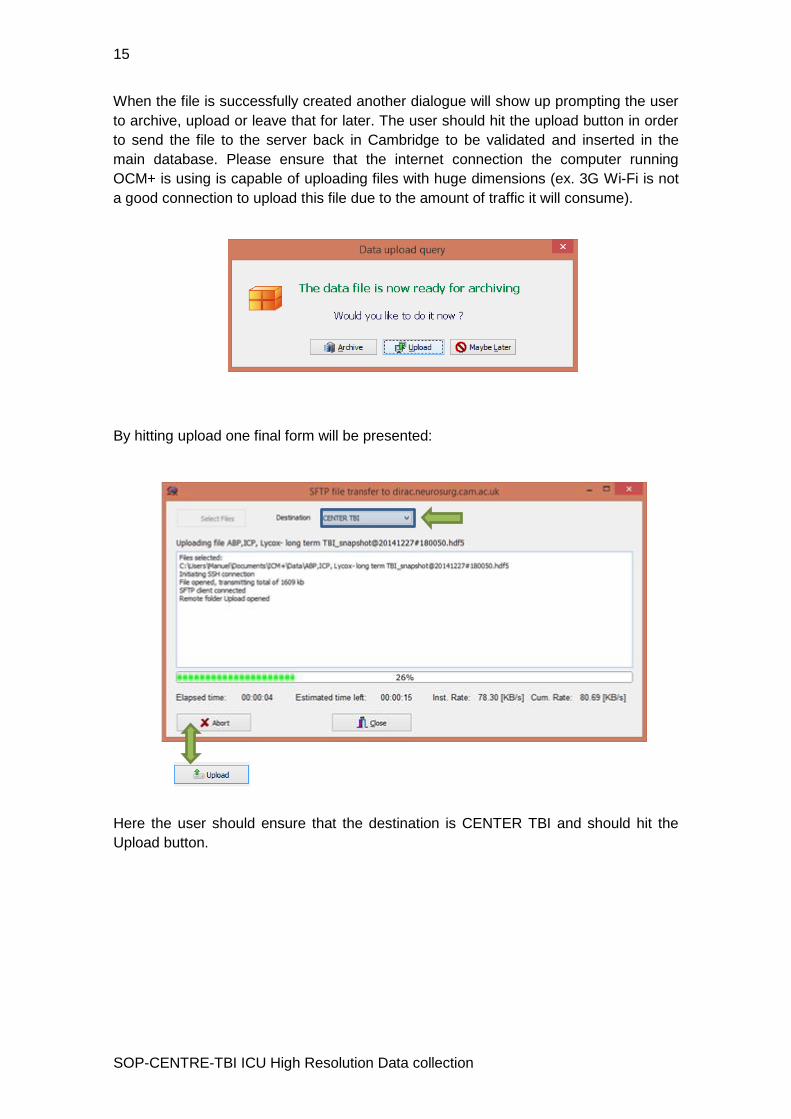
When the file is successfully created another dialogue will show up prompting the user
to archive, upload or leave that for later. The user should hit the upload button in order
to send the file to the server back in Cambridge to be validated and inserted in the
main database. Please ensure that the internet connection the computer running
OCM+ is using is capable of uploading files with huge dimensions (ex. 3G Wi-Fi is not
a good connection to upload this file due to the amount of traffic it will consume).
By hitting upload one final form will be presented:
Here the user should ensure that the destination is CENTER TBI and should hit the
Upload button.

16
SOP-CENTRE-TBI ICU High Resolution Data collection
Restoring a closed data collection session
If a session was for some reason closed and a recording needs to be restored again
the button open can be pressed.
The dialog that opens can be used to reopen the file in order to upload the data to our
servers or to restore the recording session.
To reopen a file for inspection or to upload it is only necessary to double-click the
desired file.
To restore the recording session, the highlighted button must be pressed and the
recording resumes using the same profile as when it was closed.

17
SOP-CENTRE-TBI ICU High Resolution Data collection
Manual packaging and uploading of data files
The data files can also be packaged and uploaded at a later stage, after the session is
closed using buttons in the Archive Tools section of the main menu tool bar. The data
packaging and upload procedures are the same as the ones described above.
18
SOP-CENTRE-TBI ICU High Resolution Data collection
Appendix 1: Configuring ICM+ for CENTER-TBI
The first time ICM+ is run, some configurations need to be made before the data
acquisition process begins. These configurations are made in the Settings menu. This
menu can be found by clicking the Home tab and the Settings button.
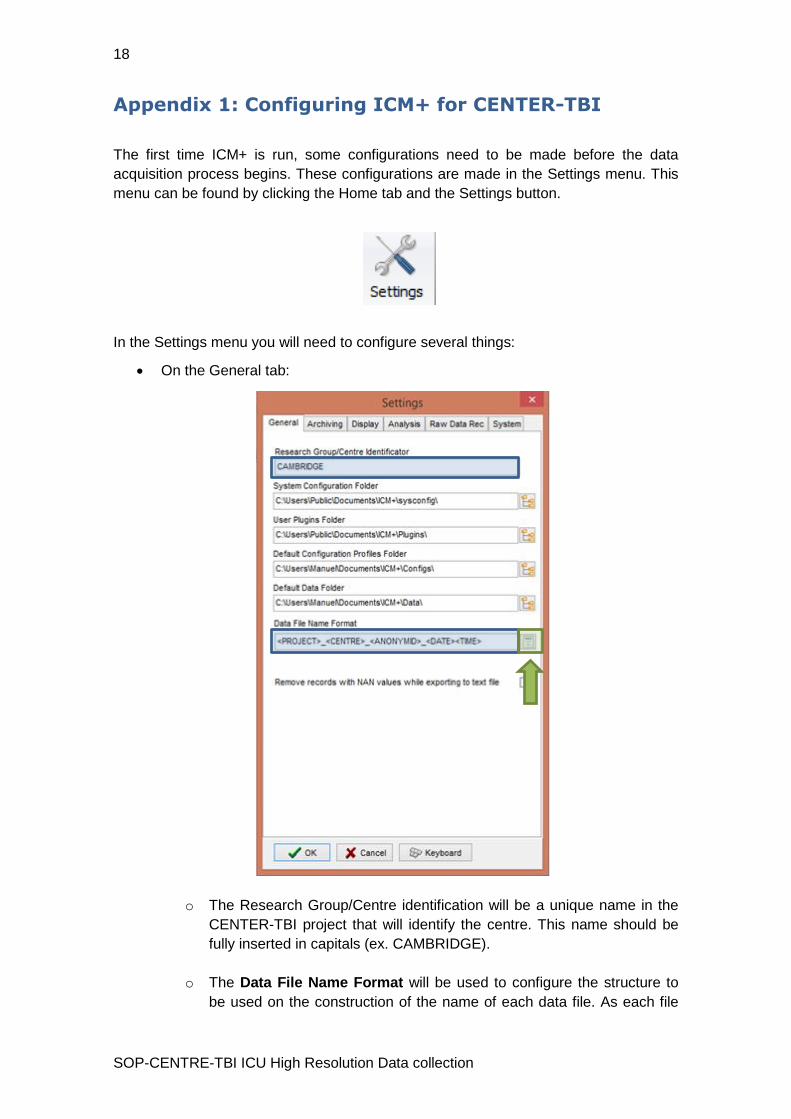
In the Settings menu you will need to configure several things:
On the General tab:
o The Research Group/Centre identification will be a unique name in the
CENTER-TBI project that will identify the centre. This name should be
fully inserted in capitals (ex. CAMBRIDGE).
o The Data File Name Format will be used to configure the structure to
be used on the construction of the name of each data file. As each file

19
SOP-CENTRE-TBI ICU High Resolution Data collection
generated in the study must have a unique identifier we agreed in using
a structure that uses the format highlighted in the picture. A description
on how to build this File Name format is presented further down in this
appendix.
On the Archiving tab:
o The Archive Folder Name Format will follow the same structure as the
Data File Name Format. This setting is not required for CENTER-TBI,
as it is only used for organising local archival storage of the data files.
o The default Destination should to be set to CENTER-TBI, but it is the
matching setting in the Project configuration that will ultimately take
precedence.

20
SOP-CENTRE-TBI ICU High Resolution Data collection
On the Raw Data Rec tab:
o The Use ‘Start’ button to control Raw Signals Recording must be
checked if you are using ICM+ to record any data directly from bed
side monitors. This is because when ICM+ is used in conjunction with
Moberg CNSMonitor, it is the latter that will record the raw data from
bed-side monitors and so ICM+ does not need to do that, and so the box
may be ticked off. Otherwise it must be on.

21
SOP-CENTRE-TBI ICU High Resolution Data collection
On the System tab:
o Set the Auto unlock program as user to Nurse. Setting the inactivity time
to a value greater than 0, eg 10 min, will cause the software to auto log-
in as that default user following a selected period of time without
interaction with the software (this will only happen of course if the
program was unlocked as another user)

22
SOP-CENTRE-TBI ICU High Resolution Data collection
To build the Data File Name Format you will need to click the highlighted button and
the following form will appear:
In this form it is possible to add/remove any name element present in the Available
Elements menu.
The ‘_’ and any additional static text can be inserted by using the element ‘<text>’ and
inserting the text to be added manually.

23
SOP-CENTRE-TBI ICU High Resolution Data collection
Appendix 2: ICM+ configuration folders and files
ICM+ uses two locations (configurable via the Settings form) to store all its
configuration files:
Location 1: C:\Users\<username>\Documents\ICM+.
There are two subfolders here:
‘Data’ folder, where all the data recorded during the acquisition process is
stored, and
‘Configs’ folder, used to store the data collection and analysis configuration
‘profile’ files, as in the figure below.
These files are written in XML making them easily editable. To do this double click on
the file, then right click anywhere on that window and select ‘View Source’. This will
open a Notepad with editable XML code. In here small adjustments can be made, ex.
changing the Moberg CNSMonitor IP address. Other, more involved configuration
modification should be done via the Signal Source and Analysis Configuration forms.
Location 2: C:\Users\Public\Documents\ICM+
Here all the environment configurations/settings are stored. This location contains a
folder called Plugins, where 3rd party function libraries reside, a folder called
TxtFilters, containing parsing definitions for different text format data files, and a folder
called sysconfig containing all the settings of the software, except the data collection
and analysis profiles which are store in the Location 1 (as above). Although these files
could be edited directly using a text editor ICM+ has specific user interface forms to
edit all aspects of the program functionality.

24
SOP-CENTRE-TBI ICU High Resolution Data collection
Once notable exception is the file CTBIEvents.ini inside CustomForms folder, which
contains CENTER-TBI specific configuration for the clinical event form. This file should
be edited manually (in a text editor) with specific information provided to each
participating centre.

25
SOP-CENTRE-TBI ICU High Resolution Data collection
Appendix 3: Editing ICM+ Projects
Projects contain various configurations specific to a particular research project. These
can be edited using Projects button in the main menu tool bar.
Clicking this button will open the Project Management dialogue, where you create,
copy, edit, delete, export/import selected projects to/from a file.
Double clicking on a selected project or clicking on Edit will open a Project Editor where
all the custom project settings can be modified.
The following screen shots describe the CENTER-TBI specific settings. These settings
would have already been preconfigured for you if you have copied the provided
project.ctb.xml file to the ICM+ sysconfig folder, or used the Project Manager to import
the settings from that file. Please do not modify those for CENTER-TBI project.
26
SOP-CENTRE-TBI ICU High Resolution Data collection
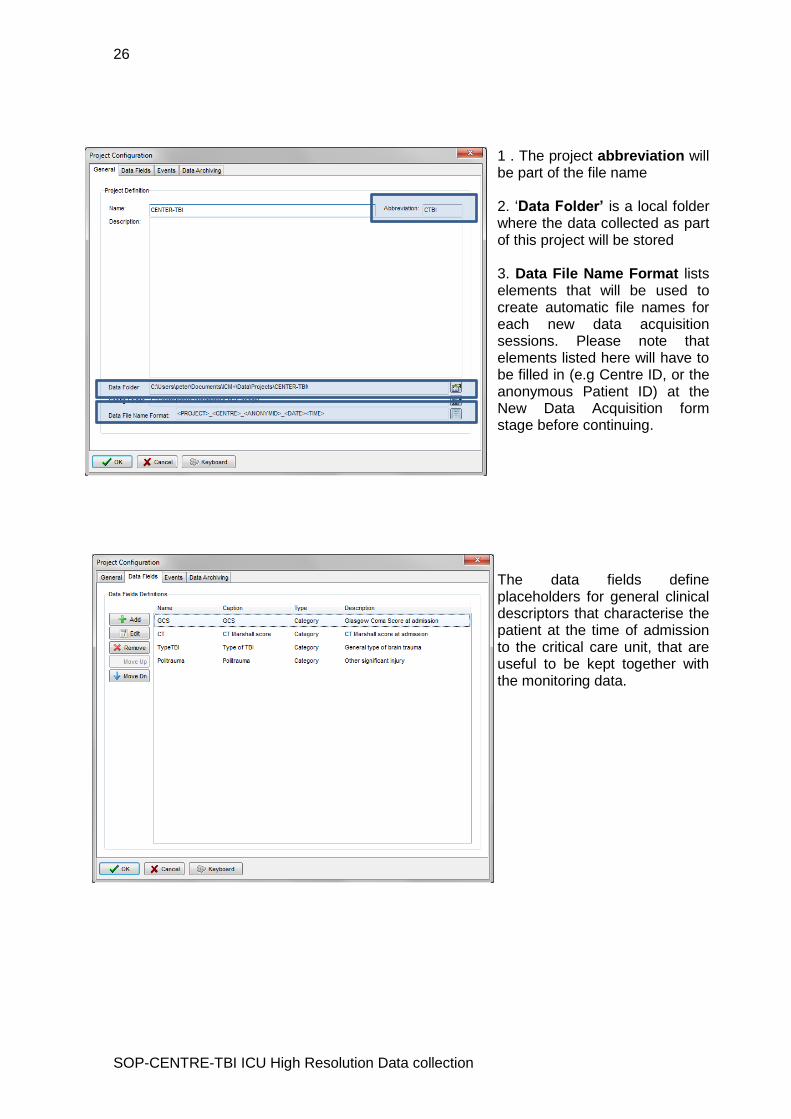
1 . The project abbreviation will be part of the file name 2. ‘Data Folder’ is a local folder where the data collected as part of this project will be stored 3. Data File Name Format lists elements that will be used to create automatic file names for each new data acquisition sessions. Please note that elements listed here will have to be filled in (e.g Centre ID, or the anonymous Patient ID) at the New Data Acquisition form stage before continuing.
The data fields define placeholders for general clinical descriptors that characterise the patient at the time of admission to the critical care unit, that are useful to be kept together with the monitoring data.

27
SOP-CENTRE-TBI ICU High Resolution Data collection
This is where events that are already defined elsewhere (in the Events form), listed in the left panel (1), can be assigned to the particular project (listed in the right panel 2.). Please note that CENTER-TBI uses a customised event form, selected using the ‘Custom Forms’ list box (3). It is possible however to add more events to the project but those will only be accessible from within the ‘Event List’ panel, toggled from the main menu tool bar panel, Charts section.
Here one can define the location and format of data archives as well as, essentially for CENTER-TBI: 1. This should be ticked in
order for you to be prompted to convert the file to HDF5 at the end of the recording session
2. the destination of the remote server for data uploads,
3. the data snapshot length and the data snapshot reminders

28
SOP-CENTRE-TBI ICU High Resolution Data collection
Appendix 4: Registering ICM+
When ICM+ is successfully installed for the first time in a computer it needs to be
registered. This will probably already be done for you when you get the laptops, but if
any major update needs to be done you will have to register it again.
To register ICM+ you need to press the Registration button on the Home tab.
This will bring up the Detailed ICM+ License Info window where you will need to press
the Register New Key button.

29
SOP-CENTRE-TBI ICU High Resolution Data collection
This will bring forth the ICM+ Registration Form and here you will have to press the
Copy Details.
This will let you paste the details anywhere you want. You will then have email those
details to Dr Peter Smielewski ([email protected]) or Manuel Cabeleira
([email protected]) so that we can generate your product key and send it to you.
You will then have to paste the Key to the highlighted space and click Register now. If
you are successful you will see the Registration successful dialogue.

30
SOP-CENTRE-TBI ICU High Resolution Data collection
And your Detailed ICM+ License Info window should look like this:
31
SOP-CENTRE-TBI ICU High Resolution Data collection
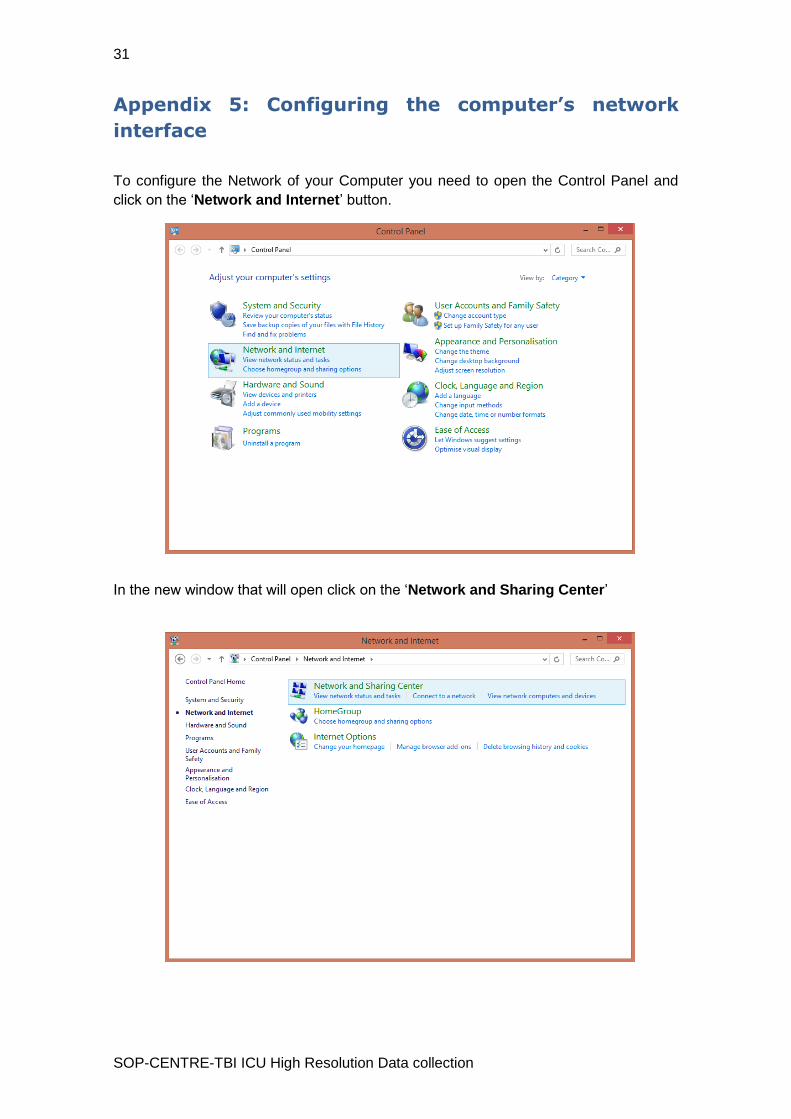
Appendix 5: Configuring the computer’s network
interface
To configure the Network of your Computer you need to open the Control Panel and
click on the ‘Network and Internet’ button.
In the new window that will open click on the ‘Network and Sharing Center’

32
SOP-CENTRE-TBI ICU High Resolution Data collection
In the new window that will open click on the ‘Change Adapter Settings’
In the new window that will open click on the ‘Ethernet’

33
SOP-CENTRE-TBI ICU High Resolution Data collection
In the new window that will open click on the ‘Properties’
In the new window that will open click on the ‘Internet Protocol Version 4 (TCP/IPv4)’
and on properties.

34
SOP-CENTRE-TBI ICU High Resolution Data collection
In the new window that will open insert the new IP address that your machine will be
using. For CENTER-TBI, when CNSMonitors are used, this has to match the
CNSMonitor network subnet settings.

35
SOP-CENTRE-TBI ICU High Resolution Data collection
Appendix 6: Description of connectors to selected
patient monitors
Moberg CNSMonitor
Crossed-over UTP (Ethernet) network cable (or possible even a regular UTP cable)
directly connecting the ICM+ laptop with Moberg CNSMonitor LAN1 port, or
A regular UTP network cable when a network infrastructure (eg network hub or router)
is in place (the connection is then to the hub/router or a designated network port).
Please make sure both the laptop and the CNSMonitor network interfaces are correctly
configured (ie both are on the same IP subnet). Details of CNSMonitor network
configuration can be found elsewhere, in the CNSMonitor manual, while step by step
instruction for setting up the network interface on the ICM+, Windows, laptop can be
found in Appendix 5.
Philips Intellivue
USB-to-Serial adapter connected to the computer
Monitor requires a cable with RJ45 (network type) connector at one end and a male
RS232 at the other (as depicted below in a MP70 monitor):

36
SOP-CENTRE-TBI ICU High Resolution Data collection
MX800: The cable visible in the photo connects the MIB/RS232 port on the Intellivue
monitor and the internal PC’s USB port, using a USB-Serial adapter. Its pin
configuration is as described above for MP70.
GE Datex Ohmeda S/5
USB-to-Serial adapter connected to the computer
Standard null modem serial cable connecting the monitor (fig below) and the USB-to-
Serial adapters
GE Carescape B 650/850
USB-to-Serial adapter connected to the computer
Standard null modem serial cable connecting the two USB-to-Serial adapters
ATEN UC-232A USB-to-Serial adapter connected to any USB port s on the Carescape
monitor

37
SOP-CENTRE-TBI ICU High Resolution Data collection
Appendix 7: Preconfigured users and passwords
Administrator – 2718
Manager – 1618
Operator – 3142
Nurse – 1414
The users, their passwords, and their rights are fully configurable in the software, using
Users form. The default users have been chosen to fulfil the following roles:
User Role
Administrator Complete access to all the software configuration options, the users and passwords
Manager Access to all the configuration options, except the users and password. This will normally be the user to do the entire configuration needed for data collection.
Operator Control of the data collection process using preconfigured profiles, and changes to the charts layout and properties.
Nurse Access to clinical annotations tools only. This should be normally set up as the default user kept logged-in during the data collection process, in order to prevent any inadvertent disruption to data recording but at the same time allowing and encouraging quick access to the clinical annotations.
Guest This ‘user’ has no rights, making it impossible to interact with the software in any way.

38
SOP-CENTRE-TBI ICU High Resolution Data collection
Appendix 8: Configuring Moberg network
The first time the Moberg device is connected to ICM+ the network between the
devices must be configured as both the CNSMonitor and ICM+ must sit on the same
network. To do this you only have to make sure that the IP addresses on both
machines belong to the same subnet. To do this you must look into two things:
The Ip address ex. ‘192.168.100.200’
The Subnet mask ex. ‘255.255.255.0’
To configure the IP address and the subnet mask on the ICM+ laptop, refer to
‘Appendix 5: Configuring the computer’s network interface’. Further down in this
chapter you can find how to do it in the CNSMonitor side.
You can define IP addresses and subnet masks yourself, but if you have an IT
specialist he should be the one doing this part. The only constraint is that no other
machine on the same network can share the same IP address with any other machine.
If you are doing this yourself you should first check if ICM+ and Moberg are the only
machines on the network (this will happen when both devices are directly connected
with a LAN cable) or if there are more machines sharing the network.
In the first case you will have total freedom and you can choose the IP addresses (one
for the CNSMonitor and one for ICM+ laptop) that you want, as long as they are within
the same subnet. In the second case you should try to find out the subnet mask and
the IP of one of the machines already on the network.
As an example:
If the subnet mask is 255.255.255.0 and the IP address of another machine in the
same subnet is lets say 192.168.100.200, the new IPs you chose for the ICM+ laptop
and the CNSMonitor must start with 192.168.100.XXX. The last three digits must be
different for every machine on the same network and must be between 0 and 255.
If the subnet mask is 255.255.0.0 the IP addresses must share the first 2 numbers (dot
separated) and will be: 192.168.XXX.XXX.
To check the IP address
already configured in the
CNSMonitor you need to click
the System Configuration
Menu and then click on the
System Information button.
This will bring up a window

39
SOP-CENTRE-TBI ICU High Resolution Data collection
that will contain the current IP address that the monitor is using.
If you need to configure a
different IP address on the
CNSMonitor you first ne need to
click on the System Admin
button and insert the password
that is asked. This password
should be ‘moberg’.

40
SOP-CENTRE-TBI ICU High Resolution Data collection
After this you will be presented
with the System Administrator
Menu and here you want to click
on the Network Setup button.
In the Network Setup Menu you
will want to click on the Network
Configuration button.
In this menu you will be able to
change both the IP address and
the Subnet mask.


![[Files.indowebster.com] TBI](https://img.dokumen.tips/doc/110x75/577cd9c51a28ab9e78a423d2/filesindowebstercom-tbi.jpg)