Embed Size (px)
Citation preview

Carbon Calculator
User Manual
Version 1.0.2
November 24, 2015
Cutech Solutions & Services Pte. Ltd.,
#04-32E, IMM building,
2 Jurong East Street 21,
Singapore 609601
Phone: +65 6665 0187
Email: [email protected]

Carbon Calculator User Manual
Table of Contents
1 Introduction ............................................................................................................................ 1
1.1 Audience ........................................................................................................................... 1
1.2 Typo Information .............................................................................................................. 2
2 System Requirements ............................................................................................................. 3
3 Login into Carbon Calculator .................................................................................................. 4
3.1 Create Account ................................................................................................................. 4
3.1.1 Change Password ...................................................................................................... 7
3.1.2 My Profile .................................................................................................................. 8
3.1.3 Reset Password ....................................................................................................... 10
3.2 Green Mark ID ................................................................................................................ 10
4 Projects ................................................................................................................................. 12
4.1 Add Project ..................................................................................................................... 12
4.1.1 Carbon User ............................................................................................................ 12
4.1.2 Green Mark (GM) User ........................................................................................... 13
4.2 Materials Input ............................................................................................................... 15
4.2.1 Attachments ............................................................................................................ 17
4.2.2 Add New Material ................................................................................................... 19
4.3 Computation .................................................................................................................. 19
4.3.1 Comments & Additional Documents ...................................................................... 22
4.3.2 Report ..................................................................................................................... 23
4.4 Revision .......................................................................................................................... 25
4.5 Synchronization .............................................................................................................. 26
5 Contact US ............................................................................................................................. 28
6 FAQ ........................................................................................................................................ 29

Carbon Calculator User Manual
Page 1 of 29
1 Introduction
Building and Construction Authority (BCA) develops a new embodied carbon calculator
website to compute embodied carbon footprints of a building development through the
declaration of the quantity used for each construction material. Based on users’ input, a
report will be generated with breakdown of computed embodied carbon footprint
contributed by each construction material. Users are allowed to submit automatically the
report to Green Mark (GM) e-portal to score for GM points in section 3.02b under version
‘Green Mark 2015’. The embodied carbon calculator website system stores and tracks the
carbon footprints calculation of various users for various projects and helps embodied
carbon calculator website administrators to analyse the collected data.
1.1 Audience
This user manual is intended for building and construction sector industry stakeholders
like Carbon Consultants, Developers, Professional Engineers, Quantity Surveyors, Industry
Partners, Researchers and Architects, to compute embodied carbon footprints for their
building developments.
Embodied carbon footprint of a product refers to
total carbon dioxide equivalents emitted into the
atmosphere from the manufacture of the product.
Carbon
Footprints
Embodied Carbon
Footprints?

Carbon Calculator User Manual
Page 2 of 29
1.2 Typo Information
NOTE indicates important information that helps you to make better use of
embodied Carbon Calculator website.
WARNING indicates an action you have to make sure in embodied Carbon
Calculator website.
CAUTION indicates a cause of action or error in embodied Carbon Calculator
website.
Bold: The word in Bold style indicates User Elements (Menus, Sub sessions, Buttons, and
Icons/Symbols) in User Interface of embodied Carbon Calculator website, which you have
to use.
Carbon Calculator User Manual
Page 3 of 29
2 System Requirements
Carbon Calculator website works on IE 7 and above, Google Chrome, Mozilla Firefox,
Safari and Opera web browsers.

Carbon Calculator User Manual
Page 4 of 29
3 Login into Carbon Calculator
To login into the embodied carbon calculator website, you have to enter your user
credentials. If you are a new user to the embodied carbon calculator website, you should
create a new account. The embodied carbon calculator website allows Green Mark (GM)
account holders to login using their Green Mark ID, so the Green Mark users do not create
a new account in the website.
3.1 Create Account
If you are a new user to the embodied carbon calculator website, go to Create New
Account option.
NOTE:
1. Registered users can only access the embodied carbon calculator
website.
2. Registered users does not require any approval while login with the
website.
3. Users with Green Mark ID do not need to create a new account.
GENERAL NOTE: In this embodied carbon calculator website, the
fields with star (*) marked symbols are mandatory.
To create a new account,
1. Type the provided URL in the address bar of your web browser.
2. Click Create New Account in the web page.
3. Type your Email ID, which will be the “User Name” of your embodied Carbon
Calculator website account.
4. Select Title of your name.
5. Type your Full Name.
6. Enter your NRIC/FIN No.

Carbon Calculator User Manual
Page 5 of 29
7. Type your Designation.
8. Select your Country.
9. Enter your UEN No.
10. Type your Company Name you have currently working.
11. Type your Company Address.
12. Enter Postal Code.
13. Enter Contact No.
14. In Terms of Use, click the hyperlink and read all the conditions given below, and make
sure to select the check box of “Yes, I have read and agree to abide by the Terms of
Use”.
15. Click Create Account. See Figure 1.
What is NRIC Number?
NRIC abbreviates National Registration
Identity Card identifying document in
Singapore, which is provided to
Singaporean Citizens and Permanent
residents of Singapore.
What is FIN Number?
FIN abbreviates Foreign Identification
Number as a unique identification
number assigned to foreigners who are
issued with immigration & work passes in
Singapore, for example, Student pass
holders.
What is UEN Number?
UEN abbreviates Unique Entity Number,
which is the standard identification
number of Entities such as Businesses,
Local Companies, LLPs, Societies and
Representative Offices.

Carbon Calculator User Manual
Page 6 of 29
Figure 1: Create New Account
16. When you have successfully created a new account, the following message appears,

Carbon Calculator User Manual
Page 7 of 29
17. The website will send the User Name and Password to your registered email id
automatically under account name: bcacarboncalculator. Now, click “Proceed to
login” to login into the embodied Carbon Calculator website.
18. If you logged into the website, you can see your name next to Welcome tag.
If you login at the first time, then the sytem will prompt you to the change the
password. System will not allow you to access into the website untill you chnaged the
password.
Additionally, you have an option to change your Display Name and Contact Number
under “My Profile”.
Back to Main Page: This Back to Main Page provided at the left side of the Create
Account, which lets you to go to the login page.
3.1.1 Change Password
If you wish to change your password you can do at any time using Change Password
option. Change Password criteria as follows,
Minimum Password length is eight. Special character required.
Once you have changed your system generated password, you can change the current
password after 24 hours only.
System will maintain up to three previous password history.
Your password will be highly secured, and it will stored in an encrypted manner.

Carbon Calculator User Manual
Page 8 of 29
To change the password,
1. Click Change Password at the top left side of the screen. Change password page
appears.
2. Type your Old Password.
3. Type your New Password.
4. Confirm your new password again in Re-enter New Password.
5. Click Change Password. See Figure 2.
Figure 2: Change Passoword
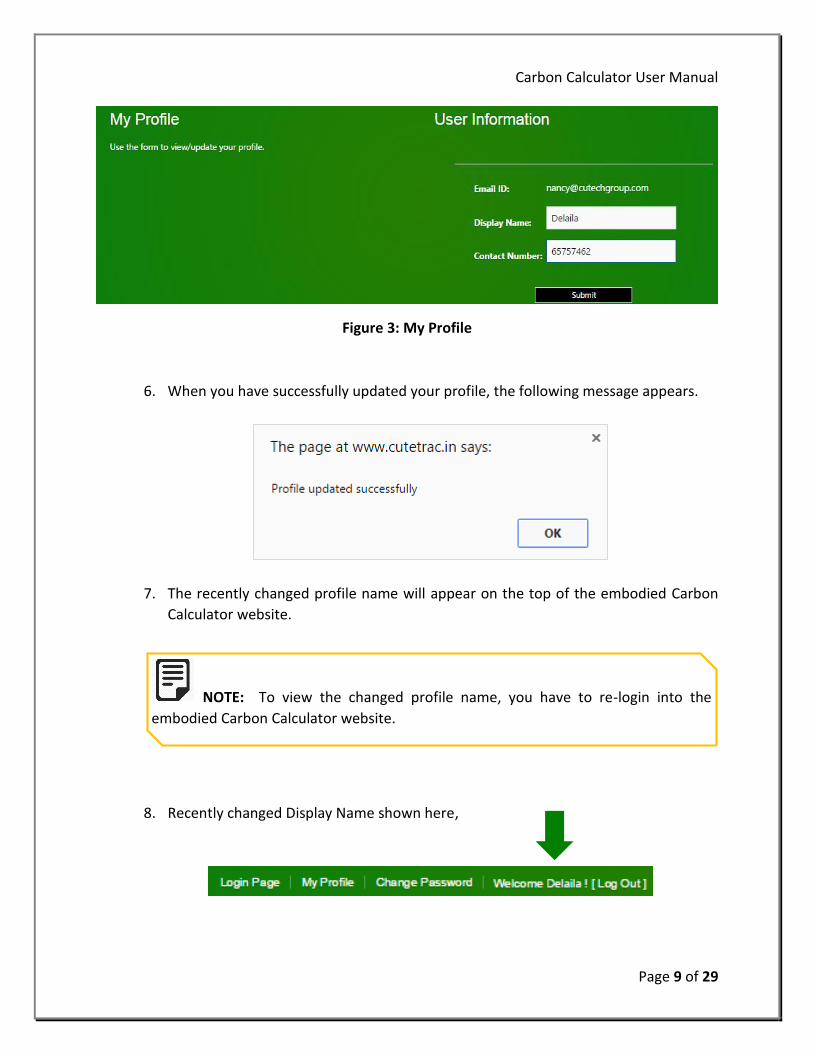
3.1.2 My Profile
My Profile is used to keep your updated display name and contact number. To update
your changes,
1. Click My Profile at the top left side of the screen. My Profile page appears.
2. In User Information, three following fields are available, Email ID, Display Name, and
Contact Number. You could see your registered email id in default.
3. Change your Display Name as you want.
4. Enter your Contact Number.
5. Click Submit. See Figure 3.
Carbon Calculator User Manual
Page 9 of 29
Figure 3: My Profile
6. When you have successfully updated your profile, the following message appears.
7. The recently changed profile name will appear on the top of the embodied Carbon
Calculator website.
8. Recently changed Display Name shown here,
NOTE: To view the changed profile name, you have to re-login into the
embodied Carbon Calculator website.

Carbon Calculator User Manual
Page 10 of 29
3.1.3 Reset Password
Carbon Calculator website provides an option to reset your password, when you have
forgot your current password. To reset your password,
1. In the login page, click “Click here”. 2. In the new window, enter Carbon ID. 3. Click Reset Password. System will send the newly generated password to your
registered email id. See Figure 4.
Figure 4: Reset Password
3.2 Green Mark ID
Carbon Calculator website allows Green Mark users to login using their Green Mark ID.
To login using the Green Mark ID,
1. Type the provided URL in the address bar of your Web Browser.
2. Click Login (Carbon/Green Mark ID).
3. Enter Green Mark ID.
4. Enter Green Mark ID Password.
5. Click Login. See Figure 5.

Carbon Calculator User Manual
Page 11 of 29
Figure 5: Reset Password
To distinguish between Carbon User and Green Mark User, system will display [GM] along
with your Display Name.

Carbon Calculator User Manual
Page 12 of 29
4 Projects
The “Projects” tab lets you to add a new project to calculate Carbon Footprints. There are
two sub divisions under Projects tab, one is Current Projects and the other is Computed
Projects.
The Current Projects lets you to add a new project. For adding a new project, process can
vary for the Normal User and Green Mark User. So you have proceed depend upon the ID
(Carbon ID or Green Mark ID) you have logged in. Where the details for adding projects
explained in detail below. Also, from Current Projects you can edit, modify and delete the
added projects when you want. The Computed Projects lets you to compute, revise and
synchronize the projects.
4.1 Add Project
4.1.1 Carbon User
To add a new project in Carbon Calculator,
1. Navigate to Projects, and click Current Projects.
2. In Current Projects, click .
Mandatory Fields
3. Select Type of Development.
4. Type Project Name.
5. Type Project Owner.
6. Type Project Address.
7. Type Structural Consultant name, who is going to work in the new project.
8. Type Architect name, who is going to work in the new project.
9. Select Gross Floor Area (m2) of the new project.
10. Type Builder name, who is going to work in the new project.
11. Click Save. See Figure 6.

Carbon Calculator User Manual
Page 13 of 29
Figure 6: Add Project
4.1.2 Green Mark (GM) User
NOTE: The embodied Carbon Calculator website shows Green Mark option to only
Green Mark users, who have logged in, while adding new project.

Carbon Calculator User Manual
Page 14 of 29
To add a new project from the Green Mark ID,
1. Enter GM (Green Mark) Reference Number. System will auto populate the project
details such as Type of Development, Project Name, Project Owner, Project
Address, Structural Consultant and Architect from Green Mark database,.
2. Click Save. See Figure 7.
Figure 7: Add New Project
After the successful creation of the project, system will take you to the Calculator page,
where you can provide the “Material Input”. In the Calculator page, you can see the
following material groups,
Concrete (Breakdown into components)
Concrete (General)
Steel
Glass
Others

Carbon Calculator User Manual
Page 15 of 29
NOTE: To add Material Input, click Go to Calculator.
4.2 Materials Input
In the Material Input page, some of the materials (Concrete (Breakdown into components), Concrete (General), Steel and Glass) are predefined and listed.
You can also add other materials additionally, if you want.
Provide Material Emission Factor (EF) along with a Supporting Document.
To enter the input value of the materials,
1. You have to click on the particular cell of the material.
2. The Material Input consist of both Material Quantity and Emission Factor, where the
“Quantity” has measured in the unit of “Kg”, and the “Emission Factor” has measured
in the unit of “Kg CO2e/kg”.
3. The Material Input should be given as a Numerical value.

Carbon Calculator User Manual
Page 16 of 29
4. See the below figure for adding inputs of Concrete (Breakdown into components).
Figure 8: Enter Material Quantity and emission Factor
5. See the below figure for added material inputs in concrete (Breakdown into
components).
Figure 9: Material Inputs
6. When you added your own Emission Factor, you have to provide supporting
documents. If you have not updated for Emission Factor, you don’t have to add any
support files. When no emission factor is added, the computation will use the system
emission factor embedded.
(*If you want to go back to the previous screen, click “Back” button provided at the
top right of the screen.)

Carbon Calculator User Manual
Page 17 of 29
NOTE: System will show Material Quantity and Material Emission Factor in Green
color until you save it.
4.2.1 Attachments
To add a new Attachment,
Click Attachment , then a new Supporting Documents window appears.
1. Click Browse to select a supporting document you want to add.
2. Click Upload. See Figure 10.
NOTE: When you have adding attachments, you have to make sure for the
following,
1. Each document size must not contain more than 10 MB in file size.
2. You can add multiple documents under one material.
Figure 10: Add Attachments
3. When you have successfully uploaded the attachments, it will shows in the list of “File
Added” under “File Upload”. See Figure 11.

Carbon Calculator User Manual
Page 18 of 29
Figure 11: Added Files
4. The below diagram shows Material Inputs for Concrete (Breakdown into
components), Concrete (General), Steel, Glass, Others, and Computation. See Figure
12.
Figure 12: Overwritten Material Input value & added Support File
5. To save all your modifications in Material Input screen, click “Save All (All Tabs)” at
the bottom of the screen.
You have to follow the same for all group of materials to input the material input values.
Additionally, if you want to add more materials, you should navigate to Add New Material
provided at left side of the Material Input page.
Carbon Calculator User Manual
Page 19 of 29
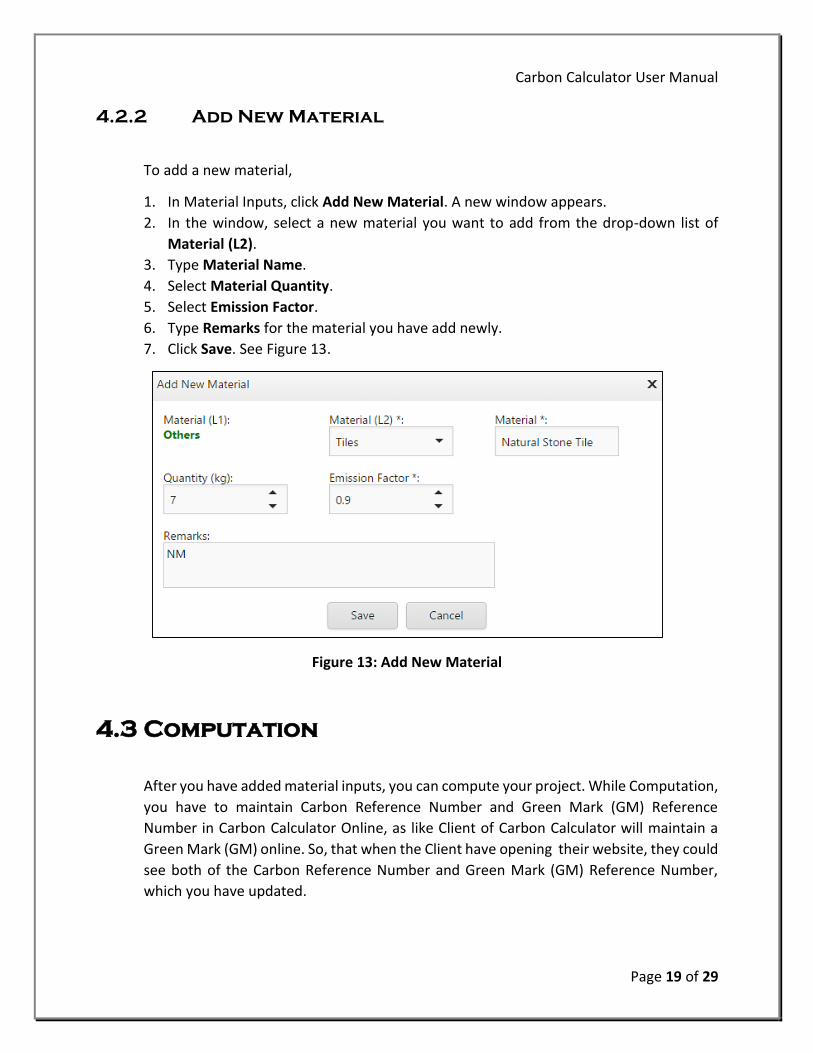
4.2.2 Add New Material
To add a new material,
1. In Material Inputs, click Add New Material. A new window appears.
2. In the window, select a new material you want to add from the drop-down list of
Material (L2).
3. Type Material Name.
4. Select Material Quantity.
5. Select Emission Factor.
6. Type Remarks for the material you have add newly.
7. Click Save. See Figure 13.
Figure 13: Add New Material
4.3 Computation
After you have added material inputs, you can compute your project. While Computation,
you have to maintain Carbon Reference Number and Green Mark (GM) Reference
Number in Carbon Calculator Online, as like Client of Carbon Calculator will maintain a
Green Mark (GM) online. So, that when the Client have opening their website, they could
see both of the Carbon Reference Number and Green Mark (GM) Reference Number,
which you have updated.

Carbon Calculator User Manual
Page 20 of 29
WARNING:
1. Make sure you have added input values for added materials.
2. Make sure you have added support documents for the given Emission Factor value.
After completion of material inputs, you can go to Computation tab. You will be prompted
with the validation message. The message will be, “Validated Successfully. You can submit
the project now”.
Figure 14: Validation Message
Validation Log has shown that, “No Errors Found”,
Figure 15: Validation Summary
After you gave successfully done for computation process without errors, you could see
that the calculated “Estimated Total Embodied Carbon Footprint” value has shown in the
same page at the Validation Log tab. You can view the "Embodied Carbon Footprint",
before you have submitting.

Carbon Calculator User Manual
Page 21 of 29
CAUTION: If the material input was not provided for the mandatory
materials, the following message will appear.
You have to go through the Validation Log in detail and you must clear all the errors
before you go for Computation.

Carbon Calculator User Manual
Page 22 of 29
4.3.1 Comments & Additional Documents
Optionally, you can provide Comments and Additional Document for the project you have
computing. To add Comments and Additional Document, navigate to the left side of the
computation screen. Refer the below screenshot.
Figure 16: Add Comments and Additional Document
WARNING: Make sure you have read User Declaration information.
To complete the above action,
1. Click Compute at the bottom left side of the screen.
2. You can receive the following message of, “By clicking this you agree to the above
user declaration. Are you sure want to Proceed?”.

Carbon Calculator User Manual
Page 23 of 29
3. Click OK. Project menu appears.
4. Now, you can see the project has added under Computed Projects.
Figure 17 : Computed Projects
Once the project has been submitted, the project will available under Computed Projects
tab. Also the system will generate a unique “Carbon Reference Number” for the
computed projects. The computed projects can be viewed by the Administrator of this
website.
CAUTION: Once the projects has been submitted, system will not allow you to
edit.
4.3.2 Report
After you have completed the project, you can generate report under Computed Projects.
To view the Carbon Footprint Report, simply click on Report under Computed Project.

Carbon Calculator User Manual
Page 24 of 29
Figure 18: Carbon Footprint Report

Carbon Calculator User Manual
Page 25 of 29
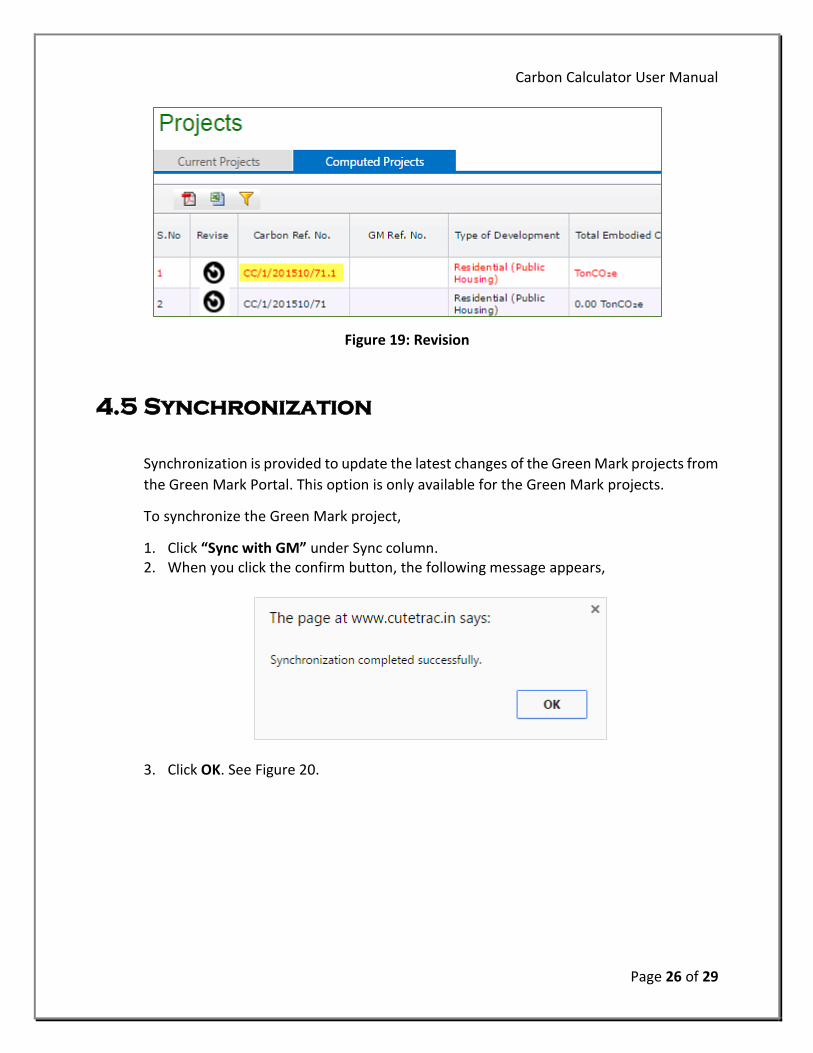
4.4 Revision
Revision helps you when there is a change from the existing computed project. Revision
applies only for the computed projects.
When users revise the computed projects, the old values input for the computed projects
should reflect in the “new” project materials input page. Which makes convenient the
users to change the values wherever necessary and no need to re-key in all the values.
To revise the project,
Navigate to the Revision column provided under Computed Projects tab.
After the Revision has made, the system will copy the contents from the existing
project and create as a new project.
The newly created project comes under Current Project.
After you have successfully computed the revised project, system will generate a new
Carbon Reference Number for the revised project.
The Carbon Reference Number will generated as a version of the parent project. For
example, if you have revised the following report “CC/0/201509/1”, the revised
reference number will be “CC/0/201509/1.01”. Also the revised project will changed
into Red color.
To revise the parent project,
1. Click Revise under the Computed Projects tab.
2. Once the project has revised, the project will be available under Current Projects
tab.
3. Click edit to make changes.
4. Click Save.
5. Go to Calculator to amend the material inputs.
6. Go to computation tab to compute the revised project.
See Figure 19.
Carbon Calculator User Manual
Page 26 of 29
Figure 19: Revision
4.5 Synchronization
Synchronization is provided to update the latest changes of the Green Mark projects from
the Green Mark Portal. This option is only available for the Green Mark projects.
To synchronize the Green Mark project,
1. Click “Sync with GM” under Sync column. 2. When you click the confirm button, the following message appears,
3. Click OK. See Figure 20.

Carbon Calculator User Manual
Page 27 of 29
Figure 20: Synchronization

Carbon Calculator User Manual
Page 28 of 29
5 Contact US
Contact our support team to learn more about Carbon Calculator website. You can also
post your feedbacks in the provided URL address.
You can contact our support team in two ways!!!
Email Phone

Carbon Calculator User Manual
Page 29 of 29
6 FAQ
Carbon Calculator website provides frequently asked questions and its answers in FAQ
page.