Embed Size (px)
Citation preview

BCI LeadManager User Manual BCI Asia
April 2013 v2.92

BCI LeadManager: User Manual
BCI LeadManager User Manual Page 2 of 59 www.bciasia.com
CONTENTS
1. INTRODUCTION ........................................................................................................................ 5
2.1 Purpose Of This Guide ........................................................................................................ 5
2.2 What’s New? ........................................................................................................................ 5
2. THE DASHBOARD .................................................................................................................... 7
2.3 The Login Screen................................................................................................................. 7
2.4 The Dashboard .................................................................................................................... 7
2.5 Dashboard Buttons .............................................................................................................. 8
2.6 Saved Search ...................................................................................................................... 9
2.7 A New Menu Bar .................................................................................................................. 9
3. LATEST PROJECTS................................................................................................................ 10
3.1 Project List Menu Bar ......................................................................................................... 10
3.2 The Actions Menu .............................................................................................................. 11
3.3 The Sort Menu ................................................................................................................... 12
3.4 Project Icons ...................................................................................................................... 12
3.5 Project List Details ............................................................................................................. 13
4. PROJECT SEARCH................................................................................................................. 14
4.1 Project Search Menu Bar ................................................................................................... 14
4.2 Basic (Default) Project Search Options .............................................................................. 15
4.3 Advanced Project Search Options ..................................................................................... 16
5. WORKING WITH PROJECT SEARCH RESULTS .................................................................. 18
5.1 The Project Listing Table ................................................................................................... 19
5.2 Project Search Tips ............................................................................................................ 19
6. THE PROJECT RECORD ........................................................................................................ 19
6.1 Project Menu Bar ............................................................................................................... 20
6.2 Project Summary Table ..................................................................................................... 21
6.3 Project Title ........................................................................................................................ 22
6.4 Project Details .................................................................................................................... 22
6.5 Project Contacts................................................................................................................. 23
6.6 Project Crm Features ......................................................................................................... 24
7. PROJECT WATCHLIST ........................................................................................................... 25
7.1 Project Watchlist Menu Title Bar ........................................................................................ 25
7.2 Project Watchlist Table ...................................................................................................... 26

BCI LeadManager: User Manual
BCI LeadManager User Manual Page 3 of 59 www.bciasia.com
7.3 Project List Menu Bar ......................................................................................................... 26
7.4 The Actions Menu .............................................................................................................. 27
7.5 The Sort Menu ................................................................................................................... 27
7.6 Project Watchlist Icons ....................................................................................................... 27
8. QUOTED PROJECTS .............................................................................................................. 27
8.1 Quoted Projects Menu Bar ................................................................................................. 28
8.2 Quoted Projects List Items ................................................................................................. 28
9. FOLLOW UPS .......................................................................................................................... 28
9.1 Follow Up Menu Bar .......................................................................................................... 29
9.2 Follow Up List Items ........................................................................................................... 30
9.3 Adding A Follow Up To A Project ....................................................................................... 30
10. COMPANY SEARCH ............................................................................................................... 31
10.1 Company Search Menu Bar ............................................................................................... 32
10.2 Basic (Default) Company Search Options ......................................................................... 32
10.3 Advanced Company Search Options ................................................................................. 33
11. COMPANY SEARCH RESULTS .............................................................................................. 36
11.1 Company Results Title Bar ................................................................................................ 36
11.2 Company Results Listing ................................................................................................... 37
11.3 Running A Mail Merge ....................................................................................................... 37
12. THE COMPANY RECORD ...................................................................................................... 38
12.1 Company Menu Bar ........................................................................................................... 38
12.2 Company Summary Table ................................................................................................. 39
12.3 Company Project Listing .................................................................................................... 39
12.4 Company Record Action Menu .......................................................................................... 40
12.5 Follow Ups, Letters And Files ............................................................................................ 41
13. COMPANY WATCHLIST ......................................................................................................... 41
13.1 Company Watchlist Menu Bar ........................................................................................... 42
13.2 Company Watchlist List Items ............................................................................................ 42
14. MAIL MERGE ........................................................................................................................... 43
15. MY BCI ..................................................................................................................................... 44
15.1 My Projects ........................................................................................................................ 44
15.2 my Contacts ....................................................................................................................... 45
16. BCI NOTIFIER ......................................................................................................................... 45
16.1 Basic Settings .................................................................................................................... 45
BCI LeadManager: User Manual
BCI LeadManager User Manual Page 4 of 59 www.bciasia.com
16.2 Advanced Settings ............................................................................................................. 46
17. GETTING THE MOST OUT OF BCI NOTIFIER ....................................................................... 47
17.1 General Saved Searches ................................................................................................... 47
17.2 Saved Search Option 1: By Stage ..................................................................................... 48
17.3 Saved Search Option 2: By Region ................................................................................... 48
18. TOOLS ..................................................................................................................................... 49
18.1 My Account ........................................................................................................................ 49
18.2 BCI Notifier ........................................................................................................................ 53
18.3 My Data And Templates .................................................................................................... 53
19. INTERNET SETTINGS ............................................................................................................ 56
20. HELP ........................................................................................................................................ 57
20.1 BCI Asia Offices ................................................................................................................. 57
21. LOG OUT ................................................................................................................................. 57
22. Appendix 1: STAGES OF CONSTRUCTION ........................................................................... 58

BCI LeadManager: User Manual
BCI LeadManager User Manual Page 5 of 59 www.bciasia.com
1. INTRODUCTION
Welcome to the User Manual for BCI LeadManager.
BCI Asia has evolved considerably in the years since its inception. The 12 months leading to the launch of the new BCI
LeadManager alone have seen the introduction of BCI Notifier - your personalised project notification service and now a new-
look Dashboard and a streamlined tracking and managing of projects allowing an improved work-flow.
We are confident you are using the industry-leading project leads service and working alongside your BCI Client Liaison
Consultant, ensuring you get the most out of your BCI LeadManager service.
2.1 PURPOSE OF THIS GUIDE
This User Manual covers each aspect of BCI LeadManager in detail, including helpful tips to assist in getting the best use out of
the system. Note: Please see the BCI LeadFinder User Guide if you are using this service instead of BCI LeadManager.
Thank you
Firstly allow us to extend our appreciation to you, the BCI Member. The history of improvements leading us to BCI
LeadManager builds strongly on your experience, your feedback and a desire to continuously improve the BCI experience.
Manual layout
Each chapter deals with a section of BCI LeadManager. With each feature explanation you will find a series of tables, each
listing the name of the function or button and the purpose of this button.
A personalised service
The power of BCI LeadManager is in the setup so make the most of your dedicated BCI Client Liaison Consultant in your initial
training session, whether in-person or via our online training tools.
As your business grows
Support from your BCI Client Liaison Consultant is ongoing, so they will be in regular contact to ensure you are receiving the
service you require and importantly to have new team members trained up on BCI LeadManager. It is vital that your BCI
LeadManager setup matches your focus. As your business grows, we tailor your service, so that the projects delivered are in
line with your strategic direction.
2.2 WHAT’S NEW?
BCI LeadManager sees some familiar features renamed and several new features added, to streamline the finding, tracking and
managing of projects in BCI.
Active Projects and Active Firms becomes Watchlist
To Activate a project or company is now ‘Add to Project Watchlist’ and ‘Add to Company Watchlist’. The Active projects screen
is now ‘Project Watchlist’ and Activated companies are now listed in your ‘Company Watchlist’. See sections ‘7. Project
Watchlist’ and ’13. Company Watchlist’ for full details.
Your new Dashboard
Navigating BCI LeadManager has never been easier with the new BCI Dashboard. This lists with easy-to-select icons, each
area of BCI LeadManager. See section ‘2. The Dashboard’ for details.
Track Quoted projects
Projects can now be tagged as ‘Quoted’, then viewed in the new ‘Quoted Projects’ screen. This is a great way to view a project
which has been quoted (a calculator icon displays next to each).
For quick reference, below is a comparison of current features which have been renamed in the evolution to BCI LeadManager.
‘Previous’ names are listed on the left, ‘New’ names on the right.

BCI LeadManager: User Manual
BCI LeadManager User Manual Page 6 of 59 www.bciasia.com
Previous New name Icon Notes
BCI Active Project Project Watchlist
Activating a project is now called Adding to Project Watchlist.
Active Firms Company Watchlist
Active Firms is now Company Watchlist and the new Company Watchlist screen lists all tracked companies in one place.
BCI Home screen BCI Dashboard Latest Projects
BCI now opens by default to your Dashboard, where icons are used to navigate quickly. Your default Home screen is now called Latest Projects.
My Tasks Follow Ups Manage your calls through Follow Ups
BCI Project and Contact Search
Basic and Advanced search
Both Project Search and Company Search screens have been simplified. ‘Basic search’ shows only commonly-used fields. ‘Advanced search’ displays all options.
NEW! Saved Search on Dashboard
This new drop-down menu allows Project Searches to be run quickly from the Dashboard.
NEW! Quoted Projects
Tag projects you have quoted and manage them on one screen, in the new ‘Quoted Projects’ screen.
NEW! Google Maps
Click the maps icon to view a project location on Google Maps.
NEW! Working with Easy view of companies a contact is working with.
NEW! Sort by company’s total project value
Keep track of Top Architects, Consultants, Developers by total project value using the company search function.

BCI LeadManager: User Manual
BCI LeadManager User Manual Page 7 of 59 www.bciasia.com
2. THE DASHBOARD
The ‘show all’ BCI home screen has evolved into your new Dashboard. While the fundamentals of using BCI remain the same,
the dashboard page allows the ability to select the function of BCI you wish to use by clicking its icon and moving quickly to that
page. We will first review the new Login screen then outline each element of the new Dashboard.
2.3 THE LOGIN SCREEN
To log in to BCI, simply open your Internet Browser and either type in ‘www.bciasia.com’, or run a Google search for ‘BCI Asia’.
Click on the ‘Member login’ button to show the Login screen.
Enter your Username into ‘Username’ and your BCI password into ‘Password’, then click ‘Login’ to enter your BCI account.
Login screen item Purpose
Forgot your password? If you have misplaced your username and/or password for your BCI account, simply click the ‘Forgot your password’ link at the Member log in page. Your login details are then emailed directly to your inbox.
2.4 THE DASHBOARD
Below is a screenshot of the new BCI Dashboard. Each icon and menu item will be explained below and in the following section
‘3. Latest Projects’.
The Dashboard screen

BCI LeadManager: User Manual
BCI LeadManager User Manual Page 8 of 59 www.bciasia.com
2.5 DASHBOARD BUTTONS
Each of the new dashboard icons are explained below.
Dashboard item Icon Purpose
Latest Projects
Displays the number of projects across all visible stages, regions and categories that have been added/updated since your last login. Clicking this icon displays a list of these projects.
Project Search
Links to the project search page where you may search BCI for projects using saved searches, project title and/or building element keywords. The project search page now has a new layout, with less visible options allowing faster searching. (Clicking ‘Advanced search’ on this page will display all project search options).
Project Watchlist
Formerly called ‘BCI Active Projects’, clicking the ‘Project Watchlist’ icon displays all projects you have previously tagged. The number in the circle indicates the number of Watchlist projects updated since your last login.
Quoted Projects
Clicking ‘Quoted Projects’ displays a list of projects previously tagged as quoted. The number in the circle shows the number of projects tagged as quoted that have been updated since your last login.
Follow Ups
Previously called ‘My Tasks’, clicking the ‘Follow Ups’ icon will display all your follow ups - including today’s, those overdue and future follow ups. The number in the circle indicates the amount of follow ups overdue. Note: This includes those due today.
Company Search
Formerly called ‘BCI Contact Search’, clicking the ‘Company Search’ icon will display the new Company search page. This includes commonly used company search fields, such as (Company name and State) for faster searching. Clicking ‘Advanced search’ on this page will display all Company search options.
Company Watchlist
Company Watchlist displays all companies you have previously tagged (by clicking add to company Watchlist when viewing a company record, formerly called ‘Active Firms’). The circled number indicates projects (that Watchlist companies are involved in) that have been updated since your last login. Then click ‘Updated projects linked to Company Watchlist…’ to view all updated projects
involving your tracked companies.
Saved Search drop-down menu
Select project searches to be run directly from the Dashboard.

BCI LeadManager: User Manual
BCI LeadManager User Manual Page 9 of 59 www.bciasia.com
2.6 SAVED SEARCH
A new ‘Saved Search’ menu is located below the dashboard icons. Clicking the drop-down menu on the right of this title
displays your previously saved project searches. This allows common searches to be run directly from the BCI Dashboard.
Saved Search drop-down menu
Select project searches to be run directly from the Dashboard.
2.7 A NEW MENU BAR
The handy dashboard icons are displayed at the top right of every page in BCI, allowing for quick access to each section. Above
the menu bar are several new title bar options. Each is outlined below.
Title Bar Item Purpose
BCI Asia logo The BCI Asia logo also acts as a home button, displaying the home screen (My Dashboard by default) whenever pressed.
Welcome message Lists the date of last login and when your BCI subscription started.
BCI Economics Lists real-time, hard project data. This includes the Forecaster report, Construction Market Outlook reports and custom research.
BCI Notifier Displays the options for setting up and customising your BCI Notifier service. This is where you define what project and company updates will be automatically emailed to you.
Tools Clicking ‘Tools’ displays a list of BCI options, which enable you to set up Watchlist folders, manage how BCI exports to Excel and add custom fields to projects.
Help Displays BCI help including quick start guides and user manuals.
Log Out Clicking this link will log you out of the BCI system.

BCI LeadManager: User Manual
BCI LeadManager User Manual Page 10 of 59 www.bciasia.com
3. LATEST PROJECTS
Latest Projects displays a full listing of projects that have been added or updated since your last login to BCI LeadManager.
What constitutes an update?
A project update occurs when the BCI Research team verifies details relating to a project and therefore publishes an update.
Confirmation includes updates of project stage (e.g. from ‘Design’ to ‘Documentation’) and whether the major consultants have
been discovered on the project (e.g. Builder or Subcontractors).
A new version for each major update
After an update, the red version listed to the right of the project name then increases by 1 (e.g. from ver.1 to ver.2). The project
pops to the top of project searches (as the most recently updated) and is emailed to you automatically if the project is in your
Watchlist. Note: The layout below will be seen for all project lists generated by clicking Latest Search, running a Project Search
and (in a summarised form) when viewing a Company record.
The Latest Projects screen (note: this is the standard project listing method, used in many other screens of BCI)
3.1 PROJECT LIST MENU BAR
Project search results are displayed in a standard table. Above this table is a menu bar of options which control the number of
projects shown per page and allow actions to be run on these projects.
Project list item Purpose
Total projects Displays the total number of projects found by a given search.
Projects/page... next 50 Indicates the number of projects being shown per page. If the total number of projects found is greater than the number set in Default projects/page, then ‘next ...’ will be displayed and clicking this link will show the next page of project results.
Default projects/page This drop-down menu indicates the number of projects displayed per page. Increase this number to see more projects at once and to print or export them in one action. Note: Currently the maximum able to be exported to Microsoft Excel at once is 300, so set this value if you are planning to export projects to a spreadsheet.
Print this list Displays a print preview of the projects currently displayed on the screen. Note: All project sorts (for example by project value or project stage) applied to the project list are reflected in the print preview. One company role (e.g. Builder or Architect) can be displayed next to every project when using print this list. This is set up in Tools and Print project list options.

BCI LeadManager: User Manual
BCI LeadManager User Manual Page 11 of 59 www.bciasia.com
Actions Clicking ‘Actions’ will display a menu of actions that are able to be run on selected (checked) projects. (e.g. Checking the boxes next to three projects then clicking Actions will display the options able to be run on these together). See the next section for a description of each Action menu option.
Sort Displays advanced sorting options for sorting the current project listing. Once options are selected, Sort project list is clicked to apply the sort. Sort menu options are discussed in detail a following section.
3.2 THE ACTIONS MENU
The actions menu lists all possible actions that can be applied to selected (ticked) projects.
Project list item Purpose
Print preview Displays a print preview of selected projects, listing all details in an easy to print format. If multiple projects have been selected (ticked), then they will be listed one after another in one window. This is the fastest way to print off all details of a project or several projects.
Print selected projects list Displays a preview of a revised project table. Only selected (ticked) projects are listed, allowing for a quick summary of key projects of interest to be printed together.
Add to Watch List Adds selected projects to your Project Watchlist. The Project Watchlist window that next appears has myself ticked by default and allows you to select the Project Watchlist folder you wish to add the selected projects to (from the folder/sub-folder drop-down menu). Other team members with BCI access (where applicable) will be also listed and ticking any of their names will also add the selected projects to their respective Project Watchlists. Note: If enabled in your BCI Notifier settings, each time a project in your Project Watchlist is updated, you will be notified via email.
Remove from Watch List Removes selected projects from your Project Watchlist. Folders do not need to be selected during this process, simply clicking Go will remove these projects and ticking other team member’s names first will also remove selected projects from their Project Watchlists. Note: Removed projects will remain visible in project lists, but when updated will no longer notify via email.
Export to Excel Exports selected projects to Microsoft Excel. Up to 300 projects may be exported at once and will display by default in two tables, listing project details firstly and contact details secondly. The format of spreadsheet can be customised in the Tools\ Manage Your Excel / Lotus 1-2-3 Export Templates (BCI Projects) menu. Note: If a security warning appears, your Internet settings may need updating. Please ensure that bciasia.com has been added to your trusted sites (in Internet Browser settings) and that active-x code is enabled. Your BCI Client Liaison Consultant will be able to assist with making these changes.
Export to Lotus 1-2-3 Exports selected projects to Lotus 1-2-3. Please contact your BCI Client Liaison Consultant
if a security warning appears in your browser (or see the Export to Excel description for more detail). The format of spreadsheet can be customized in the Tools\Manage Your Excel / Lotus 1-2-3 Export Templates (Own Projects) menu.
Show companies An advanced feature, clicking Show companies will display a contact list of all companies involved in the selected projects, including phone numbers. The resulting list can then be filtered by company role by clicking the Filter Roles button, selecting the desired roles (e.g. ‘Architect’) and clicking Filter Roles.
Archive Selected Projects Archive selected projects, hiding them from future project searches and also removing them
from your Project Watchlist (where applicable). Archived projects will not appear in future project searches but can be found and ‘Unarchived’ by clicking Project Search, clicking Advanced and selecting Archived projects from the Project Selection, then clicking Go. This will display a list of all Archived projects. Ticking project(s), clicking Actions and ‘Unarchive selected projects’ will return selected project(s) to normal project status.

BCI LeadManager: User Manual
BCI LeadManager User Manual Page 12 of 59 www.bciasia.com
Add To Quoted Adds selected (ticked) projects to your Quoted Projects. A list of these projects can then be viewed by clicking Quoted Projects in the top Menu bar.
Remove From Quoted Removes selected (ticked) projects from your Quoted Projects listing. This removes the Quoted Project tag from the right of the project name when viewed in a listing.
3.3 THE SORT MENU
Clicking the Sort button displays advanced sort options for a project listing. This sets the ‘sort by, then by’ process and applies
this sort to a project listing (e.g. Selecting Stage then Value would sort all project results by Stage and then by Value).
Project Icon Type Purpose
ASC Sort projects in ascending order, meaning the lowest value is displayed first, highest last.
DESC Sort projects in descending order, meaning the highest value is displayed first, lowest last.
Project type Sort projects by the Project type. This will see those projects named Hotel sorted opposite those named Hospital. This is helpful when seeking projects of a certain type as they are then grouped together.
Value Sort projects by total project value listed. This is frequently used to list the largest projects by value at the top of the list and the smaller projects at the bottom.
Stage Sort projects by stage. Another frequently used option, sorting by descending Stage (the down arrow), will display any project listing with earliest stage projects first and those at Construction stage last.
ID Sort the listing by project ID, the unique number given by BCI to each project. This essentially sorts from most recently created to oldest created projects, or vice versa.
Date Stamp Sort the projects by the Date Stamp value, or more specifically the date of the most recent update on each project. By default, projects are displayed sorted by Date Stamp so that most recently updated projects are listed first.
3.4 PROJECT ICONS
Project icons are used in BCI to clearly indicate if a project is Green Building certified, has been added to your Watchlist, has
been Quoted and more. These icons are explained below.
Project Icon Type Icon Purpose
Watchlist binoculars
Red binoculars are displayed to the left of projects that have previously been added to your Project Watchlist, showing projects that you are tracking. A set of blue binoculars indicate projects that have been added to another team member’s Project Watchlist. These are projects that others in your team are currently tracking. Note: Open a project to see who is currently tracking it, displayed in the ‘Watched Project by’ field.
Green Building Rating icon
Denotes that a Green Building rating has been applied for or given by the Green Building Council of individual country.
Gold star icon
A gold star indicates a project has been updated since your last login to BCI LeadManager.
Notepad
Indicates projects that have notes attached to them. Clicking the notepad icon will display the most recent project note added to this project.
Follow up phone
Indicates that a follow up note has been added to this project. Clicking the icon displays details of the follow up for editing and/or sharing with others. A green icon indicates the follow up is yet to occur and a red follow up indicates that the follow up is overdue. A yellow icon indicates completed Follow ups.

BCI LeadManager: User Manual
BCI LeadManager User Manual Page 13 of 59 www.bciasia.com
Project notification
This red symbol displays next to projects that have Project Notifications set for them. Similar to projects in your Project Watchlist, updates lead to an email being sent. However Project notifications do not get added to your Project Watchlist screen.
Next Project / Previous Project Clicking the link will display the next screen of projects or company contacts in the displayed list. Clicking the left arrow will display the previous page.
Quoted calculator
A calculator indicates that a project has been tagged as ‘Quoted’ and has been added to your ‘Quoted Projects’ list.
3.5 PROJECT LIST DETAILS
One project is displayed per row of a project listing. Several aspects of each project listed are described in further detail below.
Each table heading has both an up arrow (ascending) and a down arrow (descending) to the right, which when clicked will sort
the project listing in either direction.
Project List item Purpose
Check box Each project has a check box listed to the left of it. Checking this box selects the project for actions to be run (from the Actions menu). Clicking the check box in the title of the table will select all projects currently displayed on the page.
Project type Lists the type of project. Projects with multiple aspects will have several listed together (e.g. Library | Community Hall). The name of the project (e.g. Crown Casino) will be listed in brackets, where available, after the project type. Following this in red text will be the version of the project. The version changes when a BCI Researcher discovers that a key element of the project has changed (e.g. the stage from Tender to Contract Awarded).
Value The total project value of the project, in millions (e.g.US $0.5m is US$500,000).
Stage The current construction stage of the project.
Location The physical address of the project.
ProjectID The project ID of each project. This is a unique number assigned to each project in BCI, used to identify and track it through the construction stages.
Date Stamp Lists the date of most recent update on a project. This was when a BCI Researcher discovered a change in a key element of the project. The version will have increased by one and the project will have moved to the top of the project list as the most recently updated.

BCI LeadManager: User Manual
BCI LeadManager User Manual Page 14 of 59 www.bciasia.com
4. PROJECT SEARCH
The Project Search page is the most direct way to search for an individual project (the other is using Company Search). Project
Search also allows you to select a previously saved search and run it, quickly delivering a list of projects that match selected
criteria at the touch of a button.
The Project Search ‘Basic search’ screen
4.1 PROJECT SEARCH MENU BAR
The first two rows of the Project Search page control how the search will be run.
Project Search menu item Purpose
Select Saved Search Click this drop-down menu to view a list of all previously saved project searches. Select a search by clicking it on the list and then either modify it (such as changing date range) or click Go to run this search. Note: Selecting Last Search Performed (saved by system) will display the project search details selected for the most recently run search in this BCI login.
Go Pressing Go will run a project search based on the details entered on this page.
Save as new search After entering project search details, clicking ‘Save as new search’ will show a box that allows a name to be entered. This process will save the current search settings under this name. This search can now be found in the ‘Select New Search’ drop-down menu for future project searches.
Save search Saves changes to the current search and overwrites existing settings for this search. Common to Microsoft Word, this button will result in a naming window, where the search can be renamed, or clicking OK will save any changes over the existing search. Clicking cancel in this window will close the window and not make any changes to your search.
Share across group Ticking this option will save this project search so that it is visible to all BCI users in your group. Exercise caution with this option because this may result in large lists of saved searches for others in your group, searches that may or may not suit their needs.
Notify based on this search This option tells BCI to notify you whenever projects are updated that match this search. The results will be included in a table in your daily BCI Notifier saved search email. Unticking this box will remove this search from that email each morning.

BCI LeadManager: User Manual
BCI LeadManager User Manual Page 15 of 59 www.bciasia.com
Show all versions of project Ticking this box then pressing Go will display each individual version of each project found. If a project has had four versions (four major updates during the BCI Research process), then it will be listed four times in the project list generated by this search. This option is therefore only used where viewing versions is important.
Show combined total project value
This option will add a total project value for all projects combined to the top of the project list table generated by running this search. The benefit of this option having the option to see the estimated value of all projects found, which is useful when evaluating the size of the market.
Ver 1 projects only Displays projects that are in ‘version 1’ when the project search results are listed. That is, only projects that have been added to BCI for the first time but have not been updated since will be displayed.
Clear all selections Clears all selections and text entered into the project search page. This is a helpful way to clear out a previous search and start fresh for a new search.
4.2 BASIC (DEFAULT) PROJECT SEARCH OPTIONS
Project searching has been simplified. So that only commonly used, ‘basic’ search options are initially displayed. Click the
‘Advanced search’ button to display the full list of project search options, then click ‘Basic’ from that page to revert once more to
the simple search format. Each element of the project search is selected from its own drop-down menu. Each can be selected
by clicking on desired options and holding the CTRL key while clicking to select multiple options.
Note: By default, all options are selected within each project search element. To revert to ‘all’ within a drop-down menu, simply
click the top menu option (e.g. ‘Please select project stage’ for projects of all stages, or ‘Please select an ownership type’ for
projects of all ownership types to be included).
Project list item Purpose
Project Type / Project Name Search by project type (e.g. Residential) or by project name where available (e.g. Crown Hotel). As with all searches in BCI, we suggest that ‘less is more’, meaning typing part of a word or part of a project name is more likely to find a given project, especially for those with unusual names (e.g. ‘medic’ for all ‘Medical centre’ and ‘Medicinal processing plant’ projects). Multiple words can be separated by commas, which act as ‘OR’ commands (e.g. ‘Apartment,Townhouse,Unit’ would find projects of all 3 types). Insert the ‘&’ symbol to search using ‘AND’ an command, that is only projects where both words are present in a project name, regardless of order (e.g. ‘apartment&crest’ would find ‘crest apartments’, ‘crest forty five apartments’ and ‘apartments on crest’). Tick ‘exact match’ if searching for a word that could form a part of a longer word (e.g. ‘wind’ when wanting ‘wind farm’, not ‘window’).
Description / Keywords Search projects by description and/or keywords in the project text. This searches the project description and building element sections of the project, similar to an internet search (e.g. ‘insulation’ would find any project with the building element insulation listed in the project detail section). For searching multiple keywords, please separate keywords with commas (as with project type/name searching, commas function as ‘OR’ commands). A maximum of three keywords are possible in each search (e.g. ‘insulation, car park, fire prevention’ would find projects with any of these building elements included).
Category / Subcategory Select project categories or subcategories to include in a search, while holding CTRL key to select multiple (e.g. ‘offices & commercial’ would include this category, while ‘commercial complex’ would include projects in this subcategory of the offices & commercial group). Use the Easy Select button to be able to tick categories and/or subcategories from a convenient window and be able to untick project categories that are not of interest.
Project Stage Select project stage to include in a search, while holding CTRL key to select multiple stages (e.g. ‘design’, ‘tender’, ‘post tender’).
Project Status Select project status to include in a search, while holding CTRL key to select multiple status (e.g. ‘on-track’, ‘deferred’).

BCI LeadManager: User Manual
BCI LeadManager User Manual Page 16 of 59 www.bciasia.com
ProjectID ProjectID is a unique number assigned to each project. When a project is first added to BCI by our Research team, a ProjectID is automatically assigned and remains assigned to this project throughout the project stages. Therefore entering a ProjectID is a great way to find projects that have been printed or exported to Excel, when you wish to find if any update has been made on each project at a later date. ProjectID is also how our Research team track all queries to the Research Hotline.
Country/Province Select country/province to include in your search. Hold the CTRL key while selecting regions to select several. (e.g. Singapore, Manila, East Java).
City/Town Enter the name of a city or town to find projects only within that city/town. Only one town may be entered per search. Note: When searching by town, ensure Country/Province to default, or these selections will override any City/Town entry.
Date Stamp By specifying the Date Stamp Start / End Date, search for a list of projects published on BCI within a certain time period. Most commonly used is the Relative date drop-down menu, where a date range can be quickly selected, relative to today’s date (e.g. ‘Last 365 days’ or ‘Last 90 days’. The default value is ‘subscription start’, which will include projects added or updated on BCI since the beginning of your subscription with BCI. Select the top (blank) value in Relative date if you wish to run a search with a specific date range. Enter the first date of published changes in ‘Start (inclusive)’ and the last date to include in the ‘End (inclusive)’ field. You may find the calendar icons on the right of each field an easier way to select both start and end date, selecting the month using the ‘<’ and ‘>’ buttons then simply clicking on the date required (e.g. entering ‘01/01/2012’ in start and ‘31/12/2012’ in end will display all projects added or updated in the 2012 calendar year).
4.3 ADVANCED PROJECT SEARCH OPTIONS
When ‘Advanced search’ is clicked, the full list of Project Search options will be displayed as below.
The Project Search ‘Advanced search’ screen
Project list item Purpose
Project Type / Project Name See the ‘Basic search’ description above for details.
Description / Keywords See the ‘Basic search’ description above for details.
Note / Followup Keyword Search by a word, or part of a word in a note or follow up, previously added to any project visible in BCI (e.g. ‘AD’ would find all projects a user with the initials AD has added). This function is useful when a note has been added previously and the project needs to be found quickly. The name may not be known, but the project note details may be.
Category / Subcategory See the ‘Basic search’ description above for details.
Project Stage See the ‘Basic search’ description above for details.

BCI LeadManager: User Manual
BCI LeadManager User Manual Page 17 of 59 www.bciasia.com
Project Status See the ‘Basic search’ description above for details.
Development Type Search for projects matching the project development type you specify (e.g. ‘new’). To select multiple development types, hold down the CTRL key while selecting several.
Ownership Type Select which ownership (funding) structures to include in search (e.g. ‘Private’ to include only privately owned projects or ‘Government’ to include public owned).
Date Stamp See the ‘Basic search’ description above for details.
Tender Closing Date Search for a list of projects whose tender close dates have been advised to BCI as being after the date you specified (inclusive of the date you specified). Commonly used is the ‘Relative date’ drop-down menu, where projects with Tenders closing in the next 7, 30, 60, 90, 180 or 365 days can be chosen by selecting each item from the menu. As with the Date stamp field, you can use the calendar icons next to both the ‘close after’ and ‘close before’ fields to select exact dates for the search, or type the dates in manually.
Note: Ensure that all ‘Date Stamp’, ‘Construction start date’ and ‘Construction end date’ fields are left blank when using this field.
Construction Start Date Search for projects whose construction start dates have been are listed as before the date you specify (inclusive of the date). Commonly used is the ‘Relative date’ drop-down menu, where projects due to start in the next 7, 30, 60, 90, 180 or 365 days can be chosen by selecting each item from the menu. As with the Date stamp field, you can use the calendar icons next to both the ‘start after’ and ‘start before’ fields to select exact dates for the search, or type the dates in manually. Note: Ensure that all ‘Date Stamp’, ‘Tender closing date’ and ‘Construction end date’ fields are left blank when using this field.
Construction End Date Search for a list of projects whose construction end dates have been listed as being before the date you specify (inclusive of the date). Commonly used is the ‘Relative date’ drop-down menu, where projects due to be completed in the next 7, 30, 60, 90, 180 or 365 days can be chosen by selecting each item from the menu. As with the Date stamp field, you can use the calendar icons next to both the ‘end after’ and ‘end before’ fields to select exact dates for the search, or type the dates in manually. Note: Ensure that all ‘Date Stamp’, ‘Tender closing date’ and ‘Construction start date’ fields are left blank when using this field.
Click to include productlines / products / user-defined fields in search
Click this link to show all project, company and contact fields that exist in your BCI setup (set in Tools under each relevant section). Some examples of common project fields include ‘Internal project number’ or ‘Sales Rep’. This then allows for project searches to be run using these fields (e.g. use ‘Sales rep’ to find projects against which a certain Sales Representative’s name is listed). Where they have been previously defined in the Project and Quotes fields, this link will allow searches by projects with productlines and products values entered.
Projects displayed per page Select the number of projects to display in each screen (or page) of project results. From 25 to 500 may be selected, depending on how many projects are desired to be displayed per project results screen. The default value is defined in Tools and My Preferences and is commonly 300. 300 records is also the maximum number of projects that may be exported to Microsoft Excel in one go (e.g. to export 500 projects to Excel, first export the first screen with 300 projects, then click ‘next 200 projects’ and export the remaining 200 projects).
ProjectID See the ‘Basic search’ description above for details.
Project Selection Search within only Project Watchlist projects, Non-Project Watchlist, Archived, Non-archived or all projects. Searching all projects is the default. Project selection is used primarily when setting up your BCI Notifier email of saved searches. Searches can be saved to include Project Watchlist projects only (projects you are tracking) and other searches are saved to include Non-Project Watchlist projects only. This results in the single daily email from BCI each morning, listing Projects being tracked (in Project Watchlist) and un-tracked or new projects (non-Project Watchlist) separately. This removes double ups and keeps daily reports targeted. ‘Notify based on this search’ will be ticked for each saved search in this example.
Project Watchlist folder Search within a defined active project folder. This field is particularly useful when several people share a BCI login and the daily emails from BCI Notifier need to be split, displaying projects that have been updated, split by Project Watchlist folder (e.g. ‘James’ Watchlist’, ‘Mary’s Watchlist’, ‘Steve’s Watchlist’ listed separately). When a Project Search is set to ‘Project Watchlist folder’ of ‘Steve’s Watchlist’, this search will only find projects that have been added to Steve’s Watchlist. By setting a search for each team member individually, then ticking ‘Notify me on this search’ will ensure that the saved searches generate a daily BCI Notifier email with project leads divided by the person who is tracking the projects.

BCI LeadManager: User Manual
BCI LeadManager User Manual Page 18 of 59 www.bciasia.com
Project Value (million US$) Specify the project value range by filling in the maximum and/or minimum project value fields. Please note that these fields are in millions of dollars and you can input numbers only (e.g. ‘2’ for 2 million, ‘0.2’ for 2 hundred thousand). Entering a value into the minimum field is a common way to focus on larger, key projects and to reduce the volume of projects seen with each project search.
Floor Area (m2) Set the project floor area range by using the maximum and/or minimum floor area fields.
Please note that these fields are in square metres and you can input numbers only (e.g. ‘200’ for 200m
2, or ‘2000’ for 2000m
2). Note: if a minimum value is entered (i.e. ‘2000’) and
the project does not have a floor area value included in the listing, then the project will be excluded from the search.
Number of Storeys Select the above ground storeys range to include in the project search by filling in the maximum and/or minimum storeys fields (e.g. ‘2’ in minimum will include projects 2 storeys and greater only). Please note that you can input numbers only. Note: if a minimum value is entered (i.e. ‘2’) and the project does not have the number of storeys included in the listing, then the project will be excluded from the search.
Green Building Define what types of Green Building certification to include in the search. Includes those projects that have been completed and assessed by the local Green Building Council as having met the local Green rating.
Country/Province Select the country/province to include in your search.
City/Town Enter the name of a city or town to find projects only within that city/town. Only one town may be entered per search. Note: When searching by town, ensure Country/Province to default, or these selections will override any City/Town entry.
Postcode Enter a postcode to find projects within that postcode only (e.g. ‘5000). Postcode ranges can be entered with a dash between them (e.g. ‘5000-5200’). Multiple postcodes and/or ranges can be entered, separated by a comma (e.g. ‘5000-5200,5450,5600-5800’). Note: When searching by Postcode, ensure Country, Province, City, Town are all set to default, or these selections will override Postcodes selected.
5. WORKING WITH PROJECT SEARCH RESULTS
The results of any project search will be displayed in the same format to projects in the Latest Projects screen. Please see the
Latest Projects section for full description of each element listed.
The Project Search results screen

BCI LeadManager: User Manual
BCI LeadManager User Manual Page 19 of 59 www.bciasia.com
5.1 THE PROJECT LISTING TABLE
All project search results will be displayed in a table, listed with the most recently updated at the top. Please see section ‘3.
Latest Projects’ for a full description of each project element displayed on this screen, each button and each available Action.
5.2 PROJECT SEARCH TIPS
Some useful tips when working with project search results (and general project lists) are outlined below. Please contact your
BCI Client Liaison Consultant if you would like more assistance with either saving up your Project searches, setting up BCI
Notifier or for more information on the next BCI Academy course running in your region.
Project list tip Details
Print selected projects An effective way to share BCI projects with others in your team, your Distributors or your Channel partners is to select (tick) the projects you require, click ‘Actions’ and click ‘Print Preview’. Internet Explorer users will then click ‘File’, ‘Send’ and ‘Page by email’ (others will simply right-click in the text body, click ‘select all’, right-click and select ‘copy’, open a new email, right-click and click ‘paste’).
This emails selected projects in one smart phone and laptop-friendly list.
Sort by project type Sorting by clicking the ‘up’ or ‘down’ arrow next to the ‘Project Type’ column is helpful for quickly grouping all ‘Apartments’ or ‘Mine’ projects together in the listing.
Sort results by value A handy tip is to click the ‘up’ arrow next to the ‘Value’ column, to sort the current project listing from largest to smallest.
Sort results by stage Click the ‘down’ arrow next to the ‘Stage’ column in order to sort projects listed from beginning of construction stages to end (e.g. Design to Construction). Click the ‘up’ arrow to show Construction stage projects at the top of the list.
Sort results by location Sort projects by Country/Province by clicking the ‘up’ or ‘down’ arrow next to ‘Location’.
Sort by stage, then value Sorting by Stage then value can be a useful way to review current project activity. Click ‘Sort’, choose ‘Stage’ first and ‘Value’ second, then select ‘ASC’ (ascending) or ‘DESC’ (descending) for each aspect. Click ‘Sort’ to apply this sort to the project results.
Export projects to Excel Export projects to MS Excel by selecting (ticking) them, clicking ‘Actions’ and clicking ‘Export to Excel’. Note: if a security warning appears, click CTRL and hold for the duration of clicking ‘Export to Excel’, ‘Yes’ and ‘OK’, releasing CTRL when the spreadsheet appears. Contact your BCI Client Liaison Consultant for assistance with setting up your Internet Settings to allow exporting from BCI to Excel.
6. THE PROJECT RECORD
Clicking on the name of a project in any screen of BCI will display its project record. Each project record lists all available
information regarding a project’s location, value, scope of works, contact details of involved companies and any notes/follow ups
that have been added to the project.
Example: A Project Record

BCI LeadManager: User Manual
BCI LeadManager User Manual Page 20 of 59 www.bciasia.com
6.1 PROJECT MENU BAR
At the top of every project record is a series of useful buttons, when working with projects in BCI.
Project menu item Purpose
Add to Watch List Add the currently displayed project to your Project Watchlist. Member accounts will see the screen reload and have the project placed into their default ‘Fresh Leads’ Project Watch List folder. Manager accounts will see a new Add to Watch List window which will list each BCI user in your team. ‘Myself’ is the default option so simply clicking ‘Go’ will add this project to the default ‘Fresh leads’ Watch List Project folder. Clicking the ‘Fresh leads’ drop-down menu to the right of ‘Myself’ will allow another Watch List Project folder to be selected and the project to be filed in an appropriate folder. Ticking another BCI user’s name in the list will automatically add this project to their Project Watchlist also. Each user ticked in this way will then receive an email notification when the watched project is next updated.
Remove from Watch List Removes the currently displayed project from your Project Watchlist. Ticking other BCI user names from the list of your team will ensure that the project is no longer tracked for them either. Each user who has a project removed from their Project Watchlist will no longer receive email notifications when the project is next updated.
Add to Quoted Tag projects you have quoted and manage them one one screen, in the ‘Quoted Projects’ folder.
Export to Excel Exports selected (ticked) follow ups to Microsoft Excel. Ticking one or more follow ups (or the top check box to select/deselect the whole list) and clicking Export to Excel will generate a new spreadsheet. Press and hold the CTRL key for 20 seconds, while clicking Export to Excel, OK and Yes if a windows security message prevents the spreadsheet loading the first time. Please contact your BCI Client Liaison Consultant if you require assistance.
Export to Lotus Export selected (ticked) follow ups to Lotus 1-2-3. Ticking one or more follow ups (or the top check box to select/deselect the whole list) and clicking Export to Lotus 1-2-3 will generate a new spreadsheet. Press and hold the CTRL key for 20 seconds, while clicking Export to Lotus 1-2-3, OK and Yes if a windows security message prevents the spreadsheet loading the first time. Note: Please contact your BCI Client Liaison Consultant if you require assistance.
Add Role/Tender Customise this project by adding a company role that may not be listed as yet. This will only be seen by BCI users in your team. Clicking Add Role/Tender opens a window where the ‘Role’ can be selected (e.g. Acoustic Consultant). Remarks can be added and then clicking ‘Search BCI Contact’ and typing a company name finds the company if it is listed in BCI. Click ‘save’ to save this role against the project. The new role will be listed with the icon ‘user defined’ next to the company name.
Archive Selected Project Archive this project, hiding it from future project searches and also removing it automatically from your Project Watchlist (where applicable). Archived projects will not appear in future project searches but can be found and ‘Unarchived’ by clicking Project Search, clicking Advanced and selecting Archived projects from the Project Selection, then clicking Go. This will display a list of all Archived projects. Ticking project(s), clicking Actions and ‘Unarchive selected projects’ will return selected project(s) to normal project status.
Set/Undo Project Notification This is where you you set/undo your project notification. Updates on project notification will be sent via email.
Print Preview This red button displays a print preview window with all project details in a printer-friendly format. To email this print preview to your team or to a distributor/fabricator, click ‘File’ (top left window menu), ‘Send’ and ‘Page by Email’ to copy and paste all project information into a new email. You may like to then copy and paste the Project name into the new email’s subject line, so that the email purpose is clear.
Previous project Where this project was selected from a list of projects, clicking previous project will display the prior project in the list.
Next project Where this project was selected from a list of projects, clicking next project will display the following project in the list.

BCI LeadManager: User Manual
BCI LeadManager User Manual Page 21 of 59 www.bciasia.com
6.2 PROJECT SUMMARY TABLE
The so-called ‘vital statistics’ of each project will be listed first in a table, where the value, stage, most recent update and
location of the project can be checked at a glance.
The Project summary section of a project record
Each of these elements is described below.
Project List item Purpose
Version The project version reflects the number of updates the project has received. The version increases by one when a BCI Researcher discovers that a key element of the project has changed (e.g. Stage moves from Tender to Contract Awarded).
Published Date The date the most recent project update was published to BCI.
First Published The date information was first published regarding this project.
Project Stage The current construction stage of the project.
Project Value The total project value, in millions (e.g.US $0.5m is US$500,000 and US$1000m is US$1 billion). Note: Includes all elements of construction, so it is likely that each Building Element you may be interested in will form a percentage of this total project value.
Project Status The Status of the project. Example : On-track, Deferred or Abandoned.
Const Start The projected date that construction will commence on the project. Note: As with any information, the BCI Research team reports only what is conveyed and will endeavour to update this date should it change during the course of the project.
Const End The projected date that construction will be completed on the project
Time stamp The date of most recent project update, when the BCI Researcher discovered a change in a key element of the project. The version will likely have increased by one and the project will have moved to the top of your list as most recently updated.
Green Building Rating Lists the Green Building certification (if any) of the project. This certification indicates when projects have been assessed by the Green Building Council as having met the Green Building rating.
Town / Province The name of the Town the project is located within.
Region The Region within which the project is located.
Floor Area (m2) The project floor area of the project (if known), in square metres (m
2).
Site Area The total estimated size of the site on which construction will occur, in square metres (m2).
Note: this value is generally obtained as a project moves through Development Approval, into Documentation as this is when the scope of works is being finalised.
Storeys The number of storeys (levels) of the project.
Category Lists the category, or type of construction involved in this project. If several categories are listed, it is because several types of buildings/operations are involved in this project (e.g. ‘Offices/Commercial | Residential | Retail & Catering’ would be listed for a Retirement Village with a business centre and cafe).

BCI LeadManager: User Manual
BCI LeadManager User Manual Page 22 of 59 www.bciasia.com
Subcategory Lists the subcategory involved in this project. As with category listings, where several types of construction are involved, several subcategories will be listed (e.g. ‘Shops, Shopping Centres, serviced apartments)
ProjectID The project’s unique ID.
Ownership type Displays the dominant ownership structure of the project. ‘Private’ being privately owned projects, ‘Joint venture’ including projects with both private and public ownership and lastly ‘Government’ being those projects with public funding.
Development type The type of development planned. Options are ‘Alteration/Addition’ of existing structure(s), ‘Extension’, ‘Interior design’ of existing structure(s), ‘New’ structure(s) being constructed.
6.3 PROJECT TITLE
Lists the project type, project name and gives both address and a map to locate the project.
Example: A project title
Project title element Purpose
Project name Listed in the same format as on a multiple project listing, this includes the name of the project.
Address and map Lists the physical address for the project. Clicking on map icon next to it will generate a map for the project. Note : Where a project location is only known to a township/regional area, the map willl show only the town location. Where a project has multiple sites, the mapping may not display correctly.
6.4 PROJECT DETAILS
The project details section lists the most recent update, scope of works and building elements included on a project.
Example: Project details, showing both scope of works and building elements
BCI LeadManager: User Manual
BCI LeadManager User Manual Page 23 of 59 www.bciasia.com
Project details item Purpose
Scope of works
The set of bullet points in the project details box will detail the scope of works associated with this project. The BCI Research team will only list what is discussed with contacts related to the project (e.g. the Architect) or building aspects that have been seen in Tender documents (e.g. 500 Apartments, 20 storeys, 150 bed hotel...).
Building elements Typically the in the project details section will include all known building elements required in the project. This listis limited to only those building elements specifically mentioned to the BCI Research team over the phone, and/or those researched from the Tender documents for the project. Although a building element may not be listed, it may still be required in the project.
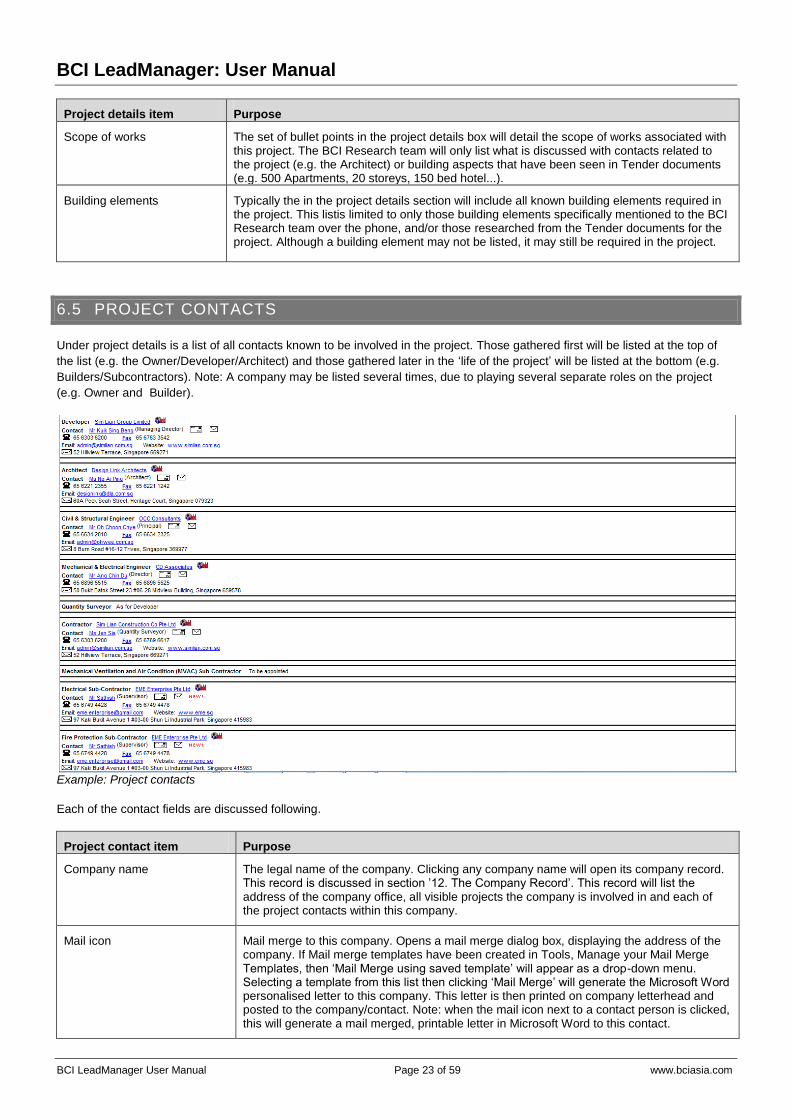
6.5 PROJECT CONTACTS
Under project details is a list of all contacts known to be involved in the project. Those gathered first will be listed at the top of
the list (e.g. the Owner/Developer/Architect) and those gathered later in the ‘life of the project’ will be listed at the bottom (e.g.
Builders/Subcontractors). Note: A company may be listed several times, due to playing several separate roles on the project
(e.g. Owner and Builder).
Example: Project contacts
Each of the contact fields are discussed following.
Project contact item Purpose
Company name The legal name of the company. Clicking any company name will open its company record. This record is discussed in section ’12. The Company Record’. This record will list the address of the company office, all visible projects the company is involved in and each of the project contacts within this company.
Mail icon Mail merge to this company. Opens a mail merge dialog box, displaying the address of the company. If Mail merge templates have been created in Tools, Manage your Mail Merge Templates, then ‘Mail Merge using saved template’ will appear as a drop-down menu. Selecting a template from this list then clicking ‘Mail Merge’ will generate the Microsoft Word personalised letter to this company. This letter is then printed on company letterhead and posted to the company/contact. Note: when the mail icon next to a contact person is clicked, this will generate a mail merged, printable letter in Microsoft Word to this contact.

BCI LeadManager: User Manual
BCI LeadManager User Manual Page 24 of 59 www.bciasia.com
Envelope icon Generate address labels. The envelope icon (to the right of the mail merge icon) will open the generate address label window, where the ‘Label format’ drop-down menu allows the label type/size to be selected, the font size and type and next starts the print process. In this way, an address label can be printed onto self-adhesive labels.
Contact Where available, the contact field will list the full name of the project contact within the listed company. Clicking the name of any contact will open a contact record, listing all contact details and with the option of adding notes/follow ups related to this contact.
Telephone Lists the known phone number for the company and/or contact.
Fax The fax number for the company.
Website: The company website, if applicable.
Address The physical address of the company office involved in this project. Note: Offices in other states will be listed where companies are involved in projects interstate.
Contact remarks Lists any comments from the BCI Research team (e.g. ‘No longer involved’, ‘Do not call’ or ‘Tender closing date January’).
6.6 PROJECT CRM FEATURES
At the foot of all Project records, ‘CRM’ (Customer Relationship Management) features are available. Here Notes, Follow-ups,
Quotations and Files can be added to each project. Note: These features are only available in BCI LeadManager.
Project button Purpose
Add Note Adds a new Note to the current project. Simply enter your note text into the ‘Note for this project’ field. Your BCI Account Management team suggest entering both the date and your initials to each note, making it easier for others in your team to identify who is working on this project (e.g. ‘24/2 OH Sent quote to Michael’). Set the ‘Visibility’ of this note to ‘Myself only’ if you want to be the only BCI user in your team to see this note. Set ‘The Whole Group’ (default) if your team need to be able to view the note. This is recommended.
Tick ‘Add to Watchlist / Remove from Watchlist’ if you would like to have this project added to your Project Watchlist when saving the note. This note can be attached to a company related to this project and also to the contact person at that company, by ticking ‘Related Contact/Company’ and choosing a person from the drop-down menu. Click ‘Save Notes’ to save or ‘Cancel’ to close.
Note: ‘Insert using commonly used notes’ displays as a drop-down at the top of each Add Note window (if previously set up Commonly used notes in the Tools menu). Selecting a commonly used note from the list will automatically paste this text into the ‘Note for this project’ field.
Add Follow-Up Task Adds a Follow up to this project. This Follow up will be saved in your ‘Follow ups’ screen. If selected, the new Follow up can be exported directly to your calendar application (generally Microsoft Outlook). See section ‘9.3 Adding a Follow up to a project’ for full details of this window and its options.
Add Project Enquiry Send an enquiry to the BCI Research team with regard to the specific project.
Upload New File Used to upload and attach files to a project. Click ‘Browse’ in the Upload New File window, to select the file to be uploaded. Add some text to ‘Description’ if needed then click ‘Submit’ to upload the file. Visibility can be set to ‘Myself only’ or ‘The Whole Group’, as with other notes. Note: Only files up to 800kb in size can be uploaded to projects in BCI LeadManager.

BCI LeadManager: User Manual
BCI LeadManager User Manual Page 25 of 59 www.bciasia.com
7. PROJECT WATCHLIST
Tracking projects of interest is best achieved by adding projects to Project Watchlist. Clicking the Project Watchlist icon then
displays all projects currently being tracked. This list is a convenient place to quickly find projects you are tracking and when
each of these projects is updated by the BCI Research team, you will receive an email. You will be first to know when the
project changes.
The Project Watchlist screen
When Notifications are sent
Email notifications will include full and updated details of the project and will be sent to you within 15 minutes of the update
being made.1
Customise your BCI Notifier setup
Whether or not BCI notifies you via email when a project you are tracking changes is controlled by settings made in the ‘BCI
Notifier’ title menu (see section ’18. BCI Notifier’ for more details).
Your BCI Client Liaison Consultant will be able to assist you with setting up BCI Notifier to suit your needs.
7.1 PROJECT WATCHLIST MENU TITLE BAR
Each button, check box option and link above projects in the Project Watchlist is outlined below.
Project list item Purpose
Total projects The number of projects currently being watched.
Projects/page The number of Project Watchlist displayed per page (per screen).
Default projects/page This drop-down menu sets the number of projects to be displayed per page. Note: 300 is the maximum number able to be exported to Microsoft Excel at once. Therefore to export 500 projects, set 300, run the export by ticking the top box, clicking Actions and Export to Excel. Save this spreadsheet as a new name (perhaps in your My Documents folder). Then return to this page, click ‘next 200 projects’ and select, actions, export once more. These two spreadsheets can then be combined to give a list of all 500 projects.
1 Average timing of project update emails is every 5-10 minutes, but may vary during extremely busy periods.

BCI LeadManager: User Manual
BCI LeadManager User Manual Page 26 of 59 www.bciasia.com
Move to Allows selected (ticked) projects to be moved to another Project Watchlist folder. Once projects are selected from the list, simply click the ‘Move to’ drop-down menu, select a Project Watchlist folder and click ‘OK.
Clicking the ‘OK’ button will confirm the action and move selected projects to the selected Project Watchlist folder. To then view the destination folder, you can click the ‘Folders:’ drop-down menu and select the destination folder from the list.
Print this list Opens a window with a printable copy of the current table of quoted projects. Clicking the printer icon on this new window generates the printer dialog box. Select your printer or PDF writer to print to a PDF file and to save it to a folder.
Actions menu See section ‘3. Latest Projects’, for an outline of the function of each menu item. Most important to the Project Watchlist Action menu is the ‘Remove from Project Watchlist’ option, which will remove all selected (ticked) projects from this list and therefore this screen. Any projects removed from the Project Watchlist list will no longer be tracked and updates on removed projects will no longer be emailed to you. Another commonly used option when removing a project is ‘Archive selected projects’. This will remove the project from the list and will also hide the project from all future searches.
Sort See subsection ‘3.3 The Sort Menu’ in section ‘3. Latest Projects’ of this document for a full explanation of the ‘Sort’ menu options.
7.2 PROJECT WATCHLIST TABLE
The Project Watchlist table lists all current projects being tracked by your BCI account. The list is sorted by default, with most
recently updated (those with the newest ‘date stamp’) at the top of the list.
Please see subsection ‘3.5 Project list details’ for a full description of each project aspect listed in the Project Watchlist table.
7.3 PROJECT LIST MENU BAR
Project search results are displayed in a standard table. Above this table is a menu bar of options which control the number of
projects shown per page and allow actions to be run on these projects.
Project list item Purpose
Total projects Displays the total number of projects found by a given search.
Projects/page... next 50 Indicates the number of projects being shown per page. If the total number of projects found is greater than the number set in Default projects/page, then ‘next ...’ will be displayed and clicking this link will show the next page of project results.
Default projects/page This drop-down menu indicates the number of projects displayed per page. Increase this number to see more projects at once and to print or export them in one action. Note: Currently the maximum able to be exported to Microsoft Excel at once is 300, so set this value if you are planning to export projects to a spreadsheet.
Print this list Displays a print preview of the projects currently displayed on the screen. Note: Any project ‘sorts’ (for example by project value or project stage) applied to the project list are reflected in the print preview. One company role (e.g. Builder or Architect) can be displayed next to every project when using print this list. This is set up in Tools and Print project list options.
Actions Clicking Actions will display a menu of actions that are able to be run on selected (checked) projects). Checking the boxes next to 3 projects then clicking Actions will display the options able to be run on these together. See the next section for a description of each action menu option.
Sort Displays advanced sorting options for sorting the current project listing. Once options are selected, Sort project list is clicked to apply the sort. Sort menu options are discussed in detail a following section.

BCI LeadManager: User Manual
BCI LeadManager User Manual Page 27 of 59 www.bciasia.com
7.4 THE ACTIONS MENU
The ‘Actions’ menu allows you to run actions on projects that have been selected (ticked) on the project listing, including ‘Print
Preview’, ‘Add to project watchlist’ and ‘Archive’.
Please see subsection ‘3.2 The Actions Menu’ in section ‘3. Latest Projects’ for a full description of each option on the ‘Actions’
menu.
7.5 THE SORT MENU
Clicking the ‘Sort’ button displays advanced sort options for a project listing. This sets the ‘sort by, then by’ process and applies
this sort to a project listing. Sorting your Project Watchlist is helpful when wanting to view largest projects first, or see projects
updated most recently first, for example. See section ‘3.3 The Sort menu’ for a full description of each option on the ‘Sort’ menu.
7.6 PROJECT WATCHLIST ICONS
Project icons are used in BCI to indicate quickly if a project is Green Building rated, has been added to your Project Watchlist
and more. These icons are explained in subsection ‘3.4 Project Icons’ in section ‘3. Latest Projects’.
8. QUOTED PROJECTS
The Quoted projects screen displays a list of all projects that have been tagged as quoted (by ticking them and through the
Actions menu selecting ‘add to quoted projects’). This list is a handy way to track all projects that have been quoted and to keep
that list in one place.
These projects are likely to have also been added to your Project Watchlist and perhaps even a Project Watchlist folder
separately, for tracking future project updates.
The Quoted Projects screen

BCI LeadManager: User Manual
BCI LeadManager User Manual Page 28 of 59 www.bciasia.com
8.1 QUOTED PROJECTS MENU BAR
Each of the buttons, check box options and links above the list of quoted projects is outlined below.
Project list item Purpose
Total projects The number of projects currently tagged as quoted.
Projects/page The number of quoted projects displayed per page (per screen).
Default projects/page This drop-down menu sets the number of projects to be displayed per page. Note: 300 is the maximum number able to be exported to Microsoft Excel at once. Therefore to export 500 projects, set 300, run the export by ticking the top box, clicking Actions and Export to Excel. Save this spreadsheet as a new name (perhaps in your My Documents folder). Then return to this page, click ‘next 200 projects’ and select, actions, export once more. These two spreadsheets can then be combined to give a list of all 500 projects.
Print this list Opens a window with a printable copy of the current table of quoted projects. Clicking the printer icon on this new window generates the printer dialog box. Select your printer or PDF writer to print to a PDF file and to save it to a folder.
Actions menu See subsection ‘3.2 The Actions Menu’ in section ‘3. Latest Projects’ for a full explanation of the ‘Actions’ menu options. Most important to the Quoted projects Action menu is the ‘Remove from Quoted projects’ option, which will remove all selected (ticked) projects from this list and therefore this screen.
Sort See subsection ‘3.3 The Sort Menu’ in section ‘3. Latest Projects’ for a full explanation of the ‘Sort’ menu options.
8.2 QUOTED PROJECTS LIST ITEMS
All projects currently marked as ‘quoted’ will be listed in order from most recent update to oldest update. This list forms a handy
way to check projects that you have quoted. Each project can then be opened to see the most recent updated information on
each. Please see section ‘5. Working with Project Search Results’ for a detailed explanation of each project list item.
9. FOLLOW UPS
This listing displays all currently active follow ups in one table. From this screen follow ups can be edited, the projects they each
relate to can be reviewed and each can be marked as completed when done.
The Follow ups screen
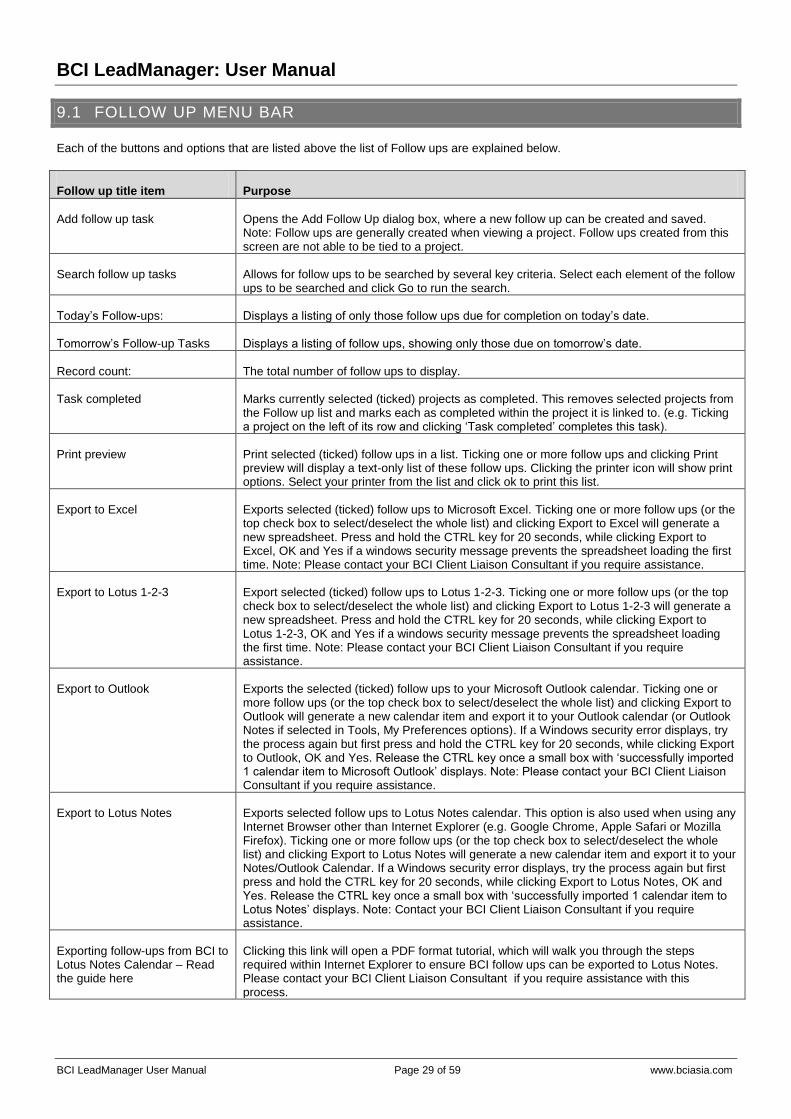
BCI LeadManager: User Manual
BCI LeadManager User Manual Page 29 of 59 www.bciasia.com
9.1 FOLLOW UP MENU BAR
Each of the buttons and options that are listed above the list of Follow ups are explained below.
Follow up title item Purpose
Add follow up task Opens the Add Follow Up dialog box, where a new follow up can be created and saved. Note: Follow ups are generally created when viewing a project. Follow ups created from this screen are not able to be tied to a project.
Search follow up tasks Allows for follow ups to be searched by several key criteria. Select each element of the follow ups to be searched and click Go to run the search.
Today’s Follow-ups: Displays a listing of only those follow ups due for completion on today’s date.
Tomorrow’s Follow-up Tasks Displays a listing of follow ups, showing only those due on tomorrow’s date.
Record count: The total number of follow ups to display.
Task completed Marks currently selected (ticked) projects as completed. This removes selected projects from the Follow up list and marks each as completed within the project it is linked to. (e.g. Ticking a project on the left of its row and clicking ‘Task completed’ completes this task).
Print preview Print selected (ticked) follow ups in a list. Ticking one or more follow ups and clicking Print preview will display a text-only list of these follow ups. Clicking the printer icon will show print options. Select your printer from the list and click ok to print this list.
Export to Excel Exports selected (ticked) follow ups to Microsoft Excel. Ticking one or more follow ups (or the top check box to select/deselect the whole list) and clicking Export to Excel will generate a new spreadsheet. Press and hold the CTRL key for 20 seconds, while clicking Export to Excel, OK and Yes if a windows security message prevents the spreadsheet loading the first time. Note: Please contact your BCI Client Liaison Consultant if you require assistance.
Export to Lotus 1-2-3 Export selected (ticked) follow ups to Lotus 1-2-3. Ticking one or more follow ups (or the top check box to select/deselect the whole list) and clicking Export to Lotus 1-2-3 will generate a new spreadsheet. Press and hold the CTRL key for 20 seconds, while clicking Export to Lotus 1-2-3, OK and Yes if a windows security message prevents the spreadsheet loading the first time. Note: Please contact your BCI Client Liaison Consultant if you require assistance.
Export to Outlook Exports the selected (ticked) follow ups to your Microsoft Outlook calendar. Ticking one or more follow ups (or the top check box to select/deselect the whole list) and clicking Export to Outlook will generate a new calendar item and export it to your Outlook calendar (or Outlook Notes if selected in Tools, My Preferences options). If a Windows security error displays, try the process again but first press and hold the CTRL key for 20 seconds, while clicking Export to Outlook, OK and Yes. Release the CTRL key once a small box with ‘successfully imported 1 calendar item to Microsoft Outlook’ displays. Note: Please contact your BCI Client Liaison Consultant if you require assistance.
Export to Lotus Notes Exports selected follow ups to Lotus Notes calendar. This option is also used when using any Internet Browser other than Internet Explorer (e.g. Google Chrome, Apple Safari or Mozilla Firefox). Ticking one or more follow ups (or the top check box to select/deselect the whole list) and clicking Export to Lotus Notes will generate a new calendar item and export it to your Notes/Outlook Calendar. If a Windows security error displays, try the process again but first press and hold the CTRL key for 20 seconds, while clicking Export to Lotus Notes, OK and Yes. Release the CTRL key once a small box with ‘successfully imported 1 calendar item to Lotus Notes’ displays. Note: Contact your BCI Client Liaison Consultant if you require assistance.
Exporting follow-ups from BCI to Lotus Notes Calendar – Read the guide here
Clicking this link will open a PDF format tutorial, which will walk you through the steps required within Internet Explorer to ensure BCI follow ups can be exported to Lotus Notes. Please contact your BCI Client Liaison Consultant if you require assistance with this process.

BCI LeadManager: User Manual
BCI LeadManager User Manual Page 30 of 59 www.bciasia.com
9.2 FOLLOW UP LIST ITEMS
This table lists each currently active follow up (those not yet completed). This table will only list follow ups assigned to your BCI
login, whether each follow up was created by you or another in the team who assigned it to you. Note: The Follow up list can be
sorted by each title by clicking on either the up or down arrow to the right of each title name (e.g. click the down arrow next to
‘Subject’ to sort the list by Subject, A to Z).
Follow up list item Purpose
Check box Checking this box selects the project for actions to be run (from the Actions menu). Clicking the check box in the title bar of the table will select all projects currently displayed on the page, clicking it to untick it will deselect all projects currently displayed. Selecting a project (or projects) by ticking the check box next to each name and then clicking ‘Completed task’ will mark these follow up tasks as completed, removing them from this list. Note: Completed follow ups are still listed against the projects they were initially created within.
Subject Lists the subject of the Follow up. Where many people share and use BCI in a team, it is helpful to include your initials at the start of each Follow up. Clicking the subject of any follow up will open the follow up window and allow export to outlook or lotus notes calendar, editing of the text and/or changing of the decision maker (displayed in the contact field on this table).
Date The due date set for each follow up.
Status The status of the follow up. ‘Active’ refers to a follow up that has not yet been ticked and marked as ‘Task completed’.
To Who the follow up is assigned to (by checking their BCI usernames in the Add follow up dialog box during creation).
By Who created the follow up. This lists the BCI username in your team who has created the follow up.
Contact The full name of the contact selected when creating the follow up (from the ‘Select decision maker’ drop-down menu). Clicking a contact name will display that person’s contact details.
Related Project Lists the name of the project within which this follow up has been created. Clicking the name of a related project will display that project’s details screen.
9.3 ADDING A FOLLOW UP TO A PROJECT
Clicking the ‘Add Follow Up Task’ button at the bottom of any project record, will open a window with options for your new
Follow up. Each option is outlined below.
Add Follow up item Purpose
Follow-up Subject Enter the subject of the Follow up. This is the visible text in BCI for this Follow-up.
Follow-up Description Further details may be entered here. Note: This text is not visible to others in your team, unless the open the individual Follow up.
Contact by Select the type of contact to be made, whether by phone, email or meeting.
Related Project This field lists the project this Follow up is being added to.
Due Date / Due time Enter the date for this follow up manually, or click the calendar icon to choose a date quickly. Then select the time of day for the Follow up.
Status ‘Active’ displays for as yet uncompleted Follow ups. Select ‘Completed’ to complete a Follow up, then save the Follow up.
Assigned to Lists to whom the Follow up is assigned. To assign others, tick the names of any other BCI users in your team, click ‘Clear emails’ and click ‘Save Follow up task’. When this Follow up is saved they will each see this Follow up in their ‘Follow Ups’ screen. Note: To re-assign a follow up from yourself to another in the team (perhaps where a project has been handed on to another in your team to manage), simply untick ‘Myself’ (representing your login), tick their name and click ‘Clear emails’ and save. This removes the Follow up from your ‘Follow ups’ listing and adds it to the recipient’s ‘Follow ups’ listing.
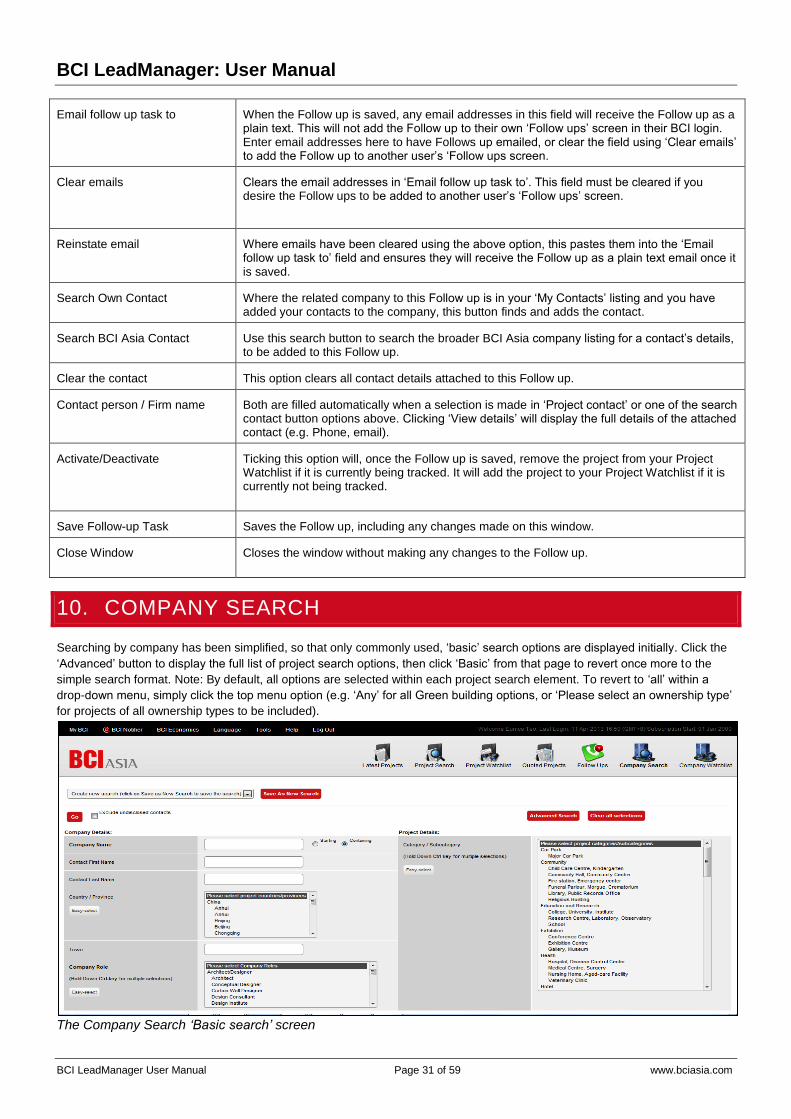
BCI LeadManager: User Manual
BCI LeadManager User Manual Page 31 of 59 www.bciasia.com
Email follow up task to When the Follow up is saved, any email addresses in this field will receive the Follow up as a plain text. This will not add the Follow up to their own ‘Follow ups’ screen in their BCI login. Enter email addresses here to have Follows up emailed, or clear the field using ‘Clear emails’ to add the Follow up to another user’s ‘Follow ups screen.
Clear emails Clears the email addresses in ‘Email follow up task to’. This field must be cleared if you desire the Follow ups to be added to another user’s ‘Follow ups’ screen.
Reinstate email Where emails have been cleared using the above option, this pastes them into the ‘Email follow up task to’ field and ensures they will receive the Follow up as a plain text email once it is saved.
Search Own Contact Where the related company to this Follow up is in your ‘My Contacts’ listing and you have added your contacts to the company, this button finds and adds the contact.
Search BCI Asia Contact Use this search button to search the broader BCI Asia company listing for a contact’s details, to be added to this Follow up.
Clear the contact This option clears all contact details attached to this Follow up.
Contact person / Firm name Both are filled automatically when a selection is made in ‘Project contact’ or one of the search contact button options above. Clicking ‘View details’ will display the full details of the attached contact (e.g. Phone, email).
Activate/Deactivate Ticking this option will, once the Follow up is saved, remove the project from your Project Watchlist if it is currently being tracked. It will add the project to your Project Watchlist if it is currently not being tracked.
Save Follow-up Task Saves the Follow up, including any changes made on this window.
Close Window Closes the window without making any changes to the Follow up.
10. COMPANY SEARCH
Searching by company has been simplified, so that only commonly used, ‘basic’ search options are displayed initially. Click the
‘Advanced’ button to display the full list of project search options, then click ‘Basic’ from that page to revert once more to the
simple search format. Note: By default, all options are selected within each project search element. To revert to ‘all’ within a
drop-down menu, simply click the top menu option (e.g. ‘Any’ for all Green building options, or ‘Please select an ownership type’
for projects of all ownership types to be included).
The Company Search ‘Basic search’ screen

BCI LeadManager: User Manual
BCI LeadManager User Manual Page 32 of 59 www.bciasia.com
10.1 COMPANY SEARCH MENU BAR
The first two rows of the Company Search page control how the search will be run.
Company Search top menu item
Purpose
Select Saved Search Click this drop-down menu to view a list of all previously saved company searches. Select a search by clicking it on the list and then either modify it (such as changing ‘date range’) or just click Go to run this search. Note: Selecting Last Search Performed (saved by system) will display details of the company search most recently run search within your BCI login.
Go Pressing Go will run a company search based on the details entered on this page.
Save as new search After entering company search details, clicking ‘Save as new search’ will show a box that allows a name to be entered and once that is done, will save the current search settings under this name. This search can now be found in the ‘Select Saved Search’ drop-down menu for future company searches.
Save search Saves changes to the current search and over-writes existing settings for this search. Much like in Microsoft Word, this button will result in a naming window, where the search can be renamed, or clicking ‘OK’ will save any changes over the existing search. Clicking ‘cancel’ in this window will close the window and not make any changes to your company search.
Share across group Ticking this option will save this company search so that it is visible to all BCI users in your group. Exercise caution with this option because this may result in large lists of saved searches for others in your group, searches that may or may not suit their needs.
Advanced When in Basic (default) search mode, displays the full listing of Company Search options.
Basic When in Advanced search mode, displays the short listing of Company Search options.
Clear all selections Clears all selections and text entered into the company search page. This is a helpful way to clear out a previous search and start fresh for a new search.
The menu items at the bottom of the screen are also described below.
Company Search menu item Purpose
Go Pressing ‘Go’ will run a company search based on the details entered on this page.
Exclude undisclosed contacts Ticking this check box will exclude all contacts within companies that are listed as ‘undisclosed’. These are the contacts who have been contacted by our Research team and advised us to not list their details. Running a company search and excluding undisclosed contacts has the benefit of generating a more concise list, showing only those contacts for whom BCI has a name. This assists with generating an Excel spreadsheet for running a Mail Merge.
Click to include user-defined fields
This option displays all previously created Company fields for use in the Company search. These fields are created in Tools, Manage your Company Fields. User-defined fields can be useful for searching for company accounts by Account Manager assigned (e.g. Creating a Company field called Account Manager and adding team member name to their Accounts’ company records would mean we can enter those initials/full name into the field here and search for all accounts by each Account Manager responsible).
10.2 BASIC (DEFAULT) COMPANY SEARCH OPTIONS
When first clicking the Company Search icon, ‘basic’ mode displays with a short list of the most commonly used search fields.
Clicking the ‘Advanced’ button will expand the list to display all company search fields. Fields seen in basic and advanced mode
are described below. When in ‘Advanced search’ mode, click the ‘Basic search’ button to return to the shorter search form.
The Basic search button
Note: The left ‘Company Details’ column lists all options that relate to the company being searched for. The right ‘Project
Details’ column lists options that relate to projects being undertaken by the company being searched for.
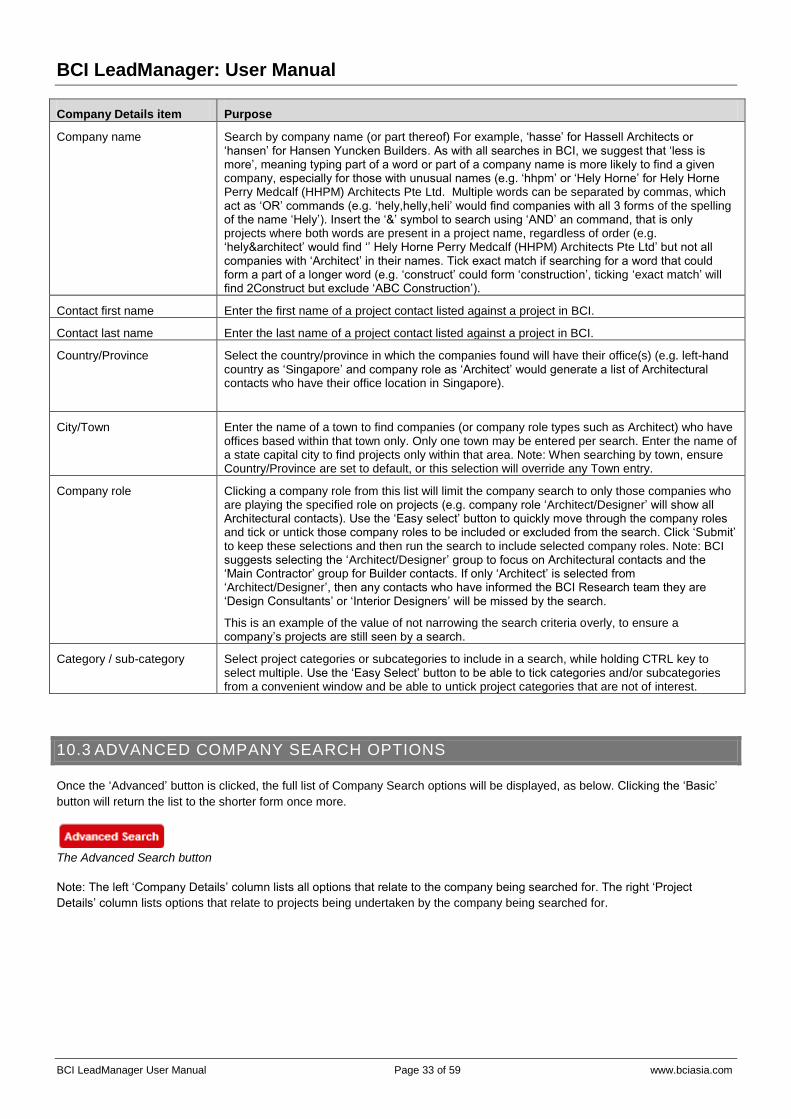
BCI LeadManager: User Manual
BCI LeadManager User Manual Page 33 of 59 www.bciasia.com
Company Details item Purpose
Company name Search by company name (or part thereof) For example, ‘hasse’ for Hassell Architects or ‘hansen’ for Hansen Yuncken Builders. As with all searches in BCI, we suggest that ‘less is more’, meaning typing part of a word or part of a company name is more likely to find a given company, especially for those with unusual names (e.g. ‘hhpm’ or ‘Hely Horne’ for Hely Horne Perry Medcalf (HHPM) Architects Pte Ltd. Multiple words can be separated by commas, which act as ‘OR’ commands (e.g. ‘hely,helly,heli’ would find companies with all 3 forms of the spelling of the name ‘Hely’). Insert the ‘&’ symbol to search using ‘AND’ an command, that is only projects where both words are present in a project name, regardless of order (e.g. ‘hely&architect’ would find ‘’ Hely Horne Perry Medcalf (HHPM) Architects Pte Ltd’ but not all companies with ‘Architect’ in their names. Tick exact match if searching for a word that could form a part of a longer word (e.g. ‘construct’ could form ‘construction’, ticking ‘exact match’ will find 2Construct but exclude ‘ABC Construction’).
Contact first name Enter the first name of a project contact listed against a project in BCI.
Contact last name Enter the last name of a project contact listed against a project in BCI.
Country/Province Select the country/province in which the companies found will have their office(s) (e.g. left-hand country as ‘Singapore’ and company role as ‘Architect’ would generate a list of Architectural contacts who have their office location in Singapore).
City/Town Enter the name of a town to find companies (or company role types such as Architect) who have offices based within that town only. Only one town may be entered per search. Enter the name of a state capital city to find projects only within that area. Note: When searching by town, ensure Country/Province are set to default, or this selection will override any Town entry.
Company role Clicking a company role from this list will limit the company search to only those companies who are playing the specified role on projects (e.g. company role ‘Architect/Designer’ will show all Architectural contacts). Use the ‘Easy select’ button to quickly move through the company roles and tick or untick those company roles to be included or excluded from the search. Click ‘Submit’ to keep these selections and then run the search to include selected company roles. Note: BCI suggests selecting the ‘Architect/Designer’ group to focus on Architectural contacts and the ‘Main Contractor’ group for Builder contacts. If only ‘Architect’ is selected from ‘Architect/Designer’, then any contacts who have informed the BCI Research team they are ‘Design Consultants’ or ‘Interior Designers’ will be missed by the search.
This is an example of the value of not narrowing the search criteria overly, to ensure a company’s projects are still seen by a search.
Category / sub-category Select project categories or subcategories to include in a search, while holding CTRL key to select multiple. Use the ‘Easy Select’ button to be able to tick categories and/or subcategories from a convenient window and be able to untick project categories that are not of interest.
10.3 ADVANCED COMPANY SEARCH OPTIONS
Once the ‘Advanced’ button is clicked, the full list of Company Search options will be displayed, as below. Clicking the ‘Basic’
button will return the list to the shorter form once more.
The Advanced Search button
Note: The left ‘Company Details’ column lists all options that relate to the company being searched for. The right ‘Project
Details’ column lists options that relate to projects being undertaken by the company being searched for.

BCI LeadManager: User Manual
BCI LeadManager User Manual Page 34 of 59 www.bciasia.com
Company Details item Purpose
Company name Search by company name or by part of company name (e.g. ‘hasse’ for Hassell Architects or ‘hansen’ for Hansen Yuncken Builders). As with all searches in BCI, we suggest that ‘less is more’, meaning typing part of a word or part of a company name is more likely to find a given company, especially for those with unusual names (e.g. ‘hhpm’ or ‘Hely Horne’ for Hely Horne Perry Medcalf (HHPM) Architects Pte Ltd. Multiple words can be separated by commas, which act as ‘OR’ commands (e.g. ‘hely,helly,heli’ would find companies with all 3 forms of the spelling of the name ‘Hely’).
Insert the ‘&’ symbol to search using ‘AND’ an command, that is only projects where both words are present in a project name, regardless of order (e.g. ‘hely&architect’ would find ‘’ Hely Horne Perry Medcalf (HHPM) Architects Pte Ltd’ but not all companies with ‘Architect’ in their names. Tick exact match if searching for a word that could form a part of a longer word (e.g. ‘construct’ could form ‘construction’, so ticking exact match will find 2Construct but exclude ‘ABC Construction’).
Contact first name Enter the first name of a project contact listed against a project in BCI.
Contact last name Enter the last name of a project contact listed against a project in BCI.
Country/Province Set the country a company must be based within. Note: ensure this field is set to the default value when searching by any smaller location field (e.g. state, region, town, address) or the country field will override all other selections and show the entire country.
City/Town Enter the name of a city/town to find companies (or company role types such as Architect) who have offices based within that town only. Only one town may be entered per search. Note: When searching by town, ensure Country, State and Region are all set to default, or these selections will override any Town entry.
Address Search for a company based on the physical location of their office. BCI suggests entering only street names rather than numbers and street types .
Postcode Enter a postcode to find companies with offices within that postcode only (e.g. ‘5000). Postcode ranges can be entered with a dash between them (e.g. ‘5000-5200’). Multiple postcodes and/or ranges can be entered, separated by a comma (e.g. ‘5000-5200,5450,5600-5800’). Note: When searching by Postcode, ensure Country, State, Region and Town are all set to default, or these selections will override Postcodes selected.
Role Clicking a company role from this list will limit the company search to only those companies who are playing the specified role on projects (e.g. company role ‘Architect/Designer’ will show all Architectural contacts). Use the ‘Easy select’ button to quickly move through the company roles and tick or untick those company roles to be included or excluded from the search. Click ‘Submit’ to keep these selections and then run the search to include selected company roles. Note: BCI suggests selecting the ‘Architect/Designer’ group to focus on Architectural contacts and the ‘Main Contractor’ group for Builder contacts. If only ‘Architect’ is selected from ‘Architect/Designer’, then any contacts who have informed the BCI Research team they are ‘Design Consultants’ or ‘Interior Designers’ will be missed by the search. This is a great example of the value of not narrowing the search criteria overly, to ensure a company’s projects are still seen by a search.
Sort by company’s total project value
Changing this value from ‘Don’t show’ to ‘In the last 12 months’ (the most popular selection) will sort all company search results to list those companies with the largest total tendered business first in the list. A commonly used field when searching for company roles such as Architect or Builder in a particular country/province (e.g. country as ‘Singapore’, company role as ‘Architect/Designer’ and sort by company’s total project value as ‘In the last 12 months’ will deliver a list of companies with the largest by Tendered business listed first.
Projects Displayed per page This drop-down menu allows the number of company records displayed by the resulting company search to be changed from 50 up to 1000. This setting of ‘1000’ is helpful when intending to export the contact list to Excel.

BCI LeadManager: User Manual
BCI LeadManager User Manual Page 35 of 59 www.bciasia.com
Project name Search by project name (e.g. ‘regional rail link’) or by part of project name, where available (e.g. ‘social house’ to find ‘social house’ and ‘social housing’). As with all searches in BCI, we suggest that ‘less is more’, meaning typing part of a word or part of a project name is more likely to find a given project, especially for those with unusual names (e.g. ‘medic’ for all ‘medical centre’ and ‘medicine plant’ named projects). Multiple words can be separated by commas, which act as ‘OR’ commands (e.g. ‘apartment,townhouse,unit’ would find projects of all 3 types). Insert the ‘&’ symbol to search using ‘AND’ an command, that is only projects where both words are present in a project name, regardless of order (e.g. ‘apartment&crest’ would find ‘crest apartments’, ‘crest two apartments’ and ‘apartments on crest’). Tick exact match if searching for a word that could form a part of a longer word (e.g. wind could form window, so ticking exact match will find ‘wind farm’ but exclude ‘windows’).
ProjectID Search within a given company for a particular Project by ProjectID. The ProjectID is a unique number assigned to each project. When a project is first added to BCI by our Research team, a ProjectID is automatically assigned and remains assigned to this project throughout the project stages. Therefore entering a ProjectID is a great way to find projects that have been printed or exported to Excel, when you wish to find if any update has been made on each project at a later date. ProjectID is also how our Research team track all queries to the Research Hotline.
Description / Keyword Include only those projects with a given description and/or keywords in the project text (e.g. Searching for ‘Hassell’ Architects (in ‘Company name’) and ‘insulation’ to find all projects that Hassell is involved in, where Insulation is listed as a building element).
For searching multiple keywords, please separate keywords with commas (as with project type/name searching, commas function as ‘OR’ commands). The maximum number of keywords in each search 3 (e.g. ‘insulation, car park, fire prevention’ would find projects by particular companies, with any of these building elements included).
Country/Province As opposed to ‘Country/Province’ on the left-hand ‘Company details’ side of this screen, the right-hand ‘Country/Province’ field refers to including only projects which are based in a particular state in the search. Several countries/province can be selected by holding CTRL while clicking each to include in the search.
Postcode Enter a postcode to find companies with offices within that postcode only (e.g. ‘5000). Postcode ranges can be entered with a dash between them (e.g. ‘5000-5200’). Multiple postcodes and/or ranges can be entered, separated by a comma (e.g. ‘5000-5200,5450,5600-5800’). Note: When searching by Postcode, ensure Country, State, Region and Town are all set to default, or these selections will override Postcodes selected.
Project value (million US$) Selects the minimum and if desired maximum values of projects to be displayed as a result of this company search.
This field can be useful when searching for a given project by a large Architect or Builder (e.g. company name ‘bovis’ and project value minimum ‘20’ would generate a list of projects Bovis Lend Lease is associated with but only show those projects over US$20million in value. This would make finding a large project of Bovis’ far quicker than looking through all projects they are involved in).
Project category / sub-category
Select project categories or subcategories to include in a search, while holding CTRL key to select multiple (e.g. ‘residential & serviced aprtments’ would include all projects within this category). Use the ‘Easy Select’ button to be able to tick categories and/or subcategories from a convenient window and be able to untick project categories that are not of interest.
Project Stage Select project stages to include in a search, while holding CTRL key to select multiple. Use the ‘Easy Select’ button to be able to tick stages from a convenient window and be able to untick those that are not of interest.
Company Tender Status Limit the company search to projects from the default ‘any’ to projects that have been won (‘only winning tenders’), undecided (‘only undecided tenders’) or lost (‘only lost tenders’). This option is most useful for Builder searches and when selecting ‘only won tenders’ as it focuses on Builder Tenders won, not Design Tenders (e.g. company role as ‘Main contractor’ and company tender status as ‘only won tenders’ will a list of Builders and their contact people. Opening any of these Builder records will only show projects they have been awarded the Tender for).
Development Type Select the development type to include in a search (eg.New Building, Refurbishment).

BCI LeadManager: User Manual
BCI LeadManager User Manual Page 36 of 59 www.bciasia.com
Ownership Type Select the ownership type to include in a search (eg.Commercial, Government).
Date stamp By specifying the Date Stamp Start / End Date, search for a list of projects published on BCI within a certain time period. Most commonly used is the Relative date drop-down menu, where a date range can be quickly selected, relative to today’s date (e.g. the most common company search option is ‘Last 365 days’ and will show only those projects that have been updated in the last 12 months, a current list of projects that a particular company has on the books).
The default value is ‘subscription start’, which will include projects added or updated on BCI since the beginning of your subscription with BCI. Select the top (blank) value in Relative date if you wish to run a search with a specific date range. Enter the first date of published changes in ‘Start (inclusive)’ and the last date to include in the ‘End (inclusive)’ field. You may find the calendar icons on the right of each field an easier way to select both start and end date, selecting the month using the ‘<’ and ‘>’ buttons then simply clicking on the date required (e.g. entering ‘01/01/2012’ in start and ‘31/12/2012’ in end will display all projects added or updated in the 2012 calendar year).
Construction Start Date The projected date that the project construction will commence on the project.
Construction End Date The projected date that the project construction will be completed on the project.
11. COMPANY SEARCH RESULTS
Company search results are listed differently to Project search results. Where project search results display in a list naming
each project and the respective stage, company searches result in a list of companies and project contacts. The focus is on
each company and clicking on a company name will display each company record with project contacts and each project listed.
The Company search results
11.1 COMPANY RESULTS TITLE BAR
Each of the options listed before the table of Company details is outlined below.
Project list item Purpose
Mail Merge & Export Clicking this link will move the page view to the Mail Merge section, below the list of companies displayed. This section allows for exporting of company details to Excel and also generating a printed mail merge from this list of contacts. See 10.5 Mail Merge for further details on each option within this section.
Print This List Opens a print preview screen, listing the Company Search results table exactly as displayed. This print preview view is ideal for printing as it lists only text, with no headers or menu bars. Any sorts applied to the Company Search results (by using the up/down arrows to the right of each column) are maintained and reflected in the print preview (e.g. sorting by Town A-Z). Click the printer icon to print.
Print Selected Firms / Contacts List
Opens a print preview screen, listing only the companies and contacts that have been selected (ticked) prior to clicking ‘Print Selected Firms / Contacts List’.

BCI LeadManager: User Manual
BCI LeadManager User Manual Page 37 of 59 www.bciasia.com
Print preview selected companies
Selecting (ticking) several companies and/or company contacts then clicking ‘Print preview selected companies’ will produce a full company summary of each of the companies and/or contact selected. This is helpful when wanting a summary of projects on the go. Selecting each of the Builder’s office records then clicking ‘Print preview selected companies’ will list each office, with projects they are tendering are involved in. Click the printer icon to print.
Filter Roles Allows the list to be fine-tuned to display only the company roles selected. Clicking ‘Filter Roles’ displays a list of all company roles (roles that companies are playing on projects, such as Builder and Architect) represented in the Company Search results page. Select one by clicking the name, or select multiple by holding the CTRL key and clicking several. Click the ‘Filter Roles’ button to apply the filter and review the results. Click ‘Filter Roles’ once more to change or remove the sort once applied.
Select / Deselect all records This tick-box allows all records on the page to be selected, or deselected in one click.
Select / Deselect the first contact from each company
This tick-box allows only the first contact listed (by alphabetical sort, by contact last name) to be selected, or deselected. In instances where a company has a large number of project contacts listed, you may decide to avoid the possible scenario of the Receptionist at this company receiving multiple letters by ticking this box before exporting/mail merging from this list.
11.2 COMPANY RESULTS LISTING
Each aspect of companies and their contacts displayed in the table is outlined below.
Company list item Purpose
Firm Name Lists the legal name of each company returned by your Company Search. Clicking on a firm name will open a company record, listing all project contacts and the projects they are associated with, in a list. Note: Larger companies may have several legal entities, or even several offices per state. Each entity/site office will be listed separately in this list.
Contact Lists the full name (if known) of each project contact, within each firm. Clicking the name of a contact will display the contact’s record, including all known information. Note: Any contact with an ‘R’ symbol besides their full name is known by the BCI Research team to have resigned. The contact’s name remains in the company listing to allow tracking of a contact and their history, but each project will progressively have the new project contact added to it, as BCI becomes aware of who is now taking over the project.
Town The town in which the company’s office is based.
Phone Lists the main phone number of each company listed. You will notice that each project contact within each company is listed with the main office number. Clicking the contact name will display their mobile number if available.
Fax Lists the fax number for each company office listed.
E-mail Lists the email address (where available) for each project contact listed.
11.3 RUNNING A MAIL MERGE
It is possible to run an email mail merge from MS Outlook, Lotus Notes or MS Word, using BCI company contact information.
BCI allows for exporting of Company Search information to an MS Excel spreadsheet to this end.
It is also possible to run a printed letter mail merge using BCI contact information. This is a streamlined process from a
Company Search in BCI.
Please see section ’11.3 Running a Mail Merge’ for details on both processes.

BCI LeadManager: User Manual
BCI LeadManager User Manual Page 38 of 59 www.bciasia.com
12. THE COMPANY RECORD
Clicking on a company’s name in any screen of BCI LeadManager will open its Company record. This lists projects the company
is involved in along with key project contacts. A Company record therefore provides a handy snapshot of past and present
business.
The Company Record screen
12.1 COMPANY MENU BAR
At the top of every Company record is a series of useful buttons for working with both projects the company is involved with and
the contact people listed for the company.
Company title bar item Purpose
Previous page Displays the previous page viewed in BCI LeadManager.
Generate Label This option is used to print an address label for each contact listed in the Company record. When clicked, a label type selection window appears. Clicking next shows the print dialog box, for printing directly on to self-adhesive address labels.
Generate Letter This option is used to generate and print a letter using the mail merge template for each contact listed in the Company record.
Transfer to ‘My Contacts’ Used to add the Company to your ‘My Contacts’ listing.
Print Preview Opens a print preview window, displaying the entire company record in a printable form. Note: All sorts (using up/down arrows) will be maintained, so if you sort a company’s project listing by Stage beginning to end of construction stages, this will be reflected in the print preview. Use the Printer icon or File, Print to print.
Working With Easy view of companies the firm/contact is working with.
Company Statistic Generates a statistics report on the number of projects and/or value of projects the company is involved in each country/province.
Add To Company Watchlist Adds the company to your Company Watchlist. A set of binoculars are displayed as an icon next to the company name and you will receive an email notification when this company is listed on a project.

BCI LeadManager: User Manual
BCI LeadManager User Manual Page 39 of 59 www.bciasia.com
12.2 COMPANY SUMMARY TABLE
The so-called ‘vital statistics’ of the viewed company will be listed first in a table. The Firm Name, Street and Town can be seen
here at a glance. Each aspect of this table is reviewed below.
The company summary section of a Company record
Each of these elements is described below.
Company summary item Purpose
Firm Name The legal name of the company. Note: Companies with many state offices will have one Company record per state and each joint venture or partnership they are involved in will be listed separately as its own entity.
Address The building or lot number of the company’s office address.
Province The province the company office falls within.
Postcode Postcode of the company location.
Country Country where the company is located.
Website Website for the company.
Phone / Email / Fax Lists the main office number of the company, the generic email address and the fax.
Last Company Update The most recent date the BCI Research team edited this Company record. Whether it be to add the red ‘R’ symbol next to a resigned contact, to update the phone number or the office address where a move has occurred.
User-Entered Fields Any ‘Company Fields’ added to your BCI subscription (from the Tools menu) will be displayed at the bottom of the company summary table. Each field will have an ‘Edit’ button to the right of it. Clicking ‘Edit’ will show a list of all User-Entered Company Fields, where you can add and edit text to each field, then save them. Some examples of fields include ‘Account Manager’ (account owner) and ‘Credit history’.
Notes Clicking ‘Add Notes’ will allow you to enter a note against this company. You will have the option of ticking ‘Company Related Project’ and choosing a project they are involved in from the list. This will ensure the note is also attached to the project. ‘Visible’ controls who can see the note. ‘Whole Group’ is your extended team and ‘Myself Only’ means only those using your BCI login will see the note.
12.3 COMPANY PROJECT LISTING
Below summary details is a full listing of all projects within your subscription that the company is involved in. Note: Some
companies have multiple legal entities/branches and will have multiple BCI Company records as a result.
The Company project listing

BCI LeadManager: User Manual
BCI LeadManager User Manual Page 40 of 59 www.bciasia.com
Company project list item Purpose
View all projects This item only displays where a filtered version of a Company record is viewed. This would occur when a Company search has been run, set to only display projects from ‘Last 365 days’. This would ‘hide’ all projects that have been updated more than one year ago. This is advisable when looking to view current work for a Company, but clicking ‘View all projects’ will remove all filters and display all visible projects. Note: Projects outside of your subscription (e.g. work in Categories not currently subscribed to) will not be visible. Please contact your BCI Client Liaison Consultant if you would like to review your categories.
Contact Lists the full name (if known) of each project contact related to this company. Each will have listed next to their name one or more projects that they are listed in BCI as being the contact for. Clicking a name will display the Contact record for that person, including all their known details. Contacts listed as ‘Undisclosed’ are those who have requested that BCI does not list their name. These projects are likely managed by one of the other listed Contacts within the company. Note: As with all project and company listings, using the ‘Up’ arrow will sort the list in descending order (largest at top), while the ‘Down’ arrow will sort in ascending order (smallest at top).
Check box Check boxes are used to select projects for running actions on. Tick each to select it.
Project Type As with any project listing in BCI LeadManager, ‘Project Type’ lists the type of project (such as ‘Apartment’), then the number of units and finally the marketing name of the building (if applicable). Clicking the Project Type will open a Project record.
Actions menu Please see the section following for a review of each Action in this menu.
Value The value of the project in millions.
Role The role that the company is playing on this project. Note: A project is listed several times if several roles are being played by the company.
Stage Displays the currently reported Stage of the project.
Location The country /province the project is located within
Tender Winner Lists ‘Yes’ if the Tender has been won by the viewed company, ‘No’ if won by another firm and ‘Undecided’ if the Tender has not yet been awarded.
Date Stamp The date of most recent significant update by the BCI Research team.
12.4 COMPANY RECORD ACTION MENU
Each of the now familiar options in the ‘Actions’ menu is explained below. This menu is similar to the ‘Actions’ menu seen on the
Project search results screen, your Project Watchlist or Quoted Projects. See section ‘3.2 The Actions Menu’ for further details
on any of the below options.
Company Action menu item Purpose
Print Preview Displays the Print Preview window, where selected project(s) can be printed or through clicking File, Send, Page via email (Internet Explorer) or copying and pasting all text (all other Internet Browsers), can be emailed to others in your team.
Print selected projects list Prints a customised list of projects as you see them on the Company record. Only those projects you have selected are included on the project list generated, making this a great way to select just the projects you will be pursuing from a company’s record and print them quickly.
Add to Watchlist Adds selected projects to your Company Watchlist for easy tracking.
Remove from Watchlist Removes selected projects from your Company Watchlist. No further notifications will be sent on removed projects.
Export to excel Export selected projects to Microsoft Excel as a spreadsheet.
Export to Lotus 1-2-3 Export selected projects to Lotus 1-2-3 as a spreadsheet.
Set/Undo Project Notification Set a project notification either on or off (for those projects currently set to notify and displaying the red ‘notifier’ symbol) for selected projects. Similar to adding a project to your Project Watchlist, email notifications will be sent when projects tagged to notify are updated. However unlike your Project Watchlist, Project Notifications do not get added to a screen for easy viewing in one place. For this reason Project Watchlist is more commonly used.

BCI LeadManager: User Manual
BCI LeadManager User Manual Page 41 of 59 www.bciasia.com
12.5 FOLLOW UPS, LETTERS AND FILES
The final section of the Company record lists Follow ups, Mail Merged letters and Files attached.
Company Action menu item Purpose
Add Follow Up Task Displays all Follow ups that have been added to the viewed company, or to contacts within this company. Click ‘View active only’ to see only those Follow ups that have not yet been completed. Click ‘View overdue only’ to see a list of overdue Follow ups. The drop-down allows you to select the name of any company contact listed on this Company record. Clicking ‘Add Follow-up Task’ opens a new window where a new Follow up can be created. See section ‘9.3 Adding a Follow up to a project’ for full details of this window and its options.
Mail-Merged Letters Lists all mail merged letters that have been created for contacts within this company. Under the ‘Generate letter’ heading are two options; ‘Word’ generates this letter in Microsoft Word and ‘HTML’ displays the letter within your Internet Browser window.
Upload New File Used to upload files and attach them to this Company record. See section ‘6.6 Project CRM Features’ for full details on the uploading files window.
13. COMPANY WATCHLIST
Company Watchlist displays all companies currently being tracked. You will receive an email notification whenever each
company in your Company Watchlist is listed on a project for the first time (Unless disabled in BCI Notifier settings).
For an Architect, first listing on a project is likely to be when they become involved in a Design Competition (during Competition
stage) or are awarded the project and involved in feasibility/sketching of plans (during Design stage).
Each Builder is likely to be listed first when Tendering (during Tender stage), or having been awarded a contract (Post-Tender
stage).
The Company Watchlist screen
Note: To add a company to your Company Watchlist, open a company record by clicking on a company name within a project
(or by running a company search). Next click the ‘Add to Company Watchlist’ link in the top menu bar in this company record
screen. The company is now being tracked and will be listed in your Company Watchlist screen.

BCI LeadManager: User Manual
BCI LeadManager User Manual Page 42 of 59 www.bciasia.com
13.1 COMPANY WATCHLIST MENU BAR
Below is a description of each item in the Company Watchlist menu bar and its purpose.
Project list item Purpose
Mail Merge Clicking this link will move the page view to the Mail Merge section, below the list of companies in your Company Watchlist. This section allows for exporting of company details to Excel and also generating a printed mail merge from this list of contacts. See 10.5 Mail Merge for further details on each option within this section.
Print This List Opens a print preview screen, listing the Company Search results table exactly as displayed. This print preview view is ideal for printing as it lists only text, with no headers or menu bars. Any sorts applied to the Company Search results (by using the up/down arrows to the right of each column) are maintained and reflected in the print preview (e.g. sorting by Town A-Z). Click the printer icon to print.
Print Selected Firms / Contacts List
Opens a print preview screen, listing only the companies and contacts that have been selected (ticked) prior to clicking ‘Print Selected Firms / Contacts List’.
Print preview selected companies
Selecting (ticking) several companies and/or company contacts then clicking ‘Print preview selected companies’ will produce a full company summary of each of the companies and/or contact selected. This is helpful when wanting a summary of projects on the go relating to for example, 2 different sites of a Commercial Builder. Selecting each of the Builder’s office records then clicking ‘Print preview selected companies’ will list each office, with projects they are tendering on/are involved in one list. Click the printer icon to print.
Filter Roles Allows the list to be fine-tuned to display only the company roles selected. Clicking ‘Filter Roles’ displays a list of all company roles (roles that companies are playing on projects, such as Builder and Architect) represented in the Company Search results page. Select one by clicking the name, or select multiple by holding the CTRL key and clicking several. Click the ‘Filter Roles’ button to apply the filter and review the results. Click ‘Filter Roles’ once more to change or remove the sort once applied.
Select / Deselect all records Selects all records on the page (or deselects them) with one click.
Select / Deselect the first contact from each company
This tick-box allows only the first contact listed (by alphabetical sort, by contact last name) to be selected, or deselected. In instances where a company has a large number of project contacts listed, you may decide to avoid the possible scenario of the Receptionist at this company receiving multiple letters by ticking this box before exporting/mail merging from this list.
13.2 COMPANY WATCHLIST LIST ITEMS
This screen will display a full list of companies and related contacts that you are tracking in BCI – your Company Watchlist. If a
company is opened then removed from your Company Watchlist, it will no longer appear on this screen. Whether or not BCI
notifies you via email when a company you are tracking becomes involved in a project is set in BCI Notifier (see section ‘18. BCI
Notifier’ for details).
Project list item Purpose
Firm Name Lists the legal name of each company within your Company Watchlist. Clicking on a firm name will open a company record, listing all project contacts and the projects they are associated with, in a list. Note: Larger companies may have several legal entities, or even several offices per state. Each entity/site office will be listed separately in this list.
Contact Lists the full name (if known) of each project contact, within each firm. Clicking the name of a contact will display the contact’s record, including all known information. Note: Any contact with an ‘R’ symbol besides their full name is known by the BCI Research team to have resigned. The contact’s name remains in the company listing to allow tracking of a contact and their history, but each project will progressively have the new project contact added to it, as BCI becomes aware of who is now taking over the project.
Country/Province The country/province within which the company’s office is based.

BCI LeadManager: User Manual
BCI LeadManager User Manual Page 43 of 59 www.bciasia.com
Phone Lists the main phone number of each company listed. You will notice that each project contact within each company is listed with the main office number. Clicking the contact name will display their mobile number if available.
Fax Lists the fax number for each company office listed.
E-mail Lists the email address (where available) for each project contact listed, within each company in your Company Watchlist.
14. MAIL MERGE
Below each Company search results listing is the Mail Merge section of BCI. From this set of tools, you are able to create a mail
merge template, add your company logo and automatically generate a personalised letter (in Microsoft Word) to each company
contact listed.
Mail Merge list item Purpose
Generate Letters Click this button once all other fields in this section are completed. This will open Microsoft Word and create an automatic, personalised letter to each selected company contact from the list above. Each letter displays on its own page.
Change your ‘View’ settings in Microsoft Word to ‘Print Layout’ in order to see each project on its own page. These letters can then be saved under today’s date, printed onto your company letterhead and posted with flyers/product information.
Generate Address Labels Prints automatic address labels for each of the selected company contacts. Clicking this button opens a new window, where you can select your label type/size from ‘Label Format’, the size and type of font to use an the alignment of the text (left/centre/right). Click Next to create the labels in Microsoft Word, add your labels to the printer and you can print directly to them.
Export Company/Contact Detail to Excel
Exports currently selected companies/contacts to Microsoft Excel as a contact list.
Include personal notes Ticking this box includes any notes added to each company contact, along with the spreadsheet. This is helpful for including mobile numbers, days worked and other extra information you may have gathered about contacts.
Export Company/Contact Detail to Lotus Notes
Exports the currently selected companies/contacts to Lotus Notes. These will be imported into your Lotus Notes address book.
Export Company/Contact Detail to 1-2-3
Exports the currently selected companies/contacts to Lotus 1-2-3.
Export Company/Contact Detail to MS Outlook
Exports the currently selected companies/contacts to Microsoft Outlook. These will appear within ‘Contacts’.
Save this as Mail Merge Template
Used to save your current settings as a new mail merge letter template, for later use. Clicking this button opens a window where you can name this new template.
Generate Letters (Save Mail-Merged Letters, Letter Name
Similar to the above, ticking this option and entering a name into the box will save this letter as a new mail merge template.
Assign Automatic Follow ups to Mail Merge as specified in tools
Ticking this box will ensure that for each letter generated during this mail merge, a follow up will automatically be added to each contact in a set number of days. Note: Click ‘Set specification’ to select within option 9 on the list, The Interval after mail merge that the follow up should be added and lastly the time of the day that each automatically created follow-up will be set for.
Option 1: Use Mail Merge Template
Select a previously saved mail merge template from this drop-down menu.
Option 2: Define Merge Format Within this section as an alternative, you are able to create a new mail merge letter and if you wish, save it as a new mail merge template. Each element is listed following.
Image/Logo Location: Clicking this link will display a dialog box from which you can locate a company logo to be used in this letter. Click ‘New Image’ (top of dialog box), click ‘Browse’, ‘Open’ and ‘Upload’. Use the links below the new image to ‘Insert into letter body’ (into the text of the letter) or ‘Insert into header’ (top header of the letter). Click ‘Clear Logo’ to clear the image/logo you currently have loaded into BCI.

BCI LeadManager: User Manual
BCI LeadManager User Manual Page 44 of 59 www.bciasia.com
Image/Logo URL Entering the web location (URL) of your company logo will result in this logo being included in the mail merge letter generated on this screen.
Image/Logo Alignment: Choose the alignment on the page (left, centre or right) of the logo specified above.
Font for Address Select the font to be used in the top ‘To’ address field in the letter created.
Greeting Dear is the default greeting but enter another word here to customise the ‘Dear Name’ introduction to the letter.
Greeting Name Select whether the first, last or both names should be included in the greeting.
Logo Placement Choose whether the logo you have attached/linked to should be displayed above the Address & Date, or Adjacent (next to) Address & Date.
Blank lines after header Allows customising how many lines on the letter should be added below the header and before the Address and date.
Font Size Selects the font size for the letter text you have entered.
Blank lines after Date Define how many lines should be displayed blank after the date, before the letter text.
Blank lines after Address Specify the number of blank lines to be added after the address field, before the greeting and text.
Letter text Add letter text into this box. Images, bullet points and tables may be copied from Microsoft Outlook or Microsoft Word and pasted into this window.
Attach Notes to contacts Typing a note into this field such as ‘posted letter dd/mm/yy’ and clicking Attach Note will attach a note to each contact selected from the Company listing. This is helpful when each contact is viewed in future, because you will be able to see that a letter has previously been posted.
15. MY BCI
The My BCI menu holds five sections within it, each an advanced area of BCI LeadManager. These are used to enter your own
projects into BCI (My Projects), enter your own companies into BCI (My Contacts) and edit both types of User-Entered records.
Each of these sections are described below.
15.1 MY PROJECTS
Projects that are not visible in BCI may be requested from the Research hotline or by sending in an enquiry by clicking ‘Add
Project Enquiry’ button on the top left corner of the menu bar. Projects that do not exist in BCI can be entered in manually, as a
User-entered project.
Once entered, User-entered projects can be managed in the same way as any BCI project, including being added to your
Project Watchlist, to Quoted and being exported to Microsoft Excel.
‘My Projects’ screen
Please see section ‘3. Latest Projects’ for a full description of all elements of the projects listed on this screen and a full review
of the Actions and Sort menu options available.

BCI LeadManager: User Manual
BCI LeadManager User Manual Page 45 of 59 www.bciasia.com
Project list item Purpose
Add Own Project Click this button to enter a new project into BCI. A wide number of field options are given but those required include Project name, Project stage, Address, Town and State. Once entered, simply click ‘OK’ to save the new project into your User-entered project listing.
Search OwnProject A search function useful for finding a User-entered project quickly. This function becomes useful when you have entered more than a dozen projects and it includes similar search criteria options to Project search. Click ‘Go’ to run the search when you have selected the criteria required.
15.2 MY CONTACTS
All companies that you have previously entered into BCI will be listed on this page. Enter a company where you are not able to
find the company in BCI, but would like to have a listing for. A User-entered company will then be added to any project.
This is particularly useful for members who operate in a specialty area, or deal with specialists involved in projects who may not
be identified by the BCI Research team (e.g. Specialist Engineers or Funding Managers).
Project list item Purpose
Add Own Firm Add a new company to BCI. Ensure you have tried to find it in the existing data by running a Company Search for several forms of the company name before taking the time to add them manually. Clicking Add Own Company displays a window will all fields available to you as you create a new User-entered company in BCI.
Search Own Project Use this button to search for a project in your User-Entered project listing.
My Contact Search This is useful as a search function to look for a Company you have previously entered into BCI. Particularly when a large number of companies have previously be entered.
Company contact listing The company and contacts listing is displayed in the same way as Company search results, please see section ’11. Company Search Results’ for full details and Actions that may be run.
Mail Merge This button expands the screen down to include all mail merge functions. Please see section ’11.3 Running a Mail Merge’ for full details on how to conduct a mail merge to your User-entered company contacts.
16. BCI NOTIFIER
The BCI Notifier screen is where the ‘magic’ happens. This page is where each element of BCI Notifier is either switched ‘On’ or
‘Off’, defining what types of project and company updates are emailed to you automatically. When BCI Notifier was first
launched in 2010, a new era of sourcing project leads began. Each option on this screen is described below.
16.1 BASIC SETTINGS
The BCI Notifier Basic Settings

BCI LeadManager: User Manual
BCI LeadManager User Manual Page 46 of 59 www.bciasia.com
Notifier option Purpose
Enable BCI Notifier service Ticking this box switches BCI Notifier on. Unticking this box will switch BCI Notifier off and stop all project and company update emails from BCI being sent. Note: BCI Notifier is set per login, so each of your team can have different settings on each separate login.
Email address This is the main email address to which all BCI Notifier emails will be sent. Only one email address may be entered into this box.
CC to email address Each additional email address in this box will also receive notification emails from this BCI login. Up to three email addresses, separated by commas, to this section.
16.2 ADVANCED SETTINGS
You can control when BCI will notify you by setting each of the Advanced Settings to either ‘On’ or ‘Off’. The Advanced Settings
are divided into two sections below and each is described in full.
Example: BCI Notifier Advanced settings
Notifier option Purpose
Project Watchlist Notifications Setting this option to ‘On’ will ensure that when each project in your Project Watchlist (each project you are tracking) is updated by the BCI Research team, you will receive an email notification. This email notification will be sent within 15 minutes of the update being made.
Individual Project Notifications A little-used option for notifications when projects are changed. Setting this option to ‘Off’, disables the option of adding an Individual notification to each project, due to adding to Watchlist covering this off. A Notifier red icon is listed next to each project for which an Individual Project Notification is set and an email will be sent within 15 minutes of each tagged project being updated. Many use Project Watchlist instead, given the benefit of having all tracked projects listed in the Project Watchlist screen as well as receiving email updates.
Saved Search Notifications The most commonly used and potentially the most powerful aspect of BCI Notifier. Switching this to ‘On’ (while setting ‘Frequency’ to either ‘Daily’ or ‘Weekly’ and selecting a day) will see notifying Project Searches run overnight and form part of your daily or weekly BCI Notifier report. To include a search in the report, simply open a saved search in the Project Search screen, tick the box ‘Notify based on this search’, click ‘Save search’ and ‘OK’. Projects are commonly split by State, by Stage (e.g. Design, Tender and Contract Awarded) and/or by Category (e.g. Commercial, Residential and Industrial). Please see section ’18. Getting the most out of BCI Notifier’ for full details on saved search options that may suit your business.
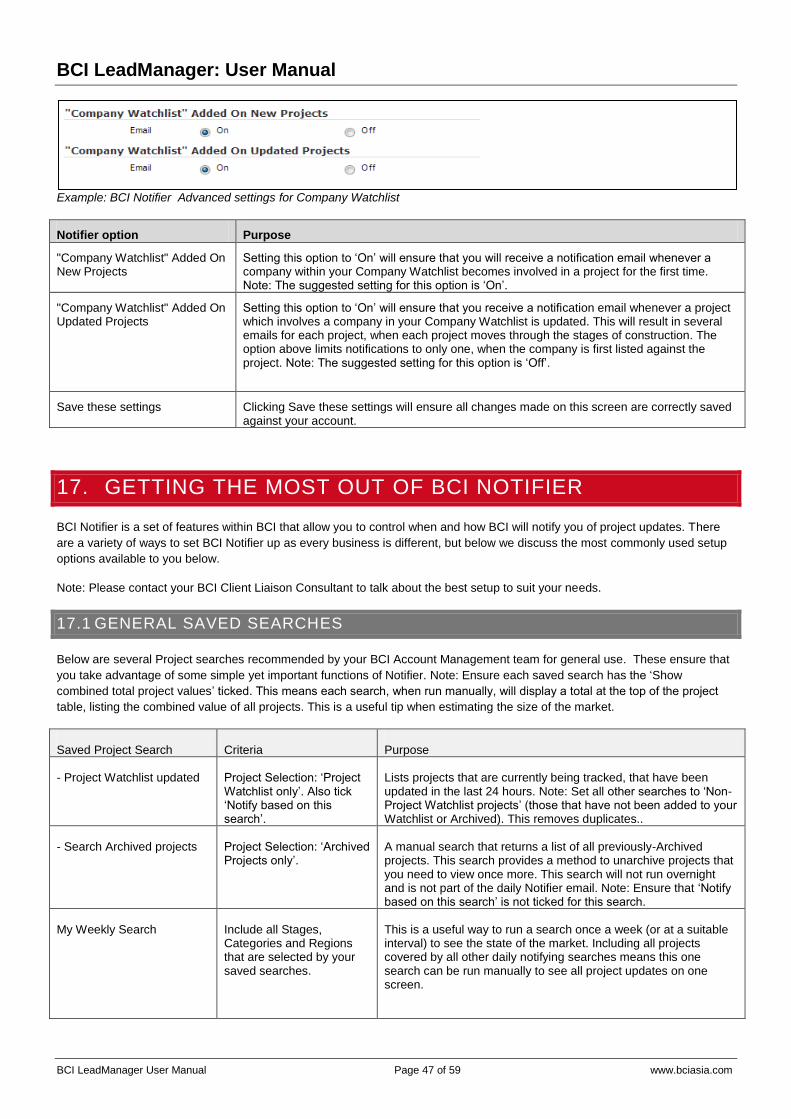
BCI LeadManager: User Manual
BCI LeadManager User Manual Page 47 of 59 www.bciasia.com
Example: BCI Notifier Advanced settings for Company Watchlist
Notifier option Purpose
"Company Watchlist" Added On New Projects
Setting this option to ‘On’ will ensure that you will receive a notification email whenever a company within your Company Watchlist becomes involved in a project for the first time. Note: The suggested setting for this option is ‘On’.
"Company Watchlist" Added On Updated Projects
Setting this option to ‘On’ will ensure that you receive a notification email whenever a project which involves a company in your Company Watchlist is updated. This will result in several emails for each project, when each project moves through the stages of construction. The option above limits notifications to only one, when the company is first listed against the project. Note: The suggested setting for this option is ‘Off’.
Save these settings Clicking Save these settings will ensure all changes made on this screen are correctly saved against your account.
17. GETTING THE MOST OUT OF BCI NOTIFIER
BCI Notifier is a set of features within BCI that allow you to control when and how BCI will notify you of project updates. There
are a variety of ways to set BCI Notifier up as every business is different, but below we discuss the most commonly used setup
options available to you below.
Note: Please contact your BCI Client Liaison Consultant to talk about the best setup to suit your needs.
17.1 GENERAL SAVED SEARCHES
Below are several Project searches recommended by your BCI Account Management team for general use. These ensure that
you take advantage of some simple yet important functions of Notifier. Note: Ensure each saved search has the ‘Show
combined total project values’ ticked. This means each search, when run manually, will display a total at the top of the project
table, listing the combined value of all projects. This is a useful tip when estimating the size of the market.
Saved Project Search Criteria Purpose
- Project Watchlist updated Project Selection: ‘Project Watchlist only’. Also tick ‘Notify based on this search’.
Lists projects that are currently being tracked, that have been updated in the last 24 hours. Note: Set all other searches to ‘Non-Project Watchlist projects’ (those that have not been added to your Watchlist or Archived). This removes duplicates..
- Search Archived projects Project Selection: ‘Archived Projects only’.
A manual search that returns a list of all previously-Archived projects. This search provides a method to unarchive projects that you need to view once more. This search will not run overnight and is not part of the daily Notifier email. Note: Ensure that ‘Notify based on this search’ is not ticked for this search.
My Weekly Search Include all Stages, Categories and Regions that are selected by your saved searches.
This is a useful way to run a search once a week (or at a suitable interval) to see the state of the market. Including all projects covered by all other daily notifying searches means this one search can be run manually to see all project updates on one screen.

BCI LeadManager: User Manual
BCI LeadManager User Manual Page 48 of 59 www.bciasia.com
Reports – Monthly report As above, include all currently used criteria from daily notifying searches.
Similar to above, but this search produces a list of the last month’s updated projects. Often set to only show projects above a certain value. This is a good way to see a summary of a region or the country, for the last month, in one list for management purposes.
Each of the commonly used saved project search suggestions reviewed next suit slightly different businesses. These may be
used together and with your BCI Client Liaison Consultant’s assistance, you will develop a saved project search setup to suit
your market.
17.2 SAVED SEARCH OPTION 1: BY STAGE
This Project search setup suits most businesses as all updated projects within your BCI subscription are divided by construction
stage, from beginning of construction (concept/design) to end (construction commenced). This quickly summarises the market
each morning in your daily Notifier email. Note: Ensure each saved search has ‘Project Selection’ set to ‘Non-Project Watchlist
only’. This ensures each search shows only projects that are new, having not been added to your Project Watchlist or Archived
previously. This removes double ups in your daily BCI Notifier email.
The below example is for a business based in Jakarta that wishes to see projects at the Design and Main Contract Awarded
stages, reported each morning.
Example: Saved search setup for a Jakarta-based business
Saved Project Search (Example)
Criteria Purpose
Jakarta 1 – Design Country/Province: Jakarta. Stage : Design Lists all Design stage projects. These are projects where Architects, Engineers and Designers will be the main contacts.
Jakarta 2 – Tender Country/Province: Jakarta. Stage : Tender Lists all Tender stage projects. Where applicable, projects will list details of all available Tendering Builders.
Jakarta 3 – Post Tender Country/Province: Jakarta Stage : Post Tender Lists all projects at the Post Tender stage. Where applicable, projects will list the names of lowest tenderers.
Jakarta 4 – Main Contract Awarded
Country/Province: Jakarta Stage : Main Contract Awarded
All projects that have moved into Construction stage.
17.3 SAVED SEARCH OPTION 2: BY REGION
This setup is great if your sales territory spans across multiple states. The setup below ensures projects in each region are
listed separately, making forwarding of projects and targeting your time per region easier. The daily BCI Notifier email that
results from this setup can have each region’s table cut and pasted into another email to share only this Region’s projects with
others in your team, or Distributors. Note: Ensure each saved search has ‘Project Selection’ set to ‘Non-Project Watchlist only’.
This ensures each search shows only projects that are new, having not been added to your Project Watchlist or Archived
previously. This removes double ups in your daily BCI Notifier email.

BCI LeadManager: User Manual
BCI LeadManager User Manual Page 49 of 59 www.bciasia.com
The below example is for a multi country focused (Indonesia, Malaysia, Singapore) business, who needs to see projects
separated by region, at Tender stage only.
Example: Saved search setup for an Multi Country focused business
Saved Project Search (Example)
Criteria Purpose
Indonesia – Tender Country: Select Indonesia. Stage : Tender. Exclude Abandoned and Deferred from each stage.
Shows projects in Indonesia Tender stage, that have been updated by the BCI Research team in the last 24 hours.
Malaysia – Tender Country: Select Malaysia. Stage : Tender. Exclude Abandoned and Deferred from each stage.
Shows projects in Malaysia Tender stage, that have been updated by the BCI Research team in the last 24 hours.
Singapore – Tender Country: Select Singapore. Stage : Tender. Exclude Abandoned and Deferred from each stage.
Shows projects in Singapore Tender stage, that have been updated by the BCI Research team in the last 24 hours.
18. TOOLS
From the Tools page, many elements of your BCI setup can be managed. While commonly used features include changing a
password and managing Microsoft Excel export templates, far more can be achieved on this screen. The options are divided
into four key sections and each is explained in detail below.
18.1 MY ACCOUNT
This section of the Tools menu is useful for settings your BCI preferences (My Preferences), changing your password (Change
Password) and viewing the number of logins of a member of your team, at a glance (Login History). Each is detailed below.
Options Option within Purpose
My Preferences The My Preferences screen, along with the BCI Notifier screen is the primary location for setting up elements of BCI. Note: The My Preferences setup is generally completed by your BCI Account Management team, during your initial training session. Each option is detailed below.
Enable Visibility Defaults
Default: Yes, Group. This option sets whether your BCI account team are able to see notes that you add to projects, contacts and companies. Set ‘Default value’ to ‘Myself’ if you want notes to only be visible to your BCI login. Set it to ‘Group’ if you would like all who use BCI in your team to view notes you add. The visibility of each note can still be set when the note is created, this just makes a handy default setting to save time. Note: Even when set to ‘Group’, only those in your BCI account group will be able to view your notes. External parties will not have access.

BCI LeadManager: User Manual
BCI LeadManager User Manual Page 50 of 59 www.bciasia.com
My Preferences (continued)
Enable Combining of BCI Project Watchlist & User Entered Project Watchlist
Default: Yes. Will combine the two Projects Watchlists in your BCI account; projects the BCI Research team have entered and projects that you yourself have entered. This simplifies your Dashboard.
Default search date range
Default: Since Subscription start. Sets the default date range of any Project search you conduct. ‘Subscription start’ is literally all projects updated in the time you have been subscribed to BCI (including any additional Archive data you may also have). Setting to ‘Subscription start’ simply ensures the maximum amount of BCI projects are searched at any time. You may change the date range on each search as you run it. Another commonly used Default search date range setting is ‘last 365 days’, providing one year of project updates, to keep search results more current.
Display Company and Contact Notes History
Default: Yes. Sets whether or not the history of previously-added notes is visible when viewing a company or a contact in BCI.
Display Word Editor Default: Yes. Controls whether text editing buttons (in a format similar to those available in Microsoft Word) are visible when viewing the results of a Company search. This is important when using BCI to run a Mail Merge, because text size, font style and other elements of the look and feel of your letter can be customised via these buttons.
Auto-Export follow-up to outlook after adding or editing follow-up
Default: Yes. Ensures that for all new Follow-ups added to projects in BCI, the ‘Export to Outlook’ option is ticked by default. This means that your Follow-ups are automatically exported from BCI and will display in your Outlook calendar. Note: Lotus Notes users will need to untick this option.
Outlook export follow-ups goes to
Default: Outlook Calendar. Defines whether Microsoft Outlook users prefer to have BCI Follow-ups sent to their ‘Calendar’, or their ‘Tasks’. Commonly, using the Outlook Calendar is the most helpful.
Startup Screen on BCI Asia Lead Manager
Default: My Dashboard. In previous versions: Latest projects. Defines which screen of BCI will display when first logging into BCI. ‘My Dashboard’ is the new, easy to use menu. Starting with viewing My Dashboard is a great way to quickly get to the area of BCI you wish to use. Another commonly used option is ‘BCI Project Watchlist’, helpful because BCI will launch directly to the list of projects that you are currently tracking. ‘Latest Projects’ can also be used, for those who prefer to see a list of recently updated projects when first logging in.
My Preferences (continued)
Automatic follow-up after mail-merge Automatic follow-up after mail-merge (continued)
Default: Interval after Mail-Merge: 10 days, Default time of follow-up: 10:00. A helpful setting that when set to the default mentioned above, will ensure that when you run a Mail Merge to a group of Company contacts within BCI, a Follow-up is automatically added to each contact at a pre-defined time/date. Your BCI Account Management team recommends sending smaller batches of Mail Merged letters, rather than one large batch, to enable following up within 10 business days if possible. This keeps letters and follow-ups relevant and memorable to your prospects.

BCI LeadManager: User Manual
BCI LeadManager User Manual Page 51 of 59 www.bciasia.com
Hide contacts in company search results
Default: Yes. When set to ‘Yes’, this setting ensures that all Company search results list with only the name of the company, while hiding the project contact names within that company. This means each company displays on one row, making for a shorter, easier to read list of Companies. Unticking this option will mean that each Company search results page will list the company name, then a row for each project contact within that company and their phone number.
Add completed follow-up as note to related company
Default: Unticked (No). This option, when ticked (‘Yes), will move all completed Follow-ups on BCI projects from the ‘Follow-ups’ section of the project record to the ‘Notes’ section. Commonly, this option is unticked, so that each Follow-up when completed, remains in the ‘Follow-ups’ section of the project but is coloured and marked as ‘Completed’. In practice, this makes for easy reading of a project, any Notes and just below it, any Follow-ups. Combining Notes and Follow-ups can make for a slower read when reviewing a project.
Enable commonly used notes for project, firm & contact notes
Default: Yes. When ticked, this option adds a handy ‘Commonly used notes’ drop-down menu to the window that opens when you add a new Note to any project, company (firm) or contact. This is a list of pre-written notes that when selected, will automatically add text to your note. Note: Options are added to (or deleted from) this drop-down menu under Tools, in the My Data and Templates section, under Commonly used notes.
Manage Your Groups A section generally only used by Administrators, this screen displays all current users of BCI within your group. This group is generally your business, or in some cases, within your parent company or partner companies. This is a quick way to ensure all users in your team have similar settings in My Preferences and to ensure Excel exports present in the same format across your team.
Members Lists the name of each team member currently assigned with a BCI login.
My Preferences Clicking the ‘Change’ link will display the ‘My Preferences’ screen for that team member’s BCI login.
Manage Your Groups (continued)
Login Log Clicking ‘View log’ next to a team member’s name will display the Check login history screen. Simply enter the ‘Starting login date’ (start date of the report) and ‘Ending login date’ (end date of the report). Click ‘Show Login History’ to display login details for that member. Each day with a login to BCI will have a green cell under ‘Times’ (number of logins that day).
Clicking the number in this column will open list with login date/time, the IP address of the computer used and both number of clicks and login duration.
This is a powerful tool to be able to review the usage of BCI by any member of your team. Note: This same function is available under ‘Login Report’ in the Tools main menu (mentioned below under Login History).
Password Clicking ‘Reset password’ for any team member will display the Change Password screen for that member. Enter your password, the new password for the team member, confirm the new password and click ‘Submit request’ to complete this change. Note: You may like to contact your BCI Client Liaison Consultant first to discuss passwords and usage of a particular login, prior to making any changes.

BCI LeadManager: User Manual
BCI LeadManager User Manual Page 52 of 59 www.bciasia.com
Name/Email Clicking ‘Change’ next to a member’s name will show the Change Display Name screen. Here the ‘Display Name’ (name shown in BCI for this particular BCI login) and Email (email address used for this login) can be updated.
Watchlist folders Clicking ‘Edit folders’ will display a list of all of that team member’s Project Watchlist folders. From this screen folders can be opened (using ‘List) and projects re-assigned (added to another user’s Project Watchlist by selecting and clicking ‘Actions’, ‘Add to Watchlist’) when team member’s change and folders can be deleted. Note: Please exercise caution when working with folders as they may contain valuable project tracking information for others in your team.
BCI Excel Templates
Clicking ‘Edit Templates’ will display the ‘Manage your BCI Excel Export Templates’ window for that member’s BCI login. See section ‘21.3 My Data and Templates’ in the ‘Manage Your Excel / Lotus 1-2-3 Export Templates (BCI Projects)’ section for more details of this page.
Own Excel Templates
Clicking ‘Edit Templates’ will display the ‘Manage your Own Excel Export Templates’ window for that member’s BCI login. See section ‘21.3 My Data and Templates’ in the ‘Manage Your Excel / Lotus 1-2-3 Export Templates (Own Projects)’ section for more details of this page.
Subscription Click the ‘Subscription’ link next to any person’s name to list all elements of their BCI login’s subscription.
Print Preview Options This section allows setting of the optional fields to include when ‘Print Preview’ is clicked within a project.
Edit choices Clicking ‘Edit choices’ will display the current selections for Print preview of projects. Clicking a type of company role (ie. Architect) from the list will show only that role type details in the print preview of any projects (holding SHIFT or CTRL while clicking will allow selection of several roles at once). Click ‘Easy Select’ to see a list and be able to tick the boxes next to the company roles you would like included in your print previews. Click ‘Update’ to save any changes made within this window.
Projects in my Subscription Displays the number of projects and firms (companies) available within your BCI LeadManager subscription.
Change Password Click here to change your password. You will be required to enter your old password (contact your BCI Client Liaison Consultant if you have misplaced this), then your new password (into ‘New Password’) and your new password once more (into ‘Confirmed Password’). Clicking ‘Submit Request’ will then save this password change.
Print Preview List Options This tool gives you the option of adding a column displaying a particular company role (e.g. Architect), to project lists that you print out by clicking ‘Print Project List’ from the Actions menu, to print a selection of ticked projects. Click ‘Edit Choices’ to select which company role you would like to display. The Role Group is the group of company roles (e.g. Design Specifer or Main Contractor). The Role within the grouping is selected from ‘Role’ (e.g. Architect). Click ‘Update’ to save the settings. Note: Only one role is displayed on the Print List.

BCI LeadManager: User Manual
BCI LeadManager User Manual Page 53 of 59 www.bciasia.com
Check Login History Clicking this link displays the Check login history screen, for your BCI login only. This is the same function that is available for all BCI users in group in ‘Login Log’ above (in the ‘Manage your Groups’ portion of this table). Enter a report start date, a report end date and click ‘Show login history’ to display a list of dates. Each number in any green cell of the ‘Times’ field if clicked, will display the date, IP address and clicks made for each login you made to BCI.
18.2 BCI NOTIFIER
This section is where basic BCI Notifier setup is conducted (Settings).
Project list item Purpose
Settings Lists the same BCI Notifier settings window as when clicking ‘BCI Notifier’ from the top menu of any BCI screen. See section ’16’. BCI Notifier’ for full details.
Notifications History Displays your history of notification emails from BCI. Simply select the start date (From) for the report, the end date (to) and click ‘Go’. This will display on which days you received notifications from BCI.
18.3 MY DATA AND TEMPLATES
An advanced set of BCI tools, the My Data and Templates set includes ability to add, then edit fields you have added to projects
(Manage Project Fields), Contacts (Manage Contact Fields) and Companies (Manage Company Fields).
Here you will also be able to personalise how BCI projects are displayed when exported to Microsoft Excel (Manage Your Excel
/ Lotus 1-2-3 Export Templates – Own Projects).
Project list item Option within Purpose
Transfer Saved Searches A Management tool, this screen allows searches to be selected and transferred to another BCI user in your group, by clicking ‘Transfer this’ next to a search. Both your Project Searches and your Company Searches are listed. Click ‘My Searches’ drop-down menu to change to viewing another BCI user’s searches. Next select the BCI user (or multiple users) to transfer the searches to and click ‘Transfer Search to selected members’.
Manage Customised BCI Project Watchlist Folders
A powerful set of options, this screen lists all current Project Watchlist folders and allows you to create new folders, delete folders and rename folders as needed. Click ‘Add new folder’, then type a folder name and click ‘Submit’ to create a folder. Tick ‘Share this folder’ if you would like all BCI users in your group to have a folder by the same name in their Project Watchlist folders (e.g. ‘Projects from David’). Note: Team members will only see their ‘copy’ of this folder so this is useful for when assigning new projects to your team and wanting them to check a specific folder regularly to find these projects. Click a folder name to edit it and use the ‘Delete’ button to delete a folder. Note: Folders must be empty before they can be deleted. Click ‘List projects’ to see all projects within a folder. Simply select all projects and click ‘Move to’ drop-down, select another folder and click ‘Ok’ to move these projects out, then you can delete the folder. Sub-folders can be added within each folder by clicking ‘Add’ in the Sub-folder column beside each folder.
Manage Project Fields This screen allows you to create, edit and delete what are called ‘User-Defined project fields’. By clicking ‘Add New Project Field’, typing a name and clicking ‘Save changes’, you add a field that will be visible on all projects viewed in BCI, by any of your team. Each project field can be clicked when viewing a project and a value added. This is
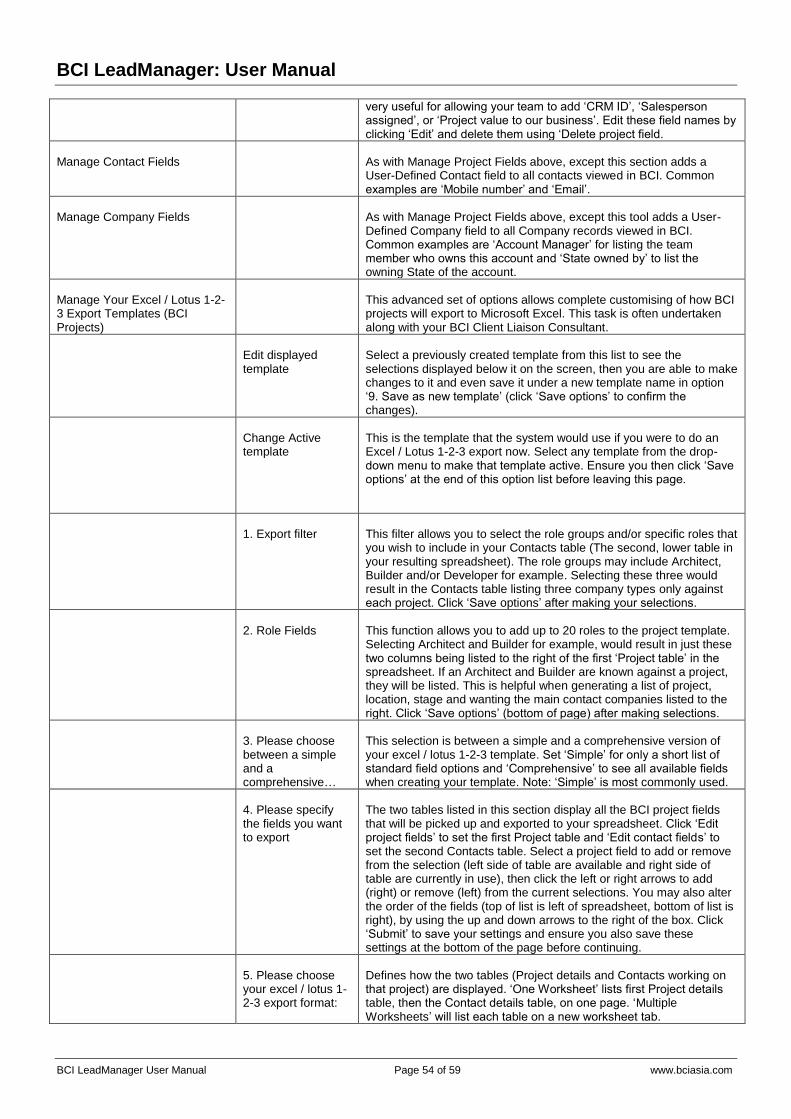
BCI LeadManager: User Manual
BCI LeadManager User Manual Page 54 of 59 www.bciasia.com
very useful for allowing your team to add ‘CRM ID’, ‘Salesperson assigned’, or ‘Project value to our business’. Edit these field names by clicking ‘Edit’ and delete them using ‘Delete project field.
Manage Contact Fields As with Manage Project Fields above, except this section adds a User-Defined Contact field to all contacts viewed in BCI. Common examples are ‘Mobile number’ and ‘Email’.
Manage Company Fields As with Manage Project Fields above, except this tool adds a User-Defined Company field to all Company records viewed in BCI. Common examples are ‘Account Manager’ for listing the team member who owns this account and ‘State owned by’ to list the owning State of the account.
Manage Your Excel / Lotus 1-2-3 Export Templates (BCI Projects)
This advanced set of options allows complete customising of how BCI projects will export to Microsoft Excel. This task is often undertaken along with your BCI Client Liaison Consultant.
Edit displayed template
Select a previously created template from this list to see the selections displayed below it on the screen, then you are able to make changes to it and even save it under a new template name in option ‘9. Save as new template’ (click ‘Save options’ to confirm the changes).
Change Active template
This is the template that the system would use if you were to do an Excel / Lotus 1-2-3 export now. Select any template from the drop-down menu to make that template active. Ensure you then click ‘Save options’ at the end of this option list before leaving this page.
1. Export filter This filter allows you to select the role groups and/or specific roles that you wish to include in your Contacts table (The second, lower table in your resulting spreadsheet). The role groups may include Architect, Builder and/or Developer for example. Selecting these three would result in the Contacts table listing three company types only against each project. Click ‘Save options’ after making your selections.
2. Role Fields This function allows you to add up to 20 roles to the project template. Selecting Architect and Builder for example, would result in just these two columns being listed to the right of the first ‘Project table’ in the spreadsheet. If an Architect and Builder are known against a project, they will be listed. This is helpful when generating a list of project, location, stage and wanting the main contact companies listed to the right. Click ‘Save options’ (bottom of page) after making selections.
3. Please choose between a simple and a comprehensive…
This selection is between a simple and a comprehensive version of your excel / lotus 1-2-3 template. Set ‘Simple’ for only a short list of standard field options and ‘Comprehensive’ to see all available fields when creating your template. Note: ‘Simple’ is most commonly used.
4. Please specify the fields you want to export
The two tables listed in this section display all the BCI project fields that will be picked up and exported to your spreadsheet. Click ‘Edit project fields’ to set the first Project table and ‘Edit contact fields’ to set the second Contacts table. Select a project field to add or remove from the selection (left side of table are available and right side of table are currently in use), then click the left or right arrows to add (right) or remove (left) from the current selections. You may also alter the order of the fields (top of list is left of spreadsheet, bottom of list is right), by using the up and down arrows to the right of the box. Click ‘Submit’ to save your settings and ensure you also save these settings at the bottom of the page before continuing.
5. Please choose your excel / lotus 1-2-3 export format:
Defines how the two tables (Project details and Contacts working on that project) are displayed. ‘One Worksheet’ lists first Project details table, then the Contact details table, on one page. ‘Multiple Worksheets’ will list each table on a new worksheet tab.

BCI LeadManager: User Manual
BCI LeadManager User Manual Page 55 of 59 www.bciasia.com
Manage Your Excel / Lotus 1-2-3 Export Templates (BCI Projects) (continued)
6. Data to export Sets the types of project information and additional notes that are included with each project when exported. Project Data and Roles (company contact details) are always exported. Tick ‘c) Follow-up Calls’ to include any follow-up notes you have added. Tick ‘d) Productlines’ to include quote/product information. Tick ‘e) Project Notes’ to include the most recent note you have added against a project and tick ‘f) User Defined-Fields’ to include any additional fields you have added to projects (such as ‘Salesperson’ or ‘Salesforce ID’. Note: Follow-Up Calls, Productlines and Project Notes are only applicable for multiple worksheet export. This function is not supported for single worksheet export.
7. Edit Template Name:
You may change the name of a saved Template as you work with it by typing over the name in this field. When ‘Save options’ is clicked at the bottom of the page, the template will be renamed.
8. Template for all members
Ticking this box will make this template visible across your entire BCI user group. All your team will then be able to Activate and use this template as their own. This is a great way to share a suitable template once you have created it.
9. Save as new template:
If you wish to save a new template, tick this box and enter the new name into ‘Template Name’. Tick ‘Activate template’ if you would like this format to be used for all exporting you do to Microsoft Excel or Lotus Notes. Tick ‘Activate template for all members’ if you would like to share this with your team and have them benefit from it automatically when they next export to a spreadsheet.
Save options Click this button whenever you have made any changes to an Export template, to ensure these are saved for later.
Delete this template Click this button to delete the currently selected template.
Manage Your Excel / Lotus 1-2-3 Export Templates (Own Projects)
As above, but this section is used to export User-Entered projects.
Commonly Used Notes Within this section, you may create, edit and delete commonly used notes. These notes then appear as a drop-down menu option on any Notes added to projects (as long as the option in Tools \ My Preferences is set to ‘Use commonly used notes’). Click ‘Add new note’ to create a new commonly used note and ensure you select whether it is to appear on Projects, Companies or Contacts. Project notes are most common.
Manage Customised Company Folders
Similar to Manage Customised Project Watchlist Folders, this section displays a list of current folders you have added to help organise your Company Watchlist. Click ‘Add new folder’ to create one and click ‘Submit’ to save. Click ‘Share across group…’ if you would like others in your team to have a folder by the same name. Although they will only see their tracked companies in their folder, this is helpful when setting up a standardised folder structure across the team.
Manage Company Fields This screen, similar to ‘Manage Project Fields’, displays a list of your User-Entered Company Fields. Each field will be seen when any Company record is opened in BCI. You can add text and have it saved against the Company record.
Manage Your Mail Merge Templates
This screen lists all your Mail Merge Templates. Often created by ticking the option when running a Mail Merge on a list of Company contacts (often from a Company search), this list can be opened by clicking the name of a template. You may then edit, update and save the template. Ensure you click ‘Save template’ after making any changes and click ‘Delete’ if you wish to delete a template. Click ‘Add New Mail Merge Template’ if you would like to create a new template from this screen.

BCI LeadManager: User Manual
BCI LeadManager User Manual Page 56 of 59 www.bciasia.com
19. INTERNET SETTINGS
The BCI LeadManager service requires some general settings to be made within your Internet Browser, in order to export
projects successfully to Microsoft Excel and Follow ups to your Calendar. With each new laptop or desktop computer, or when
upgrading software, you may need to make these settings once more. The settings required for each of the major Internet
Browsers are outlined following.
Note: There are several versions of each Internet Browser and each new version makes slight changes to the settings that are
required. Please contact your BCI Client Liaison Consultant for a full tutorial and assistance with this task.
Internet Browser Steps required
Microsoft Internet Explorer (default)
1. Open Internet Explorer. 2. Right-click in the space on the top right of your window (to the right of a tab).
a. Untick any toolbars that have installed themselves (Google, McAfee, Skype) b. Tick each of ‘Menu bar’, ‘Favourites bar’, ‘Command bar’ and ‘Status bar’
3. Click ‘Tools’ from the top menu bar, then ‘Internet Options’. 4. Select the ‘Security’ tab, click the green tick (‘Trusted sites’) and then click ‘Sites’. 5. Untick ‘Require server verification for this zone’ and into the ‘Add this website to the
zone’ field, type ‘services.bciaustralia.com’. 6. Click ‘Add’, ‘Close’, then ‘OK’. 7. In Internet Options, click ‘Trusted Sites’ once more, then ‘Custom level’. 8. Scroll down 5-10 options to the ‘Active-X’ group. Set each Active-X option to ‘enable’. 9. Scroll to the bottom of the list, then back up 10-15 options to set both ‘Pop-Up Blocker’
and ‘SmartScreen filter’ to ‘disable’. Click ‘OK’ and ‘OK’ on the Internet Options window. 10. Click ‘Tools’ from the top menu bar once more, then ‘Pop-up Blocker’. If you see ‘Turn
off Pop-up blocker’, click this option and disable it. This and step 9 are often needed. 11. Click ‘Tools’ from the top menu bar once more, then ‘SmartScreen filter’. If you see ‘Turn
off SmartScreen filter’, then click and disable it. This and step 9 are also often needed. 12. Close and restart Internet Explorer.
Google Chrome 1. Open Chrome.
2. Click the spanner icon ( ) in the top right of the screen and click ‘Options’. 3. Select ‘Under the Bonnet’ from the left menu bar and click ‘Content Settings’. 4. In ‘Pop-ups’, if ‘Do not allow any site to show pop-ups’ is selected, click ‘Manage
exceptions…’. Into ‘Add a new hostname pattern’, type ‘services.bciaustralia.com’. Select ‘Allow’ from the drop-down menu and click anywhere else on the window to save.
5. Click the ‘x’ close button in the top-right of the window to return to Google Chrome. 6. Close and restart Chrome.
Mozilla Firefox 1. Open Firefox. 2. Click ‘Tools’ from the top menu bar and select ‘options’. 3. Click the ‘Content’ tab and to the right of ‘Block popup windows’, click ‘Exceptions’. 4. Into ‘Address of web site’, enter ‘bciaustralia.com’. Click ‘Allow’ and ‘Close’. 5. Click the ‘Applications’ tab. Select ‘mailto’ and click the name in the ‘Action’ column.
Select your Email application (e.g. Microsoft Outlook) from the list. 6. Select ‘webcal’ and click the name in the ‘Action column. Select your Calendar
application (e.g. Microsoft Outlook) from the list. Click ‘OK’. 7. Close and restart Firefox.
Apple Safari 1. Open Safari.
2. Click the settings button ( ) on the top-right of the screen. 3. Click the ‘Security’ tab and untick ‘Block pop-up windows’. 4. Click the ‘x’ close button on the top right of the window to return to Safari. 5. Close and restart Safari.
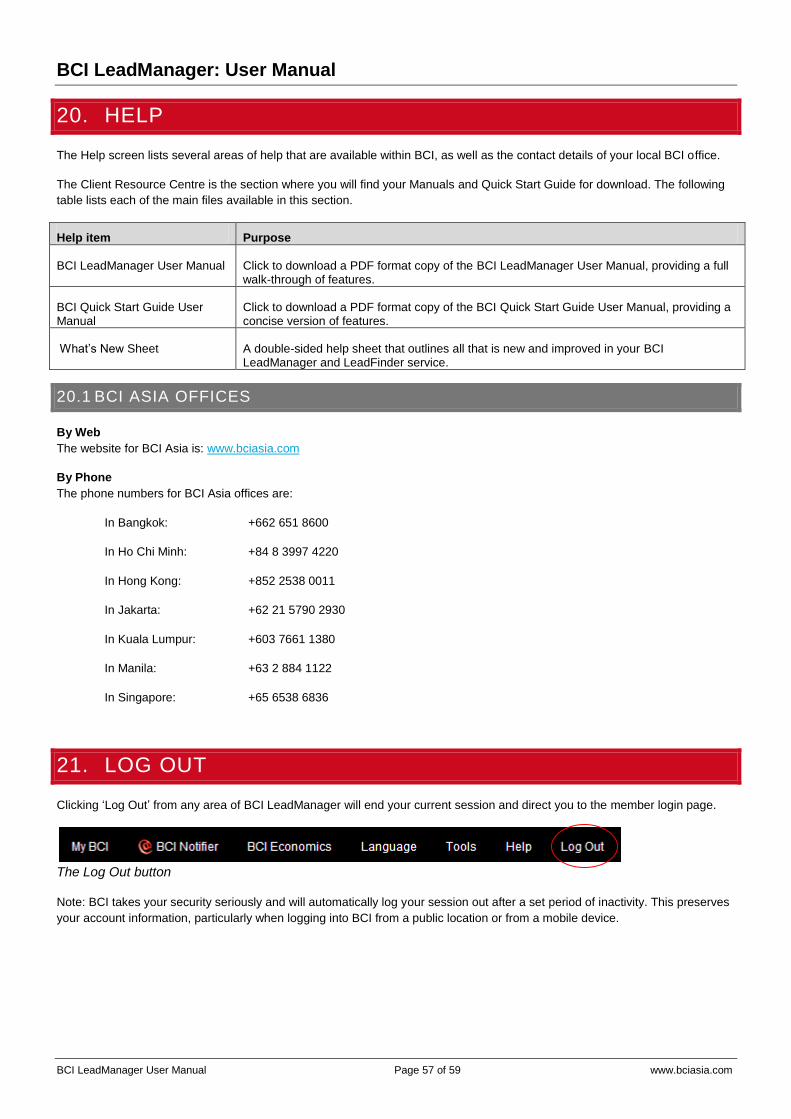
BCI LeadManager: User Manual
BCI LeadManager User Manual Page 57 of 59 www.bciasia.com
20. HELP
The Help screen lists several areas of help that are available within BCI, as well as the contact details of your local BCI office.
The Client Resource Centre is the section where you will find your Manuals and Quick Start Guide for download. The following
table lists each of the main files available in this section.
Help item Purpose
BCI LeadManager User Manual Click to download a PDF format copy of the BCI LeadManager User Manual, providing a full walk-through of features.
BCI Quick Start Guide User Manual
Click to download a PDF format copy of the BCI Quick Start Guide User Manual, providing a concise version of features.
What’s New Sheet A double-sided help sheet that outlines all that is new and improved in your BCI LeadManager and LeadFinder service.
20.1 BCI ASIA OFFICES
By Web
The website for BCI Asia is: www.bciasia.com
By Phone
The phone numbers for BCI Asia offices are:
In Bangkok: +662 651 8600
In Ho Chi Minh: +84 8 3997 4220
In Hong Kong: +852 2538 0011
In Jakarta: +62 21 5790 2930
In Kuala Lumpur: +603 7661 1380
In Manila: +63 2 884 1122
In Singapore: +65 6538 6836
21. LOG OUT
Clicking ‘Log Out’ from any area of BCI LeadManager will end your current session and direct you to the member login page.
The Log Out button
Note: BCI takes your security seriously and will automatically log your session out after a set period of inactivity. This preserves
your account information, particularly when logging into BCI from a public location or from a mobile device.

BCI LeadManager: User Manual
BCI LeadManager User Manual Page 58 of 59 www.bciasia.com
22. APPENDIX 1: STAGES OF CONSTRUCTION
Every project is unique in scope, timing and decision makers involved. However the majority of projects will follow a linear path
as displayed below. Projects may ‘loop back’ to previous Stages and BCI LeadManager will always list the most recent Stage
the project is at. (E.g. Back from Tender to ‘Design’ if the Architect changes).
Following is a short description of each Stage of construction that you will find assigned to Project records.
Stage Description
Competition
‘Design Bid’. During this phase a Developer has an Architectural, interior and other construction-related design competition/tender underway. It is during this Stage that the Design contracts are awarded. Every project does not necessarily have this phase in BCI LeadManager as often, projects only become visible to the BCI Research team once an Architectural team are awarded.
Concept
‘Planning’. During this phase the concept or schematic design is being developed. In most cases, the Developer will formulate an idea of a building he/she wishes to build. The Developer will appoint an Architect, who will produce a concept design and/or sketch plans for the building. Master plans and feasibility studies are carried out at this stage. Consultants and Engineers may also be involved at this early stage, particularly on larger Industrial/Mining projects.
Note: Only specialist Suppliers are likely to be welcomed at this early stage (e.g. Coatings Suppliers where corrosion is likely to be a factor on an off-shore LNG plant).
Design
The Architect (or Designer) refines the design of the building. Project plans have been drafted for planning/development approval. The design forms the basis of the documents, which eventually become the detailed plans for the building. The Developer will enrol the services of other consultants, such as structural engineer, mechanical engineer, electrical engineer, hydraulic engineer, interior designer and landscape designer. These consultants will assist with the design for particular parts of the project e.g. lifts, lighting, interior styling & landscaping. Note: Trusted Suppliers may also provide technical product advice at this stage. This is often considered an ideal time to introduce new products and services to the Architect.
Documentation
‘Writing the Spec’. Once the design has been completed, the Architect draws up detailed plans for the building approval commonly known as a Construction Certificate/Building Permit. Fine-tuned documentation is submitted to Council or private certifiers to get approval to start construction. Specification and working drawings are being drafted. These plans give detailed dimensions and show where building components (e.g. windows and lifts) are located. Note: Products and Services are chosen, or ‘Specified’ at this stage.
Tender
‘Builders submit pricing’. Generally, tenders for the Builder (contractor) are called after documentation is completed. However, a Builder can be appointed at any stage and in a number of ways. Bids are being called from Main Contractors. In most cases, selected companies are invited to tender, sometimes after a round of Expressions of Interest are invited. In fewer cases (mainly government projects) tenders ) tenders are called publicly, meaning that any company can submit a tender for the project. For design-and-build contracts, the Developer appoints the contractor (or 'turnkey contractor') at an early stage to manage both the design and construction of the building. In choosing a design-and-build contractor, the Developer may go through a formal or informal tender process.
Note: Builders will be accepting pricing from Suppliers and Subcontractors during this stage.
Post Tender
‘Contract has, or will soon be awarded’. Tender has closed. This is the phase between the tender close date and the start of construction. Bidders will be assessed in terms of their ability to undertake the project and the price. Once a decision has been made, the successful company will be informed and a construction timetable drawn up. At this point, the main contractor starts negotiating final contracts with the many subcontractors. Site preparation and piling may be underway at this stage if these are not done by the main contractor.

BCI LeadManager: User Manual
BCI LeadManager User Manual Page 59 of 59 www.bciasia.com
Note: The Awarded Builder will be ascertaining Bill of Quantities and placing orders with Suppliers at this stage.
Construction
‘Construction commences’. Main Contractor has commenced work on site. Main Contract Awarded or Subcontract(s) Tender or Subcontract(s) Awarded. From BCI Asia’s point of view construction commences when the successful contractor begins work on site. BCI Asia will report further on major subcontracts as they are awarded.
Note: The Awarded Builder will be taking delivery of Products and liaising with Subcontractors during installation.
Copyright © 2013 by BCI Media Group. All rights reserved.
No part of this document may be reproduced or transmitted in any form or by any means, electronic or mechanical, including
photocopying, recording, or by an information storage or retrieval system without the prior written permission of BCI Media
Group Pty Ltd unless such copying is expressly permitted by federal copyright law.