Embed Size (px)
Citation preview

Basic Introduction
To Micrographics

Table of Contents
Introduction 5 Steps to a Sound Micrographics Program
American National Standards – An Overview Why do we need standards? Basic Standards & Guidelines Neglecting Standards Life Expectancy
Inspection & Quality Control Document Orientation Density Reduction Ratio Resolution Formats Splicing
Packing & Storing Guidelines
Basic Micrographics Dictionary
Recommended Publications
ANSI Standard Publications
Basic Tips

IntroductionIntroductionIntroductionIntroduction
To begin with, microfilming is not an inexpensive solution to records
management and/or preservation challenges. As with any major purchase, much
care and analysis should be given before any decisions are made. One very
important point to remember is that microfilm is not usually a cost effective means
of storing records unless the retention period exceeds 15-20 years or is permanent.
To determine the appropriateness of microfilming any records series,
calculate the cost of filming and compare it to the cost of simply storing the
records in an ideal climate. True savings can only be realized when the cost of
storing the records exceeds the cost of filming them.
Once the decision has been made to incorporate a microfilm program into
your records management program, 5 general steps can be utilized to ensure a
sound archival (or preservation) microfilming.
1. Evaluate your specific needs to determine which records to film.
Generally, records might be filmed to:
• Preserve information contained in the records that are in poor
physical condition.
• Provide security copies of vital or historical records.
• Reduce storage space needs.
• Increase retrieval time.
2. Prepare records for filming
• Arrange documents in proper order. This could be by volume
number, chronologically, alphabetically, or any combination of
these.
• Prepare the necessary targets, keeping in mind archival microfilm
standards and the researchers that will be viewing the film in the
future.
• Create an index that details the exact order of filming, for future
retrieval purposes.
• Pull any staples, unfold and/or press larger documents to make the
filming process easier.

3. Select proper microfilm equipment and supplies.
• Silver Halide microfilm for the camera negative.
• Camera and film size (16mm, 35mm, etc.) suited for the project to
be done.
• Microfilm splicer for any retakes needed.
4. Film the records and develop the film according to the accepted
standards for preservation quality microfilm.
• Use an acceptable ratio.
• Examine the film image by image for errors due to filming,
camera, or developing.
• Test density and resolution.
• Prepare duplicate (use) copies only after all of the quality control
steps have been completed and approved.
5. Provide proper storage and handling of all completed microfilm
rolls.
• Store the camera negative in a microfilm vault separate from the
original records or the duplicate copies and in the most ideal
climate possible to ensure the life expectancy.
• Handle the camera negative only while wearing white cotton
gloves.
• Inspect all film periodically (every 1-2 years) for signs of
deterioration.
• Use the camera negative only to make additional copies of the
film.
When microfilming ANY records, and especially those in poor condition or
scheduled for destruction after filming, it is imperative that the microfilm
and storage areas meet as many federally approved standards as possible. If
they are not, valuable legal and historical records will be lost in a relatively
short period of time.

American National Standards: A Brief OverviewAmerican National Standards: A Brief OverviewAmerican National Standards: A Brief OverviewAmerican National Standards: A Brief Overview
Microforms have been subjected to more stringent standards, a more
thorough analysis of stability and image quality than any other recording medium
in history. Today’s microform standards serve to protect the consumer, to educate
the user, to guide the manufacturers of microfilm materials and those engaged in
research and testing.
Microform standards cover such topics as microform equipment, the
legibility and stability of microforms, the arrangement of images on microfiche
and roll film, storage conditions and enclosures, and packaging and labeling. Those
that are responsible for microfilming programs must be familiar with the basis of
these standards, their scopes, and their provisions.
ANSI (American National Standards Institute) is the U.S. representative to
the International Organization for Standardization (ISO). Under the auspices of
ISO, national standards delegations work to establish international standards, many
of them based on individual countries’ standards. ISO requires 75% approval by
the member bodies voting for a standard to be adopted. It is ANSI practice,
whenever possible, to adopt international standards when they will replace
comparable U.S. ones to avoid dual and potentially incompatible standards. In such
cases, a standard often bears two numbers. One such example is the Specification
for safety film, which is designated as ANSI IT9.6-1991 and ANSI/ISO 543-1990.
Standards are written, at least all those ultimately approve by ANSI,
according to strict semantic and legalistic rules. The words “shall” and “should”
are used with respect to stated requirements, which means that if the standard is
incorporated into a contractual agreement, the “shall” items have mandatory
adherence, while “should” items remain optional. Standards in the U.S. do not
have automatic legal authority, but they may be incorporated into legal and
contractual arrangements so as to be enforceable.
Why do we need standards?
1. To produce quality microfilm that will last to its expected life span of
500-1000 years.
2. To ensure that quality duplicates can be made from the negative now and in
the future.
3. To ensure the legal validity of the original documents.
4. To capture all legible information.

Basic Standards & Guidelines
1. Density levels for the camera negative
• High contrast documents: 1.00 – 1.30
• Medium contrast documents: .90 – 1.10
• Low contrast documents: .80 – 1.00
2. Resolution on the camera negative: 100 Lines per millimeter or better (if
there are future plans to digitize any projects on microfilm, the resolution
needs to be as high as possible for the transfer).
3. Chemical stability of the camera negative: Thiosulfate must not exceed 1.4
micrograms per square centimeter (ANSI).
4. Storage conditions for the camera negative: 40-50% relative humidity;
temperature 60-70 F. Both temperature and humidity are to remain as
stable as possible.
5. Targets
• Resolution, both at the start and the end of a roll.
• Information Target, which should include:
1. Reduction Ratio
2. Date of filming
3. Roll Number
4. Name of Camera Operator
5. Name of Institution
• Certificate of Authenticity, which states that all of the information
supplied on the roll is in original condition, and that all steps of the
filming and quality control process were done according to ANSI
standards. This is usually signed by both the camera operator and the
micrographics expert that is responsible for the quality control of the
film.
• Other Targets: these are encouraged and would include things such
as volume number, page numbers, series title, date spans, continued
on, continued from, as well as individual page targets such as light
ink, poor copy, page missing, intentional retake, blurred ink, etc.
These should be used as much as possible during the filming process,
so that researchers viewing the film know why an exposure is not
perfect, and that it was not through any fault of the quality control
process. It also helps for future quality control. Over time, as the film
begins to deteriorate, the exposures will fade and become out of focus.
These targets help the quality control technician to differentiate
between a poor document and deterioration.
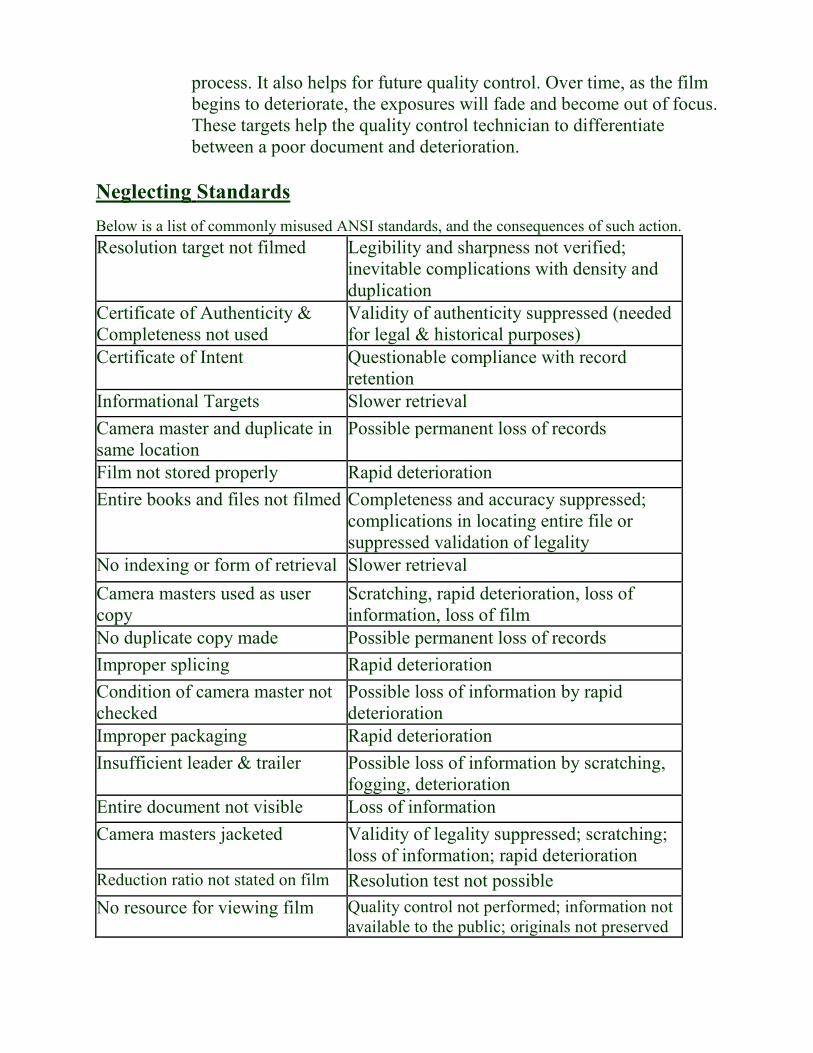
Neglecting Standards
Below is a list of commonly misused ANSI standards, and the consequences of such action.
Resolution target not filmed Legibility and sharpness not verified;
inevitable complications with density and
duplication
Certificate of Authenticity &
Completeness not used
Validity of authenticity suppressed (needed
for legal & historical purposes)
Certificate of Intent Questionable compliance with record
retention
Informational Targets Slower retrieval
Camera master and duplicate in
same location
Possible permanent loss of records
Film not stored properly Rapid deterioration
Entire books and files not filmed Completeness and accuracy suppressed;
complications in locating entire file or
suppressed validation of legality
No indexing or form of retrieval Slower retrieval
Camera masters used as user
copy
Scratching, rapid deterioration, loss of
information, loss of film
No duplicate copy made Possible permanent loss of records
Improper splicing Rapid deterioration
Condition of camera master not
checked
Possible loss of information by rapid
deterioration
Improper packaging Rapid deterioration
Insufficient leader & trailer Possible loss of information by scratching,
fogging, deterioration
Entire document not visible Loss of information
Camera masters jacketed Validity of legality suppressed; scratching;
loss of information; rapid deterioration
Reduction ratio not stated on film Resolution test not possible
No resource for viewing film Quality control not performed; information not
available to the public; originals not preserved

Life Expectancy
Definition: The length of time that information is predicted to be retrievable
in a system under extended term storage conditions.
• Silver Gelatin Master: 500 Years
• Silver Direct Duplicate: 500 Years
• Diazo Duplicate: 10 Years/100 Years in extended
term storage conditions.
• Vesicular Duplicate: 10 Years/100 Years in extended
term storage conditions.
The silver gelatin negative is an excellent choice for preservation microfilm,
and as a print master (a second negative that is made for duplicating purposes, if
the film is to be duplicated many times). However, silver gelatin duplicates do not
hold up as well to frequent use as a service copy.
Primary weaknesses of master camera negatives and silver duplicates when
used as a service copy and not stored properly for preservation are:
• Gelatin layer scratches, which allow deterioration to begin.
• Fungus growth attacks the gelatin layer and destroys the images
• The development of redox blemishes (red/orange spots and rings)
Diaz and Vesicular duplicates are a popular choice for service or user copies.
They stand up much better to prolonged use, and are much less expensive to
replace in the event of damage.

Inspection & Quality ControlInspection & Quality ControlInspection & Quality ControlInspection & Quality Control
Once the project is prepared and ready to film, there are still more factors to
be considered to ensure that the film comes out to preservation standards when the
project is completed.
• Document Orientation, the way in which the documents are placed on the
camera. There are various way in which to place documents for filming, but the
2 most common are comic and cine. The first, comic, is the placement of
documents exactly the way they would be if placed in front of a person for
reading. The top and bottom of the document is parallel to the width of the film.
When the film is placed on a reader or light table, the images flow left to right,
with the image positioned exactly for reading. Whenever possible, documents
and volumes are filmed in this manner. When they are too large to fit on the
microfilm camera board in the comic style, then they are filmed cine, which is
sideways. The top and bottom of the document is parallel to the length of the
film. When placed on a reader or light table, the images also flow left to right,
but they are sideways, with the top of the page on the left.
Document Orientation Samples:
Comic
Cine
• Density, the measure of the opacity or darkness of the exposed areas of the
film. Preservation microfilming requires particular attention to background
density as a measurement of the legibility of the image. Different types, colors,
and ages of paper produce different levels of density when filmed. It is
important to film a practice roll of a representation of every paper type in a
collection before filming, so that the light setting on the microfilm camera can
be placed to the correct setting to ensure proper exposure during filming. This is
called a light test, and it should be performed for every project, for every
camera, including those cameras with an automatic exposure setting. Images
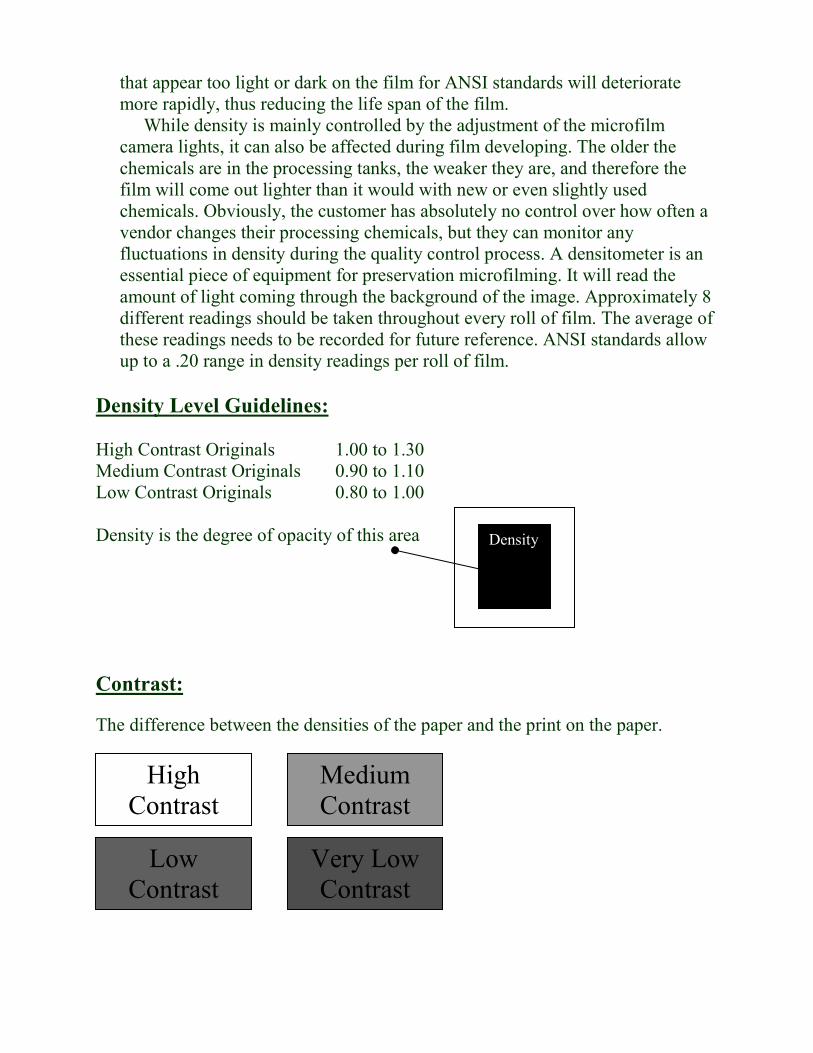
that appear too light or dark on the film for ANSI standards will deteriorate
more rapidly, thus reducing the life span of the film.
While density is mainly controlled by the adjustment of the microfilm
camera lights, it can also be affected during film developing. The older the
chemicals are in the processing tanks, the weaker they are, and therefore the
film will come out lighter than it would with new or even slightly used
chemicals. Obviously, the customer has absolutely no control over how often a
vendor changes their processing chemicals, but they can monitor any
fluctuations in density during the quality control process. A densitometer is an
essential piece of equipment for preservation microfilming. It will read the
amount of light coming through the background of the image. Approximately 8
different readings should be taken throughout every roll of film. The average of
these readings needs to be recorded for future reference. ANSI standards allow
up to a .20 range in density readings per roll of film.
Density Level Guidelines:
High Contrast Originals 1.00 to 1.30
Medium Contrast Originals 0.90 to 1.10
Low Contrast Originals 0.80 to 1.00
Density is the degree of opacity of this area
Contrast:
The difference between the densities of the paper and the print on the paper.
DENSITY
Density
High
Contrast
Low
Contrast
Medium
Contrast
Very Low
Contrast

• Reduction Ratio, represents the relationship between the size of the microfilm
image and the size of the original document. The main thing to remember in
deciding which reduction ratio to use is that the higher the ratio used, the
smaller the image will appear on the microfilm. For preservation purposes,
lower reduction ratios provide a higher image quality, as well as being more
tolerant of poor quality original documents. The degree of reduction is based on many factors, including the quality of
the original documents, the physical size of the original documents, the number
of microfilm generations to be produced from the negative, the size of
microfilm being used, the capabilities of the microfilm camera itself, as well as
the quality control level required (such as life expectancy). There will always be
compromises, which depend on what factors are most important to the project at
hand. However, always make sure that the entire image can be seen with the
reduction ratio used.
The most commonly used reduction ratios are 16X, 25X, and 32X. If
possible, only one reduction ratio should be used throughout the same roll of
film. If a change has to be made to accommodate a larger item, then a target
should be filmed beforehand to let the reader know why there is a difference in
size.
Reduction Ratio examples:
16X
25X
32X

• Resolution, the measurement of how well the microfilm camera records fine
detail. A resolution target is the most important target besides the certificate of
authenticity to be placed on the film. ANSI preservation standards require a
resolution reading for every roll of film. The resolution reading should also be
recorded along with the density reading from the film for future reference. One
of the first indications of film deterioration is a change in the resolution of the
film. As the film begins to break down, the images begin to blur. This results in
a lower resolution reading, which affects the quality of any duplicate copy made
from the negative. Once the deterioration process begins, the best option is to
have a new negative made immediately. Storing the negative in the manner
recommended by ANSI for preservation microfilm and not using it for a service
copy can dramatically slow this process down.
The resolution target should be placed at the start and end of each roll. Any
change in the resolution from the beginning to the end of the roll can indicate a
problem with the camera, or a change in the environment where the equipment
is placed. Even the most subtle of changes can sometimes drastically affect the
quality of the film. The resolution target should also be included with the light
test done before the start of any project.
SAMPLE TARGET
CHART WITHIN THE TARGET

Test Procedure
A.) Film the resolution target along with any other documents in the light
test, at the desired reduction and various light settings.
B.) Examine the target image through a 50x or 100x microscope.
C.) After determining the proper light setting for the main documents in the
project, take the resolution reading from the target filmed at the same
light setting. To do this, look at each of the 5 charts on the target. For
each chart, look for the highest numbered pattern in which all of the
parallel lines are in complete focus.
D.) Record the chart that has the lowest pattern number. For example, if 3 of
the charts have a reading of 7.1 but 2 charts have a reading of 5.6, then
the number to use in calculating the resolution is 5.6.
E.) Calculate the resolution by taking the lowest pattern number and
multiplying it by the reduction ratio that the target was filmed at. For
example, if the target was filmed at 25x, and the lowest pattern number
is 5.6, then the resolution for the roll is 140.
ANSI recommends a minimum resolution of 120-150. 200 is preferable if
scanning the microfilm into a digital format is planned at any time.
*Affecting factors: lens quality, focus setting, film and document position,
vibrations, equipment placement, overhead lights
*ALWAYS use an original test target. NEVER use a xerox copy of any test target.
• Format, the way in which a particular microimage is stored. There are 3 main
formats to choose from: rolls, aperture cards, and microfiche. Aperture cards
are used for large items such as maps, blueprints, etc. Rolls can be used for both
the negative and the duplicate, but standards require the negative to stay in the
roll form. Any time a cut is made to the negative film, the integrity of the film
itself is compromised, and deterioration can begin sooner that it normally
would. Microfiche jackets can be useful for viewing the images on film without
having to scroll through the entire roll to find the information needed. However,
it is ideal to have a duplicate roll made from the original, and have it put into
jackets for retrieval purposes.

Format Examples:
Roll Film
Aperture Card
Geauga County
Engineer’s Office
Aerial Map 1, 1970
Microfiche
• Splicing, the process of cutting the microfilm in order to insert a refilmed
section of film. Obviously, a perfect roll of film is the goal every time the
camera is loaded, but sometimes this is not possible. Equipment breakdown,
environment changes, and operator error can all occur at any time.
Unfortunately, these imperfections cannot be detected until the film is
processed. In order to save time and money, splicing is the most economical
way to correct these errors. However, it can be a tricky process, because as

stated previously, every cut in the film weakens the integrity of the film,
making it more susceptible to deterioration and breakage. There are several
types of splicing methods available: tape, heat, cement, and ultrasonic. The
ultrasonic splice is the only splicing method acceptable for archival microfilm;
however, ANSI standards recommend but do not require it.
Tape splicing is very popular for economical reasons, and most vendors are
still in the practice of using this method. Whenever possible, it is advised to
request that ultrasonic splicing be used.
Also of critical concern is the number of splices placed on the film. ANSI
standards recommend no more than 6 splices per roll of 100 ft. film. This means
that only 3 retakes can be done on a roll of film, as each retake takes 2 splices.
Splicing the retake in place is preferable, so the reader will not have to search
for it, but if there are many retakes to be done, it is possible to splice all of the
retakes with 1 splice at the end of the roll. Remember to mark the film label
with a note stating exactly what was refilmed, and where it can be found, if it is
not spliced in place.
There are other factors to consider when splicing as well. For instance,
standards require that there not be any splicing between either the beginning or
end targets and the first or last 10 exposures of information. For example, if the
first page of the first file on a roll of film turns out blurry, the retake should start
with the beginning targets and end at least 10 to 15 pages into the first file, and
vice versa for a retake at the end of a roll. Also, anywhere there is a splice on
the film, there is a bump from the 2 ends of film rejoining. During duplicating,
this can cause a problem by separating the negative from the duplicating film,
which needs to lay flat to transfer the image to the duplicate. This small area of
separation can cause the images on either side of the splice to appear blurred on
the duplicate roll. Always make sure to leave 1/4 to 1/2 inch of blank space
between the splice and the adjoining images to prevent this.
Splicing Examples: * Retake documents are number s 3,4, & 5
1 2 3 3 4 5 5 6 7 8
1 2 1 2 3 4 5 6 7 6
109 110 111 112 End Roll
Reso-
lution Re-
take 3 4 5

Packing & Storing GuidelinesPacking & Storing GuidelinesPacking & Storing GuidelinesPacking & Storing Guidelines
In order to ensure that the targeted microfilm life expectancy is met, there
are strict packaging and storing guidelines that have to be followed. Also, different
guidelines apply for both master negative microfilm and duplicate microfilm.
• Packing
-Microfiche negatives should be kept in archival microfiche envelopes as
well as boxes. Duplicate microfiche does not need to be handled as
delicately, but should always be stored upright in drawers and kept loose
(not too tightly packed together). The same would apply to aperture cards.
-Microfilm rolls should always be stored in boxes, never loose. Master
negatives should be placed on open reels and secured with archival film tags
to prevent friction. They should also be placed in archival film boxes.
Microfilm duplicates should be on closed white reels, and can be kept in
black plastic film boxes. Neither should ever be kept on closed black film
reels.
• Storage
Microfilm negatives should always be stored off-site, away from any
duplicate copies. Iron Mountain is an excellent underground storage facility.
Duplicate rolls can be stored any number of ways: file drawers, shelving
units, and desk top containers. The most important thing to remember is that
wherever the film is, it should be dark, clean, cool (70 degrees or less), &
dry (20-40% relative humidity).

Basic Micrographics DictionaryBasic Micrographics DictionaryBasic Micrographics DictionaryBasic Micrographics Dictionary
Acetate Film: Safety film with a cellulose or triacetate base. See safety film
Ammonium Thiosulfate: A compound used in fixing solutions for removing
silver halides from film after development. See sodium thiosulfate
Aperture Card: A paper card on which a frame of microfilm is stored. The card
can be punched for computer-assisted retrieval.
Archival Quality: 1. The degree to which a film retains it characteristics in use
and in storage; 2. The ability to resist deterioration over time.
Base: A transparent plastic surface which can be coated with a light-sensitive
material.
CAR: Computer Assisted Retrieval
Cartridge: A plastic container for conveniently storing and accessing roll film.
Computer-Output-Microfilm (COM): Recording microimages on film direct
from computer-stored information, bypassing the paper print out stage.
Contrast: 1. The relationship between the high (D-max) and low (D-min) density
of a photographic image (i.e., if the difference between high and low density is
excellent, the image has high contrast); 2. The density change for each exposure or
the degree of density change.
Core: Around which film or paper is wound
D-max: 1. After complete development, the density of an unexposed diazo
material; 2. Density of a silver halide material after complete exposure and
development; 3. Also maximum density.
D-min: 1. Lowest density of processed film; 2. Also minimum density.
Densitometer: A device used to measure the amount of light reflected or absorbed
by an image.
Density: The extent to which a photographic image absorbs or reflects light.
Develop: To chemically make visible latent images produced by light on a
photosensitive surface.

Diazo Film: A slow print film coated with a light sensitive diazonium salt
emulsion. An image is formed after exposure to light strong in blue ultraviolet
spectrum, and after development in an alkaline environment.
Direct Image Film: Film in which the negative or positive image is duplicated
from the previous generation using conventional processing.
Emulsion: A coating on a transparent base, which carries reactive chemicals that
create a latent image when exposed to light.
Exposure: The subjection of light sensitive material to light.
Flange: A projecting rim or edge used to strengthen or guide an object or attach it
to another object.
Fiche: Microimages on thick based 105mm microfilm roll that is cut and accessed
as a card.
Fog: Extraneous light or dark background on processed film; due to stray light,
bad chemistry, improper film loading, processing or storage, or out dated film.
Frame: The live area of film in a single exposure.
Format: The way in which a particular microimage is stored (i.e., aperture cards,
fiche, rolls, jackets).
Generation: The stages involved in reproducing a microform. The camera film is
the first generation, duplicates made from the negative are the second
generation, etc.
Halation: A ghost, erroneous image or fog appearing around an image on film,
caused by the reflection of light from the base to the emulsion, or by the scattering
or light within the film.
Hard Copy: A paper copy made form an enlarged microimage.
Jacket: A transparent card shaped device for storing strips of microfilm.
Magnification: Optical increase in size.
Master: The original document or first generation microform.

Mounter: A device for placing microfilm in aperture cards.
Negative-Appearing Image: Lines and characters in a photographic image that
appear light against a dark background.
Overexpose: To film an image using too bright a light, too large an aperture or too
long an exposure time; the image will appear too light or dark, depending on the
polarity of the materials.
Overdevelop: Excessive time, temperature, strength of developer solution or
agitation used in developing a photographic image.
Planetary Camera: A device for microfilming documents in which both
document and film are stationary during exposure.
Polarity: The maintenance or reversal of the light/dark relationship during
duplication.
Positive-Appearing Image: Lines and characters on a photographic image that
appear dark on alight background.
Reduction: The degree to which an image is reduced in size; expressed as a ratio
(24:1, 16:10) or as a power (24x, 16x).
Resolution: Degree of detail of an object reproduced in a micro image; the
measurement or resolution is expressed in terms of the discernible number of lines
per millimeter.
Rotary Camera: A device for microfilming documents in which the document
and film move at the same rate during exposure.
Silver Film: A film using light sensitive silver compounds for recording images.
Sodium Thiosulfate: A salt used in fixing solutions for removing silver halides
from film after development. Also hypo.
Step Test: 1. An orderly test of different exposures to find out which is best. 2. To
test for latitude contrast.
Unitize: To cut a roll of microfilm into single frames or groups of frames, and
store in a particular format (i.e., jackets, aperture cards).

Recommended PublicationsRecommended PublicationsRecommended PublicationsRecommended Publications
• Borck, Helga. “Preparing Material for Microfilming: A Bibliography.”
(Revised 1984) Microform Review 14 (Fall 1985): 241-43.
• Elkington, Nancy, ed. RLG Archives Microfilming Handbook. Mountain View,
CA: Research Libraries Group, 1994.
• Fox, Lisa ed. Preservation Microfilming: A Guide for Librarians and
Archivists. 2nd ed. Chicago: American Library Association, 1996. [Update of
Nancy E. Gwinn. Preservation Microfilming: A Guide for Librarians and
Archivists. Chicago: ALA, 1987.]
• Gertz, Jane E. “Preservation Microfilming for Archives and Manuscripts.”
American Archivist 53 (Spring 1990): 224-34.
• Preservation Microfilming: Planning & Production. Papers from the RTSD
Preservation Microfilming Institute, New Haven, Conn., April 21-23, 1988.
Chicago: Association for Library Collections & Technical Services, American
Library Association, 1989.
• Spreitzer, Francis, ed. Microforms in Libraries: A Manual for Evaluation and
Management. Chicago: American Library Association, 1985.

StandardsStandardsStandardsStandards
• American National Standards Institute, Inc. (ANSI), 11 West 42nd St, New
York, NY 10036, (212/642-4900).
• American National Standard for Imaging Materials- Processed Silver Gelatin
Type Black and White Film- Specifications for Stability, ANSI/NAPM IT9.1-
1996.
• American National Standard for Imaging Media-Photographic Processed Films,
Plates, and Papers- Filing Enclosures and Storage Containers, ANSI/PIMA
IT9.2-1998. • American National Standard for Imaging Media-Processed Safety Photographic
Films- Storage, ANSI/NAPM IT9.11-1993.
• American National Standard for Information and Image Management –
Recommended Practice – Microfilming Public Records on Silver Halide Film.
ANSI/AIIM MS48-1999.
• Association for Information and Image Management (AIIM), 1100 Wayne Ave,
Ste 1100, Silver Spring, MD 20910-5603, (888/839-3165). www.aiim.org
• Micrographics – Quality Control of COM Recorders that Generate Images
Using a Single Internal Display System – Part 1: Characteristics of the Software
Test Target. ISO 14648-1:2001 (For use with the Kodak Archivewriter
System).
• Micrographics – Quality Control of COM Recorders that Generate Images
Using a Single Internal Display System – Part 2: Method of use. ISO 14648-
2:2001 (For use with the Kodak Archivewriter System).
• Planning Considerations, Addressing Preparation of Documents of Image
Capture. ANSI/AIIM TR15-1997.
• Recommended Practice for the Expungement, Deletion, Correction of
Amendment of Records on Microforms. ANSI/AIIM MS42-1989.
• Recommended Practice for Identification of Microforms. ANSI/AIIM MS19-
1993.
• Recommended Practice for Inspection of Stored Silver-Gelatin Microforms for
Evidence of Deterioration. ANSI/AIIM MS45-1990.
• Recommended Practice for the Requirements and Characteristics of Original
Documents That May Be Microfilmed. ANSI/AIIM MS35-1990.
• Specifications for 16mm and 35mm Roll Microfilm. ANSI/AIIM MS14-1988.

• Standard Recommended Practice – Production, Inspection, and Quality
Assurance of First-Generation, Silver Microforms of Documents. ANSI/AIIM
MS23-2004.

Basic TipsBasic TipsBasic TipsBasic Tips
• Before beginning to film any project, check to make sure that all material was
put back in the proper order after the preparation phase.
• Never split a folder, book, or category between rolls unless absolutely
necessary. Keep track of the film level and end the roll if need be. It is much
better to end the roll early than to run out in the middle of something.
• When preparing or filming, always think of the people that will be accessing the
information for the next few hundred years. Keep everything neat and orderly,
use special targets to note anything unusual, and keep fingers out of the
exposures.
• Special Note: when microfilming with the intent of producing microfiche,
always make sure to jacket a duplicate roll of microfilm. Never jacket the
master negative. Remember, a duplicate roll of microfilm will never last as long
as a master negative, no matter how perfectly it is stored.