Embed Size (px)
Citation preview
Santa Cruz Avatar
1 | P a g e
Avatar Group Progress Notes
Updated: 11/28/2017
Avatar Group Progress Notes
Table of Contents
Group Progress Notes Overview ............................................................................................ 2
Editing Your Group Membership Using the Group Registration Form ................................ 7
Scheduling a Recurring Group Appointment ......................................................................... 7
Writing the Group Progress Note “Scratch Note” ................................................................11
Review of The My To Do’s Widget .........................................................................................16
Completing Your Group Progress Notes ..............................................................................17
What To Do When Only One Client Comes to Group ...........................................................18
Corrections: What To Do if You Make a Mistake...................................................................19
Group Progress Note Deletions ......................................................................................19
Group Progress Duration Changes ................................................................................20
Other Data Changes for Group Progress Notes ............................................................20
I have A LOT of corrections. Can I put them in a spreadsheet instead? .........................21
This document assumes you have basic knowledge of how the SC General Purpose Progress Note functions in Santa Cruz Avatar. If you are not familiar with the SC General Purpose Progress Note, you may want to review the Santa Cruz Avatar Clinicians Manual on this topic.

Santa Cruz Avatar
2 | P a g e
Avatar Group Progress Notes
Updated: 11/28/2017
Group Progress Notes Overview
Complete the Notes in My To Do’s.
From your My To Do’s, you can open your scratch notes and complete them, one after another. Once you submit your first note from the group, the next note will open up automatically, so you can easily
complete the notes for the entire group.
Create the Group Intervention Scratch Note.
Avatar gives you the opportunity to write the intervention and service information for the entire group once, rather than duplicating the work for each client. After completing the group scratch note, individualized scratch
notes, one for each client, will appear in your My To Do’s. The intervention field in each of these notes is editable. You can customize the intervention for each client.
Optional: Create an Appointment in Your Scheduling Calendar for the Group.
If you use the Avatar Scheduling Calendar, create an appointment for your group.
Register the group using the Group Registration form.
Use the Group Registration form to create your group and assign clients to the group. You will decide on a name for the group and then add your group to Avatar. You may choose how long the group runs, i.e. set an end date for the group. You will also use this form to assign clients to the group. Note that prior to writing the group notes for each session, you will have an opportunity to finalize the group attendance, adding/removing clients from the group as
needed, for that day only.

Santa Cruz Avatar
3 | P a g e
Avatar Group Progress Notes
Updated: 11/28/2017
Group Registration
Use the Group Registration form to set up a new group and to permanently add or remove clients from your group.
1. Open the Group Registration form using the Forms & Data Widget. If you do not see the form in your widget, use the Search Forms field to type in the first few letters of the form to see a pop-up list of forms. Double-click on the form you want.
2. Name Your Group: A popup window will
open asking you to select a group. Type in your group title and click New Group.
- EACH GROUP IS UNIQUE - It is possible the group title you decided on was already selected by someone else. This is OK. Groups are all assigned unique numbers, so two groups may have the same title. You should consult with your supervisor, workgroup or agency to learn about group title procedures. If you discover someone else already has used your group name, you can still click New Group. If you
do this, a group will be created with a duplicate title, but a different ID number. (This is similar to how two clients may have the same name in Avatar, but different ID numbers.)

Santa Cruz Avatar
4 | P a g e
Avatar Group Progress Notes
Updated: 11/28/2017
Avatar will ask if you want to assign Next ID Number to the group. Click Yes.
The Group Registration form will open.
3. Fill Out the Group Registration Form: Fill in the following information in the Group Registration tab.
a. Group Name will be autofilled, but you may change the name if you like. b. Enter the Group Registration Date.
IMPORTANT: THE GROUP REGISTRATION DATE SHOULD BE ON OR BEFORE THE FIRST DATE THE GROUP MEETS. For example, your group first met on Tuesday and you are now sitting down to do your notes on Thursday. Be careful to make your registration date be on Tuesday. If the group registration date is on Thursday, you won’t be able to write your notes from the Tuesday group. This is because, according to Avatar, the group did not exist on Tuesday.
c. Is this Group a Family? Avatar allows you to register families as groups. You would only do this if all of the family members are clients of your agency. For training purposes, click No.
d. Enter Group Description if desired. If there are a lot of groups at your agency, it may be helpful to put in a short description that will help you and others remember which group this is.

Santa Cruz Avatar
5 | P a g e
Avatar Group Progress Notes
Updated: 11/28/2017
4. Group Member Assignment tab You will assign group members, one at a time, to a table. To add a client to the group, you must create a new line in the table. IMPORTANT: THE CLIENT ASSIGNMENT DATE SHOULD BE ON OR BEFORE THE FIRST DATE THE CLIENT ATTENDS THE GROUP. For example, your client first came to the group on Tuesday. You sit down to write your note on Thursday. Be careful to make your assignment date for the client be on Tuesday. If the client assignment date is on Thursday, you won’t be able to write your note on this client for the Tuesday group. This is because, according to Avatar, the client was not registered for the group on Tuesday.
Santa Cruz Avatar
6 | P a g e
Avatar Group Progress Notes
Updated: 11/28/2017
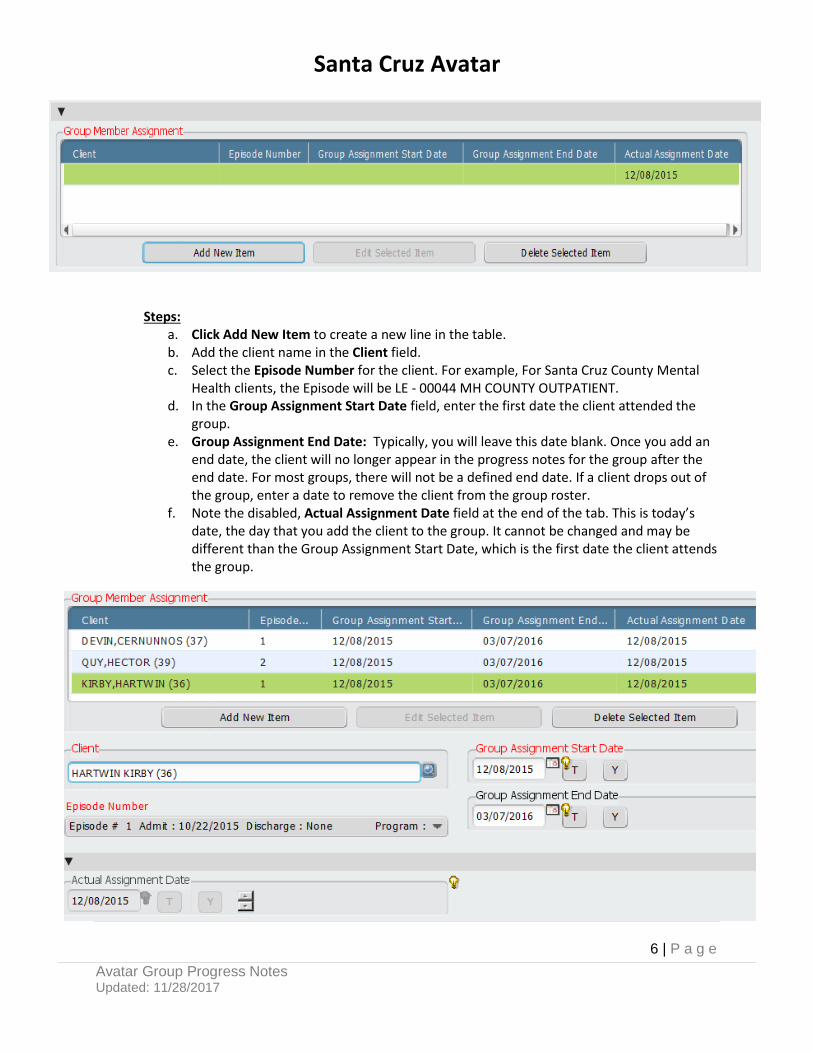
Steps:
a. Click Add New Item to create a new line in the table. b. Add the client name in the Client field. c. Select the Episode Number for the client. For example, For Santa Cruz County Mental
Health clients, the Episode will be LE - 00044 MH COUNTY OUTPATIENT. d. In the Group Assignment Start Date field, enter the first date the client attended the
group. e. Group Assignment End Date: Typically, you will leave this date blank. Once you add an
end date, the client will no longer appear in the progress notes for the group after the end date. For most groups, there will not be a defined end date. If a client drops out of the group, enter a date to remove the client from the group roster.
f. Note the disabled, Actual Assignment Date field at the end of the tab. This is today’s date, the day that you add the client to the group. It cannot be changed and may be different than the Group Assignment Start Date, which is the first date the client attends the group.

Santa Cruz Avatar
7 | P a g e
Avatar Group Progress Notes
Updated: 11/28/2017
Editing Your Group Membership Using the Group Registration Form You may, at any time permanently add and remove group members using the Group Registration form. Although you can edit group members for any single appointment by using the Group Progress Note form, to make permanent changes to your group membership, you will want to use the Group Registration form. Simply reopen the form and type in the name or number of your group in the "Select Group” field. You can then add or remove members from the group. To permanently add a new group member, click "Add New Item" and proceed as described previously. To permanently delete a group member, first, click on the group member in the Group Assignment table. Then click, "Delete Selected Item." Alternately, you can add a Group Assignment End Date and the client will be taken off the group roster when you create a group scratch note. You might want to use this method when you want to keep track of all the people who have been in your group, past and present, but don't want to have them all appear when you create your scratch notes. IMPORTANT: When discharging clients, make sure to remove them from any groups. The reason why is that any “no show” services generated by the group progress notes will prevent you from closing the episode.
Scheduling a Recurring Group Appointment Use the Scheduling Calendar and Appointment Scheduling forms to schedule a recurring appointment for your group. This is required for county staff and optional for contractor staff. Steps:
1. Open your Scheduling Calendar under My Forms, in the Forms & Data widget on the Home View. 2. Right Click on the calendar at the desired appointment time. (If you are doing this as part of a
training, make sure that the date/time of the appointment is not in the future, otherwise you will not be able to write a progress note. Avatar won't let you write notes for a therapy appointment that hasn’t happened yet.)
3. Click Add Appointment. The Add New Appointment form will open.

Santa Cruz Avatar
8 | P a g e
Avatar Group Progress Notes
Updated: 11/28/2017
4. Appointment Information tab: The Practitioner Name will be auto-populated with your name, as
well as the Appointment Site, Appointment Date and Start time. If needed, update the Duration and the End Time will automatically adjust.
5. Service Tab: a. Select Program, Service and Location codes. b. Group #: Type in the name or number of your group. Avatar will search for the group if you type
in a word that is part of the group name. If you have a group that has the same or a similar name to another group, make sure you have selected the correct group.
c. Enter the Service Code for your group. Note that you must enter information into these fields in order, as each one informs what pops up in the next one. This is because the Service Program and the location determine what Service codes are available.
6. Client Tab: Skip this tab. Notice that the fields of the tab are disabled. Because you are scheduling a group appointment, you will not enter the client name or episode here. This information is already attached to your group name and number.

Santa Cruz Avatar
9 | P a g e
Avatar Group Progress Notes
Updated: 11/28/2017
7. Co-Practitioner(s): enter up to two co-practitioners for your group.
8. Recurring Appointment tab: Set up your recurrence schedule as applicable.
9. Click the Submit button on the left side of the screen to save your appointment and return to the Scheduling Calendar.
10. Notice that the new appointment is now listed on your Scheduling Calendar. The circular arrow at the upper right of the appointment indicates that this is a recurring appointment.
Santa Cruz Avatar
10 | P a g e
Avatar Group Progress Notes
Updated: 11/28/2017
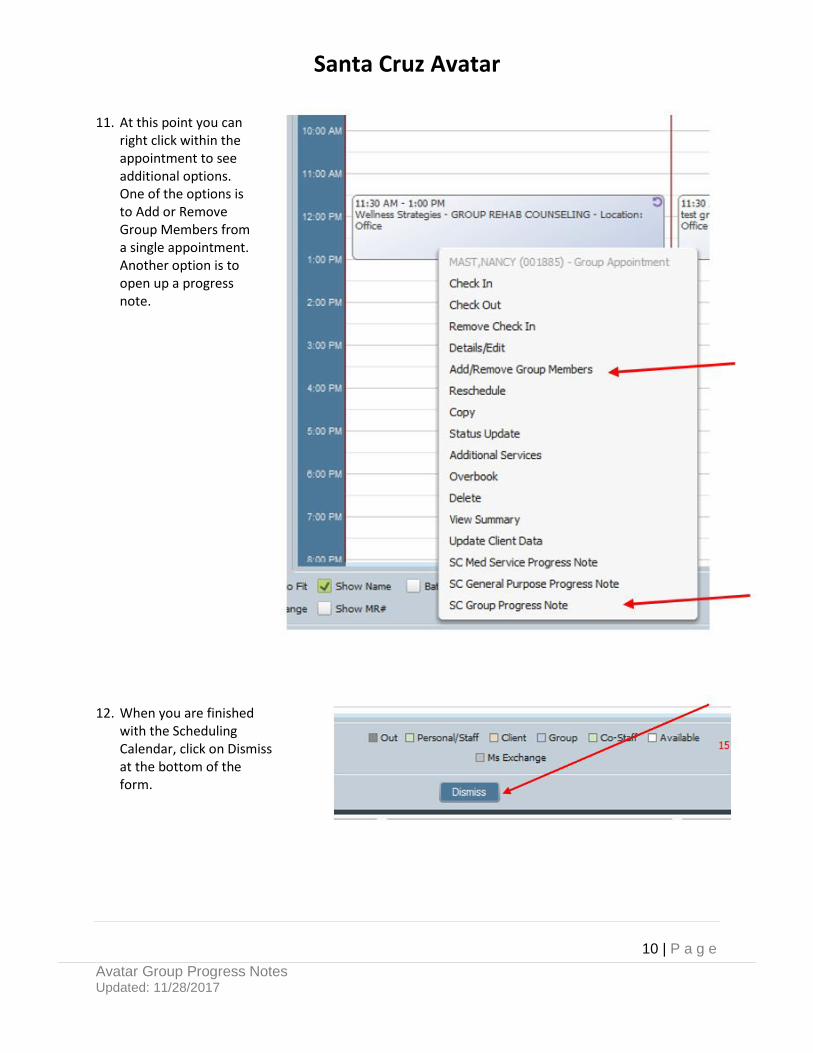
11. At this point you can
right click within the appointment to see additional options. One of the options is to Add or Remove Group Members from a single appointment. Another option is to open up a progress note.
12. When you are finished with the Scheduling Calendar, click on Dismiss at the bottom of the form.
Santa Cruz Avatar
11 | P a g e
Avatar Group Progress Notes
Updated: 11/28/2017
Writing the Group Progress Note “Scratch Note” IMPORTANT: You must enter information and click items in order, or the form may not function correctly. If you are working from your Scheduling Calendar, right click on the appointment and Open a Group Progress Note. You may also open a blank note by double-clicking the Group Progress Note form in the Forms & Data Widget.
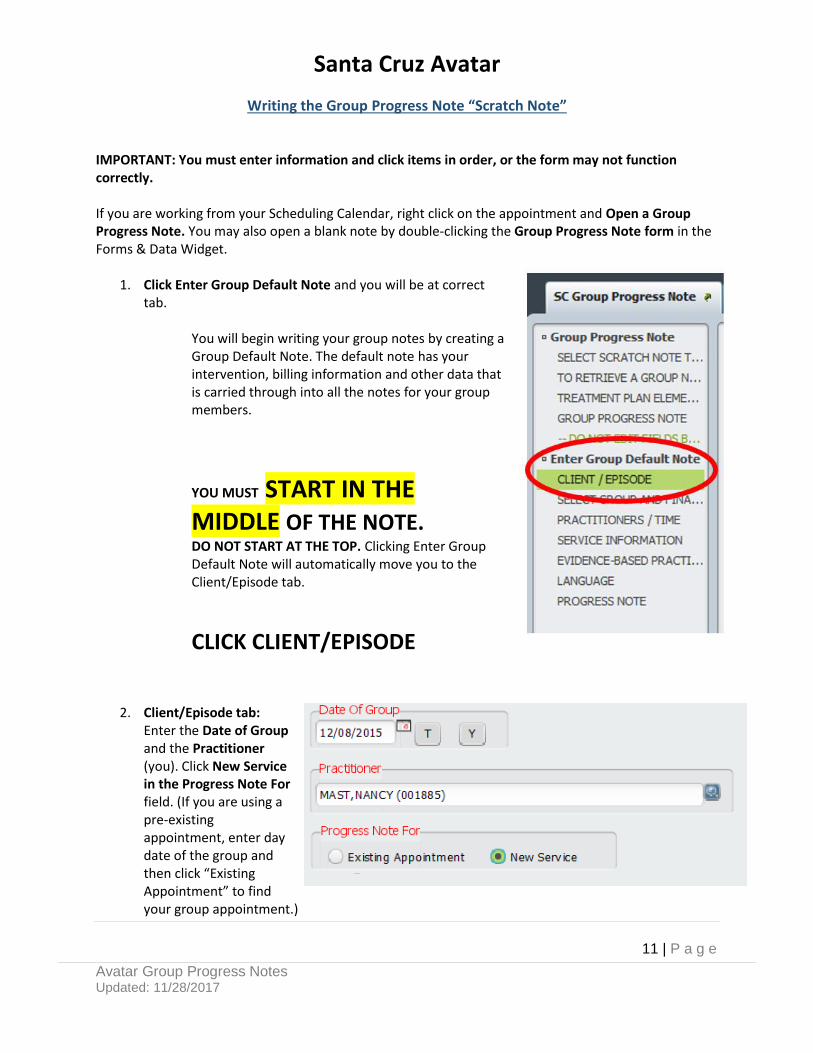
1. Click Enter Group Default Note and you will be at correct tab.
You will begin writing your group notes by creating a Group Default Note. The default note has your intervention, billing information and other data that is carried through into all the notes for your group members.
YOU MUST START IN THE MIDDLE OF THE NOTE.
DO NOT START AT THE TOP. Clicking Enter Group Default Note will automatically move you to the Client/Episode tab.
CLICK CLIENT/EPISODE
2. Client/Episode tab: Enter the Date of Group and the Practitioner (you). Click New Service in the Progress Note For field. (If you are using a pre-existing appointment, enter day date of the group and then click “Existing Appointment” to find your group appointment.)

Santa Cruz Avatar
12 | P a g e
Avatar Group Progress Notes
Updated: 11/28/2017
3. Select the Group
Enter the Group Name or Number. As with other search fields in Avatar, the field will dynamically search for your group.
4. Finalize Group Membership/Attendance. Here, you are only editing your group members for today's appointment. This does not permanently change the group members.
You now have the opportunity to finalize the attendance for your group on a particular day. (To add or remove clients from your group permanently, use the Group Registration form to edit your group members.)
IMPORTANT: Make sure you note group attendance correctly or you may end up with unfinished drafts for people who did not attend or no note for people who did. If this happens you may end up having to rewrite all of the notes for the group.
Clients Who Attended Group: The default for this section is for all group members to be checked, which means they attended the group. If anyone did not attend, click the box next to the client's name to deselect. For the clients you deselect, a service will be filed, noting the missed visit.

Santa Cruz Avatar
13 | P a g e
Avatar Group Progress Notes
Updated: 11/28/2017
Click Add Client To Group to add any new clients to the group. This change will only be for today. To permanently add a client to the group, use the Group Registration form to edit the group members.
Click Remove Client From Group to remove any clients from today's group. To permanently remove the client from the group use the Group Registration Form.
Note that there is no “missed visit” service created for clients removed from the group in this manner. If you want there to be a “missed visit” service for the client, deselect them (uncheck the client) from the group roster.
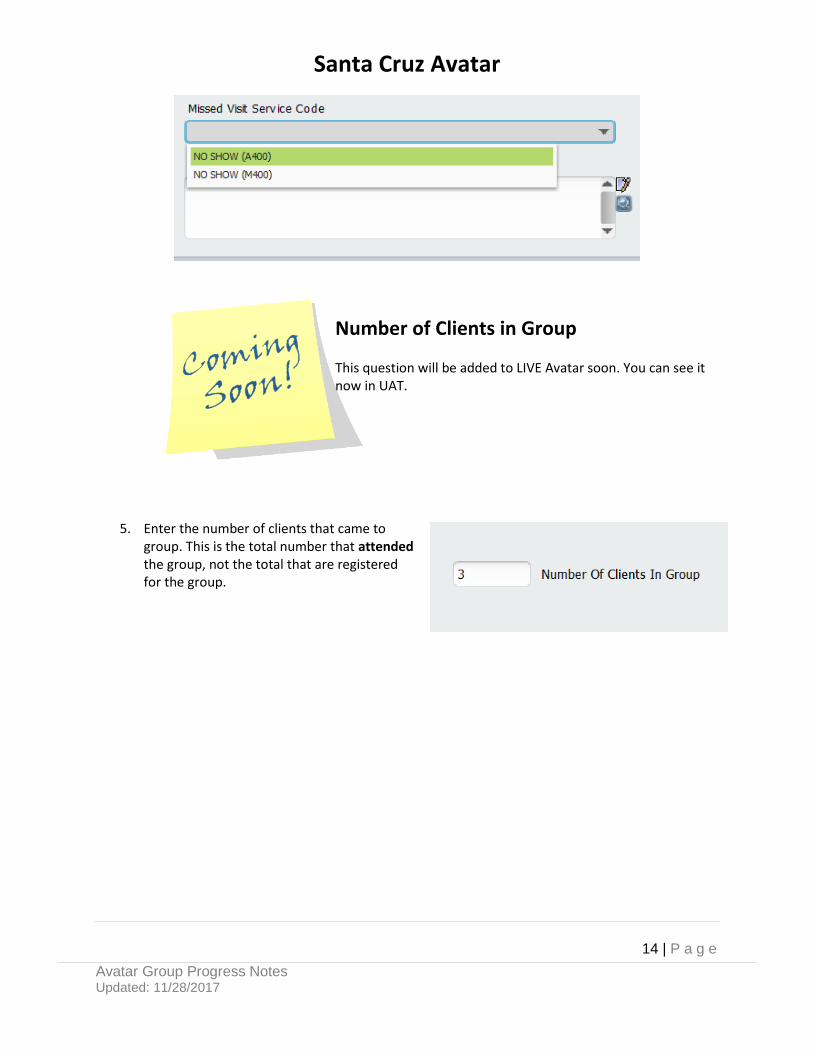
Enter a Missed Visit Service Code for missed visits, if any. This applies to any group members that were “unchecked” in the “Clients Who Attended Group,” box. After you complete your notes, if you look in the client's Service History Widget, you will see the missed visit service code for that group. Do not enter any text for the missed visit as this function is not active in Santa Cruz Avatar.
Santa Cruz Avatar
14 | P a g e
Avatar Group Progress Notes
Updated: 11/28/2017
Number of Clients in Group This question will be added to LIVE Avatar soon. You can see it now in UAT.
5. Enter the number of clients that came to group. This is the total number that attended the group, not the total that are registered for the group.
Santa Cruz Avatar
15 | P a g e
Avatar Group Progress Notes
Updated: 11/28/2017
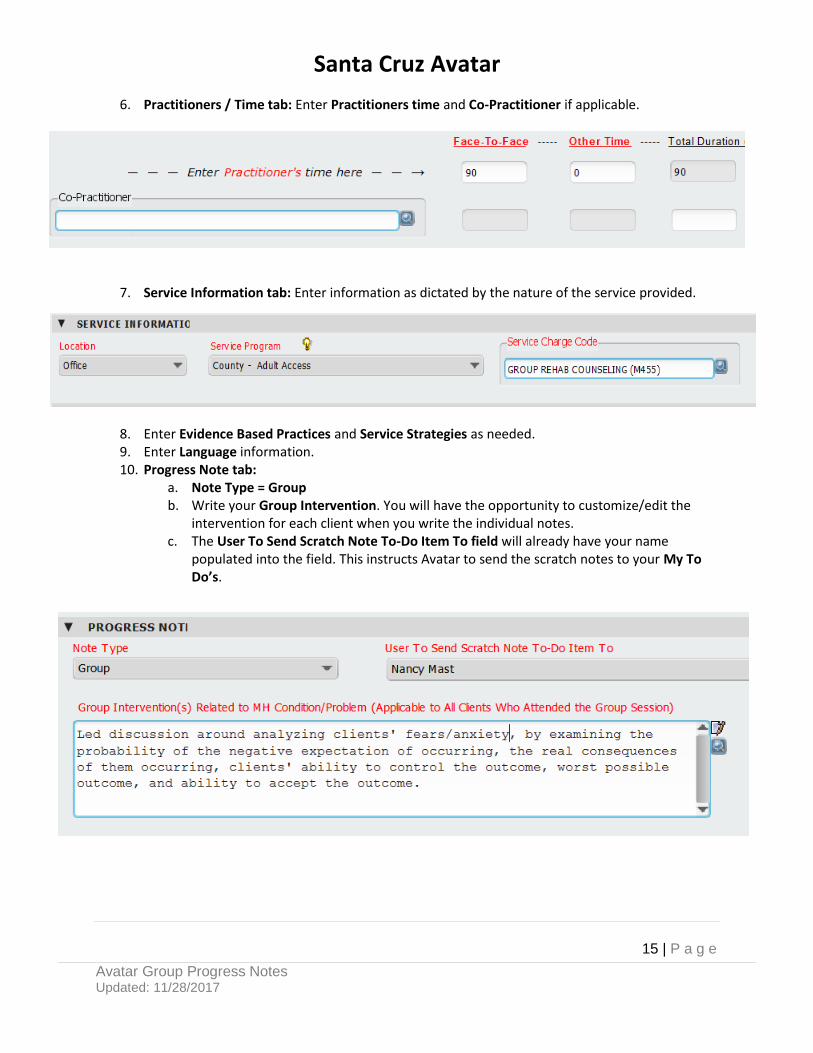
6. Practitioners / Time tab: Enter Practitioners time and Co-Practitioner if applicable.
7. Service Information tab: Enter information as dictated by the nature of the service provided.
8. Enter Evidence Based Practices and Service Strategies as needed. 9. Enter Language information. 10. Progress Note tab:
a. Note Type = Group b. Write your Group Intervention. You will have the opportunity to customize/edit the
intervention for each client when you write the individual notes. c. The User To Send Scratch Note To-Do Item To field will already have your name
populated into the field. This instructs Avatar to send the scratch notes to your My To Do’s.

Santa Cruz Avatar
16 | P a g e
Avatar Group Progress Notes
Updated: 11/28/2017
d. When you are satisfied with your Scratch Note, click File Group Default Note to save and close. When you file your group default note, Avatar will send an individual Scratch Note for each client in your group to your My To Do’s. You will receive a system message telling you there are new items in your workflow. Click OK.
Review of The My To Do’s Widget
In order to complete your Group Progress Notes, you need to understand how the My To Do’s widget works. The My To Do’s Widget is part of the Group Progress Note workflow. Once you file your Group Default Note, Avatar sends a link to individual “scratch” notes, one for each client, to your My To Do’s. All the notes will have the same service information as well as the intervention you wrote when you created your Group Default Note. In your My To Do’s you will open and complete the notes, one at a time until you have written the individual notes for all group members. After you complete your first note for a group, the next one will launch automatically until all the notes for that group are completed.
IMPORTANT: In your My To Do’s DO NOT click Review Draft Item. This will
not launch the progress note. In addition, you have started down a path that will delete your link to the note without your completing the note.

Santa Cruz Avatar
17 | P a g e
Avatar Group Progress Notes
Updated: 11/28/2017
Completing Your Group Progress Notes When you file your Group Default Note, you will receive a system message telling you there are new items in your workflow. This means that your individual notes have arrived in your My To Do’s. Click OK.
1. Close all of your open charts before completing your notes. If the chart is open for a client, you may not be able to open the scratch note from your My To Do’s. There is a handy link that closes all charts in your Clients & Staff Widget labeled “Close Open Clients.” If you click this, all of your open charts will close.

Santa Cruz Avatar
18 | P a g e
Avatar Group Progress Notes
Updated: 11/28/2017
2. Click the refresh button in your My To Do’s so you can see the draft Group Progress Notes that have been delivered to you.
3. The notes for the group will now appear in your My To Do’s. Clicking on the first note in the group will open the group progress note form for that client with all of the information you already added. Once you complete the first note, finalize it, and then submit it, the next note from the group will open up for you to complete. It is strongly recommended that you complete all the notes for the group at one time. Completing part of the notes one day and then the rest on a different day may lead to problems completing all of the notes.
REMINDER: DO NOT click Review Draft Item. This will not launch the progress note.
4. Once you have completed your group scratch note, a large portion of each individualized Group
Progress Note has already been completed. You will still need to fill in the sections of each note that are unique to each client in the group.
a. Treatment Plan Elements section: If there is a treatment plan for the client, you will
select the plan elements that the service you provided addresses.
b. Progress Note Section: Enter the Client Presentation, Response and Follow-Up sections of each note. The intervention you already entered will be there, but you may edit the Intervention section to customize for the client.
What To Do When Only One Client Comes to Group You must have at least two clients to use the Group Progress Note. (This is because the billing component of the form won't work correctly if there is only one client.)

Santa Cruz Avatar
19 | P a g e
Avatar Group Progress Notes
Updated: 11/28/2017
If only one client shows up for group, instead of using the Group Progress Note form, use the SC General Purpose Progress Note. For the "Note Type," use "Progress Note." Do not use "Group" for the "Note Type." Use an individual service code. Do not use a group service code.
Corrections: What To Do if You Make a Mistake
Group Progress Note Deletions Send your correction message to [email protected] For group note deletions the entire group will need deleting and then must be re-entered. This is because of how Avatar calculates the time for Group Progress Notes. Draft group progress notes cannot be deleted at all, either by the clinician, or by the help desk. If you need group notes deleted, put NA or VOID in all of the text boxes (problem, intervention, response and follow-up) and then finalize. Once the notes are finalized, we can delete them for you. If the client name or date is wrong, we will need to delete the note and you will rewrite it. The name or date cannot be changed once the note has been started. Group Progress Notes cannot be reverted to draft because of how Avatar calculates the time with these notes. Use the template below to provide information about the note(s). If you are re-entering your note(s), and not just having them deleted, copy and paste the information from your note into a Word document. That way you can paste it back in to Avatar when you re-create your notes. Group Progress Note Deletion Template (fill out completely) Client number: Client name: Episode number: Service Date: Data Entry Date: Total Duration time: Service code: Clinician’s name and user number: Action requested: Deletion Reason: Is this a group note? (Y/N): How many people in the group?:
Santa Cruz Avatar
20 | P a g e
Avatar Group Progress Notes
Updated: 11/28/2017
Please include the above information for every group participant. You must finalize the note first and then request a deletion. We cannot delete draft notes. (Optional: Put NA or VOID in the text blanks of the note before finalizing. This helps us find it when deleting it.)
Group Progress Duration Changes The Avatar Group Progress Note may occasionally miscalculate the duration time for some notes. If this is discovered in audit, we can change the total duration for you. Group Progress Note Duration Correction Template (fill out completely) Client number: Client name: Service Date: Data Entry Date: Service code: Episode number: Clinician’s name and user number: Change Duration time from: To: Co-clinician’s name and user number: Change co-clinician duration time from: To: How many people in the group?: Reason: Avatar Group Note Miscalculation
Other Data Changes for Group Progress Notes It is not recommended that Group Progress Notes be reverted to draft for changes, unless there is no other way to make the correction. What We Can Change for You: Service Code, Practitioner, Co – Practitioner, Total Duration, Service Program, Location, Episode (Program of Admission) What We Can't Change for You: The date of the note, client name, “Face-To-Face Time”, “Other Time” (we CAN change the Total Duration), Progress note text (what you put in the data, intervention, response, referrals and follow-up care questions).
If you need to edit the text fields on your note, instead of having the note reverted to draft, consider using the Append Progress Note form, which is described in the Avatar Clinicians Manual. You can use this form to add information to the note without having it reverted to draft.

Santa Cruz Avatar
21 | P a g e
Avatar Group Progress Notes
Updated: 11/28/2017
Use the template below to indicate what change you need in your note. Group Progress Note Correction Template (fill out completely) Client number: Client name: Service Date: Data Entry Date: Data Entry Time*: Total Duration time: Service code: Episode number: Clinician’s name and user number: Action requested (change service code, adjust total duration, etc.): Reason: Is this a group note? (Y/N): Y *If note is same-day duplicate. We might need the data entry time to distinguish your note from others that were written for that client on the same day.
I have A LOT of corrections. Can I put them in a spreadsheet instead? Yes, this is no problem as long as your spreadsheet has all the fields in the template above. Also, please do not just send in a copy of information from the Service Activity Report. This does not have all of the information we need to find the note and make the change for you.