Embed Size (px)
Citation preview

www.studioefabrics.com
Autumn AbundanceAutumn Abundance
Fabric Requirements Additional Supplies Needed
Featuring fabrics from the Autumn Abundance collection by Jennifer Brinley for
PROCESS COLOR:
GRAYSCALE:
B/W:
Batting 69” x 75”Piecing and sewing threadQuilting and sewing supplies
QUILT 1
*Includes binding**Shadow Weave Collection
Pattern InformationQuilt designed by Heidi PridemoreFinished Quilt Size 61" x 67"Skill Level: Intermediate
(A) 3338-66 .............. ¼ yard (B) 3339-66 .............. ½ yard(C) 2161-88**........... ⅜ yard(D) 3339-88 .............. 1 yard*(E) 2161-37**........... ¼ yard(F) 3338-33 .............. ½ yard(G) 3342-44 .............. ½ yard(H) 3336-88 .............. ⅝ yard(I) 2161-44**............ 1 ⅔ yards
(J) 3341-99 ............... ½ yard(K) 3338-35 .............. ¼ yard(L) 3337-99 .............. 1 ½ yardsBacking 3337-66 .............. 4 yards

www.studioefabrics.com•STUDIO e PROJECTS• Page 2 of 8
CuttingCutting InstructionsPlease note: All strips are cut across the width of fabric (WOF) from selvage to selvage edge unless otherwise noted.
WOF= Width of Fabric • LOF = Length of Fabric
Fabric A (3338-66 Swirl – Green), cut: • (1) 2” x WOF strip, sub-cut (16) 2” squares. • (1) 3 ½” x WOF strip, sub-cut (16) 2” x 3 ½” strips.
Fabric B (3339-66 Leaf Cameo – Green), cut: • (1) 5” x WOF strip, sub-cut (16) 2” x 5” strips. • (1) 6 ½” x WOF strip, sub-cut (16) 2” x 6 ½” strips.
Fabric C (2161-88 Shadow Weave – Red), cut: • (1) 2” x WOF strip, sub-cut (16) 2” squares. • (2) 4 ½” x WOF strips, sub-cut (20) 2 ½” x 4 ½” strips.
Fabric D (3339-88 Leaf Cameo – Red), cut: • (1) 2 ½” x WOF strip, sub-cut (8) 2 ½” x 4 ½” strips. • (2) 2” x WOF strips, sub-cut (12) 2” x 6 ½” strips. • (2) 2” x WOF strips, sub-cut (12) 2” x 5” strips. • (7) 2 ½” x WOF strips for the binding.
Fabric E (2161-37 Shadow Weave – Cantaloupe), cut: • (1) 2 ⅞” x WOF strip, sub-cut (2) 2 ⅞” squares, (4) 2 ½” squares and (4) 2 ½” x 4 ½” strips.
Fabric F (3338-33 Swirl – Yellow), cut: • (2) 4 ½” x WOF strips, sub-cut (20) 2 ½” x 4 ½” strips and (4) 2” squares. • (1) 2” x WOF strip, sub-cut (20) 2” squares.
Fabric G (3342-44 Plaid – Cream), cut: • (1) 2 ⅞” x WOF strip, sub-cut (5) 2 ⅞” squares. • (1) 4 ½” x WOF strip, sub-cut (10) 2 ½” x 4 ½” strips. • (1) 2 ½” x WOF strip, sub-cut (10) 2 ½” squares.
Fabric H (3336-88 Paisley – Red), cut: • (1) 2 ⅞” x WOF strip, sub-cut (5) 2 ⅞” squares. • (1) 4 ½” x WOF strip, sub-cut (10) 2 ½” x 4 ½” strips. • (1) 2 ½” x WOF strip, sub-cut (10) 2 ½” squares. • (1) 2” x WOF strip, sub-cut (12) 2” squares. • (1) 3 ½” x WOF strip, sub-cut (12) 2” x 3 ½” strips.
Fabric I (2161-44 Shadow Weave – Stone), cut: • (3) 2” x WOF strips. Sew the strips together end to end with diagonal seams and cut (2) 2” x 51 ½” strips. • (3) 2” x WOF strips. Sew the strips together end to end with diagonal seams and cut (2) 2” x 48 ½” strips. • (1) 2 ⅞” x WOF strip, sub-cut (12) 2 ⅞” squares. • (6) 2 ½” x WOF strips, sub-cut (96) 2 ½” squares. • (3) 2 ¼” x WOF strips, sub-cut (48) 2 ¼” squares. • (2) 5” x WOF strips, sub-cut (40) 2” x 5” strips. • (2) 3 ½” x WOF strips, sub-cut (40) 2” x 3 ½” strips.

www.studioefabrics.com•STUDIO e PROJECTS• Page 3 of 8
Fig. 1
Sewing
Cutting - Continued
Sew using a ¼” seam allowance with right sides together (RST) unless otherwise indicated. Always press towards the darker fabric while assembling, unless otherwise noted by the arrows.
Fig. 2 Fig. 3
Fig. 4 Fig. 5
Fabric J (3341-99 Tossed Flowers – Black), cut: • (1) 5” x WOF strip, sub-cut (12) 2” x 5” strips. • (1) 6 ½” x WOF strip, sub-cut (12) 2” x 6 ½” strips.
Fabric K (3338-35 Swirl – Orange), cut: • (1) 2” x WOF strip, sub-cut (12) 2” squares. • (1) 3 ½” x WOF strip, sub-cut (12) 2” x 3 ½” strips.
Fabric L (3337-99 Leaves – Black), cut: • (3) 5 ½” x WOF strips. Sew the strips together end to end with diagonal seams and cut (2) 5 ½” x 51 ½” strips. • (4) 8 ½” x WOF strips. Sew the strips together end to end with diagonal seams and cut (2) 8 ½” x 61 ½” strips.
Backing (3337-66 Leaves – Green), cut: • (2) 69” x WOF strips. Sew the strips together and trim to 69” x 75” for the back.
Block Assembly1. Place (1) 2 ⅞” Fabric I square on top of (1) 2 ⅞” Fabric G square, right sides together. Draw a line across the diagonal of the top square (Fig. 1). Sew ¼” away from each side of the drawn diagonal line (Fig. 1). Cut the two squares apart on the drawn diagonal line (Fig. 2) to make (2) GI squares (Fig. 3). Trim the GI squares to measure 2 ½” square. Repeat to make (10) GI squares total.
IG
make 10
HI
make 10
EI
make 4
2. Repeat Step 1 using (5) 2 ⅞” Fabric H squares and (5) 2 ⅞” Fabric I squares to make (10) 2 ½” HI squares (Fig. 4).
3. Repeat Step 1 using (2) 2 ⅞” Fabric E squares and (2) 2 ⅞” Fabric I squares to make (4) 2 ½” EI squares (Fig. 5).

www.studioefabrics.com•STUDIO e PROJECTS• Page 4 of 8
4. Place (1) 2 ½” Fabric I square on the left side of (1) 2 ½” x 4 ½” Fabric F strip, right sides together (Fig. 6). Sew across the diagonal of the square from the upper right corner to the lower left corner (Fig. 6). Flip open the triangle formed and press (Fig. 7). Trim away the excess fabric from behind the triangle, leaving a ¼” seam allowance to make (1) IF unit. Repeat to make (10) IF units total.
Fig. 6 Fig. 7
Fig. 12
Fig. 8
Fig. 10
Fig. 13 Fig. 14
Fig. 11
Fig. 16Fig. 15
Fig. 9
make 10
FI
5. Repeat Step 4 using (10) 2 ½” x 4 ½” Fabric C strips and (10) 2 ½” Fabric I squares to make (10) IC units (Fig. 8).
6. Repeat Step 4 using (4) 2 ½” x 4 ½” Fabric D strips and (4) 2 ½” Fabric I squares to make (4) ID units (Fig. 9).
8. Repeat Step 7 using (10) 2 ½” x 4 ½” Fabric G strips and (10) 2 ½” Fabric I squares to make (10) GI units (Fig. 12).
9. Repeat Step 7 using (10) 2 ½” x 4 ½” Fabric H strips and (10) 2 ½” Fabric I squares to make (10) HI units (Fig. 13).
10. Repeat Step 7 using (4) 2 ½” x 4 ½” Fabric E strips and (4) 2 ½” Fabric I squares to make (4) EI units (Fig. 14).
11. Repeat Step 7 using (10) 2 ½” x 4 ½” Fabric C strips and (10) 2 ½” Fabric I squares to make (10) CI units (Fig. 15).
12. Repeat Step 7 using (4) 2 ½” x 4 ½” Fabric D strips and (4) 2 ½” Fabric I squares to make (4) DI units (Fig. 16).
make 10I
C
make 4I
E
make 4
I D
GG
make 10
IG
make 10I
H
7. Place (1) 2 ½” Fabric I square on the right side of (1) 2 ½” x 4 ½” Fabric F strip, right sides together (Fig. 10). Sew across the diagonal of the square from the upper left corner to the lower right corner (Fig. 10). Flip open the triangle formed and press (Fig. 11). Trim away the excess fabric from behind the triangle, leaving a ¼” seam allowance to make (1) FI unit. Repeat to make (10) FI units total.
make 10
FI
make 10
IC
make 4I
D
www.studioefabrics.com•STUDIO e PROJECTS• Page 5 of 8
Fig. 18
Fig. 20
Fig. 22
Fig. 23
Fig. 17
Fig. 19
Fig. 21
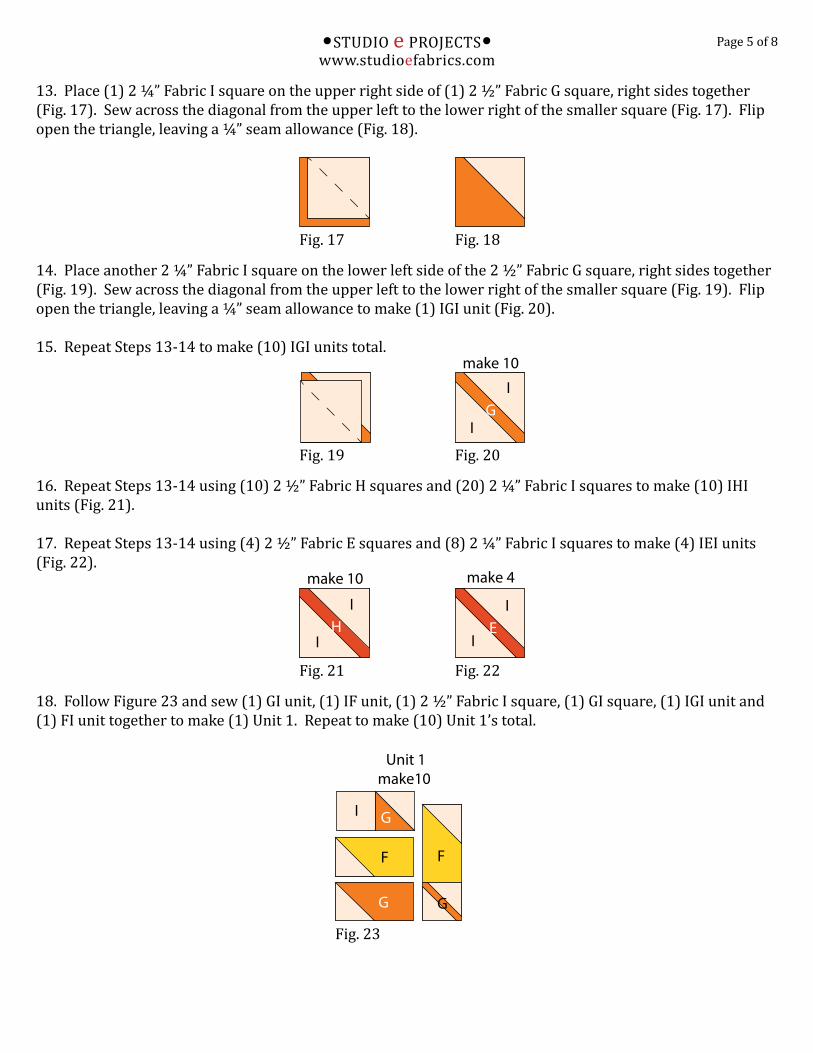
13. Place (1) 2 ¼” Fabric I square on the upper right side of (1) 2 ½” Fabric G square, right sides together (Fig. 17). Sew across the diagonal from the upper left to the lower right of the smaller square (Fig. 17). Flip open the triangle, leaving a ¼” seam allowance (Fig. 18).
14. Place another 2 ¼” Fabric I square on the lower left side of the 2 ½” Fabric G square, right sides together (Fig. 19). Sew across the diagonal from the upper left to the lower right of the smaller square (Fig. 19). Flip open the triangle, leaving a ¼” seam allowance to make (1) IGI unit (Fig. 20).
15. Repeat Steps 13-14 to make (10) IGI units total.
G
make 10
I
I
16. Repeat Steps 13-14 using (10) 2 ½” Fabric H squares and (20) 2 ¼” Fabric I squares to make (10) IHI units (Fig. 21).
17. Repeat Steps 13-14 using (4) 2 ½” Fabric E squares and (8) 2 ¼” Fabric I squares to make (4) IEI units (Fig. 22).
make 10
I
IH
make 4
I
IE
Unit 1make10
F F
I G
G G
18. Follow Figure 23 and sew (1) GI unit, (1) IF unit, (1) 2 ½” Fabric I square, (1) GI square, (1) IGI unit and (1) FI unit together to make (1) Unit 1. Repeat to make (10) Unit 1’s total.

www.studioefabrics.com•STUDIO e PROJECTS• Page 6 of 8
Fig. 24
Fig. 26
Fig. 28
Fig. 25
Fig. 27
Fig. 29
19. Follow Figure 24 and sew (1) HI unit, (1) IC unit, (1) 2 ½” Fabric I square, (1) HI square, (1) IHI unit and (1) CI unit together to make (1) Unit 2. Repeat to make (10) Unit 2’s total.
20. Follow Figure 25 and sew (1) EI unit, (1) ID unit, (1) 2 ½” Fabric I square, (1) EI square, (1) IEI unit and (1) DI unit together to make (1) Unit 3. Repeat to make (4) Unit 3’s total.
Unit 2make10
I
HH
HC
C
Unit 3make 4
I E
E
DD
21. Sew (1) 2” Fabric C square and (1) 2” Fabric A square together to make (1) CA strip. Sew (1) 2” x 3 ½” Fabric A strip to the bottom of the CA strip. Sew (1) 2” x 3 ½” Fabric I strip to the left side of the CA strip. Sew (1) 2” x 5” Fabric I strip to the top of the CA unit to make (1) C block (Fig. 26).
22. Sew (1) 2” x 5” Fabric B strip to the right side of (1) C block. Sew (1) 2” x 6 ½” Fabric B strip to the bottom of the C block to make (1) Unit 4 (Fig. 27). Repeat to make (16) Unit 4’s total.
I
I
Unit 4make 16
C
B
BA
A
I
I
C A
A
I
I
Unit 5make 12
HH J
J
FI
I
Unit 6make 12
D
D
K
K
F
23. Repeat Steps 21 and 22, following Figure 28 for fabric identification and placement to make (12) Unit 5’s.
24. Repeat Steps 21 and 22, following Figure 29 for fabric identification and placement to make (12) Unit 6’s.

www.studioefabrics.com•STUDIO e PROJECTS• Page 7 of 8
Quilt Top Assembly(Follow the Quilt Layout while assembling the quilt top.)28. Sew (1) Block One, (1) Block Two, (1) Block Three and (1) Block One together, in that order, to make Row One.
29. Sew (1) Block Two, (1) Block Three, (1) Block Two and (1) Block Three together, in that order, to make Row Two.
30. Sew (1) Block Three, (1) Block Two, (1) Block Three and (1) Block Two together, in that order, to make Row Three.
31. Sew (1) Block One, (1) Block Three, (1) Block Two and (1) Block One together, in that order, to make Row Four.
32. Sew the (4) rows together, in numerical order, to make the quilt top.
33. Sew (1) 2” x 48 ½” Fabric I strip to each side of the quilt top. Sew (1) 2” x 51 ½” Fabric I strip to the top and to the bottom of the quilt top.
34. Sew (1) 5 ½” x 51 ½” Fabric L strip to each side of the quilt top. Sew (1) 8 ½” x 61 ½” Fabric L strip to the top and to the bottom of the quilt top.
Layering, Quilting and Finishing35. Press the quilt top and 69” x 75” backing well. Layer backing (wrong side up), batting, pressed quilt top (right side up) and baste. Quilt as desired and trim excess batting and backing when quilting is complete.
Fig. 30 Fig. 31 Fig. 32
Block Onemake 4
Unit 1
Unit 2
Unit 3
Unit 4
Block Twomake 6
Unit 1
Unit 4
Unit 5
Unit 6
Block Threemake 6
Unit 4
Unit 5
Unit 6
Unit 2
25. Sew (1) Unit 1, (1) Unit 2, (1) Unit 3 and (1) Unit 4 together to make (1) Block One (Fig. 30). Repeat to make (4) Block Ones.
26. Sew (1) Unit 1, (1) Unit 5, (1) Unit 6 and (1) Unit 4 together to make (1) Block Two (Fig. 31). Repeat to make (6) Block Twos.
27. Sew (1) Unit 2, (1) Unit 5, (1) Unit 6 and (1) Unit 4 together to make (1) Block Three (Fig. 32). Repeat to make (6) Block Threes.

www.studioefabrics.com•STUDIO e PROJECTS•
© 2015 Studio e Fabrics®
Binding36. Cut the ends of the (7) Fabric D binding strips at a 45-degree angle and sew end to end to make (1) continuous piece of binding. Fold in half lengthwise and press wrong sides together.
37. Sew the binding to the front of the quilt, raw edges together. Turn the folded edge to the back, and hand stitch in place.
Quilt Layout
Page 8 of 8
1 1
1 1
2
2
2
2
2
2
3
3
3
3
3
3
I
I
I IL L
L
L