Embed Size (px)
Citation preview

MANUAL DE INSTRUCCIONES CODIGO 80121 REV C 04/07/01 (It can be modified without notice) Pag.: 1
J.P. SELECTA s.a. Ctra. NII Km 585.1 Abrera 08630 (Barcelona) España Tel (34 3) 770 08 77 Fax (34 3) 770 23 62 e-mail: [email protected] - http://www.sefes.es/selecta
AUTESTER-E 30 DRY 4001414AUTESTER-E 75 DRY 4001415AUTESTER-E 140 DRY 4001416
AUTOCLAVES AUTOMÁTICOS PARA ESTERILIZACIÓNA VAPOR CON SISTEMA PREVACUUM
AUTOMATIC AUTOCLAVES FOR STEAM STERILIZATION
ISO 9001

MANUAL DE INSTRUCCIONES CODIGO 80121 REV C 04/07/01 (Sujetas a modificaciones sin previo aviso) Pag.: 2
J.P. SELECTA s.a. Ctra. NII Km 585.1 Abrera 08630 (Barcelona) España Tel (34 3) 770 08 77 Fax (34 3) 770 23 62 e-mail: [email protected] - http://www.sefes.es/selecta
INFORMACIÓN GENERAL
1) Manipular el paquete con cuidado. Desembalarlo ycomprobar que el contenido coincide con lo indica-do en el apartado de la “Lista de embalaje”. Si seobserva algún componente dañado o la ausencia dealguno avisar rápidamente al distribuidor.
2) No instalar ni utilizar el equipo sin leer, previamente,este manual de instrucciones.
3) Estas instrucciones forman parte inseparable delaparato y deben estar disponibles a todos los usua-rios del equipo.
4) Cualquier duda puede ser aclarada contactando conel servicio técnico de J.P. SELECTA, s.a.
5) ¡ATENCIÓN! NO SE ADMITIRÁ NINGUNA MÁQUI-NA PARA REPARAR QUE NO ESTÉ DEBIDAMEN-TE LIMPIA Y DESINFECTADA.
6) Toda modificación, eliminación o falta de manteni-miento de cualquier dispositivo de la máquina,transgrede la directiva de utilización 89/655/CEE yel fabricante no se hace responsable de los dañosque pudieran derivarse.
7) No utilizar el equipo con fluidos que puedan des-prender vapores o formar mezclas explosivas o infla-mables.
ÍNDICE CONTENTS PÁG. / PAGE
INFORMACIÓN GENERAL GENERAL INFORMATION 2ÍNDICE CONTENTS 2LISTA DE EMBALAJE PACKING LISTS 3ACCESORIOS ACCESSORIES 3ESPECIFICACIÓN TÉCNICA TECHNICAL FEATURES 3DESCRIPCIÓN DEL EQUIPO EQUIPMENT DESCRIPTION 4INSTALACIÓN INSTALLATION 7OPERACIÓN OPERATION 12MANTENIMIENTO MAINTENANCE 19GARANTÍA GUARANTEE 19ESQUEMA ELÉCTRICO ELECTRICAL DIAGRAM 20RECAMBIOS SPARE PARTS 23DECLARACIÓN DE CONFORMIDAD “CE” “EC” CONFORMITY DECLARATION 24
GENERAL INFORMATION
1) Handle the parcel with care. Unpack and checkthat the contents coincide with the packing-list. Ifany part is damaged or missing, please advise thedistributor immediately.
2) Do not install or use the equipment without read-ing this handbook before.
3) This handbook must always be attached to theequipment and it must be available for all users.
4) If you have any doubts or enquiries, please con-tact with your supplier or J.P. Selecta’s technicalservice.
5) IMPORTANT! J.P. SELECTA WILL NOT ACCEPTANY APPARATUS TO BE REPAIRED IF IT ISNOT DULY CLEANED.
6) If any modification, elimination or lacking in main-tenance of any device of the equipment by the usertransgress the directive 89/655/CEE , the manu-facturer is not responsible for the damage that canoccur.
7) Do not use the apparatus with liquids which cangive off vapours capable of making explosive mix-tures.

MANUAL DE INSTRUCCIONES CODIGO 80121 REV C 04/07/01 (It can be modified without notice) Pag.: 3
J.P. SELECTA s.a. Ctra. NII Km 585.1 Abrera 08630 (Barcelona) España Tel (34 3) 770 08 77 Fax (34 3) 770 23 62 e-mail: [email protected] - http://www.sefes.es/selecta
LISTA DE EMBALAJE
El equipo estándar consta de los siguientes compo-nentes:
PACKING LIST
The standard equipment consist of the followingcomponents:
Código cestillo /Basket code
Medidas cm. /Dimensions cm.
Código autoclave /For autoclave
code
Capacidad cestillos /Number of baskets
Ø Altura / Depth
1000495 28 20 4001414 2
1000496 38 28 4001415 2
1000780 48 22 4001416 3
ACCESORIOS
* Impresora tèrmica de papel continuo con indica-ción de temperatura, presión, tiempo y modalidad.Código 4001220.
* Sonda Pt100 para lectura de la temperatura interiordel depósito, con terminal para poder ser conecta-da a un registrador o termómetro con entrada dePt100 (los cuales no son suministrados con la son-da). Código 4001219.
* Cestillos en plancha perforada en acero AISI 316:
* Bastidores en alambre de acero inox. AISI 316:
ACCESSORIES
* Themal printer with a continuous paper roll indi-cating temperature, pressure, time and operationmode. Code 4001220.
* Temperature probe Pt100 for reading the internaltemperature of the chamber. A terminal permitsthe Pt100 to be connected to a printer or tempera-ture measuring device (which are not subministredwith the probe). Part No. 4001219.
* Perforated AISI 316 stainless steel baskets:
* AISI 316 s.s. wire dividers for autoclave baskets:
Descripción Description Código/Code
Autester-E - DRY Autester-E - DRY 4001414 4001415 4001416
Cubreresistencia Shelf 5601 5600 5603
Porta gomas Carry Rubbers 34100
Manual de instrucciones Instruction manual 80121
ESPECIFICACIÓN TÉCNICA
Tensión de alimentación 115-230V 50/60 Hz segúnse indique en la placa de características de lamáquina.
Código/ Code
Secado /Drying
Capacidadl. /
Capacity l.
Medidasútiles cm. /Chamber
dimensionscm.
Medidas exteriores cm./Overall dimensions cm.
RangoºC /
RangeºC
ConsumoW. /
Consum-ption W.
Consumosecado
W. /Drying
consump-tion W.
PesoKg. /
WeightKg.
Ø Alto /Height
Alto /Height
Ancho /Length
Fondo /Width
4001414SI /YES
30 30 40 100 59 48 105ºCa / to134ºC
2800 1350 87
4001415 75 40 60 109 70 59 4300 2250 147
4000779 140 50 70 129 89 82 7500 4750 249
TECHNICAL FEATURES
Voltage supply 115-230V 50/60 Hz according to thecharacteristics plate indications.
1001217 Bastidor 4 compartimentos para cestillo código 1000495 4 divider compartments for basket code 1000495
1001218 Bastidor 6 compartimentos para cestillo código 1000496 6 divider compartments for basket code 1000496
1001222 Bastidor 7 compartimentos para cestillo código 1000780 7 divider compartments for basket code 1000780

MANUAL DE INSTRUCCIONES CODIGO 80121 REV C 04/07/01 (Sujetas a modificaciones sin previo aviso) Pag.: 4
J.P. SELECTA s.a. Ctra. NII Km 585.1 Abrera 08630 (Barcelona) España Tel (34 3) 770 08 77 Fax (34 3) 770 23 62 e-mail: [email protected] - http://www.sefes.es/selecta
DESCRIPCIÓN DEL EQUIPOLos AUTESTER-E DRY son una serie de autoclaves avapor saturado gobernados por un microprocesador ycon lectura digital de temperatura que controla:1. Función prevacuum: Purgado del aire de la cámara
al inicio del proceso por un doble ciclo de vacio.2. Detector de tapa bien cerrada.3. Llenado automático de agua de la cámara.4. Control de los parámetro de temperatura, presión y
tiempo.
EQUIPAMIENTO:* Sistema de seguridad:
VÁLVULA DE SEGURIDAD.PRESOSTATO DE SEGURIDAD.TERMOSTATO DE SEGURIDAD.DETECTOR DE TAPA BIEN CERRADA.ENVOLVENTE DE PROTECCIÓN TÉRMICA.
* Caldera, brazo y tapa en acero inoxidable 18/8/2.* Mueble exterior en acero inoxidable.* Filtro interior de vaciado* Filtro de toma de aire exterior* Válvula manual de desvaporización.* Válvula selectora de llenado.(exterior/tanque)* Válvula selectora de drenaje (exterior/tanque)* Tetina salida condensados (bomba de vacio)* Tetina toma de agua exterior.* Tetina vaciado al exterior del agua del tanque.
PRESTACIONES:
Temperatura de esterilización desde 105°C hasta 134°C.Tiempo de esterilización desde 1 min. hasta 99 min.Tiempo de secado hasta 60 min.Tres modalidades de funcionamiento:
SÓLIDOSLÍQUIDOSSÓLIDOS+SECADO
Hay 10 programas de funcionamiento.Los programas del 1 al 9 se pueden grabar en funcionde la necesidad del usuario.El programa 0 es libre y no se puede grabar.
Al encender el equipo por primera vez aparecen pordefecto los parámetros indicados en la tabla de la pági-na siguiente.
EQUIPMENT DESCRIPTIONThe Autester-E are a family of saturated with steamvapour autoclaves ruled by a microcontroller with digitalreading of the temperature which checks:1. Prevacuum function: Evacuation of the air in the
chamber at the begining of the sterilisation cycle.2. Safety door closed indicator.3. Automatic water filled of the chamber.4. Temperature, pressure and time control.
EQUIPMENT:* Safety system:
SAFETY VALVE.SAFETY PRESSURE SWITCH. SAFETYTHERMOSTAT.SAFETY DOOR CLOSED INDICATOR.THERMAL PROTECTION
* Boiler, tank and cover in 18/8/2 stainless steel.* Outer casing in stainless steel.* Inner drainage filter.* Air filter.* Manual steam drainage valve.* Select filling valve (external / tank).* Drain valve selector (external / tank).* Condensed output nipple (vacuum pump).* Tap water nipple.* Output water nipple of external tank.
FEATURES:
Sterilization temperature from 105ºC to 134ºC.Sterilization time from 1 minute up to 99 minutes.Drying time up to 60 minutes.Three types of function:
-SOLIDS-LIQUIDS-SOLIDS+DRYING
There are 10 functioning programmes.The programmes 1 to 9 can be recorded depending onthe user nedds.The programme 0 is free and cannot be saved.
When starting the machine for the first time, the defaultvalues of the different parameters are the ones indicatedin the following table:

MANUAL DE INSTRUCCIONES CODIGO 80121 REV C 04/07/01 (It can be modified without notice) Pag.: 5
J.P. SELECTA s.a. Ctra. NII Km 585.1 Abrera 08630 (Barcelona) España Tel (34 3) 770 08 77 Fax (34 3) 770 23 62 e-mail: [email protected] - http://www.sefes.es/selecta
1. Interruptor general con indicador luminoso.1. Main switch with indicator lamp.2. Indicador luminoso de puerta abierta.2. Open door indicator lamp.3. Indicador luminoso de falta de agua.3. Lack of water indicator lamp.4. Indicador luminoso de final de ciclo.4. End cycle indicator lamp.5. Selector modo líquidos.5. Liquid mode selector.6. Selector modo sólidos.6. Solid mode selector.7. Selector modo sólidos+secado.7. Solid+Drying mode selector.8. Display indicador de temperatura.8. Temperature indicator display.9. Pulsador de temperatura.9. Temperature pushbutton.
10. Pulsador de avance de parámetros.10. Paramater advance pushbutton.11. Pulsador de retroceso de parámetros.11. Paramater reverse pushbutton.12. Indicador tiempo de secado.12. Drying time indicator.13. Display indicador de tiempo.13. Time indicator display.14. Pulsador de tiempo.14. Time pushbutton.15. Pulsador de marcha.15. Starting up pushbutton.16. Display indicador del programa.16. Programme indicator display.17. Pulsador de programa.17. Programme pushbutton.18. Pulsador de paro.18. Stop pushbutton.20. Indicador luminoso de alarma.20. Alarm indicator lamp.
PANEL DE MANDOS: / CONTROL PANEL:
Programa nºProgram nº
ModoMode
Temperatura / PresiónTemperature / pressure
Tiempo de esterilizaciónSterilization time
Tiempo de secadoDrying time
1 Solid / Solid 121ºC / 1bar 30' -
2 Solid / Solid 126ºC / 1.33 bar 20' -
3 Solid / Solid 134C / 2 bar 18' -
4 Solid / Solid 134ºC / 2 bar 10' -
5 Líquido / Liquid 121ºC / 1bar 30' -
6 Solido+Secado / Solid+Dry 121ºC / 1bar 30' 35'
7 Solido+Secado / Solid+Dry 126ºC / 1.33 bar 20' 35'
8 Solido+Secado / Solid+Dry 134ºC / 2 bar 18' 35'
9 Solido+Secado / Solid+Dry 134ºC / 2 bar 10' 35'
0 Libre / Free
20
5
6
7
11
10
15
18
17
4
3
2
8
9
1213
16
14
1

MANUAL DE INSTRUCCIONES CODIGO 80121 REV C 04/07/01 (Sujetas a modificaciones sin previo aviso) Pag.: 6
J.P. SELECTA s.a. Ctra. NII Km 585.1 Abrera 08630 (Barcelona) España Tel (34 3) 770 08 77 Fax (34 3) 770 23 62 e-mail: [email protected] - http://www.sefes.es/selecta
24
25
26
27
28
29
30
31
32
PARTE TRASERA / REAR PART:
24. Filtro de aireación.24. Air filter.25. Válvula de seguridad.25. Safety valve.26. Termostato regulación secado.26. Drying control thermostat.27. Termostato de seguridad.27. Safety thermostat.28. Válvula de drenaje.28. Drainage valve.29. Válvula de vaciado vapor29. Steam drainage valve30. Entrada agua externa.30. Water inlet.31. Salida condensador31. Condensation outlet32. Salida agua tanque.32. Tank drainage.
PARTE SUPERIOR / TOP PART:
21. Válvula de llenado21. Filling valve22. Válvula de vaciado de vapor.22. Steam drainage valve.23. Tapón de llenado del tanque in-
terior.23. Internal tank filling
21 22
23

MANUAL DE INSTRUCCIONES CODIGO 80121 REV C 04/07/01 (It can be modified without notice) Pag.: 7
J.P. SELECTA s.a. Ctra. NII Km 585.1 Abrera 08630 (Barcelona) España Tel (34 3) 770 08 77 Fax (34 3) 770 23 62 e-mail: [email protected] - http://www.sefes.es/selecta
INSTALACIÓN
1) Situar el autoclave cerca de una toma de corrienteadecuado al consumo de la máquina.
2) El autoclave se asentará sobre una superficie plana,horizontal y estable, dejando un espacio libre de10cm alrededor de la máquina.
3) Inmovilizar el autoclave,ajustándolo al suelo, median-te los topes situados en la parte anterior del apara-to, previstos para tal efecto.
4) SELECCIONAR EL SISTEMA DE DRENAJE con laválvula selectora (28). Si se quiere recuperar elagua, colocar el mando de dicha válvula señalándo-lo hacia el interior de la máquina.
Si se quiere expulsar el agua al exterior, al finalde cada proceso de esterilizado, colocar el mandode dicha válvula en dirección al exterior. Fijar unamanguera en la tetina de salida de la válvula y fijartambién el otro extremo a un recipiente o desague,procurando NO OBSTRUIR EL TUBO.
INSTALLATION
1) Place the autoclave near the mains connection ac-cording to the machine consumption.
2) The autoclave should be placed on a flat, horizon-tal and stable surface, leaving a space of about10 cm at back and on each sides.
3) Using the stops provided in the lower front part ofthe apparatus, the Autoclave is immobilised andlevelled with the floor.
4) CHOOSE THE DRAINING SYSTEM with the drain-age selector valve (28). If you wish to recoverthe water, point the knob towards the inside.
If you wish to evacuate the water, at the end ofthe sterilization process, point the knob towardsthe outside. Fix a tube in the water/steam exit nip-ple of the machine, and also fix the other end to adrain or deposit without obstructing the flow.NEVER PRESS THIS TUBE BY HAND.
28

MANUAL DE INSTRUCCIONES CODIGO 80121 REV C 04/07/01 (Sujetas a modificaciones sin previo aviso) Pag.: 8
J.P. SELECTA s.a. Ctra. NII Km 585.1 Abrera 08630 (Barcelona) España Tel (34 3) 770 08 77 Fax (34 3) 770 23 62 e-mail: [email protected] - http://www.sefes.es/selecta
No poner la válvula en posición central, ya quequeda anulada cualquier forma de vaciado.
5) Seleccionar el modo llenado del autoclave mediantela válvula (21).Modo TANQUE: El autoclave se llena con el agua
del tanque interior.El llenado del tanque interior se realiza a través delorificio (23) hasta que el agua llegue a tocar el nivelde tubo de llenado.
Capacidad de los tanques interiores:
Cod. 4001414 17 litros.Cod. 4001415 30 litros.Cod. 4001416 60 litros.
VACIADO DEL TANQUE INTERIORCon la tetina (32) se podrá vaciar el tanque interior.Colocar una manguera y desenroscar la tetina a tra-vés del moleteado.
Do not place the knob valve in its central posi-tion, because the evacuation process will be can-celled.
5) Select the filling mode of the autoclave with thevalve (21).TANK mode: The autoclave fills with the water
from the internal tank.The fill of the internal tank can be done with thewater reservoir hole (23) until the water reachesthe level of the filling tube.
Capacity of the internal tanks:
Cod. 4001414 17 litres.Cod. 4001415 30 litres.Cod. 4001416 60 litres.
INTERNAL TANK EMPTYINGWith the tank drainage (32), the internal tank can beemptied. Place a hose and uncoil it.
32

MANUAL DE INSTRUCCIONES CODIGO 80121 REV C 04/07/01 (It can be modified without notice) Pag.: 9
J.P. SELECTA s.a. Ctra. NII Km 585.1 Abrera 08630 (Barcelona) España Tel (34 3) 770 08 77 Fax (34 3) 770 23 62 e-mail: [email protected] - http://www.sefes.es/selecta
Modo EXTERIOR: El autoclave se llena a través deuna red exterior mediante la teti-na(30). La presión de suministronunca será superior a 2bar.
No poner la válvula selectora de llenado en posicióncentral, ya que queda anulada cualquier forma dellenado.
Siempre que seleccionemos el llenado de lamáquina mediante la red exterior debemosseleccionar el vaciado de la máquina a la redexterior.
6) UTILIZAR SIEMPRE AGUA DESCALCIFICADA.
7) Fijar un tubo en la tetina (31) para recoger los con-densados que se forman durante las fases en quefunciona la bomba de vacío. No colocar el recipientede recogida a un nivel superior al de la tetina.
8) La cámara del autoclave se podrá vaciar simpre quela presión de trabajo esté comprendida entre 1 y 2bar. Para presiones inferiores la cámara no se vacia-rá en su totalidad.
External mode: The autoclave fills from an externalmains from the water inlet (30). Thepressure should never be greaterthan 2 bar.
Do not place the knob of the filling valve in itscentral position, because the filling process willbe cancelled.
Always that the autoclave is filled from an ex-ternal main, is necessary to empty the autoclaveto the external main.
6) ALWAYS USE DECALCIFIED WATER.
7) Place a tube on the condensation outlet (31) toget the condensations produced during the phaseswere the drying pump works. Do not place the re-cipient in a higher level than the outlet.
8) The tank of autoclave can empty if the workingpressure is between 1 and 2 bar. For lower pres-sures, the tank will not empty totally.
30
31
MANUAL DE INSTRUCCIONES CODIGO 80121 REV C 04/07/01 (Sujetas a modificaciones sin previo aviso) Pag.: 10
J.P. SELECTA s.a. Ctra. NII Km 585.1 Abrera 08630 (Barcelona) España Tel (34 3) 770 08 77 Fax (34 3) 770 23 62 e-mail: [email protected] - http://www.sefes.es/selecta
9) No se puede secar si hay agua en la cámara.
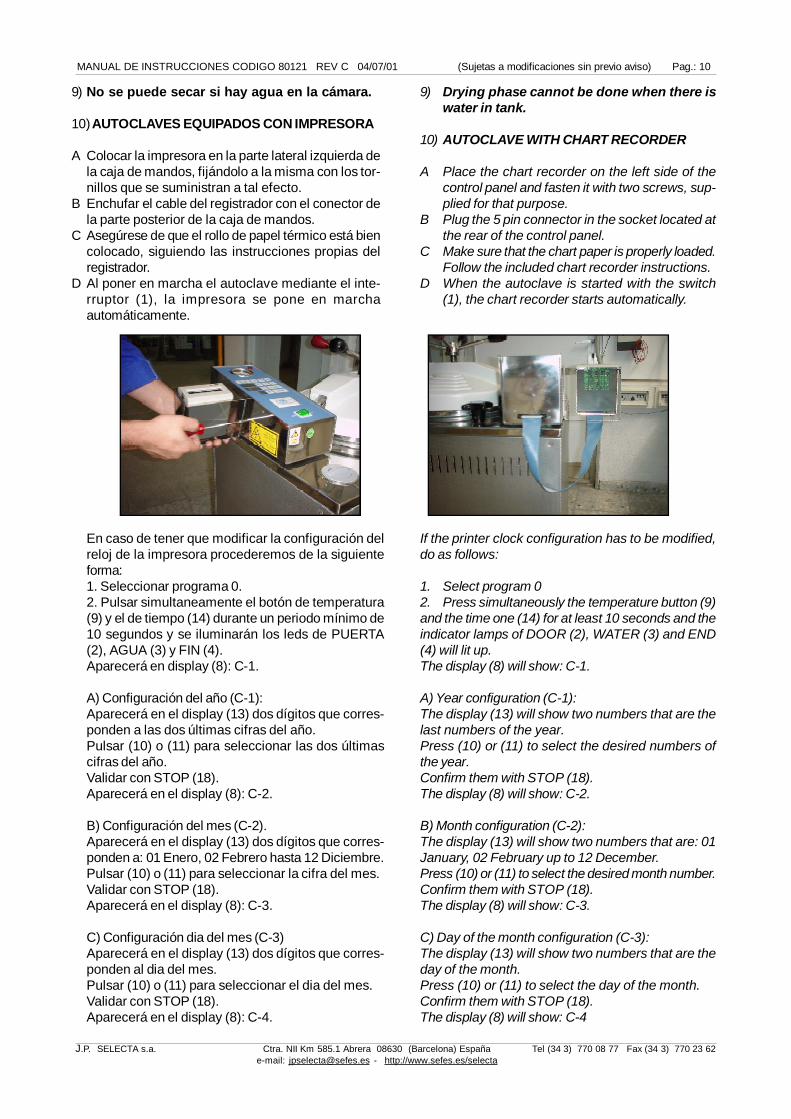
10) AUTOCLAVES EQUIPADOS CON IMPRESORA
A Colocar la impresora en la parte lateral izquierda dela caja de mandos, fijándolo a la misma con los tor-nillos que se suministran a tal efecto.
B Enchufar el cable del registrador con el conector dela parte posterior de la caja de mandos.
C Asegúrese de que el rollo de papel térmico está biencolocado, siguiendo las instrucciones propias delregistrador.
D Al poner en marcha el autoclave mediante el inte-rruptor (1), la impresora se pone en marchaautomáticamente.
9) Drying phase cannot be done when there iswater in tank.
10) AUTOCLAVE WITH CHART RECORDER
A Place the chart recorder on the left side of thecontrol panel and fasten it with two screws, sup-plied for that purpose.
B Plug the 5 pin connector in the socket located atthe rear of the control panel.
C Make sure that the chart paper is properly loaded.Follow the included chart recorder instructions.
D When the autoclave is started with the switch(1), the chart recorder starts automatically.
En caso de tener que modificar la configuración delreloj de la impresora procederemos de la siguienteforma:1. Seleccionar programa 0.2. Pulsar simultaneamente el botón de temperatura(9) y el de tiempo (14) durante un periodo mínimo de10 segundos y se iluminarán los leds de PUERTA(2), AGUA (3) y FIN (4).Aparecerá en display (8): C-1.
A) Configuración del año (C-1):Aparecerá en el display (13) dos dígitos que corres-ponden a las dos últimas cifras del año.Pulsar (10) o (11) para seleccionar las dos últimascifras del año.Validar con STOP (18).Aparecerá en el display (8): C-2.
B) Configuración del mes (C-2).Aparecerá en el display (13) dos dígitos que corres-ponden a: 01 Enero, 02 Febrero hasta 12 Diciembre.Pulsar (10) o (11) para seleccionar la cifra del mes.Validar con STOP (18).Aparecerá en el display (8): C-3.
C) Configuración dia del mes (C-3)Aparecerá en el display (13) dos dígitos que corres-ponden al dia del mes.Pulsar (10) o (11) para seleccionar el dia del mes.Validar con STOP (18).Aparecerá en el display (8): C-4.
If the printer clock configuration has to be modified,do as follows:
1. Select program 02. Press simultaneously the temperature button (9)and the time one (14) for at least 10 seconds and theindicator lamps of DOOR (2), WATER (3) and END(4) will lit up.The display (8) will show: C-1.
A) Year configuration (C-1):The display (13) will show two numbers that are thelast numbers of the year.Press (10) or (11) to select the desired numbers ofthe year.Confirm them with STOP (18).The display (8) will show: C-2.
B) Month configuration (C-2):The display (13) will show two numbers that are: 01January, 02 February up to 12 December.Press (10) or (11) to select the desired month number.Confirm them with STOP (18).The display (8) will show: C-3.
C) Day of the month configuration (C-3):The display (13) will show two numbers that are theday of the month.Press (10) or (11) to select the day of the month.Confirm them with STOP (18).The display (8) will show: C-4

MANUAL DE INSTRUCCIONES CODIGO 80121 REV C 04/07/01 (It can be modified without notice) Pag.: 11
J.P. SELECTA s.a. Ctra. NII Km 585.1 Abrera 08630 (Barcelona) España Tel (34 3) 770 08 77 Fax (34 3) 770 23 62 e-mail: [email protected] - http://www.sefes.es/selecta
CAUTION! The steam drainage valve (29) and thedrainage valve (28) are a PRESSURE and HIGHTEMPERATURE. Require the necessary precautionsto avoid SERIOUS BURNS.
NEVER PRESS THE TUBE PLACED ON THEDRAINAGE VALVE (28) BY HAND. SERIOUS BURNSCAN HAPPEN.
Do not install the autoclave in zones whereINFLAMMABLE LIQUIDS ARE STORED OR ZONESWITH SPECIAL PROTECTION.
Before opening the cover ALWAYS check that thereis NO PRESSURE. OPEN STEAM VALVE. Thepressure gauge indicator installed in the controlpanel must read 0 bar.
Do not use the apparatus if it is not earthed.
Be sure that the voltage supply is the same as theone indicated on the characteristics plate.
If you change the plug bear in mind the following:
Blue cable: NeutralBrown cable: PhaseYellow/green cable: Earth
¡ATENCIÓN! La salida de vapor por la válvula (29)y la salida de vapor y agua por la tetina de laválvula (28) es a PRESIÓN y a TEMPERATURA ELE-VADA. Tome todas las precauciones para evitarGRAVES QUEMADURAS.
NUNCA SUJETE LA MANGUERA COLOCADA EN LATETINA DE LA VÁLVULA (28) CON LA MANO YAQUE PODRÍA CAUSAR QUEMADURAS IMPORTAN-TES.No instalar el autoclave en zonas donde se alma-cenen LÍQUIDOS INFLAMABLES O ZONAS CONPROTECCIÓN ESPECIAL.
Antes de abrir la tapa del autoclave comprobarSIMPRE que NO haya PRESIÓN. ABRIR LA VÁL-VULA DE VAPOR. El indicador del manómetro ins-talado en el panel frontal de mandos debe mar-car 0 bar.No utilice el equipo sin estar conectada la tomade tierra.Asegúrese que el equipo se conecta a una ten-sión de red que coincide con la indicada en laplaca de características.Si cambia la clavija de enchufe tenga en cuentalo siguiente:
Cable azul: Neutro.Cable marrón: Fase.Cable amarillo/verde: Tierra.
D) Configuración dia de la semana (C-4)Aparecerá en el display (13) un dígito que corres-ponde a: 0= Domingo 4= Jueves
1= Lunes 5= Viernes2= Martes 6= Sábado3= Miércoles
Pulsar (10) o (11) para seleccionar el dia de la se-mana.Validar con STOP (18).Aparecerá en el display (8): C-5.
E) Configuración de la hora (C-5)Aparecerá en el display (13) dos dígitos correspon-dientes a: 00h a 23h.Pulsar (10) o (11) para seleccionar la hora.Validar con STOP (18).Aparecerá en el display (8): C-6
F) Configuración de los minutos (C-6)Aparecerá en el display (13) dos dígitos correspon-dientes a: 00 a 59 minutos.Pulsar (10) o (11) para seleccionar los minutos.Validar con STOP (18).
Se apagan los leds de PUERTA (2), AGUA (3) y FIN(4) y retornará al programa 0.
¡ATENCIÓN! IMPORTANTE PARA SU SEGURIDADCAUTION!!! IMPORTANT FOR YOUR SAFETY
D) Day of the week configuration (C-4):The display (13) will show a number that is:
0= Sunday 4= Thursday1= Monday 5= Friday2= Tuesday 6= Saturday3= Wednesday
Press (10) or (11) to select the desired day of theweek.Confirm it with STOP (18).The display (8) will show: C-5.
B) Hour configuration (C-5):The display (13) will show two numbers that are: 00hup to 23h.Press (10) or (11) to select the desired hour.Confirm it with STOP (18).The display (8) will show: C-6.
C) Minutes configuration (C-6):The display (13) will show two numbers that are: 00up to 59 minutes.Press (10) or (11) to select the minutes.Confirm them with STOP (18).
The indicator lamps of DOOR (2), WATER (3) andEND (4) will lit off and come back to program 0.

MANUAL DE INSTRUCCIONES CODIGO 80121 REV C 04/07/01 (Sujetas a modificaciones sin previo aviso) Pag.: 12
J.P. SELECTA s.a. Ctra. NII Km 585.1 Abrera 08630 (Barcelona) España Tel (34 3) 770 08 77 Fax (34 3) 770 23 62 e-mail: [email protected] - http://www.sefes.es/selecta
OPERACIÓN
PUESTA EN MARCHA:
1- Poner en marcha mediante el interruptor general (1).2- Compruebe que está cerrada la válvula de VAPOR/
STEAM (22).3- Colocar el material a esterilizar.4- Cerrar la tapa.5- Programación: Este autoclave permite dos formas
diferentes de operación, MANUAL o AUTOMÁTICA.Siendo el manual el programa 0.Siendo el automático los programas del 1 al 9.
PARA LA PROGRAMACIÓN MANUAL del modo defuncionamiento, temperatura, tiempo de esterilizacióny tiempo de secado; proceder de la siguiente forma:
1º Mediante el pulsador de programas (17) coloque eldisplay de programas a cero.
2º Seleccionar el modo de funcionamiento accionandolos pulsadores 5, 6 y 7 según se desee liquidos,sólidos o solidos+secado.
LÍQUIDOS: Al final del ciclo de esterilización, el auto-clave se para y empieza a bajar gradualmente la tem-peratura y en consecuencia la presión, evitando asíque se derramen los líquidos.
SÓLIDOS: Al final del ciclo de esterilización, el auto-clave se para y efectúa una rápida descompresión, va-ciando el líquido de la cámara, siempre que la presiónde trabajo sea igual o superior a 1 bar.
DRY: Al final del modo de sólidos se hace el vacío parasecar el interior durante un tiempo de 60 min.
3º Para seleccionar la temperatura , pulse simultánea-mente el pulsador (9) y el pulsador (10) ó (11) segúnse quiera subir o bajar la temperatura de esteriliza-ción. (valor programable entre 105°C y 134°C).
4º Para seleccionar el tiempo de esterilización pulsesimultáneamente el pulsador (14) y el pulsador (10)ó (11) según se quiera subir o bajar el tiempo deesterilización. (valor seleccionable entre 1' y 99').
5º Para seleccionar el tiempo de secado pulse simul-táneamente el pulsador (14) dos veces(automáticamente se encendera el indicador (12)) yel pulsador (10) ó (11) según se quiera subir o bajarel tiempo de secado. (valor seleccionable entre 1' y99').
OPERATION
STARTING UP:
1- Start up with mains switch (1).2- Check that the steam drainage valve (22) is closed.
3- Put in the material to be sterilized.4- Close the cover.5- Programming, this Autoclave permits two different
operation systems: MANUAL or AUTOMATIC.Been the number 0 the manual program.Been the number 1 up to 9 the automatic pro-grams.
FOR THE MANUAL PROGRAMMING of functioningmode, temperature, sterilization time and drying timemode; do as follows:
1º Put the programme display at 0 by pressing theprogramme button (17).
2º To choose the mode of working press the buttons5, 6 and 7 depending if you wish liquids, solids orsolids+drying.
LIQUIDS: At the end of the sterilization cycle, theAutoclave stops and the temperature gradually goesdown and therefore the pressure. Thus avoiding thespilling of liquids.
SOLIDS: At the end of the sterilization cycle, theAutoclave stops and a rapid decompression takesplace, emptying the liquid of the tank only if the workingpressure is the same or higher than 1 bar.
DRY: At the end of the solids system the Autoclave isemptied to dry the inside for a period of 60 minutes.
3º To choose the temperature, press the button (9)and buttons (10) or (11) simultaneously to increaseor decrease the sterilization temperature. (Program-mable value between 105ºC and 134ºC).
4º To choose the sterilization time, simultaneouslypress button (11) and buttons (14) or (11) to in-crease or decrease the sterilization time. (Selectedvalue between 1’ and 99’).
5º To choose the drying time, simultaneously pressbutton (14) two times (automatically the indicatorlamp (12) lits up) and buttons (10) or (11) to in-crease or decrease the drying time. (Selected valuebetween 1’ and 99’).

MANUAL DE INSTRUCCIONES CODIGO 80121 REV C 04/07/01 (It can be modified without notice) Pag.: 13
J.P. SELECTA s.a. Ctra. NII Km 585.1 Abrera 08630 (Barcelona) España Tel (34 3) 770 08 77 Fax (34 3) 770 23 62 e-mail: [email protected] - http://www.sefes.es/selecta
SEGURIDADES ANTES DE PULSAR START (16):* Verificar que el tiempo es diferente de 0.* Verificar que la temperatura actual es inferior a 100°C.* Verificar que no existe condición de error.
Si no hay agua en la caldera del autoclave se en-cenderá el piloto indicador (3) y permanecerá en-cendido hasta que no se haya llenado la caldera (elllenado se realiza de forma automática).
6º Pulse el pulsador de marcha (START) (15); el indi-cador del modo seleccionado (5 o 6 o 7) se pondráintermitente.
7º A partir de este momento quedan inactivos los pul-sadores de avance (10), retroceso (11) y de progra-ma(17).
8º En todo momento se podrán observar la temperatu-ra (8) y tiempo (13) prefijados, pulsando las teclascorrespondientes (9 y 14).
9º Transcurrido el tiempo prefijado, se encenderá elindicador (4) de final de ciclo sonará un aviso acús-tico.
10ºAcabado el ciclo pulsar siempre el botón deparo STOP (18).
11ºAsegúrese de que no hay presión y abra LAVÁLVULA DE VAPOR y abrir la tapa.
PARA LA PROGRAMACIÓN AUTOMÁTICA deberáescoger cualquier programa distinto de 0 pulsando elbotón (17) y a continuación pulsar el botón de marcha(15) START.Si se quieren reprogramar los programas predetermi-nados seguiremos los siguientes pasos:Ir al programa X, pulsando el botón de programa (17)durante un periodo mínimo de 10 segundos, se entraráen el menú de programación encendiéndose los ledsde PUERTA (2), AGUA (3) y FIN (4).:
1. Una vez indicado el menú de programación se pro-cederá a programar.
2. Para cambiar el programa, temperatura o tiempo seprocedera de forma normal los parámetros de modo,temperatura, tiempo y tiempo de secado tal y como seindica en los apartados 2, 3, 4 y 5.
3. Para guardar los cambios pulsar el botón STOP, sipasa un periodo de 10 segundos y no se aprieta nin-gún botón se saldrá del menú sin efectuar ningún cam-bio.
4. Se apagaran los leds PUERTA(2), AGUA(3) y FIN(4).
Los programas por defecto serán los determinados porJ.P. Selecta, s.a.
SAFETY PRECAUTION BEFORE PRESSING START(16):
* Check that the time is different from 0.* Check that the temperature is below 100ºC.* Check that there are no ERRORS.
If there is not water in the autoclave tank, the indi-cator lamp (3) will light on and will remain on untilthe tank is filled (the filling will be done automati-cally).
6º Press the START button (15) and the indicatorlamp of the selected mode (5 or 6 or 7)will light upintermittent.
7º From this moment, the buttons (10), (11) and (17)buttons are inactive.
8º The selected temperature (8) and time (13) can beobserved at any time by pressing the correspond-ing button (9) and (14).
9º When the sterilization time is reached, the indica-tor (4) for cycle end will light up and the acousticsignal will sound.
10º When the cycle is finished always press theSTOP button (18).
11º Check that there is no pressure and open THESTEAM VALVE and open the cover.
FOR AUTOMATIC PROGRAMME you must chooseany programme except 0 by pressing the button (17)and then pressing the START button (15).
To modify the default programs, do as follows:Go to the program X, pressing the program button (17)for at least 10 seconds will start the programming menuand the DOOR (2), WATER (3) and END (4) indicatorlamps will lit up:
1. Once choosed the programming menu, you can startprogramming.
2. To change the program, temperature or time do asusual. And to change the type, temperature, time anddrying time following the indications of the points 2, 3,4 and 5.
3. To save the changes press the STOP button. If for10 seconds any button is pressed, the menu will goout without saving any changes.
4. The indicator lamps of DOOR (2), WATER (3) andEND (4) will lit off.
The default programs will be those determined by J.P.Selecta, s.a.

MANUAL DE INSTRUCCIONES CODIGO 80121 REV C 04/07/01 (Sujetas a modificaciones sin previo aviso) Pag.: 14
J.P. SELECTA s.a. Ctra. NII Km 585.1 Abrera 08630 (Barcelona) España Tel (34 3) 770 08 77 Fax (34 3) 770 23 62 e-mail: [email protected] - http://www.sefes.es/selecta
Inic
ioSt
artin
gLl
enar
Filli
ngPu
rgar
fase
1Ph
ase
1 D
rain
Abrir bomba de vacioOpen vacuum pump
LlenarFill
Nivel ?Level ?
Hacer vacioVacuumP<-0.5?
CalentarHeatP<0.5?
Abrir calefacciónOpen Heating
PurgarDrain
P< 0.1?Abrir valvula purgarOpen drainage valve
Hacer vacioVacuumP<-0.5?
Abrir bomba de vacioOpen vacuum pump
NO
NO
NO
NO
Cerrar bomba de vacioClose vacuum pump
Cerrar calefacciónClose Heating
Cerrar bomba de vacioClose vacuum pump
Cerrar válvula purgarClose drainage valve
Cerrar valvula de llenadoClose filling valve
Cerrar valvula purgarClose drainage valve
Abrir valvula de llenadoOpen filling valve
Si / Yes
Si / Yes
Si / Yes
NO
Si / Yes
Si / Yes
Purg
ar F
ase
2Ph
ase
2 D
rain

MANUAL DE INSTRUCCIONES CODIGO 80121 REV C 04/07/01 (It can be modified without notice) Pag.: 15
J.P. SELECTA s.a. Ctra. NII Km 585.1 Abrera 08630 (Barcelona) España Tel (34 3) 770 08 77 Fax (34 3) 770 23 62 e-mail: [email protected] - http://www.sefes.es/selecta
Este
riliz
ació
nSt
erili
zatio
n
Vaci
ar
agua
Empt
y w
ater
Seca
doD
ryin
gFi
nEn
dCalentar
HeatTª > TCAbrir CalefacciónOpen Heating
Tiempo < LimiteTime < Limit
Abrir reloj esterilizaciónOpen sterilization timer
Válvula vaciado abiertaEmptying valve openP < 0.1
Abrir válvula de vaciadoOpen emptying valve
Tiempo < LimiteTime < Limit
Abrir calefacción fajaOpen belt heating
Abrir válvula purgadoOpen drainage valve
Abrir reloj secadoOpen dryin timer
Tª > TC Abrir calefacciónOpen heating
Cerrar calefacciónClose heating
4 mins. ? Abrir válvula de purgado
durante 4 segundosOpen drainage valve
during 4 seconds
Calefacción faja y vacioBelt heating and vacuum
SI
NO
NO
Si / Yes
NO
Si / Yes
NO
Si / Yes
NO
Si / Yes
NO
Si / Yes
Abrir Bomba de vacioOpen vacuum pump
Abrir reloj esterilizaciónOpen sterilization timer

MANUAL DE INSTRUCCIONES CODIGO 80121 REV C 04/07/01 (Sujetas a modificaciones sin previo aviso) Pag.: 16
J.P. SELECTA s.a. Ctra. NII Km 585.1 Abrera 08630 (Barcelona) España Tel (34 3) 770 08 77 Fax (34 3) 770 23 62 e-mail: [email protected] - http://www.sefes.es/selecta
RECOMENDACIONES PARA LOGRARUNA PERFECTA ESTERILIZACIÓN:
1. El material a esterilizar, tiene que estar perfectamen-te limpio, libre cualquier tipo incrustación o residuo,para ello es recomendable lavarlo con un buen de-tergente y agua destilada. Después aclararlo conabundante agua.
2. No cargar en exceso las bandejas, gradillas ocestillos, procurando dejar siempre un espacio en-tre ellos de 1 ó 2 cm, a fin de favorecer el paso delvapor y facilitar el secado.
3. Esterilización de instrumentos a granel:
3.1 Colocar el instrumental sobre el papel hidrófugoen posición abierta y que no se toquen entre sí.
3.2 Evitar colocar en una misma bandeja instrumen-tal de diferente tipo de metal.
4. Esterilizar instrumental en bolsas:
4.1 No debe de haber más de un instrumento porbolsa.
4.2 Colocar las bolsas sobre papel hidrófugo, en po-sición vertical que no se toquen entre sí ni tam-poco las paredes del autoclave.
5. Tubos:
5.1 Los tubos deben estar perfectamente limpios,aclarados y escurridos.
5.2 Colocar los tubos, a poder ser, abiertos por am-bos lados.
5.3 Procurar que los tubos no toquen la pared delautoclave, ni que formen dobleces que obstru-yan el diámetro interior.
6. Recipientes:
6.1 Nunca colocar recipientes herméticamente ce-rrados.
6.2 Colocar los recipientes boca abajo para evitarlos depósitos de agua.
7. Líquidos:
7.1 Colocar los líquidos a esterilizar en recipientespreparados para soportar la temperatura de es-terilización; y, encima de bandejas, para que sepuedan recoger posibles derrames.En caso de esterilizar AGAR, no ponerlo a tem-peratura en fase ebullición ya que durante laprimera fase de vacío éste se derramaría.
PRACTICAL RECOMMENDATIONS FORA PERFECT STERILIZATION:
1. The material to be sterilized has to be perfectlyclean, free of any incrustations and impurities, socleaning with a good detergent and distilled waterand rinsing with abundant water is recomended.
2. Do not overload the tray, baskets or racks, andleave a space between them of 1 or 2 cms to fa-cilitate the steam circulation and the drying proc-ess.
3. Sterilization of «UNWRAPPED INSTRUMENTS».
3.1 Place the instruments directly onto water-repel-lent paper, avoiding any piling up of one uponanother.
3.2 Avoid placing instruments of different metal typein the same tray.
4.Sterilization of «INSTRUMENTS IN BAGS».
4.1 Put one instrument per bag.
4.2 Place bags onto water-repellent paper, in verti-cal position avoiding any piling up of oneupon another or the autoclave walls.
5.Tubes.
5.1 The tubes have to be clean and dried.
5.2 Place tubes, if it is possible, without obstruct-ing the both ends.
5.3 Take care that the tubes do not touch the auto-clave chamber and avoid folding them becausethe inner diameter can be obstructed.
6.Receptacles.
6.1 NEVER put the receptacles hermetically closed.
6.2 Place the receptacle face down to avoid the waterresidues.
7.Liquids.
7.1 Place the liquid to be sterilized in receptaclescapable of supporting the sterilization tempera-ture; and over the shelves so you can collectthe leakages that can occur.If you are sterilizing AGAR, don’t place it at tem-perature in boiling phase, because in the firstemptying phase it would spill.

MANUAL DE INSTRUCCIONES CODIGO 80121 REV C 04/07/01 (It can be modified without notice) Pag.: 17
J.P. SELECTA s.a. Ctra. NII Km 585.1 Abrera 08630 (Barcelona) España Tel (34 3) 770 08 77 Fax (34 3) 770 23 62 e-mail: [email protected] - http://www.sefes.es/selecta
7.2 The receptacles will be filled to about 2/3 oftheir capacity. They will NEVER be closedhermetically, they will cover with cotton or sometype of tap that makes the air easy outlet and itdoes not make pressure.
7.3 Please avoid using a receptacle with a narrowneck.
7.4 At the end of the sterilization cycle, leave theautoclave to cool slowly (until the pressure is 0Kg//cm²).
SAFETY:
Safety Pressure Controller:When abnormal overpressure occurs in the sterilizationchamber the safety pressure controller acts by stoppingthe heating and opening the drain electrovalve. TheALARM indicator lamp (20) lights up simultaneouslyand error 12 appears on the display.
Safety valve:If abnormal overpressure occurred the safety valve (25)would open and expel the steam.Said valve is gauged to initiate the opening between2.2 kg/cm² and 2.5 kg/cm².
Safety Thermostat:When abnormal increase of the temperature or aconsiderable decrease in the water level occurs (withthe consequent overheating of the heater element), thesafety thermostat (27) starts working blocking theheating of the machine, opening the drain electrovalveand the ALARM indicator lamp (20) lights upsimultaneously and error 12 appears on the display.
To deblock the machine proceed as follows:
1º Stop the machine by pressing the button STOP(18) and by putting the switch in OFF position.
2º Release any pressure with valve (22).
3º Open the cover.
4º Fill the tank with water up to the working level.
5º Reset the safety thermostat (27) by pressing itsreset button. The red indicator lamp ALARM (20)will switch off.
7.2 Los recipientes se llenarán sobre los 2/3 de sucapacidad. NO SE CERRARAN herméticamen-te, se taparán con algodón o algún tipo de ta-pón que facilite la salida de aire del recipiente yno se forme presión.
7.3 Se evitará utilizar recipientes de cuello estre-cho.
7.4 Al final del ciclo de esterilización, se dejará queel autoclave se enfríe lentamente (hasta que lapresión sea 0 kg/cm²).
SEGURIDAD:
Presostato de Seguridad:Cuando se produce una sobrepresión anormal en lacámara de esterilización, actúa el presostato de segu-ridad que para la autoclave y abre la electroválvula depurgado. Simultáneamente se enciende el piloto (20)ALARM y aparece en el display error 12.
Válvula de Seguridad:Si se produjera una sobrepresión anormal se abriría laválvula de seguridad (25) expulsando el vapor.Dicha válvula está calibrada para que inicie la aperturaentre 2.2 kg/cm² y 2.5 kg/cm².
Termostato de seguridad:Cuando se produce una elevación anormal de tempe-ratura o un descenso considerable del nivel de agua(con la consiguiente sobretemperatura de la resisten-cia calefactora), entra en funcionamiento el termostatode seguridad (27) bloqueando la autoclave, abriendo laelectroválvula de purgado y simultáneamente se en-ciende el piloto (20) ALARM y aparece en el displayerror 12.
Para desbloquear la máquina proceder de la siguientemanera:
1º Parar la máquina pulsando el botón (18) STOP yponer el interruptor OFF.
2º Sacar la presión si la hay con la válvula (22).
3º Abrir la tapa.
4º Poner agua en la cubeta hasta el nivel de trabajo.
5º Rearmar el termostato de seguridad (27) pulsandoel botón RESET del mismo. Se apagará el piloto(20) rojo ALARM.

MANUAL DE INSTRUCCIONES CODIGO 80121 REV C 04/07/01 (Sujetas a modificaciones sin previo aviso) Pag.: 18
J.P. SELECTA s.a. Ctra. NII Km 585.1 Abrera 08630 (Barcelona) España Tel (34 3) 770 08 77 Fax (34 3) 770 23 62 e-mail: [email protected] - http://www.sefes.es/selecta
POSSIBLE ERRORS:Some erroneous conditions could be the reason forthe faulty operation of the Autoclave. The errors canbe detected by the microcontroller which also checksthat the process is correct.
ERROR 1Filling phase takes longer than usual.CAUSES:* Minimum level in lower tank.* Electric filling valve not on or broken.* Filling selecting valve in central position.* Short-circuit in the float level of filling.* Float level of filling blocked at the top.* Failure in the control panel.
ERROR 2It takes longer to reach the desired temperature thanusual.CAUSES:* Cut in the heating elements.* Failure in the solid-relay.* Failure in the control panel.
ERROR 3Drainage phase takes longer than usual.CAUSES:* Obstructed draining filter.* Draining electrovalve not switched on or broken.* Draining selecting valve in central position.* Failure in the control panel.
ERROR 4Open probe.CAUSES:* Broken probe.* Connections failure.
ERROR 5Temperature above 136ºCCAUSES:* Short-circuit in the float level of filling.* Loss of liquid level.* Probe failure.
ERROR 6Pressure above 2.4 bar.CAUSES:* Temperature probe failure.* Control circuit failure.
CONDICIONES DE ERROR:Existen algunas condiciones de error que pueden sercausa del mal funcionamiento y que son detectablespor el microprocesador que comprueba que el procesosea correcto:
ERROR 1Tiempo superior al previsto en la fase de llenado.CAUSAS:* Tanque interior bajo mínimos.* Electroválvula de llenado no activada o averiada.* Válvula selectora de llenado en posición central.* Boya de nivel de llenado cortocircuitada.* Boya de nivel de llenado bloqueada en la parte su-
perior.* Fallo en el panel de control.
ERROR 2Tiempo superior al previsto para alcanzar la temperatu-ra de consigna.CAUSAS:* Resistencia de calefacción cortada.* Fallo en el solid relé.* Fallo en el panel de control.
ERROR 3Tiempo superior al previsto en la fase de vaciado.CAUSAS:* Filtro de vaciado obstruido.* Electroválvula de vaciado no activada o averiada.* Válvula selectora de vaciado en posición central.* Fallo en el panel de control.
ERROR 4Sonda abierta.CAUSAS:* Rotura de sonda.* Fallo de conexiones.
ERROR 5Temperatura superior a 136ºC.CAUSAS::* Solid relé cortocircuitado..* Pérdida de nivel de líquido.* Fallo sonda.
ERROR 6Presión superior a 2.4 bar.
CAUSAS:Fallo sonda de temperatura.Fallo en el circuito de control.

MANUAL DE INSTRUCCIONES CODIGO 80121 REV C 04/07/01 (It can be modified without notice) Pag.: 19
J.P. SELECTA s.a. Ctra. NII Km 585.1 Abrera 08630 (Barcelona) España Tel (34 3) 770 08 77 Fax (34 3) 770 23 62 e-mail: [email protected] - http://www.sefes.es/selecta
MAINTENANCE
Before removing the side covers disconnect theapparatus from the mains.
The control panel must only be manipulated byauthorized personnel.
CLEANING:
For the cleaning of the different parts use the followingproducts:
Cleaning of stainless steel: Alcohol.Cleaning of plastic: Alcohol with cotton duster.
Cleaning of pipes with lime: Solution of 50% ofHydrochloric acid and 50% of water.
Clean the emptying filter of the tank, placed at thelower part of the control panel.
It is advisable to change the water after 50 uses oronce a month.
MANTENIMIENTO
Antes de quitar la tapa del aparatodesconectarlo de la red eléctrica.
La placa de control sólo debe ser manipula-da por personal de mantenimiento debida-mente autorizado.
LIMPIEZA:
Para la limpieza de las diferentes piezas de losaparatos, recomendamos los siguientes produc-tos:Limpieza del acero inoxidable: Alcohol.Limpieza de carátulas y plásticos: Alcohol con al-godón o con un paño no abrasivo.Limpieza de tuberías con cal: Mezcla del 50% desalfumán y del 50% de agua.
Limpiar el filtro de vaciado de la caldera, si-tuado en la parte inferior del panel frontal.
Es aconsejable cambiar el agua después de50 usos ó 1 vez al mes.
GARANTÍA
Este producto tiene una garantía de un año. La garan-tía no cubre los daños causados por un uso indebido opor causas ajenas a J.P. SELECTA, s.a.
Cualquier manipulación del aparato por personal noautorizado por J.P. SELECTA, s.a., anulaautomáticamente los beneficios de la garantía.
GUARANTEE
This product is guaranteed for one year. The guaranteedoes not cover damage caused by incorrect use orcauses beyond the control of J.P. SELECTA,S.A..
Any manipulation of the apparatus by personnel notauthorized by J.P. SELECTA,S.A. cancels theguarantee automatically.
ERROR 7Temperature 2ºC below the set temperature.CAUSES:* Loss of steam though:
Drainage valve.Filling valve.Vacuum valve.
* Due to bad closure or remaining switched on.* Failure of control circuit.
ERROR 8Safety relay activated.CAUSES:* Electricity cut.* Safety thermostat activated.* Safety pressure switch activated.* Failure in control circuit.
ERROR 7Temperatura 2ºC por debajo de la de consigna.CAUSAS:* Pérdida de vapor por:
Válvula de vaciado.Válvula de llenado.Válvula de vacío.
* Por estar éstas activadas o mal cerradas.* Fallo circuito de control.
ERROR 8Disparo relé de seguridad.CAUSAS:* Fallo fluido eléctrico.* Disparo termostato de seguridad.* Disparo presostato de seguridad.* Fallo circuito control.

MANUAL DE INSTRUCCIONES CODIGO 80121 REV C 04/07/01 (Sujetas a modificaciones sin previo aviso) Pag.: 20
J.P. SELECTA s.a. Ctra. NII Km 585.1 Abrera 08630 (Barcelona) España Tel (34 3) 770 08 77 Fax (34 3) 770 23 62 e-mail: [email protected] - http://www.sefes.es/selecta
ESQUEMAS ELÉCTRICOS ELECTRICAL DIAGRAMS
B

MANUAL DE INSTRUCCIONES CODIGO 80121 REV C 04/07/01 (It can be modified without notice) Pag.: 21
J.P. SELECTA s.a. Ctra. NII Km 585.1 Abrera 08630 (Barcelona) España Tel (34 3) 770 08 77 Fax (34 3) 770 23 62 e-mail: [email protected] - http://www.sefes.es/selecta
B

MANUAL DE INSTRUCCIONES CODIGO 80121 REV C 04/07/01 (Sujetas a modificaciones sin previo aviso) Pag.: 22
J.P. SELECTA s.a. Ctra. NII Km 585.1 Abrera 08630 (Barcelona) España Tel (34 3) 770 08 77 Fax (34 3) 770 23 62 e-mail: [email protected] - http://www.sefes.es/selecta
B

MANUAL DE INSTRUCCIONES CODIGO 80121 REV C 04/07/01 (It can be modified without notice) Pag.: 23
J.P. SELECTA s.a. Ctra. NII Km 585.1 Abrera 08630 (Barcelona) España Tel (34 3) 770 08 77 Fax (34 3) 770 23 62 e-mail: [email protected] - http://www.sefes.es/selecta
RECAMBIOS / SPARE PARTS
Para garantizar la seguridad del equipo los recambios deben adquirirse a J.P.SELECTA, s.a.To guarantee the safety of the equipment, the spare parts must be purchased from J.P.SELECTA,S.A.
30LITROS
75LITROS
140LITROS
Descripción Description 4001414 4001415 4001416
Circuito control Control circuit 29225 29226 29227
Circuito potencia Power circuit 29191
Contactor seguridad Safety contactor 13022 13018
Relé Relay 13020
Contactor Contactor - - 13019
Relé steril. Steril relay 36027
Relé DRY Dry relay 36027 -
Relé electroválvula Electrovalve relay - - 36030
Fusible (maniobra) Fuse (operation) 15555
Fusible (potencia) Fuse (power) 15399
Manovacuómetro Pressure and vacuum gauge 16009
Presostato (seguridad) Safety pressure switch 16212
Electroválvula N.A. (purgado) Electrovalve N.A. (drainage) 16022
Electroválvula N.C. (vaciado,secado y llenado)
Electrovalve N.A. (emptying,drying an filling) 16210
Electroválvula N.C. (vaciado) Electrovalve N.A. (emptying) - - 16215
Interruptor/selector Switch / Selector 20017
Junta tapa Lid gasket 21015 21014 21061
Piloto rojo (alarma) Red indicator lamp (alarm) 22021
Bomba vacio Vacuum pump 24209 24210
Válvula (selector llenado) Valve (filling selector) 34094
Válvula (selector vaciado) Valve (emptying selector) 34094 34578
Válvula vapor Steam valve 34556 34058
Válvula retención Retaining valve 34557 34585
Válvula seguridad Safety valve 34200 34128
Resistencia esterilización Sterilization heater element 39158 39001 39511
Resistencia secado Drying heater element 39006 39250 39320
Rueda Wheel 40007 40026
Termostato seguridad Safety thermostat 43031
Termostato secado Drying thermostat 43001
Sonda Pt100 Pt100 probe 43071
Transformador Transformer 45033
Boya nivel Level float 20052

MANUAL DE INSTRUCCIONES CODIGO 80121 REV C 04/07/01 (Sujetas a modificaciones sin previo aviso) Pag.: 24
J.P. SELECTA s.a. Ctra. NII Km 585.1 Abrera 08630 (Barcelona) España Tel (34 3) 770 08 77 Fax (34 3) 770 23 62 e-mail: [email protected] - http://www.sefes.es/selecta
DECLARACIÓN DE CONFORMIDAD “CE”“EC” CONFORMITY DECLARATION
El fabricante: / The manufacturer
J.P. SELECTA,s.a. Ctra. NII Km 585,1 08760 ABRERA (BARCELONA) SPAIN
declara que los equipos: / Declares that the equipment:
Modelo: / Model: Código: / Code:
AUTESTER-E DRY 4001414AUTESTER-E DRY 4001415AUTESTER-E DRY 4001416
Cumplen las directivas siguientes: / Meet the following Directives:
73/23/CEE Seguridad eléctrica. Electrical safety.
89/336/CEE Compatibilidad electromagnética. Electromagnetical compatibility
Cumplen las siguientes Normas:/ Meet the following Standards:
EN 50081-1 EN 50082-1 EN 61010-1
RAMÓN Mª RAMÓNDirector Técnico
DAVID PECANINSResponsable Calidad