Embed Size (px)
Citation preview

AN10868GreenChip TEA1733 series fixed frequency flyback controllerRev. 3.1 — 22 May 2013 Application note
Document information
Info Content
Keywords GreenChip, TEA1733, SMPS, flyback, adapter, notebook, LCD monitor.
Abstract The TEA1733 is a low cost member of the GreenChip family. It is a fixed-frequency flyback controller intended for power supplies up to 75 W for applications such as notebooks, printers and LCD monitors.

NXP Semiconductors AN10868GreenChip TEA1733 series fixed frequency flyback controller
Revision history
Rev Date Description
v.3.1 20130522 updated issue
Modifications: • Section 3.2.5 “VCC capacitor” has been updated.
• Section 3.4.11 “UnderVoltage LockOut (UVLO)” has been updated.
v.3 20101124 third issue
v.2 20100601 second issue
v.1 20091209 first issue
AN10868 All information provided in this document is subject to legal disclaimers. © NXP B.V. 2013. All rights reserved.
Application note Rev. 3.1 — 22 May 2013 2 of 46
Contact informationFor more information, please visit: http://www.nxp.com
For sales office addresses, please send an email to: [email protected]

NXP Semiconductors AN10868GreenChip TEA1733 series fixed frequency flyback controller
1. Introduction
The TEA1733 is a fixed frequency flyback controller that can be used for Discontinuous Conduction Mode (DCM) as well as Continuous Conduction Mode (CCM).
1.1 Scope
This application note describes the functionality of the TEA1733 series. Fixed-frequency flyback fundamentals and calculation of transformer and other large signal parts are not dealt with in this application note. The TEA1733 demoboard is described in a separate user manual (UM10385).
1.2 Features
• SMPS controller IC enabling low cost applications
• Large input voltage range (12 V to 30 V, 35 V peak allowed for 100 ms)
• Very low supply current during start and restart (typically 10 A)
• Low supply current during normal operation (typically 500 A, no load)
• Overpower compensation (high/low line compensation)
• Adjustable overpower time-out
• Adjustable overpower restart timer
• Fixed frequency with frequency jitter to reduce EMI
• Frequency reduction with fixed minimum peak current at low power operation to maintain high efficiency at low output power levels
• Slope compensation for CCM operation
• Low and adjustable OverCurrent Protection (OCP) trip level
• Soft start
• Two independent general purpose protection inputs combined on a single pin (e.g. for OverTemperature Protection (OTP) and output OverVoltage Protection (OVP))
• Internal OTP
1.3 Applications
The TEA1733 is intended for applications that require an efficient and cost-effective power supply solution up to 75 W such as:
• Notebooks
• LCD monitors
• Printers
AN10868 All information provided in this document is subject to legal disclaimers. © NXP B.V. 2013. All rights reserved.
Application note Rev. 3.1 — 22 May 2013 3 of 46

NXP Semiconductors AN10868GreenChip TEA1733 series fixed frequency flyback controller
1.4 TEA1733 series type overview
[1] The only difference between the latch version and the restart version is how the overpower protection is handled (in the N2 versions this is also how UVLO is handled). Protection triggered by the PROTECT pin (output overvoltage protection, overtemperature protection) or by the internal overtemperature protection always results in latched off-state. Protection triggered by the VINSENSE pin (brownout, input overvoltage protection) always triggers a restart.
1.5 Latched versions TEA1733LT, TEA1733MT, TEA1733LT/N2 and TEA1733MT/N2
All TEA1733 versions are available in a restart version and a latch version. The only difference between the two versions is how the OverPower Protection (OPP) is handled:
• TEA1733T, TEA1733P, TEA1733AT, TEA1733BT: OPP event initiates safe restart
• TEA1733LT, TEA1733MT: OPP event sets IC in latched off-state
• TEA1733LT/N2, TEA1733MT/N2: OPP or UVLO event sets IC in latched off-state
1.6 Higher switching frequency versions TEA1733AT, TEA1733MT(/N2) and TEA1733BT
Increasing the switching frequency has an important advantage:
• More output power possible with same inductor core size
But it also has disadvantages:
• Higher switching losses
• The switching frequency 2nd harmonic exceeds the 150 kHz boundary and must comply to the EMI standards for conducted emission. This can be a problem if there is no margin left in the low frequency area.
Note that in CCM, the power transferred from input to output does not increase linearly with the switching frequency. If the goal is to convert as much energy as possible with the smallest possible core size, CCM should be avoided.
1.7 Application schematic
Figure 1 shows a typical TEA1733 application schematic.
Table 1. TEA1733 series type overviewThis table only shows the differences between the various TEA1733 versions, all other properties are identical.
Property T LT LT/N2 P AT MT MT/N2 BT
Package SO8 DIP8 SO8
Switching frequency (kHz) 66.5 91.5 123
Overpower protection[1] restart latch restart restart latch restart
Maximum on-time protection no action restart no action no action restart no action
UVLO protection restart latch restart restart latch restart
Frequency jitter range (kHz) 4 5 7
Slope compensation (mV/s)
25 33 44
AN10868 All information provided in this document is subject to legal disclaimers. © NXP B.V. 2013. All rights reserved.
Application note Rev. 3.1 — 22 May 2013 4 of 46
xxxxxxxxxxxxxxxxxxxxx xxxxxxxxxxxxxxxxxxxxxxxxxx xxxxxxx x x x xxxxxxxxxxxxxxxxxxxxxxxxxxxxxx xxxxxxxxxxxxxxxxxxx xx xx xxxxx xxxxxxxxxxxxxxxxxxxxxxxxxxx xxxxxxxxxxxxxxxxxxx xxxxxx xxxxxxxxxxxxxxxxxxxxxxxxxxxxxxxxxxx xxxxxxxxxxxx x x xxxxxxxxxxxxxxxxxxxxx xxxxxxxxxxxxxxxxxxxxxxxxxxxxxx xxxxx xxxxxxxxxxxxxxxxxxxxxxxxxxxxxxxxxxxxxxxxxxxxxxxxxx xxxxxxxx xxxxxxxxxxxxxxxxxxxxxxxxx xxxxxxxxxxxxxxxxxxxx xxx
AN
10868
Ap
plicatio
n n
ote
NX
P S
emico
nd
ucto
rsA
N10868
Gree
nC
hip
TE
A1
733
serie
s fixe
d fre
qu
enc
y flyb
ack
co
ntro
ller
019aaa154
C17option
C19option
C18
C15
ption
1
BC1(ferrite bead)
nF V
option
R22
10 kΩ
00
C16
10 nF
C13680 μF25 V
C14680 μF25 V
R2335.7 kΩ1 %
R25option
R245.1 kΩ1 %
R20330 Ω
R21option
2-256T
U3P431SR
GND
+ 19.5 V3.34 A
All inform
ation provided
in this docum
ent is subject to leg
al disclaim
ers.©
NX
P B
.V. 2013. A
ll rights reserved.
Rev. 3.1 —
22 May 2013
5 o
f 46 Fig 1. Typical TEA1733 application schematic
F1
CX1330 nF275 V
C114.7 μF50 V
C4100 pF1 kV
RM10Lp = 600 μH
C6470 nF
C7aoption
R13
R26
option o
CY
2.2 400
R18 D3
BAS21W6.8 μH
1 kΩ
R15
4.7 Ω
R14
D2
1N4148W
D9
MBR201D10
10 Ω
R12
Q12SK3569
C5
220 nF
33 kΩ
C24.7 nF500 V
C32.2 nF630 V
6
7
2
3
1
44 tu
rns
4
58 tu
rns
8 tu
rnsC1
120 μF400 V
R21.5 MΩ
R162.2 MΩ
R43.3 MΩ
R53.3 MΩ
R943 kΩ
R1043 kΩ
R63.3 MΩ
R782 kΩ
D1SA2M
RT1 NTC470 kΩ at 25 °C11.2 kΩ at 110 °C
R175.1 kΩ1 %
ZD1BZX84J-B24
R11.5 MΩ
LF23.15 A250 V
L
N
5VINSENSE
C10100 nF
6PROTECT
C910 nF
7CTRL
R110.15 Ω
C8220 nF
C7100 nF50 V
U2-1LVT-356T
ULVT-3
A
8
4
3
2
1OPTIMER
ISENSE
DRIVER
GND
VCC
TEA1733
U1
LF1
BD1KBP206G
BD1b
BD1a
BD1d
BD1c
Θ

NXP Semiconductors AN10868GreenChip TEA1733 series fixed frequency flyback controller
2. Pin description
Table 2. Pin description
Pin number Pin name Description
1 VCC Supply voltage
At mains switch-on, the capacitor connected to this pin is charged by an external start-up circuit.
When the voltage on the pin exceeds Vstartup the IC wakes up from Power-down mode and checks if all other conditions are met to start switching.
When the voltage on the pin drops below Vth(UVLO) the TEA1733 stops switching and enters Power-down mode. (When the voltage rises above Vstartup a normal start-up procedure is carried out.)
During a safe restart procedure, this pin is internally clamped to a voltage just above Vstartup.
During latched protection this pin is internally clamped to a voltage just above Vrst(latch) to enable fast latch reset after unplugging the mains.
• Vstartup = 20.6 V (typ.)
• Vth(UVLO) = 12.2 V (typ.)
• Vclamp(VCC) during restart = Vstartup + 1 V
• Vclamp(VCC) during latched protection = Vrst(latch) + 1 V
• Vrst(latch) = 5 V
Absolute maximum rating: VCC = 30 V (35 V for 100 ms).
2 GND Ground
3 DRIVER Gate driver output for MOSFET
• Isource(DRIVER) = 0.3 A (typ.) at VDRIVER = 2 V
• Isink(DRIVER) = 0.3 A (typ.) at VDRIVER = 2 V
• Isink(DRIVER) = 0.75 A (typ.) at VDRIVER = 10 V
Frequency modulation
• Modulation range = 4 kHz ( 5 kHz in 91.5 kHz switching frequency versions and 7 kHz in the 123 kHz version)
• Modulation frequency = 280 Hz
AN10868 All information provided in this document is subject to legal disclaimers. © NXP B.V. 2013. All rights reserved.
Application note Rev. 3.1 — 22 May 2013 6 of 46

NXP Semiconductors AN10868GreenChip TEA1733 series fixed frequency flyback controller
4 ISENSE Current sense input
General
This pin senses the primary current across an external resistor and compares it to an internal control voltage. This internal control voltage, Vctrl(Ipeak) is proportional to the CTRL pin voltage: Vctrl(Ipeak) = (VCTRL 1.1) / 5.6.
Overpower protection
When the voltage on the ISENSE pin exceeds the overpower protection limit, the overpower timer is started: Vth(sense)opp = 400 mV.
Overcurrent protection
The internal control voltage Vctrl(Ipeak) is limited to 500 mV which also limits the voltage on the ISENSE input: Vsense(max) = 500 mV.
Leading edge blanking
The first 300 ns of each switching cycle, the ISENSE input is internally blanked to prevent the spike caused by parasitic capacitance triggering the peak current comparator prematurely.
Propagation delay
Going from detecting the level to switching off the driver takes time. During that time the primary current continues to increase. How much it is able to increase depends on the di/dt slope and thus on the mains voltage. So the resulting peak current not only depends on the CTRL voltage but also on the mains voltage.
Overpower compensation (high/low line compensation)
Without counter measures, the maximum output power (in CCM) would be higher for high input voltages. To compensate this effect the input voltage measured on the VINSENSE pin is internally converted to a small current on the ISENSE input. This current causes a voltage drop over the series resistor, limiting the maximum peak current for high input voltage. By tuning the series resistor, the maximum output power can be made the same for high and low mains.
Soft start
Just before the converter starts, the soft start capacitor (C5 in Figure 1) is charged by an internal current source (55 A). After the capacitor has been sufficiently charged, the current source is switched off and the controller starts switching. The soft start capacitor now slowly discharges through the soft start resistor (R12 in Figure 1), slowly enabling the primary peak current to grow.
Slope compensation
Amount of slope compensation (related to ISENSE pin):
• 66.5 kHz versions: 25 mV/s
• 91.5 kHz versions: 33 mV/s
• 123 kHz versions: 44 mV/s
The slope compensation is only active at duty cycles higher than 45 %.
Remark: R13 should be placed close to the IC. Its purpose is to prevent negative spikes from reaching the pin (these can be rectified by the internal ESD protection diode which causes a DC offset across C5).
Table 2. Pin description …continued
Pin number Pin name Description
AN10868 All information provided in this document is subject to legal disclaimers. © NXP B.V. 2013. All rights reserved.
Application note Rev. 3.1 — 22 May 2013 7 of 46

NXP Semiconductors AN10868GreenChip TEA1733 series fixed frequency flyback controller
5 VINSENSE Input voltage sense pin
This pin monitors the mains input voltage. It can detect three levels. The voltage on the VINSENSE pin should exceed Vstart(VINSENSE) to be able to start (or restart) the converter.
During operation the voltage must remain between Vdet(L)(VINSENSE) (for brownout protection) and Vdet(H)(VINSENSE) (input OVP to protect the MOSFET), otherwise the device will carry out a safe restart procedure.
This pin is intended to be connected to the rectified mains voltage via a resistor divider, a capacitor to ground is required to filter out the ripple on the rectified mains voltage.
• Vdet(H)(VINSENSE) = 3.52 V (input OVP)
• Vstart(VINSENSE) = 0.94 V
• Vdet(L)(VINSENSE) = 0.72 V (brownout protection)
See Section 3.3 for how to translate these levels to mains voltages.
Overpower compensation
The voltage on the VINSENSE pin is also used internally for the overpower compensation, see Section 3.5.
Open pin detection
An internal 20 nA current source is added for open pin detection. If the VINSENSE pin is open, the voltage rises above Vdet(H)(VINSENSE) and the device will carry out a safe restart procedure.
Table 2. Pin description …continued
Pin number Pin name Description
AN10868 All information provided in this document is subject to legal disclaimers. © NXP B.V. 2013. All rights reserved.
Application note Rev. 3.1 — 22 May 2013 8 of 46

NXP Semiconductors AN10868GreenChip TEA1733 series fixed frequency flyback controller
6 PROTECT General purpose protection input
Two independent protection features can be connected to this pin. An internal current source attempts to keep this pin at 0.65 V. This current source can sink 107 A and source 32 A. If more current is required to keep the voltage at 0.65 V the voltage will rise above 0.8 V or fall below 0.5 V and the TEA1733 will enter Latched protection mode.
7 CTRL Peak current control input
The CTRL pin voltage is converted to an internal control voltage Vctrl(Ipeak). If the voltage measured on the ISENSE pin exceeds this internal control voltage the driver is switched off.
• VCTRL for minimum flyback peak current = 1.8 V (typ.) (Vctrl(Ipeak) = 125 mV)
• VCTRL for maximum flyback peak current = 3.9 V (typ.) (Vctrl(Ipeak) = 500 mV)
• RINT(CTRL) = 7 k (internally connected to 5.4 V)
Relation between the CTRL pin voltage and the internal control voltage (VCTRL to Vctrl(Ipeak)):
• Vctrl(Ipeak) = (VCTRL 1.1) / 5.6 (typical at 25 C)
Relation between the CTRL pin current and the CTRL pin voltage (IO(CTRL) to VCTRL):
• VCTRL = 5.4 V 7 * 103 * IO(CTRL) (typical at 25 C)
8 OPTIMER Overpower timer and restart timer
Both timer functions can be more or less independently adjusted. See Section 3.7 for the calculation. The ratio of these times determines the maximum input power during a continuous overload (e.g. shorted output).
Overpower timer
If the internal control voltage, Vctrl(Ipeak) exceeds the overpower threshold of 400 mV, the overpower timer is activated. An internal 10.7 A current source charges the external OPTIMER capacitor. If the overpower condition lasts long enough to charge the OPTIMER pin to 2.5 V, the controller carries out a safe restart procedure (or enters Latched protection mode in the latched version). If the internal control voltage drops below 400 mV before the OPTIMER pin reaches 2.5 V, the OPTIMER capacitor is immediately discharged. The minimum recommended value for the OPTIMER resistor is 470 k (otherwise there is a chance that 10.7 A is not sufficient to charge the capacitor to 2.5 V). The overpower function can be disabled by choosing a resistor lower than 180 k.
Restart timer
When a safe restart procedure is triggered by one of the protection features (via the VINSENSE pin or the OPTIMER pin), the OPTIMER capacitor will be quickly charged to 4.5 V by an internal 107 A current source. The TEA1733 enters Power-down mode and does not start again until the external resistor on the OPTIMER pin has discharged the capacitor to less than 1.2 V.
Table 2. Pin description …continued
Pin number Pin name Description
AN10868 All information provided in this document is subject to legal disclaimers. © NXP B.V. 2013. All rights reserved.
Application note Rev. 3.1 — 22 May 2013 9 of 46

NXP Semiconductors AN10868GreenChip TEA1733 series fixed frequency flyback controller
3. Functional description
3.1 General
The TEA1733 has been designed for fixed-frequency CCM flyback power supplies.
The TEA1733 uses peak current control. The output voltage is measured and transferred back via an optocoupler to the CTRL pin of the TEA1733.
3.2 Start-up
3.2.1 Charging the VCC capacitor
A capacitor on the VCC pin (C11) is charged by a resistor to provide the start-up power. As long as VCC is below Vstartup (20.6 V typ.), the IC current consumption is low (only 10 A). When the capacitor is charged above Vstartup (20.6 V typ.) and all other conditions have been met, the controller starts to switch. Once the supply has started, the TEA1733 is supplied by the auxiliary winding.
For fast latch reset, the resistor must be connected before the bridge rectifier.1
A low-cost and efficient implementation for the start-up circuit is to combine it with the X-cap (CX1) discharge resistor. See Figure 3a (Start-up circuit with two resistors).
1. The only way to reset the latched protection is to bring the VCC pin below 5 V. During latched protection, the supply current is only 10 A. So if the start-up resistor is connected after the bridge rectifier, the bulk capacitor would continue to feed it for a long time after unplugging the mains.
Fig 2. VCC pin
019aaa155
C114.7 μF50 V
6.8 μH
R18 VCC
5 V LatchReset
12.2 V VCCstop
VCC
20.6 V VCCstart
switched onduring restart
switched on during latched protection
1
GND 2
D3Aux
winding
BAS21W
from mains(before bridge rectifier)
C7100 nF
21.6 V 6 V
AN10868 All information provided in this document is subject to legal disclaimers. © NXP B.V. 2013. All rights reserved.
Application note Rev. 3.1 — 22 May 2013 10 of 46
NXP Semiconductors AN10868GreenChip TEA1733 series fixed frequency flyback controller
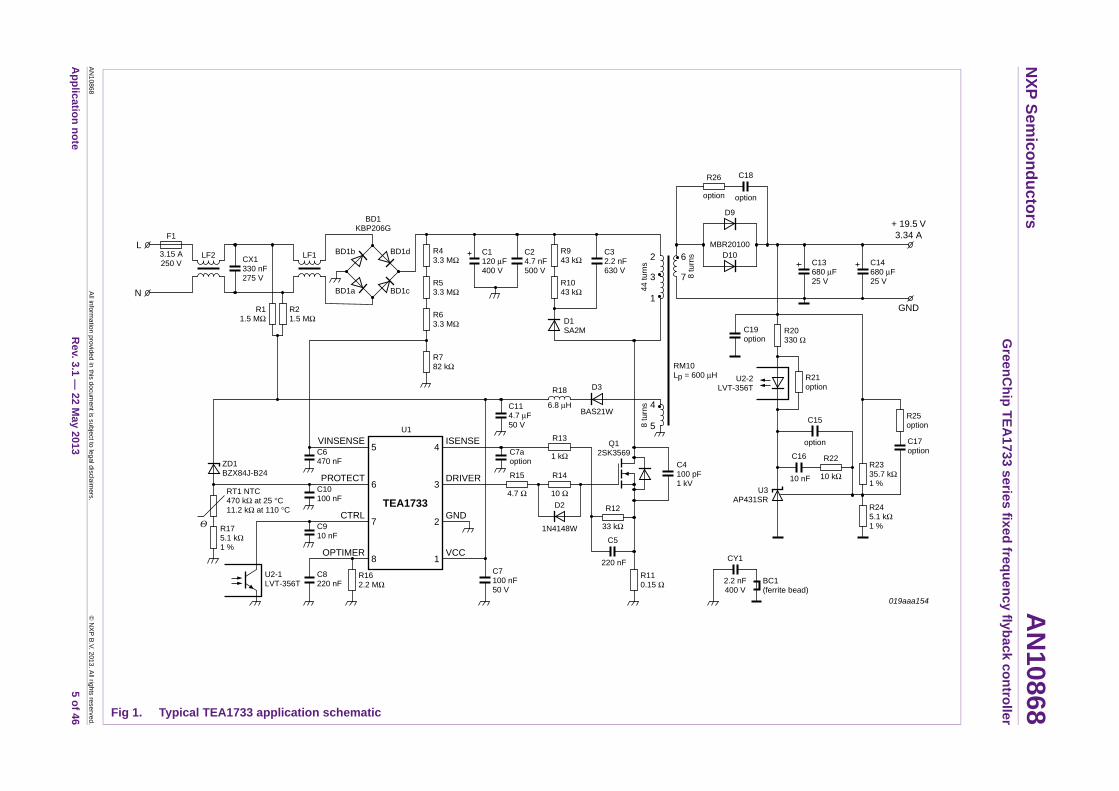
Figure 3b, shows the circuit shown in Figure 3a but drawn to show more clearly how the VCC capacitor is charged. Once the bulk capacitor C1 is fully charged, diode c and diode d stop conducting. During the positive half mains cycle diode a conducts and the current through R1 charges the VCC capacitor (C11 + C7). During this positive half cycle, part of the charge current leaks away into R2. The worst case current that leaks into R2 occurs is when the VCC capacitor is almost charged:
(1)
The value of R1 and R2 must be low enough to ensure the required discharge time of the X-cap (RC < 1 s) and also low enough to obtain an acceptable start-up time at low mains voltage. But it must also be chosen to be as high as possible to keep the no-load power consumption as low as possible.
Some examples of start-up times for different resistors are shown in Table 3.
[1] Power consumption of the combined X-cap discharge and start-up circuit at 230 V (AC).
a. Start-up circuit with two resistors b. Simplified representation
Fig 3. Start-up circuit with two resistors
019aaa156
CX1
C11 + C7
C1
VCC
R2R1
L
N
BD1b
BD1a
BD1d
BD1c
019aaa157
C11 + C7R1
R2
BD1b
BD1a
C1BD1d
BD1c
VCC
N
L
Table 3. Start-up times for different start-up resistor valuesVCC capacitance: 4.7 F + 100 nF = 4.8 F.
Resistor R1 = R2 Start-up time at 90 V (AC)
Start-up time at 115 V (AC)
Power at 230 V (AC)[1]
680 k 1.6 s 1.1 s 70 mW
820 k 2.0 s 1.4 s 59 mW
1 M 2.5 s 1.75 s 48 mW
1.2 M 3.1 s 2.1 s 40 mW
1.5 M 4.15 s 2.75 s 33 mW
Ileak
Vstartup
R2------------------ 20.6 V
1.2 M------------------- 17 A= = =
AN10868 All information provided in this document is subject to legal disclaimers. © NXP B.V. 2013. All rights reserved.
Application note Rev. 3.1 — 22 May 2013 11 of 46

NXP Semiconductors AN10868GreenChip TEA1733 series fixed frequency flyback controller
Figure 5 shows the power consumed by the combined start-up and X-cap discharge circuit as a function of the start-up time. The graph shows how to save power:
• More than 10 mW no-load power can be saved by increasing the start-up time (at 115 V (AC)) from 2 s to 3 s.
• Approximately 17 mW no-load power can be saved by specifying the start-up time at 115 V (AC) instead of 90 V (AC).
Fig 4. Start-up resistor value as a function of start-up time (VCC capacitance 4.8 F)
Fig 5. Power consumption of start-up circuit at 230 V (AC) as a function of start-up time (VCC capacitance 4.8 F)
start-up time (s)1 432
019aaa158
90 V (AC)
115 V (AC)
1.2
0.8
1.6
2.0
1.0
1.4
1.8
star
t-up
res
isto
rs (
MΩ
)
0.6
start-up time (s)1 432
019aaa159
90 V (AC)
115 V (AC)
60
40
80
100
power at 230 V (AC)(mW)
20
AN10868 All information provided in this document is subject to legal disclaimers. © NXP B.V. 2013. All rights reserved.
Application note Rev. 3.1 — 22 May 2013 12 of 46

NXP Semiconductors AN10868GreenChip TEA1733 series fixed frequency flyback controller
3.2.2 Measuring start-up time
Capacitance across the bridge diodes changes the wave shape of the voltage before the bridge rectifier with respect to the primary ground. This can significantly decrease the start-up time. Connecting the ground clip of an oscilloscope to the primary ground of the flyback converter can add a few nF across the bridge diodes (depending on the capacitance of the mains supply to ground).
To measure the correct worst case start-up time, make sure the board has no capacitive coupling to primary ground:
• Use a current probe in the mains input cable to detect mains switch-on.
• The same current probe in the mains input cable can also be used to detect when the supply starts switching. The time, from the moment the supply starts to switch until it reaches 90 % of the output voltage, is only a few ms and can be ignored with respect to the total start-up time. (If it is really required to measure the output voltage with an oscilloscope, the Y-cap must be removed so that there is no capacitive coupling to primary ground.)
• Use a resistor load instead of an electronic load. Remove Y-cap if electronic load must be used.
Also important when measuring the start-up time:
• Make sure the VCC capacitor is entirely discharged before starting a measurement.
• Do not connect a probe or multimeter to the VCC, even a 10 M impedance will influence the measurement.
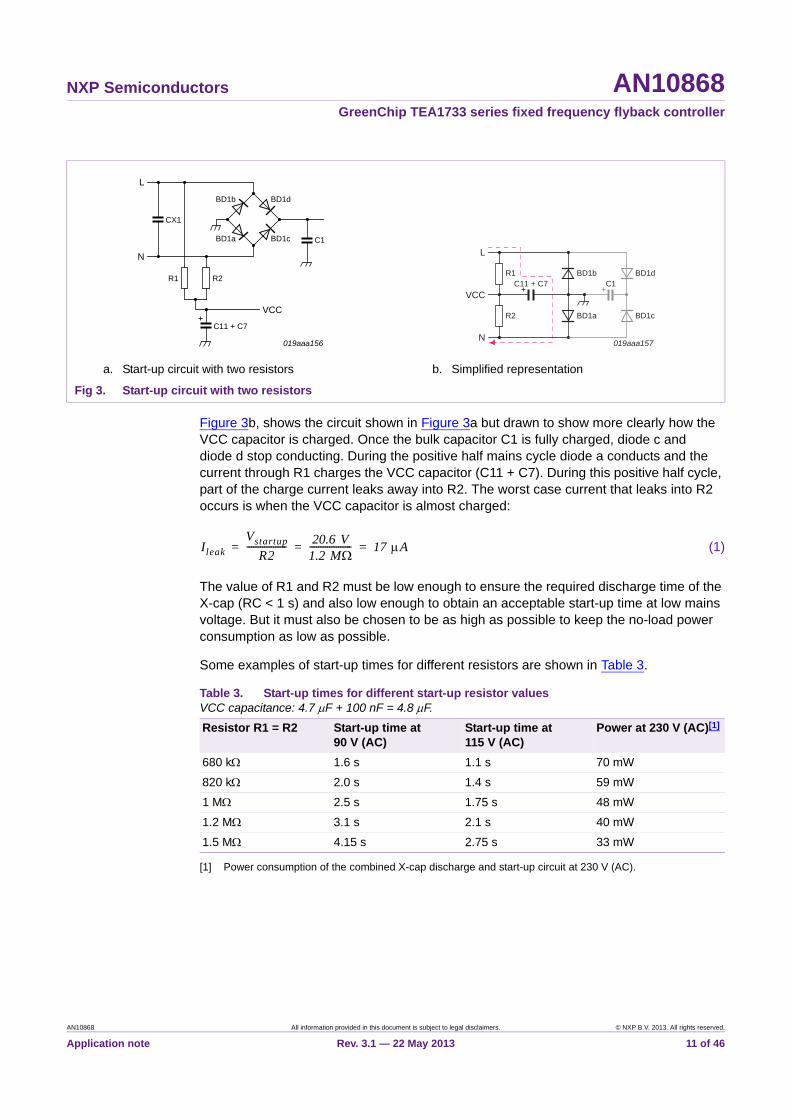
3.2.3 Start-up circuit with diodes
As explained in Section 3.2.1, the start-up circuit with two resistors also has a disadvantage. Some current does not flow into the VCC capacitor but is lost in one of the resistors. This can be prevented by placing diodes in series with the resistors as shown in Figure 6a and Figure 6b.
Figure 6a requires two resistors and two low voltage diodes. Figure 6b saves one resistor but requires two high voltage diodes.
At 90 V (AC), adding the diodes reduces the start-up time by approximately 20 % without increasing the no-load power consumption. (Approximately 10 % at 115 V.)
AN10868 All information provided in this document is subject to legal disclaimers. © NXP B.V. 2013. All rights reserved.
Application note Rev. 3.1 — 22 May 2013 13 of 46
NXP Semiconductors AN10868GreenChip TEA1733 series fixed frequency flyback controller
The diodes do not block the X-cap discharge path! The discharge of the X-cap takes place via R1 or R2 through the series diode to VCC. From VCC there are several paths to ground (even when the IC is in Power-down mode a clamp on the VCC pin is active). From ground it can find its return path to the X-cap through one of the bridge diodes.
3.2.4 Start-up circuit with charge pump
If the no-load power requirements cannot be combined with the start-up time requirements, there is a more efficient way to decrease the start-up time using the charge pump circuit illustrated in Figure 7a.
During the positive half of each mains cycle, current flows from L via Cpump and Dcharge to the VCC capacitor. This process stops when Cpump is fully charged.
During the negative half mains cycle, Cpump is discharged: From Cpump via C1 to ground. From ground via Ddischarge back to Cpump.
Unlike in the resistor start-up circuit, no significant power is lost in the circuit itself.
a. Diodes at low side b. Diodes at high side (this requires high voltage diodes but it saves one resistor)
Fig 6. Start-up circuits using diodes in series
019aaa160
CX1
C11 + C7
C1
VCC
R2R1
L
N
019aaa161
CX1
C11 + C7
C1
VCC
R1
L
N
a. Basic charge pump start-up circuit b. Practical charge pump start-up circuit with inrush current limiter and X-cap discharge
Fig 7. Start-up circuit with charge pump
019aaa162
CX1
C11 + C7
C1
VCC
Cpump10 nF
Dcharge
Ddischarge
L
N
019aaa163
CX1
C11 + C7
C1
VCC
R23 MΩ
Rinrush20 kΩ
Cpump10 nF
R13 MΩ
L
N
AN10868 All information provided in this document is subject to legal disclaimers. © NXP B.V. 2013. All rights reserved.
Application note Rev. 3.1 — 22 May 2013 14 of 46

NXP Semiconductors AN10868GreenChip TEA1733 series fixed frequency flyback controller
The charge pump circuit does not provide a discharge path for the X-cap. An efficient way to provide the X-cap discharge path is to use the resistor start-up circuit because it not only discharges the X-cap but also helps to charge the VCC capacitor, see Figure 7b.
• The value of R1 and R2 should be chosen as high as possible but low enough to comply with the X-cap discharge requirement: R C < 1 s:
– For a 330 nF X-cap: R < 3 M
– For a 220 nF X-cap: R < 4.5 M
• The value of Cpump must be chosen just high enough to reach the start-up time target (start with 10 nF and increase or decrease for correct start-up value). It must be a high voltage capacitor.
• The purpose of the resistor Rinrush is to limit the inrush current when the supply is plugged in at the top of the sine wave. To minimize losses the value should be as low as possible but high enough to comply with the pulsed power rating of the resistor to survive the inrush current.
• For the diodes, any low voltage type will do (breakdown voltage > 30 V).
• If the average start-up current at maximum input voltage exceeds the maximum current of the clamp on the VCC pin, Ddischarge should be replaced by a 24 V Zener diode.
Remark: This can occur in the latched off-state when the power consumption is very low. In that case the charge pump not only charges the VCC capacitor but also very slowly charges the high voltage bulk capacitor (C1) on the other side of the bridge rectifier. It has to be checked that in latched protection mode the charge pump does not charge the high voltage bulk capacitor above its rated voltage (check at maximum input voltage). There are two ways to solve the problem:
• Increase the load on the rectified mains voltage. (e.g. lower impedance of voltage divider on the VINSENSE pin.) Even if some load has to be added to the rectified mains voltage to prevent the charge pump damaging the high voltage bulk capacitor, the charge pump remains a more efficient solution than the resistor circuit.
• Another solution is to add an identical charge pump but connect its input to N instead of L (see Figure 8). In this case the value of Cpump can be divided by two.
CAUTION
The rated maximum voltage of the high-voltage bulk capacitor can be exceeded if it is overcharged by the charge pump.
AN10868 All information provided in this document is subject to legal disclaimers. © NXP B.V. 2013. All rights reserved.
Application note Rev. 3.1 — 22 May 2013 15 of 46

NXP Semiconductors AN10868GreenChip TEA1733 series fixed frequency flyback controller
3.2.4.1 Charge pump in combination with PFC
If a PFC (Power Factor Corrector) is used, the voltage on the bulk capacitor can be (much) higher than the rectified mains voltage. Under these circumstances, the start-up current provided by the charge pump can be reduced or even entirely stopped.
If a restart occurs during this condition, the start-up time can be very long. This can be solved by using a symmetrical charge pump.
3.2.5 VCC capacitor
The VCC capacitor should be as small as possible to make the start-up time as short as possible (and also the latch reset time).
First of all the value of the capacitor should be sufficient to supply the TEA1733 until the auxiliary winding can take over. This depends on the configured soft start time, the load on the output and the values of the secondary capacitors.
But usually the minimum value of the capacitor is determined by other factors, some worst case tests to determine the minimum value of the VCC capacitor are:
• No-load operation
The supply runs at low frequency so there is a long interval between two consecutive charge pulses from the auxiliary winding. VCC should not drop near Vth(UVLO) before the next cycle.
During no-load operation keep a healthy margin (> 2 V) between the minimum VCC value and the upper data sheet limit of Vth(UVLO). This margin prevents unintentional triggering of UVLO due to the production spread and the temperature drift of external components. It also improves the immunity to external disturbances.
• Transient from full load to no load
A transient from full load to no load may cause a small overshoot on the output voltage. Because of the absence of any external load it may take a long time for the output capacitor to discharge to the level at which the supply starts to switch again.
During that time the VCC capacitor is not charged by the auxiliary winding. This overshoot can be limited by the following modifying loop: Add R25 and C17 in Figure 1 at e.g. 3.9 k and 1 nF respectively.
Fig 8. Symmetric charge pump circuit (prevents C1 from being charged)
019aaa164
CX1
C11 + C7
C1
VCC
R23 MΩ20 kΩ
4.7 nF
R13 MΩ
L
N
20 kΩ
4.7 nF
AN10868 All information provided in this document is subject to legal disclaimers. © NXP B.V. 2013. All rights reserved.
Application note Rev. 3.1 — 22 May 2013 16 of 46

NXP Semiconductors AN10868GreenChip TEA1733 series fixed frequency flyback controller
The VCC capacitor should be a low ESR type.
3.2.6 Start-up conditions
When the VCC pin reaches Vstartup (20.6 V typ.), the controller wakes up from Power-down mode and checks if the following conditions are met:
• The PROTECT pin must be between 0.5 V and 0.8 V.
• The VINSENSE pin must be between 0.94 V and 3.52 V.
• The OPTIMER pin must be below 1.2 V.
If one or more of these conditions is not met, the controller will not switch. Due to the increased power consumption when the IC is switched on, the voltage on the VCC will eventually drop below Vth(UVLO) and the IC will enter Power-down mode. The start-up circuit will charge the VCC capacitor and the cycle repeats itself.
3.2.7 Soft start
When all start-up conditions have been met, the IC charges the soft start capacitor by switching on a 55 A current source on the ISENSE pin. As soon as the ISENSE pin reaches the internal control voltage (which is 0.5 V when the output is still low), the current source is switched off and the controller starts to switch.
At start-up the output capacitors are still empty and the control input will ask for maximum peak current, increasing the primary duty cycle until VISENSE reaches 0.5 V. But because of the charged soft start capacitor, the voltage on VISENSE is already 0.5 V. As the soft start resistor discharges the soft start capacitor, the peak current slowly increases.
The purpose of the soft start is to avoid audible noise at start-up. Increasing peak current instantly from 0 A to maximum would be audible. A soft start duration of 4 ms is a good value for most applications.
Fig 9. Start-up sequence, normal operation and restart sequence
019aaa165
output voltage
OPTIMER
PROTECT
VINSENSE
ISENSE
VCC
Vstartup
Vth(UVLO)
Vdet(VINSENSE)(H)
Vstart(VINSENSE)
Vdet(PROTECT)(H)
Vdet(PROTECT)(L)
4.5 V
charging VCCcapacitor
startingconverter
normaloperation
(power down)
protection restart
soft start
1.2 V
soft start
AN10868 All information provided in this document is subject to legal disclaimers. © NXP B.V. 2013. All rights reserved.
Application note Rev. 3.1 — 22 May 2013 17 of 46

NXP Semiconductors AN10868GreenChip TEA1733 series fixed frequency flyback controller
The duration of the soft start can be configured by changing the value of the soft start capacitor. (Do not use the soft start resistor for this purpose as this resistor also configures the overpower compensation. It is better to first configure the overpower compensation and later change the soft start capacitor to obtain the required soft start time). The
duration of the soft start is roughly equal to: .
Rstart(soft) must be a minimal 12 k, otherwise the 55 A current source is not be able to charge the capacitor to 0.5 V and the controller will not start switching.
The purpose of the extra series resistor R13 is to filter out negative spikes that would otherwise be rectified by the internal ESD protection diode, charging C5 and causing a positive offset voltage on the ISENSE pin.
For high output voltages, the peak current may show a short peak at the start. The empty output capacitors behave like a short circuit and the supply immediately goes into continuous conduction mode. During this peak the power is limited by the minimum on-time.
3.2.8 Safe restart
If a protection is triggered the controller stops switching. Depending on which protection is triggered and on the version of the IC, the protection causes a restart or latches the converter to an off-state. See Section 3.3 for an overview of the protection features.
A restart caused by a protection quickly charges the OPTIMER pin to 4.5 V. The TEA1733 then enters Power-down mode until the capacitor on the OPTIMER pin has been discharged by the resistor on the OPTIMER pin to 1.2 V. During Power-down mode the power consumption is very low (10 A) and the VCC pin is clamped to 21.6 V (which is just above Vstartup) by an internal clamp circuit.
When the OPTIMER pin drops below 1.2 V and VCC is above the VCC start-up voltage (20.6 V), the controller wakes up from Power-down mode and does a normal start-up as described in Section 3.2.
3.2.9 Clamps
The 21.6 V clamp on the VCC pin is only active during the restart delay. The purpose of the clamp is to keep the VCC pin just above Vstartup, so that after the restart delay the system will behave exactly like a normal start-up.
Tstart soft Rstart soft Cstart soft =
a. Soft start circuit b. Soft start waveform
Fig 10. Soft start circuit and waveform
019aaa166
Vctrl(Ipeak)
ISENSE 4
ESD
R13
1 kΩ
R12
R110.15 Ω
Q1
C5
220 nF
33 kΩ
55 μA
019aaa167
0.5 V
55 μAcurrent source
charges capacitor
VISENSE
capacitor dischargedby resistor
AN10868 All information provided in this document is subject to legal disclaimers. © NXP B.V. 2013. All rights reserved.
Application note Rev. 3.1 — 22 May 2013 18 of 46

NXP Semiconductors AN10868GreenChip TEA1733 series fixed frequency flyback controller
The 6 V clamp on the VCC pin is only active during latched off-state. The purpose of this clamp is to keep the VCC pin just above the latch reset level. This is to ensure a fast latch reset after unplugging the mains.
It is recommended to keep the clamp current below 0.2 mA. (So the start-up circuit should not be able to deliver more than 0.2 mA at maximum mains voltage.) Above a certain current, the clamp behaves like a current source: The voltage increases and the current remains constant.
If it is required to achieve a very fast start-up time, it should be checked that at the highest mains input voltage, the current during restart or latched off-state remains below 0.2 mA.
3.3 Input voltage sensing (VINSENSE pin)
3.3.1 General
For accurate input voltage sensing it is best to sense the input voltage after the bridge rectifier. The detection levels for start-up, brownout protection, and input OVP have been designed to be connected to the rectified mains voltage via resistor divider ratio 1:122, e.g. 10 M and 82 k. To filter out the ripple on the rectified mains voltage, a capacitor must be connected.
[1] At full load there will be a ripple on Vbulk but because of the high input voltage this ripple will be very low. The mains input detection level at full load will be approximately 5 V higher.
Fig 11. Application VINSENSE pin
Table 4. Detection levels VINSENSE pinVoltage divider as in Figure 7: 3 3.3 M and 82 k.
VINSENSE pin detection voltages
Vmains (V (RMS))
Condition Vbulk (average V(DC))
VINSENSE pin(V (DC))
Vdet(H)(VINSENSE) = input OVP 301 no load[1] 428 3.52
Vstart(VINSENSE) 80 no load[2] 111 0.94
Vdet(L)(VINSENSE) = brownout 61 0 V ripple on Vbulk[3] 88 0.72
68 20 V ripple on Vbulk 88 0.72
71 30 V ripple on Vbulk 88 0.72
75 40 V ripple on Vbulk 88 0.72
019aaa148
R43.3 MΩ
R53.3 MΩ
R63.3 MΩ
R782 kΩ
BD1C1
C6470 nF 5.2 V
Vdet(H)(VINSENSE) = 3.52 V
VINSENSE(to OPP compensationISENSE pin)
LowVin (to digital control)
HighVin (to digital control)
brownout protection
input overvoltage protection
Vstart(VINSENSE) = 0.94 VVdet(L)(VINSENSE) = 0.72 V
VINSENSE 5
AN10868 All information provided in this document is subject to legal disclaimers. © NXP B.V. 2013. All rights reserved.
Application note Rev. 3.1 — 22 May 2013 19 of 46

NXP Semiconductors AN10868GreenChip TEA1733 series fixed frequency flyback controller
[2] The Vstart(VINSENSE) level is only relevant when the supply is not running. In that case there is no load on Vbulk and there will be no ripple.
[3] The brownout detection level depends on the load. At a lower load it allows a lower mains input voltage. This is not a problem because at a lower load the input current is also lower.
For slightly different detection levels the ratio of the resistor divider can be changed. Increasing the division factor to 133 (3 3.3 M and 75 k) results in:
• Input OVP level = 329 V (RMS)
• Start level = 87 V (RMS)
• Brownout level = 77 V (RMS) (at 30 V ripple on Vbulk)
3.3.2 Start-up voltage
The controller should not start up if the mains voltage is too low. If VINSENSE is below Vstart(VINSENSE) (0.94 V typ.) the supply will not start. There is 220 mV hysteresis on this level, so once the IC is switched on, it does not stop until VINSENSE is lowered below Vdet(L)(VINSENSE) (0.72 V typ.).
3.3.3 Input overvoltage protection
Switching at a mains voltage that is too high may damage the power MOSFET. If the voltage on the VINSENSE pin exceeds 3.52 V the TEA1733 stops switching and initiates a safe restart (valid for all TEA1733 versions). The mains voltage will still be on the MOSFET but it will not have to endure the extra coil voltage.
If the input OVP is not appreciated it can be disabled by connecting a Zener diode so that the voltage on the VINSENSE pin cannot rise above 3.52 V. Low voltage Zener diodes have too much leakage for the high-impedance of this pin, so it is better to use a higher (e.g. 24 V Zener value and connect higher in the resistor divider), see Figure 12.
It is also possible to just increase the value of the input OVP. In that case a resistor should be placed in series with the Zener diode in Figure 12. Above 383 V (3 V on VINSENSE pin), the Zener diode starts to conduct. Part of the current flows through the Zener diode and the series resistor. The result is that the input voltage that is required to reach 3.52 V on the VINSENSE pin increases, depending on the value of the series resistor.
Fig 12. Disabling input OVP
019aaa149
R43.3 MΩ
R53.3 MΩ
R6b560 kΩ
R6a3.0 MΩ
R782 kΩ
BD1C1
C6470 nF
VINSENSE24 V
AN10868 All information provided in this document is subject to legal disclaimers. © NXP B.V. 2013. All rights reserved.
Application note Rev. 3.1 — 22 May 2013 20 of 46

NXP Semiconductors AN10868GreenChip TEA1733 series fixed frequency flyback controller
The input voltage compensation of the overpower compensation is also derived from the VINSENSE pin. To minimize the influence of the OVP level modification on the OPP compensation it is recommended to keep the VINSENSE pin undisturbed below 3 V.
3.3.4 Brownout protection
When the voltage on the VINSENSE pin drops below 0.72 V, the brownout protection is activated. The controller immediately stops switching and initiates a safe restart (valid for all TEA1733 versions).
3.3.5 Overpower compensation
The VINSENSE pin is also used to provide the input voltage information needed for the overpower compensation. The voltage is translated into a small current and injected on the ISENSE output. On the ISENSE output the current is converted into a voltage across a series resistor. At a high input voltage it creates an offset voltage on the ISENSE pin, limiting the maximum peak current. See Section 3.5 for more about the OPP.
3.3.6 Filter capacitor
A capacitor (C6 in Figure 11) directly on the VINSENSE pin filters out the mains ripple. For a time constant of a few 100 Hz cycles (e.g. 40 ms), so the capacitor value should be:
.
The capacitor also prevents the supply switching off when the rectified mains voltage temporarily drops below the brownout level during a short (5 ms or 10 ms) mains interruption.
3.3.7 Clamp
An internal clamp protects the pin against input voltages that are too high. The clamp voltage is 5.2 V at 50 A. The clamp voltage remains unchanged during power-down. (The clamp voltage only drops when VCC drops below 5 V.)
3.4 Protection features
3.4.1 General
Table 5 shows which protection features lead to a safe restart and which to a latched off-state. See Section 3.2.8.
C640 ms
R7---------------
AN10868 All information provided in this document is subject to legal disclaimers. © NXP B.V. 2013. All rights reserved.
Application note Rev. 3.1 — 22 May 2013 21 of 46

NXP Semiconductors AN10868GreenChip TEA1733 series fixed frequency flyback controller
[1] Switches off and waits in Power-down mode until VCC rises above Vstartup. This is not the same as safe restart procedure.
3.4.2 Input OverVoltage Protection (Input OVP)
The purpose of OVP is to protect the primary MOSFET against voltages that are too high. When the mains voltage becomes too high (VINSENSE rises above 3.52 V), the input OVP is activated. The controller immediately stops switching and performs a safe restart (valid for all TEA1733 versions). See Section 3.3 for the application of the VINSENSE pin.
3.4.3 Brownout protection
When the mains input voltage is too low (and with full load), the primary current increases, causing increased losses in many of the primary components. The purpose of the brownout protection is to protect the supply against overheating at input voltages that are too low.
When the mains voltage becomes too low (VINSENSE drops below 0.72 V), the brownout protection is activated. The controller immediately stops switching and performs a safe restart (valid for all TEA1733 versions). See Section 3.3 for application of the VINSENSE pin.
3.4.4 Internal OverTemperature Protection (Internal OTP)
When the temperature in the chip rises to above 140 C, the internal OTP sets the controller to the latched off-state (in all TEA1733 versions).
3.4.5 Maximum on-time protection (TEA1733LT/N2 and TEA1733MT/N2 only)
If a switching cycle does not reach the peak current set by the CTRL pin, the driver pulse will be ended by the maximum on-time protection. If this happens eight times in a row, the maximum on-time protection triggers a restart.
The purpose of this protection is to ensure a well defined response to mains supply dips.
3.4.6 OverPower Protection (OPP)
When the rated output power is continuously exceeded for an adjustable duration, the OPP is activated. The controller immediately stops switching and performs a safe restart or enters the latched off-state, depending on the version. See Section 3.5 for more about OPP.
Table 5. Protection handling TEA1733 series
Protection Restart versions Latched versions
T, P, AT, BT LT, MT LT/N2, MT/N2
OVP (VINSENSE pin HIGH) restart
Brownout (VINSENSE pin LOW) restart
OTP (internal) latch
OPP (OPTIMER pin) restart latch
OVP (PROTECT pin HIGH) latch
OTP (PROTECT pin LOW) latch
UnderVoltage LockOut (UVLO) restart[1] latch
Maximum on-time protection no action restart
AN10868 All information provided in this document is subject to legal disclaimers. © NXP B.V. 2013. All rights reserved.
Application note Rev. 3.1 — 22 May 2013 22 of 46
NXP Semiconductors AN10868GreenChip TEA1733 series fixed frequency flyback controller
3.4.7 Output OverVoltage Protection (Output OVP)
The purpose of the OVP is to protect the devices connected to the output but also the supply itself against output voltages that are too high (e.g. when the voltage feedback loop is disturbed).
If an overvoltage at the output occurs, the application pulls the PROTECT pin above 0.8 V and the OVP is activated. The controller immediately stops switching and enters the latched-off state (in all TEA1733 versions). See Section 3.8 for how to apply the PROTECT pin.
3.4.8 External OverTemperature Protection (External OTP)
When the temperature in the supply rises above the rated level, the application pulls the PROTECT pin below 0.5 V and the OTP is activated. The controller immediately stops switching and enters the latched-off state (in all TEA1733 versions). See Section 3.8 for how to apply the PROTECT pin.
3.4.9 Latched protection
When one of the protection features triggers the latched off-state, the IC immediately stops switching and enters Power-down mode. It clamps the VCC pin to 6 V, which is just above the reset level (5 V).
3.4.10 Resetting a latched protection
In order to reset a latched protection, the VCC pin should be brought below 5 V.
If a latched protection is triggered, the VCC pin is automatically clamped to a voltage just above the reset level. As soon as the mains is unplugged, the start-up current stops and the VCC capacitor is discharged by the 10 A supply current to the TEA1733. Because it only has to be discharged from 6 V to 5 V it resets quite fast.
With CVCC = 4.7 F the discharge time is 0.47 s (In practice the start-up current does not always immediately stop charging the VCC capacitor after unplugging the mains because the X-cap may still be charged for about one second).
3.4.11 UnderVoltage LockOut (UVLO)
If VCC drops below Vth(UVLO) the IC immediately stops switching. The purpose of the UVLO protection is to prevent the VCC voltage from dropping so much that the DRIVER pin cannot sufficiently drive the MOSFET anymore.
Keep a healthy margin (> 2 V) between the minimum VCC value (usually during no-load operation) and the upper data sheet limit of Vth(UVLO). This margin prevents unintentional triggering of UVLO due to the production spread and the temperature drift of external components. It also improves the immunity to external disturbances.
TEA1733T, TEA1733P, TEA1733AT, TEA1733BT — When during normal operation the VCC voltage drops below the undervoltage lockout threshold (Vth(UVLO) = 12.2 V typ.), the IC stops switching and enters Power-down mode. The VCC pin is clamped to 21.6 V (typ.) by an internal clamp circuit. The start-up circuit will charge the VCC capacitor and a normal start-up sequence follows.
AN10868 All information provided in this document is subject to legal disclaimers. © NXP B.V. 2013. All rights reserved.
Application note Rev. 3.1 — 22 May 2013 23 of 46

NXP Semiconductors AN10868GreenChip TEA1733 series fixed frequency flyback controller
A restart caused by undervoltage lockout is not exactly the same as a restart caused by one of the other protection features. It will not trigger the restart delay (so it will not charge the OPTIMER capacitor and waits until it is discharged again).
TEA1733LT/N2, TEA1733MT/N2 — During normal operation if VCC drops below the undervoltage lockout threshold, the IC is set to the latched protection mode. This ensures that a shorted output always triggers latched protection mode, also if VCC drops below Vth(UVLO) before OPP has a chance to respond.
3.5 OverPower Protection (OPP)
3.5.1 Continuous and temporary output power limitation
The TEA1733 has two mechanisms to protect against overload:
• Overpower protection
Overpower protection performs a safe restart (or enters the Latched protection mode in the latched version) if the rated power is continuously exceeded. OPP is delayed to allow temporary overloads.
• Cycle by cycle primary inductor current limitation
Peak current limitation prevents the core from going into saturation and thus the MOSFET from currents that are too high.
3.5.2 How the OPP operates
When the internal control voltage exceeds the overpower threshold (400 mV on the ISENSE pin), the overpower timer is activated (see Figure 17 on page 31 andFigure 21 on page 33. An internal 10.7 A current source charges the external capacitor on the OPTIMER pin. When the overpower condition lasts long enough to charge the OPTIMER pin to 2.5 V, the controller carries out a safe restart procedure (or enters Latched protection mode in the latched versions). If the internal control voltage drops below 400 mV before the OPTIMER pin reaches 2.5 V, the OPTIMER capacitor is immediately discharged. The minimum recommended value for OPTIMER resistor is 470 k (otherwise there is a chance that 10.7 A is not sufficient to charge the capacitor to 2.5 V).
3.5.3 Peak current limitation (OCP)
When the voltage on the ISENSE pin exceeds 500 mV the current switching cycle is immediately ended. When the OCP limits the peak current, the output voltage can no longer be maintained. The converter will continue to switch until the OPP is triggered or until VCC has dropped below Vth(UVLO).
3.5.4 Input voltage compensation
In fixed frequency DCM the peak current limitation can also act as overpower protection because the maximum output power is independent of the input voltage. But in fixed frequency CCM the maximum amount of power that can be transferred to the output does not only depend on the primary peak current but also on the duty cycle and therefore also on the input voltage.
The TEA1733 has built-in input voltage compensation to ensure accurate overpower protection, independent of the input voltage. It has been implemented by making the current sense signal dependent on the input voltage measured on the VINSENSE pin.
AN10868 All information provided in this document is subject to legal disclaimers. © NXP B.V. 2013. All rights reserved.
Application note Rev. 3.1 — 22 May 2013 24 of 46

NXP Semiconductors AN10868GreenChip TEA1733 series fixed frequency flyback controller
The input voltage measured on the VINSENSE pin is internally converted to a current and injected in the ISENSE pin. The current flows through the external series resistor R12 (see Figure 1) on the ISENSE pin, converting it to a voltage. The value of the series resistor should be tuned in such a way that the maximum power becomes independent of the input voltage.
3.5.5 How to configure the current sense resistor
Before the correct value of the current sense resistor can be calculated, the maximum primary peak current must be calculated. This is done with Equation 2 or Equation 3.
In DCM mode:
(2)
In CCM mode:
(3)
Where:
• Ipeak is the peak current
• Po is the maximum continuous output power
• is the expected efficiency of the flyback at maximum output power
• Vi is the minimum input voltage (= 2 the minimum mains voltage) at which the supply must be able to deliver the maximum continuous output power2
• N is the winding ratio of the coil
• Vo is the output voltage
• fsw is the switching frequency
Now the (maximum) current sense resistor value can be calculated with Equation 4:
(4)
Where:
• Ipeak is the peak current
Another way to determine the correct value for the sense resistor is by trial and error:
1. Connect a load to the output and set the load to the rated maximum continuous output power of the application.
2. Apply the minimum mains voltage at which the supply must be able to deliver the maximum continuous output power.
2. The peak current will be larger during the valley of the mains ripple. So during the majority of the time Ipeak RISENSE exceeds Vth(sense)opp. This is will however not trigger the OPP because each 100 Hz or 120 Hz cycle during the top of the ripple Ipeak RISENSE will be just below Vth(sense)opp and this discharges the OPTIMER capacitor.
Ipeak DCM2 Po
L fsw--------------------------=
Ipeak CCMPo
------
Vi NVo+
Vi NVo---------------------- 1
2 L fsw-------------------------
Vi NVoVi NVo+----------------------+=
RISENSE
Vth sense opp
Ipeak------------------------------ 400 mV
Ipeak-------------------= =
AN10868 All information provided in this document is subject to legal disclaimers. © NXP B.V. 2013. All rights reserved.
Application note Rev. 3.1 — 22 May 2013 25 of 46
NXP Semiconductors AN10868GreenChip TEA1733 series fixed frequency flyback controller
3. Increase the current sense resistor until the supply keeps running and the OPTIMER pin remains just below 2.5 V.
3.5.6 Calculating the maximum temporary output power
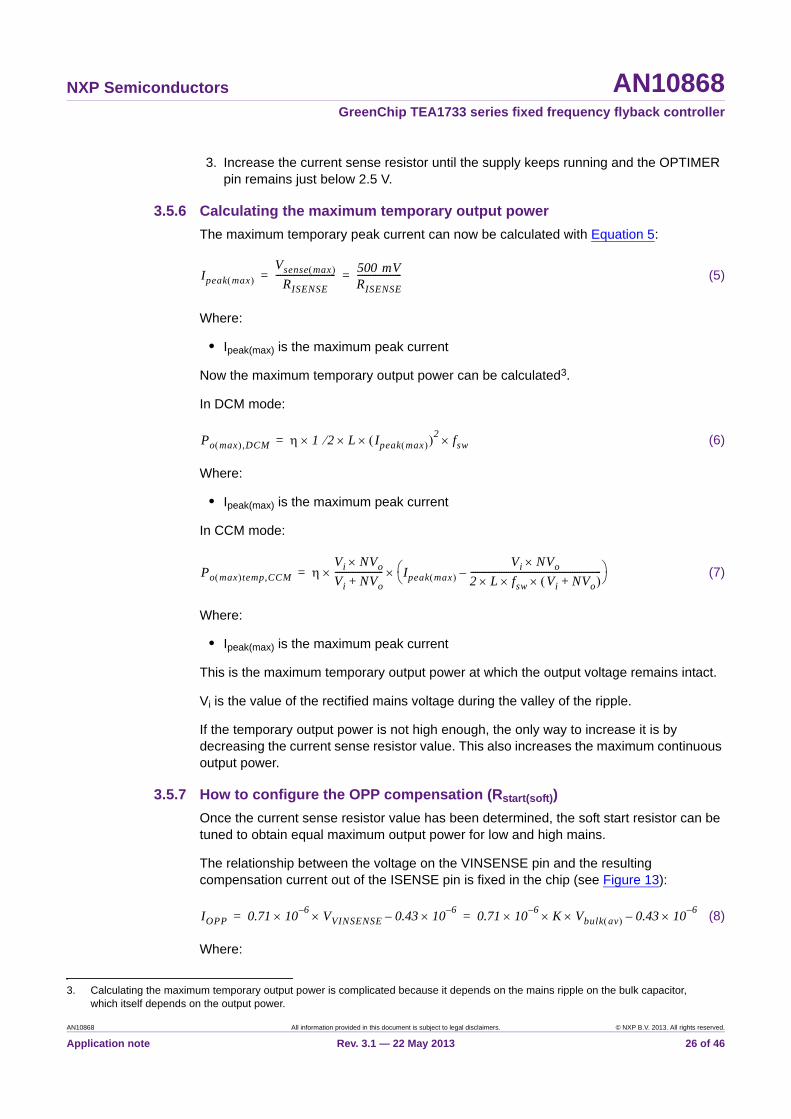
The maximum temporary peak current can now be calculated with Equation 5:
(5)
Where:
• Ipeak(max) is the maximum peak current
Now the maximum temporary output power can be calculated3.
In DCM mode:
(6)
Where:
• Ipeak(max) is the maximum peak current
In CCM mode:
(7)
Where:
• Ipeak(max) is the maximum peak current
This is the maximum temporary output power at which the output voltage remains intact.
Vi is the value of the rectified mains voltage during the valley of the ripple.
If the temporary output power is not high enough, the only way to increase it is by decreasing the current sense resistor value. This also increases the maximum continuous output power.
3.5.7 How to configure the OPP compensation (Rstart(soft))
Once the current sense resistor value has been determined, the soft start resistor can be tuned to obtain equal maximum output power for low and high mains.
The relationship between the voltage on the VINSENSE pin and the resulting compensation current out of the ISENSE pin is fixed in the chip (see Figure 13):
(8)
Where:
3. Calculating the maximum temporary output power is complicated because it depends on the mains ripple on the bulk capacitor, which itself depends on the output power.
Ipeak max Vsense max
RISENSE--------------------------- 500 mV
RISENSE--------------------= =
Po max ,DCM 1 2 L Ipeak max 2 fsw=
Po max temp,CCM Vi NVoVi NVo+---------------------- Ipeak max
Vi NVo2 L fsw Vi NVo+ -----------------------------------------------------------–
=
IOPP 0.71 106– VVINSENSE 0.43 10
6–– 0.71 106–
K Vbulk av 0.43 106––= =
AN10868 All information provided in this document is subject to legal disclaimers. © NXP B.V. 2013. All rights reserved.
Application note Rev. 3.1 — 22 May 2013 26 of 46

NXP Semiconductors AN10868GreenChip TEA1733 series fixed frequency flyback controller
• VVINSENSE is the voltage on the VINSENSE pin
• Vbulk(av) is the average rectified mains voltage
• K is the ratio of the resistor divider on the VINSENSE pin (around 1 : 122 for universal mains)
The resulting peak current reduction (Ipeak in equation) can be calculated with Equation 9:
(9)
Where:
• Ipeak is the peak current reduction
• Rstart(soft)(tot) is the total resistance from the ISENSE pin to the current sense resistor (R12 + R13 in Figure 1)
• RISENSE is the value of the current sense resistor (R11 in Figure 1)
• K is the ratio of the resistor divider on the VINSENSE pin (e.g. 1 : 122)
Section 3.5.5 describes how to calculate the peak current and the resulting output power without input voltage compensation. To calculate the output power with input voltage compensation, the Ipeak must be subtracted from the peak current before calculating the maximum output power.
Although it should be possible to calculate4 the optimal value of the soft start resistor, it is probably faster to tune it in the application.
1. Connect a load and set it to the rated maximum continuous output power of the flyback converter.
2. Apply the highest rated input voltage (usually 264 V (AC)).
Fig 13. Overpower compensation current ISENSE pin as a function of VINSENSE pin voltage
4. Exact calculation is complicated because the VINSENSE pin measures the average bulk voltage but the maximum continuous output power depends on the top of the ripple.
019aaa150
00 1
Iopc(ISENSE)(μA)
2 3
0.28
VVINSENSE (V)
1.72.0
Ipeak
Iopc ISENSE Rstart soft tot RISENSE
----------------------------------------------------------------------=
0.71 106–
K Vi av 0.43 106–– Rstart soft tot
RISENSE-------------------------------------------------------------------------------------------------------------------------------------------=
AN10868 All information provided in this document is subject to legal disclaimers. © NXP B.V. 2013. All rights reserved.
Application note Rev. 3.1 — 22 May 2013 27 of 46

NXP Semiconductors AN10868GreenChip TEA1733 series fixed frequency flyback controller
3. Increase the soft start resistor value until the voltage on the OPTIMER pin almost exceeds 2.5 V (e.g. start with 15 k).
Now the maximum output power at the minimum and the maximum input voltage should be exactly the same.
Remarks:
• The value of the total soft start resistance (the sum of R12 and R13) should not be lower than 12 k, otherwise the 55 A current source may not be able to charge the soft start capacitor to 0.5 V during start-up.
• Changing the soft start resistor value also slightly influences the maximum output power at absolute minimum input voltage. So after configuring Rstart(soft) it should be checked if it is necessary to retune the current sense resistor.
• The output power as a function of the input voltage is not a linear function (see Figure 14). When the maximum output power has been tuned to be equal for the absolute highest and lowest input voltage, the actual maximum output power will be slightly higher between these limits.
Another way to configure the compensation is to tune it in such a way that the maximum output power at nominal low mains (115 V) is exactly equal to the maximum output power at high mains (230 V). In that case the maximum output power will be exactly right at the nominal input voltages, somewhat lower at the absolute minimum and maximum input voltage and somewhat higher between the high and low nominal input voltage.
• For accurate overpower compensation it is best to connect the VINSENSE input voltage after the bridge rectifier.
• At low input power, the OPP compensation is switched off so that the minimum peak current is not influenced by the OPP compensation current.
• The maximum temporary output power also depends on the input voltage. When the OPP compensation has been configured optimally for the maximum continuous output power, it will not be compensated optimally for the maximum temporary output power. See Figure 15.
AN10868 All information provided in this document is subject to legal disclaimers. © NXP B.V. 2013. All rights reserved.
Application note Rev. 3.1 — 22 May 2013 28 of 46

NXP Semiconductors AN10868GreenChip TEA1733 series fixed frequency flyback controller
3.5.8 How to disable the OPP compensation (for DCM)
In DCM, the maximum output power does not depend on the mains voltage, so there is nothing to be compensated.
The obvious way to disable the OPP compensation would be to reduce the soft start resistor to 0 , but that would cause a problem at start-up: The total soft start resistance (the sum of R12 and R13) should be at least 12 k, otherwise the 55 A current source may not be able to charge the soft start resistor to 0.5 V during start-up.
Fig 14. Maximum continuous output power as a function of input voltage
Fig 15. Maximum temporary output power as a function of input voltage
mains input voltage (V (RMS))80 260240160 200120100 180 220140
019aaa171
70
75
65
80
85
60
max
imum
con
tinuo
us o
utpu
t pow
er (
W)
not compensated
compensated
mains input voltage (V (RMS))80 260240160 200120100 180 220140
019aaa172
85
75
95
105
max
imum
tem
pora
ry o
utpu
t pow
er (
W)
65
not compensated
compensated
AN10868 All information provided in this document is subject to legal disclaimers. © NXP B.V. 2013. All rights reserved.
Application note Rev. 3.1 — 22 May 2013 29 of 46

NXP Semiconductors AN10868GreenChip TEA1733 series fixed frequency flyback controller
The only way to disable the OPP compensation is to clamp the VINSENSE pin as shown in Figure 12. Instead of clamping it to 3 V it should be clamped to e.g. 1.2 V so that the clamp disables most of the OPP compensation without influencing the start-up and brownout detection levels on VINSENSE. Of course this also disables the input OVP. (To clamp at approximately 1.2 V: R6a = 1.8 M, R6b = 1.6 M).
3.5.9 OPP delay and restart delay
If a shorted output occurs, the supply keeps switching on and off (only valid for the non-latched version). The ratio of the on-time and off-time can be manipulated to control the maximum average output power. Both timings are defined at the OPTIMER pin. See Section 3.7 on page 33 for OPTIMER pin information.
3.5.10 Disabling the overpower protection
If the OPP is not appreciated it can be disabled by connecting a 180 k resistor from the OPTIMER pin to ground. Because of the 180 k resistor, the 10.7 A current source of the OPP is not able to charge the capacitor to 2.5 V anymore (10.7 A 180 k = 1.9 V).
The 180 k resistor also influences the restart delay, but this can be compensated by choosing a higher OPTIMER capacitor value.
It is not recommended to reduce the resistor value below 100 k, so that the internal 107 A current source is always able to charge the OPTIMER pin to 4.5 V in case of a restart event.
3.5.11 Leading edge blanking
The ISENSE input is internally blanked for the first 300 ns of each switching cycle to prevent the spike caused by parasitic capacitance (gate-source capacitance of the MOSFET and the parasitic capacitance of the transformer) triggering the peak current comparator prematurely.
3.6 CTRL pin
3.6.1 General
The CTRL pin controls the amount of output power.
Fig 16. Leading edge blanking
tleb
Vsense(max)
VISENSE t019aaa151
LEB
AN10868 All information provided in this document is subject to legal disclaimers. © NXP B.V. 2013. All rights reserved.
Application note Rev. 3.1 — 22 May 2013 30 of 46

NXP Semiconductors AN10868GreenChip TEA1733 series fixed frequency flyback controller
3.6.2 Input biasing
An internal resistor of 7 k connected to 5.4 V enables direct connection of an optocoupler transistor without any external components, to convert the output current of the optocoupler into the control voltage. The relationship between the CTRL pin current and CTRL pin voltage can be calculated with Equation 10 (see Figure 18).
(10)
3.6.3 Peak current control
The CTRL voltage sets the primary peak current. The primary current is measured by the ISENSE pin and is compared to the peak current set by the CTRL pin. As soon as the primary peak current measured by the ISENSE pin exceeds the limit set by the CTRL pin, the DRIVER output is switched LOW. The relationship between CTRL input and ISENSE output is calculated with Equation 11.
Fig 17. CTRL pin, ISENSE pin and DRIVER pin
019aaa168
MODULATION OSCILLATOR
SLOPECOMPENSATION
+5.4 V
CTRLU2-1
7 kΩ
4.7 Ω
R15
10 Ω
R14
Q1
D2
1N4148W
1 kΩ
R13 33 kΩ
R12
C5
220 nFC910 nF
7 4 ISENSE
VINSENSE(from VINSENSE pin)
OPPcompensation
3 DRIVER
ANALOGPROCESSING
Set
DutyMax
S
R
Q
LEADING EDGEBLANKING
stop
frequencyreduction
Vctrl(Ipeak)
Vctrl(Ipeak)(to overpower
protection)
Vctrl(Ipeak) = (VCTRL − 1.1) / 5.6
55 μA
0 μA to2 μA
softstart
switched on just beforestart-up until ISENSE pin
reaches 0.5 V
R110.15 Ω
Fig 18. VCTRL as a function of IO(CTRL)
VCTRL 5.4 V 7 103
IO CTRL –=
019aaa169
1.8
IO(CTRL) (mA)
3.9
5.0
00
VCTRL(V)
0.50.2
AN10868 All information provided in this document is subject to legal disclaimers. © NXP B.V. 2013. All rights reserved.
Application note Rev. 3.1 — 22 May 2013 31 of 46

NXP Semiconductors AN10868GreenChip TEA1733 series fixed frequency flyback controller
(11)
See Figure 19.
3.6.4 Frequency reduction at low output power
To ensure efficient operation at low output power, the peak current cannot be reduced below 25 % of its maximum value. Instead, to reduce the output power, the switching frequency is reduced. See Figure 19.
It is important to use the entire CTRL pin input range. If the chosen current sense resistor value is too low, only the lower part of the control curve is used. This means that frequency reduction already starts at a relatively high peak current which may result in audible noise.
If overpower protection is not appreciated (e.g. because it is handled by a secondary IC), it can be disabled (see Section 3.5.10). So if the overpower protection is not used, it is still possible to use the full input range of the CTRL input.
Figure 19 is valid for 66.5 kHz switching frequency versions. For higher switching frequency versions, the shape of the curves is the same, just replace 66.5 kHz by 91.5 kHz or 123 kHz.
3.6.5 Slope compensation
To prevent subharmonic oscillation in CCM mode at duty cycles above 50 %, the TEA1733 has built-in slope compensation. The slope compensation is internally added to the CTRL input signal (see Figure 20). Referred to the ISENSE pin, the amount of slope compensation is 25 mV/s (33 mV/s for 91.5 kHz switching frequency versions and 44 mV/s for the 123 kHz version). The slope compensation is only active on duty cycles higher than 45 %.
Vctrl Ipeak VCTRL 1.1–
5.6-----------------------------=
Fig 19. Vctrl(Ipeak) and fsw as a function of VCTRL
019aaa152
0
125
VCTRL (V)
0 0
66.5
500
1.81.55 3.9
Vctrl(Ipeak)(mV)
fsw(kHz)
Fig 20. Slope compensation waveforms
019aaa170
0
oscillator
t / T (%)
slopecompensation
45 75 100
AN10868 All information provided in this document is subject to legal disclaimers. © NXP B.V. 2013. All rights reserved.
Application note Rev. 3.1 — 22 May 2013 32 of 46

NXP Semiconductors AN10868GreenChip TEA1733 series fixed frequency flyback controller
3.7 OPTIMER pin
3.7.1 Overpower delay and restart delay
The OPTIMER pin provides two different time constants for:
• OPP delay (the time from exceeding the power limit to triggering the protection)
• Restart delay (the time from triggering the protection until the next restart attempt)
Both timer functions can be more or less independently adjusted. The ratio of these times determines the maximum power that can be delivered when the supply is continuously restarting, e.g. if the output is shorted.
Fig 21. OPTIMER pin
019aaa173
RESTARTCONTROL
OPTIMER
8
Restart
1.2 V4.5 V
400 mV
Vctrl(lpeak) Vctrl(lpeak)(from CTRL pin)
DRIVER(from DRIVER pin)
Overpower protection
2.5 VQ D
107 μA 10.7 μA
R162.2 MΩ
C8220 nF
Clamp(to 22 V clamp
on VCC pin)
Restart(from digital control)
OverPwr(to digital control)
PwrDwn(to digital
control)
Fig 22. OPTIMER waveforms
019aaa174
VOPTIMER
VISENSE
output voltage
400 mV
protectionhigh loadhigh loadnormal
load
Vprot(OPTIMER)
output load
AN10868 All information provided in this document is subject to legal disclaimers. © NXP B.V. 2013. All rights reserved.
Application note Rev. 3.1 — 22 May 2013 33 of 46

NXP Semiconductors AN10868GreenChip TEA1733 series fixed frequency flyback controller
3.7.2 Overpower delay
When the internal control voltage exceeds the overpower threshold of 400 mV, the overpower timer is activated (see Figure 21). An internal 10.7 A current source charges the external OPTIMER capacitor (C8). When the overpower condition lasts long enough to charge the OPTIMER pin to 2.5 V, the controller carries out a safe restart procedure (or enters Latched protection mode in the latched version). If the internal control voltage drops below 400 mV before the OPTIMER pin reaches 2.5 V, the OPTIMER capacitor is immediately discharged. The minimum recommended value for the OPTIMER resistor (R16) is 470 k (otherwise there is a chance that 10.7 A is not sufficient to charge the capacitor up to 2.5 V). The OPP attack time can be calculated with Equation 12.
(12)
Where R = ROPTIMER (R16) and C = COPTIMER (C8).
3.7.3 Restart delay
When a safe restart procedure is triggered by one of the protection features (via the VINSENSE pin or the OPTIMER pin), the OPTIMER capacitor will be quickly charged to 4.5 V by an internal 107 A current source. The TEA1733 enters Power-down mode and does not start again until the external resistor on the OPTIMER pin has discharged the capacitor to below 1.2 V.
The restart time consists of 2 periods:
1. Charging the capacitor from 2.5 V to 4.5 V by a 107 A current source.
2. Discharging the capacitor from 4.5 V to 1.2 V by the external resistor.
The restart time is mainly determined by the capacitor discharging from 4.5 V to 1.2 V by ROPTIMER (Equation 13).
(13)
Where R = ROPTIMER (R16) and C = COPTIMER (C8).
For a more accurate calculation the time required to charge the capacitor from 2.5 V to 4.5 V should also be calculated and added to the discharge time (Equation 14).
(14)
Where R = ROPTIMER (R16) and C = COPTIMER (C8).
3.7.4 How to configure R and C
The capacitor value has the same influence on both delays. When the resistor value is large enough (> 2 M) it only influences the restart delay. So tuning these components is most convenient in the following order:
TOPP R– C 1n 1Vprot OPTIMER
R Iprot OPTIMER ----------------------------------------------–
R– C 1n2.5 V
R 10.7 A------------------------------==
Trestart ,disch earg R– C 1nVrestart OPTIMER low
Vrestart OPTIMER high---------------------------------------------------- R– C 1n
1.2 V4.5 V-------------==
Trestart ,ch earg R C 1n 1Vprot OPTIMER
R Irestart OPTIMER ---------------------------------------------------–
1n 1Vrestart OPTIMER high
R Irestart OPTIMER ----------------------------------------------------–
– =
R C 1n 12.5 V
R 107 A----------------------------–
1n 14.5 V
R 107 A----------------------------–
– =
AN10868 All information provided in this document is subject to legal disclaimers. © NXP B.V. 2013. All rights reserved.
Application note Rev. 3.1 — 22 May 2013 34 of 46

NXP Semiconductors AN10868GreenChip TEA1733 series fixed frequency flyback controller
1. Tune or calculate the capacitor value to obtain the required OPP time.
2. Tune or calculate the resistor value to obtain the required restart time.
Some examples of OPP delay and restart delay for some different RC combinations are shown in Table 6.
3.8 PROTECT pin
3.8.1 General
Two protection features can be implemented on the same PROTECT pin using only a minimum number of components:
• OverVoltage Protection (output OVP)
• OverTemperature Protection (OTP)
The protection features on the PROTECT pin are always latched (also in the non-latched version).
3.8.2 Circuit description
An internal current source attempts to keep the voltage on the PROTECT pin equal to 0.65 V. This internal current source has a range of 107 A to +32 A (i.e. it can sink 107 A and source 32 A). If the internal current source is out of range the pin can no longer be kept in the 0.5 V to 0.8 V window and activates the protection.
Table 6. Examples of OPP attack time and restart time
ROPTIMER (M) COPTIMER (nF) TOPP (ms) Trestart (ms) Ratio TOPP / Trestart
2.2 100 25 293 1:12
2.2 220 54 644 1:12
2.2 470 116 1376 1:12
1 220 59 295 1:5
4.7 220 53 1371 1:26
Fig 23. PROTECT pin
019aaa153
NTC470 kΩ at 25 °C11.2 kΩ at 110 °C
R175.1 kΩ 1 %
C10100 nF
4.1 V
0.8 V
0.65 V
ProtHigh
ZD1BZX84J-B24
VCC
PROTECT 6
ROVP(option)
0.5 V ProtLow
current source sinks up to 107 μAor sources up to 32 μA to keepPROTECT pin close to 0.65 V
-30 0
0.50
0.65
0.80
100IO(PROTECT) (mA)
VPROTECT(V)
Θ
AN10868 All information provided in this document is subject to legal disclaimers. © NXP B.V. 2013. All rights reserved.
Application note Rev. 3.1 — 22 May 2013 35 of 46

NXP Semiconductors AN10868GreenChip TEA1733 series fixed frequency flyback controller
3.8.3 Output overvoltage protection
Output OVP is activated when the VCC voltage exceeds the voltage of the Zener diode (at 107 A) plus 0.8 V. The OVP can be tuned by placing a resistor (ROVP in Figure 23) in series with the Zener diode. A series resistor of 10 k increases the OVP voltage by approximately 1 V (V = ROVP 107 mA).
3.8.4 Overtemperature protection
The OTP is triggered when the voltage on the PROTECT pin drops below 0.5 V. This happens when the resistance of the NTC + series resistor has dropped below 0.5 V / 32 A = 15.6 k. The OTP is not influenced by VCC variations because the PROTECT pin is internally biased. The OTP is most accurate when the value of the NTC is chosen to be as high as possible.
3.8.5 Clamp
An internal clamp keeps the PROTECT pin voltage at 4.1 V to prevent damage to the PROTECT pin in case of spikes. The clamp voltage is specified at a 200 A input current (the exact voltage depends on the current). In Power-down mode, the clamp voltage drops to approximately 2 V.
3.9 DRIVER pin
3.9.1 Gate driver
The driver circuit has a current sourcing capability of typically 250 mA and a current sink capability of typically 750 mA. This permits fast turn-on and turn-off of the power MOSFET for efficient operation. See Figure 17 on page 31 for DRIVER pin control.
3.9.2 Frequency modulation
The switching frequency and its harmonics are usually responsible for a large part of the conducted EMI problems. Modulation of the switching frequency spreads all frequency peaks that are related to the switching frequency over 8 kHz wide bands, significantly decreasing the so called "average measurement". See Figure 17 on page 31 for location of oscillator and frequency modulation.
The oscillator is continuously modulated at a rate of 280 Hz and a range of 4 kHz. ( 5 kHz in 91.5 kHz switching frequency versions and 7 kHz for the 123 kHz version).
Fig 24. Frequency modulation
019aaa175
70.5
fsw (kHz)
66.5
62.5
t
1 / T = 280 Hz
AN10868 All information provided in this document is subject to legal disclaimers. © NXP B.V. 2013. All rights reserved.
Application note Rev. 3.1 — 22 May 2013 36 of 46
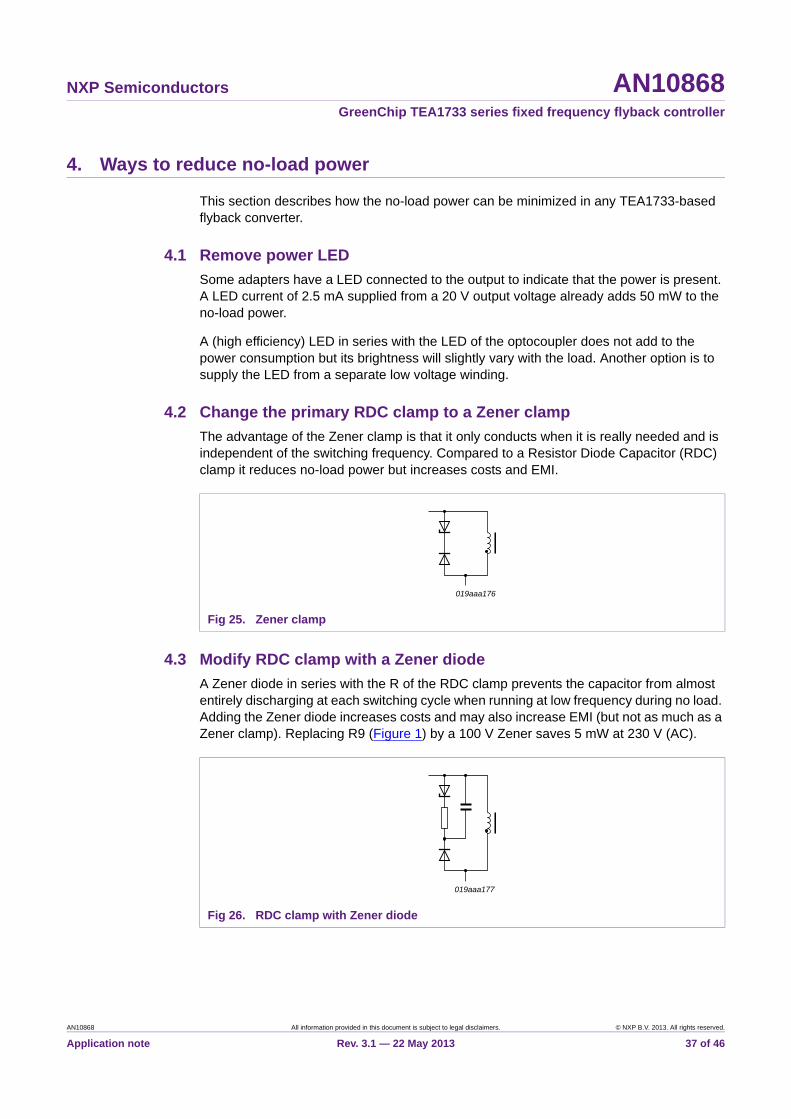
NXP Semiconductors AN10868GreenChip TEA1733 series fixed frequency flyback controller
4. Ways to reduce no-load power
This section describes how the no-load power can be minimized in any TEA1733-based flyback converter.
4.1 Remove power LED
Some adapters have a LED connected to the output to indicate that the power is present. A LED current of 2.5 mA supplied from a 20 V output voltage already adds 50 mW to the no-load power.
A (high efficiency) LED in series with the LED of the optocoupler does not add to the power consumption but its brightness will slightly vary with the load. Another option is to supply the LED from a separate low voltage winding.
4.2 Change the primary RDC clamp to a Zener clamp
The advantage of the Zener clamp is that it only conducts when it is really needed and is independent of the switching frequency. Compared to a Resistor Diode Capacitor (RDC) clamp it reduces no-load power but increases costs and EMI.
4.3 Modify RDC clamp with a Zener diode
A Zener diode in series with the R of the RDC clamp prevents the capacitor from almost entirely discharging at each switching cycle when running at low frequency during no load. Adding the Zener diode increases costs and may also increase EMI (but not as much as a Zener clamp). Replacing R9 (Figure 1) by a 100 V Zener saves 5 mW at 230 V (AC).
Fig 25. Zener clamp
019aaa176
Fig 26. RDC clamp with Zener diode
019aaa177
AN10868 All information provided in this document is subject to legal disclaimers. © NXP B.V. 2013. All rights reserved.
Application note Rev. 3.1 — 22 May 2013 37 of 46

NXP Semiconductors AN10868GreenChip TEA1733 series fixed frequency flyback controller
4.4 Reconsider start-up time specification
Usually the maximum start-up time of a power supply is specified at low nominal mains voltage (115 V (AC)). But occasionally the maximum start-up time is specified at the absolute minimum mains voltage (90 V (AC)). In this case it is worth reconsidering this requirement: 90 V (AC) will probably be encountered in less than 1 % of the field but to achieve a 2 s start-up time at 90 V (AC) requires 17 mW extra start-up power at 230 V (AC)5.
Another 11 mW can be saved by allowing a maximum start-up time of 3 s instead of 2 s. See figure Figure 5 on page 12.
4.5 Reduce VCC capacitor value
With a smaller VCC capacitor the efficiency of the start-up circuit can be significantly improved. Charging only half the VCC capacitor in the same time requires only half the power. For a maximum start-up time of 2 s at 115 V (AC), reducing the VCC capacitance from 4.8 F to 2.3 F and doubling the start-up resistor values saves approximately 20 mW.
4.6 X-cap quality
Use a good quality X-cap. A poor quality X-cap (330 nF) may dissipate as much as 25 mW at 230 V (AC) at 60 Hz. A good quality X-cap dissipates less than 2 mW.
4.7 X-cap value
Reducing the value of the X-cap also decreases the X-cap losses. It is better to solve EMI problems at the source than by solving them with a very large X-cap. Reducing the X-cap value not only reduces the losses in the X-cap itself but also in the required X-cap discharge circuit.
4.8 Active X-cap discharge
Replace a passive X-cap discharge (resistor) by an active discharge circuit (requires a high voltage transistor).
4.9 Active start-up circuit
Replace a passive start-up circuit (resistors) by an active charge circuit that is only active during start-up (requires a high voltage transistor).
4.10 Increasing the impedance of the voltage divider on VINSENSE
With R4 = R5 = R6 = 10 M and R7 = 240 k approximately 7 mW can be saved.
In this case C6 can be reduced from 470 nF to 180 nF to keep the same time constant.
5. If the two resistor start-up circuit is used and the VCC capacitance is 4.8 F (4.7 F + 100 nF).
AN10868 All information provided in this document is subject to legal disclaimers. © NXP B.V. 2013. All rights reserved.
Application note Rev. 3.1 — 22 May 2013 38 of 46

NXP Semiconductors AN10868GreenChip TEA1733 series fixed frequency flyback controller
4.11 Increase the impedance of the output voltage divider
Doubling the impedance of the voltage divider on the output (R23 and R24 in Figure 1) saves approximately 5 mW. In this case C16 and R22 also have to be adapted to keep the same loop response. How high the impedance can be increased depends very much on the layout of the PCB and the input current of the shunt regulator.
4.12 Replacing the integrated shunt regulator (TL431) by a discrete shunt regulator
The widely available integrated TL431 shunt regulator versions usually require 1 mA for proper regulation. Some manufacturers specify 0.5 mA or 0.6 mA. It is not difficult to make a low (temperature stable) discrete alternative, see Figure 27.
5. "Zero Watt" standby power design ideas
5.1 Less than 30 mW standby power
The standby power can be reduced to less than 30 mW by switching the application off entirely. (So no output voltage is available.) The solutions described in the following sections do require an external signal to switch the supply on or off. So the device that is connected to the power supply switches the power supply off when it is no longer needed. This should be no problem for battery operated equipment.
5.2 Active on
Figure 28 shows how the supply can be switched on by an external active-on control signal. The components in red have to be added with respect to the existing application.
Fig 27. Discrete shunt regulator
019aaa178
330 Ω
68 kΩ
1 MΩ1 MΩ
1 MΩ
100 pF
8.2 V
AN10868 All information provided in this document is subject to legal disclaimers. © NXP B.V. 2013. All rights reserved.
Application note Rev. 3.1 — 22 May 2013 39 of 46

NXP Semiconductors AN10868GreenChip TEA1733 series fixed frequency flyback controller
5.2.1 Shut down
Suppose the supply is running and suddenly the voltage on the external power-on signal is made low. The transistor of the optocoupler blocks and the current through R1 and R2 is forced into Zener diode ZDx. Transistor Qx pulls VINSENSE pin LOW. The TEA1733 immediately stops switching. The auxiliary winding does not supply the IC anymore and the voltage on the VCC pin drops below VUVLO. The IC enters Power-down mode.
5.2.2 Wake-up
When the power-on signal is made HIGH, the optocoupler conducts. The voltage on the Zener diode drops to 0 V and stops conducting. Qx blocks and the VINSENSE pin is released. The current through R1 and R2 now charges the VCC capacitor. The start-up time will be the same as the normal start-up time.
5.3 Active off
Figure 29 shows how the supply can be switched on by an external active-off control signal. The components in red have to be added with respect to the existing application.
Fig 28. “Zero Watt” application with active-on control signal
019aaa179
10 MΩ
10 MΩ
10 MΩ
240 kΩ
Rx56 kΩ
R23.3 MΩ
R13.3 MΩ
Active-on control signal("Power-on")
L
N
C6180 nF
C112.2 μF50 V
VINSENSE
VCC
5
1
TEA1733
ZDx30 V
Qx
Ux
BD1b
BD1a
BD1d
BD1c
AN10868 All information provided in this document is subject to legal disclaimers. © NXP B.V. 2013. All rights reserved.
Application note Rev. 3.1 — 22 May 2013 40 of 46

NXP Semiconductors AN10868GreenChip TEA1733 series fixed frequency flyback controller
5.3.1 Shut down
Suppose the supply is running and the active-off control signal is suddenly made HIGH. The transistor of the optocoupler conducts and two things happen:
• Transistor Qx conducts and pulls VINSENSE pin LOW. The TEA1733 immediately stops switching and the IC enters Power-down mode.
• VCC is clamped to 18 V which is just below Vstartup. Because of this, TEA1733 cannot do any start-up attempts.
5.3.2 Wake-up
When the power-down signal is made LOW, the optocoupler blocks and the VINSENSE pin is immediately released. The VCC capacitor was clamped just below Vstartup. This guarantees a short start-up time.
Fig 29. "Zero Watt" application with active-off signal
019aaa180
10 MΩ
10 MΩ
10 MΩ
240 kΩ
180 kΩ
2.2 MΩ
R23.3 MΩ
R13.3 MΩ
Active-off control signal("Power-down")
L
N
C6180 nF
C112.2 μF50 V
VINSENSE
VCC
5
1
TEA1733
ZDx18 V Qx
Ux
BD1b
BD1a
BD1d
BD1c
AN10868 All information provided in this document is subject to legal disclaimers. © NXP B.V. 2013. All rights reserved.
Application note Rev. 3.1 — 22 May 2013 41 of 46

NXP Semiconductors AN10868GreenChip TEA1733 series fixed frequency flyback controller
6. Layout recommendations
6.1 Input section
• Keep the mains tracks (L and N) low ohmic and close to each other to avoid loops.
• Position common mode chokes away from the power section (MOSFET and transformer) and from each other to prevent magnetic coupling to any of the other components.
• Keep tracks from the bridge rectifier to C1 low ohmic and close to each other.
6.2 Power section
• The connection from the negative terminal of the bridge rectifier to the current sense resistor R11 must go via C1.
• The connection from the positive terminal of the bridge rectifier to the transformer must go via C1.
• Keep the cross section of the loop from C1 via the transformer, MOSFET Q1 and the current sense resistor R11 back to C1 as small as possible.
• Place C2 close to C1.
• Place peak clamp circuit R9, R10, C3 and D1 close to the transformer and away from TEA1733.
• If MOSFET Q1 has a metal tab it must be insulated from the heat sink. The heat sink must be connected to the primary power ground.
6.3 Auxiliary winding
• Place rectifier D3, R18 and VCC capacitor C11 close to the auxiliary winding.
• The connection of the ground of the auxiliary winding to the central signal ground point must go via C11 (use a separate track to avoid the noise in this ground causing noise in VINSENSE pin, PROTECT pin, etc.).
• Connect the central signal ground with a low ohmic track to the central power ground (C1).
• Keep the cross section of the loop from the auxiliary winding (via D3 and R18) to VCC capacitor C11 and back to the auxiliary winding as small as possible.
6.4 Flyback controller
• Place the TEA1733 away from the transformer and the MOSFET Q1.
• Keep connection from current sense resistor R11 to TEA1733 close to ground track.
• Place VCC decoupling capacitor C7 close to the VCC pin.
• The connection from the VCC pin to the VCC capacitor, C11, must go via the VCC decoupling capacitor, C7.
• The connection from the GND pin to the central signal ground must go via the VCC decoupling capacitor, C7.
• Place R13 close to the ISENSE pin.
AN10868 All information provided in this document is subject to legal disclaimers. © NXP B.V. 2013. All rights reserved.
Application note Rev. 3.1 — 22 May 2013 42 of 46

NXP Semiconductors AN10868GreenChip TEA1733 series fixed frequency flyback controller
• Place C10 close to the PROTECT pin.
• Place C9 close to the CTRL pin.
• Place C6 close to the VINSENSE pin.
• Place C8 close to the OPTIMER pin.
6.5 Mains isolation
• Keep at least 6 mm distance between the copper tracks of the primary and the secondary side.
• Place the Y-cap CY1 close to the transformer.
6.6 Secondary side
• Heatsink secondary diode D9 and D10:
Connect the metal tab (which is usually internally connected to the cathode) directly to the heat sink. Connect the heatsink to the positive output track.
• Keep the cross section of the loop from the transformer via diodes D9 and D10 and capacitors C13 and C14 back to the transformer as small as possible. Keep output tracks close to each other.
• Use a separate signal ground for R24 and shunt regulator U3. Connect the signal ground from R24 and U3 via C19 to the power ground at C13 and C14.
• Place C19 close to R20 and R23.
• The connection of R20 and R23 to the positive output voltage must go via C19 to C13 and C14.
• Place the shunt regulator U3 and surrounding components away from transformer.
AN10868 All information provided in this document is subject to legal disclaimers. © NXP B.V. 2013. All rights reserved.
Application note Rev. 3.1 — 22 May 2013 43 of 46

NXP Semiconductors AN10868GreenChip TEA1733 series fixed frequency flyback controller
7. Legal information
7.1 Definitions
Draft — The document is a draft version only. The content is still under internal review and subject to formal approval, which may result in modifications or additions. NXP Semiconductors does not give any representations or warranties as to the accuracy or completeness of information included herein and shall have no liability for the consequences of use of such information.
7.2 Disclaimers
Limited warranty and liability — Information in this document is believed to be accurate and reliable. However, NXP Semiconductors does not give any representations or warranties, expressed or implied, as to the accuracy or completeness of such information and shall have no liability for the consequences of use of such information. NXP Semiconductors takes no responsibility for the content in this document if provided by an information source outside of NXP Semiconductors.
In no event shall NXP Semiconductors be liable for any indirect, incidental, punitive, special or consequential damages (including - without limitation - lost profits, lost savings, business interruption, costs related to the removal or replacement of any products or rework charges) whether or not such damages are based on tort (including negligence), warranty, breach of contract or any other legal theory.
Notwithstanding any damages that customer might incur for any reason whatsoever, NXP Semiconductors’ aggregate and cumulative liability towards customer for the products described herein shall be limited in accordance with the Terms and conditions of commercial sale of NXP Semiconductors.
Right to make changes — NXP Semiconductors reserves the right to make changes to information published in this document, including without limitation specifications and product descriptions, at any time and without notice. This document supersedes and replaces all information supplied prior to the publication hereof.
Suitability for use — NXP Semiconductors products are not designed, authorized or warranted to be suitable for use in life support, life-critical or safety-critical systems or equipment, nor in applications where failure or malfunction of an NXP Semiconductors product can reasonably be expected to result in personal injury, death or severe property or environmental
damage. NXP Semiconductors and its suppliers accept no liability for inclusion and/or use of NXP Semiconductors products in such equipment or applications and therefore such inclusion and/or use is at the customer’s own risk.
Applications — Applications that are described herein for any of these products are for illustrative purposes only. NXP Semiconductors makes no representation or warranty that such applications will be suitable for the specified use without further testing or modification.
Customers are responsible for the design and operation of their applications and products using NXP Semiconductors products, and NXP Semiconductors accepts no liability for any assistance with applications or customer product design. It is customer’s sole responsibility to determine whether the NXP Semiconductors product is suitable and fit for the customer’s applications and products planned, as well as for the planned application and use of customer’s third party customer(s). Customers should provide appropriate design and operating safeguards to minimize the risks associated with their applications and products.
NXP Semiconductors does not accept any liability related to any default, damage, costs or problem which is based on any weakness or default in the customer’s applications or products, or the application or use by customer’s third party customer(s). Customer is responsible for doing all necessary testing for the customer’s applications and products using NXP Semiconductors products in order to avoid a default of the applications and the products or of the application or use by customer’s third party customer(s). NXP does not accept any liability in this respect.
Export control — This document as well as the item(s) described herein may be subject to export control regulations. Export might require a prior authorization from competent authorities.
Translations — A non-English (translated) version of a document is for reference only. The English version shall prevail in case of any discrepancy between the translated and English versions.
7.3 TrademarksNotice: All referenced brands, product names, service names and trademarks are the property of their respective owners.
GreenChip — is a trademark of NXP B.V.
AN10868 All information provided in this document is subject to legal disclaimers. © NXP B.V. 2013. All rights reserved.
Application note Rev. 3.1 — 22 May 2013 44 of 46

NXP Semiconductors AN10868GreenChip TEA1733 series fixed frequency flyback controller
8. Contents
1 Introduction . . . . . . . . . . . . . . . . . . . . . . . . . . . . 31.1 Scope . . . . . . . . . . . . . . . . . . . . . . . . . . . . . . . . 31.2 Features . . . . . . . . . . . . . . . . . . . . . . . . . . . . . . 31.3 Applications . . . . . . . . . . . . . . . . . . . . . . . . . . . 31.4 TEA1733 series type overview . . . . . . . . . . . . . 41.5 Latched versions TEA1733LT, TEA1733MT,
TEA1733LT/N2 and TEA1733MT/N2 . . . . . . . . 41.6 Higher switching frequency versions TEA1733AT,
TEA1733MT(/N2) and TEA1733BT . . . . . . . . . 41.7 Application schematic . . . . . . . . . . . . . . . . . . . . 4
2 Pin description. . . . . . . . . . . . . . . . . . . . . . . . . . 6
3 Functional description . . . . . . . . . . . . . . . . . . 103.1 General . . . . . . . . . . . . . . . . . . . . . . . . . . . . . . 103.2 Start-up . . . . . . . . . . . . . . . . . . . . . . . . . . . . . . 103.2.1 Charging the VCC capacitor . . . . . . . . . . . . . . 103.2.2 Measuring start-up time . . . . . . . . . . . . . . . . . 133.2.3 Start-up circuit with diodes . . . . . . . . . . . . . . . 133.2.4 Start-up circuit with charge pump . . . . . . . . . . 143.2.4.1 Charge pump in combination with PFC . . . . . 163.2.5 VCC capacitor. . . . . . . . . . . . . . . . . . . . . . . . . 163.2.6 Start-up conditions . . . . . . . . . . . . . . . . . . . . . 173.2.7 Soft start . . . . . . . . . . . . . . . . . . . . . . . . . . . . . 173.2.8 Safe restart . . . . . . . . . . . . . . . . . . . . . . . . . . . 183.2.9 Clamps . . . . . . . . . . . . . . . . . . . . . . . . . . . . . . 183.3 Input voltage sensing (VINSENSE pin) . . . . . 193.3.1 General . . . . . . . . . . . . . . . . . . . . . . . . . . . . . . 193.3.2 Start-up voltage. . . . . . . . . . . . . . . . . . . . . . . . 203.3.3 Input overvoltage protection . . . . . . . . . . . . . . 203.3.4 Brownout protection . . . . . . . . . . . . . . . . . . . . 213.3.5 Overpower compensation. . . . . . . . . . . . . . . . 213.3.6 Filter capacitor . . . . . . . . . . . . . . . . . . . . . . . . 213.3.7 Clamp . . . . . . . . . . . . . . . . . . . . . . . . . . . . . . . 213.4 Protection features . . . . . . . . . . . . . . . . . . . . . 213.4.1 General . . . . . . . . . . . . . . . . . . . . . . . . . . . . . . 213.4.2 Input OverVoltage Protection (Input OVP) . . . 223.4.3 Brownout protection . . . . . . . . . . . . . . . . . . . . 223.4.4 Internal OverTemperature Protection (Internal
OTP) . . . . . . . . . . . . . . . . . . . . . . . . . . . . . . . . 223.4.5 Maximum on-time protection (TEA1733LT/N2
and TEA1733MT/N2 only) . . . . . . . . . . . . . . . 223.4.6 OverPower Protection (OPP) . . . . . . . . . . . . . 223.4.7 Output OverVoltage Protection (Output OVP) 233.4.8 External OverTemperature Protection
(External OTP) . . . . . . . . . . . . . . . . . . . . . . . . 233.4.9 Latched protection . . . . . . . . . . . . . . . . . . . . . 233.4.10 Resetting a latched protection . . . . . . . . . . . . 233.4.11 UnderVoltage LockOut (UVLO) . . . . . . . . . . . 23
3.5 OverPower Protection (OPP). . . . . . . . . . . . . 243.5.1 Continuous and temporary output power
limitation. . . . . . . . . . . . . . . . . . . . . . . . . . . . . 243.5.2 How the OPP operates . . . . . . . . . . . . . . . . . 243.5.3 Peak current limitation (OCP) . . . . . . . . . . . . 243.5.4 Input voltage compensation . . . . . . . . . . . . . . 243.5.5 How to configure the current sense resistor . 253.5.6 Calculating the maximum temporary output
power . . . . . . . . . . . . . . . . . . . . . . . . . . . . . . . 263.5.7 How to configure the OPP compensation
(Rstart(soft)). . . . . . . . . . . . . . . . . . . . . . . . . . . . 263.5.8 How to disable the OPP compensation
(for DCM) . . . . . . . . . . . . . . . . . . . . . . . . . . . . 293.5.9 OPP delay and restart delay . . . . . . . . . . . . . 303.5.10 Disabling the overpower protection . . . . . . . . 303.5.11 Leading edge blanking. . . . . . . . . . . . . . . . . . 303.6 CTRL pin . . . . . . . . . . . . . . . . . . . . . . . . . . . . 303.6.1 General . . . . . . . . . . . . . . . . . . . . . . . . . . . . . 303.6.2 Input biasing. . . . . . . . . . . . . . . . . . . . . . . . . . 313.6.3 Peak current control. . . . . . . . . . . . . . . . . . . . 313.6.4 Frequency reduction at low output power . . . 323.6.5 Slope compensation . . . . . . . . . . . . . . . . . . . 323.7 OPTIMER pin. . . . . . . . . . . . . . . . . . . . . . . . . 333.7.1 Overpower delay and restart delay . . . . . . . . 333.7.2 Overpower delay . . . . . . . . . . . . . . . . . . . . . . 343.7.3 Restart delay . . . . . . . . . . . . . . . . . . . . . . . . . 343.7.4 How to configure R and C . . . . . . . . . . . . . . . 343.8 PROTECT pin . . . . . . . . . . . . . . . . . . . . . . . . 353.8.1 General . . . . . . . . . . . . . . . . . . . . . . . . . . . . . 353.8.2 Circuit description . . . . . . . . . . . . . . . . . . . . . 353.8.3 Output overvoltage protection . . . . . . . . . . . . 363.8.4 Overtemperature protection . . . . . . . . . . . . . . 363.8.5 Clamp. . . . . . . . . . . . . . . . . . . . . . . . . . . . . . . 363.9 DRIVER pin . . . . . . . . . . . . . . . . . . . . . . . . . . 363.9.1 Gate driver . . . . . . . . . . . . . . . . . . . . . . . . . . . 363.9.2 Frequency modulation . . . . . . . . . . . . . . . . . . 36
4 Ways to reduce no-load power . . . . . . . . . . . 374.1 Remove power LED. . . . . . . . . . . . . . . . . . . . 374.2 Change the primary RDC clamp to
a Zener clamp . . . . . . . . . . . . . . . . . . . . . . . . 374.3 Modify RDC clamp with a Zener diode . . . . . 374.4 Reconsider start-up time specification . . . . . . 384.5 Reduce VCC capacitor value. . . . . . . . . . . . . 384.6 X-cap quality . . . . . . . . . . . . . . . . . . . . . . . . . 384.7 X-cap value . . . . . . . . . . . . . . . . . . . . . . . . . . 384.8 Active X-cap discharge . . . . . . . . . . . . . . . . . 384.9 Active start-up circuit . . . . . . . . . . . . . . . . . . . 38
AN10868 All information provided in this document is subject to legal disclaimers. © NXP B.V. 2013. All rights reserved.
Application note Rev. 3.1 — 22 May 2013 45 of 46
continued >>
NXP Semiconductors AN10868GreenChip TEA1733 series fixed frequency flyback controller
4.10 Increasing the impedance of the voltage divider on VINSENSE. . . . . . . . . . . . . . . . . . . 38
4.11 Increase the impedance of the output voltage divider . . . . . . . . . . . . . . . . . . . . . . . . . . . . . . . 39
4.12 Replacing the integrated shunt regulator (TL431) by a discrete shunt regulator. . . . . . . 39
5 "Zero Watt" standby power design ideas . . . 395.1 Less than 30 mW standby power . . . . . . . . . . 395.2 Active on. . . . . . . . . . . . . . . . . . . . . . . . . . . . . 395.2.1 Shut down. . . . . . . . . . . . . . . . . . . . . . . . . . . . 405.2.2 Wake-up . . . . . . . . . . . . . . . . . . . . . . . . . . . . . 405.3 Active off . . . . . . . . . . . . . . . . . . . . . . . . . . . . . 405.3.1 Shut down. . . . . . . . . . . . . . . . . . . . . . . . . . . . 415.3.2 Wake-up . . . . . . . . . . . . . . . . . . . . . . . . . . . . . 41
6 Layout recommendations . . . . . . . . . . . . . . . . 426.1 Input section . . . . . . . . . . . . . . . . . . . . . . . . . . 426.2 Power section . . . . . . . . . . . . . . . . . . . . . . . . . 426.3 Auxiliary winding. . . . . . . . . . . . . . . . . . . . . . . 426.4 Flyback controller . . . . . . . . . . . . . . . . . . . . . . 426.5 Mains isolation . . . . . . . . . . . . . . . . . . . . . . . . 436.6 Secondary side. . . . . . . . . . . . . . . . . . . . . . . . 43
7 Legal information. . . . . . . . . . . . . . . . . . . . . . . 447.1 Definitions. . . . . . . . . . . . . . . . . . . . . . . . . . . . 447.2 Disclaimers . . . . . . . . . . . . . . . . . . . . . . . . . . . 447.3 Trademarks. . . . . . . . . . . . . . . . . . . . . . . . . . . 44
8 Contents . . . . . . . . . . . . . . . . . . . . . . . . . . . . . . 45
© NXP B.V. 2013. All rights reserved.
For more information, please visit: http://www.nxp.comFor sales office addresses, please send an email to: [email protected]
Date of release: 22 May 2013
Document identifier: AN10868
Please be aware that important notices concerning this document and the product(s)described herein, have been included in section ‘Legal information’.


![UK BS 7671 16 VDE 0100 EN-60601/60335/60950/61010 VDE …download.flukecal.com/pub/literature/Fluke... · 2 [1] 50 kΩ 60 kΩ 100 kΩ / 20 V 500,000 8 10 kΩ 10 GΩ 4.5 CE Low Voltage](https://img.dokumen.tips/doc/110x75/5e7807e35be0b42eba4126eb/uk-bs-7671-16-vde-0100-en-60601603356095061010-vde-2-1-50-k-60-k-100-k.jpg)