Embed Size (px)
Citation preview

Amazon Odoo Bridge User Guide
A guide to cover all aspects of using Amazon OdooBridge For Odoo.
By:Prakash Kumar
Webkul Software Pvt. Ltd.

USER MANUAL VER. 1.0.0
Extension Version: 1.xCompatibility : CE / EE 11.xWebsite: http://webkul.comSupport: https://webkul.uvdesk.com
Versions of this document
Version Date Description
VER. 1.0.0 OCT 16 2017 First published version

Contents
• Overview
• Installation
• Module Dependencies• Python Dependencies• Installing Module
• Configuration
• Prerequisite
• Creation of Amazon Instance + Credentials Placement
• Generic Configuration
• State Mapping
• Price-list
• Product SKU Sequence
• Language
• Default Delivery Product
• Warehouse and Stock Location
• Test Connection
• Advance Configuration
• Product
• Default Price
• Default Quantity
• Default Description
• Cron Automation• Generate Report• Import Product
• Import Order• User Manual
• How Import Operation Work ?• Generate Report
• Import Products
• Import Orders
• Export/Update Products
• FAQs
• Support

Overview
Amazon Odoo Bridge Odoo Extension provides seamlessand automatic integration between Amazon and Odoo. Itallows you to manage products, orders and stocksmoothly on both ends by providing effortless import/export functionality.
You can synchronize Products, Quantities and Sale ordersfrom Amazon to Odoo as well as Odoo to Amazon. Youcan also connect multiple Amazon stores(Amazon-IN,Amazon-US etc.) with a single Odoo and manage allAmazon store data from one place.
If you are an Amazon Seller and also running your store
over multiple marketplaces/eCommerce (like etsy, ebay,magento, prestashop, Cs-cart, woocommerce etc. ) youmust need a comprehensive solution like Amazon OdooBridge Odoo Extension which allows you to manage yourdata of all channels from a centralized single interface.
Amazon Odoo Bridge Extension works in support withOdoo Multi Channel Module which can easily solve yourdata management problems by providing a centralizedsingle interface for managing records of various channelsat a single place.
With help of Amazon Odoo Bridge and Odoo MultiChannel module you can connect with multiple channelsat a same time along with Amazon.
It leads to saving the your time and money by reducingefforts required in managing consistent data over allchannels at once.

Installation
Module Dependencies :
Amazon Odoo Bridge required these moduledependencies :
➢ Odoo Multi Channel Sale
Python(3.5) Library Dependencies :
You also need to install mws library by ➢ cmd: pip install mws
Installing Module :After placing all required module dependencies in addonsfolder along with Amazon Odoo Bridge module andinstalling mws, proceed to module installation in Odoo byfollowing the steps mentioned below:
➢ Go to Apps Menu & Activate Developer Mode.➢ Update Module List.➢ Amazon Odoo Bridge In Apps.➢ Click On Install.
For more details about module installation in Odoo visitHow to install Module in Odoo .

Configuration
Prerequisite :
Before Instance Creation/Configuration you need tofollow theseprerequisite steps :
➢ Registering to use Amazon MWS.➢ Enable Multi Currency and Activate Amazon Store
Currency.➢ Enable Multi Language and load Amazon Store
Language.➢ Create Pricelist with Amazon Marketplace Currency .
Creation of Amazon Instance :
The first step after installation is to create a instance ofAmazon channel in Odoo, for this go to :Multi Channel ==> Channel ==> Instance
Here for new Amazon Instance creation you need to

Select “Channel Type”: “Amazon” and place theAmazon MWS Credentials obtained while
Prerequisite(Registering to use Amazon MWS)
MWS Access key
MWS Secret key
MWS Merchant ID

MWS Marketplace IDNOTE:
Domain
◦ Select the Amazon market place domain on yourstore is present .
Report Fields
◦ Select the Report Fields in which you will have to create the
mapping of all the report header based on your marketplacelanguage.

Generic Configuration :
During Amazon Instance creation you can configure thesegeneral things:
➢ State Mapping
◦ Choose the Odoo Order/Invoice/Delivery State based on
Amazon Order State.
◦ For example :-you can select confirm state of an order and
open state of paid state of invoice over Odoo for unshipped state over Amazon.
➢ Price-list
◦ Select the Pricelist according to the currency you are using in
Amazon.
◦ The currency of Price-list in Odoo and Price-list in Amazon
Marketplace should be same.➢ Product SKU Sequence
◦ Select the Default Code / SKU Sequence object which will be
used during the product export , in case object does not have Default Code / SKU.
➢ Language
◦ Select the language you are using in the instance.

➢ Default Delivery Product
◦ Select the Default Delivery Product which will be used to
manage delivery cost by adding delivery cost as a sale order line.
➢ Warehouse and Stock Location
◦ Select the Warehouse and Stock Locations whereyou want to manage your instance's stock.
➢ Auto Evaluate Feed
◦ Marked it as True, so the feeds will evaluate automatically after
import.

Test Connection :After Basic configuration, you can validate credentials byclicking "Test Connection" button.

If all credentials/configuration are mention correctly, youwill get a message about successful validation.
Advance Configuration :
Under advance configuration, you can configure followingthings:
Product
◦ Default Price
▪ Default product price to be used during export.Since you can’t set zero price of product whileexporting the product. it should be positiveinteger .

◦ Default Quantity
▪ Default product quantity to be used duringexport. Since you can’t set zero quantity ofproduct while exporting the product. It should bea positive integer.
Cron Automation
◦ Import Order
▪ Using this you can set the cron to import the neworder automatically after an interval.
◦ Import Order Status
▪ Using this you can set the cron to import statusof draft order automatically after an interval andcreate invoice/delivery.
◦ Import Product
▪ Using this you can set the cron to import theproduct automatically after an interval.
◦ Request Report/Generate Report
▪ Using this you can set the cron to generate areport after an interval, so that at the time ofproduct data import, updated productinformation may get reflected in Product report.


User Manual
How Import Operation Works ?Import Operation is done using two steps process.
Feed Creation
◦ Import Operation creates feeds like products/categories feed, orders/partners feed etc.
Feed Evaluation.
◦ Actual record creation is done at the time ofevaluation .
◦ NOTE: It can be done automatically by placing Truefor “Auto Evaluate Feed” in channelconfiguration .
Generate Report :Before products and orders import, it is necessary to
generate product inventory report so that during importprocess the product quantity and other data should getupdated properly.
To generate the report you need to follow these steps :Step1: Activate the Developer modeStep2: Go to Multi Channel ==> Miscellaneous ==>
Configuration ==> Amazon==>Reports.

Step3: Here select the Amazon channel and Click on"Send Request".Step4: After getting the Request ID, Click on "GenerateReport".

Step5: After getting ReportID Click on "Receive Data" .

Import Product :
After successful report generation, its time to importproducts. As mentioned earlier, the import operation works in atwo steps process-Product Feed Creation and Product Feed Evaluation.
Product Feed Creation :
In order to create feeds, follow these steps-
Step 1: Go to Multi Channel ==> Channel ==>Instance
Step 2: Open the Operation Tabs
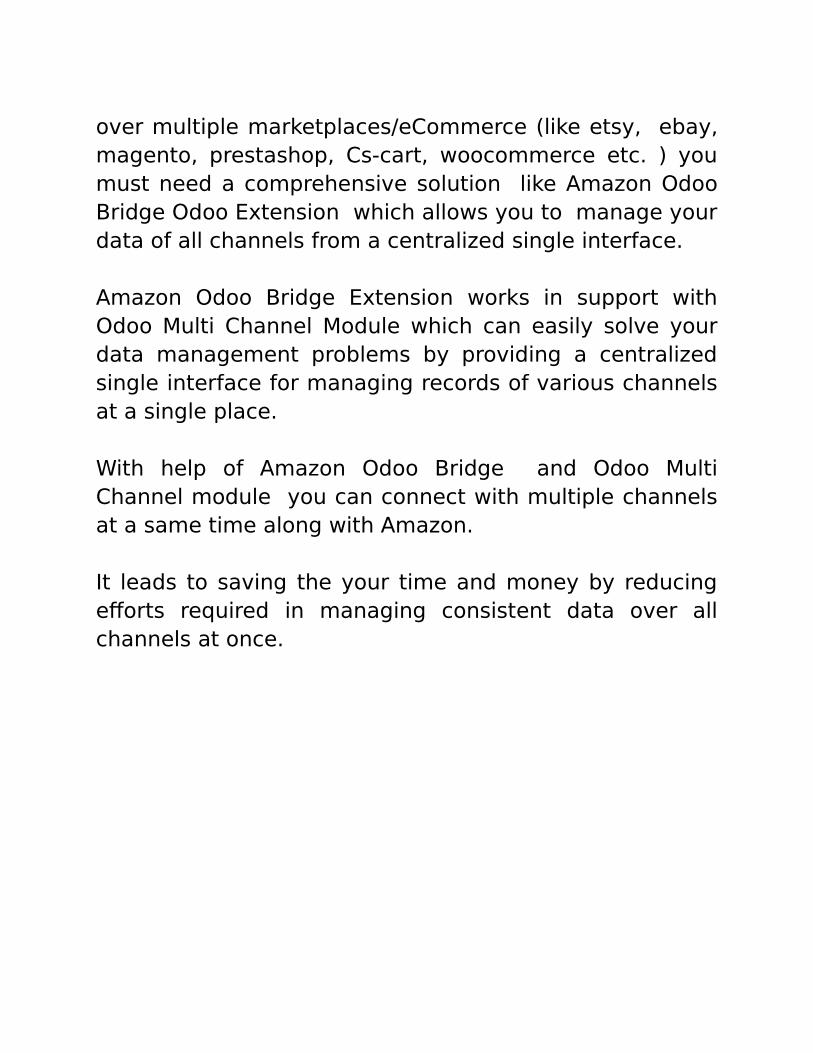
Step 3: Click on Import ProductsStep 4: Select Operation Type Import and Report Dataand Click on “Import Now”.
Product Feed Evaluation :
Now after successful feed import, you will have tomanually evaluate the feed in case the “Auto EvaluateFeed” is not enabled for the channel .
For Feed Evaluation- Follow these steps:
Step 1: Go to Multi Channel ==> Miscellaneous ==>
Feeds==>Product Feeds
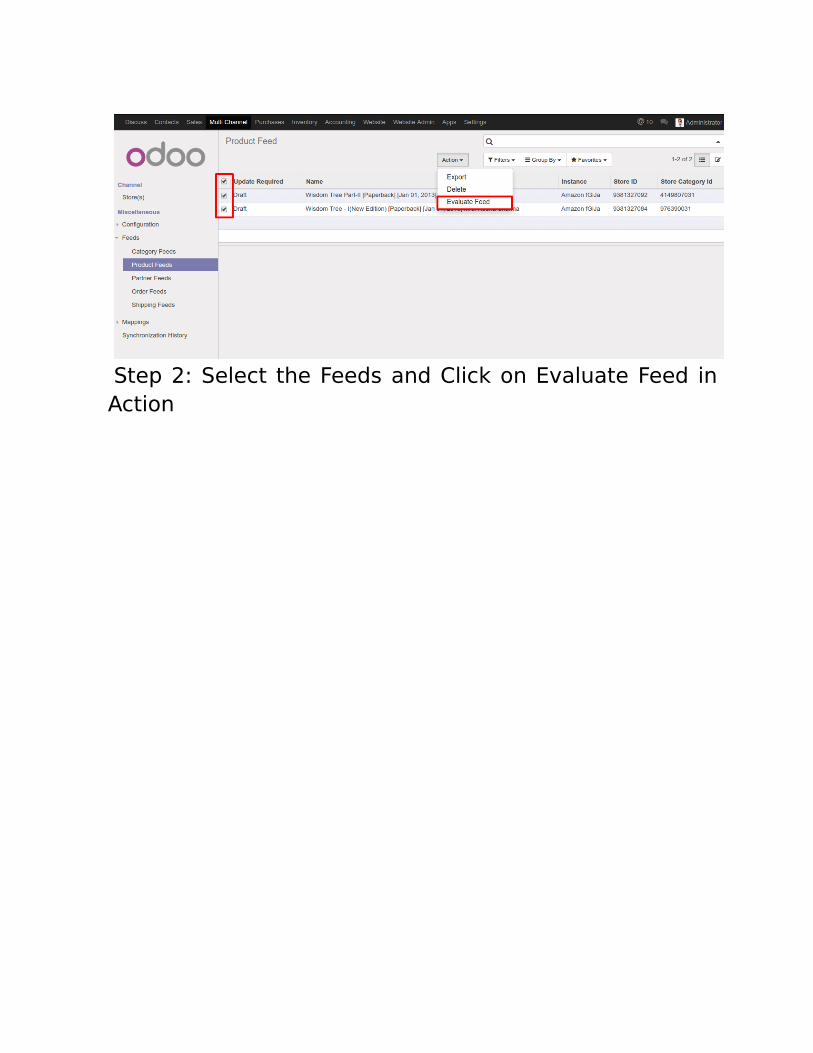
Step 2: Select the Feeds and Click on Evaluate Feed inAction

Import Order :
The order import process is same as product import,it isa two step process-
Order Feed Creation and Order Feed Evaluation .
Order Feed Creation :
For Feed Creation, Follow these steps:
Step 1: Go to Multi Channel ==> Channel ==>Instance
Step 2: Open the Operation Tabs

Step 3: Click on Import OrdersStep 4: Inside the wizard, Choose the report and placeDate Interval [From Date , To Date] between which youwant to import orders.Step 5: Click on Import Now.
Order Feed Evaluation :
Now after a successful feed import, you will have tomanually evaluate the feeds in case the “AutoEvaluate Feed” is not enabled for the channel .
For Feed Evaluation-
Follow these mention steps:
Step 1: Go to Multi Channel ==> Miscellaneous

==> Feeds==>OrderFeeds
Step 2: Select the Feeds and Click on Evaluate Feed inAction

Export/Update Product :
In order to export the order over Amazon, your productmust have a valid UPC/EAN Code placed in the barcodefield.
NOTE: During the Product Export, If product don't haveany Quantity, Price and Description assigned to it thenthese information will be picked up from Advanceconfiguration. Quantity, Price and Description arerequired during product export, so it can't beblank/Zero .
For Product Feed submission follow these steps:
Step 1: Go to Sale ==> Product Variants
Step 2: Select Products

Step 3: Click on Export/Update Products in Action Bar
Step 4: Select Amazon Channel, Sequence and ProductFeed TypeStep 5: Click on Export Products

After Feed Submission -Go to Multi Channel ==> Configuration
==> Amazon==>Feeds Open the Previously submitted feed requests and clickon Get Feed Result, In case of successful feedsubmission the mapping will be created on Odoo end forthe respective product.
The Update process is same as export process, in thepopup wizard select operation "update", feed typeprice/quantity and click on update .

FAQ
Blog
◦ Amazon Odoo Bridge
◦ Multi Channel Sale
General
◦ Ac tivate Developer Mode
◦ How to Install Module in Odoo
◦ Registering to use Amazon MWS◦ Enable Multi Currency in Odoo
Support
If you need a support or have any suggestion regarding featuresof our extensions. Please use our online support desk to contact oursupport team using https://webkul.uvdesk.com .