Embed Size (px)
Citation preview
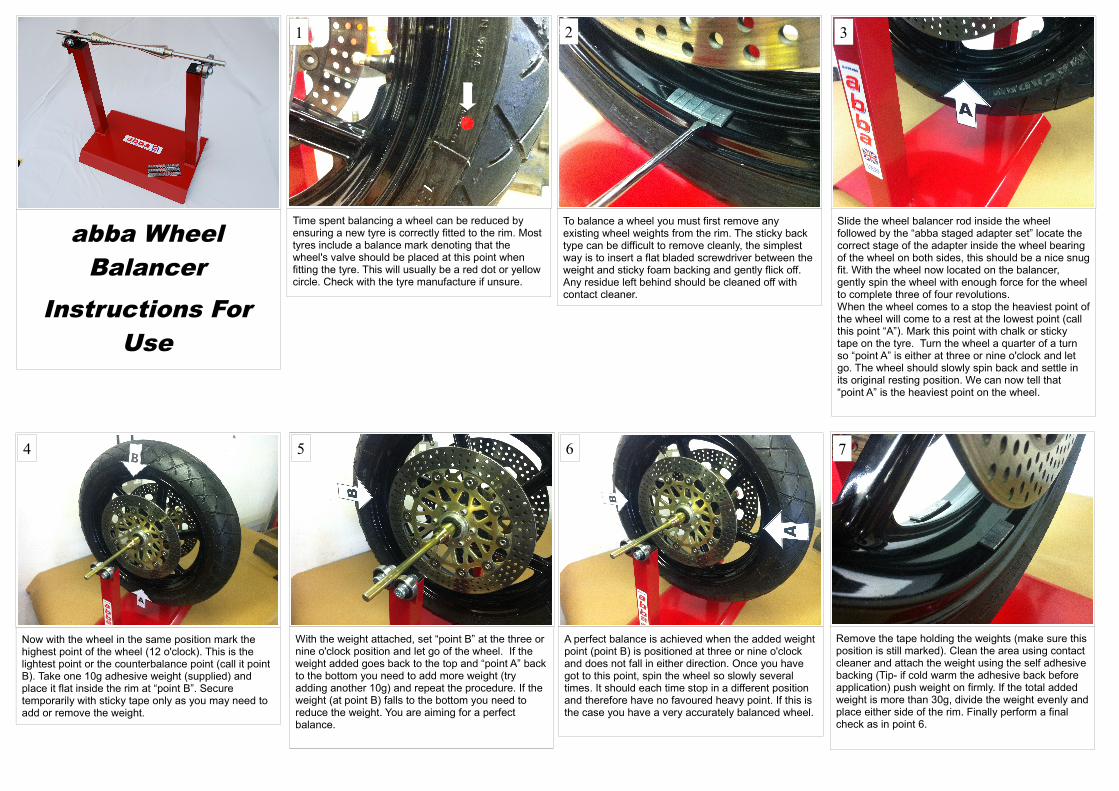
To balance a wheel you must first remove any existing wheel weights from the rim. The sticky back type can be difficult to remove cleanly, the simplest way is to insert a flat bladed screwdriver between the weight and sticky foam backing and gently flick off. Any residue left behind should be cleaned off with contact cleaner.
Slide the wheel balancer rod inside the wheel followed by the “abba staged adapter set” locate the correct stage of the adapter inside the wheel bearing of the wheel on both sides, this should be a nice snug fit. With the wheel now located on the balancer, gently spin the wheel with enough force for the wheel to complete three of four revolutions.When the wheel comes to a stop the heaviest point of the wheel will come to a rest at the lowest point (call this point “A”). Mark this point with chalk or sticky tape on the tyre. Turn the wheel a quarter of a turn so “point A” is either at three or nine o'clock and let go. The wheel should slowly spin back and settle in its original resting position. We can now tell that “point A” is the heaviest point on the wheel.
Now with the wheel in the same position mark the highest point of the wheel (12 o'clock). This is the lightest point or the counterbalance point (call it point B). Take one 10g adhesive weight (supplied) and place it flat inside the rim at “point B”. Secure temporarily with sticky tape only as you may need to add or remove the weight.
With the weight attached, set “point B” at the three or nine o'clock position and let go of the wheel. If the weight added goes back to the top and “point A” back to the bottom you need to add more weight (try adding another 10g) and repeat the procedure. If the weight (at point B) falls to the bottom you need to reduce the weight. You are aiming for a perfect balance.
A perfect balance is achieved when the added weight point (point B) is positioned at three or nine o'clock and does not fall in either direction. Once you have got to this point, spin the wheel so slowly several times. It should each time stop in a different position and therefore have no favoured heavy point. If this is the case you have a very accurately balanced wheel.
Remove the tape holding the weights (make sure this position is still marked). Clean the area using contact cleaner and attach the weight using the self adhesive backing (Tip- if cold warm the adhesive back before application) push weight on firmly. If the total added weight is more than 30g, divide the weight evenly and place either side of the rim. Finally perform a final check as in point 6.
abba Wheel Balancer
Instructions For Use
Time spent balancing a wheel can be reduced by ensuring a new tyre is correctly fitted to the rim. Most tyres include a balance mark denoting that the wheel's valve should be placed at this point when fitting the tyre. This will usually be a red dot or yellow circle. Check with the tyre manufacture if unsure.
1 2 3
4 5 6 7