Embed Size (px)
Citation preview

I recently renovated a carriage house that was to be used for entertaining or for extended stays from my clients’ family. On the upper level, more than half of the 20-ft. by 24-ft. space was taken up by the kitchen. To make the kitchen efficient, the clients and I wanted the island to be a space for work-
ing as well as for gathering and eating. A few issues came up as I designed the rest of the kitchen. For example,
positioning the sink and the major appliances along the outside wall wouldn’t leave much space for storage. To have room for seating, the island needed an overhanging counter on three sides, which left room for only two base cabinets. I knew that the big overhang would create space for drawers below the top, a detail seen on many tables. Table-style legs on an island of this size, though, would look bulky and would interfere with seating. My challenge became how to support
A Clever Island With Drawers
BY JOSEPH B. LANZA
This slick storage solution is a small-kitchen space saver
COPYRIGHT 2013 by The Taunton Press, Inc. Copying and distribution of this article is not permitted.
FAll/wInTer 2013 39

Check the fit. Because the frame’s strength depends on the locations and the tightness of the bridle joints, dry-fit the entire frame around the cabinets before applying glue.
Add the top. Once the frame is assembled, measure and cut a piece of 1⁄2-in. plywood that will strengthen the base for the solid maple countertop.
Edges concealed. Although the plywood is hidden by the drawers and trim, the author recessed the plywood into the frame and covered the sides with a band of poplar.
To get both seating and storage in this island, the top had to multitask. The key to its success is an open frame made of 5/4 poplar strong enough to support a cantilevered maple countertop, yet with space for six drawers. The addition of a layer of 1⁄2-in. plywood creates a structure stronger than the frame alone.
I SLAND TOP DOES DOUBLE DUTY
Cut 1⁄2-in. elongated holes with a router and a 1⁄4-in. straight bit to allow the top to move seasonally.Top attached to
plywood with 12 #8 by 11⁄4-in. washer-head screws
Drawers on the cantilevered top operate with side-mounted slides.
Random-width (5 in., 7 in., 9 in.) walnut boards are beaded on one edge, joined with loose tongues, and attached with pneumatic nails and construction adhesive.
Walnut drawer fronts, detailed with 3⁄8-in. radiused edges
COPYRIGHT 2013 by The Taunton Press, Inc. Copying and distribution of this article is not permitted.
FIne HOMeBUIlDInG40 Drawings: John Hartman
drawers without legs. Here was my solution: Two plywood base cabinets with solid, sub-stantial tops and backs support a frame of 5/4 poplar glued and screwed together and skinned with a piece of 1⁄2-in. birch plywood. This frame supports a countertop of solid 6/4 maple, which, in turn, stiffens and supports the frame. The frame carries the drawers on side-mount slides to save space. The base is covered with 4/4 walnut random-width beadboard, drawers, and door fronts.
Start with the boxesI’m a big fan of simple cabinet boxes, and these boxes fit that category perfectly. I often use 3⁄4-in. birch plywood, and I glue, nail, and screw the butt joints together. I wanted these two cabinets to be able to support the big maple top, so I stiffened them with 3⁄4-in. backs and full (rather than strip) tops. One cabinet holds the microwave, and the other features a drawer above a pair of doors.
At the site, I marked the locations for the boxes and screwed 2x cleats to the floor just inside their footprints at each end. Between where the two cabinets would rest, I anchored another cleat the same thickness as the frame and screwed the cabinets to the cleats.
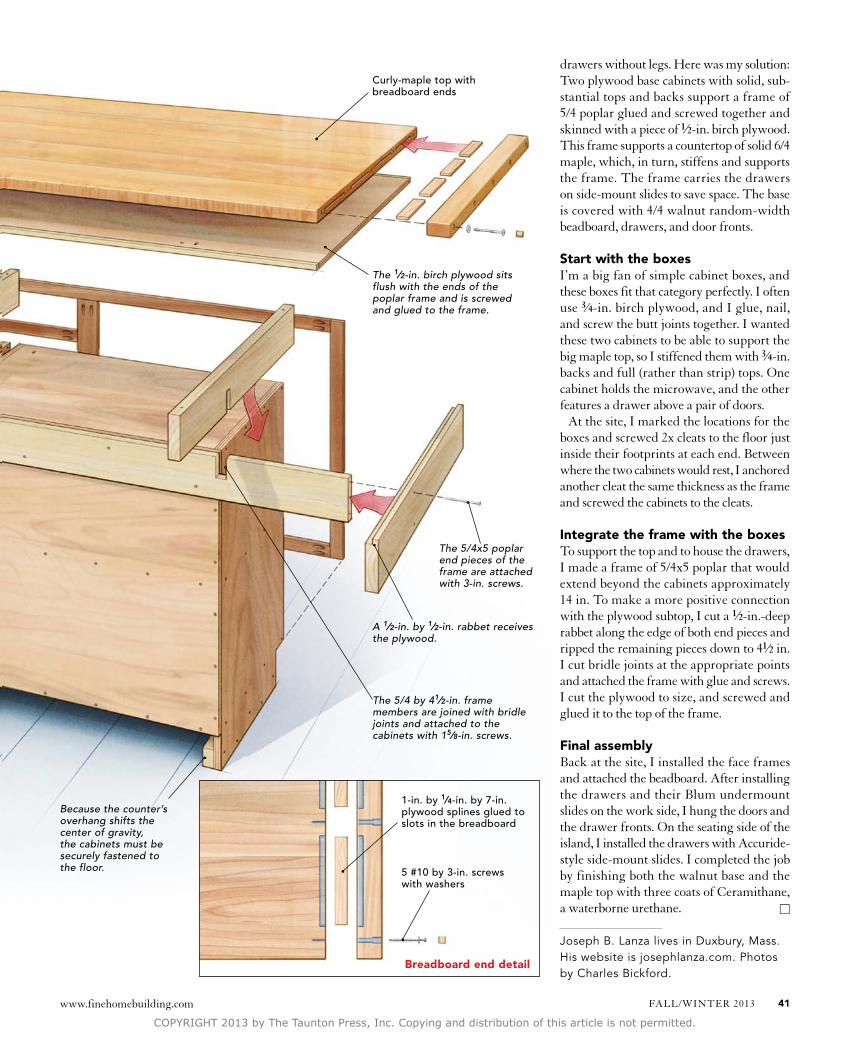
Integrate the frame with the boxesTo support the top and to house the drawers, I made a frame of 5/4x5 poplar that would extend beyond the cabinets approximately 14 in. To make a more positive connection with the plywood subtop, I cut a 1⁄2-in.-deep rabbet along the edge of both end pieces and ripped the remaining pieces down to 41⁄2 in. I cut bridle joints at the appropriate points and attached the frame with glue and screws. I cut the plywood to size, and screwed and glued it to the top of the frame.
Final assemblyBack at the site, I installed the face frames and attached the beadboard. After installing the drawers and their Blum undermount slides on the work side, I hung the doors and the drawer fronts. On the seating side of the island, I installed the drawers with Accuride-style side-mount slides. I completed the job by finishing both the walnut base and the maple top with three coats of Ceramithane, a waterborne urethane. □
Joseph B. Lanza lives in Duxbury, Mass. His website is josephlanza.com. Photos by Charles Bickford.
Curly-maple top with breadboard ends
The 1⁄2-in. birch plywood sits flush with the ends of the poplar frame and is screwed and glued to the frame.
A 1⁄2-in. by 1⁄2-in. rabbet receives the plywood.
The 5/4 by 41⁄2-in. frame members are joined with bridle joints and attached to the cabinets with 15⁄8-in. screws.
The 5/4x5 poplar end pieces of the frame are attached with 3-in. screws.
Because the counter’s overhang shifts the center of gravity, the cabinets must be securely fastened to the floor.
1-in. by 1⁄4-in. by 7-in. plywood splines glued to slots in the breadboard
5 #10 by 3-in. screws with washers
Breadboard end detail
COPYRIGHT 2013 by The Taunton Press, Inc. Copying and distribution of this article is not permitted.
www.finehomebuilding.com FAll/wInTer 2013 41