Embed Size (px)
Citation preview

1
1D Solid-state NMR Procedure
(Avance III Machines running Topspin 3.1 under Windows 7)
Jerry Hu ([email protected], x7914, office: 1524, CNSI) Spectroscopy Facility
Materials Research Laboratory University of California Santa Barbara
Version 1.0 Last Modified Nov. 12, 2013

2
***Safety Issues***
If you, or people working with you, have magnetic metal implants, please consult your doctor for possible effects of magnetic field;
For those who have pacemakers, please stay away from NMR magnets; Be aware of High Radio-Frequency Power in Solid-state NMR. Remove from your pocket anything ferromagnetic or vulnerable to magnetic field:
! Your wallet, bank cards, credit cards, and any cards with magnetic stripes; ! Electronics: cell phone, mp3, ipod, etc.; ! Mechanic watches; ! Keys and other magnetic items.
Table of Contents I. Logsheet & Recharge ........................................................................................................................ 4
II. ................................................................................................................................... 4 2.1. Login and Launch TopSpin ........................................................................................................ 4
2.2. ........................................................................................................ 4
III. ......................................................................................................................... 6
3.1. ..................................................................................................................... 6 3.1.1. About Samples .................................................................................................................... 6 3.1.2. Packing/Unpacking Samples ............................................................................................... 6 3.1.3. Magic Angle Spinning (MAS) ............................................................................................ 8
3.2. ....................................................................................................................... 10
3.3. ......................................................................................................................... 13
3.4. Set Key Parameters under ................................................................................. 13
3.5. ............................................................................................................................ 14

3
IV. .............................................................................................................................. 16
4.1. .................................................................................................... 16
4.2. ...................................................................................................... 16
4.3. ............................................................................................................ 17
4.4. ............................................................................................................ 17
4.5. ................................................................................................................... 18
4.6. ............................................................................................................... 18
V. ........................................................................................................................... 19
5.1. ........................................................................................................................ 19
5.2. .......................................................................................................... 19
5.3. .......................................................................................................................... 20 VI. Wrap-up ....................................................................................................................................... 21
6.1. Eject your sample ..................................................................................................................... 21 6.2. Exit Topspin ............................................................................................................................. 21 6.3. Logoff your account ................................................................................................................. 21 6.4. Complete the logsheet .............................................................................................................. 21
VII. Appendices ................................................................................................................................... 22 7.1. Appendix 1: Introduction to Solid-State NMR ........................................................................ 22 7.2. Appendix 2: CPMAS (Cross Polarization under MAS) ........................................................... 22 7.3. Appendix 3: Online NMR Book and Bruker NMR Encyclopedia ........................................... 24 7.4. Appendix 4: Requirements for CNSI Access ........................................................................... 24
4
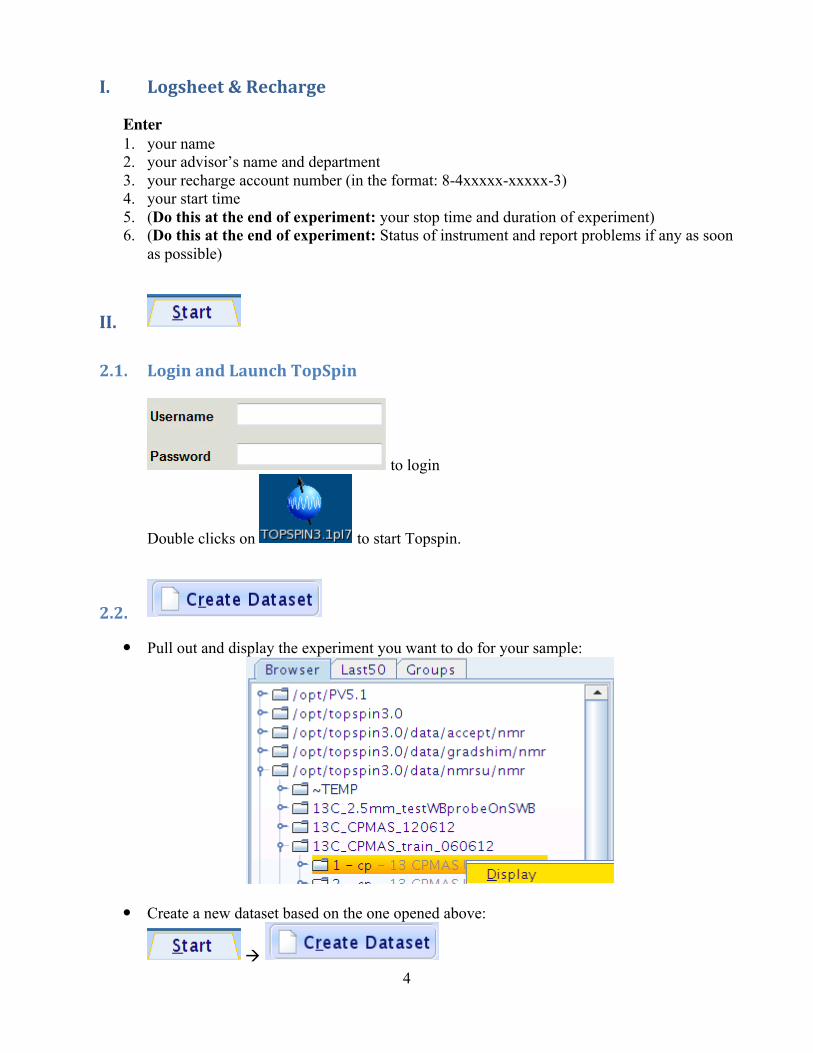
I. Logsheet & Recharge
Enter 1. your name 2. your advisor’s name and department 3. your recharge account number (in the format: 8-4xxxxx-xxxxx-3) 4. your start time 5. (Do this at the end of experiment: your stop time and duration of experiment) 6. (Do this at the end of experiment: Status of instrument and report problems if any as soon
as possible)
II.
2.1. Login and Launch TopSpin
to login
Double clicks on to start Topspin.
2.2.
• Pull out and display the experiment you want to do for your sample:
• Create a new dataset based on the one opened above:
"
5
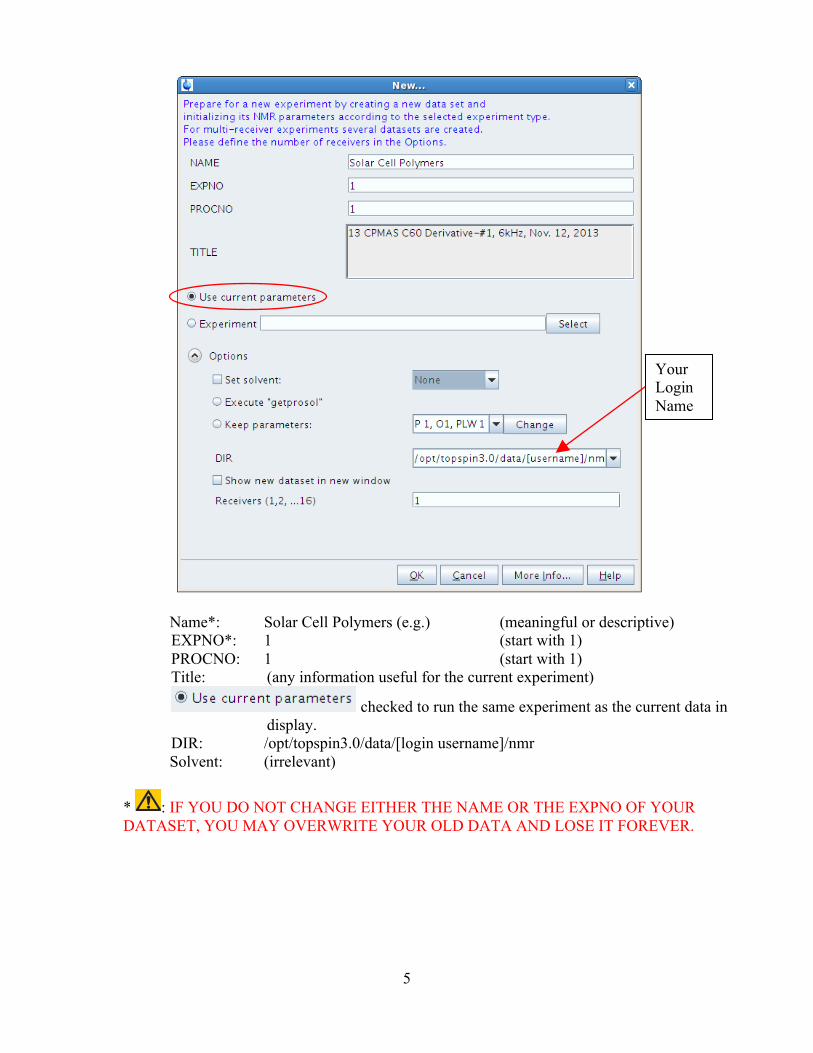
Name*: Solar Cell Polymers (e.g.) (meaningful or descriptive) EXPNO*: 1 (start with 1) PROCNO: 1 (start with 1) Title: (any information useful for the current experiment)
checked to run the same experiment as the current data in display.
DIR: /opt/topspin3.0/data/[login username]/nmr Solvent: (irrelevant)
* : IF YOU DO NOT CHANGE EITHER THE NAME OR THE EXPNO OF YOUR DATASET, YOU MAY OVERWRITE YOUR OLD DATA AND LOSE IT FOREVER.
Your Login Name

6
III.
3.1. 3.1.1. About Samples
• Samples feasible: Powders, Single crystals, Plastics/Rubbers, Ceramics, LT liquids, Tissues,
Liquid crystals, More … • Requirements: Dry, Pure, and small particles (smaller than table salts) for MAS. • Sample Volume for 4mm rotors: ~100mg and ~200mg for organic and inorganic powders,
respectively. Bruker Rotor Dimensions (mm)
O.D. Length Depth I.D. Volume (mm3) 1.3 7.68 through 0.78 3.67 2.5 12.07 through 1.23 14.34 3.2 15.36 10.90 2.17 56.81 4.0 17.97 16.21 2.98 125.33 7.0 17.95 16.41 5.59 440.53
3.1.2. Packing/Unpacking Samples • Choose the right rotor and cap: size (4mm is the most popular), paint half of the bottom and
should to black, and test the empty rotor/cap pair for good spinning.
• Pack sample with packing tools into a rotor as uniformly as possible through gentle tapping,
press sample with a presser straight down (NO SIDEWAYS) for more sample (But DON’T break the presser !!!). Leave ~2mm space at the top for cap.

7
• Cap the rotor with bare hands only and clean the outside of the rotor with ethanol-rinsed
napkin.
If the cap is too tight, use the multi-piece cap opener for assistance.
• Clean the rotor surface with an ethanol-damped kimwipe. • Repaint with a black Sharpie half of the rotor bottom including shoulder for spinning speed
detection. • Test the spinning of the newly packed rotor on the MAS test station (in room 1414).

8
• After NMR experiments, remove the cap, unpack sample with a matched drill bit and
spatula. • Clean the inside of rotor/cap with brushes, cotton swabs, kimwipes, etc. and get the
rotor/cap ready for next use.
3.1.3. Magic Angle Spinning (MAS)
# Magic Angle (θm=54.7°) between rotor axis and magnetic field
# " " "
window pops up:

9
# (Important: It is important to make sure there is no sample already inside the magnet.) In the
pop up window, see if the reading is zero first. Click if it is,
otherwise and wait for spinning to go down to zero, and then click on
.
Direct click on a button performs the default function of the button, while LMB click on the triangle on the right of a button displays other functions of the button.
# Load the sample from the top of the magnet by removing the sample catcher and dropping
the sample in the hole of the transfer line with the painted end down;
Probe in use
Spinning reading
Target rate
Insert or Eject Sample
Stop spinning
Start spinning

10
4mm Sample Catchers (left: 4mm; right: 3.2mm & 2.5mm)
# Click on to push sample down to the probe. # Use the box to set the target spinning rate: type in the number and
hit return. For a newly packed sample, start with a low spinning, e.g. 3kHz.
# Click button to start spinning and wait for the spinning to stabilize (which normally takes half a minute).
# If spinning is stable at a low rate, increase the in an increment of 2 – 3kHz, and hit return. Repeat the process until the final desired rate is set.
3.2.
" "
(or click on for a thick curve display)
" After ~20s, you will see a WOBB window showing the tuning/matching curve, the horizontal position of which corresponds to tuning and the depth to matching.

11
$ Go to the probe.
This is a piece of equipment which goes into the magnet from the bottom. It has cables and hoses attached.
Magic Angle X Tuning X Match
H Tuning X Range H Match

12
$ On the IPSO 500MHz and 800MHz NMR instruments, the RF filter
( ) on the side of X preamplifier of the HPPR box has to match the nucleus to be observed and be replaced as necessary. So is the range rod on the probe.
To tune probe from nucleus X (e.g. 13C) to Y (e.g. 29Si), filter on the HPPR box, tuning rod and range rod on the probe have to be set correctly according to the tuning table given to the probe (if available). Use a large WBSW (e.g. 60MHz) in WOBB at first for coarse tuning and 4MHz at the end for fine tuning.
$ With the supplied tool, turn the tuning rod (with T) so that the curve aligns with the ver-tical red line and the matching rod (with M) to make the curve reach all the way to the zero line of Y axis. Go back and forth between tuning and matching for optimization.
You can also look at the preamplifier box called HPPR (a small box with cables next to the magnet) and minimize the number of LEDs lit on the horizontal (tune) and the vertical (match) LED arrays, normally 3 green LEDs lit for match and 1 green LED (and maybe a yellow one) lit for tune.
.
$ Tune and Match 1H channel:
After the 13C channel is optimized, click on , or press the F2 button on HPPR twice, to switch to 1H and wait until the 1H curve occurs (takes ~20s). Adjust the Tuning and Matching Rods for 1H to optimize 1H.
To tune 1H on the IPSO 500Mhz and 800MHz, the cable from the 1H port on
13
the probe has to be connected to the HPPR box. $ If 1H tuning have changed significantly, go back to 13C by clicking on , or pressing
the F2 button on HPPR twice, and check its tuning. Make adjustment if necessary.
$ Click on to quit the probe tune/match process.
On the IPSO 500MHz and 800MHz NMR machines, make sure that after 1H tuning the cable from the 1H port on the probe is connected to a 1H filter to bypass the HPPR box for a better S/N ratio for X nuclei NMR with 1H used for CP, decoupling, etc.
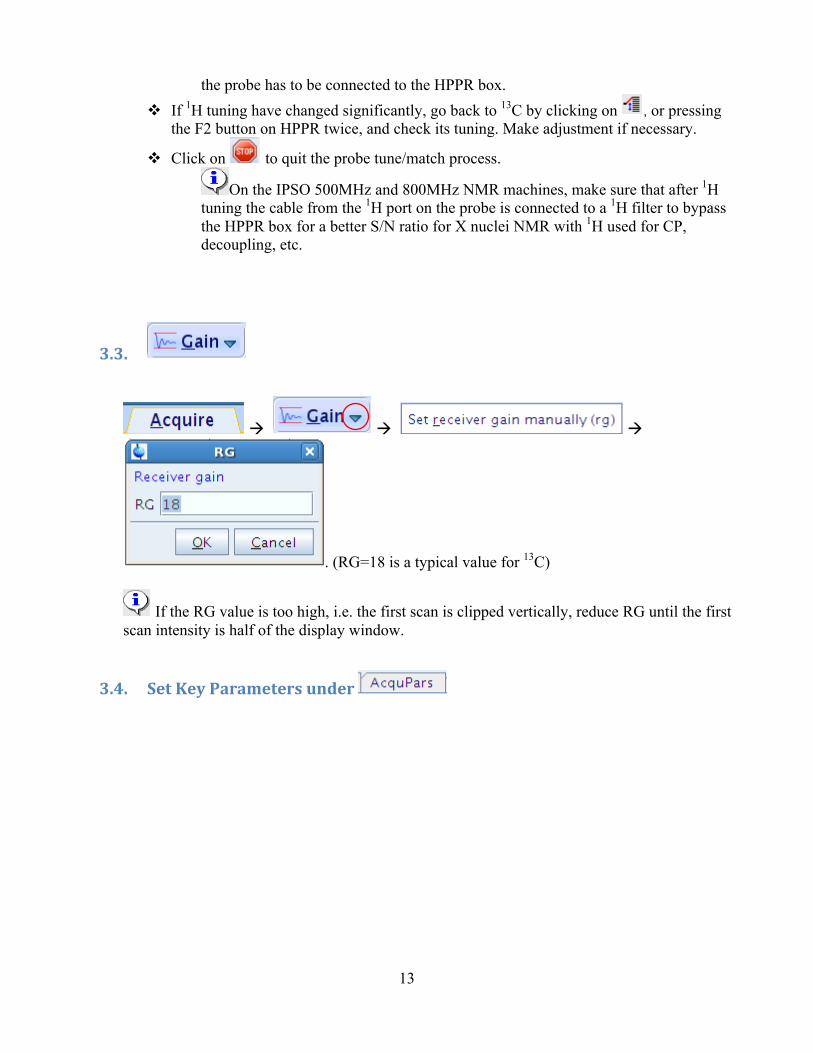
3.3.
" " "
. (RG=18 is a typical value for 13C)
If the RG value is too high, i.e. the first scan is clipped vertically, reduce RG until the first scan intensity is half of the display window.
3.4. Set Key Parameters under

14
3.5.
" to start data acquisition
in the options can be used to estimate the experimental time.

15

16
IV.
4.1.
" "
Set LB = 5 – 25 and click on "
4.2.
When there are broad peaks on the spectrum, which is normally the case for solid-state NMR, manual phase correction may be necessary.
" " use for the peak at the redline

17
and for other peaks with LMB clicked-and-held on them and moved up or down (to see phase clearly, scale up intensity 8x).
" "
" "
" to save phase values.
4.3.
It is necessary to calibrate the chemical shift in solid-state NMR because of the lack of solvents.
• Run a reference sample (e.g. adamantane for 13C) under the same conditions as for your samples.
• Zoom in to a peak of known chemical shift " " "
Click on the top of the peak " " " Take the SR value to your spectrum.
4.4.
18
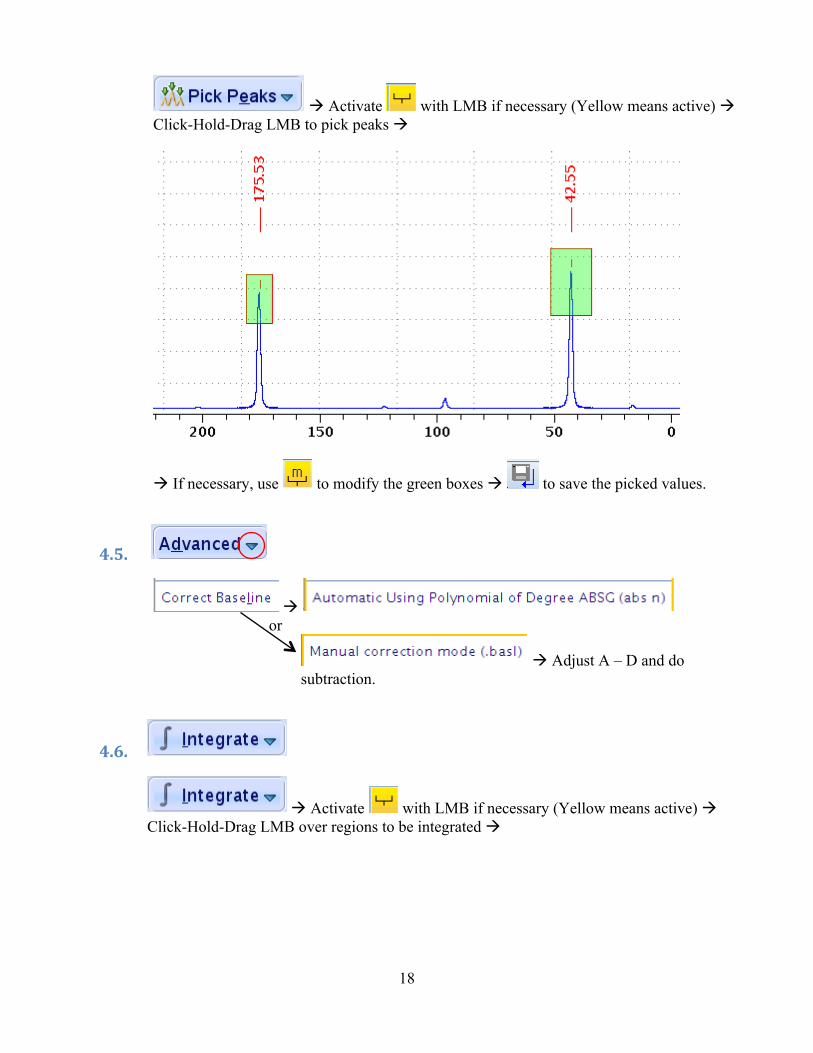
" Activate with LMB if necessary (Yellow means active) " Click-Hold-Drag LMB to pick peaks "
" If necessary, use to modify the green boxes " to save the picked values.
4.5.
" or
" Adjust A – D and do subtraction.
4.6.
" Activate with LMB if necessary (Yellow means active) " Click-Hold-Drag LMB over regions to be integrated "

19
" If necessary, calibrate integrals: RMB click on an integral to be used as reference, select
, and input a calibration value " to save the integral values.
V.
5.1. Print the active window, WYSIWYG.
5.2. Use the Plot Editor for more controlled printing.
" Plot Editor opens:

20
To change layouts, " " "
5.3. Save spectrum in .pdf, .png, and other formats.
21
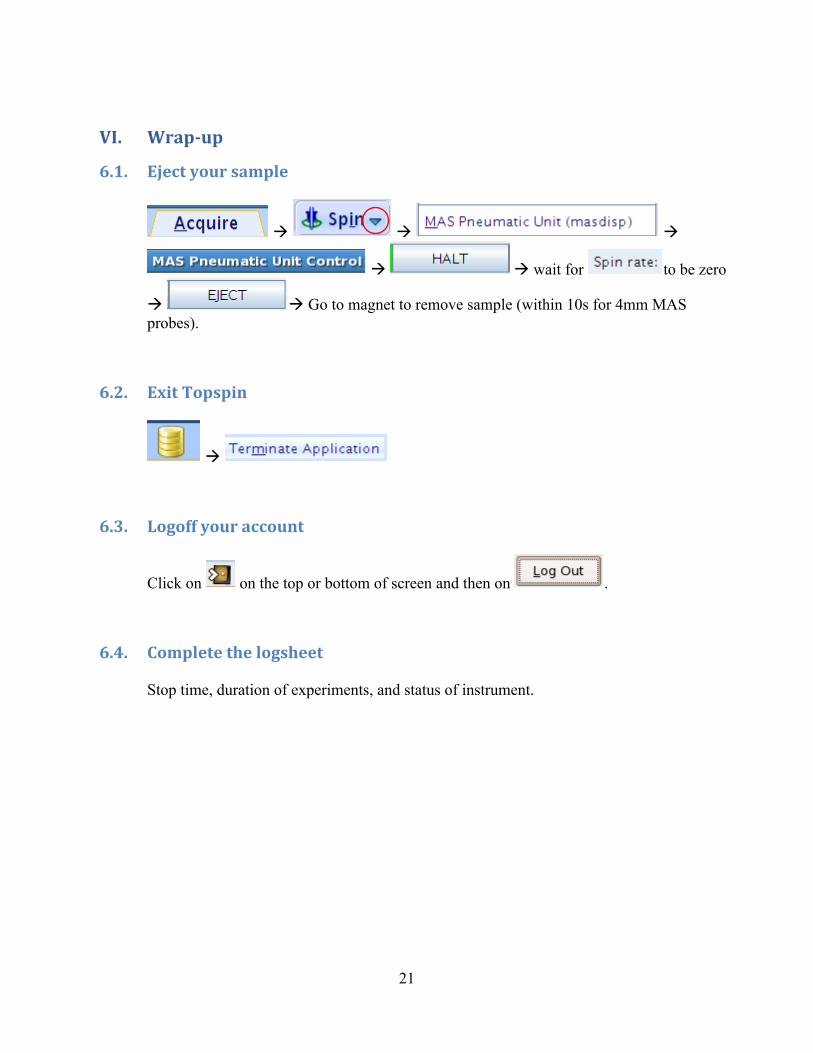
VI. Wrap-‐up
6.1. Eject your sample
" " "
" " wait for to be zero
" " Go to magnet to remove sample (within 10s for 4mm MAS probes).
6.2. Exit Topspin
"
6.3. Logoff your account
Click on on the top or bottom of screen and then on .
6.4. Complete the logsheet
Stop time, duration of experiments, and status of instrument.

22
VII. Appendices
7.1. Appendix 1: Introduction to Solid-‐State NMR
a. What is solid-state NMR ? NMR spectroscopy is performed directly on the samples in solid states or in
oriented pseudo-solid phases, for example: Solid-state samples
Solid-state Example Materials Powder Anything powderable:
Amino acids, Organic compounds, Inorganic materials, …
Single Crystal Anything forming single crystals: Organic, Inorganic, Biological, …
Chunk Solid Materials
Machinable to cylindrical shapes to fit into MAS rotors: polymers (plastic, …)
Film Stand-alone films or supported on substrates LT Liquid and Slurry Materials
Anything which can be solidified: solvent, dissolved solute, protein, etc.
Oriented pseudo-solid phases: Liquid crystal, Lipid, etc.
b. Why Solid-state NMR ? It is desirable to run NMR experiments in solid-states when
• Samples are not dissolvable. • Properties change after dissolution. • local structures are to be measured accurately:
c. Differences between conventional solution NMR and Solid-state NMR:
In solution: J-coupling, in the order of a couple of hundred Hz at most, dominates under fast tumbling of molecules, and high resolution spectra prevail in most cases.
In Solid-state: Other than J-coupling, there are other overwhelmingly dominating interactions intra- or inter- molecularly:
Interaction Strength J Hz CSA Up to ~2000 ppm Dipolar Up to tens of kHz Quadrpolar Up to tens of MHz
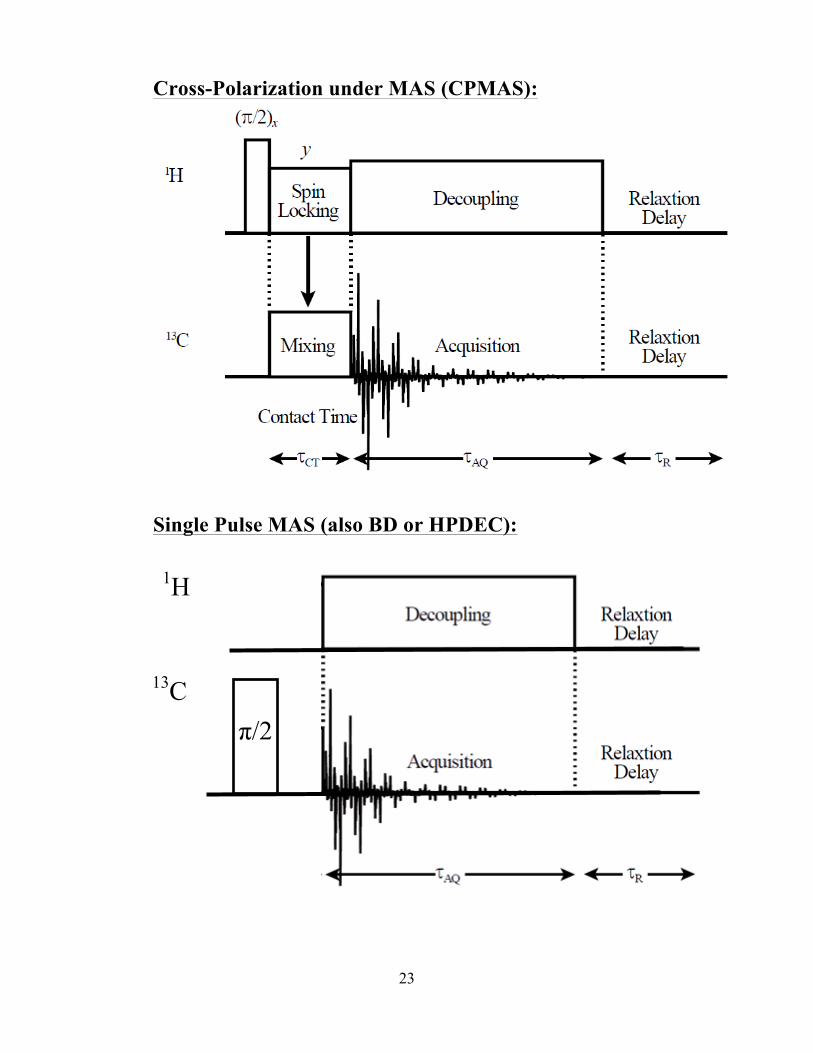
7.2. Appendix 2: CPMAS (Cross Polarization under MAS)
23
Cross-Polarization under MAS (CPMAS):
Single Pulse MAS (also BD or HPDEC):
π/2
13C
1H

24
7.3. Appendix 3: Online NMR Book and Bruker NMR Encyclopedia
1) NMR Book: http://www.cis.rit.edu/htbooks/nmr/ Introduction to NMR concepts and practical issues. 2) NMR Guide & Encyclopedia: http://www.bruker.de/guide/ All you want to know about NMR.
7.4. Appendix 4: Requirements for CNSI Access
You have to pass the mini quiz within one month after training in order to be qualified for access to the NMR facility of MRL, which includes:
• Key Card for Lab & Building:
1. Pass the MRL safety training; 2. Fill out the CNSI access form:
http://www.cnsi.ucsb.edu/facilities/building_services/access/access_application.pdf
3. Take the form to Sylvia in 2066G, MRL • Web Scheduling Account • NMR Account These requirements apply to both on- and off-campus users.