Embed Size (px)
Citation preview

MEDICINE BALL
WORKOUTS
SAMPLE
MEDICINE BALL
WORKOUTS
Strengthen Major and Supporting Muscle Groups for Increased Power,
Coordination, and Core Stability
BRETT STEWART

To my kids, Vivi & Ian—you are stronger, smarter and more talented than you may ever imagine.
When you believe in yourself, anything is possible.
—Dad
C O N T E N T S
PART 1: OVE RVI EW 9
I NTROD UCTION 10
WHAT I S A M E D ICI N E BALL? 13
WHY US E A M E D ICI N E BALL? 15
HOW TO US E A M E D ICI N E BALL 17
FR EQU E NTLY AS KE D QU E STION S 19
B E FOR E YOU B EG I N 23
PR E PAR I NG FOR TH E WOR KOUTS 24
EXE RCI S E PROG R E SS ION 29
WHAT’S YOU R MOTIVATION? 33
PART 2: PROG RAM S 37
BAS IC PROG RAM 39
ADVANCE D PROG RAM 45
B EYON D M E D ICI N E BALL WOR KOUTS: MAI NTAI N I NG YOU R PHYS IQU E 51
PART 3: EXE RCI S E S 53
ADVANCE D M E D ICI N E BALL EXE RCI S E S 81
M E D ICI N E BALL TOSS E S 87
GAM E S 97

PART 1: OVE RVI EW
9
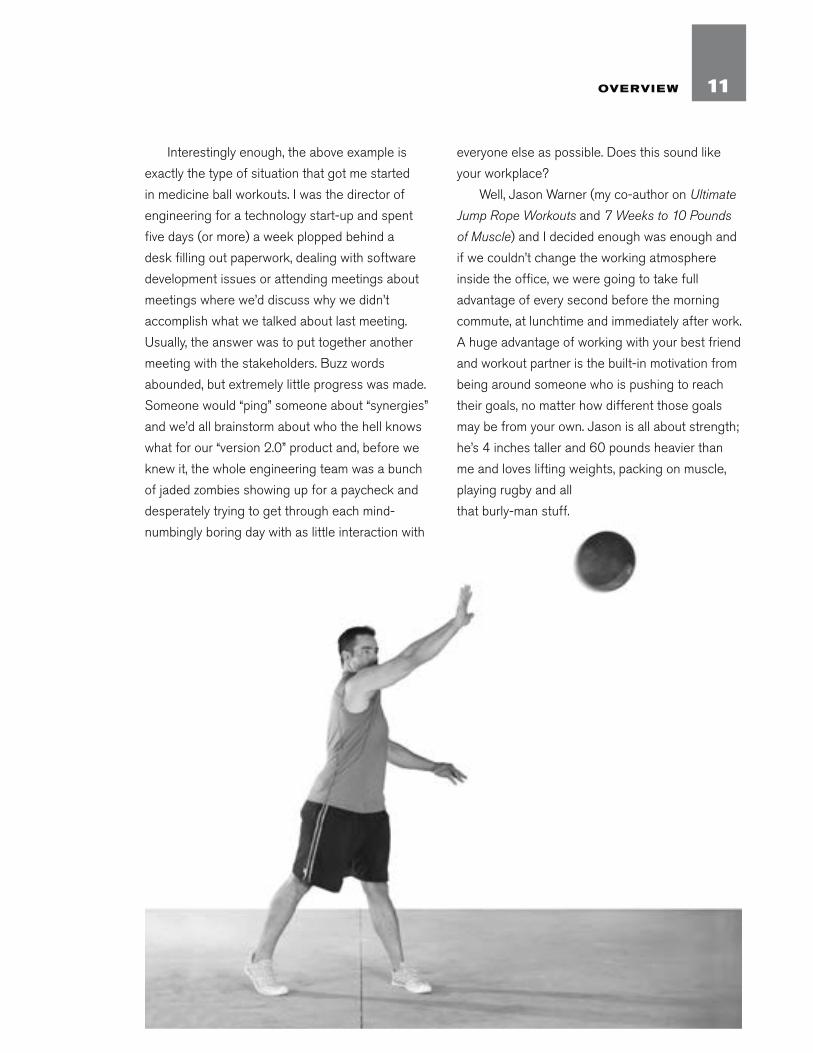
Interestingly enough, the above example is
exactly the type of situation that got me started
in medicine ball workouts. I was the director of
engineering for a technology start-up and spent
five days (or more) a week plopped behind a
desk filling out paperwork, dealing with software
development issues or attending meetings about
meetings where we’d discuss why we didn’t
accomplish what we talked about last meeting.
Usually, the answer was to put together another
meeting with the stakeholders. Buzz words
abounded, but extremely little progress was made.
Someone would “ping” someone about “synergies”
and we’d all brainstorm about who the hell knows
what for our “version 2.0” product and, before we
knew it, the whole engineering team was a bunch
of jaded zombies showing up for a paycheck and
desperately trying to get through each mind-
numbingly boring day with as little interaction with
everyone else as possible. Does this sound like
your workplace?
Well, Jason Warner (my co-author on Ultimate
Jump Rope Workouts and 7 Weeks to 10 Pounds
of Muscle) and I decided enough was enough and
if we couldn’t change the working atmosphere
inside the office, we were going to take full
advantage of every second before the morning
commute, at lunchtime and immediately after work.
A huge advantage of working with your best friend
and workout partner is the built-in motivation from
being around someone who is pushing to reach
their goals, no matter how different those goals
may be from your own. Jason is all about strength;
he’s 4 inches taller and 60 pounds heavier than
me and loves lifting weights, packing on muscle,
playing rugby and all
that burly-man stuff.
11OVERVIEW

A medicine ball is also known as an exercise ball, a med ball or a
fitness ball, not to be confused with an inflatable exercise ball, a
physio ball, a stability ball or a buffoon ball. (Ok, I made up that last
one—just trying to have a little fun with all these redundant names.)
What Is a Medicine Ball?
13
There’s a reason why nearly all sports are based around a ball.
The spherical shape allows for multiple hand placement for lifting,
tossing and catching in play, and also makes the perfect object
for strength training or optimal sports performance. Speaking of
sports, the irony is not lost on me that a bowling ball, used by some
of the least-fit professional athletes on the planet, is more akin to
a medicine ball than the footballs used by modern gladiators of the
gridiron. It just doesn’t seem to add up, right? Well, enough about
that.
Why Use a Medicine Ball?
15
If you’ve ever picked up a basketball or volleyball, all but the largest
and heaviest of medicine balls shouldn’t be too much of a surprise
when you first grab one. Normally, rubber-coated balls are textured
to provide plenty of grip and many of the high-tech newer models
feature dimples and patterns to enhance the tactile experience.
Larger and heavier leather ones may take a little getting used to,
but those should be handled once you’ve developed a little more
experience, dexterity and strength.
How to Use a Medicine Ball
17
Q. What type/size/weight should I use?
A. Well, it depends on how big your hands are, how strong you are
and what your fitness goals are. This multi-part question requires
at least a few answers, and is a common one I receive all the time.
Experienced athletes looking to build strength while developing
sports-specific proficiency should opt for the heaviest balls they can
handle, while individuals looking to develop their flexibility and tone
their physique are best served by easier-to-handle, lighter balls. For
the most part, the exercises found in this book can be performed
with any of the medicine balls listed in the table on page 14. The
easiest to obtain and usually the least expensive are the first two on
that list (9-, 10- or 11-inch models), and they’re normally available
in weights ranging from 4 to 25 pounds. You can find them at most
large sporting goods stores.
Frequently Asked Questions
19
mobile app like the one I made as a companion to
this book (shameless plug). The bottom line is: You
can find the time quite easily if you want to, and
you want to, right?
Tip: Work out for half of your lunch break three
days a week. If you get an hour, use 30 minutes
to warm up, work out, cool down and clean up and
you’ll still have plenty of time to eat the (healthy)
lunch that you packed. It only takes a little
planning to make this work, so make it happen!
Q. What’s this “rest” thing you keep talking about?
Have you seen my schedule?
A. If you don’t rest, you won’t recover. If you
don’t recover, you lose most of the benefit from
your workout. I use the term “most” because
you still burned some extra calories during the
exercise and raised your heart rate to obtain some
cardiovascular conditioning benefit...but if you
don’t rest well, you’ll miss out on the benefits of
building lean muscle.
Q. What are the benefits of building lean muscle?
A. Wow, what a perfect segue from the previous
question! Aside from the obvious aesthetic
benefits of having a muscular physique, building
lean muscle is one of those “gifts that keep
giving”: the more lean muscle you have, the
more calories your body will naturally burn
throughout the day to keep your awesome
physique, well, awesome. Lean muscle not only
acts like a furnace for burning calories and fat,
but it also makes the muscles that you have
even more adept at growing by stimulating
insulin and testosterone development. (Yes, this
is a ridiculously simple overview of your body’s
biomechanics and energy systems, but this is just
an FAQ, not a PhD dissertation.) Lean muscle is a
good thing, cool?
Q. My buddy/the guy at the gym/my mother’s co-
worker Dawn said I should do Workout X and I’ll be
the fittest person on the planet! Why don’t you just
show me a shortcut to fitness like Workout X, huh?
Are you trying to hide something?!
A. Step 1: Chill. Out.
Step 2. Repeat Step 1.
I’ll let you in on a little secret: Every workout is
the best ever, provided you stick to it and get
the results you want. I’ve developed and tested
hundreds of my own different programs. Along the
way I’ve tried out many of the big-name programs
that you see online and even on late-night TV with
varying levels of success. Some I like quite a bit to
this day and others I’m glad I tried out just once.
There are a million different ways to work out—the
best way to learn what works for you is to give
new exercise routines a shot. Not only will you
add to your repertoire of exercises, you’ll be hitting
some muscles in new and exciting ways and
getting fitter along the way. I like to view getting—
and staying—fit as a journey: Take it all in and try
some new stuff. You never know what you’ll learn
along the way!
Q. I have an injury. Can I still work out?
A. See your doctor. Boring answer, but the truth.
The workouts are rigorous and the addition of
a medicine ball could make some very common
injuries worse if you’re not careful. Above all
else, be safe and see your doctor first before
performing any demanding physical activity.
Q. I already work out at the gym. Would I get
anything out of this?
A. Absolutely! The exercises and workouts here
would make anyone a fitter person, not to mention
a better athlete. Who can’t use a stronger core,
21OVERVIEW

If I haven’t beaten you over the head with the “see your doctor first
before starting any workout program” phrasing, let’s just give you
five practical examples of why seeing a doctor first is the most
important step toward getting in shape:
Before You Begin
23
Anatomical Position: This is essentially the
“default position” for your body as nearly all joints
are in neutral position with the exception of your
elbows (which are rotated forward to bring your
palms onto the frontal plane)—feet face forward
and are about shoulder-width apart, spine is erect,
arms are extended at the sides of your trunk with
palms facing forward. The three different
anatomical planes of movement are median,
frontal and horizontal, and all are described by
starting with the anatomical position. Median plane
splits your body laterally into right and left halves
with a line vertical to your belly button (the medial
line). Frontal plane splits your body into a front
(anterior) and back (posterior) from the side,
bisecting your torso vertically in a line that runs
through your ears, shoulders, hips and ankles.
Horizontal plane splits your body into upper
(superior) and lower (inferior) halves at your belly
button. Most motions in life are a combination of
these planes.
Athletic Position: Similar to anatomical
position, this is often described as “ready position”
for many sports or training. I’ll refer to this in nearly
every exercise where you’re on your feet. In a
standing position, your feet face forward and are
approximately shoulder-width apart and slightly
rotated outward (laterally) about 10–15 degrees
for greater balance. Knees, hips and elbows are
slightly bent (commonly referred to as “softening
your joints”), and arms are rotated slightly forward
at the shoulders. This position should have you
ready for quick action or reaction in any direction,
primarily a median or horizontal plane.
Tip: Don’t confuse athletic position with the
“ready position” of some sports. For example, a
shortstop will have a far deeper knee bend and
hip drop to allow for a more explosive lateral or
vertical movement when the ball is hit.
Flexion & Extension: Often confused, these
are relatively easy to remember once you get the
general mental picture. Flexion is accomplished
by bending a hinge (elbow, knee) joint, while
straightening is extension. Forcing one of these
joints past straight is considered hyperextension,
and commonly responsible for serious injuries.
Note the word “general” above—you can also
extend and flex at the hip and shoulder (ball and
socket) joints without bending; raising your arm or
leg forward and upward is flexion, while returning
it to anatomical position is extension. The neck,
wrists, fingers and toes all get in on the flexion
and extension action, but you get the general idea
and you’re not getting quizzed.
Rotation: You’ll be using this one quite a bit,
primarily when twisting the trunk. Simply put, this
rotation is bringing the side of the body bisected
by the frontal plane toward the medial plane while
traveling along the transverse plane. Sorry, couldn’t
resist. In other words, rotating your trunk so one
of your shoulders is aligned with your belly button.
Easy, right?
25OVERVIEW
to 20 additional pounds in your hands. It’s very
important that you focus on proper form and utilize
the proper muscles to complete each exercise.
This means no cheating by arching your back on
push-ups or allowing your knees to bow in during
squats—you’re only cheating yourself. Every
proper-form rep just gets you closer to your goals!
If you have a pre-existing condition like
joint instability or a muscular imbalance, make
sure you recognize any physical limitations, take
your time and work your way up slowly while
focusing on training with good form. It’s far more
important to be careful with nagging injuries than
it is to worry about completing all the exercises
in any specified amount of time. Performing
the exercises with proper form will help you to
build strength, flexibility and balance as well as
improve your sports performance—but not if you
ignore the warning signs and hurt yourself. If
pain or soreness persists, please see a medical
professional.
When performing any exercise routine that
requires you to lift, pull or press your bodyweight,
don’t take any chances with unsafe equipment. In
addition, make sure you’re properly trained to use
any equipment before you start a workout. Always
be aware of your surroundings and make sure
you have plenty of room to execute moves safely
without hitting or tripping over other objects.
27OVERVIEW
Guess what, you’re not a professional athlete. How do I know?
Because you’re reading this section. Seriously, every professional
athlete I’ve ever worked with would already be three exercises into
the Advanced program—it’s just how they’re wired. The good news
is that, because you’re not getting paid to train and perform, you
can take your time getting in tune with the workouts and preparing
your body to perform each exercise with proper form. No one will be
holding a finish line at the end of each workout, and no one will be
judging you as you progress from simple to advanced movements. If
they’re secretly taking inventory of your exercises, then they should
focus on their own workout!
Exercise Progression
29
Stretching should generally be done after a
workout. It’ll help you reduce muscle soreness
from the workout, increase range of motion and
flexibility within a joint or muscle, and prepare
your body for any future workouts. Stretching
immediately post-exercise while your muscles are
still warm allows your muscles to return to their full
range of motion (which gives you more flexibility
gains) and reduces the chance of injury or fatigue
in the hours or days after an intense workout. It’s
important to remember that even when you’re
warm and loose, you should never “bounce”
during stretching. Keep your movements slow and
controlled.
Here’s the proper workout progression to
keep in mind:
1. Basic warm-up: Walk, jog, jumping
jacks—raise your heart rate and body temperature
slightly, loosen up stiff muscles and get a very light
sweat (if any).
2. Dynamic warm-up/shake-out: After
at least 5 minutes of warm-up, shake out your
arms and legs and perform some of the dynamic
warm-ups listed in the “Dynamic Yoga Warm-Up”
on page 104.
3. Perform some slow, controlled bodyweight exercises: Focusing on
maintaining perfect form, perform 3–6 bodyweight
reps of a multi-joint, multi-muscle exercise like
wood chops (page 57) or burpees (page 60).
Skip the medicine ball for this warm-up.
4. Work out: Be mindful of your form on
every rep. Maintain your intensity and crush your
workout.
5. Shake-out/stretch: Shake out your tight
muscles, then perform some stretches listed on
page XXX.
6. Eat: Immediately post-workout, consume a
recovery drink with a 4:1 ratio of carbs to protein
in order to replenish your glycogen stores and
also give your muscles the amino acids they need
to repair and strengthen. A protein shake with a
banana or chocolate milk are very good choices.
7. Rest: Jump-start the building process by
resting. A 20-minute nap after eating never hurts.
Avoiding InjuriesAs we covered earlier in the FAQs (page 19),
bodyweight strength training combined with
weights is an incredibly efficient way to build
strength, flexibility and balance as well as develop
a lean, ripped physique. Let’s be honest, though;
none of us are perfect. Due to years of improper
posture, sports injuries or even weak musculature,
we all have imbalances that can affect proper
form and even put us on the fast track to injury. In
addition, jumping into a new exercise routine too
quickly or doing the exercises with improper form
can exacerbate any pre-existing injury. Unstable
surfaces make it even more precarious for first-
timers or those coming back after a layoff. This
is why I recommend starting out by performing
bodyweight versions of each exercise before
stepping it up by adding in weights.
Throughout the routine, you should expect to
experience mild soreness and fatigue, especially
when you’re just getting started. The feeling of
your muscles being “pumped” and the fatigue of
an exhausting workout should be expected. These
are positive feelings.
On the other hand, any sharp pain, muscle
spasm or numbness is a warning sign that you
need to stop and not push yourself any harder.
Some small muscle groups may fatigue more
quickly because they’re often overlooked in other
workouts. Your hands and forearms are doing a
tremendous amount of work and can easily tire
out. If you feel you can’t grip or support yourself
31OVERVIEW
Let’s face it—some days we all feel like we need a good reason
just to get out of bed in the morning. I have a great gig writing
books and training some awesome folks, but there are plenty of
times when I’d like to smash the alarm and bury my head under the
covers. Workouts are the same way for most people—if you can
think of any reason to skip it, you probably will. I’ll admit to missing
my share of workouts, but it never seems to be worth it: When I skip
one, I just ending up paying for it later with a subpar performance
at a race or even feeling miserable because I feel like I’ve let
myself down. Usually the penalty is worse and lasts longer than the
workout would’ve anyway. My wife can always tell when I’m cranky
and has even thrown me out of the house to go for a run and cheer-
up—and it actually works!
What’s Your Motivation?
33
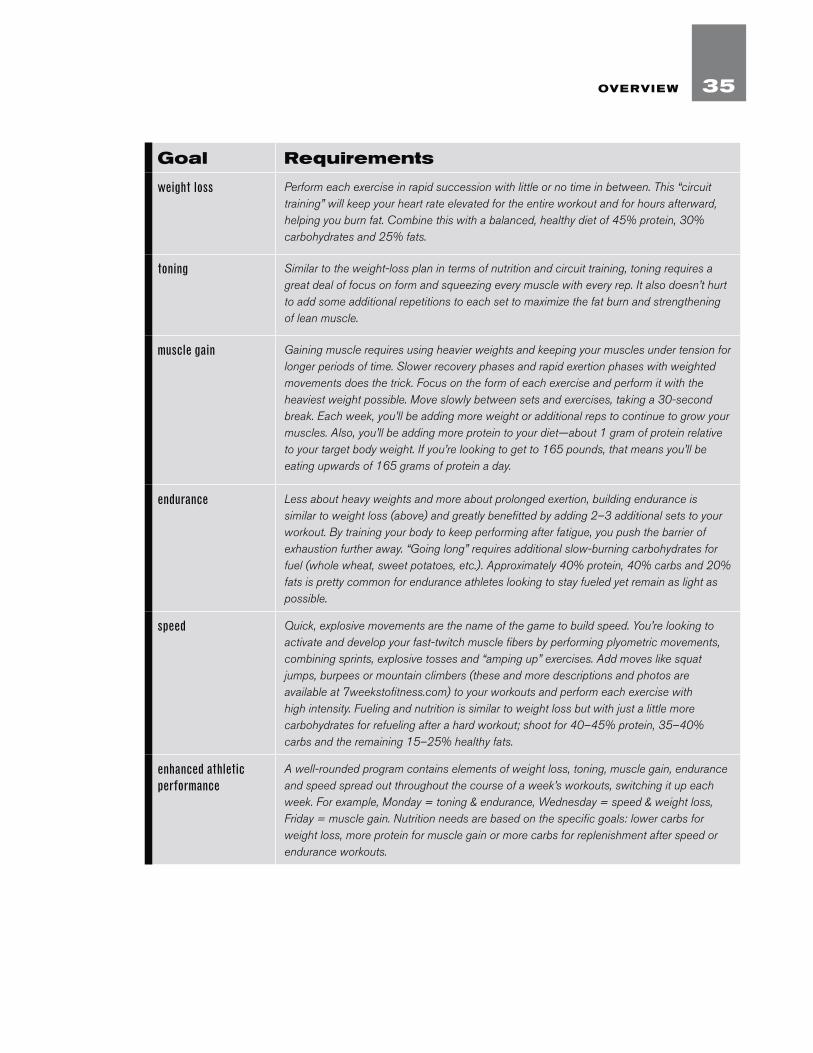
Goal Requirements
weight loss Perform each exercise in rapid succession with little or no time in between. This “circuit
training” will keep your heart rate elevated for the entire workout and for hours afterward,
helping you burn fat. Combine this with a balanced, healthy diet of 45% protein, 30%
carbohydrates and 25% fats.
toning Similar to the weight-loss plan in terms of nutrition and circuit training, toning requires a
great deal of focus on form and squeezing every muscle with every rep. It also doesn’t hurt
to add some additional repetitions to each set to maximize the fat burn and strengthening
of lean muscle.
muscle gain Gaining muscle requires using heavier weights and keeping your muscles under tension for
longer periods of time. Slower recovery phases and rapid exertion phases with weighted
movements does the trick. Focus on the form of each exercise and perform it with the
heaviest weight possible. Move slowly between sets and exercises, taking a 30-second
break. Each week, you’ll be adding more weight or additional reps to continue to grow your
muscles. Also, you’ll be adding more protein to your diet—about 1 gram of protein relative
to your target body weight. If you’re looking to get to 165 pounds, that means you’ll be
eating upwards of 165 grams of protein a day.
endurance Less about heavy weights and more about prolonged exertion, building endurance is
similar to weight loss (above) and greatly benefitted by adding 2–3 additional sets to your
workout. By training your body to keep performing after fatigue, you push the barrier of
exhaustion further away. “Going long” requires additional slow-burning carbohydrates for
fuel (whole wheat, sweet potatoes, etc.). Approximately 40% protein, 40% carbs and 20%
fats is pretty common for endurance athletes looking to stay fueled yet remain as light as
possible.
speed Quick, explosive movements are the name of the game to build speed. You’re looking to
activate and develop your fast-twitch muscle fibers by performing plyometric movements,
combining sprints, explosive tosses and “amping up” exercises. Add moves like squat
jumps, burpees or mountain climbers (these and more descriptions and photos are
available at 7weekstofitness.com) to your workouts and perform each exercise with
high intensity. Fueling and nutrition is similar to weight loss but with just a little more
carbohydrates for refueling after a hard workout; shoot for 40–45% protein, 35–40%
carbs and the remaining 15–25% healthy fats.
enhanced athletic performance
A well-rounded program contains elements of weight loss, toning, muscle gain, endurance
and speed spread out throughout the course of a week’s workouts, switching it up each
week. For example, Monday = toning & endurance, Wednesday = speed & weight loss,
Friday = muscle gain. Nutrition needs are based on the specific goals: lower carbs for
weight loss, more protein for muscle gain or more carbs for replenishment after speed or
endurance workouts.
35OVERVIEW

PART 2: PROG RAM S
37
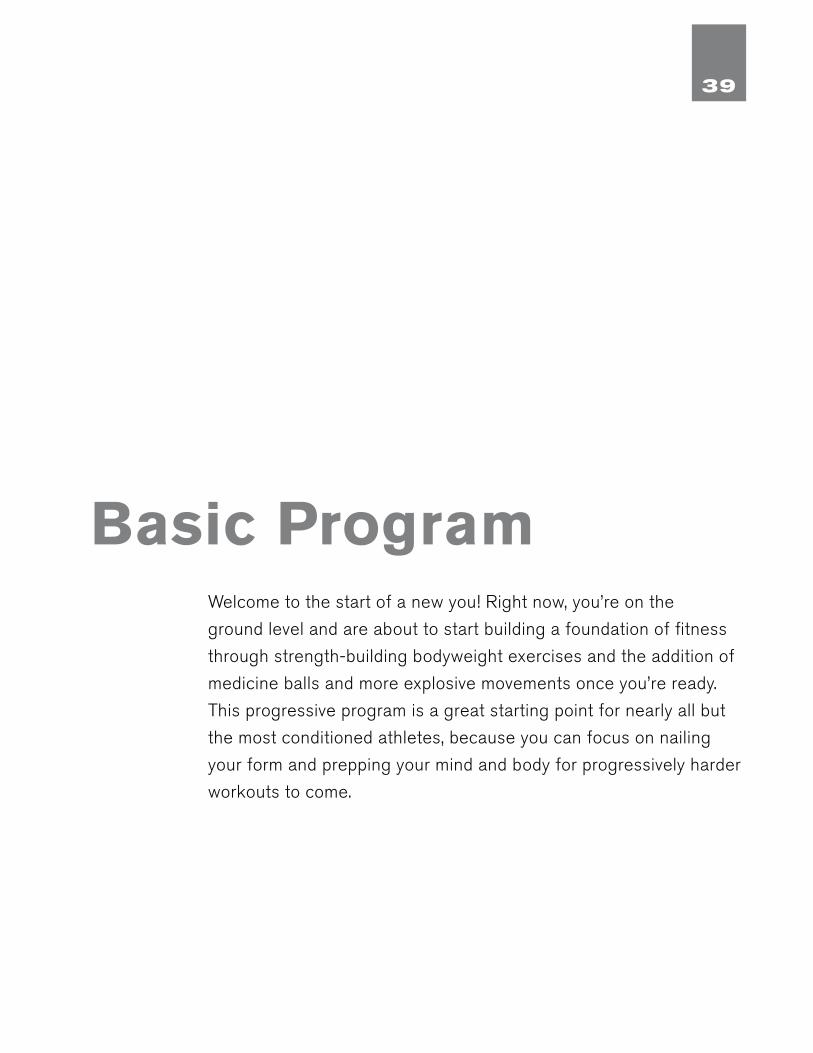
Welcome to the start of a new you! Right now, you’re on the
ground level and are about to start building a foundation of fitness
through strength-building bodyweight exercises and the addition of
medicine balls and more explosive movements once you’re ready.
This progressive program is a great starting point for nearly all but
the most conditioned athletes, because you can focus on nailing
your form and prepping your mind and body for progressively harder
workouts to come.
Basic Program
39

Week 1 Rest 2 minutes after every set
Mon set 1 3 Goblet Squat (page 54)
6 Mason Twist (page 73)
6 Good Morning (page 74)
4 Push-Up (page 70)
:25 Plank (page 66)
Mon set 2 3 Ball Thruster (page 55)
4 Elephant Twist (page 65)
5 Sit-Up (page 76)
4 Curl & Press (per arm) (page 71)
6 Crunch w/Toe Touch (page 77)
Mon set 3 5 Romanian Deadlift (page 59)
6 T-Twist (page 64)
4 Superman (page 75)
6 Press & Triceps Ext. (page 72)
6 Mason Twist (page 73)
Tues Rest
Wed set 1 3 Ball Thruster 4 Lunge & Twist (page 58)
4 Superman 5 Sit-Up 6 Press & Triceps Ext.
Wed set 2 5 Wall Ball (page 56)
5 Romanian Deadlift
6 Good Morning (page 74)
:25 Plank 4 Curl & Press (per arm)
Wed set 3 4 Wood Chop (page 57)
3 Goblet Squat 6 Mason Twist 6 Crunch w/Toe Touch
4 Push-Up
Thur Rest
Fri set 1 4 Wood Chop 3 Ball Thruster 5 Sit-Up 6 T- Twist 4 Push-Up
Fri set 2 6 Mason Twist 5 Romanian Deadlift
:25 Plank 4 Superman 4 Curl & Press (per arm)
Fri set 3 5 Wall Ball 4 Lunge & Twist 6 Crunch w/Toe Touch
6 Good Morning 6 Press & Triceps Ext.
41PROGRAMS
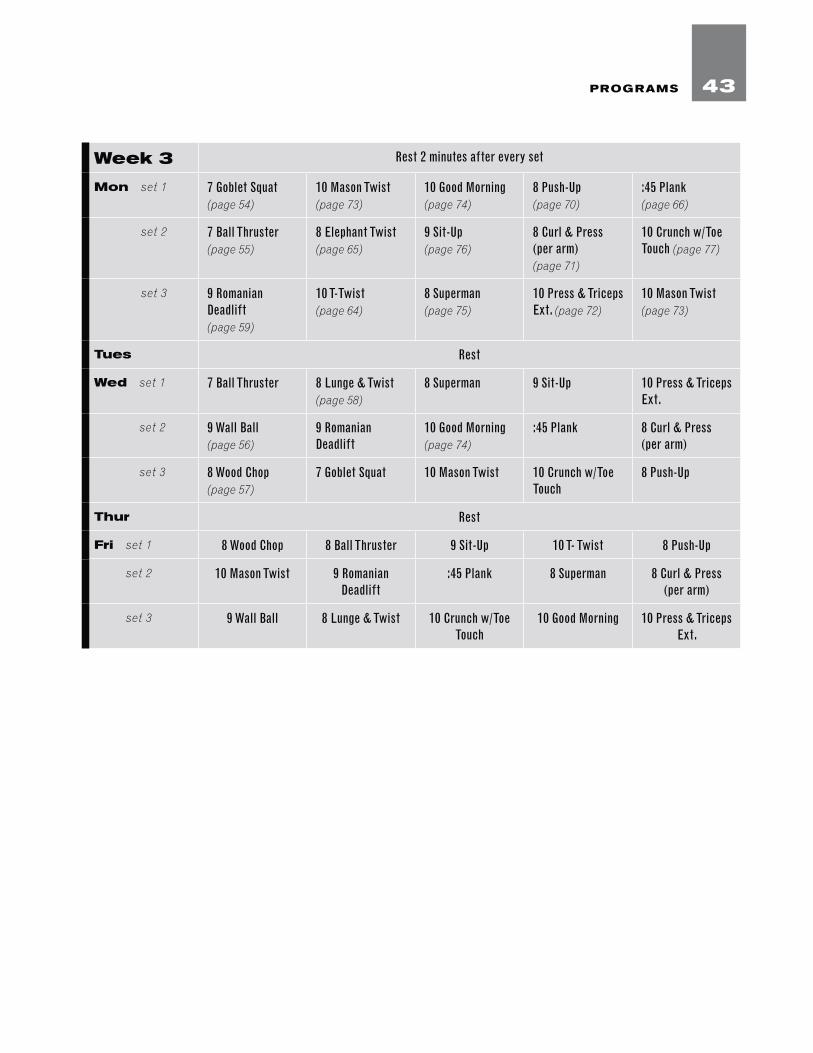
Week 3 Rest 2 minutes after every set
Mon set 1 7 Goblet Squat (page 54)
10 Mason Twist (page 73)
10 Good Morning (page 74)
8 Push-Up (page 70)
:45 Plank (page 66)
Mon set 2 7 Ball Thruster (page 55)
8 Elephant Twist (page 65)
9 Sit-Up (page 76)
8 Curl & Press (per arm) (page 71)
10 Crunch w/Toe Touch (page 77)
Mon set 3 9 Romanian Deadlift (page 59)
10 T-Twist (page 64)
8 Superman (page 75)
10 Press & Triceps Ext. (page 72)
10 Mason Twist (page 73)
Tues Rest
Wed set 1 7 Ball Thruster 8 Lunge & Twist (page 58)
8 Superman 9 Sit-Up 10 Press & Triceps Ext.
Wed set 2 9 Wall Ball (page 56)
9 Romanian Deadlift
10 Good Morning (page 74)
:45 Plank 8 Curl & Press (per arm)
Wed set 3 8 Wood Chop (page 57)
7 Goblet Squat 10 Mason Twist 10 Crunch w/Toe Touch
8 Push-Up
Thur Rest
Fri set 1 8 Wood Chop 8 Ball Thruster 9 Sit-Up 10 T- Twist 8 Push-Up
Fri set 2 10 Mason Twist 9 Romanian Deadlift
:45 Plank 8 Superman 8 Curl & Press (per arm)
Fri set 3 9 Wall Ball 8 Lunge & Twist 10 Crunch w/Toe Touch
10 Good Morning 10 Press & Triceps Ext.
43PROGRAMS
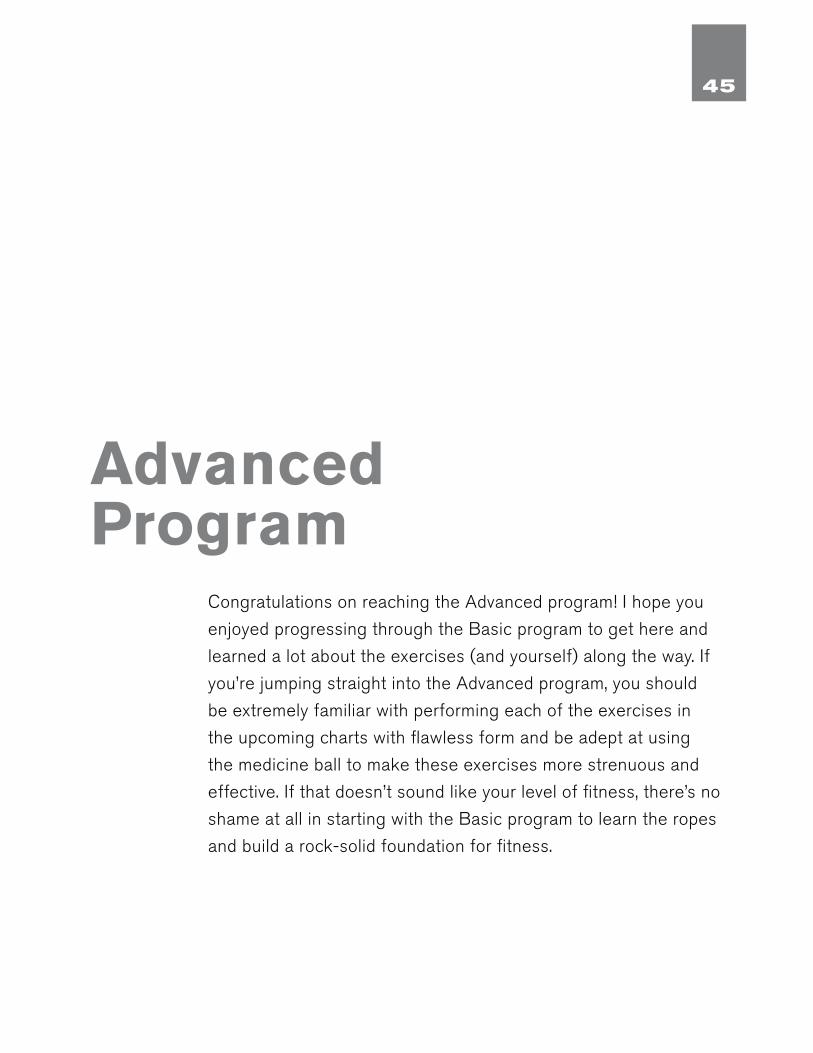
Congratulations on reaching the Advanced program! I hope you
enjoyed progressing through the Basic program to get here and
learned a lot about the exercises (and yourself) along the way. If
you’re jumping straight into the Advanced program, you should
be extremely familiar with performing each of the exercises in
the upcoming charts with flawless form and be adept at using
the medicine ball to make these exercises more strenuous and
effective. If that doesn’t sound like your level of fitness, there’s no
shame at all in starting with the Basic program to learn the ropes
and build a rock-solid foundation for fitness.
Advanced Program
45
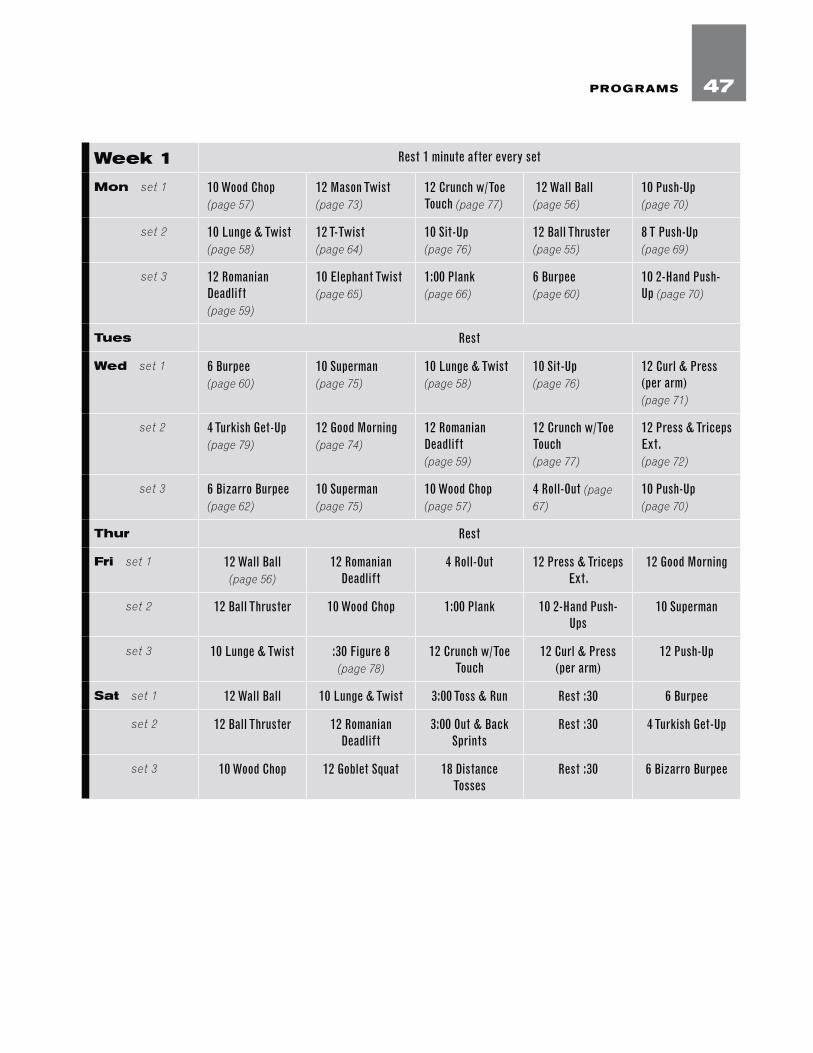
Week 1 Rest 1 minute after every set
Mon set 1 10 Wood Chop (page 57)
12 Mason Twist (page 73)
12 Crunch w/Toe Touch (page 77)
12 Wall Ball (page 56)
10 Push-Up (page 70)
Mon set 2 10 Lunge & Twist (page 58)
12 T-Twist (page 64)
10 Sit-Up (page 76)
12 Ball Thruster (page 55)
8 T Push-Up (page 69)
Mon set 3 12 Romanian Deadlift (page 59)
10 Elephant Twist (page 65)
1:00 Plank(page 66)
6 Burpee (page 60)
10 2-Hand Push-Up (page 70)
Tues Rest
Wed set 1 6 Burpee (page 60)
10 Superman (page 75)
10 Lunge & Twist (page 58)
10 Sit-Up (page 76)
12 Curl & Press (per arm) (page 71)
Wed set 2 4 Turkish Get-Up (page 79)
12 Good Morning (page 74)
12 Romanian Deadlift (page 59)
12 Crunch w/Toe Touch (page 77)
12 Press & Triceps Ext. (page 72)
Wed set 3 6 Bizarro Burpee (page 62)
10 Superman (page 75)
10 Wood Chop (page 57)
4 Roll-Out (page 67)
10 Push-Up (page 70)
Thur Rest
Fri set 1 12 Wall Ball (page 56)
12 Romanian Deadlift
4 Roll-Out 12 Press & Triceps Ext.
12 Good Morning
Fri set 2 12 Ball Thruster 10 Wood Chop 1:00 Plank 10 2-Hand Push-Ups
10 Superman
Fri set 3 10 Lunge & Twist :30 Figure 8 (page 78)
12 Crunch w/Toe Touch
12 Curl & Press (per arm)
12 Push-Up
Sat set 1 12 Wall Ball 10 Lunge & Twist 3:00 Toss & Run Rest :30 6 Burpee
Sat set 2 12 Ball Thruster 12 Romanian Deadlift
3:00 Out & Back Sprints
Rest :30 4 Turkish Get-Up
Sat set 3 10 Wood Chop 12 Goblet Squat 18 Distance Tosses
Rest :30 6 Bizarro Burpee
47PROGRAMS
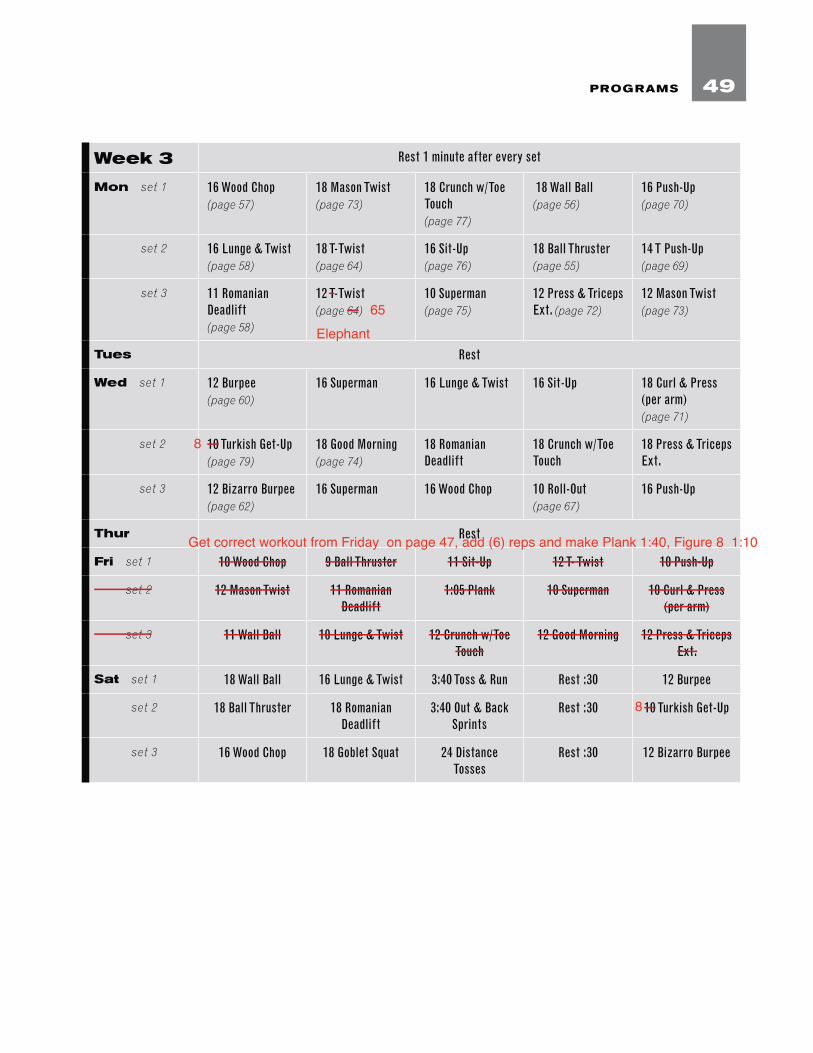
Week 3 Rest 1 minute after every set
Mon set 1 16 Wood Chop (page 57)
18 Mason Twist (page 73)
18 Crunch w/Toe Touch (page 77)
18 Wall Ball (page 56)
16 Push-Up (page 70)
Mon set 2 16 Lunge & Twist (page 58)
18 T-Twist (page 64)
16 Sit-Up (page 76)
18 Ball Thruster (page 55)
14 T Push-Up (page 69)
Mon set 3 11 Romanian Deadlift (page 58)
12 T-Twist (page 64)
10 Superman (page 75)
12 Press & Triceps Ext. (page 72)
12 Mason Twist (page 73)
Tues Rest
Wed set 1 12 Burpee (page 60)
16 Superman 16 Lunge & Twist 16 Sit-Up 18 Curl & Press (per arm) (page 71)
Wed set 2 10 Turkish Get-Up (page 79)
18 Good Morning (page 74)
18 Romanian Deadlift
18 Crunch w/Toe Touch
18 Press & Triceps Ext.
Wed set 3 12 Bizarro Burpee (page 62)
16 Superman 16 Wood Chop 10 Roll-Out (page 67)
16 Push-Up
Thur Rest
Fri set 1 10 Wood Chop 9 Ball Thruster 11 Sit-Up 12 T- Twist 10 Push-Up
Fri set 2 12 Mason Twist 11 Romanian Deadlift
1:05 Plank 10 Superman 10 Curl & Press (per arm)
Fri set 3 11 Wall Ball 10 Lunge & Twist 12 Crunch w/Toe Touch
12 Good Morning 12 Press & Triceps Ext.
Sat set 1 18 Wall Ball 16 Lunge & Twist 3:40 Toss & Run Rest :30 12 Burpee
Sat set 2 18 Ball Thruster 18 Romanian Deadlift
3:40 Out & Back Sprints
Rest :30 10 Turkish Get-Up
Sat set 3 16 Wood Chop 18 Goblet Squat 24 Distance Tosses
Rest :30 12 Bizarro Burpee
49PROGRAMS
Get correct workout from Friday on page 47, add (6) reps and make Plank 1:40, Figure 8 1:10
8
8
Elephant
65
Congratulations on completing the Advanced program! I hope it
was a fun challenge that you’re proud of! I’ve been extremely lucky
to be able to share dozens of different programs and hundreds
of exercises, stretches, warm-ups, routines and games so far in
my 7 Weeks to Fitness and Ultimate Workouts book series. It’s
an amazing and humbling experience when I receive e-mails or
Facebook posts from around the world thanking me for any of my
books making a difference in someone’s life. Nearly all of those
messages end with the question: “What do I do next?”
Beyond Medicine Ball Workouts: Maintaining Your Physique
51
PART 3: EXE RCI S E S
53
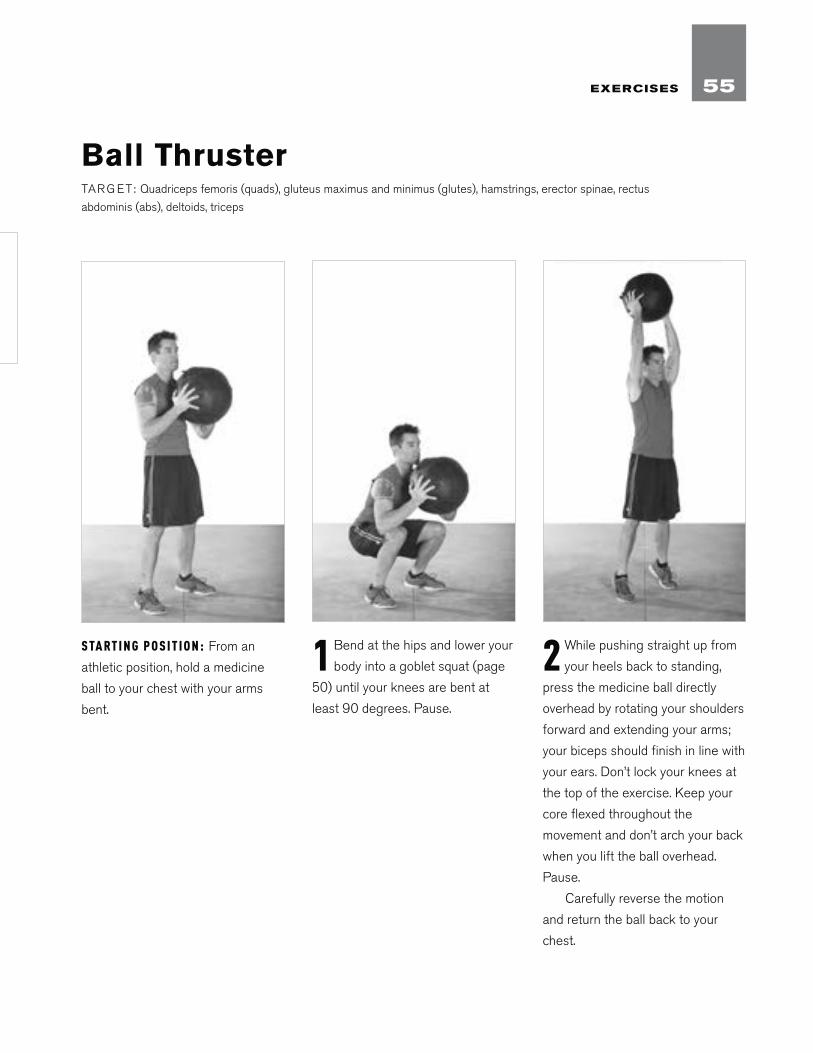
S TA RT I N G P O S I T I O N : From an
athletic position, hold a medicine
ball to your chest with your arms
bent.
1 Bend at the hips and lower your
body into a goblet squat (page
50) until your knees are bent at
least 90 degrees. Pause.
2 While pushing straight up from
your heels back to standing,
press the medicine ball directly
overhead by rotating your shoulders
forward and extending your arms;
your biceps should finish in line with
your ears. Don’t lock your knees at
the top of the exercise. Keep your
core flexed throughout the
movement and don’t arch your back
when you lift the ball overhead.
Pause.
Carefully reverse the motion
and return the ball back to your
chest.
Ball ThrusterTAR G ET: Quadriceps femoris (quads), gluteus maximus and minimus (glutes), hamstrings, erector spinae, rectus
abdominis (abs), deltoids, triceps
55EXERCISES

S TA RT I N G P O S I T I O N : From an
athletic position, hold a medicine ball
to your chest with your arms bent and
initiate a squat (see page 54 for
goblet squat technique): Drop your
torso straight down until your legs are
past parallel; your butt should be as
close to the floor as you can get
without falling backward. Don’t let your
knees bow inward, which can cause
injury. Slowly bring the ball toward
your right foot using your arms; your
shoulders and hips should remain
pointing straight forward. Don’t lean to
the right because the imbalance of the
weight helps to work your left obliques
to maintain proper position.
Wood ChopTAR G ET: Quadriceps femoris (quads), gluteus maximus and minimus (glutes), hamstrings, erector spinae, rectus
abdominis (abs), deltoids, triceps
1–2 Pressing through your heels, raise your torso
straight up and lift the ball up and toward the left
side of your body. When the ball reaches your left shoulder,
twist your core to the left and continue pressing the ball
directly overhead, with both arms fully extended, back straight,
head up high and looking to the left, and your entire core
engaged (abs and glutes contracted) to keep you in a stable
position.
Slowly return the ball
back to the starting position
in a controlled manner.
Repeat to the other side.
That’s 1 rep.
T I P : During the twist and top position, your hips should be pointing forward as much as possible; you’re rotating with your obliques and torso, not your hips. Of course, there will be some hip rotation, but keep it to a minimum.
57EXERCISES

S TA RT I N G P O S I T I O N : From an
athletic position, hold a medicine
ball at your waist with your arms
fully extended.
1 Keeping your lower back
straight and knees slightly bent,
bend at the waist to lower the ball
as close as you can to your legs as
you descend. Don’t bounce at the
bottom of the movement—descend
in a slow, controlled manner and
maintain your balance. Keep your
shoulders back to prevent your
upper back from rounding. Pause.
2 Engage your hamstrings and
glutes to assist your lower back
in raising your body back to start
position.
That’s 1 rep.
Romanian DeadliftTAR G ET: Gluteus maximus and minimus (glutes), hamstrings, erector spinae
59EXERCISES
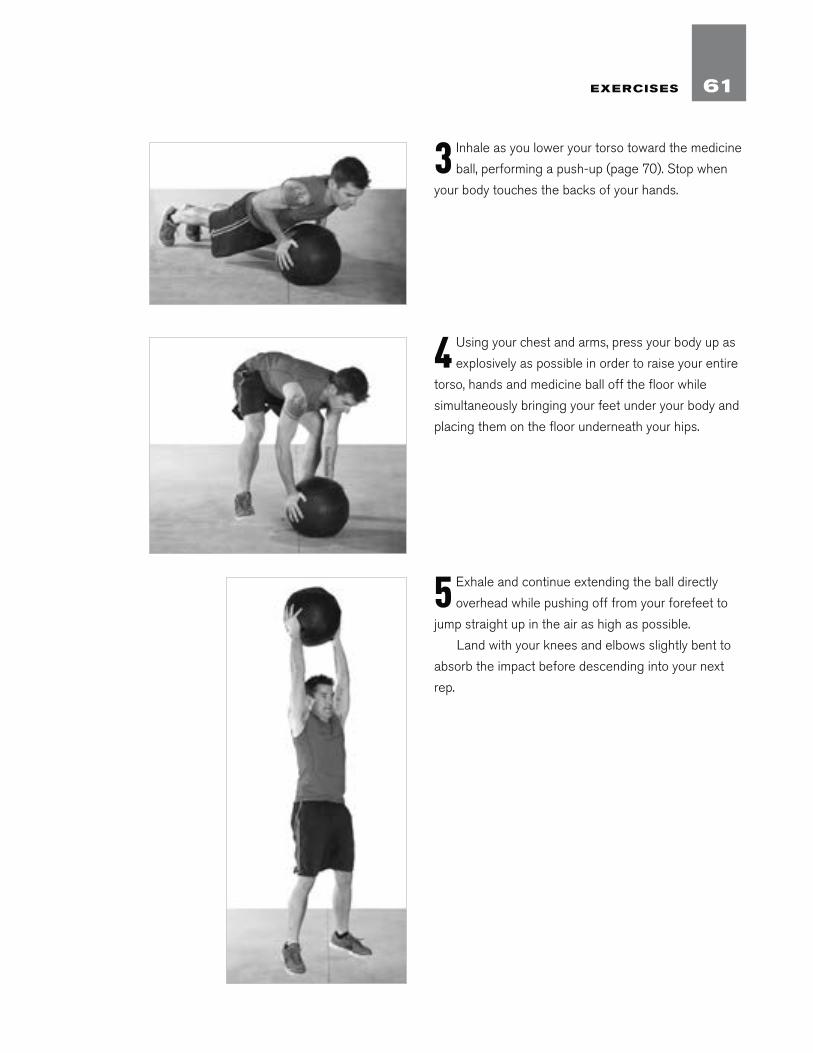
4 Using your chest and arms, press your body up as
explosively as possible in order to raise your entire
torso, hands and medicine ball off the floor while
simultaneously bringing your feet under your body and
placing them on the floor underneath your hips.
3 Inhale as you lower your torso toward the medicine
ball, performing a push-up (page 70). Stop when
your body touches the backs of your hands.
5 Exhale and continue extending the ball directly
overhead while pushing off from your forefeet to
jump straight up in the air as high as possible.
Land with your knees and elbows slightly bent to
absorb the impact before descending into your next
rep.
61EXERCISES
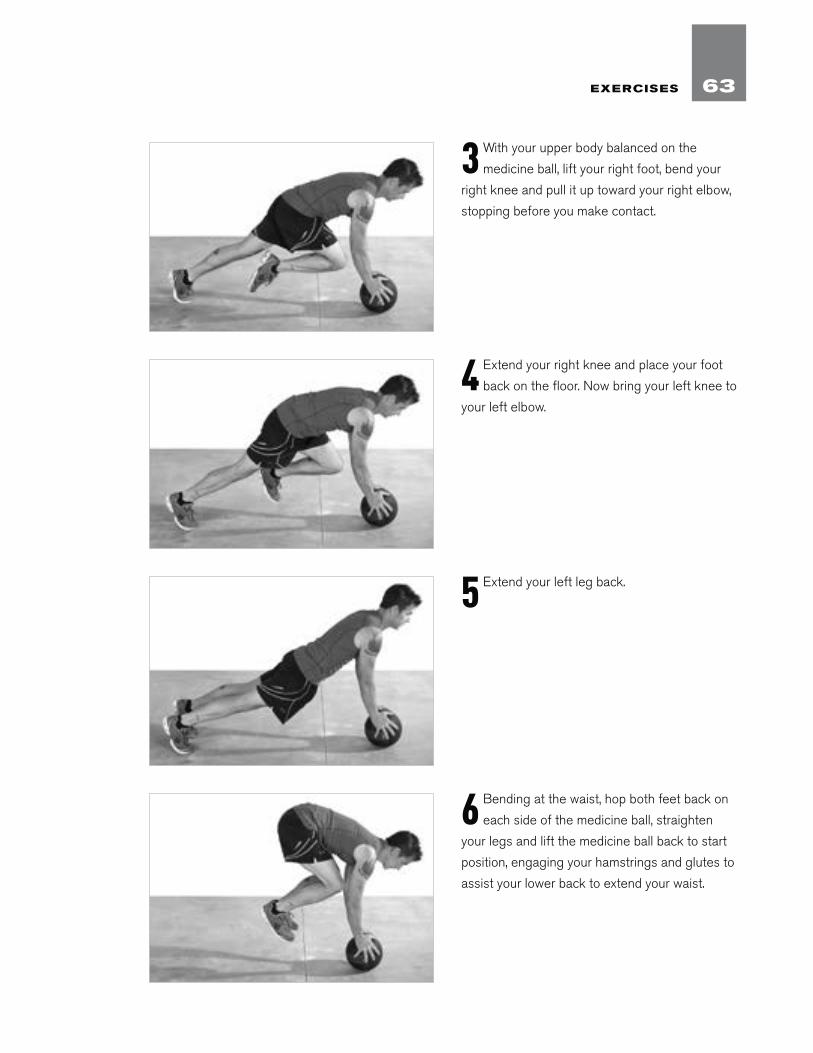
3 With your upper body balanced on the
medicine ball, lift your right foot, bend your
right knee and pull it up toward your right elbow,
stopping before you make contact.
4 Extend your right knee and place your foot
back on the floor. Now bring your left knee to
your left elbow.
5 Extend your left leg back.
6 Bending at the waist, hop both feet back on
each side of the medicine ball, straighten
your legs and lift the medicine ball back to start
position, engaging your hamstrings and glutes to
assist your lower back to extend your waist.
63EXERCISES
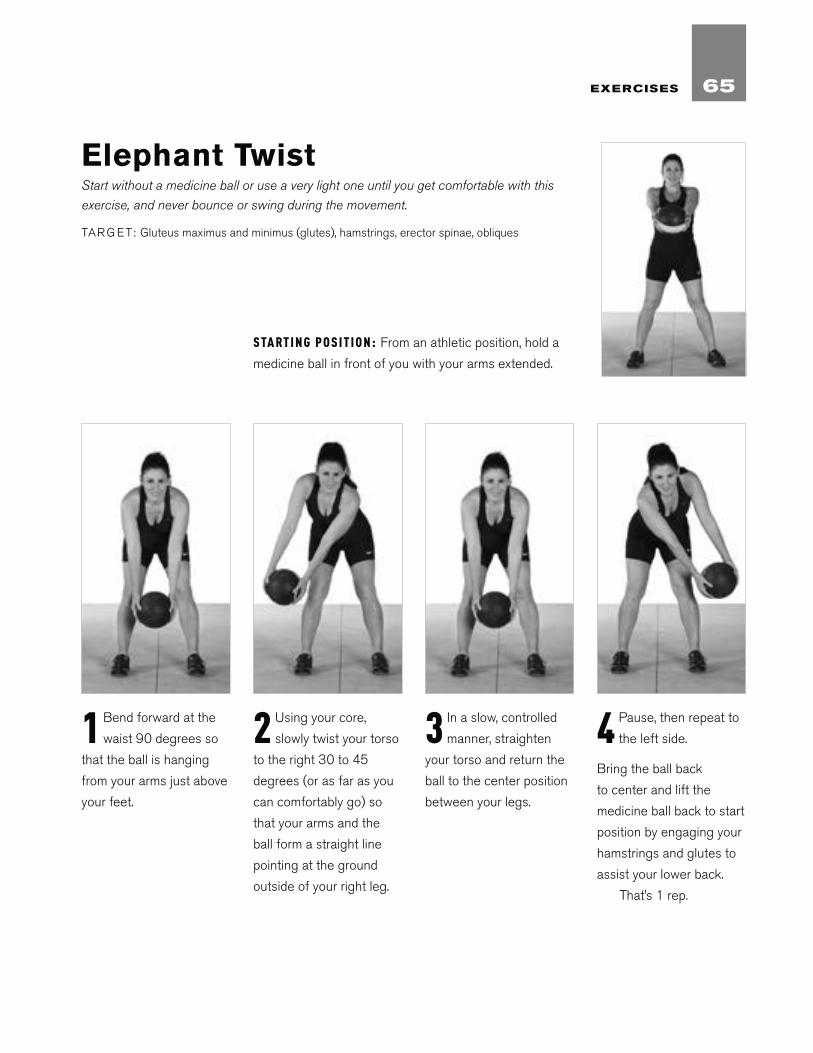
1 Bend forward at the
waist 90 degrees so
that the ball is hanging
from your arms just above
your feet.
2 Using your core,
slowly twist your torso
to the right 30 to 45
degrees (or as far as you
can comfortably go) so
that your arms and the
ball form a straight line
pointing at the ground
outside of your right leg.
3 In a slow, controlled
manner, straighten
your torso and return the
ball to the center position
between your legs.
4 Pause, then repeat to
the left side.
Bring the ball back
to center and lift the
medicine ball back to start
position by engaging your
hamstrings and glutes to
assist your lower back.
That’s 1 rep.
Elephant Twist Start without a medicine ball or use a very light one until you get comfortable with this
exercise, and never bounce or swing during the movement.
TAR G ET: Gluteus maximus and minimus (glutes), hamstrings, erector spinae, obliques
S TA RT I N G P O S I T I O N : From an athletic position, hold a
medicine ball in front of you with your arms extended.
65EXERCISES
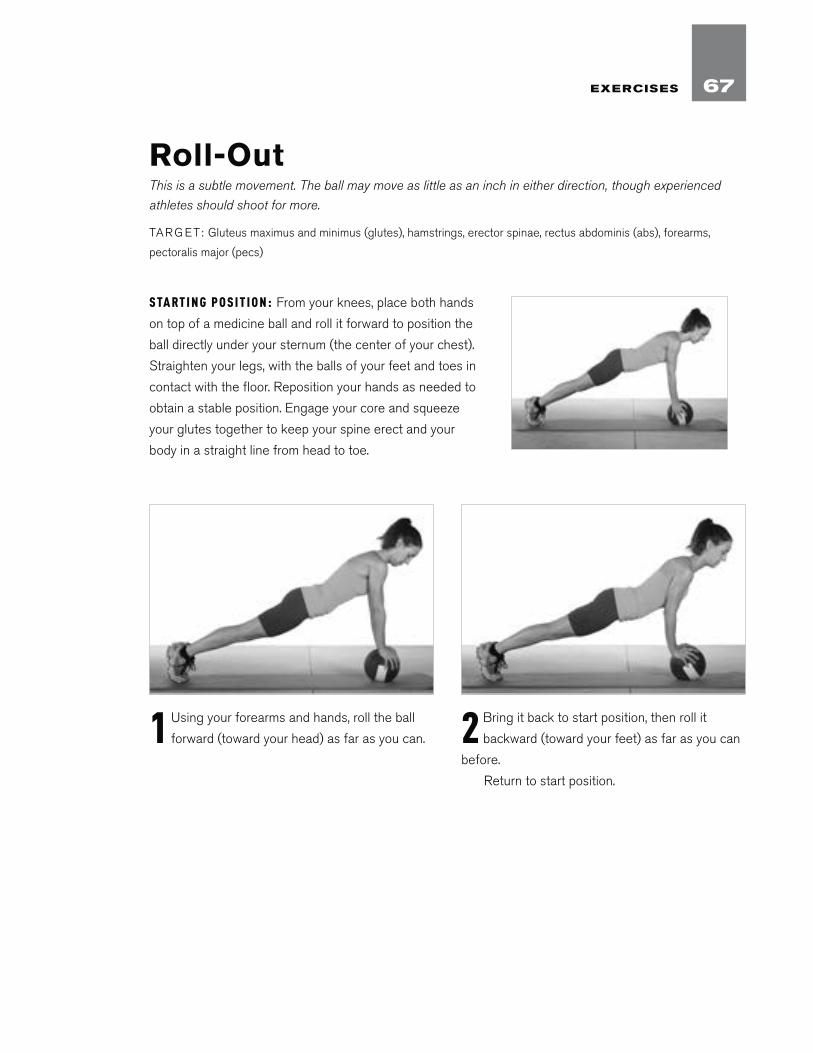
S TA RT I N G P O S I T I O N : From your knees, place both hands
on top of a medicine ball and roll it forward to position the
ball directly under your sternum (the center of your chest).
Straighten your legs, with the balls of your feet and toes in
contact with the floor. Reposition your hands as needed to
obtain a stable position. Engage your core and squeeze
your glutes together to keep your spine erect and your
body in a straight line from head to toe.
Roll-OutThis is a subtle movement. The ball may move as little as an inch in either direction, though experienced
athletes should shoot for more.
TAR G ET: Gluteus maximus and minimus (glutes), hamstrings, erector spinae, rectus abdominis (abs), forearms,
pectoralis major (pecs)
1 Using your forearms and hands, roll the ball
forward (toward your head) as far as you can. 2 Bring it back to start position, then roll it
backward (toward your feet) as far as you can
before.
Return to start position.
67EXERCISES
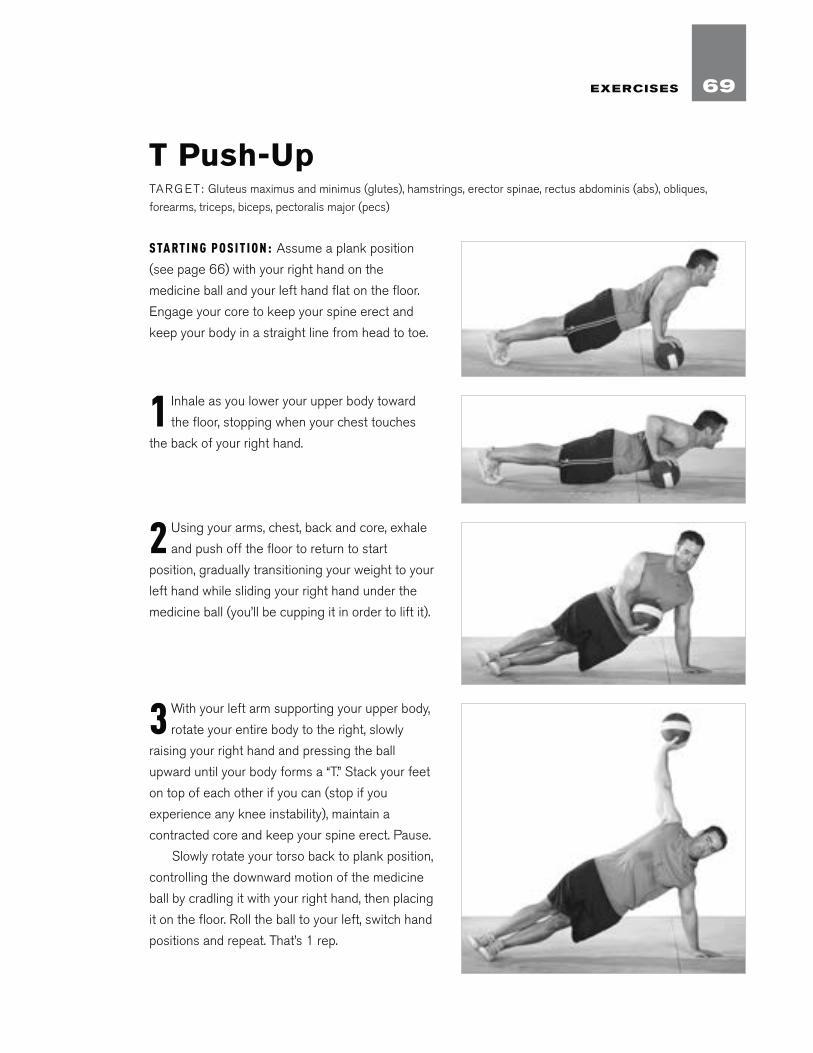
S TA RT I N G P O S I T I O N : Assume a plank position
(see page 66) with your right hand on the
medicine ball and your left hand flat on the floor.
Engage your core to keep your spine erect and
keep your body in a straight line from head to toe.
T Push-UpTAR G ET: Gluteus maximus and minimus (glutes), hamstrings, erector spinae, rectus abdominis (abs), obliques,
forearms, triceps, biceps, pectoralis major (pecs)
1 Inhale as you lower your upper body toward
the floor, stopping when your chest touches
the back of your right hand.
2 Using your arms, chest, back and core, exhale
and push off the floor to return to start
position, gradually transitioning your weight to your
left hand while sliding your right hand under the
medicine ball (you’ll be cupping it in order to lift it).
3 With your left arm supporting your upper body,
rotate your entire body to the right, slowly
raising your right hand and pressing the ball
upward until your body forms a “T.” Stack your feet
on top of each other if you can (stop if you
experience any knee instability), maintain a
contracted core and keep your spine erect. Pause.
Slowly rotate your torso back to plank position,
controlling the downward motion of the medicine
ball by cradling it with your right hand, then placing
it on the floor. Roll the ball to your left, switch hand
positions and repeat. That’s 1 rep.
69EXERCISES
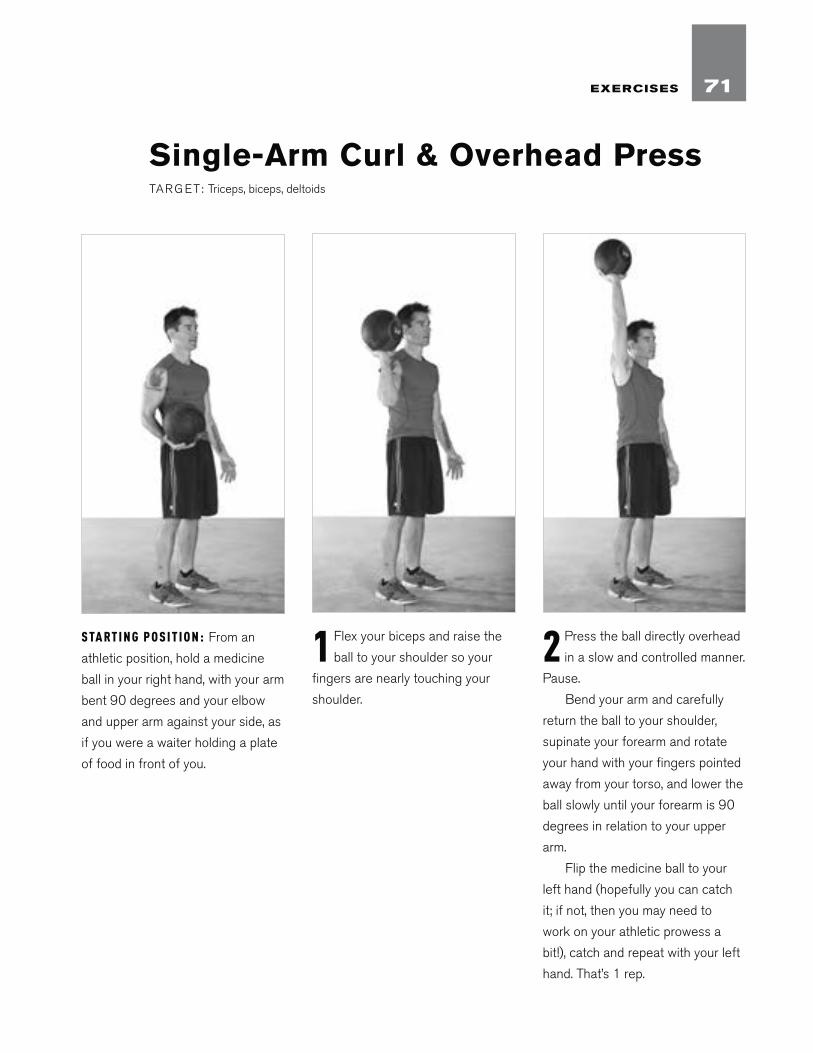
S TA RT I N G P O S I T I O N : From an
athletic position, hold a medicine
ball in your right hand, with your arm
bent 90 degrees and your elbow
and upper arm against your side, as
if you were a waiter holding a plate
of food in front of you.
1 Flex your biceps and raise the
ball to your shoulder so your
fingers are nearly touching your
shoulder.
2 Press the ball directly overhead
in a slow and controlled manner.
Pause.
Bend your arm and carefully
return the ball to your shoulder,
supinate your forearm and rotate
your hand with your fingers pointed
away from your torso, and lower the
ball slowly until your forearm is 90
degrees in relation to your upper
arm.
Flip the medicine ball to your
left hand (hopefully you can catch
it; if not, then you may need to
work on your athletic prowess a
bit!), catch and repeat with your left
hand. That’s 1 rep.
Single-Arm Curl & Overhead PressTAR G ET: Triceps, biceps, deltoids
71EXERCISES
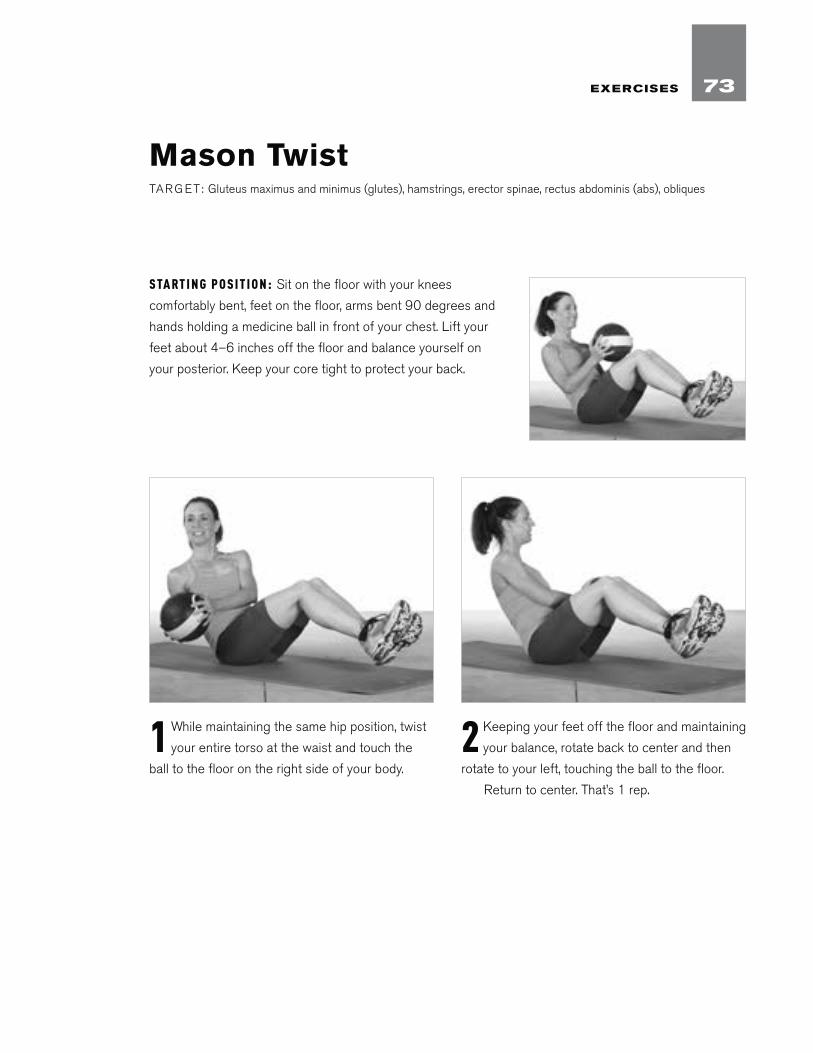
S TA RT I N G P O S I T I O N : Sit on the floor with your knees
comfortably bent, feet on the floor, arms bent 90 degrees and
hands holding a medicine ball in front of your chest. Lift your
feet about 4–6 inches off the floor and balance yourself on
your posterior. Keep your core tight to protect your back.
Mason TwistTAR G ET: Gluteus maximus and minimus (glutes), hamstrings, erector spinae, rectus abdominis (abs), obliques
1 While maintaining the same hip position, twist
your entire torso at the waist and touch the
ball to the floor on the right side of your body.
2 Keeping your feet off the floor and maintaining
your balance, rotate back to center and then
rotate to your left, touching the ball to the floor.
Return to center. That’s 1 rep.
73EXERCISES
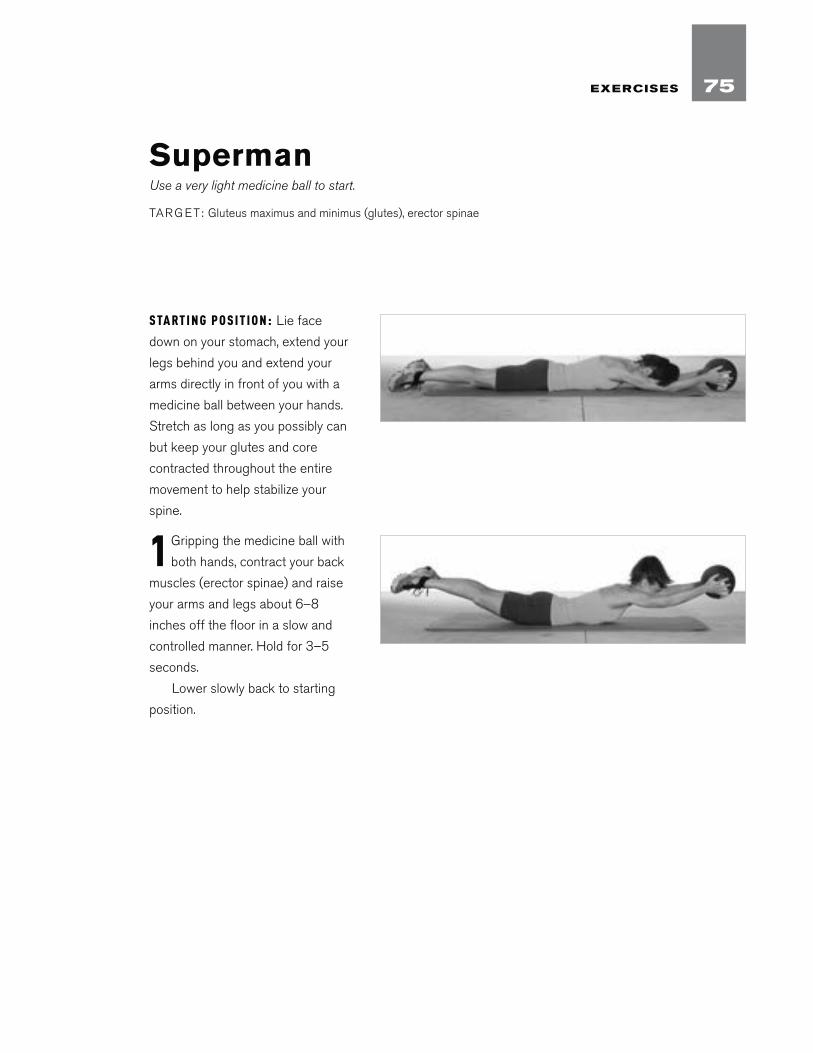
S TA RT I N G P O S I T I O N : Lie face
down on your stomach, extend your
legs behind you and extend your
arms directly in front of you with a
medicine ball between your hands.
Stretch as long as you possibly can
but keep your glutes and core
contracted throughout the entire
movement to help stabilize your
spine.
1 Gripping the medicine ball with
both hands, contract your back
muscles (erector spinae) and raise
your arms and legs about 6–8
inches off the floor in a slow and
controlled manner. Hold for 3–5
seconds.
Lower slowly back to starting
position.
SupermanUse a very light medicine ball to start.
TAR G ET: Gluteus maximus and minimus (glutes), erector spinae
75EXERCISES
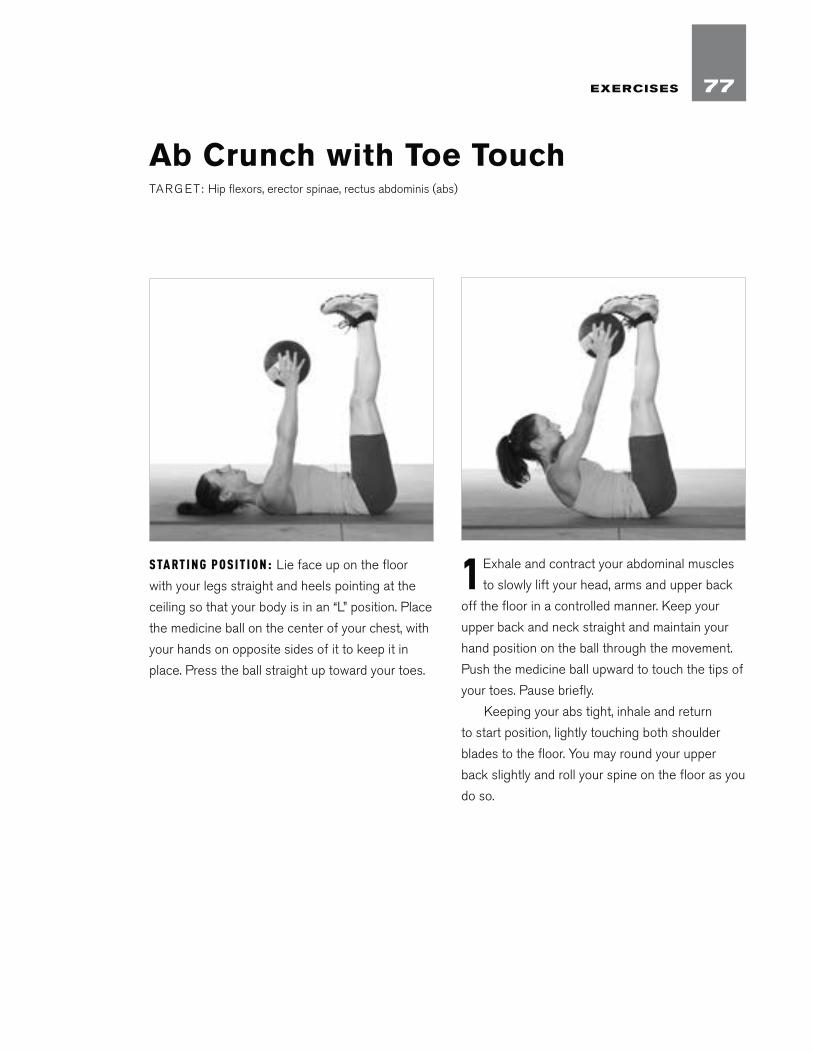
S TA RT I N G P O S I T I O N : Lie face up on the floor
with your legs straight and heels pointing at the
ceiling so that your body is in an “L” position. Place
the medicine ball on the center of your chest, with
your hands on opposite sides of it to keep it in
place. Press the ball straight up toward your toes.
1 Exhale and contract your abdominal muscles
to slowly lift your head, arms and upper back
off the floor in a controlled manner. Keep your
upper back and neck straight and maintain your
hand position on the ball through the movement.
Push the medicine ball upward to touch the tips of
your toes. Pause briefly.
Keeping your abs tight, inhale and return
to start position, lightly touching both shoulder
blades to the floor. You may round your upper
back slightly and roll your spine on the floor as you
do so.
Ab Crunch with Toe TouchTAR G ET: Hip flexors, erector spinae, rectus abdominis (abs)
77EXERCISES

S TA RT I N G P O S I T I O N : Lie face up on the floor and press a
medicine ball to the ceiling with your left hand. Your right arm
should be extended along the floor at about 45 degrees
relative to your torso. Your right leg is extended straight out
from your hip, toes pointing upward. Bend your left knee and
bring your left heel as close to your butt as possible, with your
toe rotated outward about 5–10 degrees.
Turkish Get-UpThis is a complicated move to perfect. The best way to perform this is with a training partner reading the
instructions while you master the movements. Good luck!
TAR G ET: Full body
1 Press your left hand higher while rolling your
torso onto your right forearm, bending at the
elbow and pressing your left heel into the floor to
raise your left glute off the floor while rolling onto
your right hip.
2 With your left hand still holding the medicine
ball, press off the floor with your right forearm
and hand to straighten your right arm and place
your hand on the floor; press your hips upward to
lift your butt off the floor. You’re now supported by
your left foot flat on the ground, the outside of
your right foot and your right hand.
79EXERCISES

Advanced Medicine Ball Exercises
81
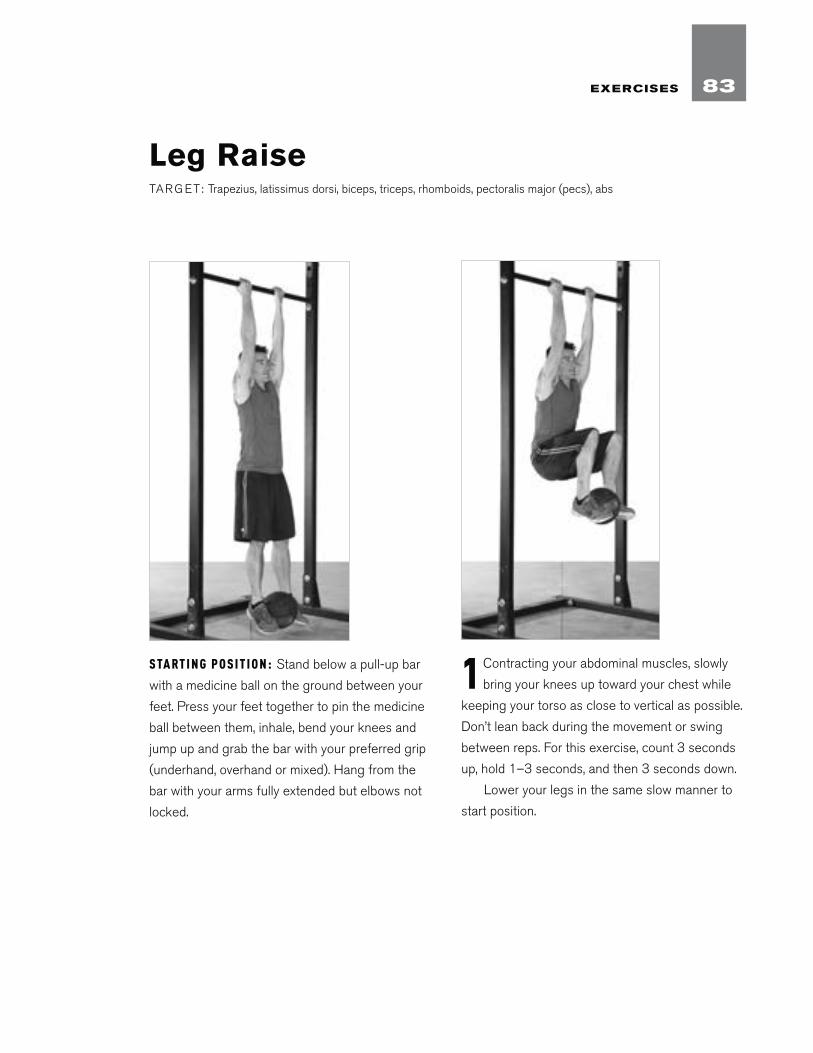
S TA RT I N G P O S I T I O N : Stand below a pull-up bar
with a medicine ball on the ground between your
feet. Press your feet together to pin the medicine
ball between them, inhale, bend your knees and
jump up and grab the bar with your preferred grip
(underhand, overhand or mixed). Hang from the
bar with your arms fully extended but elbows not
locked.
1 Contracting your abdominal muscles, slowly
bring your knees up toward your chest while
keeping your torso as close to vertical as possible.
Don’t lean back during the movement or swing
between reps. For this exercise, count 3 seconds
up, hold 1–3 seconds, and then 3 seconds down.
Lower your legs in the same slow manner to
start position.
Leg RaiseTAR G ET: Trapezius, latissimus dorsi, biceps, triceps, rhomboids, pectoralis major (pecs), abs
83EXERCISES
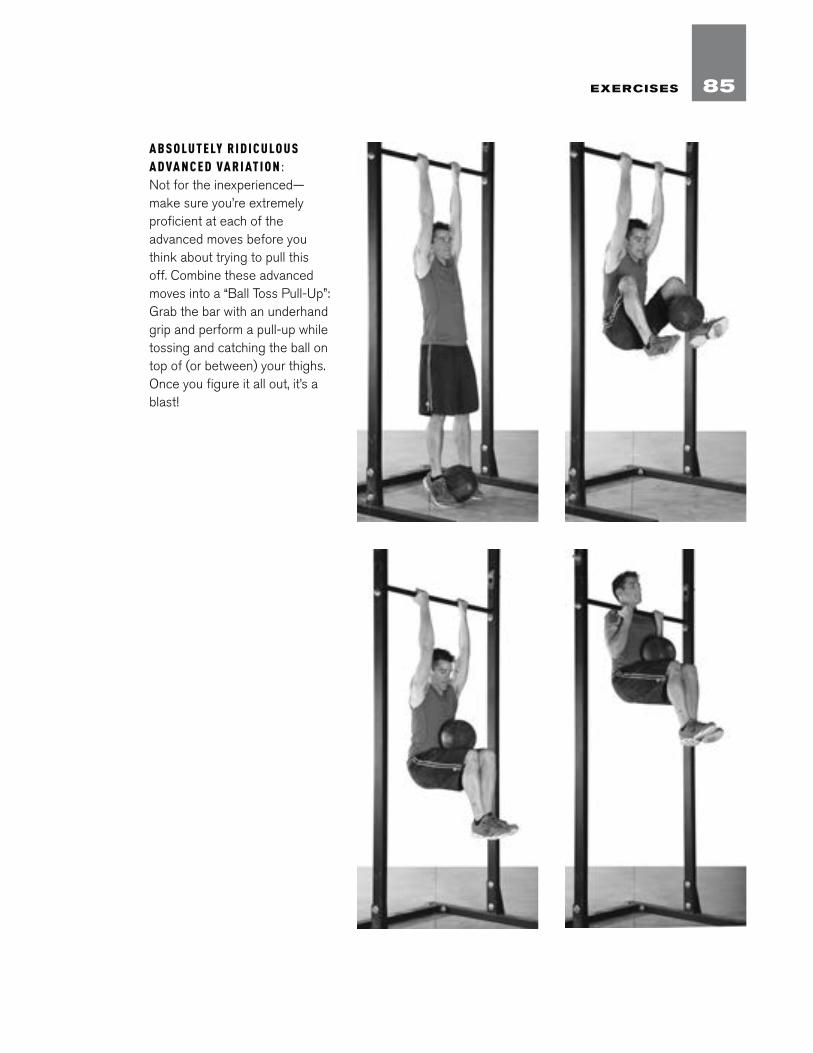
A B S O LU T E LY R I D I C U LO U S A D VA N C E D VA R I AT I O N :
Not for the inexperienced—
make sure you’re extremely
proficient at each of the
advanced moves before you
think about trying to pull this
off. Combine these advanced
moves into a “Ball Toss Pull-Up”:
Grab the bar with an underhand
grip and perform a pull-up while
tossing and catching the ball on
top of (or between) your thighs.
Once you figure it all out, it’s a
blast!
85EXERCISES
Medicine balls are a fantastic way to add weights to calisthenics
but there’s a lot of fun to be had just by tossing a medicine ball.
Explosively throwing a medicine ball as far as you can, twisting and
tossing to a partner or heaving one down against the floor or up a
wall can all help to strengthen and shred your body as well as forge
an iron core. And the best part? These tosses, drills and games are
a blast!
Medicine Ball Tosses
87
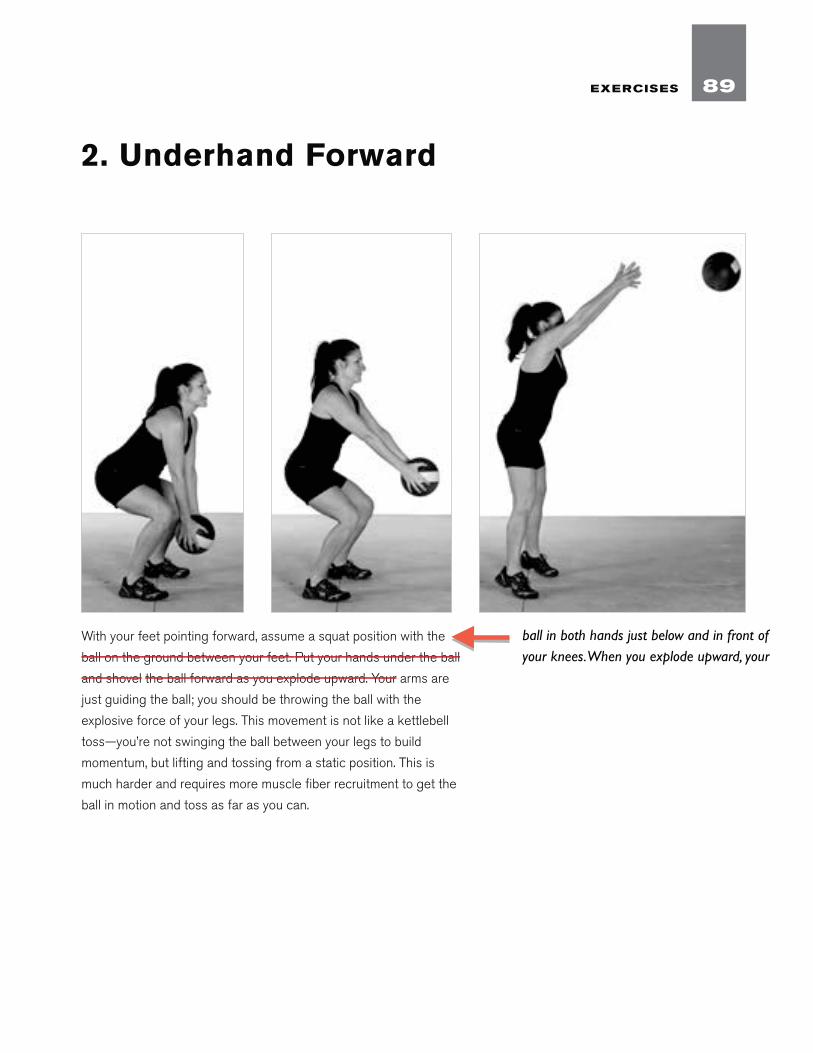
With your feet pointing forward, assume a squat position with the
ball on the ground between your feet. Put your hands under the ball
and shovel the ball forward as you explode upward. Your arms are
just guiding the ball; you should be throwing the ball with the
explosive force of your legs. This movement is not like a kettlebell
toss—you’re not swinging the ball between your legs to build
momentum, but lifting and tossing from a static position. This is
much harder and requires more muscle fiber recruitment to get the
ball in motion and toss as far as you can.
2. Underhand Forward
89EXERCISES
ball in both hands just below and in front of your knees. When you explode upward, your
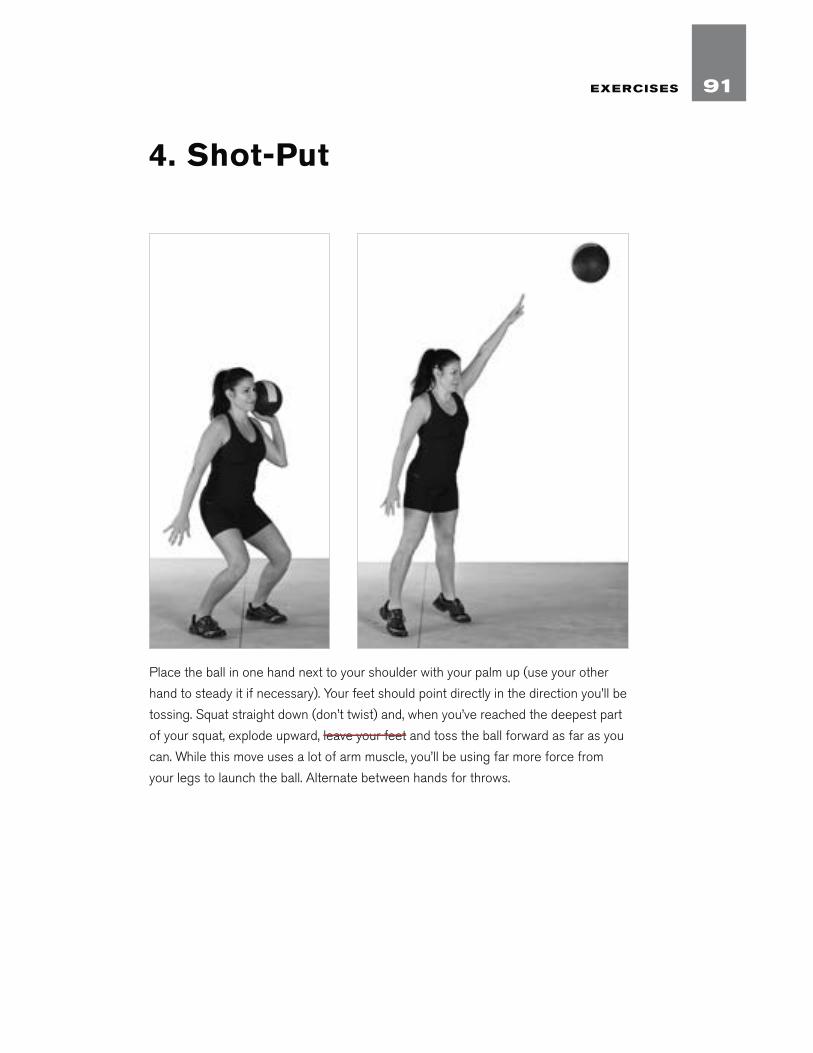
Place the ball in one hand next to your shoulder with your palm up (use your other
hand to steady it if necessary). Your feet should point directly in the direction you’ll be
tossing. Squat straight down (don’t twist) and, when you’ve reached the deepest part
of your squat, explode upward, leave your feet and toss the ball forward as far as you
can. While this move uses a lot of arm muscle, you’ll be using far more force from
your legs to launch the ball. Alternate between hands for throws.
4. Shot-Put
91EXERCISES
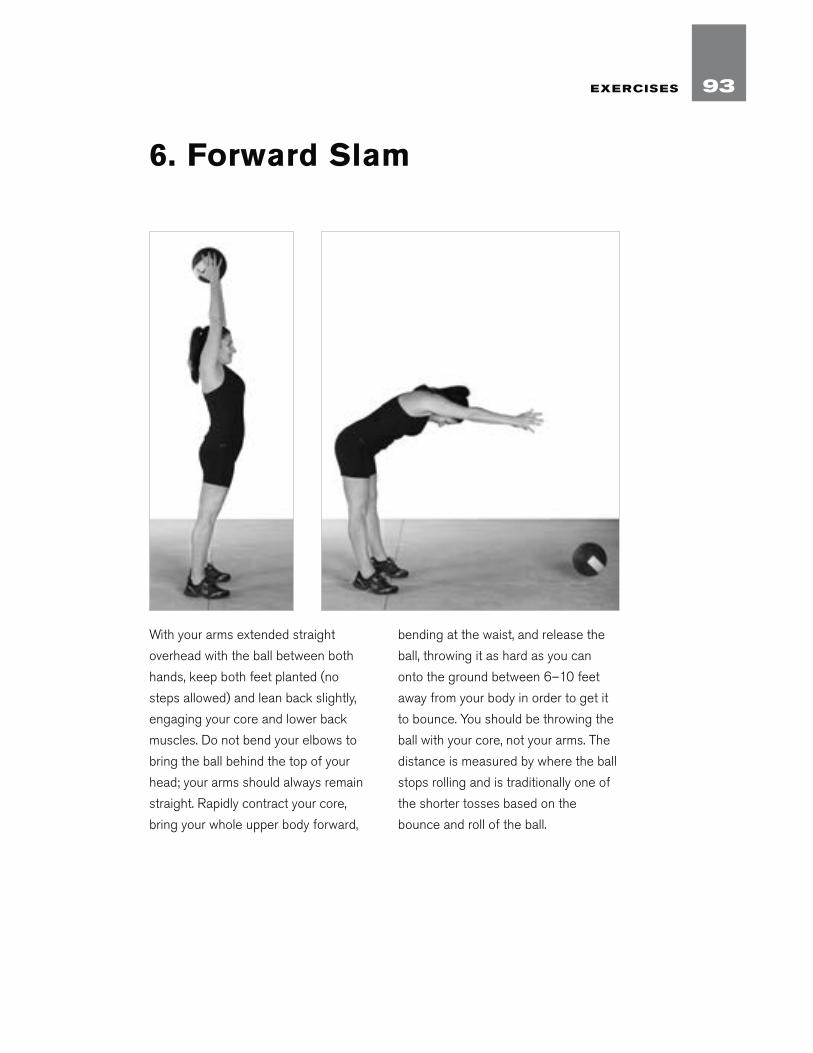
With your arms extended straight
overhead with the ball between both
hands, keep both feet planted (no
steps allowed) and lean back slightly,
engaging your core and lower back
muscles. Do not bend your elbows to
bring the ball behind the top of your
head; your arms should always remain
straight. Rapidly contract your core,
bring your whole upper body forward,
bending at the waist, and release the
ball, throwing it as hard as you can
onto the ground between 6–10 feet
away from your body in order to get it
to bounce. You should be throwing the
ball with your core, not your arms. The
distance is measured by where the ball
stops rolling and is traditionally one of
the shorter tosses based on the
bounce and roll of the ball.
6. Forward Slam
93EXERCISES
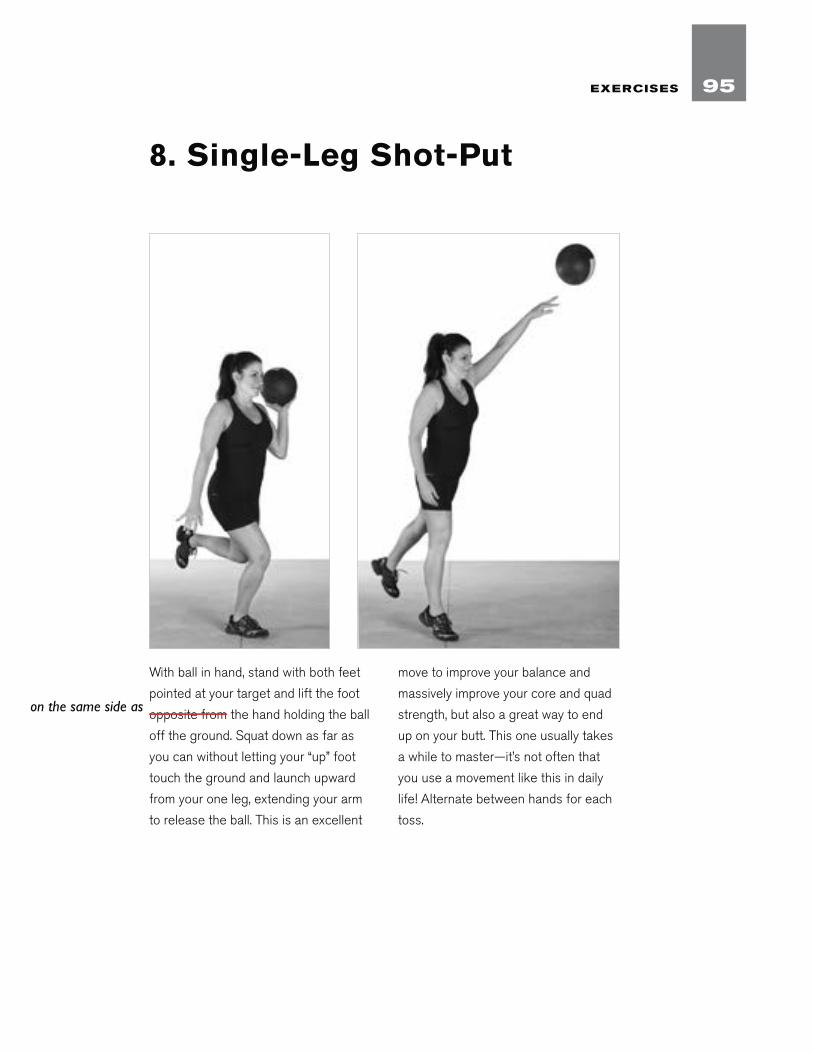
With ball in hand, stand with both feet
pointed at your target and lift the foot
opposite from the hand holding the ball
off the ground. Squat down as far as
you can without letting your “up” foot
touch the ground and launch upward
from your one leg, extending your arm
to release the ball. This is an excellent
move to improve your balance and
massively improve your core and quad
strength, but also a great way to end
up on your butt. This one usually takes
a while to master—it’s not often that
you use a movement like this in daily
life! Alternate between hands for each
toss.
8. Single-Leg Shot-Put
95EXERCISES
on the same side as
Getting in shape is hard work; there’s no real way around it. You
need to eat right, exercise and recover in between workouts, not to
mention try and function in your daily life. Some exercises are more
enjoyable than others, but none are quite as exciting as playing
competitive games with yourself or a partner. Whether you’re on
your own or facing off against a friendly opponent, challenge
yourself with these games by giving your all to each sprint, lift, carry
or toss and you’ll reap the endurance, strength, speed and weight-
loss benefits. These games were designed to enhance athletic
performance and erase the doldrums and monotony of plain old
cardio while using medicine ball tosses, lifts and carries. They’ll
augment squats and sprints to stoke your metabolism, torch fat and
build a lean, strong physique. “Toss and Run” was actually inspired
by and adapted from an exercise performed at some NFL training
camps to build functional strength, develop a strong core and
support muscles for the rigors of a football season.
Games
97
D E S C R I P T I O N : Using 4 cones, place 2 cones
side by side and the other pair about 10 feet
away. Stand next to a pair of cones and face your
partner, who’s standing next to the other pair of
cones. Choose who goes first. Begin tossing the
ball as far as you can toward your partner’s cones.
Your partner will move his “distance cone” (just
pick one of the cones to move) to the spot where
your ball bounces. In the case of the forward
slam, it’ll be where the ball finishes rolling. Your
opponent will make his next throw from there,
whether it’s farther or closer than the original 10
feet. The “starting cone” will remain in place to
mark the spot from which you began the match. A
match is played by alternating through all 9 tosses
on page 87 to determine a winner for each
round. The winner is the person whose distance
cone is still closest to his starting cone.
Cross-BallThis game started out pretty simply as two players
trying to toss a light (4- or 6-pound) medicine ball
past each other within the confines of a “goal”
made up by 2 cones. Immediately, it was a hit and
Jason (author of Ultimate Jump Rope Workouts)
and I started playing a ton of matches daily and
refined the rules in a whole host of ways. We
developed penalties, different scoring plays and
even a round-robin tournament with multiple
players on each team where the action never
stopped. Maybe in retrospect we loved the game a
little too much and tinkered with the rules a little too
often. So here it is in the original form. If you’d like
to expand on it, then have a blast.
A L LO W E D TO S S E S : Shot-Put, Chest Pass, Hip
Toss, Underhand Forward
P L E A S E N OT E : There’s some risk associated
with this game since you and a partner will
be heaving a medicine ball toward each other
with the intention of catching it off the bounce.
Overhand forward and underhand backward are
too dangerous to be used in this type of game as
the ball can be thrown with high velocity. Only use
the allowed tosses and be cautious—this game is
for fun and fitness, not trying to hurt each other!
Always be careful when catching a bounced
medicine ball as you can easily injure your hands,
arms or any part of your body that unintentionally
comes in contact with the ball. Never try to catch a
ball that has not bounced in the field of play.
D E S C R I P T I O N : Set up 2 goals with cones 12 feet
apart from each other—this area is the field of
play. Both goals should be 8 feet wide. The goal
is to toss the ball so that it bounces in the field
of play and then through the opponent’s goal;
the opponent’s goal is to catch the ball with both
hands before it touches the ground inside their
goal. There is no point scored unless the ball
touches the ground, despite bouncing over the
goal line.
All tosses take place from each goal line;
there’s no stepping forward into the field of play in
order to toss the ball. That’s a foul and the ball is
turned over to the opponent.
S C O R I N G :
then touches the ground on the opposite side
of the opponent’s goal line
their goal line without it bouncing in the field
of play
ball out of bounds on the outside of either of
your opponent’s goal cones. The first one to 5
points wins.
99EXERCISES

PART 4: APPE N D IX
101
Once you’ve completed a basic warm-up (like
5 minutes of walking on a treadmill or elliptical, 50
jumping jacks, 50 toe touches or similar), use the
“Dynamic Yoga Warm-Up” on page 104. This
sequence of movements will get your lower body
ready.
POOR MAN’S YOGA DYNAM IC WAR M-U P Dynamic Yoga Warm-Up on page 104 is called
the “Poor Man’s Yoga” sequence because it’s
a combination of moves that requires balance,
flexibility and strength while providing great post–
warm up dynamic activation of your lower body
and core. This sequence will get the muscles and
joints of your lower body ready for the workout
and will make sure your muscles, tendons
and ligaments have full range of motion and
sufficient pliability for your workout. Remember,
this isn’t a stretch per se; it’s a fluid series of
sequential movements to work your body on
multiple planes using multiple muscles across
multiple joints—the true definition of a dynamic
compound movement. Be sure to perform each
movement carefully and correctly to maximize the
benefits. I greatly recommend that you practice
all three of these moves by themselves before
you do them in combination, especially the lunge.
Like any other exercise, performing warm-ups,
stretches or dynamic movements like these is a
complete waste of time and can potentially cause
an injury if done with bad form. Bad lunge form
can cause you to bow your upward knee inward
and potentially damage your knee—bad news.
Plus, you may need to build up your balance from
position to position in order to maintain proper
form. Take your time, learn how to do it right and
then worry about adding intensity or frequency.
Don’t rush movements simply to move on; just
focus on doing them correctly and it will become
second nature.
After you’ve completed the “yoga” sequence,
be sure to also warm up your upper body. Work
through the movements on pages 106 to 108
to prepare your arms, shoulders, chest and back.
These exercises also serve as great stretches
for your entire body after you’re done with your
workout.
T I P : Walk to the gym if you can. One to two miles of walking will raise your body temperature, engage your core and warm up your legs. Aside from the physical benefits, this is a great way to clear your mind and mentally prepare before a workout and to cool down and loosen up tight muscles on your way home.
103EXERCISES

3 Slowly press up from your left
heel and push your body back
into a standing position with both
feet parallel.
4 Bend at the waist and bring
your head toward your knees,
placing your hands on the backs of
your lower calves and pulling
slightly to assist in getting your
noggin closer to your knees.
5 Release your hands and slowly
return to starting position.
That’s 1 rep.
Repeat with your right leg. Perform
5 reps on each side. Never bounce
or yank with your arms to pull
yourself into position. As you repeat,
each subsequent movement should
provide a little deeper range of
motion.
105EXERCISES
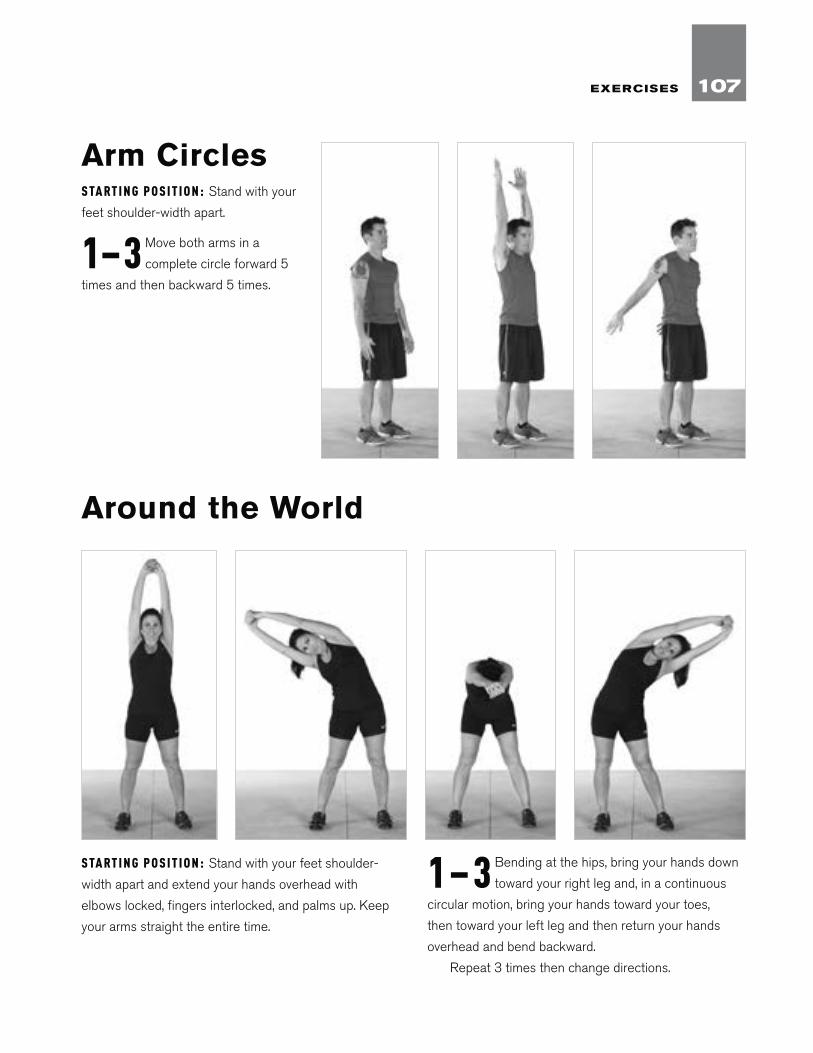
Arm CirclesS TA RT I N G P O S I T I O N : Stand with your
feet shoulder-width apart.
1–3 Move both arms in a
complete circle forward 5
times and then backward 5 times.
Around the World
S TA RT I N G P O S I T I O N : Stand with your feet shoulder-
width apart and extend your hands overhead with
elbows locked, fingers interlocked, and palms up. Keep
your arms straight the entire time.
1–3 Bending at the hips, bring your hands down
toward your right leg and, in a continuous
circular motion, bring your hands toward your toes,
then toward your left leg and then return your hands
overhead and bend backward.
Repeat 3 times then change directions.
107EXERCISES

HHip Toss, 96
Hyperextension, 25
IInjuries, 21, 26–27, 31–32
symptoms, 32
Intensity, 38, 46
LLeapfrog, 98
Leg Raise, 83
Lumberjack Stretch, 108
Lunge and Twist, 58
MMason Twist, 73
Medical clearance, 21, 23–24
Medicine balls
FAQs, 19–20
history, 14, 16
name, origin, 14
types, 14, 19–20
use, 15–16, 17–18
Motivation, 33–34
Muscle, lean, 21
Muscle gain, as goal, 35
Muscle soreness, 26
NNutrition plans, 22
OOne-Handed Push-Up, 68
Out and Back Sprints, 98
Overhead Forward Toss, 88
Overhead Press, 71
Overhead Press and Triceps Extension, 72
Overtraining, 20
PPain, 26–27, 31–32
Plank, 66
Programs, 38–50
advanced, 38, 45–50
basic, 38, 39–44
Pull-Up, 82
Push-Up, 70
RRange of motion (ROM), 26
Ready position, 25
Rest, 40, 46
importance, 20, 21
Roll-Out, 67
Romanian Deadlift, 59
Rotation, 25
SShot Put, 91
Shot-Put Twist, 92
Shoulders and Upper Back Stretch, 106
Single-Arm Curl and Overhead Press, 71
Single-Leg Shot Put, 95
Sit-Up, 76
Speed, as goal, 35
Squat Jump with Foot Toss, 84–85
Stretching/warming-up, 30–31, 102–108
Superman, 75
111INDEX
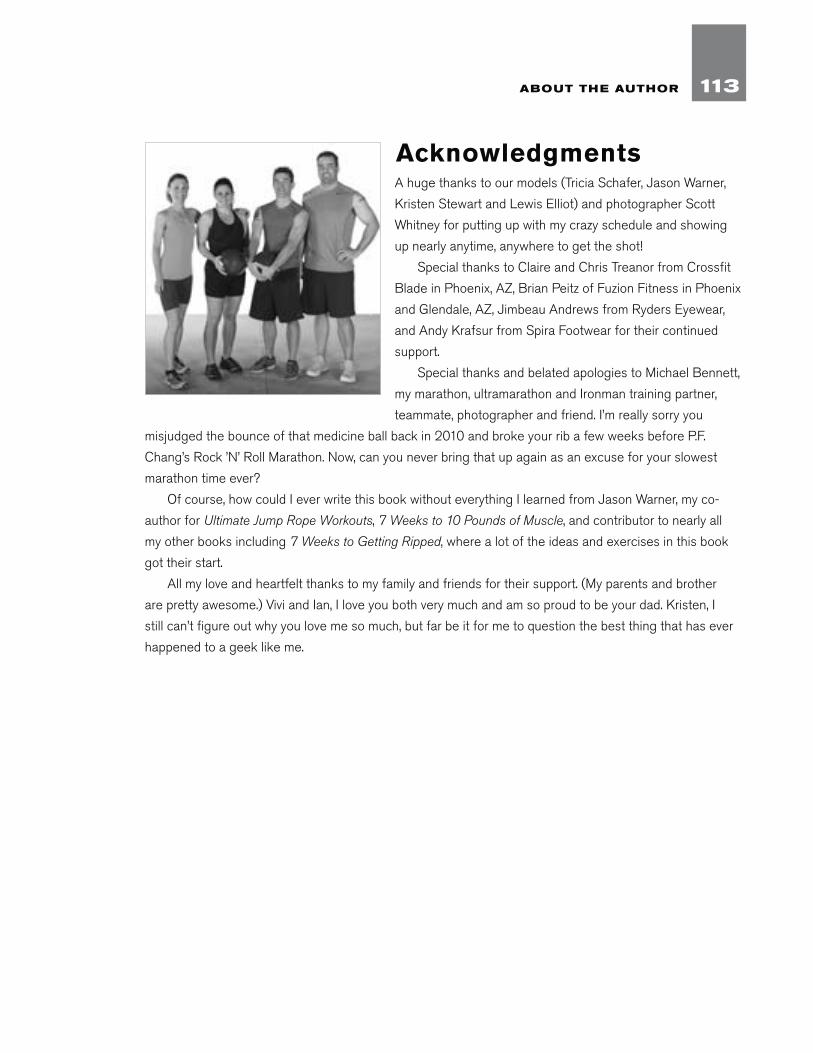
AcknowledgmentsA huge thanks to our models (Tricia Schafer, Jason Warner,
Kristen Stewart and Lewis Elliot) and photographer Scott
Whitney for putting up with my crazy schedule and showing
up nearly anytime, anywhere to get the shot!
Special thanks to Claire and Chris Treanor from Crossfit
Blade in Phoenix, AZ, Brian Peitz of Fuzion Fitness in Phoenix
and Glendale, AZ, Jimbeau Andrews from Ryders Eyewear,
and Andy Krafsur from Spira Footwear for their continued
support.
Special thanks and belated apologies to Michael Bennett,
my marathon, ultramarathon and Ironman training partner,
teammate, photographer and friend. I’m really sorry you
misjudged the bounce of that medicine ball back in 2010 and broke your rib a few weeks before P.F.
Chang’s Rock ’N’ Roll Marathon. Now, can you never bring that up again as an excuse for your slowest
marathon time ever?
Of course, how could I ever write this book without everything I learned from Jason Warner, my co-
author for Ultimate Jump Rope Workouts, 7 Weeks to 10 Pounds of Muscle, and contributor to nearly all
my other books including 7 Weeks to Getting Ripped, where a lot of the ideas and exercises in this book
got their start.
All my love and heartfelt thanks to my family and friends for their support. (My parents and brother
are pretty awesome.) Vivi and Ian, I love you both very much and am so proud to be your dad. Kristen, I
still can’t figure out why you love me so much, but far be it for me to question the best thing that has ever
happened to a geek like me.
113ABOUT THE AUTHOR


