Embed Size (px)
Citation preview
User Guide
MD Industrial 3D Printer
MINGDA TECHNOLOGY CO.,LTD
Legal Statement
Shenzhen MINGDA Technology Co., Ltd, all rights reserved. It won't be informed if the information in this article was changed in the future. MINGDA doesn't made any type of guarantee about this information, including but not limited to marketability and special-purpose applicability of implied warranties. MIINGDA Company won't be responsible for the incidental or indirect damages which was caused by the error of this text, or due to providing, presentation or using of this information. MIGNDA is a registered trademark of Shenzhen MINGDA Technology Co., Ltd. The WindowsXP, WindowsVista and Windows7, Windows8 is the registrar of their respective owners.
Contents
◎ Legal Statement ◎ Contents 1 Brief Introduction ................................................................................................................. 1
User-guide instructions ................................................................................................................. 1 Learn more information................................................................................................................. 1 Safety precautions ......................................................................................................................... 1
2 Overview ............................................................................................................................. 2 View of 3D Printer .......................................................................................................................... 2 Tool box accessories ...................................................................................................................... 3
3 Installation ........................................................................................................................... 3 Take Out the Machine .................................................................................................................... 3 Install the Material Shelf ................................................................................................................ 3 Plugged in ...................................................................................................................................... 3 Turn on the power switch .............................................................................................................. 3 Dismantle the Model ..................................................................................................................... 3 Paste the Masking Tape ................................................................................................................. 4 Install the Material ( for example, PLA materials ) ........................................................................ 4
4 Manual Calibration ............................................................................................................... 5 Fine Tune the Printing Platform ..................................................................................................... 5 Adjusting the overall height of the Printing Platform.................................................................... 5 Printing the Test Files ..................................................................................................................... 5
5 Printing Operation ................................................................................................................ 6 Display panel .................................................................................................................................. 6
6 Software .............................................................................................................................. 7 Download Printing Software .......................................................................................................... 7 Install the Printing Software ( for example, Cura ) ...................................................................... 7 Create STL File ................................................................................................................................ 8 Cura Overview ............................................................................................................................... 9 Open STL File with Cura ............................................................................................................... 11 Model rotation, scaling, mirroring with Cura .............................................................................. 12 Transfer stl Model into gcode Document with Cura .................................................................... 13 Printing Parts ............................................................................................................................... 14 Pause and Continue to Print ........................................................................................................ 14 Power Outages ............................................................................................................................. 14
7 General Maintenance .......................................................................................................... 14 Daily Preventive Maintenance ..................................................................................................... 14 500 hours maintenance ............................................................................................................... 15 1000 hours maintenance ............................................................................................................. 15
8 Trouble Removal ................................................................................................................. 15 9 Support ............................................................................................................................... 16
Customer Support ....................................................................................................................... 16 Working Computer Specifications .............................................................................................. 16 MINGDA Limited Warranty Statement ....................................................................................... 16
10 Quality Assurance...................................................................................................................... 16
- 1 -
MINGDA TECHNOLOGY CO.,LTD
www.md-3d.com
1 Brief Introduction MD Series Industrial 3D Printers adhere to the design concept of the simple to the extreme. It can print
product quickly and easily, even if you've never used a 3D Printer. The printer prints the model with PLA or ABS, so the products will be strong and durable. You can make drilling,
tapping, grinding and painting on the PLA or ABS models. MD Series 3D Printers combine proprietary hardware, software and materials technologies creatively.
Welcome to a new world of 3D printing!
User-Guide Instructions
This User Guide has been carefully organized into "Installation", "Operation", "Maintenance" and "Troubleshooting" sections for client to read and understand. Be sure to read the sections carefully to get the best use of your 3D printer.
Learn More Information
SD card provides the electronic user guide. This guide provides information as following topics: 1. troubleshooting information 2. important safety statements and regulatory information 3. Printing supplies related information 4. Detailed instructions for use You can also find more information on the official website. http://www.md-3d.com http://www.3dMINGDA.com
Safety Precautions
The following precautions ensure that the customer uses the printer correctly and protects the printer from damage. Please always follow these precautions.
1. Use the specified power supply voltage. Do not connect multiple devices to the printer's power outlet to avoid overload.
2. Make sure the printer is properly grounded, Or it may cause electric shock, fire or electromagnetic interference.
3. Contact your after-sales or local service before disassembling or repairing the printer by yourself. Check the "Support" section in the User Guide.
4. It is recommended to use the power cord that came with the printer. Do not damage, cut or repair the power cord. Damaged power cords present a risk of fire or electric shock. Please replace the damaged power cord with a quality-certified power cord. Do not allow metal or liquid to come into the printer and contact with the internal parts of the printer. It may cause fire, electric shock or other serious accident.
5. Turn off the printer and unplug the power cord from the electrical outlet under the following conditions: 1) The printer emits smoke or emits an abnormal smell. 2) The printer emits abnormal noise that has never occurred during normal operation. 3) Metal or liquid (not required for cleaning or routine maintenance) come into the printer. 4) Thunderstorm weather. 5) Power off
This guide contains the following categories.
Note: potentially dangerous situation, if not avoided, may result in minor or moderate injury.
Warning: potentially dangerous situation, if not avoided, may result in serious injury.
High temperature surface: The high temperature surface symbol indicates the presence of high temperature
equipment. When working near hot parts, be careful and wear safety gloves.
Gloves: When performing some maintenance procedures, the machine may be hot, so need to use gloves to
avoid burns.
Safety glasses: Please wear safety glasses to avoid eye injury.
Lifting hazard: Two or more people should cooperate when lifting, so as not to cause serious injury.
Recovery: Use the correct method for recovering materials and packaging materials.
- 2 -
MINGDA TECHNOLOGY CO.,LTD
www.md-3d.com
ESD: Use standard electrostatic discharge (ESD) precautions when working with or near electronic
components.
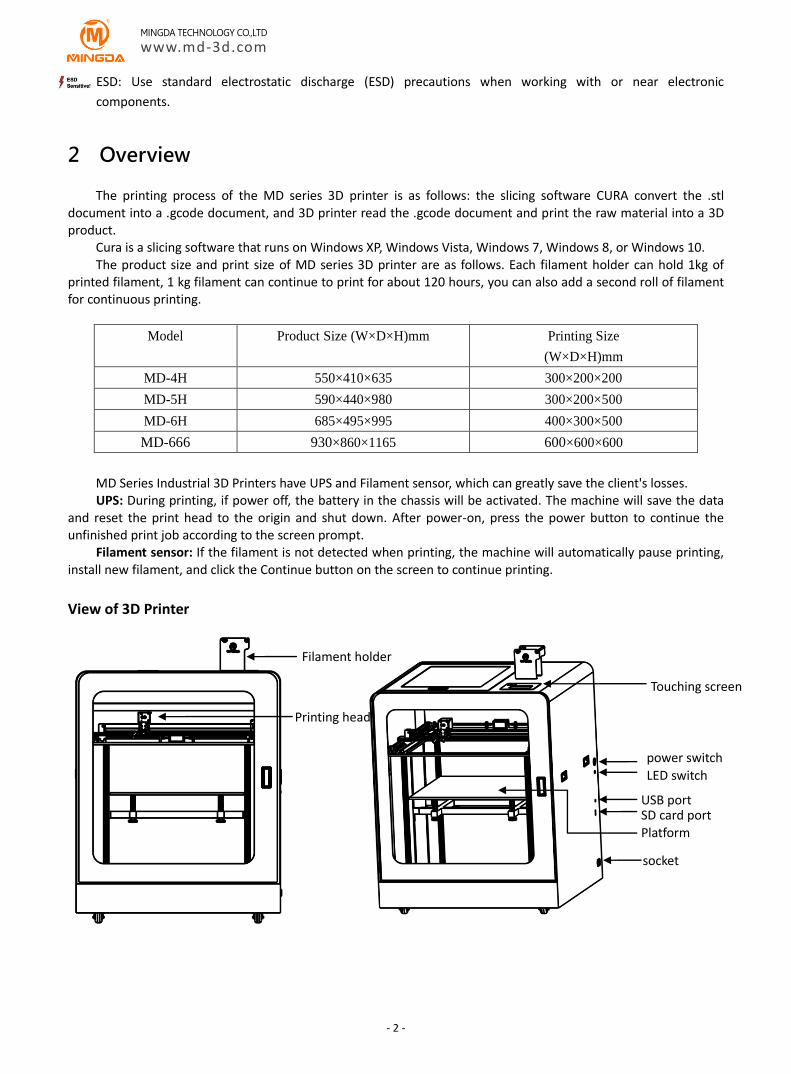
2 Overview
The printing process of the MD series 3D printer is as follows: the slicing software CURA convert the .stl document into a .gcode document, and 3D printer read the .gcode document and print the raw material into a 3D product.
Cura is a slicing software that runs on Windows XP, Windows Vista, Windows 7, Windows 8, or Windows 10. The product size and print size of MD series 3D printer are as follows. Each filament holder can hold 1kg of
printed filament, 1 kg filament can continue to print for about 120 hours, you can also add a second roll of filament for continuous printing.
Model Product Size (W×D×H)mm Printing Size
(W×D×H)mm
MD-4H 550×410×635 300×200×200
MD-5H 590×440×980 300×200×500
MD-6H 685×495×995 400×300×500
MD-666 930×860×1165 600×600×600
MD Series Industrial 3D Printers have UPS and Filament sensor, which can greatly save the client's losses. UPS: During printing, if power off, the battery in the chassis will be activated. The machine will save the data
and reset the print head to the origin and shut down. After power-on, press the power button to continue the unfinished print job according to the screen prompt.
Filament sensor: If the filament is not detected when printing, the machine will automatically pause printing, install new filament, and click the Continue button on the screen to continue printing.
View of 3D Printer
Filament holder
Printing head
Touching screen
power switch
LED switch
USB port SD card port
Platform
socket
- 3 -
MINGDA TECHNOLOGY CO.,LTD
www.md-3d.com
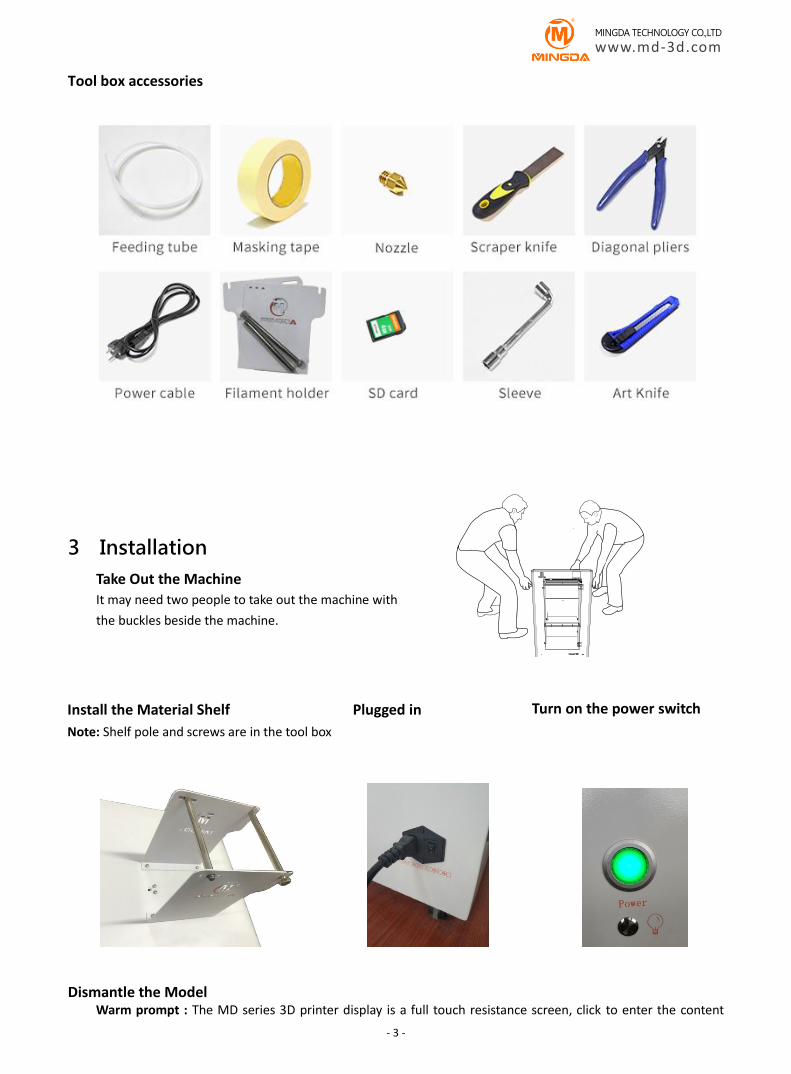
Tool box accessories
3 Installation
Take Out the Machine
It may need two people to take out the machine with
the buckles beside the machine.
Dismantle the Model Warm prompt : The MD series 3D printer display is a full touch resistance screen, click to enter the content
Install the Material Shelf
Note: Shelf pole and screws are in the tool box
Plugged in Turn on the power switch
- 4 -
MINGDA TECHNOLOGY CO.,LTD
www.md-3d.com
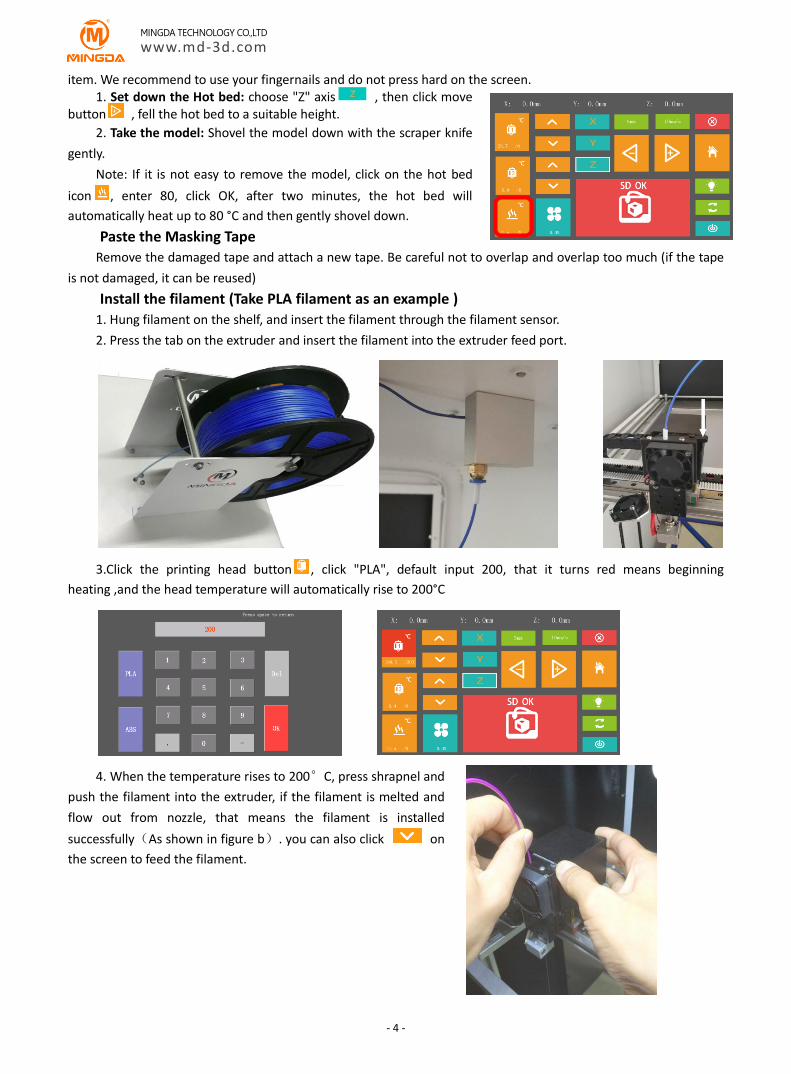
item. We recommend to use your fingernails and do not press hard on the screen. 1. Set down the Hot bed: choose "Z" axis , then click move
button , fell the hot bed to a suitable height.
2. Take the model: Shovel the model down with the scraper knife
gently.
Note: If it is not easy to remove the model, click on the hot bed
icon , enter 80, click OK, after two minutes, the hot bed will
automatically heat up to 80 °C and then gently shovel down.
Paste the Masking Tape
Remove the damaged tape and attach a new tape. Be careful not to overlap and overlap too much (if the tape
is not damaged, it can be reused)
Install the filament (Take PLA filament as an example )
1. Hung filament on the shelf, and insert the filament through the filament sensor.
2. Press the tab on the extruder and insert the filament into the extruder feed port.
3.Click the printing head button , click "PLA", default input 200, that it turns red means beginning
heating ,and the head temperature will automatically rise to 200°C
4. When the temperature rises to 200°C, press shrapnel and
push the filament into the extruder, if the filament is melted and
flow out from nozzle, that means the filament is installed
successfully(As shown in figure b). you can also click on
the screen to feed the filament.
- 5 -
MINGDA TECHNOLOGY CO.,LTD
www.md-3d.com
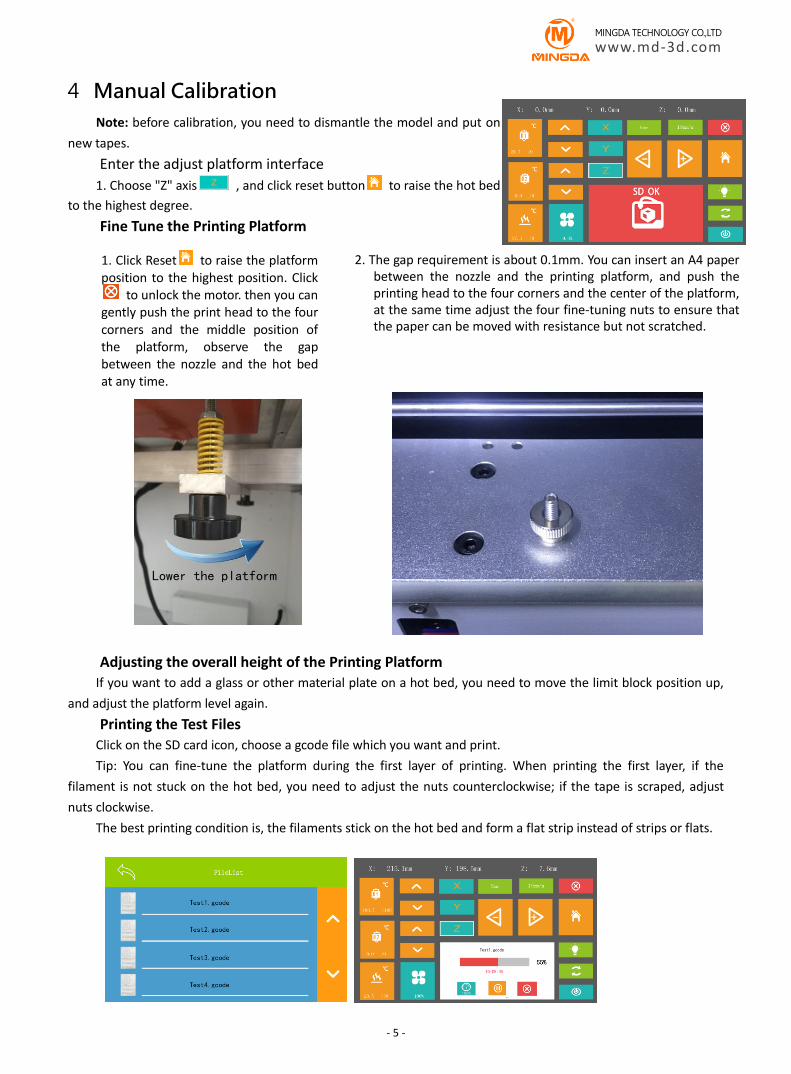
4 Manual Calibration
Note: before calibration, you need to dismantle the model and put on
new tapes.
Enter the adjust platform interface
1. Choose "Z" axis , and click reset button to raise the hot bed
to the highest degree.
Fine Tune the Printing Platform
Adjusting the overall height of the Printing Platform
If you want to add a glass or other material plate on a hot bed, you need to move the limit block position up,
and adjust the platform level again.
Printing the Test Files
Click on the SD card icon, choose a gcode file which you want and print.
Tip: You can fine-tune the platform during the first layer of printing. When printing the first layer, if the
filament is not stuck on the hot bed, you need to adjust the nuts counterclockwise; if the tape is scraped, adjust
nuts clockwise.
The best printing condition is, the filaments stick on the hot bed and form a flat strip instead of strips or flats.
1. Click Reset to raise the platform position to the highest position. Click
to unlock the motor. then you can gently push the print head to the four corners and the middle position of the platform, observe the gap between the nozzle and the hot bed at any time.
2. The gap requirement is about 0.1mm. You can insert an A4 paper between the nozzle and the printing platform, and push the printing head to the four corners and the center of the platform, at the same time adjust the four fine-tuning nuts to ensure that the paper can be moved with resistance but not scratched.

- 6 -
MINGDA TECHNOLOGY CO.,LTD
www.md-3d.com
5 Printing Operation
Display Panel
○1 XYZ axis coordinate values displayed in real time
○2 Head preheating: press the icon, input a number and click OK, it will begin to heat while the icon turns
red. Click again to cancel heating.
○3 Extrusion and Retraction: click icon to feed filament, The print head 2 can only be used in a two-color
machine.
Note: The icon it means retraction, If it is used improperly, it will cause the plug. We recommended
customer not to use it.
Material extrusion length and speed: can be adjusted manually.
Length and speed of extrusion: It can be manual adjusted.
○4 Bed preheating: press the icon, input a number and click OK, it will begin to heat while the icon turns
red. Click again to cancel heating.
○5 XYZ axis: It will show red border when clicking the icon ,then you can click to move the head or bed.
○6 Length and speed of moving: moving settings of head, also it can be manual adjusted.
○7 Moving: Icon means moving towards zero axis, icon means moving outwards from zero axis. Zero
axis is located in upper left corner of front print area.
When moving , choose X、Y or Z axis first, then click icon or to move.
○8 Unlock the motors: If you click, the motors will be unlocked, then you can push printing head by hand.
You can stop moving by click button at any time.
○9 Reset: When choosing X、Y or Z axis, you can press icon to reset that axis you choose. If there is not any
1
2
4
5
8
9
12
6
10
7
3
13
14
11
- 7 -
MINGDA TECHNOLOGY CO.,LTD
www.md-3d.com
axis to be chosen, it will reset XYZ axis in turn.
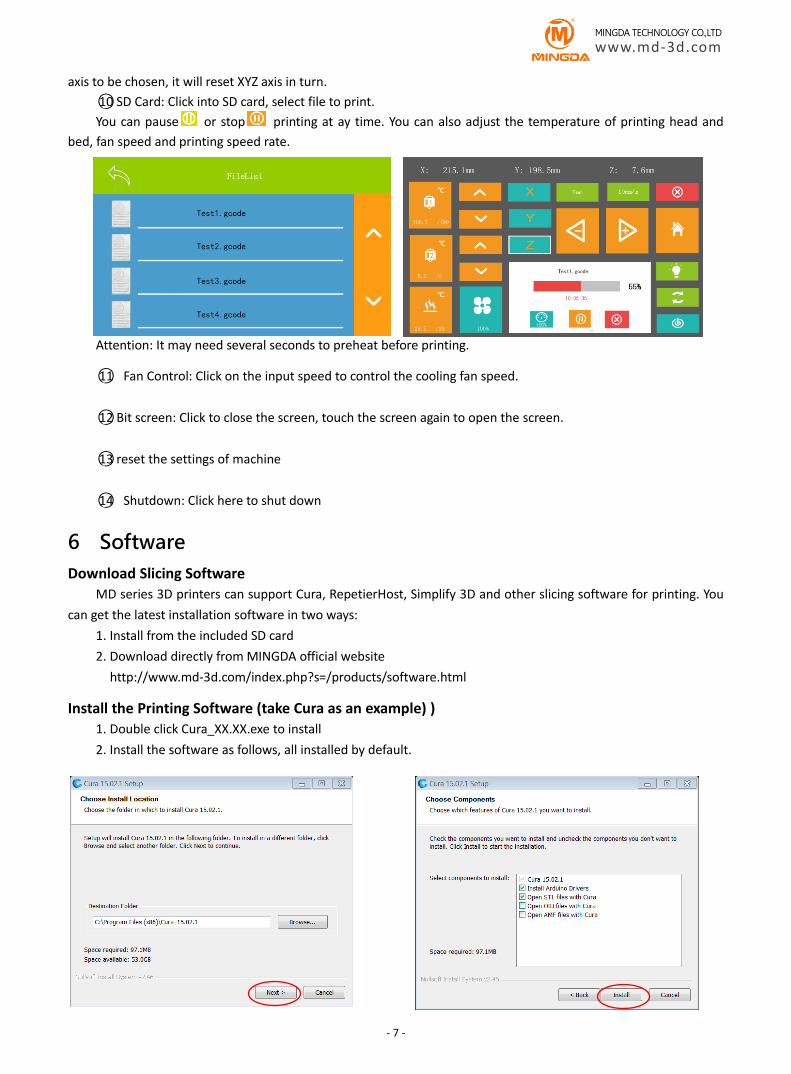
○10 SD Card: Click into SD card, select file to print.
You can pause or stop printing at ay time. You can also adjust the temperature of printing head and
bed, fan speed and printing speed rate.
Attention: It may need several seconds to preheat before printing.
○11 Fan Control: Click on the input speed to control the cooling fan speed.
○12 Bit screen: Click to close the screen, touch the screen again to open the screen.
○13 reset the settings of machine
○14 Shutdown: Click here to shut down
6 Software
Download Slicing Software
MD series 3D printers can support Cura, RepetierHost, Simplify 3D and other slicing software for printing. You
can get the latest installation software in two ways:
1. Install from the included SD card
2. Download directly from MINGDA official website
http://www.md-3d.com/index.php?s=/products/software.html
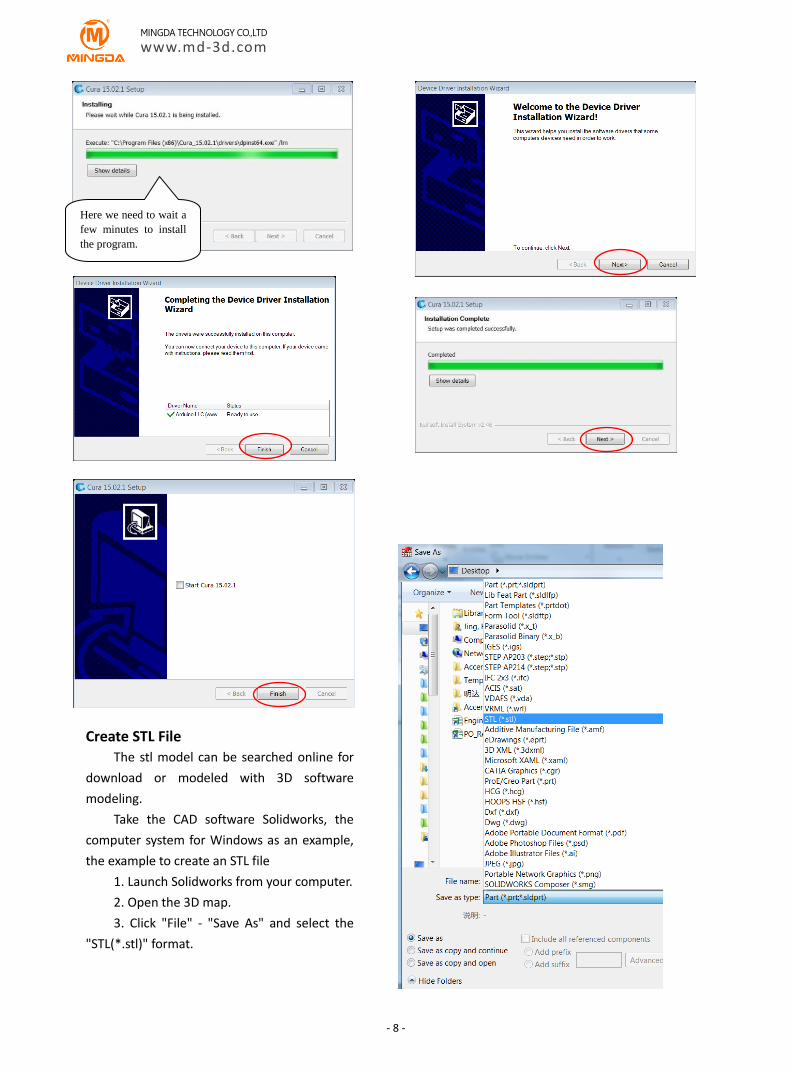
Install the Printing Software (take Cura as an example) )
1. Double click Cura_XX.XX.exe to install
2. Install the software as follows, all installed by default.
- 8 -
MINGDA TECHNOLOGY CO.,LTD
www.md-3d.com
Here we need to wait a
few minutes to install
the program.
Create STL File
The stl model can be searched online for
download or modeled with 3D software
modeling.
Take the CAD software Solidworks, the
computer system for Windows as an example,
the example to create an STL file
1. Launch Solidworks from your computer.
2. Open the 3D map.
3. Click "File" - "Save As" and select the
"STL(*.stl)" format.
- 9 -
MINGDA TECHNOLOGY CO.,LTD
www.md-3d.com
Cura Overview
Take the version Cura_15.02.1 and Windows 7 as an example to illustrate the Cura software settings.
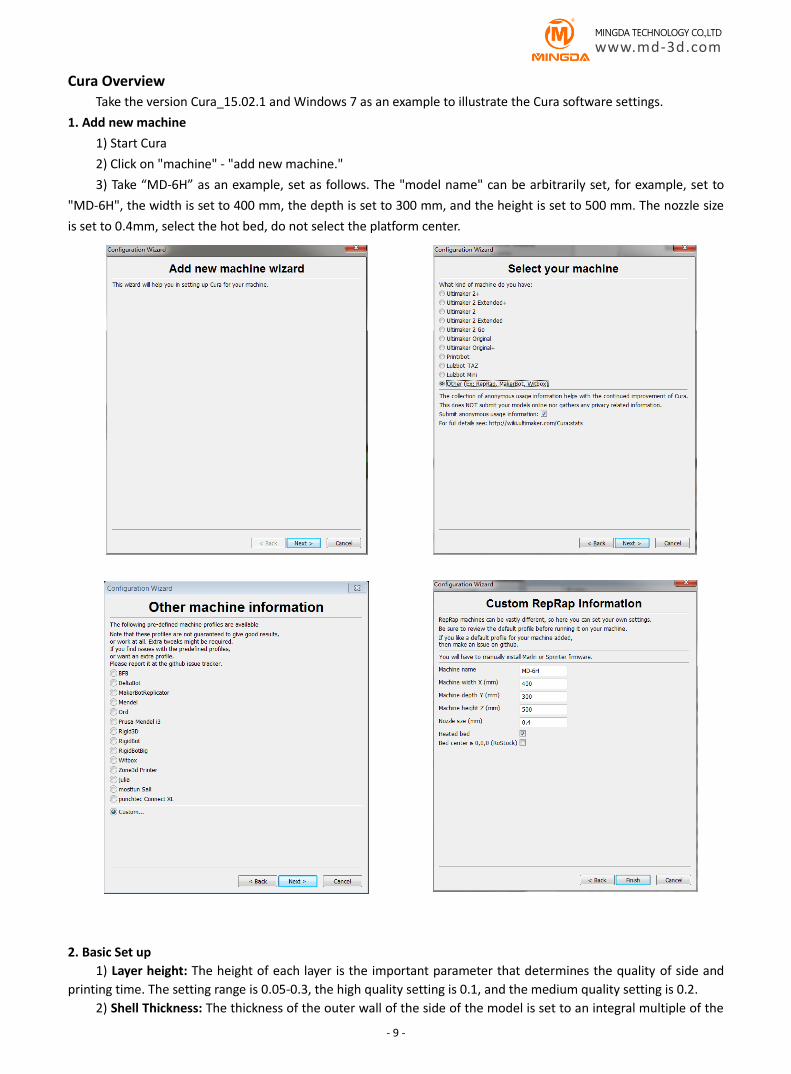
1. Add new machine
1) Start Cura
2) Click on "machine" - "add new machine."
3) Take “MD-6H” as an example, set as follows. The "model name" can be arbitrarily set, for example, set to
"MD-6H", the width is set to 400 mm, the depth is set to 300 mm, and the height is set to 500 mm. The nozzle size
is set to 0.4mm, select the hot bed, do not select the platform center.
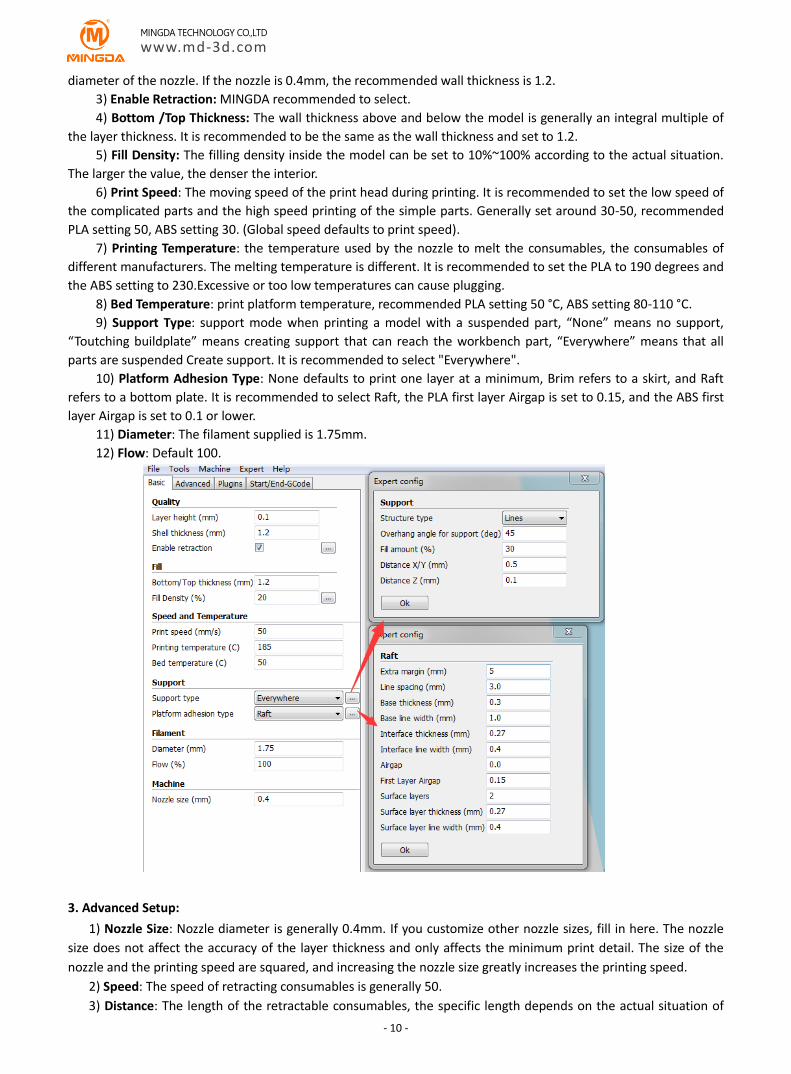
2. Basic Set up
1) Layer height: The height of each layer is the important parameter that determines the quality of side and
printing time. The setting range is 0.05-0.3, the high quality setting is 0.1, and the medium quality setting is 0.2.
2) Shell Thickness: The thickness of the outer wall of the side of the model is set to an integral multiple of the
- 10 -
MINGDA TECHNOLOGY CO.,LTD
www.md-3d.com
diameter of the nozzle. If the nozzle is 0.4mm, the recommended wall thickness is 1.2.
3) Enable Retraction: MINGDA recommended to select.
4) Bottom /Top Thickness: The wall thickness above and below the model is generally an integral multiple of
the layer thickness. It is recommended to be the same as the wall thickness and set to 1.2.
5) Fill Density: The filling density inside the model can be set to 10%~100% according to the actual situation.
The larger the value, the denser the interior.
6) Print Speed: The moving speed of the print head during printing. It is recommended to set the low speed of
the complicated parts and the high speed printing of the simple parts. Generally set around 30-50, recommended
PLA setting 50, ABS setting 30. (Global speed defaults to print speed).
7) Printing Temperature: the temperature used by the nozzle to melt the consumables, the consumables of
different manufacturers. The melting temperature is different. It is recommended to set the PLA to 190 degrees and
the ABS setting to 230.Excessive or too low temperatures can cause plugging.
8) Bed Temperature: print platform temperature, recommended PLA setting 50 °C, ABS setting 80-110 °C.
9) Support Type: support mode when printing a model with a suspended part, “None” means no support,
“Toutching buildplate” means creating support that can reach the workbench part, “Everywhere” means that all
parts are suspended Create support. It is recommended to select "Everywhere".
10) Platform Adhesion Type: None defaults to print one layer at a minimum, Brim refers to a skirt, and Raft
refers to a bottom plate. It is recommended to select Raft, the PLA first layer Airgap is set to 0.15, and the ABS first
layer Airgap is set to 0.1 or lower.
11) Diameter: The filament supplied is 1.75mm.
12) Flow: Default 100.
3. Advanced Setup:
1) Nozzle Size: Nozzle diameter is generally 0.4mm. If you customize other nozzle sizes, fill in here. The nozzle
size does not affect the accuracy of the layer thickness and only affects the minimum print detail. The size of the
nozzle and the printing speed are squared, and increasing the nozzle size greatly increases the printing speed.
2) Speed: The speed of retracting consumables is generally 50.
3) Distance: The length of the retractable consumables, the specific length depends on the actual situation of
- 11 -
MINGDA TECHNOLOGY CO.,LTD
www.md-3d.com
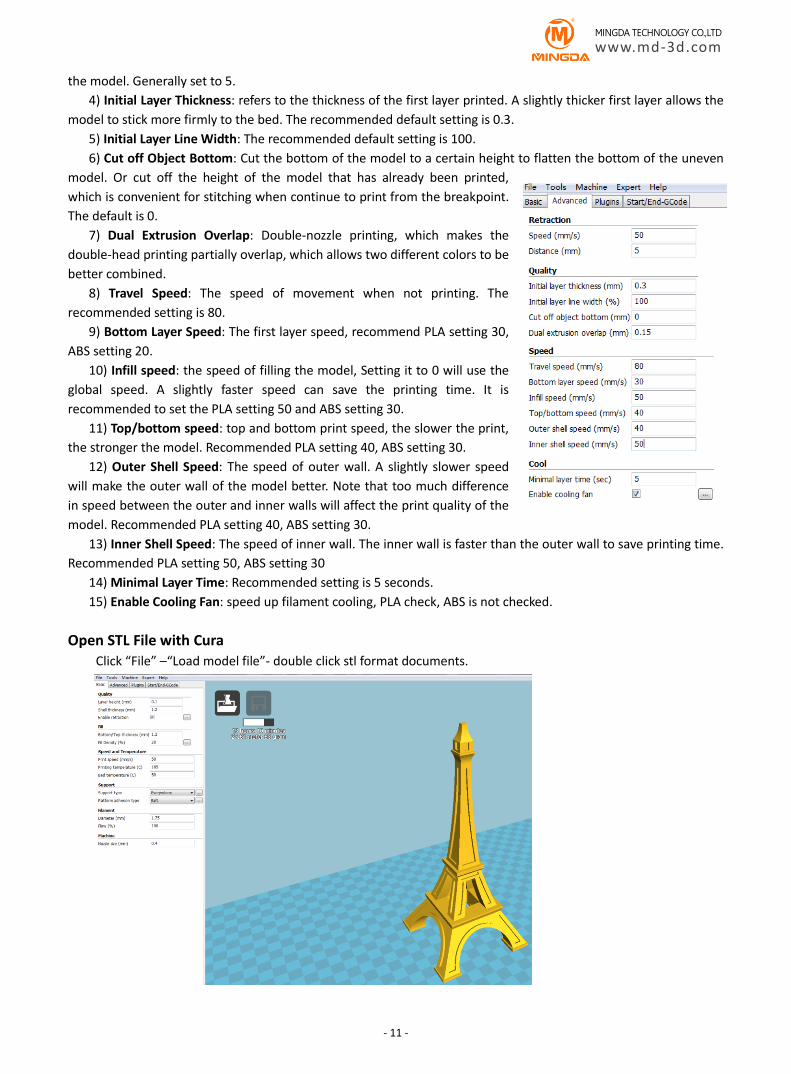
the model. Generally set to 5.
4) Initial Layer Thickness: refers to the thickness of the first layer printed. A slightly thicker first layer allows the
model to stick more firmly to the bed. The recommended default setting is 0.3.
5) Initial Layer Line Width: The recommended default setting is 100.
6) Cut off Object Bottom: Cut the bottom of the model to a certain height to flatten the bottom of the uneven
model. Or cut off the height of the model that has already been printed,
which is convenient for stitching when continue to print from the breakpoint.
The default is 0.
7) Dual Extrusion Overlap: Double-nozzle printing, which makes the
double-head printing partially overlap, which allows two different colors to be
better combined.
8) Travel Speed: The speed of movement when not printing. The
recommended setting is 80.
9) Bottom Layer Speed: The first layer speed, recommend PLA setting 30,
ABS setting 20.
10) Infill speed: the speed of filling the model, Setting it to 0 will use the
global speed. A slightly faster speed can save the printing time. It is
recommended to set the PLA setting 50 and ABS setting 30.
11) Top/bottom speed: top and bottom print speed, the slower the print,
the stronger the model. Recommended PLA setting 40, ABS setting 30.
12) Outer Shell Speed: The speed of outer wall. A slightly slower speed
will make the outer wall of the model better. Note that too much difference
in speed between the outer and inner walls will affect the print quality of the
model. Recommended PLA setting 40, ABS setting 30.
13) Inner Shell Speed: The speed of inner wall. The inner wall is faster than the outer wall to save printing time.
Recommended PLA setting 50, ABS setting 30
14) Minimal Layer Time: Recommended setting is 5 seconds.
15) Enable Cooling Fan: speed up filament cooling, PLA check, ABS is not checked.
Open STL File with Cura
Click “File” –“Load model file”- double click stl format documents.
- 12 -
MINGDA TECHNOLOGY CO.,LTD
www.md-3d.com
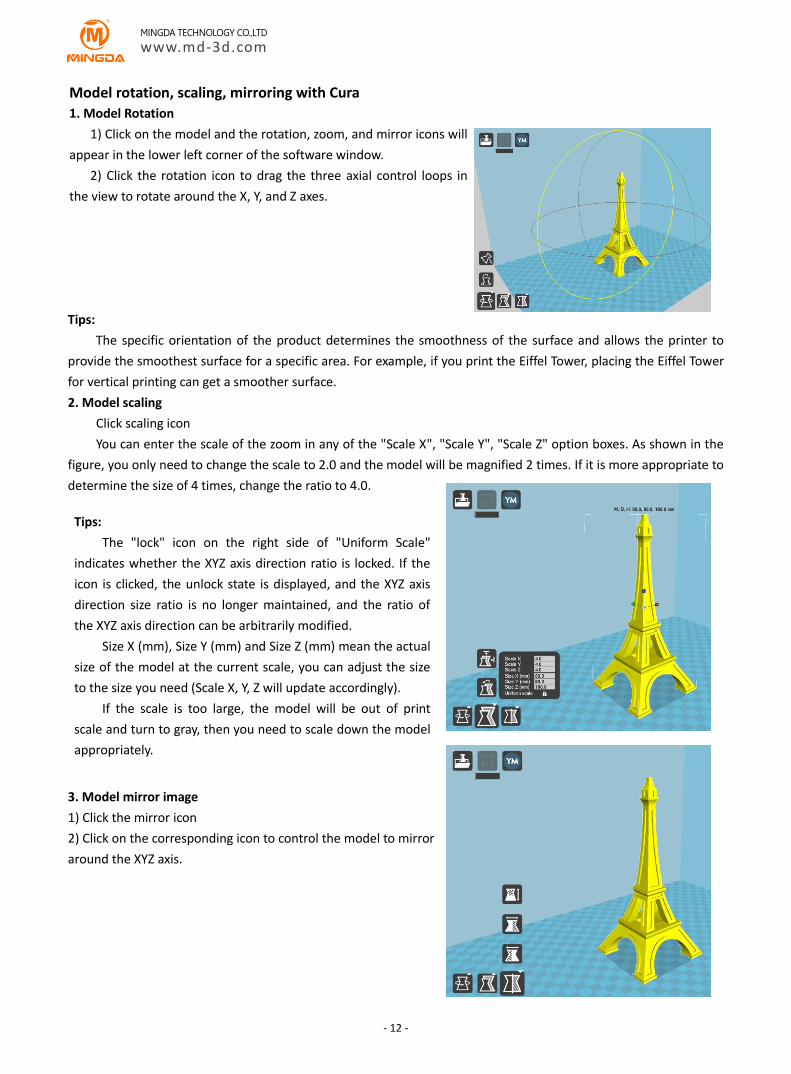
Tips:
The specific orientation of the product determines the smoothness of the surface and allows the printer to
provide the smoothest surface for a specific area. For example, if you print the Eiffel Tower, placing the Eiffel Tower
for vertical printing can get a smoother surface.
2. Model scaling
Click scaling icon
You can enter the scale of the zoom in any of the "Scale X", "Scale Y", "Scale Z" option boxes. As shown in the
figure, you only need to change the scale to 2.0 and the model will be magnified 2 times. If it is more appropriate to
determine the size of 4 times, change the ratio to 4.0.
3. Model mirror image
1) Click the mirror icon
2) Click on the corresponding icon to control the model to mirror
around the XYZ axis.
Model rotation, scaling, mirroring with Cura
1. Model Rotation
1) Click on the model and the rotation, zoom, and mirror icons will
appear in the lower left corner of the software window.
2) Click the rotation icon to drag the three axial control loops in
the view to rotate around the X, Y, and Z axes.
Tips:
The "lock" icon on the right side of "Uniform Scale"
indicates whether the XYZ axis direction ratio is locked. If the
icon is clicked, the unlock state is displayed, and the XYZ axis
direction size ratio is no longer maintained, and the ratio of
the XYZ axis direction can be arbitrarily modified.
Size X (mm), Size Y (mm) and Size Z (mm) mean the actual
size of the model at the current scale, you can adjust the size
to the size you need (Scale X, Y, Z will update accordingly).
If the scale is too large, the model will be out of print
scale and turn to gray, then you need to scale down the model
appropriately.
- 13 -
MINGDA TECHNOLOGY CO.,LTD
www.md-3d.com
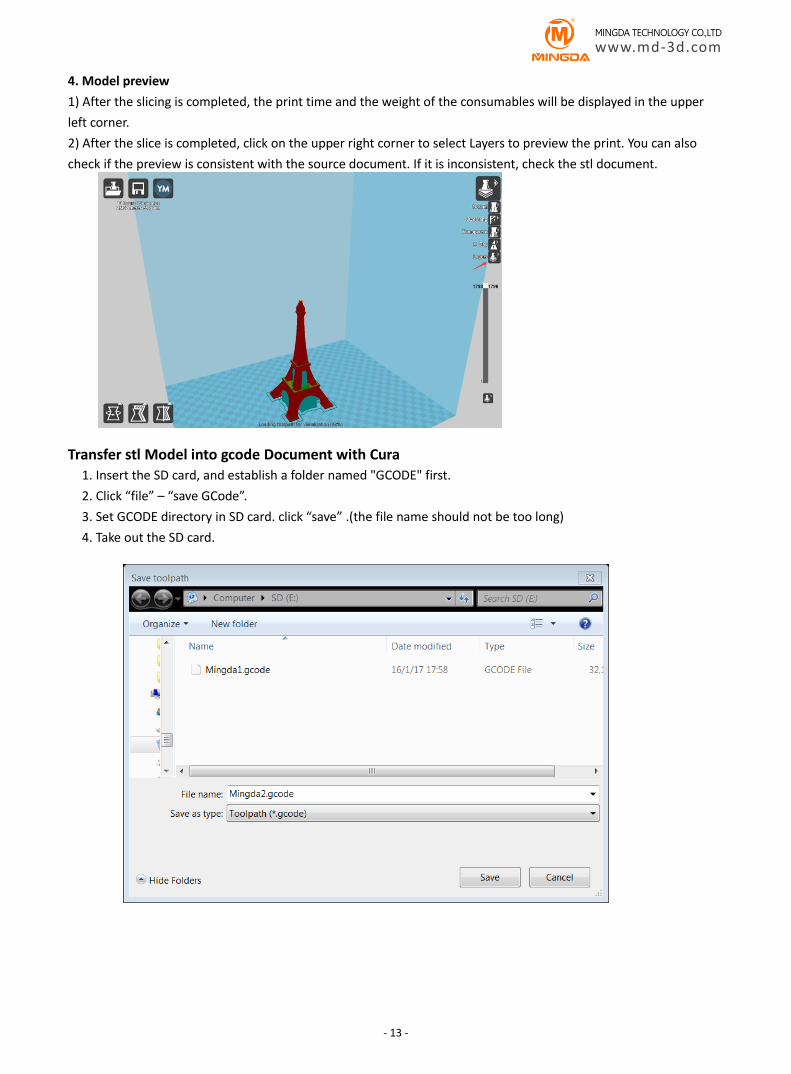
4. Model preview
1) After the slicing is completed, the print time and the weight of the consumables will be displayed in the upper
left corner.
2) After the slice is completed, click on the upper right corner to select Layers to preview the print. You can also
check if the preview is consistent with the source document. If it is inconsistent, check the stl document.
Transfer stl Model into gcode Document with Cura
1. Insert the SD card, and establish a folder named "GCODE" first.
2. Click “file” – “save GCode”.
3. Set GCODE directory in SD card. click “save” .(the file name should not be too long)
4. Take out the SD card.
- 14 -
MINGDA TECHNOLOGY CO.,LTD
www.md-3d.com
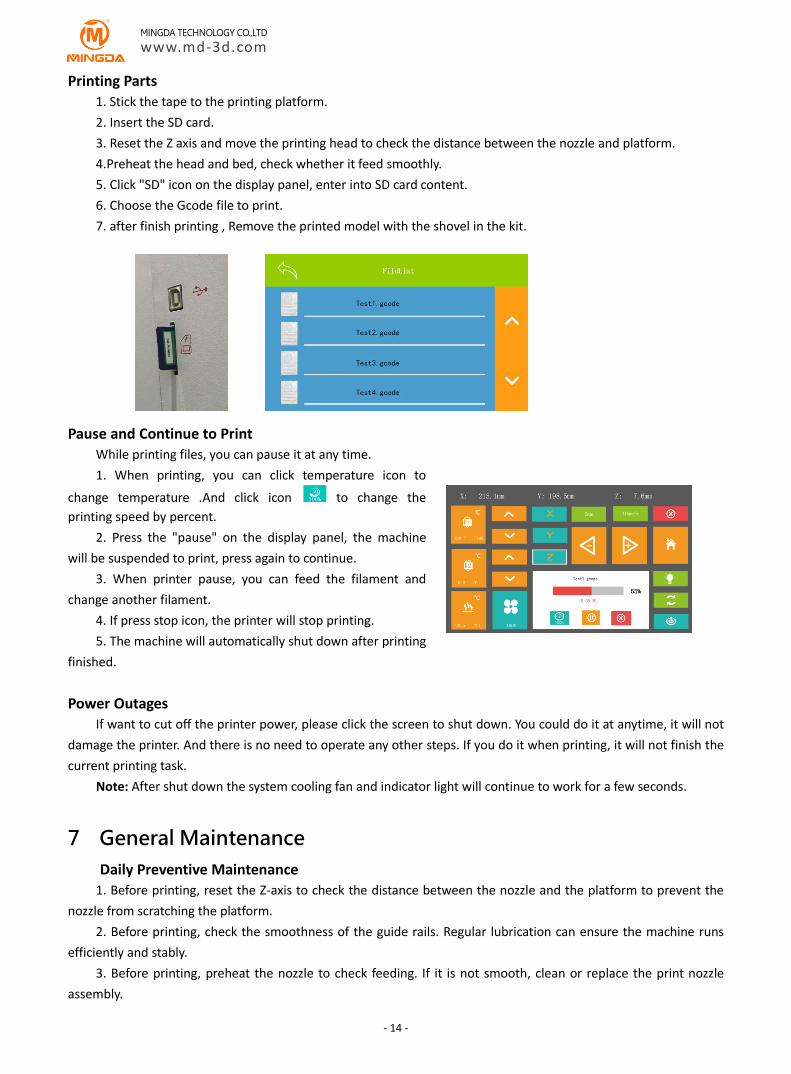
Printing Parts
1. Stick the tape to the printing platform.
2. Insert the SD card.
3. Reset the Z axis and move the printing head to check the distance between the nozzle and platform.
4.Preheat the head and bed, check whether it feed smoothly.
5. Click "SD" icon on the display panel, enter into SD card content.
6. Choose the Gcode file to print.
7. after finish printing , Remove the printed model with the shovel in the kit.
Pause and Continue to Print
While printing files, you can pause it at any time.
1. When printing, you can click temperature icon to
change temperature .And click icon to change the
printing speed by percent.
2. Press the "pause" on the display panel, the machine
will be suspended to print, press again to continue.
3. When printer pause, you can feed the filament and
change another filament.
4. If press stop icon, the printer will stop printing.
5. The machine will automatically shut down after printing
finished.
Power Outages
If want to cut off the printer power, please click the screen to shut down. You could do it at anytime, it will not
damage the printer. And there is no need to operate any other steps. If you do it when printing, it will not finish the
current printing task.
Note: After shut down the system cooling fan and indicator light will continue to work for a few seconds.
7 General Maintenance
Daily Preventive Maintenance
1. Before printing, reset the Z-axis to check the distance between the nozzle and the platform to prevent the
nozzle from scratching the platform.
2. Before printing, check the smoothness of the guide rails. Regular lubrication can ensure the machine runs
efficiently and stably.
3. Before printing, preheat the nozzle to check feeding. If it is not smooth, clean or replace the print nozzle
assembly.
- 15 -
MINGDA TECHNOLOGY CO.,LTD
www.md-3d.com
4. After printing is completed, clean all the accumulated materials and stains on the printing platform, the
guide screw and the inside of the machine.
5. Filament that are not used for a long time should be sealed and stored. Excessive absorption of moisture
from the air can make the filament brittle.
500 Hours Maintenance
About every 500 hours you should
clean up the printer.
1.Clean the door and do not use ammonia-containing cleaners to avoid damaging the window. An ethanol
cleaner can be used.
2. To clean the guide rails, first wipe the sides of the guide rails with anti-rust paint and re-add lubricant.
3. Check the screws, check if the mounting screws such as the synchronous wheel, optical axis and motor are
loose. If it is loose, it should be tightened in time.
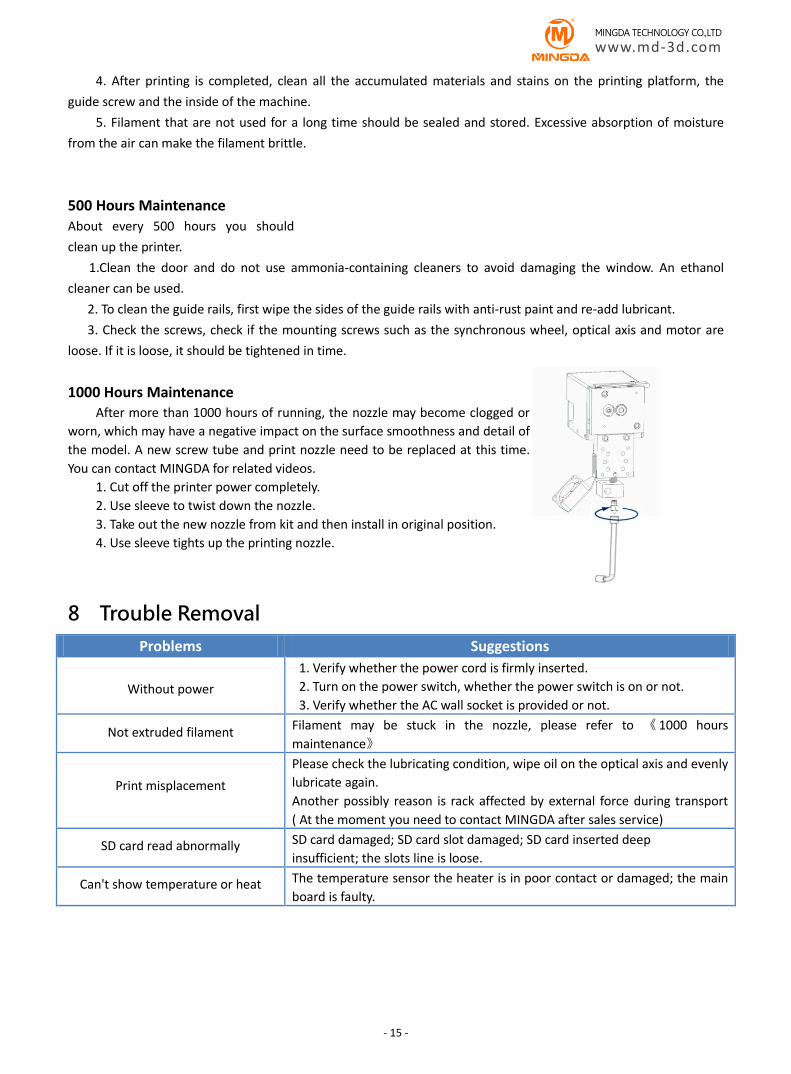
1000 Hours Maintenance After more than 1000 hours of running, the nozzle may become clogged or
worn, which may have a negative impact on the surface smoothness and detail of
the model. A new screw tube and print nozzle need to be replaced at this time.
You can contact MINGDA for related videos.
1. Cut off the printer power completely.
2. Use sleeve to twist down the nozzle.
3. Take out the new nozzle from kit and then install in original position.
4. Use sleeve tights up the printing nozzle.
8 Trouble Removal
Problems Suggestions
Without power
1. Verify whether the power cord is firmly inserted.
2. Turn on the power switch, whether the power switch is on or not.
3. Verify whether the AC wall socket is provided or not.
Not extruded filament Filament may be stuck in the nozzle, please refer to 《1000 hours
maintenance》
Print misplacement
Please check the lubricating condition, wipe oil on the optical axis and evenly
lubricate again.
Another possibly reason is rack affected by external force during transport
( At the moment you need to contact MINGDA after sales service)
SD card read abnormally SD card damaged; SD card slot damaged; SD card inserted deep
insufficient; the slots line is loose.
Can't show temperature or heat The temperature sensor the heater is in poor contact or damaged; the main
board is faulty.

- 16 -
MINGDA TECHNOLOGY CO.,LTD
www.md-3d.com
9 Support
Customer Support
Please visit http://www.md-3d.com/index.php?s=/news/support.html
Working Computer Specifications
Operation system MicrosoftWindowsXP、MicrosoftWindowsVista or MicrosoftWindows7
processor minimum value : 2.4 GHz, faster processor could shorten the processing time
RAM minimum value: 1GB (WindowsVista or Windows7 is 2 GB)Recommendation:2 GB(WindowsVista or
Windows7 is 3 GB)
Hardware installation: 90 MB monitor graphics resolution minimum value: 1024x768
Recommendation: 1280x1024 ( can use the wide-screen )
Necessary video card: In line with OpenGL accelerated graphics card Recommendation: OpenGL hardware
support to recommend 128 MB graphics card memory
MINGDA Limited Warranty Statement
Besides limited warranty, within the maximum range allowed by law. MINGDA or any authorized dealer have
not made any other statements or implied guarantee, including marketability and special-purpose applicability of
implied warranties. MINGDA has not supplied, undertake or provide, authorized to assume responsibility for it or
any other guarantee, including any authorized dealer or other express or implied warranties to the independent
third party.
10 Quality Assurance
MINGDA has formulated strict production process and inspection process, from every parts to the assembly
process, there are strict testing standards, equipped with sophisticated detection tools, each machine must go
through high temperature, extreme noise, wall thickness, printing speed, Velocity measurement of cantilever beam,
angle test and othertest for more than a dozen processes before the delivery , just for the stability of the machine,
ensure each machines can fully realize the value of the products for our customers.
Perfect after sales service system One year warranty
we will provide you free maintenance, if quality issues of the printer is not impersonal factors.
Three months warranty parts: fan, synchronous wheel, heating element, sensor element, limit switch, belts,
bed heater.
One year warranty parts: motherboard, LCD board, power supply, Power cut module.
Five years of free maintenance
1 years to 5 years from the delivery day, if the machine has non-human damage performance fault, MINGDA
will provide free maintenance service. If you need to replace the parts, you can also purchased on our web shop to
replace by yourself.
Lifetime technical support
MINGDA provide lifetime free technical support to customers, If there is any technical problem with the
machine, please contact our professional after-sales technicians on the work time, we will provide the perfect
solution for you.

MINGDA TECHNOLOGY CO.,LTD Sales director: Doris Email: [email protected] Skype: mdantistatic Website: www.md-3d.com
Address: 1st Floor; XinChao Industrial Zone; No. 597 DaHe Village; GuanHu Street ; LongHua District; Shenzhen; 518110;
Guangdong Province; China
3D Printer Leading Brand


