Embed Size (px)
Citation preview

Before you begin
Preparations
Printing from a PictBridgecamera (PictBridge mode)
Printing from a PC(PC mode)
Troubleshooting
Additional information
2-190-186-11 (1)
2004 Sony Corporation
Operating InstructionsBefore operating this printer, please readthis manual thoroughly and retain it forfuture reference.
Digital PhotoPrinter
DPP-FP30

2 GB
WARNING
To prevent fire or shock hazard, donot expose the unit to rain ormoisture.
To avoid electrical shock, do not openthe cabinet. Refer servicing toqualified personnel only.
Owner’s RecordThe model and serial numbers are located onthe bottom. Record the serial number in thespace provided below. Refer to thesenumbers whenever you call upon your Sonydealer regarding this product.Model No. DPP-FP30Serial No.
For the customers in the U.S.A.
CAUTIONYou are cautioned that any changes or modificationsnot expressly approved in this manual could voidyour authority to operate this equipment.
Note:This equipment has been tested and found to complywith the limits for a Class B digital device, pursuant toPart 15 of the FCC Rules.These limits are designed to provide reasonableprotection against harmful interference in aresidential installation. This equipment generates,uses, and can radiate radio frequency energy and,if not installed and used in accordance with theinstructions, may cause harmful interference toradio communications. However, there is noguarantee that interference will not occur in aparticular installation. If this equipment doescause harmful interference to radio or televisionreception, which can be determined by turningthe equipment off and on, the user is encouragedto try to correct the interference by one or more ofthe following measures:– Reorient or relocate the receiving antenna.– Increase the separation between the equipment
and receiver.– Connect the equipment into an outlet on a circuit
different from that to which the receiver isconnected.
– Consult the dealer or an experienced radio/TVtechnician for help.
The shielded interface cable recommended in thismanual must be used with this equipment in order tocomply with the limits for a digital device pursuant toSubpart B of Part 15 of Fcc Rules.If you have any questions about this product, youmay call:Sony Customer Information Services Center1-800-222-SONY (7669)or Sony Web site at www.sony.com
Declaration of ConformityTrade Name: SONYModel No.: DPP-FP30Responsible Party:
Sony Electronics Inc.Address: 16450 W. Bernardo Dr, San
Diego, CA 92127 U.S.A.Telephone No.: 858-942-2230This device complies with part 15 of the FCCRules. Operation is subject to the followingtwo conditions:(1) this device may not cause harmfulinterference, and (2) this device must accept anyinterference received, including interference thatmay cause undesired operation.
WARNINGThe equipment should be connected to an easilyaccessible mains outlet socket.(So that it may be disconnected from the mainsif required)
Attention for thecustomers in Europe
This product has been tested and foundcompliant with the limits sets out in the EMCDirective for using connection cables shorterthan 3 meters (9.8 feet).

3 GB
Duplication, edition, or printing of a CD, TVprograms, copyrighted materials such aspictures or publications, or any other materialsexcept for your own recording or creation islimited to private or domestic use only. Unlessyou hold copyright or have permission ofcopyright holders for the materials to beduplicated, use of those materials beyond thislimit may infringe the provisions of thecopyright law and be subject to the copyrightholder’s claim for damages.When using photo images with this printer, payspecial attention not to infringe the provisions ofthe copyright law. Any unauthorized use ormodification of others’ portrait may alsoinfringe their rights.For some demonstrations, performances, orexhibits, photography may be forbidden.
On trademarks and copyrights• VAIO is the trademark of Sony Corporation.• Microsoft and Windows® are registered
trademarks or trademarks of MicrosoftCorporation in the United States and othercountries.
• IBM and PC/AT are registered trademarks ofInternational Business Machines Corporation.
• MMX and Pentium are registered trademarksof Intel Corporation.
•This software is based in part on the work ofthe independent JPEG Group.
• LibtiffCopyright © 1988-1997 Sam LefflerCopyright © 1991-1997 Silicon Graphics, Inc.
• Lib pngCopyright © 1995, 1996 Guy Eric Schalnat,Group 42, Inc.Copyright © 1996, 1997 Andreas DilgerCopyright © 1998, 1999 Glenn Randers-Pehrson
• Zlib© 1995- 2002 Jean-loup Gailly and Mark Adler
• This product uses “Exif Toolkit For WindowsVer.2.4 (Copyright © 1998 FUJI PHOTO FILMCO., LTD. All rights reserved)”. Exif is theexchangeable image file format for digital stillcameras specified by the JEITA (JapanElectronics and Information TechnologyIndustries Association).
• All other companies and product namesmentioned herein may be the trademarks orregistered trademarks of their respectivecompanies. Furthermore, “™” and “®” are notmentioned in each case in this manual.
Notice for users
Program © 2004 Sony CorporationDocumentation ©2004 Sony Corporation
All rights reserved. This manual or the softwaredescribed herein, in whole or in part, may not bereproduced, translated or reduced to any machinereadable form without prior written approval fromSony Corporation.
IN NO EVENT SHALL SONY CORPORATION BELIABLE FOR ANY INCIDENTAL,CONSEQUENTIAL OR SPECIAL DAMAGES,WHETHER BASED ON TORT, CONTACT, OROTHERWISE, ARISING OUT OF OR INCONNECTION WITH THIS MANUAL, THESOFTWARE OR OTHER INFORMATIONCONTAINED HEREIN OR THE USE THEREOF.
By breaking the seal of the envelope of the CD-ROM package, you accept all the terms andconditions of this agreement. If you do not acceptthese terms and conditions, please return this diskenvelope unopened, along with the rest of thepackage, immediately to the dealer where youobtained it.
Sony Corporation reserves the right to make anymodification to this manual or the informationcontained herein at any time without notice.The software described herein may also begoverned by the terms of a separate user licenseagreement.
User RegistrationTo receive customer services, complete and returnthe registration card included in your package.
Any design data such as sample pictures providedin this software cannot be modified or duplicatedexcept for the purpose of personal use. Anyunauthorized duplication of this software isprohibited under copyright law.Please note that unauthorized duplication ormodification of others’ portraits or copyrightedwork could infringe the rights reserved by rightholders.

4 GB
Table of contents
Before you begin
Overview ................................................ 5What you can do with this printer .............. 5Features .................................................... 6
Preparations
1 Checking the contents of thepackage ............................................ 7
2 Preparing the printing pack (not supplied) .................................. 8Sizes of print paper ................................... 8Optional printing packs ............................. 8
3 Loading the print cartridge ............... 9
4 Inserting the print paper ................. 10
Printing from a PictBridgecamera (PictBridge mode)
Printing images fromthe digital camera ........................... 13
Printing from a PC (PC mode)
Installing the software .......................... 15System requirements ............................... 15Installing the printer driver ...................... 16Uninstalling the printer driver .................. 20Installing the PictureGear Studio .............. 22Uninstalling the PictureGear Studio ......... 24
Printing photos from the PictureGearStudio ............................................. 25Printing from other application software .. 32
Troubleshooting
If trouble occurs .................................... 33
If paper jams ........................................ 41
Additional information
Precautions ........................................... 42
Specifications ....................................... 44Printing range ......................................... 45
Glossary ................................................ 46
Identifying the parts ............................. 47
Index .................................................... 49

5 GB
Befo
re you
beg
inBefore you begin
Overview
What you can do with this printer
The Digital Photo Printer DPP-FP30 provides the following two operation modes,depending on the device you use for printing.
Printing from a PictBridgecamera (PictBridge mode) c Page 13
Connect a PictBridge-compliantdigital camera to the printer to printimages using the camera.
Printing from a PC(PC mode) c Page 15
Connect a PC to the printer to printimages using the PC.
Depending on the operation mode you choose, follow the operation flow below:
PictBridge mode PC mode
Get the printer ready for printing• Prepare the printing pack (not supplied) (page 8)• Load the print cartridge (page 9)• Insert the print paper (page 10)
Install the supplied softwareon the PC (page 15)
Connect to an AC outlet
Connect to a camera (page 13)
Use the camera to print an
image (page 13)
Connect to a PC (page 19)
Use the PC to print an image
(page 25)

6 GB
Features
PictBridge-compliant*(page 13)The printer supports the PictBridgestandard, so that you can print an imageeasily from a PictBridge-compliantdigital camera.
Windows PC support with aconvenient USB connection (page 15)By connecting the printer to your PC viaa USB connector and installing thesupplied printer driver, you can printimages from your PC.
Super Coat 2The Super Coat 2 feature enables highdurability and moisture or fingerprintresistance, keeping your prints in goodcondition for an extended period of time.
Auto Fine Print 3The Auto Fine Print 3 analyses thepicture information of an image,including the Exif data, and corrects theresulting picture to make an image lookmore natural and beautiful.
Exif 2.21** (Exif Print)support (page 46)When you use the supplied PictureGearStudio software to print an image fromyour PC, you can choose Exif Printpicture correction in addition to theconventional OS picture correction. InExif Print correction, the suppliedprinter driver uses the Exif data of animage and the printer‘s color processingto adjust and reproduce an image withsupreme picture quality.
Red-eye reduction and otheradjustments (PC mode only, page29)You can adjust an image to reduce thered-eye phenomenon that may occurwhen the subject was shot with flash.Adjustments of brightness, hue, andother elements of picture quality are alsopossible.
Paper tray allowing bulk printing of20 sheets (page 10)With the supplied paper tray, you canprint up to 20 sheets of print paper atone time.
A choice of print sizes (page 8)You can select from Post Card size and3.5 x 5 inch size.
Note
In some regions, 3.5 x 5 inch size print paperis not sold.
* PictBridge is a standard that allows youto connect a digital camera directly to aprinter without a PC, enabling directprinting on the spot.
** Exif (Exchangeable image file format fordigital cameras) Print is a global standardfor digital photo printing. A digitalcamera supporting Exif Print stores datarelevant to the shooting conditions aseach shot is taken. The printer utilises theExif Print data stored in each image file toensure the printed result matches theoriginal shot as closely as possible.

7 GB
Preparatio
ns
Preparations
This section explains how to prepareyour printer. Follow the procedures inthis section to get the printer ready forprinting.
1 Checking the contentsof the package (thispage)
x
2 Prepare the printingpack (not supplied)(page 8)
x
3 Loading the printcartridge (page 9)
x
4 Inserting the printpaper (page 10)
After you finish preparations, read theexplanations for each operation mode(pages 5 to 6) to print an image.
1 Checking thecontents of thepackage
Make sure that the following accessoriesare supplied with your printer.
Paper tray (1)
CD-ROM (1)
– Sony DPP-FP30 Printer DriverSoftware for Windows® XPProfessional/Windows® XP HomeEdition/Windows® 2000Professional/Windows®Millennium Edition/Windows® 98Second Edition
– PictureGear Studio V.2.0
AC power adaptor (1)
AC power cord * (1)
• Color printing pack (1)• Operating Instructions (this booklet, 1)• Warranty (1)• Sony End User Software License
Agreement (1)
* The AC power cord illustrated is for 120Vonly. The plug shape and specifications ofthe AC power cord differ depending onthe region you purchased the printer.

8 GB
2 Preparing theprinting pack (notsupplied)
To print an image, you needan optional printing packdesigned for the printer. Thepack contains a set of printpaper and a print cartridge.
Sizes of print paper
You can select the print paper from thefollowing two sizes:• Post card (4 x 6 inch) size (101.6 x
184.4 mm)• 3.5 x 5 inch size (89 x 159 mm)*
Optional printing packs
Select the printing pack according to thetype of printing you intend to do:
Post card sizeSVM-F40P• Two packs with each 20 sheets of Post
Card size photo paper• Print cartridge for 40 printsSVM-F80P• Four packs with each 20 sheets of
Post Card size photo paper• 2 Print cartridges each for 40 prints
3.5 x 5 inch sizebSVM-F40L*• Two packs with each 20 sheets of 3.5
x 5 inch size photo paper• Print cartridge for 40 prints
*Note
In some regions, 3.5 x 5 inch size print paperis not sold.
To order printing packs, visit thefollowing web site:www.sony.com/printers
Notes on using printing packs• Always use the print cartridge and print
paper from the same carton as a set. If youmix cartridges and paper of differenttypes, printing may not be possible.
• The side without the imprinting is theprinting surface. Inferior print qualitymay result if the printing surface iscontaminated with dust or fingerprints. Becareful to avoid touching the printingsurface.
• Do not bend the paper or tear it off atthe perforations before printing.
• Do not print on used sheets of printpaper or attempt to rewind the ribboninside the print cartridge. Doing socould result in damages to the printer.
• Please do not disassemble the printcartridge.
Notes on storing printing packs (forquality prints)• When you are going to store a partially-
used pack of the print cartridge and printpaper for an extended period of time, storeit in its original bag or in a similarcontainer.
• Avoid placing the printing pack inlocations that are subject to hightemperature, high humidity, excessivedust, or direct sunlight.
• Use printing pack within two years fromthe date of production.
Note on storing printouts• Do not affix cellophane tape or plastic
erasers to printouts. Also avoid leavingprintouts under plastic desk mats.
Caution• TV program, films, video tapes and other
materials may be copyrighted.Unauthorized video printing of suchmaterials may be country to the provisionsof the copyright law.

9 GB
Preparatio
ns
Removing the print cartridgeWhen the print cartridge runs out, theERROR indicator will flash slowly.Open the cartridge compartment lid,push up the eject lever, and remove theused print cartridge.
Notes
• Use the print cartridge contained in thesame box with the print paper.
• Do not touch the ink ribbon or place theprint cartridge in a dusty location.Fingerprints or dust on the ink ribbon mayresult in imperfect printing.
3 Loading the printcartridge
1 Pull and open the cartridgecompartment lid.
2 Insert the print cartridge tothe back in the arrowdirection until it clicks intoplace.
Arrow
3 Close the cartridgecompartment lid.
Continued
ERROR indicator
Eject lever
Ink ribbon

10 GB
• Never put your hand into the cartridgecompartment. The thermal head reacheshigh temperatures, especially afterrepeated printing.
• Do not rewind the ink ribbon and use therewound print cartridge for printing.Otherwise, proper printing result will notbe obtained, or even a malfunction mayoccur.
• If the print cartridge does not click intoplace, remove it and then re-insert it. If theink ribbon is too slack to be loaded, windthe ink ribbon in the direction of the arrowto remove the slack.
• Do not remove the print cartridge whileprinting.
Notes on storing the print cartridge
• Avoid placing the print cartridge in alocation subject to high temperatures, highhumidity, excessive dust or direct sunlight
• When you are going to store a partially-used cartridge, store it in its original bag.
4 Inserting the printpaper
1 Open the eject paper tray.
2 Slide the paper tray lid in theopposite direction to thepaper feeding direction (1)and then lift open it (2).
3 Set the tray adaptor accordingto the print paper size youwant to use.
Note
In some regions, 3.5 x 5 inch size printpaper is not sold.

11 GB
Preparatio
ns
x To use Post Card (4 x 6 inch)size print paper
Press the tray and the back ofthe tray adaptor to release thelocks of the adaptor (1), andremove and lift the tray adaptorfrom the lock holes (2).
Continued
4 Set the print paper into thetray.Riffle the print paper. Then insertthe print paper with its printingsurface (the side with no imprint)facing up.
• To set the Post Card size printpaper, face the stamp marker tothe paper feeding direction.
• To set the 3.5 x 5 inch size printpaper, align an arrow imprint tothe paper feeding direction.
Insert the protective sheet togetherwith paper. You can set up to 20sheets of print paper.
Release the lock.
To attach the tray adaptor tothe trayPut the projections of the trayadaptor into the lock holes of thetray (1), and then slide down theadaptor until its back lock clicks intoplace (2).
x To use 3.5 x 5 inch size printpaper
Keep the tray adaptor installed.
Printing surface
Paper feedingdirection
Face stamp marker(Post Card size) orarrow imprint (3.5 x 5inch size) towardfeeding direction.
Note
Do not touch the printing surface.Fingerprints on the printing surface mayresult in imperfect printing.
5 Remove the protective sheet.
Tray adaptor
Tray adaptor

12 GB
6 Close the paper tray lid (1)and slide it to the paperfeeding direction (2).Keep the paper eject tray open.
7 Push and open the printer’spaper tray compartment lid.
8 Insert the paper tray into theprinter.Insert it firmly until it clicks intoplace.
Notes
• Do not remove the paper tray duringprinting.
• To avoid paper jam or malfunctions of theprinter, make sure the following beforeprinting:– Do not write or type on the print paper.
Use the oil ink pen to write on the paperafter printing. You cannot type on theprint paper.
– Do not attach sticker or stamps on theprint paper.
– Do not hold or bend the print paper.– When adding print paper to a partially
full tray, make sure that the totalnumber of sheets does not exceed 20 forthe print paper.
– Do not print on the used print paper.Printing an image twice on the samepaper will not make the printed imagethicker.
– Use the print paper for this printer only.– Do not use the print paper ejected
without printed.
Notes on storing the print paper
• Avoid storing the paper with the printedfaces touching each other or in contactwith rubber or plastic products includingvinyl chloride or plasticizer for anextended period of time; color changes ordeterioration of the printed image mayoccur.
• Avoid placing the print paper in a locationsubject to high temperatures, highhumidity, excessive dust or direct sunlight.
• When you are going to store partially-usedprint paper, store it in its original bag.

13 GB
Printin
g fro
m a PictB
ridg
e camera (PictB
ridg
e mo
de)
Printing from a PictBridge camera (PictBridge mode)
Continued
Printing images fromthe digital camera
You can connect a PictBridge-compliantdigital camera and print an imagedirectly from your digital camera.
1 Set your digital camera readyfor printing with a PictBridge-compliant printer.The settings and operations that arenecessary before connection differdepending on the digital camera.For details, see the operatinginstructions of the digital camerayou use.
2 Connect the printer to the ACpower source.1 Insert one plug of the supplied
AC power cord to the suppliedAC power adaptor.2 Insert the other plug of the AC
power cord to the wall outlet.3 Insert the plug of the AC power
adaptor to the DC IN jack of theprinter.
The STANDBY indicator lights inred.
To the walloutlet
AC poweradaptor(supplied)
AC power cord(supplied)
Notes
• Connect the AC power adaptor to an easilyaccessible wall outlet close by. If sometrouble occurs while using the adaptor,immediately shut off the power bydisconnecting the plug from the wall outlet.
• When you have finished using the ACpower adaptor, disconnect it from the DC INjack of the printer and the wall outlet.
• The set is not disconnected from the ACpower source (mains) as long as it isconnected to the wall outlet , even if the unititself has been turned off.
• The AC power cord illustrated is for 120Vonly. The plug shape and specifications ofthe AC power cord differ depending on theregion you purchased the printer.
• The print paper emerges from the paperoutlet a few times during printing. Do notblock the paper outlet with the AC poweradaptor or AC power cord.
3 Turn on the printer.The STANDBY indicator of theprinter lights in green.
To turn off the printerKeep pressing STANDBY for longerthan one second until theSTANDBY indicator turns to red.
4 Connect a PictBridge-compliantdigital camera to the printer.Use the USB connecting cablesupplied with the digital camera.

14 GB
5 Operate the digital camera toprint an image.The printer supports the followingprints:• Single-image print.• All images print (ALL)
Notes
• If you replace a print cartridge while theprinter is connected to a digital camera, animage may not be printed properly. If thisoccurs, make the paper size setting of thedigital camera again or disconnect andthen connect the digital camera.
• Never move or turn off the printer while itis printing; the print cartridge or papermay become stuck. If this happens, turnthe printer off and then on, and resumeprinting from the beginning.
• The print paper may emerge a few timesduring printing. Do not touch nor pull theemerged paper. Wait for the print paper tobe fully ejected after printing ends.
• Make sure to spare enough space behindthe printer during printing.
• If print paper runs out during continuousprinting or if you print with no print paperin the paper tray, the printer’s ERRORindicator lights. Feed the print paperwithout turning off the power and resumeprinting.
On the PICTBRIDGE indicatorThe PICTBRIDGE indicator shows theconnection status between the printerand the digital camera as follows:
• When the indication lights: Theconnection between the printer andthe PictBridge-compliant digitalcamera is established.
• When the indication blinks: Thedevice that does not support thePictBridge feature is connected. Or theimage to be printed is damaged.
To the PICTBRIDGE connector(USB A-TYPE)
To thePictBridgeconnector(USB)
PictBridge-compliantdigital camera
Notes
• You cannot connect a PictBridge-compliant digital camera and a PCsimultaneously to the printer. Whenprinting from a digital camera,remove the PC from the printer.
• The connector is designed for thePictBridge only. Never connect adevice other than a PictBridge-compliant digital camera.
• The type of USB connecting cableyou should use may differdepending on the digital camera.Use a USB connecting cable with anA-TYPE connector for the printerand an appropriate type for yourdigital camera.
• Use a commercially available USBcable shorter than 3m in length.
When you connect a PictBridge-compliant digital camera to theprinterThe printer automatically enters thePictBridge mode. The PICTBRIDGEindicator turns to green.
PICTBRIDGE indicator

15 GB
Printin
g fro
m a PC
(PC m
od
e)Printing from a PC (PC mode)
To print from a PC connected to theprinter, you need to install the suppliedsoftware to your PC.This section explains how to install thesupplied software on your PC and howto use the supplied PictureGear Studiosoftware to print an image.Please also refer to the operatinginstructions of your PC.
On trademarks and copyrights ofPictureGear Studio• On copyrights of design materials
The copyrights of the design materialscontained in this software are owned bySony Corporation or Sony MusicCommunications Corporation. Anycommercial use is prohibited by thecopyrights laws.
• Duplication of copyrighted materials, suchas photographs, is prohibited except forprivate or domestic use.
• All other companies and product namesmentioned herein may be the trademarksor registered trademarks of their respectivecompanies. Furthermore, “™” and “®” arenot mentioned in each case in this manual.
Installing thesoftware
System requirements
To use the supplied printer driver andPictureGear Studio, your PC must meetthe following system requirements:
OS: Microsoft Windows® XPProfessional/Windows® XP HomeEdition/Windows® 2000Professional/Windows®
Millennium Edition/Windows ® 98Second Edition, pre-installed (IBMPC/AT compatible)(Windows 95, Windows 98 GoldEdition, Windows NT, otherversions (ex. Server, Personal) ofWindows 2000 are not supported.)
CPU: Pentium III 500MHz or faster(Pentium III 800MHz or faster isrecommended.)
RAM: 128 MB or more (256 MB or moreis recommended.)
Hard disk space: 200 MB or more(Depending on the Windowsversion you use, more space will berequired. To handle image data,you will need additional hard diskspace.)
Display:Screen area: 800 x 600 pixels or moreColors: High Color (16-bit) or more
Continued

16 GB
On the supplied CD-ROMThe supplied CD-ROM contains thefollowing software:• Printer driver for DPP-FP30: The
software describes the printer’srequirements and enables printingfrom the computer.
• PictureGear Studio: Sony’s originalsoftware application that allows youto handle still images—capturing,managing, processing, and printing.
Notes
• If a hub is used to connect the printer andyour PC, or if two or more USB devicesincluding other printers are connected toyour PC, a trouble may occur. If thisoccurs, simplify the connections betweenyour PC and the printer.
• You cannot operate the printer fromanother USB device being usedsimultaneously.
• Do not remove the USB cable from orconnect it to the printer during datacommunication or printing. The printermay not work properly.
• The printer does not support systemstandby/hibernate mode of the computer.During printing, do not change your PC tosystem standby/hibernate mode.
• We cannot guarantee operations with allpersonal computers, even though theymay meet or exceed the systemrequirements.
Installing the printer driver
1 Make sure that the printer isdisconnected from thecomputer.
Note
If you connect the printer to your PC inthis stage, either of the following dialogboxes are displayed:
• When using Windows 98SE/Me:Add New Hardware Wizard
• When using Windows 2000/XP:Found New Hardware Wizard
If this occurs, disconnect the printerfrom the PC and then click “Cancel” inthe dialog box.
2 Turn on your computer andstart Windows.• When installing or uninstalling
the software in Windows® 2000Professional, log on to Windowsas “Administrator” or “Poweruser”.
• When installing or uninstallingthe software with Windows® XPProfessional/Home Edition, logon using a “Computeradministrator” user account.
Notes
• Be sure to close all runningprograms before installing thesoftware.
• The dialog boxes in this section arethose in Windows XP Professional,unless otherwise specified. Theinstallation procedures and thedialog boxes shown differdepending on the operating system.

17 GB
Printin
g fro
m a PC
(PC m
od
e)
3 Insert the supplied CD-ROMinto the CD-ROM drive of yourcomputer.The setup starts automatically andthe installation window isdisplayed.
Note
In case the installation window is notautomatically displayed, double-clickthe “Setup.exe” of the CD-ROM.
4 Click “Installing PrinterDriver”.
The “Sony DPP-FP30 -InstallShieldWizard” dialog boxappears.
5 Click “Next”.
The license agreement dialog box isdisplayed.
6 Check “I accept the terms ofthe license agreement” andclick “Next”.If you check “I do not accept theterms of the license agreement”,you cannot proceed to the next step.
The “Ready to install the program”dialog box is displayed.
7 Click “Install”.
The “Printer connection” dialog boxis displayed.
Continued

18 GB
8 Connect the printer to the ACpower source.1 Insert one plug of the supplied
AC power cord to the suppliedAC power adaptor.2 Insert the other plug of the AC
power cord to the wall outlet.3 Insert the plug of the AC power
adaptor to the DC IN jack of theprinter.
The STANDBY indicator lights inred.
• The AC power cord illustrated is for 120Vonly. The plug shape and specifications ofthe AC power cord differ depending onthe region you purchased the printer.
• The print paper emerges from the paperoutlet a few times during printing. Do notblock the paper outlet with the AC poweradaptor or AC power cord.
9 Turn on the printer.The STANDBY indicator lights ingreen.
To turn off the printerKeep pressing STANDBY for longerthan one second until theSTANDBY indicator turns to red.
10Click “Next”.
To the walloutletAC power
cord(supplied)
Notes
• Connect the AC power adaptor to an easilyaccessible wall outlet close by. If sometrouble occurs while using the adaptor,immediately shut off the power bydisconnecting the plug from the walloutlet.
• When you have finished using the ACpower adaptor, disconnect it from the DCIN jack of the printer and the wall outlet.
• The set is not disconnected from the ACpower source (mains) as long as it isconnected to the wall outlet , even if theunit itself has been turned off.
AC poweradaptor(supplied)

19 GB
Printin
g fro
m a PC
(PC m
od
e)
11Connect the USB connectors ofthe printer and yourcomputer.Use a commercially available USBconnecting cable.
Continued
Notes
• You cannot connect a PictBridge-compliant digital camera and a PCsimultaneously to the printer. Whenprinting from a PC, remove thedigital camera from the printer.
• Use a commercially available A-BTYPE USB-compatible connectingcable shorter than 3m in length. Thetype of USB cable you should usemay differ depending on thecomputer. For details, see theinstructions manual of yourcomputer.
When you connect a PCThe printer automatically enters thePC mode and the printer setup willstart automatically.When the printer setup is complete,the “Setup Complete” dialog box isdisplayed.
Windows PCTo USBconnector
To USBconnector(B-TYPE)
12Click “Finish”.
The installation of the printer driveris complete. When you areprompted to restart your computer,restart the computer.
13• To finish installation, click“Complete” and remove theCD-ROM from yourcomputer and keep it forfuture use.
• To continue to install thePictureGear Studio software,click “Installing thePictureGear Studio” andfollow the procedures onpages 22.

20 GB
Notes
• If the printer driver CD-ROM is promptedduring the installation, specify thefollowing directory:
-When using the Windows 98SE/Me: D\Driver\Win98.me -When using the Windows 2000/XP: D\Driver\Win2000.me
“D” stands for the CD-ROM drive of yourPC and may differ depending on thesystem.
• The supplied CD-ROM will be requiredwhen you uninstall or re-install the printerdriver. Keep it in good order for possiblefuture use.
• If the installation fails, remove the printerfrom your computer, restart yourcomputer, and then do the installationprocedures from the step 3.
• After installation, the “Sony DPP-FP30” isnot set as the default printer. Set theprinter you use for each application.
• Before you use the printer, read theReadme file (the Readme folder of the CD-ROMcEnglish foldercReadme.txt).
Checking the installationOpen the “Printers and Faxes”(Windows XP Home Edition/XPProfessional only) or “Printers” from the“Control Panel”. When the “Sony DPP-FP30” is displayed in the “Printers andFaxes” or “Printers” window, theprinter driver has been successfullyinstalled.
Uninstalling the printer driver
When the printer driver becomesunnecessary, remove it from your PChard disk as follows:
1 Disconnect the USB cable fromyour printer and thecomputer.
2 Insert the supplied CD-ROMinto the CD-ROM drive of yourcomputer.The setup starts automatically andthe installation window isdisplayed.
Note
In case the installation window is notautomatically displayed, double-clickthe “Setup.exe” of the CD-ROM.
3 Click “Installing PrinterDriver”.
The “Sony DPP-FP30 - InstallShieldWizard” dialog box appears.

21 GB
Printin
g fro
m a PC
(PC m
od
e)
4 Click “Next”.
The license agreement dialog box isdisplayed.
5 Check “I accept the terms ofthe license agreement” andclick “Next”.If you check “I do not accept theterms of the license agreement”,you cannot proceed withuninstallation.
The dialog box used for confirminguninstallation is displayed.
6 Click “Yes”.
The dialog box used for restartingthe computer is displayed.
7 Check “Yes, I want to restartmy computer now” and click“OK”.
After the computer is restarted, therelevant files will be deleted anduninstallation is complete.
To check uninstallationSelect “Printers and Faxes” (WindowsXP Home Edition/XP Professional only)or “Printers” from the “Control Panel”to check if the “DPP-FP30” is displayed.If not, the printer driver is successfullyremoved.
Continued

22 GB
Installing the PictureGearStudio
Install the PictureGear Studio to yourcomputer.
1 Turn on your computer andstart Windows.• When installing or uninstalling
the software in Windows® 2000Professional, log on Windows asthe user name of “Administrator”or “Power user”.
• When installing or uninstallingthe software in Windows® XPProfessional/Home Edition, logon as a user name with the“Computer administrator” useraccount.
Notes
• Be sure to close all runningprograms before installing thesoftware.
• The dialog boxes in this section arethose in Windows XP Professional,unless otherwise specified. Theinstallation procedures and thedialog boxes shown differdepending on the operation system.
2 Insert the supplied CD-ROMinto the CD-ROM drive of yourcomputer.The setup starts automatically andthe installation window isdisplayed.
Notes
• In case the installation window isnot automatically displayed, double-click the “Setup.exe” of the CD-ROM.
• Depending on the PC systemenvironments, the Microsoft DataAccess Component 2.7 and Jet 1.0should be installed during thePictureGear Studio installation. Ifso, the dialog box used for installingthe programs will be displayedautomatically; Follow the on-screeninstructions proceed with theinstallation.
3 Click “Installing PictureGearStudio”.
The “PictureGear Studio Setup”dialog box appears.
4 Click “Next”.

23 GB
Printin
g fro
m a PC
(PC m
od
e)
The dialog box to specify thedestination folder is displayed.
5 Check the destination andthen click “Next”.To specify a different destinationfolder, click “Browse”,
The “PictureGear Studio MediaWatcher” dialog box is displayed.
6 To register the MediaWatcher, check “Register thePictureGear Studio MediaWatcher in the startupfolder.” and then click “OK”.
When the installation is completed,the installation complete dialog boxis displayed.
What is “PictureGear Studio MediaWatcher”?The PictureGear Studio MediaWatcher detects insertion of adevice or medium storing photoswhen the PictureGear Studio isinstalled in an operating systemother than the Windows XP.To change the settings done duringinstallation, follow the proceduresbelow:1 After you install the PictureGear
Studio software, click “Start”,“Programs”, “PictureGearStudio”, “Tools”, and then“Media Watcher”.The PictureGear Studio MediaWatcher is started.
2 Click the PictureGear StudioMedia Watcher icon on thetaskbar with the right mousebutton, and click “Settings” fromthe menu displayed.
3 Add or clear the check mark for“Starts the Media Watcher whenyou log on Widows”.To do registration, check theoption. To cancel registration,clear the check box.
7 To display the Readme file,check “View Readme File” andthen click “Finish”.
Continued

24 GB
• When you check “View ReadmeFile”, the Readme file isdisplayed. When you close theReadme file, the PictureGearStudio Setup dialog box is alsoclosed.
• When you do not check “ViewReadme File”, the PictureGearStudio Setup dialog box is closed.
8 Remove the CD-ROM fromyour computer and keep it forfuture use.
Notes
• If the installation fails, do the installationprocedures from step 2.
• The supplied CD-ROM will be requiredwhen you uninstall or re-install thePictureGear Studio. Keep it in good orderfor possible future use.
• The PictureGear Studio supplied with theDPP-FP30 has the following limitations:– In PhotoCollection, you cannot select
paper other than “Sony”.– In PrintStudio, you cannot create or print
“Label”.– In PrintStudio, you cannot create or print
a “Sticker, name card, or card”.– In PrintStudio, you cannot print part of
“Postcard” designs.To delete the above limitations andupgrade the software to the versionsupplied with VAIO computer or CLIEhandheld, execute the “Setup.exe” in the“pgs.add” folder.
Uninstalling the PictureGearStudio
When the software becomesunnecessary, remove it from your PChard disk as follows:
1 Remove the USB cablebetween the printer and thePC.
2 Insert the supplied CD-ROMinto the CD-ROM drive of yourcomputer.The setup starts automatically andthe installation window isdisplayed.
Note
In case the installation window is notautomatically displayed, double-clickthe “Setup.exe” of the CD-ROM.
3 Click “Installing PictureGearStudio”.
The dialog box used for confirmingdeletion is displayed.

25 GB
Printin
g fro
m a PC
(PC m
od
e)
4 Click “Yes”.
The deletion complete dialog box isdisplayed.
5 Click “Finish”.The relevant files are deleted.
Tips
You can also remove the software from theControl Panel. Select “Add/RemovePrograms” from the “Control Panel.” Thenselect PictureGear Studio and click“Remove”.
Printing photos fromthe PictureGearStudio
PictureGear Studio allows you to carryout a series of procedures for handling astill image—capturing, managing,processing, and outputting. You canuse the software to print an image fromyour PC in the post card or 3.5 x 5 inchsize print paper.
Note
In some regions, 3.5 x 5 inch size print paperis not sold.
1 Start the PictureGear Studio.The PictureGear Studio window isdisplayed.
2 Click “Photo Collection”.
The “Photo Collection” window isdisplayed.
3 Click the desired photocategory folder.For explanations, “Sample” folder isselected in the following example.
Continued

26 GB
4 Click “Print”.
The Print dialog box is displayed.
5 Select the photos that youwant to print, set the numberof copies to be printed foreach photo, and then click“Apply”.
The print paper selection dialog boxis displayed.
Note
Make sure to set the print quantity inthis dialog box. Even if you set thenumber of copies in “Paper/Output”tab of the “Sony DPP-FP30 Properties”dialog box, the print quantity will not bereflected.
6 Click “Sony”, and then selectthe desired paper size.
Select either of the following papersizes for the DPP-F series:
• DPP-F series 4 x 6“ (Postcard size)SVM-F40P/F80P
• DPP-F series 3.5 x 5”SVM-F40L
Notes
• In some regions, 3.5 x 5 inch sizeprint paper (SVM-F40L, DPP-Fseries) is not sold.
• If you select paper other than theDPP-F series paper, you cannotobtain proper printing results.
When you select the paper size, theprint dialog box is displayed.
7 In the “Printer” drop-down listbox, select “Sony DPP-FP30”and then click “Properties”.In the “Printer” drop-down list box,select the printer that you actuallyuse.

27 GB
Printin
g fro
m a PC
(PC m
od
e)
Items Functions
Print All All the photos selected inthe “Select Photo” windowwill be printed.
Print the selected page onlyThe image being displayedin the “Print Preview” willbe printed.
Printer Select “Sony DPP-FP30”.
Border Free Print• When checked, an image
will be printed withoutmargins around it.
• When unchecked, animage will be printedwith margins around it.
Exif print • When checked, an imageshot with a Exif Print(Exif 2.21)-compliantdigital camera will beadjusted and printedwith its optimum picturequality.
Note
The image displayed onthe monitor will not beadjusted.
• When unchecked, animage will be printedwithout adjustments.
Properties Specifies orientation,picture quality and otherdetails.
When you click “Properties”, thedocument properties dialog box forthe selected printer is displayed.
8 In the “Paper/Output” tab,specify the paper size.
Items Functions
Paper size From the drop-down listbox, select the paper sizeyou actually use forprinting:• Post card• 3.5x5 inch
Note
In some regions, 3.5 x 5 inchsize print paper is not sold.
Then check either of thefollowing to specify themargins around the image:• With border: an image is
printed with bordersaround it.
• Borderless: an image isprinted without bordersaround it.
Orientation Select the orientation ofan image when printed:• Portrait• Landscape• Rotates 180 degrees
Note
Depending on theapplication software youuse, orientation may notchange even if you changeportrait or landscape setting.
Continued

28 GB
Items Functions
Copies Specify the number ofcopies to be printed.
Note
Depending on theapplication software youuse, the print quantitysetting of the applicationhas priority over thatspecified here.
Enlarge/ Specify the percentage toReduce enlarge or reduce the
size of an image whenprinted.You can set the referencepoint when an image isenlarged or reduced bychecking “Upper leftreference”.• When unchecked, an
image is enlarged orreduced with thecenter as the referencepoint. Usually, usethis option.
• When checked, animage is enlarged orreduced with theupper left corner asthe reference point.You need to use thisoption when usingsome types ofapplications. In caseprinting does notcomplete satisfactorilywith the optionunchecked, select thisoption.
Print previewCheck this option todisplay a preview of animage before printed.
9 In the “Graphics” tab, set thecolor reproduction and picturequality.
Items Functions
Color reproduction/Picture qualitySelect the setting from the drop-down list box:•Off: An image will be printed
without adjustment.•Auto Fine Print 3:From the
“Settings” drop-down list box,select either of the followingcorrection method:– Photographical: An image
will be adjustedautomatically and printedwith natural and beautifulpictures. (Recommendedoption)
–Vivid: An image will beadjusted automatically andprinted with more vividpictures. (In this setting, astronger sharpness correctionis given, making picturesmore vivid.)

29 GB
Printin
g fro
m a PC
(PC m
od
e)
Items Functions
•ICM (system): From the“Settings” drop-down listbox, select either of thefollowing correction method:– Graphics: when graphics or
vivid colors are used.– Match: when you want to
match colors.– Pictures: when a
photograph or pictures areprinted.
Note
The ICM setting is valid onlywhen you are using an ICM-compliant applicationsoftware. When printingfrom the applicationsoftware that does notsupport the ICM system, animage may be printed withincorrect colors.
Exif PrintCheck it to adjust and print animage shot with a Exif Print(Exif 2.21)-compliant digitalcamera. The printer driveruses the color conversion andExif shooting data to adjust theimage. This option is effectiveonly with PictureGear Studio.
Red-eye reductionCheck it to automaticallyreduce the red-eyephenomenon of the subjectshot by using a flash light.
Notes
•When you check this option,make sure to select “Preview”to display the preview imagebefore printing and check thatthe red-eye reduction hasbeen correctly processed tothe image.
•Red-eye phenomenon will bedetected automatically, and itmay not be corrected.
If red-eye phenomenon is notcorrected, use the PictureGearStudio correction function.
•Red-eye reduction is enabledonly when you have installedthe software from“Setup.exe” in the suppliedCD-ROM. For the details seethe Readme.txt.
Continued

30 GB
Items Functions
Print settings Adjusts the color elements and
sharpness.R:Adjusts the red and blue
elements. The higher you setthe level, the more reddishthe picture becomes as if itreceives red light. The loweryou set the level, the darkerthe picture becomes as if lightblue is added.
G:Adjusts the green and purpleelements. The higher you setthe level, the more greenishthe picture becomes as if itreceives green light. Thelower you set the level, thedarker the picture becomesas if red purple is added.
B:Adjusts the blue and yellowelements. The higher you setthe level, the more bluish thepicture becomes as if itreceives blue light. Thelower you set the level, thedarker the picture becomesas if yellow is added.
Sharp (sharpness): The higheryou set the sharpness level,the more distinct the outlinesbecome
10Click “OK”.The print dialog box is displayed.
11Click “Print All” or “Print theselected page only”.
The confirmation dialog box forprinting is displayed.
12Make sure that the specifiedprint paper and print cartridgeare loaded and click “OK”.
Printing starts.

31 GB
Printin
g fro
m a PC
(PC m
od
e)
When “Print preview” is checked instep 8The preview window is displayed.Check the adjustment results andthen click “Print”.
Printing resumes.
Notes
• Never move or turn off the printer while itis printing; the print cartridge or papermay become stuck. If this happens, turnthe printer off and then on, and resumeprinting from the beginning.
• The print paper may emerge a few timesduring printing. Do not touch nor pull theemerged paper. Wait for the print paper tobe fully ejected after printing ends.
• Make sure to spare enough space behindthe printer during printing.
• If print paper runs out during continuousprinting or if you print with no print paperin the paper tray, the printer’s ERRORindicator lights. Feed the print paperwithout turning off the power and resumeprinting.
Continued
To stop printing
1 Open the “Print” dialog boxfrom the desktop.
2 Click the document name thatyou want to cancel printing ofand then click “Cancel” fromthe “Document” menu.
The dialog box used for confirmingthe deletion is displayed.
3 Click “Yes”.
The printing job is canceled.
Note
Do not cancel the printing job on process,which may cause a paper jam.

32 GB
Printing from otherapplication software
You can use a commercially-availableapplication software to print an imagefrom the DPP-FP30. Select “DPP-FP30”in the print dialog box and select theprint paper size in the page setup dialogbox. For details in print settings, seesteps 8 and 9 on pages 27 and 30.
On “Borderless” setting in the “Papersize” sectionWhen using an application other thanthe PictureGear Studio, an image mightbe printed with borders even if youselect borderless print in the “Papersize” section of the “Paper/Output” tabin the “Sony DPP-FP30 Properties”dialog box.When you select the borderless printoption, the printing rage information forborderless print will be supplied to theapplication. Some applications,however, may arrange and print theimage with borders within the specifiedrange.If this occurs, do either of the followingto print an image without borders:
• When you can set print range with anapplication, set an image to be printedfully in the print range. For example,select “Full page photo print” or asimilar option.
• Set a larger value in the “Enlarge/Reduce” text box in the “Paper/Output” tab of the “Sony DPP-FP30Properties” dialog box.If borders remain on the right andbottom sides of a printed image evenafter you set a larger value, check“Upper left reference”.
In either case, make sure to display andcheck the preview image beforeprinting.
Orientation settingDepending on the application softwareyou use, orientation may not changeeven if you change portrait or landscapesetting.
With border/borderless setting of theprinter driverWhen the application software you usehas border/borderless setting, wesuggest you select borderless as theprinter driver setting.
Print quantity setting in theProperties dialog boxDepending on the application softwareyou use, the print quantity setting of theapplication you use may have priorityover the setting specified in the printerdriver dialog box.
Exif Print Settings in the “Graphics”tabThe Exif Print setting in the “Colorreproduction/Picture quality” sectionsupports the PictureGear Studio only. Ifyou use other application to print animage with this option checked, theimage may be printed with incorrectcolors. If this occurs, remove the check.

33 GB
Trou
blesh
oo
ting
Troubleshooting
If trouble occurs
If you run into any problems using the printer, use the following guidelines to solvethe problem. If the problem persists, consult your Sony dealer.
PowerSymptom
The printercannot be turnedon.
The printercannot be turnedoff.
Check
• Is the AC power cordproperly connected?
• Is the AC power adaptorproperly connected?
Cause/Solutions
c Connect one plug of the supplied ACpower cord to the supplied AC poweradaptor, and the other plug to the walloutlet. Then insert the plug of the ACpower adaptor to the DC IN connector ofthe printer securely. (.pages 13, 18)
c Keep pressing STANDBY for longerthan one second until the STANDBYindicator turns to red.
Connecting with a digital camera
Symptom
ThePICTBRIDGEindicator of theprinter does notlight.
Cause/Solutions
c Connect the cable correctly.
c Press STANDBY to turn on theSTANDBY indicator in green.
c See the homepage for the digital camerayou are using.
c If a USB mouse or other non-PictBridge-compliant device is connected, remove itand connect a PictBridge-compliant device.
c Disconnect the digital camera and theprinter and then connect them again. Orturn off and then on the printer and thedigital camera.
c Connect the cable again after printing iscomplete.
c You cannot connect a PictBridge-compliant digital camera and the PC tothe printer at the same time. Remove theUSB cable of the PC and connect thedigital camera again to the printer.
Check
• Is the digital cameraconnected correctly?
• Is the printer turned on?
• Does the firmware of yourdigital camera support theprinter?
• Is the PICTBRIDGEindicator of the printerflashing?
• Is printing in process?
• Is the printer connected tothe PC?

34 GB
Symptom
I lost the suppliedCD-ROM andwant to obtain anew one.
The printerdriver cannot beinstalled.
Check
• Are you sure that you havefollowed the installationprocedures correctly?
• Is another applicationprogram running?
• Did you specify the CD-ROM as the installation CD-ROM correctly?
• Is the USB driver installed?
Connecting with a computer
Cause/Solutions
c Please download the printer driver fromthe Customer support home page(.page 41). Or contact your Sonydealer.
c Follow the procedures in the operatinginstructions to install the driver(.page 16). If an error occurs, restartyour computer and do the installationprocedures again.
c Exit all applications and then install thedriver again.
c Double-click My Computer, and then theCD-ROM icon in the open window.Follow the procedures in the operatinginstructions to install the driver.
c The USB driver may not be installedproperly. Follow the operatinginstructions to install the USB driveragain.
Symptom
An error isdisplayed withthe digitalcamera and youcannot makeprinting.
You cannot makea DPOF printing.
You cannot makea date printing.
Check
• Are you using the identicaltype of print paper andprint cartridge?
Cause/Solutions
c Insert the print paper whose type isidentical with the print cartridge loaded.To change the type of the print cartridge,postpone printing, replace printcartridges, and then resume printing.
c Some types of digital cameras do notsupport DPOF printing. Use anothermethod for printing.
c The printer does not support dateprinting. Some types of digital camerasprovide date print setting. Even if youset the date print setting effective, thedate will not be printed.

35 GB
Trou
blesh
oo
ting
Symptom
The printerdriver cannot beinstalled.
The printer doesnot respond tothe printingorder from thePC.
Check
• Can you read the CD-ROMwith Explorer?
• Is there an anti-virusprogram or other programrunning on the system?
• Did you log onto WindowsXP/2000 Professional using anAdministrator user account?
• Is an error messagedisplayed stating that anerror was detected in outputof documents via USB?
• Is a PictBridge-compliantdigital camera connected tothe printer?
Cause/Solutions
c If there is an error with the CD-ROM,you may not be able to read it. If anerror message is displayed on your PC,check the contents and remove thesource of the problem. Then install theprinter driver again. For details on theerror contents, see the operatinginstructions of your PC.
c If there is an anti-virus program or otherprogram running on the system, exit itand then start installing the driver.
c To install the driver in Windows XP/2000 Professional, log onto Windowsusing an Administrator user account.
c Check if the ERROR indicator of theprinter lights or flashes. If it does, do thefollowing procedures, which may solvethe problem:1 Turn off and then on the printer.2 Disconnect the AC power adaptor
from the printer.3 Wait for 5 to 10 seconds, and then
connect the AC adaptor again.4 Restart your computer.If these do not solve the problem,consult with your Sony dealer or servicefacilities.
c Remove the USB cable and then connectit again.
c You cannot connect a PictBridge-compliant digital camera and the PC tothe printer at the same time. Remove thecable from the PICTBRIDGE connectorand connect the PC again to the printer.
36 GB
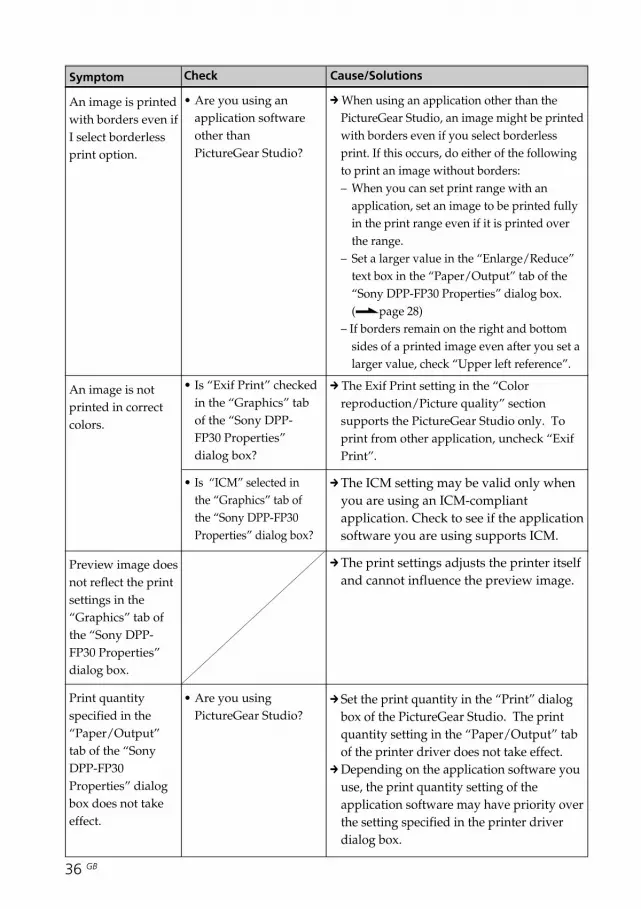
Symptom
An image is printedwith borders even ifI select borderlessprint option.
An image is notprinted in correctcolors.
Preview image doesnot reflect the printsettings in the“Graphics” tab ofthe “Sony DPP-FP30 Properties”dialog box.
Print quantityspecified in the“Paper/Output”tab of the “SonyDPP-FP30Properties” dialogbox does not takeeffect.
Check
• Are you using anapplication softwareother thanPictureGear Studio?
• Is “Exif Print” checkedin the “Graphics” tabof the “Sony DPP-FP30 Properties”dialog box?
• Is “ICM” selected inthe “Graphics” tab ofthe “Sony DPP-FP30Properties” dialog box?
• Are you usingPictureGear Studio?
Cause/Solutions
c When using an application other than thePictureGear Studio, an image might be printedwith borders even if you select borderlessprint. If this occurs, do either of the followingto print an image without borders:– When you can set print range with an
application, set an image to be printed fullyin the print range even if it is printed overthe range.
– Set a larger value in the “Enlarge/Reduce”text box in the “Paper/Output” tab of the“Sony DPP-FP30 Properties” dialog box.(.page 28)
– If borders remain on the right and bottomsides of a printed image even after you set alarger value, check “Upper left reference”.
c The Exif Print setting in the “Colorreproduction/Picture quality” sectionsupports the PictureGear Studio only. Toprint from other application, uncheck “ExifPrint”.
c The ICM setting may be valid only whenyou are using an ICM-compliantapplication. Check to see if the applicationsoftware you are using supports ICM.
c The print settings adjusts the printer itselfand cannot influence the preview image.
c Set the print quantity in the “Print” dialogbox of the PictureGear Studio. The printquantity setting in the “Paper/Output” tabof the printer driver does not take effect.
c Depending on the application software youuse, the print quantity setting of theapplication software may have priority overthe setting specified in the printer driverdialog box.

37 GB
Trou
blesh
oo
ting
Symptom
Paper does notfeed.
The print paperemerges duringprinting inprocess.
PrintingWhen you place print paper in the paper tray and start printing, paper feedingerror may occur: the printer does not feed paper; the printer may feedoverlapped paper; or the printer may feed paper diagonally. If this occurs, checkthe items listed in the following symptom “Paper does not feed”.
Check
• Is the print paper properlyset in the paper tray?
• Are you using print paperthat was not designed forthe printer?
• Is the print paper jammed?
• Is it in the middle of theprinting process?
Cause/Solutions
c If print paper is not properly loaded, theprinter may develop trouble. Check thefollowing:• Is the correct set of print paper and print
cartridge loaded? (.page 8)• Did you place print paper exceeding the
limit in the paper tray? (.page 10)• Did you set the tray adaptor according
to the print paper size you use?(.page 10)
• Did you riffle the print paper thoroughly?• Did you bend or fold the print paper
before printing?c If print paper runs out during continuous
printing or if you print with no print paperin the paper tray, the printer’s ERRORindicator lights. Feed the print paperwithout turning off the power and resumeprinting.
c Use print paper designed for the printer. Ifyou use incompatible print paper, theprinter may develop trouble. (.page 8)
c When the printer cannot feed the printpaper, the ERROR indicator flashesrapidly. Remove the paper tray andcheck paper jam. (.page 41)
c The print paper may emerge a few timesduring printing. Do not touch nor pullthe emerged paper. Wait for the printpaper to be fully ejected after printingends. Make sure to spare enough spacebehind the printer during printing.

38 GB
Printed results
Symptom
The printedpictures areinferior inquality.
Check
• Did you print previewimage data?
• Did you allow dust to geton the print cartridge?
• Did you allow dust orfinger prints to get on theprinted surface?
• Did you use used printpaper?
• Did you use an AdobeRGB-compliant digital camera,not compatible with theDCF 2.0, to shoot an imagein the AdobeRGB mode?
Cause/Solutions
c When a digital camera saves an image, apreview image may be saved along withthe primary images. The printed qualityof the preview images will not be asgood as the primary images. Note that ifyou delete the preview images, the datafor the primary images may bedamaged.
c Wipe the plastic part of the printcartridge and remove dust.
c Do not touch the printing surface (theshiny-side with no imprint). Fingerprintson the printing surface may result inimperfect printing.
c Do not print on used print paper.Printing an image twice on the samepaper will not make the printed imagethicker. Doing so could result indamages to the printer.
c An AdobeRGB image file that supportsthe DCF 2.0 will undergo colorcorrections, but an AdobeRGB image filethat does not support the DCF 2.0 will beprinted in vague colors without colorcorrections.
What is an AdobeRGB?An AdobeRGB is a color space that theAdobe System Incorporated employsand uses as the default setting for imageprocessing software including the AdobePhotoshop. The AdobeRGB, an optionalcolor space extended with the DCF 2.0,determines the color ranges widely usedin printing industry.
For whether or not a digital camerasupports the AdobeRGB, see theoperating instructions of the digitalcamera.

39 GB
Trou
blesh
oo
ting
Symptom
The picturequality andcolors of theimage previewedon the screen ofthe digitalcamera differsfrom thoseprinted.
The imagecannot be printedfully in the printrange.
The image isstretchedhorizontallywhen printed.
Check
• Is the aspect ratio of theimage correct?
• Did you rotate the imageor add other process?
Cause/Solutions
c Because of differences in the phosphormethod or profiles of a monitor or LCDdisplay, please regard the image beingdisplayed on the screen as just areference.
c Depending on the type of digital cameraused, the aspect ratio of the recordedimage differs, so the image may not beprinted covering the entire printablearea.
c Depending on the type of digital cameraused, the image may be stretchedvertically if it has been rotated orprocessed using your digital camera.This is not because of trouble with theprinter, but because the image wasrewritten with your digital camera.

40 GB
Symptom
I cannot insertthe printcartridgesmoothly.
The printcartridge cannotbe removed.
The print paperis not ejected.
Printing stopsmidway.
Check
• Is the ERROR indicatorflashing rapidly?
• Does the ERROR indicatorlight?
• Is the ERROR indicatorflashing rapidly?
Others
Cause/Solutions
c If the print cartridge does not click intoplace, remove it and then re-insert it.Only when the ink ribbon is too slack tobe loaded, wind the ink ribbon in thedirection of the arrow to remove theslack. (.page 10)
c Turn off the STANDBY button and thenturn it on. After the initial motion stops,try to remove the cartridge. If this doesnot solve the problem, contact Sonyservice facilities or your Sony dealer.
c Paper is jammed. See “If paper jams”(.page 41) and remove jammedpaper from the printer. If jammed papercannot be removed, contact the Sonyservice facilities.
c Remove the print paper and resumeprinting. If you cannot remove the printpaper, follow the procedures shown in“If paper jams” (.page 41) andremove jammed paper from the printer.
c Paper is jammed. See “If paper jams”(.page 41) and remove jammedpaper from the printer. If jammed papercannot be removed, contact the Sonyservice facilities.

41 GB
Trou
blesh
oo
ting
If paper jams
If the print paper jams, the ERRORindicator lights or flashes rapidly andprinting stops.When the ERROR indicator lights,remove the print paper and resumeprinting.When the ERROR indicator flashesrapidly, turn off the power with theprint paper and print cartridge loaded.Then turn on the printer again. Whenthe printer’s initial loading process ends,remove the paper tray from the printer.Check if there is jammed paper in thepaper outlet or feeding slot of the printerand remove the jammed paper, if any.
Note
If you cannot remove the jammed paper,contact your Sony dealer or service facilities.
To turn off the printerKeep pressing STANDBY for longerthan one second until the STANDBYindicator turns to red.
Customer support home pageThe latest support information isavailable at the following homepageaddresses:
For the customers in the U.S.A.:http://www.sel.sony.com/SEL/service/conselec/
For the customers in Canada:http://www.sony.ca/service
For the customers in Europe:http://www.sonydigitallink.com/index/index.asp
For the customers in Singapore:
http://www.css.ap.sony.com
Pull out thejammed paperslowly.
Take out thepaper tray toremove thejammed paper.

42 GB
Additional information
Precautions
On safety• Be careful not to set or drop any
heavy objects on the power cord, orto damage the power cord in anyway. Never operate this printer witha damaged power cord.
• Should any solid object or liquid fallinto the cabinet, unplug the printerand have it checked by qualifiedpersonnel before operating it anyfurther.
• Never disassemble the printer.• To disconnect the power cord, pull it
out by the plug. Never pull thepower cord itself.
• When the printer is not going to beused for an extended period of time,disconnect the power cord from thewall outlet.
• Do not handle the printer roughly.• To reduce the risk of electrical shock,
always unplug the printer from theelectrical outlet before cleaning andservicing the printer.
On installation• Avoid placing the printer in a
location subject to:– vibration– high humidity– excessive dust– direct sunlight– extremely high or low
temperatures• Do not use electrical equipment near
the printer. The printer will not workproperly in electromagnetic fields.
• Do not place heavy objects on theprinter.
• Leave enough room around theprinter so that the ventilation holesare not blocked. Blocking these holesmay cause internal heat build-up.
• Leave enough room behind theprinter. If there is not enough space,printing will be failed or a problemmay occur.
On the AC power adaptor• Be sure to use the AC power adaptor
supplied with the printer. Do not useother AC power adaptors, as this maycause a malfunction.
• Do not use an electrical transformer(travel converter), as this may causeoverheat or a malfunction.
• In case the cord of the AC adaptor isdisconnected or damaged, never use itany longer, as this may cause danger.

43 GB
Ad
ditio
nal in
form
ation
On moisture condensationIf the printer is brought directly from acold location to a warm location orplaced in an extremely warm or humidroom, moisture may condense inside theunit. In such cases the printer willprobably not work properly and mayeven develop a fault if you persist inusing it. If moisture condensationoccurs, unplug the AC power cord of theprinter and do not use the printer for atleast one hour.
On transportWhen you transport the printer, removethe print cartridge, paper tray, ACpower adaptor from the printer and putthe printer and its peripherals in theoriginal box with the protectivepackaging.If you no longer have the original boxand packing parts, use similar packingmaterial so that the printer will not bedamaged while being transported.
On cleaningClean the cabinet, panel and controlswith a soft dry cloth, or a soft clothlightly moistened with a mild detergentsolution. Do not use any type of solvent,such as alcohol or benzine, which maydamage the finish.
On restrictions on duplicationIf duplicating documents with theprinter, pay special attention to thefollowing:
• Duplication of banknotes, coins, orsecurities is against the law.
• Duplication of blank certificates,licenses, passports, private securities,or unused postal stamps is alsoagainst the law.
• TV program, films, video tapes,others’ portraits or other materialsmay be copyrighted. Unauthorizedvideo printing of such materials mayinfringe the provisions of thecopyright law.

44 GB
Specifications
x Printer
Printing method
Dye sublimation printing (Yellow/Magenta/Cyan 3 pass)
Resolution
300 dpi x 300 dpi
Image processing per dot
256 levels (8 bits for each Yellow/Magenta/Cyan), approx. 16 770 000 colors
Printing size
Post Card (4 x 6 inch) size:101.6 x 152.4 mm (maximum,borderless)
3.5 x 5 inch size*1:89 x 127 mm (maximum, borderless)
Printing time (per sheet)
Post Card (4 x 6 inch) size: approx. 90seconds
3.5 x 5 inch size*1: approx. 80 seconds(excluding the time for dataprocessing and data transferring fromthe computer or digital camera. )
Input/Output connectors
USB connector (1)PICTBRIDGE connector (1)
Compatible image file formats*2
JPEG: DCF*3 2.0 compatible, Exif*4 2.21compatible
Maximum number of pixels to behandled
JPEG: 10 000 (H) x 7 500 (V) dots
Print cartridge/Print Paper
See “Preparing the printing pack (notsupplied)” on page 8.
Power requirements
DC IN jack, DC 24V(On standby mode, less than 1W)
Operating temperature
5 ˚C to 35 ˚C (41 ˚F to 95 ˚F)
Dimensions
Approx. 175 x 60.5 x 137 mm(7 x 2 1/2 x 5 1/2 inches)(w/h/d, excluding protruding parts)(400 mm (15 3/4 inches) of depth whenthe paper tray is installed.)
Mass
Approx. 950g (2 lb 2 oz)(excluding the 100 g (4 oz) paper tray)
Supplied accessories
See “Checking the contents of thepackage” on page 7.
x AC power adaptor
Power requirements
AC 100 to 240 V, 50/60 Hz, 1.5 to 0.75 A
Rated output voltage
DC 24 V, 2.2 A
Operating temperature
5 ˚C to 35 ˚C (41 ˚F to 95 ˚F)
Dimensions
Approx. 60 x 30.5 x 122 mm(2 3/8 x 1 1/4 x 4 7/8 inches)(w/h/d, excluding protruding parts)
Mass
Approx. 305 g (11 oz)
Design and specifications are subject tochange without notice.
*1: In some regions, 3.5 x 5 inch size printpaper is not sold.
*2: Some special file types are notcompatible.
*3: “DCF” stands for Design rule forCamera File system.
*4: “Exif” is an image file formatcontaining an image data added with itsthumbnail data for viewing, shot datedata and the shooting conditions data.

45 GB
Ad
ditio
nal in
form
ation
The above illustrations are those when an image with a 2:3 aspect ratio is printed.The printing range differs for a border or a borderless print.
Note
In some regions, 3.5 x 5 inch size print paper is not sold.
Printing range
Postcard size
3.5 x 5 inch size
152.4 mm/6 inch (1 800 dots)
95.5 mm/3 7/8 inch (1 128 dots)
101.6 mm/4 inch(1 200 dots)
146.3 mm/5 7/8 inch (1 728 dots)
127 mm/5 inch (1 500 dots)
83.9 mm/3 3/8 inch(990 dots)
89 mm/3 5/8 inch (1 050 dots)
122 mm/4 7/8 inch (1 450 dots)Border printrange
Borderlessprint range
Perforations

46 GB
Glossary
Auto Fine Print 3
The function automatically correctsthe picture quality so that an imagemay be printed in more vivid, clearand beautiful pictures. It is especiallyeffective for a darker image with lowcontrast. The pictures are corrected toreproduce natural skin colors, vividtree leaf green, or clear sky blue.
DCF (Design rule for Camera Filesystem)
The standard specified by JEITA(Japan Electronics and InformationTechnology Industries Association) tomaintain the file exchangeability andcompatibilities between digitalcameras and related products.
Exif 2.21 (Exif Print)
Exif (Exchangeable image file formatfor digital cameras) Print is a globalstandard for digital photo printing. Adigital camera supporting Exif Printstores the data relevant to theconditions of shooting as each shot istaken. The printer utilises the ExifPrint data stored in each image file toensure the printed result matches theoriginal shot as closely as possible*1. *1 When the “Auto Fine Print 3” is
enabled and an image (JPEG file) isshot by an Exif Print (Exif 2.21)-compliant digital camera, the image isautomatically adjusted to its optimumpicture quality and printed.
PictBridge
A standard specified by Camera &Imaging Products Association thatallows you to connect PictBridge-complaint digital camera directly tothe printer without a PC, enablingdirect printing on the spot.

47 GB
Ad
ditio
nal in
form
ation
Identifying the partsFor details, see the pages indicated inthe parentheses.
Printer1 Paper tray compartment lid (pages
12)2 STANDBY button (pages 13, 18)
• To turn on the printer, press STANDBYto turn on the STANDBY indicator ingreen.
• To turn off the printer, keep pressingSTANDBY for more than one seconduntil the STANDBY indicator turns inred.
3 STANDBY indicator (pages 13, 18)• Lights in red: The printer is in the
standby mode.• Lights in green: The printer is powered
on.• Flashes in green: Printing is in process.
4 PICTBRIDGE indicator (page 14)• Lights: The printer is being connected
to a PictBridge-compliant digitalcamera.
• Flashes: A device that does not supportthe PictBridge feature is connected. Or,the image to be printed is damaged.
5 ERROR indicator (pages 9, 35, 37,41)• Lights: The paper tray is not inserted.
No print paper is in the paper tray.Paper remains in the printer. Printpaper is running out.
• Flashes slowly: The print cartridgeends. No print cartridge is inserted.
• Flashes rapidly: Paper is jammed.Malfunction occurs with the printer.
6 Cartridge compartment lid (pages9)
7 Print cartridge eject lever (page 9)8 Print cartridge (Not supplied)
Continued

48 GB
9 Ventilation holes
0 USB connector (page 19)Connects to the USB connector of yourPC.
qa DC IN jack (pages 13, 18)Insert the AC power adaptor suppliedhere, and then connect the AC poweradaptor and the wall outlet with thesupplied AC power cord.
qs PICTBRIDGE connector (page 14)Connect the PictBridge-compliant digitalcamera.
Paper tray1 Tray adaptor (page 11)
Use the adaptor only when you feed 3.5 x5 inch size paper into the paper tray.
Note
In some regions, 3.5 x 5 inch size printpaper is not sold.
2 Paper eject tray (page 10)3 Paper tray lid (page 10)

49 GB
Ad
ditio
nal in
form
ation
Index
Symbols3.5 x 5 inch size 8
AAC power adaptor7, 13, 18AC power cord 7, 13, 18Auto Fine Print 3 6, 46
BBorder/borderless print27
CCartridge compartmentlid 9Cleaning
Outsides the printer 43Connecting
Computer 19PictBridge-compliantdigital camera 13To AC outlet 13, 18
DDC IN jack 13, 18DCF (Design rule forCamera File system) 46
EEject lever 9Enlarge/reduce 28ERROR indicator9, 35, 37, 41Exif Print 6, 27, 29, 46
FFeatures 6
IICM 29Inserting
Print cartridge 9Installing
Picture Gear Studio 22Printer driver 16System requirements15
MMoisture condensation43
OOperation flows 5Operation modes 5Orientation 27Overview 5
PPaper jams 41Paper size 8, 27Paper tray 10, 48PC mode 5, 19PictBridge 5, 13, 46PICTBRIDGE indicator14Picture quality 28, 30Post card size 8Preview 31Print cartridge 8, 9Print paper 8, 10Print Setting 30Printing
From a PictBridge-compliant digitalcamera 13From your PC 25
Printing pack 8Printing range 45Printing surface 11, 38
RRed-eye reduction 29Restrictions onduplication 43
SSTANDBY indicator13, 18Stop printing 31Super Coat 2 6Supplied accessories 7System requirements 15
TTransport 43Troubleshooting 33
UUninstalling
Picture Gear Studio 24Printer driver 20
USB connector 19

Sony Corporation Printed in China


