Embed Size (px)
Citation preview
Talend Data IntegrationStudioUser Guide
6.3.1
Talend Data Integration Studio
Adapted for v6.3.1. Supersedes previous releases.
Publication date: January 19, 2017Copyright © 2017 Talend Inc. All rights reserved.
Notices
Talend is a trademark of Talend, Inc.
All brands, product names, company names, trademarks and service marks are the properties of their respectiveowners.
End User License Agreement
The software described in this documentation is provided under Talend's End User License Agreement (EULA)for commercial products. By using the software, you are considered to have fully understood and unconditionallyaccepted all the terms and conditions of the EULA.
To read the EULA now, visit http://www.talend.com/legal-terms/us-eula.
Talend Data Integration Studio User Guide
Table of ContentsPreface ................................................. ix
1. General information . . . . . . . . . . . . . . . . . . . . . . . . . . ix1.1. Purpose . . . . . . . . . . . . . . . . . . . . . . . . . . . . . . . ix1.2. Audience . . . . . . . . . . . . . . . . . . . . . . . . . . . . . ix1.3. Typographical conventions . . . . . . . . . . ix
2. Feedback and Support . . . . . . . . . . . . . . . . . . . . . . . ixChapter 1. Data Integration: Conceptsand Principles ........................................ 1
1.1. Data analytics . . . . . . . . . . . . . . . . . . . . . . . . . . . . . . . . 21.2. Operational integration . . . . . . . . . . . . . . . . . . . . . 21.3. Talend Data Integration functionalarchitecture . . . . . . . . . . . . . . . . . . . . . . . . . . . . . . . . . . . . . . . 31.4. Teamwork and developmentconsolidation for Data Integration . . . . . . . . . . . . . . 41.5. Execution monitoring . . . . . . . . . . . . . . . . . . . . . . . 5
Chapter 2. Working with projects ............ 72.1. Introduction to projects . . . . . . . . . . . . . . . . . . . . . 82.2. How to create a project . . . . . . . . . . . . . . . . . . . . . 82.3. How to create a sandbox project . . . . . . . . . . 102.4. How to import a demo project . . . . . . . . . . . . 122.5. How to import local projects . . . . . . . . . . . . . . 142.6. How to open a local project . . . . . . . . . . . . . . . 162.7. How to open a remote project . . . . . . . . . . . . . 172.8. How to delete a local project . . . . . . . . . . . . . . 192.9. How to export a project . . . . . . . . . . . . . . . . . . . 192.10. Working collaboratively on projectitems . . . . . . . . . . . . . . . . . . . . . . . . . . . . . . . . . . . . . . . . . . . . . . 20
2.10.1. Lock principle . . . . . . . . . . . . . . . . . . . . 212.10.2. Lock types . . . . . . . . . . . . . . . . . . . . . . . . 232.10.3. How to access items of aremote project in offline mode . . . . . . . . . . . 242.10.4. How to handle changes notcommitted to the SVN or Git . . . . . . . . . . . . 262.10.5. How to log information onedited items . . . . . . . . . . . . . . . . . . . . . . . . . . . . . . . 282.10.6. How to delete shared items . . . . . . . 30
2.11. Working with project branches andtags . . . . . . . . . . . . . . . . . . . . . . . . . . . . . . . . . . . . . . . . . . . . . . . 30
2.11.1. How to create a local branchfrom Talend Studio (Git only) . . . . . . . . . . . 302.11.2. How to push changes on alocal branch to the remote end (Gitonly) . . . . . . . . . . . . . . . . . . . . . . . . . . . . . . . . . . . . . . 322.11.3. How to update a local branch(Git only) . . . . . . . . . . . . . . . . . . . . . . . . . . . . . . . . . 342.11.4. How to revert a local branchto the previous update state (Gitonly) . . . . . . . . . . . . . . . . . . . . . . . . . . . . . . . . . . . . . . 352.11.5. How to delete a local branch(Git only) . . . . . . . . . . . . . . . . . . . . . . . . . . . . . . . . . 362.11.6. How to create a tag for aproject . . . . . . . . . . . . . . . . . . . . . . . . . . . . . . . . . . . . 372.11.7. How to switch betweenbranches or tags . . . . . . . . . . . . . . . . . . . . . . . . . . 392.11.8. How to view the projecthistory specific to a branch or tag(Git only) . . . . . . . . . . . . . . . . . . . . . . . . . . . . . . . . . 412.11.9. How to resolve conflictsbetween branches (Git only) . . . . . . . . . . . . . 42
Chapter 3. Designing a BusinessModel .................................................. 49
3.1. What is a Business Model . . . . . . . . . . . . . . . . . 503.2. Opening or creating a BusinessModel . . . . . . . . . . . . . . . . . . . . . . . . . . . . . . . . . . . . . . . . . . . . 50
3.2.1. How to open a BusinessModel . . . . . . . . . . . . . . . . . . . . . . . . . . . . . . . . . . . . . 513.2.2. How to create a BusinessModel . . . . . . . . . . . . . . . . . . . . . . . . . . . . . . . . . . . . . 51
3.3. Modeling a Business Model . . . . . . . . . . . . . . . 523.3.1. Shapes . . . . . . . . . . . . . . . . . . . . . . . . . . . . . 533.3.2. Connecting shapes . . . . . . . . . . . . . . . . . 543.3.3. How to comment and arrangea model . . . . . . . . . . . . . . . . . . . . . . . . . . . . . . . . . . . 563.3.4. Business Models . . . . . . . . . . . . . . . . . . . 57
3.4. Assigning repository elements to aBusiness Model . . . . . . . . . . . . . . . . . . . . . . . . . . . . . . . . . . 603.5. Editing a Business Model . . . . . . . . . . . . . . . . . . 613.6. Saving a Business Model . . . . . . . . . . . . . . . . . . . 61
Chapter 4. Designing a Job .................... 634.1. What is a Job design . . . . . . . . . . . . . . . . . . . . . . . 644.2. Getting started with a basic Job . . . . . . . . . . . 64
4.2.1. Creating a Job . . . . . . . . . . . . . . . . . . . . . 644.2.2. Adding components to the Job . . . . 664.2.3. Connecting the componentstogether . . . . . . . . . . . . . . . . . . . . . . . . . . . . . . . . . . . 694.2.4. Configuring the components . . . . . . . 714.2.5. Executing the Job . . . . . . . . . . . . . . . . . . 72
4.3. Creating a Job from a template . . . . . . . . . . . 734.3.1. How to output data from a fileto a database table and vice versa . . . . . . . . 734.3.2. How to output data from onedatabase table to another . . . . . . . . . . . . . . . . . 784.3.3. How to output data from a fileto a Joblet in a specific format . . . . . . . . . . . 84
4.4. Creating a Job using a Job creationAPI . . . . . . . . . . . . . . . . . . . . . . . . . . . . . . . . . . . . . . . . . . . . . . . 87
4.4.1. How to create a Job script . . . . . . . . . 874.4.2. How to write a Job script . . . . . . . . . . 894.4.3. How to edit a Job script . . . . . . . . . . . 944.4.4. How to generate a Job designfrom a Jobscript . . . . . . . . . . . . . . . . . . . . . . . . . . 944.4.5. How to export a Job script . . . . . . . . . 954.4.6. How to open an exported Jobscript . . . . . . . . . . . . . . . . . . . . . . . . . . . . . . . . . . . . . . 954.4.7. How to display a Job script . . . . . . . . 96
4.5. Working with components . . . . . . . . . . . . . . . . . 964.5.1. How to add a componentbetween two connected components . . . . . 964.5.2. How to define componentproperties . . . . . . . . . . . . . . . . . . . . . . . . . . . . . . . . 1004.5.3. How to define the startcomponent . . . . . . . . . . . . . . . . . . . . . . . . . . . . . . . 1104.5.4. How to find Jobs containing aspecific component . . . . . . . . . . . . . . . . . . . . . 1114.5.5. How to set default values inthe schema of a component . . . . . . . . . . . . . 113
4.6. Using connections . . . . . . . . . . . . . . . . . . . . . . . . . 1154.6.1. Connection types . . . . . . . . . . . . . . . . . 1154.6.2. How to define connectionsettings . . . . . . . . . . . . . . . . . . . . . . . . . . . . . . . . . . 1204.6.3. How to add a conditionalbreakpoint . . . . . . . . . . . . . . . . . . . . . . . . . . . . . . . 1234.6.4. How to partition a data flow . . . . . . 123
4.7. Using contexts and variables . . . . . . . . . . . . . 1244.7.1. How to define contextvariables for a Job . . . . . . . . . . . . . . . . . . . . . . 1254.7.2. How to centralize contextvariables in the Repository . . . . . . . . . . . . . 1304.7.3. How to apply Repositorycontext variables to a Job . . . . . . . . . . . . . . . 1374.7.4. How to use variables in a Job . . . . 1394.7.5. How to run a Job in a selectedcontext . . . . . . . . . . . . . . . . . . . . . . . . . . . . . . . . . . . 1394.7.6. StoreSQLQuery . . . . . . . . . . . . . . . . . . 140
4.8. Using parallelization to optimize Jobperformance . . . . . . . . . . . . . . . . . . . . . . . . . . . . . . . . . . . . 140
4.8.1. How to execute multipleSubjobs in parallel . . . . . . . . . . . . . . . . . . . . . . 1414.8.2. How to launch paralleliterations to read data . . . . . . . . . . . . . . . . . . . 142

Talend Data Integration Studio
iv Talend Data Integration Studio User Guide
4.8.3. How to orchestrate parallelexecutions of Subjobs . . . . . . . . . . . . . . . . . . . 1424.8.4. How to write data in parallel . . . . . 1434.8.5. How to enable parallelizationof data flows . . . . . . . . . . . . . . . . . . . . . . . . . . . . 144
4.9. Handling Jobs: advanced subjects . . . . . . . 1534.9.1. How to map data flows . . . . . . . . . . . 1534.9.2. How to create queries usingthe SQLBuilder . . . . . . . . . . . . . . . . . . . . . . . . . 1534.9.3. How to set checkpoints ontrigger connections . . . . . . . . . . . . . . . . . . . . . . 1584.9.4. How to download/uploadTalend Community components . . . . . . . . 1594.9.5. How to use the tPrejob andtPostjob components . . . . . . . . . . . . . . . . . . . . 1654.9.6. How to use the Use OutputStream feature . . . . . . . . . . . . . . . . . . . . . . . . . . . 166
4.10. Handling Jobs: miscellaneoussubjects . . . . . . . . . . . . . . . . . . . . . . . . . . . . . . . . . . . . . . . . . 166
4.10.1. How to use folders . . . . . . . . . . . . . . 1674.10.2. How to share a databaseconnection . . . . . . . . . . . . . . . . . . . . . . . . . . . . . . . 1674.10.3. How to handle error icons oncomponents or Jobs . . . . . . . . . . . . . . . . . . . . . 1684.10.4. How to add notes to a Jobdesign . . . . . . . . . . . . . . . . . . . . . . . . . . . . . . . . . . . 1704.10.5. How to view in-process data . . . . 1714.10.6. How to display the code orthe outline of your Job . . . . . . . . . . . . . . . . . . 1734.10.7. How to manage the subjobdisplay . . . . . . . . . . . . . . . . . . . . . . . . . . . . . . . . . . . 1754.10.8. How to define options on theJob view . . . . . . . . . . . . . . . . . . . . . . . . . . . . . . . . . 177
Chapter 5. Managing Jobs ................... 1795.1. Activating/Deactivating a componentor a subjob . . . . . . . . . . . . . . . . . . . . . . . . . . . . . . . . . . . . . 180
5.1.1. Activate or deactivate acomponent . . . . . . . . . . . . . . . . . . . . . . . . . . . . . . . 1805.1.2. Activate or deactivate a subjob . . . 1805.1.3. Activate or deactivate alllinked subjobs . . . . . . . . . . . . . . . . . . . . . . . . . . . 181
5.2. Importing/exporting items andbuilding Jobs . . . . . . . . . . . . . . . . . . . . . . . . . . . . . . . . . . . 181
5.2.1. How to import items . . . . . . . . . . . . . 1815.2.2. How to build Jobs . . . . . . . . . . . . . . . . 1855.2.3. How to export items . . . . . . . . . . . . . 1925.2.4. How to change contextparameters in Jobs . . . . . . . . . . . . . . . . . . . . . . 194
5.3. Managing repository items . . . . . . . . . . . . . . . 1955.3.1. How to handle updates inrepository items . . . . . . . . . . . . . . . . . . . . . . . . . 1955.3.2. How to analyze repositoryitems . . . . . . . . . . . . . . . . . . . . . . . . . . . . . . . . . . . . . 198
5.4. Searching a Job in the repository . . . . . . . . 2055.5. Managing Job versions . . . . . . . . . . . . . . . . . . . 2075.6. Documenting a Job . . . . . . . . . . . . . . . . . . . . . . . 208
5.6.1. How to generate HTMLdocumentation . . . . . . . . . . . . . . . . . . . . . . . . . . . 2095.6.2. How to autogeneratedocumentation . . . . . . . . . . . . . . . . . . . . . . . . . . . 2105.6.3. How to update thedocumentation on the spot . . . . . . . . . . . . . . 212
5.7. Working with referenced projects . . . . . . . 2135.7.1. How to access items in thereferenced projects . . . . . . . . . . . . . . . . . . . . . . 2135.7.2. How to use referencedprojects . . . . . . . . . . . . . . . . . . . . . . . . . . . . . . . . . . 2135.7.3. How to set the display mode ofreferenced projects . . . . . . . . . . . . . . . . . . . . . . 215
5.8. Comparing Jobs . . . . . . . . . . . . . . . . . . . . . . . . . . 2165.9. Handling Job execution . . . . . . . . . . . . . . . . . . 221
5.9.1. How to run a Job in normalmode . . . . . . . . . . . . . . . . . . . . . . . . . . . . . . . . . . . . 2215.9.2. How to run a Job in JavaDebug mode . . . . . . . . . . . . . . . . . . . . . . . . . . . . 2225.9.3. How to run a Job in TracesDebug mode . . . . . . . . . . . . . . . . . . . . . . . . . . . . 2235.9.4. How to set advanced executionsettings . . . . . . . . . . . . . . . . . . . . . . . . . . . . . . . . . . 2265.9.5. How to customize log4j outputlevel at runtime . . . . . . . . . . . . . . . . . . . . . . . . . 2285.9.6. How to show JVM resourceusage during Job execution . . . . . . . . . . . . . 2285.9.7. How to display specialcharacters in the console . . . . . . . . . . . . . . . . 2295.9.8. How to run a Job remotely . . . . . . . 2305.9.9. How to run a Job remotelywith SSL enabled . . . . . . . . . . . . . . . . . . . . . . . 2315.9.10. How to schedule Jobexecutions via the Job Conductor . . . . . . . 2325.9.11. How to deploy a Job onSpagoBI server . . . . . . . . . . . . . . . . . . . . . . . . . . 2325.9.12. How to recover Job executionin case of failure . . . . . . . . . . . . . . . . . . . . . . . . 235
5.10. Testing Jobs using test cases . . . . . . . . . . . . 2365.10.1. How to create a test case . . . . . . . . 2365.10.2. How to set up a test case . . . . . . . . 2395.10.3. How to execute test cases . . . . . . . 2415.10.4. Managing test cases . . . . . . . . . . . . . 243
5.11. Managing Jobs on differentbranches and tags . . . . . . . . . . . . . . . . . . . . . . . . . . . . . 243
5.11.1. How to copy a Job to abranch . . . . . . . . . . . . . . . . . . . . . . . . . . . . . . . . . . . 2445.11.2. How to revert a project itemon a tag . . . . . . . . . . . . . . . . . . . . . . . . . . . . . . . . . 246
Chapter 6. Mapping data flows ............ 2476.1. Map editor interfaces . . . . . . . . . . . . . . . . . . . . . 2486.2. tMap operation . . . . . . . . . . . . . . . . . . . . . . . . . . . 249
6.2.1. Setting the input flow in theMap Editor . . . . . . . . . . . . . . . . . . . . . . . . . . . . . . 2506.2.2. Mapping variables . . . . . . . . . . . . . . . . 2576.2.3. Using the expression editor . . . . . . 2596.2.4. Mapping the Output setting . . . . . . 2636.2.5. Setting schemas in the MapEditor . . . . . . . . . . . . . . . . . . . . . . . . . . . . . . . . . . . . 2686.2.6. Solving memory limitationissues in tMap use . . . . . . . . . . . . . . . . . . . . . . 2716.2.7. Handling Lookups . . . . . . . . . . . . . . . . 2736.2.8. Loading multiple lookup flowsin parallel . . . . . . . . . . . . . . . . . . . . . . . . . . . . . . . 2766.2.9. Previewing data . . . . . . . . . . . . . . . . . . 277
6.3. tXMLMap operation . . . . . . . . . . . . . . . . . . . . . 2796.3.1. Using the document type tocreate the XML tree . . . . . . . . . . . . . . . . . . . . 2806.3.2. Defining the output mode . . . . . . . . 2916.3.3. Editing the XML tree schema . . . . 296
Chapter 7. Managing Metadata ............ 2997.1. Objectives . . . . . . . . . . . . . . . . . . . . . . . . . . . . . . . . . 3007.2. Centralizing database metadata . . . . . . . . . 301
7.2.1. Setting up a databaseconnection . . . . . . . . . . . . . . . . . . . . . . . . . . . . . . . 3017.2.2. Retrieving table schemas . . . . . . . . . 306
7.3. Centralizing JDBC metadata . . . . . . . . . . . . 3107.3.1. Setting up a JDBC connection . . . 3107.3.2. Retrieving table schemas . . . . . . . . . 312
7.4. Centralizing SAS metadata . . . . . . . . . . . . . . 3137.4.1. Setting up a SAS connection . . . . . 3147.4.2. Retrieving table schemas . . . . . . . . . 316
7.5. Centralizing SAP metadata . . . . . . . . . . . . . . 3177.5.1. Setting up an SAP connection . . . . 3187.5.2. Retrieving SAP tables . . . . . . . . . . . . 3207.5.3. Retrieving an SAP function . . . . . . 323
Talend Data Integration Studio
Talend Data Integration Studio User Guide v
7.5.4. Retrieving the SAP BWobjects metadata . . . . . . . . . . . . . . . . . . . . . . . . 3297.5.5. Creating a file from SAPIDOC . . . . . . . . . . . . . . . . . . . . . . . . . . . . . . . . . . . . 332
7.6. Centralizing File Delimited metadata . . . 3347.7. Centralizing File Positional metadata . . . 3407.8. Centralizing File Regex metadata . . . . . . . 3467.9. Centralizing XML file metadata . . . . . . . . . 350
7.9.1. Setting up XML metadata foran input file . . . . . . . . . . . . . . . . . . . . . . . . . . . . . 3507.9.2. Setting up XML metadata foran output file . . . . . . . . . . . . . . . . . . . . . . . . . . . . 360
7.10. Centralizing File Excel metadata . . . . . . . 3707.11. Centralizing File LDIF metadata . . . . . . . 3757.12. Centralizing JSON file metadata . . . . . . . 380
7.12.1. Setting up JSON metadata foran input file . . . . . . . . . . . . . . . . . . . . . . . . . . . . . 3807.12.2. Setting up JSON metadata foran output file . . . . . . . . . . . . . . . . . . . . . . . . . . . . 387
7.13. Centralizing LDAP connectionmetadata . . . . . . . . . . . . . . . . . . . . . . . . . . . . . . . . . . . . . . . . 3957.14. Centralizing Salesforce metadata . . . . . . . 4007.15. Setting up a generic schema . . . . . . . . . . . . 404
7.15.1. Setting up a generic schemafrom scratch . . . . . . . . . . . . . . . . . . . . . . . . . . . . . 4047.15.2. Setting up a generic schemafrom an XML file . . . . . . . . . . . . . . . . . . . . . . . 4077.15.3. Saving a component schemaas a generic schema . . . . . . . . . . . . . . . . . . . . . 409
7.16. Centralizing MDM metadata . . . . . . . . . . . 4107.16.1. Setting up the connection . . . . . . . 4107.16.2. Defining MDM schema . . . . . . . . . 413
7.17. Managing a survivorship rulepackage . . . . . . . . . . . . . . . . . . . . . . . . . . . . . . . . . . . . . . . . . 429
7.17.1. How to view or edit asurvivorship rule item . . . . . . . . . . . . . . . . . . . 430
7.18. Centralizing BRMS (Drools Guvnor)metadata . . . . . . . . . . . . . . . . . . . . . . . . . . . . . . . . . . . . . . . . 4357.19. Centralizing Embedded Rules(Drools) . . . . . . . . . . . . . . . . . . . . . . . . . . . . . . . . . . . . . . . . . 4447.20. Centralizing Web Service metadata . . . . 446
7.20.1. Setting up a simple schema . . . . . 4477.20.2. Setting up an advancedschema . . . . . . . . . . . . . . . . . . . . . . . . . . . . . . . . . . 4517.20.3. Discovering Web servicesusing the Web Service Explorer . . . . . . . . 459
7.21. Centralizing a Validation Rule . . . . . . . . . 4627.22. Centralizing an FTP connection . . . . . . . . 4737.23. Centralizing HL7 metadata(deprecated) . . . . . . . . . . . . . . . . . . . . . . . . . . . . . . . . . . . . 475
7.23.1. Centralizing HL7 metadatafor an input file . . . . . . . . . . . . . . . . . . . . . . . . . 4757.23.2. Setting up an HL7 schema foran output file . . . . . . . . . . . . . . . . . . . . . . . . . . . . 479
7.24. Centralizing UN/EDIFACTmetadata . . . . . . . . . . . . . . . . . . . . . . . . . . . . . . . . . . . . . . . . 4857.25. Exporting metadata as context andreusing context parameters to set up aconnection . . . . . . . . . . . . . . . . . . . . . . . . . . . . . . . . . . . . . . 489
7.25.1. How to export connectiondetails as context variables . . . . . . . . . . . . . 4907.25.2. How to use variables of anexisting context group to set up aconnection . . . . . . . . . . . . . . . . . . . . . . . . . . . . . . . 494
7.26. Importing metadata from a CSVfile . . . . . . . . . . . . . . . . . . . . . . . . . . . . . . . . . . . . . . . . . . . . . . . 498
7.26.1. How to import databasemetadata . . . . . . . . . . . . . . . . . . . . . . . . . . . . . . . . . 4997.26.2. How to import delimited filemetadata . . . . . . . . . . . . . . . . . . . . . . . . . . . . . . . . . 501
7.27. How to use centralized metadata in aJob . . . . . . . . . . . . . . . . . . . . . . . . . . . . . . . . . . . . . . . . . . . . . . 503
Chapter 8. Managing routines .............. 5078.1. What are routines . . . . . . . . . . . . . . . . . . . . . . . . 5088.2. Accessing the System Routines . . . . . . . . . . . 5088.3. Customizing the system routines . . . . . . . . . 5108.4. Managing user routines . . . . . . . . . . . . . . . . . . 511
8.4.1. How to create user routines . . . . . . 5118.4.2. How to edit user routines . . . . . . . . . 5128.4.3. How to edit user routinelibraries . . . . . . . . . . . . . . . . . . . . . . . . . . . . . . . . . . 513
8.5. Calling a routine from a Job . . . . . . . . . . . . . 5148.6. Use case: Creating a file for thecurrent date . . . . . . . . . . . . . . . . . . . . . . . . . . . . . . . . . . . . 515
Chapter 9. Using SQL templates ........... 5179.1. What is ELT . . . . . . . . . . . . . . . . . . . . . . . . . . . . . . 5189.2. Introducing Talend SQL templates . . . . . . 5189.3. Managing Talend SQL templates . . . . . . . . 518
9.3.1. Types of system SQLtemplates . . . . . . . . . . . . . . . . . . . . . . . . . . . . . . . . 5199.3.2. How to access a system SQLtemplate . . . . . . . . . . . . . . . . . . . . . . . . . . . . . . . . . 5199.3.3. How to create user-definedSQL templates . . . . . . . . . . . . . . . . . . . . . . . . . . 5219.3.4. A use case of system SQLtemplates . . . . . . . . . . . . . . . . . . . . . . . . . . . . . . . . 523
Chapter 10. Change Data Capture(CDC): publish/subscribe ..................... 529
10.1. CDC architectural overview . . . . . . . . . . . . 53010.1.1. Trigger mode . . . . . . . . . . . . . . . . . . . 53010.1.2. CDC Redo/Archive logmode . . . . . . . . . . . . . . . . . . . . . . . . . . . . . . . . . . . . 53110.1.3. XStream mode . . . . . . . . . . . . . . . . . . 531
10.2. CDC: a publish/subscribe principle . . . . 53210.3. Setting up a CDC environment . . . . . . . . . 532
10.3.1. How to set up CDC inTrigger mode . . . . . . . . . . . . . . . . . . . . . . . . . . . . 53310.3.2. How to set up CDC in OracleRedo/Archive log mode . . . . . . . . . . . . . . . . . 53810.3.3. How to set up CDC in OracleXStream mode . . . . . . . . . . . . . . . . . . . . . . . . . . 54510.3.4. How to set up CDC inRedo/Archive log mode (journal) forAS/400 . . . . . . . . . . . . . . . . . . . . . . . . . . . . . . . . . . 556
10.4. Database support for CDC . . . . . . . . . . . . . 564Chapter 11. Designing a Joblet ............. 565
11.1. What is a Joblet . . . . . . . . . . . . . . . . . . . . . . . . . 56611.2. How to create a Joblet from scratch . . . . 56611.3. How to create a Joblet from a Job . . . . . . 56911.4. How to use a Joblet in a Job . . . . . . . . . . . . 57111.5. How to use a Joblet in the beginningof a Job . . . . . . . . . . . . . . . . . . . . . . . . . . . . . . . . . . . . . . . . . 57211.6. How to launch a Joblet . . . . . . . . . . . . . . . . . . 57311.7. How to edit a Joblet . . . . . . . . . . . . . . . . . . . . . 57511.8. How to organize Joblets . . . . . . . . . . . . . . . . . 57511.9. How to apply a context variable to aJoblet . . . . . . . . . . . . . . . . . . . . . . . . . . . . . . . . . . . . . . . . . . . 57511.10. How to set up routine dependencieson a Joblet . . . . . . . . . . . . . . . . . . . . . . . . . . . . . . . . . . . . . 576
Appendix A. GUI ................................ 579A.1. Main window . . . . . . . . . . . . . . . . . . . . . . . . . . . . . . 580A.2. Menu bar and Toolbar . . . . . . . . . . . . . . . . . . . . . 580
A.2.1. Menu bar of Talend Studio . . . . . . 581A.2.2. Toolbar of Talend Studio . . . . . . . . 582
A.3. Repository tree view . . . . . . . . . . . . . . . . . . . . . . 583A.4. Design workspace . . . . . . . . . . . . . . . . . . . . . . . . . 584A.5. Palette . . . . . . . . . . . . . . . . . . . . . . . . . . . . . . . . . . . . . . 585A.6. Configuration tabs . . . . . . . . . . . . . . . . . . . . . . . . . 585A.7. Outline and code summary panel . . . . . . . . . . 588A.8. Shortcuts and aliases . . . . . . . . . . . . . . . . . . . . . . 588
Appendix B. Customizing TalendStudio and setting Studio preferences .... 589
Talend Data Integration Studio
vi Talend Data Integration Studio User Guide
B.1. Customizing project settings . . . . . . . . . . . . . . 590B.1.1. Customizing Maven buildscript templates . . . . . . . . . . . . . . . . . . . . . . . . . 590B.1.2. Palette Settings . . . . . . . . . . . . . . . . . . 593B.1.3. Automatic data typeconversion . . . . . . . . . . . . . . . . . . . . . . . . . . . . . . . 594B.1.4. Type mapping . . . . . . . . . . . . . . . . . . . 595B.1.5. Version management . . . . . . . . . . . . 596B.1.6. Status management . . . . . . . . . . . . . . 598B.1.7. Job Settings . . . . . . . . . . . . . . . . . . . . . . 599B.1.8. Stats & Logs . . . . . . . . . . . . . . . . . . . . . 599B.1.9. Context settings . . . . . . . . . . . . . . . . . . 600B.1.10. Applying Project Settings . . . . . . 601B.1.11. Log4j settings . . . . . . . . . . . . . . . . . . 602B.1.12. Status settings . . . . . . . . . . . . . . . . . . 603B.1.13. Security settings . . . . . . . . . . . . . . . . 605B.1.14. Custom component . . . . . . . . . . . . . 605
B.2. Customizing the workspace . . . . . . . . . . . . . . . 606B.2.1. How to change the Palettelayout and settings . . . . . . . . . . . . . . . . . . . . . . 606B.2.2. How to change panelspositions . . . . . . . . . . . . . . . . . . . . . . . . . . . . . . . . . 610B.2.3. How to display Jobconfiguration tabs/views . . . . . . . . . . . . . . . . 611
B.3. Filtering entries listed in the Repositorytree view . . . . . . . . . . . . . . . . . . . . . . . . . . . . . . . . . . . . . . . . 612
B.3.1. How to filter by Job name . . . . . . . 612B.3.2. How to filter by user . . . . . . . . . . . . . 613B.3.3. How to filter by job status . . . . . . . 615B.3.4. How to choose whatrepository nodes to display . . . . . . . . . . . . . 616
B.4. Setting Talend Studio preferences . . . . . . . . . 617B.4.1. Job script preferences(JobScript) . . . . . . . . . . . . . . . . . . . . . . . . . . . . . . . 618B.4.2. Java Interpreter path (Talend) . . . . 620B.4.3. Compiler compliance level . . . . . . 620B.4.4. Designer preferences (Talend> Appearance) . . . . . . . . . . . . . . . . . . . . . . . . . . 621B.4.5. How to define the usercomponent folder (Talend >Components) . . . . . . . . . . . . . . . . . . . . . . . . . . . . 622B.4.6. How to change specificcomponent settings (Talend >Components) . . . . . . . . . . . . . . . . . . . . . . . . . . . . 623B.4.7. Documentation preferences(Talend > Documentation) . . . . . . . . . . . . . . 624B.4.8. Exchange preferences (Talend> Exchange) . . . . . . . . . . . . . . . . . . . . . . . . . . . . . 625B.4.9. Adding code by default(Talend > Import/Export) . . . . . . . . . . . . . . . 626B.4.10. Metadata Bridge preferences(Talend > Import/Export) . . . . . . . . . . . . . . . 626B.4.11. Language preferences(Talend > Internationalization) . . . . . . . . . 627B.4.12. Palette preferences (Talend >Palette Settings) . . . . . . . . . . . . . . . . . . . . . . . . . 628B.4.13. Performance preferences(Talend > Performance) . . . . . . . . . . . . . . . . 629B.4.14. Nexus settings preferences(Talend > Performance) . . . . . . . . . . . . . . . . 630B.4.15. Project reference preferences(Talend > Repository) . . . . . . . . . . . . . . . . . . 631B.4.16. Debug and Job executionpreferences (Talend > Run/Debug) . . . . . 631B.4.17. Distant run configuration(Talend > Run/Debug) . . . . . . . . . . . . . . . . . . 633B.4.18. Displaying special charactersfor schema columns (Talend >Specific settings) . . . . . . . . . . . . . . . . . . . . . . . . 634B.4.19. Schema preferences (Talend> Specific Settings) . . . . . . . . . . . . . . . . . . . . . 634
B.4.20. SQL Builder preferences(Talend > Specific Settings) . . . . . . . . . . . . 636B.4.21. SSL settings preferences(Talend > SSL) . . . . . . . . . . . . . . . . . . . . . . . . . 636B.4.22. Usage Data Collectorpreferences (Talend > Usage DataCollector) . . . . . . . . . . . . . . . . . . . . . . . . . . . . . . . . 638
Appendix C. Theory into practice: Jobexamples ............................................ 641
C.1. tMap Job example . . . . . . . . . . . . . . . . . . . . . . . . . 642C.1.1. Input data . . . . . . . . . . . . . . . . . . . . . . . . 642C.1.2. Output data . . . . . . . . . . . . . . . . . . . . . . 642C.1.3. Reference data . . . . . . . . . . . . . . . . . . . 642C.1.4. Translating the scenario into aJob . . . . . . . . . . . . . . . . . . . . . . . . . . . . . . . . . . . . . . . 643
C.2. Using the output stream feature . . . . . . . . . . . 650C.2.1. Input data . . . . . . . . . . . . . . . . . . . . . . . . 650C.2.2. Output data . . . . . . . . . . . . . . . . . . . . . . 651C.2.3. Translating the scenario into aJob . . . . . . . . . . . . . . . . . . . . . . . . . . . . . . . . . . . . . . . 651
C.3. Using the Implicit Context Loadfeature . . . . . . . . . . . . . . . . . . . . . . . . . . . . . . . . . . . . . . . . . . . 657
C.3.1. Preparing context parametersources . . . . . . . . . . . . . . . . . . . . . . . . . . . . . . . . . . 658C.3.2. Creating the Job and definingcontext variables . . . . . . . . . . . . . . . . . . . . . . . . 658C.3.3. Configuring the components . . . . . 660C.3.4. Configuring the ImplicitContext Load feature . . . . . . . . . . . . . . . . . . . 661C.3.5. Executing the Job . . . . . . . . . . . . . . . . 662
C.4. Using the Multi-thread Executionfeature to run Jobs in parallel . . . . . . . . . . . . . . . . . . . 664C.5. Calling the MetaServlet REST Webservice to execute a task . . . . . . . . . . . . . . . . . . . . . . . . 667
C.5.1. Dropping and linking thecomponents . . . . . . . . . . . . . . . . . . . . . . . . . . . . . 668C.5.2. Configuring the contextvariables . . . . . . . . . . . . . . . . . . . . . . . . . . . . . . . . . 668C.5.3. Configuring the Routine . . . . . . . . . 669C.5.4. Configuring the components . . . . . 669
C.6. Validation rules Job example . . . . . . . . . . . . . . 670C.6.1. Using a reference validationrule . . . . . . . . . . . . . . . . . . . . . . . . . . . . . . . . . . . . . . 671C.6.2. Using a basic validation rule . . . . . 674
Appendix D. SQL template writingrules .................................................. 679
D.1. SQL statements . . . . . . . . . . . . . . . . . . . . . . . . . . . . 680D.2. Comment lines . . . . . . . . . . . . . . . . . . . . . . . . . . . . . 680D.3. The <%...%> syntax . . . . . . . . . . . . . . . . . . . . . . . 680D.4. The <%=...%> syntax . . . . . . . . . . . . . . . . . . . . . 681D.5. The </.../> syntax . . . . . . . . . . . . . . . . . . . . . . . . . . 681D.6. Code to access the component schemaelements . . . . . . . . . . . . . . . . . . . . . . . . . . . . . . . . . . . . . . . . . 682D.7. Code to access the component matrixproperties . . . . . . . . . . . . . . . . . . . . . . . . . . . . . . . . . . . . . . . . 682
Appendix E. System routines ............... 685E.1. Numeric Routines . . . . . . . . . . . . . . . . . . . . . . . . . . 686
E.1.1. How to create a Sequence . . . . . . . . 686E.1.2. How to convert an ImpliedDecimal . . . . . . . . . . . . . . . . . . . . . . . . . . . . . . . . . 686
E.2. Relational Routines . . . . . . . . . . . . . . . . . . . . . . . . 687E.3. StringHandling Routines . . . . . . . . . . . . . . . . . . . 687
E.3.1. How to store a string inalphabetical order . . . . . . . . . . . . . . . . . . . . . . . 688E.3.2. How to check whether a stringis alphabetical . . . . . . . . . . . . . . . . . . . . . . . . . . . 688E.3.3. How to replace an element in astring . . . . . . . . . . . . . . . . . . . . . . . . . . . . . . . . . . . . 689E.3.4. How to check the positionof a specific character or substring,within a string . . . . . . . . . . . . . . . . . . . . . . . . . . . 689
Talend Data Integration Studio
Talend Data Integration Studio User Guide vii
E.3.5. How to calculate the length ofa string . . . . . . . . . . . . . . . . . . . . . . . . . . . . . . . . . . 689E.3.6. How to delete blankcharacters . . . . . . . . . . . . . . . . . . . . . . . . . . . . . . . . 689
E.4. TalendDataGenerator Routines . . . . . . . . . . . . 690E.4.1. How to generate fictitiousdata . . . . . . . . . . . . . . . . . . . . . . . . . . . . . . . . . . . . . . 690
E.5. TalendDate Routines . . . . . . . . . . . . . . . . . . . . . . . 691E.5.1. How to format a Date . . . . . . . . . . . . 692E.5.2. How to check a Date . . . . . . . . . . . . . 692E.5.3. How to compare Dates . . . . . . . . . . . 692E.5.4. How to configure a Date . . . . . . . . . 693E.5.5. How to parse a Date . . . . . . . . . . . . . 693E.5.6. How to retrieve part of a Date . . . 693E.5.7. How to format the CurrentDate . . . . . . . . . . . . . . . . . . . . . . . . . . . . . . . . . . . . . 694
E.6. TalendString Routines . . . . . . . . . . . . . . . . . . . . . 694E.6.1. How to format an XML string . . . 695E.6.2. How to trim a string . . . . . . . . . . . . . 695E.6.3. How to remove accents from astring . . . . . . . . . . . . . . . . . . . . . . . . . . . . . . . . . . . . 695

Talend Data Integration Studio User Guide
Talend Data Integration Studio User Guide
Preface
1. General information
1.1. Purpose
This User Guide explains how to manage Talend Data Integration Studio functions in a normaloperational context.
Information presented in this document applies to Talend Data Integration Studio 6.3.1.
1.2. Audience
This guide is for users and administrators of Talend Data Integration Studio.
The layout of GUI screens provided in this document may vary slightly from your actual GUI.
1.3. Typographical conventions
This guide uses the following typographical conventions:
• text in bold: window and dialog box buttons and fields, keyboard keys, menus, and menu options,
• text in [bold]: window, wizard, and dialog box titles,
• text in courier: system parameters typed in by the user,
• text in italics: file, schema, column, row, and variable names,
•The icon indicates an item that provides additional information about an important point. It isalso used to add comments related to a table or a figure,
•The icon indicates a message that gives information about the execution requirements orrecommendation type. It is also used to refer to situations or information the end-user needs to beaware of or pay special attention to.
• Any command is highlighted with a grey background or code typeface.
2. Feedback and SupportYour feedback is valuable. Do not hesitate to give your input, make suggestions or requests regardingthis documentation or product and find support from the Talend team, on Talend's Forum website at:
Feedback and Support
x Talend Data Integration Studio User Guide
http://talendforge.org/forum
Talend Data Integration Studio User Guide
Chapter 1. Data Integration: Concepts andPrinciplesThere is nothing new about the fact that organizations' information systems tend to grow in complexity. The reasonsfor this include the "layer stackup trend" (a new solution is deployed although old systems are still maintained) andthe fact that information systems need to be more and more connected to those of vendors, partners and customers.
A third reason is the multiplication of data storage formats (XML files, positional flat files, delimited flat files,multi-valued files and so on), protocols (FTP, HTTP, SOAP, SCP and so on) and database technologies.
A question arises from these statements: How to manage a proper integration of this data scattered throughout thecompany's information systems? Various functions lie behind the data integration principle: business intelligenceor analytics integration (data warehousing) and operational integration (data capture and migration, databasesynchronization, inter-application data exchange and so on).
Both ETL for analytics and ETL for operational integration needs are addressed by Talend Studio.
Furthermore industrialization features and extended monitoring capabilities are also offered in Talend Studio.
Data analytics
2 Talend Data Integration Studio User Guide
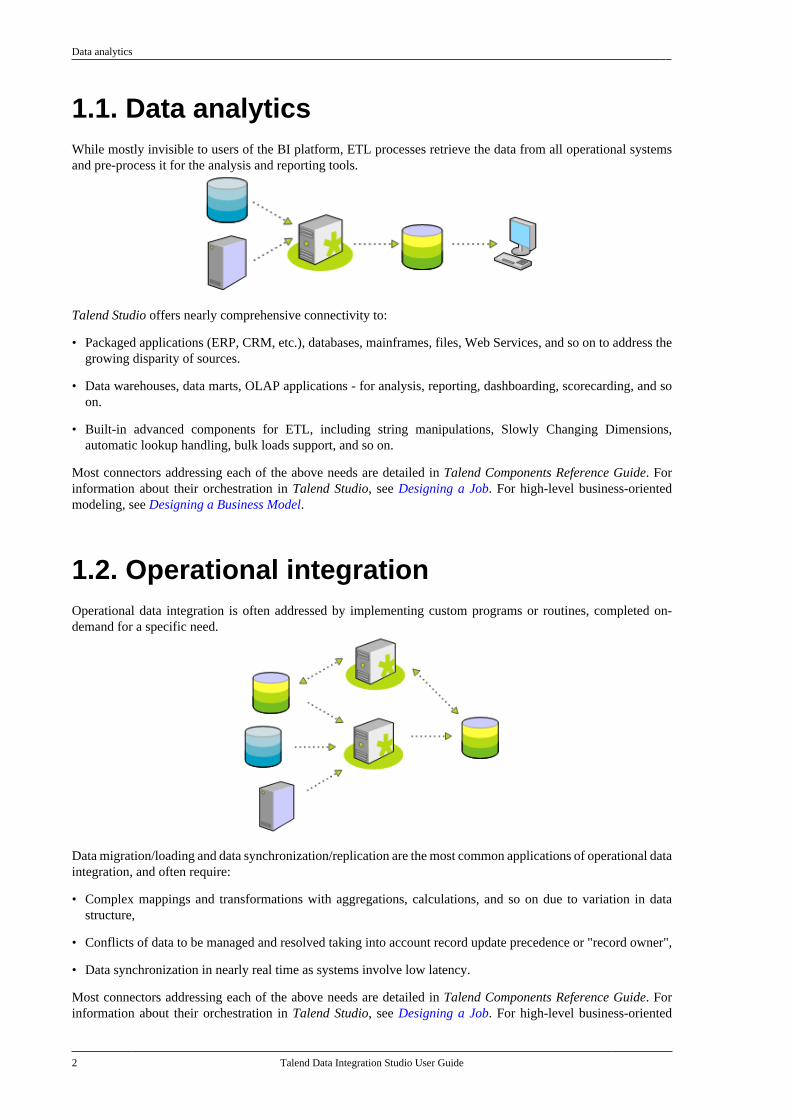
1.1. Data analyticsWhile mostly invisible to users of the BI platform, ETL processes retrieve the data from all operational systemsand pre-process it for the analysis and reporting tools.
Talend Studio offers nearly comprehensive connectivity to:
• Packaged applications (ERP, CRM, etc.), databases, mainframes, files, Web Services, and so on to address thegrowing disparity of sources.
• Data warehouses, data marts, OLAP applications - for analysis, reporting, dashboarding, scorecarding, and soon.
• Built-in advanced components for ETL, including string manipulations, Slowly Changing Dimensions,automatic lookup handling, bulk loads support, and so on.
Most connectors addressing each of the above needs are detailed in Talend Components Reference Guide. Forinformation about their orchestration in Talend Studio, see Designing a Job. For high-level business-orientedmodeling, see Designing a Business Model.
1.2. Operational integrationOperational data integration is often addressed by implementing custom programs or routines, completed on-demand for a specific need.
Data migration/loading and data synchronization/replication are the most common applications of operational dataintegration, and often require:
• Complex mappings and transformations with aggregations, calculations, and so on due to variation in datastructure,
• Conflicts of data to be managed and resolved taking into account record update precedence or "record owner",
• Data synchronization in nearly real time as systems involve low latency.
Most connectors addressing each of the above needs are detailed in Talend Components Reference Guide. Forinformation about their orchestration in Talend Studio, see Designing a Job. For high-level business-oriented
Talend Data Integration functional architecture
Talend Data Integration Studio User Guide 3
modeling, see Designing a Business Model. For information about designing a detailed data integration Job usingthe output stream feature, see Using the output stream feature.
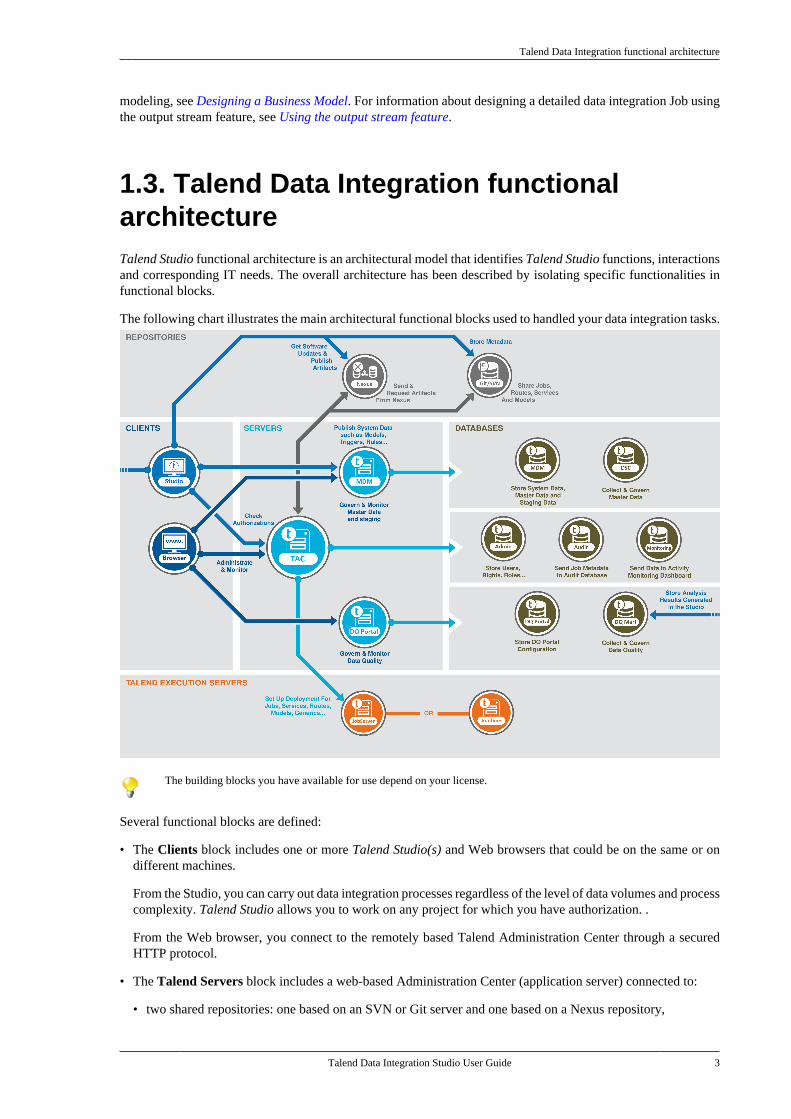
1.3. Talend Data Integration functionalarchitectureTalend Studio functional architecture is an architectural model that identifies Talend Studio functions, interactionsand corresponding IT needs. The overall architecture has been described by isolating specific functionalities infunctional blocks.
The following chart illustrates the main architectural functional blocks used to handled your data integration tasks.
The building blocks you have available for use depend on your license.
Several functional blocks are defined:
• The Clients block includes one or more Talend Studio(s) and Web browsers that could be on the same or ondifferent machines.
From the Studio, you can carry out data integration processes regardless of the level of data volumes and processcomplexity. Talend Studio allows you to work on any project for which you have authorization. .
From the Web browser, you connect to the remotely based Talend Administration Center through a securedHTTP protocol.
• The Talend Servers block includes a web-based Administration Center (application server) connected to:
• two shared repositories: one based on an SVN or Git server and one based on a Nexus repository,
Teamwork and development consolidation for Data Integration
4 Talend Data Integration Studio User Guide
• databases: one for administration metadata, one for audit information, and one for Activity monitoring,
• Talend execution server(s).
Talend Administration Center enables the management and administration of all projects. Administrationmetadata (user accounts, access rights and project authorization for example) is stored in the Administrationdatabase. Project metadata (Jobs, Business Models and Routines for example) is stored in the SVN or Git server.
For detailed information about the Administration Center, see Talend Administration Center User Guide.
• The Repositories block includes the SVN or Git server and the Nexus repository. The SVN or Git server isused to centralize all project metadata like Jobs and Business Models shared between different end-users, andaccessible from the Talend Studio to develop them and from Talend Administration Center to publish, deployand monitor them.
The Nexus repository is used to store:
• Software Updates available for download,
• Jobs that are published from the Talend Studio and are ready to be deployed and executed.
• The Talend Execution Servers block includes one or more execution servers, deployed inside your informationsystem. Talend Jobs are deployed to the Job servers through the Administration Center's Job Conductor to beexecuted on scheduled time, date, or event.
For detailed information about execution servers, see Talend Administration Center User Guide.
• The Databases block includes the Administration, the Audit and the Monitoring databases. The Administrationdatabase is used to manage user accounts, access rights and project authorization, and so on. The Audit databaseis used to evaluate different aspects of the Jobs implemented in projects realized in Talend Studio with the aimof providing solid quantitative and qualitative factors for process-oriented decision support. The Monitoringdatabases include the Talend Activity Monitoring Console database and the Service Activity Monitoringdatabase.
The Talend Activity Monitoring Console allows you to monitor the execution of technical processes. It providesdetailed monitoring capabilities that can be used to consolidate collected log information, understand theunderlying data flows interaction, prevent faults that could be unexpectedly generated and support the systemmanagement decisions.
The Service Activity Monitoring allows you to monitor service calls. It provides monitoring and consolidatedevent information that the end-user can use to understand the underlying requests and replies that compose theevent, monitor faults and support the system management decisions.
1.4. Teamwork and developmentconsolidation for Data IntegrationManaging complex deployments generally requires a solid teamwork and optimization of executions which cannotbe ensured without the following:
• Consolidation of all project information and enterprise metadata in a centralized repository so that allstakeholders can access the same, single version of the truth. For more information regarding the sharedrepository in Talend Studio, see Working collaboratively on project items.
• Coordination and scheduling of the execution of data integration Jobs, with a centralized execution interface.For more information regarding the Job Conductor, see How to schedule Job executions via the Job Conductorand check Talend Administration Center User Guide.
Execution monitoring
Talend Data Integration Studio User Guide 5
• Parallelization of integration processes between all processing resources.
• Optimization of the use of the execution grid to ensure optimal scalability and availability of the integrationprocesses. For more information about virtual execution servers, check Talend Administration Center UserGuide.
• Remote execution of Jobs on specified systems, for testing and running Jobs upon request on specific systems.For more information regarding the distant run, see How to run a Job remotely.
1.5. Execution monitoringOne of the greatest challenges faced by developers of integration processes and IT Operations staff in charge ofcontrolling their execution is to be able to control and monitor the execution of these critical processes. Indeed,failure handling and error notification can - and should - be included in data integration processes.
Furthermore, beyond on-error notification, it is often critical to monitor the overall health of the integrationprocesses and to watch for any degradation in their performance.
The Talend Activity Monitoring Console monitors Job events (successes, failures, warnings, etc.), execution timesand data volumes through a single console, fully integrated in Talend Studio, the AMC perspective.
For more information regarding Talend Activity Monitoring Console operation, see Talend Activity MonitoringConsole User Guide.
The Talend Activity Monitoring Console is also available as one of the Monitoring modules of TalendAdministration Center.
Another powerful functionality that is integrated in Talend Studio is monitoring task executions via TalendAdministration Center. Monitoring task execution automatically tracks task completion. It tracks in real-time thestatus of all triggered tasks or those waiting to be triggered. This way, monitoring can support rapid identificationof bug issues.
For more information about tracking task completion, see Talend Administration Center User Guide.

Talend Data Integration Studio User Guide
Talend Data Integration Studio User Guide
Chapter 2. Working with projectsOnce you launch your Talend Studio and before you start a Business Model, a data integration Job, or any othertasks, you need first create or import a project.
This chapter deals with how to create, import, export, delete, and work in projects in Talend Studio. For how tolaunch and get started with Talend Studio, see the Getting Started Guide.
Introduction to projects
8 Talend Data Integration Studio User Guide
2.1. Introduction to projectsIn Talend Studio, the highest physical structure for storing all different types of data integration Jobs, metadata,routines, etc. is the "project".
From the login window of the Studio, you can:
• create a local project.
When you launch the Studio using a locally loaded license for the first time, there are no default projects listed.You need to create a project that will hold all data integration Jobs and business models you design in the currentinstance of the Studio.
You can create as many projects as you need to store your data of different instances of your Studio.
When creating a new project, a tree folder is automatically created in the workspace directory on your repositoryserver. This will correspond to the Repository tree view displayed on the main window of the Studio.
For more information, see How to create a project.
• import the Demo project to discover the features of Talend Studio based on samples of different ready-to-useJobs. When you import the Demo project, it is automatically installed in the workspace directory of the currentsession of the Studio.
For more information, see How to import a demo project.
• import projects you have already created with previous releases of Talend Studio into your current Talend Studioworkspace directory.
For more information, see How to import local projects.
• open a project you created or imported in the Studio. You can as well open a project stored on the remoterepository.
For more information on how to open a local project, see How to open a local project. For more informationon how to open a remote project, see How to open a remote project.
• create a sandbox project.
For more information, see How to create a sandbox project.
• delete local projects that you already created or imported and that you do not need any longer.
For more information, see How to delete a local project.
Once you launch Talend Studio, you can export the resources of one or more of the created projects in the currentinstance of the Studio. For more information, see How to export a project.
Talend Studio enables you as well to work on projects collaboratively. For more information about how to sharea project, see Working collaboratively on project items.
2.2. How to create a projectTo create a local project at the initial startup of the Studio, do the following:
1. Launch Talend Studio and connect to a local repository.
How to create a project
Talend Data Integration Studio User Guide 9
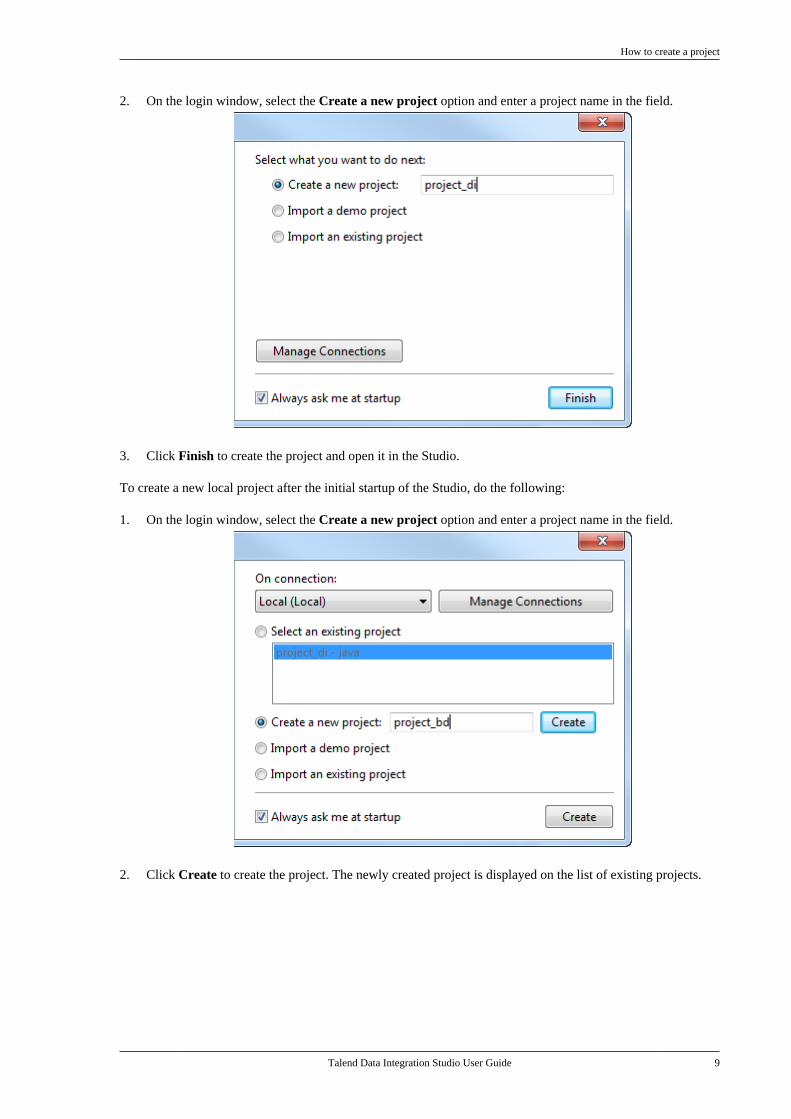
2. On the login window, select the Create a new project option and enter a project name in the field.
3. Click Finish to create the project and open it in the Studio.
To create a new local project after the initial startup of the Studio, do the following:
1. On the login window, select the Create a new project option and enter a project name in the field.
2. Click Create to create the project. The newly created project is displayed on the list of existing projects.
How to create a sandbox project
10 Talend Data Integration Studio User Guide
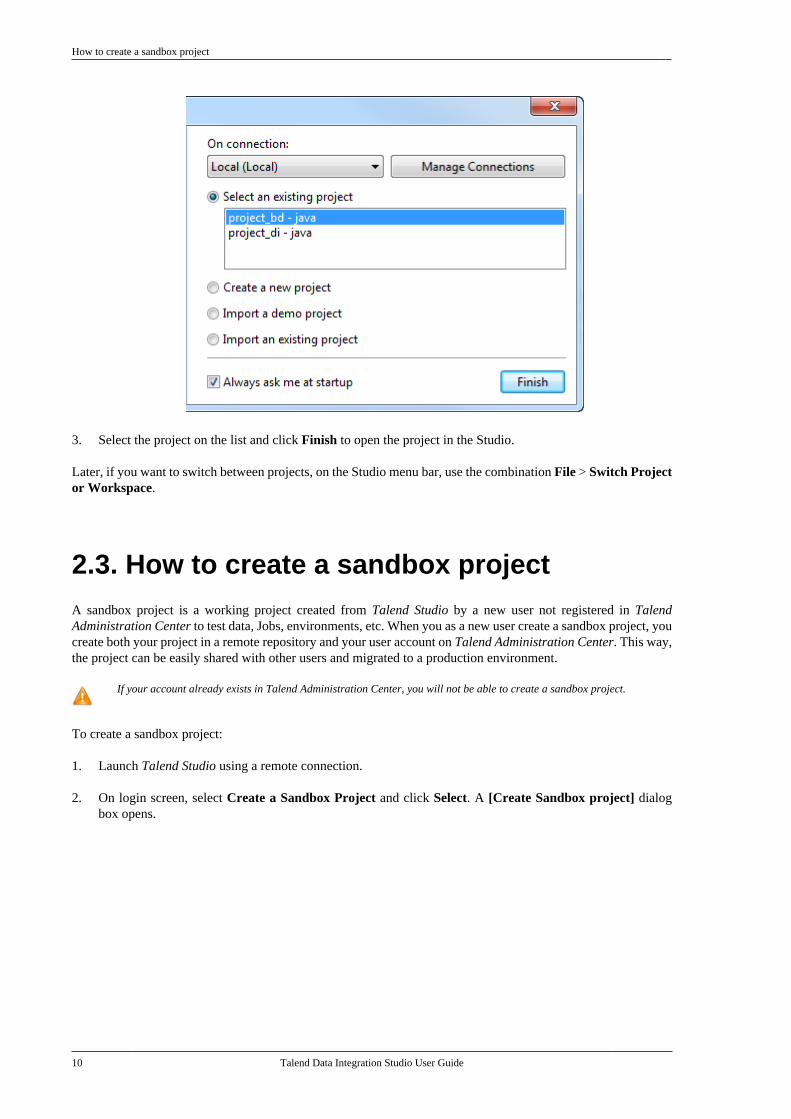
3. Select the project on the list and click Finish to open the project in the Studio.
Later, if you want to switch between projects, on the Studio menu bar, use the combination File > Switch Projector Workspace.
2.3. How to create a sandbox projectA sandbox project is a working project created from Talend Studio by a new user not registered in TalendAdministration Center to test data, Jobs, environments, etc. When you as a new user create a sandbox project, youcreate both your project in a remote repository and your user account on Talend Administration Center. This way,the project can be easily shared with other users and migrated to a production environment.
If your account already exists in Talend Administration Center, you will not be able to create a sandbox project.
To create a sandbox project:
1. Launch Talend Studio using a remote connection.
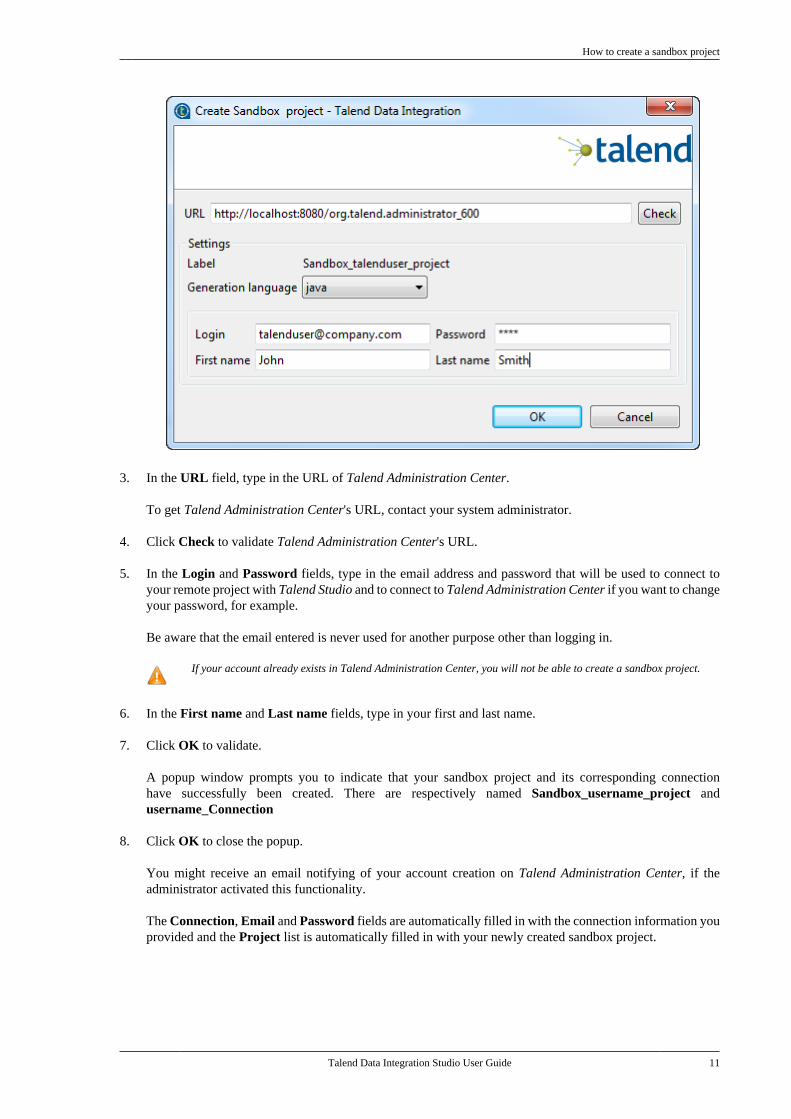
2. On login screen, select Create a Sandbox Project and click Select. A [Create Sandbox project] dialogbox opens.
How to create a sandbox project
Talend Data Integration Studio User Guide 11
3. In the URL field, type in the URL of Talend Administration Center.
To get Talend Administration Center's URL, contact your system administrator.
4. Click Check to validate Talend Administration Center's URL.
5. In the Login and Password fields, type in the email address and password that will be used to connect toyour remote project with Talend Studio and to connect to Talend Administration Center if you want to changeyour password, for example.
Be aware that the email entered is never used for another purpose other than logging in.
If your account already exists in Talend Administration Center, you will not be able to create a sandbox project.
6. In the First name and Last name fields, type in your first and last name.
7. Click OK to validate.
A popup window prompts you to indicate that your sandbox project and its corresponding connectionhave successfully been created. There are respectively named Sandbox_username_project andusername_Connection
8. Click OK to close the popup.
You might receive an email notifying of your account creation on Talend Administration Center, if theadministrator activated this functionality.
The Connection, Email and Password fields are automatically filled in with the connection information youprovided and the Project list is automatically filled in with your newly created sandbox project.
How to import a demo project
12 Talend Data Integration Studio User Guide
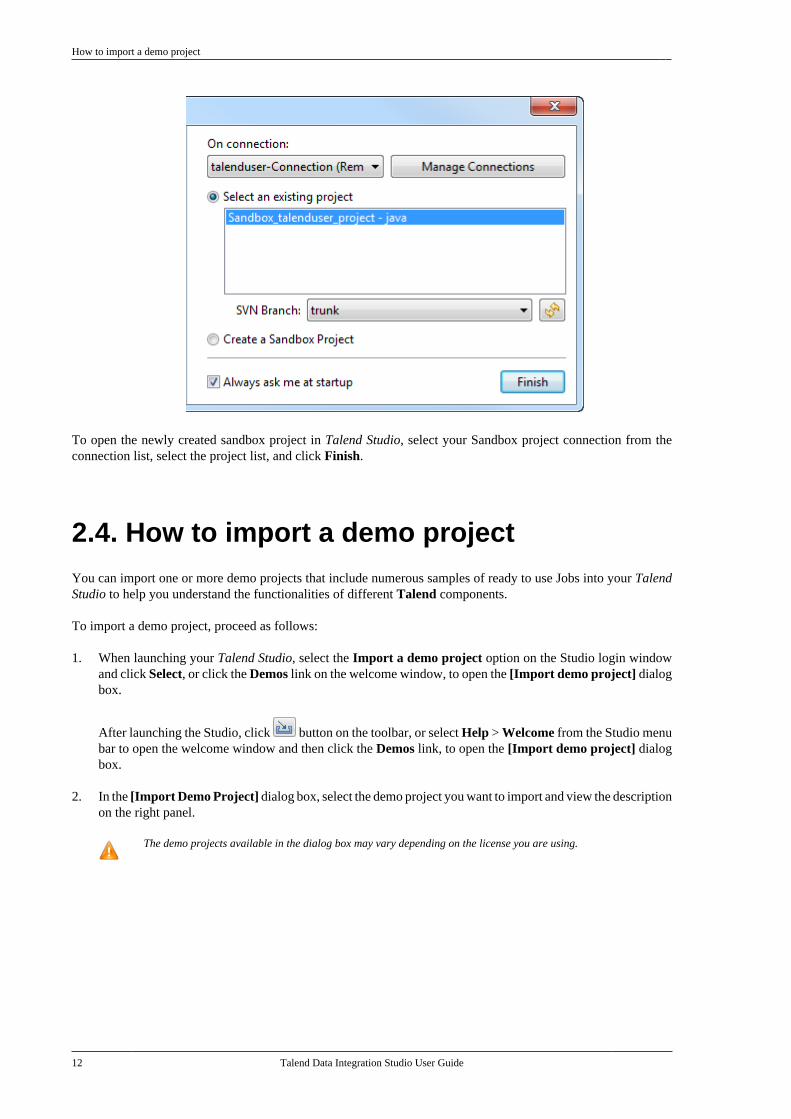
To open the newly created sandbox project in Talend Studio, select your Sandbox project connection from theconnection list, select the project list, and click Finish.
2.4. How to import a demo projectYou can import one or more demo projects that include numerous samples of ready to use Jobs into your TalendStudio to help you understand the functionalities of different Talend components.
To import a demo project, proceed as follows:
1. When launching your Talend Studio, select the Import a demo project option on the Studio login windowand click Select, or click the Demos link on the welcome window, to open the [Import demo project] dialogbox.
After launching the Studio, click button on the toolbar, or select Help > Welcome from the Studio menubar to open the welcome window and then click the Demos link, to open the [Import demo project] dialogbox.
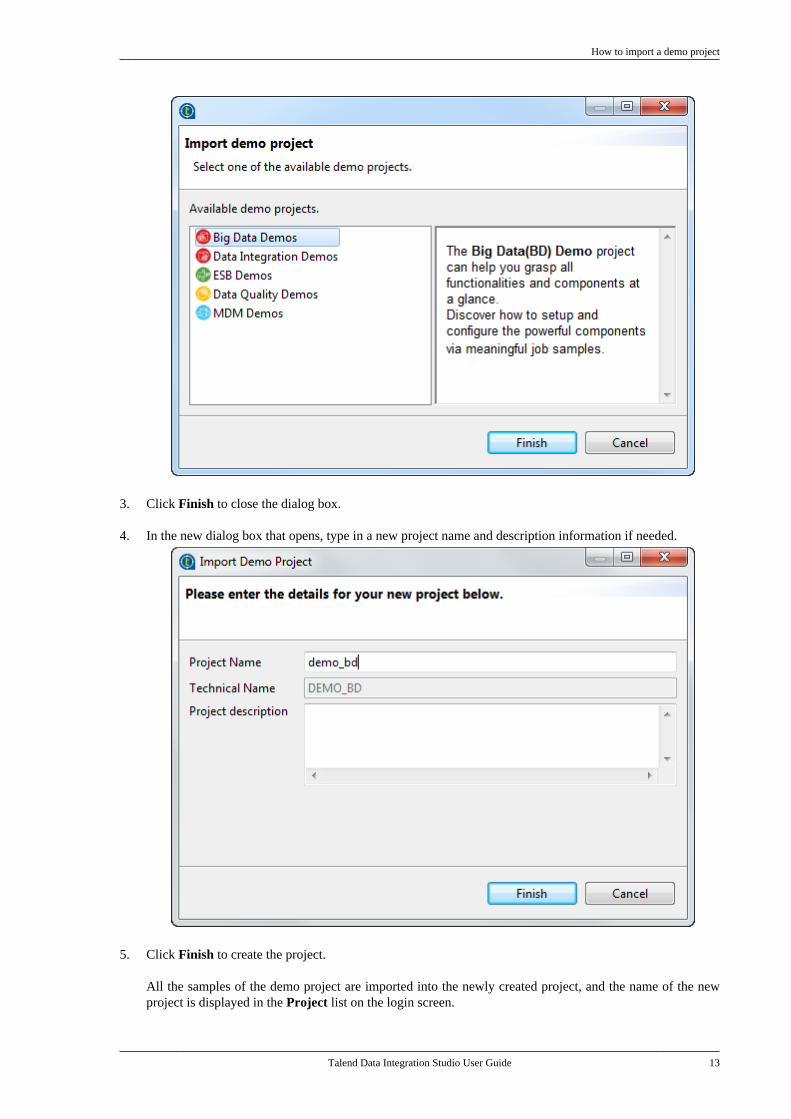
2. In the [Import Demo Project] dialog box, select the demo project you want to import and view the descriptionon the right panel.
The demo projects available in the dialog box may vary depending on the license you are using.
How to import a demo project
Talend Data Integration Studio User Guide 13
3. Click Finish to close the dialog box.
4. In the new dialog box that opens, type in a new project name and description information if needed.
5. Click Finish to create the project.
All the samples of the demo project are imported into the newly created project, and the name of the newproject is displayed in the Project list on the login screen.

How to import local projects
14 Talend Data Integration Studio User Guide
6. To open the imported demo project in Talend Studio, back on the login window, select it from the Projectlist and then click Finish.
The Job samples in the open demo project are automatically imported into your workspace directory andmade available in the Repository tree view under the Job Designs folder.
2.5. How to import local projectsIn Talend Studio, you can import one or more projects you already created with previous releases of the Studio.
To import a single project, do the following:
1. From the Studio login window, select Import an existing project then click Select to open the [Import]wizard.
2. Click the Import project as button and enter a name for your new project in the Project Name field.
3. Click Select root directory or Select archive file depending on the source you want to import from.
How to import local projects
Talend Data Integration Studio User Guide 15
4. Click Browse... to select the workspace directory/archive file of the specific project folder. By default,the workspace in selection is the current release's one. Browse up to reach the previous release workspacedirectory or the archive file containing the projects to import.
5. Click Finish to validate the operation and return to the login window.
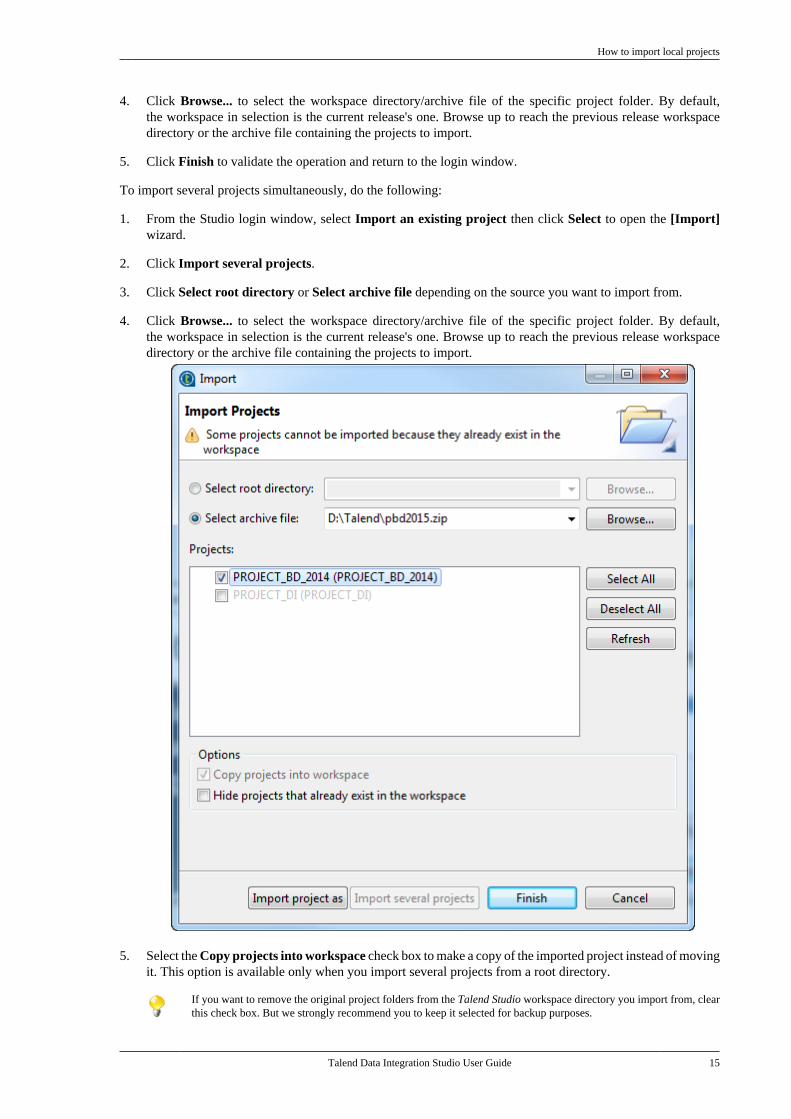
To import several projects simultaneously, do the following:
1. From the Studio login window, select Import an existing project then click Select to open the [Import]wizard.
2. Click Import several projects.
3. Click Select root directory or Select archive file depending on the source you want to import from.
4. Click Browse... to select the workspace directory/archive file of the specific project folder. By default,the workspace in selection is the current release's one. Browse up to reach the previous release workspacedirectory or the archive file containing the projects to import.
5. Select the Copy projects into workspace check box to make a copy of the imported project instead of movingit. This option is available only when you import several projects from a root directory.
If you want to remove the original project folders from the Talend Studio workspace directory you import from, clearthis check box. But we strongly recommend you to keep it selected for backup purposes.
How to open a local project
16 Talend Data Integration Studio User Guide
6. Select the Hide projects that already exist in the workspace check box to hide existing projects from theProjects list. This option is available only when you import several projects.
7. From the Projects list, select the projects to import and click Finish to validate the operation.
Make sure that the name of the imported project is not already used for a remote project. Otherwise, an error messagewill appear when you try to import the project unless you store the local and remote projects in two different workspacedirectories.
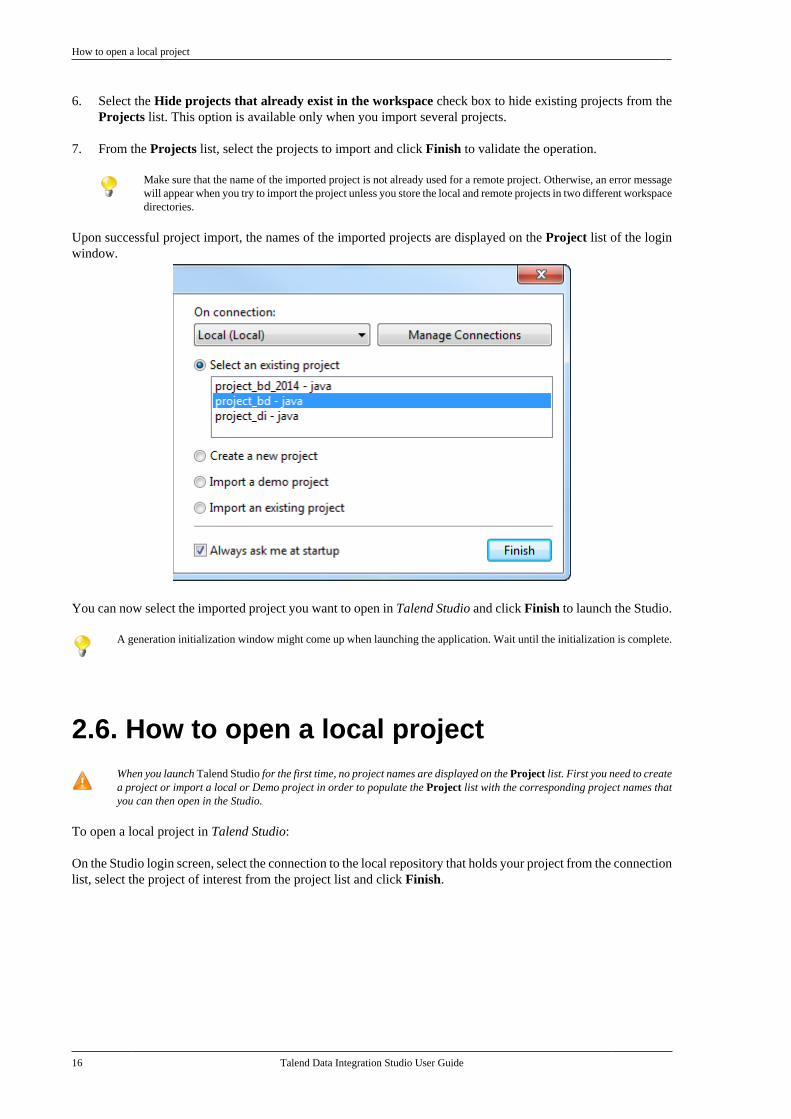
Upon successful project import, the names of the imported projects are displayed on the Project list of the loginwindow.
You can now select the imported project you want to open in Talend Studio and click Finish to launch the Studio.
A generation initialization window might come up when launching the application. Wait until the initialization is complete.
2.6. How to open a local projectWhen you launch Talend Studio for the first time, no project names are displayed on the Project list. First you need to createa project or import a local or Demo project in order to populate the Project list with the corresponding project names thatyou can then open in the Studio.
To open a local project in Talend Studio:
On the Studio login screen, select the connection to the local repository that holds your project from the connectionlist, select the project of interest from the project list and click Finish.
How to open a remote project
Talend Data Integration Studio User Guide 17
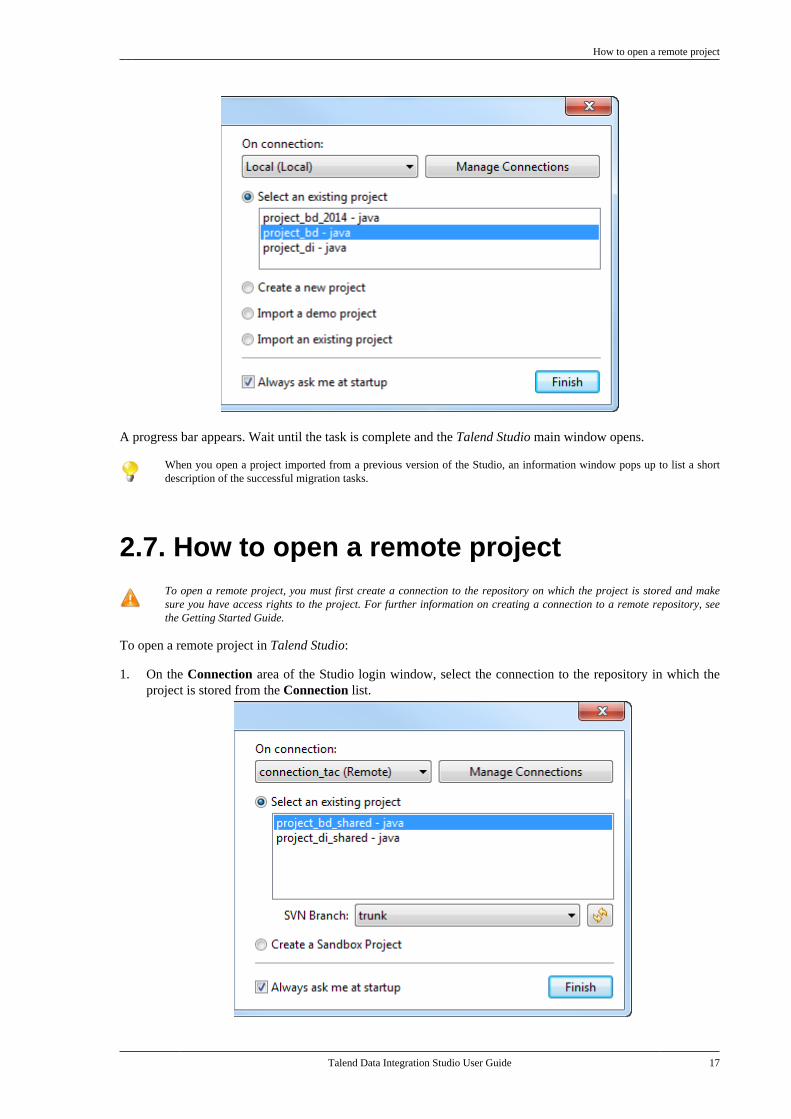
A progress bar appears. Wait until the task is complete and the Talend Studio main window opens.
When you open a project imported from a previous version of the Studio, an information window pops up to list a shortdescription of the successful migration tasks.
2.7. How to open a remote projectTo open a remote project, you must first create a connection to the repository on which the project is stored and makesure you have access rights to the project. For further information on creating a connection to a remote repository, seethe Getting Started Guide.
To open a remote project in Talend Studio:
1. On the Connection area of the Studio login window, select the connection to the repository in which theproject is stored from the Connection list.
How to open a remote project
18 Talend Data Integration Studio User Guide
As soon as you are connected with Talend Administration Center and if an update for your Studio is found, an updatebutton appears at the bottom of the login window and the Open button becomes inoperable. Click update to downloadand install the update. When the installation completes, click the restart button that appears next to the update buttonto restart your Studio so that the newly installed update takes effect. For more information on the software updateprocess, see the Talend Installation Guide.
2. Click the Refresh button to update the list of existing projects, which are the projects allocated to you inTalend Administration Center.
Note that, if an administrator edits your access rights on a project while you are already connected to thisproject in the Studio, you have to relaunch the Studio to take these rights into account.
3. From the project list, select the project you want to open.
4. From the Branch list, select the trunk (SVN only) or master (Git only), a branch, or a tag, whichever is desired.
A tag is a read-only copy of an SVN or Git managed project. If you choose to open a tag, you can make changes toyour project items but you will be unable to permanently save your changes to a Job unless you copy the Job to abranch or the trunk. For how to copy a Job to a branch, see How to copy a Job to a branch.
5. Click Finish to launch the selected project in the Studio.
A progress bar appears, and the Talend Studio main window opens. A generation engine initialization dialog boxdisplays. Wait until the initialization is complete.
Upon opening a remote project, Talend Studio checks periodically its connection with Talend AdministrationCenter.
When Talend Studio detects loss of connection, it tries automatically to reconnect to Talend Administration Center.You can view the connection progress on the Progress tab by double-clicking Check Administrator connection
at the lower right corner of the Talend Studio main window. If you click the button at this phase, the projectwill enter the read-only mode.
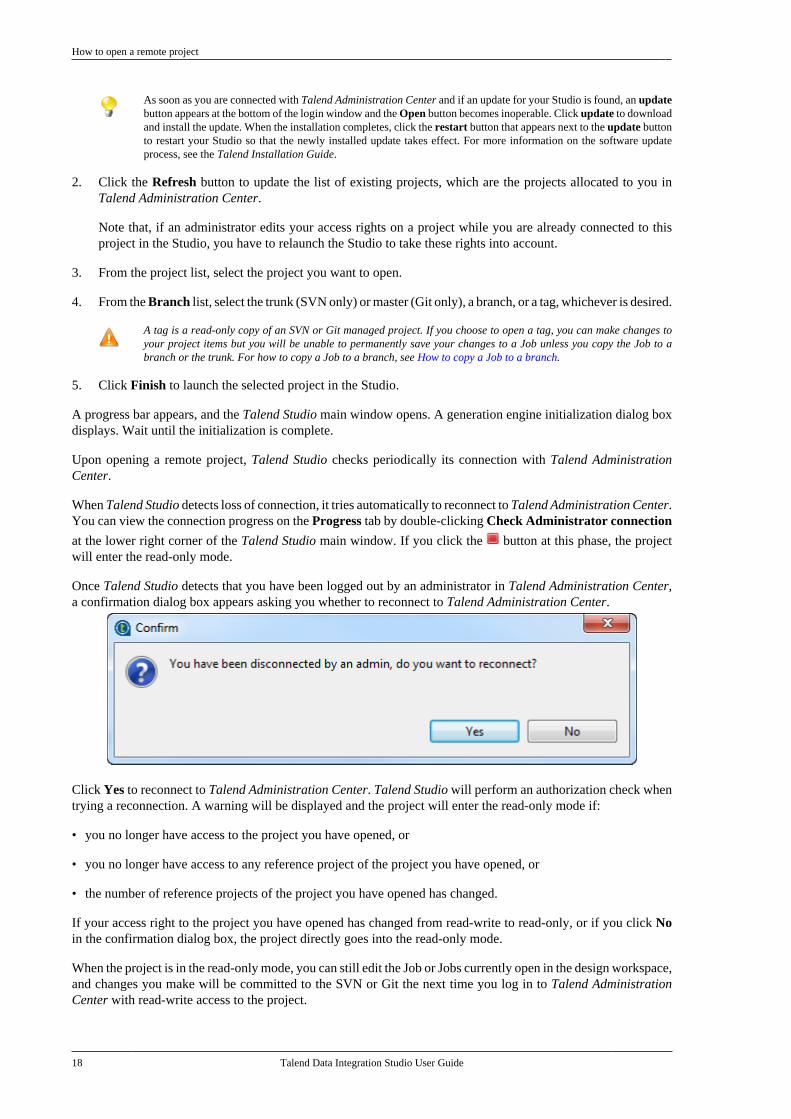
Once Talend Studio detects that you have been logged out by an administrator in Talend Administration Center,a confirmation dialog box appears asking you whether to reconnect to Talend Administration Center.
Click Yes to reconnect to Talend Administration Center. Talend Studio will perform an authorization check whentrying a reconnection. A warning will be displayed and the project will enter the read-only mode if:
• you no longer have access to the project you have opened, or
• you no longer have access to any reference project of the project you have opened, or
• the number of reference projects of the project you have opened has changed.
If your access right to the project you have opened has changed from read-write to read-only, or if you click Noin the confirmation dialog box, the project directly goes into the read-only mode.
When the project is in the read-only mode, you can still edit the Job or Jobs currently open in the design workspace,and changes you make will be committed to the SVN or Git the next time you log in to Talend AdministrationCenter with read-write access to the project.
How to delete a local project
Talend Data Integration Studio User Guide 19
2.8. How to delete a local projectYou can delete only local projects in Talend Studio. To delete shared projects, you need to access Talend AdministrationCenter.
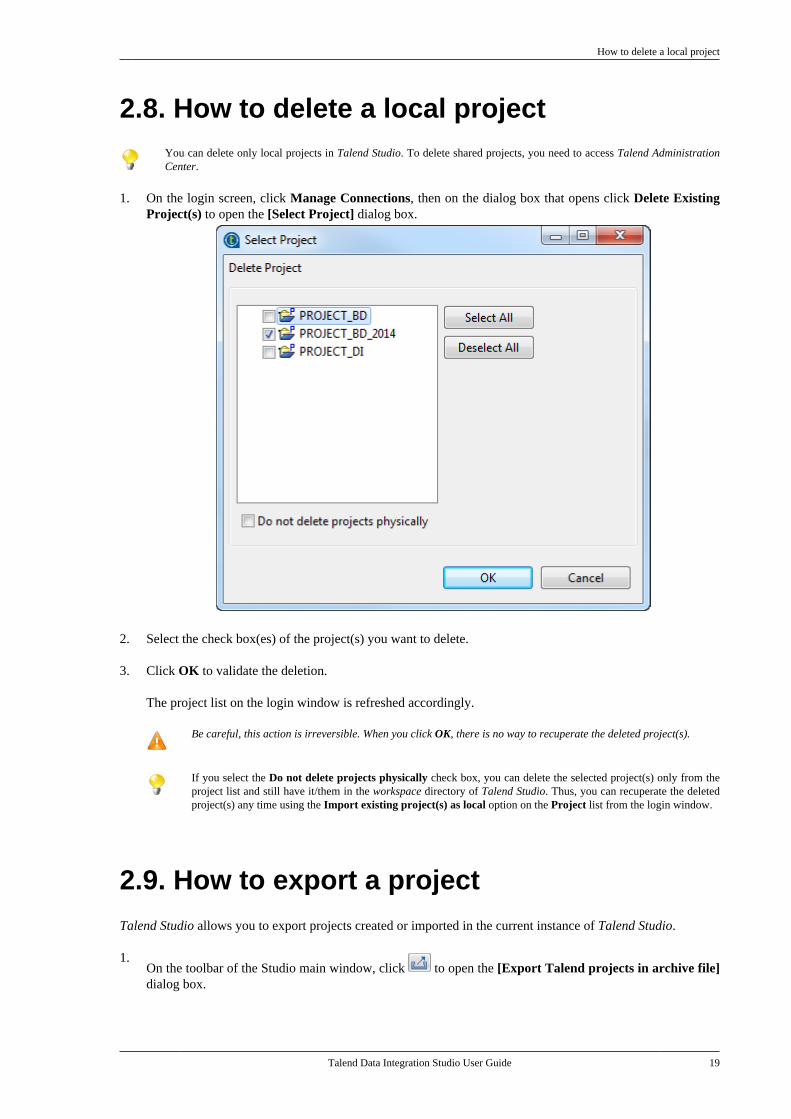
1. On the login screen, click Manage Connections, then on the dialog box that opens click Delete ExistingProject(s) to open the [Select Project] dialog box.
2. Select the check box(es) of the project(s) you want to delete.
3. Click OK to validate the deletion.
The project list on the login window is refreshed accordingly.
Be careful, this action is irreversible. When you click OK, there is no way to recuperate the deleted project(s).
If you select the Do not delete projects physically check box, you can delete the selected project(s) only from theproject list and still have it/them in the workspace directory of Talend Studio. Thus, you can recuperate the deletedproject(s) any time using the Import existing project(s) as local option on the Project list from the login window.
2.9. How to export a projectTalend Studio allows you to export projects created or imported in the current instance of Talend Studio.
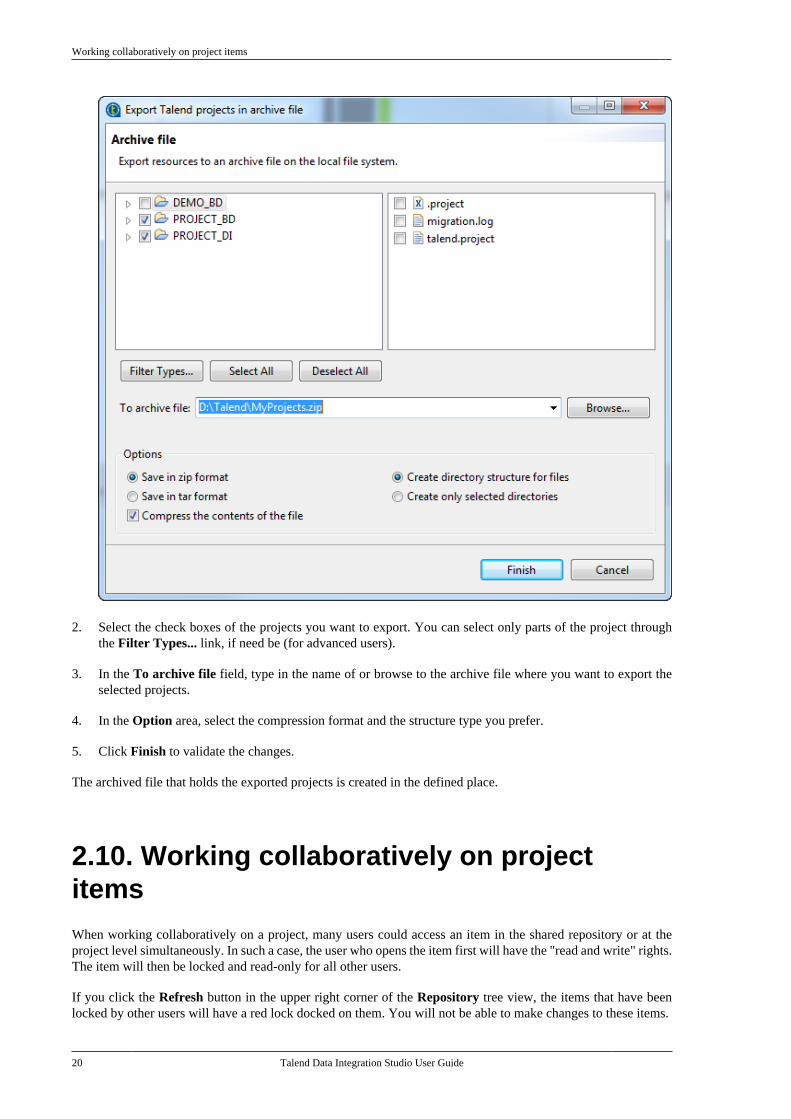
1.On the toolbar of the Studio main window, click to open the [Export Talend projects in archive file]dialog box.
Working collaboratively on project items
20 Talend Data Integration Studio User Guide
2. Select the check boxes of the projects you want to export. You can select only parts of the project throughthe Filter Types... link, if need be (for advanced users).
3. In the To archive file field, type in the name of or browse to the archive file where you want to export theselected projects.
4. In the Option area, select the compression format and the structure type you prefer.
5. Click Finish to validate the changes.
The archived file that holds the exported projects is created in the defined place.
2.10. Working collaboratively on projectitemsWhen working collaboratively on a project, many users could access an item in the shared repository or at theproject level simultaneously. In such a case, the user who opens the item first will have the "read and write" rights.The item will then be locked and read-only for all other users.
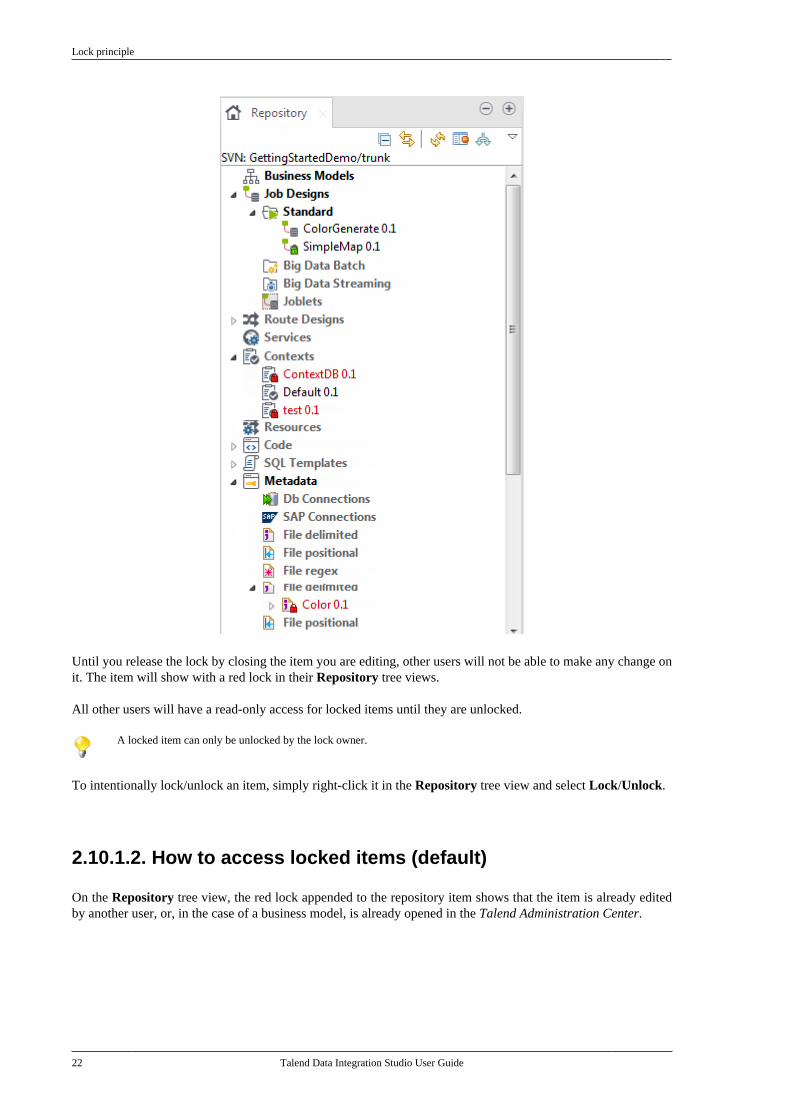
If you click the Refresh button in the upper right corner of the Repository tree view, the items that have beenlocked by other users will have a red lock docked on them. You will not be able to make changes to these items.
Lock principle
Talend Data Integration Studio User Guide 21
By default, upon each action you make in your Talend Studio, the lock status of all items is automatically refreshedtoo. If you find communications with the Talend Administration Center slow or if the project contains a big numberof locked items, you can disable the automatic retrieval of lock status in the Talend Studio preferences settings togain performance. For more information, see Performance preferences (Talend > Performance).
Items stored in the Repository tree view that are submitted to lock/unlock system include:
• Business Models,
• Jobs,
• Routines,
• Metadata of various types (DB connection, File...),
• Other items such as documentations, CDC, etc.
Items at project level are also submitted to lock/unlock system. These items include all Project Settings.
Talend Studio provides several lock modes that allow to grant the "read and write" rights to one of the simultaneoususers of the repository item.
2.10.1. Lock principle
The Lock status is a particular state for all items of your Talend projects. Locks are to be used to prevent editionconflicts as different users can possibly work on the same item.
2.10.1.1. How to lock/unlock an item (default)
In the default mode, when you first open an item in the Repository tree view, you get the edition privilege anda green lock is docked at the edited item.
Lock principle
22 Talend Data Integration Studio User Guide
Until you release the lock by closing the item you are editing, other users will not be able to make any change onit. The item will show with a red lock in their Repository tree views.
All other users will have a read-only access for locked items until they are unlocked.
A locked item can only be unlocked by the lock owner.
To intentionally lock/unlock an item, simply right-click it in the Repository tree view and select Lock/Unlock.
2.10.1.2. How to access locked items (default)
On the Repository tree view, the red lock appended to the repository item shows that the item is already editedby another user, or, in the case of a business model, is already opened in the Talend Administration Center.
Lock types
Talend Data Integration Studio User Guide 23
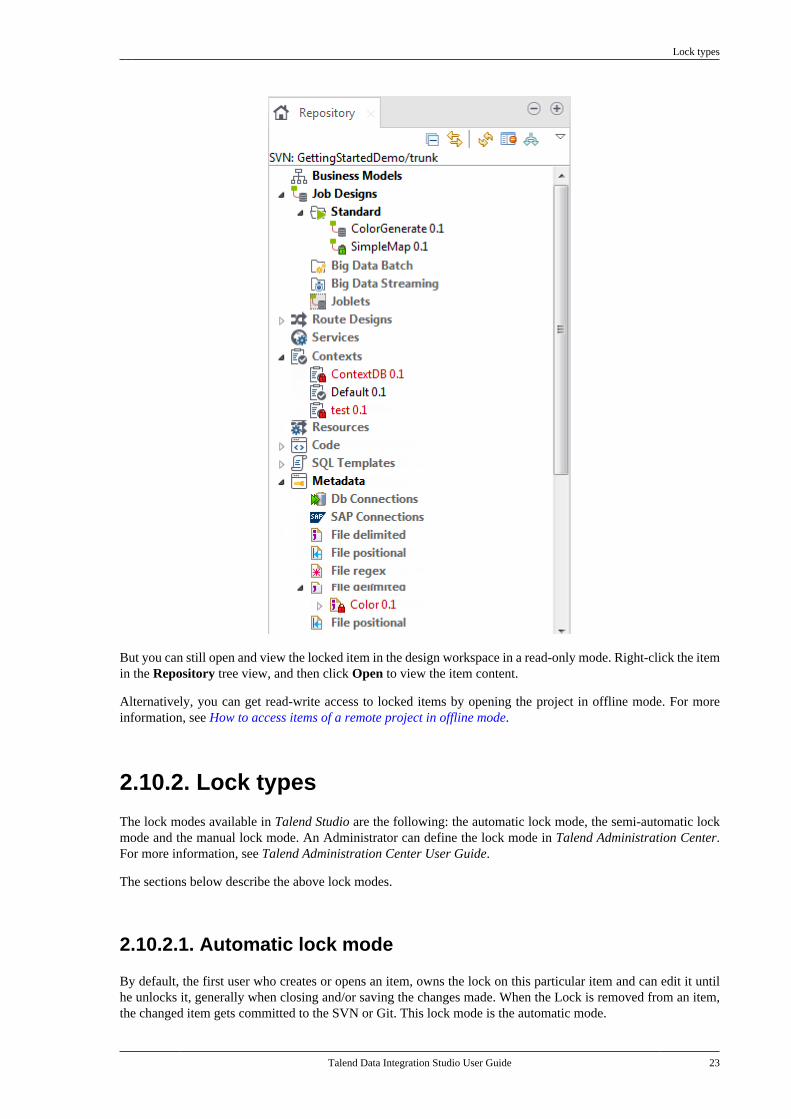
But you can still open and view the locked item in the design workspace in a read-only mode. Right-click the itemin the Repository tree view, and then click Open to view the item content.
Alternatively, you can get read-write access to locked items by opening the project in offline mode. For moreinformation, see How to access items of a remote project in offline mode.
2.10.2. Lock types
The lock modes available in Talend Studio are the following: the automatic lock mode, the semi-automatic lockmode and the manual lock mode. An Administrator can define the lock mode in Talend Administration Center.For more information, see Talend Administration Center User Guide.
The sections below describe the above lock modes.
2.10.2.1. Automatic lock mode
By default, the first user who creates or opens an item, owns the lock on this particular item and can edit it untilhe unlocks it, generally when closing and/or saving the changes made. When the Lock is removed from an item,the changed item gets committed to the SVN or Git. This lock mode is the automatic mode.
How to access items of a remote project in offline mode
24 Talend Data Integration Studio User Guide
This is the default mode for SVN or Git storage.
Also, you have the possibility to log information about the changes you made on any item, on the condition thatthe relevant option is selected in Talend Administration Center. Check Talend Administration Center User Guidefor further details and read How to log information on edited items.
2.10.2.2. Semi-automatic lock mode
When the Ask user option is selected in the Talend Administration Center web application, you get prompted toput a lock on any item you open in the Studio.
If you want to edit the item you are opening, click OK to put a lock on it. The item becomes read-only for otherusers like in the default mode.
When closing or saving the item, you get prompted again to unlock it. If you are complete with the changes, thenclick OK to remove the lock and allow other users to lock it if needed.
If you do not need to open the item in edition mode (lock) then click No when prompted to open it in read-onlymode.
2.10.2.3. Manual lock mode
When the manual lock mode option is selected in Talend Administration Center, you cannot lock any item, unlessintentionally.
To intentionally lock an item (for edition purpose for example), simply right-click it and select the Lock optionwhile the item is in the closed state.
The same way, a locked item can only be unlocked through the same procedure by the lock owner (or throughTalend Administration Center web application by the administrator).
By default, items can only be opened in read-only in this manual lock mode.
2.10.3. How to access items of a remote project inoffline mode
Talend Studio allows you to open a remote project in offline (local) mode, so that you can edit any items in parallelwith other users and commit your changes to the SVN or Git when you log on to the remote project again, or saveyour changes locally if the edited items are locked by other users or are in conflict.
Prerequisite: You have already logged on to the remote project successfully via a remote connection so that theproject information already exists in the workspace directory of your Talend Studio.
To open a remote project in offline mode, do the following:
1. Launch your Talend Studio, or if you have already opened the project using a remote connection, restart yourStudio by selecting File > Switch Project or Workspace from the menu.
2. Create a local connection by following the steps described in the Getting Started Guide, without modifyingthe workspace directory that contains the information of the remote project in the Workspace field.
How to access items of a remote project in offline mode
Talend Data Integration Studio User Guide 25
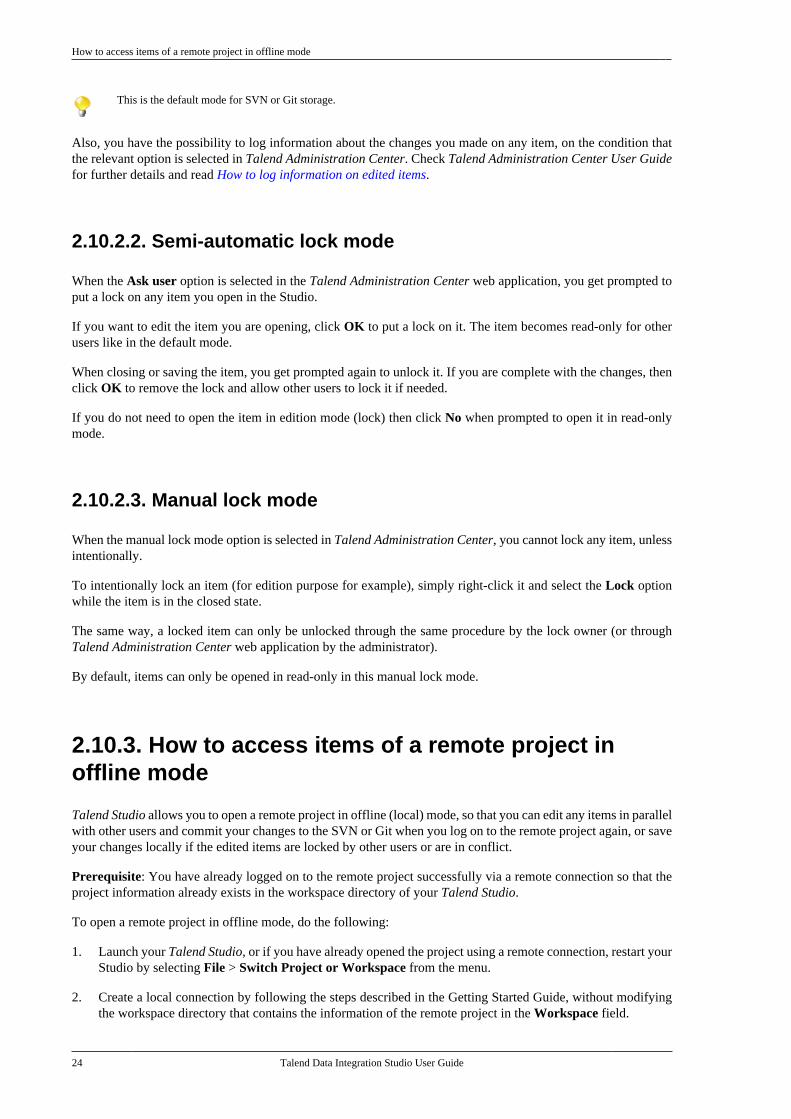
3. On the login screen, select the local connection you just created from the Connection list, and select theremote project from the Project field, and then click Finish.
Now you can continue working locally on the project branch that you previously worked on.
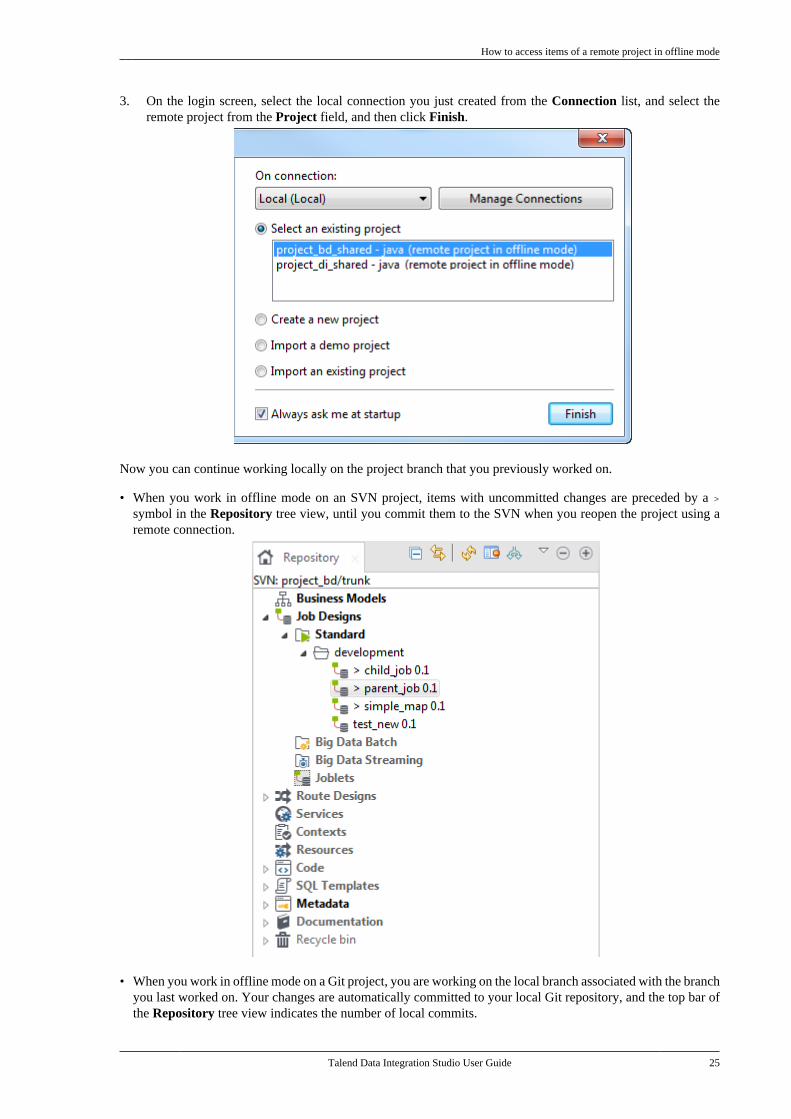
• When you work in offline mode on an SVN project, items with uncommitted changes are preceded by a >symbol in the Repository tree view, until you commit them to the SVN when you reopen the project using aremote connection.
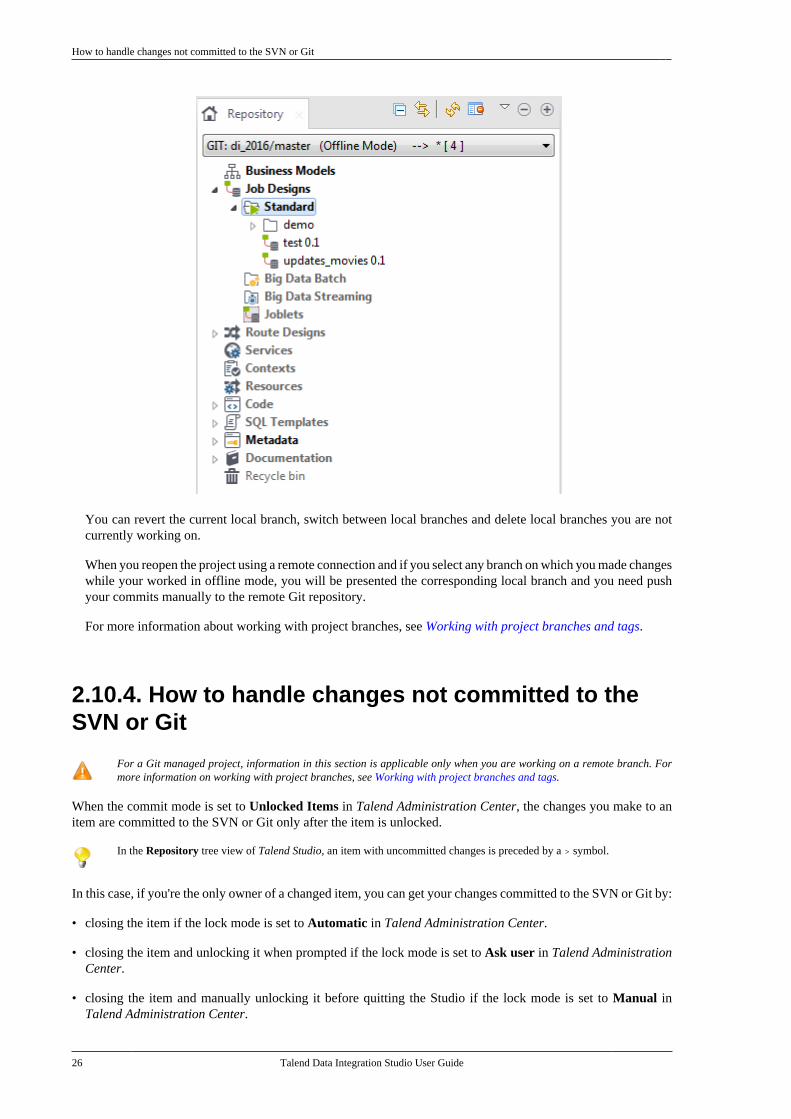
• When you work in offline mode on a Git project, you are working on the local branch associated with the branchyou last worked on. Your changes are automatically committed to your local Git repository, and the top bar ofthe Repository tree view indicates the number of local commits.
How to handle changes not committed to the SVN or Git
26 Talend Data Integration Studio User Guide
You can revert the current local branch, switch between local branches and delete local branches you are notcurrently working on.
When you reopen the project using a remote connection and if you select any branch on which you made changeswhile your worked in offline mode, you will be presented the corresponding local branch and you need pushyour commits manually to the remote Git repository.
For more information about working with project branches, see Working with project branches and tags.
2.10.4. How to handle changes not committed to theSVN or Git
For a Git managed project, information in this section is applicable only when you are working on a remote branch. Formore information on working with project branches, see Working with project branches and tags.
When the commit mode is set to Unlocked Items in Talend Administration Center, the changes you make to anitem are committed to the SVN or Git only after the item is unlocked.
In the Repository tree view of Talend Studio, an item with uncommitted changes is preceded by a > symbol.
In this case, if you're the only owner of a changed item, you can get your changes committed to the SVN or Git by:
• closing the item if the lock mode is set to Automatic in Talend Administration Center.
• closing the item and unlocking it when prompted if the lock mode is set to Ask user in Talend AdministrationCenter.
• closing the item and manually unlocking it before quitting the Studio if the lock mode is set to Manual inTalend Administration Center.
How to handle changes not committed to the SVN or Git
Talend Data Integration Studio User Guide 27
In cetain situations, a dialog box opens when uncommitted items are found, providing you options to handle thoseitems. For details, see Handling uncommitted items when prompted (SVN only) and Handling uncommitted itemswhen prompted (Git only) respectively.
For more information about the commit mode and lock mode options, see Talend Administration Center UserGuide.
2.10.4.1. Handling uncommitted items when prompted (SVN only)
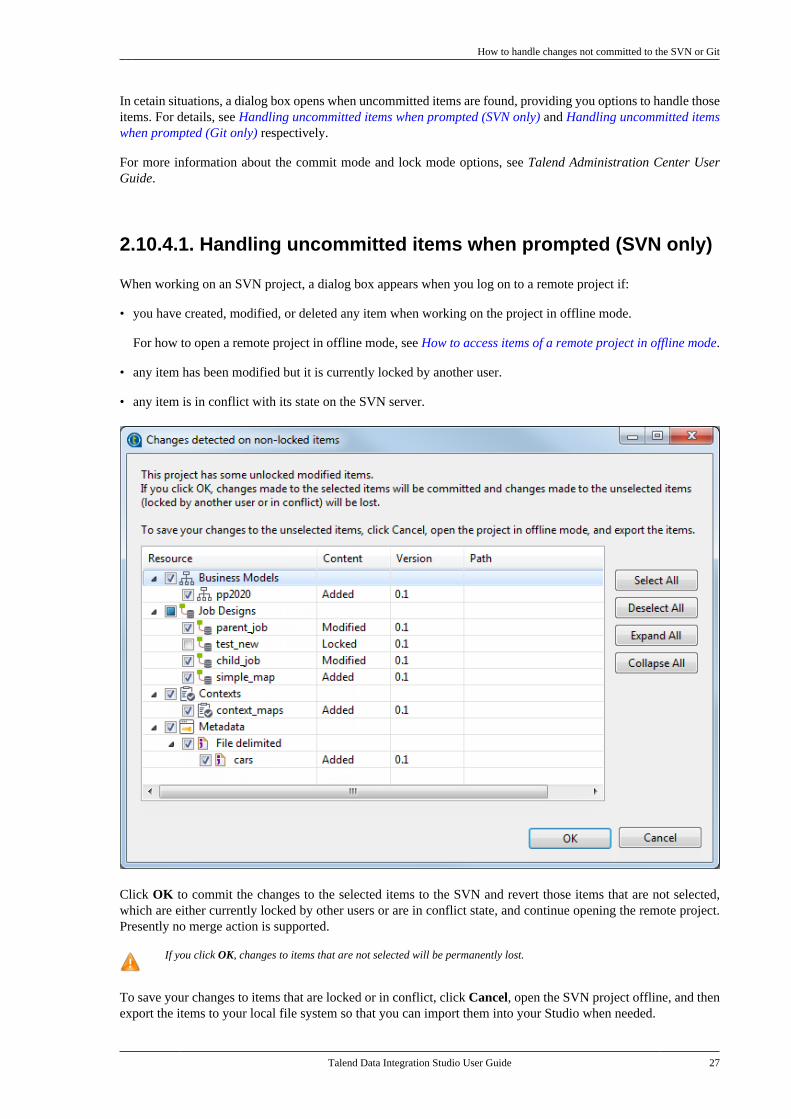
When working on an SVN project, a dialog box appears when you log on to a remote project if:
• you have created, modified, or deleted any item when working on the project in offline mode.
For how to open a remote project in offline mode, see How to access items of a remote project in offline mode.
• any item has been modified but it is currently locked by another user.
• any item is in conflict with its state on the SVN server.
Click OK to commit the changes to the selected items to the SVN and revert those items that are not selected,which are either currently locked by other users or are in conflict state, and continue opening the remote project.Presently no merge action is supported.
If you click OK, changes to items that are not selected will be permanently lost.
To save your changes to items that are locked or in conflict, click Cancel, open the SVN project offline, and thenexport the items to your local file system so that you can import them into your Studio when needed.
How to log information on edited items
28 Talend Data Integration Studio User Guide
2.10.4.2. Handling uncommitted items when prompted (Git only)
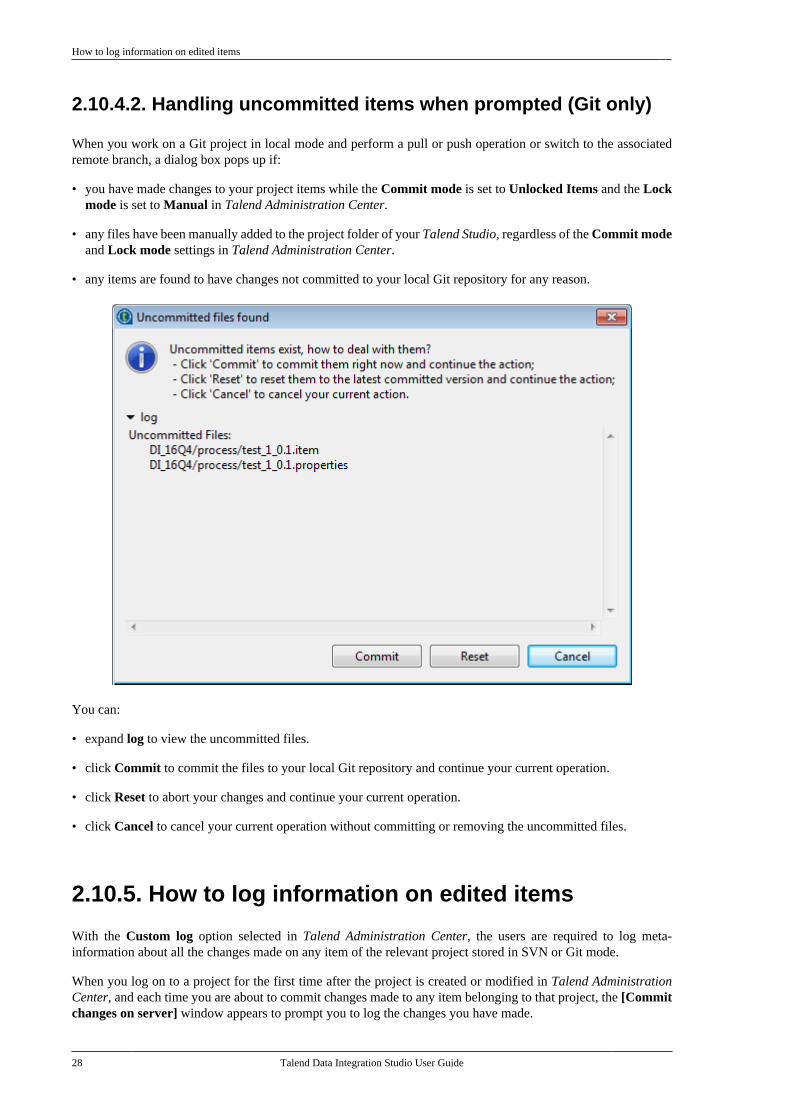
When you work on a Git project in local mode and perform a pull or push operation or switch to the associatedremote branch, a dialog box pops up if:
• you have made changes to your project items while the Commit mode is set to Unlocked Items and the Lockmode is set to Manual in Talend Administration Center.
• any files have been manually added to the project folder of your Talend Studio, regardless of the Commit modeand Lock mode settings in Talend Administration Center.
• any items are found to have changes not committed to your local Git repository for any reason.
You can:
• expand log to view the uncommitted files.
• click Commit to commit the files to your local Git repository and continue your current operation.
• click Reset to abort your changes and continue your current operation.
• click Cancel to cancel your current operation without committing or removing the uncommitted files.
2.10.5. How to log information on edited items
With the Custom log option selected in Talend Administration Center, the users are required to log meta-information about all the changes made on any item of the relevant project stored in SVN or Git mode.
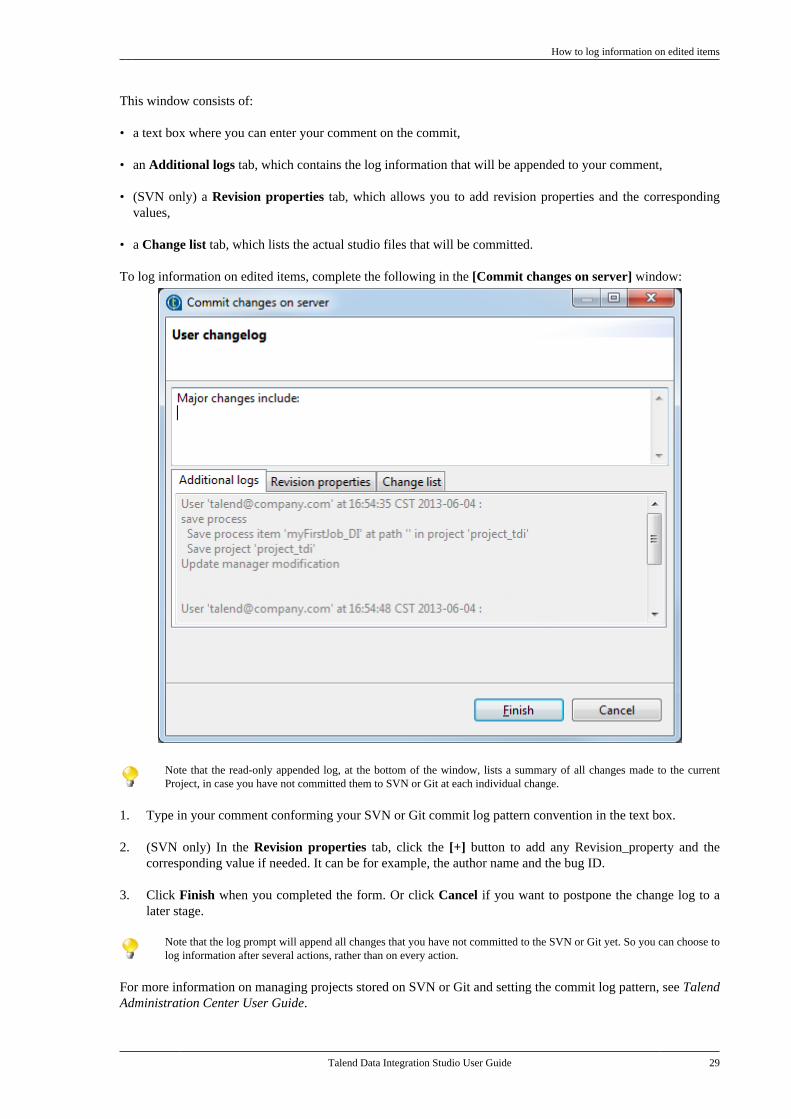
When you log on to a project for the first time after the project is created or modified in Talend AdministrationCenter, and each time you are about to commit changes made to any item belonging to that project, the [Commitchanges on server] window appears to prompt you to log the changes you have made.
How to log information on edited items
Talend Data Integration Studio User Guide 29
This window consists of:
• a text box where you can enter your comment on the commit,
• an Additional logs tab, which contains the log information that will be appended to your comment,
• (SVN only) a Revision properties tab, which allows you to add revision properties and the correspondingvalues,
• a Change list tab, which lists the actual studio files that will be committed.
To log information on edited items, complete the following in the [Commit changes on server] window:
Note that the read-only appended log, at the bottom of the window, lists a summary of all changes made to the currentProject, in case you have not committed them to SVN or Git at each individual change.
1. Type in your comment conforming your SVN or Git commit log pattern convention in the text box.
2. (SVN only) In the Revision properties tab, click the [+] button to add any Revision_property and thecorresponding value if needed. It can be for example, the author name and the bug ID.
3. Click Finish when you completed the form. Or click Cancel if you want to postpone the change log to alater stage.
Note that the log prompt will append all changes that you have not committed to the SVN or Git yet. So you can choose tolog information after several actions, rather than on every action.
For more information on managing projects stored on SVN or Git and setting the commit log pattern, see TalendAdministration Center User Guide.
How to delete shared items
30 Talend Data Integration Studio User Guide
2.10.6. How to delete shared items
You can delete any item in the shared repository unless it is concurrently edited by another user, if the item isopen. You can still delete items opened as read-only by other users.
2.11. Working with project branches and tagsAs explained earlier in this chapter, a project is the highest physical structure for storing all different types of dataintegration Jobs, metadata, routines, and so on. Talend Studio supports a version control system that enables youto have different copies of a project in different SVN or Git branches or tags. The items in one project branch ortag are independent of those in another.
This section addresses topics related to project branches and tags, including:
• How to create a local branch from Talend Studio (Git only)
• How to push changes on a local branch to the remote end (Git only)
• How to update a local branch (Git only)
• How to revert a local branch to the previous update state (Git only)
• How to delete a local branch (Git only)
• How to create a tag for a project
• How to switch between branches or tags
• How to view the project history specific to a branch or tag (Git only)
• How to resolve conflicts between branches (Git only)
2.11.1. How to create a local branch from TalendStudio (Git only)
When working on a Git managed project, you can create local branches from within your Talend Studio and keepyour changes local until you push them to the Git server.
Your Talend Studio provides two options for you to create a local branch:
• Creating a new branch based on a selected source.
• Checking out a remote branch as a local one.
In the context of Git branching, master can be regarded as a special branch.
Creating a new branch based on a selected source
1. From the Talend Studio, click the top bar of the Repository tree view and select New Branch from the drop-down menu.
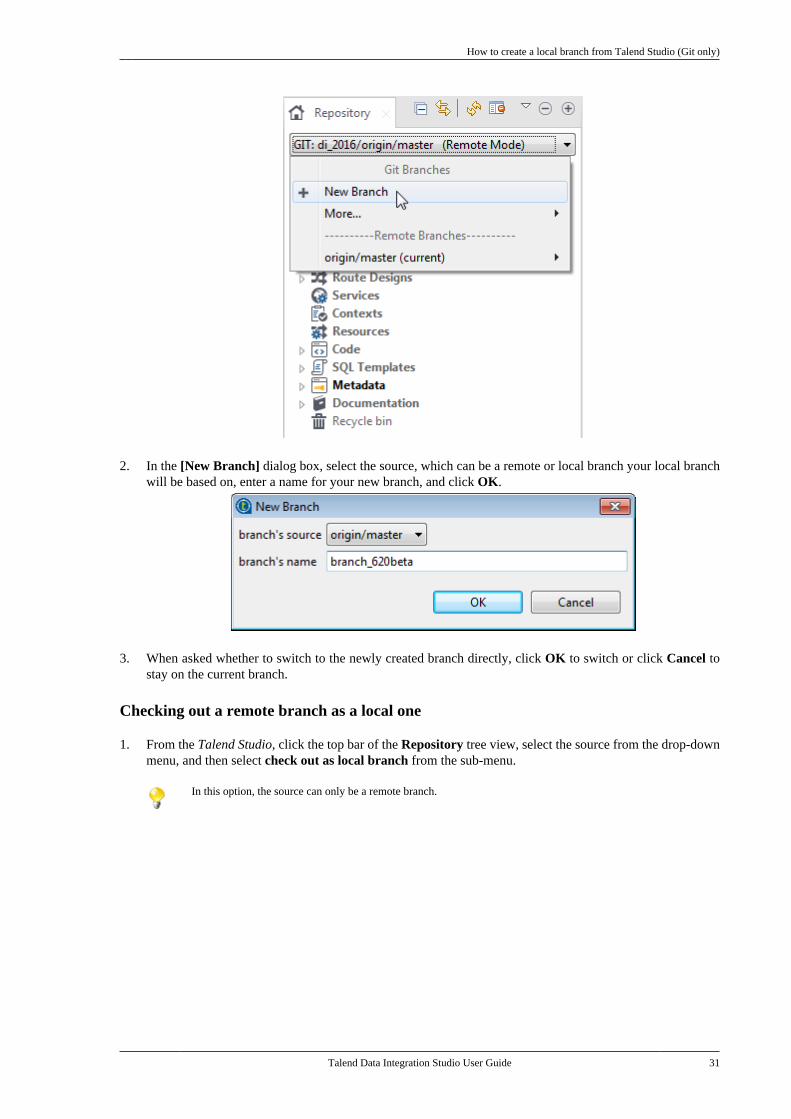
How to create a local branch from Talend Studio (Git only)
Talend Data Integration Studio User Guide 31
2. In the [New Branch] dialog box, select the source, which can be a remote or local branch your local branchwill be based on, enter a name for your new branch, and click OK.
3. When asked whether to switch to the newly created branch directly, click OK to switch or click Cancel tostay on the current branch.
Checking out a remote branch as a local one
1. From the Talend Studio, click the top bar of the Repository tree view, select the source from the drop-downmenu, and then select check out as local branch from the sub-menu.
In this option, the source can only be a remote branch.
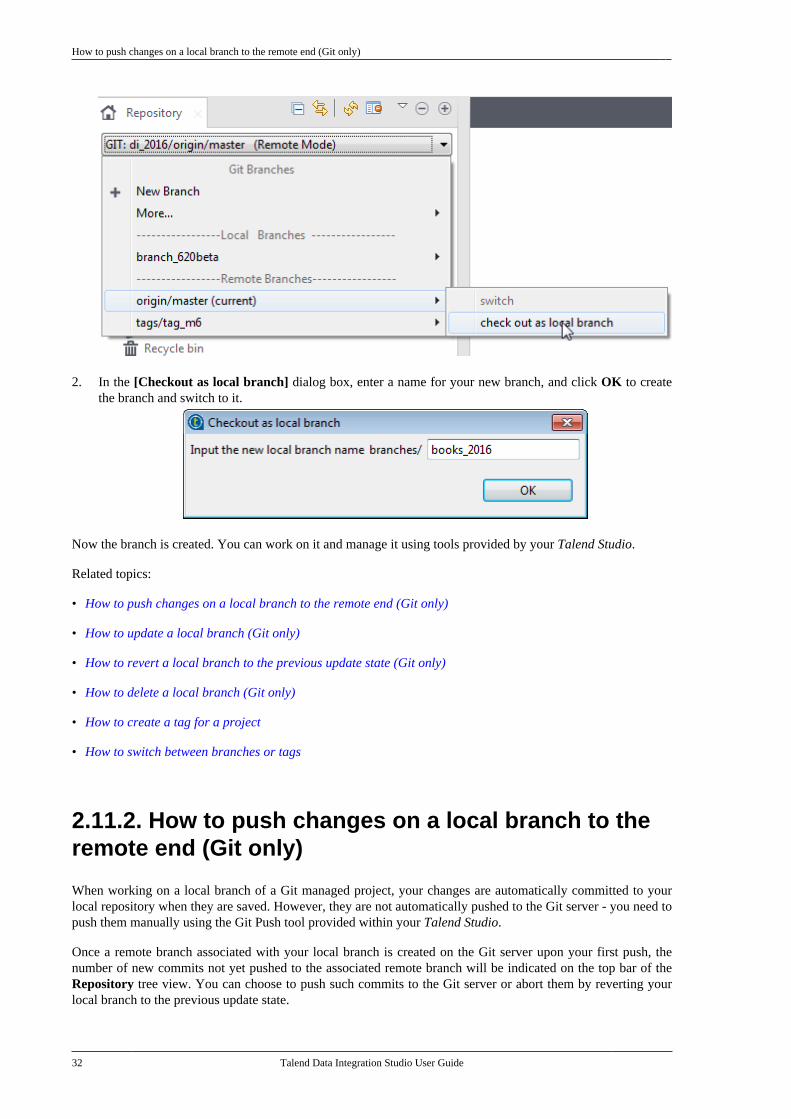
How to push changes on a local branch to the remote end (Git only)
32 Talend Data Integration Studio User Guide
2. In the [Checkout as local branch] dialog box, enter a name for your new branch, and click OK to createthe branch and switch to it.
Now the branch is created. You can work on it and manage it using tools provided by your Talend Studio.
Related topics:
• How to push changes on a local branch to the remote end (Git only)
• How to update a local branch (Git only)
• How to revert a local branch to the previous update state (Git only)
• How to delete a local branch (Git only)
• How to create a tag for a project
• How to switch between branches or tags
2.11.2. How to push changes on a local branch to theremote end (Git only)
When working on a local branch of a Git managed project, your changes are automatically committed to yourlocal repository when they are saved. However, they are not automatically pushed to the Git server - you need topush them manually using the Git Push tool provided within your Talend Studio.
Once a remote branch associated with your local branch is created on the Git server upon your first push, thenumber of new commits not yet pushed to the associated remote branch will be indicated on the top bar of theRepository tree view. You can choose to push such commits to the Git server or abort them by reverting yourlocal branch to the previous update state.
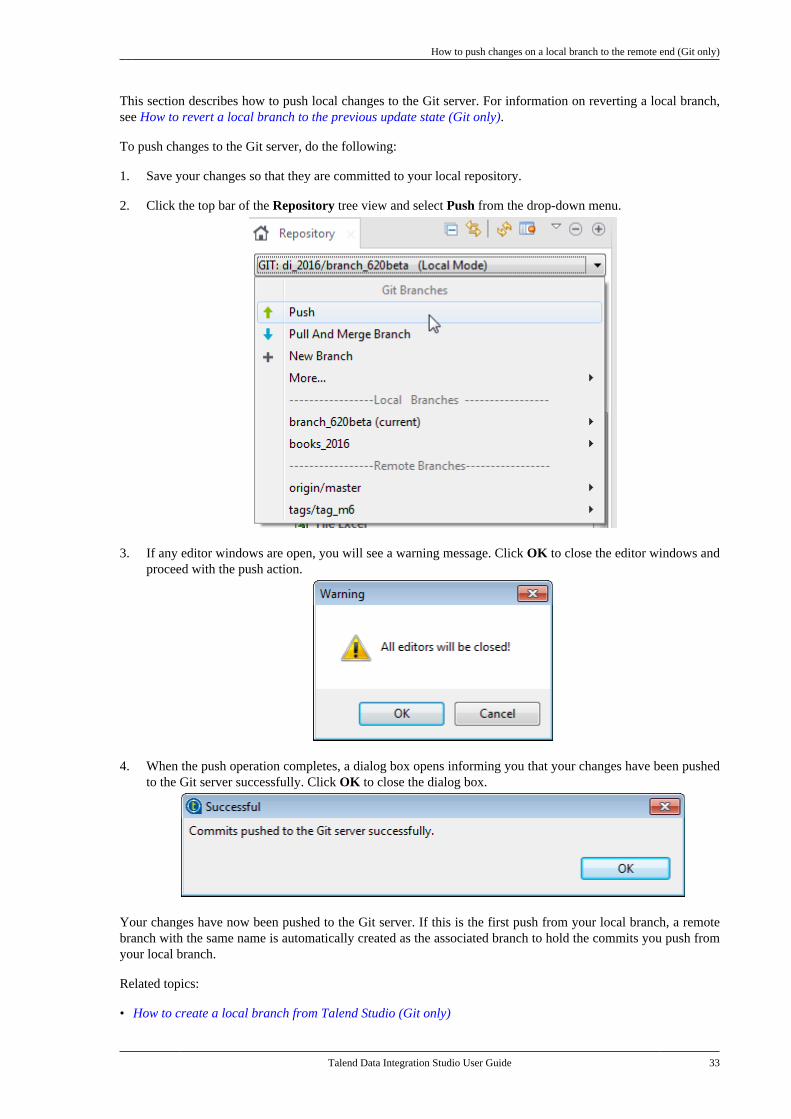
How to push changes on a local branch to the remote end (Git only)
Talend Data Integration Studio User Guide 33
This section describes how to push local changes to the Git server. For information on reverting a local branch,see How to revert a local branch to the previous update state (Git only).
To push changes to the Git server, do the following:
1. Save your changes so that they are committed to your local repository.
2. Click the top bar of the Repository tree view and select Push from the drop-down menu.
3. If any editor windows are open, you will see a warning message. Click OK to close the editor windows andproceed with the push action.
4. When the push operation completes, a dialog box opens informing you that your changes have been pushedto the Git server successfully. Click OK to close the dialog box.
Your changes have now been pushed to the Git server. If this is the first push from your local branch, a remotebranch with the same name is automatically created as the associated branch to hold the commits you push fromyour local branch.
Related topics:
• How to create a local branch from Talend Studio (Git only)
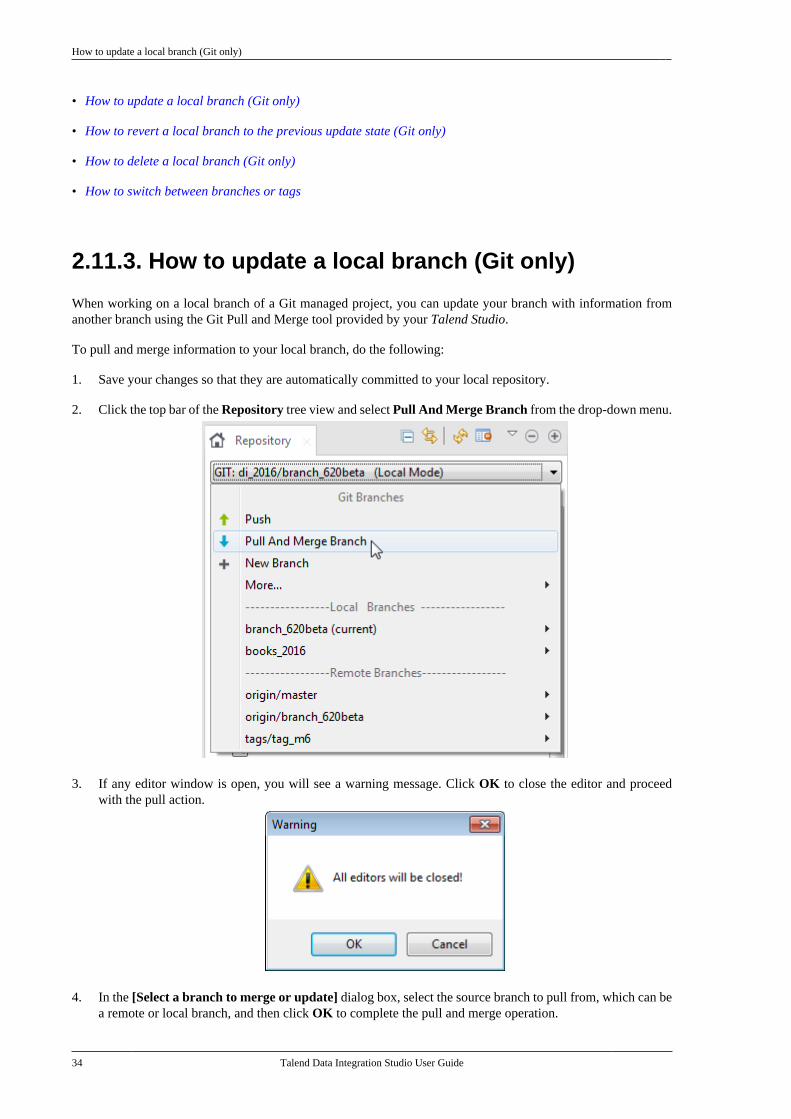
How to update a local branch (Git only)
34 Talend Data Integration Studio User Guide
• How to update a local branch (Git only)
• How to revert a local branch to the previous update state (Git only)
• How to delete a local branch (Git only)
• How to switch between branches or tags
2.11.3. How to update a local branch (Git only)
When working on a local branch of a Git managed project, you can update your branch with information fromanother branch using the Git Pull and Merge tool provided by your Talend Studio.
To pull and merge information to your local branch, do the following:
1. Save your changes so that they are automatically committed to your local repository.
2. Click the top bar of the Repository tree view and select Pull And Merge Branch from the drop-down menu.
3. If any editor window is open, you will see a warning message. Click OK to close the editor and proceedwith the pull action.
4. In the [Select a branch to merge or update] dialog box, select the source branch to pull from, which can bea remote or local branch, and then click OK to complete the pull and merge operation.
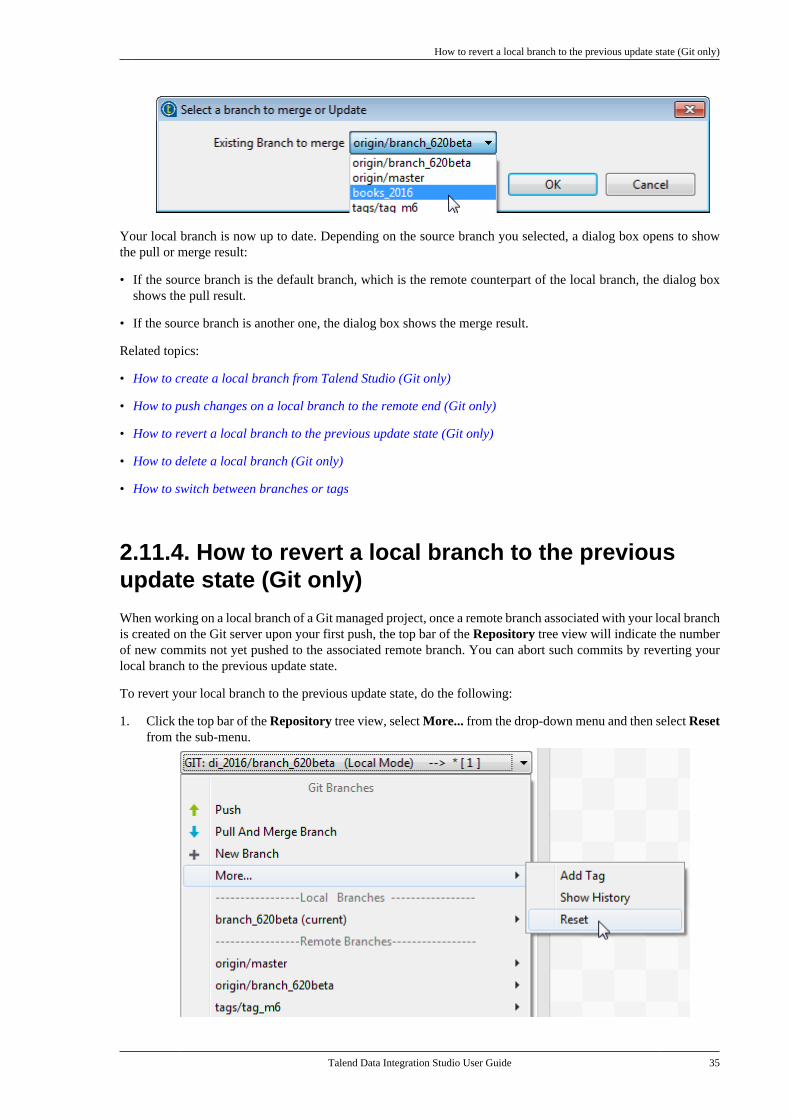
How to revert a local branch to the previous update state (Git only)
Talend Data Integration Studio User Guide 35
Your local branch is now up to date. Depending on the source branch you selected, a dialog box opens to showthe pull or merge result:
• If the source branch is the default branch, which is the remote counterpart of the local branch, the dialog boxshows the pull result.
• If the source branch is another one, the dialog box shows the merge result.
Related topics:
• How to create a local branch from Talend Studio (Git only)
• How to push changes on a local branch to the remote end (Git only)
• How to revert a local branch to the previous update state (Git only)
• How to delete a local branch (Git only)
• How to switch between branches or tags
2.11.4. How to revert a local branch to the previousupdate state (Git only)
When working on a local branch of a Git managed project, once a remote branch associated with your local branchis created on the Git server upon your first push, the top bar of the Repository tree view will indicate the numberof new commits not yet pushed to the associated remote branch. You can abort such commits by reverting yourlocal branch to the previous update state.
To revert your local branch to the previous update state, do the following:
1. Click the top bar of the Repository tree view, select More... from the drop-down menu and then select Resetfrom the sub-menu.
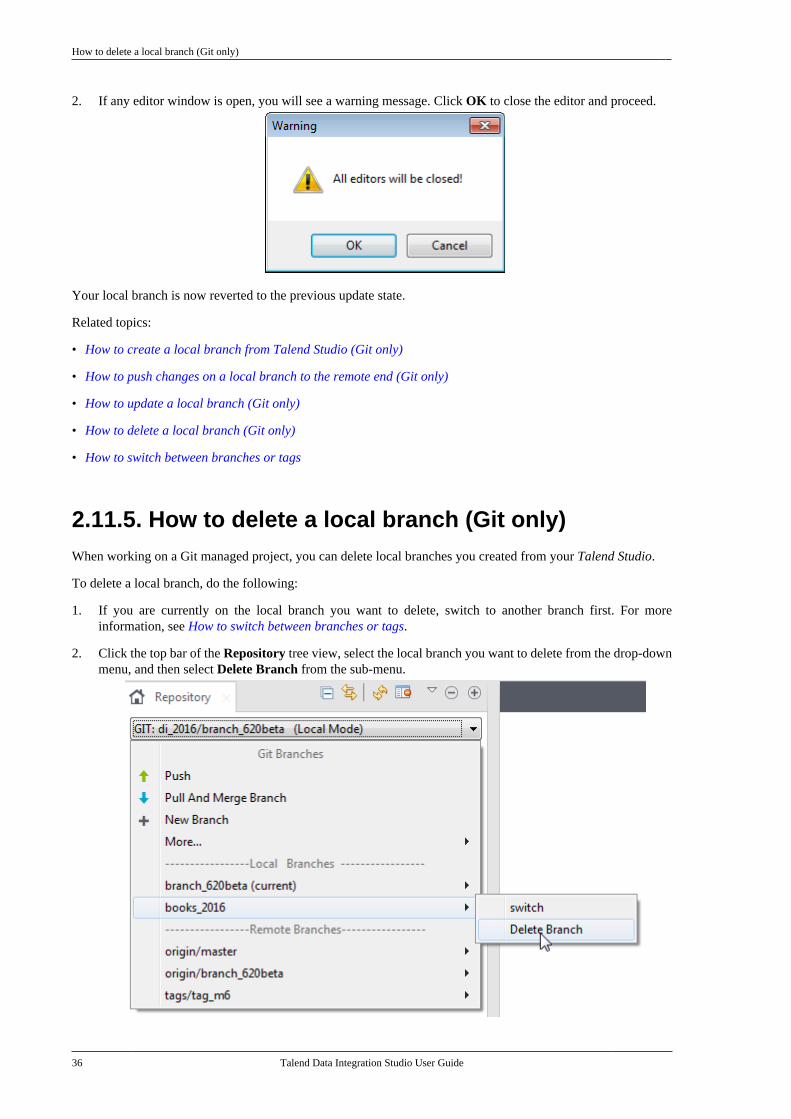
How to delete a local branch (Git only)
36 Talend Data Integration Studio User Guide
2. If any editor window is open, you will see a warning message. Click OK to close the editor and proceed.
Your local branch is now reverted to the previous update state.
Related topics:
• How to create a local branch from Talend Studio (Git only)
• How to push changes on a local branch to the remote end (Git only)
• How to update a local branch (Git only)
• How to delete a local branch (Git only)
• How to switch between branches or tags
2.11.5. How to delete a local branch (Git only)When working on a Git managed project, you can delete local branches you created from your Talend Studio.
To delete a local branch, do the following:
1. If you are currently on the local branch you want to delete, switch to another branch first. For moreinformation, see How to switch between branches or tags.
2. Click the top bar of the Repository tree view, select the local branch you want to delete from the drop-downmenu, and then select Delete Branch from the sub-menu.
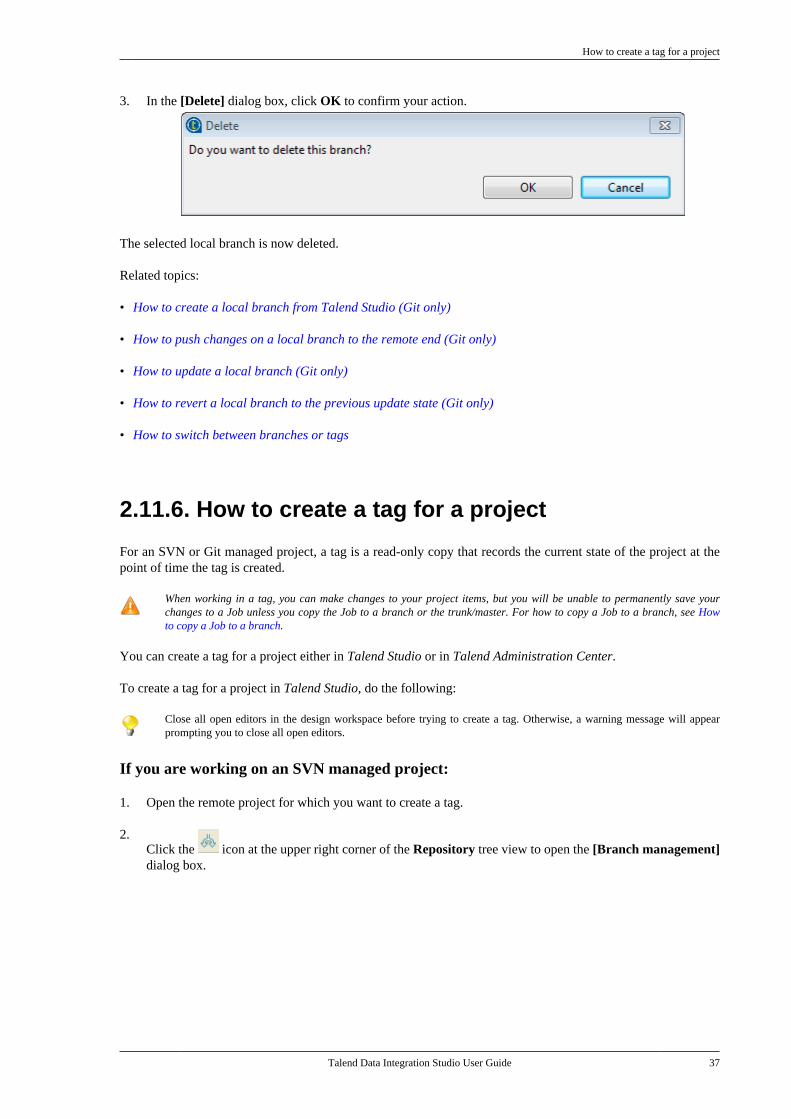
How to create a tag for a project
Talend Data Integration Studio User Guide 37
3. In the [Delete] dialog box, click OK to confirm your action.
The selected local branch is now deleted.
Related topics:
• How to create a local branch from Talend Studio (Git only)
• How to push changes on a local branch to the remote end (Git only)
• How to update a local branch (Git only)
• How to revert a local branch to the previous update state (Git only)
• How to switch between branches or tags
2.11.6. How to create a tag for a project
For an SVN or Git managed project, a tag is a read-only copy that records the current state of the project at thepoint of time the tag is created.
When working in a tag, you can make changes to your project items, but you will be unable to permanently save yourchanges to a Job unless you copy the Job to a branch or the trunk/master. For how to copy a Job to a branch, see Howto copy a Job to a branch.
You can create a tag for a project either in Talend Studio or in Talend Administration Center.
To create a tag for a project in Talend Studio, do the following:
Close all open editors in the design workspace before trying to create a tag. Otherwise, a warning message will appearprompting you to close all open editors.
If you are working on an SVN managed project:
1. Open the remote project for which you want to create a tag.
2.Click the icon at the upper right corner of the Repository tree view to open the [Branch management]dialog box.
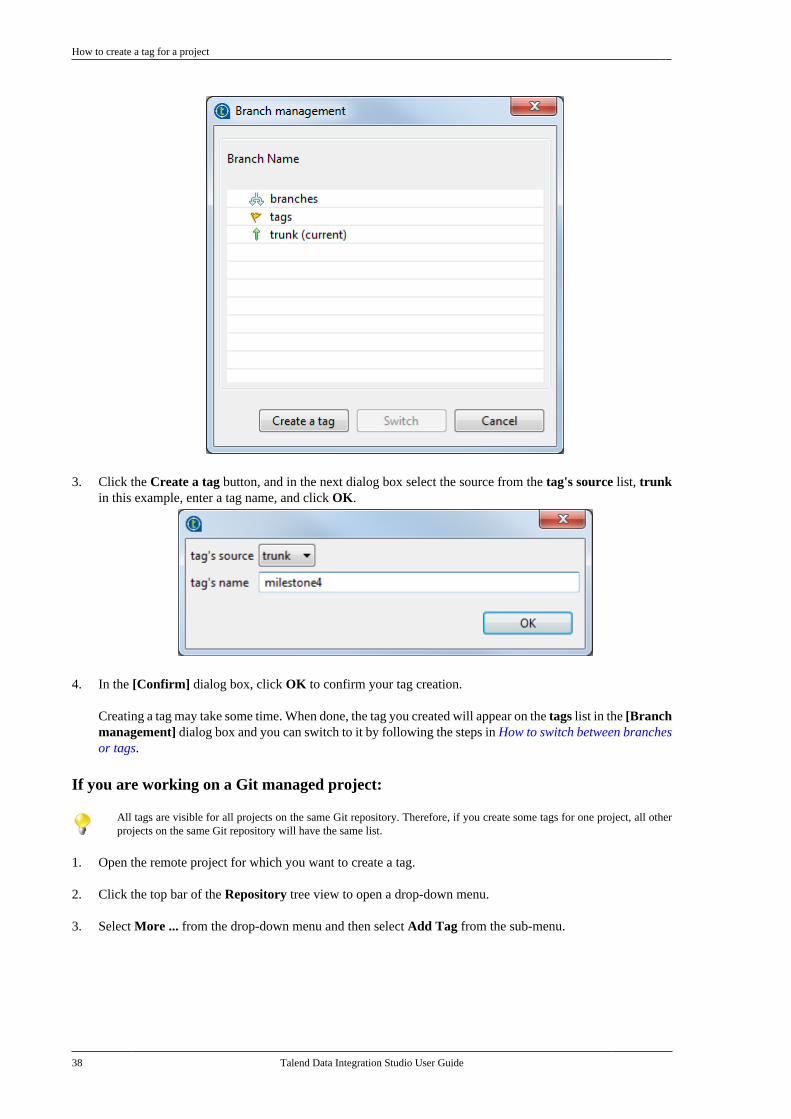
How to create a tag for a project
38 Talend Data Integration Studio User Guide
3. Click the Create a tag button, and in the next dialog box select the source from the tag's source list, trunkin this example, enter a tag name, and click OK.
4. In the [Confirm] dialog box, click OK to confirm your tag creation.
Creating a tag may take some time. When done, the tag you created will appear on the tags list in the [Branchmanagement] dialog box and you can switch to it by following the steps in How to switch between branchesor tags.
If you are working on a Git managed project:
All tags are visible for all projects on the same Git repository. Therefore, if you create some tags for one project, all otherprojects on the same Git repository will have the same list.
1. Open the remote project for which you want to create a tag.
2. Click the top bar of the Repository tree view to open a drop-down menu.
3. Select More ... from the drop-down menu and then select Add Tag from the sub-menu.
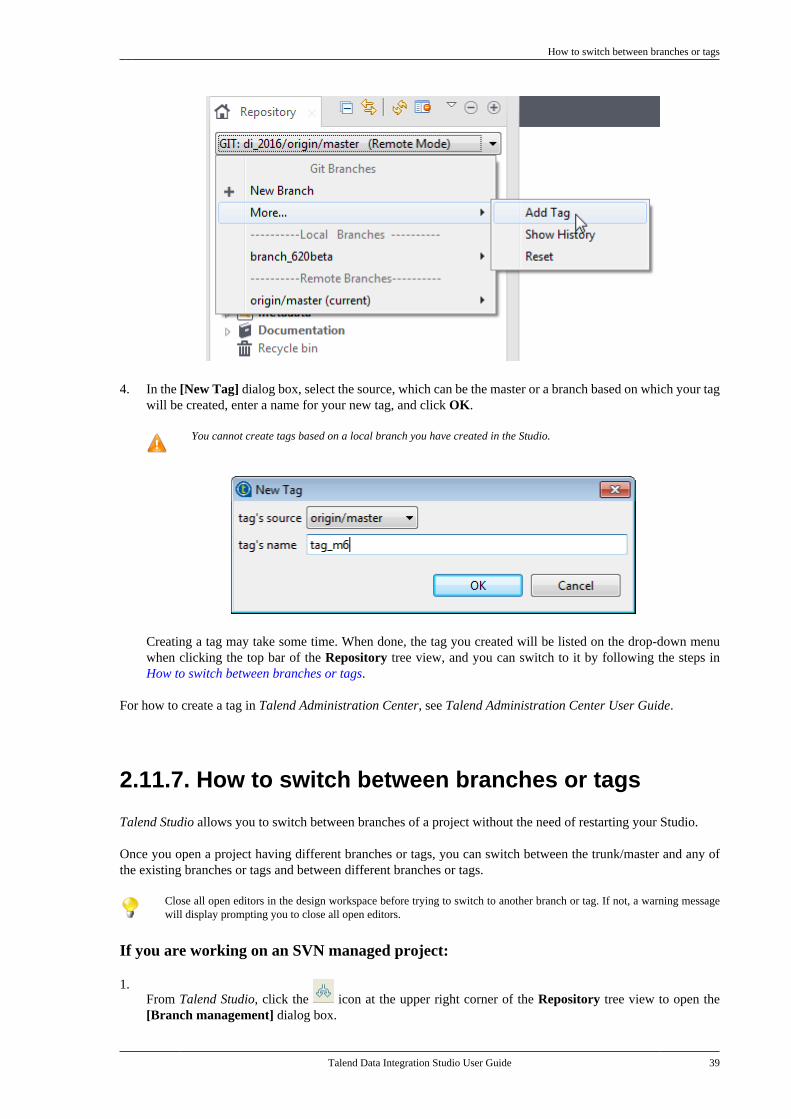
How to switch between branches or tags
Talend Data Integration Studio User Guide 39
4. In the [New Tag] dialog box, select the source, which can be the master or a branch based on which your tagwill be created, enter a name for your new tag, and click OK.
You cannot create tags based on a local branch you have created in the Studio.
Creating a tag may take some time. When done, the tag you created will be listed on the drop-down menuwhen clicking the top bar of the Repository tree view, and you can switch to it by following the steps inHow to switch between branches or tags.
For how to create a tag in Talend Administration Center, see Talend Administration Center User Guide.
2.11.7. How to switch between branches or tags
Talend Studio allows you to switch between branches of a project without the need of restarting your Studio.
Once you open a project having different branches or tags, you can switch between the trunk/master and any ofthe existing branches or tags and between different branches or tags.
Close all open editors in the design workspace before trying to switch to another branch or tag. If not, a warning messagewill display prompting you to close all open editors.
If you are working on an SVN managed project:
1.From Talend Studio, click the icon at the upper right corner of the Repository tree view to open the[Branch management] dialog box.
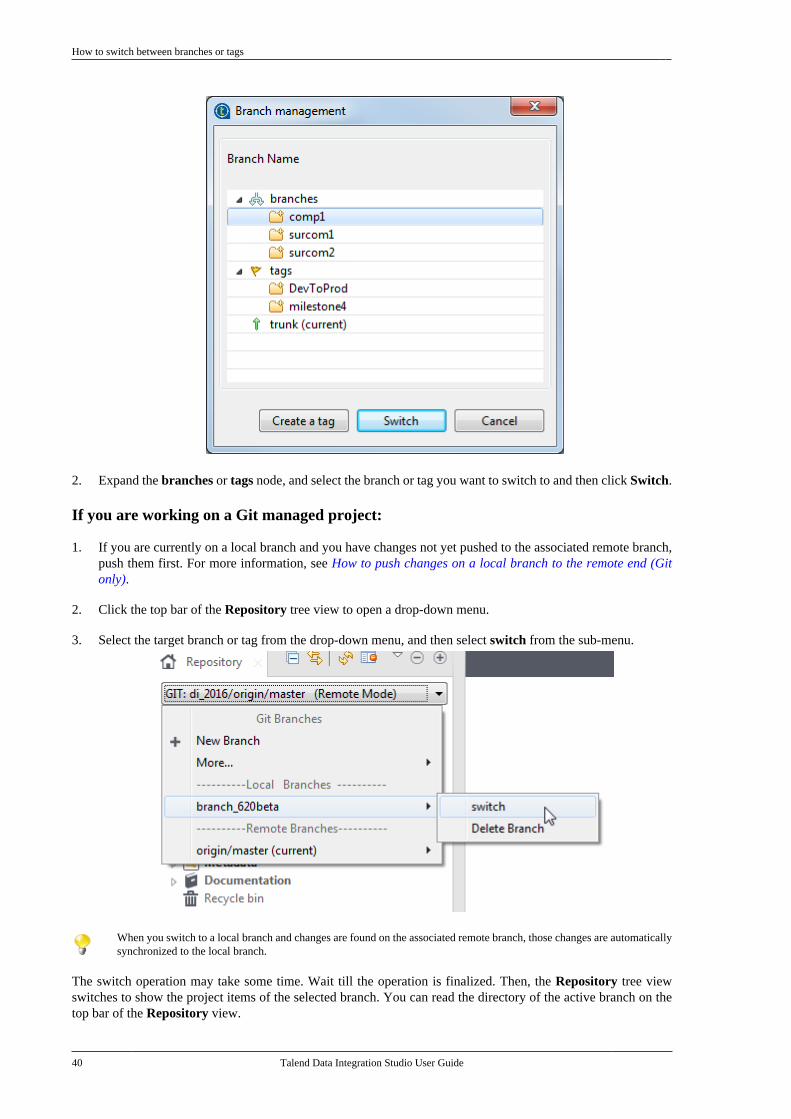
How to switch between branches or tags
40 Talend Data Integration Studio User Guide
2. Expand the branches or tags node, and select the branch or tag you want to switch to and then click Switch.
If you are working on a Git managed project:
1. If you are currently on a local branch and you have changes not yet pushed to the associated remote branch,push them first. For more information, see How to push changes on a local branch to the remote end (Gitonly).
2. Click the top bar of the Repository tree view to open a drop-down menu.
3. Select the target branch or tag from the drop-down menu, and then select switch from the sub-menu.
When you switch to a local branch and changes are found on the associated remote branch, those changes are automaticallysynchronized to the local branch.
The switch operation may take some time. Wait till the operation is finalized. Then, the Repository tree viewswitches to show the project items of the selected branch. You can read the directory of the active branch on thetop bar of the Repository view.
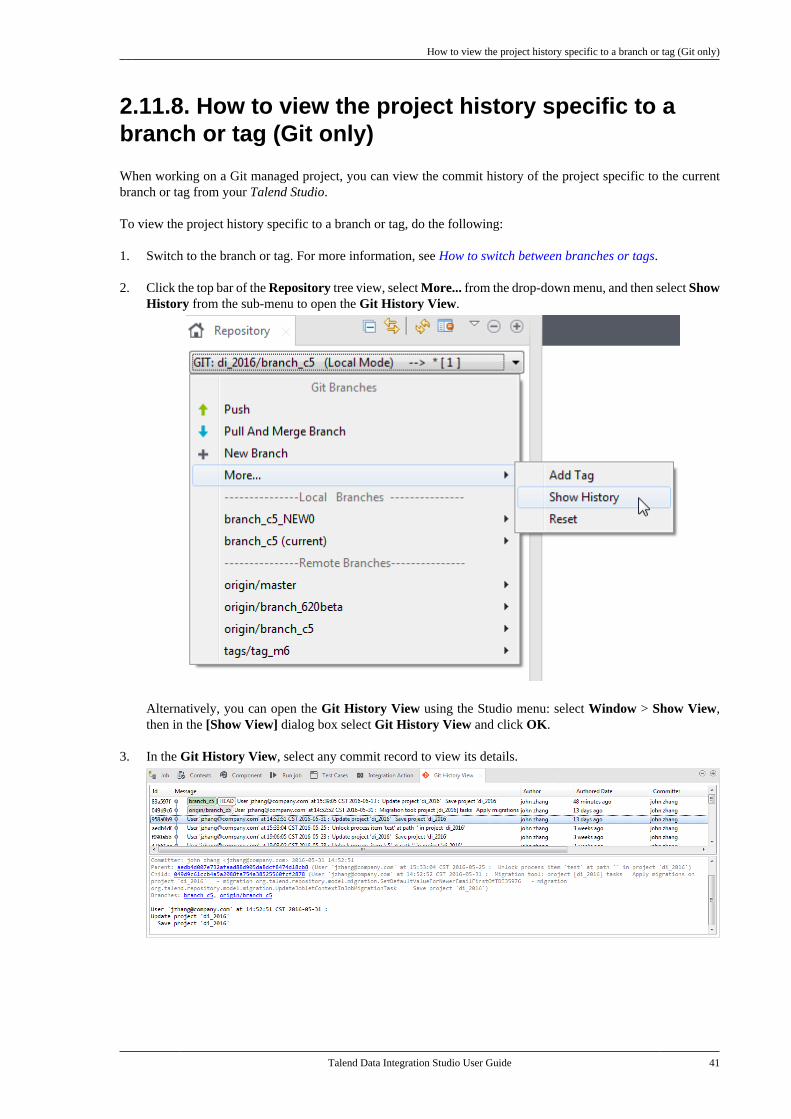
How to view the project history specific to a branch or tag (Git only)
Talend Data Integration Studio User Guide 41
2.11.8. How to view the project history specific to abranch or tag (Git only)
When working on a Git managed project, you can view the commit history of the project specific to the currentbranch or tag from your Talend Studio.
To view the project history specific to a branch or tag, do the following:
1. Switch to the branch or tag. For more information, see How to switch between branches or tags.
2. Click the top bar of the Repository tree view, select More... from the drop-down menu, and then select ShowHistory from the sub-menu to open the Git History View.
Alternatively, you can open the Git History View using the Studio menu: select Window > Show View,then in the [Show View] dialog box select Git History View and click OK.
3. In the Git History View, select any commit record to view its details.
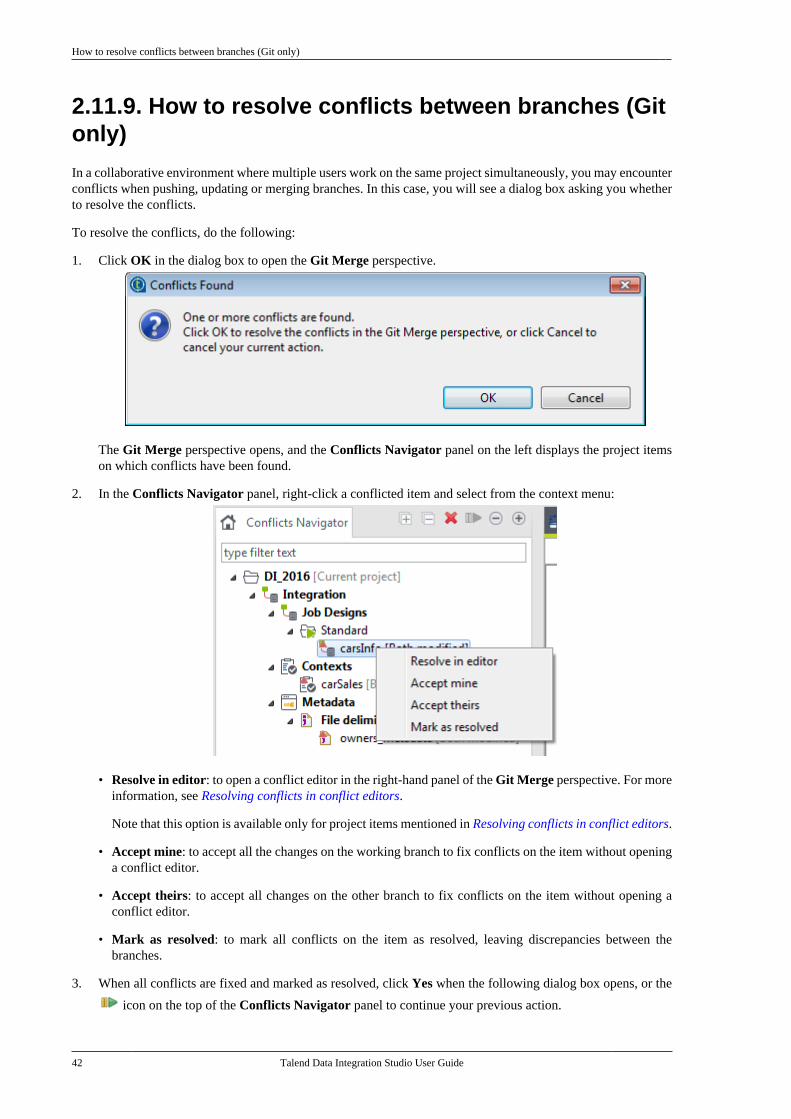
How to resolve conflicts between branches (Git only)
42 Talend Data Integration Studio User Guide
2.11.9. How to resolve conflicts between branches (Gitonly)
In a collaborative environment where multiple users work on the same project simultaneously, you may encounterconflicts when pushing, updating or merging branches. In this case, you will see a dialog box asking you whetherto resolve the conflicts.
To resolve the conflicts, do the following:
1. Click OK in the dialog box to open the Git Merge perspective.
The Git Merge perspective opens, and the Conflicts Navigator panel on the left displays the project itemson which conflicts have been found.
2. In the Conflicts Navigator panel, right-click a conflicted item and select from the context menu:
• Resolve in editor: to open a conflict editor in the right-hand panel of the Git Merge perspective. For moreinformation, see Resolving conflicts in conflict editors.
Note that this option is available only for project items mentioned in Resolving conflicts in conflict editors.
• Accept mine: to accept all the changes on the working branch to fix conflicts on the item without openinga conflict editor.
• Accept theirs: to accept all changes on the other branch to fix conflicts on the item without opening aconflict editor.
• Mark as resolved: to mark all conflicts on the item as resolved, leaving discrepancies between thebranches.
3. When all conflicts are fixed and marked as resolved, click Yes when the following dialog box opens, or the
icon on the top of the Conflicts Navigator panel to continue your previous action.

How to resolve conflicts between branches (Git only)
Talend Data Integration Studio User Guide 43
2.11.9.1. Resolving conflicts in conflict editors
Depending on the nature of a conflicted project item, Talend Studio provides one of the following types of conflicteditors for you to compare changes on the project item between both branches graphically:
• Job Compare editor, if the conflicted project item is a standard Job, a Joblet, or a test case.
• EMF Compare (Eclipse Modeling Framework) editor, if the conflicted item is a context group, or a databaseconnection.
• Text Compare editor, if the conflicted item is a general text file, a routine, a Job script, or a SQL script.
To open a conflict editor, right-click a conflicted project item in the Conflicts Navigator tree view and selectResolve in editor from the contextual menu.
After fixing conflicts in an editor, mark the conflicts as resolved and close the editor to continue your previousbranch operation.
The following sections outline how to use these editors.
Job Compare editor
The upper part of the Job Compare editor displays a tree view that shows all the design and parameter items ofthe Job on which conflicts have occurred. A dark red conflict indicator is seen on the icon of each conflicted item.
In this tree view, you can expand each node and select the conflicted items to explore the details of the conflicts.
The lower part displays a comparison view that shows the details of the different versions of the selected item.In this comparison view:
• When a design item, such as a component or a connection, is selected in the upper tree view, the item ishighlighted graphically.
• When a parameter item, such as the schema of a component, is selected in the upper tree view, a yellow warningsign indicates each conflicted parameter, such as a schema column, of that item.
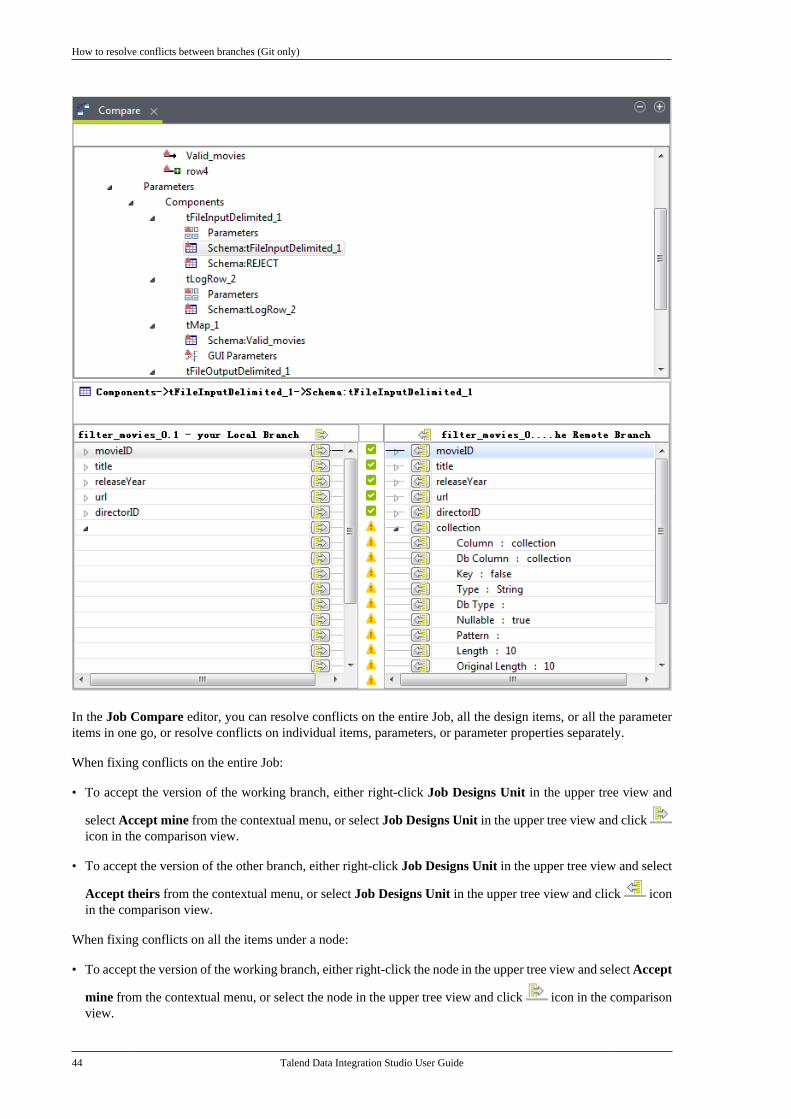
How to resolve conflicts between branches (Git only)
44 Talend Data Integration Studio User Guide
In the Job Compare editor, you can resolve conflicts on the entire Job, all the design items, or all the parameteritems in one go, or resolve conflicts on individual items, parameters, or parameter properties separately.
When fixing conflicts on the entire Job:
• To accept the version of the working branch, either right-click Job Designs Unit in the upper tree view and
select Accept mine from the contextual menu, or select Job Designs Unit in the upper tree view and click icon in the comparison view.
• To accept the version of the other branch, either right-click Job Designs Unit in the upper tree view and select
Accept theirs from the contextual menu, or select Job Designs Unit in the upper tree view and click iconin the comparison view.
When fixing conflicts on all the items under a node:
• To accept the version of the working branch, either right-click the node in the upper tree view and select Accept
mine from the contextual menu, or select the node in the upper tree view and click icon in the comparisonview.
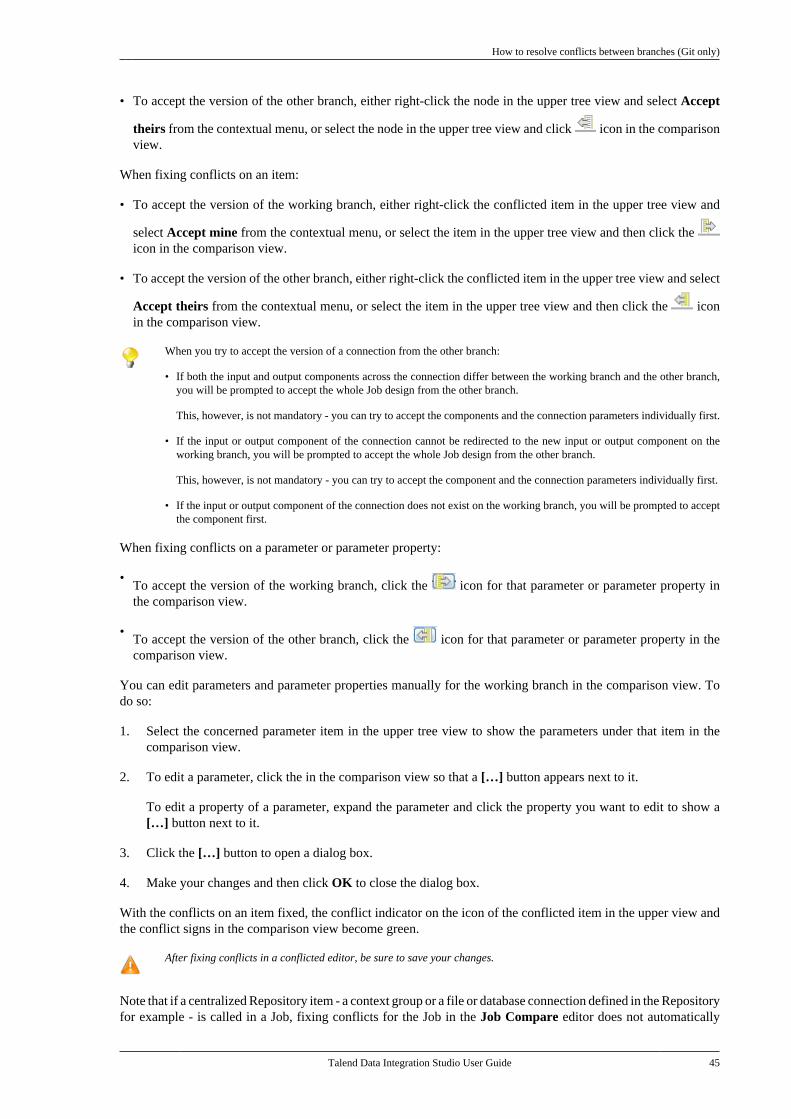
How to resolve conflicts between branches (Git only)
Talend Data Integration Studio User Guide 45
• To accept the version of the other branch, either right-click the node in the upper tree view and select Accept
theirs from the contextual menu, or select the node in the upper tree view and click icon in the comparisonview.
When fixing conflicts on an item:
• To accept the version of the working branch, either right-click the conflicted item in the upper tree view and
select Accept mine from the contextual menu, or select the item in the upper tree view and then click the icon in the comparison view.
• To accept the version of the other branch, either right-click the conflicted item in the upper tree view and select
Accept theirs from the contextual menu, or select the item in the upper tree view and then click the iconin the comparison view.
When you try to accept the version of a connection from the other branch:
• If both the input and output components across the connection differ between the working branch and the other branch,you will be prompted to accept the whole Job design from the other branch.
This, however, is not mandatory - you can try to accept the components and the connection parameters individually first.
• If the input or output component of the connection cannot be redirected to the new input or output component on theworking branch, you will be prompted to accept the whole Job design from the other branch.
This, however, is not mandatory - you can try to accept the component and the connection parameters individually first.
• If the input or output component of the connection does not exist on the working branch, you will be prompted to acceptthe component first.
When fixing conflicts on a parameter or parameter property:
•To accept the version of the working branch, click the icon for that parameter or parameter property inthe comparison view.
•To accept the version of the other branch, click the icon for that parameter or parameter property in thecomparison view.
You can edit parameters and parameter properties manually for the working branch in the comparison view. Todo so:
1. Select the concerned parameter item in the upper tree view to show the parameters under that item in thecomparison view.
2. To edit a parameter, click the in the comparison view so that a […] button appears next to it.
To edit a property of a parameter, expand the parameter and click the property you want to edit to show a[…] button next to it.
3. Click the […] button to open a dialog box.
4. Make your changes and then click OK to close the dialog box.
With the conflicts on an item fixed, the conflict indicator on the icon of the conflicted item in the upper view andthe conflict signs in the comparison view become green.
After fixing conflicts in a conflicted editor, be sure to save your changes.
Note that if a centralized Repository item - a context group or a file or database connection defined in the Repositoryfor example - is called in a Job, fixing conflicts for the Job in the Job Compare editor does not automatically
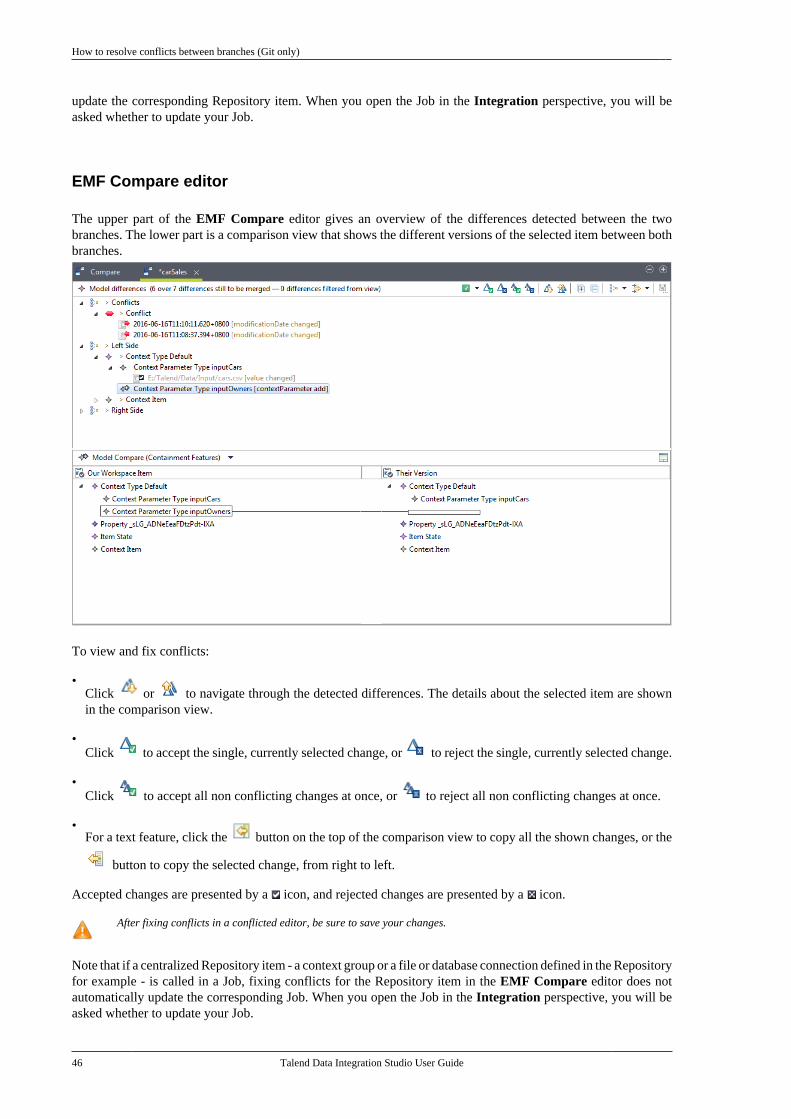
How to resolve conflicts between branches (Git only)
46 Talend Data Integration Studio User Guide
update the corresponding Repository item. When you open the Job in the Integration perspective, you will beasked whether to update your Job.
EMF Compare editor
The upper part of the EMF Compare editor gives an overview of the differences detected between the twobranches. The lower part is a comparison view that shows the different versions of the selected item between bothbranches.
To view and fix conflicts:
•Click or to navigate through the detected differences. The details about the selected item are shownin the comparison view.
•Click to accept the single, currently selected change, or to reject the single, currently selected change.
•Click to accept all non conflicting changes at once, or to reject all non conflicting changes at once.
•For a text feature, click the button on the top of the comparison view to copy all the shown changes, or the
button to copy the selected change, from right to left.
Accepted changes are presented by a icon, and rejected changes are presented by a icon.
After fixing conflicts in a conflicted editor, be sure to save your changes.
Note that if a centralized Repository item - a context group or a file or database connection defined in the Repositoryfor example - is called in a Job, fixing conflicts for the Repository item in the EMF Compare editor does notautomatically update the corresponding Job. When you open the Job in the Integration perspective, you will beasked whether to update your Job.
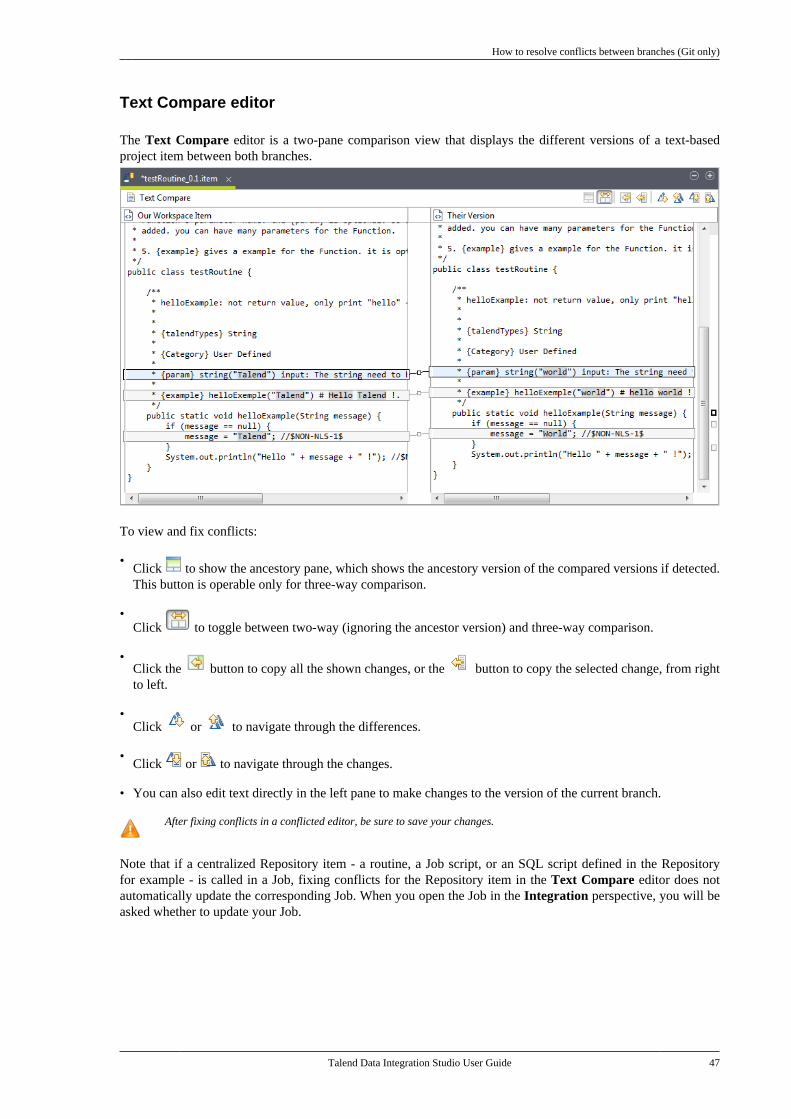
How to resolve conflicts between branches (Git only)
Talend Data Integration Studio User Guide 47
Text Compare editor
The Text Compare editor is a two-pane comparison view that displays the different versions of a text-basedproject item between both branches.
To view and fix conflicts:
•Click to show the ancestory pane, which shows the ancestory version of the compared versions if detected.This button is operable only for three-way comparison.
•Click to toggle between two-way (ignoring the ancestor version) and three-way comparison.
•Click the button to copy all the shown changes, or the button to copy the selected change, from rightto left.
•Click or to navigate through the differences.
•Click or to navigate through the changes.
• You can also edit text directly in the left pane to make changes to the version of the current branch.
After fixing conflicts in a conflicted editor, be sure to save your changes.
Note that if a centralized Repository item - a routine, a Job script, or an SQL script defined in the Repositoryfor example - is called in a Job, fixing conflicts for the Repository item in the Text Compare editor does notautomatically update the corresponding Job. When you open the Job in the Integration perspective, you will beasked whether to update your Job.

Talend Data Integration Studio User Guide
Talend Data Integration Studio User Guide
Chapter 3. Designing a Business ModelThe Integration perspective of Talend Studio offers the best tool to formalize business descriptions into buildingblocks and their relationships. Talend Studio allows to design systems, connections, processes and requirementsusing standardized workflow notation through an intuitive graphical library of shapes and links.
This chapter aims at business managers, decision makers or developers who want to model their flow managementneeds at a macro level.
What is a Business Model
50 Talend Data Integration Studio User Guide
3.1. What is a Business ModelTalend's Business Models allow data integration project stakeholders to graphically represent their needsregardless of the technical implementation requirements. Business Models help the IT operation staff understandthese expressed needs and translate them into technical processes (Jobs). They typically include both the systemsand processes already operating in the enterprise, as well as the ones that will be needed in the future.
Designing Business Models is part of the enterprises' best practices that organizations should adopt at a very earlystage of a data integration project in order to ensure its success. Because Business Models usually help detectand resolve quickly project bottlenecks and weak points, they help limit the budget overspendings and/or reducethe upfront investment. Then during and after the project implementation, Business Models can be reviewed andcorrected to reflect any required change.
A Business Model is a non technical view of a business workflow need.
Generally, a typical Business Model will include the strategic systems or processes already up and running in yourcompany as well as new needs. You can symbolize these systems, processes and needs using multiple shapes andcreate the connections among them. Likely, all of them can be easily described using repository attributes andformatting tools.
In the design workspace of the Integration perspective of Talend Studio, you can use multiple tools in order to:
• draw your business needs,
• create and assign numerous repository items to your model objects,
• define the business model properties of your model objects.
3.2. Opening or creating a Business ModelOpen Talend Studio following the procedure as detailed in the Getting Started Guide.
In the Repository tree view of the Integration perspective, right-click the Documentation > Business Modelsnodes.
How to open a Business Model
Talend Data Integration Studio User Guide 51
Select Expand/Collapse to display all existing Business Models (if any).
3.2.1. How to open a Business Model
Double-click the name of the Business Model to be opened.
The selected Business Model opens up on the design workspace.
3.2.2. How to create a Business Model
To create a business model, proceed as follows:
1. Right-click the Business Models node and select Create Business Model.
The creation wizard guides you through the steps to create a new Business Model.
2. Enter the Business Model properties according to the following table:
Field Description
Name the name of the new Business Model. A message comes up if you enter prohibited characters.
Purpose Business Model purpose or any useful information regarding the Business Model use.
Description Business Model description.
Author a read-only field that shows by default the current user login.
Locker a read-only field that shows by default the login of the user who owns the lock on the current Job. Thisfield is empty when you are creating a Business Model and has data only when you are editing theproperties of an existing Business Model.
Version a read-only field. You can manually increment the version using the M and m buttons.
Status a list to select from the status of the Business Model you are creating.
Path a list to select from the folder in which the Business Model will be created.
3. The Modeler opens up on the empty design workspace.
You can create as many models as you want and open them all.

Modeling a Business Model
52 Talend Data Integration Studio User Guide
The Modeler is made of the following panels:
• The Integration perspective's design workspace
• a Palette of shapes and lines specific to the business modeling
• the Business Model panel showing specific information about all or part of the model.
3.3. Modeling a Business ModelIf you have multiple tabs opened on your design workspace, click the relevant tab in order to show the appropriatemodel information.
In the Business Model view, you can see information relative to the active model.
Use the Palette to drop the relevant shapes on the design workspace and connect them together with branches andarrange or improve the model visual aspect by zooming in or out.
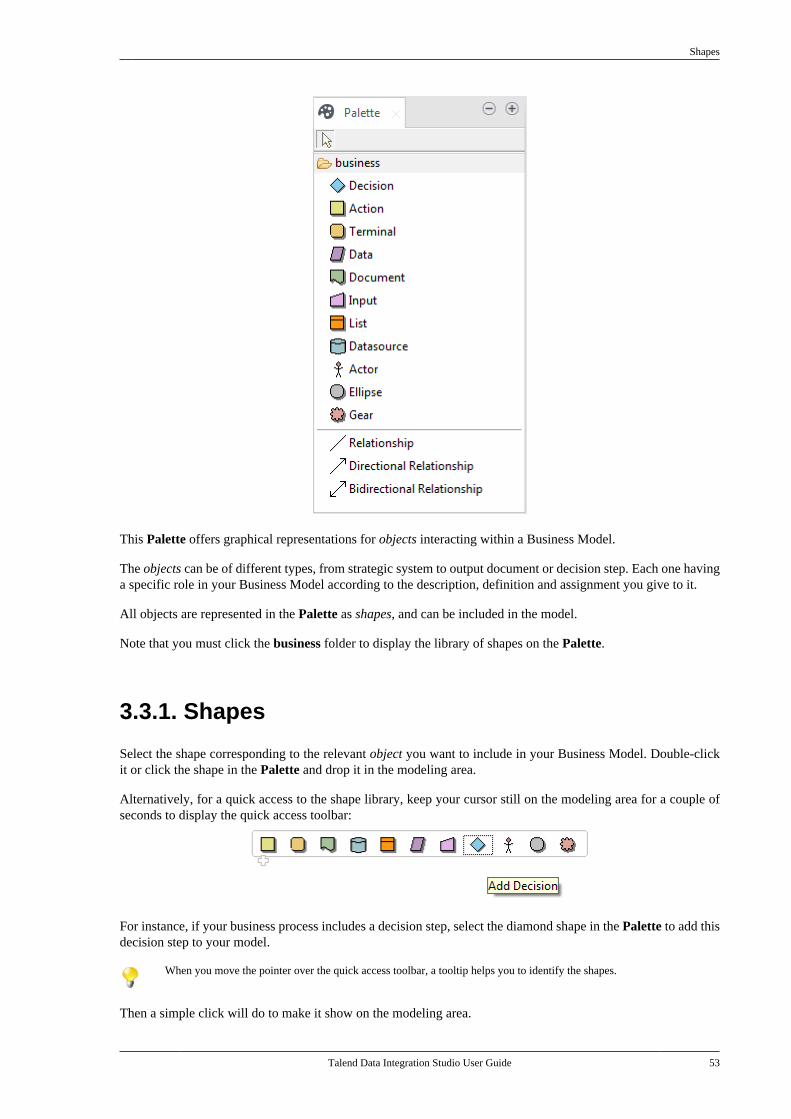
Shapes
Talend Data Integration Studio User Guide 53
This Palette offers graphical representations for objects interacting within a Business Model.
The objects can be of different types, from strategic system to output document or decision step. Each one havinga specific role in your Business Model according to the description, definition and assignment you give to it.
All objects are represented in the Palette as shapes, and can be included in the model.
Note that you must click the business folder to display the library of shapes on the Palette.
3.3.1. Shapes
Select the shape corresponding to the relevant object you want to include in your Business Model. Double-clickit or click the shape in the Palette and drop it in the modeling area.
Alternatively, for a quick access to the shape library, keep your cursor still on the modeling area for a couple ofseconds to display the quick access toolbar:
For instance, if your business process includes a decision step, select the diamond shape in the Palette to add thisdecision step to your model.
When you move the pointer over the quick access toolbar, a tooltip helps you to identify the shapes.
Then a simple click will do to make it show on the modeling area.
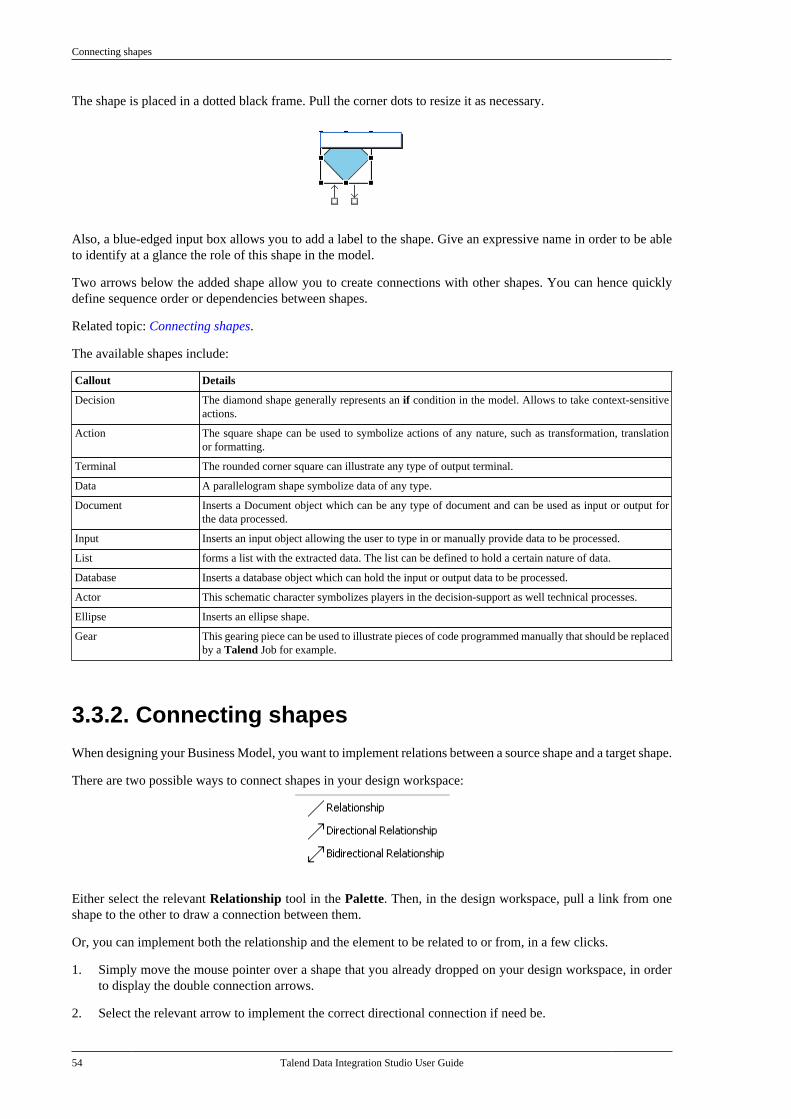
Connecting shapes
54 Talend Data Integration Studio User Guide
The shape is placed in a dotted black frame. Pull the corner dots to resize it as necessary.
Also, a blue-edged input box allows you to add a label to the shape. Give an expressive name in order to be ableto identify at a glance the role of this shape in the model.
Two arrows below the added shape allow you to create connections with other shapes. You can hence quicklydefine sequence order or dependencies between shapes.
Related topic: Connecting shapes.
The available shapes include:
Callout Details
Decision The diamond shape generally represents an if condition in the model. Allows to take context-sensitiveactions.
Action The square shape can be used to symbolize actions of any nature, such as transformation, translationor formatting.
Terminal The rounded corner square can illustrate any type of output terminal.
Data A parallelogram shape symbolize data of any type.
Document Inserts a Document object which can be any type of document and can be used as input or output forthe data processed.
Input Inserts an input object allowing the user to type in or manually provide data to be processed.
List forms a list with the extracted data. The list can be defined to hold a certain nature of data.
Database Inserts a database object which can hold the input or output data to be processed.
Actor This schematic character symbolizes players in the decision-support as well technical processes.
Ellipse Inserts an ellipse shape.
Gear This gearing piece can be used to illustrate pieces of code programmed manually that should be replacedby a Talend Job for example.
3.3.2. Connecting shapes
When designing your Business Model, you want to implement relations between a source shape and a target shape.
There are two possible ways to connect shapes in your design workspace:
Either select the relevant Relationship tool in the Palette. Then, in the design workspace, pull a link from oneshape to the other to draw a connection between them.
Or, you can implement both the relationship and the element to be related to or from, in a few clicks.
1. Simply move the mouse pointer over a shape that you already dropped on your design workspace, in orderto display the double connection arrows.
2. Select the relevant arrow to implement the correct directional connection if need be.
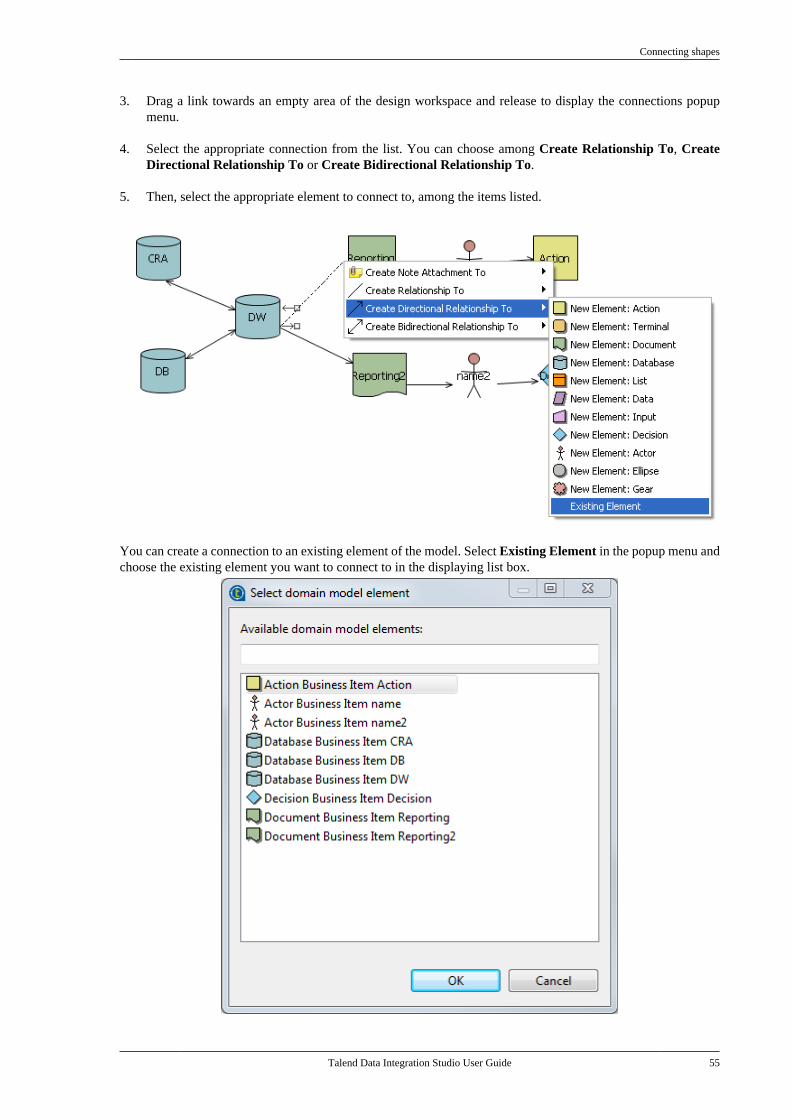
Connecting shapes
Talend Data Integration Studio User Guide 55
3. Drag a link towards an empty area of the design workspace and release to display the connections popupmenu.
4. Select the appropriate connection from the list. You can choose among Create Relationship To, CreateDirectional Relationship To or Create Bidirectional Relationship To.
5. Then, select the appropriate element to connect to, among the items listed.
You can create a connection to an existing element of the model. Select Existing Element in the popup menu andchoose the existing element you want to connect to in the displaying list box.
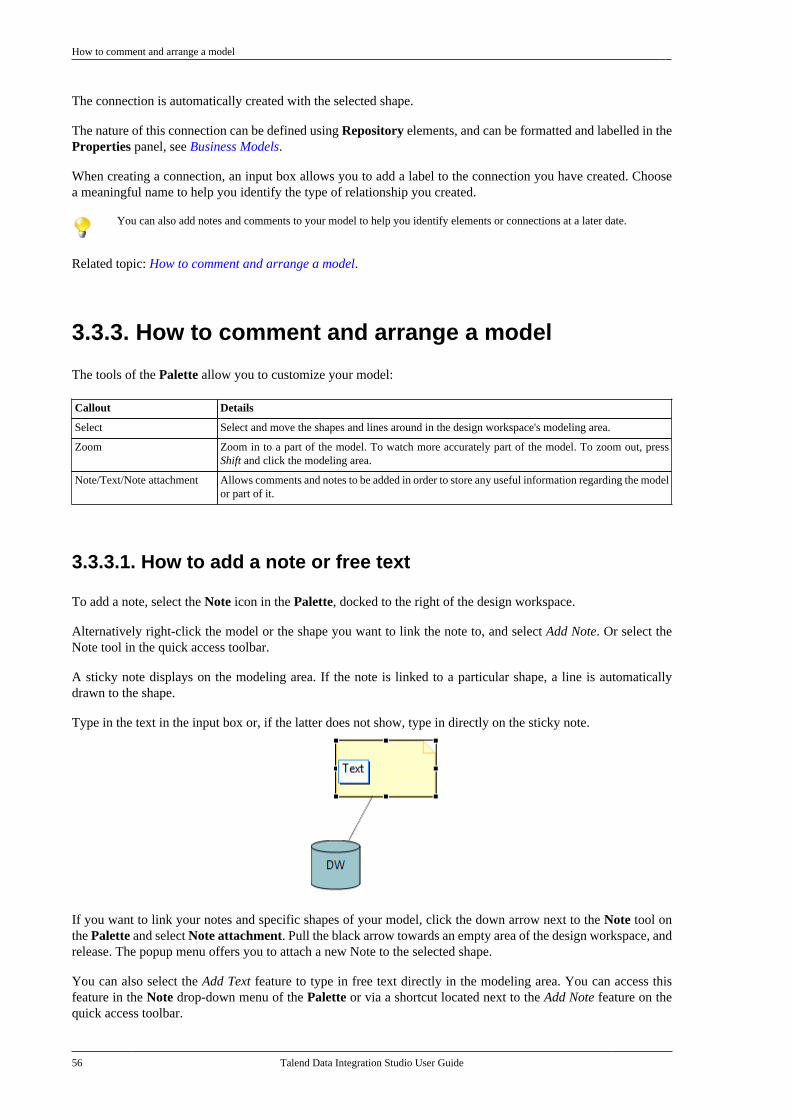
How to comment and arrange a model
56 Talend Data Integration Studio User Guide
The connection is automatically created with the selected shape.
The nature of this connection can be defined using Repository elements, and can be formatted and labelled in theProperties panel, see Business Models.
When creating a connection, an input box allows you to add a label to the connection you have created. Choosea meaningful name to help you identify the type of relationship you created.
You can also add notes and comments to your model to help you identify elements or connections at a later date.
Related topic: How to comment and arrange a model.
3.3.3. How to comment and arrange a model
The tools of the Palette allow you to customize your model:
Callout Details
Select Select and move the shapes and lines around in the design workspace's modeling area.
Zoom Zoom in to a part of the model. To watch more accurately part of the model. To zoom out, pressShift and click the modeling area.
Note/Text/Note attachment Allows comments and notes to be added in order to store any useful information regarding the modelor part of it.
3.3.3.1. How to add a note or free text
To add a note, select the Note icon in the Palette, docked to the right of the design workspace.
Alternatively right-click the model or the shape you want to link the note to, and select Add Note. Or select theNote tool in the quick access toolbar.
A sticky note displays on the modeling area. If the note is linked to a particular shape, a line is automaticallydrawn to the shape.
Type in the text in the input box or, if the latter does not show, type in directly on the sticky note.
If you want to link your notes and specific shapes of your model, click the down arrow next to the Note tool onthe Palette and select Note attachment. Pull the black arrow towards an empty area of the design workspace, andrelease. The popup menu offers you to attach a new Note to the selected shape.
You can also select the Add Text feature to type in free text directly in the modeling area. You can access thisfeature in the Note drop-down menu of the Palette or via a shortcut located next to the Add Note feature on thequick access toolbar.
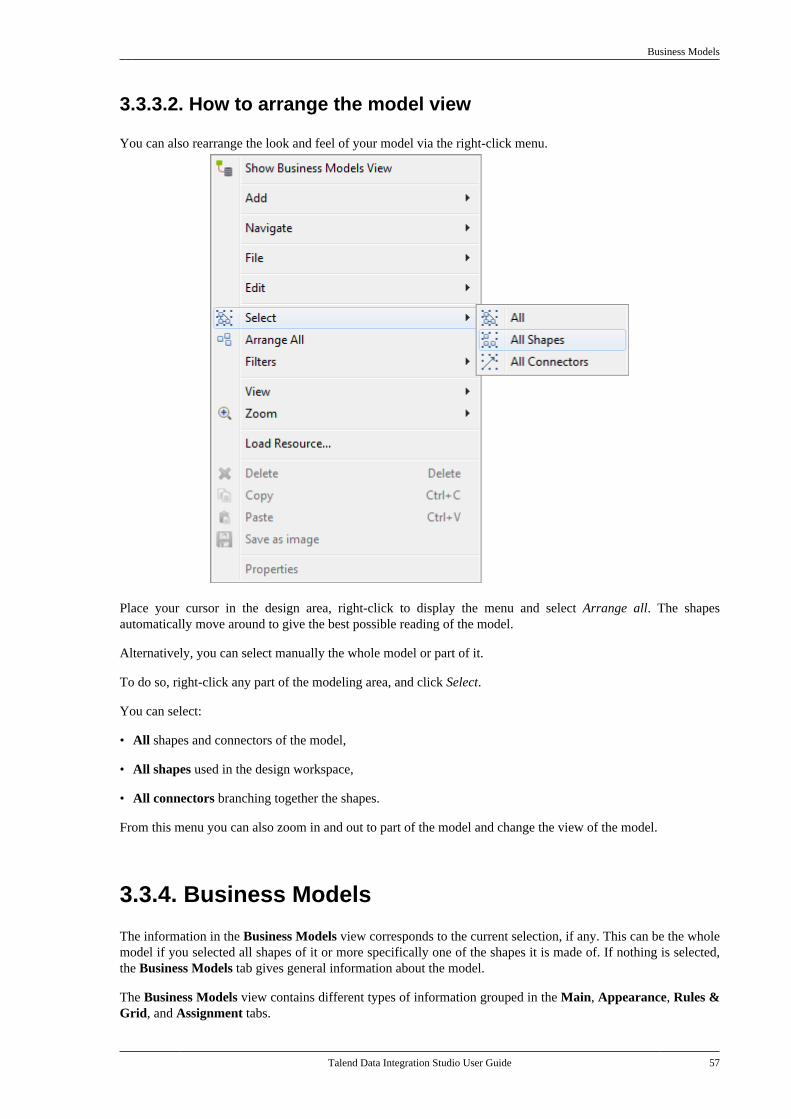
Business Models
Talend Data Integration Studio User Guide 57
3.3.3.2. How to arrange the model view
You can also rearrange the look and feel of your model via the right-click menu.
Place your cursor in the design area, right-click to display the menu and select Arrange all. The shapesautomatically move around to give the best possible reading of the model.
Alternatively, you can select manually the whole model or part of it.
To do so, right-click any part of the modeling area, and click Select.
You can select:
• All shapes and connectors of the model,
• All shapes used in the design workspace,
• All connectors branching together the shapes.
From this menu you can also zoom in and out to part of the model and change the view of the model.
3.3.4. Business Models
The information in the Business Models view corresponds to the current selection, if any. This can be the wholemodel if you selected all shapes of it or more specifically one of the shapes it is made of. If nothing is selected,the Business Models tab gives general information about the model.
The Business Models view contains different types of information grouped in the Main, Appearance, Rules &Grid, and Assignment tabs.
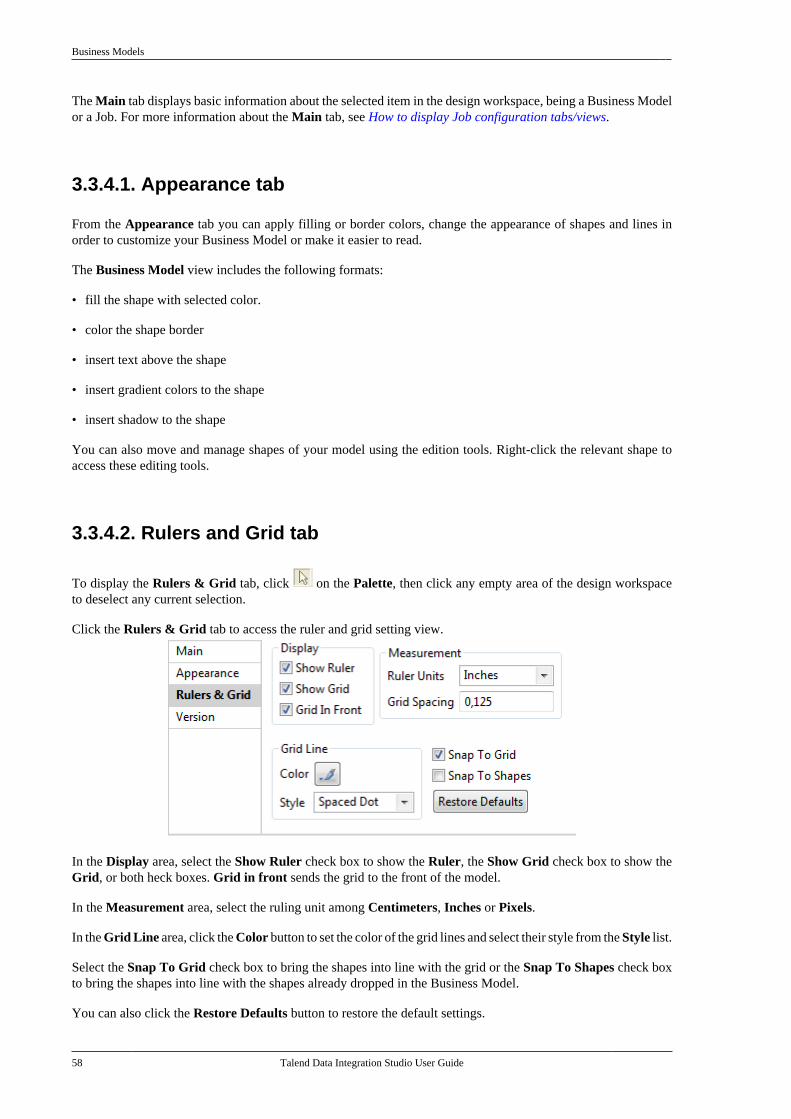
Business Models
58 Talend Data Integration Studio User Guide
The Main tab displays basic information about the selected item in the design workspace, being a Business Modelor a Job. For more information about the Main tab, see How to display Job configuration tabs/views.
3.3.4.1. Appearance tab
From the Appearance tab you can apply filling or border colors, change the appearance of shapes and lines inorder to customize your Business Model or make it easier to read.
The Business Model view includes the following formats:
• fill the shape with selected color.
• color the shape border
• insert text above the shape
• insert gradient colors to the shape
• insert shadow to the shape
You can also move and manage shapes of your model using the edition tools. Right-click the relevant shape toaccess these editing tools.
3.3.4.2. Rulers and Grid tab
To display the Rulers & Grid tab, click on the Palette, then click any empty area of the design workspaceto deselect any current selection.
Click the Rulers & Grid tab to access the ruler and grid setting view.
In the Display area, select the Show Ruler check box to show the Ruler, the Show Grid check box to show theGrid, or both heck boxes. Grid in front sends the grid to the front of the model.
In the Measurement area, select the ruling unit among Centimeters, Inches or Pixels.
In the Grid Line area, click the Color button to set the color of the grid lines and select their style from the Style list.
Select the Snap To Grid check box to bring the shapes into line with the grid or the Snap To Shapes check boxto bring the shapes into line with the shapes already dropped in the Business Model.
You can also click the Restore Defaults button to restore the default settings.
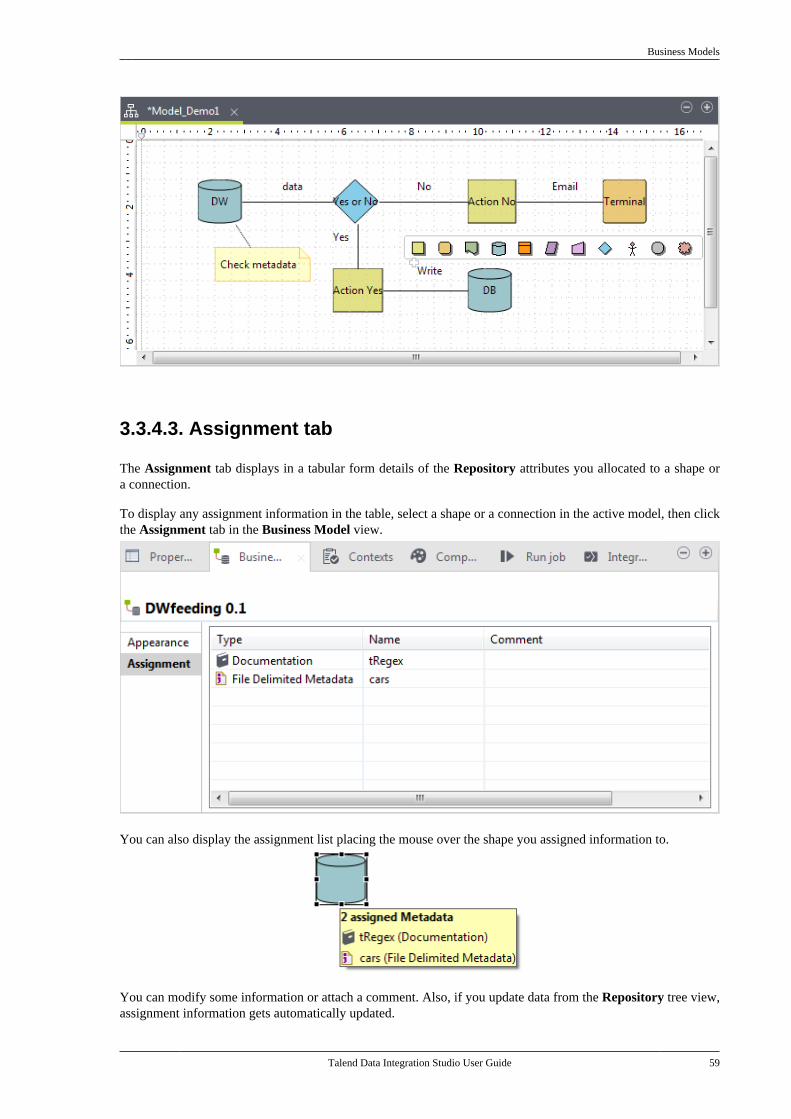
Business Models
Talend Data Integration Studio User Guide 59
3.3.4.3. Assignment tab
The Assignment tab displays in a tabular form details of the Repository attributes you allocated to a shape ora connection.
To display any assignment information in the table, select a shape or a connection in the active model, then clickthe Assignment tab in the Business Model view.
You can also display the assignment list placing the mouse over the shape you assigned information to.
You can modify some information or attach a comment. Also, if you update data from the Repository tree view,assignment information gets automatically updated.
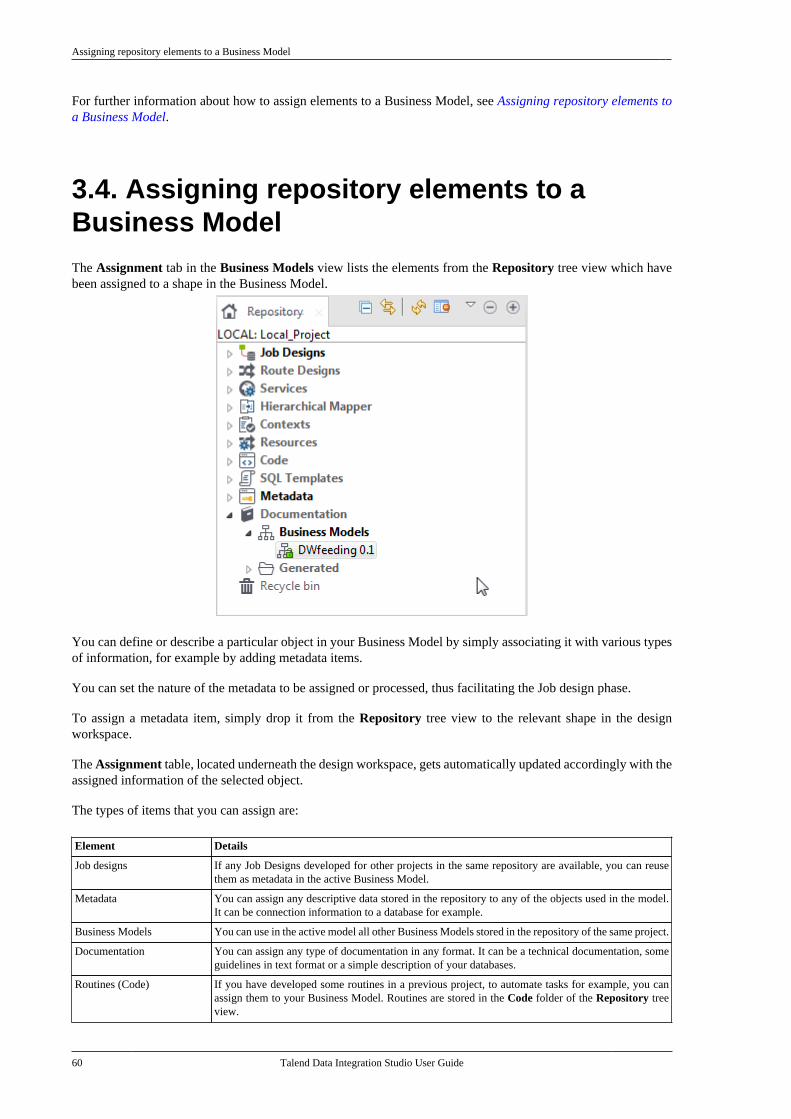
Assigning repository elements to a Business Model
60 Talend Data Integration Studio User Guide
For further information about how to assign elements to a Business Model, see Assigning repository elements toa Business Model.
3.4. Assigning repository elements to aBusiness ModelThe Assignment tab in the Business Models view lists the elements from the Repository tree view which havebeen assigned to a shape in the Business Model.
You can define or describe a particular object in your Business Model by simply associating it with various typesof information, for example by adding metadata items.
You can set the nature of the metadata to be assigned or processed, thus facilitating the Job design phase.
To assign a metadata item, simply drop it from the Repository tree view to the relevant shape in the designworkspace.
The Assignment table, located underneath the design workspace, gets automatically updated accordingly with theassigned information of the selected object.
The types of items that you can assign are:
Element Details
Job designs If any Job Designs developed for other projects in the same repository are available, you can reusethem as metadata in the active Business Model.
Metadata You can assign any descriptive data stored in the repository to any of the objects used in the model.It can be connection information to a database for example.
Business Models You can use in the active model all other Business Models stored in the repository of the same project.
Documentation You can assign any type of documentation in any format. It can be a technical documentation, someguidelines in text format or a simple description of your databases.
Routines (Code) If you have developed some routines in a previous project, to automate tasks for example, you canassign them to your Business Model. Routines are stored in the Code folder of the Repository treeview.
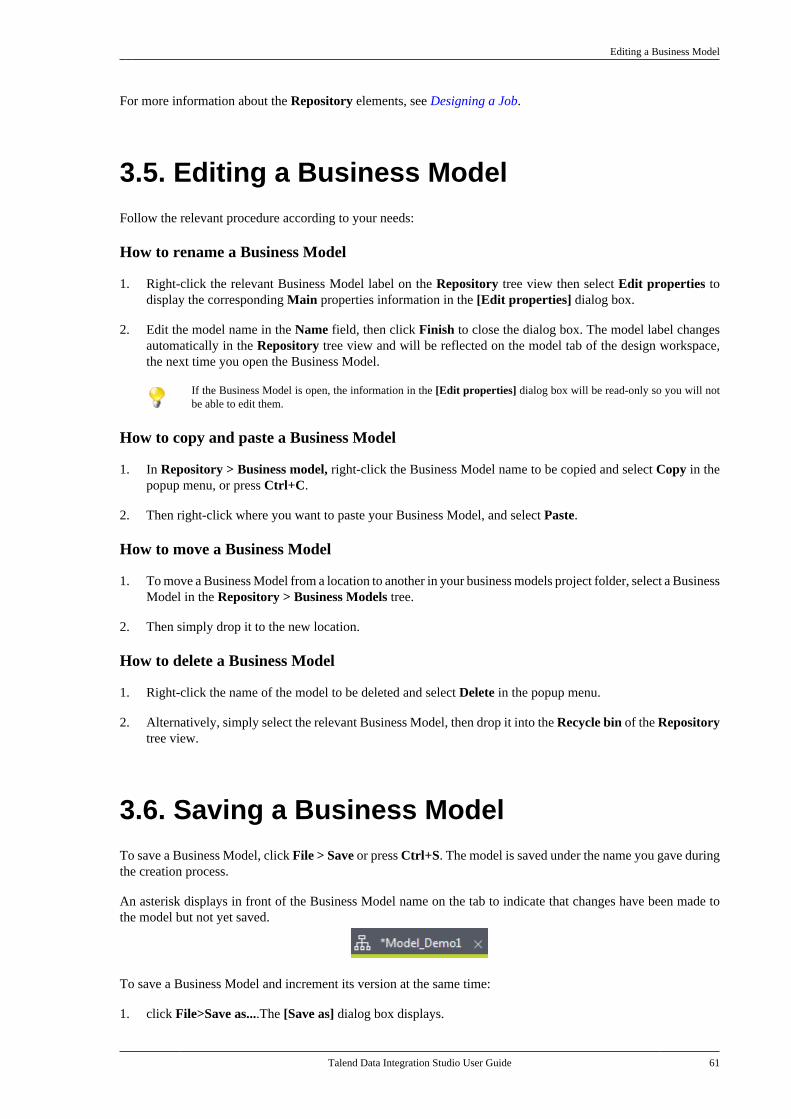
Editing a Business Model
Talend Data Integration Studio User Guide 61
For more information about the Repository elements, see Designing a Job.
3.5. Editing a Business ModelFollow the relevant procedure according to your needs:
How to rename a Business Model
1. Right-click the relevant Business Model label on the Repository tree view then select Edit properties todisplay the corresponding Main properties information in the [Edit properties] dialog box.
2. Edit the model name in the Name field, then click Finish to close the dialog box. The model label changesautomatically in the Repository tree view and will be reflected on the model tab of the design workspace,the next time you open the Business Model.
If the Business Model is open, the information in the [Edit properties] dialog box will be read-only so you will notbe able to edit them.
How to copy and paste a Business Model
1. In Repository > Business model, right-click the Business Model name to be copied and select Copy in thepopup menu, or press Ctrl+C.
2. Then right-click where you want to paste your Business Model, and select Paste.
How to move a Business Model
1. To move a Business Model from a location to another in your business models project folder, select a BusinessModel in the Repository > Business Models tree.
2. Then simply drop it to the new location.
How to delete a Business Model
1. Right-click the name of the model to be deleted and select Delete in the popup menu.
2. Alternatively, simply select the relevant Business Model, then drop it into the Recycle bin of the Repositorytree view.
3.6. Saving a Business ModelTo save a Business Model, click File > Save or press Ctrl+S. The model is saved under the name you gave duringthe creation process.
An asterisk displays in front of the Business Model name on the tab to indicate that changes have been made tothe model but not yet saved.
To save a Business Model and increment its version at the same time:
1. click File>Save as....The [Save as] dialog box displays.
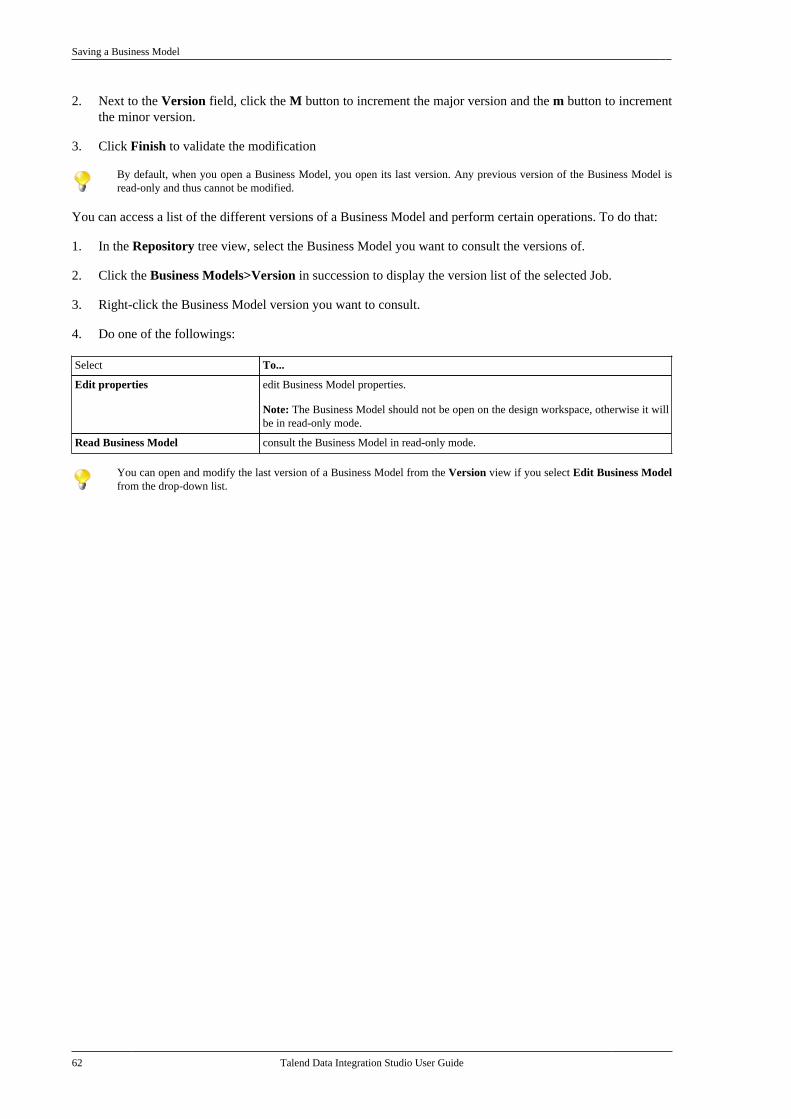
Saving a Business Model
62 Talend Data Integration Studio User Guide
2. Next to the Version field, click the M button to increment the major version and the m button to incrementthe minor version.
3. Click Finish to validate the modification
By default, when you open a Business Model, you open its last version. Any previous version of the Business Model isread-only and thus cannot be modified.
You can access a list of the different versions of a Business Model and perform certain operations. To do that:
1. In the Repository tree view, select the Business Model you want to consult the versions of.
2. Click the Business Models>Version in succession to display the version list of the selected Job.
3. Right-click the Business Model version you want to consult.
4. Do one of the followings:
Select To...
Edit properties edit Business Model properties.
Note: The Business Model should not be open on the design workspace, otherwise it willbe in read-only mode.
Read Business Model consult the Business Model in read-only mode.
You can open and modify the last version of a Business Model from the Version view if you select Edit Business Modelfrom the drop-down list.

Talend Data Integration Studio User Guide
Chapter 4. Designing a JobTalend Studio is the tool with the capabilities that treat all of the different sources and targets required in dataintegration processes and all other associated operations.
Via Talend Studio, you are able to design data integration Jobs that allow you to put in place up and run dataflowmanagement processes.
This chapter addresses the needs of programmers or IT managers who are ready to implement the technical aspectsof a Business Model (regardless of whether it was designed in the Business Modeler of the Integration perspectiveof Talend Studio).
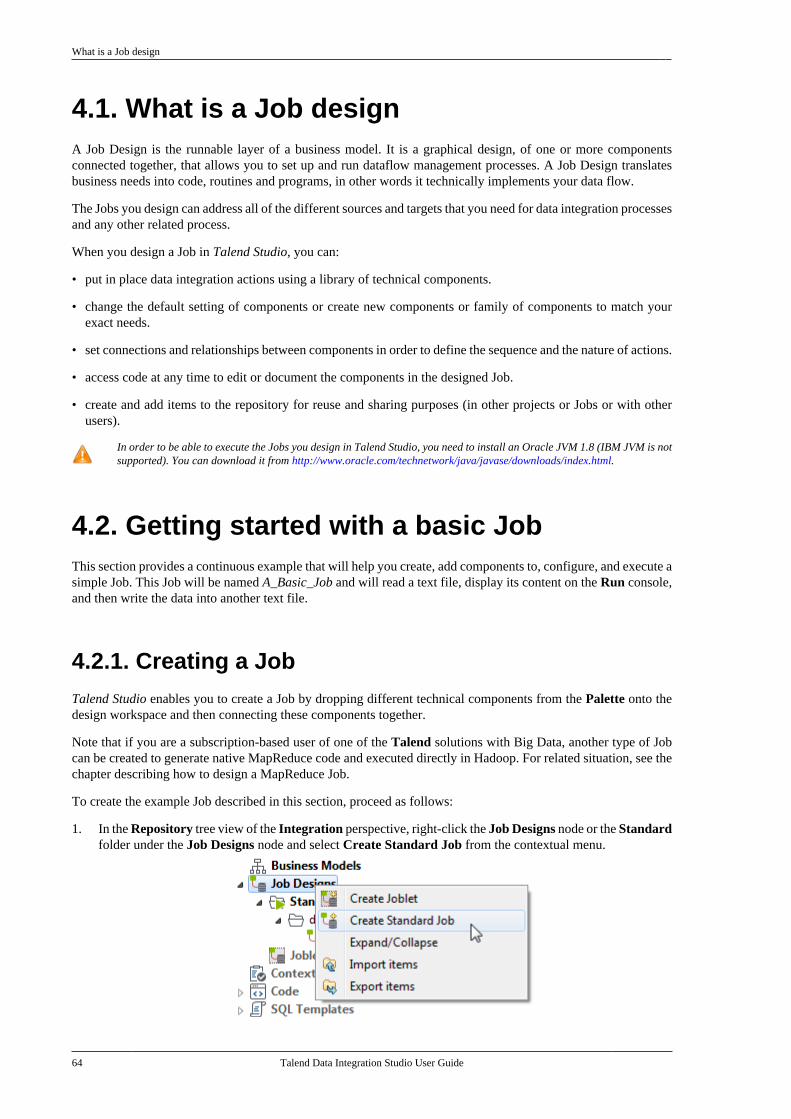
What is a Job design
64 Talend Data Integration Studio User Guide
4.1. What is a Job designA Job Design is the runnable layer of a business model. It is a graphical design, of one or more componentsconnected together, that allows you to set up and run dataflow management processes. A Job Design translatesbusiness needs into code, routines and programs, in other words it technically implements your data flow.
The Jobs you design can address all of the different sources and targets that you need for data integration processesand any other related process.
When you design a Job in Talend Studio, you can:
• put in place data integration actions using a library of technical components.
• change the default setting of components or create new components or family of components to match yourexact needs.
• set connections and relationships between components in order to define the sequence and the nature of actions.
• access code at any time to edit or document the components in the designed Job.
• create and add items to the repository for reuse and sharing purposes (in other projects or Jobs or with otherusers).
In order to be able to execute the Jobs you design in Talend Studio, you need to install an Oracle JVM 1.8 (IBM JVM is notsupported). You can download it from http://www.oracle.com/technetwork/java/javase/downloads/index.html.
4.2. Getting started with a basic JobThis section provides a continuous example that will help you create, add components to, configure, and execute asimple Job. This Job will be named A_Basic_Job and will read a text file, display its content on the Run console,and then write the data into another text file.
4.2.1. Creating a Job
Talend Studio enables you to create a Job by dropping different technical components from the Palette onto thedesign workspace and then connecting these components together.
Note that if you are a subscription-based user of one of the Talend solutions with Big Data, another type of Jobcan be created to generate native MapReduce code and executed directly in Hadoop. For related situation, see thechapter describing how to design a MapReduce Job.
To create the example Job described in this section, proceed as follows:
1. In the Repository tree view of the Integration perspective, right-click the Job Designs node or the Standardfolder under the Job Designs node and select Create Standard Job from the contextual menu.

Creating a Job
Talend Data Integration Studio User Guide 65
The [New Job] wizard opens to help you define the main properties of the new Job.
2. Fill the Job properties as shown in the previous screenshot.
The fields correspond to the following properties:
Field Description
Name the name of the new Job.
Note that a message comes up if you enter prohibited characters.
Purpose Job purpose or any useful information regarding the Job use.
Description Job description containing any information that helps you describe what the Job does and how it does it.
Author a read-only field that shows by default the current user login.
Locker a read-only field that shows by default the login of the user who owns the lock on the current Job. Thisfield is empty when you are creating a Job and has data only when you are editing the properties ofan existing Job.
Version a read-only field. You can manually increment the version using the M and m buttons. For moreinformation, see Managing Job versions.
Status a list to select from the status of the Job you are creating.
Path a list to select from the folder in which the Job will be created.
3. An empty design workspace opens up showing the name of the Job as a tab label.
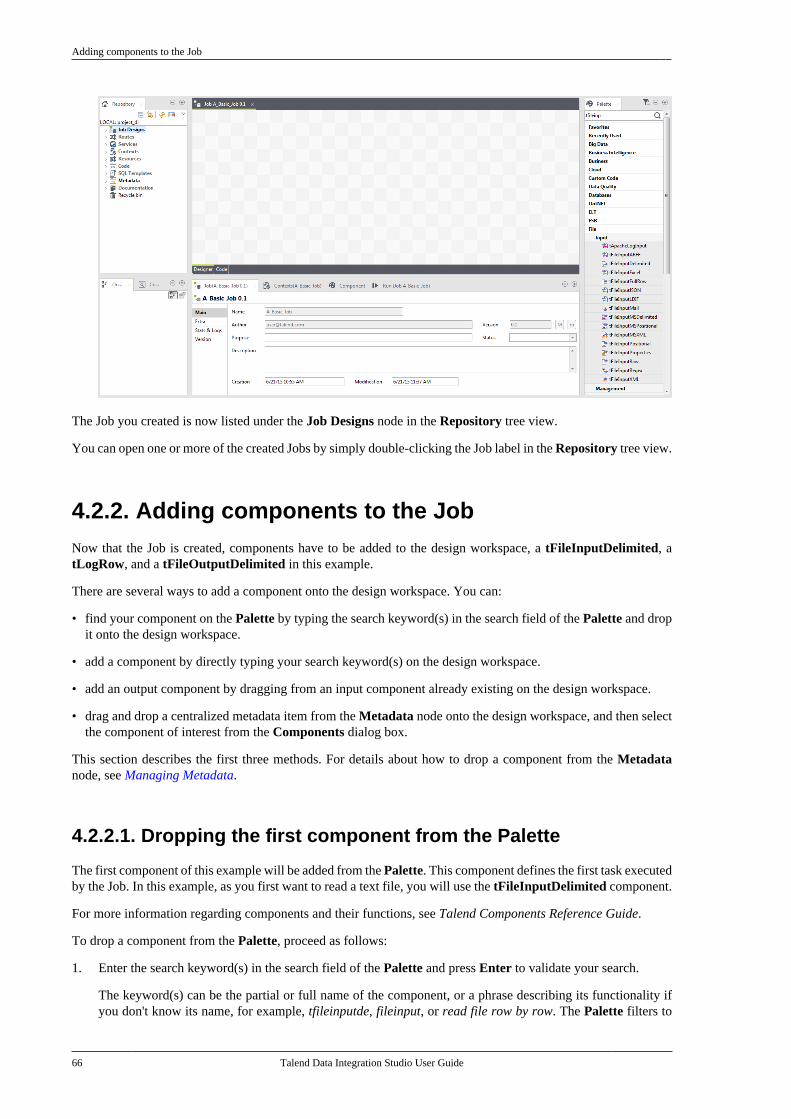
Adding components to the Job
66 Talend Data Integration Studio User Guide
The Job you created is now listed under the Job Designs node in the Repository tree view.
You can open one or more of the created Jobs by simply double-clicking the Job label in the Repository tree view.
4.2.2. Adding components to the JobNow that the Job is created, components have to be added to the design workspace, a tFileInputDelimited, atLogRow, and a tFileOutputDelimited in this example.
There are several ways to add a component onto the design workspace. You can:
• find your component on the Palette by typing the search keyword(s) in the search field of the Palette and dropit onto the design workspace.
• add a component by directly typing your search keyword(s) on the design workspace.
• add an output component by dragging from an input component already existing on the design workspace.
• drag and drop a centralized metadata item from the Metadata node onto the design workspace, and then selectthe component of interest from the Components dialog box.
This section describes the first three methods. For details about how to drop a component from the Metadatanode, see Managing Metadata.
4.2.2.1. Dropping the first component from the Palette
The first component of this example will be added from the Palette. This component defines the first task executedby the Job. In this example, as you first want to read a text file, you will use the tFileInputDelimited component.
For more information regarding components and their functions, see Talend Components Reference Guide.
To drop a component from the Palette, proceed as follows:
1. Enter the search keyword(s) in the search field of the Palette and press Enter to validate your search.
The keyword(s) can be the partial or full name of the component, or a phrase describing its functionality ifyou don't know its name, for example, tfileinputde, fileinput, or read file row by row. The Palette filters to
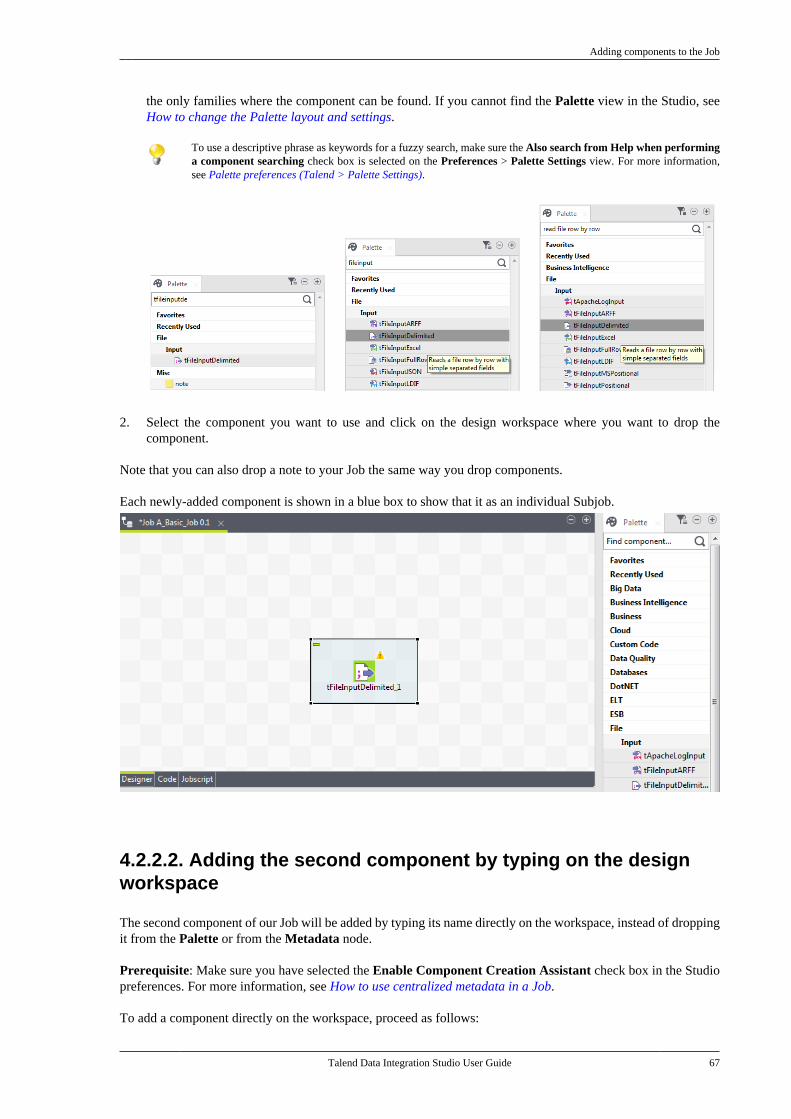
Adding components to the Job
Talend Data Integration Studio User Guide 67
the only families where the component can be found. If you cannot find the Palette view in the Studio, seeHow to change the Palette layout and settings.
To use a descriptive phrase as keywords for a fuzzy search, make sure the Also search from Help when performinga component searching check box is selected on the Preferences > Palette Settings view. For more information,see Palette preferences (Talend > Palette Settings).
2. Select the component you want to use and click on the design workspace where you want to drop thecomponent.
Note that you can also drop a note to your Job the same way you drop components.
Each newly-added component is shown in a blue box to show that it as an individual Subjob.
4.2.2.2. Adding the second component by typing on the designworkspace
The second component of our Job will be added by typing its name directly on the workspace, instead of droppingit from the Palette or from the Metadata node.
Prerequisite: Make sure you have selected the Enable Component Creation Assistant check box in the Studiopreferences. For more information, see How to use centralized metadata in a Job.
To add a component directly on the workspace, proceed as follows:
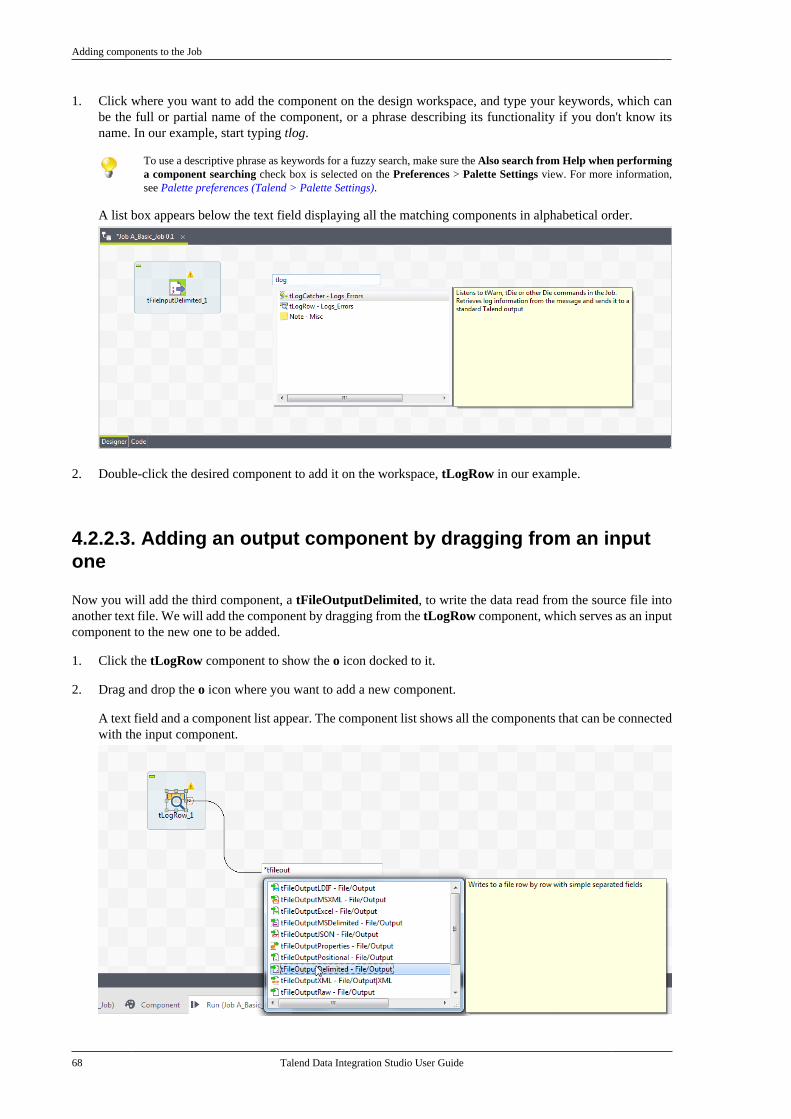
Adding components to the Job
68 Talend Data Integration Studio User Guide
1. Click where you want to add the component on the design workspace, and type your keywords, which canbe the full or partial name of the component, or a phrase describing its functionality if you don't know itsname. In our example, start typing tlog.
To use a descriptive phrase as keywords for a fuzzy search, make sure the Also search from Help when performinga component searching check box is selected on the Preferences > Palette Settings view. For more information,see Palette preferences (Talend > Palette Settings).
A list box appears below the text field displaying all the matching components in alphabetical order.
2. Double-click the desired component to add it on the workspace, tLogRow in our example.
4.2.2.3. Adding an output component by dragging from an inputone
Now you will add the third component, a tFileOutputDelimited, to write the data read from the source file intoanother text file. We will add the component by dragging from the tLogRow component, which serves as an inputcomponent to the new one to be added.
1. Click the tLogRow component to show the o icon docked to it.
2. Drag and drop the o icon where you want to add a new component.
A text field and a component list appear. The component list shows all the components that can be connectedwith the input component.

Connecting the components together
Talend Data Integration Studio User Guide 69
3. To narrow the search, type in the text field the name of the component you want to add or part of it, or a phrasedescribing the component's functionality if you don't know its name, and then double-click the component ofinterest, tFileOutputDelimited in this example, on the component list to add it onto the design workspace.The new component is automatically connected with the input component tLogRow, using a Row > Mainconnection.
To use a descriptive phrase as keywords for a fuzzy search, make sure the Also search from Help when performinga component searching check box is selected on the Preferences > Palette Settings view. For more information,see Palette preferences (Talend > Palette Settings).
4.2.3. Connecting the components together
Now that the components have been added on the workspace, they have to be connected together. Componentsconnected together form a subjob. Jobs are composed of one or several subjobs carrying out various processes.
In this example, as the tLogRow and tFileOutputDelimited components are already connected, you only needto connect the tFileInputDelimited to the tLogRow component.
To connect the components together, use either of the following methods:
Right-click and click again
1. Right-click the source component, tFileInputDelimited in this example.
2. In the contextual menu that opens, select the type of connection you want to use to link the components,Row > Main in this example.
3. Click the target component to create the link, tLogRow in this example.
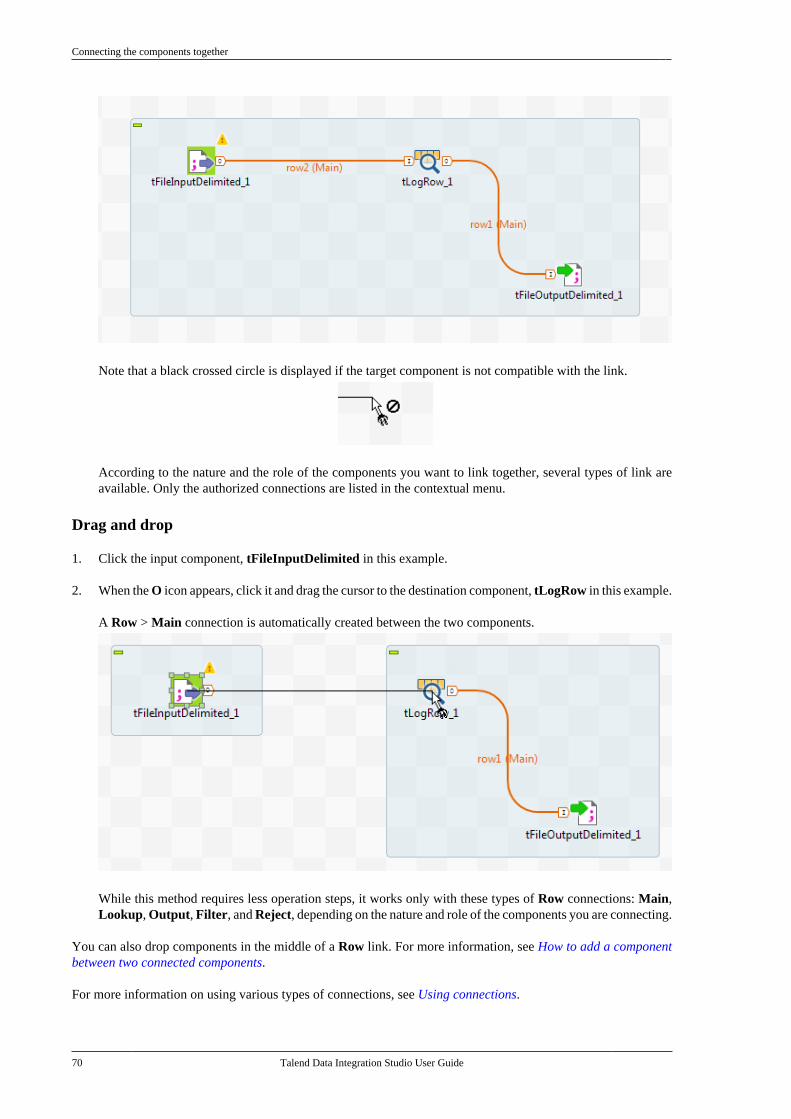
Connecting the components together
70 Talend Data Integration Studio User Guide
Note that a black crossed circle is displayed if the target component is not compatible with the link.
According to the nature and the role of the components you want to link together, several types of link areavailable. Only the authorized connections are listed in the contextual menu.
Drag and drop
1. Click the input component, tFileInputDelimited in this example.
2. When the O icon appears, click it and drag the cursor to the destination component, tLogRow in this example.
A Row > Main connection is automatically created between the two components.
While this method requires less operation steps, it works only with these types of Row connections: Main,Lookup, Output, Filter, and Reject, depending on the nature and role of the components you are connecting.
You can also drop components in the middle of a Row link. For more information, see How to add a componentbetween two connected components.
For more information on using various types of connections, see Using connections.
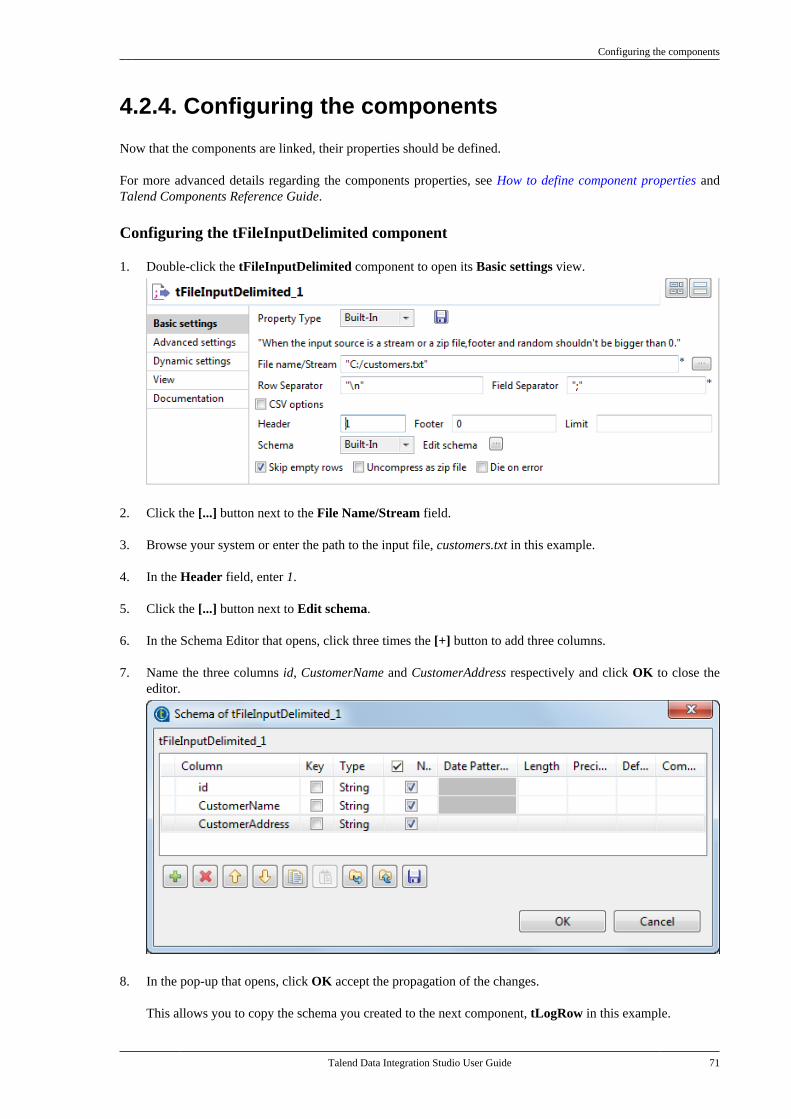
Configuring the components
Talend Data Integration Studio User Guide 71
4.2.4. Configuring the components
Now that the components are linked, their properties should be defined.
For more advanced details regarding the components properties, see How to define component properties andTalend Components Reference Guide.
Configuring the tFileInputDelimited component
1. Double-click the tFileInputDelimited component to open its Basic settings view.
2. Click the [...] button next to the File Name/Stream field.
3. Browse your system or enter the path to the input file, customers.txt in this example.
4. In the Header field, enter 1.
5. Click the [...] button next to Edit schema.
6. In the Schema Editor that opens, click three times the [+] button to add three columns.
7. Name the three columns id, CustomerName and CustomerAddress respectively and click OK to close theeditor.
8. In the pop-up that opens, click OK accept the propagation of the changes.
This allows you to copy the schema you created to the next component, tLogRow in this example.
Executing the Job
72 Talend Data Integration Studio User Guide
Configuring the tLogRow component
1. Double-click the tLogRow component to open its Basic settings view.
2. In the Mode area, select Table (print values in cells of a table).
By doing so, the contents of the customers.txt file will be printed in a table and therefore more readable.
Configuring the tFileOutputDelimited component
1. Double-click the tFileOutputDelimited component to open its Basic settings view.
2. Click the [...] button next to the File Name field.
3. Browse your system or enter the path to the output file, customers.csv in this example.
4. Select the Include Header check box.
5. If needed, click the Sync columns button to retrieve the schema from the input component.
4.2.5. Executing the Job
Now that components are configured, the Job can be executed.
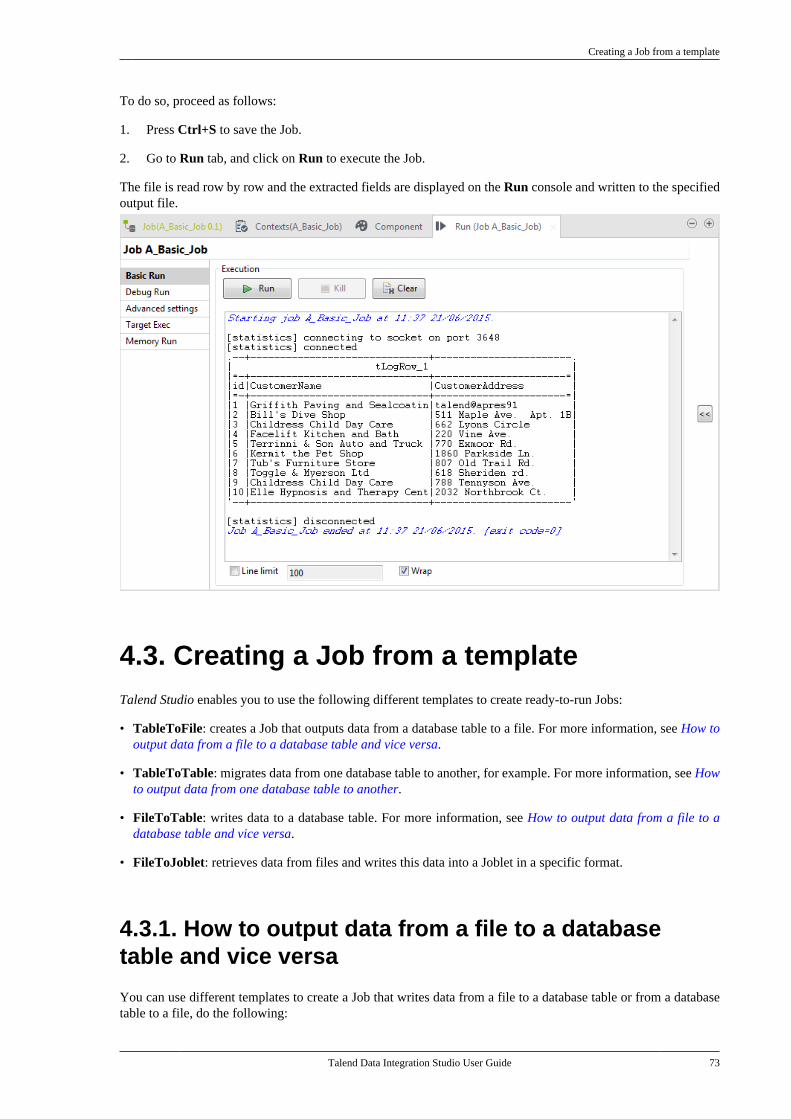
Creating a Job from a template
Talend Data Integration Studio User Guide 73
To do so, proceed as follows:
1. Press Ctrl+S to save the Job.
2. Go to Run tab, and click on Run to execute the Job.
The file is read row by row and the extracted fields are displayed on the Run console and written to the specifiedoutput file.
4.3. Creating a Job from a templateTalend Studio enables you to use the following different templates to create ready-to-run Jobs:
• TableToFile: creates a Job that outputs data from a database table to a file. For more information, see How tooutput data from a file to a database table and vice versa.
• TableToTable: migrates data from one database table to another, for example. For more information, see Howto output data from one database table to another.
• FileToTable: writes data to a database table. For more information, see How to output data from a file to adatabase table and vice versa.
• FileToJoblet: retrieves data from files and writes this data into a Joblet in a specific format.
4.3.1. How to output data from a file to a databasetable and vice versa
You can use different templates to create a Job that writes data from a file to a database table or from a databasetable to a file, do the following:
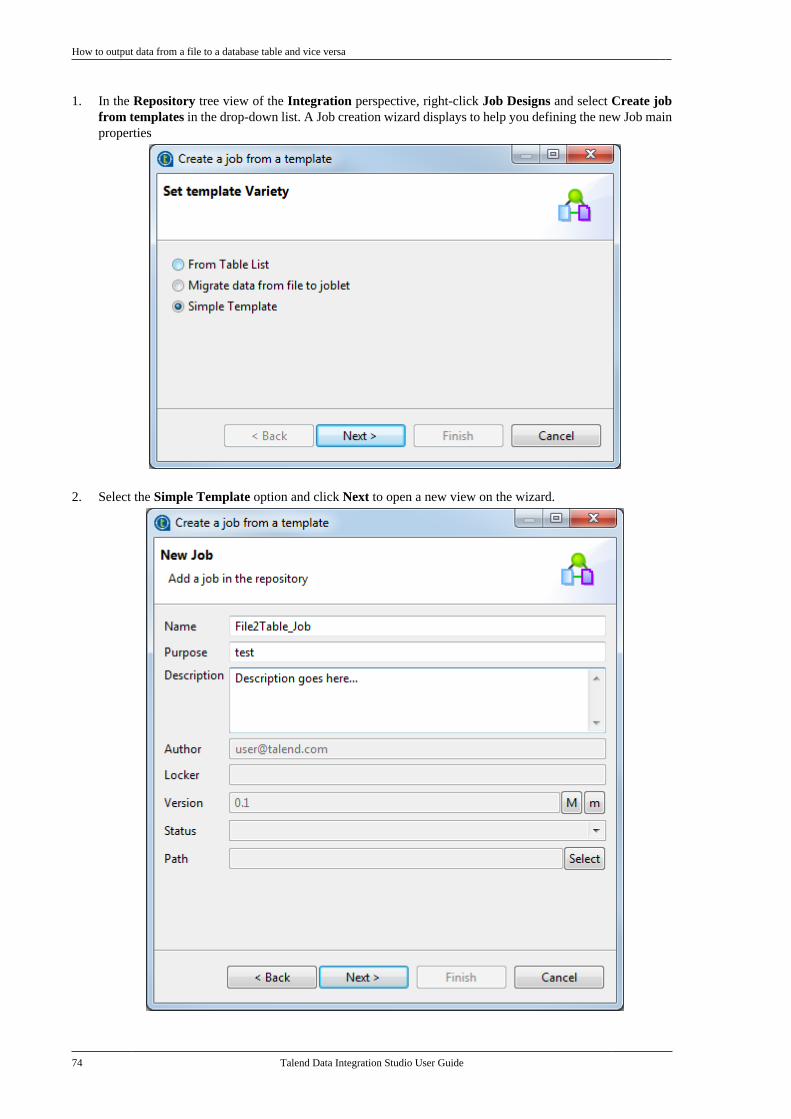
How to output data from a file to a database table and vice versa
74 Talend Data Integration Studio User Guide
1. In the Repository tree view of the Integration perspective, right-click Job Designs and select Create jobfrom templates in the drop-down list. A Job creation wizard displays to help you defining the new Job mainproperties
2. Select the Simple Template option and click Next to open a new view on the wizard.
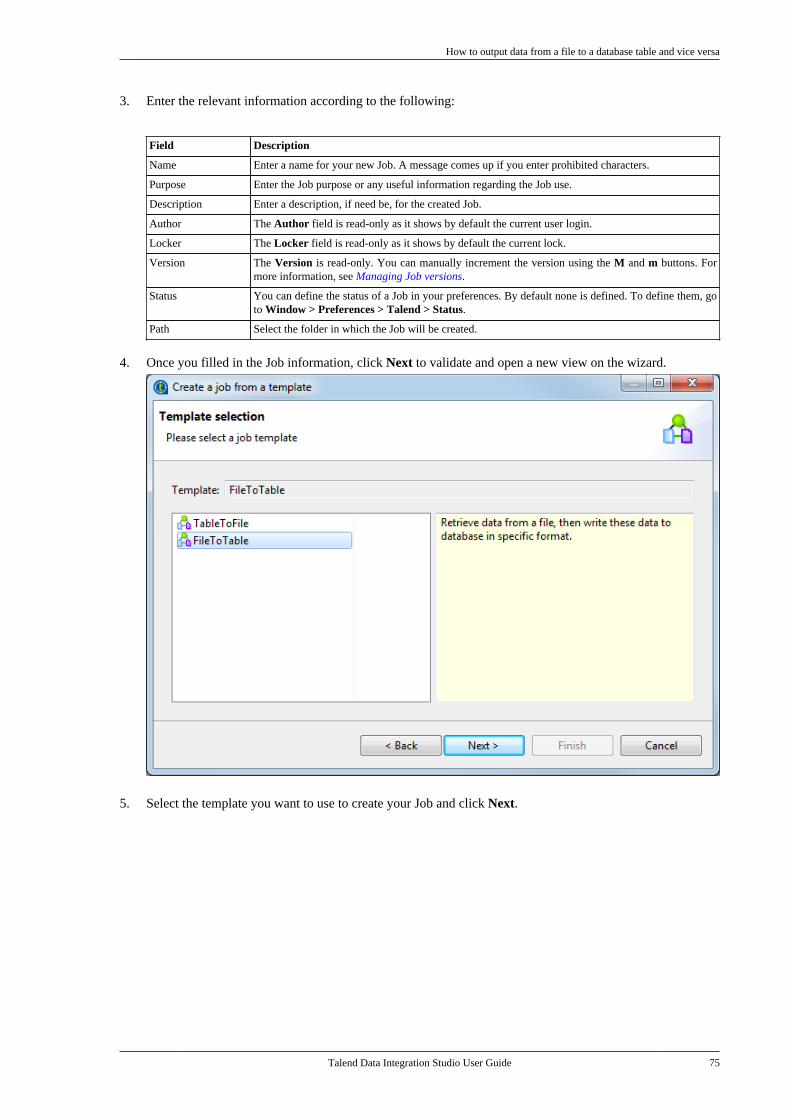
How to output data from a file to a database table and vice versa
Talend Data Integration Studio User Guide 75
3. Enter the relevant information according to the following:
Field Description
Name Enter a name for your new Job. A message comes up if you enter prohibited characters.
Purpose Enter the Job purpose or any useful information regarding the Job use.
Description Enter a description, if need be, for the created Job.
Author The Author field is read-only as it shows by default the current user login.
Locker The Locker field is read-only as it shows by default the current lock.
Version The Version is read-only. You can manually increment the version using the M and m buttons. Formore information, see Managing Job versions.
Status You can define the status of a Job in your preferences. By default none is defined. To define them, goto Window > Preferences > Talend > Status.
Path Select the folder in which the Job will be created.
4. Once you filled in the Job information, click Next to validate and open a new view on the wizard.
5. Select the template you want to use to create your Job and click Next.
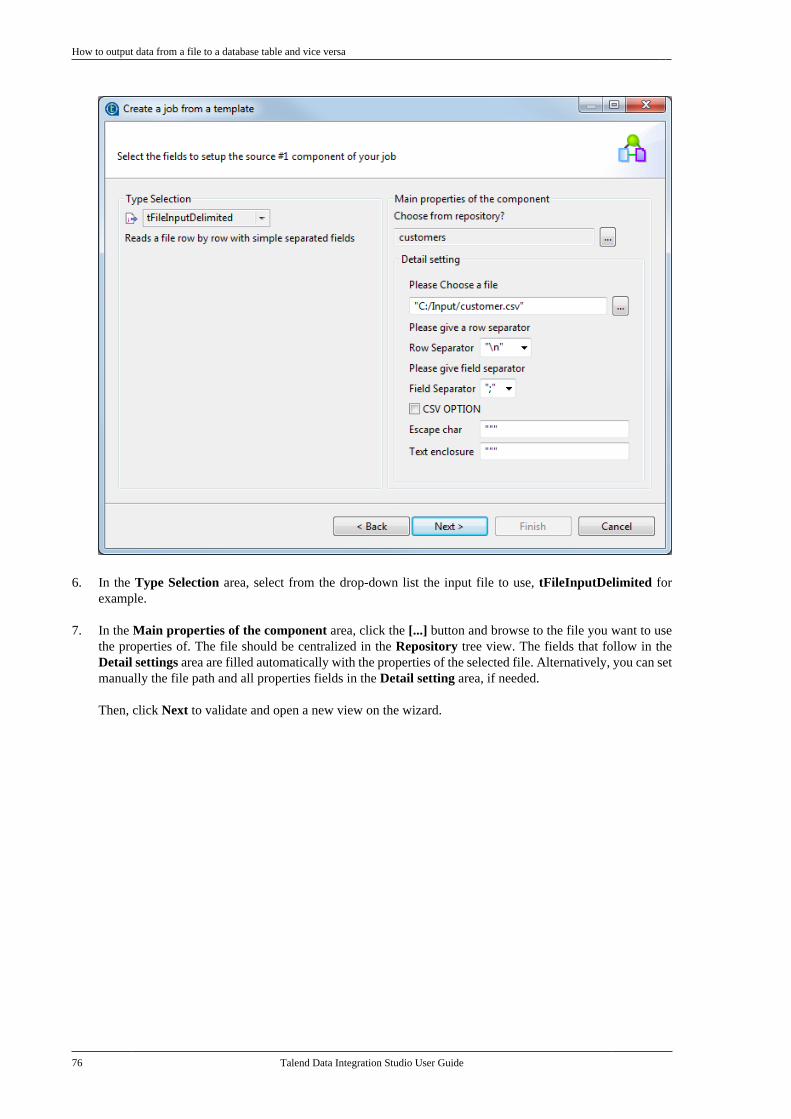
How to output data from a file to a database table and vice versa
76 Talend Data Integration Studio User Guide
6. In the Type Selection area, select from the drop-down list the input file to use, tFileInputDelimited forexample.
7. In the Main properties of the component area, click the [...] button and browse to the file you want to usethe properties of. The file should be centralized in the Repository tree view. The fields that follow in theDetail settings area are filled automatically with the properties of the selected file. Alternatively, you can setmanually the file path and all properties fields in the Detail setting area, if needed.
Then, click Next to validate and open a new view on the wizard.
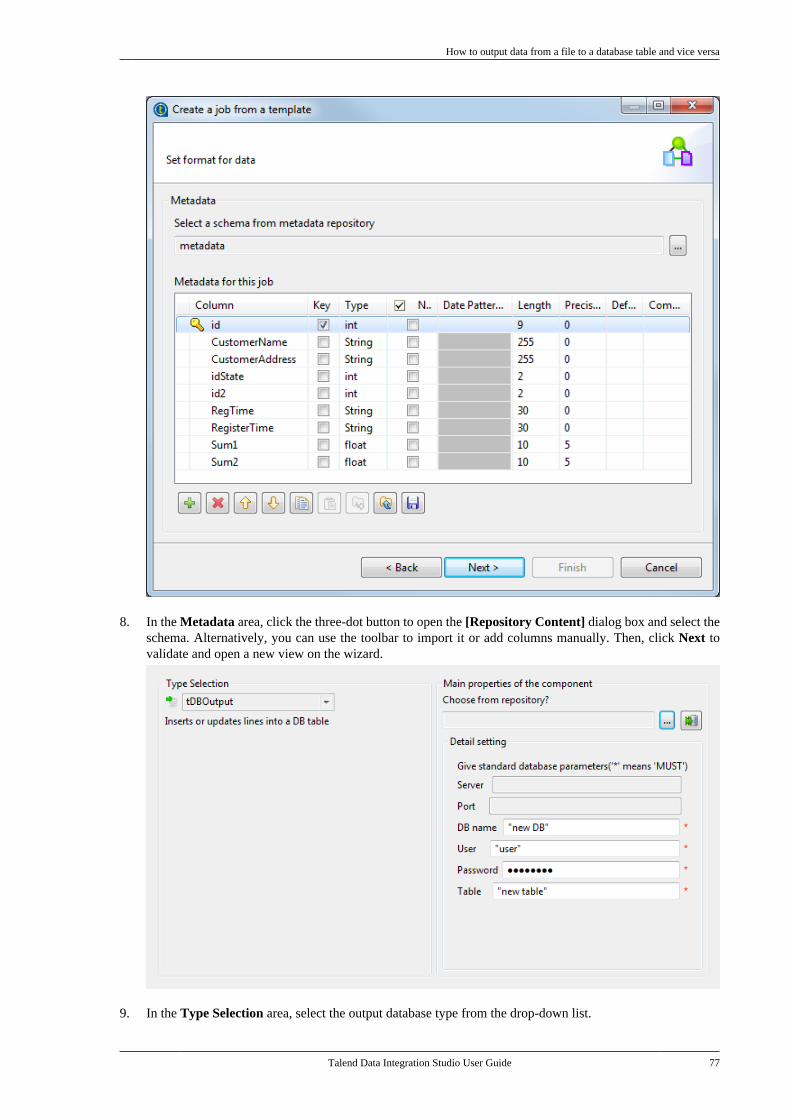
How to output data from a file to a database table and vice versa
Talend Data Integration Studio User Guide 77
8. In the Metadata area, click the three-dot button to open the [Repository Content] dialog box and select theschema. Alternatively, you can use the toolbar to import it or add columns manually. Then, click Next tovalidate and open a new view on the wizard.
9. In the Type Selection area, select the output database type from the drop-down list.

How to output data from one database table to another
78 Talend Data Integration Studio User Guide
10. In the Main properties of the component area, click the three-dot button and browse to the connection youwant to use the properties of. The Database connection should be centralized in the Repository tree view.The fields that follow in the Detail settings area are filled automatically with the properties of the selectedconnection. Alternatively, you can set manually the database details and all properties fields in the Detailsetting area, if needed.
Then, click Finish to close the wizard.
The ready-to-run Job is created and listed under the Job Designs node in the Repository tree view.
Once the Job is created, you can modify the properties of each of the components in the Job according to yourneeds.
4.3.2. How to output data from one database table toanother
You can use different templates to create a Job that writes data from a database table to another database tableor from a database table to a file.
To output data from one database table to another database table, do the following:
1. In the Repository tree view of the Integration perspective, right-click Job Designs and select Create jobfrom templates in the drop-down list. A Job creation wizard displays to help you defining the new Job mainproperties
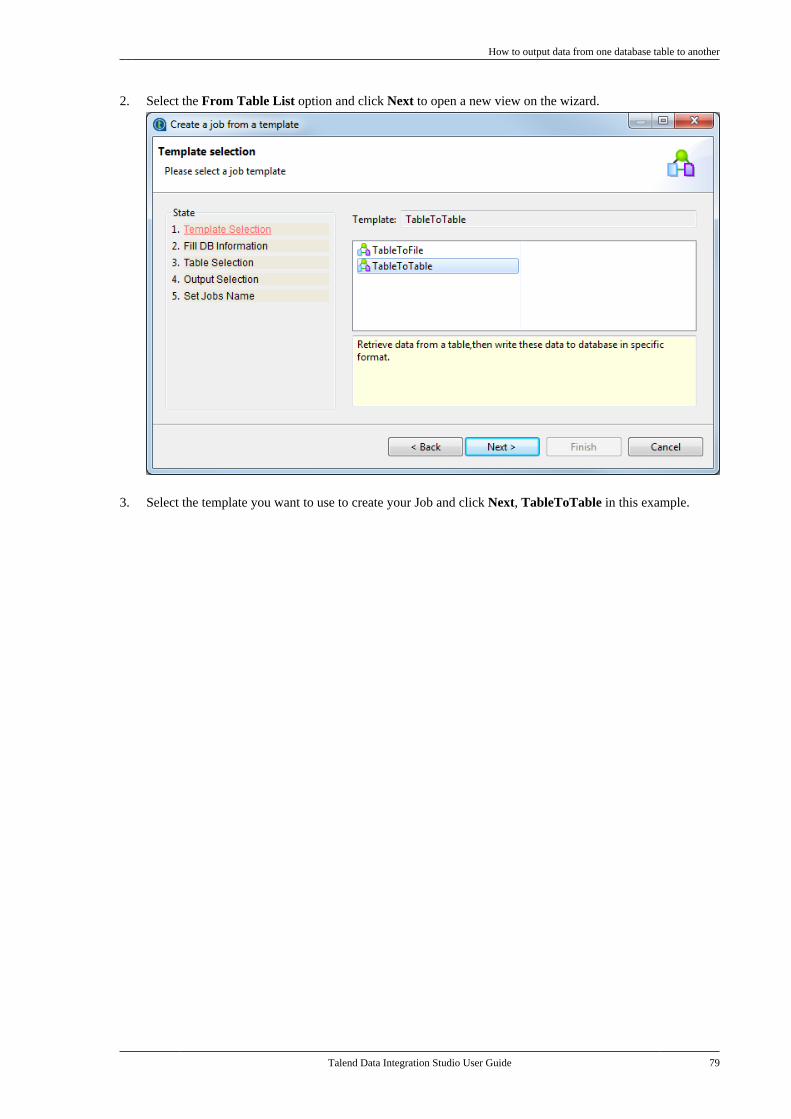
How to output data from one database table to another
Talend Data Integration Studio User Guide 79
2. Select the From Table List option and click Next to open a new view on the wizard.
3. Select the template you want to use to create your Job and click Next, TableToTable in this example.
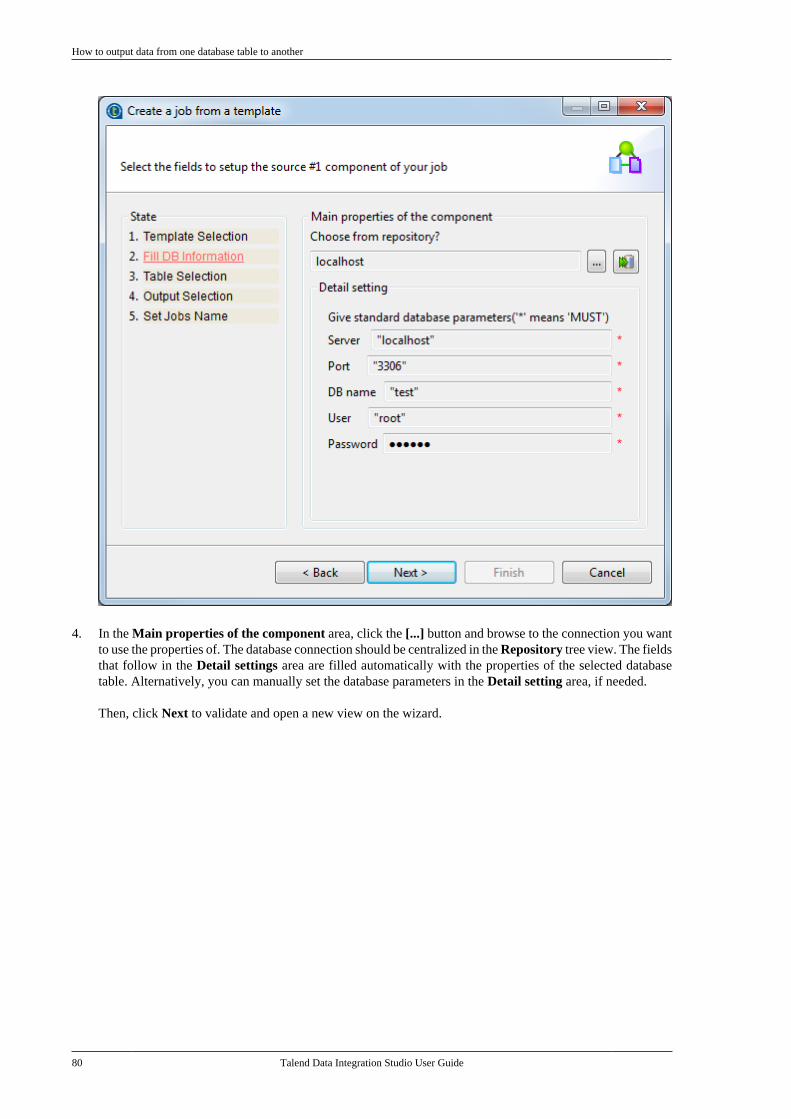
How to output data from one database table to another
80 Talend Data Integration Studio User Guide
4. In the Main properties of the component area, click the [...] button and browse to the connection you wantto use the properties of. The database connection should be centralized in the Repository tree view. The fieldsthat follow in the Detail settings area are filled automatically with the properties of the selected databasetable. Alternatively, you can manually set the database parameters in the Detail setting area, if needed.
Then, click Next to validate and open a new view on the wizard.
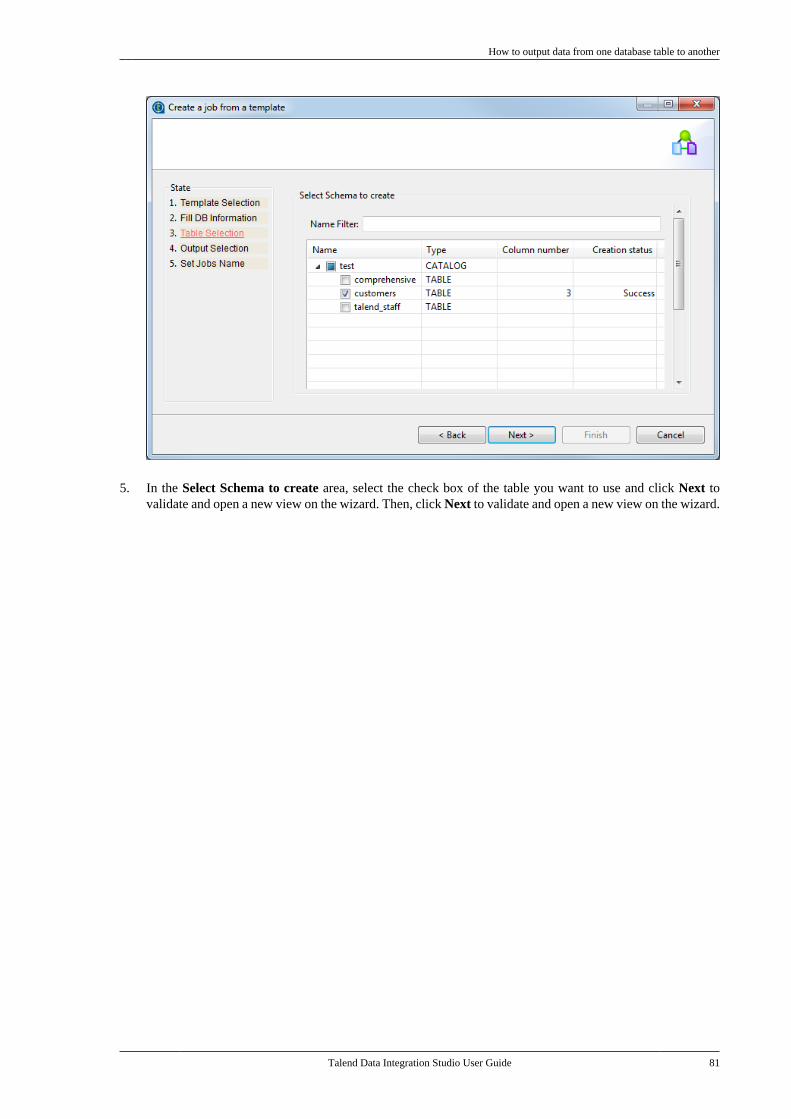
How to output data from one database table to another
Talend Data Integration Studio User Guide 81
5. In the Select Schema to create area, select the check box of the table you want to use and click Next tovalidate and open a new view on the wizard. Then, click Next to validate and open a new view on the wizard.
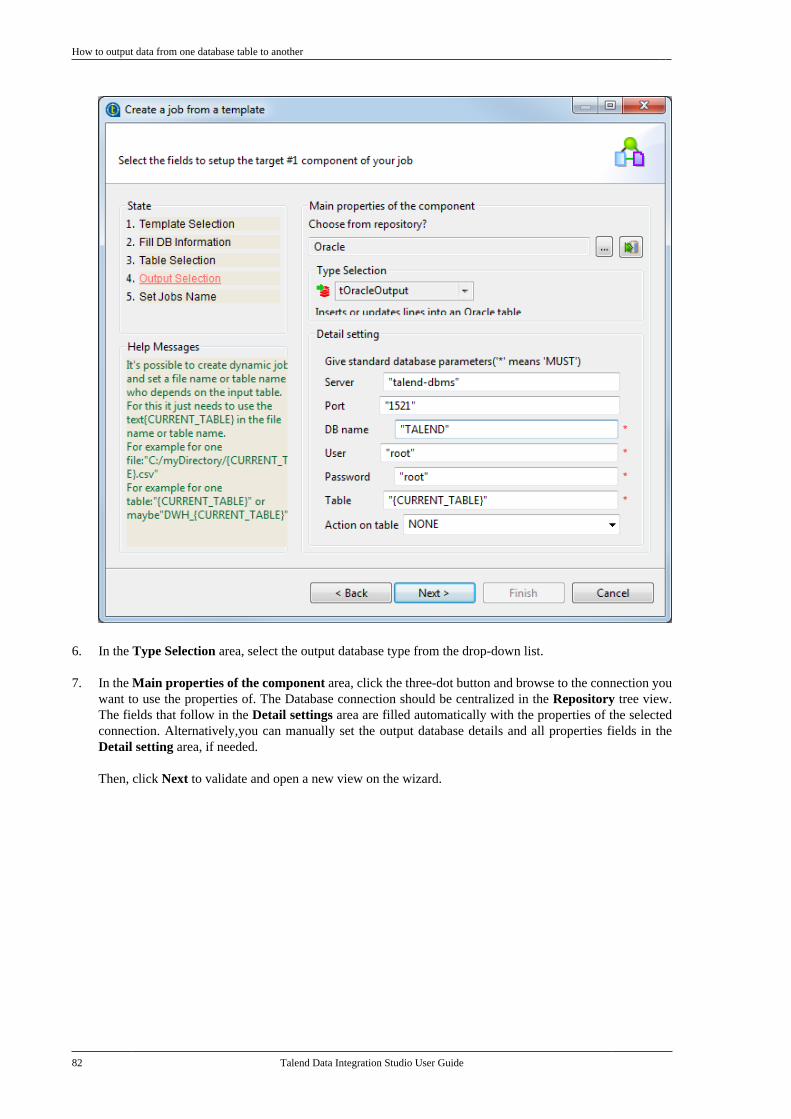
How to output data from one database table to another
82 Talend Data Integration Studio User Guide
6. In the Type Selection area, select the output database type from the drop-down list.
7. In the Main properties of the component area, click the three-dot button and browse to the connection youwant to use the properties of. The Database connection should be centralized in the Repository tree view.The fields that follow in the Detail settings area are filled automatically with the properties of the selectedconnection. Alternatively,you can manually set the output database details and all properties fields in theDetail setting area, if needed.
Then, click Next to validate and open a new view on the wizard.
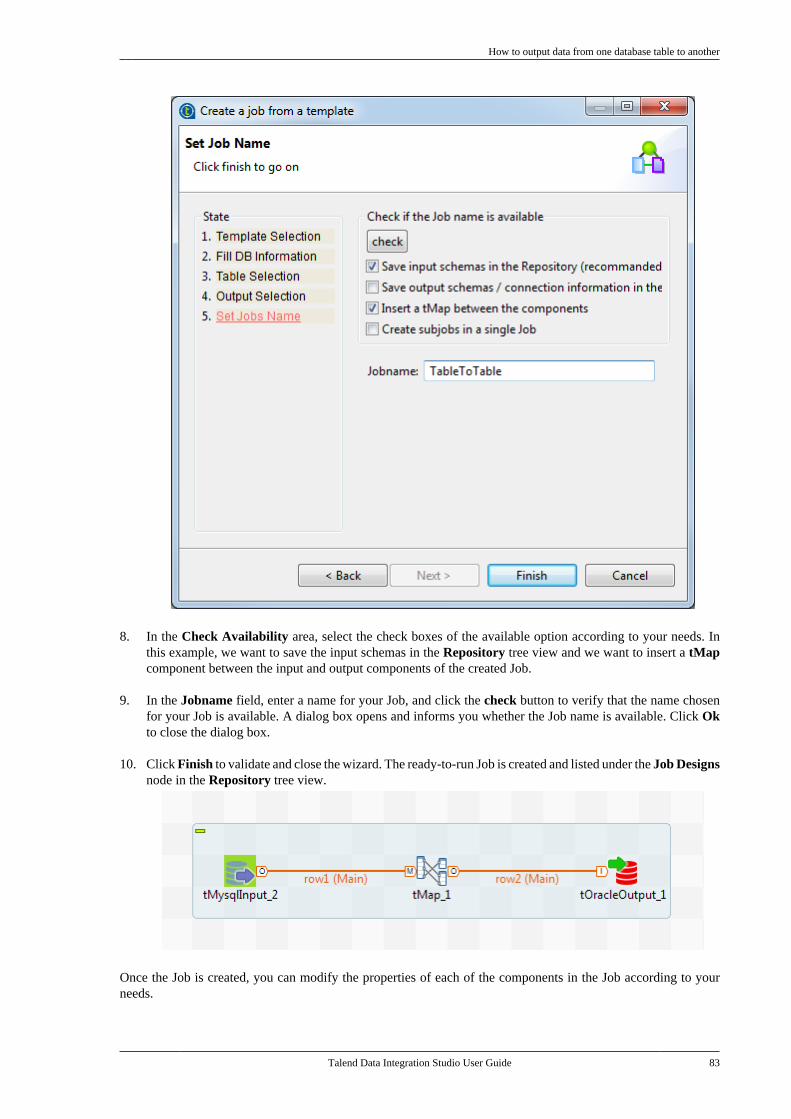
How to output data from one database table to another
Talend Data Integration Studio User Guide 83
8. In the Check Availability area, select the check boxes of the available option according to your needs. Inthis example, we want to save the input schemas in the Repository tree view and we want to insert a tMapcomponent between the input and output components of the created Job.
9. In the Jobname field, enter a name for your Job, and click the check button to verify that the name chosenfor your Job is available. A dialog box opens and informs you whether the Job name is available. Click Okto close the dialog box.
10. Click Finish to validate and close the wizard. The ready-to-run Job is created and listed under the Job Designsnode in the Repository tree view.
Once the Job is created, you can modify the properties of each of the components in the Job according to yourneeds.
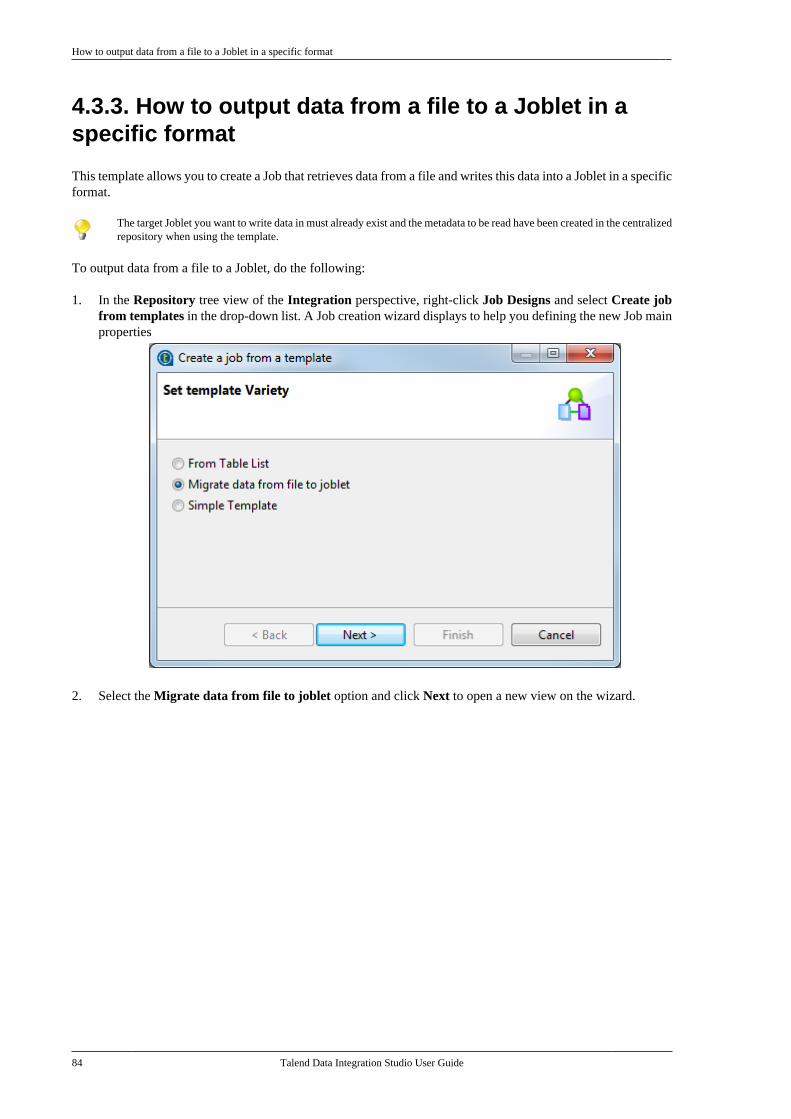
How to output data from a file to a Joblet in a specific format
84 Talend Data Integration Studio User Guide
4.3.3. How to output data from a file to a Joblet in aspecific format
This template allows you to create a Job that retrieves data from a file and writes this data into a Joblet in a specificformat.
The target Joblet you want to write data in must already exist and the metadata to be read have been created in the centralizedrepository when using the template.
To output data from a file to a Joblet, do the following:
1. In the Repository tree view of the Integration perspective, right-click Job Designs and select Create jobfrom templates in the drop-down list. A Job creation wizard displays to help you defining the new Job mainproperties
2. Select the Migrate data from file to joblet option and click Next to open a new view on the wizard.
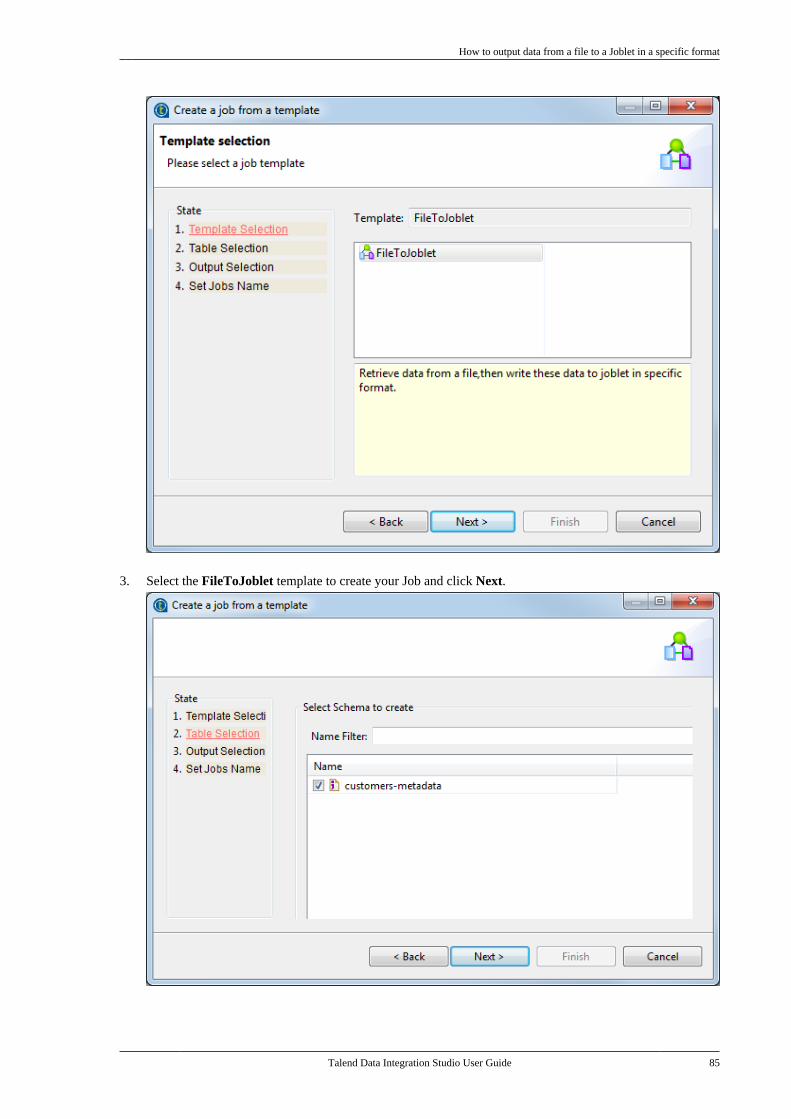
How to output data from a file to a Joblet in a specific format
Talend Data Integration Studio User Guide 85
3. Select the FileToJoblet template to create your Job and click Next.
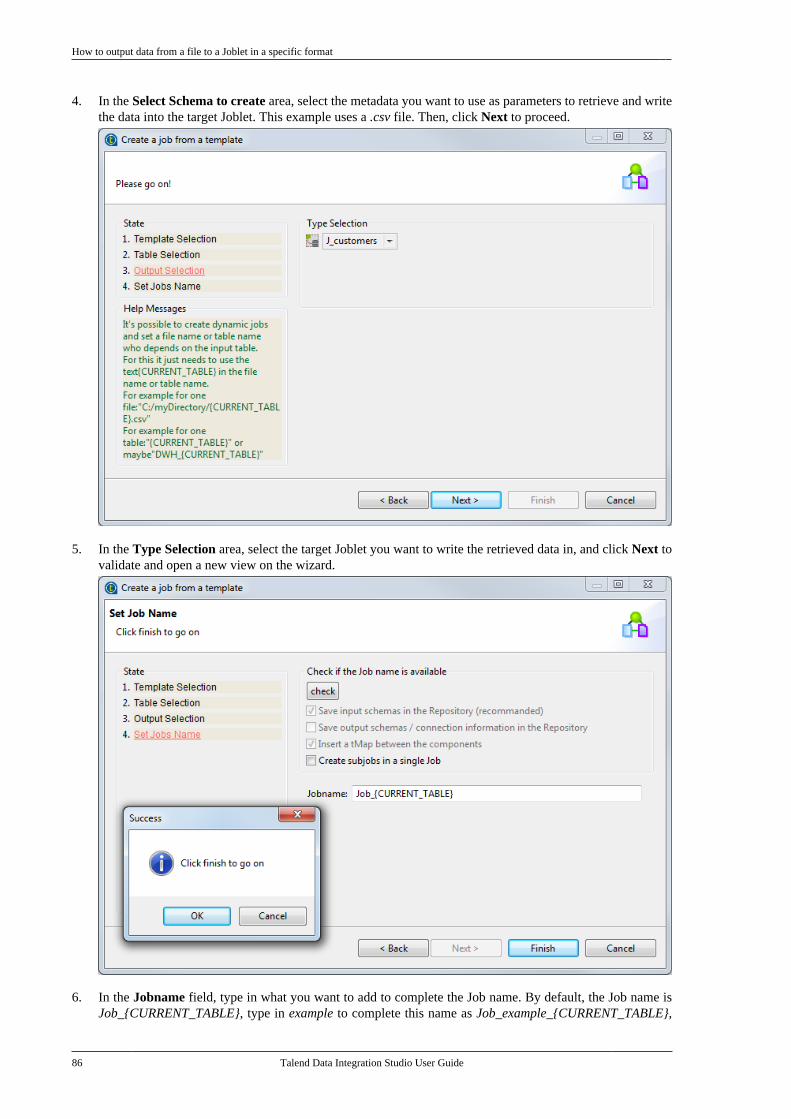
How to output data from a file to a Joblet in a specific format
86 Talend Data Integration Studio User Guide
4. In the Select Schema to create area, select the metadata you want to use as parameters to retrieve and writethe data into the target Joblet. This example uses a .csv file. Then, click Next to proceed.
5. In the Type Selection area, select the target Joblet you want to write the retrieved data in, and click Next tovalidate and open a new view on the wizard.
6. In the Jobname field, type in what you want to add to complete the Job name. By default, the Job name isJob_{CURRENT_TABLE}, type in example to complete this name as Job_example_{CURRENT_TABLE},
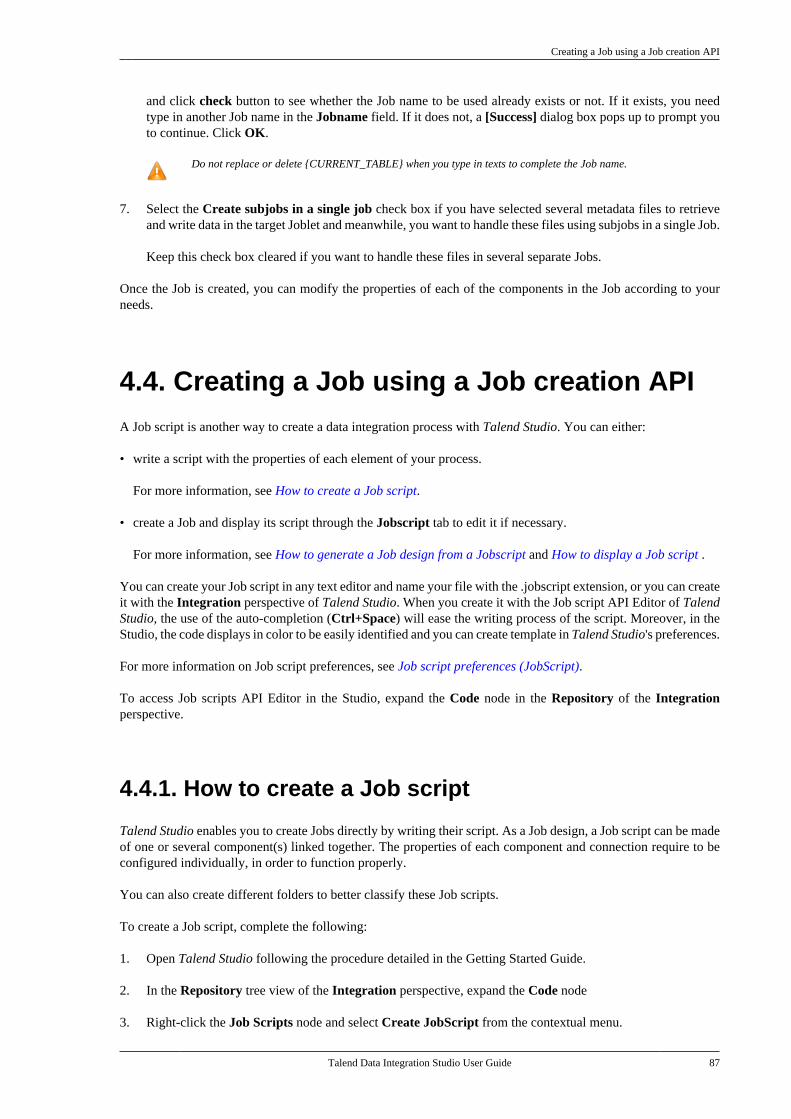
Creating a Job using a Job creation API
Talend Data Integration Studio User Guide 87
and click check button to see whether the Job name to be used already exists or not. If it exists, you needtype in another Job name in the Jobname field. If it does not, a [Success] dialog box pops up to prompt youto continue. Click OK.
Do not replace or delete {CURRENT_TABLE} when you type in texts to complete the Job name.
7. Select the Create subjobs in a single job check box if you have selected several metadata files to retrieveand write data in the target Joblet and meanwhile, you want to handle these files using subjobs in a single Job.
Keep this check box cleared if you want to handle these files in several separate Jobs.
Once the Job is created, you can modify the properties of each of the components in the Job according to yourneeds.
4.4. Creating a Job using a Job creation APIA Job script is another way to create a data integration process with Talend Studio. You can either:
• write a script with the properties of each element of your process.
For more information, see How to create a Job script.
• create a Job and display its script through the Jobscript tab to edit it if necessary.
For more information, see How to generate a Job design from a Jobscript and How to display a Job script .
You can create your Job script in any text editor and name your file with the .jobscript extension, or you can createit with the Integration perspective of Talend Studio. When you create it with the Job script API Editor of TalendStudio, the use of the auto-completion (Ctrl+Space) will ease the writing process of the script. Moreover, in theStudio, the code displays in color to be easily identified and you can create template in Talend Studio's preferences.
For more information on Job script preferences, see Job script preferences (JobScript).
To access Job scripts API Editor in the Studio, expand the Code node in the Repository of the Integrationperspective.
4.4.1. How to create a Job script
Talend Studio enables you to create Jobs directly by writing their script. As a Job design, a Job script can be madeof one or several component(s) linked together. The properties of each component and connection require to beconfigured individually, in order to function properly.
You can also create different folders to better classify these Job scripts.
To create a Job script, complete the following:
1. Open Talend Studio following the procedure detailed in the Getting Started Guide.
2. In the Repository tree view of the Integration perspective, expand the Code node
3. Right-click the Job Scripts node and select Create JobScript from the contextual menu.
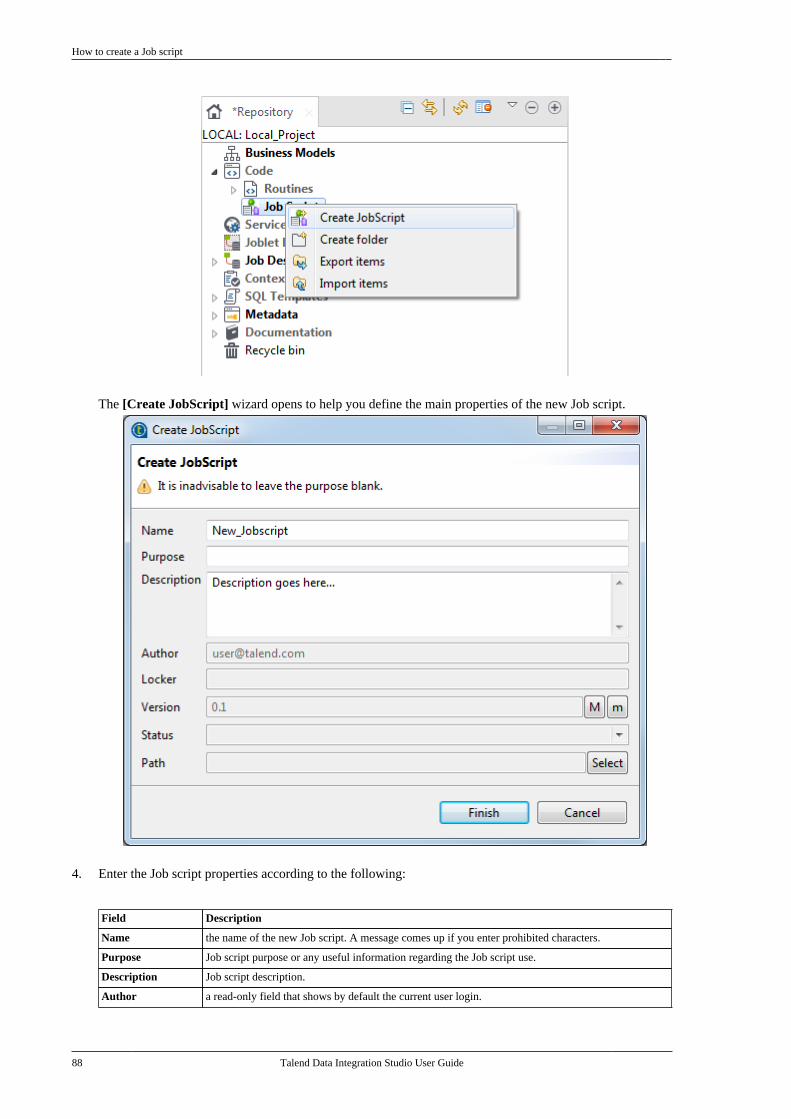
How to create a Job script
88 Talend Data Integration Studio User Guide
The [Create JobScript] wizard opens to help you define the main properties of the new Job script.
4. Enter the Job script properties according to the following:
Field Description
Name the name of the new Job script. A message comes up if you enter prohibited characters.
Purpose Job script purpose or any useful information regarding the Job script use.
Description Job script description.
Author a read-only field that shows by default the current user login.
How to write a Job script
Talend Data Integration Studio User Guide 89
Field Description
Locker a read-only field that shows by default the login of the user who owns the lock on the current Job. Thisfield is empty when you are creating a Job script and has data only when you are editing the propertiesof an existing Job script.
Version a read-only field. You can manually increment the version using the M and m buttons. For moreinformation, see Managing Job versions.
Status a list to select from the status of the Job script you are creating.
Path a list to select from the folder in which the Job script will be created.
5. Click Finish to create the Job script.
An empty jobscript file opens up in the workspace showing the name of the script as a tab label.
Type in the script corresponding to your Job.
Once your Job script created, you can:
• edit it,
• generate its corresponding Job design,
• export it.
4.4.2. How to write a Job scriptIn the API Editor of the Talend Studio, you can use the auto-completion (Ctrl+Space) to help you write your Jobscript. Functions, parameters and some values will be suggested to you.
The code will display in color to easily differentiate the code, the values and the comment. And the syntax ischecked for any mistake. If a parameter is wrongly set a red cross displays. Moreover, you can use template towrite your Job script. For more information on the color definition of the text or on how to manage Job scripttemplates, see Job script preferences (JobScript).
A Job script is mainly made as following:
• First, the components of your process.
• Second, the connections between those components.
• Other information like context parameters, other parameters and notes.
4.4.2.1. Component properties
Component properties can be divided into three main parts:
• component definition
• component schema
• specific settings
To add a component, type in the addComponent{} function and define its properties between the brackets:
Function Parameter Value
setComponentDefinition{} TYPE Type in the component you want to use, for example:tRowGenerator.
NAME Type in the name you want to give to the component, forexample: tRowGenerator_1.
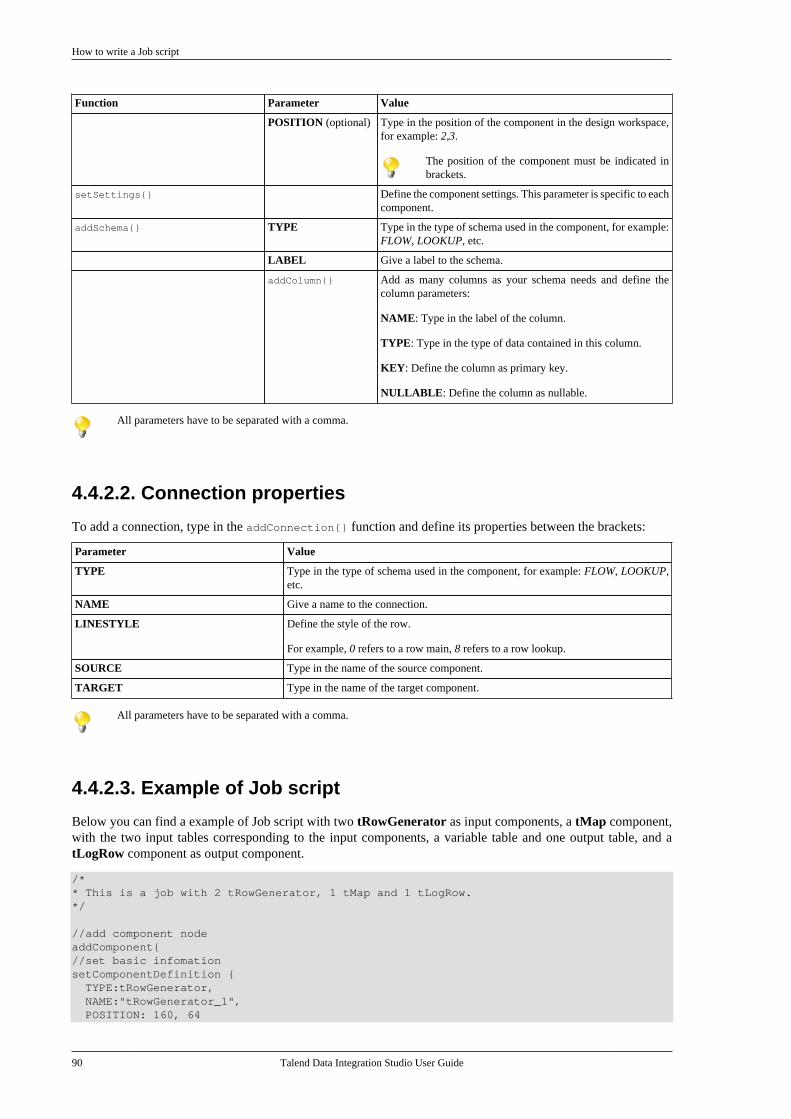
How to write a Job script
90 Talend Data Integration Studio User Guide
Function Parameter Value
POSITION (optional) Type in the position of the component in the design workspace,for example: 2,3.
The position of the component must be indicated inbrackets.
setSettings{} Define the component settings. This parameter is specific to eachcomponent.
addSchema{} TYPE Type in the type of schema used in the component, for example:FLOW, LOOKUP, etc.
LABEL Give a label to the schema.
addColumn{} Add as many columns as your schema needs and define thecolumn parameters:
NAME: Type in the label of the column.
TYPE: Type in the type of data contained in this column.
KEY: Define the column as primary key.
NULLABLE: Define the column as nullable.
All parameters have to be separated with a comma.
4.4.2.2. Connection properties
To add a connection, type in the addConnection{} function and define its properties between the brackets:
Parameter Value
TYPE Type in the type of schema used in the component, for example: FLOW, LOOKUP,etc.
NAME Give a name to the connection.
LINESTYLE Define the style of the row.
For example, 0 refers to a row main, 8 refers to a row lookup.
SOURCE Type in the name of the source component.
TARGET Type in the name of the target component.
All parameters have to be separated with a comma.
4.4.2.3. Example of Job script
Below you can find a example of Job script with two tRowGenerator as input components, a tMap component,with the two input tables corresponding to the input components, a variable table and one output table, and atLogRow component as output component.
/** This is a job with 2 tRowGenerator, 1 tMap and 1 tLogRow.*/ //add component node addComponent{//set basic infomationsetComponentDefinition { TYPE:tRowGenerator, NAME:"tRowGenerator_1", POSITION: 160, 64
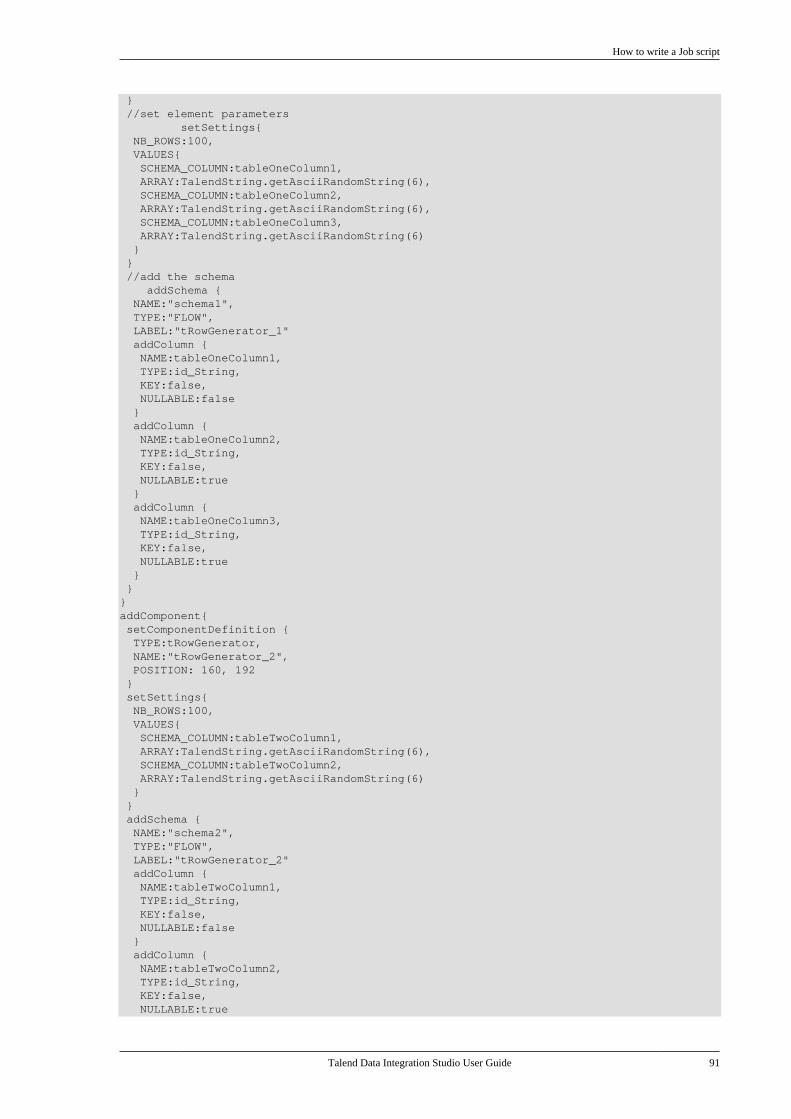
How to write a Job script
Talend Data Integration Studio User Guide 91
} //set element parameters setSettings{ NB_ROWS:100, VALUES{ SCHEMA_COLUMN:tableOneColumn1, ARRAY:TalendString.getAsciiRandomString(6), SCHEMA_COLUMN:tableOneColumn2, ARRAY:TalendString.getAsciiRandomString(6), SCHEMA_COLUMN:tableOneColumn3, ARRAY:TalendString.getAsciiRandomString(6) } } //add the schema addSchema { NAME:"schema1", TYPE:"FLOW", LABEL:"tRowGenerator_1" addColumn { NAME:tableOneColumn1, TYPE:id_String, KEY:false, NULLABLE:false } addColumn { NAME:tableOneColumn2, TYPE:id_String, KEY:false, NULLABLE:true } addColumn { NAME:tableOneColumn3, TYPE:id_String, KEY:false, NULLABLE:true } }}addComponent{ setComponentDefinition { TYPE:tRowGenerator, NAME:"tRowGenerator_2", POSITION: 160, 192 } setSettings{ NB_ROWS:100, VALUES{ SCHEMA_COLUMN:tableTwoColumn1, ARRAY:TalendString.getAsciiRandomString(6), SCHEMA_COLUMN:tableTwoColumn2, ARRAY:TalendString.getAsciiRandomString(6) } } addSchema { NAME:"schema2", TYPE:"FLOW", LABEL:"tRowGenerator_2" addColumn { NAME:tableTwoColumn1, TYPE:id_String, KEY:false, NULLABLE:false } addColumn { NAME:tableTwoColumn2, TYPE:id_String, KEY:false, NULLABLE:true
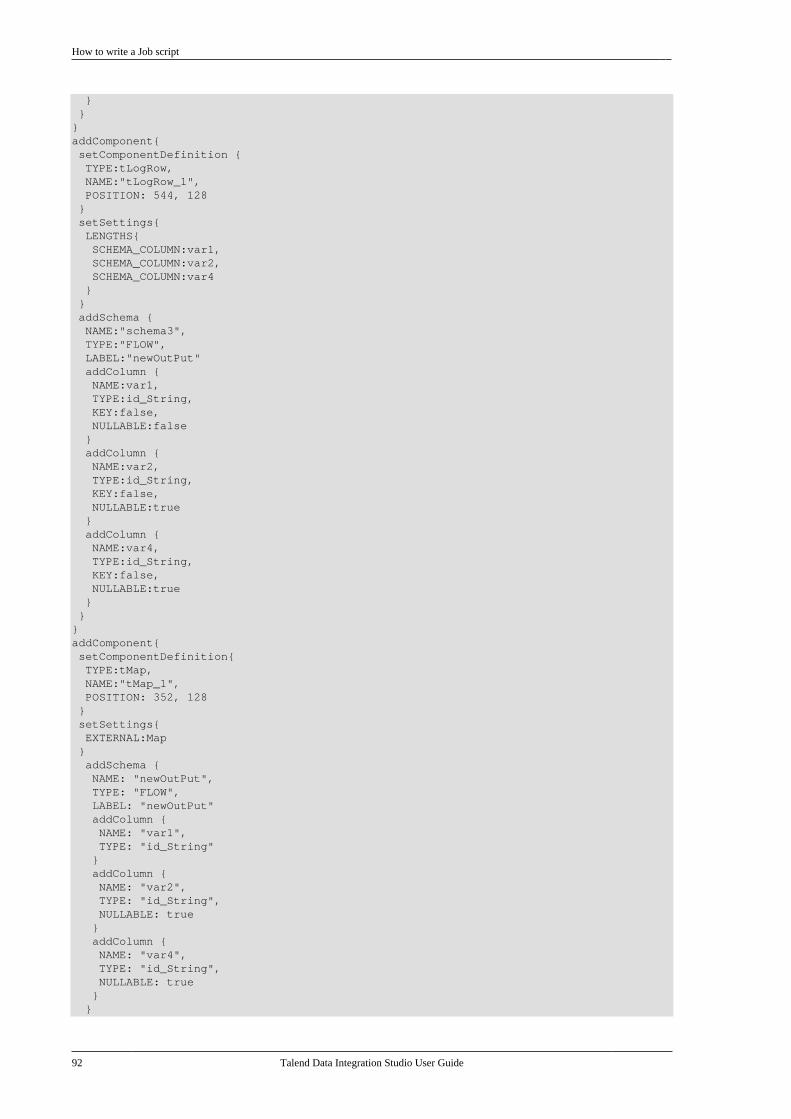
How to write a Job script
92 Talend Data Integration Studio User Guide
} }}addComponent{ setComponentDefinition { TYPE:tLogRow, NAME:"tLogRow_1", POSITION: 544, 128 } setSettings{ LENGTHS{ SCHEMA_COLUMN:var1, SCHEMA_COLUMN:var2, SCHEMA_COLUMN:var4 } } addSchema { NAME:"schema3", TYPE:"FLOW", LABEL:"newOutPut" addColumn { NAME:var1, TYPE:id_String, KEY:false, NULLABLE:false } addColumn { NAME:var2, TYPE:id_String, KEY:false, NULLABLE:true } addColumn { NAME:var4, TYPE:id_String, KEY:false, NULLABLE:true } }}addComponent{ setComponentDefinition{ TYPE:tMap, NAME:"tMap_1", POSITION: 352, 128 } setSettings{ EXTERNAL:Map } addSchema { NAME: "newOutPut", TYPE: "FLOW", LABEL: "newOutPut" addColumn { NAME: "var1", TYPE: "id_String" } addColumn { NAME: "var2", TYPE: "id_String", NULLABLE: true } addColumn { NAME: "var4", TYPE: "id_String", NULLABLE: true } }
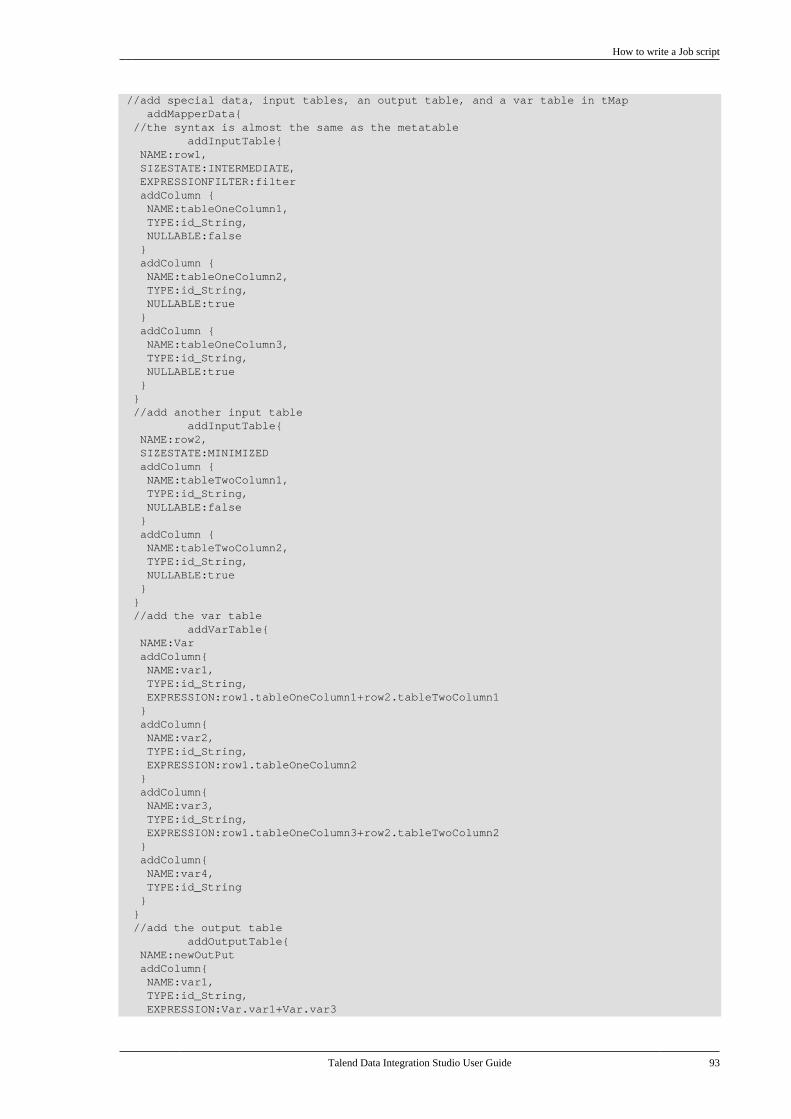
How to write a Job script
Talend Data Integration Studio User Guide 93
//add special data, input tables, an output table, and a var table in tMap addMapperData{ //the syntax is almost the same as the metatable addInputTable{ NAME:row1, SIZESTATE:INTERMEDIATE, EXPRESSIONFILTER:filter addColumn { NAME:tableOneColumn1, TYPE:id_String, NULLABLE:false } addColumn { NAME:tableOneColumn2, TYPE:id_String, NULLABLE:true } addColumn { NAME:tableOneColumn3, TYPE:id_String, NULLABLE:true } } //add another input table addInputTable{ NAME:row2, SIZESTATE:MINIMIZED addColumn { NAME:tableTwoColumn1, TYPE:id_String, NULLABLE:false } addColumn { NAME:tableTwoColumn2, TYPE:id_String, NULLABLE:true } } //add the var table addVarTable{ NAME:Var addColumn{ NAME:var1, TYPE:id_String, EXPRESSION:row1.tableOneColumn1+row2.tableTwoColumn1 } addColumn{ NAME:var2, TYPE:id_String, EXPRESSION:row1.tableOneColumn2 } addColumn{ NAME:var3, TYPE:id_String, EXPRESSION:row1.tableOneColumn3+row2.tableTwoColumn2 } addColumn{ NAME:var4, TYPE:id_String } } //add the output table addOutputTable{ NAME:newOutPut addColumn{ NAME:var1, TYPE:id_String, EXPRESSION:Var.var1+Var.var3
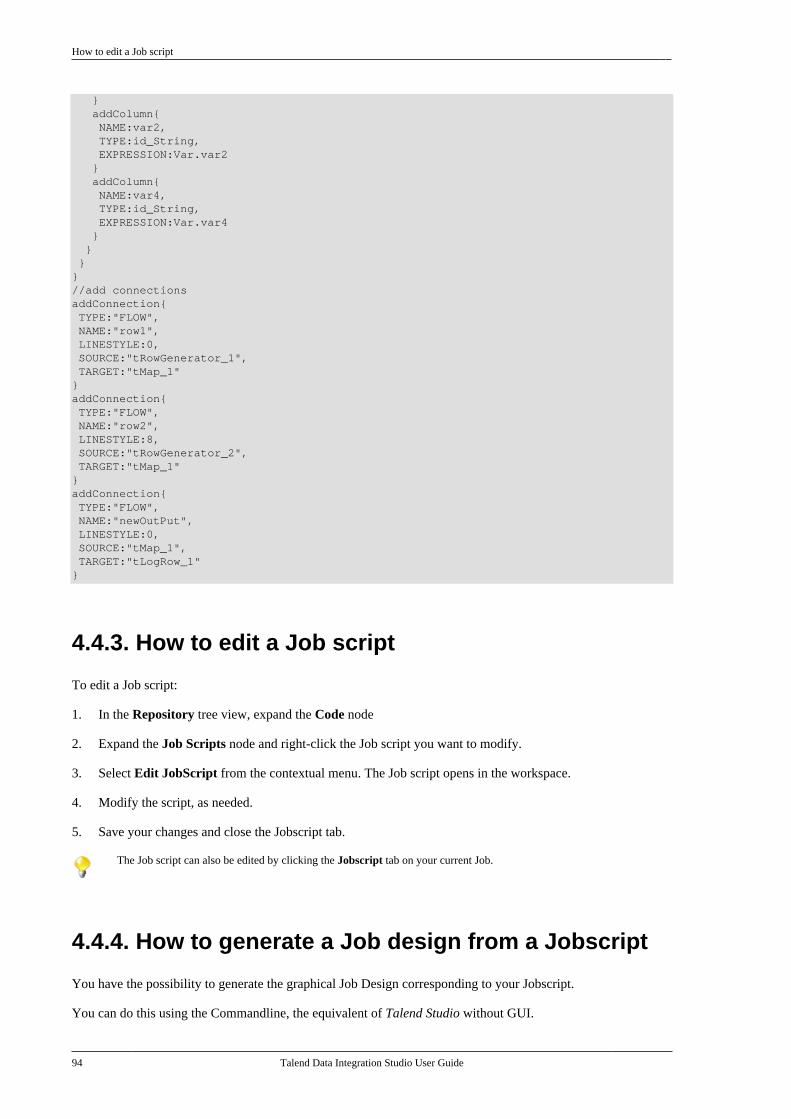
How to edit a Job script
94 Talend Data Integration Studio User Guide
} addColumn{ NAME:var2, TYPE:id_String, EXPRESSION:Var.var2 } addColumn{ NAME:var4, TYPE:id_String, EXPRESSION:Var.var4 } } }}//add connections addConnection{ TYPE:"FLOW", NAME:"row1", LINESTYLE:0, SOURCE:"tRowGenerator_1", TARGET:"tMap_1"}addConnection{ TYPE:"FLOW", NAME:"row2", LINESTYLE:8, SOURCE:"tRowGenerator_2", TARGET:"tMap_1"}addConnection{ TYPE:"FLOW", NAME:"newOutPut", LINESTYLE:0, SOURCE:"tMap_1", TARGET:"tLogRow_1"}
4.4.3. How to edit a Job script
To edit a Job script:
1. In the Repository tree view, expand the Code node
2. Expand the Job Scripts node and right-click the Job script you want to modify.
3. Select Edit JobScript from the contextual menu. The Job script opens in the workspace.
4. Modify the script, as needed.
5. Save your changes and close the Jobscript tab.
The Job script can also be edited by clicking the Jobscript tab on your current Job.
4.4.4. How to generate a Job design from a Jobscript
You have the possibility to generate the graphical Job Design corresponding to your Jobscript.
You can do this using the Commandline, the equivalent of Talend Studio without GUI.
How to export a Job script
Talend Data Integration Studio User Guide 95
1. Launch the CommandLine.
2. Connect to your repository with the initLocal or initRemote commands. Example:
initRemote http://localhost:8080/org.talend.administrator -ul [email protected] -up admin
The parameter values are given as examples and need to be replaced with your actual information(port, credentials). For more information on how to use these commands, see the help provided in theCommandLine.
3. Connect to your project and branch/tag with the logonProject command. If you do not know the name ofyour project or branch/tag, type in the listProject -b command first. Example:
logonProject -pn di_project -ul [email protected] -up admin -br branches/v1.0.0
The parameter values are given as examples and need to be replaced with your actual information (project/branch/tag name, credentials). For more information on how to use this command, see the help providedin the CommandLine.
4. Type in the following command to generate a Job from your Job script:
createJob NameOfJob -sf path\yourJobscript.jobscript
The Job is created in your CommandLine workspace in the process folder: commandline-workspace\YourProjectName\process.
If you want to open this Job in Talend Studio, you will have to import it in the Talend Studio workspace first.
For more information on how to import items in Talend Studio, see How to import items.
With the graphical interface of the Studio, you can generate this Job using your Jobscript. Proceed as follows:
1. In the Repository tree view, expand the Code node
2. Expand the Job Scripts node and right-click the Job script you want to generate the Job Design of.
3. Select Generate Job from the contextual menu. A Job with the same name as the Job script is created in theJob Designs node of the Repository. You can open it and execute it, if needed.
4.4.5. How to export a Job script
To export a Job script:
1. In the Repository tree view, expand the Code node
2. Expand the Job Scripts node and right-click the Job script you want to export.
3. Select Export Job Script from the contextual menu. An [Export Job Script] wizard displays.
4. Select the folder in which you want to export your Job script to.
5. Click OK. A file with a .jobscript file extension is exported in the defined folder.
4.4.6. How to open an exported Job script
If a Job script is not stored on your Repository, if you created it manually in a text editor for example, you canalways open and edit it in Talend Studio.
How to display a Job script
96 Talend Data Integration Studio User Guide
To do so,
1. In Talend Studio, click menu File, and Open/Edit Job Script. An [Open/Edit Job Script] wizard displays.
2. Browse to the jobscript file you want to open and select it.
3. Click Open. The jobscript file opens in the workspace of the Integration perspective of Talend Studio. Youcan modify the script if needed and save your changes.
Jobscript files can be opened and edited in the Studio but they cannot be saved in the Repository.
4.4.7. How to display a Job script
If you have created a Job without using a Job script, you can always visualize the script of the Job and edit it.
For more information about Job creation without Job script, see Creating a Job.
To display a Job script, do the following:
1. In the Respository tree view, double click the Job you want to open.
2. Click on the Jobscript tab situated under the design workspace to view and edit the script if necessary.
From this view, you can visualize and/or modify all the elements of your Job: the script version, the context variables, theJob parameters including project information, Job settings, and routines called in the Job, the names of the components,their schema, their parameters, the connections used to link them, their position, the text notes added to the Job (if any),the subjob information, etc.
For more information, see How to write a Job script and How to edit a Job script.
4.5. Working with componentsThe sections below give detailed information about various subjects related to handling components in a dataintegration Job, including:
• How to add a component between two connected components
• How to define component properties
• How to define the start component
• How to find Jobs containing a specific component
• How to set default values in the schema of a component
4.5.1. How to add a component between twoconnected components
When designing a Job, you can insert a component between two components linked by a Row connection, providedthat the new component can serve as a middle component between the two.
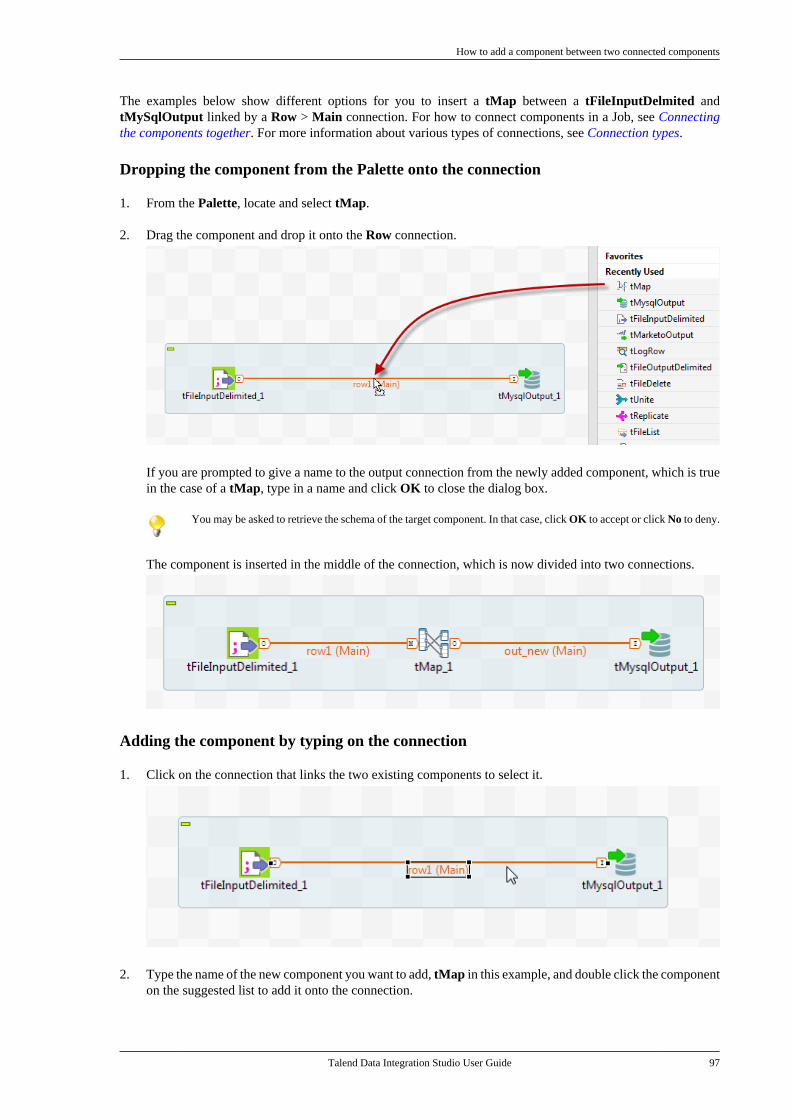
How to add a component between two connected components
Talend Data Integration Studio User Guide 97
The examples below show different options for you to insert a tMap between a tFileInputDelmited andtMySqlOutput linked by a Row > Main connection. For how to connect components in a Job, see Connectingthe components together. For more information about various types of connections, see Connection types.
Dropping the component from the Palette onto the connection
1. From the Palette, locate and select tMap.
2. Drag the component and drop it onto the Row connection.
If you are prompted to give a name to the output connection from the newly added component, which is truein the case of a tMap, type in a name and click OK to close the dialog box.
You may be asked to retrieve the schema of the target component. In that case, click OK to accept or click No to deny.
The component is inserted in the middle of the connection, which is now divided into two connections.
Adding the component by typing on the connection
1. Click on the connection that links the two existing components to select it.
2. Type the name of the new component you want to add, tMap in this example, and double click the componenton the suggested list to add it onto the connection.

How to add a component between two connected components
98 Talend Data Integration Studio User Guide
3. If you are prompted to give a name to the output connection from the newly added component, which is truein the case of a tMap, type in a name and click OK to close the dialog box.
You may be asked to retrieve the schema of the target component. In that case, click OK to accept or click No to deny.
The component is inserted in the middle of the connection, which is now divided in two connections.
Adding the component to the design workspace and moving the existing connection
1. Add the new component, tMap in this example, onto the design workspace by either dropping it from thePalette or clicking in the design workspace and typing the component name.
How to add a component between two connected components
Talend Data Integration Studio User Guide 99
2. Select the connection and move your mouse pointer towards the end of the connection until the mouse pointerbecomes a + symbol.
3. Drag the connection from the tMySqlOutput component and drop it onto the tMap component.
4. Connect the tMap component to the tMySqlOutput using a Row > Main connection.
How to define component properties
100 Talend Data Integration Studio User Guide
4.5.2. How to define component properties
The properties information for each component forming a Job or a subjob allows to set the actual technicalimplementation of the active Job.
Each component is defined by basic and advanced properties shown respectively on the Basic Settings tab andthe Advanced Settings tab of the Component view of the selected component in the design workspace. TheComponent view gathers also other collateral information related to the component in use, including View andDocumentation tabs.
For more an example of a basic Job design, see Getting started with a basic Job.
4.5.2.1. Basic Settings tab
The Basic Settings tab is part of the Component view, which is located on the lower part of the designing editorof the Integration perspective of Talend Studio.
Each component has specific basic settings according to its function requirements within the Job. For a detaileddescription of each component properties and use, see Talend Components Reference Guide.
Some components require code to be input or functions to be set. Make sure you use Java code in properties.
How to define component properties
Talend Data Integration Studio User Guide 101
For File and Database components, you can centralize properties in metadata files located in the Metadatadirectory of the Repository tree view. This means that on the Basic Settings tab you can set properties on thespot, using the Built-In Property Type or use the properties you stored in the Metadata Manager using theRepository Property Type. The latter option helps you save time.
Select Repository as Property Type and choose the metadata file holding the relevant information. Related topic:Managing Metadata.
Alternatively, you can drop the Metadata item from the Repository tree view directly to the component alreadydropped on the design workspace, for its properties to be filled in automatically.
If you selected the Built-in mode and set manually the properties of a component, you can also save thoseproperties as metadata in the Repository. To do so:
1. Click the floppy disk icon. The metadata creation wizard corresponding to the component opens.
2. Follow the steps in the wizard. For more information about the creation of metadata items, see ManagingMetadata.
3. The metadata displays under the Metadata node of the Repository.
For all components that handle a data flow (most components), you can define a Talend schema in order todescribe and possibly select the data to be processed. Like the Properties data, this schema is either Built-in orstored remotely in the Repository in a metadata file that you created. A detailed description of the Schema settingis provided in the next sections.
How to set a built-in schema
A schema created as Built-in is meant for a single use in a Job, hence cannot be reused in another Job.
Select Built-in in the Property Type list of the Basic settings view, and click the Edit Schema button to createyour built-in schema by adding columns and describing their content, according to the input file definition.
Make sure the data type in the Type column is correctly defined.
For more information regarding Java data types, including date pattern, see Java API Specification.
Below are the commonly used Talend data types:
• Object: a generic Talend data type that allows processing data without regard to its content, for example, adata file not otherwise supported can be processed with a tFileInputRaw component by specifying that it hasa data type of Object.
How to define component properties
102 Talend Data Integration Studio User Guide
• List: a space-separated list of primitive type elements in an XML Schema definition, defined using the xsd:listelement.
• Dynamic: a data type that can be set for a single column at the end of a schema to allow processing fields asVARCHAR(100) columns named either as ‘Column<X>’ or, if the input includes a header, from the columnnames appearing in the header. For more information, see Dynamic schema.
• Document: a data type that allows processing an entire XML document without regarding to its content.
In all output properties, you also have to define the schema of the output. To retrieve the schema defined in theinput schema, click the Sync columns tab in the Basic settings view.
When creating a database table, you are recommended to specify the Length field for all columns of type String, Integer orLong and specify the Precision field for all columns of type Double, Float or BigDecimal in the schema of the componentused. Otherwise, unexpected errors may occur.
How to set a repository schema
If you often use certain database connections or specific files when creating your data integration Jobs, you canavoid defining the same properties over and over again by creating metadata files and storing them in the Metadatanode in the Repository tree view of the Integration perspective.
To recall a metadata file into your current Job, select Repository in the Schema list and then select the relevantmetadata file. Or, drop the metadata item from the Repository tree view directly to the component already droppedon the design workspace. Then click Edit Schema to check that the data is appropriate.
You can edit a repository schema used in a Job from the Basic settings view. However, note that the schema hencebecomes Built-in in the current Job.
You can also use a repository schema partially. For more information, see How to use a repository schemapartially.
You cannot change the schema stored in the repository from this window. To edit the schema stored remotely, right-click itunder the Metadata node and select the corresponding edit option (Edit connection or Edit file) from the contextual menu.
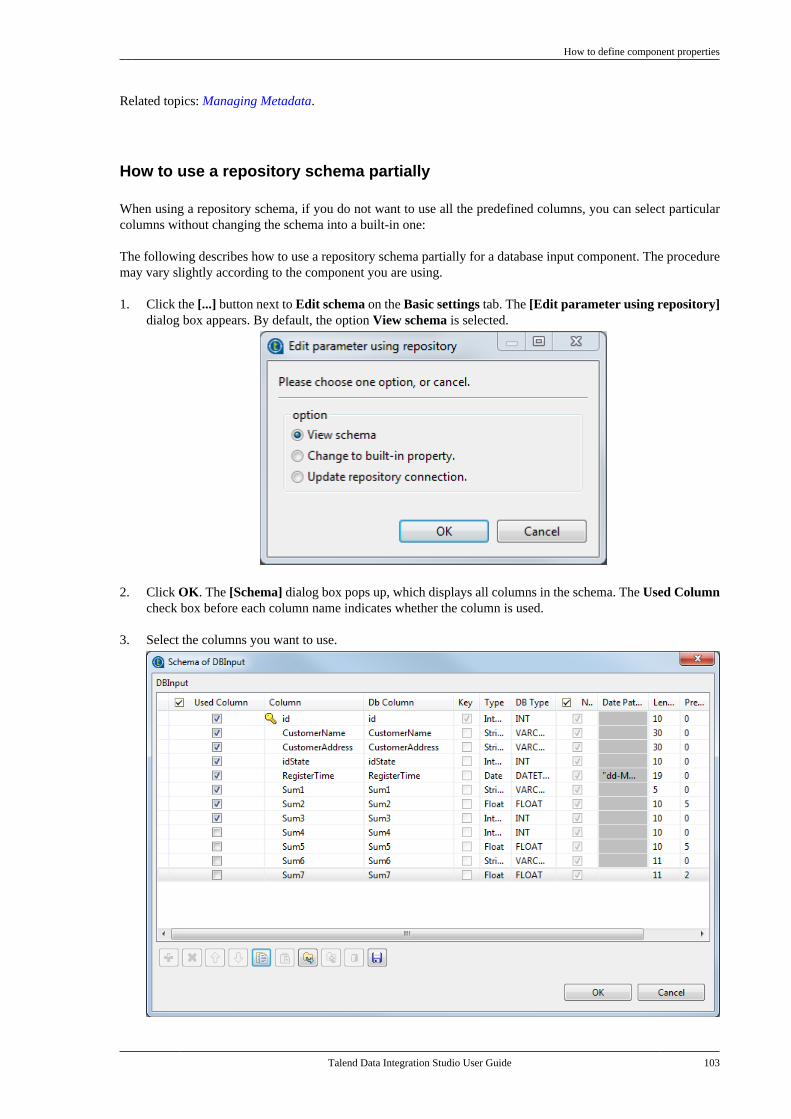
How to define component properties
Talend Data Integration Studio User Guide 103
Related topics: Managing Metadata.
How to use a repository schema partially
When using a repository schema, if you do not want to use all the predefined columns, you can select particularcolumns without changing the schema into a built-in one:
The following describes how to use a repository schema partially for a database input component. The proceduremay vary slightly according to the component you are using.
1. Click the [...] button next to Edit schema on the Basic settings tab. The [Edit parameter using repository]dialog box appears. By default, the option View schema is selected.
2. Click OK. The [Schema] dialog box pops up, which displays all columns in the schema. The Used Columncheck box before each column name indicates whether the column is used.
3. Select the columns you want to use.
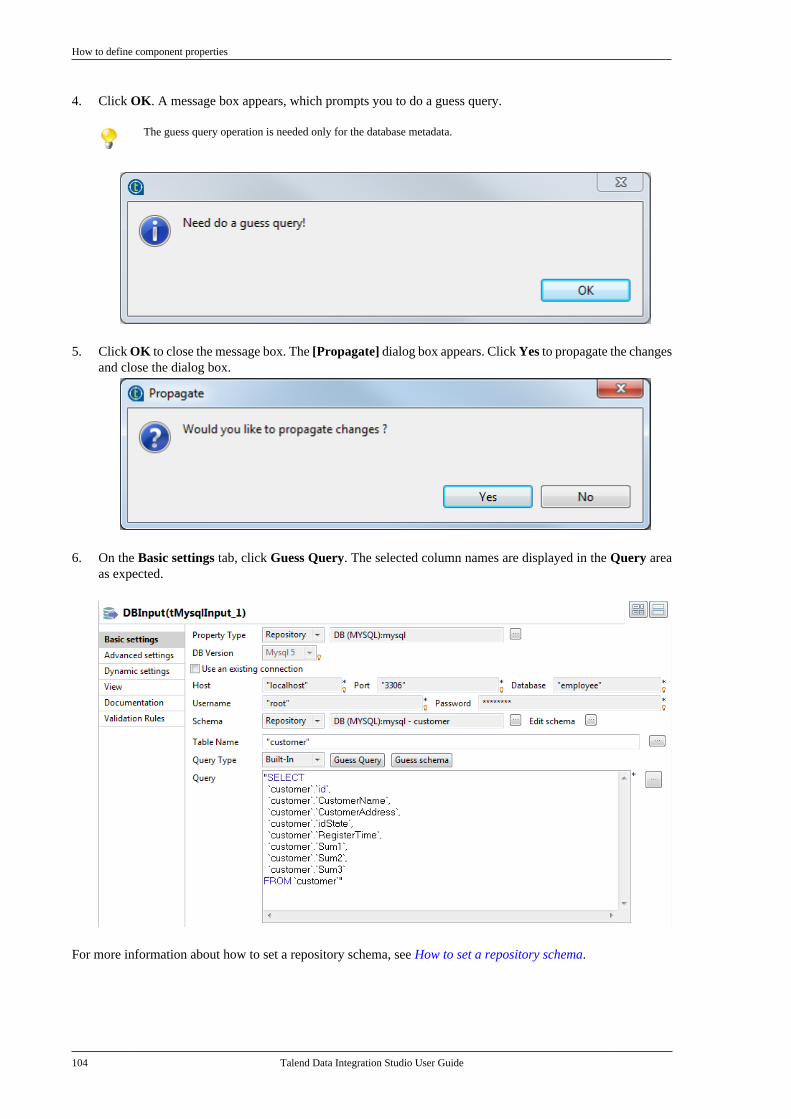
How to define component properties
104 Talend Data Integration Studio User Guide
4. Click OK. A message box appears, which prompts you to do a guess query.
The guess query operation is needed only for the database metadata.
5. Click OK to close the message box. The [Propagate] dialog box appears. Click Yes to propagate the changesand close the dialog box.
6. On the Basic settings tab, click Guess Query. The selected column names are displayed in the Query areaas expected.
For more information about how to set a repository schema, see How to set a repository schema.
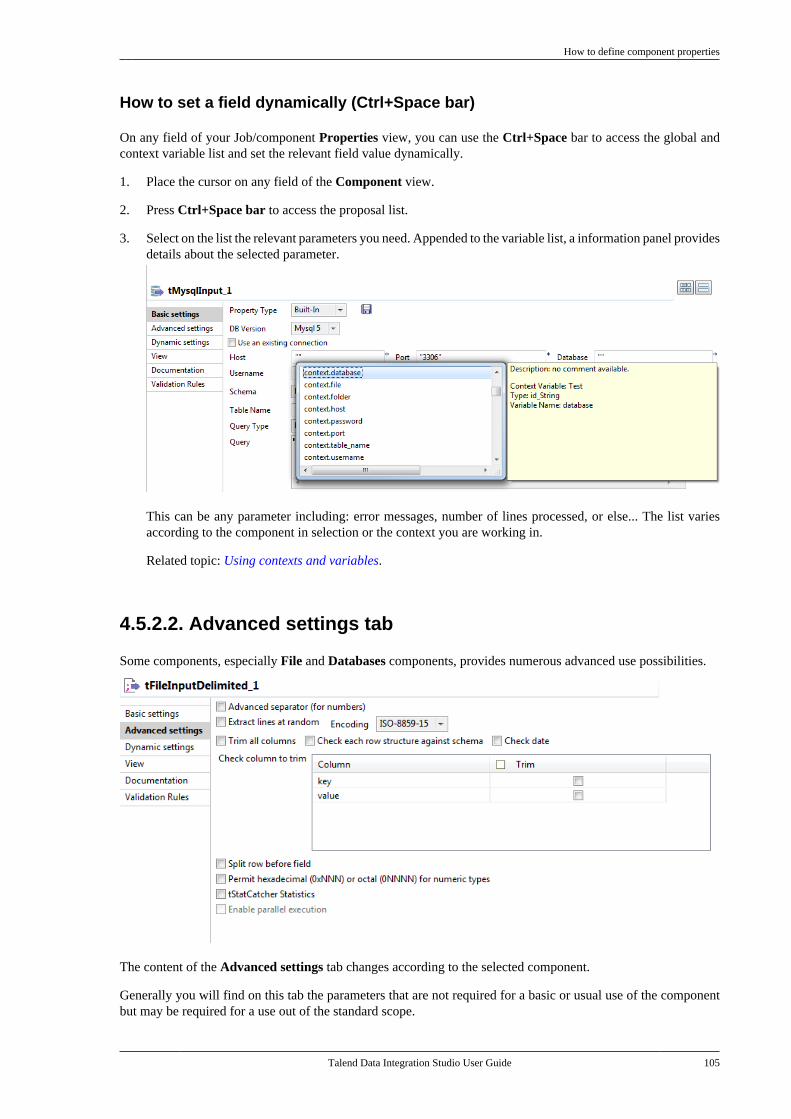
How to define component properties
Talend Data Integration Studio User Guide 105
How to set a field dynamically (Ctrl+Space bar)
On any field of your Job/component Properties view, you can use the Ctrl+Space bar to access the global andcontext variable list and set the relevant field value dynamically.
1. Place the cursor on any field of the Component view.
2. Press Ctrl+Space bar to access the proposal list.
3. Select on the list the relevant parameters you need. Appended to the variable list, a information panel providesdetails about the selected parameter.
This can be any parameter including: error messages, number of lines processed, or else... The list variesaccording to the component in selection or the context you are working in.
Related topic: Using contexts and variables.
4.5.2.2. Advanced settings tab
Some components, especially File and Databases components, provides numerous advanced use possibilities.
The content of the Advanced settings tab changes according to the selected component.
Generally you will find on this tab the parameters that are not required for a basic or usual use of the componentbut may be required for a use out of the standard scope.
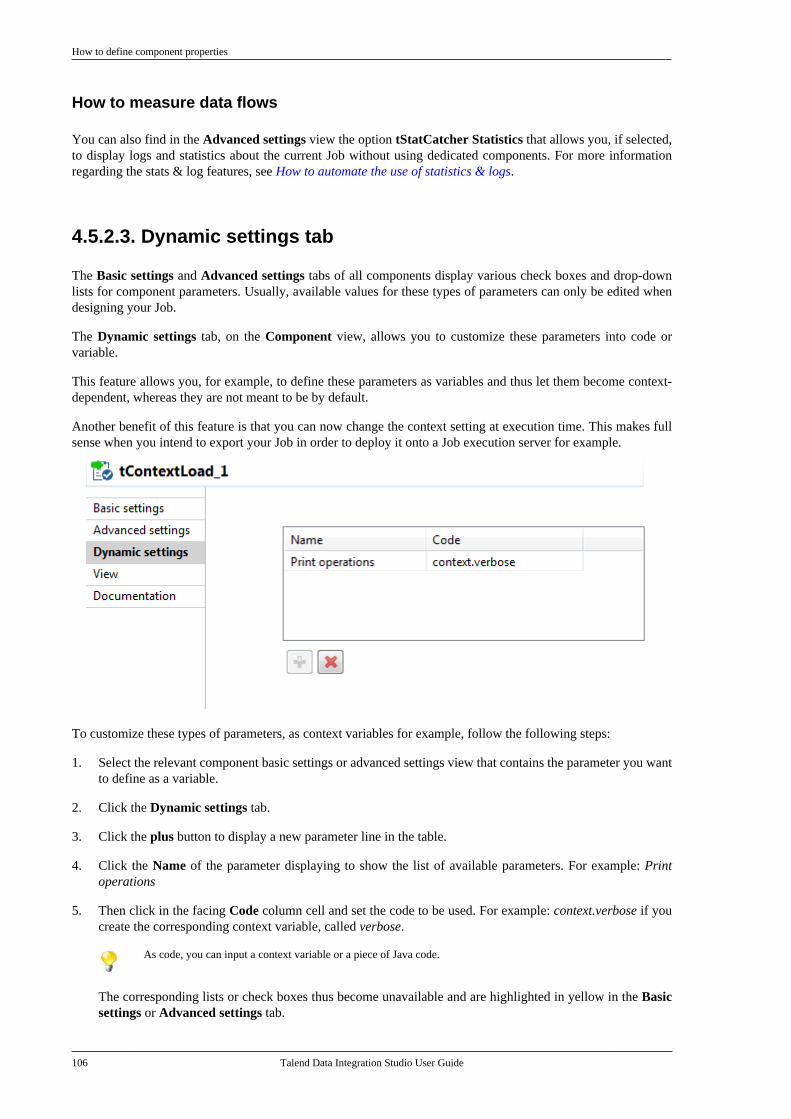
How to define component properties
106 Talend Data Integration Studio User Guide
How to measure data flows
You can also find in the Advanced settings view the option tStatCatcher Statistics that allows you, if selected,to display logs and statistics about the current Job without using dedicated components. For more informationregarding the stats & log features, see How to automate the use of statistics & logs.
4.5.2.3. Dynamic settings tab
The Basic settings and Advanced settings tabs of all components display various check boxes and drop-downlists for component parameters. Usually, available values for these types of parameters can only be edited whendesigning your Job.
The Dynamic settings tab, on the Component view, allows you to customize these parameters into code orvariable.
This feature allows you, for example, to define these parameters as variables and thus let them become context-dependent, whereas they are not meant to be by default.
Another benefit of this feature is that you can now change the context setting at execution time. This makes fullsense when you intend to export your Job in order to deploy it onto a Job execution server for example.
To customize these types of parameters, as context variables for example, follow the following steps:
1. Select the relevant component basic settings or advanced settings view that contains the parameter you wantto define as a variable.
2. Click the Dynamic settings tab.
3. Click the plus button to display a new parameter line in the table.
4. Click the Name of the parameter displaying to show the list of available parameters. For example: Printoperations
5. Then click in the facing Code column cell and set the code to be used. For example: context.verbose if youcreate the corresponding context variable, called verbose.
As code, you can input a context variable or a piece of Java code.
The corresponding lists or check boxes thus become unavailable and are highlighted in yellow in the Basicsettings or Advanced settings tab.
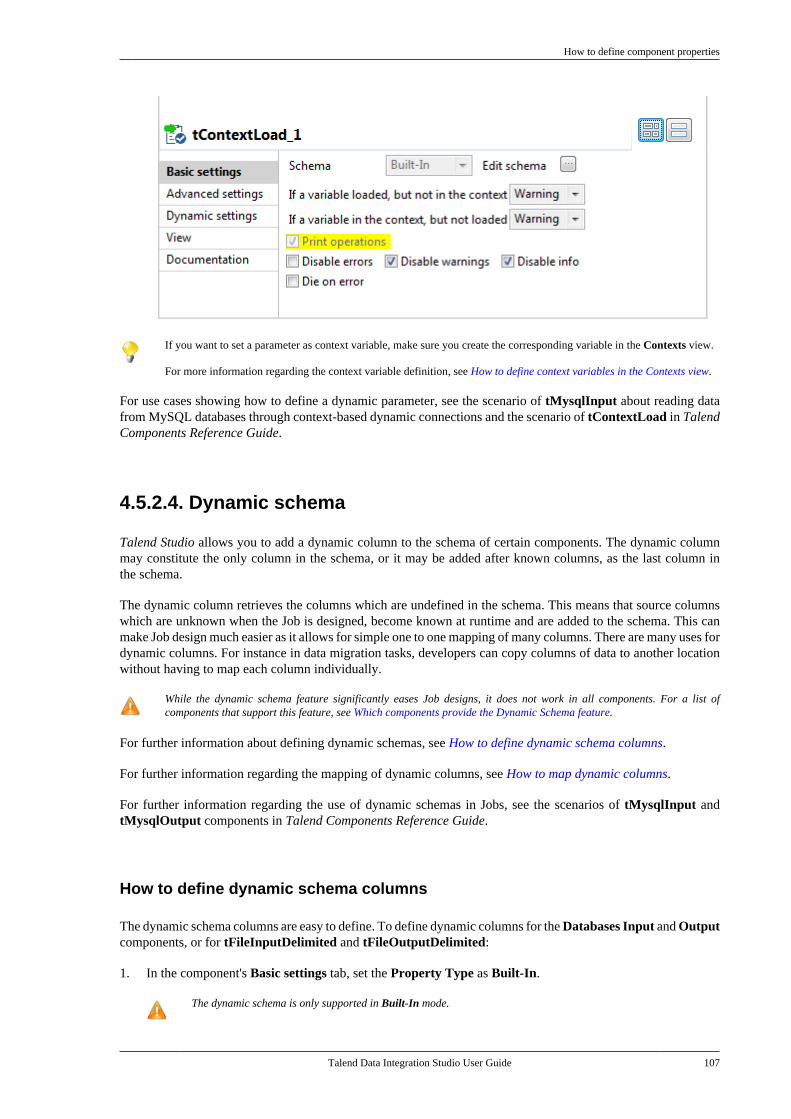
How to define component properties
Talend Data Integration Studio User Guide 107
If you want to set a parameter as context variable, make sure you create the corresponding variable in the Contexts view.
For more information regarding the context variable definition, see How to define context variables in the Contexts view.
For use cases showing how to define a dynamic parameter, see the scenario of tMysqlInput about reading datafrom MySQL databases through context-based dynamic connections and the scenario of tContextLoad in TalendComponents Reference Guide.
4.5.2.4. Dynamic schema
Talend Studio allows you to add a dynamic column to the schema of certain components. The dynamic columnmay constitute the only column in the schema, or it may be added after known columns, as the last column inthe schema.
The dynamic column retrieves the columns which are undefined in the schema. This means that source columnswhich are unknown when the Job is designed, become known at runtime and are added to the schema. This canmake Job design much easier as it allows for simple one to one mapping of many columns. There are many uses fordynamic columns. For instance in data migration tasks, developers can copy columns of data to another locationwithout having to map each column individually.
While the dynamic schema feature significantly eases Job designs, it does not work in all components. For a list ofcomponents that support this feature, see Which components provide the Dynamic Schema feature.
For further information about defining dynamic schemas, see How to define dynamic schema columns.
For further information regarding the mapping of dynamic columns, see How to map dynamic columns.
For further information regarding the use of dynamic schemas in Jobs, see the scenarios of tMysqlInput andtMysqlOutput components in Talend Components Reference Guide.
How to define dynamic schema columns
The dynamic schema columns are easy to define. To define dynamic columns for the Databases Input and Outputcomponents, or for tFileInputDelimited and tFileOutputDelimited:
1. In the component's Basic settings tab, set the Property Type as Built-In.
The dynamic schema is only supported in Built-In mode.
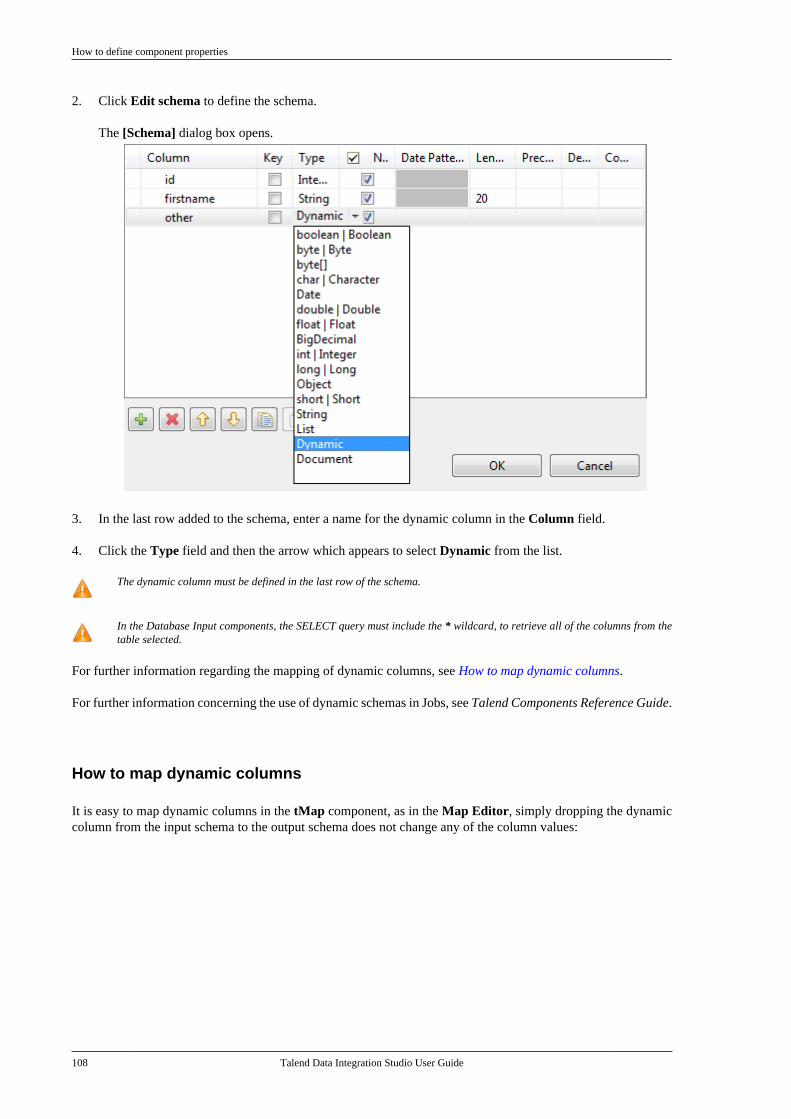
How to define component properties
108 Talend Data Integration Studio User Guide
2. Click Edit schema to define the schema.
The [Schema] dialog box opens.
3. In the last row added to the schema, enter a name for the dynamic column in the Column field.
4. Click the Type field and then the arrow which appears to select Dynamic from the list.
The dynamic column must be defined in the last row of the schema.
In the Database Input components, the SELECT query must include the * wildcard, to retrieve all of the columns from thetable selected.
For further information regarding the mapping of dynamic columns, see How to map dynamic columns.
For further information concerning the use of dynamic schemas in Jobs, see Talend Components Reference Guide.
How to map dynamic columns
It is easy to map dynamic columns in the tMap component, as in the Map Editor, simply dropping the dynamiccolumn from the input schema to the output schema does not change any of the column values:
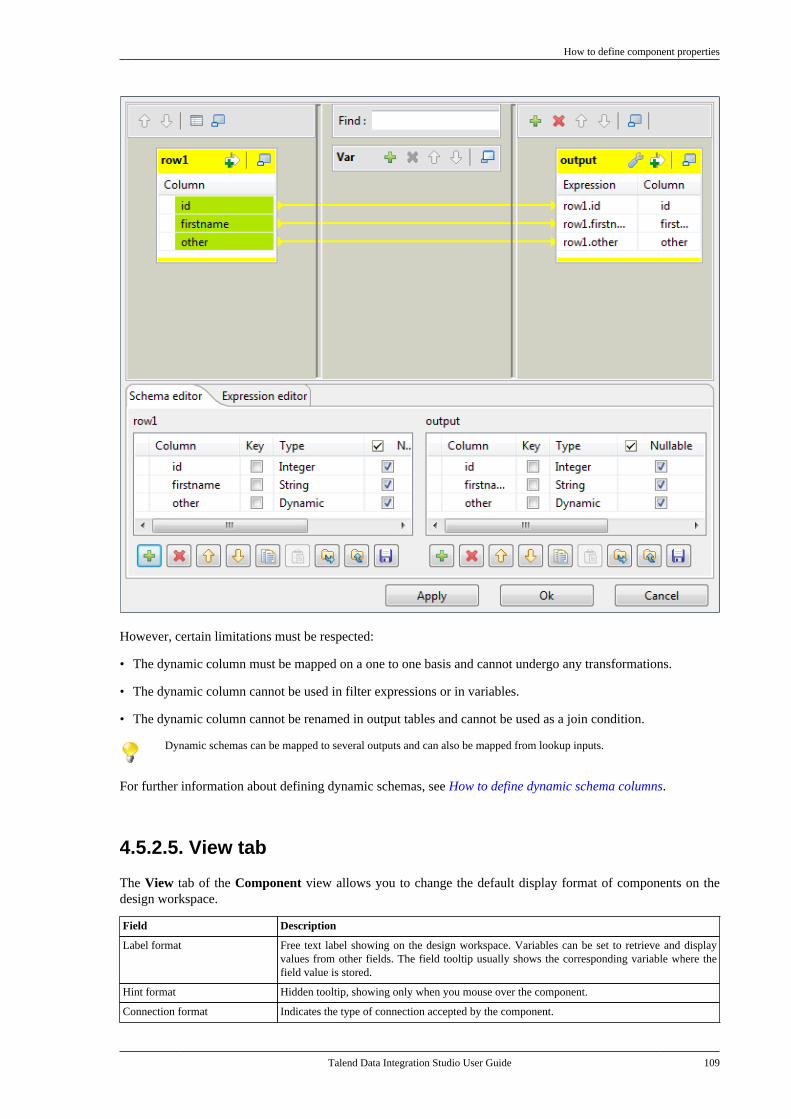
How to define component properties
Talend Data Integration Studio User Guide 109
However, certain limitations must be respected:
• The dynamic column must be mapped on a one to one basis and cannot undergo any transformations.
• The dynamic column cannot be used in filter expressions or in variables.
• The dynamic column cannot be renamed in output tables and cannot be used as a join condition.
Dynamic schemas can be mapped to several outputs and can also be mapped from lookup inputs.
For further information about defining dynamic schemas, see How to define dynamic schema columns.
4.5.2.5. View tab
The View tab of the Component view allows you to change the default display format of components on thedesign workspace.
Field Description
Label format Free text label showing on the design workspace. Variables can be set to retrieve and displayvalues from other fields. The field tooltip usually shows the corresponding variable where thefield value is stored.
Hint format Hidden tooltip, showing only when you mouse over the component.
Connection format Indicates the type of connection accepted by the component.
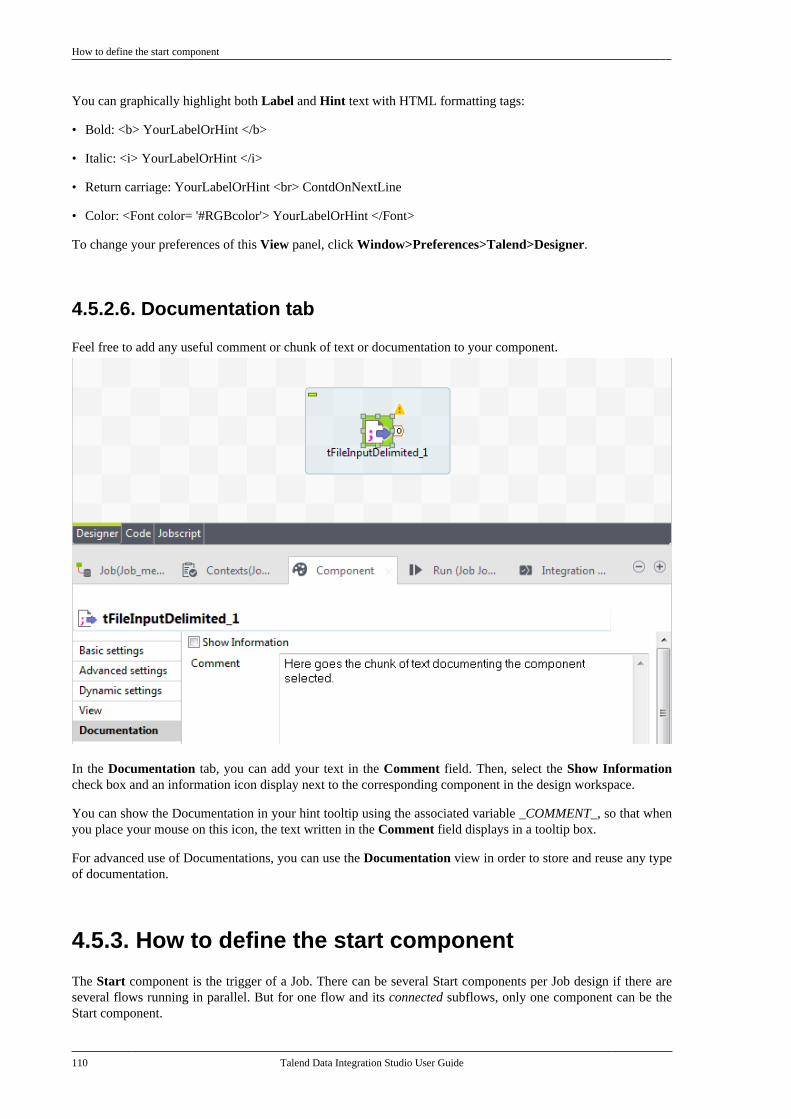
How to define the start component
110 Talend Data Integration Studio User Guide
You can graphically highlight both Label and Hint text with HTML formatting tags:
• Bold: <b> YourLabelOrHint </b>
• Italic: <i> YourLabelOrHint </i>
• Return carriage: YourLabelOrHint <br> ContdOnNextLine
• Color: <Font color= '#RGBcolor'> YourLabelOrHint </Font>
To change your preferences of this View panel, click Window>Preferences>Talend>Designer.
4.5.2.6. Documentation tab
Feel free to add any useful comment or chunk of text or documentation to your component.
In the Documentation tab, you can add your text in the Comment field. Then, select the Show Informationcheck box and an information icon display next to the corresponding component in the design workspace.
You can show the Documentation in your hint tooltip using the associated variable _COMMENT_, so that whenyou place your mouse on this icon, the text written in the Comment field displays in a tooltip box.
For advanced use of Documentations, you can use the Documentation view in order to store and reuse any typeof documentation.
4.5.3. How to define the start component
The Start component is the trigger of a Job. There can be several Start components per Job design if there areseveral flows running in parallel. But for one flow and its connected subflows, only one component can be theStart component.
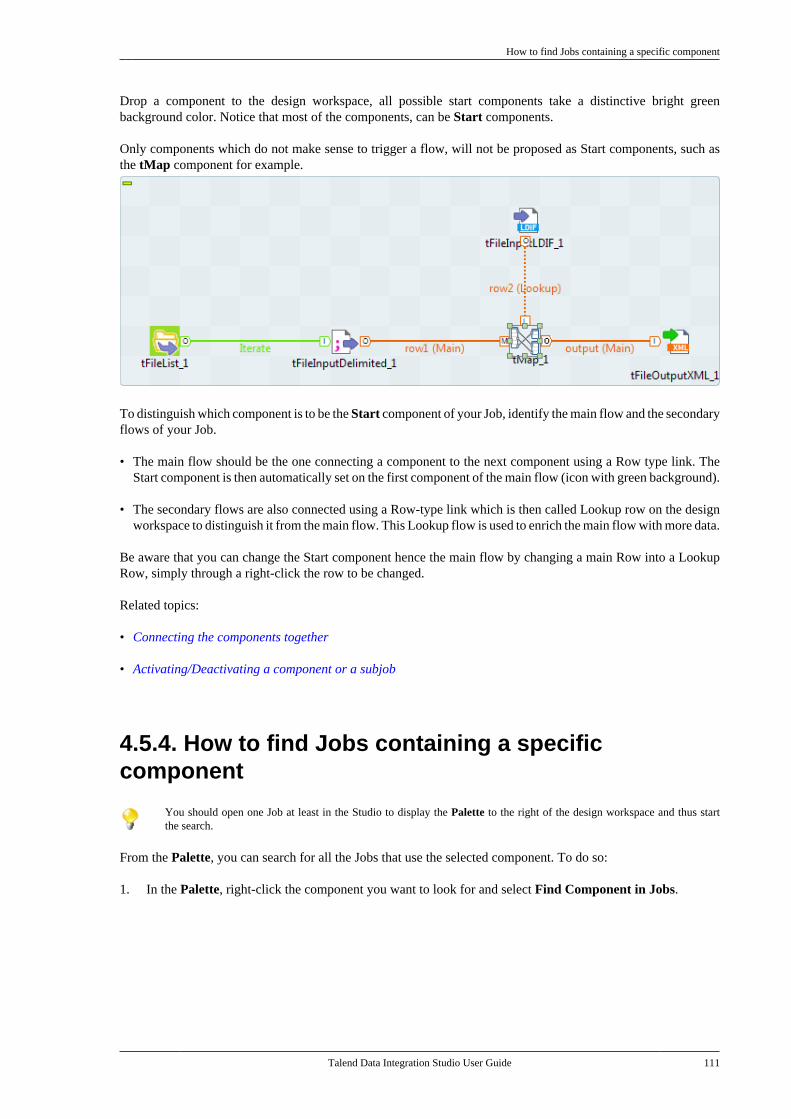
How to find Jobs containing a specific component
Talend Data Integration Studio User Guide 111
Drop a component to the design workspace, all possible start components take a distinctive bright greenbackground color. Notice that most of the components, can be Start components.
Only components which do not make sense to trigger a flow, will not be proposed as Start components, such asthe tMap component for example.
To distinguish which component is to be the Start component of your Job, identify the main flow and the secondaryflows of your Job.
• The main flow should be the one connecting a component to the next component using a Row type link. TheStart component is then automatically set on the first component of the main flow (icon with green background).
• The secondary flows are also connected using a Row-type link which is then called Lookup row on the designworkspace to distinguish it from the main flow. This Lookup flow is used to enrich the main flow with more data.
Be aware that you can change the Start component hence the main flow by changing a main Row into a LookupRow, simply through a right-click the row to be changed.
Related topics:
• Connecting the components together
• Activating/Deactivating a component or a subjob
4.5.4. How to find Jobs containing a specificcomponent
You should open one Job at least in the Studio to display the Palette to the right of the design workspace and thus startthe search.
From the Palette, you can search for all the Jobs that use the selected component. To do so:
1. In the Palette, right-click the component you want to look for and select Find Component in Jobs.
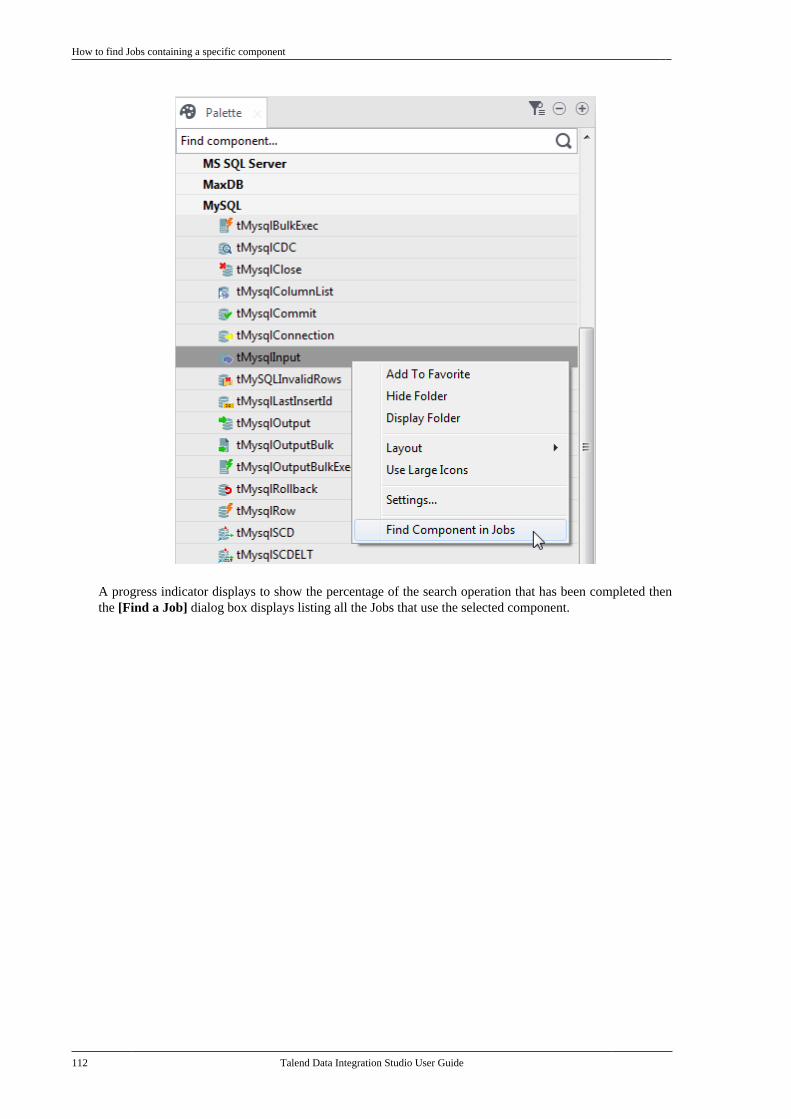
How to find Jobs containing a specific component
112 Talend Data Integration Studio User Guide
A progress indicator displays to show the percentage of the search operation that has been completed thenthe [Find a Job] dialog box displays listing all the Jobs that use the selected component.
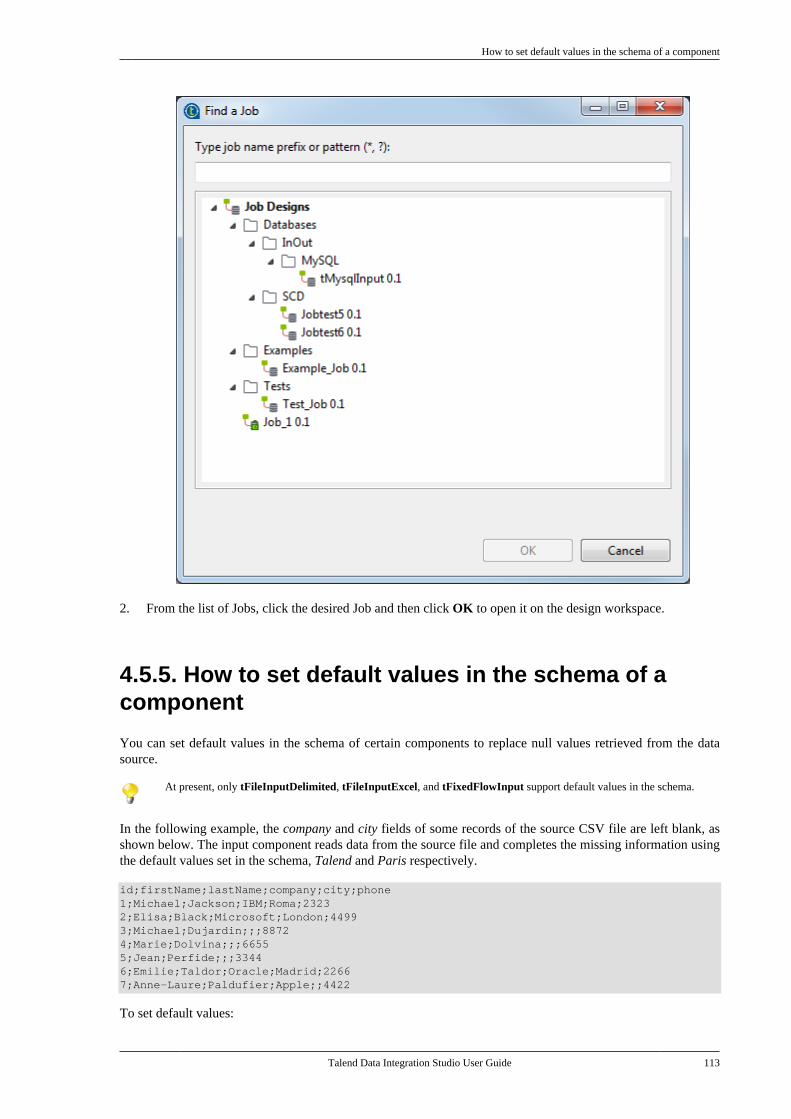
How to set default values in the schema of a component
Talend Data Integration Studio User Guide 113
2. From the list of Jobs, click the desired Job and then click OK to open it on the design workspace.
4.5.5. How to set default values in the schema of acomponent
You can set default values in the schema of certain components to replace null values retrieved from the datasource.
At present, only tFileInputDelimited, tFileInputExcel, and tFixedFlowInput support default values in the schema.
In the following example, the company and city fields of some records of the source CSV file are left blank, asshown below. The input component reads data from the source file and completes the missing information usingthe default values set in the schema, Talend and Paris respectively.
id;firstName;lastName;company;city;phone1;Michael;Jackson;IBM;Roma;23232;Elisa;Black;Microsoft;London;44993;Michael;Dujardin;;;88724;Marie;Dolvina;;;66555;Jean;Perfide;;;33446;Emilie;Taldor;Oracle;Madrid;22667;Anne-Laure;Paldufier;Apple;;4422
To set default values:
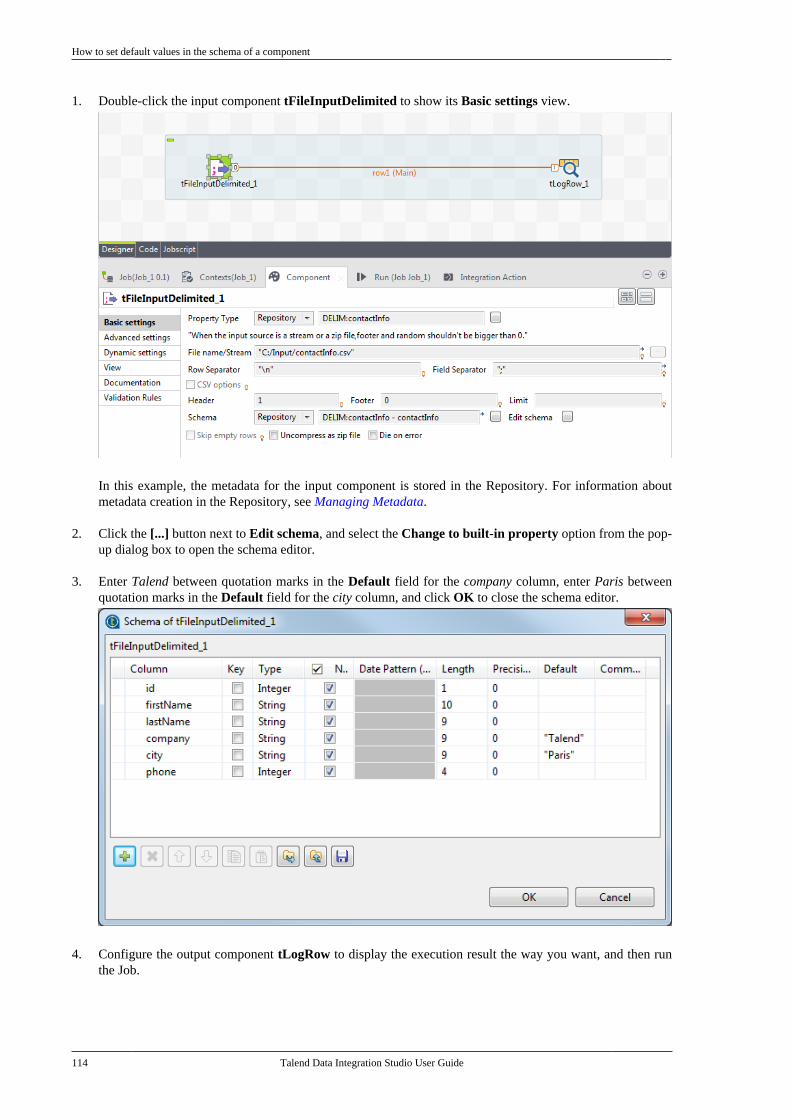
How to set default values in the schema of a component
114 Talend Data Integration Studio User Guide
1. Double-click the input component tFileInputDelimited to show its Basic settings view.
In this example, the metadata for the input component is stored in the Repository. For information aboutmetadata creation in the Repository, see Managing Metadata.
2. Click the [...] button next to Edit schema, and select the Change to built-in property option from the pop-up dialog box to open the schema editor.
3. Enter Talend between quotation marks in the Default field for the company column, enter Paris betweenquotation marks in the Default field for the city column, and click OK to close the schema editor.
4. Configure the output component tLogRow to display the execution result the way you want, and then runthe Job.
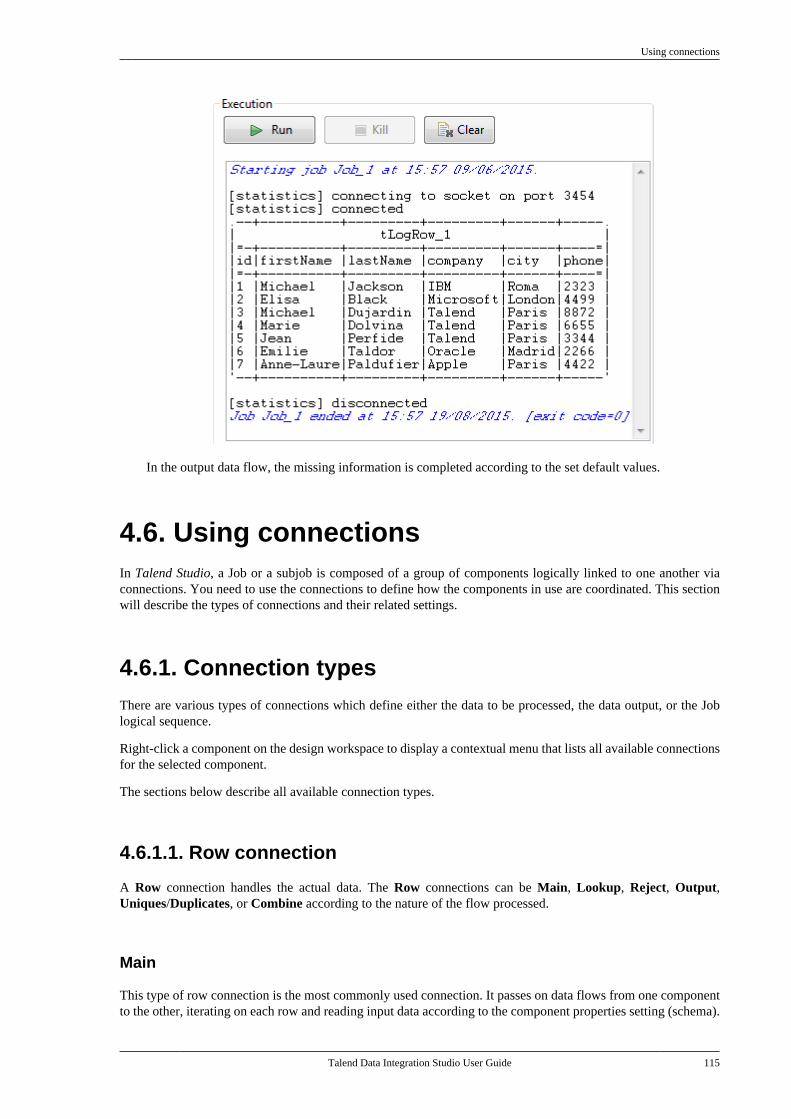
Using connections
Talend Data Integration Studio User Guide 115
In the output data flow, the missing information is completed according to the set default values.
4.6. Using connectionsIn Talend Studio, a Job or a subjob is composed of a group of components logically linked to one another viaconnections. You need to use the connections to define how the components in use are coordinated. This sectionwill describe the types of connections and their related settings.
4.6.1. Connection typesThere are various types of connections which define either the data to be processed, the data output, or the Joblogical sequence.
Right-click a component on the design workspace to display a contextual menu that lists all available connectionsfor the selected component.
The sections below describe all available connection types.
4.6.1.1. Row connection
A Row connection handles the actual data. The Row connections can be Main, Lookup, Reject, Output,Uniques/Duplicates, or Combine according to the nature of the flow processed.
Main
This type of row connection is the most commonly used connection. It passes on data flows from one componentto the other, iterating on each row and reading input data according to the component properties setting (schema).
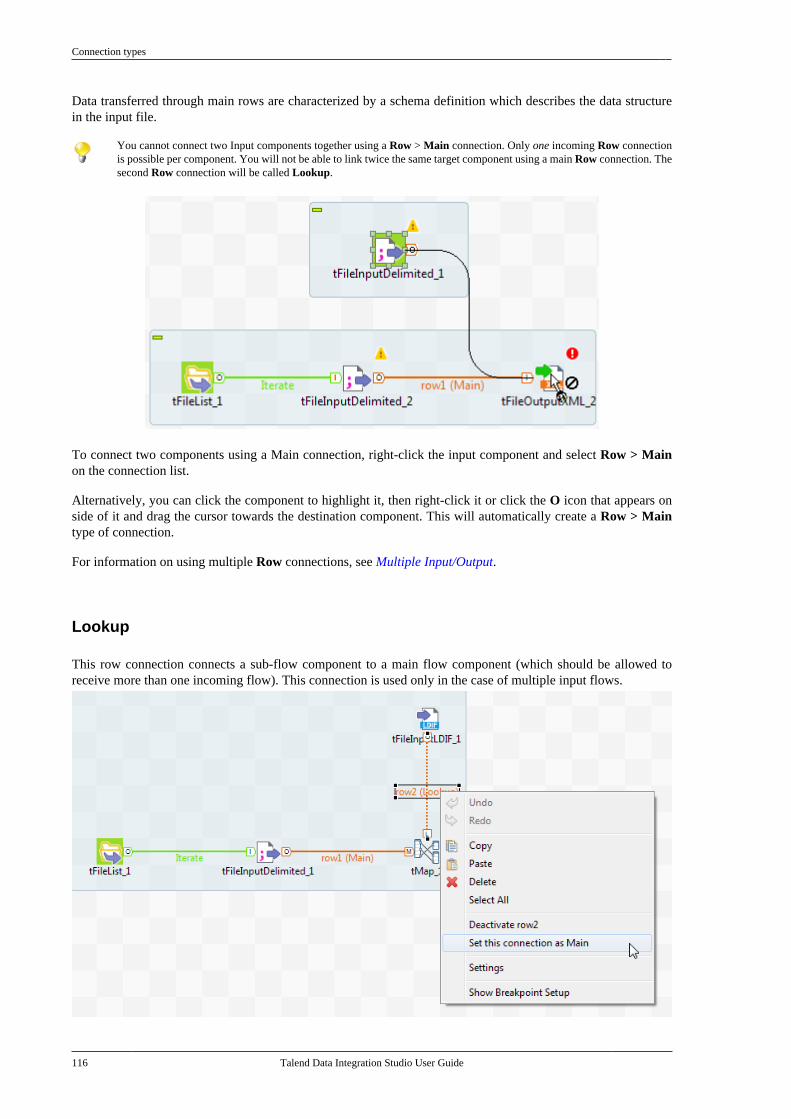
Connection types
116 Talend Data Integration Studio User Guide
Data transferred through main rows are characterized by a schema definition which describes the data structurein the input file.
You cannot connect two Input components together using a Row > Main connection. Only one incoming Row connectionis possible per component. You will not be able to link twice the same target component using a main Row connection. Thesecond Row connection will be called Lookup.
To connect two components using a Main connection, right-click the input component and select Row > Mainon the connection list.
Alternatively, you can click the component to highlight it, then right-click it or click the O icon that appears onside of it and drag the cursor towards the destination component. This will automatically create a Row > Maintype of connection.
For information on using multiple Row connections, see Multiple Input/Output.
Lookup
This row connection connects a sub-flow component to a main flow component (which should be allowed toreceive more than one incoming flow). This connection is used only in the case of multiple input flows.
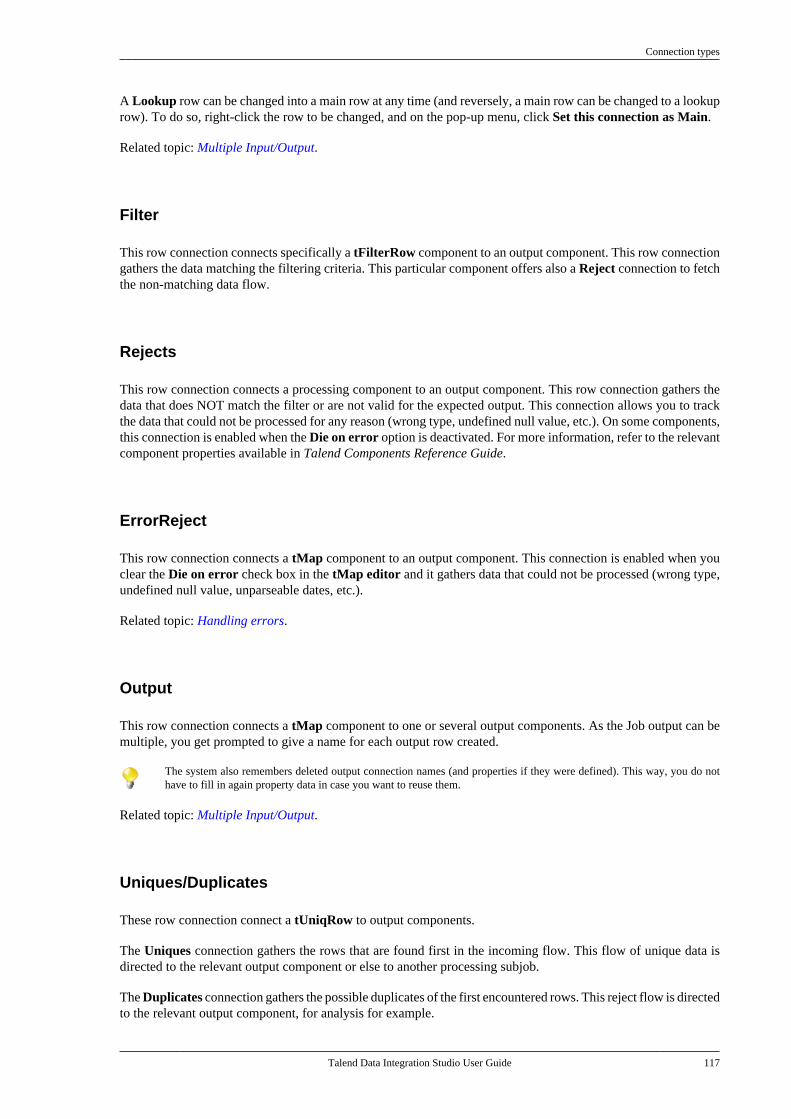
Connection types
Talend Data Integration Studio User Guide 117
A Lookup row can be changed into a main row at any time (and reversely, a main row can be changed to a lookuprow). To do so, right-click the row to be changed, and on the pop-up menu, click Set this connection as Main.
Related topic: Multiple Input/Output.
Filter
This row connection connects specifically a tFilterRow component to an output component. This row connectiongathers the data matching the filtering criteria. This particular component offers also a Reject connection to fetchthe non-matching data flow.
Rejects
This row connection connects a processing component to an output component. This row connection gathers thedata that does NOT match the filter or are not valid for the expected output. This connection allows you to trackthe data that could not be processed for any reason (wrong type, undefined null value, etc.). On some components,this connection is enabled when the Die on error option is deactivated. For more information, refer to the relevantcomponent properties available in Talend Components Reference Guide.
ErrorReject
This row connection connects a tMap component to an output component. This connection is enabled when youclear the Die on error check box in the tMap editor and it gathers data that could not be processed (wrong type,undefined null value, unparseable dates, etc.).
Related topic: Handling errors.
Output
This row connection connects a tMap component to one or several output components. As the Job output can bemultiple, you get prompted to give a name for each output row created.
The system also remembers deleted output connection names (and properties if they were defined). This way, you do nothave to fill in again property data in case you want to reuse them.
Related topic: Multiple Input/Output.
Uniques/Duplicates
These row connection connect a tUniqRow to output components.
The Uniques connection gathers the rows that are found first in the incoming flow. This flow of unique data isdirected to the relevant output component or else to another processing subjob.
The Duplicates connection gathers the possible duplicates of the first encountered rows. This reject flow is directedto the relevant output component, for analysis for example.
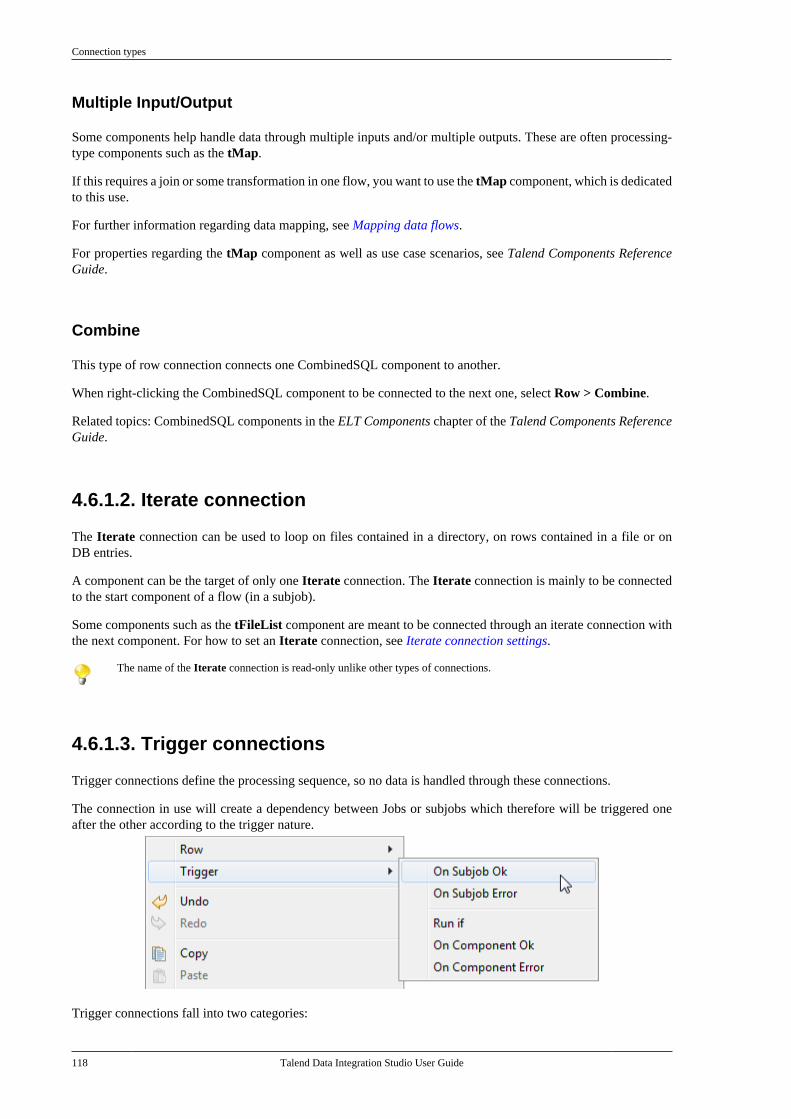
Connection types
118 Talend Data Integration Studio User Guide
Multiple Input/Output
Some components help handle data through multiple inputs and/or multiple outputs. These are often processing-type components such as the tMap.
If this requires a join or some transformation in one flow, you want to use the tMap component, which is dedicatedto this use.
For further information regarding data mapping, see Mapping data flows.
For properties regarding the tMap component as well as use case scenarios, see Talend Components ReferenceGuide.
Combine
This type of row connection connects one CombinedSQL component to another.
When right-clicking the CombinedSQL component to be connected to the next one, select Row > Combine.
Related topics: CombinedSQL components in the ELT Components chapter of the Talend Components ReferenceGuide.
4.6.1.2. Iterate connection
The Iterate connection can be used to loop on files contained in a directory, on rows contained in a file or onDB entries.
A component can be the target of only one Iterate connection. The Iterate connection is mainly to be connectedto the start component of a flow (in a subjob).
Some components such as the tFileList component are meant to be connected through an iterate connection withthe next component. For how to set an Iterate connection, see Iterate connection settings.
The name of the Iterate connection is read-only unlike other types of connections.
4.6.1.3. Trigger connections
Trigger connections define the processing sequence, so no data is handled through these connections.
The connection in use will create a dependency between Jobs or subjobs which therefore will be triggered oneafter the other according to the trigger nature.
Trigger connections fall into two categories:
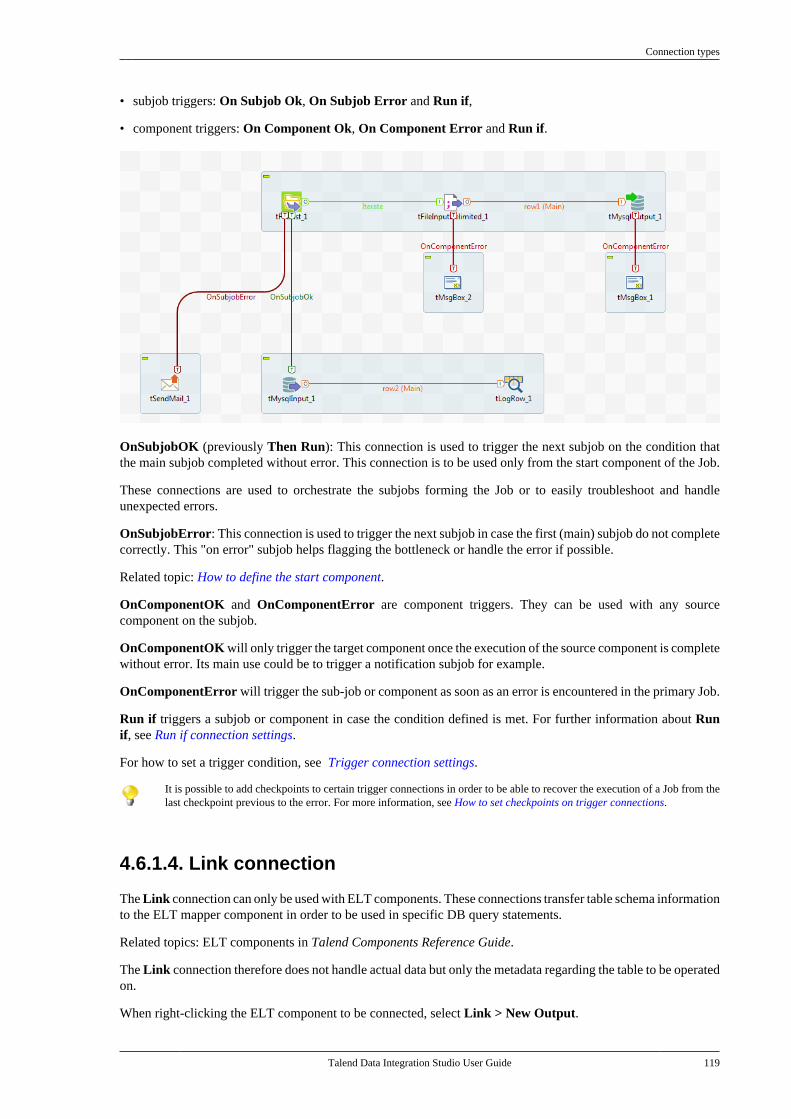
Connection types
Talend Data Integration Studio User Guide 119
• subjob triggers: On Subjob Ok, On Subjob Error and Run if,
• component triggers: On Component Ok, On Component Error and Run if.
OnSubjobOK (previously Then Run): This connection is used to trigger the next subjob on the condition thatthe main subjob completed without error. This connection is to be used only from the start component of the Job.
These connections are used to orchestrate the subjobs forming the Job or to easily troubleshoot and handleunexpected errors.
OnSubjobError: This connection is used to trigger the next subjob in case the first (main) subjob do not completecorrectly. This "on error" subjob helps flagging the bottleneck or handle the error if possible.
Related topic: How to define the start component.
OnComponentOK and OnComponentError are component triggers. They can be used with any sourcecomponent on the subjob.
OnComponentOK will only trigger the target component once the execution of the source component is completewithout error. Its main use could be to trigger a notification subjob for example.
OnComponentError will trigger the sub-job or component as soon as an error is encountered in the primary Job.
Run if triggers a subjob or component in case the condition defined is met. For further information about Runif, see Run if connection settings.
For how to set a trigger condition, see Trigger connection settings.
It is possible to add checkpoints to certain trigger connections in order to be able to recover the execution of a Job from thelast checkpoint previous to the error. For more information, see How to set checkpoints on trigger connections.
4.6.1.4. Link connection
The Link connection can only be used with ELT components. These connections transfer table schema informationto the ELT mapper component in order to be used in specific DB query statements.
Related topics: ELT components in Talend Components Reference Guide.
The Link connection therefore does not handle actual data but only the metadata regarding the table to be operatedon.
When right-clicking the ELT component to be connected, select Link > New Output.
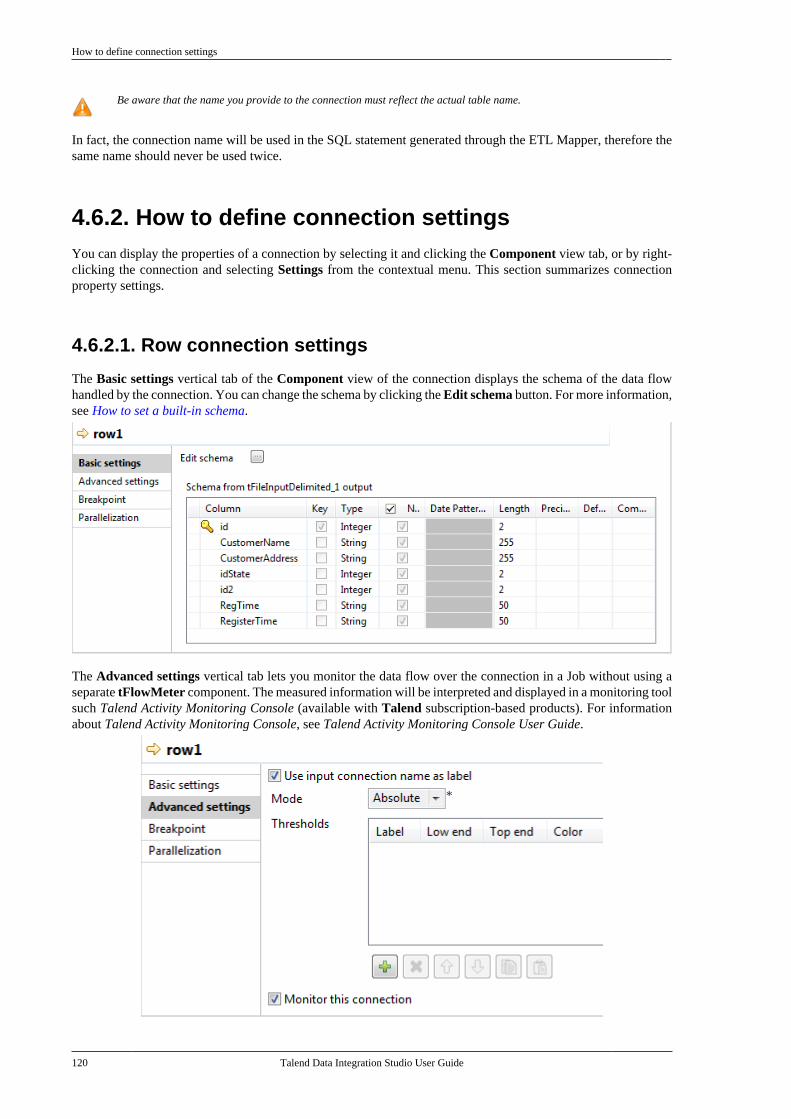
How to define connection settings
120 Talend Data Integration Studio User Guide
Be aware that the name you provide to the connection must reflect the actual table name.
In fact, the connection name will be used in the SQL statement generated through the ETL Mapper, therefore thesame name should never be used twice.
4.6.2. How to define connection settingsYou can display the properties of a connection by selecting it and clicking the Component view tab, or by right-clicking the connection and selecting Settings from the contextual menu. This section summarizes connectionproperty settings.
4.6.2.1. Row connection settings
The Basic settings vertical tab of the Component view of the connection displays the schema of the data flowhandled by the connection. You can change the schema by clicking the Edit schema button. For more information,see How to set a built-in schema.
The Advanced settings vertical tab lets you monitor the data flow over the connection in a Job without using aseparate tFlowMeter component. The measured information will be interpreted and displayed in a monitoring toolsuch Talend Activity Monitoring Console (available with Talend subscription-based products). For informationabout Talend Activity Monitoring Console, see Talend Activity Monitoring Console User Guide.
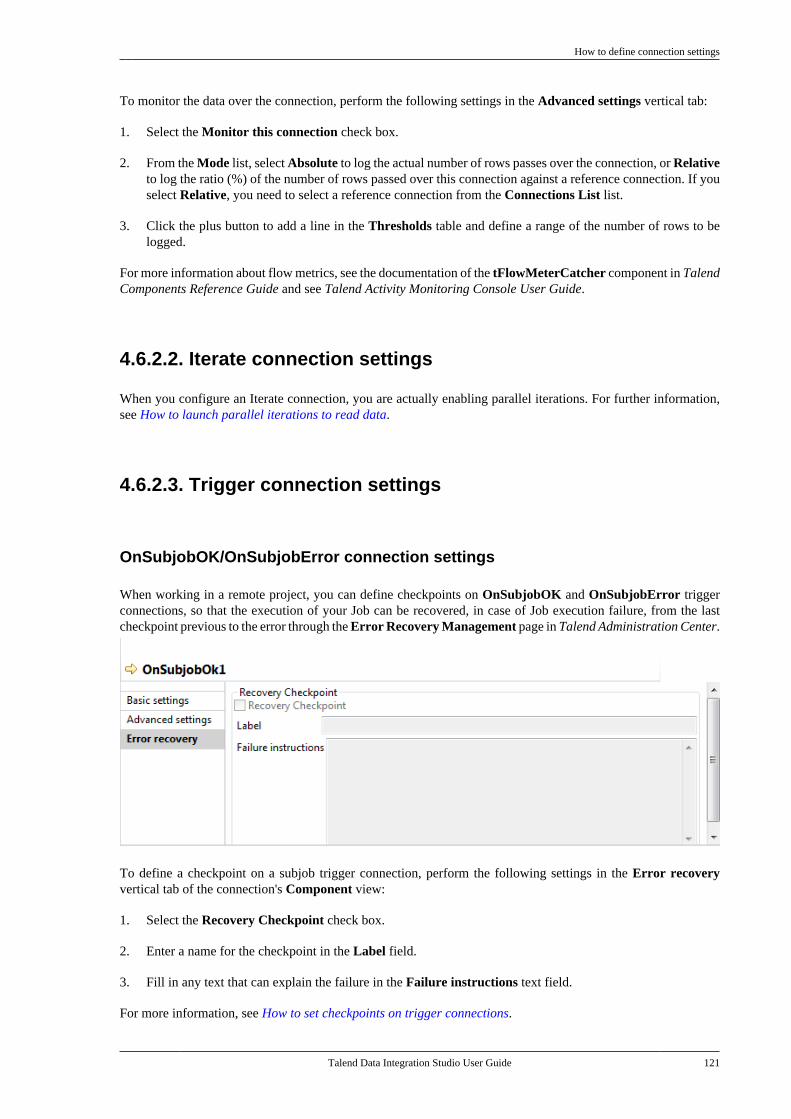
How to define connection settings
Talend Data Integration Studio User Guide 121
To monitor the data over the connection, perform the following settings in the Advanced settings vertical tab:
1. Select the Monitor this connection check box.
2. From the Mode list, select Absolute to log the actual number of rows passes over the connection, or Relativeto log the ratio (%) of the number of rows passed over this connection against a reference connection. If youselect Relative, you need to select a reference connection from the Connections List list.
3. Click the plus button to add a line in the Thresholds table and define a range of the number of rows to belogged.
For more information about flow metrics, see the documentation of the tFlowMeterCatcher component in TalendComponents Reference Guide and see Talend Activity Monitoring Console User Guide.
4.6.2.2. Iterate connection settings
When you configure an Iterate connection, you are actually enabling parallel iterations. For further information,see How to launch parallel iterations to read data.
4.6.2.3. Trigger connection settings
OnSubjobOK/OnSubjobError connection settings
When working in a remote project, you can define checkpoints on OnSubjobOK and OnSubjobError triggerconnections, so that the execution of your Job can be recovered, in case of Job execution failure, from the lastcheckpoint previous to the error through the Error Recovery Management page in Talend Administration Center.
To define a checkpoint on a subjob trigger connection, perform the following settings in the Error recoveryvertical tab of the connection's Component view:
1. Select the Recovery Checkpoint check box.
2. Enter a name for the checkpoint in the Label field.
3. Fill in any text that can explain the failure in the Failure instructions text field.
For more information, see How to set checkpoints on trigger connections.
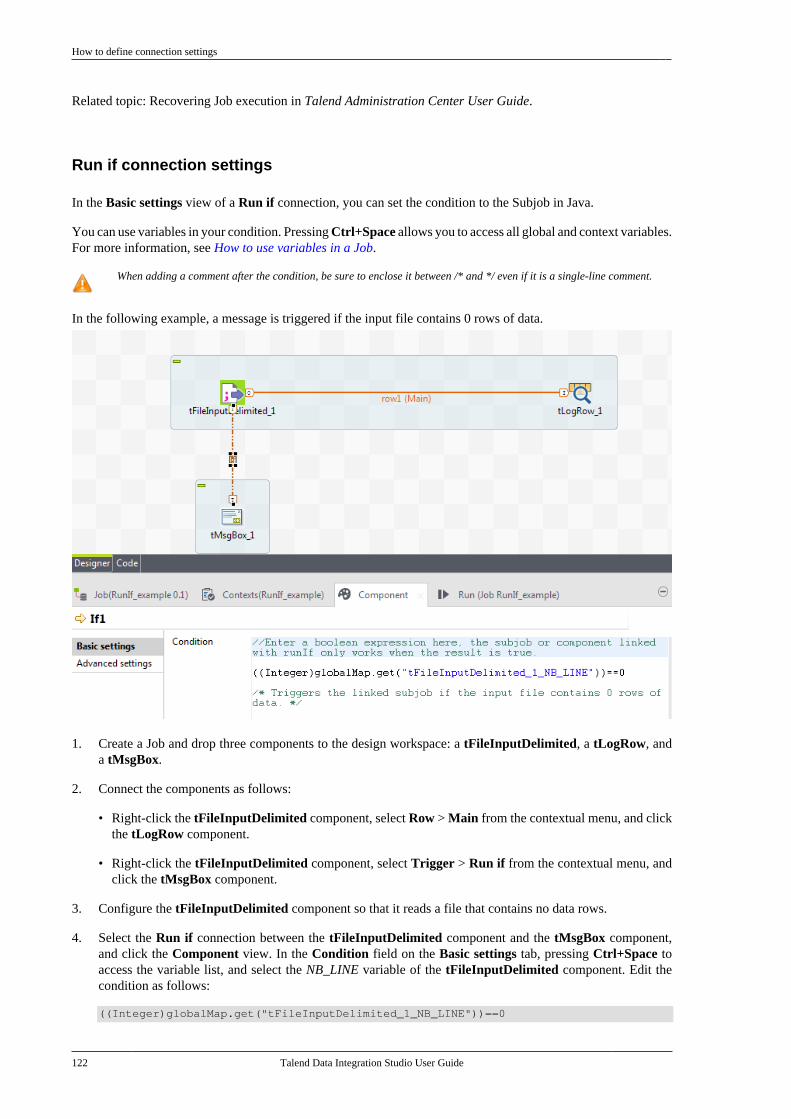
How to define connection settings
122 Talend Data Integration Studio User Guide
Related topic: Recovering Job execution in Talend Administration Center User Guide.
Run if connection settings
In the Basic settings view of a Run if connection, you can set the condition to the Subjob in Java.
You can use variables in your condition. Pressing Ctrl+Space allows you to access all global and context variables.For more information, see How to use variables in a Job.
When adding a comment after the condition, be sure to enclose it between /* and */ even if it is a single-line comment.
In the following example, a message is triggered if the input file contains 0 rows of data.
1. Create a Job and drop three components to the design workspace: a tFileInputDelimited, a tLogRow, anda tMsgBox.
2. Connect the components as follows:
• Right-click the tFileInputDelimited component, select Row > Main from the contextual menu, and clickthe tLogRow component.
• Right-click the tFileInputDelimited component, select Trigger > Run if from the contextual menu, andclick the tMsgBox component.
3. Configure the tFileInputDelimited component so that it reads a file that contains no data rows.
4. Select the Run if connection between the tFileInputDelimited component and the tMsgBox component,and click the Component view. In the Condition field on the Basic settings tab, pressing Ctrl+Space toaccess the variable list, and select the NB_LINE variable of the tFileInputDelimited component. Edit thecondition as follows:
((Integer)globalMap.get("tFileInputDelimited_1_NB_LINE"))==0
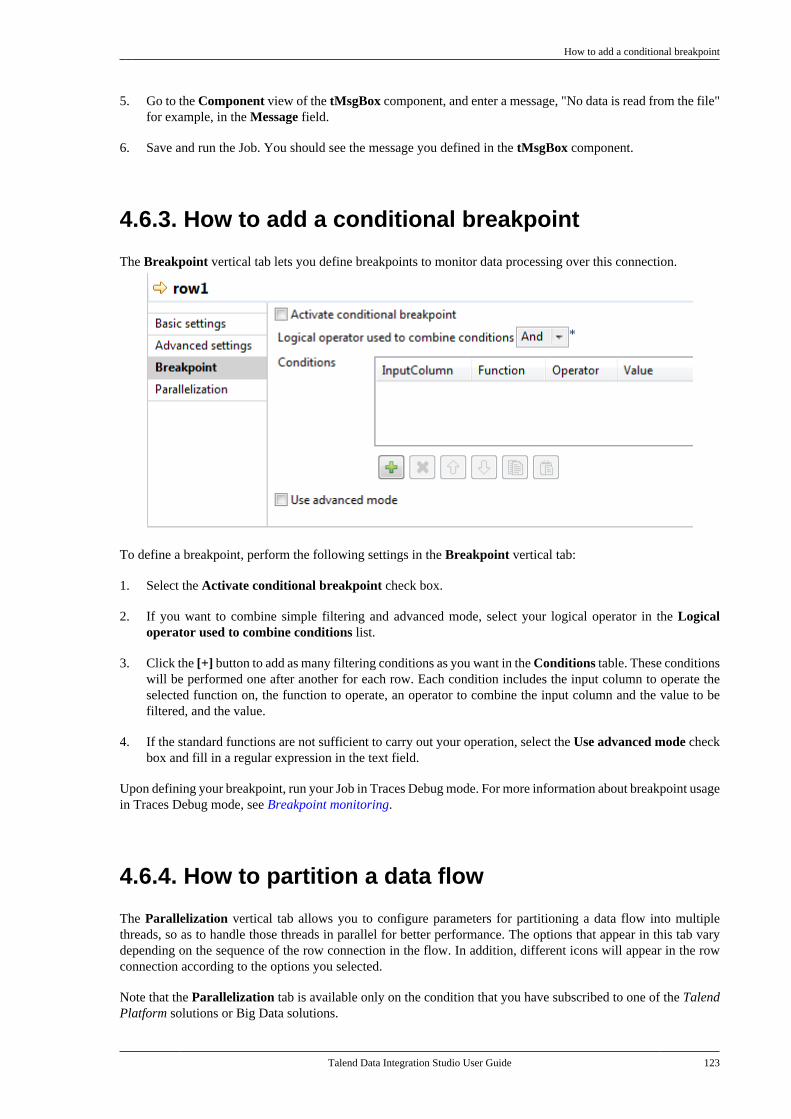
How to add a conditional breakpoint
Talend Data Integration Studio User Guide 123
5. Go to the Component view of the tMsgBox component, and enter a message, "No data is read from the file"for example, in the Message field.
6. Save and run the Job. You should see the message you defined in the tMsgBox component.
4.6.3. How to add a conditional breakpoint
The Breakpoint vertical tab lets you define breakpoints to monitor data processing over this connection.
To define a breakpoint, perform the following settings in the Breakpoint vertical tab:
1. Select the Activate conditional breakpoint check box.
2. If you want to combine simple filtering and advanced mode, select your logical operator in the Logicaloperator used to combine conditions list.
3. Click the [+] button to add as many filtering conditions as you want in the Conditions table. These conditionswill be performed one after another for each row. Each condition includes the input column to operate theselected function on, the function to operate, an operator to combine the input column and the value to befiltered, and the value.
4. If the standard functions are not sufficient to carry out your operation, select the Use advanced mode checkbox and fill in a regular expression in the text field.
Upon defining your breakpoint, run your Job in Traces Debug mode. For more information about breakpoint usagein Traces Debug mode, see Breakpoint monitoring.
4.6.4. How to partition a data flow
The Parallelization vertical tab allows you to configure parameters for partitioning a data flow into multiplethreads, so as to handle those threads in parallel for better performance. The options that appear in this tab varydepending on the sequence of the row connection in the flow. In addition, different icons will appear in the rowconnection according to the options you selected.
Note that the Parallelization tab is available only on the condition that you have subscribed to one of the TalendPlatform solutions or Big Data solutions.
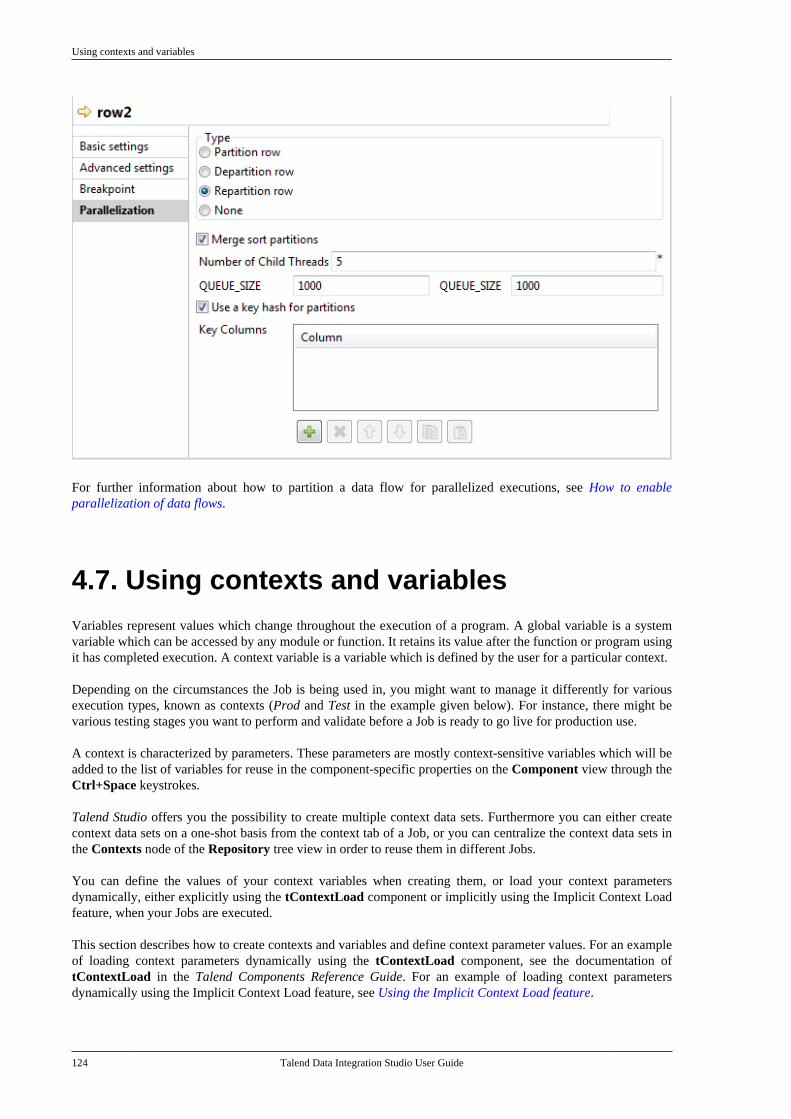
Using contexts and variables
124 Talend Data Integration Studio User Guide
For further information about how to partition a data flow for parallelized executions, see How to enableparallelization of data flows.
4.7. Using contexts and variablesVariables represent values which change throughout the execution of a program. A global variable is a systemvariable which can be accessed by any module or function. It retains its value after the function or program usingit has completed execution. A context variable is a variable which is defined by the user for a particular context.
Depending on the circumstances the Job is being used in, you might want to manage it differently for variousexecution types, known as contexts (Prod and Test in the example given below). For instance, there might bevarious testing stages you want to perform and validate before a Job is ready to go live for production use.
A context is characterized by parameters. These parameters are mostly context-sensitive variables which will beadded to the list of variables for reuse in the component-specific properties on the Component view through theCtrl+Space keystrokes.
Talend Studio offers you the possibility to create multiple context data sets. Furthermore you can either createcontext data sets on a one-shot basis from the context tab of a Job, or you can centralize the context data sets inthe Contexts node of the Repository tree view in order to reuse them in different Jobs.
You can define the values of your context variables when creating them, or load your context parametersdynamically, either explicitly using the tContextLoad component or implicitly using the Implicit Context Loadfeature, when your Jobs are executed.
This section describes how to create contexts and variables and define context parameter values. For an exampleof loading context parameters dynamically using the tContextLoad component, see the documentation oftContextLoad in the Talend Components Reference Guide. For an example of loading context parametersdynamically using the Implicit Context Load feature, see Using the Implicit Context Load feature.

How to define context variables for a Job
Talend Data Integration Studio User Guide 125
4.7.1. How to define context variables for a Job
You can define context variables for a particular Job in two ways:
• Using the Contexts view of the Job. See How to define context variables in the Contexts view.
• Using the F5 key from the Component view of a component. See How to define variables from the Componentview.
4.7.1.1. How to define context variables in the Contexts view
The Contexts view is positioned among the configuration tabs below design workspace.
If you cannot find the Contexts view on the tab system of Talend Studio, go to Window > Show view > Talend, and selectContexts.
The Contexts tab view shows all of the variables that have been defined for each component in the current Joband context variables imported into the current Job.
From this view, you can manage your built-in variables:
• Create and manage built-in contexts.
• Create, edit and delete built-in variables.
• Reorganize the context variables.
• Add built-in context variables to the Repository.
• Import variables from a Repository context source for use in the current Job.
• Edit Repository-stored context variables and update the changes to the Repository.
• Remove imported Repository variables from the current Job.
The following example will demonstrate how to define two contexts named Prod and Test and a set of variables- host, port, database, username, password, and table_name - under the two contexts for a Job.
Defining contexts
1. Open the Job in the design workspace.
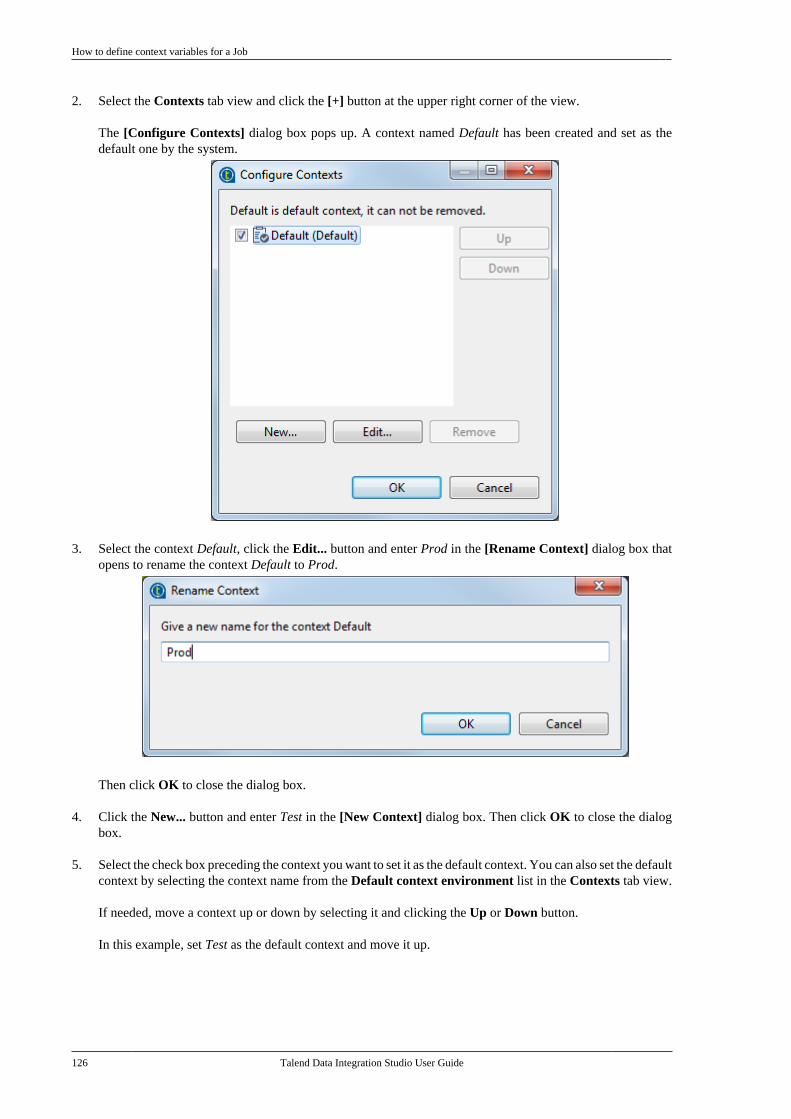
How to define context variables for a Job
126 Talend Data Integration Studio User Guide
2. Select the Contexts tab view and click the [+] button at the upper right corner of the view.
The [Configure Contexts] dialog box pops up. A context named Default has been created and set as thedefault one by the system.
3. Select the context Default, click the Edit... button and enter Prod in the [Rename Context] dialog box thatopens to rename the context Default to Prod.
Then click OK to close the dialog box.
4. Click the New... button and enter Test in the [New Context] dialog box. Then click OK to close the dialogbox.
5. Select the check box preceding the context you want to set it as the default context. You can also set the defaultcontext by selecting the context name from the Default context environment list in the Contexts tab view.
If needed, move a context up or down by selecting it and clicking the Up or Down button.
In this example, set Test as the default context and move it up.

How to define context variables for a Job
Talend Data Integration Studio User Guide 127
6. Click OK to validate your context definition and close the [Configure Contexts] dialog box.
The newly created contexts are shown in the context variables table of the Contexts tab view.
Defining variables
1. Click the [+] button at the bottom of the Contexts tab view to add a parameter line in the table.
2. Click in the Name field and enter the name of the variable you are creating, host in this example.
3. From the Type list, select the type of the variable corresponding to the component field where it will be used,String for the variable host in this example.

How to define context variables for a Job
128 Talend Data Integration Studio User Guide
4. If needed, click in the Comment field and enter a comment to describe the variable.
5. Click in the Value field and enter the variable value under each context.
For different variable types, the Value field appear slightly different when you click in it and functionsdifferently:
Type Value field Default value
String (default type) Editable text field null
Boolean Drop-down list box with two options: true and false
Character, Double, Integer,Long, Short, Object, BigDecimal
Editable text field
Date Editable text field, with a button to open the [Select Date& Time] dialog box.
File Editable text field, with a button to open the [Open] dialogbox for file selection.
Directory Editable text field, with a button to open the [Browse forFolder] dialog box for folder selection.
List of Value Editable text field, with a button to open the [ConfigureValues] dialog box for list creation and configuration.
(Empty)
Password Editable text field; text entered appears encrypted.
It is recommended that you enclose the values of string type variables between double quotation marks to avoidpossible errors during Job execution.
6. If needed, select the check box next to the variable of interest and enter the prompt message in thecorresponding Prompt field. This allows you to see a prompt for the variable value and to edit it at theexecution time.
You can show/hide a Prompt column of the table by clicking the black right/left pointing triangle next tothe relevant context name.
7. Repeat the steps above to define all the variables in this example.
• port, type String,
• database, type String,
• username, type String,
• password, type Password,
• table_name, type String.
All the variables created and their values under different contexts are displayed in the table and are ready foruse in your Job. You can further edit the variables in this view if needed.
You can also add a built-in context variable to the Repository to make it reusable across different Jobs. Formore information, see How to add a built-in context variable to the Repository.
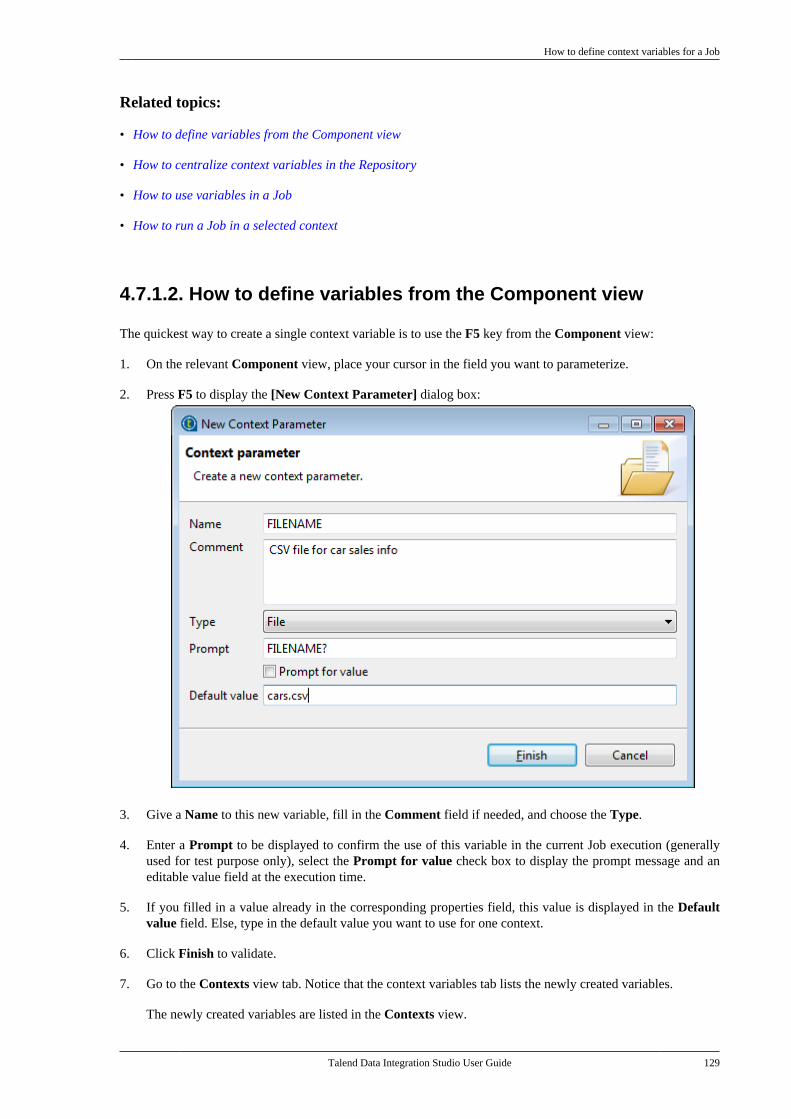
How to define context variables for a Job
Talend Data Integration Studio User Guide 129
Related topics:
• How to define variables from the Component view
• How to centralize context variables in the Repository
• How to use variables in a Job
• How to run a Job in a selected context
4.7.1.2. How to define variables from the Component view
The quickest way to create a single context variable is to use the F5 key from the Component view:
1. On the relevant Component view, place your cursor in the field you want to parameterize.
2. Press F5 to display the [New Context Parameter] dialog box:
3. Give a Name to this new variable, fill in the Comment field if needed, and choose the Type.
4. Enter a Prompt to be displayed to confirm the use of this variable in the current Job execution (generallyused for test purpose only), select the Prompt for value check box to display the prompt message and aneditable value field at the execution time.
5. If you filled in a value already in the corresponding properties field, this value is displayed in the Defaultvalue field. Else, type in the default value you want to use for one context.
6. Click Finish to validate.
7. Go to the Contexts view tab. Notice that the context variables tab lists the newly created variables.
The newly created variables are listed in the Contexts view.
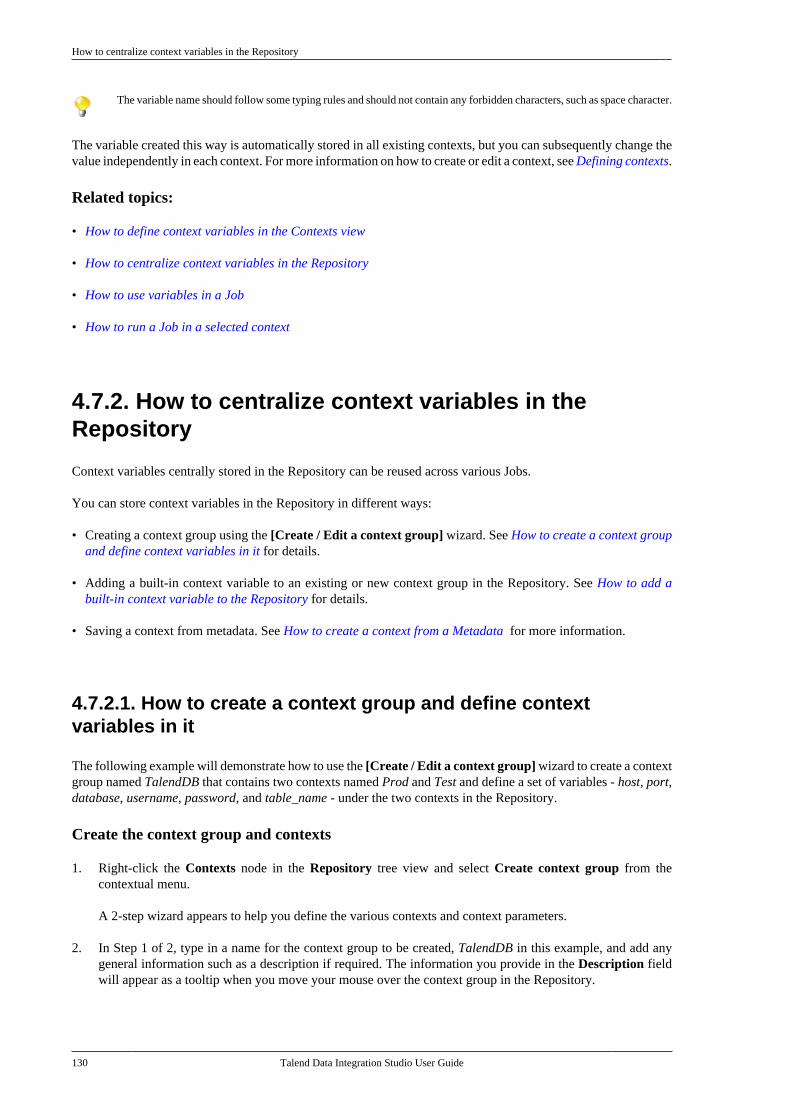
How to centralize context variables in the Repository
130 Talend Data Integration Studio User Guide
The variable name should follow some typing rules and should not contain any forbidden characters, such as space character.
The variable created this way is automatically stored in all existing contexts, but you can subsequently change thevalue independently in each context. For more information on how to create or edit a context, see Defining contexts.
Related topics:
• How to define context variables in the Contexts view
• How to centralize context variables in the Repository
• How to use variables in a Job
• How to run a Job in a selected context
4.7.2. How to centralize context variables in theRepository
Context variables centrally stored in the Repository can be reused across various Jobs.
You can store context variables in the Repository in different ways:
• Creating a context group using the [Create / Edit a context group] wizard. See How to create a context groupand define context variables in it for details.
• Adding a built-in context variable to an existing or new context group in the Repository. See How to add abuilt-in context variable to the Repository for details.
• Saving a context from metadata. See How to create a context from a Metadata for more information.
4.7.2.1. How to create a context group and define contextvariables in it
The following example will demonstrate how to use the [Create / Edit a context group] wizard to create a contextgroup named TalendDB that contains two contexts named Prod and Test and define a set of variables - host, port,database, username, password, and table_name - under the two contexts in the Repository.
Create the context group and contexts
1. Right-click the Contexts node in the Repository tree view and select Create context group from thecontextual menu.
A 2-step wizard appears to help you define the various contexts and context parameters.
2. In Step 1 of 2, type in a name for the context group to be created, TalendDB in this example, and add anygeneral information such as a description if required. The information you provide in the Description fieldwill appear as a tooltip when you move your mouse over the context group in the Repository.
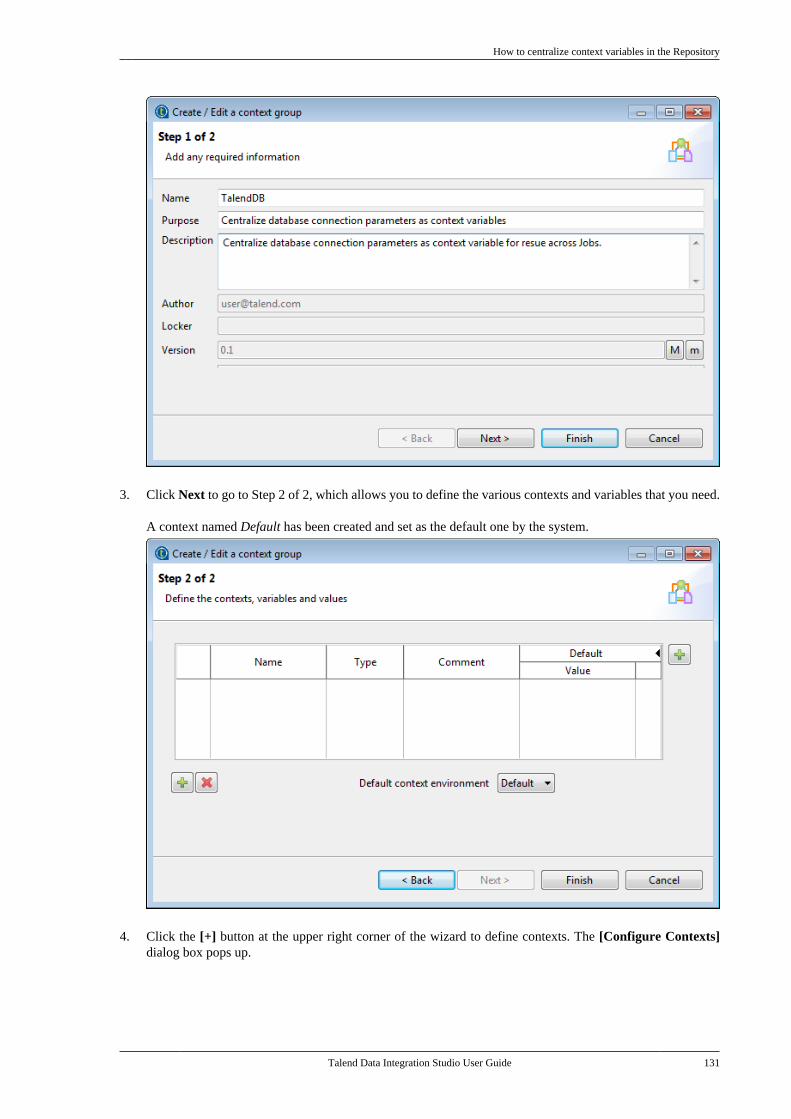
How to centralize context variables in the Repository
Talend Data Integration Studio User Guide 131
3. Click Next to go to Step 2 of 2, which allows you to define the various contexts and variables that you need.
A context named Default has been created and set as the default one by the system.
4. Click the [+] button at the upper right corner of the wizard to define contexts. The [Configure Contexts]dialog box pops up.
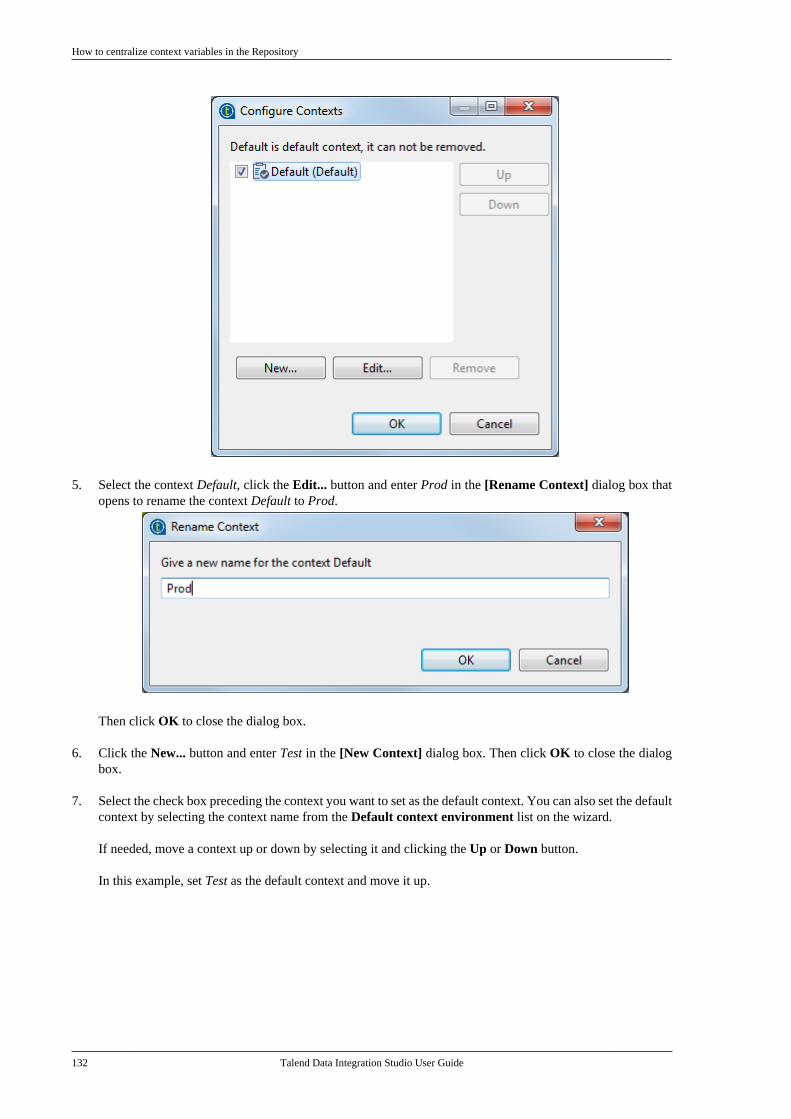
How to centralize context variables in the Repository
132 Talend Data Integration Studio User Guide
5. Select the context Default, click the Edit... button and enter Prod in the [Rename Context] dialog box thatopens to rename the context Default to Prod.
Then click OK to close the dialog box.
6. Click the New... button and enter Test in the [New Context] dialog box. Then click OK to close the dialogbox.
7. Select the check box preceding the context you want to set as the default context. You can also set the defaultcontext by selecting the context name from the Default context environment list on the wizard.
If needed, move a context up or down by selecting it and clicking the Up or Down button.
In this example, set Test as the default context and move it up.
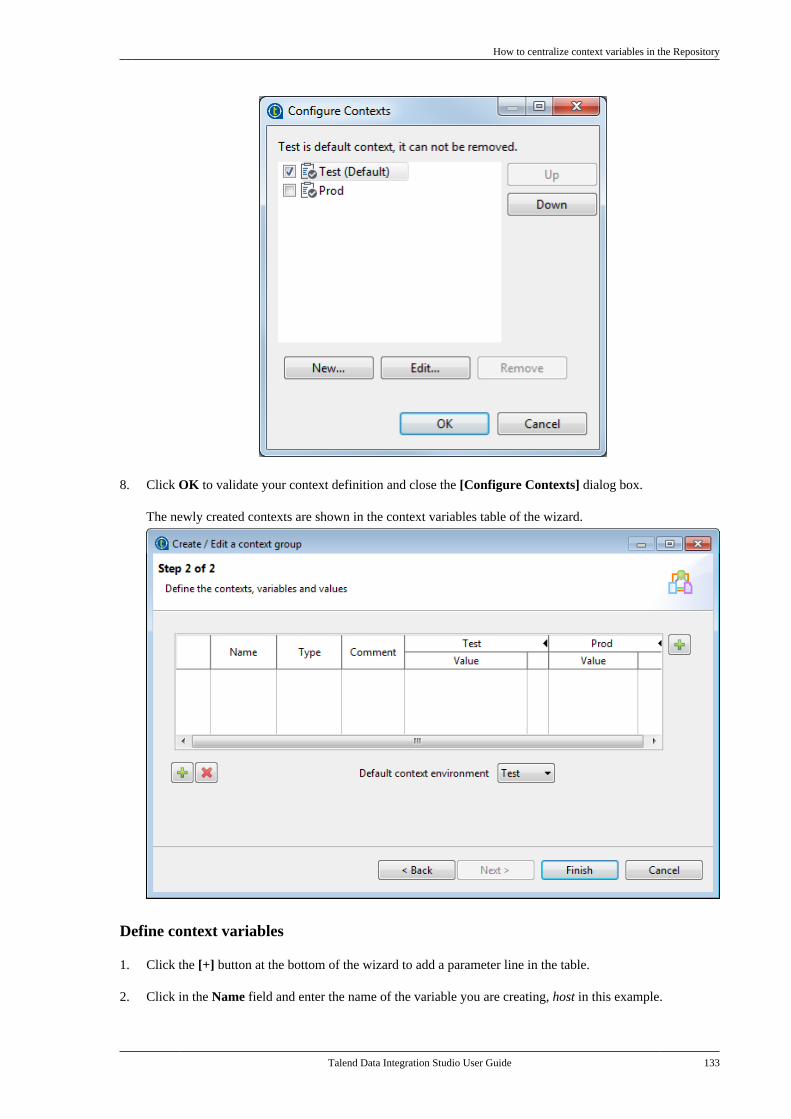
How to centralize context variables in the Repository
Talend Data Integration Studio User Guide 133
8. Click OK to validate your context definition and close the [Configure Contexts] dialog box.
The newly created contexts are shown in the context variables table of the wizard.
Define context variables
1. Click the [+] button at the bottom of the wizard to add a parameter line in the table.
2. Click in the Name field and enter the name of the variable you are creating, host in this example.
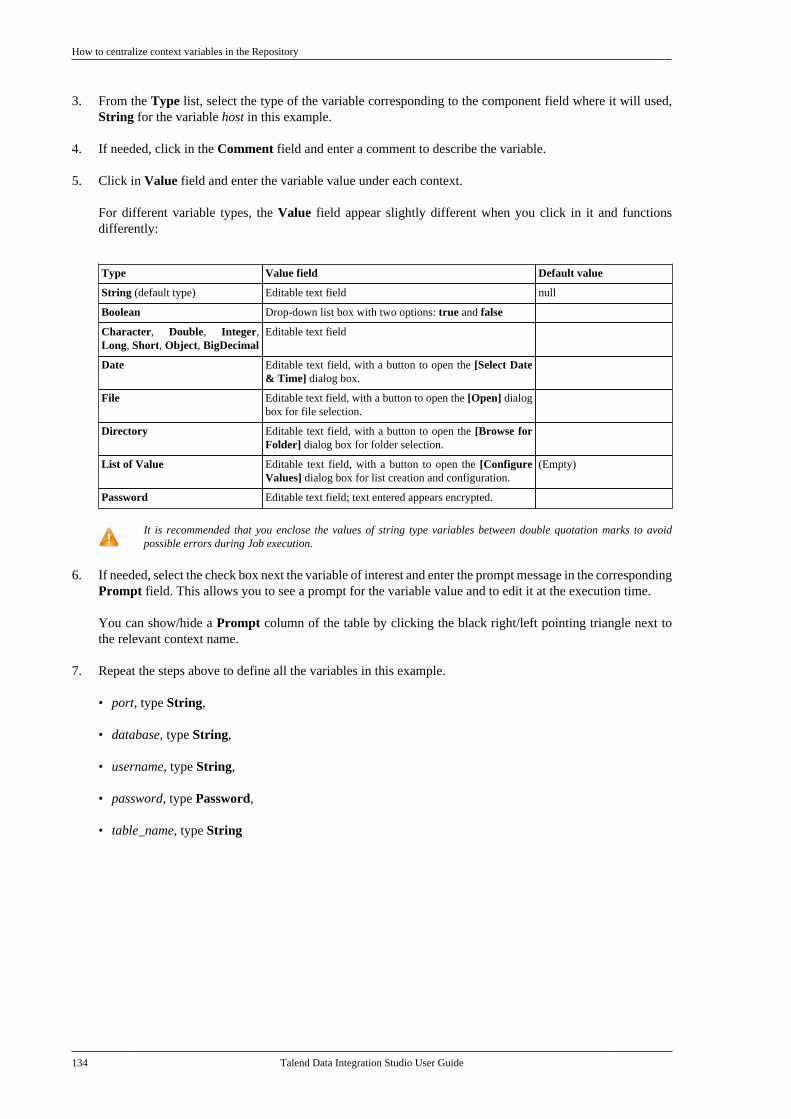
How to centralize context variables in the Repository
134 Talend Data Integration Studio User Guide
3. From the Type list, select the type of the variable corresponding to the component field where it will used,String for the variable host in this example.
4. If needed, click in the Comment field and enter a comment to describe the variable.
5. Click in Value field and enter the variable value under each context.
For different variable types, the Value field appear slightly different when you click in it and functionsdifferently:
Type Value field Default value
String (default type) Editable text field null
Boolean Drop-down list box with two options: true and false
Character, Double, Integer,Long, Short, Object, BigDecimal
Editable text field
Date Editable text field, with a button to open the [Select Date& Time] dialog box.
File Editable text field, with a button to open the [Open] dialogbox for file selection.
Directory Editable text field, with a button to open the [Browse forFolder] dialog box for folder selection.
List of Value Editable text field, with a button to open the [ConfigureValues] dialog box for list creation and configuration.
(Empty)
Password Editable text field; text entered appears encrypted.
It is recommended that you enclose the values of string type variables between double quotation marks to avoidpossible errors during Job execution.
6. If needed, select the check box next the variable of interest and enter the prompt message in the correspondingPrompt field. This allows you to see a prompt for the variable value and to edit it at the execution time.
You can show/hide a Prompt column of the table by clicking the black right/left pointing triangle next tothe relevant context name.
7. Repeat the steps above to define all the variables in this example.
• port, type String,
• database, type String,
• username, type String,
• password, type Password,
• table_name, type String
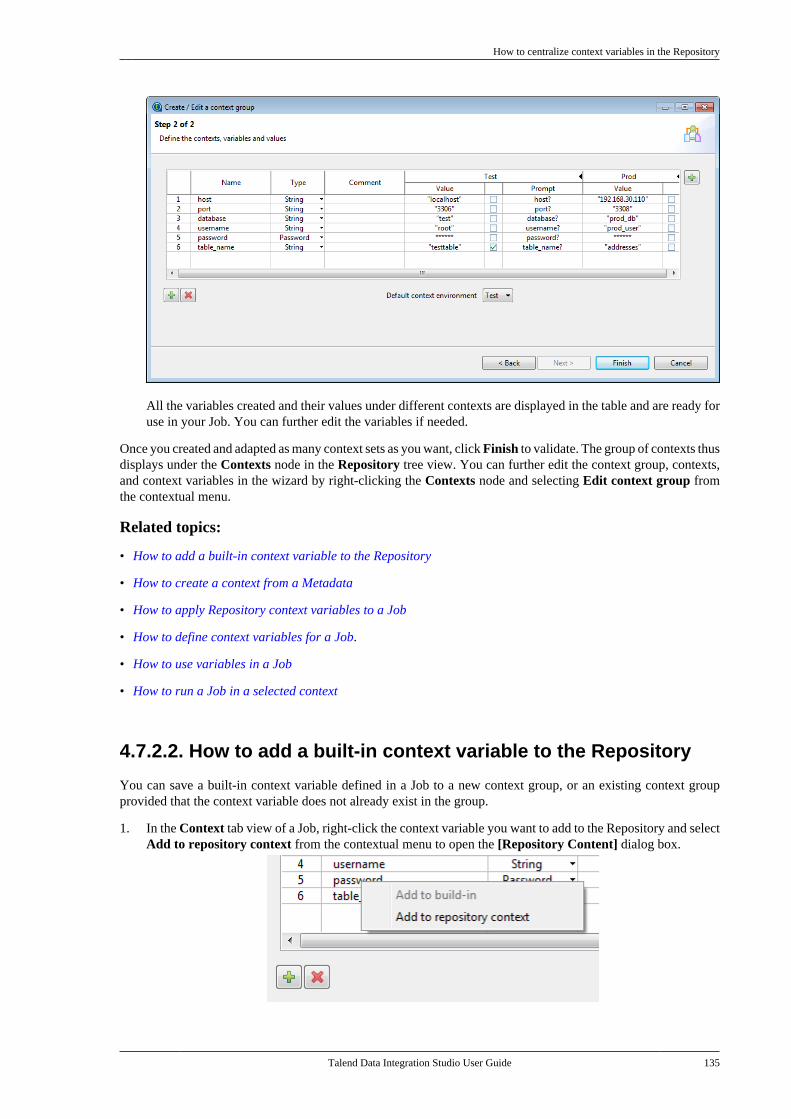
How to centralize context variables in the Repository
Talend Data Integration Studio User Guide 135
All the variables created and their values under different contexts are displayed in the table and are ready foruse in your Job. You can further edit the variables if needed.
Once you created and adapted as many context sets as you want, click Finish to validate. The group of contexts thusdisplays under the Contexts node in the Repository tree view. You can further edit the context group, contexts,and context variables in the wizard by right-clicking the Contexts node and selecting Edit context group fromthe contextual menu.
Related topics:
• How to add a built-in context variable to the Repository
• How to create a context from a Metadata
• How to apply Repository context variables to a Job
• How to define context variables for a Job.
• How to use variables in a Job
• How to run a Job in a selected context
4.7.2.2. How to add a built-in context variable to the Repository
You can save a built-in context variable defined in a Job to a new context group, or an existing context groupprovided that the context variable does not already exist in the group.
1. In the Context tab view of a Job, right-click the context variable you want to add to the Repository and selectAdd to repository context from the contextual menu to open the [Repository Content] dialog box.
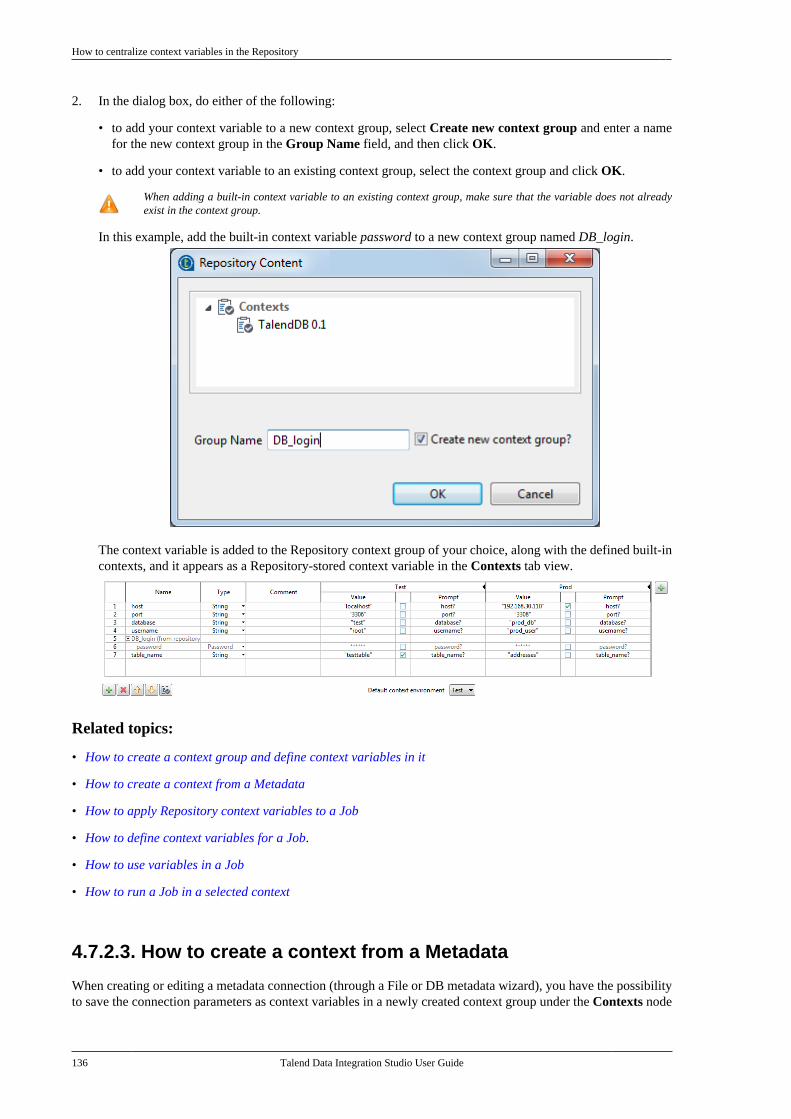
How to centralize context variables in the Repository
136 Talend Data Integration Studio User Guide
2. In the dialog box, do either of the following:
• to add your context variable to a new context group, select Create new context group and enter a namefor the new context group in the Group Name field, and then click OK.
• to add your context variable to an existing context group, select the context group and click OK.
When adding a built-in context variable to an existing context group, make sure that the variable does not alreadyexist in the context group.
In this example, add the built-in context variable password to a new context group named DB_login.
The context variable is added to the Repository context group of your choice, along with the defined built-incontexts, and it appears as a Repository-stored context variable in the Contexts tab view.
Related topics:
• How to create a context group and define context variables in it
• How to create a context from a Metadata
• How to apply Repository context variables to a Job
• How to define context variables for a Job.
• How to use variables in a Job
• How to run a Job in a selected context
4.7.2.3. How to create a context from a Metadata
When creating or editing a metadata connection (through a File or DB metadata wizard), you have the possibilityto save the connection parameters as context variables in a newly created context group under the Contexts node
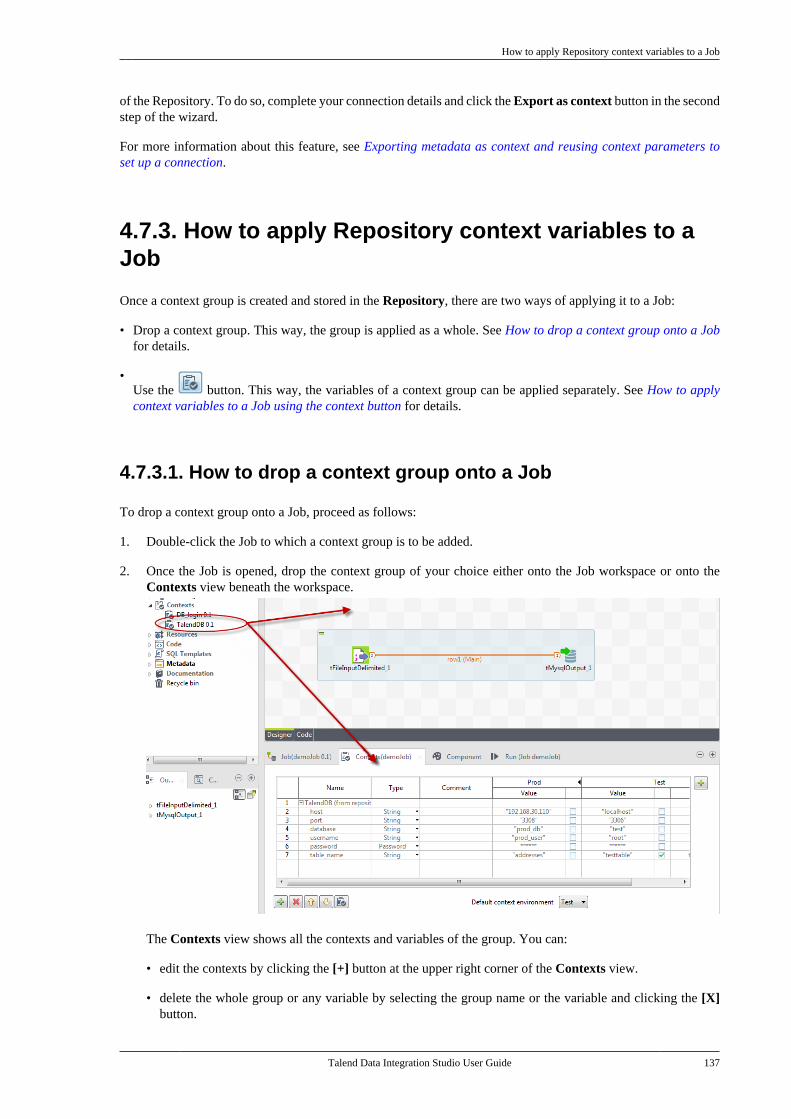
How to apply Repository context variables to a Job
Talend Data Integration Studio User Guide 137
of the Repository. To do so, complete your connection details and click the Export as context button in the secondstep of the wizard.
For more information about this feature, see Exporting metadata as context and reusing context parameters toset up a connection.
4.7.3. How to apply Repository context variables to aJob
Once a context group is created and stored in the Repository, there are two ways of applying it to a Job:
• Drop a context group. This way, the group is applied as a whole. See How to drop a context group onto a Jobfor details.
•Use the button. This way, the variables of a context group can be applied separately. See How to applycontext variables to a Job using the context button for details.
4.7.3.1. How to drop a context group onto a Job
To drop a context group onto a Job, proceed as follows:
1. Double-click the Job to which a context group is to be added.
2. Once the Job is opened, drop the context group of your choice either onto the Job workspace or onto theContexts view beneath the workspace.
The Contexts view shows all the contexts and variables of the group. You can:
• edit the contexts by clicking the [+] button at the upper right corner of the Contexts view.
• delete the whole group or any variable by selecting the group name or the variable and clicking the [X]button.
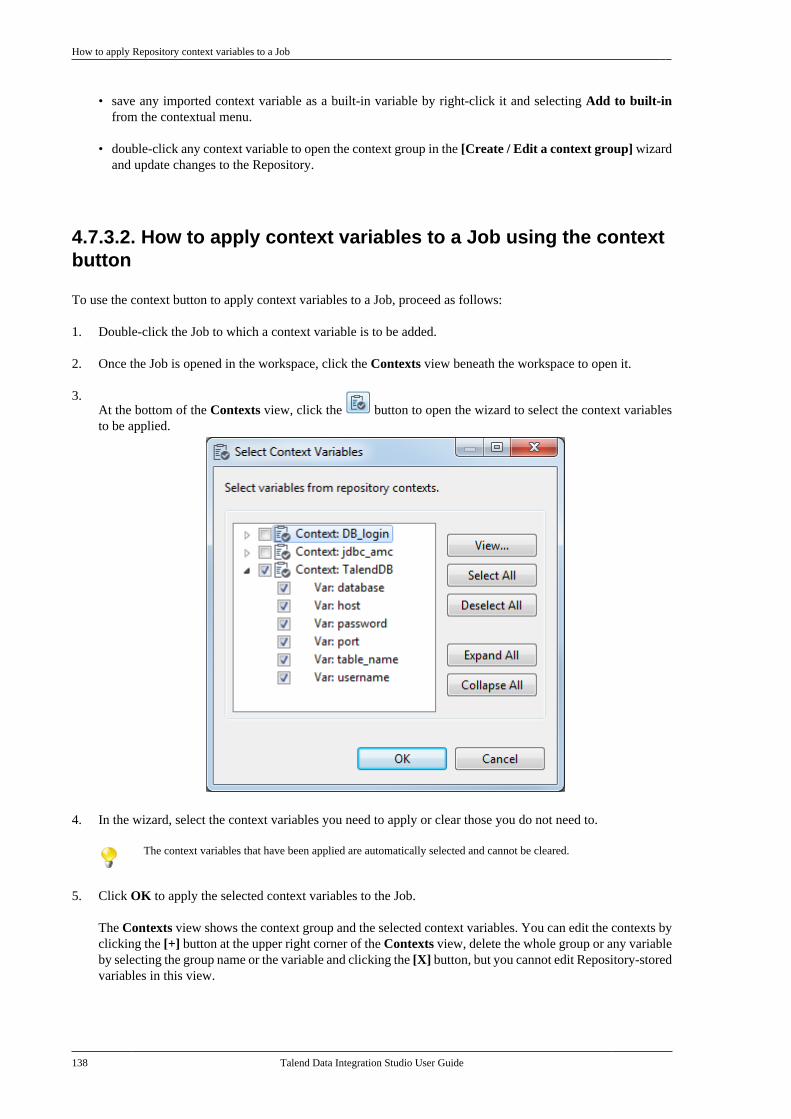
How to apply Repository context variables to a Job
138 Talend Data Integration Studio User Guide
• save any imported context variable as a built-in variable by right-click it and selecting Add to built-infrom the contextual menu.
• double-click any context variable to open the context group in the [Create / Edit a context group] wizardand update changes to the Repository.
4.7.3.2. How to apply context variables to a Job using the contextbutton
To use the context button to apply context variables to a Job, proceed as follows:
1. Double-click the Job to which a context variable is to be added.
2. Once the Job is opened in the workspace, click the Contexts view beneath the workspace to open it.
3.At the bottom of the Contexts view, click the button to open the wizard to select the context variablesto be applied.
4. In the wizard, select the context variables you need to apply or clear those you do not need to.
The context variables that have been applied are automatically selected and cannot be cleared.
5. Click OK to apply the selected context variables to the Job.
The Contexts view shows the context group and the selected context variables. You can edit the contexts byclicking the [+] button at the upper right corner of the Contexts view, delete the whole group or any variableby selecting the group name or the variable and clicking the [X] button, but you cannot edit Repository-storedvariables in this view.
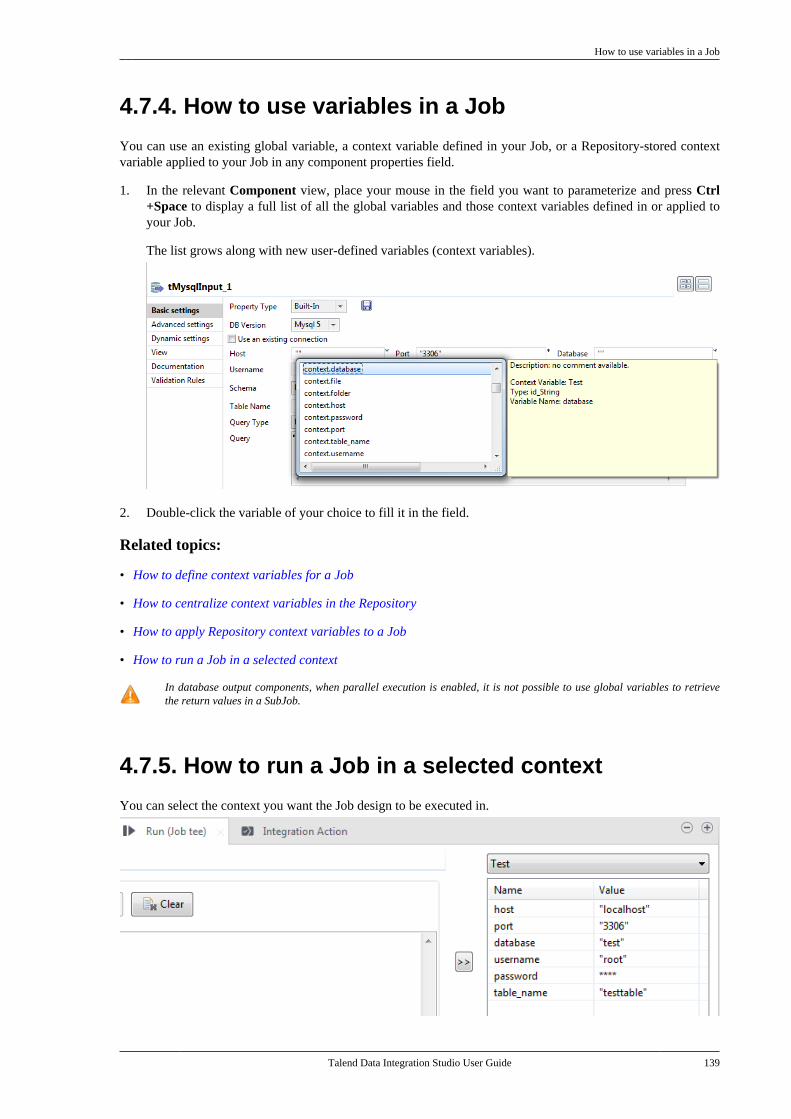
How to use variables in a Job
Talend Data Integration Studio User Guide 139
4.7.4. How to use variables in a Job
You can use an existing global variable, a context variable defined in your Job, or a Repository-stored contextvariable applied to your Job in any component properties field.
1. In the relevant Component view, place your mouse in the field you want to parameterize and press Ctrl+Space to display a full list of all the global variables and those context variables defined in or applied toyour Job.
The list grows along with new user-defined variables (context variables).
2. Double-click the variable of your choice to fill it in the field.
Related topics:
• How to define context variables for a Job
• How to centralize context variables in the Repository
• How to apply Repository context variables to a Job
• How to run a Job in a selected context
In database output components, when parallel execution is enabled, it is not possible to use global variables to retrievethe return values in a SubJob.
4.7.5. How to run a Job in a selected context
You can select the context you want the Job design to be executed in.
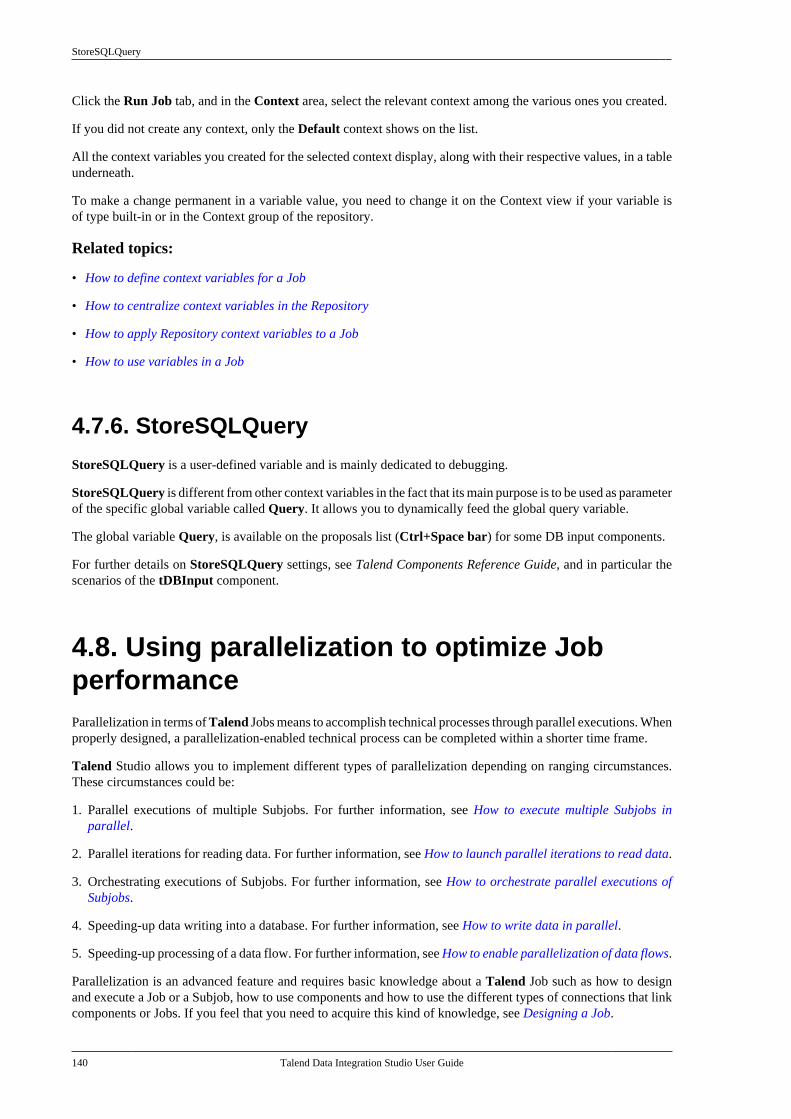
StoreSQLQuery
140 Talend Data Integration Studio User Guide
Click the Run Job tab, and in the Context area, select the relevant context among the various ones you created.
If you did not create any context, only the Default context shows on the list.
All the context variables you created for the selected context display, along with their respective values, in a tableunderneath.
To make a change permanent in a variable value, you need to change it on the Context view if your variable isof type built-in or in the Context group of the repository.
Related topics:
• How to define context variables for a Job
• How to centralize context variables in the Repository
• How to apply Repository context variables to a Job
• How to use variables in a Job
4.7.6. StoreSQLQuery
StoreSQLQuery is a user-defined variable and is mainly dedicated to debugging.
StoreSQLQuery is different from other context variables in the fact that its main purpose is to be used as parameterof the specific global variable called Query. It allows you to dynamically feed the global query variable.
The global variable Query, is available on the proposals list (Ctrl+Space bar) for some DB input components.
For further details on StoreSQLQuery settings, see Talend Components Reference Guide, and in particular thescenarios of the tDBInput component.
4.8. Using parallelization to optimize JobperformanceParallelization in terms of Talend Jobs means to accomplish technical processes through parallel executions. Whenproperly designed, a parallelization-enabled technical process can be completed within a shorter time frame.
Talend Studio allows you to implement different types of parallelization depending on ranging circumstances.These circumstances could be:
1. Parallel executions of multiple Subjobs. For further information, see How to execute multiple Subjobs inparallel.
2. Parallel iterations for reading data. For further information, see How to launch parallel iterations to read data.
3. Orchestrating executions of Subjobs. For further information, see How to orchestrate parallel executions ofSubjobs.
4. Speeding-up data writing into a database. For further information, see How to write data in parallel.
5. Speeding-up processing of a data flow. For further information, see How to enable parallelization of data flows.
Parallelization is an advanced feature and requires basic knowledge about a Talend Job such as how to designand execute a Job or a Subjob, how to use components and how to use the different types of connections that linkcomponents or Jobs. If you feel that you need to acquire this kind of knowledge, see Designing a Job.
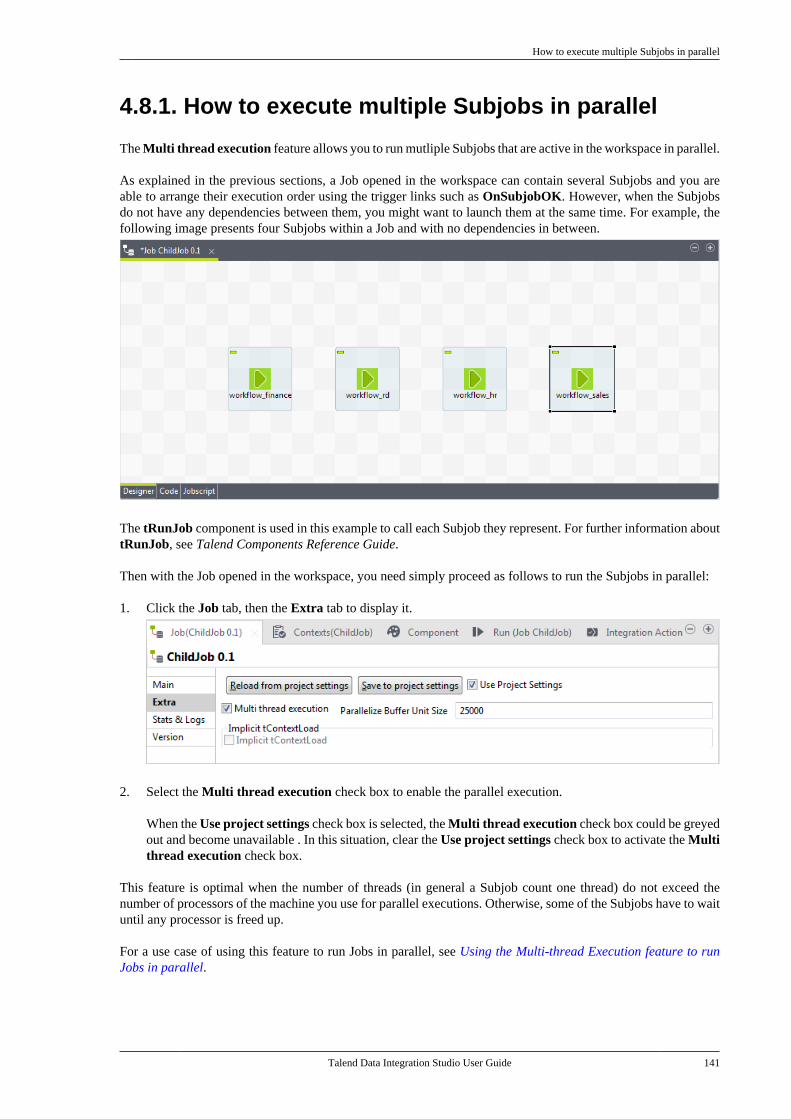
How to execute multiple Subjobs in parallel
Talend Data Integration Studio User Guide 141
4.8.1. How to execute multiple Subjobs in parallel
The Multi thread execution feature allows you to run mutliple Subjobs that are active in the workspace in parallel.
As explained in the previous sections, a Job opened in the workspace can contain several Subjobs and you areable to arrange their execution order using the trigger links such as OnSubjobOK. However, when the Subjobsdo not have any dependencies between them, you might want to launch them at the same time. For example, thefollowing image presents four Subjobs within a Job and with no dependencies in between.
The tRunJob component is used in this example to call each Subjob they represent. For further information abouttRunJob, see Talend Components Reference Guide.
Then with the Job opened in the workspace, you need simply proceed as follows to run the Subjobs in parallel:
1. Click the Job tab, then the Extra tab to display it.
2. Select the Multi thread execution check box to enable the parallel execution.
When the Use project settings check box is selected, the Multi thread execution check box could be greyedout and become unavailable . In this situation, clear the Use project settings check box to activate the Multithread execution check box.
This feature is optimal when the number of threads (in general a Subjob count one thread) do not exceed thenumber of processors of the machine you use for parallel executions. Otherwise, some of the Subjobs have to waituntil any processor is freed up.
For a use case of using this feature to run Jobs in parallel, see Using the Multi-thread Execution feature to runJobs in parallel.
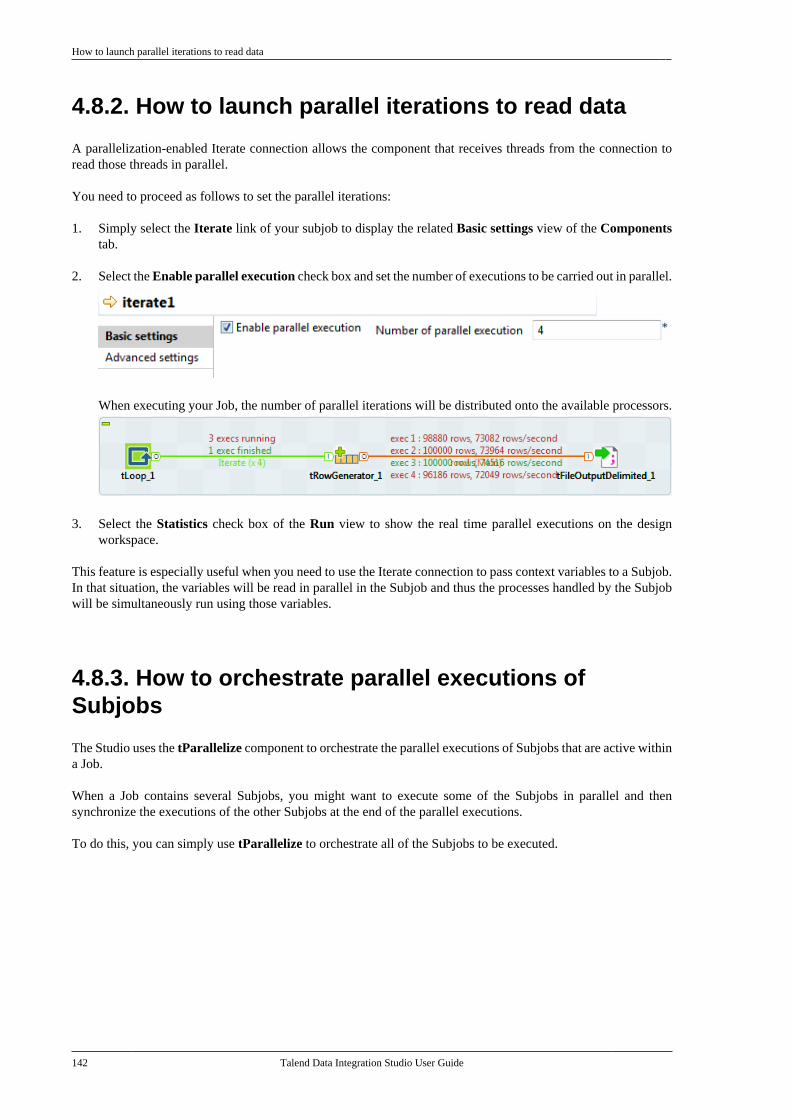
How to launch parallel iterations to read data
142 Talend Data Integration Studio User Guide
4.8.2. How to launch parallel iterations to read data
A parallelization-enabled Iterate connection allows the component that receives threads from the connection toread those threads in parallel.
You need to proceed as follows to set the parallel iterations:
1. Simply select the Iterate link of your subjob to display the related Basic settings view of the Componentstab.
2. Select the Enable parallel execution check box and set the number of executions to be carried out in parallel.
When executing your Job, the number of parallel iterations will be distributed onto the available processors.
3. Select the Statistics check box of the Run view to show the real time parallel executions on the designworkspace.
This feature is especially useful when you need to use the Iterate connection to pass context variables to a Subjob.In that situation, the variables will be read in parallel in the Subjob and thus the processes handled by the Subjobwill be simultaneously run using those variables.
4.8.3. How to orchestrate parallel executions ofSubjobs
The Studio uses the tParallelize component to orchestrate the parallel executions of Subjobs that are active withina Job.
When a Job contains several Subjobs, you might want to execute some of the Subjobs in parallel and thensynchronize the executions of the other Subjobs at the end of the parallel executions.
To do this, you can simply use tParallelize to orchestrate all of the Subjobs to be executed.
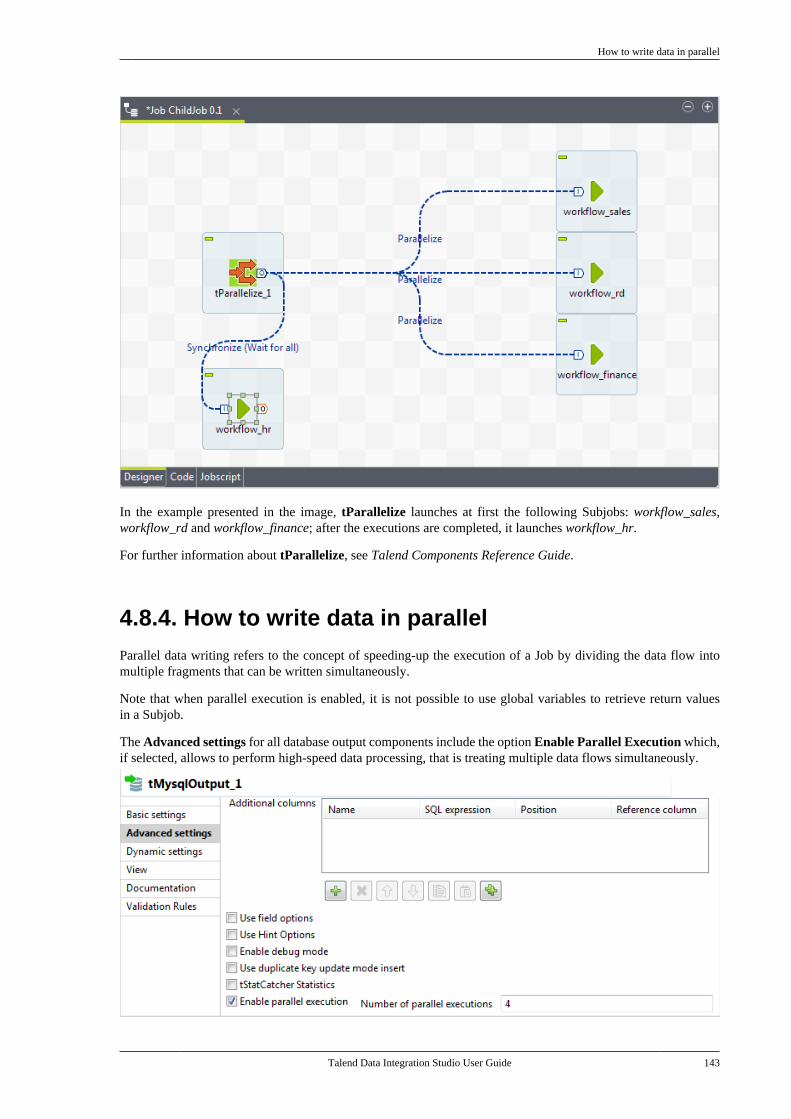
How to write data in parallel
Talend Data Integration Studio User Guide 143
In the example presented in the image, tParallelize launches at first the following Subjobs: workflow_sales,workflow_rd and workflow_finance; after the executions are completed, it launches workflow_hr.
For further information about tParallelize, see Talend Components Reference Guide.
4.8.4. How to write data in parallelParallel data writing refers to the concept of speeding-up the execution of a Job by dividing the data flow intomultiple fragments that can be written simultaneously.
Note that when parallel execution is enabled, it is not possible to use global variables to retrieve return valuesin a Subjob.
The Advanced settings for all database output components include the option Enable Parallel Execution which,if selected, allows to perform high-speed data processing, that is treating multiple data flows simultaneously.
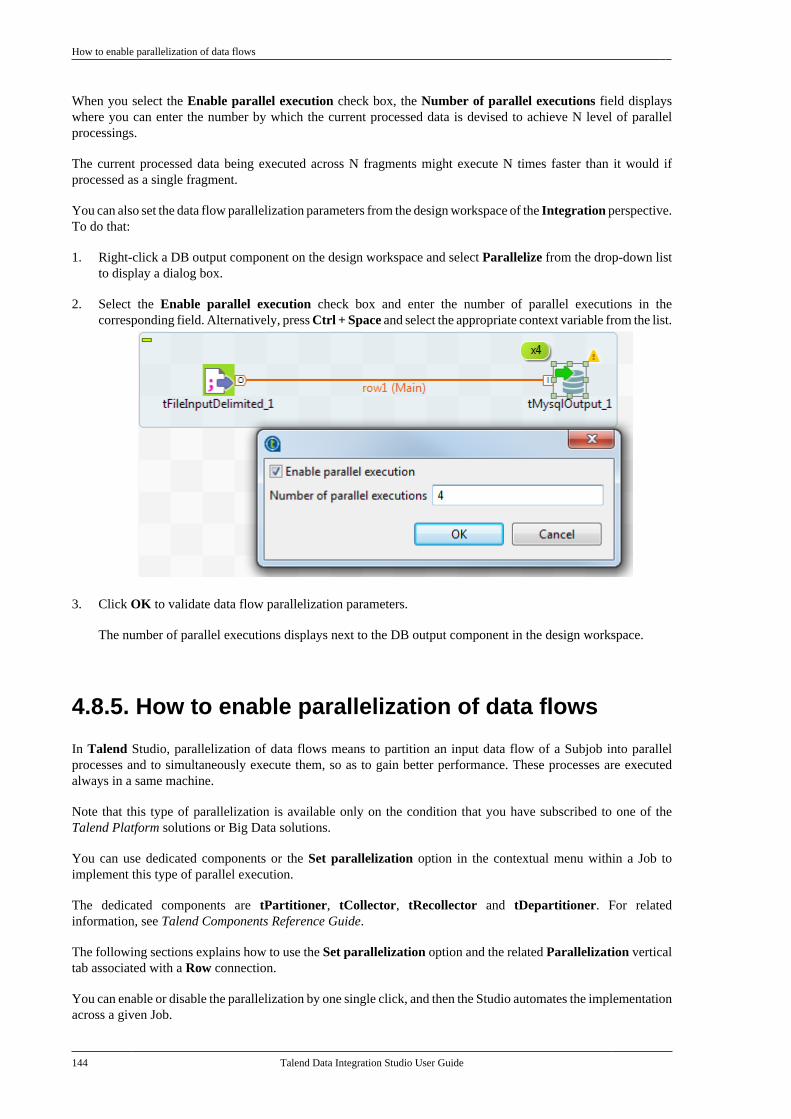
How to enable parallelization of data flows
144 Talend Data Integration Studio User Guide
When you select the Enable parallel execution check box, the Number of parallel executions field displayswhere you can enter the number by which the current processed data is devised to achieve N level of parallelprocessings.
The current processed data being executed across N fragments might execute N times faster than it would ifprocessed as a single fragment.
You can also set the data flow parallelization parameters from the design workspace of the Integration perspective.To do that:
1. Right-click a DB output component on the design workspace and select Parallelize from the drop-down listto display a dialog box.
2. Select the Enable parallel execution check box and enter the number of parallel executions in thecorresponding field. Alternatively, press Ctrl + Space and select the appropriate context variable from the list.
3. Click OK to validate data flow parallelization parameters.
The number of parallel executions displays next to the DB output component in the design workspace.
4.8.5. How to enable parallelization of data flows
In Talend Studio, parallelization of data flows means to partition an input data flow of a Subjob into parallelprocesses and to simultaneously execute them, so as to gain better performance. These processes are executedalways in a same machine.
Note that this type of parallelization is available only on the condition that you have subscribed to one of theTalend Platform solutions or Big Data solutions.
You can use dedicated components or the Set parallelization option in the contextual menu within a Job toimplement this type of parallel execution.
The dedicated components are tPartitioner, tCollector, tRecollector and tDepartitioner. For relatedinformation, see Talend Components Reference Guide.
The following sections explains how to use the Set parallelization option and the related Parallelization verticaltab associated with a Row connection.
You can enable or disable the parallelization by one single click, and then the Studio automates the implementationacross a given Job.
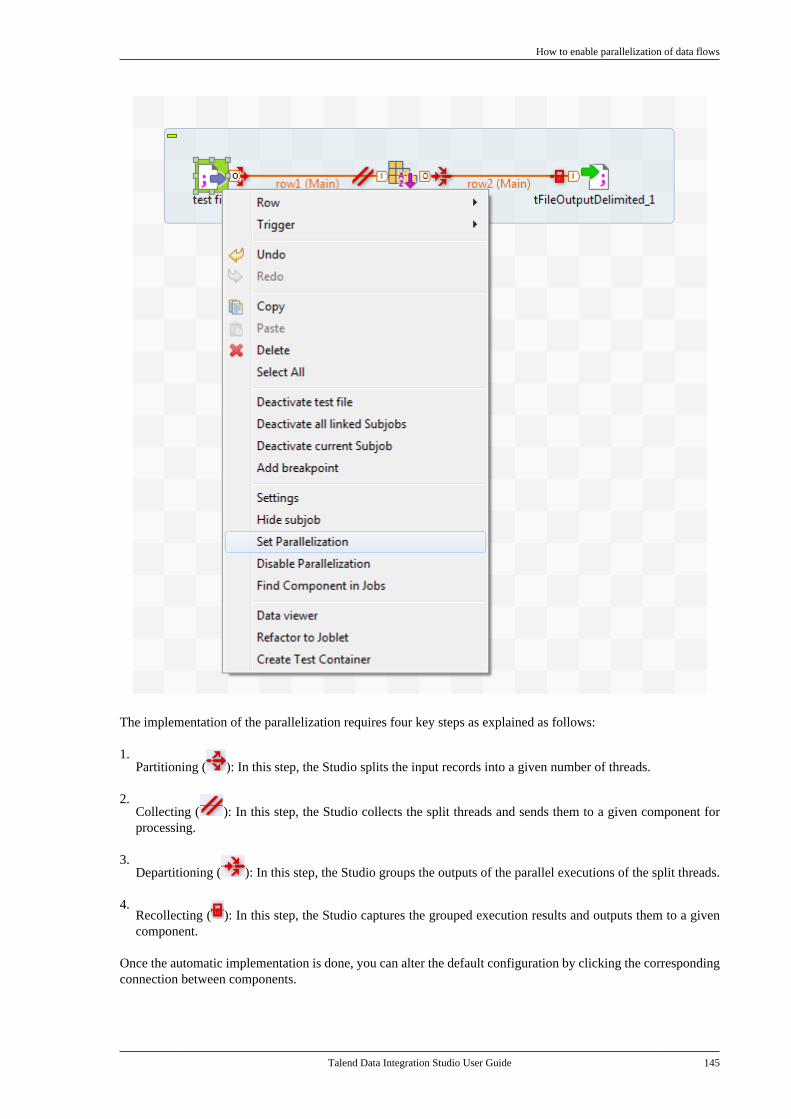
How to enable parallelization of data flows
Talend Data Integration Studio User Guide 145
The implementation of the parallelization requires four key steps as explained as follows:
1.Partitioning ( ): In this step, the Studio splits the input records into a given number of threads.
2.Collecting ( ): In this step, the Studio collects the split threads and sends them to a given component forprocessing.
3.Departitioning ( ): In this step, the Studio groups the outputs of the parallel executions of the split threads.
4.Recollecting ( ): In this step, the Studio captures the grouped execution results and outputs them to a givencomponent.
Once the automatic implementation is done, you can alter the default configuration by clicking the correspondingconnection between components.
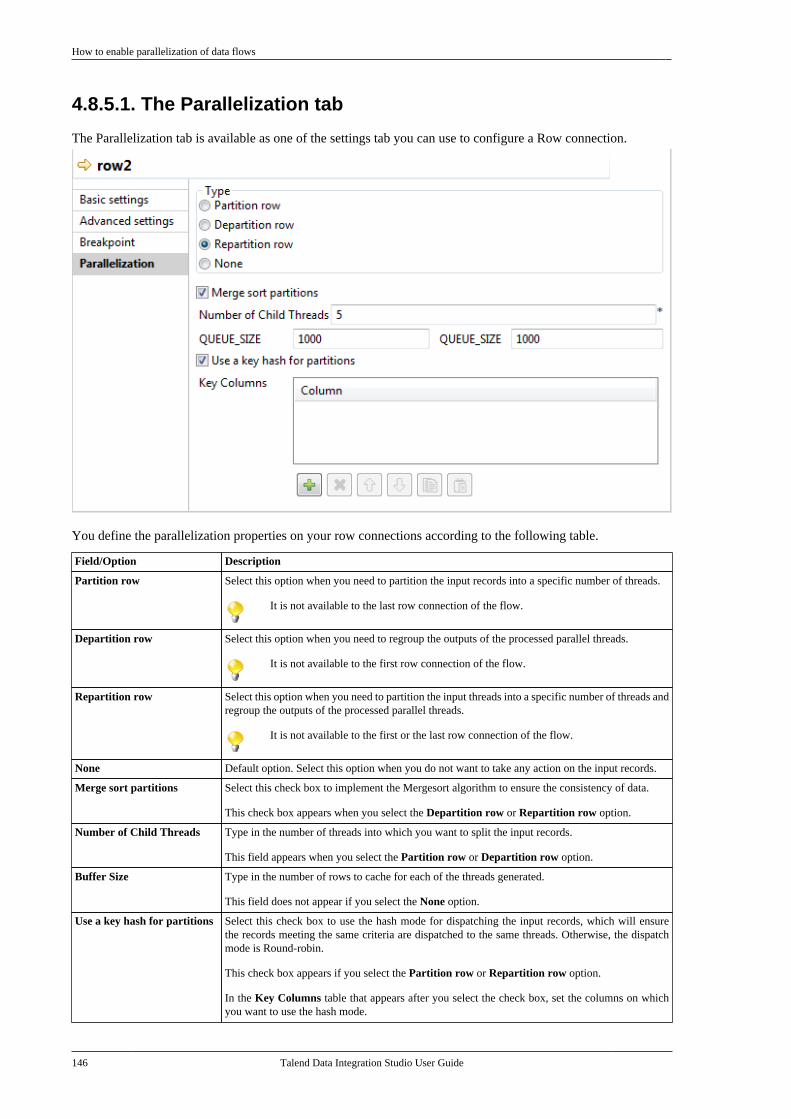
How to enable parallelization of data flows
146 Talend Data Integration Studio User Guide
4.8.5.1. The Parallelization tab
The Parallelization tab is available as one of the settings tab you can use to configure a Row connection.
You define the parallelization properties on your row connections according to the following table.
Field/Option Description
Partition row Select this option when you need to partition the input records into a specific number of threads.
It is not available to the last row connection of the flow.
Departition row Select this option when you need to regroup the outputs of the processed parallel threads.
It is not available to the first row connection of the flow.
Repartition row Select this option when you need to partition the input threads into a specific number of threads andregroup the outputs of the processed parallel threads.
It is not available to the first or the last row connection of the flow.
None Default option. Select this option when you do not want to take any action on the input records.
Merge sort partitions Select this check box to implement the Mergesort algorithm to ensure the consistency of data.
This check box appears when you select the Departition row or Repartition row option.
Number of Child Threads Type in the number of threads into which you want to split the input records.
This field appears when you select the Partition row or Departition row option.
Buffer Size Type in the number of rows to cache for each of the threads generated.
This field does not appear if you select the None option.
Use a key hash for partitions Select this check box to use the hash mode for dispatching the input records, which will ensurethe records meeting the same criteria are dispatched to the same threads. Otherwise, the dispatchmode is Round-robin.
This check box appears if you select the Partition row or Repartition row option.
In the Key Columns table that appears after you select the check box, set the columns on whichyou want to use the hash mode.
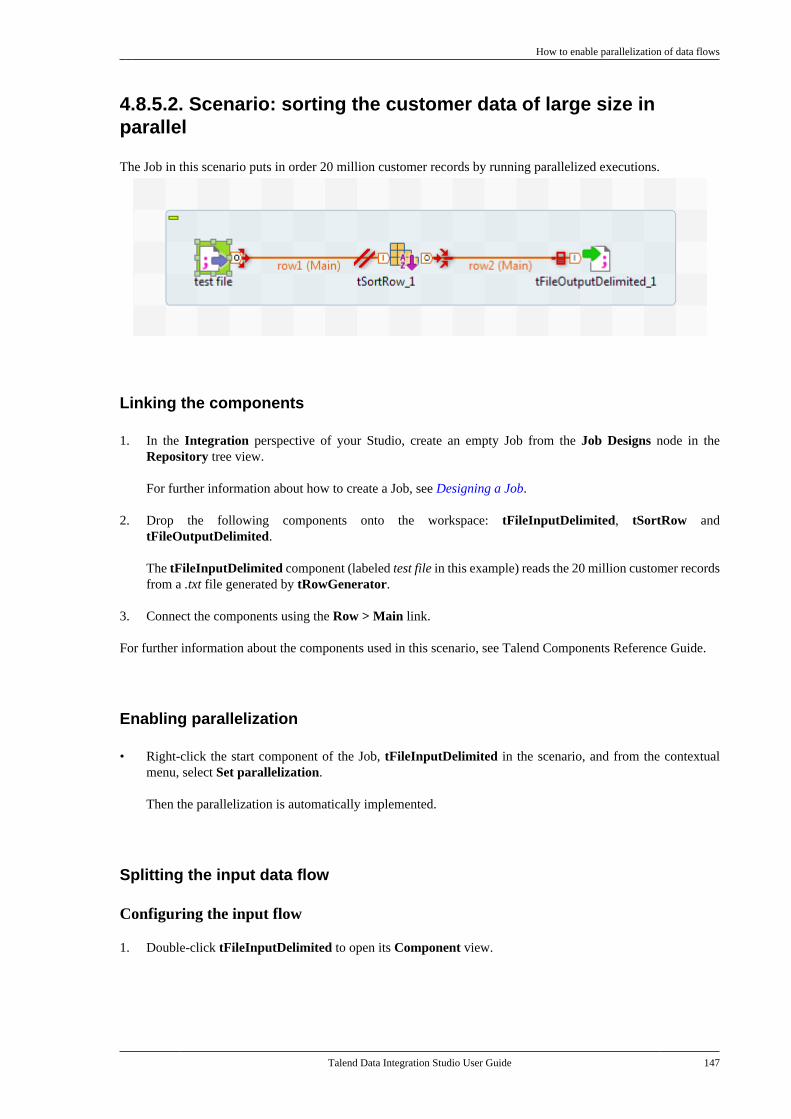
How to enable parallelization of data flows
Talend Data Integration Studio User Guide 147
4.8.5.2. Scenario: sorting the customer data of large size inparallel
The Job in this scenario puts in order 20 million customer records by running parallelized executions.
Linking the components
1. In the Integration perspective of your Studio, create an empty Job from the Job Designs node in theRepository tree view.
For further information about how to create a Job, see Designing a Job.
2. Drop the following components onto the workspace: tFileInputDelimited, tSortRow andtFileOutputDelimited.
The tFileInputDelimited component (labeled test file in this example) reads the 20 million customer recordsfrom a .txt file generated by tRowGenerator.
3. Connect the components using the Row > Main link.
For further information about the components used in this scenario, see Talend Components Reference Guide.
Enabling parallelization
• Right-click the start component of the Job, tFileInputDelimited in the scenario, and from the contextualmenu, select Set parallelization.
Then the parallelization is automatically implemented.
Splitting the input data flow
Configuring the input flow
1. Double-click tFileInputDelimited to open its Component view.
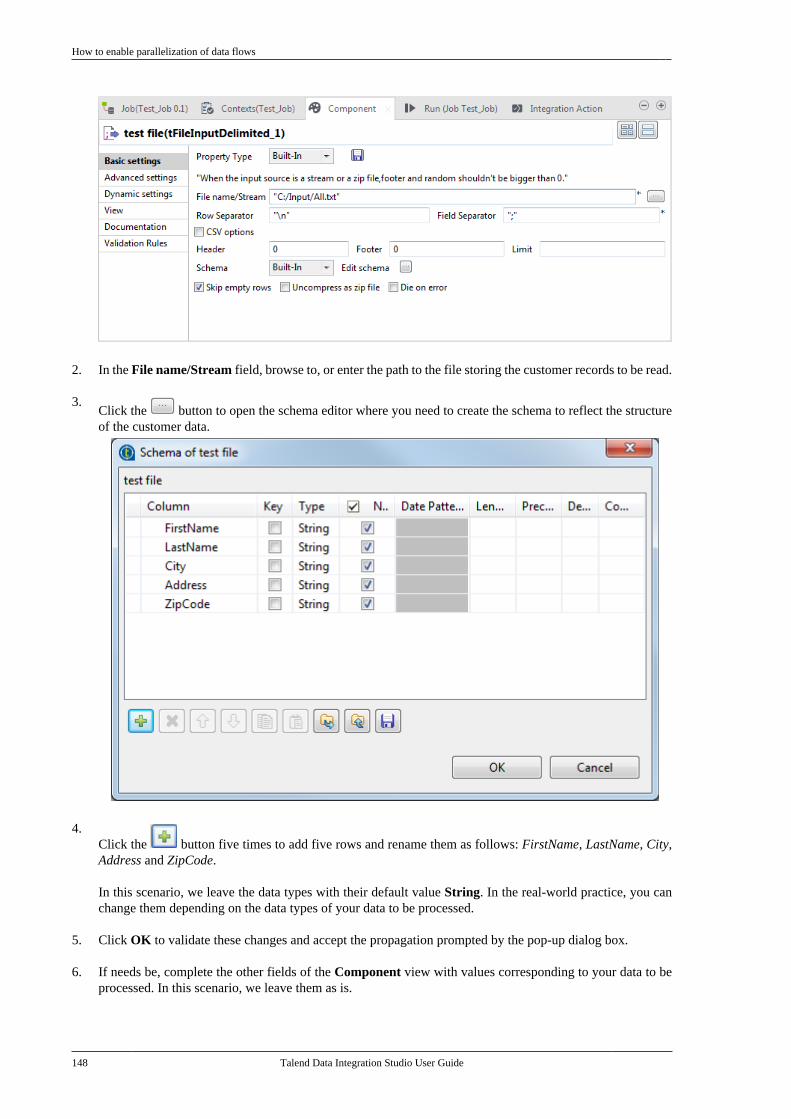
How to enable parallelization of data flows
148 Talend Data Integration Studio User Guide
2. In the File name/Stream field, browse to, or enter the path to the file storing the customer records to be read.
3.Click the button to open the schema editor where you need to create the schema to reflect the structureof the customer data.
4.Click the button five times to add five rows and rename them as follows: FirstName, LastName, City,Address and ZipCode.
In this scenario, we leave the data types with their default value String. In the real-world practice, you canchange them depending on the data types of your data to be processed.
5. Click OK to validate these changes and accept the propagation prompted by the pop-up dialog box.
6. If needs be, complete the other fields of the Component view with values corresponding to your data to beprocessed. In this scenario, we leave them as is.
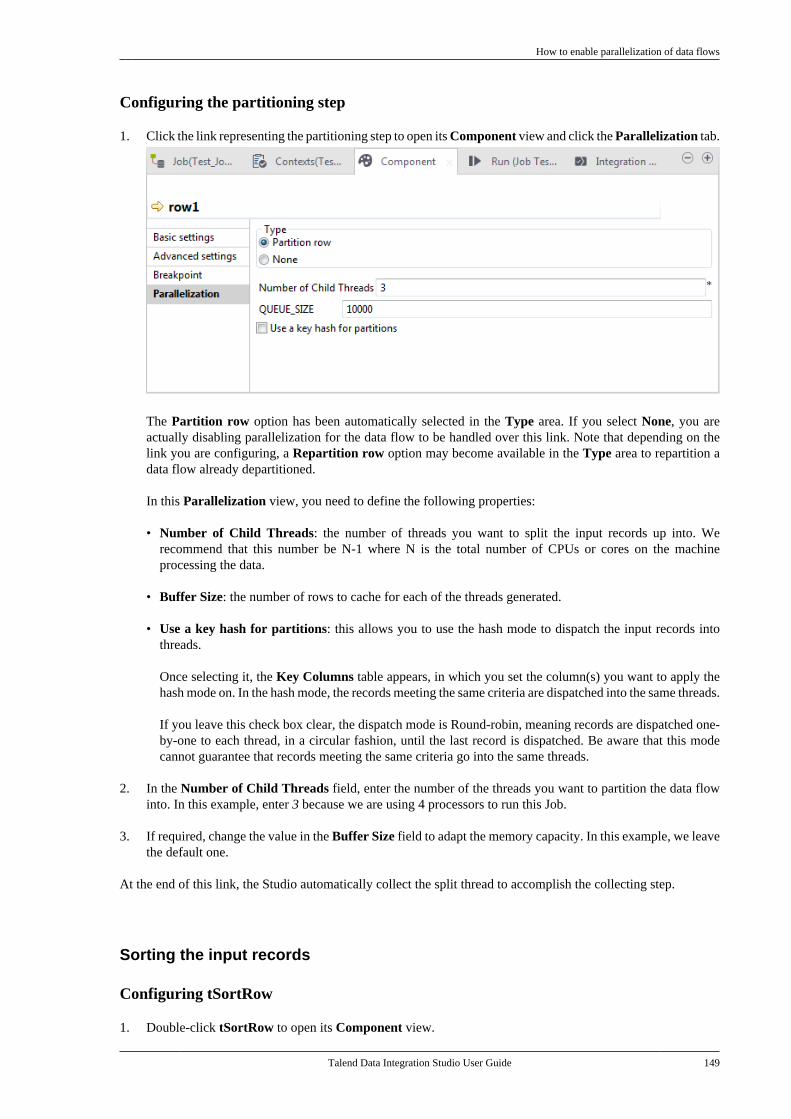
How to enable parallelization of data flows
Talend Data Integration Studio User Guide 149
Configuring the partitioning step
1. Click the link representing the partitioning step to open its Component view and click the Parallelization tab.
The Partition row option has been automatically selected in the Type area. If you select None, you areactually disabling parallelization for the data flow to be handled over this link. Note that depending on thelink you are configuring, a Repartition row option may become available in the Type area to repartition adata flow already departitioned.
In this Parallelization view, you need to define the following properties:
• Number of Child Threads: the number of threads you want to split the input records up into. Werecommend that this number be N-1 where N is the total number of CPUs or cores on the machineprocessing the data.
• Buffer Size: the number of rows to cache for each of the threads generated.
• Use a key hash for partitions: this allows you to use the hash mode to dispatch the input records intothreads.
Once selecting it, the Key Columns table appears, in which you set the column(s) you want to apply thehash mode on. In the hash mode, the records meeting the same criteria are dispatched into the same threads.
If you leave this check box clear, the dispatch mode is Round-robin, meaning records are dispatched one-by-one to each thread, in a circular fashion, until the last record is dispatched. Be aware that this modecannot guarantee that records meeting the same criteria go into the same threads.
2. In the Number of Child Threads field, enter the number of the threads you want to partition the data flowinto. In this example, enter 3 because we are using 4 processors to run this Job.
3. If required, change the value in the Buffer Size field to adapt the memory capacity. In this example, we leavethe default one.
At the end of this link, the Studio automatically collect the split thread to accomplish the collecting step.
Sorting the input records
Configuring tSortRow
1. Double-click tSortRow to open its Component view.
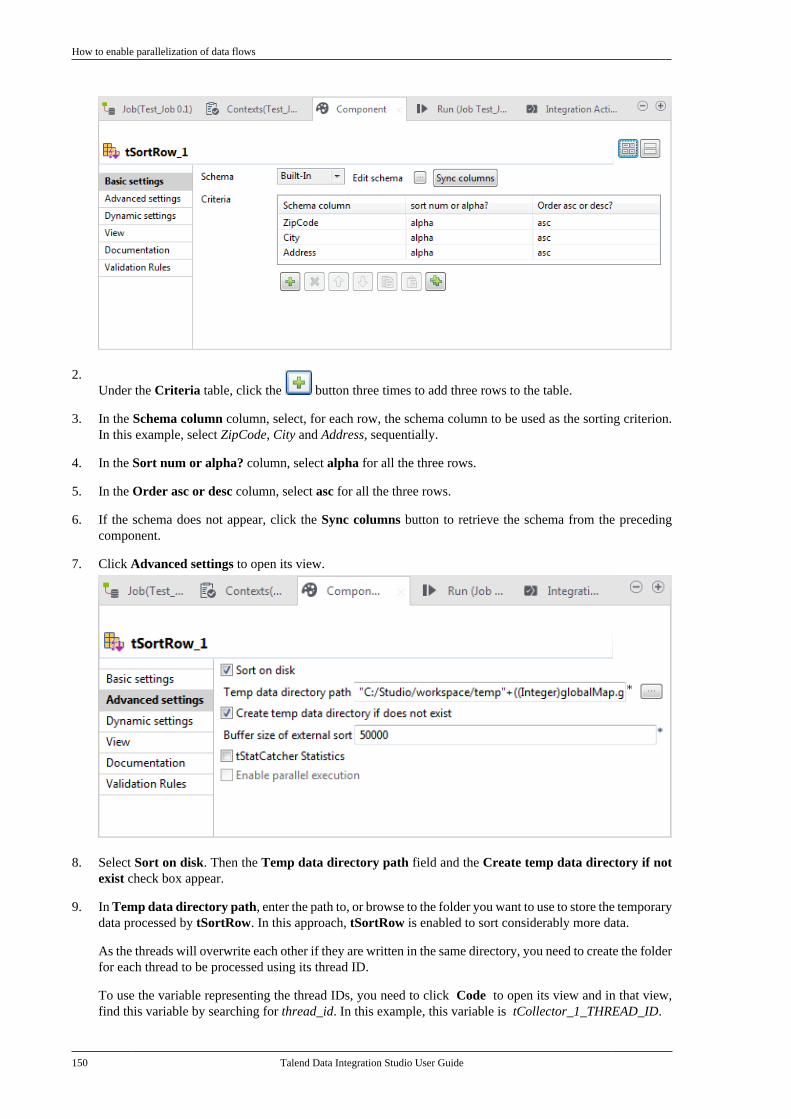
How to enable parallelization of data flows
150 Talend Data Integration Studio User Guide
2.Under the Criteria table, click the button three times to add three rows to the table.
3. In the Schema column column, select, for each row, the schema column to be used as the sorting criterion.In this example, select ZipCode, City and Address, sequentially.
4. In the Sort num or alpha? column, select alpha for all the three rows.
5. In the Order asc or desc column, select asc for all the three rows.
6. If the schema does not appear, click the Sync columns button to retrieve the schema from the precedingcomponent.
7. Click Advanced settings to open its view.
8. Select Sort on disk. Then the Temp data directory path field and the Create temp data directory if notexist check box appear.
9. In Temp data directory path, enter the path to, or browse to the folder you want to use to store the temporarydata processed by tSortRow. In this approach, tSortRow is enabled to sort considerably more data.
As the threads will overwrite each other if they are written in the same directory, you need to create the folderfor each thread to be processed using its thread ID.
To use the variable representing the thread IDs, you need to click Code to open its view and in that view,find this variable by searching for thread_id. In this example, this variable is tCollector_1_THREAD_ID.
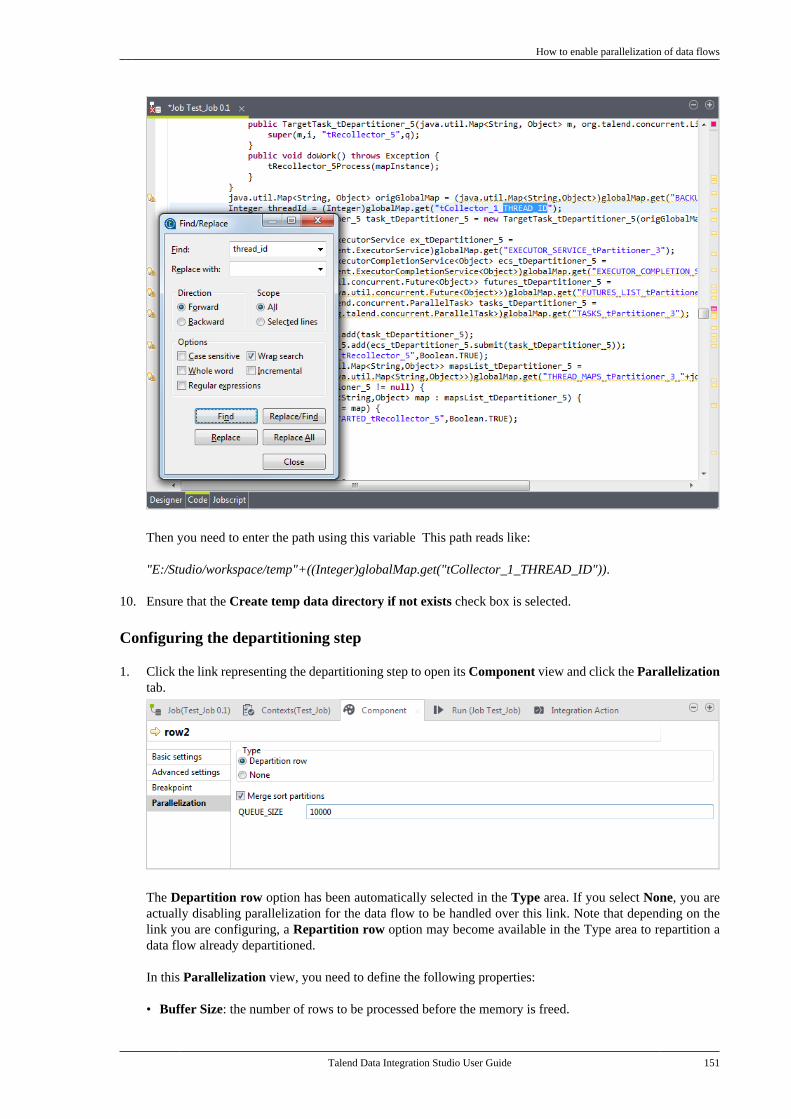
How to enable parallelization of data flows
Talend Data Integration Studio User Guide 151
Then you need to enter the path using this variable This path reads like:
"E:/Studio/workspace/temp"+((Integer)globalMap.get("tCollector_1_THREAD_ID")).
10. Ensure that the Create temp data directory if not exists check box is selected.
Configuring the departitioning step
1. Click the link representing the departitioning step to open its Component view and click the Parallelizationtab.
The Departition row option has been automatically selected in the Type area. If you select None, you areactually disabling parallelization for the data flow to be handled over this link. Note that depending on thelink you are configuring, a Repartition row option may become available in the Type area to repartition adata flow already departitioned.
In this Parallelization view, you need to define the following properties:
• Buffer Size: the number of rows to be processed before the memory is freed.
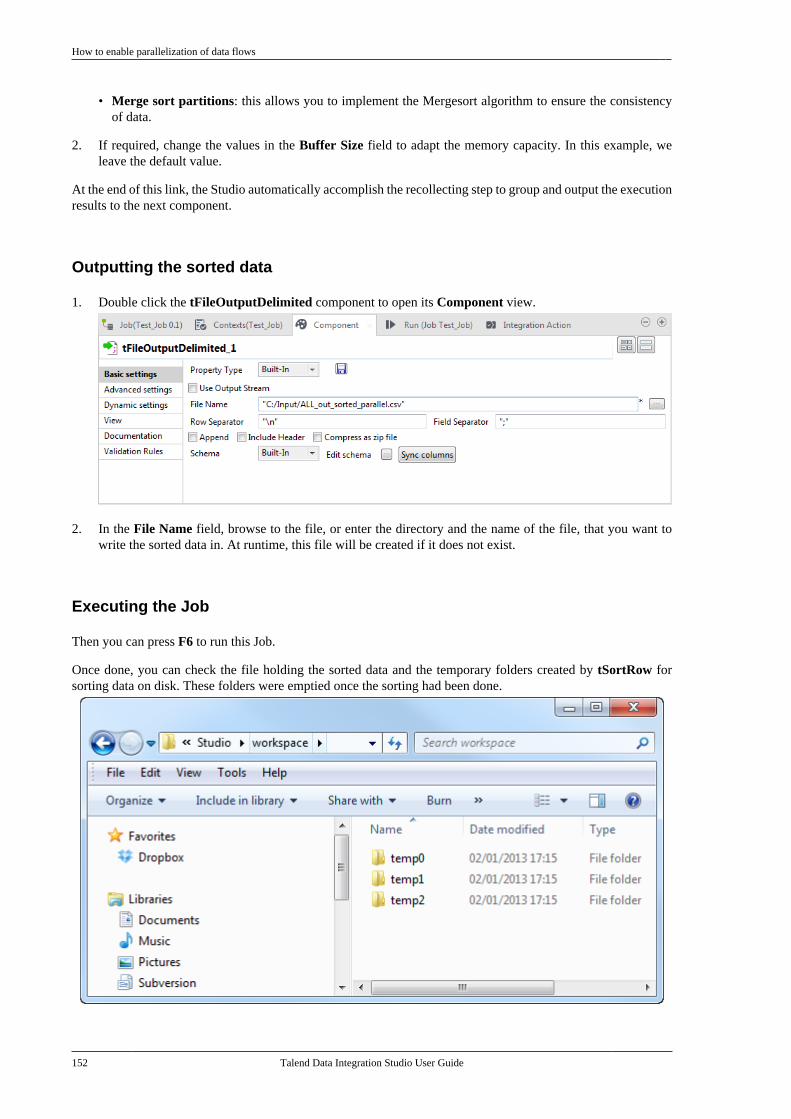
How to enable parallelization of data flows
152 Talend Data Integration Studio User Guide
• Merge sort partitions: this allows you to implement the Mergesort algorithm to ensure the consistencyof data.
2. If required, change the values in the Buffer Size field to adapt the memory capacity. In this example, weleave the default value.
At the end of this link, the Studio automatically accomplish the recollecting step to group and output the executionresults to the next component.
Outputting the sorted data
1. Double click the tFileOutputDelimited component to open its Component view.
2. In the File Name field, browse to the file, or enter the directory and the name of the file, that you want towrite the sorted data in. At runtime, this file will be created if it does not exist.
Executing the Job
Then you can press F6 to run this Job.
Once done, you can check the file holding the sorted data and the temporary folders created by tSortRow forsorting data on disk. These folders were emptied once the sorting had been done.
Handling Jobs: advanced subjects
Talend Data Integration Studio User Guide 153
4.9. Handling Jobs: advanced subjectsThe sections below give detail information about various advanced configuration situations of a data integrationJob including handling multiple input and output flows, using SQL queries, using external components in the Job,scheduling a task to run your Job.
4.9.1. How to map data flows
The most common way to handle multiple input and output flows in your Job including transformations and datare-routing is to use the tMap component.
For more information about the principles of using this component, see Designing a Job.
For examples of Jobs using this component, see tMap in Talend Components Reference Guide.
4.9.2. How to create queries using the SQLBuilder
SQLBuilder helps you create your SQL queries and monitor the changes between DB tables and metadata tables.This editor is available in all DBInput and DBSQLRow components (specific or generic).
You can create a query using the SQLbuilder whether your database table schema is stored in the Repository treeview or built-in directly in the Job.
Fill in the DB connection details and select the appropriate repository entry if you defined it.
Remove the default query statement in the Query field of the Basic settings view of the Component panel. Thenclick the [...] button to open the [SQL Builder] editor.
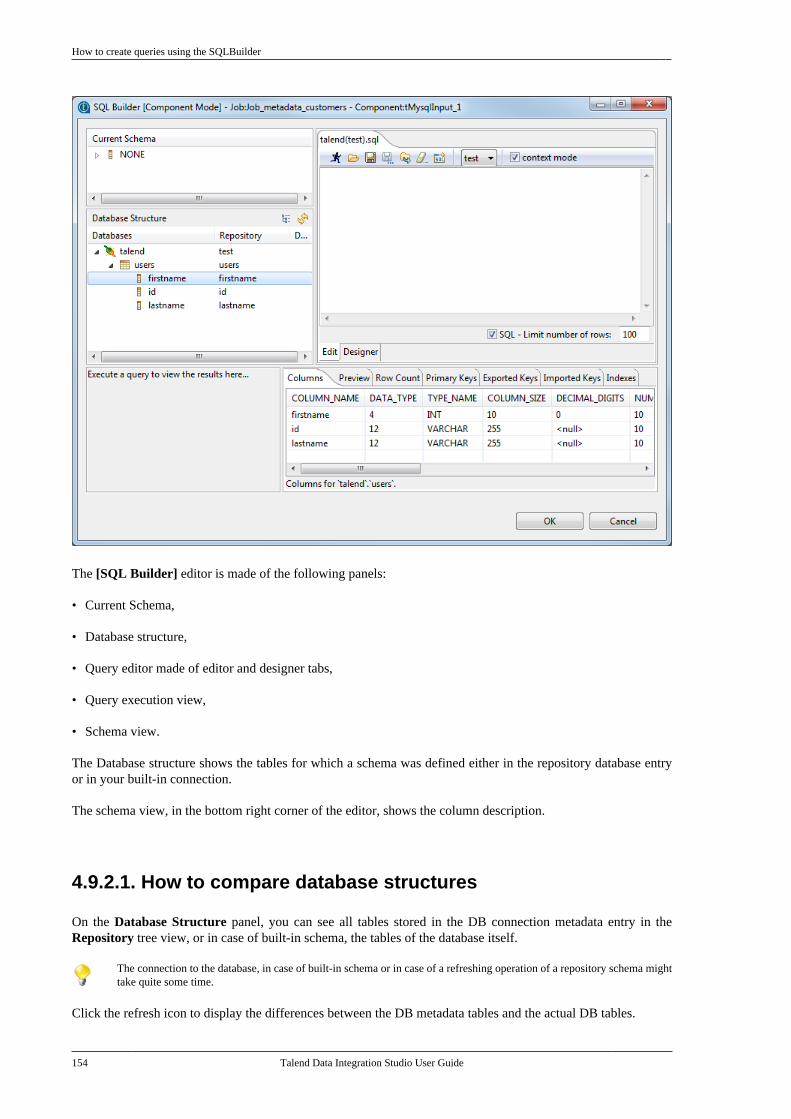
How to create queries using the SQLBuilder
154 Talend Data Integration Studio User Guide
The [SQL Builder] editor is made of the following panels:
• Current Schema,
• Database structure,
• Query editor made of editor and designer tabs,
• Query execution view,
• Schema view.
The Database structure shows the tables for which a schema was defined either in the repository database entryor in your built-in connection.
The schema view, in the bottom right corner of the editor, shows the column description.
4.9.2.1. How to compare database structures
On the Database Structure panel, you can see all tables stored in the DB connection metadata entry in theRepository tree view, or in case of built-in schema, the tables of the database itself.
The connection to the database, in case of built-in schema or in case of a refreshing operation of a repository schema mighttake quite some time.
Click the refresh icon to display the differences between the DB metadata tables and the actual DB tables.
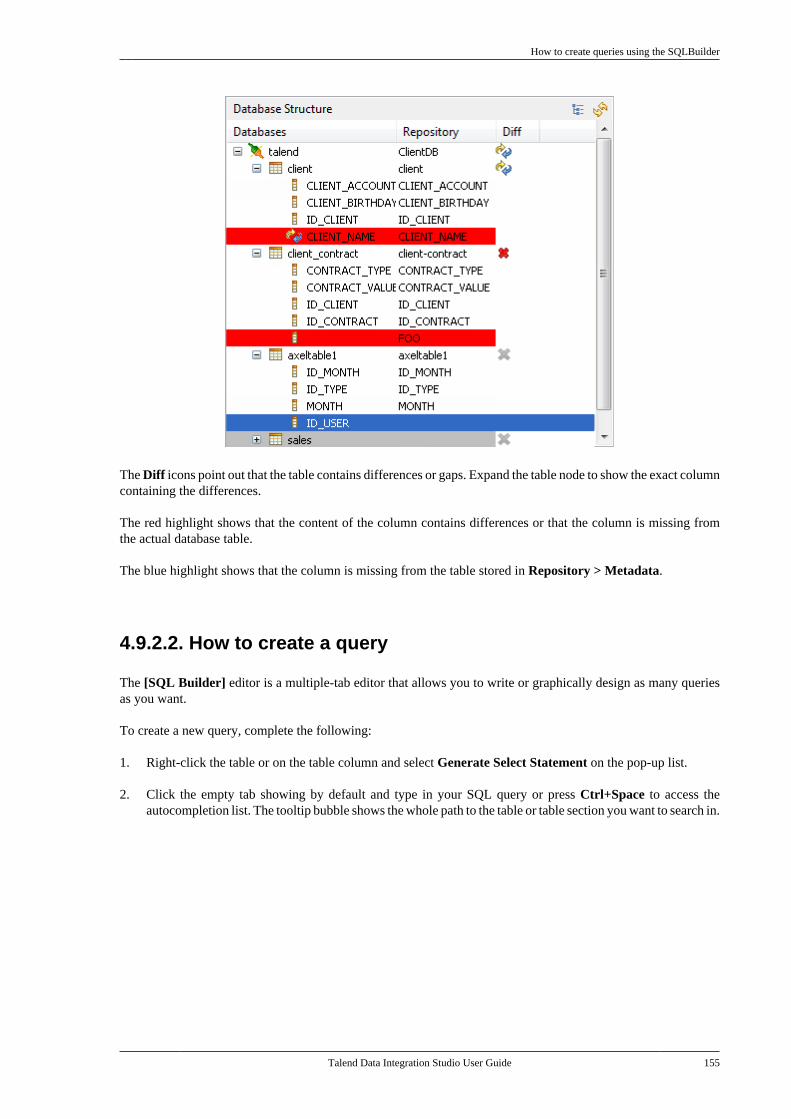
How to create queries using the SQLBuilder
Talend Data Integration Studio User Guide 155
The Diff icons point out that the table contains differences or gaps. Expand the table node to show the exact columncontaining the differences.
The red highlight shows that the content of the column contains differences or that the column is missing fromthe actual database table.
The blue highlight shows that the column is missing from the table stored in Repository > Metadata.
4.9.2.2. How to create a query
The [SQL Builder] editor is a multiple-tab editor that allows you to write or graphically design as many queriesas you want.
To create a new query, complete the following:
1. Right-click the table or on the table column and select Generate Select Statement on the pop-up list.
2. Click the empty tab showing by default and type in your SQL query or press Ctrl+Space to access theautocompletion list. The tooltip bubble shows the whole path to the table or table section you want to search in.
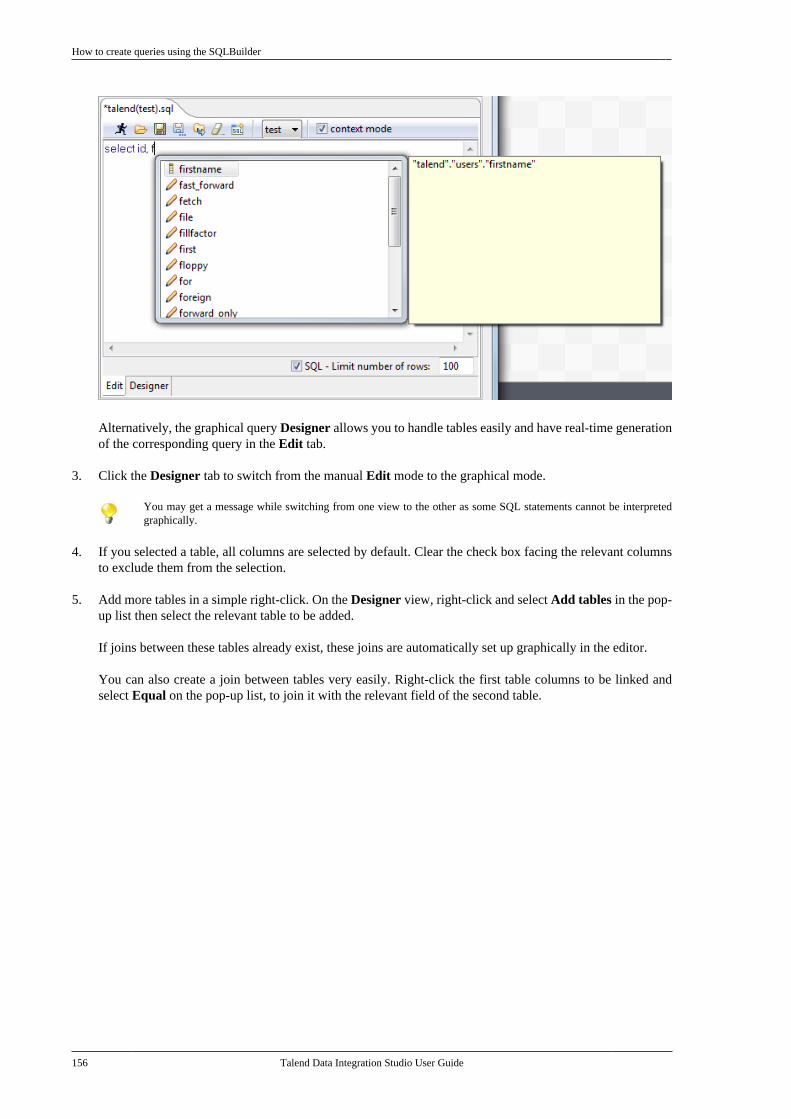
How to create queries using the SQLBuilder
156 Talend Data Integration Studio User Guide
Alternatively, the graphical query Designer allows you to handle tables easily and have real-time generationof the corresponding query in the Edit tab.
3. Click the Designer tab to switch from the manual Edit mode to the graphical mode.
You may get a message while switching from one view to the other as some SQL statements cannot be interpretedgraphically.
4. If you selected a table, all columns are selected by default. Clear the check box facing the relevant columnsto exclude them from the selection.
5. Add more tables in a simple right-click. On the Designer view, right-click and select Add tables in the pop-up list then select the relevant table to be added.
If joins between these tables already exist, these joins are automatically set up graphically in the editor.
You can also create a join between tables very easily. Right-click the first table columns to be linked andselect Equal on the pop-up list, to join it with the relevant field of the second table.
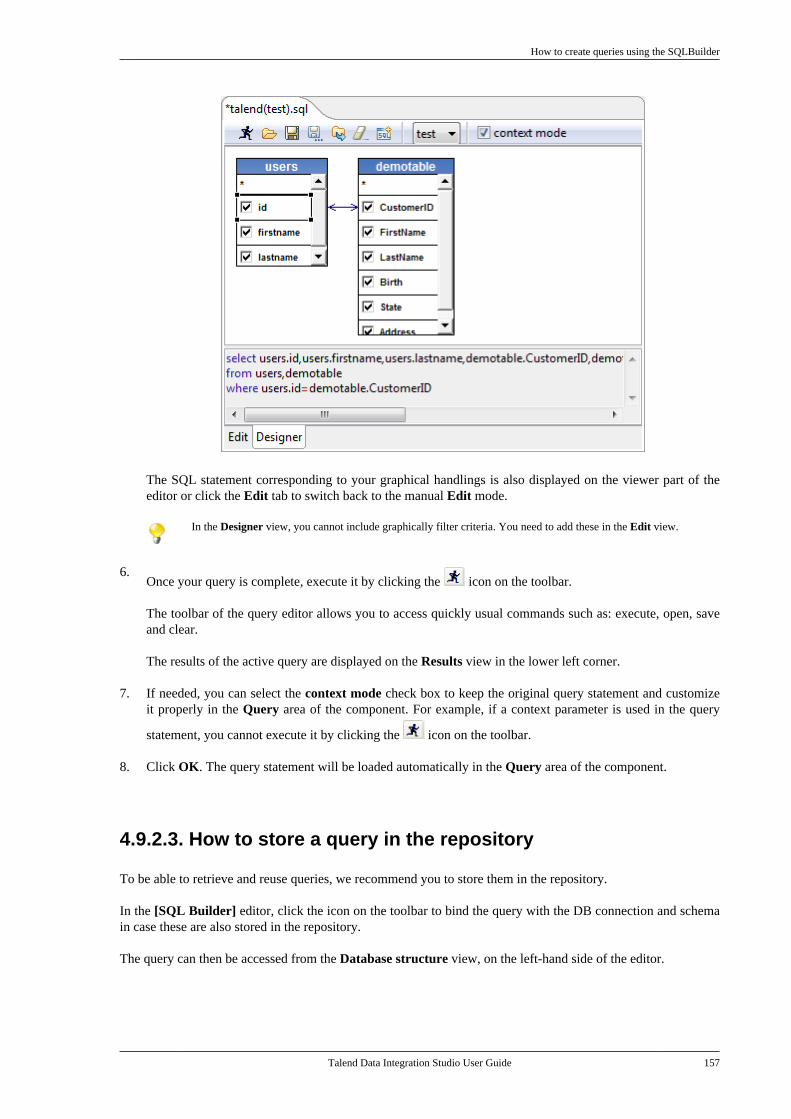
How to create queries using the SQLBuilder
Talend Data Integration Studio User Guide 157
The SQL statement corresponding to your graphical handlings is also displayed on the viewer part of theeditor or click the Edit tab to switch back to the manual Edit mode.
In the Designer view, you cannot include graphically filter criteria. You need to add these in the Edit view.
6.Once your query is complete, execute it by clicking the icon on the toolbar.
The toolbar of the query editor allows you to access quickly usual commands such as: execute, open, saveand clear.
The results of the active query are displayed on the Results view in the lower left corner.
7. If needed, you can select the context mode check box to keep the original query statement and customizeit properly in the Query area of the component. For example, if a context parameter is used in the query
statement, you cannot execute it by clicking the icon on the toolbar.
8. Click OK. The query statement will be loaded automatically in the Query area of the component.
4.9.2.3. How to store a query in the repository
To be able to retrieve and reuse queries, we recommend you to store them in the repository.
In the [SQL Builder] editor, click the icon on the toolbar to bind the query with the DB connection and schemain case these are also stored in the repository.
The query can then be accessed from the Database structure view, on the left-hand side of the editor.
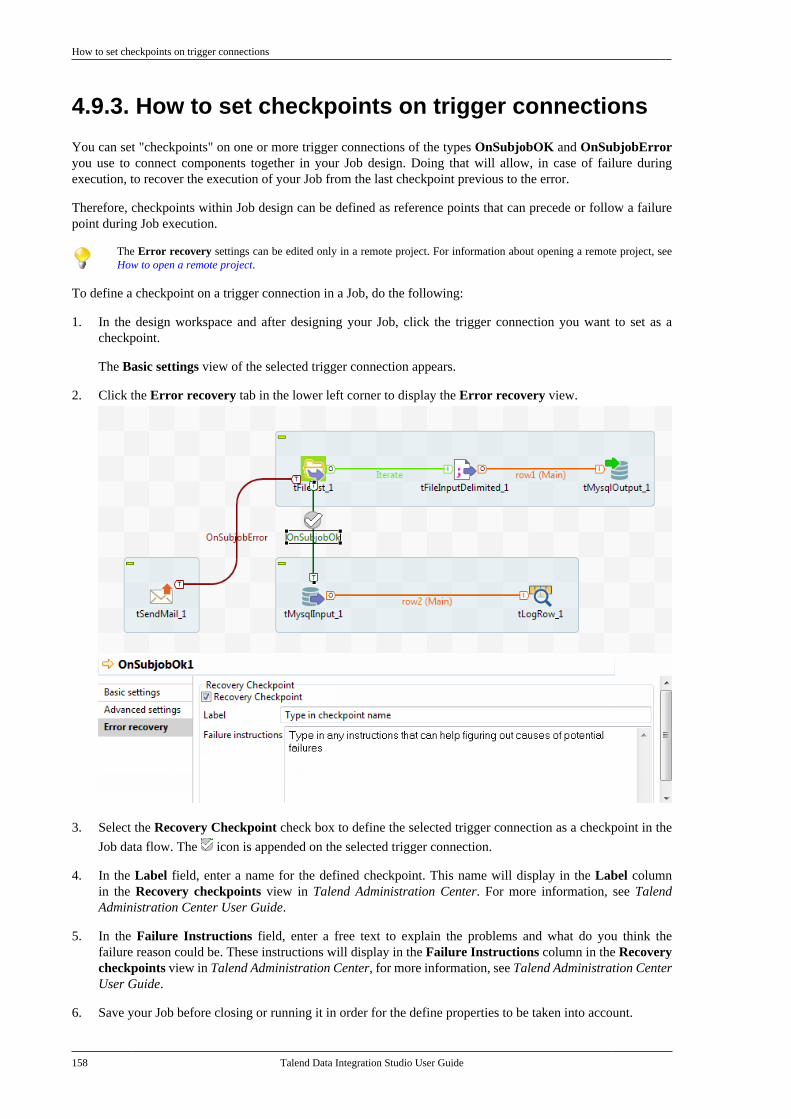
How to set checkpoints on trigger connections
158 Talend Data Integration Studio User Guide
4.9.3. How to set checkpoints on trigger connections
You can set "checkpoints" on one or more trigger connections of the types OnSubjobOK and OnSubjobErroryou use to connect components together in your Job design. Doing that will allow, in case of failure duringexecution, to recover the execution of your Job from the last checkpoint previous to the error.
Therefore, checkpoints within Job design can be defined as reference points that can precede or follow a failurepoint during Job execution.
The Error recovery settings can be edited only in a remote project. For information about opening a remote project, seeHow to open a remote project.
To define a checkpoint on a trigger connection in a Job, do the following:
1. In the design workspace and after designing your Job, click the trigger connection you want to set as acheckpoint.
The Basic settings view of the selected trigger connection appears.
2. Click the Error recovery tab in the lower left corner to display the Error recovery view.
3. Select the Recovery Checkpoint check box to define the selected trigger connection as a checkpoint in the
Job data flow. The icon is appended on the selected trigger connection.
4. In the Label field, enter a name for the defined checkpoint. This name will display in the Label columnin the Recovery checkpoints view in Talend Administration Center. For more information, see TalendAdministration Center User Guide.
5. In the Failure Instructions field, enter a free text to explain the problems and what do you think thefailure reason could be. These instructions will display in the Failure Instructions column in the Recoverycheckpoints view in Talend Administration Center, for more information, see Talend Administration CenterUser Guide.
6. Save your Job before closing or running it in order for the define properties to be taken into account.
How to download/upload Talend Community components
Talend Data Integration Studio User Guide 159
Later, and in case of failure during the execution of the designed Job, you can recover this Job execution from thelatest checkpoint previous to the failure through the Error Recovery Management page in Talend AdministrationCenter.
For more information, see the recovering job execution chapter in Talend Administration Center User Guide.
4.9.4. How to download/upload Talend Communitycomponents
Talend Studio enables you to access a list of all community components in Talend Exchange that are compatiblewith your current version of Talend Studio. You can then download and install these components to use them laterin the Job designs you carry out in the Studio. From Talend Studio, you can also upload components you havecreated to Talend Exchange to share with other community users.
A click on the Exchange link on the toolbar of Talend Studio opens the Exchange tab view on the designworkspace, where you can find lists of:
• components available in Talend Exchange for you to download and install,
• components you downloaded and installed in previous versions of Talend Studio but not installed yet in yourcurrent Studio,
• components you have created and uploaded to Talend Exchange to share with other Talend Community users.
Note that the approach explained in this section is to be used for the above-mentioned components only.
• Before you can download community components or upload your own components to the community, you need to sign into Talend Exchange from your Studio first. If you did not sign in to Talend Exchange when launching the Studio, youstill have a chance to sign in from the Talend Exchange preferences settings page. For more information, see Exchangepreferences (Talend > Exchange).
• The community components available for download are not validated by Talend. This explains why you may encountercomponent loading errors sometimes when trying to install certain community components, why an installed communitycomponent may have a different name in the Palette than in the Exchange tab view, and why you may not be able to finda component in the Palette after it is seemingly installed successfully.
4.9.4.1. How to install community components from TalendExchange
To install community components from Talend Exchange to the Palette of your current Talend Studio:
1. Click the Exchange link on the toolbar of Talend Studio to open the Exchange tab view on the designworkspace.
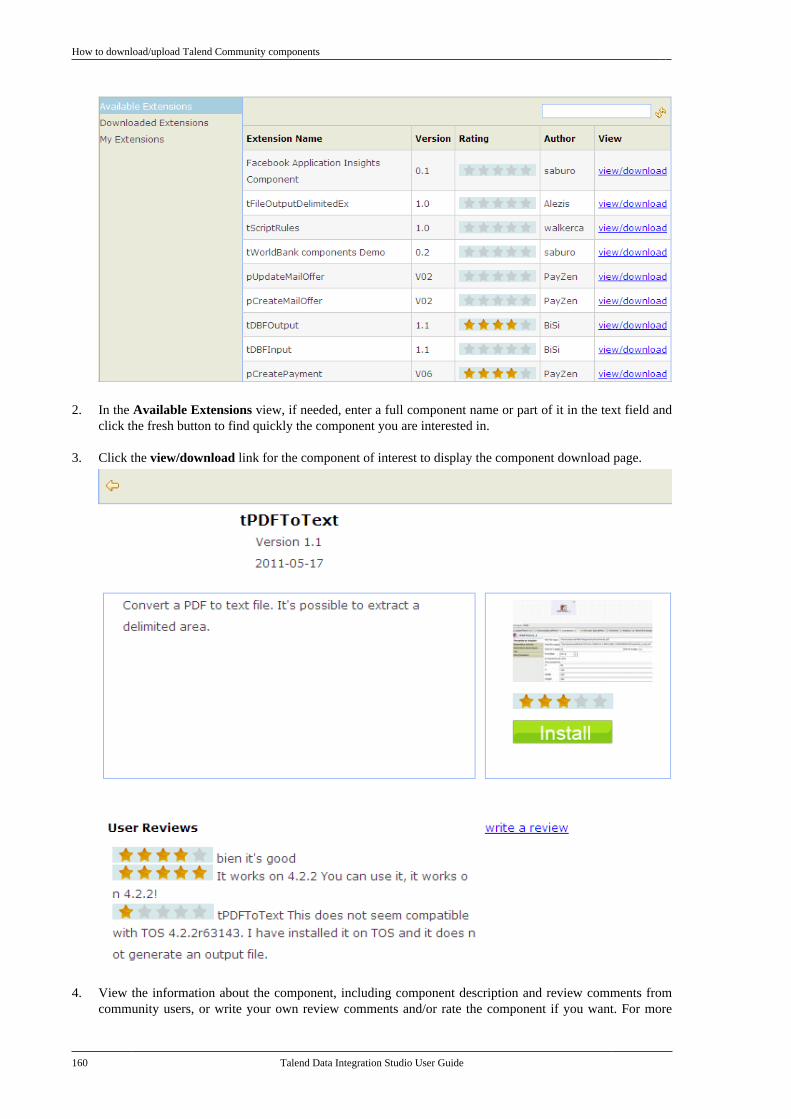
How to download/upload Talend Community components
160 Talend Data Integration Studio User Guide
2. In the Available Extensions view, if needed, enter a full component name or part of it in the text field andclick the fresh button to find quickly the component you are interested in.
3. Click the view/download link for the component of interest to display the component download page.
4. View the information about the component, including component description and review comments fromcommunity users, or write your own review comments and/or rate the component if you want. For more
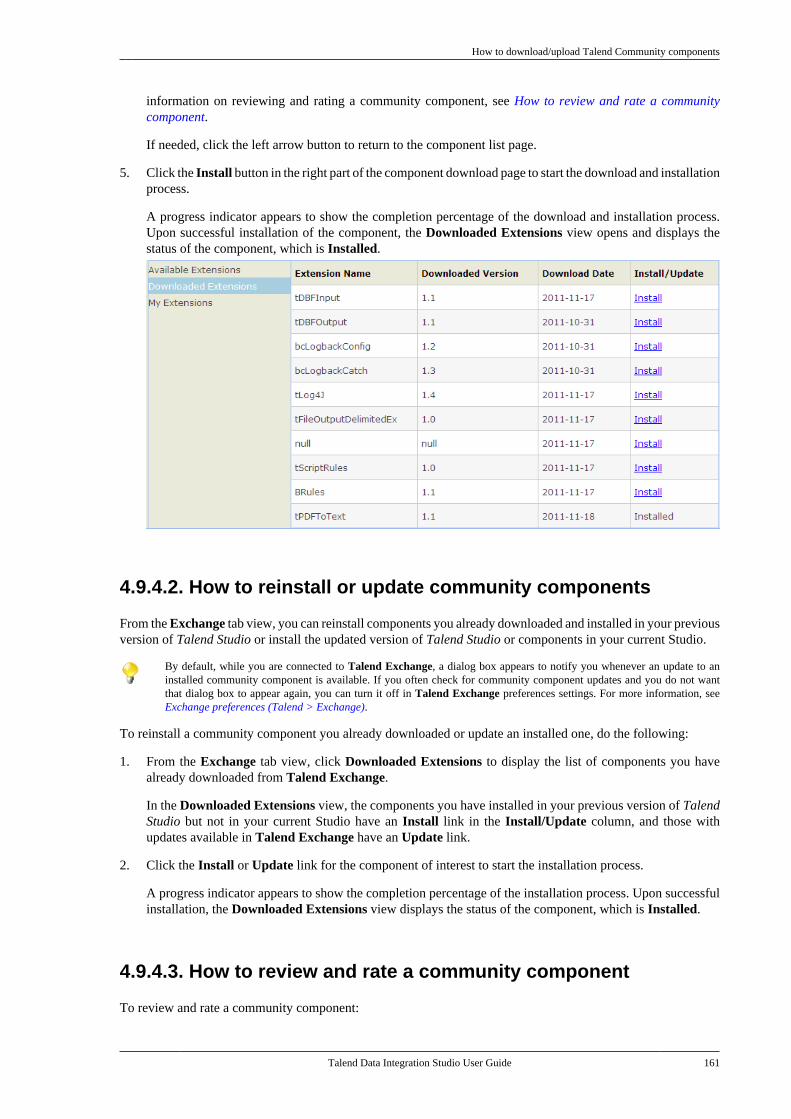
How to download/upload Talend Community components
Talend Data Integration Studio User Guide 161
information on reviewing and rating a community component, see How to review and rate a communitycomponent.
If needed, click the left arrow button to return to the component list page.
5. Click the Install button in the right part of the component download page to start the download and installationprocess.
A progress indicator appears to show the completion percentage of the download and installation process.Upon successful installation of the component, the Downloaded Extensions view opens and displays thestatus of the component, which is Installed.
4.9.4.2. How to reinstall or update community components
From the Exchange tab view, you can reinstall components you already downloaded and installed in your previousversion of Talend Studio or install the updated version of Talend Studio or components in your current Studio.
By default, while you are connected to Talend Exchange, a dialog box appears to notify you whenever an update to aninstalled community component is available. If you often check for community component updates and you do not wantthat dialog box to appear again, you can turn it off in Talend Exchange preferences settings. For more information, seeExchange preferences (Talend > Exchange).
To reinstall a community component you already downloaded or update an installed one, do the following:
1. From the Exchange tab view, click Downloaded Extensions to display the list of components you havealready downloaded from Talend Exchange.
In the Downloaded Extensions view, the components you have installed in your previous version of TalendStudio but not in your current Studio have an Install link in the Install/Update column, and those withupdates available in Talend Exchange have an Update link.
2. Click the Install or Update link for the component of interest to start the installation process.
A progress indicator appears to show the completion percentage of the installation process. Upon successfulinstallation, the Downloaded Extensions view displays the status of the component, which is Installed.
4.9.4.3. How to review and rate a community component
To review and rate a community component:
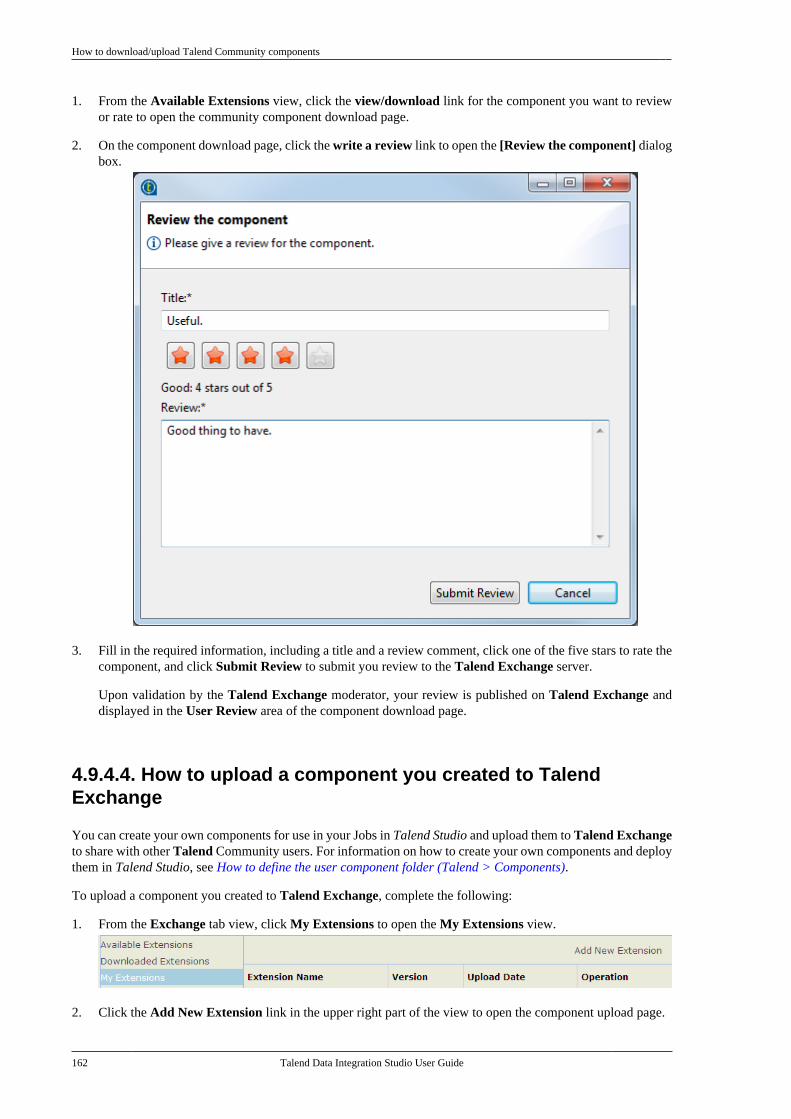
How to download/upload Talend Community components
162 Talend Data Integration Studio User Guide
1. From the Available Extensions view, click the view/download link for the component you want to reviewor rate to open the community component download page.
2. On the component download page, click the write a review link to open the [Review the component] dialogbox.
3. Fill in the required information, including a title and a review comment, click one of the five stars to rate thecomponent, and click Submit Review to submit you review to the Talend Exchange server.
Upon validation by the Talend Exchange moderator, your review is published on Talend Exchange anddisplayed in the User Review area of the component download page.
4.9.4.4. How to upload a component you created to TalendExchange
You can create your own components for use in your Jobs in Talend Studio and upload them to Talend Exchangeto share with other Talend Community users. For information on how to create your own components and deploythem in Talend Studio, see How to define the user component folder (Talend > Components).
To upload a component you created to Talend Exchange, complete the following:
1. From the Exchange tab view, click My Extensions to open the My Extensions view.
2. Click the Add New Extension link in the upper right part of the view to open the component upload page.
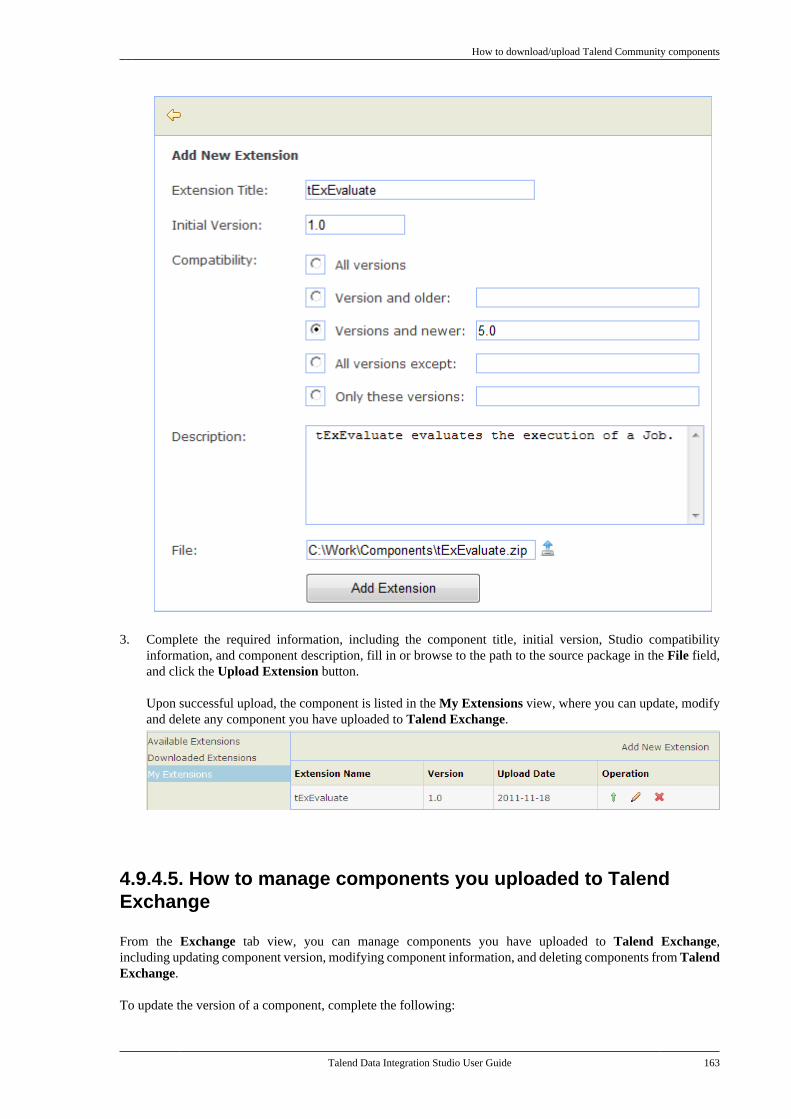
How to download/upload Talend Community components
Talend Data Integration Studio User Guide 163
3. Complete the required information, including the component title, initial version, Studio compatibilityinformation, and component description, fill in or browse to the path to the source package in the File field,and click the Upload Extension button.
Upon successful upload, the component is listed in the My Extensions view, where you can update, modifyand delete any component you have uploaded to Talend Exchange.
4.9.4.5. How to manage components you uploaded to TalendExchange
From the Exchange tab view, you can manage components you have uploaded to Talend Exchange,including updating component version, modifying component information, and deleting components from TalendExchange.
To update the version of a component, complete the following:
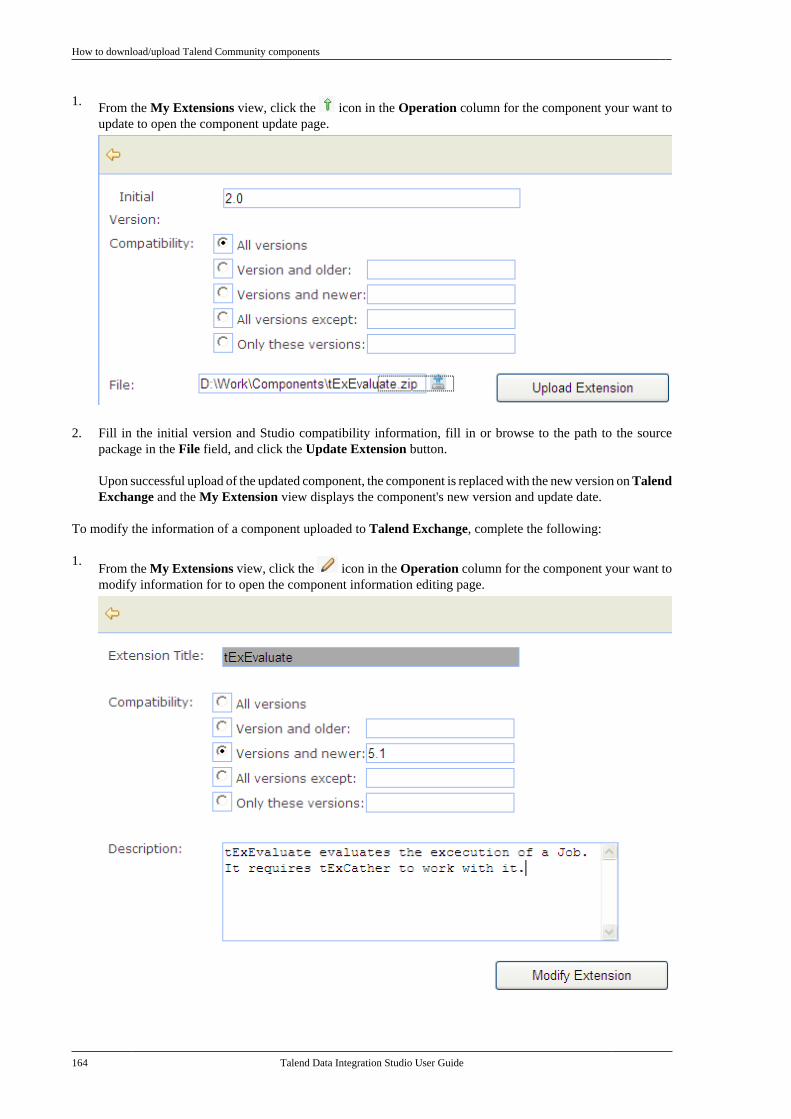
How to download/upload Talend Community components
164 Talend Data Integration Studio User Guide
1. From the My Extensions view, click the icon in the Operation column for the component your want toupdate to open the component update page.
2. Fill in the initial version and Studio compatibility information, fill in or browse to the path to the sourcepackage in the File field, and click the Update Extension button.
Upon successful upload of the updated component, the component is replaced with the new version on TalendExchange and the My Extension view displays the component's new version and update date.
To modify the information of a component uploaded to Talend Exchange, complete the following:
1.From the My Extensions view, click the icon in the Operation column for the component your want tomodify information for to open the component information editing page.
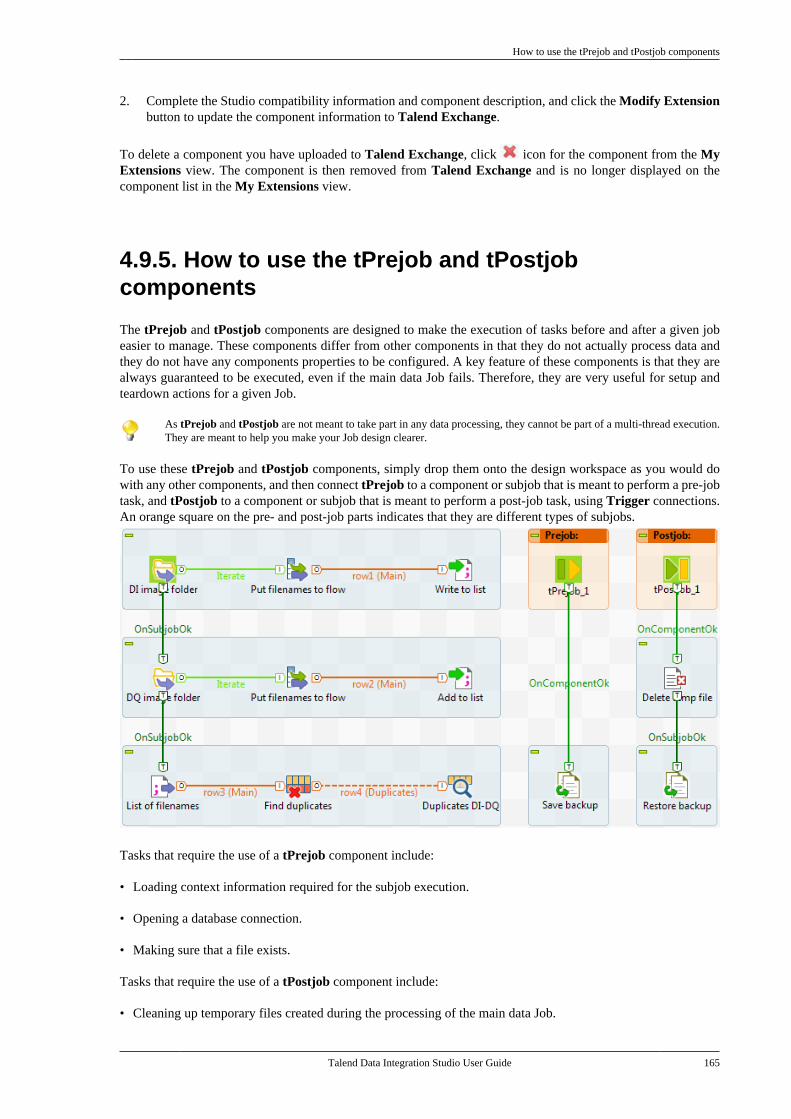
How to use the tPrejob and tPostjob components
Talend Data Integration Studio User Guide 165
2. Complete the Studio compatibility information and component description, and click the Modify Extensionbutton to update the component information to Talend Exchange.
To delete a component you have uploaded to Talend Exchange, click icon for the component from the MyExtensions view. The component is then removed from Talend Exchange and is no longer displayed on thecomponent list in the My Extensions view.
4.9.5. How to use the tPrejob and tPostjobcomponents
The tPrejob and tPostjob components are designed to make the execution of tasks before and after a given jobeasier to manage. These components differ from other components in that they do not actually process data andthey do not have any components properties to be configured. A key feature of these components is that they arealways guaranteed to be executed, even if the main data Job fails. Therefore, they are very useful for setup andteardown actions for a given Job.
As tPrejob and tPostjob are not meant to take part in any data processing, they cannot be part of a multi-thread execution.They are meant to help you make your Job design clearer.
To use these tPrejob and tPostjob components, simply drop them onto the design workspace as you would dowith any other components, and then connect tPrejob to a component or subjob that is meant to perform a pre-jobtask, and tPostjob to a component or subjob that is meant to perform a post-job task, using Trigger connections.An orange square on the pre- and post-job parts indicates that they are different types of subjobs.
Tasks that require the use of a tPrejob component include:
• Loading context information required for the subjob execution.
• Opening a database connection.
• Making sure that a file exists.
Tasks that require the use of a tPostjob component include:
• Cleaning up temporary files created during the processing of the main data Job.
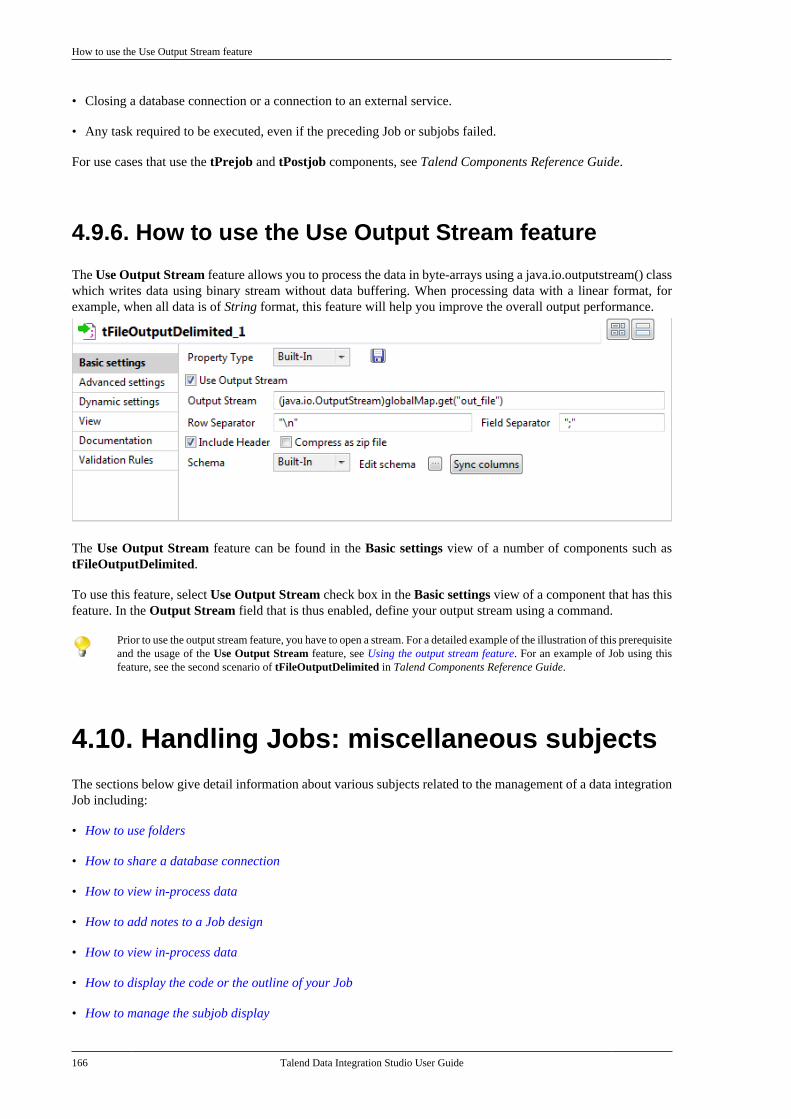
How to use the Use Output Stream feature
166 Talend Data Integration Studio User Guide
• Closing a database connection or a connection to an external service.
• Any task required to be executed, even if the preceding Job or subjobs failed.
For use cases that use the tPrejob and tPostjob components, see Talend Components Reference Guide.
4.9.6. How to use the Use Output Stream feature
The Use Output Stream feature allows you to process the data in byte-arrays using a java.io.outputstream() classwhich writes data using binary stream without data buffering. When processing data with a linear format, forexample, when all data is of String format, this feature will help you improve the overall output performance.
The Use Output Stream feature can be found in the Basic settings view of a number of components such astFileOutputDelimited.
To use this feature, select Use Output Stream check box in the Basic settings view of a component that has thisfeature. In the Output Stream field that is thus enabled, define your output stream using a command.
Prior to use the output stream feature, you have to open a stream. For a detailed example of the illustration of this prerequisiteand the usage of the Use Output Stream feature, see Using the output stream feature. For an example of Job using thisfeature, see the second scenario of tFileOutputDelimited in Talend Components Reference Guide.
4.10. Handling Jobs: miscellaneous subjectsThe sections below give detail information about various subjects related to the management of a data integrationJob including:
• How to use folders
• How to share a database connection
• How to view in-process data
• How to add notes to a Job design
• How to view in-process data
• How to display the code or the outline of your Job
• How to manage the subjob display

How to use folders
Talend Data Integration Studio User Guide 167
• How to define options on the Job view
4.10.1. How to use folders
You can organize your Jobs into folders.
To create a folder, proceed as follows:
1. In the Repository tree view of the Integration perspective, right-click Job Designs and select Create folderfrom the contextual menu.
The [New folder] dialog box displays.
2. In the Label field, enter a name for the folder and then click Finish to confirm your changes and close thedialog box.
The created folder is listed under the Job Designs node in the Repository tree view.
If you have already created Jobs that you want to move into this new folder, simply drop them into the folder.
4.10.2. How to share a database connection
If you have various Jobs using the same database connection, you can factorize the connection by using the Useor register a shared DB Connection option so that the connection can be shared between parent and child Jobs.
This option has been added to all database connection components in order to reduce the number of connectionsto open and close.
The Use or register a shared DB Connection option of all database connection components is incompatible with the Usedynamic job and Use an independent process to run subjob options of the tRunJob component. Using a shared databaseconnection together with a tRunJob component with either of these two options enabled will cause your Job to fail.
Assume that you have two related Jobs (a parent Job and a child Job) that both need to connect to your remoteMySQL database. To use a shared database connection in the two Jobs, to the following:
1. Add a tMysqlConnection (assuming that you work with a MySQL database) to both the parent and the childJob, if they are not using a database connection component.
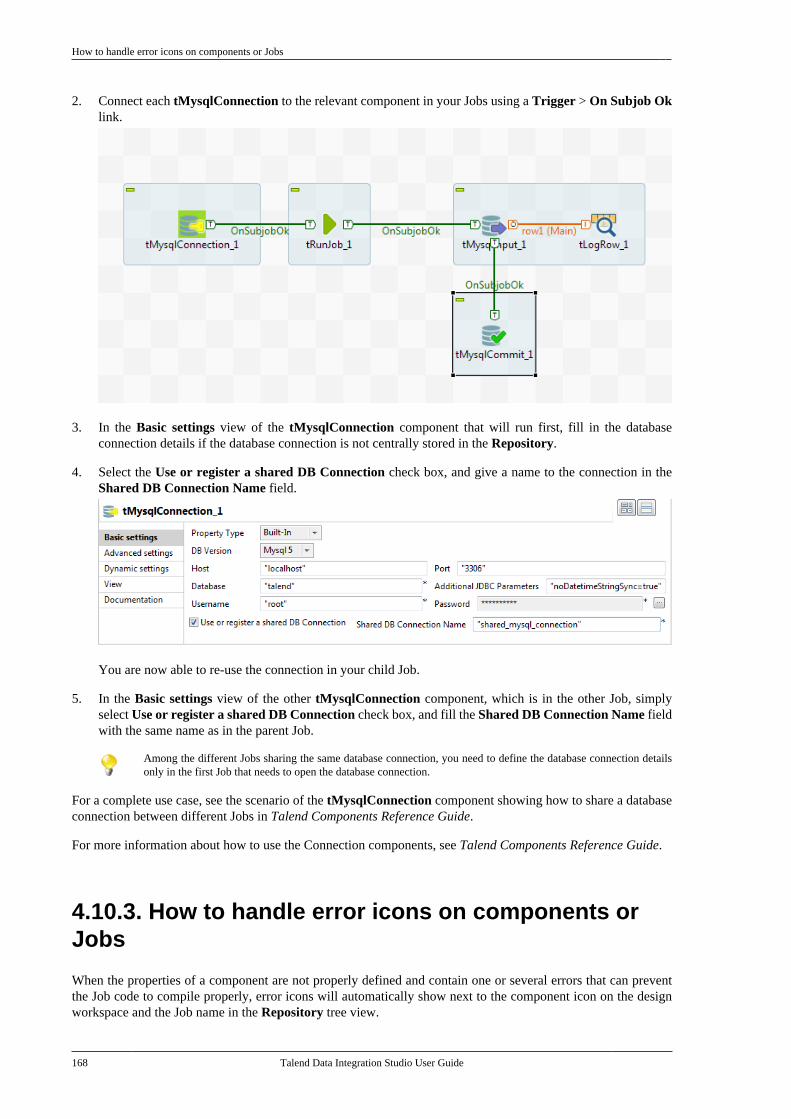
How to handle error icons on components or Jobs
168 Talend Data Integration Studio User Guide
2. Connect each tMysqlConnection to the relevant component in your Jobs using a Trigger > On Subjob Oklink.
3. In the Basic settings view of the tMysqlConnection component that will run first, fill in the databaseconnection details if the database connection is not centrally stored in the Repository.
4. Select the Use or register a shared DB Connection check box, and give a name to the connection in theShared DB Connection Name field.
You are now able to re-use the connection in your child Job.
5. In the Basic settings view of the other tMysqlConnection component, which is in the other Job, simplyselect Use or register a shared DB Connection check box, and fill the Shared DB Connection Name fieldwith the same name as in the parent Job.
Among the different Jobs sharing the same database connection, you need to define the database connection detailsonly in the first Job that needs to open the database connection.
For a complete use case, see the scenario of the tMysqlConnection component showing how to share a databaseconnection between different Jobs in Talend Components Reference Guide.
For more information about how to use the Connection components, see Talend Components Reference Guide.
4.10.3. How to handle error icons on components orJobs
When the properties of a component are not properly defined and contain one or several errors that can preventthe Job code to compile properly, error icons will automatically show next to the component icon on the designworkspace and the Job name in the Repository tree view.
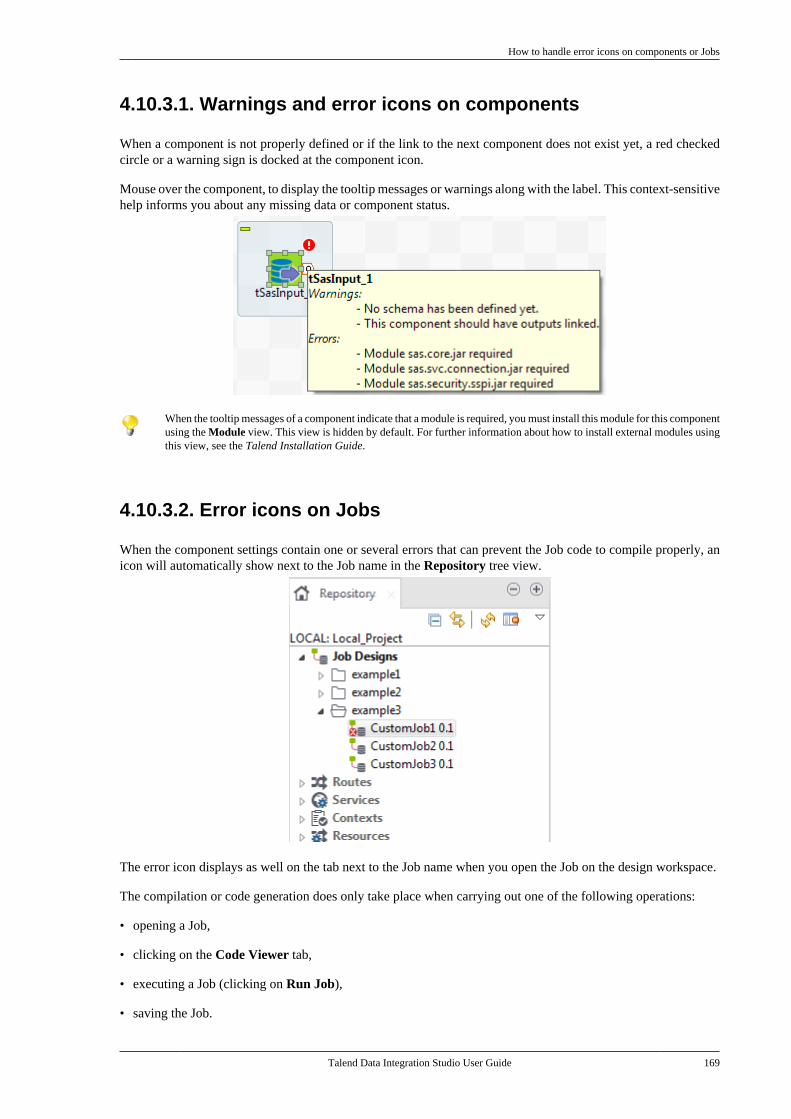
How to handle error icons on components or Jobs
Talend Data Integration Studio User Guide 169
4.10.3.1. Warnings and error icons on components
When a component is not properly defined or if the link to the next component does not exist yet, a red checkedcircle or a warning sign is docked at the component icon.
Mouse over the component, to display the tooltip messages or warnings along with the label. This context-sensitivehelp informs you about any missing data or component status.
When the tooltip messages of a component indicate that a module is required, you must install this module for this componentusing the Module view. This view is hidden by default. For further information about how to install external modules usingthis view, see the Talend Installation Guide.
4.10.3.2. Error icons on Jobs
When the component settings contain one or several errors that can prevent the Job code to compile properly, anicon will automatically show next to the Job name in the Repository tree view.
The error icon displays as well on the tab next to the Job name when you open the Job on the design workspace.
The compilation or code generation does only take place when carrying out one of the following operations:
• opening a Job,
• clicking on the Code Viewer tab,
• executing a Job (clicking on Run Job),
• saving the Job.
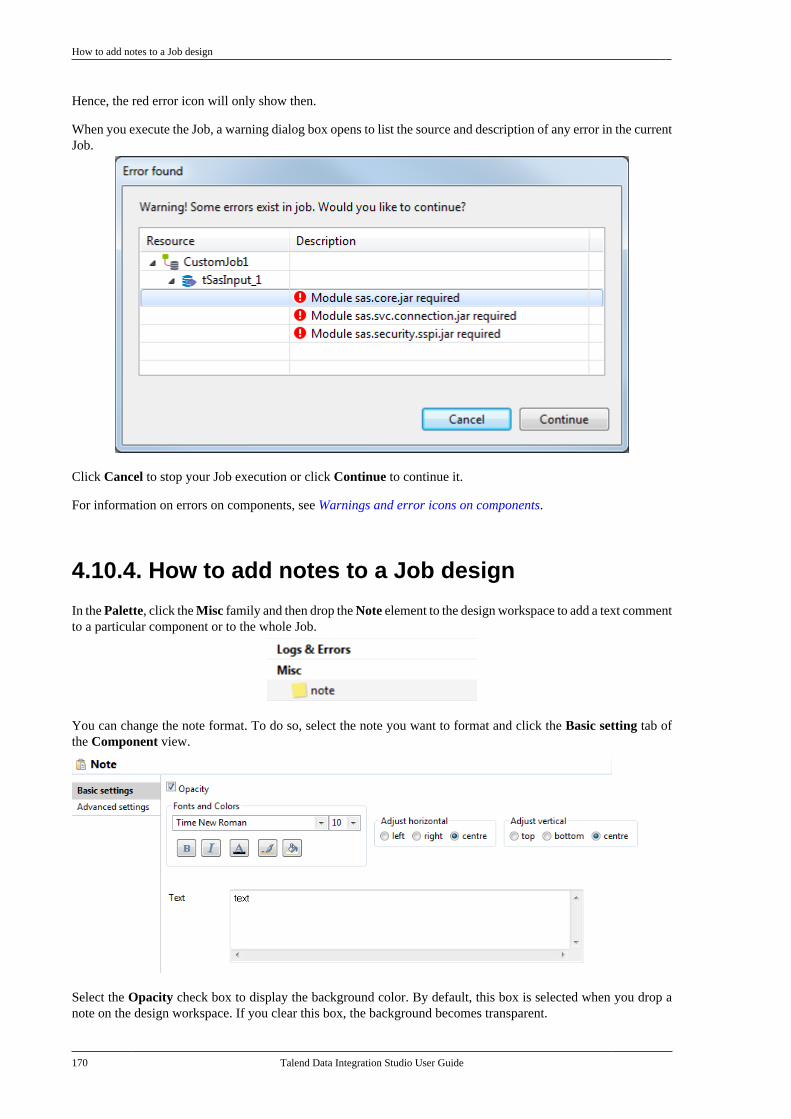
How to add notes to a Job design
170 Talend Data Integration Studio User Guide
Hence, the red error icon will only show then.
When you execute the Job, a warning dialog box opens to list the source and description of any error in the currentJob.
Click Cancel to stop your Job execution or click Continue to continue it.
For information on errors on components, see Warnings and error icons on components.
4.10.4. How to add notes to a Job design
In the Palette, click the Misc family and then drop the Note element to the design workspace to add a text commentto a particular component or to the whole Job.
You can change the note format. To do so, select the note you want to format and click the Basic setting tab ofthe Component view.
Select the Opacity check box to display the background color. By default, this box is selected when you drop anote on the design workspace. If you clear this box, the background becomes transparent.
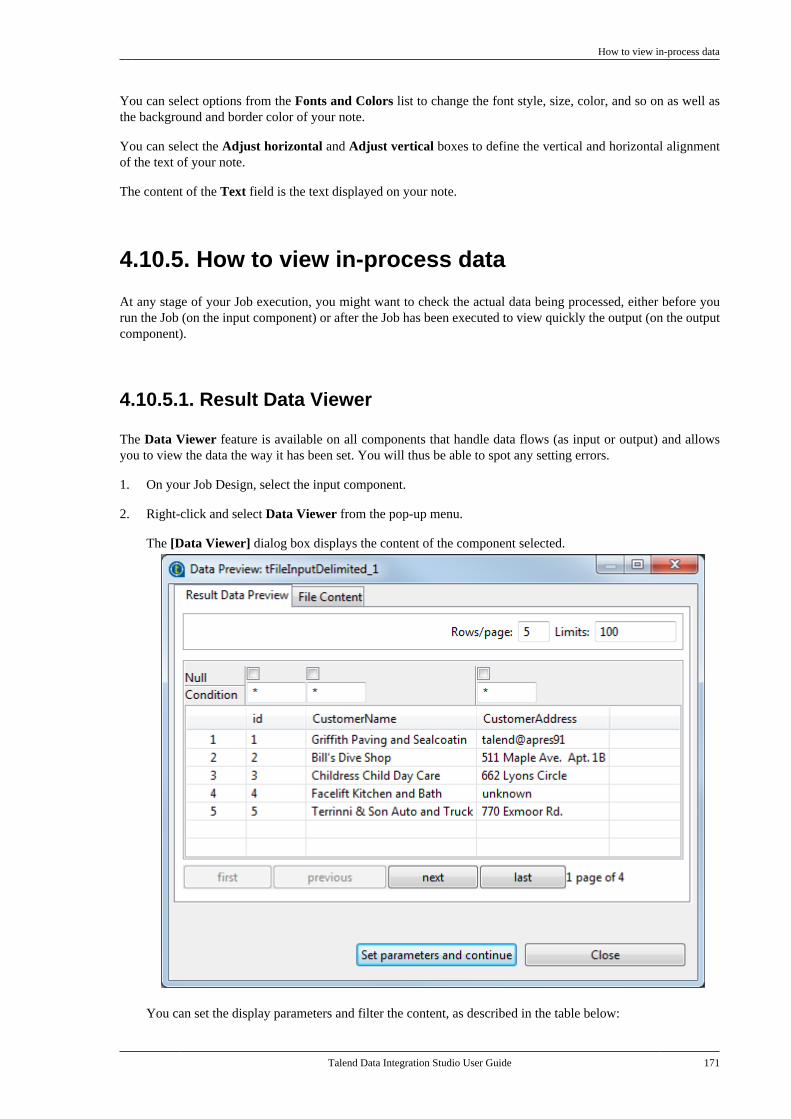
How to view in-process data
Talend Data Integration Studio User Guide 171
You can select options from the Fonts and Colors list to change the font style, size, color, and so on as well asthe background and border color of your note.
You can select the Adjust horizontal and Adjust vertical boxes to define the vertical and horizontal alignmentof the text of your note.
The content of the Text field is the text displayed on your note.
4.10.5. How to view in-process data
At any stage of your Job execution, you might want to check the actual data being processed, either before yourun the Job (on the input component) or after the Job has been executed to view quickly the output (on the outputcomponent).
4.10.5.1. Result Data Viewer
The Data Viewer feature is available on all components that handle data flows (as input or output) and allowsyou to view the data the way it has been set. You will thus be able to spot any setting errors.
1. On your Job Design, select the input component.
2. Right-click and select Data Viewer from the pop-up menu.
The [Data Viewer] dialog box displays the content of the component selected.
You can set the display parameters and filter the content, as described in the table below:
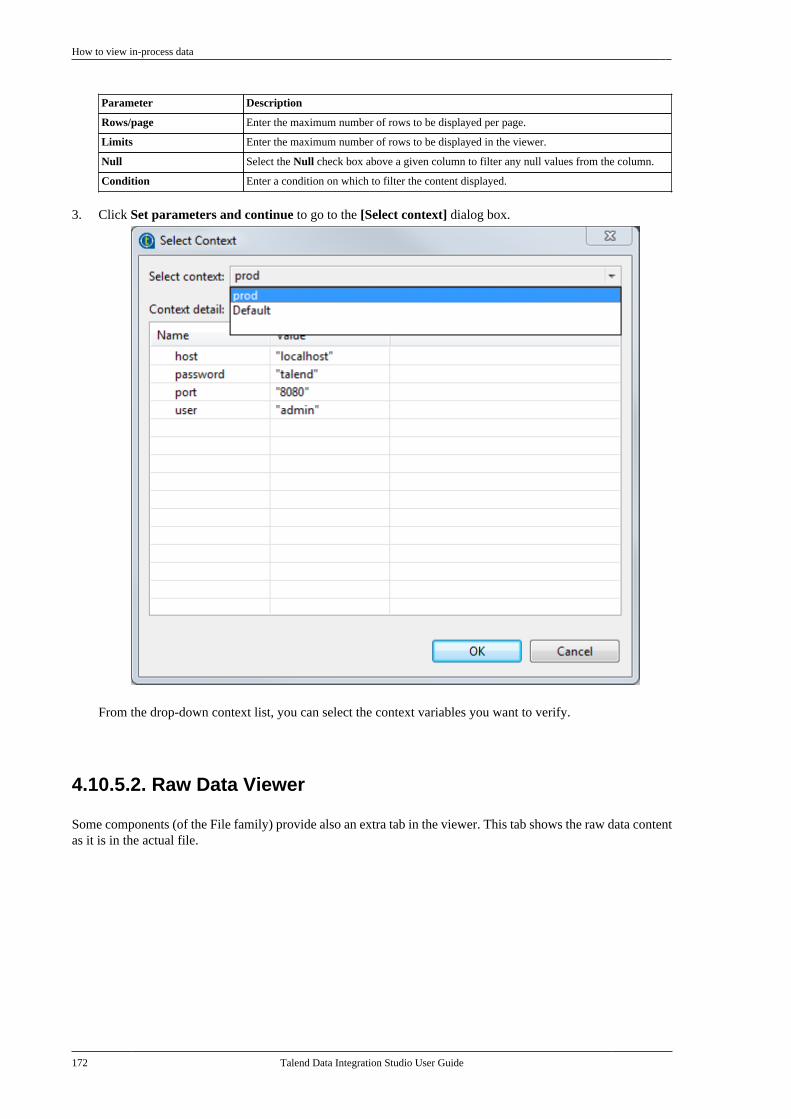
How to view in-process data
172 Talend Data Integration Studio User Guide
Parameter Description
Rows/page Enter the maximum number of rows to be displayed per page.
Limits Enter the maximum number of rows to be displayed in the viewer.
Null Select the Null check box above a given column to filter any null values from the column.
Condition Enter a condition on which to filter the content displayed.
3. Click Set parameters and continue to go to the [Select context] dialog box.
From the drop-down context list, you can select the context variables you want to verify.
4.10.5.2. Raw Data Viewer
Some components (of the File family) provide also an extra tab in the viewer. This tab shows the raw data contentas it is in the actual file.
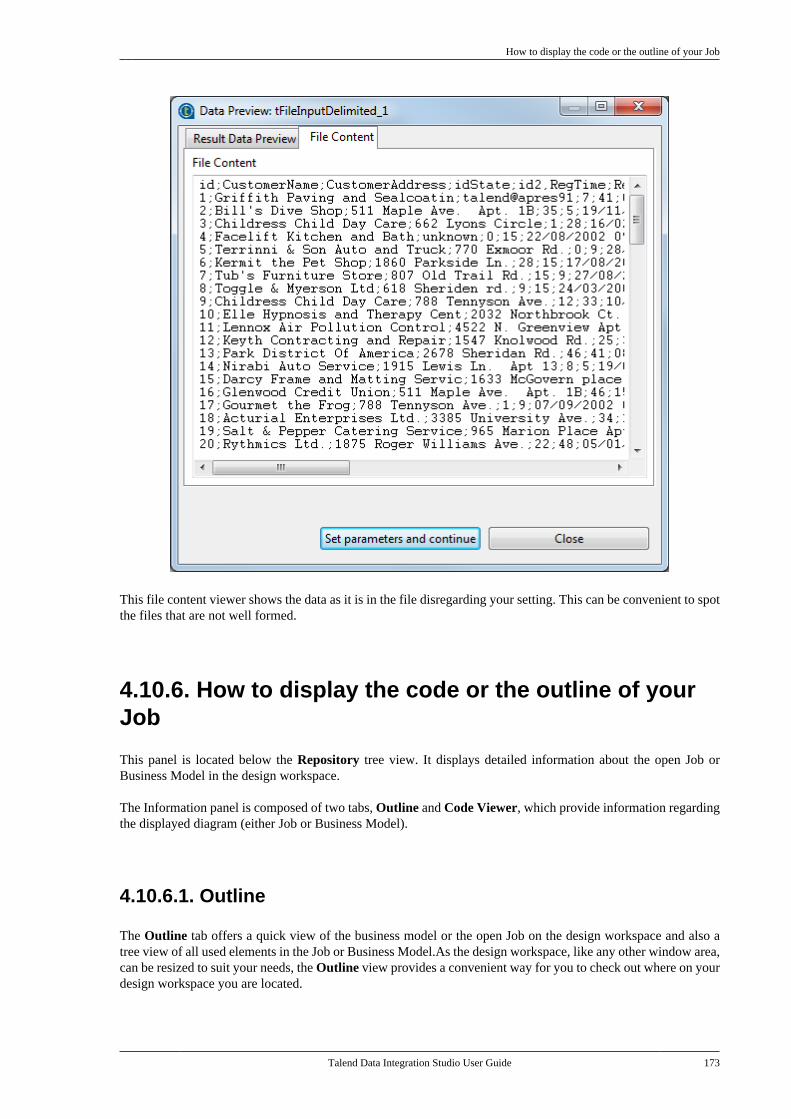
How to display the code or the outline of your Job
Talend Data Integration Studio User Guide 173
This file content viewer shows the data as it is in the file disregarding your setting. This can be convenient to spotthe files that are not well formed.
4.10.6. How to display the code or the outline of yourJob
This panel is located below the Repository tree view. It displays detailed information about the open Job orBusiness Model in the design workspace.
The Information panel is composed of two tabs, Outline and Code Viewer, which provide information regardingthe displayed diagram (either Job or Business Model).
4.10.6.1. Outline
The Outline tab offers a quick view of the business model or the open Job on the design workspace and also atree view of all used elements in the Job or Business Model.As the design workspace, like any other window area,can be resized to suit your needs, the Outline view provides a convenient way for you to check out where on yourdesign workspace you are located.
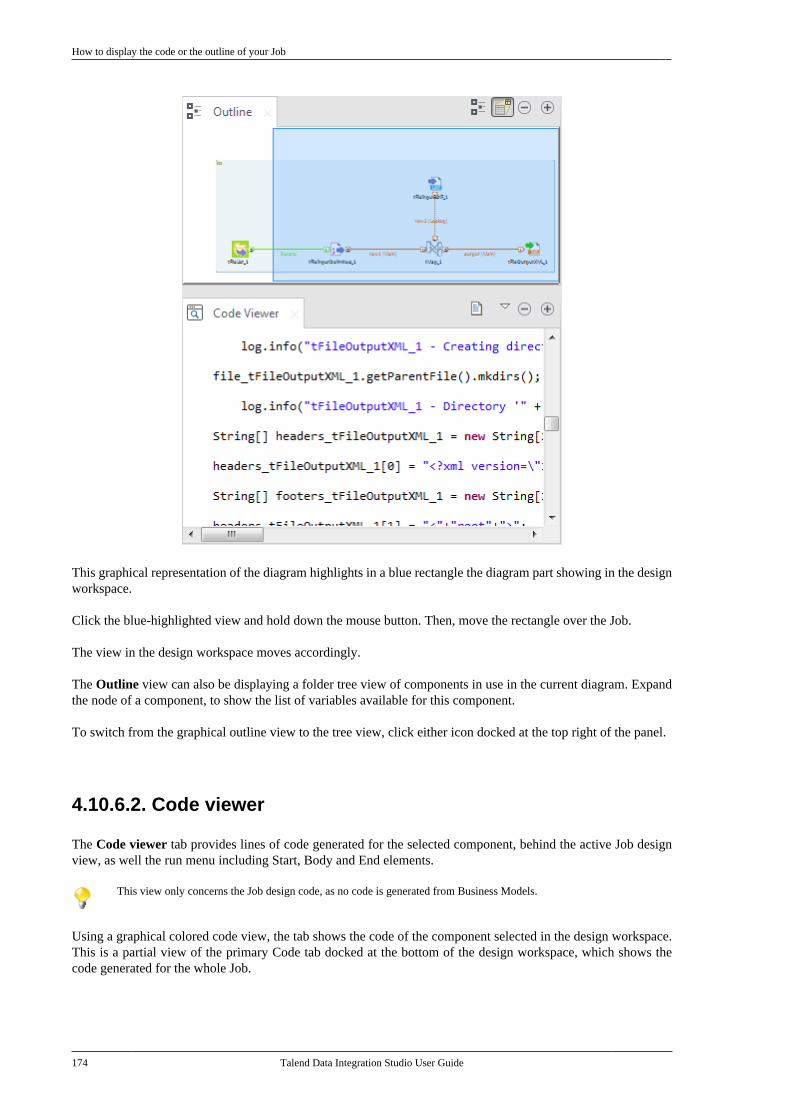
How to display the code or the outline of your Job
174 Talend Data Integration Studio User Guide
This graphical representation of the diagram highlights in a blue rectangle the diagram part showing in the designworkspace.
Click the blue-highlighted view and hold down the mouse button. Then, move the rectangle over the Job.
The view in the design workspace moves accordingly.
The Outline view can also be displaying a folder tree view of components in use in the current diagram. Expandthe node of a component, to show the list of variables available for this component.
To switch from the graphical outline view to the tree view, click either icon docked at the top right of the panel.
4.10.6.2. Code viewer
The Code viewer tab provides lines of code generated for the selected component, behind the active Job designview, as well the run menu including Start, Body and End elements.
This view only concerns the Job design code, as no code is generated from Business Models.
Using a graphical colored code view, the tab shows the code of the component selected in the design workspace.This is a partial view of the primary Code tab docked at the bottom of the design workspace, which shows thecode generated for the whole Job.
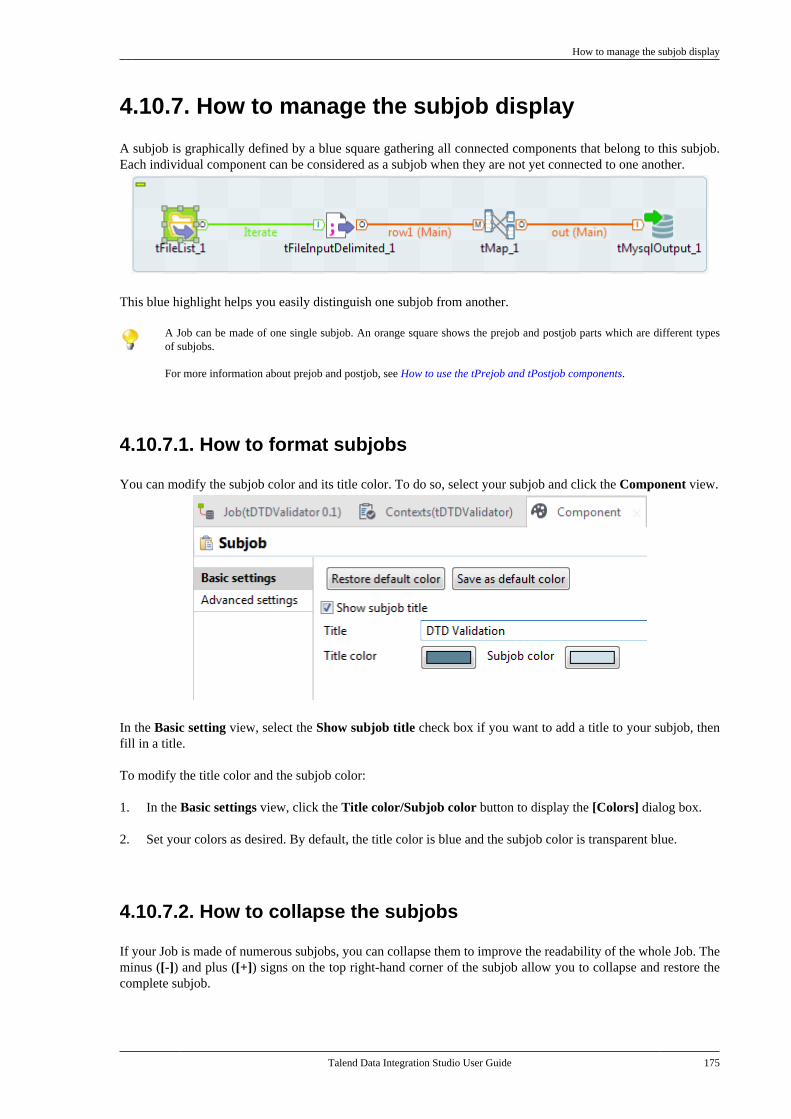
How to manage the subjob display
Talend Data Integration Studio User Guide 175
4.10.7. How to manage the subjob display
A subjob is graphically defined by a blue square gathering all connected components that belong to this subjob.Each individual component can be considered as a subjob when they are not yet connected to one another.
This blue highlight helps you easily distinguish one subjob from another.
A Job can be made of one single subjob. An orange square shows the prejob and postjob parts which are different typesof subjobs.
For more information about prejob and postjob, see How to use the tPrejob and tPostjob components.
4.10.7.1. How to format subjobs
You can modify the subjob color and its title color. To do so, select your subjob and click the Component view.
In the Basic setting view, select the Show subjob title check box if you want to add a title to your subjob, thenfill in a title.
To modify the title color and the subjob color:
1. In the Basic settings view, click the Title color/Subjob color button to display the [Colors] dialog box.
2. Set your colors as desired. By default, the title color is blue and the subjob color is transparent blue.
4.10.7.2. How to collapse the subjobs
If your Job is made of numerous subjobs, you can collapse them to improve the readability of the whole Job. Theminus ([-]) and plus ([+]) signs on the top right-hand corner of the subjob allow you to collapse and restore thecomplete subjob.
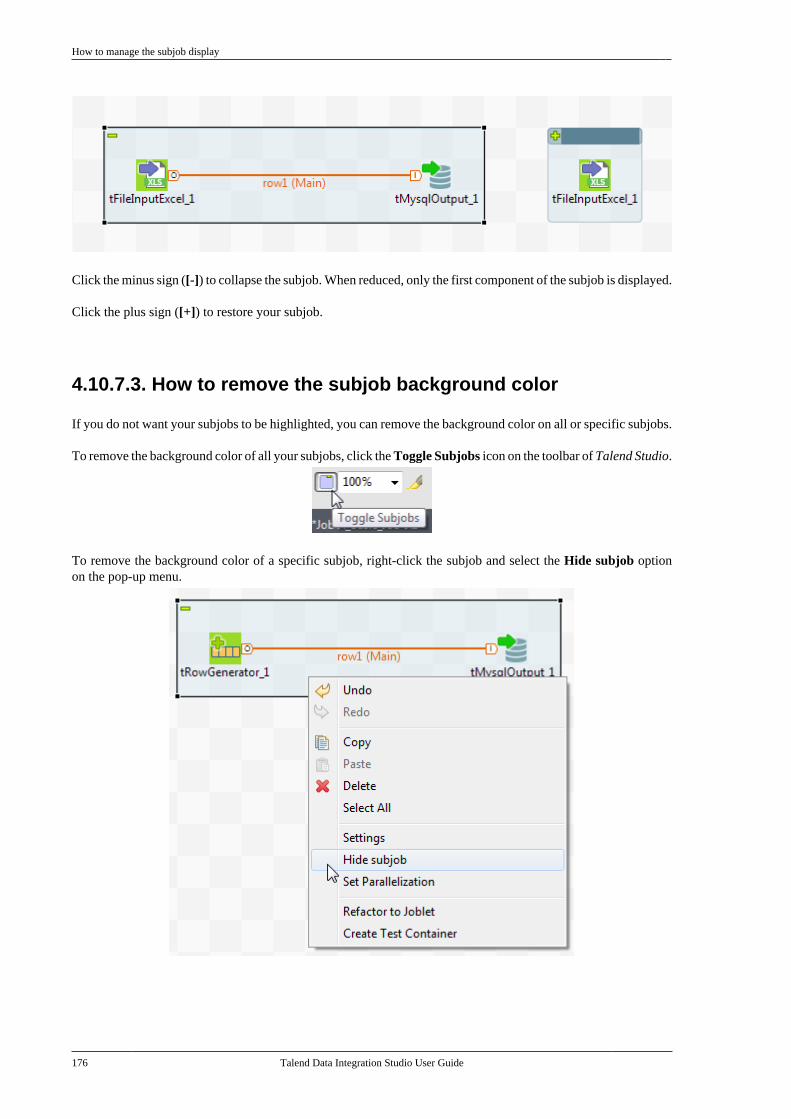
How to manage the subjob display
176 Talend Data Integration Studio User Guide
Click the minus sign ([-]) to collapse the subjob. When reduced, only the first component of the subjob is displayed.
Click the plus sign ([+]) to restore your subjob.
4.10.7.3. How to remove the subjob background color
If you do not want your subjobs to be highlighted, you can remove the background color on all or specific subjobs.
To remove the background color of all your subjobs, click the Toggle Subjobs icon on the toolbar of Talend Studio.
To remove the background color of a specific subjob, right-click the subjob and select the Hide subjob optionon the pop-up menu.
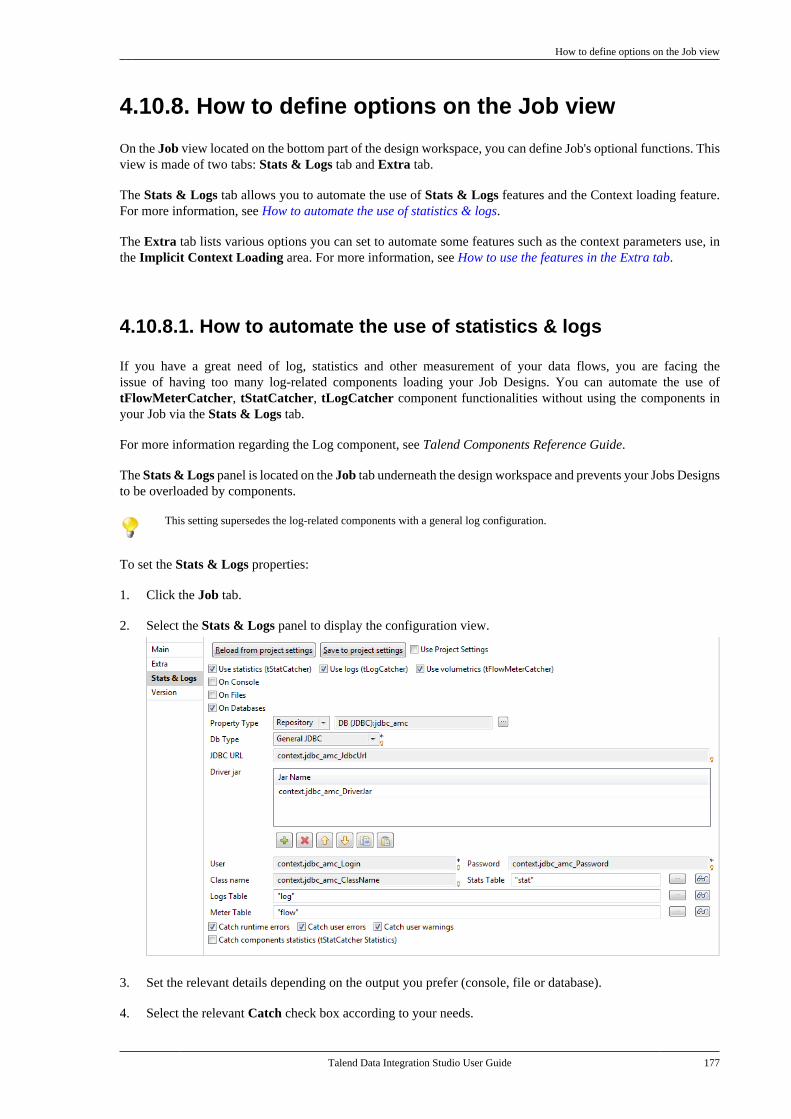
How to define options on the Job view
Talend Data Integration Studio User Guide 177
4.10.8. How to define options on the Job view
On the Job view located on the bottom part of the design workspace, you can define Job's optional functions. Thisview is made of two tabs: Stats & Logs tab and Extra tab.
The Stats & Logs tab allows you to automate the use of Stats & Logs features and the Context loading feature.For more information, see How to automate the use of statistics & logs.
The Extra tab lists various options you can set to automate some features such as the context parameters use, inthe Implicit Context Loading area. For more information, see How to use the features in the Extra tab.
4.10.8.1. How to automate the use of statistics & logs
If you have a great need of log, statistics and other measurement of your data flows, you are facing theissue of having too many log-related components loading your Job Designs. You can automate the use oftFlowMeterCatcher, tStatCatcher, tLogCatcher component functionalities without using the components inyour Job via the Stats & Logs tab.
For more information regarding the Log component, see Talend Components Reference Guide.
The Stats & Logs panel is located on the Job tab underneath the design workspace and prevents your Jobs Designsto be overloaded by components.
This setting supersedes the log-related components with a general log configuration.
To set the Stats & Logs properties:
1. Click the Job tab.
2. Select the Stats & Logs panel to display the configuration view.
3. Set the relevant details depending on the output you prefer (console, file or database).
4. Select the relevant Catch check box according to your needs.
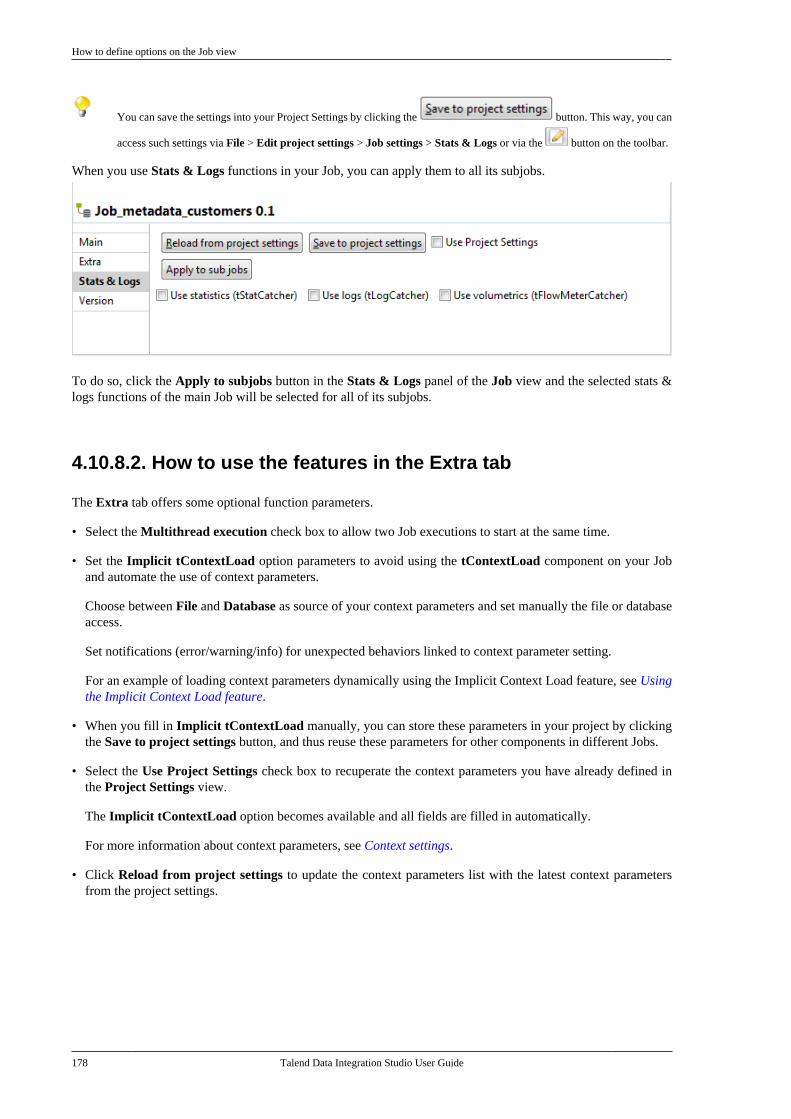
How to define options on the Job view
178 Talend Data Integration Studio User Guide
You can save the settings into your Project Settings by clicking the button. This way, you can
access such settings via File > Edit project settings > Job settings > Stats & Logs or via the button on the toolbar.
When you use Stats & Logs functions in your Job, you can apply them to all its subjobs.
To do so, click the Apply to subjobs button in the Stats & Logs panel of the Job view and the selected stats &logs functions of the main Job will be selected for all of its subjobs.
4.10.8.2. How to use the features in the Extra tab
The Extra tab offers some optional function parameters.
• Select the Multithread execution check box to allow two Job executions to start at the same time.
• Set the Implicit tContextLoad option parameters to avoid using the tContextLoad component on your Joband automate the use of context parameters.
Choose between File and Database as source of your context parameters and set manually the file or databaseaccess.
Set notifications (error/warning/info) for unexpected behaviors linked to context parameter setting.
For an example of loading context parameters dynamically using the Implicit Context Load feature, see Usingthe Implicit Context Load feature.
• When you fill in Implicit tContextLoad manually, you can store these parameters in your project by clickingthe Save to project settings button, and thus reuse these parameters for other components in different Jobs.
• Select the Use Project Settings check box to recuperate the context parameters you have already defined inthe Project Settings view.
The Implicit tContextLoad option becomes available and all fields are filled in automatically.
For more information about context parameters, see Context settings.
• Click Reload from project settings to update the context parameters list with the latest context parametersfrom the project settings.
Talend Data Integration Studio User Guide
Chapter 5. Managing JobsThis chapter describes the management procedures you can carry out on the Jobs you design in Talend Studio oryou can carry out on any of the items included in a project, for example routines or metadata.
These management procedures include importing and exporting Jobs and items between different projects ormachines, scheduling Job execution, running and deploying Jobs on distant servers and copying Jobs onto differentSVN or Git branches.
Activating/Deactivating a component or a subjob
180 Talend Data Integration Studio User Guide
5.1. Activating/Deactivating a component or asubjobYou can activate or deactivate a subjob directly connected to the selected component. You can also activate ordeactivate a single component as well as all the subjobs linked to a Start component. The Start component is thetrigger of the Job. It has a green background. For more information about Start components, see How to definethe start component.
When a component or a subjob is deactivated, you are not able to create or modify links from or to it. Moreover,at runtime, no code is generated for the deactivated component or subjob.
5.1.1. Activate or deactivate a component
To activate or deactivate a component, proceed as follows:
1. Right-click the component you want to activate or deactivate, the tFixedFlowInput component for example.
2. Select the option corresponding to the action you want to perform:
• Activate tFixedFlowInput_1 if you want to activate it.
• Deactivate tFixedFlowInput_1 if you want to deactivate it.
5.1.2. Activate or deactivate a subjob
To activate or deactivate a subjob, proceed as follows:
1. Right-click any component composing the subjob.
2. Select the option corresponding to the action you want to perform:
Activate or deactivate all linked subjobs
Talend Data Integration Studio User Guide 181
• Activate current Subjob if you want to activate it.
• Deactivate current Subjob if you want to deactivate it.
5.1.3. Activate or deactivate all linked subjobs
To activate or deactivate all linked subjobs, proceed as follows:
1. Right-click the Start component.
2. Select the option corresponding to the action you want to perform:
• Activate all linked Subjobs if you want to activate them.
• Deactivate all linked Subjobs if you want to deactivate them.
5.2. Importing/exporting items and buildingJobsTalend Studio enables you to import/export your Jobs or items in your Jobs from/to various projects or variousversions of the Studio. It enables you as well to build Jobs and thus deploy and execute those created in the Studioon any server.
5.2.1. How to import items
You can import items from previous versions of Talend Studio or from a different project of your current version.
The items you can possibly import are multiple:
• Business Models
• Jobs Designs
• Routines
• Documentation
• Metadata
Talend Studio allows any authorized user to import any project item from a local repository into the remoterepository and share them with other users.
To import items, right-click any entry such as Job Designs or Business Models in the Repository tree view and
select Import Items from the contextual menu or directly click the icon on the toolbar to open the [Importitems] dialog box and then select an import option.
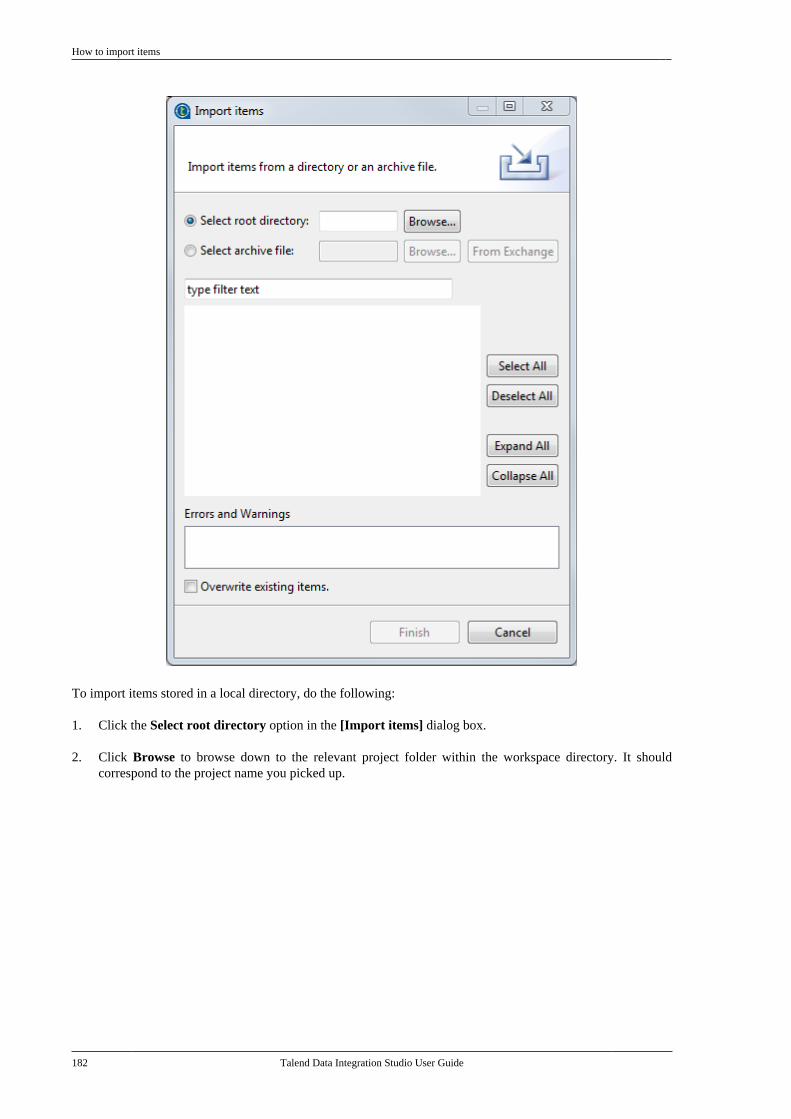
How to import items
182 Talend Data Integration Studio User Guide
To import items stored in a local directory, do the following:
1. Click the Select root directory option in the [Import items] dialog box.
2. Click Browse to browse down to the relevant project folder within the workspace directory. It shouldcorrespond to the project name you picked up.
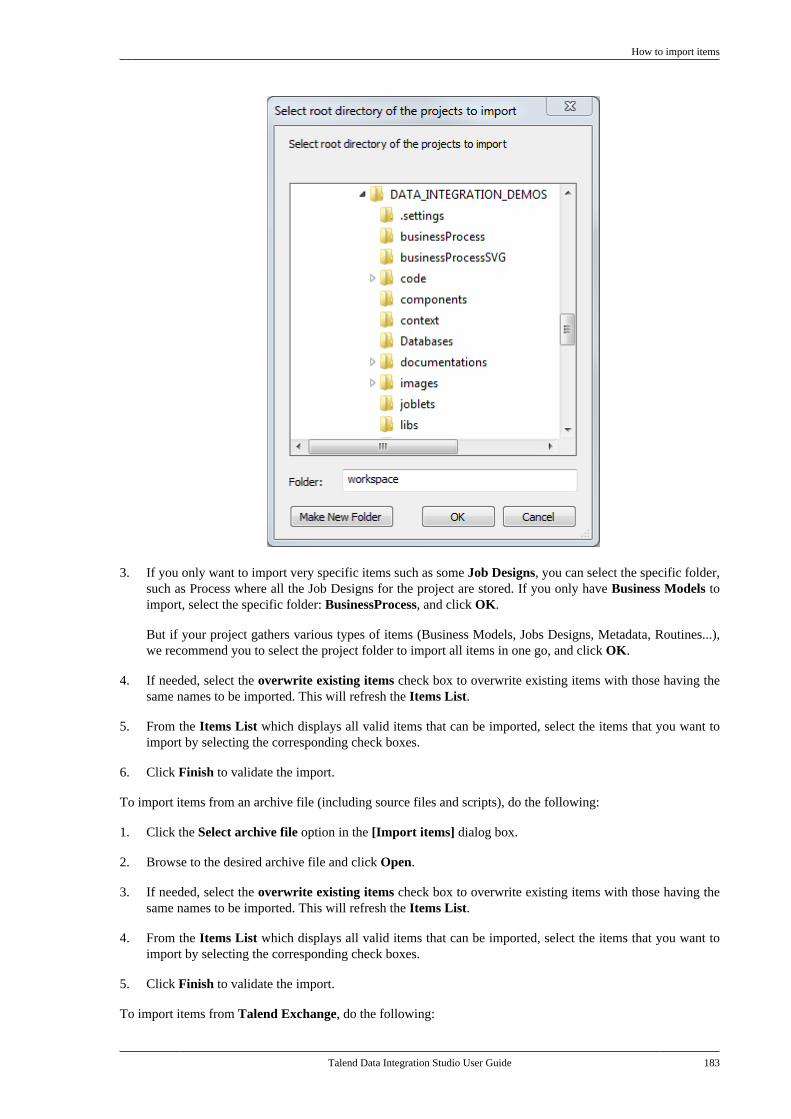
How to import items
Talend Data Integration Studio User Guide 183
3. If you only want to import very specific items such as some Job Designs, you can select the specific folder,such as Process where all the Job Designs for the project are stored. If you only have Business Models toimport, select the specific folder: BusinessProcess, and click OK.
But if your project gathers various types of items (Business Models, Jobs Designs, Metadata, Routines...),we recommend you to select the project folder to import all items in one go, and click OK.
4. If needed, select the overwrite existing items check box to overwrite existing items with those having thesame names to be imported. This will refresh the Items List.
5. From the Items List which displays all valid items that can be imported, select the items that you want toimport by selecting the corresponding check boxes.
6. Click Finish to validate the import.
To import items from an archive file (including source files and scripts), do the following:
1. Click the Select archive file option in the [Import items] dialog box.
2. Browse to the desired archive file and click Open.
3. If needed, select the overwrite existing items check box to overwrite existing items with those having thesame names to be imported. This will refresh the Items List.
4. From the Items List which displays all valid items that can be imported, select the items that you want toimport by selecting the corresponding check boxes.
5. Click Finish to validate the import.
To import items from Talend Exchange, do the following:
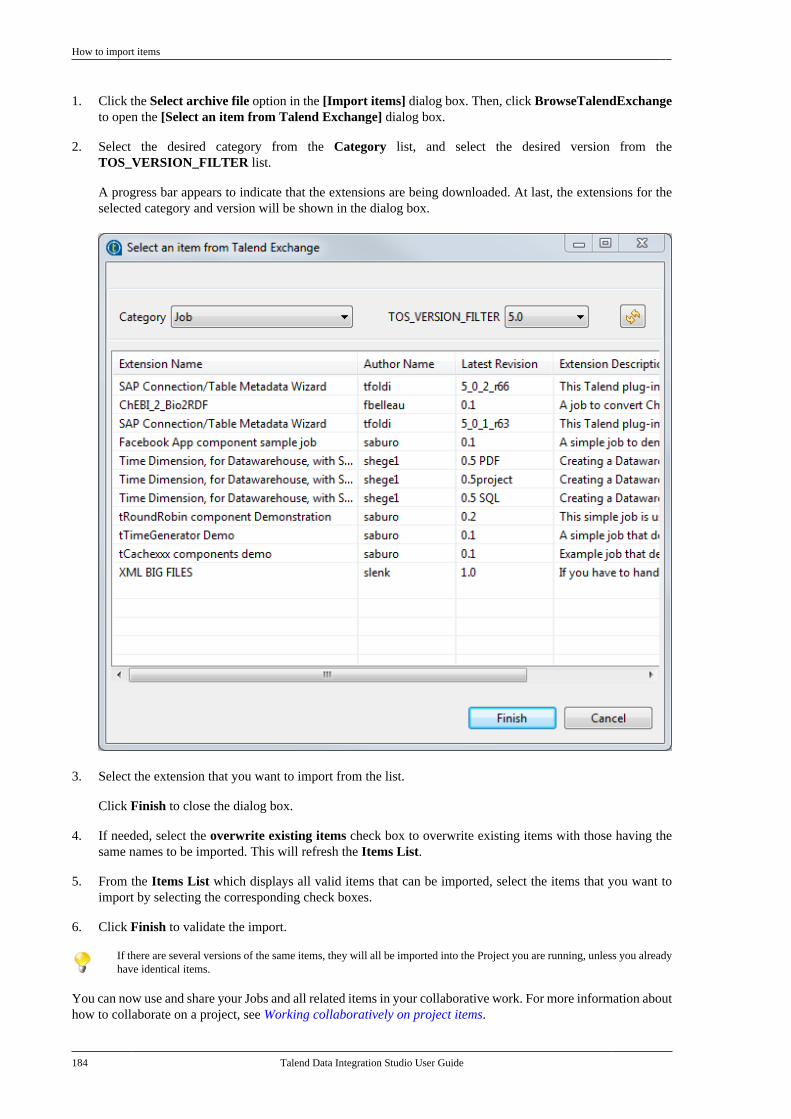
How to import items
184 Talend Data Integration Studio User Guide
1. Click the Select archive file option in the [Import items] dialog box. Then, click BrowseTalendExchangeto open the [Select an item from Talend Exchange] dialog box.
2. Select the desired category from the Category list, and select the desired version from theTOS_VERSION_FILTER list.
A progress bar appears to indicate that the extensions are being downloaded. At last, the extensions for theselected category and version will be shown in the dialog box.
3. Select the extension that you want to import from the list.
Click Finish to close the dialog box.
4. If needed, select the overwrite existing items check box to overwrite existing items with those having thesame names to be imported. This will refresh the Items List.
5. From the Items List which displays all valid items that can be imported, select the items that you want toimport by selecting the corresponding check boxes.
6. Click Finish to validate the import.
If there are several versions of the same items, they will all be imported into the Project you are running, unless you alreadyhave identical items.
You can now use and share your Jobs and all related items in your collaborative work. For more information abouthow to collaborate on a project, see Working collaboratively on project items.
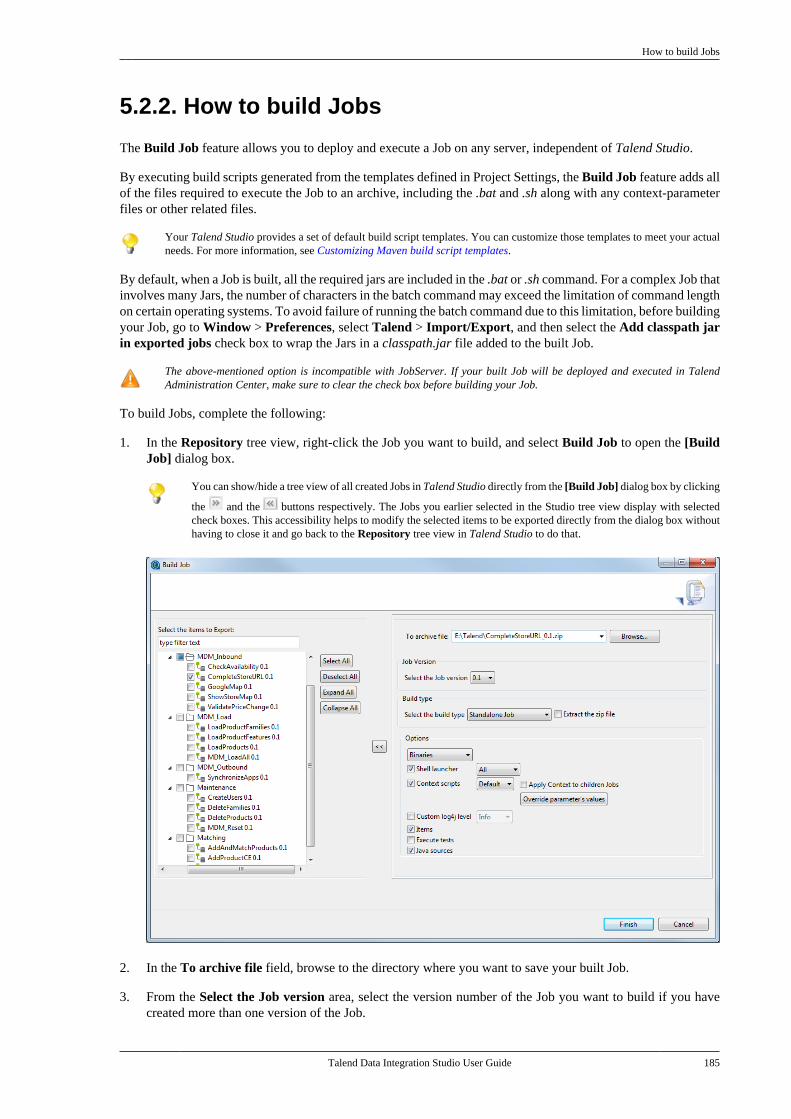
How to build Jobs
Talend Data Integration Studio User Guide 185
5.2.2. How to build Jobs
The Build Job feature allows you to deploy and execute a Job on any server, independent of Talend Studio.
By executing build scripts generated from the templates defined in Project Settings, the Build Job feature adds allof the files required to execute the Job to an archive, including the .bat and .sh along with any context-parameterfiles or other related files.
Your Talend Studio provides a set of default build script templates. You can customize those templates to meet your actualneeds. For more information, see Customizing Maven build script templates.
By default, when a Job is built, all the required jars are included in the .bat or .sh command. For a complex Job thatinvolves many Jars, the number of characters in the batch command may exceed the limitation of command lengthon certain operating systems. To avoid failure of running the batch command due to this limitation, before buildingyour Job, go to Window > Preferences, select Talend > Import/Export, and then select the Add classpath jarin exported jobs check box to wrap the Jars in a classpath.jar file added to the built Job.
The above-mentioned option is incompatible with JobServer. If your built Job will be deployed and executed in TalendAdministration Center, make sure to clear the check box before building your Job.
To build Jobs, complete the following:
1. In the Repository tree view, right-click the Job you want to build, and select Build Job to open the [BuildJob] dialog box.
You can show/hide a tree view of all created Jobs in Talend Studio directly from the [Build Job] dialog box by clicking
the and the buttons respectively. The Jobs you earlier selected in the Studio tree view display with selectedcheck boxes. This accessibility helps to modify the selected items to be exported directly from the dialog box withouthaving to close it and go back to the Repository tree view in Talend Studio to do that.
2. In the To archive file field, browse to the directory where you want to save your built Job.
3. From the Select the Job version area, select the version number of the Job you want to build if you havecreated more than one version of the Job.
How to build Jobs
186 Talend Data Integration Studio User Guide
4. Select the Build Type from the list between Standalone Job, Axis Webservice (WAR), Axis Webservice(Zip) and OSGI Bundle For ESB.
If the data service Job includes the tRESTClient or tESBConsumer component, and none of the ServiceRegistry, Service Locator or Service Activity Monitor is enabled in the component, the data service Job canbe built as OSGI Bundle For ESB or Standalone Job. With the Service Registry, Service Locator or ServiceActivity Monitor enabled, the data service Job including the tRESTClient or tESBConsumer componentcan only be built as OSGI Bundle For ESB.
5. Select the Extract the zip file check box if you want the archive file to be automatically extracted in thetarget directory.
6. In the Options area, select a build type between Binaries and Sources (Maven) and the file type(s) you wantto add to the archive file. The check boxes corresponding to the file types necessary for the execution of theJob are selected by default. You can clear these check boxes depending on what you want to build.
Option Description
Binaries / Sources (Maven) Select Binaries from the list box to build your Job as an executable Job.
Select Sources (Maven) to build the sources of your Job and include in the archive file theMaven build scripts generated from the templates defined in Project Settings so that you canrebuild your Job in an Apache Maven system.
Shell launcher Select this check box to export the .bat and/or .sh files necessary to launch the built Job.
• All: exports the .bat and .sh files.
• Unix exports the .sh file.
• Windows exports the .bat file.
Context scripts Select this check box to export ALL context parameters files and not just those you selectin the corresponding list.
To export only one context, select the context that fits your needs from theContext scripts list, including the .bat or .sh files holding the appropriate contextparameters. Then you can, if you wish, edit the .bat and .sh files to manually modifythe context type.
Apply to children Select this check box if you want to apply the context selected from the list to all child Jobs.
Custom log4j level Select this check box to activate the Log4j output level list and select an output level forthe built Job.
For more information on Log4j settings, see Log4j settings.
Items Select this check box to export the sources used by the Job during its execution including the.item and .properties files, Java and Talend sources.
If you select the Items or Source files check box, you can reuse the built Job ina Talend Studio installed on another machine. These source files are only used inTalend Studio.
Execute tests Select this check box to execute the test case(s) of the Job, if any, when building the Job, andinclude the test report files in the sunfire-reports folder of the build archive.
This check box is available only when the Binaries option is selected.
For more information on how to create test cases, see Testing Jobs using test cases.
Add test sources Select this check box to include the sources of the test case(s) of the Job, if any, in the buildarchive.
This check box is available only when the Sources (Maven) option is selected.
For more information on how to create test cases, see Testing Jobs using test cases.
Java sources Select this check box to export the .java file holding Java classes generated by the Job whendesigning it.
This check box is available only when the Binaries option is selected.
Include libraries Select this check box to include dependencies of the Job in the build archive.
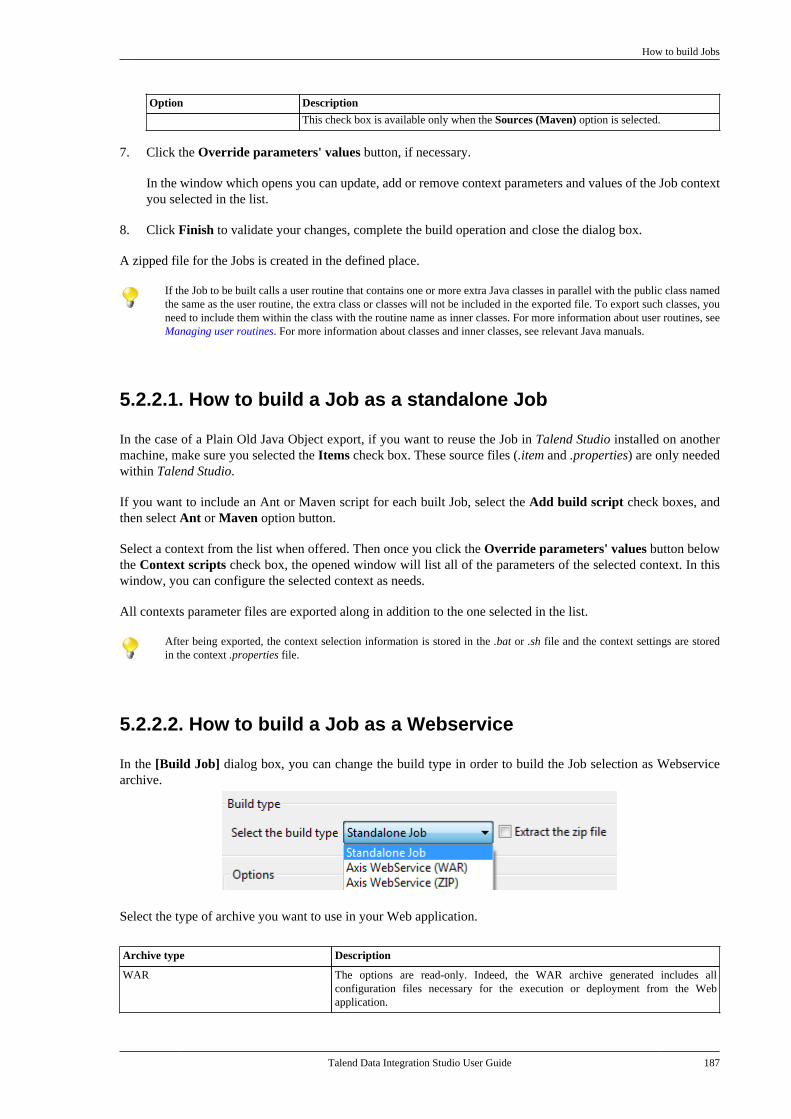
How to build Jobs
Talend Data Integration Studio User Guide 187
Option Description
This check box is available only when the Sources (Maven) option is selected.
7. Click the Override parameters' values button, if necessary.
In the window which opens you can update, add or remove context parameters and values of the Job contextyou selected in the list.
8. Click Finish to validate your changes, complete the build operation and close the dialog box.
A zipped file for the Jobs is created in the defined place.
If the Job to be built calls a user routine that contains one or more extra Java classes in parallel with the public class namedthe same as the user routine, the extra class or classes will not be included in the exported file. To export such classes, youneed to include them within the class with the routine name as inner classes. For more information about user routines, seeManaging user routines. For more information about classes and inner classes, see relevant Java manuals.
5.2.2.1. How to build a Job as a standalone Job
In the case of a Plain Old Java Object export, if you want to reuse the Job in Talend Studio installed on anothermachine, make sure you selected the Items check box. These source files (.item and .properties) are only neededwithin Talend Studio.
If you want to include an Ant or Maven script for each built Job, select the Add build script check boxes, andthen select Ant or Maven option button.
Select a context from the list when offered. Then once you click the Override parameters' values button belowthe Context scripts check box, the opened window will list all of the parameters of the selected context. In thiswindow, you can configure the selected context as needs.
All contexts parameter files are exported along in addition to the one selected in the list.
After being exported, the context selection information is stored in the .bat or .sh file and the context settings are storedin the context .properties file.
5.2.2.2. How to build a Job as a Webservice
In the [Build Job] dialog box, you can change the build type in order to build the Job selection as Webservicearchive.
Select the type of archive you want to use in your Web application.
Archive type Description
WAR The options are read-only. Indeed, the WAR archive generated includes allconfiguration files necessary for the execution or deployment from the Webapplication.
How to build Jobs
188 Talend Data Integration Studio User Guide
Archive type Description
ZIP All options are available. In the case the files of your Web application config are allset, you have the possibility to only set the Context parameters if relevant and exportonly the Classes into the archive.
Once the archive is produced, place the WAR or the relevant Class from the ZIP (or unzipped files) into therelevant location, of your Web application server.
The URL to be used to deploy the Job, typically reads as follow:
http://localhost:8080/Webappname/services/JobName?method=runJob&args=null
where the parameters stand as follow:
URL parameters Description
http://localhost:8080/ Type in the Webapp host and port.
/Webappname/ Type in the actual name of your web application.
/services/ Type in "services" as the standard call term for web services.
/JobName Type in the exact name of the Job you want to execute.
?method=runJob&args=null The method is RunJob to execute the Job.
The call return from the Web application is 0 when there is no error and different from 0 in case of error. For areal-life example of creating and building a Job as a Webservice and calling the built Job from a browser, see Anexample of building a Job as a Web service.
The tBufferOutput component was especially designed for this type of deployment. For more informationregarding this component, see Talend Components Reference Guide.
5.2.2.3. An example of building a Job as a Web service
This scenario describes first a simple Job that creates a .txt file and writes in it the current date along with firstand last names. Secondly, it shows how to build this Job as a Webservice. And finally, it calls the Job built asa Webservice from a browser. The built Job as a Webservice will simply return the "return code" given by theoperating system.
Creating the Job:
1. Drop the following components from the Palette onto the design workspace: tFixedFlowInput andtFileOutputDelimited.
2. Connect tFixedFlowInput to tFileOutputDelimited using a Row > Main link.
3. In the design workspace, select tFixedFlowInput, and click the Component tab to define the basic settingsfor tFixedFlowInput.
4. Set the Schema to Built-In and click the [...] button next to Edit Schema to describe the data structure youwant to create from internal variables. In this scenario, the schema is made of three columns, now, firstname,and lastname.
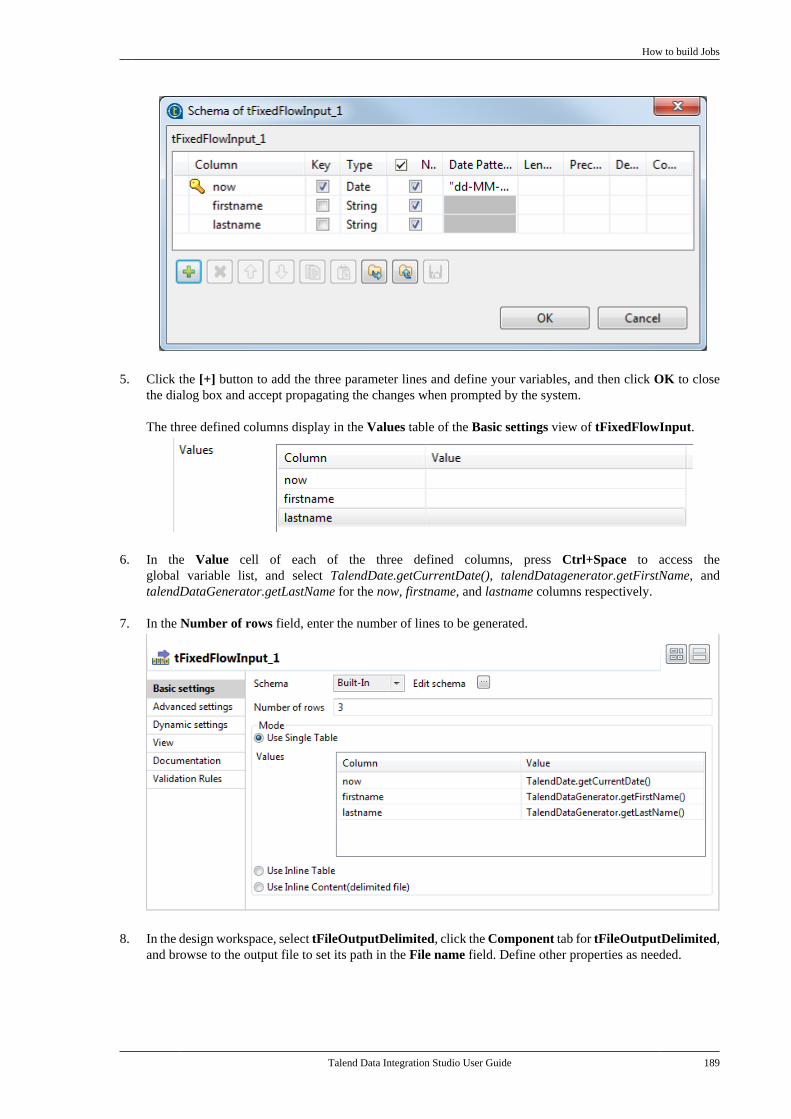
How to build Jobs
Talend Data Integration Studio User Guide 189
5. Click the [+] button to add the three parameter lines and define your variables, and then click OK to closethe dialog box and accept propagating the changes when prompted by the system.
The three defined columns display in the Values table of the Basic settings view of tFixedFlowInput.
6. In the Value cell of each of the three defined columns, press Ctrl+Space to access theglobal variable list, and select TalendDate.getCurrentDate(), talendDatagenerator.getFirstName, andtalendDataGenerator.getLastName for the now, firstname, and lastname columns respectively.
7. In the Number of rows field, enter the number of lines to be generated.
8. In the design workspace, select tFileOutputDelimited, click the Component tab for tFileOutputDelimited,and browse to the output file to set its path in the File name field. Define other properties as needed.
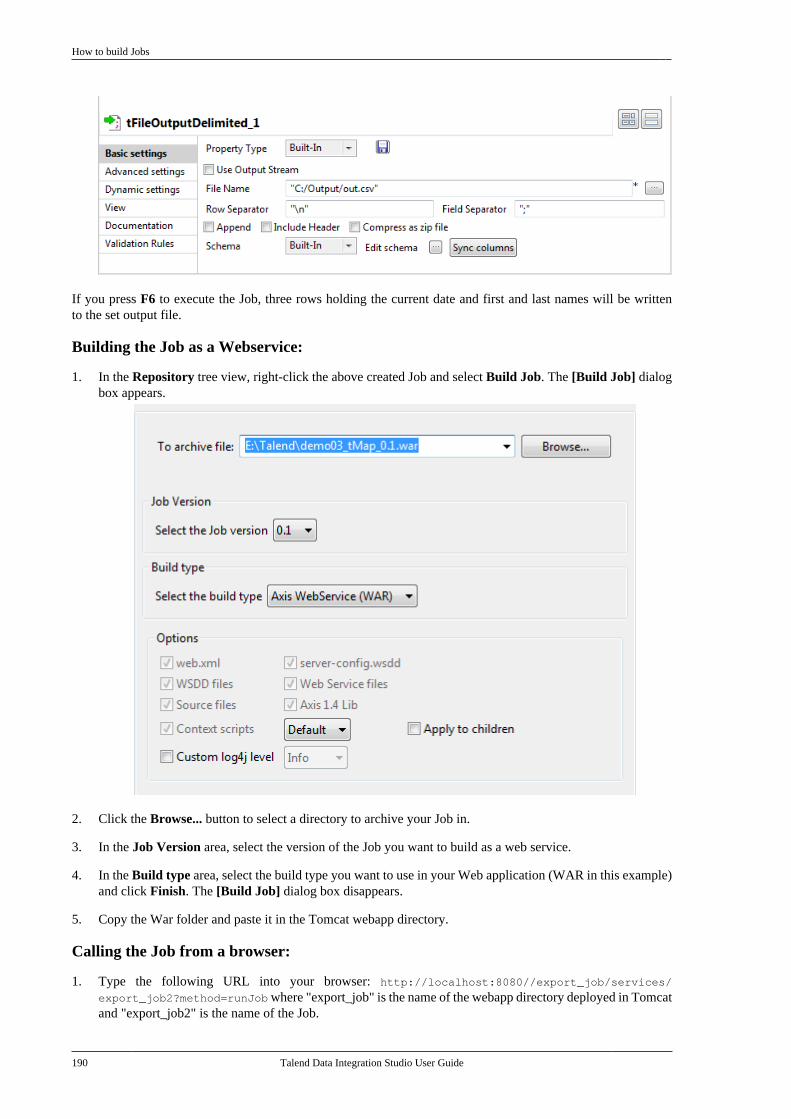
How to build Jobs
190 Talend Data Integration Studio User Guide
If you press F6 to execute the Job, three rows holding the current date and first and last names will be writtento the set output file.
Building the Job as a Webservice:
1. In the Repository tree view, right-click the above created Job and select Build Job. The [Build Job] dialogbox appears.
2. Click the Browse... button to select a directory to archive your Job in.
3. In the Job Version area, select the version of the Job you want to build as a web service.
4. In the Build type area, select the build type you want to use in your Web application (WAR in this example)and click Finish. The [Build Job] dialog box disappears.
5. Copy the War folder and paste it in the Tomcat webapp directory.
Calling the Job from a browser:
1. Type the following URL into your browser: http://localhost:8080//export_job/services/
export_job2?method=runJob where "export_job" is the name of the webapp directory deployed in Tomcatand "export_job2" is the name of the Job.
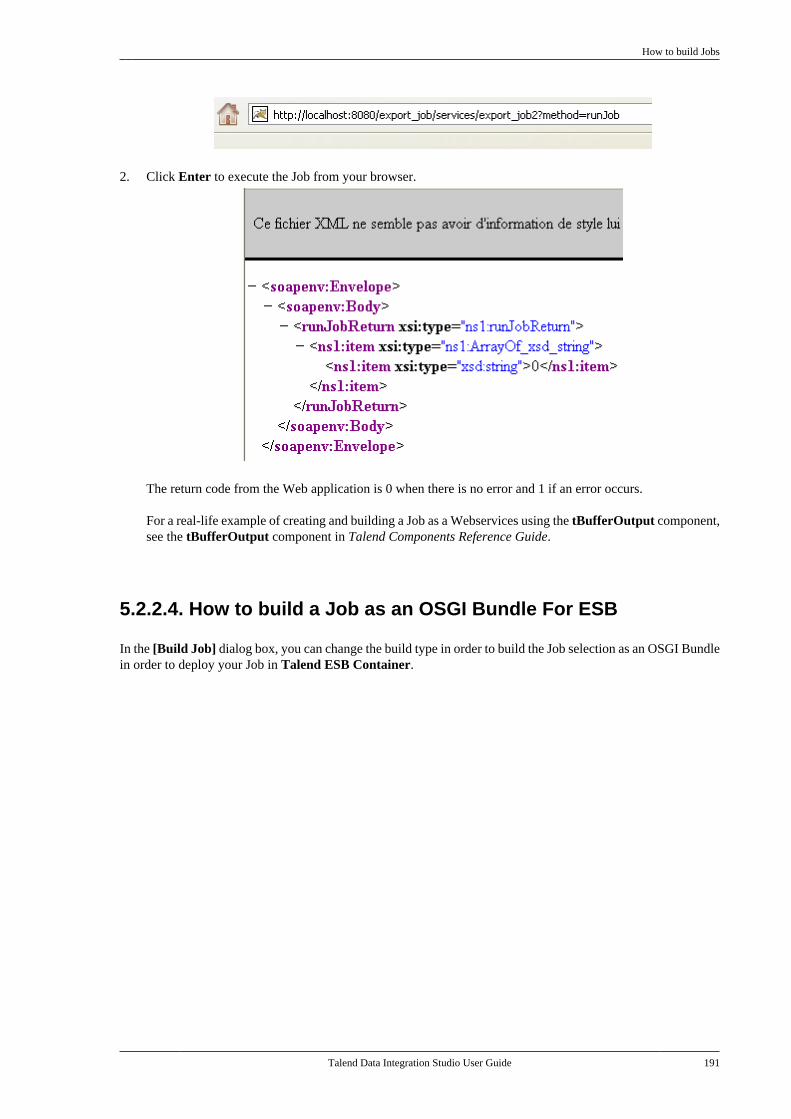
How to build Jobs
Talend Data Integration Studio User Guide 191
2. Click Enter to execute the Job from your browser.
The return code from the Web application is 0 when there is no error and 1 if an error occurs.
For a real-life example of creating and building a Job as a Webservices using the tBufferOutput component,see the tBufferOutput component in Talend Components Reference Guide.
5.2.2.4. How to build a Job as an OSGI Bundle For ESB
In the [Build Job] dialog box, you can change the build type in order to build the Job selection as an OSGI Bundlein order to deploy your Job in Talend ESB Container.
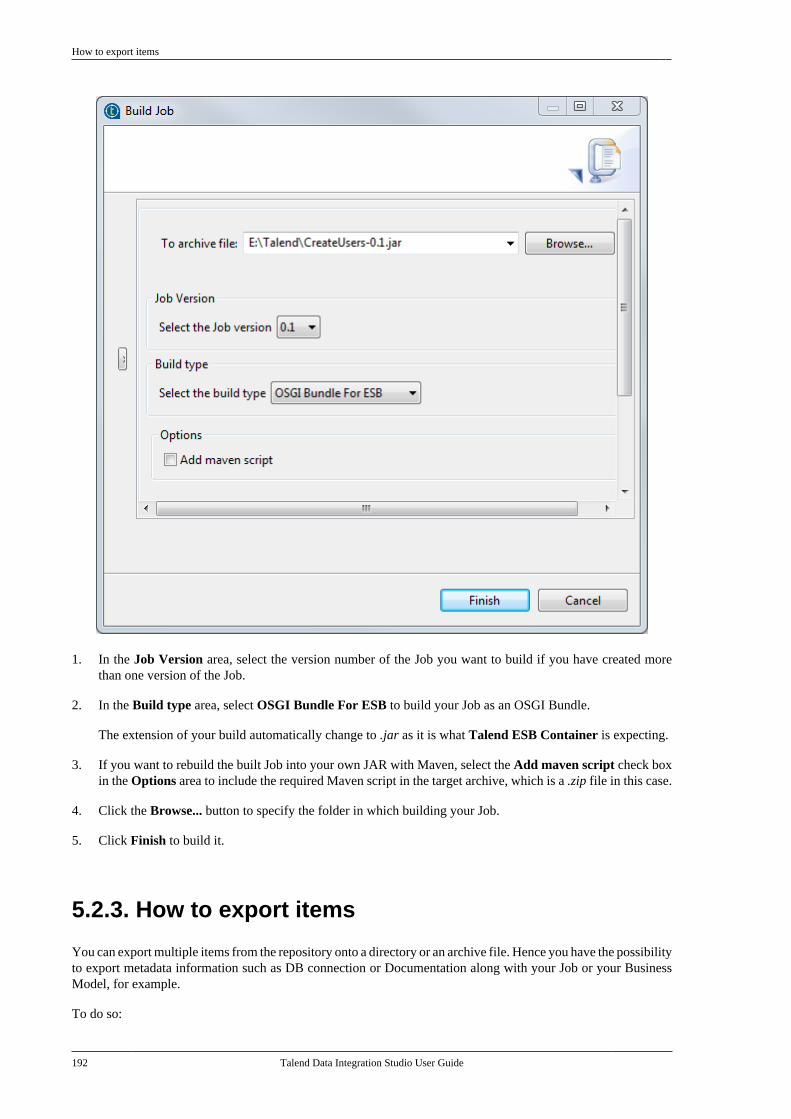
How to export items
192 Talend Data Integration Studio User Guide
1. In the Job Version area, select the version number of the Job you want to build if you have created morethan one version of the Job.
2. In the Build type area, select OSGI Bundle For ESB to build your Job as an OSGI Bundle.
The extension of your build automatically change to .jar as it is what Talend ESB Container is expecting.
3. If you want to rebuild the built Job into your own JAR with Maven, select the Add maven script check boxin the Options area to include the required Maven script in the target archive, which is a .zip file in this case.
4. Click the Browse... button to specify the folder in which building your Job.
5. Click Finish to build it.
5.2.3. How to export items
You can export multiple items from the repository onto a directory or an archive file. Hence you have the possibilityto export metadata information such as DB connection or Documentation along with your Job or your BusinessModel, for example.
To do so:
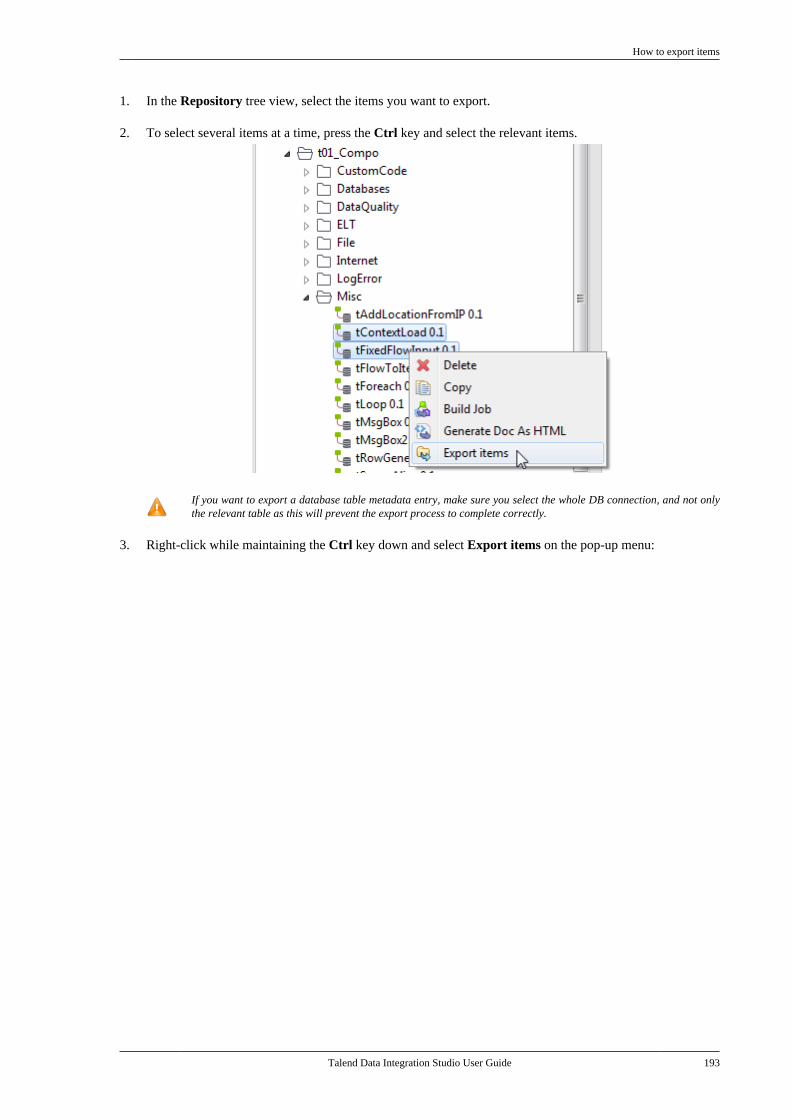
How to export items
Talend Data Integration Studio User Guide 193
1. In the Repository tree view, select the items you want to export.
2. To select several items at a time, press the Ctrl key and select the relevant items.
If you want to export a database table metadata entry, make sure you select the whole DB connection, and not onlythe relevant table as this will prevent the export process to complete correctly.
3. Right-click while maintaining the Ctrl key down and select Export items on the pop-up menu:
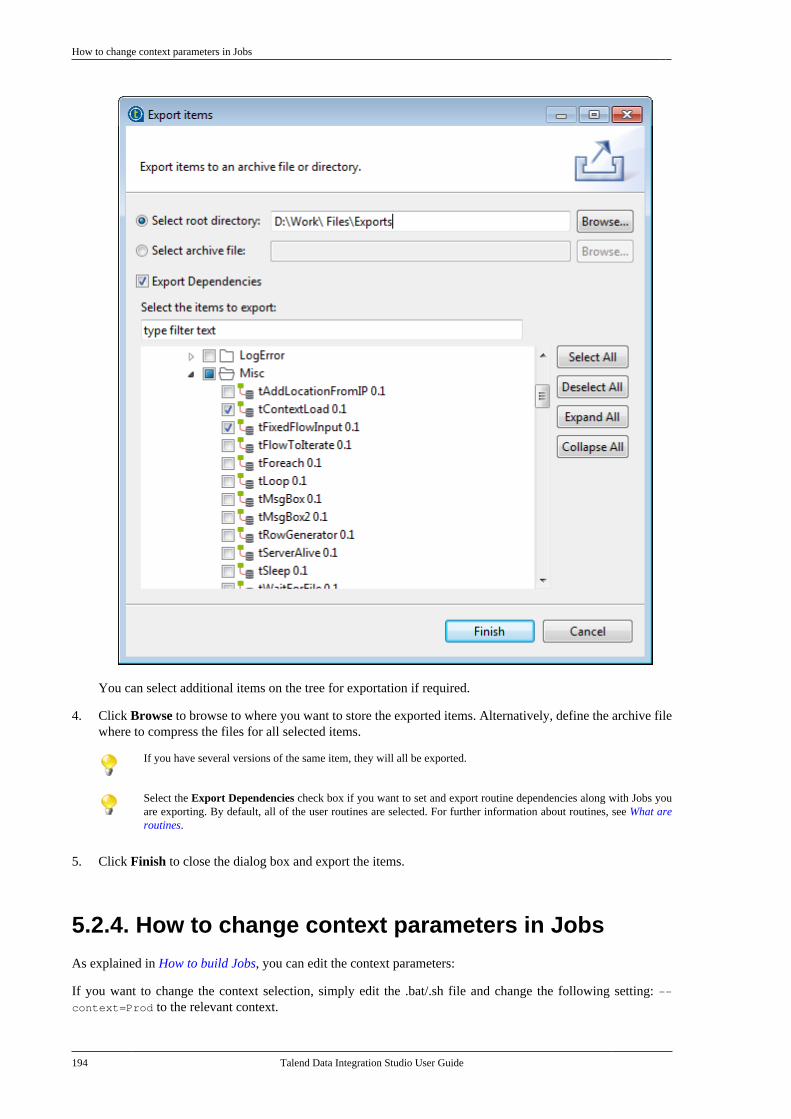
How to change context parameters in Jobs
194 Talend Data Integration Studio User Guide
You can select additional items on the tree for exportation if required.
4. Click Browse to browse to where you want to store the exported items. Alternatively, define the archive filewhere to compress the files for all selected items.
If you have several versions of the same item, they will all be exported.
Select the Export Dependencies check box if you want to set and export routine dependencies along with Jobs youare exporting. By default, all of the user routines are selected. For further information about routines, see What areroutines.
5. Click Finish to close the dialog box and export the items.
5.2.4. How to change context parameters in Jobs
As explained in How to build Jobs, you can edit the context parameters:
If you want to change the context selection, simply edit the .bat/.sh file and change the following setting: --context=Prod to the relevant context.
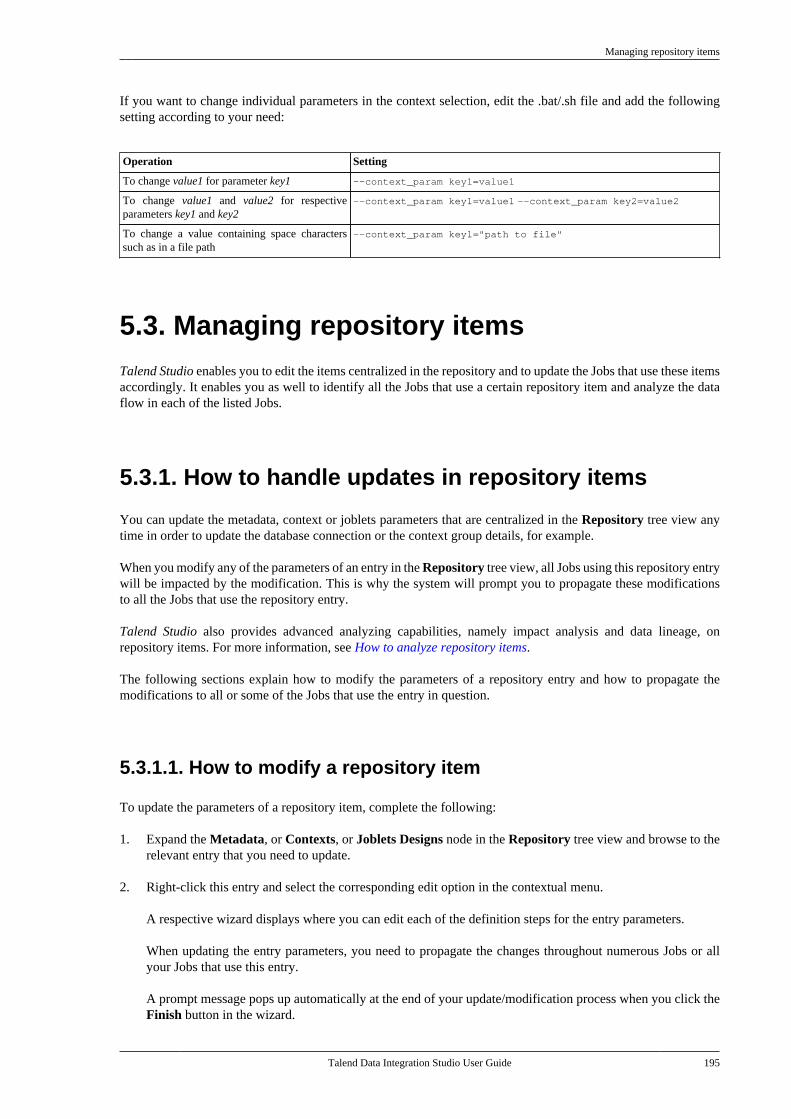
Managing repository items
Talend Data Integration Studio User Guide 195
If you want to change individual parameters in the context selection, edit the .bat/.sh file and add the followingsetting according to your need:
Operation Setting
To change value1 for parameter key1 --context_param key1=value1
To change value1 and value2 for respectiveparameters key1 and key2
--context_param key1=value1 --context_param key2=value2
To change a value containing space characterssuch as in a file path
--context_param key1="path to file"
5.3. Managing repository itemsTalend Studio enables you to edit the items centralized in the repository and to update the Jobs that use these itemsaccordingly. It enables you as well to identify all the Jobs that use a certain repository item and analyze the dataflow in each of the listed Jobs.
5.3.1. How to handle updates in repository items
You can update the metadata, context or joblets parameters that are centralized in the Repository tree view anytime in order to update the database connection or the context group details, for example.
When you modify any of the parameters of an entry in the Repository tree view, all Jobs using this repository entrywill be impacted by the modification. This is why the system will prompt you to propagate these modificationsto all the Jobs that use the repository entry.
Talend Studio also provides advanced analyzing capabilities, namely impact analysis and data lineage, onrepository items. For more information, see How to analyze repository items.
The following sections explain how to modify the parameters of a repository entry and how to propagate themodifications to all or some of the Jobs that use the entry in question.
5.3.1.1. How to modify a repository item
To update the parameters of a repository item, complete the following:
1. Expand the Metadata, or Contexts, or Joblets Designs node in the Repository tree view and browse to therelevant entry that you need to update.
2. Right-click this entry and select the corresponding edit option in the contextual menu.
A respective wizard displays where you can edit each of the definition steps for the entry parameters.
When updating the entry parameters, you need to propagate the changes throughout numerous Jobs or allyour Jobs that use this entry.
A prompt message pops up automatically at the end of your update/modification process when you click theFinish button in the wizard.
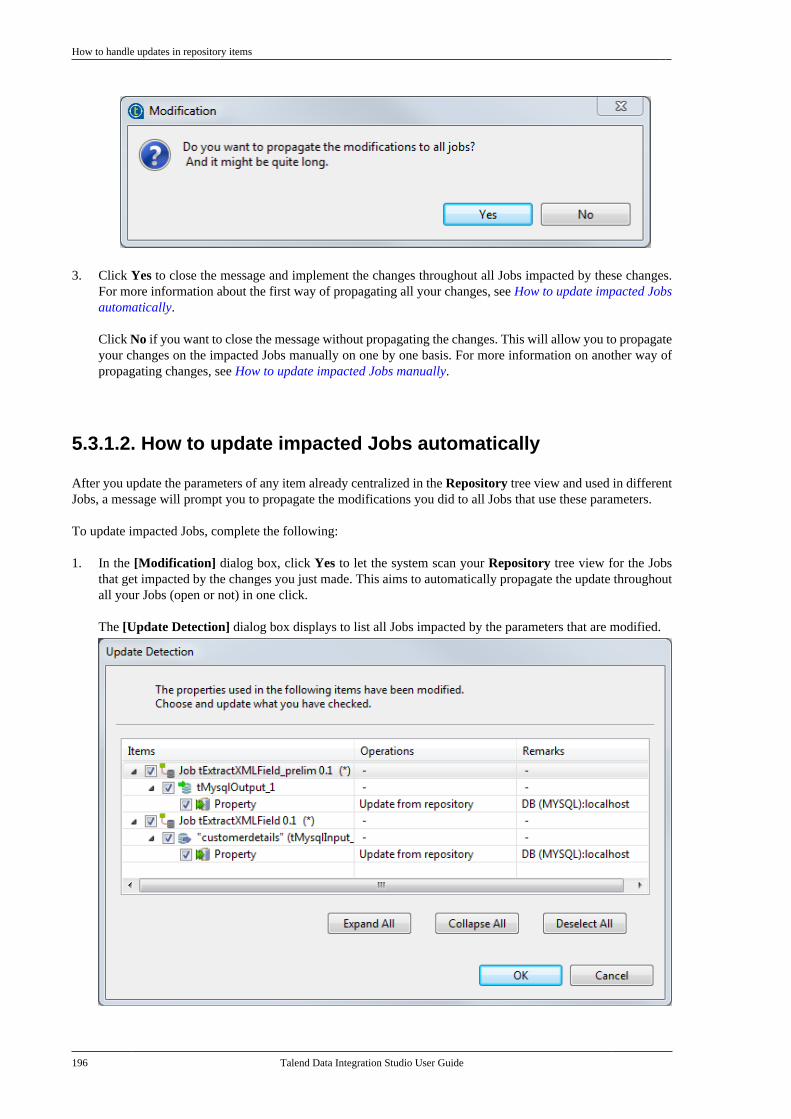
How to handle updates in repository items
196 Talend Data Integration Studio User Guide
3. Click Yes to close the message and implement the changes throughout all Jobs impacted by these changes.For more information about the first way of propagating all your changes, see How to update impacted Jobsautomatically.
Click No if you want to close the message without propagating the changes. This will allow you to propagateyour changes on the impacted Jobs manually on one by one basis. For more information on another way ofpropagating changes, see How to update impacted Jobs manually.
5.3.1.2. How to update impacted Jobs automatically
After you update the parameters of any item already centralized in the Repository tree view and used in differentJobs, a message will prompt you to propagate the modifications you did to all Jobs that use these parameters.
To update impacted Jobs, complete the following:
1. In the [Modification] dialog box, click Yes to let the system scan your Repository tree view for the Jobsthat get impacted by the changes you just made. This aims to automatically propagate the update throughoutall your Jobs (open or not) in one click.
The [Update Detection] dialog box displays to list all Jobs impacted by the parameters that are modified.
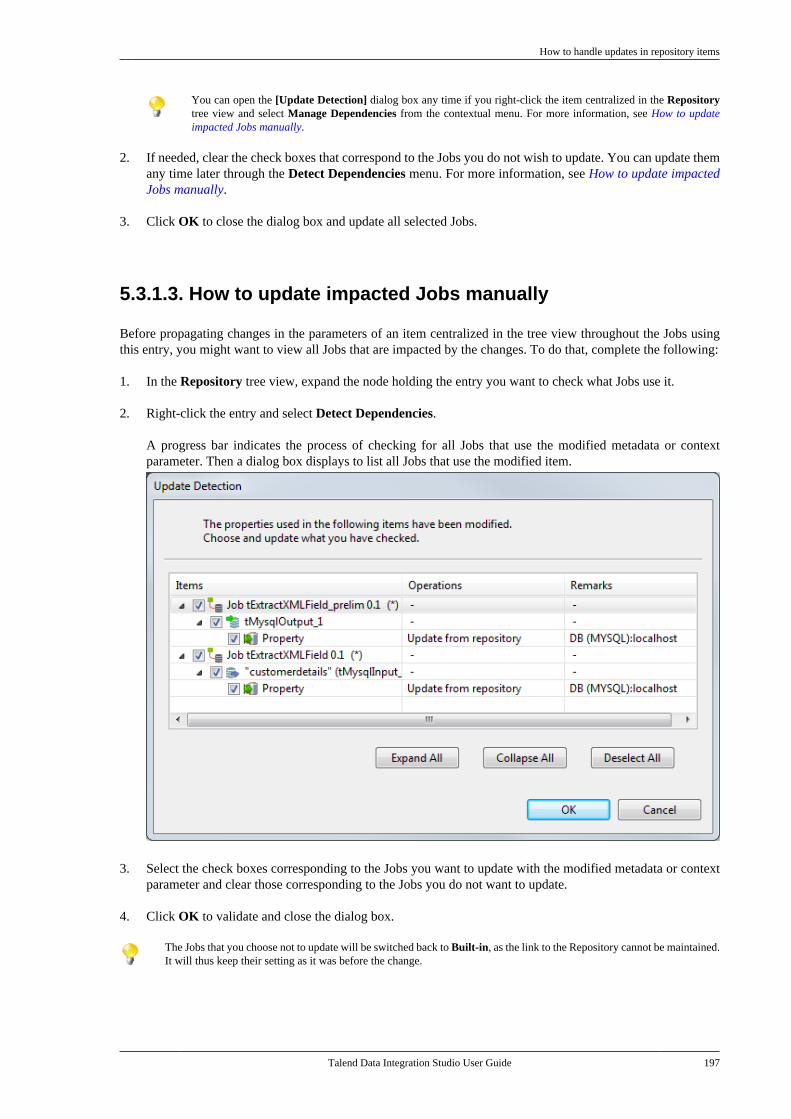
How to handle updates in repository items
Talend Data Integration Studio User Guide 197
You can open the [Update Detection] dialog box any time if you right-click the item centralized in the Repositorytree view and select Manage Dependencies from the contextual menu. For more information, see How to updateimpacted Jobs manually.
2. If needed, clear the check boxes that correspond to the Jobs you do not wish to update. You can update themany time later through the Detect Dependencies menu. For more information, see How to update impactedJobs manually.
3. Click OK to close the dialog box and update all selected Jobs.
5.3.1.3. How to update impacted Jobs manually
Before propagating changes in the parameters of an item centralized in the tree view throughout the Jobs usingthis entry, you might want to view all Jobs that are impacted by the changes. To do that, complete the following:
1. In the Repository tree view, expand the node holding the entry you want to check what Jobs use it.
2. Right-click the entry and select Detect Dependencies.
A progress bar indicates the process of checking for all Jobs that use the modified metadata or contextparameter. Then a dialog box displays to list all Jobs that use the modified item.
3. Select the check boxes corresponding to the Jobs you want to update with the modified metadata or contextparameter and clear those corresponding to the Jobs you do not want to update.
4. Click OK to validate and close the dialog box.
The Jobs that you choose not to update will be switched back to Built-in, as the link to the Repository cannot be maintained.It will thus keep their setting as it was before the change.
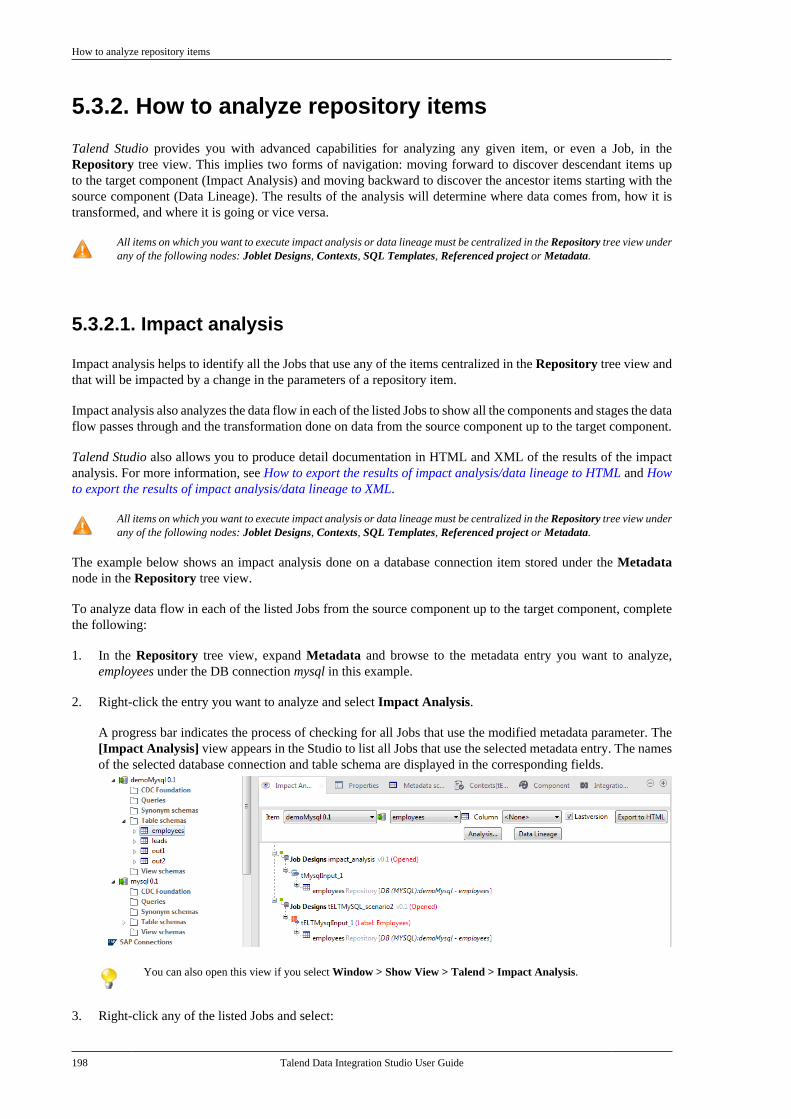
How to analyze repository items
198 Talend Data Integration Studio User Guide
5.3.2. How to analyze repository items
Talend Studio provides you with advanced capabilities for analyzing any given item, or even a Job, in theRepository tree view. This implies two forms of navigation: moving forward to discover descendant items upto the target component (Impact Analysis) and moving backward to discover the ancestor items starting with thesource component (Data Lineage). The results of the analysis will determine where data comes from, how it istransformed, and where it is going or vice versa.
All items on which you want to execute impact analysis or data lineage must be centralized in the Repository tree view underany of the following nodes: Joblet Designs, Contexts, SQL Templates, Referenced project or Metadata.
5.3.2.1. Impact analysis
Impact analysis helps to identify all the Jobs that use any of the items centralized in the Repository tree view andthat will be impacted by a change in the parameters of a repository item.
Impact analysis also analyzes the data flow in each of the listed Jobs to show all the components and stages the dataflow passes through and the transformation done on data from the source component up to the target component.
Talend Studio also allows you to produce detail documentation in HTML and XML of the results of the impactanalysis. For more information, see How to export the results of impact analysis/data lineage to HTML and Howto export the results of impact analysis/data lineage to XML.
All items on which you want to execute impact analysis or data lineage must be centralized in the Repository tree view underany of the following nodes: Joblet Designs, Contexts, SQL Templates, Referenced project or Metadata.
The example below shows an impact analysis done on a database connection item stored under the Metadatanode in the Repository tree view.
To analyze data flow in each of the listed Jobs from the source component up to the target component, completethe following:
1. In the Repository tree view, expand Metadata and browse to the metadata entry you want to analyze,employees under the DB connection mysql in this example.
2. Right-click the entry you want to analyze and select Impact Analysis.
A progress bar indicates the process of checking for all Jobs that use the modified metadata parameter. The[Impact Analysis] view appears in the Studio to list all Jobs that use the selected metadata entry. The namesof the selected database connection and table schema are displayed in the corresponding fields.
You can also open this view if you select Window > Show View > Talend > Impact Analysis.
3. Right-click any of the listed Jobs and select:
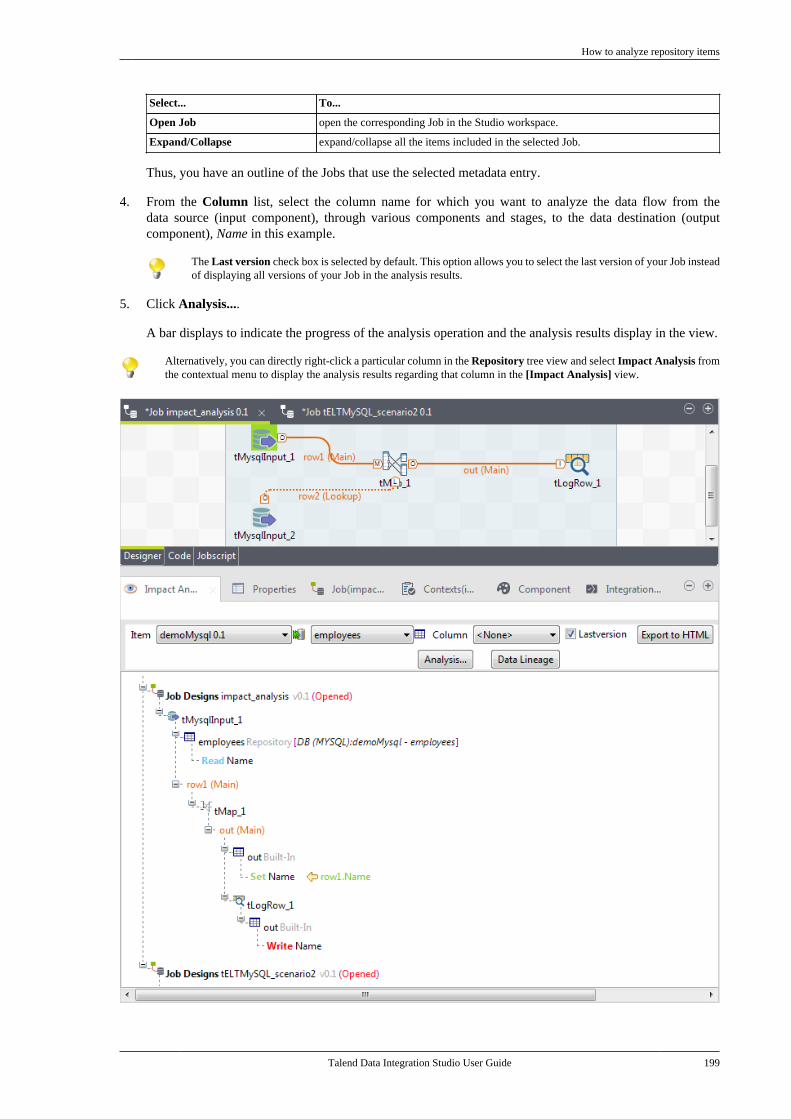
How to analyze repository items
Talend Data Integration Studio User Guide 199
Select... To...
Open Job open the corresponding Job in the Studio workspace.
Expand/Collapse expand/collapse all the items included in the selected Job.
Thus, you have an outline of the Jobs that use the selected metadata entry.
4. From the Column list, select the column name for which you want to analyze the data flow from thedata source (input component), through various components and stages, to the data destination (outputcomponent), Name in this example.
The Last version check box is selected by default. This option allows you to select the last version of your Job insteadof displaying all versions of your Job in the analysis results.
5. Click Analysis....
A bar displays to indicate the progress of the analysis operation and the analysis results display in the view.
Alternatively, you can directly right-click a particular column in the Repository tree view and select Impact Analysis fromthe contextual menu to display the analysis results regarding that column in the [Impact Analysis] view.
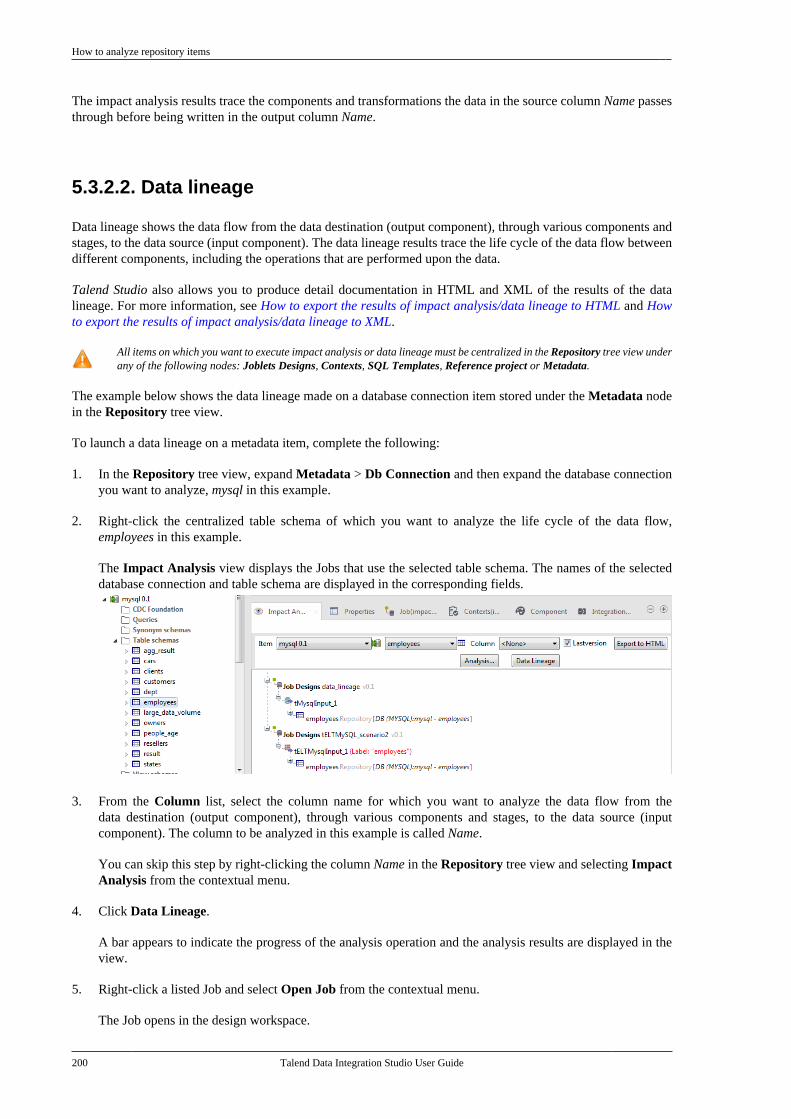
How to analyze repository items
200 Talend Data Integration Studio User Guide
The impact analysis results trace the components and transformations the data in the source column Name passesthrough before being written in the output column Name.
5.3.2.2. Data lineage
Data lineage shows the data flow from the data destination (output component), through various components andstages, to the data source (input component). The data lineage results trace the life cycle of the data flow betweendifferent components, including the operations that are performed upon the data.
Talend Studio also allows you to produce detail documentation in HTML and XML of the results of the datalineage. For more information, see How to export the results of impact analysis/data lineage to HTML and Howto export the results of impact analysis/data lineage to XML.
All items on which you want to execute impact analysis or data lineage must be centralized in the Repository tree view underany of the following nodes: Joblets Designs, Contexts, SQL Templates, Reference project or Metadata.
The example below shows the data lineage made on a database connection item stored under the Metadata nodein the Repository tree view.
To launch a data lineage on a metadata item, complete the following:
1. In the Repository tree view, expand Metadata > Db Connection and then expand the database connectionyou want to analyze, mysql in this example.
2. Right-click the centralized table schema of which you want to analyze the life cycle of the data flow,employees in this example.
The Impact Analysis view displays the Jobs that use the selected table schema. The names of the selecteddatabase connection and table schema are displayed in the corresponding fields.
3. From the Column list, select the column name for which you want to analyze the data flow from thedata destination (output component), through various components and stages, to the data source (inputcomponent). The column to be analyzed in this example is called Name.
You can skip this step by right-clicking the column Name in the Repository tree view and selecting ImpactAnalysis from the contextual menu.
4. Click Data Lineage.
A bar appears to indicate the progress of the analysis operation and the analysis results are displayed in theview.
5. Right-click a listed Job and select Open Job from the contextual menu.
The Job opens in the design workspace.
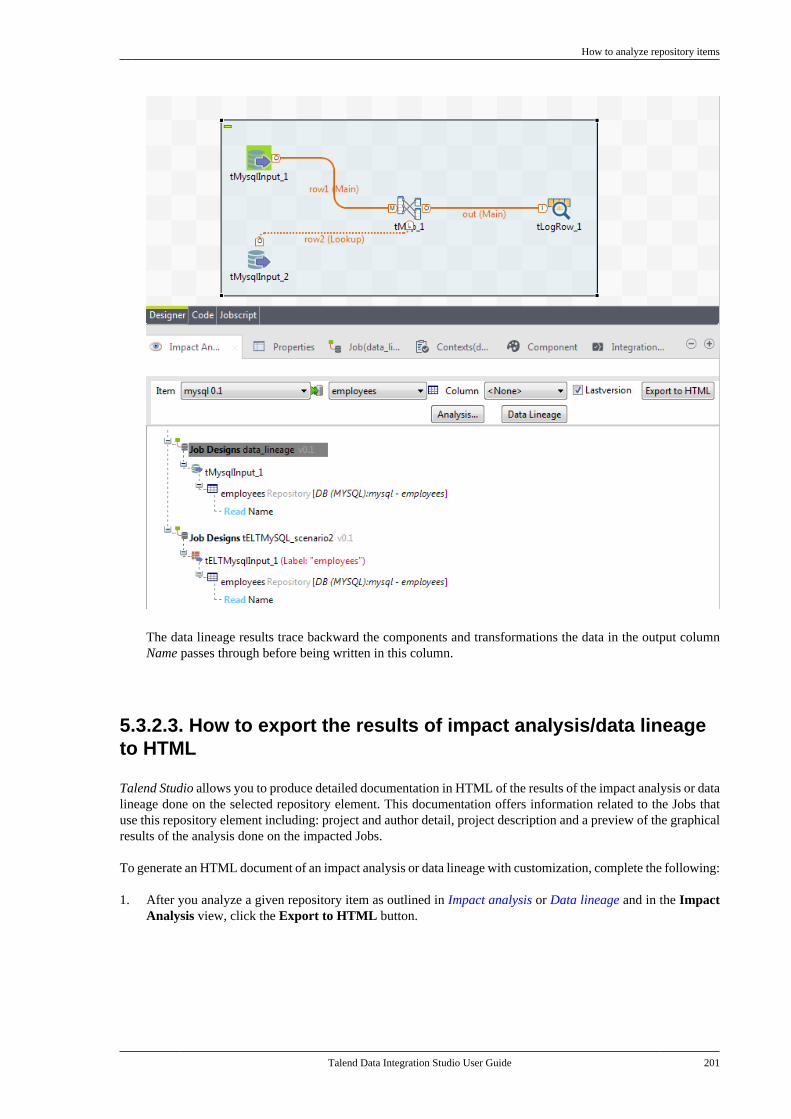
How to analyze repository items
Talend Data Integration Studio User Guide 201
The data lineage results trace backward the components and transformations the data in the output columnName passes through before being written in this column.
5.3.2.3. How to export the results of impact analysis/data lineageto HTML
Talend Studio allows you to produce detailed documentation in HTML of the results of the impact analysis or datalineage done on the selected repository element. This documentation offers information related to the Jobs thatuse this repository element including: project and author detail, project description and a preview of the graphicalresults of the analysis done on the impacted Jobs.
To generate an HTML document of an impact analysis or data lineage with customization, complete the following:
1. After you analyze a given repository item as outlined in Impact analysis or Data lineage and in the ImpactAnalysis view, click the Export to HTML button.
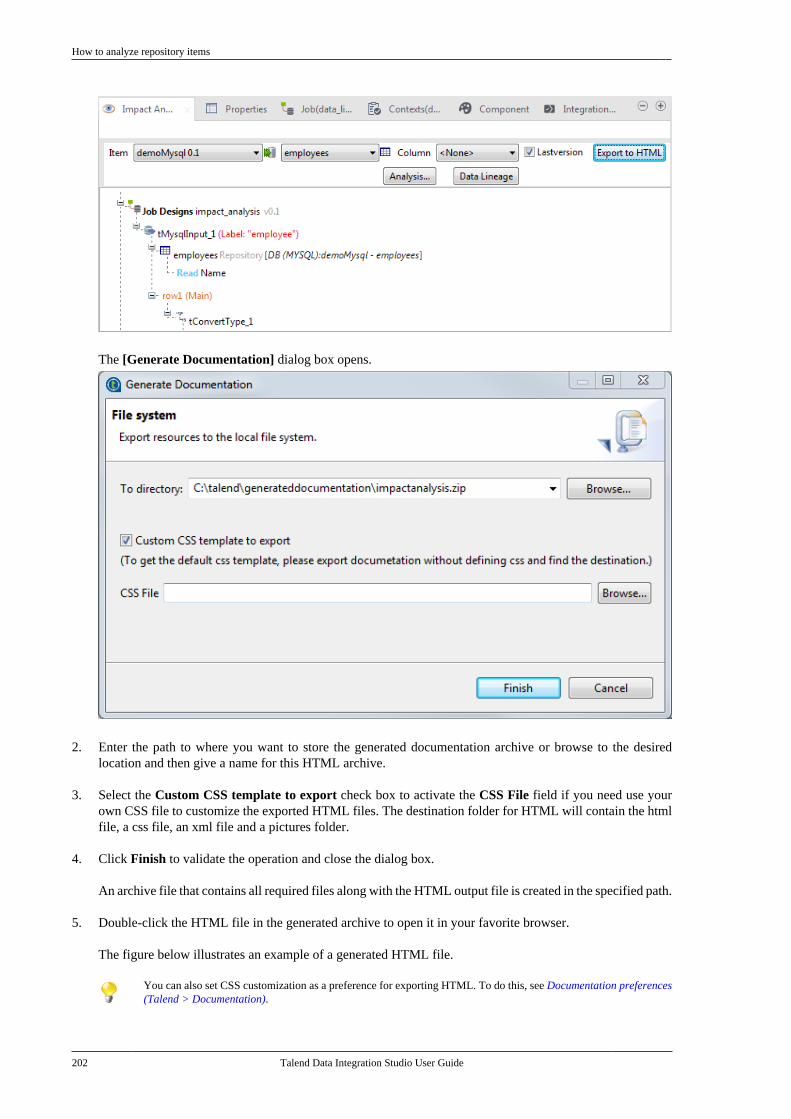
How to analyze repository items
202 Talend Data Integration Studio User Guide
The [Generate Documentation] dialog box opens.
2. Enter the path to where you want to store the generated documentation archive or browse to the desiredlocation and then give a name for this HTML archive.
3. Select the Custom CSS template to export check box to activate the CSS File field if you need use yourown CSS file to customize the exported HTML files. The destination folder for HTML will contain the htmlfile, a css file, an xml file and a pictures folder.
4. Click Finish to validate the operation and close the dialog box.
An archive file that contains all required files along with the HTML output file is created in the specified path.
5. Double-click the HTML file in the generated archive to open it in your favorite browser.
The figure below illustrates an example of a generated HTML file.
You can also set CSS customization as a preference for exporting HTML. To do this, see Documentation preferences(Talend > Documentation).
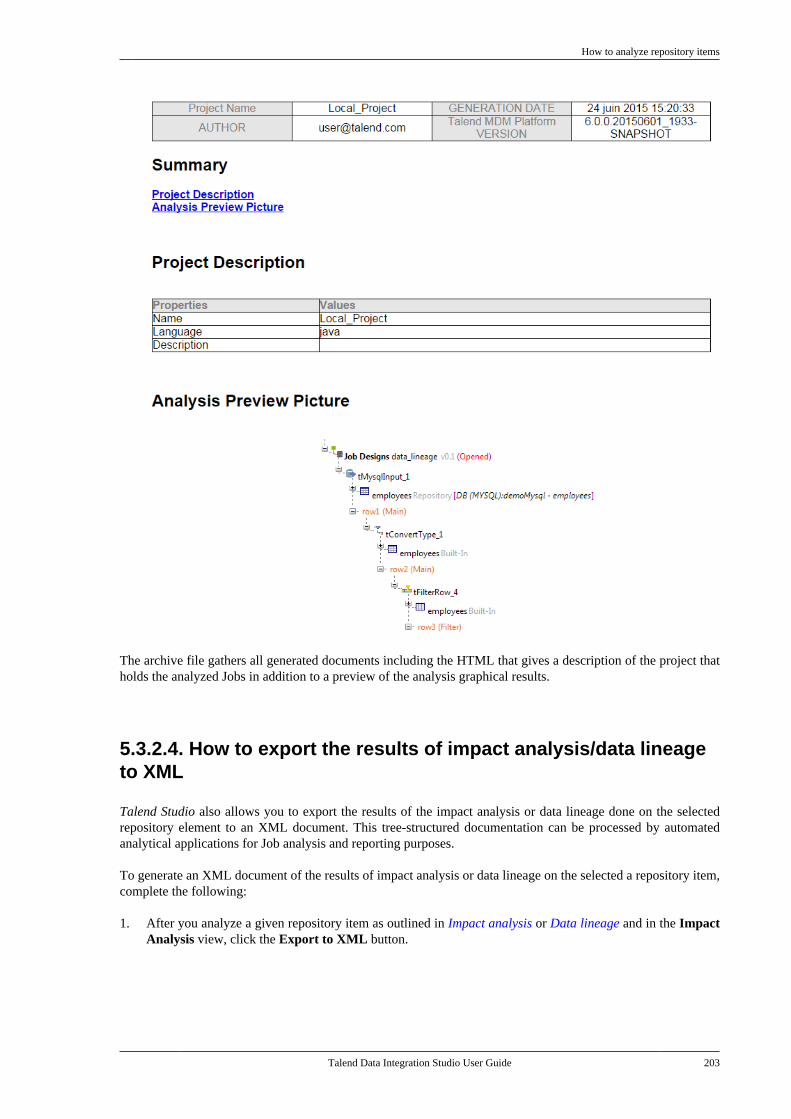
How to analyze repository items
Talend Data Integration Studio User Guide 203
The archive file gathers all generated documents including the HTML that gives a description of the project thatholds the analyzed Jobs in addition to a preview of the analysis graphical results.
5.3.2.4. How to export the results of impact analysis/data lineageto XML
Talend Studio also allows you to export the results of the impact analysis or data lineage done on the selectedrepository element to an XML document. This tree-structured documentation can be processed by automatedanalytical applications for Job analysis and reporting purposes.
To generate an XML document of the results of impact analysis or data lineage on the selected a repository item,complete the following:
1. After you analyze a given repository item as outlined in Impact analysis or Data lineage and in the ImpactAnalysis view, click the Export to XML button.
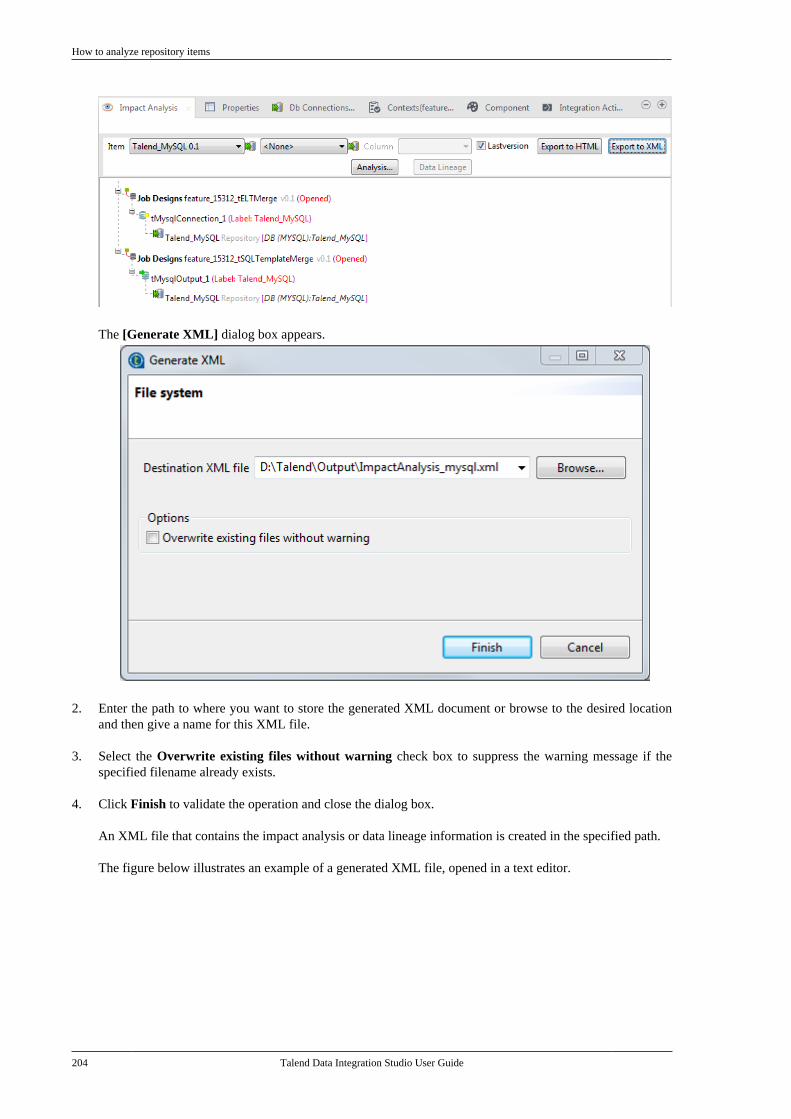
How to analyze repository items
204 Talend Data Integration Studio User Guide
The [Generate XML] dialog box appears.
2. Enter the path to where you want to store the generated XML document or browse to the desired locationand then give a name for this XML file.
3. Select the Overwrite existing files without warning check box to suppress the warning message if thespecified filename already exists.
4. Click Finish to validate the operation and close the dialog box.
An XML file that contains the impact analysis or data lineage information is created in the specified path.
The figure below illustrates an example of a generated XML file, opened in a text editor.
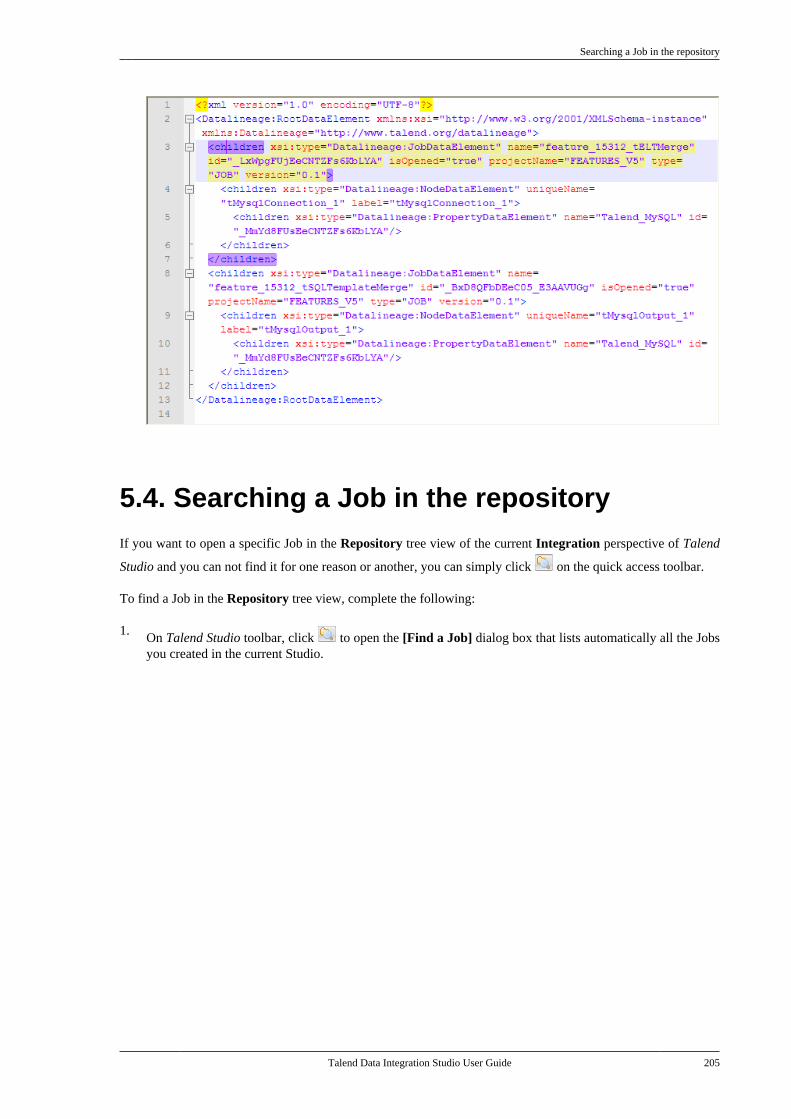
Searching a Job in the repository
Talend Data Integration Studio User Guide 205
5.4. Searching a Job in the repositoryIf you want to open a specific Job in the Repository tree view of the current Integration perspective of Talend
Studio and you can not find it for one reason or another, you can simply click on the quick access toolbar.
To find a Job in the Repository tree view, complete the following:
1. On Talend Studio toolbar, click to open the [Find a Job] dialog box that lists automatically all the Jobsyou created in the current Studio.
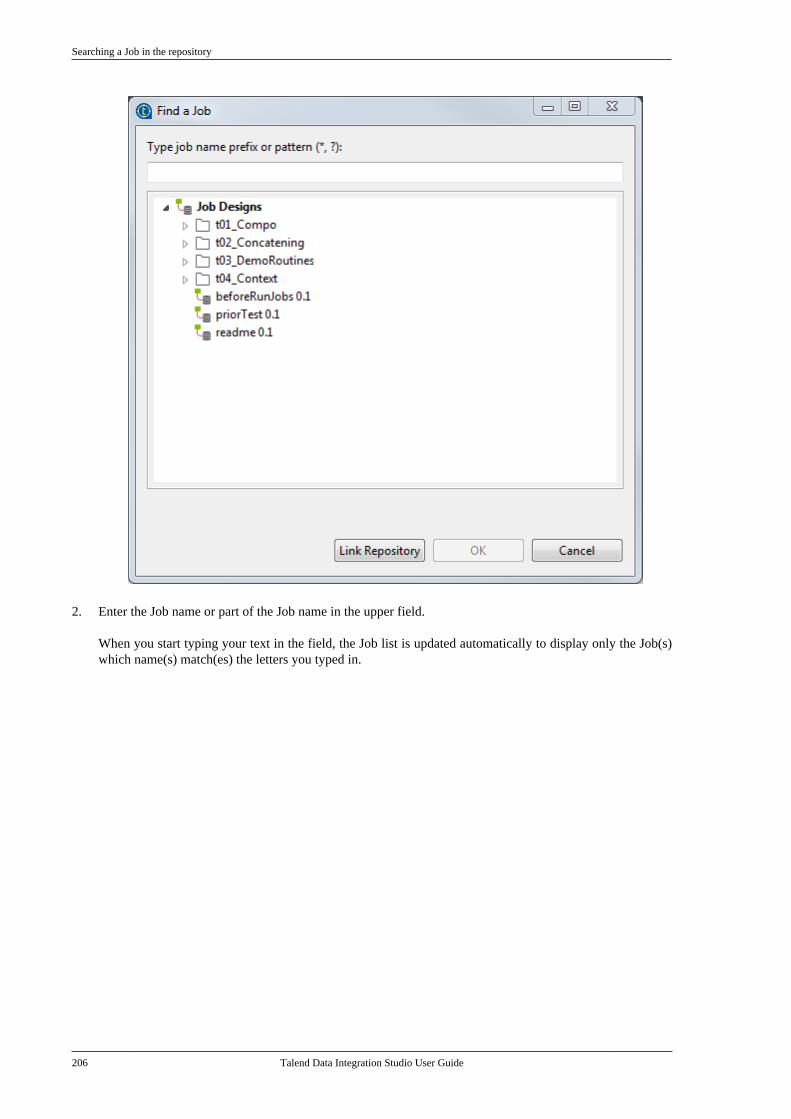
Searching a Job in the repository
206 Talend Data Integration Studio User Guide
2. Enter the Job name or part of the Job name in the upper field.
When you start typing your text in the field, the Job list is updated automatically to display only the Job(s)which name(s) match(es) the letters you typed in.
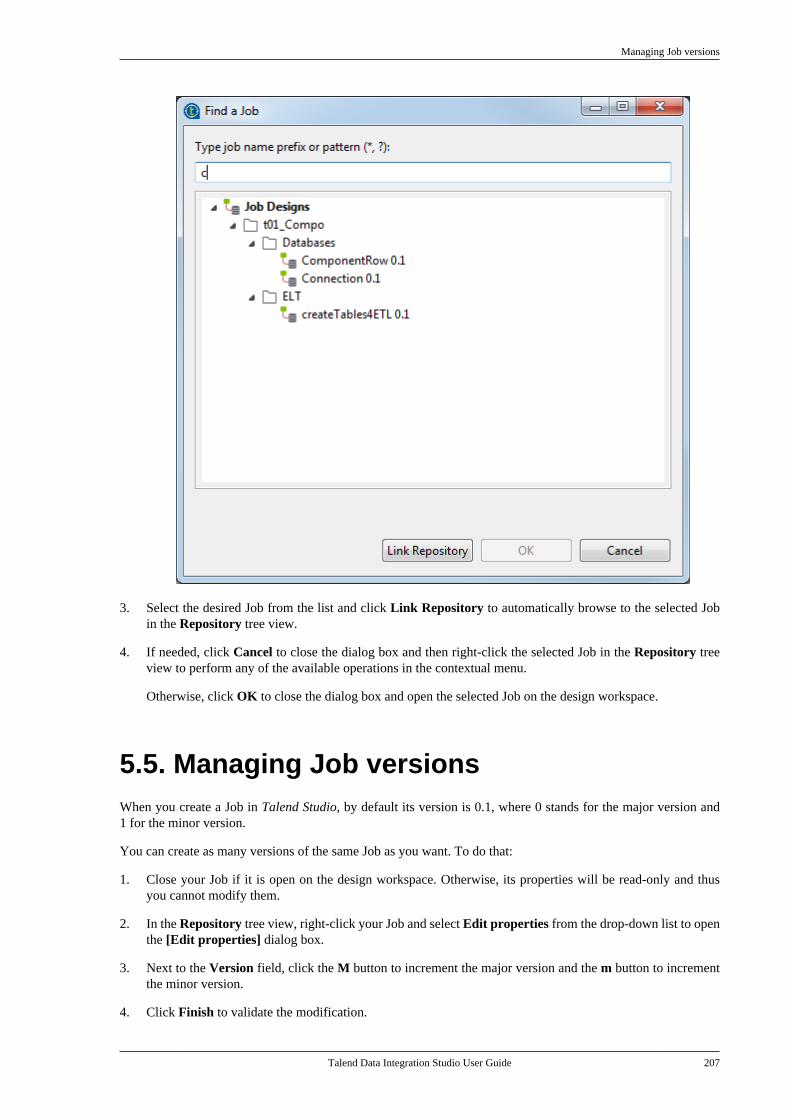
Managing Job versions
Talend Data Integration Studio User Guide 207
3. Select the desired Job from the list and click Link Repository to automatically browse to the selected Jobin the Repository tree view.
4. If needed, click Cancel to close the dialog box and then right-click the selected Job in the Repository treeview to perform any of the available operations in the contextual menu.
Otherwise, click OK to close the dialog box and open the selected Job on the design workspace.
5.5. Managing Job versionsWhen you create a Job in Talend Studio, by default its version is 0.1, where 0 stands for the major version and1 for the minor version.
You can create as many versions of the same Job as you want. To do that:
1. Close your Job if it is open on the design workspace. Otherwise, its properties will be read-only and thusyou cannot modify them.
2. In the Repository tree view, right-click your Job and select Edit properties from the drop-down list to openthe [Edit properties] dialog box.
3. Next to the Version field, click the M button to increment the major version and the m button to incrementthe minor version.
4. Click Finish to validate the modification.
Documenting a Job
208 Talend Data Integration Studio User Guide
By default, when you open a Job, you open its last version.
Any previous version of the Job is read-only and thus cannot be modified.
To change the version of your Job, you can also:
1. Close your Job if it is open on the design workspace. Otherwise, its properties will be read-only and thusyou cannot modify them.
2. In the Repository tree view, right-click your Job and select Open another version from the drop-down list.
3. In the dialog box, select the Create new version and open it check box and click the M button to incrementthe major version and the m button to increment the minor version.
4. Click Finish to validate the modification and open this new version of your Job.
You can also save your currently active Job and increment its version at the same time, by clicking File > SaveAs... and setting a new version in the [Save As] dialog box.
If you give your Job a new name, this option does not overwrite your current Job, but it saves your Job as a new one withthe same version of the current Job or with a new version if you specify one.
You can access a list of the different versions of a Job and perform certain operations. To do that:
1. In the Repository tree view, select the Job you want to consult the versions of.
2. On the configuration tabs panel, click the Job tab and then click Version to display the version list of theselected Job.
3. Right-click the Job version you want to consult.
4. Do one of the followings:
Select To...
Edit Job open the last version of the Job.
This option is available only when you select the last version of the Job.
Read job consult the Job in read-only mode.
Open Job Hierarchy consult the hierarchy of the Job.
View documentation generate and open the documentation of the Job.
Edit properties edit Job properties.
Note: The Job should not be open on the design workspace, otherwise it will be inread-only mode.
This option is available only when you select the last version of the Job.
Run job execute the Job.
Generate Doc As HTML generate details documentation about the Job.
You can also manage the version of several Jobs and/or metadata at the same time, as well as Jobs and theirdependencies and/or child Jobs from the Project Settings. For more information, see Version management.
5.6. Documenting a JobTalend Studio enables you to generate documentation that gives general information about your projects, Jobs orjoblets. You can automate the generation of such documentation and edit any of the generated documents.
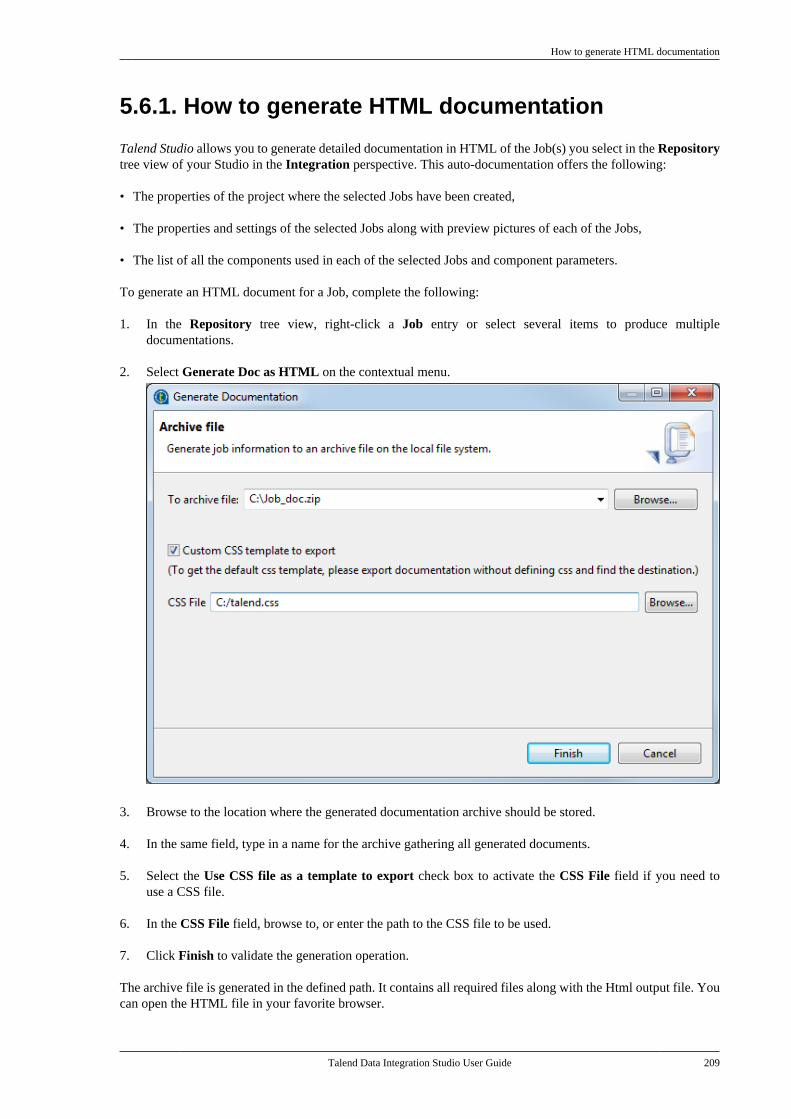
How to generate HTML documentation
Talend Data Integration Studio User Guide 209
5.6.1. How to generate HTML documentation
Talend Studio allows you to generate detailed documentation in HTML of the Job(s) you select in the Repositorytree view of your Studio in the Integration perspective. This auto-documentation offers the following:
• The properties of the project where the selected Jobs have been created,
• The properties and settings of the selected Jobs along with preview pictures of each of the Jobs,
• The list of all the components used in each of the selected Jobs and component parameters.
To generate an HTML document for a Job, complete the following:
1. In the Repository tree view, right-click a Job entry or select several items to produce multipledocumentations.
2. Select Generate Doc as HTML on the contextual menu.
3. Browse to the location where the generated documentation archive should be stored.
4. In the same field, type in a name for the archive gathering all generated documents.
5. Select the Use CSS file as a template to export check box to activate the CSS File field if you need touse a CSS file.
6. In the CSS File field, browse to, or enter the path to the CSS file to be used.
7. Click Finish to validate the generation operation.
The archive file is generated in the defined path. It contains all required files along with the Html output file. Youcan open the HTML file in your favorite browser.
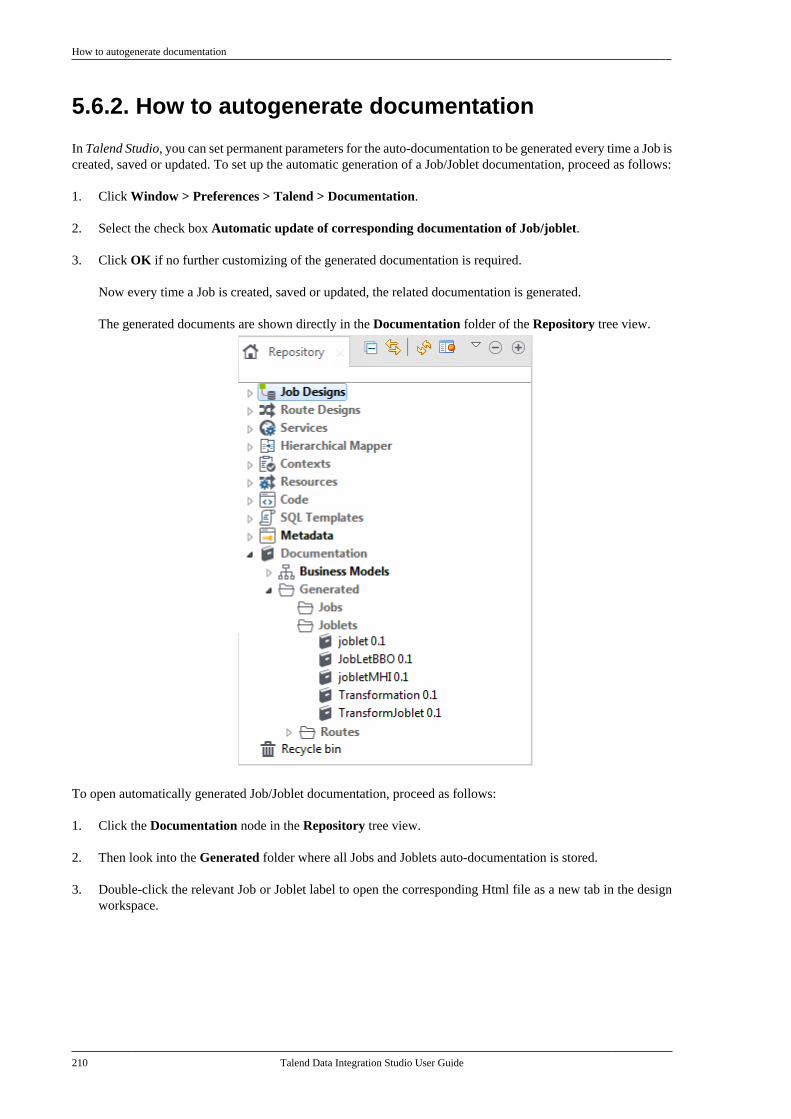
How to autogenerate documentation
210 Talend Data Integration Studio User Guide
5.6.2. How to autogenerate documentation
In Talend Studio, you can set permanent parameters for the auto-documentation to be generated every time a Job iscreated, saved or updated. To set up the automatic generation of a Job/Joblet documentation, proceed as follows:
1. Click Window > Preferences > Talend > Documentation.
2. Select the check box Automatic update of corresponding documentation of Job/joblet.
3. Click OK if no further customizing of the generated documentation is required.
Now every time a Job is created, saved or updated, the related documentation is generated.
The generated documents are shown directly in the Documentation folder of the Repository tree view.
To open automatically generated Job/Joblet documentation, proceed as follows:
1. Click the Documentation node in the Repository tree view.
2. Then look into the Generated folder where all Jobs and Joblets auto-documentation is stored.
3. Double-click the relevant Job or Joblet label to open the corresponding Html file as a new tab in the designworkspace.
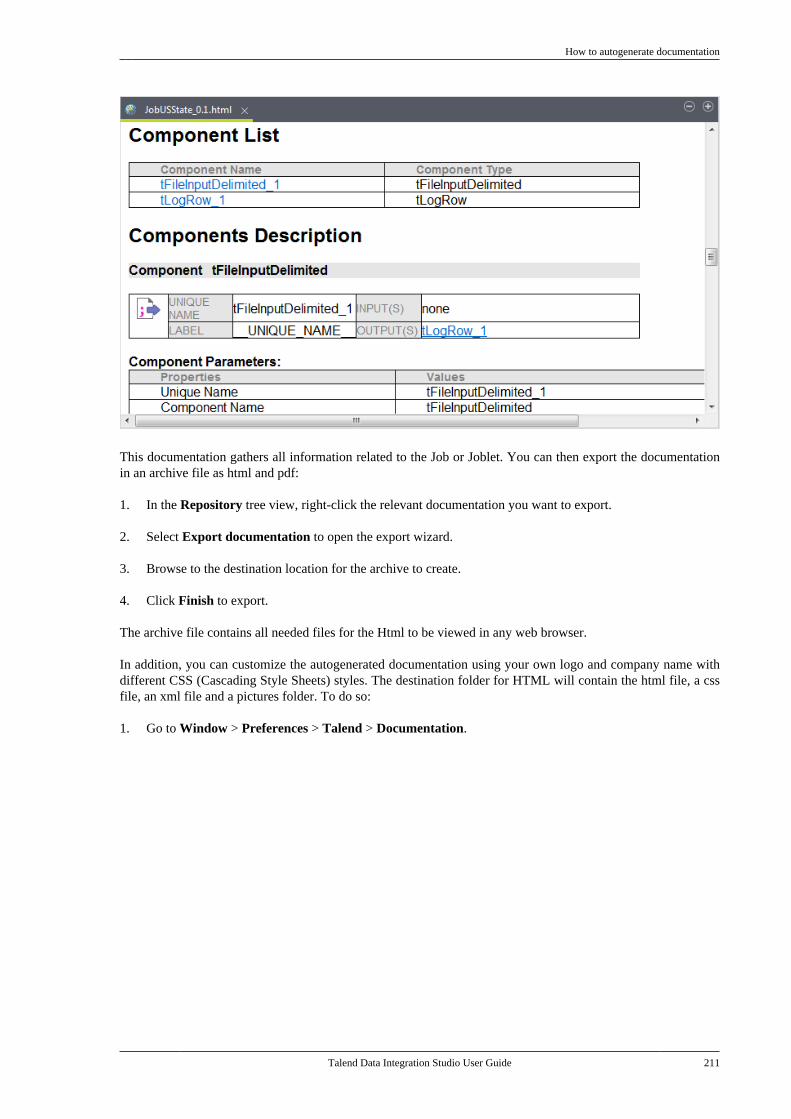
How to autogenerate documentation
Talend Data Integration Studio User Guide 211
This documentation gathers all information related to the Job or Joblet. You can then export the documentationin an archive file as html and pdf:
1. In the Repository tree view, right-click the relevant documentation you want to export.
2. Select Export documentation to open the export wizard.
3. Browse to the destination location for the archive to create.
4. Click Finish to export.
The archive file contains all needed files for the Html to be viewed in any web browser.
In addition, you can customize the autogenerated documentation using your own logo and company name withdifferent CSS (Cascading Style Sheets) styles. The destination folder for HTML will contain the html file, a cssfile, an xml file and a pictures folder. To do so:
1. Go to Window > Preferences > Talend > Documentation.
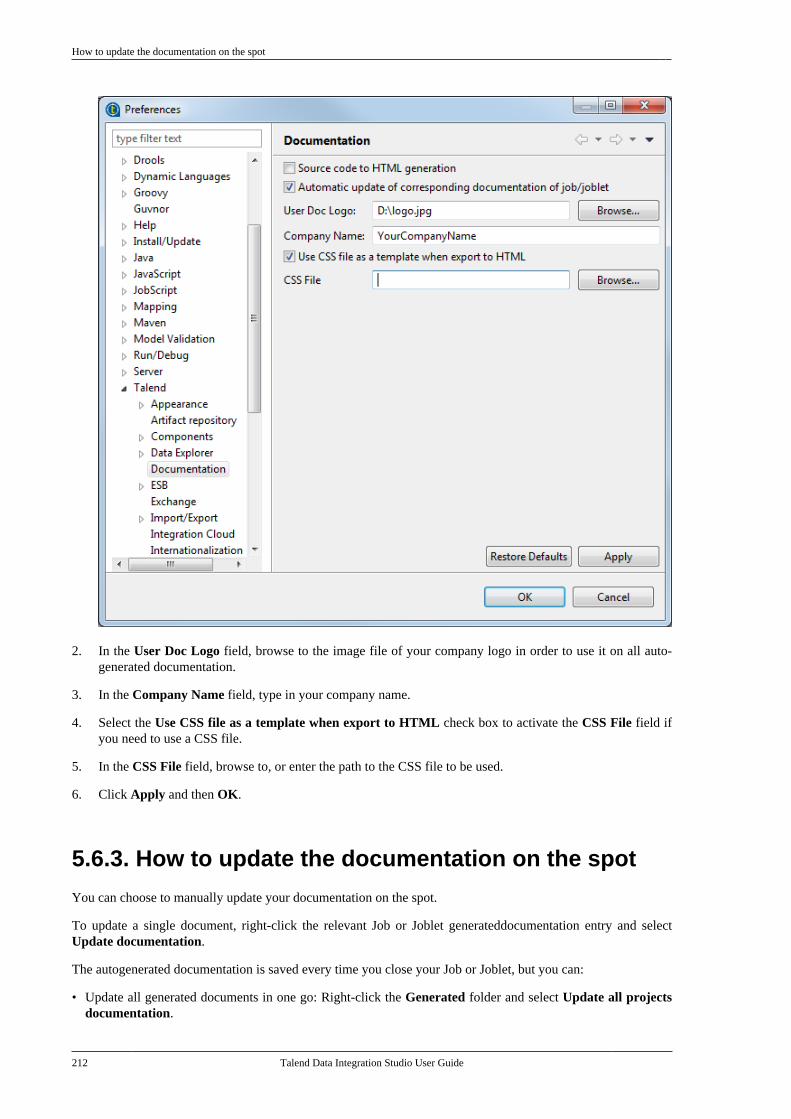
How to update the documentation on the spot
212 Talend Data Integration Studio User Guide
2. In the User Doc Logo field, browse to the image file of your company logo in order to use it on all auto-generated documentation.
3. In the Company Name field, type in your company name.
4. Select the Use CSS file as a template when export to HTML check box to activate the CSS File field ifyou need to use a CSS file.
5. In the CSS File field, browse to, or enter the path to the CSS file to be used.
6. Click Apply and then OK.
5.6.3. How to update the documentation on the spot
You can choose to manually update your documentation on the spot.
To update a single document, right-click the relevant Job or Joblet generateddocumentation entry and selectUpdate documentation.
The autogenerated documentation is saved every time you close your Job or Joblet, but you can:
• Update all generated documents in one go: Right-click the Generated folder and select Update all projectsdocumentation.
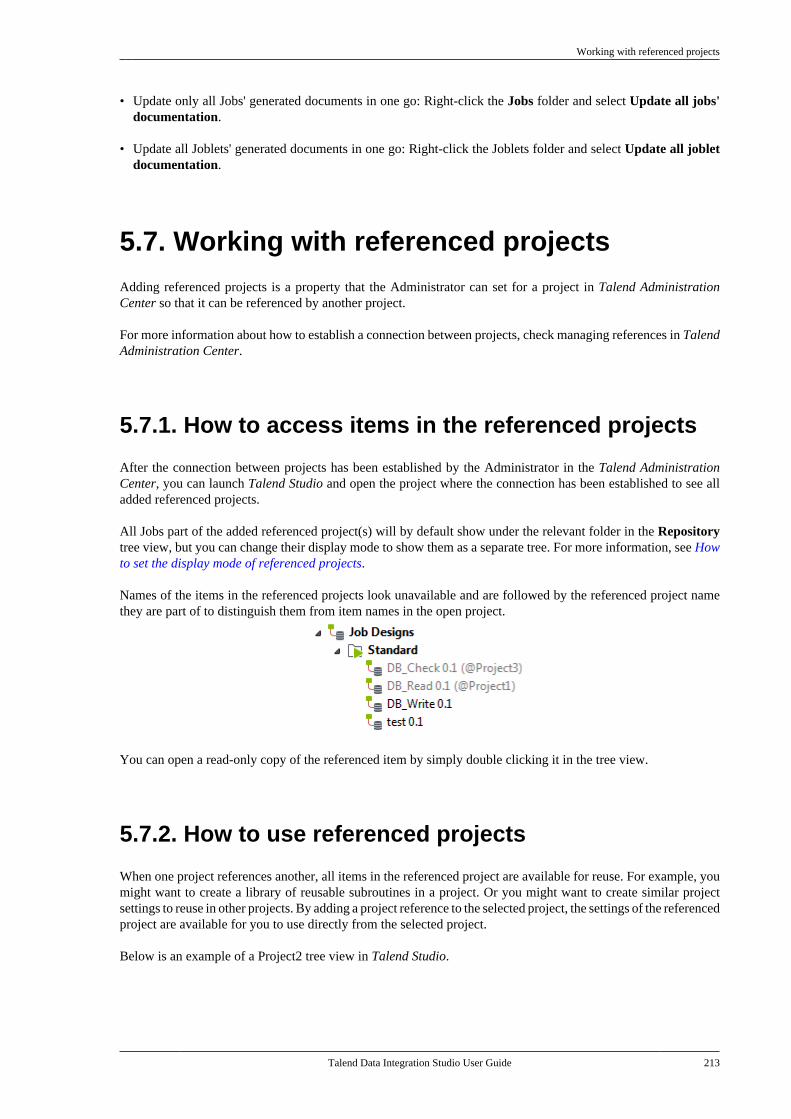
Working with referenced projects
Talend Data Integration Studio User Guide 213
• Update only all Jobs' generated documents in one go: Right-click the Jobs folder and select Update all jobs'documentation.
• Update all Joblets' generated documents in one go: Right-click the Joblets folder and select Update all jobletdocumentation.
5.7. Working with referenced projectsAdding referenced projects is a property that the Administrator can set for a project in Talend AdministrationCenter so that it can be referenced by another project.
For more information about how to establish a connection between projects, check managing references in TalendAdministration Center.
5.7.1. How to access items in the referenced projects
After the connection between projects has been established by the Administrator in the Talend AdministrationCenter, you can launch Talend Studio and open the project where the connection has been established to see alladded referenced projects.
All Jobs part of the added referenced project(s) will by default show under the relevant folder in the Repositorytree view, but you can change their display mode to show them as a separate tree. For more information, see Howto set the display mode of referenced projects.
Names of the items in the referenced projects look unavailable and are followed by the referenced project namethey are part of to distinguish them from item names in the open project.
You can open a read-only copy of the referenced item by simply double clicking it in the tree view.
5.7.2. How to use referenced projects
When one project references another, all items in the referenced project are available for reuse. For example, youmight want to create a library of reusable subroutines in a project. Or you might want to create similar projectsettings to reuse in other projects. By adding a project reference to the selected project, the settings of the referencedproject are available for you to use directly from the selected project.
Below is an example of a Project2 tree view in Talend Studio.
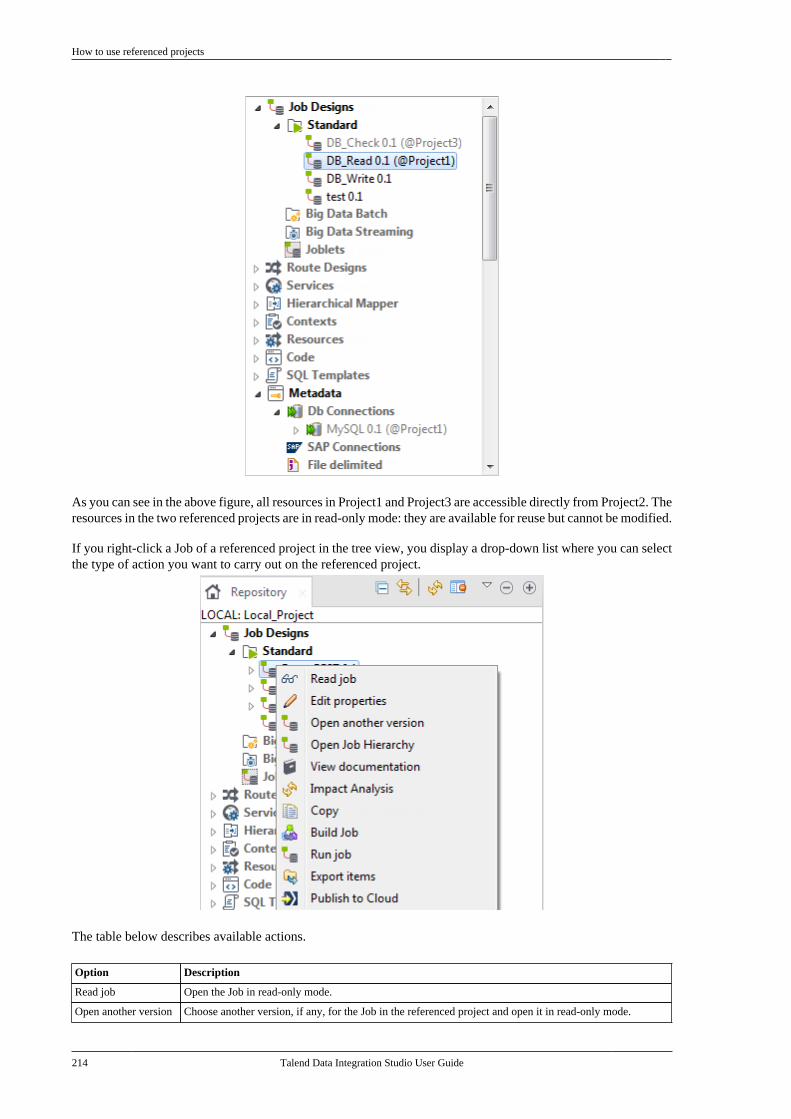
How to use referenced projects
214 Talend Data Integration Studio User Guide
As you can see in the above figure, all resources in Project1 and Project3 are accessible directly from Project2. Theresources in the two referenced projects are in read-only mode: they are available for reuse but cannot be modified.
If you right-click a Job of a referenced project in the tree view, you display a drop-down list where you can selectthe type of action you want to carry out on the referenced project.
The table below describes available actions.
Option Description
Read job Open the Job in read-only mode.
Open another version Choose another version, if any, for the Job in the referenced project and open it in read-only mode.
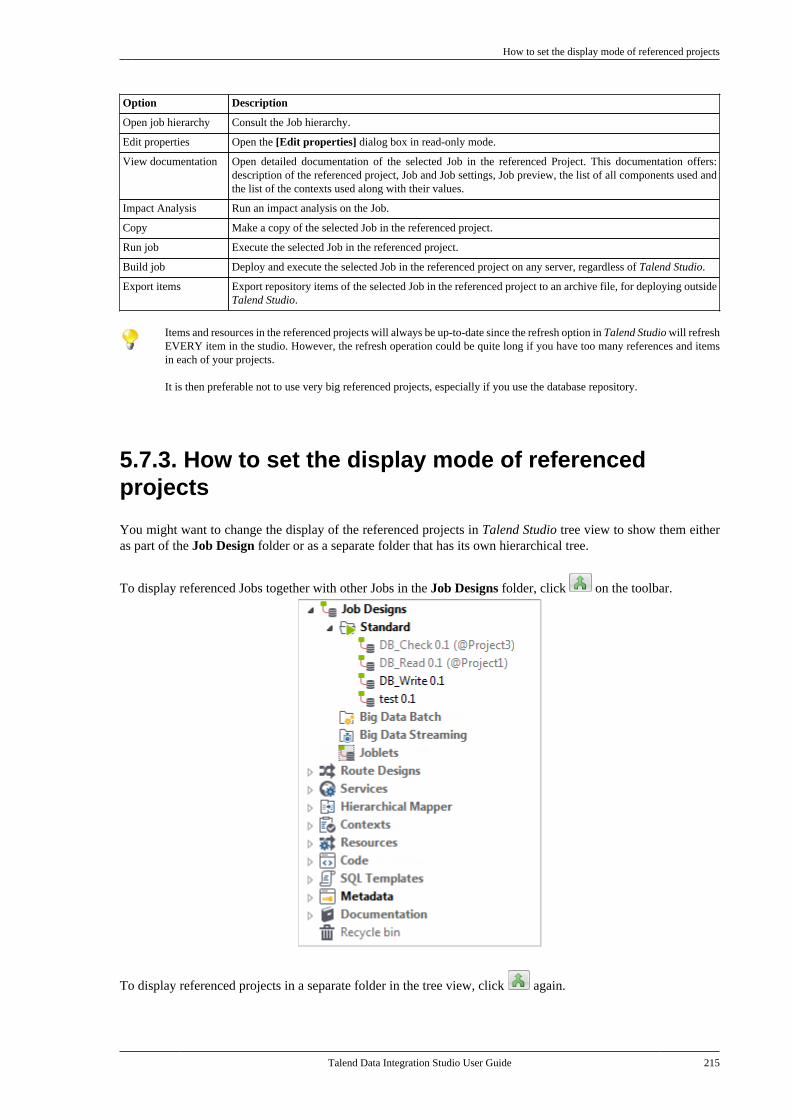
How to set the display mode of referenced projects
Talend Data Integration Studio User Guide 215
Option Description
Open job hierarchy Consult the Job hierarchy.
Edit properties Open the [Edit properties] dialog box in read-only mode.
View documentation Open detailed documentation of the selected Job in the referenced Project. This documentation offers:description of the referenced project, Job and Job settings, Job preview, the list of all components used andthe list of the contexts used along with their values.
Impact Analysis Run an impact analysis on the Job.
Copy Make a copy of the selected Job in the referenced project.
Run job Execute the selected Job in the referenced project.
Build job Deploy and execute the selected Job in the referenced project on any server, regardless of Talend Studio.
Export items Export repository items of the selected Job in the referenced project to an archive file, for deploying outsideTalend Studio.
Items and resources in the referenced projects will always be up-to-date since the refresh option in Talend Studio will refreshEVERY item in the studio. However, the refresh operation could be quite long if you have too many references and itemsin each of your projects.
It is then preferable not to use very big referenced projects, especially if you use the database repository.
5.7.3. How to set the display mode of referencedprojects
You might want to change the display of the referenced projects in Talend Studio tree view to show them eitheras part of the Job Design folder or as a separate folder that has its own hierarchical tree.
To display referenced Jobs together with other Jobs in the Job Designs folder, click on the toolbar.
To display referenced projects in a separate folder in the tree view, click again.

Comparing Jobs
216 Talend Data Integration Studio User Guide
5.8. Comparing JobsTalend Studio provides a Compare Job option that enables you to compare Jobs on the same or different branchesin order to list the differences in the items used in the two Jobs. Using this option, you can:
• compare different versions of the same Job,
• compare the same Job in different releases of the Studio, in order to see if any modifications were done on theJob in the previous/current release, for example,
• compare Jobs that have been designed using the same template, but different parameters, to check the differencesamong these Jobs.
Differences between the compared Jobs are displayed in the Compare Result view. The result detail are groupedunder the three categories: Jobsettings, Components and Connectors.
The table below gives the description of the comparison results under each of the above categories.
Category Description
Jobsettings lists all differences related to the settings of the compared Job.
Components lists the differences in the components and component parameter used in the two Jobs. Aminus sign appended on top of a component listed in the Compare Result view indicatesthat this component is missing in the design of one of the two compared Jobs. A plus signappended on top of a component listed in the view indicates that this component is added in
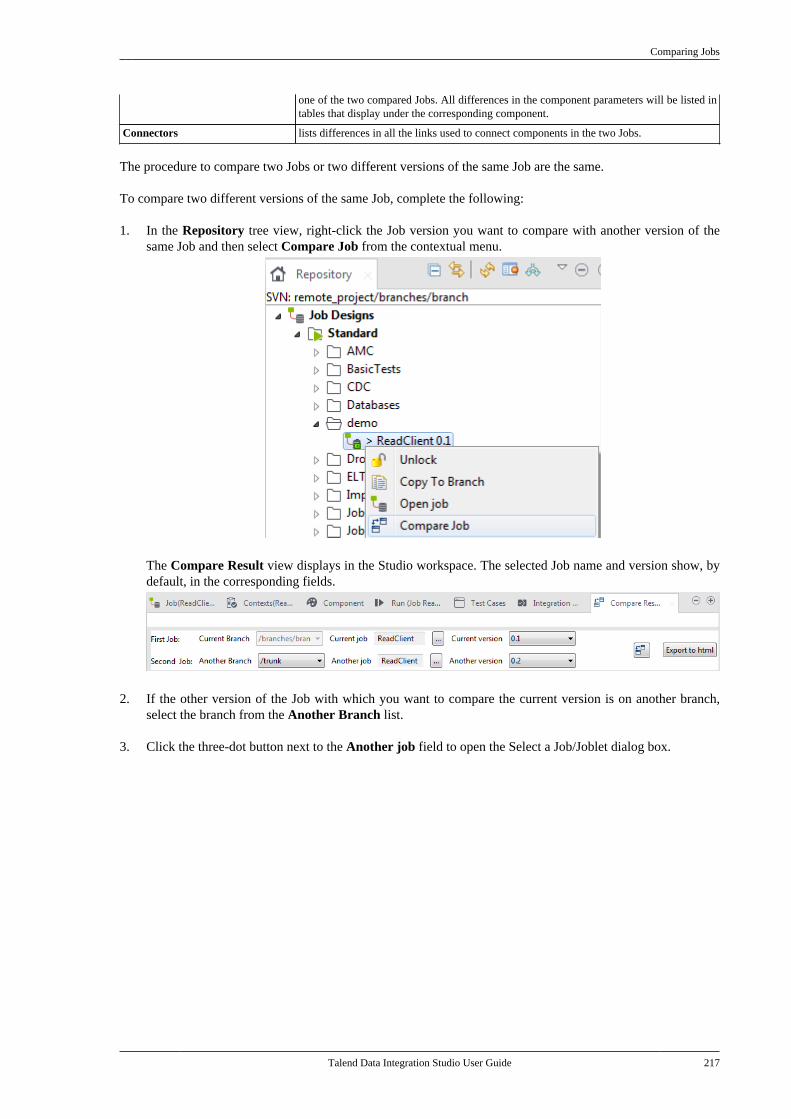
Comparing Jobs
Talend Data Integration Studio User Guide 217
one of the two compared Jobs. All differences in the component parameters will be listed intables that display under the corresponding component.
Connectors lists differences in all the links used to connect components in the two Jobs.
The procedure to compare two Jobs or two different versions of the same Job are the same.
To compare two different versions of the same Job, complete the following:
1. In the Repository tree view, right-click the Job version you want to compare with another version of thesame Job and then select Compare Job from the contextual menu.
The Compare Result view displays in the Studio workspace. The selected Job name and version show, bydefault, in the corresponding fields.
2. If the other version of the Job with which you want to compare the current version is on another branch,select the branch from the Another Branch list.
3. Click the three-dot button next to the Another job field to open the Select a Job/Joblet dialog box.
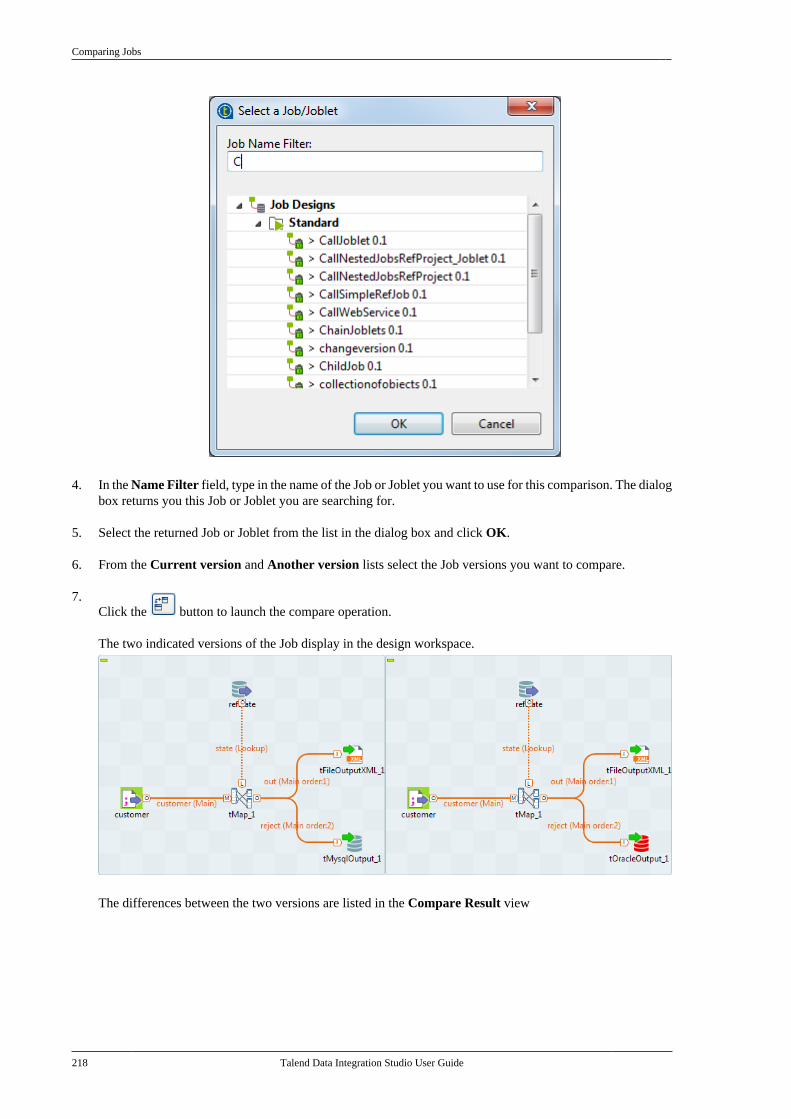
Comparing Jobs
218 Talend Data Integration Studio User Guide
4. In the Name Filter field, type in the name of the Job or Joblet you want to use for this comparison. The dialogbox returns you this Job or Joblet you are searching for.
5. Select the returned Job or Joblet from the list in the dialog box and click OK.
6. From the Current version and Another version lists select the Job versions you want to compare.
7.Click the button to launch the compare operation.
The two indicated versions of the Job display in the design workspace.
The differences between the two versions are listed in the Compare Result view
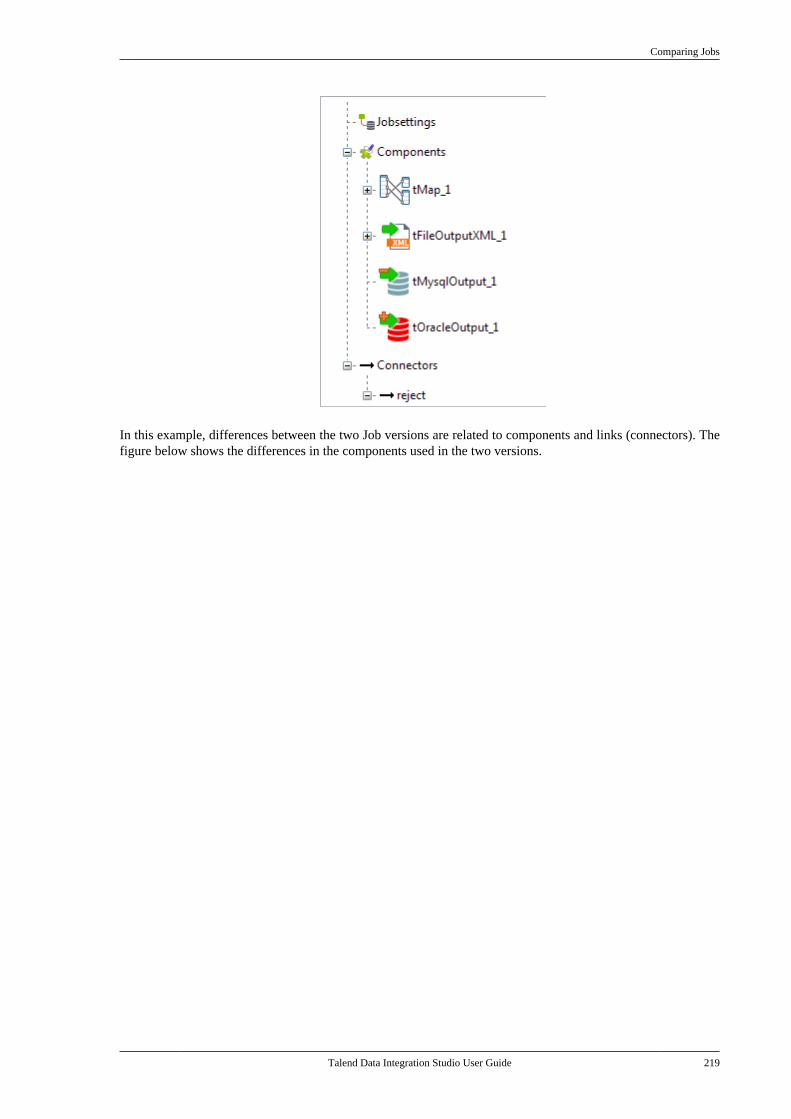
Comparing Jobs
Talend Data Integration Studio User Guide 219
In this example, differences between the two Job versions are related to components and links (connectors). Thefigure below shows the differences in the components used in the two versions.
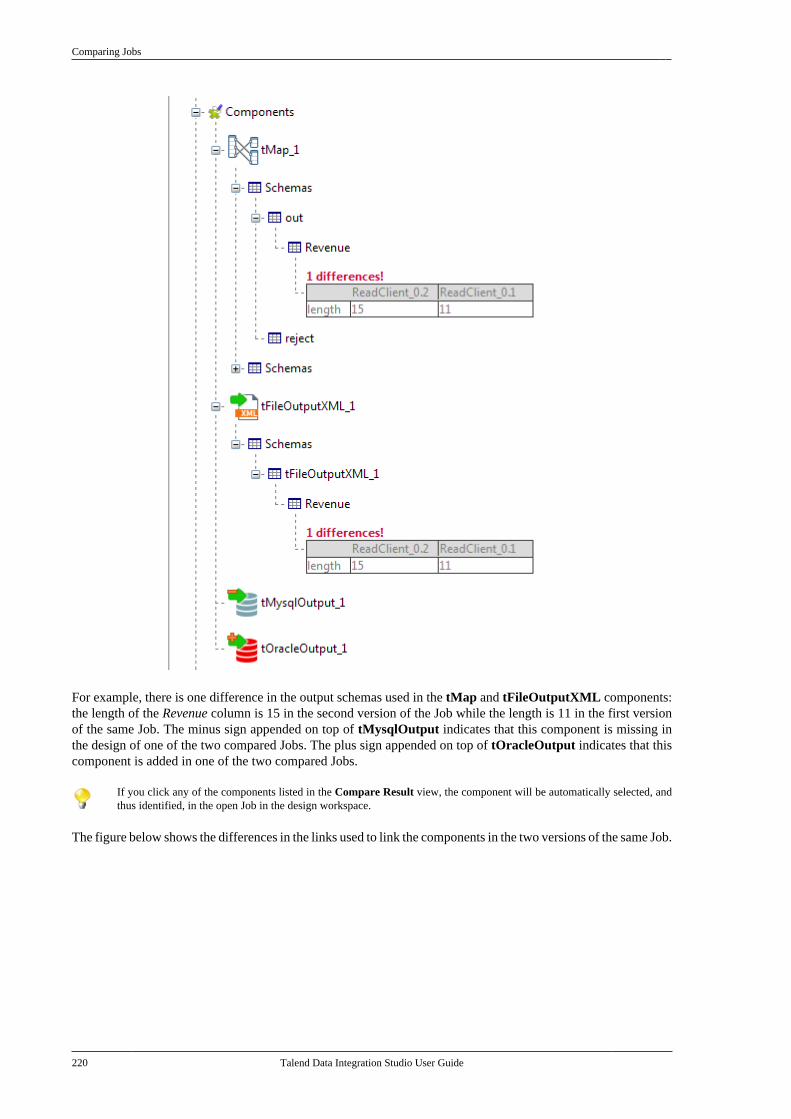
Comparing Jobs
220 Talend Data Integration Studio User Guide
For example, there is one difference in the output schemas used in the tMap and tFileOutputXML components:the length of the Revenue column is 15 in the second version of the Job while the length is 11 in the first versionof the same Job. The minus sign appended on top of tMysqlOutput indicates that this component is missing inthe design of one of the two compared Jobs. The plus sign appended on top of tOracleOutput indicates that thiscomponent is added in one of the two compared Jobs.
If you click any of the components listed in the Compare Result view, the component will be automatically selected, andthus identified, in the open Job in the design workspace.
The figure below shows the differences in the links used to link the components in the two versions of the same Job.

Handling Job execution
Talend Data Integration Studio User Guide 221
In this example, there is one difference related to the reject link used in the two versions: the target of this link inthe first version is a tMysqlOutput component, while it is a tOracleOutput component in the second version.
You can export the Job compare results to an html file by clicking Export to html. Then browse to the directory you towant to save the file in and enter a file name. You have the option of using a default CSS template or a customized one.The destination folder will contain the html file, a css file, an xml file and a pictures folder. For related topic, see How toexport the results of impact analysis/data lineage to HTML.
5.9. Handling Job executionYou can execute a Job in several ways. This mainly depends on the purpose of your Job execution and on youruser level.
This section describes:
• How to run a Job in normal mode
• How to run a Job in Java Debug mode
• How to run a Job in Traces Debug mode
• How to set advanced execution settings
• How to run a Job remotely
• How to customize log4j output level at runtime
• How to show JVM resource usage during Job execution
• How to run a Job remotely with SSL enabled
• How to schedule Job executions via the Job Conductor
• How to deploy a Job on SpagoBI server
• How to recover Job execution in case of failure
5.9.1. How to run a Job in normal modeMake sure you saved your Job before running it in order for all properties to be taken into account.
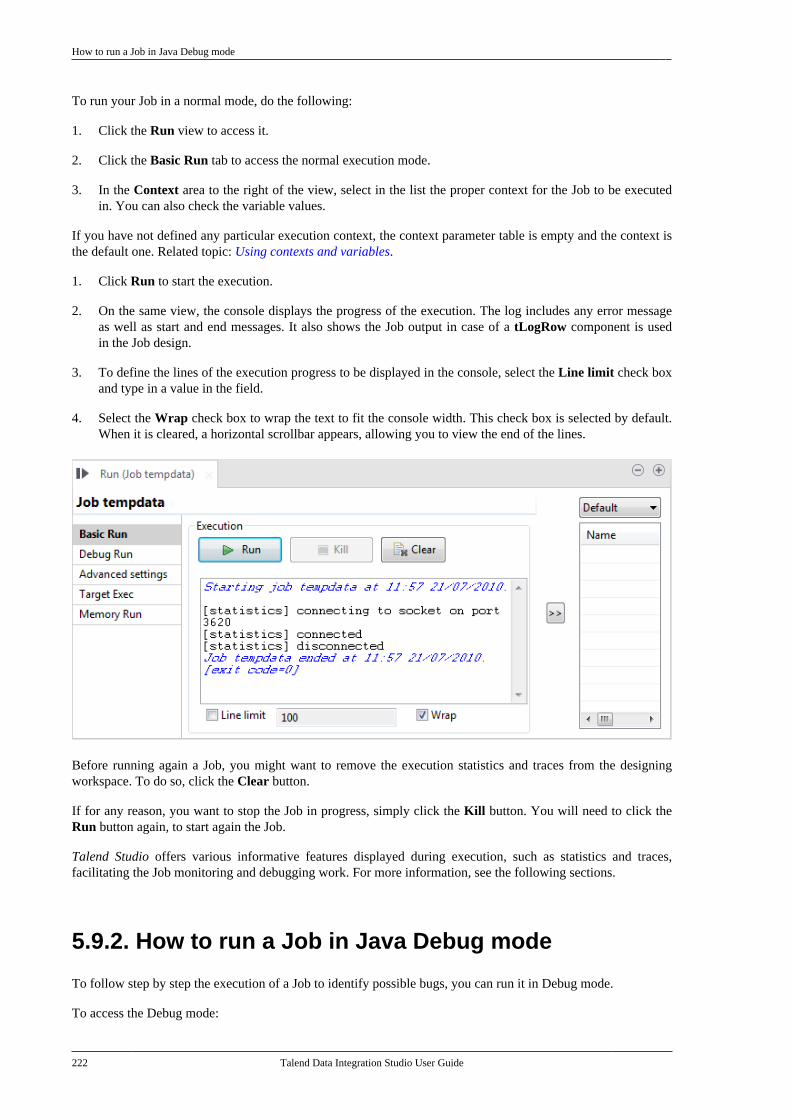
How to run a Job in Java Debug mode
222 Talend Data Integration Studio User Guide
To run your Job in a normal mode, do the following:
1. Click the Run view to access it.
2. Click the Basic Run tab to access the normal execution mode.
3. In the Context area to the right of the view, select in the list the proper context for the Job to be executedin. You can also check the variable values.
If you have not defined any particular execution context, the context parameter table is empty and the context isthe default one. Related topic: Using contexts and variables.
1. Click Run to start the execution.
2. On the same view, the console displays the progress of the execution. The log includes any error messageas well as start and end messages. It also shows the Job output in case of a tLogRow component is usedin the Job design.
3. To define the lines of the execution progress to be displayed in the console, select the Line limit check boxand type in a value in the field.
4. Select the Wrap check box to wrap the text to fit the console width. This check box is selected by default.When it is cleared, a horizontal scrollbar appears, allowing you to view the end of the lines.
Before running again a Job, you might want to remove the execution statistics and traces from the designingworkspace. To do so, click the Clear button.
If for any reason, you want to stop the Job in progress, simply click the Kill button. You will need to click theRun button again, to start again the Job.
Talend Studio offers various informative features displayed during execution, such as statistics and traces,facilitating the Job monitoring and debugging work. For more information, see the following sections.
5.9.2. How to run a Job in Java Debug mode
To follow step by step the execution of a Job to identify possible bugs, you can run it in Debug mode.
To access the Debug mode:

How to run a Job in Traces Debug mode
Talend Data Integration Studio User Guide 223
1. Click the Run view to access it.
2. Click the Debug Run tab to access the debug execution modes.
Before running your Job in Debug mode, add breakpoints to the major steps of your Job flow.
This will allow you to get the Job to automatically stop at each breakpoint. This way, components and theirrespective variables can be verified individually and debugged if required.
To add breakpoints to a component, right-click it on the design workspace, and select Add breakpoint on thecontextual menu.
A pause icon displays next to the component where the break is added.
To switch to debug mode, click the Java Debug button on the Debug Run tab of the Run panel. Talend Studio'smain window gets reorganized for debugging.
You can then run the Job step by step and check each breakpoint component for the expected behavior and variablevalues.
To switch back to Talend Studio designer mode, click Window, then Perspective and select Integration.
5.9.3. How to run a Job in Traces Debug mode
The traces feature allows you to monitor data processing when running a Job in the Integration perspective ofTalend Studio.
It provides a row by row view of the component behavior and displays the dynamic result next to the Row linkon the design workspace.
This feature allows you to monitor all the components of a Job, without switching to the debug mode, hencewithout requiring advanced Java knowledge.
The Traces function displays the content of processed rows in a table.
Exception is made for external components which cannot offer this feature if their design does not include it.
You can activate or deactivate Traces or decide what processed columns to display in the traces table thatdisplays on the design workspace when launching the current Job.You can either choose to monitor the whole dataprocessing or monitor the data processing row by row or at a certain breakpoint. For more information about the
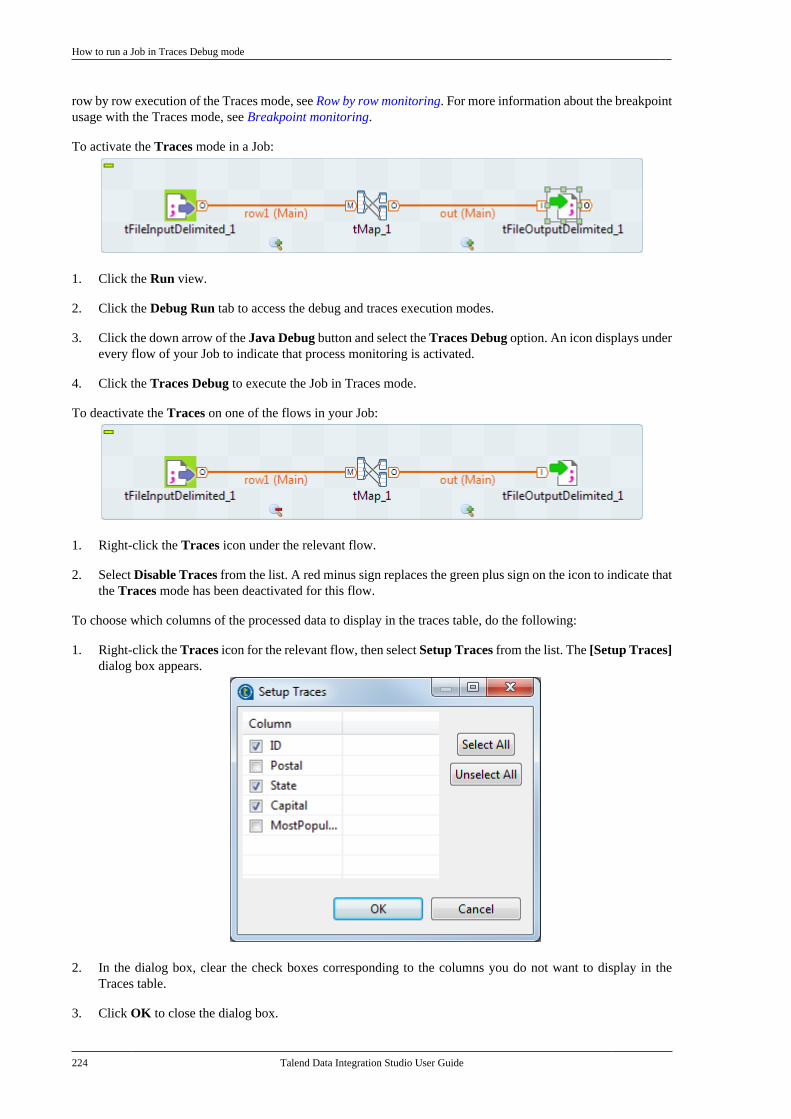
How to run a Job in Traces Debug mode
224 Talend Data Integration Studio User Guide
row by row execution of the Traces mode, see Row by row monitoring. For more information about the breakpointusage with the Traces mode, see Breakpoint monitoring.
To activate the Traces mode in a Job:
1. Click the Run view.
2. Click the Debug Run tab to access the debug and traces execution modes.
3. Click the down arrow of the Java Debug button and select the Traces Debug option. An icon displays underevery flow of your Job to indicate that process monitoring is activated.
4. Click the Traces Debug to execute the Job in Traces mode.
To deactivate the Traces on one of the flows in your Job:
1. Right-click the Traces icon under the relevant flow.
2. Select Disable Traces from the list. A red minus sign replaces the green plus sign on the icon to indicate thatthe Traces mode has been deactivated for this flow.
To choose which columns of the processed data to display in the traces table, do the following:
1. Right-click the Traces icon for the relevant flow, then select Setup Traces from the list. The [Setup Traces]dialog box appears.
2. In the dialog box, clear the check boxes corresponding to the columns you do not want to display in theTraces table.
3. Click OK to close the dialog box.
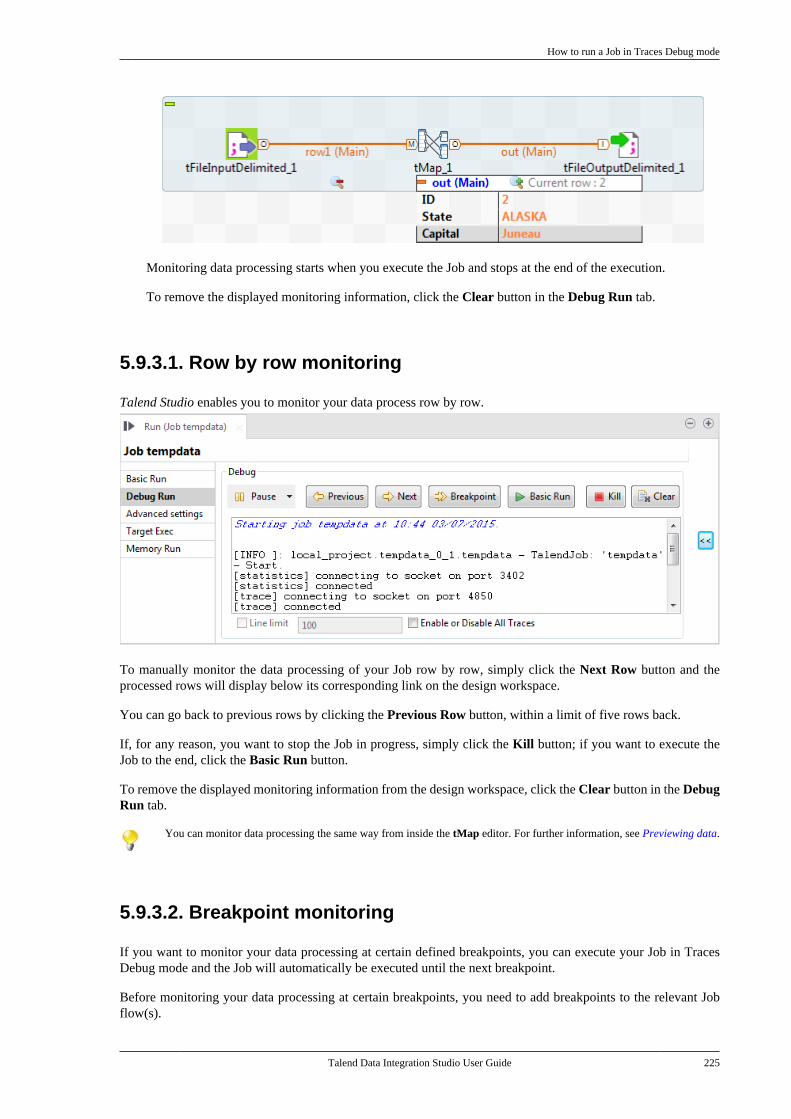
How to run a Job in Traces Debug mode
Talend Data Integration Studio User Guide 225
Monitoring data processing starts when you execute the Job and stops at the end of the execution.
To remove the displayed monitoring information, click the Clear button in the Debug Run tab.
5.9.3.1. Row by row monitoring
Talend Studio enables you to monitor your data process row by row.
To manually monitor the data processing of your Job row by row, simply click the Next Row button and theprocessed rows will display below its corresponding link on the design workspace.
You can go back to previous rows by clicking the Previous Row button, within a limit of five rows back.
If, for any reason, you want to stop the Job in progress, simply click the Kill button; if you want to execute theJob to the end, click the Basic Run button.
To remove the displayed monitoring information from the design workspace, click the Clear button in the DebugRun tab.
You can monitor data processing the same way from inside the tMap editor. For further information, see Previewing data.
5.9.3.2. Breakpoint monitoring
If you want to monitor your data processing at certain defined breakpoints, you can execute your Job in TracesDebug mode and the Job will automatically be executed until the next breakpoint.
Before monitoring your data processing at certain breakpoints, you need to add breakpoints to the relevant Jobflow(s).
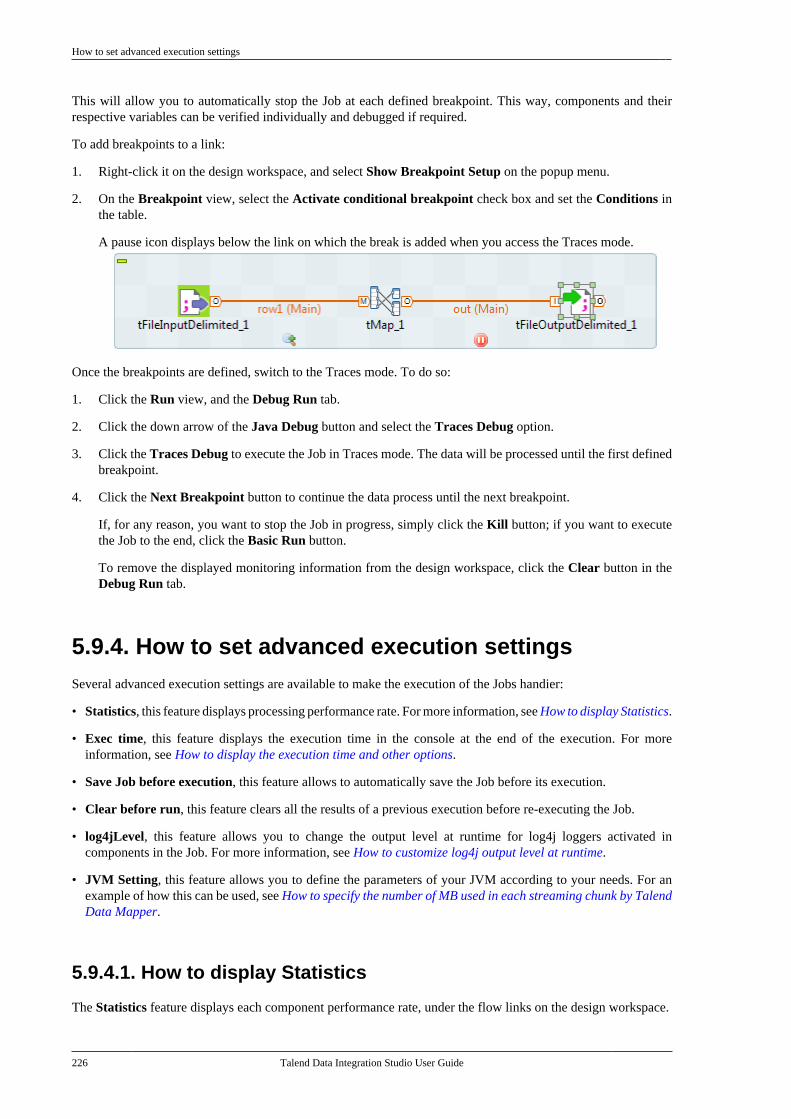
How to set advanced execution settings
226 Talend Data Integration Studio User Guide
This will allow you to automatically stop the Job at each defined breakpoint. This way, components and theirrespective variables can be verified individually and debugged if required.
To add breakpoints to a link:
1. Right-click it on the design workspace, and select Show Breakpoint Setup on the popup menu.
2. On the Breakpoint view, select the Activate conditional breakpoint check box and set the Conditions inthe table.
A pause icon displays below the link on which the break is added when you access the Traces mode.
Once the breakpoints are defined, switch to the Traces mode. To do so:
1. Click the Run view, and the Debug Run tab.
2. Click the down arrow of the Java Debug button and select the Traces Debug option.
3. Click the Traces Debug to execute the Job in Traces mode. The data will be processed until the first definedbreakpoint.
4. Click the Next Breakpoint button to continue the data process until the next breakpoint.
If, for any reason, you want to stop the Job in progress, simply click the Kill button; if you want to executethe Job to the end, click the Basic Run button.
To remove the displayed monitoring information from the design workspace, click the Clear button in theDebug Run tab.
5.9.4. How to set advanced execution settingsSeveral advanced execution settings are available to make the execution of the Jobs handier:
• Statistics, this feature displays processing performance rate. For more information, see How to display Statistics.
• Exec time, this feature displays the execution time in the console at the end of the execution. For moreinformation, see How to display the execution time and other options.
• Save Job before execution, this feature allows to automatically save the Job before its execution.
• Clear before run, this feature clears all the results of a previous execution before re-executing the Job.
• log4jLevel, this feature allows you to change the output level at runtime for log4j loggers activated incomponents in the Job. For more information, see How to customize log4j output level at runtime.
• JVM Setting, this feature allows you to define the parameters of your JVM according to your needs. For anexample of how this can be used, see How to specify the number of MB used in each streaming chunk by TalendData Mapper.
5.9.4.1. How to display Statistics
The Statistics feature displays each component performance rate, under the flow links on the design workspace.
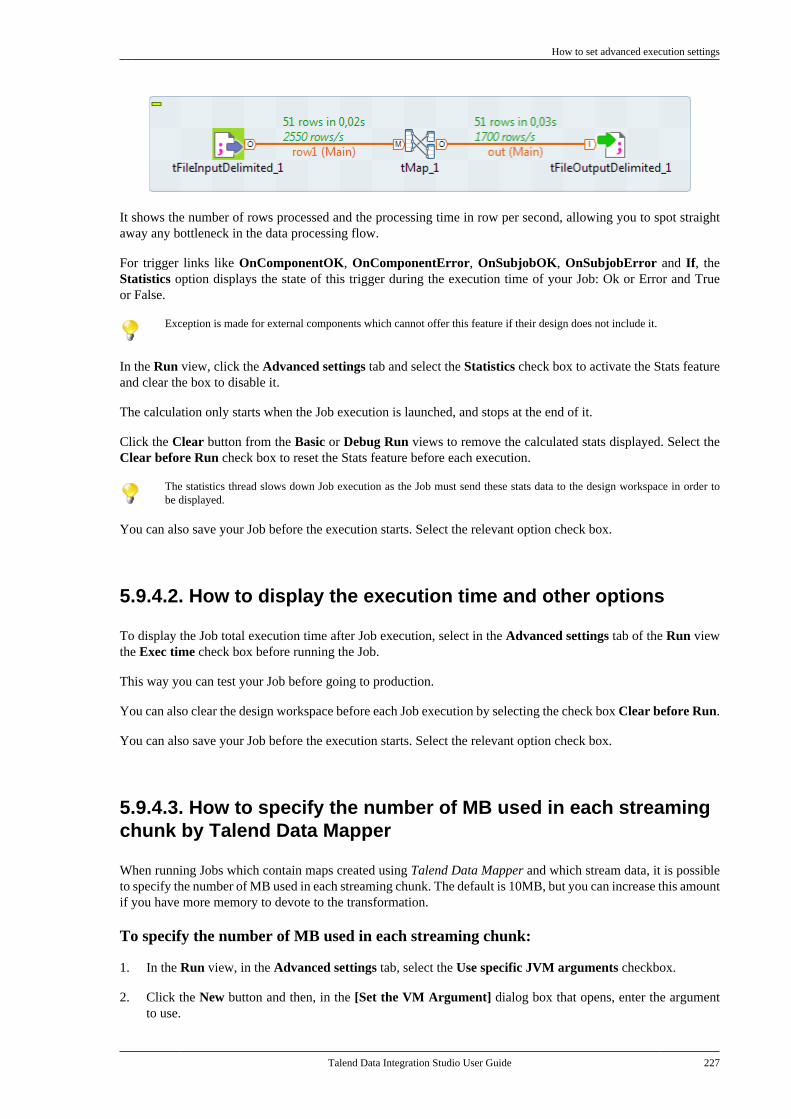
How to set advanced execution settings
Talend Data Integration Studio User Guide 227
It shows the number of rows processed and the processing time in row per second, allowing you to spot straightaway any bottleneck in the data processing flow.
For trigger links like OnComponentOK, OnComponentError, OnSubjobOK, OnSubjobError and If, theStatistics option displays the state of this trigger during the execution time of your Job: Ok or Error and Trueor False.
Exception is made for external components which cannot offer this feature if their design does not include it.
In the Run view, click the Advanced settings tab and select the Statistics check box to activate the Stats featureand clear the box to disable it.
The calculation only starts when the Job execution is launched, and stops at the end of it.
Click the Clear button from the Basic or Debug Run views to remove the calculated stats displayed. Select theClear before Run check box to reset the Stats feature before each execution.
The statistics thread slows down Job execution as the Job must send these stats data to the design workspace in order tobe displayed.
You can also save your Job before the execution starts. Select the relevant option check box.
5.9.4.2. How to display the execution time and other options
To display the Job total execution time after Job execution, select in the Advanced settings tab of the Run viewthe Exec time check box before running the Job.
This way you can test your Job before going to production.
You can also clear the design workspace before each Job execution by selecting the check box Clear before Run.
You can also save your Job before the execution starts. Select the relevant option check box.
5.9.4.3. How to specify the number of MB used in each streamingchunk by Talend Data Mapper
When running Jobs which contain maps created using Talend Data Mapper and which stream data, it is possibleto specify the number of MB used in each streaming chunk. The default is 10MB, but you can increase this amountif you have more memory to devote to the transformation.
To specify the number of MB used in each streaming chunk:
1. In the Run view, in the Advanced settings tab, select the Use specific JVM arguments checkbox.
2. Click the New button and then, in the [Set the VM Argument] dialog box that opens, enter the argumentto use.
How to customize log4j output level at runtime
228 Talend Data Integration Studio User Guide
For example, use -DTDM_STREAM_MEMORY_LIMIT=20 to stream in chunks of 20MB.
3. Click OK to add the argument.
5.9.5. How to customize log4j output level at runtime
When activated in components, the Apache logging utility log4j outputs component-related logging informationat runtime. By default, all logging messages of or higher than the level defined in the log4j configuration will beoutput to the defined target.
You can change the logging output level for an execution of your Job. To do so, take the following steps:
1. In the Run view, click the Advanced settings tab.
2. Select the log4jLevel check box, and select the desired output level from the drop-down list.
This check box is displayed only when log4j is activated in components. For more information, see Log4jsettings.
For more information on the logging output levels, see Apache documentation at http://logging.apache.org/log4j/1.2/apidocs/org/apache/log4j/Level.html.
3. Run your Job. All the logging messages of and higher than the level you set are output to the defined target.
For information on how to activate log4j in components and how to customize log4j configuration, see Log4jsettings.
For more information regarding the components with which you can use the log4j feature, see https://help.talend.com/display/KB/List+of+components+that+support+the+log4j+feature.
5.9.6. How to show JVM resource usage during Jobexecution
The Memory Run vertical tab of the Run view of your Talend Studio allows you to monitor real-time JVMresource usage during Job execution, including memory consumption and host CPU usage, so that you can takeappropriate actions when the resource usage is too high and results in low performance of your Talend Studio,such as increasing the memory allocated to the JVM, stopping unnecessary Jobs, and so on.
To monitor JVM resource usage at Job execution, do the following:
1. Open your Job.
In the Run view, click the Memory Run tab.
2. Click Run to run the Job.
You can click Run on the Memory Run tab to monitor the JVM resource usage by your Job at any timeeven after you launch your Job from the Basic Run tab.
The Studio console displays curve graphs showing the JVM heap usage and CPU usage respectively duringthe Job execution. Warning messages are shown in red on the Job execution information area when therelevant thresholds are reached.

How to display special characters in the console
Talend Data Integration Studio User Guide 229
3. To view the information about resources used at a certain point of time during the Job execution, move themouse onto that point of time on the relevant graph. Depending on the graph on which you move your mousepointer, you can see the information about allocated heap size, the 90% heap threshold, and the 70% heapthreshold, or the CPU usage, at the point of time.
4. To run the Garbage Collector at a particular interval, select the With Garbage Collector pace set to checkbox and select an interval in seconds. The Garbage Collector automatically runs at the specified interval.
To run the Garbage Collector once immediately, click the Trigger GC button.
5. To export the log information into a text file, click the Export button and select a file to save the log.
6. To stop the Job, click the Kill button.
5.9.7. How to display special characters in the console
Talend Studio can display special characters in the console. To enable the display of Chinese, Japanese or Koreancharacters, for example, proceed as follows before executing the Job:
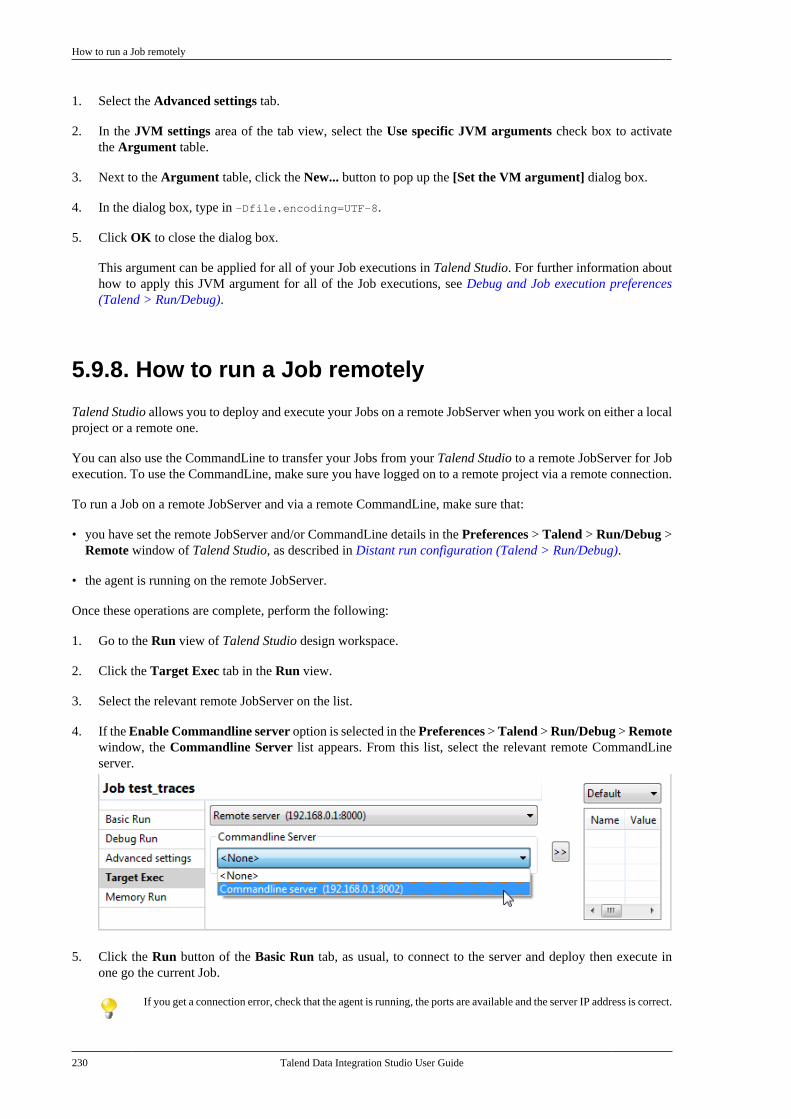
How to run a Job remotely
230 Talend Data Integration Studio User Guide
1. Select the Advanced settings tab.
2. In the JVM settings area of the tab view, select the Use specific JVM arguments check box to activatethe Argument table.
3. Next to the Argument table, click the New... button to pop up the [Set the VM argument] dialog box.
4. In the dialog box, type in -Dfile.encoding=UTF-8.
5. Click OK to close the dialog box.
This argument can be applied for all of your Job executions in Talend Studio. For further information abouthow to apply this JVM argument for all of the Job executions, see Debug and Job execution preferences(Talend > Run/Debug).
5.9.8. How to run a Job remotely
Talend Studio allows you to deploy and execute your Jobs on a remote JobServer when you work on either a localproject or a remote one.
You can also use the CommandLine to transfer your Jobs from your Talend Studio to a remote JobServer for Jobexecution. To use the CommandLine, make sure you have logged on to a remote project via a remote connection.
To run a Job on a remote JobServer and via a remote CommandLine, make sure that:
• you have set the remote JobServer and/or CommandLine details in the Preferences > Talend > Run/Debug >Remote window of Talend Studio, as described in Distant run configuration (Talend > Run/Debug).
• the agent is running on the remote JobServer.
Once these operations are complete, perform the following:
1. Go to the Run view of Talend Studio design workspace.
2. Click the Target Exec tab in the Run view.
3. Select the relevant remote JobServer on the list.
4. If the Enable Commandline server option is selected in the Preferences > Talend > Run/Debug > Remotewindow, the Commandline Server list appears. From this list, select the relevant remote CommandLineserver.
5. Click the Run button of the Basic Run tab, as usual, to connect to the server and deploy then execute inone go the current Job.
If you get a connection error, check that the agent is running, the ports are available and the server IP address is correct.
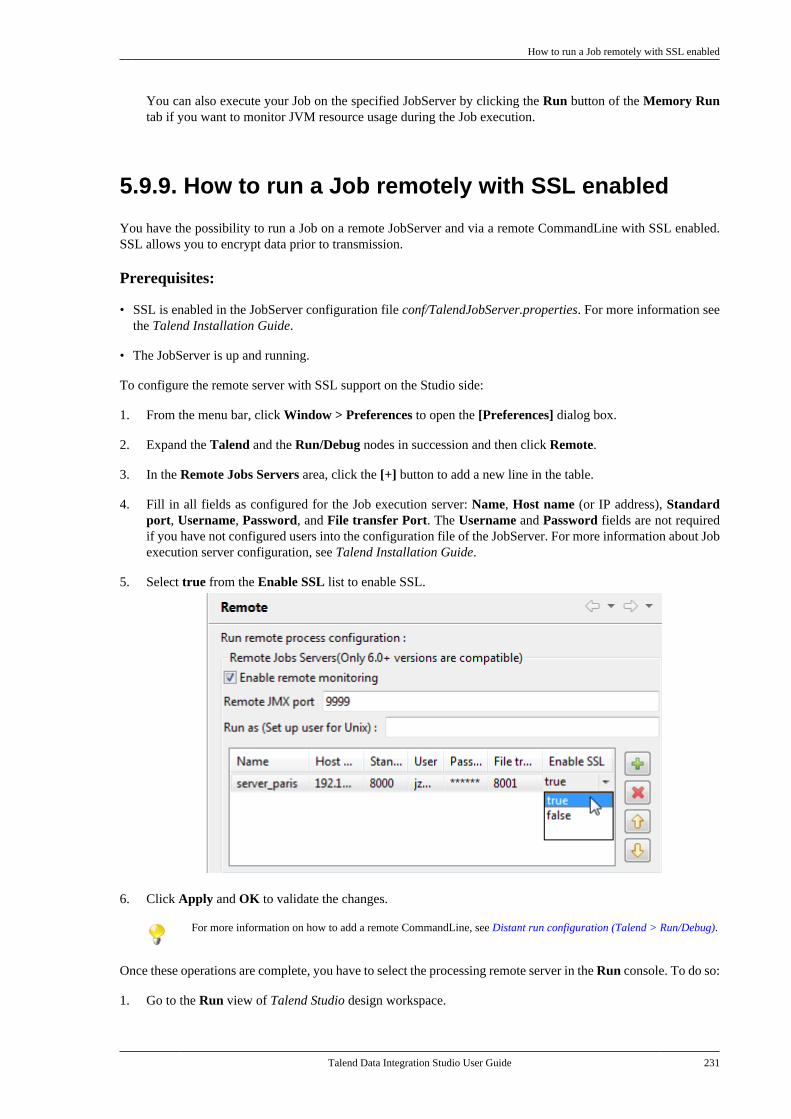
How to run a Job remotely with SSL enabled
Talend Data Integration Studio User Guide 231
You can also execute your Job on the specified JobServer by clicking the Run button of the Memory Runtab if you want to monitor JVM resource usage during the Job execution.
5.9.9. How to run a Job remotely with SSL enabled
You have the possibility to run a Job on a remote JobServer and via a remote CommandLine with SSL enabled.SSL allows you to encrypt data prior to transmission.
Prerequisites:
• SSL is enabled in the JobServer configuration file conf/TalendJobServer.properties. For more information seethe Talend Installation Guide.
• The JobServer is up and running.
To configure the remote server with SSL support on the Studio side:
1. From the menu bar, click Window > Preferences to open the [Preferences] dialog box.
2. Expand the Talend and the Run/Debug nodes in succession and then click Remote.
3. In the Remote Jobs Servers area, click the [+] button to add a new line in the table.
4. Fill in all fields as configured for the Job execution server: Name, Host name (or IP address), Standardport, Username, Password, and File transfer Port. The Username and Password fields are not requiredif you have not configured users into the configuration file of the JobServer. For more information about Jobexecution server configuration, see Talend Installation Guide.
5. Select true from the Enable SSL list to enable SSL.
6. Click Apply and OK to validate the changes.
For more information on how to add a remote CommandLine, see Distant run configuration (Talend > Run/Debug).
Once these operations are complete, you have to select the processing remote server in the Run console. To do so:
1. Go to the Run view of Talend Studio design workspace.
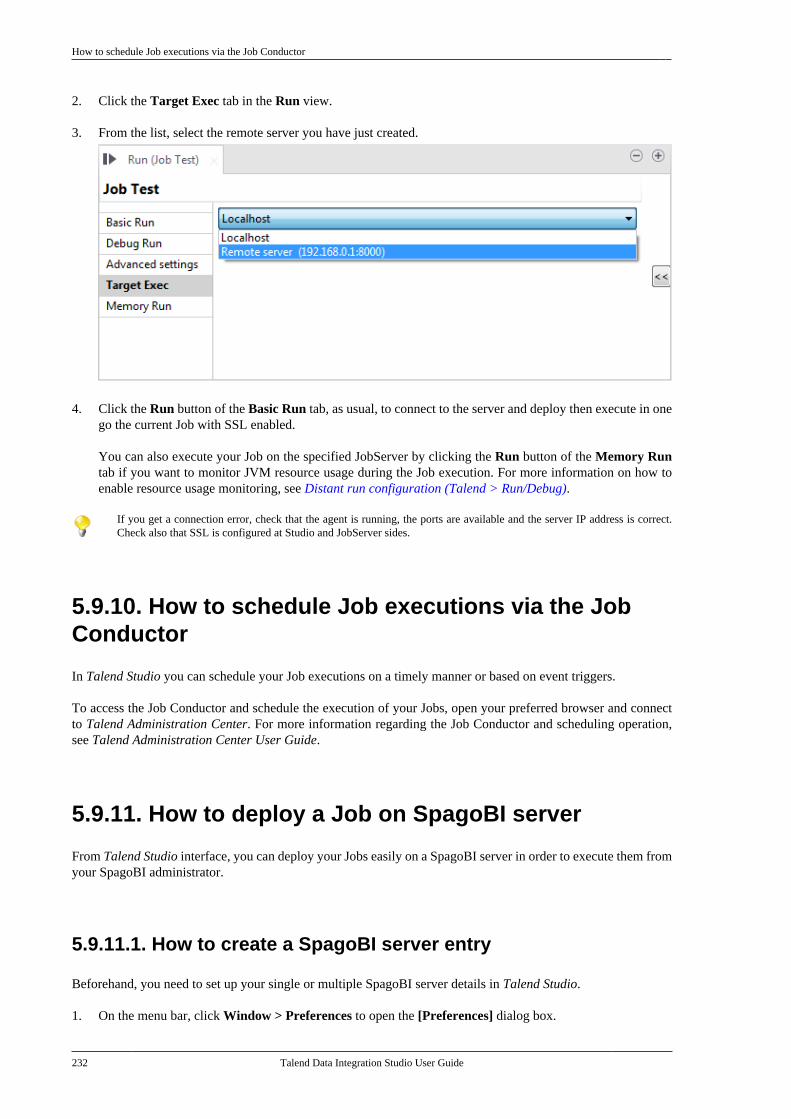
How to schedule Job executions via the Job Conductor
232 Talend Data Integration Studio User Guide
2. Click the Target Exec tab in the Run view.
3. From the list, select the remote server you have just created.
4. Click the Run button of the Basic Run tab, as usual, to connect to the server and deploy then execute in onego the current Job with SSL enabled.
You can also execute your Job on the specified JobServer by clicking the Run button of the Memory Runtab if you want to monitor JVM resource usage during the Job execution. For more information on how toenable resource usage monitoring, see Distant run configuration (Talend > Run/Debug).
If you get a connection error, check that the agent is running, the ports are available and the server IP address is correct.Check also that SSL is configured at Studio and JobServer sides.
5.9.10. How to schedule Job executions via the JobConductor
In Talend Studio you can schedule your Job executions on a timely manner or based on event triggers.
To access the Job Conductor and schedule the execution of your Jobs, open your preferred browser and connectto Talend Administration Center. For more information regarding the Job Conductor and scheduling operation,see Talend Administration Center User Guide.
5.9.11. How to deploy a Job on SpagoBI server
From Talend Studio interface, you can deploy your Jobs easily on a SpagoBI server in order to execute them fromyour SpagoBI administrator.
5.9.11.1. How to create a SpagoBI server entry
Beforehand, you need to set up your single or multiple SpagoBI server details in Talend Studio.
1. On the menu bar, click Window > Preferences to open the [Preferences] dialog box.

How to deploy a Job on SpagoBI server
Talend Data Integration Studio User Guide 233
2. Expand the Talend > Import/Export nodes in succession and select SpagoBI Server to display the relevantview.
3. Select the Enable/Disable Deploy on SpagoBI check box to activate the deployment operation.
4. Click New to open the [Create new SpagoBi server] dialog box and add a new server to the list.
5. Enter your SpagoBI server details, as described below:
Field Description
Engine Name Internal engine name used in Talend Studio. This name is not used in the generated code.
Short description Free text to describe the server entry you are recording.
Host IP address or host name of the machine running the SpagoBI server.
Login User name required to log on to the SpagoBI server.
Password Password for SpagoBI server logon authentication.
6. Click OK to validate the details of the new server entry and close the dialog box.
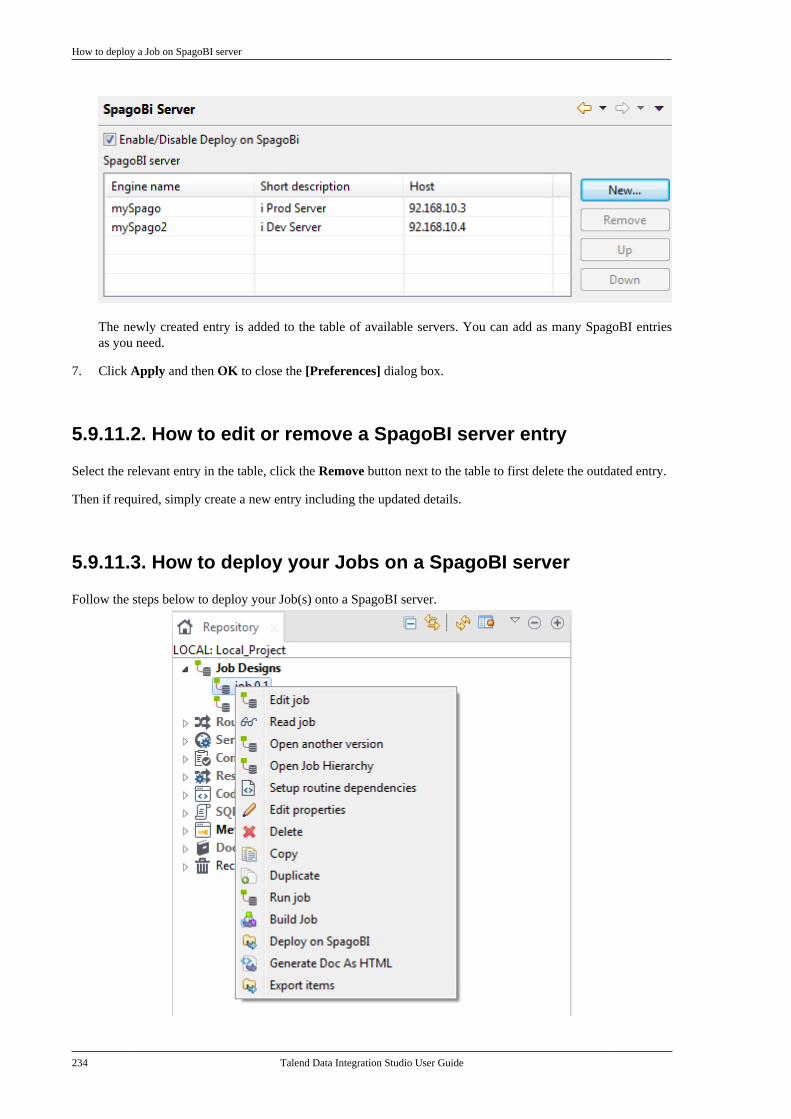
How to deploy a Job on SpagoBI server
234 Talend Data Integration Studio User Guide
The newly created entry is added to the table of available servers. You can add as many SpagoBI entriesas you need.
7. Click Apply and then OK to close the [Preferences] dialog box.
5.9.11.2. How to edit or remove a SpagoBI server entry
Select the relevant entry in the table, click the Remove button next to the table to first delete the outdated entry.
Then if required, simply create a new entry including the updated details.
5.9.11.3. How to deploy your Jobs on a SpagoBI server
Follow the steps below to deploy your Job(s) onto a SpagoBI server.
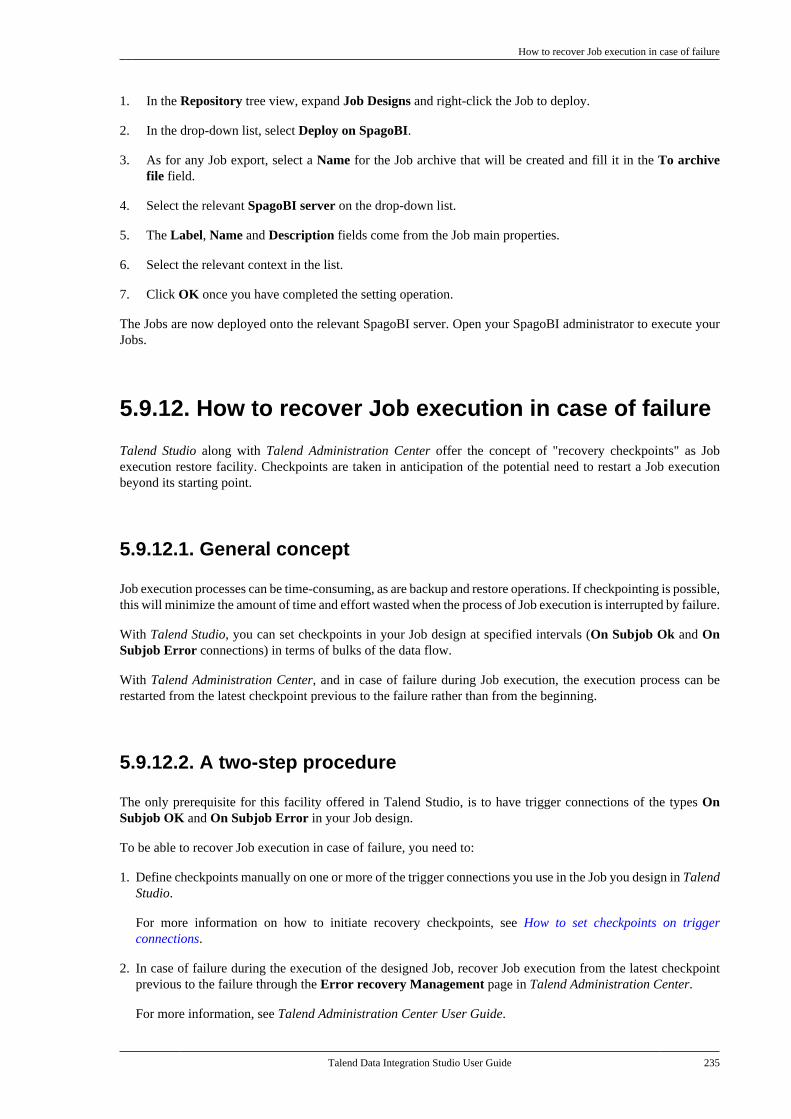
How to recover Job execution in case of failure
Talend Data Integration Studio User Guide 235
1. In the Repository tree view, expand Job Designs and right-click the Job to deploy.
2. In the drop-down list, select Deploy on SpagoBI.
3. As for any Job export, select a Name for the Job archive that will be created and fill it in the To archivefile field.
4. Select the relevant SpagoBI server on the drop-down list.
5. The Label, Name and Description fields come from the Job main properties.
6. Select the relevant context in the list.
7. Click OK once you have completed the setting operation.
The Jobs are now deployed onto the relevant SpagoBI server. Open your SpagoBI administrator to execute yourJobs.
5.9.12. How to recover Job execution in case of failure
Talend Studio along with Talend Administration Center offer the concept of "recovery checkpoints" as Jobexecution restore facility. Checkpoints are taken in anticipation of the potential need to restart a Job executionbeyond its starting point.
5.9.12.1. General concept
Job execution processes can be time-consuming, as are backup and restore operations. If checkpointing is possible,this will minimize the amount of time and effort wasted when the process of Job execution is interrupted by failure.
With Talend Studio, you can set checkpoints in your Job design at specified intervals (On Subjob Ok and OnSubjob Error connections) in terms of bulks of the data flow.
With Talend Administration Center, and in case of failure during Job execution, the execution process can berestarted from the latest checkpoint previous to the failure rather than from the beginning.
5.9.12.2. A two-step procedure
The only prerequisite for this facility offered in Talend Studio, is to have trigger connections of the types OnSubjob OK and On Subjob Error in your Job design.
To be able to recover Job execution in case of failure, you need to:
1. Define checkpoints manually on one or more of the trigger connections you use in the Job you design in TalendStudio.
For more information on how to initiate recovery checkpoints, see How to set checkpoints on triggerconnections.
2. In case of failure during the execution of the designed Job, recover Job execution from the latest checkpointprevious to the failure through the Error recovery Management page in Talend Administration Center.
For more information, see Talend Administration Center User Guide.
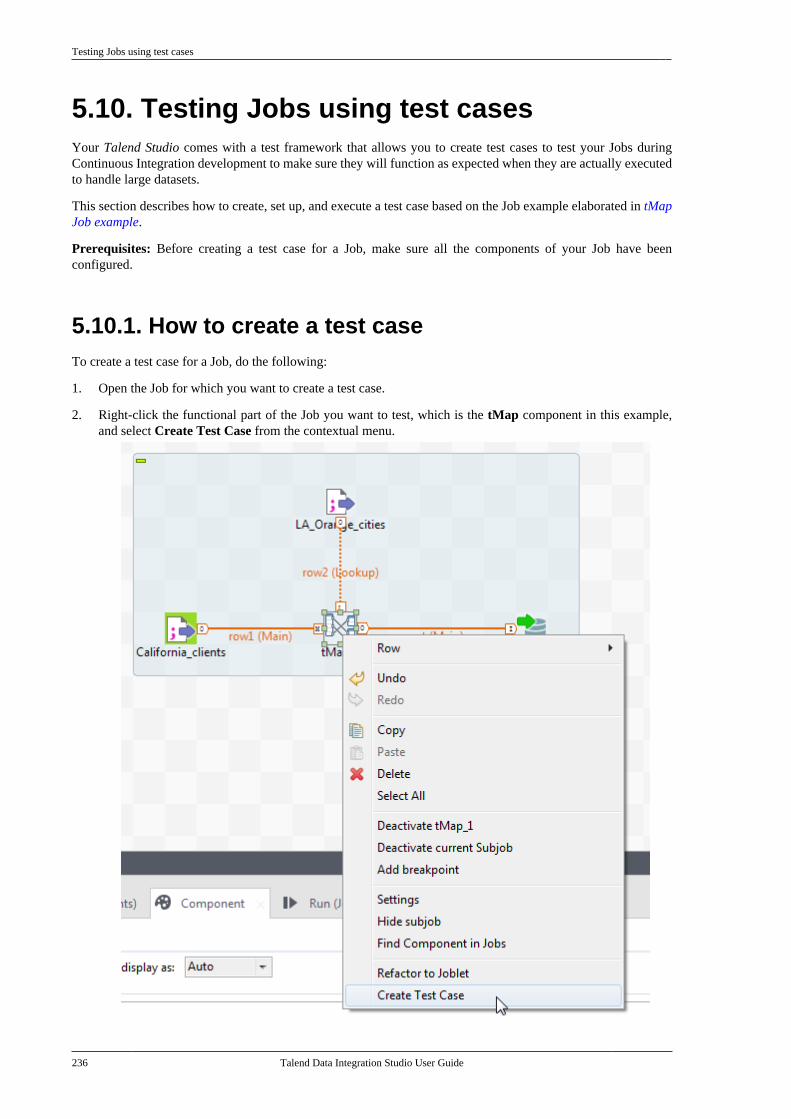
Testing Jobs using test cases
236 Talend Data Integration Studio User Guide
5.10. Testing Jobs using test casesYour Talend Studio comes with a test framework that allows you to create test cases to test your Jobs duringContinuous Integration development to make sure they will function as expected when they are actually executedto handle large datasets.
This section describes how to create, set up, and execute a test case based on the Job example elaborated in tMapJob example.
Prerequisites: Before creating a test case for a Job, make sure all the components of your Job have beenconfigured.
5.10.1. How to create a test caseTo create a test case for a Job, do the following:
1. Open the Job for which you want to create a test case.
2. Right-click the functional part of the Job you want to test, which is the tMap component in this example,and select Create Test Case from the contextual menu.
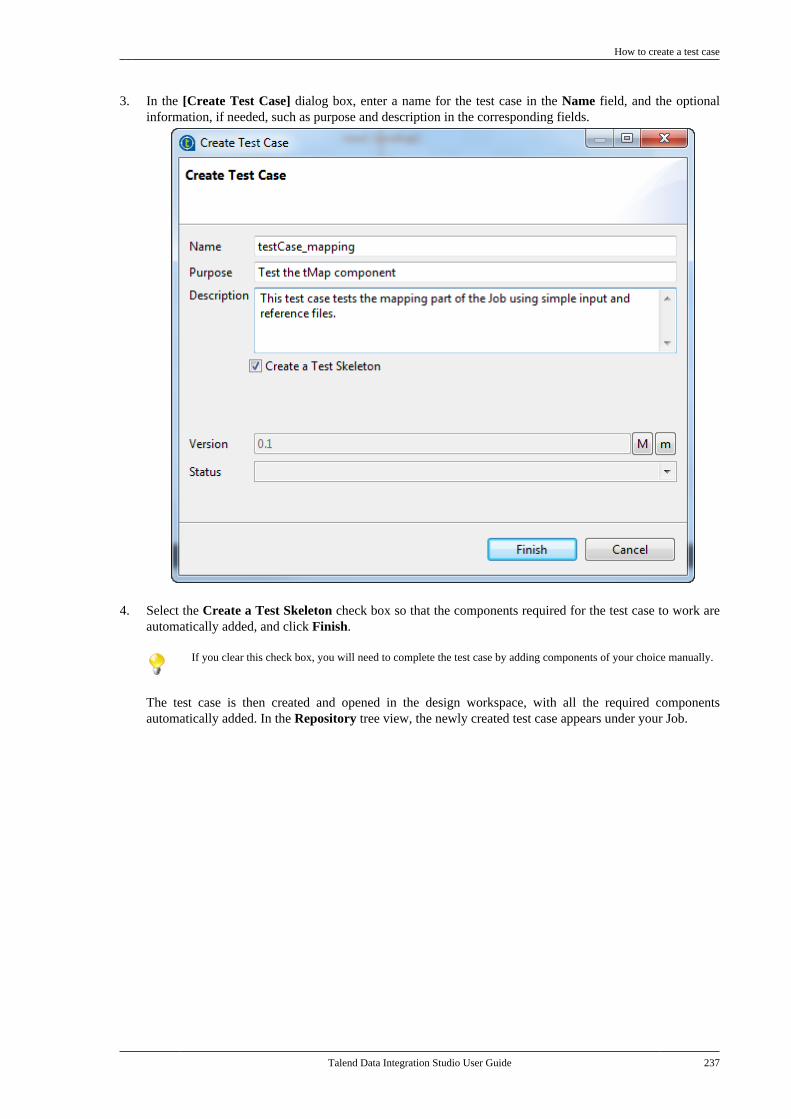
How to create a test case
Talend Data Integration Studio User Guide 237
3. In the [Create Test Case] dialog box, enter a name for the test case in the Name field, and the optionalinformation, if needed, such as purpose and description in the corresponding fields.
4. Select the Create a Test Skeleton check box so that the components required for the test case to work areautomatically added, and click Finish.
If you clear this check box, you will need to complete the test case by adding components of your choice manually.
The test case is then created and opened in the design workspace, with all the required componentsautomatically added. In the Repository tree view, the newly created test case appears under your Job.
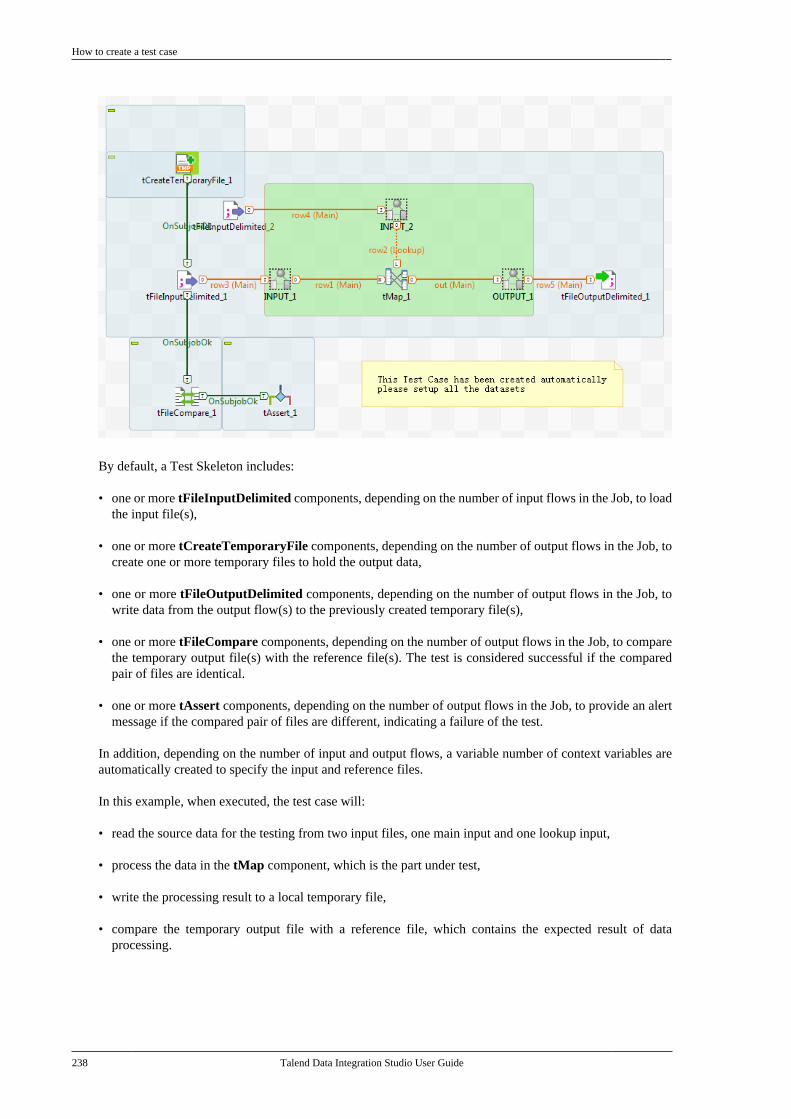
How to create a test case
238 Talend Data Integration Studio User Guide
By default, a Test Skeleton includes:
• one or more tFileInputDelimited components, depending on the number of input flows in the Job, to loadthe input file(s),
• one or more tCreateTemporaryFile components, depending on the number of output flows in the Job, tocreate one or more temporary files to hold the output data,
• one or more tFileOutputDelimited components, depending on the number of output flows in the Job, towrite data from the output flow(s) to the previously created temporary file(s),
• one or more tFileCompare components, depending on the number of output flows in the Job, to comparethe temporary output file(s) with the reference file(s). The test is considered successful if the comparedpair of files are identical.
• one or more tAssert components, depending on the number of output flows in the Job, to provide an alertmessage if the compared pair of files are different, indicating a failure of the test.
In addition, depending on the number of input and output flows, a variable number of context variables areautomatically created to specify the input and reference files.
In this example, when executed, the test case will:
• read the source data for the testing from two input files, one main input and one lookup input,
• process the data in the tMap component, which is the part under test,
• write the processing result to a local temporary file,
• compare the temporary output file with a reference file, which contains the expected result of dataprocessing.
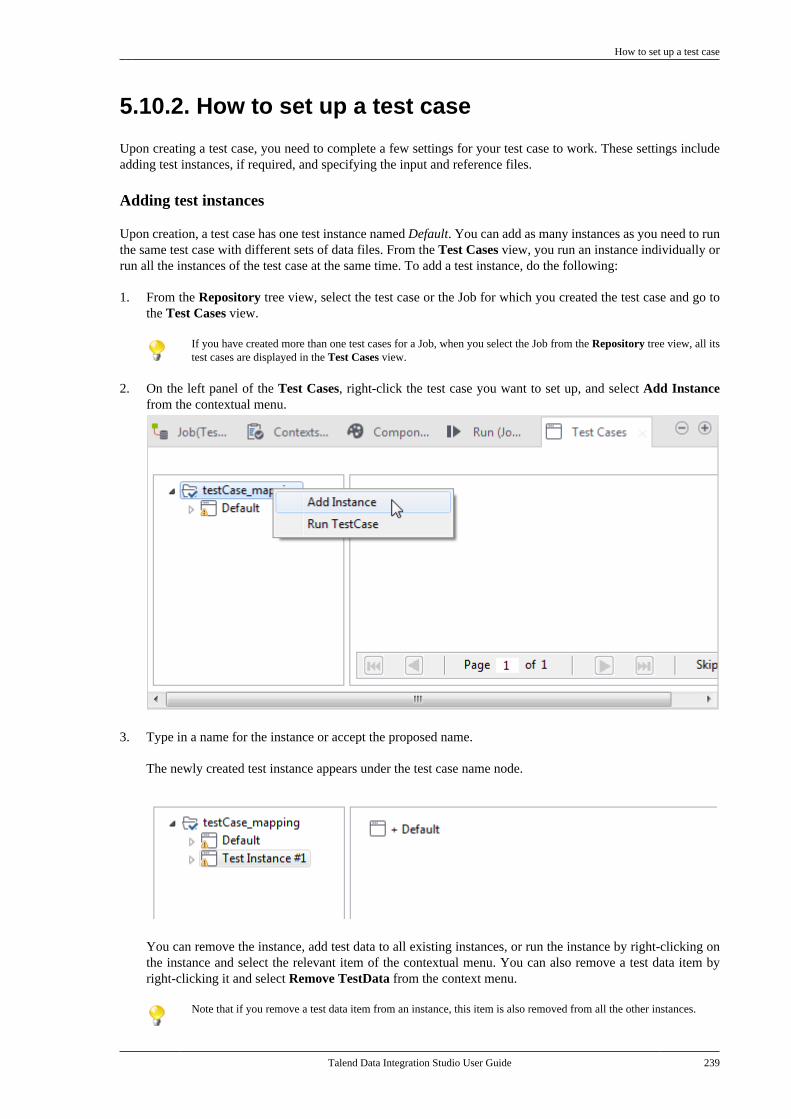
How to set up a test case
Talend Data Integration Studio User Guide 239
5.10.2. How to set up a test case
Upon creating a test case, you need to complete a few settings for your test case to work. These settings includeadding test instances, if required, and specifying the input and reference files.
Adding test instances
Upon creation, a test case has one test instance named Default. You can add as many instances as you need to runthe same test case with different sets of data files. From the Test Cases view, you run an instance individually orrun all the instances of the test case at the same time. To add a test instance, do the following:
1. From the Repository tree view, select the test case or the Job for which you created the test case and go tothe Test Cases view.
If you have created more than one test cases for a Job, when you select the Job from the Repository tree view, all itstest cases are displayed in the Test Cases view.
2. On the left panel of the Test Cases, right-click the test case you want to set up, and select Add Instancefrom the contextual menu.
3. Type in a name for the instance or accept the proposed name.
The newly created test instance appears under the test case name node.
You can remove the instance, add test data to all existing instances, or run the instance by right-clicking onthe instance and select the relevant item of the contextual menu. You can also remove a test data item byright-clicking it and select Remove TestData from the context menu.
Note that if you remove a test data item from an instance, this item is also removed from all the other instances.
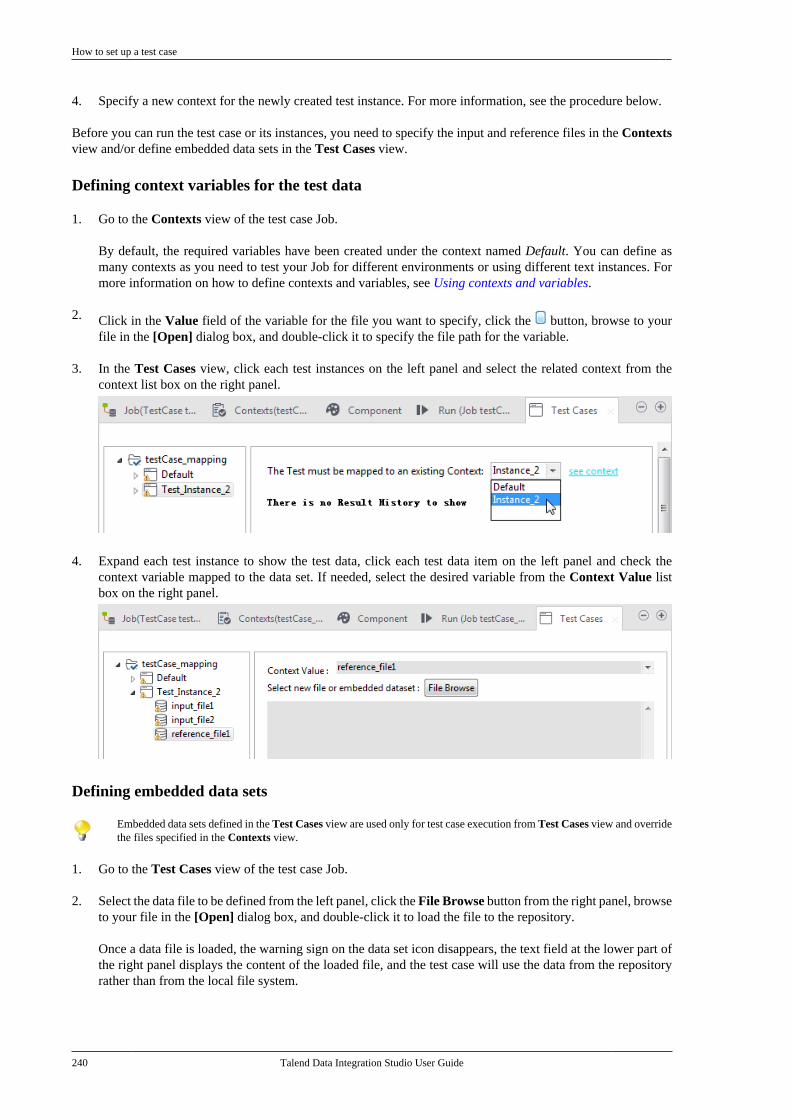
How to set up a test case
240 Talend Data Integration Studio User Guide
4. Specify a new context for the newly created test instance. For more information, see the procedure below.
Before you can run the test case or its instances, you need to specify the input and reference files in the Contextsview and/or define embedded data sets in the Test Cases view.
Defining context variables for the test data
1. Go to the Contexts view of the test case Job.
By default, the required variables have been created under the context named Default. You can define asmany contexts as you need to test your Job for different environments or using different text instances. Formore information on how to define contexts and variables, see Using contexts and variables.
2. Click in the Value field of the variable for the file you want to specify, click the button, browse to yourfile in the [Open] dialog box, and double-click it to specify the file path for the variable.
3. In the Test Cases view, click each test instances on the left panel and select the related context from thecontext list box on the right panel.
4. Expand each test instance to show the test data, click each test data item on the left panel and check thecontext variable mapped to the data set. If needed, select the desired variable from the Context Value listbox on the right panel.
Defining embedded data sets
Embedded data sets defined in the Test Cases view are used only for test case execution from Test Cases view and overridethe files specified in the Contexts view.
1. Go to the Test Cases view of the test case Job.
2. Select the data file to be defined from the left panel, click the File Browse button from the right panel, browseto your file in the [Open] dialog box, and double-click it to load the file to the repository.
Once a data file is loaded, the warning sign on the data set icon disappears, the text field at the lower part ofthe right panel displays the content of the loaded file, and the test case will use the data from the repositoryrather than from the local file system.
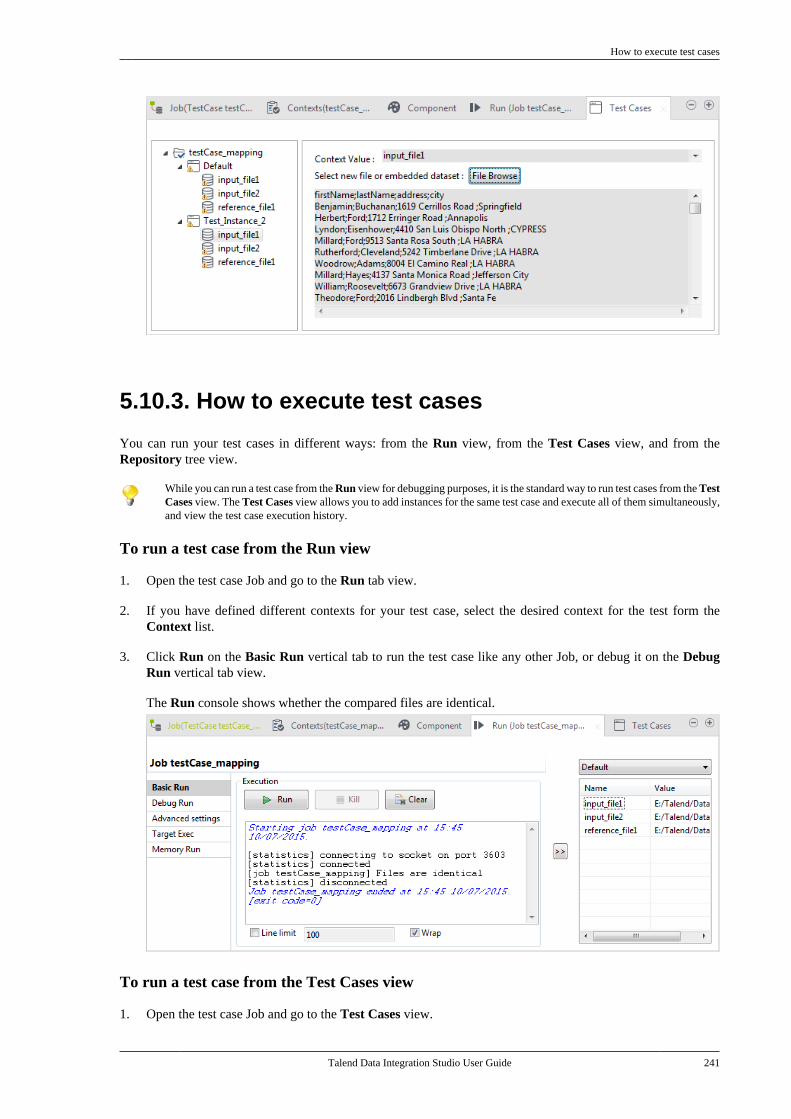
How to execute test cases
Talend Data Integration Studio User Guide 241
5.10.3. How to execute test cases
You can run your test cases in different ways: from the Run view, from the Test Cases view, and from theRepository tree view.
While you can run a test case from the Run view for debugging purposes, it is the standard way to run test cases from the TestCases view. The Test Cases view allows you to add instances for the same test case and execute all of them simultaneously,and view the test case execution history.
To run a test case from the Run view
1. Open the test case Job and go to the Run tab view.
2. If you have defined different contexts for your test case, select the desired context for the test form theContext list.
3. Click Run on the Basic Run vertical tab to run the test case like any other Job, or debug it on the DebugRun vertical tab view.
The Run console shows whether the compared files are identical.
To run a test case from the Test Cases view
1. Open the test case Job and go to the Test Cases view.
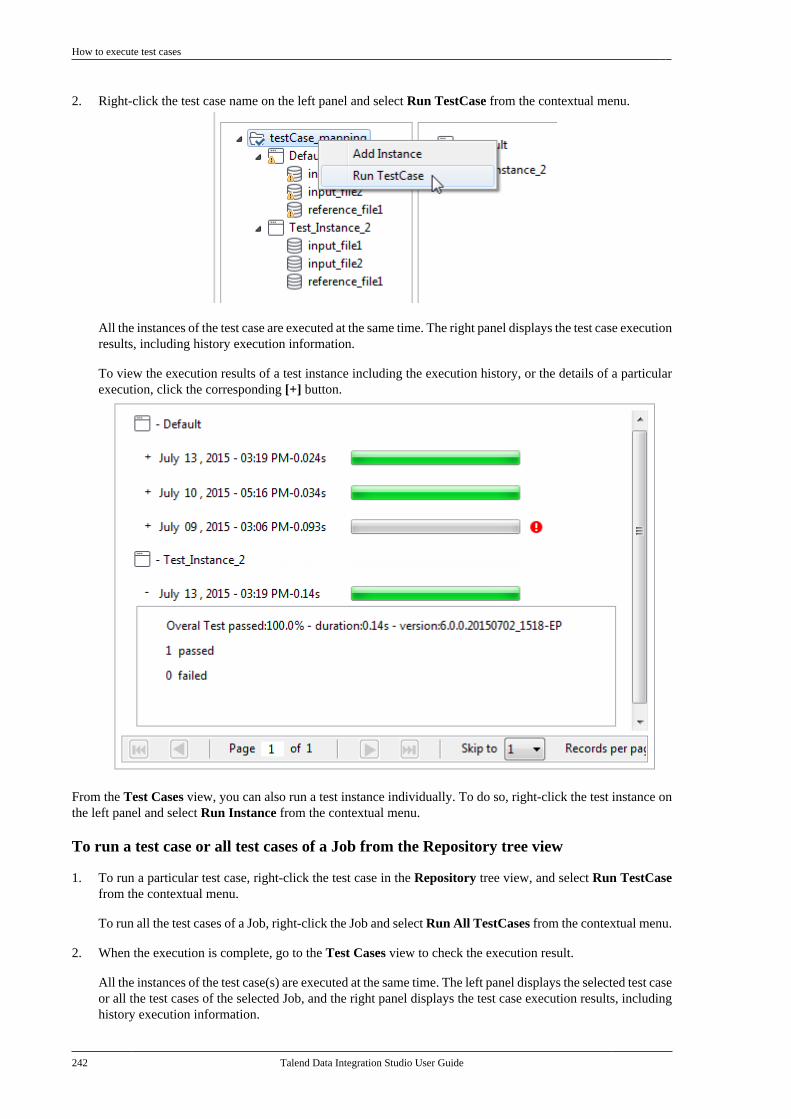
How to execute test cases
242 Talend Data Integration Studio User Guide
2. Right-click the test case name on the left panel and select Run TestCase from the contextual menu.
All the instances of the test case are executed at the same time. The right panel displays the test case executionresults, including history execution information.
To view the execution results of a test instance including the execution history, or the details of a particularexecution, click the corresponding [+] button.
From the Test Cases view, you can also run a test instance individually. To do so, right-click the test instance onthe left panel and select Run Instance from the contextual menu.
To run a test case or all test cases of a Job from the Repository tree view
1. To run a particular test case, right-click the test case in the Repository tree view, and select Run TestCasefrom the contextual menu.
To run all the test cases of a Job, right-click the Job and select Run All TestCases from the contextual menu.
2. When the execution is complete, go to the Test Cases view to check the execution result.
All the instances of the test case(s) are executed at the same time. The left panel displays the selected test caseor all the test cases of the selected Job, and the right panel displays the test case execution results, includinghistory execution information.
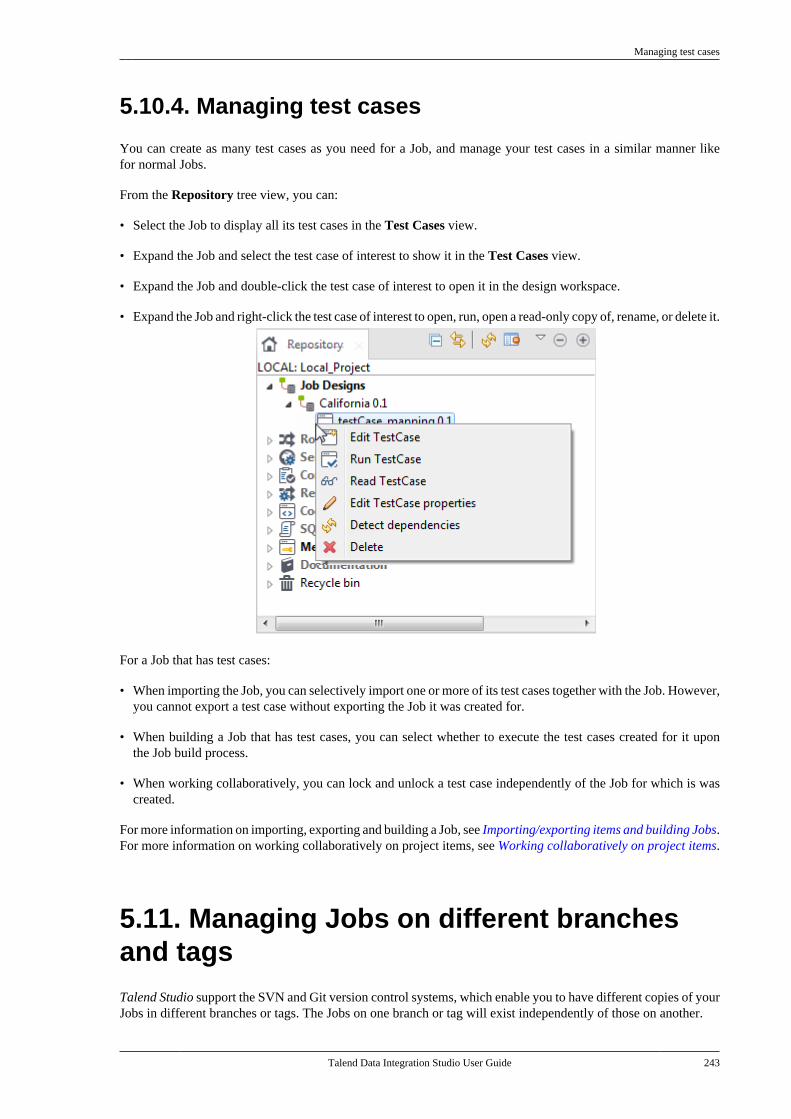
Managing test cases
Talend Data Integration Studio User Guide 243
5.10.4. Managing test cases
You can create as many test cases as you need for a Job, and manage your test cases in a similar manner likefor normal Jobs.
From the Repository tree view, you can:
• Select the Job to display all its test cases in the Test Cases view.
• Expand the Job and select the test case of interest to show it in the Test Cases view.
• Expand the Job and double-click the test case of interest to open it in the design workspace.
• Expand the Job and right-click the test case of interest to open, run, open a read-only copy of, rename, or delete it.
For a Job that has test cases:
• When importing the Job, you can selectively import one or more of its test cases together with the Job. However,you cannot export a test case without exporting the Job it was created for.
• When building a Job that has test cases, you can select whether to execute the test cases created for it uponthe Job build process.
• When working collaboratively, you can lock and unlock a test case independently of the Job for which is wascreated.
For more information on importing, exporting and building a Job, see Importing/exporting items and building Jobs.For more information on working collaboratively on project items, see Working collaboratively on project items.
5.11. Managing Jobs on different branchesand tagsTalend Studio support the SVN and Git version control systems, which enable you to have different copies of yourJobs in different branches or tags. The Jobs on one branch or tag will exist independently of those on another.
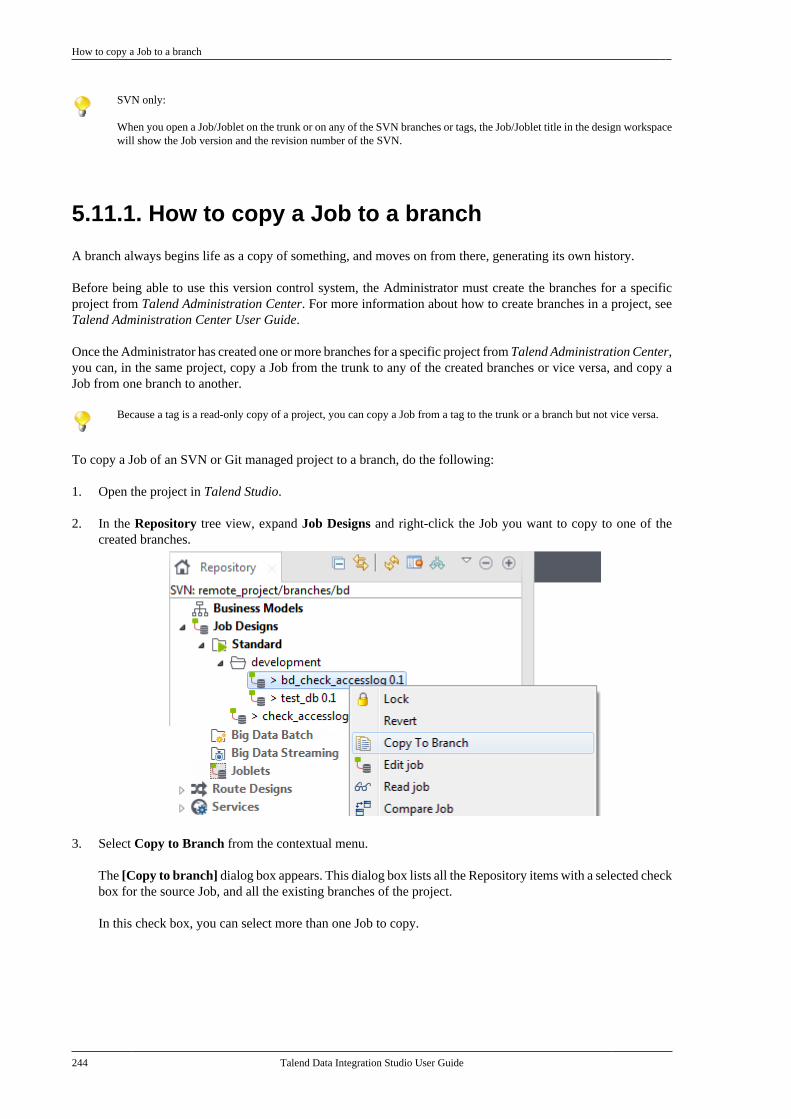
How to copy a Job to a branch
244 Talend Data Integration Studio User Guide
SVN only:
When you open a Job/Joblet on the trunk or on any of the SVN branches or tags, the Job/Joblet title in the design workspacewill show the Job version and the revision number of the SVN.
5.11.1. How to copy a Job to a branch
A branch always begins life as a copy of something, and moves on from there, generating its own history.
Before being able to use this version control system, the Administrator must create the branches for a specificproject from Talend Administration Center. For more information about how to create branches in a project, seeTalend Administration Center User Guide.
Once the Administrator has created one or more branches for a specific project from Talend Administration Center,you can, in the same project, copy a Job from the trunk to any of the created branches or vice versa, and copy aJob from one branch to another.
Because a tag is a read-only copy of a project, you can copy a Job from a tag to the trunk or a branch but not vice versa.
To copy a Job of an SVN or Git managed project to a branch, do the following:
1. Open the project in Talend Studio.
2. In the Repository tree view, expand Job Designs and right-click the Job you want to copy to one of thecreated branches.
3. Select Copy to Branch from the contextual menu.
The [Copy to branch] dialog box appears. This dialog box lists all the Repository items with a selected checkbox for the source Job, and all the existing branches of the project.
In this check box, you can select more than one Job to copy.
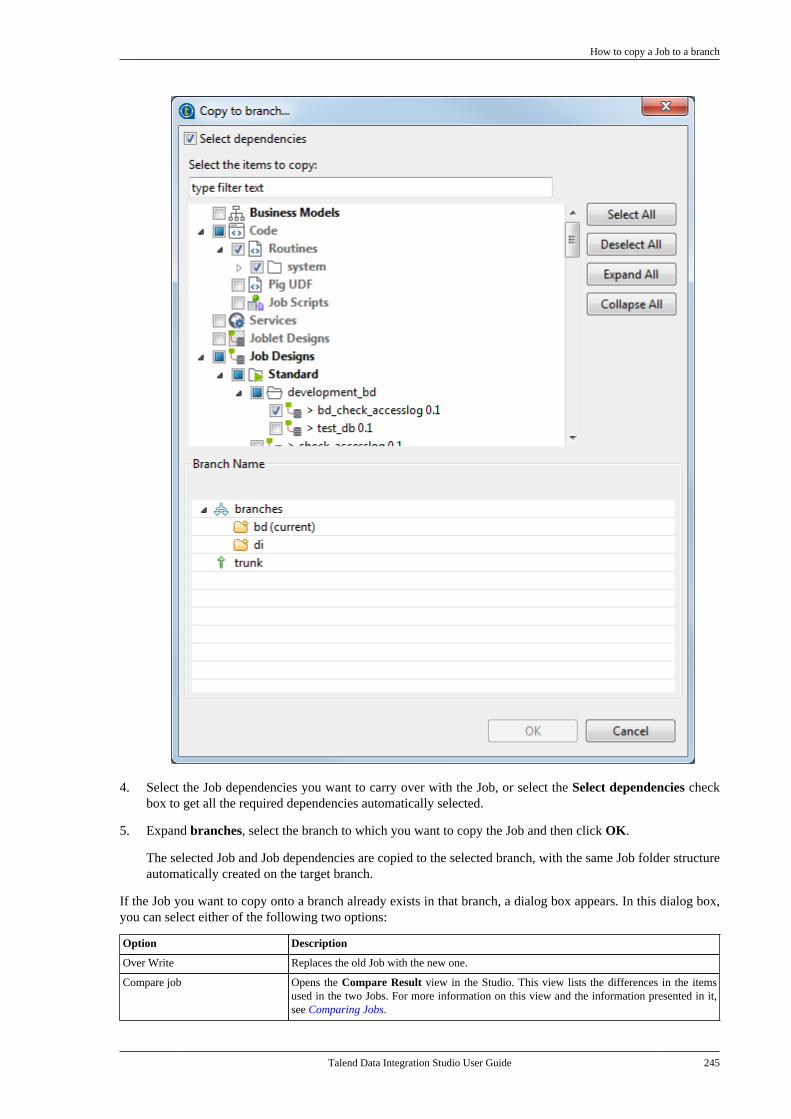
How to copy a Job to a branch
Talend Data Integration Studio User Guide 245
4. Select the Job dependencies you want to carry over with the Job, or select the Select dependencies checkbox to get all the required dependencies automatically selected.
5. Expand branches, select the branch to which you want to copy the Job and then click OK.
The selected Job and Job dependencies are copied to the selected branch, with the same Job folder structureautomatically created on the target branch.
If the Job you want to copy onto a branch already exists in that branch, a dialog box appears. In this dialog box,you can select either of the following two options:
Option Description
Over Write Replaces the old Job with the new one.
Compare job Opens the Compare Result view in the Studio. This view lists the differences in the itemsused in the two Jobs. For more information on this view and the information presented in it,see Comparing Jobs.
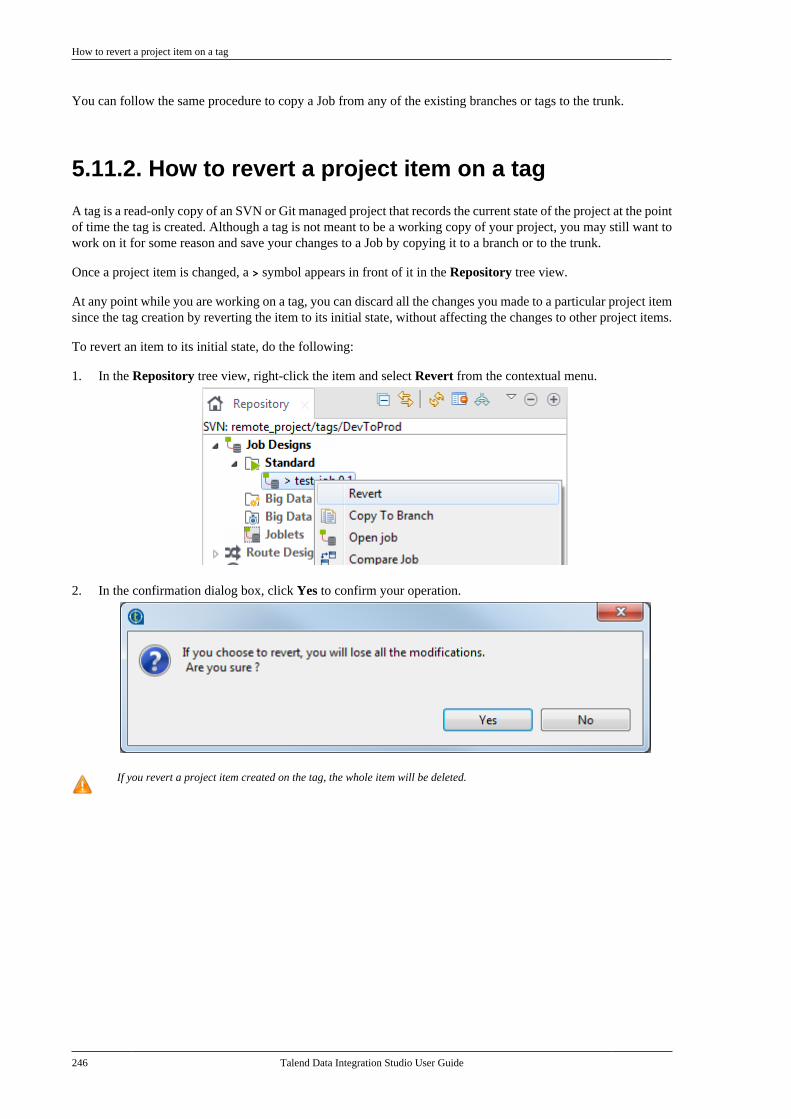
How to revert a project item on a tag
246 Talend Data Integration Studio User Guide
You can follow the same procedure to copy a Job from any of the existing branches or tags to the trunk.
5.11.2. How to revert a project item on a tag
A tag is a read-only copy of an SVN or Git managed project that records the current state of the project at the pointof time the tag is created. Although a tag is not meant to be a working copy of your project, you may still want towork on it for some reason and save your changes to a Job by copying it to a branch or to the trunk.
Once a project item is changed, a > symbol appears in front of it in the Repository tree view.
At any point while you are working on a tag, you can discard all the changes you made to a particular project itemsince the tag creation by reverting the item to its initial state, without affecting the changes to other project items.
To revert an item to its initial state, do the following:
1. In the Repository tree view, right-click the item and select Revert from the contextual menu.
2. In the confirmation dialog box, click Yes to confirm your operation.
If you revert a project item created on the tag, the whole item will be deleted.
Talend Data Integration Studio User Guide
Chapter 6. Mapping data flowsThe most common way to handle multiple input and output flows including transformations and data re-routingis to use dedicated mapping components.
This chapter explains the theory behind how those mapping components can be used, by taking as example thetypical ones which you can refer to for the use of the other mapping components. For further information orscenarios and use cases about the mapping components, see Talend Components Reference Guide.
Map editor interfaces
248 Talend Data Integration Studio User Guide
6.1. Map editor interfacesMapping components are advanced components which require more detailed explanation than other TalendComponents. The Map Editor is an "all-in-one" tool allowing you to define all parameters needed to map,transform and route your data flows via a convenient graphical interface.
You can minimize and restore the Map Editor and all tables in the Map Editor using the window icons.
This figure presents the interface of tMap. Those of the other mapping components differ slightly in appearance.For example, in addition to the Schema editor and the Expression editor tabs on the lower part of this interface,tXMLMap has a third tab called Tree schema editor. For further information about tXMLMap, see tXMLMapoperation.
The Map Editor is made of several panels:
• The Input panel is the top left panel on the editor. It offers a graphical representation of all (main and lookup)incoming data flows. The data are gathered in various columns of input tables. Note that the table name reflectsthe main or lookup row from the Job design on the design workspace.
• The Variable panel is the central panel in the Map Editor. It allows the centralization of redundant informationthrough the mapping to variable and allows you to carry out transformations.
• The Search panel is above the Variable panel. It allow you to search in the editor for columns or expressionsthat contain the text you enter in the Find field.
• The Output panel is the top right panel on the editor. It allows mapping data and fields from Input tables andVariables to the appropriate Output rows.
• Both bottom panels are the Input and Output schemas description. The Schema editor tab offers a schema viewof all columns of input and output tables in selection in their respective panel.
tMap operation
Talend Data Integration Studio User Guide 249
• Expression editor is the edition tool for all expression keys of Input/Output data, variable expressions orfiltering conditions.
The name of input/output tables in the Map Editor reflects the name of the incoming and outgoing flows (rowconnections).
The following sections present separately different mapping components of which each is able to map flows ofa specific nature.
6.2. tMap operationtMap allows the following types of operations:
• data multiplexing and demultiplexing,
• data transformation on any type of fields,
• fields concatenation and interchange,
• field filtering using constraints,
• data rejecting.
As all these operations of transformation and/or routing are carried out by tMap, this component cannot be a startor end component in the Job design.
tMap uses incoming connections to pre-fill input schemas with data in the Map Editor. Therefore, you cannotcreate new input schemas directly in the Map Editor. Instead, you need to implement as many Row connectionsincoming to tMap component as required, in order to create as many input schemas as needed.
The same way, create as many output row connections as required. However, you can fill in the output with contentdirectly in the Map Editor through a convenient graphical editor.
Note that there can be only one Main incoming rows. All other incoming rows are of Lookup type. Related topic:Row connection.
Setting the input flow in the Map Editor
250 Talend Data Integration Studio User Guide
Lookup rows are incoming connections from secondary (or reference) flows of data. These reference data mightdepend directly or indirectly on the primary flow. This dependency relationship is translated with a graphicalmapping and the creation of an expression key.
The Map Editor requires the connections to be implemented in your Job in order to be able to define the inputand output flows in the Map Editor. You also need to create the actual mapping in your Job in order to displaythe Map Editor in the Preview area of the Basic settings view of the tMap component.
To open the Map Editor in a new window, double-click the tMap icon in the design workspace or click the three-dot button next to the Map Editor in the Basic settings view of the tMap component.
The following sections give the information necessary to use the tMap component in any of your Job designs.
6.2.1. Setting the input flow in the Map Editor
The order of the Input tables is essential. The top table reflects the Main flow connection, and for this reason, isgiven priority for reading and processing through the tMap component.
For this priority reason, you are not allowed to move up or down the Main flow table. This ensures that no Joincan be lost.
Setting the input flow in the Map Editor
Talend Data Integration Studio User Guide 251
Although you can use the up and down arrows to interchange Lookup tables order, be aware that the Joins betweentwo lookup tables may then be lost.
Related topic: How to use Explicit Join.
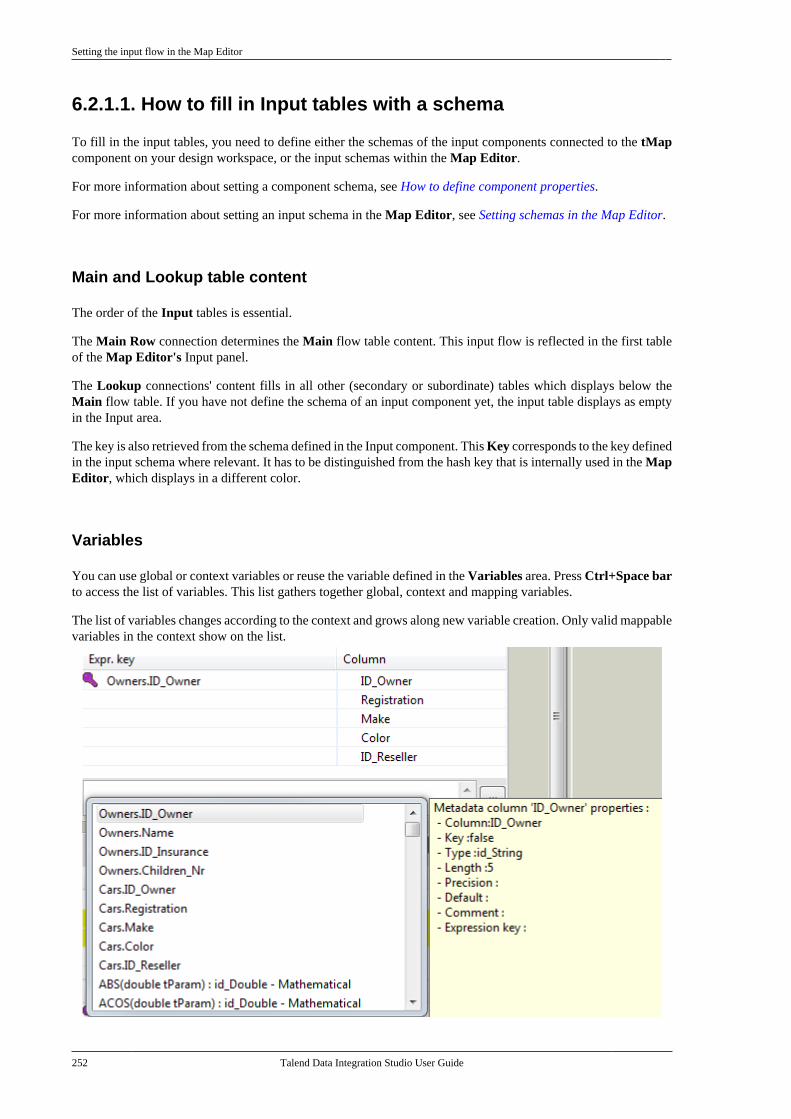
Setting the input flow in the Map Editor
252 Talend Data Integration Studio User Guide
6.2.1.1. How to fill in Input tables with a schema
To fill in the input tables, you need to define either the schemas of the input components connected to the tMapcomponent on your design workspace, or the input schemas within the Map Editor.
For more information about setting a component schema, see How to define component properties.
For more information about setting an input schema in the Map Editor, see Setting schemas in the Map Editor.
Main and Lookup table content
The order of the Input tables is essential.
The Main Row connection determines the Main flow table content. This input flow is reflected in the first tableof the Map Editor's Input panel.
The Lookup connections' content fills in all other (secondary or subordinate) tables which displays below theMain flow table. If you have not define the schema of an input component yet, the input table displays as emptyin the Input area.
The key is also retrieved from the schema defined in the Input component. This Key corresponds to the key definedin the input schema where relevant. It has to be distinguished from the hash key that is internally used in the MapEditor, which displays in a different color.
Variables
You can use global or context variables or reuse the variable defined in the Variables area. Press Ctrl+Space barto access the list of variables. This list gathers together global, context and mapping variables.
The list of variables changes according to the context and grows along new variable creation. Only valid mappablevariables in the context show on the list.
Setting the input flow in the Map Editor
Talend Data Integration Studio User Guide 253
Docked at the Variable list, a metadata tip box display to provide information about the selected column.
Related topic: Mapping variables
6.2.1.2. How to use Explicit Join
In fact, Joins let you select data from a table depending upon the data from another table. In the Map Editorcontext, the data of a Main table and of a Lookup table can be bound together on expression keys. In this case,the order of table does fully make sense.
Simply drop column names from one table to a subordinate one, to create a Join relationship between the twotables. This way, you can retrieve and process data from multiple inputs.
The join displays graphically as a purple link and creates automatically a key that will be used as a hash key tospeed up the match search.
You can create direct joins between the main table and lookup tables. But you can also create indirect joins fromthe main table to a lookup table, via another lookup table. This requires a direct join between one of the Lookuptable to the Main one.
You cannot create a Join from a subordinate table towards a superior table in the Input area.
The Expression key field which is filled in with the dragged and dropped data is editable in the input schema,whereas the column name can only be changed from the Schema editor panel.
You can either insert the dragged data into a new entry or replace the existing entries or else concatenate allselected data into one cell.

Setting the input flow in the Map Editor
254 Talend Data Integration Studio User Guide
For further information about possible types of drag and drops, see Mapping the Output setting .
If you have a big number of input tables, you can use the minimize/maximize icon to reduce or restore the table size in theInput area. The Join binding two tables remains visible even though the table is minimized.
Creating a Join automatically assigns a hash key onto the joined field name. The key symbol displays in violet onthe input table itself and is removed when the Join between the two tables is removed.
Related topics:
• Setting schemas in the Map Editor
• How to use Inner Join
Along with the explicit Join you can select whether you want to filter down to a unique match or if you allowseveral matches to be taken into account. In this last case, you can choose to consider only the first or the lastmatch or all of them.
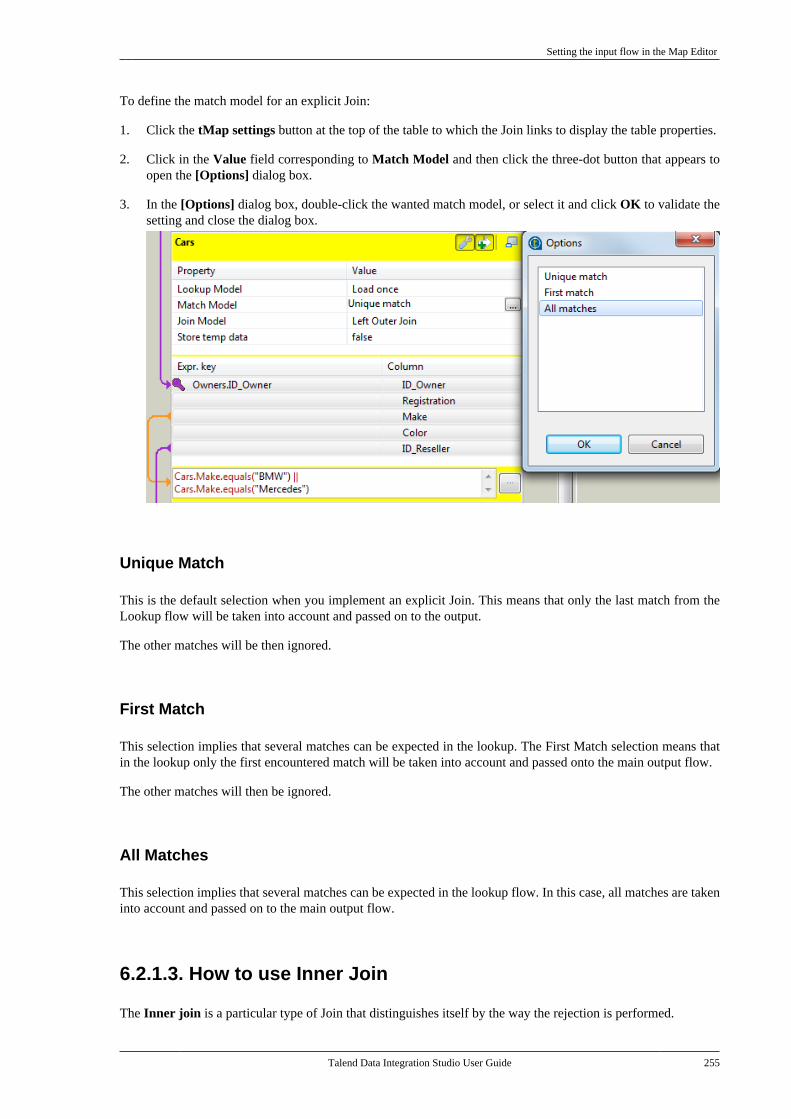
Setting the input flow in the Map Editor
Talend Data Integration Studio User Guide 255
To define the match model for an explicit Join:
1. Click the tMap settings button at the top of the table to which the Join links to display the table properties.
2. Click in the Value field corresponding to Match Model and then click the three-dot button that appears toopen the [Options] dialog box.
3. In the [Options] dialog box, double-click the wanted match model, or select it and click OK to validate thesetting and close the dialog box.
Unique Match
This is the default selection when you implement an explicit Join. This means that only the last match from theLookup flow will be taken into account and passed on to the output.
The other matches will be then ignored.
First Match
This selection implies that several matches can be expected in the lookup. The First Match selection means thatin the lookup only the first encountered match will be taken into account and passed onto the main output flow.
The other matches will then be ignored.
All Matches
This selection implies that several matches can be expected in the lookup flow. In this case, all matches are takeninto account and passed on to the main output flow.
6.2.1.3. How to use Inner Join
The Inner join is a particular type of Join that distinguishes itself by the way the rejection is performed.
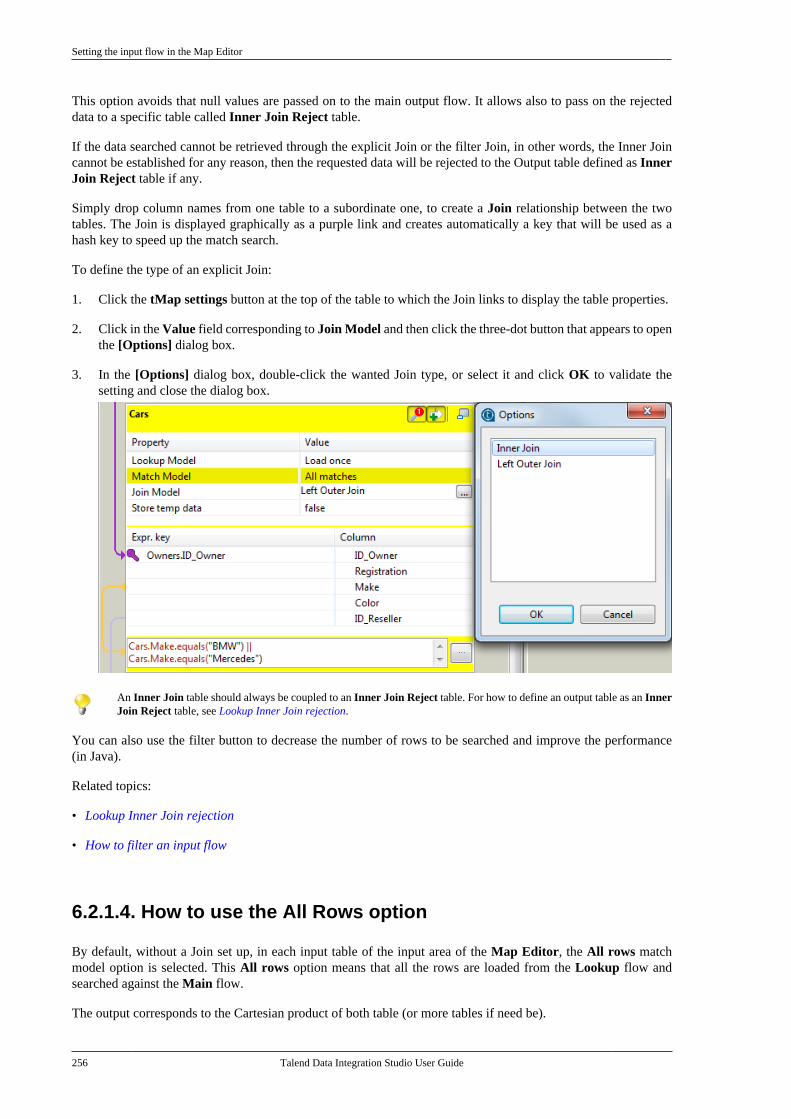
Setting the input flow in the Map Editor
256 Talend Data Integration Studio User Guide
This option avoids that null values are passed on to the main output flow. It allows also to pass on the rejecteddata to a specific table called Inner Join Reject table.
If the data searched cannot be retrieved through the explicit Join or the filter Join, in other words, the Inner Joincannot be established for any reason, then the requested data will be rejected to the Output table defined as InnerJoin Reject table if any.
Simply drop column names from one table to a subordinate one, to create a Join relationship between the twotables. The Join is displayed graphically as a purple link and creates automatically a key that will be used as ahash key to speed up the match search.
To define the type of an explicit Join:
1. Click the tMap settings button at the top of the table to which the Join links to display the table properties.
2. Click in the Value field corresponding to Join Model and then click the three-dot button that appears to openthe [Options] dialog box.
3. In the [Options] dialog box, double-click the wanted Join type, or select it and click OK to validate thesetting and close the dialog box.
An Inner Join table should always be coupled to an Inner Join Reject table. For how to define an output table as an InnerJoin Reject table, see Lookup Inner Join rejection.
You can also use the filter button to decrease the number of rows to be searched and improve the performance(in Java).
Related topics:
• Lookup Inner Join rejection
• How to filter an input flow
6.2.1.4. How to use the All Rows option
By default, without a Join set up, in each input table of the input area of the Map Editor, the All rows matchmodel option is selected. This All rows option means that all the rows are loaded from the Lookup flow andsearched against the Main flow.
The output corresponds to the Cartesian product of both table (or more tables if need be).

Mapping variables
Talend Data Integration Studio User Guide 257
If you create an explicit or an inner Join between two tables, the All rows option is no longer available. You then have toselect Unique match, First match or All matches. For more information, see How to use Explicit Join and How to useInner Join.
6.2.1.5. How to filter an input flow
Click the Filter button next to the tMap settings button to add a Filter field.
In the Filter field, type in the condition to be applied. This allows to reduce the number of rows parsed againstthe main flow, enhancing the performance on long and heterogeneous flows.
You can use the Auto-completion tool via the Ctrl+Space bar keystrokes in order to reuse schema columns inthe condition statement.
6.2.1.6. How to remove input entries from table
To remove input entries, click the red cross sign on the Schema Editor of the selected table. Press Ctrl or Shiftand click fields for multiple selection to be removed.
If you remove Input entries from the Map Editor schema, this removal also occurs in your component schema definition.
6.2.2. Mapping variables
The Var table (variable table) regroups all mapping variables which are used numerous times in various places.
You can also use the Expression field of the Var table to carry out any transformation you want to, using JavaCode.
Variables help you save processing time and avoid you to retype many times the same data.
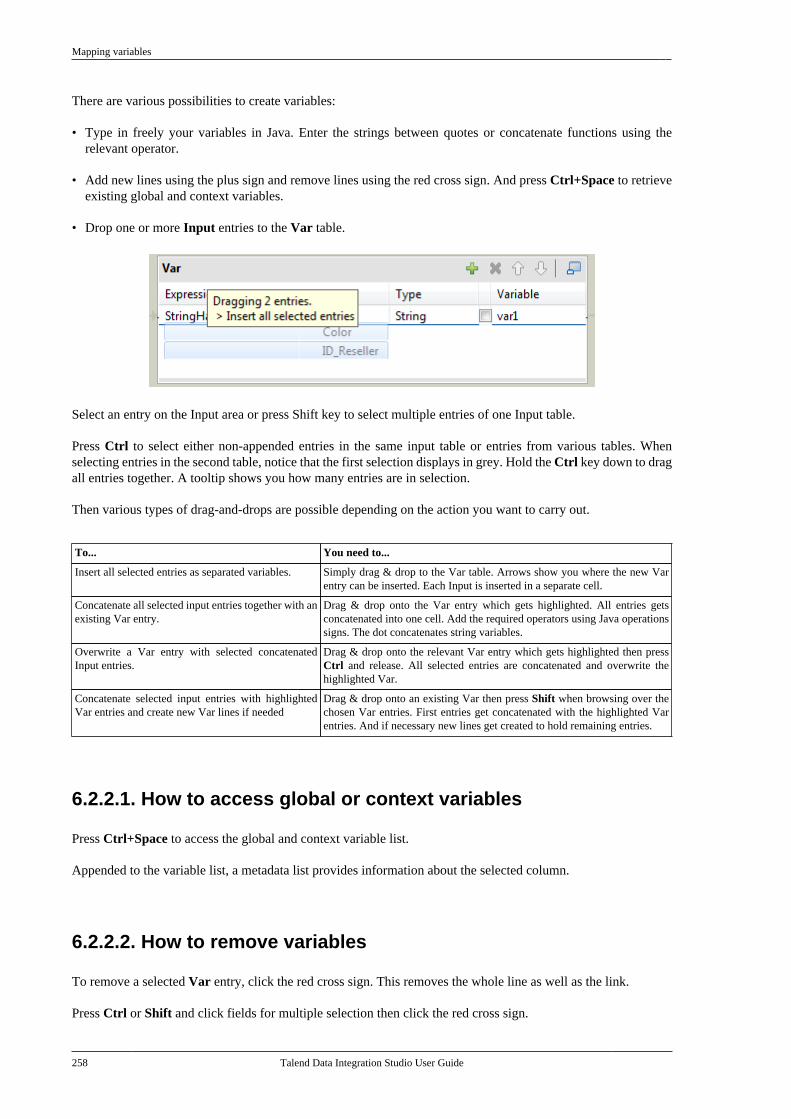
Mapping variables
258 Talend Data Integration Studio User Guide
There are various possibilities to create variables:
• Type in freely your variables in Java. Enter the strings between quotes or concatenate functions using therelevant operator.
• Add new lines using the plus sign and remove lines using the red cross sign. And press Ctrl+Space to retrieveexisting global and context variables.
• Drop one or more Input entries to the Var table.
Select an entry on the Input area or press Shift key to select multiple entries of one Input table.
Press Ctrl to select either non-appended entries in the same input table or entries from various tables. Whenselecting entries in the second table, notice that the first selection displays in grey. Hold the Ctrl key down to dragall entries together. A tooltip shows you how many entries are in selection.
Then various types of drag-and-drops are possible depending on the action you want to carry out.
To... You need to...
Insert all selected entries as separated variables. Simply drag & drop to the Var table. Arrows show you where the new Varentry can be inserted. Each Input is inserted in a separate cell.
Concatenate all selected input entries together with anexisting Var entry.
Drag & drop onto the Var entry which gets highlighted. All entries getsconcatenated into one cell. Add the required operators using Java operationssigns. The dot concatenates string variables.
Overwrite a Var entry with selected concatenatedInput entries.
Drag & drop onto the relevant Var entry which gets highlighted then pressCtrl and release. All selected entries are concatenated and overwrite thehighlighted Var.
Concatenate selected input entries with highlightedVar entries and create new Var lines if needed
Drag & drop onto an existing Var then press Shift when browsing over thechosen Var entries. First entries get concatenated with the highlighted Varentries. And if necessary new lines get created to hold remaining entries.
6.2.2.1. How to access global or context variables
Press Ctrl+Space to access the global and context variable list.
Appended to the variable list, a metadata list provides information about the selected column.
6.2.2.2. How to remove variables
To remove a selected Var entry, click the red cross sign. This removes the whole line as well as the link.
Press Ctrl or Shift and click fields for multiple selection then click the red cross sign.
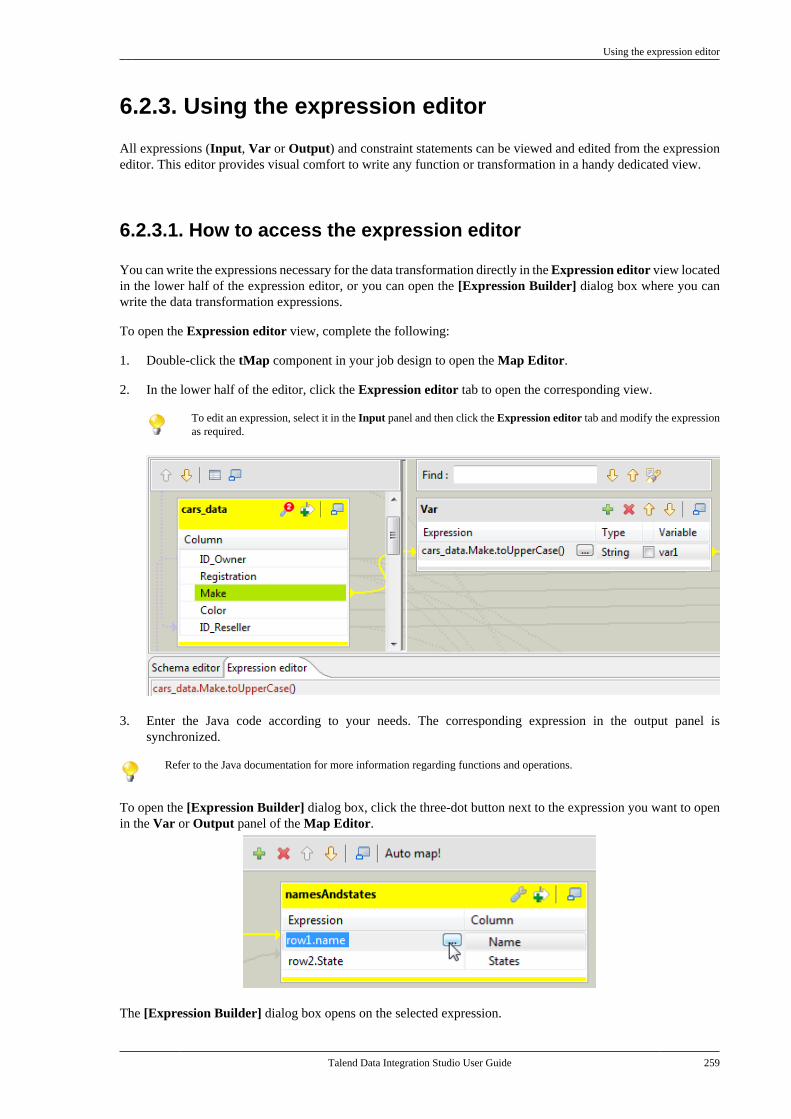
Using the expression editor
Talend Data Integration Studio User Guide 259
6.2.3. Using the expression editor
All expressions (Input, Var or Output) and constraint statements can be viewed and edited from the expressioneditor. This editor provides visual comfort to write any function or transformation in a handy dedicated view.
6.2.3.1. How to access the expression editor
You can write the expressions necessary for the data transformation directly in the Expression editor view locatedin the lower half of the expression editor, or you can open the [Expression Builder] dialog box where you canwrite the data transformation expressions.
To open the Expression editor view, complete the following:
1. Double-click the tMap component in your job design to open the Map Editor.
2. In the lower half of the editor, click the Expression editor tab to open the corresponding view.
To edit an expression, select it in the Input panel and then click the Expression editor tab and modify the expressionas required.
3. Enter the Java code according to your needs. The corresponding expression in the output panel issynchronized.
Refer to the Java documentation for more information regarding functions and operations.
To open the [Expression Builder] dialog box, click the three-dot button next to the expression you want to openin the Var or Output panel of the Map Editor.
The [Expression Builder] dialog box opens on the selected expression.
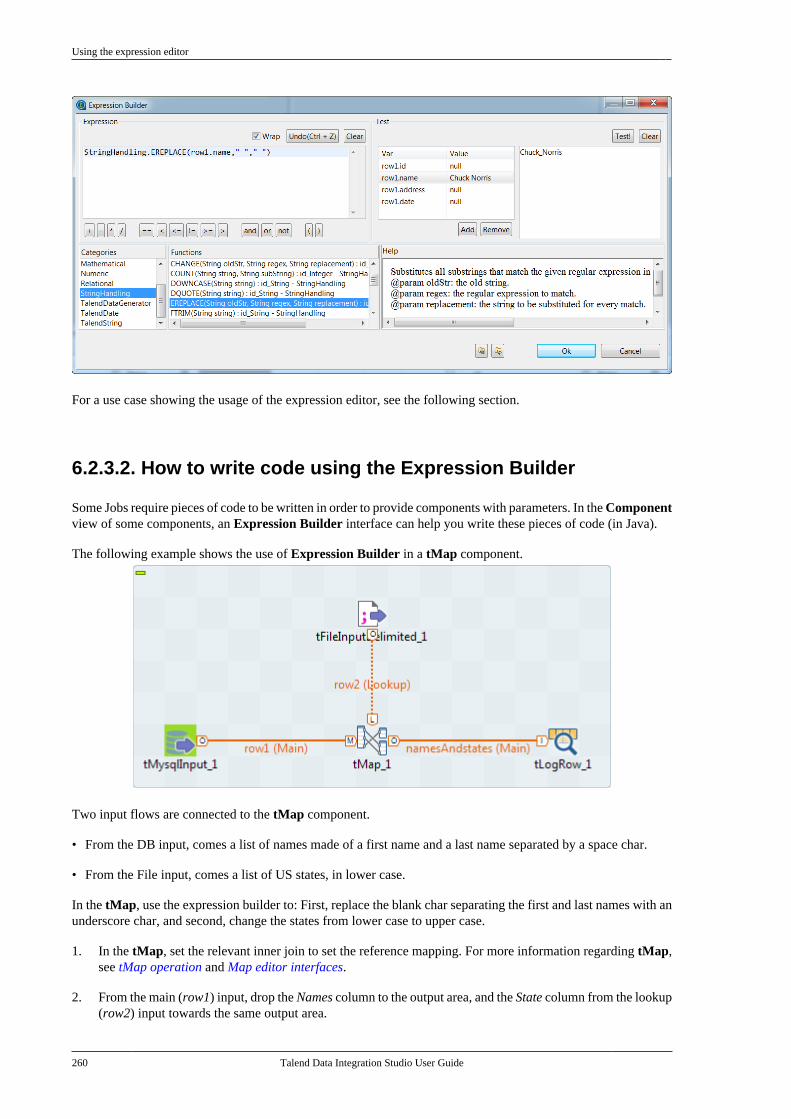
Using the expression editor
260 Talend Data Integration Studio User Guide
For a use case showing the usage of the expression editor, see the following section.
6.2.3.2. How to write code using the Expression Builder
Some Jobs require pieces of code to be written in order to provide components with parameters. In the Componentview of some components, an Expression Builder interface can help you write these pieces of code (in Java).
The following example shows the use of Expression Builder in a tMap component.
Two input flows are connected to the tMap component.
• From the DB input, comes a list of names made of a first name and a last name separated by a space char.
• From the File input, comes a list of US states, in lower case.
In the tMap, use the expression builder to: First, replace the blank char separating the first and last names with anunderscore char, and second, change the states from lower case to upper case.
1. In the tMap, set the relevant inner join to set the reference mapping. For more information regarding tMap,see tMap operation and Map editor interfaces.
2. From the main (row1) input, drop the Names column to the output area, and the State column from the lookup(row2) input towards the same output area.
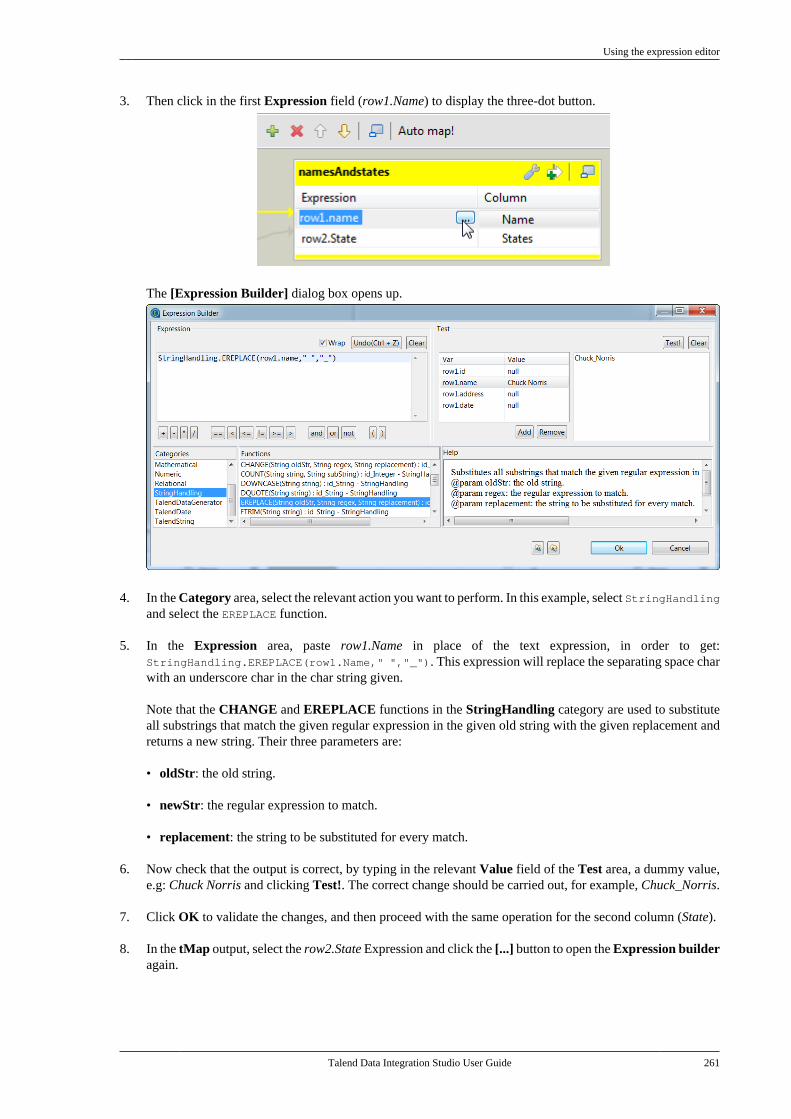
Using the expression editor
Talend Data Integration Studio User Guide 261
3. Then click in the first Expression field (row1.Name) to display the three-dot button.
The [Expression Builder] dialog box opens up.
4. In the Category area, select the relevant action you want to perform. In this example, select StringHandlingand select the EREPLACE function.
5. In the Expression area, paste row1.Name in place of the text expression, in order to get:StringHandling.EREPLACE(row1.Name," ","_"). This expression will replace the separating space charwith an underscore char in the char string given.
Note that the CHANGE and EREPLACE functions in the StringHandling category are used to substituteall substrings that match the given regular expression in the given old string with the given replacement andreturns a new string. Their three parameters are:
• oldStr: the old string.
• newStr: the regular expression to match.
• replacement: the string to be substituted for every match.
6. Now check that the output is correct, by typing in the relevant Value field of the Test area, a dummy value,e.g: Chuck Norris and clicking Test!. The correct change should be carried out, for example, Chuck_Norris.
7. Click OK to validate the changes, and then proceed with the same operation for the second column (State).
8. In the tMap output, select the row2.State Expression and click the [...] button to open the Expression builderagain.
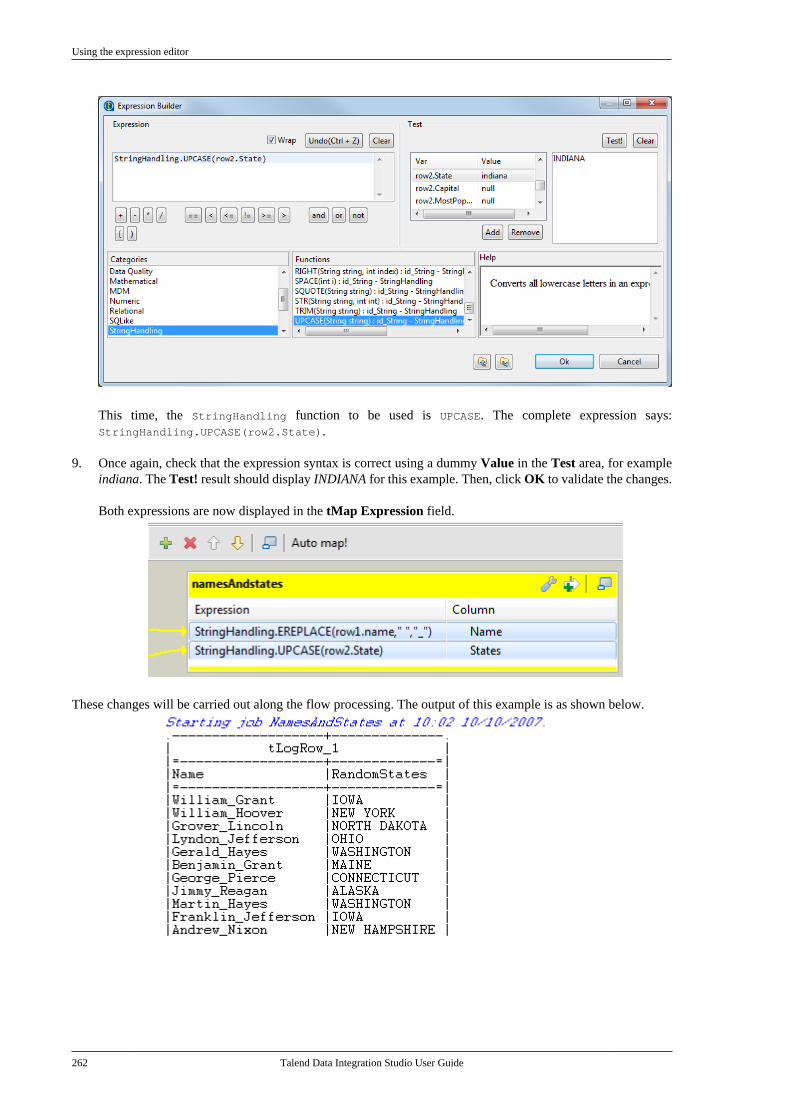
Using the expression editor
262 Talend Data Integration Studio User Guide
This time, the StringHandling function to be used is UPCASE. The complete expression says:StringHandling.UPCASE(row2.State).
9. Once again, check that the expression syntax is correct using a dummy Value in the Test area, for exampleindiana. The Test! result should display INDIANA for this example. Then, click OK to validate the changes.
Both expressions are now displayed in the tMap Expression field.
These changes will be carried out along the flow processing. The output of this example is as shown below.
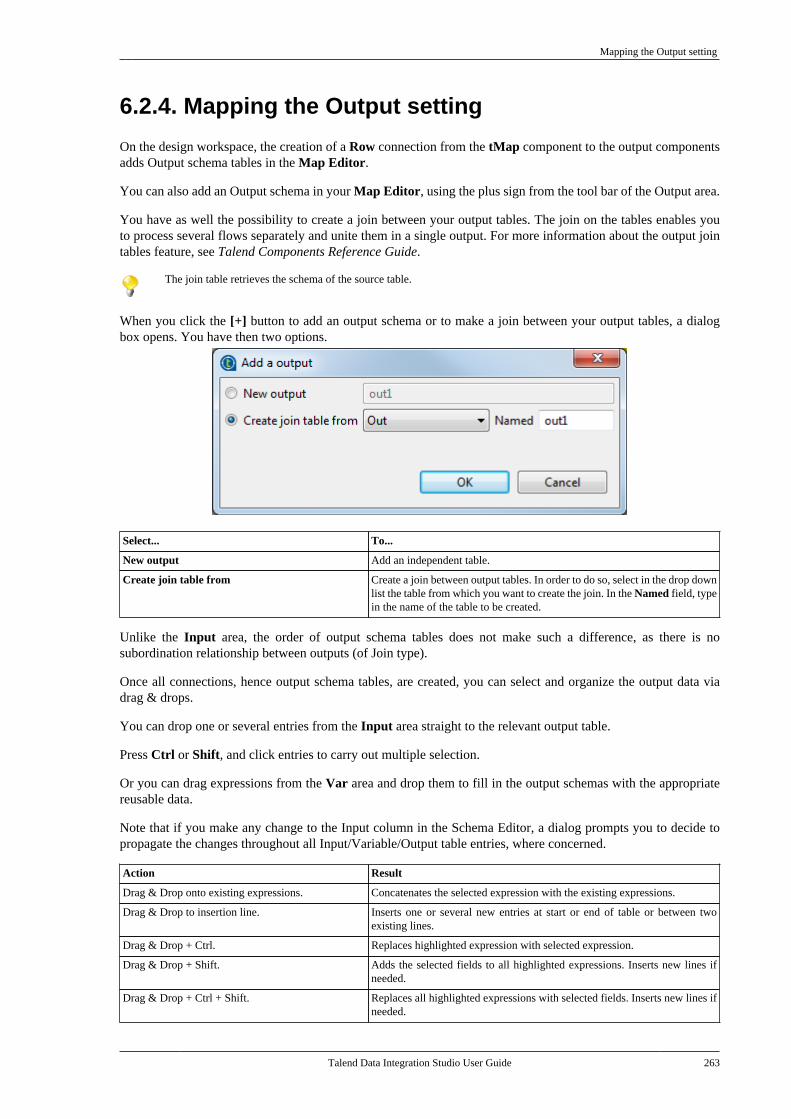
Mapping the Output setting
Talend Data Integration Studio User Guide 263
6.2.4. Mapping the Output setting
On the design workspace, the creation of a Row connection from the tMap component to the output componentsadds Output schema tables in the Map Editor.
You can also add an Output schema in your Map Editor, using the plus sign from the tool bar of the Output area.
You have as well the possibility to create a join between your output tables. The join on the tables enables youto process several flows separately and unite them in a single output. For more information about the output jointables feature, see Talend Components Reference Guide.
The join table retrieves the schema of the source table.
When you click the [+] button to add an output schema or to make a join between your output tables, a dialogbox opens. You have then two options.
Select... To...
New output Add an independent table.
Create join table from Create a join between output tables. In order to do so, select in the drop downlist the table from which you want to create the join. In the Named field, typein the name of the table to be created.
Unlike the Input area, the order of output schema tables does not make such a difference, as there is nosubordination relationship between outputs (of Join type).
Once all connections, hence output schema tables, are created, you can select and organize the output data viadrag & drops.
You can drop one or several entries from the Input area straight to the relevant output table.
Press Ctrl or Shift, and click entries to carry out multiple selection.
Or you can drag expressions from the Var area and drop them to fill in the output schemas with the appropriatereusable data.
Note that if you make any change to the Input column in the Schema Editor, a dialog prompts you to decide topropagate the changes throughout all Input/Variable/Output table entries, where concerned.
Action Result
Drag & Drop onto existing expressions. Concatenates the selected expression with the existing expressions.
Drag & Drop to insertion line. Inserts one or several new entries at start or end of table or between twoexisting lines.
Drag & Drop + Ctrl. Replaces highlighted expression with selected expression.
Drag & Drop + Shift. Adds the selected fields to all highlighted expressions. Inserts new lines ifneeded.
Drag & Drop + Ctrl + Shift. Replaces all highlighted expressions with selected fields. Inserts new lines ifneeded.
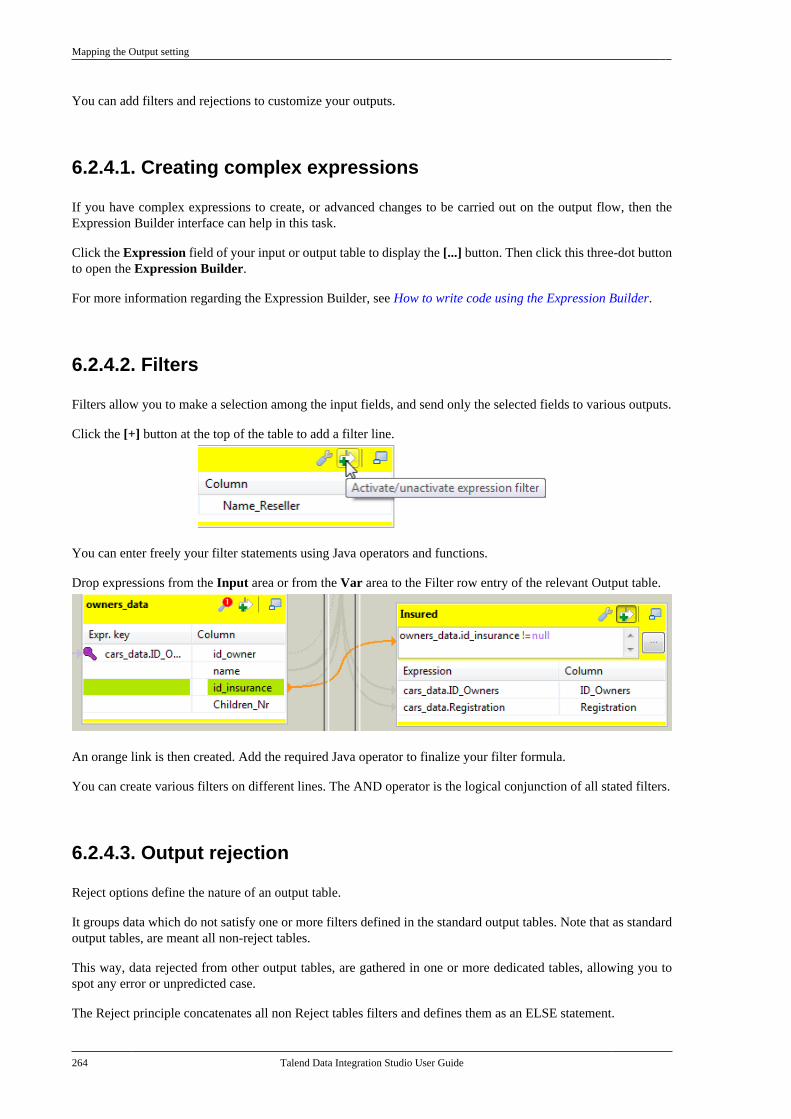
Mapping the Output setting
264 Talend Data Integration Studio User Guide
You can add filters and rejections to customize your outputs.
6.2.4.1. Creating complex expressions
If you have complex expressions to create, or advanced changes to be carried out on the output flow, then theExpression Builder interface can help in this task.
Click the Expression field of your input or output table to display the [...] button. Then click this three-dot buttonto open the Expression Builder.
For more information regarding the Expression Builder, see How to write code using the Expression Builder.
6.2.4.2. Filters
Filters allow you to make a selection among the input fields, and send only the selected fields to various outputs.
Click the [+] button at the top of the table to add a filter line.
You can enter freely your filter statements using Java operators and functions.
Drop expressions from the Input area or from the Var area to the Filter row entry of the relevant Output table.
An orange link is then created. Add the required Java operator to finalize your filter formula.
You can create various filters on different lines. The AND operator is the logical conjunction of all stated filters.
6.2.4.3. Output rejection
Reject options define the nature of an output table.
It groups data which do not satisfy one or more filters defined in the standard output tables. Note that as standardoutput tables, are meant all non-reject tables.
This way, data rejected from other output tables, are gathered in one or more dedicated tables, allowing you tospot any error or unpredicted case.
The Reject principle concatenates all non Reject tables filters and defines them as an ELSE statement.
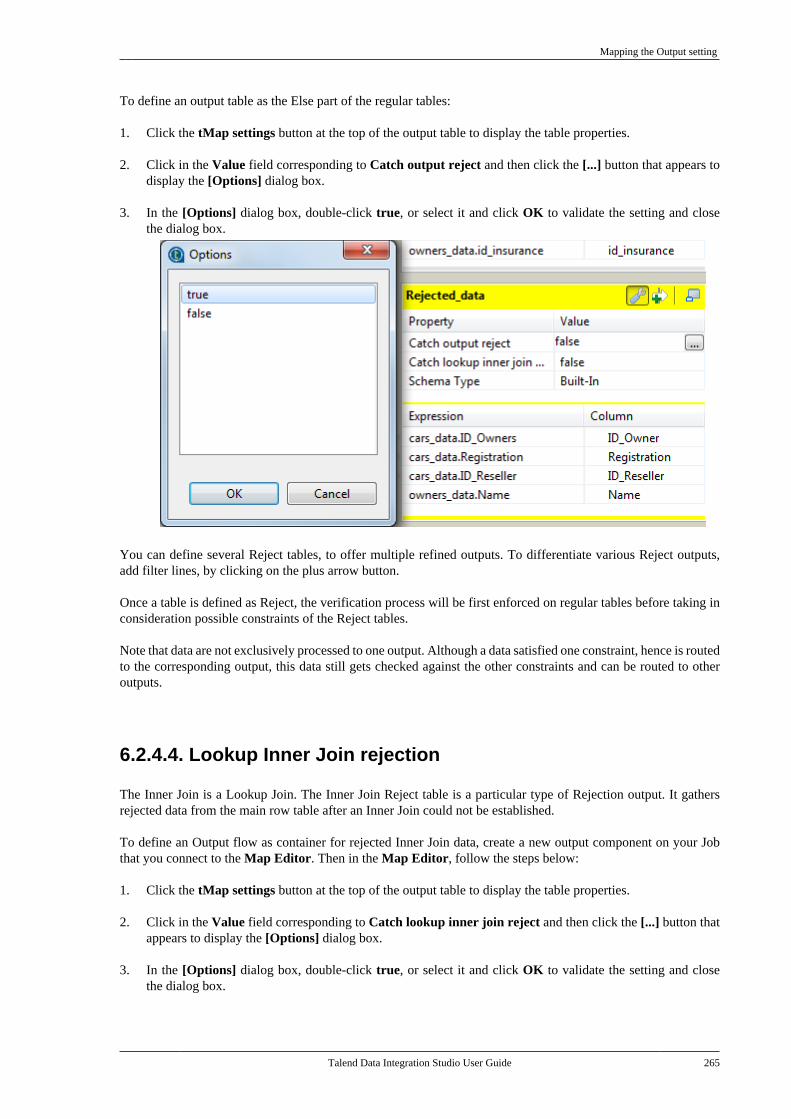
Mapping the Output setting
Talend Data Integration Studio User Guide 265
To define an output table as the Else part of the regular tables:
1. Click the tMap settings button at the top of the output table to display the table properties.
2. Click in the Value field corresponding to Catch output reject and then click the [...] button that appears todisplay the [Options] dialog box.
3. In the [Options] dialog box, double-click true, or select it and click OK to validate the setting and closethe dialog box.
You can define several Reject tables, to offer multiple refined outputs. To differentiate various Reject outputs,add filter lines, by clicking on the plus arrow button.
Once a table is defined as Reject, the verification process will be first enforced on regular tables before taking inconsideration possible constraints of the Reject tables.
Note that data are not exclusively processed to one output. Although a data satisfied one constraint, hence is routedto the corresponding output, this data still gets checked against the other constraints and can be routed to otheroutputs.
6.2.4.4. Lookup Inner Join rejection
The Inner Join is a Lookup Join. The Inner Join Reject table is a particular type of Rejection output. It gathersrejected data from the main row table after an Inner Join could not be established.
To define an Output flow as container for rejected Inner Join data, create a new output component on your Jobthat you connect to the Map Editor. Then in the Map Editor, follow the steps below:
1. Click the tMap settings button at the top of the output table to display the table properties.
2. Click in the Value field corresponding to Catch lookup inner join reject and then click the [...] button thatappears to display the [Options] dialog box.
3. In the [Options] dialog box, double-click true, or select it and click OK to validate the setting and closethe dialog box.
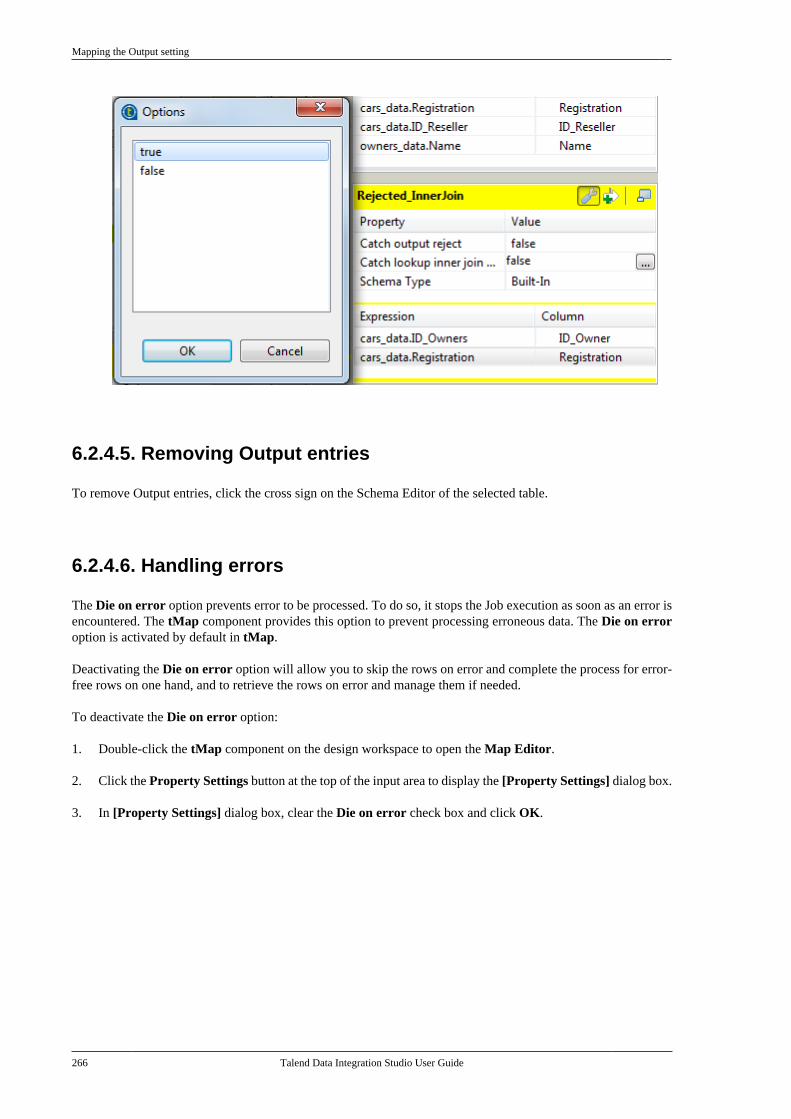
Mapping the Output setting
266 Talend Data Integration Studio User Guide
6.2.4.5. Removing Output entries
To remove Output entries, click the cross sign on the Schema Editor of the selected table.
6.2.4.6. Handling errors
The Die on error option prevents error to be processed. To do so, it stops the Job execution as soon as an error isencountered. The tMap component provides this option to prevent processing erroneous data. The Die on erroroption is activated by default in tMap.
Deactivating the Die on error option will allow you to skip the rows on error and complete the process for error-free rows on one hand, and to retrieve the rows on error and manage them if needed.
To deactivate the Die on error option:
1. Double-click the tMap component on the design workspace to open the Map Editor.
2. Click the Property Settings button at the top of the input area to display the [Property Settings] dialog box.
3. In [Property Settings] dialog box, clear the Die on error check box and click OK.
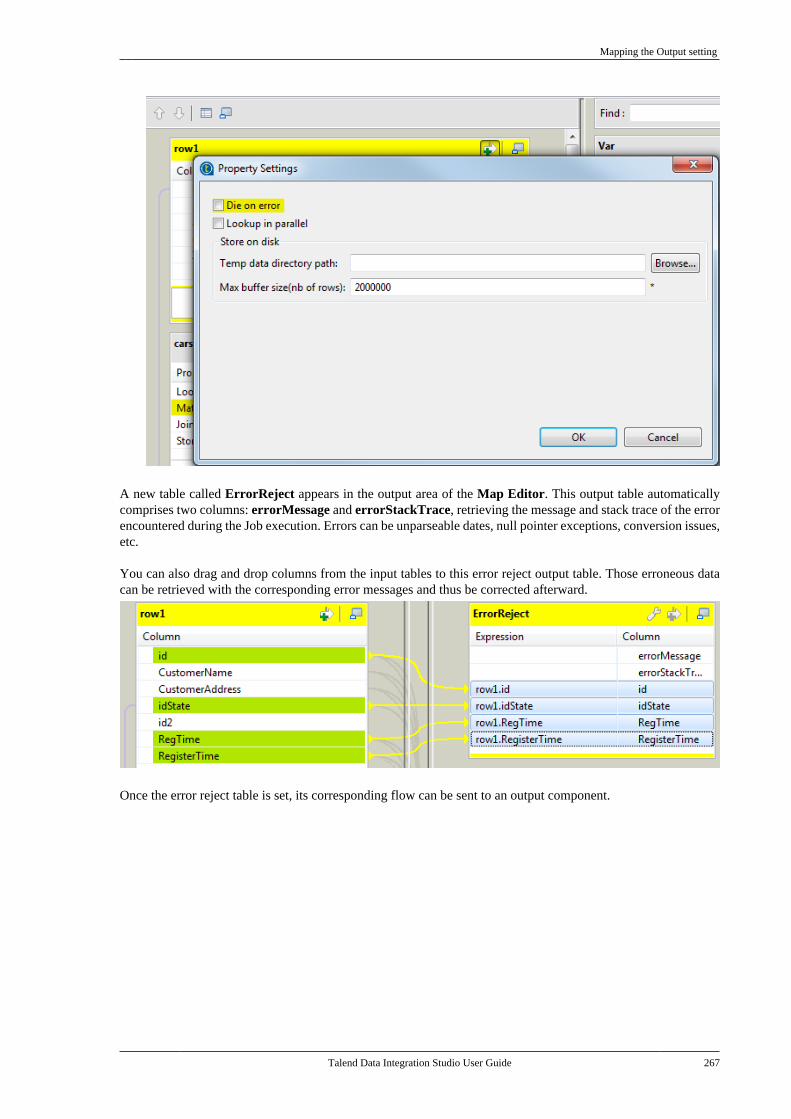
Mapping the Output setting
Talend Data Integration Studio User Guide 267
A new table called ErrorReject appears in the output area of the Map Editor. This output table automaticallycomprises two columns: errorMessage and errorStackTrace, retrieving the message and stack trace of the errorencountered during the Job execution. Errors can be unparseable dates, null pointer exceptions, conversion issues,etc.
You can also drag and drop columns from the input tables to this error reject output table. Those erroneous datacan be retrieved with the corresponding error messages and thus be corrected afterward.
Once the error reject table is set, its corresponding flow can be sent to an output component.
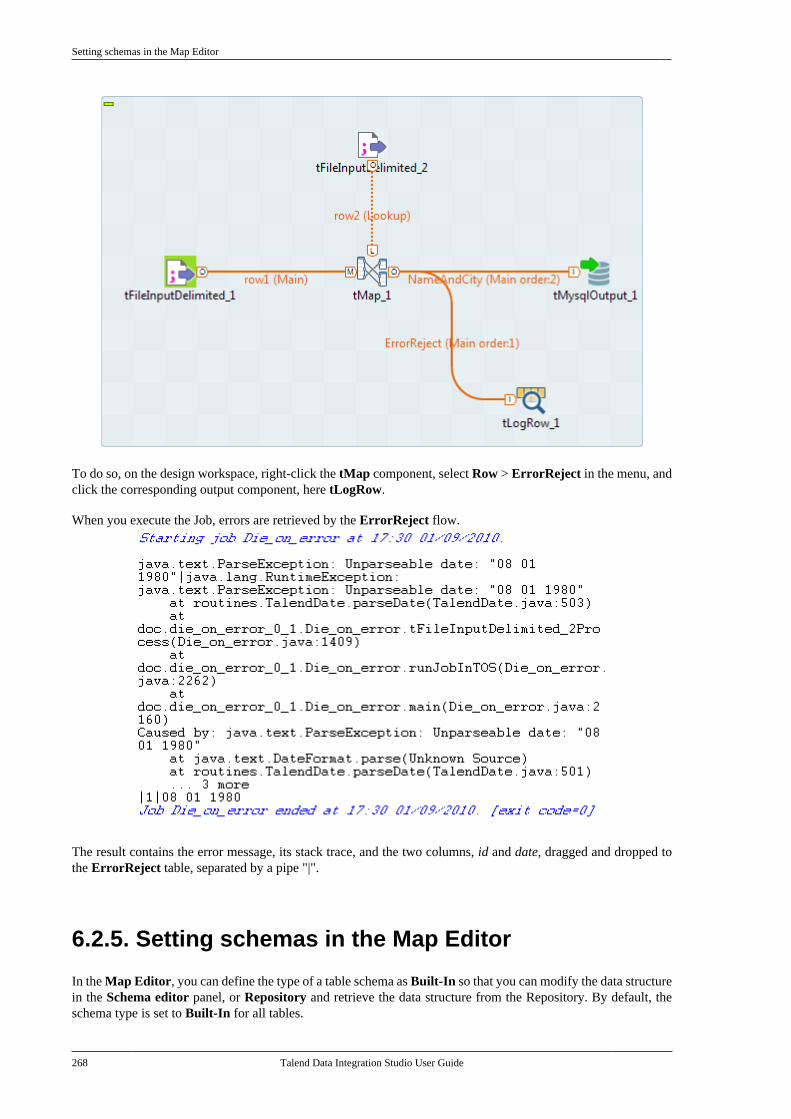
Setting schemas in the Map Editor
268 Talend Data Integration Studio User Guide
To do so, on the design workspace, right-click the tMap component, select Row > ErrorReject in the menu, andclick the corresponding output component, here tLogRow.
When you execute the Job, errors are retrieved by the ErrorReject flow.
The result contains the error message, its stack trace, and the two columns, id and date, dragged and dropped tothe ErrorReject table, separated by a pipe "|".
6.2.5. Setting schemas in the Map Editor
In the Map Editor, you can define the type of a table schema as Built-In so that you can modify the data structurein the Schema editor panel, or Repository and retrieve the data structure from the Repository. By default, theschema type is set to Built-In for all tables.
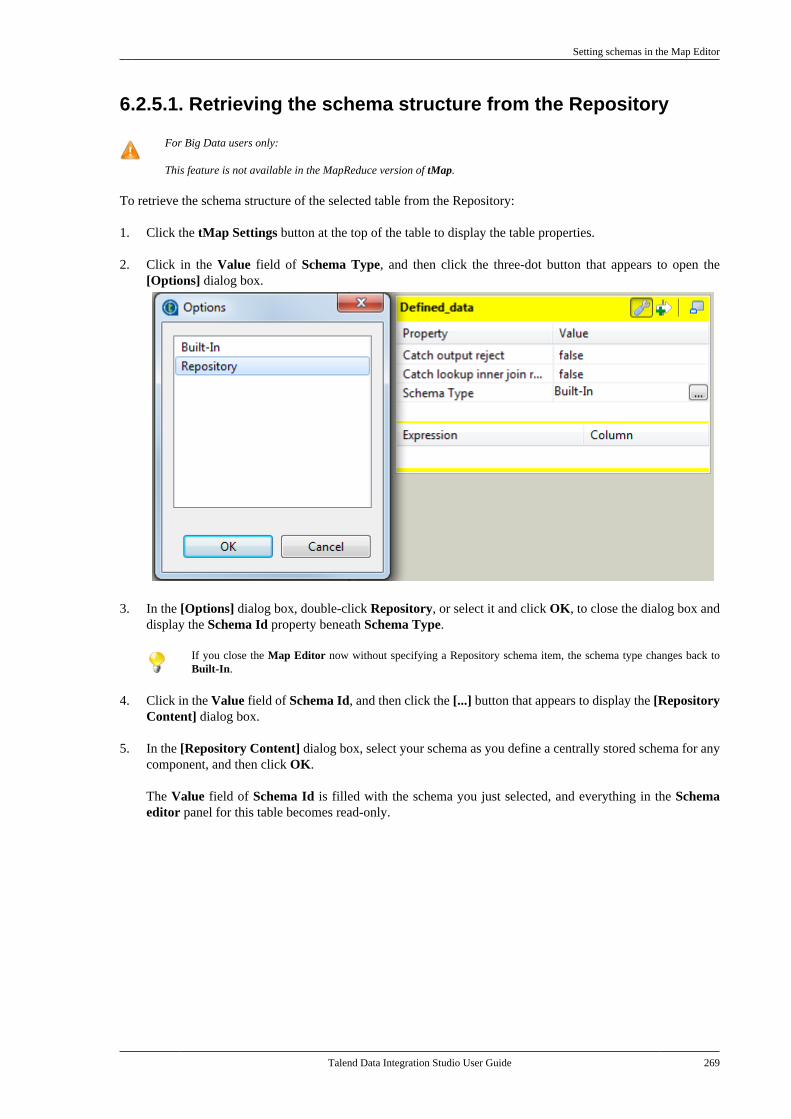
Setting schemas in the Map Editor
Talend Data Integration Studio User Guide 269
6.2.5.1. Retrieving the schema structure from the Repository
For Big Data users only:
This feature is not available in the MapReduce version of tMap.
To retrieve the schema structure of the selected table from the Repository:
1. Click the tMap Settings button at the top of the table to display the table properties.
2. Click in the Value field of Schema Type, and then click the three-dot button that appears to open the[Options] dialog box.
3. In the [Options] dialog box, double-click Repository, or select it and click OK, to close the dialog box anddisplay the Schema Id property beneath Schema Type.
If you close the Map Editor now without specifying a Repository schema item, the schema type changes back toBuilt-In.
4. Click in the Value field of Schema Id, and then click the [...] button that appears to display the [RepositoryContent] dialog box.
5. In the [Repository Content] dialog box, select your schema as you define a centrally stored schema for anycomponent, and then click OK.
The Value field of Schema Id is filled with the schema you just selected, and everything in the Schemaeditor panel for this table becomes read-only.
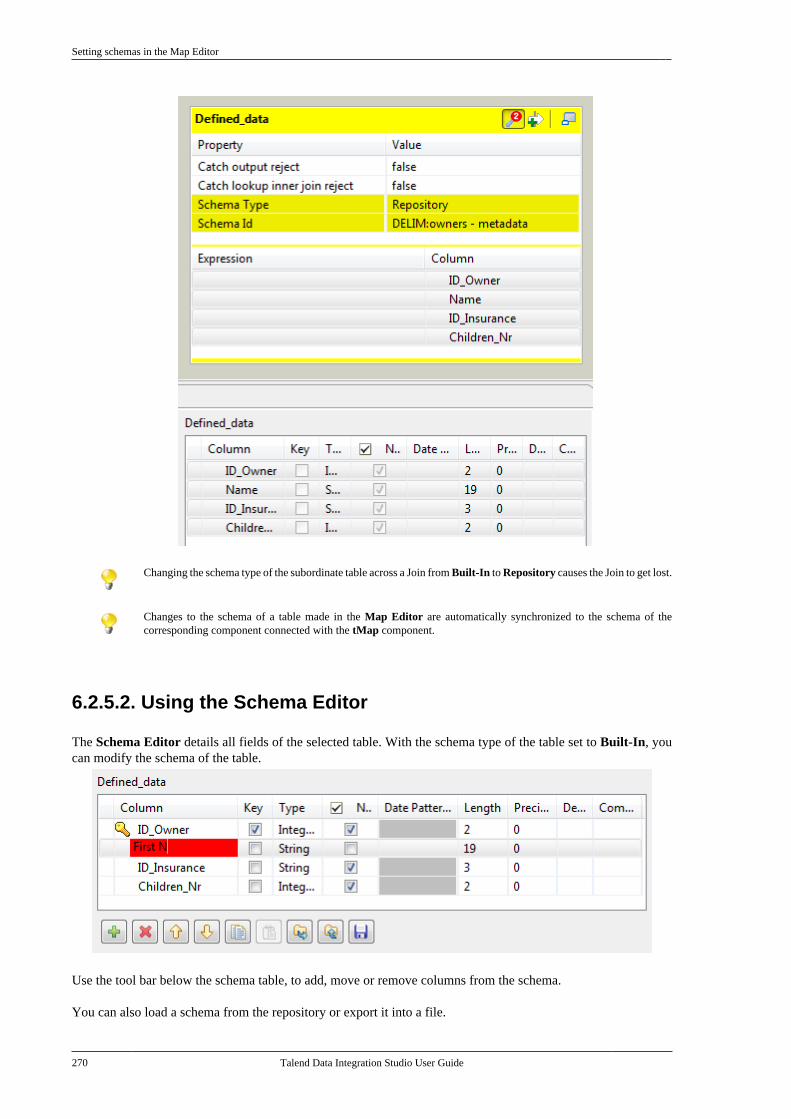
Setting schemas in the Map Editor
270 Talend Data Integration Studio User Guide
Changing the schema type of the subordinate table across a Join from Built-In to Repository causes the Join to get lost.
Changes to the schema of a table made in the Map Editor are automatically synchronized to the schema of thecorresponding component connected with the tMap component.
6.2.5.2. Using the Schema Editor
The Schema Editor details all fields of the selected table. With the schema type of the table set to Built-In, youcan modify the schema of the table.
Use the tool bar below the schema table, to add, move or remove columns from the schema.
You can also load a schema from the repository or export it into a file.
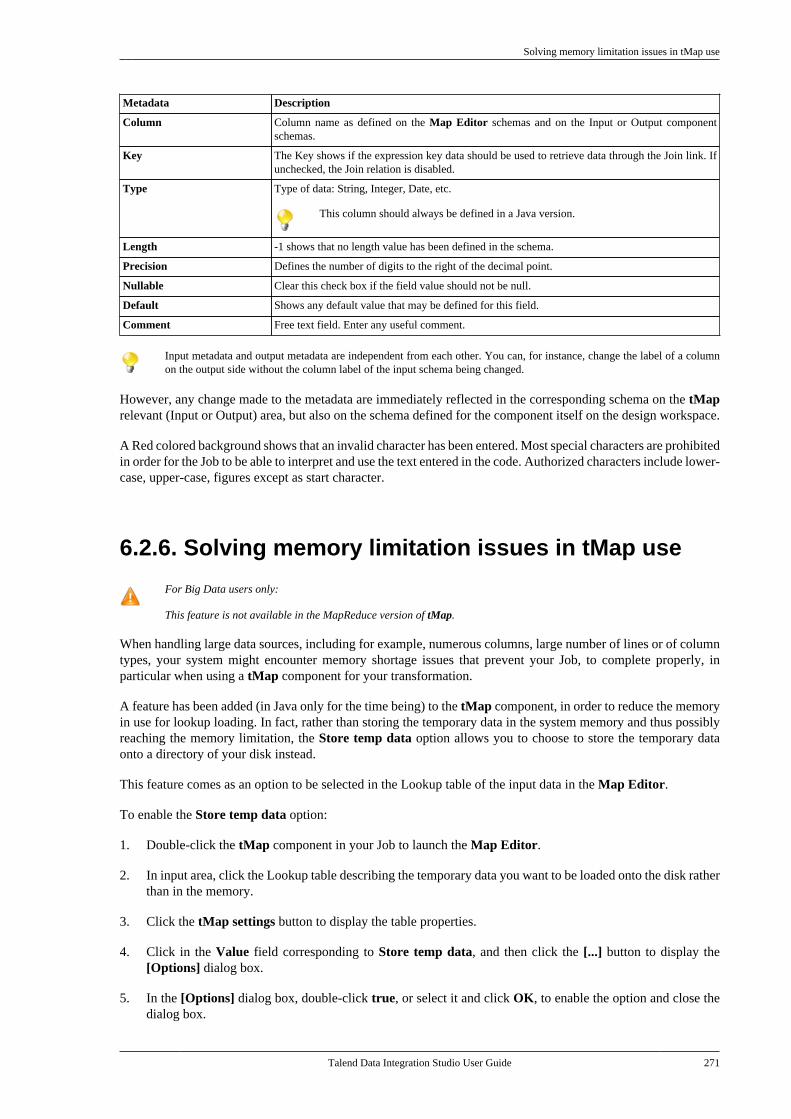
Solving memory limitation issues in tMap use
Talend Data Integration Studio User Guide 271
Metadata Description
Column Column name as defined on the Map Editor schemas and on the Input or Output componentschemas.
Key The Key shows if the expression key data should be used to retrieve data through the Join link. Ifunchecked, the Join relation is disabled.
Type Type of data: String, Integer, Date, etc.
This column should always be defined in a Java version.
Length -1 shows that no length value has been defined in the schema.
Precision Defines the number of digits to the right of the decimal point.
Nullable Clear this check box if the field value should not be null.
Default Shows any default value that may be defined for this field.
Comment Free text field. Enter any useful comment.
Input metadata and output metadata are independent from each other. You can, for instance, change the label of a columnon the output side without the column label of the input schema being changed.
However, any change made to the metadata are immediately reflected in the corresponding schema on the tMaprelevant (Input or Output) area, but also on the schema defined for the component itself on the design workspace.
A Red colored background shows that an invalid character has been entered. Most special characters are prohibitedin order for the Job to be able to interpret and use the text entered in the code. Authorized characters include lower-case, upper-case, figures except as start character.
6.2.6. Solving memory limitation issues in tMap use
For Big Data users only:
This feature is not available in the MapReduce version of tMap.
When handling large data sources, including for example, numerous columns, large number of lines or of columntypes, your system might encounter memory shortage issues that prevent your Job, to complete properly, inparticular when using a tMap component for your transformation.
A feature has been added (in Java only for the time being) to the tMap component, in order to reduce the memoryin use for lookup loading. In fact, rather than storing the temporary data in the system memory and thus possiblyreaching the memory limitation, the Store temp data option allows you to choose to store the temporary dataonto a directory of your disk instead.
This feature comes as an option to be selected in the Lookup table of the input data in the Map Editor.
To enable the Store temp data option:
1. Double-click the tMap component in your Job to launch the Map Editor.
2. In input area, click the Lookup table describing the temporary data you want to be loaded onto the disk ratherthan in the memory.
3. Click the tMap settings button to display the table properties.
4. Click in the Value field corresponding to Store temp data, and then click the [...] button to display the[Options] dialog box.
5. In the [Options] dialog box, double-click true, or select it and click OK, to enable the option and close thedialog box.
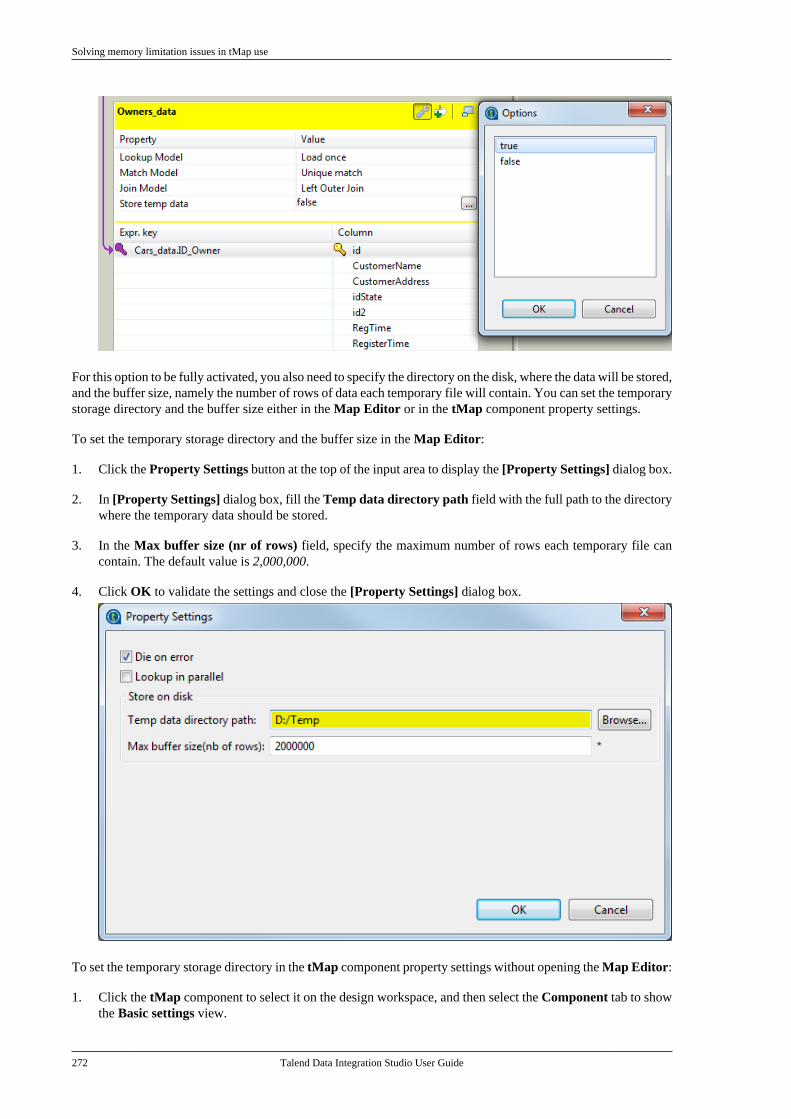
Solving memory limitation issues in tMap use
272 Talend Data Integration Studio User Guide
For this option to be fully activated, you also need to specify the directory on the disk, where the data will be stored,and the buffer size, namely the number of rows of data each temporary file will contain. You can set the temporarystorage directory and the buffer size either in the Map Editor or in the tMap component property settings.
To set the temporary storage directory and the buffer size in the Map Editor:
1. Click the Property Settings button at the top of the input area to display the [Property Settings] dialog box.
2. In [Property Settings] dialog box, fill the Temp data directory path field with the full path to the directorywhere the temporary data should be stored.
3. In the Max buffer size (nr of rows) field, specify the maximum number of rows each temporary file cancontain. The default value is 2,000,000.
4. Click OK to validate the settings and close the [Property Settings] dialog box.
To set the temporary storage directory in the tMap component property settings without opening the Map Editor:
1. Click the tMap component to select it on the design workspace, and then select the Component tab to showthe Basic settings view.
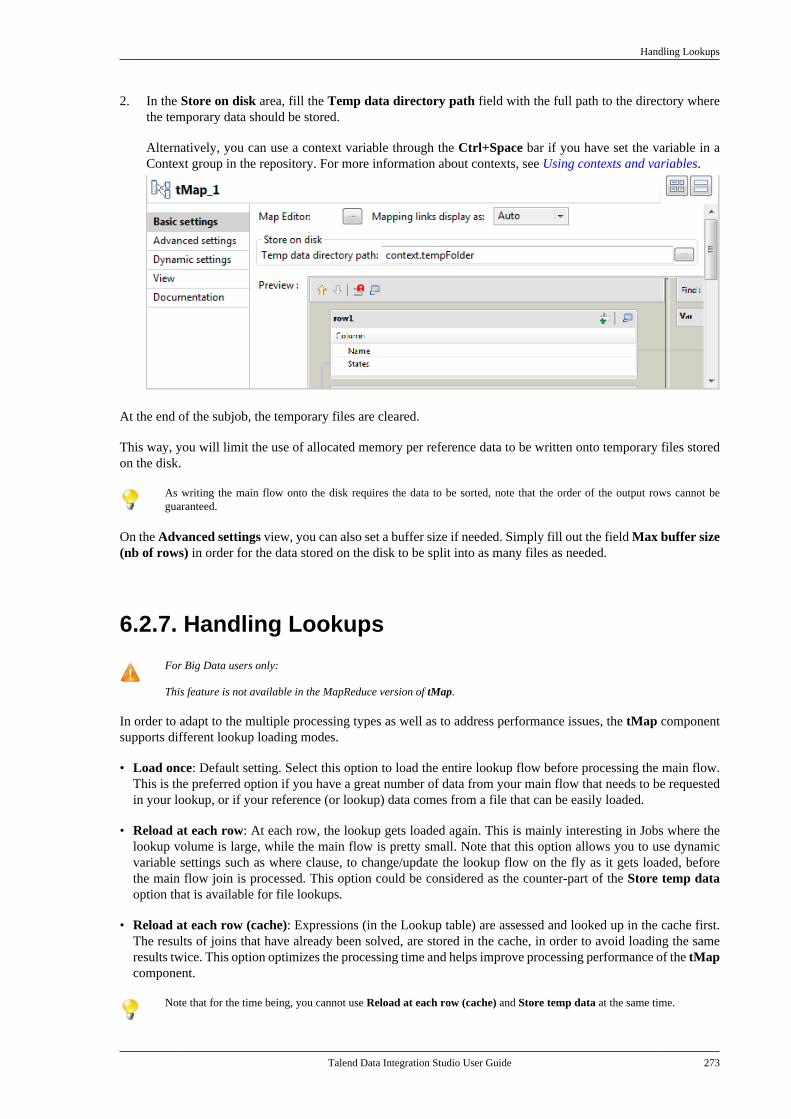
Handling Lookups
Talend Data Integration Studio User Guide 273
2. In the Store on disk area, fill the Temp data directory path field with the full path to the directory wherethe temporary data should be stored.
Alternatively, you can use a context variable through the Ctrl+Space bar if you have set the variable in aContext group in the repository. For more information about contexts, see Using contexts and variables.
At the end of the subjob, the temporary files are cleared.
This way, you will limit the use of allocated memory per reference data to be written onto temporary files storedon the disk.
As writing the main flow onto the disk requires the data to be sorted, note that the order of the output rows cannot beguaranteed.
On the Advanced settings view, you can also set a buffer size if needed. Simply fill out the field Max buffer size(nb of rows) in order for the data stored on the disk to be split into as many files as needed.
6.2.7. Handling Lookups
For Big Data users only:
This feature is not available in the MapReduce version of tMap.
In order to adapt to the multiple processing types as well as to address performance issues, the tMap componentsupports different lookup loading modes.
• Load once: Default setting. Select this option to load the entire lookup flow before processing the main flow.This is the preferred option if you have a great number of data from your main flow that needs to be requestedin your lookup, or if your reference (or lookup) data comes from a file that can be easily loaded.
• Reload at each row: At each row, the lookup gets loaded again. This is mainly interesting in Jobs where thelookup volume is large, while the main flow is pretty small. Note that this option allows you to use dynamicvariable settings such as where clause, to change/update the lookup flow on the fly as it gets loaded, beforethe main flow join is processed. This option could be considered as the counter-part of the Store temp dataoption that is available for file lookups.
• Reload at each row (cache): Expressions (in the Lookup table) are assessed and looked up in the cache first.The results of joins that have already been solved, are stored in the cache, in order to avoid loading the sameresults twice. This option optimizes the processing time and helps improve processing performance of the tMapcomponent.
Note that for the time being, you cannot use Reload at each row (cache) and Store temp data at the same time.
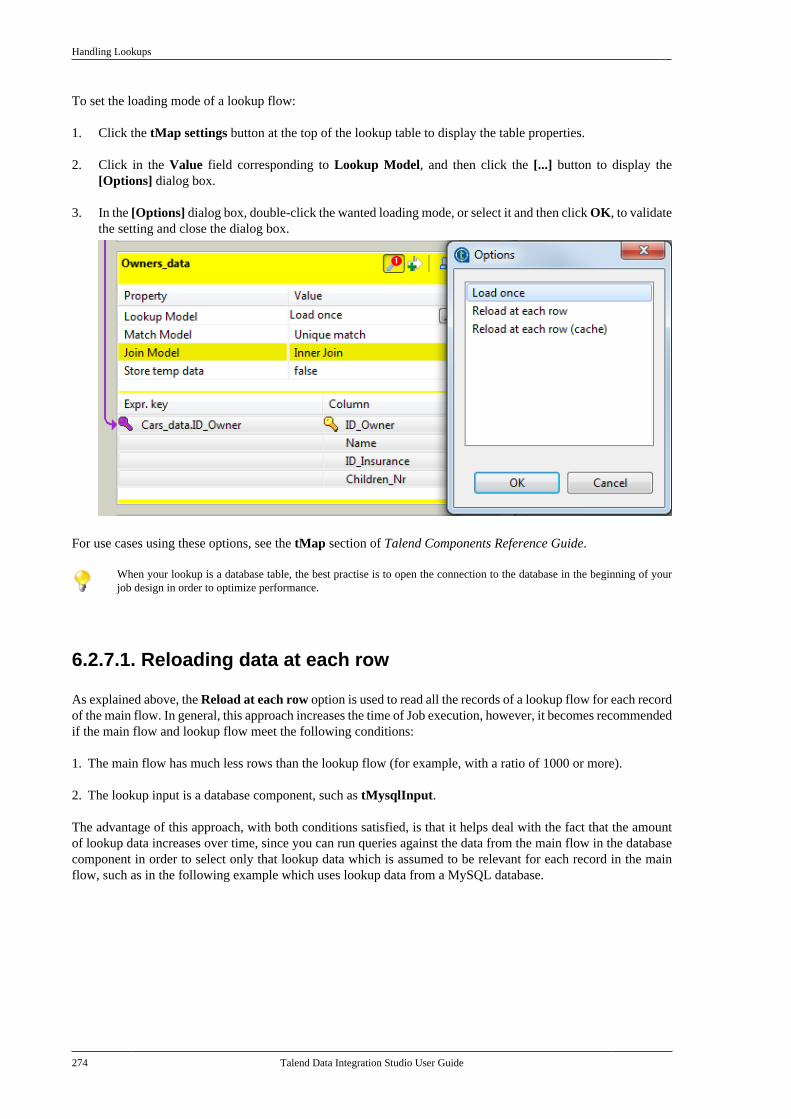
Handling Lookups
274 Talend Data Integration Studio User Guide
To set the loading mode of a lookup flow:
1. Click the tMap settings button at the top of the lookup table to display the table properties.
2. Click in the Value field corresponding to Lookup Model, and then click the [...] button to display the[Options] dialog box.
3. In the [Options] dialog box, double-click the wanted loading mode, or select it and then click OK, to validatethe setting and close the dialog box.
For use cases using these options, see the tMap section of Talend Components Reference Guide.
When your lookup is a database table, the best practise is to open the connection to the database in the beginning of yourjob design in order to optimize performance.
6.2.7.1. Reloading data at each row
As explained above, the Reload at each row option is used to read all the records of a lookup flow for each recordof the main flow. In general, this approach increases the time of Job execution, however, it becomes recommendedif the main flow and lookup flow meet the following conditions:
1. The main flow has much less rows than the lookup flow (for example, with a ratio of 1000 or more).
2. The lookup input is a database component, such as tMysqlInput.
The advantage of this approach, with both conditions satisfied, is that it helps deal with the fact that the amountof lookup data increases over time, since you can run queries against the data from the main flow in the databasecomponent in order to select only that lookup data which is assumed to be relevant for each record in the mainflow, such as in the following example which uses lookup data from a MySQL database.
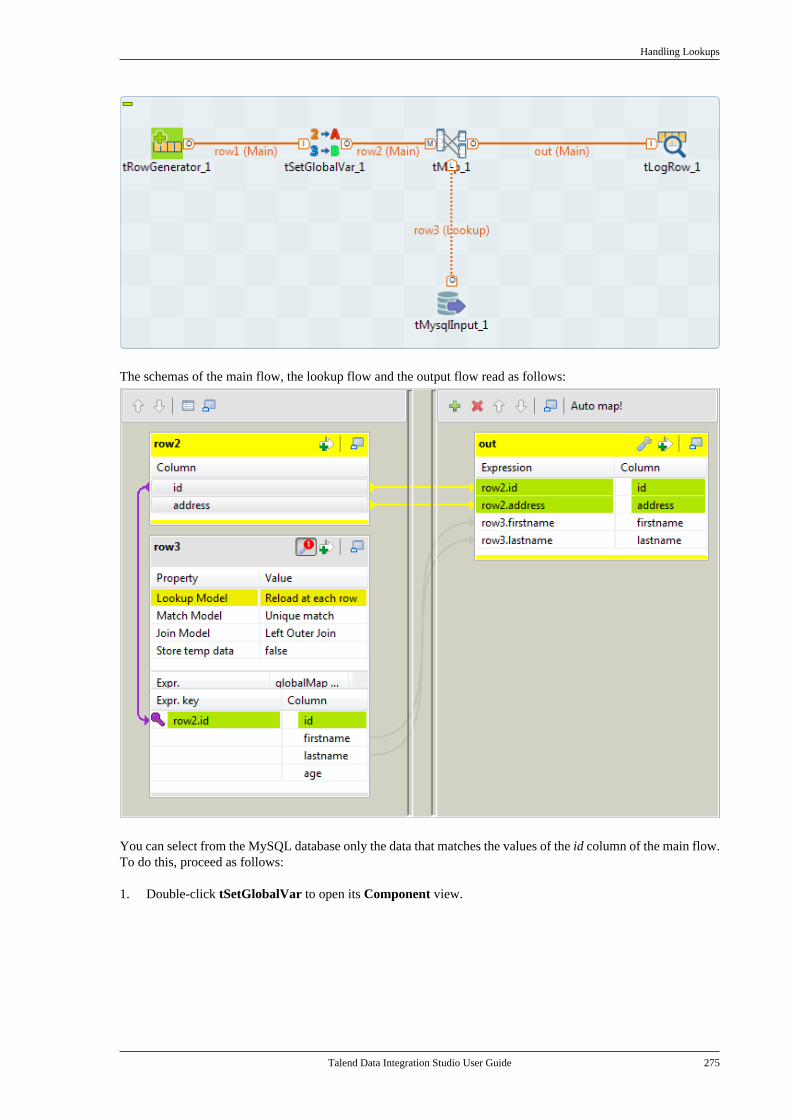
Handling Lookups
Talend Data Integration Studio User Guide 275
The schemas of the main flow, the lookup flow and the output flow read as follows:
You can select from the MySQL database only the data that matches the values of the id column of the main flow.To do this, proceed as follows:
1. Double-click tSetGlobalVar to open its Component view.
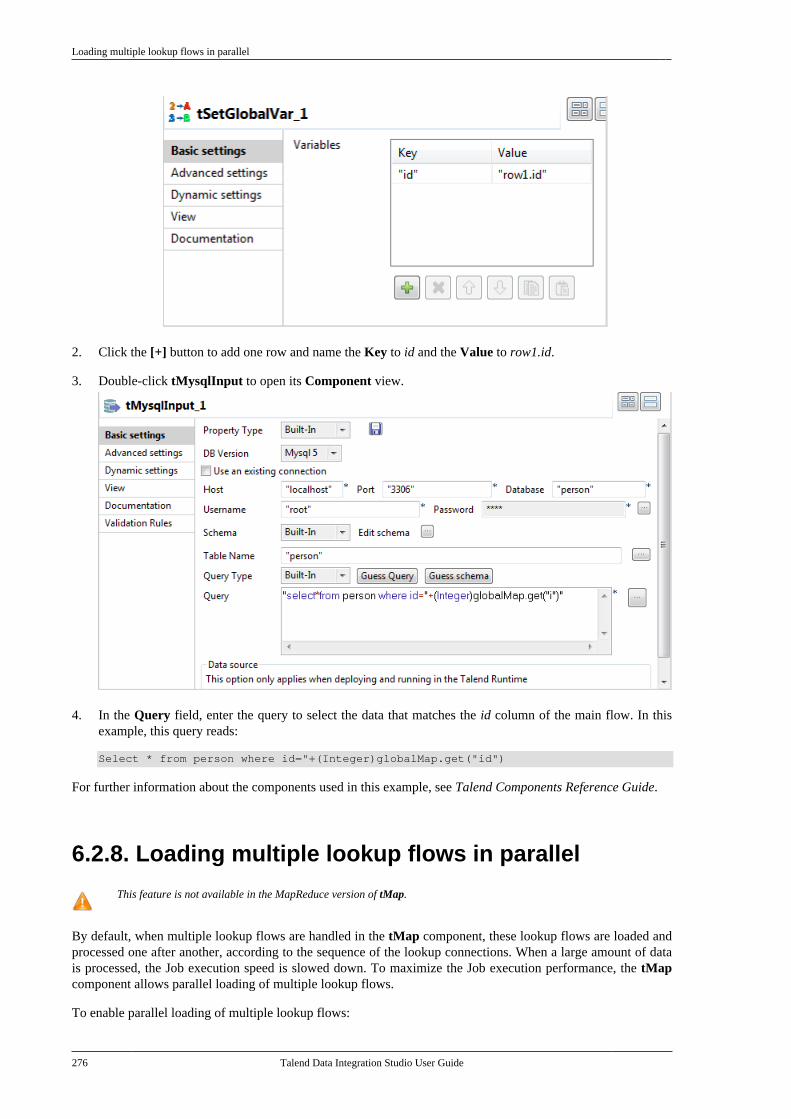
Loading multiple lookup flows in parallel
276 Talend Data Integration Studio User Guide
2. Click the [+] button to add one row and name the Key to id and the Value to row1.id.
3. Double-click tMysqlInput to open its Component view.
4. In the Query field, enter the query to select the data that matches the id column of the main flow. In thisexample, this query reads:
Select * from person where id="+(Integer)globalMap.get("id")
For further information about the components used in this example, see Talend Components Reference Guide.
6.2.8. Loading multiple lookup flows in parallel
This feature is not available in the MapReduce version of tMap.
By default, when multiple lookup flows are handled in the tMap component, these lookup flows are loaded andprocessed one after another, according to the sequence of the lookup connections. When a large amount of datais processed, the Job execution speed is slowed down. To maximize the Job execution performance, the tMapcomponent allows parallel loading of multiple lookup flows.
To enable parallel loading of multiple lookup flows:

Previewing data
Talend Data Integration Studio User Guide 277
1. Double-click the tMap component to launch the Map Editor.
2. Click the Property Settings button at the top of the input area to open the [Property Settings] dialog box.
3. Select the Lookup in parallel check box and click OK to validate the setting and close the dialog box.
4. Click OK to close the Map Editor.
With this option enabled, all the lookup flows will be loaded and processed in the tMap component simultaneously,and then the main input flow will be processed.
6.2.9. Previewing data
This feature is not available for a MapReduce Job.
Like the Traces Debug mode of the Run view that allows you to monitor data processing during Job execution,the tMap component offers you that same functionality in its editor. This allows you to monitor the data mappingand processing before the execution while configuring the tMap component.
For further information about monitoring data processes from the Run view, see Row by row monitoring.
To preview data mapping and processing during tMap configuration:
1. Activate the Traces Debug mode in the Run view. For more information regarding the Traces Debugexecution mode and how to activate it, see How to run a Job in Traces Debug mode.
2. Double-click tMap on the design workspace to open its editor.
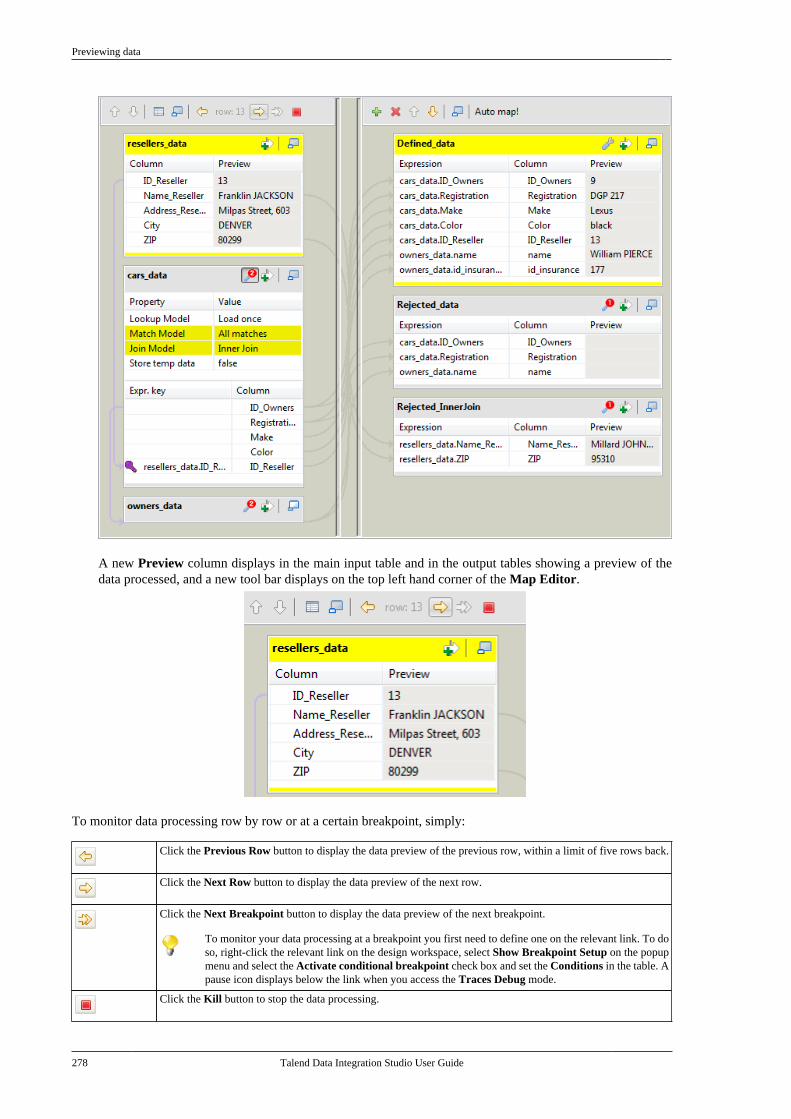
Previewing data
278 Talend Data Integration Studio User Guide
A new Preview column displays in the main input table and in the output tables showing a preview of thedata processed, and a new tool bar displays on the top left hand corner of the Map Editor.
To monitor data processing row by row or at a certain breakpoint, simply:
Click the Previous Row button to display the data preview of the previous row, within a limit of five rows back.
Click the Next Row button to display the data preview of the next row.
Click the Next Breakpoint button to display the data preview of the next breakpoint.
To monitor your data processing at a breakpoint you first need to define one on the relevant link. To doso, right-click the relevant link on the design workspace, select Show Breakpoint Setup on the popupmenu and select the Activate conditional breakpoint check box and set the Conditions in the table. Apause icon displays below the link when you access the Traces Debug mode.
Click the Kill button to stop the data processing.
tXMLMap operation
Talend Data Integration Studio User Guide 279
To deactivate the data preview in the Map Editor:
1. Click OK to close the Map Editor.
2. Go back to the Run view and click the Basic Run tab.
3. Double-click tMap on the design workspace to open the Map Editor.
6.3. tXMLMap operationBefore starting this section, we recommend reading the previous tMap sections for the basic knowledge of a Talend mappingcomponent.
tXMLMap is fine-tuned to leverage the Document data type for processing XML data, a case of transformationthat often mixes hierarchical data (XML) and flat data together. This Document type carries a complete user-specific XML flow. In using tXMLMap, you are able to add as many input or output flows as required into avisual map editor to perform, on these flows, the operations as follows:
• data multiplexing and demultiplexing,
• data transformation on any type of fields, particularly on the Document type,
• data matching via different models, for example, the Unique match mode (related topic: How to use ExplicitJoin),
• Automated XML tree construction on both of the input and the output sides,
• inner join and left outer join (related topic: How to use Inner Join)
• lookup between data sources whatever they are flat or XML data using models like Load once (related topic:Handling Lookups),
• fields concatenation and interchange,
• field filtering using constraints,
• data rejecting.
Like tMap, a map editor is required to configure these operations. To open this map editor, you can double-clickthe tXMLMap icon in the design workspace, or alternatively, click the three-dot button next to the Map Editorin the Basic settings view of the tXMLMap component.
tXMLMap and tMap use the common approaches to accomplish most of these operations. Therefore, thefollowing sections explain only the particular operations to which tXMLMap is dedicated for processing thehierarchical XML data.
The operations focusing on hierarchical data are:
• using the Document type to create the XML tree;
• managing the output XML data;
• editing the XML tree schema.
The following sections present more relevant details.
Different from tMap, tXMLMap does not provide the Store temp data option for storing temporary data onto the directoryof your disk. For further information about this option of tMap, see Solving memory limitation issues in tMap use.
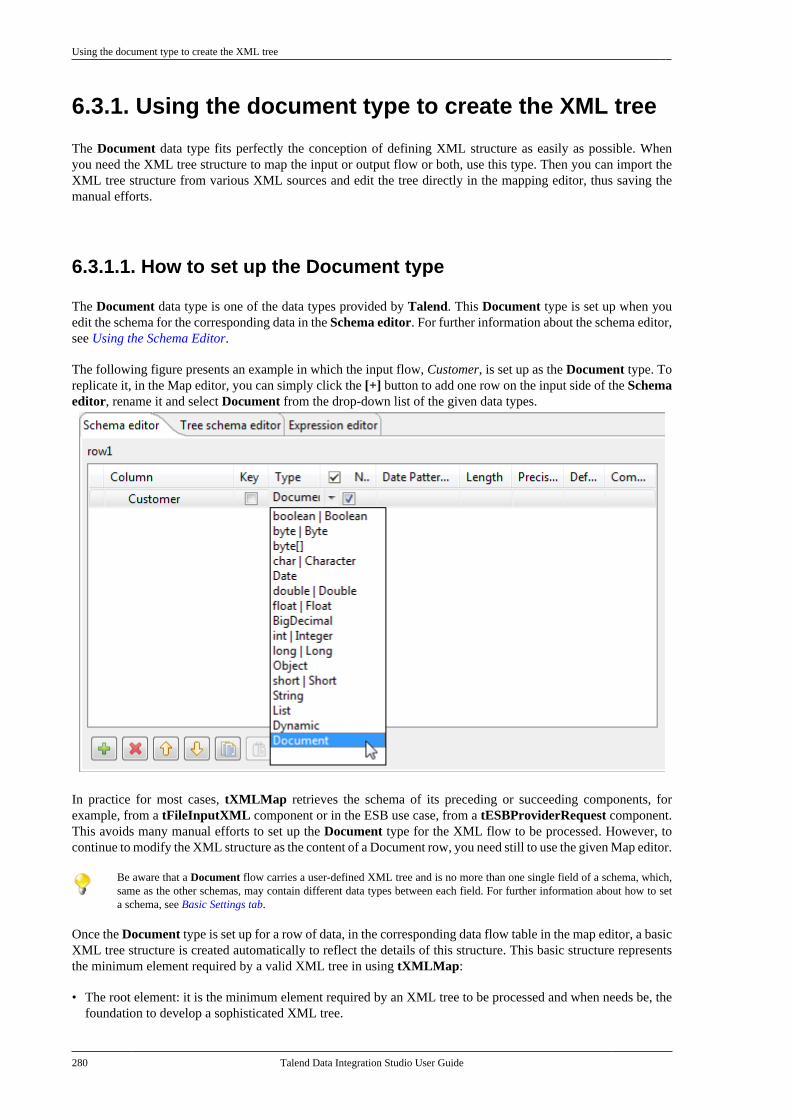
Using the document type to create the XML tree
280 Talend Data Integration Studio User Guide
6.3.1. Using the document type to create the XML tree
The Document data type fits perfectly the conception of defining XML structure as easily as possible. Whenyou need the XML tree structure to map the input or output flow or both, use this type. Then you can import theXML tree structure from various XML sources and edit the tree directly in the mapping editor, thus saving themanual efforts.
6.3.1.1. How to set up the Document type
The Document data type is one of the data types provided by Talend. This Document type is set up when youedit the schema for the corresponding data in the Schema editor. For further information about the schema editor,see Using the Schema Editor.
The following figure presents an example in which the input flow, Customer, is set up as the Document type. Toreplicate it, in the Map editor, you can simply click the [+] button to add one row on the input side of the Schemaeditor, rename it and select Document from the drop-down list of the given data types.
In practice for most cases, tXMLMap retrieves the schema of its preceding or succeeding components, forexample, from a tFileInputXML component or in the ESB use case, from a tESBProviderRequest component.This avoids many manual efforts to set up the Document type for the XML flow to be processed. However, tocontinue to modify the XML structure as the content of a Document row, you need still to use the given Map editor.
Be aware that a Document flow carries a user-defined XML tree and is no more than one single field of a schema, which,same as the other schemas, may contain different data types between each field. For further information about how to seta schema, see Basic Settings tab.
Once the Document type is set up for a row of data, in the corresponding data flow table in the map editor, a basicXML tree structure is created automatically to reflect the details of this structure. This basic structure representsthe minimum element required by a valid XML tree in using tXMLMap:
• The root element: it is the minimum element required by an XML tree to be processed and when needs be, thefoundation to develop a sophisticated XML tree.
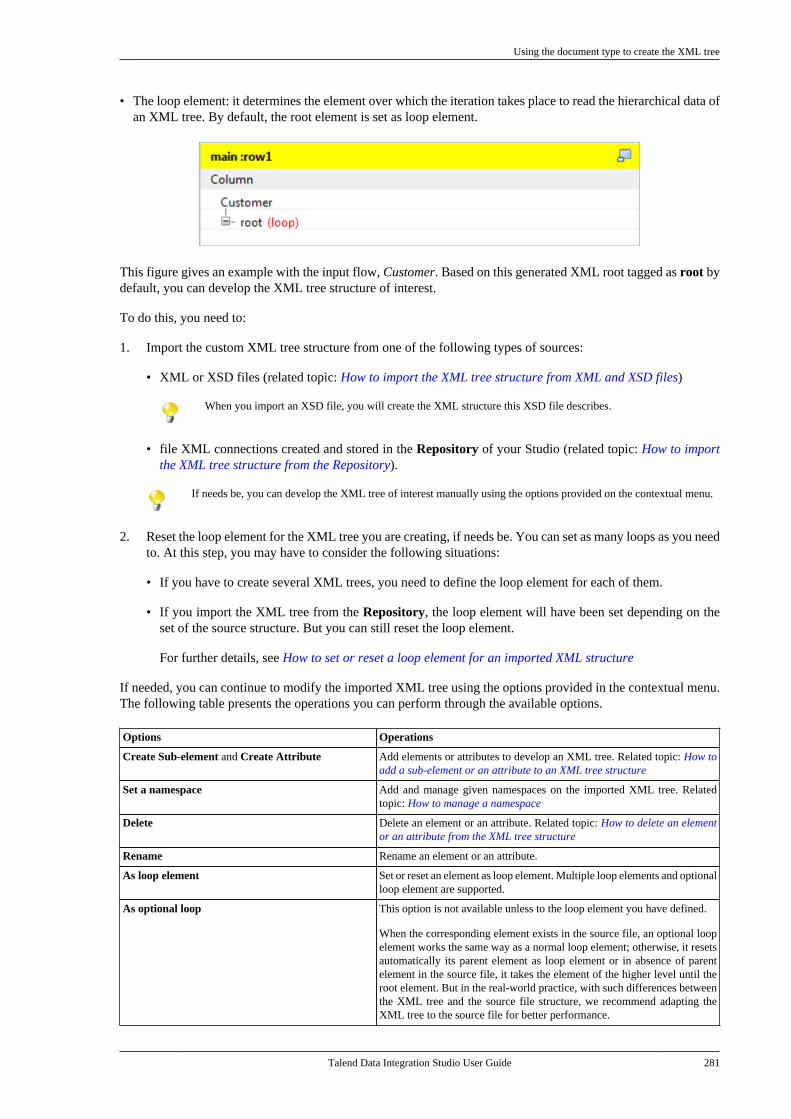
Using the document type to create the XML tree
Talend Data Integration Studio User Guide 281
• The loop element: it determines the element over which the iteration takes place to read the hierarchical data ofan XML tree. By default, the root element is set as loop element.
This figure gives an example with the input flow, Customer. Based on this generated XML root tagged as root bydefault, you can develop the XML tree structure of interest.
To do this, you need to:
1. Import the custom XML tree structure from one of the following types of sources:
• XML or XSD files (related topic: How to import the XML tree structure from XML and XSD files)
When you import an XSD file, you will create the XML structure this XSD file describes.
• file XML connections created and stored in the Repository of your Studio (related topic: How to importthe XML tree structure from the Repository).
If needs be, you can develop the XML tree of interest manually using the options provided on the contextual menu.
2. Reset the loop element for the XML tree you are creating, if needs be. You can set as many loops as you needto. At this step, you may have to consider the following situations:
• If you have to create several XML trees, you need to define the loop element for each of them.
• If you import the XML tree from the Repository, the loop element will have been set depending on theset of the source structure. But you can still reset the loop element.
For further details, see How to set or reset a loop element for an imported XML structure
If needed, you can continue to modify the imported XML tree using the options provided in the contextual menu.The following table presents the operations you can perform through the available options.
Options Operations
Create Sub-element and Create Attribute Add elements or attributes to develop an XML tree. Related topic: How toadd a sub-element or an attribute to an XML tree structure
Set a namespace Add and manage given namespaces on the imported XML tree. Relatedtopic: How to manage a namespace
Delete Delete an element or an attribute. Related topic: How to delete an elementor an attribute from the XML tree structure
Rename Rename an element or an attribute.
As loop element Set or reset an element as loop element. Multiple loop elements and optionalloop element are supported.
As optional loop This option is not available unless to the loop element you have defined.
When the corresponding element exists in the source file, an optional loopelement works the same way as a normal loop element; otherwise, it resetsautomatically its parent element as loop element or in absence of parentelement in the source file, it takes the element of the higher level until theroot element. But in the real-world practice, with such differences betweenthe XML tree and the source file structure, we recommend adapting theXML tree to the source file for better performance.
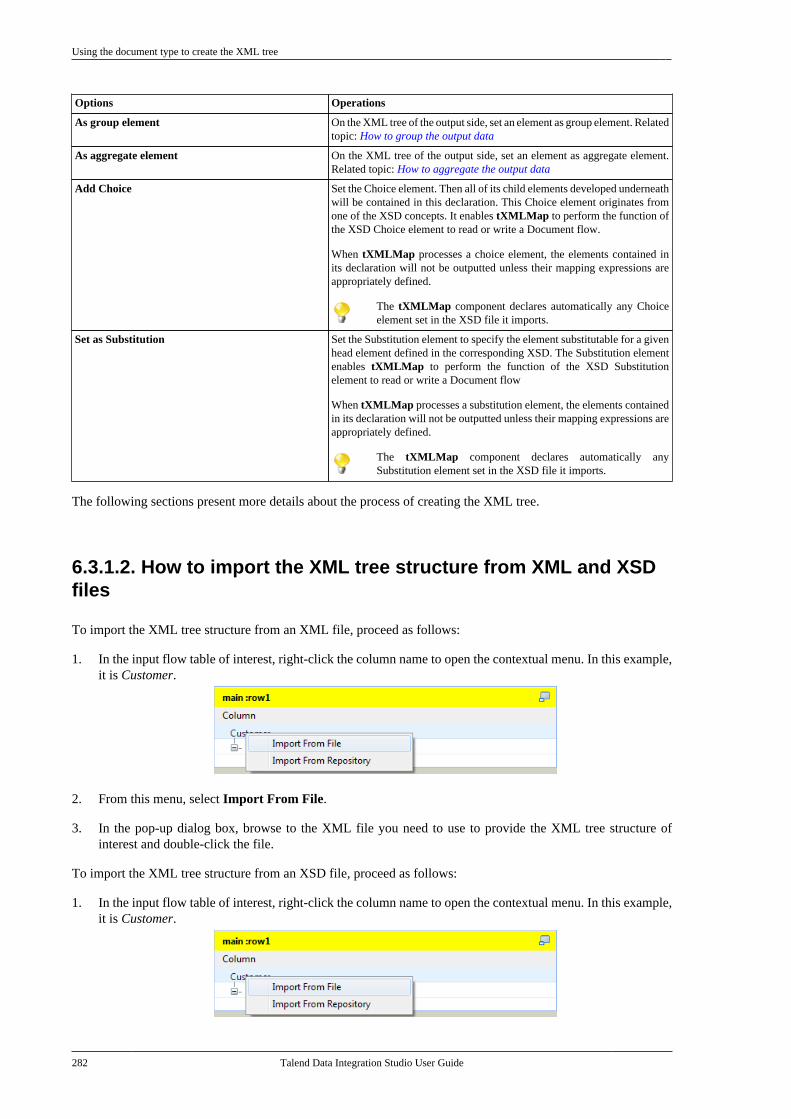
Using the document type to create the XML tree
282 Talend Data Integration Studio User Guide
Options Operations
As group element On the XML tree of the output side, set an element as group element. Relatedtopic: How to group the output data
As aggregate element On the XML tree of the output side, set an element as aggregate element.Related topic: How to aggregate the output data
Add Choice Set the Choice element. Then all of its child elements developed underneathwill be contained in this declaration. This Choice element originates fromone of the XSD concepts. It enables tXMLMap to perform the function ofthe XSD Choice element to read or write a Document flow.
When tXMLMap processes a choice element, the elements contained inits declaration will not be outputted unless their mapping expressions areappropriately defined.
The tXMLMap component declares automatically any Choiceelement set in the XSD file it imports.
Set as Substitution Set the Substitution element to specify the element substitutable for a givenhead element defined in the corresponding XSD. The Substitution elementenables tXMLMap to perform the function of the XSD Substitutionelement to read or write a Document flow
When tXMLMap processes a substitution element, the elements containedin its declaration will not be outputted unless their mapping expressions areappropriately defined.
The tXMLMap component declares automatically anySubstitution element set in the XSD file it imports.
The following sections present more details about the process of creating the XML tree.
6.3.1.2. How to import the XML tree structure from XML and XSDfiles
To import the XML tree structure from an XML file, proceed as follows:
1. In the input flow table of interest, right-click the column name to open the contextual menu. In this example,it is Customer.
2. From this menu, select Import From File.
3. In the pop-up dialog box, browse to the XML file you need to use to provide the XML tree structure ofinterest and double-click the file.
To import the XML tree structure from an XSD file, proceed as follows:
1. In the input flow table of interest, right-click the column name to open the contextual menu. In this example,it is Customer.

Using the document type to create the XML tree
Talend Data Integration Studio User Guide 283
2. From this menu, select Import From File.
3. In the pop-up dialog box, browse to the XSD file you need to use to provide the XML tree structure of interestand double-click the file.
4. In the dialog box that appears, select an element from the Root list as the root of your XML tree, and clickOK. Then the XML tree described by the XSD file imported is established.
The root of the imported XML tree is adaptable:
• When importing either an input or an output XML tree structure from an XSD file, you can choose an element asthe root of your XML tree.
• Once an XML structure is imported, the root tag is renamed automatically with the name of the XML source. Tochange this root name manually, you need use the tree schema editor. For further information about this editor, seeEditing the XML tree schema.
Then, you need to define the loop element in this XML tree structure. For further information about how to definea loop element, see How to set or reset a loop element for an imported XML structure.
6.3.1.3. How to import the XML tree structure from the Repository
To do this, proceed as follows:
1. In any input flow table, right click the column name to open the contextual menu. In this example, it isCustomer.
2. From this menu, select Import From Repository.
3. In the pop-up repository content list, select the XML connection or the MDM connection of interest to importthe corresponding XML tree structure.
Using the document type to create the XML tree
284 Talend Data Integration Studio User Guide
This figure presents an example of this Repository-stored XML connection.
To import an XML tree structure from the Repository, the corresponding XML connection should have been created.For further information about how to create a file XML connection in the Repository, see Centralizing XML filemetadata.
4. Click OK to validate this selection.
The XML tree structure is created and a loop is defined automatically as this loop was already defined during thecreation of the current Repository-stored XML connection.
6.3.1.4. How to set or reset a loop element for an imported XMLstructure
You need to set at least one loop element for each XML tree if it does not have any. If it does, you may have toreset the existing loop element when needs be.
Whatever you need to set or reset a loop element, proceed as follows:
1. In the created XML tree structure, right-click the element you need to define as loop. For example, you needto define the Customer element as loop in the following figure.
Using the document type to create the XML tree
Talend Data Integration Studio User Guide 285
2. From the pop-up contextual menu, select As loop element to define the selected element as loop.
Once done, this selected element is marked with the text: loop.
If you close the Map Editor without having set the required loop element for a given XML tree, its root element will beset automatically as loop element.
6.3.1.5. How to add a sub-element or an attribute to an XML treestructure
In the XML tree structure view, you are able to manually add a sub-element or an attribute to the root or to anyof the existing elements when needs be.
To do either of these operations, proceed as follows:
1. In the XML tree you need to edit, right-click the element to which you need to add a sub-element or anattribute underneath and select Create Sub-Element or Create Attribute according to your purpose.
Using the document type to create the XML tree
286 Talend Data Integration Studio User Guide
2. In the pop-up [Create New Element] wizard, type in the name you need to use for the added sub-elementor attribute.
3. Click OK to validate this creation. The new sub-element or attribute displays in the XML tree structure youare editing.
6.3.1.6. How to delete an element or an attribute from the XMLtree structure
From an established XML tree, you may need to delete an element or an attribute. To do this, proceed as follows:
1. In the XML tree you need to edit, right-click the element or the attribute you need to delete.
Using the document type to create the XML tree
Talend Data Integration Studio User Guide 287
2. In the pop-up contextual menu, select Delete.
Then the selected element or attribute is deleted, including all of the sub-elements or the attributes attachedto it underneath.
6.3.1.7. How to manage a namespace
When necessary, you are able to set and edit namespace for each of the element in the a created XML tree of theinput or the output data flow.
Defining a namespace
To do this, proceed as follows:
1. In the XML tree of the input or the output data flow you need to edit, right click the element for which youneed to declare a namespace. For example, in a Customer XML tree of the output flow, you need to set anamespace for the root.
2. In the pop-up contextual menu, select Set a namespace. Then the [Namespace dialog] wizard displays.
3. In this wizard, type in the URI you need to use.

Using the document type to create the XML tree
288 Talend Data Integration Studio User Guide
4. If you need to set a prefix for this namespace you are editing, select the Prefix check box in this wizard andtype in the prefix you need. In this example, we select it and type in xhtml.
5. Click OK to validate this declaration.
Modifying the default value of a namespace
To do this, proceed as follows:
1. In the XML tree that the namespace you need to edit belongs to, right-click this namespace to open thecontextual menu.
2. In this menu, select Change Namespace to open the corresponding wizard.
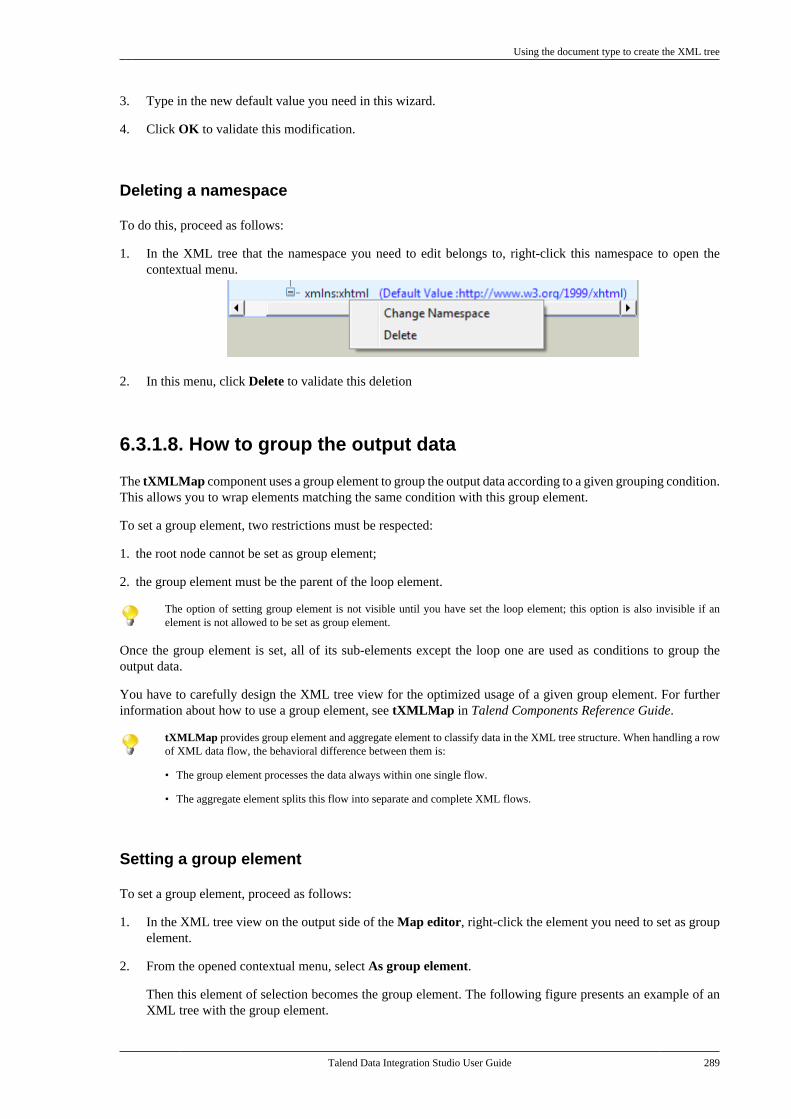
Using the document type to create the XML tree
Talend Data Integration Studio User Guide 289
3. Type in the new default value you need in this wizard.
4. Click OK to validate this modification.
Deleting a namespace
To do this, proceed as follows:
1. In the XML tree that the namespace you need to edit belongs to, right-click this namespace to open thecontextual menu.
2. In this menu, click Delete to validate this deletion
6.3.1.8. How to group the output data
The tXMLMap component uses a group element to group the output data according to a given grouping condition.This allows you to wrap elements matching the same condition with this group element.
To set a group element, two restrictions must be respected:
1. the root node cannot be set as group element;
2. the group element must be the parent of the loop element.
The option of setting group element is not visible until you have set the loop element; this option is also invisible if anelement is not allowed to be set as group element.
Once the group element is set, all of its sub-elements except the loop one are used as conditions to group theoutput data.
You have to carefully design the XML tree view for the optimized usage of a given group element. For furtherinformation about how to use a group element, see tXMLMap in Talend Components Reference Guide.
tXMLMap provides group element and aggregate element to classify data in the XML tree structure. When handling a rowof XML data flow, the behavioral difference between them is:
• The group element processes the data always within one single flow.
• The aggregate element splits this flow into separate and complete XML flows.
Setting a group element
To set a group element, proceed as follows:
1. In the XML tree view on the output side of the Map editor, right-click the element you need to set as groupelement.
2. From the opened contextual menu, select As group element.
Then this element of selection becomes the group element. The following figure presents an example of anXML tree with the group element.
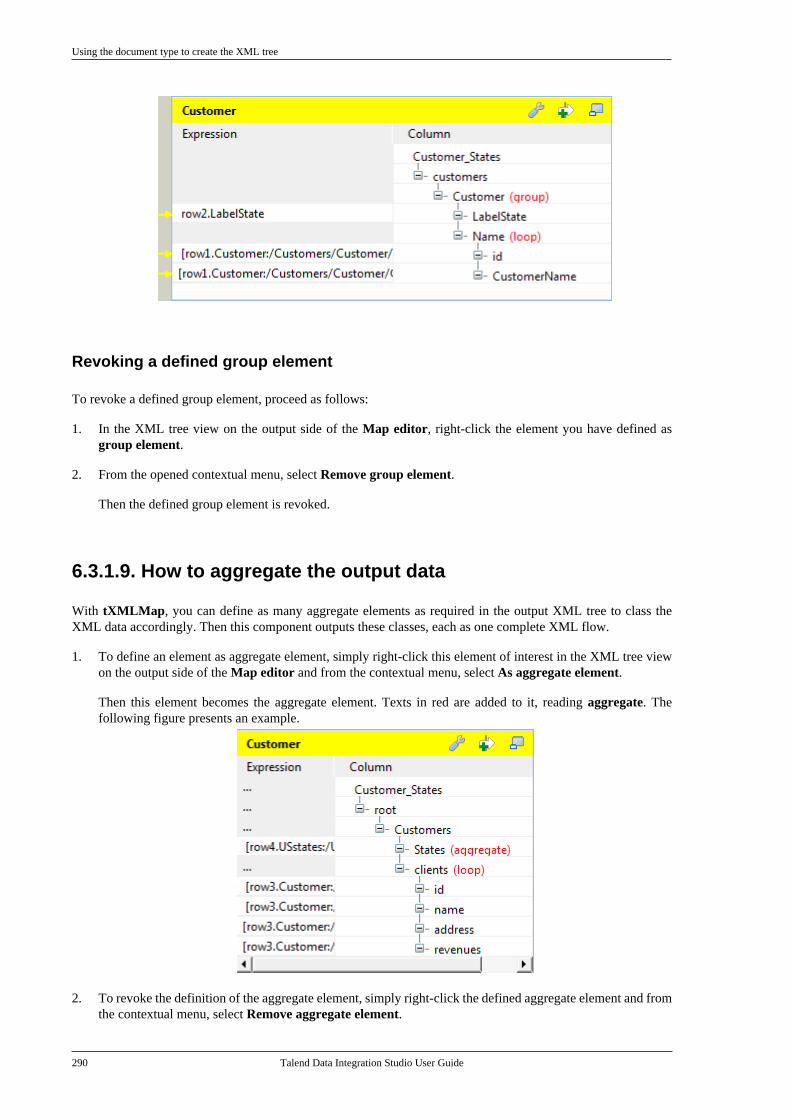
Using the document type to create the XML tree
290 Talend Data Integration Studio User Guide
Revoking a defined group element
To revoke a defined group element, proceed as follows:
1. In the XML tree view on the output side of the Map editor, right-click the element you have defined asgroup element.
2. From the opened contextual menu, select Remove group element.
Then the defined group element is revoked.
6.3.1.9. How to aggregate the output data
With tXMLMap, you can define as many aggregate elements as required in the output XML tree to class theXML data accordingly. Then this component outputs these classes, each as one complete XML flow.
1. To define an element as aggregate element, simply right-click this element of interest in the XML tree viewon the output side of the Map editor and from the contextual menu, select As aggregate element.
Then this element becomes the aggregate element. Texts in red are added to it, reading aggregate. Thefollowing figure presents an example.
2. To revoke the definition of the aggregate element, simply right-click the defined aggregate element and fromthe contextual menu, select Remove aggregate element.

Defining the output mode
Talend Data Integration Studio User Guide 291
To define an element as aggregate element, ensure that this element has no child element and the All in one feature is beingdisabled. The As aggregate element option is not available in the contextual menu until both of the conditions are respected.For further information about the All in one feature, see How to output elements into one document.
For an example about how to use the aggregate element with tXMLMap, see Talend Components ReferenceGuide.
tXMLMap provides group element and aggregate element to classify data in the XML tree structure. When handling onerow of data ( one complete XML flow), the behavioral difference between them is:
• The group element processes the data always within one single flow.
• The aggregate element splits this flow into separate and complete XML flows.
6.3.2. Defining the output mode
To define the output mode of the document-type data, you are defining whether to put all of the XML elements intoone single XML flow and when empty element exist, whether to output them. By doing this, you do not changethe structure of the XML tree you have created.
6.3.2.1. How to output elements into one document
Unless you are using the aggregate element which always classifies the output elements and splits an output XMLflow, you are able to determine whether an XML flow is output as one single flow or as separate flows, using theAll in one feature in the tXMLMap editor.
To do this, on the output side of the Map editor, proceed as follows:
1. Click the pincer icon to open the map setting panel. The following figure presents an example.
2. Click the All in one field and from the drop-down list, select true or false to decide whether the output XMLflow should be one single flow.
• If you select true, the XML data is output all in one single flow. In this example, the single flow readsas follows:
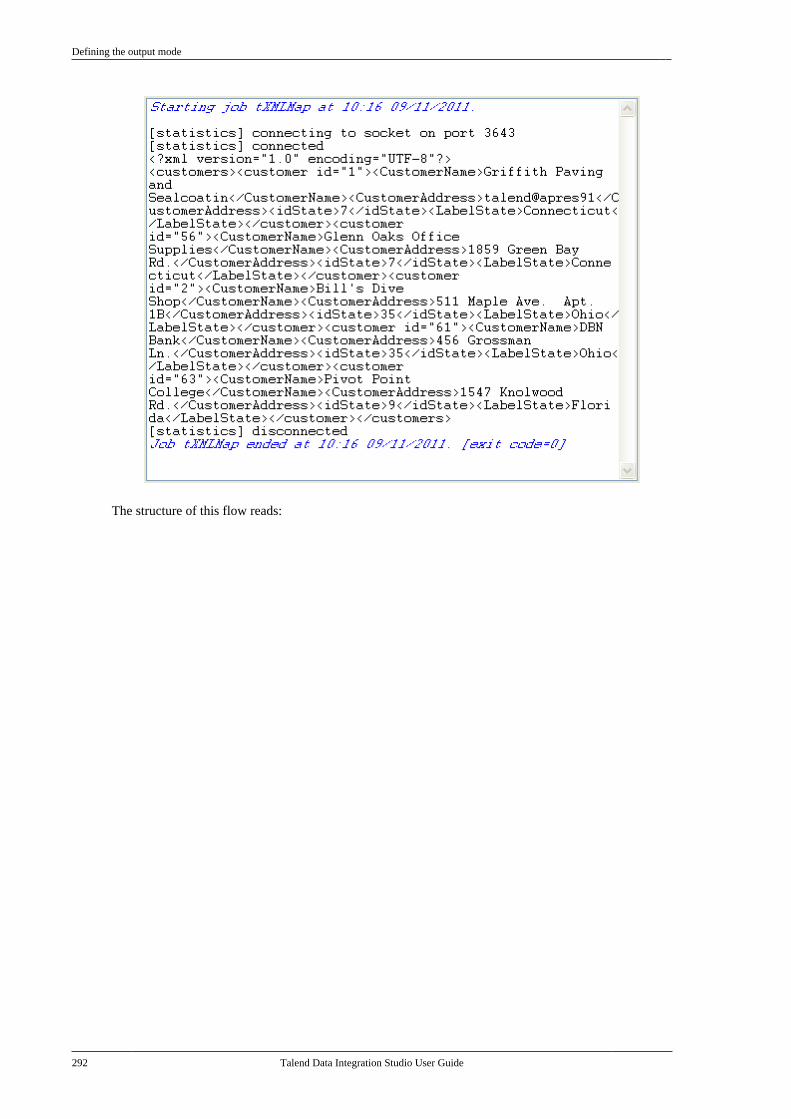
Defining the output mode
292 Talend Data Integration Studio User Guide
The structure of this flow reads:
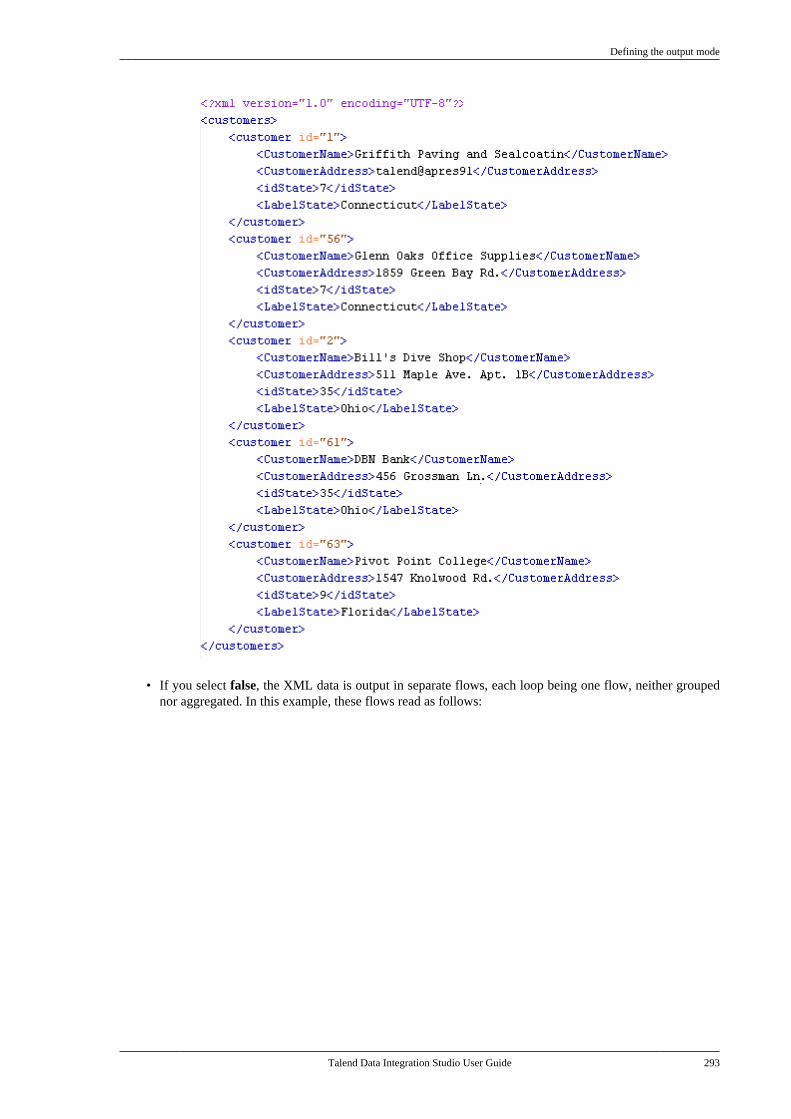
Defining the output mode
Talend Data Integration Studio User Guide 293
• If you select false, the XML data is output in separate flows, each loop being one flow, neither groupednor aggregated. In this example, these flows read as follows:
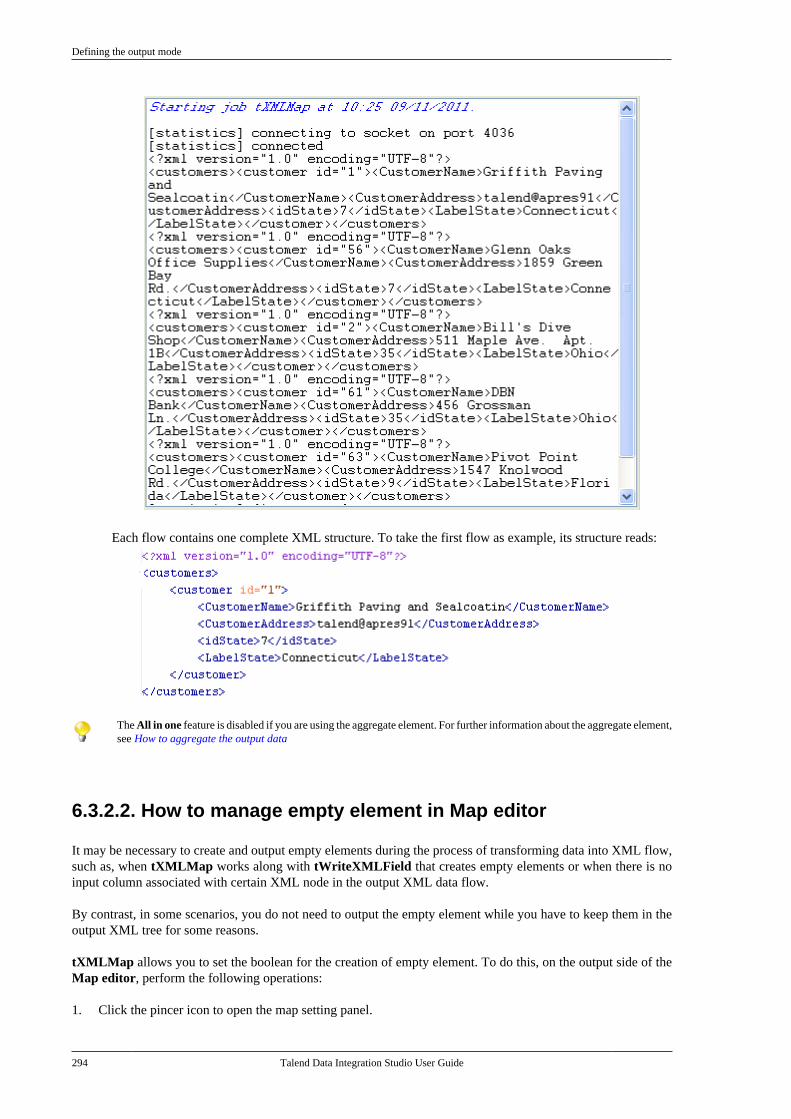
Defining the output mode
294 Talend Data Integration Studio User Guide
Each flow contains one complete XML structure. To take the first flow as example, its structure reads:
The All in one feature is disabled if you are using the aggregate element. For further information about the aggregate element,see How to aggregate the output data
6.3.2.2. How to manage empty element in Map editor
It may be necessary to create and output empty elements during the process of transforming data into XML flow,such as, when tXMLMap works along with tWriteXMLField that creates empty elements or when there is noinput column associated with certain XML node in the output XML data flow.
By contrast, in some scenarios, you do not need to output the empty element while you have to keep them in theoutput XML tree for some reasons.
tXMLMap allows you to set the boolean for the creation of empty element. To do this, on the output side of theMap editor, perform the following operations:
1. Click the pincer icon to open the map setting panel.
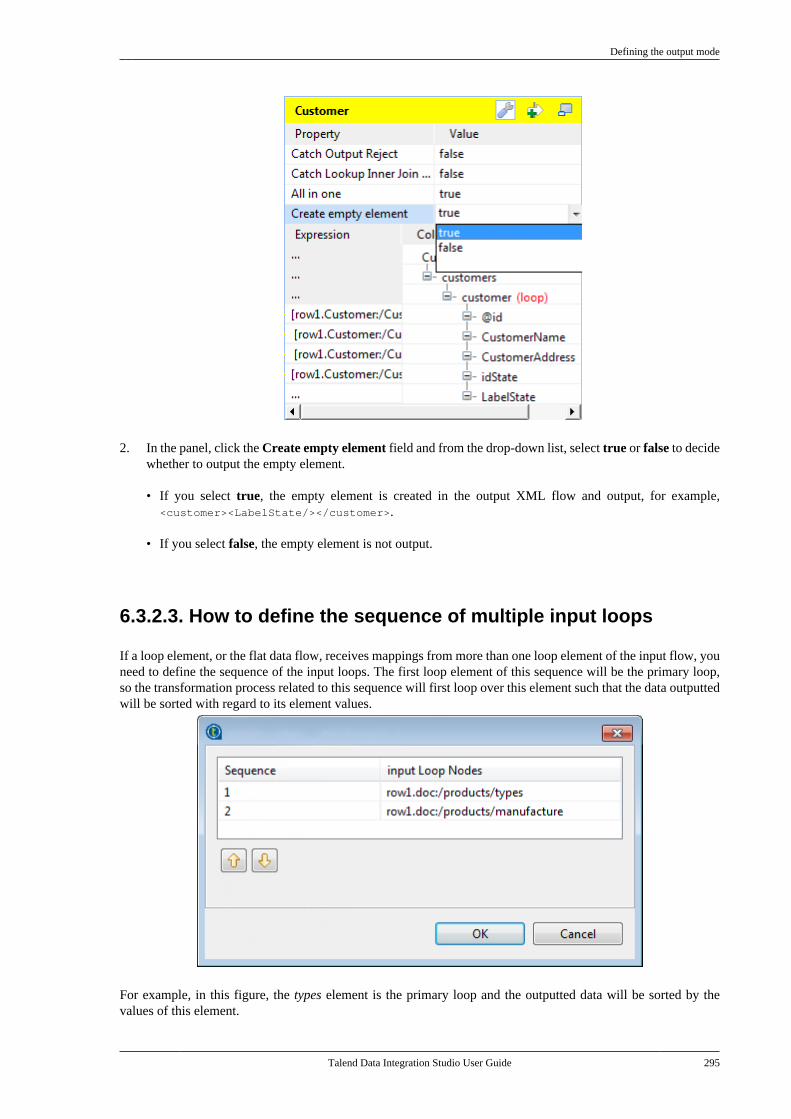
Defining the output mode
Talend Data Integration Studio User Guide 295
2. In the panel, click the Create empty element field and from the drop-down list, select true or false to decidewhether to output the empty element.
• If you select true, the empty element is created in the output XML flow and output, for example,<customer><LabelState/></customer>.
• If you select false, the empty element is not output.
6.3.2.3. How to define the sequence of multiple input loops
If a loop element, or the flat data flow, receives mappings from more than one loop element of the input flow, youneed to define the sequence of the input loops. The first loop element of this sequence will be the primary loop,so the transformation process related to this sequence will first loop over this element such that the data outputtedwill be sorted with regard to its element values.
For example, in this figure, the types element is the primary loop and the outputted data will be sorted by thevalues of this element.
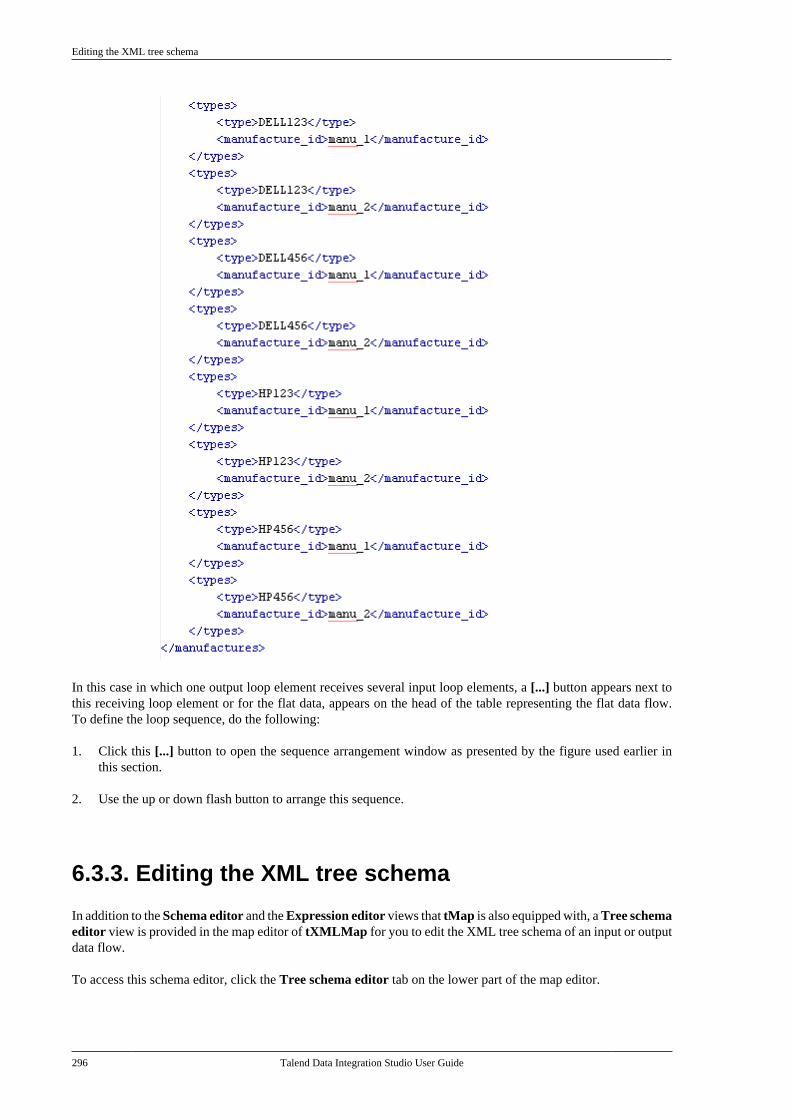
Editing the XML tree schema
296 Talend Data Integration Studio User Guide
In this case in which one output loop element receives several input loop elements, a [...] button appears next tothis receiving loop element or for the flat data, appears on the head of the table representing the flat data flow.To define the loop sequence, do the following:
1. Click this [...] button to open the sequence arrangement window as presented by the figure used earlier inthis section.
2. Use the up or down flash button to arrange this sequence.
6.3.3. Editing the XML tree schema
In addition to the Schema editor and the Expression editor views that tMap is also equipped with, a Tree schemaeditor view is provided in the map editor of tXMLMap for you to edit the XML tree schema of an input or outputdata flow.
To access this schema editor, click the Tree schema editor tab on the lower part of the map editor.
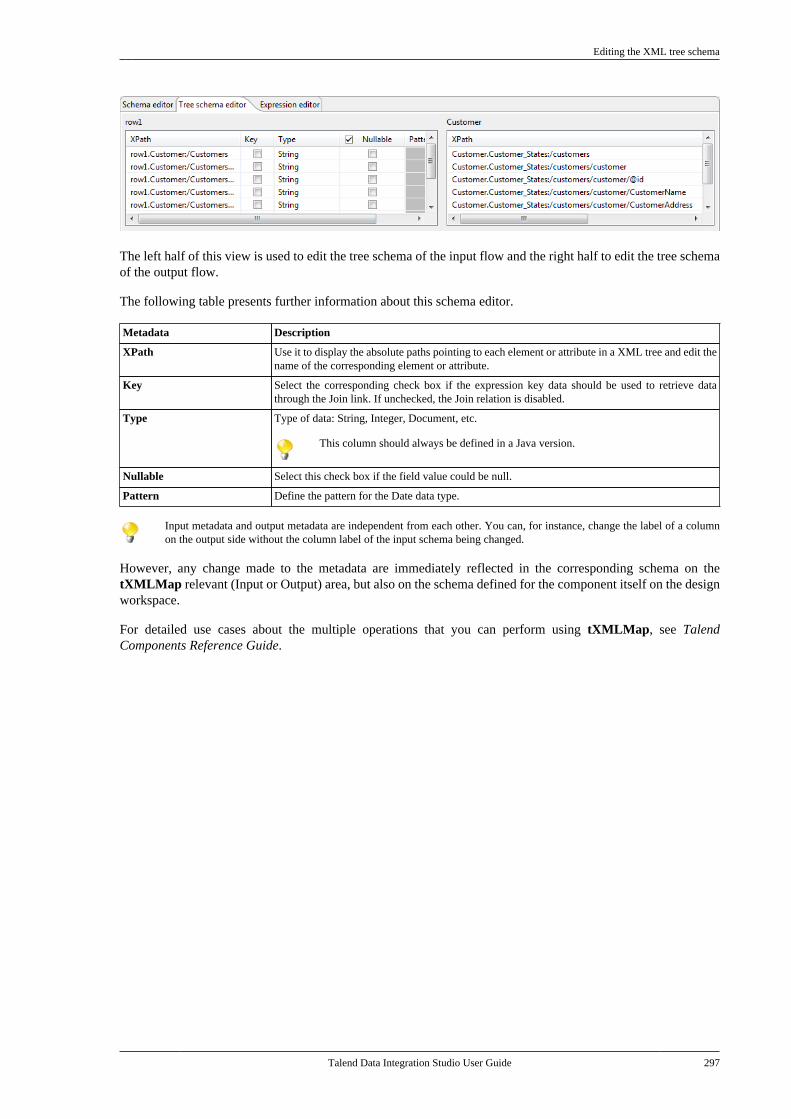
Editing the XML tree schema
Talend Data Integration Studio User Guide 297
The left half of this view is used to edit the tree schema of the input flow and the right half to edit the tree schemaof the output flow.
The following table presents further information about this schema editor.
Metadata Description
XPath Use it to display the absolute paths pointing to each element or attribute in a XML tree and edit thename of the corresponding element or attribute.
Key Select the corresponding check box if the expression key data should be used to retrieve datathrough the Join link. If unchecked, the Join relation is disabled.
Type Type of data: String, Integer, Document, etc.
This column should always be defined in a Java version.
Nullable Select this check box if the field value could be null.
Pattern Define the pattern for the Date data type.
Input metadata and output metadata are independent from each other. You can, for instance, change the label of a columnon the output side without the column label of the input schema being changed.
However, any change made to the metadata are immediately reflected in the corresponding schema on thetXMLMap relevant (Input or Output) area, but also on the schema defined for the component itself on the designworkspace.
For detailed use cases about the multiple operations that you can perform using tXMLMap, see TalendComponents Reference Guide.

Talend Data Integration Studio User Guide
Talend Data Integration Studio User Guide
Chapter 7. Managing MetadataMetadata in Talend Studio is definitional data that provides information about or documentation of other datamanaged within Talend Studio.
In the Integration perspective of the studio, the Metadata folder stores reusable information on files, databases,and/or systems that you need to create your Jobs.
Various corresponding wizards help you store these pieces of information and use them later to set the connectionparameters of the relevant input or output components, but you can also store the data description called "schemas"in your studio.
Wizards' procedures slightly differ depending on the type of connection chosen.
This chapter provides procedures to create and manage various metadata items in the Repository that can be usedin all your Job designs. For how to use a Repository metadata item, see How to use centralized metadata in aJob and How to set a repository schema.
Before starting any metadata management processes, you need to be familiar with the Graphical User Interface(GUI) of your studio. For more information, see the appendix describing GUI elements.
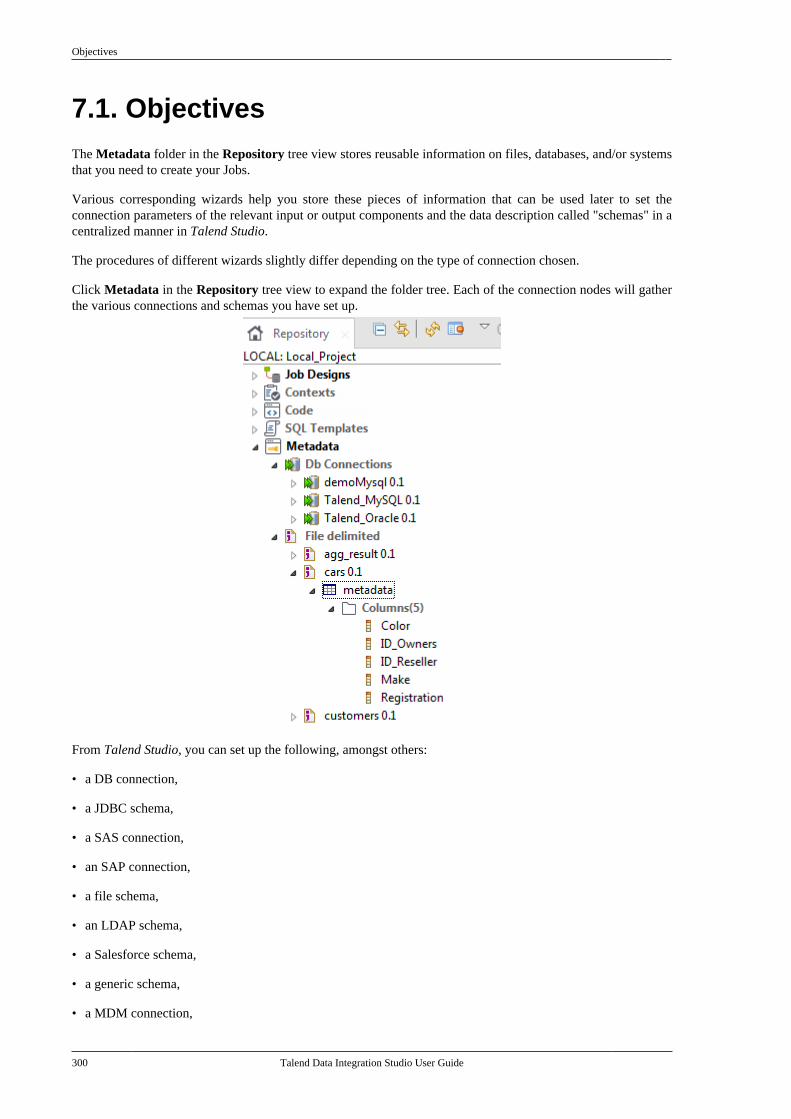
Objectives
300 Talend Data Integration Studio User Guide
7.1. ObjectivesThe Metadata folder in the Repository tree view stores reusable information on files, databases, and/or systemsthat you need to create your Jobs.
Various corresponding wizards help you store these pieces of information that can be used later to set theconnection parameters of the relevant input or output components and the data description called "schemas" in acentralized manner in Talend Studio.
The procedures of different wizards slightly differ depending on the type of connection chosen.
Click Metadata in the Repository tree view to expand the folder tree. Each of the connection nodes will gatherthe various connections and schemas you have set up.
From Talend Studio, you can set up the following, amongst others:
• a DB connection,
• a JDBC schema,
• a SAS connection,
• an SAP connection,
• a file schema,
• an LDAP schema,
• a Salesforce schema,
• a generic schema,
• a MDM connection,
Centralizing database metadata
Talend Data Integration Studio User Guide 301
• a Drools connection,
• a WSDL schema,
• a Validation rule,
• a FTP connection,
• a HL7 connection.
7.2. Centralizing database metadataIf you often need to connect to database tables of any kind, then you may want to centralize the connectioninformation details in the Metadata folder in the Repository tree view.
This setup procedure is made of two separate but closely related major tasks:
1. Set up a database connection,
2. Retrieve the table schemas.
The sections below describe how to complete the tasks in detail.
Prerequisites: Talend Studio requires specific third-party Java libraries or database drivers (.jar files) to beinstalled in order to connect to sources or targets. Due to license restrictions, Talend may not be able to shipcertain required libraries or drivers; in that situation, the connection wizard to be presented in the followingsections displays related information to help you identify and install the libraries or drivers in question. For moreinformation, see the Talend Installation Guide.
7.2.1. Setting up a database connection
To create a database connection from scratch, expand Metadata in the Repository tree view, right-click DbConnections and select Create connection from the contextual menu to open the database connection setupwizard.
To centralize database connection parameters you have defined in a Job, click the icon in the Basic settingsview of the relevant database component with its Property Type set to Built-in to open the database connectionsetup wizard.
To modify an existing database connection, right-click the connection item from the Repository tree view, andselect Edit connection to open the connection setup wizard.
Then define the general properties and parameters of the connection in the wizard.
7.2.1.1. Defining general properties
1. In the connection setup wizard, give your connection a name in the Name field. This name will appear as thedatabase connection name under the Metadata node of the Repository tree view.
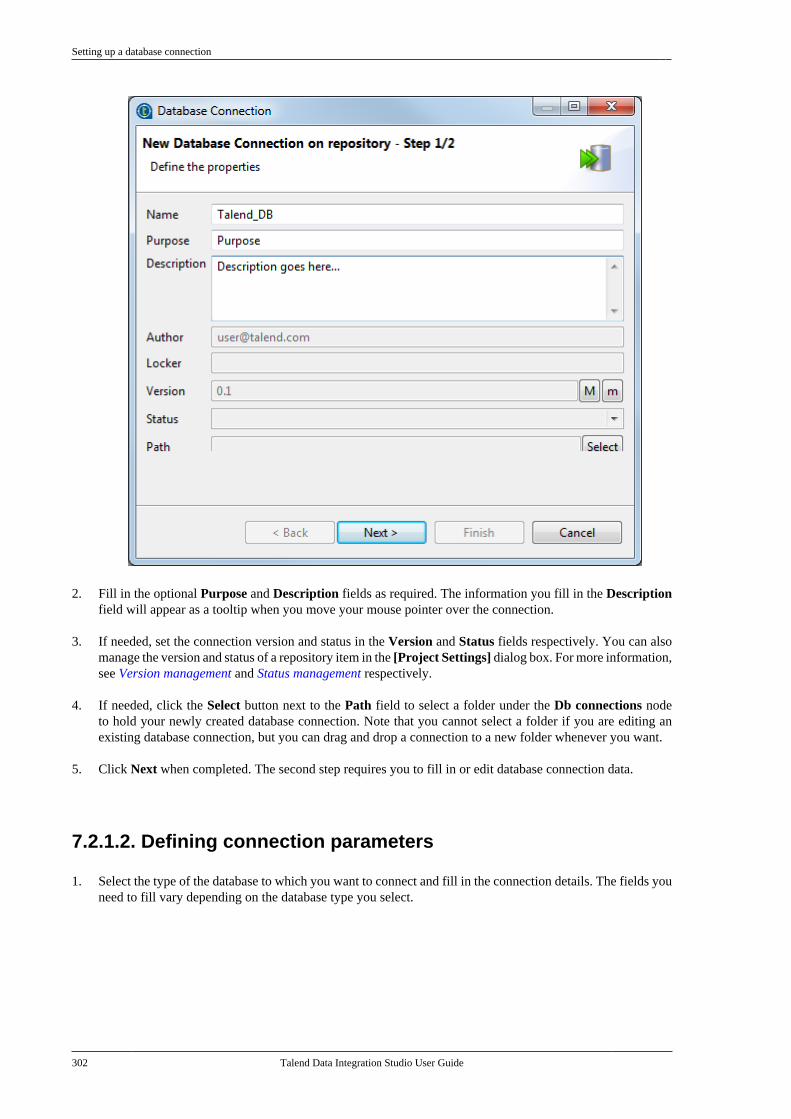
Setting up a database connection
302 Talend Data Integration Studio User Guide
2. Fill in the optional Purpose and Description fields as required. The information you fill in the Descriptionfield will appear as a tooltip when you move your mouse pointer over the connection.
3. If needed, set the connection version and status in the Version and Status fields respectively. You can alsomanage the version and status of a repository item in the [Project Settings] dialog box. For more information,see Version management and Status management respectively.
4. If needed, click the Select button next to the Path field to select a folder under the Db connections nodeto hold your newly created database connection. Note that you cannot select a folder if you are editing anexisting database connection, but you can drag and drop a connection to a new folder whenever you want.
5. Click Next when completed. The second step requires you to fill in or edit database connection data.
7.2.1.2. Defining connection parameters
1. Select the type of the database to which you want to connect and fill in the connection details. The fields youneed to fill vary depending on the database type you select.

Setting up a database connection
Talend Data Integration Studio User Guide 303
When you are creating the database connection of some databases like AS/400, HSQDB, Informix, Microsoft SQL,MySQL, Oracle, Sybase, or Teradata, you can specify additional connection properties through the Additionalparameters field in the Database Settings area.
In Talend Studio 6.0 and onwards, due to limitations of Java 8, ODBC is no longer supported for Access databaseconnections, and the only supported database driver type is JDBC.
Also due to Java 8 limitations, you cannot create Generic ODBC or Microsoft SQL Server (ODBC) connections inTalend Studio 6.0 and onwards unless you import such connections created in an earlier version of Talend Studio -in that case, you can create Generic ODBC and Microsoft SQL Server (ODBC) connections but they work only withJava 7.
For an MS SQL Server (JDBC) connection, when Microsoft is selected from the Db Version list, you need todownload the Microsoft JDBC driver for SQL Server on Microsoft Download Center, unpack the downloaded zipfile, choose a jar in the unzipped folder based on your JRE version, rename the jar to mssql-jdbc.jar and installit manually. For more information about choosing the jar, see the System Requirements information on MicrosoftDownload Center.
If you need to connect to Hive, we recommend using one of the Talend solutions with Big Data.

Setting up a database connection
304 Talend Data Integration Studio User Guide
If you are creating an MSSQL connection, in order to be able to retrieve all table schemas in the database, be sure to:
- enter dbo in the Schema field if you are connecting to MSSQL 2000,
- remove dbo from the Schema field if you are connecting to MSSQL 2005/2008.
2. Click Check to check your connection.
If the connection fails, a message box is displayed to indicate this failure and from that message box. Fromthat message box, click the Details button to read further information.
If a missing library or driver (.jar file) has provoked this failure, you can read that from the Details paneland then install the specified library or driver.
The Studio provides multiple approaches to automate the installation. For further information, see the chapterdescribing how to install external modules of the Talend Installation Guide.
3. If you are creating a Teradata connection, select Yes for the User SQL Mode option at the bottom of thewizard to use the SQL queries to retrieve metadata. The JDBC driver is not recommended with this databasebecause of possible bad performance.
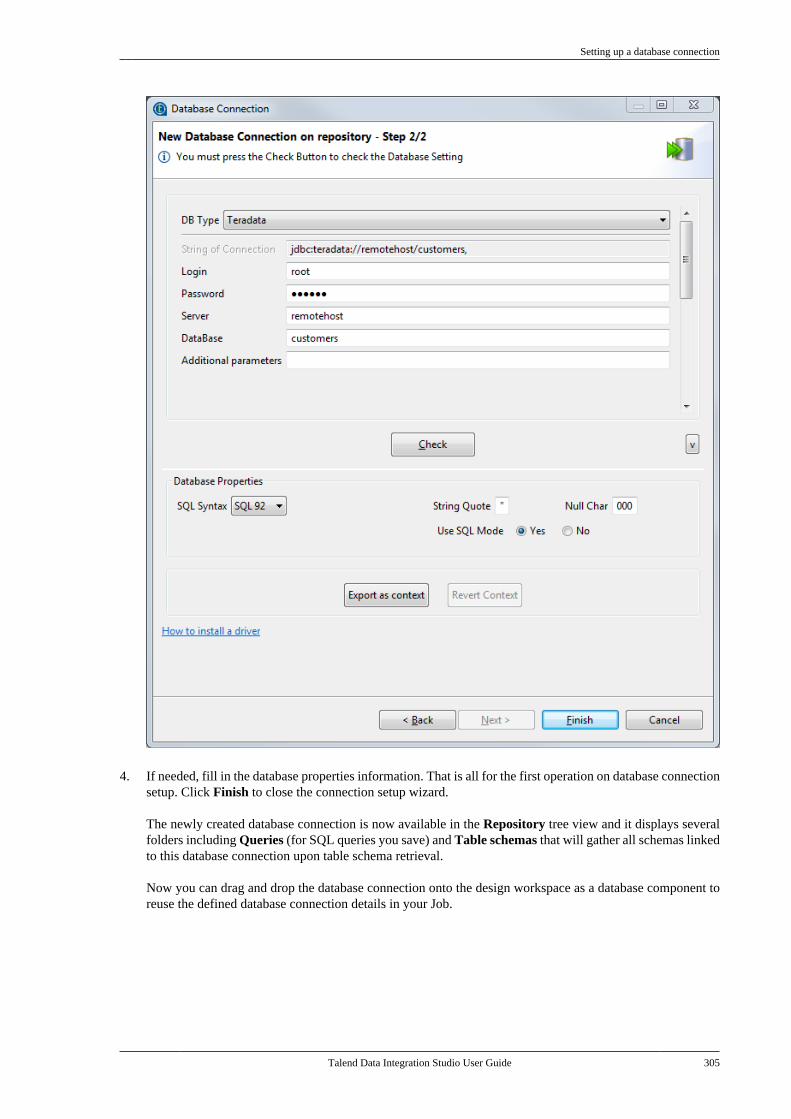
Setting up a database connection
Talend Data Integration Studio User Guide 305
4. If needed, fill in the database properties information. That is all for the first operation on database connectionsetup. Click Finish to close the connection setup wizard.
The newly created database connection is now available in the Repository tree view and it displays severalfolders including Queries (for SQL queries you save) and Table schemas that will gather all schemas linkedto this database connection upon table schema retrieval.
Now you can drag and drop the database connection onto the design workspace as a database component toreuse the defined database connection details in your Job.
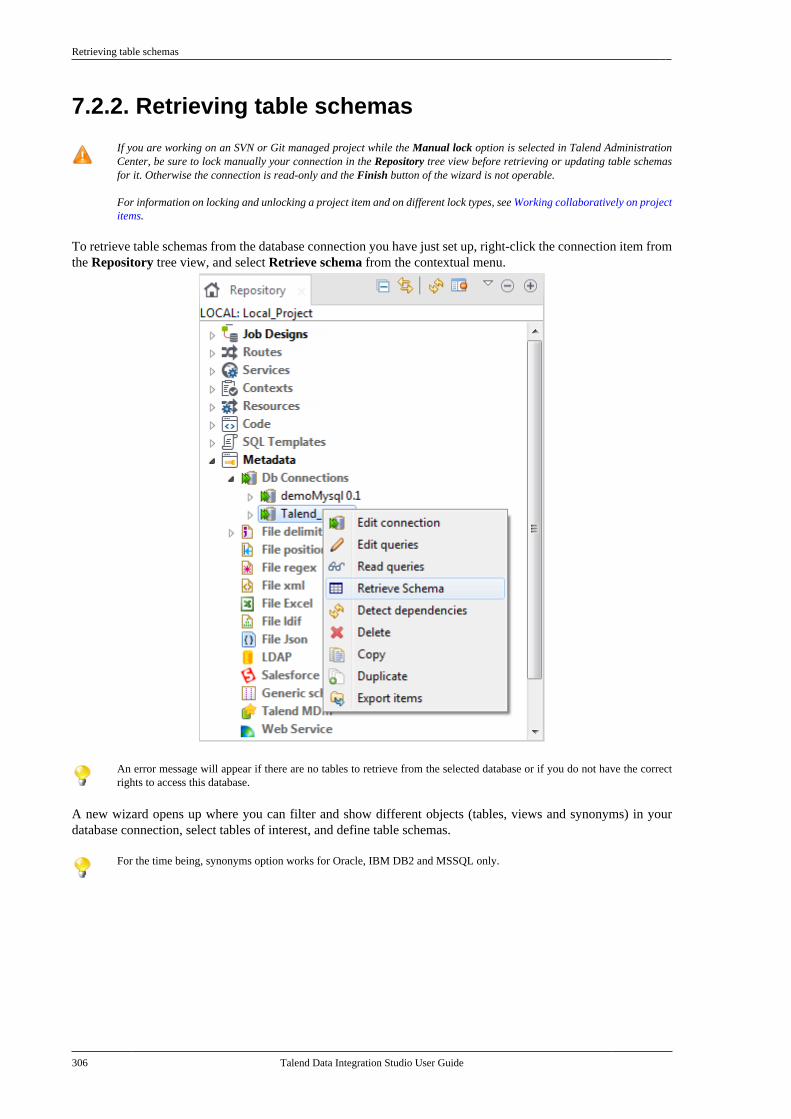
Retrieving table schemas
306 Talend Data Integration Studio User Guide
7.2.2. Retrieving table schemas
If you are working on an SVN or Git managed project while the Manual lock option is selected in Talend AdministrationCenter, be sure to lock manually your connection in the Repository tree view before retrieving or updating table schemasfor it. Otherwise the connection is read-only and the Finish button of the wizard is not operable.
For information on locking and unlocking a project item and on different lock types, see Working collaboratively on projectitems.
To retrieve table schemas from the database connection you have just set up, right-click the connection item fromthe Repository tree view, and select Retrieve schema from the contextual menu.
An error message will appear if there are no tables to retrieve from the selected database or if you do not have the correctrights to access this database.
A new wizard opens up where you can filter and show different objects (tables, views and synonyms) in yourdatabase connection, select tables of interest, and define table schemas.
For the time being, synonyms option works for Oracle, IBM DB2 and MSSQL only.
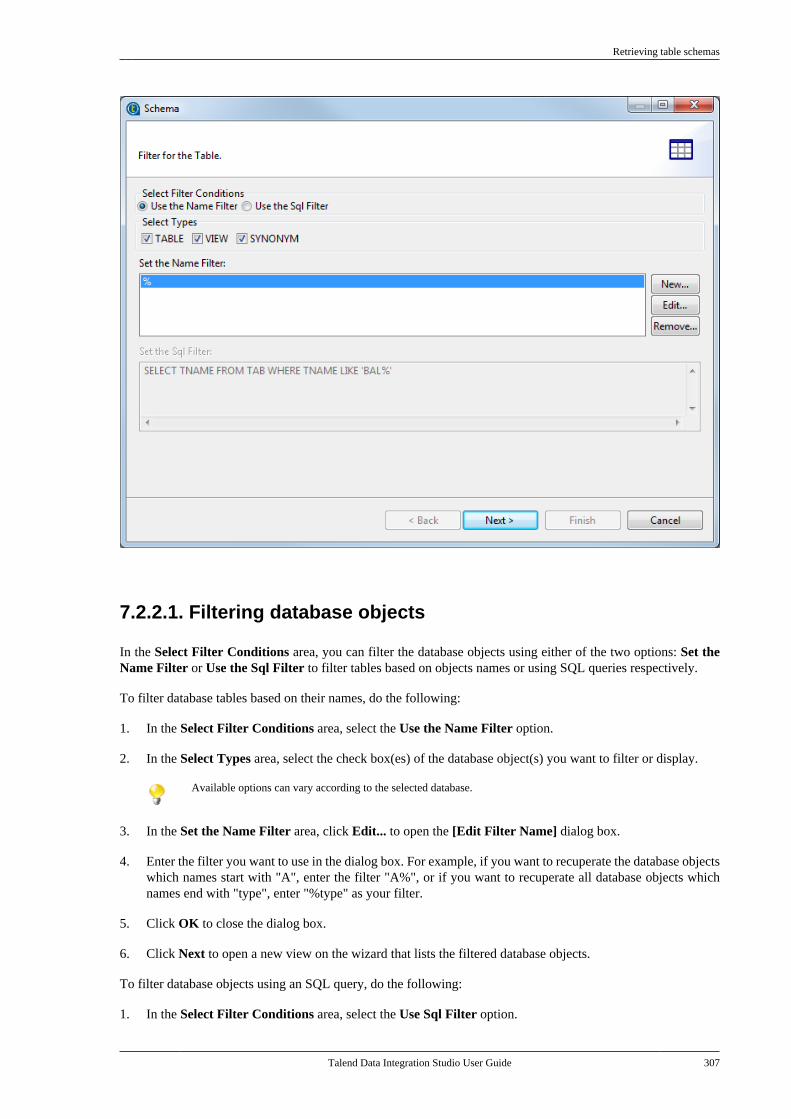
Retrieving table schemas
Talend Data Integration Studio User Guide 307
7.2.2.1. Filtering database objects
In the Select Filter Conditions area, you can filter the database objects using either of the two options: Set theName Filter or Use the Sql Filter to filter tables based on objects names or using SQL queries respectively.
To filter database tables based on their names, do the following:
1. In the Select Filter Conditions area, select the Use the Name Filter option.
2. In the Select Types area, select the check box(es) of the database object(s) you want to filter or display.
Available options can vary according to the selected database.
3. In the Set the Name Filter area, click Edit... to open the [Edit Filter Name] dialog box.
4. Enter the filter you want to use in the dialog box. For example, if you want to recuperate the database objectswhich names start with "A", enter the filter "A%", or if you want to recuperate all database objects whichnames end with "type", enter "%type" as your filter.
5. Click OK to close the dialog box.
6. Click Next to open a new view on the wizard that lists the filtered database objects.
To filter database objects using an SQL query, do the following:
1. In the Select Filter Conditions area, select the Use Sql Filter option.
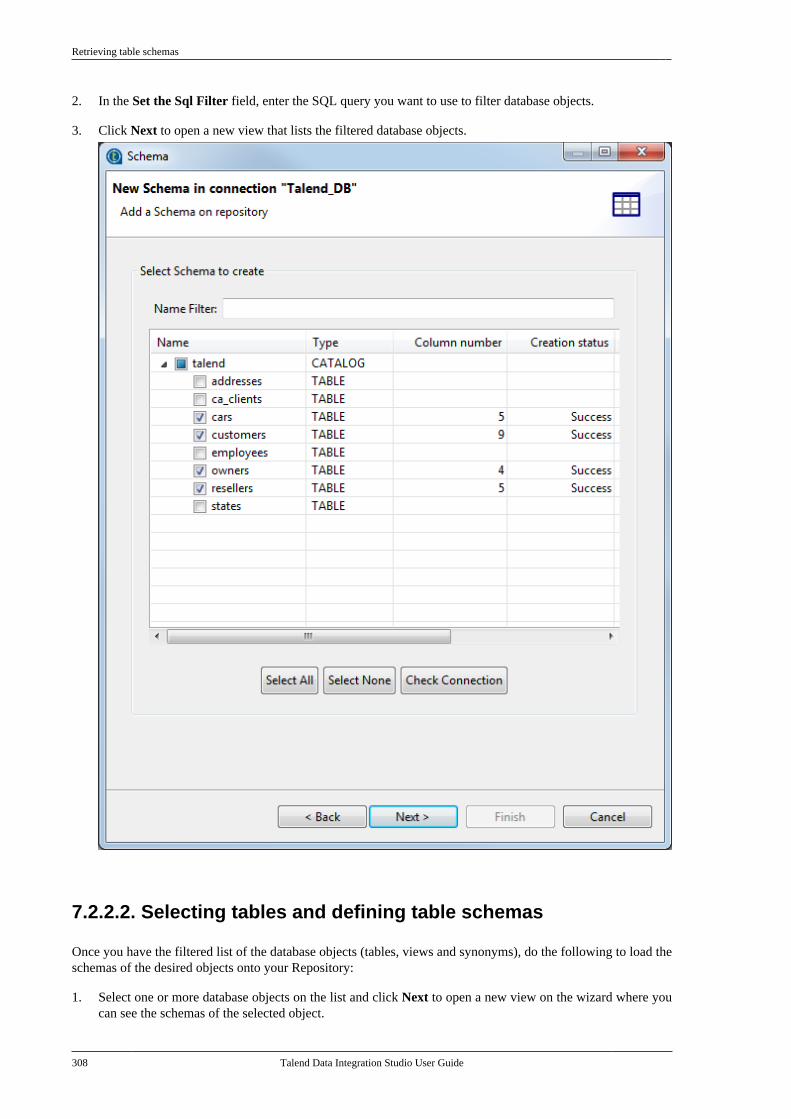
Retrieving table schemas
308 Talend Data Integration Studio User Guide
2. In the Set the Sql Filter field, enter the SQL query you want to use to filter database objects.
3. Click Next to open a new view that lists the filtered database objects.
7.2.2.2. Selecting tables and defining table schemas
Once you have the filtered list of the database objects (tables, views and synonyms), do the following to load theschemas of the desired objects onto your Repository:
1. Select one or more database objects on the list and click Next to open a new view on the wizard where youcan see the schemas of the selected object.
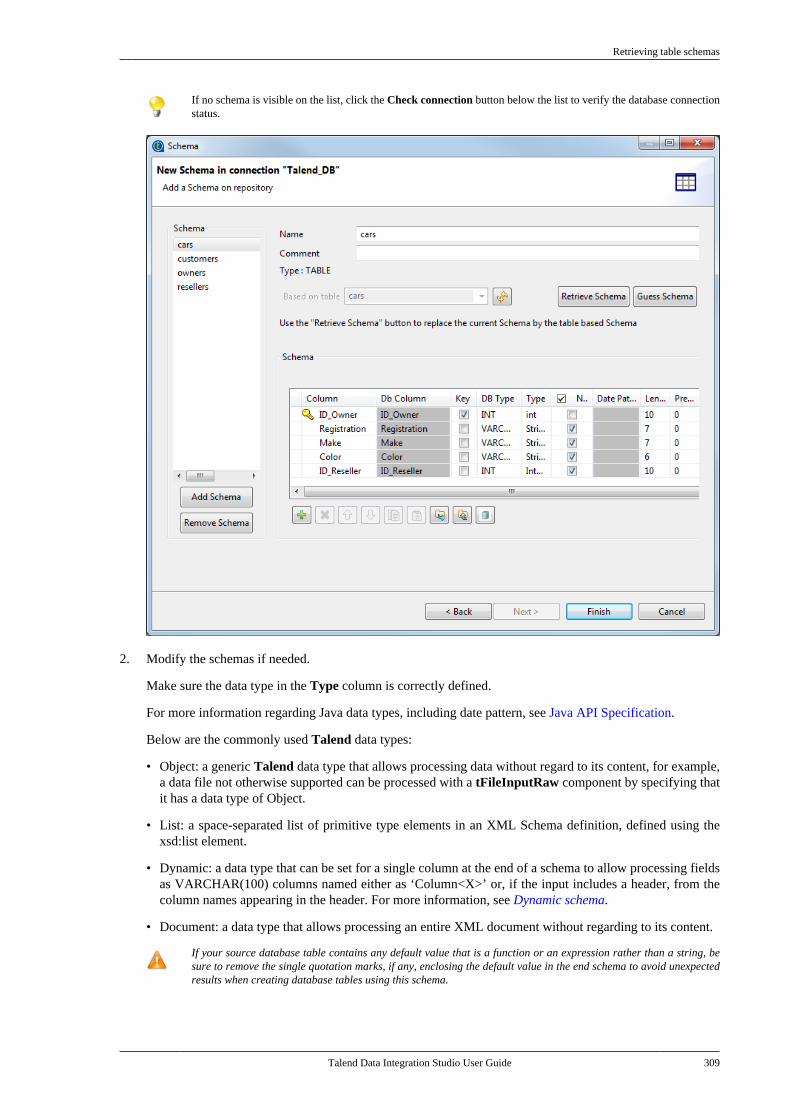
Retrieving table schemas
Talend Data Integration Studio User Guide 309
If no schema is visible on the list, click the Check connection button below the list to verify the database connectionstatus.
2. Modify the schemas if needed.
Make sure the data type in the Type column is correctly defined.
For more information regarding Java data types, including date pattern, see Java API Specification.
Below are the commonly used Talend data types:
• Object: a generic Talend data type that allows processing data without regard to its content, for example,a data file not otherwise supported can be processed with a tFileInputRaw component by specifying thatit has a data type of Object.
• List: a space-separated list of primitive type elements in an XML Schema definition, defined using thexsd:list element.
• Dynamic: a data type that can be set for a single column at the end of a schema to allow processing fieldsas VARCHAR(100) columns named either as ‘Column<X>’ or, if the input includes a header, from thecolumn names appearing in the header. For more information, see Dynamic schema.
• Document: a data type that allows processing an entire XML document without regarding to its content.
If your source database table contains any default value that is a function or an expression rather than a string, besure to remove the single quotation marks, if any, enclosing the default value in the end schema to avoid unexpectedresults when creating database tables using this schema.
Centralizing JDBC metadata
310 Talend Data Integration Studio User Guide
For more information, see https://help.talend.com/display/KB/Verifying+default+values+in+a+retrieved+schema.
By default, the schema displayed on the Schema panel is based on the first table selected in the list of schemasloaded (left panel). You can change the name of the schema and according to your needs. You can alsocustomize the schema structure in the schema panel.
The tool bar allows you to add, remove or move columns in your schema. In addition, you can load an XMLschema from a file or export the current schema as XML.
To retrieve a schema based on one of the loaded table schemas, select the DB table schema name in the drop-down list and click Retrieve schema. Note that the retrieved schema then overwrites any current schemaand does not retain any custom edits.
When done, click Finish to complete the database schema creation. All the retrieved schemas are displayedin the Table schemas sub-folder under the relevant database connection node.
Now you can drag and drop any table schema of the database connection from the Repository tree view ontothe design workspace as a new database component or onto an existing component to reuse the metadata. Formore information, see How to use centralized metadata in a Job and How to set a repository schema.
7.3. Centralizing JDBC metadataTo centralize DB table based metadata into a JDBC connection under the Metadata node of the Repository treeview, the procedure is made of two separate but closely related tasks:
1. Set up a JDBC connection,
2. Retrieve the table schemas.
The sections below describe how to complete the tasks in detail.
7.3.1. Setting up a JDBC connection
1. To create a JDBC connection from scratch, expand Metadata in the Repository tree view, right-click DbConnections and select Create connection from the contextual menu to open the database connection setupwizard.
To centralize database connection parameters you have defined in a Job into a JDBC connection, click the
icon in the Basic settings view of the relevant database component with its Property Type set to Built-in to open the database connection setup wizard.
To modify an existing JDBC connection, right-click the connection item from the Repository tree view, andselect Edit connection to open the connection setup wizard.
2. Fill in the schema generic information, such as the connection Name and Description, and then click Nextto proceed to define the connection details.
For further information, see the section on defining general properties in Setting up a database connection.
3. Select General JDBC from the DB Type list.
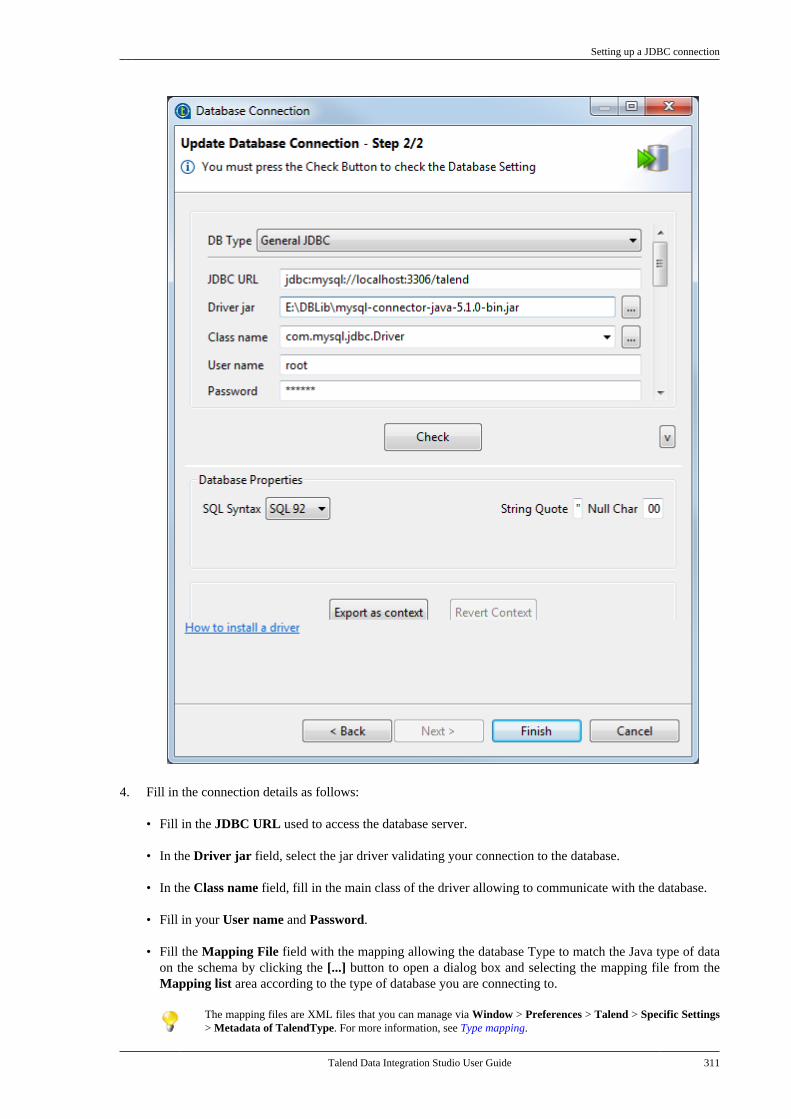
Setting up a JDBC connection
Talend Data Integration Studio User Guide 311
4. Fill in the connection details as follows:
• Fill in the JDBC URL used to access the database server.
• In the Driver jar field, select the jar driver validating your connection to the database.
• In the Class name field, fill in the main class of the driver allowing to communicate with the database.
• Fill in your User name and Password.
• Fill the Mapping File field with the mapping allowing the database Type to match the Java type of dataon the schema by clicking the [...] button to open a dialog box and selecting the mapping file from theMapping list area according to the type of database you are connecting to.
The mapping files are XML files that you can manage via Window > Preferences > Talend > Specific Settings> Metadata of TalendType. For more information, see Type mapping.
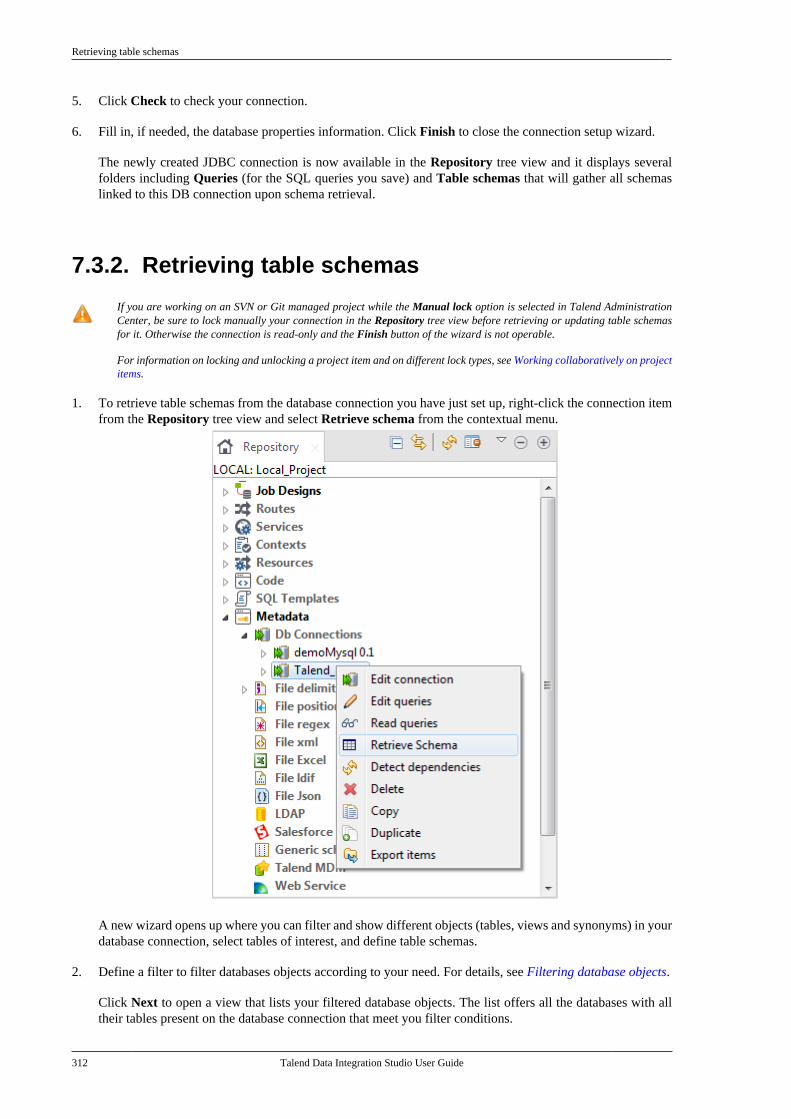
Retrieving table schemas
312 Talend Data Integration Studio User Guide
5. Click Check to check your connection.
6. Fill in, if needed, the database properties information. Click Finish to close the connection setup wizard.
The newly created JDBC connection is now available in the Repository tree view and it displays severalfolders including Queries (for the SQL queries you save) and Table schemas that will gather all schemaslinked to this DB connection upon schema retrieval.
7.3.2. Retrieving table schemas
If you are working on an SVN or Git managed project while the Manual lock option is selected in Talend AdministrationCenter, be sure to lock manually your connection in the Repository tree view before retrieving or updating table schemasfor it. Otherwise the connection is read-only and the Finish button of the wizard is not operable.
For information on locking and unlocking a project item and on different lock types, see Working collaboratively on projectitems.
1. To retrieve table schemas from the database connection you have just set up, right-click the connection itemfrom the Repository tree view and select Retrieve schema from the contextual menu.
A new wizard opens up where you can filter and show different objects (tables, views and synonyms) in yourdatabase connection, select tables of interest, and define table schemas.
2. Define a filter to filter databases objects according to your need. For details, see Filtering database objects.
Click Next to open a view that lists your filtered database objects. The list offers all the databases with alltheir tables present on the database connection that meet you filter conditions.
Centralizing SAS metadata
Talend Data Integration Studio User Guide 313
If no database is visible on the list, click Check connection to verify the database connection.
3. Select one or more tables on the list to load them onto your repository file system. Your repository schemaswill be based on these tables.
4. Click Next. On the next window, four setting panels help you define the schemas to create. Modify theschemas if needed.
Make sure the data type in the Type column is correctly defined.
For more information regarding Java data types, including date pattern, see Java API Specification.
Below are the commonly used Talend data types:
• Object: a generic Talend data type that allows processing data without regard to its content, for example,a data file not otherwise supported can be processed with a tFileInputRaw component by specifying thatit has a data type of Object.
• List: a space-separated list of primitive type elements in an XML Schema definition, defined using thexsd:list element.
• Dynamic: a data type that can be set for a single column at the end of a schema to allow processing fieldsas VARCHAR(100) columns named either as ‘Column<X>’ or, if the input includes a header, from thecolumn names appearing in the header. For more information, see Dynamic schema.
• Document: a data type that allows processing an entire XML document without regarding to its content.
If your source database table contains any default value that is a function or an expression rather than a string, besure to remove the single quotation marks, if any, enclosing the default value in the end schema to avoid unexpectedresults when creating database tables using this schema.
For more information, see https://help.talend.com/display/KB/Verifying+default+values+in+a+retrieved+schema.
By default, the schema displayed on the Schema panel is based on the first table selected in the list of schemasloaded (left panel). You can change the name of the schema and according to your needs, you can alsocustomize the schema structure in the schema panel.
The tool bar allows you to add, remove or move columns in your schema. In addition, you can load an XMLschema from a file or export the current schema as XML.
To retrieve a schema based on one of the loaded table schemas, select the database table schema name inthe drop-down list and click Retrieve schema. Note that the retrieved schema then overwrites any currentschema and does not retain any custom edits.
When done, click Finish to complete the database schema creation. All the retrieved schemas are displayedin the Table schemas sub-folder under the relevant database connection node.
Now you can drag and drop any table schema of the database connection from the Repository tree view ontothe design workspace as a new database component or onto an existing component to reuse the metadata. Formore information, see How to use centralized metadata in a Job and How to set a repository schema.
7.4. Centralizing SAS metadataIf you often need to connect to a remote SAS system, you can centralize the connection information in theRepository.
To centralize the metadata information of a SAS connection in the Repository, you need to complete two majortasks:
Setting up a SAS connection
314 Talend Data Integration Studio User Guide
1. Set up a SAS connection,
2. Retrieve the database schemas.
Prerequisites:
• Talend Studio requires specific third-party Java libraries or database drivers (.jar files) to be installed in orderto connect to sources or targets. Due to license restrictions, Talend may not be able to ship certain requiredlibraries or drivers; in that situation, the connection wizard to be presented in the following sections displaysrelated information to help you identify and install the libraries or drivers in question. For more information,see the Talend Installation Guide.
• Before carrying on the procedure below to configure your SAS connection, make sure that you retrieve yourmetadata from the SAS server and export it in XML format.
7.4.1. Setting up a SAS connection
1. In the Repository tree view of Talend Studio, right-click DB Connections under the Metadata node andselect Create connection from the contextual menu to open the [Database Connection] wizard.
2. Fill in the general properties of the connection, such as Name and Description and click Next to open a newview on the wizard to define the connection details.
For further information, see the section on defining general properties in Setting up a database connection.
3. In the DB Type field of the [Database Connection] wizard, select SAS and fill in the fields that follow withSAS connection information.
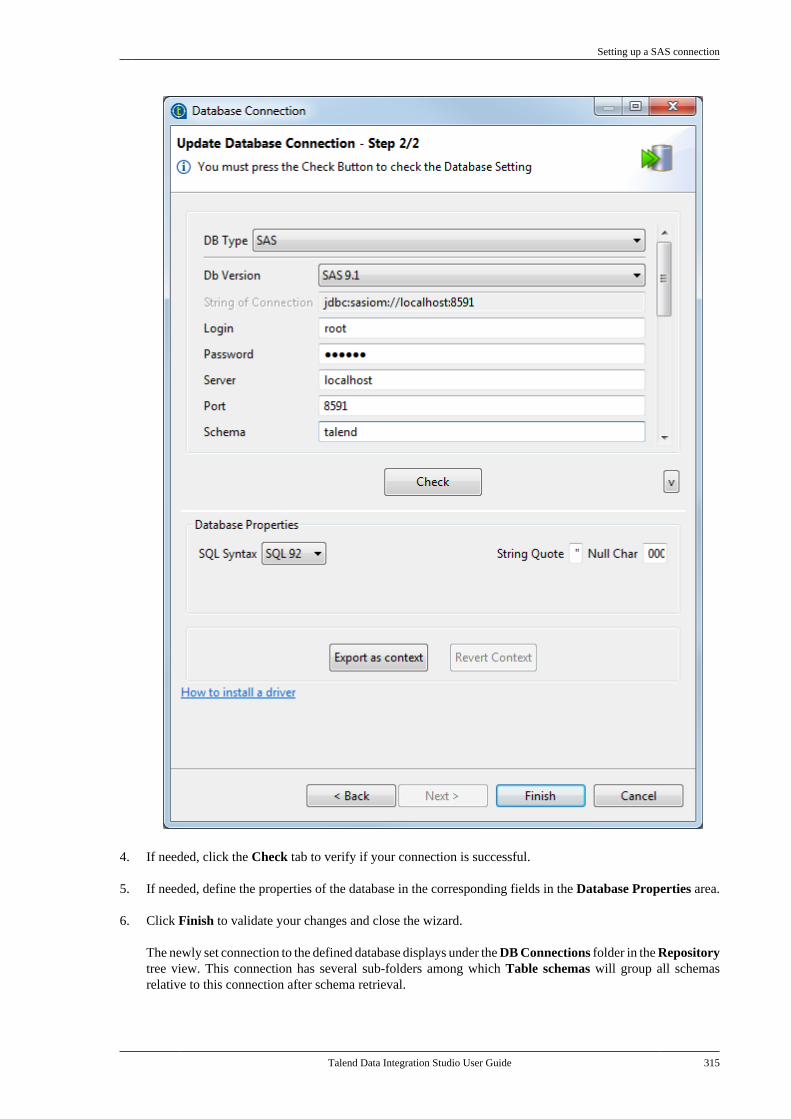
Setting up a SAS connection
Talend Data Integration Studio User Guide 315
4. If needed, click the Check tab to verify if your connection is successful.
5. If needed, define the properties of the database in the corresponding fields in the Database Properties area.
6. Click Finish to validate your changes and close the wizard.
The newly set connection to the defined database displays under the DB Connections folder in the Repositorytree view. This connection has several sub-folders among which Table schemas will group all schemasrelative to this connection after schema retrieval.
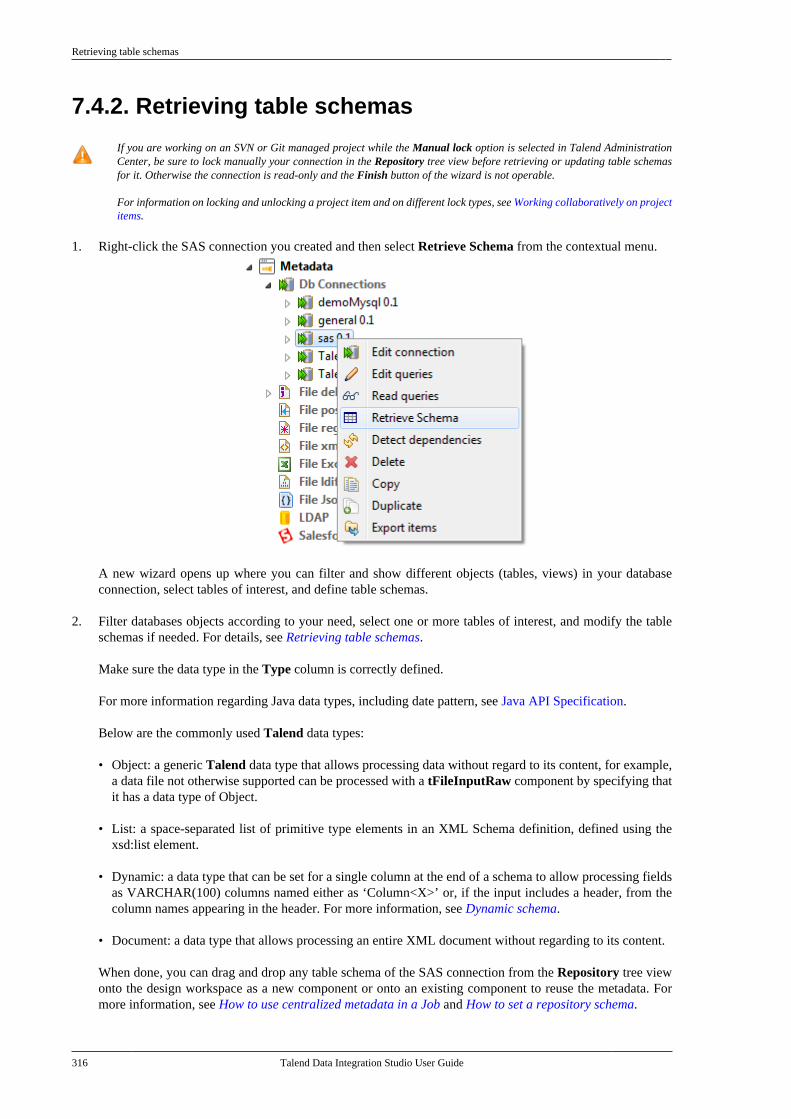
Retrieving table schemas
316 Talend Data Integration Studio User Guide
7.4.2. Retrieving table schemas
If you are working on an SVN or Git managed project while the Manual lock option is selected in Talend AdministrationCenter, be sure to lock manually your connection in the Repository tree view before retrieving or updating table schemasfor it. Otherwise the connection is read-only and the Finish button of the wizard is not operable.
For information on locking and unlocking a project item and on different lock types, see Working collaboratively on projectitems.
1. Right-click the SAS connection you created and then select Retrieve Schema from the contextual menu.
A new wizard opens up where you can filter and show different objects (tables, views) in your databaseconnection, select tables of interest, and define table schemas.
2. Filter databases objects according to your need, select one or more tables of interest, and modify the tableschemas if needed. For details, see Retrieving table schemas.
Make sure the data type in the Type column is correctly defined.
For more information regarding Java data types, including date pattern, see Java API Specification.
Below are the commonly used Talend data types:
• Object: a generic Talend data type that allows processing data without regard to its content, for example,a data file not otherwise supported can be processed with a tFileInputRaw component by specifying thatit has a data type of Object.
• List: a space-separated list of primitive type elements in an XML Schema definition, defined using thexsd:list element.
• Dynamic: a data type that can be set for a single column at the end of a schema to allow processing fieldsas VARCHAR(100) columns named either as ‘Column<X>’ or, if the input includes a header, from thecolumn names appearing in the header. For more information, see Dynamic schema.
• Document: a data type that allows processing an entire XML document without regarding to its content.
When done, you can drag and drop any table schema of the SAS connection from the Repository tree viewonto the design workspace as a new component or onto an existing component to reuse the metadata. Formore information, see How to use centralized metadata in a Job and How to set a repository schema.
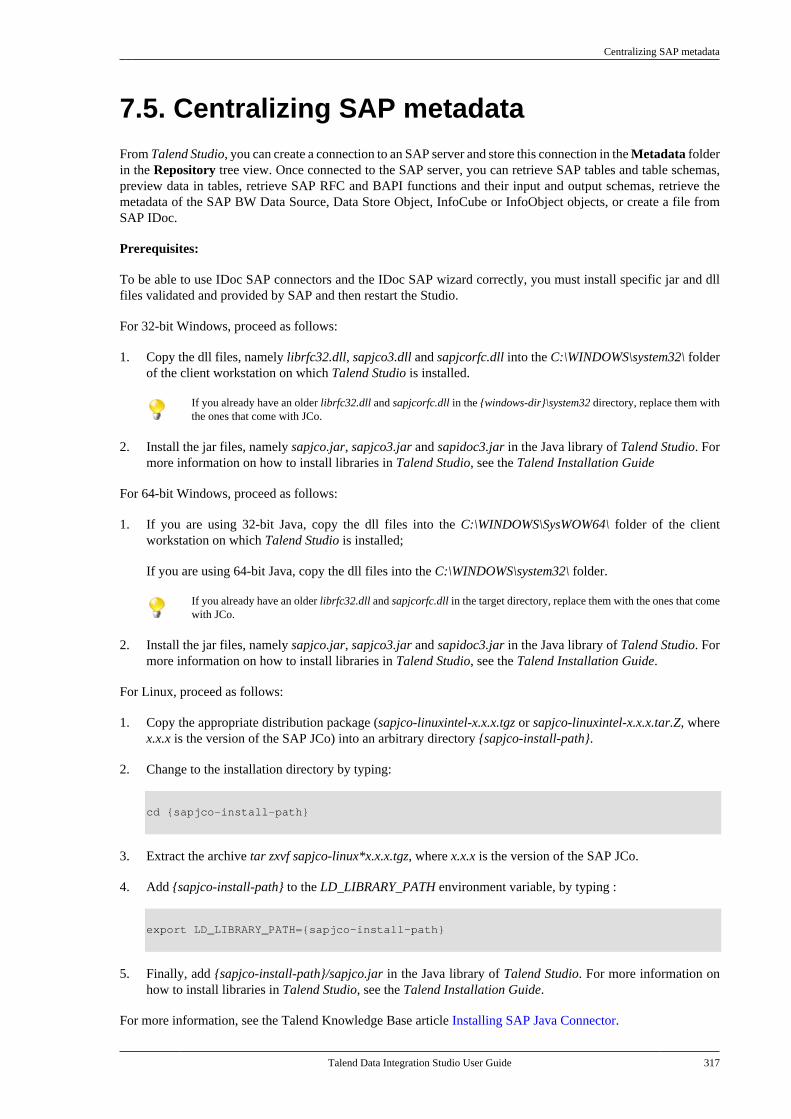
Centralizing SAP metadata
Talend Data Integration Studio User Guide 317
7.5. Centralizing SAP metadataFrom Talend Studio, you can create a connection to an SAP server and store this connection in the Metadata folderin the Repository tree view. Once connected to the SAP server, you can retrieve SAP tables and table schemas,preview data in tables, retrieve SAP RFC and BAPI functions and their input and output schemas, retrieve themetadata of the SAP BW Data Source, Data Store Object, InfoCube or InfoObject objects, or create a file fromSAP IDoc.
Prerequisites:
To be able to use IDoc SAP connectors and the IDoc SAP wizard correctly, you must install specific jar and dllfiles validated and provided by SAP and then restart the Studio.
For 32-bit Windows, proceed as follows:
1. Copy the dll files, namely librfc32.dll, sapjco3.dll and sapjcorfc.dll into the C:\WINDOWS\system32\ folderof the client workstation on which Talend Studio is installed.
If you already have an older librfc32.dll and sapjcorfc.dll in the {windows-dir}\system32 directory, replace them withthe ones that come with JCo.
2. Install the jar files, namely sapjco.jar, sapjco3.jar and sapidoc3.jar in the Java library of Talend Studio. Formore information on how to install libraries in Talend Studio, see the Talend Installation Guide
For 64-bit Windows, proceed as follows:
1. If you are using 32-bit Java, copy the dll files into the C:\WINDOWS\SysWOW64\ folder of the clientworkstation on which Talend Studio is installed;
If you are using 64-bit Java, copy the dll files into the C:\WINDOWS\system32\ folder.
If you already have an older librfc32.dll and sapjcorfc.dll in the target directory, replace them with the ones that comewith JCo.
2. Install the jar files, namely sapjco.jar, sapjco3.jar and sapidoc3.jar in the Java library of Talend Studio. Formore information on how to install libraries in Talend Studio, see the Talend Installation Guide.
For Linux, proceed as follows:
1. Copy the appropriate distribution package (sapjco-linuxintel-x.x.x.tgz or sapjco-linuxintel-x.x.x.tar.Z, wherex.x.x is the version of the SAP JCo) into an arbitrary directory {sapjco-install-path}.
2. Change to the installation directory by typing:
cd {sapjco-install-path}
3. Extract the archive tar zxvf sapjco-linux*x.x.x.tgz, where x.x.x is the version of the SAP JCo.
4. Add {sapjco-install-path} to the LD_LIBRARY_PATH environment variable, by typing :
export LD_LIBRARY_PATH={sapjco-install-path}
5. Finally, add {sapjco-install-path}/sapjco.jar in the Java library of Talend Studio. For more information onhow to install libraries in Talend Studio, see the Talend Installation Guide.
For more information, see the Talend Knowledge Base article Installing SAP Java Connector.
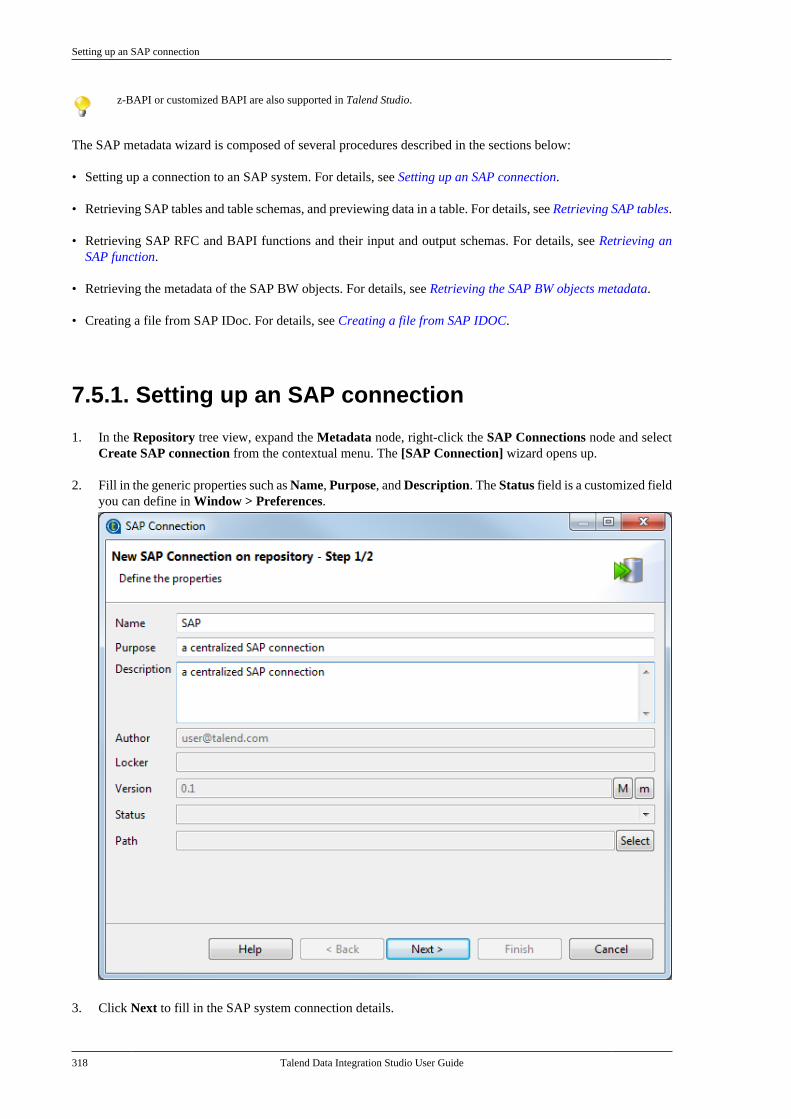
Setting up an SAP connection
318 Talend Data Integration Studio User Guide
z-BAPI or customized BAPI are also supported in Talend Studio.
The SAP metadata wizard is composed of several procedures described in the sections below:
• Setting up a connection to an SAP system. For details, see Setting up an SAP connection.
• Retrieving SAP tables and table schemas, and previewing data in a table. For details, see Retrieving SAP tables.
• Retrieving SAP RFC and BAPI functions and their input and output schemas. For details, see Retrieving anSAP function.
• Retrieving the metadata of the SAP BW objects. For details, see Retrieving the SAP BW objects metadata.
• Creating a file from SAP IDoc. For details, see Creating a file from SAP IDOC.
7.5.1. Setting up an SAP connection
1. In the Repository tree view, expand the Metadata node, right-click the SAP Connections node and selectCreate SAP connection from the contextual menu. The [SAP Connection] wizard opens up.
2. Fill in the generic properties such as Name, Purpose, and Description. The Status field is a customized fieldyou can define in Window > Preferences.
3. Click Next to fill in the SAP system connection details.
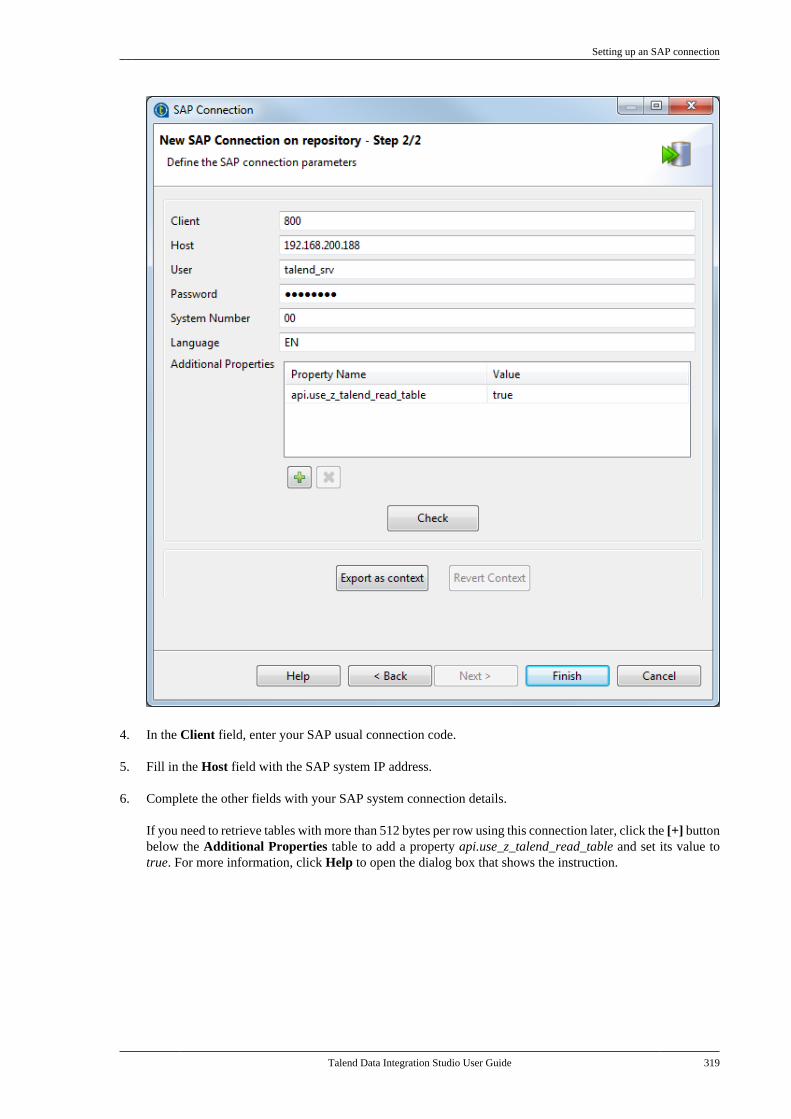
Setting up an SAP connection
Talend Data Integration Studio User Guide 319
4. In the Client field, enter your SAP usual connection code.
5. Fill in the Host field with the SAP system IP address.
6. Complete the other fields with your SAP system connection details.
If you need to retrieve tables with more than 512 bytes per row using this connection later, click the [+] buttonbelow the Additional Properties table to add a property api.use_z_talend_read_table and set its value totrue. For more information, click Help to open the dialog box that shows the instruction.
Retrieving SAP tables
320 Talend Data Integration Studio User Guide
7. Click Check to make sure that the connection works.
8. Click Finish to validate and save the settings. The newly created SAP connection node appears under theMetadata > SAP Connections node in the Repository tree view. Now you can drop the SAP connectionnode onto your design workspace as an SAP component, with the connection details automatically filled. Ifyou need to further edit an SAP connection, right-click the connection node and select Edit SAP Connectionfrom the contextual menu to open this wizard again and make your modifications.
7.5.2. Retrieving SAP tables
If you are working on an SVN or Git managed project while the Manual lock option is selected in Talend AdministrationCenter, be sure to lock manually your connection in the Repository tree view before retrieving or updating table schemasfor it. Otherwise the connection is read-only and the Finish button of the wizard is not operable.
For information on locking and unlocking a project item and on different lock types, see Working collaboratively on projectitems.
In this step, we will retrieve SAP tables and table schemas of interest, and preview data in tables from the connectedSAP system.
1. In the Repository tree view, right-click the newly created SAP connection and select Retrieve SAP Tablefrom the contextual menu. The [SAP Table wizard] dialog box opens up.
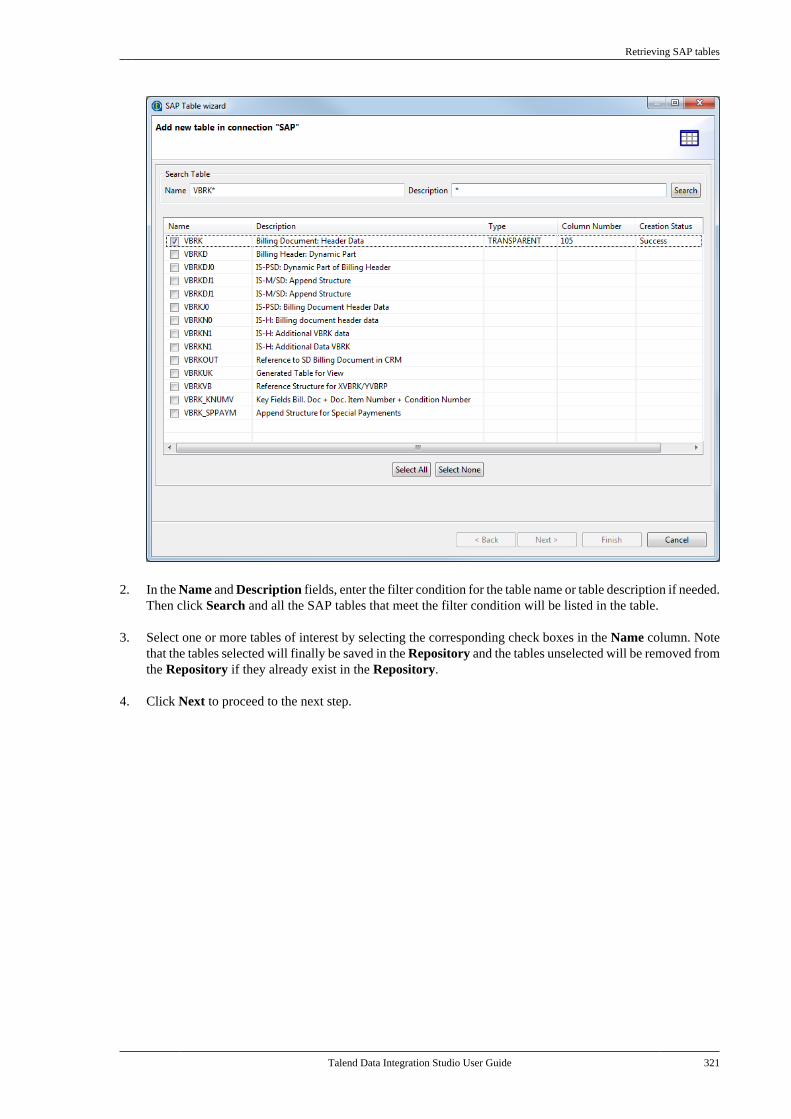
Retrieving SAP tables
Talend Data Integration Studio User Guide 321
2. In the Name and Description fields, enter the filter condition for the table name or table description if needed.Then click Search and all the SAP tables that meet the filter condition will be listed in the table.
3. Select one or more tables of interest by selecting the corresponding check boxes in the Name column. Notethat the tables selected will finally be saved in the Repository and the tables unselected will be removed fromthe Repository if they already exist in the Repository.
4. Click Next to proceed to the next step.
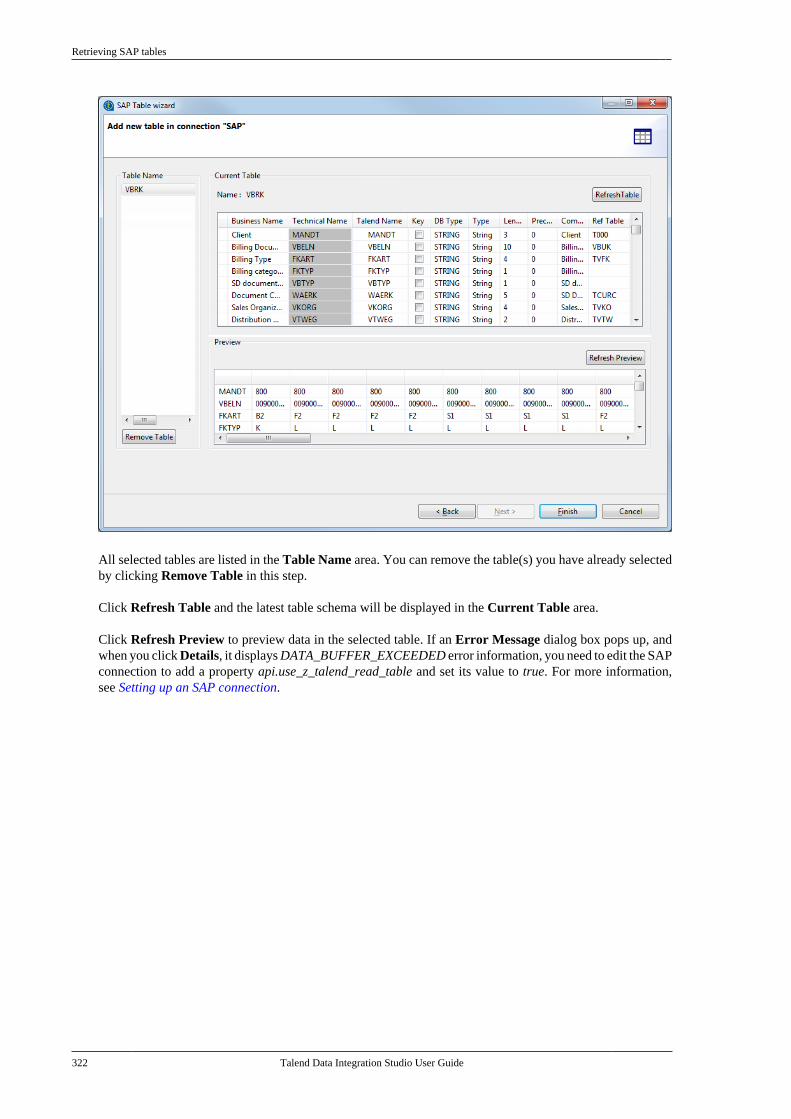
Retrieving SAP tables
322 Talend Data Integration Studio User Guide
All selected tables are listed in the Table Name area. You can remove the table(s) you have already selectedby clicking Remove Table in this step.
Click Refresh Table and the latest table schema will be displayed in the Current Table area.
Click Refresh Preview to preview data in the selected table. If an Error Message dialog box pops up, andwhen you click Details, it displays DATA_BUFFER_EXCEEDED error information, you need to edit the SAPconnection to add a property api.use_z_talend_read_table and set its value to true. For more information,see Setting up an SAP connection.
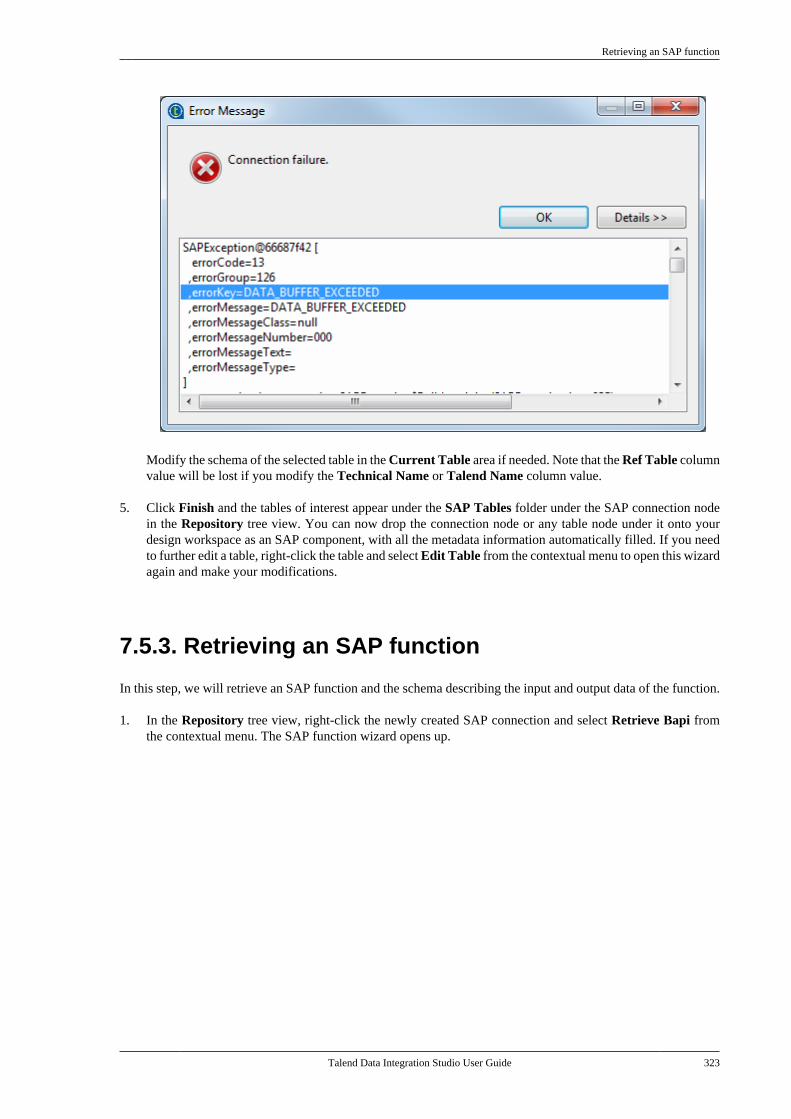
Retrieving an SAP function
Talend Data Integration Studio User Guide 323
Modify the schema of the selected table in the Current Table area if needed. Note that the Ref Table columnvalue will be lost if you modify the Technical Name or Talend Name column value.
5. Click Finish and the tables of interest appear under the SAP Tables folder under the SAP connection nodein the Repository tree view. You can now drop the connection node or any table node under it onto yourdesign workspace as an SAP component, with all the metadata information automatically filled. If you needto further edit a table, right-click the table and select Edit Table from the contextual menu to open this wizardagain and make your modifications.
7.5.3. Retrieving an SAP function
In this step, we will retrieve an SAP function and the schema describing the input and output data of the function.
1. In the Repository tree view, right-click the newly created SAP connection and select Retrieve Bapi fromthe contextual menu. The SAP function wizard opens up.
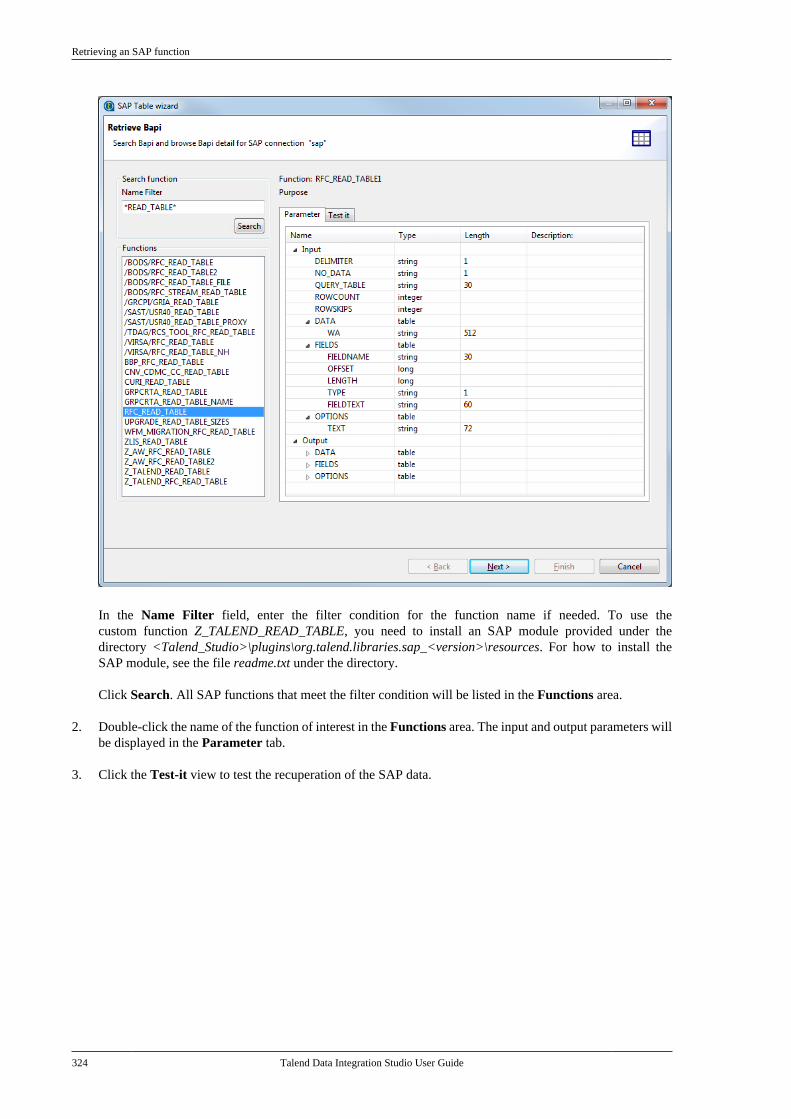
Retrieving an SAP function
324 Talend Data Integration Studio User Guide
In the Name Filter field, enter the filter condition for the function name if needed. To use thecustom function Z_TALEND_READ_TABLE, you need to install an SAP module provided under thedirectory <Talend_Studio>\plugins\org.talend.libraries.sap_<version>\resources. For how to install theSAP module, see the file readme.txt under the directory.
Click Search. All SAP functions that meet the filter condition will be listed in the Functions area.
2. Double-click the name of the function of interest in the Functions area. The input and output parameters willbe displayed in the Parameter tab.
3. Click the Test-it view to test the recuperation of the SAP data.
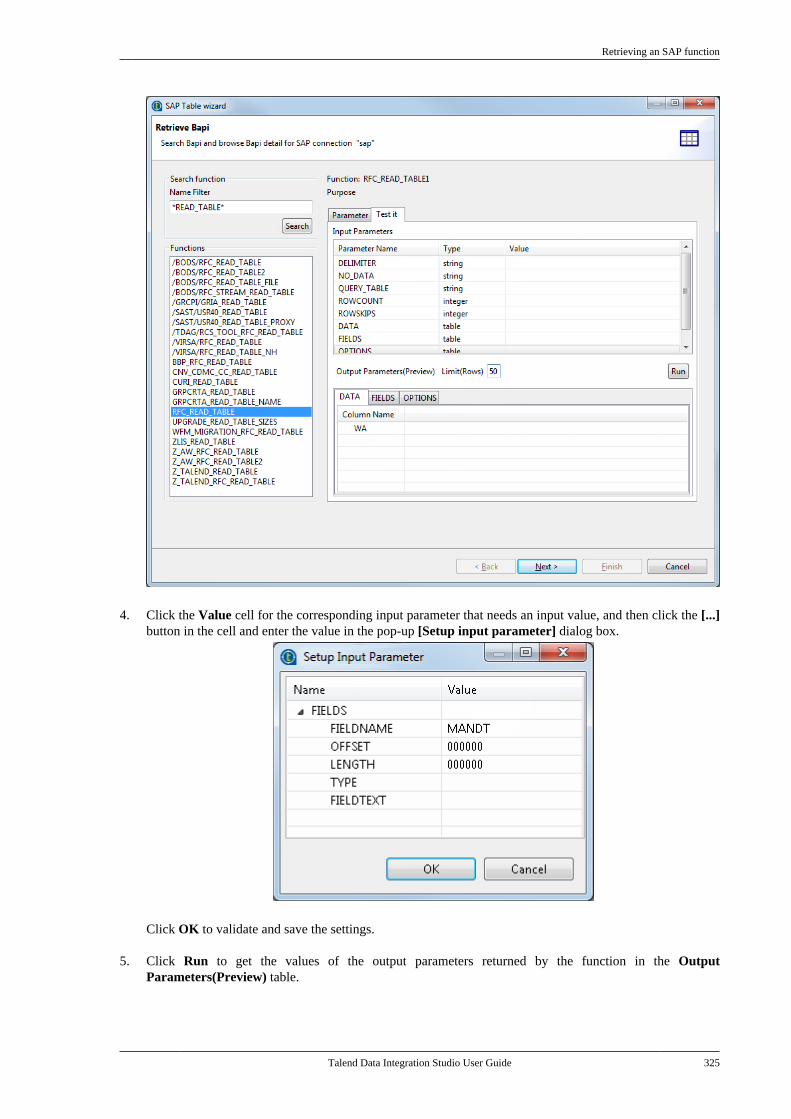
Retrieving an SAP function
Talend Data Integration Studio User Guide 325
4. Click the Value cell for the corresponding input parameter that needs an input value, and then click the [...]button in the cell and enter the value in the pop-up [Setup input parameter] dialog box.
Click OK to validate and save the settings.
5. Click Run to get the values of the output parameters returned by the function in the OutputParameters(Preview) table.
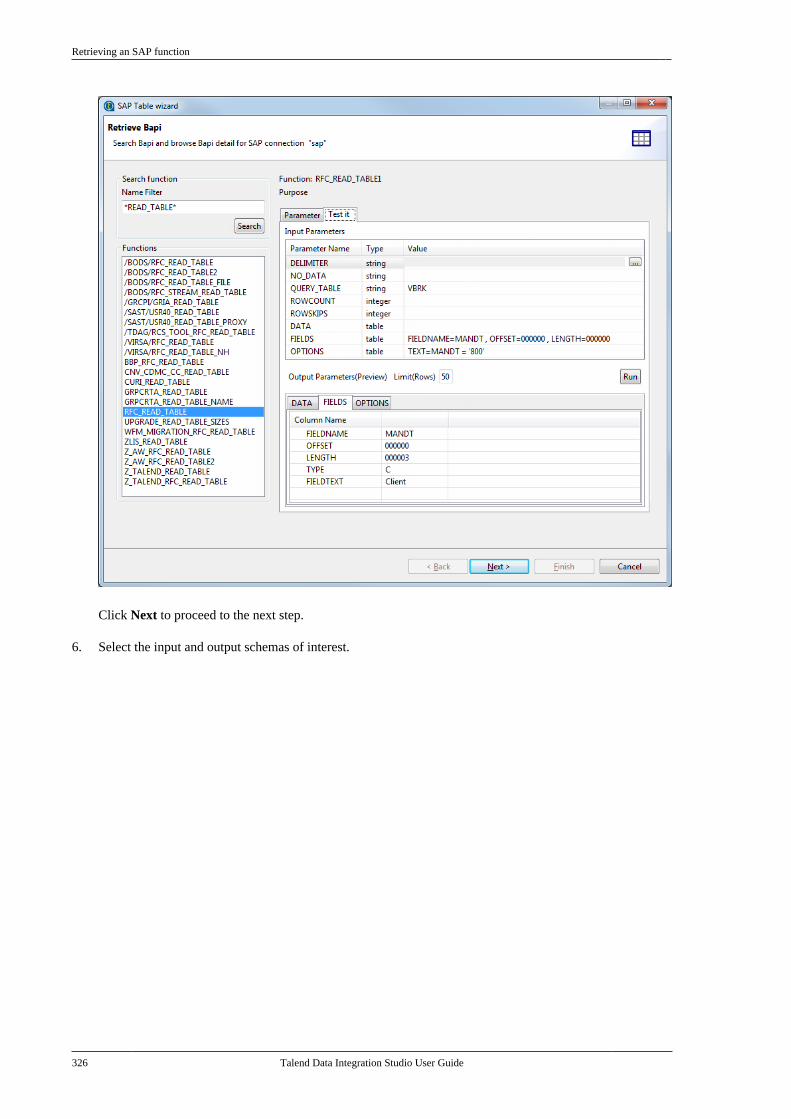
Retrieving an SAP function
326 Talend Data Integration Studio User Guide
Click Next to proceed to the next step.
6. Select the input and output schemas of interest.
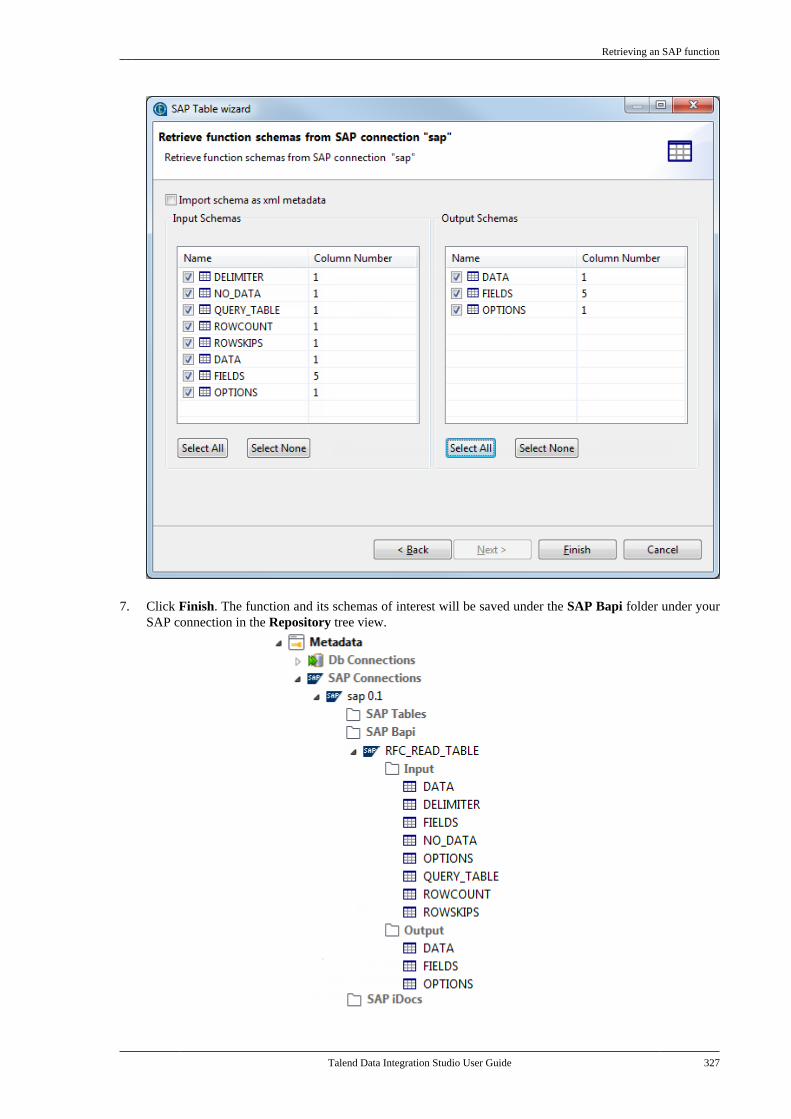
Retrieving an SAP function
Talend Data Integration Studio User Guide 327
7. Click Finish. The function and its schemas of interest will be saved under the SAP Bapi folder under yourSAP connection in the Repository tree view.
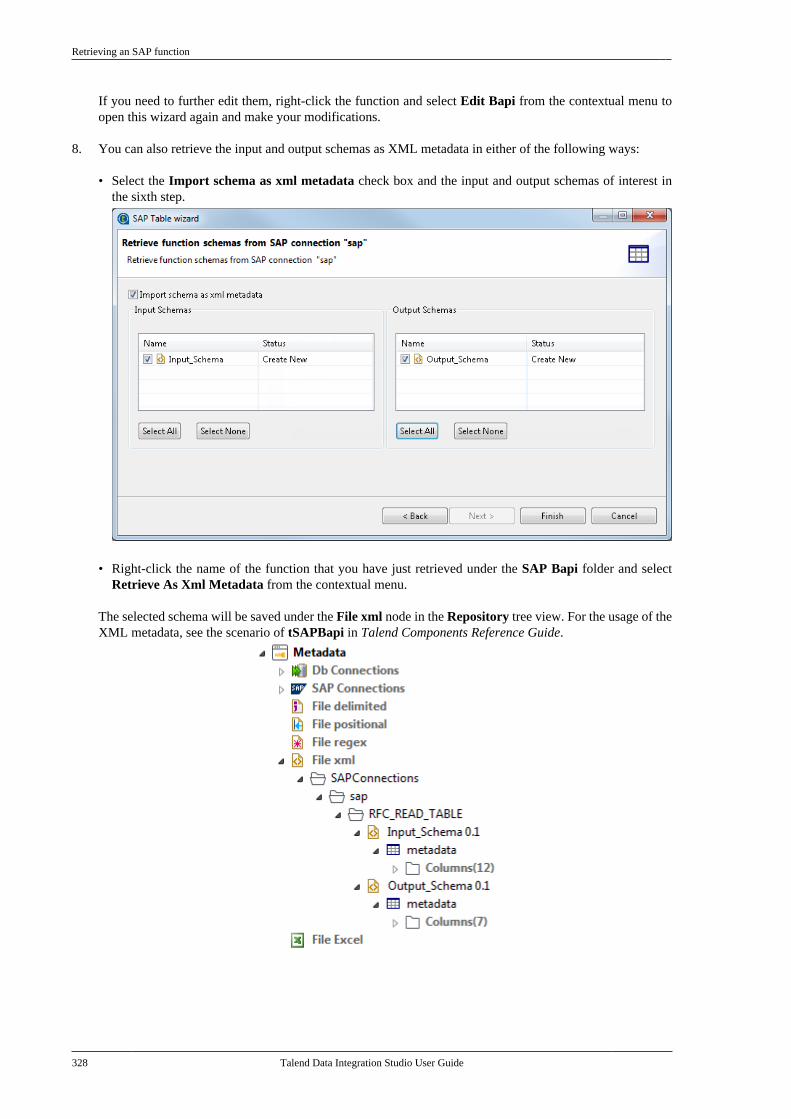
Retrieving an SAP function
328 Talend Data Integration Studio User Guide
If you need to further edit them, right-click the function and select Edit Bapi from the contextual menu toopen this wizard again and make your modifications.
8. You can also retrieve the input and output schemas as XML metadata in either of the following ways:
• Select the Import schema as xml metadata check box and the input and output schemas of interest inthe sixth step.
• Right-click the name of the function that you have just retrieved under the SAP Bapi folder and selectRetrieve As Xml Metadata from the contextual menu.
The selected schema will be saved under the File xml node in the Repository tree view. For the usage of theXML metadata, see the scenario of tSAPBapi in Talend Components Reference Guide.
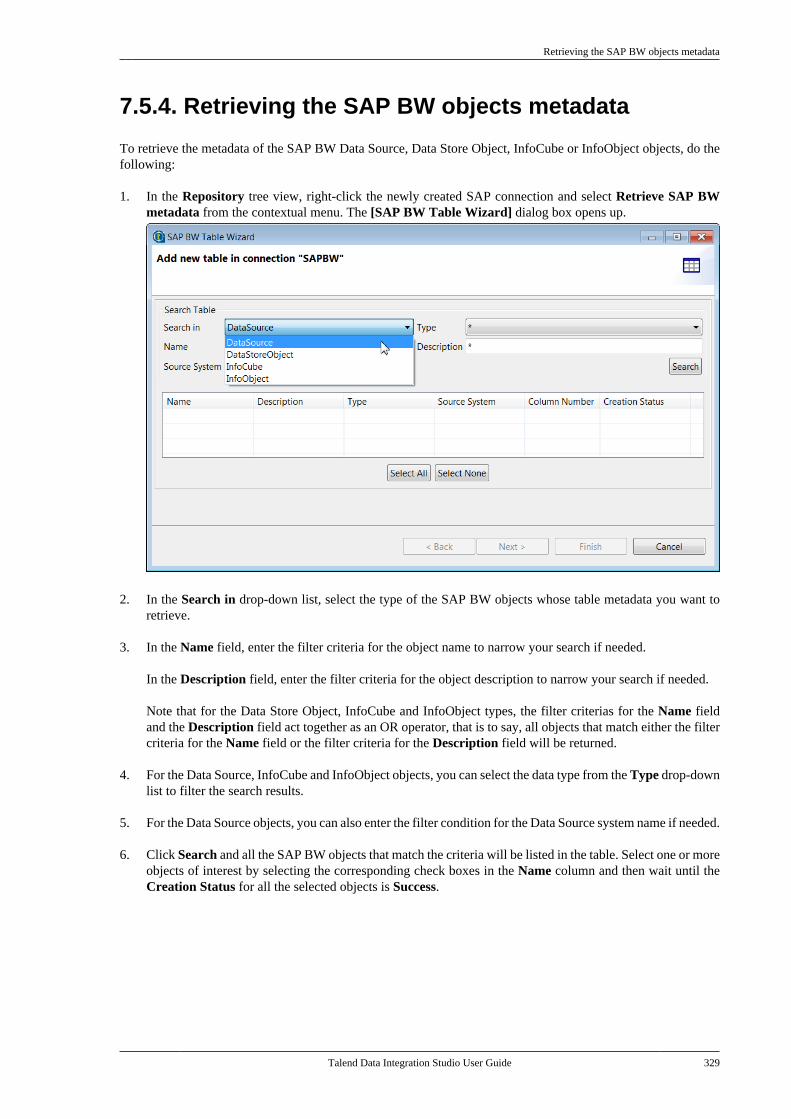
Retrieving the SAP BW objects metadata
Talend Data Integration Studio User Guide 329
7.5.4. Retrieving the SAP BW objects metadata
To retrieve the metadata of the SAP BW Data Source, Data Store Object, InfoCube or InfoObject objects, do thefollowing:
1. In the Repository tree view, right-click the newly created SAP connection and select Retrieve SAP BWmetadata from the contextual menu. The [SAP BW Table Wizard] dialog box opens up.
2. In the Search in drop-down list, select the type of the SAP BW objects whose table metadata you want toretrieve.
3. In the Name field, enter the filter criteria for the object name to narrow your search if needed.
In the Description field, enter the filter criteria for the object description to narrow your search if needed.
Note that for the Data Store Object, InfoCube and InfoObject types, the filter criterias for the Name fieldand the Description field act together as an OR operator, that is to say, all objects that match either the filtercriteria for the Name field or the filter criteria for the Description field will be returned.
4. For the Data Source, InfoCube and InfoObject objects, you can select the data type from the Type drop-downlist to filter the search results.
5. For the Data Source objects, you can also enter the filter condition for the Data Source system name if needed.
6. Click Search and all the SAP BW objects that match the criteria will be listed in the table. Select one or moreobjects of interest by selecting the corresponding check boxes in the Name column and then wait until theCreation Status for all the selected objects is Success.
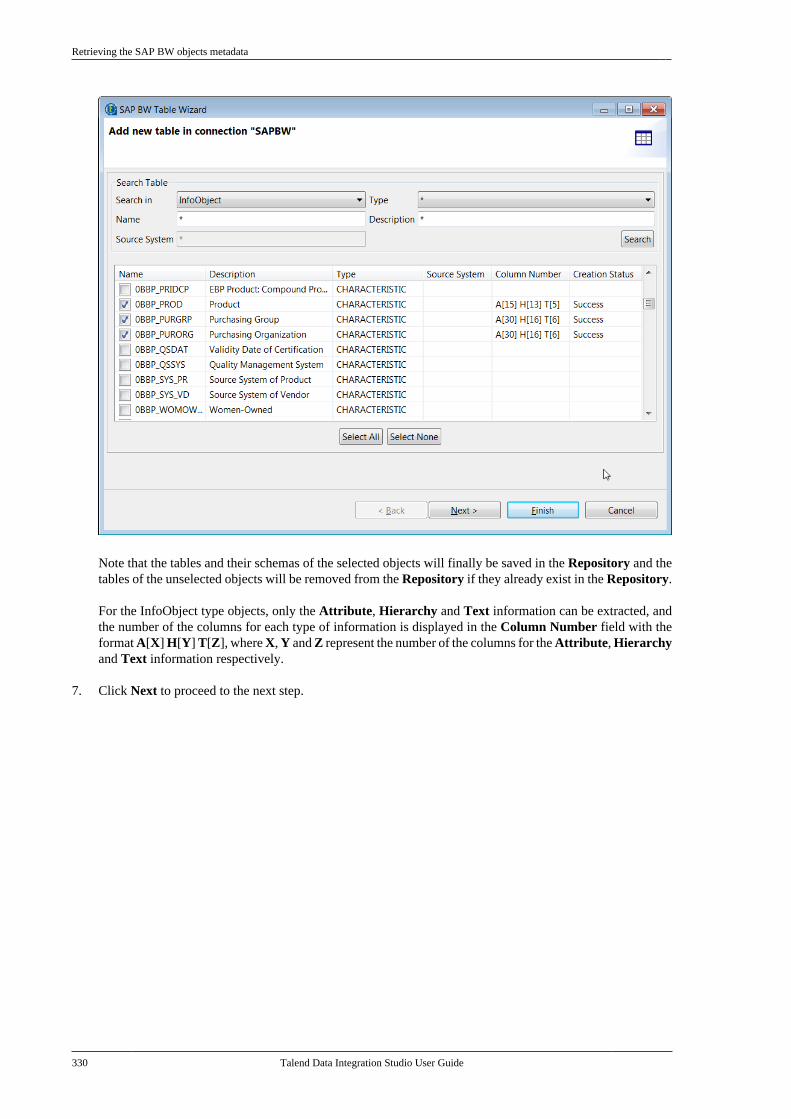
Retrieving the SAP BW objects metadata
330 Talend Data Integration Studio User Guide
Note that the tables and their schemas of the selected objects will finally be saved in the Repository and thetables of the unselected objects will be removed from the Repository if they already exist in the Repository.
For the InfoObject type objects, only the Attribute, Hierarchy and Text information can be extracted, andthe number of the columns for each type of information is displayed in the Column Number field with theformat A[X] H[Y] T[Z], where X, Y and Z represent the number of the columns for the Attribute, Hierarchyand Text information respectively.
7. Click Next to proceed to the next step.
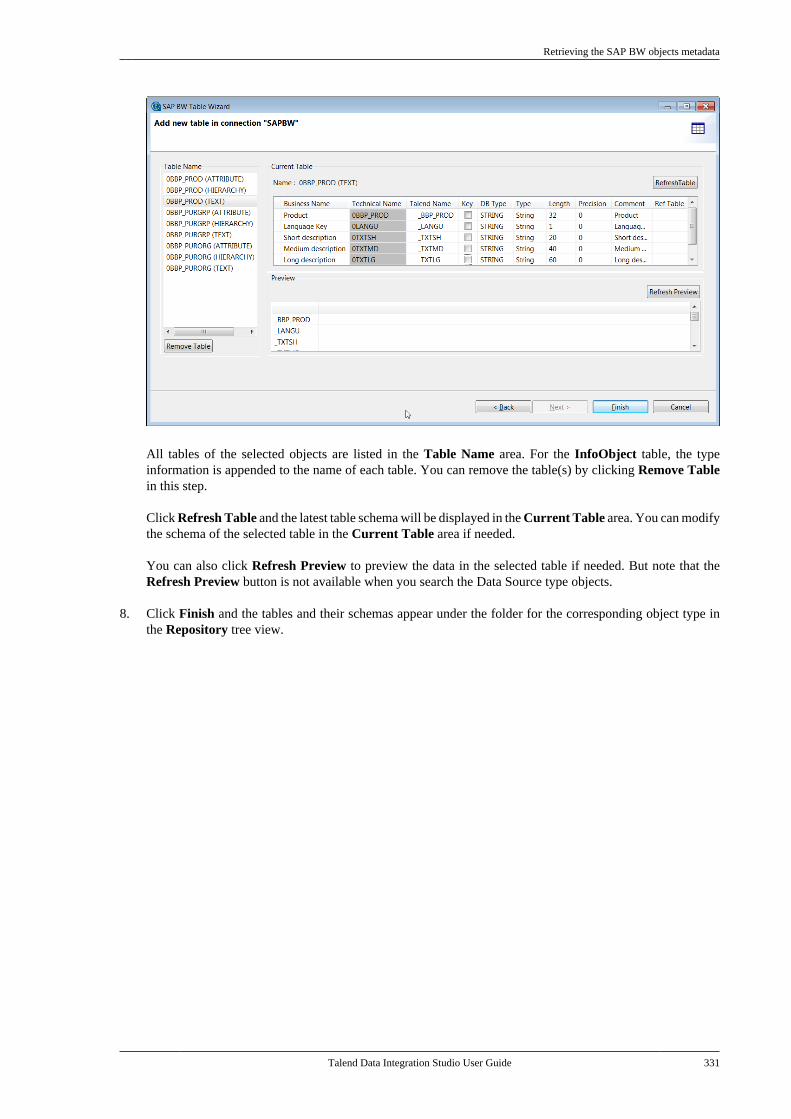
Retrieving the SAP BW objects metadata
Talend Data Integration Studio User Guide 331
All tables of the selected objects are listed in the Table Name area. For the InfoObject table, the typeinformation is appended to the name of each table. You can remove the table(s) by clicking Remove Tablein this step.
Click Refresh Table and the latest table schema will be displayed in the Current Table area. You can modifythe schema of the selected table in the Current Table area if needed.
You can also click Refresh Preview to preview the data in the selected table if needed. But note that theRefresh Preview button is not available when you search the Data Source type objects.
8. Click Finish and the tables and their schemas appear under the folder for the corresponding object type inthe Repository tree view.
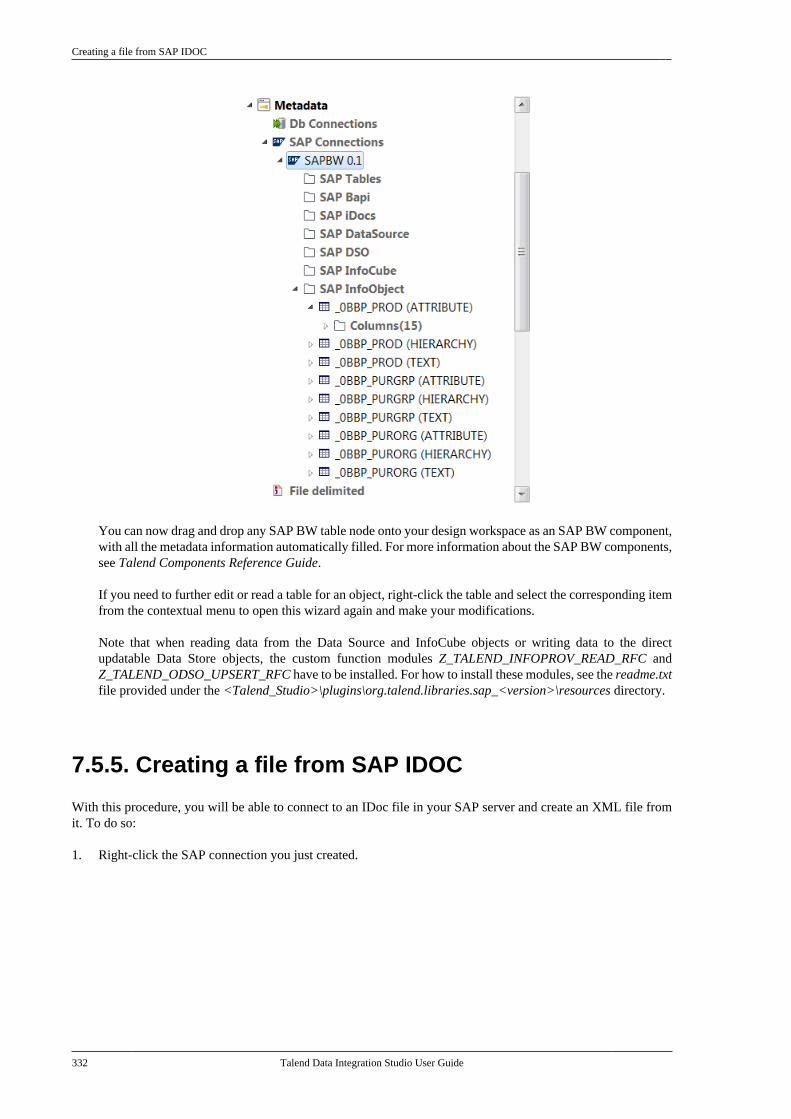
Creating a file from SAP IDOC
332 Talend Data Integration Studio User Guide
You can now drag and drop any SAP BW table node onto your design workspace as an SAP BW component,with all the metadata information automatically filled. For more information about the SAP BW components,see Talend Components Reference Guide.
If you need to further edit or read a table for an object, right-click the table and select the corresponding itemfrom the contextual menu to open this wizard again and make your modifications.
Note that when reading data from the Data Source and InfoCube objects or writing data to the directupdatable Data Store objects, the custom function modules Z_TALEND_INFOPROV_READ_RFC andZ_TALEND_ODSO_UPSERT_RFC have to be installed. For how to install these modules, see the readme.txtfile provided under the <Talend_Studio>\plugins\org.talend.libraries.sap_<version>\resources directory.
7.5.5. Creating a file from SAP IDOC
With this procedure, you will be able to connect to an IDoc file in your SAP server and create an XML file fromit. To do so:
1. Right-click the SAP connection you just created.
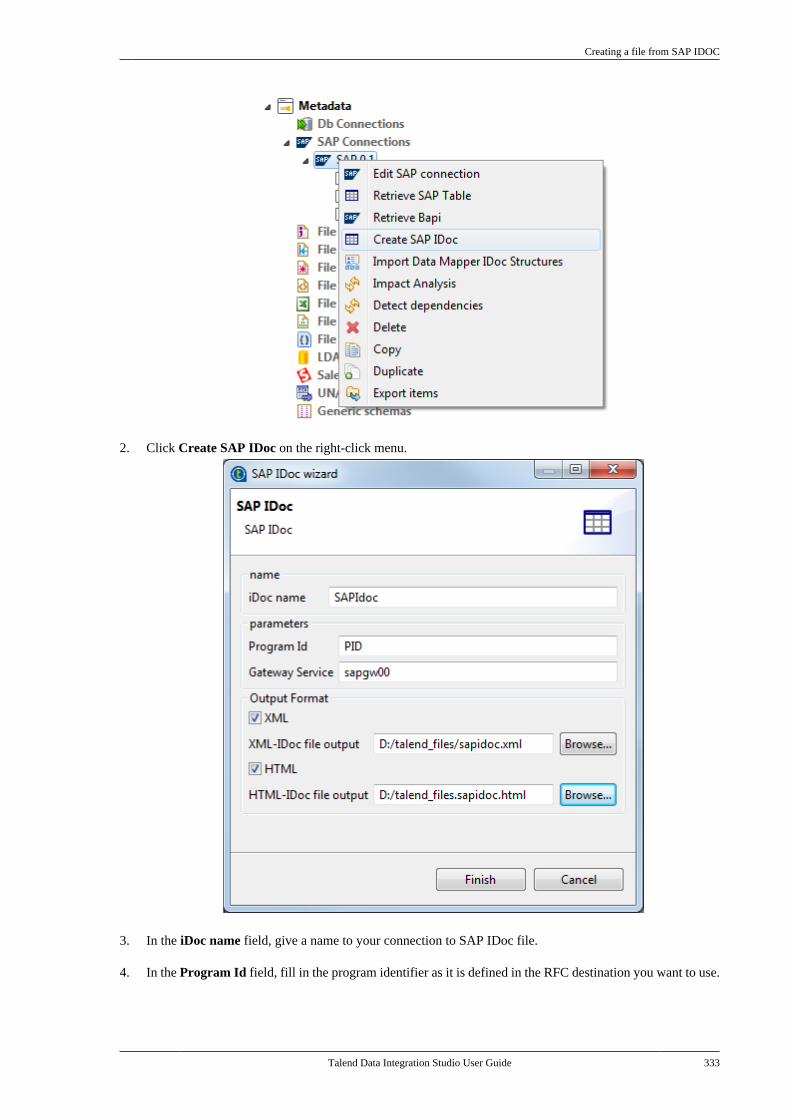
Creating a file from SAP IDOC
Talend Data Integration Studio User Guide 333
2. Click Create SAP IDoc on the right-click menu.
3. In the iDoc name field, give a name to your connection to SAP IDoc file.
4. In the Program Id field, fill in the program identifier as it is defined in the RFC destination you want to use.
Centralizing File Delimited metadata
334 Talend Data Integration Studio User Guide
5. In the Gateway Service field, fill in the name of the service that enable Talend system to communicate withSAP system. To get the service name, you can edit the service file in the C:\WINDOWS\system32\drivers\etc\ folder of the workstation on which the SAP server is installed.
6. In the Output Format area, you can select XML and/or HTML check boxes according to the type of outputyou want to generate from SAP IDoc.
7. Click Browse... to set the file(s) path and name.
8. Click Finish to close the dialog box and validate the creation of the IDoc file connection.
The new connection displays under the SAP iDocs node of your SAP connection in the Repository tree view.You can now use it with the tSAPIDocInput and tSAPIDocOutput components. For more information on thesecomponents, see Talend Components Reference Guide.
7.6. Centralizing File Delimited metadataIf you often need to read data from and/or write data to delimited files, you may want to centralize theirmetadata in the Repository for easy reuse. File Delimited metadata can be used to define the properties oftFileInputDelimited, tFileOutputDelimited, and t*OutputBulk components.
The file schema creation is very similar for all types of file connections: Delimited, Positional, Regex, XML, or Ldif.
Unlike the database connection wizard, the [New Delimited File] wizard gathers both file connection and schemadefinitions in a four-step procedure.
To create a File Delimited connection from scratch, expand Metadata in the Repository tree view, right-clickFile Delimited and select Create file delimited from the contextual menu to open the file metadata setup wizard.
To centralize a file connection and its schema you have defined in a Job, click the icon in the Basic settingsview of the relevant component with its Property Type set to Built-in to open the file metadata setup wizard.
Then define the general properties and file schema in the wizard.
Defining the general properties
1. In the file metadata setup wizard, fill in the Name field, which is mandatory, and the Purpose and Descriptionfields if you choose to do so. The information you provide in the Description field will appear as a tooltipwhen you move your mouse pointer over the file connection.
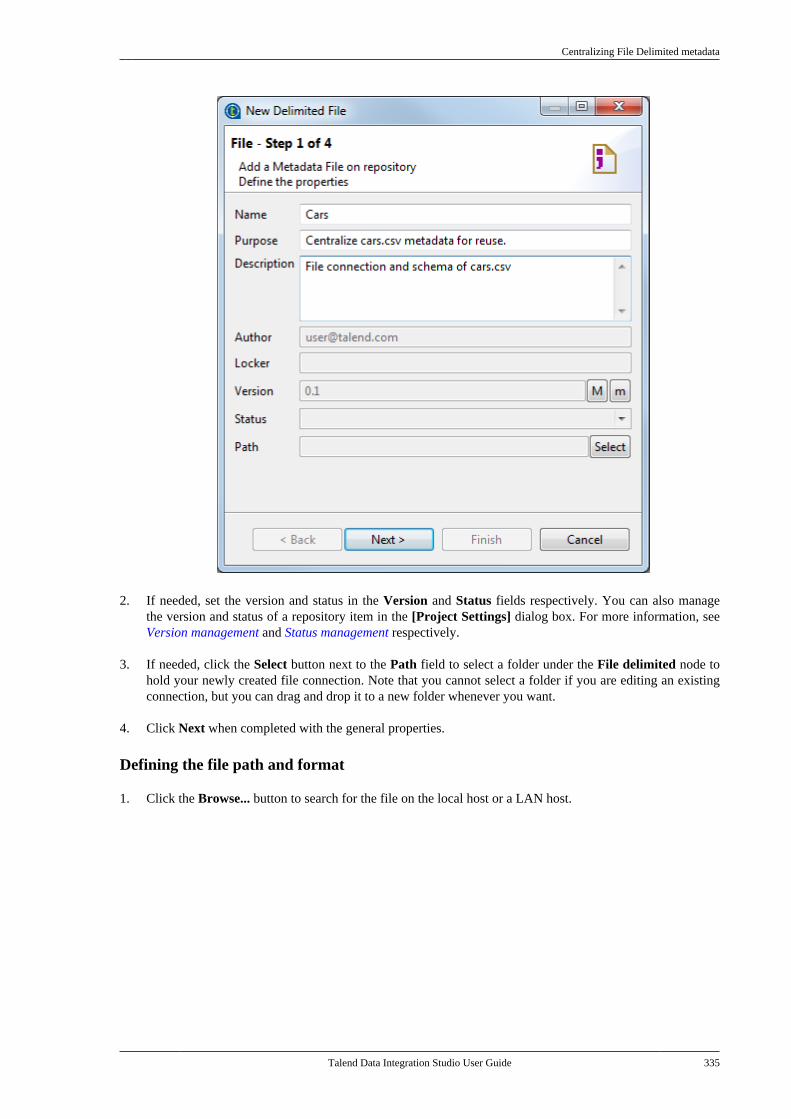
Centralizing File Delimited metadata
Talend Data Integration Studio User Guide 335
2. If needed, set the version and status in the Version and Status fields respectively. You can also managethe version and status of a repository item in the [Project Settings] dialog box. For more information, seeVersion management and Status management respectively.
3. If needed, click the Select button next to the Path field to select a folder under the File delimited node tohold your newly created file connection. Note that you cannot select a folder if you are editing an existingconnection, but you can drag and drop it to a new folder whenever you want.
4. Click Next when completed with the general properties.
Defining the file path and format
1. Click the Browse... button to search for the file on the local host or a LAN host.
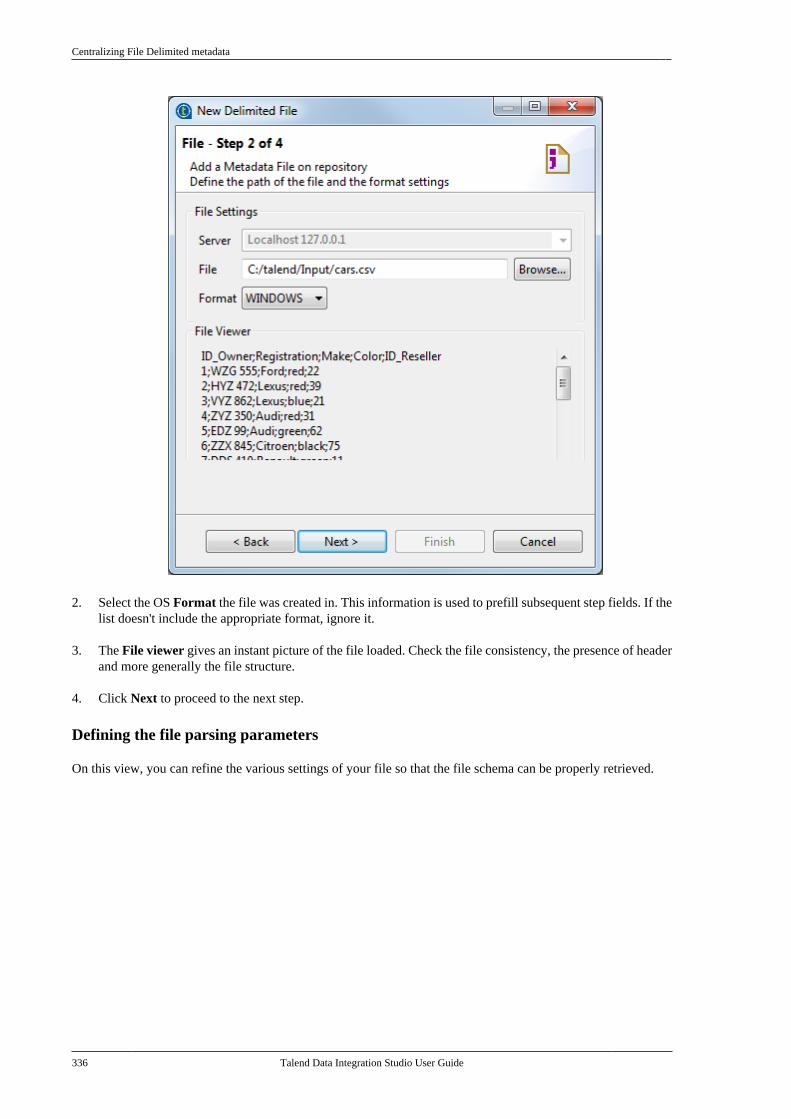
Centralizing File Delimited metadata
336 Talend Data Integration Studio User Guide
2. Select the OS Format the file was created in. This information is used to prefill subsequent step fields. If thelist doesn't include the appropriate format, ignore it.
3. The File viewer gives an instant picture of the file loaded. Check the file consistency, the presence of headerand more generally the file structure.
4. Click Next to proceed to the next step.
Defining the file parsing parameters
On this view, you can refine the various settings of your file so that the file schema can be properly retrieved.
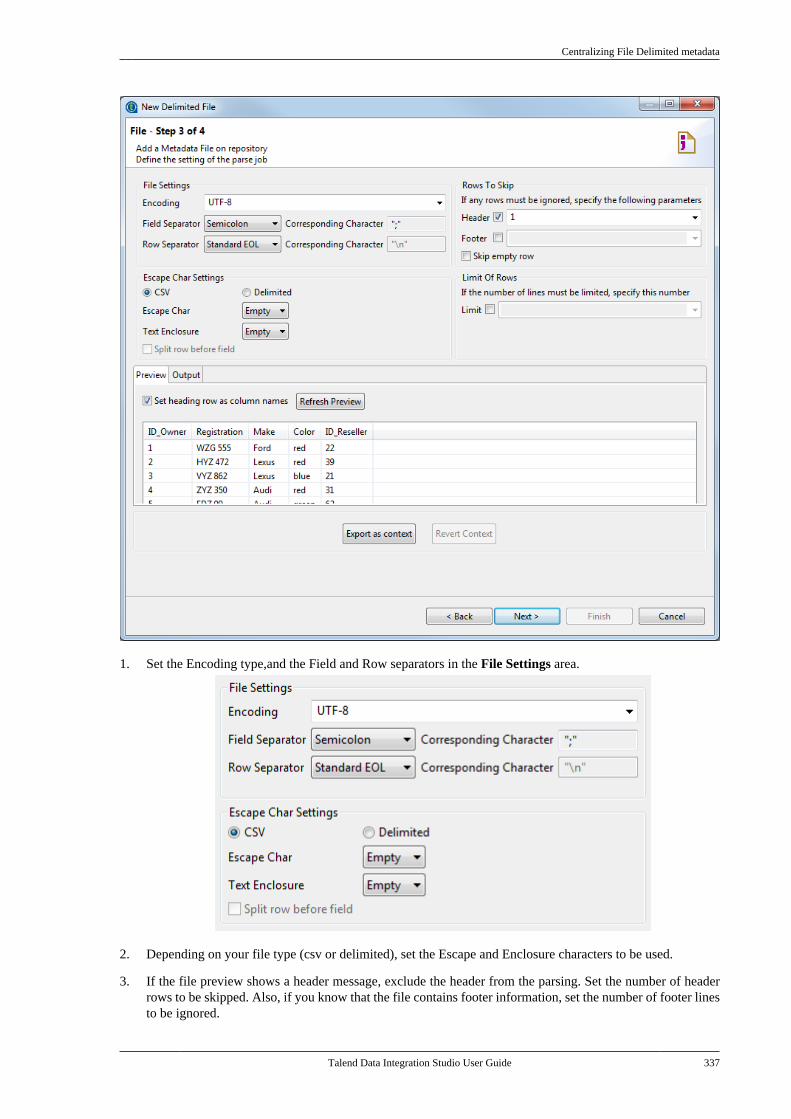
Centralizing File Delimited metadata
Talend Data Integration Studio User Guide 337
1. Set the Encoding type,and the Field and Row separators in the File Settings area.
2. Depending on your file type (csv or delimited), set the Escape and Enclosure characters to be used.
3. If the file preview shows a header message, exclude the header from the parsing. Set the number of headerrows to be skipped. Also, if you know that the file contains footer information, set the number of footer linesto be ignored.
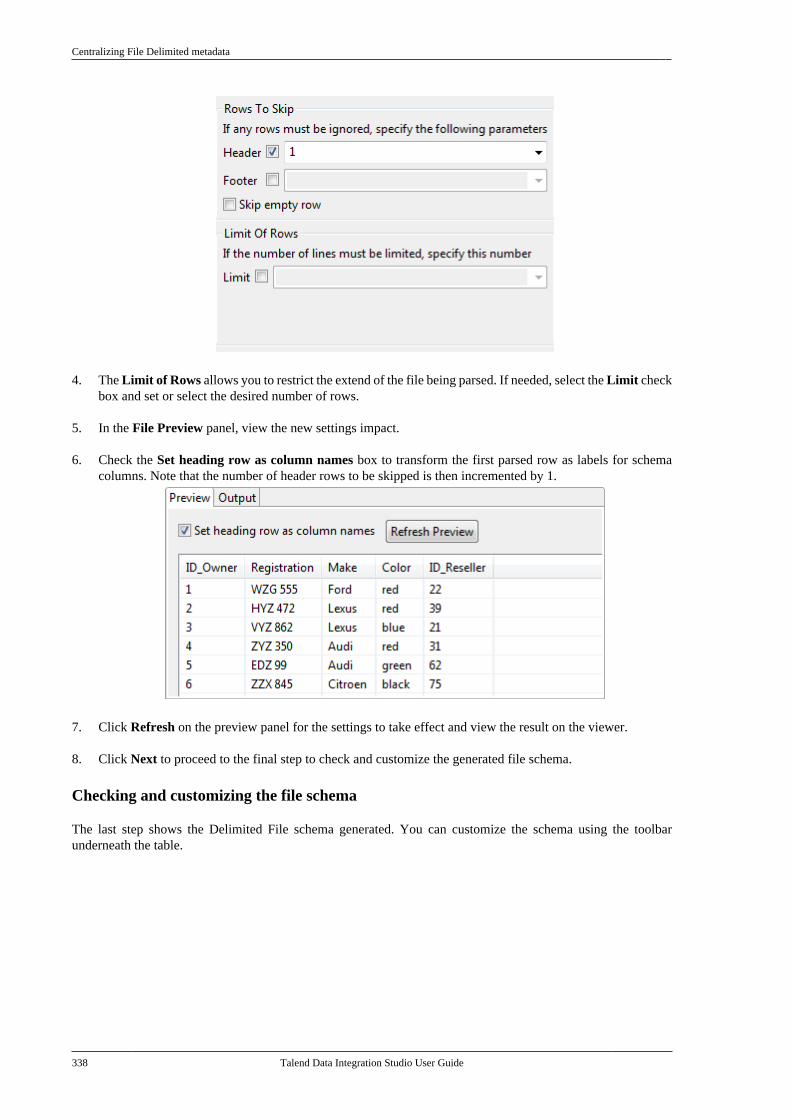
Centralizing File Delimited metadata
338 Talend Data Integration Studio User Guide
4. The Limit of Rows allows you to restrict the extend of the file being parsed. If needed, select the Limit checkbox and set or select the desired number of rows.
5. In the File Preview panel, view the new settings impact.
6. Check the Set heading row as column names box to transform the first parsed row as labels for schemacolumns. Note that the number of header rows to be skipped is then incremented by 1.
7. Click Refresh on the preview panel for the settings to take effect and view the result on the viewer.
8. Click Next to proceed to the final step to check and customize the generated file schema.
Checking and customizing the file schema
The last step shows the Delimited File schema generated. You can customize the schema using the toolbarunderneath the table.
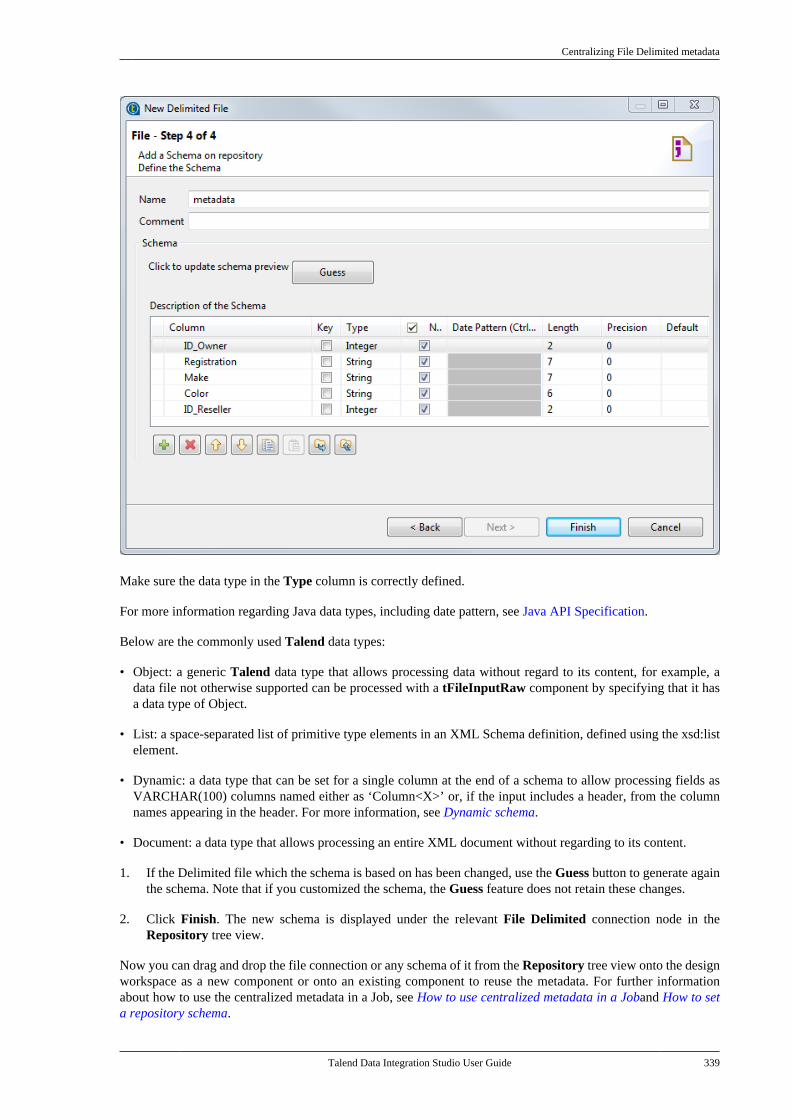
Centralizing File Delimited metadata
Talend Data Integration Studio User Guide 339
Make sure the data type in the Type column is correctly defined.
For more information regarding Java data types, including date pattern, see Java API Specification.
Below are the commonly used Talend data types:
• Object: a generic Talend data type that allows processing data without regard to its content, for example, adata file not otherwise supported can be processed with a tFileInputRaw component by specifying that it hasa data type of Object.
• List: a space-separated list of primitive type elements in an XML Schema definition, defined using the xsd:listelement.
• Dynamic: a data type that can be set for a single column at the end of a schema to allow processing fields asVARCHAR(100) columns named either as ‘Column<X>’ or, if the input includes a header, from the columnnames appearing in the header. For more information, see Dynamic schema.
• Document: a data type that allows processing an entire XML document without regarding to its content.
1. If the Delimited file which the schema is based on has been changed, use the Guess button to generate againthe schema. Note that if you customized the schema, the Guess feature does not retain these changes.
2. Click Finish. The new schema is displayed under the relevant File Delimited connection node in theRepository tree view.
Now you can drag and drop the file connection or any schema of it from the Repository tree view onto the designworkspace as a new component or onto an existing component to reuse the metadata. For further informationabout how to use the centralized metadata in a Job, see How to use centralized metadata in a Joband How to seta repository schema.
Centralizing File Positional metadata
340 Talend Data Integration Studio User Guide
To modify an existing file connection, right-click it from the Repository tree view, and select Edit file delimitedto open the file metadata setup wizard.
To add a new schema to an existing file connection, right-click the connection from the Repository tree view andselect Retrieve Schema from the contextual menu.
To edit an existing file schema, right-click the schema from the Repository tree view and select Edit Schemafrom the contextual menu.
7.7. Centralizing File Positional metadataIf you often need to read data from and/or write data to certain positional files, you may want to centralizetheir metadata in the Repository for easy reuse. File Positional metadata can be used to define the properties oftFileInputPositional, tFileOutputPositional, and tFileInputMSPositional components.
The [New Positional File] wizard gathers both file connection and schema definitions in a four-step procedure.
To create a File Positional connection from scratch, expand Metadata in the Repository tree view, right-clickFile positional and select Create file positional from the contextual menu to open the file metadata setup wizard.
To centralize a file connection and its schema you have defined in a Job, click the icon in the Basic settingsview of the relevant component with its Property Type set to Built-in to open the file metadata setup wizard.
Then define the general properties and file schema in the wizard.
Defining the general properties
1. In the file metadata setup wizard, fill in the Name field, which is mandatory, and the Purpose and Descriptionfields if you choose to do so. The information you provide in the Description field will appear as a tooltipwhen you move your mouse pointer over the file connection.
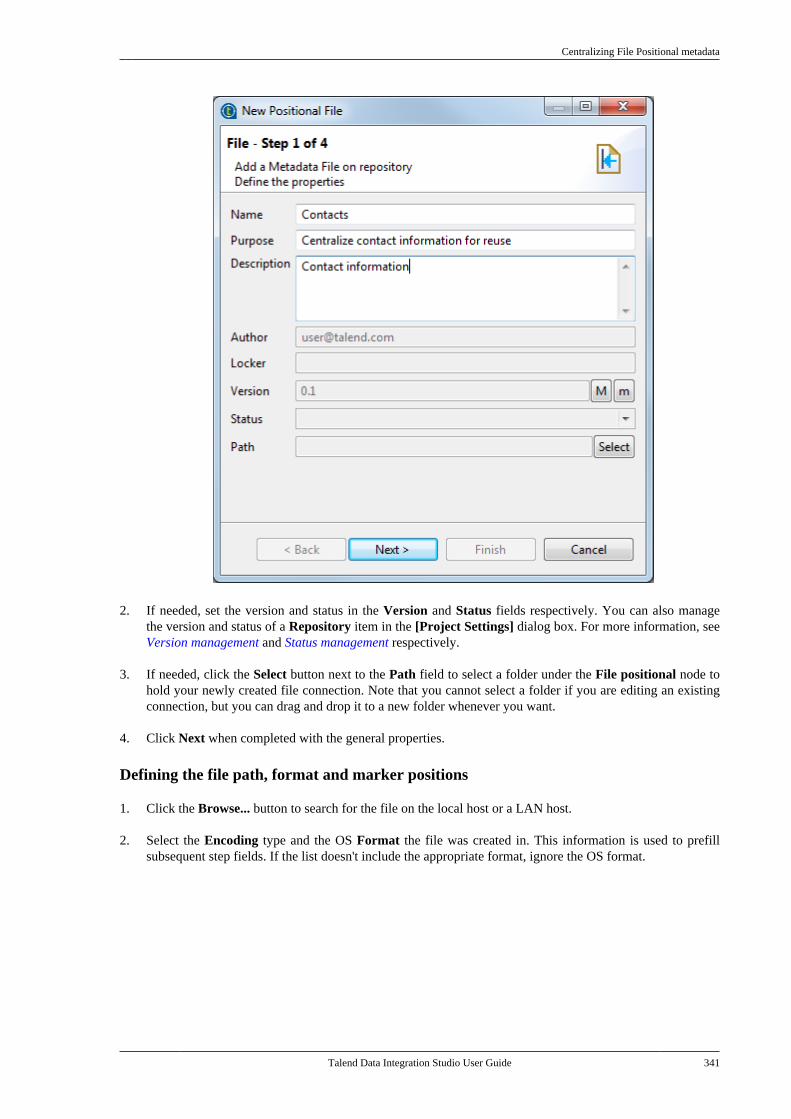
Centralizing File Positional metadata
Talend Data Integration Studio User Guide 341
2. If needed, set the version and status in the Version and Status fields respectively. You can also managethe version and status of a Repository item in the [Project Settings] dialog box. For more information, seeVersion management and Status management respectively.
3. If needed, click the Select button next to the Path field to select a folder under the File positional node tohold your newly created file connection. Note that you cannot select a folder if you are editing an existingconnection, but you can drag and drop it to a new folder whenever you want.
4. Click Next when completed with the general properties.
Defining the file path, format and marker positions
1. Click the Browse... button to search for the file on the local host or a LAN host.
2. Select the Encoding type and the OS Format the file was created in. This information is used to prefillsubsequent step fields. If the list doesn't include the appropriate format, ignore the OS format.
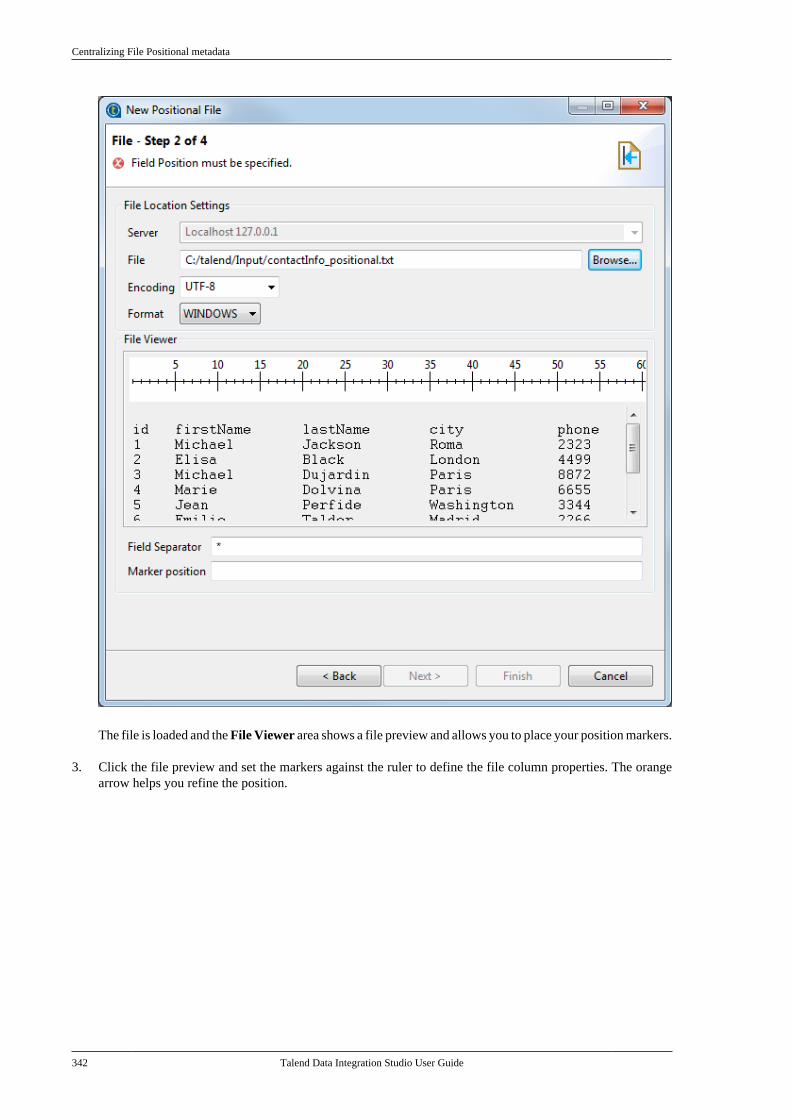
Centralizing File Positional metadata
342 Talend Data Integration Studio User Guide
The file is loaded and the File Viewer area shows a file preview and allows you to place your position markers.
3. Click the file preview and set the markers against the ruler to define the file column properties. The orangearrow helps you refine the position.
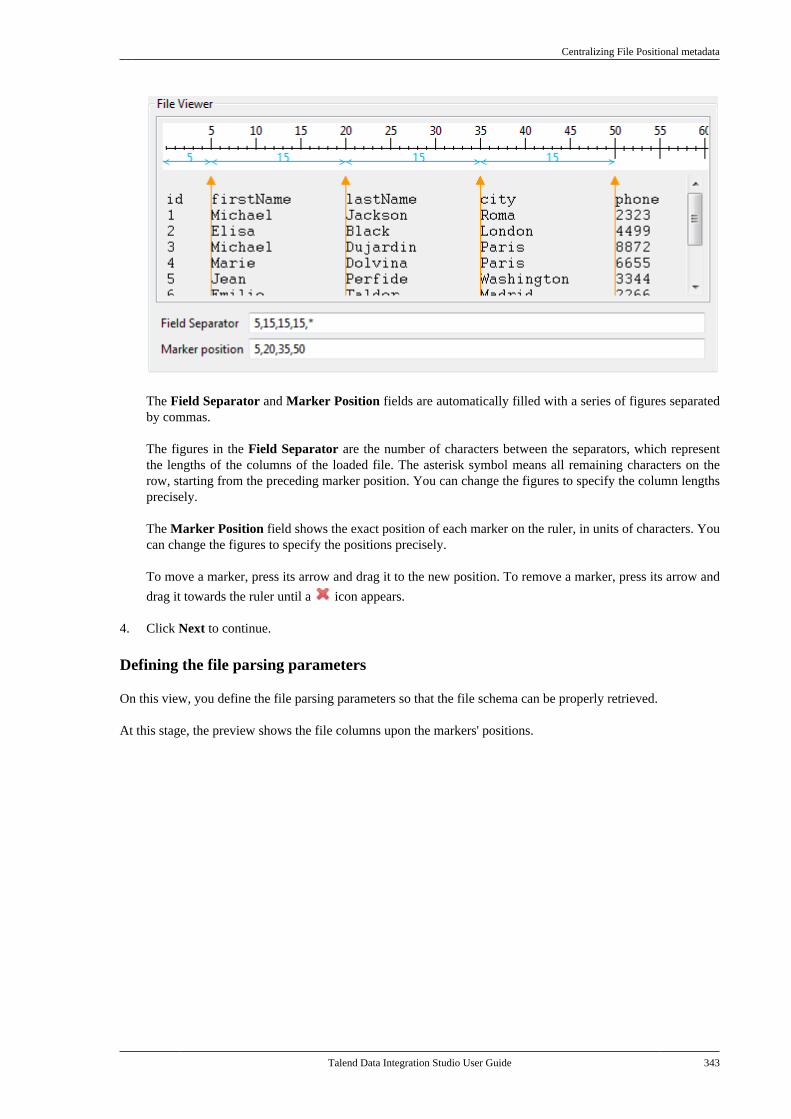
Centralizing File Positional metadata
Talend Data Integration Studio User Guide 343
The Field Separator and Marker Position fields are automatically filled with a series of figures separatedby commas.
The figures in the Field Separator are the number of characters between the separators, which representthe lengths of the columns of the loaded file. The asterisk symbol means all remaining characters on therow, starting from the preceding marker position. You can change the figures to specify the column lengthsprecisely.
The Marker Position field shows the exact position of each marker on the ruler, in units of characters. Youcan change the figures to specify the positions precisely.
To move a marker, press its arrow and drag it to the new position. To remove a marker, press its arrow and
drag it towards the ruler until a icon appears.
4. Click Next to continue.
Defining the file parsing parameters
On this view, you define the file parsing parameters so that the file schema can be properly retrieved.
At this stage, the preview shows the file columns upon the markers' positions.
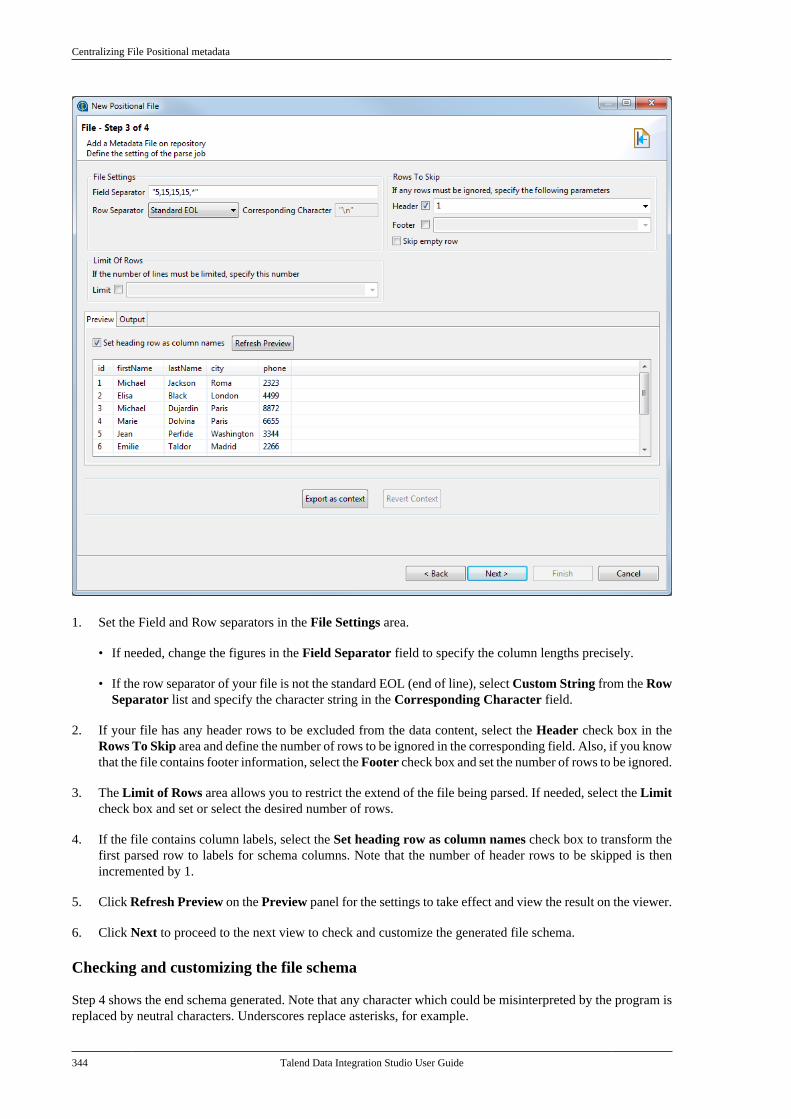
Centralizing File Positional metadata
344 Talend Data Integration Studio User Guide
1. Set the Field and Row separators in the File Settings area.
• If needed, change the figures in the Field Separator field to specify the column lengths precisely.
• If the row separator of your file is not the standard EOL (end of line), select Custom String from the RowSeparator list and specify the character string in the Corresponding Character field.
2. If your file has any header rows to be excluded from the data content, select the Header check box in theRows To Skip area and define the number of rows to be ignored in the corresponding field. Also, if you knowthat the file contains footer information, select the Footer check box and set the number of rows to be ignored.
3. The Limit of Rows area allows you to restrict the extend of the file being parsed. If needed, select the Limitcheck box and set or select the desired number of rows.
4. If the file contains column labels, select the Set heading row as column names check box to transform thefirst parsed row to labels for schema columns. Note that the number of header rows to be skipped is thenincremented by 1.
5. Click Refresh Preview on the Preview panel for the settings to take effect and view the result on the viewer.
6. Click Next to proceed to the next view to check and customize the generated file schema.
Checking and customizing the file schema
Step 4 shows the end schema generated. Note that any character which could be misinterpreted by the program isreplaced by neutral characters. Underscores replace asterisks, for example.
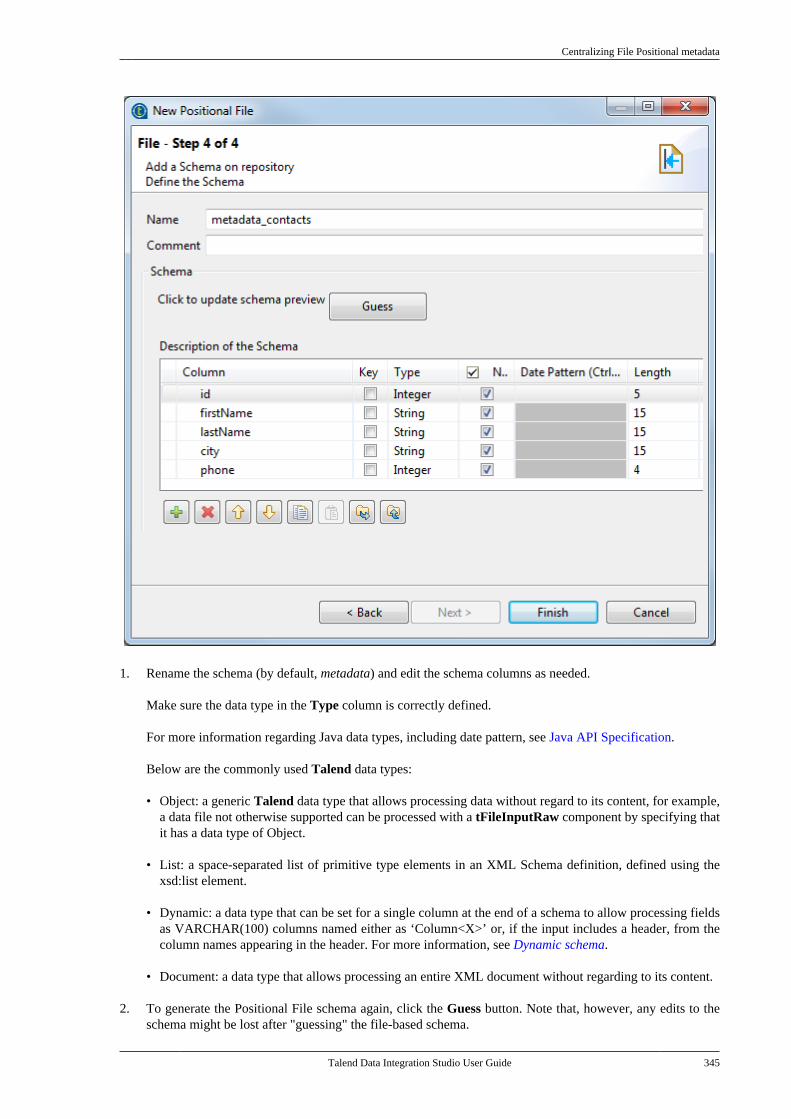
Centralizing File Positional metadata
Talend Data Integration Studio User Guide 345
1. Rename the schema (by default, metadata) and edit the schema columns as needed.
Make sure the data type in the Type column is correctly defined.
For more information regarding Java data types, including date pattern, see Java API Specification.
Below are the commonly used Talend data types:
• Object: a generic Talend data type that allows processing data without regard to its content, for example,a data file not otherwise supported can be processed with a tFileInputRaw component by specifying thatit has a data type of Object.
• List: a space-separated list of primitive type elements in an XML Schema definition, defined using thexsd:list element.
• Dynamic: a data type that can be set for a single column at the end of a schema to allow processing fieldsas VARCHAR(100) columns named either as ‘Column<X>’ or, if the input includes a header, from thecolumn names appearing in the header. For more information, see Dynamic schema.
• Document: a data type that allows processing an entire XML document without regarding to its content.
2. To generate the Positional File schema again, click the Guess button. Note that, however, any edits to theschema might be lost after "guessing" the file-based schema.
Centralizing File Regex metadata
346 Talend Data Integration Studio User Guide
3. When done, click Finish to close the wizard.
The new schema is displayed under the relevant File positional connection node in the Repository tree view. Youcan drop the defined metadata from the Repository onto the design workspace as a new component or onto anexisting component to reuse the metadata. For further information about how to use the centralized metadata in aJob, see How to use centralized metadata in a Joband How to set a repository schema.
To modify an existing file connection, right-click it from the Repository tree view, and select Edit file positionalto open the file metadata setup wizard.
To add a new schema to an existing file connection, right-click the connection from the Repository tree view andselect Retrieve Schema from the contextual menu.
To edit an existing file schema, right-click the schema from the Repository tree view and select Edit Schemafrom the contextual menu.
7.8. Centralizing File Regex metadataRegex file schemas are used for files made of regular expressions, such as log files. If you often need to connectto a regex file, you may want to centralize its connection and schema information in the Repository for easy reuse.
The [New RegEx File] wizard gathers both file connection and schema definitions in a four-step procedure.
This procedure requires some advanced knowledge on regular expression syntax.
To create a File Regex connection from scratch, expand the Metadata node in the Repository tree view, right-click File Regex and select Create file regex from the contextual menu to open the file metadata setup wizard.
To centralize a file connection and its schema you have defined in a Job, click the icon in the Basic settingsview of the relevant component with its Property Type set to Built-in to open the file metadata setup wizard.
Then define the general properties and file schema in the wizard.
Defining the general properties
1. In the file metadata setup wizard, fill in the Name field, which is mandatory, and the Purpose and Descriptionfields if you choose to do so. The information you provide in the Description field will appear as a tooltipwhen you move your mouse pointer over the file connection.
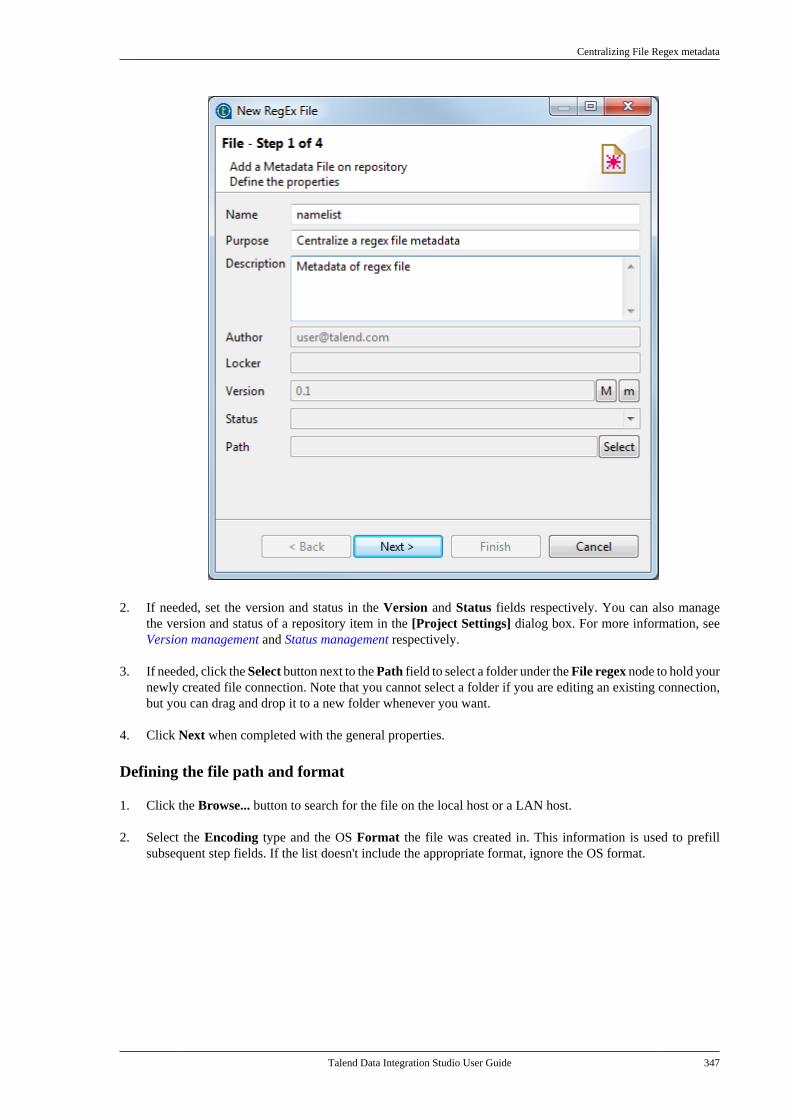
Centralizing File Regex metadata
Talend Data Integration Studio User Guide 347
2. If needed, set the version and status in the Version and Status fields respectively. You can also managethe version and status of a repository item in the [Project Settings] dialog box. For more information, seeVersion management and Status management respectively.
3. If needed, click the Select button next to the Path field to select a folder under the File regex node to hold yournewly created file connection. Note that you cannot select a folder if you are editing an existing connection,but you can drag and drop it to a new folder whenever you want.
4. Click Next when completed with the general properties.
Defining the file path and format
1. Click the Browse... button to search for the file on the local host or a LAN host.
2. Select the Encoding type and the OS Format the file was created in. This information is used to prefillsubsequent step fields. If the list doesn't include the appropriate format, ignore the OS format.
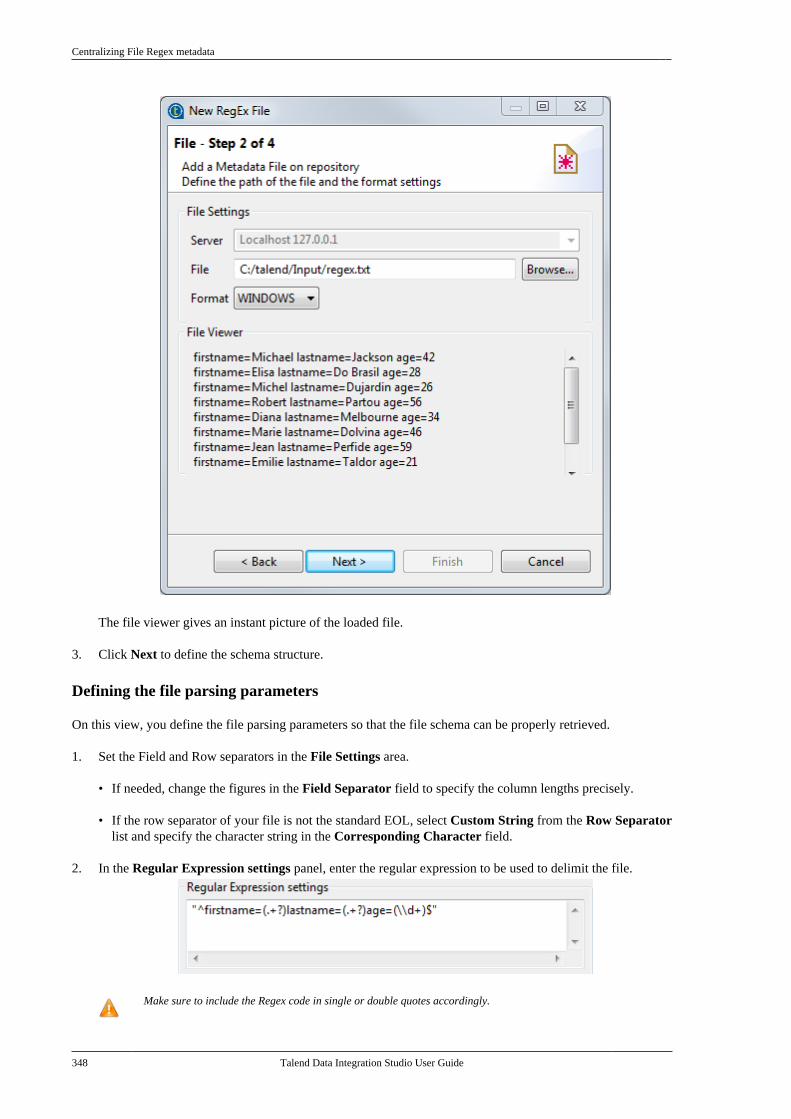
Centralizing File Regex metadata
348 Talend Data Integration Studio User Guide
The file viewer gives an instant picture of the loaded file.
3. Click Next to define the schema structure.
Defining the file parsing parameters
On this view, you define the file parsing parameters so that the file schema can be properly retrieved.
1. Set the Field and Row separators in the File Settings area.
• If needed, change the figures in the Field Separator field to specify the column lengths precisely.
• If the row separator of your file is not the standard EOL, select Custom String from the Row Separatorlist and specify the character string in the Corresponding Character field.
2. In the Regular Expression settings panel, enter the regular expression to be used to delimit the file.
Make sure to include the Regex code in single or double quotes accordingly.

Centralizing File Regex metadata
Talend Data Integration Studio User Guide 349
3. If your file has any header rows to be excluded from the data content, select the Header check box in theRows To Skip area and define the number of rows to be ignored in the corresponding field. Also, if you knowthat the file contains footer information, select the Footer check box and set the number of rows to be ignored.
4. The Limit of Rows allows you to restrict the extend of the file being parsed. If needed, select the Limit checkbox and set or select the desired number of rows.
5. If the file contains column labels, select the Set heading row as column names check box to transform thefirst parsed row to labels for schema columns. Note that the number of header rows to be skipped is thenincremented by 1.
6. Then click Refresh preview to take the changes into account. The button changes to Stop until the previewis refreshed.
7. Click Next to proceed to the next view where you can check and customize the generated Regex File schema.
Checking and customizing the file schema
1. Rename the schema (by default, metadata) and edit the schema columns as needed.
Make sure the data type in the Type column is correctly defined.
For more information regarding Java data types, including date pattern, see Java API Specification.
Below are the commonly used Talend data types:
• Object: a generic Talend data type that allows processing data without regard to its content, for example,a data file not otherwise supported can be processed with a tFileInputRaw component by specifying thatit has a data type of Object.
• List: a space-separated list of primitive type elements in an XML Schema definition, defined using thexsd:list element.
• Dynamic: a data type that can be set for a single column at the end of a schema to allow processing fieldsas VARCHAR(100) columns named either as ‘Column<X>’ or, if the input includes a header, from thecolumn names appearing in the header. For more information, see Dynamic schema.
• Document: a data type that allows processing an entire XML document without regarding to its content.
2. To retrieve or update the Regex File schema, click Guess. Note however that any edits to the schema mightbe lost after guessing the file based schema.
3. When done, click Finish to close the wizard.
The new schema is displayed under the relevant File regex node in the Repository tree view. You can dropthe defined metadata from the Repository onto the design workspace as a new component or onto an existing
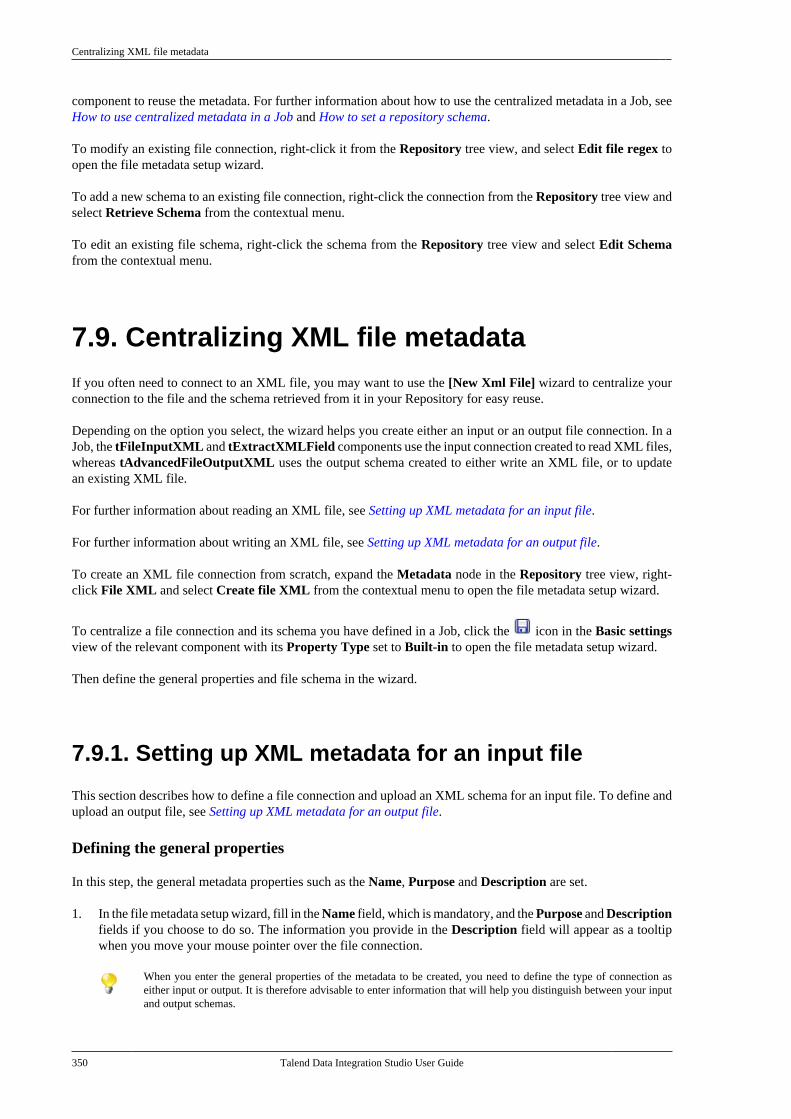
Centralizing XML file metadata
350 Talend Data Integration Studio User Guide
component to reuse the metadata. For further information about how to use the centralized metadata in a Job, seeHow to use centralized metadata in a Job and How to set a repository schema.
To modify an existing file connection, right-click it from the Repository tree view, and select Edit file regex toopen the file metadata setup wizard.
To add a new schema to an existing file connection, right-click the connection from the Repository tree view andselect Retrieve Schema from the contextual menu.
To edit an existing file schema, right-click the schema from the Repository tree view and select Edit Schemafrom the contextual menu.
7.9. Centralizing XML file metadataIf you often need to connect to an XML file, you may want to use the [New Xml File] wizard to centralize yourconnection to the file and the schema retrieved from it in your Repository for easy reuse.
Depending on the option you select, the wizard helps you create either an input or an output file connection. In aJob, the tFileInputXML and tExtractXMLField components use the input connection created to read XML files,whereas tAdvancedFileOutputXML uses the output schema created to either write an XML file, or to updatean existing XML file.
For further information about reading an XML file, see Setting up XML metadata for an input file.
For further information about writing an XML file, see Setting up XML metadata for an output file.
To create an XML file connection from scratch, expand the Metadata node in the Repository tree view, right-click File XML and select Create file XML from the contextual menu to open the file metadata setup wizard.
To centralize a file connection and its schema you have defined in a Job, click the icon in the Basic settingsview of the relevant component with its Property Type set to Built-in to open the file metadata setup wizard.
Then define the general properties and file schema in the wizard.
7.9.1. Setting up XML metadata for an input file
This section describes how to define a file connection and upload an XML schema for an input file. To define andupload an output file, see Setting up XML metadata for an output file.
Defining the general properties
In this step, the general metadata properties such as the Name, Purpose and Description are set.
1. In the file metadata setup wizard, fill in the Name field, which is mandatory, and the Purpose and Descriptionfields if you choose to do so. The information you provide in the Description field will appear as a tooltipwhen you move your mouse pointer over the file connection.
When you enter the general properties of the metadata to be created, you need to define the type of connection aseither input or output. It is therefore advisable to enter information that will help you distinguish between your inputand output schemas.
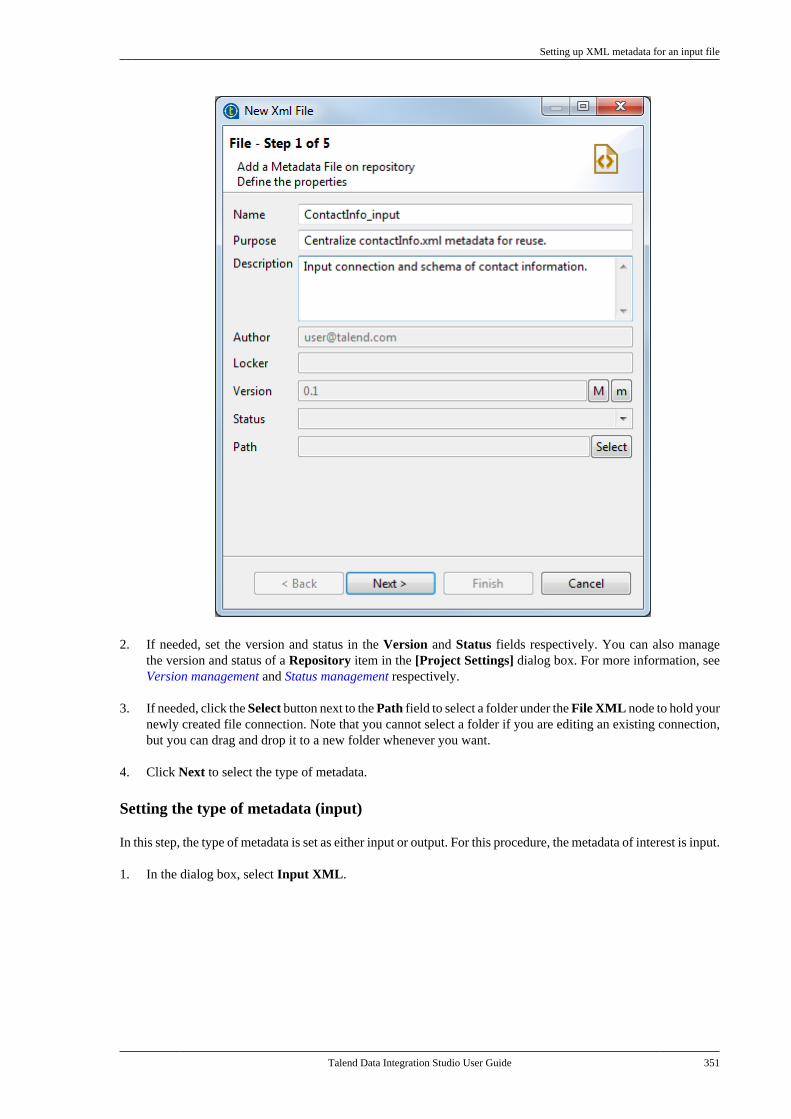
Setting up XML metadata for an input file
Talend Data Integration Studio User Guide 351
2. If needed, set the version and status in the Version and Status fields respectively. You can also managethe version and status of a Repository item in the [Project Settings] dialog box. For more information, seeVersion management and Status management respectively.
3. If needed, click the Select button next to the Path field to select a folder under the File XML node to hold yournewly created file connection. Note that you cannot select a folder if you are editing an existing connection,but you can drag and drop it to a new folder whenever you want.
4. Click Next to select the type of metadata.
Setting the type of metadata (input)
In this step, the type of metadata is set as either input or output. For this procedure, the metadata of interest is input.
1. In the dialog box, select Input XML.
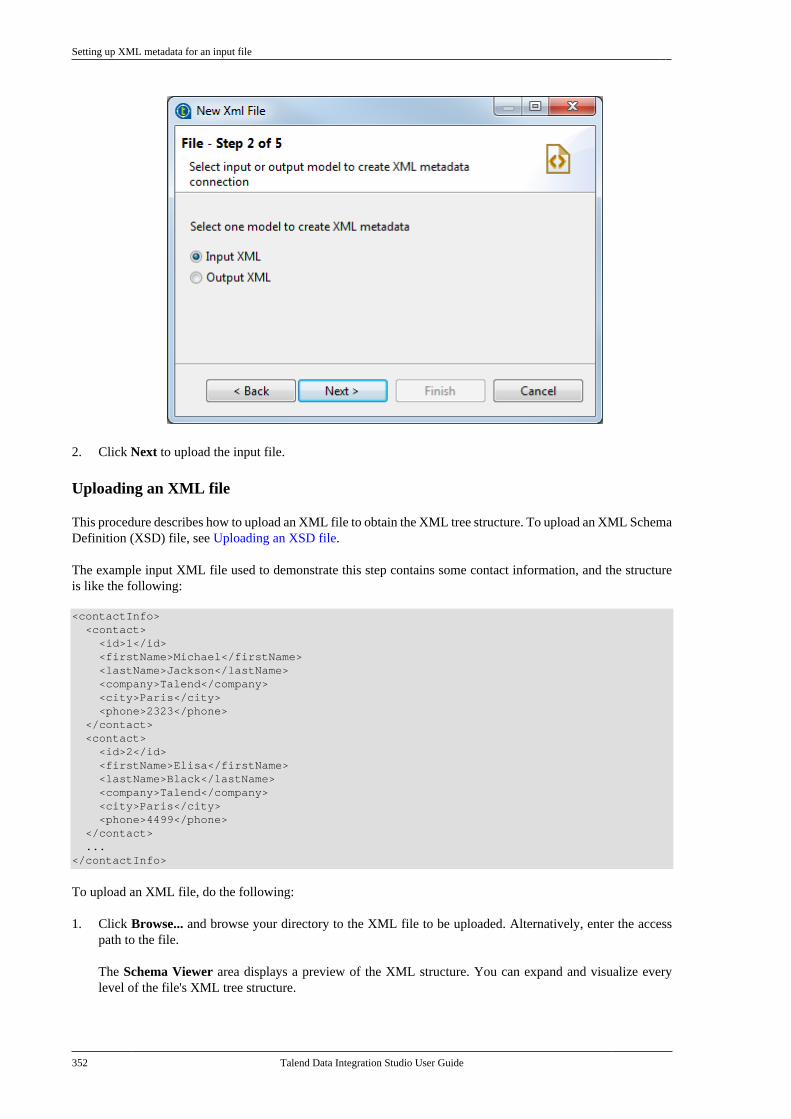
Setting up XML metadata for an input file
352 Talend Data Integration Studio User Guide
2. Click Next to upload the input file.
Uploading an XML file
This procedure describes how to upload an XML file to obtain the XML tree structure. To upload an XML SchemaDefinition (XSD) file, see Uploading an XSD file.
The example input XML file used to demonstrate this step contains some contact information, and the structureis like the following:
<contactInfo> <contact> <id>1</id> <firstName>Michael</firstName> <lastName>Jackson</lastName> <company>Talend</company> <city>Paris</city> <phone>2323</phone> </contact> <contact> <id>2</id> <firstName>Elisa</firstName> <lastName>Black</lastName> <company>Talend</company> <city>Paris</city> <phone>4499</phone> </contact> ...</contactInfo>
To upload an XML file, do the following:
1. Click Browse... and browse your directory to the XML file to be uploaded. Alternatively, enter the accesspath to the file.
The Schema Viewer area displays a preview of the XML structure. You can expand and visualize everylevel of the file's XML tree structure.
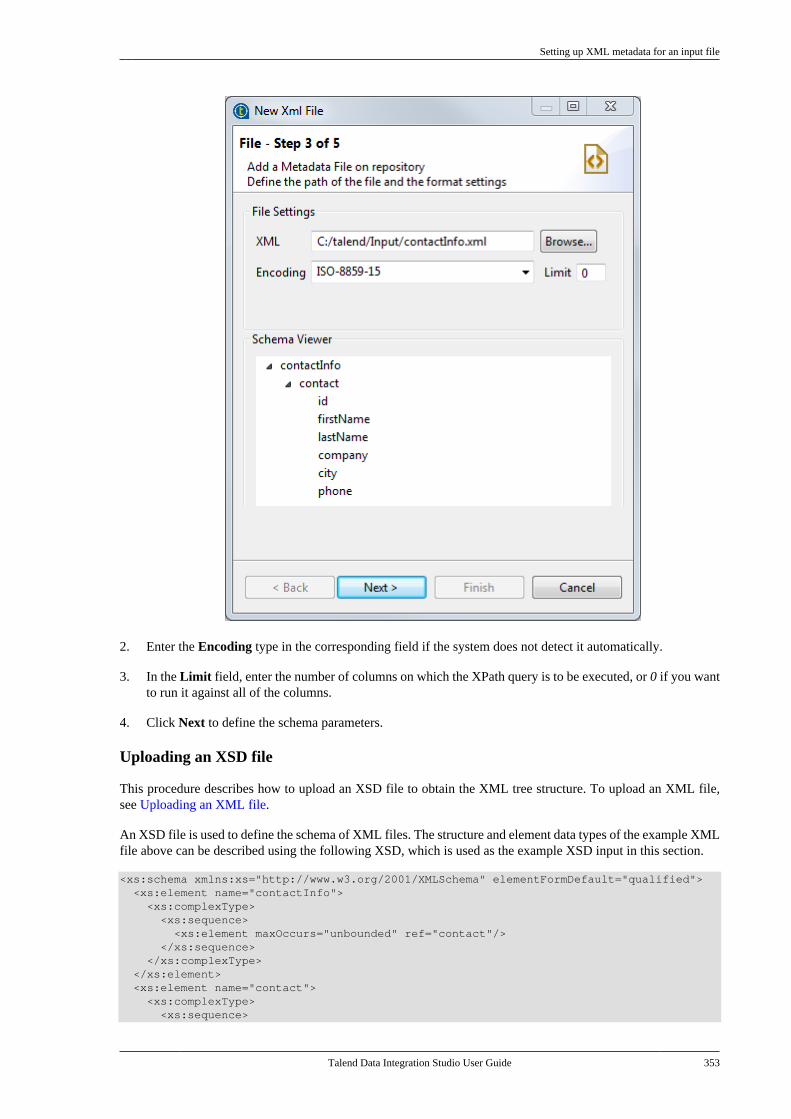
Setting up XML metadata for an input file
Talend Data Integration Studio User Guide 353
2. Enter the Encoding type in the corresponding field if the system does not detect it automatically.
3. In the Limit field, enter the number of columns on which the XPath query is to be executed, or 0 if you wantto run it against all of the columns.
4. Click Next to define the schema parameters.
Uploading an XSD file
This procedure describes how to upload an XSD file to obtain the XML tree structure. To upload an XML file,see Uploading an XML file.
An XSD file is used to define the schema of XML files. The structure and element data types of the example XMLfile above can be described using the following XSD, which is used as the example XSD input in this section.
<xs:schema xmlns:xs="http://www.w3.org/2001/XMLSchema" elementFormDefault="qualified"> <xs:element name="contactInfo"> <xs:complexType> <xs:sequence> <xs:element maxOccurs="unbounded" ref="contact"/> </xs:sequence> </xs:complexType> </xs:element> <xs:element name="contact"> <xs:complexType> <xs:sequence>

Setting up XML metadata for an input file
354 Talend Data Integration Studio User Guide
<xs:element ref="id"/> <xs:element ref="firstName"/> <xs:element ref="lastName"/> <xs:element ref="company"/> <xs:element ref="city"/> <xs:element ref="phone"/> </xs:sequence> </xs:complexType> </xs:element> <xs:element name="id" type="xs:integer"/> <xs:element name="firstName" type="xs:NCName"/> <xs:element name="lastName" type="xs:NCName"/> <xs:element name="company" type="xs:NCName"/> <xs:element name="city" type="xs:NCName"/> <xs:element name="phone" type="xs:integer"/></xs:schema>
For more information on XML Schema, see http://www.w3.org/XML/Schema.
When loading an XSD file,
• the data will be saved in the Repository, and therefore the metadata will not be affected by the deletion or displacementof the file.
• you can choose an element as the root of your XML tree.
To load an XSD file, do the following:
1. Click Browse... and browse your directory to the XSD file to be uploaded. Alternatively, enter the accesspath to the file.
2. In the dialog box the appears, select an element from the Root list as the root of your XML tree, and click OK.
The Schema Viewer area displays a preview of the XML structure. You can expand and visualize everylevel of the file's XML tree structure.
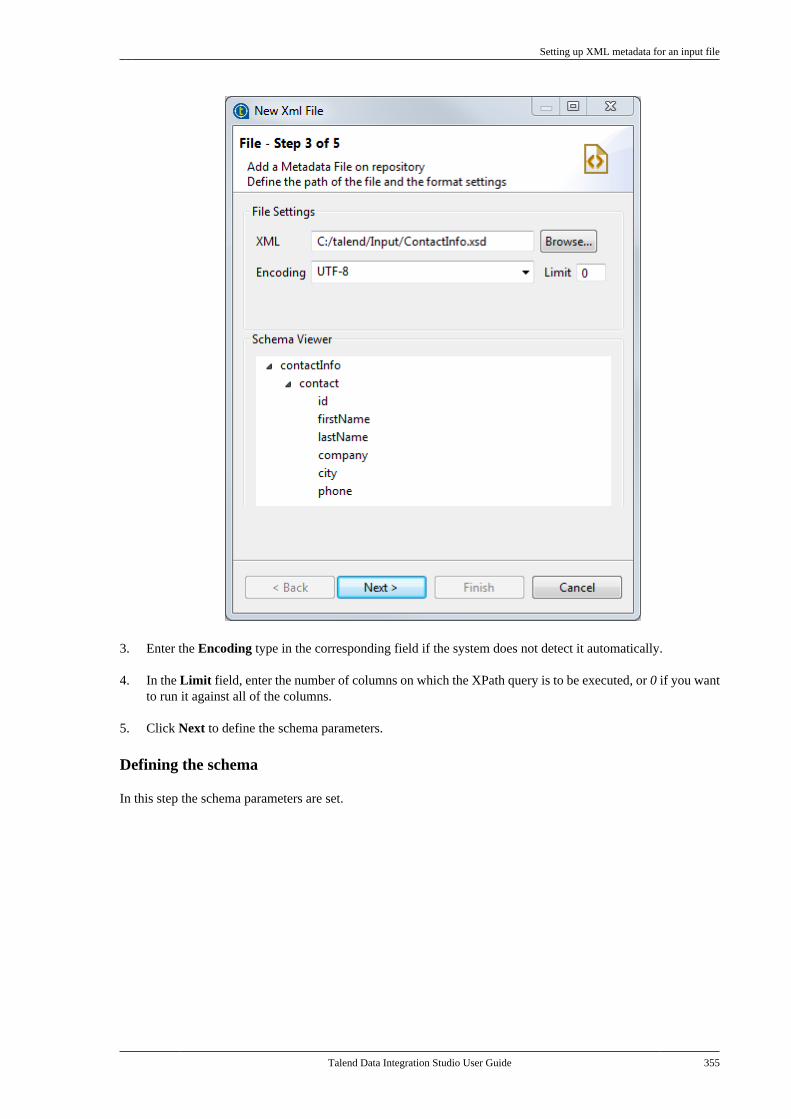
Setting up XML metadata for an input file
Talend Data Integration Studio User Guide 355
3. Enter the Encoding type in the corresponding field if the system does not detect it automatically.
4. In the Limit field, enter the number of columns on which the XPath query is to be executed, or 0 if you wantto run it against all of the columns.
5. Click Next to define the schema parameters.
Defining the schema
In this step the schema parameters are set.
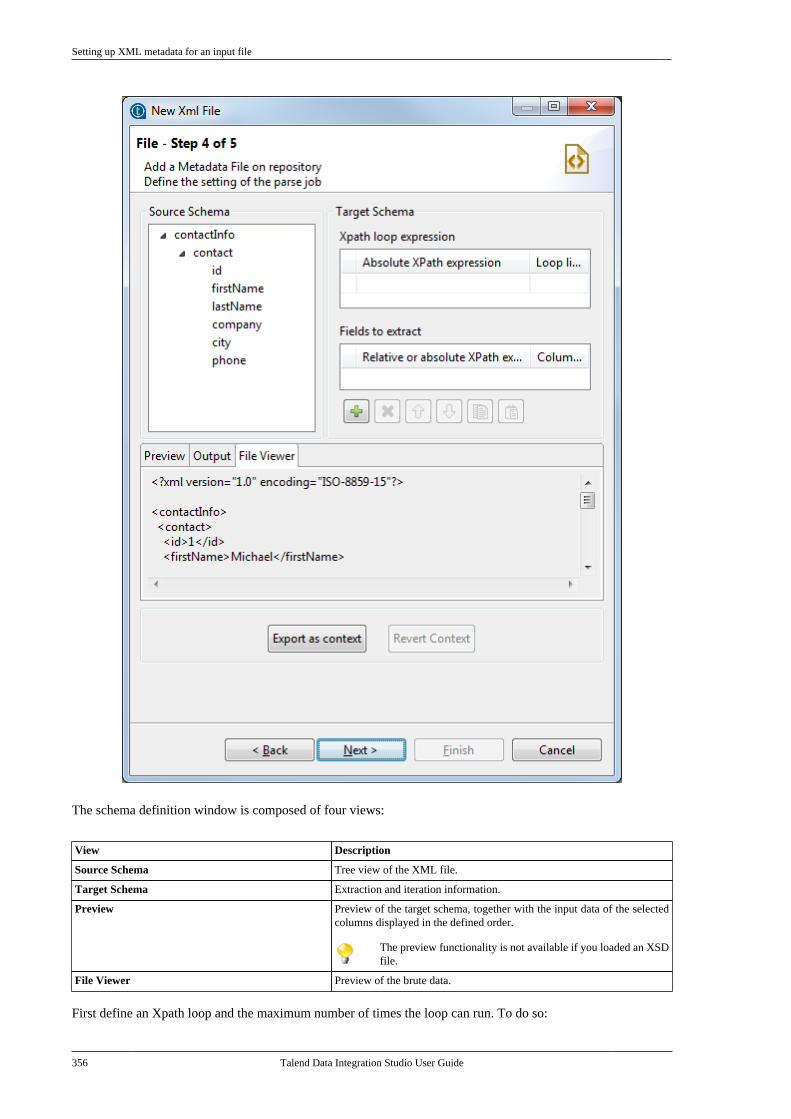
Setting up XML metadata for an input file
356 Talend Data Integration Studio User Guide
The schema definition window is composed of four views:
View Description
Source Schema Tree view of the XML file.
Target Schema Extraction and iteration information.
Preview Preview of the target schema, together with the input data of the selectedcolumns displayed in the defined order.
The preview functionality is not available if you loaded an XSDfile.
File Viewer Preview of the brute data.
First define an Xpath loop and the maximum number of times the loop can run. To do so:
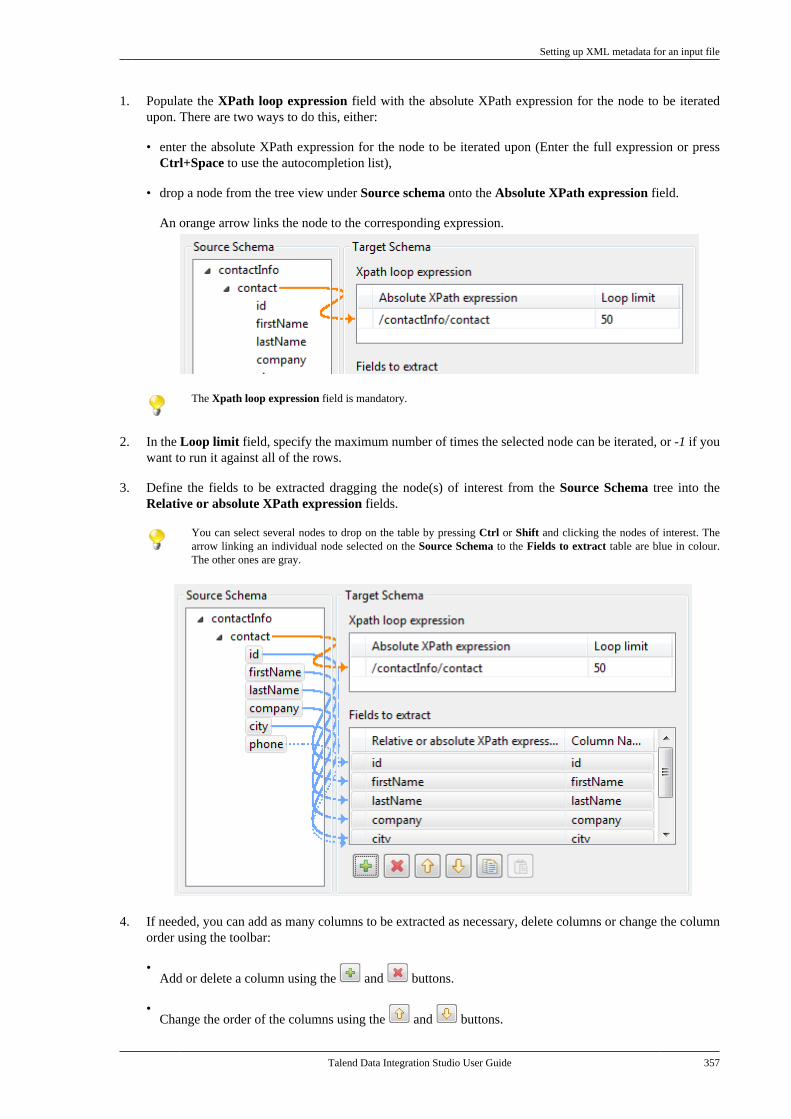
Setting up XML metadata for an input file
Talend Data Integration Studio User Guide 357
1. Populate the XPath loop expression field with the absolute XPath expression for the node to be iteratedupon. There are two ways to do this, either:
• enter the absolute XPath expression for the node to be iterated upon (Enter the full expression or pressCtrl+Space to use the autocompletion list),
• drop a node from the tree view under Source schema onto the Absolute XPath expression field.
An orange arrow links the node to the corresponding expression.
The Xpath loop expression field is mandatory.
2. In the Loop limit field, specify the maximum number of times the selected node can be iterated, or -1 if youwant to run it against all of the rows.
3. Define the fields to be extracted dragging the node(s) of interest from the Source Schema tree into theRelative or absolute XPath expression fields.
You can select several nodes to drop on the table by pressing Ctrl or Shift and clicking the nodes of interest. Thearrow linking an individual node selected on the Source Schema to the Fields to extract table are blue in colour.The other ones are gray.
4. If needed, you can add as many columns to be extracted as necessary, delete columns or change the columnorder using the toolbar:
•Add or delete a column using the and buttons.
•Change the order of the columns using the and buttons.
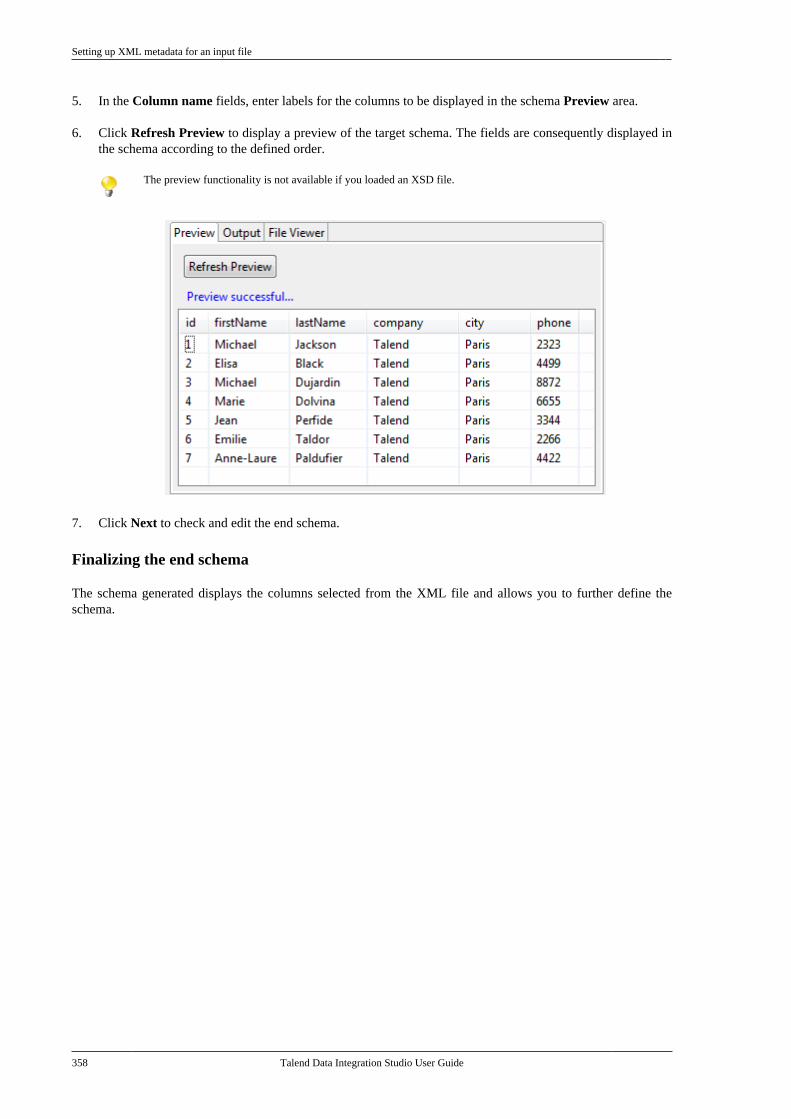
Setting up XML metadata for an input file
358 Talend Data Integration Studio User Guide
5. In the Column name fields, enter labels for the columns to be displayed in the schema Preview area.
6. Click Refresh Preview to display a preview of the target schema. The fields are consequently displayed inthe schema according to the defined order.
The preview functionality is not available if you loaded an XSD file.
7. Click Next to check and edit the end schema.
Finalizing the end schema
The schema generated displays the columns selected from the XML file and allows you to further define theschema.
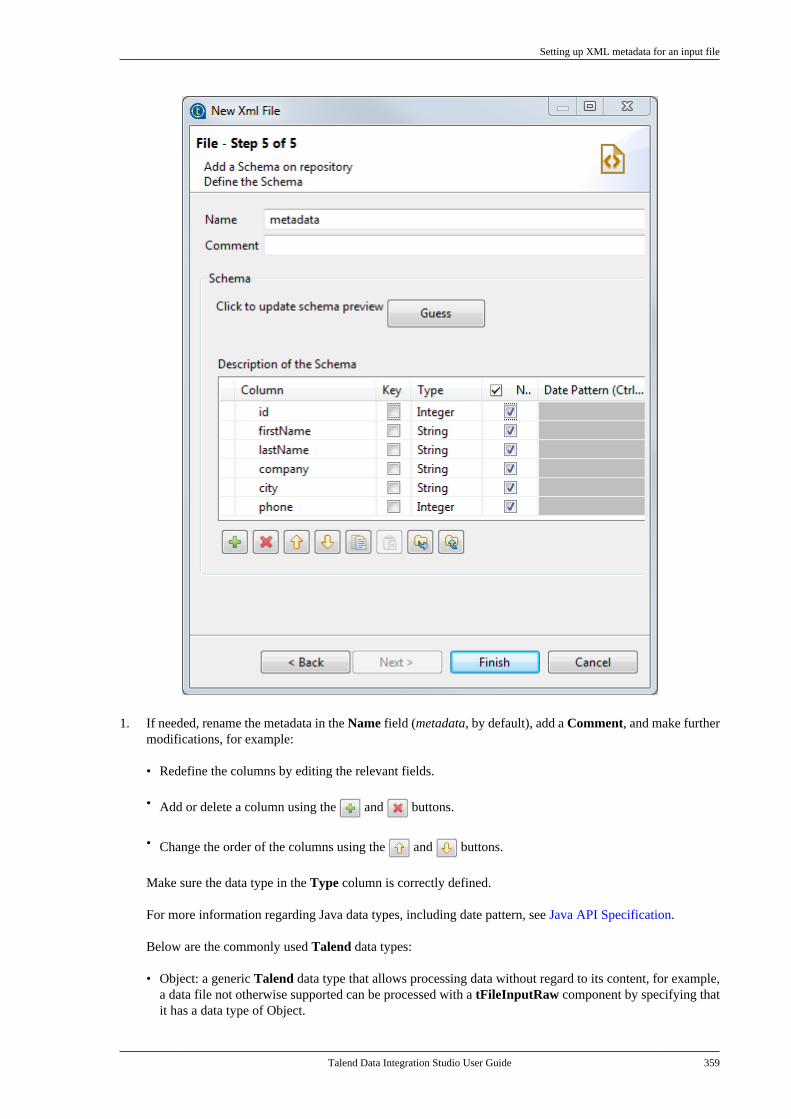
Setting up XML metadata for an input file
Talend Data Integration Studio User Guide 359
1. If needed, rename the metadata in the Name field (metadata, by default), add a Comment, and make furthermodifications, for example:
• Redefine the columns by editing the relevant fields.
• Add or delete a column using the and buttons.
• Change the order of the columns using the and buttons.
Make sure the data type in the Type column is correctly defined.
For more information regarding Java data types, including date pattern, see Java API Specification.
Below are the commonly used Talend data types:
• Object: a generic Talend data type that allows processing data without regard to its content, for example,a data file not otherwise supported can be processed with a tFileInputRaw component by specifying thatit has a data type of Object.

Setting up XML metadata for an output file
360 Talend Data Integration Studio User Guide
• List: a space-separated list of primitive type elements in an XML Schema definition, defined using thexsd:list element.
• Dynamic: a data type that can be set for a single column at the end of a schema to allow processing fieldsas VARCHAR(100) columns named either as ‘Column<X>’ or, if the input includes a header, from thecolumn names appearing in the header. For more information, see Dynamic schema.
• Document: a data type that allows processing an entire XML document without regarding to its content.
2. If the XML file which the schema is based on has been changed, click the Guess button to generate theschema again. Note that if you have customized the schema, the Guess feature does not retain these changes.
3. Click Finish. The new file connection, along with it schema, appears under the File XML node in theRepository tree view.
Now you can drag and drop the file connection or any schema of it from the Repository tree view onto the designworkspace as a new tFileInputXML or tExtractXMLField component or onto an existing component to reusethe metadata. For further information about how to use the centralized metadata in a Job, see How to use centralizedmetadata in a Joband How to set a repository schema.
To modify an existing file connection, right-click it from the Repository tree view, and select Edit file xml toopen the file metadata setup wizard.
To add a new schema to an existing file connection, right-click the connection from the Repository tree view andselect Retrieve Schema from the contextual menu.
To edit an existing file schema, right-click the schema from the Repository tree view and select Edit Schemafrom the contextual menu.
7.9.2. Setting up XML metadata for an output file
This section describes how to define a file connection and upload an XML schema for an output file. To defineand upload an XML schema for an input file, see Setting up XML metadata for an input file.
Defining the general properties
In this step, the general metadata properties such as the Name, Purpose and Description are set.
1. In the file metadata setup wizard, fill in the Name field, which is mandatory, and the Purpose and Descriptionfields if you choose to do so. The information you provide in the Description field will appear as a tooltipwhen you move your mouse pointer over the file connection.
When you enter the general properties of the metadata to be created, you need to define the type of connection aseither input or output. It is therefore advisable to enter information that will help you distinguish between your inputand output schemas.
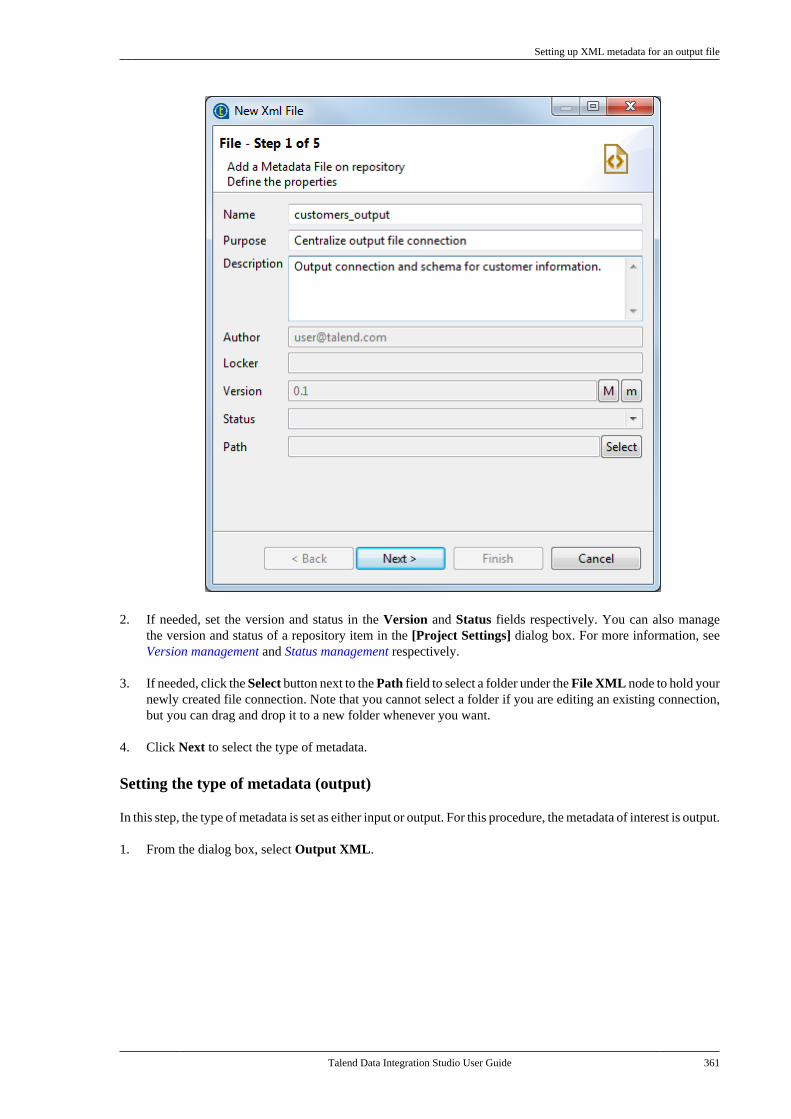
Setting up XML metadata for an output file
Talend Data Integration Studio User Guide 361
2. If needed, set the version and status in the Version and Status fields respectively. You can also managethe version and status of a repository item in the [Project Settings] dialog box. For more information, seeVersion management and Status management respectively.
3. If needed, click the Select button next to the Path field to select a folder under the File XML node to hold yournewly created file connection. Note that you cannot select a folder if you are editing an existing connection,but you can drag and drop it to a new folder whenever you want.
4. Click Next to select the type of metadata.
Setting the type of metadata (output)
In this step, the type of metadata is set as either input or output. For this procedure, the metadata of interest is output.
1. From the dialog box, select Output XML.
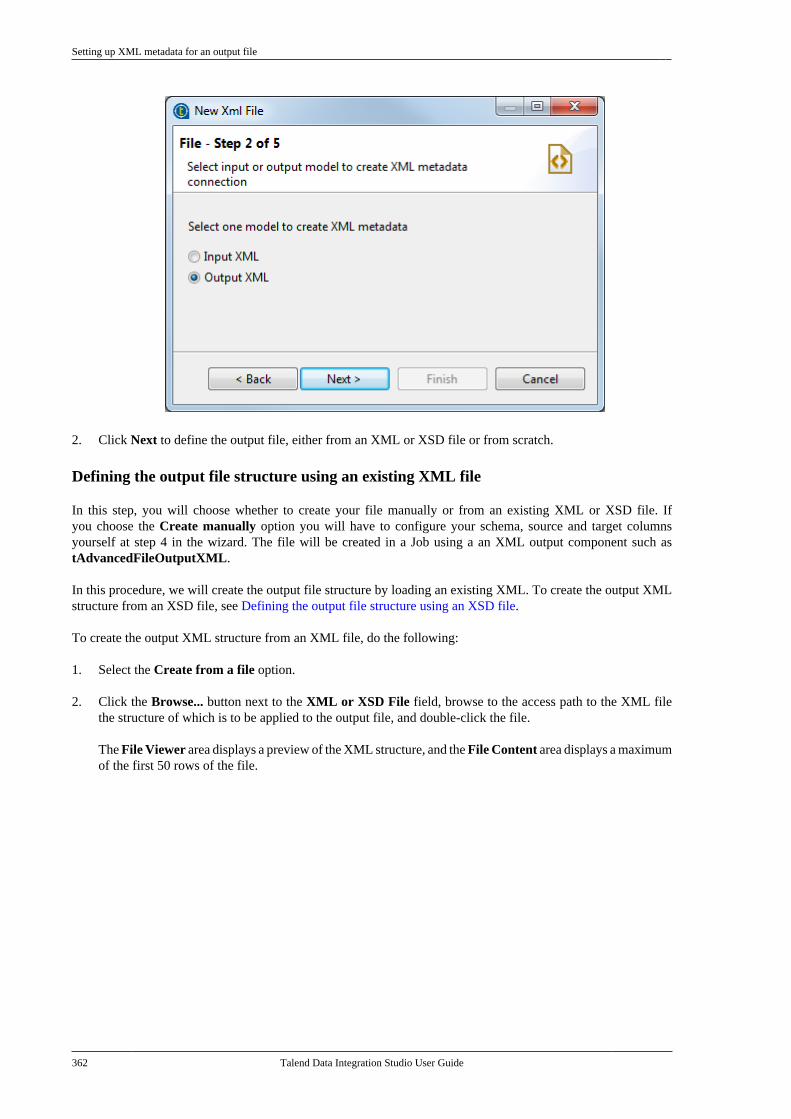
Setting up XML metadata for an output file
362 Talend Data Integration Studio User Guide
2. Click Next to define the output file, either from an XML or XSD file or from scratch.
Defining the output file structure using an existing XML file
In this step, you will choose whether to create your file manually or from an existing XML or XSD file. Ifyou choose the Create manually option you will have to configure your schema, source and target columnsyourself at step 4 in the wizard. The file will be created in a Job using a an XML output component such astAdvancedFileOutputXML.
In this procedure, we will create the output file structure by loading an existing XML. To create the output XMLstructure from an XSD file, see Defining the output file structure using an XSD file.
To create the output XML structure from an XML file, do the following:
1. Select the Create from a file option.
2. Click the Browse... button next to the XML or XSD File field, browse to the access path to the XML filethe structure of which is to be applied to the output file, and double-click the file.
The File Viewer area displays a preview of the XML structure, and the File Content area displays a maximumof the first 50 rows of the file.
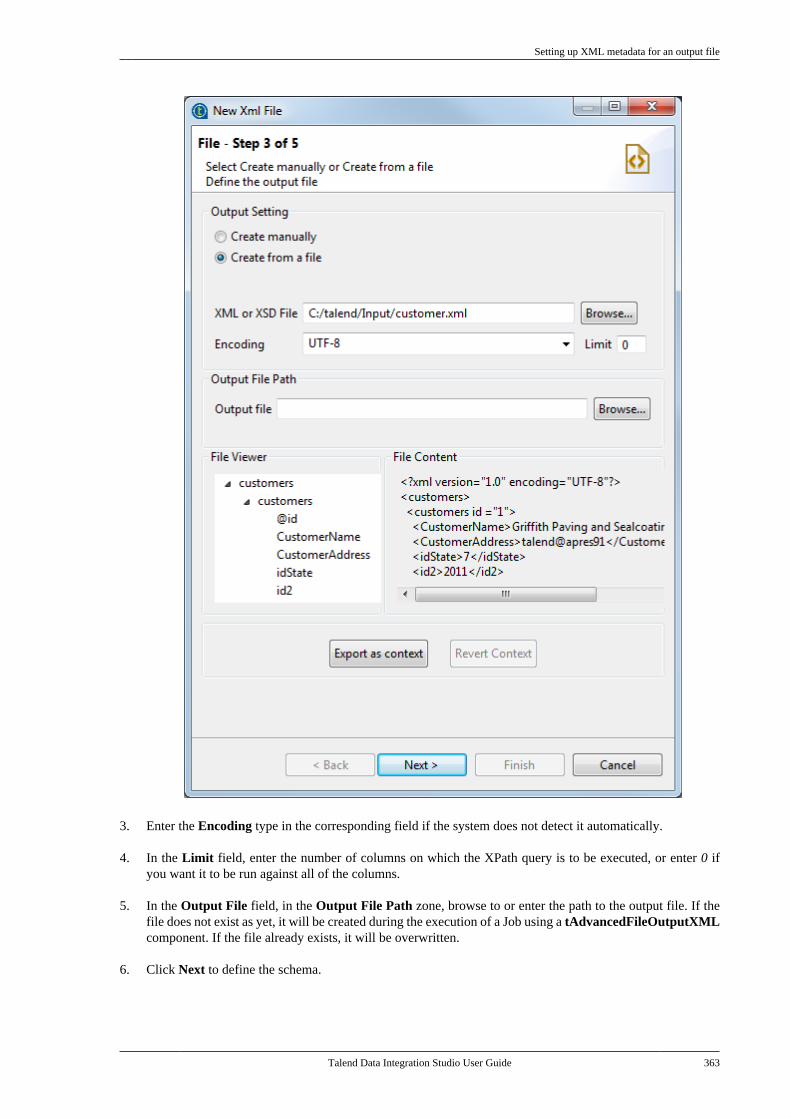
Setting up XML metadata for an output file
Talend Data Integration Studio User Guide 363
3. Enter the Encoding type in the corresponding field if the system does not detect it automatically.
4. In the Limit field, enter the number of columns on which the XPath query is to be executed, or enter 0 ifyou want it to be run against all of the columns.
5. In the Output File field, in the Output File Path zone, browse to or enter the path to the output file. If thefile does not exist as yet, it will be created during the execution of a Job using a tAdvancedFileOutputXMLcomponent. If the file already exists, it will be overwritten.
6. Click Next to define the schema.
Setting up XML metadata for an output file
364 Talend Data Integration Studio User Guide
Defining the output file structure using an XSD file
This procedure describes how to define the output XML file structure from an XSD file. To define the XMLstructure from an XML file, see Defining the output file structure using an existing XML file.
When loading an XSD file,
• the data will be saved in the Repository, and therefore the metadata will not be affected by the deletion or displacementof the file.
• you can choose an element as the root of your XML tree.
To create the output XML structure from an XSD file, do the following:
1. Select the Create from a file option.
2. Click the Browse... button next to the XML or XSD File field, browse to the access path to the XSD file thestructure of which is to be applied to the output file, and double-click the file.
3. In the dialog box the appears, select an element from the Root list as the root of your XML tree, and click OK.
The File Viewer area displays a preview of the XML structure, and the File Content area displays a maximumof the first 50 rows of the file.
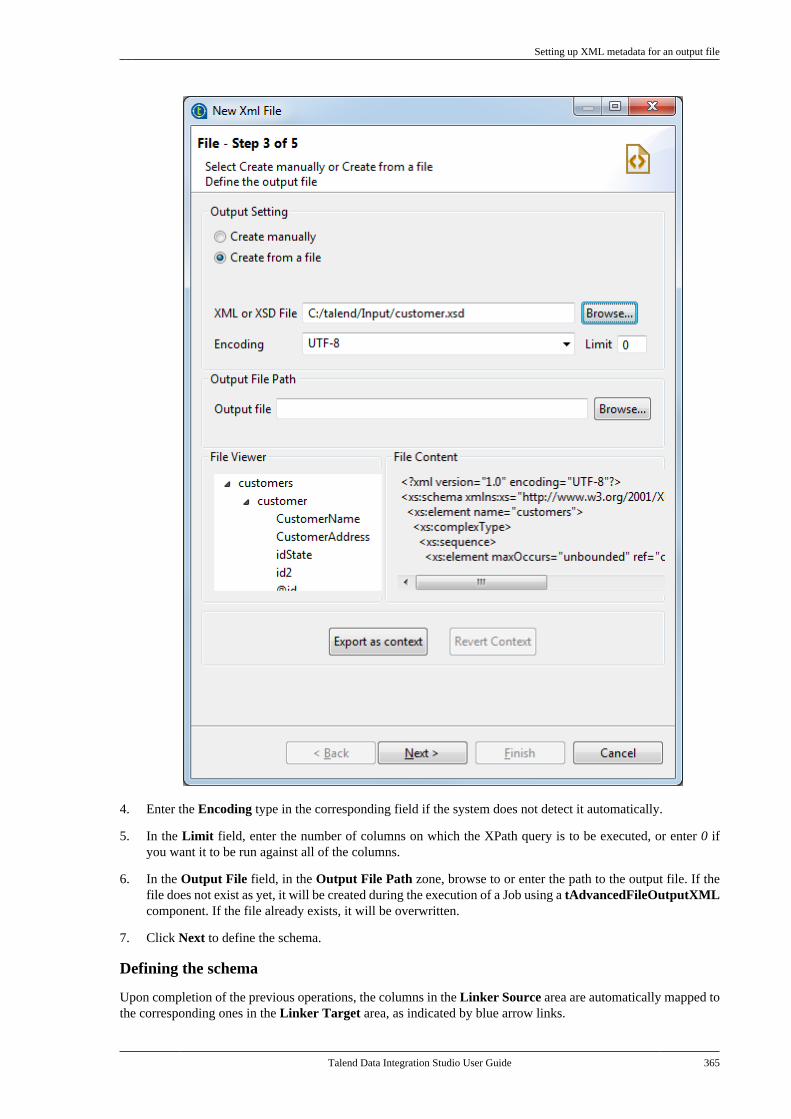
Setting up XML metadata for an output file
Talend Data Integration Studio User Guide 365
4. Enter the Encoding type in the corresponding field if the system does not detect it automatically.
5. In the Limit field, enter the number of columns on which the XPath query is to be executed, or enter 0 ifyou want it to be run against all of the columns.
6. In the Output File field, in the Output File Path zone, browse to or enter the path to the output file. If thefile does not exist as yet, it will be created during the execution of a Job using a tAdvancedFileOutputXMLcomponent. If the file already exists, it will be overwritten.
7. Click Next to define the schema.
Defining the schema
Upon completion of the previous operations, the columns in the Linker Source area are automatically mapped tothe corresponding ones in the Linker Target area, as indicated by blue arrow links.
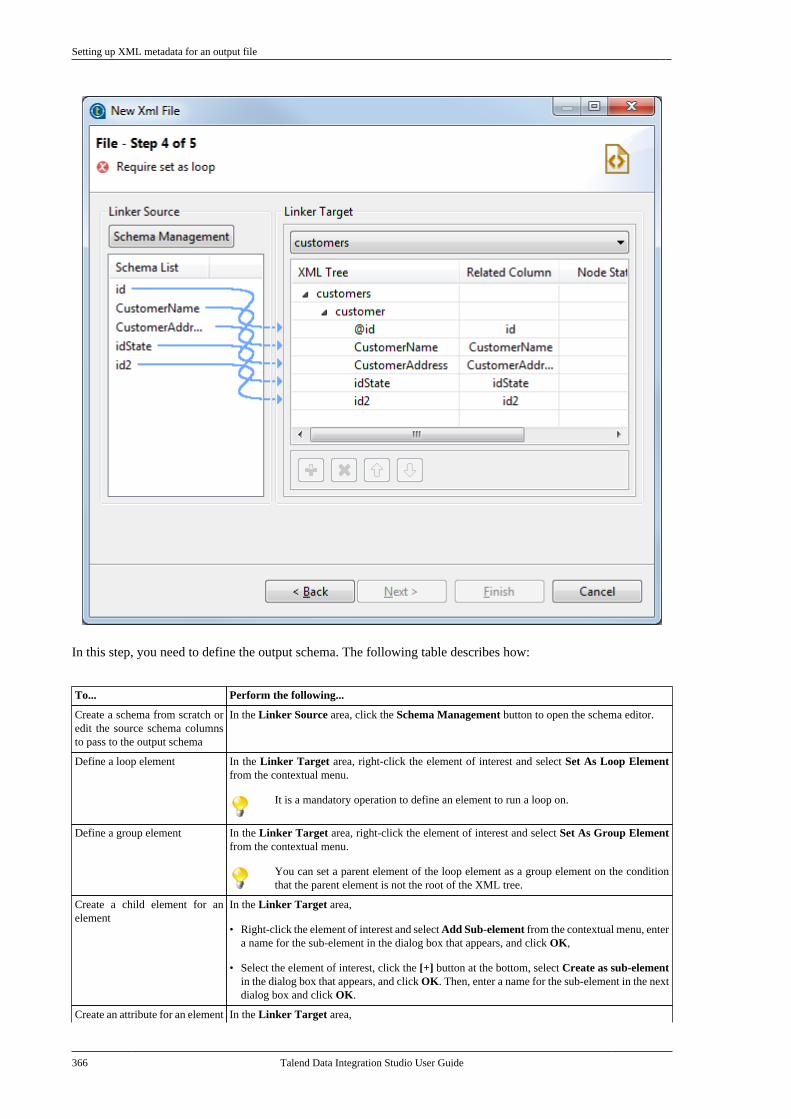
Setting up XML metadata for an output file
366 Talend Data Integration Studio User Guide
In this step, you need to define the output schema. The following table describes how:
To... Perform the following...
Create a schema from scratch oredit the source schema columnsto pass to the output schema
In the Linker Source area, click the Schema Management button to open the schema editor.
Define a loop element In the Linker Target area, right-click the element of interest and select Set As Loop Elementfrom the contextual menu.
It is a mandatory operation to define an element to run a loop on.
Define a group element In the Linker Target area, right-click the element of interest and select Set As Group Elementfrom the contextual menu.
You can set a parent element of the loop element as a group element on the conditionthat the parent element is not the root of the XML tree.
Create a child element for anelement
In the Linker Target area,
• Right-click the element of interest and select Add Sub-element from the contextual menu, entera name for the sub-element in the dialog box that appears, and click OK,
• Select the element of interest, click the [+] button at the bottom, select Create as sub-elementin the dialog box that appears, and click OK. Then, enter a name for the sub-element in the nextdialog box and click OK.
Create an attribute for an element In the Linker Target area,
Setting up XML metadata for an output file
Talend Data Integration Studio User Guide 367
To... Perform the following...
• Right-click the element of interest and select Add Attribute from the contextual menu, enter aname for the attribute in the dialog box that appears, and click OK,
• Select the element of interest, click the [+] button at the bottom, select Create as attribute inthe dialog box that appears, and click OK. Then, enter a name for the attribute in the next dialogbox and click OK.
Create a name space for anelement
In the Linker Target area,
• Right-click the element of interest and select Add Name Space from the contextual menu, entera name for the name space in the dialog box that appears, and click OK,
• Select the element of interest, click the [+] button at the bottom, select Create as name spacein the dialog box that appears, and click OK. Then, enter a name for the name space in the nextdialog box and click OK.
Delete one or more elements/attributes/name spaces
In the Linker Target area,
• Right-click the element(s)/attribute(s)/name space(s) of interest and select Delete from thecontextual menu
• Select the element(s)/attribute(s)/name space(s) of interest and click the [x] button at the bottom
• Select the element(s)/attribute(s)/name space(s) of interest and press the Delete key.
Deleting an element will also delete its children, if any.
Adjust the order of one or moreelements
In the Linker Target area, select the element(s) of interest and click the and buttons.
Set a static value for an element/attribute/name space
In the Linker Target area, right-click the element/attribute/name space of interest and select SetA Fix Value from the contextual menu.
• The value you set will replace any value retrieved for the corresponding column fromthe incoming data flow in your Job.
• You can set a static value for a child element of the loop element only, on the conditionthat the element does not have its own children and does not have a source-targetmapping on it.
Create a source-target mapping Select the column of interest in the Linker Source area, drop it onto the node of interest in theLinker Target area, and select Create as sub-element of target node, Create as attribute oftarget node, or Add linker to target node according to your need in the dialog box that appears,and click OK.
If you choose an option that is not permitted for the target node, you will see a warning messageand your operation will fail.
Remove a source-target mapping In the Linker Target area, right-click the node of interest and select Disconnect Linker from thecontextual menu.
Create an XML tree from anotherXML or XSD file
Right-click any schema item in the Linker Target area and select Import XML Tree fromthe contextual menu to load another XML or XSD file. Then, you need to create source-targetmappings manually and define the output schema all again.
You can select and drop several fields at a time, using the Ctrl + Shift technique to make multiple selections, thereforemaking mapping faster. You can also make multiple selections for right-click operations.
1. In the Linker Target area, right-click the element you want to run a loop on and select Set As Loop Elementfrom the contextual menu.
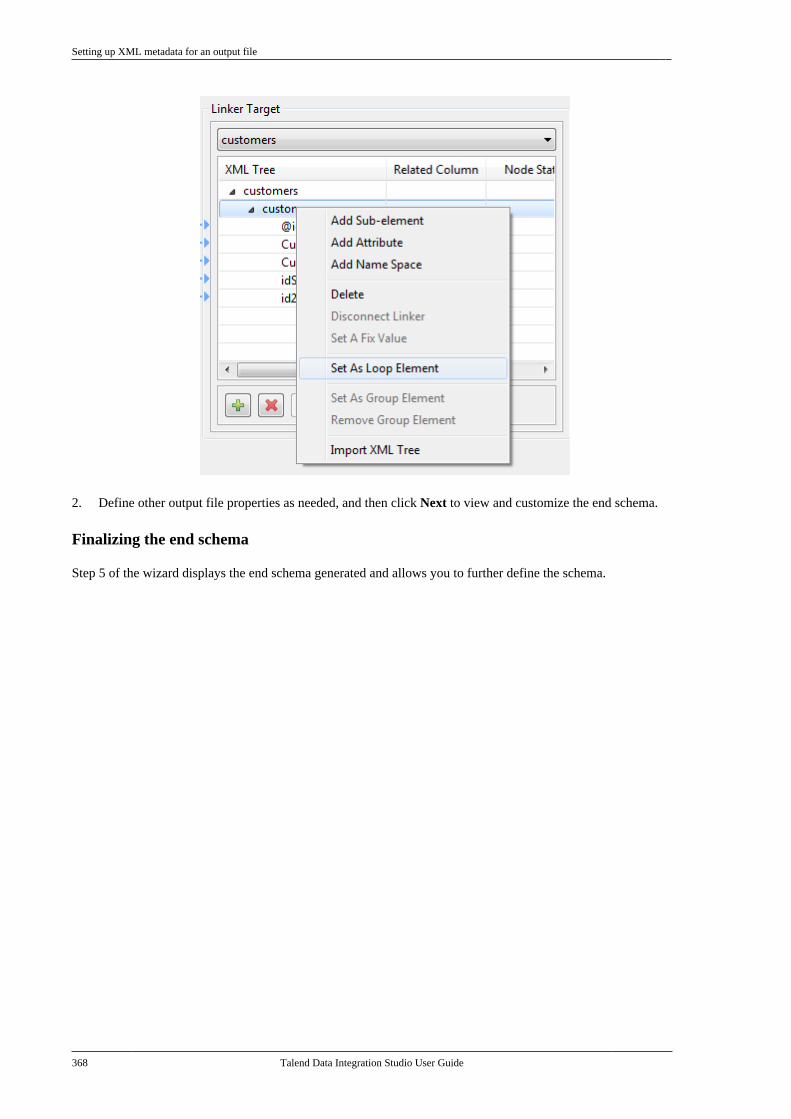
Setting up XML metadata for an output file
368 Talend Data Integration Studio User Guide
2. Define other output file properties as needed, and then click Next to view and customize the end schema.
Finalizing the end schema
Step 5 of the wizard displays the end schema generated and allows you to further define the schema.
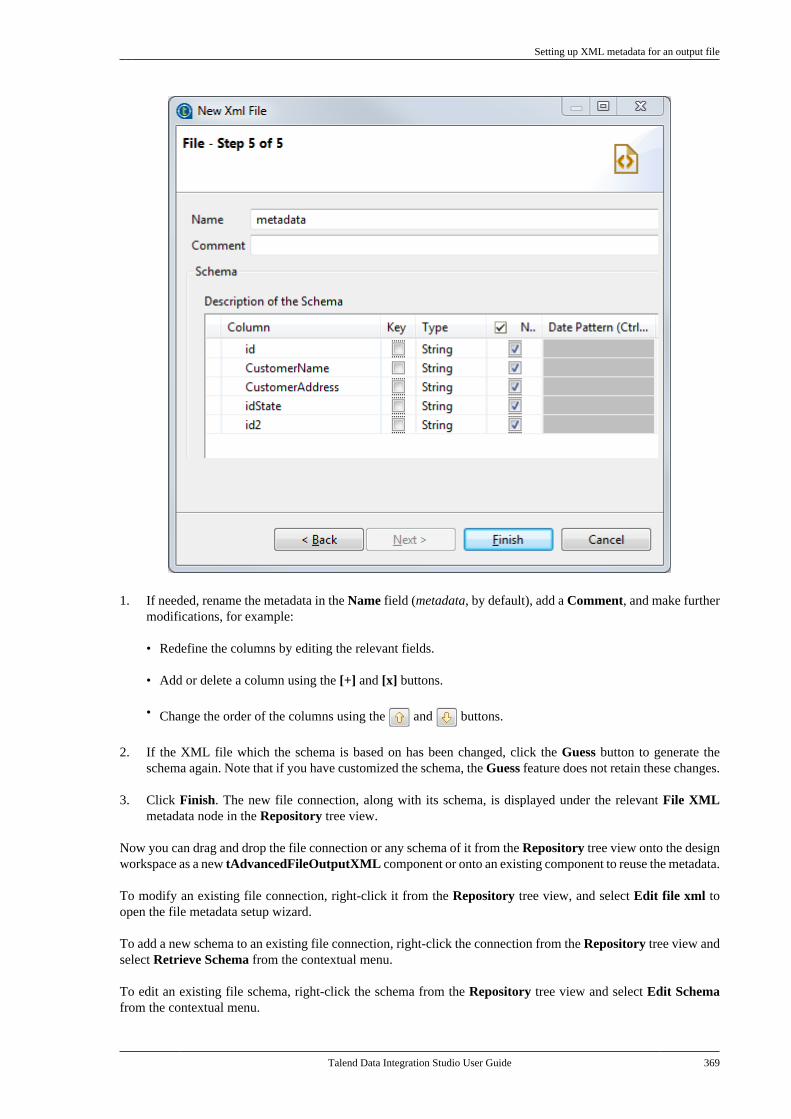
Setting up XML metadata for an output file
Talend Data Integration Studio User Guide 369
1. If needed, rename the metadata in the Name field (metadata, by default), add a Comment, and make furthermodifications, for example:
• Redefine the columns by editing the relevant fields.
• Add or delete a column using the [+] and [x] buttons.
• Change the order of the columns using the and buttons.
2. If the XML file which the schema is based on has been changed, click the Guess button to generate theschema again. Note that if you have customized the schema, the Guess feature does not retain these changes.
3. Click Finish. The new file connection, along with its schema, is displayed under the relevant File XMLmetadata node in the Repository tree view.
Now you can drag and drop the file connection or any schema of it from the Repository tree view onto the designworkspace as a new tAdvancedFileOutputXML component or onto an existing component to reuse the metadata.
To modify an existing file connection, right-click it from the Repository tree view, and select Edit file xml toopen the file metadata setup wizard.
To add a new schema to an existing file connection, right-click the connection from the Repository tree view andselect Retrieve Schema from the contextual menu.
To edit an existing file schema, right-click the schema from the Repository tree view and select Edit Schemafrom the contextual menu.
Centralizing File Excel metadata
370 Talend Data Integration Studio User Guide
7.10. Centralizing File Excel metadataIf you often need to read data from and/or write data to a certain Excel spreadsheet file, you may want to centralizethe connection to the file, along with its data structure, in the Repository for easy reuse. This will save you mucheffort because you will not have to define the metadata details manually in the relevant components each timeyou use the file.
You can centralize an Excel file connection either from an existing Excel file, or from Excel file property settingsdefined in a Job.
To centralize a File Excel connection and its schema from an Excel file, expand Metadata in the Repositorytree view, right-click File Excel and select Create file Excel from the contextual menu to open the file metadatasetup wizard.
To centralize a file connection and its schema you have already defined in a Job, click the icon in the Basicsettings view of the relevant component, with its Property Type set to Built-in, to open the file metadata setupwizard.
Then complete these tasks step by step following the wizard:
• Define the general information that will identify the file connection. See Defining the general properties.
• Load the file of interest. See Loading the file.
• Parse the file to retrieve the file schema. See Parsing the file.
• Finalize the file schema. See Finalizing the end schema.
Defining the general properties
1. In the file metadata setup wizard, fill in the Name field, which is mandatory, and the Purpose and Descriptionfields if needed. The information you provide in the Description field will appear as a tooltip when you moveyour mouse pointer over the file connection.
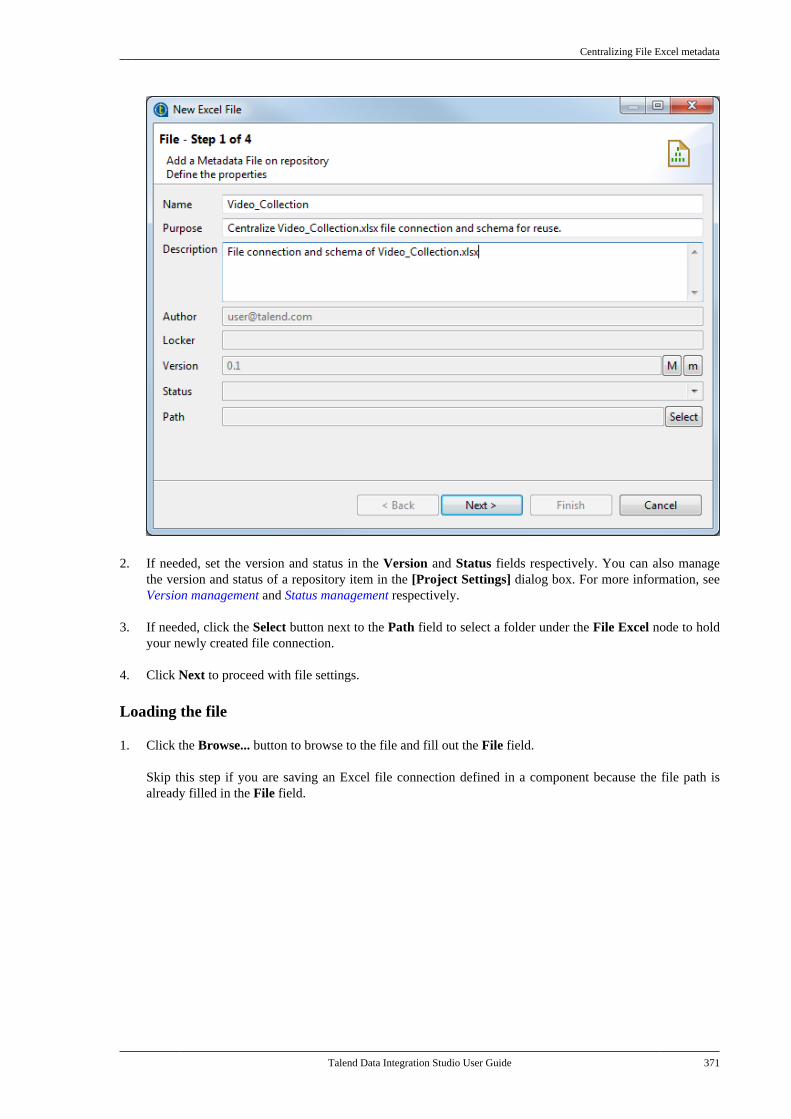
Centralizing File Excel metadata
Talend Data Integration Studio User Guide 371
2. If needed, set the version and status in the Version and Status fields respectively. You can also managethe version and status of a repository item in the [Project Settings] dialog box. For more information, seeVersion management and Status management respectively.
3. If needed, click the Select button next to the Path field to select a folder under the File Excel node to holdyour newly created file connection.
4. Click Next to proceed with file settings.
Loading the file
1. Click the Browse... button to browse to the file and fill out the File field.
Skip this step if you are saving an Excel file connection defined in a component because the file path isalready filled in the File field.
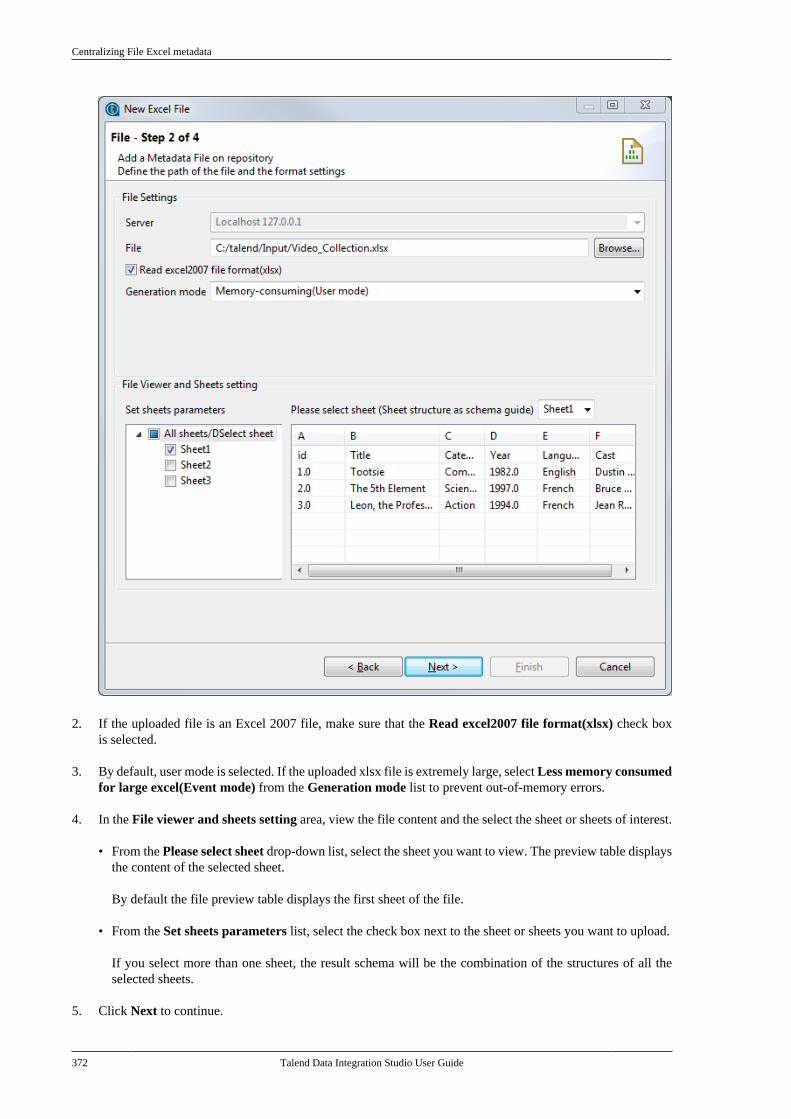
Centralizing File Excel metadata
372 Talend Data Integration Studio User Guide
2. If the uploaded file is an Excel 2007 file, make sure that the Read excel2007 file format(xlsx) check boxis selected.
3. By default, user mode is selected. If the uploaded xlsx file is extremely large, select Less memory consumedfor large excel(Event mode) from the Generation mode list to prevent out-of-memory errors.
4. In the File viewer and sheets setting area, view the file content and the select the sheet or sheets of interest.
• From the Please select sheet drop-down list, select the sheet you want to view. The preview table displaysthe content of the selected sheet.
By default the file preview table displays the first sheet of the file.
• From the Set sheets parameters list, select the check box next to the sheet or sheets you want to upload.
If you select more than one sheet, the result schema will be the combination of the structures of all theselected sheets.
5. Click Next to continue.
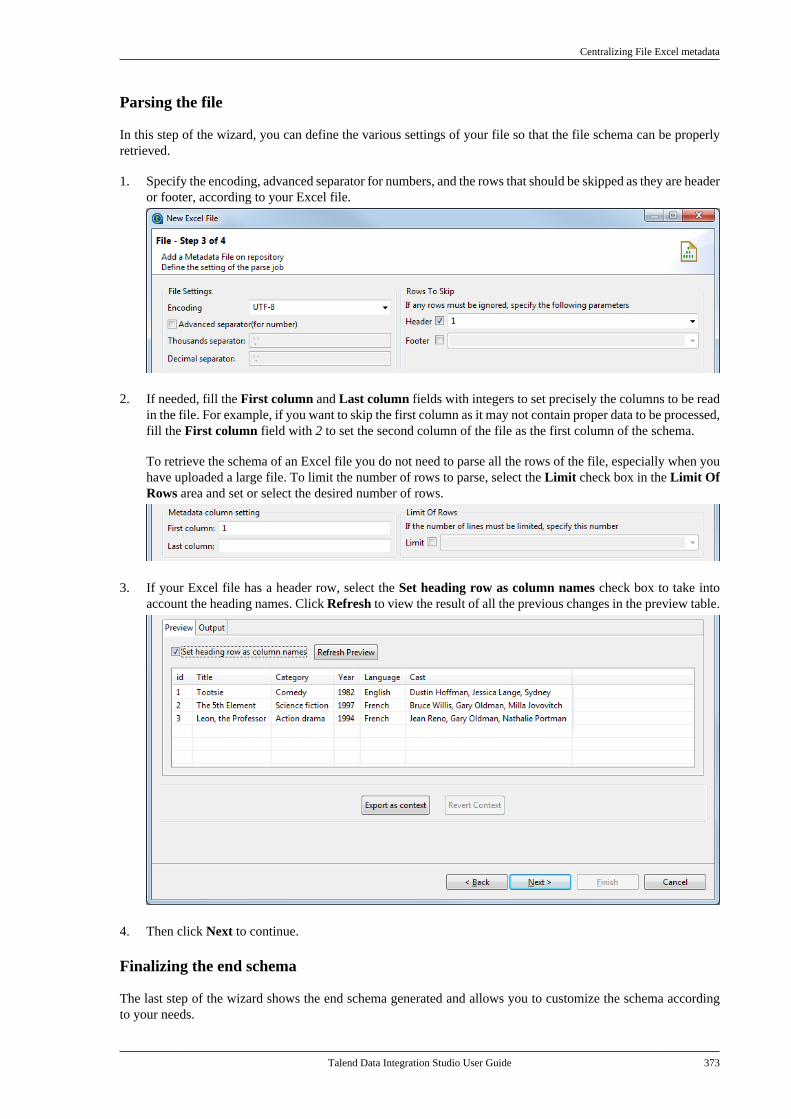
Centralizing File Excel metadata
Talend Data Integration Studio User Guide 373
Parsing the file
In this step of the wizard, you can define the various settings of your file so that the file schema can be properlyretrieved.
1. Specify the encoding, advanced separator for numbers, and the rows that should be skipped as they are headeror footer, according to your Excel file.
2. If needed, fill the First column and Last column fields with integers to set precisely the columns to be readin the file. For example, if you want to skip the first column as it may not contain proper data to be processed,fill the First column field with 2 to set the second column of the file as the first column of the schema.
To retrieve the schema of an Excel file you do not need to parse all the rows of the file, especially when youhave uploaded a large file. To limit the number of rows to parse, select the Limit check box in the Limit OfRows area and set or select the desired number of rows.
3. If your Excel file has a header row, select the Set heading row as column names check box to take intoaccount the heading names. Click Refresh to view the result of all the previous changes in the preview table.
4. Then click Next to continue.
Finalizing the end schema
The last step of the wizard shows the end schema generated and allows you to customize the schema accordingto your needs.
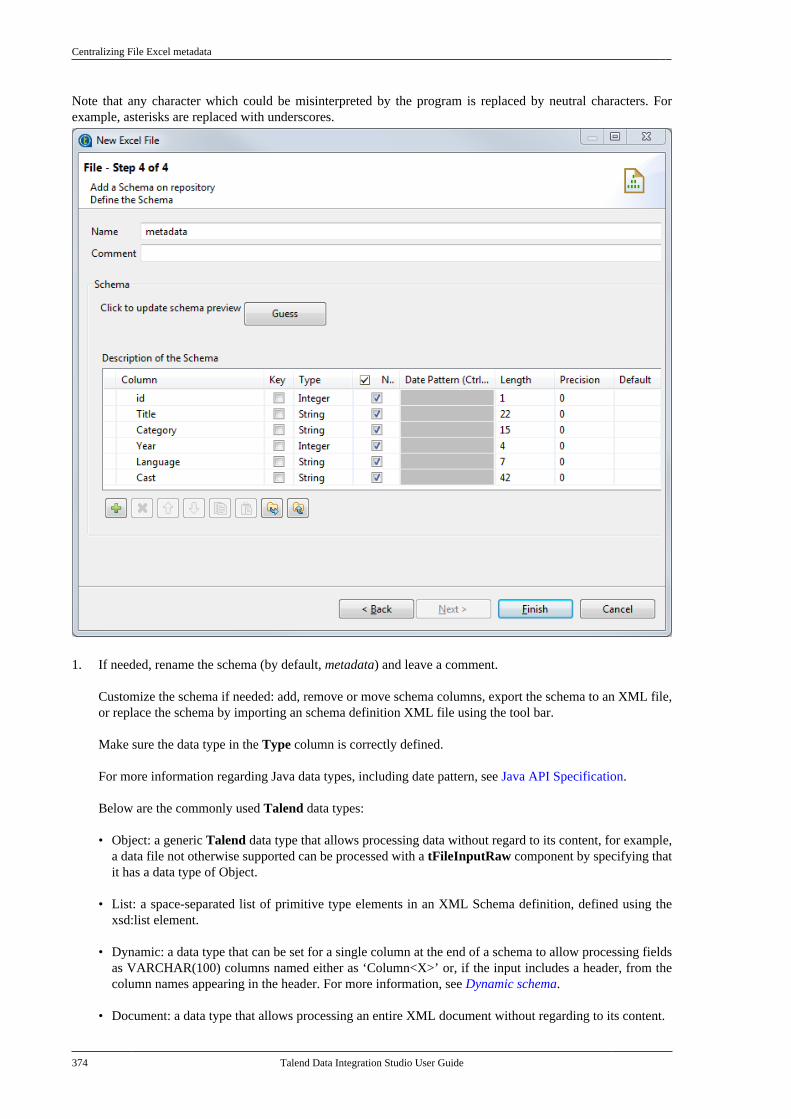
Centralizing File Excel metadata
374 Talend Data Integration Studio User Guide
Note that any character which could be misinterpreted by the program is replaced by neutral characters. Forexample, asterisks are replaced with underscores.
1. If needed, rename the schema (by default, metadata) and leave a comment.
Customize the schema if needed: add, remove or move schema columns, export the schema to an XML file,or replace the schema by importing an schema definition XML file using the tool bar.
Make sure the data type in the Type column is correctly defined.
For more information regarding Java data types, including date pattern, see Java API Specification.
Below are the commonly used Talend data types:
• Object: a generic Talend data type that allows processing data without regard to its content, for example,a data file not otherwise supported can be processed with a tFileInputRaw component by specifying thatit has a data type of Object.
• List: a space-separated list of primitive type elements in an XML Schema definition, defined using thexsd:list element.
• Dynamic: a data type that can be set for a single column at the end of a schema to allow processing fieldsas VARCHAR(100) columns named either as ‘Column<X>’ or, if the input includes a header, from thecolumn names appearing in the header. For more information, see Dynamic schema.
• Document: a data type that allows processing an entire XML document without regarding to its content.
Centralizing File LDIF metadata
Talend Data Integration Studio User Guide 375
2. If the Excel file which the schema is based on has been changed, click the Guess button to generate theschema again. Note that if you have customized the schema, the Guess feature does not retain these changes.
3. Click Finish. The new schema is displayed under the relevant File Excel connection node in the Repositorytree view.
Now you can drag and drop the file connection or the schema of it from the Repository tree view onto the designworkspace as a new component or onto an existing component to reuse the metadata. For further informationabout how to use the centralized metadata in a Job, see How to use centralized metadata in a Joband How to seta repository schema.
To modify an existing file connection, right-click it from the Repository tree view, and select Edit file Excel toopen the file metadata setup wizard.
To add a new schema to an existing file connection, right-click the connection from the Repository tree view andselect Retrieve Schema from the contextual menu.
To edit an existing file schema, right-click the schema from the Repository tree view and select Edit Schemafrom the contextual menu.
7.11. Centralizing File LDIF metadataLDIF files are directory files described by attributes. If you often need to read certain LDIF files, you may wantto centralize the connections to these LDIF-type files and their attribute descriptions in the Repository for easyreuse. This way you will not have to define the metadata details manually in the relevant components each timeyou use the files.
You can centralize an LDIF file connection either from an existing LDIF file, or from the LDIF file propertysettings defined in a Job.
To centralize an LDIF connection and its schema from an LDIF file, expand Metadata in the Repository tree view,right-click File ldif and select Create file ldif from the contextual menu to open the file metadata setup wizard.
To centralize a file connection and its schema you have already defined in a Job, click the icon in the Basicsettings view of the relevant component, with its Property Type set to Built-in, to open the file metadata setupwizard.
Then complete these steps following the wizard:
Make sure that you have installed the required third-party module as described in the Talend Installation Guide.
1. Fill in the general information in the relevant fields to identify the LDIF file metadata, including Name,Purpose and Description.
The Name field is required, and the information you provide in the Description field will appear as a tooltipwhen you move your mouse pointer over the file connection.
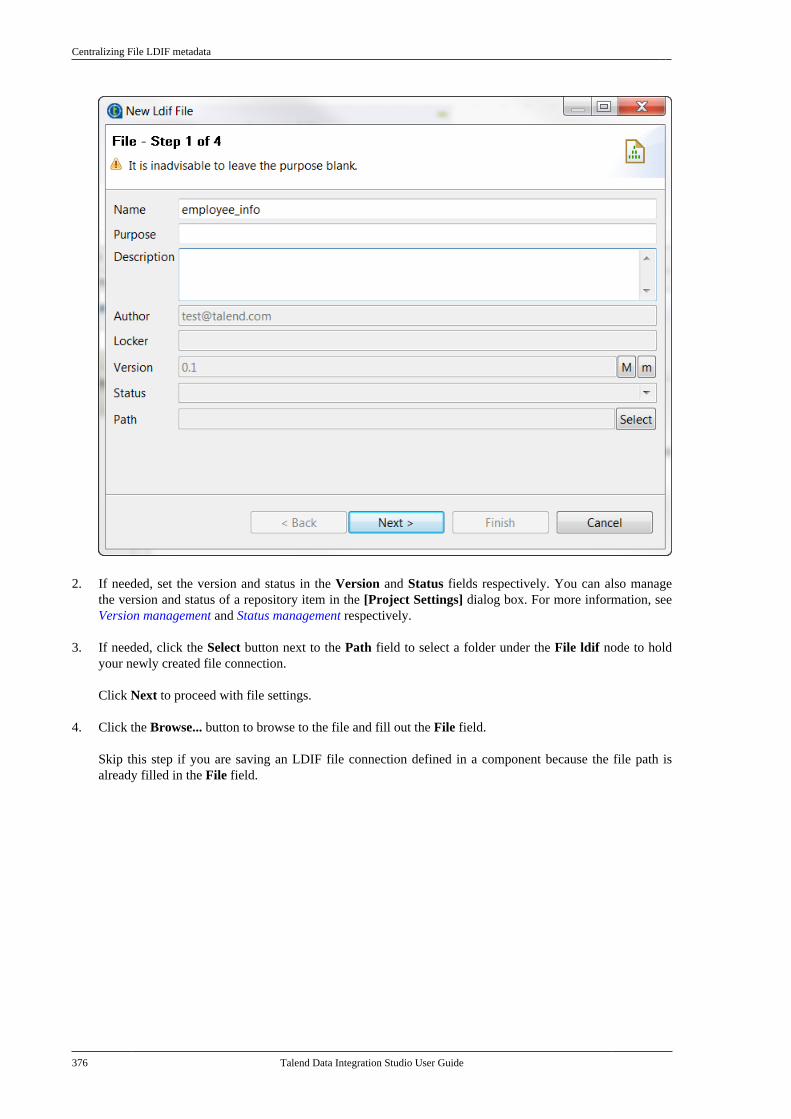
Centralizing File LDIF metadata
376 Talend Data Integration Studio User Guide
2. If needed, set the version and status in the Version and Status fields respectively. You can also managethe version and status of a repository item in the [Project Settings] dialog box. For more information, seeVersion management and Status management respectively.
3. If needed, click the Select button next to the Path field to select a folder under the File ldif node to holdyour newly created file connection.
Click Next to proceed with file settings.
4. Click the Browse... button to browse to the file and fill out the File field.
Skip this step if you are saving an LDIF file connection defined in a component because the file path isalready filled in the File field.
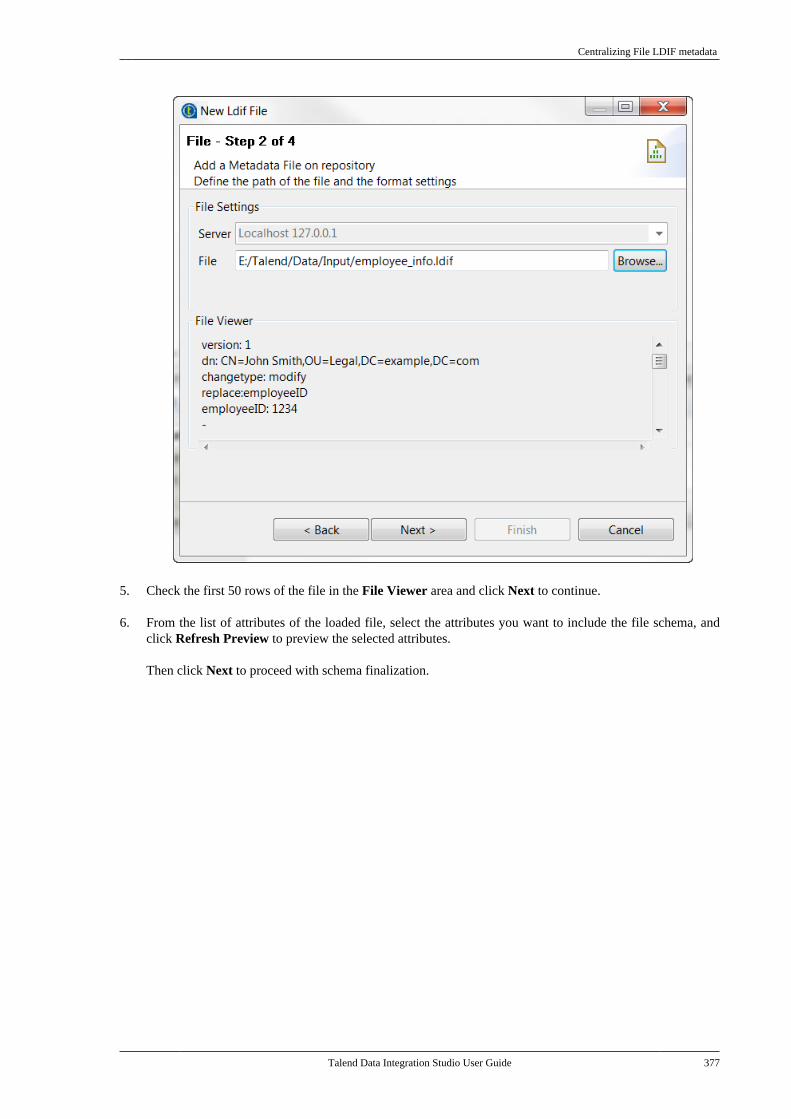
Centralizing File LDIF metadata
Talend Data Integration Studio User Guide 377
5. Check the first 50 rows of the file in the File Viewer area and click Next to continue.
6. From the list of attributes of the loaded file, select the attributes you want to include the file schema, andclick Refresh Preview to preview the selected attributes.
Then click Next to proceed with schema finalization.
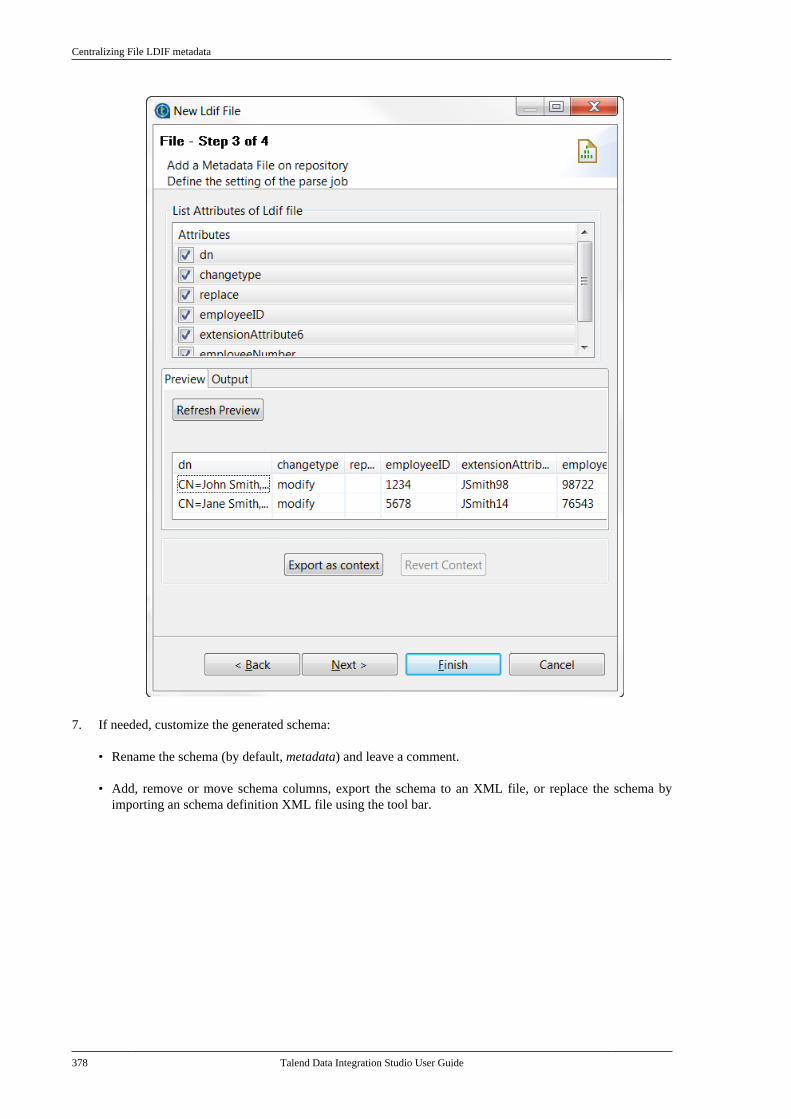
Centralizing File LDIF metadata
378 Talend Data Integration Studio User Guide
7. If needed, customize the generated schema:
• Rename the schema (by default, metadata) and leave a comment.
• Add, remove or move schema columns, export the schema to an XML file, or replace the schema byimporting an schema definition XML file using the tool bar.
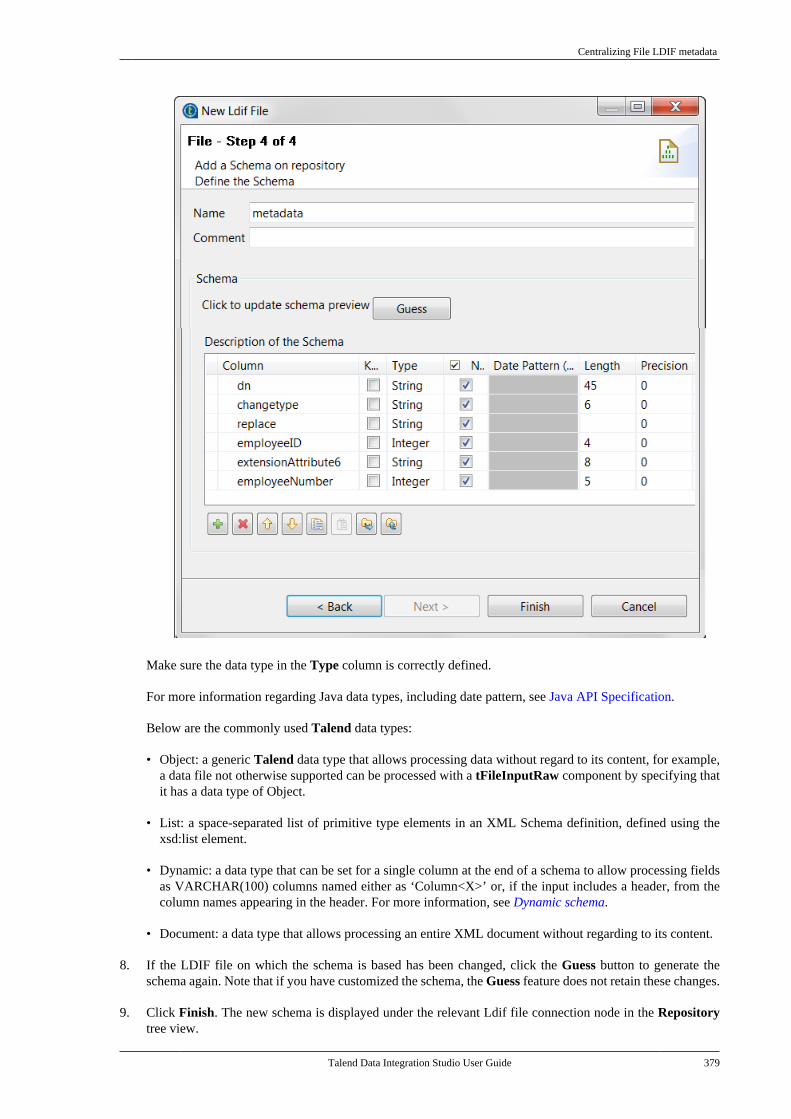
Centralizing File LDIF metadata
Talend Data Integration Studio User Guide 379
Make sure the data type in the Type column is correctly defined.
For more information regarding Java data types, including date pattern, see Java API Specification.
Below are the commonly used Talend data types:
• Object: a generic Talend data type that allows processing data without regard to its content, for example,a data file not otherwise supported can be processed with a tFileInputRaw component by specifying thatit has a data type of Object.
• List: a space-separated list of primitive type elements in an XML Schema definition, defined using thexsd:list element.
• Dynamic: a data type that can be set for a single column at the end of a schema to allow processing fieldsas VARCHAR(100) columns named either as ‘Column<X>’ or, if the input includes a header, from thecolumn names appearing in the header. For more information, see Dynamic schema.
• Document: a data type that allows processing an entire XML document without regarding to its content.
8. If the LDIF file on which the schema is based has been changed, click the Guess button to generate theschema again. Note that if you have customized the schema, the Guess feature does not retain these changes.
9. Click Finish. The new schema is displayed under the relevant Ldif file connection node in the Repositorytree view.
Centralizing JSON file metadata
380 Talend Data Integration Studio User Guide
Now you can drag and drop the file connection or the schema of it from the Repository tree view onto the designworkspace as a new component or onto an existing component to reuse the metadata. For further informationabout how to use the centralized metadata in a Job, see How to use centralized metadata in a Joband How to seta repository schema.
To modify an existing file connection, right-click it from the Repository tree view, and select Edit file ldif toopen the file metadata setup wizard.
To add a new schema to an existing file connection, right-click the connection from the Repository tree view andselect Retrieve Schema from the contextual menu.
To edit an existing file schema, right-click the schema from the Repository tree view and select Edit Schemafrom the contextual menu.
7.12. Centralizing JSON file metadataIf you often need to use a JSON file, you may want to use the [New Json File] wizard to centralize the fileconnection, XPath query statements, and data structure in the Repository for easy reuse.
Depending on the option you select, the wizard helps you create either an input or an output file connections. In aJob, the tFileInputJSON and tExtractJSONFields components use the input schema created to read JSON files/fields, whereas tWriteJSONField uses the output schema created to write a JSON field, which can be saved ina file by tFileOutputJSON or extracted by tExtractJSONFields.
For information about setting up input JSON file metadata, see Setting up JSON metadata for an input file.
For information about setting up output JSON metadata, see Setting up JSON metadata for an output file.
In the Repository view, expand the Metadata node, right click File JSON, and select Create JSON Schemafrom the contextual menu to open the [New Json File] wizard.
7.12.1. Setting up JSON metadata for an input file
This section describes how to define a file connection and upload a JSON schema for an input file. To define anoutput JSON file connection and schema, see Setting up JSON metadata for an output file.
Defining the general properties
1. In the wizard, fill in the general information in the relevant fields to identify the JSON file metadata, includingName, Purpose and Description.
The Name field is required, and the information you provide in the Description field will appear as a tooltipwhen you move your mouse pointer over the file connection.
In this step, it is advisable to enter information that will help you distinguish between your input and output connections,which will be defined in the next step.
Setting up JSON metadata for an input file
Talend Data Integration Studio User Guide 381
2. If needed, set the version and status in the Version and Status fields respectively.
You can also manage the version and status of a repository item in the [Project Settings] dialog box. Formore information, see Version management and Status management respectively.
3. If needed, click the Select button next to the Path field to select a folder under the File Json node to holdyour newly created file connection.
4. Click Next to select the type of metadata.
Setting the type of metadata and loading the input file
1. In the dialog box, select Input Json and click Next to proceed to the next step of the wizard to load theinput file.
Setting up JSON metadata for an input file
382 Talend Data Integration Studio User Guide
2. From the Read By list box, select the type of query to read the source JSON file.
• JsonPath: read the JSON data based on a JsonPath query.
This is the default and recommended query type to read JSON data in order to gain performance and toavoid problems that you may encounter when reading JSON data based on an XPath query.
• Xpath: read the JSON data based on an XPath query.
3. Click Browse... and browse your directory to the JSON file to be uploaded. Alternatively, enter the full pathto the file or the URL that links to the JSON file.
The Schema Viewer area displays a preview of the JSON structure. You can expand and visualize everylevel of the file's JSON tree structure.
Setting up JSON metadata for an input file
Talend Data Integration Studio User Guide 383
4. Enter the Encoding type in the corresponding field if the system does not detect it automatically.
5. In the Limit field, enter the number of columns on which the JsonPath or XPath query is to be executed, or0 if you want to run it against all of the columns.
6. Click Next to define the schema parameters.
Defining the schema
In this step you will set the schema parameters.
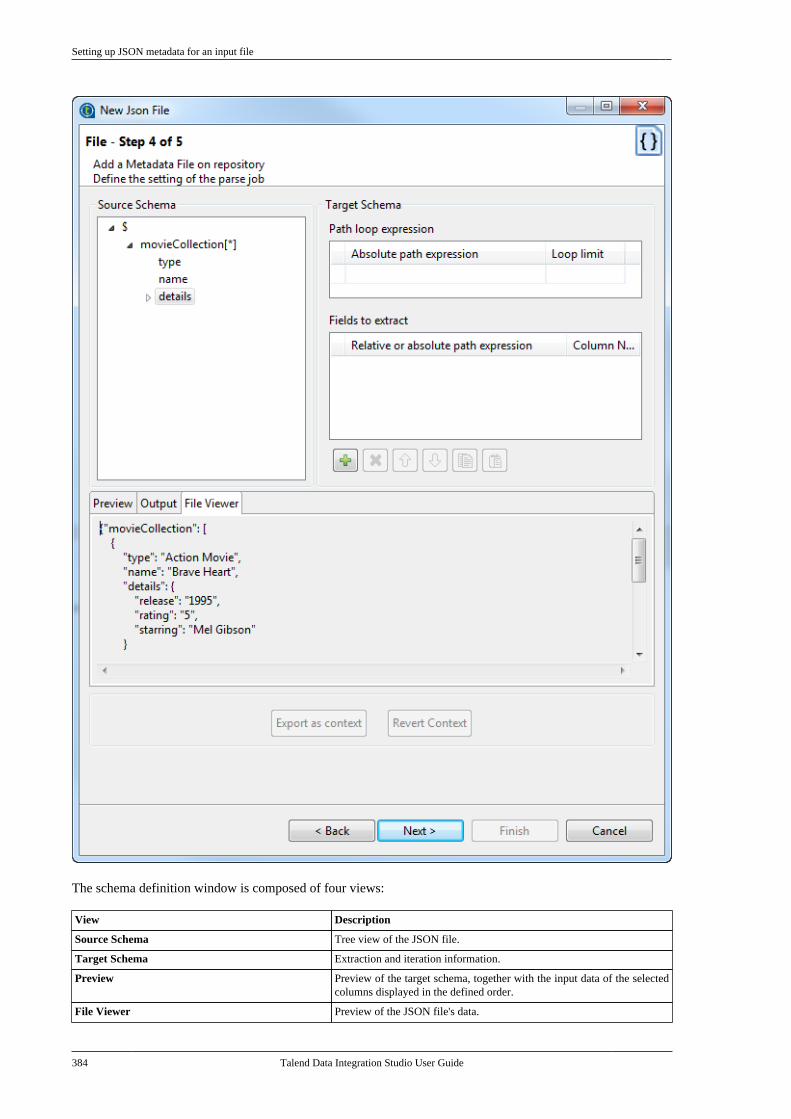
Setting up JSON metadata for an input file
384 Talend Data Integration Studio User Guide
The schema definition window is composed of four views:
View Description
Source Schema Tree view of the JSON file.
Target Schema Extraction and iteration information.
Preview Preview of the target schema, together with the input data of the selectedcolumns displayed in the defined order.
File Viewer Preview of the JSON file's data.
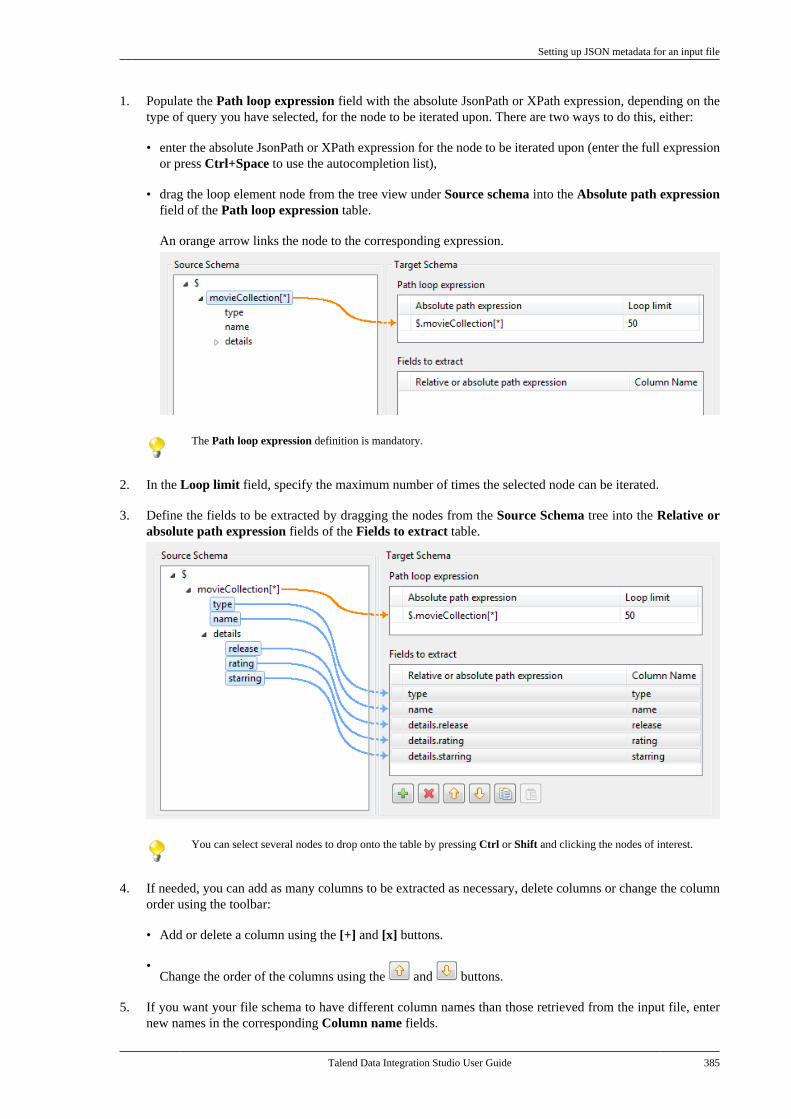
Setting up JSON metadata for an input file
Talend Data Integration Studio User Guide 385
1. Populate the Path loop expression field with the absolute JsonPath or XPath expression, depending on thetype of query you have selected, for the node to be iterated upon. There are two ways to do this, either:
• enter the absolute JsonPath or XPath expression for the node to be iterated upon (enter the full expressionor press Ctrl+Space to use the autocompletion list),
• drag the loop element node from the tree view under Source schema into the Absolute path expressionfield of the Path loop expression table.
An orange arrow links the node to the corresponding expression.
The Path loop expression definition is mandatory.
2. In the Loop limit field, specify the maximum number of times the selected node can be iterated.
3. Define the fields to be extracted by dragging the nodes from the Source Schema tree into the Relative orabsolute path expression fields of the Fields to extract table.
You can select several nodes to drop onto the table by pressing Ctrl or Shift and clicking the nodes of interest.
4. If needed, you can add as many columns to be extracted as necessary, delete columns or change the columnorder using the toolbar:
• Add or delete a column using the [+] and [x] buttons.
•Change the order of the columns using the and buttons.
5. If you want your file schema to have different column names than those retrieved from the input file, enternew names in the corresponding Column name fields.
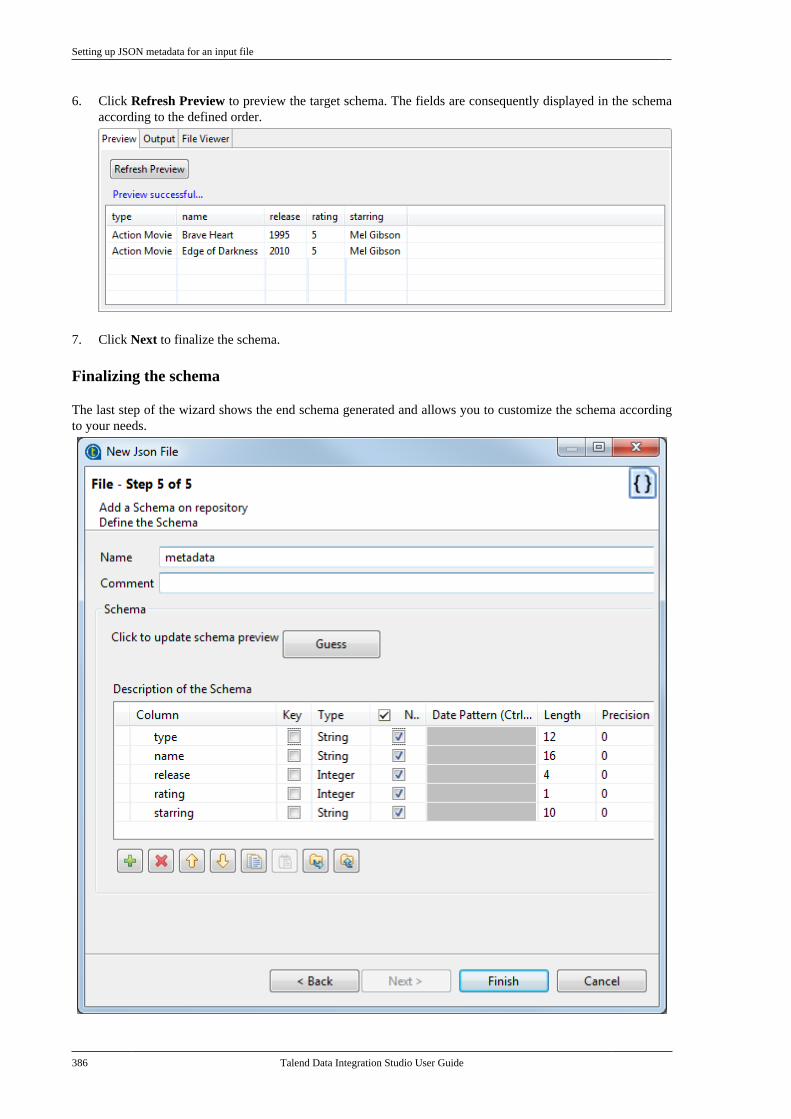
Setting up JSON metadata for an input file
386 Talend Data Integration Studio User Guide
6. Click Refresh Preview to preview the target schema. The fields are consequently displayed in the schemaaccording to the defined order.
7. Click Next to finalize the schema.
Finalizing the schema
The last step of the wizard shows the end schema generated and allows you to customize the schema accordingto your needs.
Setting up JSON metadata for an output file
Talend Data Integration Studio User Guide 387
1. If needed, rename the schema (by default, metadata) and leave a comment.
Customize the schema if needed: add, remove or move schema columns, export the schema to an XML file,or replace the schema by importing an schema definition XML file using the tool bar.
Make sure the data type in the Type column is correctly defined.
For more information regarding Java data types, including date pattern, see Java API Specification.
Below are the commonly used Talend data types:
• Object: a generic Talend data type that allows processing data without regard to its content, for example,a data file not otherwise supported can be processed with a tFileInputRaw component by specifying thatit has a data type of Object.
• List: a space-separated list of primitive type elements in an XML Schema definition, defined using thexsd:list element.
• Dynamic: a data type that can be set for a single column at the end of a schema to allow processing fieldsas VARCHAR(100) columns named either as ‘Column<X>’ or, if the input includes a header, from thecolumn names appearing in the header. For more information, see Dynamic schema.
• Document: a data type that allows processing an entire XML document without regarding to its content.
2. If the JSON file which the schema is based on has been changed, click the Guess button to generate theschema again. Note that if you have customized the schema, the Guess feature does not retain these changes.
3. Click Finish. The new file connection, along with its schema, is displayed under the relevant File Jsonmetadata node in the Repository tree view.
Now you can drag and drop the file connection or the schema of it from the Repository tree view onto the designworkspace as a new tFileInputJSON or tExtractJSONFields component or onto an existing component to reusethe metadata. For further information about how to use the centralized metadata in a Job, see How to use centralizedmetadata in a Job and How to set a repository schema.
To modify an existing file connection, right-click it from the Repository tree view, and select Edit JSON to openthe file metadata setup wizard.
To add a new schema to an existing file connection, right-click the connection from the Repository tree view andselect Retrieve Schema from the contextual menu.
To edit an existing file schema, right-click the schema from the Repository tree view and select Edit Schemafrom the contextual menu.
7.12.2. Setting up JSON metadata for an output file
This section describes how to define JSON metadata for an output file. To define JSON metadata for an input file,see Setting up JSON metadata for an input file.
Defining general properties
1. In the wizard, fill in the general information in the relevant fields to identify the JSON file metadata, includingName, Purpose and Description.
The Name field is required, and the information you provide in the Description field will appear as a tooltipwhen you move your mouse pointer over the file connection.
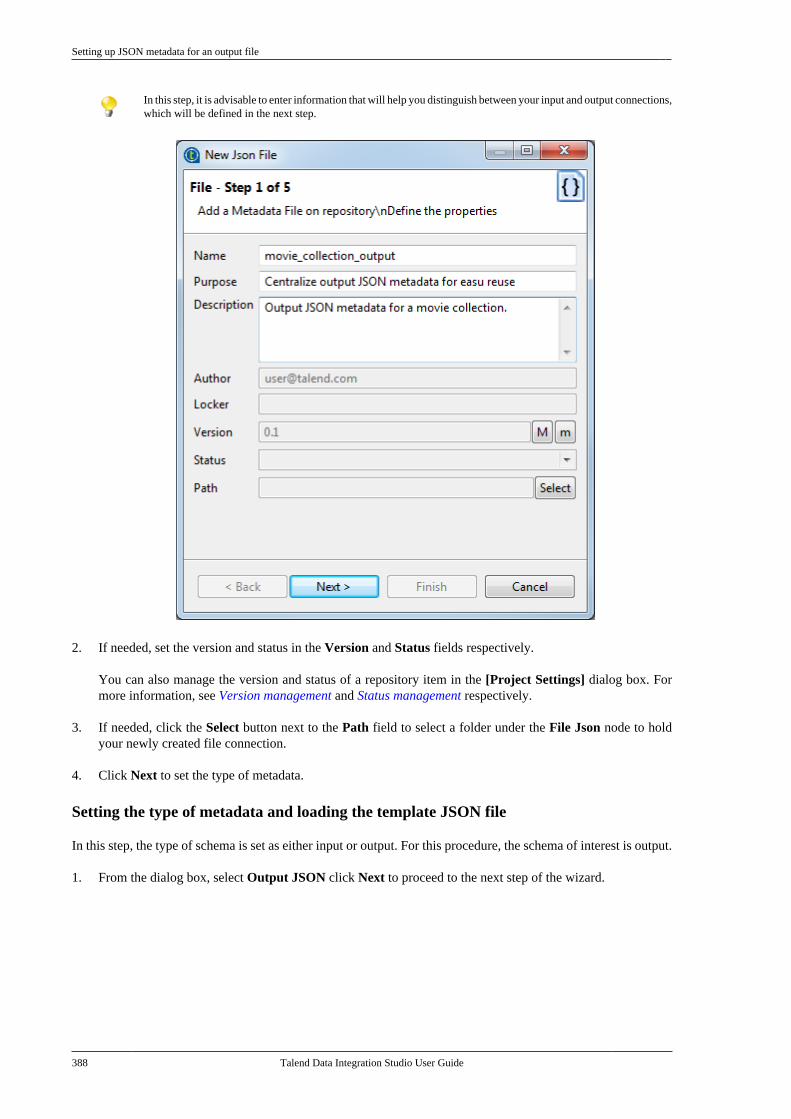
Setting up JSON metadata for an output file
388 Talend Data Integration Studio User Guide
In this step, it is advisable to enter information that will help you distinguish between your input and output connections,which will be defined in the next step.
2. If needed, set the version and status in the Version and Status fields respectively.
You can also manage the version and status of a repository item in the [Project Settings] dialog box. Formore information, see Version management and Status management respectively.
3. If needed, click the Select button next to the Path field to select a folder under the File Json node to holdyour newly created file connection.
4. Click Next to set the type of metadata.
Setting the type of metadata and loading the template JSON file
In this step, the type of schema is set as either input or output. For this procedure, the schema of interest is output.
1. From the dialog box, select Output JSON click Next to proceed to the next step of the wizard.
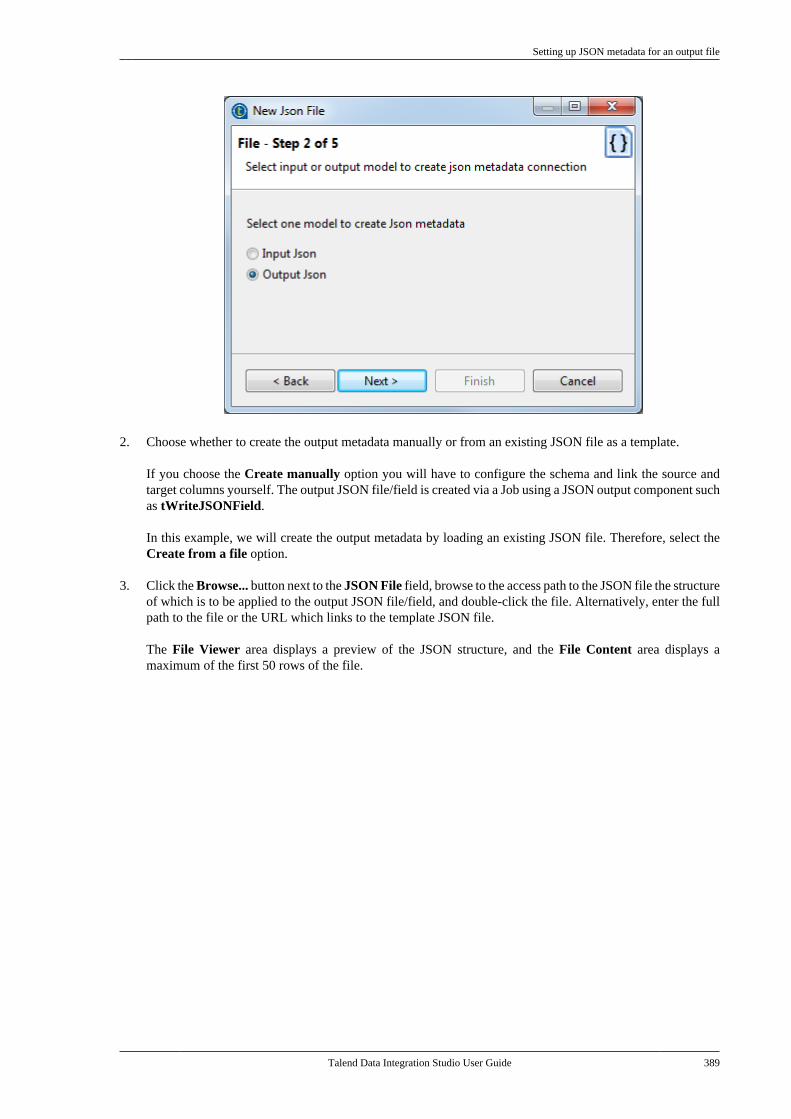
Setting up JSON metadata for an output file
Talend Data Integration Studio User Guide 389
2. Choose whether to create the output metadata manually or from an existing JSON file as a template.
If you choose the Create manually option you will have to configure the schema and link the source andtarget columns yourself. The output JSON file/field is created via a Job using a JSON output component suchas tWriteJSONField.
In this example, we will create the output metadata by loading an existing JSON file. Therefore, select theCreate from a file option.
3. Click the Browse... button next to the JSON File field, browse to the access path to the JSON file the structureof which is to be applied to the output JSON file/field, and double-click the file. Alternatively, enter the fullpath to the file or the URL which links to the template JSON file.
The File Viewer area displays a preview of the JSON structure, and the File Content area displays amaximum of the first 50 rows of the file.
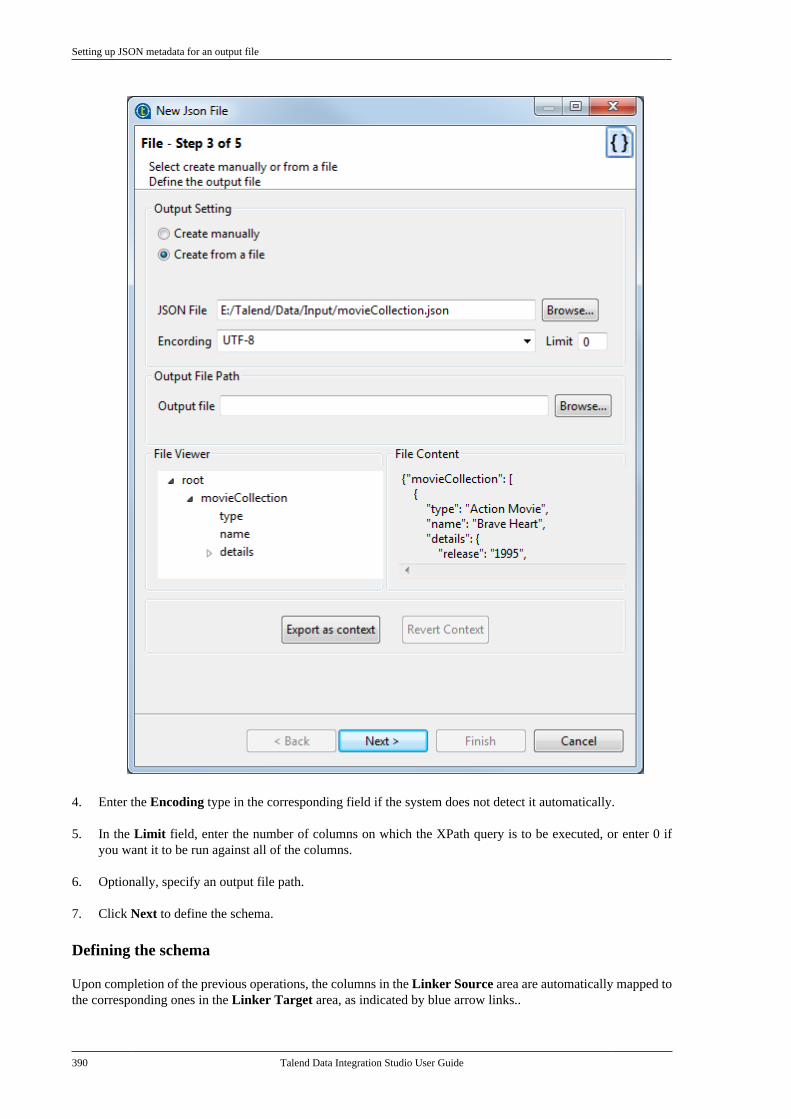
Setting up JSON metadata for an output file
390 Talend Data Integration Studio User Guide
4. Enter the Encoding type in the corresponding field if the system does not detect it automatically.
5. In the Limit field, enter the number of columns on which the XPath query is to be executed, or enter 0 ifyou want it to be run against all of the columns.
6. Optionally, specify an output file path.
7. Click Next to define the schema.
Defining the schema
Upon completion of the previous operations, the columns in the Linker Source area are automatically mapped tothe corresponding ones in the Linker Target area, as indicated by blue arrow links..
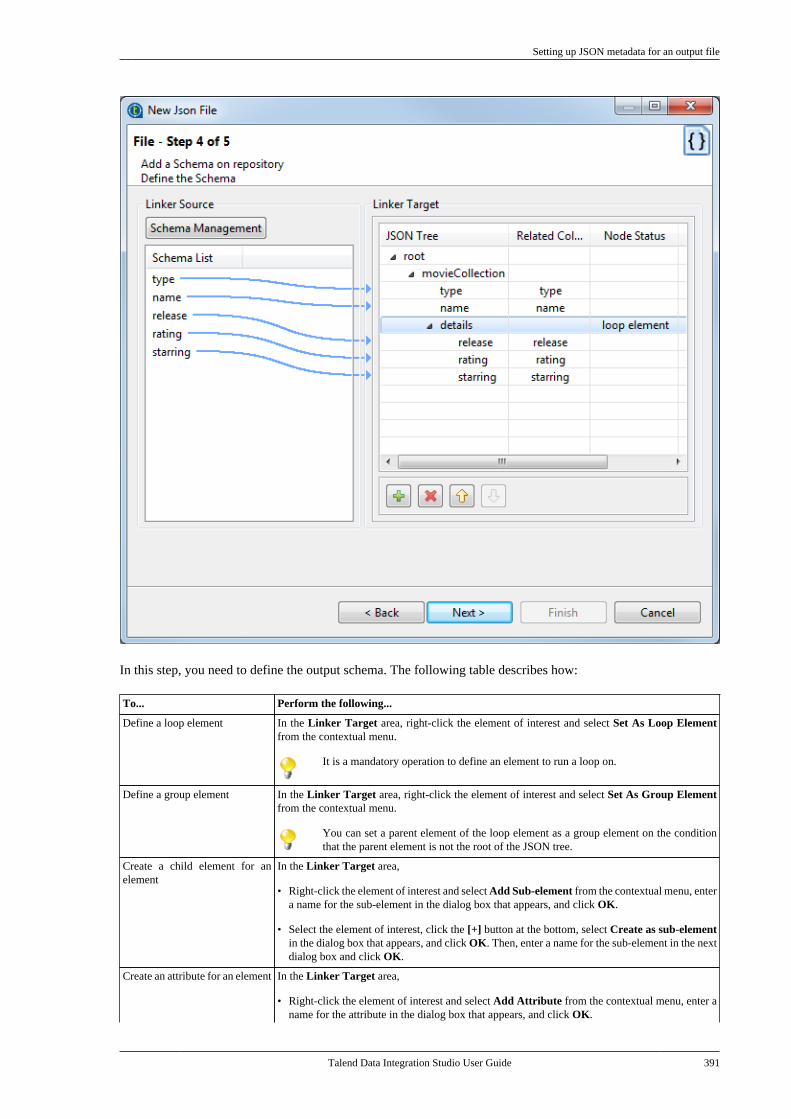
Setting up JSON metadata for an output file
Talend Data Integration Studio User Guide 391
In this step, you need to define the output schema. The following table describes how:
To... Perform the following...
Define a loop element In the Linker Target area, right-click the element of interest and select Set As Loop Elementfrom the contextual menu.
It is a mandatory operation to define an element to run a loop on.
Define a group element In the Linker Target area, right-click the element of interest and select Set As Group Elementfrom the contextual menu.
You can set a parent element of the loop element as a group element on the conditionthat the parent element is not the root of the JSON tree.
Create a child element for anelement
In the Linker Target area,
• Right-click the element of interest and select Add Sub-element from the contextual menu, entera name for the sub-element in the dialog box that appears, and click OK.
• Select the element of interest, click the [+] button at the bottom, select Create as sub-elementin the dialog box that appears, and click OK. Then, enter a name for the sub-element in the nextdialog box and click OK.
Create an attribute for an element In the Linker Target area,
• Right-click the element of interest and select Add Attribute from the contextual menu, enter aname for the attribute in the dialog box that appears, and click OK.

Setting up JSON metadata for an output file
392 Talend Data Integration Studio User Guide
To... Perform the following...
• Select the element of interest, click the [+] button at the bottom, select Create as attribute inthe dialog box that appears, and click OK. Then, enter a name for the attribute in the next dialogbox and click OK.
Create a name space for anelement
In the Linker Target area,
• Right-click the element of interest and select Add Name Space from the contextual menu, entera name for the name space in the dialog box that appears, and click OK.
• Select the element of interest, click the [+] button at the bottom, select Create as name spacein the dialog box that appears, and click OK. Then, enter a name for the name space in the nextdialog box and click OK.
Delete one or more elements/attributes/name spaces
In the Linker Target area,
• Right-click the element(s)/attribute(s)/name space(s) of interest and select Delete from thecontextual menu.
• Select the element(s)/attribute(s)/name space(s) of interest and click the [x] button at the bottom.
• Select the element(s)/attribute(s)/name space(s) of interest and press the Delete key.
Deleting an element will also delete its children, if any.
Adjust the order of one or moreelements
In the Linker Target area, select the element(s) of interest and click the and buttons.
Set a static value for an element/attribute/name space
In the Linker Target area, right-click the element/attribute/name space of interest and select SetA Fix Value from the contextual menu.
• The value you set will replace any value retrieved for the corresponding column fromthe incoming data flow in your Job.
• You can set a static value for a child element of the loop element only, on the conditionthat the element does not have its own children and does not have a source-targetmapping on it.
Create a source-target mapping Select the column of interest in the Linker Source area, drop it onto the node of interest in theLinker Target area, and select Create as sub-element of target node, Create as attribute oftarget node, or Add linker to target node according to your need in the dialog box that appears,and click OK.
If you choose an option that is not permitted for the target node, you will see a warning messageand your operation will fail.
Remove a source-target mapping In the Linker Target area, right-click the node of interest and select Disconnect Linker from thecontextual menu.
Create a JSON tree from anotherJSON file
Right-click any schema item in the Linker Target area and select Import JSON Tree fromthe contextual menu to load another JSON file. Then, you need to create source-target mappingsmanually and define the output schema all again.
You can select and drop several fields at a time, using the Ctrl + Shift technique to make multiple selections, thereforemaking mapping faster. You can also make multiple selections for right-click operations.
1. In the Linker Target area, right-click the element you want to set as the loop element and select Set AsLoop Element from the contextual menu.
In this example, define a loop to run on the details element.
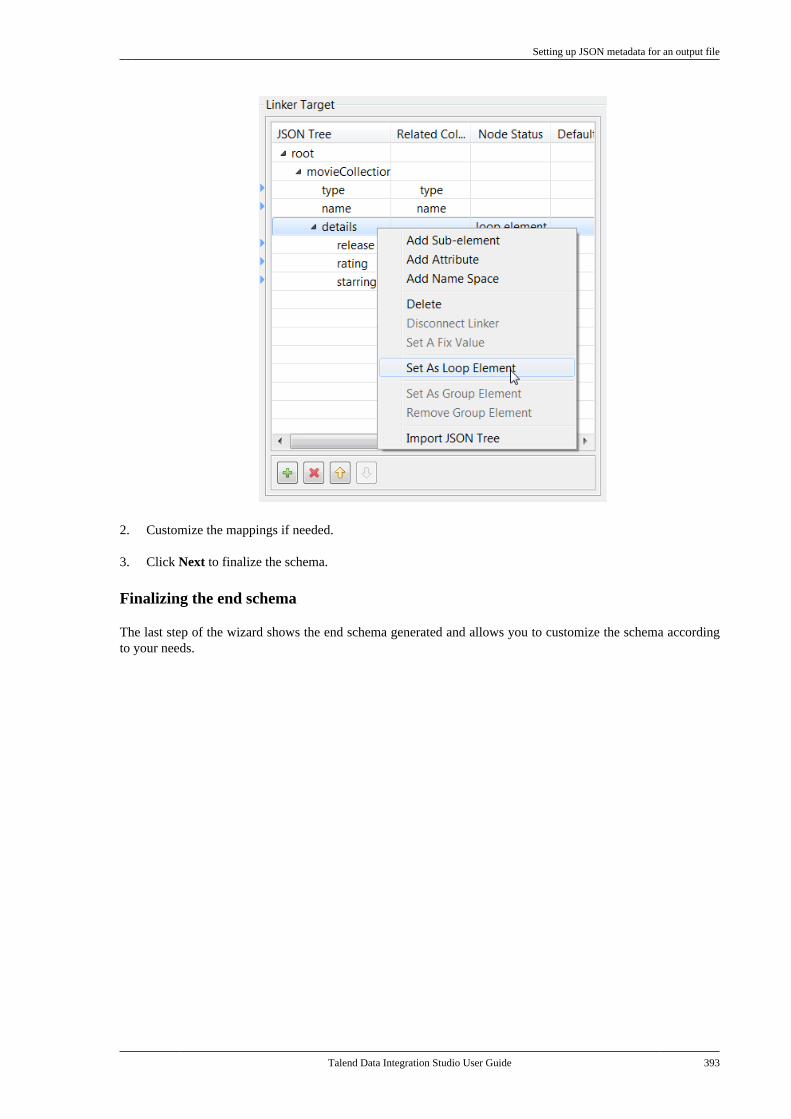
Setting up JSON metadata for an output file
Talend Data Integration Studio User Guide 393
2. Customize the mappings if needed.
3. Click Next to finalize the schema.
Finalizing the end schema
The last step of the wizard shows the end schema generated and allows you to customize the schema accordingto your needs.
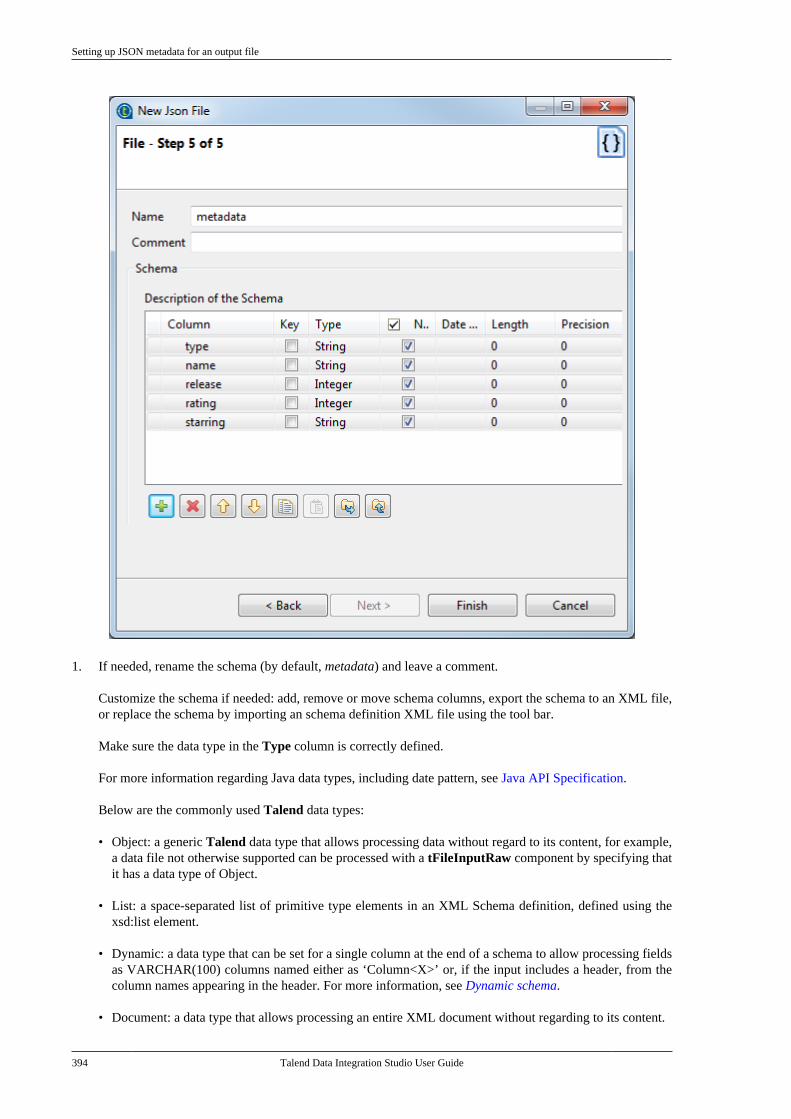
Setting up JSON metadata for an output file
394 Talend Data Integration Studio User Guide
1. If needed, rename the schema (by default, metadata) and leave a comment.
Customize the schema if needed: add, remove or move schema columns, export the schema to an XML file,or replace the schema by importing an schema definition XML file using the tool bar.
Make sure the data type in the Type column is correctly defined.
For more information regarding Java data types, including date pattern, see Java API Specification.
Below are the commonly used Talend data types:
• Object: a generic Talend data type that allows processing data without regard to its content, for example,a data file not otherwise supported can be processed with a tFileInputRaw component by specifying thatit has a data type of Object.
• List: a space-separated list of primitive type elements in an XML Schema definition, defined using thexsd:list element.
• Dynamic: a data type that can be set for a single column at the end of a schema to allow processing fieldsas VARCHAR(100) columns named either as ‘Column<X>’ or, if the input includes a header, from thecolumn names appearing in the header. For more information, see Dynamic schema.
• Document: a data type that allows processing an entire XML document without regarding to its content.
Centralizing LDAP connection metadata
Talend Data Integration Studio User Guide 395
2. If the JSON file which the schema is based on has been changed, click the Guess button to generate theschema again. Note that if you have customized the schema, the Guess feature does not retain these changes.
3. Click Finish. The new file connection, along with its schema, is displayed under the relevant File Jsonmetadata node in the Repository tree view.
Now you can drag and drop the file connection or the schema of it from the Repository tree view onto the designworkspace as a new tWriteJSONField component or onto an existing component to reuse the metadata. Forfurther information about how to use the centralized metadata in a Job, see How to use centralized metadata ina Joband How to set a repository schema.
To modify an existing file connection, right-click it from the Repository tree view, and select Edit JSON to openthe file metadata setup wizard.
To add a new schema to an existing file connection, right-click the connection from the Repository tree view andselect Retrieve Schema from the contextual menu.
If you are working on an SVN or Git managed project while the Manual lock option is selected in Talend AdministrationCenter, be sure to lock manually your connection in the Repository tree view before retrieving or updating table schemasfor it. Otherwise the connection is read-only and the Finish button of the wizard is not operable.
For information on locking and unlocking a project item and on different lock types, see Working collaboratively on projectitems.
To edit an existing file schema, right-click the schema from the Repository tree view and select Edit Schemafrom the contextual menu.
7.13. Centralizing LDAP connection metadataIf you often need to access an LDAP directory, you want to centralize your LDAP server connection in theRepository tree view for easy reuse.
You can create an LDAP connection either from an accessible LDAP directory, or by saving the LDAP settingsdefined in a Job.
To create an LDAP connection from an accessible LDAP directory, expand the Metadata node in the Repositorytree view, right-click the LDAP tree node, and select Create LDAP schema from the contextual menu to openthe [Create new LDAP schema] wizard.
To centralize an LDAP connection and its schema you have already defined in a Job, click the icon in theBasic settings view of the relevant component, with its Property Type set to Built-In, to open the [Create newLDAP schema] wizard.
Unlike the DB connection wizard, the LDAP wizard gathers both LDAP server connection and schema definitionin a five-step procedure.
Defining the general properties
1. Fill in the general information in the relevant fields to identify the LDAP connection to be created, includingName, Purpose and Description.
The Name field is required, and the information you provide in the Description field will appear as a tooltipwhen you move your mouse pointer over the LDAP connection.
2. If needed, set the version and status in the Version and Status fields respectively. You can also managethe version and status of a Repository item in the [Project Settings] dialog box. For more information, seeVersion management and Status management respectively.
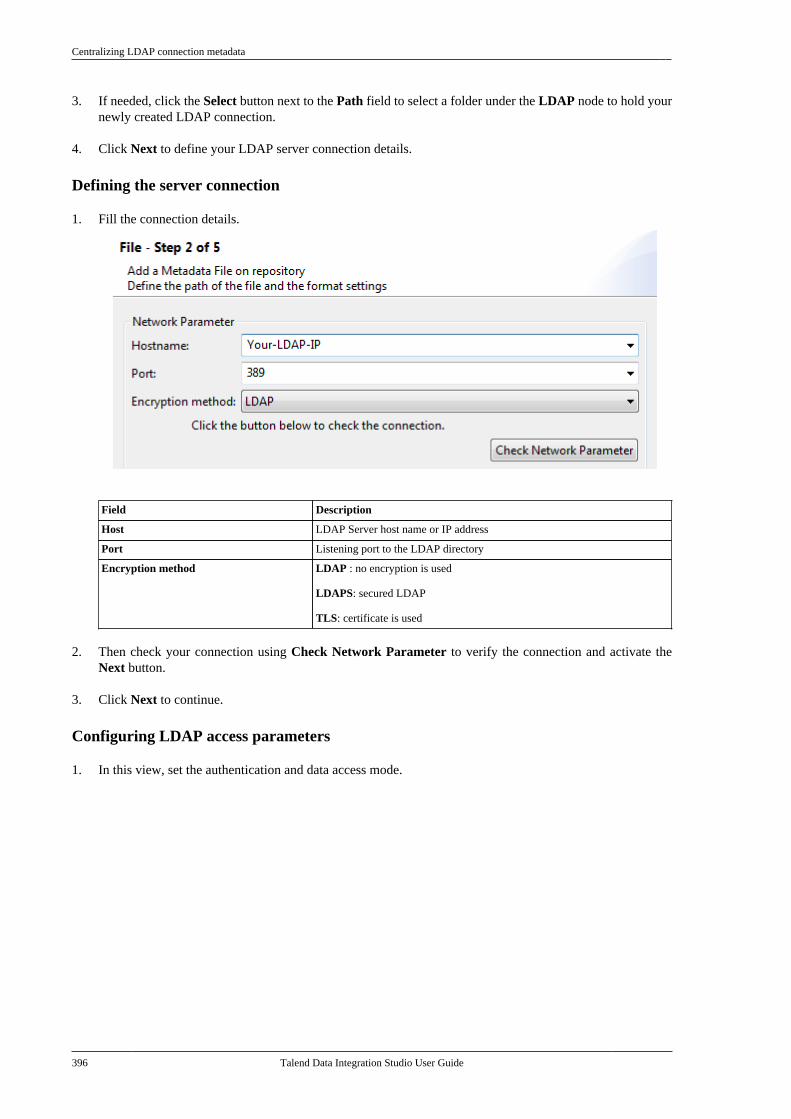
Centralizing LDAP connection metadata
396 Talend Data Integration Studio User Guide
3. If needed, click the Select button next to the Path field to select a folder under the LDAP node to hold yournewly created LDAP connection.
4. Click Next to define your LDAP server connection details.
Defining the server connection
1. Fill the connection details.
Field Description
Host LDAP Server host name or IP address
Port Listening port to the LDAP directory
Encryption method LDAP : no encryption is used
LDAPS: secured LDAP
TLS: certificate is used
2. Then check your connection using Check Network Parameter to verify the connection and activate theNext button.
3. Click Next to continue.
Configuring LDAP access parameters
1. In this view, set the authentication and data access mode.
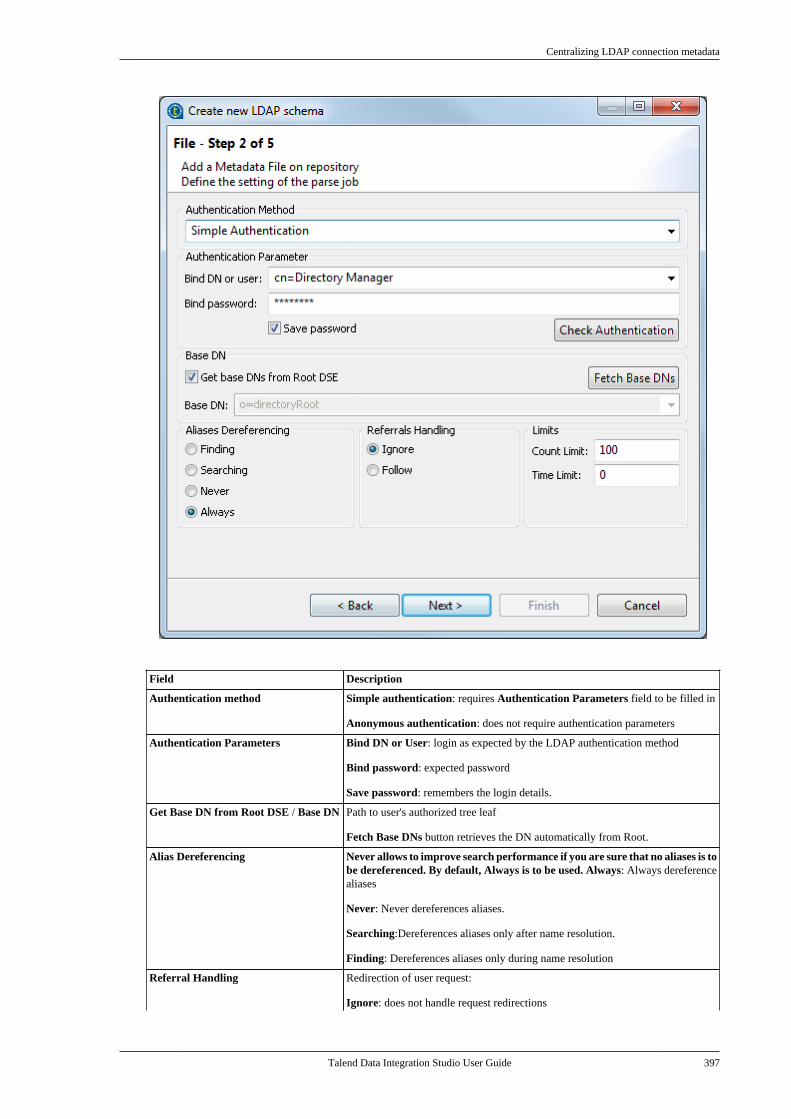
Centralizing LDAP connection metadata
Talend Data Integration Studio User Guide 397
Field Description
Authentication method Simple authentication: requires Authentication Parameters field to be filled in
Anonymous authentication: does not require authentication parameters
Authentication Parameters Bind DN or User: login as expected by the LDAP authentication method
Bind password: expected password
Save password: remembers the login details.
Get Base DN from Root DSE / Base DN Path to user's authorized tree leaf
Fetch Base DNs button retrieves the DN automatically from Root.
Alias Dereferencing Never allows to improve search performance if you are sure that no aliases is tobe dereferenced. By default, Always is to be used. Always: Always dereferencealiases
Never: Never dereferences aliases.
Searching:Dereferences aliases only after name resolution.
Finding: Dereferences aliases only during name resolution
Referral Handling Redirection of user request:
Ignore: does not handle request redirections
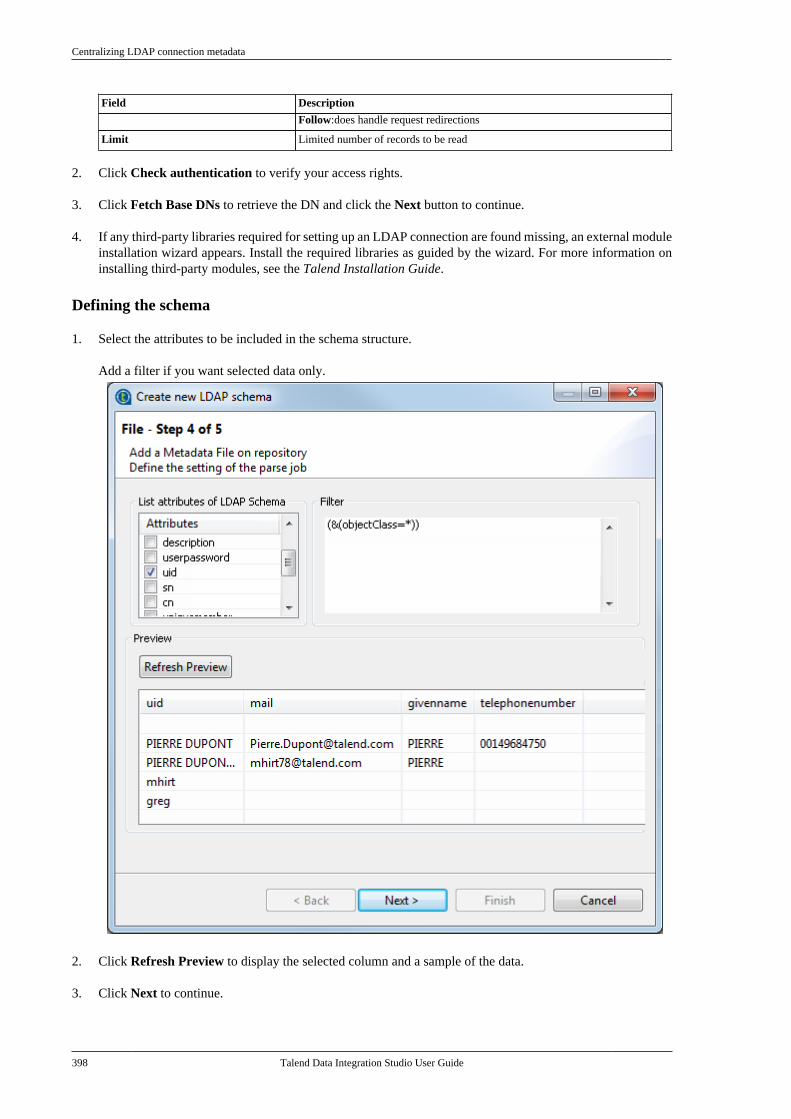
Centralizing LDAP connection metadata
398 Talend Data Integration Studio User Guide
Field Description
Follow:does handle request redirections
Limit Limited number of records to be read
2. Click Check authentication to verify your access rights.
3. Click Fetch Base DNs to retrieve the DN and click the Next button to continue.
4. If any third-party libraries required for setting up an LDAP connection are found missing, an external moduleinstallation wizard appears. Install the required libraries as guided by the wizard. For more information oninstalling third-party modules, see the Talend Installation Guide.
Defining the schema
1. Select the attributes to be included in the schema structure.
Add a filter if you want selected data only.
2. Click Refresh Preview to display the selected column and a sample of the data.
3. Click Next to continue.
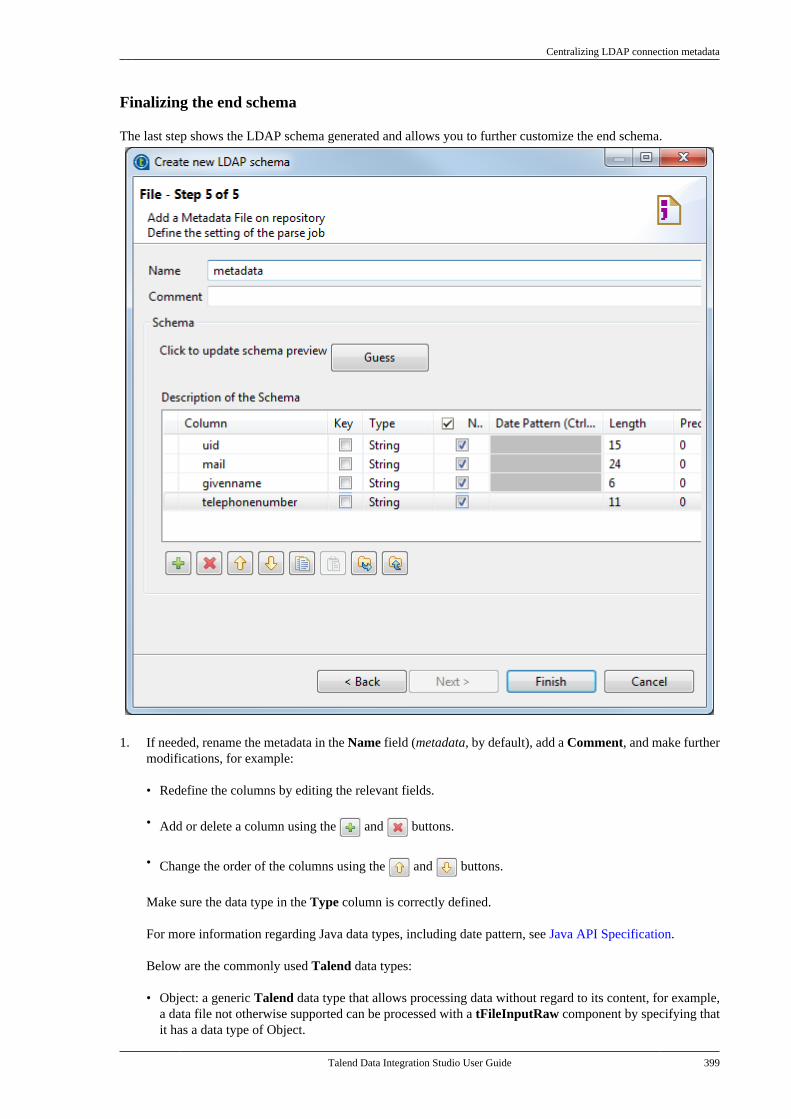
Centralizing LDAP connection metadata
Talend Data Integration Studio User Guide 399
Finalizing the end schema
The last step shows the LDAP schema generated and allows you to further customize the end schema.
1. If needed, rename the metadata in the Name field (metadata, by default), add a Comment, and make furthermodifications, for example:
• Redefine the columns by editing the relevant fields.
• Add or delete a column using the and buttons.
• Change the order of the columns using the and buttons.
Make sure the data type in the Type column is correctly defined.
For more information regarding Java data types, including date pattern, see Java API Specification.
Below are the commonly used Talend data types:
• Object: a generic Talend data type that allows processing data without regard to its content, for example,a data file not otherwise supported can be processed with a tFileInputRaw component by specifying thatit has a data type of Object.
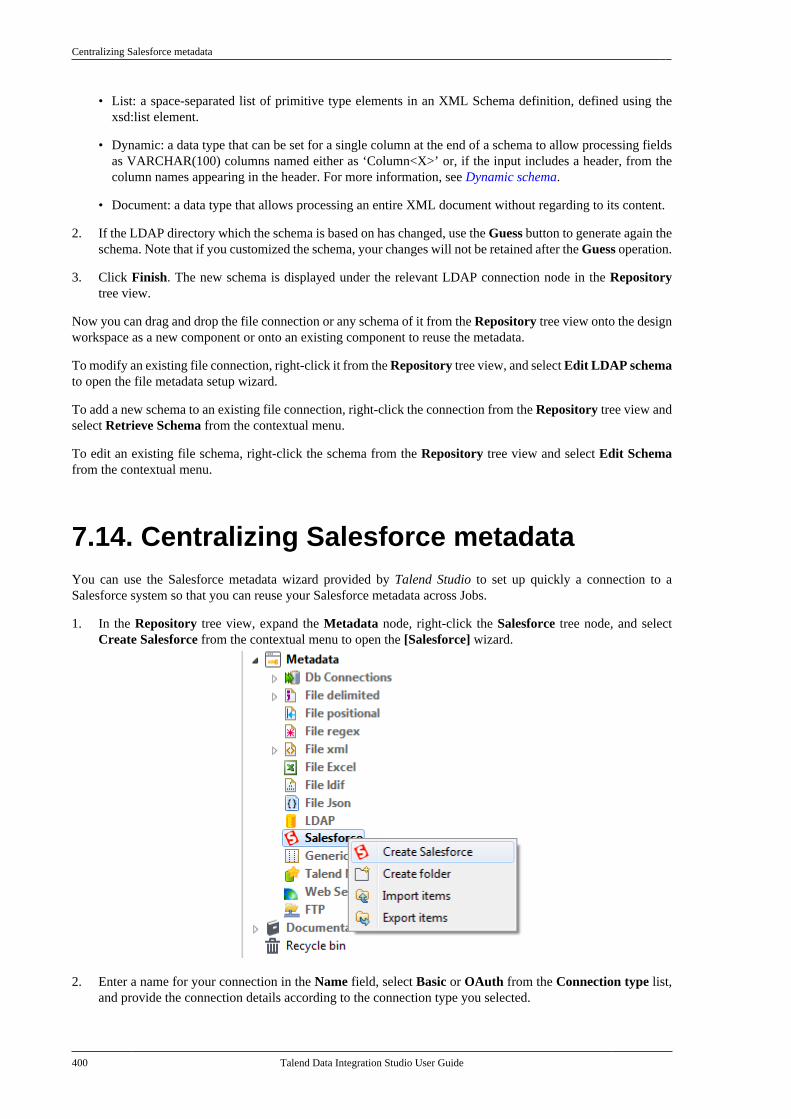
Centralizing Salesforce metadata
400 Talend Data Integration Studio User Guide
• List: a space-separated list of primitive type elements in an XML Schema definition, defined using thexsd:list element.
• Dynamic: a data type that can be set for a single column at the end of a schema to allow processing fieldsas VARCHAR(100) columns named either as ‘Column<X>’ or, if the input includes a header, from thecolumn names appearing in the header. For more information, see Dynamic schema.
• Document: a data type that allows processing an entire XML document without regarding to its content.
2. If the LDAP directory which the schema is based on has changed, use the Guess button to generate again theschema. Note that if you customized the schema, your changes will not be retained after the Guess operation.
3. Click Finish. The new schema is displayed under the relevant LDAP connection node in the Repositorytree view.
Now you can drag and drop the file connection or any schema of it from the Repository tree view onto the designworkspace as a new component or onto an existing component to reuse the metadata.
To modify an existing file connection, right-click it from the Repository tree view, and select Edit LDAP schemato open the file metadata setup wizard.
To add a new schema to an existing file connection, right-click the connection from the Repository tree view andselect Retrieve Schema from the contextual menu.
To edit an existing file schema, right-click the schema from the Repository tree view and select Edit Schemafrom the contextual menu.
7.14. Centralizing Salesforce metadataYou can use the Salesforce metadata wizard provided by Talend Studio to set up quickly a connection to aSalesforce system so that you can reuse your Salesforce metadata across Jobs.
1. In the Repository tree view, expand the Metadata node, right-click the Salesforce tree node, and selectCreate Salesforce from the contextual menu to open the [Salesforce] wizard.
2. Enter a name for your connection in the Name field, select Basic or OAuth from the Connection type list,and provide the connection details according to the connection type you selected.
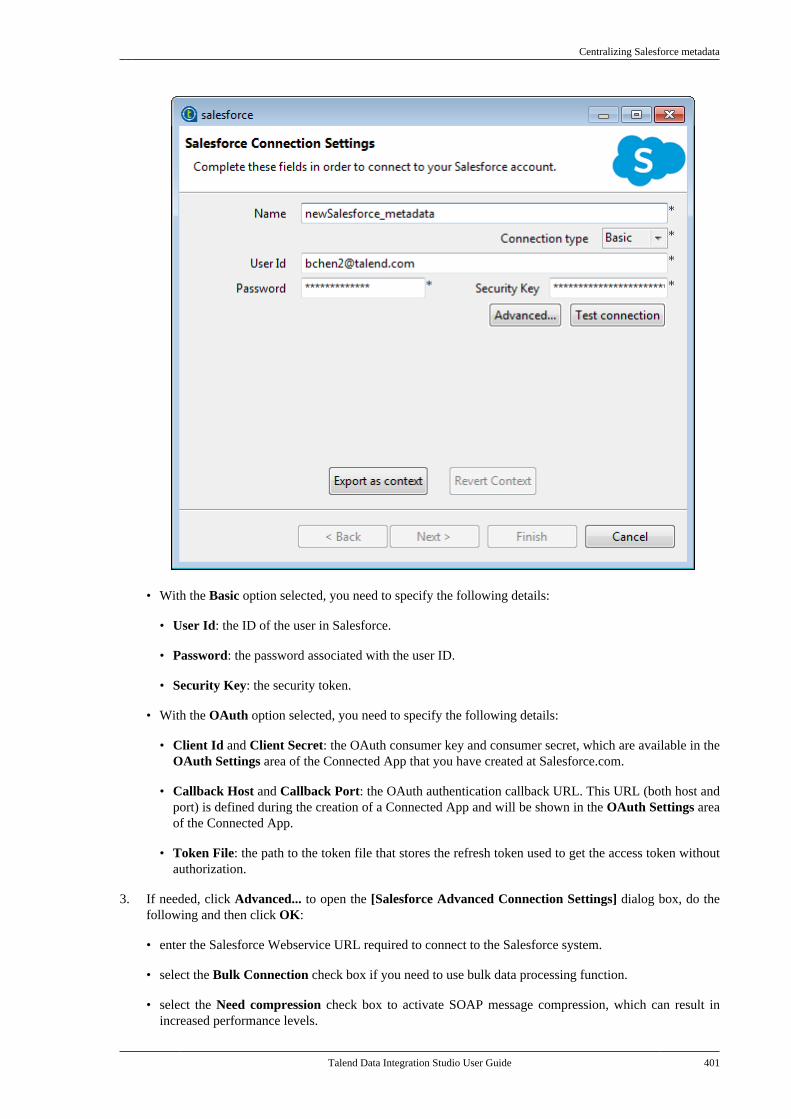
Centralizing Salesforce metadata
Talend Data Integration Studio User Guide 401
• With the Basic option selected, you need to specify the following details:
• User Id: the ID of the user in Salesforce.
• Password: the password associated with the user ID.
• Security Key: the security token.
• With the OAuth option selected, you need to specify the following details:
• Client Id and Client Secret: the OAuth consumer key and consumer secret, which are available in theOAuth Settings area of the Connected App that you have created at Salesforce.com.
• Callback Host and Callback Port: the OAuth authentication callback URL. This URL (both host andport) is defined during the creation of a Connected App and will be shown in the OAuth Settings areaof the Connected App.
• Token File: the path to the token file that stores the refresh token used to get the access token withoutauthorization.
3. If needed, click Advanced... to open the [Salesforce Advanced Connection Settings] dialog box, do thefollowing and then click OK:
• enter the Salesforce Webservice URL required to connect to the Salesforce system.
• select the Bulk Connection check box if you need to use bulk data processing function.
• select the Need compression check box to activate SOAP message compression, which can result inincreased performance levels.
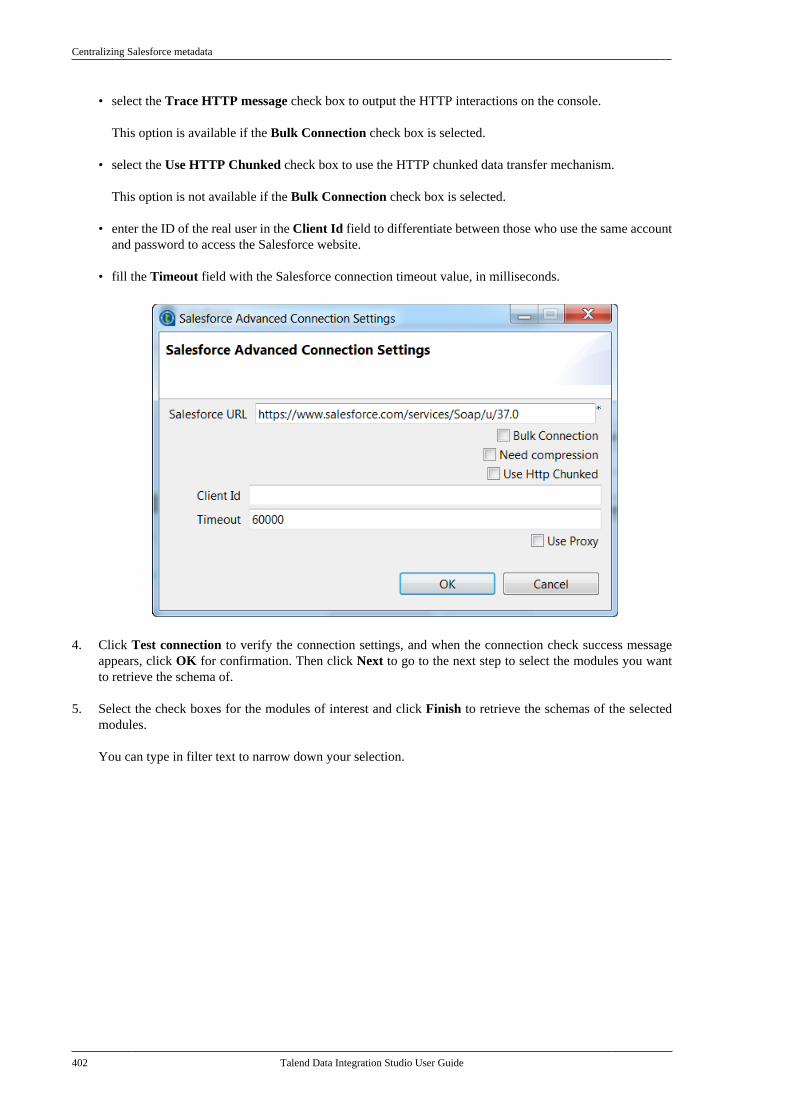
Centralizing Salesforce metadata
402 Talend Data Integration Studio User Guide
• select the Trace HTTP message check box to output the HTTP interactions on the console.
This option is available if the Bulk Connection check box is selected.
• select the Use HTTP Chunked check box to use the HTTP chunked data transfer mechanism.
This option is not available if the Bulk Connection check box is selected.
• enter the ID of the real user in the Client Id field to differentiate between those who use the same accountand password to access the Salesforce website.
• fill the Timeout field with the Salesforce connection timeout value, in milliseconds.
4. Click Test connection to verify the connection settings, and when the connection check success messageappears, click OK for confirmation. Then click Next to go to the next step to select the modules you wantto retrieve the schema of.
5. Select the check boxes for the modules of interest and click Finish to retrieve the schemas of the selectedmodules.
You can type in filter text to narrow down your selection.
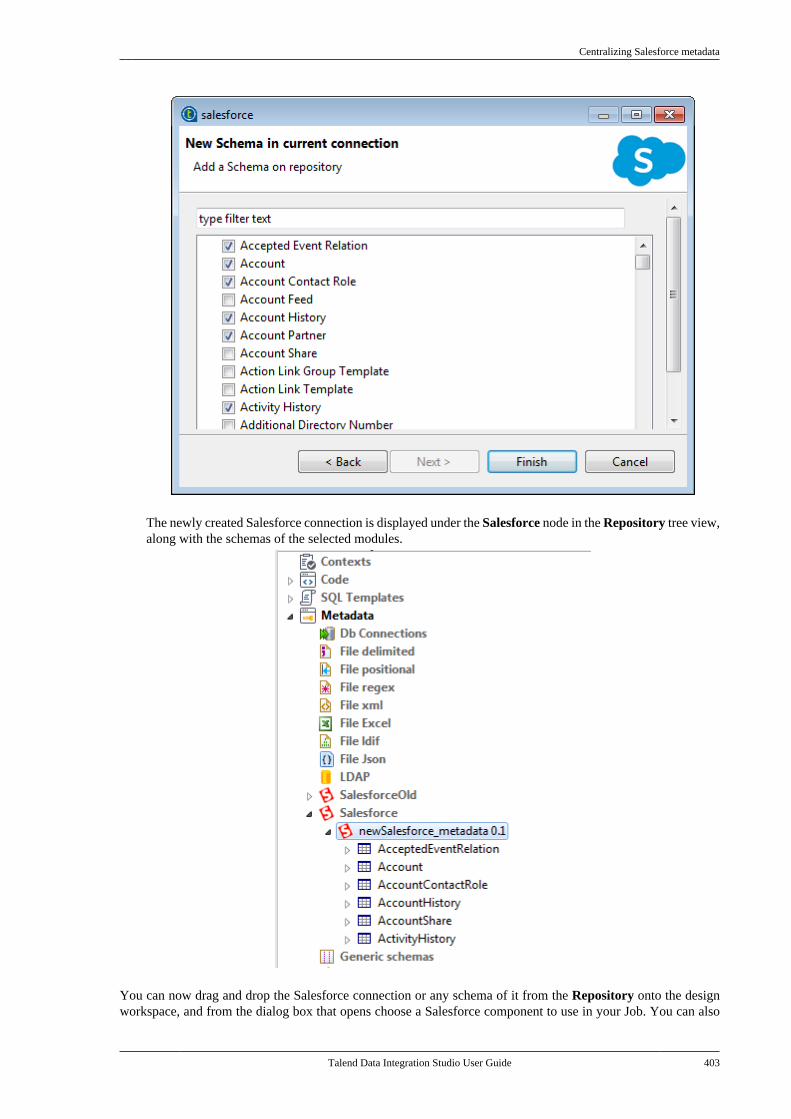
Centralizing Salesforce metadata
Talend Data Integration Studio User Guide 403
The newly created Salesforce connection is displayed under the Salesforce node in the Repository tree view,along with the schemas of the selected modules.
You can now drag and drop the Salesforce connection or any schema of it from the Repository onto the designworkspace, and from the dialog box that opens choose a Salesforce component to use in your Job. You can also

Setting up a generic schema
404 Talend Data Integration Studio User Guide
drop the Salesforce connection or a schema of it onto an existing component to reuse the connection or metadatadetails in the component. For more information about dropping component metadata in the design workspace,see How to use centralized metadata in a Job. For more information on Salesforce components, see the TalendComponents Reference Guide.
To modify the Salesforce metadata entry, right-click it from the Repository tree view, and select Edit Salesforceto open the file metadata setup wizard.
To edit an existing Salesforce schema, right-click the schema from the Repository tree view and select EditSchema from the contextual menu.
7.15. Setting up a generic schemaTalend Studio allows you to create a generic schema to use in your Jobs if none of the specific metadata wizardsmatches your need or if you do not have any source file to take the schema from.
You can create a generic schema:
• from scratch. For details, see Setting up a generic schema from scratch,
• from a schema definition XML file. For details, see Setting up a generic schema from an XML file, and
• from the schema defined in a component. For details, see Saving a component schema as a generic schema.
To use a generic schema on a component, use either of the following methods:
• Select Repository from the Schema drop-down list in the component Basic settings view.
Click the [...] button to open the [Repository Content] dialog box, select the generic schema under the Genericschemas node and click OK.
• Select the metadata node of the generic schema from the Repository tree view and drop it onto the component.
7.15.1. Setting up a generic schema from scratch
To create a generic schema from scratch, proceed as follows:
1. Right-click Generic schemas under the Metadata node in the Repository tree view, and select Creategeneric schema.
2. In the schema creation wizard that appears, fill in the generic schema properties such as schema Name andDescription. The Status field is a customized field. For more information about how to define the field, seeStatus settings.
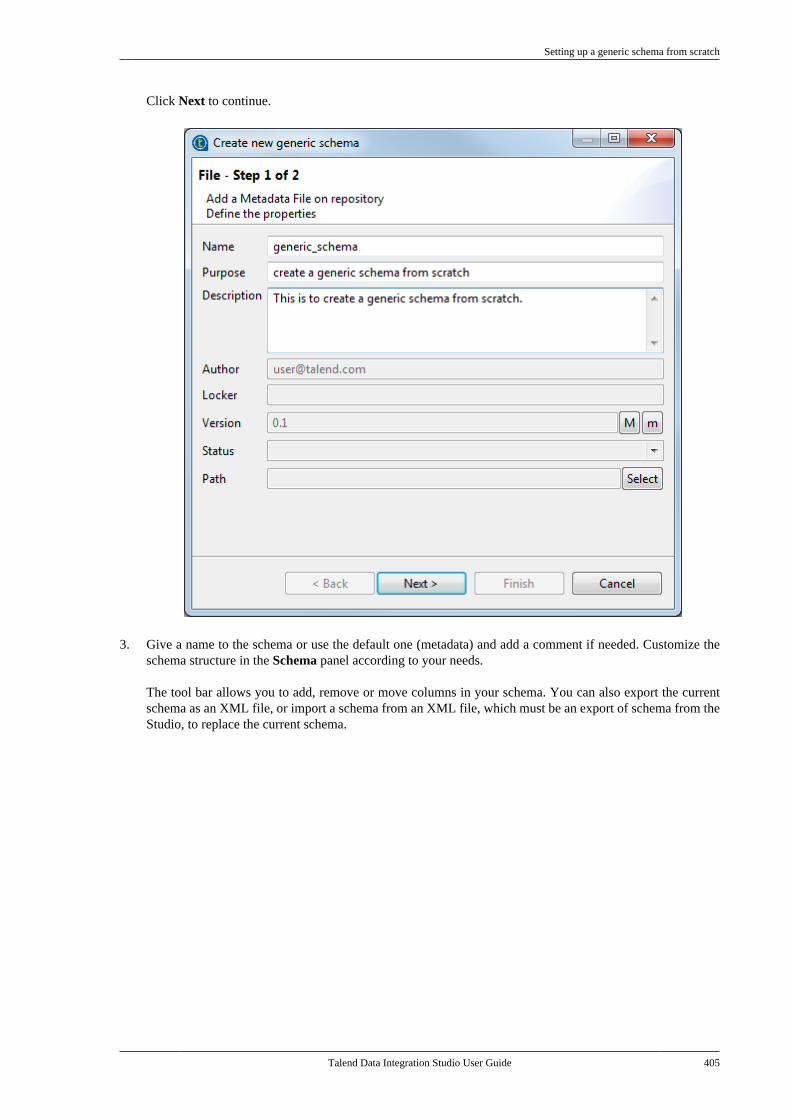
Setting up a generic schema from scratch
Talend Data Integration Studio User Guide 405
Click Next to continue.
3. Give a name to the schema or use the default one (metadata) and add a comment if needed. Customize theschema structure in the Schema panel according to your needs.
The tool bar allows you to add, remove or move columns in your schema. You can also export the currentschema as an XML file, or import a schema from an XML file, which must be an export of schema from theStudio, to replace the current schema.
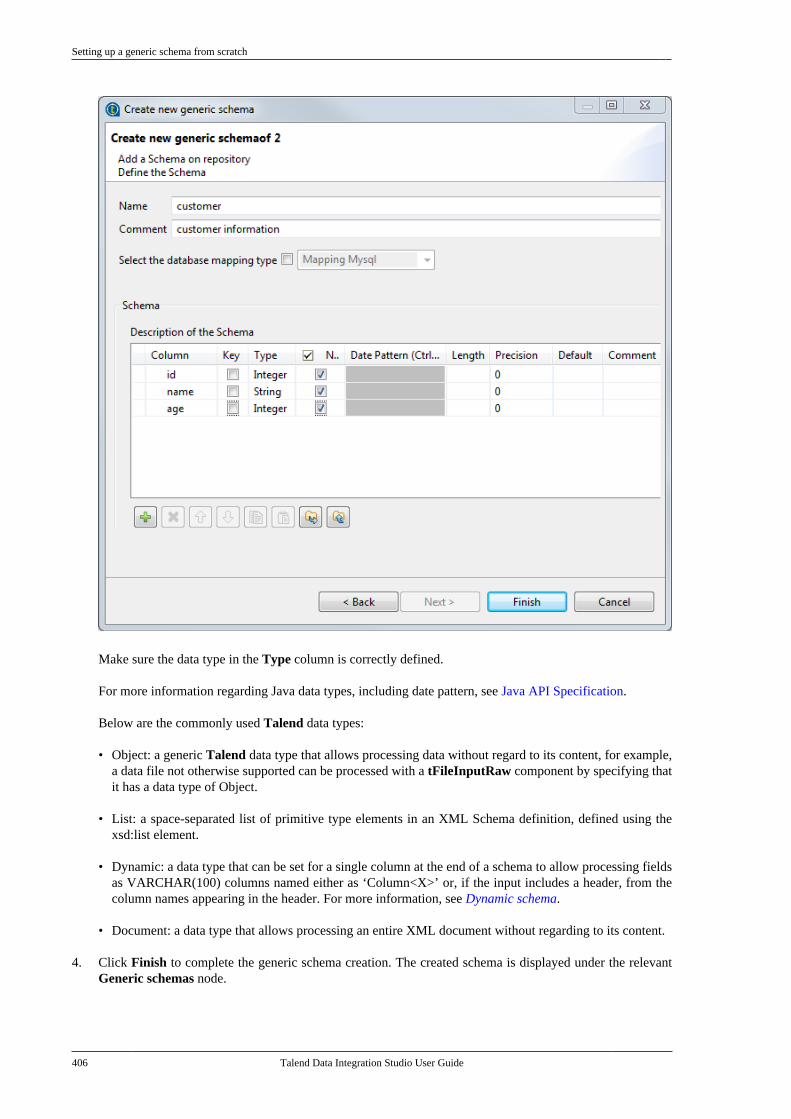
Setting up a generic schema from scratch
406 Talend Data Integration Studio User Guide
Make sure the data type in the Type column is correctly defined.
For more information regarding Java data types, including date pattern, see Java API Specification.
Below are the commonly used Talend data types:
• Object: a generic Talend data type that allows processing data without regard to its content, for example,a data file not otherwise supported can be processed with a tFileInputRaw component by specifying thatit has a data type of Object.
• List: a space-separated list of primitive type elements in an XML Schema definition, defined using thexsd:list element.
• Dynamic: a data type that can be set for a single column at the end of a schema to allow processing fieldsas VARCHAR(100) columns named either as ‘Column<X>’ or, if the input includes a header, from thecolumn names appearing in the header. For more information, see Dynamic schema.
• Document: a data type that allows processing an entire XML document without regarding to its content.
4. Click Finish to complete the generic schema creation. The created schema is displayed under the relevantGeneric schemas node.
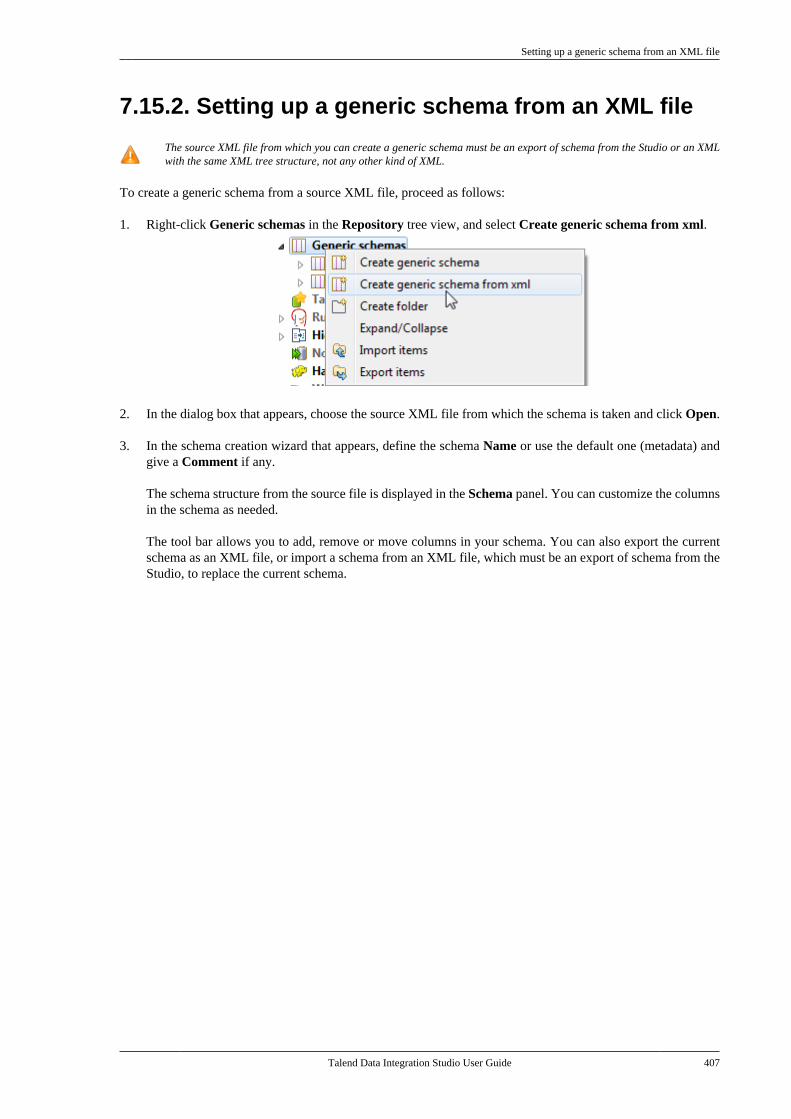
Setting up a generic schema from an XML file
Talend Data Integration Studio User Guide 407
7.15.2. Setting up a generic schema from an XML file
The source XML file from which you can create a generic schema must be an export of schema from the Studio or an XMLwith the same XML tree structure, not any other kind of XML.
To create a generic schema from a source XML file, proceed as follows:
1. Right-click Generic schemas in the Repository tree view, and select Create generic schema from xml.
2. In the dialog box that appears, choose the source XML file from which the schema is taken and click Open.
3. In the schema creation wizard that appears, define the schema Name or use the default one (metadata) andgive a Comment if any.
The schema structure from the source file is displayed in the Schema panel. You can customize the columnsin the schema as needed.
The tool bar allows you to add, remove or move columns in your schema. You can also export the currentschema as an XML file, or import a schema from an XML file, which must be an export of schema from theStudio, to replace the current schema.
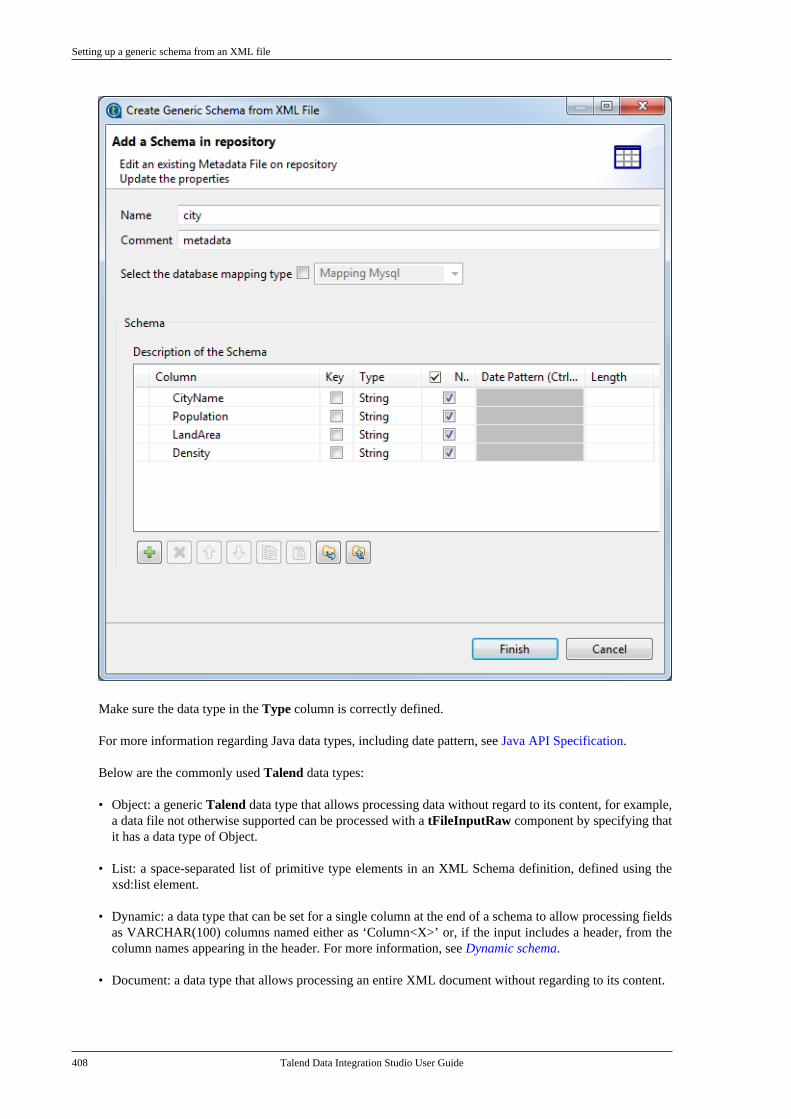
Setting up a generic schema from an XML file
408 Talend Data Integration Studio User Guide
Make sure the data type in the Type column is correctly defined.
For more information regarding Java data types, including date pattern, see Java API Specification.
Below are the commonly used Talend data types:
• Object: a generic Talend data type that allows processing data without regard to its content, for example,a data file not otherwise supported can be processed with a tFileInputRaw component by specifying thatit has a data type of Object.
• List: a space-separated list of primitive type elements in an XML Schema definition, defined using thexsd:list element.
• Dynamic: a data type that can be set for a single column at the end of a schema to allow processing fieldsas VARCHAR(100) columns named either as ‘Column<X>’ or, if the input includes a header, from thecolumn names appearing in the header. For more information, see Dynamic schema.
• Document: a data type that allows processing an entire XML document without regarding to its content.
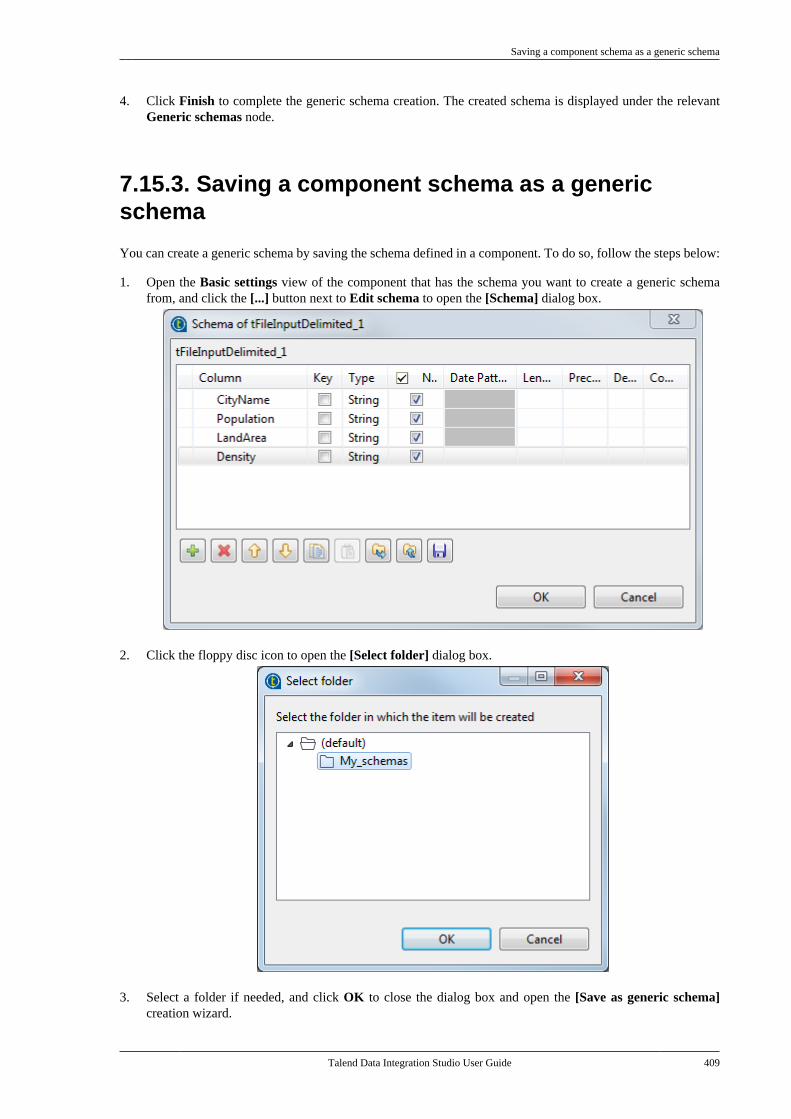
Saving a component schema as a generic schema
Talend Data Integration Studio User Guide 409
4. Click Finish to complete the generic schema creation. The created schema is displayed under the relevantGeneric schemas node.
7.15.3. Saving a component schema as a genericschema
You can create a generic schema by saving the schema defined in a component. To do so, follow the steps below:
1. Open the Basic settings view of the component that has the schema you want to create a generic schemafrom, and click the [...] button next to Edit schema to open the [Schema] dialog box.
2. Click the floppy disc icon to open the [Select folder] dialog box.
3. Select a folder if needed, and click OK to close the dialog box and open the [Save as generic schema]creation wizard.
Centralizing MDM metadata
410 Talend Data Integration Studio User Guide
4. Fill in the Name field (required) and the other fields if needed, and click Finish to save the schema. Thenclose the [Schema] dialog box opened from the component Basic settings view.
The schema is saved in the selected folder under the Generic schemas node in the Repository tree view.
7.16. Centralizing MDM metadataTalend Studio enables you to centralize the details of one or more MDM connections under the Metadata folderin the Repository tree view. You can then use any of these established connections to connect to the MDM server.
You can also set up an MDM connection the same way by clicking the icon in the Basic settings view of thetMDMInput and tMDMOutput components. For more information, see the Talend MDM component chapter in TalendComponents Reference Guide.
According to the option you select, the wizard helps you create an input XML, an output XML or a receive XMLschema. Later, in a Talend Job, the tMDMInput component uses the defined input schema to read master datastored in XML documents, tMDMOutput uses the defined output schema to either write master data in an XMLdocument on the MDM server, or to update existing XML documents and finally the tMDMReceive componentuses the defined XML schema to receive an MDM record in XML from MDM triggers and processes.
7.16.1. Setting up the connectionTo establish an MDM connection, complete the following:
Setting up the connection
Talend Data Integration Studio User Guide 411
1. In the Repository tree view, expand Metadata and right-click Talend MDM.
2. Select Create MDM Connection from the contextual menu.
The connection wizard is displayed.
3. Fill in the connection properties such as Name, Purpose and Description. The Status field is a customizedfield that can be defined. For more information, see Status settings.
4. Click Next to proceed to the next step.
Setting up the connection
412 Talend Data Integration Studio User Guide
5. From the Version list, select the version of the MDM server to which you want to connect.
The default value in the Server URL field varies depending on what you selected in the Version list.
6. Fill in the connection details including the authentication information to the MDM server and then clickCheck to check the connection you have created.
A dialog box pops up to show that your connection is successful. Click OK to close it.
If needed, you can click Export as context to export this Talend MDM connection details to a new contextgroup in the Repository or reuse variables of an existing context group to set up your metadata connection. Formore information, see Exporting metadata as context and reusing context parameters to set up a connection.
7. Click Next to proceed to the next step.
Defining MDM schema
Talend Data Integration Studio User Guide 413
8. From the Data-Model list, select the data model against which the master data is validated.
9. From the Data-Container list, select the data container that holds the master data you want to access.
10. Click Finish to validate your changes and close the dialog box.
The newly created connection is listed under Talend MDM under the Metadata folder in the Repositorytree view.
You need now to retrieve the XML schema of the business entities linked to this MDM connection.
7.16.2. Defining MDM schema
7.16.2.1. Defining Input MDM schema
This section describes how to define and download an input MDM XML schema. To define and download anoutput MDM XML schema, see Defining output MDM schema.
To set the values to be fetched from one or more entities linked to a specific MDM connection, complete thefollowing:
1. In the Repository tree view, expand Metadata and right-click the MDM connection for which you want toretrieve the entity values.
2. Select Retrieve Entity from the contextual menu.
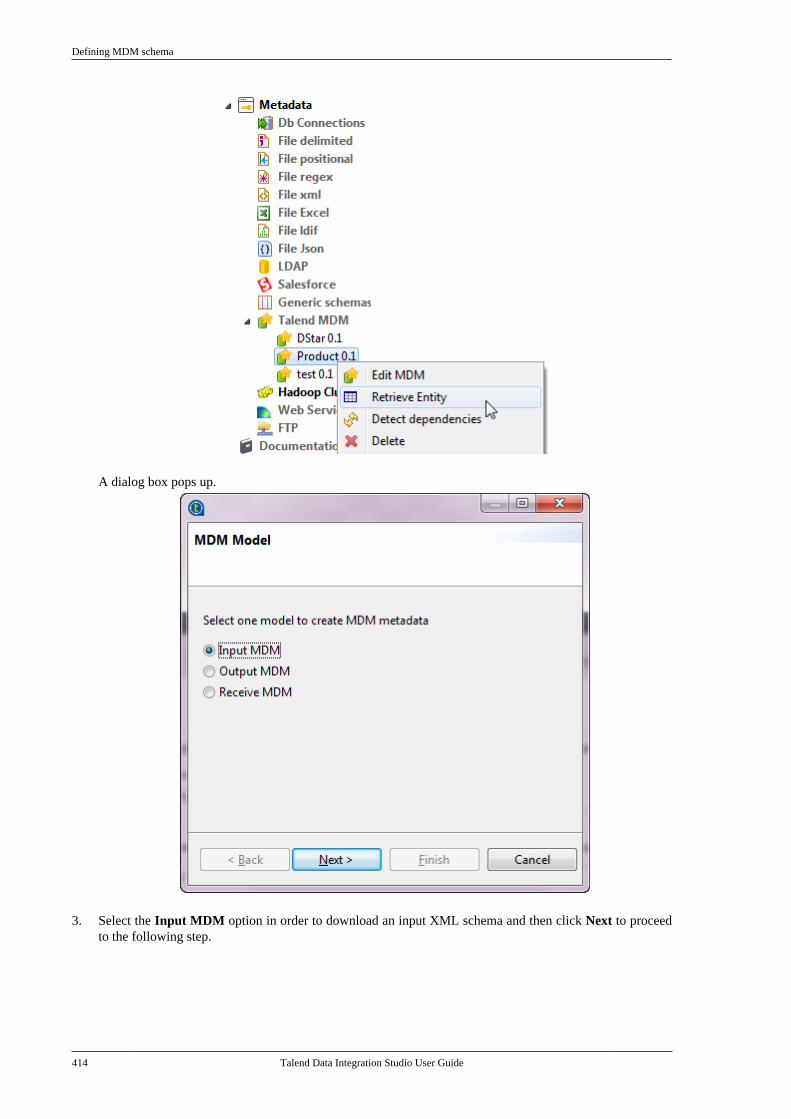
Defining MDM schema
414 Talend Data Integration Studio User Guide
A dialog box pops up.
3. Select the Input MDM option in order to download an input XML schema and then click Next to proceedto the following step.
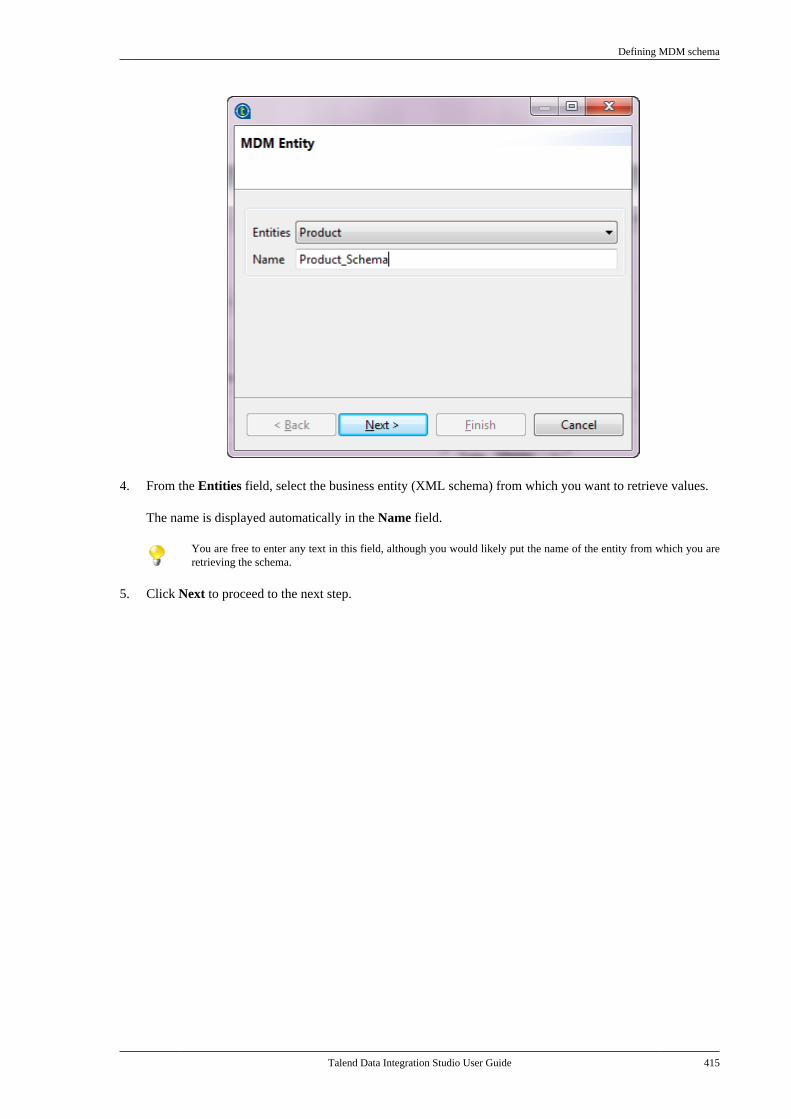
Defining MDM schema
Talend Data Integration Studio User Guide 415
4. From the Entities field, select the business entity (XML schema) from which you want to retrieve values.
The name is displayed automatically in the Name field.
You are free to enter any text in this field, although you would likely put the name of the entity from which you areretrieving the schema.
5. Click Next to proceed to the next step.
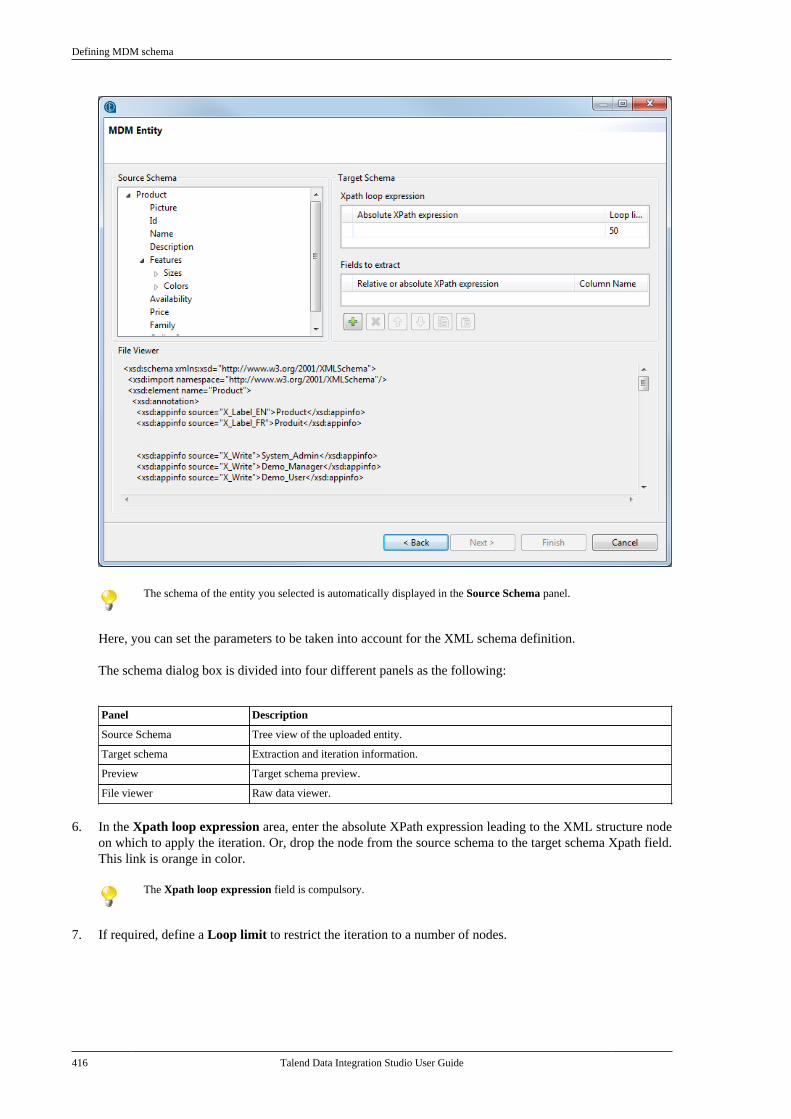
Defining MDM schema
416 Talend Data Integration Studio User Guide
The schema of the entity you selected is automatically displayed in the Source Schema panel.
Here, you can set the parameters to be taken into account for the XML schema definition.
The schema dialog box is divided into four different panels as the following:
Panel Description
Source Schema Tree view of the uploaded entity.
Target schema Extraction and iteration information.
Preview Target schema preview.
File viewer Raw data viewer.
6. In the Xpath loop expression area, enter the absolute XPath expression leading to the XML structure nodeon which to apply the iteration. Or, drop the node from the source schema to the target schema Xpath field.This link is orange in color.
The Xpath loop expression field is compulsory.
7. If required, define a Loop limit to restrict the iteration to a number of nodes.
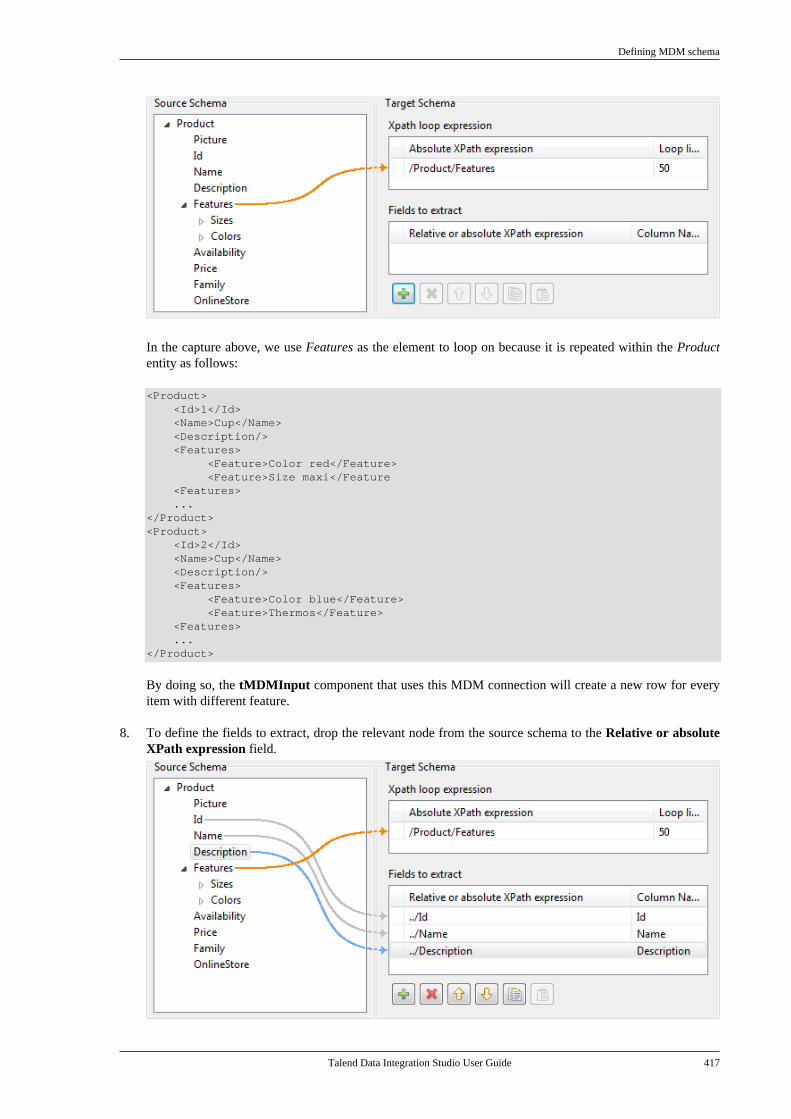
Defining MDM schema
Talend Data Integration Studio User Guide 417
In the capture above, we use Features as the element to loop on because it is repeated within the Productentity as follows:
<Product> <Id>1</Id> <Name>Cup</Name> <Description/> <Features> <Feature>Color red</Feature> <Feature>Size maxi</Feature <Features> ...</Product><Product> <Id>2</Id> <Name>Cup</Name> <Description/> <Features> <Feature>Color blue</Feature> <Feature>Thermos</Feature> <Features> ...</Product>
By doing so, the tMDMInput component that uses this MDM connection will create a new row for everyitem with different feature.
8. To define the fields to extract, drop the relevant node from the source schema to the Relative or absoluteXPath expression field.
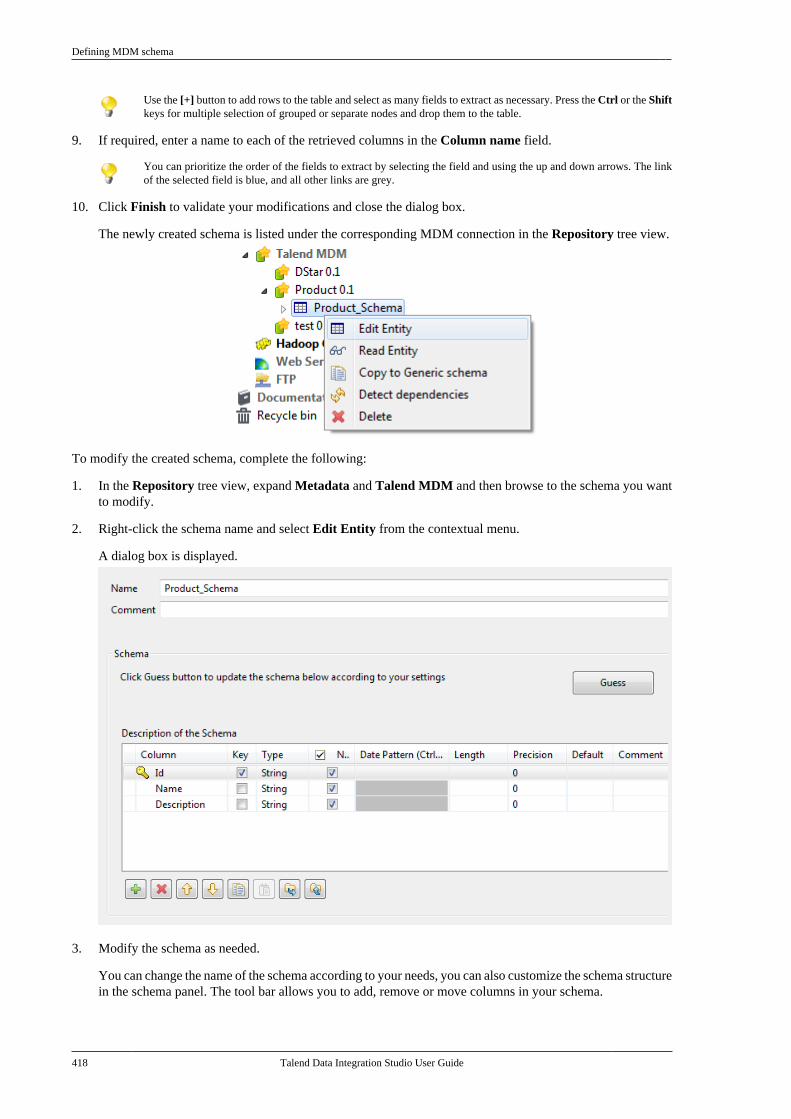
Defining MDM schema
418 Talend Data Integration Studio User Guide
Use the [+] button to add rows to the table and select as many fields to extract as necessary. Press the Ctrl or the Shiftkeys for multiple selection of grouped or separate nodes and drop them to the table.
9. If required, enter a name to each of the retrieved columns in the Column name field.
You can prioritize the order of the fields to extract by selecting the field and using the up and down arrows. The linkof the selected field is blue, and all other links are grey.
10. Click Finish to validate your modifications and close the dialog box.
The newly created schema is listed under the corresponding MDM connection in the Repository tree view.
To modify the created schema, complete the following:
1. In the Repository tree view, expand Metadata and Talend MDM and then browse to the schema you wantto modify.
2. Right-click the schema name and select Edit Entity from the contextual menu.
A dialog box is displayed.
3. Modify the schema as needed.
You can change the name of the schema according to your needs, you can also customize the schema structurein the schema panel. The tool bar allows you to add, remove or move columns in your schema.
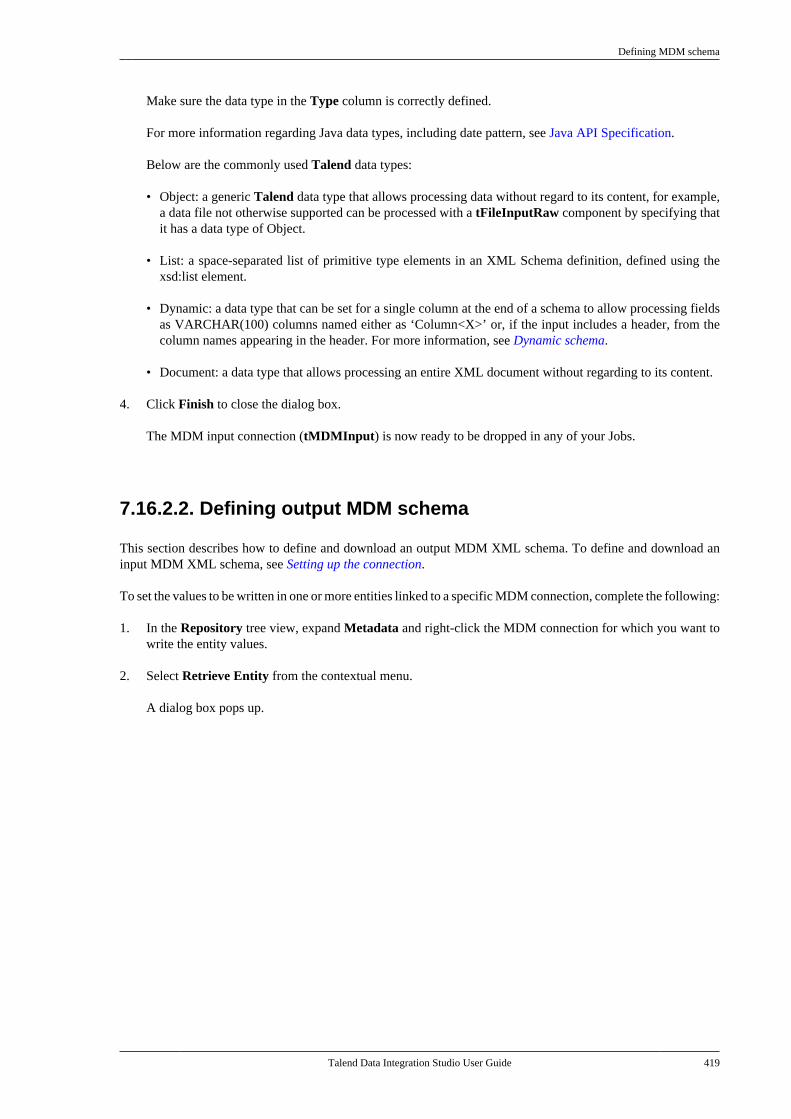
Defining MDM schema
Talend Data Integration Studio User Guide 419
Make sure the data type in the Type column is correctly defined.
For more information regarding Java data types, including date pattern, see Java API Specification.
Below are the commonly used Talend data types:
• Object: a generic Talend data type that allows processing data without regard to its content, for example,a data file not otherwise supported can be processed with a tFileInputRaw component by specifying thatit has a data type of Object.
• List: a space-separated list of primitive type elements in an XML Schema definition, defined using thexsd:list element.
• Dynamic: a data type that can be set for a single column at the end of a schema to allow processing fieldsas VARCHAR(100) columns named either as ‘Column<X>’ or, if the input includes a header, from thecolumn names appearing in the header. For more information, see Dynamic schema.
• Document: a data type that allows processing an entire XML document without regarding to its content.
4. Click Finish to close the dialog box.
The MDM input connection (tMDMInput) is now ready to be dropped in any of your Jobs.
7.16.2.2. Defining output MDM schema
This section describes how to define and download an output MDM XML schema. To define and download aninput MDM XML schema, see Setting up the connection.
To set the values to be written in one or more entities linked to a specific MDM connection, complete the following:
1. In the Repository tree view, expand Metadata and right-click the MDM connection for which you want towrite the entity values.
2. Select Retrieve Entity from the contextual menu.
A dialog box pops up.
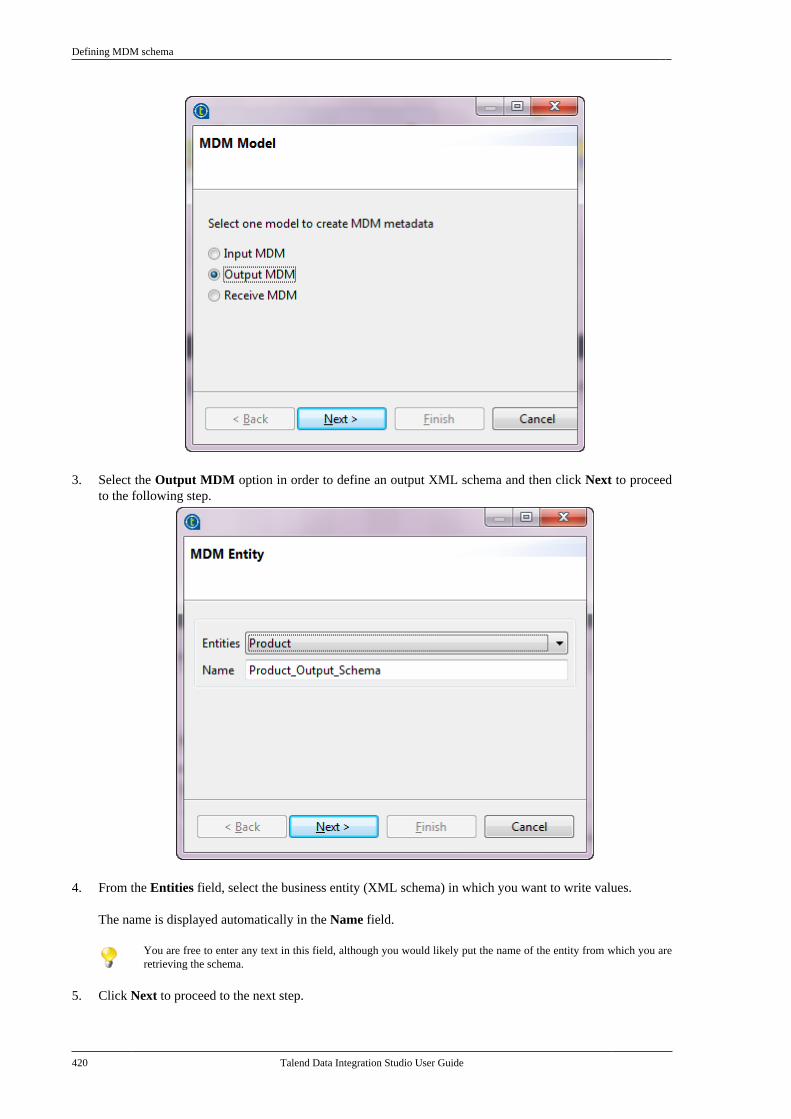
Defining MDM schema
420 Talend Data Integration Studio User Guide
3. Select the Output MDM option in order to define an output XML schema and then click Next to proceedto the following step.
4. From the Entities field, select the business entity (XML schema) in which you want to write values.
The name is displayed automatically in the Name field.
You are free to enter any text in this field, although you would likely put the name of the entity from which you areretrieving the schema.
5. Click Next to proceed to the next step.
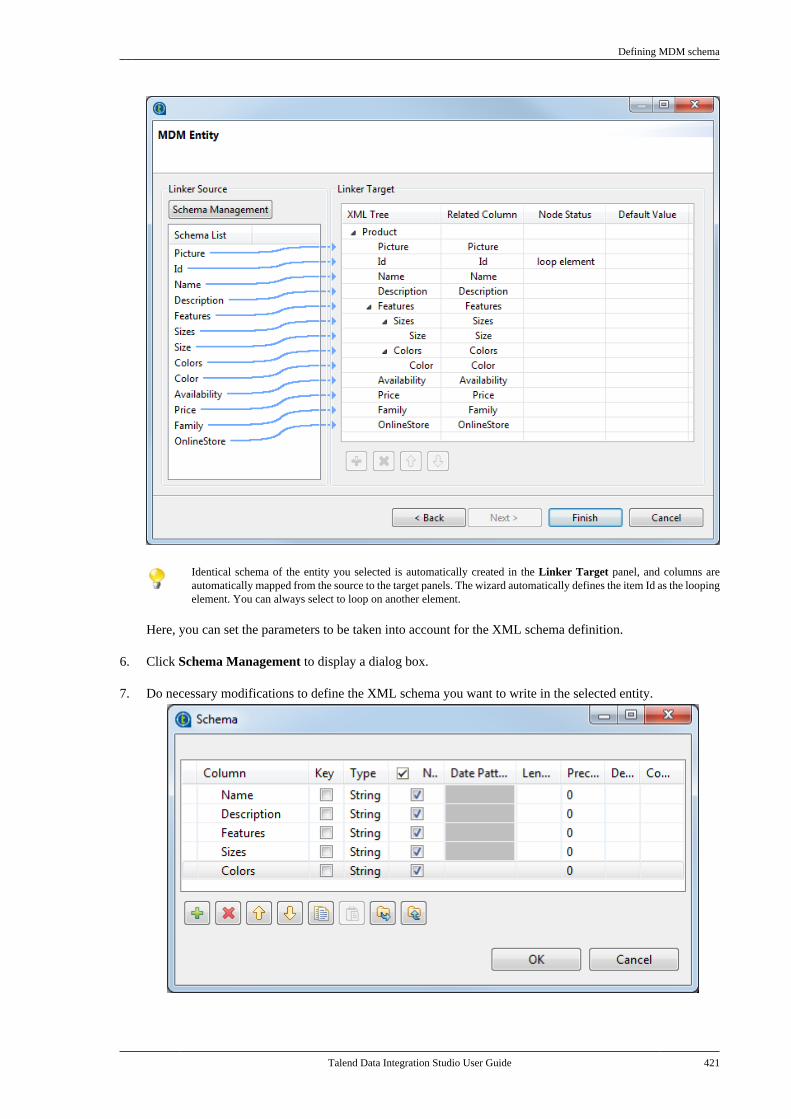
Defining MDM schema
Talend Data Integration Studio User Guide 421
Identical schema of the entity you selected is automatically created in the Linker Target panel, and columns areautomatically mapped from the source to the target panels. The wizard automatically defines the item Id as the loopingelement. You can always select to loop on another element.
Here, you can set the parameters to be taken into account for the XML schema definition.
6. Click Schema Management to display a dialog box.
7. Do necessary modifications to define the XML schema you want to write in the selected entity.
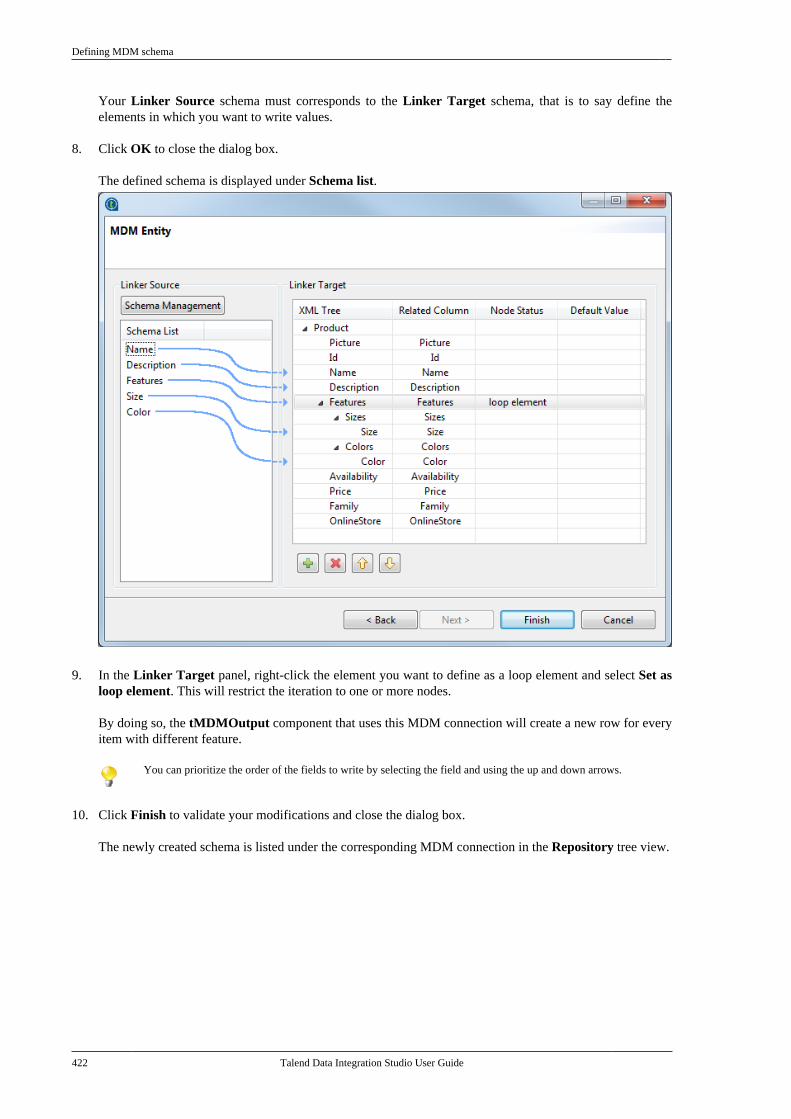
Defining MDM schema
422 Talend Data Integration Studio User Guide
Your Linker Source schema must corresponds to the Linker Target schema, that is to say define theelements in which you want to write values.
8. Click OK to close the dialog box.
The defined schema is displayed under Schema list.
9. In the Linker Target panel, right-click the element you want to define as a loop element and select Set asloop element. This will restrict the iteration to one or more nodes.
By doing so, the tMDMOutput component that uses this MDM connection will create a new row for everyitem with different feature.
You can prioritize the order of the fields to write by selecting the field and using the up and down arrows.
10. Click Finish to validate your modifications and close the dialog box.
The newly created schema is listed under the corresponding MDM connection in the Repository tree view.
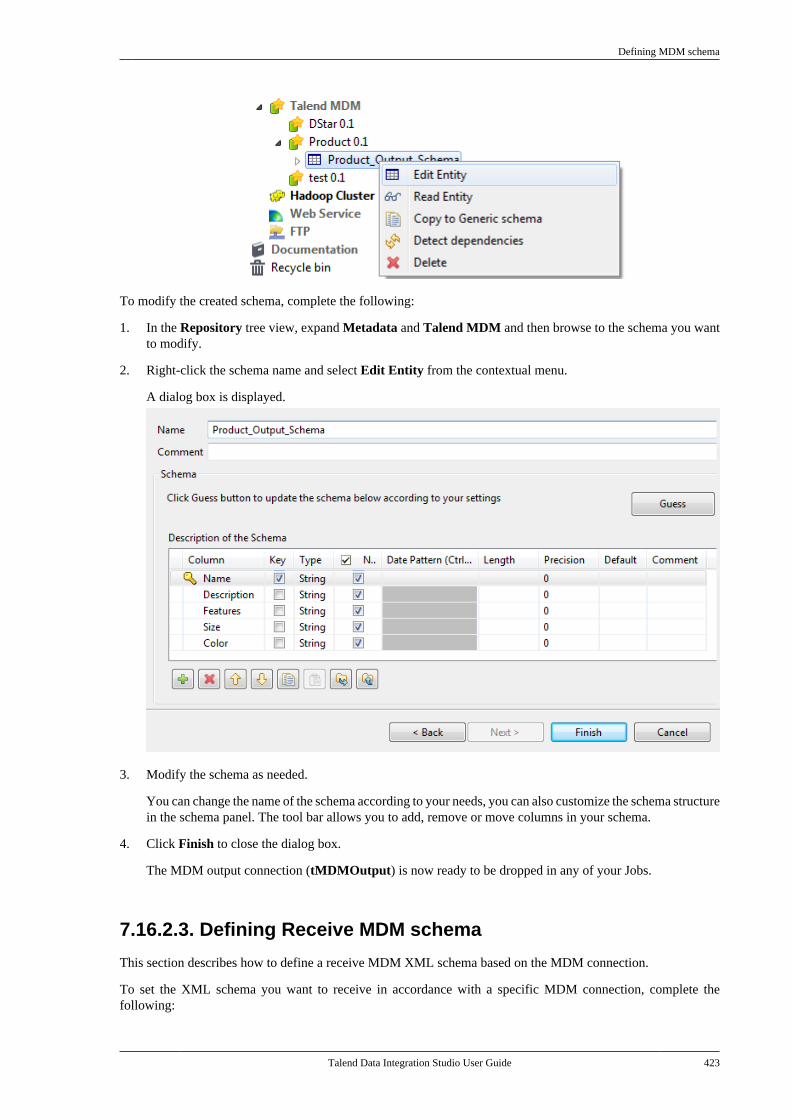
Defining MDM schema
Talend Data Integration Studio User Guide 423
To modify the created schema, complete the following:
1. In the Repository tree view, expand Metadata and Talend MDM and then browse to the schema you wantto modify.
2. Right-click the schema name and select Edit Entity from the contextual menu.
A dialog box is displayed.
3. Modify the schema as needed.
You can change the name of the schema according to your needs, you can also customize the schema structurein the schema panel. The tool bar allows you to add, remove or move columns in your schema.
4. Click Finish to close the dialog box.
The MDM output connection (tMDMOutput) is now ready to be dropped in any of your Jobs.
7.16.2.3. Defining Receive MDM schema
This section describes how to define a receive MDM XML schema based on the MDM connection.
To set the XML schema you want to receive in accordance with a specific MDM connection, complete thefollowing:

Defining MDM schema
424 Talend Data Integration Studio User Guide
1. In the Repository tree view, expand Metadata and right-click the MDM connection for which you want toretrieve the entity values.
2. Select Retrieve Entity from the contextual menu.
A dialog box displays.
3. Select the Receive MDM option in order to define a receive XML schema and then click Next to proceedto the following step.
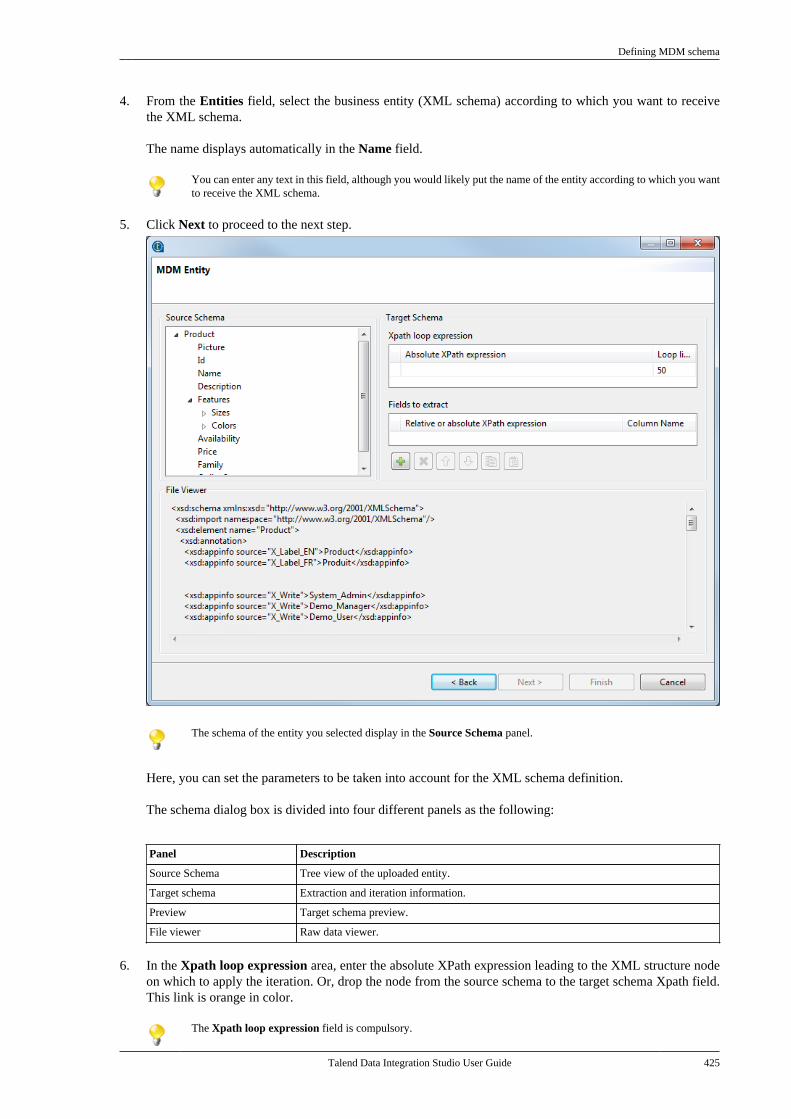
Defining MDM schema
Talend Data Integration Studio User Guide 425
4. From the Entities field, select the business entity (XML schema) according to which you want to receivethe XML schema.
The name displays automatically in the Name field.
You can enter any text in this field, although you would likely put the name of the entity according to which you wantto receive the XML schema.
5. Click Next to proceed to the next step.
The schema of the entity you selected display in the Source Schema panel.
Here, you can set the parameters to be taken into account for the XML schema definition.
The schema dialog box is divided into four different panels as the following:
Panel Description
Source Schema Tree view of the uploaded entity.
Target schema Extraction and iteration information.
Preview Target schema preview.
File viewer Raw data viewer.
6. In the Xpath loop expression area, enter the absolute XPath expression leading to the XML structure nodeon which to apply the iteration. Or, drop the node from the source schema to the target schema Xpath field.This link is orange in color.
The Xpath loop expression field is compulsory.
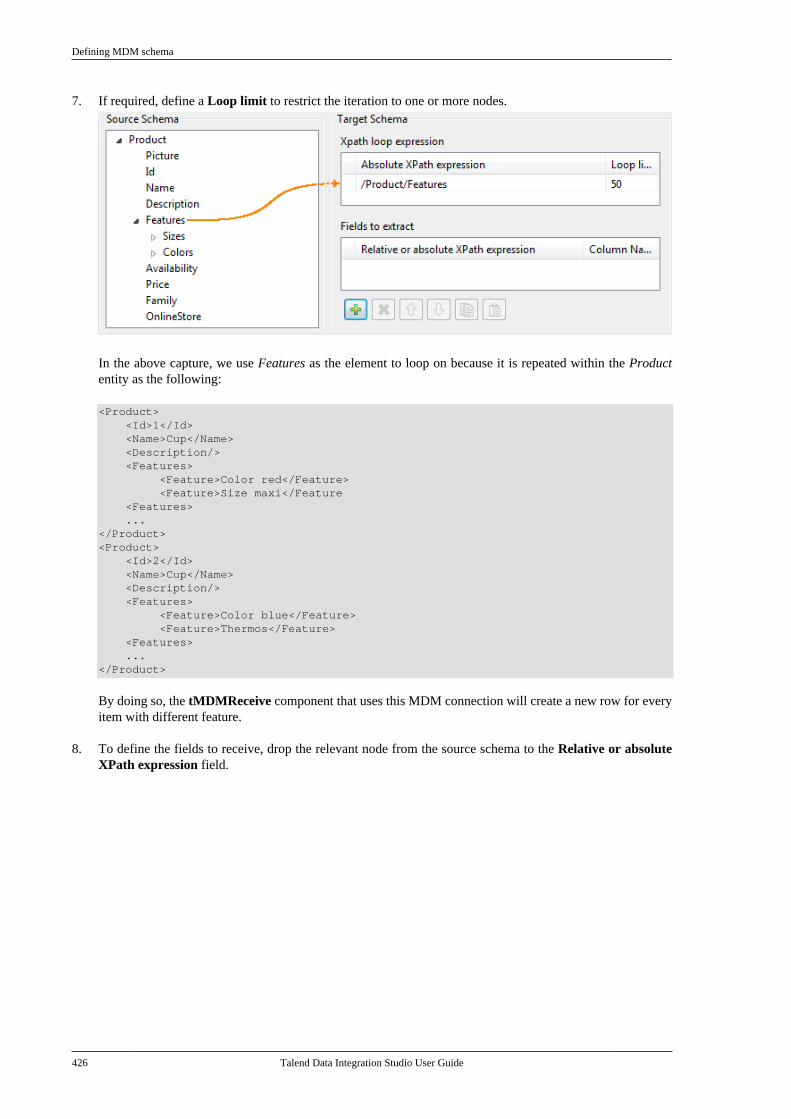
Defining MDM schema
426 Talend Data Integration Studio User Guide
7. If required, define a Loop limit to restrict the iteration to one or more nodes.
In the above capture, we use Features as the element to loop on because it is repeated within the Productentity as the following:
<Product> <Id>1</Id> <Name>Cup</Name> <Description/> <Features> <Feature>Color red</Feature> <Feature>Size maxi</Feature <Features> ...</Product><Product> <Id>2</Id> <Name>Cup</Name> <Description/> <Features> <Feature>Color blue</Feature> <Feature>Thermos</Feature> <Features> ...</Product>
By doing so, the tMDMReceive component that uses this MDM connection will create a new row for everyitem with different feature.
8. To define the fields to receive, drop the relevant node from the source schema to the Relative or absoluteXPath expression field.

Defining MDM schema
Talend Data Integration Studio User Guide 427
Use the plus sign to add rows to the table and select as many fields to extract as necessary. Press the Ctrl or the Shiftkeys for multiple selection of grouped or separate nodes and drop them to the table.
9. If required, enter a name to each of the received columns in the Column name field.
You can prioritize the order of the fields you want to receive by selecting the field and using the up and down arrows.The link of the selected field is blue, and all other links are grey.
10. Click Finish to validate your modifications and close the dialog box.
The newly created schema is listed under the corresponding MDM connection in the Repository tree view.
To modify the created schema, complete the following:
1. In the Repository tree view, expand Metadata and Talend MDM and then browse to the schema you wantto modify.
2. Right-click the schema name and select Edit Entity from the contextual menu.
A dialog box displays.
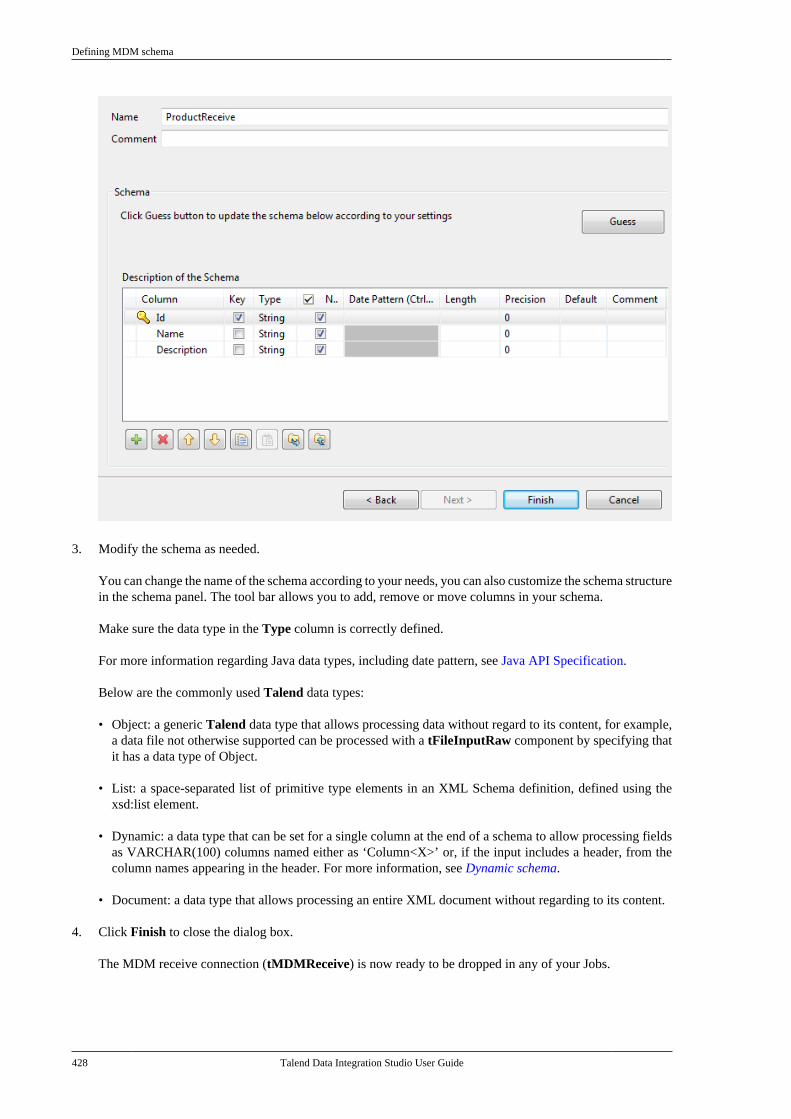
Defining MDM schema
428 Talend Data Integration Studio User Guide
3. Modify the schema as needed.
You can change the name of the schema according to your needs, you can also customize the schema structurein the schema panel. The tool bar allows you to add, remove or move columns in your schema.
Make sure the data type in the Type column is correctly defined.
For more information regarding Java data types, including date pattern, see Java API Specification.
Below are the commonly used Talend data types:
• Object: a generic Talend data type that allows processing data without regard to its content, for example,a data file not otherwise supported can be processed with a tFileInputRaw component by specifying thatit has a data type of Object.
• List: a space-separated list of primitive type elements in an XML Schema definition, defined using thexsd:list element.
• Dynamic: a data type that can be set for a single column at the end of a schema to allow processing fieldsas VARCHAR(100) columns named either as ‘Column<X>’ or, if the input includes a header, from thecolumn names appearing in the header. For more information, see Dynamic schema.
• Document: a data type that allows processing an entire XML document without regarding to its content.
4. Click Finish to close the dialog box.
The MDM receive connection (tMDMReceive) is now ready to be dropped in any of your Jobs.
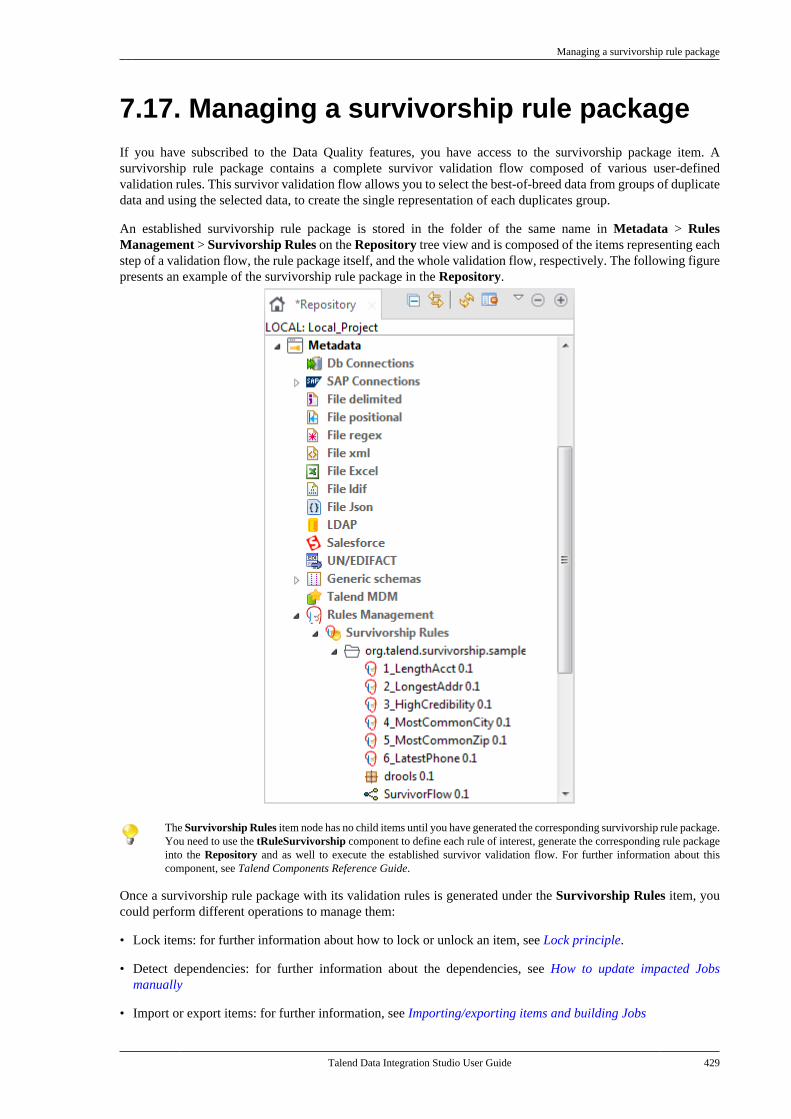
Managing a survivorship rule package
Talend Data Integration Studio User Guide 429
7.17. Managing a survivorship rule packageIf you have subscribed to the Data Quality features, you have access to the survivorship package item. Asurvivorship rule package contains a complete survivor validation flow composed of various user-definedvalidation rules. This survivor validation flow allows you to select the best-of-breed data from groups of duplicatedata and using the selected data, to create the single representation of each duplicates group.
An established survivorship rule package is stored in the folder of the same name in Metadata > RulesManagement > Survivorship Rules on the Repository tree view and is composed of the items representing eachstep of a validation flow, the rule package itself, and the whole validation flow, respectively. The following figurepresents an example of the survivorship rule package in the Repository.
The Survivorship Rules item node has no child items until you have generated the corresponding survivorship rule package.You need to use the tRuleSurvivorship component to define each rule of interest, generate the corresponding rule packageinto the Repository and as well to execute the established survivor validation flow. For further information about thiscomponent, see Talend Components Reference Guide.
Once a survivorship rule package with its validation rules is generated under the Survivorship Rules item, youcould perform different operations to manage them:
• Lock items: for further information about how to lock or unlock an item, see Lock principle.
• Detect dependencies: for further information about the dependencies, see How to update impacted Jobsmanually
• Import or export items: for further information, see Importing/exporting items and building Jobs
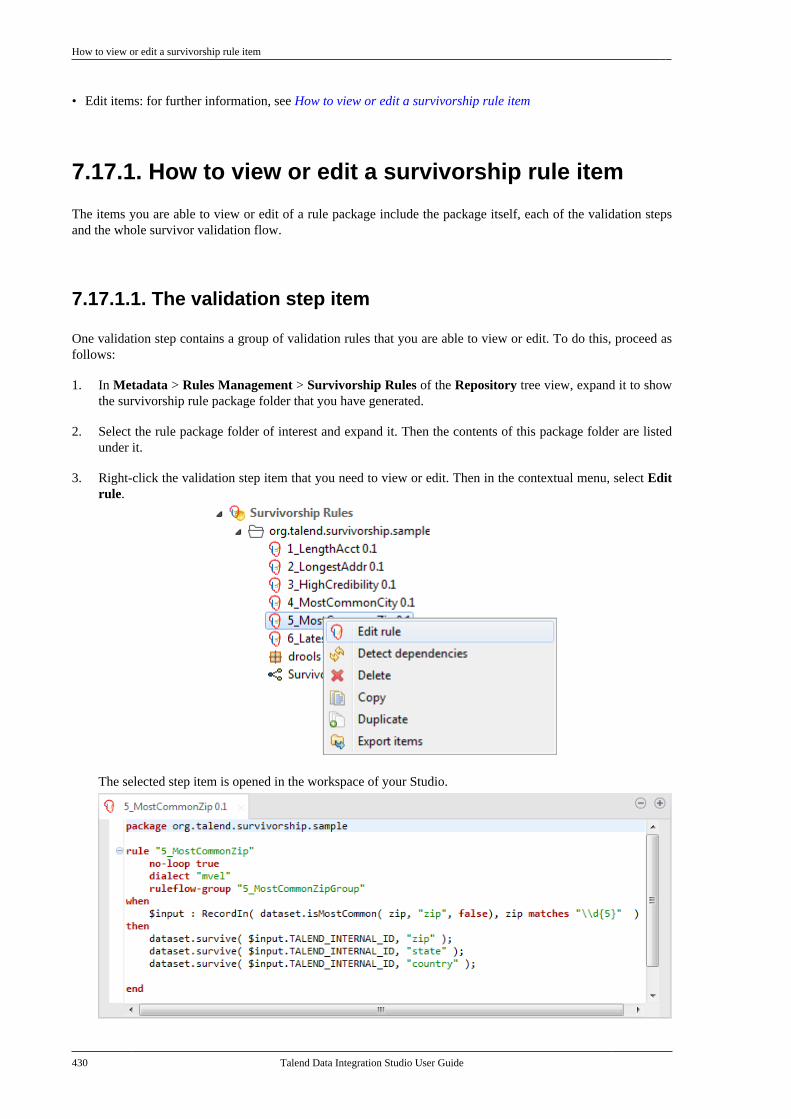
How to view or edit a survivorship rule item
430 Talend Data Integration Studio User Guide
• Edit items: for further information, see How to view or edit a survivorship rule item
7.17.1. How to view or edit a survivorship rule item
The items you are able to view or edit of a rule package include the package itself, each of the validation stepsand the whole survivor validation flow.
7.17.1.1. The validation step item
One validation step contains a group of validation rules that you are able to view or edit. To do this, proceed asfollows:
1. In Metadata > Rules Management > Survivorship Rules of the Repository tree view, expand it to showthe survivorship rule package folder that you have generated.
2. Select the rule package folder of interest and expand it. Then the contents of this package folder are listedunder it.
3. Right-click the validation step item that you need to view or edit. Then in the contextual menu, select Editrule.
The selected step item is opened in the workspace of your Studio.
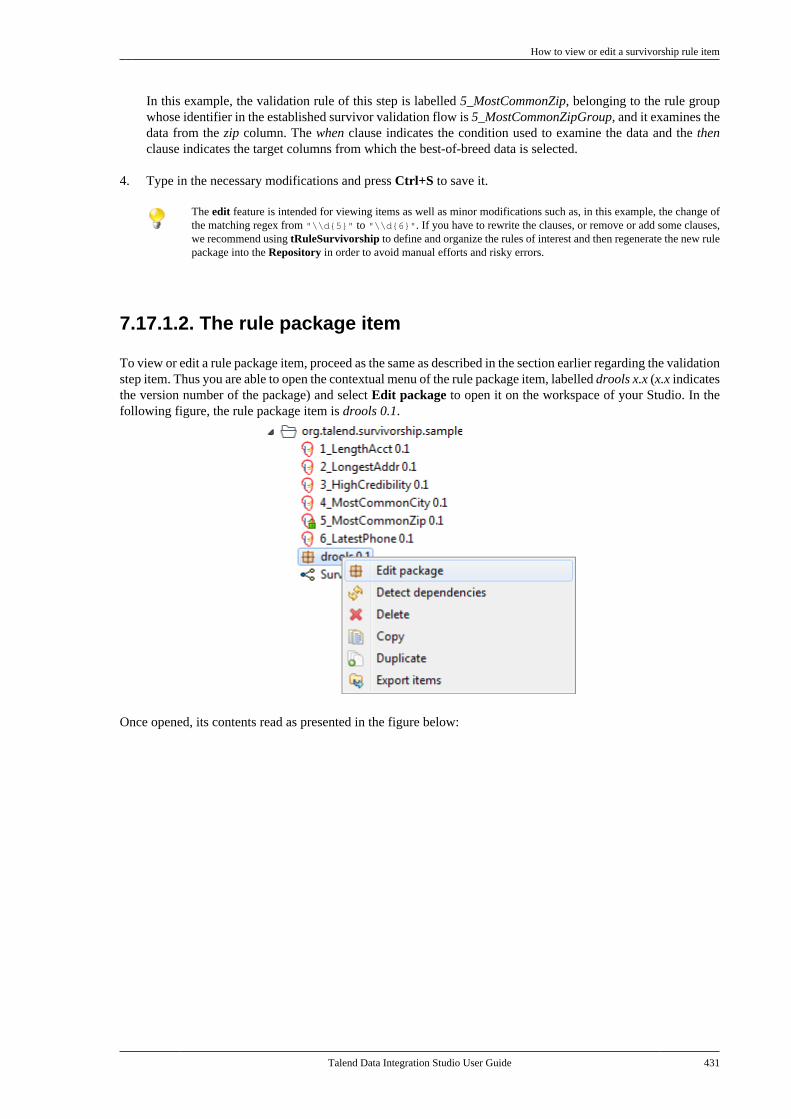
How to view or edit a survivorship rule item
Talend Data Integration Studio User Guide 431
In this example, the validation rule of this step is labelled 5_MostCommonZip, belonging to the rule groupwhose identifier in the established survivor validation flow is 5_MostCommonZipGroup, and it examines thedata from the zip column. The when clause indicates the condition used to examine the data and the thenclause indicates the target columns from which the best-of-breed data is selected.
4. Type in the necessary modifications and press Ctrl+S to save it.
The edit feature is intended for viewing items as well as minor modifications such as, in this example, the change ofthe matching regex from "\\d{5}" to "\\d{6}". If you have to rewrite the clauses, or remove or add some clauses,we recommend using tRuleSurvivorship to define and organize the rules of interest and then regenerate the new rulepackage into the Repository in order to avoid manual efforts and risky errors.
7.17.1.2. The rule package item
To view or edit a rule package item, proceed as the same as described in the section earlier regarding the validationstep item. Thus you are able to open the contextual menu of the rule package item, labelled drools x.x (x.x indicatesthe version number of the package) and select Edit package to open it on the workspace of your Studio. In thefollowing figure, the rule package item is drools 0.1.
Once opened, its contents read as presented in the figure below:
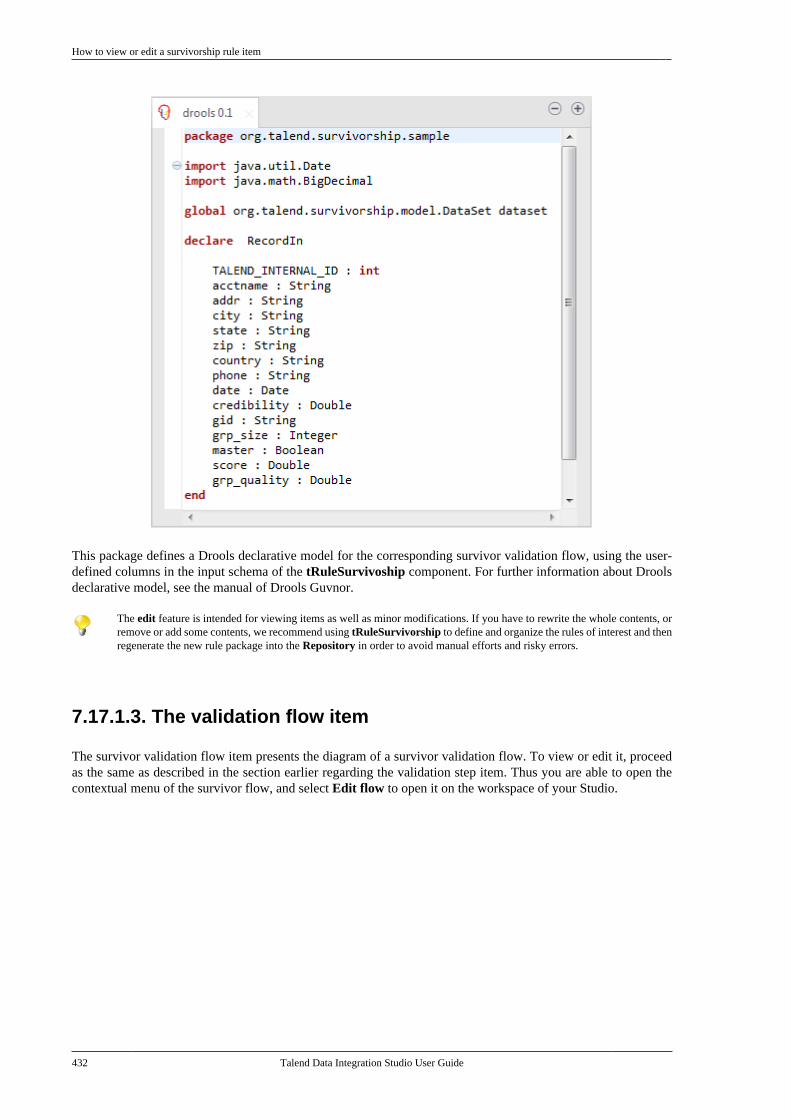
How to view or edit a survivorship rule item
432 Talend Data Integration Studio User Guide
This package defines a Drools declarative model for the corresponding survivor validation flow, using the user-defined columns in the input schema of the tRuleSurvivoship component. For further information about Droolsdeclarative model, see the manual of Drools Guvnor.
The edit feature is intended for viewing items as well as minor modifications. If you have to rewrite the whole contents, orremove or add some contents, we recommend using tRuleSurvivorship to define and organize the rules of interest and thenregenerate the new rule package into the Repository in order to avoid manual efforts and risky errors.
7.17.1.3. The validation flow item
The survivor validation flow item presents the diagram of a survivor validation flow. To view or edit it, proceedas the same as described in the section earlier regarding the validation step item. Thus you are able to open thecontextual menu of the survivor flow, and select Edit flow to open it on the workspace of your Studio.
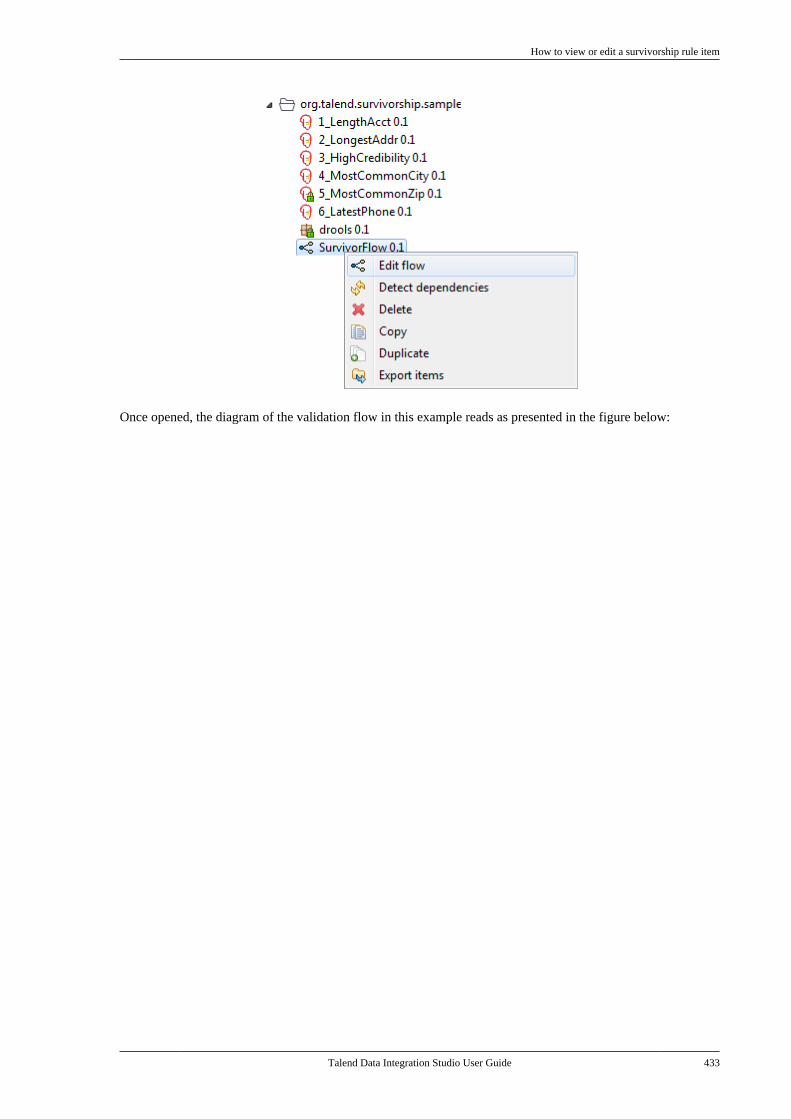
How to view or edit a survivorship rule item
Talend Data Integration Studio User Guide 433
Once opened, the diagram of the validation flow in this example reads as presented in the figure below:
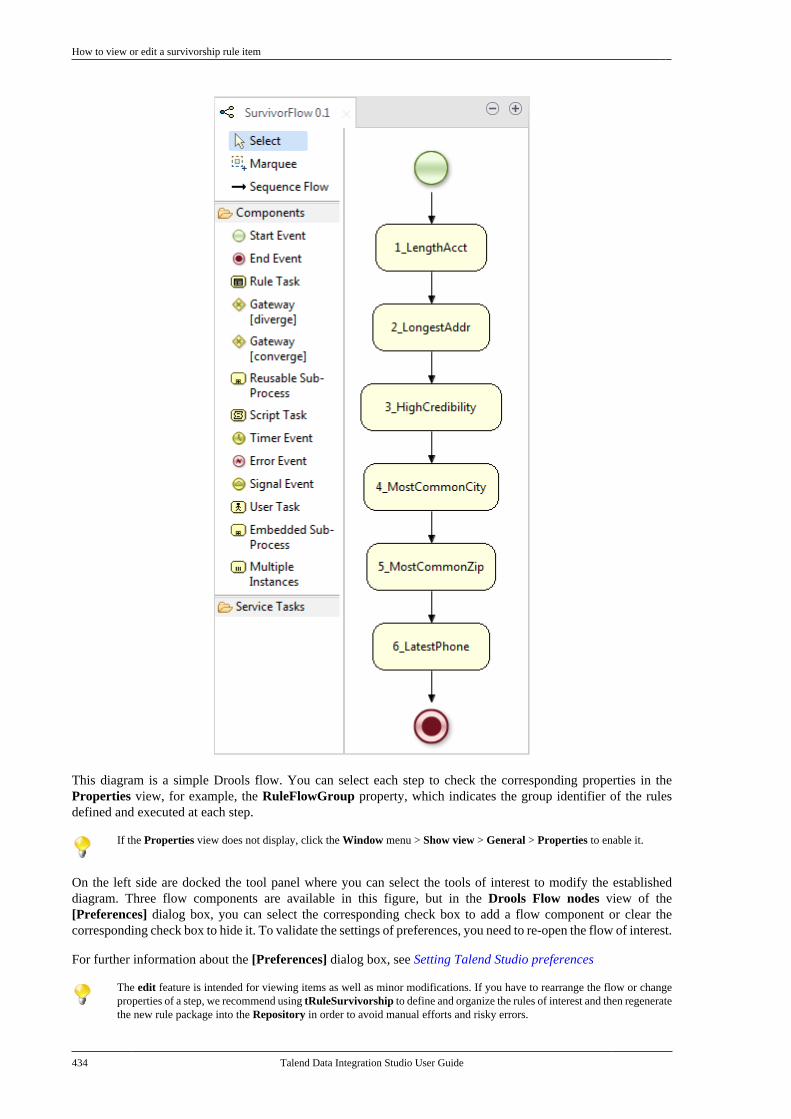
How to view or edit a survivorship rule item
434 Talend Data Integration Studio User Guide
This diagram is a simple Drools flow. You can select each step to check the corresponding properties in theProperties view, for example, the RuleFlowGroup property, which indicates the group identifier of the rulesdefined and executed at each step.
If the Properties view does not display, click the Window menu > Show view > General > Properties to enable it.
On the left side are docked the tool panel where you can select the tools of interest to modify the establisheddiagram. Three flow components are available in this figure, but in the Drools Flow nodes view of the[Preferences] dialog box, you can select the corresponding check box to add a flow component or clear thecorresponding check box to hide it. To validate the settings of preferences, you need to re-open the flow of interest.
For further information about the [Preferences] dialog box, see Setting Talend Studio preferences
The edit feature is intended for viewing items as well as minor modifications. If you have to rearrange the flow or changeproperties of a step, we recommend using tRuleSurvivorship to define and organize the rules of interest and then regeneratethe new rule package into the Repository in order to avoid manual efforts and risky errors.
Centralizing BRMS (Drools Guvnor) metadata
Talend Data Integration Studio User Guide 435
For further information about a Drools flow and its editing tools, see the relative Drools manuals.
7.18. Centralizing BRMS (Drools Guvnor)metadataTalend Studio enables you to save connection details to a Drools Guvnor repository library under the Metadatafolder in the Repository tree view. The BRMS connection wizard leads you through the connection steps andallows you to browse the library for Business Rules which are saved along with the connection metadata and dulytransformed into a form in which they can easily be used in Jobs.
Defining the general properties
This step describes how to launch the BRMS wizard and then set the connection metadata such the Name, Purposeand Description.
1. In the Repository tree view, expand the Metadata node and the Rules Management node.
2. Right-click BRMS, and select Create BRMS from the pop-up menu.
The BRMS wizard opens:
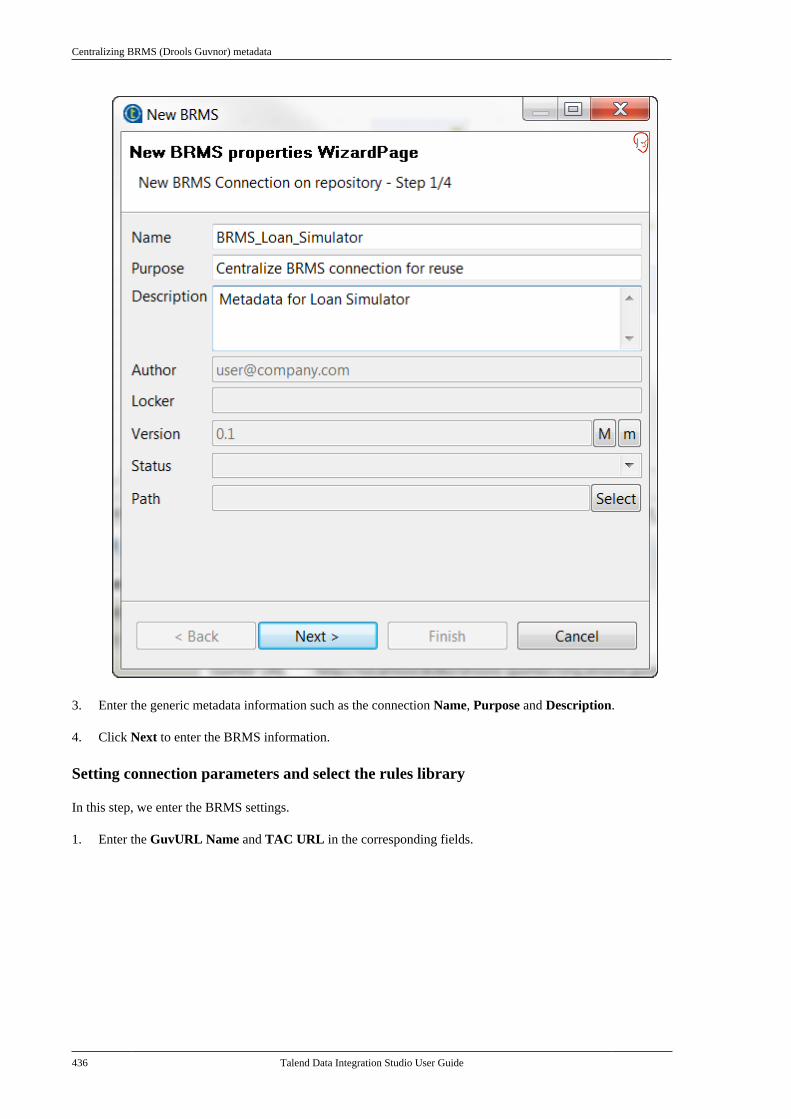
Centralizing BRMS (Drools Guvnor) metadata
436 Talend Data Integration Studio User Guide
3. Enter the generic metadata information such as the connection Name, Purpose and Description.
4. Click Next to enter the BRMS information.
Setting connection parameters and select the rules library
In this step, we enter the BRMS settings.
1. Enter the GuvURL Name and TAC URL in the corresponding fields.
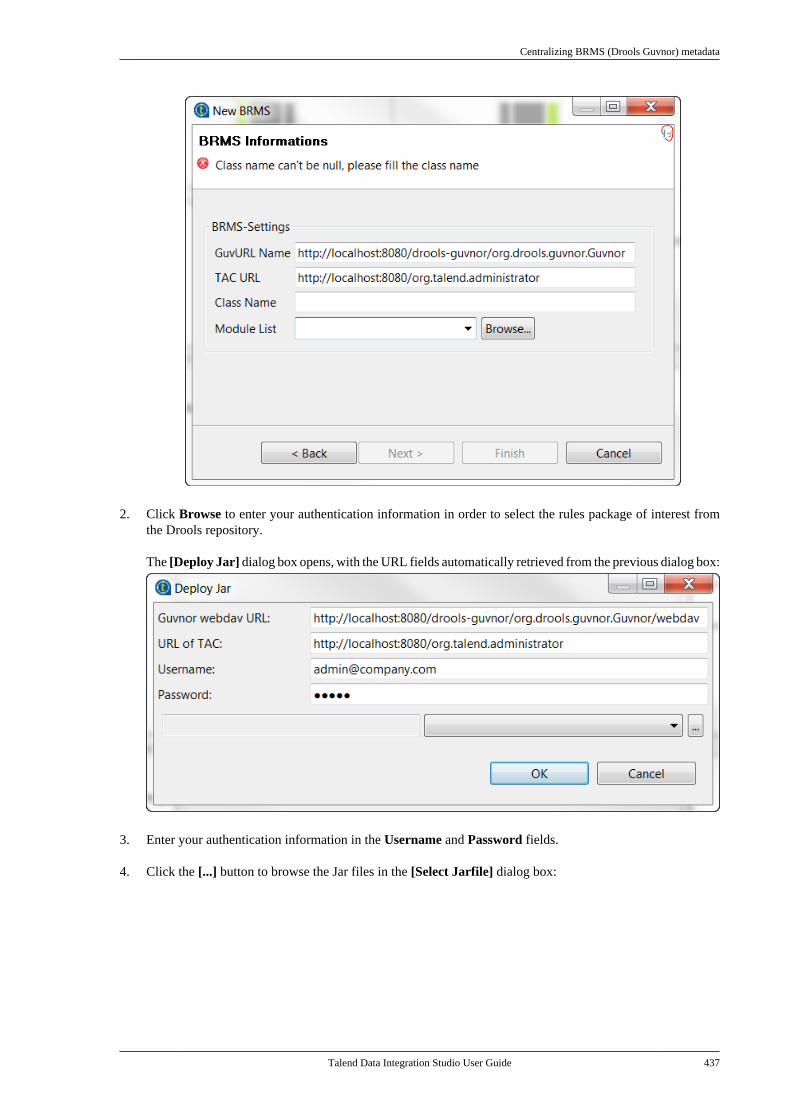
Centralizing BRMS (Drools Guvnor) metadata
Talend Data Integration Studio User Guide 437
2. Click Browse to enter your authentication information in order to select the rules package of interest fromthe Drools repository.
The [Deploy Jar] dialog box opens, with the URL fields automatically retrieved from the previous dialog box:
3. Enter your authentication information in the Username and Password fields.
4. Click the [...] button to browse the Jar files in the [Select Jarfile] dialog box:
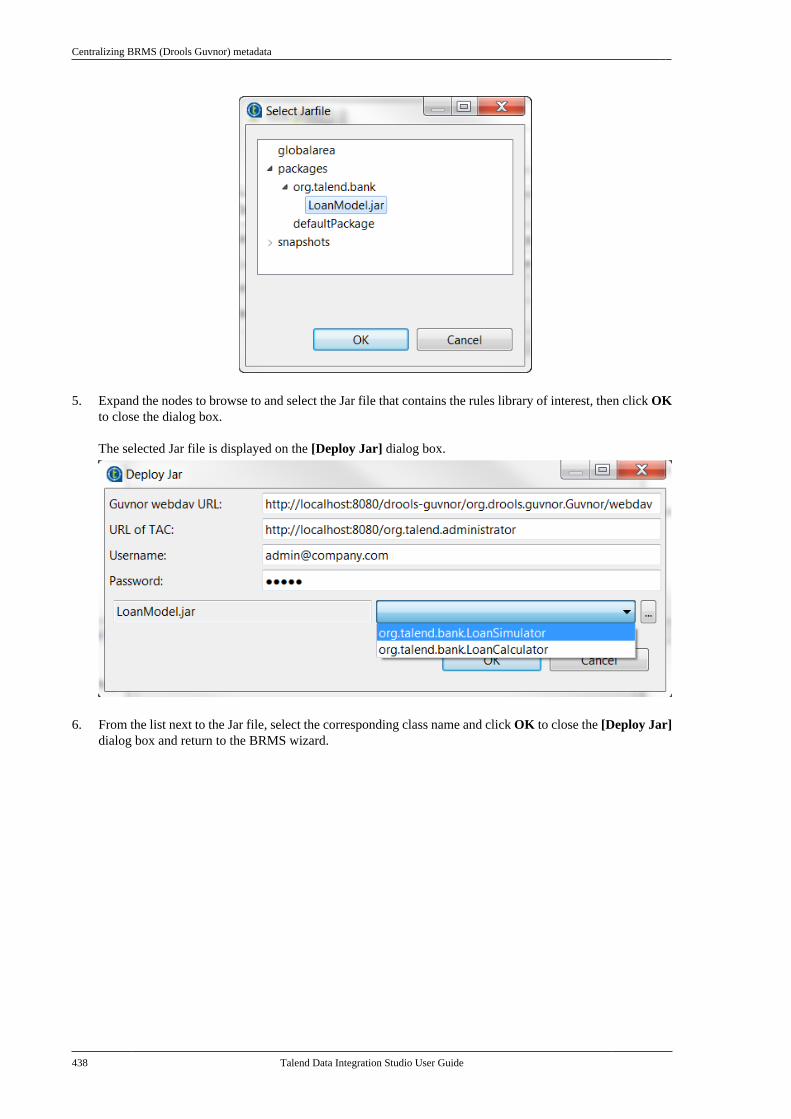
Centralizing BRMS (Drools Guvnor) metadata
438 Talend Data Integration Studio User Guide
5. Expand the nodes to browse to and select the Jar file that contains the rules library of interest, then click OKto close the dialog box.
The selected Jar file is displayed on the [Deploy Jar] dialog box.
6. From the list next to the Jar file, select the corresponding class name and click OK to close the [Deploy Jar]dialog box and return to the BRMS wizard.
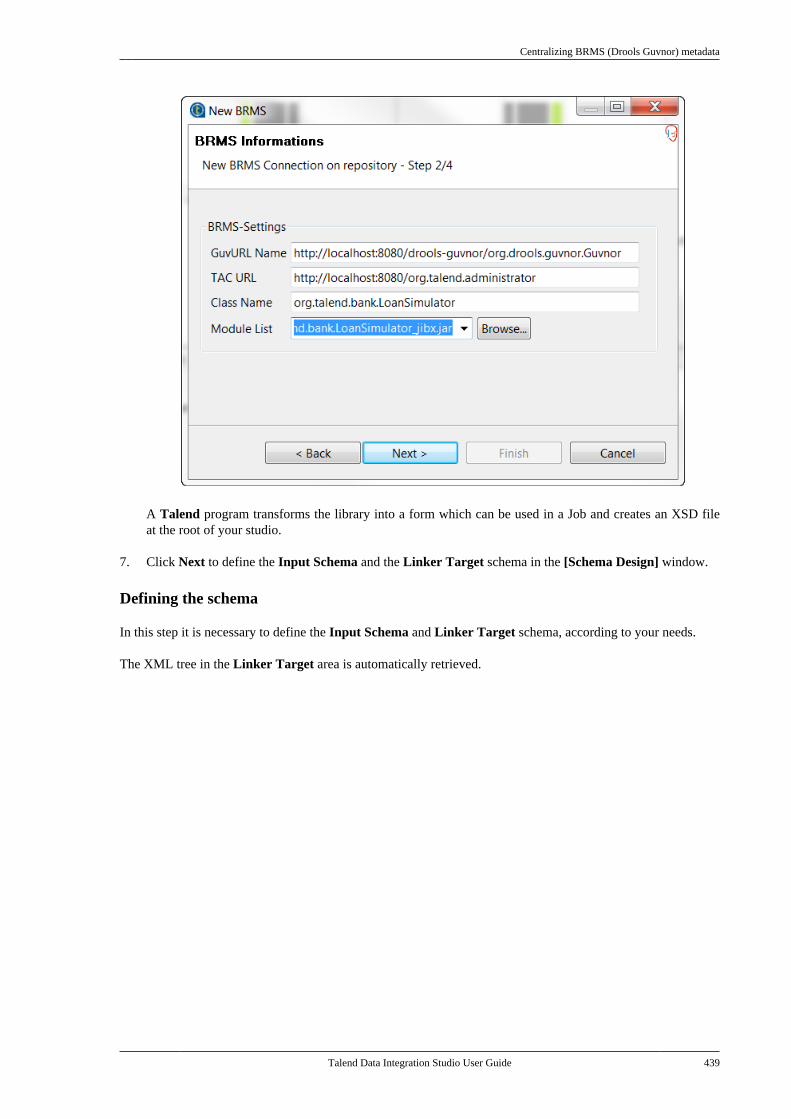
Centralizing BRMS (Drools Guvnor) metadata
Talend Data Integration Studio User Guide 439
A Talend program transforms the library into a form which can be used in a Job and creates an XSD fileat the root of your studio.
7. Click Next to define the Input Schema and the Linker Target schema in the [Schema Design] window.
Defining the schema
In this step it is necessary to define the Input Schema and Linker Target schema, according to your needs.
The XML tree in the Linker Target area is automatically retrieved.
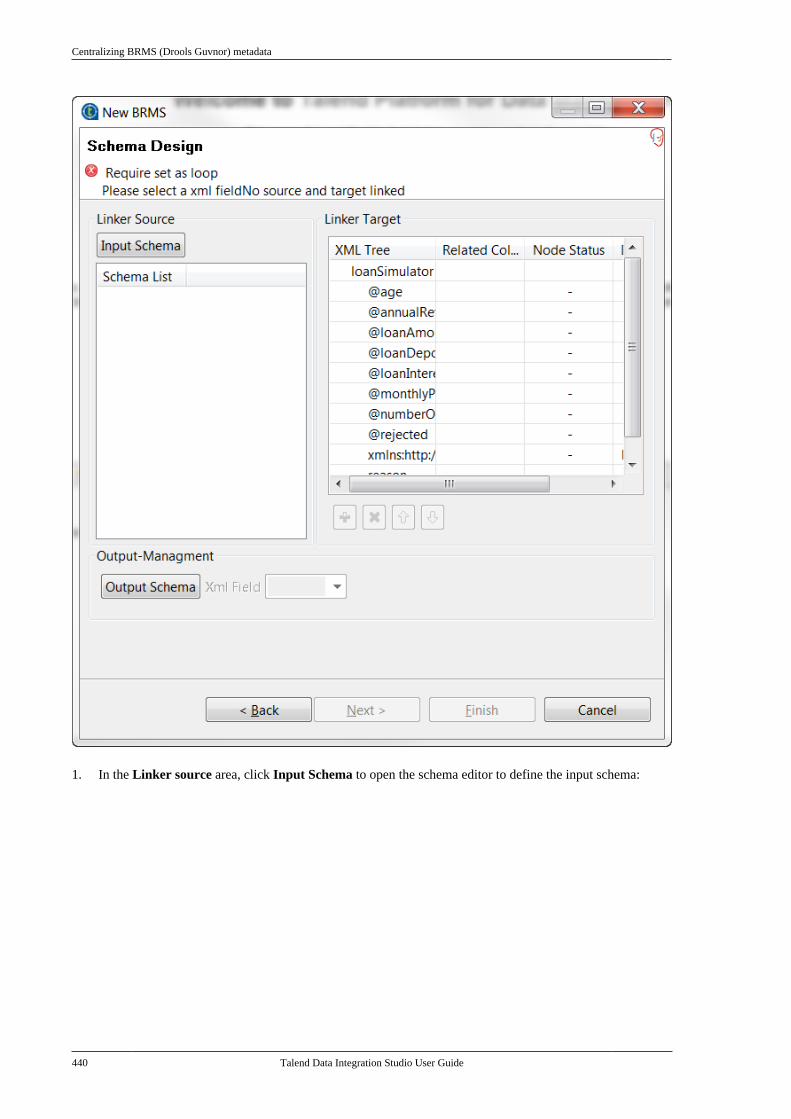
Centralizing BRMS (Drools Guvnor) metadata
440 Talend Data Integration Studio User Guide
1. In the Linker source area, click Input Schema to open the schema editor to define the input schema:
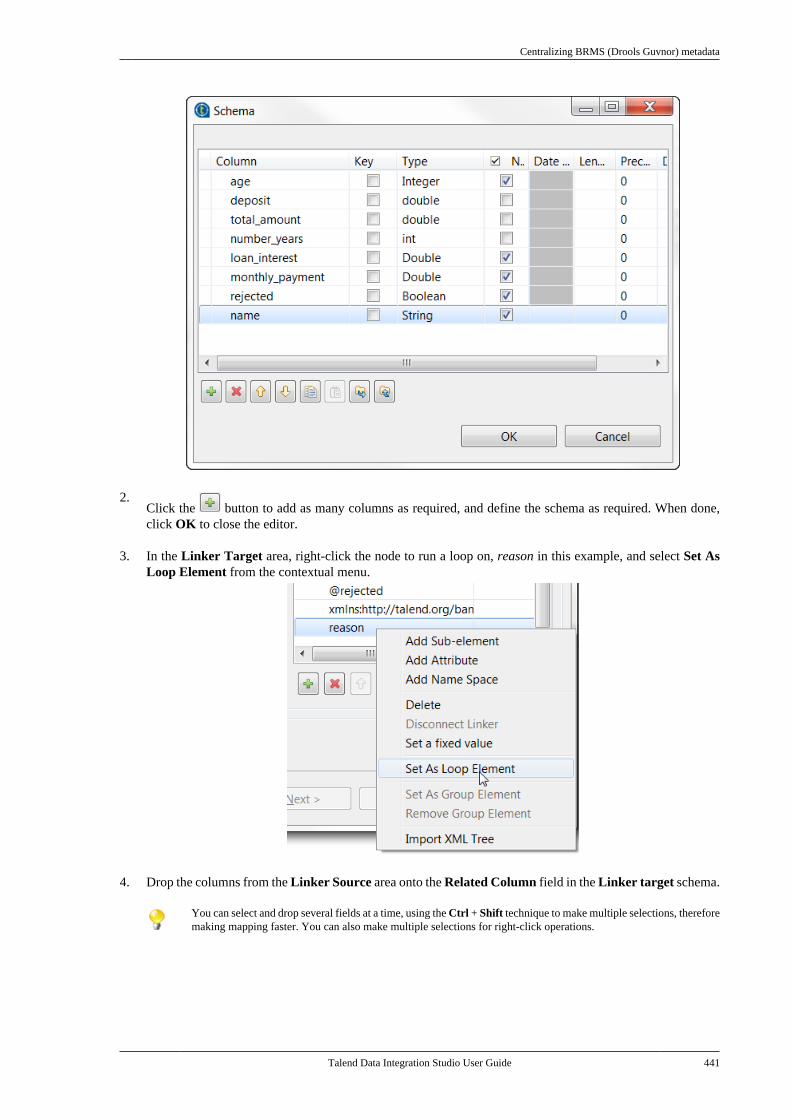
Centralizing BRMS (Drools Guvnor) metadata
Talend Data Integration Studio User Guide 441
2.Click the button to add as many columns as required, and define the schema as required. When done,click OK to close the editor.
3. In the Linker Target area, right-click the node to run a loop on, reason in this example, and select Set AsLoop Element from the contextual menu.
4. Drop the columns from the Linker Source area onto the Related Column field in the Linker target schema.
You can select and drop several fields at a time, using the Ctrl + Shift technique to make multiple selections, thereforemaking mapping faster. You can also make multiple selections for right-click operations.
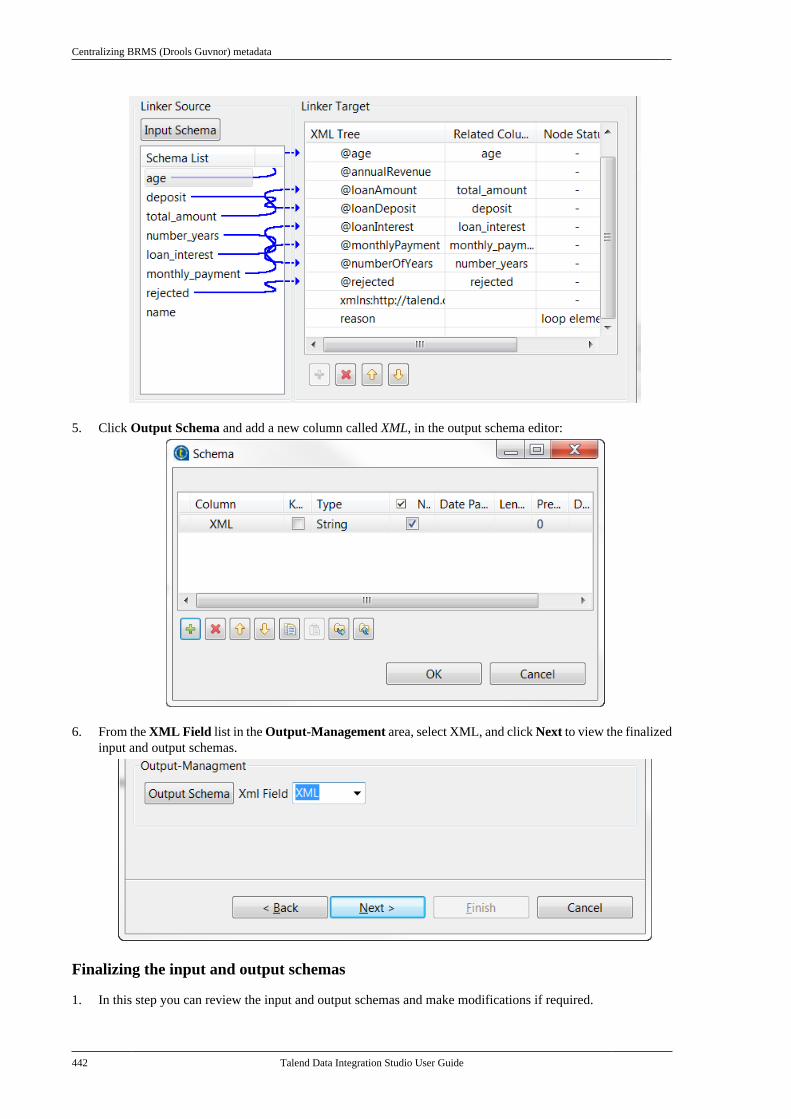
Centralizing BRMS (Drools Guvnor) metadata
442 Talend Data Integration Studio User Guide
5. Click Output Schema and add a new column called XML, in the output schema editor:
6. From the XML Field list in the Output-Management area, select XML, and click Next to view the finalizedinput and output schemas.
Finalizing the input and output schemas
1. In this step you can review the input and output schemas and make modifications if required.
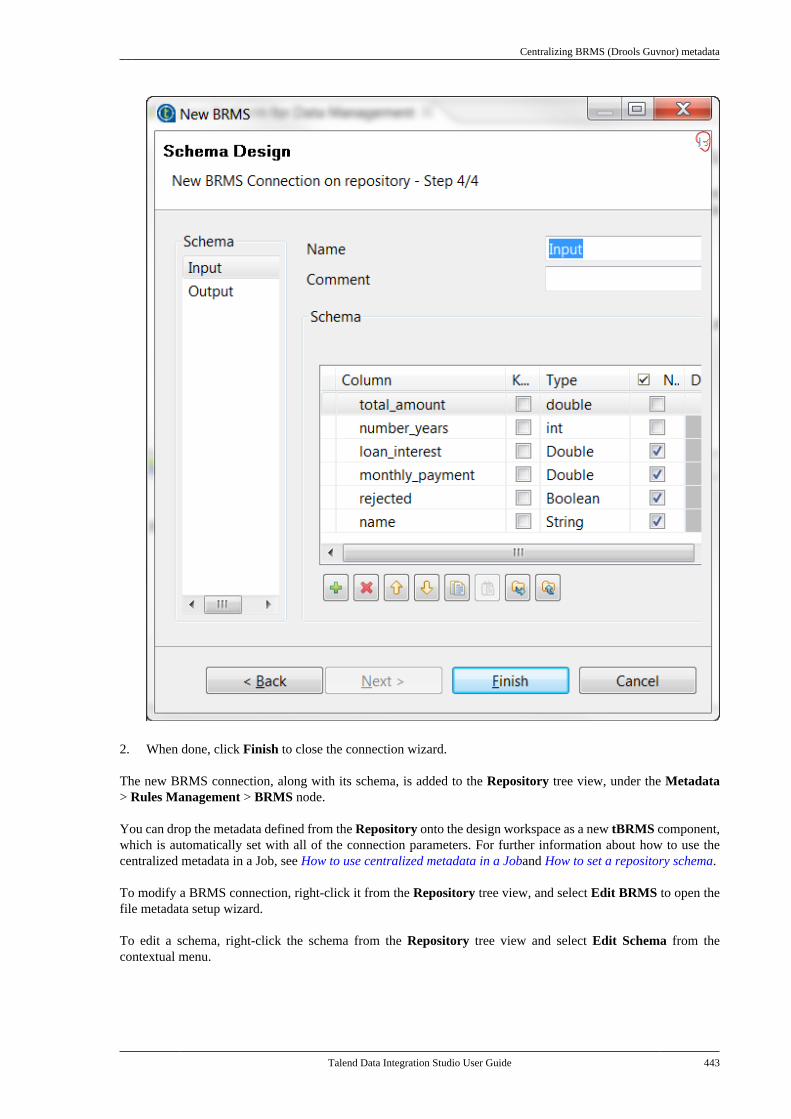
Centralizing BRMS (Drools Guvnor) metadata
Talend Data Integration Studio User Guide 443
2. When done, click Finish to close the connection wizard.
The new BRMS connection, along with its schema, is added to the Repository tree view, under the Metadata> Rules Management > BRMS node.
You can drop the metadata defined from the Repository onto the design workspace as a new tBRMS component,which is automatically set with all of the connection parameters. For further information about how to use thecentralized metadata in a Job, see How to use centralized metadata in a Joband How to set a repository schema.
To modify a BRMS connection, right-click it from the Repository tree view, and select Edit BRMS to open thefile metadata setup wizard.
To edit a schema, right-click the schema from the Repository tree view and select Edit Schema from thecontextual menu.

Centralizing Embedded Rules (Drools)
444 Talend Data Integration Studio User Guide
7.19. Centralizing Embedded Rules (Drools)Talend Studio provides the basis for storing and managing business rules through the integration of the DroolsBusiness Rule Management System (BRMS). It supports the dynamic addition and removal of business ruleswhich you can later execute in defined Jobs.
Drools Guvnor, a web based business rules governance system, has been integrated in Talend Studio. With Drools Guvnor,non-technical users can quickly and easily create and modify complex business logic directly, via the Guvnor interface. Formore information, see Talend Administration Center User Guide.
Through the Rules folder in the Metadata node of the Repository tree view, you can create your own personalizedrules or access a file that holds predefined rules. Then you can use the tRule component to apply the encodedrules in one or more of your job designs.
For more information about using rules with the tRules component, see Talend Components Reference Guide.
To start setting up an embedded rule, do the following:
Defining the general properties
1. In the Repository tree view, expand the Metadata node and the Rules Management node.
2. Right-click the Embedded Rules folder.
3. In the contextual menu, select Create Rules to display the [New Rule...] wizard that will guide you throughthe steps of creating or selecting the business rules you want to use.
The Embedded Rules files are either Drools or Excel files of .drl or .xls formats, respectively.
4. In the [New Rule...] wizard, fill in schema generic information, such as Name and Description and clickNext to open a new view on the wizard.
For further information, see Setting up a database connection.
Uploading or creating a file
Through the [New Rule...] wizard, you can either:
• create a rule file of Drools format in which you can store the newly created rules, or
• connect to an existing rule file of Drools or Excel format.
When you connect to an Excel file, make sure that all occurrences of project and job names on top of the file correspond tothe project you launch the Studio on and to the Job you want to use the rules in.
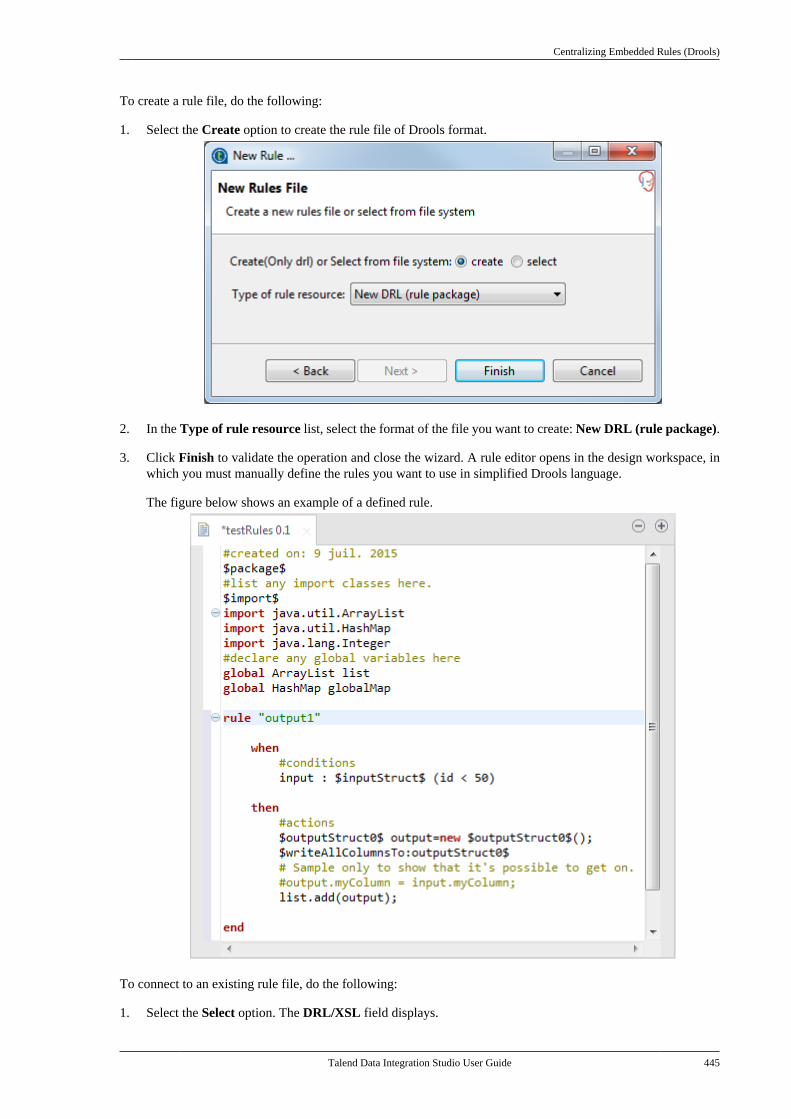
Centralizing Embedded Rules (Drools)
Talend Data Integration Studio User Guide 445
To create a rule file, do the following:
1. Select the Create option to create the rule file of Drools format.
2. In the Type of rule resource list, select the format of the file you want to create: New DRL (rule package).
3. Click Finish to validate the operation and close the wizard. A rule editor opens in the design workspace, inwhich you must manually define the rules you want to use in simplified Drools language.
The figure below shows an example of a defined rule.
To connect to an existing rule file, do the following:
1. Select the Select option. The DRL/XSL field displays.
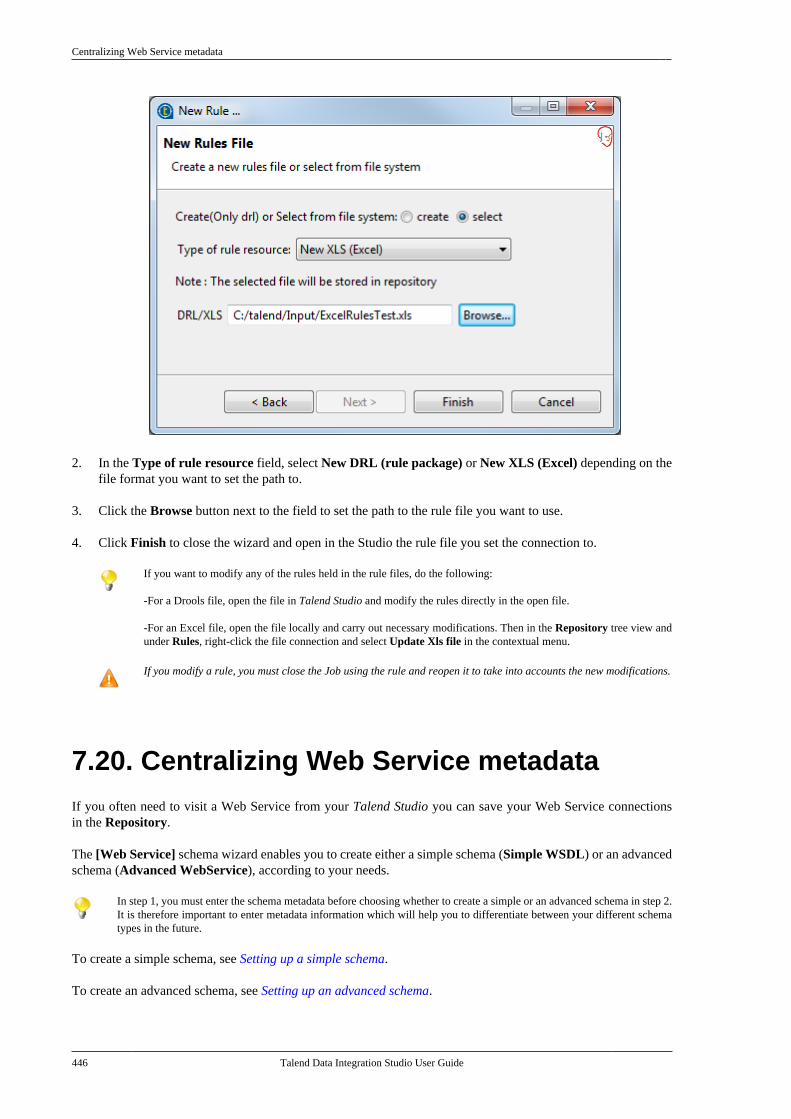
Centralizing Web Service metadata
446 Talend Data Integration Studio User Guide
2. In the Type of rule resource field, select New DRL (rule package) or New XLS (Excel) depending on thefile format you want to set the path to.
3. Click the Browse button next to the field to set the path to the rule file you want to use.
4. Click Finish to close the wizard and open in the Studio the rule file you set the connection to.
If you want to modify any of the rules held in the rule files, do the following:
-For a Drools file, open the file in Talend Studio and modify the rules directly in the open file.
-For an Excel file, open the file locally and carry out necessary modifications. Then in the Repository tree view andunder Rules, right-click the file connection and select Update Xls file in the contextual menu.
If you modify a rule, you must close the Job using the rule and reopen it to take into accounts the new modifications.
7.20. Centralizing Web Service metadataIf you often need to visit a Web Service from your Talend Studio you can save your Web Service connectionsin the Repository.
The [Web Service] schema wizard enables you to create either a simple schema (Simple WSDL) or an advancedschema (Advanced WebService), according to your needs.
In step 1, you must enter the schema metadata before choosing whether to create a simple or an advanced schema in step 2.It is therefore important to enter metadata information which will help you to differentiate between your different schematypes in the future.
To create a simple schema, see Setting up a simple schema.
To create an advanced schema, see Setting up an advanced schema.
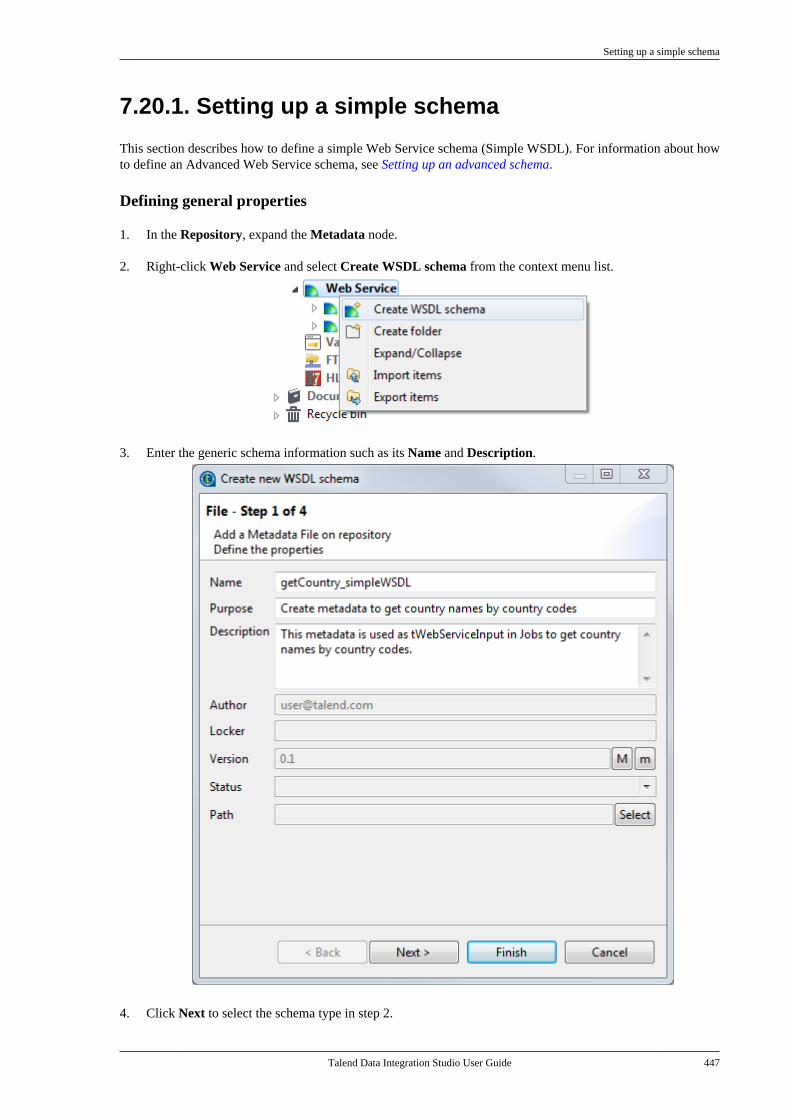
Setting up a simple schema
Talend Data Integration Studio User Guide 447
7.20.1. Setting up a simple schema
This section describes how to define a simple Web Service schema (Simple WSDL). For information about howto define an Advanced Web Service schema, see Setting up an advanced schema.
Defining general properties
1. In the Repository, expand the Metadata node.
2. Right-click Web Service and select Create WSDL schema from the context menu list.
3. Enter the generic schema information such as its Name and Description.
4. Click Next to select the schema type in step 2.
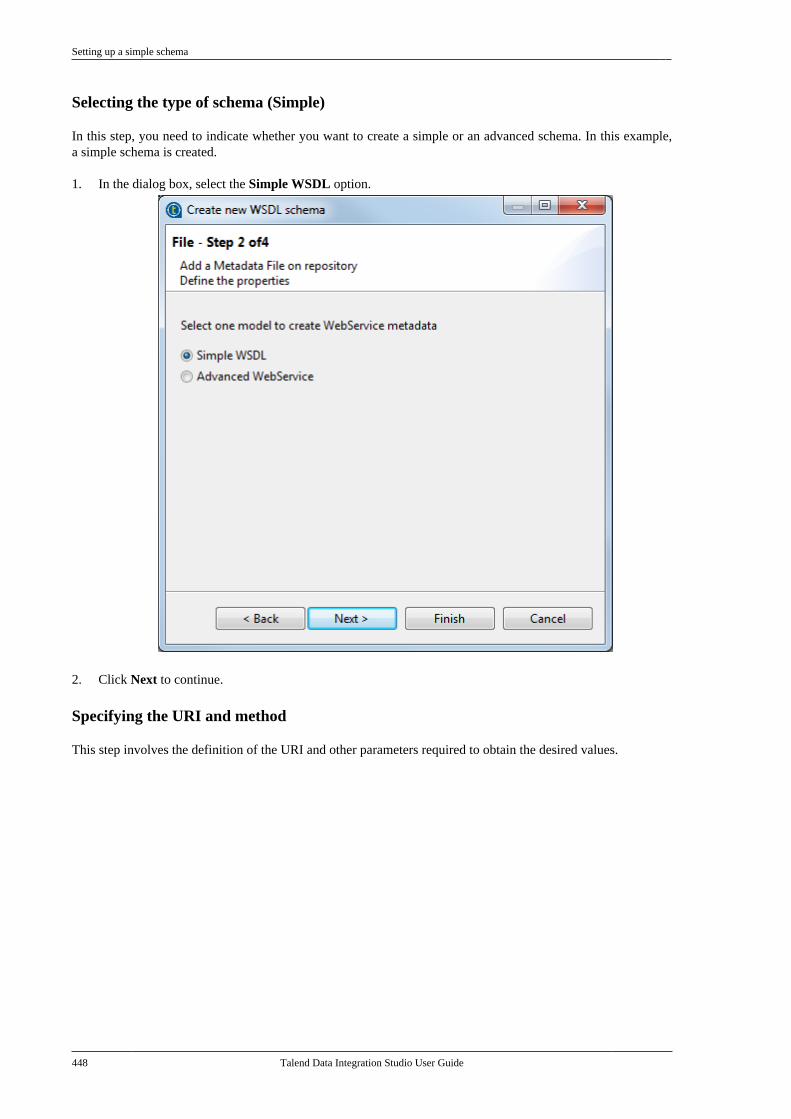
Setting up a simple schema
448 Talend Data Integration Studio User Guide
Selecting the type of schema (Simple)
In this step, you need to indicate whether you want to create a simple or an advanced schema. In this example,a simple schema is created.
1. In the dialog box, select the Simple WSDL option.
2. Click Next to continue.
Specifying the URI and method
This step involves the definition of the URI and other parameters required to obtain the desired values.
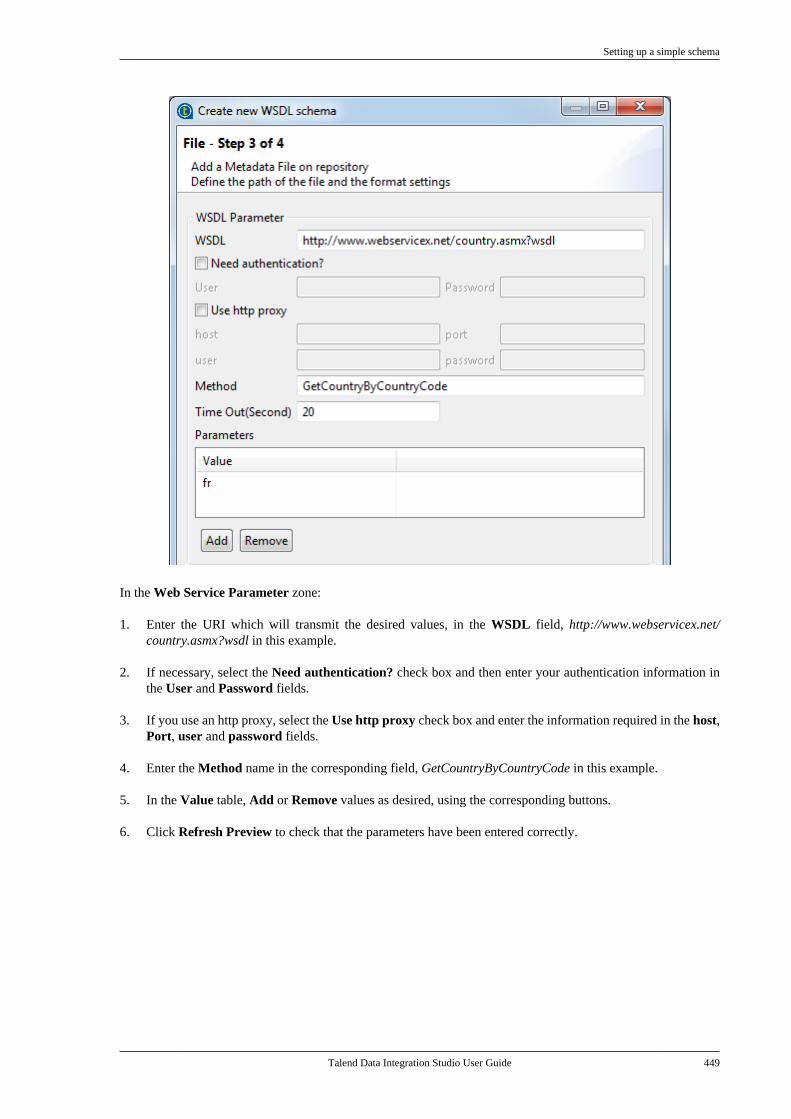
Setting up a simple schema
Talend Data Integration Studio User Guide 449
In the Web Service Parameter zone:
1. Enter the URI which will transmit the desired values, in the WSDL field, http://www.webservicex.net/country.asmx?wsdl in this example.
2. If necessary, select the Need authentication? check box and then enter your authentication information inthe User and Password fields.
3. If you use an http proxy, select the Use http proxy check box and enter the information required in the host,Port, user and password fields.
4. Enter the Method name in the corresponding field, GetCountryByCountryCode in this example.
5. In the Value table, Add or Remove values as desired, using the corresponding buttons.
6. Click Refresh Preview to check that the parameters have been entered correctly.
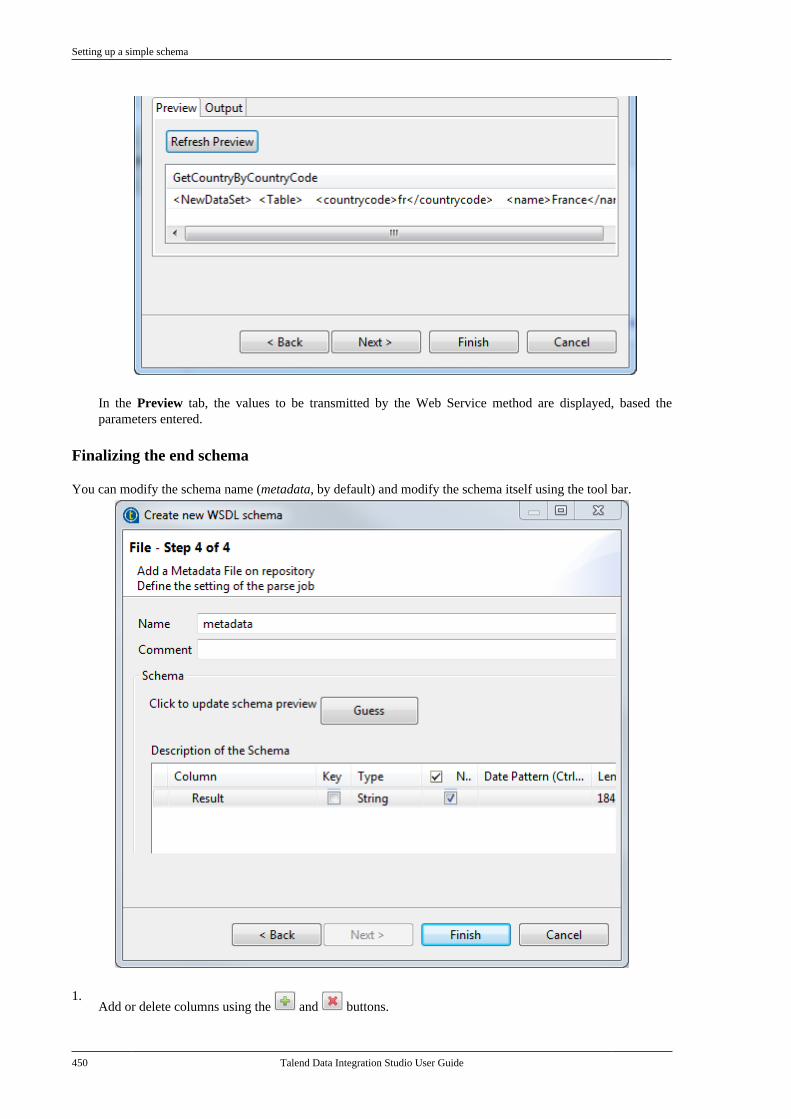
Setting up a simple schema
450 Talend Data Integration Studio User Guide
In the Preview tab, the values to be transmitted by the Web Service method are displayed, based theparameters entered.
Finalizing the end schema
You can modify the schema name (metadata, by default) and modify the schema itself using the tool bar.
1.Add or delete columns using the and buttons.
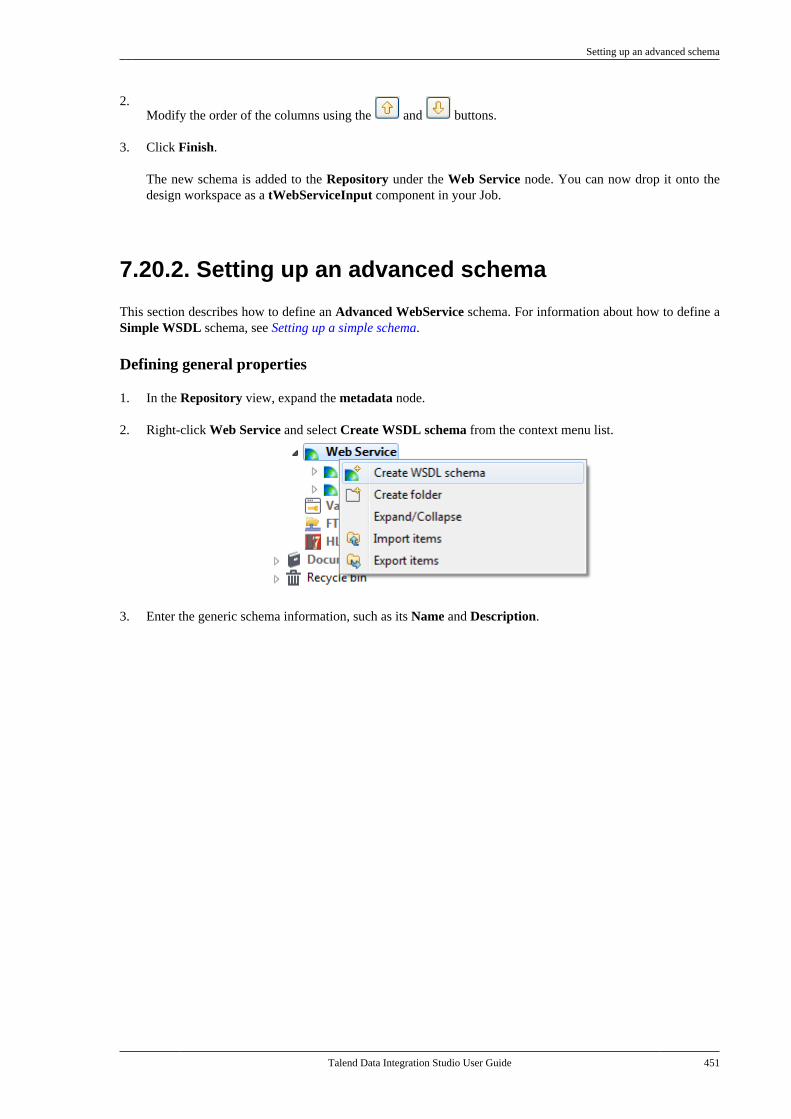
Setting up an advanced schema
Talend Data Integration Studio User Guide 451
2.Modify the order of the columns using the and buttons.
3. Click Finish.
The new schema is added to the Repository under the Web Service node. You can now drop it onto thedesign workspace as a tWebServiceInput component in your Job.
7.20.2. Setting up an advanced schema
This section describes how to define an Advanced WebService schema. For information about how to define aSimple WSDL schema, see Setting up a simple schema.
Defining general properties
1. In the Repository view, expand the metadata node.
2. Right-click Web Service and select Create WSDL schema from the context menu list.
3. Enter the generic schema information, such as its Name and Description.
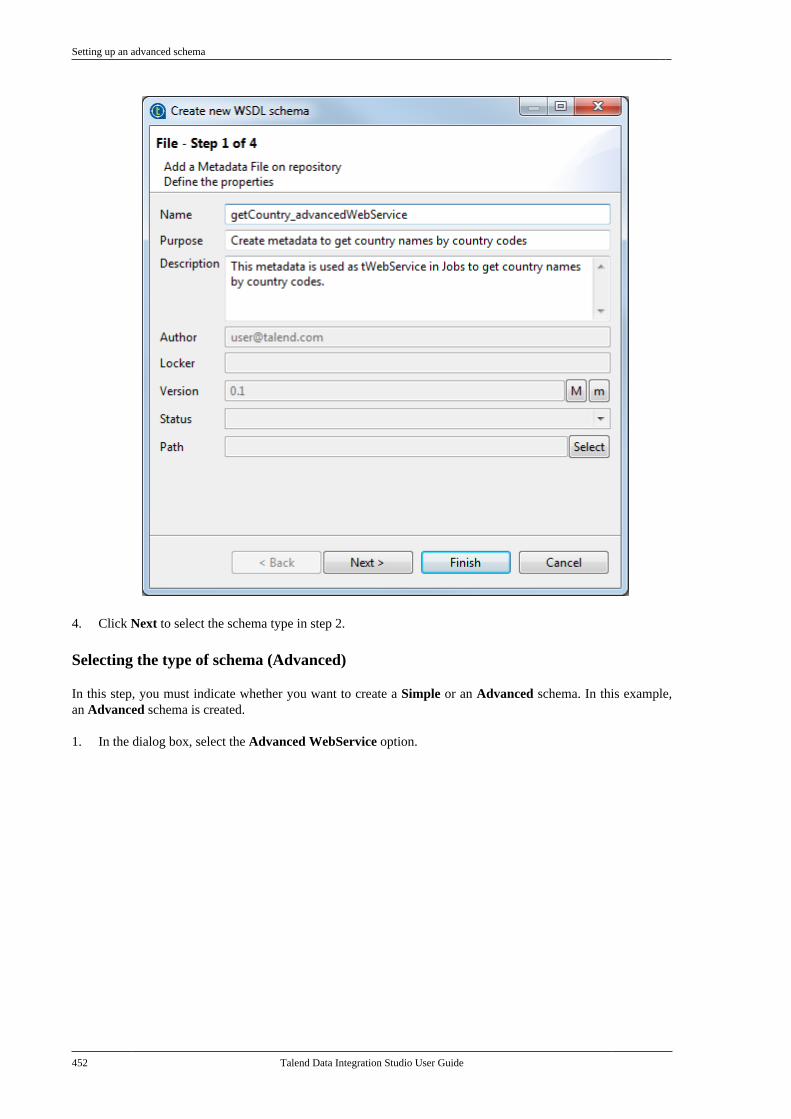
Setting up an advanced schema
452 Talend Data Integration Studio User Guide
4. Click Next to select the schema type in step 2.
Selecting the type of schema (Advanced)
In this step, you must indicate whether you want to create a Simple or an Advanced schema. In this example,an Advanced schema is created.
1. In the dialog box, select the Advanced WebService option.
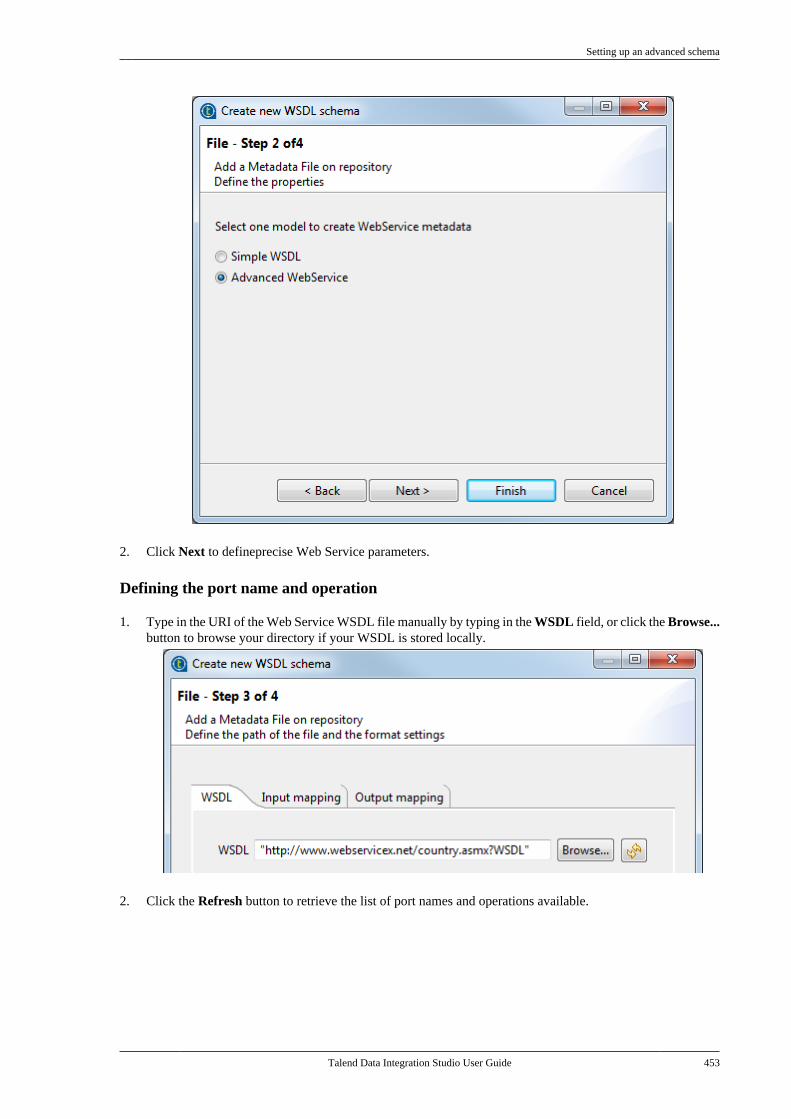
Setting up an advanced schema
Talend Data Integration Studio User Guide 453
2. Click Next to defineprecise Web Service parameters.
Defining the port name and operation
1. Type in the URI of the Web Service WSDL file manually by typing in the WSDL field, or click the Browse...button to browse your directory if your WSDL is stored locally.
2. Click the Refresh button to retrieve the list of port names and operations available.
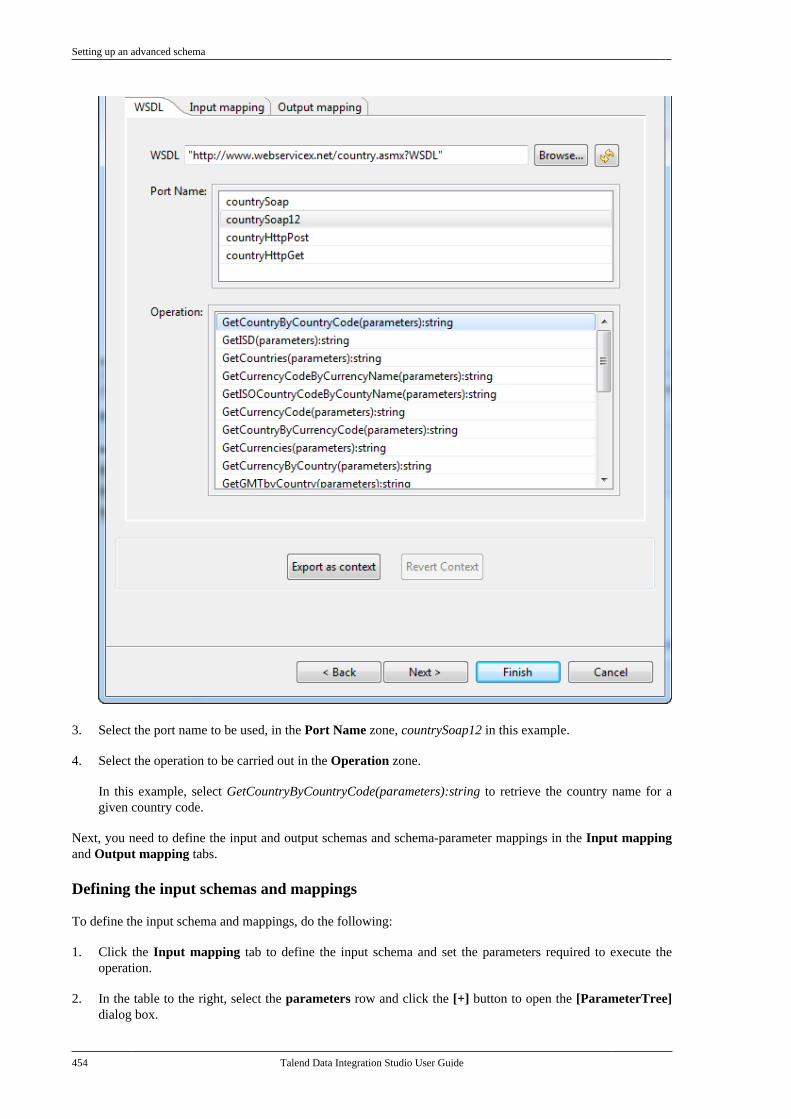
Setting up an advanced schema
454 Talend Data Integration Studio User Guide
3. Select the port name to be used, in the Port Name zone, countrySoap12 in this example.
4. Select the operation to be carried out in the Operation zone.
In this example, select GetCountryByCountryCode(parameters):string to retrieve the country name for agiven country code.
Next, you need to define the input and output schemas and schema-parameter mappings in the Input mappingand Output mapping tabs.
Defining the input schemas and mappings
To define the input schema and mappings, do the following:
1. Click the Input mapping tab to define the input schema and set the parameters required to execute theoperation.
2. In the table to the right, select the parameters row and click the [+] button to open the [ParameterTree]dialog box.
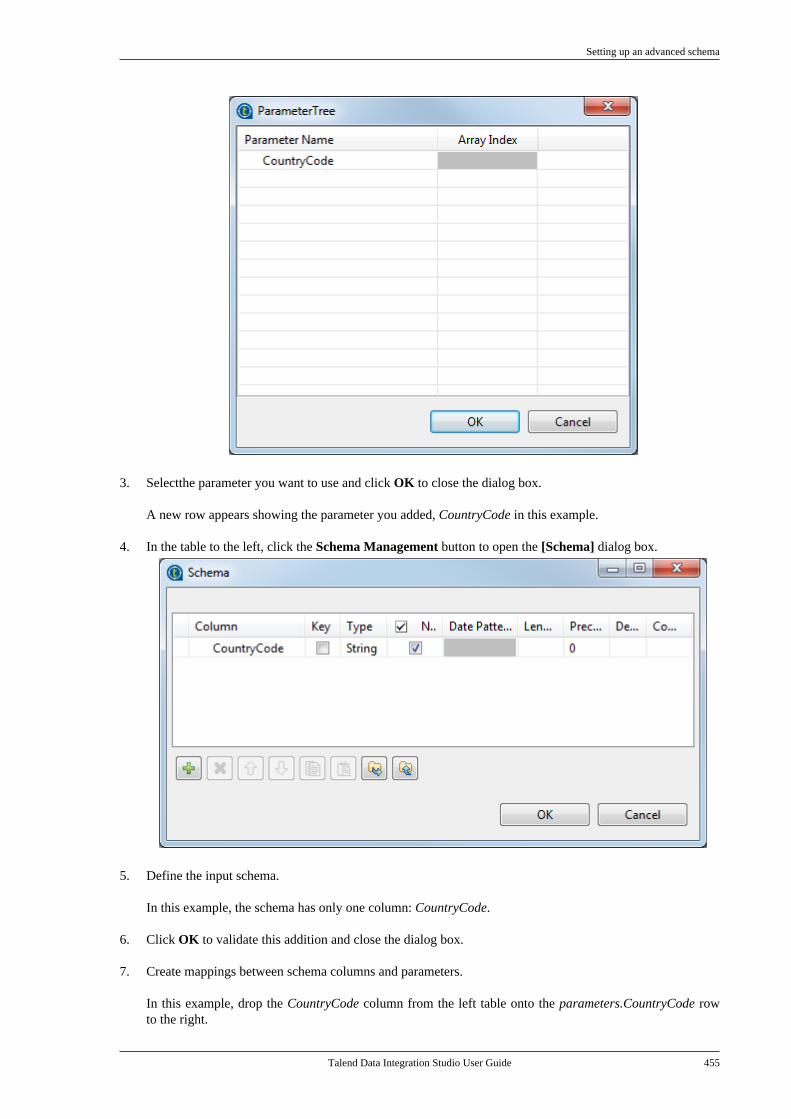
Setting up an advanced schema
Talend Data Integration Studio User Guide 455
3. Selectthe parameter you want to use and click OK to close the dialog box.
A new row appears showing the parameter you added, CountryCode in this example.
4. In the table to the left, click the Schema Management button to open the [Schema] dialog box.
5. Define the input schema.
In this example, the schema has only one column: CountryCode.
6. Click OK to validate this addition and close the dialog box.
7. Create mappings between schema columns and parameters.
In this example, drop the CountryCode column from the left table onto the parameters.CountryCode rowto the right.
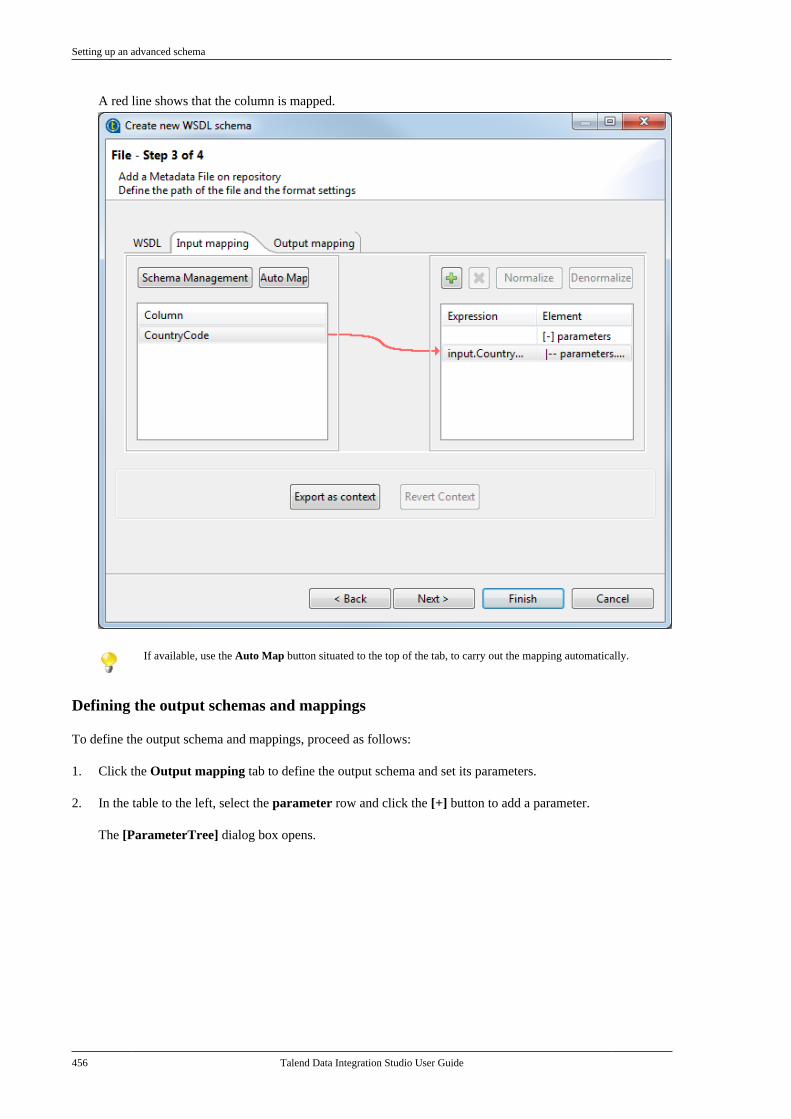
Setting up an advanced schema
456 Talend Data Integration Studio User Guide
A red line shows that the column is mapped.
If available, use the Auto Map button situated to the top of the tab, to carry out the mapping automatically.
Defining the output schemas and mappings
To define the output schema and mappings, proceed as follows:
1. Click the Output mapping tab to define the output schema and set its parameters.
2. In the table to the left, select the parameter row and click the [+] button to add a parameter.
The [ParameterTree] dialog box opens.
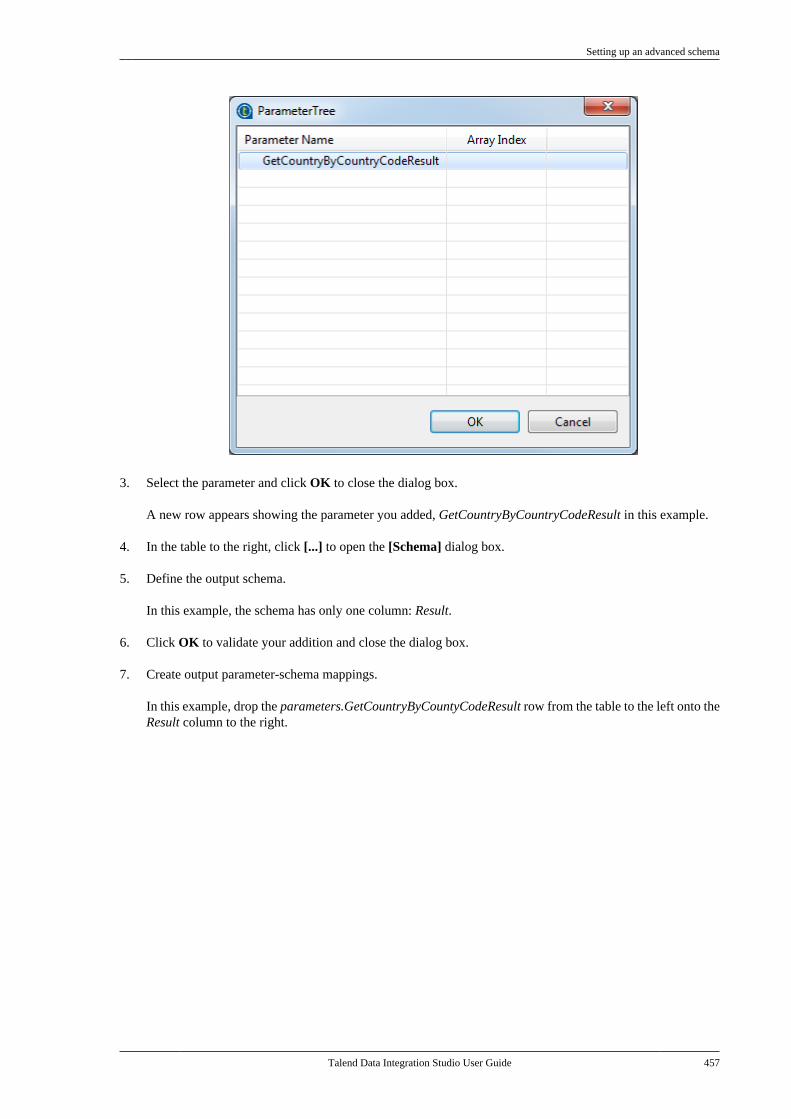
Setting up an advanced schema
Talend Data Integration Studio User Guide 457
3. Select the parameter and click OK to close the dialog box.
A new row appears showing the parameter you added, GetCountryByCountryCodeResult in this example.
4. In the table to the right, click [...] to open the [Schema] dialog box.
5. Define the output schema.
In this example, the schema has only one column: Result.
6. Click OK to validate your addition and close the dialog box.
7. Create output parameter-schema mappings.
In this example, drop the parameters.GetCountryByCountyCodeResult row from the table to the left onto theResult column to the right.
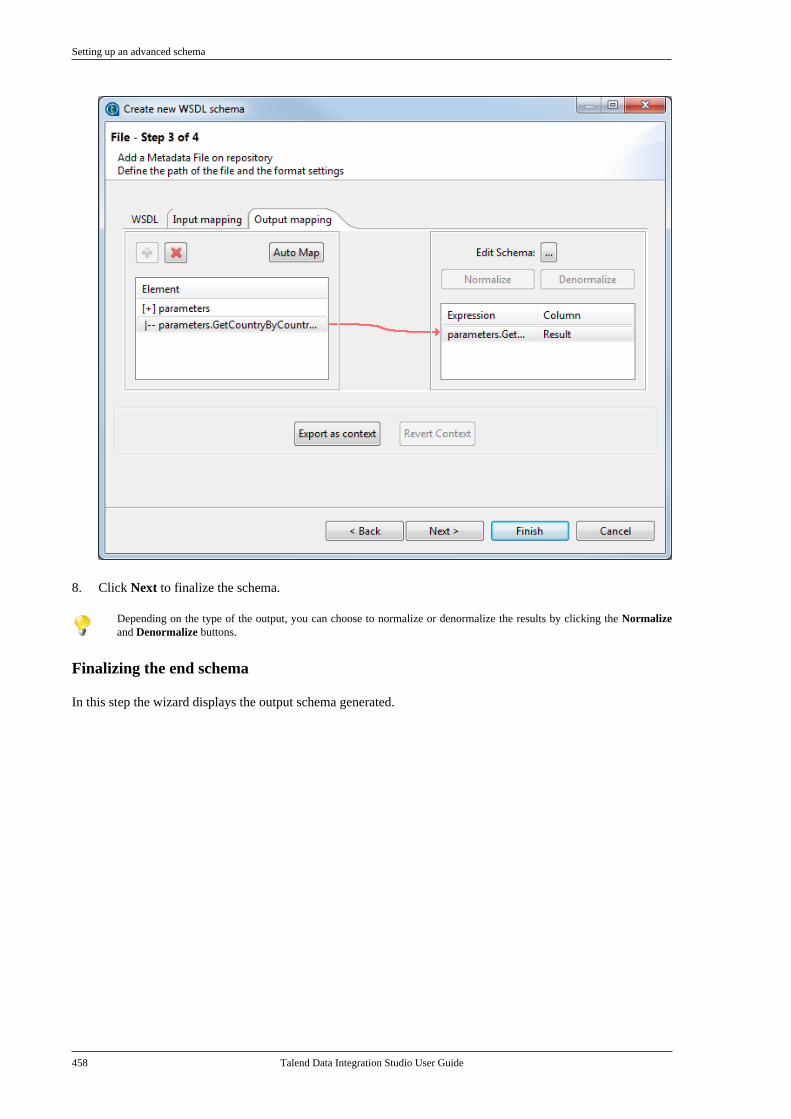
Setting up an advanced schema
458 Talend Data Integration Studio User Guide
8. Click Next to finalize the schema.
Depending on the type of the output, you can choose to normalize or denormalize the results by clicking the Normalizeand Denormalize buttons.
Finalizing the end schema
In this step the wizard displays the output schema generated.
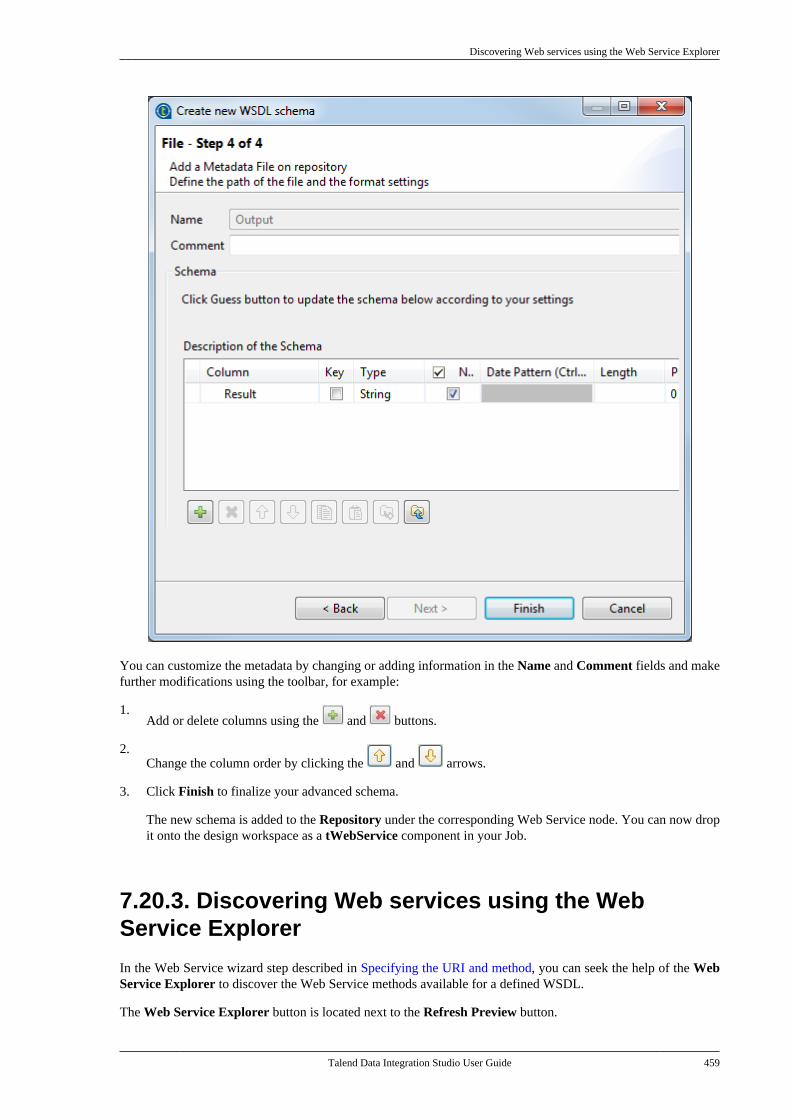
Discovering Web services using the Web Service Explorer
Talend Data Integration Studio User Guide 459
You can customize the metadata by changing or adding information in the Name and Comment fields and makefurther modifications using the toolbar, for example:
1.Add or delete columns using the and buttons.
2.Change the column order by clicking the and arrows.
3. Click Finish to finalize your advanced schema.
The new schema is added to the Repository under the corresponding Web Service node. You can now dropit onto the design workspace as a tWebService component in your Job.
7.20.3. Discovering Web services using the WebService Explorer
In the Web Service wizard step described in Specifying the URI and method, you can seek the help of the WebService Explorer to discover the Web Service methods available for a defined WSDL.
The Web Service Explorer button is located next to the Refresh Preview button.
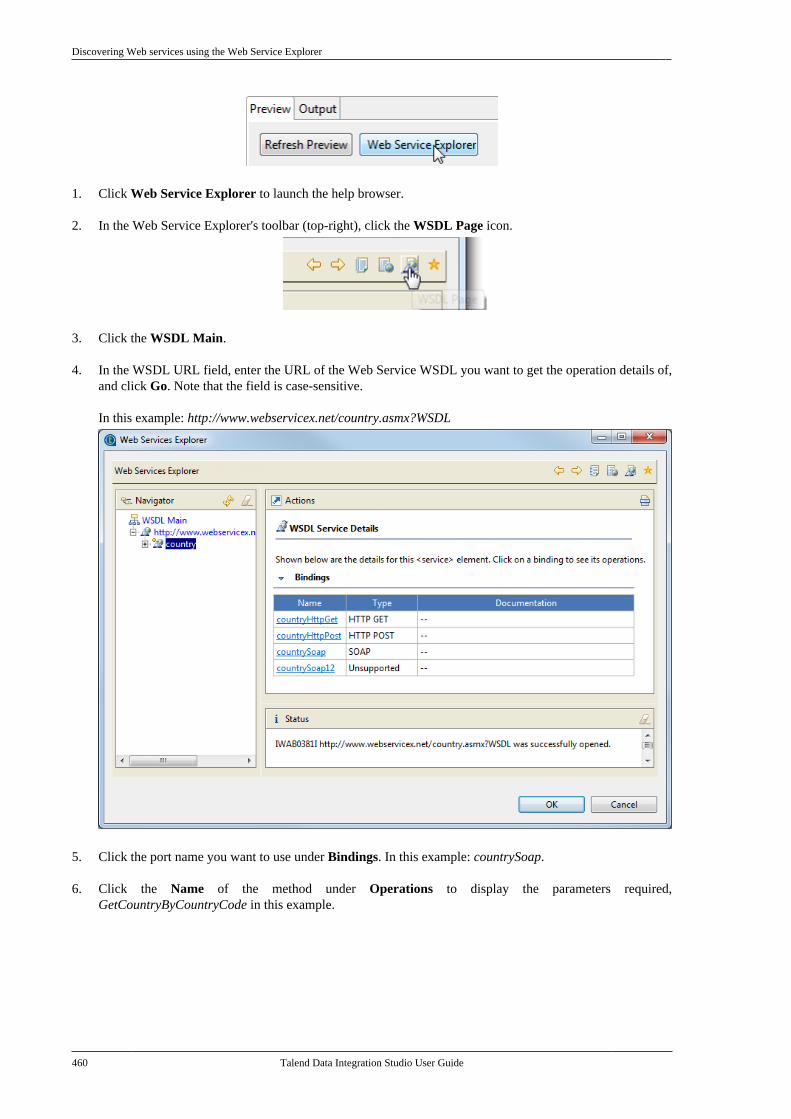
Discovering Web services using the Web Service Explorer
460 Talend Data Integration Studio User Guide
1. Click Web Service Explorer to launch the help browser.
2. In the Web Service Explorer's toolbar (top-right), click the WSDL Page icon.
3. Click the WSDL Main.
4. In the WSDL URL field, enter the URL of the Web Service WSDL you want to get the operation details of,and click Go. Note that the field is case-sensitive.
In this example: http://www.webservicex.net/country.asmx?WSDL
5. Click the port name you want to use under Bindings. In this example: countrySoap.
6. Click the Name of the method under Operations to display the parameters required,GetCountryByCountryCode in this example.
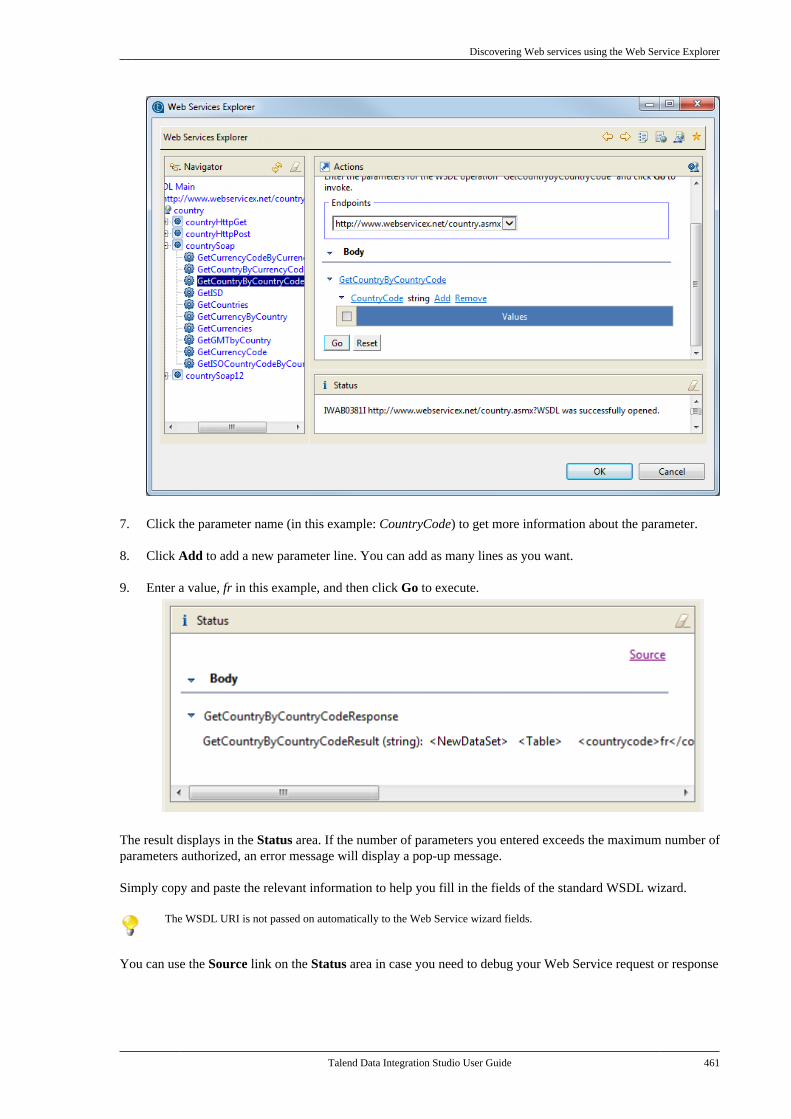
Discovering Web services using the Web Service Explorer
Talend Data Integration Studio User Guide 461
7. Click the parameter name (in this example: CountryCode) to get more information about the parameter.
8. Click Add to add a new parameter line. You can add as many lines as you want.
9. Enter a value, fr in this example, and then click Go to execute.
The result displays in the Status area. If the number of parameters you entered exceeds the maximum number ofparameters authorized, an error message will display a pop-up message.
Simply copy and paste the relevant information to help you fill in the fields of the standard WSDL wizard.
The WSDL URI is not passed on automatically to the Web Service wizard fields.
You can use the Source link on the Status area in case you need to debug your Web Service request or response
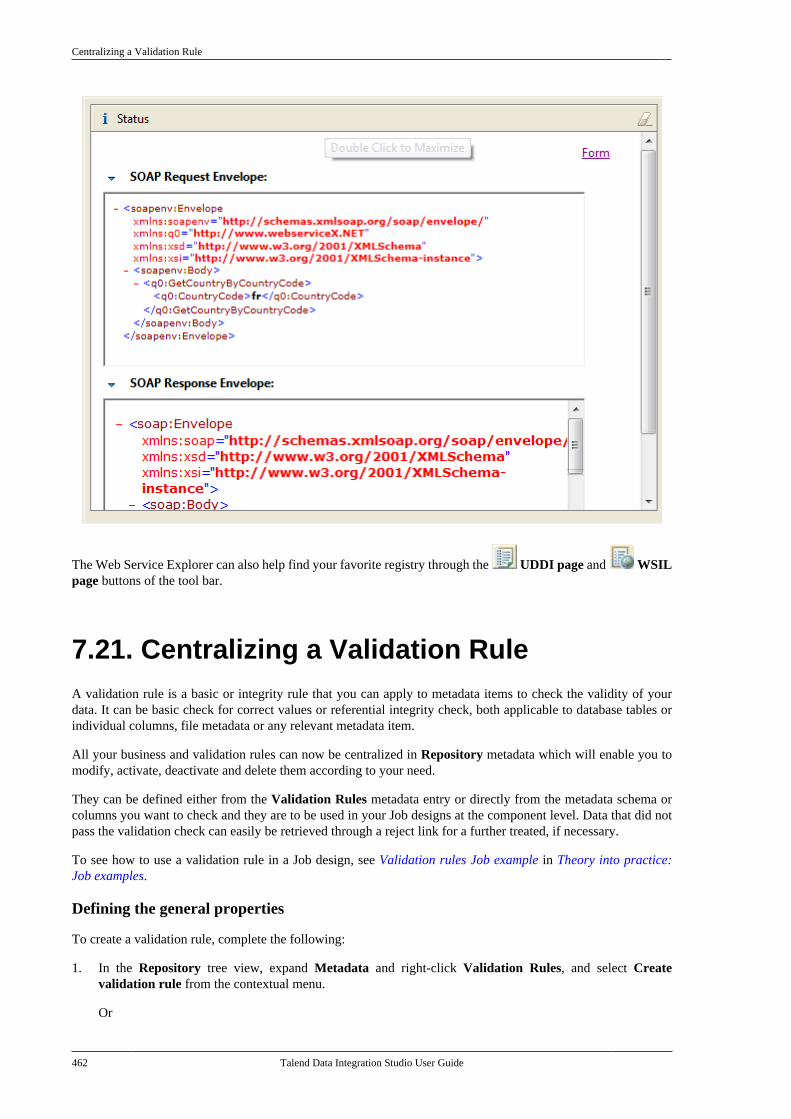
Centralizing a Validation Rule
462 Talend Data Integration Studio User Guide
The Web Service Explorer can also help find your favorite registry through the UDDI page and WSILpage buttons of the tool bar.
7.21. Centralizing a Validation RuleA validation rule is a basic or integrity rule that you can apply to metadata items to check the validity of yourdata. It can be basic check for correct values or referential integrity check, both applicable to database tables orindividual columns, file metadata or any relevant metadata item.
All your business and validation rules can now be centralized in Repository metadata which will enable you tomodify, activate, deactivate and delete them according to your need.
They can be defined either from the Validation Rules metadata entry or directly from the metadata schema orcolumns you want to check and they are to be used in your Job designs at the component level. Data that did notpass the validation check can easily be retrieved through a reject link for a further treated, if necessary.
To see how to use a validation rule in a Job design, see Validation rules Job example in Theory into practice:Job examples.
Defining the general properties
To create a validation rule, complete the following:
1. In the Repository tree view, expand Metadata and right-click Validation Rules, and select Createvalidation rule from the contextual menu.
Or
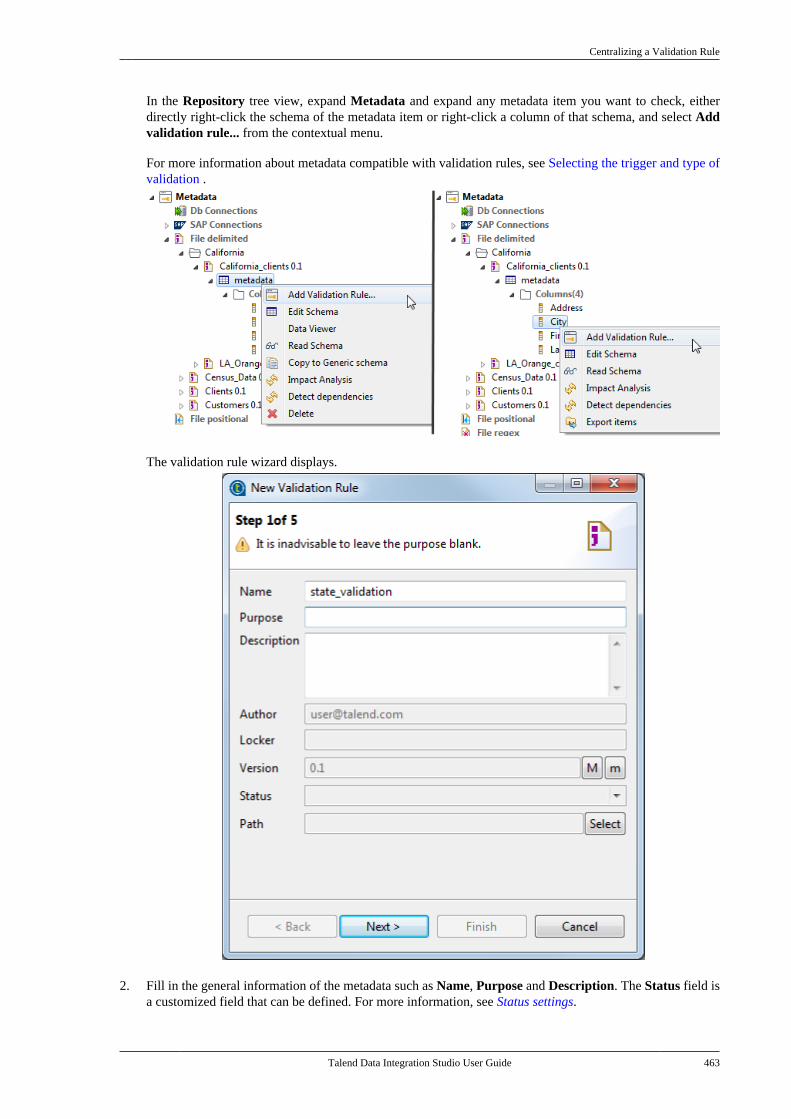
Centralizing a Validation Rule
Talend Data Integration Studio User Guide 463
In the Repository tree view, expand Metadata and expand any metadata item you want to check, eitherdirectly right-click the schema of the metadata item or right-click a column of that schema, and select Addvalidation rule... from the contextual menu.
For more information about metadata compatible with validation rules, see Selecting the trigger and type ofvalidation .
The validation rule wizard displays.
2. Fill in the general information of the metadata such as Name, Purpose and Description. The Status field isa customized field that can be defined. For more information, see Status settings.
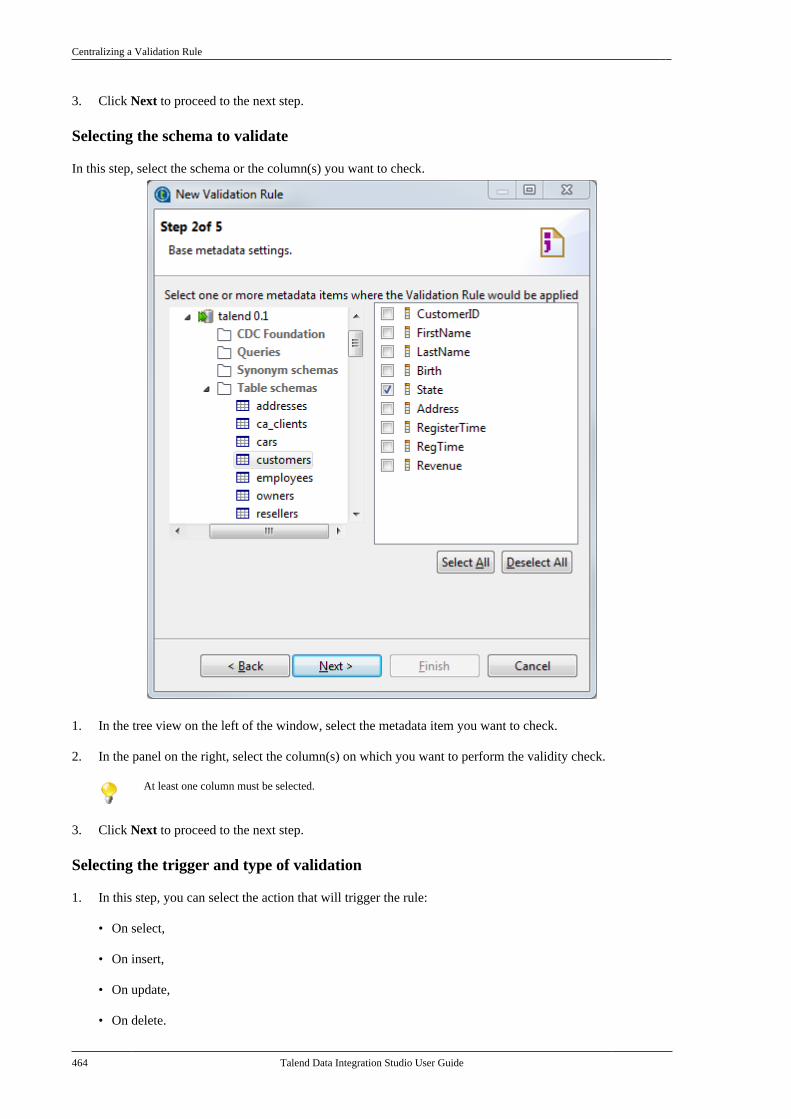
Centralizing a Validation Rule
464 Talend Data Integration Studio User Guide
3. Click Next to proceed to the next step.
Selecting the schema to validate
In this step, select the schema or the column(s) you want to check.
1. In the tree view on the left of the window, select the metadata item you want to check.
2. In the panel on the right, select the column(s) on which you want to perform the validity check.
At least one column must be selected.
3. Click Next to proceed to the next step.
Selecting the trigger and type of validation
1. In this step, you can select the action that will trigger the rule:
• On select,
• On insert,
• On update,
• On delete.
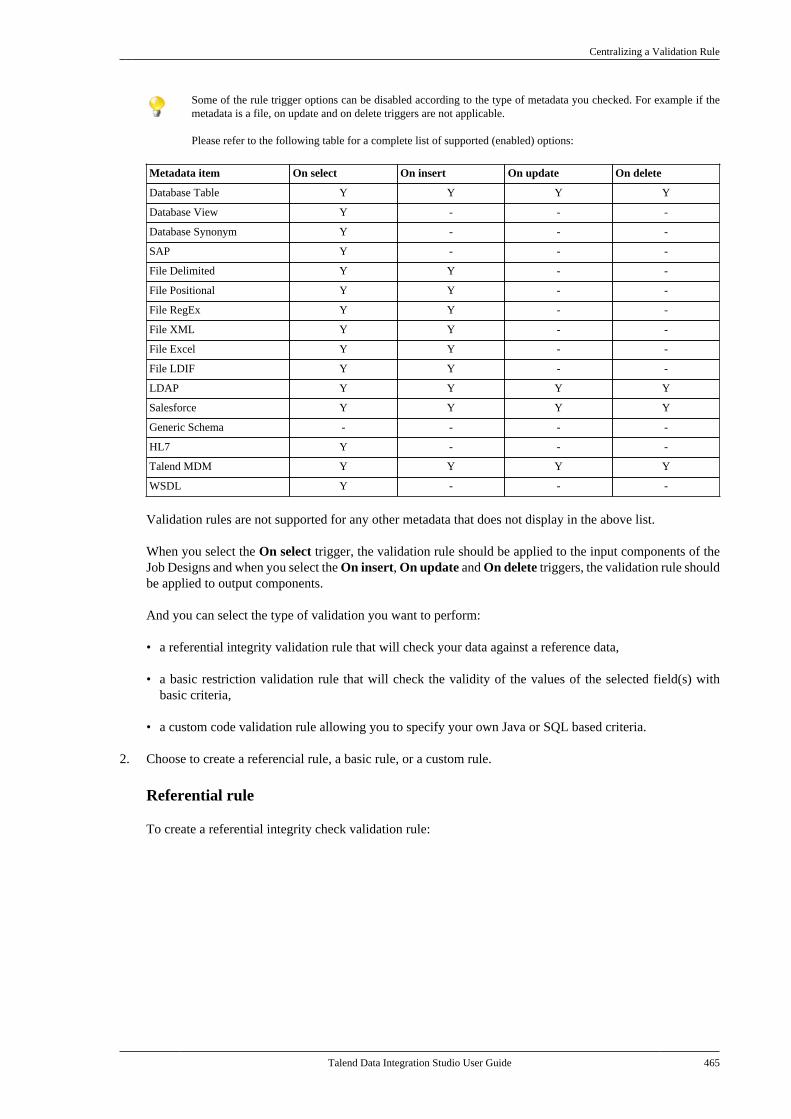
Centralizing a Validation Rule
Talend Data Integration Studio User Guide 465
Some of the rule trigger options can be disabled according to the type of metadata you checked. For example if themetadata is a file, on update and on delete triggers are not applicable.
Please refer to the following table for a complete list of supported (enabled) options:
Metadata item On select On insert On update On delete
Database Table Y Y Y Y
Database View Y - - -
Database Synonym Y - - -
SAP Y - - -
File Delimited Y Y - -
File Positional Y Y - -
File RegEx Y Y - -
File XML Y Y - -
File Excel Y Y - -
File LDIF Y Y - -
LDAP Y Y Y Y
Salesforce Y Y Y Y
Generic Schema - - - -
HL7 Y - - -
Talend MDM Y Y Y Y
WSDL Y - - -
Validation rules are not supported for any other metadata that does not display in the above list.
When you select the On select trigger, the validation rule should be applied to the input components of theJob Designs and when you select the On insert, On update and On delete triggers, the validation rule shouldbe applied to output components.
And you can select the type of validation you want to perform:
• a referential integrity validation rule that will check your data against a reference data,
• a basic restriction validation rule that will check the validity of the values of the selected field(s) withbasic criteria,
• a custom code validation rule allowing you to specify your own Java or SQL based criteria.
2. Choose to create a referencial rule, a basic rule, or a custom rule.
Referential rule
To create a referential integrity check validation rule:
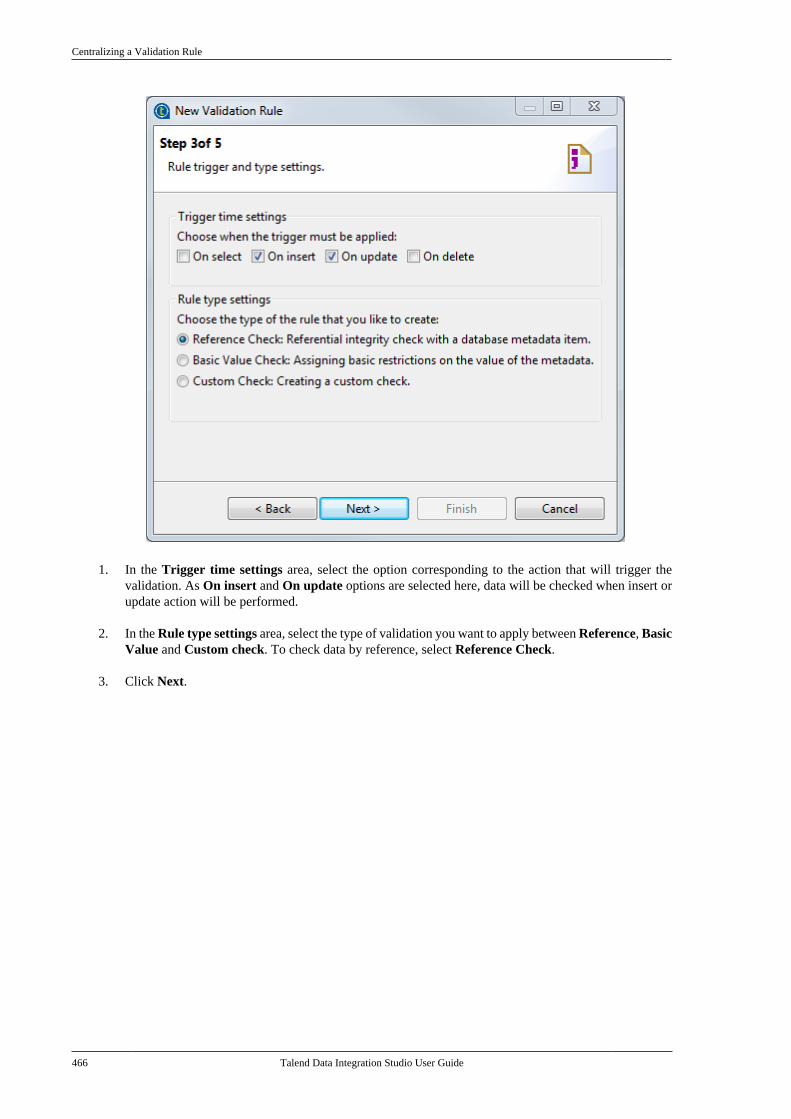
Centralizing a Validation Rule
466 Talend Data Integration Studio User Guide
1. In the Trigger time settings area, select the option corresponding to the action that will trigger thevalidation. As On insert and On update options are selected here, data will be checked when insert orupdate action will be performed.
2. In the Rule type settings area, select the type of validation you want to apply between Reference, BasicValue and Custom check. To check data by reference, select Reference Check.
3. Click Next.
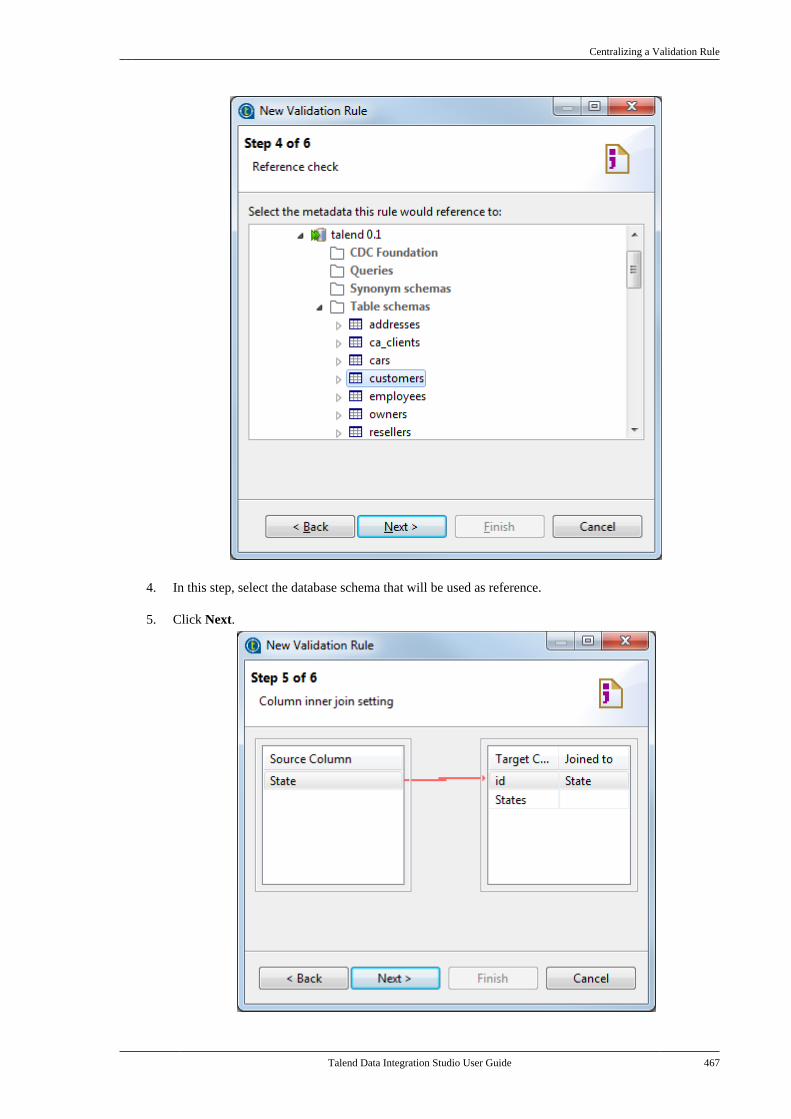
Centralizing a Validation Rule
Talend Data Integration Studio User Guide 467
4. In this step, select the database schema that will be used as reference.
5. Click Next.
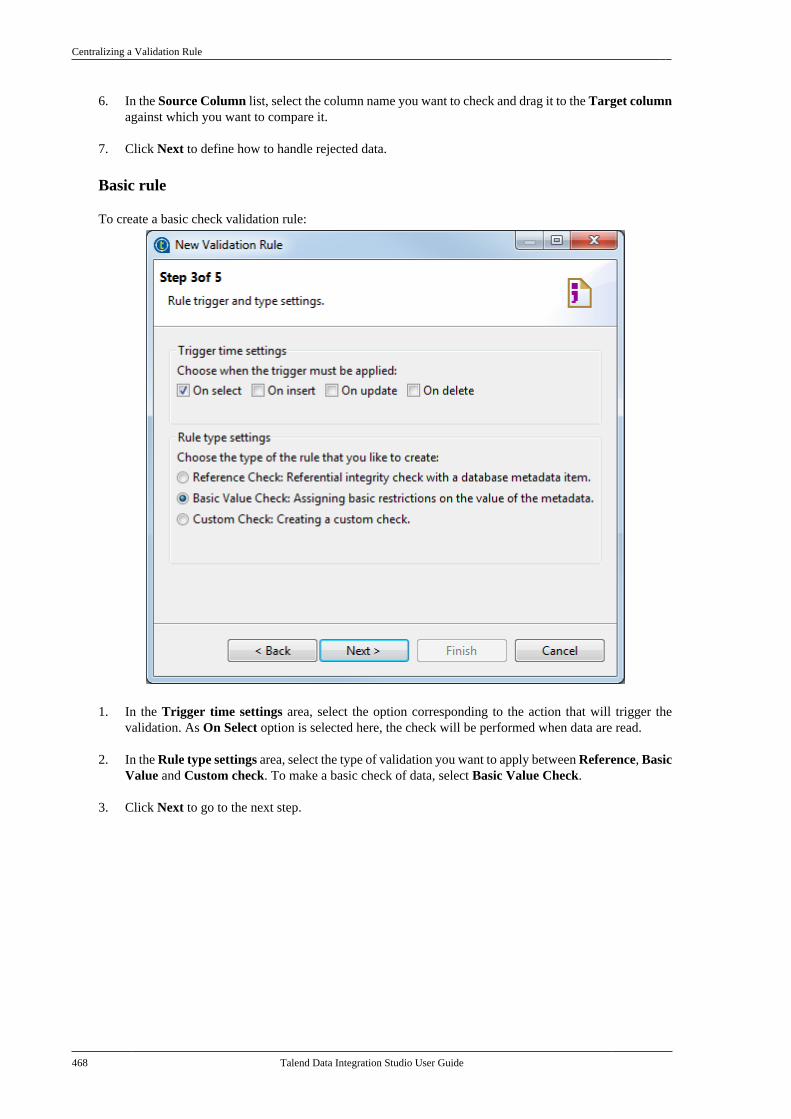
Centralizing a Validation Rule
468 Talend Data Integration Studio User Guide
6. In the Source Column list, select the column name you want to check and drag it to the Target columnagainst which you want to compare it.
7. Click Next to define how to handle rejected data.
Basic rule
To create a basic check validation rule:
1. In the Trigger time settings area, select the option corresponding to the action that will trigger thevalidation. As On Select option is selected here, the check will be performed when data are read.
2. In the Rule type settings area, select the type of validation you want to apply between Reference, BasicValue and Custom check. To make a basic check of data, select Basic Value Check.
3. Click Next to go to the next step.
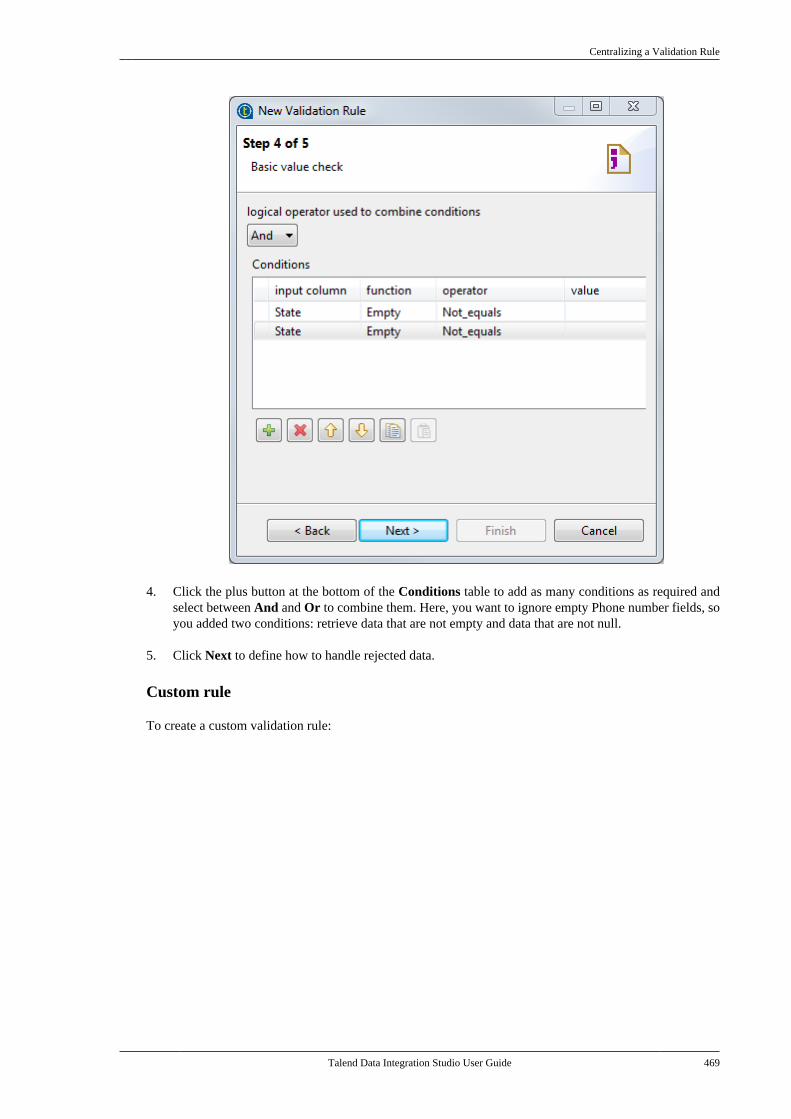
Centralizing a Validation Rule
Talend Data Integration Studio User Guide 469
4. Click the plus button at the bottom of the Conditions table to add as many conditions as required andselect between And and Or to combine them. Here, you want to ignore empty Phone number fields, soyou added two conditions: retrieve data that are not empty and data that are not null.
5. Click Next to define how to handle rejected data.
Custom rule
To create a custom validation rule:
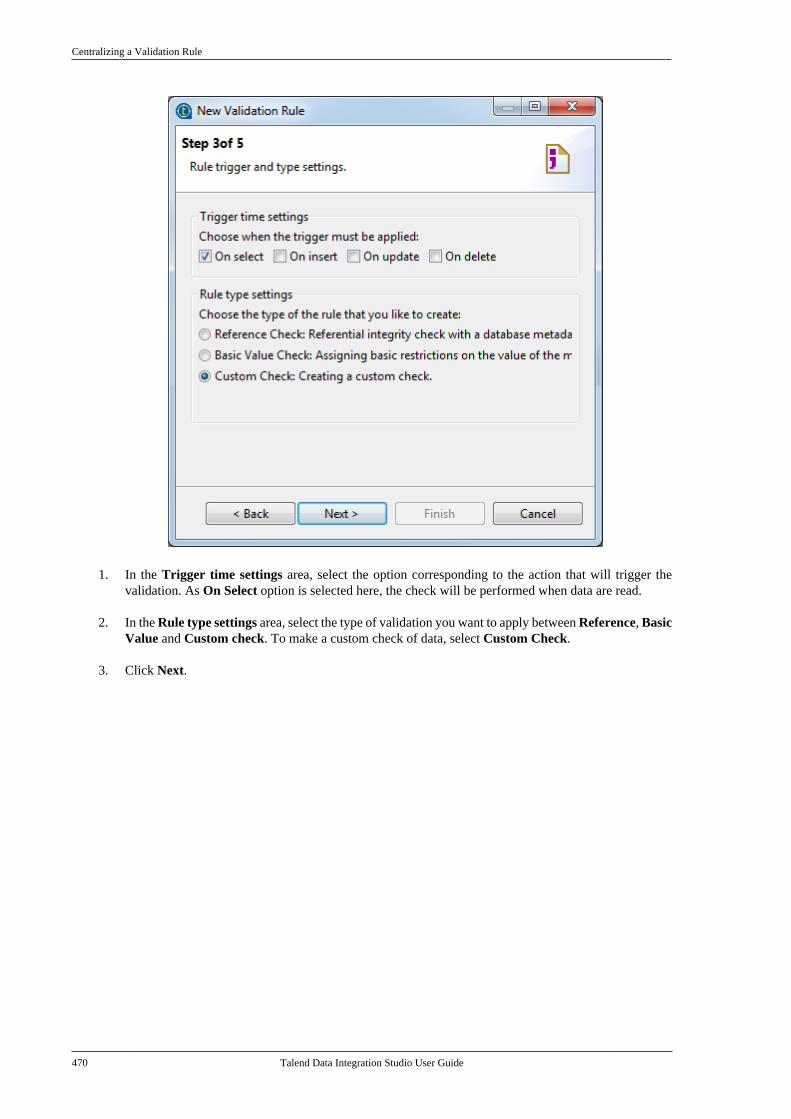
Centralizing a Validation Rule
470 Talend Data Integration Studio User Guide
1. In the Trigger time settings area, select the option corresponding to the action that will trigger thevalidation. As On Select option is selected here, the check will be performed when data are read.
2. In the Rule type settings area, select the type of validation you want to apply between Reference, BasicValue and Custom check. To make a custom check of data, select Custom Check.
3. Click Next.
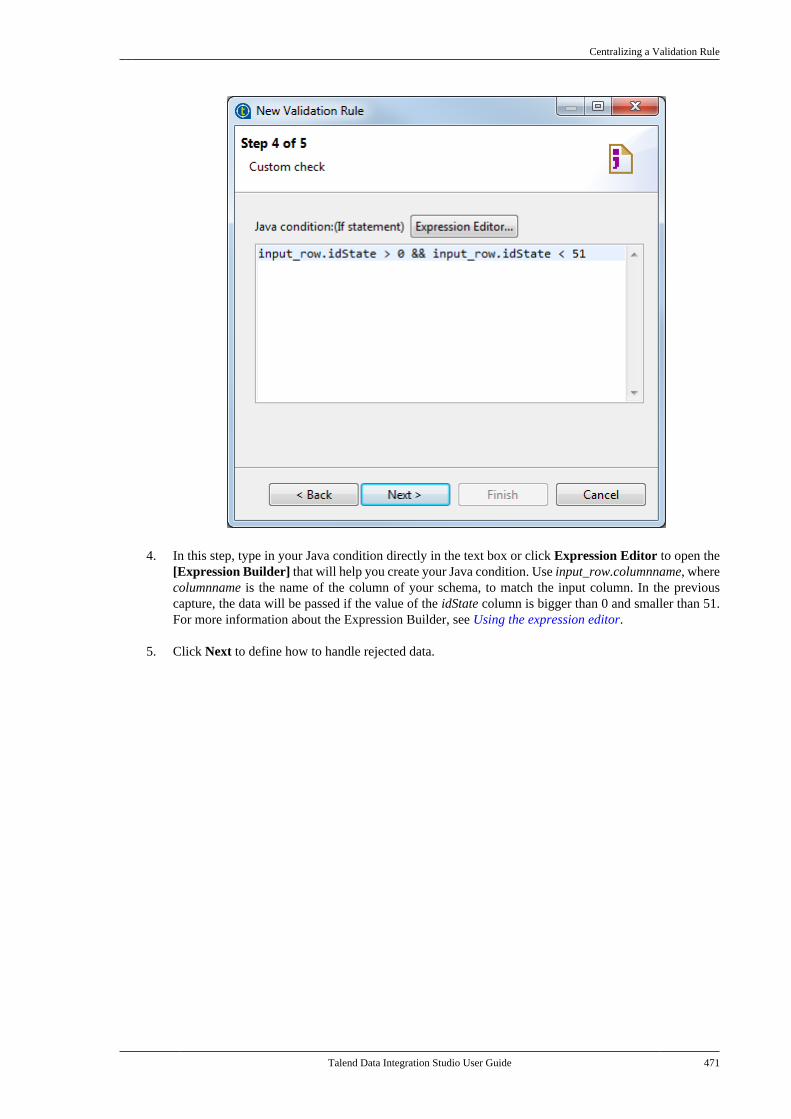
Centralizing a Validation Rule
Talend Data Integration Studio User Guide 471
4. In this step, type in your Java condition directly in the text box or click Expression Editor to open the[Expression Builder] that will help you create your Java condition. Use input_row.columnname, wherecolumnname is the name of the column of your schema, to match the input column. In the previouscapture, the data will be passed if the value of the idState column is bigger than 0 and smaller than 51.For more information about the Expression Builder, see Using the expression editor.
5. Click Next to define how to handle rejected data.
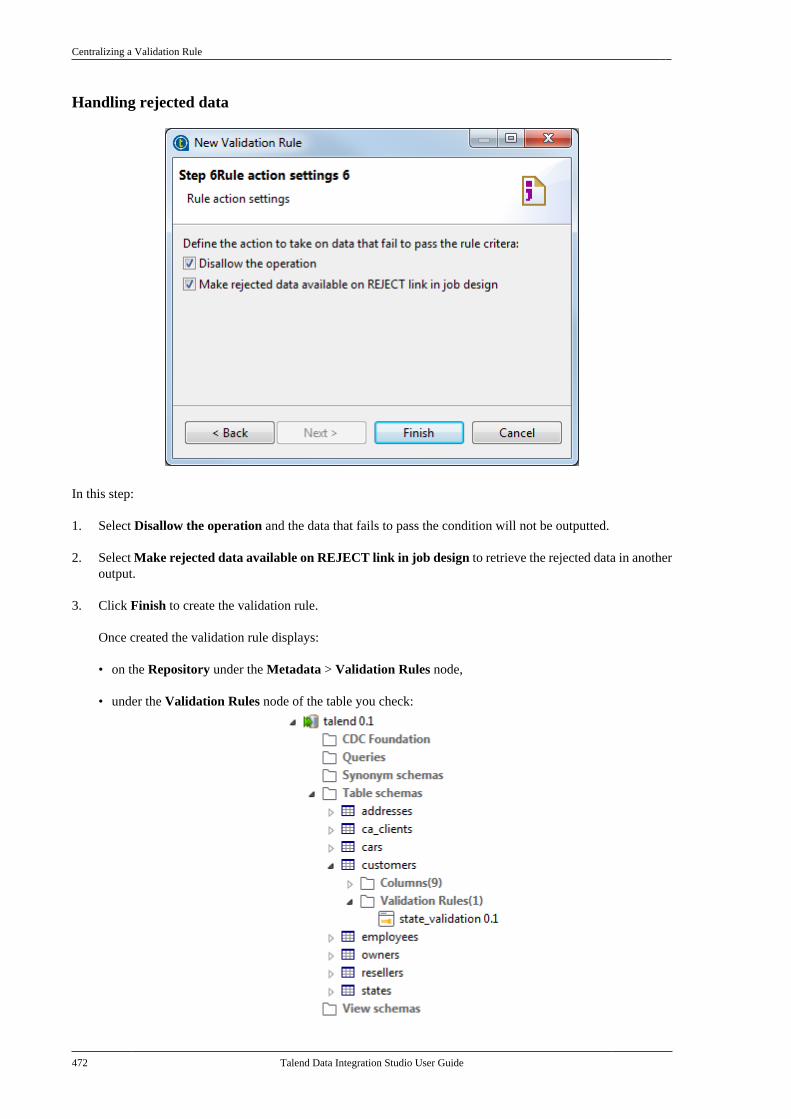
Centralizing a Validation Rule
472 Talend Data Integration Studio User Guide
Handling rejected data
In this step:
1. Select Disallow the operation and the data that fails to pass the condition will not be outputted.
2. Select Make rejected data available on REJECT link in job design to retrieve the rejected data in anotheroutput.
3. Click Finish to create the validation rule.
Once created the validation rule displays:
• on the Repository under the Metadata > Validation Rules node,
• under the Validation Rules node of the table you check:
Centralizing an FTP connection
Talend Data Integration Studio User Guide 473
To see how to use a validation rule in a Job Design, see Validation rules Job example in Theory into practice:Job examples.
7.22. Centralizing an FTP connectionIf you need to connect to an FTP server regularly, you can centralize the connection information under theMetadata node in the Repository view.
Defining the general properties
To create a connection to an FTP server, follow the steps below:
1. Expand the Metadata node in the Repository tree view.
2. Right-click FTP and select Create FTP from the context menu.
The connection wizard opens:
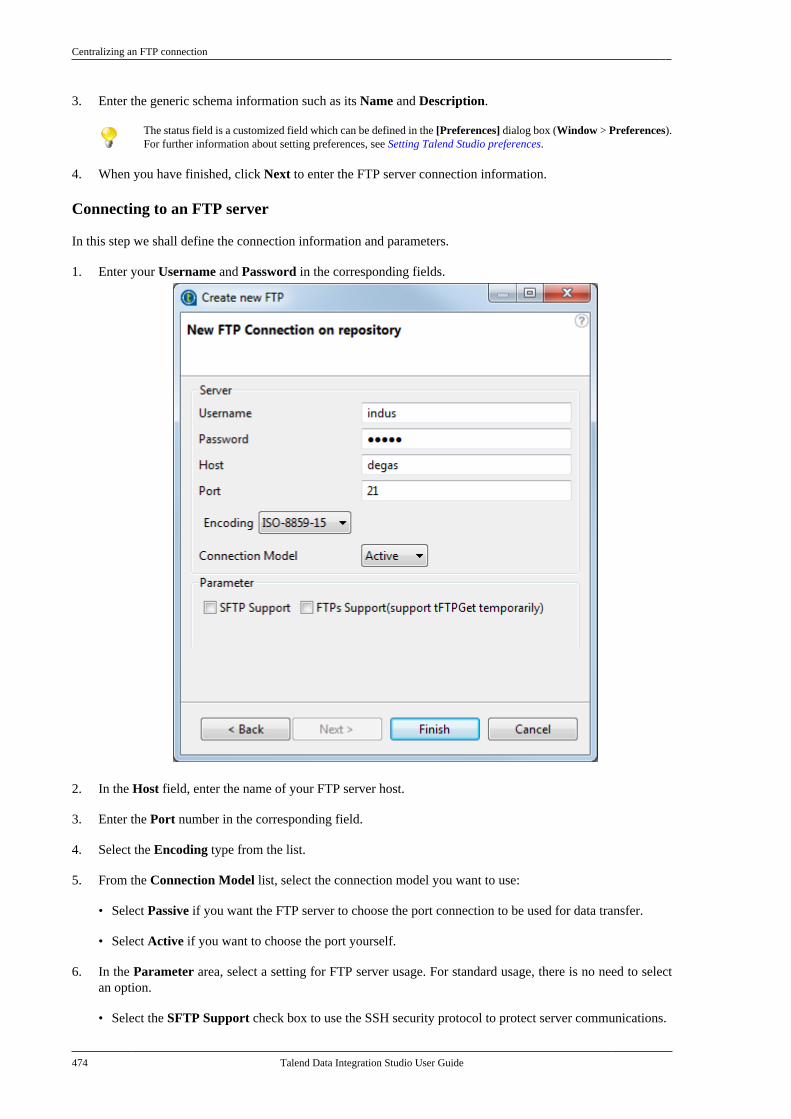
Centralizing an FTP connection
474 Talend Data Integration Studio User Guide
3. Enter the generic schema information such as its Name and Description.
The status field is a customized field which can be defined in the [Preferences] dialog box (Window > Preferences).For further information about setting preferences, see Setting Talend Studio preferences.
4. When you have finished, click Next to enter the FTP server connection information.
Connecting to an FTP server
In this step we shall define the connection information and parameters.
1. Enter your Username and Password in the corresponding fields.
2. In the Host field, enter the name of your FTP server host.
3. Enter the Port number in the corresponding field.
4. Select the Encoding type from the list.
5. From the Connection Model list, select the connection model you want to use:
• Select Passive if you want the FTP server to choose the port connection to be used for data transfer.
• Select Active if you want to choose the port yourself.
6. In the Parameter area, select a setting for FTP server usage. For standard usage, there is no need to selectan option.
• Select the SFTP Support check box to use the SSH security protocol to protect server communications.

Centralizing HL7 metadata (deprecated)
Talend Data Integration Studio User Guide 475
An Authentication method appears. Select Public key or Password according to what you use.
• Select the FTPs Support check box to protect server communication with the SSL security protocol.
• Select the Use Socks Proxy check box if you want to use this option, then enter the proxy information (thehost name, port number, username and password).
7. Click Finish to close the wizard.
All of the connections created appear under the FTP server connection node, in the Repository view.
You can drop the connection metadata from the Repository onto the design workspace. A dialog box opens inwhich you can choose the component to be used in your Job.
For further information about how to drop metadata onto the workspace, see How to use centralized metadatain a Job.
7.23. Centralizing HL7 metadata (deprecated)According to the HL7 metadata model option you select, the wizard helps you create either an input or anoutput schema. In a Job, the tHL7Input component uses the input schema created to read an HL7 file, whereastHL7Output uses the output schema created to either write an HL7 file, or update an existing HL7 file.
The step, in which you define the general properties of the schema to be created, precedes the next step at which you set thetype of schema as either input or output. It is therefore advisable to enter names which will help you to distinguish betweenyour input and output schemas.
If you want to read an HL7 structured message, see Centralizing HL7 metadata for an input file.
If you want to write an HL7 structured message, see Setting up an HL7 schema for an output file.
7.23.1. Centralizing HL7 metadata for an input file
This section describes how to set up and load an HL7 schema for an input file. To set up and load an HL7 schemafor an output file, see Setting up an HL7 schema for an output file.
Defining the general properties
In this step, the schema metadata such as the Name, Purpose and Description are set.
1. In the Repository tree view, expand the Metadata node.
2. Right-click HL7, and select Create HL7 from the pop-up menu.
3. Enter the generic schema information such as its name and description.
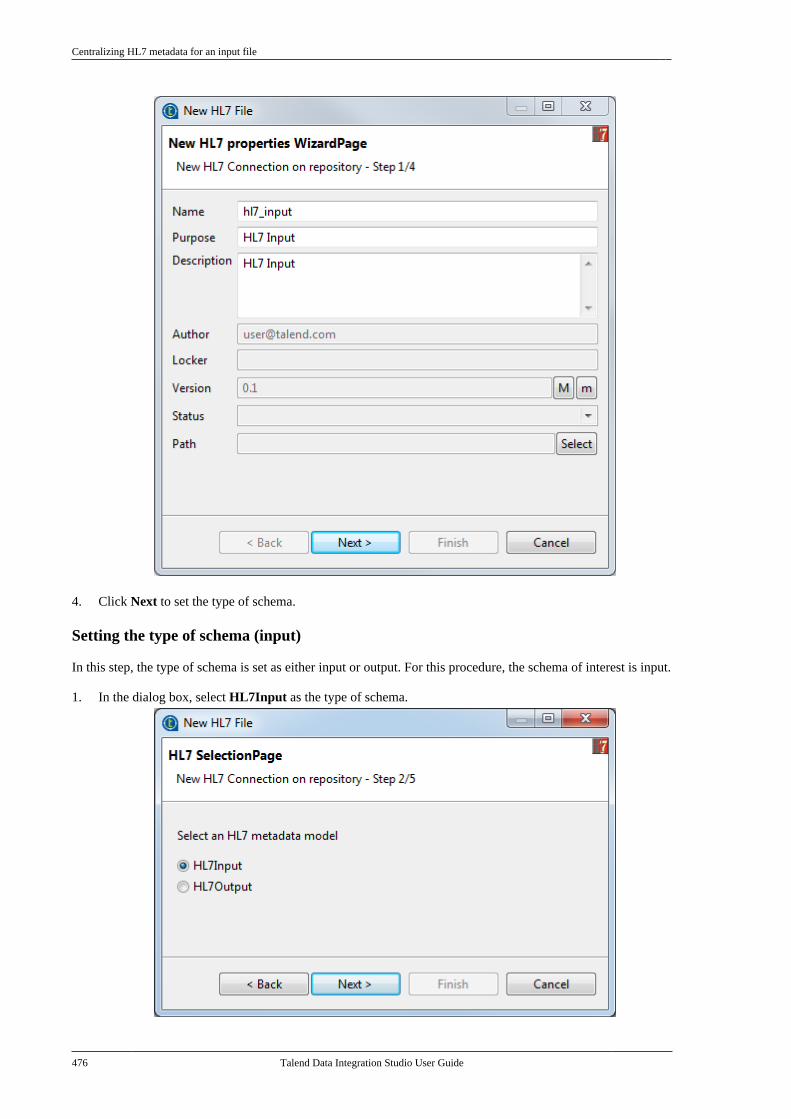
Centralizing HL7 metadata for an input file
476 Talend Data Integration Studio User Guide
4. Click Next to set the type of schema.
Setting the type of schema (input)
In this step, the type of schema is set as either input or output. For this procedure, the schema of interest is input.
1. In the dialog box, select HL7Input as the type of schema.
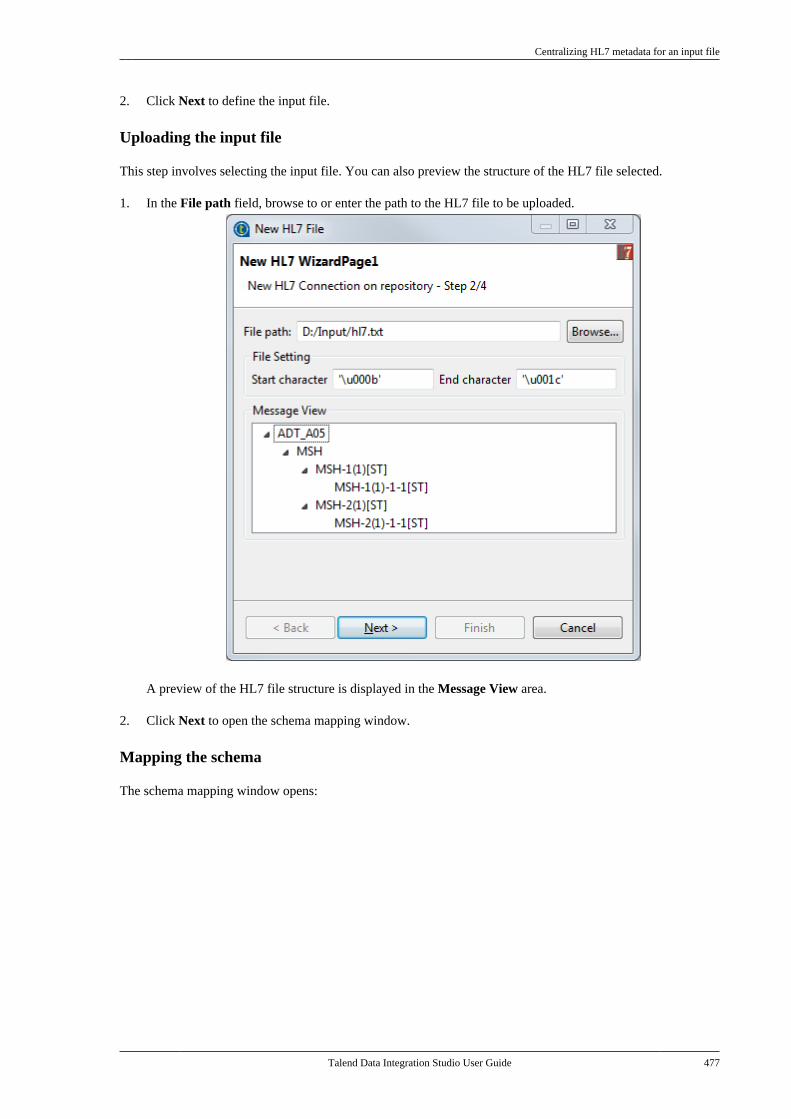
Centralizing HL7 metadata for an input file
Talend Data Integration Studio User Guide 477
2. Click Next to define the input file.
Uploading the input file
This step involves selecting the input file. You can also preview the structure of the HL7 file selected.
1. In the File path field, browse to or enter the path to the HL7 file to be uploaded.
A preview of the HL7 file structure is displayed in the Message View area.
2. Click Next to open the schema mapping window.
Mapping the schema
The schema mapping window opens:

Centralizing HL7 metadata for an input file
478 Talend Data Integration Studio User Guide
1. In the Schema View area, select the type of segment from the Segment (As Schema) drop-down list.
2. In the Message View area, select the elements or attributes of each message segment that you want in theschema.
The HL7 structure is comparable to that of XML. The elements and attributes selected from the Message View mustcorrespond to the type of segment selected.
3. Drop the columns selected onto the Schema View table.
4. Click the corresponding User Column field if you want to change the name and enter the new name manually.
5. Click Next to finalize the schema.
Finalizing the schema
This step shows the final schema generated. The name corresponds to the type of segment selected.
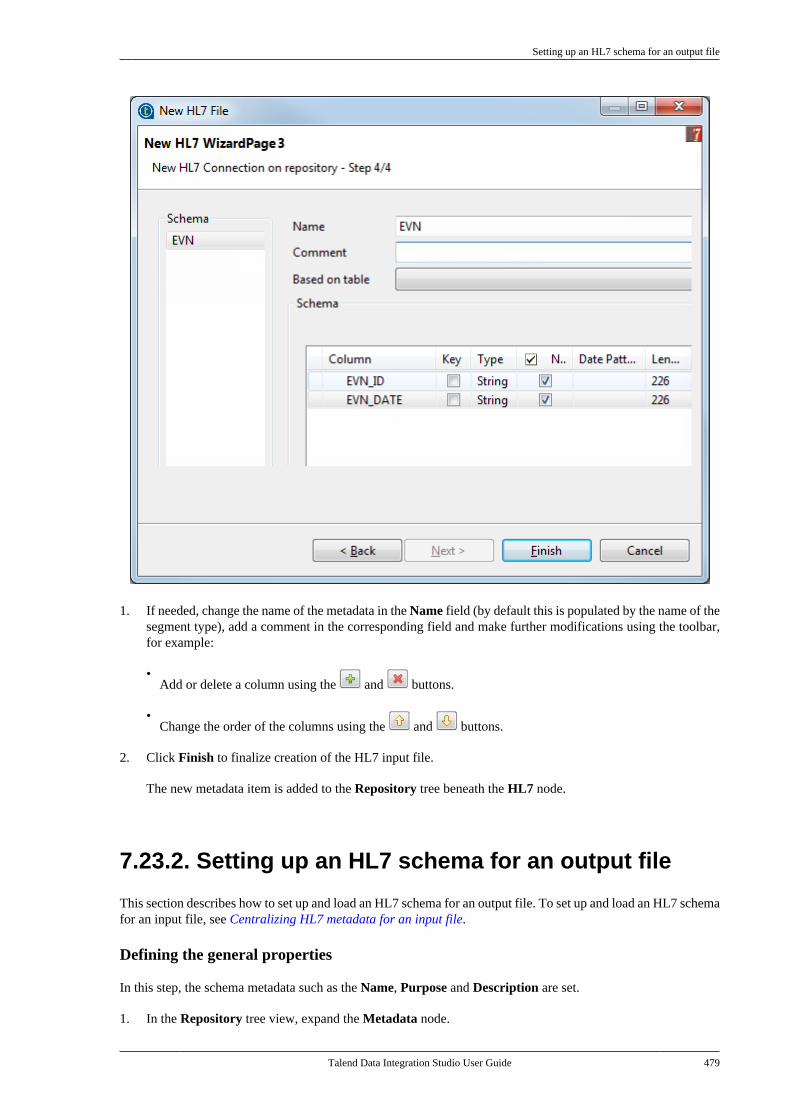
Setting up an HL7 schema for an output file
Talend Data Integration Studio User Guide 479
1. If needed, change the name of the metadata in the Name field (by default this is populated by the name of thesegment type), add a comment in the corresponding field and make further modifications using the toolbar,for example:
•Add or delete a column using the and buttons.
•Change the order of the columns using the and buttons.
2. Click Finish to finalize creation of the HL7 input file.
The new metadata item is added to the Repository tree beneath the HL7 node.
7.23.2. Setting up an HL7 schema for an output file
This section describes how to set up and load an HL7 schema for an output file. To set up and load an HL7 schemafor an input file, see Centralizing HL7 metadata for an input file.
Defining the general properties
In this step, the schema metadata such as the Name, Purpose and Description are set.
1. In the Repository tree view, expand the Metadata node.

Setting up an HL7 schema for an output file
480 Talend Data Integration Studio User Guide
2. Right-click HL7, and select Create HL7 from the pop-up menu.
3. Enter the generic schema information such as its name and description.
4. Click Next to set the type of schema.
Setting the type of schema (output)
In this step, the type of schema is set as either input or output. For this procedure, the schema of interest is output.
1. In the dialog box, select HL7Output as the type of schema.
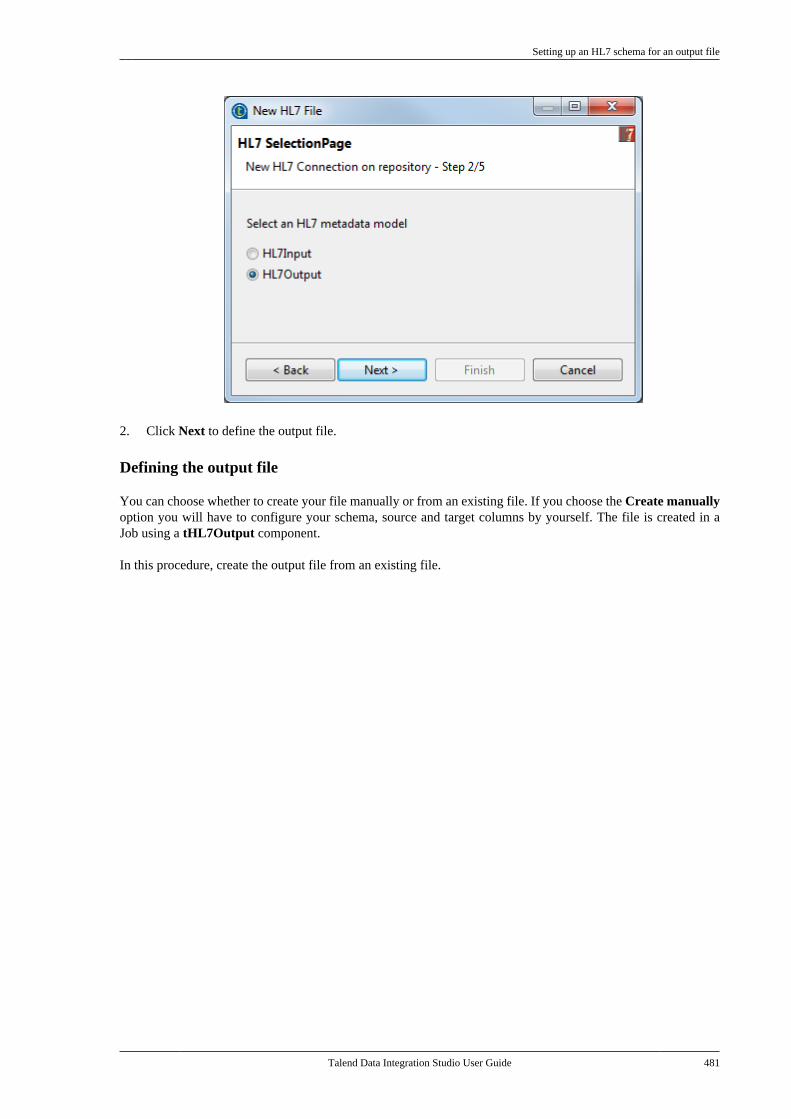
Setting up an HL7 schema for an output file
Talend Data Integration Studio User Guide 481
2. Click Next to define the output file.
Defining the output file
You can choose whether to create your file manually or from an existing file. If you choose the Create manuallyoption you will have to configure your schema, source and target columns by yourself. The file is created in aJob using a tHL7Output component.
In this procedure, create the output file from an existing file.
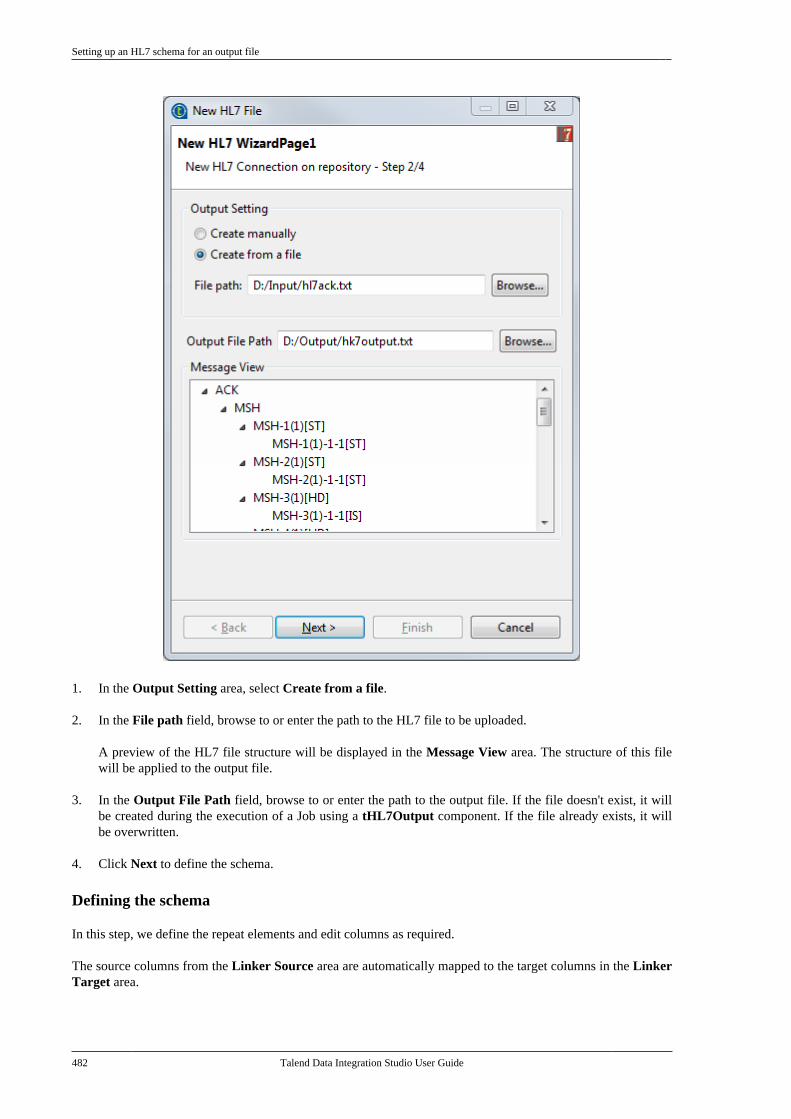
Setting up an HL7 schema for an output file
482 Talend Data Integration Studio User Guide
1. In the Output Setting area, select Create from a file.
2. In the File path field, browse to or enter the path to the HL7 file to be uploaded.
A preview of the HL7 file structure will be displayed in the Message View area. The structure of this filewill be applied to the output file.
3. In the Output File Path field, browse to or enter the path to the output file. If the file doesn't exist, it willbe created during the execution of a Job using a tHL7Output component. If the file already exists, it willbe overwritten.
4. Click Next to define the schema.
Defining the schema
In this step, we define the repeat elements and edit columns as required.
The source columns from the Linker Source area are automatically mapped to the target columns in the LinkerTarget area.
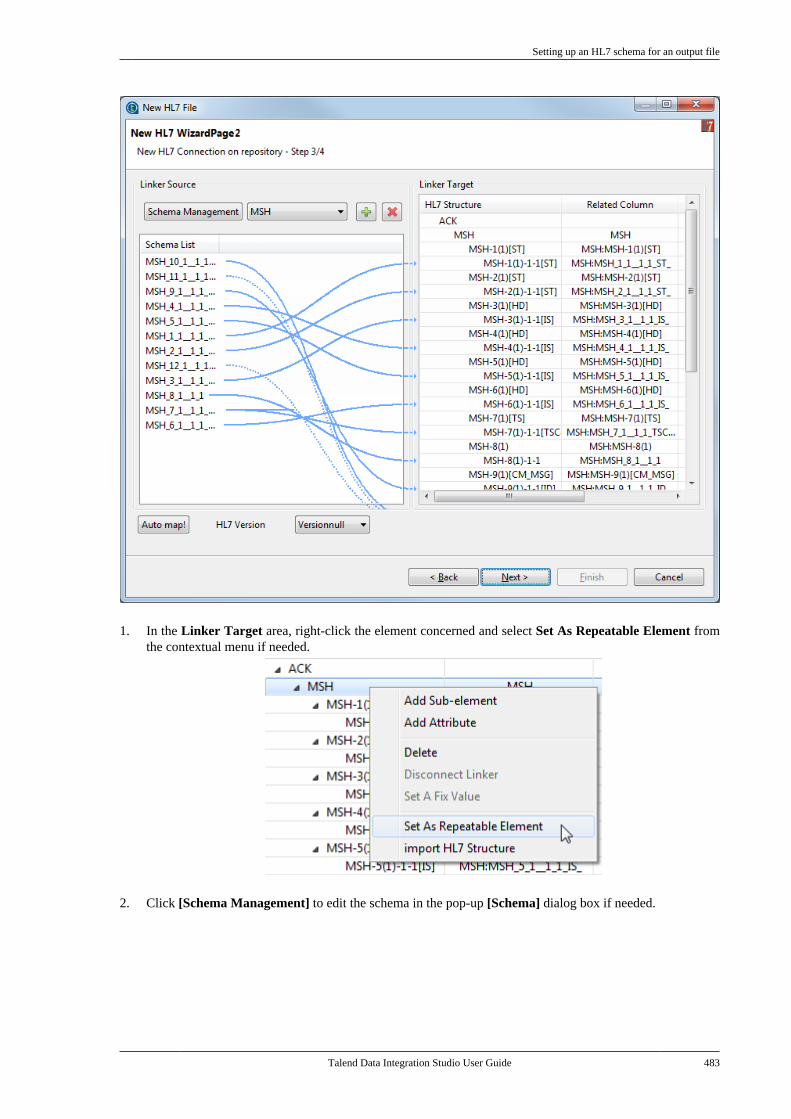
Setting up an HL7 schema for an output file
Talend Data Integration Studio User Guide 483
1. In the Linker Target area, right-click the element concerned and select Set As Repeatable Element fromthe contextual menu if needed.
2. Click [Schema Management] to edit the schema in the pop-up [Schema] dialog box if needed.
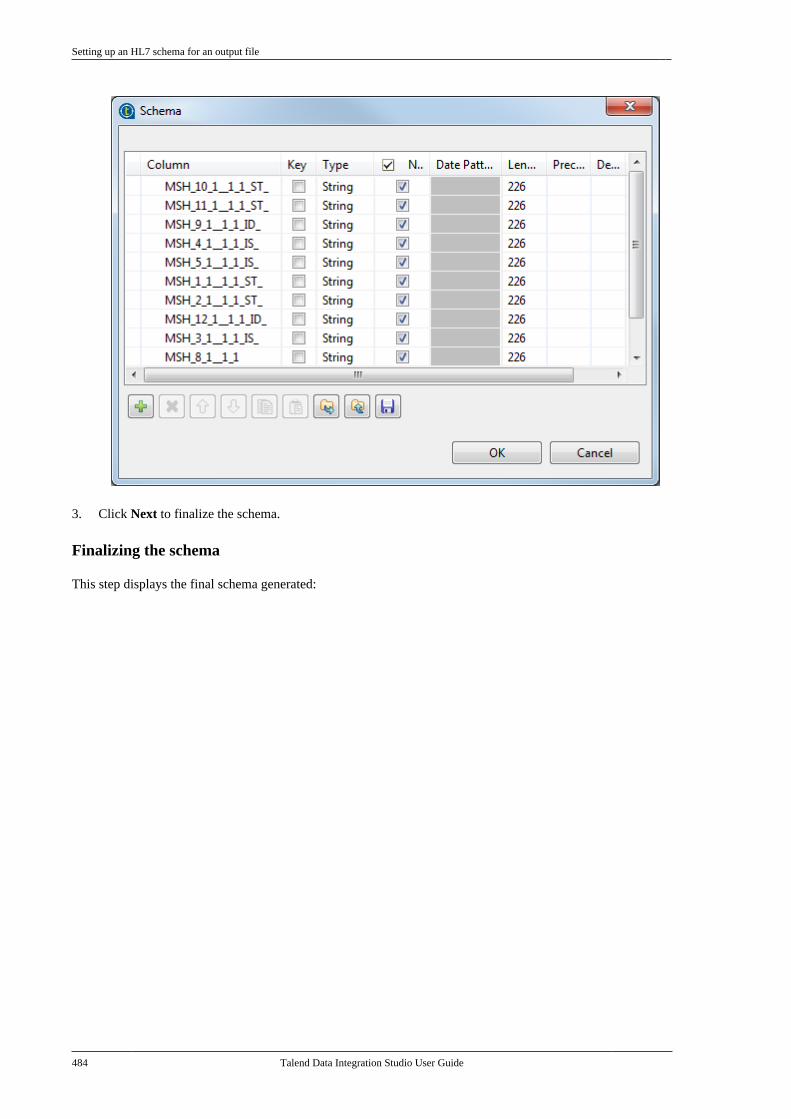
Setting up an HL7 schema for an output file
484 Talend Data Integration Studio User Guide
3. Click Next to finalize the schema.
Finalizing the schema
This step displays the final schema generated:
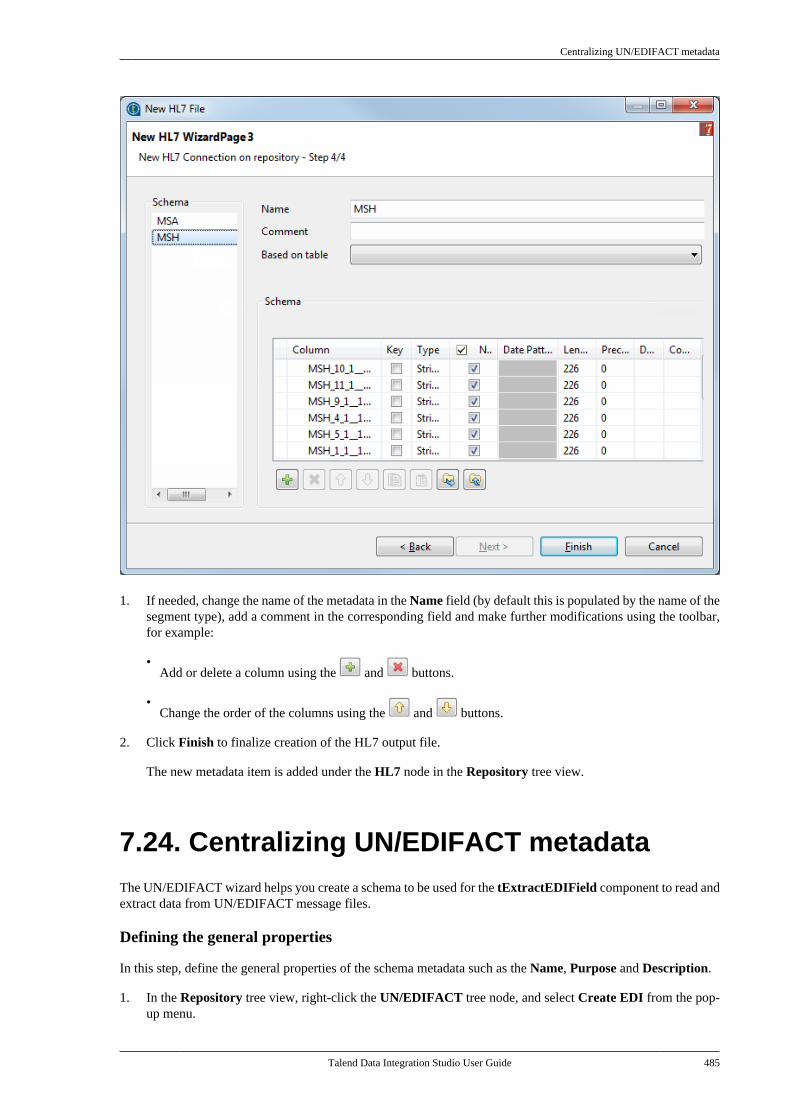
Centralizing UN/EDIFACT metadata
Talend Data Integration Studio User Guide 485
1. If needed, change the name of the metadata in the Name field (by default this is populated by the name of thesegment type), add a comment in the corresponding field and make further modifications using the toolbar,for example:
•Add or delete a column using the and buttons.
•Change the order of the columns using the and buttons.
2. Click Finish to finalize creation of the HL7 output file.
The new metadata item is added under the HL7 node in the Repository tree view.
7.24. Centralizing UN/EDIFACT metadataThe UN/EDIFACT wizard helps you create a schema to be used for the tExtractEDIField component to read andextract data from UN/EDIFACT message files.
Defining the general properties
In this step, define the general properties of the schema metadata such as the Name, Purpose and Description.
1. In the Repository tree view, right-click the UN/EDIFACT tree node, and select Create EDI from the pop-up menu.
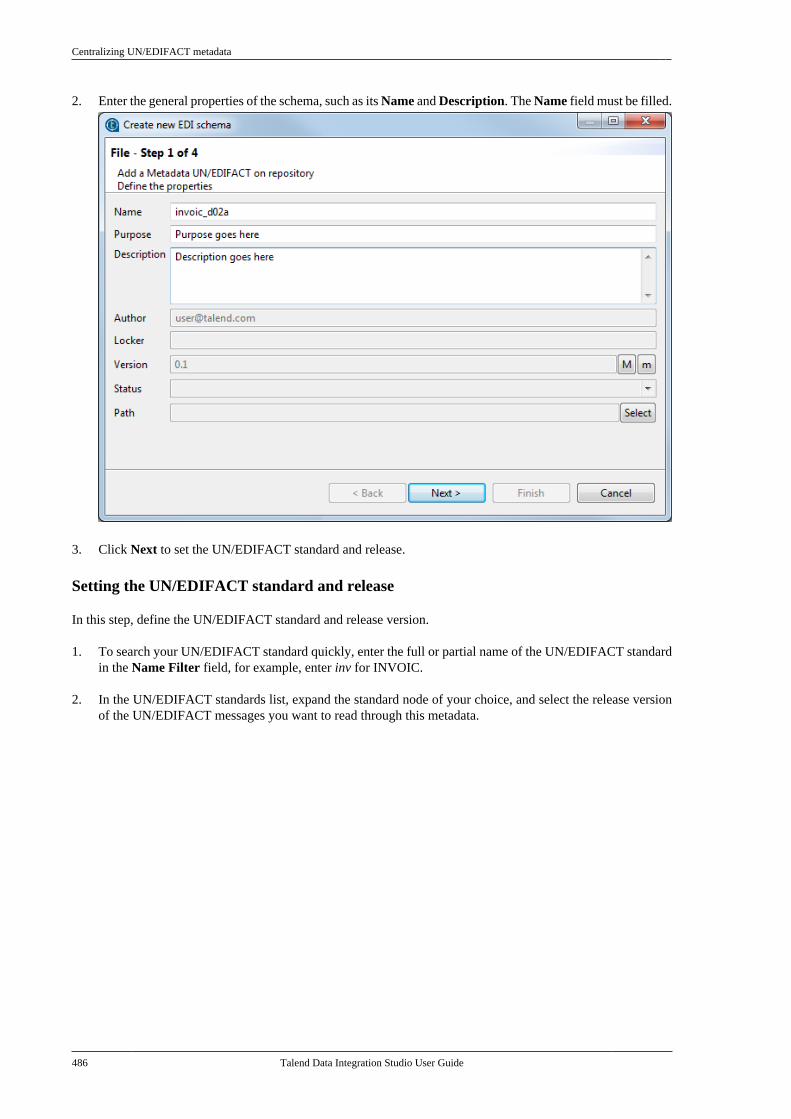
Centralizing UN/EDIFACT metadata
486 Talend Data Integration Studio User Guide
2. Enter the general properties of the schema, such as its Name and Description. The Name field must be filled.
3. Click Next to set the UN/EDIFACT standard and release.
Setting the UN/EDIFACT standard and release
In this step, define the UN/EDIFACT standard and release version.
1. To search your UN/EDIFACT standard quickly, enter the full or partial name of the UN/EDIFACT standardin the Name Filter field, for example, enter inv for INVOIC.
2. In the UN/EDIFACT standards list, expand the standard node of your choice, and select the release versionof the UN/EDIFACT messages you want to read through this metadata.
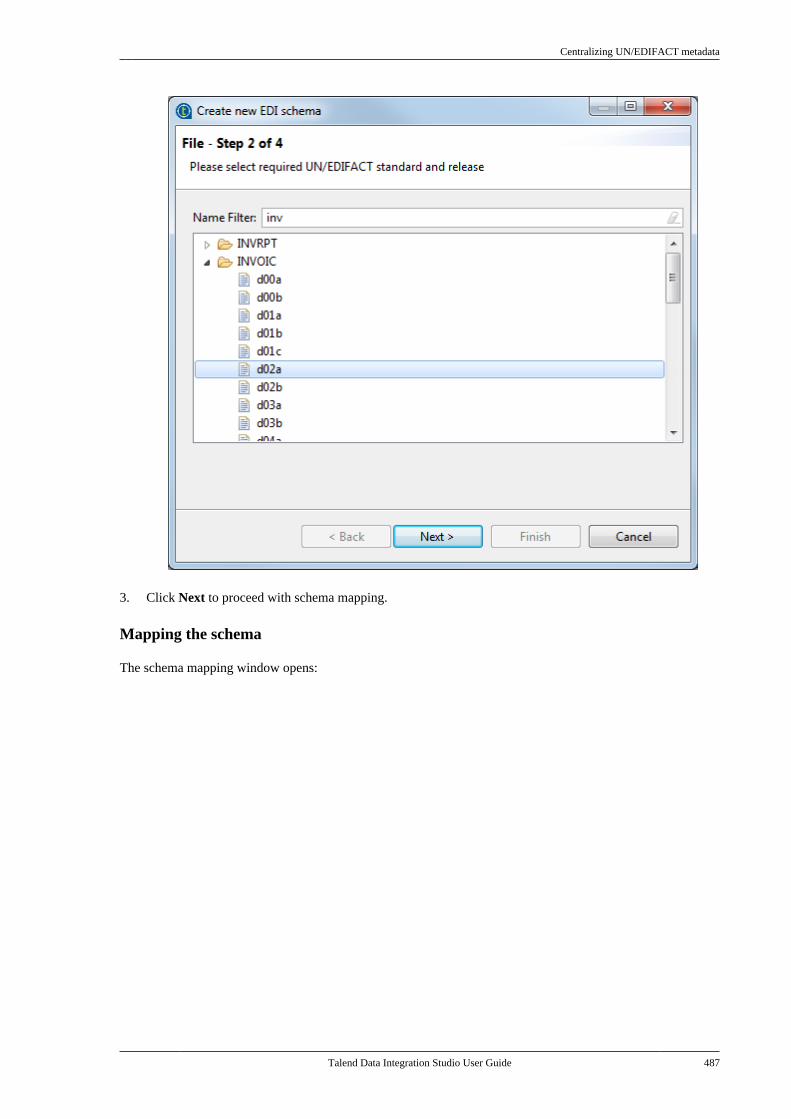
Centralizing UN/EDIFACT metadata
Talend Data Integration Studio User Guide 487
3. Click Next to proceed with schema mapping.
Mapping the schema
The schema mapping window opens:
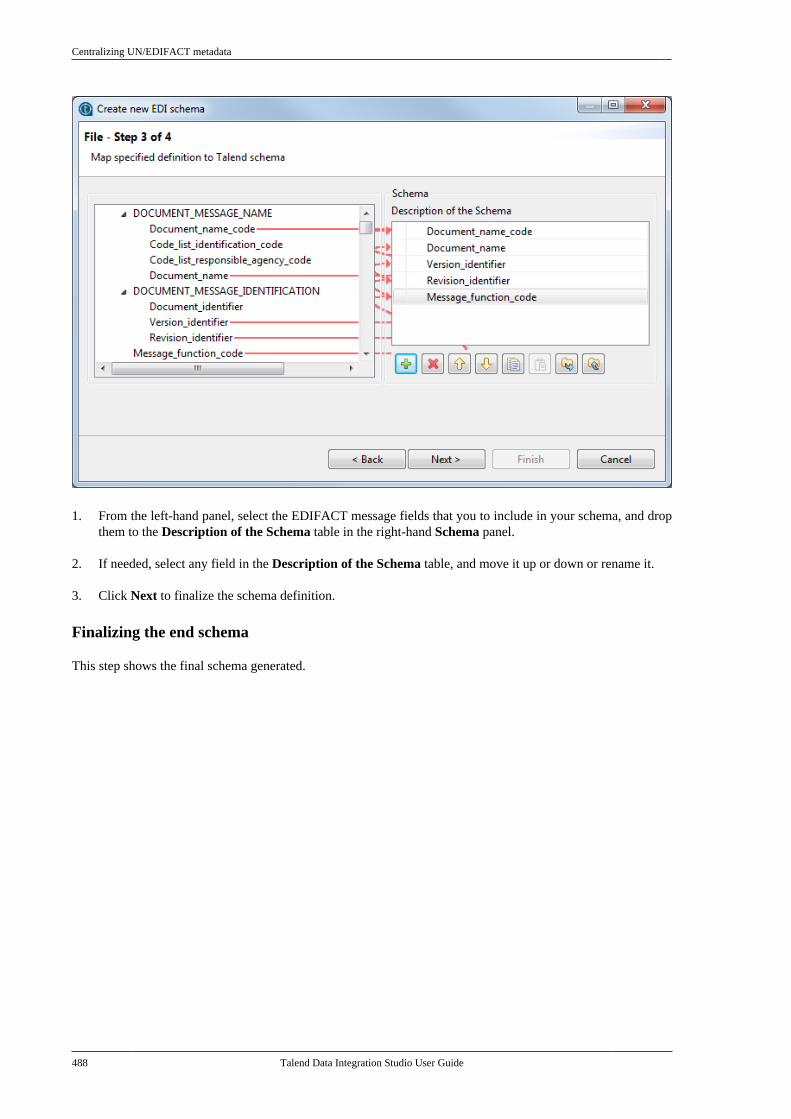
Centralizing UN/EDIFACT metadata
488 Talend Data Integration Studio User Guide
1. From the left-hand panel, select the EDIFACT message fields that you to include in your schema, and dropthem to the Description of the Schema table in the right-hand Schema panel.
2. If needed, select any field in the Description of the Schema table, and move it up or down or rename it.
3. Click Next to finalize the schema definition.
Finalizing the end schema
This step shows the final schema generated.
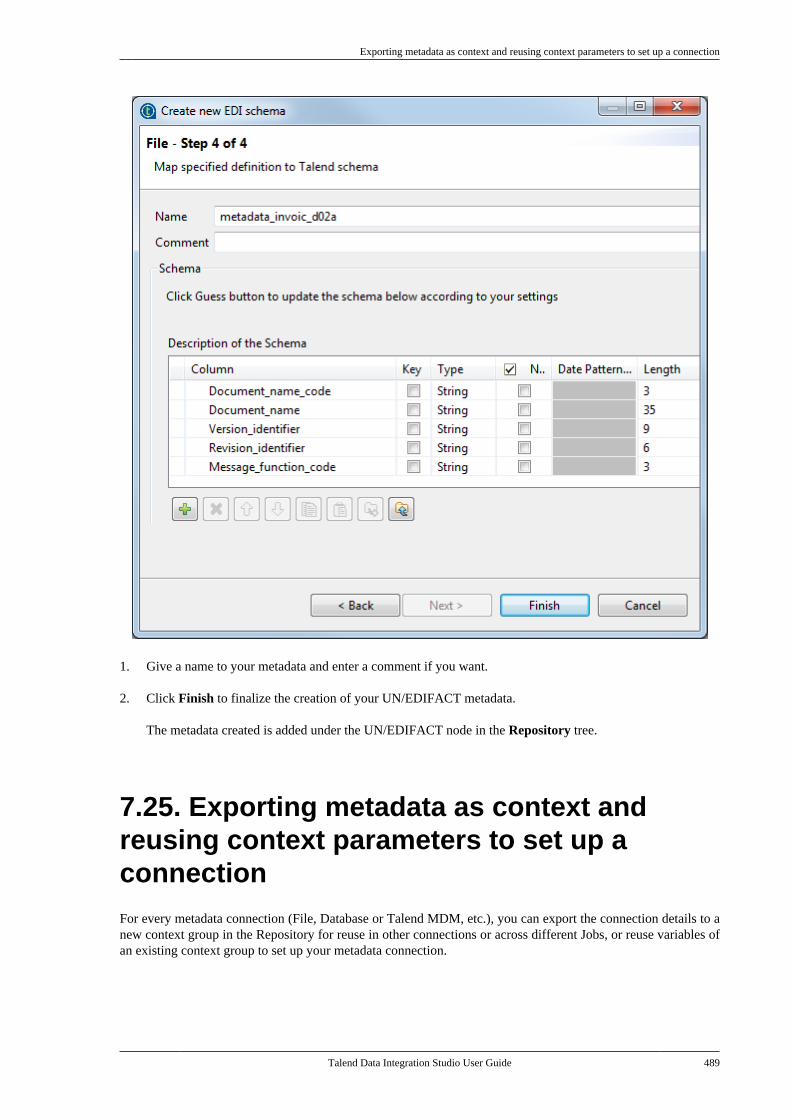
Exporting metadata as context and reusing context parameters to set up a connection
Talend Data Integration Studio User Guide 489
1. Give a name to your metadata and enter a comment if you want.
2. Click Finish to finalize the creation of your UN/EDIFACT metadata.
The metadata created is added under the UN/EDIFACT node in the Repository tree.
7.25. Exporting metadata as context andreusing context parameters to set up aconnectionFor every metadata connection (File, Database or Talend MDM, etc.), you can export the connection details to anew context group in the Repository for reuse in other connections or across different Jobs, or reuse variables ofan existing context group to set up your metadata connection.
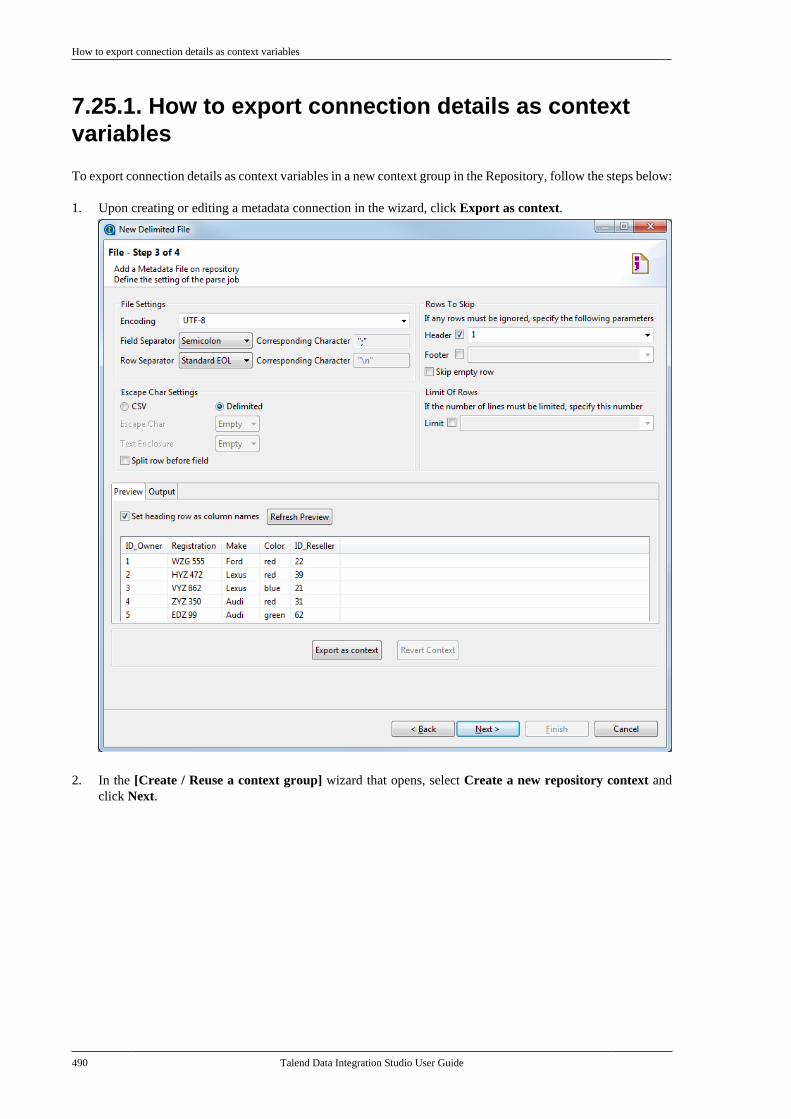
How to export connection details as context variables
490 Talend Data Integration Studio User Guide
7.25.1. How to export connection details as contextvariables
To export connection details as context variables in a new context group in the Repository, follow the steps below:
1. Upon creating or editing a metadata connection in the wizard, click Export as context.
2. In the [Create / Reuse a context group] wizard that opens, select Create a new repository context andclick Next.
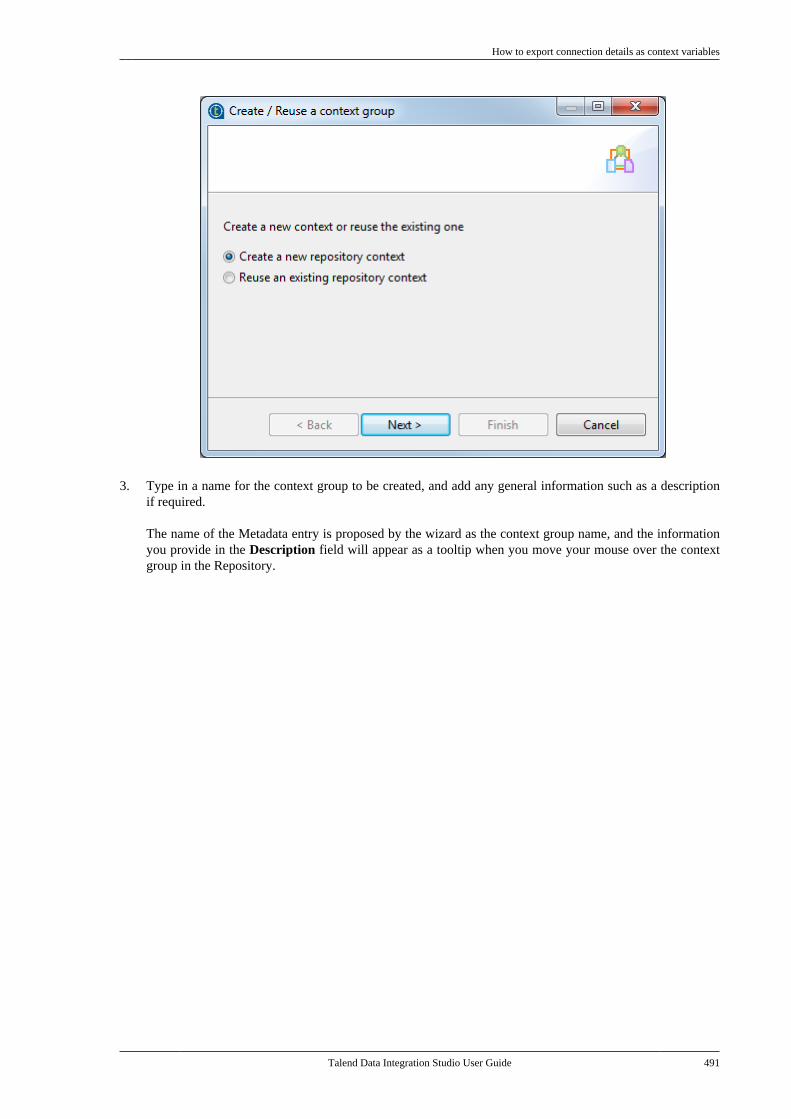
How to export connection details as context variables
Talend Data Integration Studio User Guide 491
3. Type in a name for the context group to be created, and add any general information such as a descriptionif required.
The name of the Metadata entry is proposed by the wizard as the context group name, and the informationyou provide in the Description field will appear as a tooltip when you move your mouse over the contextgroup in the Repository.
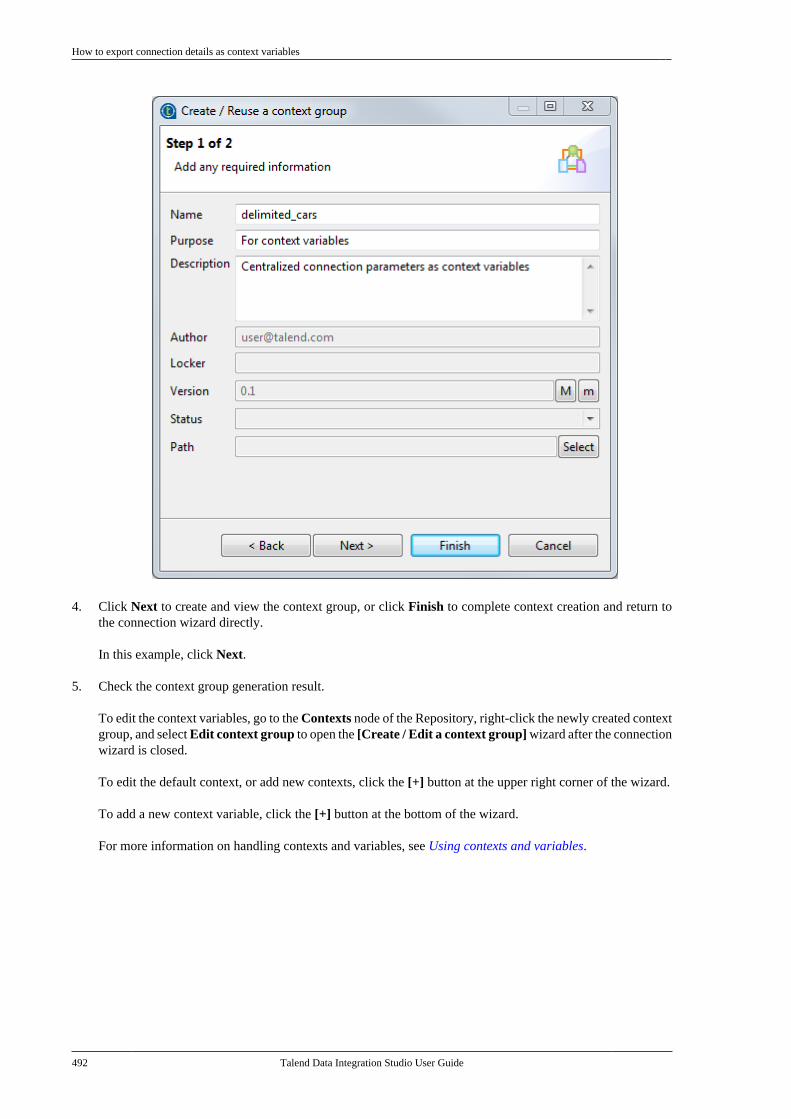
How to export connection details as context variables
492 Talend Data Integration Studio User Guide
4. Click Next to create and view the context group, or click Finish to complete context creation and return tothe connection wizard directly.
In this example, click Next.
5. Check the context group generation result.
To edit the context variables, go to the Contexts node of the Repository, right-click the newly created contextgroup, and select Edit context group to open the [Create / Edit a context group] wizard after the connectionwizard is closed.
To edit the default context, or add new contexts, click the [+] button at the upper right corner of the wizard.
To add a new context variable, click the [+] button at the bottom of the wizard.
For more information on handling contexts and variables, see Using contexts and variables.
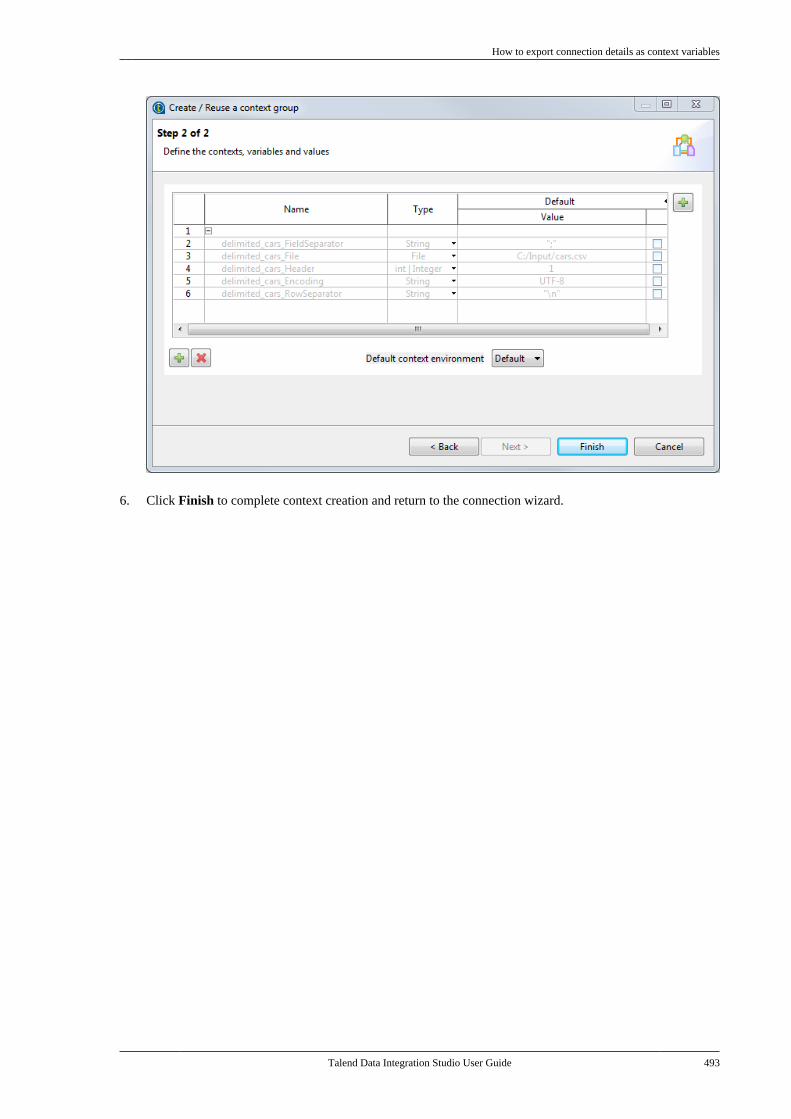
How to export connection details as context variables
Talend Data Integration Studio User Guide 493
6. Click Finish to complete context creation and return to the connection wizard.
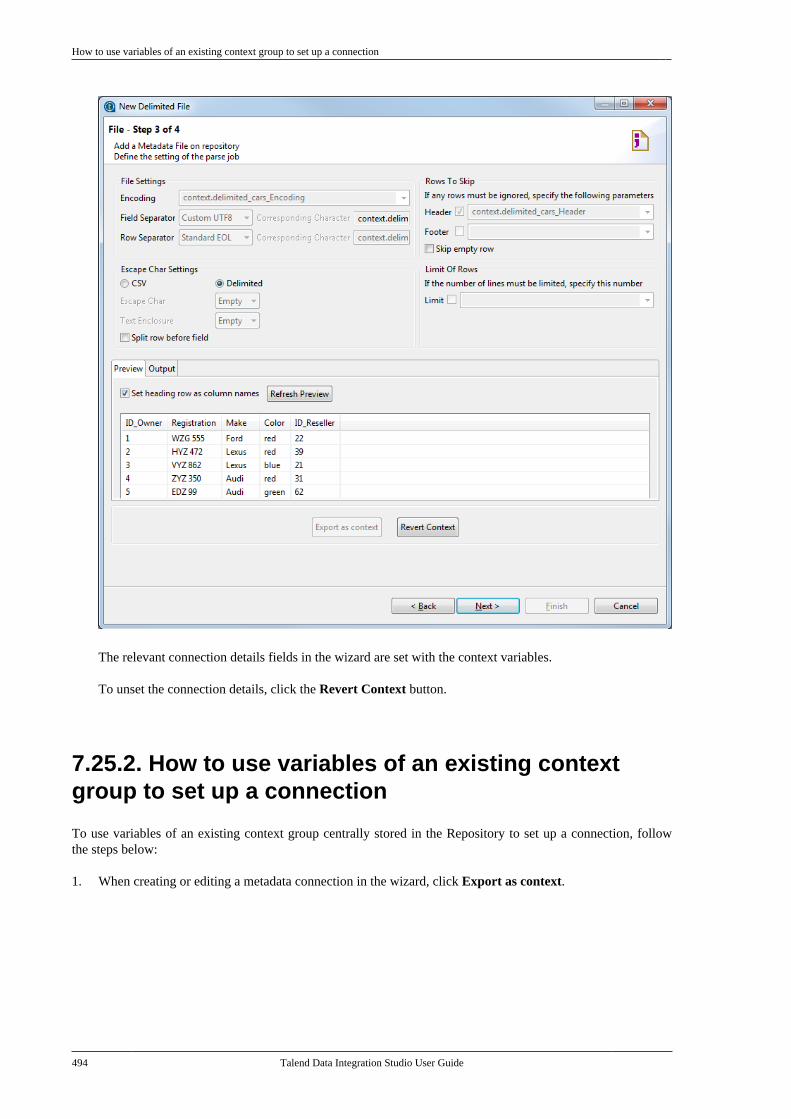
How to use variables of an existing context group to set up a connection
494 Talend Data Integration Studio User Guide
The relevant connection details fields in the wizard are set with the context variables.
To unset the connection details, click the Revert Context button.
7.25.2. How to use variables of an existing contextgroup to set up a connection
To use variables of an existing context group centrally stored in the Repository to set up a connection, followthe steps below:
1. When creating or editing a metadata connection in the wizard, click Export as context.
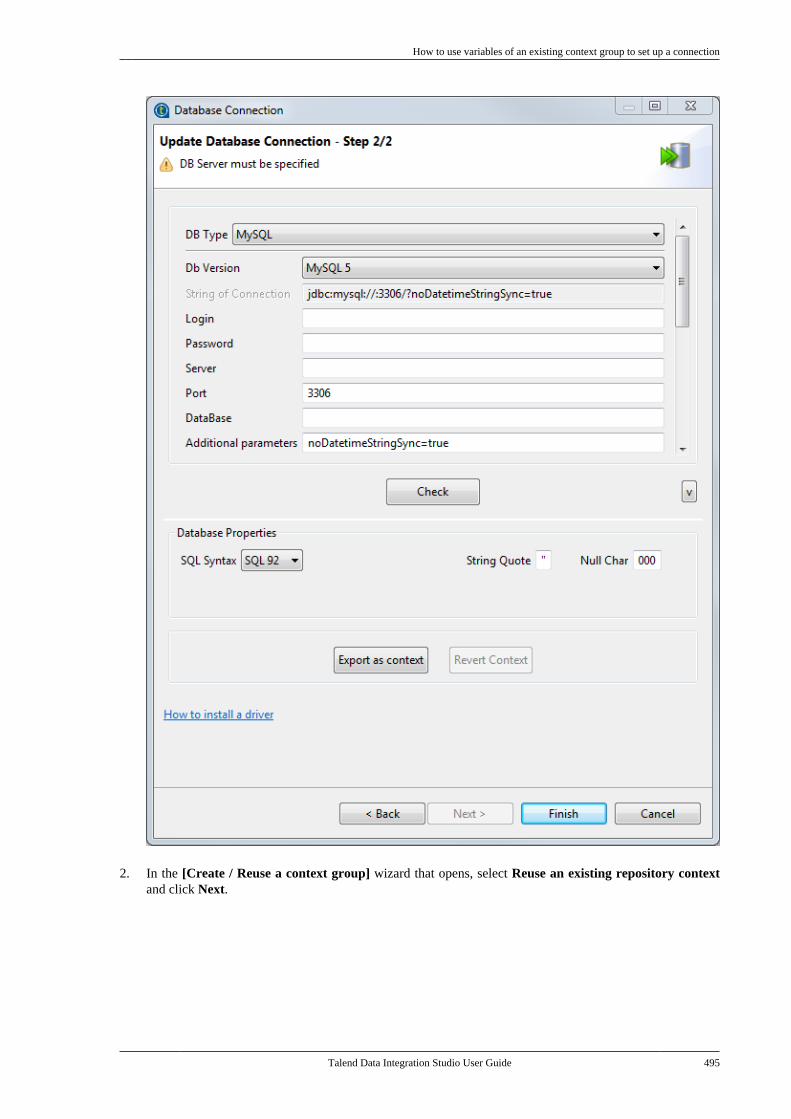
How to use variables of an existing context group to set up a connection
Talend Data Integration Studio User Guide 495
2. In the [Create / Reuse a context group] wizard that opens, select Reuse an existing repository contextand click Next.

How to use variables of an existing context group to set up a connection
496 Talend Data Integration Studio User Guide
3. Select a context group from the list and click Next.
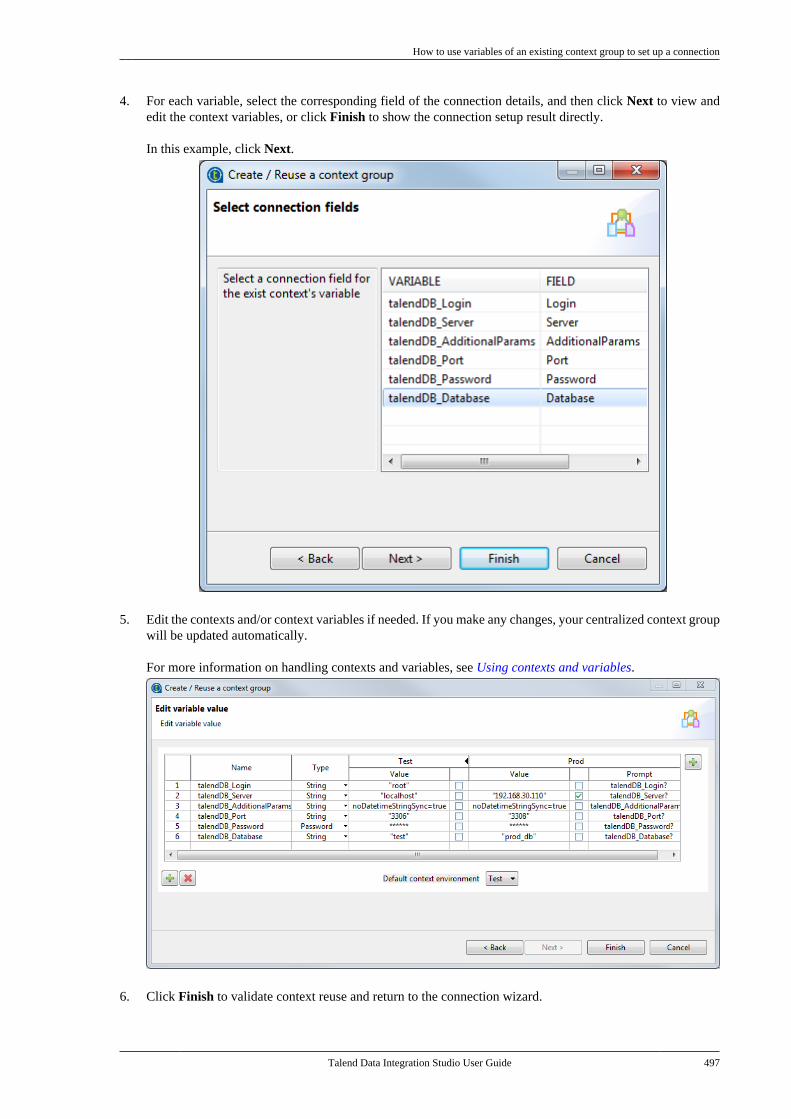
How to use variables of an existing context group to set up a connection
Talend Data Integration Studio User Guide 497
4. For each variable, select the corresponding field of the connection details, and then click Next to view andedit the context variables, or click Finish to show the connection setup result directly.
In this example, click Next.
5. Edit the contexts and/or context variables if needed. If you make any changes, your centralized context groupwill be updated automatically.
For more information on handling contexts and variables, see Using contexts and variables.
6. Click Finish to validate context reuse and return to the connection wizard.
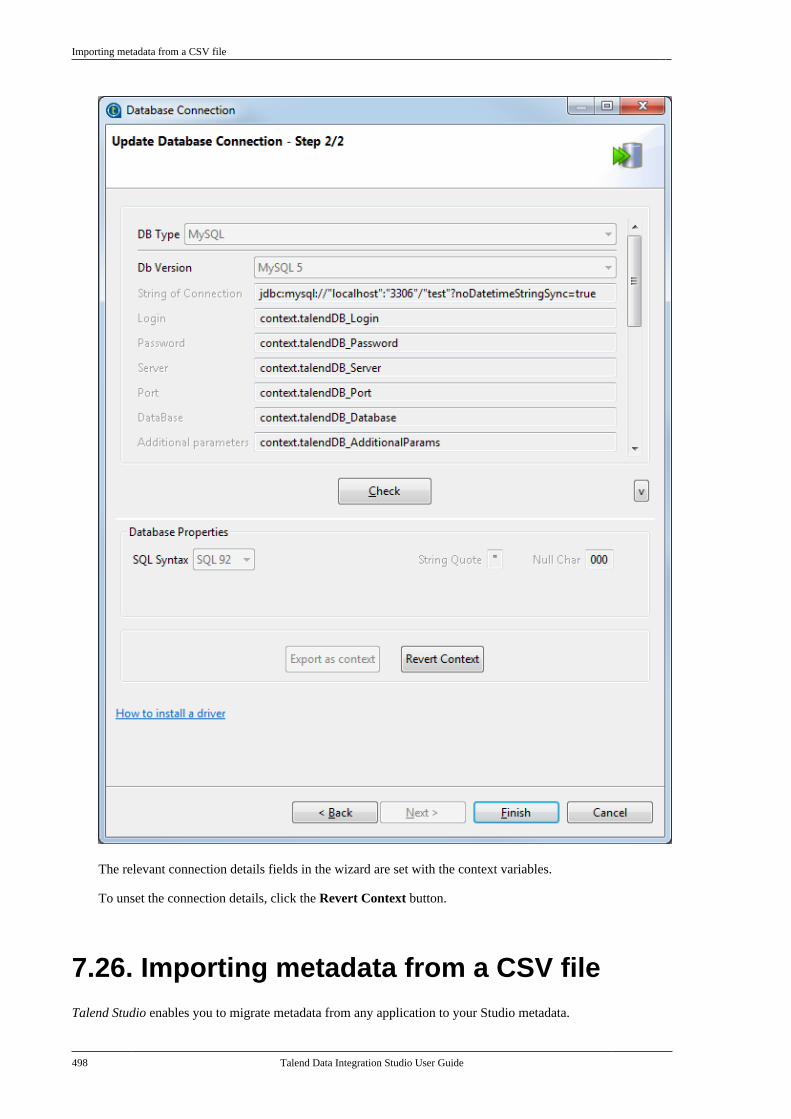
Importing metadata from a CSV file
498 Talend Data Integration Studio User Guide
The relevant connection details fields in the wizard are set with the context variables.
To unset the connection details, click the Revert Context button.
7.26. Importing metadata from a CSV fileTalend Studio enables you to migrate metadata from any application to your Studio metadata.
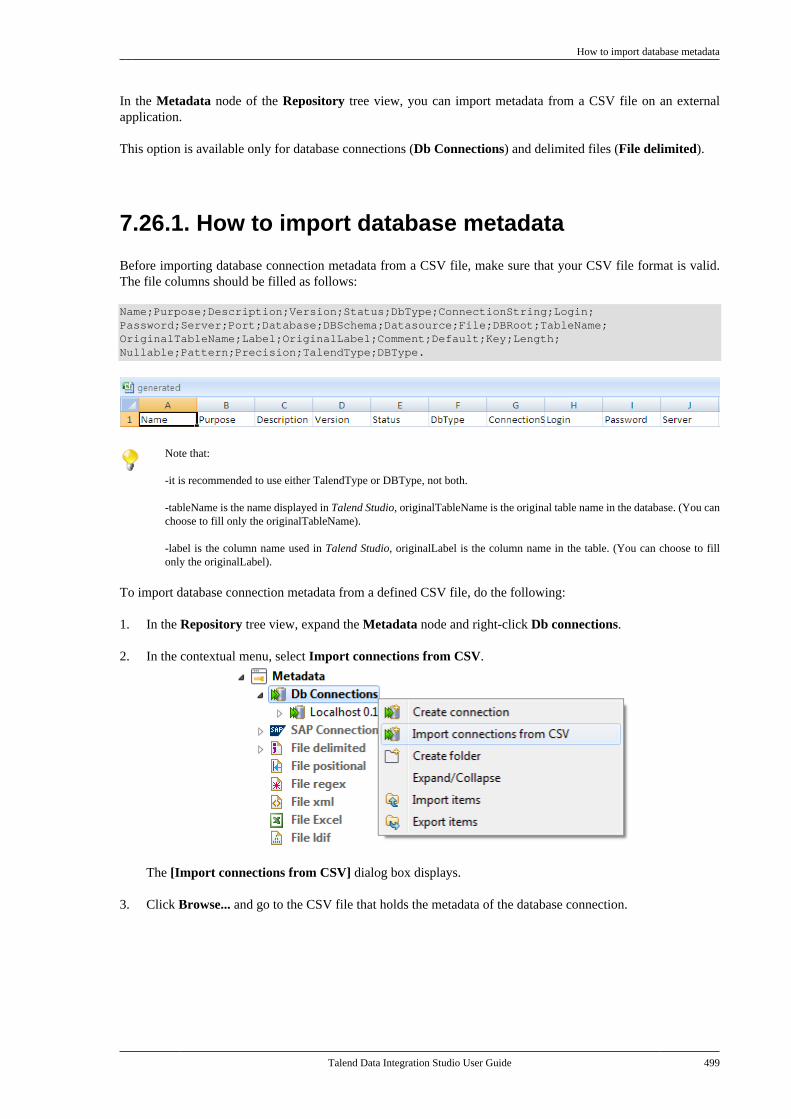
How to import database metadata
Talend Data Integration Studio User Guide 499
In the Metadata node of the Repository tree view, you can import metadata from a CSV file on an externalapplication.
This option is available only for database connections (Db Connections) and delimited files (File delimited).
7.26.1. How to import database metadata
Before importing database connection metadata from a CSV file, make sure that your CSV file format is valid.The file columns should be filled as follows:
Name;Purpose;Description;Version;Status;DbType;ConnectionString;Login;Password;Server;Port;Database;DBSchema;Datasource;File;DBRoot;TableName;OriginalTableName;Label;OriginalLabel;Comment;Default;Key;Length;Nullable;Pattern;Precision;TalendType;DBType.
Note that:
-it is recommended to use either TalendType or DBType, not both.
-tableName is the name displayed in Talend Studio, originalTableName is the original table name in the database. (You canchoose to fill only the originalTableName).
-label is the column name used in Talend Studio, originalLabel is the column name in the table. (You can choose to fillonly the originalLabel).
To import database connection metadata from a defined CSV file, do the following:
1. In the Repository tree view, expand the Metadata node and right-click Db connections.
2. In the contextual menu, select Import connections from CSV.
The [Import connections from CSV] dialog box displays.
3. Click Browse... and go to the CSV file that holds the metadata of the database connection.
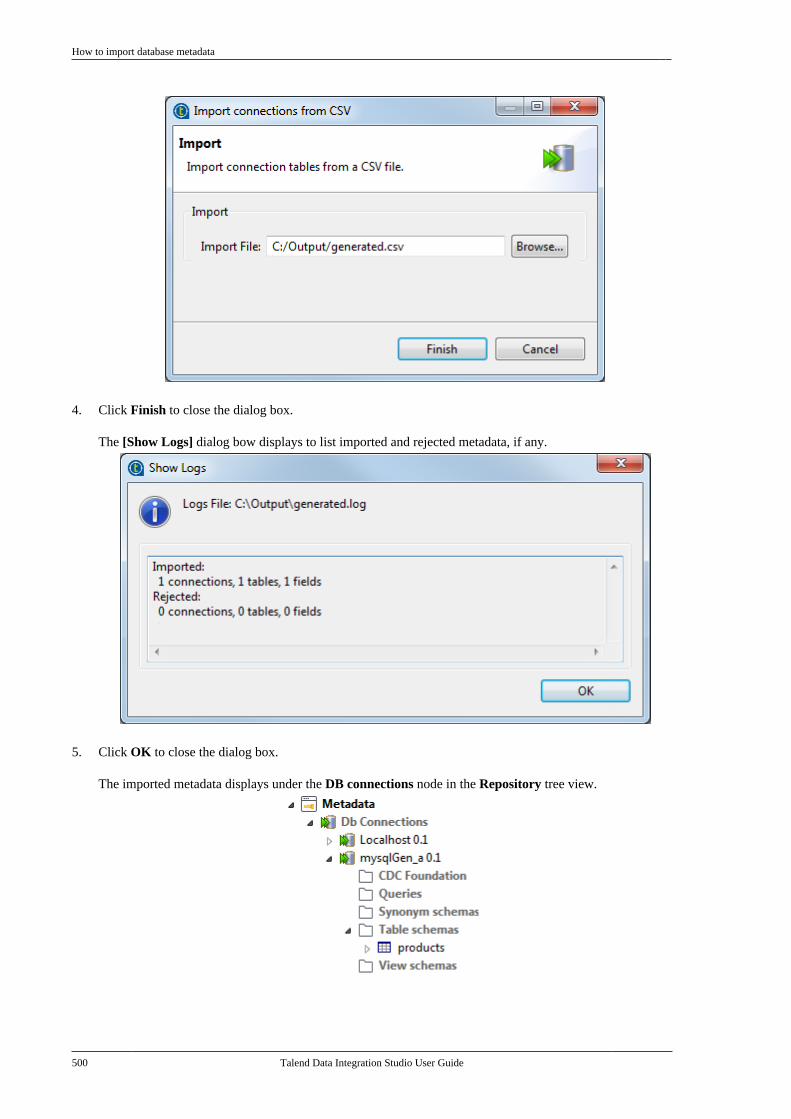
How to import database metadata
500 Talend Data Integration Studio User Guide
4. Click Finish to close the dialog box.
The [Show Logs] dialog bow displays to list imported and rejected metadata, if any.
5. Click OK to close the dialog box.
The imported metadata displays under the DB connections node in the Repository tree view.
How to import delimited file metadata
Talend Data Integration Studio User Guide 501
7.26.2. How to import delimited file metadata
You can import the metadata of a delimited file from a predefined CSV file.
Before importing delimited file metadata from a CSV file, make sure that each line of your CSV file complieswith the following format:
Name*; Purpose; Description; Version(0.1 by default); Status(DEV|TEST|PROD); FilePath*; FileFormat(UNIX|WINDOWS|MAC); Encoding; FieldSeparatorValue; RowSeparatorValue; EscapeType; EscapeChar; TextEnclosure; FirstLineCaption(true|false); HeaderValue; FooterValue; RemoveEmptyRow(true|false); LimitValue; TableName*; Label*; Comment; DefaultValue; Key*(true|false); Length*; Nullable(true|false); Pattern; Precision; TalendType
Note that:
• The fields with an asterisk (*) must not be left blank.
• Name is the file connection name that will be created under the File delimited node. You can create multiplefile connections by specifying different connection names.
• TableName is the name of the file schema, and Label is the column name in the schema.
• Escape sequences must be used to specify CSV metacharacters or control characters, such as ; or \n.
• The FirstLineCaption field must be set to true and the HeaderValue field must be filled properly if thedelimited file contains a header row and rows to be skipped.
The following example shows how to import the metadata of a delimited file named directors.csv from a predefinedCSV file named directors_metadata.csv.
Below is an abstract of the file directors.csv, which has two columns id and name:
id;name1;Gregg Araki2;P.J. Hogan3;Alan Rudolph
The CSV file directors_metadata.csv contains two lines to describe the metadata of directors.csv:
directors;Centralize directors metadata;Metadata of directors.csv; 0.1;DEV; E:\Talend\Data\Input\directors.csv;WINDOWS;UTF-8; "\";\""; "\"\\n\""; Delimited;;;true;1;;false;;directors_schema;id;;;false;1;true;;0;id_Integer
directors;Centralize directors metadata;Metadata of directors.csv;0.1;DEV; E:\Talend\Data\Input\directors.csv;WINDOWS;UTF-8; "\";\""; "\"\\n\""; Delimited;;;true;1;;false;;directors_schema;name;;;false;1;true;;0;id_String
To import delimited file connection metadata from the above-mentioned CSV file, do the following:
1. In the Repository tree view, expand the Metadata node and right-click File delimited.
2. In the contextual menu, select Import connections from CSV.
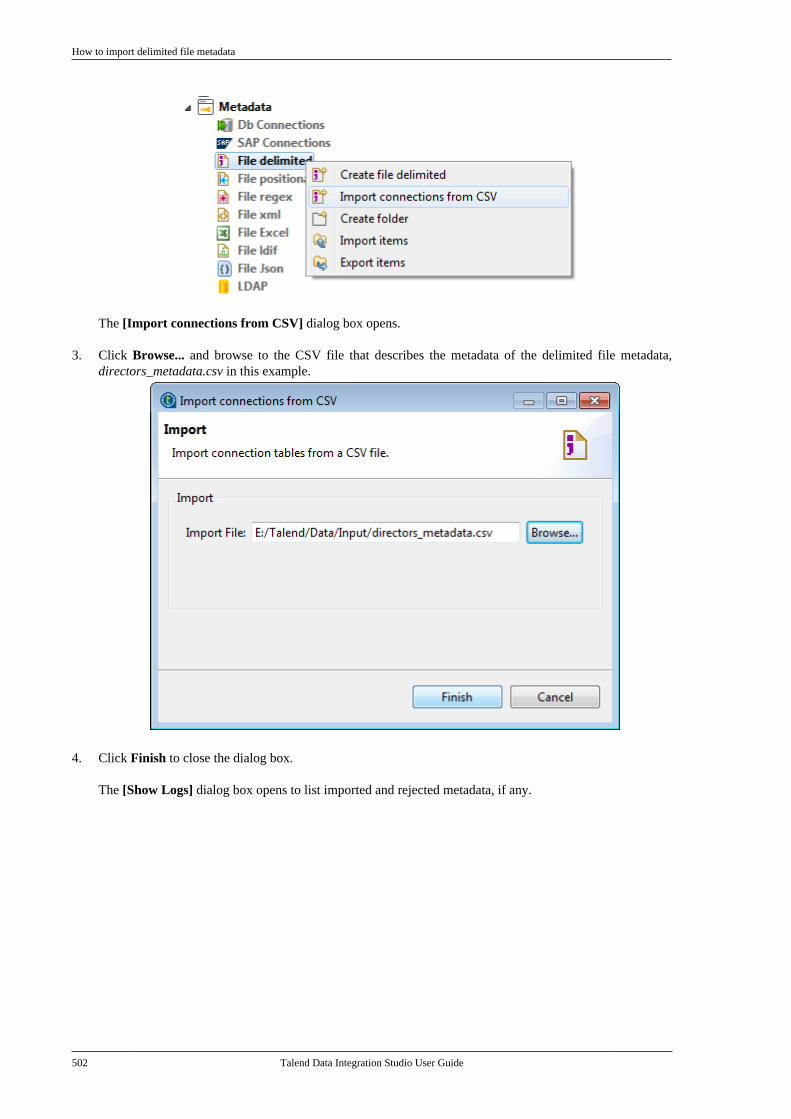
How to import delimited file metadata
502 Talend Data Integration Studio User Guide
The [Import connections from CSV] dialog box opens.
3. Click Browse... and browse to the CSV file that describes the metadata of the delimited file metadata,directors_metadata.csv in this example.
4. Click Finish to close the dialog box.
The [Show Logs] dialog box opens to list imported and rejected metadata, if any.
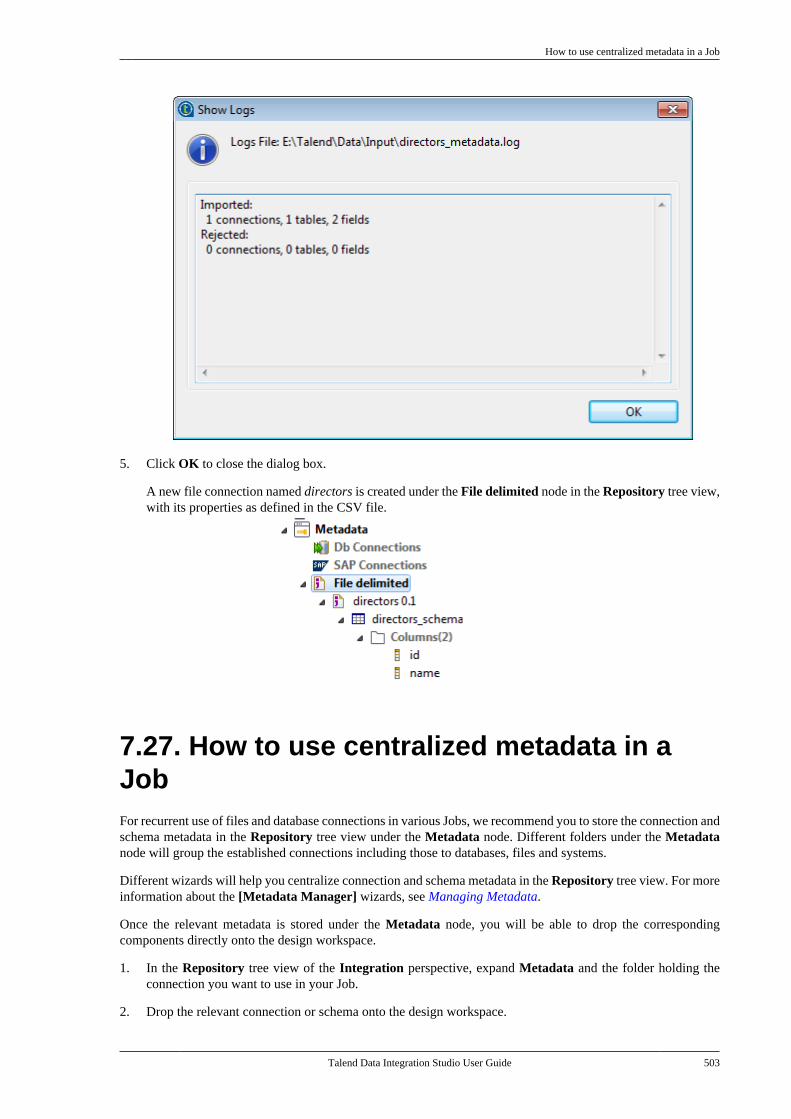
How to use centralized metadata in a Job
Talend Data Integration Studio User Guide 503
5. Click OK to close the dialog box.
A new file connection named directors is created under the File delimited node in the Repository tree view,with its properties as defined in the CSV file.
7.27. How to use centralized metadata in aJobFor recurrent use of files and database connections in various Jobs, we recommend you to store the connection andschema metadata in the Repository tree view under the Metadata node. Different folders under the Metadatanode will group the established connections including those to databases, files and systems.
Different wizards will help you centralize connection and schema metadata in the Repository tree view. For moreinformation about the [Metadata Manager] wizards, see Managing Metadata.
Once the relevant metadata is stored under the Metadata node, you will be able to drop the correspondingcomponents directly onto the design workspace.
1. In the Repository tree view of the Integration perspective, expand Metadata and the folder holding theconnection you want to use in your Job.
2. Drop the relevant connection or schema onto the design workspace.
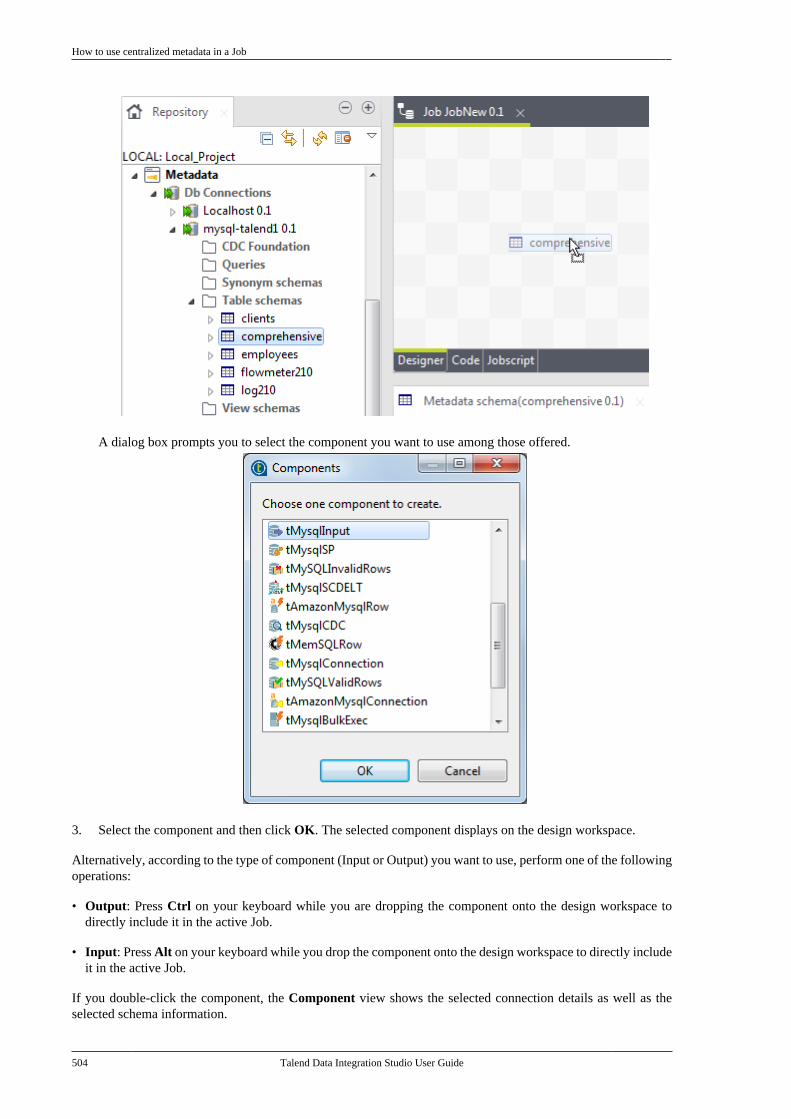
How to use centralized metadata in a Job
504 Talend Data Integration Studio User Guide
A dialog box prompts you to select the component you want to use among those offered.
3. Select the component and then click OK. The selected component displays on the design workspace.
Alternatively, according to the type of component (Input or Output) you want to use, perform one of the followingoperations:
• Output: Press Ctrl on your keyboard while you are dropping the component onto the design workspace todirectly include it in the active Job.
• Input: Press Alt on your keyboard while you drop the component onto the design workspace to directly includeit in the active Job.
If you double-click the component, the Component view shows the selected connection details as well as theselected schema information.
How to use centralized metadata in a Job
Talend Data Integration Studio User Guide 505
If you select the connection without selecting a schema, then the properties will be filled with the first encountered schema.

Talend Data Integration Studio User Guide
Talend Data Integration Studio User Guide
Chapter 8. Managing routinesThis chapter defines the routines, along with user scenarios, and explains how to create your own routines or howto customize the system routines. The chapter also gives an overview of the main routines and use cases of them.To have an overview of the most commonly used routines and other use cases, see System routines.
What are routines
508 Talend Data Integration Studio User Guide
8.1. What are routinesRoutines are fairly complex Java functions, generally used to factorize code. They therefore optimize dataprocessing and improve Job capacities.
You can also use the Repository tree view to store frequently used parts of code or extract parts of existingcompany functions, by calling them via the routines. This factorization makes it easier to resolve any problemswhich may arise and allows you to update the code used in multiple Jobs quickly and easily.
On top of this, certain system routines adopt the most common Java methods, using the Talend syntax. This allowsyou to escalate Java errors in the studio directly, thereby facilitating the identification and resolution of problemswhich may arise as your integration processes evolve with Talend.
There are two types of routines:
• System routines: a number of system routines are provided. They are classed according to the type of data whichthey process: numerical, string, date...
• User routines: these are routines which you have created or adapted from existing routines.
You do not need any knowledge of the Java language to create and use Talend routines.
All of the routines are stored under Code > Routines in the Repository tree view.
For further information concerning the system routines, see Accessing the System Routines.
For further information about how to create user routines, see How to create user routines.
You can also set up routine dependencies on Jobs. To do so, simply right click a Job on the Repository tree view and selectSet up routine dependencies. In the dialog box which opens, all routines are set by default. You can use the tool bar toremove routines if required.
8.2. Accessing the System RoutinesTo access the system routines, click Code > Routines > system. The routines or functions are classed accordingto their usage.
The system folder and its content are read only.

Accessing the System Routines
Talend Data Integration Studio User Guide 509
Each class or category in the system folder contains several routines or functions. Double-click the class that youwant to open.
If you have subscribed to one of the Talend solutions with the Profiling perspective, you will have access to routines specificto data quality in the Routines node. These data quality routines handle the first and last names and the titles.
All of the routines or functions within a class are composed of some descriptive text, followed by the correspondingJava code. In the Routines view, you can use the scrollbar to browse the different routines. Or alternatively:
1. Press Ctrl+O in the routines view.
A dialog box displays a list of the different routines in the category.
2. Click the routine of interest.
The view jumps to the section comprising the routine's descriptive text and corresponding code.
The syntax of routine call statements is case sensitive.
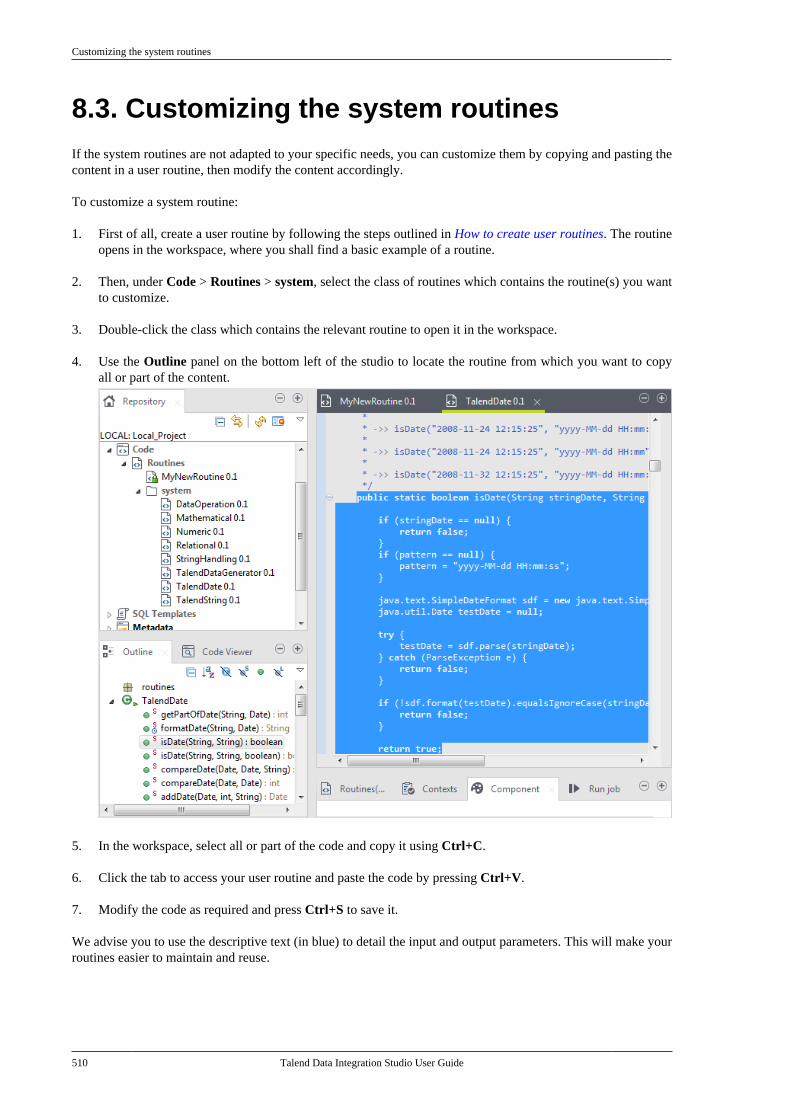
Customizing the system routines
510 Talend Data Integration Studio User Guide
8.3. Customizing the system routinesIf the system routines are not adapted to your specific needs, you can customize them by copying and pasting thecontent in a user routine, then modify the content accordingly.
To customize a system routine:
1. First of all, create a user routine by following the steps outlined in How to create user routines. The routineopens in the workspace, where you shall find a basic example of a routine.
2. Then, under Code > Routines > system, select the class of routines which contains the routine(s) you wantto customize.
3. Double-click the class which contains the relevant routine to open it in the workspace.
4. Use the Outline panel on the bottom left of the studio to locate the routine from which you want to copyall or part of the content.
5. In the workspace, select all or part of the code and copy it using Ctrl+C.
6. Click the tab to access your user routine and paste the code by pressing Ctrl+V.
7. Modify the code as required and press Ctrl+S to save it.
We advise you to use the descriptive text (in blue) to detail the input and output parameters. This will make yourroutines easier to maintain and reuse.
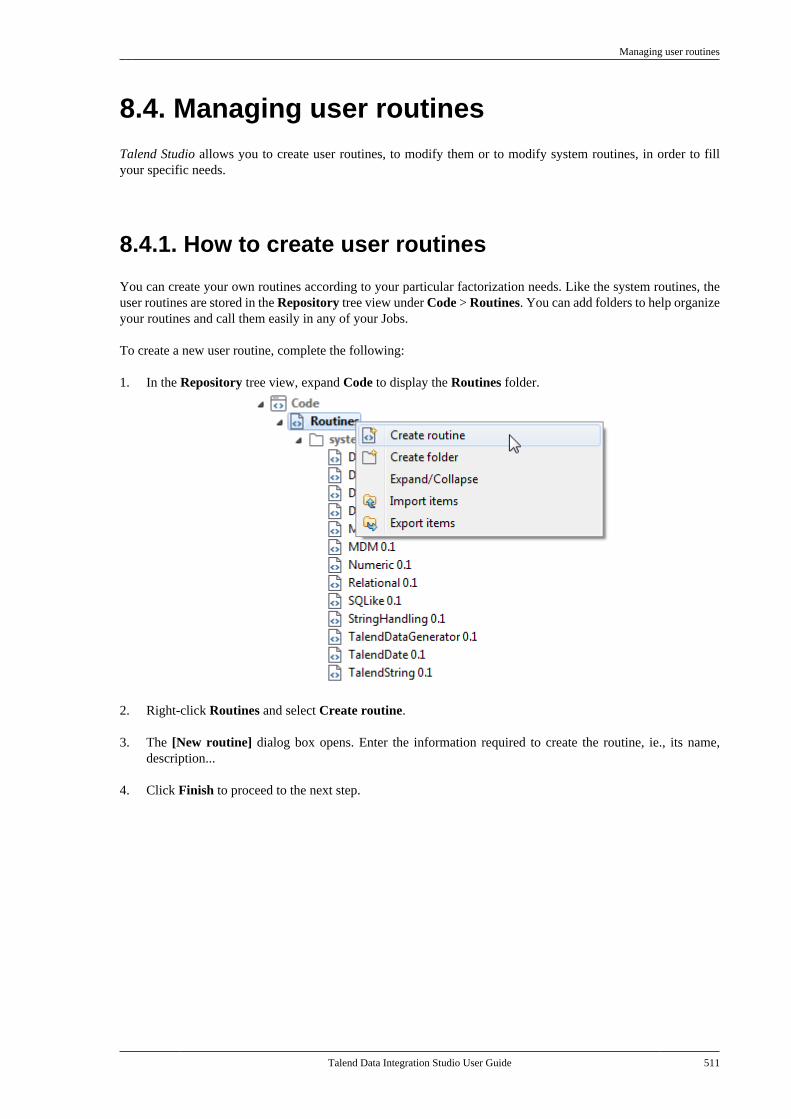
Managing user routines
Talend Data Integration Studio User Guide 511
8.4. Managing user routinesTalend Studio allows you to create user routines, to modify them or to modify system routines, in order to fillyour specific needs.
8.4.1. How to create user routines
You can create your own routines according to your particular factorization needs. Like the system routines, theuser routines are stored in the Repository tree view under Code > Routines. You can add folders to help organizeyour routines and call them easily in any of your Jobs.
To create a new user routine, complete the following:
1. In the Repository tree view, expand Code to display the Routines folder.
2. Right-click Routines and select Create routine.
3. The [New routine] dialog box opens. Enter the information required to create the routine, ie., its name,description...
4. Click Finish to proceed to the next step.
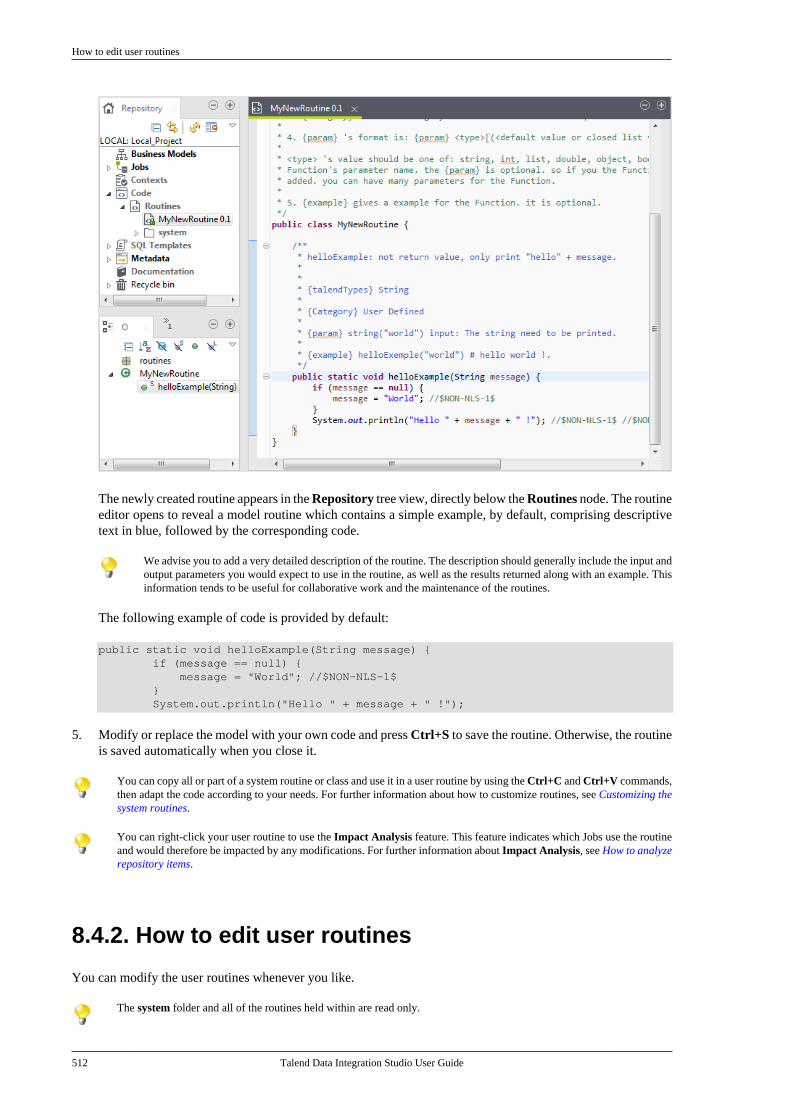
How to edit user routines
512 Talend Data Integration Studio User Guide
The newly created routine appears in the Repository tree view, directly below the Routines node. The routineeditor opens to reveal a model routine which contains a simple example, by default, comprising descriptivetext in blue, followed by the corresponding code.
We advise you to add a very detailed description of the routine. The description should generally include the input andoutput parameters you would expect to use in the routine, as well as the results returned along with an example. Thisinformation tends to be useful for collaborative work and the maintenance of the routines.
The following example of code is provided by default:
public static void helloExample(String message) { if (message == null) { message = "World"; //$NON-NLS-1$ } System.out.println("Hello " + message + " !");
5. Modify or replace the model with your own code and press Ctrl+S to save the routine. Otherwise, the routineis saved automatically when you close it.
You can copy all or part of a system routine or class and use it in a user routine by using the Ctrl+C and Ctrl+V commands,then adapt the code according to your needs. For further information about how to customize routines, see Customizing thesystem routines.
You can right-click your user routine to use the Impact Analysis feature. This feature indicates which Jobs use the routineand would therefore be impacted by any modifications. For further information about Impact Analysis, see How to analyzerepository items.
8.4.2. How to edit user routines
You can modify the user routines whenever you like.
The system folder and all of the routines held within are read only.
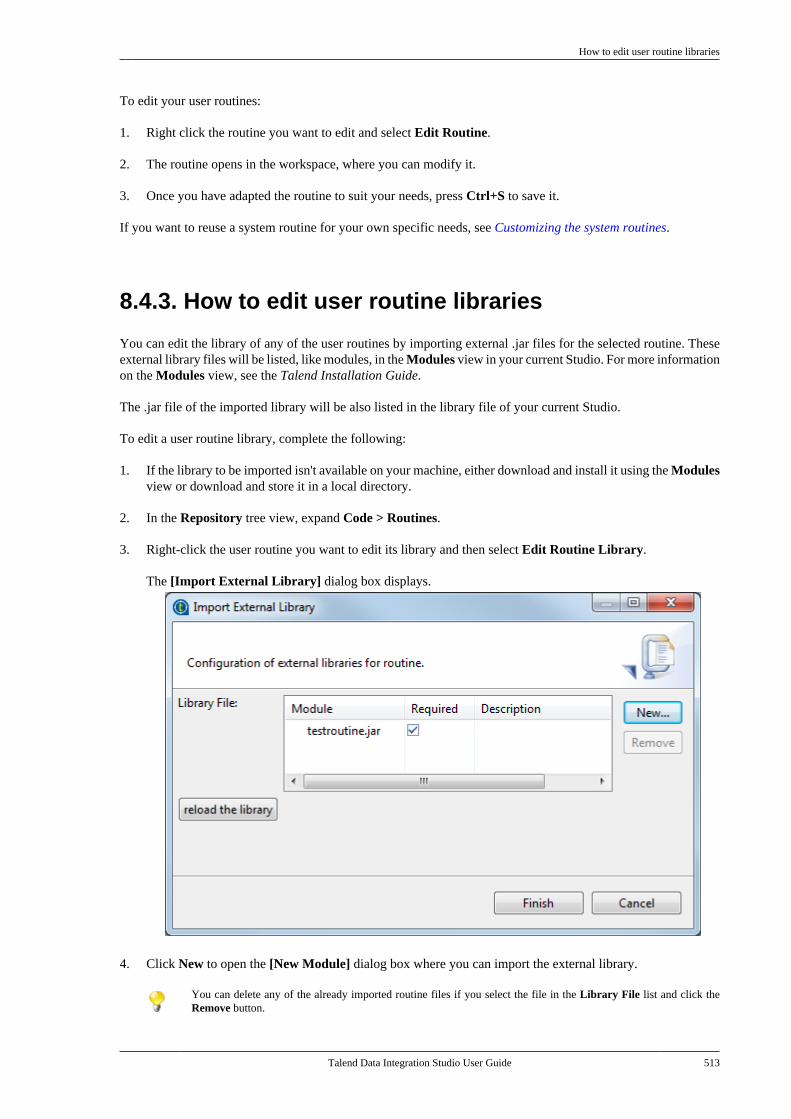
How to edit user routine libraries
Talend Data Integration Studio User Guide 513
To edit your user routines:
1. Right click the routine you want to edit and select Edit Routine.
2. The routine opens in the workspace, where you can modify it.
3. Once you have adapted the routine to suit your needs, press Ctrl+S to save it.
If you want to reuse a system routine for your own specific needs, see Customizing the system routines.
8.4.3. How to edit user routine libraries
You can edit the library of any of the user routines by importing external .jar files for the selected routine. Theseexternal library files will be listed, like modules, in the Modules view in your current Studio. For more informationon the Modules view, see the Talend Installation Guide.
The .jar file of the imported library will be also listed in the library file of your current Studio.
To edit a user routine library, complete the following:
1. If the library to be imported isn't available on your machine, either download and install it using the Modulesview or download and store it in a local directory.
2. In the Repository tree view, expand Code > Routines.
3. Right-click the user routine you want to edit its library and then select Edit Routine Library.
The [Import External Library] dialog box displays.
4. Click New to open the [New Module] dialog box where you can import the external library.
You can delete any of the already imported routine files if you select the file in the Library File list and click theRemove button.
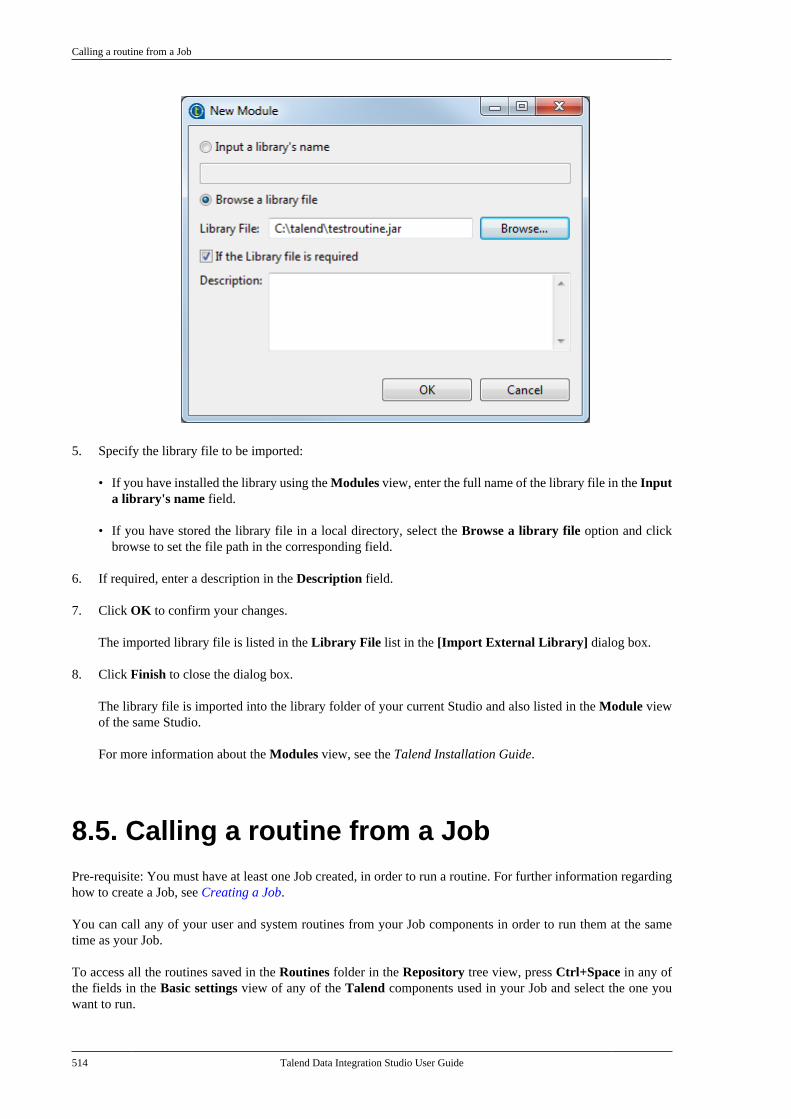
Calling a routine from a Job
514 Talend Data Integration Studio User Guide
5. Specify the library file to be imported:
• If you have installed the library using the Modules view, enter the full name of the library file in the Inputa library's name field.
• If you have stored the library file in a local directory, select the Browse a library file option and clickbrowse to set the file path in the corresponding field.
6. If required, enter a description in the Description field.
7. Click OK to confirm your changes.
The imported library file is listed in the Library File list in the [Import External Library] dialog box.
8. Click Finish to close the dialog box.
The library file is imported into the library folder of your current Studio and also listed in the Module viewof the same Studio.
For more information about the Modules view, see the Talend Installation Guide.
8.5. Calling a routine from a JobPre-requisite: You must have at least one Job created, in order to run a routine. For further information regardinghow to create a Job, see Creating a Job.
You can call any of your user and system routines from your Job components in order to run them at the sametime as your Job.
To access all the routines saved in the Routines folder in the Repository tree view, press Ctrl+Space in any ofthe fields in the Basic settings view of any of the Talend components used in your Job and select the one youwant to run.
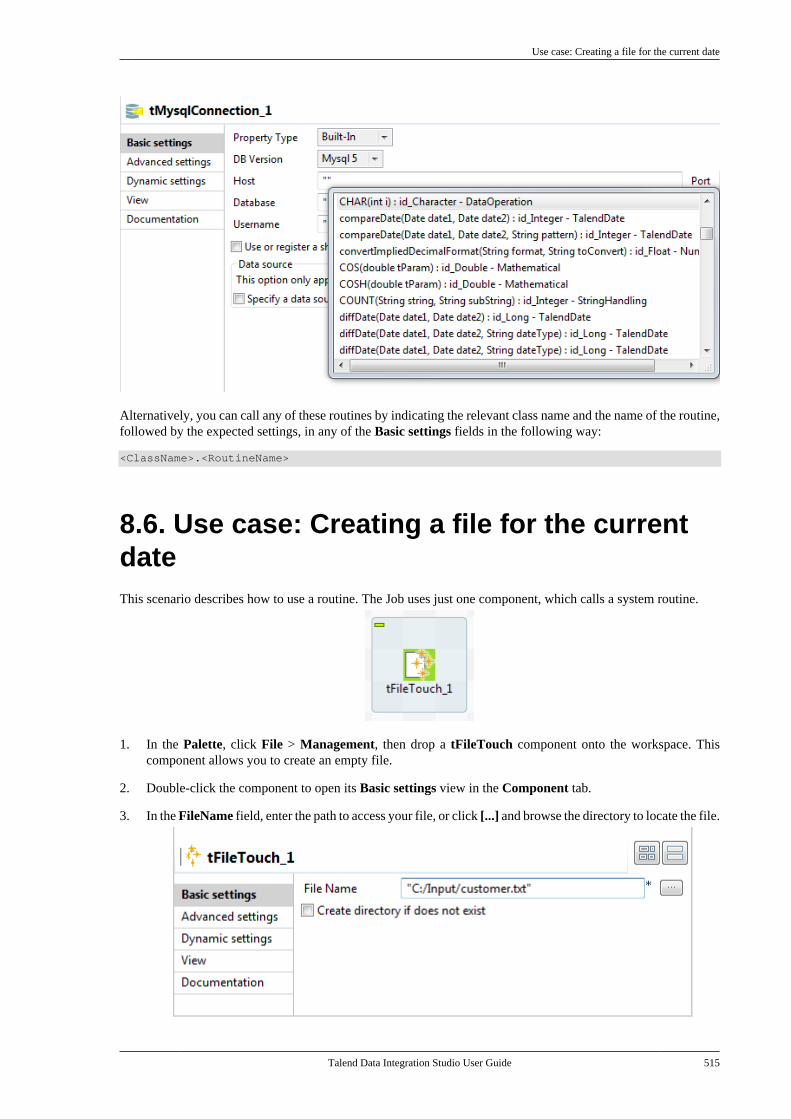
Use case: Creating a file for the current date
Talend Data Integration Studio User Guide 515
Alternatively, you can call any of these routines by indicating the relevant class name and the name of the routine,followed by the expected settings, in any of the Basic settings fields in the following way:
<ClassName>.<RoutineName>
8.6. Use case: Creating a file for the currentdateThis scenario describes how to use a routine. The Job uses just one component, which calls a system routine.
1. In the Palette, click File > Management, then drop a tFileTouch component onto the workspace. Thiscomponent allows you to create an empty file.
2. Double-click the component to open its Basic settings view in the Component tab.
3. In the FileName field, enter the path to access your file, or click [...] and browse the directory to locate the file.
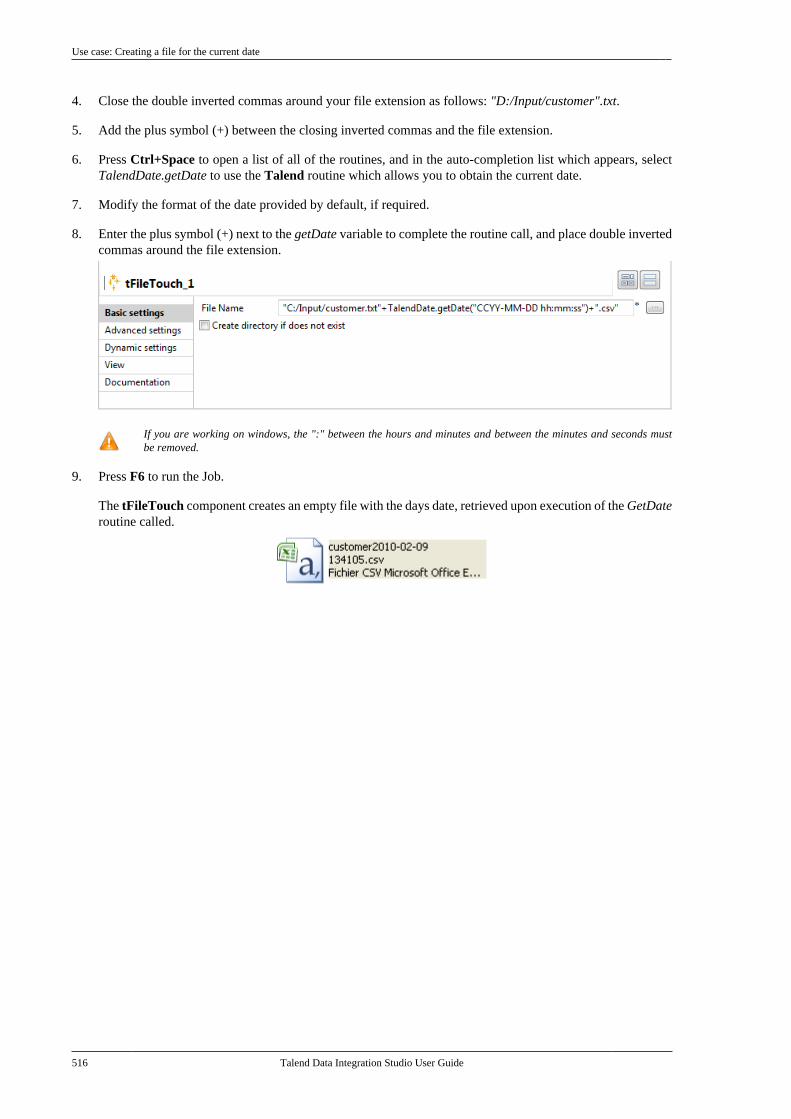
Use case: Creating a file for the current date
516 Talend Data Integration Studio User Guide
4. Close the double inverted commas around your file extension as follows: "D:/Input/customer".txt.
5. Add the plus symbol (+) between the closing inverted commas and the file extension.
6. Press Ctrl+Space to open a list of all of the routines, and in the auto-completion list which appears, selectTalendDate.getDate to use the Talend routine which allows you to obtain the current date.
7. Modify the format of the date provided by default, if required.
8. Enter the plus symbol (+) next to the getDate variable to complete the routine call, and place double invertedcommas around the file extension.
If you are working on windows, the ":" between the hours and minutes and between the minutes and seconds mustbe removed.
9. Press F6 to run the Job.
The tFileTouch component creates an empty file with the days date, retrieved upon execution of the GetDateroutine called.
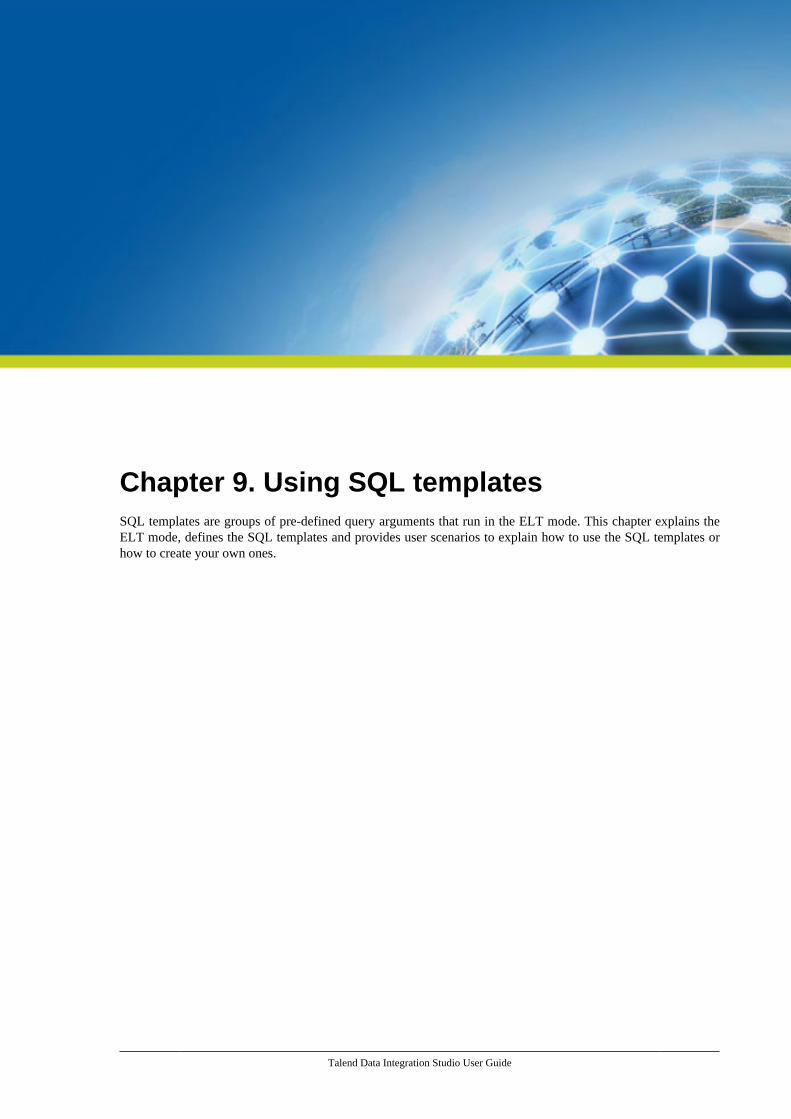
Talend Data Integration Studio User Guide
Chapter 9. Using SQL templatesSQL templates are groups of pre-defined query arguments that run in the ELT mode. This chapter explains theELT mode, defines the SQL templates and provides user scenarios to explain how to use the SQL templates orhow to create your own ones.
What is ELT
518 Talend Data Integration Studio User Guide
9.1. What is ELTExtract, Load and Transform (ELT) is a data manipulation process in database usage, especially in datawarehousing. Different from the traditional ETL (Extract, Transform, Load) mode, in ELT, data is extracted,loaded into the database and then is transformed where it sits in the database, prior to use. This data is migrated inbulk according to the data set and the transformation process occurs after the data has been loaded into the targetedDBMS in its raw format. This way, less stress is placed on the network and larger throughput is gained.
However, the ELT mode is certainly not optimal for all situations, for example,
• As SQL is less powerful than Java, the scope of available data transformations is limited.
• ELT requires users that have high proficiency in SQL tuning and DBMS tuning.
• Using ELT with Talend Studio, you cannot pass or reject one single row of data as you can do in ETL. For moreinformation about row rejection, see Row connection.
Based on the advantages and disadvantages of ELT, the SQL templates are designed as the ELT facilitationrequires.
9.2. Introducing Talend SQL templatesSQL is a standardized query language used to access and manage information in databases. Its scope includes dataquery and update, schema creation and modification, and data access control. Talend Studio provides a range ofSQL templates to simplify the most common tasks. It also comprises a SQL editor which allows you to customizeor design your own SQL templates to meet less common requirements.
These SQL templates are used with the components from the Talend ELT component family includingtSQLTemplate, tSQLTemplateFilterColumns, tSQLTemplateCommit, tSQLTemplateFilterRows,tSQLTemplateRollback, tSQLTemplateAggregate and tSQLTemplateMerge. These components execute theselected SQL statements. Using the UNION, EXCEPT and INTERSECT operators, you can modify data directlyon the DBMS without using the system memory.
Moreover, with the help of these SQL templates, you can optimize the efficiency of your database managementsystem by storing and retrieving your data according to the structural requirements.
Talend Studio provides the following types of SQL templates under the SQL templates node in the Repositorytree view:
• System SQL templates: They are classified according to the type of database for which they are tailored.
• User-defined SQL templates: these are templates which you have created or adapted from existing templates.
More detailed information about the SQL templates is presented in the below sections.
For further information concerning the components from the ELT component family, see Talend ComponentsReference Guide.
As most of the SQL templates are tailored for specific databases, if you change database in your system, it is inevitable toswitch to or develop new templates for the new database.
9.3. Managing Talend SQL templatesTalend Studio enables you via the SQL Templates folder in the Repository tree view to use system or user-defined SQL templates in the Jobs you create in the Studio using the ELT components.
The below sections show you how to manage these two types of SQL templates.
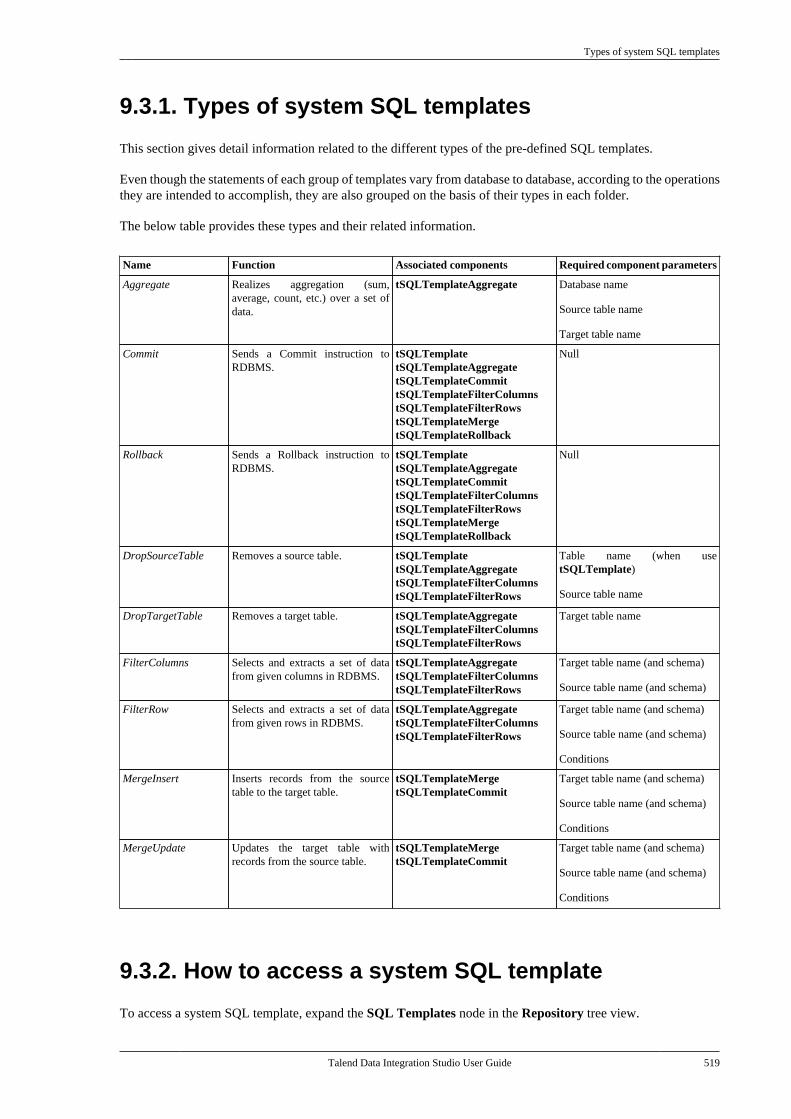
Types of system SQL templates
Talend Data Integration Studio User Guide 519
9.3.1. Types of system SQL templates
This section gives detail information related to the different types of the pre-defined SQL templates.
Even though the statements of each group of templates vary from database to database, according to the operationsthey are intended to accomplish, they are also grouped on the basis of their types in each folder.
The below table provides these types and their related information.
Name Function Associated components Required component parameters
Aggregate Realizes aggregation (sum,average, count, etc.) over a set ofdata.
tSQLTemplateAggregate Database name
Source table name
Target table name
Commit Sends a Commit instruction toRDBMS.
tSQLTemplatetSQLTemplateAggregatetSQLTemplateCommittSQLTemplateFilterColumnstSQLTemplateFilterRowstSQLTemplateMergetSQLTemplateRollback
Null
Rollback Sends a Rollback instruction toRDBMS.
tSQLTemplatetSQLTemplateAggregatetSQLTemplateCommittSQLTemplateFilterColumnstSQLTemplateFilterRowstSQLTemplateMergetSQLTemplateRollback
Null
DropSourceTable Removes a source table. tSQLTemplatetSQLTemplateAggregatetSQLTemplateFilterColumnstSQLTemplateFilterRows
Table name (when usetSQLTemplate)
Source table name
DropTargetTable Removes a target table. tSQLTemplateAggregatetSQLTemplateFilterColumnstSQLTemplateFilterRows
Target table name
FilterColumns Selects and extracts a set of datafrom given columns in RDBMS.
tSQLTemplateAggregatetSQLTemplateFilterColumnstSQLTemplateFilterRows
Target table name (and schema)
Source table name (and schema)
FilterRow Selects and extracts a set of datafrom given rows in RDBMS.
tSQLTemplateAggregatetSQLTemplateFilterColumnstSQLTemplateFilterRows
Target table name (and schema)
Source table name (and schema)
Conditions
MergeInsert Inserts records from the sourcetable to the target table.
tSQLTemplateMergetSQLTemplateCommit
Target table name (and schema)
Source table name (and schema)
Conditions
MergeUpdate Updates the target table withrecords from the source table.
tSQLTemplateMergetSQLTemplateCommit
Target table name (and schema)
Source table name (and schema)
Conditions
9.3.2. How to access a system SQL template
To access a system SQL template, expand the SQL Templates node in the Repository tree view.
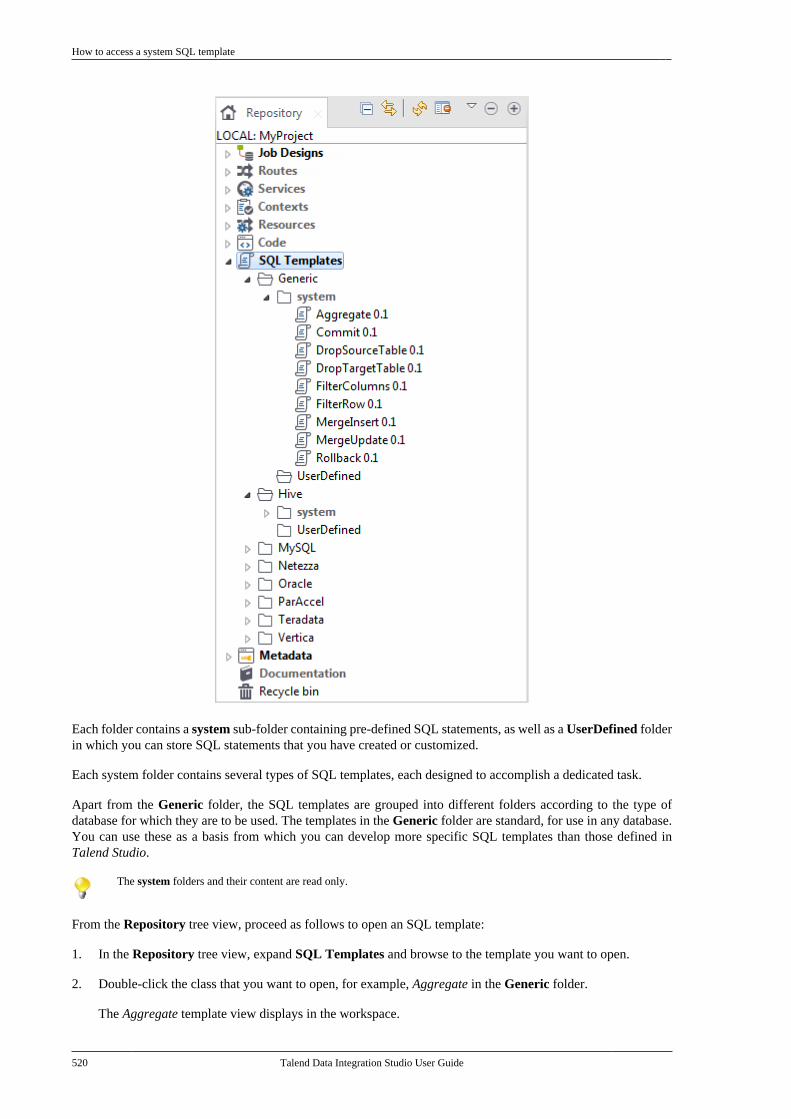
How to access a system SQL template
520 Talend Data Integration Studio User Guide
Each folder contains a system sub-folder containing pre-defined SQL statements, as well as a UserDefined folderin which you can store SQL statements that you have created or customized.
Each system folder contains several types of SQL templates, each designed to accomplish a dedicated task.
Apart from the Generic folder, the SQL templates are grouped into different folders according to the type ofdatabase for which they are to be used. The templates in the Generic folder are standard, for use in any database.You can use these as a basis from which you can develop more specific SQL templates than those defined inTalend Studio.
The system folders and their content are read only.
From the Repository tree view, proceed as follows to open an SQL template:
1. In the Repository tree view, expand SQL Templates and browse to the template you want to open.
2. Double-click the class that you want to open, for example, Aggregate in the Generic folder.
The Aggregate template view displays in the workspace.
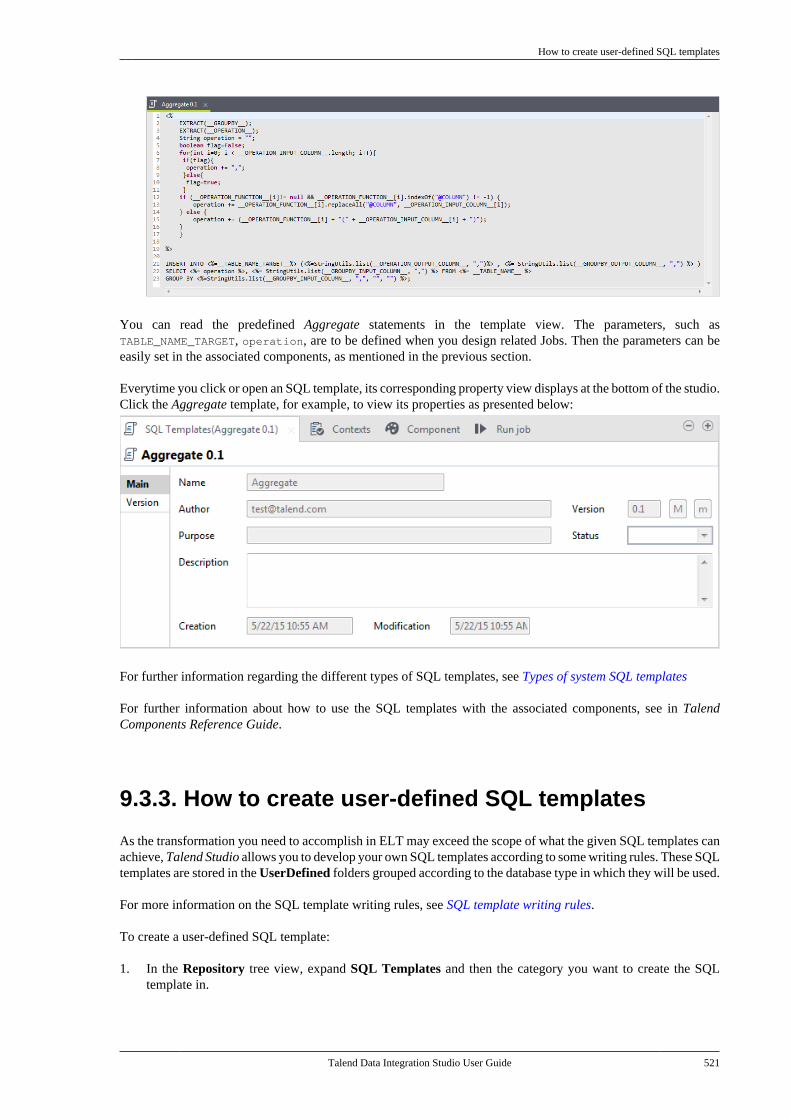
How to create user-defined SQL templates
Talend Data Integration Studio User Guide 521
You can read the predefined Aggregate statements in the template view. The parameters, such asTABLE_NAME_TARGET, operation, are to be defined when you design related Jobs. Then the parameters can beeasily set in the associated components, as mentioned in the previous section.
Everytime you click or open an SQL template, its corresponding property view displays at the bottom of the studio.Click the Aggregate template, for example, to view its properties as presented below:
For further information regarding the different types of SQL templates, see Types of system SQL templates
For further information about how to use the SQL templates with the associated components, see in TalendComponents Reference Guide.
9.3.3. How to create user-defined SQL templates
As the transformation you need to accomplish in ELT may exceed the scope of what the given SQL templates canachieve, Talend Studio allows you to develop your own SQL templates according to some writing rules. These SQLtemplates are stored in the UserDefined folders grouped according to the database type in which they will be used.
For more information on the SQL template writing rules, see SQL template writing rules.
To create a user-defined SQL template:
1. In the Repository tree view, expand SQL Templates and then the category you want to create the SQLtemplate in.
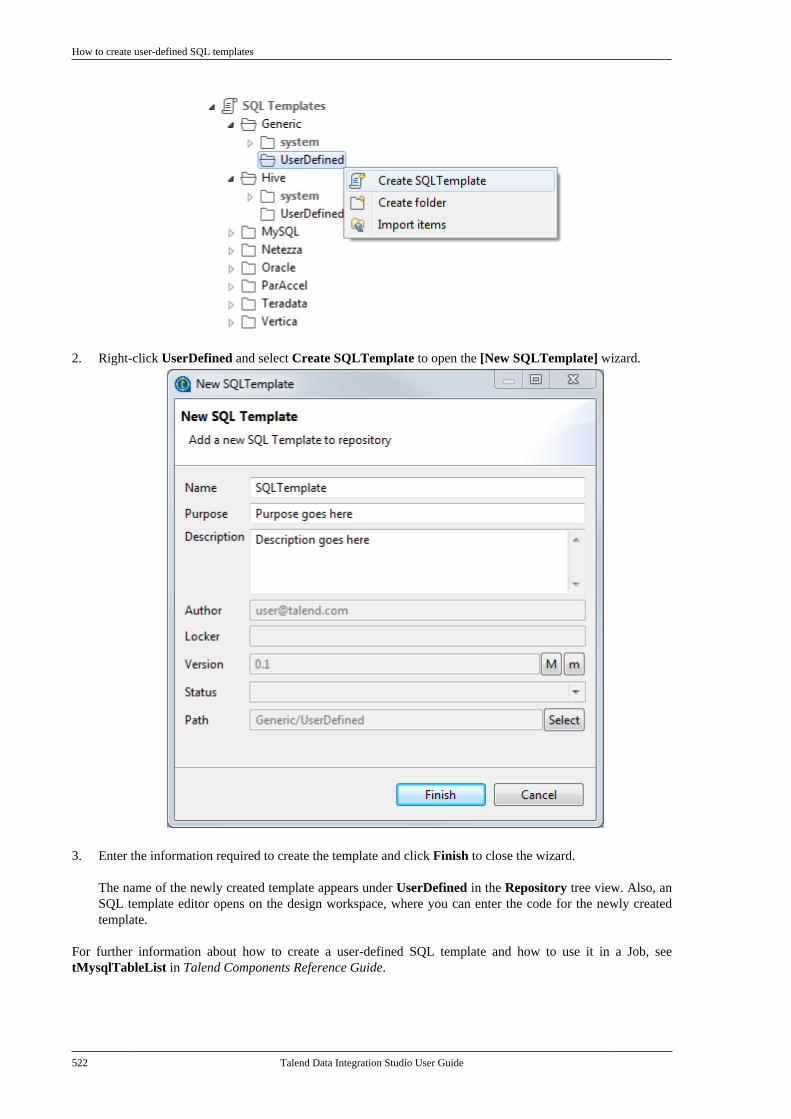
How to create user-defined SQL templates
522 Talend Data Integration Studio User Guide
2. Right-click UserDefined and select Create SQLTemplate to open the [New SQLTemplate] wizard.
3. Enter the information required to create the template and click Finish to close the wizard.
The name of the newly created template appears under UserDefined in the Repository tree view. Also, anSQL template editor opens on the design workspace, where you can enter the code for the newly createdtemplate.
For further information about how to create a user-defined SQL template and how to use it in a Job, seetMysqlTableList in Talend Components Reference Guide.
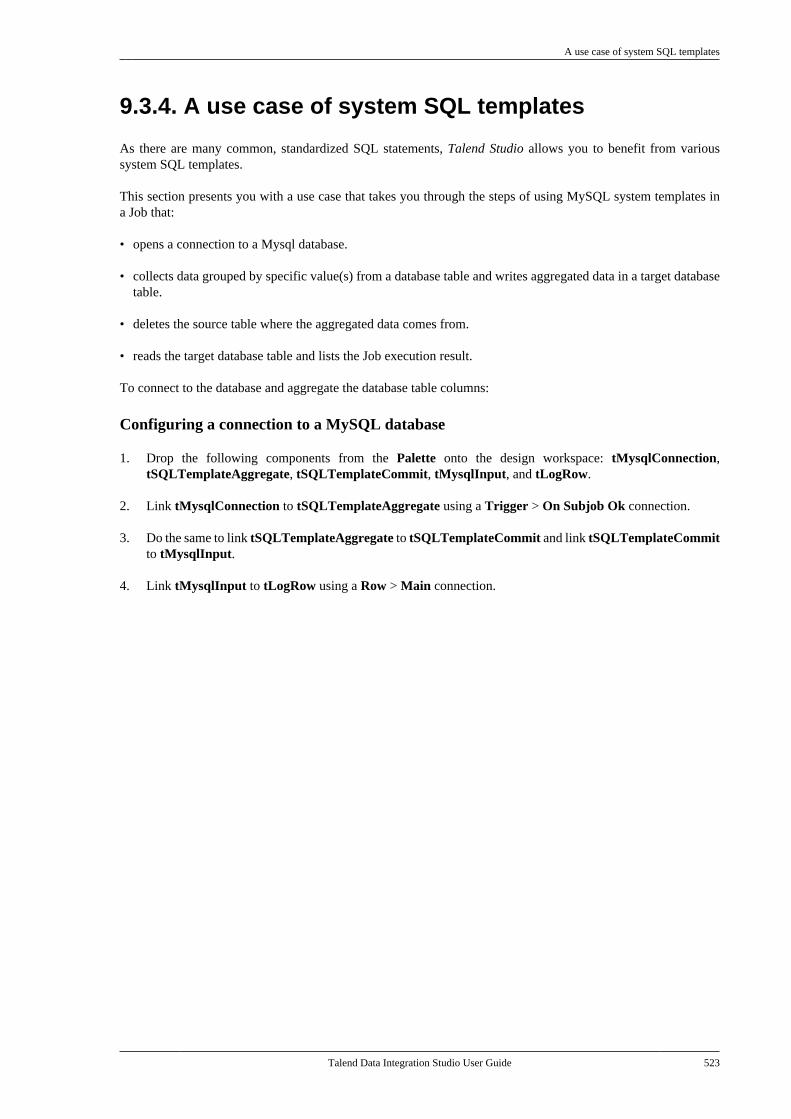
A use case of system SQL templates
Talend Data Integration Studio User Guide 523
9.3.4. A use case of system SQL templates
As there are many common, standardized SQL statements, Talend Studio allows you to benefit from varioussystem SQL templates.
This section presents you with a use case that takes you through the steps of using MySQL system templates ina Job that:
• opens a connection to a Mysql database.
• collects data grouped by specific value(s) from a database table and writes aggregated data in a target databasetable.
• deletes the source table where the aggregated data comes from.
• reads the target database table and lists the Job execution result.
To connect to the database and aggregate the database table columns:
Configuring a connection to a MySQL database
1. Drop the following components from the Palette onto the design workspace: tMysqlConnection,tSQLTemplateAggregate, tSQLTemplateCommit, tMysqlInput, and tLogRow.
2. Link tMysqlConnection to tSQLTemplateAggregate using a Trigger > On Subjob Ok connection.
3. Do the same to link tSQLTemplateAggregate to tSQLTemplateCommit and link tSQLTemplateCommitto tMysqlInput.
4. Link tMysqlInput to tLogRow using a Row > Main connection.

A use case of system SQL templates
524 Talend Data Integration Studio User Guide
5. Double-click tMysqlConnection to open its Basic settings view.
6. In the Basic settings view, set the database connection details manually.
7. Double-click tSQLTemplateCommit to open its Basic settings view.
8. On the Database Type list, select the relevant database type, and from the Component List, select therelevant database connection component if more than one connection is used.
Grouping data, writing aggregated data and dropping the source table
1. Double-click tSQLTemplateAggregate to open its Basic settings view.
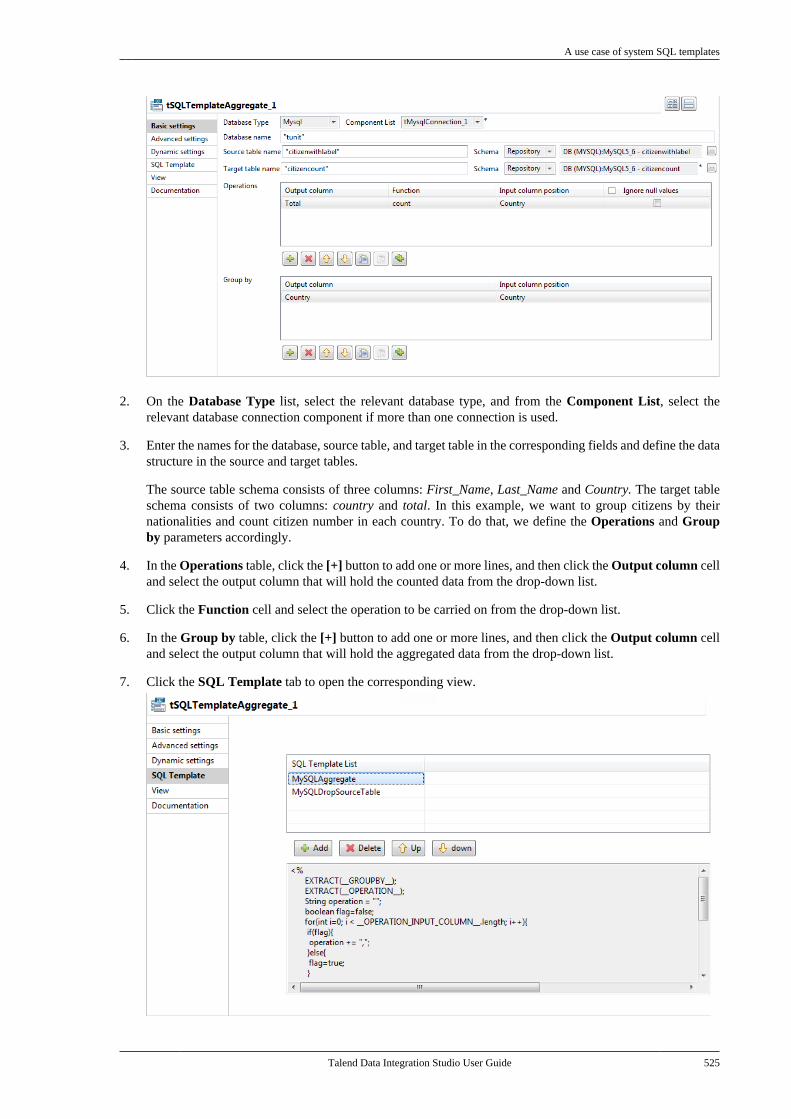
A use case of system SQL templates
Talend Data Integration Studio User Guide 525
2. On the Database Type list, select the relevant database type, and from the Component List, select therelevant database connection component if more than one connection is used.
3. Enter the names for the database, source table, and target table in the corresponding fields and define the datastructure in the source and target tables.
The source table schema consists of three columns: First_Name, Last_Name and Country. The target tableschema consists of two columns: country and total. In this example, we want to group citizens by theirnationalities and count citizen number in each country. To do that, we define the Operations and Groupby parameters accordingly.
4. In the Operations table, click the [+] button to add one or more lines, and then click the Output column celland select the output column that will hold the counted data from the drop-down list.
5. Click the Function cell and select the operation to be carried on from the drop-down list.
6. In the Group by table, click the [+] button to add one or more lines, and then click the Output column celland select the output column that will hold the aggregated data from the drop-down list.
7. Click the SQL Template tab to open the corresponding view.
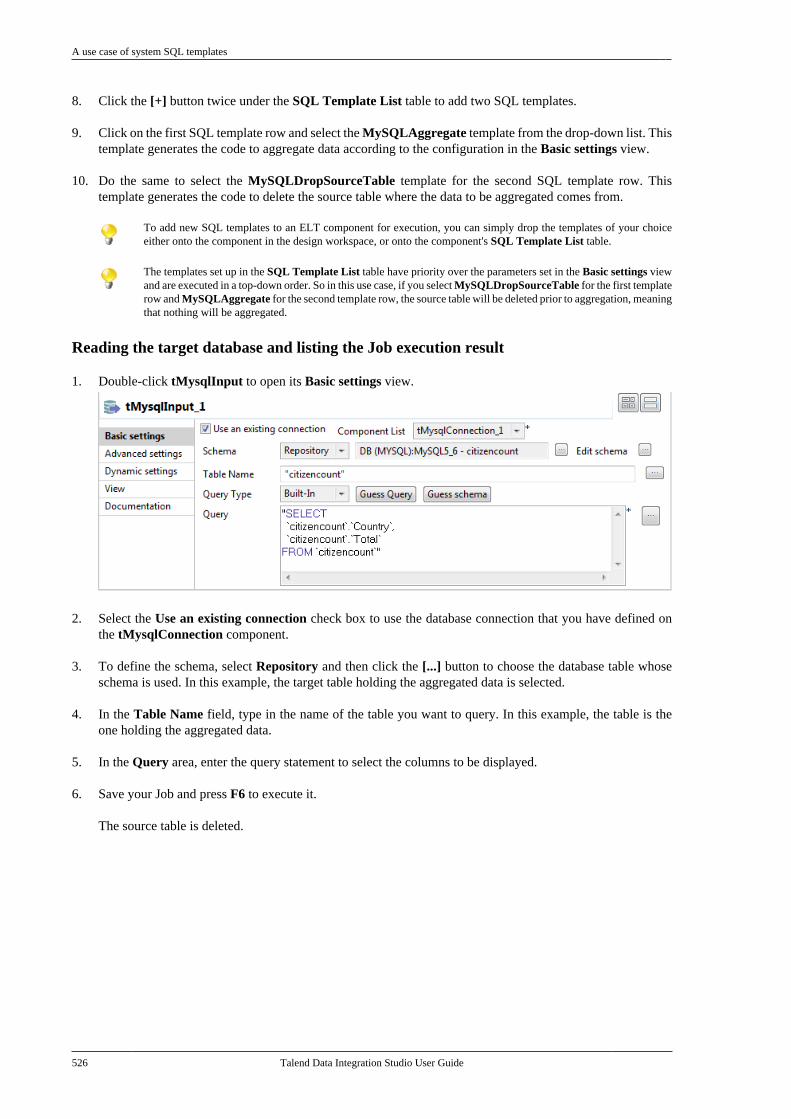
A use case of system SQL templates
526 Talend Data Integration Studio User Guide
8. Click the [+] button twice under the SQL Template List table to add two SQL templates.
9. Click on the first SQL template row and select the MySQLAggregate template from the drop-down list. Thistemplate generates the code to aggregate data according to the configuration in the Basic settings view.
10. Do the same to select the MySQLDropSourceTable template for the second SQL template row. Thistemplate generates the code to delete the source table where the data to be aggregated comes from.
To add new SQL templates to an ELT component for execution, you can simply drop the templates of your choiceeither onto the component in the design workspace, or onto the component's SQL Template List table.
The templates set up in the SQL Template List table have priority over the parameters set in the Basic settings viewand are executed in a top-down order. So in this use case, if you select MySQLDropSourceTable for the first templaterow and MySQLAggregate for the second template row, the source table will be deleted prior to aggregation, meaningthat nothing will be aggregated.
Reading the target database and listing the Job execution result
1. Double-click tMysqlInput to open its Basic settings view.
2. Select the Use an existing connection check box to use the database connection that you have defined onthe tMysqlConnection component.
3. To define the schema, select Repository and then click the [...] button to choose the database table whoseschema is used. In this example, the target table holding the aggregated data is selected.
4. In the Table Name field, type in the name of the table you want to query. In this example, the table is theone holding the aggregated data.
5. In the Query area, enter the query statement to select the columns to be displayed.
6. Save your Job and press F6 to execute it.
The source table is deleted.
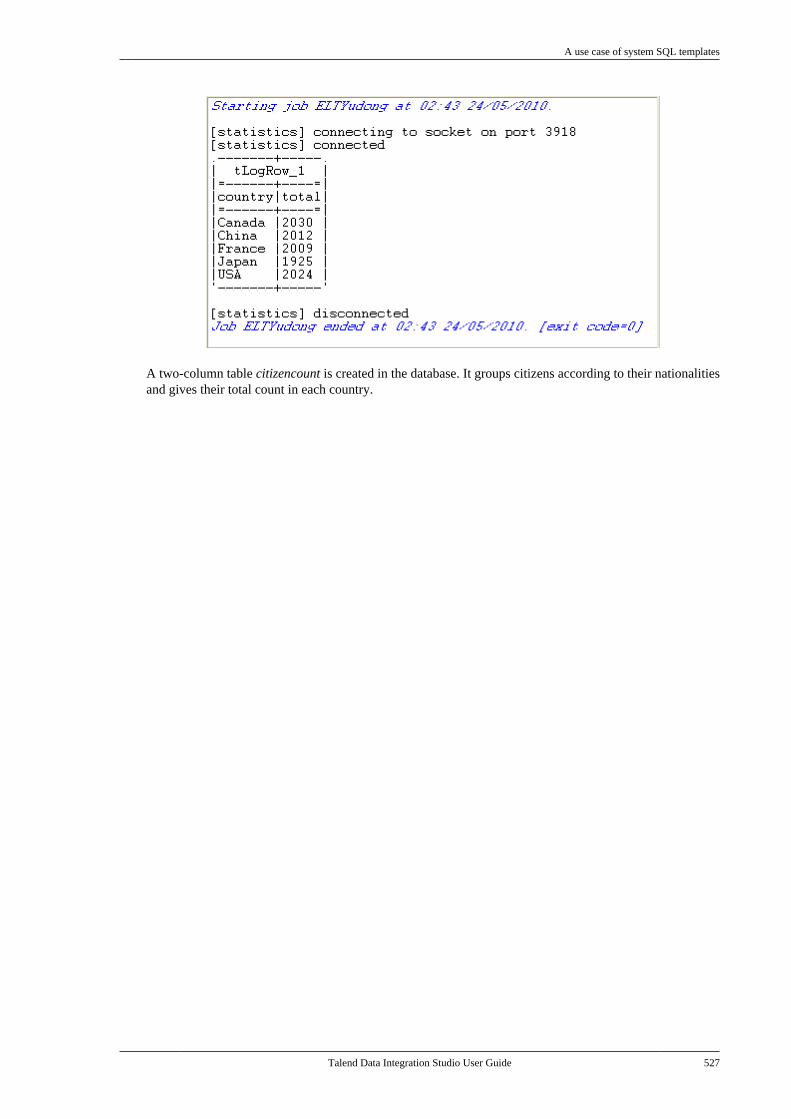
A use case of system SQL templates
Talend Data Integration Studio User Guide 527
A two-column table citizencount is created in the database. It groups citizens according to their nationalitiesand gives their total count in each country.

Talend Data Integration Studio User Guide

Talend Data Integration Studio User Guide
Chapter 10. Change Data Capture (CDC):publish/subscribeThis chapter explains CDC architecture and gives the basics to set up a CDC environment in Talend Studio. Thischapter is meant for administrators and Talend Studio users involved in data integration projects that involve theregular extraction and transportation of a large amount of data from one system to another system or systems.
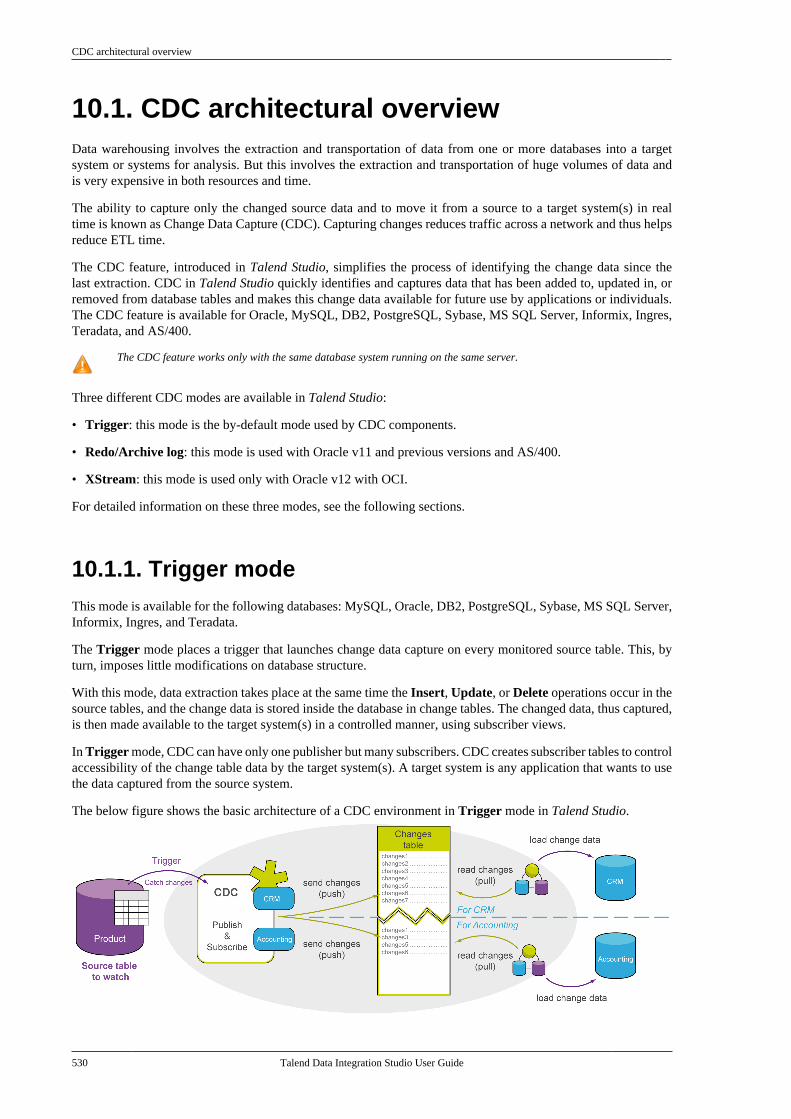
CDC architectural overview
530 Talend Data Integration Studio User Guide
10.1. CDC architectural overviewData warehousing involves the extraction and transportation of data from one or more databases into a targetsystem or systems for analysis. But this involves the extraction and transportation of huge volumes of data andis very expensive in both resources and time.
The ability to capture only the changed source data and to move it from a source to a target system(s) in realtime is known as Change Data Capture (CDC). Capturing changes reduces traffic across a network and thus helpsreduce ETL time.
The CDC feature, introduced in Talend Studio, simplifies the process of identifying the change data since thelast extraction. CDC in Talend Studio quickly identifies and captures data that has been added to, updated in, orremoved from database tables and makes this change data available for future use by applications or individuals.The CDC feature is available for Oracle, MySQL, DB2, PostgreSQL, Sybase, MS SQL Server, Informix, Ingres,Teradata, and AS/400.
The CDC feature works only with the same database system running on the same server.
Three different CDC modes are available in Talend Studio:
• Trigger: this mode is the by-default mode used by CDC components.
• Redo/Archive log: this mode is used with Oracle v11 and previous versions and AS/400.
• XStream: this mode is used only with Oracle v12 with OCI.
For detailed information on these three modes, see the following sections.
10.1.1. Trigger modeThis mode is available for the following databases: MySQL, Oracle, DB2, PostgreSQL, Sybase, MS SQL Server,Informix, Ingres, and Teradata.
The Trigger mode places a trigger that launches change data capture on every monitored source table. This, byturn, imposes little modifications on database structure.
With this mode, data extraction takes place at the same time the Insert, Update, or Delete operations occur in thesource tables, and the change data is stored inside the database in change tables. The changed data, thus captured,is then made available to the target system(s) in a controlled manner, using subscriber views.
In Trigger mode, CDC can have only one publisher but many subscribers. CDC creates subscriber tables to controlaccessibility of the change table data by the target system(s). A target system is any application that wants to usethe data captured from the source system.
The below figure shows the basic architecture of a CDC environment in Trigger mode in Talend Studio.
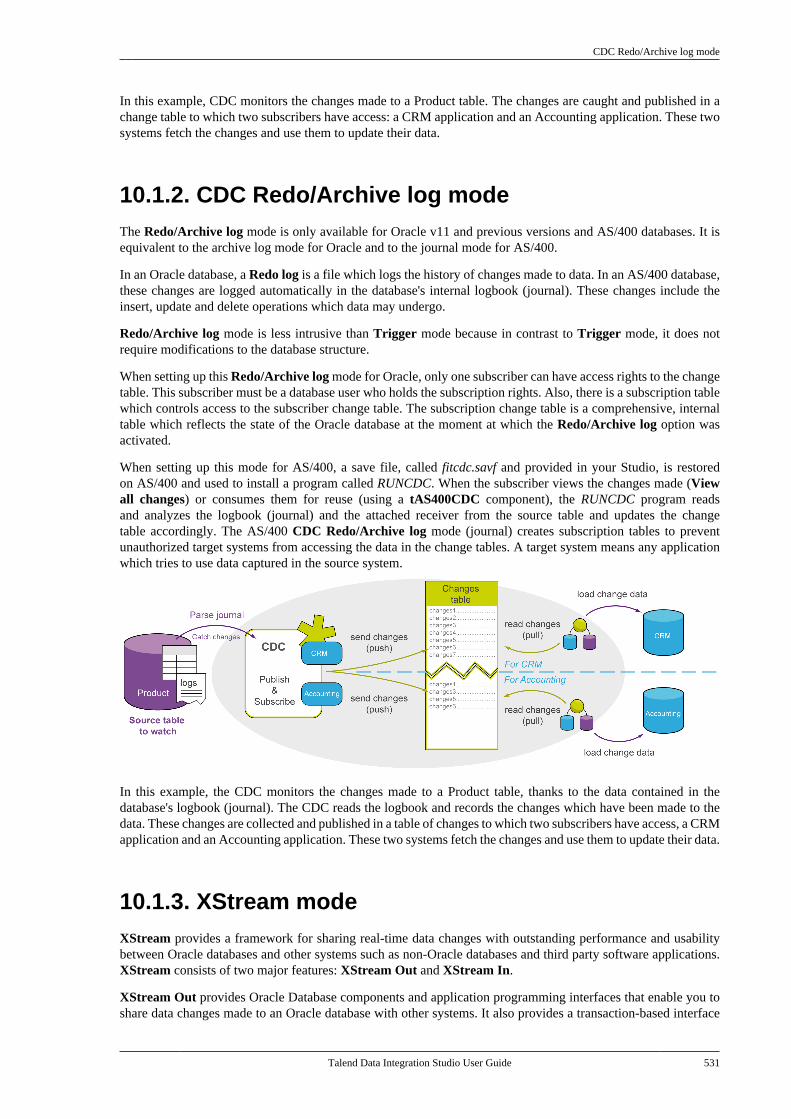
CDC Redo/Archive log mode
Talend Data Integration Studio User Guide 531
In this example, CDC monitors the changes made to a Product table. The changes are caught and published in achange table to which two subscribers have access: a CRM application and an Accounting application. These twosystems fetch the changes and use them to update their data.
10.1.2. CDC Redo/Archive log modeThe Redo/Archive log mode is only available for Oracle v11 and previous versions and AS/400 databases. It isequivalent to the archive log mode for Oracle and to the journal mode for AS/400.
In an Oracle database, a Redo log is a file which logs the history of changes made to data. In an AS/400 database,these changes are logged automatically in the database's internal logbook (journal). These changes include theinsert, update and delete operations which data may undergo.
Redo/Archive log mode is less intrusive than Trigger mode because in contrast to Trigger mode, it does notrequire modifications to the database structure.
When setting up this Redo/Archive log mode for Oracle, only one subscriber can have access rights to the changetable. This subscriber must be a database user who holds the subscription rights. Also, there is a subscription tablewhich controls access to the subscriber change table. The subscription change table is a comprehensive, internaltable which reflects the state of the Oracle database at the moment at which the Redo/Archive log option wasactivated.
When setting up this mode for AS/400, a save file, called fitcdc.savf and provided in your Studio, is restoredon AS/400 and used to install a program called RUNCDC. When the subscriber views the changes made (Viewall changes) or consumes them for reuse (using a tAS400CDC component), the RUNCDC program readsand analyzes the logbook (journal) and the attached receiver from the source table and updates the changetable accordingly. The AS/400 CDC Redo/Archive log mode (journal) creates subscription tables to preventunauthorized target systems from accessing the data in the change tables. A target system means any applicationwhich tries to use data captured in the source system.
In this example, the CDC monitors the changes made to a Product table, thanks to the data contained in thedatabase's logbook (journal). The CDC reads the logbook and records the changes which have been made to thedata. These changes are collected and published in a table of changes to which two subscribers have access, a CRMapplication and an Accounting application. These two systems fetch the changes and use them to update their data.
10.1.3. XStream modeXStream provides a framework for sharing real-time data changes with outstanding performance and usabilitybetween Oracle databases and other systems such as non-Oracle databases and third party software applications.XStream consists of two major features: XStream Out and XStream In.
XStream Out provides Oracle Database components and application programming interfaces that enable you toshare data changes made to an Oracle database with other systems. It also provides a transaction-based interface
CDC: a publish/subscribe principle
532 Talend Data Integration Studio User Guide
for streaming the changes captured from the redo log of the Oracle database to client applications with an outboundserver. An outbound server is an optional Oracle background process that sends data changes to a client application.
XStream In provides Oracle Database components and application programming interfaces that enable you toshare data changes made to other systems with an Oracle database. It also provides a transaction-based interfacefor sending information to an Oracle database from client applications with an inbound server. An inbound serveris an optional Oracle background process that receives data changes from a client application.
The XStream mode is only available for Oracle v12 with OCI in Talend Studio. For more information about theXStream mode, see http://docs.oracle.com/cd/E11882_01/server.112/e16545/toc.htm.
10.2. CDC: a publish/subscribe principleThe CDC architecture is based on the publisher/subscriber model.
The publisher captures the change data and makes it available to the subscribers. The subscribers utilize the changedata obtained from the publisher.
The main tasks performed by the publisher are:
• identifying the source tables from which the change data needs to be captured.
• capturing the change data and storing it in specially created change tables.
• allowing subscribers controlled access to the change data.
In Trigger mode, or the AS/400 Redo/Archive log mode (journal) the subscriber is a table that only lists theapplications that have access rights to the change tables. In the Oracle Redo/Archive log mode, the subscriber isa user of the database. The subscriber may not be interested in all the data that is published by the publisher.
10.3. Setting up a CDC environmentThe CDC feature is part of Talend Studio; you do not need to install any software other than Talend Studio touse CDC.
However, if you want to use CDC in Redo/Archive log mode for an Oracle, you must first of all configure thedatabase so that it generates the redo records that hold all insert, update or delete changes made in datafiles. Forfurther information, see Prerequisites for the Oracle Redo/Archive log mode.
If you want to use CDC in Redo/Archive log mode for AS/400, you must verify that the prerequisites on yourAS/400 are all met. For further information, see The prerequisites on AS/400.
For the time being, CDC is only available in Java and is for Oracle, MySQL, DB2, PostgreSQL, Sybase, MS SQL Server,Informix, Ingres, and Teradata in Trigger mode, for Oracle and AS/400 databases in Redo/Archive log mode, and forOracle in XStream mode.
To set up a CDC environment you must understand the basics involved in designing a Job in Talend Studio, and particularlythe definition of metadata items.
When setting up a CDC environment, make sure that the database connection for CDC is on the same server with the sourcedata to which changes are to be captured.
For more information on how to design a Job in Talend Studio, see Designing a Job.
For more information on how to define metadata items in Talend Studio, see Managing Metadata.
For more information on database support for CDC, see Database support for CDC.
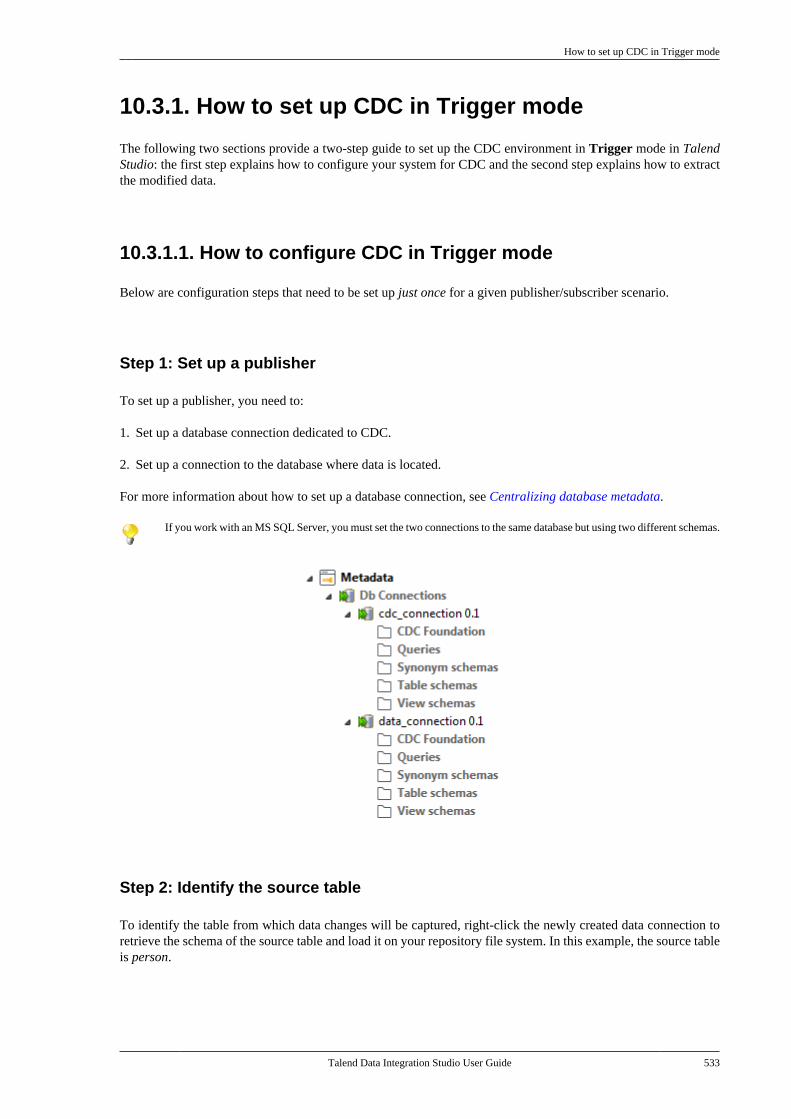
How to set up CDC in Trigger mode
Talend Data Integration Studio User Guide 533
10.3.1. How to set up CDC in Trigger mode
The following two sections provide a two-step guide to set up the CDC environment in Trigger mode in TalendStudio: the first step explains how to configure your system for CDC and the second step explains how to extractthe modified data.
10.3.1.1. How to configure CDC in Trigger mode
Below are configuration steps that need to be set up just once for a given publisher/subscriber scenario.
Step 1: Set up a publisher
To set up a publisher, you need to:
1. Set up a database connection dedicated to CDC.
2. Set up a connection to the database where data is located.
For more information about how to set up a database connection, see Centralizing database metadata.
If you work with an MS SQL Server, you must set the two connections to the same database but using two different schemas.
Step 2: Identify the source table
To identify the table from which data changes will be captured, right-click the newly created data connection toretrieve the schema of the source table and load it on your repository file system. In this example, the source tableis person.
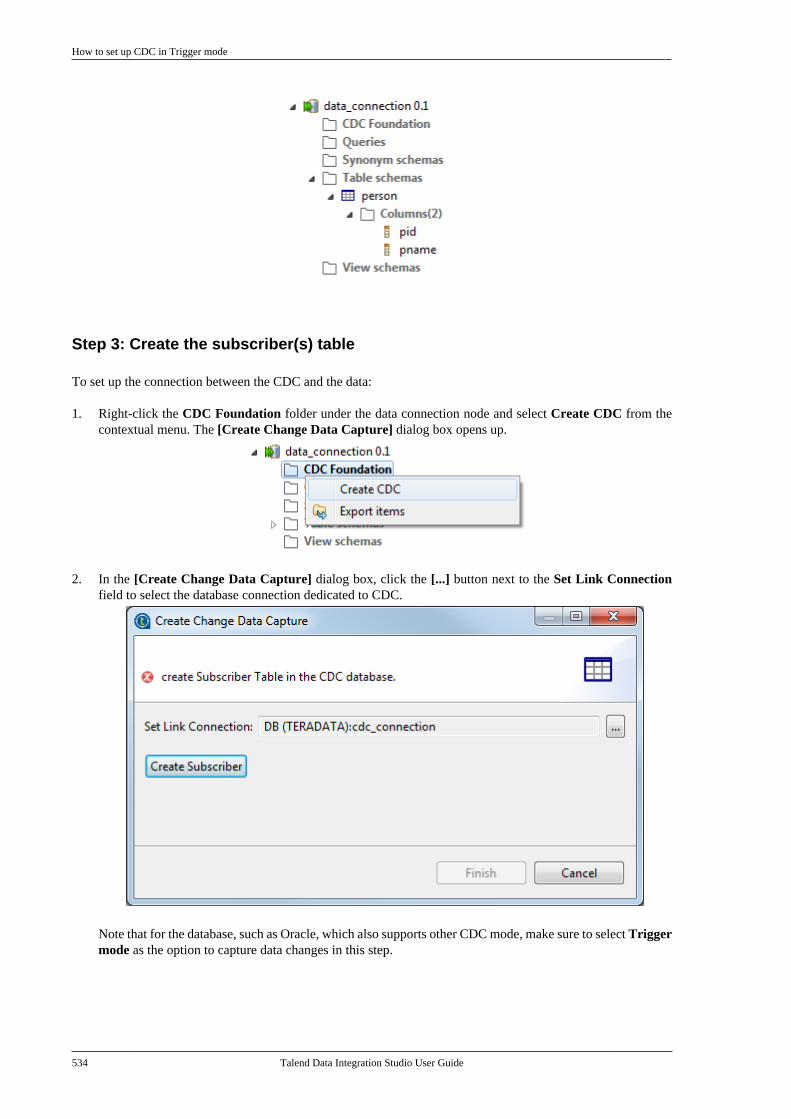
How to set up CDC in Trigger mode
534 Talend Data Integration Studio User Guide
Step 3: Create the subscriber(s) table
To set up the connection between the CDC and the data:
1. Right-click the CDC Foundation folder under the data connection node and select Create CDC from thecontextual menu. The [Create Change Data Capture] dialog box opens up.
2. In the [Create Change Data Capture] dialog box, click the [...] button next to the Set Link Connectionfield to select the database connection dedicated to CDC.
Note that for the database, such as Oracle, which also supports other CDC mode, make sure to select Triggermode as the option to capture data changes in this step.
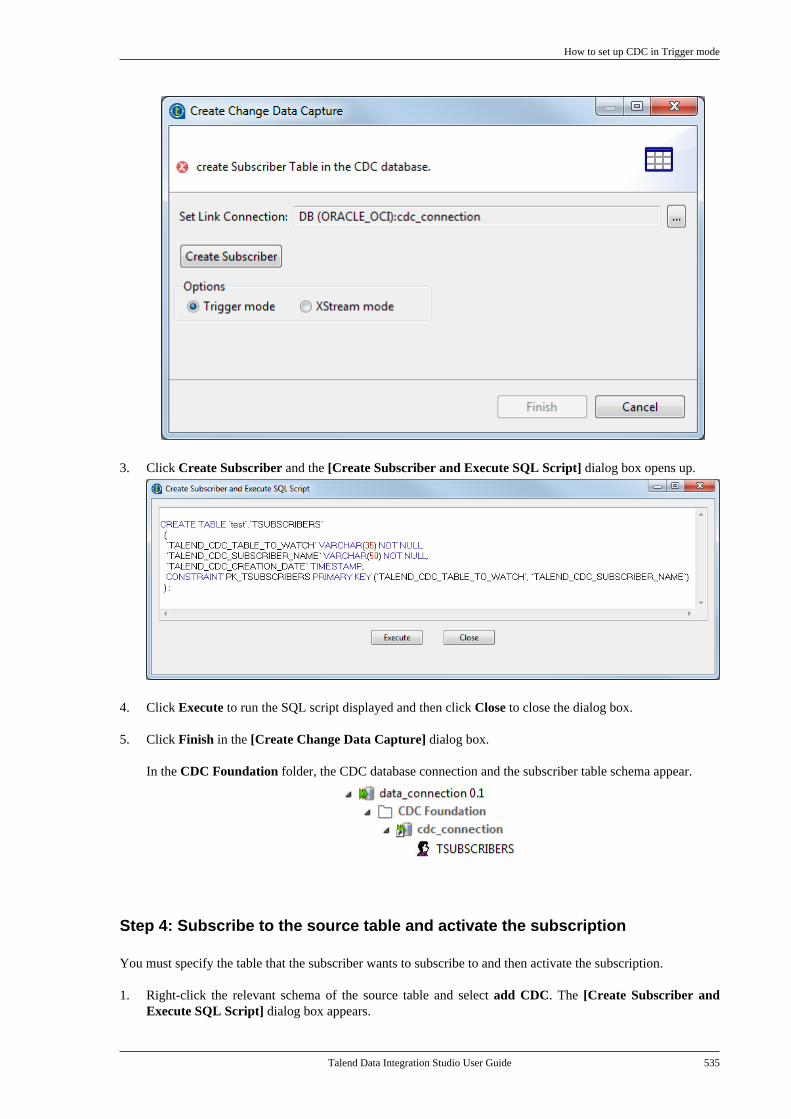
How to set up CDC in Trigger mode
Talend Data Integration Studio User Guide 535
3. Click Create Subscriber and the [Create Subscriber and Execute SQL Script] dialog box opens up.
4. Click Execute to run the SQL script displayed and then click Close to close the dialog box.
5. Click Finish in the [Create Change Data Capture] dialog box.
In the CDC Foundation folder, the CDC database connection and the subscriber table schema appear.
Step 4: Subscribe to the source table and activate the subscription
You must specify the table that the subscriber wants to subscribe to and then activate the subscription.
1. Right-click the relevant schema of the source table and select add CDC. The [Create Subscriber andExecute SQL Script] dialog box appears.
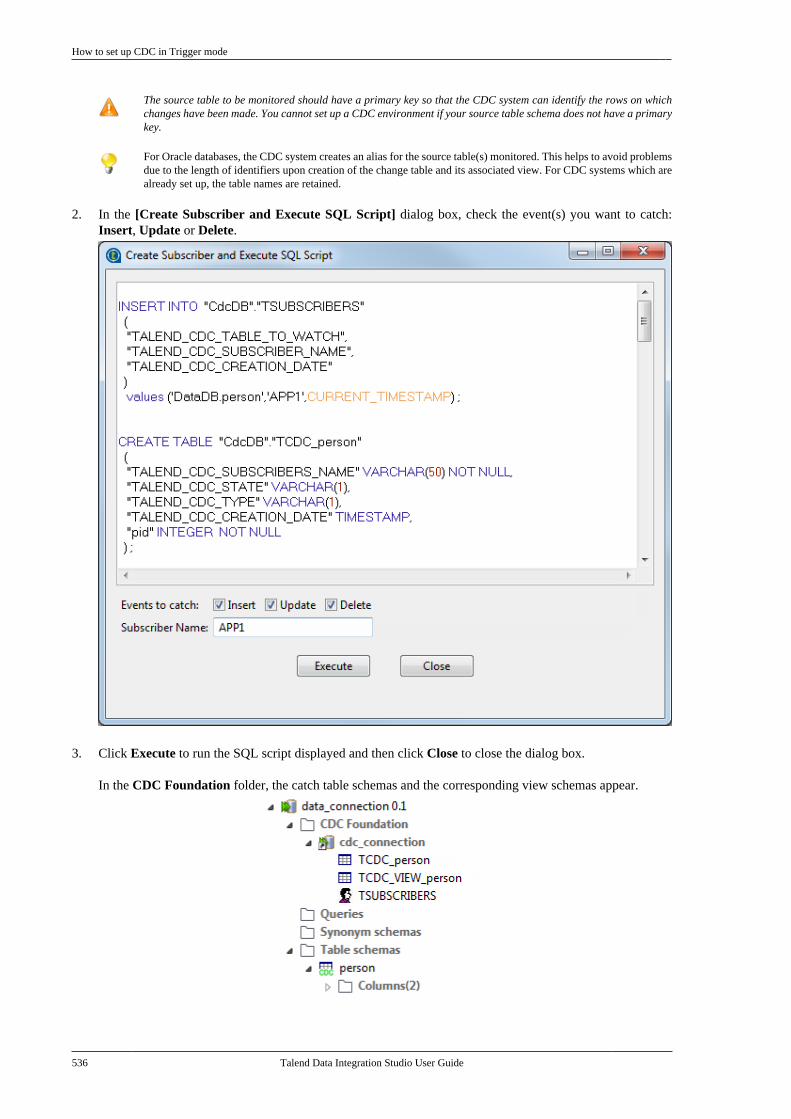
How to set up CDC in Trigger mode
536 Talend Data Integration Studio User Guide
The source table to be monitored should have a primary key so that the CDC system can identify the rows on whichchanges have been made. You cannot set up a CDC environment if your source table schema does not have a primarykey.
For Oracle databases, the CDC system creates an alias for the source table(s) monitored. This helps to avoid problemsdue to the length of identifiers upon creation of the change table and its associated view. For CDC systems which arealready set up, the table names are retained.
2. In the [Create Subscriber and Execute SQL Script] dialog box, check the event(s) you want to catch:Insert, Update or Delete.
3. Click Execute to run the SQL script displayed and then click Close to close the dialog box.
In the CDC Foundation folder, the catch table schemas and the corresponding view schemas appear.
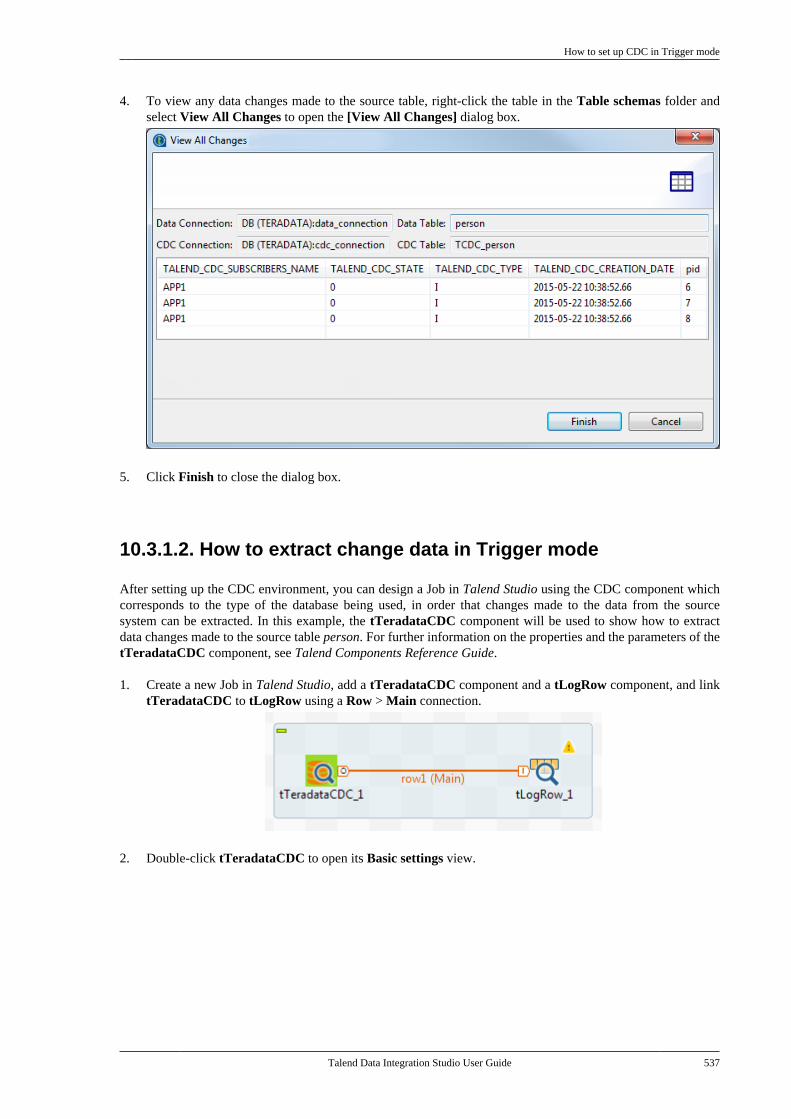
How to set up CDC in Trigger mode
Talend Data Integration Studio User Guide 537
4. To view any data changes made to the source table, right-click the table in the Table schemas folder andselect View All Changes to open the [View All Changes] dialog box.
5. Click Finish to close the dialog box.
10.3.1.2. How to extract change data in Trigger mode
After setting up the CDC environment, you can design a Job in Talend Studio using the CDC component whichcorresponds to the type of the database being used, in order that changes made to the data from the sourcesystem can be extracted. In this example, the tTeradataCDC component will be used to show how to extractdata changes made to the source table person. For further information on the properties and the parameters of thetTeradataCDC component, see Talend Components Reference Guide.
1. Create a new Job in Talend Studio, add a tTeradataCDC component and a tLogRow component, and linktTeradataCDC to tLogRow using a Row > Main connection.
2. Double-click tTeradataCDC to open its Basic settings view.
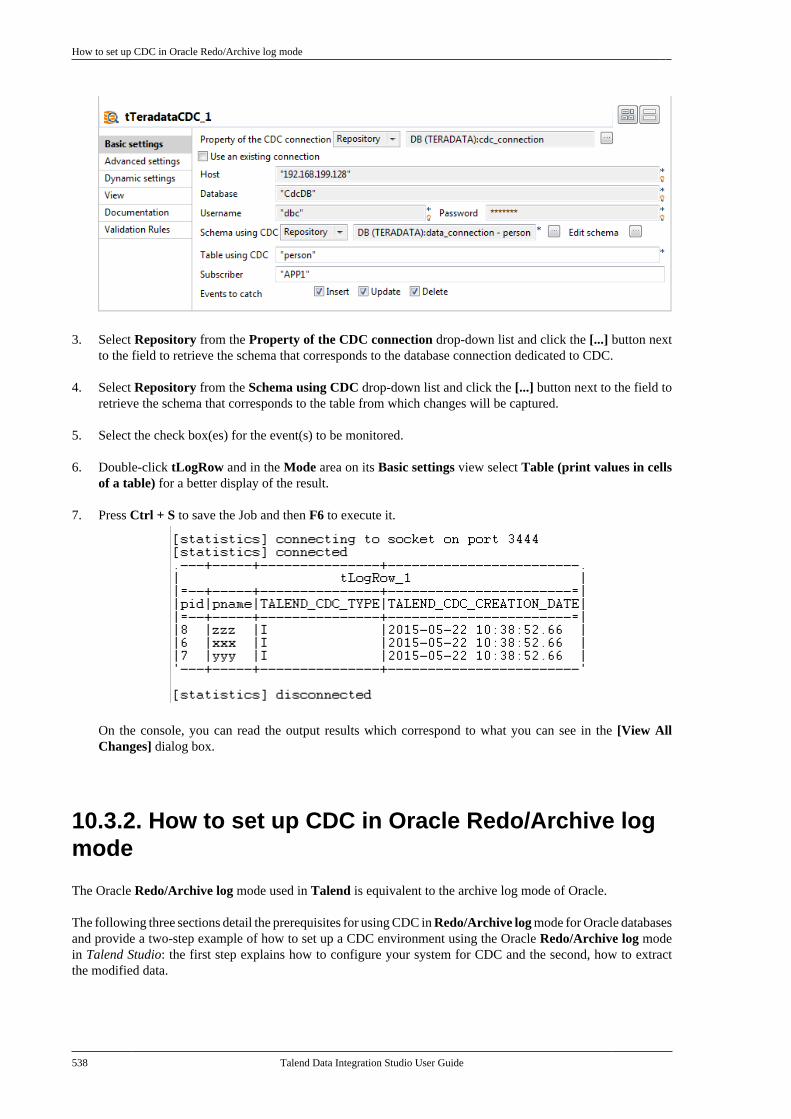
How to set up CDC in Oracle Redo/Archive log mode
538 Talend Data Integration Studio User Guide
3. Select Repository from the Property of the CDC connection drop-down list and click the [...] button nextto the field to retrieve the schema that corresponds to the database connection dedicated to CDC.
4. Select Repository from the Schema using CDC drop-down list and click the [...] button next to the field toretrieve the schema that corresponds to the table from which changes will be captured.
5. Select the check box(es) for the event(s) to be monitored.
6. Double-click tLogRow and in the Mode area on its Basic settings view select Table (print values in cellsof a table) for a better display of the result.
7. Press Ctrl + S to save the Job and then F6 to execute it.
On the console, you can read the output results which correspond to what you can see in the [View AllChanges] dialog box.
10.3.2. How to set up CDC in Oracle Redo/Archive logmode
The Oracle Redo/Archive log mode used in Talend is equivalent to the archive log mode of Oracle.
The following three sections detail the prerequisites for using CDC in Redo/Archive log mode for Oracle databasesand provide a two-step example of how to set up a CDC environment using the Oracle Redo/Archive log modein Talend Studio: the first step explains how to configure your system for CDC and the second, how to extractthe modified data.
How to set up CDC in Oracle Redo/Archive log mode
Talend Data Integration Studio User Guide 539
10.3.2.1. Prerequisites for the Oracle Redo/Archive log mode
The CDC feature in this mode for Oracle is available for the 10g version of the Oracle database and later versions.Before being able to use CDC in Redo/Archive log mode in Talend Studio, the administrator of the database tobe supervised should do the following:
1. Activate the active log mode in the Oracle database.
2. Set up CDC in the Oracle database.
3. Create and give all rights to the source user.
4. Create and give all rights to the publisher.
Activate the archive log mode in Oracle
To do so, connect to the Oracle database as an administrator and activate the active log mode using the followingqueries:
connect / as sysdba;shutdown;startup exclusive mount;alter database archivelog;alter database open;
Set up CDC in Oracle
To do so, create a tablespace for the source user and the publisher respectively, then create a source user andgive it all the rights necessary to make modifications, and create a publisher and give it all the rights necessaryto capture and publish modifications.
In the example below, the $ORACLE_PATH varies depending on where Oracle is installed. The source user iscalled source, and the publisher is called publisher:
create tablespace SOURCE datafile '$ORACLE_PATH/oradata/Oracle/SOURCE.dbf' size 50M;
create user sourceidentified by sourcedefault tablespace SOURCE quota unlimited on SOURCEquota unlimited on SYSTEMquota unlimited on SYSAUX;
grant connect, create table to source;grant create tablespace to source;grant unlimited tablespace to source;grant select_catalog_role to source;grant execute_catalog_role to source;grant create sequence to source;grant create session to source;grant dba to source;grant execute on SYS.DBMS_CDC_PUBLISH to source;alter user source quota unlimited on users;
create tablespace PUBLISHER datafile '$ORACLE_PATH/oradata/Oracle/PUBLISHER.dbf' size 50M;
create user publisheridentified by publisher
How to set up CDC in Oracle Redo/Archive log mode
540 Talend Data Integration Studio User Guide
default tablespace PUBLISHERquota unlimited on PUBLISHERquota unlimited on SYSTEMquota unlimited on SYSAUX;
grant connect, create table to publisher;grant create tablespace to publisher;grant unlimited tablespace to publisher;grant select_catalog_role to publisher;grant execute_catalog_role to publisher;grant create sequence to publisher;grant create session to publisher;grant dba to publisher;grant execute on SYS.DBMS_CDC_PUBLISH to publisher;execute DBMS_STREAMS_AUTH.GRANT_ADMIN_PRIVILEGE(GRANTEE=>'publisher');
The select_catalog_role procedure allows the publisher to consult all Oracle dictionaries.
The execute_catalog_role procedure allows the publisher to execute the dictionary procedures.
The SYS.DBMS_CDC_PUBLISH procedure allows the publisher to configure the CDC system that will capture andpublish change data in one or more source tables.
The procedure: DBMS_STREAMS_AUTH.GRANT_ADMIN_PRIVILEGE(GRANTEE=>'publisher')gives the user theadministration privileges necessary to carry out data replication (stream). The GRANT_ADMIN_PRIVILEGEprocedure allows the user to carry out data capture and propagation operations.
10.3.2.2. How to configure CDC in Oracle Redo/Archive log mode
The followings are configuration steps that need to be set up once for a given publisher/subscriber scenario.
Step 1: Set up a publisher
To set up a publisher, you need to:
1. Create a new Job in Talend Studio.
2. Set a DB connection dedicated to CDC by using the "publisher" user that has all necessary rights.
3. Set a DB connection to the database you want to supervise.
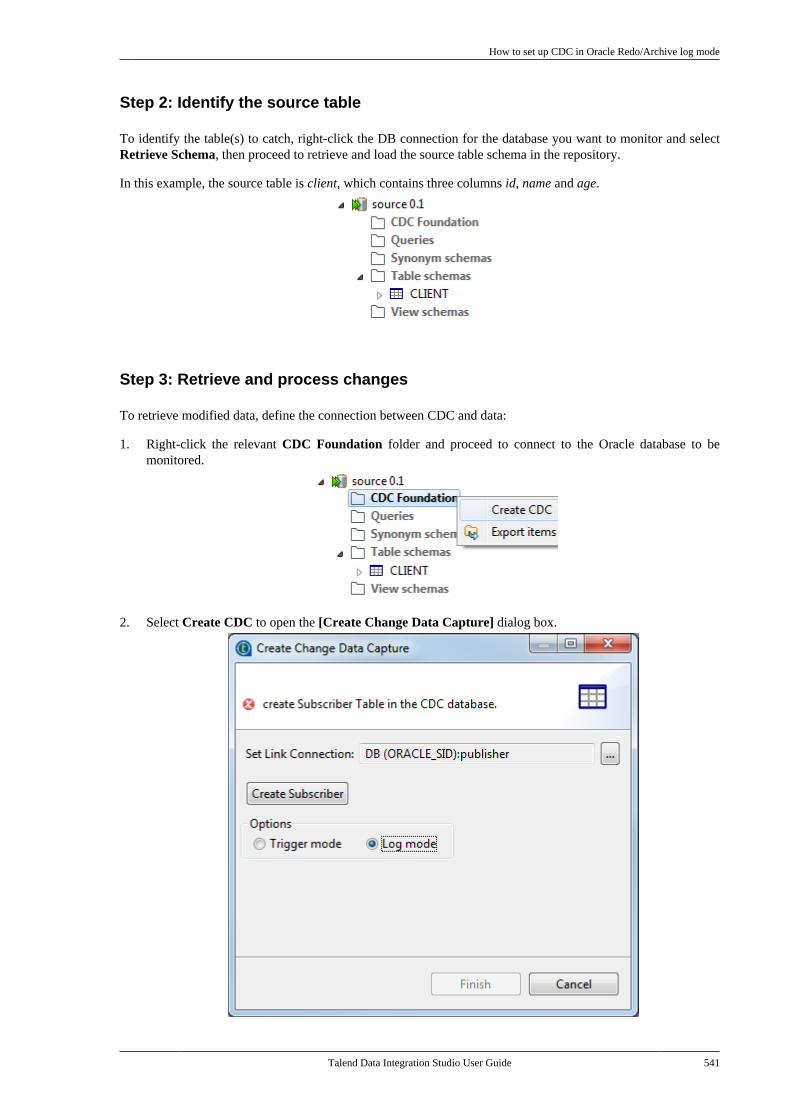
How to set up CDC in Oracle Redo/Archive log mode
Talend Data Integration Studio User Guide 541
Step 2: Identify the source table
To identify the table(s) to catch, right-click the DB connection for the database you want to monitor and selectRetrieve Schema, then proceed to retrieve and load the source table schema in the repository.
In this example, the source table is client, which contains three columns id, name and age.
Step 3: Retrieve and process changes
To retrieve modified data, define the connection between CDC and data:
1. Right-click the relevant CDC Foundation folder and proceed to connect to the Oracle database to bemonitored.
2. Select Create CDC to open the [Create Change Data Capture] dialog box.
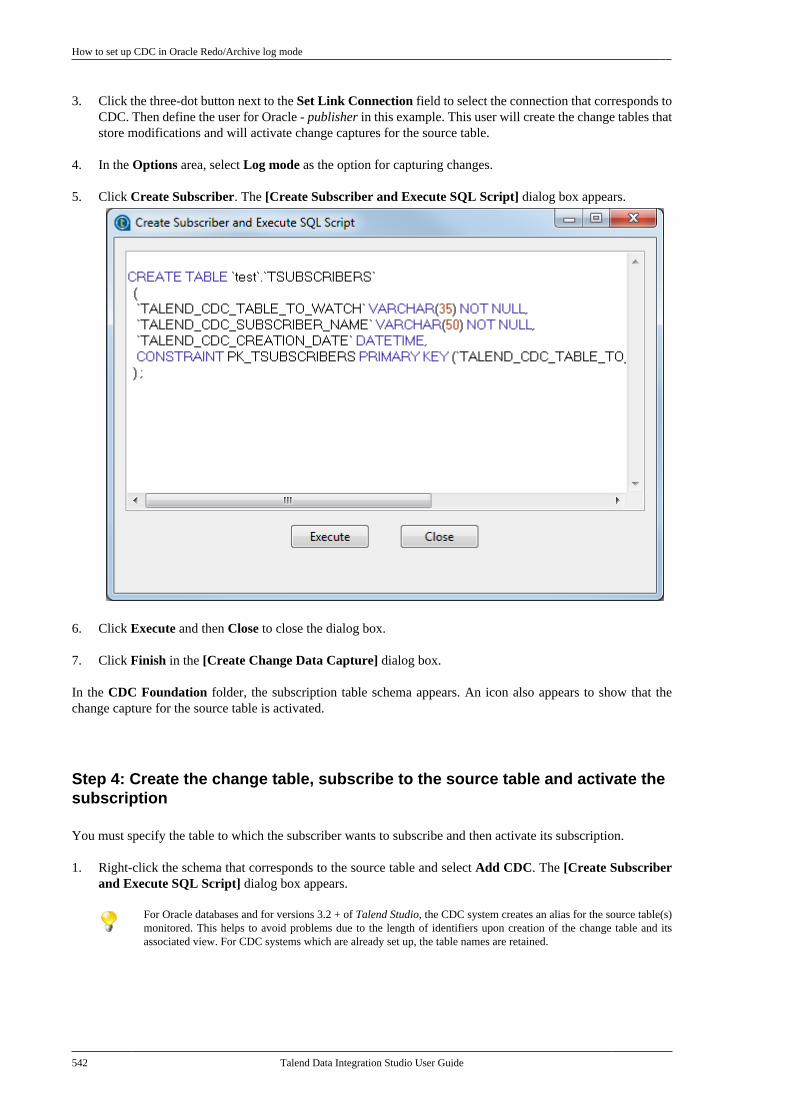
How to set up CDC in Oracle Redo/Archive log mode
542 Talend Data Integration Studio User Guide
3. Click the three-dot button next to the Set Link Connection field to select the connection that corresponds toCDC. Then define the user for Oracle - publisher in this example. This user will create the change tables thatstore modifications and will activate change captures for the source table.
4. In the Options area, select Log mode as the option for capturing changes.
5. Click Create Subscriber. The [Create Subscriber and Execute SQL Script] dialog box appears.
6. Click Execute and then Close to close the dialog box.
7. Click Finish in the [Create Change Data Capture] dialog box.
In the CDC Foundation folder, the subscription table schema appears. An icon also appears to show that thechange capture for the source table is activated.
Step 4: Create the change table, subscribe to the source table and activate thesubscription
You must specify the table to which the subscriber wants to subscribe and then activate its subscription.
1. Right-click the schema that corresponds to the source table and select Add CDC. The [Create Subscriberand Execute SQL Script] dialog box appears.
For Oracle databases and for versions 3.2 + of Talend Studio, the CDC system creates an alias for the source table(s)monitored. This helps to avoid problems due to the length of identifiers upon creation of the change table and itsassociated view. For CDC systems which are already set up, the table names are retained.
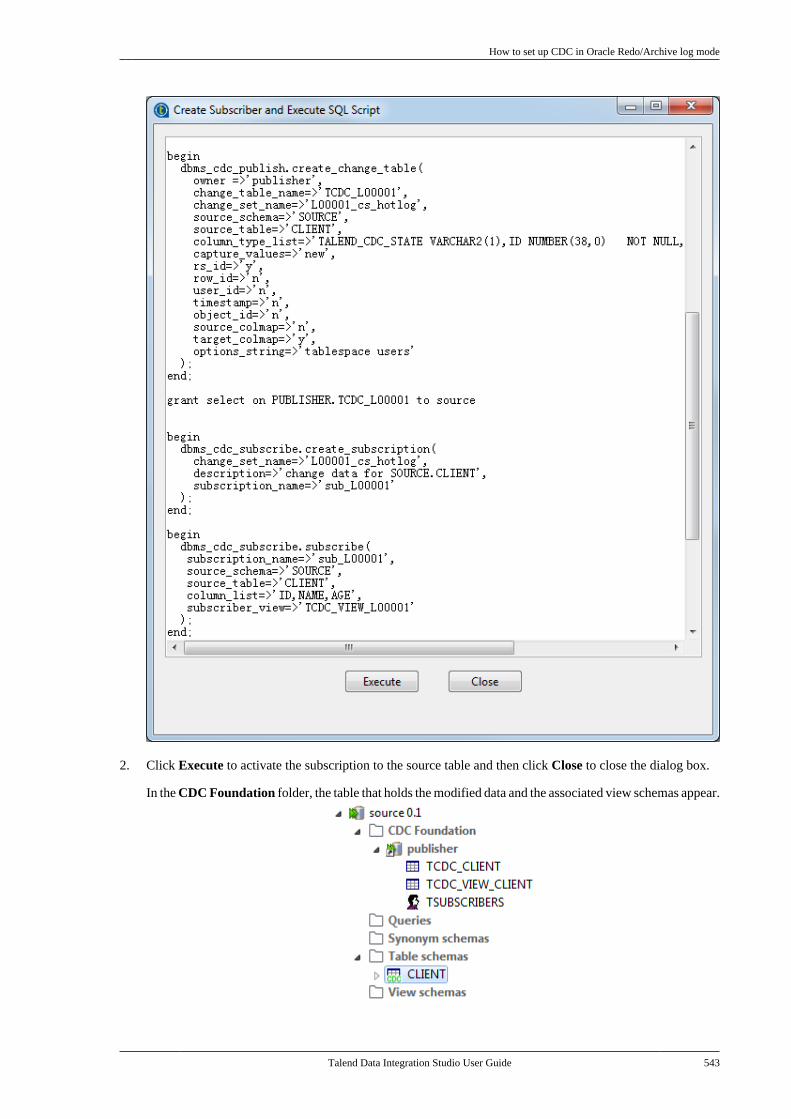
How to set up CDC in Oracle Redo/Archive log mode
Talend Data Integration Studio User Guide 543
2. Click Execute to activate the subscription to the source table and then click Close to close the dialog box.
In the CDC Foundation folder, the table that holds the modified data and the associated view schemas appear.
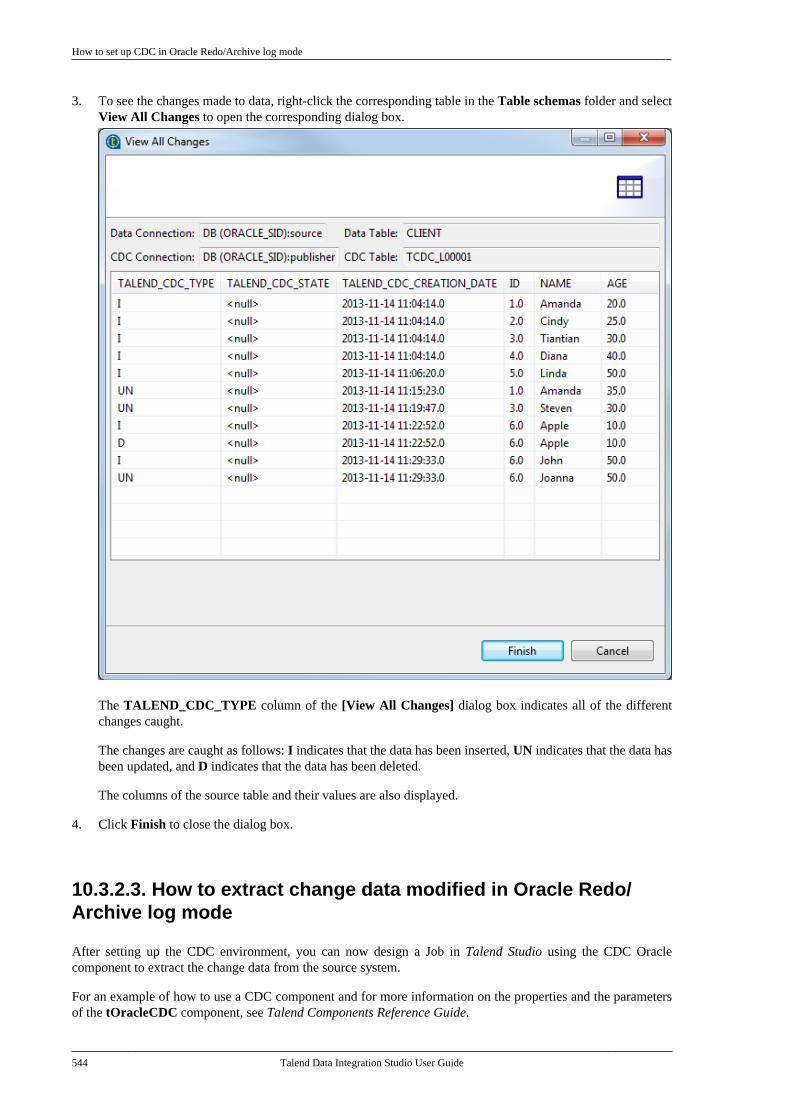
How to set up CDC in Oracle Redo/Archive log mode
544 Talend Data Integration Studio User Guide
3. To see the changes made to data, right-click the corresponding table in the Table schemas folder and selectView All Changes to open the corresponding dialog box.
The TALEND_CDC_TYPE column of the [View All Changes] dialog box indicates all of the differentchanges caught.
The changes are caught as follows: I indicates that the data has been inserted, UN indicates that the data hasbeen updated, and D indicates that the data has been deleted.
The columns of the source table and their values are also displayed.
4. Click Finish to close the dialog box.
10.3.2.3. How to extract change data modified in Oracle Redo/Archive log mode
After setting up the CDC environment, you can now design a Job in Talend Studio using the CDC Oraclecomponent to extract the change data from the source system.
For an example of how to use a CDC component and for more information on the properties and the parametersof the tOracleCDC component, see Talend Components Reference Guide.
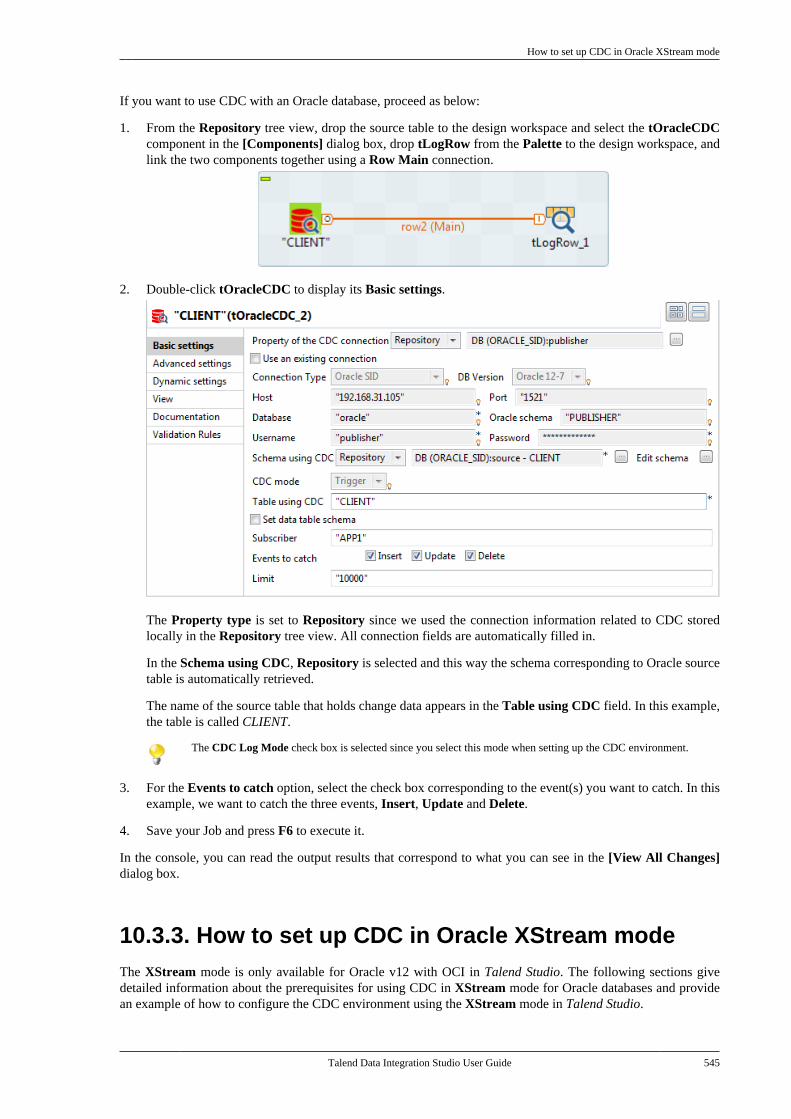
How to set up CDC in Oracle XStream mode
Talend Data Integration Studio User Guide 545
If you want to use CDC with an Oracle database, proceed as below:
1. From the Repository tree view, drop the source table to the design workspace and select the tOracleCDCcomponent in the [Components] dialog box, drop tLogRow from the Palette to the design workspace, andlink the two components together using a Row Main connection.
2. Double-click tOracleCDC to display its Basic settings.
The Property type is set to Repository since we used the connection information related to CDC storedlocally in the Repository tree view. All connection fields are automatically filled in.
In the Schema using CDC, Repository is selected and this way the schema corresponding to Oracle sourcetable is automatically retrieved.
The name of the source table that holds change data appears in the Table using CDC field. In this example,the table is called CLIENT.
The CDC Log Mode check box is selected since you select this mode when setting up the CDC environment.
3. For the Events to catch option, select the check box corresponding to the event(s) you want to catch. In thisexample, we want to catch the three events, Insert, Update and Delete.
4. Save your Job and press F6 to execute it.
In the console, you can read the output results that correspond to what you can see in the [View All Changes]dialog box.
10.3.3. How to set up CDC in Oracle XStream modeThe XStream mode is only available for Oracle v12 with OCI in Talend Studio. The following sections givedetailed information about the prerequisites for using CDC in XStream mode for Oracle databases and providean example of how to configure the CDC environment using the XStream mode in Talend Studio.
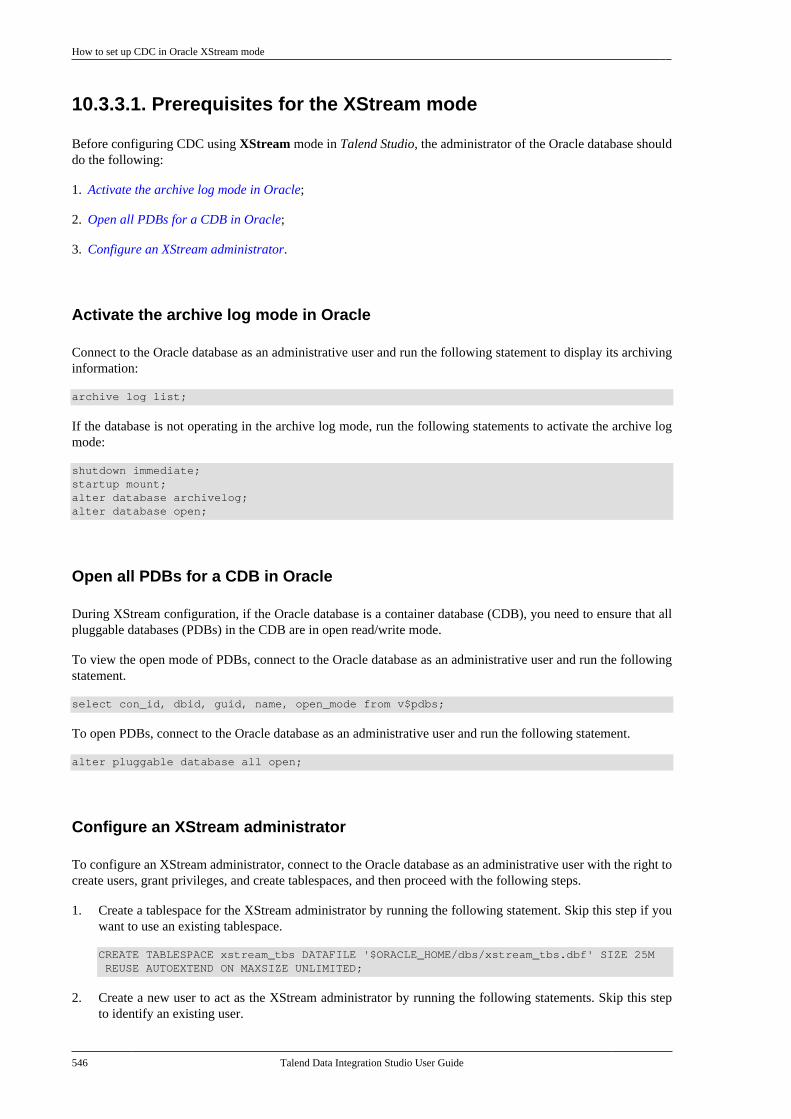
How to set up CDC in Oracle XStream mode
546 Talend Data Integration Studio User Guide
10.3.3.1. Prerequisites for the XStream mode
Before configuring CDC using XStream mode in Talend Studio, the administrator of the Oracle database shoulddo the following:
1. Activate the archive log mode in Oracle;
2. Open all PDBs for a CDB in Oracle;
3. Configure an XStream administrator.
Activate the archive log mode in Oracle
Connect to the Oracle database as an administrative user and run the following statement to display its archivinginformation:
archive log list;
If the database is not operating in the archive log mode, run the following statements to activate the archive logmode:
shutdown immediate;startup mount;alter database archivelog;alter database open;
Open all PDBs for a CDB in Oracle
During XStream configuration, if the Oracle database is a container database (CDB), you need to ensure that allpluggable databases (PDBs) in the CDB are in open read/write mode.
To view the open mode of PDBs, connect to the Oracle database as an administrative user and run the followingstatement.
select con_id, dbid, guid, name, open_mode from v$pdbs;
To open PDBs, connect to the Oracle database as an administrative user and run the following statement.
alter pluggable database all open;
Configure an XStream administrator
To configure an XStream administrator, connect to the Oracle database as an administrative user with the right tocreate users, grant privileges, and create tablespaces, and then proceed with the following steps.
1. Create a tablespace for the XStream administrator by running the following statement. Skip this step if youwant to use an existing tablespace.
CREATE TABLESPACE xstream_tbs DATAFILE '$ORACLE_HOME/dbs/xstream_tbs.dbf' SIZE 25M REUSE AUTOEXTEND ON MAXSIZE UNLIMITED;
2. Create a new user to act as the XStream administrator by running the following statements. Skip this stepto identify an existing user.
How to set up CDC in Oracle XStream mode
Talend Data Integration Studio User Guide 547
CREATE USER username IDENTIFIED BY passwordDEFAULT TABLESPACE xstream_tbsQUOTA UNLIMITED ON xstream_tbs;
• If you are creating an XStream administrator in a CDB, the XStream administrator must be a common user. Thename of a common user must begin with c## or C##, and you need to include the CONTAINER=ALL clause inthe statement.
• If you are creating an XStream administrator using the Oracle default tablespace, you need to remove the DEFAULTTABLESPACE and QUOTA UNLIMITED ON clauses in the statement.
3. Grant privileges to the XStream administrator by running the following statements and procedures:
GRANT DBA TO username;GRANT CONNECT, CREATE TABLE TO username;GRANT RESOURCE TO username;GRANT CREATE TABLESPACE TO username;GRANT UNLIMITED TABLESPACE TO username;GRANT SELECT_CATALOG_ROLE TO username;GRANT EXECUTE_CATALOG_ROLE TO username;GRANT CREATE SEQUENCE TO username;GRANT CREATE SESSION TO username;GRANT CREATE ANY VIEW TO username;GRANT CREATE ANY TABLE TO username;GRANT SELECT ANY TABLE TO username;GRANT COMMENT ANY TABLE TO username;GRANT LOCK ANY TABLE TO username;GRANT SELECT ANY DICTIONARY TO username;GRANT EXECUTE ON SYS.DBMS_CDC_PUBLISH to username;ALTER USER username QUOTA UNLIMITED ON USERS;GRANT CREATE ANY TRIGGER TO username;GRANT ALTER ANY TRIGGER TO username;GRANT DROP ANY TRIGGER TO username;
BEGIN DBMS_XSTREAM_AUTH.GRANT_ADMIN_PRIVILEGE( grantee => 'username', privilege_type => 'CAPTURE', grant_select_privileges => TRUE);END;/
BEGIN DBMS_XSTREAM_AUTH.GRANT_ADMIN_PRIVILEGE( grantee => 'username', privilege_type => 'APPLY', grant_select_privileges => TRUE);END;/
Note that if you are granting privileges to a common user, you need to include the CONTAINER=ALL clause inthe above GRANT statements and procedures.
10.3.3.2. How to configure CDC using XStream mode
This section provides detailed information about configuring the XStream Out and XStream In in Talend Studio.
Configure XStream Out in Talend Studio
To configure XStream Out in Talend Studio, do the following:
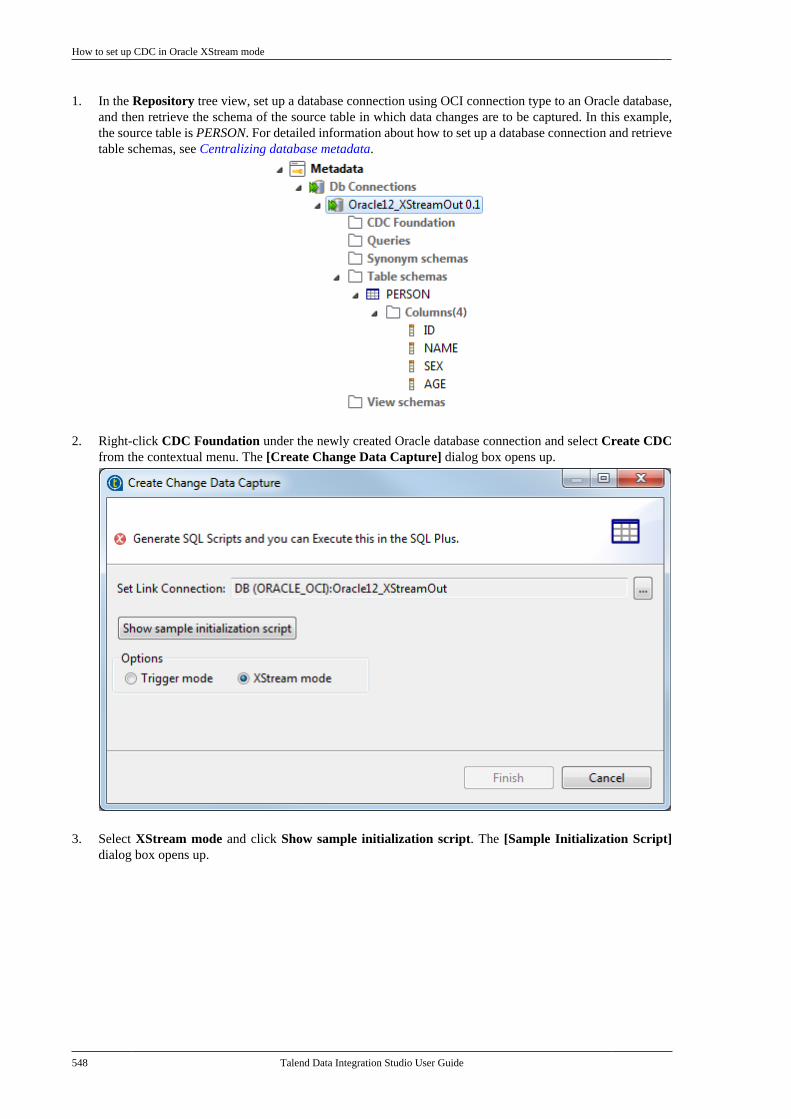
How to set up CDC in Oracle XStream mode
548 Talend Data Integration Studio User Guide
1. In the Repository tree view, set up a database connection using OCI connection type to an Oracle database,and then retrieve the schema of the source table in which data changes are to be captured. In this example,the source table is PERSON. For detailed information about how to set up a database connection and retrievetable schemas, see Centralizing database metadata.
2. Right-click CDC Foundation under the newly created Oracle database connection and select Create CDCfrom the contextual menu. The [Create Change Data Capture] dialog box opens up.
3. Select XStream mode and click Show sample initialization script. The [Sample Initialization Script]dialog box opens up.

How to set up CDC in Oracle XStream mode
Talend Data Integration Studio User Guide 549
Note that this is only a sample script for configuring XStream on an Oracle 12c server, you need to updatethe username, password, and tablespace information according to your settings and run the statements andprocedures in Oracle. For detailed information, see Prerequisites for the XStream mode.
Click OK to close the [Sample Initialization Script] dialog box.
Click Finish to create CDC in Oracle and close the [Create Change Data Capture] dialog box.
4. Right-click the source table and select add CDC from the contextual menu.
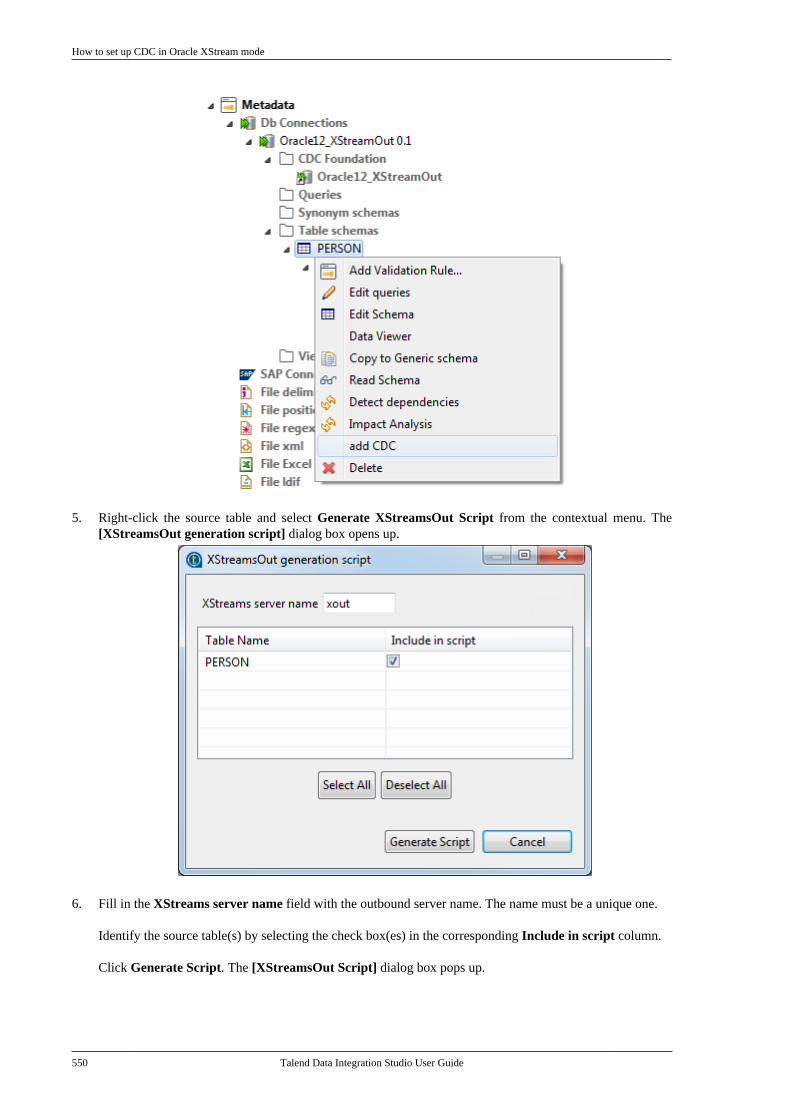
How to set up CDC in Oracle XStream mode
550 Talend Data Integration Studio User Guide
5. Right-click the source table and select Generate XStreamsOut Script from the contextual menu. The[XStreamsOut generation script] dialog box opens up.
6. Fill in the XStreams server name field with the outbound server name. The name must be a unique one.
Identify the source table(s) by selecting the check box(es) in the corresponding Include in script column.
Click Generate Script. The [XStreamsOut Script] dialog box pops up.
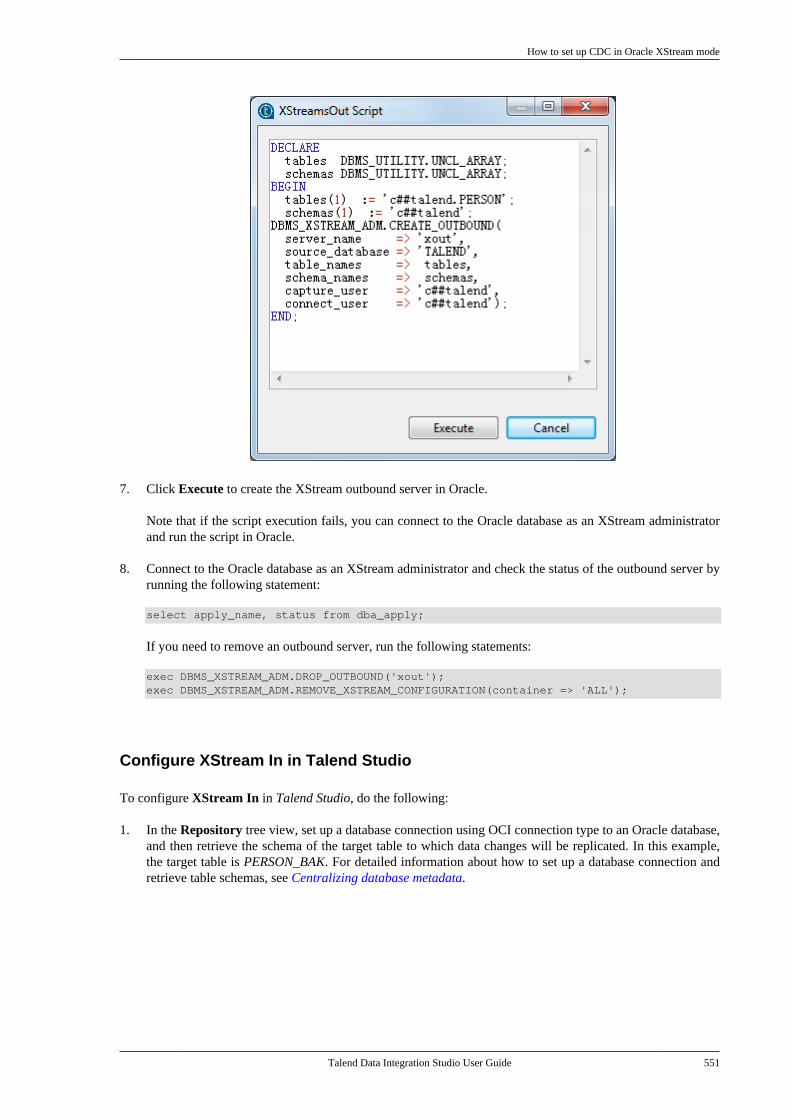
How to set up CDC in Oracle XStream mode
Talend Data Integration Studio User Guide 551
7. Click Execute to create the XStream outbound server in Oracle.
Note that if the script execution fails, you can connect to the Oracle database as an XStream administratorand run the script in Oracle.
8. Connect to the Oracle database as an XStream administrator and check the status of the outbound server byrunning the following statement:
select apply_name, status from dba_apply;
If you need to remove an outbound server, run the following statements:
exec DBMS_XSTREAM_ADM.DROP_OUTBOUND('xout'); exec DBMS_XSTREAM_ADM.REMOVE_XSTREAM_CONFIGURATION(container => 'ALL');
Configure XStream In in Talend Studio
To configure XStream In in Talend Studio, do the following:
1. In the Repository tree view, set up a database connection using OCI connection type to an Oracle database,and then retrieve the schema of the target table to which data changes will be replicated. In this example,the target table is PERSON_BAK. For detailed information about how to set up a database connection andretrieve table schemas, see Centralizing database metadata.
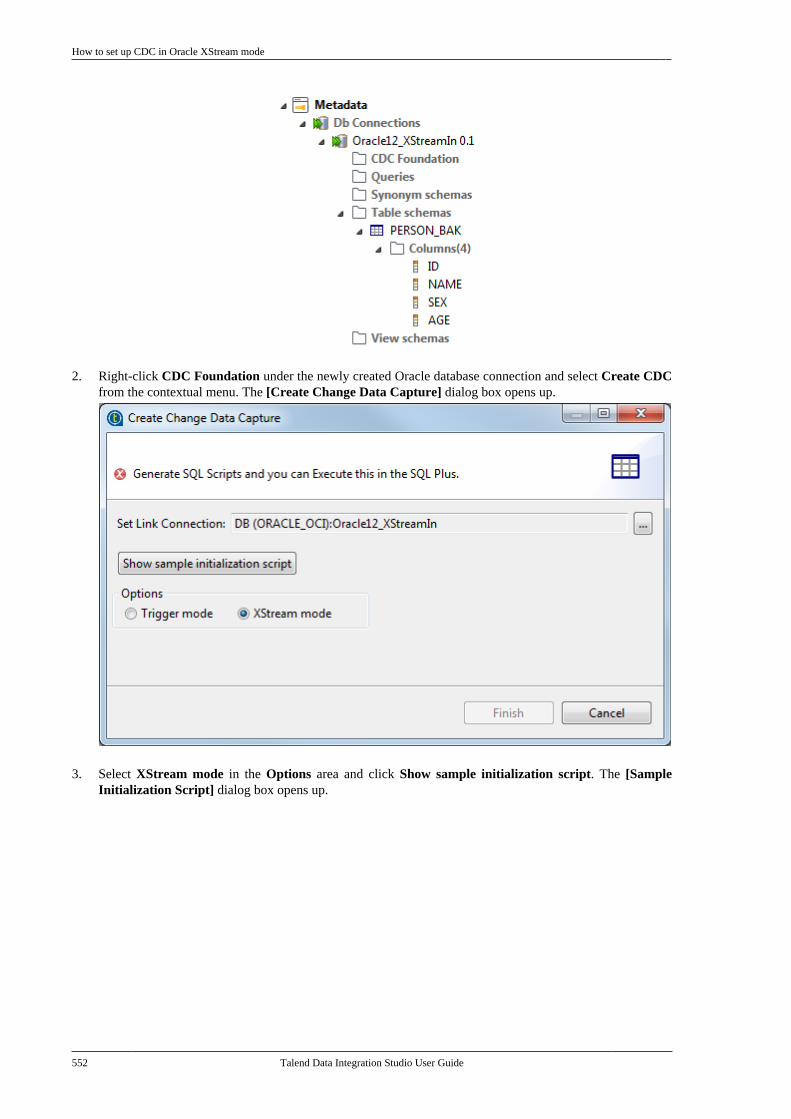
How to set up CDC in Oracle XStream mode
552 Talend Data Integration Studio User Guide
2. Right-click CDC Foundation under the newly created Oracle database connection and select Create CDCfrom the contextual menu. The [Create Change Data Capture] dialog box opens up.
3. Select XStream mode in the Options area and click Show sample initialization script. The [SampleInitialization Script] dialog box opens up.
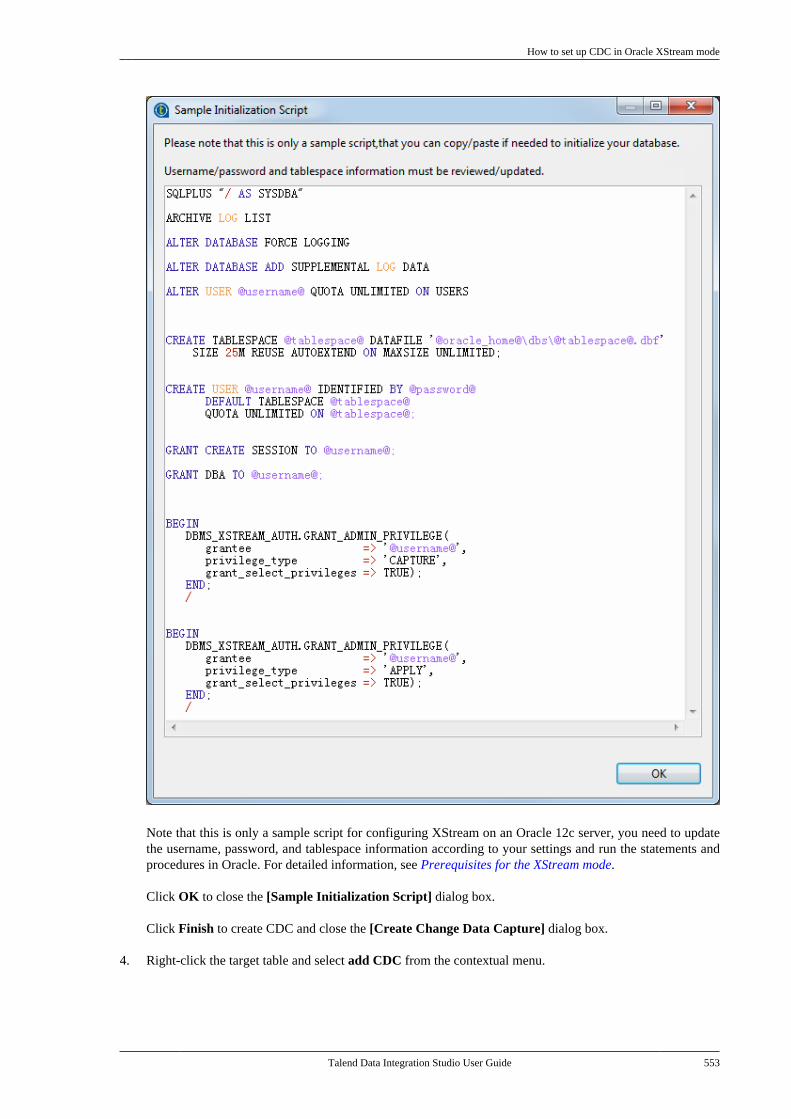
How to set up CDC in Oracle XStream mode
Talend Data Integration Studio User Guide 553
Note that this is only a sample script for configuring XStream on an Oracle 12c server, you need to updatethe username, password, and tablespace information according to your settings and run the statements andprocedures in Oracle. For detailed information, see Prerequisites for the XStream mode.
Click OK to close the [Sample Initialization Script] dialog box.
Click Finish to create CDC and close the [Create Change Data Capture] dialog box.
4. Right-click the target table and select add CDC from the contextual menu.
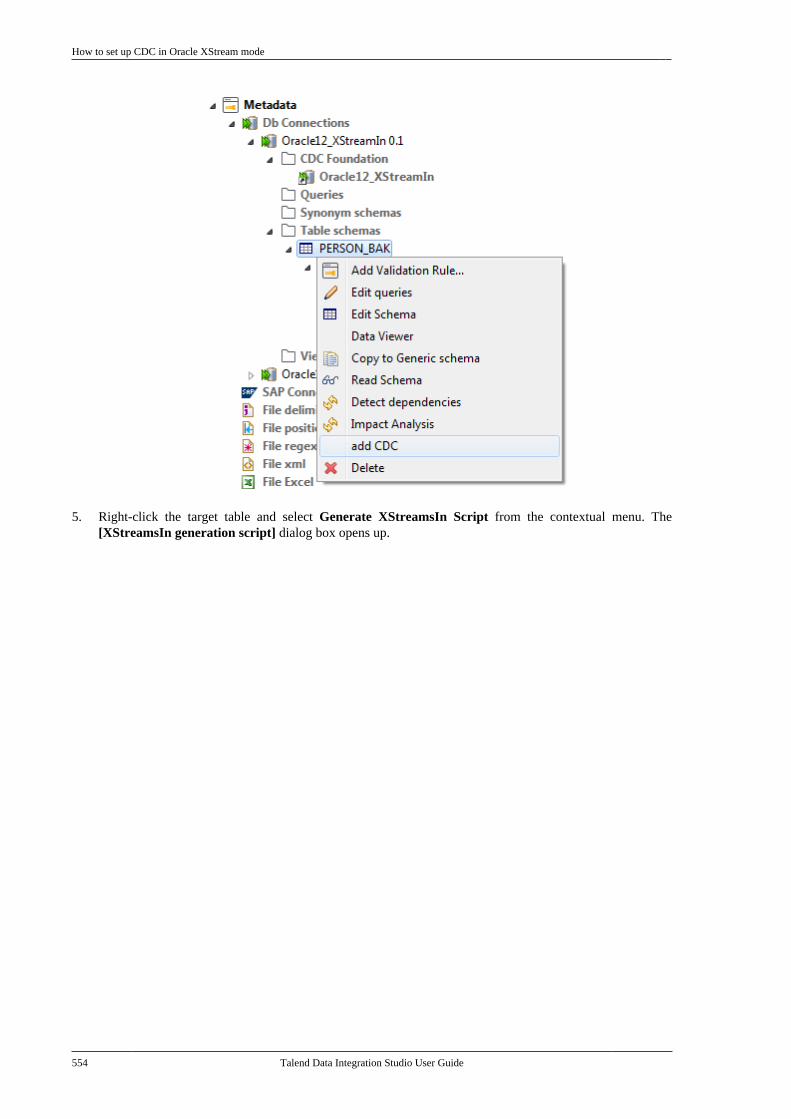
How to set up CDC in Oracle XStream mode
554 Talend Data Integration Studio User Guide
5. Right-click the target table and select Generate XStreamsIn Script from the contextual menu. The[XStreamsIn generation script] dialog box opens up.
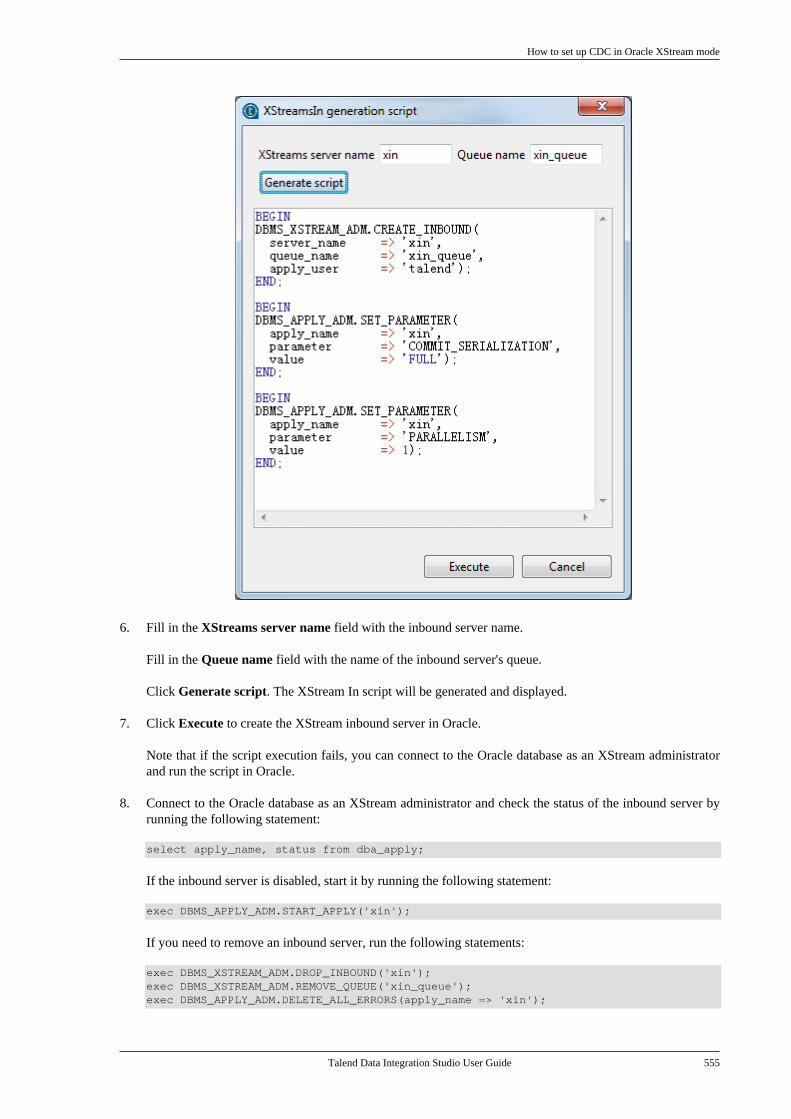
How to set up CDC in Oracle XStream mode
Talend Data Integration Studio User Guide 555
6. Fill in the XStreams server name field with the inbound server name.
Fill in the Queue name field with the name of the inbound server's queue.
Click Generate script. The XStream In script will be generated and displayed.
7. Click Execute to create the XStream inbound server in Oracle.
Note that if the script execution fails, you can connect to the Oracle database as an XStream administratorand run the script in Oracle.
8. Connect to the Oracle database as an XStream administrator and check the status of the inbound server byrunning the following statement:
select apply_name, status from dba_apply;
If the inbound server is disabled, start it by running the following statement:
exec DBMS_APPLY_ADM.START_APPLY('xin');
If you need to remove an inbound server, run the following statements:
exec DBMS_XSTREAM_ADM.DROP_INBOUND('xin');exec DBMS_XSTREAM_ADM.REMOVE_QUEUE('xin_queue'); exec DBMS_APPLY_ADM.DELETE_ALL_ERRORS(apply_name => 'xin');
How to set up CDC in Redo/Archive log mode (journal) for AS/400
556 Talend Data Integration Studio User Guide
10.3.3.3. How to extract and synchronize data changes inXStream mode
After setting up the CDC environment using XStream mode, you can now design a Job in Talend Studio using theOracle CDC component tOracleCDC to extract data changes from the source system and tOracleCDCOutputto replicate the data changes to the target system.
For an example of how to use the Oracle CDC components and for more information about the properties and theparameters of the Oracle CDC components, see Talend Components Reference Guide.
10.3.4. How to set up CDC in Redo/Archive log mode(journal) for AS/400
In the AS/400 Redo/Archive log mode, the Studio runs its AS/400-dedicated RUNCDC program to read andanalyze journals and receivers, extract change information from the source table, update the CDC table (the changetable) and make queries on the changes. Both the long name and the short name of a source table are used butonly the short name is used to name the CDC table.
Since version 5.4.2, the Studio does not automatically create, modify or delete any journal and can only run theCDC process on the basis of the journal and receivers that you or the administrator of your AS/400 system canprovide depending on the policy of your company. For this reason, ensure that an old receiver has been treated byRUNCDC before deleting it so as to avoid lost of the information recorded in that receiver.
The following two sections describe how to set up a CDC environment in Talend Studio. The contents describedinclude:
• the prerequisites on AS/400;
• how to configure your system for CDC usage;
• how to extract the modified data;
• the prerequisites for reusing a CDC environment migrated from one of the 5.4.1 or earlier versions of the Studio.
10.3.4.1. The prerequisites on AS/400
Prior to setting up CDC in Redo/Archive log mode (journal) on AS/400, you need to verify the prerequisites asfollows on your AS/400:
• OS AS/400 V5R3M0, V5R4M0 or V6R1M0 is used;
• the AS/400 user account for CDC must have *ALLOBJ privileges or at least all of the following privileges:
- CRTSAVF,
- CLRSAVF,
- DLTF,
- RSTLIB,
- DLTLIB,
- CRTLIB,
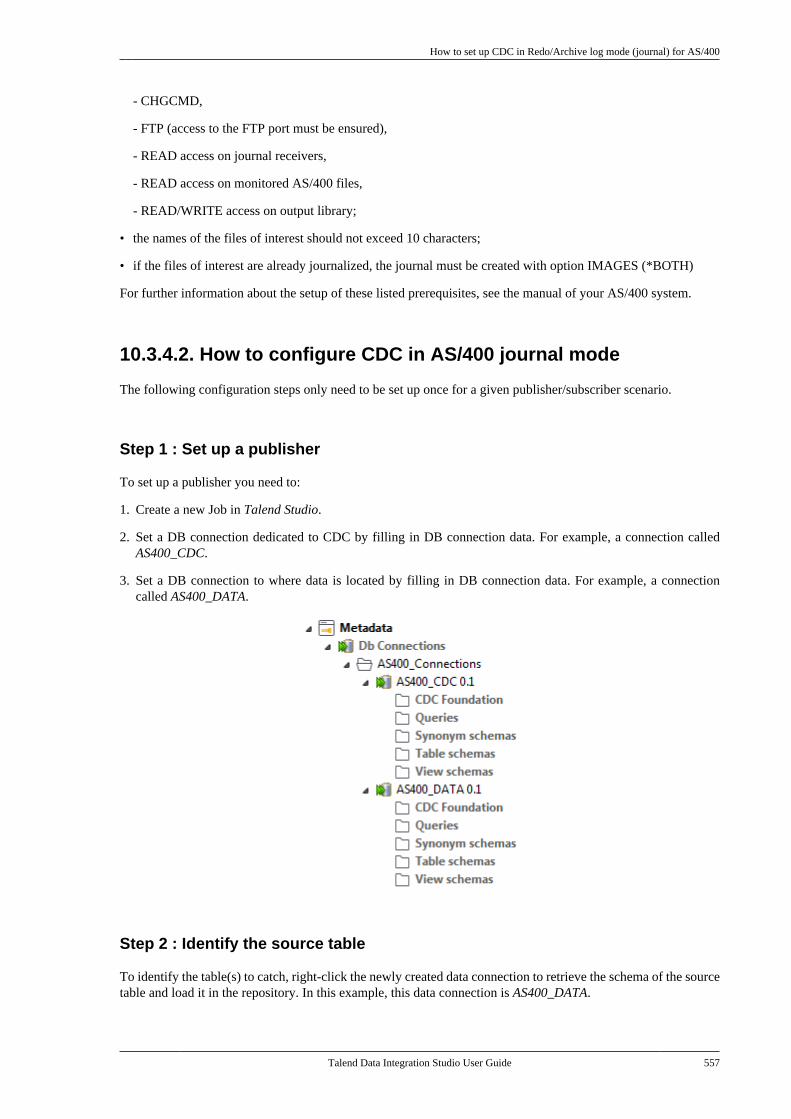
How to set up CDC in Redo/Archive log mode (journal) for AS/400
Talend Data Integration Studio User Guide 557
- CHGCMD,
- FTP (access to the FTP port must be ensured),
- READ access on journal receivers,
- READ access on monitored AS/400 files,
- READ/WRITE access on output library;
• the names of the files of interest should not exceed 10 characters;
• if the files of interest are already journalized, the journal must be created with option IMAGES (*BOTH)
For further information about the setup of these listed prerequisites, see the manual of your AS/400 system.
10.3.4.2. How to configure CDC in AS/400 journal mode
The following configuration steps only need to be set up once for a given publisher/subscriber scenario.
Step 1 : Set up a publisher
To set up a publisher you need to:
1. Create a new Job in Talend Studio.
2. Set a DB connection dedicated to CDC by filling in DB connection data. For example, a connection calledAS400_CDC.
3. Set a DB connection to where data is located by filling in DB connection data. For example, a connectioncalled AS400_DATA.
Step 2 : Identify the source table
To identify the table(s) to catch, right-click the newly created data connection to retrieve the schema of the sourcetable and load it in the repository. In this example, this data connection is AS400_DATA.
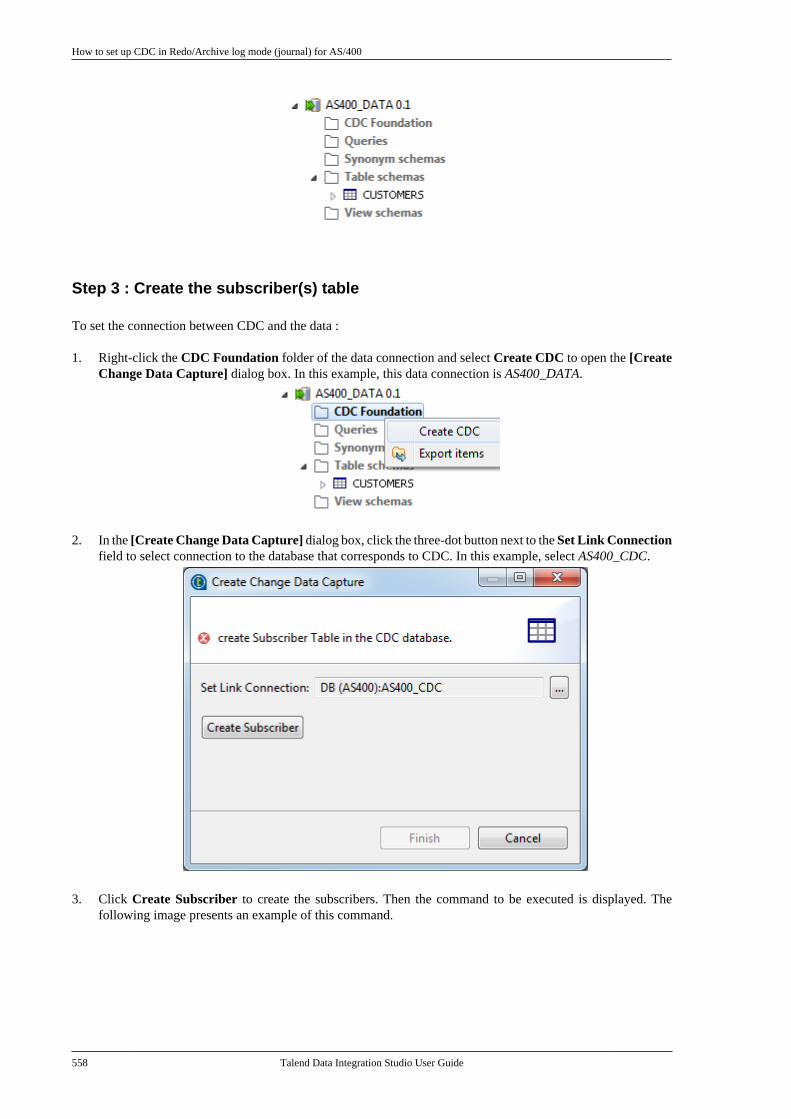
How to set up CDC in Redo/Archive log mode (journal) for AS/400
558 Talend Data Integration Studio User Guide
Step 3 : Create the subscriber(s) table
To set the connection between CDC and the data :
1. Right-click the CDC Foundation folder of the data connection and select Create CDC to open the [CreateChange Data Capture] dialog box. In this example, this data connection is AS400_DATA.
2. In the [Create Change Data Capture] dialog box, click the three-dot button next to the Set Link Connectionfield to select connection to the database that corresponds to CDC. In this example, select AS400_CDC.
3. Click Create Subscriber to create the subscribers. Then the command to be executed is displayed. Thefollowing image presents an example of this command.
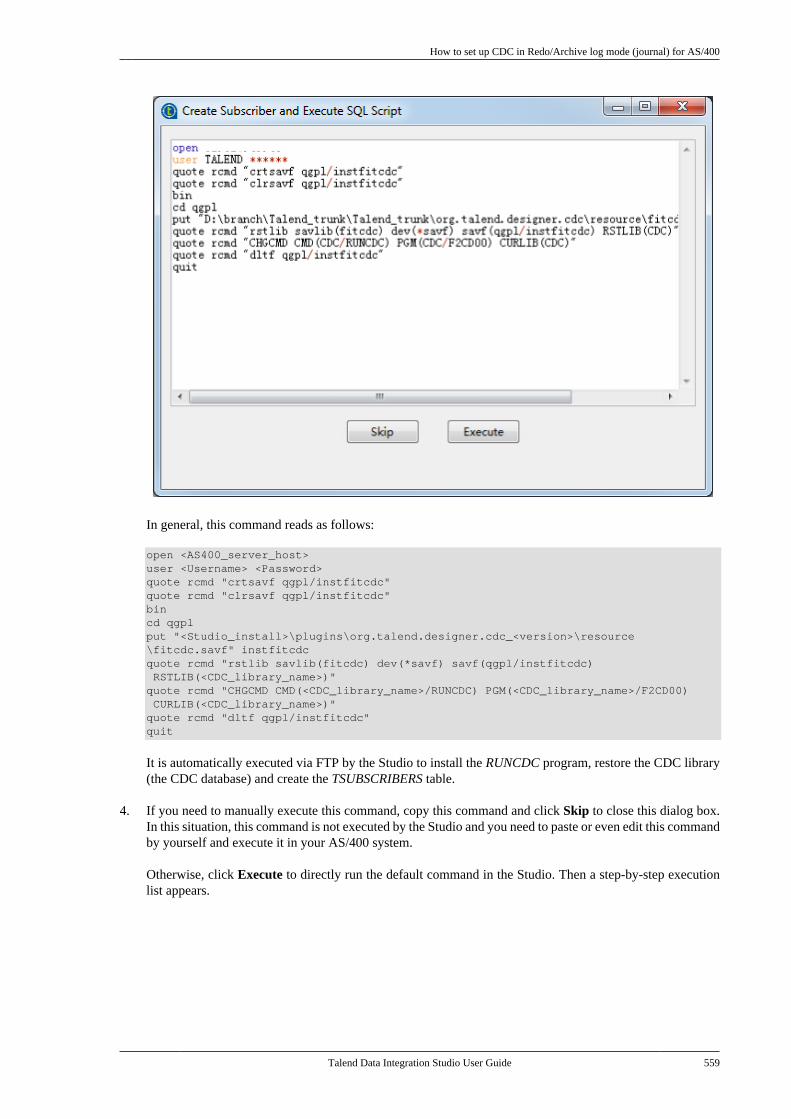
How to set up CDC in Redo/Archive log mode (journal) for AS/400
Talend Data Integration Studio User Guide 559
In general, this command reads as follows:
open <AS400_server_host>user <Username> <Password>quote rcmd "crtsavf qgpl/instfitcdc"quote rcmd "clrsavf qgpl/instfitcdc"bincd qgplput "<Studio_install>\plugins\org.talend.designer.cdc_<version>\resource\fitcdc.savf" instfitcdcquote rcmd "rstlib savlib(fitcdc) dev(*savf) savf(qgpl/instfitcdc) RSTLIB(<CDC_library_name>)"quote rcmd "CHGCMD CMD(<CDC_library_name>/RUNCDC) PGM(<CDC_library_name>/F2CD00) CURLIB(<CDC_library_name>)"quote rcmd "dltf qgpl/instfitcdc"quit
It is automatically executed via FTP by the Studio to install the RUNCDC program, restore the CDC library(the CDC database) and create the TSUBSCRIBERS table.
4. If you need to manually execute this command, copy this command and click Skip to close this dialog box.In this situation, this command is not executed by the Studio and you need to paste or even edit this commandby yourself and execute it in your AS/400 system.
Otherwise, click Execute to directly run the default command in the Studio. Then a step-by-step executionlist appears.
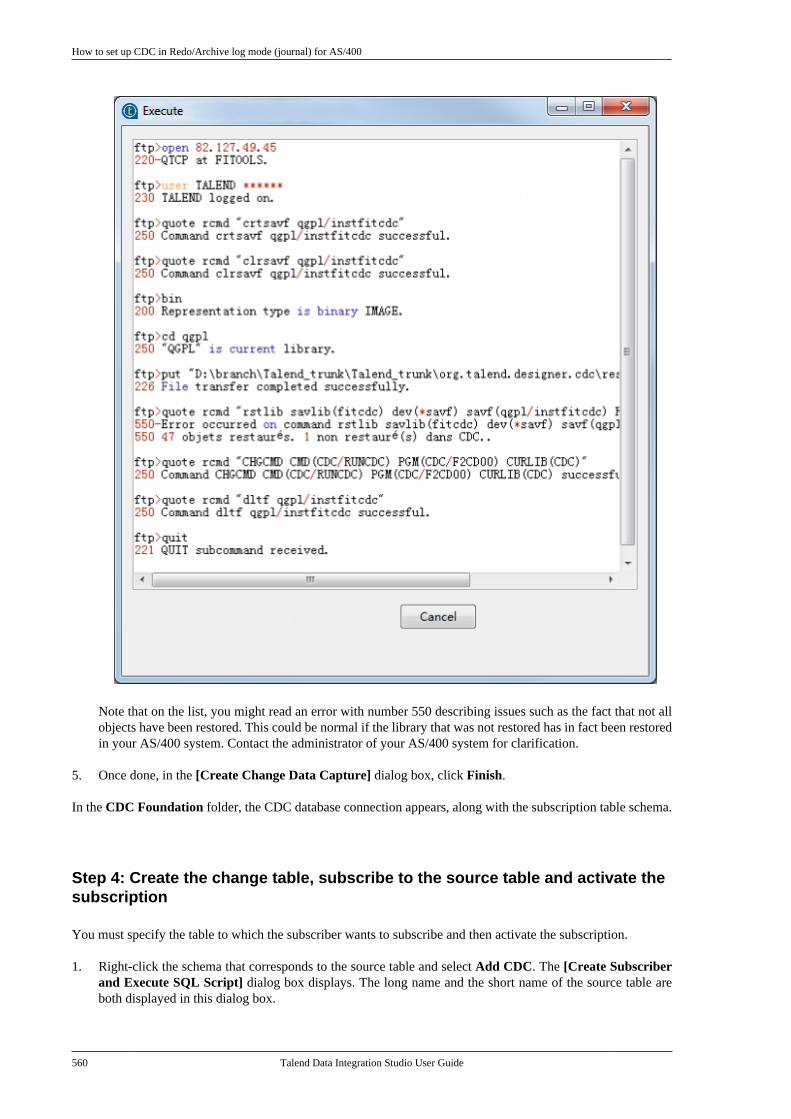
How to set up CDC in Redo/Archive log mode (journal) for AS/400
560 Talend Data Integration Studio User Guide
Note that on the list, you might read an error with number 550 describing issues such as the fact that not allobjects have been restored. This could be normal if the library that was not restored has in fact been restoredin your AS/400 system. Contact the administrator of your AS/400 system for clarification.
5. Once done, in the [Create Change Data Capture] dialog box, click Finish.
In the CDC Foundation folder, the CDC database connection appears, along with the subscription table schema.
Step 4: Create the change table, subscribe to the source table and activate thesubscription
You must specify the table to which the subscriber wants to subscribe and then activate the subscription.
1. Right-click the schema that corresponds to the source table and select Add CDC. The [Create Subscriberand Execute SQL Script] dialog box displays. The long name and the short name of the source table areboth displayed in this dialog box.
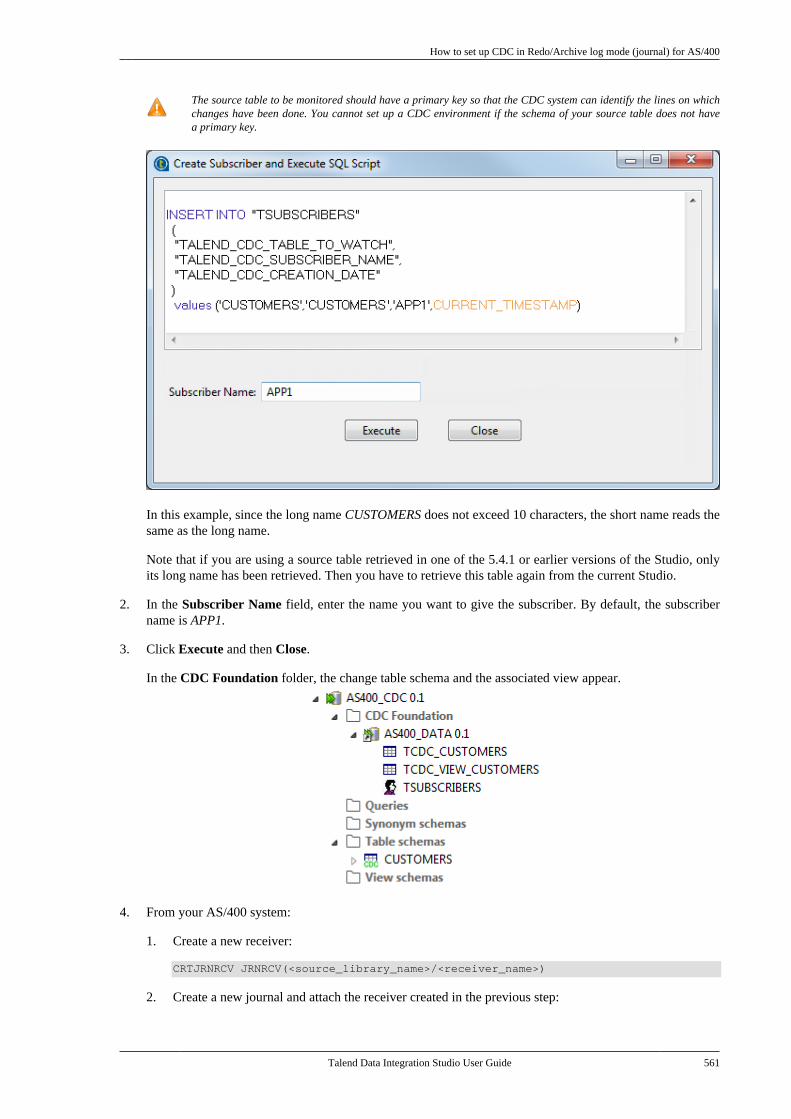
How to set up CDC in Redo/Archive log mode (journal) for AS/400
Talend Data Integration Studio User Guide 561
The source table to be monitored should have a primary key so that the CDC system can identify the lines on whichchanges have been done. You cannot set up a CDC environment if the schema of your source table does not havea primary key.
In this example, since the long name CUSTOMERS does not exceed 10 characters, the short name reads thesame as the long name.
Note that if you are using a source table retrieved in one of the 5.4.1 or earlier versions of the Studio, onlyits long name has been retrieved. Then you have to retrieve this table again from the current Studio.
2. In the Subscriber Name field, enter the name you want to give the subscriber. By default, the subscribername is APP1.
3. Click Execute and then Close.
In the CDC Foundation folder, the change table schema and the associated view appear.
4. From your AS/400 system:
1. Create a new receiver:
CRTJRNRCV JRNRCV(<source_library_name>/<receiver_name>)
2. Create a new journal and attach the receiver created in the previous step:
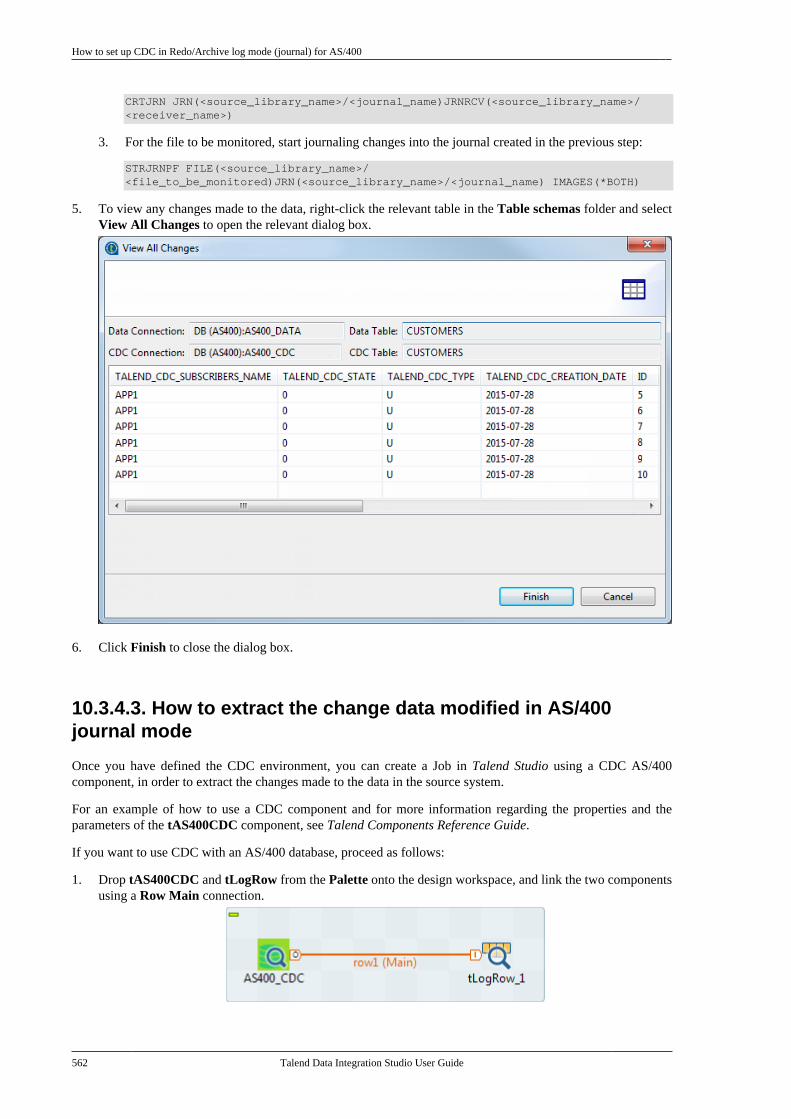
How to set up CDC in Redo/Archive log mode (journal) for AS/400
562 Talend Data Integration Studio User Guide
CRTJRN JRN(<source_library_name>/<journal_name)JRNRCV(<source_library_name>/<receiver_name>)
3. For the file to be monitored, start journaling changes into the journal created in the previous step:
STRJRNPF FILE(<source_library_name>/<file_to_be_monitored)JRN(<source_library_name>/<journal_name) IMAGES(*BOTH)
5. To view any changes made to the data, right-click the relevant table in the Table schemas folder and selectView All Changes to open the relevant dialog box.
6. Click Finish to close the dialog box.
10.3.4.3. How to extract the change data modified in AS/400journal mode
Once you have defined the CDC environment, you can create a Job in Talend Studio using a CDC AS/400component, in order to extract the changes made to the data in the source system.
For an example of how to use a CDC component and for more information regarding the properties and theparameters of the tAS400CDC component, see Talend Components Reference Guide.
If you want to use CDC with an AS/400 database, proceed as follows:
1. Drop tAS400CDC and tLogRow from the Palette onto the design workspace, and link the two componentsusing a Row Main connection.
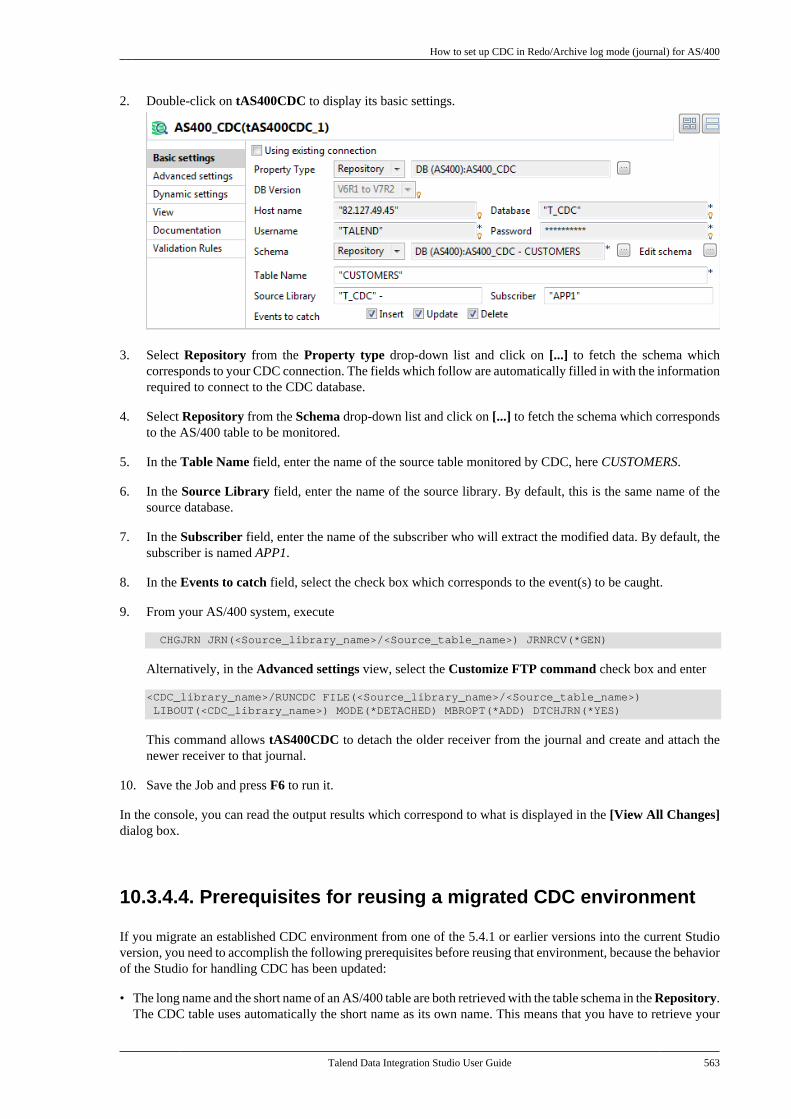
How to set up CDC in Redo/Archive log mode (journal) for AS/400
Talend Data Integration Studio User Guide 563
2. Double-click on tAS400CDC to display its basic settings.
3. Select Repository from the Property type drop-down list and click on [...] to fetch the schema whichcorresponds to your CDC connection. The fields which follow are automatically filled in with the informationrequired to connect to the CDC database.
4. Select Repository from the Schema drop-down list and click on [...] to fetch the schema which correspondsto the AS/400 table to be monitored.
5. In the Table Name field, enter the name of the source table monitored by CDC, here CUSTOMERS.
6. In the Source Library field, enter the name of the source library. By default, this is the same name of thesource database.
7. In the Subscriber field, enter the name of the subscriber who will extract the modified data. By default, thesubscriber is named APP1.
8. In the Events to catch field, select the check box which corresponds to the event(s) to be caught.
9. From your AS/400 system, execute
CHGJRN JRN(<Source_library_name>/<Source_table_name>) JRNRCV(*GEN)
Alternatively, in the Advanced settings view, select the Customize FTP command check box and enter
<CDC_library_name>/RUNCDC FILE(<Source_library_name>/<Source_table_name>) LIBOUT(<CDC_library_name>) MODE(*DETACHED) MBROPT(*ADD) DTCHJRN(*YES)
This command allows tAS400CDC to detach the older receiver from the journal and create and attach thenewer receiver to that journal.
10. Save the Job and press F6 to run it.
In the console, you can read the output results which correspond to what is displayed in the [View All Changes]dialog box.
10.3.4.4. Prerequisites for reusing a migrated CDC environment
If you migrate an established CDC environment from one of the 5.4.1 or earlier versions into the current Studioversion, you need to accomplish the following prerequisites before reusing that environment, because the behaviorof the Studio for handling CDC has been updated:
• The long name and the short name of an AS/400 table are both retrieved with the table schema in the Repository.The CDC table uses automatically the short name as its own name. This means that you have to retrieve your
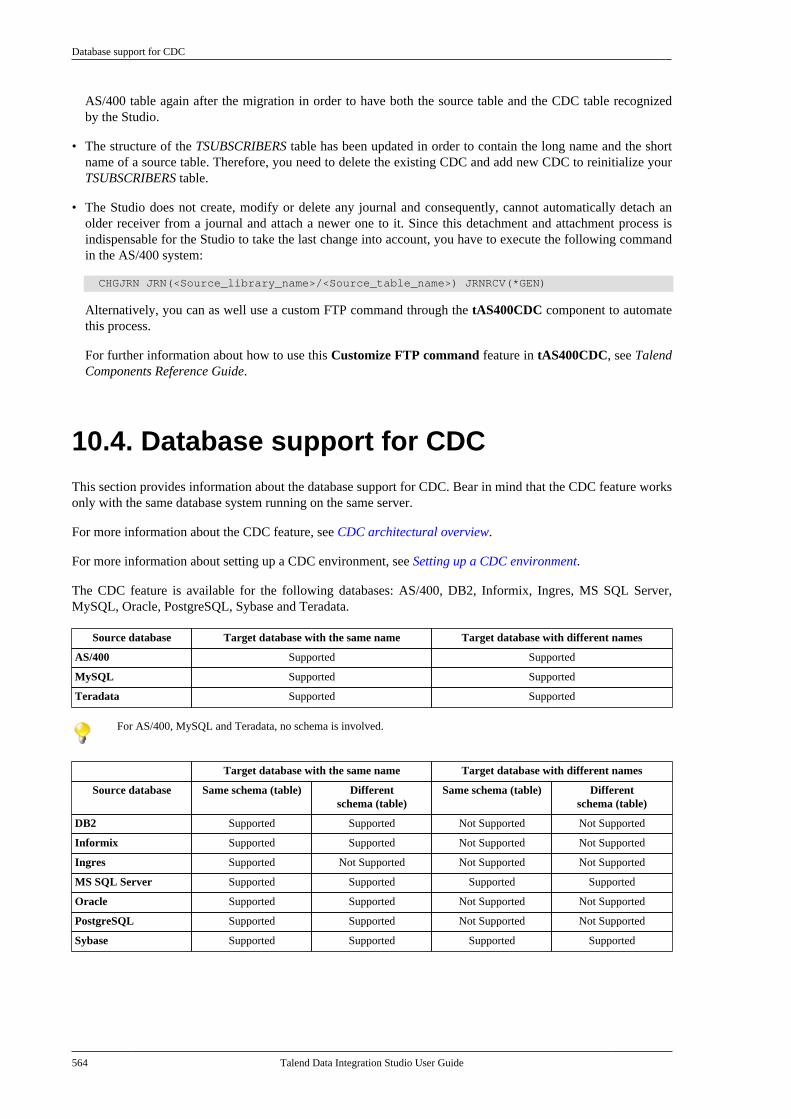
Database support for CDC
564 Talend Data Integration Studio User Guide
AS/400 table again after the migration in order to have both the source table and the CDC table recognizedby the Studio.
• The structure of the TSUBSCRIBERS table has been updated in order to contain the long name and the shortname of a source table. Therefore, you need to delete the existing CDC and add new CDC to reinitialize yourTSUBSCRIBERS table.
• The Studio does not create, modify or delete any journal and consequently, cannot automatically detach anolder receiver from a journal and attach a newer one to it. Since this detachment and attachment process isindispensable for the Studio to take the last change into account, you have to execute the following commandin the AS/400 system:
CHGJRN JRN(<Source_library_name>/<Source_table_name>) JRNRCV(*GEN)
Alternatively, you can as well use a custom FTP command through the tAS400CDC component to automatethis process.
For further information about how to use this Customize FTP command feature in tAS400CDC, see TalendComponents Reference Guide.
10.4. Database support for CDCThis section provides information about the database support for CDC. Bear in mind that the CDC feature worksonly with the same database system running on the same server.
For more information about the CDC feature, see CDC architectural overview.
For more information about setting up a CDC environment, see Setting up a CDC environment.
The CDC feature is available for the following databases: AS/400, DB2, Informix, Ingres, MS SQL Server,MySQL, Oracle, PostgreSQL, Sybase and Teradata.
Source database Target database with the same name Target database with different names
AS/400 Supported Supported
MySQL Supported Supported
Teradata Supported Supported
For AS/400, MySQL and Teradata, no schema is involved.
Target database with the same name Target database with different names
Source database Same schema (table) Differentschema (table)
Same schema (table) Differentschema (table)
DB2 Supported Supported Not Supported Not Supported
Informix Supported Supported Not Supported Not Supported
Ingres Supported Not Supported Not Supported Not Supported
MS SQL Server Supported Supported Supported Supported
Oracle Supported Supported Not Supported Not Supported
PostgreSQL Supported Supported Not Supported Not Supported
Sybase Supported Supported Supported Supported
Talend Data Integration Studio User Guide
Chapter 11. Designing a JobletThis chapter covers the Joblet creation and management in Talend Studio.
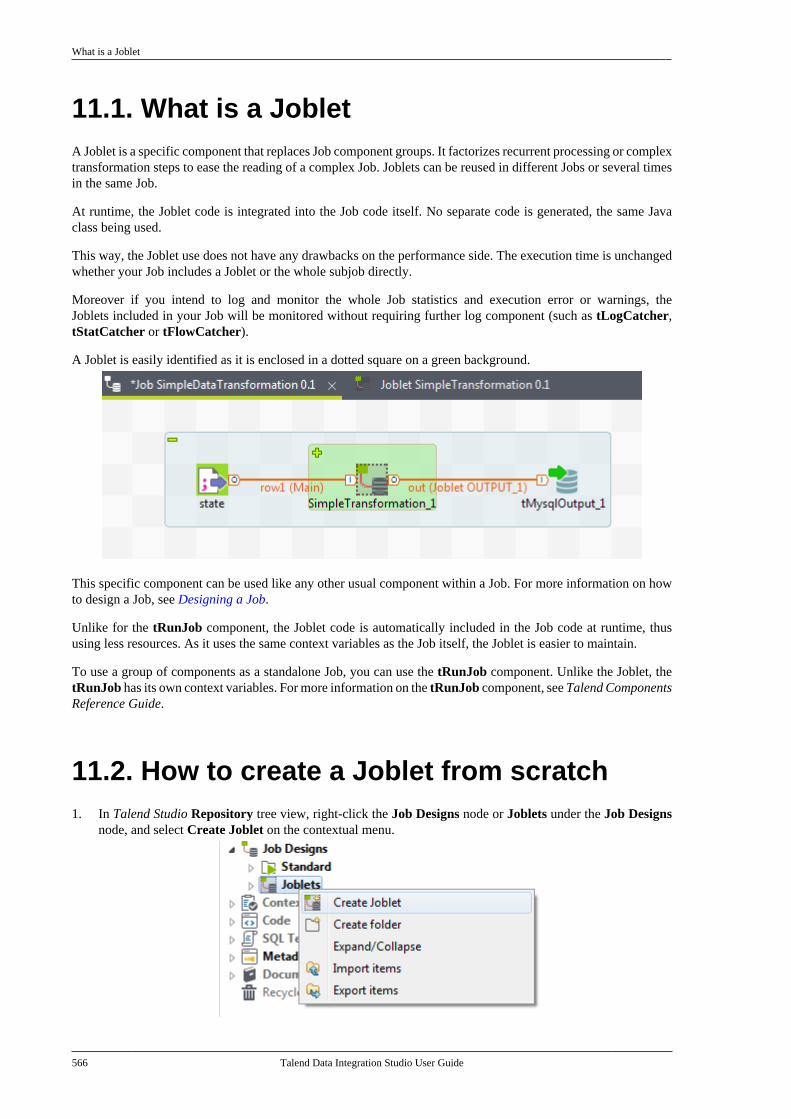
What is a Joblet
566 Talend Data Integration Studio User Guide
11.1. What is a JobletA Joblet is a specific component that replaces Job component groups. It factorizes recurrent processing or complextransformation steps to ease the reading of a complex Job. Joblets can be reused in different Jobs or several timesin the same Job.
At runtime, the Joblet code is integrated into the Job code itself. No separate code is generated, the same Javaclass being used.
This way, the Joblet use does not have any drawbacks on the performance side. The execution time is unchangedwhether your Job includes a Joblet or the whole subjob directly.
Moreover if you intend to log and monitor the whole Job statistics and execution error or warnings, theJoblets included in your Job will be monitored without requiring further log component (such as tLogCatcher,tStatCatcher or tFlowCatcher).
A Joblet is easily identified as it is enclosed in a dotted square on a green background.
This specific component can be used like any other usual component within a Job. For more information on howto design a Job, see Designing a Job.
Unlike for the tRunJob component, the Joblet code is automatically included in the Job code at runtime, thususing less resources. As it uses the same context variables as the Job itself, the Joblet is easier to maintain.
To use a group of components as a standalone Job, you can use the tRunJob component. Unlike the Joblet, thetRunJob has its own context variables. For more information on the tRunJob component, see Talend ComponentsReference Guide.
11.2. How to create a Joblet from scratch1. In Talend Studio Repository tree view, right-click the Job Designs node or Joblets under the Job Designs
node, and select Create Joblet on the contextual menu.
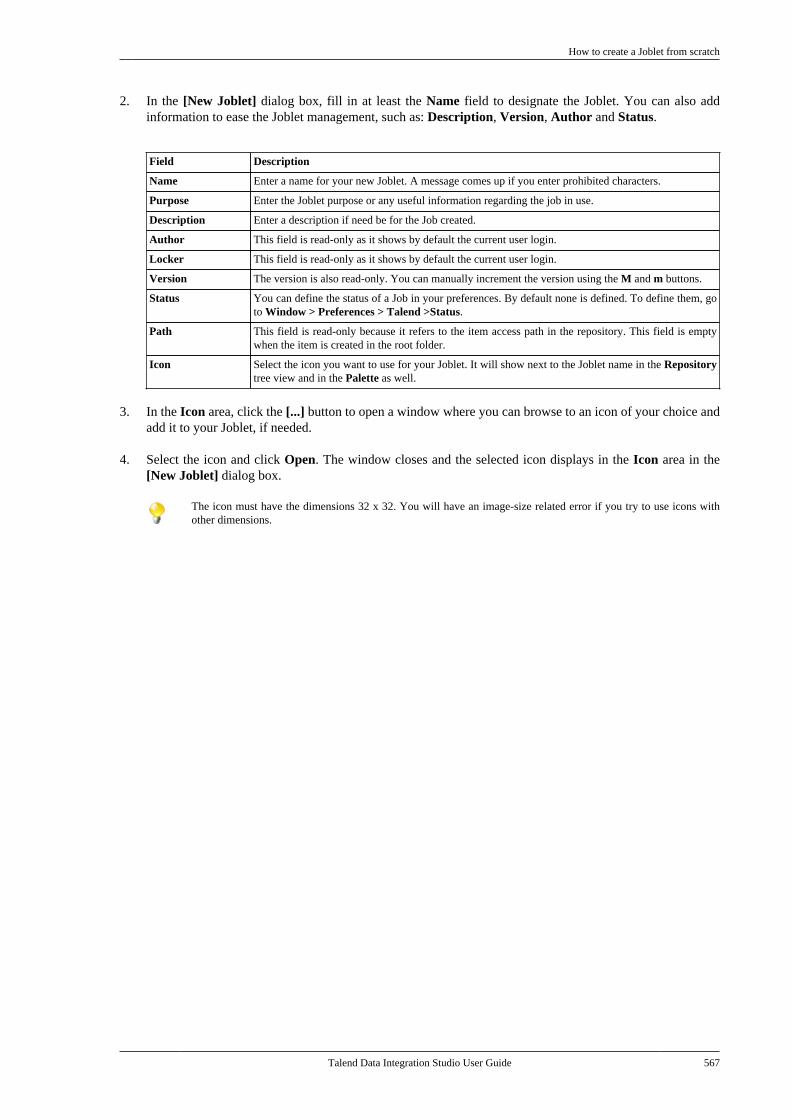
How to create a Joblet from scratch
Talend Data Integration Studio User Guide 567
2. In the [New Joblet] dialog box, fill in at least the Name field to designate the Joblet. You can also addinformation to ease the Joblet management, such as: Description, Version, Author and Status.
Field Description
Name Enter a name for your new Joblet. A message comes up if you enter prohibited characters.
Purpose Enter the Joblet purpose or any useful information regarding the job in use.
Description Enter a description if need be for the Job created.
Author This field is read-only as it shows by default the current user login.
Locker This field is read-only as it shows by default the current user login.
Version The version is also read-only. You can manually increment the version using the M and m buttons.
Status You can define the status of a Job in your preferences. By default none is defined. To define them, goto Window > Preferences > Talend >Status.
Path This field is read-only because it refers to the item access path in the repository. This field is emptywhen the item is created in the root folder.
Icon Select the icon you want to use for your Joblet. It will show next to the Joblet name in the Repositorytree view and in the Palette as well.
3. In the Icon area, click the [...] button to open a window where you can browse to an icon of your choice andadd it to your Joblet, if needed.
4. Select the icon and click Open. The window closes and the selected icon displays in the Icon area in the[New Joblet] dialog box.
The icon must have the dimensions 32 x 32. You will have an image-size related error if you try to use icons withother dimensions.
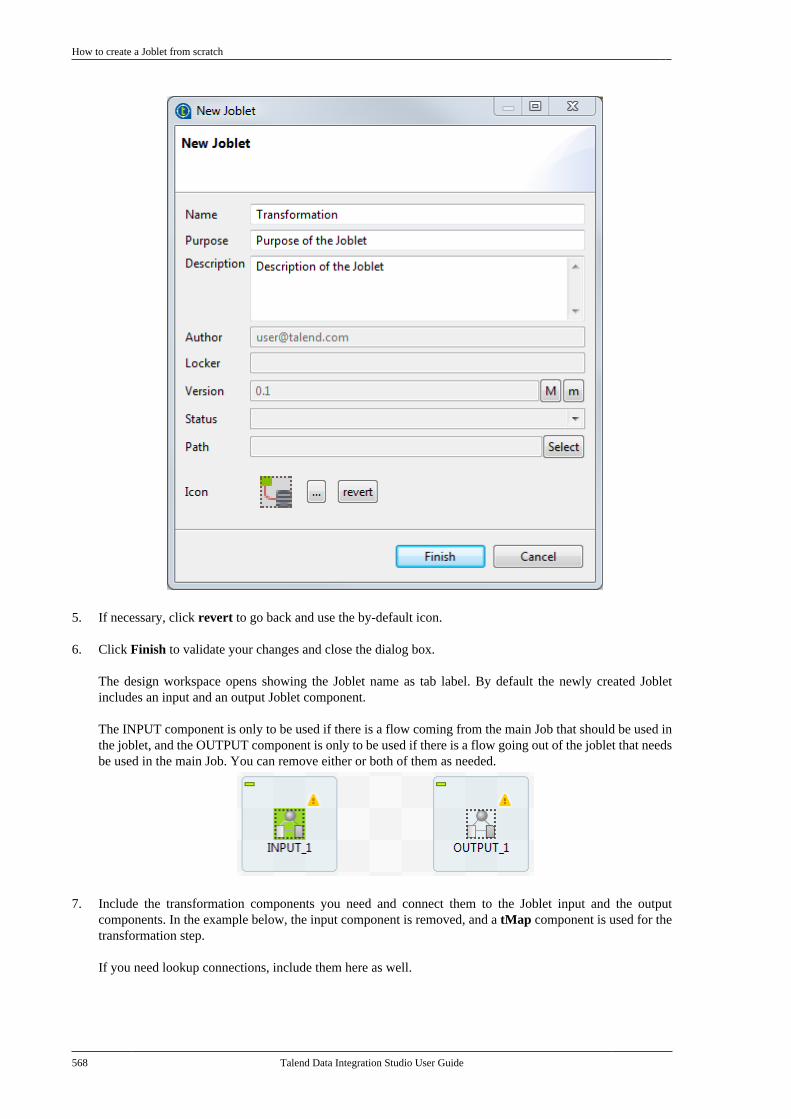
How to create a Joblet from scratch
568 Talend Data Integration Studio User Guide
5. If necessary, click revert to go back and use the by-default icon.
6. Click Finish to validate your changes and close the dialog box.
The design workspace opens showing the Joblet name as tab label. By default the newly created Jobletincludes an input and an output Joblet component.
The INPUT component is only to be used if there is a flow coming from the main Job that should be used inthe joblet, and the OUTPUT component is only to be used if there is a flow going out of the joblet that needsbe used in the main Job. You can remove either or both of them as needed.
7. Include the transformation components you need and connect them to the Joblet input and the outputcomponents. In the example below, the input component is removed, and a tMap component is used for thetransformation step.
If you need lookup connections, include them here as well.
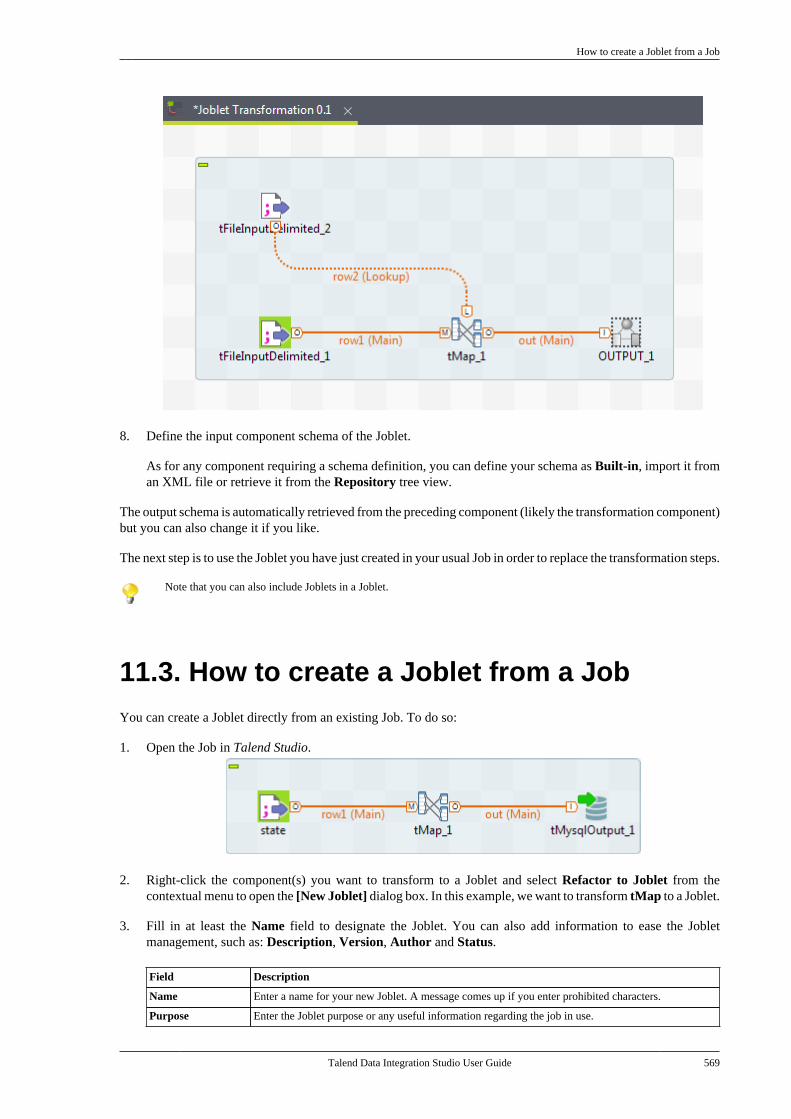
How to create a Joblet from a Job
Talend Data Integration Studio User Guide 569
8. Define the input component schema of the Joblet.
As for any component requiring a schema definition, you can define your schema as Built-in, import it froman XML file or retrieve it from the Repository tree view.
The output schema is automatically retrieved from the preceding component (likely the transformation component)but you can also change it if you like.
The next step is to use the Joblet you have just created in your usual Job in order to replace the transformation steps.
Note that you can also include Joblets in a Joblet.
11.3. How to create a Joblet from a JobYou can create a Joblet directly from an existing Job. To do so:
1. Open the Job in Talend Studio.
2. Right-click the component(s) you want to transform to a Joblet and select Refactor to Joblet from thecontextual menu to open the [New Joblet] dialog box. In this example, we want to transform tMap to a Joblet.
3. Fill in at least the Name field to designate the Joblet. You can also add information to ease the Jobletmanagement, such as: Description, Version, Author and Status.
Field Description
Name Enter a name for your new Joblet. A message comes up if you enter prohibited characters.
Purpose Enter the Joblet purpose or any useful information regarding the job in use.
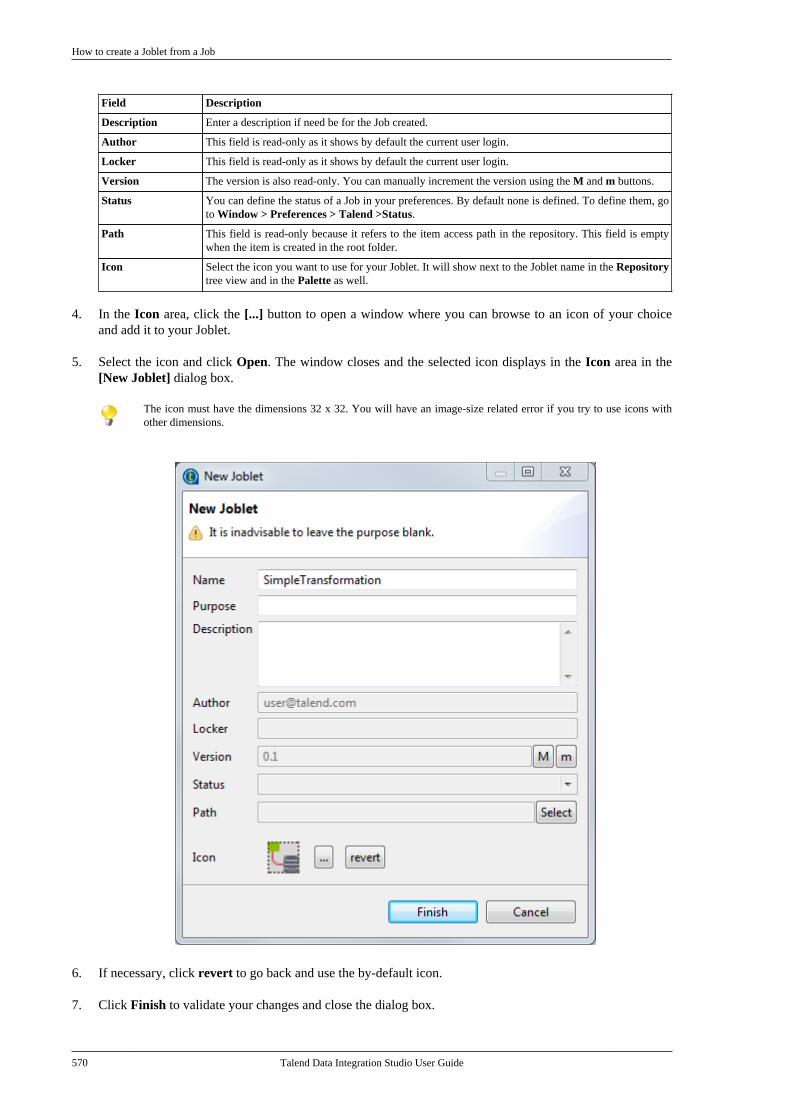
How to create a Joblet from a Job
570 Talend Data Integration Studio User Guide
Field Description
Description Enter a description if need be for the Job created.
Author This field is read-only as it shows by default the current user login.
Locker This field is read-only as it shows by default the current user login.
Version The version is also read-only. You can manually increment the version using the M and m buttons.
Status You can define the status of a Job in your preferences. By default none is defined. To define them, goto Window > Preferences > Talend >Status.
Path This field is read-only because it refers to the item access path in the repository. This field is emptywhen the item is created in the root folder.
Icon Select the icon you want to use for your Joblet. It will show next to the Joblet name in the Repositorytree view and in the Palette as well.
4. In the Icon area, click the [...] button to open a window where you can browse to an icon of your choiceand add it to your Joblet.
5. Select the icon and click Open. The window closes and the selected icon displays in the Icon area in the[New Joblet] dialog box.
The icon must have the dimensions 32 x 32. You will have an image-size related error if you try to use icons withother dimensions.
6. If necessary, click revert to go back and use the by-default icon.
7. Click Finish to validate your changes and close the dialog box.
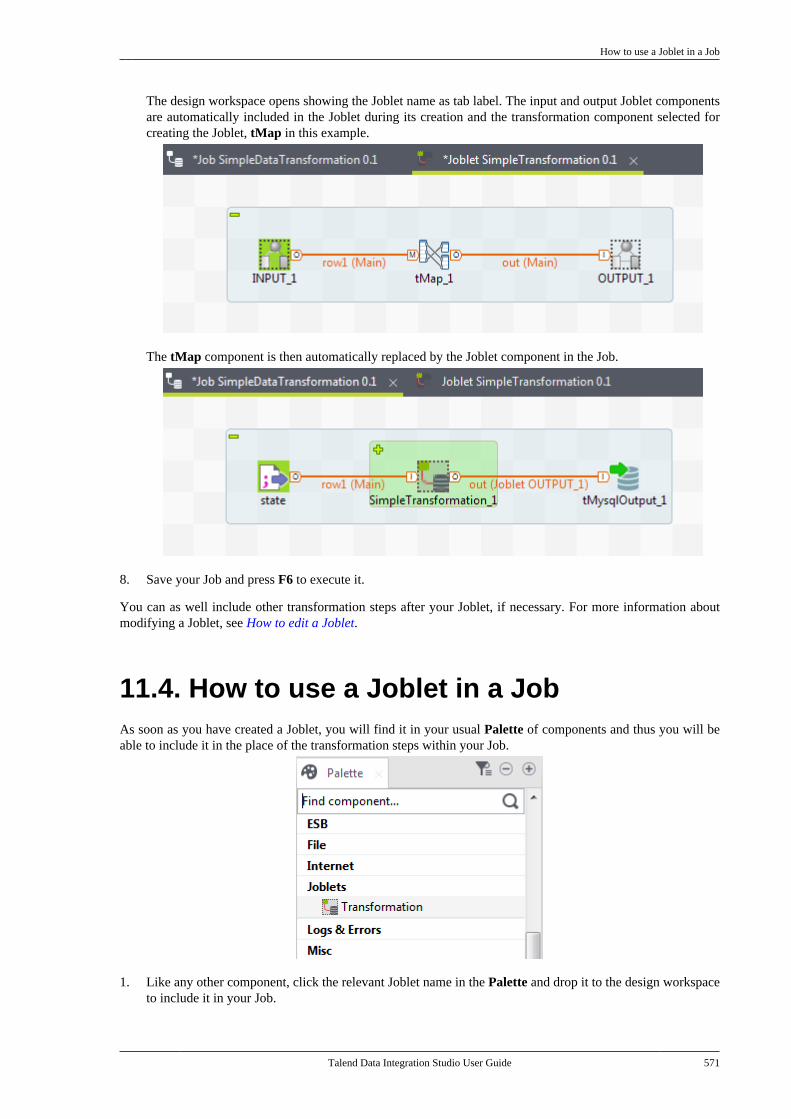
How to use a Joblet in a Job
Talend Data Integration Studio User Guide 571
The design workspace opens showing the Joblet name as tab label. The input and output Joblet componentsare automatically included in the Joblet during its creation and the transformation component selected forcreating the Joblet, tMap in this example.
The tMap component is then automatically replaced by the Joblet component in the Job.
8. Save your Job and press F6 to execute it.
You can as well include other transformation steps after your Joblet, if necessary. For more information aboutmodifying a Joblet, see How to edit a Joblet.
11.4. How to use a Joblet in a JobAs soon as you have created a Joblet, you will find it in your usual Palette of components and thus you will beable to include it in the place of the transformation steps within your Job.
1. Like any other component, click the relevant Joblet name in the Palette and drop it to the design workspaceto include it in your Job.
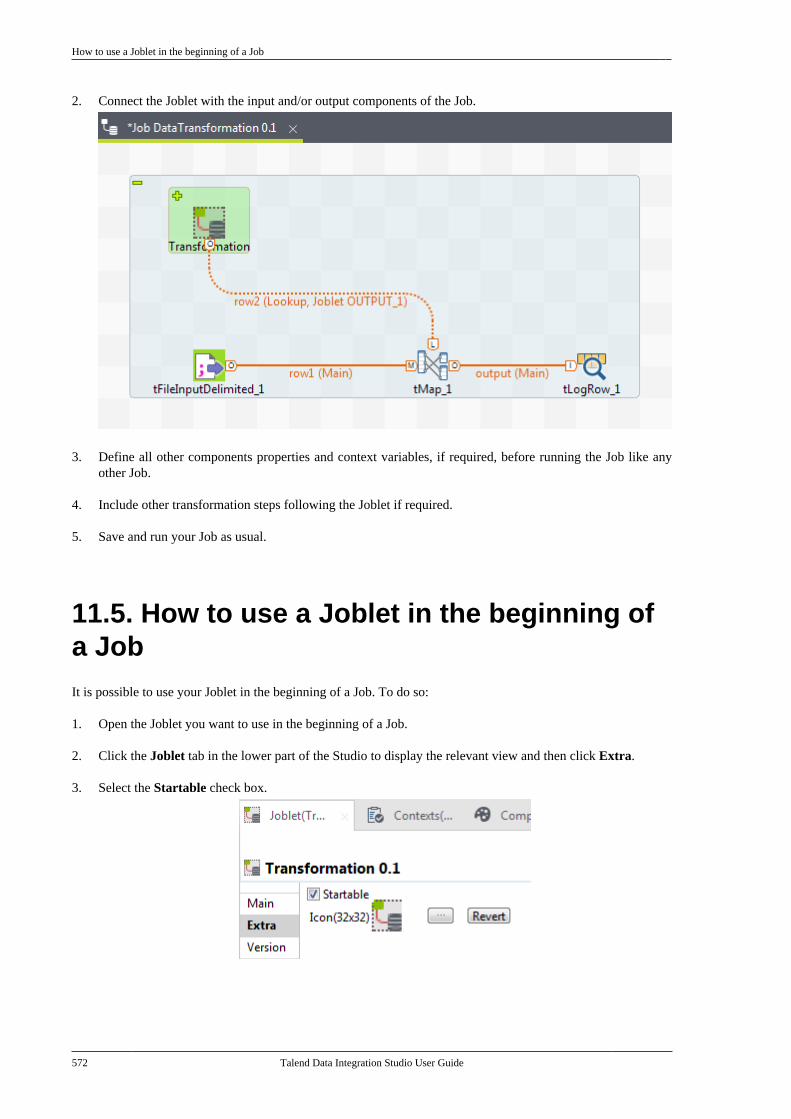
How to use a Joblet in the beginning of a Job
572 Talend Data Integration Studio User Guide
2. Connect the Joblet with the input and/or output components of the Job.
3. Define all other components properties and context variables, if required, before running the Job like anyother Job.
4. Include other transformation steps following the Joblet if required.
5. Save and run your Job as usual.
11.5. How to use a Joblet in the beginning ofa JobIt is possible to use your Joblet in the beginning of a Job. To do so:
1. Open the Joblet you want to use in the beginning of a Job.
2. Click the Joblet tab in the lower part of the Studio to display the relevant view and then click Extra.
3. Select the Startable check box.
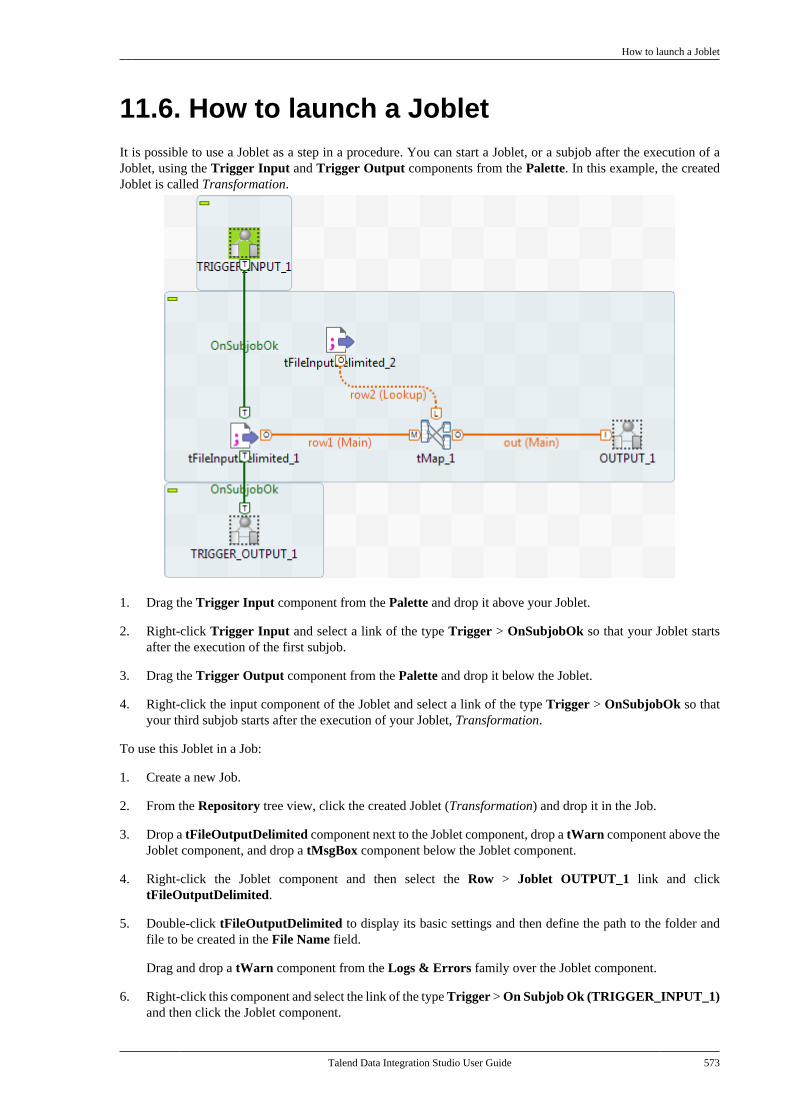
How to launch a Joblet
Talend Data Integration Studio User Guide 573
11.6. How to launch a JobletIt is possible to use a Joblet as a step in a procedure. You can start a Joblet, or a subjob after the execution of aJoblet, using the Trigger Input and Trigger Output components from the Palette. In this example, the createdJoblet is called Transformation.
1. Drag the Trigger Input component from the Palette and drop it above your Joblet.
2. Right-click Trigger Input and select a link of the type Trigger > OnSubjobOk so that your Joblet startsafter the execution of the first subjob.
3. Drag the Trigger Output component from the Palette and drop it below the Joblet.
4. Right-click the input component of the Joblet and select a link of the type Trigger > OnSubjobOk so thatyour third subjob starts after the execution of your Joblet, Transformation.
To use this Joblet in a Job:
1. Create a new Job.
2. From the Repository tree view, click the created Joblet (Transformation) and drop it in the Job.
3. Drop a tFileOutputDelimited component next to the Joblet component, drop a tWarn component above theJoblet component, and drop a tMsgBox component below the Joblet component.
4. Right-click the Joblet component and then select the Row > Joblet OUTPUT_1 link and clicktFileOutputDelimited.
5. Double-click tFileOutputDelimited to display its basic settings and then define the path to the folder andfile to be created in the File Name field.
Drag and drop a tWarn component from the Logs & Errors family over the Joblet component.
6. Right-click this component and select the link of the type Trigger > On Subjob Ok (TRIGGER_INPUT_1)and then click the Joblet component.
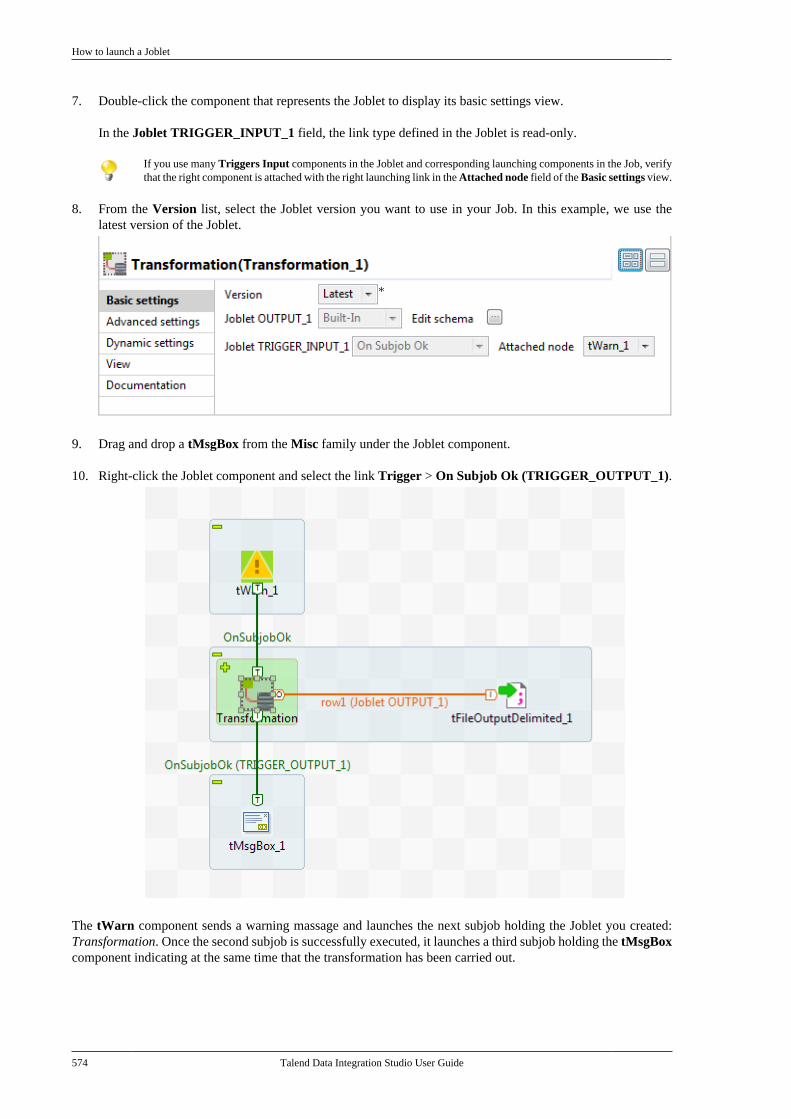
How to launch a Joblet
574 Talend Data Integration Studio User Guide
7. Double-click the component that represents the Joblet to display its basic settings view.
In the Joblet TRIGGER_INPUT_1 field, the link type defined in the Joblet is read-only.
If you use many Triggers Input components in the Joblet and corresponding launching components in the Job, verifythat the right component is attached with the right launching link in the Attached node field of the Basic settings view.
8. From the Version list, select the Joblet version you want to use in your Job. In this example, we use thelatest version of the Joblet.
9. Drag and drop a tMsgBox from the Misc family under the Joblet component.
10. Right-click the Joblet component and select the link Trigger > On Subjob Ok (TRIGGER_OUTPUT_1).
The tWarn component sends a warning massage and launches the next subjob holding the Joblet you created:Transformation. Once the second subjob is successfully executed, it launches a third subjob holding the tMsgBoxcomponent indicating at the same time that the transformation has been carried out.
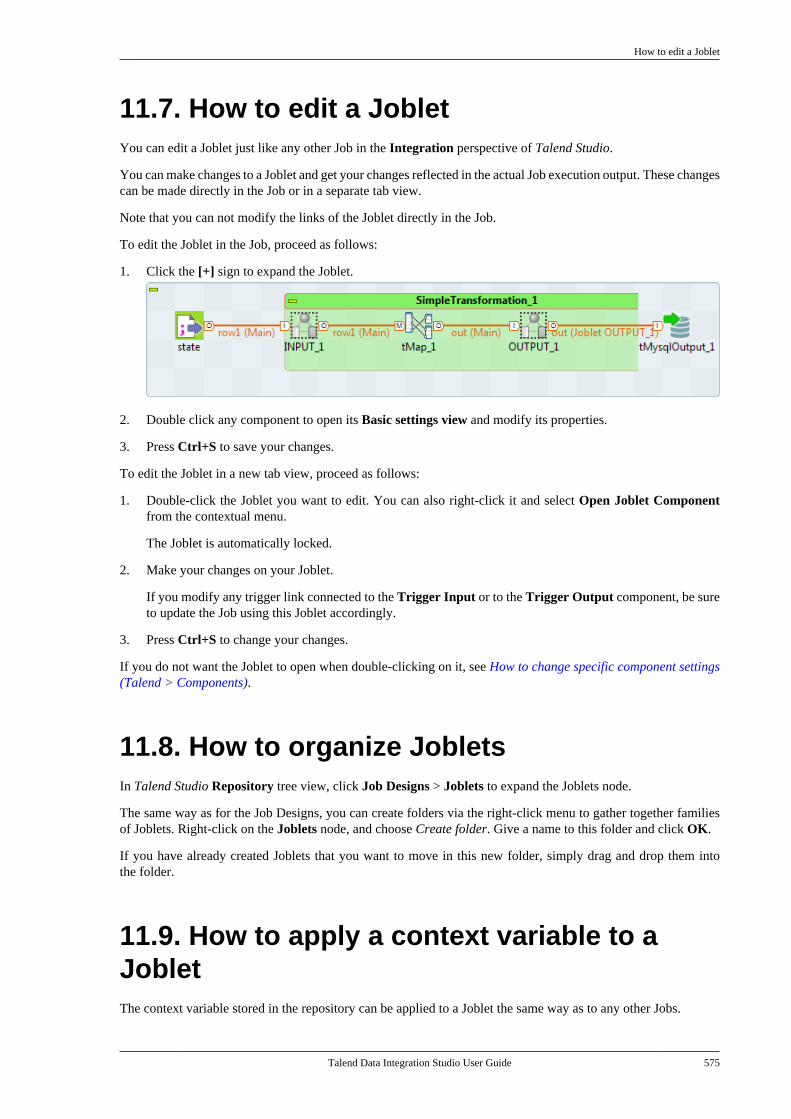
How to edit a Joblet
Talend Data Integration Studio User Guide 575
11.7. How to edit a JobletYou can edit a Joblet just like any other Job in the Integration perspective of Talend Studio.
You can make changes to a Joblet and get your changes reflected in the actual Job execution output. These changescan be made directly in the Job or in a separate tab view.
Note that you can not modify the links of the Joblet directly in the Job.
To edit the Joblet in the Job, proceed as follows:
1. Click the [+] sign to expand the Joblet.
2. Double click any component to open its Basic settings view and modify its properties.
3. Press Ctrl+S to save your changes.
To edit the Joblet in a new tab view, proceed as follows:
1. Double-click the Joblet you want to edit. You can also right-click it and select Open Joblet Componentfrom the contextual menu.
The Joblet is automatically locked.
2. Make your changes on your Joblet.
If you modify any trigger link connected to the Trigger Input or to the Trigger Output component, be sureto update the Job using this Joblet accordingly.
3. Press Ctrl+S to change your changes.
If you do not want the Joblet to open when double-clicking on it, see How to change specific component settings(Talend > Components).
11.8. How to organize JobletsIn Talend Studio Repository tree view, click Job Designs > Joblets to expand the Joblets node.
The same way as for the Job Designs, you can create folders via the right-click menu to gather together familiesof Joblets. Right-click on the Joblets node, and choose Create folder. Give a name to this folder and click OK.
If you have already created Joblets that you want to move in this new folder, simply drag and drop them intothe folder.
11.9. How to apply a context variable to aJobletThe context variable stored in the repository can be applied to a Joblet the same way as to any other Jobs.
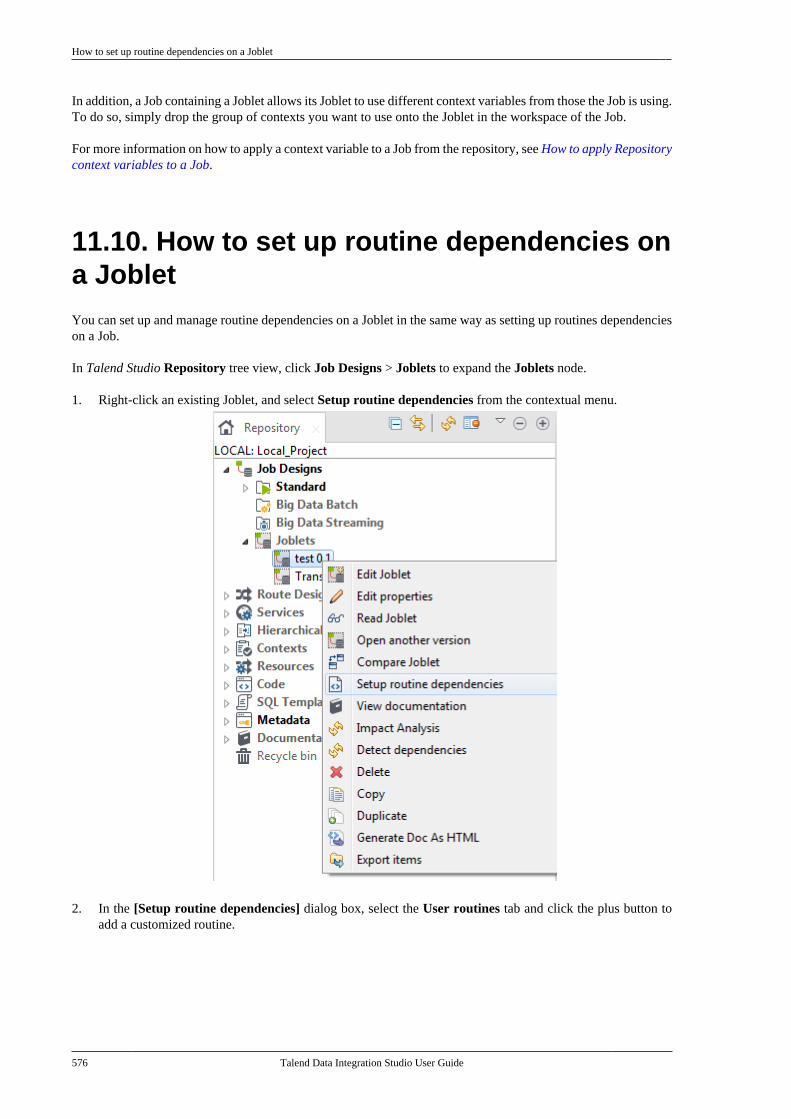
How to set up routine dependencies on a Joblet
576 Talend Data Integration Studio User Guide
In addition, a Job containing a Joblet allows its Joblet to use different context variables from those the Job is using.To do so, simply drop the group of contexts you want to use onto the Joblet in the workspace of the Job.
For more information on how to apply a context variable to a Job from the repository, see How to apply Repositorycontext variables to a Job.
11.10. How to set up routine dependencies ona JobletYou can set up and manage routine dependencies on a Joblet in the same way as setting up routines dependencieson a Job.
In Talend Studio Repository tree view, click Job Designs > Joblets to expand the Joblets node.
1. Right-click an existing Joblet, and select Setup routine dependencies from the contextual menu.
2. In the [Setup routine dependencies] dialog box, select the User routines tab and click the plus button toadd a customized routine.
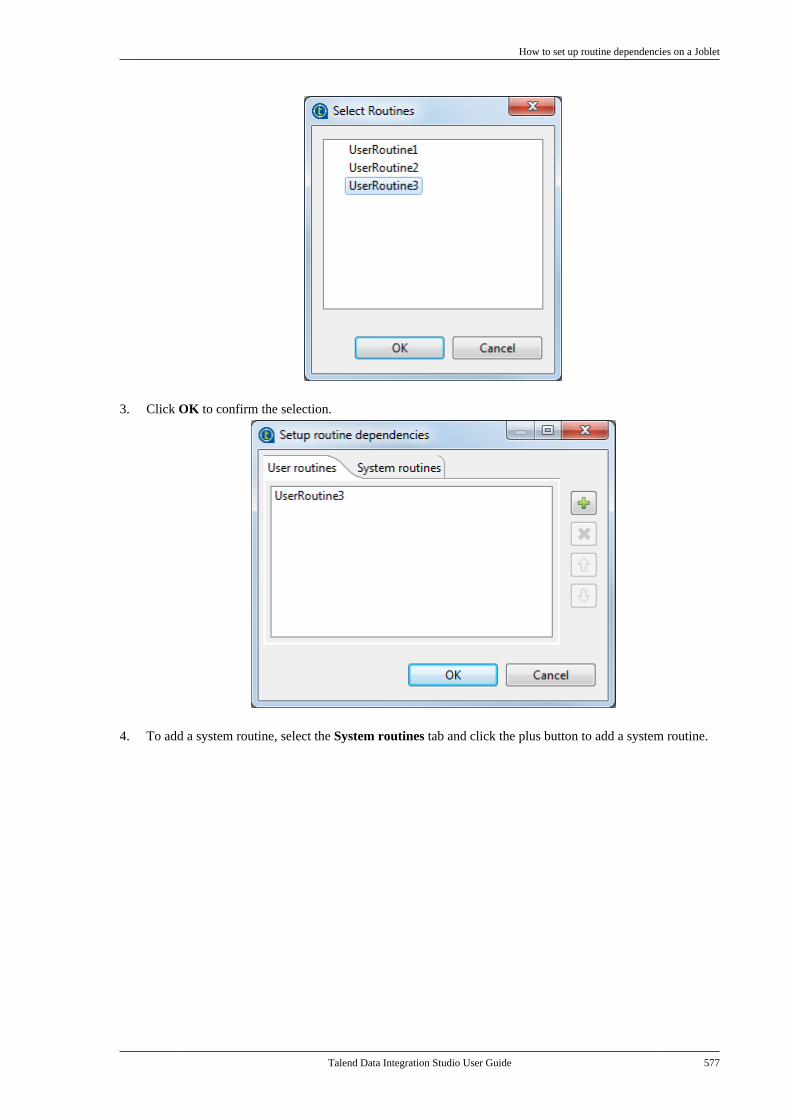
How to set up routine dependencies on a Joblet
Talend Data Integration Studio User Guide 577
3. Click OK to confirm the selection.
4. To add a system routine, select the System routines tab and click the plus button to add a system routine.
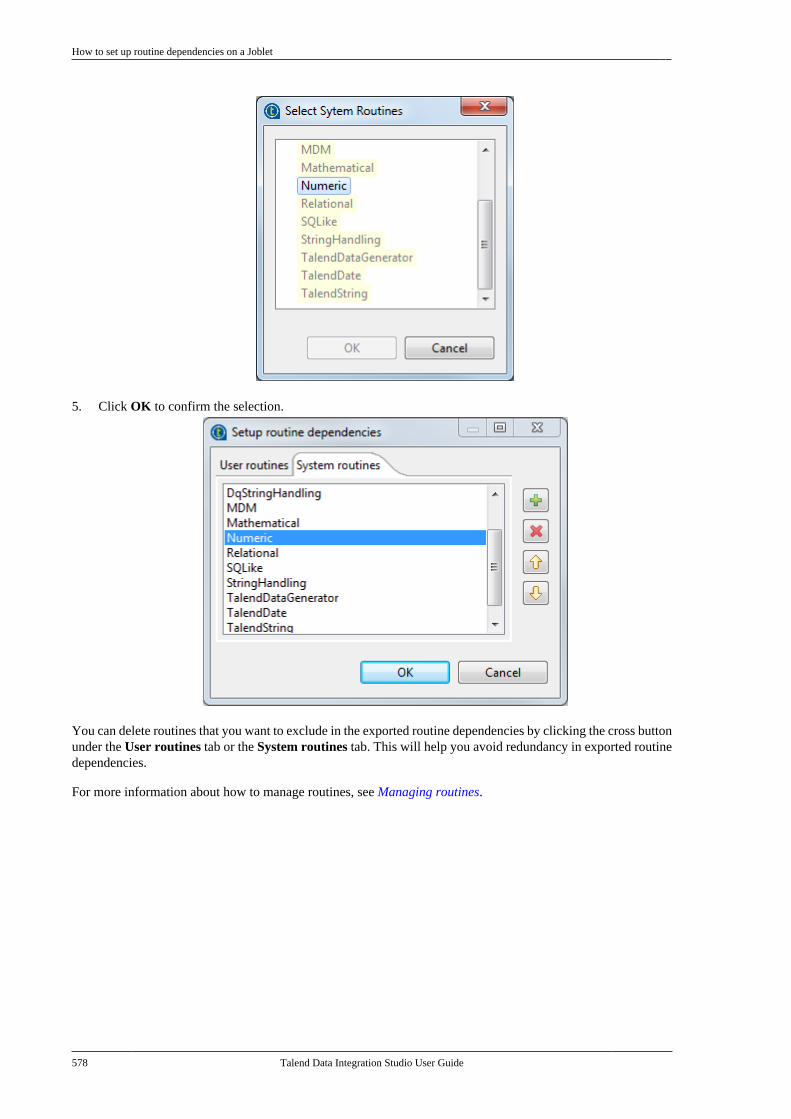
How to set up routine dependencies on a Joblet
578 Talend Data Integration Studio User Guide
5. Click OK to confirm the selection.
You can delete routines that you want to exclude in the exported routine dependencies by clicking the cross buttonunder the User routines tab or the System routines tab. This will help you avoid redundancy in exported routinedependencies.
For more information about how to manage routines, see Managing routines.

Talend Data Integration Studio User Guide
Appendix A. GUIThis appendix describes the Graphical User Interface (GUI) of Talend Studio.
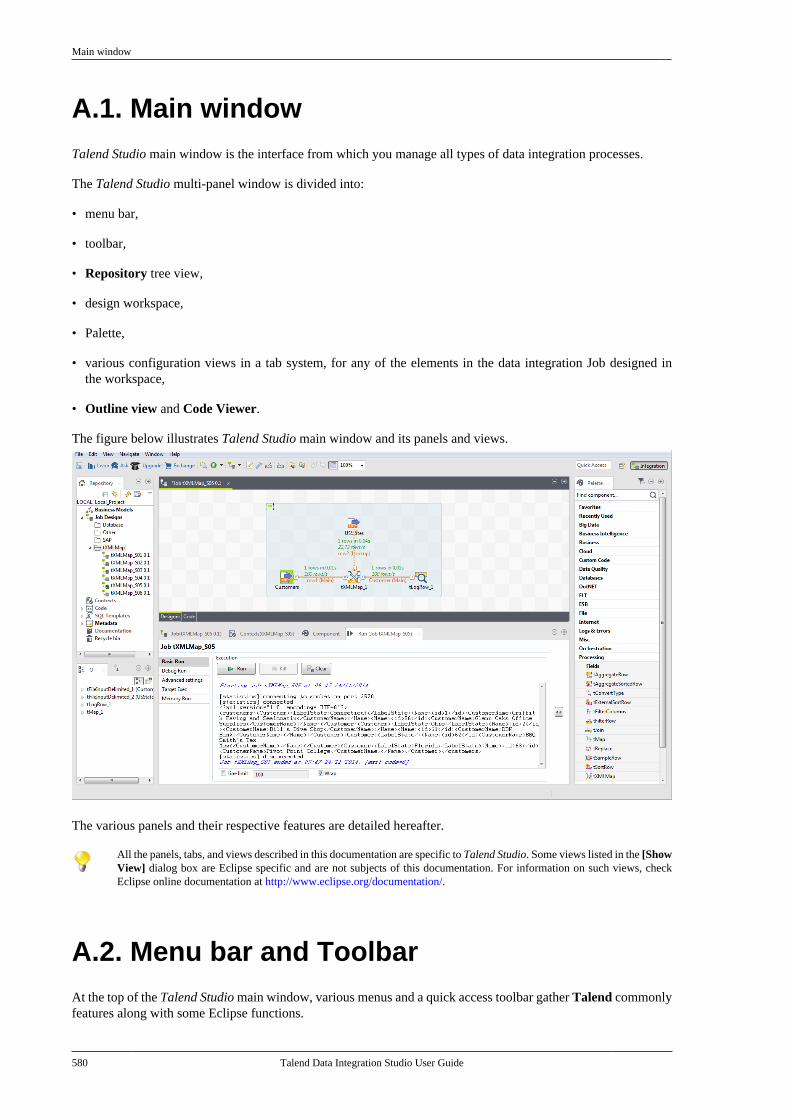
Main window
580 Talend Data Integration Studio User Guide
A.1. Main windowTalend Studio main window is the interface from which you manage all types of data integration processes.
The Talend Studio multi-panel window is divided into:
• menu bar,
• toolbar,
• Repository tree view,
• design workspace,
• Palette,
• various configuration views in a tab system, for any of the elements in the data integration Job designed inthe workspace,
• Outline view and Code Viewer.
The figure below illustrates Talend Studio main window and its panels and views.
The various panels and their respective features are detailed hereafter.
All the panels, tabs, and views described in this documentation are specific to Talend Studio. Some views listed in the [ShowView] dialog box are Eclipse specific and are not subjects of this documentation. For information on such views, checkEclipse online documentation at http://www.eclipse.org/documentation/.
A.2. Menu bar and ToolbarAt the top of the Talend Studio main window, various menus and a quick access toolbar gather Talend commonlyfeatures along with some Eclipse functions.
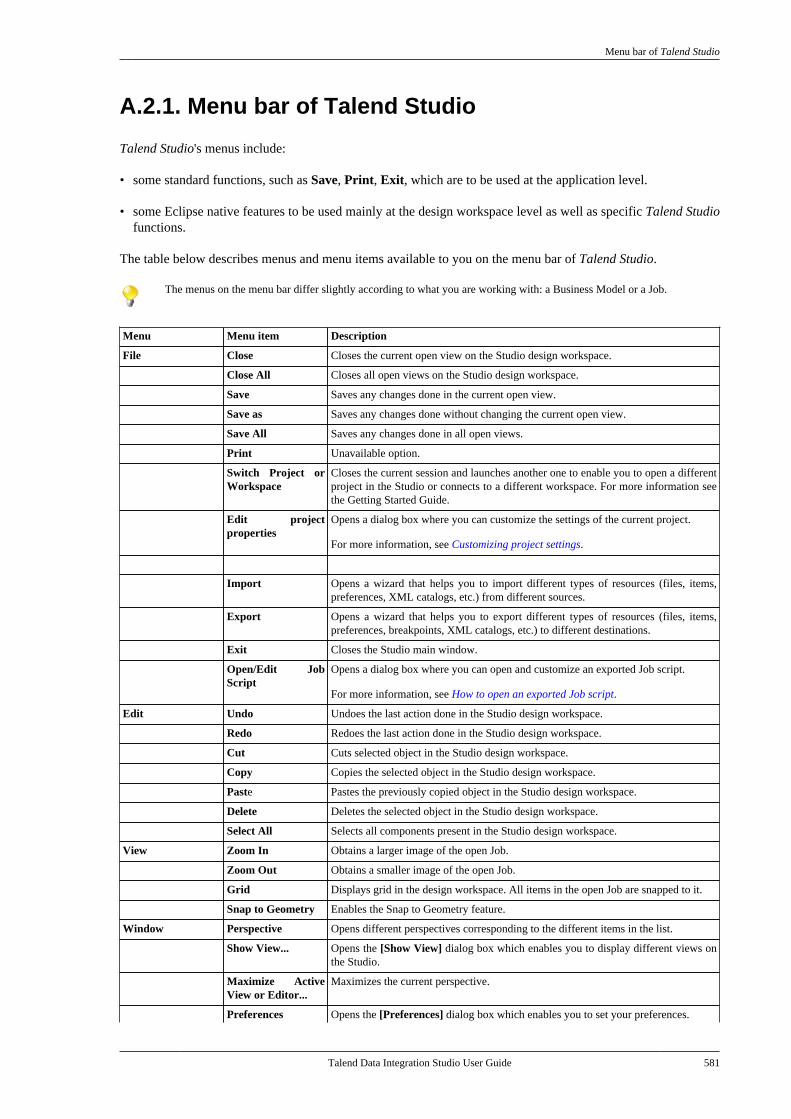
Menu bar of Talend Studio
Talend Data Integration Studio User Guide 581
A.2.1. Menu bar of Talend Studio
Talend Studio's menus include:
• some standard functions, such as Save, Print, Exit, which are to be used at the application level.
• some Eclipse native features to be used mainly at the design workspace level as well as specific Talend Studiofunctions.
The table below describes menus and menu items available to you on the menu bar of Talend Studio.
The menus on the menu bar differ slightly according to what you are working with: a Business Model or a Job.
Menu Menu item Description
File Close Closes the current open view on the Studio design workspace.
Close All Closes all open views on the Studio design workspace.
Save Saves any changes done in the current open view.
Save as Saves any changes done without changing the current open view.
Save All Saves any changes done in all open views.
Print Unavailable option.
Switch Project orWorkspace
Closes the current session and launches another one to enable you to open a differentproject in the Studio or connects to a different workspace. For more information seethe Getting Started Guide.
Edit projectproperties
Opens a dialog box where you can customize the settings of the current project.
For more information, see Customizing project settings.
Import Opens a wizard that helps you to import different types of resources (files, items,preferences, XML catalogs, etc.) from different sources.
Export Opens a wizard that helps you to export different types of resources (files, items,preferences, breakpoints, XML catalogs, etc.) to different destinations.
Exit Closes the Studio main window.
Open/Edit JobScript
Opens a dialog box where you can open and customize an exported Job script.
For more information, see How to open an exported Job script.
Edit Undo Undoes the last action done in the Studio design workspace.
Redo Redoes the last action done in the Studio design workspace.
Cut Cuts selected object in the Studio design workspace.
Copy Copies the selected object in the Studio design workspace.
Paste Pastes the previously copied object in the Studio design workspace.
Delete Deletes the selected object in the Studio design workspace.
Select All Selects all components present in the Studio design workspace.
View Zoom In Obtains a larger image of the open Job.
Zoom Out Obtains a smaller image of the open Job.
Grid Displays grid in the design workspace. All items in the open Job are snapped to it.
Snap to Geometry Enables the Snap to Geometry feature.
Window Perspective Opens different perspectives corresponding to the different items in the list.
Show View... Opens the [Show View] dialog box which enables you to display different views onthe Studio.
Maximize ActiveView or Editor...
Maximizes the current perspective.
Preferences Opens the [Preferences] dialog box which enables you to set your preferences.
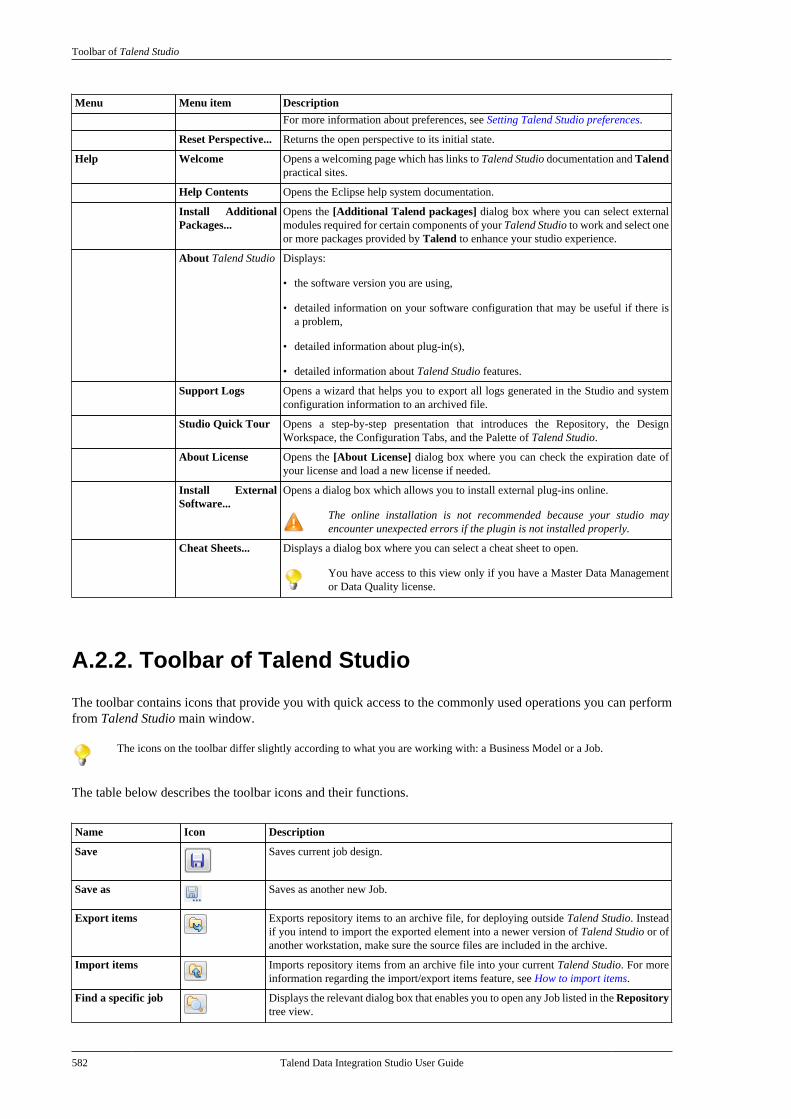
Toolbar of Talend Studio
582 Talend Data Integration Studio User Guide
Menu Menu item Description
For more information about preferences, see Setting Talend Studio preferences.
Reset Perspective... Returns the open perspective to its initial state.
Help Welcome Opens a welcoming page which has links to Talend Studio documentation and Talendpractical sites.
Help Contents Opens the Eclipse help system documentation.
Install AdditionalPackages...
Opens the [Additional Talend packages] dialog box where you can select externalmodules required for certain components of your Talend Studio to work and select oneor more packages provided by Talend to enhance your studio experience.
About Talend Studio Displays:
• the software version you are using,
• detailed information on your software configuration that may be useful if there isa problem,
• detailed information about plug-in(s),
• detailed information about Talend Studio features.
Support Logs Opens a wizard that helps you to export all logs generated in the Studio and systemconfiguration information to an archived file.
Studio Quick Tour Opens a step-by-step presentation that introduces the Repository, the DesignWorkspace, the Configuration Tabs, and the Palette of Talend Studio.
About License Opens the [About License] dialog box where you can check the expiration date ofyour license and load a new license if needed.
Install ExternalSoftware...
Opens a dialog box which allows you to install external plug-ins online.
The online installation is not recommended because your studio mayencounter unexpected errors if the plugin is not installed properly.
Cheat Sheets... Displays a dialog box where you can select a cheat sheet to open.
You have access to this view only if you have a Master Data Managementor Data Quality license.
A.2.2. Toolbar of Talend Studio
The toolbar contains icons that provide you with quick access to the commonly used operations you can performfrom Talend Studio main window.
The icons on the toolbar differ slightly according to what you are working with: a Business Model or a Job.
The table below describes the toolbar icons and their functions.
Name Icon Description
Save Saves current job design.
Save as Saves as another new Job.
Export items Exports repository items to an archive file, for deploying outside Talend Studio. Insteadif you intend to import the exported element into a newer version of Talend Studio or ofanother workstation, make sure the source files are included in the archive.
Import items Imports repository items from an archive file into your current Talend Studio. For moreinformation regarding the import/export items feature, see How to import items.
Find a specific job Displays the relevant dialog box that enables you to open any Job listed in the Repositorytree view.
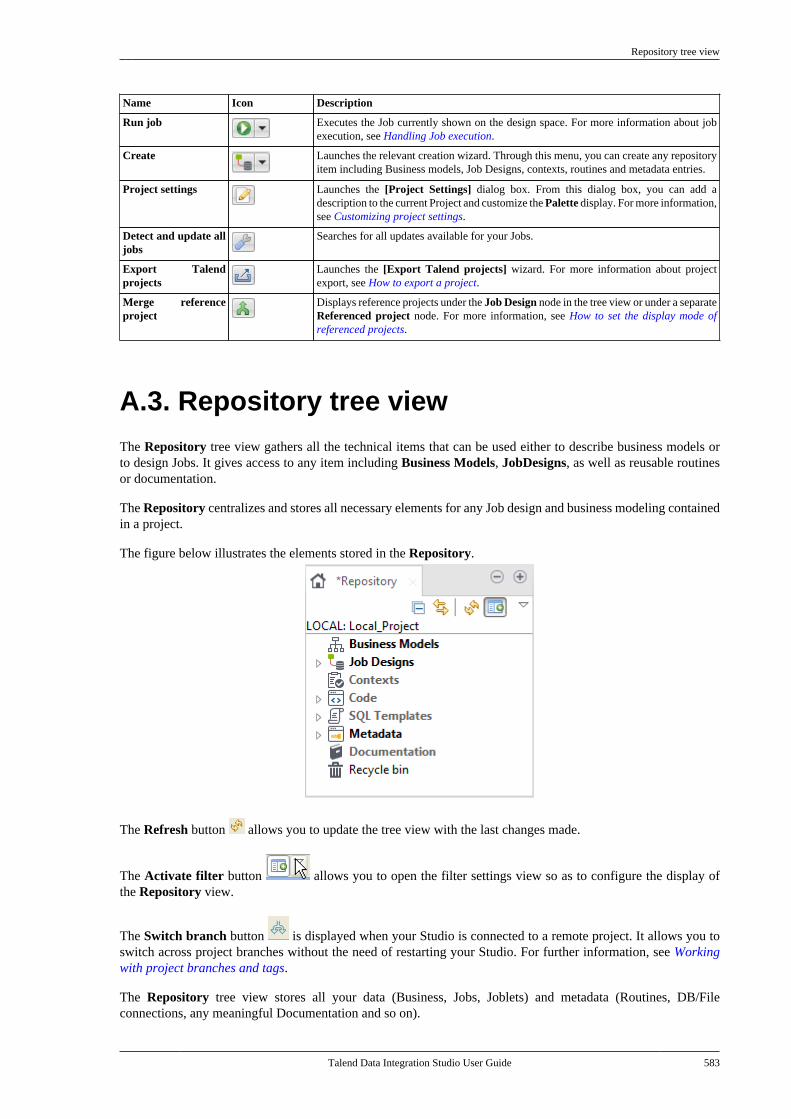
Repository tree view
Talend Data Integration Studio User Guide 583
Name Icon Description
Run job Executes the Job currently shown on the design space. For more information about jobexecution, see Handling Job execution.
Create Launches the relevant creation wizard. Through this menu, you can create any repositoryitem including Business models, Job Designs, contexts, routines and metadata entries.
Project settings Launches the [Project Settings] dialog box. From this dialog box, you can add adescription to the current Project and customize the Palette display. For more information,see Customizing project settings.
Detect and update alljobs
Searches for all updates available for your Jobs.
Export Talendprojects
Launches the [Export Talend projects] wizard. For more information about projectexport, see How to export a project.
Merge referenceproject
Displays reference projects under the Job Design node in the tree view or under a separateReferenced project node. For more information, see How to set the display mode ofreferenced projects.
A.3. Repository tree viewThe Repository tree view gathers all the technical items that can be used either to describe business models orto design Jobs. It gives access to any item including Business Models, JobDesigns, as well as reusable routinesor documentation.
The Repository centralizes and stores all necessary elements for any Job design and business modeling containedin a project.
The figure below illustrates the elements stored in the Repository.
The Refresh button allows you to update the tree view with the last changes made.
The Activate filter button allows you to open the filter settings view so as to configure the display ofthe Repository view.
The Switch branch button is displayed when your Studio is connected to a remote project. It allows you toswitch across project branches without the need of restarting your Studio. For further information, see Workingwith project branches and tags.
The Repository tree view stores all your data (Business, Jobs, Joblets) and metadata (Routines, DB/Fileconnections, any meaningful Documentation and so on).
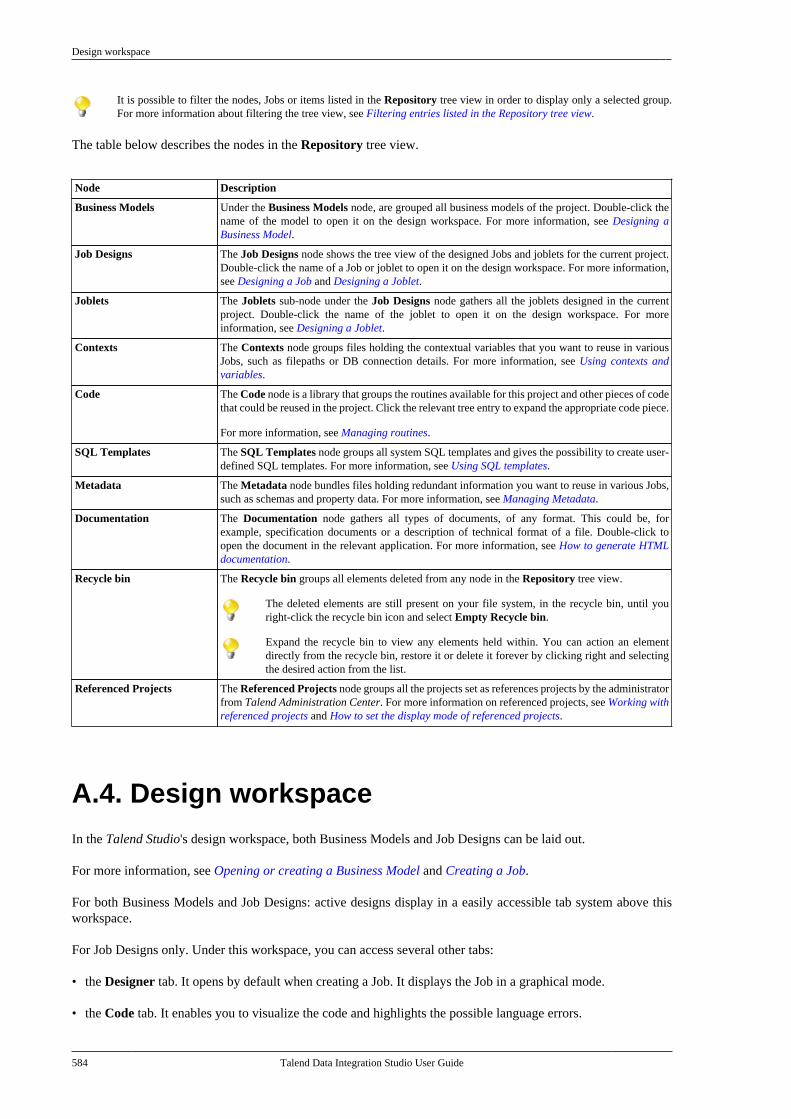
Design workspace
584 Talend Data Integration Studio User Guide
It is possible to filter the nodes, Jobs or items listed in the Repository tree view in order to display only a selected group.For more information about filtering the tree view, see Filtering entries listed in the Repository tree view.
The table below describes the nodes in the Repository tree view.
Node Description
Business Models Under the Business Models node, are grouped all business models of the project. Double-click thename of the model to open it on the design workspace. For more information, see Designing aBusiness Model.
Job Designs The Job Designs node shows the tree view of the designed Jobs and joblets for the current project.Double-click the name of a Job or joblet to open it on the design workspace. For more information,see Designing a Job and Designing a Joblet.
Joblets The Joblets sub-node under the Job Designs node gathers all the joblets designed in the currentproject. Double-click the name of the joblet to open it on the design workspace. For moreinformation, see Designing a Joblet.
Contexts The Contexts node groups files holding the contextual variables that you want to reuse in variousJobs, such as filepaths or DB connection details. For more information, see Using contexts andvariables.
Code The Code node is a library that groups the routines available for this project and other pieces of codethat could be reused in the project. Click the relevant tree entry to expand the appropriate code piece.
For more information, see Managing routines.
SQL Templates The SQL Templates node groups all system SQL templates and gives the possibility to create user-defined SQL templates. For more information, see Using SQL templates.
Metadata The Metadata node bundles files holding redundant information you want to reuse in various Jobs,such as schemas and property data. For more information, see Managing Metadata.
Documentation The Documentation node gathers all types of documents, of any format. This could be, forexample, specification documents or a description of technical format of a file. Double-click toopen the document in the relevant application. For more information, see How to generate HTMLdocumentation.
Recycle bin The Recycle bin groups all elements deleted from any node in the Repository tree view.
The deleted elements are still present on your file system, in the recycle bin, until youright-click the recycle bin icon and select Empty Recycle bin.
Expand the recycle bin to view any elements held within. You can action an elementdirectly from the recycle bin, restore it or delete it forever by clicking right and selectingthe desired action from the list.
Referenced Projects The Referenced Projects node groups all the projects set as references projects by the administratorfrom Talend Administration Center. For more information on referenced projects, see Working withreferenced projects and How to set the display mode of referenced projects.
A.4. Design workspaceIn the Talend Studio's design workspace, both Business Models and Job Designs can be laid out.
For more information, see Opening or creating a Business Model and Creating a Job.
For both Business Models and Job Designs: active designs display in a easily accessible tab system above thisworkspace.
For Job Designs only. Under this workspace, you can access several other tabs:
• the Designer tab. It opens by default when creating a Job. It displays the Job in a graphical mode.
• the Code tab. It enables you to visualize the code and highlights the possible language errors.
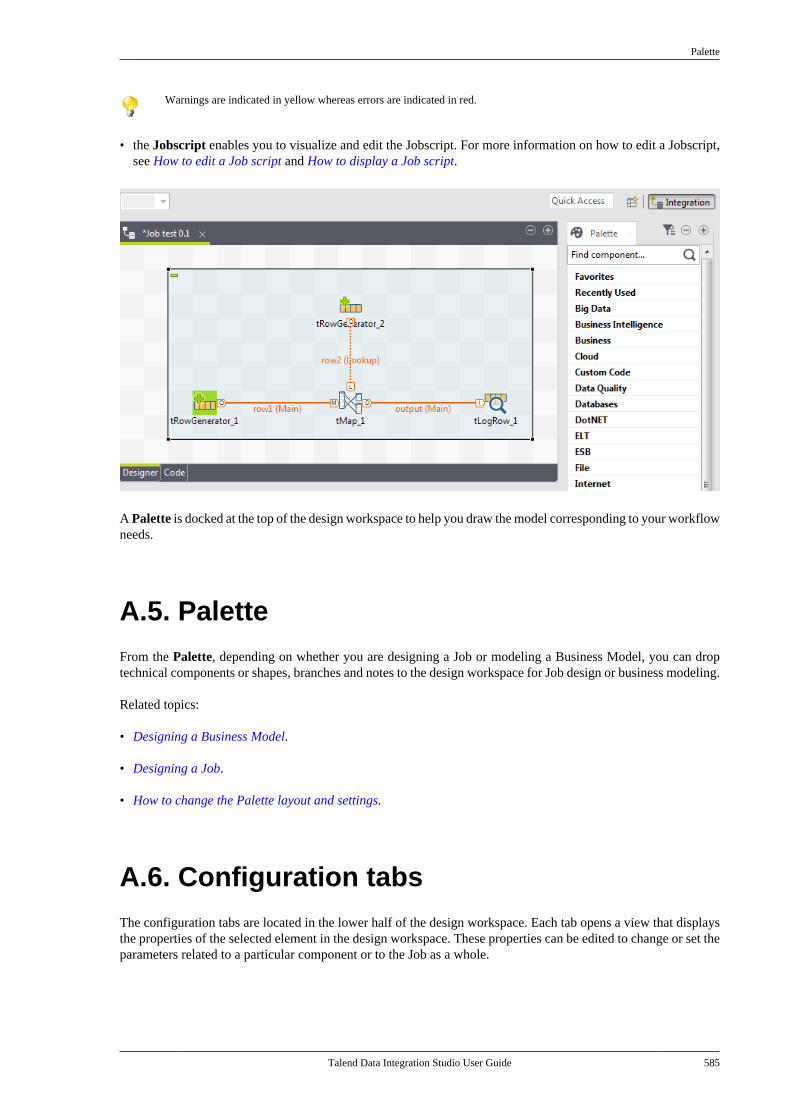
Palette
Talend Data Integration Studio User Guide 585
Warnings are indicated in yellow whereas errors are indicated in red.
• the Jobscript enables you to visualize and edit the Jobscript. For more information on how to edit a Jobscript,see How to edit a Job script and How to display a Job script.
A Palette is docked at the top of the design workspace to help you draw the model corresponding to your workflowneeds.
A.5. PaletteFrom the Palette, depending on whether you are designing a Job or modeling a Business Model, you can droptechnical components or shapes, branches and notes to the design workspace for Job design or business modeling.
Related topics:
• Designing a Business Model.
• Designing a Job.
• How to change the Palette layout and settings.
A.6. Configuration tabsThe configuration tabs are located in the lower half of the design workspace. Each tab opens a view that displaysthe properties of the selected element in the design workspace. These properties can be edited to change or set theparameters related to a particular component or to the Job as a whole.
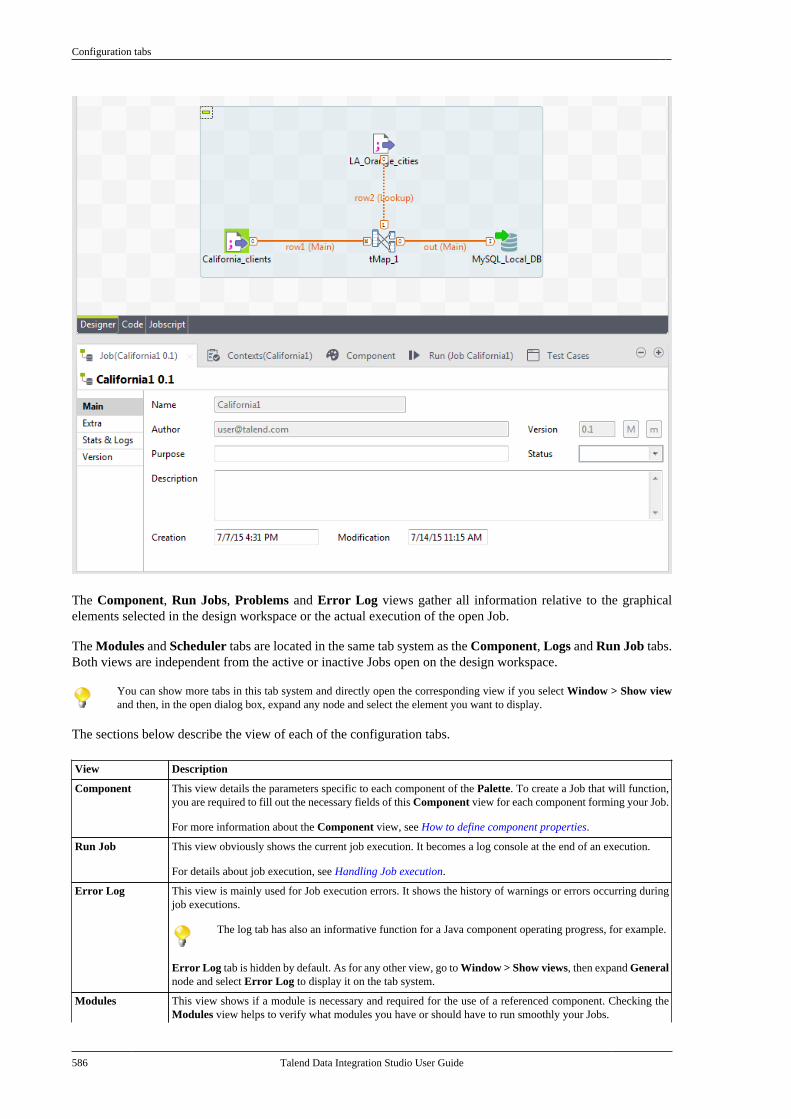
Configuration tabs
586 Talend Data Integration Studio User Guide
The Component, Run Jobs, Problems and Error Log views gather all information relative to the graphicalelements selected in the design workspace or the actual execution of the open Job.
The Modules and Scheduler tabs are located in the same tab system as the Component, Logs and Run Job tabs.Both views are independent from the active or inactive Jobs open on the design workspace.
You can show more tabs in this tab system and directly open the corresponding view if you select Window > Show viewand then, in the open dialog box, expand any node and select the element you want to display.
The sections below describe the view of each of the configuration tabs.
View Description
Component This view details the parameters specific to each component of the Palette. To create a Job that will function,you are required to fill out the necessary fields of this Component view for each component forming your Job.
For more information about the Component view, see How to define component properties.
Run Job This view obviously shows the current job execution. It becomes a log console at the end of an execution.
For details about job execution, see Handling Job execution.
Error Log This view is mainly used for Job execution errors. It shows the history of warnings or errors occurring duringjob executions.
The log tab has also an informative function for a Java component operating progress, for example.
Error Log tab is hidden by default. As for any other view, go to Window > Show views, then expand Generalnode and select Error Log to display it on the tab system.
Modules This view shows if a module is necessary and required for the use of a referenced component. Checking theModules view helps to verify what modules you have or should have to run smoothly your Jobs.
Configuration tabs
Talend Data Integration Studio User Guide 587
View Description
For more information, see the Talend Installation Guide.
The Job view displays various information related to the open Job on the design workspace. This view hasthe following tabs:
Main tab
This tab displays basic information about the Job opened on the design workspace, for example its name, author,version number, etc. The information is read-only. To edit it you have to close your Job, right-click its label onthe Repository tree view and click Edit properties on the drop-down list.
Extra tab
This tab displays extra parameters including multi thread and implicit context loading features. For moreinformation, see How to use the features in the Extra tab
Stats/Log tab
This tab allows you to enable/disable the statistics and logs for the whole Job.
You can already enable these features for every single component of your Job by simply using and setting therelevant components: tFlowMeterCatcher, tStatCatcher, tLogCatcher.
For more information about these components, see Talend Components Reference Guide.
In addition, you can now set these features for the whole active Job (for all components of your Job) in one go,without using the Catcher components mentioned above. This way, all components get tracked and logged inthe File or Database table according to your setting.
You can also save the current setting to Project Settings by clicking the button.
For more details about the Stats & Logs automation, see How to automate the use of statistics & logs.
Job view
Version tab
This tab displays the different versions of the Job opened on the design workspace and their creation andmodification dates.
History tab
This tab displays the different revisions of the Job stored on the SVN or Git repository and their date and author.It appears for the job created in a remote project.
Test Cases When a Job is selected from the Repository tree view or currently open on the design workspace, this viewlets you view and run the test cases created for the Job.
When a test case is selected from the Repository tree view or currently open on the design workspace, thisview displays the various information related to the test case, and lets you configure and run the test case orits instances.
For more information on how to create, configure and run test cases, see Testing Jobs using test cases.
Problems This view displays the messages linked to the icons docked at a components in case of problem, for examplewhen part of its setting is missing. Three types of icons/messages exist: Error, Warning and Infos.
For more information, see Warnings and error icons on components.
Job Hierarchy This view displays a tree folder showing the child Job(s) of the parent Job selected. To show this view, right-click the parent Job in the Repository tree view and select Open Job Hierarchy on the drop-down list.
You can also show this view in the Window > Show view... combination where you can select Talend > JobHierarchy.
You can see Job Hierarchy only if you create a parent Job and one or more child Job(s) via the tRunJobcomponent. For more information about tRunJob, see Talend Components Reference Guide.
Properties When inserting a shape in the design workspace, the Properties view offers a range of formatting tools to helpyou customizing your business model and improve its readability.
Outline and code summary panel
588 Talend Data Integration Studio User Guide
A.7. Outline and code summary panelThis panel is located below the Repository tree view. It displays detailed information about the open Job orBusiness Model in the design workspace.
The Information panel is composed of two tabs, Outline and Code Viewer, which provide information regardingthe displayed diagram (either Job or Business Model) and also the generated code.
For more information, see How to display the code or the outline of your Job.
A.8. Shortcuts and aliasesBelow is a table gathering all keyboard shortcuts currently in use:
Shortcut Operation Context
F2 Shows Component settings view. Global application
F4 Shows Run Job view. Global application
F6 Runs current Job or shows Run Job view if no Job is open. Global application
Ctrl + F2 Shows Module view. Global application
Ctrl + F3 Shows Problems view. Global application
Ctrl + H Shows the Designer view of the current Job. Global application
Ctrl + G Shows the Code view of the current Job. Global application
Ctrl + R Restores the initial Repository view. From Repository view
Ctrl + Shift + F3 Synchronizes components javajet components. Global application
Ctrl + Shift + J Opens a Job. Global application (In Windows)
F7 Switches to Debug mode. From Run Job view
F5 Refreshes the Repository view. From Repository view
F8 Kills current Job. From Run Job view
F5 Refreshes Modules install status. From Modules view
Ctrl+L Execute SQL queries. Talend commands (in Windows)
Ctrl+Space bar Access global and user-defined variables. It can be errormessages or line number for example, depending on thecomponent selected.
From any component field in Job orComponent views
Talend Data Integration Studio User Guide
Appendix B. Customizing Talend Studio andsetting Studio preferencesThis chapter provides information on how to customize the Talend Studio and set Studio preferences so that yourTalend Studio works the way you want.
In the following sections, you will find information on:
• Customizing project settings
• Customizing the workspace
• Filtering entries listed in the Repository tree view
• Setting Talend Studio preferences
Customizing project settings
590 Talend Data Integration Studio User Guide
B.1. Customizing project settingsTalend Studio enables you to customize the information and settings of the project in progress, including thePalette, Job settings and Job version management, for example.
To customize project settings:
1.Click on the Studio tool bar, or select File > Edit Project Properties from the menu bar.
The [Project Settings] dialog box opens.
2. In the tree diagram to the left of the dialog box, select the setting you wish to customize and then customizeit, using the options that appear to the right of the box.
From the dialog box you can also export or import the full assemblage of settings that define a particular project:
• To export the settings, click on the Export button. The export will generate an XML file containing all of yourproject settings.
• To import settings, click on the Import button and select the XML file containing the parameters of the projectwhich you want to apply to the current project.
B.1.1. Customizing Maven build script templates
Your Talend Studio provides the following default templates for generating build scripts:
• Maven script templates for standalone Job export
• A Maven script template for OSGI bundle export of Jobs
Based on the default, global build templates, you can create folder-level build scripts. Build scripts generatedbased on these templates are executed when building Jobs, and are added to your build archive if you select theSources (Maven) option when building a Job so that you can rebuild your built Job sources using Maven.
This section provides information on how to customize the build script templates. For information on how to builda Job, see How to build Jobs.
B.1.1.1. How to customize the global build script templates
In the [Project Settings] dialog box, you can find and customize the default, global build script templates underthe Build > Maven > Default node. These script templates apply to all Jobs in the root folder and all sub-foldersexcept those with their own build script templates set up.
The following example shows how to customize the global POM script template for standalone Jobs:
1. From the menu bar, click File > Edit Project properties to open the [Project Settings] dialog box.
2. Expand the Build > Maven > Default nodes, and then click the Standalone Job node to open the relevantview that displays the content of the POM script template.
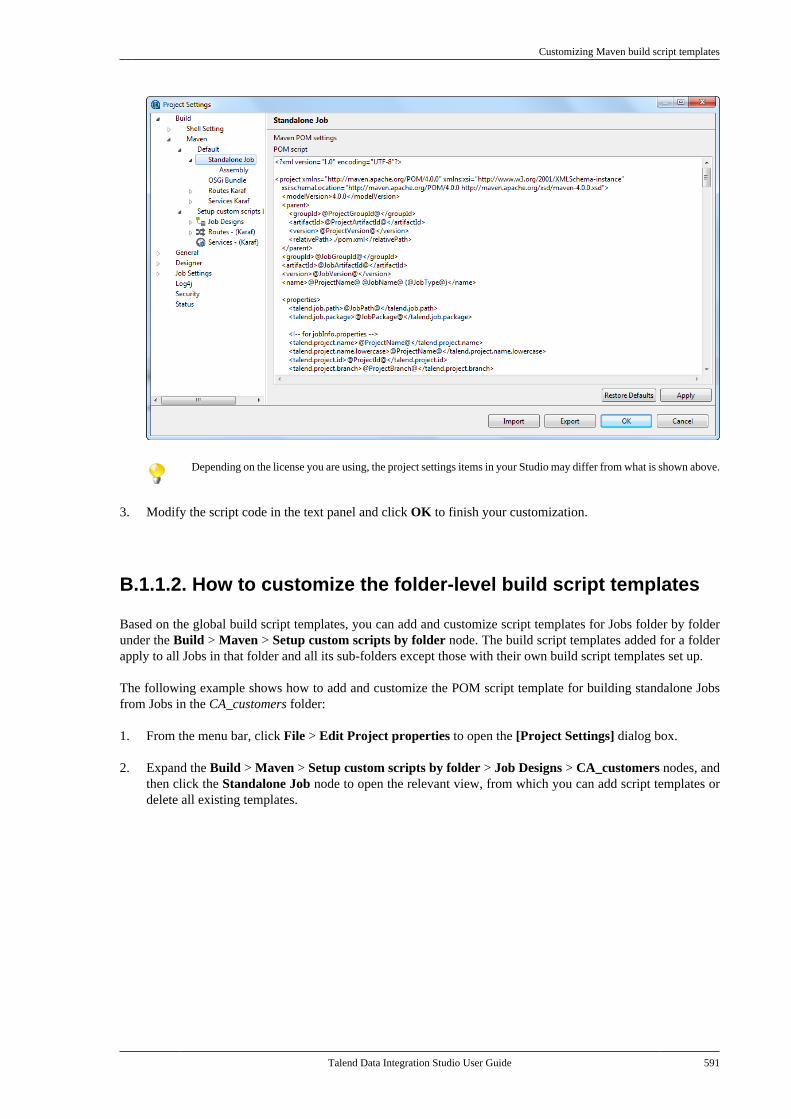
Customizing Maven build script templates
Talend Data Integration Studio User Guide 591
Depending on the license you are using, the project settings items in your Studio may differ from what is shown above.
3. Modify the script code in the text panel and click OK to finish your customization.
B.1.1.2. How to customize the folder-level build script templates
Based on the global build script templates, you can add and customize script templates for Jobs folder by folderunder the Build > Maven > Setup custom scripts by folder node. The build script templates added for a folderapply to all Jobs in that folder and all its sub-folders except those with their own build script templates set up.
The following example shows how to add and customize the POM script template for building standalone Jobsfrom Jobs in the CA_customers folder:
1. From the menu bar, click File > Edit Project properties to open the [Project Settings] dialog box.
2. Expand the Build > Maven > Setup custom scripts by folder > Job Designs > CA_customers nodes, andthen click the Standalone Job node to open the relevant view, from which you can add script templates ordelete all existing templates.
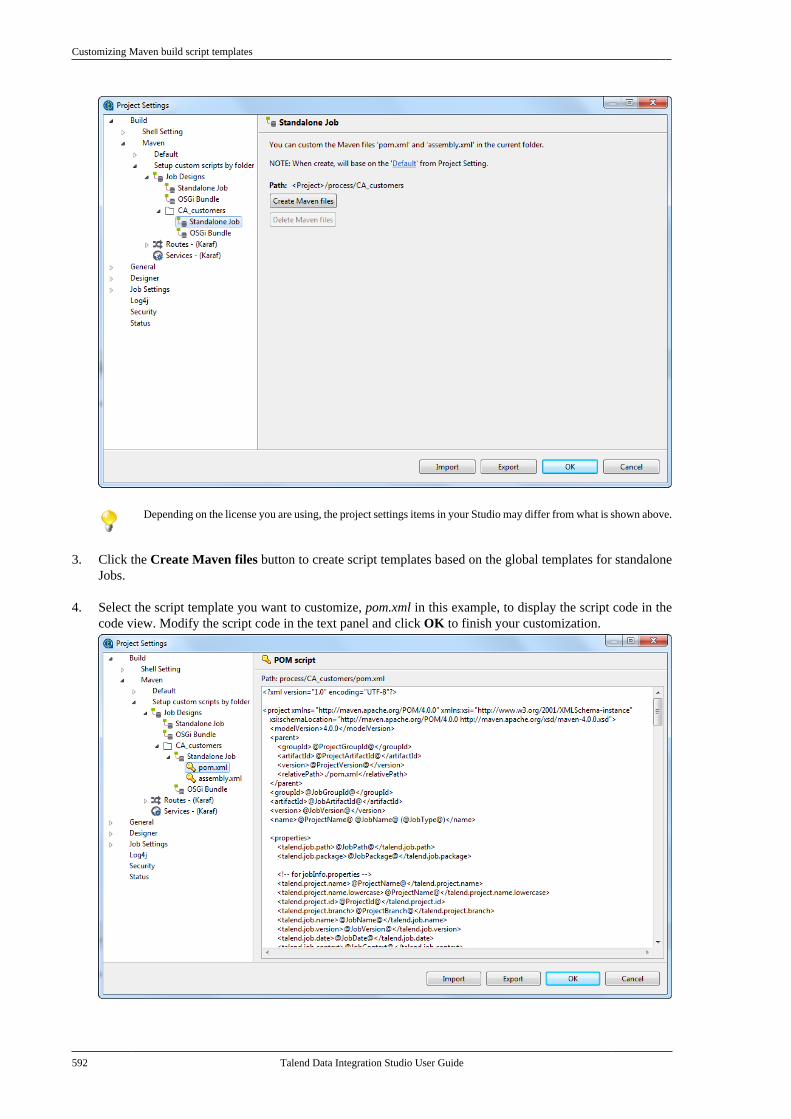
Customizing Maven build script templates
592 Talend Data Integration Studio User Guide
Depending on the license you are using, the project settings items in your Studio may differ from what is shown above.
3. Click the Create Maven files button to create script templates based on the global templates for standaloneJobs.
4. Select the script template you want to customize, pom.xml in this example, to display the script code in thecode view. Modify the script code in the text panel and click OK to finish your customization.
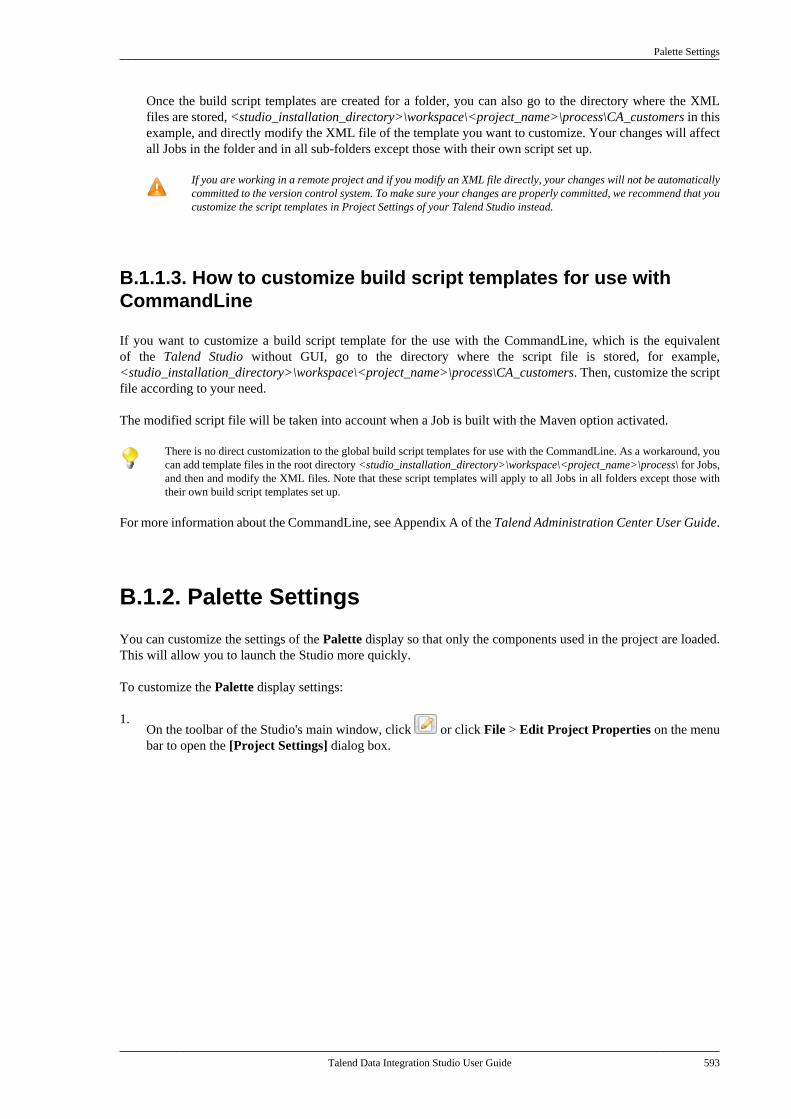
Palette Settings
Talend Data Integration Studio User Guide 593
Once the build script templates are created for a folder, you can also go to the directory where the XMLfiles are stored, <studio_installation_directory>\workspace\<project_name>\process\CA_customers in thisexample, and directly modify the XML file of the template you want to customize. Your changes will affectall Jobs in the folder and in all sub-folders except those with their own script set up.
If you are working in a remote project and if you modify an XML file directly, your changes will not be automaticallycommitted to the version control system. To make sure your changes are properly committed, we recommend that youcustomize the script templates in Project Settings of your Talend Studio instead.
B.1.1.3. How to customize build script templates for use withCommandLine
If you want to customize a build script template for the use with the CommandLine, which is the equivalentof the Talend Studio without GUI, go to the directory where the script file is stored, for example,<studio_installation_directory>\workspace\<project_name>\process\CA_customers. Then, customize the scriptfile according to your need.
The modified script file will be taken into account when a Job is built with the Maven option activated.
There is no direct customization to the global build script templates for use with the CommandLine. As a workaround, youcan add template files in the root directory <studio_installation_directory>\workspace\<project_name>\process\ for Jobs,and then and modify the XML files. Note that these script templates will apply to all Jobs in all folders except those withtheir own build script templates set up.
For more information about the CommandLine, see Appendix A of the Talend Administration Center User Guide.
B.1.2. Palette Settings
You can customize the settings of the Palette display so that only the components used in the project are loaded.This will allow you to launch the Studio more quickly.
To customize the Palette display settings:
1.On the toolbar of the Studio's main window, click or click File > Edit Project Properties on the menubar to open the [Project Settings] dialog box.
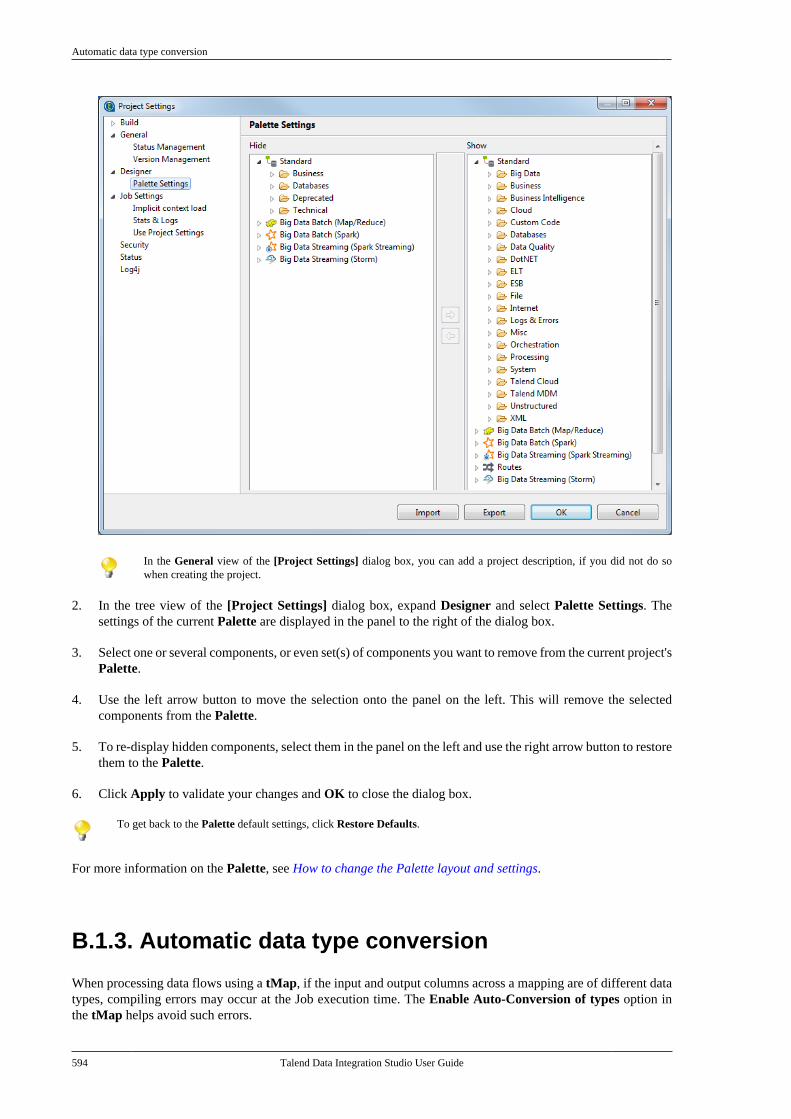
Automatic data type conversion
594 Talend Data Integration Studio User Guide
In the General view of the [Project Settings] dialog box, you can add a project description, if you did not do sowhen creating the project.
2. In the tree view of the [Project Settings] dialog box, expand Designer and select Palette Settings. Thesettings of the current Palette are displayed in the panel to the right of the dialog box.
3. Select one or several components, or even set(s) of components you want to remove from the current project'sPalette.
4. Use the left arrow button to move the selection onto the panel on the left. This will remove the selectedcomponents from the Palette.
5. To re-display hidden components, select them in the panel on the left and use the right arrow button to restorethem to the Palette.
6. Click Apply to validate your changes and OK to close the dialog box.
To get back to the Palette default settings, click Restore Defaults.
For more information on the Palette, see How to change the Palette layout and settings.
B.1.3. Automatic data type conversion
When processing data flows using a tMap, if the input and output columns across a mapping are of different datatypes, compiling errors may occur at the Job execution time. The Enable Auto-Conversion of types option inthe tMap helps avoid such errors.
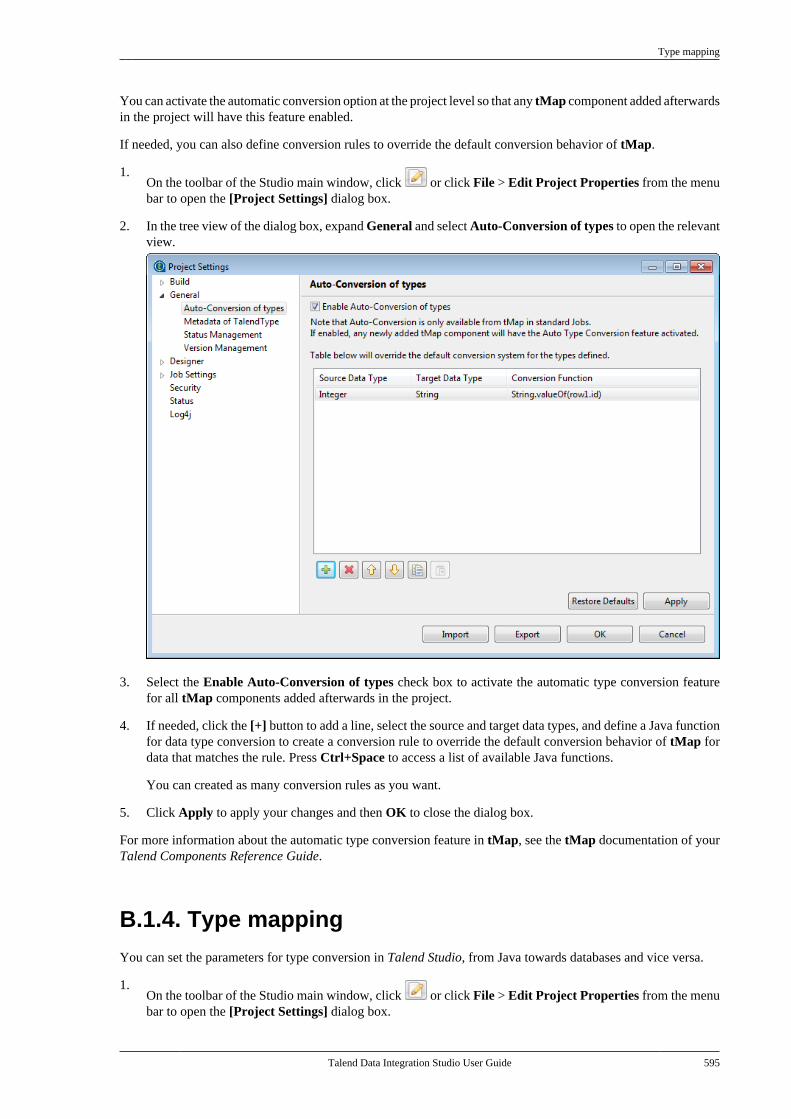
Type mapping
Talend Data Integration Studio User Guide 595
You can activate the automatic conversion option at the project level so that any tMap component added afterwardsin the project will have this feature enabled.
If needed, you can also define conversion rules to override the default conversion behavior of tMap.
1.On the toolbar of the Studio main window, click or click File > Edit Project Properties from the menubar to open the [Project Settings] dialog box.
2. In the tree view of the dialog box, expand General and select Auto-Conversion of types to open the relevantview.
3. Select the Enable Auto-Conversion of types check box to activate the automatic type conversion featurefor all tMap components added afterwards in the project.
4. If needed, click the [+] button to add a line, select the source and target data types, and define a Java functionfor data type conversion to create a conversion rule to override the default conversion behavior of tMap fordata that matches the rule. Press Ctrl+Space to access a list of available Java functions.
You can created as many conversion rules as you want.
5. Click Apply to apply your changes and then OK to close the dialog box.
For more information about the automatic type conversion feature in tMap, see the tMap documentation of yourTalend Components Reference Guide.
B.1.4. Type mapping
You can set the parameters for type conversion in Talend Studio, from Java towards databases and vice versa.
1.On the toolbar of the Studio main window, click or click File > Edit Project Properties from the menubar to open the [Project Settings] dialog box.
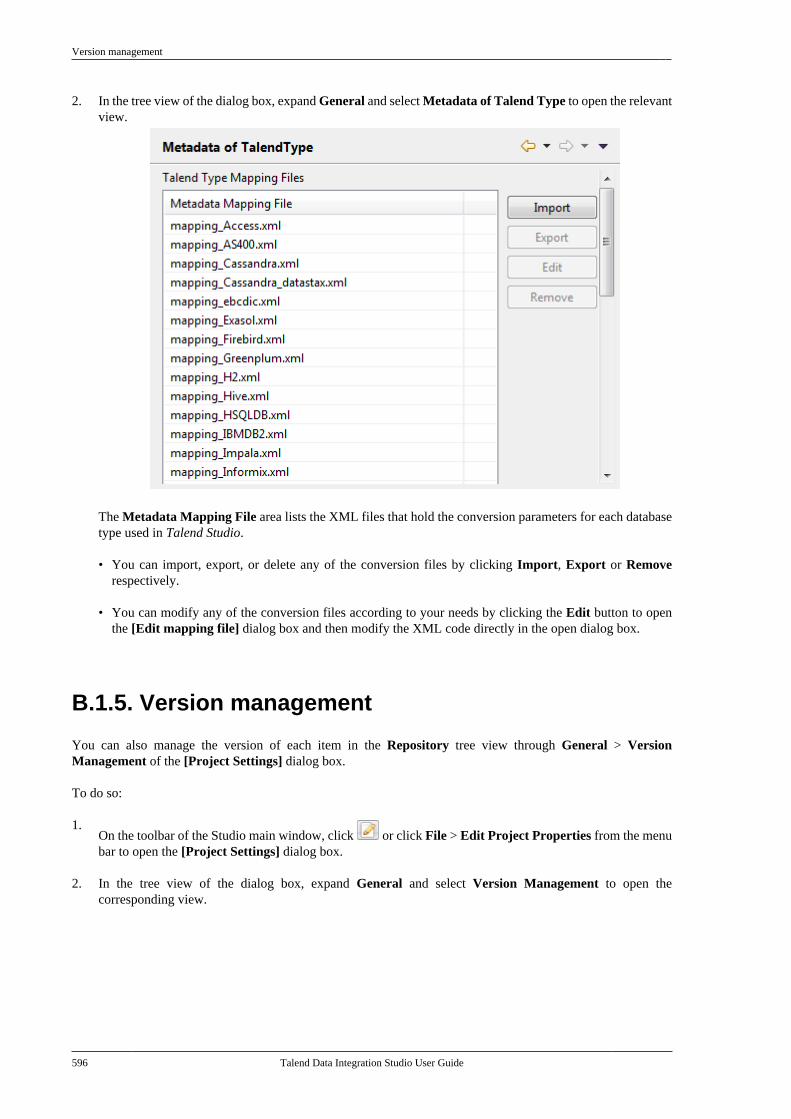
Version management
596 Talend Data Integration Studio User Guide
2. In the tree view of the dialog box, expand General and select Metadata of Talend Type to open the relevantview.
The Metadata Mapping File area lists the XML files that hold the conversion parameters for each databasetype used in Talend Studio.
• You can import, export, or delete any of the conversion files by clicking Import, Export or Removerespectively.
• You can modify any of the conversion files according to your needs by clicking the Edit button to openthe [Edit mapping file] dialog box and then modify the XML code directly in the open dialog box.
B.1.5. Version management
You can also manage the version of each item in the Repository tree view through General > VersionManagement of the [Project Settings] dialog box.
To do so:
1.On the toolbar of the Studio main window, click or click File > Edit Project Properties from the menubar to open the [Project Settings] dialog box.
2. In the tree view of the dialog box, expand General and select Version Management to open thecorresponding view.
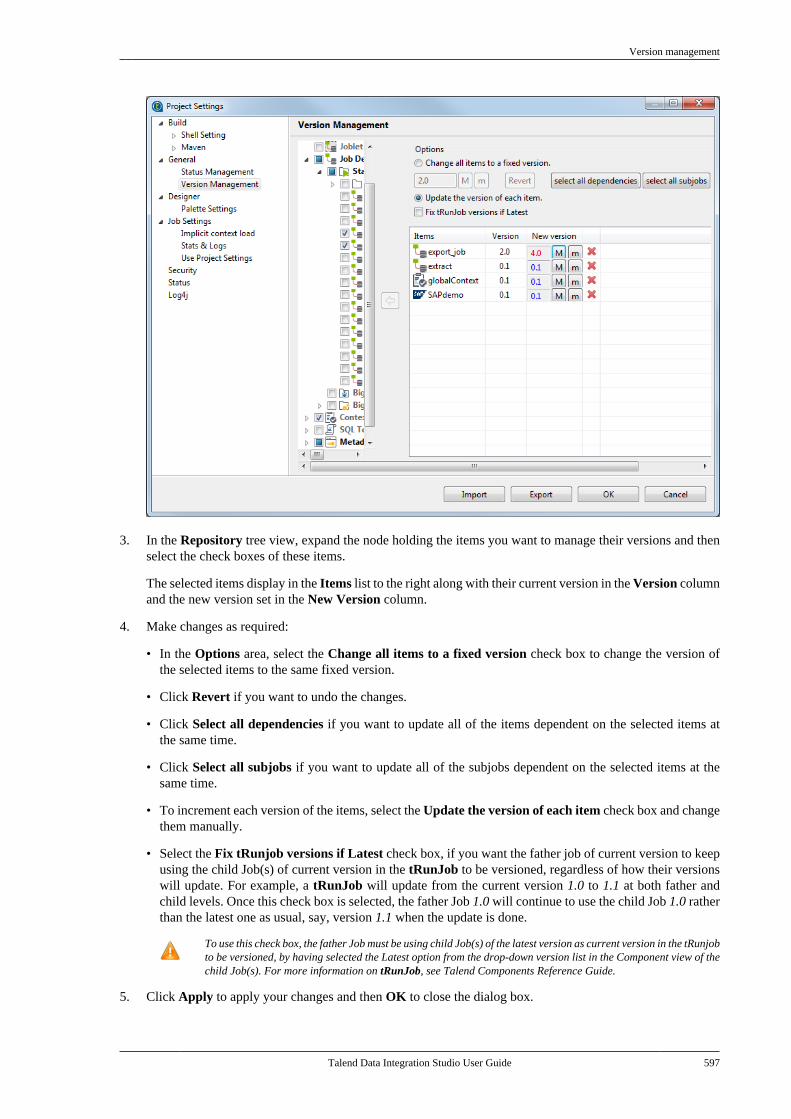
Version management
Talend Data Integration Studio User Guide 597
3. In the Repository tree view, expand the node holding the items you want to manage their versions and thenselect the check boxes of these items.
The selected items display in the Items list to the right along with their current version in the Version columnand the new version set in the New Version column.
4. Make changes as required:
• In the Options area, select the Change all items to a fixed version check box to change the version ofthe selected items to the same fixed version.
• Click Revert if you want to undo the changes.
• Click Select all dependencies if you want to update all of the items dependent on the selected items atthe same time.
• Click Select all subjobs if you want to update all of the subjobs dependent on the selected items at thesame time.
• To increment each version of the items, select the Update the version of each item check box and changethem manually.
• Select the Fix tRunjob versions if Latest check box, if you want the father job of current version to keepusing the child Job(s) of current version in the tRunJob to be versioned, regardless of how their versionswill update. For example, a tRunJob will update from the current version 1.0 to 1.1 at both father andchild levels. Once this check box is selected, the father Job 1.0 will continue to use the child Job 1.0 ratherthan the latest one as usual, say, version 1.1 when the update is done.
To use this check box, the father Job must be using child Job(s) of the latest version as current version in the tRunjobto be versioned, by having selected the Latest option from the drop-down version list in the Component view of thechild Job(s). For more information on tRunJob, see Talend Components Reference Guide.
5. Click Apply to apply your changes and then OK to close the dialog box.

Status management
598 Talend Data Integration Studio User Guide
For more information on version management, see Managing Job versions.
B.1.6. Status management
You can also manage the status of each item in the Repository tree view through General > Status Managementof the [Project Settings] dialog box.
To do so:
1.On the toolbar of the Studio main window, click or click File > Edit Project Properties from the menubar to open the [Project Settings] dialog box.
2. In the tree view of the dialog box, expand General and select Status Management to open the correspondingview.
3. In the Repository tree view, expand the node holding the items you want to manage their status and thenselect the check boxes of these items.
The selected items display in the Items list to the right along with their current status in the Status columnand the new status set in the New Status column.
4. In the Options area, select the Change all technical items to a fixed status check box to change the statusof the selected items to the same fixed status.
5. Click Revert if you want to undo the changes.
6. To increment each status of the items, select the Update the version of each item check box and changethem manually.
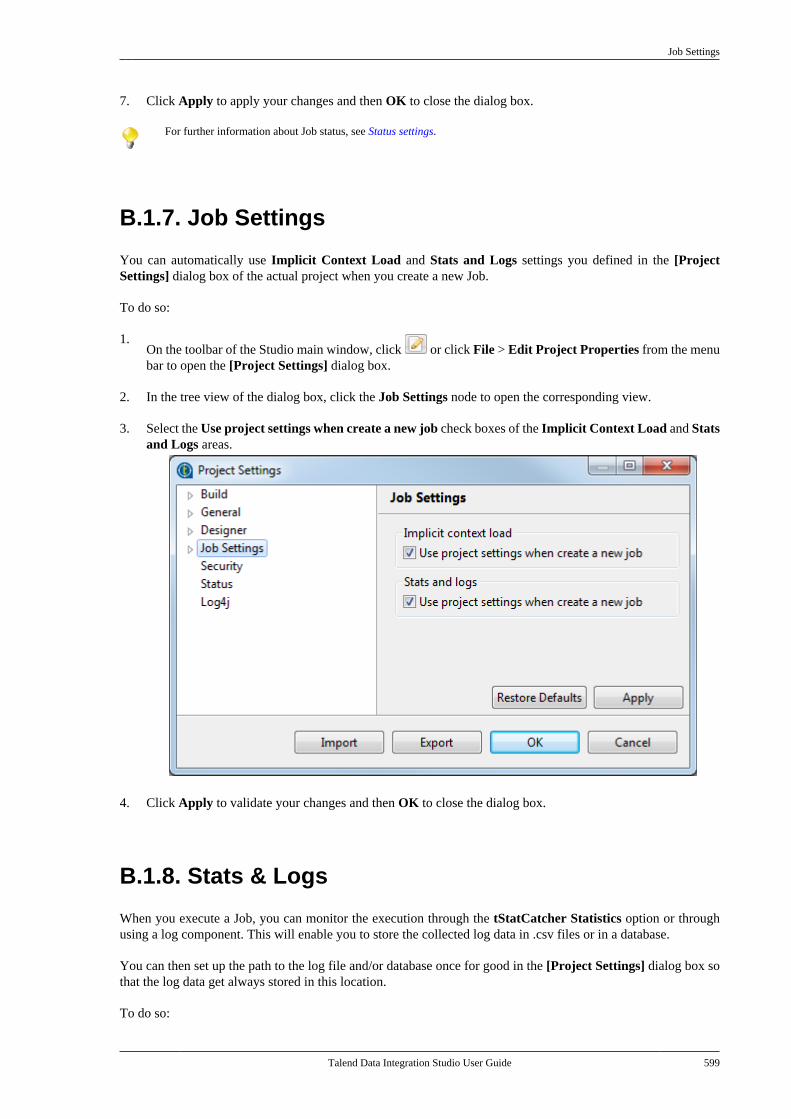
Job Settings
Talend Data Integration Studio User Guide 599
7. Click Apply to apply your changes and then OK to close the dialog box.
For further information about Job status, see Status settings.
B.1.7. Job Settings
You can automatically use Implicit Context Load and Stats and Logs settings you defined in the [ProjectSettings] dialog box of the actual project when you create a new Job.
To do so:
1.On the toolbar of the Studio main window, click or click File > Edit Project Properties from the menubar to open the [Project Settings] dialog box.
2. In the tree view of the dialog box, click the Job Settings node to open the corresponding view.
3. Select the Use project settings when create a new job check boxes of the Implicit Context Load and Statsand Logs areas.
4. Click Apply to validate your changes and then OK to close the dialog box.
B.1.8. Stats & Logs
When you execute a Job, you can monitor the execution through the tStatCatcher Statistics option or throughusing a log component. This will enable you to store the collected log data in .csv files or in a database.
You can then set up the path to the log file and/or database once for good in the [Project Settings] dialog box sothat the log data get always stored in this location.
To do so:
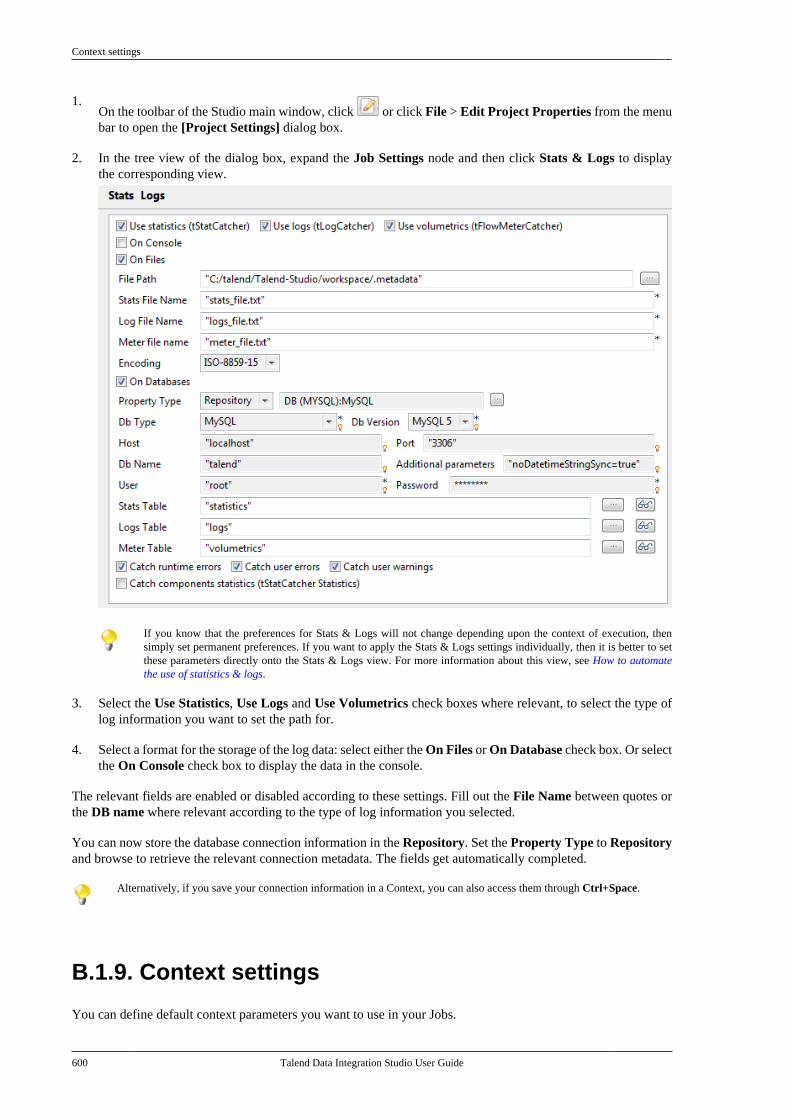
Context settings
600 Talend Data Integration Studio User Guide
1.On the toolbar of the Studio main window, click or click File > Edit Project Properties from the menubar to open the [Project Settings] dialog box.
2. In the tree view of the dialog box, expand the Job Settings node and then click Stats & Logs to displaythe corresponding view.
If you know that the preferences for Stats & Logs will not change depending upon the context of execution, thensimply set permanent preferences. If you want to apply the Stats & Logs settings individually, then it is better to setthese parameters directly onto the Stats & Logs view. For more information about this view, see How to automatethe use of statistics & logs.
3. Select the Use Statistics, Use Logs and Use Volumetrics check boxes where relevant, to select the type oflog information you want to set the path for.
4. Select a format for the storage of the log data: select either the On Files or On Database check box. Or selectthe On Console check box to display the data in the console.
The relevant fields are enabled or disabled according to these settings. Fill out the File Name between quotes orthe DB name where relevant according to the type of log information you selected.
You can now store the database connection information in the Repository. Set the Property Type to Repositoryand browse to retrieve the relevant connection metadata. The fields get automatically completed.
Alternatively, if you save your connection information in a Context, you can also access them through Ctrl+Space.
B.1.9. Context settings
You can define default context parameters you want to use in your Jobs.
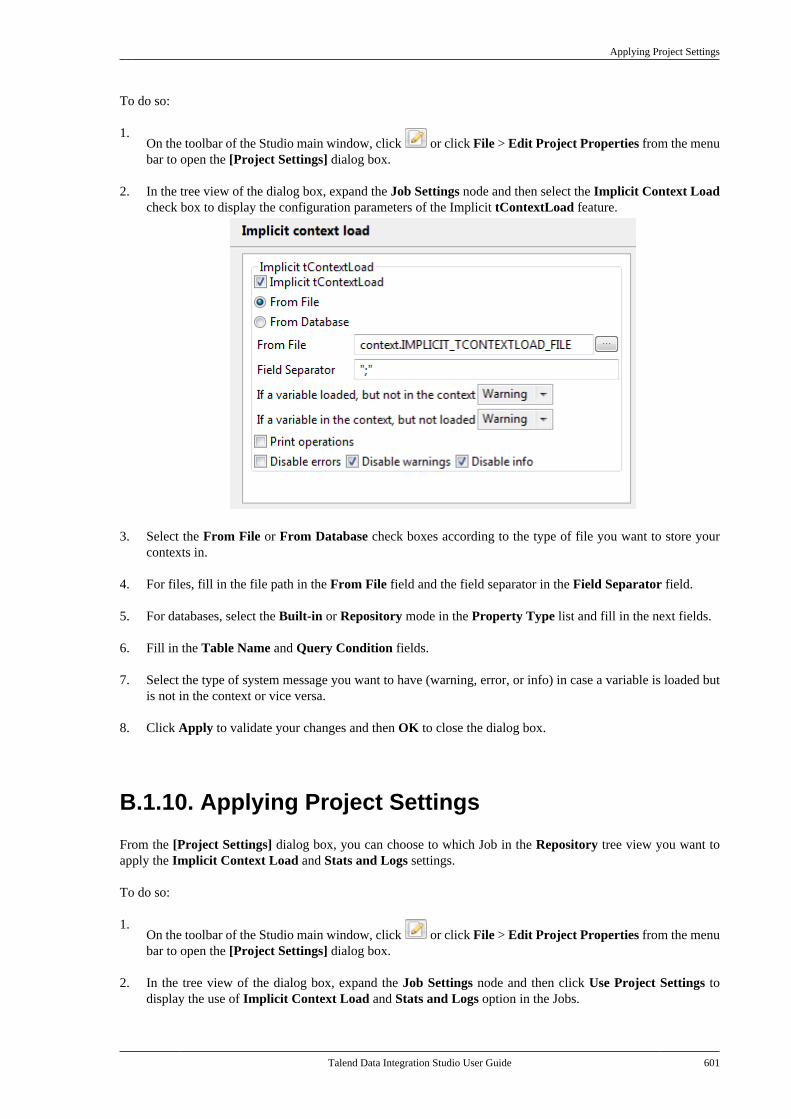
Applying Project Settings
Talend Data Integration Studio User Guide 601
To do so:
1.On the toolbar of the Studio main window, click or click File > Edit Project Properties from the menubar to open the [Project Settings] dialog box.
2. In the tree view of the dialog box, expand the Job Settings node and then select the Implicit Context Loadcheck box to display the configuration parameters of the Implicit tContextLoad feature.
3. Select the From File or From Database check boxes according to the type of file you want to store yourcontexts in.
4. For files, fill in the file path in the From File field and the field separator in the Field Separator field.
5. For databases, select the Built-in or Repository mode in the Property Type list and fill in the next fields.
6. Fill in the Table Name and Query Condition fields.
7. Select the type of system message you want to have (warning, error, or info) in case a variable is loaded butis not in the context or vice versa.
8. Click Apply to validate your changes and then OK to close the dialog box.
B.1.10. Applying Project Settings
From the [Project Settings] dialog box, you can choose to which Job in the Repository tree view you want toapply the Implicit Context Load and Stats and Logs settings.
To do so:
1.On the toolbar of the Studio main window, click or click File > Edit Project Properties from the menubar to open the [Project Settings] dialog box.
2. In the tree view of the dialog box, expand the Job Settings node and then click Use Project Settings todisplay the use of Implicit Context Load and Stats and Logs option in the Jobs.
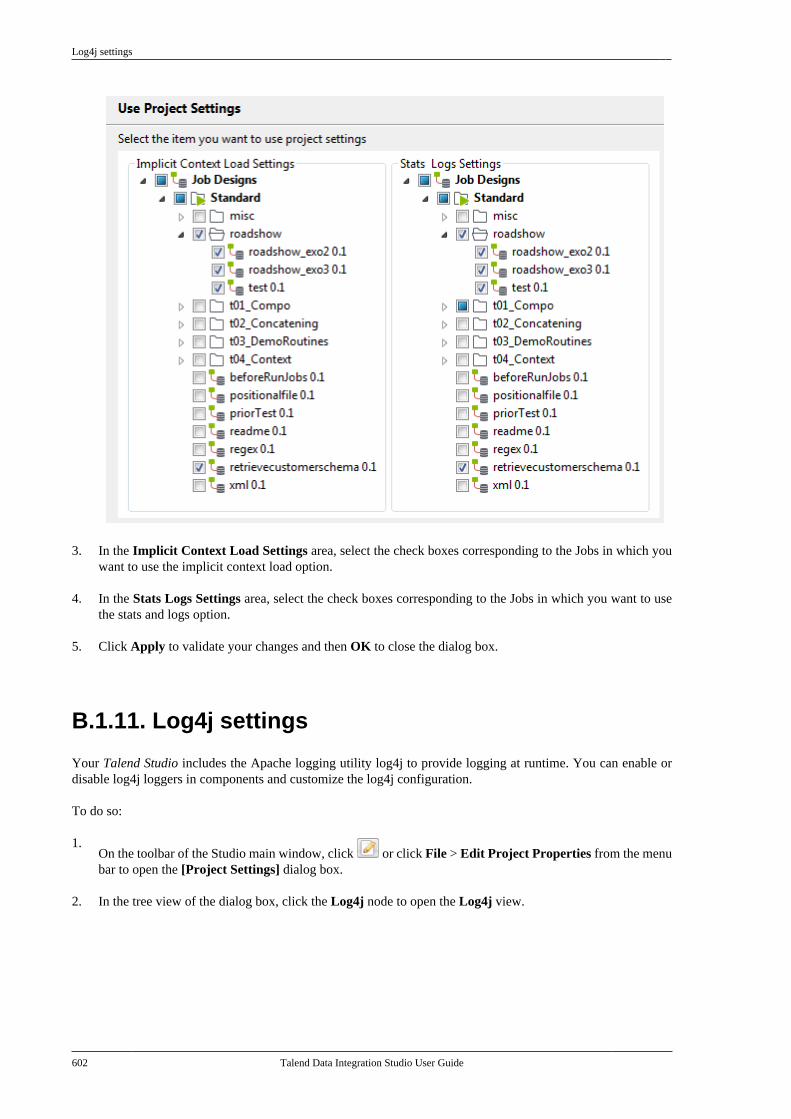
Log4j settings
602 Talend Data Integration Studio User Guide
3. In the Implicit Context Load Settings area, select the check boxes corresponding to the Jobs in which youwant to use the implicit context load option.
4. In the Stats Logs Settings area, select the check boxes corresponding to the Jobs in which you want to usethe stats and logs option.
5. Click Apply to validate your changes and then OK to close the dialog box.
B.1.11. Log4j settings
Your Talend Studio includes the Apache logging utility log4j to provide logging at runtime. You can enable ordisable log4j loggers in components and customize the log4j configuration.
To do so:
1.On the toolbar of the Studio main window, click or click File > Edit Project Properties from the menubar to open the [Project Settings] dialog box.
2. In the tree view of the dialog box, click the Log4j node to open the Log4j view.
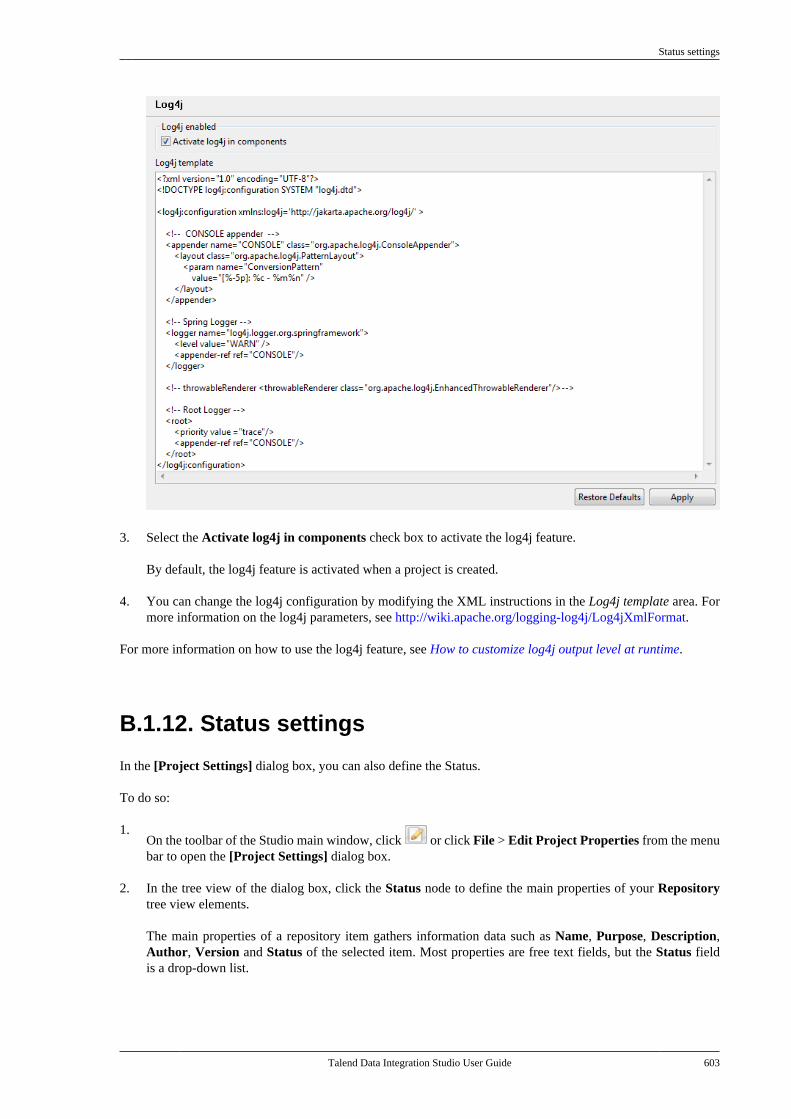
Status settings
Talend Data Integration Studio User Guide 603
3. Select the Activate log4j in components check box to activate the log4j feature.
By default, the log4j feature is activated when a project is created.
4. You can change the log4j configuration by modifying the XML instructions in the Log4j template area. Formore information on the log4j parameters, see http://wiki.apache.org/logging-log4j/Log4jXmlFormat.
For more information on how to use the log4j feature, see How to customize log4j output level at runtime.
B.1.12. Status settings
In the [Project Settings] dialog box, you can also define the Status.
To do so:
1.On the toolbar of the Studio main window, click or click File > Edit Project Properties from the menubar to open the [Project Settings] dialog box.
2. In the tree view of the dialog box, click the Status node to define the main properties of your Repositorytree view elements.
The main properties of a repository item gathers information data such as Name, Purpose, Description,Author, Version and Status of the selected item. Most properties are free text fields, but the Status fieldis a drop-down list.
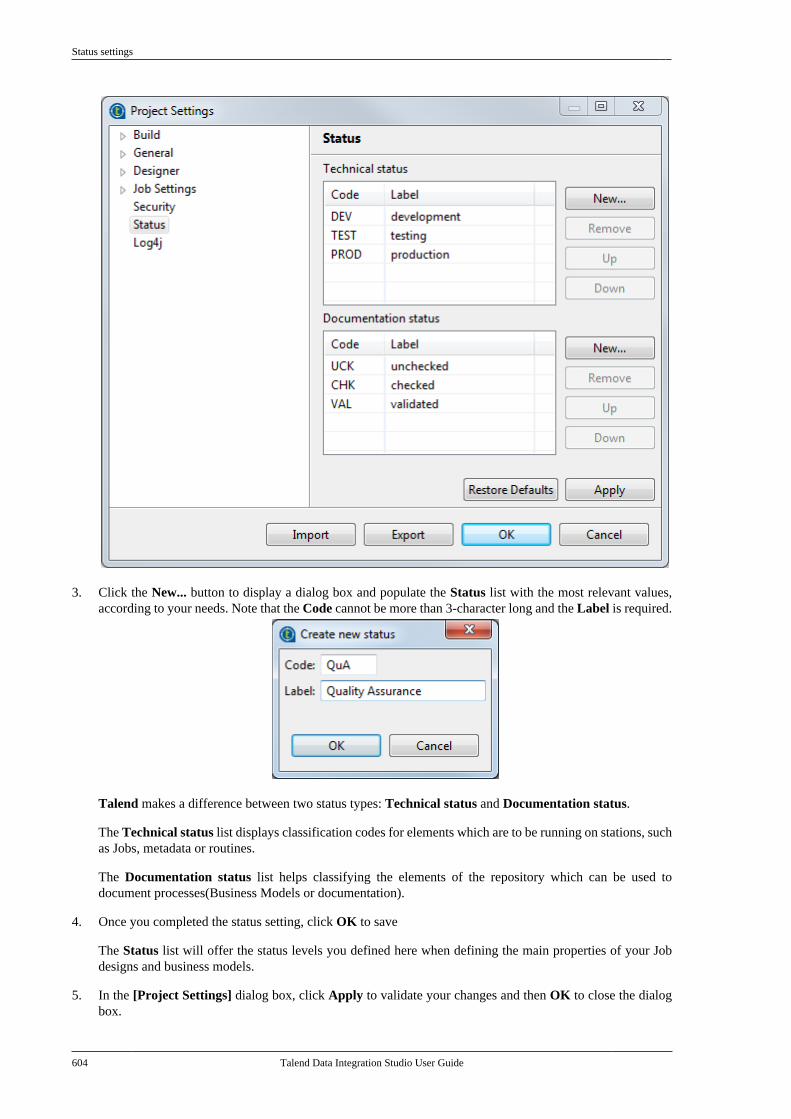
Status settings
604 Talend Data Integration Studio User Guide
3. Click the New... button to display a dialog box and populate the Status list with the most relevant values,according to your needs. Note that the Code cannot be more than 3-character long and the Label is required.
Talend makes a difference between two status types: Technical status and Documentation status.
The Technical status list displays classification codes for elements which are to be running on stations, suchas Jobs, metadata or routines.
The Documentation status list helps classifying the elements of the repository which can be used todocument processes(Business Models or documentation).
4. Once you completed the status setting, click OK to save
The Status list will offer the status levels you defined here when defining the main properties of your Jobdesigns and business models.
5. In the [Project Settings] dialog box, click Apply to validate your changes and then OK to close the dialogbox.
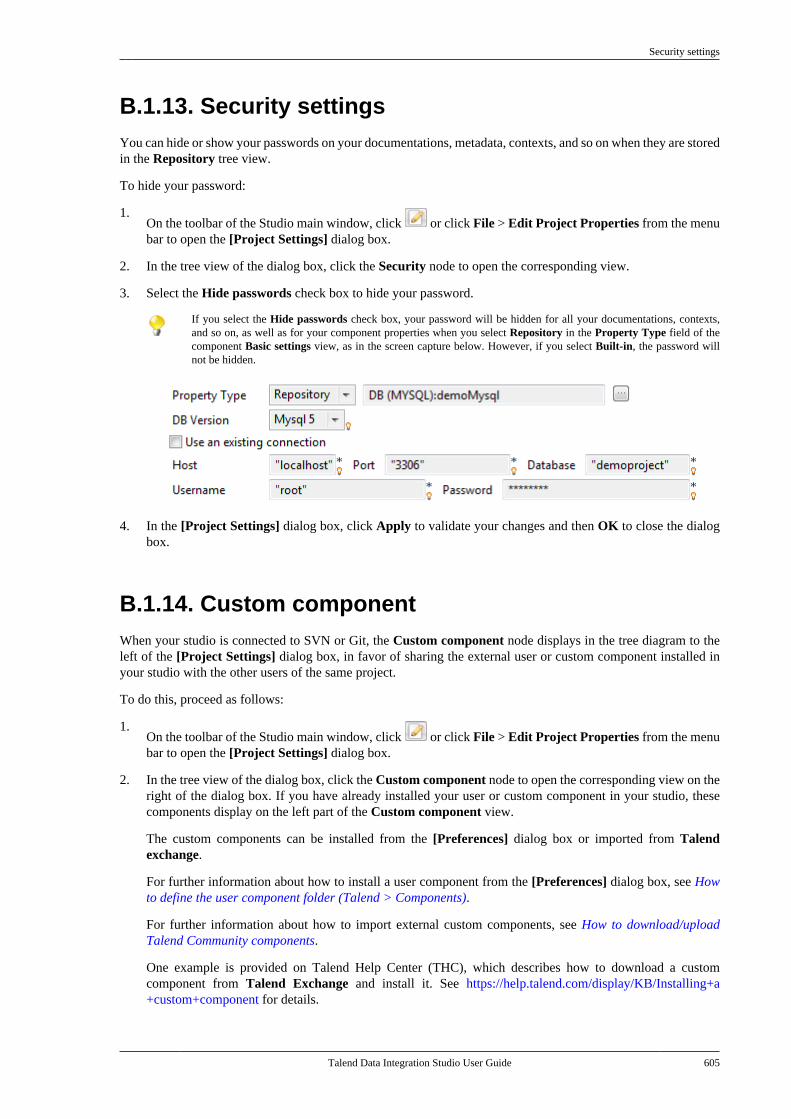
Security settings
Talend Data Integration Studio User Guide 605
B.1.13. Security settingsYou can hide or show your passwords on your documentations, metadata, contexts, and so on when they are storedin the Repository tree view.
To hide your password:
1.On the toolbar of the Studio main window, click or click File > Edit Project Properties from the menubar to open the [Project Settings] dialog box.
2. In the tree view of the dialog box, click the Security node to open the corresponding view.
3. Select the Hide passwords check box to hide your password.
If you select the Hide passwords check box, your password will be hidden for all your documentations, contexts,and so on, as well as for your component properties when you select Repository in the Property Type field of thecomponent Basic settings view, as in the screen capture below. However, if you select Built-in, the password willnot be hidden.
4. In the [Project Settings] dialog box, click Apply to validate your changes and then OK to close the dialogbox.
B.1.14. Custom componentWhen your studio is connected to SVN or Git, the Custom component node displays in the tree diagram to theleft of the [Project Settings] dialog box, in favor of sharing the external user or custom component installed inyour studio with the other users of the same project.
To do this, proceed as follows:
1.On the toolbar of the Studio main window, click or click File > Edit Project Properties from the menubar to open the [Project Settings] dialog box.
2. In the tree view of the dialog box, click the Custom component node to open the corresponding view on theright of the dialog box. If you have already installed your user or custom component in your studio, thesecomponents display on the left part of the Custom component view.
The custom components can be installed from the [Preferences] dialog box or imported from Talendexchange.
For further information about how to install a user component from the [Preferences] dialog box, see Howto define the user component folder (Talend > Components).
For further information about how to import external custom components, see How to download/uploadTalend Community components.
One example is provided on Talend Help Center (THC), which describes how to download a customcomponent from Talend Exchange and install it. See https://help.talend.com/display/KB/Installing+a+custom+component for details.
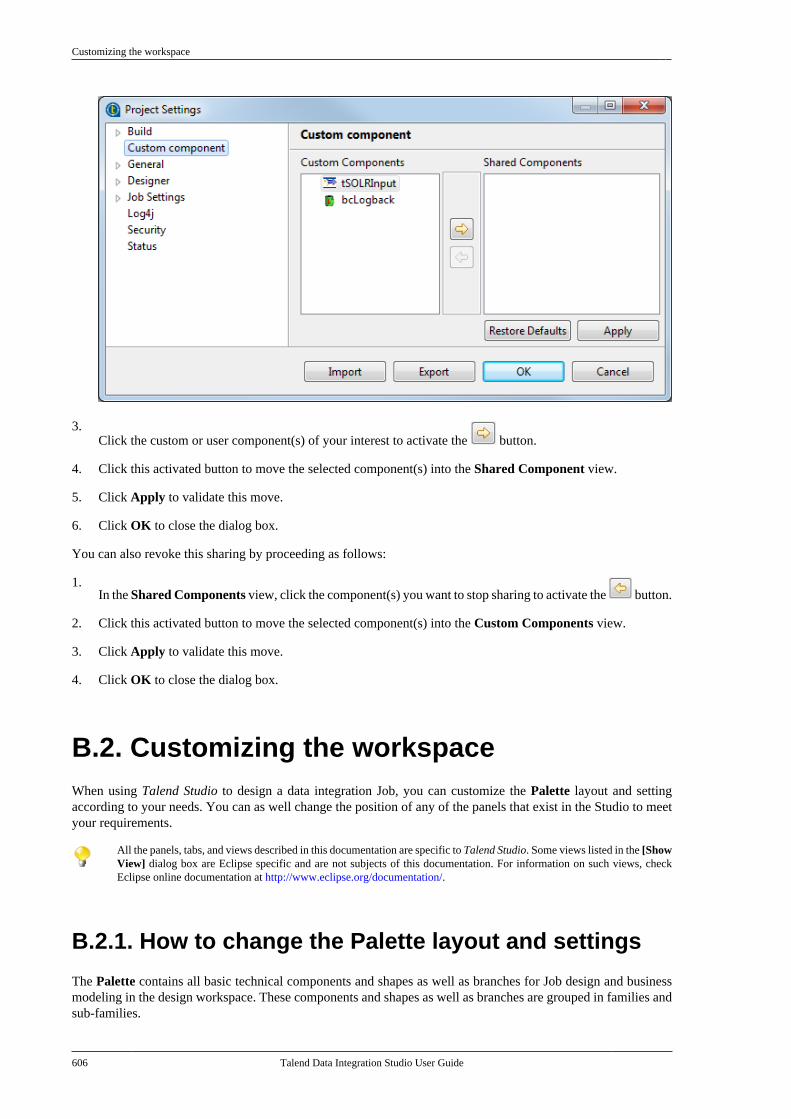
Customizing the workspace
606 Talend Data Integration Studio User Guide
3.Click the custom or user component(s) of your interest to activate the button.
4. Click this activated button to move the selected component(s) into the Shared Component view.
5. Click Apply to validate this move.
6. Click OK to close the dialog box.
You can also revoke this sharing by proceeding as follows:
1.In the Shared Components view, click the component(s) you want to stop sharing to activate the button.
2. Click this activated button to move the selected component(s) into the Custom Components view.
3. Click Apply to validate this move.
4. Click OK to close the dialog box.
B.2. Customizing the workspaceWhen using Talend Studio to design a data integration Job, you can customize the Palette layout and settingaccording to your needs. You can as well change the position of any of the panels that exist in the Studio to meetyour requirements.
All the panels, tabs, and views described in this documentation are specific to Talend Studio. Some views listed in the [ShowView] dialog box are Eclipse specific and are not subjects of this documentation. For information on such views, checkEclipse online documentation at http://www.eclipse.org/documentation/.
B.2.1. How to change the Palette layout and settings
The Palette contains all basic technical components and shapes as well as branches for Job design and businessmodeling in the design workspace. These components and shapes as well as branches are grouped in families andsub-families.
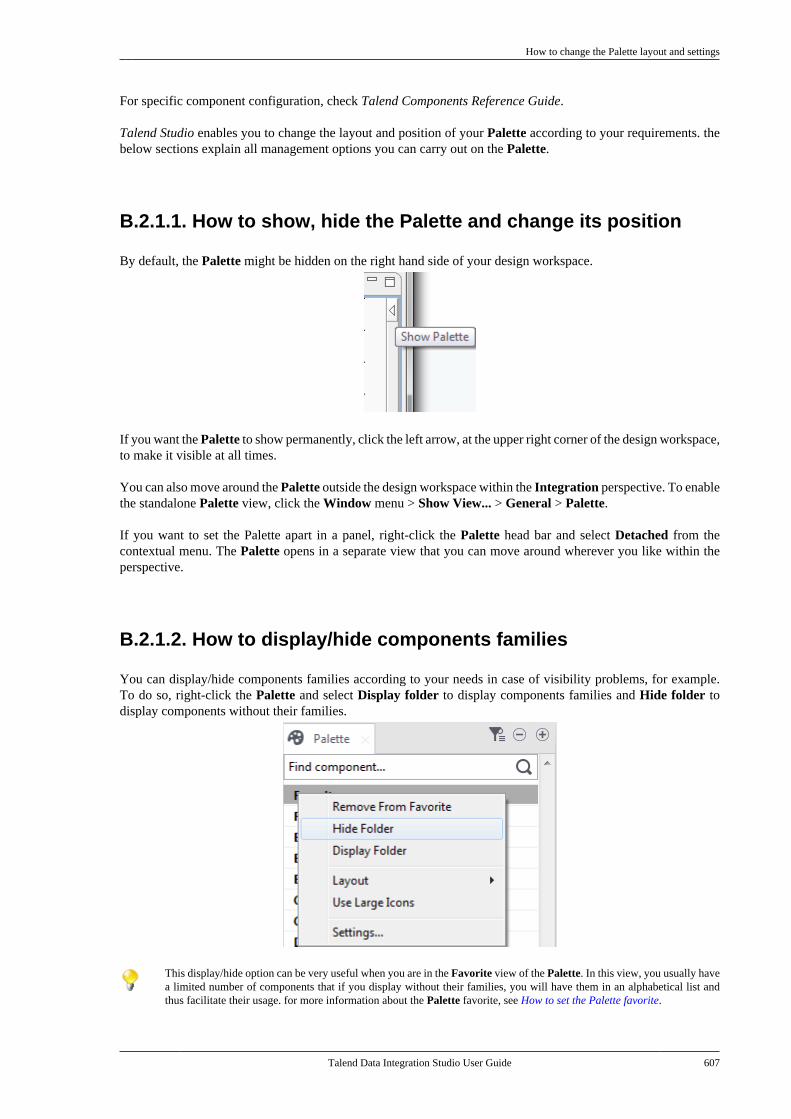
How to change the Palette layout and settings
Talend Data Integration Studio User Guide 607
For specific component configuration, check Talend Components Reference Guide.
Talend Studio enables you to change the layout and position of your Palette according to your requirements. thebelow sections explain all management options you can carry out on the Palette.
B.2.1.1. How to show, hide the Palette and change its position
By default, the Palette might be hidden on the right hand side of your design workspace.
If you want the Palette to show permanently, click the left arrow, at the upper right corner of the design workspace,to make it visible at all times.
You can also move around the Palette outside the design workspace within the Integration perspective. To enablethe standalone Palette view, click the Window menu > Show View... > General > Palette.
If you want to set the Palette apart in a panel, right-click the Palette head bar and select Detached from thecontextual menu. The Palette opens in a separate view that you can move around wherever you like within theperspective.
B.2.1.2. How to display/hide components families
You can display/hide components families according to your needs in case of visibility problems, for example.To do so, right-click the Palette and select Display folder to display components families and Hide folder todisplay components without their families.
This display/hide option can be very useful when you are in the Favorite view of the Palette. In this view, you usually havea limited number of components that if you display without their families, you will have them in an alphabetical list andthus facilitate their usage. for more information about the Palette favorite, see How to set the Palette favorite.
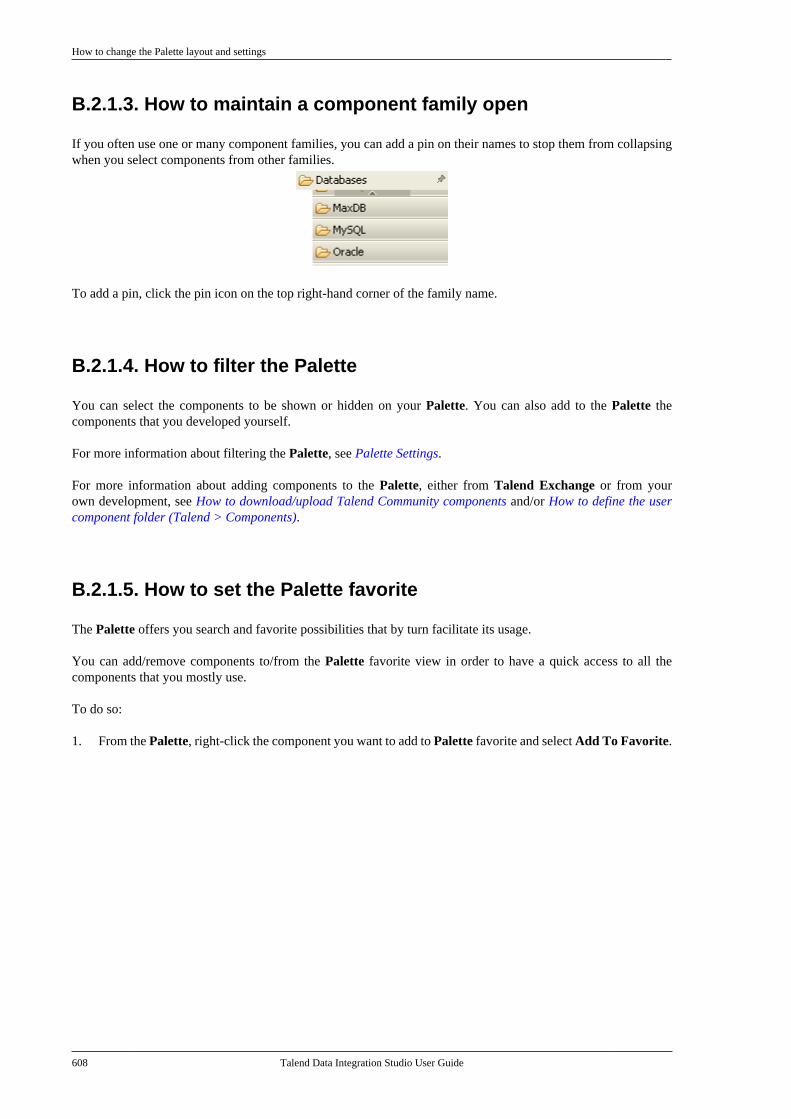
How to change the Palette layout and settings
608 Talend Data Integration Studio User Guide
B.2.1.3. How to maintain a component family open
If you often use one or many component families, you can add a pin on their names to stop them from collapsingwhen you select components from other families.
To add a pin, click the pin icon on the top right-hand corner of the family name.
B.2.1.4. How to filter the Palette
You can select the components to be shown or hidden on your Palette. You can also add to the Palette thecomponents that you developed yourself.
For more information about filtering the Palette, see Palette Settings.
For more information about adding components to the Palette, either from Talend Exchange or from yourown development, see How to download/upload Talend Community components and/or How to define the usercomponent folder (Talend > Components).
B.2.1.5. How to set the Palette favorite
The Palette offers you search and favorite possibilities that by turn facilitate its usage.
You can add/remove components to/from the Palette favorite view in order to have a quick access to all thecomponents that you mostly use.
To do so:
1. From the Palette, right-click the component you want to add to Palette favorite and select Add To Favorite.
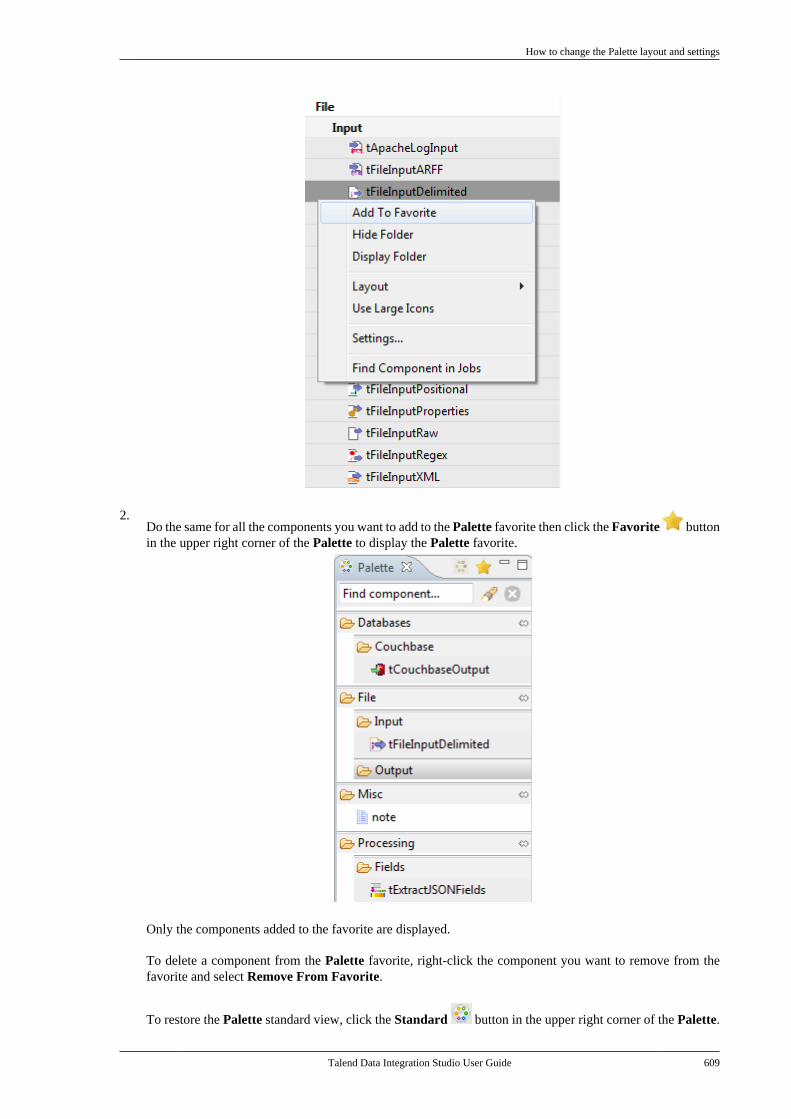
How to change the Palette layout and settings
Talend Data Integration Studio User Guide 609
2.Do the same for all the components you want to add to the Palette favorite then click the Favorite buttonin the upper right corner of the Palette to display the Palette favorite.
Only the components added to the favorite are displayed.
To delete a component from the Palette favorite, right-click the component you want to remove from thefavorite and select Remove From Favorite.
To restore the Palette standard view, click the Standard button in the upper right corner of the Palette.

How to change panels positions
610 Talend Data Integration Studio User Guide
B.2.1.6. How to change components layout in the Palette
You can change the layout of the component list in the Palette to display them in columns or in lists, as iconsonly or as icons with short description.
You can also enlarge the component icons for better readability of the component list.
To do so, right-click any component family in the Palette and select the desired option in the contextual menu orclick Settings to open the [Palette Settings] window and fine-tune the layout.
B.2.1.7. How to add external components to the Palette
Talend Studio enables you to add external components to the Palette of your Studio and use them in your Jobdesigns.
For more information about the creation and development of user components, refer to the component creationtutorial on our wiki at https://help.talend.com/pages/viewpage.action?pageId=226000909.
For more information about how to download user components in your Studio, see How to download/uploadTalend Community components.
B.2.2. How to change panels positionsAll panels in the open Studio can be moved around according to your needs.
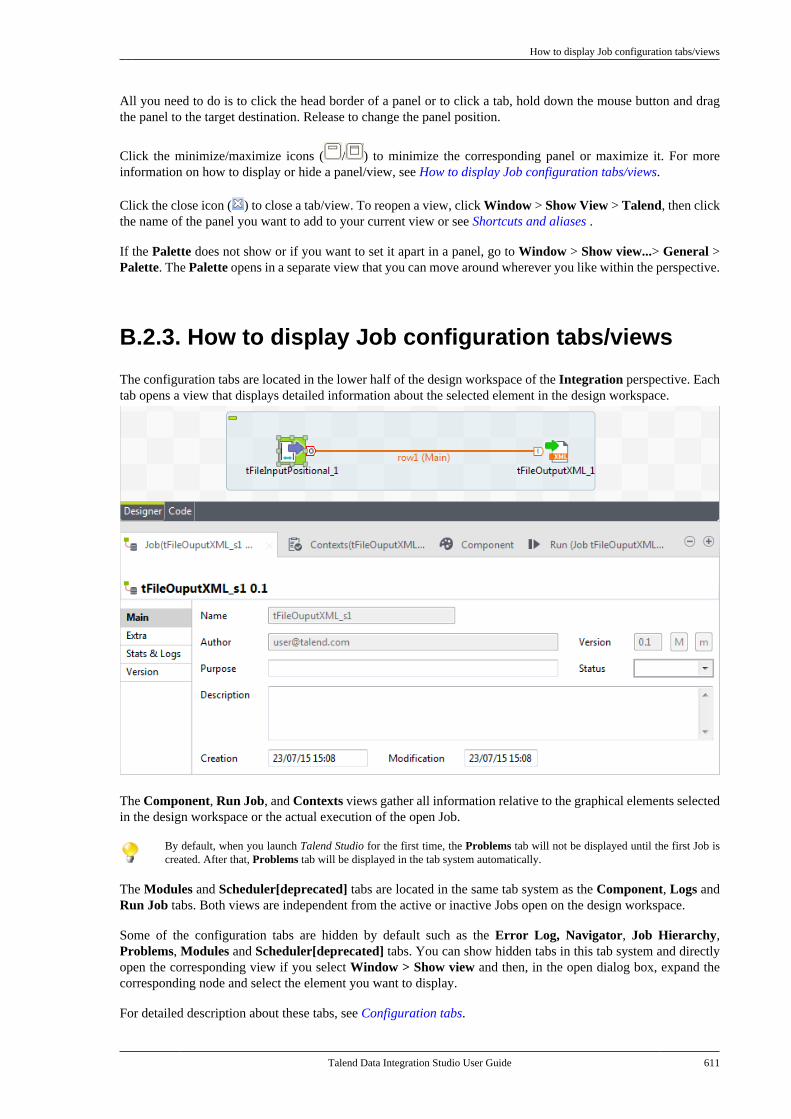
How to display Job configuration tabs/views
Talend Data Integration Studio User Guide 611
All you need to do is to click the head border of a panel or to click a tab, hold down the mouse button and dragthe panel to the target destination. Release to change the panel position.
Click the minimize/maximize icons ( / ) to minimize the corresponding panel or maximize it. For moreinformation on how to display or hide a panel/view, see How to display Job configuration tabs/views.
Click the close icon ( ) to close a tab/view. To reopen a view, click Window > Show View > Talend, then clickthe name of the panel you want to add to your current view or see Shortcuts and aliases .
If the Palette does not show or if you want to set it apart in a panel, go to Window > Show view...> General >Palette. The Palette opens in a separate view that you can move around wherever you like within the perspective.
B.2.3. How to display Job configuration tabs/views
The configuration tabs are located in the lower half of the design workspace of the Integration perspective. Eachtab opens a view that displays detailed information about the selected element in the design workspace.
The Component, Run Job, and Contexts views gather all information relative to the graphical elements selectedin the design workspace or the actual execution of the open Job.
By default, when you launch Talend Studio for the first time, the Problems tab will not be displayed until the first Job iscreated. After that, Problems tab will be displayed in the tab system automatically.
The Modules and Scheduler[deprecated] tabs are located in the same tab system as the Component, Logs andRun Job tabs. Both views are independent from the active or inactive Jobs open on the design workspace.
Some of the configuration tabs are hidden by default such as the Error Log, Navigator, Job Hierarchy,Problems, Modules and Scheduler[deprecated] tabs. You can show hidden tabs in this tab system and directlyopen the corresponding view if you select Window > Show view and then, in the open dialog box, expand thecorresponding node and select the element you want to display.
For detailed description about these tabs, see Configuration tabs.
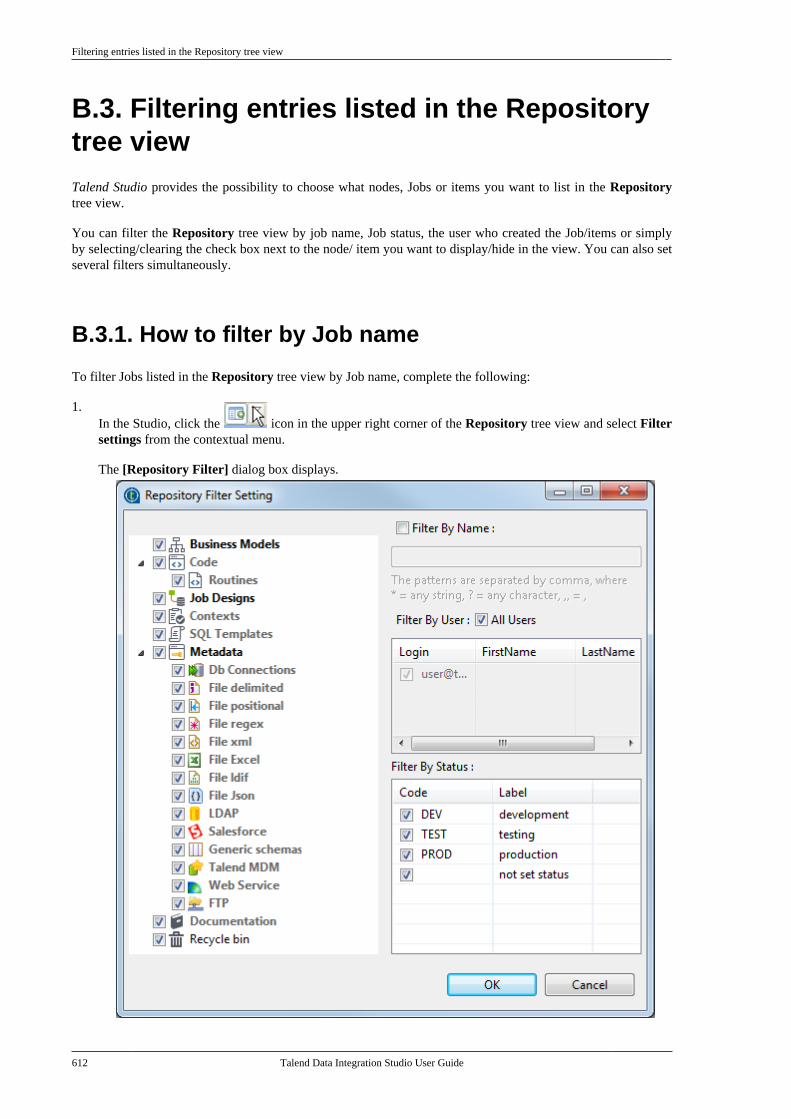
Filtering entries listed in the Repository tree view
612 Talend Data Integration Studio User Guide
B.3. Filtering entries listed in the Repositorytree viewTalend Studio provides the possibility to choose what nodes, Jobs or items you want to list in the Repositorytree view.
You can filter the Repository tree view by job name, Job status, the user who created the Job/items or simplyby selecting/clearing the check box next to the node/ item you want to display/hide in the view. You can also setseveral filters simultaneously.
B.3.1. How to filter by Job name
To filter Jobs listed in the Repository tree view by Job name, complete the following:
1.In the Studio, click the icon in the upper right corner of the Repository tree view and select Filtersettings from the contextual menu.
The [Repository Filter] dialog box displays.
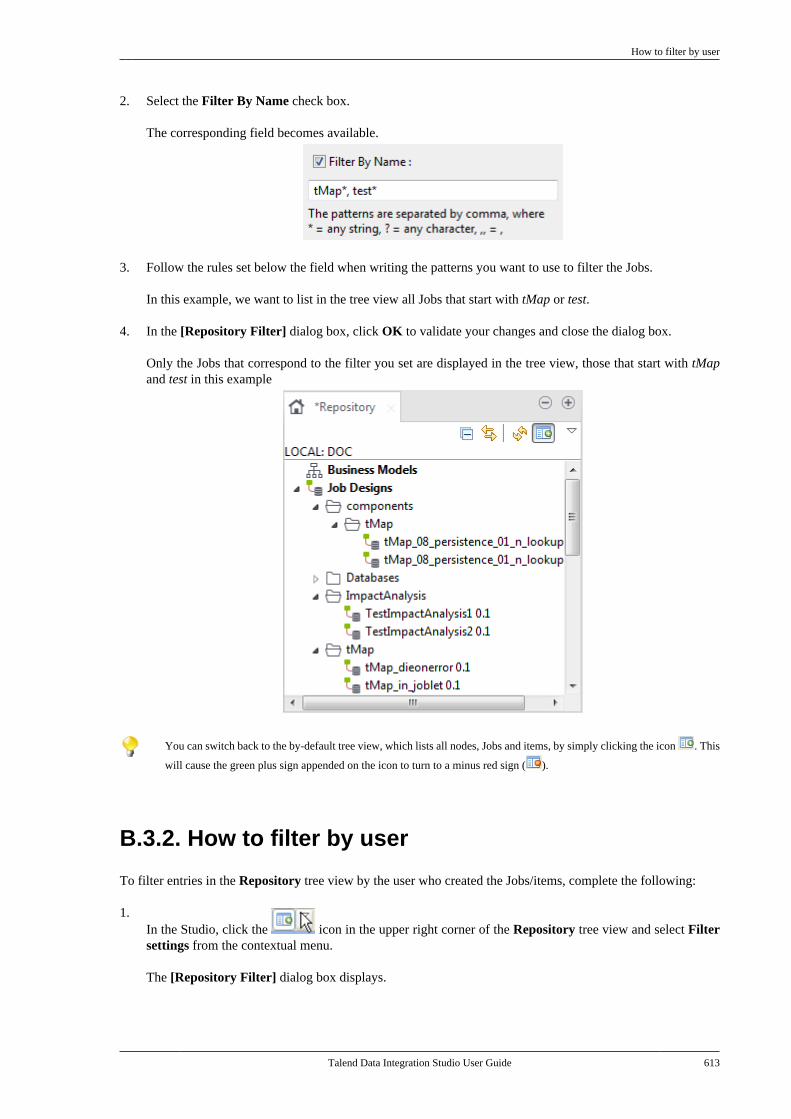
How to filter by user
Talend Data Integration Studio User Guide 613
2. Select the Filter By Name check box.
The corresponding field becomes available.
3. Follow the rules set below the field when writing the patterns you want to use to filter the Jobs.
In this example, we want to list in the tree view all Jobs that start with tMap or test.
4. In the [Repository Filter] dialog box, click OK to validate your changes and close the dialog box.
Only the Jobs that correspond to the filter you set are displayed in the tree view, those that start with tMapand test in this example
You can switch back to the by-default tree view, which lists all nodes, Jobs and items, by simply clicking the icon . This
will cause the green plus sign appended on the icon to turn to a minus red sign ( ).
B.3.2. How to filter by user
To filter entries in the Repository tree view by the user who created the Jobs/items, complete the following:
1.In the Studio, click the icon in the upper right corner of the Repository tree view and select Filtersettings from the contextual menu.
The [Repository Filter] dialog box displays.
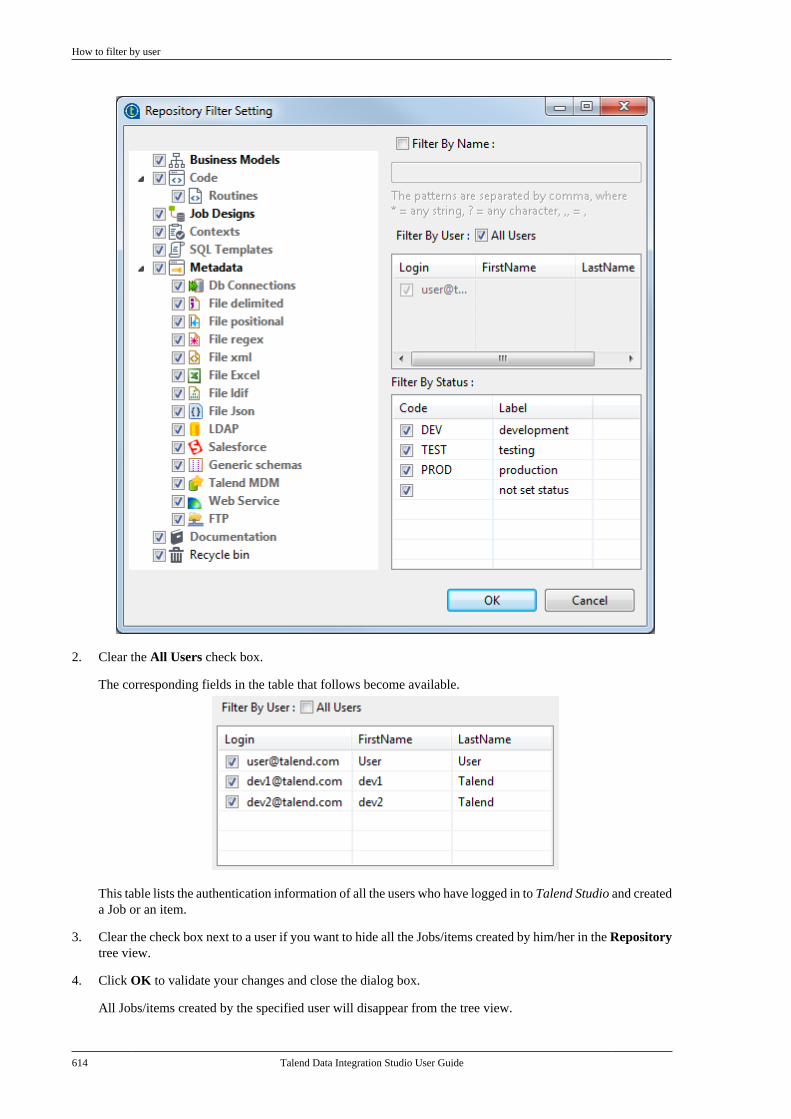
How to filter by user
614 Talend Data Integration Studio User Guide
2. Clear the All Users check box.
The corresponding fields in the table that follows become available.
This table lists the authentication information of all the users who have logged in to Talend Studio and createda Job or an item.
3. Clear the check box next to a user if you want to hide all the Jobs/items created by him/her in the Repositorytree view.
4. Click OK to validate your changes and close the dialog box.
All Jobs/items created by the specified user will disappear from the tree view.
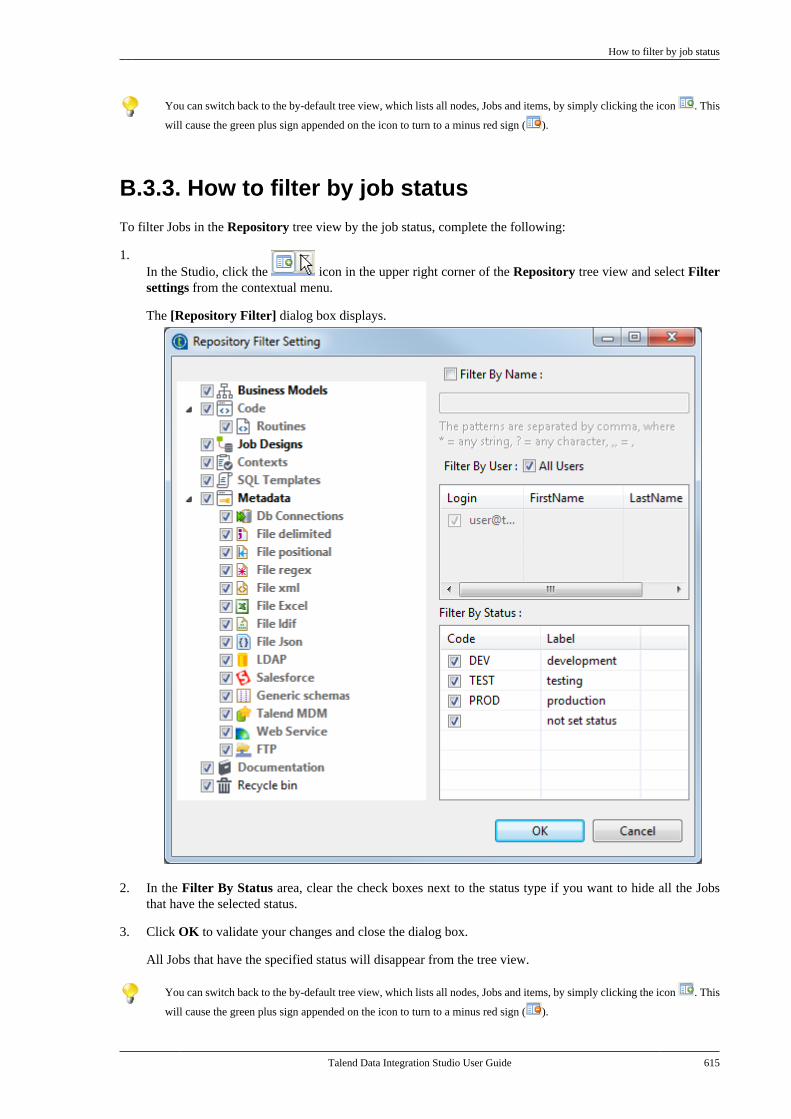
How to filter by job status
Talend Data Integration Studio User Guide 615
You can switch back to the by-default tree view, which lists all nodes, Jobs and items, by simply clicking the icon . This
will cause the green plus sign appended on the icon to turn to a minus red sign ( ).
B.3.3. How to filter by job status
To filter Jobs in the Repository tree view by the job status, complete the following:
1.In the Studio, click the icon in the upper right corner of the Repository tree view and select Filtersettings from the contextual menu.
The [Repository Filter] dialog box displays.
2. In the Filter By Status area, clear the check boxes next to the status type if you want to hide all the Jobsthat have the selected status.
3. Click OK to validate your changes and close the dialog box.
All Jobs that have the specified status will disappear from the tree view.
You can switch back to the by-default tree view, which lists all nodes, Jobs and items, by simply clicking the icon . This
will cause the green plus sign appended on the icon to turn to a minus red sign ( ).
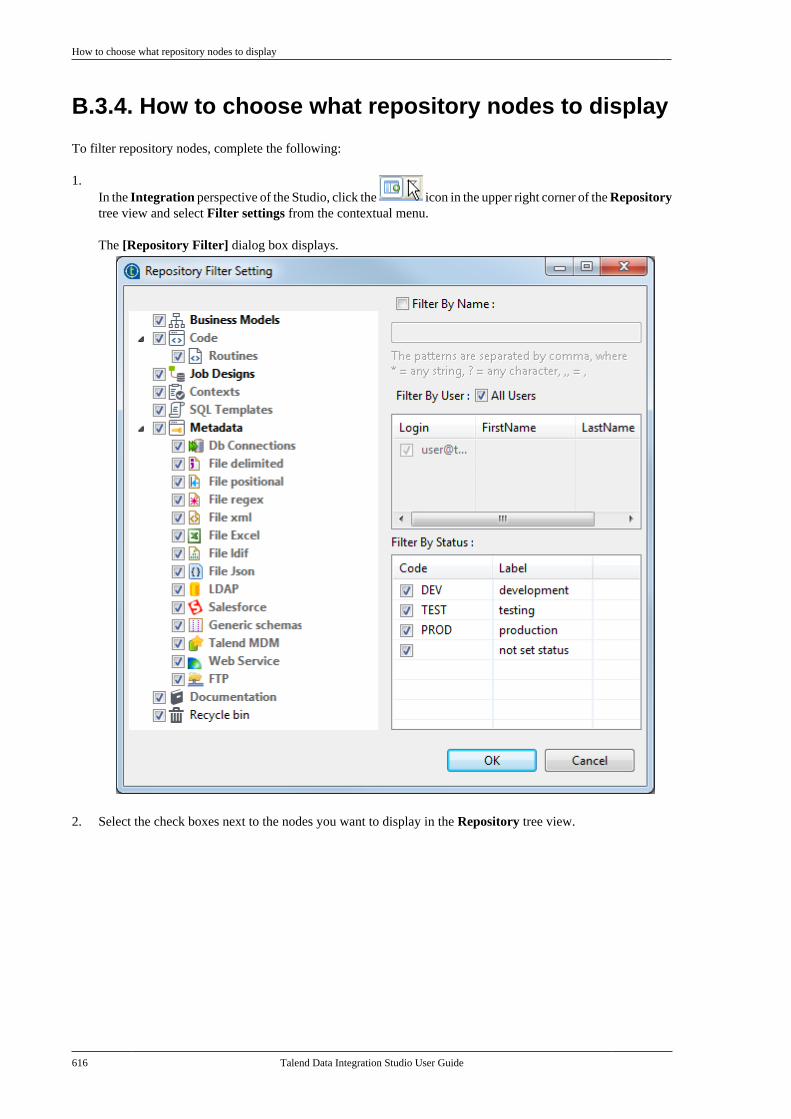
How to choose what repository nodes to display
616 Talend Data Integration Studio User Guide
B.3.4. How to choose what repository nodes to display
To filter repository nodes, complete the following:
1.In the Integration perspective of the Studio, click the icon in the upper right corner of the Repositorytree view and select Filter settings from the contextual menu.
The [Repository Filter] dialog box displays.
2. Select the check boxes next to the nodes you want to display in the Repository tree view.
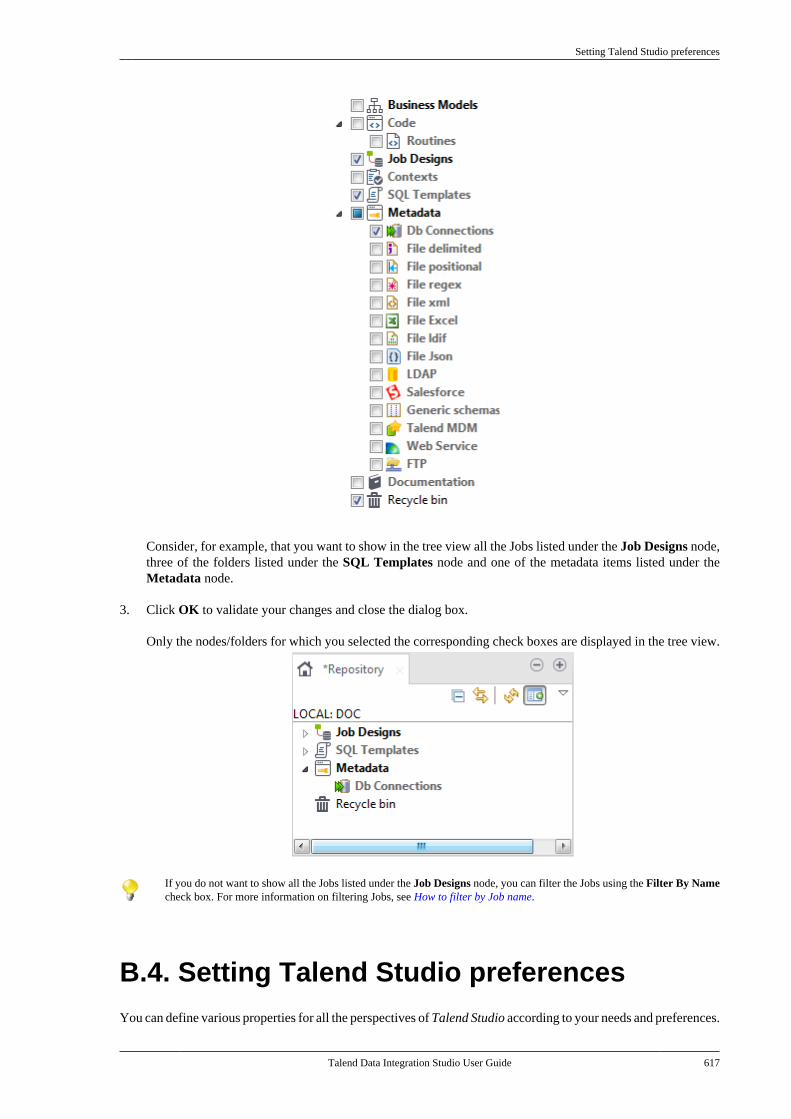
Setting Talend Studio preferences
Talend Data Integration Studio User Guide 617
Consider, for example, that you want to show in the tree view all the Jobs listed under the Job Designs node,three of the folders listed under the SQL Templates node and one of the metadata items listed under theMetadata node.
3. Click OK to validate your changes and close the dialog box.
Only the nodes/folders for which you selected the corresponding check boxes are displayed in the tree view.
If you do not want to show all the Jobs listed under the Job Designs node, you can filter the Jobs using the Filter By Namecheck box. For more information on filtering Jobs, see How to filter by Job name.
B.4. Setting Talend Studio preferencesYou can define various properties for all the perspectives of Talend Studio according to your needs and preferences.
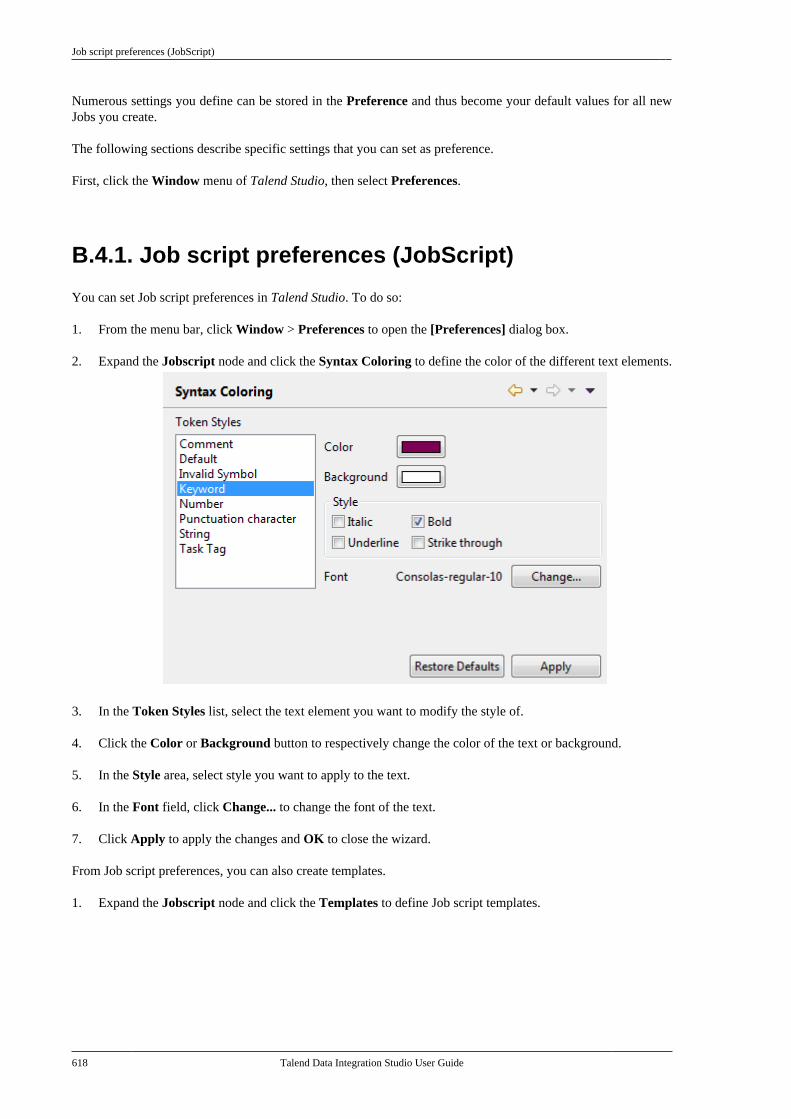
Job script preferences (JobScript)
618 Talend Data Integration Studio User Guide
Numerous settings you define can be stored in the Preference and thus become your default values for all newJobs you create.
The following sections describe specific settings that you can set as preference.
First, click the Window menu of Talend Studio, then select Preferences.
B.4.1. Job script preferences (JobScript)
You can set Job script preferences in Talend Studio. To do so:
1. From the menu bar, click Window > Preferences to open the [Preferences] dialog box.
2. Expand the Jobscript node and click the Syntax Coloring to define the color of the different text elements.
3. In the Token Styles list, select the text element you want to modify the style of.
4. Click the Color or Background button to respectively change the color of the text or background.
5. In the Style area, select style you want to apply to the text.
6. In the Font field, click Change... to change the font of the text.
7. Click Apply to apply the changes and OK to close the wizard.
From Job script preferences, you can also create templates.
1. Expand the Jobscript node and click the Templates to define Job script templates.
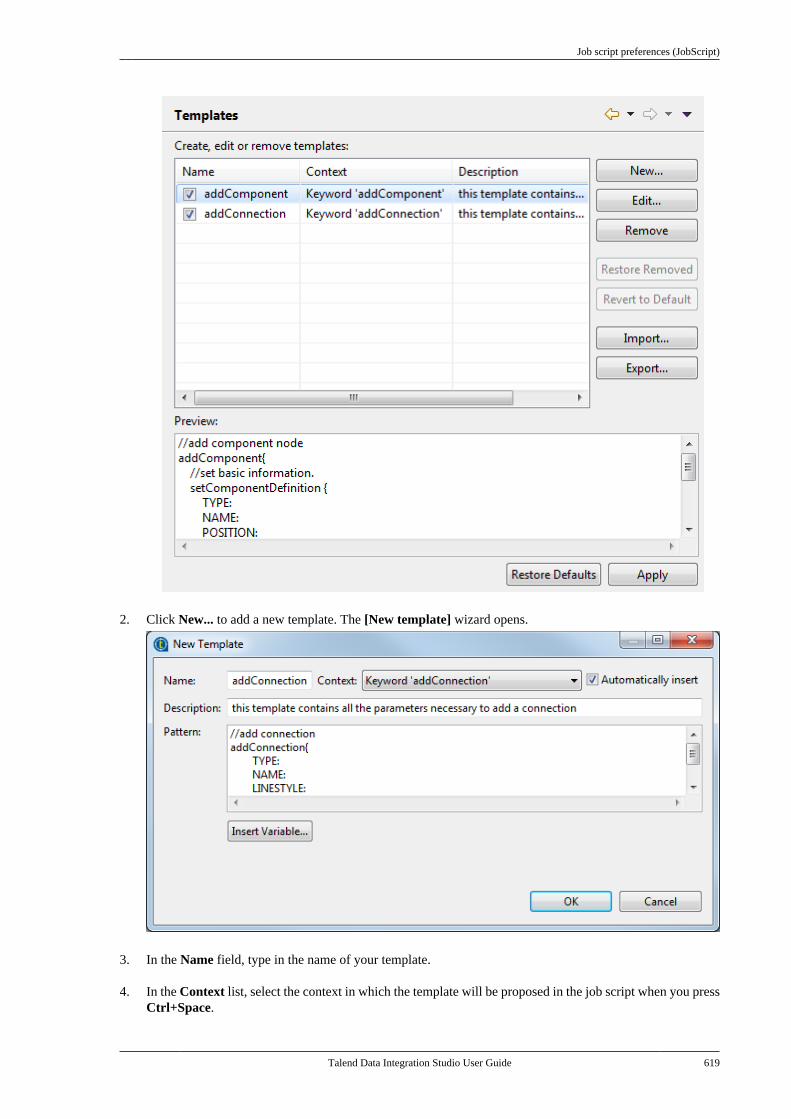
Job script preferences (JobScript)
Talend Data Integration Studio User Guide 619
2. Click New... to add a new template. The [New template] wizard opens.
3. In the Name field, type in the name of your template.
4. In the Context list, select the context in which the template will be proposed in the job script when you pressCtrl+Space.
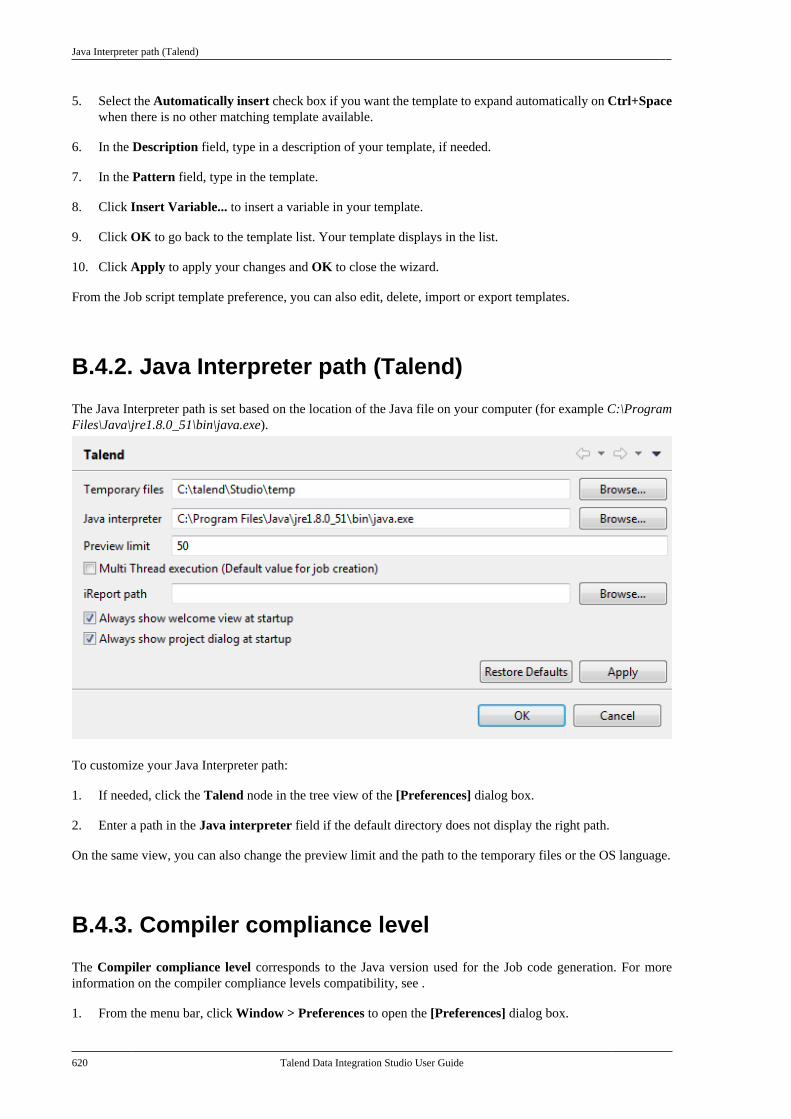
Java Interpreter path (Talend)
620 Talend Data Integration Studio User Guide
5. Select the Automatically insert check box if you want the template to expand automatically on Ctrl+Spacewhen there is no other matching template available.
6. In the Description field, type in a description of your template, if needed.
7. In the Pattern field, type in the template.
8. Click Insert Variable... to insert a variable in your template.
9. Click OK to go back to the template list. Your template displays in the list.
10. Click Apply to apply your changes and OK to close the wizard.
From the Job script template preference, you can also edit, delete, import or export templates.
B.4.2. Java Interpreter path (Talend)
The Java Interpreter path is set based on the location of the Java file on your computer (for example C:\ProgramFiles\Java\jre1.8.0_51\bin\java.exe).
To customize your Java Interpreter path:
1. If needed, click the Talend node in the tree view of the [Preferences] dialog box.
2. Enter a path in the Java interpreter field if the default directory does not display the right path.
On the same view, you can also change the preview limit and the path to the temporary files or the OS language.
B.4.3. Compiler compliance level
The Compiler compliance level corresponds to the Java version used for the Job code generation. For moreinformation on the compiler compliance levels compatibility, see .
1. From the menu bar, click Window > Preferences to open the [Preferences] dialog box.
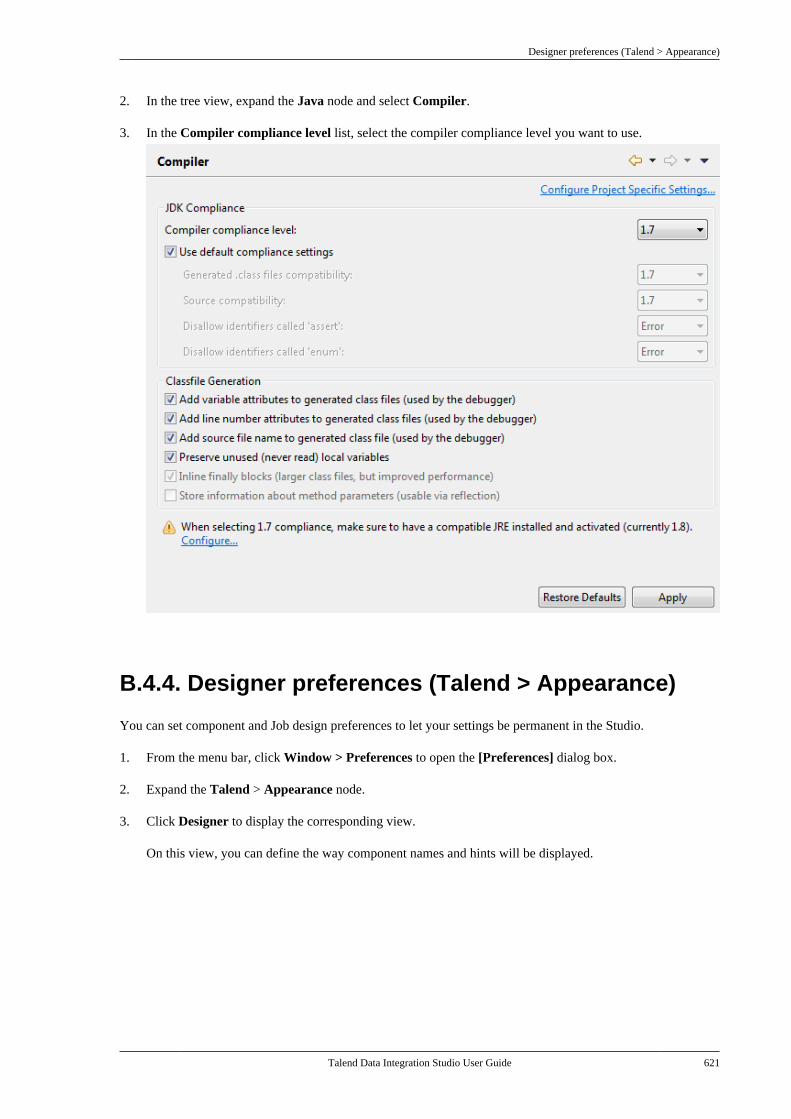
Designer preferences (Talend > Appearance)
Talend Data Integration Studio User Guide 621
2. In the tree view, expand the Java node and select Compiler.
3. In the Compiler compliance level list, select the compiler compliance level you want to use.
B.4.4. Designer preferences (Talend > Appearance)
You can set component and Job design preferences to let your settings be permanent in the Studio.
1. From the menu bar, click Window > Preferences to open the [Preferences] dialog box.
2. Expand the Talend > Appearance node.
3. Click Designer to display the corresponding view.
On this view, you can define the way component names and hints will be displayed.
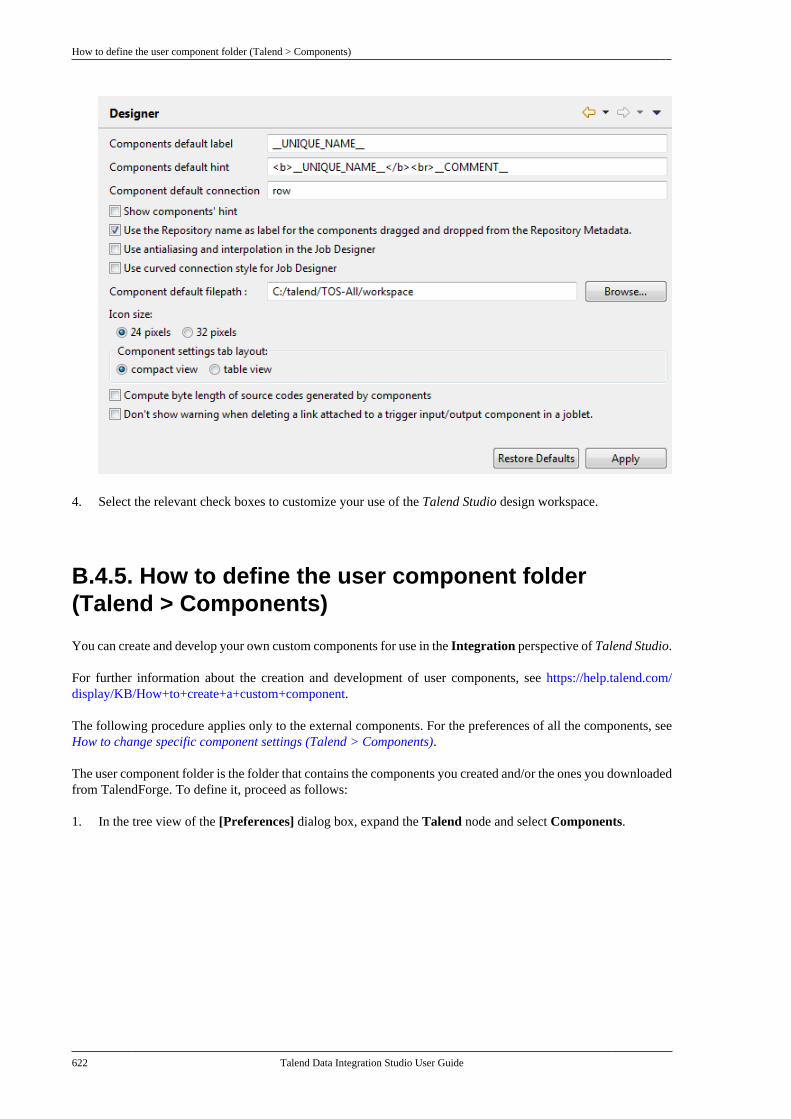
How to define the user component folder (Talend > Components)
622 Talend Data Integration Studio User Guide
4. Select the relevant check boxes to customize your use of the Talend Studio design workspace.
B.4.5. How to define the user component folder(Talend > Components)
You can create and develop your own custom components for use in the Integration perspective of Talend Studio.
For further information about the creation and development of user components, see https://help.talend.com/display/KB/How+to+create+a+custom+component.
The following procedure applies only to the external components. For the preferences of all the components, seeHow to change specific component settings (Talend > Components).
The user component folder is the folder that contains the components you created and/or the ones you downloadedfrom TalendForge. To define it, proceed as follows:
1. In the tree view of the [Preferences] dialog box, expand the Talend node and select Components.
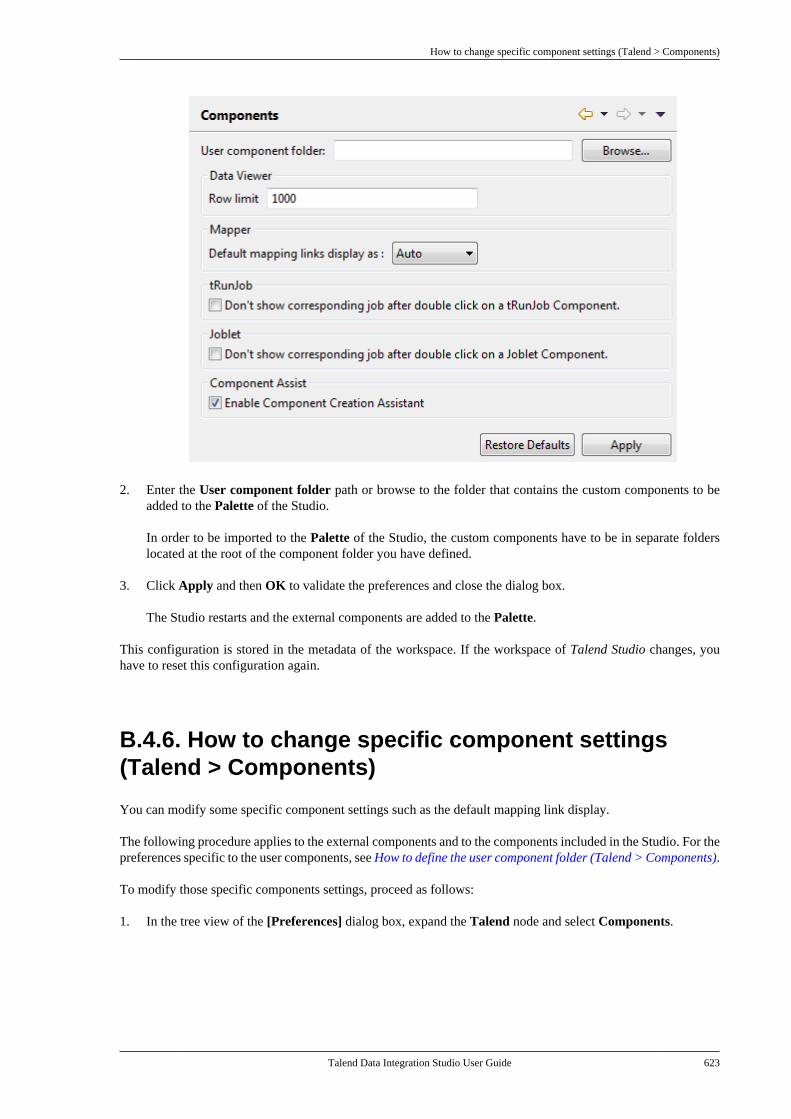
How to change specific component settings (Talend > Components)
Talend Data Integration Studio User Guide 623
2. Enter the User component folder path or browse to the folder that contains the custom components to beadded to the Palette of the Studio.
In order to be imported to the Palette of the Studio, the custom components have to be in separate folderslocated at the root of the component folder you have defined.
3. Click Apply and then OK to validate the preferences and close the dialog box.
The Studio restarts and the external components are added to the Palette.
This configuration is stored in the metadata of the workspace. If the workspace of Talend Studio changes, youhave to reset this configuration again.
B.4.6. How to change specific component settings(Talend > Components)
You can modify some specific component settings such as the default mapping link display.
The following procedure applies to the external components and to the components included in the Studio. For thepreferences specific to the user components, see How to define the user component folder (Talend > Components).
To modify those specific components settings, proceed as follows:
1. In the tree view of the [Preferences] dialog box, expand the Talend node and select Components.
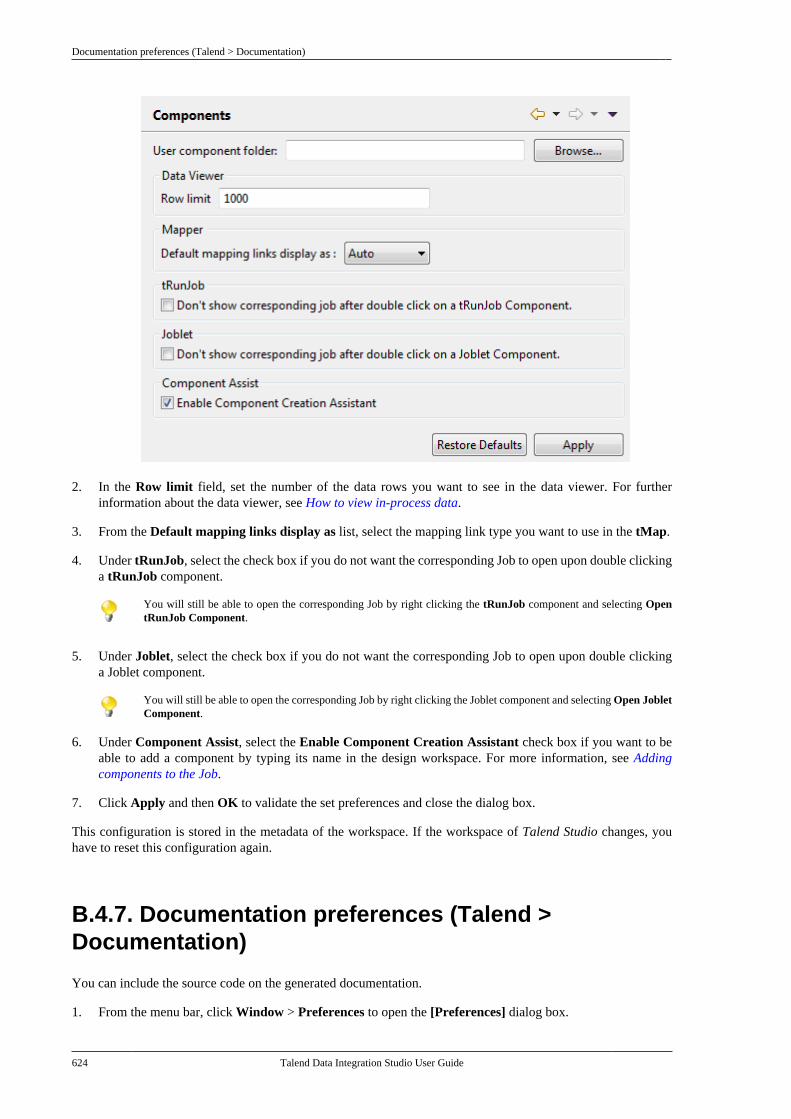
Documentation preferences (Talend > Documentation)
624 Talend Data Integration Studio User Guide
2. In the Row limit field, set the number of the data rows you want to see in the data viewer. For furtherinformation about the data viewer, see How to view in-process data.
3. From the Default mapping links display as list, select the mapping link type you want to use in the tMap.
4. Under tRunJob, select the check box if you do not want the corresponding Job to open upon double clickinga tRunJob component.
You will still be able to open the corresponding Job by right clicking the tRunJob component and selecting OpentRunJob Component.
5. Under Joblet, select the check box if you do not want the corresponding Job to open upon double clickinga Joblet component.
You will still be able to open the corresponding Job by right clicking the Joblet component and selecting Open JobletComponent.
6. Under Component Assist, select the Enable Component Creation Assistant check box if you want to beable to add a component by typing its name in the design workspace. For more information, see Addingcomponents to the Job.
7. Click Apply and then OK to validate the set preferences and close the dialog box.
This configuration is stored in the metadata of the workspace. If the workspace of Talend Studio changes, youhave to reset this configuration again.
B.4.7. Documentation preferences (Talend >Documentation)
You can include the source code on the generated documentation.
1. From the menu bar, click Window > Preferences to open the [Preferences] dialog box.
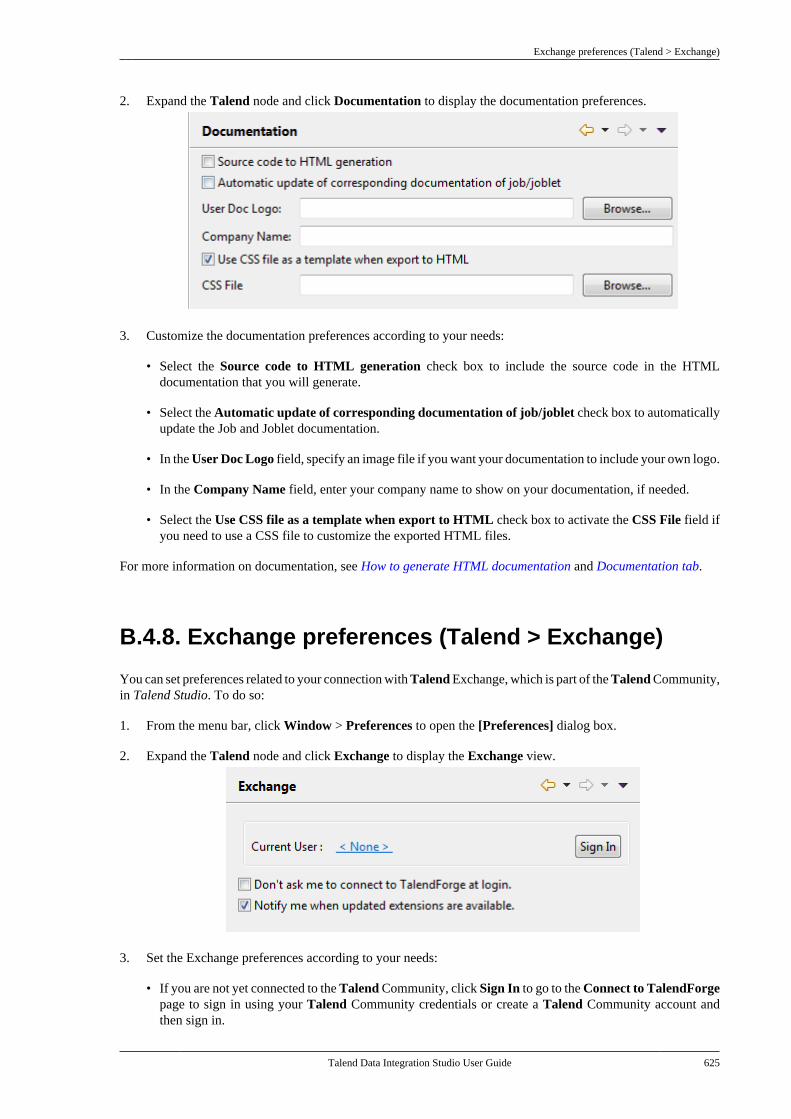
Exchange preferences (Talend > Exchange)
Talend Data Integration Studio User Guide 625
2. Expand the Talend node and click Documentation to display the documentation preferences.
3. Customize the documentation preferences according to your needs:
• Select the Source code to HTML generation check box to include the source code in the HTMLdocumentation that you will generate.
• Select the Automatic update of corresponding documentation of job/joblet check box to automaticallyupdate the Job and Joblet documentation.
• In the User Doc Logo field, specify an image file if you want your documentation to include your own logo.
• In the Company Name field, enter your company name to show on your documentation, if needed.
• Select the Use CSS file as a template when export to HTML check box to activate the CSS File field ifyou need to use a CSS file to customize the exported HTML files.
For more information on documentation, see How to generate HTML documentation and Documentation tab.
B.4.8. Exchange preferences (Talend > Exchange)
You can set preferences related to your connection with Talend Exchange, which is part of the Talend Community,in Talend Studio. To do so:
1. From the menu bar, click Window > Preferences to open the [Preferences] dialog box.
2. Expand the Talend node and click Exchange to display the Exchange view.
3. Set the Exchange preferences according to your needs:
• If you are not yet connected to the Talend Community, click Sign In to go to the Connect to TalendForgepage to sign in using your Talend Community credentials or create a Talend Community account andthen sign in.
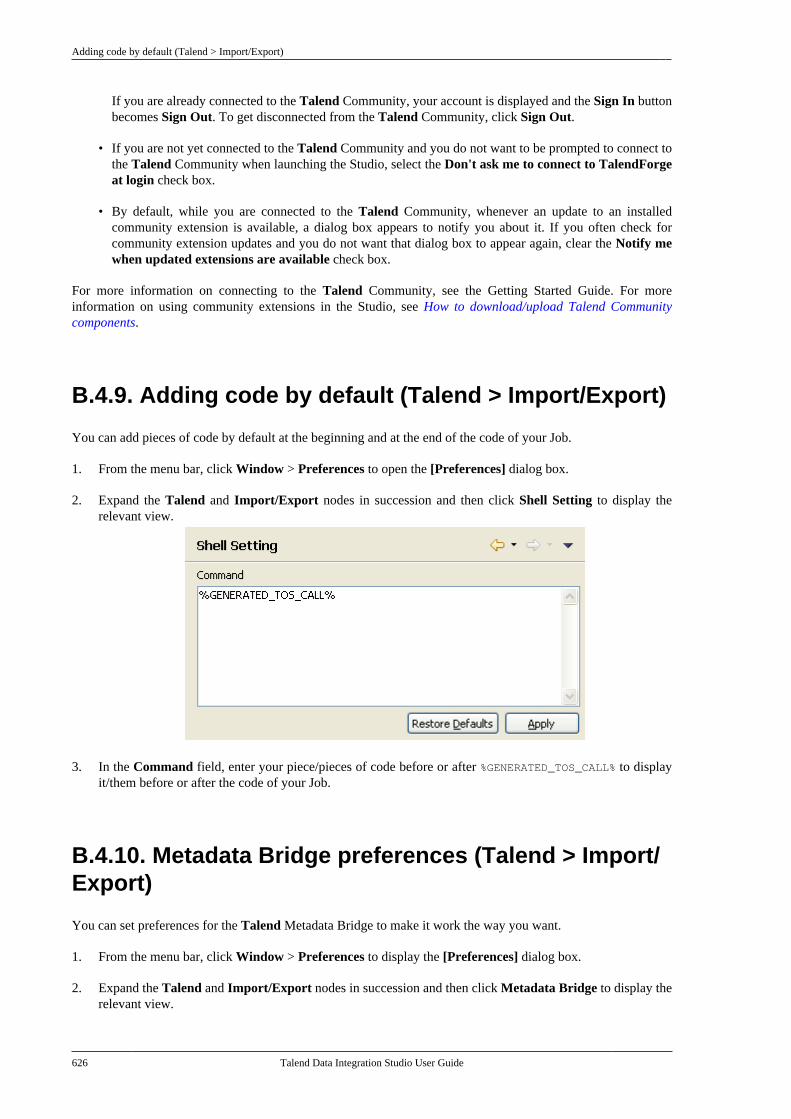
Adding code by default (Talend > Import/Export)
626 Talend Data Integration Studio User Guide
If you are already connected to the Talend Community, your account is displayed and the Sign In buttonbecomes Sign Out. To get disconnected from the Talend Community, click Sign Out.
• If you are not yet connected to the Talend Community and you do not want to be prompted to connect tothe Talend Community when launching the Studio, select the Don't ask me to connect to TalendForgeat login check box.
• By default, while you are connected to the Talend Community, whenever an update to an installedcommunity extension is available, a dialog box appears to notify you about it. If you often check forcommunity extension updates and you do not want that dialog box to appear again, clear the Notify mewhen updated extensions are available check box.
For more information on connecting to the Talend Community, see the Getting Started Guide. For moreinformation on using community extensions in the Studio, see How to download/upload Talend Communitycomponents.
B.4.9. Adding code by default (Talend > Import/Export)
You can add pieces of code by default at the beginning and at the end of the code of your Job.
1. From the menu bar, click Window > Preferences to open the [Preferences] dialog box.
2. Expand the Talend and Import/Export nodes in succession and then click Shell Setting to display therelevant view.
3. In the Command field, enter your piece/pieces of code before or after %GENERATED_TOS_CALL% to displayit/them before or after the code of your Job.
B.4.10. Metadata Bridge preferences (Talend > Import/Export)
You can set preferences for the Talend Metadata Bridge to make it work the way you want.
1. From the menu bar, click Window > Preferences to display the [Preferences] dialog box.
2. Expand the Talend and Import/Export nodes in succession and then click Metadata Bridge to display therelevant view.
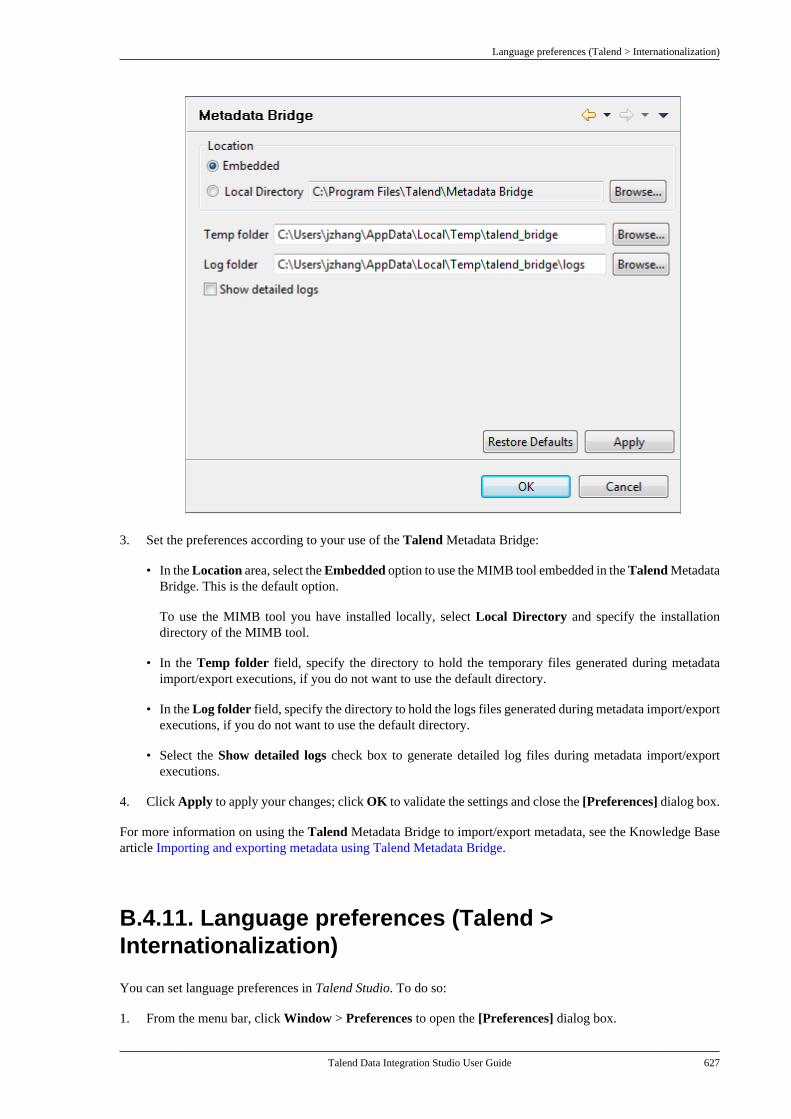
Language preferences (Talend > Internationalization)
Talend Data Integration Studio User Guide 627
3. Set the preferences according to your use of the Talend Metadata Bridge:
• In the Location area, select the Embedded option to use the MIMB tool embedded in the Talend MetadataBridge. This is the default option.
To use the MIMB tool you have installed locally, select Local Directory and specify the installationdirectory of the MIMB tool.
• In the Temp folder field, specify the directory to hold the temporary files generated during metadataimport/export executions, if you do not want to use the default directory.
• In the Log folder field, specify the directory to hold the logs files generated during metadata import/exportexecutions, if you do not want to use the default directory.
• Select the Show detailed logs check box to generate detailed log files during metadata import/exportexecutions.
4. Click Apply to apply your changes; click OK to validate the settings and close the [Preferences] dialog box.
For more information on using the Talend Metadata Bridge to import/export metadata, see the Knowledge Basearticle Importing and exporting metadata using Talend Metadata Bridge.
B.4.11. Language preferences (Talend >Internationalization)
You can set language preferences in Talend Studio. To do so:
1. From the menu bar, click Window > Preferences to open the [Preferences] dialog box.
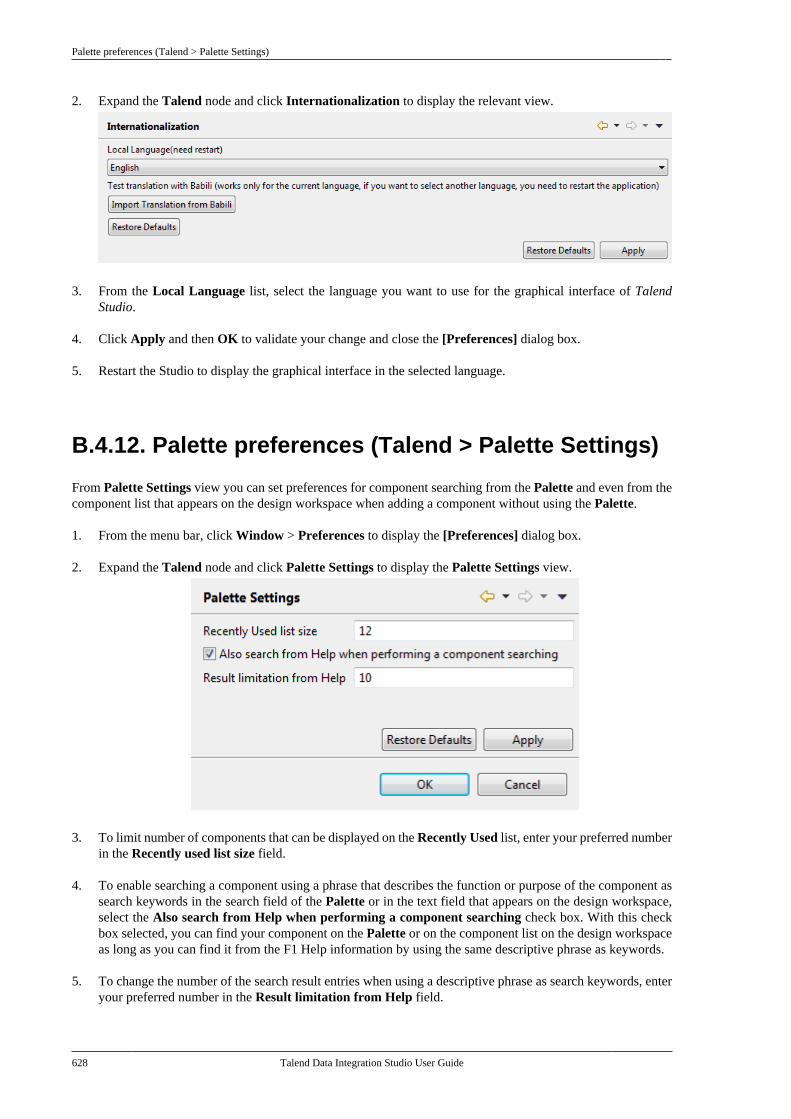
Palette preferences (Talend > Palette Settings)
628 Talend Data Integration Studio User Guide
2. Expand the Talend node and click Internationalization to display the relevant view.
3. From the Local Language list, select the language you want to use for the graphical interface of TalendStudio.
4. Click Apply and then OK to validate your change and close the [Preferences] dialog box.
5. Restart the Studio to display the graphical interface in the selected language.
B.4.12. Palette preferences (Talend > Palette Settings)
From Palette Settings view you can set preferences for component searching from the Palette and even from thecomponent list that appears on the design workspace when adding a component without using the Palette.
1. From the menu bar, click Window > Preferences to display the [Preferences] dialog box.
2. Expand the Talend node and click Palette Settings to display the Palette Settings view.
3. To limit number of components that can be displayed on the Recently Used list, enter your preferred numberin the Recently used list size field.
4. To enable searching a component using a phrase that describes the function or purpose of the component assearch keywords in the search field of the Palette or in the text field that appears on the design workspace,select the Also search from Help when performing a component searching check box. With this checkbox selected, you can find your component on the Palette or on the component list on the design workspaceas long as you can find it from the F1 Help information by using the same descriptive phrase as keywords.
5. To change the number of the search result entries when using a descriptive phrase as search keywords, enteryour preferred number in the Result limitation from Help field.
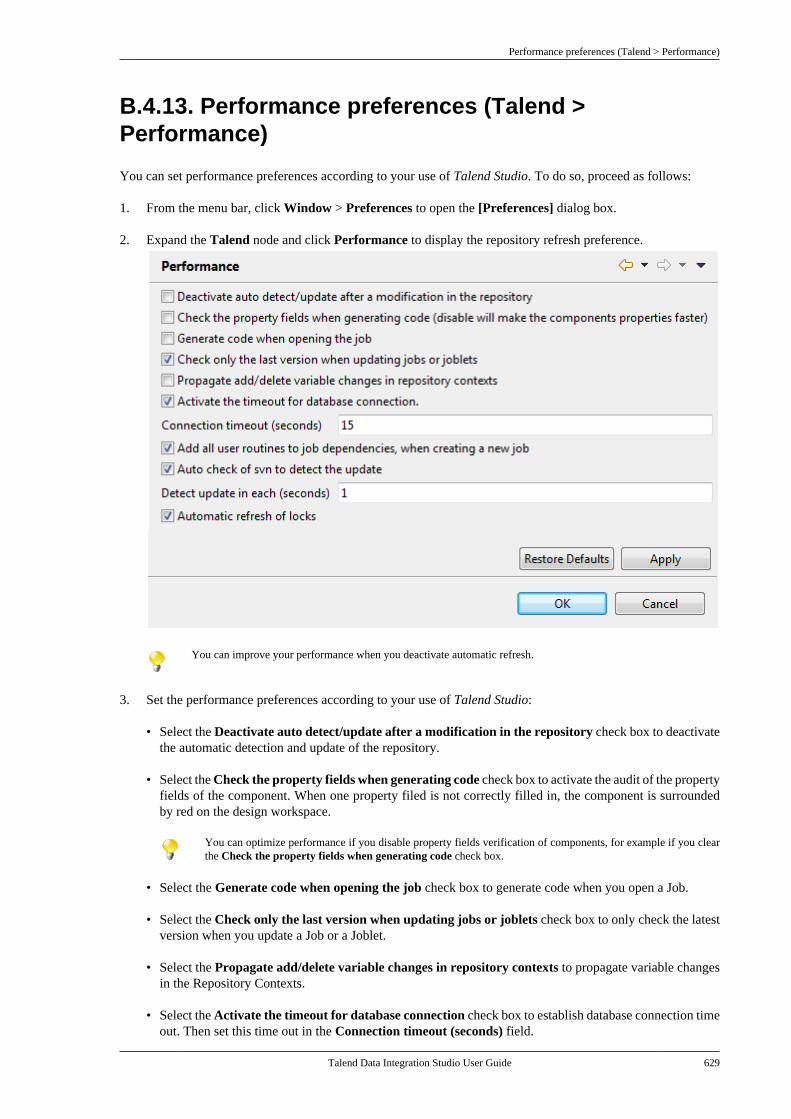
Performance preferences (Talend > Performance)
Talend Data Integration Studio User Guide 629
B.4.13. Performance preferences (Talend >Performance)
You can set performance preferences according to your use of Talend Studio. To do so, proceed as follows:
1. From the menu bar, click Window > Preferences to open the [Preferences] dialog box.
2. Expand the Talend node and click Performance to display the repository refresh preference.
You can improve your performance when you deactivate automatic refresh.
3. Set the performance preferences according to your use of Talend Studio:
• Select the Deactivate auto detect/update after a modification in the repository check box to deactivatethe automatic detection and update of the repository.
• Select the Check the property fields when generating code check box to activate the audit of the propertyfields of the component. When one property filed is not correctly filled in, the component is surroundedby red on the design workspace.
You can optimize performance if you disable property fields verification of components, for example if you clearthe Check the property fields when generating code check box.
• Select the Generate code when opening the job check box to generate code when you open a Job.
• Select the Check only the last version when updating jobs or joblets check box to only check the latestversion when you update a Job or a Joblet.
• Select the Propagate add/delete variable changes in repository contexts to propagate variable changesin the Repository Contexts.
• Select the Activate the timeout for database connection check box to establish database connection timeout. Then set this time out in the Connection timeout (seconds) field.
Nexus settings preferences (Talend > Performance)
630 Talend Data Integration Studio User Guide
• Select the Add all user routines to job dependencies, when create new job check box to add all userroutines to Job dependencies upon the creation of new Jobs.
• When working in an SVN managed project, select the Auto check of svn to detect the update check boxto allow the Studio to automatically check if there had been new commits on the svn, making the Studiofaster. Then set the time interval between these checks in the Detect update in each (seconds) field.
If you clear this check box, the Studio updates the svn for each operation it makes. This slows down theStudio but reduces the number of requests on the svn server.
• When working in an SVN or Git managed project, select the Automatic refresh of locks check box toallow the Studio to automatically retrieve the lock status of all items contained in the project upon eachaction made in the Studio. If you find communications with the Talend Administration Center slow or ifthe project contains a big number of locked items, you can clear this check box to gain performance ofthe Studio.
B.4.14. Nexus settings preferences (Talend >Performance)
You can set preferences for Talend Studio to the check for updates of custom libraries on the Nexus server.
1. From the menu bar, click Window > Preferences to display the [Preferences] dialog box.
2. Expand the Talend and Performance nodes in succession and then click Nexus settings to display therelevant view.
Project reference preferences (Talend > Repository)
Talend Data Integration Studio User Guide 631
3. Set the preferences according to your needs:
• In the Timeout for nexus connection (ms) field, specify the time in milliseconds you want your TalendStudio to wait for an interaction with the Nexus server before cutting the connection, 0 for an infinitetimeout.
• In the Jars check frequency field, specify how often you want your Talend Studio to check for updates:
• -1 if you don't want your Talend Studio to check for updates at all.
• 0 if you want your Talend Studio to check for updates at any action that needs a Jar or Jars, for examplewhen a Job is built or executed from the Studio.
• the number of days between two checks.
4. Click Apply to apply your changes; click OK to validate the settings and close the [Preferences] dialog box.
For more information on installing and configuring Nexus artifact repository, see the Talend Installation Guide.
B.4.15. Project reference preferences (Talend >Repository)
You can set your preferences for project references in Talend Studio. To do so:
1. From the menu bar, click Window > Preferences to open the [Preferences] dialog box.
2. Develop the Talend node and click Repository to display the relevant view.
3. Select the [Merge the reference project] dialog box to show referenced projects as part of the Job Designsfolder.
4. Click Apply and then OK to close the [Preferences] dialog box.
For more detailed information about project reference preferences, see How to set the display mode of referencedprojects.
B.4.16. Debug and Job execution preferences (Talend> Run/Debug)
You can set your preferences for debug and job executions in Talend Studio. To do so:
1. From the menu bar, click Window > Preferences to display the [Preferences] dialog box.
2. Expand the Talend node and click Run/Debug to display the relevant view.
Debug and Job execution preferences (Talend > Run/Debug)
632 Talend Data Integration Studio User Guide
• In the Talend client configuration area, you can define the execution options to be used by default:
Stats port range Specify a range for the ports used for generating statistics, in particular, if the ports defined bydefault are used by other applications.
Trace port range Specify a range for the ports used for generating traces, in particular, if the ports defined by defaultare used by other applications.
Save before run Select this check box to save your Job automatically before its execution.
Clear before run Select this check box to delete the results of a previous execution before re-executing the Job.
Exec time Select this check box to show Job execution duration.
Statistics Select this check box to show the statistics measurement of data flow during Job execution.
Traces Select this check box to show data processing during job execution.
Pause time Enter the time you want to set before each data line in the traces table.
• In the Job Run VM arguments list, you can define the parameter of your current JVM according to your needs.The by-default parameters -Xms256M and -Xmx1024M correspond respectively to the minimal and maximalmemory capacities reserved for your Job executions.
If you want to use some JVM parameters for only a specific Job execution, for example if you want to displaythe execution result for this specific Job in Japanese, you need open this Job's Run view and then in the Runview, configure the advanced execution settings to define the corresponding parameters.
For further information about the advanced execution settings of a specific Job, see How to set advanced executionsettings.
For more information about possible parameters, check the site http://www.oracle.com/technetwork/java/javase/tech/vmoptions-jsp-140102.html.

Distant run configuration (Talend > Run/Debug)
Talend Data Integration Studio User Guide 633
B.4.17. Distant run configuration (Talend > Run/Debug)
Talend Studio allows you to deploy and execute your Jobs on a remote JobServer when you work on either a localproject or a remote one.
You can also use the CommandLine to transfer your Jobs from your Talend Studio to a remote JobServer for Jobexecution. To use the CommandLine, make sure you have logged on to a remote project via a remote connection.
To remotely execute your Jobs, you need to configure the remote JobServer details in the Studio preferences. Youcan also configure the CommandLine you will use.
To open the preference page for distant run settings, do the following:
1. From the menu bar, click Window > Preferences to open the [Preferences] dialog box.
2. Expand the Talend and the Run/Debug nodes in succession and then click Remote.
To allow monitoring the JVM resource usage during Job execution on a remote JobServer, do the following:
1. Select the Enable remote monitoring check box.
2. In Remote JMX port field, enter a listening port number that is free in your system.
Displaying special characters for schema columns (Talend > Specific settings)
634 Talend Data Integration Studio User Guide
To define a specific Unix OS user allowed to start the Job execution on a remote JobServer, enter the user namein the Run as (Set up user for Unix) field. If left blank, any of the existing Operating System users can startthe Job execution.
To add a remote Job server:
1. In the Remote Jobs Servers area, click the [+] button to add a new line in the table.
2. Fill in all the fields for the JobServer: Name, Host name (or IP address), Standard port, Username,Password, and File transfer Port. The Username and Password fields are not required if no users areconfigured in the configuration file conf/users.csv of the JobServer. For more information about Job executionserver configuration, see the Talend Installation Guide.
If you use the CommandLine to transfer your Jobs to the remote JobServer, make sure the JobServer nameis identical to the execution server label configured in Talend Administration Center. For more information,see the Talend Administration Center User Guide.
To add a remote CommandLine server:
1. Select the Enable commandline server check box if you want to use a remote commandline.
2. Click the plus button to add a new line in the table.
3. Fill in the fields as configured for the commandline in Talend Administration Center: Name, Host name (orIP address), and Port. For more information, see Talend Administration Center User Guide.
Click Apply and OK to validate the changes.
For more information about how to execute a Job on a remote server, see How to run a Job remotely.
B.4.18. Displaying special characters for schemacolumns (Talend > Specific settings)
You may need to retrieve a table schema that contains columns written with special characters like Chinese,Japanese, Korean. In this case, you need to enable Talend Studio to read the special characters. To do so:
1. From the menu bar, click Window > Preferences to open the [Preferences] dialog box.
2. On the tree view of the opened dialog box, expand the Talend node.
3. Click the Specific settings node to display the corresponding view on the right of the dialog box.
4. Select the Allow specific characters (UTF8,...) for columns of schemas check box.
B.4.19. Schema preferences (Talend > SpecificSettings)
You can define the default data length and type of the schema fields of your components.
Schema preferences (Talend > Specific Settings)
Talend Data Integration Studio User Guide 635
1. From the menu bar, click Window > Preferences to open the [Preferences] dialog box.
2. Expand the Talend node, and click Specific Settings > Default Type and Length to display the data lengthand type of your schema.
3. Set the parameters according to your needs:
• In the Default Settings for Fields with Null Values area, fill in the data type and the field length to applyto the null fields.
• In the Default Settings for All Fields area, fill in the data type and the field length to apply to all fieldsof the schema.
• In the Default Length for Data Type area, fill in the field length for each type of data.
SQL Builder preferences (Talend > Specific Settings)
636 Talend Data Integration Studio User Guide
B.4.20. SQL Builder preferences (Talend > SpecificSettings)
You can set your preferences for the SQL Builder. To do so:
1. From the menu bar, click Window > Preferences to open the [Preferences] dialog box.
2. Expand the Talend and Specific Settings nodes in succession and then click Sql Builder to display therelevant view.
3. Customize the SQL Builder preferences according to your needs:
• Select the add quotes, when you generated sql statement check box to precede and follow column andtable names with inverted commas in your SQL queries.
• In the AS400 SQL generation area, select the Standard SQL Statement or System SQL Statementcheck boxes to use standard or system SQL statements respectively when you use an AS/400 database.
• Clear the Enable check queries in the database components (disable to avoid warnings for specificqueries) check box to deactivate the verification of queries in all database components.
B.4.21. SSL settings preferences (Talend > SSL)
You can set SSL preferences to configure your Talend Studio for secure communications with remote servers.
1. From the menu bar, click Window > Preferences to display the [Preferences] dialog box.
2. Expand the Talend node and then click SSL to display the relevant view.
SSL settings preferences (Talend > SSL)
Talend Data Integration Studio User Guide 637
3. Define the Keystore Configuration for the local certificate to be sent to the remote host:
a. Click Browse next to the Path field and browse to the keystore file that stores your local credentials.
b. In the Password field, enter the keystore password.
c. From the Keystore Type list, select the type of keystore to use.
4. Define the Truststore Configuration for verification of the remote host's certificate:
a. Click Browse next to the Path field and browse to the truststore file.
b. In the Password field, enter the truststore password.
c. From the Keystore Type list, select the type of keystore to use.
5. Click Apply to apply your changes; click OK to validate the settings and close the [Preferences] dialog box.
6. Restart your Talend Studio for the configurations to take effect.
Usage Data Collector preferences (Talend > Usage Data Collector)
638 Talend Data Integration Studio User Guide
B.4.22. Usage Data Collector preferences (Talend >Usage Data Collector)
By allowing Talend Studio to collect your Studio usage statistics, you help users better understand Talend productsand help Talend better learn how users are using the products, thus enabling Talend to improve product qualityand performance to serve users better.
By default, Talend Studio automatically collects your Studio usage data and sends this data on a regular basisto servers hosted by Talend. You can view the usage data collection and upload information and customize theUsage Data Collector preferences according to your needs.
Be assured that only the Studio usage statistics data will be collected and none of your private information will be collectedand transmitted to Talend.
1. From the menu bar, click Window > Preferences to display the [Preferences] dialog box.
2. Expand the Talend node and click Usage Data Collector to display the Usage Data Collector view.
3. Read the message about the Usage Data Collector, and, if you do not want the Usage Data Collector to collectand upload your Studio usage information, clear the Enable capture check box.
4. To have a preview of the usage data captured by the Usage Data Collector, expand the Usage Data Collectornode and click Preview.
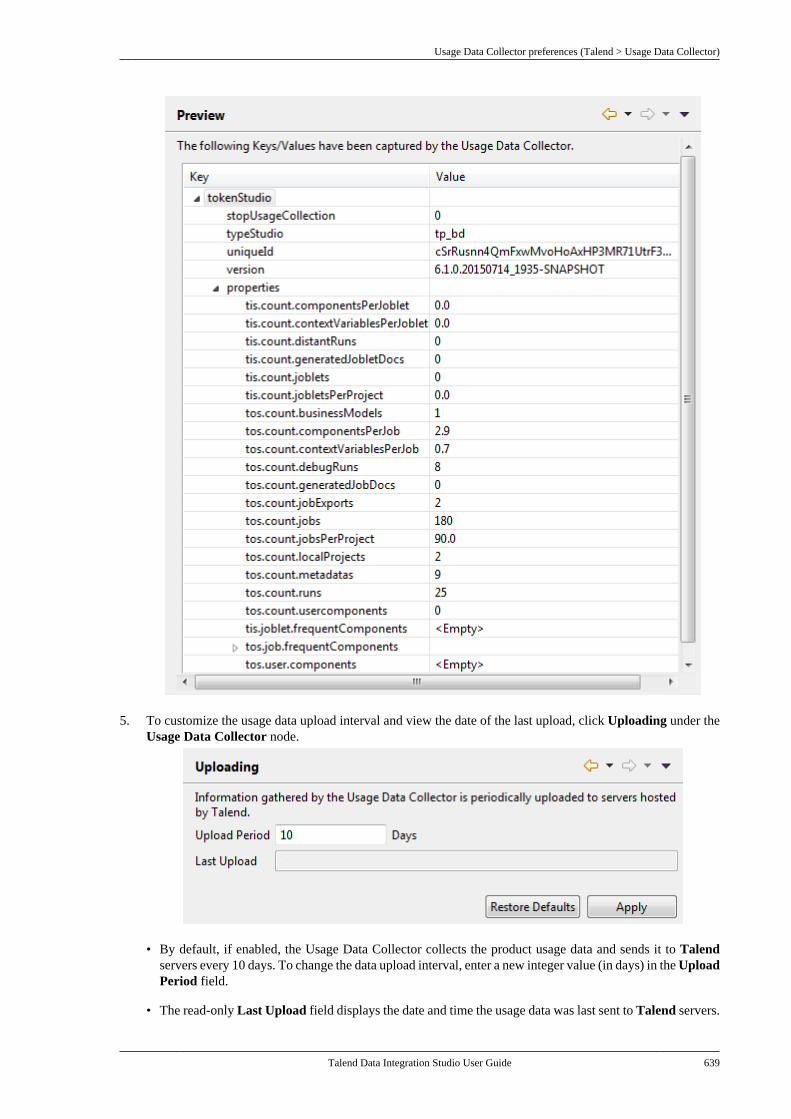
Usage Data Collector preferences (Talend > Usage Data Collector)
Talend Data Integration Studio User Guide 639
5. To customize the usage data upload interval and view the date of the last upload, click Uploading under theUsage Data Collector node.
• By default, if enabled, the Usage Data Collector collects the product usage data and sends it to Talendservers every 10 days. To change the data upload interval, enter a new integer value (in days) in the UploadPeriod field.
• The read-only Last Upload field displays the date and time the usage data was last sent to Talend servers.

Talend Data Integration Studio User Guide
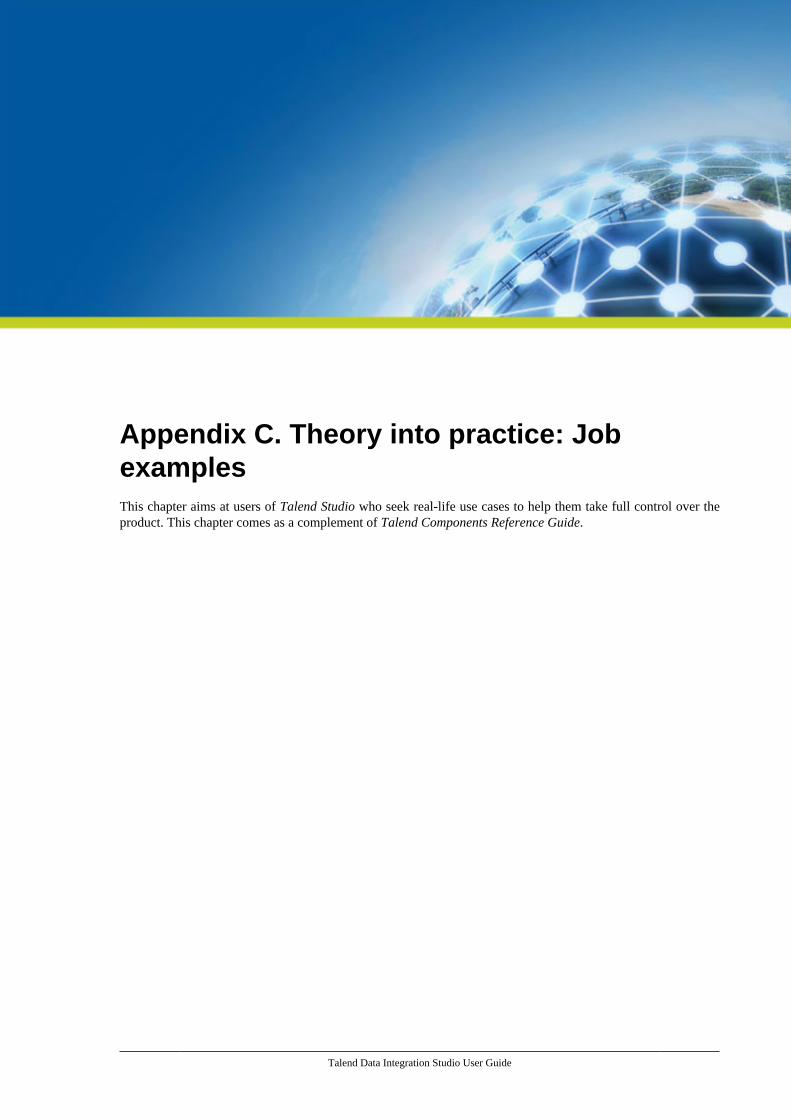
Talend Data Integration Studio User Guide
Appendix C. Theory into practice: JobexamplesThis chapter aims at users of Talend Studio who seek real-life use cases to help them take full control over theproduct. This chapter comes as a complement of Talend Components Reference Guide.
tMap Job example
642 Talend Data Integration Studio User Guide
C.1. tMap Job exampleTo illustrate the way Talend Studio operates, find below a real-life example scenario. In this scenario, we willload a MySQL table with a file, that gets transformed on the fly. Then in a further step, we will select the datato be loaded using a dynamic filter.
Before actually starting the Job, let's inspect the input data and the expected output data.
C.1.1. Input dataOur input file, the data of which will be loaded into the database table, lists clients from all over the State ofCalifornia.
The file structure usually called Schema in Talend Studio includes the following columns:
• First name
• Last name
• Address
• City
C.1.2. Output dataWe want to load into the database, California clients living in a couple of Counties only: Orange and Los Angelescounties.
The table structure is slightly different, therefore the data expected to be loaded into the DB table should havethe following structure:
• Key (key, Type: Integer)
• Name (Type: String, max. length: 40)
• Address (Type: String, max.length: 40)
• County (Type: String, max. length:40)
In order to load this table, we will need to use the following mapping process:
The Key column is fed with an auto-incremented integer.
The Name column is filled out with a concatenation of first and last names.
The Address column data comes from the equivalent Address column of the input file, but supports a upper-casetransformation before the loading.
The County column is fed with the name of the County where the city is located using a reference file which willhelp filtering Orange and Los Angeles counties' cities.
C.1.3. Reference dataAs only Orange and Los Angeles counties data should be loaded into the database, we need to map cities ofCalifornia with their respective county, in order to filter only Orange and Los Angeles ones.
Translating the scenario into a Job
Talend Data Integration Studio User Guide 643
To do so, we will use a reference file, listing cities that are located in Orange and Los Angeles counties such as:
City County
Agoura Hills Los Angeles
Alhambra Los Angeles
Aliso Viejo Orange
Anaheim Orange
Arcadia Los Angeles
The reference file in this Job is named LosAngelesandOrangeCounties.txt.
C.1.4. Translating the scenario into a Job
In order to implement this scenario, let's break down the Job into four steps:
1. Creation of the Job, configuration of the input file parameters, and reading of the input file,
2. Mapping of data and transformations,
3. Definition of the reference file parameters, relevant mapping using the tMap component, and selection of innerjoin mode,
4. Redirection of the output into a MySQL table.
C.1.4.1. Step 1: Job creation, input definition, file reading
Launch Talend Studio, and create a local project or import the demo project if you are launching Talend Studiofor the first time. For more information, see Working with projects.
The main window of Talend Studio is divided into several areas:
• On the left-hand side: the Repository tree view that holds Jobs, Business Models, Metadata, shared Code,Documentation and so on.
• In the center: the Editor (main Design area)
• At the bottom: Component and Job tabs
• On the right-hand side: the Palette of business or technical components depending on the software tool youare using within Talend Studio.
To the left of the Studio, the Repository tree view that gives an access to:
• The Business Modeler: For more information, see Modeling a Business Model.
• The Job Designer: For details about this part, see Getting started with a basic Job.
• The Metadata Manager: For details about this part, see Managing Metadata.
• Contexts and routines: For details, see Using contexts and variables and Managing routines.
To create the Job, right-click Job Designs in the Repository tree view and select Create Job.
In the dialog box displaying then, only the first field (Name) is required. Type in California1 and click Finish.
An empty Job then opens on the main window and the Palette of technical components (by default, to the right ofthe Studio) comes up showing a dozen of component families such as: Databases, Files, Internet, Data Qualityand so on, hundreds of components are already available.
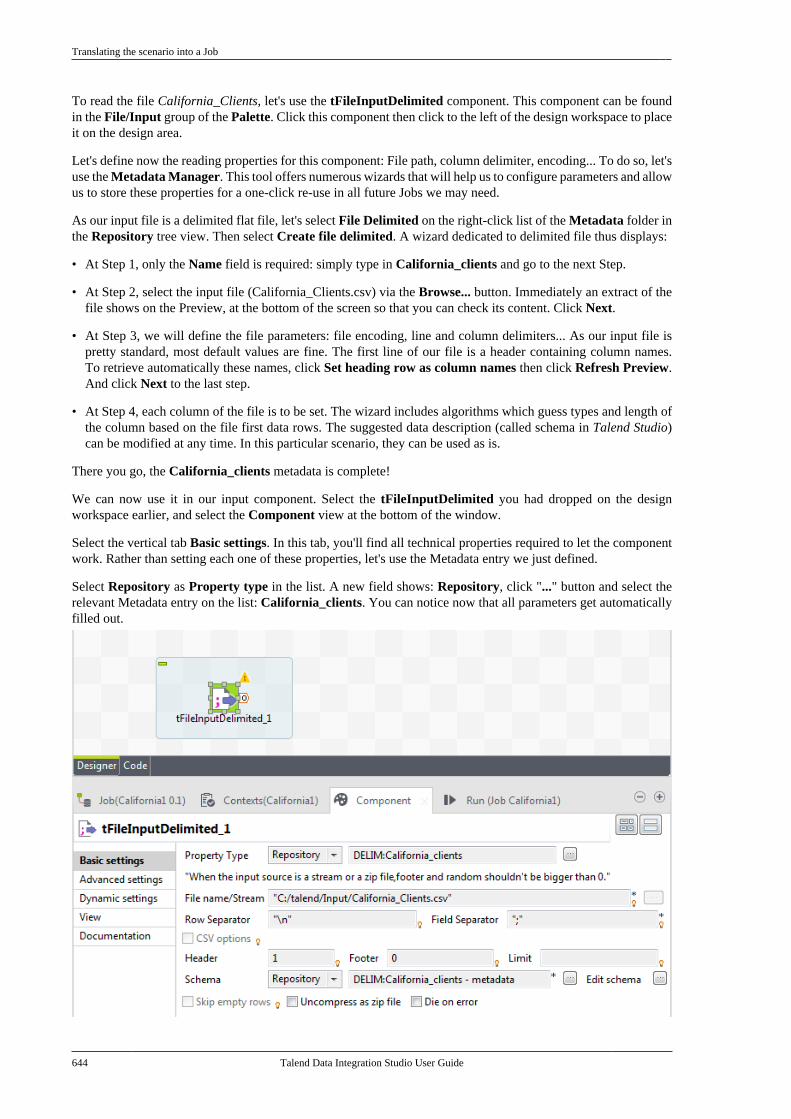
Translating the scenario into a Job
644 Talend Data Integration Studio User Guide
To read the file California_Clients, let's use the tFileInputDelimited component. This component can be foundin the File/Input group of the Palette. Click this component then click to the left of the design workspace to placeit on the design area.
Let's define now the reading properties for this component: File path, column delimiter, encoding... To do so, let'suse the Metadata Manager. This tool offers numerous wizards that will help us to configure parameters and allowus to store these properties for a one-click re-use in all future Jobs we may need.
As our input file is a delimited flat file, let's select File Delimited on the right-click list of the Metadata folder inthe Repository tree view. Then select Create file delimited. A wizard dedicated to delimited file thus displays:
• At Step 1, only the Name field is required: simply type in California_clients and go to the next Step.
• At Step 2, select the input file (California_Clients.csv) via the Browse... button. Immediately an extract of thefile shows on the Preview, at the bottom of the screen so that you can check its content. Click Next.
• At Step 3, we will define the file parameters: file encoding, line and column delimiters... As our input file ispretty standard, most default values are fine. The first line of our file is a header containing column names.To retrieve automatically these names, click Set heading row as column names then click Refresh Preview.And click Next to the last step.
• At Step 4, each column of the file is to be set. The wizard includes algorithms which guess types and length ofthe column based on the file first data rows. The suggested data description (called schema in Talend Studio)can be modified at any time. In this particular scenario, they can be used as is.
There you go, the California_clients metadata is complete!
We can now use it in our input component. Select the tFileInputDelimited you had dropped on the designworkspace earlier, and select the Component view at the bottom of the window.
Select the vertical tab Basic settings. In this tab, you'll find all technical properties required to let the componentwork. Rather than setting each one of these properties, let's use the Metadata entry we just defined.
Select Repository as Property type in the list. A new field shows: Repository, click "..." button and select therelevant Metadata entry on the list: California_clients. You can notice now that all parameters get automaticallyfilled out.
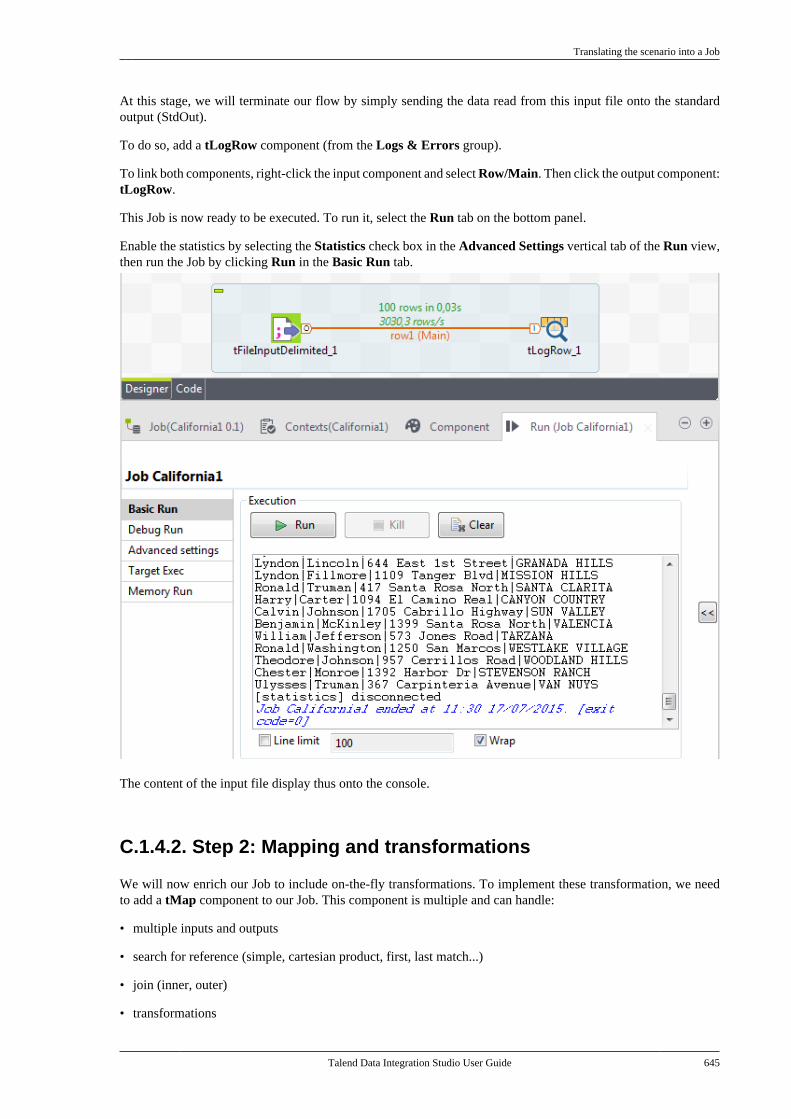
Translating the scenario into a Job
Talend Data Integration Studio User Guide 645
At this stage, we will terminate our flow by simply sending the data read from this input file onto the standardoutput (StdOut).
To do so, add a tLogRow component (from the Logs & Errors group).
To link both components, right-click the input component and select Row/Main. Then click the output component:tLogRow.
This Job is now ready to be executed. To run it, select the Run tab on the bottom panel.
Enable the statistics by selecting the Statistics check box in the Advanced Settings vertical tab of the Run view,then run the Job by clicking Run in the Basic Run tab.
The content of the input file display thus onto the console.
C.1.4.2. Step 2: Mapping and transformations
We will now enrich our Job to include on-the-fly transformations. To implement these transformation, we needto add a tMap component to our Job. This component is multiple and can handle:
• multiple inputs and outputs
• search for reference (simple, cartesian product, first, last match...)
• join (inner, outer)
• transformations
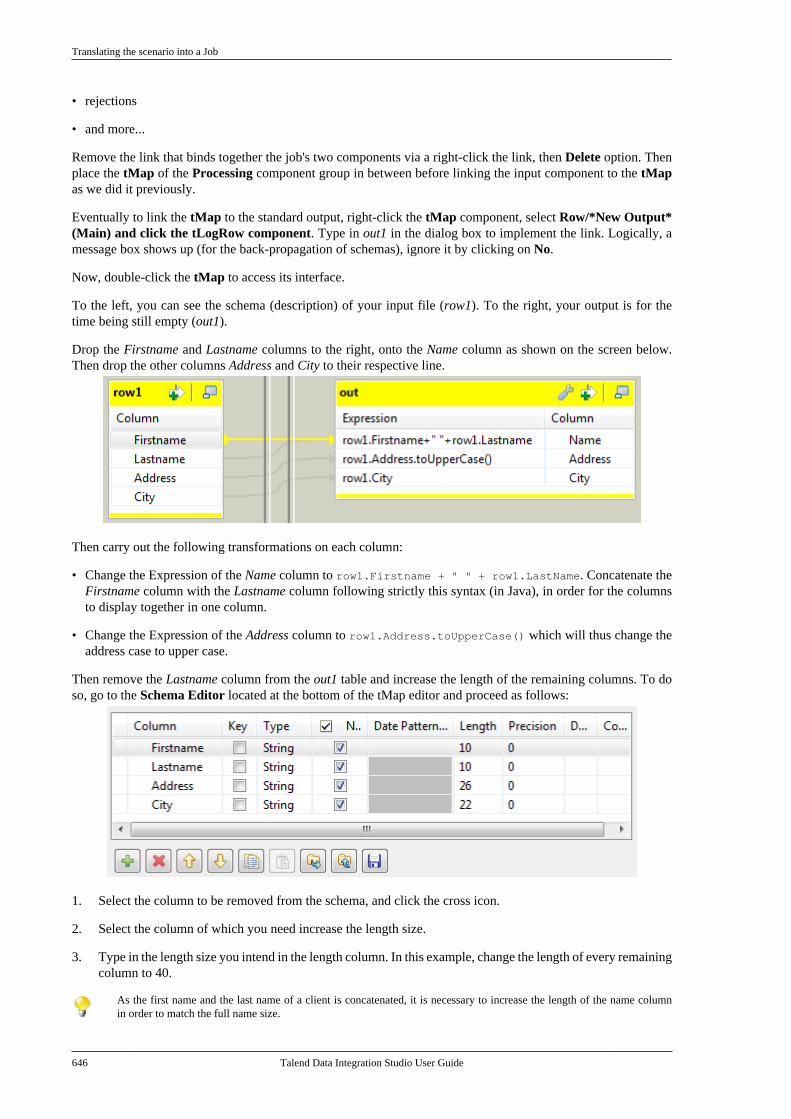
Translating the scenario into a Job
646 Talend Data Integration Studio User Guide
• rejections
• and more...
Remove the link that binds together the job's two components via a right-click the link, then Delete option. Thenplace the tMap of the Processing component group in between before linking the input component to the tMapas we did it previously.
Eventually to link the tMap to the standard output, right-click the tMap component, select Row/*New Output*(Main) and click the tLogRow component. Type in out1 in the dialog box to implement the link. Logically, amessage box shows up (for the back-propagation of schemas), ignore it by clicking on No.
Now, double-click the tMap to access its interface.
To the left, you can see the schema (description) of your input file (row1). To the right, your output is for thetime being still empty (out1).
Drop the Firstname and Lastname columns to the right, onto the Name column as shown on the screen below.Then drop the other columns Address and City to their respective line.
Then carry out the following transformations on each column:
• Change the Expression of the Name column to row1.Firstname + " " + row1.LastName. Concatenate theFirstname column with the Lastname column following strictly this syntax (in Java), in order for the columnsto display together in one column.
• Change the Expression of the Address column to row1.Address.toUpperCase() which will thus change theaddress case to upper case.
Then remove the Lastname column from the out1 table and increase the length of the remaining columns. To doso, go to the Schema Editor located at the bottom of the tMap editor and proceed as follows:
1. Select the column to be removed from the schema, and click the cross icon.
2. Select the column of which you need increase the length size.
3. Type in the length size you intend in the length column. In this example, change the length of every remainingcolumn to 40.
As the first name and the last name of a client is concatenated, it is necessary to increase the length of the name columnin order to match the full name size.
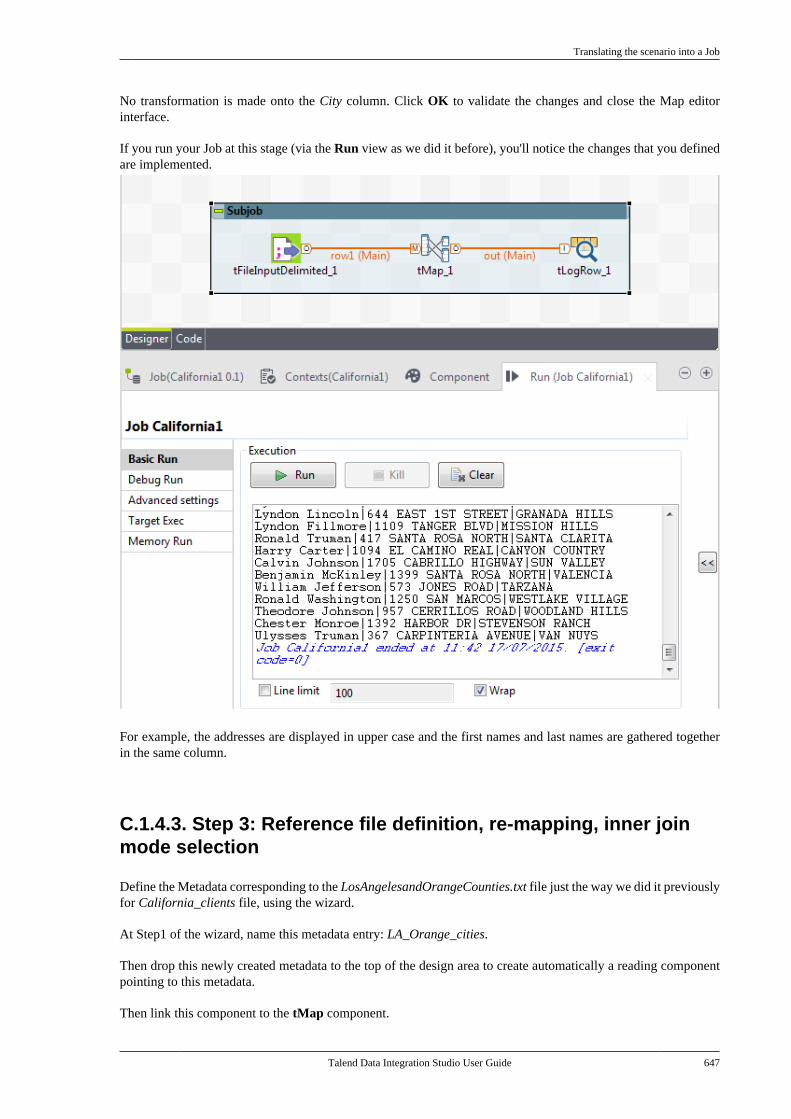
Translating the scenario into a Job
Talend Data Integration Studio User Guide 647
No transformation is made onto the City column. Click OK to validate the changes and close the Map editorinterface.
If you run your Job at this stage (via the Run view as we did it before), you'll notice the changes that you definedare implemented.
For example, the addresses are displayed in upper case and the first names and last names are gathered togetherin the same column.
C.1.4.3. Step 3: Reference file definition, re-mapping, inner joinmode selection
Define the Metadata corresponding to the LosAngelesandOrangeCounties.txt file just the way we did it previouslyfor California_clients file, using the wizard.
At Step1 of the wizard, name this metadata entry: LA_Orange_cities.
Then drop this newly created metadata to the top of the design area to create automatically a reading componentpointing to this metadata.
Then link this component to the tMap component.
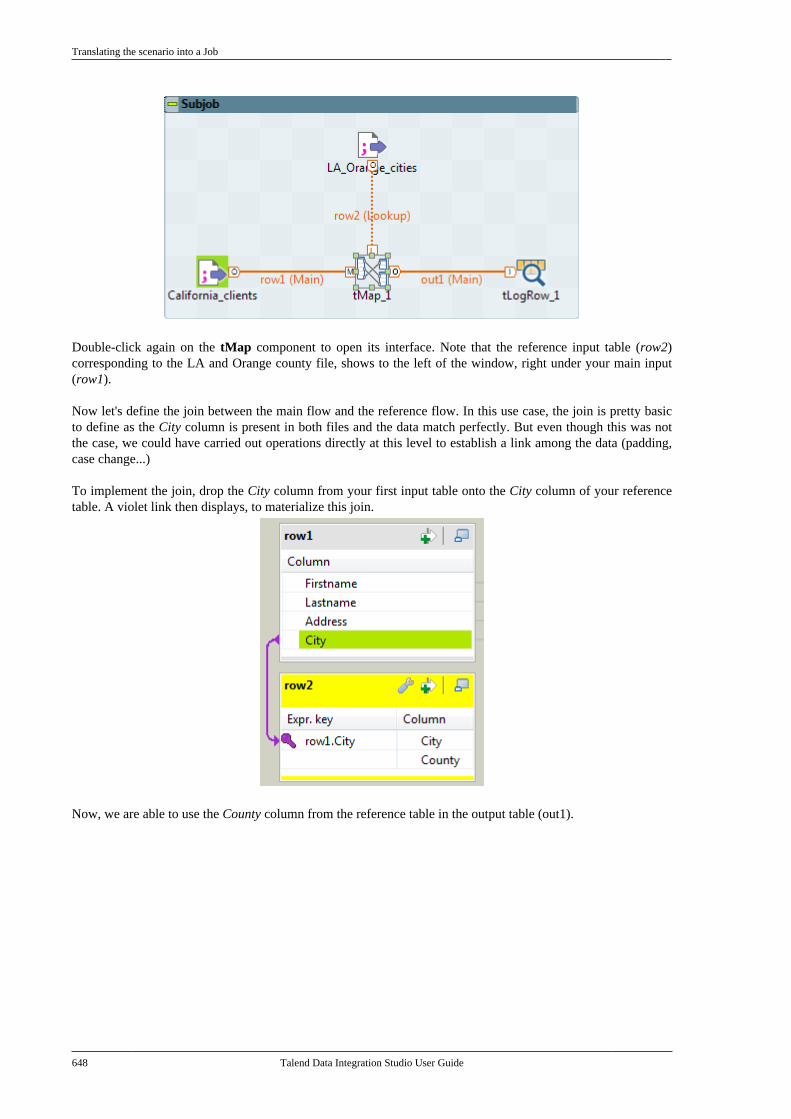
Translating the scenario into a Job
648 Talend Data Integration Studio User Guide
Double-click again on the tMap component to open its interface. Note that the reference input table (row2)corresponding to the LA and Orange county file, shows to the left of the window, right under your main input(row1).
Now let's define the join between the main flow and the reference flow. In this use case, the join is pretty basicto define as the City column is present in both files and the data match perfectly. But even though this was notthe case, we could have carried out operations directly at this level to establish a link among the data (padding,case change...)
To implement the join, drop the City column from your first input table onto the City column of your referencetable. A violet link then displays, to materialize this join.
Now, we are able to use the County column from the reference table in the output table (out1).
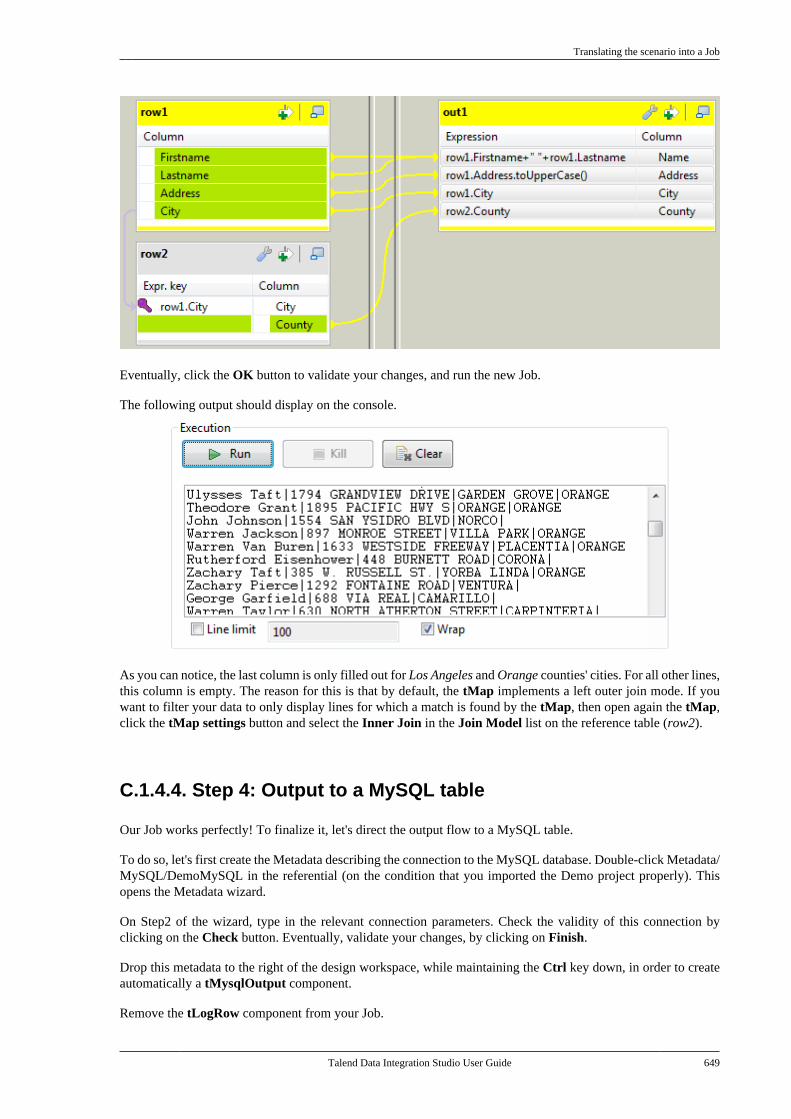
Translating the scenario into a Job
Talend Data Integration Studio User Guide 649
Eventually, click the OK button to validate your changes, and run the new Job.
The following output should display on the console.
As you can notice, the last column is only filled out for Los Angeles and Orange counties' cities. For all other lines,this column is empty. The reason for this is that by default, the tMap implements a left outer join mode. If youwant to filter your data to only display lines for which a match is found by the tMap, then open again the tMap,click the tMap settings button and select the Inner Join in the Join Model list on the reference table (row2).
C.1.4.4. Step 4: Output to a MySQL table
Our Job works perfectly! To finalize it, let's direct the output flow to a MySQL table.
To do so, let's first create the Metadata describing the connection to the MySQL database. Double-click Metadata/MySQL/DemoMySQL in the referential (on the condition that you imported the Demo project properly). Thisopens the Metadata wizard.
On Step2 of the wizard, type in the relevant connection parameters. Check the validity of this connection byclicking on the Check button. Eventually, validate your changes, by clicking on Finish.
Drop this metadata to the right of the design workspace, while maintaining the Ctrl key down, in order to createautomatically a tMysqlOutput component.
Remove the tLogRow component from your Job.
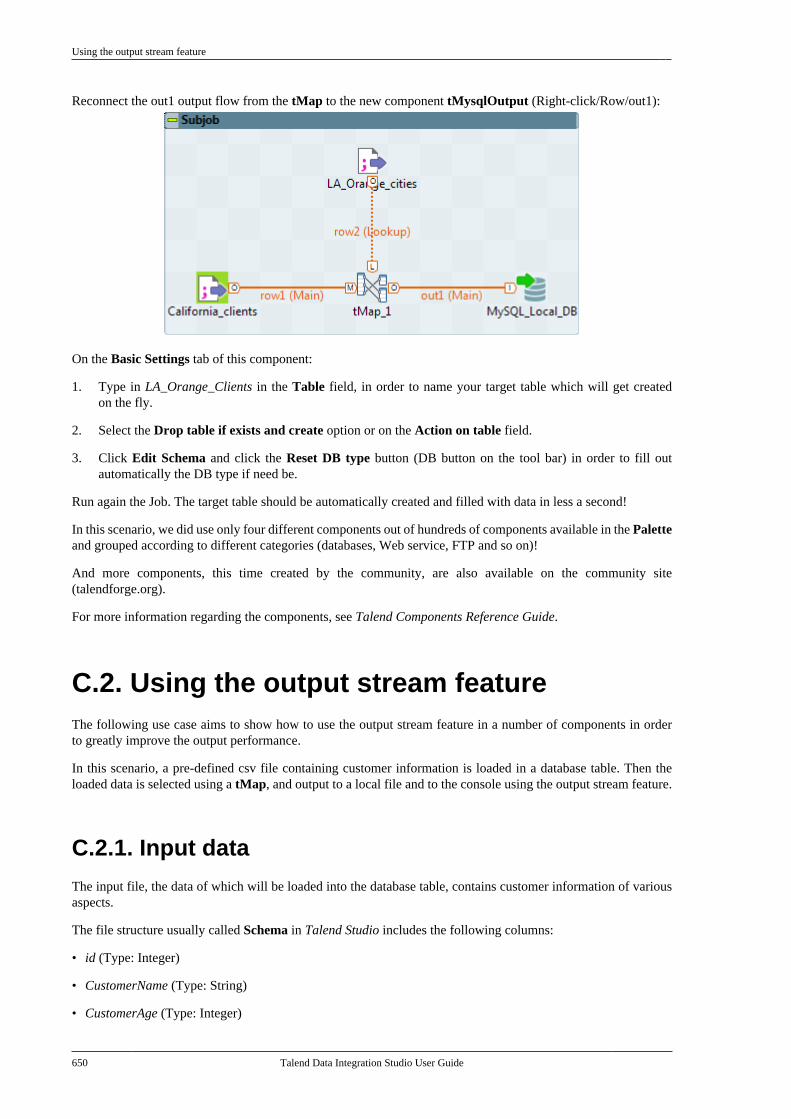
Using the output stream feature
650 Talend Data Integration Studio User Guide
Reconnect the out1 output flow from the tMap to the new component tMysqlOutput (Right-click/Row/out1):
On the Basic Settings tab of this component:
1. Type in LA_Orange_Clients in the Table field, in order to name your target table which will get createdon the fly.
2. Select the Drop table if exists and create option or on the Action on table field.
3. Click Edit Schema and click the Reset DB type button (DB button on the tool bar) in order to fill outautomatically the DB type if need be.
Run again the Job. The target table should be automatically created and filled with data in less a second!
In this scenario, we did use only four different components out of hundreds of components available in the Paletteand grouped according to different categories (databases, Web service, FTP and so on)!
And more components, this time created by the community, are also available on the community site(talendforge.org).
For more information regarding the components, see Talend Components Reference Guide.
C.2. Using the output stream featureThe following use case aims to show how to use the output stream feature in a number of components in orderto greatly improve the output performance.
In this scenario, a pre-defined csv file containing customer information is loaded in a database table. Then theloaded data is selected using a tMap, and output to a local file and to the console using the output stream feature.
C.2.1. Input data
The input file, the data of which will be loaded into the database table, contains customer information of variousaspects.
The file structure usually called Schema in Talend Studio includes the following columns:
• id (Type: Integer)
• CustomerName (Type: String)
• CustomerAge (Type: Integer)
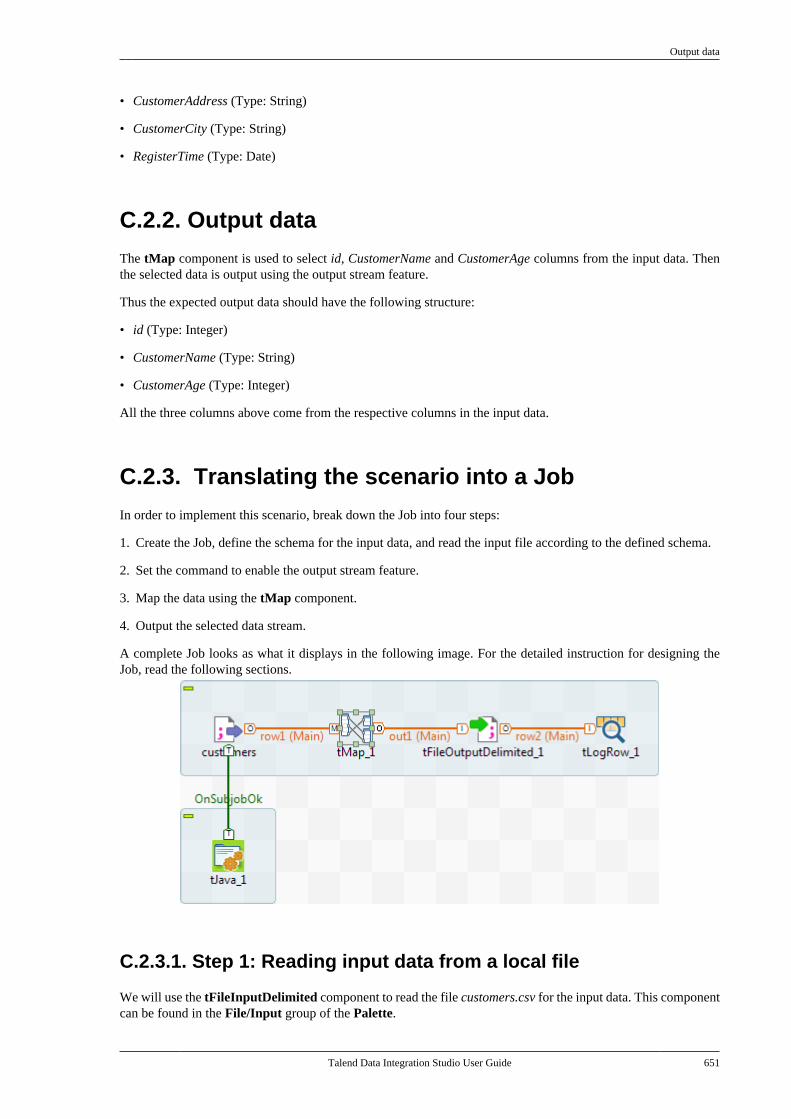
Output data
Talend Data Integration Studio User Guide 651
• CustomerAddress (Type: String)
• CustomerCity (Type: String)
• RegisterTime (Type: Date)
C.2.2. Output data
The tMap component is used to select id, CustomerName and CustomerAge columns from the input data. Thenthe selected data is output using the output stream feature.
Thus the expected output data should have the following structure:
• id (Type: Integer)
• CustomerName (Type: String)
• CustomerAge (Type: Integer)
All the three columns above come from the respective columns in the input data.
C.2.3. Translating the scenario into a Job
In order to implement this scenario, break down the Job into four steps:
1. Create the Job, define the schema for the input data, and read the input file according to the defined schema.
2. Set the command to enable the output stream feature.
3. Map the data using the tMap component.
4. Output the selected data stream.
A complete Job looks as what it displays in the following image. For the detailed instruction for designing theJob, read the following sections.
C.2.3.1. Step 1: Reading input data from a local file
We will use the tFileInputDelimited component to read the file customers.csv for the input data. This componentcan be found in the File/Input group of the Palette.

Translating the scenario into a Job
652 Talend Data Integration Studio User Guide
1. Drop a tFileInputDelimited component onto the design workspace, and double-click the to open the Basicsettings view to set its properties.
2. Click the three-dot button next to the File name/Stream field to browse to the path of the input data file.You can also type in the path of the input data file manually.
3. Click Edit schema to open a dialog box to configure the file structure of the input file.
4. Click the plus button to add six columns and set the Type and columns names to what we listed in thefollowing:
5. Click OK to close the dialog box.
C.2.3.2. Step2: Setting the command to enable the output streamfeature
Now we will make use of tJava to set the command for creating an output file and a directory that contains theoutput file.
To do so:
1. Drop a tJava component onto the design workspace, and double-click it to open the Basic settings view toset its properties.
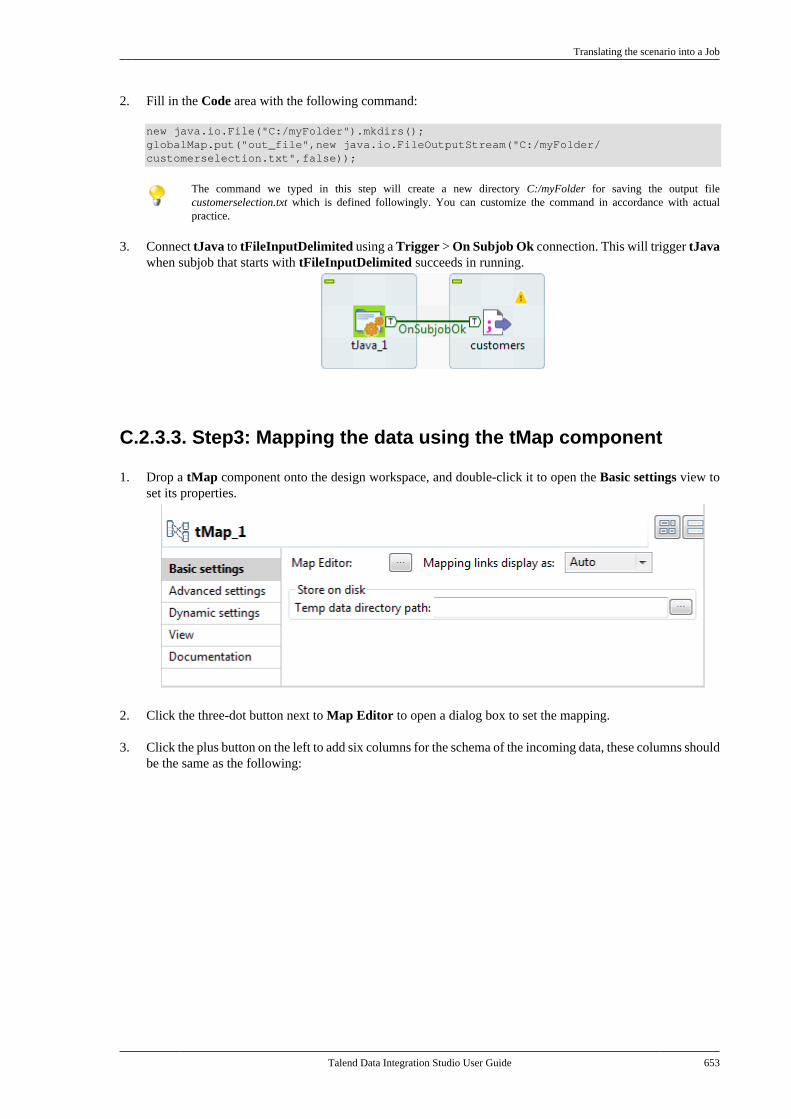
Translating the scenario into a Job
Talend Data Integration Studio User Guide 653
2. Fill in the Code area with the following command:
new java.io.File("C:/myFolder").mkdirs(); globalMap.put("out_file",new java.io.FileOutputStream("C:/myFolder/customerselection.txt",false));
The command we typed in this step will create a new directory C:/myFolder for saving the output filecustomerselection.txt which is defined followingly. You can customize the command in accordance with actualpractice.
3. Connect tJava to tFileInputDelimited using a Trigger > On Subjob Ok connection. This will trigger tJavawhen subjob that starts with tFileInputDelimited succeeds in running.
C.2.3.3. Step3: Mapping the data using the tMap component
1. Drop a tMap component onto the design workspace, and double-click it to open the Basic settings view toset its properties.
2. Click the three-dot button next to Map Editor to open a dialog box to set the mapping.
3. Click the plus button on the left to add six columns for the schema of the incoming data, these columns shouldbe the same as the following:
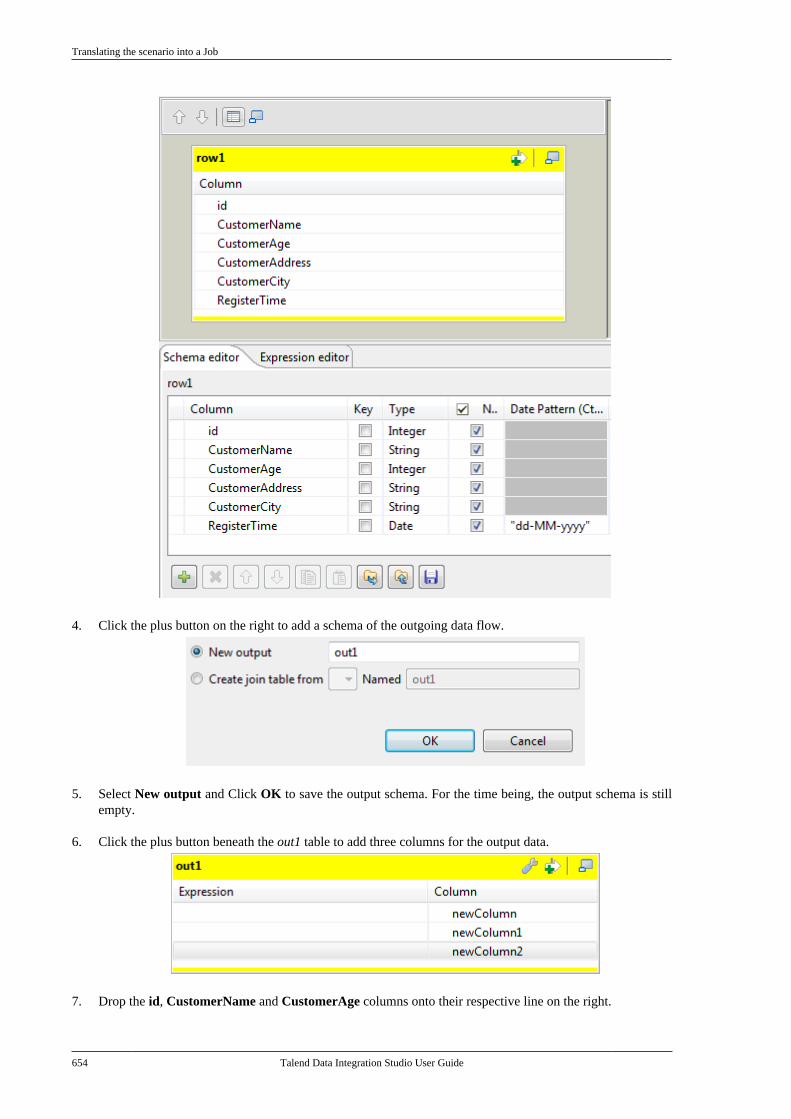
Translating the scenario into a Job
654 Talend Data Integration Studio User Guide
4. Click the plus button on the right to add a schema of the outgoing data flow.
5. Select New output and Click OK to save the output schema. For the time being, the output schema is stillempty.
6. Click the plus button beneath the out1 table to add three columns for the output data.
7. Drop the id, CustomerName and CustomerAge columns onto their respective line on the right.
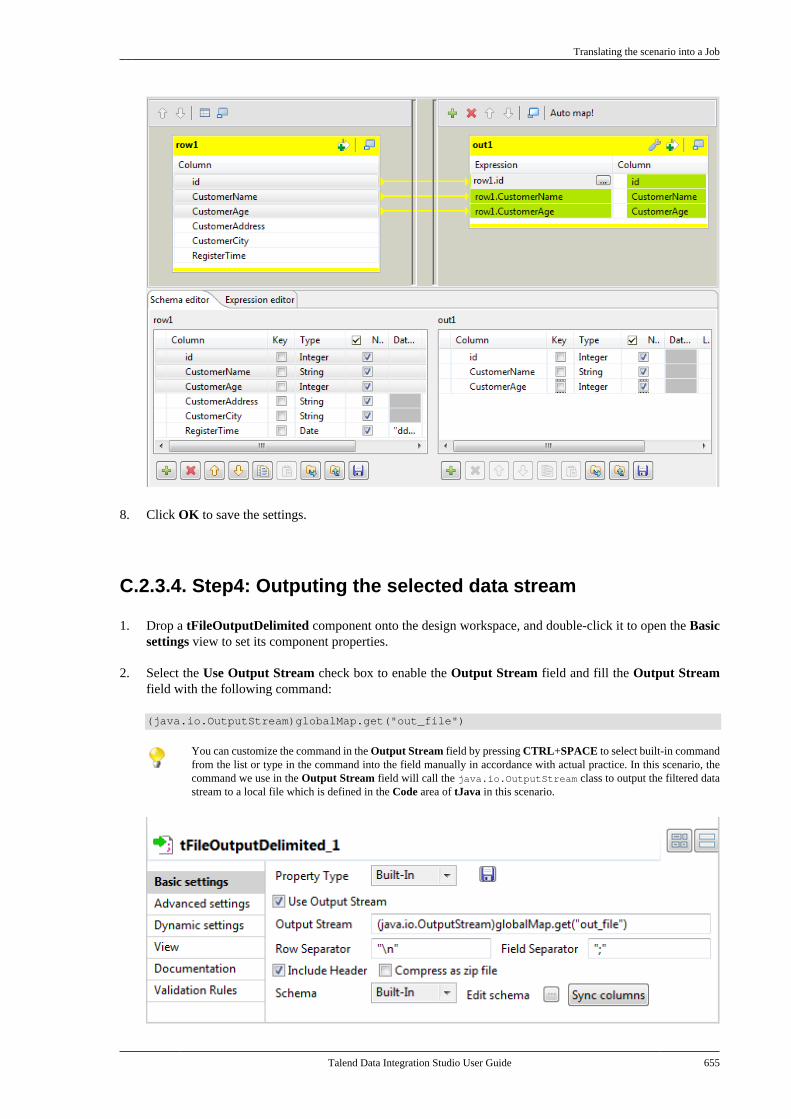
Translating the scenario into a Job
Talend Data Integration Studio User Guide 655
8. Click OK to save the settings.
C.2.3.4. Step4: Outputing the selected data stream
1. Drop a tFileOutputDelimited component onto the design workspace, and double-click it to open the Basicsettings view to set its component properties.
2. Select the Use Output Stream check box to enable the Output Stream field and fill the Output Streamfield with the following command:
(java.io.OutputStream)globalMap.get("out_file")
You can customize the command in the Output Stream field by pressing CTRL+SPACE to select built-in commandfrom the list or type in the command into the field manually in accordance with actual practice. In this scenario, thecommand we use in the Output Stream field will call the java.io.OutputStream class to output the filtered datastream to a local file which is defined in the Code area of tJava in this scenario.
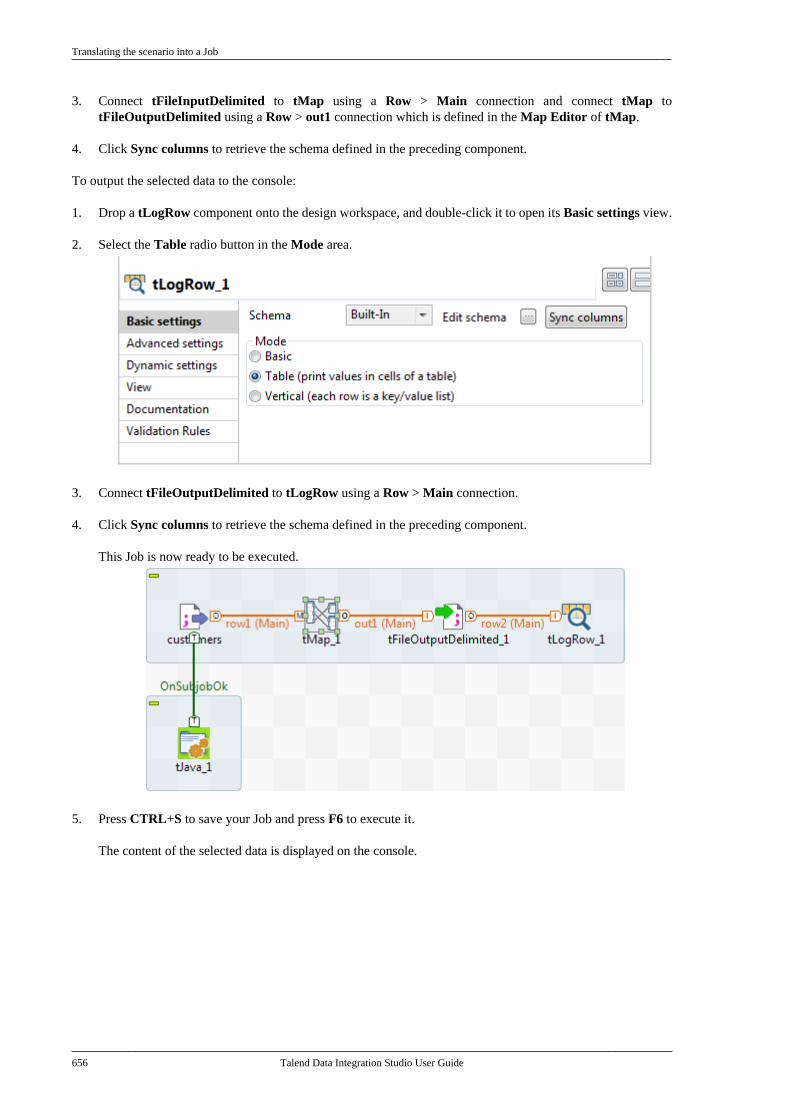
Translating the scenario into a Job
656 Talend Data Integration Studio User Guide
3. Connect tFileInputDelimited to tMap using a Row > Main connection and connect tMap totFileOutputDelimited using a Row > out1 connection which is defined in the Map Editor of tMap.
4. Click Sync columns to retrieve the schema defined in the preceding component.
To output the selected data to the console:
1. Drop a tLogRow component onto the design workspace, and double-click it to open its Basic settings view.
2. Select the Table radio button in the Mode area.
3. Connect tFileOutputDelimited to tLogRow using a Row > Main connection.
4. Click Sync columns to retrieve the schema defined in the preceding component.
This Job is now ready to be executed.
5. Press CTRL+S to save your Job and press F6 to execute it.
The content of the selected data is displayed on the console.
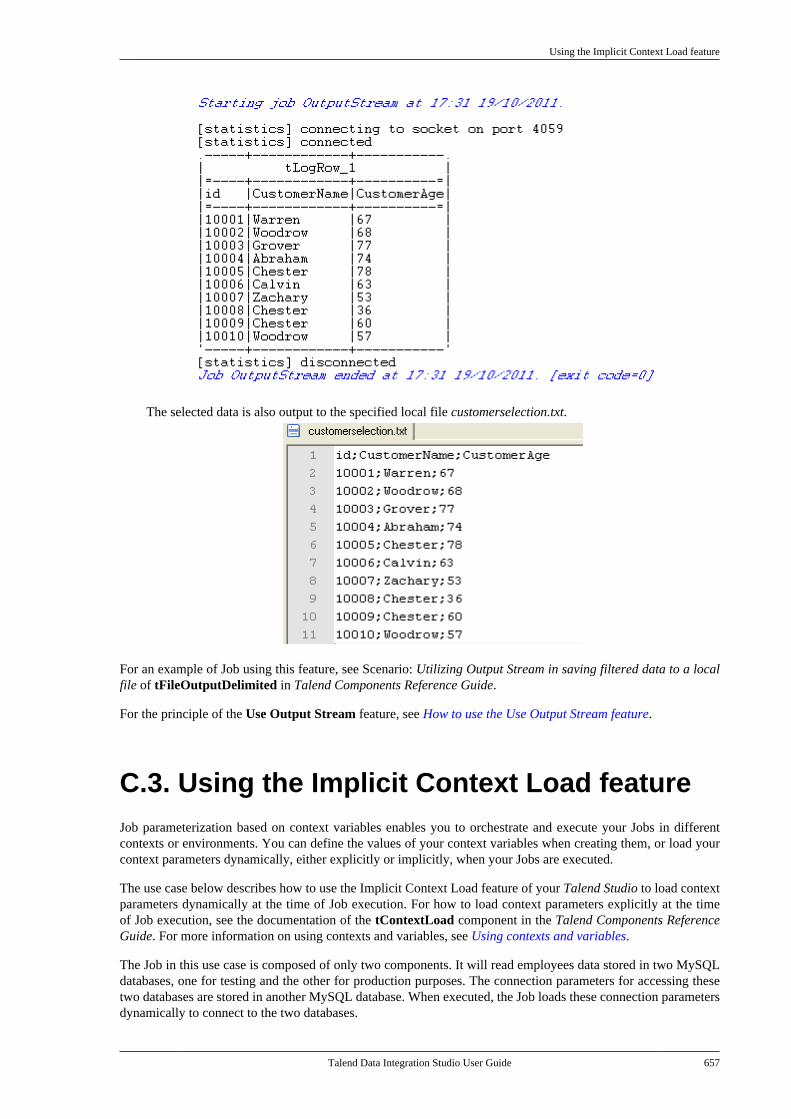
Using the Implicit Context Load feature
Talend Data Integration Studio User Guide 657
The selected data is also output to the specified local file customerselection.txt.
For an example of Job using this feature, see Scenario: Utilizing Output Stream in saving filtered data to a localfile of tFileOutputDelimited in Talend Components Reference Guide.
For the principle of the Use Output Stream feature, see How to use the Use Output Stream feature.
C.3. Using the Implicit Context Load featureJob parameterization based on context variables enables you to orchestrate and execute your Jobs in differentcontexts or environments. You can define the values of your context variables when creating them, or load yourcontext parameters dynamically, either explicitly or implicitly, when your Jobs are executed.
The use case below describes how to use the Implicit Context Load feature of your Talend Studio to load contextparameters dynamically at the time of Job execution. For how to load context parameters explicitly at the timeof Job execution, see the documentation of the tContextLoad component in the Talend Components ReferenceGuide. For more information on using contexts and variables, see Using contexts and variables.
The Job in this use case is composed of only two components. It will read employees data stored in two MySQLdatabases, one for testing and the other for production purposes. The connection parameters for accessing thesetwo databases are stored in another MySQL database. When executed, the Job loads these connection parametersdynamically to connect to the two databases.
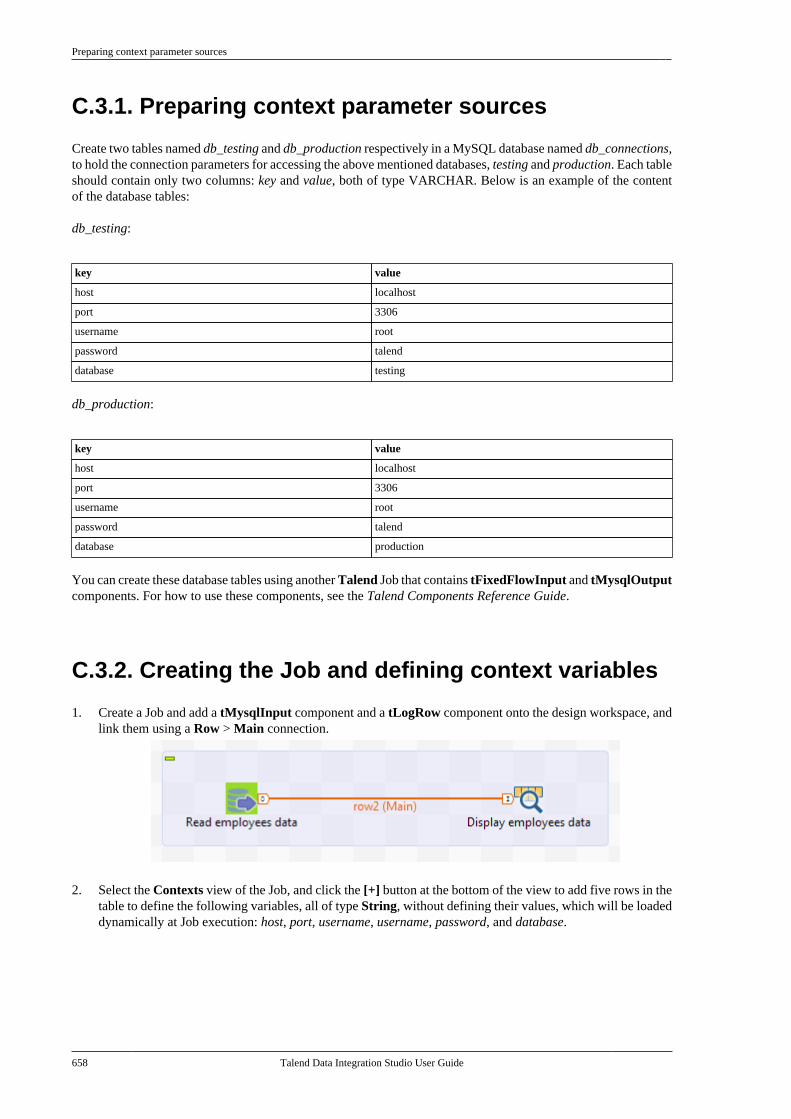
Preparing context parameter sources
658 Talend Data Integration Studio User Guide
C.3.1. Preparing context parameter sources
Create two tables named db_testing and db_production respectively in a MySQL database named db_connections,to hold the connection parameters for accessing the above mentioned databases, testing and production. Each tableshould contain only two columns: key and value, both of type VARCHAR. Below is an example of the contentof the database tables:
db_testing:
key value
host localhost
port 3306
username root
password talend
database testing
db_production:
key value
host localhost
port 3306
username root
password talend
database production
You can create these database tables using another Talend Job that contains tFixedFlowInput and tMysqlOutputcomponents. For how to use these components, see the Talend Components Reference Guide.
C.3.2. Creating the Job and defining context variables
1. Create a Job and add a tMysqlInput component and a tLogRow component onto the design workspace, andlink them using a Row > Main connection.
2. Select the Contexts view of the Job, and click the [+] button at the bottom of the view to add five rows in thetable to define the following variables, all of type String, without defining their values, which will be loadeddynamically at Job execution: host, port, username, username, password, and database.
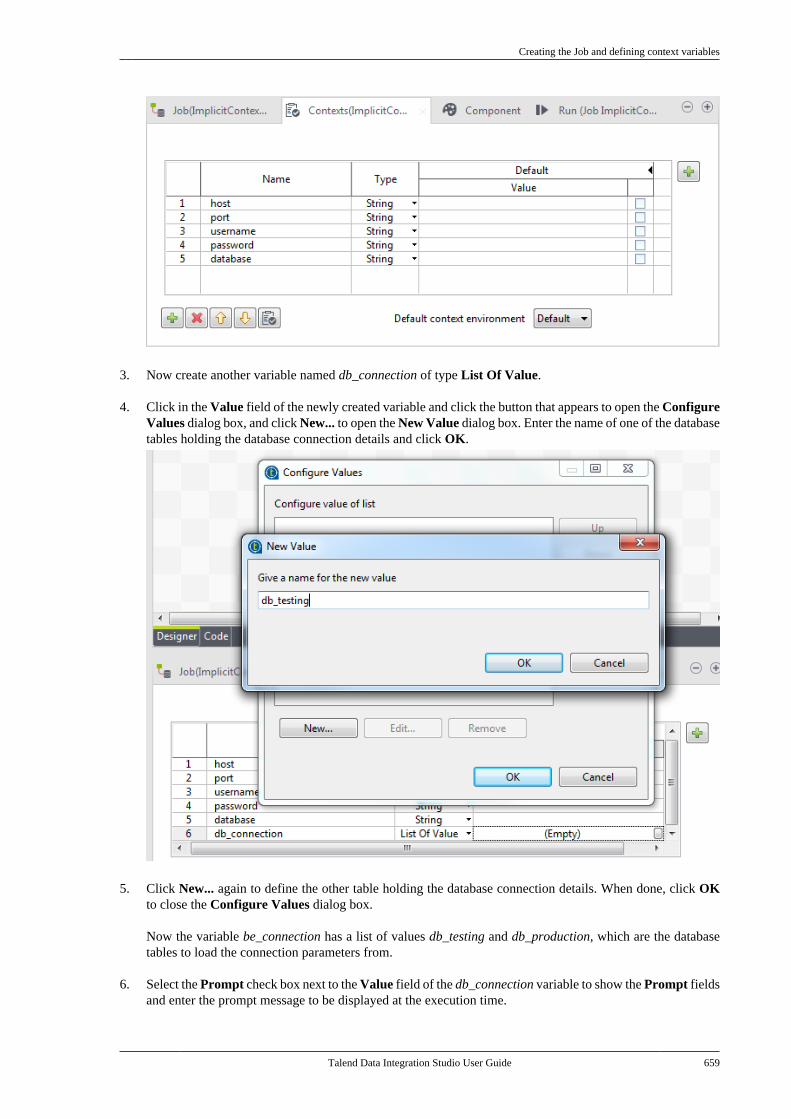
Creating the Job and defining context variables
Talend Data Integration Studio User Guide 659
3. Now create another variable named db_connection of type List Of Value.
4. Click in the Value field of the newly created variable and click the button that appears to open the ConfigureValues dialog box, and click New... to open the New Value dialog box. Enter the name of one of the databasetables holding the database connection details and click OK.
5. Click New... again to define the other table holding the database connection details. When done, click OKto close the Configure Values dialog box.
Now the variable be_connection has a list of values db_testing and db_production, which are the databasetables to load the connection parameters from.
6. Select the Prompt check box next to the Value field of the db_connection variable to show the Prompt fieldsand enter the prompt message to be displayed at the execution time.
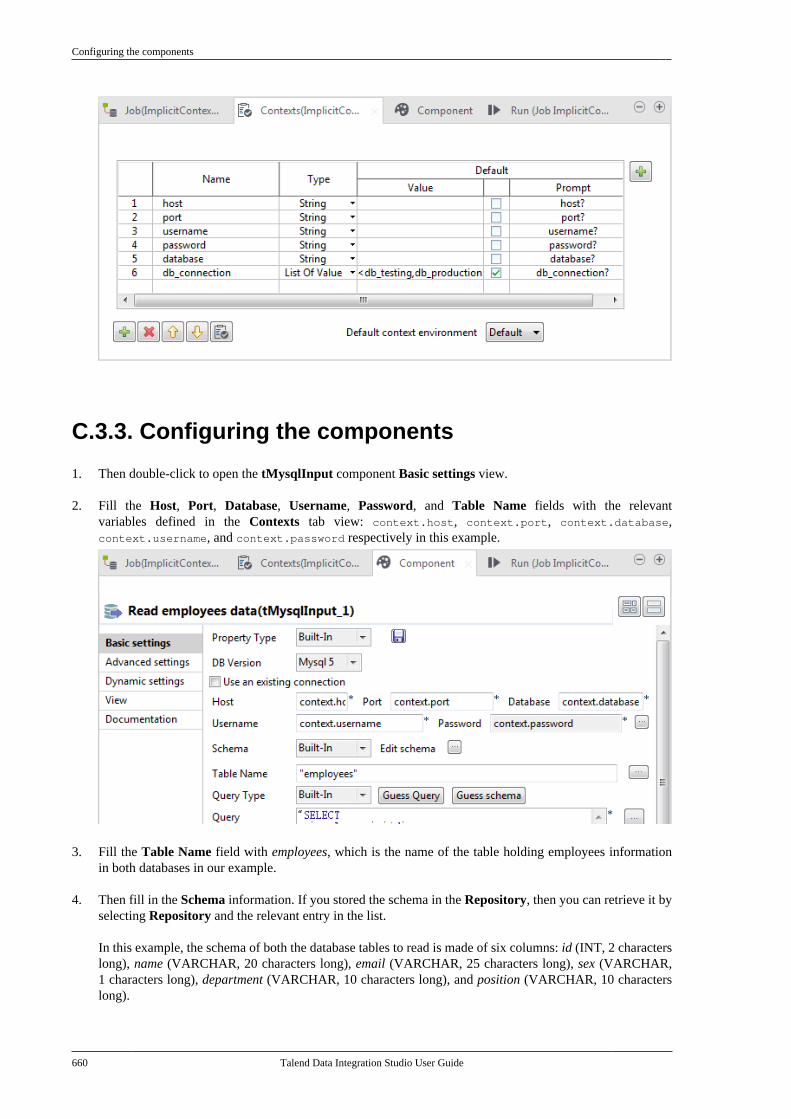
Configuring the components
660 Talend Data Integration Studio User Guide
C.3.3. Configuring the components
1. Then double-click to open the tMysqlInput component Basic settings view.
2. Fill the Host, Port, Database, Username, Password, and Table Name fields with the relevantvariables defined in the Contexts tab view: context.host, context.port, context.database,context.username, and context.password respectively in this example.
3. Fill the Table Name field with employees, which is the name of the table holding employees informationin both databases in our example.
4. Then fill in the Schema information. If you stored the schema in the Repository, then you can retrieve it byselecting Repository and the relevant entry in the list.
In this example, the schema of both the database tables to read is made of six columns: id (INT, 2 characterslong), name (VARCHAR, 20 characters long), email (VARCHAR, 25 characters long), sex (VARCHAR,1 characters long), department (VARCHAR, 10 characters long), and position (VARCHAR, 10 characterslong).
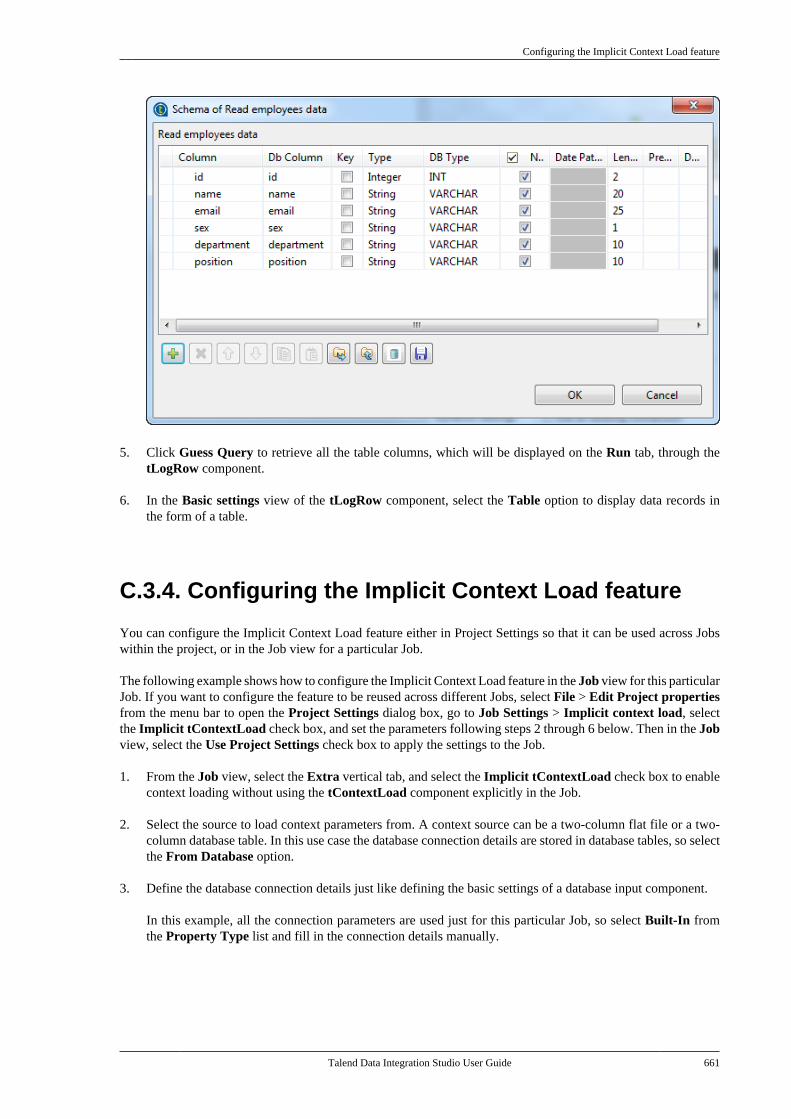
Configuring the Implicit Context Load feature
Talend Data Integration Studio User Guide 661
5. Click Guess Query to retrieve all the table columns, which will be displayed on the Run tab, through thetLogRow component.
6. In the Basic settings view of the tLogRow component, select the Table option to display data records inthe form of a table.
C.3.4. Configuring the Implicit Context Load feature
You can configure the Implicit Context Load feature either in Project Settings so that it can be used across Jobswithin the project, or in the Job view for a particular Job.
The following example shows how to configure the Implicit Context Load feature in the Job view for this particularJob. If you want to configure the feature to be reused across different Jobs, select File > Edit Project propertiesfrom the menu bar to open the Project Settings dialog box, go to Job Settings > Implicit context load, selectthe Implicit tContextLoad check box, and set the parameters following steps 2 through 6 below. Then in the Jobview, select the Use Project Settings check box to apply the settings to the Job.
1. From the Job view, select the Extra vertical tab, and select the Implicit tContextLoad check box to enablecontext loading without using the tContextLoad component explicitly in the Job.
2. Select the source to load context parameters from. A context source can be a two-column flat file or a two-column database table. In this use case the database connection details are stored in database tables, so selectthe From Database option.
3. Define the database connection details just like defining the basic settings of a database input component.
In this example, all the connection parameters are used just for this particular Job, so select Built-In fromthe Property Type list and fill in the connection details manually.

Executing the Job
662 Talend Data Integration Studio User Guide
4. Fill the Table Name field with the context variable named db_connection defined in the Contexts view ofthe Job so that we will be able to choose the database table to load context parameters from dynamicallyat Job execution.
5. As we will fetch all the connection details from the database tables unconditionally, leave the QueryCondition field blank.
6. Select the Print operations check box to list the context parameters loaded at Job execution.
C.3.5. Executing the Job
1. Press Ctrl+S to save the Job, and press F6 to run the Job.
A dialog box pops up asking you to select a database. Select a database and click OK.
The loaded context parameters and the content of the employees table of the selected database are displayedon the Run console.
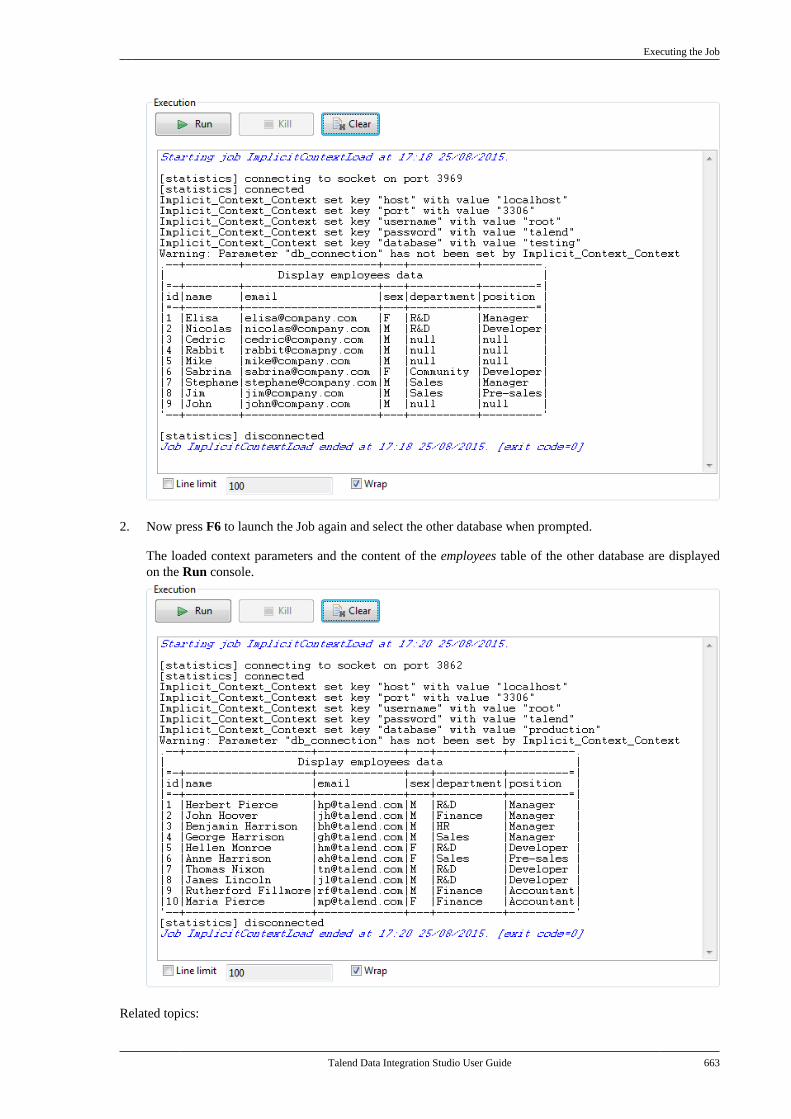
Executing the Job
Talend Data Integration Studio User Guide 663
2. Now press F6 to launch the Job again and select the other database when prompted.
The loaded context parameters and the content of the employees table of the other database are displayedon the Run console.
Related topics:
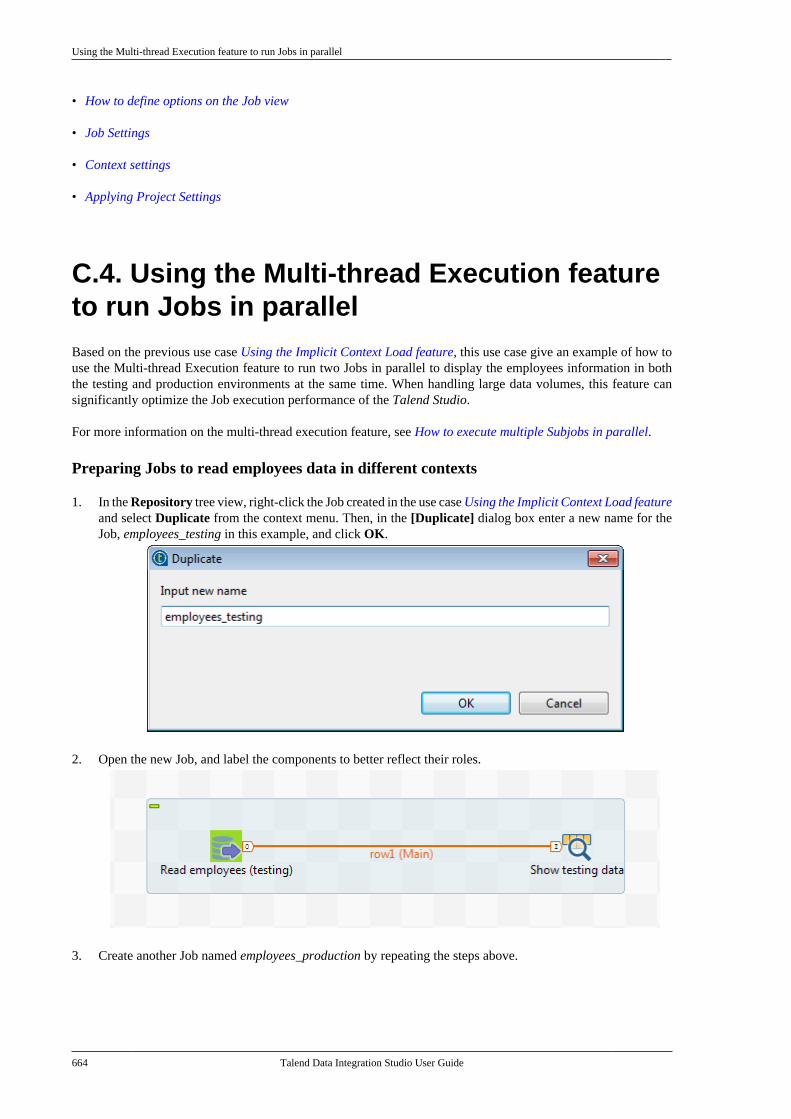
Using the Multi-thread Execution feature to run Jobs in parallel
664 Talend Data Integration Studio User Guide
• How to define options on the Job view
• Job Settings
• Context settings
• Applying Project Settings
C.4. Using the Multi-thread Execution featureto run Jobs in parallelBased on the previous use case Using the Implicit Context Load feature, this use case give an example of how touse the Multi-thread Execution feature to run two Jobs in parallel to display the employees information in boththe testing and production environments at the same time. When handling large data volumes, this feature cansignificantly optimize the Job execution performance of the Talend Studio.
For more information on the multi-thread execution feature, see How to execute multiple Subjobs in parallel.
Preparing Jobs to read employees data in different contexts
1. In the Repository tree view, right-click the Job created in the use case Using the Implicit Context Load featureand select Duplicate from the context menu. Then, in the [Duplicate] dialog box enter a new name for theJob, employees_testing in this example, and click OK.
2. Open the new Job, and label the components to better reflect their roles.
3. Create another Job named employees_production by repeating the steps above.
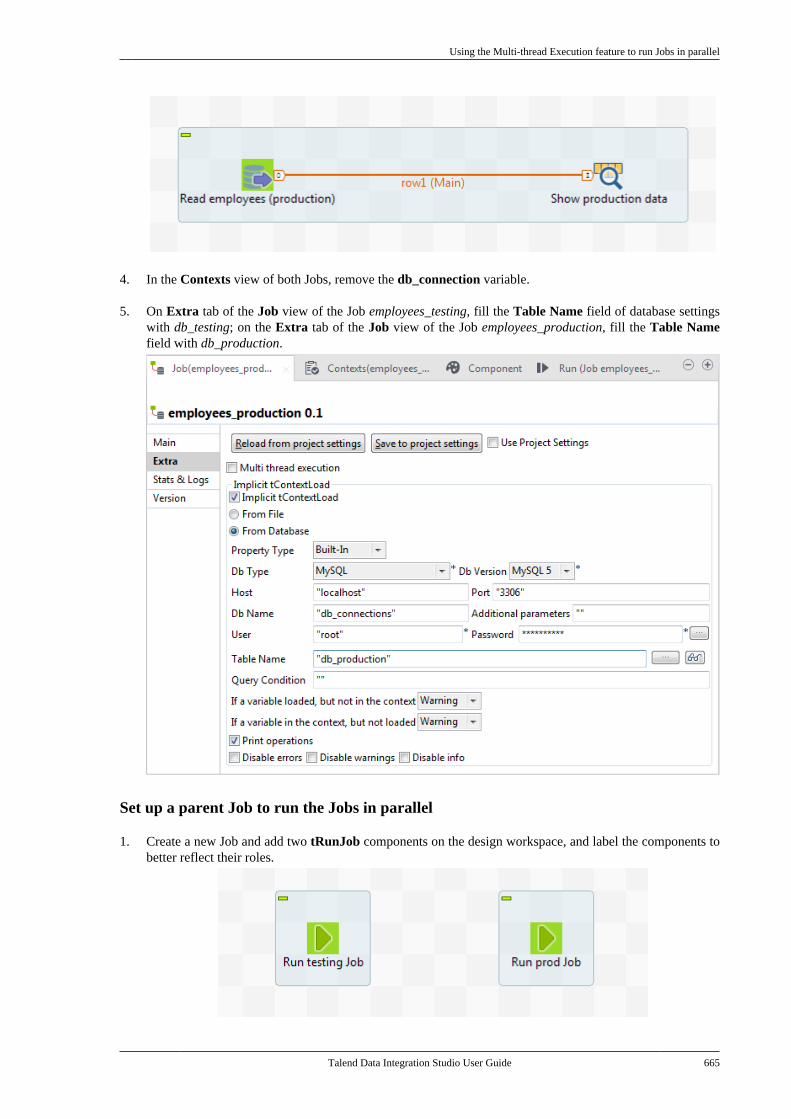
Using the Multi-thread Execution feature to run Jobs in parallel
Talend Data Integration Studio User Guide 665
4. In the Contexts view of both Jobs, remove the db_connection variable.
5. On Extra tab of the Job view of the Job employees_testing, fill the Table Name field of database settingswith db_testing; on the Extra tab of the Job view of the Job employees_production, fill the Table Namefield with db_production.
Set up a parent Job to run the Jobs in parallel
1. Create a new Job and add two tRunJob components on the design workspace, and label the components tobetter reflect their roles.
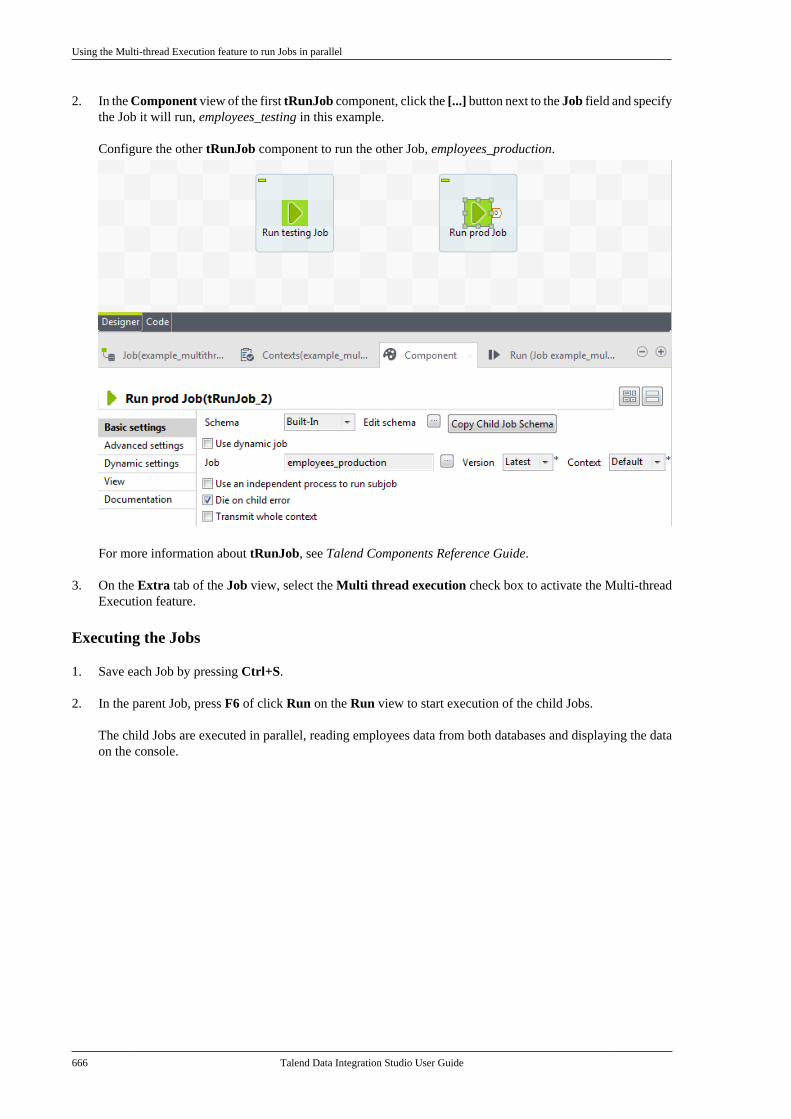
Using the Multi-thread Execution feature to run Jobs in parallel
666 Talend Data Integration Studio User Guide
2. In the Component view of the first tRunJob component, click the [...] button next to the Job field and specifythe Job it will run, employees_testing in this example.
Configure the other tRunJob component to run the other Job, employees_production.
For more information about tRunJob, see Talend Components Reference Guide.
3. On the Extra tab of the Job view, select the Multi thread execution check box to activate the Multi-threadExecution feature.
Executing the Jobs
1. Save each Job by pressing Ctrl+S.
2. In the parent Job, press F6 of click Run on the Run view to start execution of the child Jobs.
The child Jobs are executed in parallel, reading employees data from both databases and displaying the dataon the console.
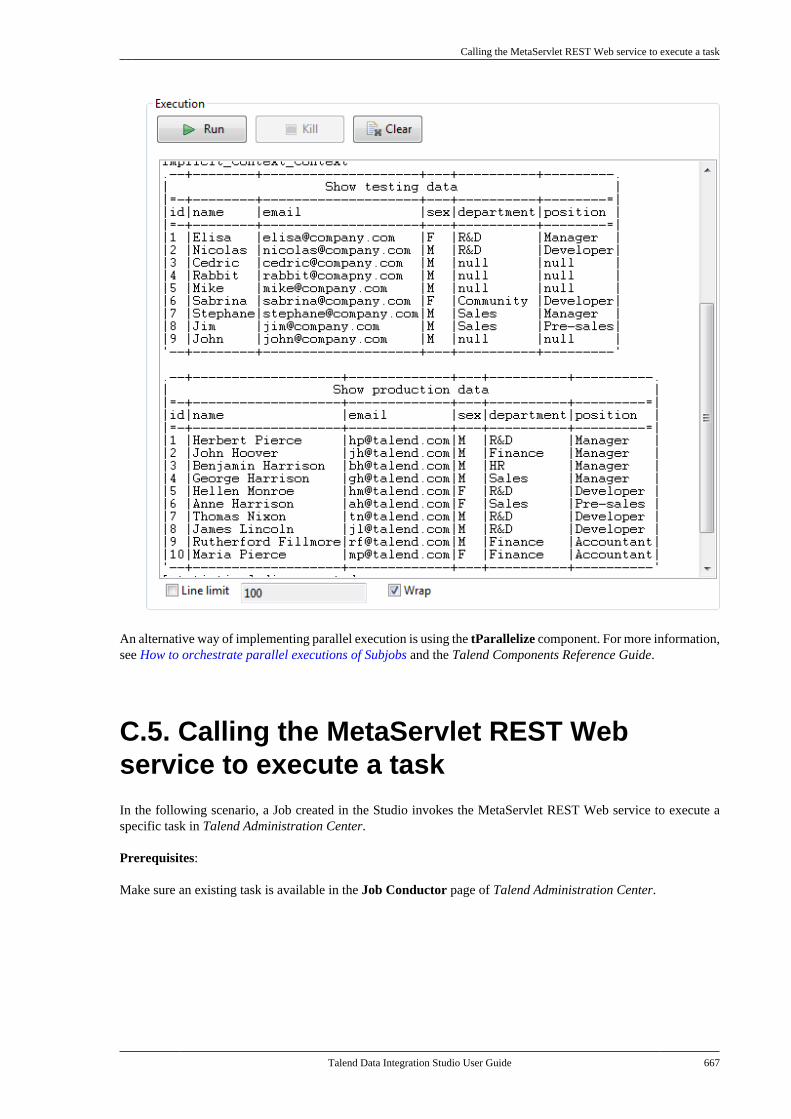
Calling the MetaServlet REST Web service to execute a task
Talend Data Integration Studio User Guide 667
An alternative way of implementing parallel execution is using the tParallelize component. For more information,see How to orchestrate parallel executions of Subjobs and the Talend Components Reference Guide.
C.5. Calling the MetaServlet REST Webservice to execute a taskIn the following scenario, a Job created in the Studio invokes the MetaServlet REST Web service to execute aspecific task in Talend Administration Center.
Prerequisites:
Make sure an existing task is available in the Job Conductor page of Talend Administration Center.
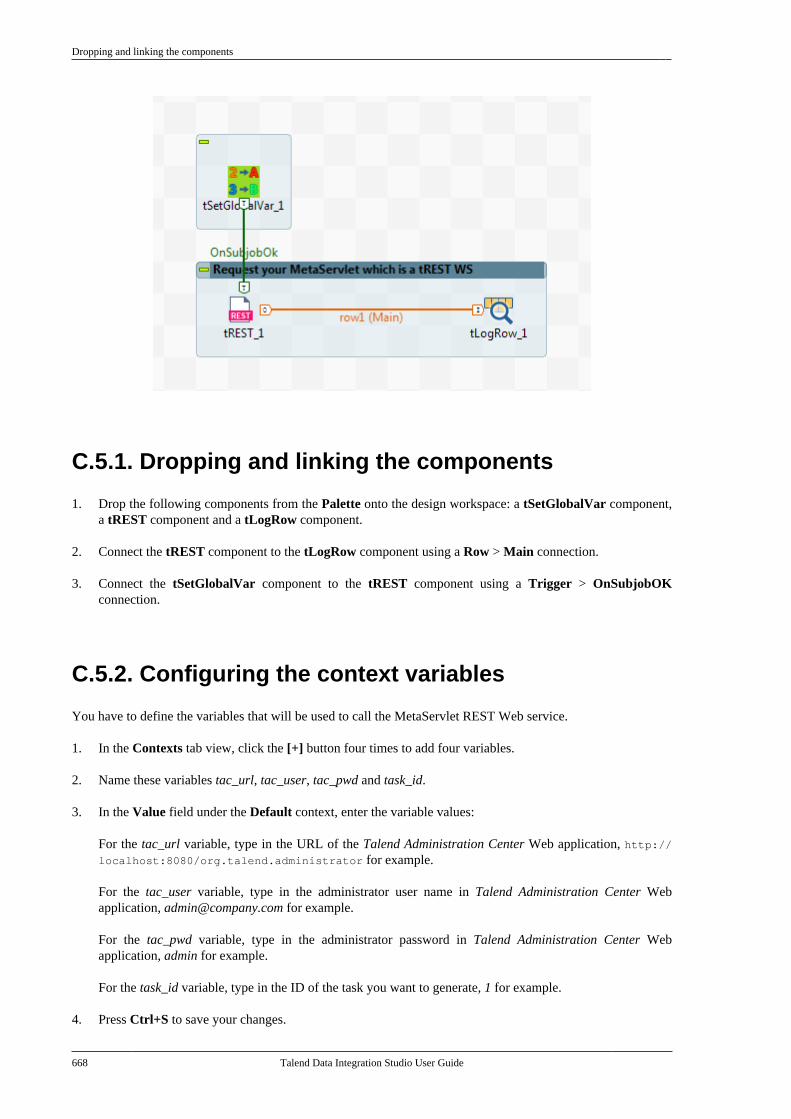
Dropping and linking the components
668 Talend Data Integration Studio User Guide
C.5.1. Dropping and linking the components
1. Drop the following components from the Palette onto the design workspace: a tSetGlobalVar component,a tREST component and a tLogRow component.
2. Connect the tREST component to the tLogRow component using a Row > Main connection.
3. Connect the tSetGlobalVar component to the tREST component using a Trigger > OnSubjobOKconnection.
C.5.2. Configuring the context variables
You have to define the variables that will be used to call the MetaServlet REST Web service.
1. In the Contexts tab view, click the [+] button four times to add four variables.
2. Name these variables tac_url, tac_user, tac_pwd and task_id.
3. In the Value field under the Default context, enter the variable values:
For the tac_url variable, type in the URL of the Talend Administration Center Web application, http://localhost:8080/org.talend.administrator for example.
For the tac_user variable, type in the administrator user name in Talend Administration Center Webapplication, [email protected] for example.
For the tac_pwd variable, type in the administrator password in Talend Administration Center Webapplication, admin for example.
For the task_id variable, type in the ID of the task you want to generate, 1 for example.
4. Press Ctrl+S to save your changes.
Configuring the Routine
Talend Data Integration Studio User Guide 669
C.5.3. Configuring the Routine
You have to define a user routine that encodes the MetaServlet parameters in base64 to be transmitted to the RESTAPI. This routine will be called in the Job.
1. In the Repository tree view, expand Code to display the Routines folder.
2. Right-click Routines and select Create routine.
3. The [New routine] dialog box opens. Enter the information required to create the routine, then click Finishto proceed to the next step.
The newly created routine appears in the Repository tree view, directly below the Routines node. The routineeditor opens to reveal a model routine which contains a simple example, by default, comprising descriptivetext in blue, followed by the corresponding code.
4. At the beginning, right after the package routines line of code, add the following:
import com.sun.org.apache.xml.internal.security.utils.Base64;
To do so, start typing and press Ctrl+Space to open the list of templates, then selectcom.sun.org.apache.xml.internal.security.utils.*; then replace the * sign with Base64.
5. Modify the model at the end with your own code:
public static String base64Encode(String message) {
return message==null ? null : "" + Base64.encode(message.getBytes()).replace("\n", ""); }public static void main(String[] args) { String tmp = "{\"actionName\":\"runTask\",\"taskId\":\"1\",\"mode\":\"synchronous\",\"authPass\":\"talend\",\"authUser\":\"[email protected]\"}";
System.out.println("Base 64: " + base64Encode(tmp)); }}
This allows you to encode the MetaServlet action, runTask, in base64.
For more information about the parameters and actions available in the MetaServlet, see the TalendAdministration Center User Guide.
C.5.4. Configuring the components
1. Double-click the tSetGlobalVar component to display its Basic settings view in the Component tab.
2. Click the [+] button to add a line in the Variables table:
In the Key field, type in jsonEncoded
In the Value fields, type in:
MetaServlet.base64Encode("{\"actionName\":\"runTask\",\"taskId\":\"" + context.task_id + "\",\"mode\":\"synchronous\",\"context\":{\"Default\":\"" + ((String)globalMap.get("tMsgBox_1_RESULT")) + "\"},
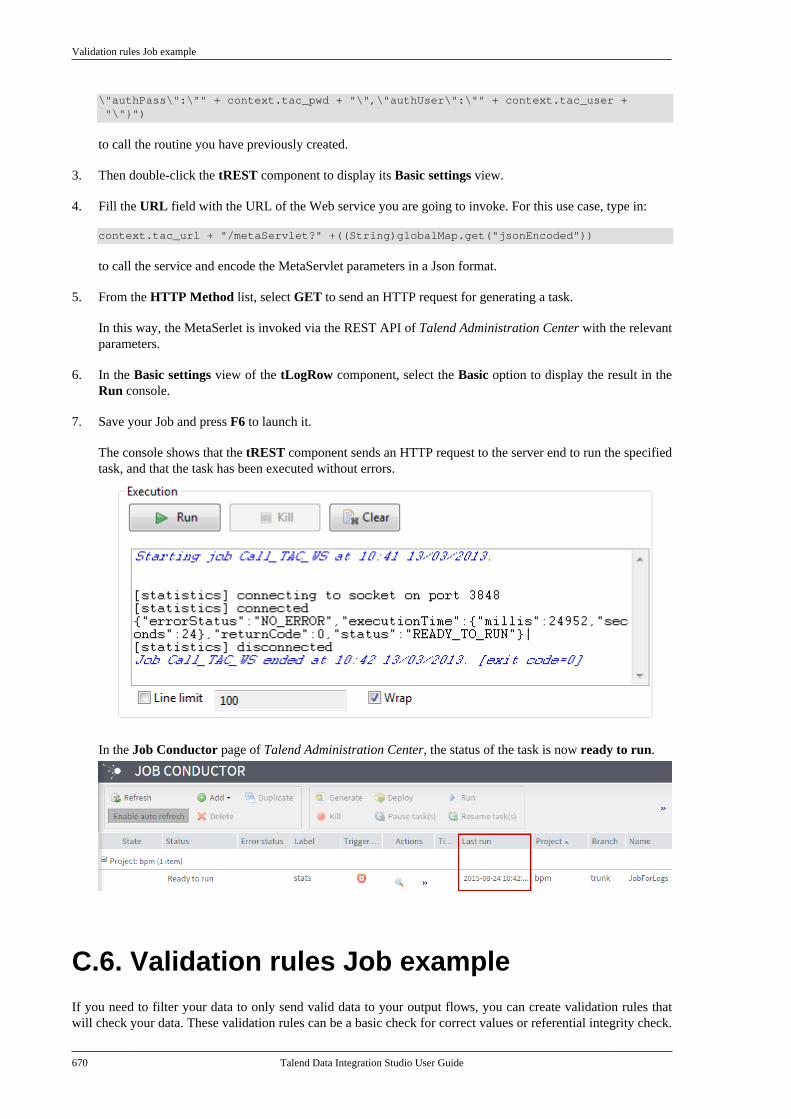
Validation rules Job example
670 Talend Data Integration Studio User Guide
\"authPass\":\"" + context.tac_pwd + "\",\"authUser\":\"" + context.tac_user + "\"}")
to call the routine you have previously created.
3. Then double-click the tREST component to display its Basic settings view.
4. Fill the URL field with the URL of the Web service you are going to invoke. For this use case, type in:
context.tac_url + "/metaServlet?" +((String)globalMap.get("jsonEncoded"))
to call the service and encode the MetaServlet parameters in a Json format.
5. From the HTTP Method list, select GET to send an HTTP request for generating a task.
In this way, the MetaSerlet is invoked via the REST API of Talend Administration Center with the relevantparameters.
6. In the Basic settings view of the tLogRow component, select the Basic option to display the result in theRun console.
7. Save your Job and press F6 to launch it.
The console shows that the tREST component sends an HTTP request to the server end to run the specifiedtask, and that the task has been executed without errors.
In the Job Conductor page of Talend Administration Center, the status of the task is now ready to run.
C.6. Validation rules Job exampleIf you need to filter your data to only send valid data to your output flows, you can create validation rules thatwill check your data. These validation rules can be a basic check for correct values or referential integrity check.
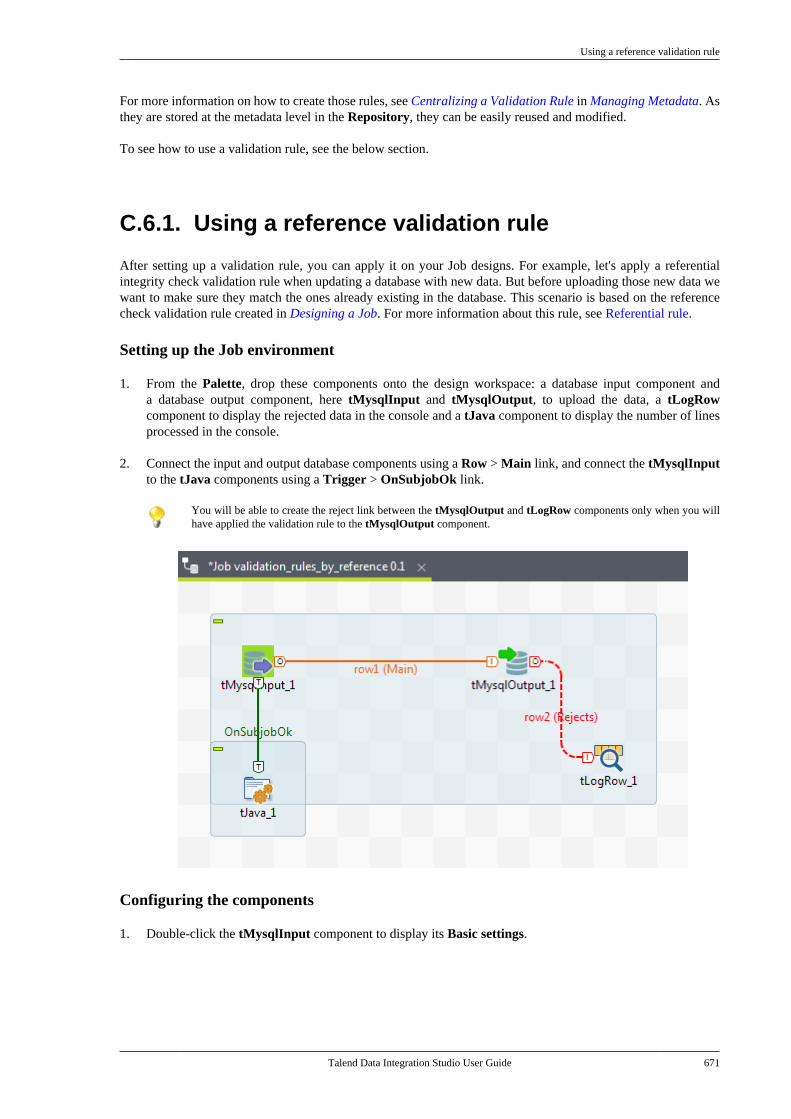
Using a reference validation rule
Talend Data Integration Studio User Guide 671
For more information on how to create those rules, see Centralizing a Validation Rule in Managing Metadata. Asthey are stored at the metadata level in the Repository, they can be easily reused and modified.
To see how to use a validation rule, see the below section.
C.6.1. Using a reference validation rule
After setting up a validation rule, you can apply it on your Job designs. For example, let's apply a referentialintegrity check validation rule when updating a database with new data. But before uploading those new data wewant to make sure they match the ones already existing in the database. This scenario is based on the referencecheck validation rule created in Designing a Job. For more information about this rule, see Referential rule.
Setting up the Job environment
1. From the Palette, drop these components onto the design workspace: a database input component anda database output component, here tMysqlInput and tMysqlOutput, to upload the data, a tLogRowcomponent to display the rejected data in the console and a tJava component to display the number of linesprocessed in the console.
2. Connect the input and output database components using a Row > Main link, and connect the tMysqlInputto the tJava components using a Trigger > OnSubjobOk link.
You will be able to create the reject link between the tMysqlOutput and tLogRow components only when you willhave applied the validation rule to the tMysqlOutput component.
Configuring the components
1. Double-click the tMysqlInput component to display its Basic settings.
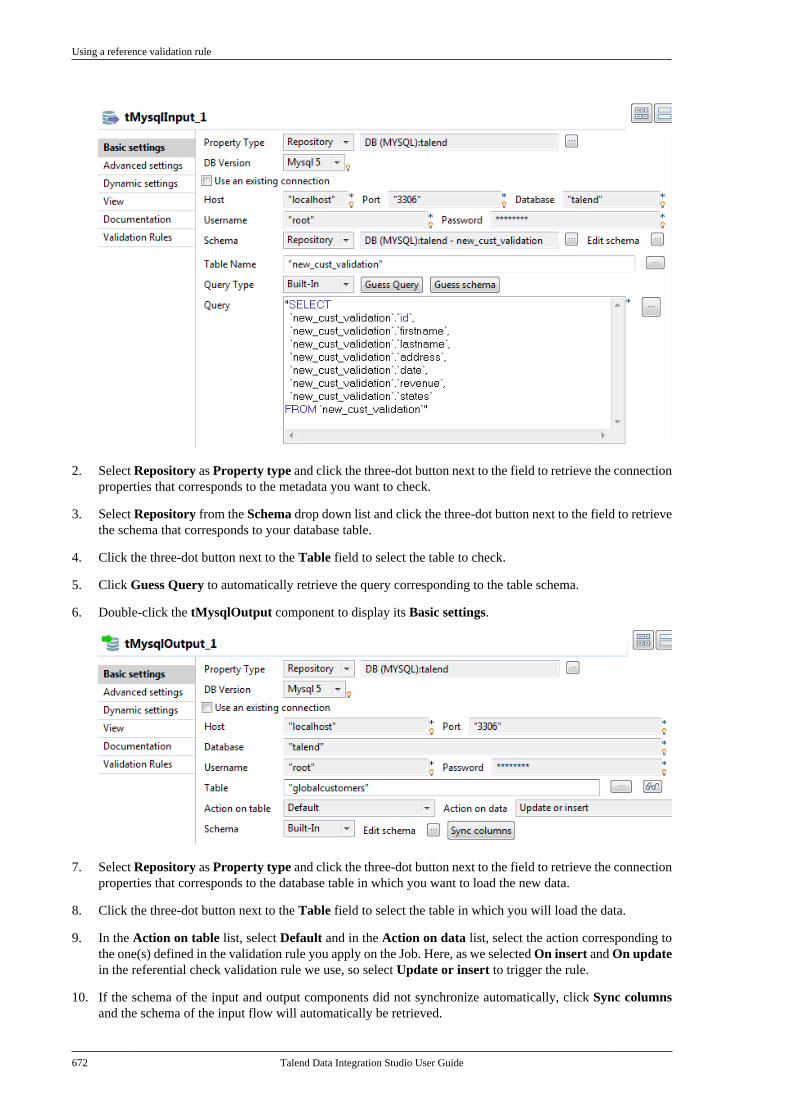
Using a reference validation rule
672 Talend Data Integration Studio User Guide
2. Select Repository as Property type and click the three-dot button next to the field to retrieve the connectionproperties that corresponds to the metadata you want to check.
3. Select Repository from the Schema drop down list and click the three-dot button next to the field to retrievethe schema that corresponds to your database table.
4. Click the three-dot button next to the Table field to select the table to check.
5. Click Guess Query to automatically retrieve the query corresponding to the table schema.
6. Double-click the tMysqlOutput component to display its Basic settings.
7. Select Repository as Property type and click the three-dot button next to the field to retrieve the connectionproperties that corresponds to the database table in which you want to load the new data.
8. Click the three-dot button next to the Table field to select the table in which you will load the data.
9. In the Action on table list, select Default and in the Action on data list, select the action corresponding tothe one(s) defined in the validation rule you apply on the Job. Here, as we selected On insert and On updatein the referential check validation rule we use, so select Update or insert to trigger the rule.
10. If the schema of the input and output components did not synchronize automatically, click Sync columnsand the schema of the input flow will automatically be retrieved.
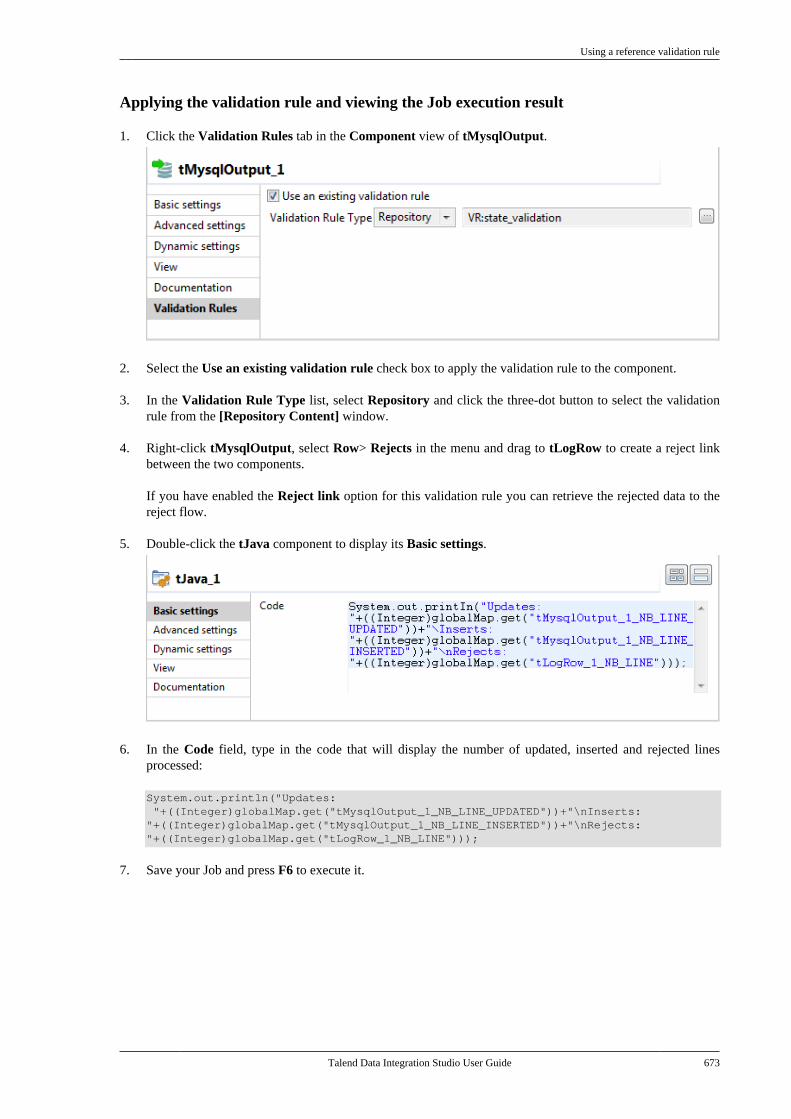
Using a reference validation rule
Talend Data Integration Studio User Guide 673
Applying the validation rule and viewing the Job execution result
1. Click the Validation Rules tab in the Component view of tMysqlOutput.
2. Select the Use an existing validation rule check box to apply the validation rule to the component.
3. In the Validation Rule Type list, select Repository and click the three-dot button to select the validationrule from the [Repository Content] window.
4. Right-click tMysqlOutput, select Row> Rejects in the menu and drag to tLogRow to create a reject linkbetween the two components.
If you have enabled the Reject link option for this validation rule you can retrieve the rejected data to thereject flow.
5. Double-click the tJava component to display its Basic settings.
6. In the Code field, type in the code that will display the number of updated, inserted and rejected linesprocessed:
System.out.println("Updates: "+((Integer)globalMap.get("tMysqlOutput_1_NB_LINE_UPDATED"))+"\nInserts:"+((Integer)globalMap.get("tMysqlOutput_1_NB_LINE_INSERTED"))+"\nRejects:"+((Integer)globalMap.get("tLogRow_1_NB_LINE")));
7. Save your Job and press F6 to execute it.
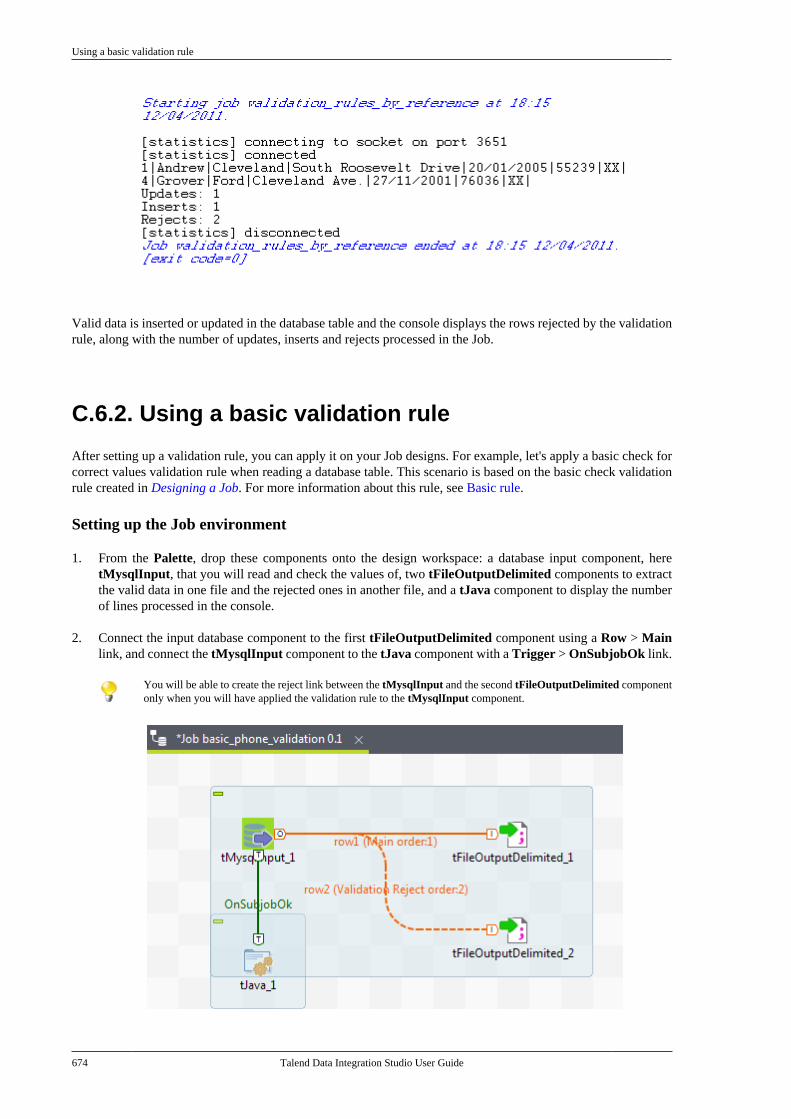
Using a basic validation rule
674 Talend Data Integration Studio User Guide
Valid data is inserted or updated in the database table and the console displays the rows rejected by the validationrule, along with the number of updates, inserts and rejects processed in the Job.
C.6.2. Using a basic validation rule
After setting up a validation rule, you can apply it on your Job designs. For example, let's apply a basic check forcorrect values validation rule when reading a database table. This scenario is based on the basic check validationrule created in Designing a Job. For more information about this rule, see Basic rule.
Setting up the Job environment
1. From the Palette, drop these components onto the design workspace: a database input component, heretMysqlInput, that you will read and check the values of, two tFileOutputDelimited components to extractthe valid data in one file and the rejected ones in another file, and a tJava component to display the numberof lines processed in the console.
2. Connect the input database component to the first tFileOutputDelimited component using a Row > Mainlink, and connect the tMysqlInput component to the tJava component with a Trigger > OnSubjobOk link.
You will be able to create the reject link between the tMysqlInput and the second tFileOutputDelimited componentonly when you will have applied the validation rule to the tMysqlInput component.
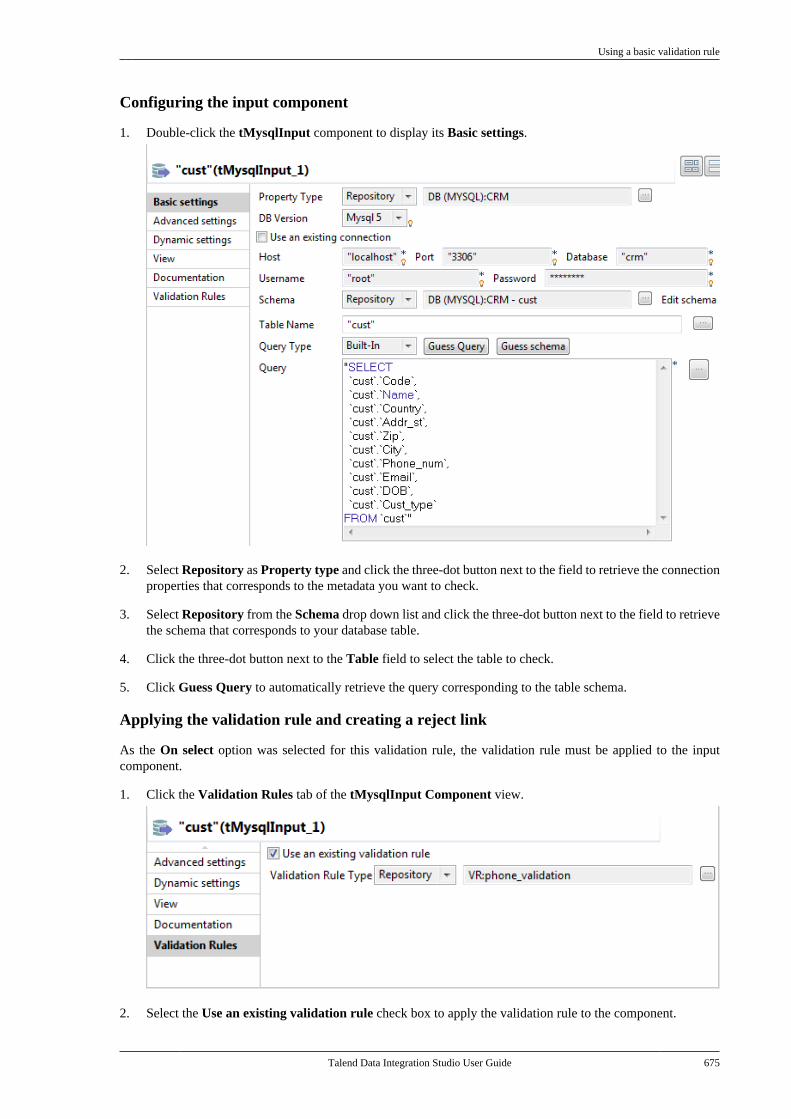
Using a basic validation rule
Talend Data Integration Studio User Guide 675
Configuring the input component
1. Double-click the tMysqlInput component to display its Basic settings.
2. Select Repository as Property type and click the three-dot button next to the field to retrieve the connectionproperties that corresponds to the metadata you want to check.
3. Select Repository from the Schema drop down list and click the three-dot button next to the field to retrievethe schema that corresponds to your database table.
4. Click the three-dot button next to the Table field to select the table to check.
5. Click Guess Query to automatically retrieve the query corresponding to the table schema.
Applying the validation rule and creating a reject link
As the On select option was selected for this validation rule, the validation rule must be applied to the inputcomponent.
1. Click the Validation Rules tab of the tMysqlInput Component view.
2. Select the Use an existing validation rule check box to apply the validation rule to the component.
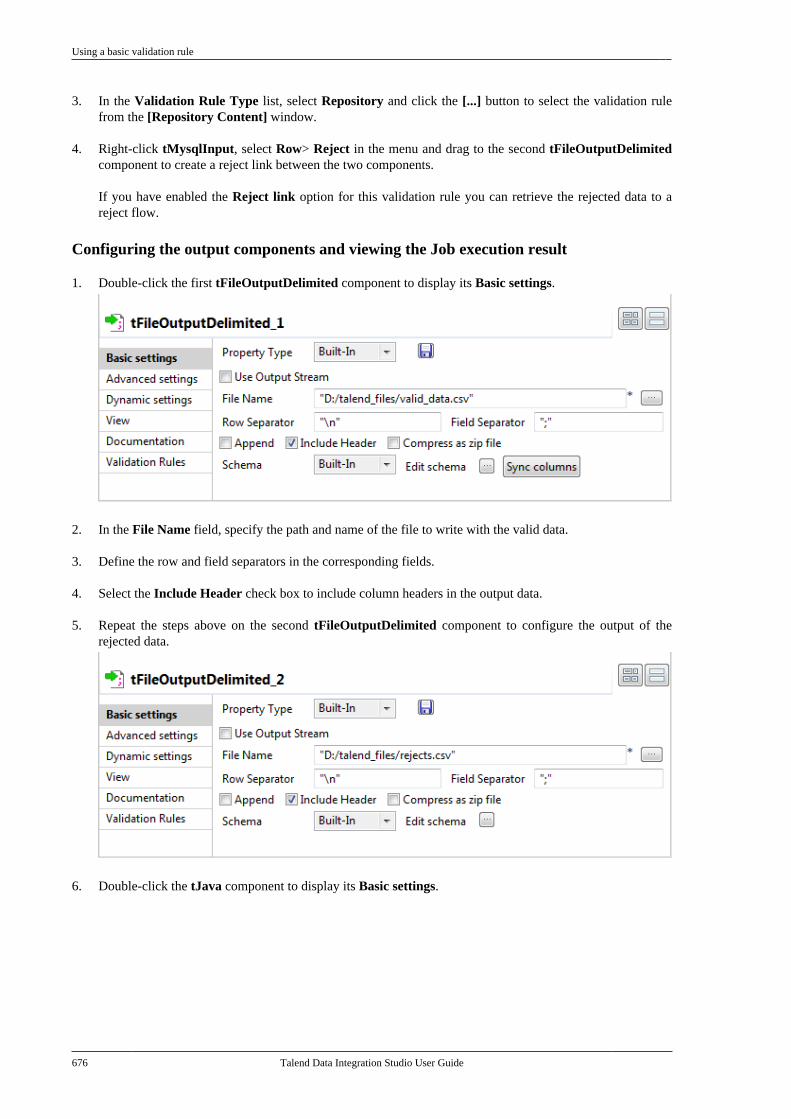
Using a basic validation rule
676 Talend Data Integration Studio User Guide
3. In the Validation Rule Type list, select Repository and click the [...] button to select the validation rulefrom the [Repository Content] window.
4. Right-click tMysqlInput, select Row> Reject in the menu and drag to the second tFileOutputDelimitedcomponent to create a reject link between the two components.
If you have enabled the Reject link option for this validation rule you can retrieve the rejected data to areject flow.
Configuring the output components and viewing the Job execution result
1. Double-click the first tFileOutputDelimited component to display its Basic settings.
2. In the File Name field, specify the path and name of the file to write with the valid data.
3. Define the row and field separators in the corresponding fields.
4. Select the Include Header check box to include column headers in the output data.
5. Repeat the steps above on the second tFileOutputDelimited component to configure the output of therejected data.
6. Double-click the tJava component to display its Basic settings.
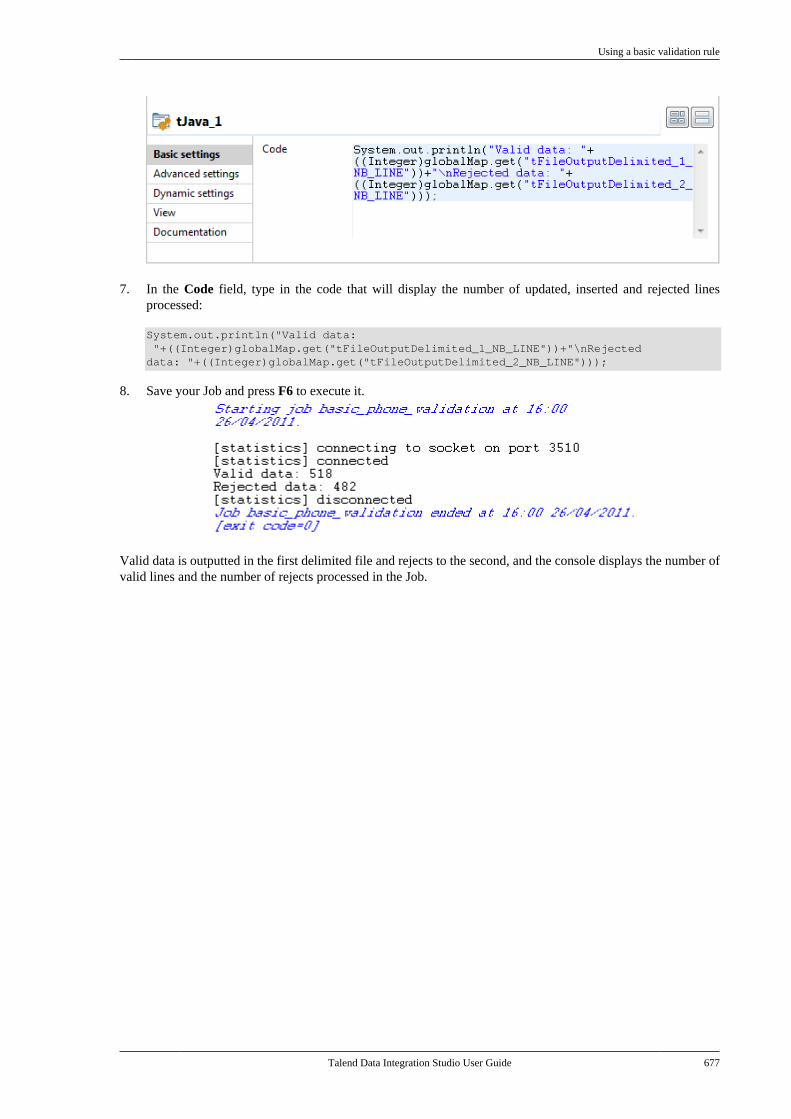
Using a basic validation rule
Talend Data Integration Studio User Guide 677
7. In the Code field, type in the code that will display the number of updated, inserted and rejected linesprocessed:
System.out.println("Valid data: "+((Integer)globalMap.get("tFileOutputDelimited_1_NB_LINE"))+"\nRejecteddata: "+((Integer)globalMap.get("tFileOutputDelimited_2_NB_LINE")));
8. Save your Job and press F6 to execute it.
Valid data is outputted in the first delimited file and rejects to the second, and the console displays the number ofvalid lines and the number of rejects processed in the Job.

Talend Data Integration Studio User Guide

Talend Data Integration Studio User Guide
Appendix D. SQL template writing rulesThis chapter describes the rules applied for the creation of SQL templates. It aims to help users of SQL templatesin Talend Studio to understand and develop the SQL templates for more customized usage.
These rules provide details that you have to respect when writing the template statement, a comment line or thedifferent relevant syntaxes.
These rules helps to use the SQL code in specific use cases, such as to access the various parameters defined incomponents.
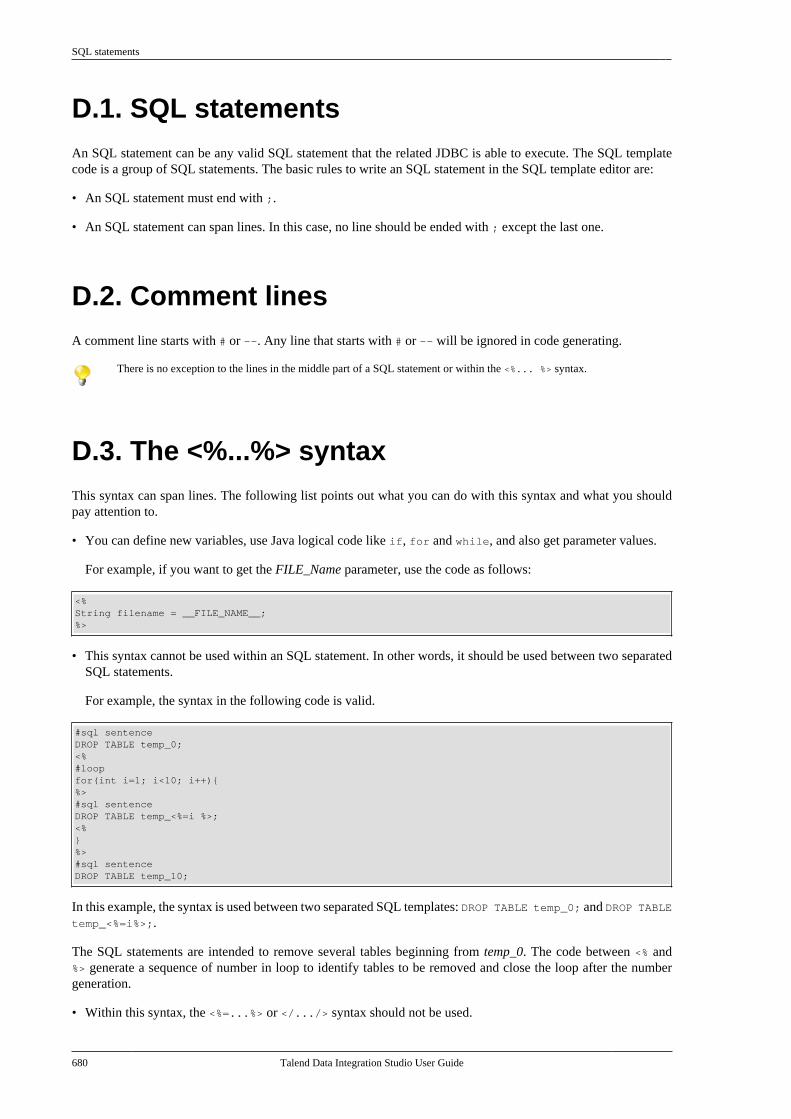
SQL statements
680 Talend Data Integration Studio User Guide
D.1. SQL statementsAn SQL statement can be any valid SQL statement that the related JDBC is able to execute. The SQL templatecode is a group of SQL statements. The basic rules to write an SQL statement in the SQL template editor are:
• An SQL statement must end with ;.
• An SQL statement can span lines. In this case, no line should be ended with ; except the last one.
D.2. Comment linesA comment line starts with # or --. Any line that starts with # or -- will be ignored in code generating.
There is no exception to the lines in the middle part of a SQL statement or within the <%... %> syntax.
D.3. The <%...%> syntaxThis syntax can span lines. The following list points out what you can do with this syntax and what you shouldpay attention to.
• You can define new variables, use Java logical code like if, for and while, and also get parameter values.
For example, if you want to get the FILE_Name parameter, use the code as follows:
<%String filename = __FILE_NAME__;%>
• This syntax cannot be used within an SQL statement. In other words, it should be used between two separatedSQL statements.
For example, the syntax in the following code is valid.
#sql sentenceDROP TABLE temp_0;<%#loopfor(int i=1; i<10; i++){%>#sql sentenceDROP TABLE temp_<%=i %>;<%}%>#sql sentenceDROP TABLE temp_10;
In this example, the syntax is used between two separated SQL templates: DROP TABLE temp_0; and DROP TABLEtemp_<%=i%>;.
The SQL statements are intended to remove several tables beginning from temp_0. The code between <% and%> generate a sequence of number in loop to identify tables to be removed and close the loop after the numbergeneration.
• Within this syntax, the <%=...%> or </.../> syntax should not be used.
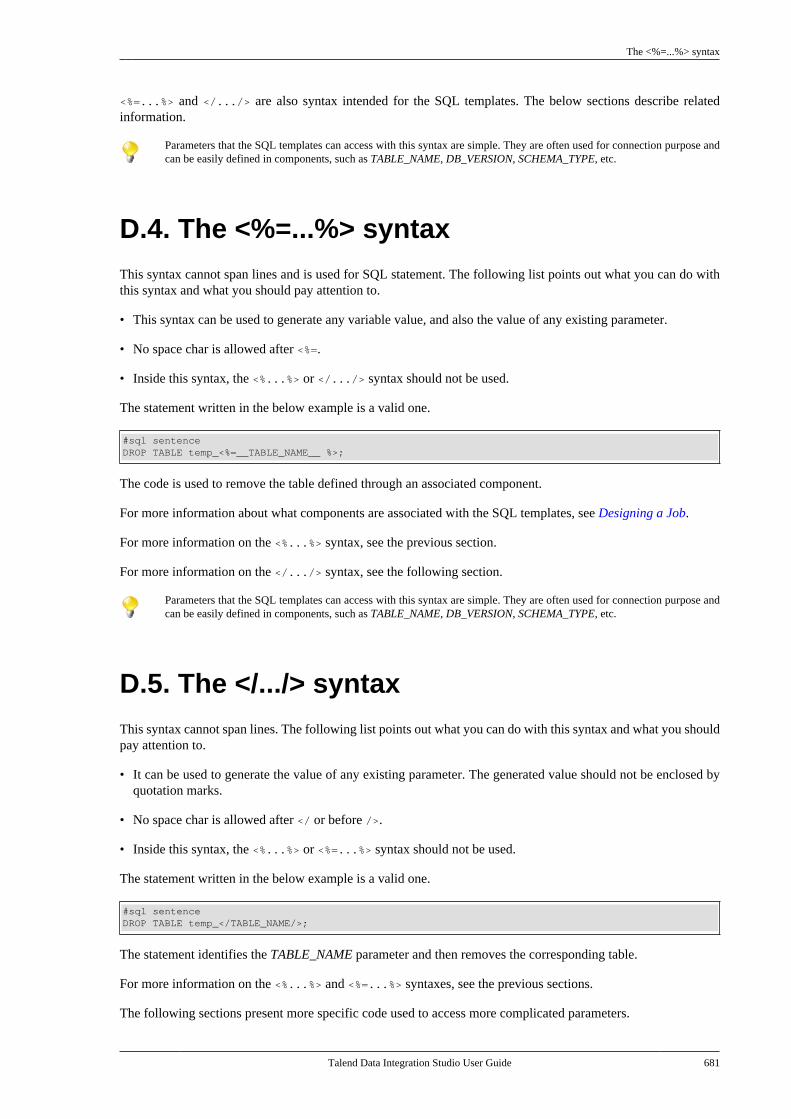
The <%=...%> syntax
Talend Data Integration Studio User Guide 681
<%=...%> and </.../> are also syntax intended for the SQL templates. The below sections describe relatedinformation.
Parameters that the SQL templates can access with this syntax are simple. They are often used for connection purpose andcan be easily defined in components, such as TABLE_NAME, DB_VERSION, SCHEMA_TYPE, etc.
D.4. The <%=...%> syntaxThis syntax cannot span lines and is used for SQL statement. The following list points out what you can do withthis syntax and what you should pay attention to.
• This syntax can be used to generate any variable value, and also the value of any existing parameter.
• No space char is allowed after <%=.
• Inside this syntax, the <%...%> or </.../> syntax should not be used.
The statement written in the below example is a valid one.
#sql sentenceDROP TABLE temp_<%=__TABLE_NAME__ %>;
The code is used to remove the table defined through an associated component.
For more information about what components are associated with the SQL templates, see Designing a Job.
For more information on the <%...%> syntax, see the previous section.
For more information on the </.../> syntax, see the following section.
Parameters that the SQL templates can access with this syntax are simple. They are often used for connection purpose andcan be easily defined in components, such as TABLE_NAME, DB_VERSION, SCHEMA_TYPE, etc.
D.5. The </.../> syntaxThis syntax cannot span lines. The following list points out what you can do with this syntax and what you shouldpay attention to.
• It can be used to generate the value of any existing parameter. The generated value should not be enclosed byquotation marks.
• No space char is allowed after </ or before />.
• Inside this syntax, the <%...%> or <%=...%> syntax should not be used.
The statement written in the below example is a valid one.
#sql sentenceDROP TABLE temp_</TABLE_NAME/>;
The statement identifies the TABLE_NAME parameter and then removes the corresponding table.
For more information on the <%...%> and <%=...%> syntaxes, see the previous sections.
The following sections present more specific code used to access more complicated parameters.
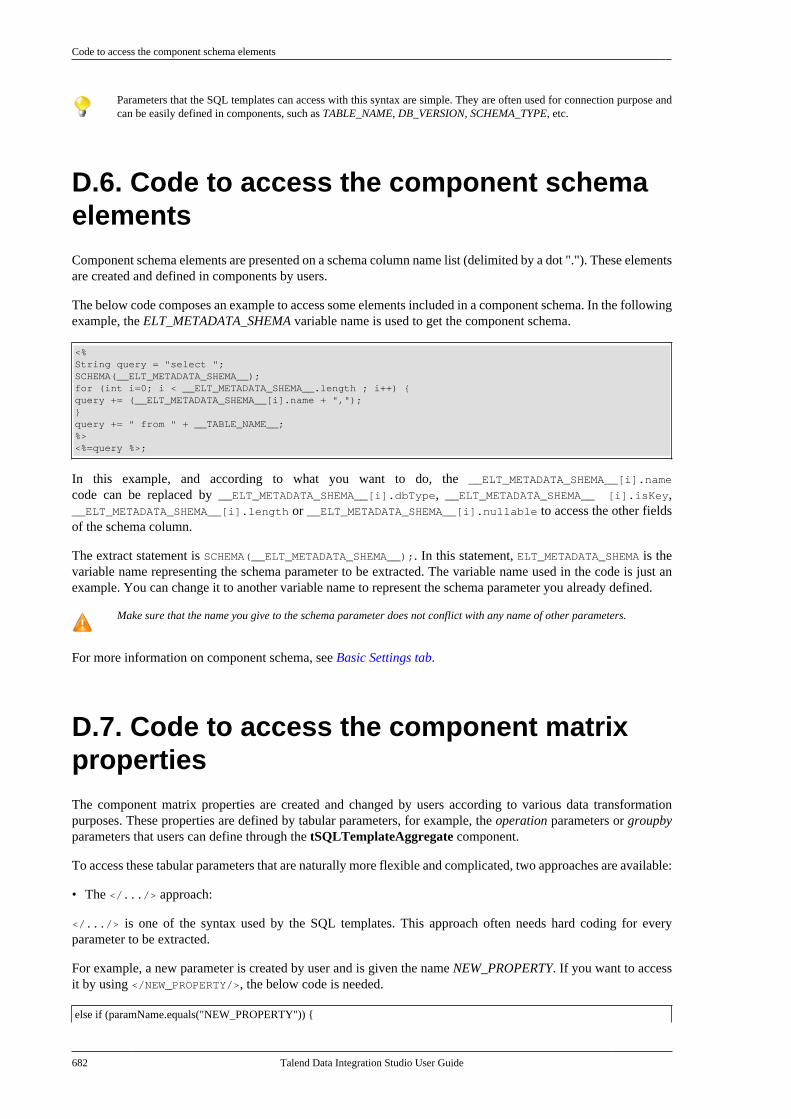
Code to access the component schema elements
682 Talend Data Integration Studio User Guide
Parameters that the SQL templates can access with this syntax are simple. They are often used for connection purpose andcan be easily defined in components, such as TABLE_NAME, DB_VERSION, SCHEMA_TYPE, etc.
D.6. Code to access the component schemaelementsComponent schema elements are presented on a schema column name list (delimited by a dot "."). These elementsare created and defined in components by users.
The below code composes an example to access some elements included in a component schema. In the followingexample, the ELT_METADATA_SHEMA variable name is used to get the component schema.
<%String query = "select ";SCHEMA(__ELT_METADATA_SHEMA__);for (int i=0; i < __ELT_METADATA_SHEMA__.length ; i++) {query += (__ELT_METADATA_SHEMA__[i].name + ",");}query += " from " + __TABLE_NAME__;%><%=query %>;
In this example, and according to what you want to do, the __ELT_METADATA_SHEMA__[i].name
code can be replaced by __ELT_METADATA_SHEMA__[i].dbType, __ELT_METADATA_SHEMA__ [i].isKey,__ELT_METADATA_SHEMA__[i].length or __ELT_METADATA_SHEMA__[i].nullable to access the other fieldsof the schema column.
The extract statement is SCHEMA(__ELT_METADATA_SHEMA__);. In this statement, ELT_METADATA_SHEMA is thevariable name representing the schema parameter to be extracted. The variable name used in the code is just anexample. You can change it to another variable name to represent the schema parameter you already defined.
Make sure that the name you give to the schema parameter does not conflict with any name of other parameters.
For more information on component schema, see Basic Settings tab.
D.7. Code to access the component matrixpropertiesThe component matrix properties are created and changed by users according to various data transformationpurposes. These properties are defined by tabular parameters, for example, the operation parameters or groupbyparameters that users can define through the tSQLTemplateAggregate component.
To access these tabular parameters that are naturally more flexible and complicated, two approaches are available:
• The </.../> approach:
</.../> is one of the syntax used by the SQL templates. This approach often needs hard coding for everyparameter to be extracted.
For example, a new parameter is created by user and is given the name NEW_PROPERTY. If you want to accessit by using </NEW_PROPERTY/>, the below code is needed.
else if (paramName.equals("NEW_PROPERTY")) {
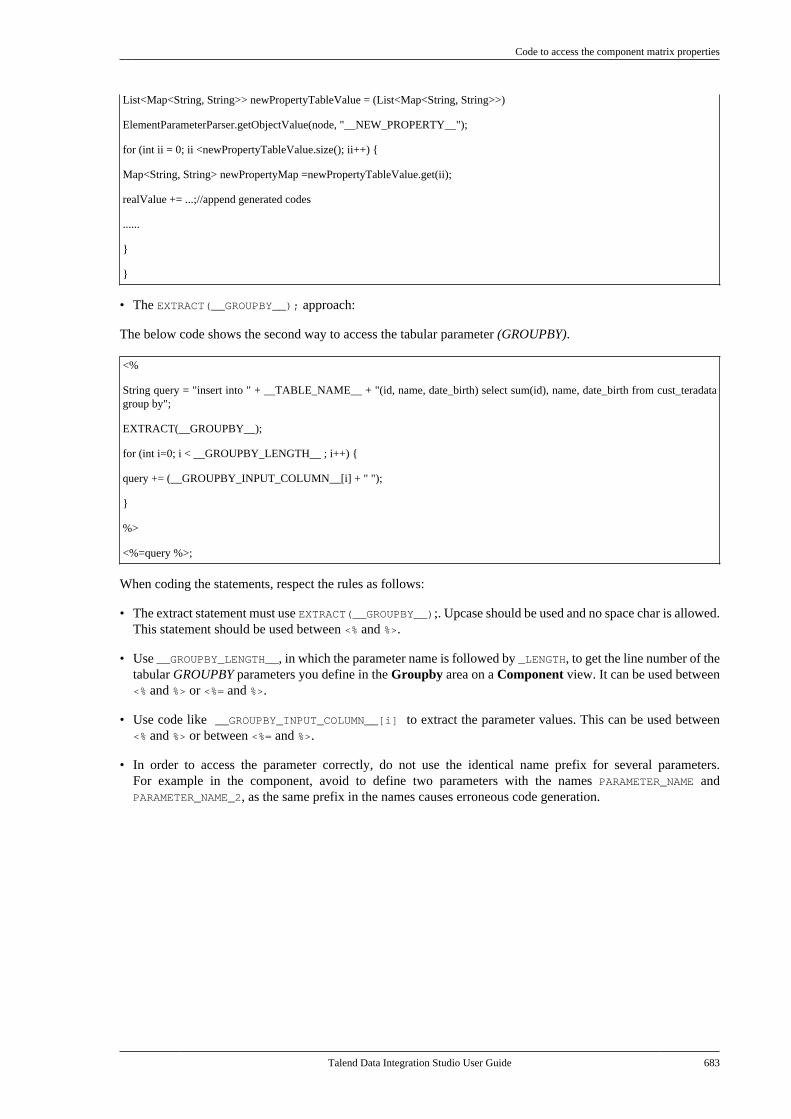
Code to access the component matrix properties
Talend Data Integration Studio User Guide 683
List<Map<String, String>> newPropertyTableValue = (List<Map<String, String>>)
ElementParameterParser.getObjectValue(node, "__NEW_PROPERTY__");
for (int ii = 0; ii <newPropertyTableValue.size(); ii++) {
Map<String, String> newPropertyMap =newPropertyTableValue.get(ii);
realValue += ...;//append generated codes
......
}
}
• The EXTRACT(__GROUPBY__); approach:
The below code shows the second way to access the tabular parameter (GROUPBY).
<%
String query = "insert into " + __TABLE_NAME__ + "(id, name, date_birth) select sum(id), name, date_birth from cust_teradatagroup by";
EXTRACT(__GROUPBY__);
for (int i=0; i < __GROUPBY_LENGTH__ ; i++) {
query += (__GROUPBY_INPUT_COLUMN__[i] + " ");
}
%>
<%=query %>;
When coding the statements, respect the rules as follows:
• The extract statement must use EXTRACT(__GROUPBY__);. Upcase should be used and no space char is allowed.This statement should be used between <% and %>.
• Use __GROUPBY_LENGTH__, in which the parameter name is followed by _LENGTH, to get the line number of thetabular GROUPBY parameters you define in the Groupby area on a Component view. It can be used between<% and %> or <%= and %>.
• Use code like __GROUPBY_INPUT_COLUMN__[i] to extract the parameter values. This can be used between<% and %> or between <%= and %>.
• In order to access the parameter correctly, do not use the identical name prefix for several parameters.For example in the component, avoid to define two parameters with the names PARAMETER_NAME andPARAMETER_NAME_2, as the same prefix in the names causes erroneous code generation.

Talend Data Integration Studio User Guide
Talend Data Integration Studio User Guide
Appendix E. System routinesThis appendix gives you an overview of the most commonly used routines, along with use cases. In this Appendix,routines follow the order in which they display in the Repository. They are grouped according to their types. Eachtype is detailed in a different section.
For more information on how to define routines, to access to system routines or to manage system or user routines,see Managing routines.
Before starting any data integration processes, you need to be familiar with Talend Studio Graphical User Interface(GUI). For more information, see GUI.
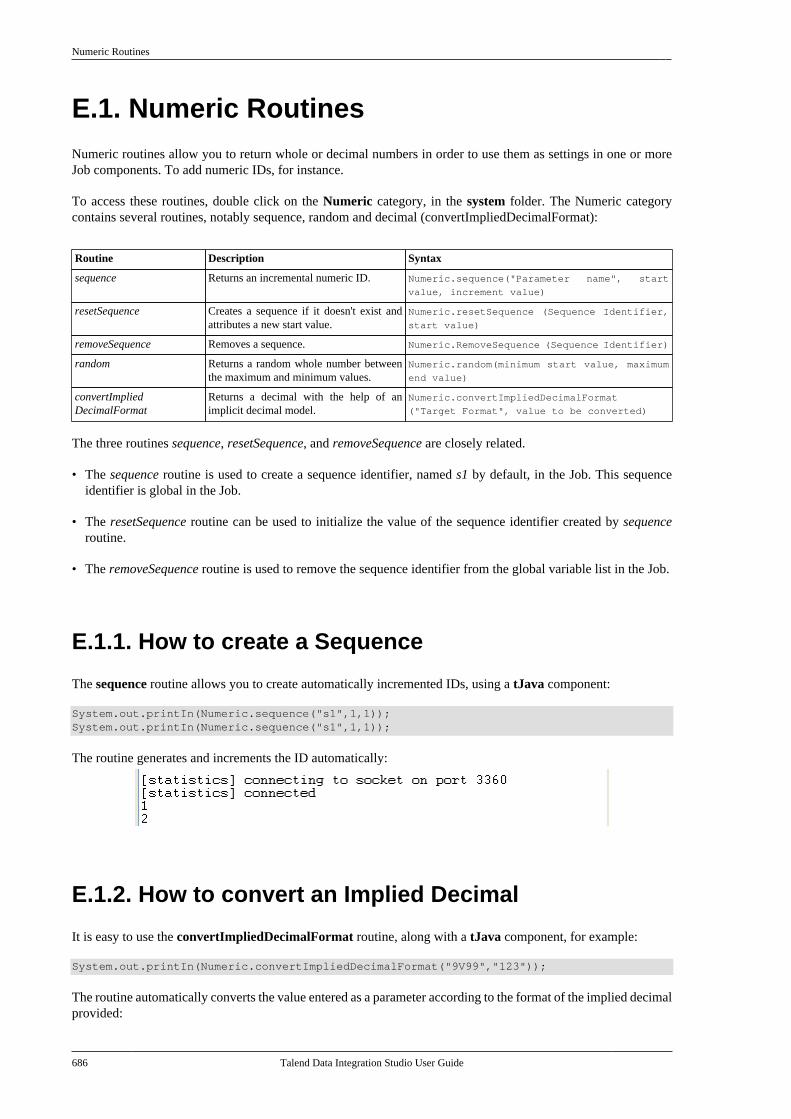
Numeric Routines
686 Talend Data Integration Studio User Guide
E.1. Numeric RoutinesNumeric routines allow you to return whole or decimal numbers in order to use them as settings in one or moreJob components. To add numeric IDs, for instance.
To access these routines, double click on the Numeric category, in the system folder. The Numeric categorycontains several routines, notably sequence, random and decimal (convertImpliedDecimalFormat):
Routine Description Syntax
sequence Returns an incremental numeric ID. Numeric.sequence("Parameter name", start
value, increment value)
resetSequence Creates a sequence if it doesn't exist andattributes a new start value.
Numeric.resetSequence (Sequence Identifier,
start value)
removeSequence Removes a sequence. Numeric.RemoveSequence (Sequence Identifier)
random Returns a random whole number betweenthe maximum and minimum values.
Numeric.random(minimum start value, maximum
end value)
convertImpliedDecimalFormat
Returns a decimal with the help of animplicit decimal model.
Numeric.convertImpliedDecimalFormat
("Target Format", value to be converted)
The three routines sequence, resetSequence, and removeSequence are closely related.
• The sequence routine is used to create a sequence identifier, named s1 by default, in the Job. This sequenceidentifier is global in the Job.
• The resetSequence routine can be used to initialize the value of the sequence identifier created by sequenceroutine.
• The removeSequence routine is used to remove the sequence identifier from the global variable list in the Job.
E.1.1. How to create a Sequence
The sequence routine allows you to create automatically incremented IDs, using a tJava component:
System.out.printIn(Numeric.sequence("s1",1,1)); System.out.printIn(Numeric.sequence("s1",1,1));
The routine generates and increments the ID automatically:
E.1.2. How to convert an Implied Decimal
It is easy to use the convertImpliedDecimalFormat routine, along with a tJava component, for example:
System.out.printIn(Numeric.convertImpliedDecimalFormat("9V99","123"));
The routine automatically converts the value entered as a parameter according to the format of the implied decimalprovided:
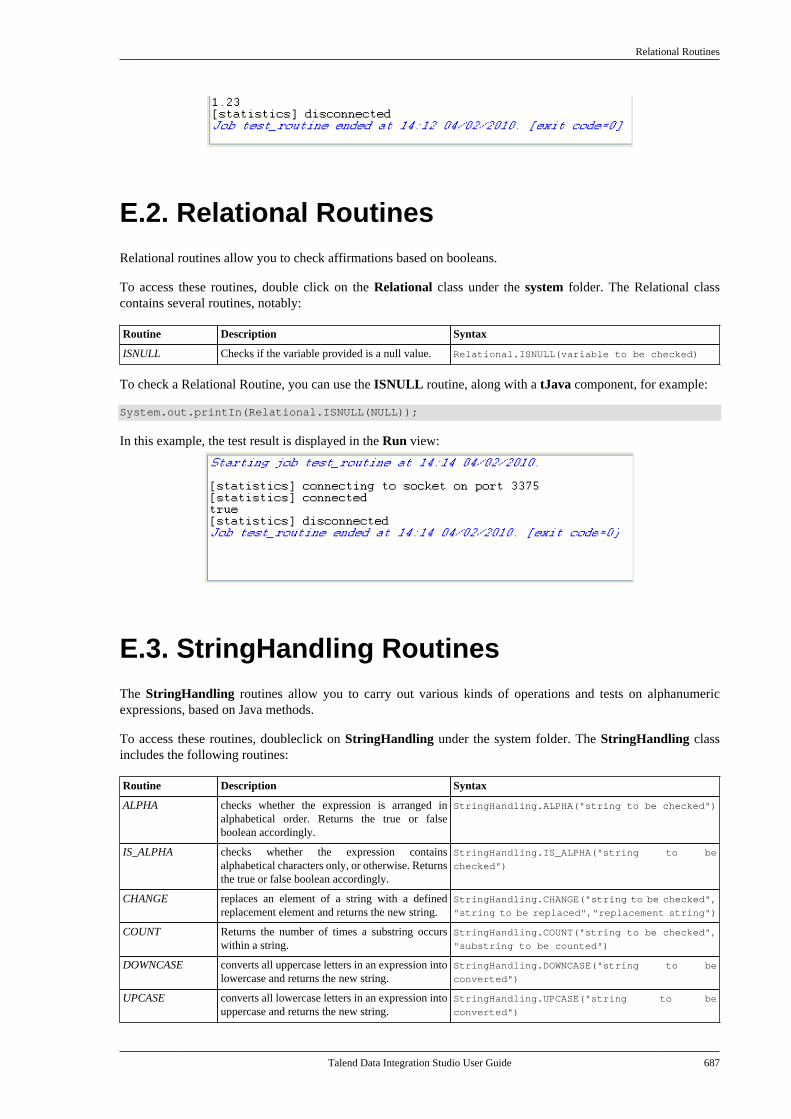
Relational Routines
Talend Data Integration Studio User Guide 687
E.2. Relational RoutinesRelational routines allow you to check affirmations based on booleans.
To access these routines, double click on the Relational class under the system folder. The Relational classcontains several routines, notably:
Routine Description Syntax
ISNULL Checks if the variable provided is a null value. Relational.ISNULL(variable to be checked)
To check a Relational Routine, you can use the ISNULL routine, along with a tJava component, for example:
System.out.printIn(Relational.ISNULL(NULL));
In this example, the test result is displayed in the Run view:
E.3. StringHandling RoutinesThe StringHandling routines allow you to carry out various kinds of operations and tests on alphanumericexpressions, based on Java methods.
To access these routines, doubleclick on StringHandling under the system folder. The StringHandling classincludes the following routines:
Routine Description Syntax
ALPHA checks whether the expression is arranged inalphabetical order. Returns the true or falseboolean accordingly.
StringHandling.ALPHA("string to be checked")
IS_ALPHA checks whether the expression containsalphabetical characters only, or otherwise. Returnsthe true or false boolean accordingly.
StringHandling.IS_ALPHA("string to be
checked")
CHANGE replaces an element of a string with a definedreplacement element and returns the new string.
StringHandling.CHANGE("string to be checked",
"string to be replaced","replacement string")
COUNT Returns the number of times a substring occurswithin a string.
StringHandling.COUNT("string to be checked",
"substring to be counted")
DOWNCASE converts all uppercase letters in an expression intolowercase and returns the new string.
StringHandling.DOWNCASE("string to be
converted")
UPCASE converts all lowercase letters in an expression intouppercase and returns the new string.
StringHandling.UPCASE("string to be
converted")
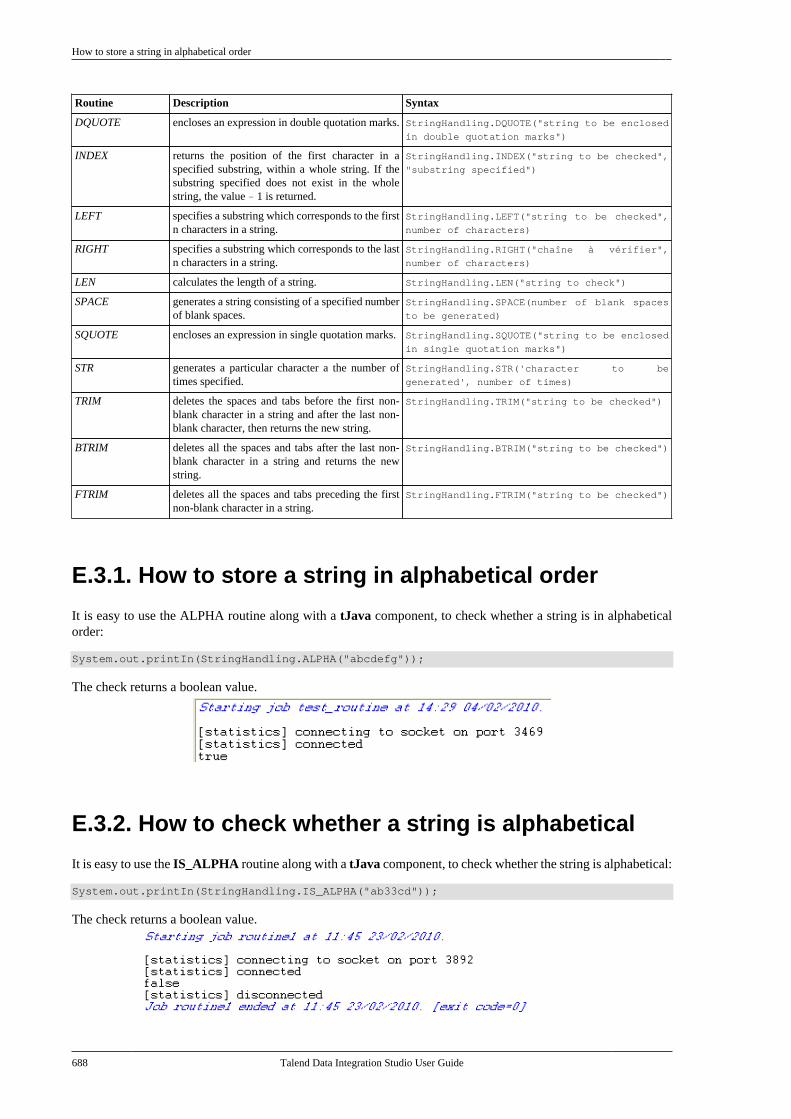
How to store a string in alphabetical order
688 Talend Data Integration Studio User Guide
Routine Description Syntax
DQUOTE encloses an expression in double quotation marks. StringHandling.DQUOTE("string to be enclosed
in double quotation marks")
INDEX returns the position of the first character in aspecified substring, within a whole string. If thesubstring specified does not exist in the wholestring, the value - 1 is returned.
StringHandling.INDEX("string to be checked",
"substring specified")
LEFT specifies a substring which corresponds to the firstn characters in a string.
StringHandling.LEFT("string to be checked",
number of characters)
RIGHT specifies a substring which corresponds to the lastn characters in a string.
StringHandling.RIGHT("chaîne à vérifier",
number of characters)
LEN calculates the length of a string. StringHandling.LEN("string to check")
SPACE generates a string consisting of a specified numberof blank spaces.
StringHandling.SPACE(number of blank spaces
to be generated)
SQUOTE encloses an expression in single quotation marks. StringHandling.SQUOTE("string to be enclosed
in single quotation marks")
STR generates a particular character a the number oftimes specified.
StringHandling.STR('character to be
generated', number of times)
TRIM deletes the spaces and tabs before the first non-blank character in a string and after the last non-blank character, then returns the new string.
StringHandling.TRIM("string to be checked")
BTRIM deletes all the spaces and tabs after the last non-blank character in a string and returns the newstring.
StringHandling.BTRIM("string to be checked")
FTRIM deletes all the spaces and tabs preceding the firstnon-blank character in a string.
StringHandling.FTRIM("string to be checked")
E.3.1. How to store a string in alphabetical order
It is easy to use the ALPHA routine along with a tJava component, to check whether a string is in alphabeticalorder:
System.out.printIn(StringHandling.ALPHA("abcdefg"));
The check returns a boolean value.
E.3.2. How to check whether a string is alphabetical
It is easy to use the IS_ALPHA routine along with a tJava component, to check whether the string is alphabetical:
System.out.printIn(StringHandling.IS_ALPHA("ab33cd"));
The check returns a boolean value.
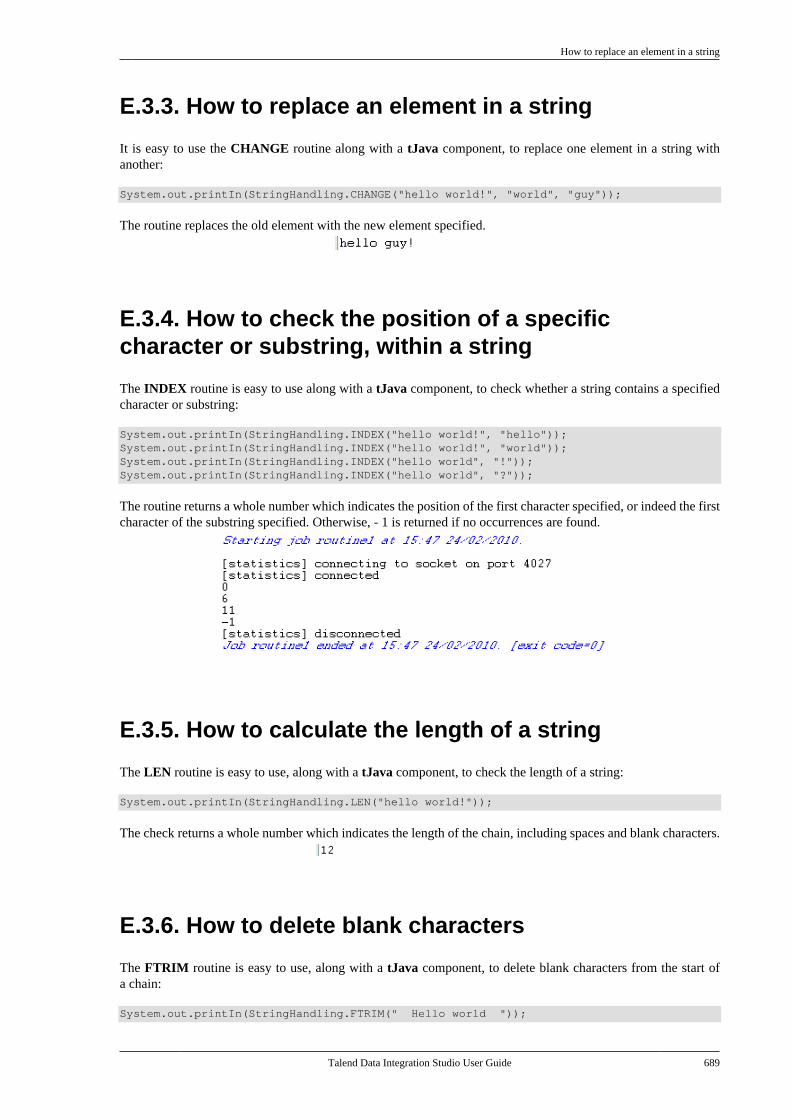
How to replace an element in a string
Talend Data Integration Studio User Guide 689
E.3.3. How to replace an element in a string
It is easy to use the CHANGE routine along with a tJava component, to replace one element in a string withanother:
System.out.printIn(StringHandling.CHANGE("hello world!", "world", "guy"));
The routine replaces the old element with the new element specified.
E.3.4. How to check the position of a specificcharacter or substring, within a string
The INDEX routine is easy to use along with a tJava component, to check whether a string contains a specifiedcharacter or substring:
System.out.printIn(StringHandling.INDEX("hello world!", "hello"));System.out.printIn(StringHandling.INDEX("hello world!", "world")); System.out.printIn(StringHandling.INDEX("hello world", "!")); System.out.printIn(StringHandling.INDEX("hello world", "?"));
The routine returns a whole number which indicates the position of the first character specified, or indeed the firstcharacter of the substring specified. Otherwise, - 1 is returned if no occurrences are found.
E.3.5. How to calculate the length of a string
The LEN routine is easy to use, along with a tJava component, to check the length of a string:
System.out.printIn(StringHandling.LEN("hello world!"));
The check returns a whole number which indicates the length of the chain, including spaces and blank characters.
E.3.6. How to delete blank characters
The FTRIM routine is easy to use, along with a tJava component, to delete blank characters from the start ofa chain:
System.out.printIn(StringHandling.FTRIM(" Hello world "));
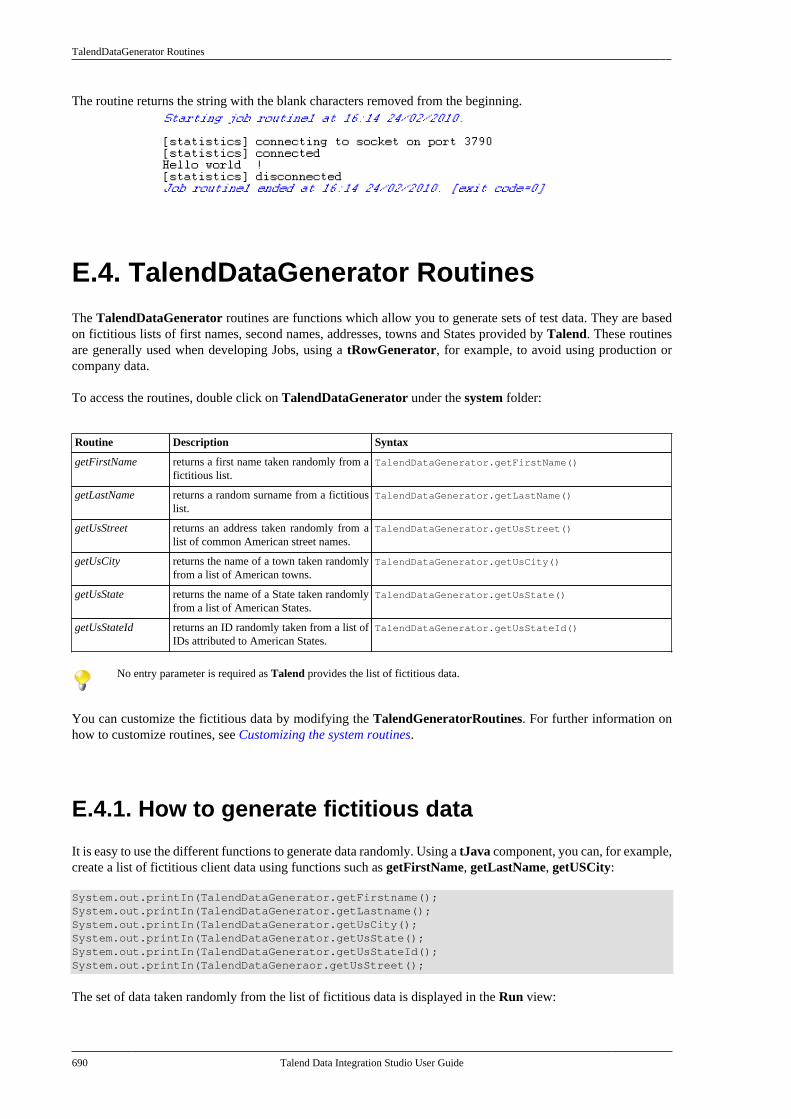
TalendDataGenerator Routines
690 Talend Data Integration Studio User Guide
The routine returns the string with the blank characters removed from the beginning.
E.4. TalendDataGenerator RoutinesThe TalendDataGenerator routines are functions which allow you to generate sets of test data. They are basedon fictitious lists of first names, second names, addresses, towns and States provided by Talend. These routinesare generally used when developing Jobs, using a tRowGenerator, for example, to avoid using production orcompany data.
To access the routines, double click on TalendDataGenerator under the system folder:
Routine Description Syntax
getFirstName returns a first name taken randomly from afictitious list.
TalendDataGenerator.getFirstName()
getLastName returns a random surname from a fictitiouslist.
TalendDataGenerator.getLastName()
getUsStreet returns an address taken randomly from alist of common American street names.
TalendDataGenerator.getUsStreet()
getUsCity returns the name of a town taken randomlyfrom a list of American towns.
TalendDataGenerator.getUsCity()
getUsState returns the name of a State taken randomlyfrom a list of American States.
TalendDataGenerator.getUsState()
getUsStateId returns an ID randomly taken from a list ofIDs attributed to American States.
TalendDataGenerator.getUsStateId()
No entry parameter is required as Talend provides the list of fictitious data.
You can customize the fictitious data by modifying the TalendGeneratorRoutines. For further information onhow to customize routines, see Customizing the system routines.
E.4.1. How to generate fictitious data
It is easy to use the different functions to generate data randomly. Using a tJava component, you can, for example,create a list of fictitious client data using functions such as getFirstName, getLastName, getUSCity:
System.out.printIn(TalendDataGenerator.getFirstname();System.out.printIn(TalendDataGenerator.getLastname(); System.out.printIn(TalendDataGenerator.getUsCity(); System.out.printIn(TalendDataGenerator.getUsState();System.out.printIn(TalendDataGenerator.getUsStateId();System.out.printIn(TalendDataGeneraor.getUsStreet();
The set of data taken randomly from the list of fictitious data is displayed in the Run view:
TalendDate Routines
Talend Data Integration Studio User Guide 691
E.5. TalendDate RoutinesThe TalendDate routines allow you to carry out different kinds of operations and checks concerning the formatof Date expressions.
To access these routines, double click on TalendDate under the system folder:
Routine Description Syntax
addDate adds n days, n months, n hours, n minutes or nseconds to a Java date and returns the new date.
The Date format is: "yyyy", "MM", "dd", "HH","mm", "ss" or "SSS".
TalendDate.addDate("String date initiale",
"format Date - eg.: yyyy/MM/dd", whole
n,"format of the part of the date to which n
is to be added - eg.:yyyy").
compareDate compares all or part of two dates according tothe format specified. Returns 0 if the dates areidentical, -1 if the first date is earlier and 1 if thesecond date is earlier.
TalendDate.compareDate(Date date1, Date
date2, "format to be compared - eg.: yyyy-
MM-dd")
diffDate returns the difference between two dates interms of days, months or years according to thecomparison parameter specified.
TalendDate.diffDate(Date1(), Date2(),
"format of the part of the date to be compared
- eg.:yyyy")
diffDateFloor returns the difference between two dates byfloor in terms of years, months, days, hours,minutes, seconds or milliseconds according to thecomparison parameter specified.
TalendDate.diffDateFloor(Date1(), Date2(),
"format of the part of the date to be compared
- eg.:MM")
formatDate returns a date string which corresponds to theformat specified.
TalendDate.formatDate("date format - eg.:
yyyy-MM-dd HH:mm:ss", Date() to be formatted
formatDateLocale changes a date into a date/hour string according tothe format used in the target country.
TalendDate.formatDateLocale ("format
target", java.util.Date date, "language or
country code")
getCurrentDate returns the current date. No entry parameter isrequired.
TalendDate.getCurrentDate()
getDate returns the current date and hour in the formatspecified (optional). This string can contain fixedcharacter strings or variables linked to the date. Bydefault, the string is returned in the format, DD/MM/CCYY.
TalendDate.getDate("Format of the string -
ex: CCYY-MM-DD")
getFirstDayOfMonth changes the date of an event to the first day of thecurrent month and returns the new date.
TalendDate.getFirstDayMonth(Date)
getLastDayOfMonth changes the date of an event to the last day of thecurrent month and returns the new date.
TalendDate.getLastDayMonth(Date)
getPartOfDate returns part of a date according to the formatspecified. This string can contain fixed characterstrings or variables linked to the date.
TalendDate.getPartOfDate("String indicating
the part of the date to be retrieved, "String
in the format of the date to be parsed")
getRandomDate returns a random date, in the ISO format. TalendDate.getRandomDate("format date of the
character string", String minDate, String
maxDate)
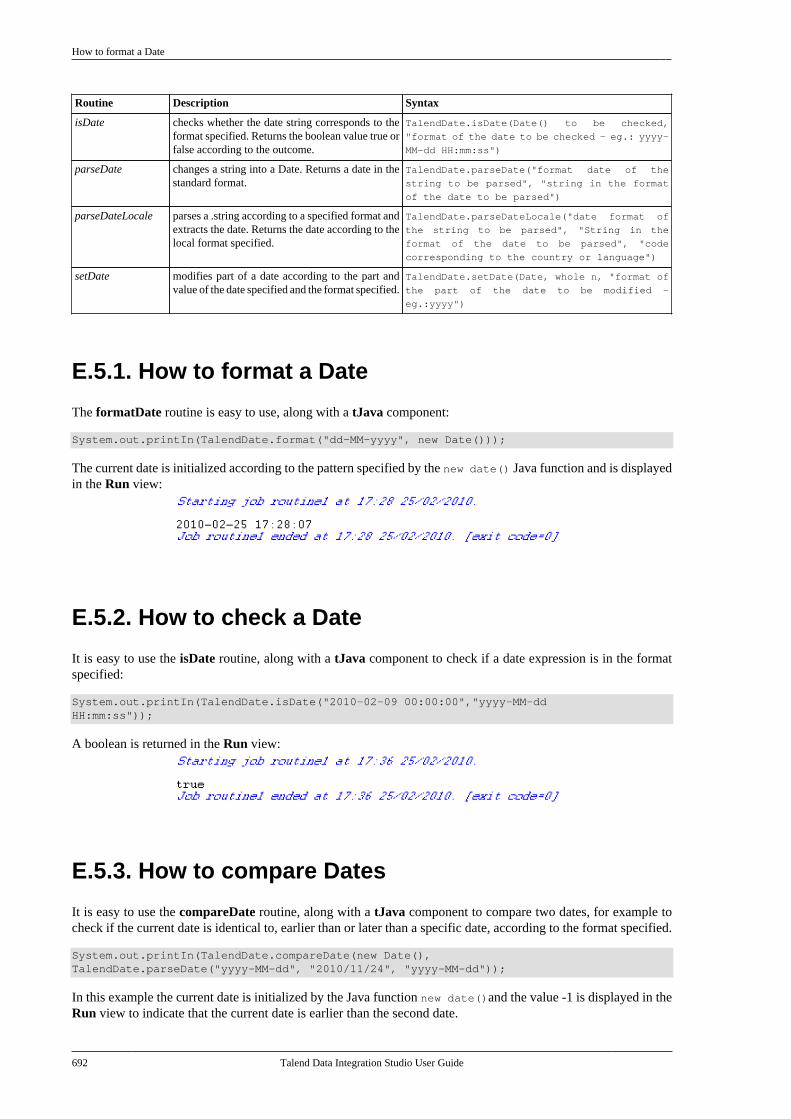
How to format a Date
692 Talend Data Integration Studio User Guide
Routine Description Syntax
isDate checks whether the date string corresponds to theformat specified. Returns the boolean value true orfalse according to the outcome.
TalendDate.isDate(Date() to be checked,
"format of the date to be checked - eg.: yyyy-
MM-dd HH:mm:ss")
parseDate changes a string into a Date. Returns a date in thestandard format.
TalendDate.parseDate("format date of the
string to be parsed", "string in the format
of the date to be parsed")
parseDateLocale parses a .string according to a specified format andextracts the date. Returns the date according to thelocal format specified.
TalendDate.parseDateLocale("date format of
the string to be parsed", "String in the
format of the date to be parsed", "code
corresponding to the country or language")
setDate modifies part of a date according to the part andvalue of the date specified and the format specified.
TalendDate.setDate(Date, whole n, "format of
the part of the date to be modified -
eg.:yyyy")
E.5.1. How to format a Date
The formatDate routine is easy to use, along with a tJava component:
System.out.printIn(TalendDate.format("dd-MM-yyyy", new Date()));
The current date is initialized according to the pattern specified by the new date() Java function and is displayedin the Run view:
E.5.2. How to check a Date
It is easy to use the isDate routine, along with a tJava component to check if a date expression is in the formatspecified:
System.out.printIn(TalendDate.isDate("2010-02-09 00:00:00","yyyy-MM-dd HH:mm:ss"));
A boolean is returned in the Run view:
E.5.3. How to compare Dates
It is easy to use the compareDate routine, along with a tJava component to compare two dates, for example tocheck if the current date is identical to, earlier than or later than a specific date, according to the format specified.
System.out.printIn(TalendDate.compareDate(new Date(),TalendDate.parseDate("yyyy-MM-dd", "2010/11/24", "yyyy-MM-dd"));
In this example the current date is initialized by the Java function new date()and the value -1 is displayed in theRun view to indicate that the current date is earlier than the second date.
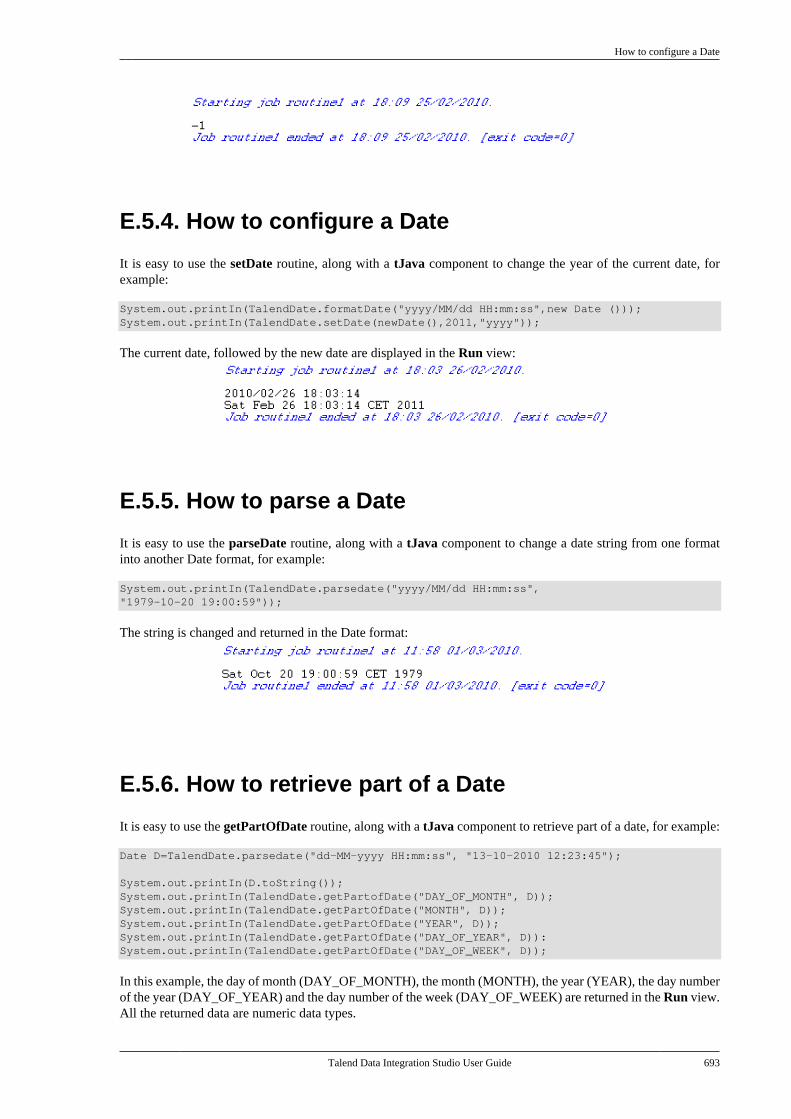
How to configure a Date
Talend Data Integration Studio User Guide 693
E.5.4. How to configure a Date
It is easy to use the setDate routine, along with a tJava component to change the year of the current date, forexample:
System.out.printIn(TalendDate.formatDate("yyyy/MM/dd HH:mm:ss",new Date ()));System.out.printIn(TalendDate.setDate(newDate(),2011,"yyyy"));
The current date, followed by the new date are displayed in the Run view:
E.5.5. How to parse a Date
It is easy to use the parseDate routine, along with a tJava component to change a date string from one formatinto another Date format, for example:
System.out.printIn(TalendDate.parsedate("yyyy/MM/dd HH:mm:ss","1979-10-20 19:00:59"));
The string is changed and returned in the Date format:
E.5.6. How to retrieve part of a Date
It is easy to use the getPartOfDate routine, along with a tJava component to retrieve part of a date, for example:
Date D=TalendDate.parsedate("dd-MM-yyyy HH:mm:ss", "13-10-2010 12:23:45");
System.out.printIn(D.toString());System.out.printIn(TalendDate.getPartofDate("DAY_OF_MONTH", D));System.out.printIn(TalendDate.getPartOfDate("MONTH", D));System.out.printIn(TalendDate.getPartOfDate("YEAR", D));System.out.printIn(TalendDate.getPartOfDate("DAY_OF_YEAR", D)):System.out.printIn(TalendDate.getPartOfDate("DAY_OF_WEEK", D));
In this example, the day of month (DAY_OF_MONTH), the month (MONTH), the year (YEAR), the day numberof the year (DAY_OF_YEAR) and the day number of the week (DAY_OF_WEEK) are returned in the Run view.All the returned data are numeric data types.
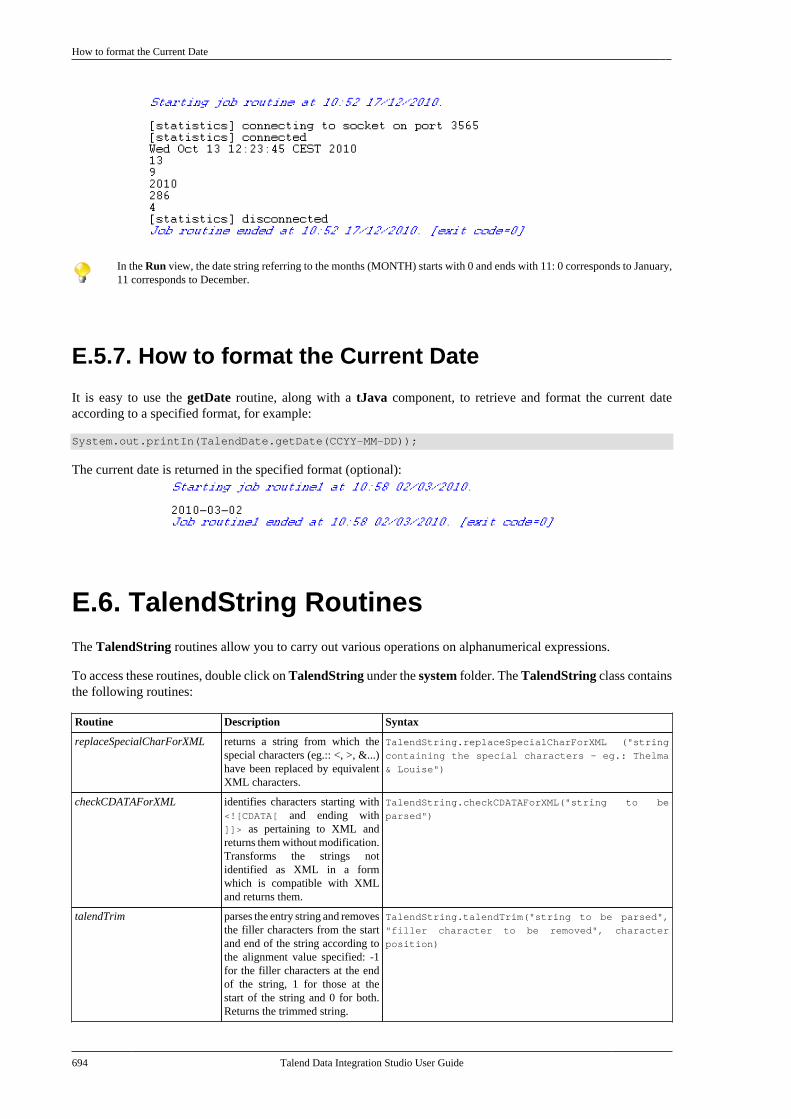
How to format the Current Date
694 Talend Data Integration Studio User Guide
In the Run view, the date string referring to the months (MONTH) starts with 0 and ends with 11: 0 corresponds to January,11 corresponds to December.
E.5.7. How to format the Current Date
It is easy to use the getDate routine, along with a tJava component, to retrieve and format the current dateaccording to a specified format, for example:
System.out.printIn(TalendDate.getDate(CCYY-MM-DD));
The current date is returned in the specified format (optional):
E.6. TalendString RoutinesThe TalendString routines allow you to carry out various operations on alphanumerical expressions.
To access these routines, double click on TalendString under the system folder. The TalendString class containsthe following routines:
Routine Description Syntax
replaceSpecialCharForXML returns a string from which thespecial characters (eg.:: <, >, &...)have been replaced by equivalentXML characters.
TalendString.replaceSpecialCharForXML ("string
containing the special characters - eg.: Thelma
& Louise")
checkCDATAForXML identifies characters starting with<![CDATA[ and ending with]]> as pertaining to XML andreturns them without modification.Transforms the strings notidentified as XML in a formwhich is compatible with XMLand returns them.
TalendString.checkCDATAForXML("string to be
parsed")
talendTrim parses the entry string and removesthe filler characters from the startand end of the string according tothe alignment value specified: -1for the filler characters at the endof the string, 1 for those at thestart of the string and 0 for both.Returns the trimmed string.
TalendString.talendTrim("string to be parsed",
"filler character to be removed", character
position)
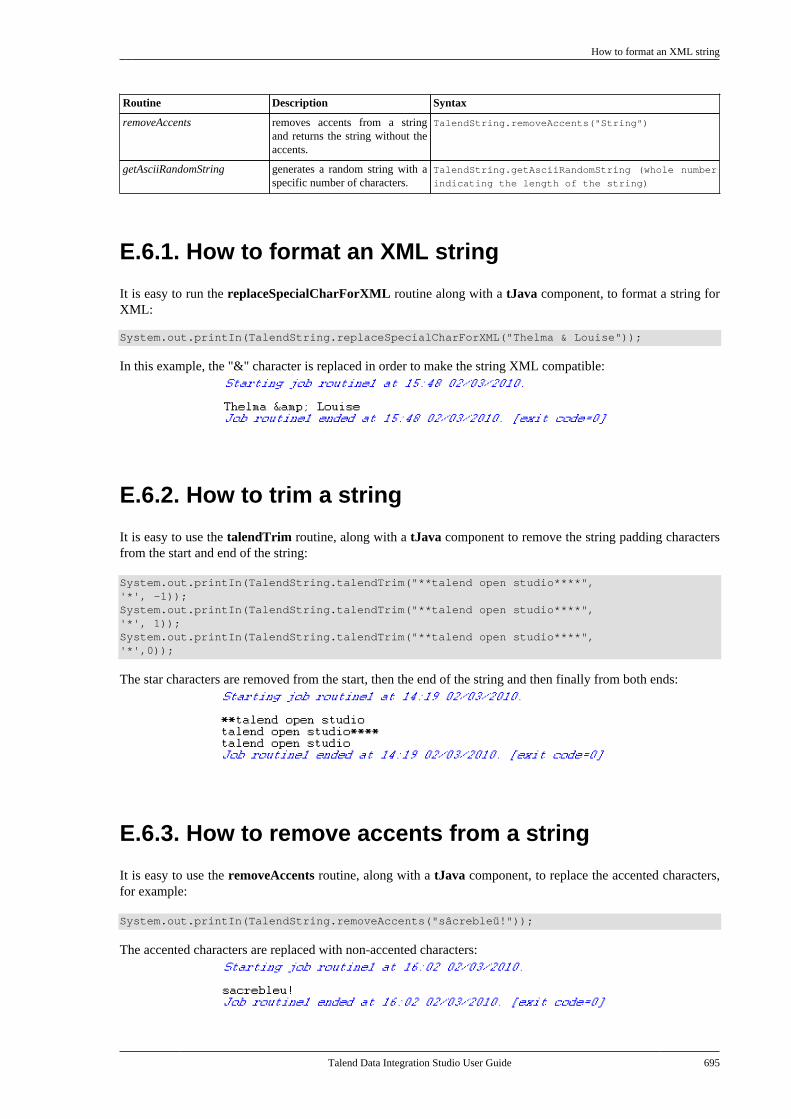
How to format an XML string
Talend Data Integration Studio User Guide 695
Routine Description Syntax
removeAccents removes accents from a stringand returns the string without theaccents.
TalendString.removeAccents("String")
getAsciiRandomString generates a random string with aspecific number of characters.
TalendString.getAsciiRandomString (whole number
indicating the length of the string)
E.6.1. How to format an XML string
It is easy to run the replaceSpecialCharForXML routine along with a tJava component, to format a string forXML:
System.out.printIn(TalendString.replaceSpecialCharForXML("Thelma & Louise"));
In this example, the "&" character is replaced in order to make the string XML compatible:
E.6.2. How to trim a string
It is easy to use the talendTrim routine, along with a tJava component to remove the string padding charactersfrom the start and end of the string:
System.out.printIn(TalendString.talendTrim("**talend open studio****",'*', -1));System.out.printIn(TalendString.talendTrim("**talend open studio****",'*', 1)); System.out.printIn(TalendString.talendTrim("**talend open studio****",'*',0));
The star characters are removed from the start, then the end of the string and then finally from both ends:
E.6.3. How to remove accents from a string
It is easy to use the removeAccents routine, along with a tJava component, to replace the accented characters,for example:
System.out.printIn(TalendString.removeAccents("sâcrebleü!"));
The accented characters are replaced with non-accented characters:

Talend Data Integration Studio User Guide


