Embed Size (px)
Citation preview
Talend Administration CenterUser Guide
7.1.1
ContentsCopyright.............................................................................................................................................. 5Talend Administration Center: Concepts and Principles................................................................6
Operating principles......................................................................................................................................................................6What modules and features are available depending on your license..................................................................... 9User roles/rights in the Administration Center............................................................................................................... 11What domains can you work in depending on your user type and license...........................................................15
Getting started with Talend Administration Center.....................................................................17Prerequisites to use Talend Administration Center....................................................................................................... 17Accessing the Administration Center.................................................................................................................................. 17Configuring Talend Administration Center........................................................................................................................27Managing Users............................................................................................................................................................................50Managing projects.......................................................................................................................................................................70Managing project authorizations...........................................................................................................................................84Managing project references.................................................................................................................................................. 87Removing locks on projects....................................................................................................................................................88Managing licenses.......................................................................................................................................................................90Managing rights associated with roles...............................................................................................................................95Managing notifications..............................................................................................................................................................97Checking for updates.............................................................................................................................................................. 109Changing user passwords......................................................................................................................................................111
Migrating your projects and generating reports........................................................................ 114Prerequisites to perform a project migration................................................................................................................ 114Migrating projects.....................................................................................................................................................................115Accessing detailed reports on migration.........................................................................................................................117
Backing up databases and SVN repositories...............................................................................120Prerequisites to use the Backup page..............................................................................................................................120Scheduling a backup............................................................................................................................................................... 120Executing a backup..................................................................................................................................................................122
Executing Jobs, Routes and Services........................................................................................... 124Configuring execution servers.............................................................................................................................................124Configuring virtual servers....................................................................................................................................................132Defining server authorizations............................................................................................................................................ 136Executing data integration Jobs from Job Conductor.................................................................................................138Executing data integration Jobs on a server based on Amazon EC2.................................................................... 177Planning the execution of data integration Jobs......................................................................................................... 180Executing Big Data Streaming Jobs from Big Data Streaming Conductor.......................................................... 191Publishing Services, Routes, and Jobs.............................................................................................................................. 191Executing Services, Routes, and data service Jobs, and applying Profiles from ESB Conductor..................205
Working in cluster mode............................................................................................................... 222Clustering: Concepts and Principles..................................................................................................................................222Prerequisites and configuration.......................................................................................................................................... 222Deploying a Job or a Route in cluster mode................................................................................................................. 223
Managing Repository items...........................................................................................................226
Accessing the Repository Browser page..........................................................................................................................226Getting started with the Repository Browser................................................................................................................ 227Managing and editing repository items...........................................................................................................................233Searching repository items................................................................................................................................................... 247
Monitoring task execution and accessing logs...........................................................................249Prerequisites to accessing the Monitoring pages........................................................................................................ 249Accessing the Monitoring node...........................................................................................................................................249Monitoring Jobs with Talend Activity Monitoring Console.......................................................................................250Displaying the commands executed in the CommandLine...................................................................................... 253Displaying log events..............................................................................................................................................................255Audit logs.....................................................................................................................................................................................259Monitoring task executions in the Monitoring node.................................................................................................. 263
Collecting the Job execution statistics........................................................................................ 270What are real time statistics................................................................................................................................................270Accessing real time statistics...............................................................................................................................................270
Recovering the execution of a Job...............................................................................................277What are recovery checkpoints........................................................................................................................................... 277Recovering job execution......................................................................................................................................................277
Monitoring the Service endpoints................................................................................................286Prerequisites to access the Service Locator page........................................................................................................286Accessing Service Locator..................................................................................................................................................... 286Monitoring the Service endpoints......................................................................................................................................287
Monitoring the Service activity.....................................................................................................294Prerequisites to access Service Activity Monitoring....................................................................................................294Accessing Service Activity Monitoring..............................................................................................................................294Monitoring the Service events............................................................................................................................................ 295
Managing ESB Resources and authorizations.............................................................................303Prerequisites................................................................................................................................................................................303Accessing the Authorization page......................................................................................................................................303Authorizing the Resources.................................................................................................................................................... 304
Managing Services and Policies................................................................................................... 320Prerequisites to access the Service Registry page...................................................................................................... 320Accessing the Service Registry page.................................................................................................................................320Registering the services.........................................................................................................................................................321
Managing the Provisioning Service..............................................................................................348Prerequisites to access the Provisioning of ESB Infrastructure module..............................................................348Accessing the Provisioning page........................................................................................................................................348Managing provisions................................................................................................................................................................349
Business rules..................................................................................................................................365Drools and Talend....................................................................................................................................................................365Business rule tools...................................................................................................................................................................366Steps to follow when using Drools...................................................................................................................................366Accessing Drools web application..................................................................................................................................... 367Working with business rules................................................................................................................................................ 368Building and deploying business rules............................................................................................................................ 384Cloning a Drools repository..................................................................................................................................................385
Migrating from the integrated Drools Web application to a standalone KIE Drools Workbench................386
Auditing projects (deprecated)..................................................................................................... 387Auditing a project.....................................................................................................................................................................387Customizing audit database................................................................................................................................................. 389
CommandLine features.................................................................................................................. 391CommandLine overview......................................................................................................................................................... 391Operating modes.......................................................................................................................................................................392Updating your license using the CommandLine...........................................................................................................394Generating a Job created with a Job creation API using the CommandLine......................................................395Executing a Job on a server with SSL enabled using the CommandLine............................................................396Building a Job using the CommandLine..........................................................................................................................396Publishing a Service, a Route or a data service Job into an Artifact repository using the CommandLine...397
Non-GUI operation in metaServlet...............................................................................................399Calling metaServlet..................................................................................................................................................................399Parameters and actions in metaServlet...........................................................................................................................400Using Scripts to Call MetaServlet Actions...................................................................................................................... 402Using MetaServlet to print the log file of a task.........................................................................................................403Running a task with context parameters using MetaServlet...................................................................................404Executing a task and returning its status using MetaServlet..................................................................................406Using MetaServlet to handle ESB execution tasks......................................................................................................409
Theory into practice: Executing and monitoring a data integration Job................................. 416Before replicating this use case......................................................................................................................................... 416Scheduling the execution of a Job.................................................................................................................................... 416Monitoring the execution of a Job.................................................................................................................................... 418
Theory into practice: Executing a Service, a data service Job, a Route and monitoring aService..........................................................................................................................................422
Before starting the use case................................................................................................................................................ 422Publishing a Service, a data service Job and a Route................................................................................................ 423Executing a Service, a data service Job and a Route................................................................................................. 424Monitoring the Service endpoints status........................................................................................................................ 425Monitoring the Service activity........................................................................................................................................... 426

Copyright
5
Copyright
Adapted for 7.1.1. Supersedes previous releases.
Publication date: November 12, 2018
Copyright © 2018 Talend. All rights reserved.
The content of this document is correct at the time of publication.
However, more recent updates may be available in the online version that can be found on TalendHelp Center.
Notices
Talend is a trademark of Talend, Inc.
All brands, product names, company names, trademarks and service marks are the properties of theirrespective owners.
End User License Agreement
The software described in this documentation is provided under Talend 's End User Software andSubscription Agreement ("Agreement") for commercial products. By using the software, you areconsidered to have fully understood and unconditionally accepted all the terms and conditions of theAgreement.
To read the Agreement now, visit http://www.talend.com/legal-terms/us-eula.
Talend Administration Center: Concepts and Principles
6
Talend Administration Center: Concepts andPrinciples
The Talend solutions offer the opportunity to work cooperatively on various projects: Data Integration,ESB, Data Management, Data Services, Enterprise Integration, MDM, or all of them.
This collaborative work is handled via Talend Administration Center, a web-based applicationcentralizing the management and administration of your studio. Talend Administration Center alsocentralizes the users' role management and access rights to your projects and the scheduling andmonitoring of processes (Jobs).
Projects and processes are all centralized in a remote repository enabling resource sharing and projectconfiguration.
Users created via Talend Administration Center will be able to connect to the projects they have beenassigned to in the studio, where they will be able to create technical processes (Jobs) that would thenbe made available via Talend Administration Center for remote launching, scheduling and monitoring.
Talend Administration Center allows you to:
• Manage operating and connection information via the Configuration page of the application. Formore information, see Configuring Talend Administration Center on page 27.
• Administrate projects, manage users and licenses via the Projects, Users and Licenses pages.For more information, see Managing projects on page 70, Managing project references onpage 87, Managing project authorizations on page 84, Managing Users on page 50, andManaging licenses on page 90.
• Schedule deployment and roll-out of processes (Jobs) via the Conductor node and monitor them viathe Monitoring node. For more information, see Executing Jobs, Routes and Services on page 124and Monitoring task execution and accessing logs on page 249.
Other pages might be available to you depending on your license. For more information, please referto What modules and features are available depending on your license on page 9.
Operating principlesThe operating principles could be summarized into the following major topics:
• building technical or business-related processes,
• administrating users, projects, access rights, and processes and their dependencies,
• deploying and executing technical processes,
• monitoring the execution of the technical processes.
Each of the above topics has been graphically described by isolating specific functionalities indifferent functional blocks.
The availability of some functionalities depends on your license. For more information on whichfunctionalities are available to you, see What modules and features are available depending on yourlicense on page 9.
Talend Administration Center: Concepts and Principles
7
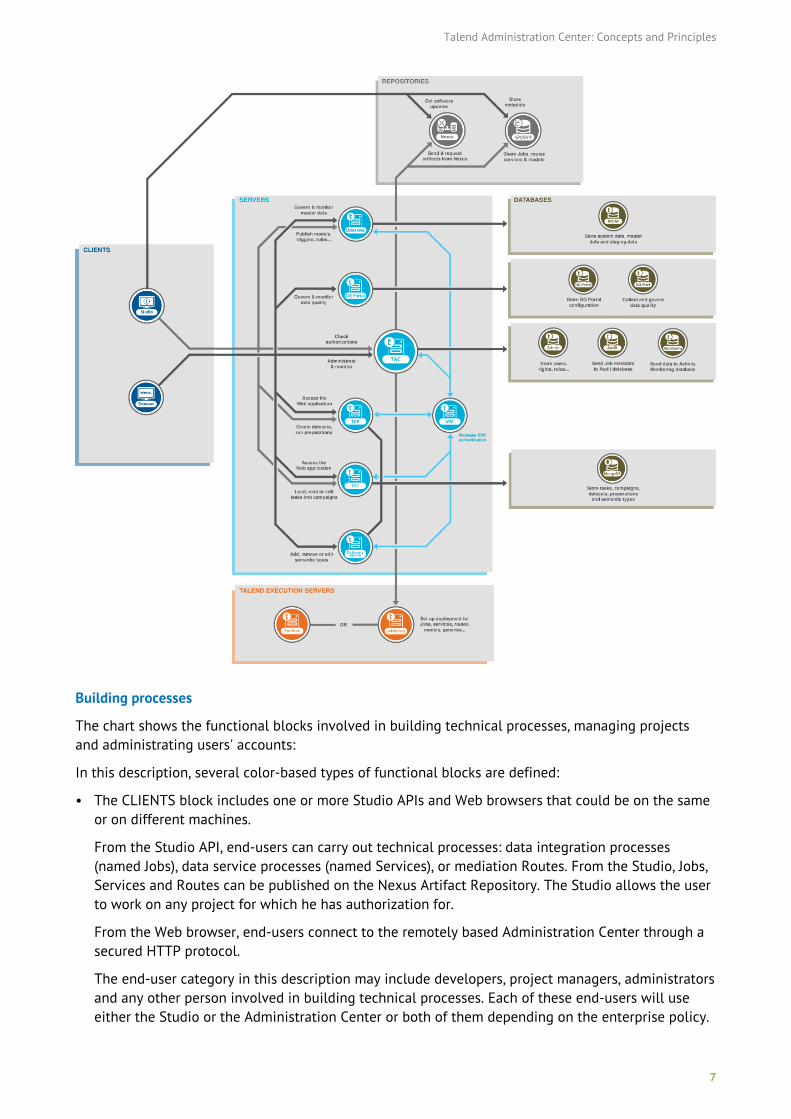
Building processes
The chart shows the functional blocks involved in building technical processes, managing projectsand administrating users' accounts:
In this description, several color-based types of functional blocks are defined:
• The CLIENTS block includes one or more Studio APIs and Web browsers that could be on the sameor on different machines.
From the Studio API, end-users can carry out technical processes: data integration processes(named Jobs), data service processes (named Services), or mediation Routes. From the Studio, Jobs,Services and Routes can be published on the Nexus Artifact Repository. The Studio allows the userto work on any project for which he has authorization for.
From the Web browser, end-users connect to the remotely based Administration Center through asecured HTTP protocol.
The end-user category in this description may include developers, project managers, administratorsand any other person involved in building technical processes. Each of these end-users will useeither the Studio or the Administration Center or both of them depending on the enterprise policy.
Talend Administration Center: Concepts and Principles
8
For more information about users' rights and roles, see User roles/rights in the AdministrationCenter on page 11.
• The TALEND SERVERS and DATABASES blocks and the SVN grey circle include a web-basedAdministration Center (application server) connected to two shared repositories: one based on anSVN server and one based on a database server (Admin).
The Administration Center enables the management and administration of all projects.Administration metadata (user accounts, access rights and project authorization for example)is stored in the database server and project metadata (Jobs, Routines, Business Models, Routes,Services, for example) is stored in the SVN server to easily share them between the different end-users.
Deployment and execution
The chart also shows the execution servers (JobServers and Talend Runtimes) and the Nexus ArtifactRepository. Artifact Repository is involved in publishing Jobs, Web, REST and data services, andmediation routes created in the studio or any other Java IDE, and the execution server is involved indeploying and executing them:
• The Nexus grey circle represents the Artifact Repository that stores all Jobs, Routes and Servicesthat are published from the Studio and are ready to be deployed and executed in the executionserver.
• The TALEND EXECUTION SERVERS block represents the execution servers that run the technicalprocesses according to the execution scheduling set up in the Talend Administration Center Webapplication. Those execution servers can be:
• One or more Talend Runtimes (execution container) deployed inside your information system.The Talend Runtime deploys and executes the Jobs, Routes and Services retrieved from theArtifact Repository according to the set up defined in the Administration Center via the webapplication.
If you have several Talend Runtimes on which to deploy the artifacts, you will be able toload balance their execution according to your needs. All instances of Talend Runtime willcommunicate between each other via the Service Locator to identify the one more likely todeploy and execute the artifact(s) set to deployment in Talend Administration Center. TheTalend Runtime elected for the deployment will request for the artifact(s) to deploy and executefrom the Artifact Repository and the Artifact Repository will thus send the artifact(s) requestedalong with all the dependencies needed for its/their execution to the Talend Runtime, that willdeploy and execute them.
• One or more JobServers deployed inside your information system that run technical processes(Jobs) according to scheduled time, date or event set in the Talend Administration Center Webapplication.
For more information on how to manage deployment, see Executing Jobs, Routes and Services onpage 124.
Monitoring
The chart also shows the Monitoring module:
• The AMC/SAM green circle shows the Activity Monitoring Console and the Service ActivityMonitoring.
Talend Administration Center: Concepts and Principles
9
The Activity Monitoring Console allows end-users to monitor the execution of technical processes.It provides detailed monitoring capabilities that can be used to consolidate collected loginformation, understand the underlying data flows interaction, prevent faults that could beunexpectedly generated and support the system management decisions. For more information, seeMonitoring task execution and accessing logs on page 249.
The Service Activity Monitoring allows the end-users to monitor service calls. It providesmonitoring and consolidated event information that the end-user can use to understand theunderlying requests and replies that compose the event, monitor faults that may be unexpectedlygenerated and support the system management decisions. For more information, see Monitoringthe Service activity on page 294.
For more information on how to install and configure the Monitoring items, see Installing the TalendActivity Monitoring Console web application on Talend Help Center.
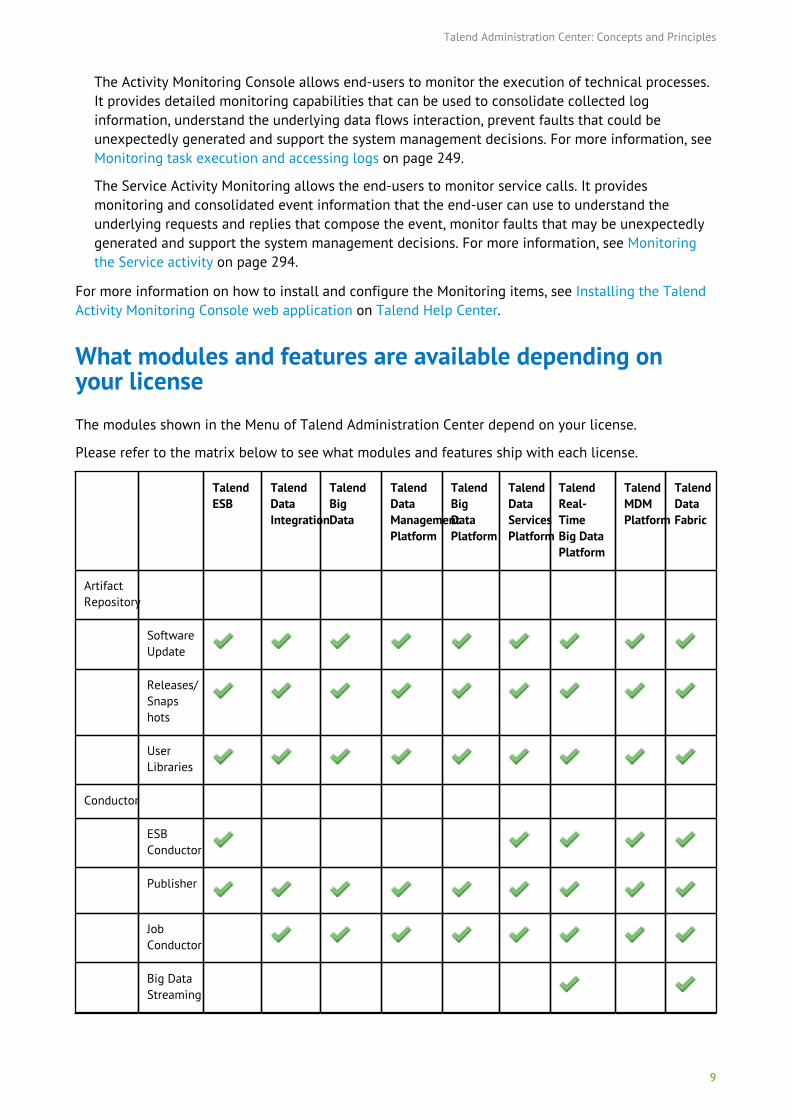
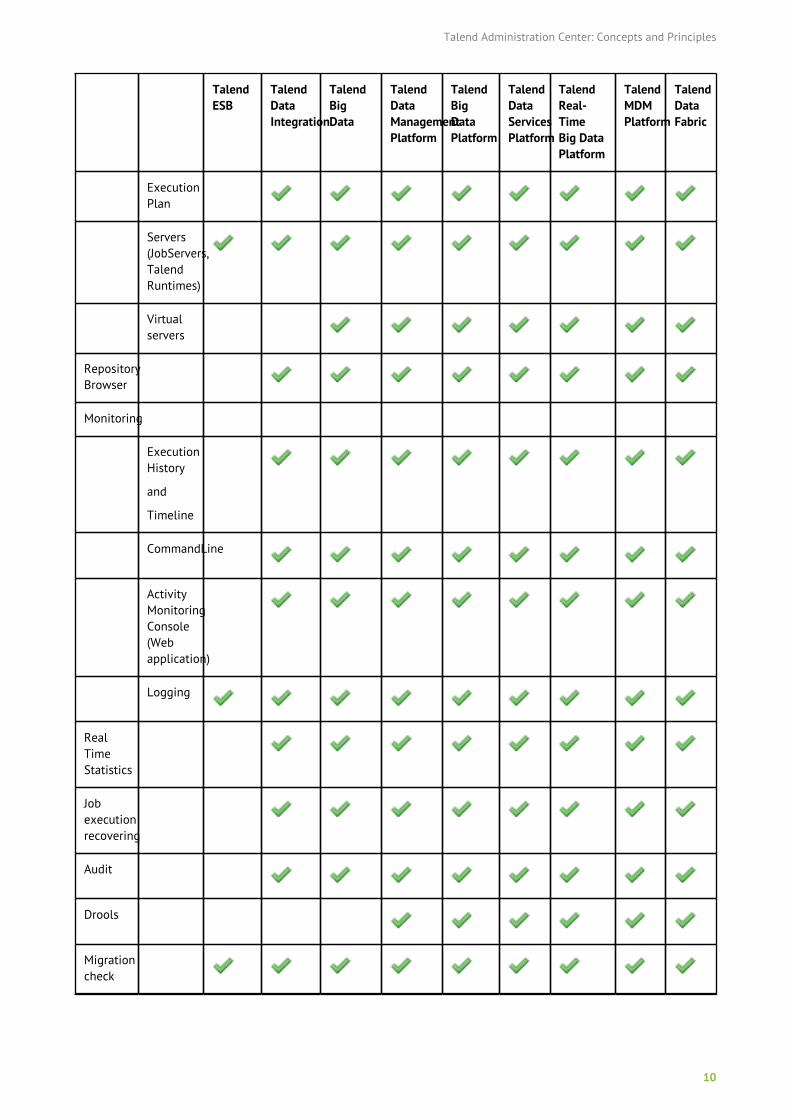
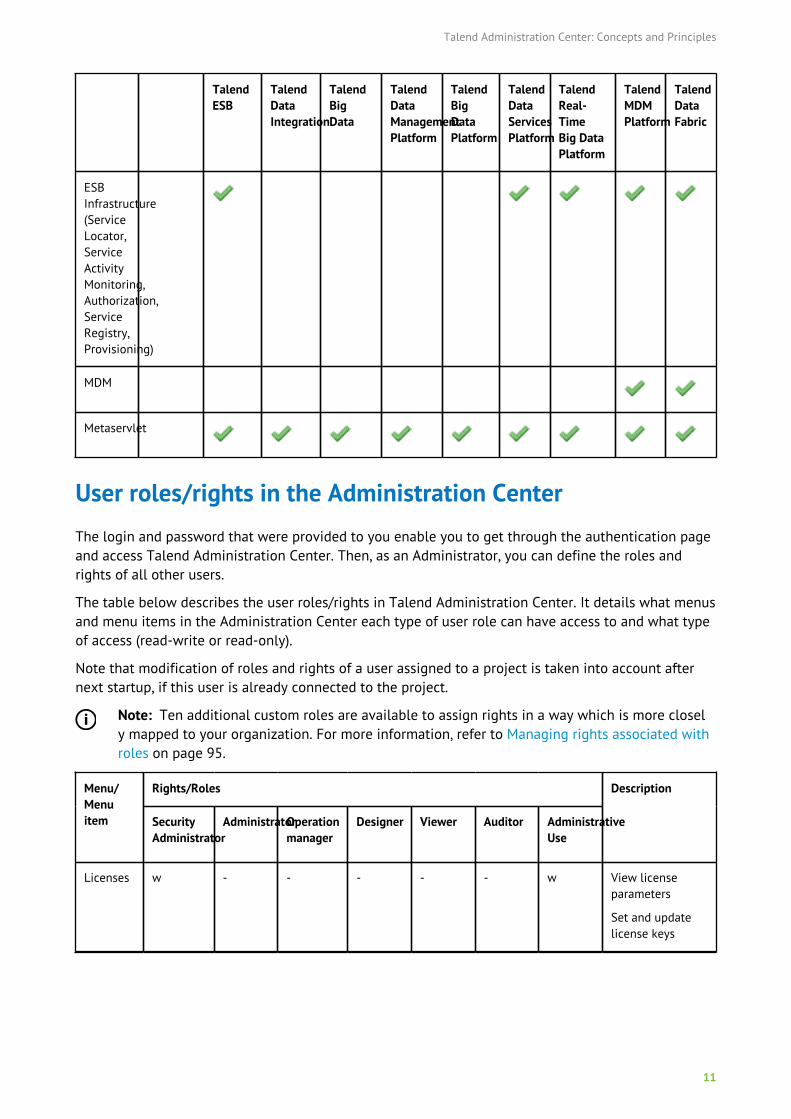
What modules and features are available depending onyour licenseThe modules shown in the Menu of Talend Administration Center depend on your license.
Please refer to the matrix below to see what modules and features ship with each license.
TalendESB
TalendDataIntegration
TalendBigData
TalendDataManagementPlatform
TalendBigDataPlatform
TalendDataServicesPlatform
TalendReal-TimeBig DataPlatform
TalendMDMPlatform
TalendDataFabric
ArtifactRepository
SoftwareUpdate
Releases/Snapshots
UserLibraries
Conductor
ESBConductor
Publisher
JobConductor
Big DataStreaming
Talend Administration Center: Concepts and Principles
10
TalendESB
TalendDataIntegration
TalendBigData
TalendDataManagementPlatform
TalendBigDataPlatform
TalendDataServicesPlatform
TalendReal-TimeBig DataPlatform
TalendMDMPlatform
TalendDataFabric
ExecutionPlan
Servers(JobServers,TalendRuntimes)
Virtualservers
RepositoryBrowser
Monitoring
ExecutionHistory
and
Timeline
CommandLine
ActivityMonitoringConsole(Webapplication)
Logging
RealTimeStatistics
Jobexecutionrecovering
Audit
Drools
Migrationcheck
Talend Administration Center: Concepts and Principles
11
TalendESB
TalendDataIntegration
TalendBigData
TalendDataManagementPlatform
TalendBigDataPlatform
TalendDataServicesPlatform
TalendReal-TimeBig DataPlatform
TalendMDMPlatform
TalendDataFabric
ESBInfrastructure(ServiceLocator,ServiceActivityMonitoring,Authorization,ServiceRegistry,Provisioning)
MDM
Metaservlet
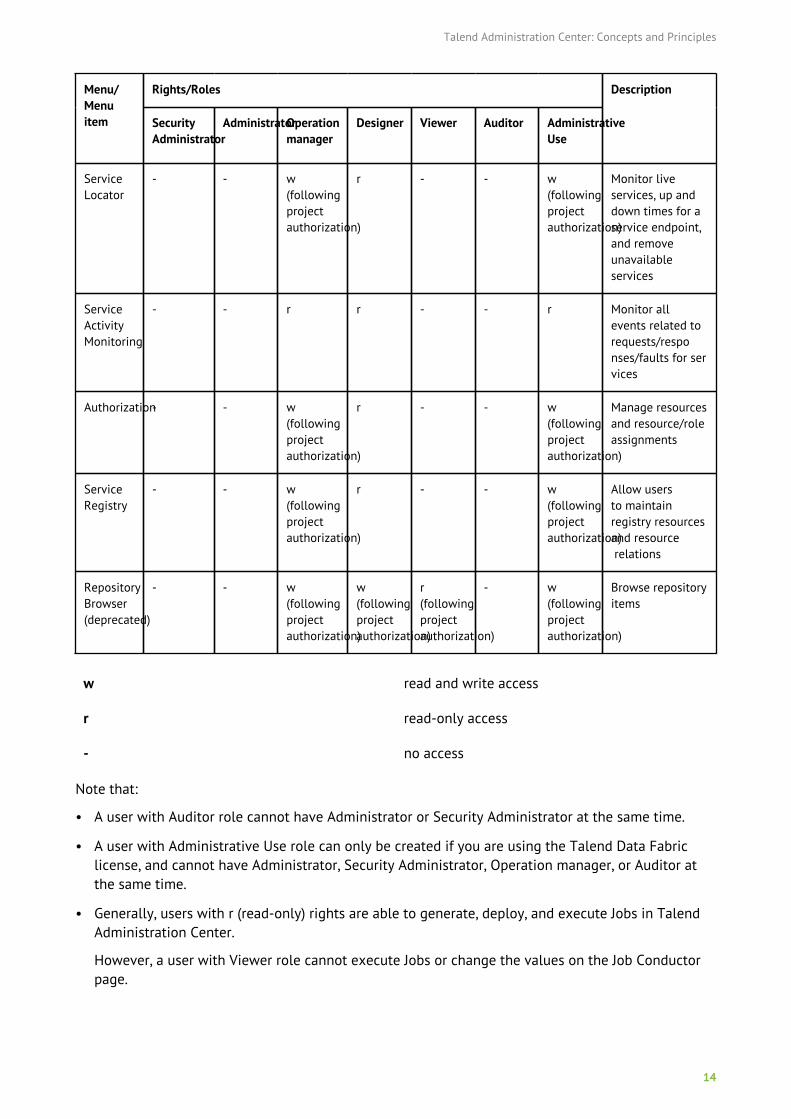
User roles/rights in the Administration CenterThe login and password that were provided to you enable you to get through the authentication pageand access Talend Administration Center. Then, as an Administrator, you can define the roles andrights of all other users.
The table below describes the user roles/rights in Talend Administration Center. It details what menusand menu items in the Administration Center each type of user role can have access to and what typeof access (read-write or read-only).
Note that modification of roles and rights of a user assigned to a project is taken into account afternext startup, if this user is already connected to the project.
Note: Ten additional custom roles are available to assign rights in a way which is more closely mapped to your organization. For more information, refer to Managing rights associated withroles on page 95.
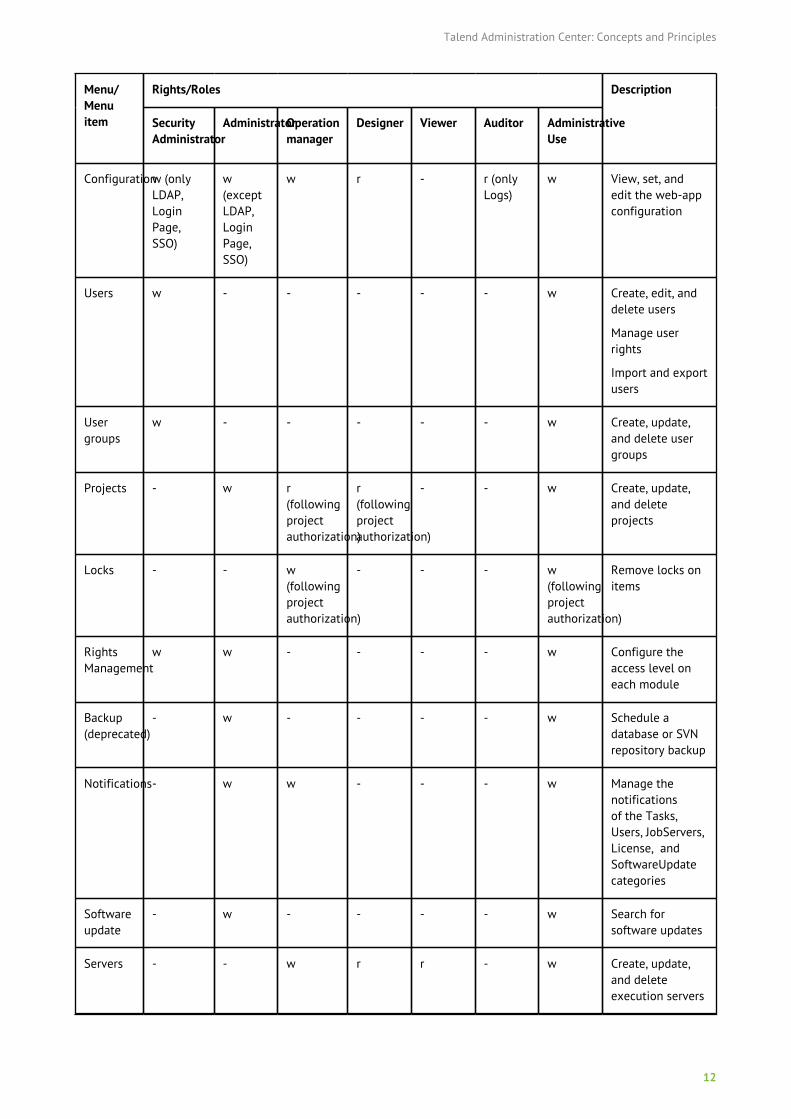
Rights/RolesMenu/Menuitem
SecurityAdministrator
AdministratorOperationmanager
Designer Viewer Auditor AdministrativeUse
Description
Licenses w - - - - - w View licenseparameters
Set and updatelicense keys
Talend Administration Center: Concepts and Principles
12
Rights/RolesMenu/Menuitem
SecurityAdministrator
AdministratorOperationmanager
Designer Viewer Auditor AdministrativeUse
Description
Configurationw (onlyLDAP,LoginPage,SSO)
w(exceptLDAP,LoginPage,SSO)
w r - r (onlyLogs)
w View, set, andedit the web-appconfiguration
Users w - - - - - w Create, edit, anddelete users
Manage userrights
Import and exportusers
Usergroups
w - - - - - w Create, update,and delete usergroups
Projects - w r(followingprojectauthorization)
r(followingprojectauthorization)
- - w Create, update,and deleteprojects
Locks - - w(followingprojectauthorization)
- - - w(followingprojectauthorization)
Remove locks onitems
RightsManagement
w w - - - - w Configure theaccess level oneach module
Backup(deprecated)
- w - - - - w Schedule adatabase or SVNrepository backup
Notifications- w w - - - w Manage thenotificationsof the Tasks,Users, JobServers,License, andSoftwareUpdatecategories
Softwareupdate
- w - - - - w Search forsoftware updates
Servers - - w r r - w Create, update,and deleteexecution servers
Talend Administration Center: Concepts and Principles
13
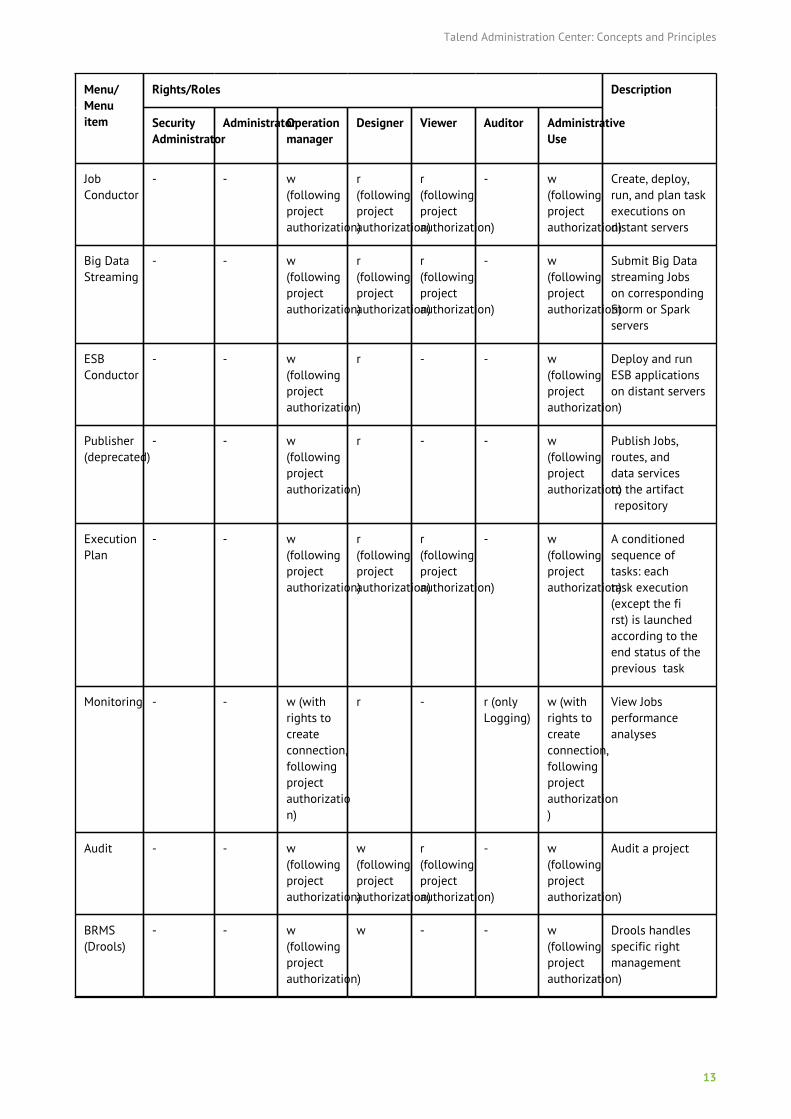
Rights/RolesMenu/Menuitem
SecurityAdministrator
AdministratorOperationmanager
Designer Viewer Auditor AdministrativeUse
Description
JobConductor
- - w(followingprojectauthorization)
r(followingprojectauthorization)
r(followingprojectauthorization)
- w(followingprojectauthorization)
Create, deploy,run, and plan taskexecutions ondistant servers
Big DataStreaming
- - w(followingprojectauthorization)
r(followingprojectauthorization)
r(followingprojectauthorization)
- w(followingprojectauthorization)
Submit Big Datastreaming Jobson correspondingStorm or Spark servers
ESBConductor
- - w(followingprojectauthorization)
r - - w(followingprojectauthorization)
Deploy and runESB applicationson distant servers
Publisher(deprecated)
- - w(followingprojectauthorization)
r - - w(followingprojectauthorization)
Publish Jobs,routes, anddata servicesto the artifact repository
ExecutionPlan
- - w(followingprojectauthorization)
r(followingprojectauthorization)
r(followingprojectauthorization)
- w(followingprojectauthorization)
A conditionedsequence oftasks: eachtask execution(except the first) is launchedaccording to theend status of theprevious task
Monitoring - - w (withrights tocreateconnection,followingproject authorization)
r - r (onlyLogging)
w (withrights tocreateconnection,followingproject authorization)
View Jobsperformanceanalyses
Audit - - w(followingprojectauthorization)
w(followingprojectauthorization)
r(followingprojectauthorization)
- w(followingprojectauthorization)
Audit a project
BRMS(Drools)
- - w(followingprojectauthorization)
w - - w(followingprojectauthorization)
Drools handlesspecific rightmanagement
Talend Administration Center: Concepts and Principles
14
Rights/RolesMenu/Menuitem
SecurityAdministrator
AdministratorOperationmanager
Designer Viewer Auditor AdministrativeUse
Description
ServiceLocator
- - w(followingprojectauthorization)
r - - w(followingprojectauthorization)
Monitor liveservices, up anddown times for aservice endpoint,and removeunavailableservices
ServiceActivityMonitoring
- - r r - - r Monitor allevents related torequests/responses/faults for services
Authorization- - w(followingprojectauthorization)
r - - w(followingprojectauthorization)
Manage resourcesand resource/roleassignments
ServiceRegistry
- - w(followingprojectauthorization)
r - - w(followingprojectauthorization)
Allow usersto maintainregistry resourcesand resource relations
RepositoryBrowser(deprecated)
- - w(followingprojectauthorization)
w(followingprojectauthorization)
r(followingprojectauthorization)
- w(followingprojectauthorization)
Browse repositoryitems
w read and write access
r read-only access
- no access
Note that:
• A user with Auditor role cannot have Administrator or Security Administrator at the same time.
• A user with Administrative Use role can only be created if you are using the Talend Data Fabriclicense, and cannot have Administrator, Security Administrator, Operation manager, or Auditor atthe same time.
• Generally, users with r (read-only) rights are able to generate, deploy, and execute Jobs in TalendAdministration Center.
However, a user with Viewer role cannot execute Jobs or change the values on the Job Conductorpage.
Talend Administration Center: Concepts and Principles
15
• The second person pronoun "you" used through out the document addresses the user of TalendAdministration Center depending on his/her roles and rights and not any generic user of theAdministration Center.
• The Operation manager, Designer, and Viewer all have read access on Studio (following project authorization). The Designer also has write access.
For more information about the pages you can access through each menu item, see What modules andfeatures are available depending on your license on page 9.
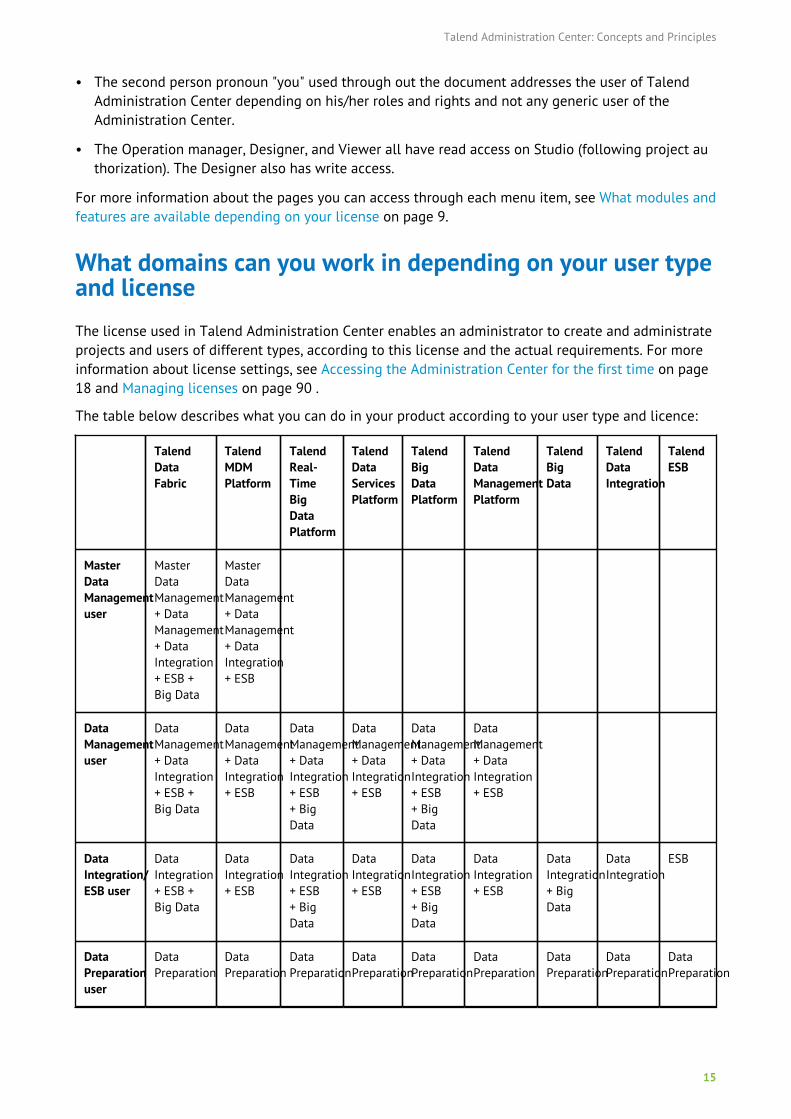
What domains can you work in depending on your user typeand licenseThe license used in Talend Administration Center enables an administrator to create and administrateprojects and users of different types, according to this license and the actual requirements. For moreinformation about license settings, see Accessing the Administration Center for the first time on page18 and Managing licenses on page 90 .
The table below describes what you can do in your product according to your user type and licence:
TalendDataFabric
TalendMDMPlatform
TalendReal-TimeBigDataPlatform
TalendDataServicesPlatform
TalendBigDataPlatform
TalendDataManagementPlatform
TalendBigData
TalendDataIntegration
TalendESB
MasterDataManagementuser
MasterDataManagement+ DataManagement+ DataIntegration+ ESB +Big Data
MasterDataManagement+ DataManagement+ DataIntegration+ ESB
DataManagementuser
DataManagement+ DataIntegration+ ESB +Big Data
DataManagement+ DataIntegration+ ESB
DataManagement+ DataIntegration+ ESB+ BigData
DataManagement+ DataIntegration+ ESB
DataManagement+ DataIntegration+ ESB+ BigData
DataManagement+ DataIntegration+ ESB
DataIntegration/ESB user
DataIntegration+ ESB +Big Data
DataIntegration+ ESB
DataIntegration+ ESB+ BigData
DataIntegration+ ESB
DataIntegration+ ESB+ BigData
DataIntegration+ ESB
DataIntegration+ BigData
DataIntegration
ESB
DataPreparationuser
DataPreparation
DataPreparation
DataPreparation
DataPreparation
DataPreparation
DataPreparation
DataPreparation
DataPreparation
DataPreparation
Talend Administration Center: Concepts and Principles
16
TalendDataFabric
TalendMDMPlatform
TalendReal-TimeBigDataPlatform
TalendDataServicesPlatform
TalendBigDataPlatform
TalendDataManagementPlatform
TalendBigData
TalendDataIntegration
TalendESB
DataStewardshipuser
DataStewardship
DataStewardship
DataStewardship
DataStewardship
DataStewardship
DataStewardship
DataStewardship
DataStewardship
DataStewardship
Furthermore, in a Studio, users will not be able to access the projects unless they are using theappropriate license and have acquired the project authorization from the administrators.
For more information about user and project management in Talend Administration Center,see Managing Users on page 50, Managing projects on page 70, and Managing projectauthorizations on page 84.
Getting started with Talend Administration Center
17
Getting started with Talend Administration Center
Talend Administration Center is a web-based application delivered with one Administrator account.
If Single-Sign On is not activated, this account is created by default, however if SSO was enabledduring installation you need to configure the link between the web application and your Identityprovider account.
This account enables the administrator to:
• create, delete and edit all Talend Studio users and projects.
• monitor and schedule remote job executions.
Note that once Single-Sign On is enabled, you will not be able to manage from Talend AdministrationCenter all the user settings handled by the Identity Provider, such as user passwords, project types onwhich users are assigned or user roles.
Talend Administration Center is also delivered with one default configuration account which enablesyou to manage your system applications and database connection.
Any user account registered in Talend Administration Center accesses a limited version of theAdministration Center to manage login information or access the monitoring and executionscheduling console.
Prerequisites to use Talend Administration CenterCheck that:
• The remote repository is created on a dedicated Git or SVN server.
• The Talend Administration Center web application is deployed on an application server.
For more information, see Compatible containers on Talend Help Center.
• A login and password, and a license key have been provided to you, allowing the Administratorto get through the authentication page and access to Talend Administration Center. For moreinformation regarding user roles and rights in the Administration Center, see User roles/rights inthe Administration Center on page 11.
• You have a web browser which is compatible with the Talend Administration Center webapplication.
For more information, see Compatible Web browsers on Talend Help Center.
For more information regarding other installation requirements, see Hardware requirements andSoftware requirements on Talend Help Center.
Accessing the Administration CenterAbout this task
To access the Administration Center, follow these steps:
Getting started with Talend Administration Center
18
Procedure
1. In the address bar of your web browser, type or paste the URL corresponding to the location ofTalend Administration Center.
For example: http://localhost:8080/org.talend.administrator
2. Press Enter to display the Talend Administration Center login page.
Accessing the Administration Center for the first time
When you access Talend Administration Center for the first time, you have to complete checking stepsbefore being able to log in.
The login process depends on the Single Sign-On (SSO) configuration:
• If SSO is deactivated, you can log in to the application with the default user credentials.
• If SSO was enabled during installation, you have to configure SSO according to your IdentityProvider System. For more information on how to enable SSO when installing TalendAdministration Center (manually or via Talend Installer), see Enabling Single-Sign On for TalendAdministration Center on Talend Help Center.
Logging in to Talend Administration Center without SSO
Procedure
1. On the Talend Administration Center, click Go to db config page.
2. Type in the administrator password (admin by default) in the Database Configuration page and clickOK.
3. If no license or an invalid license is found during the series of checks, you are prompted to specifya license. Click Set new license.
4. Click Browse to browse to your license file and click Upload.
The license determines the types of users and projects you can manage in Talend AdministrationCenter. For more information, see What domains can you work in depending on your user type andlicense on page 15.
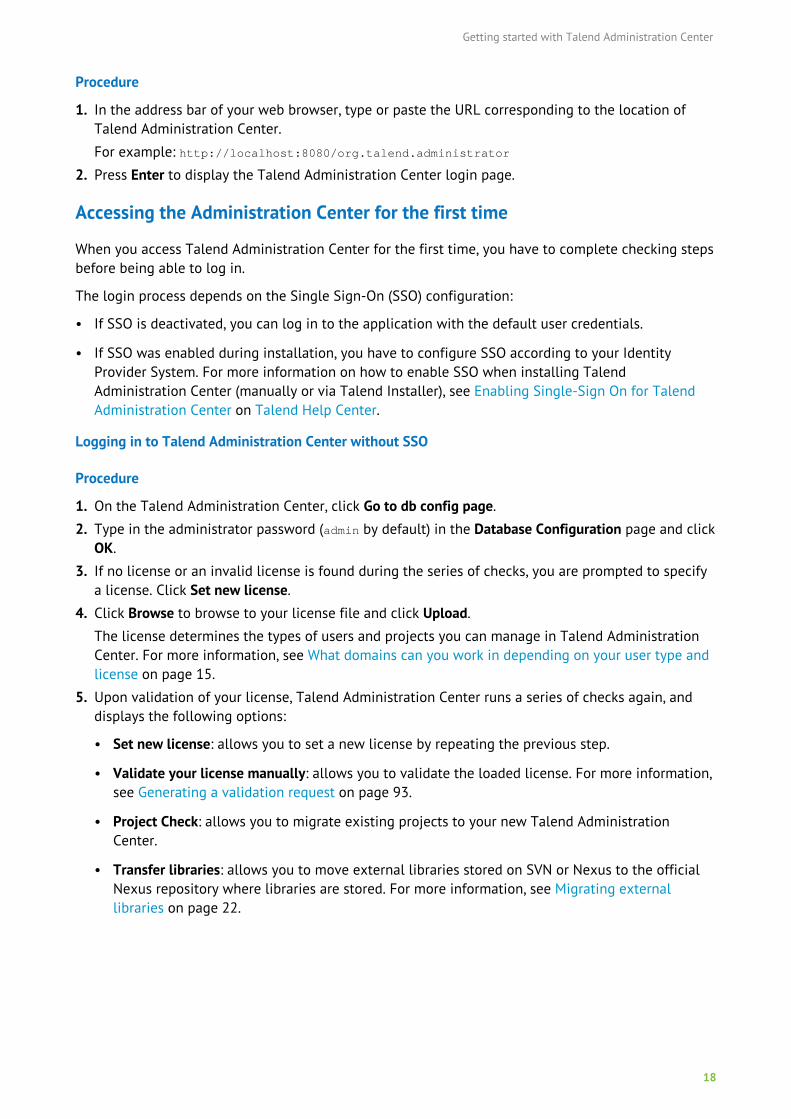
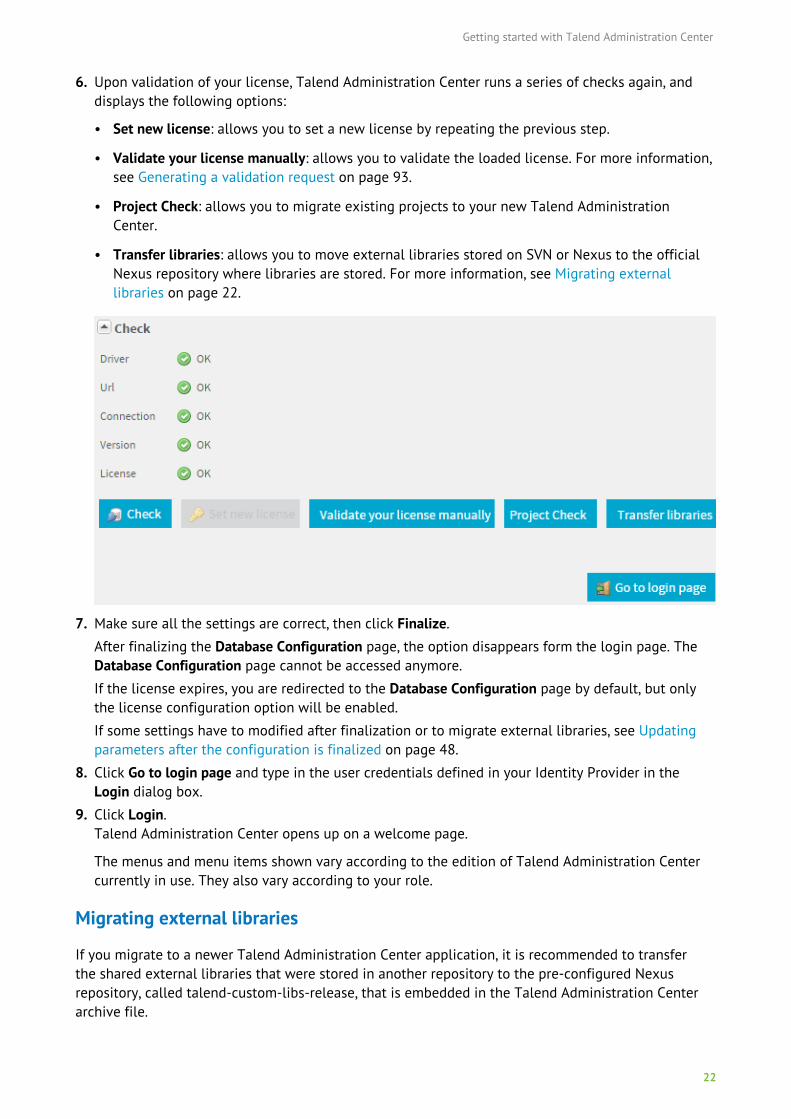
5. Upon validation of your license, Talend Administration Center runs a series of checks again, anddisplays the following options:
• Set new license: allows you to set a new license by repeating the previous step.
• Validate your license manually: allows you to validate the loaded license. For more information,see Generating a validation request on page 93.
• Project Check: allows you to migrate existing projects to your new Talend AdministrationCenter.
• Transfer libraries: allows you to move external libraries stored on SVN or Nexus to the officialNexus repository where libraries are stored. For more information, see Migrating externallibraries on page 22.
Getting started with Talend Administration Center
19
6. Make sure all the settings are correct, then click Finalize.
After finalizing the Database Configuration page, the option Go to db config page disappears formthe login page. The Database Configuration page cannot be accessed anymore.
If the license expires, you are redirected to the Database Configuration page by default, but onlythe license configuration option will be enabled.
If some settings have to be modified after finalization or to migrate external libraries, see Updatingparameters after the configuration is finalized on page 48.
7. Click Go to login page and type in the default credentials ([email protected]/admin) in theLogin dialog box.
After the first connection, it is strongly recommended not to use the default user account to accessthe application for security reasons. You can either change the default credentials of this account([email protected]/admin) or create another administrator user and remove the defaultaccount.
If you want to change the default password that allows you to change the database configuration(recommended), you have to edit the database.config.password parameter value in theconfiguration.properties file. For more information, see Change the default password used toconfigure the database on Talend Help Center.
8. Click Login.Talend Administration Center opens up on a welcome page.
The menus and menu items shown vary according to the edition of Talend Administration Centercurrently in use. They also vary based on your role.
Using SSO to log in to Talend Administration Center
Procedure
1. On the Talend Administration Center, click Go to db config page.
2. Type in the administrator password (admin by default) in the Database Configuration page and clickOK.
If you want to change the default password that allows you to change the database configuration(recommended), you have to edit the database.config.password parameter value in theconfiguration.properties file. For more information, see Change the default password used toconfigure the database on Talend Help Center.
Getting started with Talend Administration Center
20
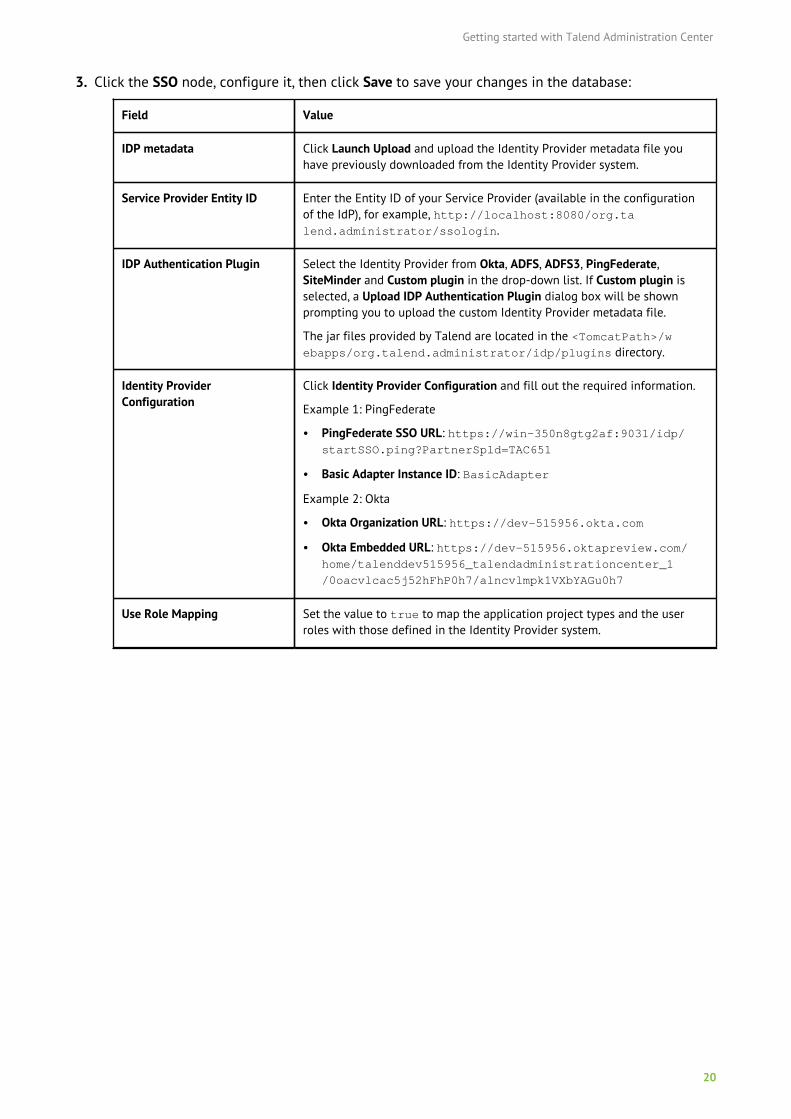
3. Click the SSO node, configure it, then click Save to save your changes in the database:
Field Value
IDP metadata Click Launch Upload and upload the Identity Provider metadata file youhave previously downloaded from the Identity Provider system.
Service Provider Entity ID Enter the Entity ID of your Service Provider (available in the configurationof the IdP), for example, http://localhost:8080/org.talend.administrator/ssologin.
IDP Authentication Plugin Select the Identity Provider from Okta, ADFS, ADFS3, PingFederate,SiteMinder and Custom plugin in the drop-down list. If Custom plugin isselected, a Upload IDP Authentication Plugin dialog box will be shownprompting you to upload the custom Identity Provider metadata file.
The jar files provided by Talend are located in the <TomcatPath>/webapps/org.talend.administrator/idp/plugins directory.
Identity ProviderConfiguration
Click Identity Provider Configuration and fill out the required information.
Example 1: PingFederate
• PingFederate SSO URL: https://win-350n8gtg2af:9031/idp/startSSO.ping?PartnerSpld=TAC651
• Basic Adapter Instance ID: BasicAdapter
Example 2: Okta
• Okta Organization URL: https://dev-515956.okta.com
• Okta Embedded URL: https://dev-515956.oktapreview.com/home/talenddev515956_talendadministrationcenter_1
/0oacvlcac5j52hFhP0h7/alncvlmpk1VXbYAGu0h7
Use Role Mapping Set the value to true to map the application project types and the userroles with those defined in the Identity Provider system.
Getting started with Talend Administration Center
21
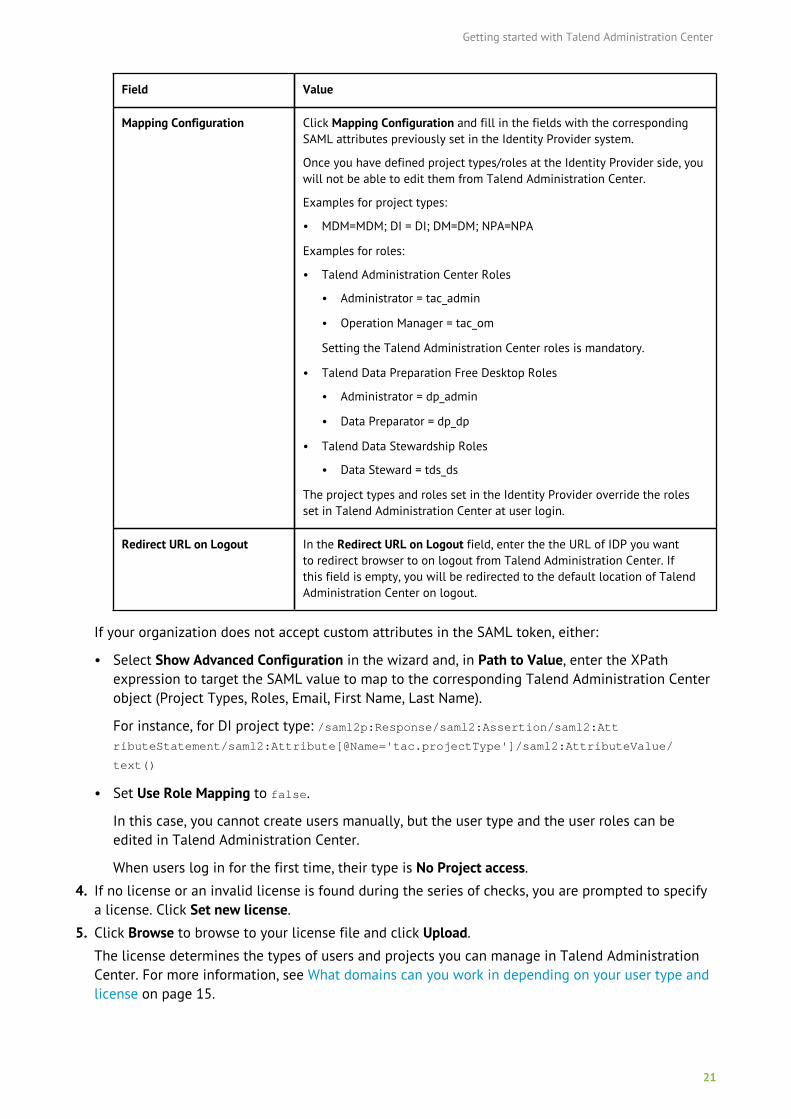
Field Value
Mapping Configuration Click Mapping Configuration and fill in the fields with the correspondingSAML attributes previously set in the Identity Provider system.
Once you have defined project types/roles at the Identity Provider side, youwill not be able to edit them from Talend Administration Center.
Examples for project types:
• MDM=MDM; DI = DI; DM=DM; NPA=NPA
Examples for roles:
• Talend Administration Center Roles
• Administrator = tac_admin
• Operation Manager = tac_om
Setting the Talend Administration Center roles is mandatory.
• Talend Data Preparation Free Desktop Roles
• Administrator = dp_admin
• Data Preparator = dp_dp
• Talend Data Stewardship Roles
• Data Steward = tds_ds
The project types and roles set in the Identity Provider override the rolesset in Talend Administration Center at user login.
Redirect URL on Logout In the Redirect URL on Logout field, enter the the URL of IDP you wantto redirect browser to on logout from Talend Administration Center. Ifthis field is empty, you will be redirected to the default location of TalendAdministration Center on logout.
If your organization does not accept custom attributes in the SAML token, either:
• Select Show Advanced Configuration in the wizard and, in Path to Value, enter the XPathexpression to target the SAML value to map to the corresponding Talend Administration Centerobject (Project Types, Roles, Email, First Name, Last Name).
For instance, for DI project type: /saml2p:Response/saml2:Assertion/saml2:AttributeStatement/saml2:Attribute[@Name='tac.projectType']/saml2:AttributeValue/
text()
• Set Use Role Mapping to false.
In this case, you cannot create users manually, but the user type and the user roles can beedited in Talend Administration Center.
When users log in for the first time, their type is No Project access.
4. If no license or an invalid license is found during the series of checks, you are prompted to specifya license. Click Set new license.
5. Click Browse to browse to your license file and click Upload.
The license determines the types of users and projects you can manage in Talend AdministrationCenter. For more information, see What domains can you work in depending on your user type andlicense on page 15.
Getting started with Talend Administration Center
22
6. Upon validation of your license, Talend Administration Center runs a series of checks again, anddisplays the following options:
• Set new license: allows you to set a new license by repeating the previous step.
• Validate your license manually: allows you to validate the loaded license. For more information,see Generating a validation request on page 93.
• Project Check: allows you to migrate existing projects to your new Talend AdministrationCenter.
• Transfer libraries: allows you to move external libraries stored on SVN or Nexus to the officialNexus repository where libraries are stored. For more information, see Migrating externallibraries on page 22.
7. Make sure all the settings are correct, then click Finalize.
After finalizing the Database Configuration page, the option disappears form the login page. TheDatabase Configuration page cannot be accessed anymore.
If the license expires, you are redirected to the Database Configuration page by default, but onlythe license configuration option will be enabled.
If some settings have to modified after finalization or to migrate external libraries, see Updatingparameters after the configuration is finalized on page 48.
8. Click Go to login page and type in the user credentials defined in your Identity Provider in theLogin dialog box.
9. Click Login.Talend Administration Center opens up on a welcome page.
The menus and menu items shown vary according to the edition of Talend Administration Centercurrently in use. They also vary according to your role.
Migrating external libraries
If you migrate to a newer Talend Administration Center application, it is recommended to transferthe shared external libraries that were stored in another repository to the pre-configured Nexusrepository, called talend-custom-libs-release, that is embedded in the Talend Administration Centerarchive file.
Getting started with Talend Administration Center
23
• If you migrate from a version 5.x to a version 6.x, you need to move the libraries from yourSubversion libraries repository to the new talend-custom-libs-release Nexus repository.
• If you migrate from version 6.0, 6.1 or 6.2, you need to move the libraries from the talend-custom-libs Nexus repository to the new talend-custom-libs-release Nexus repository.
If so, you need first to execute the Nexus migration script that is embedded in the TalendAdministration Center archive file. For more information, see Upgrading Talend Artifact Repositoryon Talend Help Center.
From Subversion to Nexus
Procedure
1. Go to the Talend Administration Center Database configuration page.
To access the Database configuration page, you must update the configuration.properties file. Forinstructions, see Updating parameters after the configuration is finalized on page 48.
2. Click Transfer libraries to open the Transfer libraries window, select the SVN to Nexus tab and fillin the connection information to the Subversion repository where your libraries are stored.
The connection information to the new Talend Nexus repository (talend-custom-libs-release) arefilled in by default. You only need to select the Nexus version from the Type drop-down list (Nexusor Nexus 3).
3. Click Transfer to start the migration of your libraries.
A progress bar indicates the status of the migration, and a message is displayed to confirm themigration success.
Your external libraries are now stored in the Talend Nexus repository.
From Nexus to Nexus
Procedure
1. Go to the Talend Administration Center Database configuration page.
To access the Database configuration page, you must update the configuration.properties file. Forinstructions, see Updating parameters after the configuration is finalized on page 48.
2. Click Transfer libraries to open the Transfer libraries window, select the Nexus to Nexus tab andfill in the connection information to the Nexus repository where your libraries are stored.
The connection information to the new Talend Nexus repository (talend-custom-libs-release) arefilled in by default. You only need to select the Nexus version from the Type drop-down list (Nexusor Nexus 3).
3. Click Transfer to start the migration of your libraries.
A progress bar indicates the status of the migration, and a message is displayed to confirm themigration success.
Your external libraries are now stored in the Talend Nexus repository.
Logging in to a previously configured Administration Center
If Talend Administration Center has already been configured by an administrator user, you will beable to log in the application with the credentials the admin user defined either directly from the webapplication (no SSO) or from your Identity Provider system (with SSO).
Getting started with Talend Administration Center
24
Without SSO
Procedure
1. Open a web browser and navigate to the Talend Administration Center URL address.
Example: http://localhost:8080/org.talend.administrator
2. In the Login window, type in the login and password provided to you by the administrator whocreated your user account.
You can select the Remember me check box to remember your username, so that you don't needto enter it the next time you log in to Talend Administration Center. If you are using a publiccomputer, however, it is recommended to clear this check box for enhanced security.
3. Click the Login button.
Talend Administration Center opens up on a welcome page.
The menus and menu items shown vary according to the edition of Talend Administration Centercurrently in use. They also vary according to your role, whether you are an Administrator, Operationmanager, Designer or Viewer.
4. Click the Login button.
With SSO
Procedure
1. Open a web browser and navigate to the Talend Administration Center URL address.
Example : http://localhost:8080/org.talend.administrator
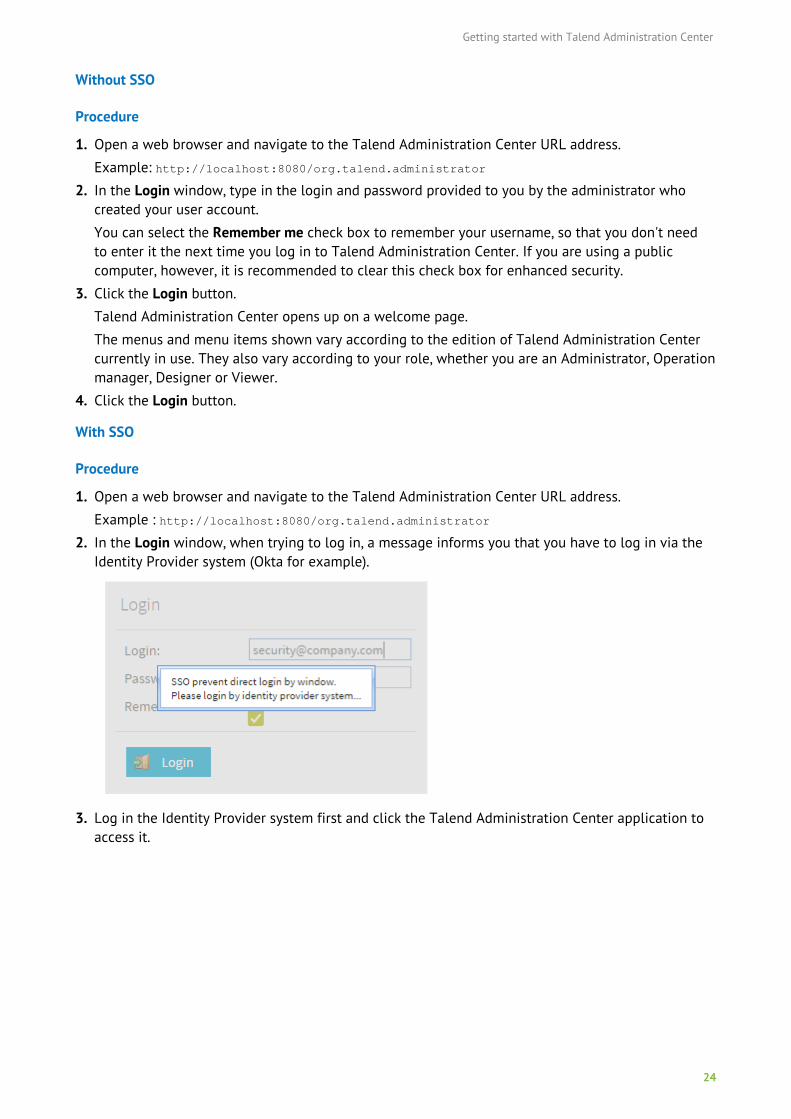
2. In the Login window, when trying to log in, a message informs you that you have to log in via theIdentity Provider system (Okta for example).
3. Log in the Identity Provider system first and click the Talend Administration Center application toaccess it.
Getting started with Talend Administration Center
25
Talend Administration Center opens up on a welcome page.
The menus and menu items shown vary according to the edition of Talend Administration Centercurrently in use. They also vary according to your role, whether you are an Administrator, Operationmanager, Designer or Viewer.
4. Click the Login button.
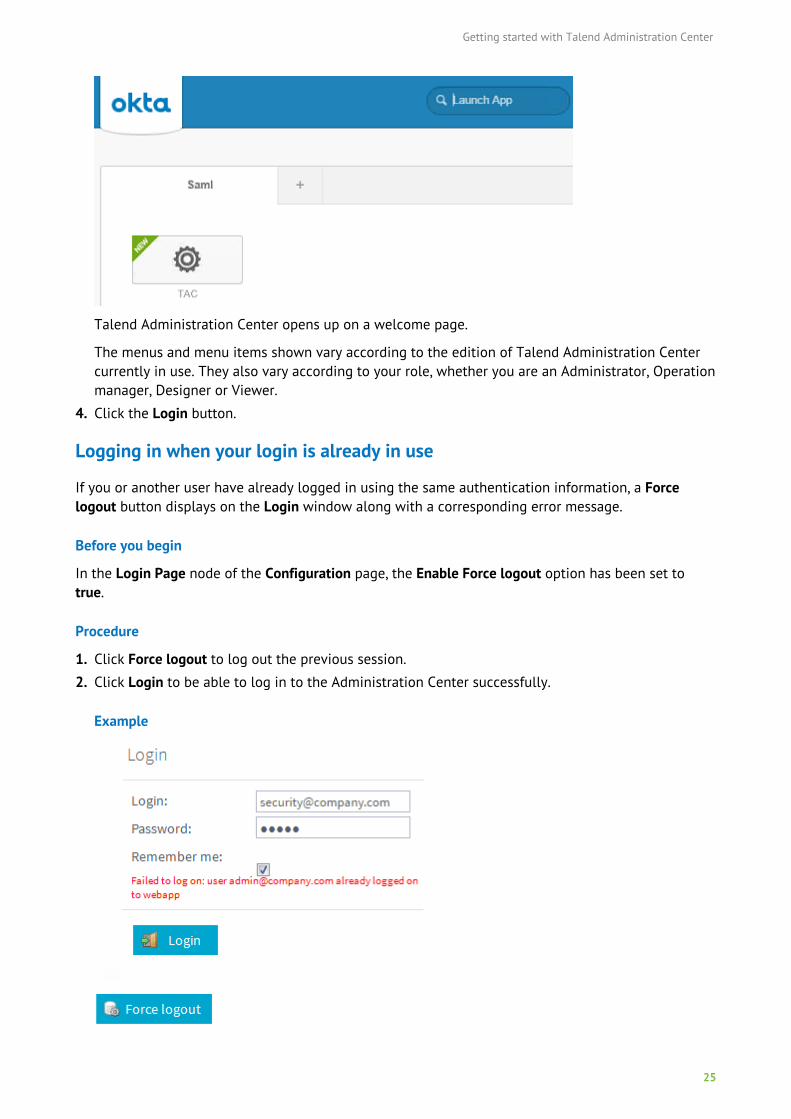
Logging in when your login is already in use
If you or another user have already logged in using the same authentication information, a Forcelogout button displays on the Login window along with a corresponding error message.
Before you begin
In the Login Page node of the Configuration page, the Enable Force logout option has been set totrue.
Procedure
1. Click Force logout to log out the previous session.
2. Click Login to be able to log in to the Administration Center successfully.
Example
Getting started with Talend Administration Center
26
Logging off the Administration Center
Procedure
Click the Logout button at the bottom of the tree view of Talend Administration Center to log offfrom the active session. To log on again, fill in your authentication details.
Resetting your password
Send a new password by email (with an SMTP protocol)
About this task
If you forgot your connection password to Talend Administration Center, you can perform one of thefollowing operations to send an email holding a link to a password resetting form:
• click the Forgot your password? button. To activate this option and display the button, you haveto activate an SMTP protocol in the Configuration page of Talend Administration Center. For moreinformation on how to configure the SMTP protocol, see Setting up an SMTP protocol on page42. If this Forgot your password? button does not display even though you activated SMTP, itcan mean that this option has not been activated at installation time. In this case, contact yourAdministrator who will be able to enable it from the configuration.properties file.
• use the resetPassword the MetaServlet application For more information on MetaServlet, see Non-GUI operation in metaServlet on page 399.
Procedure
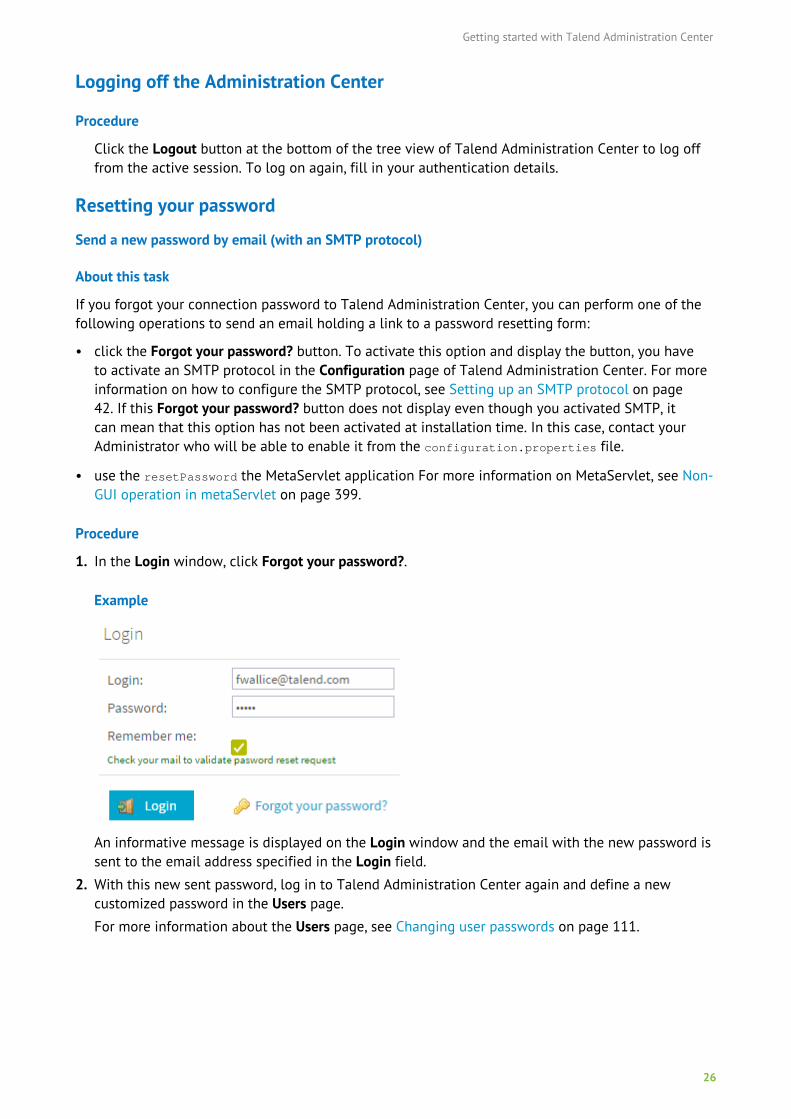
1. In the Login window, click Forgot your password?.
Example
An informative message is displayed on the Login window and the email with the new password issent to the email address specified in the Login field.
2. With this new sent password, log in to Talend Administration Center again and define a newcustomized password in the Users page.
For more information about the Users page, see Changing user passwords on page 111.
Getting started with Talend Administration Center
27
Set the password to admin again (without SMTP protocol)
About this task
If you have not configured an email server, you can execute an SQL statement in the applicationdatabase to set the user password to admin again.
Procedure
1. Go to the Configuration page of Talend Administration Center, expand the Database node and clickthe URL next to the Web Console field to open the database web console.
2. In the database, execute the following statement:
UPDATE `user` set `password`=0x21232F297A57A5A743894A0E4A801FC3 where id =<userID>;
where 0x21... corresponds to the encrypted password admin.
Note that you can find the ID (number) corresponding to the user for which you want to edit thepassword by executing this statement:
select id, login from user;
3. With this new password, log in to Talend Administration Center again and define a new customizedpassword in the Users page.
For more information about the Users page, see Changing user passwords on page 111.
For more information about the advanced configuration you can perform on the TalendAdministration Center database, see Talend Administration Center advanced configuration onTalend Help Center.
Configuring Talend Administration CenterNote: Only users that have the Administrator or Operation Manager role and rights can havethe read-write access to this page. Other users, depending on their roles, can have either theread-only access or no access to this page. For further information on access rights, see Userroles/rights in the Administration Center on page 11. When a user of the Administration Centeropens this page, he/she will have access only to the items for which the user has been grantedthe appropriate authorization by the Administrator.
From Talend Administration Center home page, you can access the Configuration page that offersaccurate details on application parameters and their related values including database connection.The items displayed in this page depend on your license. Thus, some of the sections below may referto modules that are not available in your Talend Administration Center application.
To find out if you have access to the different modules described in the sections below, please refer toWhat modules and features are available depending on your license on page 9.
Accessing the Configuration page
The Configuration page offers accurate details on application parameters and their related valuesincluding database connection. All these parameters are grouped by module. This helps understandand troubleshoot module-related problems.
Getting started with Talend Administration Center
28
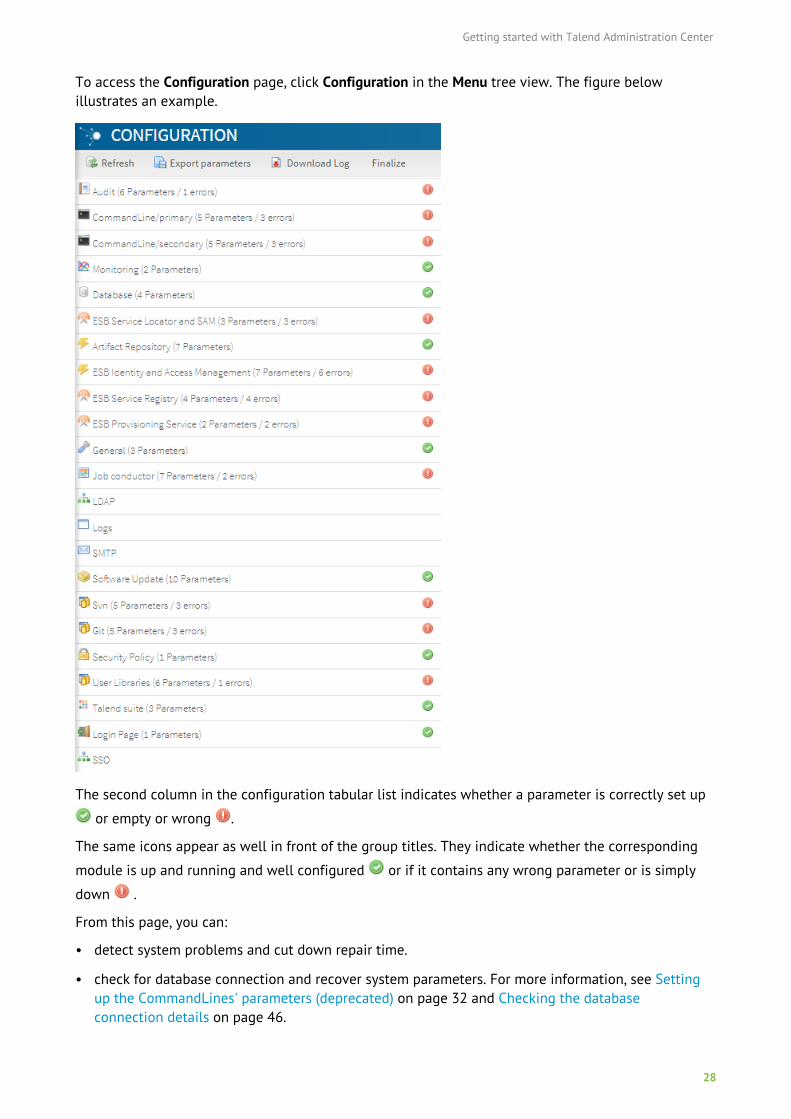
To access the Configuration page, click Configuration in the Menu tree view. The figure belowillustrates an example.
The second column in the configuration tabular list indicates whether a parameter is correctly set up
or empty or wrong .
The same icons appear as well in front of the group titles. They indicate whether the corresponding
module is up and running and well configured or if it contains any wrong parameter or is simply
down .
From this page, you can:
• detect system problems and cut down repair time.
• check for database connection and recover system parameters. For more information, see Settingup the CommandLines' parameters (deprecated) on page 32 and Checking the databaseconnection details on page 46.
Getting started with Talend Administration Center
29
• edit the value of the parameter in question directly in the list by clicking the icon if it showsnext to the parameter value, or
• export all system parameters, including database connection details, using the Export parametersbutton on the toolbar.
• download log file(s) from your Administration Center. In case of issue with Talend AdministrationCenter, click Download log on the toolbar and save the zip containing the log file(s) so that youcould send them to Talend Support later.
The Administrator or Security Administrator must finalize the Configuration page after all thesetting are configured. The page is read-only after it is finalized. To enable access to it, see Updatingparameters after the configuration is finalized on page 48.
Configuring parameters according to your system
The parameters described in the following sections do not follow the same order as the applicationinterface (which is alphabetical) because they are sorted in order of importance, from essential tooptional. It it thus recommended to follow this order when configuring your application.
Setting up SVN or Git parameters
Your project metadata is either stored in Subversion or Git. If you are using a SVN/Git repository, youcan modify the location URL, user and password from Talend Administration Center.
When you will connect to a remote repository in the Studio, you will have to enter the URL ofyour Talend Administration Center in the Web-app URL field so that the Studio can retrieve theseparameters.
Before you begin
• the repository is on the Subversion/Git server and you have copied its URL.
For Git users:
• it is recommended to check via git bash that the repository is accessible, that you can pushyour changes on it and, if you use SSH, that the host is known.
• all branches/tags are visible for all projects on the same Git repository. Therefore, if you createsome branches/tags for one project, all other projects on the same Git repository will have thesame list of branches and tags.
• if you want to create projects in multiple Git repositories (not only the one set on theConfiguration page), you need to add a parameter in a configuration file. For more information,see Configuring Talend Administration Center to handle multiple Git repositories on TalendHelp Center.
• the SVN/Git username and password correspond to an existing user in Subversion/Git.
For Git users: note that the SSH key passphrase feature is not supported in this release of TalendAdministration Center.
Procedure
1. On the Menu tree view, click Configuration.
2. Click the Svn or Git group to display its parameters.
Getting started with Talend Administration Center
30
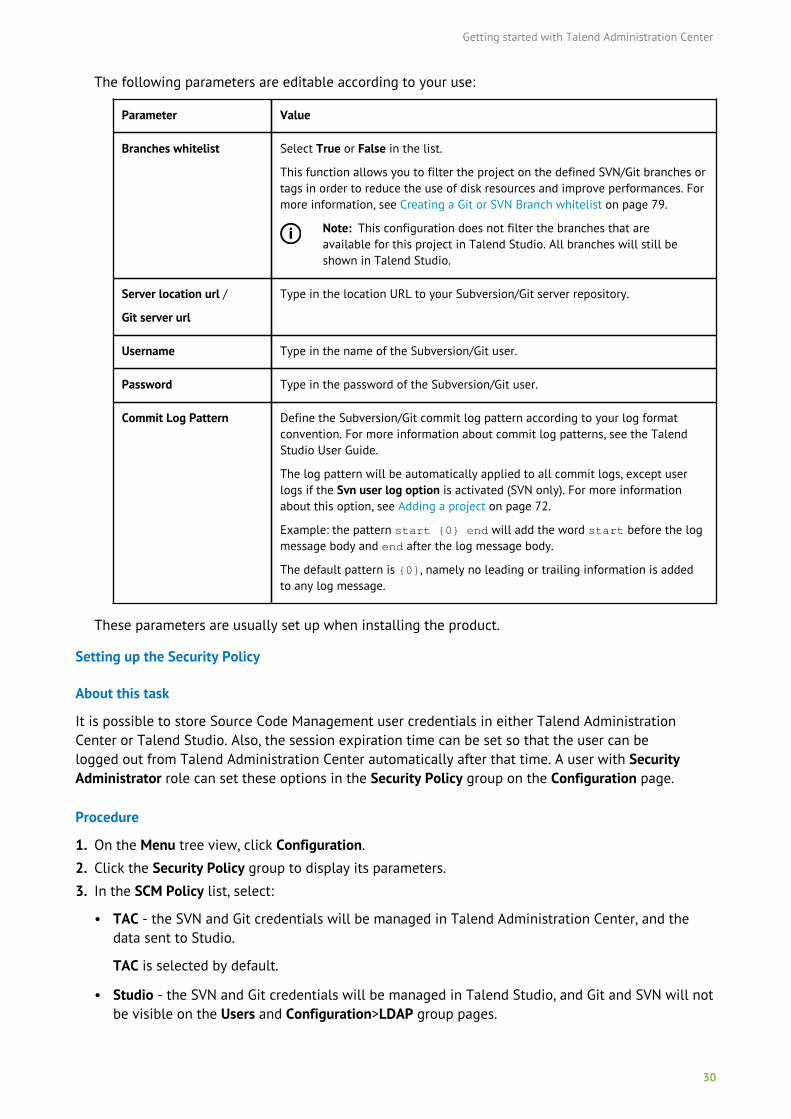
The following parameters are editable according to your use:
Parameter Value
Branches whitelist Select True or False in the list.
This function allows you to filter the project on the defined SVN/Git branches ortags in order to reduce the use of disk resources and improve performances. Formore information, see Creating a Git or SVN Branch whitelist on page 79.
Note: This configuration does not filter the branches that areavailable for this project in Talend Studio. All branches will still beshown in Talend Studio.
Server location url /
Git server url
Type in the location URL to your Subversion/Git server repository.
Username Type in the name of the Subversion/Git user.
Password Type in the password of the Subversion/Git user.
Commit Log Pattern Define the Subversion/Git commit log pattern according to your log formatconvention. For more information about commit log patterns, see the TalendStudio User Guide.
The log pattern will be automatically applied to all commit logs, except userlogs if the Svn user log option is activated (SVN only). For more informationabout this option, see Adding a project on page 72.
Example: the pattern start {0} end will add the word start before the logmessage body and end after the log message body.
The default pattern is {0}, namely no leading or trailing information is addedto any log message.
These parameters are usually set up when installing the product.
Setting up the Security Policy
About this task
It is possible to store Source Code Management user credentials in either Talend AdministrationCenter or Talend Studio. Also, the session expiration time can be set so that the user can belogged out from Talend Administration Center automatically after that time. A user with SecurityAdministrator role can set these options in the Security Policy group on the Configuration page.
Procedure
1. On the Menu tree view, click Configuration.
2. Click the Security Policy group to display its parameters.
3. In the SCM Policy list, select:
• TAC - the SVN and Git credentials will be managed in Talend Administration Center, and thedata sent to Studio.
TAC is selected by default.
• Studio - the SVN and Git credentials will be managed in Talend Studio, and Git and SVN will notbe visible on the Users and Configuration>LDAP group pages.
Getting started with Talend Administration Center
31
In the pop up window, you can choose to keep or delete the user credentials from the TalendAdministration Center database. Talend Administration Center will not send the data to Studioeven if you select Keep credentials.
4. In the Session lifetime(mins) field, enter the timeout value (in minutes) for the user to be loggedout from Talend Administration Center if there is no activity in that period of time. The defaultvalue is 120.
If SSO login is enabled, the user will be redirected to page configured in the Redirect URL onLogout field in the SSO group on Configuration page. For more information, see Enabling SSO onpage 43.
Setting up the user library location
About this task
Some specific third-party Java libraries or database drivers (.jar files), known as external modules,can be required by Talend components or by connection wizards. Due to license restrictions, Talendmay not be able to ship certain external modules within Talend Studio, but you can download, install,and store them in a shared repository. Nexus is delivered with the Talend Administration Centerarchive file.
Note that, if you are working in collaborative mode and you do not fill these parameters, the externallibraries that you have downloaded at Studio start-up will not be shared and thus the other usersof Talend Administration Center will not be able to use CommandLine to generate their Jobs.Additionally, if you migrate to a more recent version of Talend Administration Center, those requiredlibraries will not be backed up.
Users with Designer role need to have the corresponding Configuration visualization right selected onthe Rights management page to have access to user libraries configuration. For more information, seeManaging rights associated with roles on page 95.
For more information about these external libraries, see Installing external modules on Talend HelpCenter.
Procedure
1. On the Menu tree view, click Configuration.
2. Click the User Libraries group to display its parameters.
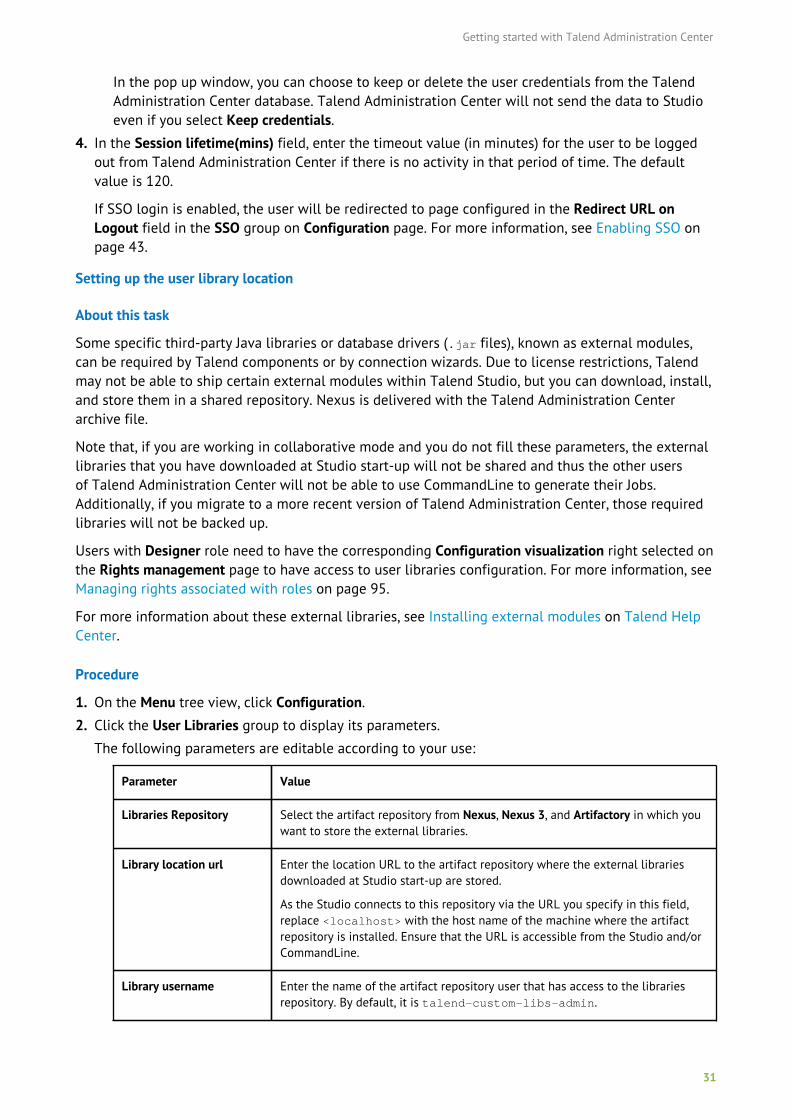
The following parameters are editable according to your use:
Parameter Value
Libraries Repository Select the artifact repository from Nexus, Nexus 3, and Artifactory in which youwant to store the external libraries.
Library location url Enter the location URL to the artifact repository where the external librariesdownloaded at Studio start-up are stored.
As the Studio connects to this repository via the URL you specify in this field,replace <localhost> with the host name of the machine where the artifactrepository is installed. Ensure that the URL is accessible from the Studio and/orCommandLine.
Library username Enter the name of the artifact repository user that has access to the librariesrepository. By default, it is talend-custom-libs-admin.
Getting started with Talend Administration Center
32
Parameter Value
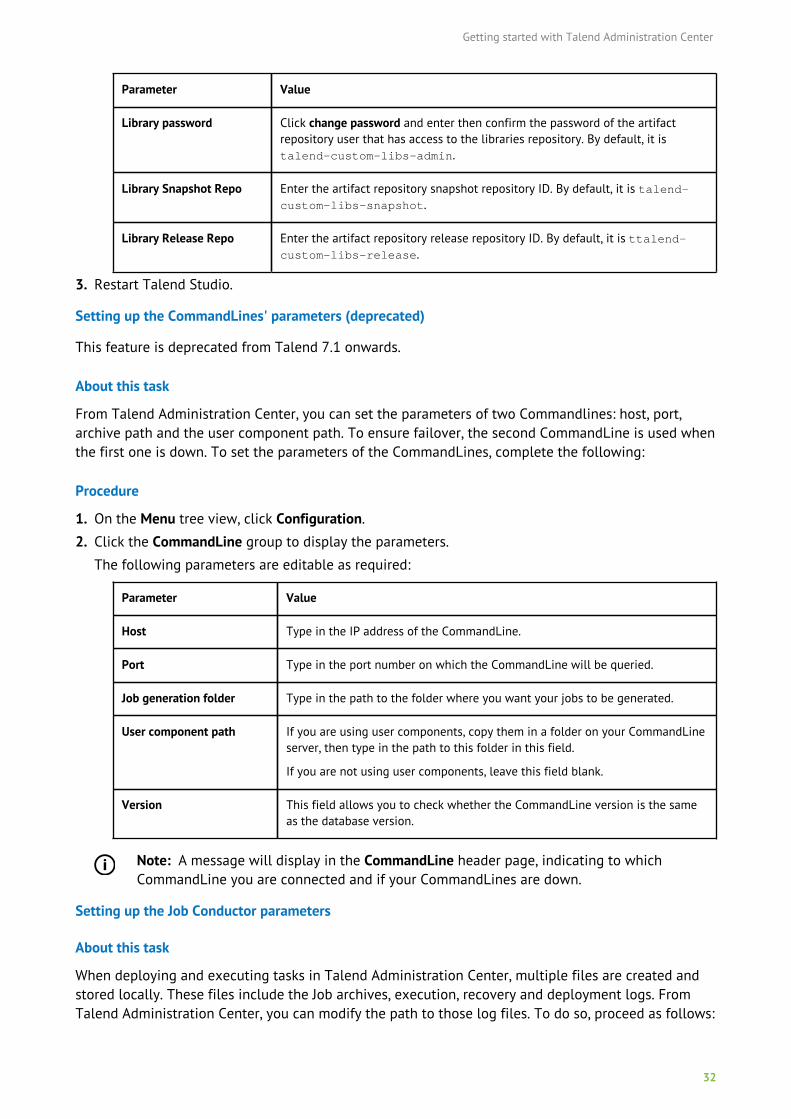
Library password Click change password and enter then confirm the password of the artifactrepository user that has access to the libraries repository. By default, it istalend-custom-libs-admin.
Library Snapshot Repo Enter the artifact repository snapshot repository ID. By default, it is talend-custom-libs-snapshot.
Library Release Repo Enter the artifact repository release repository ID. By default, it is ttalend-custom-libs-release.
3. Restart Talend Studio.
Setting up the CommandLines' parameters (deprecated)
This feature is deprecated from Talend 7.1 onwards.
About this task
From Talend Administration Center, you can set the parameters of two Commandlines: host, port,archive path and the user component path. To ensure failover, the second CommandLine is used whenthe first one is down. To set the parameters of the CommandLines, complete the following:
Procedure
1. On the Menu tree view, click Configuration.
2. Click the CommandLine group to display the parameters.
The following parameters are editable as required:
Parameter Value
Host Type in the IP address of the CommandLine.
Port Type in the port number on which the CommandLine will be queried.
Job generation folder Type in the path to the folder where you want your jobs to be generated.
User component path If you are using user components, copy them in a folder on your CommandLineserver, then type in the path to this folder in this field.
If you are not using user components, leave this field blank.
Version This field allows you to check whether the CommandLine version is the sameas the database version.
Note: A message will display in the CommandLine header page, indicating to whichCommandLine you are connected and if your CommandLines are down.
Setting up the Job Conductor parameters
About this task
When deploying and executing tasks in Talend Administration Center, multiple files are created andstored locally. These files include the Job archives, execution, recovery and deployment logs. FromTalend Administration Center, you can modify the path to those log files. To do so, proceed as follows:
Getting started with Talend Administration Center
33
Procedure
1. On the Menu tree view, click Configuration.
2. Click the Job Conductor group to display its parameters.
The parameters are the following:
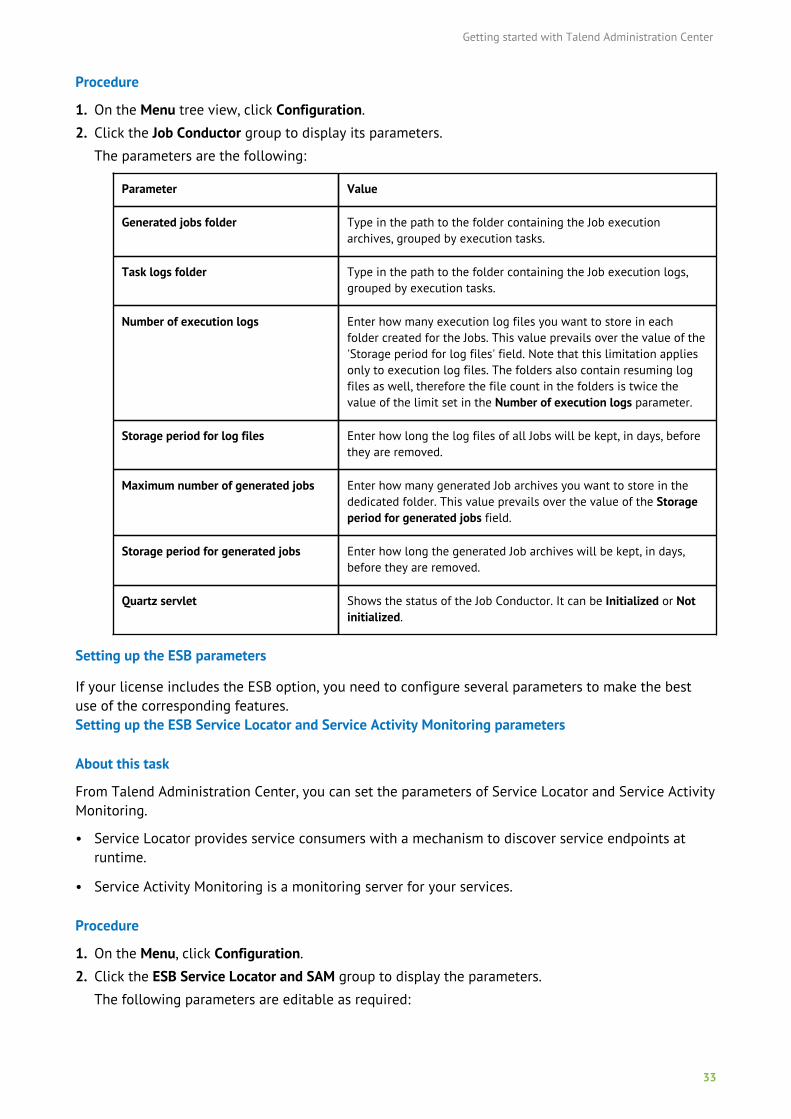
Parameter Value
Generated jobs folder Type in the path to the folder containing the Job executionarchives, grouped by execution tasks.
Task logs folder Type in the path to the folder containing the Job execution logs,grouped by execution tasks.
Number of execution logs Enter how many execution log files you want to store in eachfolder created for the Jobs. This value prevails over the value of the'Storage period for log files' field. Note that this limitation appliesonly to execution log files. The folders also contain resuming logfiles as well, therefore the file count in the folders is twice thevalue of the limit set in the Number of execution logs parameter.
Storage period for log files Enter how long the log files of all Jobs will be kept, in days, beforethey are removed.
Maximum number of generated jobs Enter how many generated Job archives you want to store in thededicated folder. This value prevails over the value of the Storageperiod for generated jobs field.
Storage period for generated jobs Enter how long the generated Job archives will be kept, in days,before they are removed.
Quartz servlet Shows the status of the Job Conductor. It can be Initialized or Notinitialized.
Setting up the ESB parameters
If your license includes the ESB option, you need to configure several parameters to make the bestuse of the corresponding features.Setting up the ESB Service Locator and Service Activity Monitoring parameters
About this task
From Talend Administration Center, you can set the parameters of Service Locator and Service ActivityMonitoring.
• Service Locator provides service consumers with a mechanism to discover service endpoints atruntime.
• Service Activity Monitoring is a monitoring server for your services.
Procedure
1. On the Menu, click Configuration.
2. Click the ESB Service Locator and SAM group to display the parameters.
The following parameters are editable as required:
Getting started with Talend Administration Center
34
Parameter Value
Service Locator Server(s) Type in the URL to the Service Locator server(s) and the credentials toaccess the server(s) when authentication is enabled. If there are multipleservers, separate them with a comma, for example: 192.168.0.1:2181,192.168.0.2:2181;user=tesb;password=tesb
Service Activity MonitoringServer
Type in the URL to the Service Activity Monitoring server.
Authentication Type The authentication required on the Service Activity Monitoring server end.The types available are None, and Basic.
Username Type in the username to connect to the Service Activity Monitoring serverif the authentication type is Basic.
Password Type in the password to connect to the Service Activity Monitoring serverif the authentication type is Basic.
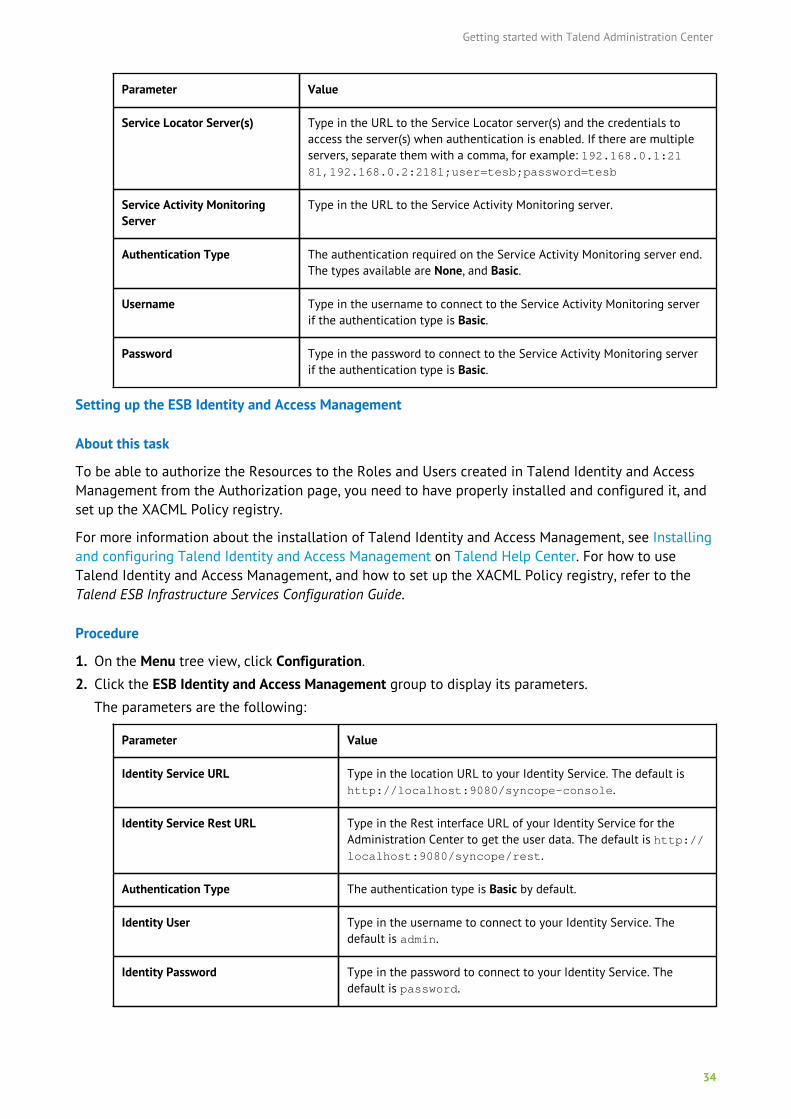
Setting up the ESB Identity and Access Management
About this task
To be able to authorize the Resources to the Roles and Users created in Talend Identity and AccessManagement from the Authorization page, you need to have properly installed and configured it, andset up the XACML Policy registry.
For more information about the installation of Talend Identity and Access Management, see Installingand configuring Talend Identity and Access Management on Talend Help Center. For how to useTalend Identity and Access Management, and how to set up the XACML Policy registry, refer to theTalend ESB Infrastructure Services Configuration Guide.
Procedure
1. On the Menu tree view, click Configuration.
2. Click the ESB Identity and Access Management group to display its parameters.
The parameters are the following:
Parameter Value
Identity Service URL Type in the location URL to your Identity Service. The default ishttp://localhost:9080/syncope-console.
Identity Service Rest URL Type in the Rest interface URL of your Identity Service for theAdministration Center to get the user data. The default is http://localhost:9080/syncope/rest.
Authentication Type The authentication type is Basic by default.
Identity User Type in the username to connect to your Identity Service. Thedefault is admin.
Identity Password Type in the password to connect to your Identity Service. Thedefault is password.

Getting started with Talend Administration Center
35
Parameter Value
Authorization (PAP) URL The URL of the XACML Policy Registry to retrieve policies from. Thedefault is http://localhost:9001/services/XacmlRegistryAtom.
Setting up the ESB Service Registry
About this task
To be able to manage services, policies and their relations in the Service Registry page, you needto have properly set up the registry and the Service Registry feature. For how to set up the ServiceRegistry, refer to Talend ESB Infrastructure Services Configuration Guide.
Procedure
1. On the Menu tree view, click Configuration.
2. Click the ESB Service Registry group to display its parameters.
The parameters are the following:
Parameter Value
Service Registry API The URL of the Service Registry interface. The default is http://localhost:8040/services/registry/admin.
Authentication Type The authentication required on the Service Registry server end. Thetypes available are None, and Basic.
Username Type in the username to connect to the Service Registry if theauthentication type is Basic.
Password Type in the password to connect to the Service Registry if theauthentication type is Basic.
Lookup Service The URL of the Lookup Service interface. The default is http://localhost:8040/services/registry/lookup.
Authentication Type The authentication required by the Lookup Service. The typesavailable are None, and Basic.
Username Type in the username to connect to the Lookup Service if theauthentication type is Basic.
Password Type in the password to connect to the Lookup Service if theauthentication type is Basic.
Setting up the ESB Provisioning Service
About this task
To be able to distribute features and resources, and configure your Talend Runtimes more easily viathe Provisioning page, you need to have properly set up the Provisioning Service feature. For how toset up the Provisioning Service, refer to Talend ESB Infrastructure Services Configuration Guide.
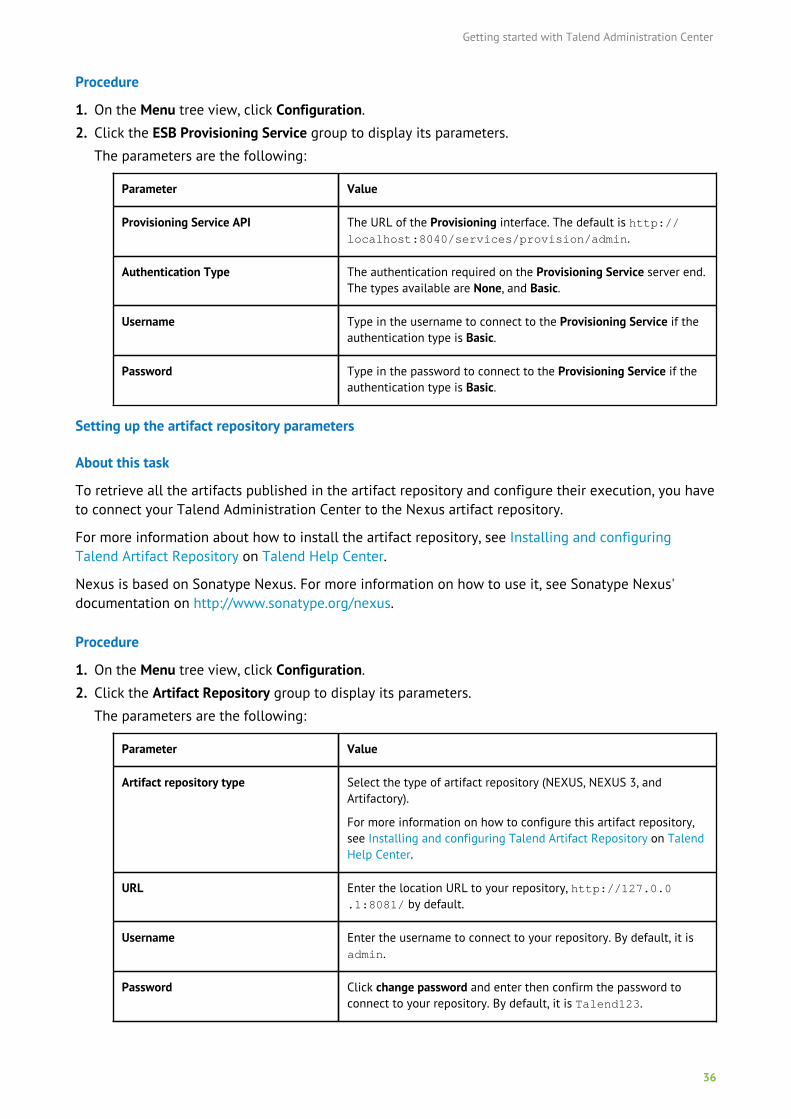
Getting started with Talend Administration Center
36
Procedure
1. On the Menu tree view, click Configuration.
2. Click the ESB Provisioning Service group to display its parameters.
The parameters are the following:
Parameter Value
Provisioning Service API The URL of the Provisioning interface. The default is http://localhost:8040/services/provision/admin.
Authentication Type The authentication required on the Provisioning Service server end.The types available are None, and Basic.
Username Type in the username to connect to the Provisioning Service if theauthentication type is Basic.
Password Type in the password to connect to the Provisioning Service if theauthentication type is Basic.
Setting up the artifact repository parameters
About this task
To retrieve all the artifacts published in the artifact repository and configure their execution, you haveto connect your Talend Administration Center to the Nexus artifact repository.
For more information about how to install the artifact repository, see Installing and configuringTalend Artifact Repository on Talend Help Center.
Nexus is based on Sonatype Nexus. For more information on how to use it, see Sonatype Nexus'documentation on http://www.sonatype.org/nexus.
Procedure
1. On the Menu tree view, click Configuration.
2. Click the Artifact Repository group to display its parameters.
The parameters are the following:
Parameter Value
Artifact repository type Select the type of artifact repository (NEXUS, NEXUS 3, andArtifactory).
For more information on how to configure this artifact repository,see Installing and configuring Talend Artifact Repository on TalendHelp Center.
URL Enter the location URL to your repository, http://127.0.0.1:8081/ by default.
Username Enter the username to connect to your repository. By default, it isadmin.
Password Click change password and enter then confirm the password toconnect to your repository. By default, it is Talend123.
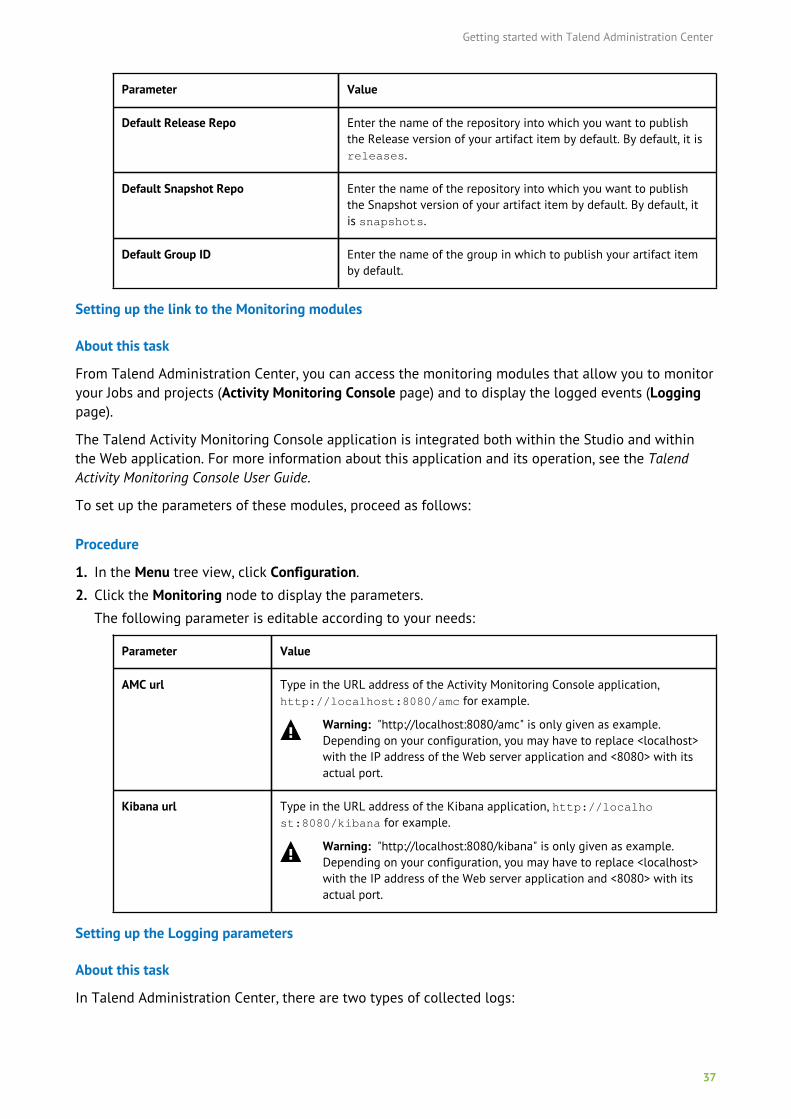
Getting started with Talend Administration Center
37
Parameter Value
Default Release Repo Enter the name of the repository into which you want to publishthe Release version of your artifact item by default. By default, it isreleases.
Default Snapshot Repo Enter the name of the repository into which you want to publishthe Snapshot version of your artifact item by default. By default, itis snapshots.
Default Group ID Enter the name of the group in which to publish your artifact itemby default.
Setting up the link to the Monitoring modules
About this task
From Talend Administration Center, you can access the monitoring modules that allow you to monitoryour Jobs and projects (Activity Monitoring Console page) and to display the logged events (Loggingpage).
The Talend Activity Monitoring Console application is integrated both within the Studio and withinthe Web application. For more information about this application and its operation, see the TalendActivity Monitoring Console User Guide.
To set up the parameters of these modules, proceed as follows:
Procedure
1. In the Menu tree view, click Configuration.
2. Click the Monitoring node to display the parameters.
The following parameter is editable according to your needs:
Parameter Value
AMC url Type in the URL address of the Activity Monitoring Console application,http://localhost:8080/amc for example.
Warning: "http://localhost:8080/amc" is only given as example.Depending on your configuration, you may have to replace <localhost>with the IP address of the Web server application and <8080> with itsactual port.
Kibana url Type in the URL address of the Kibana application, http://localhost:8080/kibana for example.
Warning: "http://localhost:8080/kibana" is only given as example.Depending on your configuration, you may have to replace <localhost>with the IP address of the Web server application and <8080> with itsactual port.
Setting up the Logging parameters
About this task
In Talend Administration Center, there are two types of collected logs:
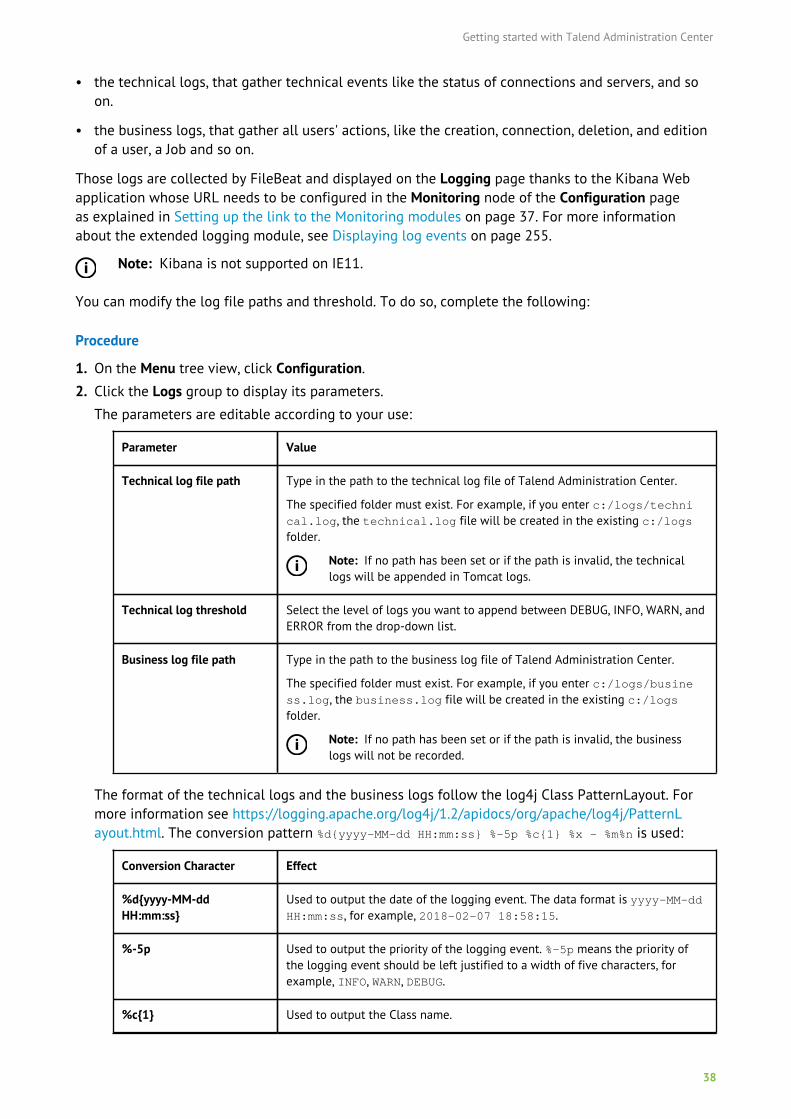
Getting started with Talend Administration Center
38
• the technical logs, that gather technical events like the status of connections and servers, and soon.
• the business logs, that gather all users' actions, like the creation, connection, deletion, and editionof a user, a Job and so on.
Those logs are collected by FileBeat and displayed on the Logging page thanks to the Kibana Webapplication whose URL needs to be configured in the Monitoring node of the Configuration pageas explained in Setting up the link to the Monitoring modules on page 37. For more informationabout the extended logging module, see Displaying log events on page 255.
Note: Kibana is not supported on IE11.
You can modify the log file paths and threshold. To do so, complete the following:
Procedure
1. On the Menu tree view, click Configuration.
2. Click the Logs group to display its parameters.
The parameters are editable according to your use:
Parameter Value
Technical log file path Type in the path to the technical log file of Talend Administration Center.
The specified folder must exist. For example, if you enter c:/logs/technical.log, the technical.log file will be created in the existing c:/logsfolder.
Note: If no path has been set or if the path is invalid, the technicallogs will be appended in Tomcat logs.
Technical log threshold Select the level of logs you want to append between DEBUG, INFO, WARN, andERROR from the drop-down list.
Business log file path Type in the path to the business log file of Talend Administration Center.
The specified folder must exist. For example, if you enter c:/logs/business.log, the business.log file will be created in the existing c:/logsfolder.
Note: If no path has been set or if the path is invalid, the businesslogs will not be recorded.
The format of the technical logs and the business logs follow the log4j Class PatternLayout. Formore information see https://logging.apache.org/log4j/1.2/apidocs/org/apache/log4j/PatternLayout.html. The conversion pattern %d{yyyy-MM-dd HH:mm:ss} %-5p %c{1} %x - %m%n is used:
Conversion Character Effect
%d{yyyy-MM-ddHH:mm:ss}
Used to output the date of the logging event. The data format is yyyy-MM-ddHH:mm:ss, for example, 2018-02-07 18:58:15.
%-5p Used to output the priority of the logging event. %-5p means the priority ofthe logging event should be left justified to a width of five characters, forexample, INFO, WARN, DEBUG.
%c{1} Used to output the Class name.
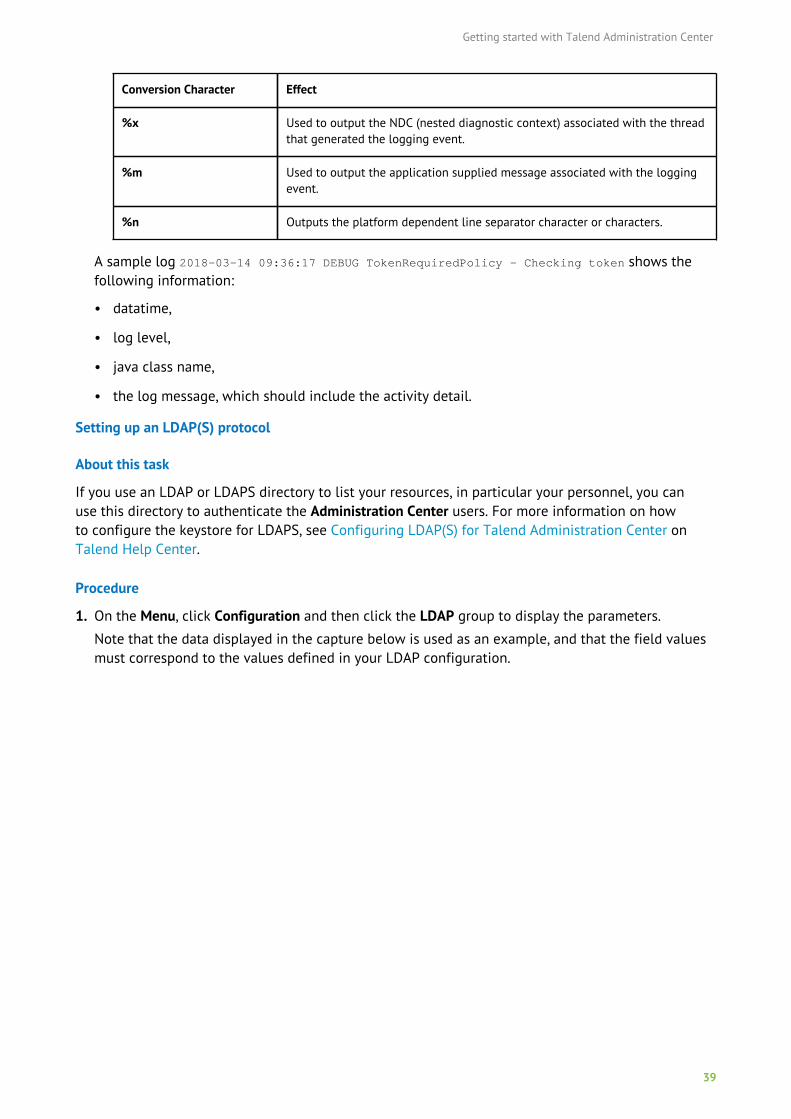
Getting started with Talend Administration Center
39
Conversion Character Effect
%x Used to output the NDC (nested diagnostic context) associated with the threadthat generated the logging event.
%m Used to output the application supplied message associated with the loggingevent.
%n Outputs the platform dependent line separator character or characters.
A sample log 2018-03-14 09:36:17 DEBUG TokenRequiredPolicy - Checking token shows thefollowing information:
• datatime,
• log level,
• java class name,
• the log message, which should include the activity detail.
Setting up an LDAP(S) protocol
About this task
If you use an LDAP or LDAPS directory to list your resources, in particular your personnel, you canuse this directory to authenticate the Administration Center users. For more information on howto configure the keystore for LDAPS, see Configuring LDAP(S) for Talend Administration Center onTalend Help Center.
Procedure
1. On the Menu, click Configuration and then click the LDAP group to display the parameters.
Note that the data displayed in the capture below is used as an example, and that the field valuesmust correspond to the values defined in your LDAP configuration.
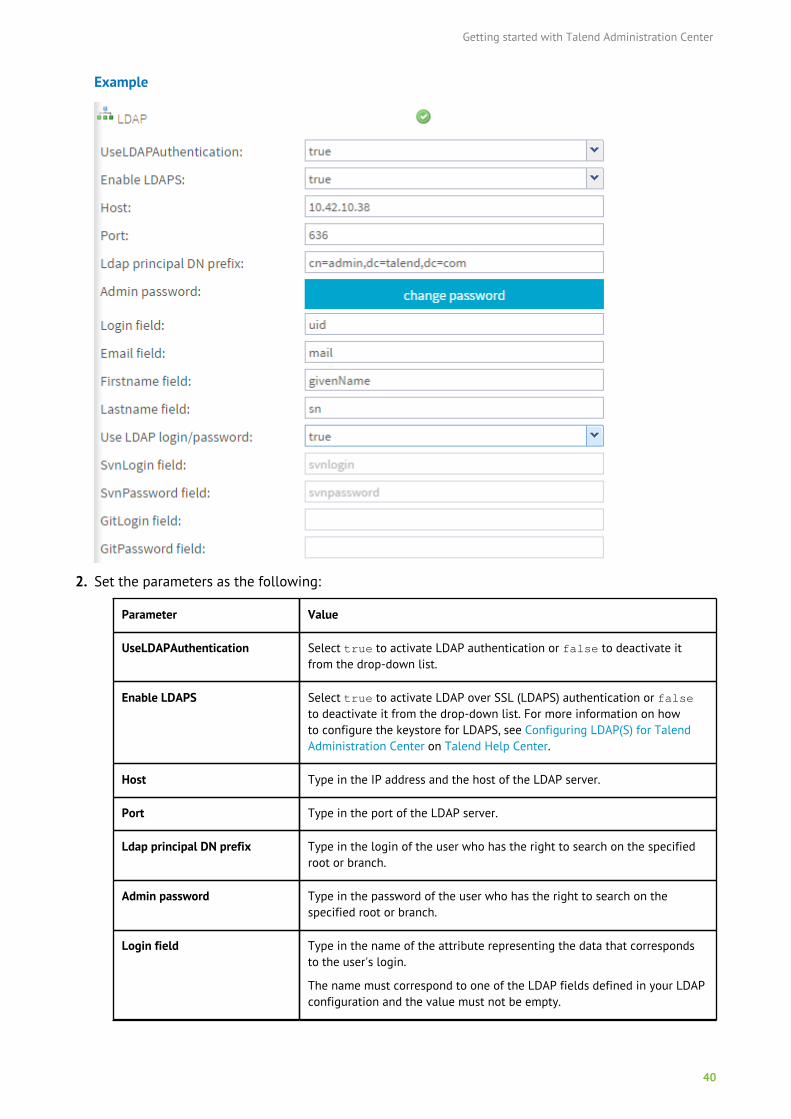
Getting started with Talend Administration Center
40
Example
2. Set the parameters as the following:
Parameter Value
UseLDAPAuthentication Select true to activate LDAP authentication or false to deactivate itfrom the drop-down list.
Enable LDAPS Select true to activate LDAP over SSL (LDAPS) authentication or falseto deactivate it from the drop-down list. For more information on howto configure the keystore for LDAPS, see Configuring LDAP(S) for TalendAdministration Center on Talend Help Center.
Host Type in the IP address and the host of the LDAP server.
Port Type in the port of the LDAP server.
Ldap principal DN prefix Type in the login of the user who has the right to search on the specifiedroot or branch.
Admin password Type in the password of the user who has the right to search on thespecified root or branch.
Login field Type in the name of the attribute representing the data that correspondsto the user's login.
The name must correspond to one of the LDAP fields defined in your LDAPconfiguration and the value must not be empty.
Getting started with Talend Administration Center
41
Parameter Value
Email field Type in the name of the attribute representing the data that correspondsto the user's Email.
The name must correspond to one of the LDAP fields defined in your LDAPconfiguration and the value must not be empty.
Firstname field Type in the name of the attribute representing the data that correspondsto the user's Firstname.
The name must correspond to one of the LDAP fields defined in your LDAPconfiguration and the value must not be empty.
Lastname field Type in the name of the attribute representing the data that correspondsto the user's Lastname.
The name must correspond to one of the LDAP fields defined in your LDAPconfiguration and the value must not be empty.
Use LDAP login/password Select true so that Talend Administration Center credentials are usedto login to SVN/Git. In this case, Talend Studio checks user credentialsdirectly against the LDAP.
When setting the option to false, the previously defined mappings in thefields below are not cleared.
SvnLogin field /
GitLogin field
Type in name of the attribute representing the data that corresponds tothe user's SVN or GIT login. This field must correspond to the field definedin your LDAP configuration.
If you use the LDAP system to handle the SVN and Git credentials, therecommended way is to edit these credentials through LDAP and notthrough the Users page as Talend Administration Center will automaticallyretrieve the changes done on these credentials.
SvnPassword field /
GitPassword field
Type in name of the attribute representing the data that corresponds tothe user's SVN or GIT password. This field must correspond to the fielddefined in your LDAP configuration.
If you use the LDAP system to handle the SVN and Git credentials, therecommended way is to edit these credentials through LDAP and notthrough the Users page as Talend Administration Center will automaticallyretrieve the changes done on these credentials.
For more information on how to manage encryption of the SVN passwordin LDAP for Talend Administration Center, see the documentation onManaging password encryption/decryption in Talend AdministrationCenteron Talend Help Center (https://help.talend.com).
Once the LDAP authentication is activated, the creation of the user account in the Users page ismodified. From now on, only the Distinguished name is required as the other information aboutthe user is retrieved from the LDAP directory. This way, user's login and password used to connectto Talend Administration Center or to Talend Studio are those defined in the LDAP directory. Formore information on the creation of a user account using LDAP authentication system, see How toadd a user with LDAP on page 63.
Getting started with Talend Administration Center
42
Setting up an SMTP protocol
About this task
On Talend Administration Center, you can get notified when an event occurs. To realize this feature,you should first set up the parameters of the email system which will send notifications to you.
Procedure
1. On the Menu tree view, click Configuration.
2. Click the SMTP group to display the parameters.
The following parameters are editable according to your use:
Parameter Value
Use SMTP Select true to activate SMTP or false to deactivate it.
Host Type in the IP address of your mail server.
Port Type in the port of your mail server.
Require SSL Select true if your email server uses an SSL authentication.
Username Type in the email address that will be displayed as the sender information in thenotification received by the recipients. Whether this field is optional depends on yourlocal configuration of SMTP authentication.
An anonymous user may be used to send notifications. By default, the first admin emailaddress will be used.
Password If your email server requires an authentication, type in the password corresponding tothe mailbox that will send the notification. If your message server is anonymous, thisfield is optional.
From Address(optional)
Type in the SMTP From email address, [email protected] for example. Bydefault, if the field is empty, it is the value of the SMTP User Name that will be used.
Once the SMTP parameters are set up, you can configure the notifications that will be sent, fromthe Notification page. For more information on the notifications, see Managing notifications onpage 97.
Note: If one of the SMTP parameters is down, a warning will display at the top of theNotification page to inform the user that the notification might not work due to an SMTPserver connection error.
Setting up Software Update parameters
From Talend Administration Center, you can edit the Software Update parameters.
The following parameters are editable according to your needs:
Parameter Value
Talend update url Location URL to the Talend remote repository from which software updates areretrieved, this field is filled by default.
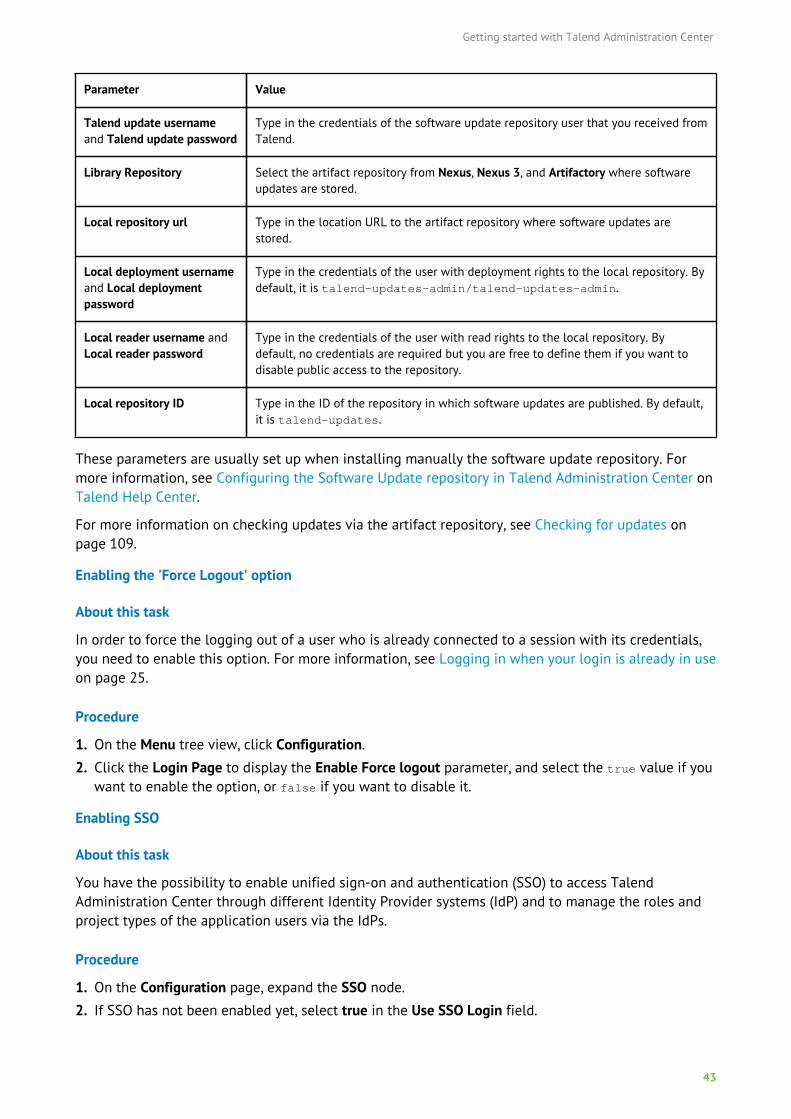
Getting started with Talend Administration Center
43
Parameter Value
Talend update usernameand Talend update password
Type in the credentials of the software update repository user that you received fromTalend.
Library Repository Select the artifact repository from Nexus, Nexus 3, and Artifactory where softwareupdates are stored.
Local repository url Type in the location URL to the artifact repository where software updates arestored.
Local deployment usernameand Local deploymentpassword
Type in the credentials of the user with deployment rights to the local repository. Bydefault, it is talend-updates-admin/talend-updates-admin.
Local reader username andLocal reader password
Type in the credentials of the user with read rights to the local repository. Bydefault, no credentials are required but you are free to define them if you want todisable public access to the repository.
Local repository ID Type in the ID of the repository in which software updates are published. By default,it is talend-updates.
These parameters are usually set up when installing manually the software update repository. Formore information, see Configuring the Software Update repository in Talend Administration Center onTalend Help Center.
For more information on checking updates via the artifact repository, see Checking for updates onpage 109.
Enabling the 'Force Logout' option
About this task
In order to force the logging out of a user who is already connected to a session with its credentials,you need to enable this option. For more information, see Logging in when your login is already in useon page 25.
Procedure
1. On the Menu tree view, click Configuration.
2. Click the Login Page to display the Enable Force logout parameter, and select the true value if youwant to enable the option, or false if you want to disable it.
Enabling SSO
About this task
You have the possibility to enable unified sign-on and authentication (SSO) to access TalendAdministration Center through different Identity Provider systems (IdP) and to manage the roles andproject types of the application users via the IdPs.
Procedure
1. On the Configuration page, expand the SSO node.
2. If SSO has not been enabled yet, select true in the Use SSO Login field.
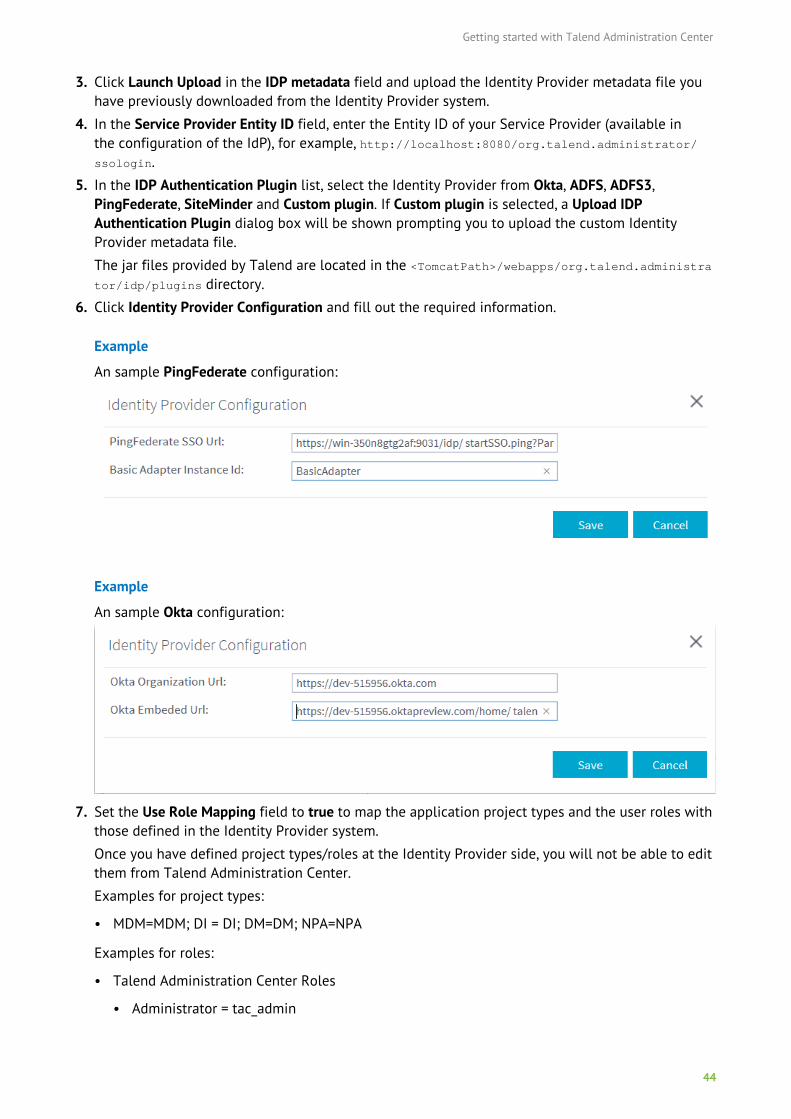
Getting started with Talend Administration Center
44
3. Click Launch Upload in the IDP metadata field and upload the Identity Provider metadata file youhave previously downloaded from the Identity Provider system.
4. In the Service Provider Entity ID field, enter the Entity ID of your Service Provider (available inthe configuration of the IdP), for example, http://localhost:8080/org.talend.administrator/ssologin.
5. In the IDP Authentication Plugin list, select the Identity Provider from Okta, ADFS, ADFS3,PingFederate, SiteMinder and Custom plugin. If Custom plugin is selected, a Upload IDPAuthentication Plugin dialog box will be shown prompting you to upload the custom IdentityProvider metadata file.
The jar files provided by Talend are located in the <TomcatPath>/webapps/org.talend.administrator/idp/plugins directory.
6. Click Identity Provider Configuration and fill out the required information.
Example
An sample PingFederate configuration:
Example
An sample Okta configuration:
7. Set the Use Role Mapping field to true to map the application project types and the user roles withthose defined in the Identity Provider system.
Once you have defined project types/roles at the Identity Provider side, you will not be able to editthem from Talend Administration Center.
Examples for project types:
• MDM=MDM; DI = DI; DM=DM; NPA=NPA
Examples for roles:
• Talend Administration Center Roles
• Administrator = tac_admin
Getting started with Talend Administration Center
45
• Operation Manager = tac_om
Note: Setting the Talend Administration Center roles is mandatory.
• Talend Data Preparation Roles
• Administrator = dp_admin
• Data Preparator = dp_dp
• Talend Data Stewardship Roles
• Data Steward = tds_ds
If your organization does not accept custom attributes in the SAML token, either:
• Select Show Advanced Configuration in the wizard and, in Path to Value, enter the XPathexpression to target the SAML value to map to the corresponding Talend Administration Centerobject (Project Types, Roles, Email, First Name, Last Name).
Example: /saml2p:Response/saml2:Assertion/saml2:AttributeStatement/saml2:Attribute[@Name='tac.projectType']/saml2:AttributeValue/text()
• Set Use Role Mapping to false.
In this case, you cannot create users manually, but the user type and the user roles can beedited in Talend Administration Center.
When users log in for the first time, their type is No Project Access.
The project types and roles set in the Identity Provider override the roles set in TalendAdministration Center at user login.
The default login timeout is set to 120 seconds, which you can change by adding the parametersso.config.clientLoginTimeout with the desired timeout in the <ApplicationPath>/WEB-INF/classes/configuration.properties file.
8. In the Redirect URL on Logout field, enter the the URL of IDP you want to redirect browser to onlogout from Talend Administration Center.
If this field is empty, you will be redirected to the default location of Talend Administration Centeron logout.
Checking the parameters configured by default
Some generic parameters are filled in by default in the Configuration page. The following sectionsdescribe how to display those parameters and edit them if needed.
Checking general information about Talend Administration Center
About this task
To check the general information of Talend Administration Center, do the following:
Procedure
1. On the Menu tree view, click Configuration.
2. Click the General group to display the parameters.
The following parameters are read only:
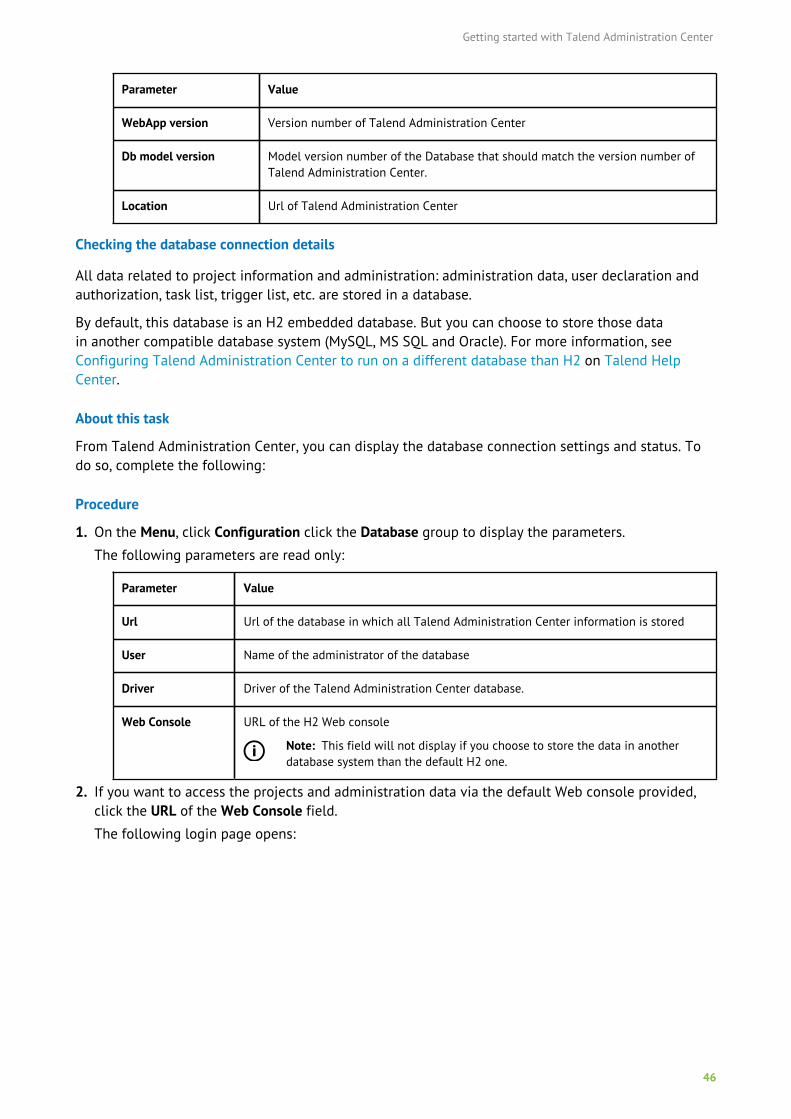
Getting started with Talend Administration Center
46
Parameter Value
WebApp version Version number of Talend Administration Center
Db model version Model version number of the Database that should match the version number ofTalend Administration Center.
Location Url of Talend Administration Center
Checking the database connection details
All data related to project information and administration: administration data, user declaration andauthorization, task list, trigger list, etc. are stored in a database.
By default, this database is an H2 embedded database. But you can choose to store those datain another compatible database system (MySQL, MS SQL and Oracle). For more information, seeConfiguring Talend Administration Center to run on a different database than H2 on Talend HelpCenter.
About this task
From Talend Administration Center, you can display the database connection settings and status. Todo so, complete the following:
Procedure
1. On the Menu, click Configuration click the Database group to display the parameters.
The following parameters are read only:
Parameter Value
Url Url of the database in which all Talend Administration Center information is stored
User Name of the administrator of the database
Driver Driver of the Talend Administration Center database.
Web Console URL of the H2 Web console
Note: This field will not display if you choose to store the data in anotherdatabase system than the default H2 one.
2. If you want to access the projects and administration data via the default Web console provided,click the URL of the Web Console field.
The following login page opens:
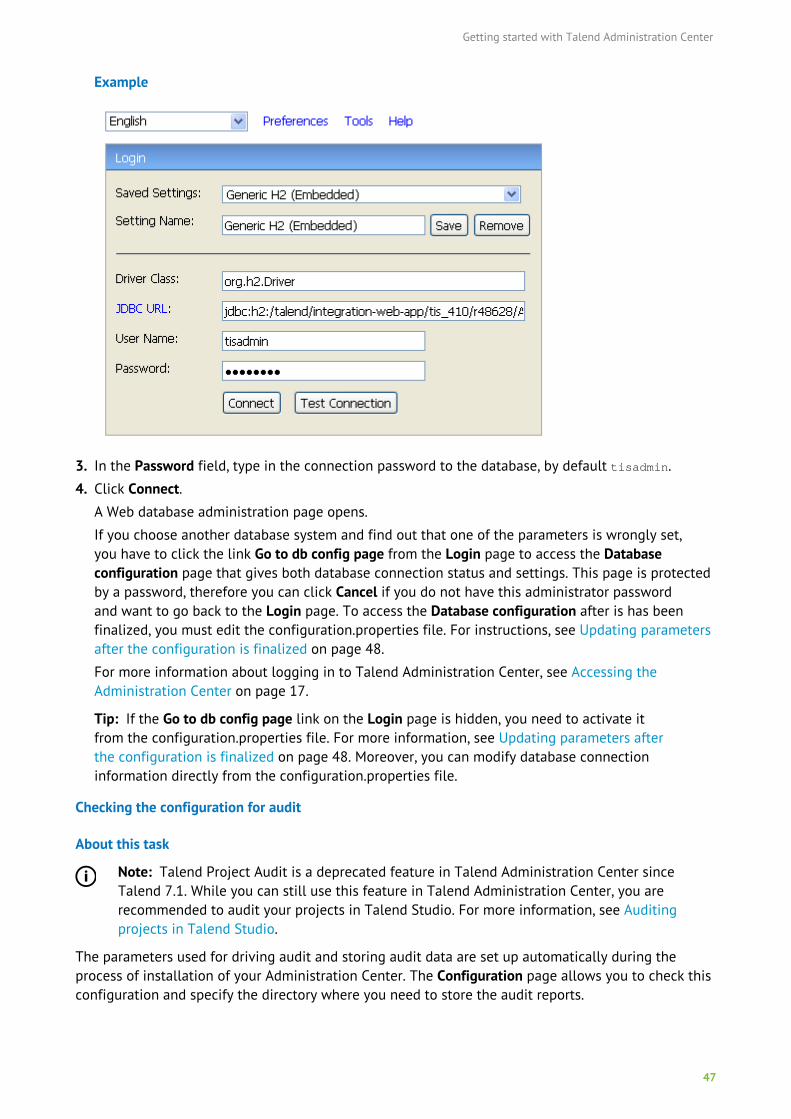
Getting started with Talend Administration Center
47
Example
3. In the Password field, type in the connection password to the database, by default tisadmin.
4. Click Connect.A Web database administration page opens.
If you choose another database system and find out that one of the parameters is wrongly set,you have to click the link Go to db config page from the Login page to access the Databaseconfiguration page that gives both database connection status and settings. This page is protectedby a password, therefore you can click Cancel if you do not have this administrator passwordand want to go back to the Login page. To access the Database configuration after is has beenfinalized, you must edit the configuration.properties file. For instructions, see Updating parametersafter the configuration is finalized on page 48.
For more information about logging in to Talend Administration Center, see Accessing theAdministration Center on page 17.
Tip: If the Go to db config page link on the Login page is hidden, you need to activate itfrom the configuration.properties file. For more information, see Updating parameters afterthe configuration is finalized on page 48. Moreover, you can modify database connectioninformation directly from the configuration.properties file.
Checking the configuration for audit
About this task
Note: Talend Project Audit is a deprecated feature in Talend Administration Center sinceTalend 7.1. While you can still use this feature in Talend Administration Center, you arerecommended to audit your projects in Talend Studio. For more information, see Auditingprojects in Talend Studio.
The parameters used for driving audit and storing audit data are set up automatically during theprocess of installation of your Administration Center. The Configuration page allows you to check thisconfiguration and specify the directory where you need to store the audit reports.
Getting started with Talend Administration Center
48
Procedure
In the Reports stored path field of the Audit area, type in the path pointing to the folder of interestfor storing the audit reports.
The other fields in this area present the connection parameters to the database, initially an H2database named talend_audit, dedicated to storing audit data. With Talend Administration Center,you can manage this audit database the same way as you do to the database storing the datarelated to project information and administration. For further information about this way ofmanagement, see Checking the database connection details on page 46.
When need be, you are able to create a custom audit database using the Audit page of TalendAdministration Center. For further information, see Customizing audit database on page 389.
Updating parameters after the configuration is finalized
About this task
To update the parameters configured on the Configuration and Database configuration pages afterthey have been finalized, you must edit the configuration.properties file in the <TalendAdministrationCenterInstallationDirectory>/apache-tomcat/webapps/org.talend.administrator/WEB-
INF/classes folder.
Procedure
1. Stop Talend Administration Center.
2. Open the configuration.properties file.
3. To enable access to the Configuration page for the Administrator or the Security Administrator,uncomment the appropriate lines:
configuration.admin.enable=trueconfiguration.securityadmin.enable=true
4. To enable access to the Database configuration, uncomment the following line in the file:
configuration.dbadmin.enable=true
5. Save the changes.
6. Start Talend Administration Center.
7. Update the parameters and finalize the configuration.
Results
When the configuration is finalized, the parameter values change to false.
Note: If the lines are missing from the configuration.properties file, the configuration isconsidered finalized.
Advanced configuration of links in the Menu
Setting up links to other Talend suite Web applications
Talend DQ Portal is deprecated from Talend 7.1 onwards.
If you have other Talend web applications like Talend DQ Portal and Talend MDM Web UI, you canaccess them from Talend Administration Center.
Getting started with Talend Administration Center
49
About this task
To set the link to the corresponding web application, complete the following:
Procedure
1. In the Menu tree view, click Configuration to open the corresponding page.
2. Expand Talend suite and then click in the line corresponding to the web application to which youwant to set the link.
3. Set the parameters as the following:
Parameter Value
Data Quality portal Type in the URL to Talend DQ Portal web application.
For example, http://10.66.10.42:8080/tdqportal/
Drools The default URL to Drools Kie Workbench is kie-drools-wb.
You can change it to http://<hostname>:<port>/kie-drools-wbwhere <hostname> is the IP address/hostname and <port> is the port of theapplication server on which Talend Administration Center is installed.
For example, http://10.42.10.84:8080/kie-drools-wb/ if the URLaddress corresponding to the location of Talend Administration Center ishttp://10.42.10.84:8080/org.talend.administrator
MDM Type in the URL to Talend MDM Web UI web application.
For example, http://10.84.10.42:8080/talendmdm/secure/
Results
Once the links are set, the corresponding modules display on the Menu of Talend AdministrationCenter and in the Welcome page. You can simply click one of them to access the corresponding webapplication or page.
Setting up dynamic links
About this task
A dynamic link is an item you can click to open the website of interest directly from TalendAdministration Center. Once configured, it appears on the Menu tree view and by one single click,directs you to the website it is associated with.
To configure a dynamic link, proceed as follows:
Procedure
1. Stop your Tomcat server if it is already launched.
2. Open the configuration.properties file of the Talend Administration Center to be used.
This file is located in the classes folder of this Talend Administration Center on your Tomcatserver, for example: <TomcatPath>\webapps\org.talend.administrator\WEB-INF\classes where<TomcatPath> designates the Tomcat installation path.
3. At the end of the file for example, enter the dynamic link of interest using the given syntax:dynamiclink.<key>=<label>#<url>#<order>.
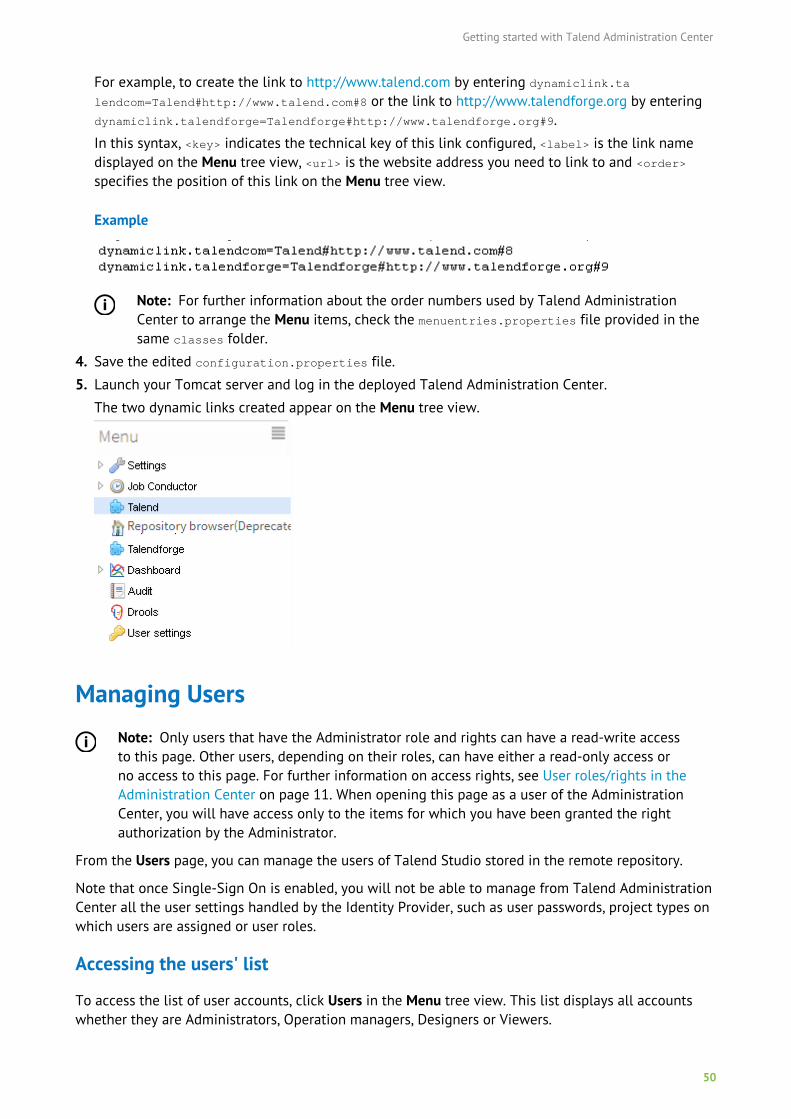
Getting started with Talend Administration Center
50
For example, to create the link to http://www.talend.com by entering dynamiclink.talendcom=Talend#http://www.talend.com#8 or the link to http://www.talendforge.org by enteringdynamiclink.talendforge=Talendforge#http://www.talendforge.org#9.
In this syntax, <key> indicates the technical key of this link configured, <label> is the link namedisplayed on the Menu tree view, <url> is the website address you need to link to and <order>specifies the position of this link on the Menu tree view.
Example
Note: For further information about the order numbers used by Talend AdministrationCenter to arrange the Menu items, check the menuentries.properties file provided in thesame classes folder.
4. Save the edited configuration.properties file.
5. Launch your Tomcat server and log in the deployed Talend Administration Center.
The two dynamic links created appear on the Menu tree view.
Managing UsersNote: Only users that have the Administrator role and rights can have a read-write accessto this page. Other users, depending on their roles, can have either a read-only access orno access to this page. For further information on access rights, see User roles/rights in theAdministration Center on page 11. When opening this page as a user of the AdministrationCenter, you will have access only to the items for which you have been granted the rightauthorization by the Administrator.
From the Users page, you can manage the users of Talend Studio stored in the remote repository.
Note that once Single-Sign On is enabled, you will not be able to manage from Talend AdministrationCenter all the user settings handled by the Identity Provider, such as user passwords, project types onwhich users are assigned or user roles.
Accessing the users' list
To access the list of user accounts, click Users in the Menu tree view. This list displays all accountswhether they are Administrators, Operation managers, Designers or Viewers.

Getting started with Talend Administration Center
51
When you access this list for the first time, and if SSO was not enabled, only the default administratoraccount shows on the list.
The account list provides the following information for each user. If SSO was enabled, some fieldsmight be read-only.
Column Description
Login User's email address used to login to the remote repository of Talend Studio.
Role Administrator, Operation manager, Designer and Viewer. For more information, see Userroles/rights in the Administration Center on page 11.
Group Group to which the user has been added. For more information, see Grouping users by usertype on page 66.
Last Name Last name of the user.
First Name First name of the user.
Type Data Integration/ESB, Data Management and Master Data Management according to thelicense you set in Talend Administration Center. For more information, see What domainscan you work in depending on your user type and license on page 15.
Active The user account is activated when the corresponding Active column is filled with .
If an account is deactivated, the icon displays and the user can not access TalendAdministration Center and/or Talend Studio.
Dictionary Service The user has access to Talend Dictionary Service. The user can view, edit or remove thesemantic types or dictionaries used by default in Talend web applications.
Logged inIndicates which users are logged in the Talend Studio ( icon) and Talend Administration
Center ( icon) and for what period of time.
Creation The creation date of the account in Talend Administration Center.
Getting started with Talend Administration Center
52
Column Description
SVN/Git login The user login to SVN/Git. Note that this user must have been previously created in SVN/Git.
If you use the LDAP system to handle the SVN and Git credentials, these credentials mustbe edited through LDAP as Talend Administration Center will automatically retrieve thechanges performed.
Note: New designer users, not created by the Administrator, can appear in the list andconsume users from the license. Those designers are created from Talend Studio when userscreate their sandbox project. For more information on how users create sandbox projects, seeCreating a sandbox project on Talend Help Center and for more information on how to managesandbox projects, see Managing sandbox projects on page 75.
The buttons on the toolbar of the Users page allow you to refresh the display of the account list, adda new account, duplicate an account which already exists, delete one or more accounts and importusers.
Note: The account list refreshes automatically every 30 seconds by default. You can adjustthe frequency of the auto refresh by editing the value of the admin.userandgroup.conf.uiAutoRefreshFrequency property in seconds in the database configuration table. If it is set to 0,the auto refresh is disabled. Note that you need to restart the database server for the changesto take effect.
The right panel of the Users page allows you to create new user accounts and to modify selectedaccounts. For more information, see Adding a user on page 52 and Editing a user on page 68.
The two areas, Data and Connection stats, in this panel display more detailed information about theselected account. For more information, see Displaying the connection information of a user on page65.
You can hide/show this panel by clicking respectively the and the buttons located in the upperright corner of the panel.
Adding a user
To add users, you can:
• add new user accounts from the Users page of Talend Administration Center.
• create users with LDAP. Creating a user account with LDAP is slightly different from the defaultoperation. With LDAP, only the Distinguished name and the role are required, while with thedefault operation, the First name, Last name and Password are all required.
When you want to use the LDAP system to list and authenticate users, you must first activate LDAPauthentication on the Configuration page of Talend Administration Center. For more informationon activating LDAP authentication, see Setting up an LDAP(S) protocol on page 39.
• create users via an Identity Provider system (Okta, SiteMinder).
Note that once Single-Sign On is enabled, you will not be able to manage from TalendAdministration Center all the user settings handled by the Identity Provider, such as userpasswords, project types on which users are assigned or user roles.
When you want to use an Identity Provider system to list and authenticate users, you must firstactivate both SSO and Role Mapping on the Configuration page of Talend Administration Center.For more information, see Enabling SSO on page 43.
Getting started with Talend Administration Center
53
You cannot activate both LDAP and SSO at the same time as user management needs to be handledeither in LDAP or in your Identity Provider.
For more information on the user creation modes, see the following sub-sections.
How to add a user (default)
About this task
Note: To do this via the MetaServlet application, use the createUser command. For moreinformation about the MetaServlet parameters, see Parameters and actions in metaServlet onpage 400.
Procedure
1. On the Users page, click Add to create a new account.
You can create MDM, Data Management, or Data Integration/ESB users with predefined roles.
2. In the Data panel to the right, fill in the following information.
Field Description
Login Type in the user's email address that will be used to log on to the remoterepository of Talend Studio.
First Name Type in the user's first name.
Last Name Type in the user's last name.
Password Type in a password for this account.
SVN/GIT login Type in the SVN or GIT login (or both, depending on where your projects arestored) in order for the user to commit the modifications made on TalendStudio with this SVN/GIT login instead of the default one.
Note that the login and password must correspond to a user that has beenpreviously created in SVN/GIT.
SVN/GIT password Type in the SVN/GIT password corresponding to the SVN/GIT login.
Note that the login and password must correspond to a user that has beenpreviously created in SVN/GIT.
Type Select the type of project the user will be working on depending on thelicense you set in Talend Administration Center. For more information, seeWhat domains can you work in depending on your user type and license onpage 15.
Note: If the license set in Talend Administration Center is a DataIntegration or ESB license only, this field will not display as therewill not be other types available.
Getting started with Talend Administration Center
54
Field Description
RoleClick to open a dialog box where you can select from the list the userrole(s) you want to assign to the selected user. You can assign the userseveral roles. To do so, select the check boxes of the roles you want toassign to the selected user and click Validate in the dialog box.
Note that if you enabled the Role Mapping option in the SSO node ofthe Configuration page, this field might be automatically filled. For moreinformation, see Enabling SSO on page 43.
The role(s) will define the read and write privileges related to themanagement of all entities in Talend Administration Center. For moreinformation on user roles, see User roles/rights in the Administration Centeron page 11.
Data Preparation User Select this option to grant the user data preparation roles.
If the option is selected, the Data Preparation Role field appears. Choose theappropriate roles for the user from the list.
Data Stewardship User Select this option to grant the user data stewardship roles.
If the option is selected, the Data Stewardship Role field appears. Choosethe appropriate roles for the user from the list.
Master Data ManagementWeb User
Select this option to grant the user MDM Web User roles.
If the option is selected, the Master Data Management Web Role fieldappears. Choose the appropriate roles for the user from the list.
Dictionary Service User Select this option to grant access to Talend Dictionary Service.
If this option is selected, the Dictionary Service Role field appears. The usercan view, edit or remove the semantic types or dictionaries used by defaultin Talend web applications. Choose the appropriate roles for the user fromthe list.
A Dictionary Service User can be created only if your license includes DataManagement.
GroupClick to open a dialog box where you can select from the list the checkbox of the user group(s) in which you want to add to the selected user.
Note that the user group must have been previously created. Oncecreated, this group can be assigned to a project of the same type. For moreinformation on user roles, see User roles/rights in the Administration Centeron page 11.
Active Activate/deactivate an account to enable/disable the selected user to accessTalend Administration Center and/or Talend Studio.
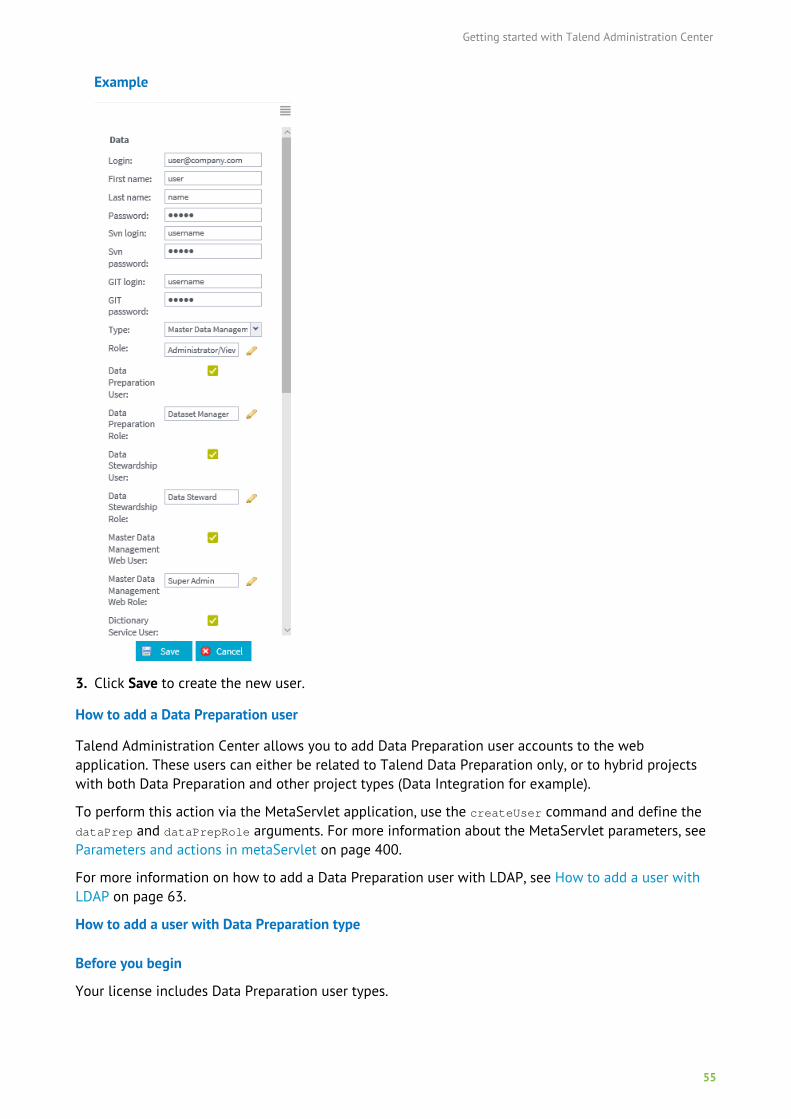
Getting started with Talend Administration Center
55
Example
3. Click Save to create the new user.
How to add a Data Preparation user
Talend Administration Center allows you to add Data Preparation user accounts to the webapplication. These users can either be related to Talend Data Preparation only, or to hybrid projectswith both Data Preparation and other project types (Data Integration for example).
To perform this action via the MetaServlet application, use the createUser command and define thedataPrep and dataPrepRole arguments. For more information about the MetaServlet parameters, seeParameters and actions in metaServlet on page 400.
For more information on how to add a Data Preparation user with LDAP, see How to add a user withLDAP on page 63.
How to add a user with Data Preparation type
Before you begin
Your license includes Data Preparation user types.
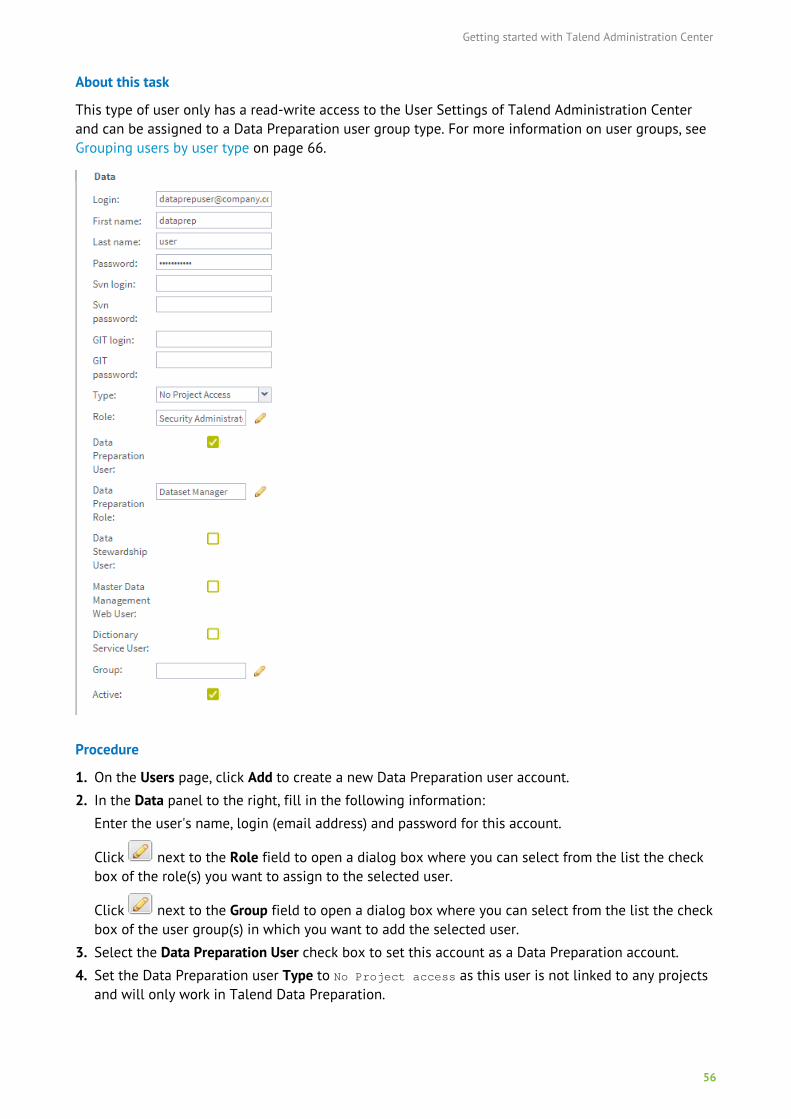
Getting started with Talend Administration Center
56
About this task
This type of user only has a read-write access to the User Settings of Talend Administration Centerand can be assigned to a Data Preparation user group type. For more information on user groups, seeGrouping users by user type on page 66.
Procedure
1. On the Users page, click Add to create a new Data Preparation user account.
2. In the Data panel to the right, fill in the following information:
Enter the user's name, login (email address) and password for this account.
Click next to the Role field to open a dialog box where you can select from the list the checkbox of the role(s) you want to assign to the selected user.
Click next to the Group field to open a dialog box where you can select from the list the checkbox of the user group(s) in which you want to add the selected user.
3. Select the Data Preparation User check box to set this account as a Data Preparation account.
4. Set the Data Preparation user Type to No Project access as this user is not linked to any projectsand will only work in Talend Data Preparation.
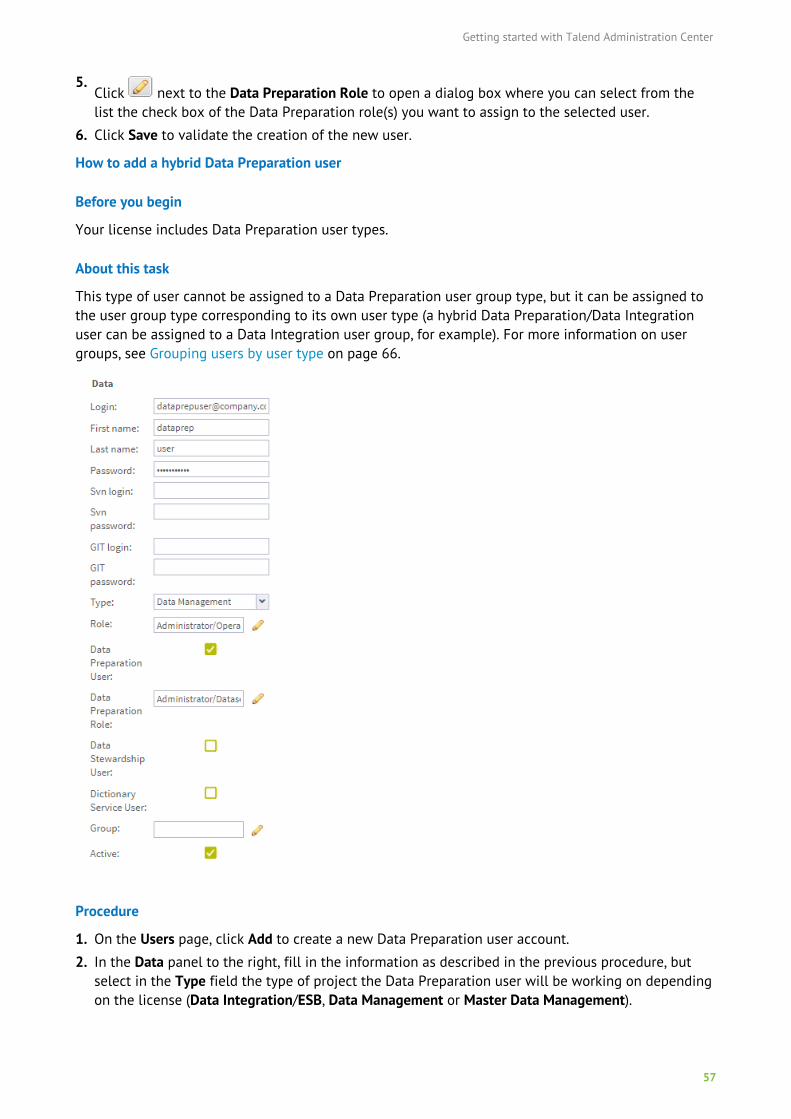
Getting started with Talend Administration Center
57
5.Click next to the Data Preparation Role to open a dialog box where you can select from thelist the check box of the Data Preparation role(s) you want to assign to the selected user.
6. Click Save to validate the creation of the new user.
How to add a hybrid Data Preparation user
Before you begin
Your license includes Data Preparation user types.
About this task
This type of user cannot be assigned to a Data Preparation user group type, but it can be assigned tothe user group type corresponding to its own user type (a hybrid Data Preparation/Data Integrationuser can be assigned to a Data Integration user group, for example). For more information on usergroups, see Grouping users by user type on page 66.
Procedure
1. On the Users page, click Add to create a new Data Preparation user account.
2. In the Data panel to the right, fill in the information as described in the previous procedure, butselect in the Type field the type of project the Data Preparation user will be working on dependingon the license (Data Integration/ESB, Data Management or Master Data Management).
Getting started with Talend Administration Center
58
Note that if you enabled the Role Mapping option in the SSO node of the Configuration page, thesefields might be automatically filled. For more information, see Enabling SSO on page 43.
3. Click Save to validate the creation of the new user.
How to add a Data Stewardship user
Talend Administration Center allows you to define Data Stewardship users and assign thempredefined roles. This makes the user list accessible from Talend Data Stewardship where users canbe assigned to specific campaigns and tasks.
These users can either be related to Talend Data Stewardship only, or to hybrid projects with bothData Stewardship and other project types (Data Management for example).
To perform this action via the MetaServlet application, use the createUser command and define thetds and tdsRoles arguments. For more information about the MetaServlet parameters, see Parametersand actions in metaServlet on page 400.
For more information on how to add a Data Stewardship user with LDAP, see How to add a user withLDAP on page 63.
How to add a user with Data Stewardship type
Before you begin
Your license includes Data Stewardship user types.
About this task
This type of user only has a read-write access to the User Settings of Talend Administration Centerand can be assigned to a Data Stewardship user group type. For more information on user groups, seeGrouping users by user type on page 66.
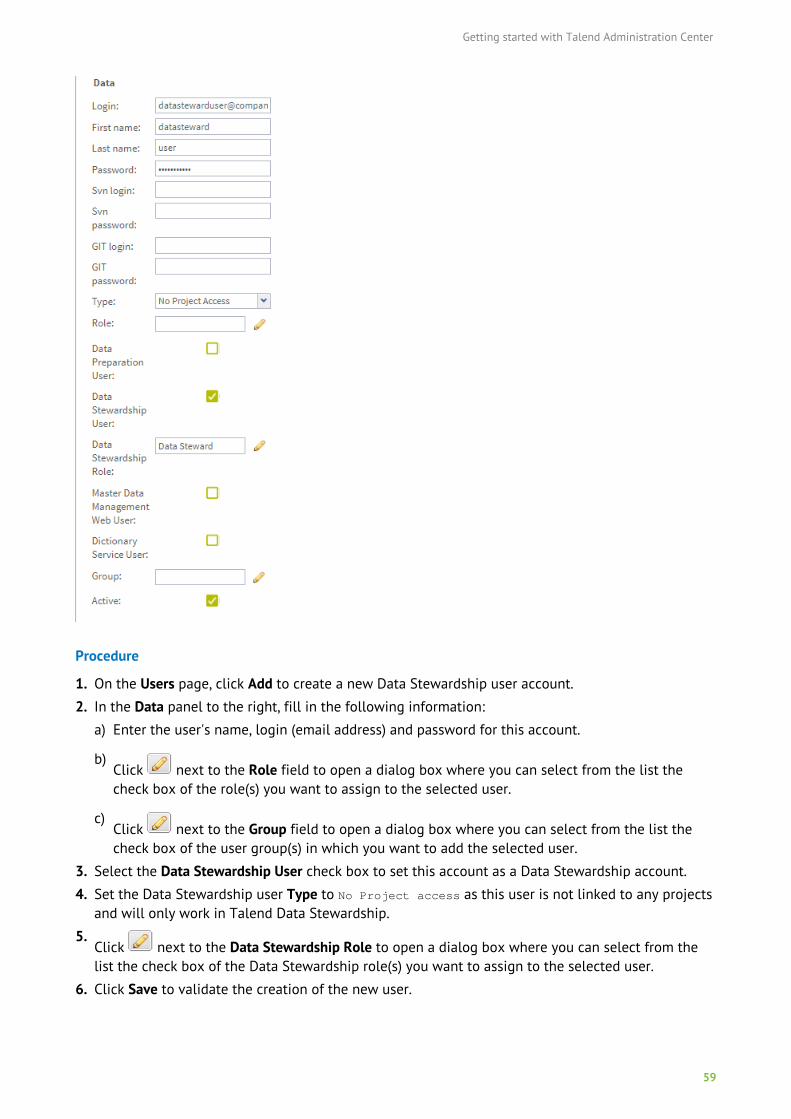
Getting started with Talend Administration Center
59
Procedure
1. On the Users page, click Add to create a new Data Stewardship user account.
2. In the Data panel to the right, fill in the following information:
a) Enter the user's name, login (email address) and password for this account.
b)Click next to the Role field to open a dialog box where you can select from the list thecheck box of the role(s) you want to assign to the selected user.
c)Click next to the Group field to open a dialog box where you can select from the list thecheck box of the user group(s) in which you want to add the selected user.
3. Select the Data Stewardship User check box to set this account as a Data Stewardship account.
4. Set the Data Stewardship user Type to No Project access as this user is not linked to any projectsand will only work in Talend Data Stewardship.
5.Click next to the Data Stewardship Role to open a dialog box where you can select from thelist the check box of the Data Stewardship role(s) you want to assign to the selected user.
6. Click Save to validate the creation of the new user.
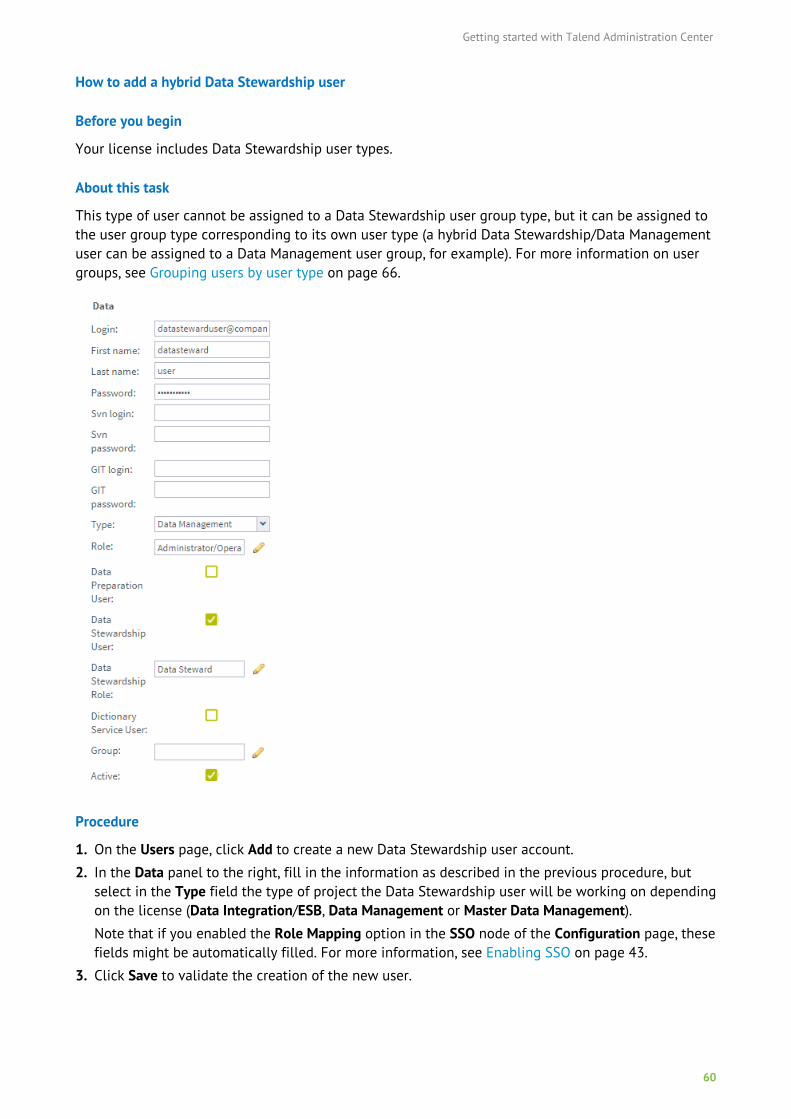
Getting started with Talend Administration Center
60
How to add a hybrid Data Stewardship user
Before you begin
Your license includes Data Stewardship user types.
About this task
This type of user cannot be assigned to a Data Stewardship user group type, but it can be assigned tothe user group type corresponding to its own user type (a hybrid Data Stewardship/Data Managementuser can be assigned to a Data Management user group, for example). For more information on usergroups, see Grouping users by user type on page 66.
Procedure
1. On the Users page, click Add to create a new Data Stewardship user account.
2. In the Data panel to the right, fill in the information as described in the previous procedure, butselect in the Type field the type of project the Data Stewardship user will be working on dependingon the license (Data Integration/ESB, Data Management or Master Data Management).Note that if you enabled the Role Mapping option in the SSO node of the Configuration page, thesefields might be automatically filled. For more information, see Enabling SSO on page 43.
3. Click Save to validate the creation of the new user.
Getting started with Talend Administration Center
61
How to add an MDM user
In Talend Administration Center, you can create MDM users and define their permissions for accessingTalend MDM.
All MDM Studio and web users are managed by Talend Administration Center.
The list of MDM users can be retrieved from the User Manager page in Talend MDM Web UI, whereadministrators can assign them custom roles created and defined in Talend Studio.
For more information about the user management in Talend MDM Web UI, see Talend MDM Web UIUser Guide.
For more information about how to create and define custom roles in Talend Studio, see TalendStudio User Guide.
To add an MDM user via the MetaServlet application, use the createUser command and define themdm and mdmRoles arguments. For more information about the MetaServlet parameters, see Parametersand actions in metaServlet on page 400.
For more information on how to add an MDM user with LDAP, see How to add a user with LDAP onpage 63.
Before you begin
Make sure you have a license for a Talend subscription product with Talend MDM.
Procedure
1. On the Users page, click Add to create a new user account.The Data panel opens to the right, where you need to define the user's information.
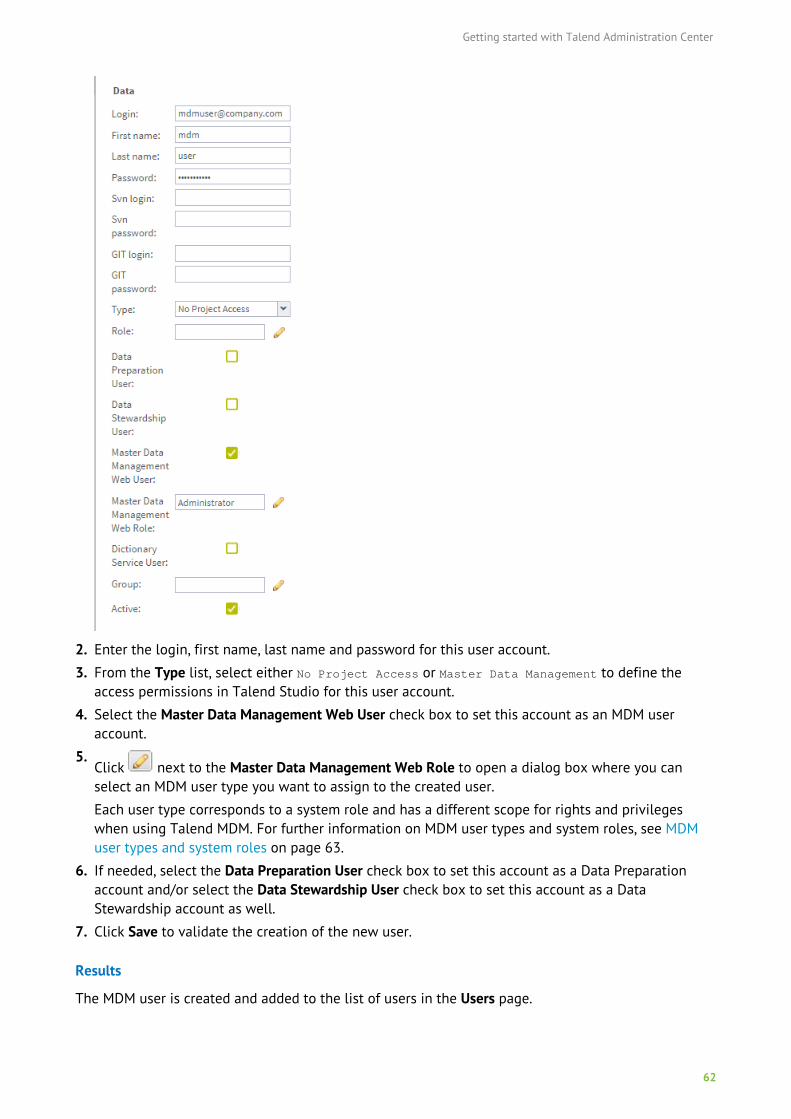
Getting started with Talend Administration Center
62
2. Enter the login, first name, last name and password for this user account.
3. From the Type list, select either No Project Access or Master Data Management to define theaccess permissions in Talend Studio for this user account.
4. Select the Master Data Management Web User check box to set this account as an MDM useraccount.
5.Click next to the Master Data Management Web Role to open a dialog box where you canselect an MDM user type you want to assign to the created user.
Each user type corresponds to a system role and has a different scope for rights and privilegeswhen using Talend MDM. For further information on MDM user types and system roles, see MDMuser types and system roles on page 63.
6. If needed, select the Data Preparation User check box to set this account as a Data Preparationaccount and/or select the Data Stewardship User check box to set this account as a DataStewardship account as well.
7. Click Save to validate the creation of the new user.
Results
The MDM user is created and added to the list of users in the Users page.
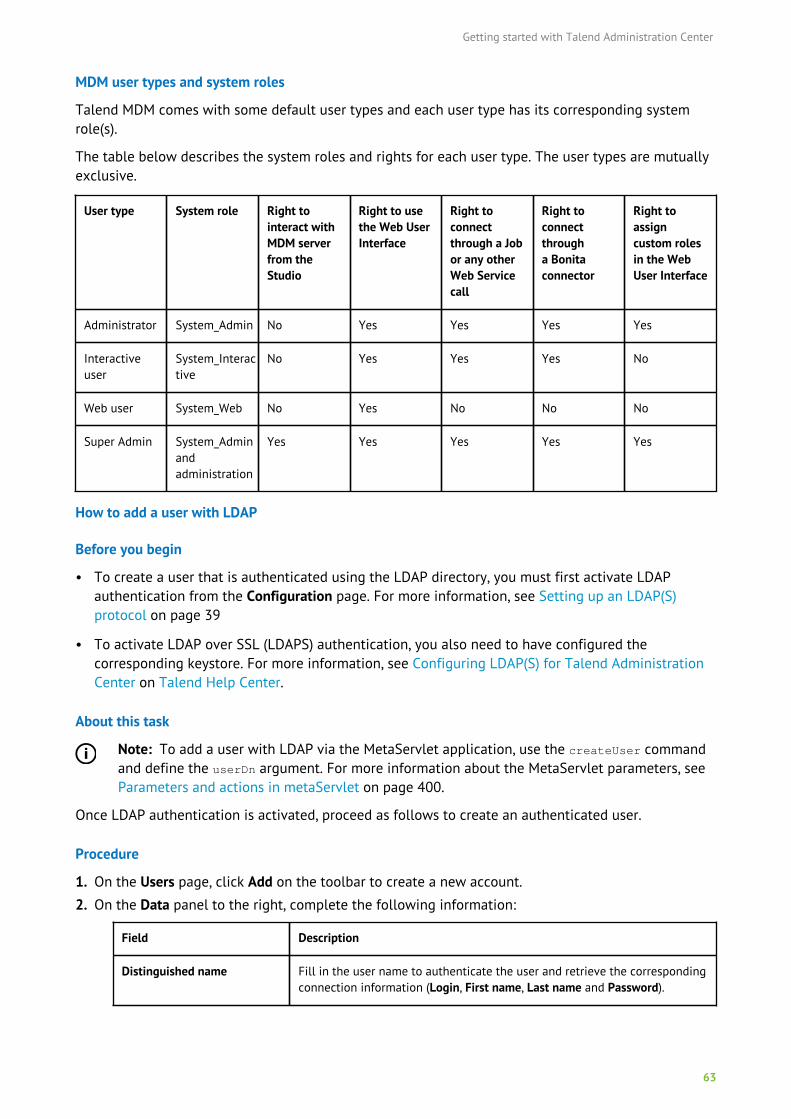
Getting started with Talend Administration Center
63
MDM user types and system roles
Talend MDM comes with some default user types and each user type has its corresponding systemrole(s).
The table below describes the system roles and rights for each user type. The user types are mutuallyexclusive.
User type System role Right tointeract withMDM serverfrom theStudio
Right to usethe Web UserInterface
Right toconnectthrough a Jobor any otherWeb Servicecall
Right toconnectthrougha Bonitaconnector
Right toassigncustom rolesin the WebUser Interface
Administrator System_Admin No Yes Yes Yes Yes
Interactiveuser
System_Interactive
No Yes Yes Yes No
Web user System_Web No Yes No No No
Super Admin System_Adminandadministration
Yes Yes Yes Yes Yes
How to add a user with LDAP
Before you begin
• To create a user that is authenticated using the LDAP directory, you must first activate LDAPauthentication from the Configuration page. For more information, see Setting up an LDAP(S)protocol on page 39
• To activate LDAP over SSL (LDAPS) authentication, you also need to have configured thecorresponding keystore. For more information, see Configuring LDAP(S) for Talend AdministrationCenter on Talend Help Center.
About this task
Note: To add a user with LDAP via the MetaServlet application, use the createUser commandand define the userDn argument. For more information about the MetaServlet parameters, seeParameters and actions in metaServlet on page 400.
Once LDAP authentication is activated, proceed as follows to create an authenticated user.
Procedure
1. On the Users page, click Add on the toolbar to create a new account.
2. On the Data panel to the right, complete the following information:
Field Description
Distinguished name Fill in the user name to authenticate the user and retrieve the correspondingconnection information (Login, First name, Last name and Password).
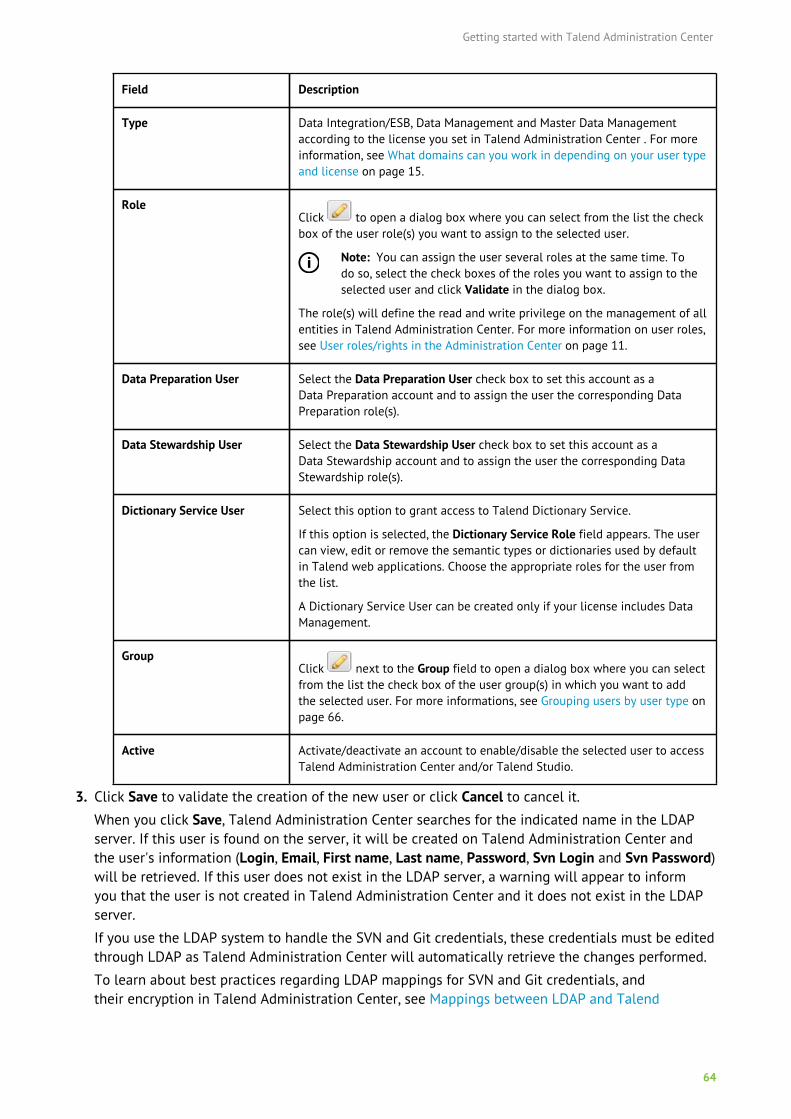
Getting started with Talend Administration Center
64
Field Description
Type Data Integration/ESB, Data Management and Master Data Managementaccording to the license you set in Talend Administration Center . For moreinformation, see What domains can you work in depending on your user typeand license on page 15.
RoleClick to open a dialog box where you can select from the list the checkbox of the user role(s) you want to assign to the selected user.
Note: You can assign the user several roles at the same time. Todo so, select the check boxes of the roles you want to assign to theselected user and click Validate in the dialog box.
The role(s) will define the read and write privilege on the management of allentities in Talend Administration Center. For more information on user roles,see User roles/rights in the Administration Center on page 11.
Data Preparation User Select the Data Preparation User check box to set this account as aData Preparation account and to assign the user the corresponding DataPreparation role(s).
Data Stewardship User Select the Data Stewardship User check box to set this account as aData Stewardship account and to assign the user the corresponding DataStewardship role(s).
Dictionary Service User Select this option to grant access to Talend Dictionary Service.
If this option is selected, the Dictionary Service Role field appears. The usercan view, edit or remove the semantic types or dictionaries used by defaultin Talend web applications. Choose the appropriate roles for the user fromthe list.
A Dictionary Service User can be created only if your license includes DataManagement.
GroupClick next to the Group field to open a dialog box where you can selectfrom the list the check box of the user group(s) in which you want to addthe selected user. For more informations, see Grouping users by user type onpage 66.
Active Activate/deactivate an account to enable/disable the selected user to accessTalend Administration Center and/or Talend Studio.
3. Click Save to validate the creation of the new user or click Cancel to cancel it.
When you click Save, Talend Administration Center searches for the indicated name in the LDAPserver. If this user is found on the server, it will be created on Talend Administration Center andthe user's information (Login, Email, First name, Last name, Password, Svn Login and Svn Password)will be retrieved. If this user does not exist in the LDAP server, a warning will appear to informyou that the user is not created in Talend Administration Center and it does not exist in the LDAPserver.
If you use the LDAP system to handle the SVN and Git credentials, these credentials must be editedthrough LDAP as Talend Administration Center will automatically retrieve the changes performed.
To learn about best practices regarding LDAP mappings for SVN and Git credentials, andtheir encryption in Talend Administration Center, see Mappings between LDAP and Talend
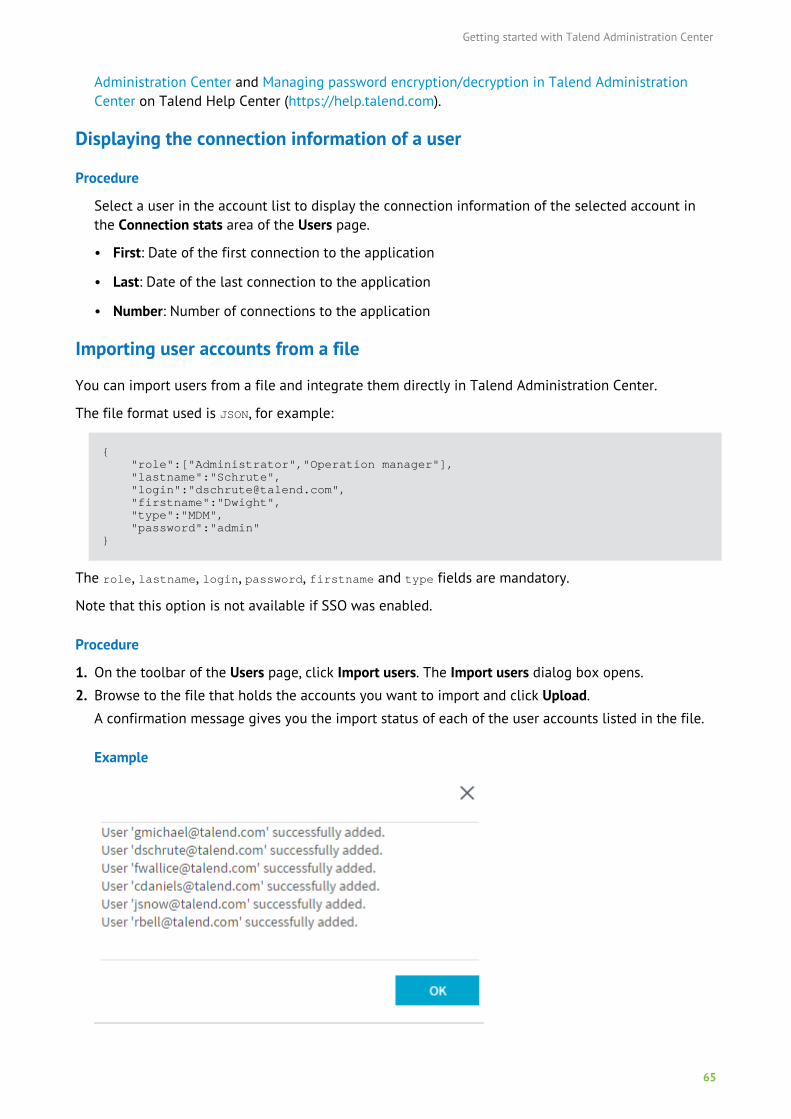
Getting started with Talend Administration Center
65
Administration Center and Managing password encryption/decryption in Talend AdministrationCenter on Talend Help Center (https://help.talend.com).
Displaying the connection information of a user
Procedure
Select a user in the account list to display the connection information of the selected account inthe Connection stats area of the Users page.
• First: Date of the first connection to the application
• Last: Date of the last connection to the application
• Number: Number of connections to the application
Importing user accounts from a file
You can import users from a file and integrate them directly in Talend Administration Center.
The file format used is JSON, for example:
{ "role":["Administrator","Operation manager"], "lastname":"Schrute", "login":"[email protected]", "firstname":"Dwight", "type":"MDM", "password":"admin"}
The role, lastname, login, password, firstname and type fields are mandatory.
Note that this option is not available if SSO was enabled.
Procedure
1. On the toolbar of the Users page, click Import users. The Import users dialog box opens.
2. Browse to the file that holds the accounts you want to import and click Upload.
A confirmation message gives you the import status of each of the user accounts listed in the file.
Example
Getting started with Talend Administration Center
66
3. Click Close to close the confirmation message. The imported user accounts are listed in theaccount list, sorted by role.
Grouping users by user type
From the User Groups page of Talend Administration Center, you can organize existing users ingroups based on their type (Data Integration/ESB, Data Management, Master Data Management, DataPreparation, Data Stewardship). Once created, these groups can be assigned to projects of the sametype.
User groups allow administrators to manage large amount of users by organizing them efficiently inorder to assign them easily to corresponding projects.
In case you have several licenses and one includes Big Data, you can narrow the scope of user groupsto Big Data enabled users only.
To get a user's groups, use the getUserInfo command. For more information about the MetaServletparameters, see Parameters and actions in metaServlet on page 400.
Add users to a group
Before you begin
You have already created several users of the same type from the Users page. For more information,see Adding a user on page 52.
About this task
Note: To perform these actions via the MetaServlet application, use the createUserGroup, addUserToUserGroup and listUserGroup commands. For more information about theMetaServlet parameters, see Parameters and actions in metaServlet on page 400.
Procedure
1. On the User Groups page, click the Add a user group button on the User Groups panel of the page.
2. In the User Group window that opens, give a name, a type, corresponding roles (if necessary) toyour user group and select Big Data Enabled if it applies, then click Save.
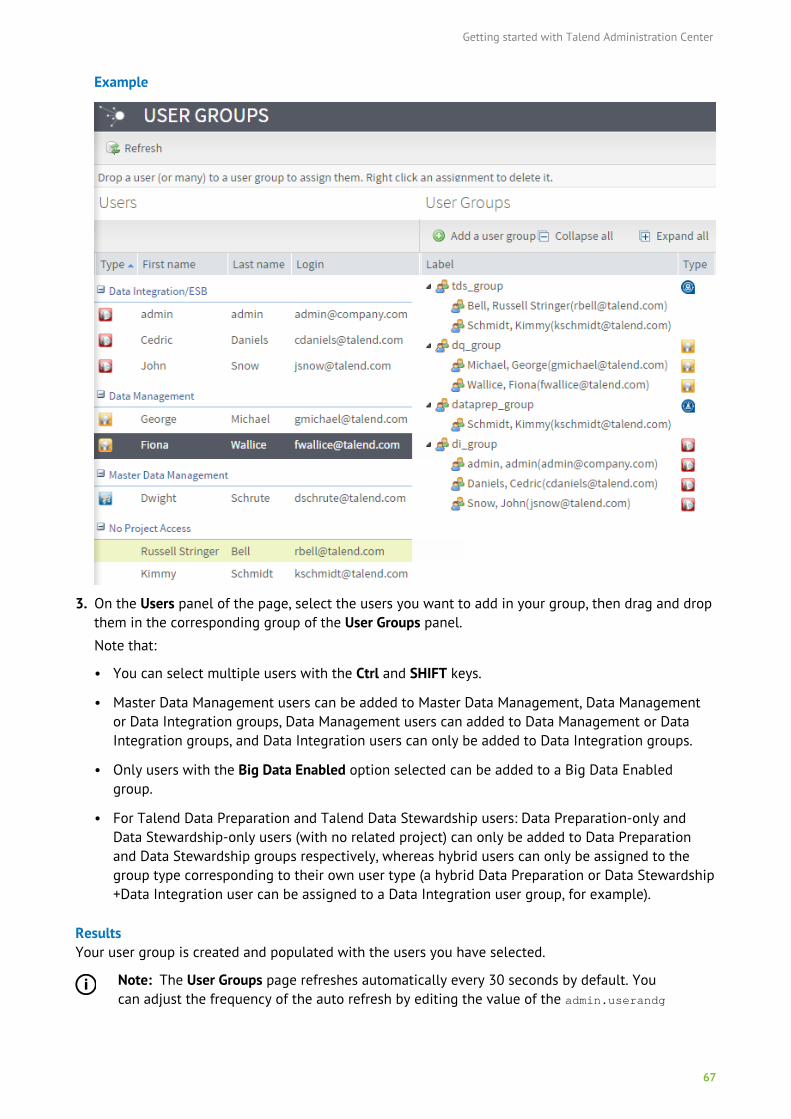
Getting started with Talend Administration Center
67
Example
3. On the Users panel of the page, select the users you want to add in your group, then drag and dropthem in the corresponding group of the User Groups panel.
Note that:
• You can select multiple users with the Ctrl and SHIFT keys.
• Master Data Management users can be added to Master Data Management, Data Managementor Data Integration groups, Data Management users can added to Data Management or DataIntegration groups, and Data Integration users can only be added to Data Integration groups.
• Only users with the Big Data Enabled option selected can be added to a Big Data Enabledgroup.
• For Talend Data Preparation and Talend Data Stewardship users: Data Preparation-only andData Stewardship-only users (with no related project) can only be added to Data Preparationand Data Stewardship groups respectively, whereas hybrid users can only be assigned to thegroup type corresponding to their own user type (a hybrid Data Preparation or Data Stewardship+Data Integration user can be assigned to a Data Integration user group, for example).
ResultsYour user group is created and populated with the users you have selected.
Note: The User Groups page refreshes automatically every 30 seconds by default. Youcan adjust the frequency of the auto refresh by editing the value of the admin.userandg
Getting started with Talend Administration Center
68
roup.conf.uiAutoRefreshFrequency property in seconds in the database configuration table. Ifit is set to 0, the auto refresh is disabled. Note that you need to restart the database server forthe changes to take effect.
What to do nextNext step: Now that your user group is created, you can assign it to a project of the same type. Formore information, see Authorizing users on projects on page 85.
Remove users from a user group
Procedure
To remove a user from an existing user group, right-click the user from the Users panel of the UserGroups page and click Remove assignment.Note that you can select multiple users to be removed with the Ctrl and SHIFT keys.
Editing or deleting a user account
Editing a user
About this task
Note that this option is not available if SSO was enabled.
Procedure
1. In the Menu tree-view, select Users to open the list of users.
2. Select the user you want to edit from the list of users.
3. In the Data area, modify the user details as needed, then click Save to validate the modification.
Activating/deactivating an account
You can activate/deactivate a user to enable/disable the selected user to access the AdministrationCenter internal resources.
If an account is deactivated, you cannot use the corresponding login to create another account.
Note that this option is not available if SSO was enabled.
Procedure
1. Select the user you want to activate/deactivate on the Users page.
2. In the Data view, select/clear the Active check box, then click Save to validate the operation orclick Cancel to ignore it.
Duplicating a user
To avoid creating a new user from scratch, you can duplicate an existing one and modify its metadatato create a new user in the list.
Note that this option is not available if SSO was enabled.
Procedure
1. On the Users page, select the user you want to duplicate.
2. On the toolbar, click Duplicate.
Getting started with Talend Administration Center
69
The Data area opens with a copy of the selected user that you can modify as needed.
3. Click Save to validate the operation or click Cancel to cancel it.
Deleting an account
About this task
You cannot delete a user when the user:
• is currently connected to the application,
• has locked items, for example, because the user is currently working on these items,
• is the only active administrator user. There must always be at least one active administrator user.
If a user you deleted subscribed to notifications, the user will automatically be removed fromthese notifications when you delete their accounts. If the deleted user is the only subscriber tothe notification, this notification will be automatically deleted. For more information regardingnotifications, see Managing notifications on page 97.
Procedure
1. On the Users page, select the user you want to delete.
2. On the toolbar, click Delete.
A confirmation dialog box appears.
3. Click OK to remove the account from the account list.
Managing user sessions in Talend Studio, Talend Data Preparation FreeDesktop and Talend Administration Center
About this task
From the Users page of Talend Administration Center, you can see which users are logged in theTalend Studio, in Talend Data Preparation Free Desktop and in Talend Administration Center andlog them out if needed. This feature might be useful if your license includes users that can worksimultaneously on the Studio or Talend Administration Center. For more information on concurrentusers, see Managing licenses on page 90.
Procedure
1. On the user account list, select the user you want to log out and click the or icon on theLogged in column.
The Manage user sessions dialog box opens and display the connection duration of the user to theTalend products.
Getting started with Talend Administration Center
70
Example
2. Click:
• the Logout from Studio button next to the icon to log the user out of the Studio.
• the Logout from TAC button next to the icon to log the user out of Talend AdministrationCenter.
•the Logout from DataPrep button next to the icon to log the user out of Talend DataPreparation
• Logout from all to log the user out of both applications.
Managing projectsNote: Only users that have the Administrator role and rights can have a read-write accessto this page. Other users, depending on their roles, can have either a read-only access orno access to this page. For further information on access rights, see User roles/rights in theAdministration Center on page 11. When opening this page as a user of the AdministrationCenter, you will have access only to the items for which you have been granted the rightauthorization by the Administrator.
From the Projects page, you can add projects, duplicate projects, view/edit the selected projectinformation or delete projects. You can also create different branches for a project.
Accessing the project list
To access the project list stored in the remote repository, click Projects in the Menu tree view.
When you access the Projects page for the first time, no projects show on the list. To allocateresources and define user accesses to projects, you first need to add projects to the list. For moreinformation, see Adding a project on page 72.
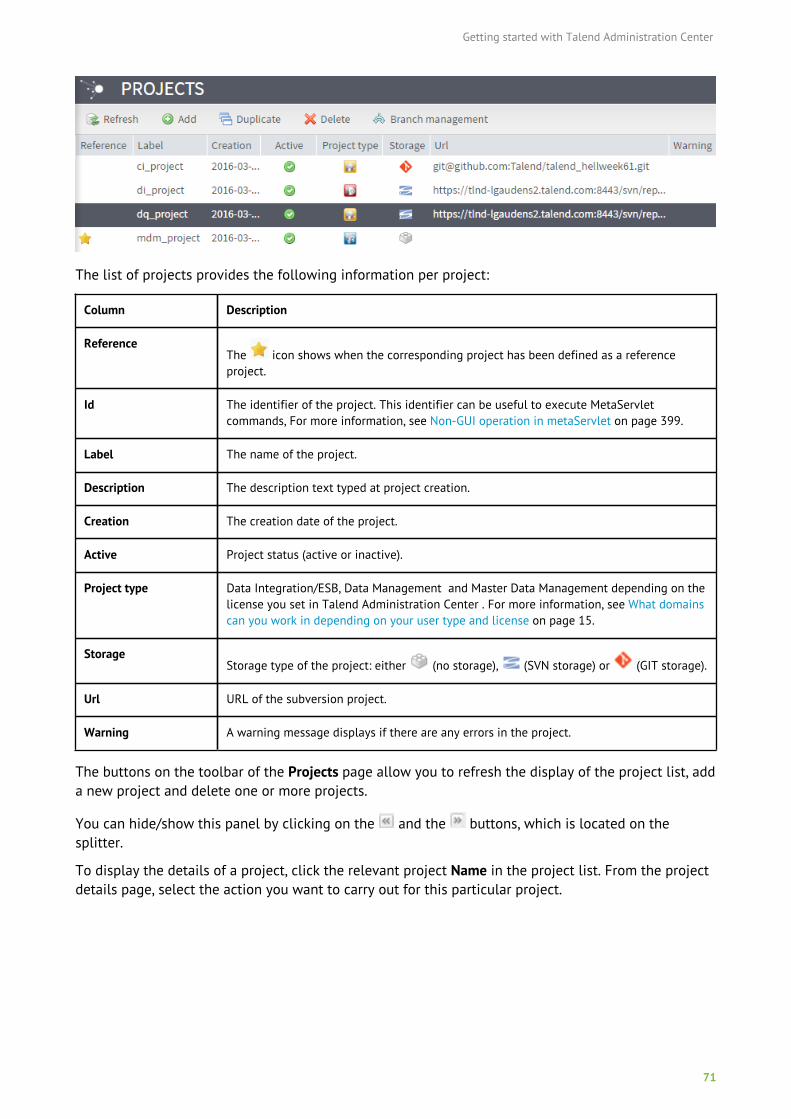
Getting started with Talend Administration Center
71
The list of projects provides the following information per project:
Column Description
ReferenceThe icon shows when the corresponding project has been defined as a referenceproject.
Id The identifier of the project. This identifier can be useful to execute MetaServletcommands, For more information, see Non-GUI operation in metaServlet on page 399.
Label The name of the project.
Description The description text typed at project creation.
Creation The creation date of the project.
Active Project status (active or inactive).
Project type Data Integration/ESB, Data Management and Master Data Management depending on thelicense you set in Talend Administration Center . For more information, see What domainscan you work in depending on your user type and license on page 15.
StorageStorage type of the project: either (no storage), (SVN storage) or (GIT storage).
Url URL of the subversion project.
Warning A warning message displays if there are any errors in the project.
The buttons on the toolbar of the Projects page allow you to refresh the display of the project list, adda new project and delete one or more projects.
You can hide/show this panel by clicking on the and the buttons, which is located on thesplitter.
To display the details of a project, click the relevant project Name in the project list. From the projectdetails page, select the action you want to carry out for this particular project.
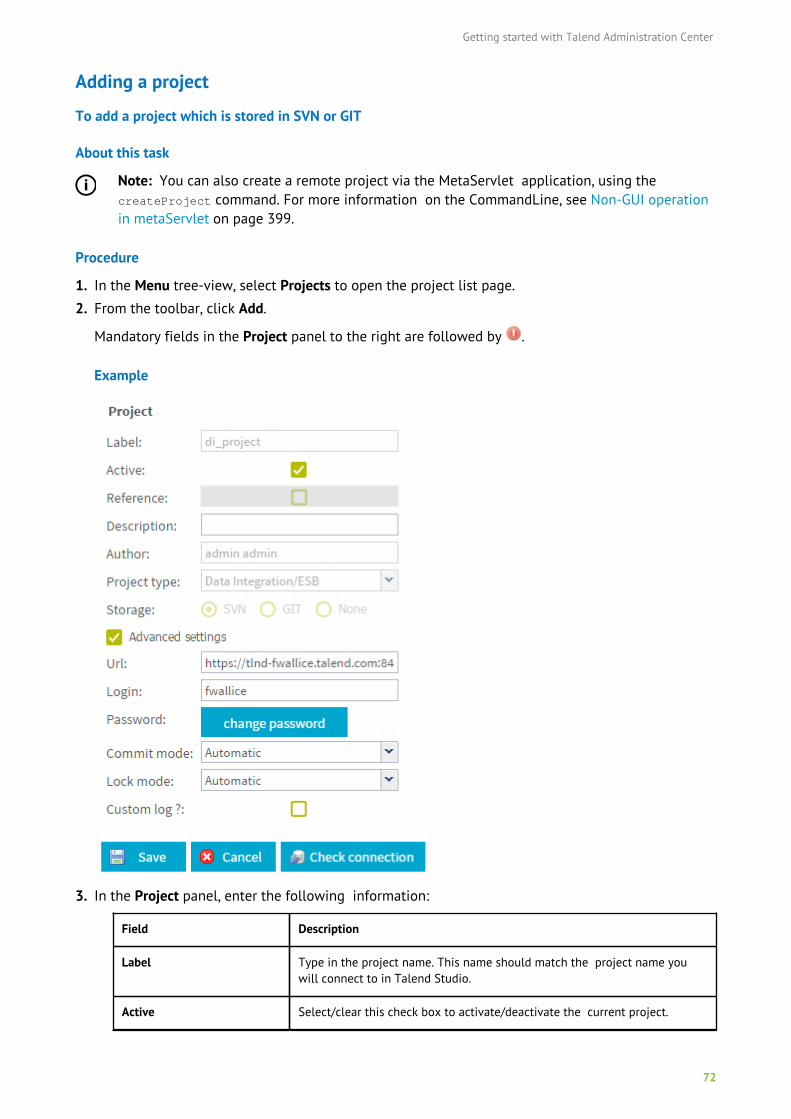
Getting started with Talend Administration Center
72
Adding a project
To add a project which is stored in SVN or GIT
About this task
Note: You can also create a remote project via the MetaServlet application, using thecreateProject command. For more information on the CommandLine, see Non-GUI operationin metaServlet on page 399.
Procedure
1. In the Menu tree-view, select Projects to open the project list page.
2. From the toolbar, click Add.
Mandatory fields in the Project panel to the right are followed by .
Example
3. In the Project panel, enter the following information:
Field Description
Label Type in the project name. This name should match the project name youwill connect to in Talend Studio.
Active Select/clear this check box to activate/deactivate the current project.
Getting started with Talend Administration Center
73
Field Description
Reference When you select a project in the Projects list that is already used as aproject reference, this check box is selected by default.
Description Fill in a description if needed.
Author The first and last names of the project author. This field is read-only and socannot be modified.
Project type Select the type of project according to the license you set in TalendAdministration Center. For more information, see What domains can youwork in depending on your user type and license on page 15.
Note: If the license set in Talend Administration Center is a Data Integration or ESB license only, this field will not display as therewill not be other types available.
Big Data Enabled Enable so that only Big Data Enabled users/user groups can access theproject.
Storage Select the storage type SVN or GIT depending on where your project isstored.
Advanced settings Select this check box if you want to use a connection (URL), a commitmode (Commit mode), or a lock mode (Lock mode) which differ from thedefault connection you have defined on the Configuration page, then fill inthe fields that follow according to your needs.
For more information on the connection used by default, see Setting up SVNor Git parameters on page 29.
Url Enter the connection URL to the SVN or GIT repository.
Note: When you create a project, note that SVN automaticallycreates a default structure in your repository (<project name>/branches|tags|trunk) to store the project metadata.
For SVN projects:
Subversion URLs use the following syntax: Repository URL/project name.
A typical Subversion repository often holds the files (or source code) forseveral projects. Usually, each project is a subdirectory in the repository'sfile system tree.
Subversions' URLs can match any of the following syntaxes:
svn+ssh://<login>@<hostName>/<repositoryName>/<project name>
ex:
• svn+ssh://[email protected]/svn/repo/tac_di
• http://10.42.10.99/repo/<project name>
Login Type in the user login to the repository.
Password Type in the user password to the repository.
Getting started with Talend Administration Center
74
Field Description
Commit mode Different types are possible to submit the latest changes done to Projects orto any item in the Repository in Talend Studio:
• Automatic: Talend Studio automatically commits the changes made onthe Project and Repository items. This is the default setting,
• Unlocked items: Talend Studio commits the changes made on certainitems when those items are unlocked. An item is unlocked either whenyou close it or when you manually unlock it, depending on theLockmode selected (see Lock mode in this table). For more informationabout lock principles, see Lock principle on Talend Help Center.
Lock mode Different SVN lock types are possible:
• Automatic: Items are automatically locked/unlocked when a user wantsto edit them in Talend Studio,
• Ask user: The user is prompted to lock/unlock items when needed,
• Manual: The user needs to manually use the Lock/Unlock option in the contextual menu of the items.
For more information regarding lock management, see Removing locks onprojects on page 88 and Lock types on Talend Help Center.
Custom log Select this check box if you want the users to be prompted to enter theirown commit log for each commit. The auto generated application log willbe still appended at the end.
For more information, see Logging information on edited items on TalendHelp Center.
4. Click Check connection to verify your connection status.
5. Click Save to validate the creation of the new project or click Cancel to cancel it.
To add a project which is not stored in SVN or GIT
If you have already executed your Jobs on a development environment and want to have the exactsame Jobs you have previously generated on your production environment, you can create a "no-SVN/GIT" project in which you will import the generated Jobs.
In this case, note that the name of the project must be the same as the name of the developmentproject in which you have previously generated your Jobs.
For more information on how to import a Job that has been previously generated, see Adding anexecution task to a pre-generated Job on page 145.
Procedure
1. From the toolbar of the Projects page, click Add.
Mandatory fields in the Project panel to the right are followed by .
2. In the Project panel, enter the following information:
Field Description
Label Type in the project name. This name should match the project name inwhich you have previously generated your Jobs.
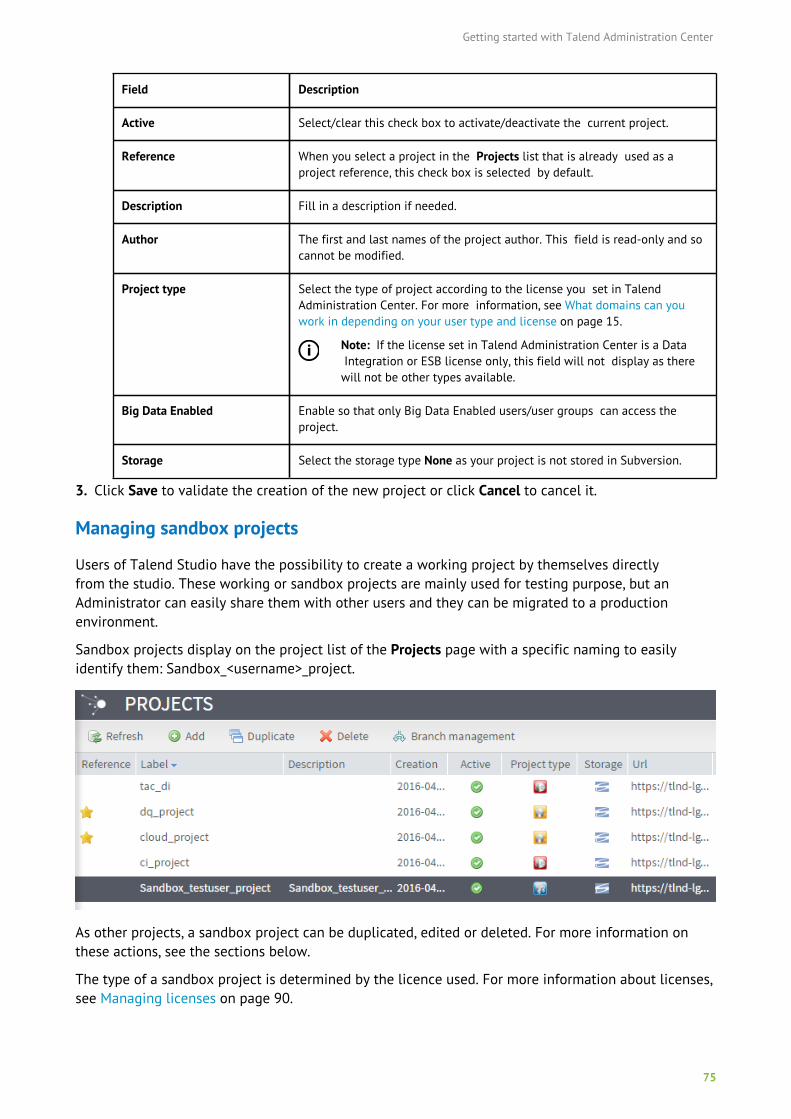
Getting started with Talend Administration Center
75
Field Description
Active Select/clear this check box to activate/deactivate the current project.
Reference When you select a project in the Projects list that is already used as aproject reference, this check box is selected by default.
Description Fill in a description if needed.
Author The first and last names of the project author. This field is read-only and socannot be modified.
Project type Select the type of project according to the license you set in TalendAdministration Center. For more information, see What domains can youwork in depending on your user type and license on page 15.
Note: If the license set in Talend Administration Center is a Data Integration or ESB license only, this field will not display as therewill not be other types available.
Big Data Enabled Enable so that only Big Data Enabled users/user groups can access theproject.
Storage Select the storage type None as your project is not stored in Subversion.
3. Click Save to validate the creation of the new project or click Cancel to cancel it.
Managing sandbox projects
Users of Talend Studio have the possibility to create a working project by themselves directlyfrom the studio. These working or sandbox projects are mainly used for testing purpose, but anAdministrator can easily share them with other users and they can be migrated to a productionenvironment.
Sandbox projects display on the project list of the Projects page with a specific naming to easilyidentify them: Sandbox_<username>_project.
As other projects, a sandbox project can be duplicated, edited or deleted. For more information onthese actions, see the sections below.
The type of a sandbox project is determined by the licence used. For more information about licenses,see Managing licenses on page 90.
Getting started with Talend Administration Center
76
When a user creates his/her sandbox project, he/she also creates his/her account as a designer useron the Users page of Talend Administration Center. For more information on the Users page, seeManaging Users on page 50. Thus, a user is consumed from Talend Administration Center's license.If you activated the SMTP option on the Configuration page of Talend Administration Center, the userwill receive an email notifying him/her of the creation of his/her account. For more information onnotifications, see Setting up an SMTP protocol on page 42.
Moreover, the user will automatically be authorized to access his/her sandbox project on the Projectsauthorizations page. From this page, you will be able to remove the authorization, share the projectwith other users or give read only and read & write rights to users. For more information on Projectsauthorizations, see Managing project authorizations on page 84.
For more information on how to create a sandbox project, see Creating a sandbox project on TalendHelp Center.
Editing the details of a project
About this task
Warning: Pay much attention when modifying the URL of a database or the URL of Subversion.Make sure to validate the editing operation first with the relevant administrator.
Note: You can also edit the details of a project via the MetaServlet application, using theupdateProject command based on the project ID. For more information on MetaServlet, seeNon-GUI operation in metaServlet on page 399.
To edit the details of a project:
Procedure
1. In the Menu tree-view, select Projects to open the project list.
2. Select the project you want to edit from the project list.
3. In the Project panel, modify the project details as needed.
The Label, Author and Repository type are read-only fields and thus cannot be modified.
4. Click Save to validate the modifications or click Cancel to cancel it.
Activating/deactivating a project
About this task
Note: The lable of a deactivated project cannot be used to create another project.
To activate/deactivate a project:
Procedure
1. Select the project you want to activate/deactivate on the Projects page.
2. In the Project panel, select/clear the Active check box.
3. Click Save to validate the operation or click Cancel to cancel it.
Getting started with Talend Administration Center
77
Managing SVN/Git branches and tags for a project
Talend solutions provide a version control system that enables users to have different versions of thesame project in different SVN/Git branches and tags. Talend Administration Center enables you tocreate/delete branches and tags of the project stored on SVN or Git.
About Git branches: All branches/tags are visible for all projects on the same Git repository. Therefore,if you create branches/tags for one project, all other projects on the same Git repository will have thesame list.
You can also manage SVN/Git branches and tags via the Metaservlet. For more information, see Non-GUI operation in metaServlet on page 399.
For more information about best practices in using SVN/Git branches and tags with the Talendproducts, see Branching, merging and tagging in Talend on Talend Help Center.
How to manage SVN/Git branches
When a project is stored on SVN or Git, you can create branches for this project from TalendAdministration Center:
Talend Administration Center enables you to delete any of the branches of the project stored on SVNor Git.
To create a Git or SVN branch
Procedure
1. In the Menu tree view, click Projects to display the Projects page.
2. Select the project for which you want to create one or more branches.
3. On the toolbar, click the Branch management button.
The Branch management dialog box opens.
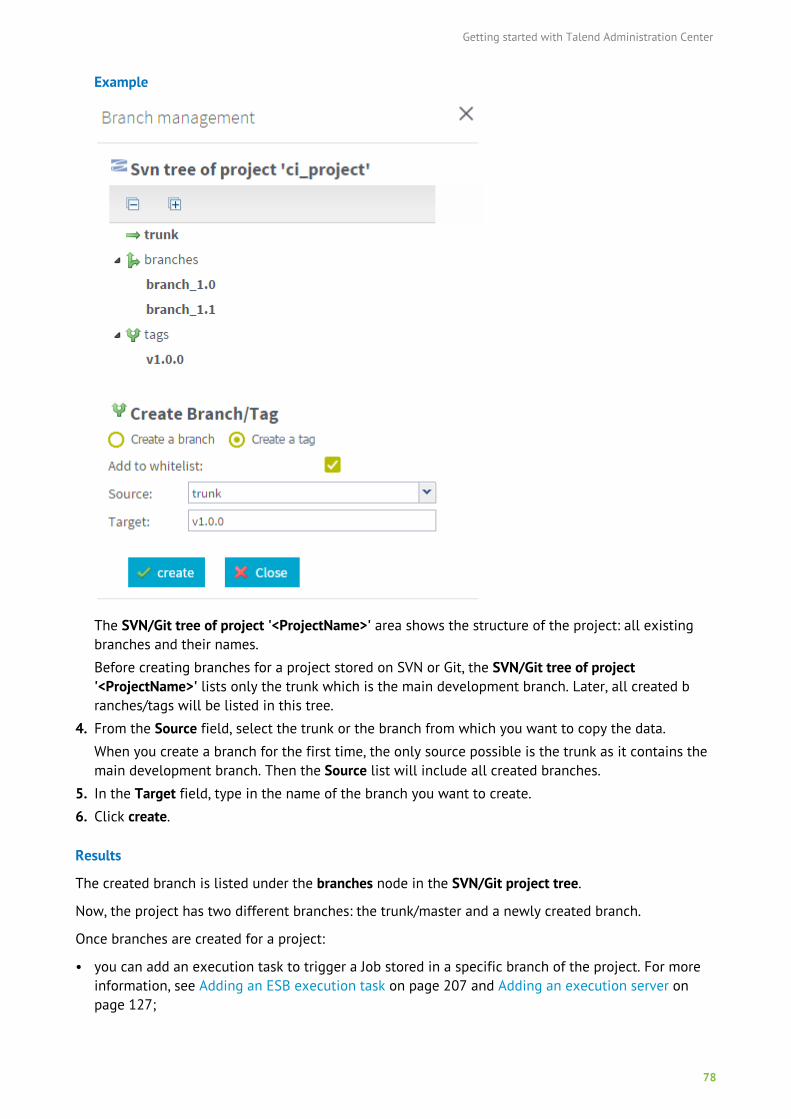
Getting started with Talend Administration Center
78
Example
The SVN/Git tree of project '<ProjectName>' area shows the structure of the project: all existingbranches and their names.
Before creating branches for a project stored on SVN or Git, the SVN/Git tree of project'<ProjectName>' lists only the trunk which is the main development branch. Later, all created branches/tags will be listed in this tree.
4. From the Source field, select the trunk or the branch from which you want to copy the data.
When you create a branch for the first time, the only source possible is the trunk as it contains themain development branch. Then the Source list will include all created branches.
5. In the Target field, type in the name of the branch you want to create.
6. Click create.
Results
The created branch is listed under the branches node in the SVN/Git project tree.
Now, the project has two different branches: the trunk/master and a newly created branch.
Once branches are created for a project:
• you can add an execution task to trigger a Job stored in a specific branch of the project. For moreinformation, see Adding an ESB execution task on page 207 and Adding an execution server onpage 127;
Getting started with Talend Administration Center
79
• users of Talend Studio can switch from the trunk to a branch or copy an item from a branch toanother branch or a tag. For more information, see Working with project branches and tags onTalend Help Center.
To delete a Git or SVN Branch
About this task
Warning: The branches must be deleted from Talend Administration Center and not directlyfrom SVN or Git.
Note: You can also delete a branch or a tag via the MetaServlet application, using thedeleteBranch command. For more information on MetaServlet, see Non-GUI operation inmetaServlet on page 399.
Procedure
1. In the Menu tree view, click Projects to display the Projects page.
From the project list, select the project for which you want to delete an existing branch.
The Branch management dialog box opens.
Example
2. In the SVN/Git tree of project '<ProjectName>', right-click the branch you want to delete andselect Delete this branch from the contextual menu.
A confirmation message is displayed.
3. Click OK to confirm the deletion operation and close the message.
A warning message will alert you if you try to delete a branch used by the Job Conductor.The selected branch is deleted from the SVN/Git tree of project '<ProjectName>' and from theproject on SVN or Git.
Creating a Git or SVN Branch whitelistTalend Administration Center allows you to filter the project on the defined SVN/Git branches or tagsin order to reduce the use of disk resources and improve performances.
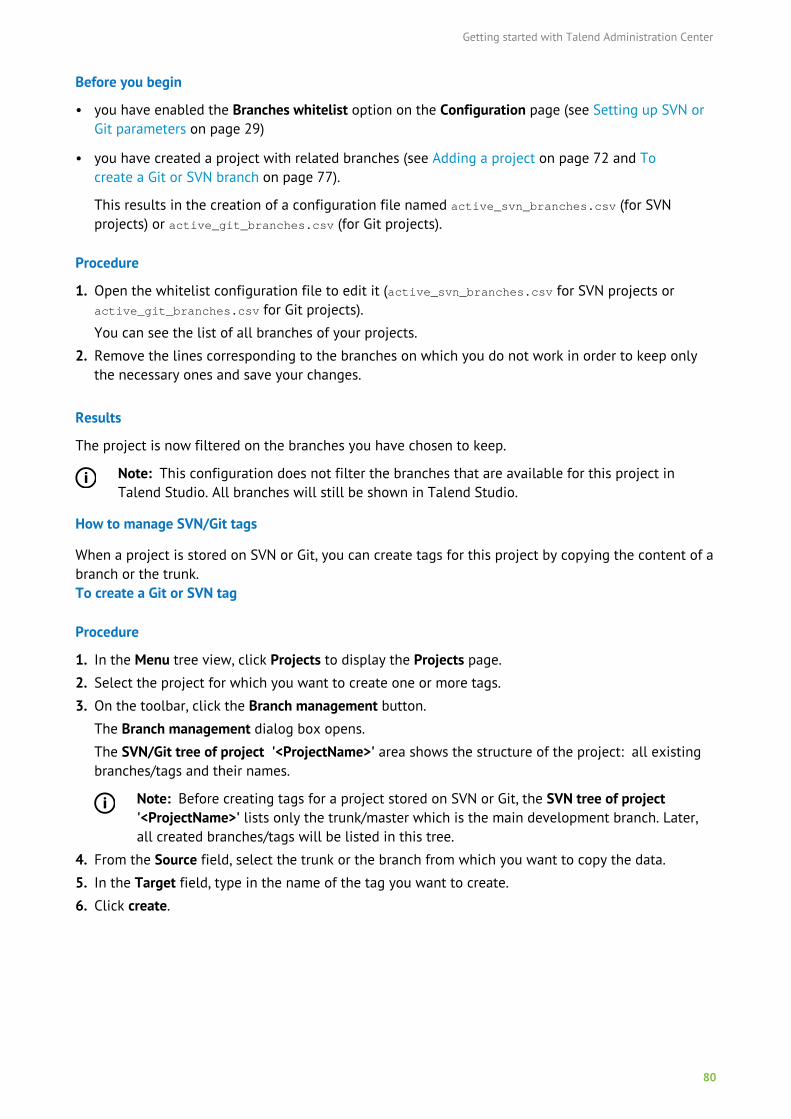
Getting started with Talend Administration Center
80
Before you begin
• you have enabled the Branches whitelist option on the Configuration page (see Setting up SVN orGit parameters on page 29)
• you have created a project with related branches (see Adding a project on page 72 and Tocreate a Git or SVN branch on page 77).
This results in the creation of a configuration file named active_svn_branches.csv (for SVNprojects) or active_git_branches.csv (for Git projects).
Procedure
1. Open the whitelist configuration file to edit it (active_svn_branches.csv for SVN projects oractive_git_branches.csv for Git projects).
You can see the list of all branches of your projects.
2. Remove the lines corresponding to the branches on which you do not work in order to keep onlythe necessary ones and save your changes.
Results
The project is now filtered on the branches you have chosen to keep.
Note: This configuration does not filter the branches that are available for this project inTalend Studio. All branches will still be shown in Talend Studio.
How to manage SVN/Git tags
When a project is stored on SVN or Git, you can create tags for this project by copying the content of abranch or the trunk.To create a Git or SVN tag
Procedure
1. In the Menu tree view, click Projects to display the Projects page.
2. Select the project for which you want to create one or more tags.
3. On the toolbar, click the Branch management button.
The Branch management dialog box opens.
The SVN/Git tree of project '<ProjectName>' area shows the structure of the project: all existingbranches/tags and their names.
Note: Before creating tags for a project stored on SVN or Git, the SVN tree of project'<ProjectName>' lists only the trunk/master which is the main development branch. Later,all created branches/tags will be listed in this tree.
4. From the Source field, select the trunk or the branch from which you want to copy the data.
5. In the Target field, type in the name of the tag you want to create.
6. Click create.
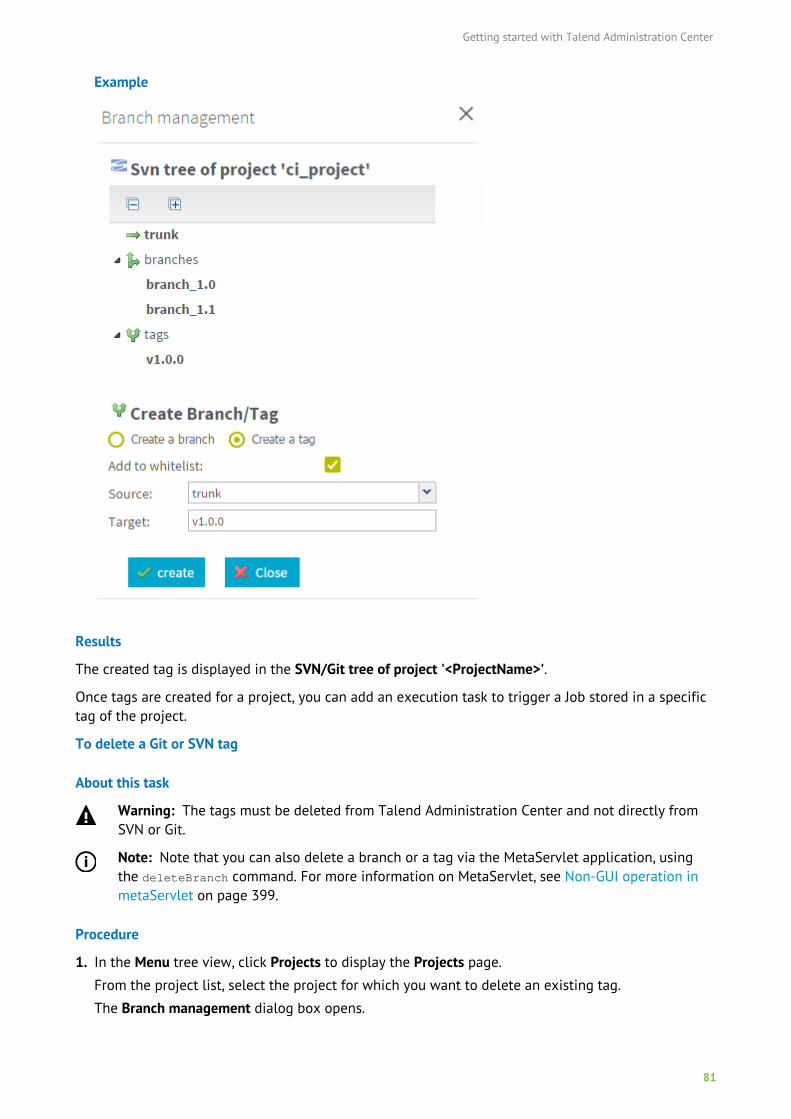
Getting started with Talend Administration Center
81
Example
Results
The created tag is displayed in the SVN/Git tree of project '<ProjectName>'.
Once tags are created for a project, you can add an execution task to trigger a Job stored in a specifictag of the project.
To delete a Git or SVN tag
About this task
Warning: The tags must be deleted from Talend Administration Center and not directly fromSVN or Git.
Note: Note that you can also delete a branch or a tag via the MetaServlet application, usingthe deleteBranch command. For more information on MetaServlet, see Non-GUI operation inmetaServlet on page 399.
Procedure
1. In the Menu tree view, click Projects to display the Projects page.
From the project list, select the project for which you want to delete an existing tag.
The Branch management dialog box opens.
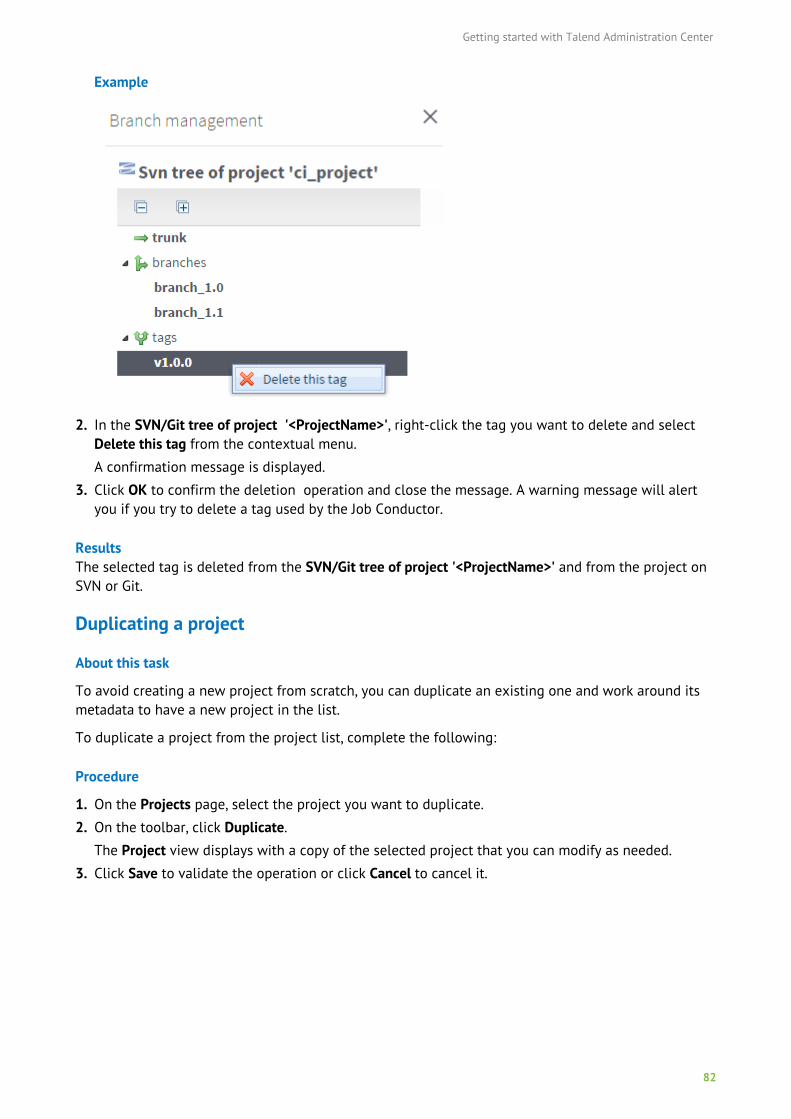
Getting started with Talend Administration Center
82
Example
2. In the SVN/Git tree of project '<ProjectName>', right-click the tag you want to delete and selectDelete this tag from the contextual menu.
A confirmation message is displayed.
3. Click OK to confirm the deletion operation and close the message. A warning message will alertyou if you try to delete a tag used by the Job Conductor.
ResultsThe selected tag is deleted from the SVN/Git tree of project '<ProjectName>' and from the project onSVN or Git.
Duplicating a project
About this task
To avoid creating a new project from scratch, you can duplicate an existing one and work around itsmetadata to have a new project in the list.
To duplicate a project from the project list, complete the following:
Procedure
1. On the Projects page, select the project you want to duplicate.
2. On the toolbar, click Duplicate.
The Project view displays with a copy of the selected project that you can modify as needed.
3. Click Save to validate the operation or click Cancel to cancel it.
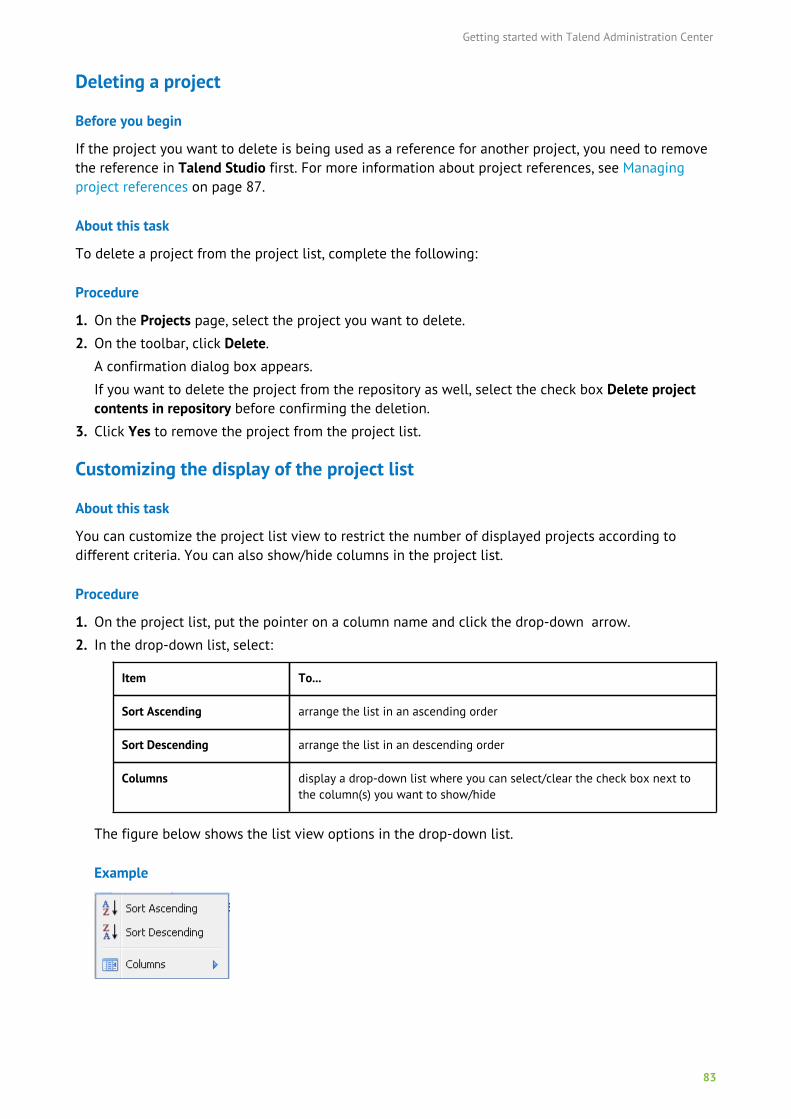
Getting started with Talend Administration Center
83
Deleting a project
Before you begin
If the project you want to delete is being used as a reference for another project, you need to removethe reference in Talend Studio first. For more information about project references, see Managingproject references on page 87.
About this task
To delete a project from the project list, complete the following:
Procedure
1. On the Projects page, select the project you want to delete.
2. On the toolbar, click Delete.
A confirmation dialog box appears.
If you want to delete the project from the repository as well, select the check box Delete projectcontents in repository before confirming the deletion.
3. Click Yes to remove the project from the project list.
Customizing the display of the project list
About this task
You can customize the project list view to restrict the number of displayed projects according todifferent criteria. You can also show/hide columns in the project list.
Procedure
1. On the project list, put the pointer on a column name and click the drop-down arrow.
2. In the drop-down list, select:
Item To...
Sort Ascending arrange the list in an ascending order
Sort Descending arrange the list in an descending order
Columns display a drop-down list where you can select/clear the check box next tothe column(s) you want to show/hide
The figure below shows the list view options in the drop-down list.
Example

Getting started with Talend Administration Center
84
You can also apply filters on all project columns by typing in key words or by selecting check boxesin the Filters fields of these columns. To remove the filters and reset the page, you have to click
the cog icon on the right of the top toolbar.
Managing project authorizationsNote: Only users that have the Administrator role and rights can have a read-write accessto this page. Other users, depending on their roles, can have either a read-only access orno access to this page. For further information on access rights, see User roles/rights in theAdministration Center on page 11. When opening this page as a user of the AdministrationCenter, you will have access only to the items for which you have been granted the rightauthorization by the Administrator.
The Project Authorizations page in Talend Administration Center allows you to manage userauthorizations. From this page, you can:
• visualize existing authorizations, see Accessing the project authorization list on page 84.
• give a user or a user group the right to access one or more projects, see Authorizing users onprojects on page 85.
• change or delete existing authorizations, see Changing or deleting authorizations on projects onpage 86.
Accessing the project authorization list
About this task
To display the project authorization list for the users of Talend Studio:
Procedure
In the Menu tree-view, click Project Authorizations.
The list of projects is displayed in the Project panel and the list of users is displayed in the User/Group Authorizations for the Project: <projectName> panel if you ordered authorizations byprojects.
Note that the authorizations can be ordered by projects (Authorizations by project) or by users(Authorizations by user/group).
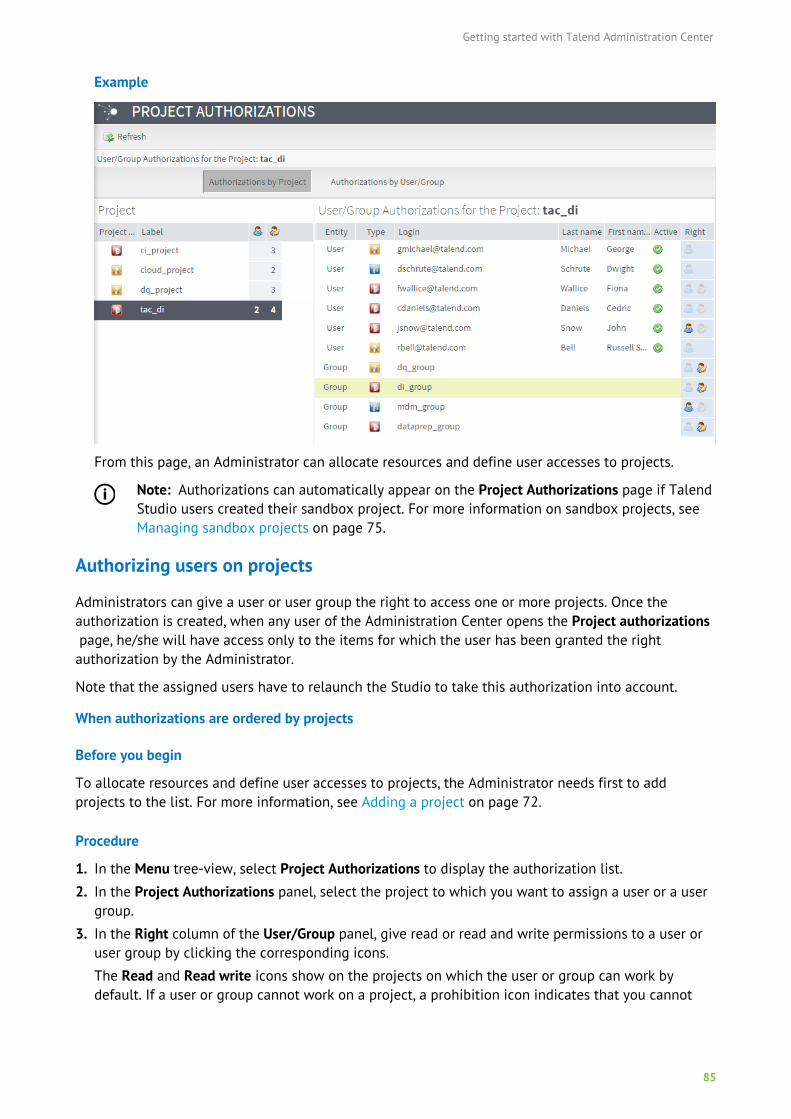
Getting started with Talend Administration Center
85
Example
From this page, an Administrator can allocate resources and define user accesses to projects.
Note: Authorizations can automatically appear on the Project Authorizations page if TalendStudio users created their sandbox project. For more information on sandbox projects, seeManaging sandbox projects on page 75.
Authorizing users on projects
Administrators can give a user or user group the right to access one or more projects. Once theauthorization is created, when any user of the Administration Center opens the Project authorizations page, he/she will have access only to the items for which the user has been granted the rightauthorization by the Administrator.
Note that the assigned users have to relaunch the Studio to take this authorization into account.
When authorizations are ordered by projects
Before you begin
To allocate resources and define user accesses to projects, the Administrator needs first to addprojects to the list. For more information, see Adding a project on page 72.
Procedure
1. In the Menu tree-view, select Project Authorizations to display the authorization list.
2. In the Project Authorizations panel, select the project to which you want to assign a user or a usergroup.
3. In the Right column of the User/Group panel, give read or read and write permissions to a user oruser group by clicking the corresponding icons.
The Read and Read write icons show on the projects on which the user or group can work bydefault. If a user or group cannot work on a project, a prohibition icon indicates that you cannot
Getting started with Talend Administration Center
86
give rights to this user: it depends on the Type that is defined during the user creation in the Userspage.
Results
The number of users that have read access as well as the number of users that have read and writeaccess to a project are updated in the corresponding columns of the Projects Authorizations panel.
When authorizations are ordered by users or user groups
Before you begin
To allocate resources and define user accesses to projects, the Administrator needs first to addprojects to the list. For more information, see Adding a project on page 72.
Procedure
1. In the Menu tree-view, select Project authorizations to display the authorization list.
2. In the User/Group panel, select the user you want to assign to a project.
3. In the Right column of the Projects Authorizations panel, give read or read and write permissionsto the user or user group by clicking the corresponding icons.
The Read and Read write icons show on the projects on which the user or group can work bydefault. If a user or group cannot work on a project, a prohibition icon indicates that you cannotgive rights to this user: it depends on the Type that is defined during the user creation in the Userspage.
Note: A user or user group can only have access to a project of the same type or asubordinate type as his. For more information about users' types, see What domains can youwork in depending on your user type and license on page 15.
Results
The number of users that have read access as well as the number of users that have read and writeaccess to a project are updated in the corresponding columns of the Projects Authorizations panel.
Changing or deleting authorizations on projects
In the User panel of the Projects authorizations page, users' or user groups' rights show next to theirnames.
The types of projects available in the Projects panel depends on the license you are using. For moreinformation, see What domains can you work in depending on your user type and license on page 15.
How to change users' authorizations
Procedure
1. In the User/Group panel, select the user or user group whose rights you want to change.
In the Project panel, the Read and Read write icons show on the projects on which the user orgroup can work by default. If a user or group cannot work on a project, a prohibition icon indicatesthat you cannot give rights to this user: it depends on the Type that is defined during the usercreation in the Users page.
2. Click the desired project in the Project panel and then click the Read write icon to switch betweenread-only and read-write.
Getting started with Talend Administration Center
87
How to delete users' authorizations
Procedure
1. In the User panel, select the user or user group whose rights you want to delete.
In the Project panel, the Read and Read write icons show on the projects on which the user orgroup can work by default. If a user or group cannot work on a project, a prohibition icon indicatesthat you cannot give rights to this user: it depends on the Type that is defined during the usercreation in the Users page.
2. Click the icon corresponding to the right you want to delete in the Project panel to delete theuser's or group's rights.
Results
The icon is greyed and the user or group has no rights on this project.
Managing project referencesNote: Project references is a read-only page. The management of project references has beenmoved to Talend Studio. For more information, see Defining project references on Talend HelpCenter.
A project reference is a property that you can set for a project in Talend Studio so that all or some ofthe project items can be referenced by another project.
• When one project references another, the items (Jobs, Metadata, Business Modeler and so on) in thereferenced project are available for reuse.
• When one project is stored on SVN or GIT, its items are structured in trunk or master and branchesso that the reference can be established at either levels to provide more flexibility in projectusability.
For more details on how to create branches for a project on Talend Administration Center, see Tocreate a Git or SVN branch on page 77.
Accessing the project references page
To display the reference list for the projects created on Talend Administration Center from an earlierversion before 7.0, click Project references in the Menu tree view.
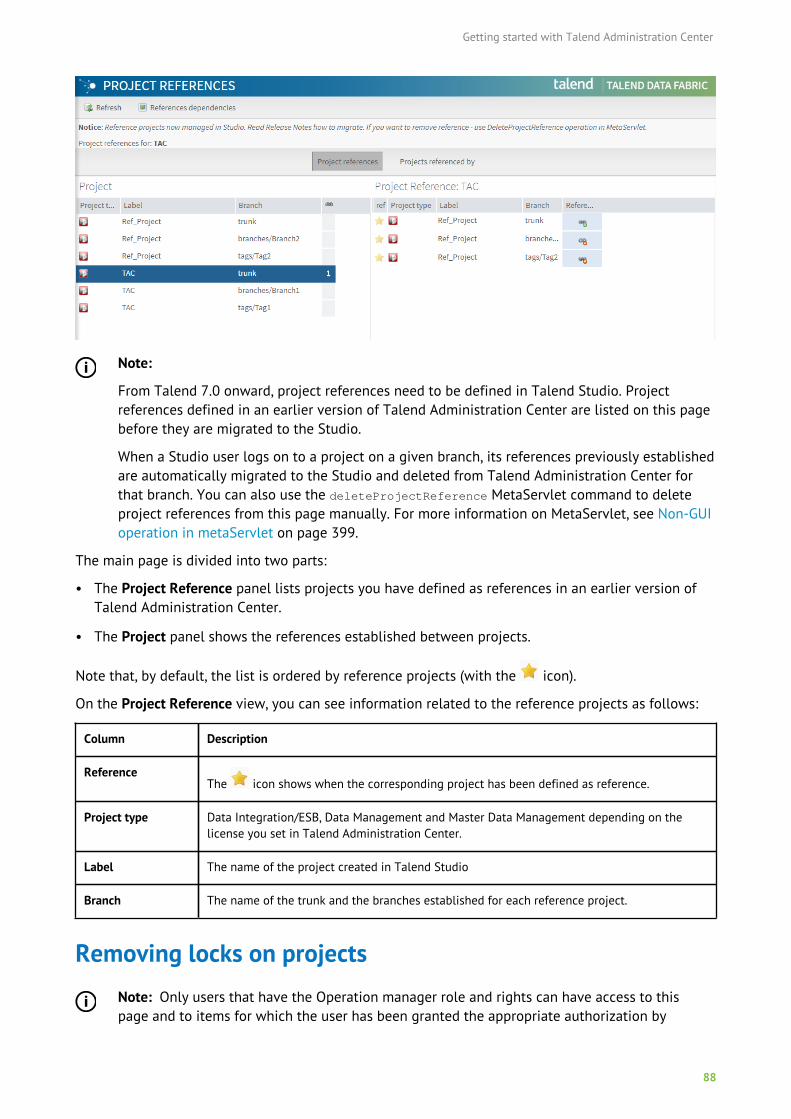
Getting started with Talend Administration Center
88
Note:
From Talend 7.0 onward, project references need to be defined in Talend Studio. Projectreferences defined in an earlier version of Talend Administration Center are listed on this pagebefore they are migrated to the Studio.
When a Studio user logs on to a project on a given branch, its references previously establishedare automatically migrated to the Studio and deleted from Talend Administration Center forthat branch. You can also use the deleteProjectReference MetaServlet command to deleteproject references from this page manually. For more information on MetaServlet, see Non-GUIoperation in metaServlet on page 399.
The main page is divided into two parts:
• The Project Reference panel lists projects you have defined as references in an earlier version ofTalend Administration Center.
• The Project panel shows the references established between projects.
Note that, by default, the list is ordered by reference projects (with the icon).
On the Project Reference view, you can see information related to the reference projects as follows:
Column Description
ReferenceThe icon shows when the corresponding project has been defined as reference.
Project type Data Integration/ESB, Data Management and Master Data Management depending on thelicense you set in Talend Administration Center.
Label The name of the project created in Talend Studio
Branch The name of the trunk and the branches established for each reference project.
Removing locks on projectsNote: Only users that have the Operation manager role and rights can have access to thispage and to items for which the user has been granted the appropriate authorization by
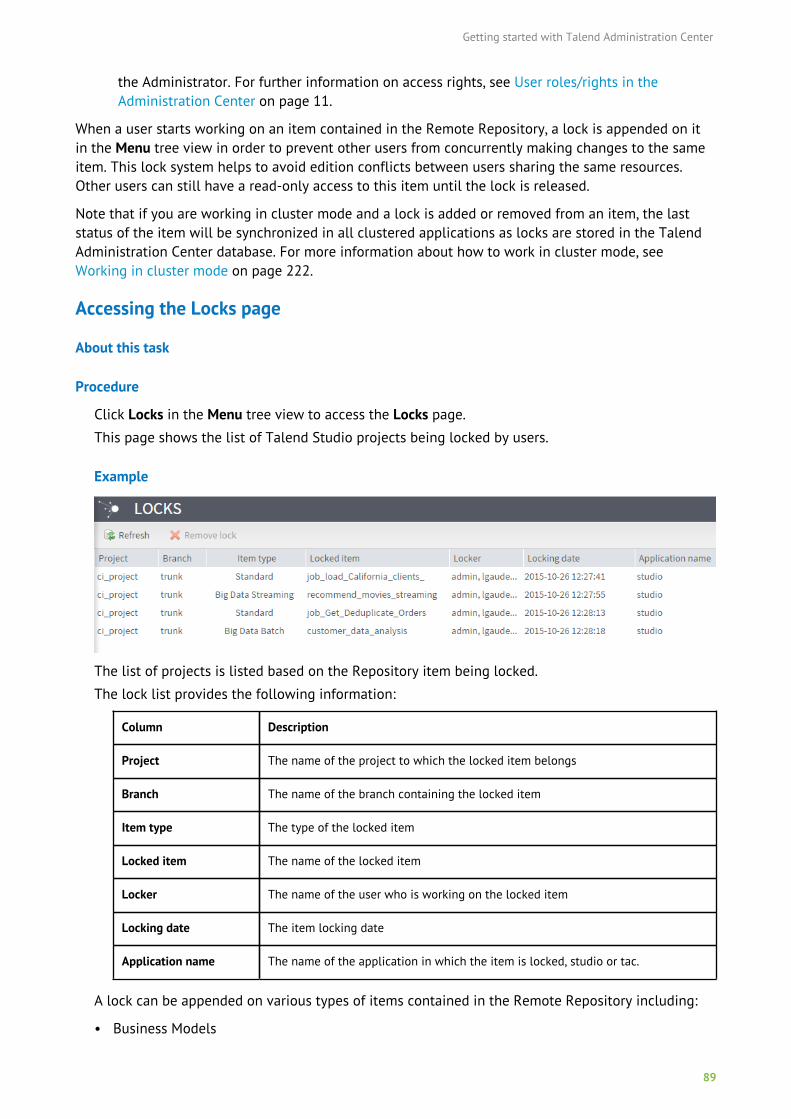
Getting started with Talend Administration Center
89
the Administrator. For further information on access rights, see User roles/rights in theAdministration Center on page 11.
When a user starts working on an item contained in the Remote Repository, a lock is appended on itin the Menu tree view in order to prevent other users from concurrently making changes to the sameitem. This lock system helps to avoid edition conflicts between users sharing the same resources.Other users can still have a read-only access to this item until the lock is released.
Note that if you are working in cluster mode and a lock is added or removed from an item, the laststatus of the item will be synchronized in all clustered applications as locks are stored in the TalendAdministration Center database. For more information about how to work in cluster mode, seeWorking in cluster mode on page 222.
Accessing the Locks page
About this task
Procedure
Click Locks in the Menu tree view to access the Locks page.
This page shows the list of Talend Studio projects being locked by users.
Example
The list of projects is listed based on the Repository item being locked.
The lock list provides the following information:
Column Description
Project The name of the project to which the locked item belongs
Branch The name of the branch containing the locked item
Item type The type of the locked item
Locked item The name of the locked item
Locker The name of the user who is working on the locked item
Locking date The item locking date
Application name The name of the application in which the item is locked, studio or tac.
A lock can be appended on various types of items contained in the Remote Repository including:
• Business Models
Getting started with Talend Administration Center
90
• Job Designs
• Routines
• Metadata of various types (DB connection, File, etc.)
• other items such as documentations, etc.
Note: In case of system crash or user absence, an Administrator can unlock an item viaTalend Administration Center.
Removing a lock from one or several projects
About this task
To remove a lock from one or several project items, complete the following:
Procedure
1. On the Locks page, select the project item or items you want to remove the lock(s) from.
2. On the toolbar, click Remove lock.
The lock list is refreshed automatically, but you can refresh it any time by clicking Refresh on thetoolbar.
Managing licensesNote: Only users that have the Administrator role and rights can have access to this page. Forfurther information on access rights, see User roles/rights in the Administration Center on page11.
From the license page in Talend Administration Center, an administrator can:
• check the parameters of the licenses and add new licenses. For more information, see Adding oneor more licenses on page 92.
• validate the license. For more information, see Generating a validation request on page 93.
In the Menu tree view, click Licenses to display the license parameters for the Administration Center.The parameters displayed may vary depending on your license.
The Available users area shows the number of users created in the current active licenses, as well asthe sum of users allowed in these active licenses.
The Stored license keys area shows all licenses and their parameters. If the Show inactive option isnot selected, only the active licenses are displayed in the area.
The All active license runtime details area shows the number of CPU cores allowed by the licenses forESB servers, the actual number of CPU cores used by all active ESB servers, and the number of activeESB servers.
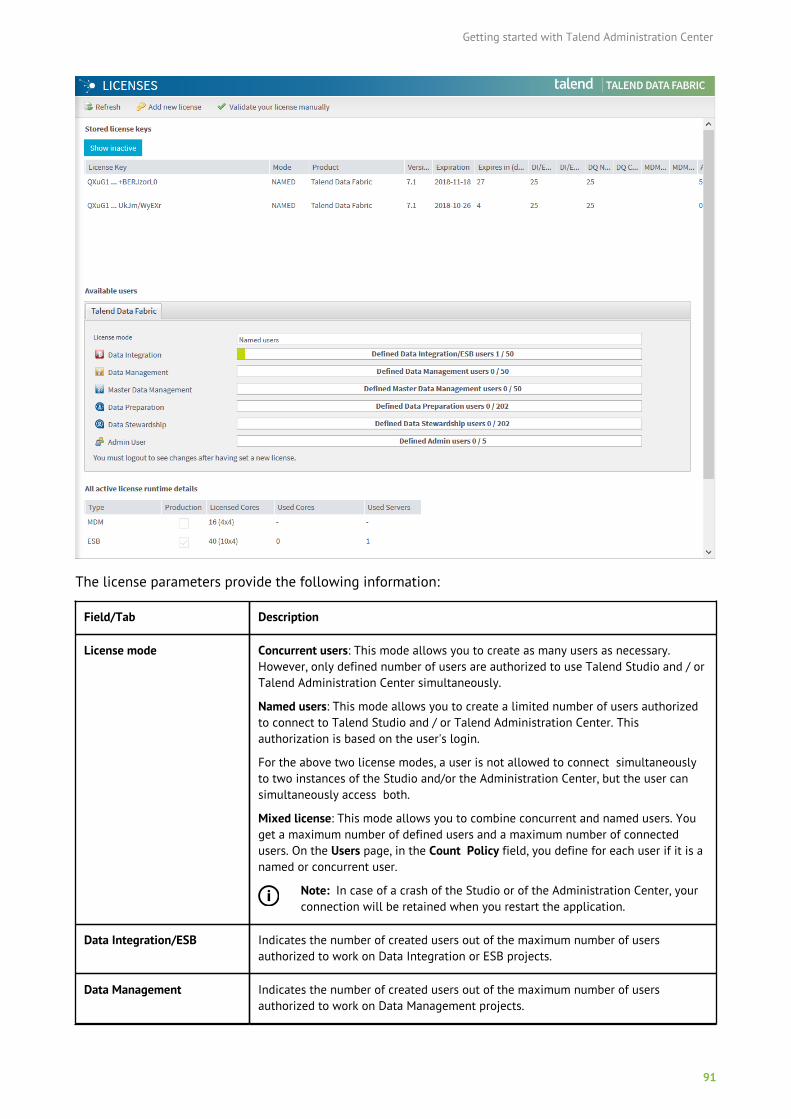
Getting started with Talend Administration Center
91
The license parameters provide the following information:
Field/Tab Description
License mode Concurrent users: This mode allows you to create as many users as necessary.However, only defined number of users are authorized to use Talend Studio and / orTalend Administration Center simultaneously.
Named users: This mode allows you to create a limited number of users authorizedto connect to Talend Studio and / or Talend Administration Center. Thisauthorization is based on the user's login.
For the above two license modes, a user is not allowed to connect simultaneouslyto two instances of the Studio and/or the Administration Center, but the user cansimultaneously access both.
Mixed license: This mode allows you to combine concurrent and named users. Youget a maximum number of defined users and a maximum number of connectedusers. On the Users page, in the Count Policy field, you define for each user if it is anamed or concurrent user.
Note: In case of a crash of the Studio or of the Administration Center, yourconnection will be retained when you restart the application.
Data Integration/ESB Indicates the number of created users out of the maximum number of usersauthorized to work on Data Integration or ESB projects.
Data Management Indicates the number of created users out of the maximum number of usersauthorized to work on Data Management projects.
Getting started with Talend Administration Center
92
Field/Tab Description
Master Data Management Indicates the number of created users out of the maximum number of usersauthorized to work on Master Data Management projects.
ESB Runtime Indicates the number of ESB Talend Runtime instances authorized.
Data Preparation Indicates the number of created users out of the maximum number of usersauthorized to work on Data Preparation projects. This license type only includesNamed users.
Data Stewardship Indicates the number of created users out of the maximum number of usersauthorized to work on Data Stewardship projects. This license type only includesNamed users.
Admin User Indicates the number of created users out of the maximum number of usersauthorized to perform Administrative operations. This license type includes bothNamed and Concurrent users.
Product Name of the Talend product.
Version Version of the Talend product.
Expiration License expiration date.
Expires in (days) Number of days left before the license expires.
Runtime Number of runtime servers allowed in the license.
The Open button allows you to display the details (instances number and type, tobe used in Production or not, etc.) of the runtime servers allowed for the selectedlicense.
Note that if you add several licenses that contain runtime servers, the sum of theseruntime servers is displayed in the All active runtime details area.
Talend Cloud Indicates whether Talend Cloud is included in the license.
Active Status of the license. It can be either active ( ) or inactive ( ).
If your license is not or no longer valid, you can always access the Users page and remove or disablea user account, such as when you have changed the license and your new license allows fewer usersthan the old one.
Note: A warning message will be displayed 20 days before your license expiration date and 10days before your token expiration date.
Adding one or more licenses
Licenses may be:
• "incompatible": in this case, the combination of non-Big Data and Big Data licenses is not allowed.
• "compatible": in this case, the combination of the non-Big Data and Big Data licenses is allowed.
Getting started with Talend Administration Center
93
Upload a new license
About this task
You need to upload a new license file to change the current active license.
Note: You can also set a new license via the MetaServlet application, using the setLicenseKeycommand. For more information on MetaServlet, see Non-GUI operation in metaServlet onpage 399.
Procedure
1. In the Licenses page, click Add new license on the top toolbar to open the corresponding popupwindow.
2. From this window, click Browse... to select the file containing the new license, then click Upload toset the new license.
Results
Upon validation of your new license, the license key and its parameters are displayed in the Storedlicense keys area, along with the other licenses.
Activate or reactivate a specific license
About this task
If you have uploaded more than one license and want to activate a specific license, do the following.
If you recently renewed your license, you may have to validate your license manually to reactivate it.For more information, see How to validate a license after renewalon Talend Help Center (https://help.talend.com).
Procedure
1. Select the license you want to activate.
2. Right-click and select Reactivate.
Results
• If the activated license is "incompatible" with the other stored licenses, the other licenses aredeactivated. This may result in the number of users exceeding the limit allowed in the new license.In this case, the administrator must access the Users or the Licenses pages in unblocking mode tofix this issue.
• If the activated license is "compatible" with at least one of the stored license, all these compatiblelicenses are set to Active.
Generating a validation request
Usually, license validation needs an internet connection, but it is also possible to validate a licensewithout connection.
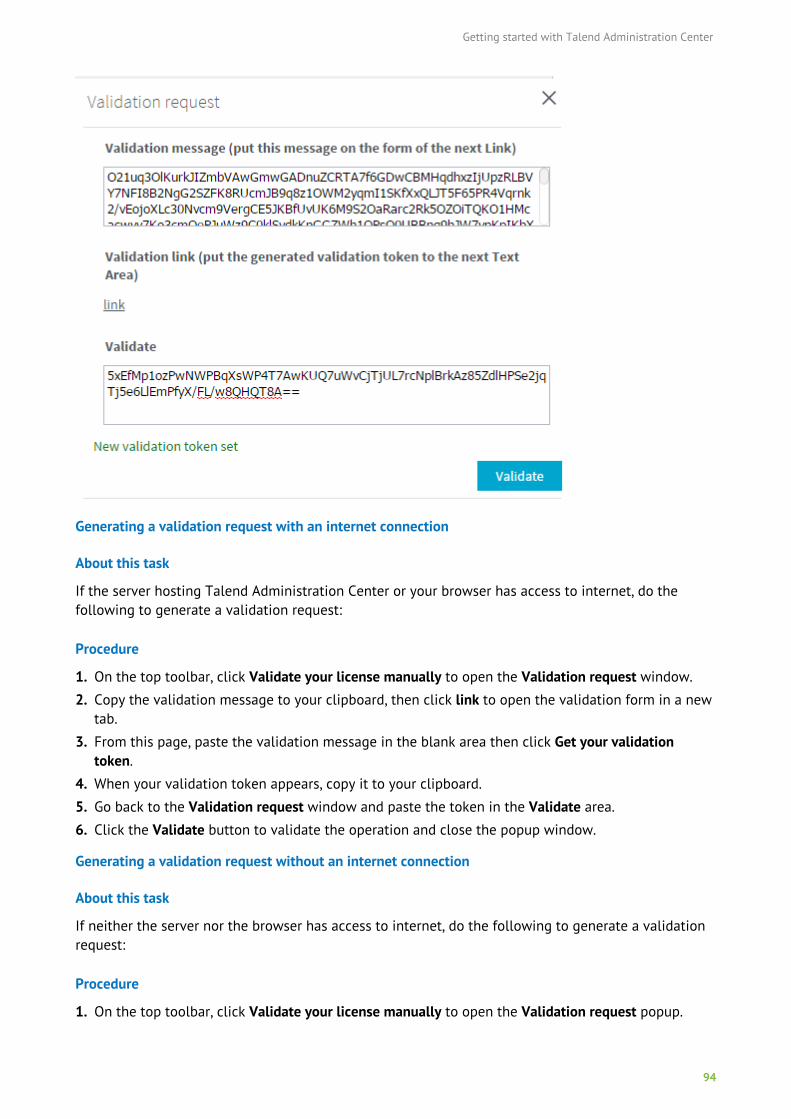
Getting started with Talend Administration Center
94
Generating a validation request with an internet connection
About this task
If the server hosting Talend Administration Center or your browser has access to internet, do thefollowing to generate a validation request:
Procedure
1. On the top toolbar, click Validate your license manually to open the Validation request window.
2. Copy the validation message to your clipboard, then click link to open the validation form in a newtab.
3. From this page, paste the validation message in the blank area then click Get your validationtoken.
4. When your validation token appears, copy it to your clipboard.
5. Go back to the Validation request window and paste the token in the Validate area.
6. Click the Validate button to validate the operation and close the popup window.
Generating a validation request without an internet connection
About this task
If neither the server nor the browser has access to internet, do the following to generate a validationrequest:
Procedure
1. On the top toolbar, click Validate your license manually to open the Validation request popup.
Getting started with Talend Administration Center
95
2. Click link.
A Web page is displayed with a connection error messages.
3. Copy the URL from the address bar and paste it in a text file.
4. Paste the URL in a browser that has access to internet and press Enter.5. From this page, paste the validation message in the blank area then click Get your validation
token.
6. When your validation token is displayed, copy it to your clipboard.
7. Go back to the Validation request window and paste the token in the Validate area.
8. Click the Validate button to validate the operation and close the popup window.
Managing rights associated with rolesNote: Only users who have the Administrator role can have read-write access to this page. Forfurther information on access rights, see User roles/rights in the Administration Center on page11.
The Rights management page in Talend Administration Center allows you to manage user rightsaccording to their roles. From this page, you can restrict access rights or enable custom roles.
Accessing the list of rights and roles
To display the list of rights available to users with a specific role click Rights management in theMenu tree-view.
The list of roles is displayed in the Role panel on the left and the list of associated rights is displayedin the right panel.
For example, the User management right allows you to create, edit or delete users while the Uservisualization right only gives to a specific role a right to visualize users.
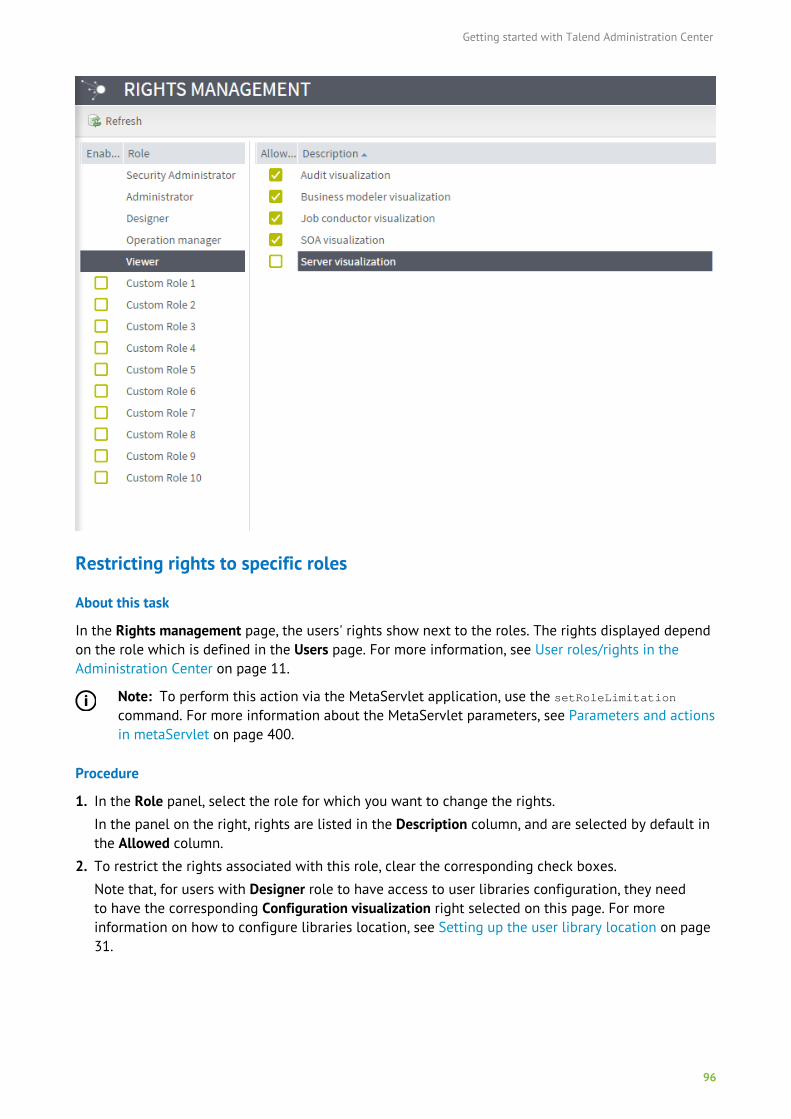
Getting started with Talend Administration Center
96
Restricting rights to specific roles
About this task
In the Rights management page, the users' rights show next to the roles. The rights displayed dependon the role which is defined in the Users page. For more information, see User roles/rights in theAdministration Center on page 11.
Note: To perform this action via the MetaServlet application, use the setRoleLimitationcommand. For more information about the MetaServlet parameters, see Parameters and actionsin metaServlet on page 400.
Procedure
1. In the Role panel, select the role for which you want to change the rights.
In the panel on the right, rights are listed in the Description column, and are selected by default inthe Allowed column.
2. To restrict the rights associated with this role, clear the corresponding check boxes.
Note that, for users with Designer role to have access to user libraries configuration, they needto have the corresponding Configuration visualization right selected on this page. For moreinformation on how to configure libraries location, see Setting up the user library location on page31.
Getting started with Talend Administration Center
97
Using Custom roles (Technical Preview)
About this task
To fine-tune rights management, ten custom roles can be used (Custom Role 1 to Custom Role 10) toassign users any combination of rights available for other roles (Administrator, Security Administrator,Designer, Operation Manager and Viewer).
By default, these roles are not enabled and have no rights assigned.
Note: Custom roles cannot be assigned to users with the No Project Access type.
Procedure
1. In the Menu tree-view, click Rights management.2. Select the Custom Role(s) to enable.
3. Select the rights to assign to the custom role(s).
Results
On your next connection to Talend Administration Center, the custom roles you have enabled willappear in the Role drop-down, on the Users page.
Managing notificationsNote: Only users that have the Administrator or Operation manager roles and rights can have aread-write access to this page. For further information on access rights, see User roles/rights inthe Administration Center on page 11.
The Notifications page allows you to configure alerts based on events. An event can be a user creationor deletion, a task failure or a change in the status of one or more job servers (whether the statuschanges from up to down or down to up).
If one of the SMTP parameters of the Configuration page is down, a warning will display at the topof the Notifications page to inform you that the notification might not work due to an SMTP serverconnection error.
Accessing the notification list
On the Menu tree view to the left, click Notifications to display the notification list.
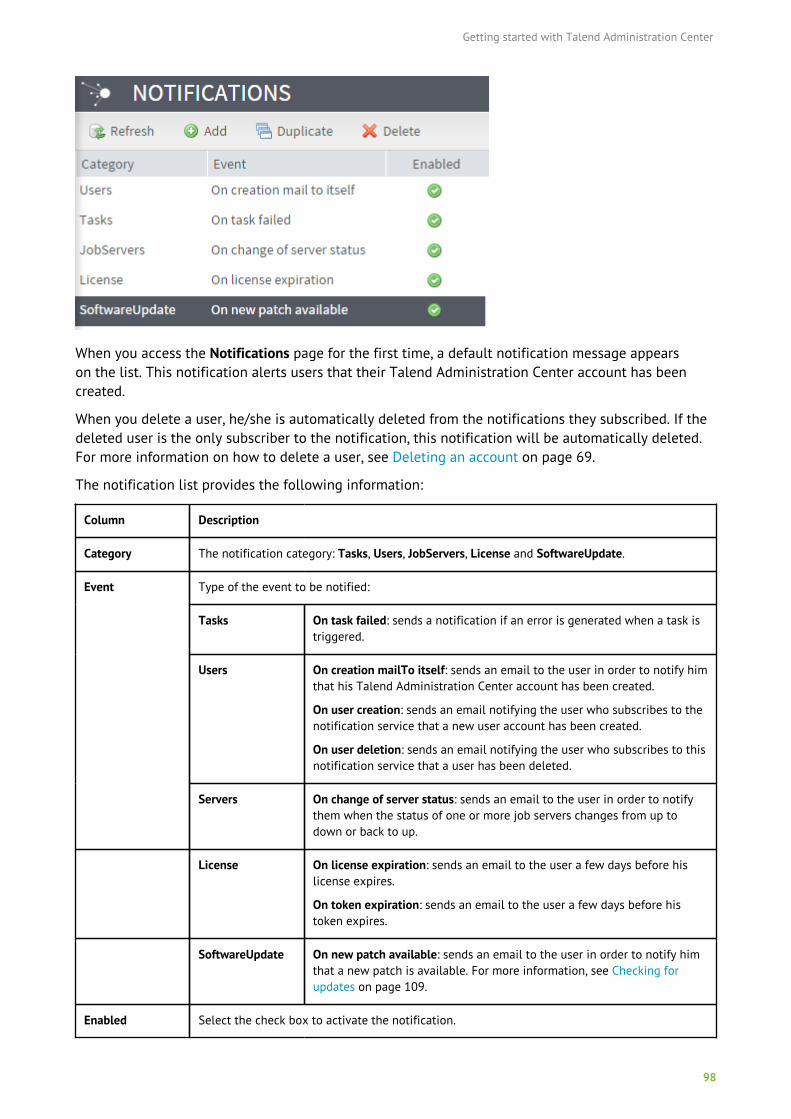
Getting started with Talend Administration Center
98
When you access the Notifications page for the first time, a default notification message appearson the list. This notification alerts users that their Talend Administration Center account has beencreated.
When you delete a user, he/she is automatically deleted from the notifications they subscribed. If thedeleted user is the only subscriber to the notification, this notification will be automatically deleted.For more information on how to delete a user, see Deleting an account on page 69.
The notification list provides the following information:
Column Description
Category The notification category: Tasks, Users, JobServers, License and SoftwareUpdate.
Type of the event to be notified:
Tasks On task failed: sends a notification if an error is generated when a task istriggered.
Users On creation mailTo itself: sends an email to the user in order to notify himthat his Talend Administration Center account has been created.
On user creation: sends an email notifying the user who subscribes to thenotification service that a new user account has been created.
On user deletion: sends an email notifying the user who subscribes to thisnotification service that a user has been deleted.
Event
Servers On change of server status: sends an email to the user in order to notifythem when the status of one or more job servers changes from up todown or back to up.
License On license expiration: sends an email to the user a few days before hislicense expires.
On token expiration: sends an email to the user a few days before histoken expires.
SoftwareUpdate On new patch available: sends an email to the user in order to notify himthat a new patch is available. For more information, see Checking forupdates on page 109.
Enabled Select the check box to activate the notification.
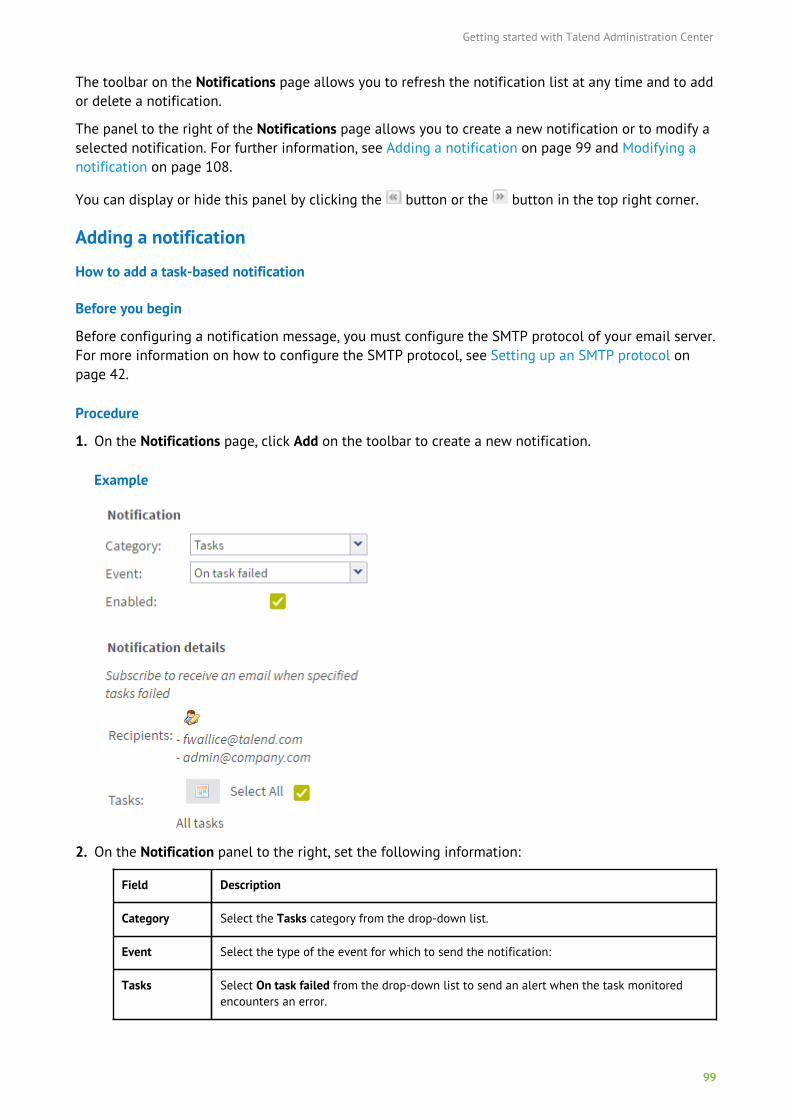
Getting started with Talend Administration Center
99
The toolbar on the Notifications page allows you to refresh the notification list at any time and to addor delete a notification.
The panel to the right of the Notifications page allows you to create a new notification or to modify aselected notification. For further information, see Adding a notification on page 99 and Modifying anotification on page 108.
You can display or hide this panel by clicking the button or the button in the top right corner.
Adding a notification
How to add a task-based notification
Before you begin
Before configuring a notification message, you must configure the SMTP protocol of your email server.For more information on how to configure the SMTP protocol, see Setting up an SMTP protocol onpage 42.
Procedure
1. On the Notifications page, click Add on the toolbar to create a new notification.
Example
2. On the Notification panel to the right, set the following information:
Field Description
Category Select the Tasks category from the drop-down list.
Event Select the type of the event for which to send the notification:
Tasks Select On task failed from the drop-down list to send an alert when the task monitoredencounters an error.
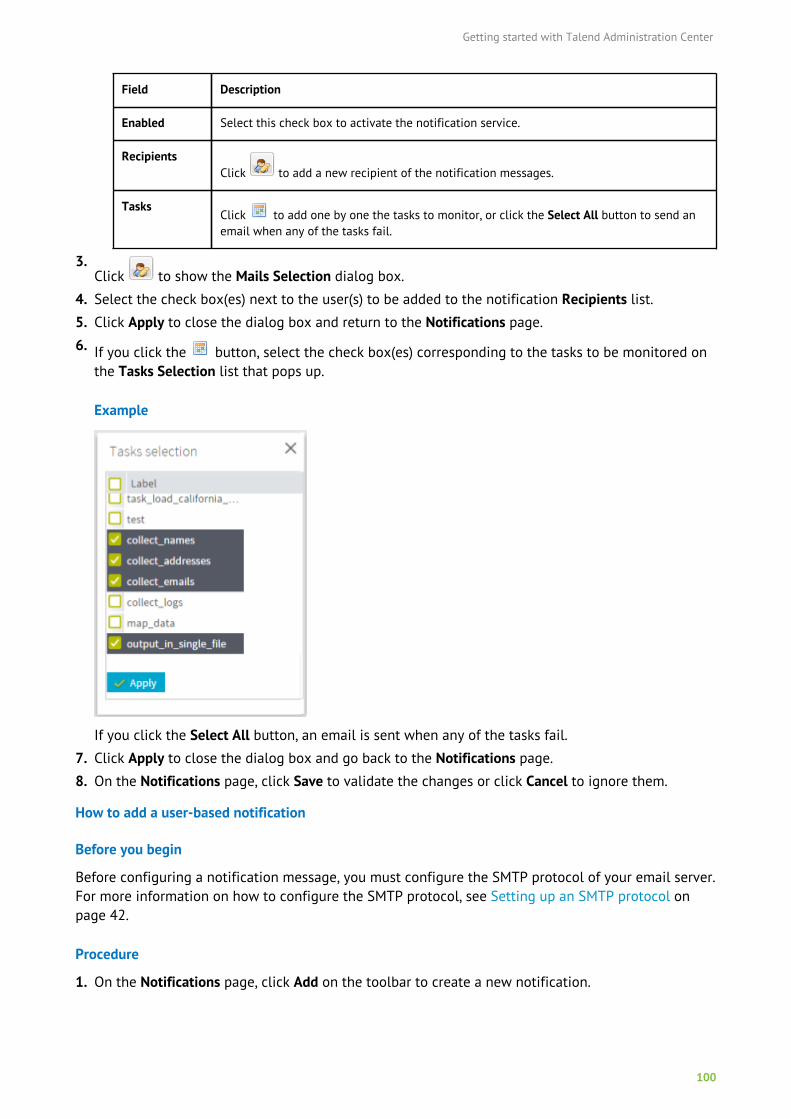
Getting started with Talend Administration Center
100
Field Description
Enabled Select this check box to activate the notification service.
RecipientsClick to add a new recipient of the notification messages.
TasksClick to add one by one the tasks to monitor, or click the Select All button to send anemail when any of the tasks fail.
3.Click to show the Mails Selection dialog box.
4. Select the check box(es) next to the user(s) to be added to the notification Recipients list.
5. Click Apply to close the dialog box and return to the Notifications page.
6. If you click the button, select the check box(es) corresponding to the tasks to be monitored onthe Tasks Selection list that pops up.
Example
If you click the Select All button, an email is sent when any of the tasks fail.
7. Click Apply to close the dialog box and go back to the Notifications page.
8. On the Notifications page, click Save to validate the changes or click Cancel to ignore them.
How to add a user-based notification
Before you begin
Before configuring a notification message, you must configure the SMTP protocol of your email server.For more information on how to configure the SMTP protocol, see Setting up an SMTP protocol onpage 42.
Procedure
1. On the Notifications page, click Add on the toolbar to create a new notification.
Getting started with Talend Administration Center
101
Example
2. On the Notification panel to the right, set the following information:
Field Description
Category Select the Users category from the drop down list.
Event Select the type of the event for which to send the notification:
Users Select On creation mailTo itself to notify the user that its Talend Administration Centeraccount has been created.
Select On user creation to send an email notifying the user who subscribes to thisnotification type when a new account is created.
Select On user deletion to send an email notifying the user who subscribes to thisnotification type when a user account is deleted.
Enabled Select this check box to activate the notification service.
RecipientsClick the button to add a new recipient of the notification emails.
Note: This field is not available when you select MailNewUserNotification.
3.Click the button to show the Mails Selection dialog box.
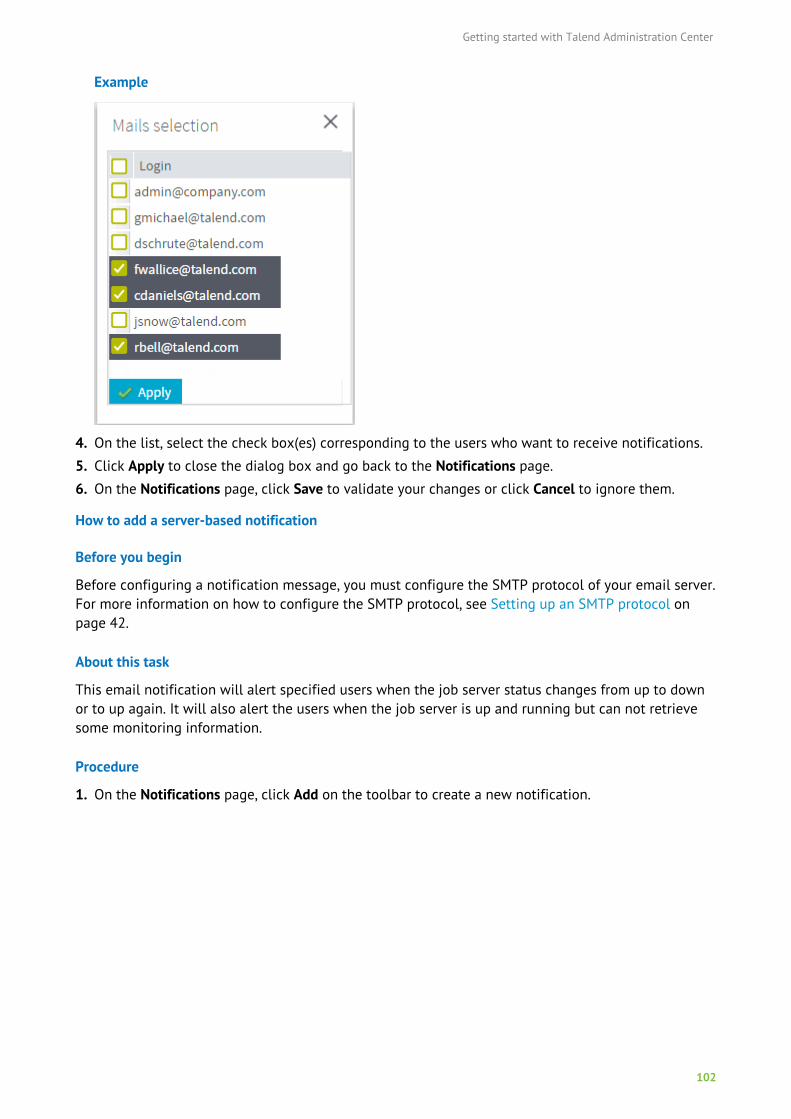
Getting started with Talend Administration Center
102
Example
4. On the list, select the check box(es) corresponding to the users who want to receive notifications.
5. Click Apply to close the dialog box and go back to the Notifications page.
6. On the Notifications page, click Save to validate your changes or click Cancel to ignore them.
How to add a server-based notification
Before you begin
Before configuring a notification message, you must configure the SMTP protocol of your email server.For more information on how to configure the SMTP protocol, see Setting up an SMTP protocol onpage 42.
About this task
This email notification will alert specified users when the job server status changes from up to downor to up again. It will also alert the users when the job server is up and running but can not retrievesome monitoring information.
Procedure
1. On the Notifications page, click Add on the toolbar to create a new notification.
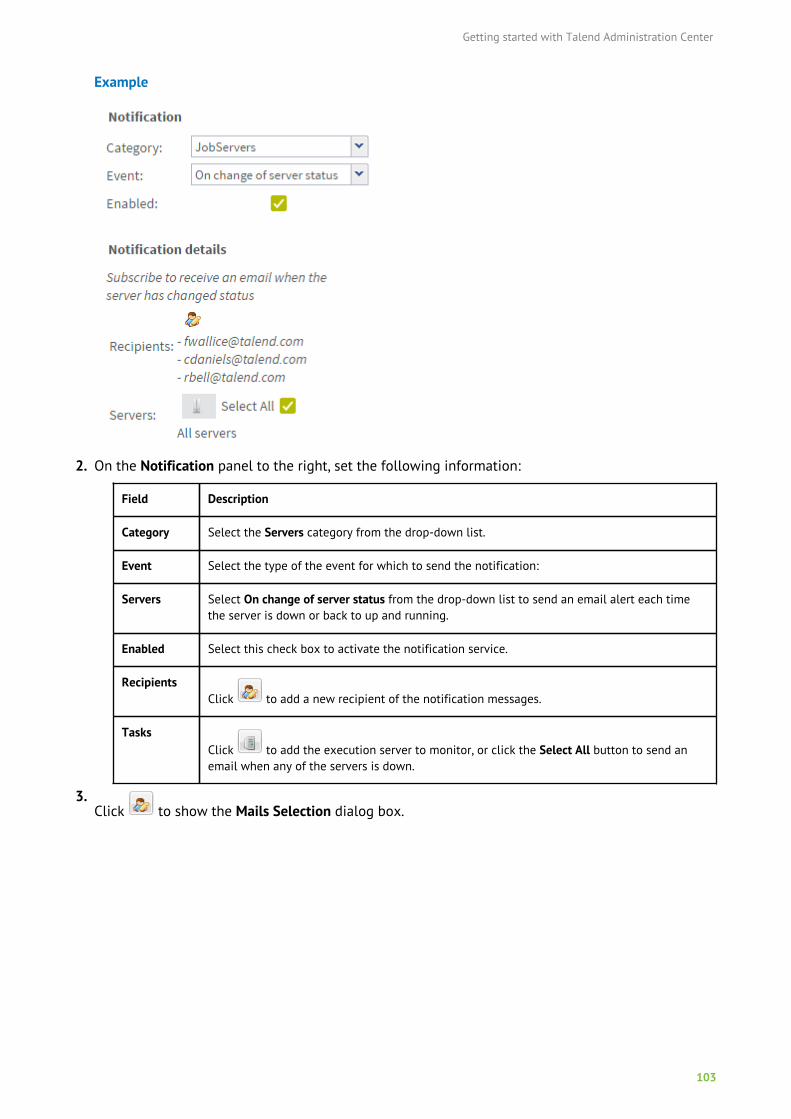
Getting started with Talend Administration Center
103
Example
2. On the Notification panel to the right, set the following information:
Field Description
Category Select the Servers category from the drop-down list.
Event Select the type of the event for which to send the notification:
Servers Select On change of server status from the drop-down list to send an email alert each timethe server is down or back to up and running.
Enabled Select this check box to activate the notification service.
RecipientsClick to add a new recipient of the notification messages.
TasksClick to add the execution server to monitor, or click the Select All button to send anemail when any of the servers is down.
3.Click to show the Mails Selection dialog box.
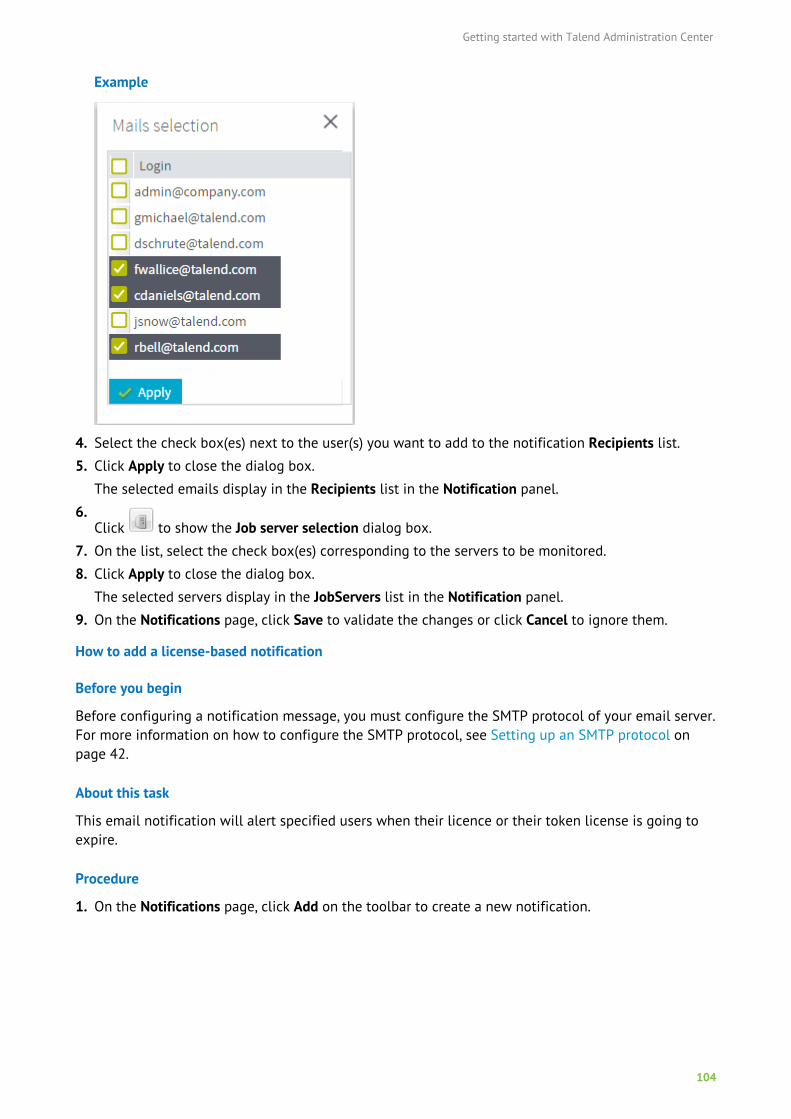
Getting started with Talend Administration Center
104
Example
4. Select the check box(es) next to the user(s) you want to add to the notification Recipients list.
5. Click Apply to close the dialog box.
The selected emails display in the Recipients list in the Notification panel.
6.Click to show the Job server selection dialog box.
7. On the list, select the check box(es) corresponding to the servers to be monitored.
8. Click Apply to close the dialog box.
The selected servers display in the JobServers list in the Notification panel.
9. On the Notifications page, click Save to validate the changes or click Cancel to ignore them.
How to add a license-based notification
Before you begin
Before configuring a notification message, you must configure the SMTP protocol of your email server.For more information on how to configure the SMTP protocol, see Setting up an SMTP protocol onpage 42.
About this task
This email notification will alert specified users when their licence or their token license is going toexpire.
Procedure
1. On the Notifications page, click Add on the toolbar to create a new notification.
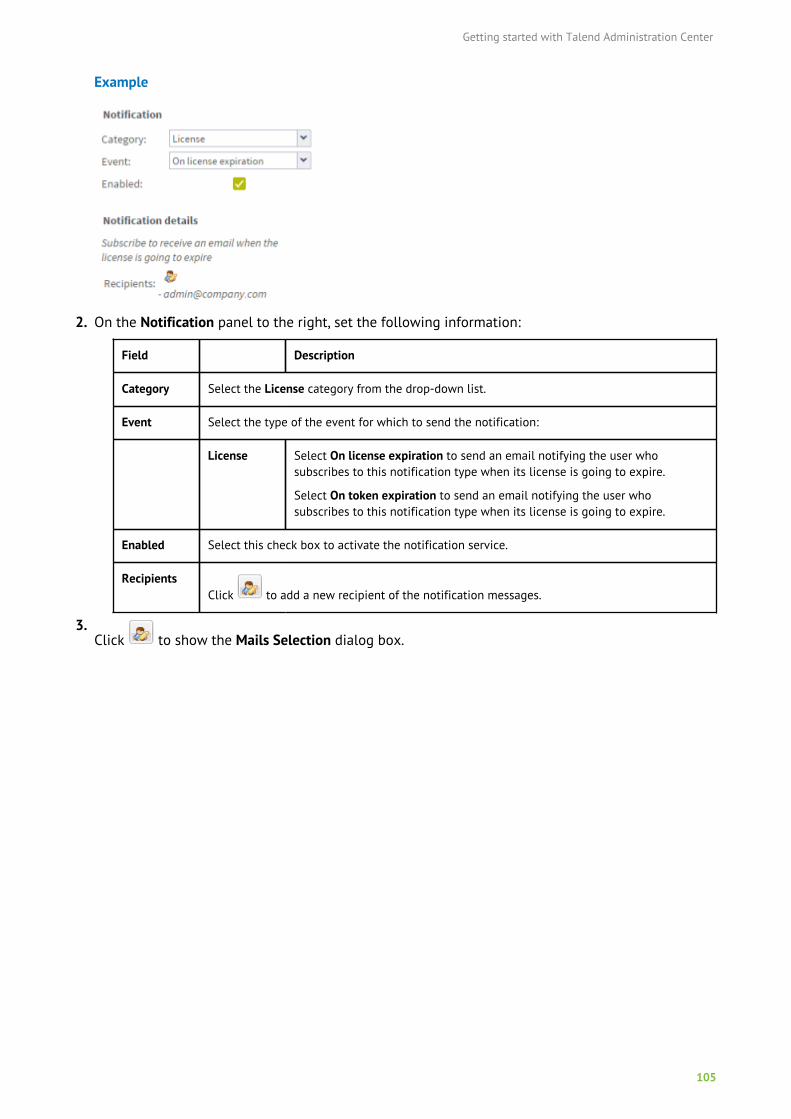
Getting started with Talend Administration Center
105
Example
2. On the Notification panel to the right, set the following information:
Field Description
Category Select the License category from the drop-down list.
Event Select the type of the event for which to send the notification:
License Select On license expiration to send an email notifying the user whosubscribes to this notification type when its license is going to expire.
Select On token expiration to send an email notifying the user whosubscribes to this notification type when its license is going to expire.
Enabled Select this check box to activate the notification service.
RecipientsClick to add a new recipient of the notification messages.
3.Click to show the Mails Selection dialog box.
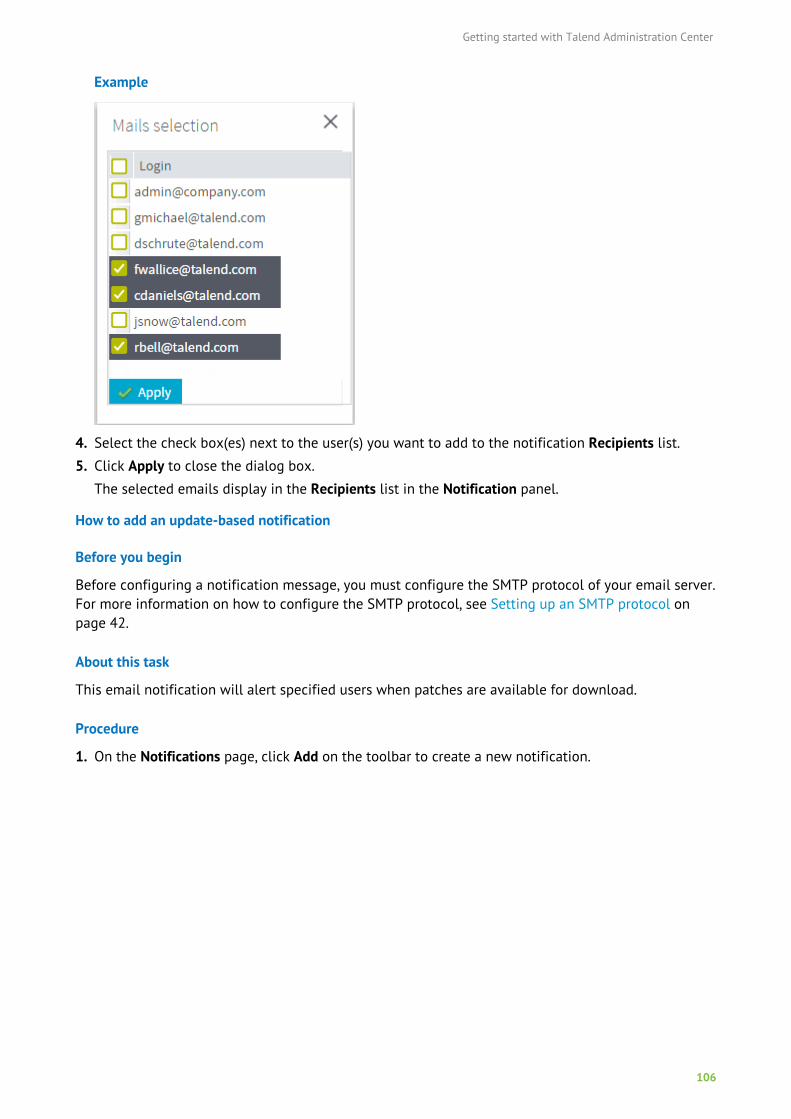
Getting started with Talend Administration Center
106
Example
4. Select the check box(es) next to the user(s) you want to add to the notification Recipients list.
5. Click Apply to close the dialog box.
The selected emails display in the Recipients list in the Notification panel.
How to add an update-based notification
Before you begin
Before configuring a notification message, you must configure the SMTP protocol of your email server.For more information on how to configure the SMTP protocol, see Setting up an SMTP protocol onpage 42.
About this task
This email notification will alert specified users when patches are available for download.
Procedure
1. On the Notifications page, click Add on the toolbar to create a new notification.
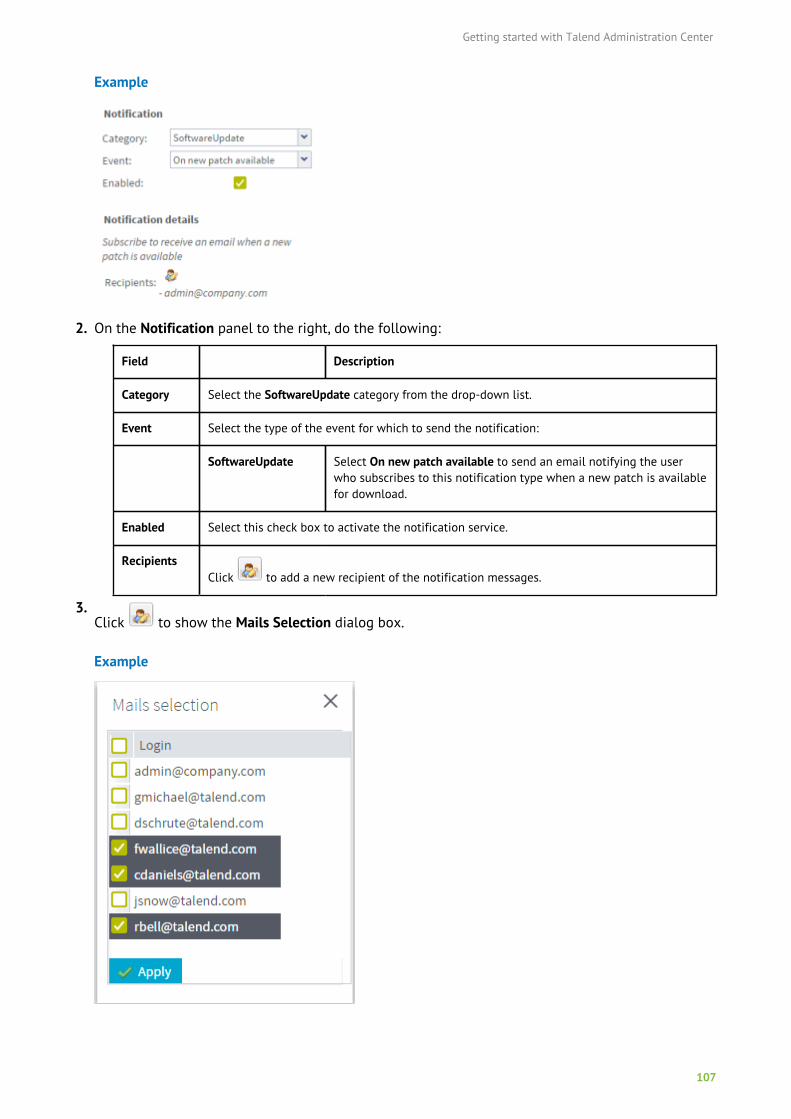
Getting started with Talend Administration Center
107
Example
2. On the Notification panel to the right, do the following:
Field Description
Category Select the SoftwareUpdate category from the drop-down list.
Event Select the type of the event for which to send the notification:
SoftwareUpdate Select On new patch available to send an email notifying the userwho subscribes to this notification type when a new patch is availablefor download.
Enabled Select this check box to activate the notification service.
RecipientsClick to add a new recipient of the notification messages.
3.Click to show the Mails Selection dialog box.
Example
Getting started with Talend Administration Center
108
4. Select the check box(es) next to the user(s) you want to add to the notification Recipients list.
5. Click Apply to close the dialog box.
The selected emails display in the Recipients list in the Notification panel.
Modifying a notification
Before you begin
Before configuring a notification message, you must configure the SMTP protocol of your email server.For more information on how to configure the SMTP protocol, see Setting up an SMTP protocol onpage 42.
About this task
To modify a notification, complete the following:
Procedure
1. On the Menu tree view, select Notifications to access the notification list.
2. Select the notification that you want to modify.
3. On the Notification panel, modify the information.
4. Click Save to validate the changes or click Cancel to ignore them.
Activating/deactivating a notification
About this task
You can activate or deactivate a notification according to your needs.
To do this, complete the following:
Procedure
1. On the Notifications page, select the notification you need to activate or deactivate from the list.
2. On the Notification panel, clear the Active check box to deactivate the notification or select thecheck box to activate it.
3. Click Save to validate the changes or click Cancel to ignore them.
Deleting a notification
About this task
Note: When you delete a user, he/she is automatically deleted from the notifications theysubscribed. If the deleted user is the only subscriber to the notification, this notification will beautomatically deleted. For more information on how to delete a user, see Deleting an accounton page 69.
To delete a notification, complete the following:
Procedure
1. On the Notifications page, select the notification you want to delete.
2. On the toolbar, click the Delete button. A dialog box pops up asking for confirmation.
Getting started with Talend Administration Center
109
3. Click OK to close the dialog box and delete the notification from the list.
Customizing the notification list
About this task
You can sort the notification list according to various criteria. You can also display or hide one orseveral columns of the list.
Procedure
1. On the notification list, click the down arrow on any of the columns.
2. On the drop-down list, select:
Element To..
Sort Ascending Sort the list in the ascendant order.
Sort Descending Sort the list in the descendant order.
Columns Display a drop-down list containing all the available columns. Select thecheck boxes corresponding to the columns you want to display or clear thosecorresponding to the columns you want to hide.
Note: By default, the accounts are regrouped by Category.
The following figure illustrates the drop-down list of options used to sort the notifications.
Checking for updatesFrom Talend Administration Center home page, you can access the Software update page that allowsyou to check for the latest patches of your Studio. These patches are retrieved from software updaterepositories.
For more information on how to set the parameters on the Configuration page, see Setting upSoftware Update parameters on page 42 .
Note: These parameters must be correctly filled in order for the Web application to connect tothe software update repository. Otherwise, a message will be displayed in the Software updatepage to inform you that the repository URL is unreachable.
For more information on the software update repositories, see Configuring the Software Updaterepository in Talend Administration Center on Talend Help Center (https://help.talend.com).
Accessing the Software Update page
Procedure
To access this page, select Software Update in the Menu tree view.
Getting started with Talend Administration Center
110
From this page, you can:
• see the current version of Talend Administration Center,
• accept the patches available for your Studio,
• see all patches that were previously accepted.
Note: You can set a notification that will warn you when new patches are available. Formore information, see Managing notifications on page 97.
Checking the current version
Procedure
Select Software update in the Menu and see the version number of your current version.
You can see below the See all accepted patches hyperlink pointing to a page where you canvisualize all the updates of your current version that have been accepted.
If your version is up-to-date and no patch is available, you will see a message indicating that yourversion is up to date.
Example
If there are some patches that you can download, you will receive a message in the bannernotifying you that patches are available, and these patches will appear on the page.
Accepting a new patch
About this task
You can also accept patches for the Studio in order to improve its performance.
Note that you will only be able to see and accept patches available for the current version of yourStudio.
Getting started with Talend Administration Center
111
Procedure
1. Under the Patches for current version area, select the patch you want to add to your currentversion.
2.
Click the icon to confirm your choice and download the desired patch.
3. Once you have downloaded a patch, click Refresh.
You can see that it no longer appears in the Patches for current version area.
Results
When all the patches have been accepted, a message is displayed, indicating that your version is up todate.
The next time you start the Studio, the patches you have accepted in Talend Administration Centerwill be automatically detected.
Changing user passwordsAbout this task
On the User settings page, any user can change his/her password to connect to Talend applications, aswell as his/her login and password to SVN, via Talend Administration Center.
Editing passwords is not available if SSO has been enabled.
For better understanding of Git/SVN credentials management with LDAP authentication enabled, seeMappings between LDAP and Talend Administration Center and Managing password encryption/decryption in Talend Administration Center on Talend Help Center (https://help.talend.com).
Procedure
1. Log on to Talend Administration Center web application.
The menus and menus items vary according to your role/rights (Administrator, Operation manager,Designer or Viewer) in Talend Administration Center.
Note: Only users with active accounts can access the Administration Center and changetheir password.
2. In the Menu tree view of the Administration Center, select User settings to display thecorresponding page.
Getting started with Talend Administration Center
112
Example
3. In the Svn/Git Account area:
a) Type in or modify your SVN/Git login and password in the corresponding fields.
Note that the SVN/Git login and password must correspond to a user that has been previouslycreated in SVN/Git.
b) Click Save to confirm these modifications.
4. In the User Password area (Note that this option is not available if SSO was enabled):
a) Enter your new password in the New password field.
The information bar below the field will indicate if the newly entered password is Very weak,Medium or Strong.
b) Enter the new password in the Confirm password field.
c) Click Validate to confirm your modification.
Getting started with Talend Administration Center
113
Results
Eventually, a message displays to confirm that the modification has been carried out without issue.Otherwise, an error message points out the issue that needs to be corrected for the modifications tobe taken into account.

Migrating your projects and generating reports
114
Migrating your projects and generating reports
If you migrated to a newer version of Talend Administration Center and want to retrieve your existingprojects, you may want to migrate these projects.
Talend Administration Center allows you to select the projects to be migrated and to generatecorresponding reports using the Commandline applications.
The Migration Check page of Talend Administration Center allows you to:
• connect the previous version of your CommandLine application to the new one,
• migrate each existing project,
• generate and download a report for each migration.
Note that you can also migrate projects and generate reports directly from the CommandLinethanks to the migrationCheck and generateMigrationReport command. For more information aboutthese commands, display the Help provided in the CommandLine. For more information on theCommandLine, see CommandLine features on page 391.
Prerequisites to perform a project migrationTo perform a migration of your projects, you need to have previously:
• launched the CommandLine application that was connected to the previous version of TalendAdministration Center (old CommandLine) and set its parameters on the Configuration page of theweb application.
• launched the CommandLine application that is connected to the current version of TalendAdministration Center (new CommandLine) and set its parameters on the Configuration page of theweb application.
• backed up the SVN repository that contains your existing projects (using the svnadmin dumpcommand) and restored it to a new SVN repository.
• (optional, to optimize the migration reports) installed patches in the CommandLine in order toknow more precisely whether the Jobs were generating successfully in the previous versions.For more information on how to improve the Migration Check report, see How to improve themigration check report on Talend Help Center (https://help.talend.com).
Editing the default path to your reports (optional)
About this task
(Optional) By default, migration reports are stored in the following folders: /Talend/MigrationCheck/reports on Linux or C:/Talend/MigrationCheck/reports on Windows. If you want to edit thedefault path to the folder where your reports will be stored, you need to do so in the configuration.properties file:
Procedure
1. Open the following file <TomcatPath>/webapps/org.talend.administrator/WEB-INF/classes/configuration.properties.
Migrating your projects and generating reports
115
2. Add the following parameter and value, then save your changes:
migrationCheck.conf.reportPath=<FolderPath>
where <FolderPath> corresponds to the path to the folder where you want to store your migrationreports.
Migrating projectsAbout this task
To migrate your projects, proceed as follows:
Procedure
1. In the Menu tree view of Talend Administration Center, click Migration Check to open thecorresponding page.
2. Click the CommandLine buttons on the top toolbar to configure the connections to both source(old) and target (new) CommandLine applications.
Example
3. Select the projects you want to migrate.
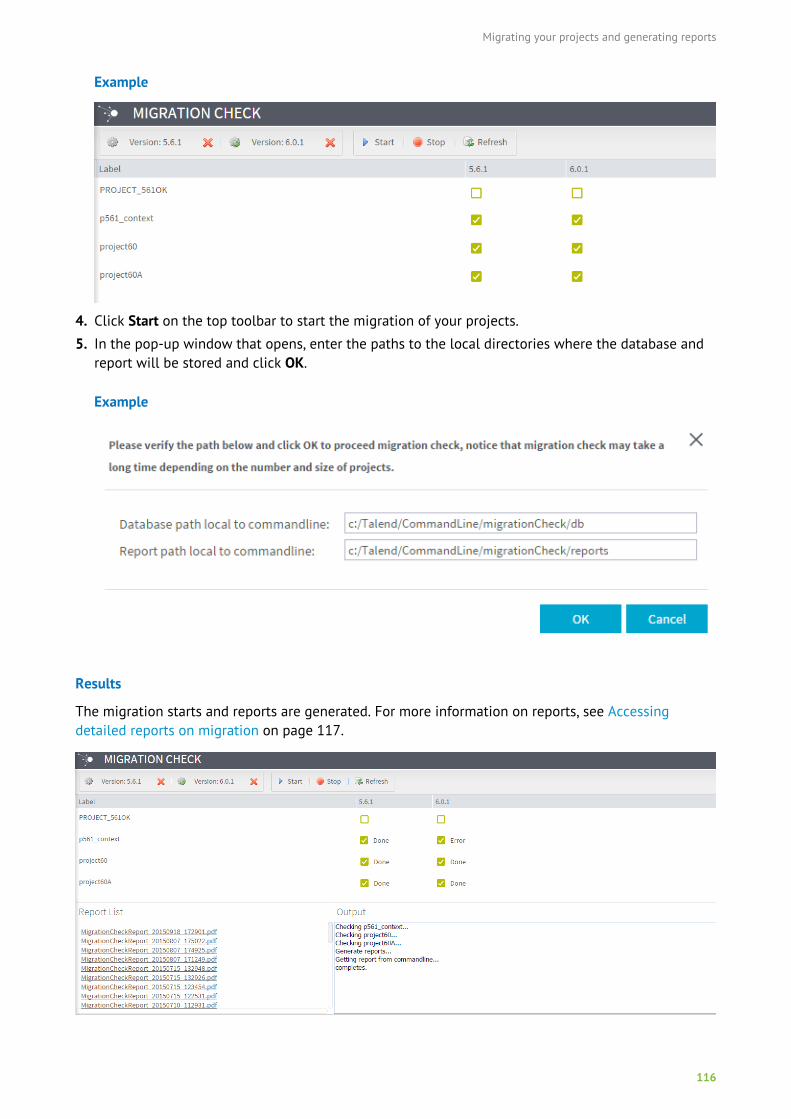
Migrating your projects and generating reports
116
Example
4. Click Start on the top toolbar to start the migration of your projects.
5. In the pop-up window that opens, enter the paths to the local directories where the database andreport will be stored and click OK.
Example
Results
The migration starts and reports are generated. For more information on reports, see Accessingdetailed reports on migration on page 117.
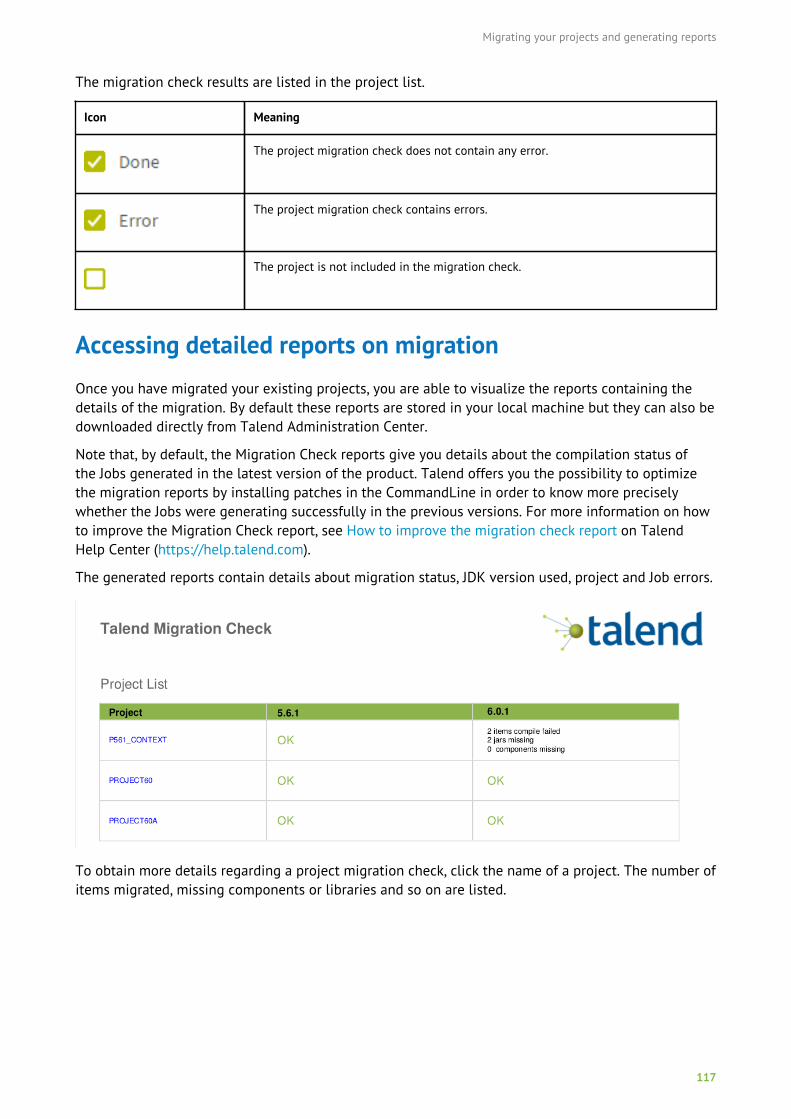
Migrating your projects and generating reports
117
The migration check results are listed in the project list.
Icon Meaning
The project migration check does not contain any error.
The project migration check contains errors.
The project is not included in the migration check.
Accessing detailed reports on migrationOnce you have migrated your existing projects, you are able to visualize the reports containing thedetails of the migration. By default these reports are stored in your local machine but they can also bedownloaded directly from Talend Administration Center.
Note that, by default, the Migration Check reports give you details about the compilation status ofthe Jobs generated in the latest version of the product. Talend offers you the possibility to optimizethe migration reports by installing patches in the CommandLine in order to know more preciselywhether the Jobs were generating successfully in the previous versions. For more information on howto improve the Migration Check report, see How to improve the migration check report on TalendHelp Center (https://help.talend.com).
The generated reports contain details about migration status, JDK version used, project and Job errors.
To obtain more details regarding a project migration check, click the name of a project. The number ofitems migrated, missing components or libraries and so on are listed.
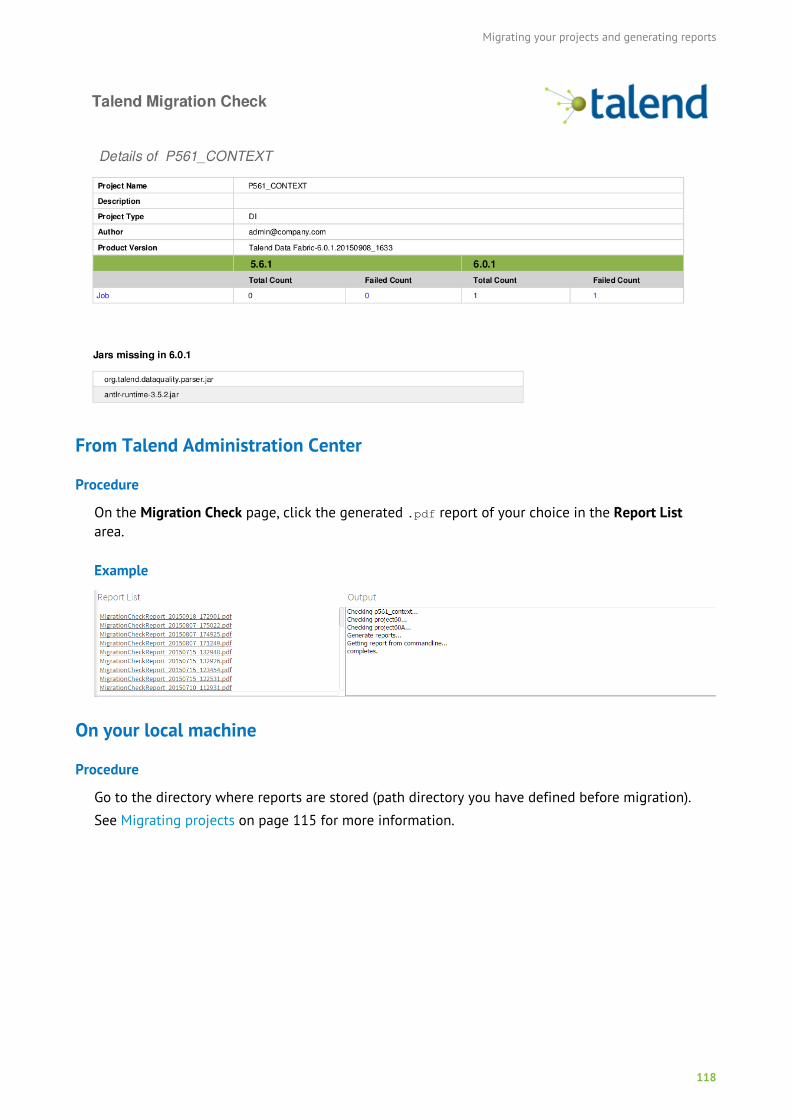
Migrating your projects and generating reports
118
From Talend Administration Center
Procedure
On the Migration Check page, click the generated .pdf report of your choice in the Report Listarea.
Example
On your local machine
Procedure
Go to the directory where reports are stored (path directory you have defined before migration).
See Migrating projects on page 115 for more information.
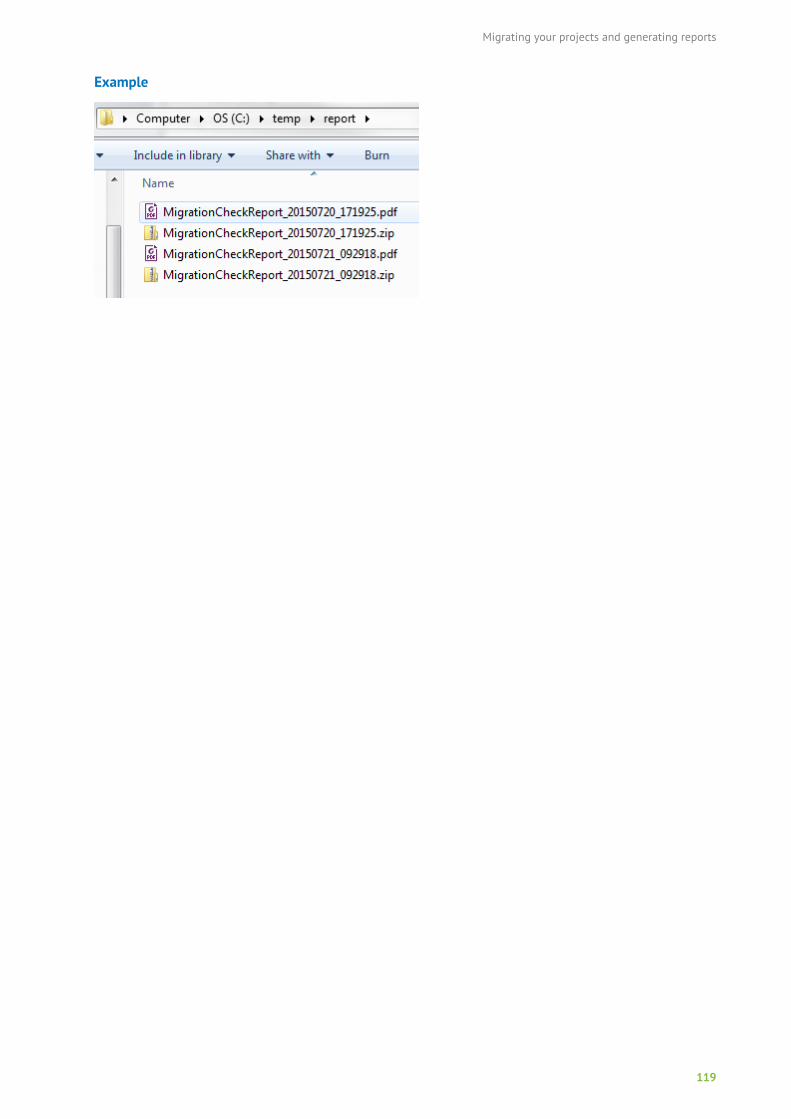
Migrating your projects and generating reports
119
Example
Backing up databases and SVN repositories
120
Backing up databases and SVN repositories
The Backup page allows you to schedule the backup of your databases (administration centerdatabase, Audit database, Talend Activity Monitoring Console database, etc.) and SVN repositories.
On the Backup page, you are able to:
• schedule the backup of your databases and/or SVN repositories and define the frequency ofbackups,
• run a backup of your databases and/or SVN repositories manually,
• store the backed up databases or SVN repositories in a specified directory.
Prerequisites to use the Backup pageTo perform a backup through the Backup page, you need to have previously downloaded and installedthe utility which allows you to perform this backup:
• If you want to backup your database, install:
• mysqldump for MySQL databases
• sqlcmd for SQL Server databases
• exp for Oracle databases
• pg_dump for PostgreSQL databases
• If you want to backup your SVN repository, install:
• svnadmin for local SVN repositories
• svnrdump for remote SVN repositories
Make sure the path to the utilities you want to use is configured in the system environment variablesbefore starting Talend Administration Center.
Scheduling a backupOn the Backup page, you can schedule the backup of your databases (administration center database,Audit database, Talend Activity Monitoring Console database, etc.) and SVN repositories.
Warning: Only users who have the Administrator role can have read-write access to this page.For further information on access rights, see User roles/rights in the Administration Center onpage 11.
In the Menu tree view, click Backup to open the corresponding page.
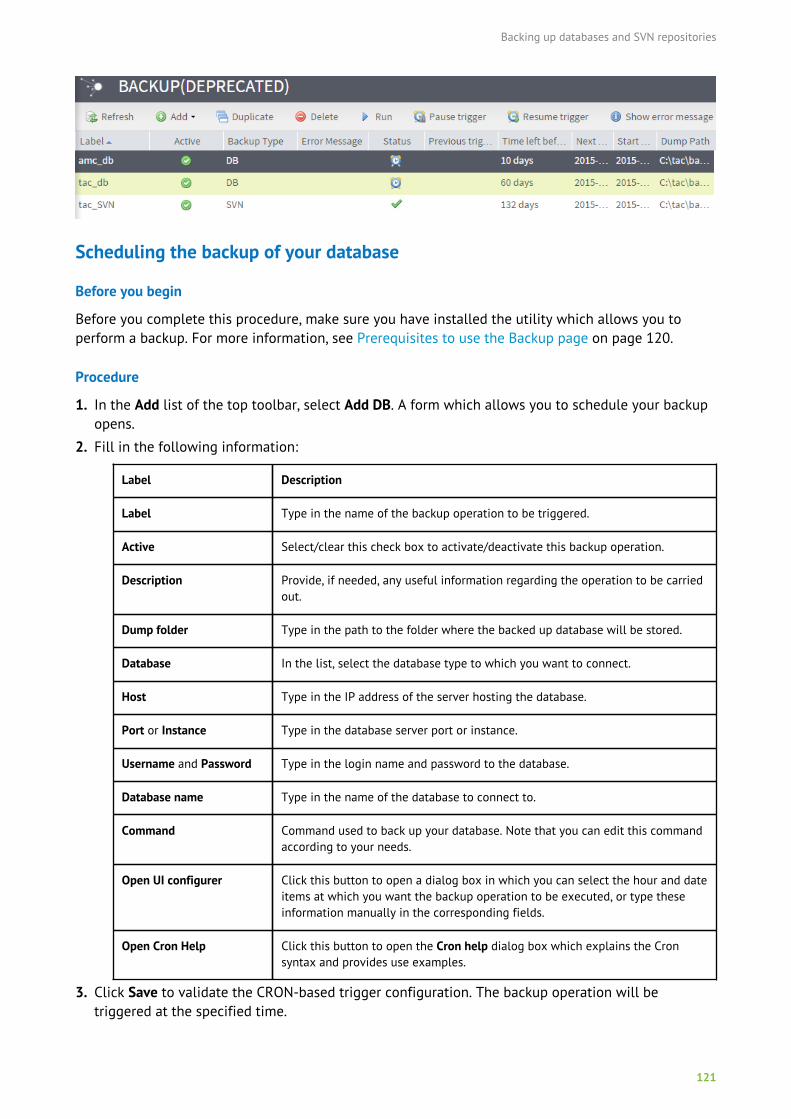
Backing up databases and SVN repositories
121
Scheduling the backup of your database
Before you begin
Before you complete this procedure, make sure you have installed the utility which allows you toperform a backup. For more information, see Prerequisites to use the Backup page on page 120.
Procedure
1. In the Add list of the top toolbar, select Add DB. A form which allows you to schedule your backupopens.
2. Fill in the following information:
Label Description
Label Type in the name of the backup operation to be triggered.
Active Select/clear this check box to activate/deactivate this backup operation.
Description Provide, if needed, any useful information regarding the operation to be carriedout.
Dump folder Type in the path to the folder where the backed up database will be stored.
Database In the list, select the database type to which you want to connect.
Host Type in the IP address of the server hosting the database.
Port or Instance Type in the database server port or instance.
Username and Password Type in the login name and password to the database.
Database name Type in the name of the database to connect to.
Command Command used to back up your database. Note that you can edit this commandaccording to your needs.
Open UI configurer Click this button to open a dialog box in which you can select the hour and dateitems at which you want the backup operation to be executed, or type theseinformation manually in the corresponding fields.
Open Cron Help Click this button to open the Cron help dialog box which explains the Cronsyntax and provides use examples.
3. Click Save to validate the CRON-based trigger configuration. The backup operation will betriggered at the specified time.
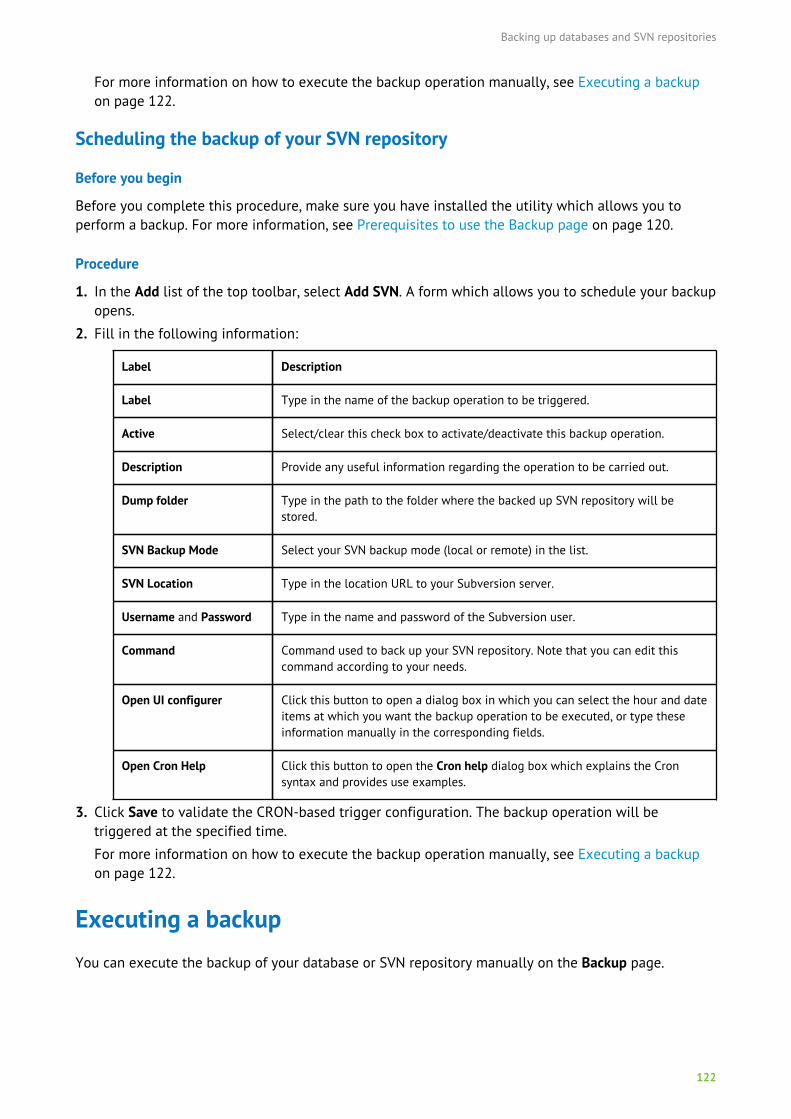
Backing up databases and SVN repositories
122
For more information on how to execute the backup operation manually, see Executing a backupon page 122.
Scheduling the backup of your SVN repository
Before you begin
Before you complete this procedure, make sure you have installed the utility which allows you toperform a backup. For more information, see Prerequisites to use the Backup page on page 120.
Procedure
1. In the Add list of the top toolbar, select Add SVN. A form which allows you to schedule your backupopens.
2. Fill in the following information:
Label Description
Label Type in the name of the backup operation to be triggered.
Active Select/clear this check box to activate/deactivate this backup operation.
Description Provide any useful information regarding the operation to be carried out.
Dump folder Type in the path to the folder where the backed up SVN repository will bestored.
SVN Backup Mode Select your SVN backup mode (local or remote) in the list.
SVN Location Type in the location URL to your Subversion server.
Username and Password Type in the name and password of the Subversion user.
Command Command used to back up your SVN repository. Note that you can edit thiscommand according to your needs.
Open UI configurer Click this button to open a dialog box in which you can select the hour and dateitems at which you want the backup operation to be executed, or type theseinformation manually in the corresponding fields.
Open Cron Help Click this button to open the Cron help dialog box which explains the Cronsyntax and provides use examples.
3. Click Save to validate the CRON-based trigger configuration. The backup operation will betriggered at the specified time.
For more information on how to execute the backup operation manually, see Executing a backupon page 122.
Executing a backupYou can execute the backup of your database or SVN repository manually on the Backup page.
Backing up databases and SVN repositories
123
Warning: Only users who have the Administrator role can have read-write access to this page.For further information on access rights, see User roles/rights in the Administration Center onpage 11.
Before you begin
Before you complete this procedure, make sure you have installed the utility which allows you toperform a backup. For more information, see Prerequisites to use the Backup page on page 120.
Procedure
1. In the Menu tree view, click Backup to open the corresponding page.
2. On the Backup page, click Add on the top toolbar and add a backup operation on your database orSVN repository as explained in Scheduling a backup on page 120.
Once the form is saved, the backup operation appears in the list.
3. Click Run on the top toolbar to launch the backup operation immediately.
Executing Jobs, Routes and Services
124
Executing Jobs, Routes and Services
Talend Administration Center is a web-based application delivered with the Job Conductor, Big DataStreaming Conductor and ESB Conductor modules. These modules allow you, from a single console,to:
Talend Administration Center is a web-based application delivered with the Job Conductor module.This module allows you, from a single console, to:
• Configure the remote physical execution servers and group them in virtual servers. For moreinformation, see Configuring execution servers on page 124 and Configuring virtual servers onpage 132.
• Schedule time-based data integration Jobs and create execution plans. For more information, seeExecuting data integration Jobs from Job Conductor on page 138 and Planning the execution ofdata integration Jobs on page 180.
• Set up the publication, deployment and execution of Service, Routes and data service Jobs. Formore information, see Publishing Services, Routes, and Jobs on page 191 and Executing Services,Routes, and data service Jobs, and applying Profiles from ESB Conductor on page 205.
In order to know if you have access to these modules, see What modules and features are availabledepending on your license on page 9.
Configuring execution servers
Prerequisites to configuring execution servers
Note: Only users that have the Operation Manager role and rights can have read-write accessto this page. Other users, depending on their roles, can have either read-only access or noaccess to this page. For further information on access rights, see User roles/rights in theAdministration Center on page 11.
• Before you can launch any of the execution tasks you have scheduled, you need to configure theservers on which you will deploy them. Ensure that the script is running on the execution server tobe able to deploy the task.
Note that server rates are based on indicators, whose bounds (such as free disk space limits) andweight are defined in the file: monitoring_client.properties which is located in <ApplicationPath>\WEB-INF\lib\org.talend.monitoring.client-A.B.C_rYYYYY.jar. These constraints are usedto calculate a usage value based on outbound values, and to determine which server to be used forload balancing (cluster mode).
• 100: server availability is optimal, indicator values are within bounds,
• < 100: one or several indicators' values are out of bound.
For more information on how to edit the monitoring_client.properties and overwrite the defaultvalues, see Installing and configuring your Talend JobServer on Talend Help Center.
• Make sure the execution server version is compatible with the Talend Administration Center andStudio versions. For more information, see the Compatible execution servers on Talend HelpCenter.
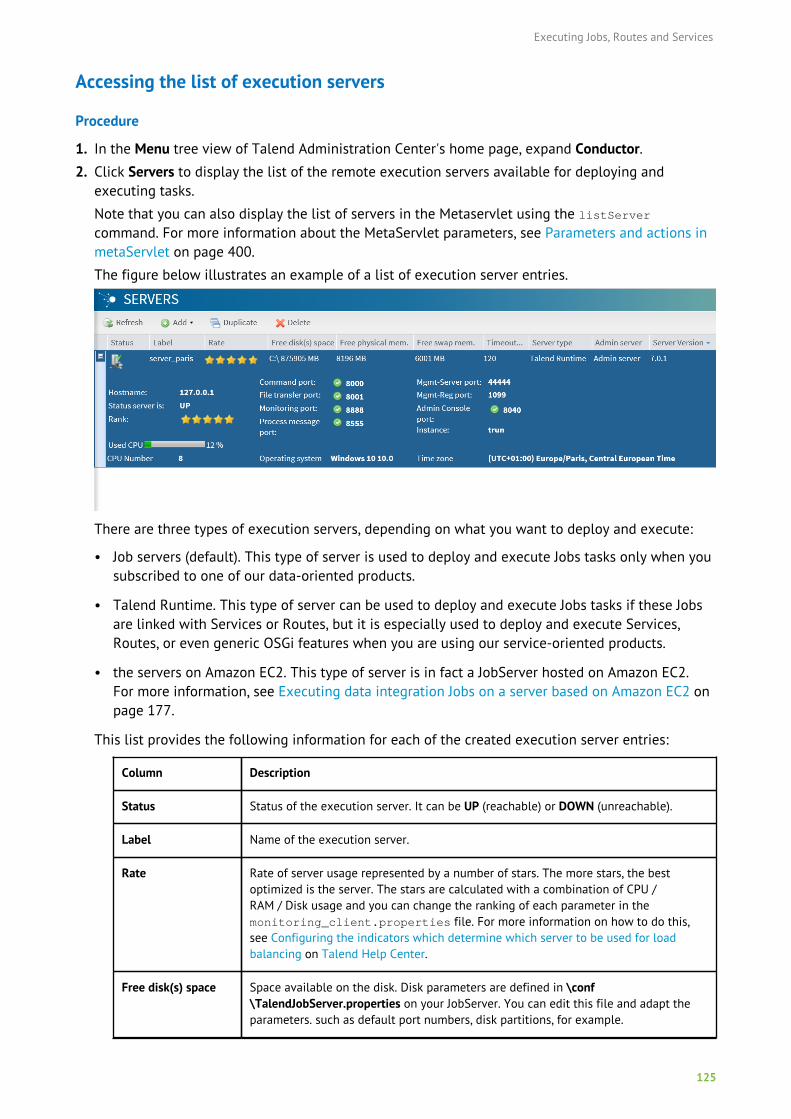
Executing Jobs, Routes and Services
125
Accessing the list of execution servers
Procedure
1. In the Menu tree view of Talend Administration Center's home page, expand Conductor.2. Click Servers to display the list of the remote execution servers available for deploying and
executing tasks.
Note that you can also display the list of servers in the Metaservlet using the listServercommand. For more information about the MetaServlet parameters, see Parameters and actions inmetaServlet on page 400.
The figure below illustrates an example of a list of execution server entries.
There are three types of execution servers, depending on what you want to deploy and execute:
• Job servers (default). This type of server is used to deploy and execute Jobs tasks only when yousubscribed to one of our data-oriented products.
• Talend Runtime. This type of server can be used to deploy and execute Jobs tasks if these Jobsare linked with Services or Routes, but it is especially used to deploy and execute Services,Routes, or even generic OSGi features when you are using our service-oriented products.
• the servers on Amazon EC2. This type of server is in fact a JobServer hosted on Amazon EC2.For more information, see Executing data integration Jobs on a server based on Amazon EC2 onpage 177.
This list provides the following information for each of the created execution server entries:
Column Description
Status Status of the execution server. It can be UP (reachable) or DOWN (unreachable).
Label Name of the execution server.
Rate Rate of server usage represented by a number of stars. The more stars, the bestoptimized is the server. The stars are calculated with a combination of CPU /RAM / Disk usage and you can change the ranking of each parameter in themonitoring_client.properties file. For more information on how to do this,see Configuring the indicators which determine which server to be used for loadbalancing on Talend Help Center.
Free disk(s) space Space available on the disk. Disk parameters are defined in \conf\TalendJobServer.properties on your JobServer. You can edit this file and adapt theparameters. such as default port numbers, disk partitions, for example.
Executing Jobs, Routes and Services
126
Column Description
Free physicalmemory
Available physical memory.
Free swap memory Available swap memory.
Command port Port of the execution server (8000 by default).
Host IP address or DNS name of the execution server.
Active The execution server is activated when the corresponding Active check box isselected. If a server is deactivated, it can not be used to execute a task.
Status server Status of the execution server. It can be: UP, DOWN, INACTIVE.
CPU Number Number of processing units.
Used CPU CPUs being in use in total.
File transfer port Port for file transfer (8001 by default).
Monitoring port Port for monitoring (8888 by default).
Process messageport
Port for the execution of process messages publisher (8555 by default).
Timeout onunknown status
The predetermined period of time (defined in Adding an execution server on page127) after which a specific action related to the Job status is taken on the selectedtask.
Operating system Operating System of the execution server.
Server type Type of execution server according to the type of solution you subscribed to: a data-oriented solution or a service-oriented solution or both. It can be:
• Job servers (default). This kind of server is used to deploy and execute Jobs tasksonly when you subscribed to one of our data-oriented products.
• Talend Runtime. This kind of server can be used to deploy and execute Jobs tasksif these Jobs are linked with Services or Routes, but it is especially used to deployand execute Services, Routes, or even generic OSGi features when you are usingour service-oriented products.
Server version Version of the execution server.
Admin server If the server is a Talend Runtime server, click the Admin server button to accessthe Administration Web console allowing you to manage the container of TalendRuntime.
AwsEC2Server If the server is hosted on an Amazon instance, the value of this column is true.Otherwise, the value of the column is false.
From the Servers page, you can:
• add a new execution server. For more information, see Adding an execution server on page127.
Executing Jobs, Routes and Services
127
• edit the details of a server. For more information, see Editing an execution server on page 130.
• duplicate a server. For more information, see Duplicating an execution server on page 130.
• remove one or more servers. For more information, see Deleting an execution server on page131.
Note: To optimize system performance, delete servers that you do not use any more fromthe servers list.
Adding an execution server
About this task
The following procedure describes how to add a simple execution server (JobServer or TalendRuntime type) on the Servers page. For more information on how to add a server hosted on AmazonEC2, see Executing data integration Jobs on a server based on Amazon EC2 on page 177.
To perform this action via the MetaServlet application, use the addServer command. For moreinformation about the MetaServlet parameters, see Parameters and actions in metaServlet on page400.
To add a simple execution server:
Procedure
1. From the toolbar on the Servers page, click Add > Add server to open the Execution serverconfiguration panel.
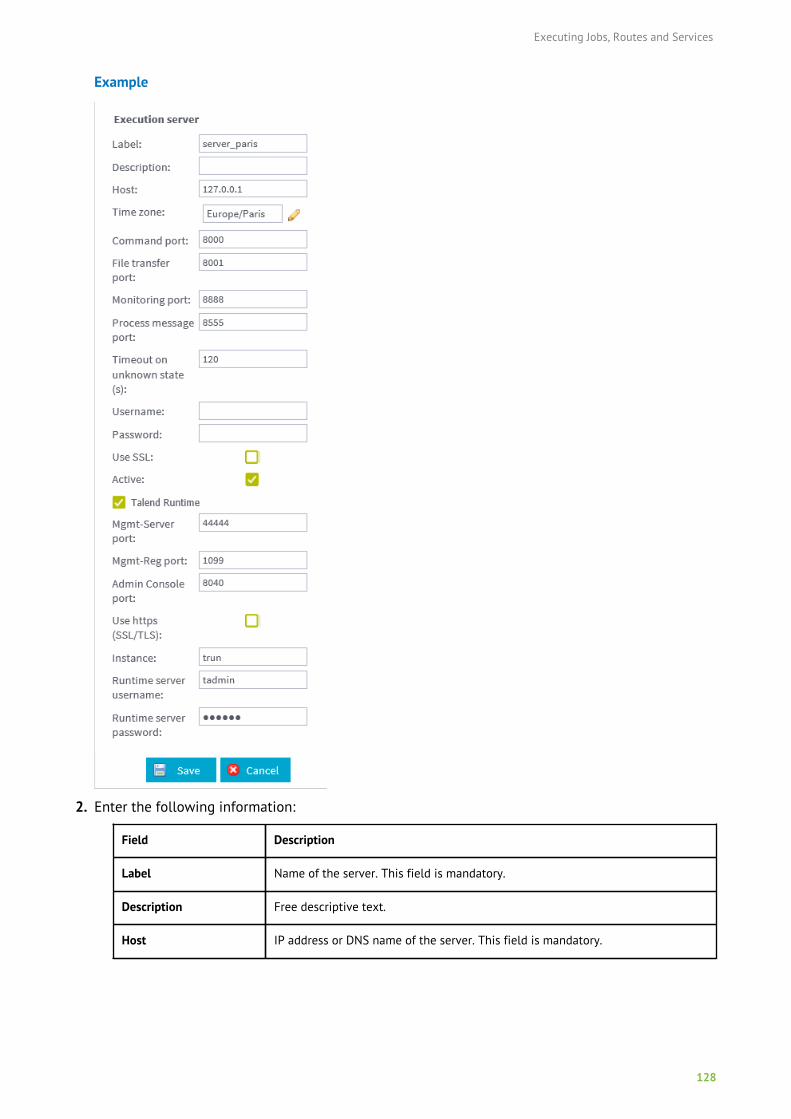
Executing Jobs, Routes and Services
128
Example
2. Enter the following information:
Field Description
Label Name of the server. This field is mandatory.
Description Free descriptive text.
Host IP address or DNS name of the server. This field is mandatory.
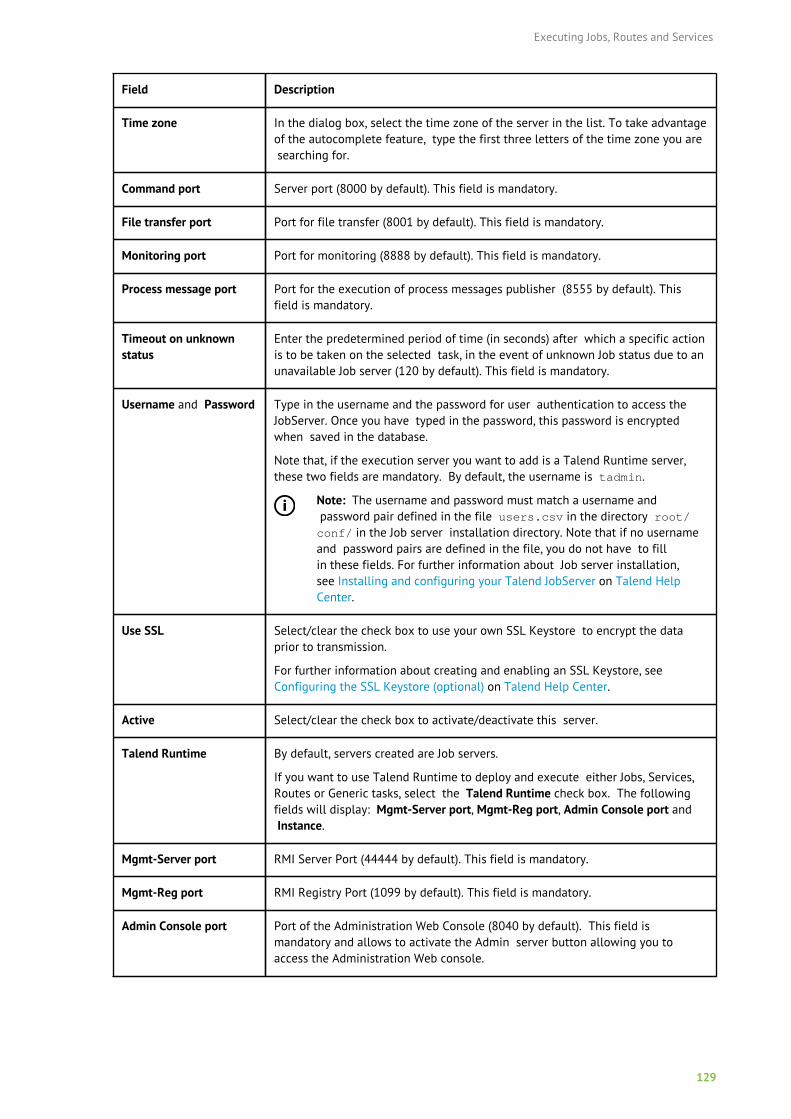
Executing Jobs, Routes and Services
129
Field Description
Time zone In the dialog box, select the time zone of the server in the list. To take advantageof the autocomplete feature, type the first three letters of the time zone you are searching for.
Command port Server port (8000 by default). This field is mandatory.
File transfer port Port for file transfer (8001 by default). This field is mandatory.
Monitoring port Port for monitoring (8888 by default). This field is mandatory.
Process message port Port for the execution of process messages publisher (8555 by default). Thisfield is mandatory.
Timeout on unknownstatus
Enter the predetermined period of time (in seconds) after which a specific actionis to be taken on the selected task, in the event of unknown Job status due to an unavailable Job server (120 by default). This field is mandatory.
Username and Password Type in the username and the password for user authentication to access theJobServer. Once you have typed in the password, this password is encryptedwhen saved in the database.
Note that, if the execution server you want to add is a Talend Runtime server,these two fields are mandatory. By default, the username is tadmin.
Note: The username and password must match a username and password pair defined in the file users.csv in the directory root/conf/ in the Job server installation directory. Note that if no usernameand password pairs are defined in the file, you do not have to fillin these fields. For further information about Job server installation,see Installing and configuring your Talend JobServer on Talend HelpCenter.
Use SSL Select/clear the check box to use your own SSL Keystore to encrypt the dataprior to transmission.
For further information about creating and enabling an SSL Keystore, seeConfiguring the SSL Keystore (optional) on Talend Help Center.
Active Select/clear the check box to activate/deactivate this server.
Talend Runtime By default, servers created are Job servers.
If you want to use Talend Runtime to deploy and execute either Jobs, Services,Routes or Generic tasks, select the Talend Runtime check box. The followingfields will display: Mgmt-Server port, Mgmt-Reg port, Admin Console port and Instance.
Mgmt-Server port RMI Server Port (44444 by default). This field is mandatory.
Mgmt-Reg port RMI Registry Port (1099 by default). This field is mandatory.
Admin Console port Port of the Administration Web Console (8040 by default). This field ismandatory and allows to activate the Admin server button allowing you toaccess the Administration Web console.
Executing Jobs, Routes and Services
130
Field Description
Instance Type in the name of the container instance in which you will deploy and executeyour Services, Routes or Generic tasks. The default value is trun, which isspecified in the karaf.name field of the <TalendRuntimePath>/container/etc/system.properties file.
As a second option, this field also allows the specification of the full JMXserviceURL of the container instance. If the value of this field starts withservice:jmx, it will be treated as a full JMX serviceURL and used as is. The fullJMX serviceURL of the container instance is specified in the <TalendRuntimePath>/container/etc/org.apache.karaf.management.cfg configuration file. With this option, you are also allowed to use an alternativeJMX serviceURL with Talend Administration Center to communicate with theTalend Runtime server. Note that in this case the Karaf instance name still needsto be provided in addition to the serviceURL in the form of <alternate_jmx_service_url>;<instance_name>. For example:
service:jmx:rmi://localhost:44444/jndi/rmi://localhost:1099/
jmxrmi;trun.
3. Click Save to validate the configuration or click Cancel to cancel the configuration. The newlycreated server appears on the list.
If you want to be informed of the server change of status, you can add a notification on this server.For more information, see How to add a server-based notification on page 102.
Editing an execution server
About this task
To edit the details of an execution server, complete the following:
Procedure
1. On the Servers page, select the server entry you want to modify. Its details display in theExecution server panel.
2. Make the relevant changes to server details where necessary.
If some execution tasks are configured to run on this server and you edit the server, a pop-upwindow opens and lists the tasks that might be impacted by this change.
3. Click Save to validate the changes or click Cancel to cancel.
Duplicating an execution server
About this task
To duplicate an execution server, complete the following:
Procedure
1. On the Servers page, select the server entry you want to duplicate then click Duplicate on the toptoolbar.
2. In the Execution server panel, make the relevant changes to server details where necessary.
3. Click Save to validate the duplication or click Cancel to cancel the changes.
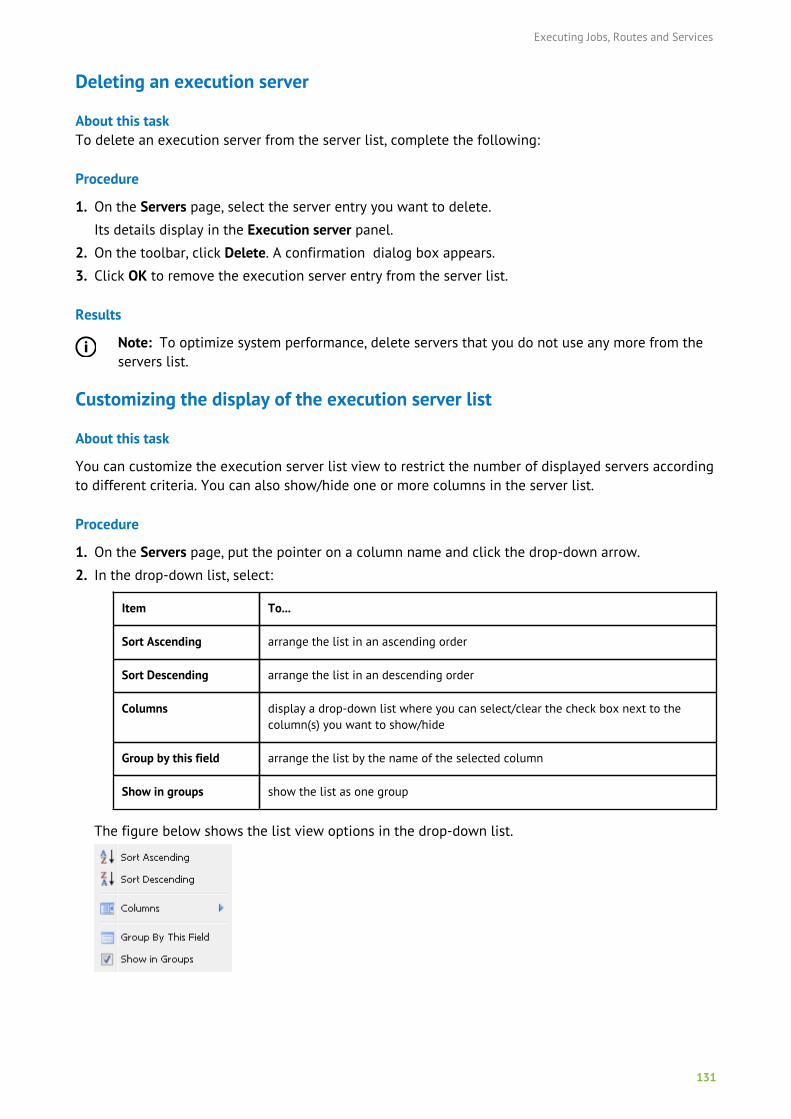
Executing Jobs, Routes and Services
131
Deleting an execution server
About this taskTo delete an execution server from the server list, complete the following:
Procedure
1. On the Servers page, select the server entry you want to delete.
Its details display in the Execution server panel.
2. On the toolbar, click Delete. A confirmation dialog box appears.
3. Click OK to remove the execution server entry from the server list.
Results
Note: To optimize system performance, delete servers that you do not use any more from theservers list.
Customizing the display of the execution server list
About this task
You can customize the execution server list view to restrict the number of displayed servers accordingto different criteria. You can also show/hide one or more columns in the server list.
Procedure
1. On the Servers page, put the pointer on a column name and click the drop-down arrow.
2. In the drop-down list, select:
Item To...
Sort Ascending arrange the list in an ascending order
Sort Descending arrange the list in an descending order
Columns display a drop-down list where you can select/clear the check box next to thecolumn(s) you want to show/hide
Group by this field arrange the list by the name of the selected column
Show in groups show the list as one group
The figure below shows the list view options in the drop-down list.
Executing Jobs, Routes and Services
132
You can also apply filters on the server status, label, description, host or type by typing in keywords or by selecting check boxes in the Filters fields of these columns. To remove the filters and
reset the page, you have to click the cog icon on the right of the top toolbar.
Refreshing the execution server list
About this task
The execution server list is refreshed automatically at regular intervals of time, but you can refresh itany time.
Procedure
1. Click Refresh on the toolbar.
Note: You can change the refresh interval value by supplying the parameter scheduler.conf.uiAutoRefreshFrequency (value in seconds) in the file <tac_installation_folder>/apache-tomcat/webapps/org.talend.administrator/WEB-INF/classes/
configuration.properties.
2. Restart Talend Administration Center for the changes to take effect.
Configuring virtual serversNote: Only users that have the Operation Manager role and rights can have read-write accessto this page. Other users, depending on their roles, can have either read-only access or noaccess to this page. For further information on access rights, see User roles/rights in theAdministration Center on page 11.
A virtual server is a group of physical servers from which the best rated server will automaticallyget preferred at Job execution time. In Talend Administration Center, simply select physical serversand group them into a virtual server. Then set the execution task onto this virtual server as for anyexecution server, in order to automatically select the best server to execute the task onto.
Access to the Virtual servers page depend on your license. For more information, see What modulesand features are available depending on your license on page 9.
Accessing the list of virtual servers
Before you begin
All physical servers available are set on the Servers page. See Configuring execution servers on page124 for more information.
About this task
To access the list of virtual servers from Talend Administration Center as well as the execution serversthat are assigned accordingly:
Procedure
In the Menu tree view, expand Conductor and then click Virtual Servers
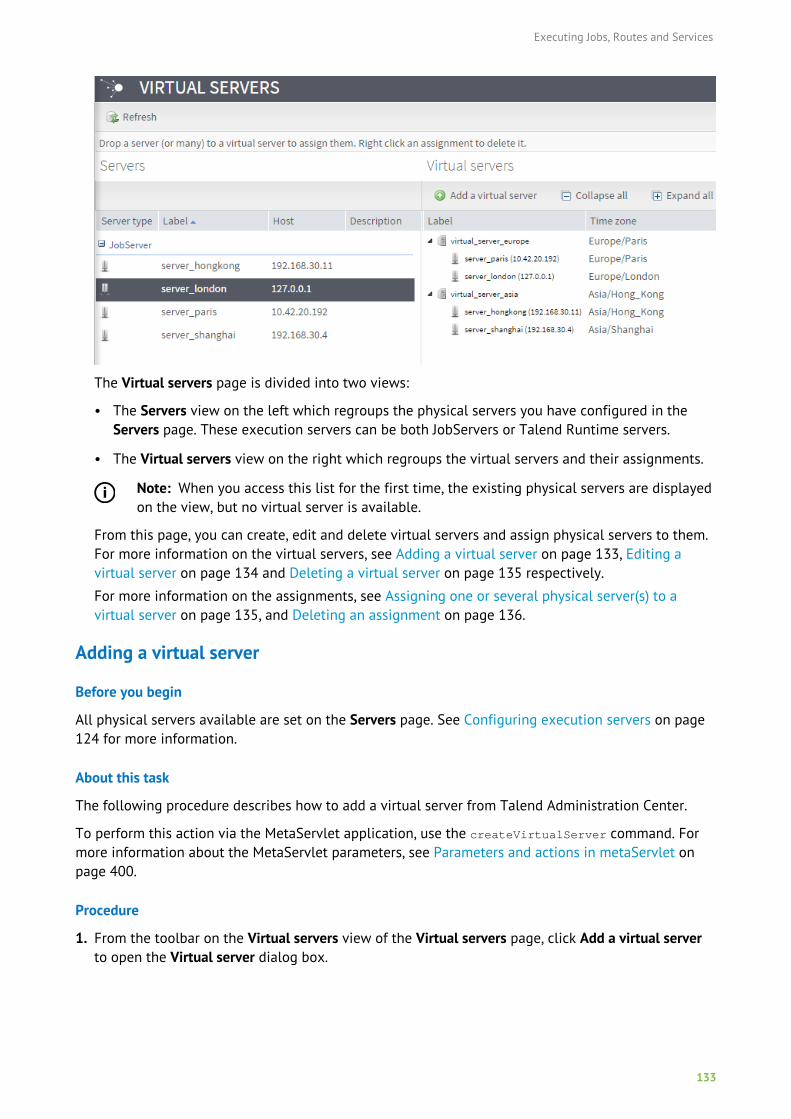
Executing Jobs, Routes and Services
133
The Virtual servers page is divided into two views:
• The Servers view on the left which regroups the physical servers you have configured in theServers page. These execution servers can be both JobServers or Talend Runtime servers.
• The Virtual servers view on the right which regroups the virtual servers and their assignments.
Note: When you access this list for the first time, the existing physical servers are displayedon the view, but no virtual server is available.
From this page, you can create, edit and delete virtual servers and assign physical servers to them.For more information on the virtual servers, see Adding a virtual server on page 133, Editing avirtual server on page 134 and Deleting a virtual server on page 135 respectively.
For more information on the assignments, see Assigning one or several physical server(s) to avirtual server on page 135, and Deleting an assignment on page 136.
Adding a virtual server
Before you begin
All physical servers available are set on the Servers page. See Configuring execution servers on page124 for more information.
About this task
The following procedure describes how to add a virtual server from Talend Administration Center.
To perform this action via the MetaServlet application, use the createVirtualServer command. Formore information about the MetaServlet parameters, see Parameters and actions in metaServlet onpage 400.
Procedure
1. From the toolbar on the Virtual servers view of the Virtual servers page, click Add a virtual serverto open the Virtual server dialog box.
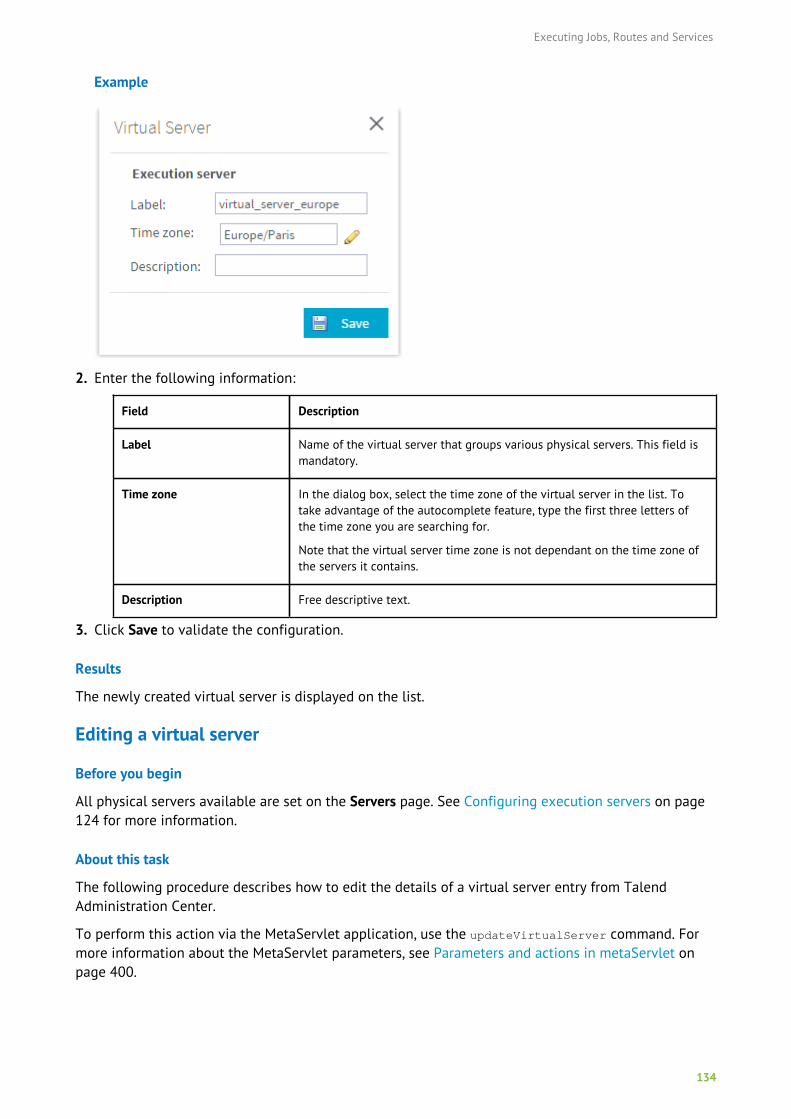
Executing Jobs, Routes and Services
134
Example
2. Enter the following information:
Field Description
Label Name of the virtual server that groups various physical servers. This field ismandatory.
Time zone In the dialog box, select the time zone of the virtual server in the list. Totake advantage of the autocomplete feature, type the first three letters ofthe time zone you are searching for.
Note that the virtual server time zone is not dependant on the time zone ofthe servers it contains.
Description Free descriptive text.
3. Click Save to validate the configuration.
Results
The newly created virtual server is displayed on the list.
Editing a virtual server
Before you begin
All physical servers available are set on the Servers page. See Configuring execution servers on page124 for more information.
About this task
The following procedure describes how to edit the details of a virtual server entry from TalendAdministration Center.
To perform this action via the MetaServlet application, use the updateVirtualServer command. Formore information about the MetaServlet parameters, see Parameters and actions in metaServlet onpage 400.
Executing Jobs, Routes and Services
135
Procedure
1. On the Virtual servers of the Virtual server page, right-click on the server entry you want to modify.
2. Select Edit virtual server on the menu to open the Virtual server dialog box.
3. In the dialog box, make the relevant changes to server details where necessary.
4. Click Save to validate the changes.
Deleting a virtual server
Before you begin
All physical servers available are set on the Servers page. See Configuring execution servers on page124 for more information.
About this task
The following procedure describes how to delete a virtual server entry from the virtual server list fromTalend Administration Center.
To perform this action via the MetaServlet application, use the removeVirtualServer command. Formore information about the MetaServlet parameters, see Parameters and actions in metaServlet onpage 400.
Procedure
1. On the Virtual servers view of the Virtual servers page, right-click on the server entry you want todelete.
2. On the menu, click Delete virtual server to delete the server from the list. Then a confirmationdialog box appears.
3. Click OK to remove the virtual server entry from the server list.
Refreshing the virtual server list
The list of virtual servers is refreshed automatically at regular intervals of time, but you can refresh itany time by clicking Refresh on the toolbar on the top of the page.
Assigning one or several physical server(s) to a virtual server
About this task
All physical servers available are set on the Servers page. See Configuring execution servers on page124 for more information.
The following procedure describes how to group various execution servers in one virtual serverin Talend Administration Center. To perform this action via the MetaServlet application, use theaddServerToVirtualServer command. For more information about the MetaServlet parameters, seeParameters and actions in metaServlet on page 400.
Procedure
1. On the Virtual servers page, select one or more server(s) in the Job servers view.
Executing Jobs, Routes and Services
136
2. Drag and drop the selected server(s) onto a virtual server where you want to regroup or add theserver(s). While dropping the selection in the relevant virtual server, an icon appears to indicate ifyou can/cannot group the execution server(s) in the selected virtual server.
Deleting an assignment
Before you begin
All physical servers available are set on the Servers page. See Configuring execution servers on page124 for more information.
About this task
The following procedure describes how to delete a virtual server assignment from TalendAdministration Center.
To perform this action via the MetaServlet application, use the removeServersFromVirtualServercommand. For more information about the MetaServlet parameters, see Parameters and actions inmetaServlet on page 400.
Procedure
1. On the Virtual servers page, right-click on the assigned server entry you want to remove from avirtual server on the Virtual servers view.
A pop-up menu opens.
2. Click Remove assignment.A confirmation message appears to confirm deletion.
Defining server authorizationsNote: Only users that have the Operation Manager role and rights can have a read-write accessto the tasks list. Other types of users can have a read-only access or no access to the list. Forfurther information on access rights, see User roles/rights in the Administration Center on page11. When opening this page as a user of the Administration Center, you will have access only tothe items for which you have been granted the appropriate authorization by the Administrator.
The Server Project Authorizations page in Talend Administration Center allows you to manage serverauthorizations on projects. From this page, you can give an execution or virtual server the right toexecute Jobs and Services in one or more projects or restrict these rights to some specific projects,thus ensuring a control over the resources available for a given project.
Accessing the server authorization list
About this task
To display the project authorization list for the execution servers:
Procedure
In the Menu tree-view, click Server Project Authorizations.
The list of projects is displayed in the Project panel and the list of servers is displayed in the ServerAuthorizations for the Project: <projectName> panel if you ordered authorizations by projects.
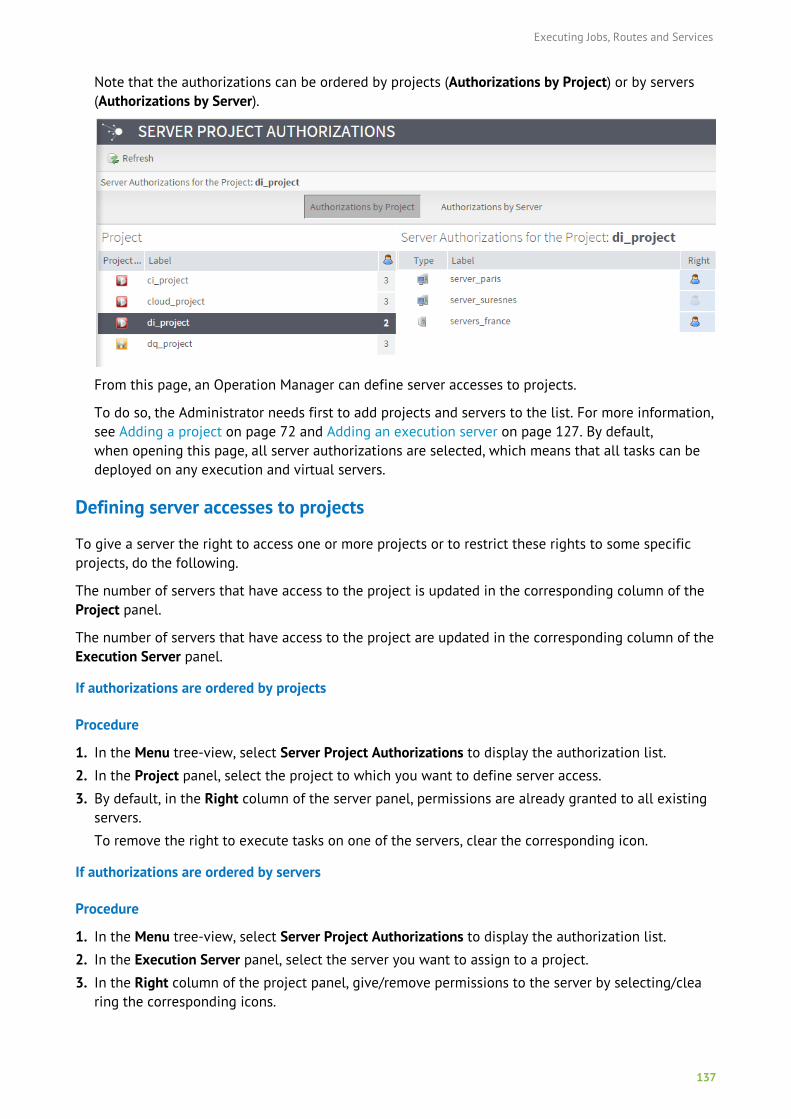
Executing Jobs, Routes and Services
137
Note that the authorizations can be ordered by projects (Authorizations by Project) or by servers(Authorizations by Server).
From this page, an Operation Manager can define server accesses to projects.
To do so, the Administrator needs first to add projects and servers to the list. For more information,see Adding a project on page 72 and Adding an execution server on page 127. By default,when opening this page, all server authorizations are selected, which means that all tasks can bedeployed on any execution and virtual servers.
Defining server accesses to projects
To give a server the right to access one or more projects or to restrict these rights to some specificprojects, do the following.
The number of servers that have access to the project is updated in the corresponding column of theProject panel.
The number of servers that have access to the project are updated in the corresponding column of theExecution Server panel.
If authorizations are ordered by projects
Procedure
1. In the Menu tree-view, select Server Project Authorizations to display the authorization list.
2. In the Project panel, select the project to which you want to define server access.
3. By default, in the Right column of the server panel, permissions are already granted to all existingservers.
To remove the right to execute tasks on one of the servers, clear the corresponding icon.
If authorizations are ordered by servers
Procedure
1. In the Menu tree-view, select Server Project Authorizations to display the authorization list.
2. In the Execution Server panel, select the server you want to assign to a project.
3. In the Right column of the project panel, give/remove permissions to the server by selecting/clearing the corresponding icons.
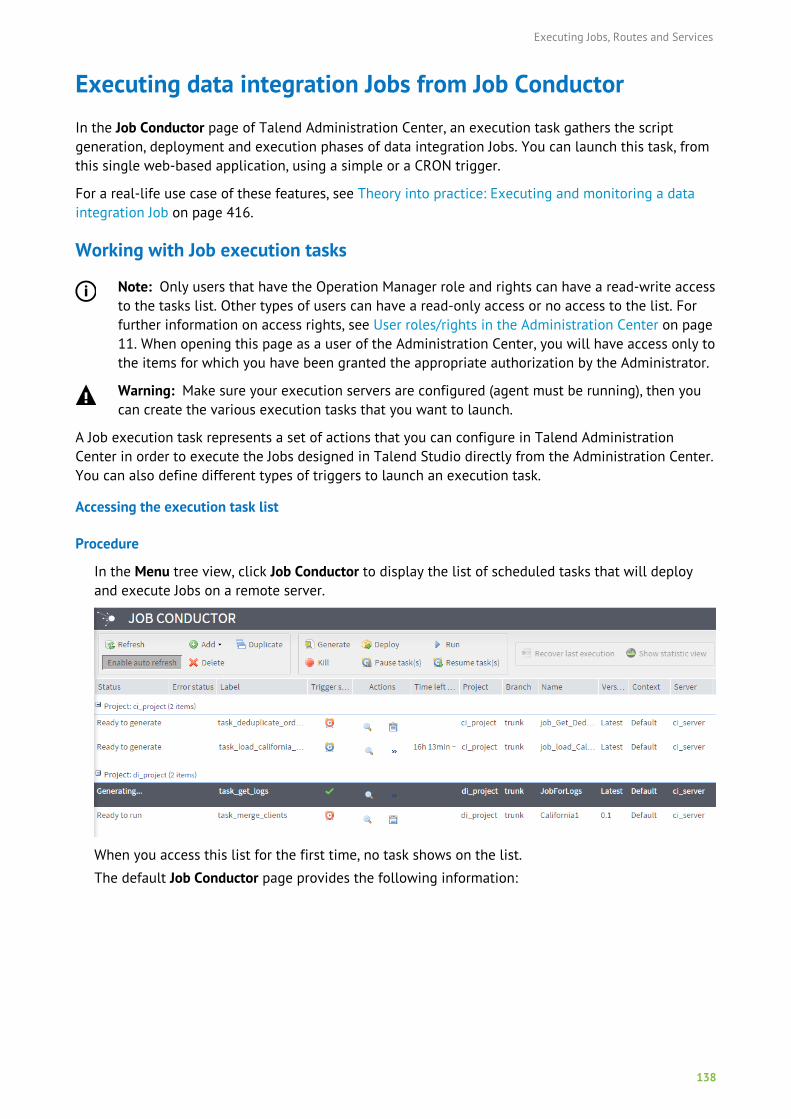
Executing Jobs, Routes and Services
138
Executing data integration Jobs from Job ConductorIn the Job Conductor page of Talend Administration Center, an execution task gathers the scriptgeneration, deployment and execution phases of data integration Jobs. You can launch this task, fromthis single web-based application, using a simple or a CRON trigger.
For a real-life use case of these features, see Theory into practice: Executing and monitoring a dataintegration Job on page 416.
Working with Job execution tasks
Note: Only users that have the Operation Manager role and rights can have a read-write accessto the tasks list. Other types of users can have a read-only access or no access to the list. Forfurther information on access rights, see User roles/rights in the Administration Center on page11. When opening this page as a user of the Administration Center, you will have access only tothe items for which you have been granted the appropriate authorization by the Administrator.
Warning: Make sure your execution servers are configured (agent must be running), then youcan create the various execution tasks that you want to launch.
A Job execution task represents a set of actions that you can configure in Talend AdministrationCenter in order to execute the Jobs designed in Talend Studio directly from the Administration Center.You can also define different types of triggers to launch an execution task.
Accessing the execution task list
Procedure
In the Menu tree view, click Job Conductor to display the list of scheduled tasks that will deployand execute Jobs on a remote server.
When you access this list for the first time, no task shows on the list.
The default Job Conductor page provides the following information:

Executing Jobs, Routes and Services
139
Column label Description
State Priority among tasks that are not yet executed. Status can be: awaitingexecution or frozen exec.
Note: Frozen exec will require a manual resume operation.
Warning: If the threshold for simultaneous executions is exceeded(by default more than 20 executions at the time), all simultaneousexecutions above the threshold will acquire the status "awaitingexecution".
To reset the threshold according to your needs, look for quartz.properties in the installation folders of Talend Administration Center and changethe threshold accordingly in the following parameter: org.quartz.threadPool.threadCount = 20
Status Status of the current task. It can be: Ready to generate, Ready to deploy, Readyto install, Ready to run or Incomplete configuration.
Error status Error message is displayed if the task does not complete properly.
Label Name of the task to be executed.
Trigger status Triggering state:
• No trigger: no trigger has been set for this task.
• Running: the trigger is activated and the task execution will start.
• Completed: the task is complete.
• All triggers paused: the trigger has been paused and needs to be
resumed manually.
Actions Actions you can do:
•: opens a pop-up window with the last execution details of the selected
task. From this window, you can visualize the logs, the context values andthe advanced information of the task, as well as navigate between thedifferent task executions.
•: opens the execution history of the selected task.
Time left before nexttriggering
Time before the next triggering occurs.
Project Name of the project containing the Job to be executed.
Branch Name of the branch/tag containing the Job to be executed.
Job Name of the Job to be executed.
Version Version of the Job as defined in Talend Studio.
Context Name of the context as defined for this Job in Talend Studio.
Executing Jobs, Routes and Services
140
Column label Description
Execution server Name of the server on which the task was last executed.
Virtual server Name of the virtual server, if any.
Some extra columns are hidden by default but can be displayed in the table. For more information,see Customizing the display of the task list on page 159.
These extra columns provide the following information:
Column Description
Active The task is activated when the corresponding Active check box is selected. If atask is deactivated, it can not be executed in the execution server.
CommandLine version Revision number of the CommandLine.
Description The description text typed at task creation.
Id Unique identifier that can be used as parameter to launch the task via aWebservice, for example.
idQuartzJob Quartz Job identifier associated to the corresponding task.
Last deployment Date and time of the last time the Job was deployed.
Last ended run Date and time of the last time the Job execution was complete.
Last run Date and time of the last time the Job was executed.
Last script generation Date and time of the last time the script was generated.
Next triggering on Date and time of the next triggering.
SVN revision SVN revision number of the Job.
Adding a normal execution task
The Talend Administration Center allows you to add execution tasks on Jobs that are either based onthe SVN or GIT repository, or pre-generated by the Studio as zip files. According to your needs, readone of the procedures below.
Note that once the task is added, you still can switch from one mode to the other.
Adding an execution task to a Job based on SVN/GIT repository
About this task
Note: SVN/GIT-based tasks are deprecated in Talend Administration Center. It is recommendedto add execution tasks to a Job published to Nexus.
Procedure
1. From the toolbar on the Job Conductor page, click Add > Normal Task to clear the Execution taskconfiguration panel.
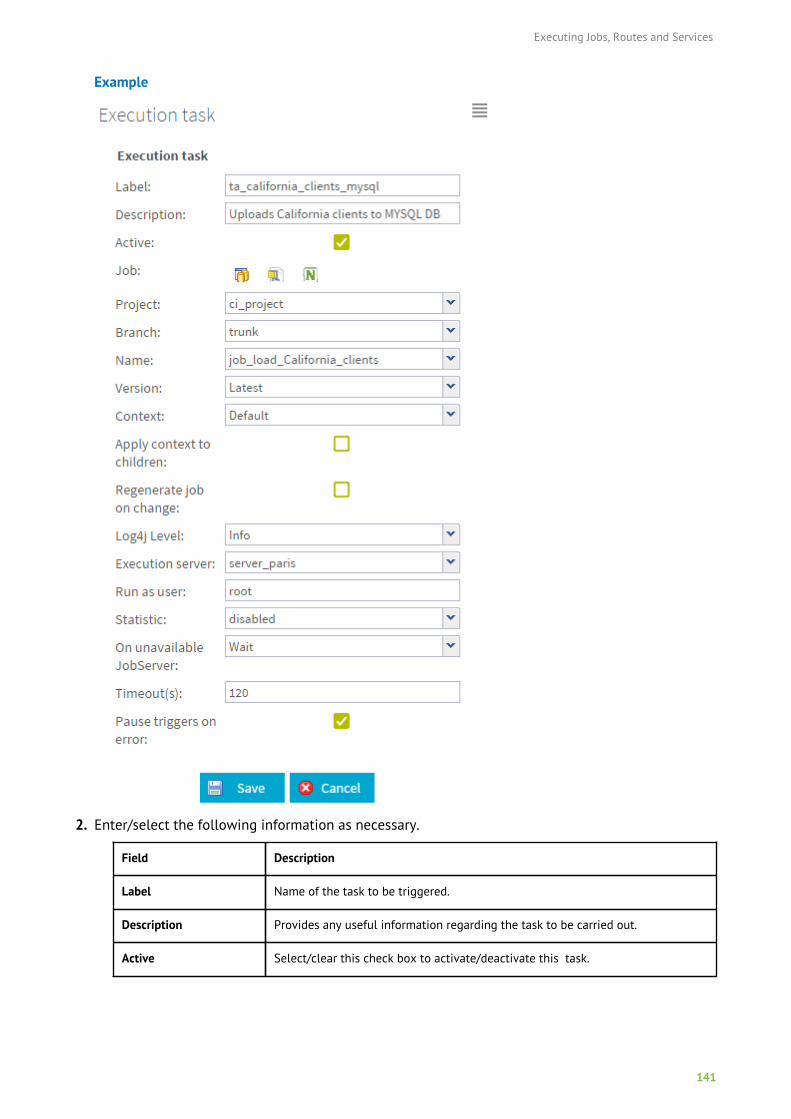
Executing Jobs, Routes and Services
141
Example
2. Enter/select the following information as necessary.
Field Description
Label Name of the task to be triggered.
Description Provides any useful information regarding the task to be carried out.
Active Select/clear this check box to activate/deactivate this task.
Executing Jobs, Routes and Services
142
Field Description
JobBy clicking the icon, you will open a dedicated Job filter to search for theJob of interest. This can avoid investing too much time in looking for the Jobyou need to execute. For further information, see the example below this table.
You also have the possibility to associate a pre-generated zip file or a Jobpublished to Nexus to your task. For more information, see Adding an executiontask to a pre-generated Job on page 145 and Adding an execution task to a Jobpublished to Nexus on page 149.
Project Select the project that holds the Job to be executed. This field will beautomatically filled if you have selected the project of interest using the Jobfilter.
Branch Select the SVN/GIT branch/tag, if any is created, of the project containing theJob to be executed. This field will be automatically filled if you have selectedthe branch/tag of interest using the Job filter. For more information aboutprojects stored on SVN or GIT, see Managing SVN/Git branches and tags for aproject on page 77.
Name Select the Job to be executed. This field will be automatically filled if you haveselected the Job of interest using the Job filter.
From this field, you can select both Standard and Big Data Batch (Map/Reduceand Spark) Jobs depending on your license.
Version If the Job exists in different versions, select the version you want to execute. Orselect Latest version from the list in order to automatically execute the latestversion of the selected Job.
This field will be automatically filled if you have selected the Job version ofinterest using the Job filter.
Note: If you select a given version of the Job, except the latest,Job execution will be faster since there is no need to generate anddeploy it before execution. However, when you select Latest version,Job execution will be longer since the Job will be regenerated anddeployed before the execution.
Context If several contexts are available for the selected Job, select the relevant context.This field will be automatically filled if you have selected the Job context ofinterest using the Job filter.
Apply context to children Select this check box if you want to apply the selected context to all childrenJobs.
Regenerate Job onchange
Select this check box if you want to regenerate the selected Job before taskdeployment and execution every time a modification is made to the Job itself.
This check box is only useful if you select the latest version of the Job forexecution, since the modifications will only be made to the latest version.
Warning: Note that if you selected Latest version, in case a new version of the Job is created in Studio, the Job will be regenerated evenif you did not select the Regenerate Job on change check box.
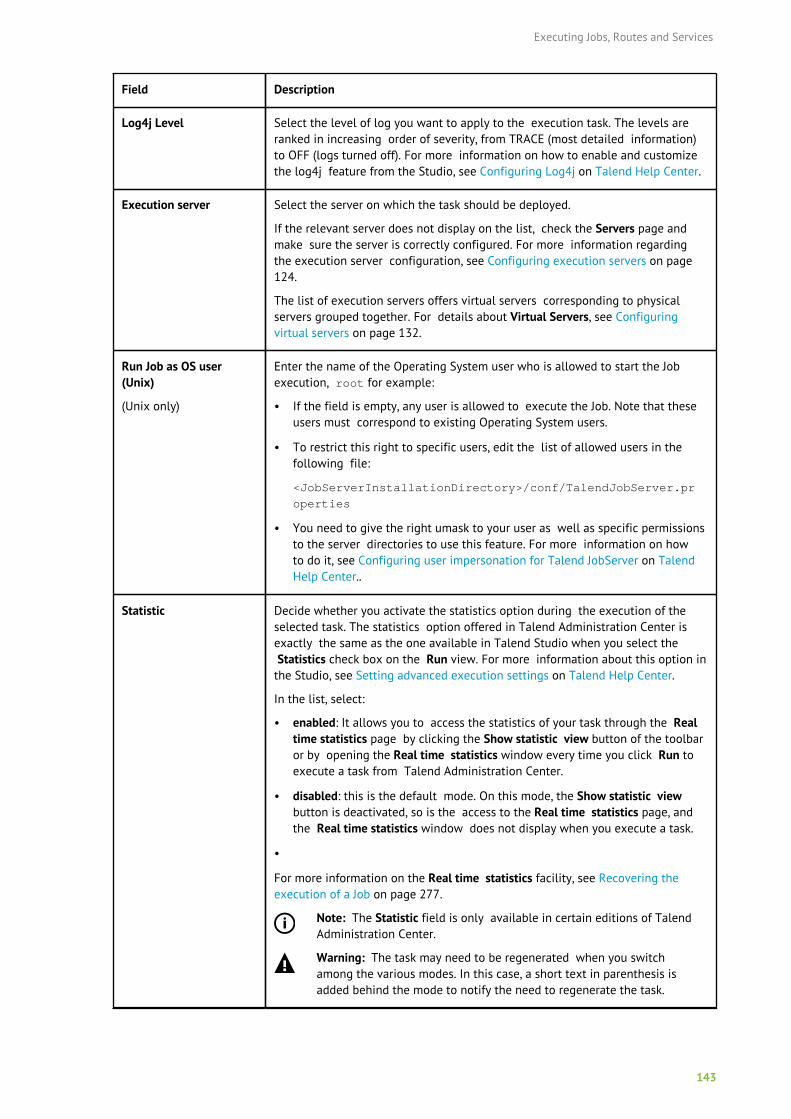
Executing Jobs, Routes and Services
143
Field Description
Log4j Level Select the level of log you want to apply to the execution task. The levels areranked in increasing order of severity, from TRACE (most detailed information)to OFF (logs turned off). For more information on how to enable and customizethe log4j feature from the Studio, see Configuring Log4j on Talend Help Center.
Execution server Select the server on which the task should be deployed.
If the relevant server does not display on the list, check the Servers page andmake sure the server is correctly configured. For more information regardingthe execution server configuration, see Configuring execution servers on page124.
The list of execution servers offers virtual servers corresponding to physicalservers grouped together. For details about Virtual Servers, see Configuringvirtual servers on page 132.
Run Job as OS user(Unix)
(Unix only)
Enter the name of the Operating System user who is allowed to start the Jobexecution, root for example:
• If the field is empty, any user is allowed to execute the Job. Note that theseusers must correspond to existing Operating System users.
• To restrict this right to specific users, edit the list of allowed users in thefollowing file:
<JobServerInstallationDirectory>/conf/TalendJobServer.pr
operties
• You need to give the right umask to your user as well as specific permissionsto the server directories to use this feature. For more information on howto do it, see Configuring user impersonation for Talend JobServer on TalendHelp Center..
Statistic Decide whether you activate the statistics option during the execution of theselected task. The statistics option offered in Talend Administration Center isexactly the same as the one available in Talend Studio when you select the Statistics check box on the Run view. For more information about this option inthe Studio, see Setting advanced execution settings on Talend Help Center.
In the list, select:
• enabled: It allows you to access the statistics of your task through the Realtime statistics page by clicking the Show statistic view button of the toolbaror by opening the Real time statistics window every time you click Run toexecute a task from Talend Administration Center.
• disabled: this is the default mode. On this mode, the Show statistic viewbutton is deactivated, so is the access to the Real time statistics page, andthe Real time statistics window does not display when you execute a task.
•
For more information on the Real time statistics facility, see Recovering theexecution of a Job on page 277.
Note: The Statistic field is only available in certain editions of TalendAdministration Center.
Warning: The task may need to be regenerated when you switchamong the various modes. In this case, a short text in parenthesis isadded behind the mode to notify the need to regenerate the task.
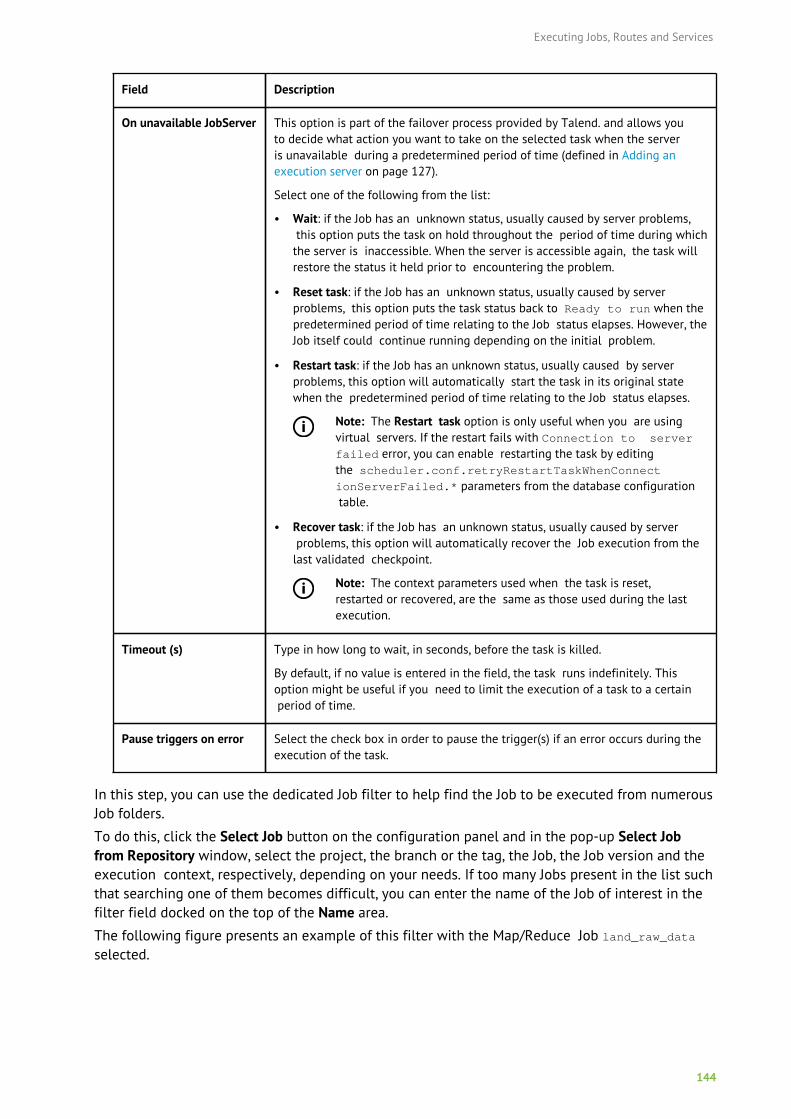
Executing Jobs, Routes and Services
144
Field Description
On unavailable JobServer This option is part of the failover process provided by Talend. and allows youto decide what action you want to take on the selected task when the serveris unavailable during a predetermined period of time (defined in Adding anexecution server on page 127).
Select one of the following from the list:
• Wait: if the Job has an unknown status, usually caused by server problems, this option puts the task on hold throughout the period of time during whichthe server is inaccessible. When the server is accessible again, the task willrestore the status it held prior to encountering the problem.
• Reset task: if the Job has an unknown status, usually caused by serverproblems, this option puts the task status back to Ready to run when the predetermined period of time relating to the Job status elapses. However, theJob itself could continue running depending on the initial problem.
• Restart task: if the Job has an unknown status, usually caused by serverproblems, this option will automatically start the task in its original statewhen the predetermined period of time relating to the Job status elapses.
Note: The Restart task option is only useful when you are usingvirtual servers. If the restart fails with Connection to serverfailed error, you can enable restarting the task by editingthe scheduler.conf.retryRestartTaskWhenConnectionServerFailed.* parameters from the database configuration table.
• Recover task: if the Job has an unknown status, usually caused by server problems, this option will automatically recover the Job execution from thelast validated checkpoint.
Note: The context parameters used when the task is reset,restarted or recovered, are the same as those used during the lastexecution.
Timeout (s) Type in how long to wait, in seconds, before the task is killed.
By default, if no value is entered in the field, the task runs indefinitely. Thisoption might be useful if you need to limit the execution of a task to a certain period of time.
Pause triggers on error Select the check box in order to pause the trigger(s) if an error occurs during theexecution of the task.
In this step, you can use the dedicated Job filter to help find the Job to be executed from numerousJob folders.
To do this, click the Select Job button on the configuration panel and in the pop-up Select Jobfrom Repository window, select the project, the branch or the tag, the Job, the Job version and theexecution context, respectively, depending on your needs. If too many Jobs present in the list suchthat searching one of them becomes difficult, you can enter the name of the Job of interest in thefilter field docked on the top of the Name area.
The following figure presents an example of this filter with the Map/Reduce Job land_raw_dataselected.
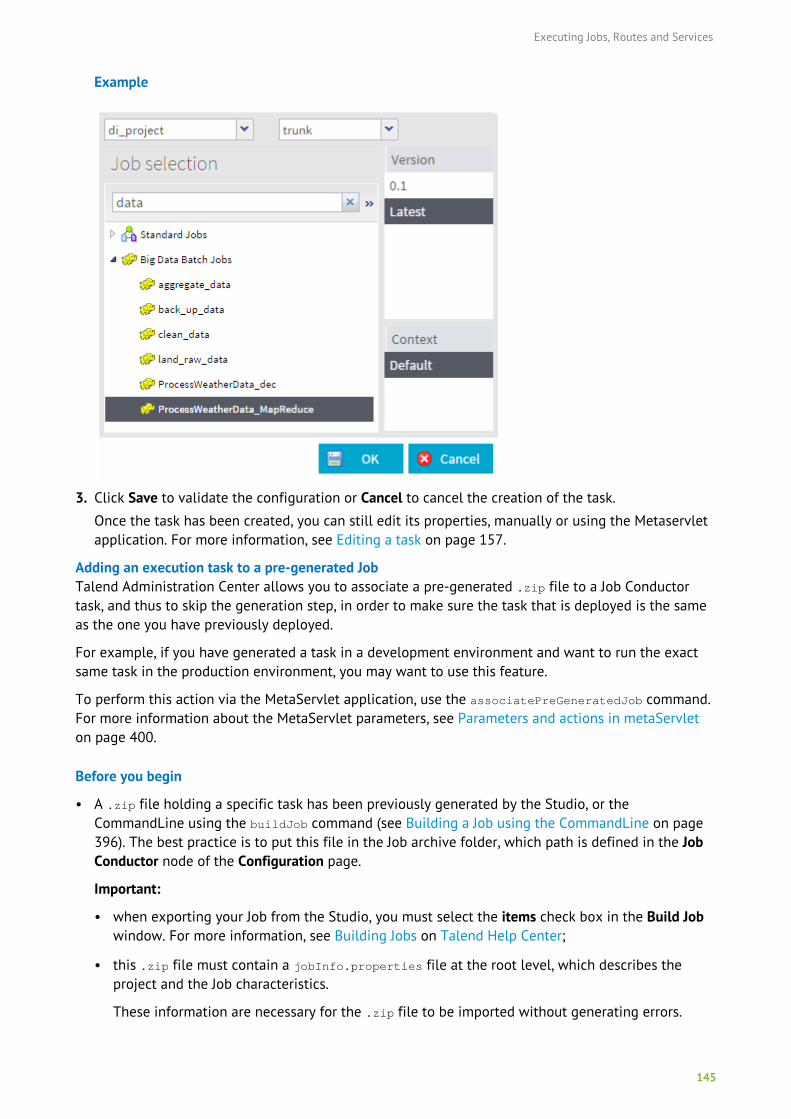
Executing Jobs, Routes and Services
145
Example
3. Click Save to validate the configuration or Cancel to cancel the creation of the task.
Once the task has been created, you can still edit its properties, manually or using the Metaservletapplication. For more information, see Editing a task on page 157.
Adding an execution task to a pre-generated JobTalend Administration Center allows you to associate a pre-generated .zip file to a Job Conductortask, and thus to skip the generation step, in order to make sure the task that is deployed is the sameas the one you have previously deployed.
For example, if you have generated a task in a development environment and want to run the exactsame task in the production environment, you may want to use this feature.
To perform this action via the MetaServlet application, use the associatePreGeneratedJob command.For more information about the MetaServlet parameters, see Parameters and actions in metaServleton page 400.
Before you begin
• A .zip file holding a specific task has been previously generated by the Studio, or theCommandLine using the buildJob command (see Building a Job using the CommandLine on page396). The best practice is to put this file in the Job archive folder, which path is defined in the JobConductor node of the Configuration page.
Important:
• when exporting your Job from the Studio, you must select the items check box in the Build Jobwindow. For more information, see Building Jobs on Talend Help Center;
• this .zip file must contain a jobInfo.properties file at the root level, which describes theproject and the Job characteristics.
These information are necessary for the .zip file to be imported without generating errors.
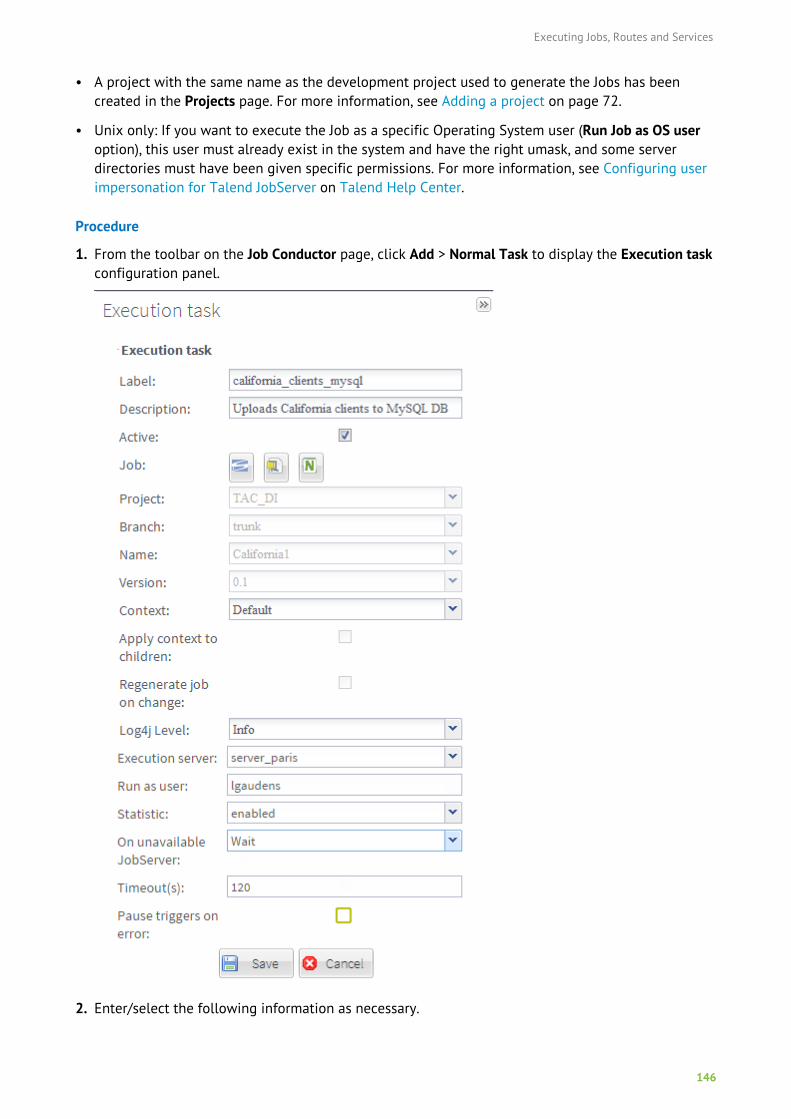
Executing Jobs, Routes and Services
146
• A project with the same name as the development project used to generate the Jobs has beencreated in the Projects page. For more information, see Adding a project on page 72.
• Unix only: If you want to execute the Job as a specific Operating System user (Run Job as OS useroption), this user must already exist in the system and have the right umask, and some serverdirectories must have been given specific permissions. For more information, see Configuring userimpersonation for Talend JobServer on Talend Help Center.
Procedure
1. From the toolbar on the Job Conductor page, click Add > Normal Task to display the Execution taskconfiguration panel.
2. Enter/select the following information as necessary.

Executing Jobs, Routes and Services
147
Field Description
Label Name of the task to be triggered.
Description Provides any useful information regarding the task to be carried out.
Active Select/clear this check box to activate/deactivate this task.
JobClick the icon to open the Import generated code window. This windowallows you to retrieve the pre-generated file holding the desired Job and toassociate this Job to the task.
Note that, when exporting your Job from the Studio, you must select the itemscheck box in the Build Job window to be able to import your Job successfully onthe Job Conductor page. For more information, see Building Jobs on Talend HelpCenter.
You also have the possibility to add a task to a Job based on SVN/GIT repositoryor published to Nexus. For more information, see Adding an execution task to aJob based on SVN/GIT repository on page 140 and Adding an execution task toa Job published to Nexus on page 149.
Project This field is automatically completed and is read-only.
Note that this project must exist in Talend Administration Center.
Branch This field is automatically completed and is read-only.
Name This field is automatically completed and is read-only.
Version This field is automatically completed and is read-only.
Context If you have defined several contexts in the Studio for the selected Job, select therelevant context in the list.
Apply context to children This field is automatically completed and is read-only. It can be set when the Jobis built from the Studio as a standalone Job.
Regenerate Job onchange
Select this check box if you want to regenerate the selected Job before taskdeployment and execution every time a modification is made to the Job itself.
This check box is only useful if you select the latest version of the Job forexecution, since the modifications will only be made to the latest version.
Warning: Note that if you selected Latest version, in case a newversion of the Job is created in Studio, the Job will be regenerated evenif you did not select the Regenerate Job on change check box.
Log4j Level Select the level of log you want to apply to the execution task. The levels areranked in increasing order of severity, from TRACE (most detailed information) toOFF (logs turned off). For more information on how to enable and customize thelog4j feature from the Studio, see Configuring Log4j on Talend Help Center.
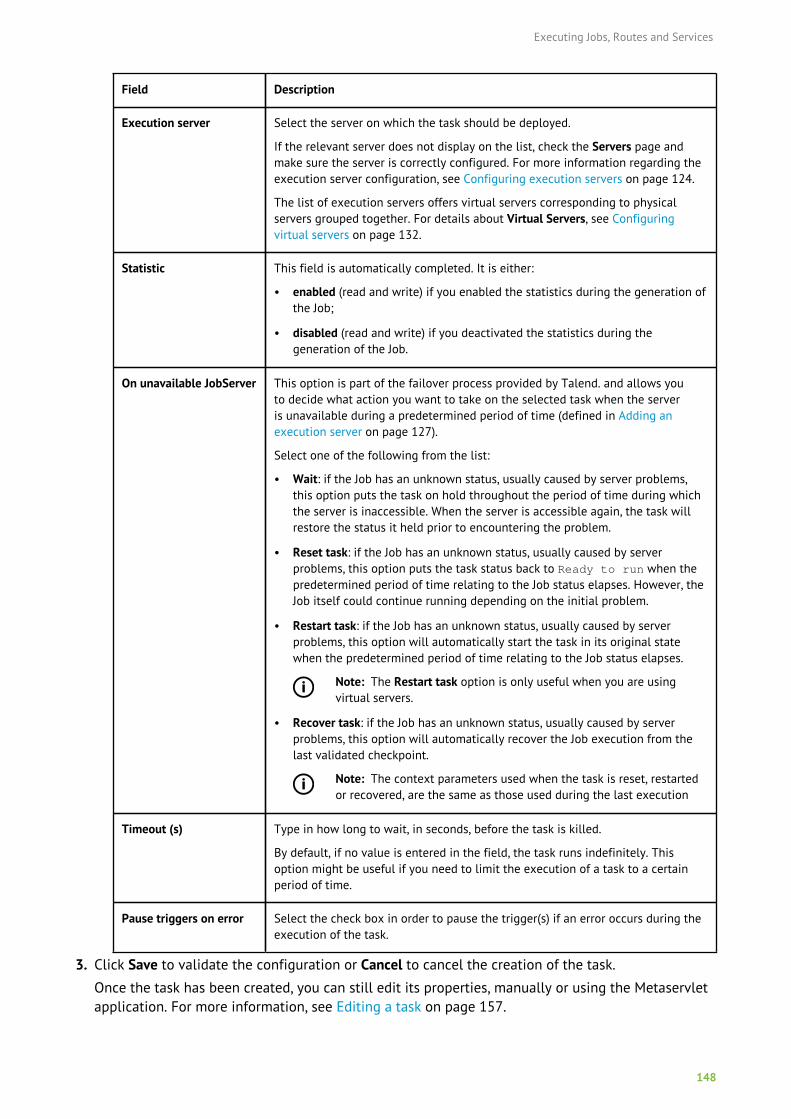
Executing Jobs, Routes and Services
148
Field Description
Execution server Select the server on which the task should be deployed.
If the relevant server does not display on the list, check the Servers page andmake sure the server is correctly configured. For more information regarding theexecution server configuration, see Configuring execution servers on page 124.
The list of execution servers offers virtual servers corresponding to physicalservers grouped together. For details about Virtual Servers, see Configuringvirtual servers on page 132.
Statistic This field is automatically completed. It is either:
• enabled (read and write) if you enabled the statistics during the generation ofthe Job;
• disabled (read and write) if you deactivated the statistics during thegeneration of the Job.
On unavailable JobServer This option is part of the failover process provided by Talend. and allows youto decide what action you want to take on the selected task when the serveris unavailable during a predetermined period of time (defined in Adding anexecution server on page 127).
Select one of the following from the list:
• Wait: if the Job has an unknown status, usually caused by server problems,this option puts the task on hold throughout the period of time during whichthe server is inaccessible. When the server is accessible again, the task willrestore the status it held prior to encountering the problem.
• Reset task: if the Job has an unknown status, usually caused by serverproblems, this option puts the task status back to Ready to run when thepredetermined period of time relating to the Job status elapses. However, theJob itself could continue running depending on the initial problem.
• Restart task: if the Job has an unknown status, usually caused by serverproblems, this option will automatically start the task in its original statewhen the predetermined period of time relating to the Job status elapses.
Note: The Restart task option is only useful when you are usingvirtual servers.
• Recover task: if the Job has an unknown status, usually caused by serverproblems, this option will automatically recover the Job execution from thelast validated checkpoint.
Note: The context parameters used when the task is reset, restartedor recovered, are the same as those used during the last execution
Timeout (s) Type in how long to wait, in seconds, before the task is killed.
By default, if no value is entered in the field, the task runs indefinitely. Thisoption might be useful if you need to limit the execution of a task to a certainperiod of time.
Pause triggers on error Select the check box in order to pause the trigger(s) if an error occurs during theexecution of the task.
3. Click Save to validate the configuration or Cancel to cancel the creation of the task.
Once the task has been created, you can still edit its properties, manually or using the Metaservletapplication. For more information, see Editing a task on page 157.
Executing Jobs, Routes and Services
149
Adding an execution task to a Job published to NexusTalend Administration Center allows you to add an execution task to a Job published in the Nexusartifact repository as a .zip file, and thus to skip the generation step, in order to make sure the taskthat is deployed is the same as the one you have previously deployed.
Before you begin
• The parameters to connect to the Nexus artifact repository are filled in the Artifact Repositorynode of the Configuration page. For more information, see Setting up the artifact repositoryparameters on page 36.
• The Job you want to add has been previously published to the Nexus artifact repository from theStudio.
• Unix only: If you want to execute the Job as a specific Operating System user (Run Job as OS useroption), this user must already exist in the system, he must have the right umask and some serverdirectories must have been given specific permissions. For more information, see Configuring userimpersonation for Talend JobServer on Talend Help Center.
Procedure
1. From the toolbar on the Job Conductor page, click Add > Normal Task to display the Execution taskconfiguration panel.
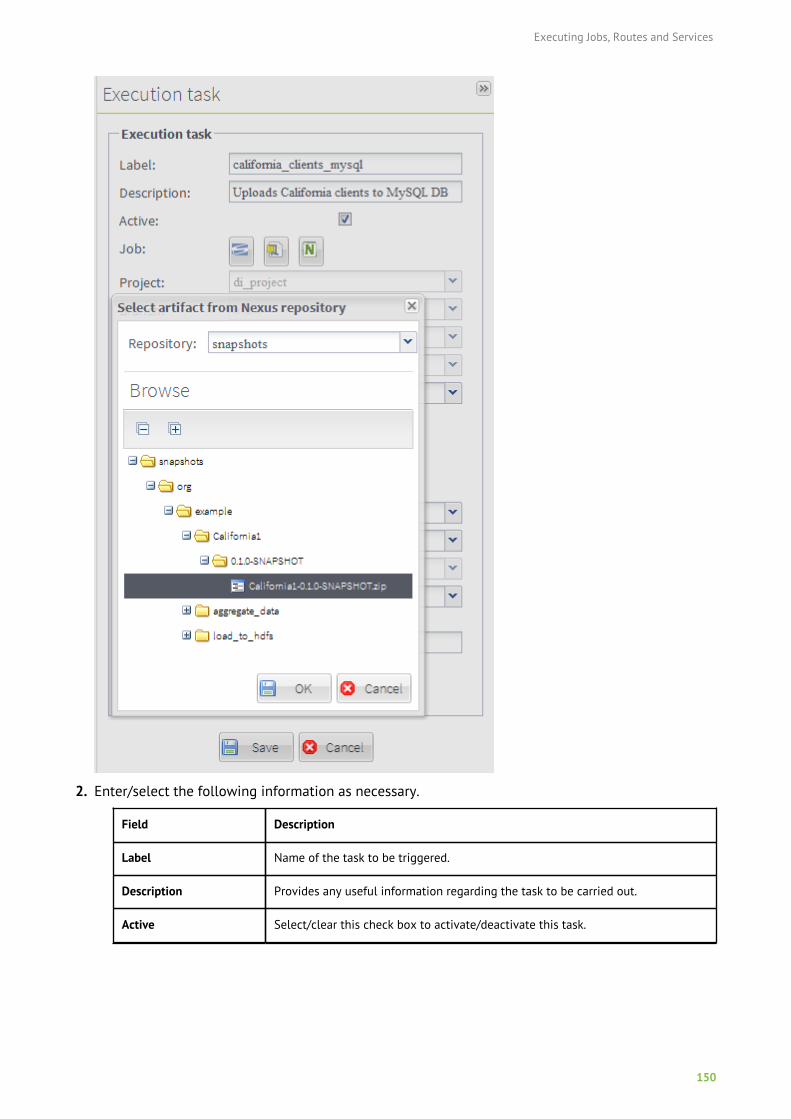
Executing Jobs, Routes and Services
150
2. Enter/select the following information as necessary.
Field Description
Label Name of the task to be triggered.
Description Provides any useful information regarding the task to be carried out.
Active Select/clear this check box to activate/deactivate this task.
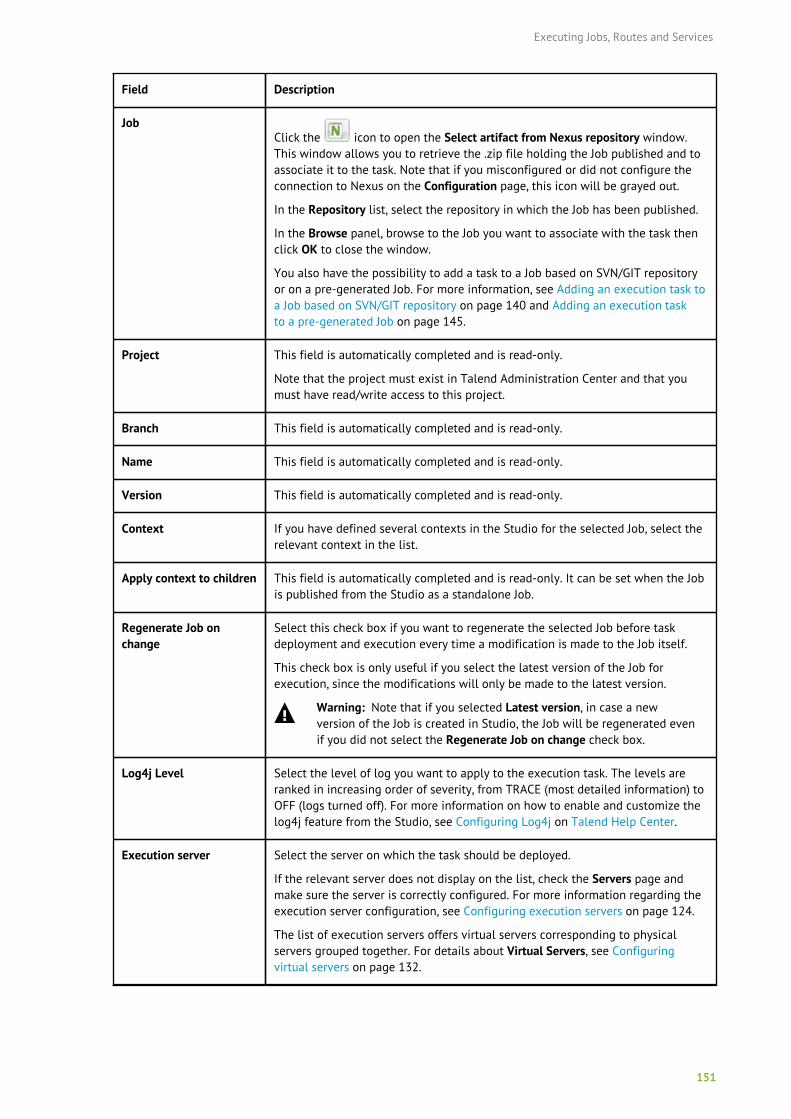
Executing Jobs, Routes and Services
151
Field Description
JobClick the icon to open the Select artifact from Nexus repository window.This window allows you to retrieve the .zip file holding the Job published and toassociate it to the task. Note that if you misconfigured or did not configure theconnection to Nexus on the Configuration page, this icon will be grayed out.
In the Repository list, select the repository in which the Job has been published.
In the Browse panel, browse to the Job you want to associate with the task thenclick OK to close the window.
You also have the possibility to add a task to a Job based on SVN/GIT repositoryor on a pre-generated Job. For more information, see Adding an execution task toa Job based on SVN/GIT repository on page 140 and Adding an execution taskto a pre-generated Job on page 145.
Project This field is automatically completed and is read-only.
Note that the project must exist in Talend Administration Center and that youmust have read/write access to this project.
Branch This field is automatically completed and is read-only.
Name This field is automatically completed and is read-only.
Version This field is automatically completed and is read-only.
Context If you have defined several contexts in the Studio for the selected Job, select therelevant context in the list.
Apply context to children This field is automatically completed and is read-only. It can be set when the Jobis published from the Studio as a standalone Job.
Regenerate Job onchange
Select this check box if you want to regenerate the selected Job before taskdeployment and execution every time a modification is made to the Job itself.
This check box is only useful if you select the latest version of the Job forexecution, since the modifications will only be made to the latest version.
Warning: Note that if you selected Latest version, in case a newversion of the Job is created in Studio, the Job will be regenerated evenif you did not select the Regenerate Job on change check box.
Log4j Level Select the level of log you want to apply to the execution task. The levels areranked in increasing order of severity, from TRACE (most detailed information) toOFF (logs turned off). For more information on how to enable and customize thelog4j feature from the Studio, see Configuring Log4j on Talend Help Center.
Execution server Select the server on which the task should be deployed.
If the relevant server does not display on the list, check the Servers page andmake sure the server is correctly configured. For more information regarding theexecution server configuration, see Configuring execution servers on page 124.
The list of execution servers offers virtual servers corresponding to physicalservers grouped together. For details about Virtual Servers, see Configuringvirtual servers on page 132.
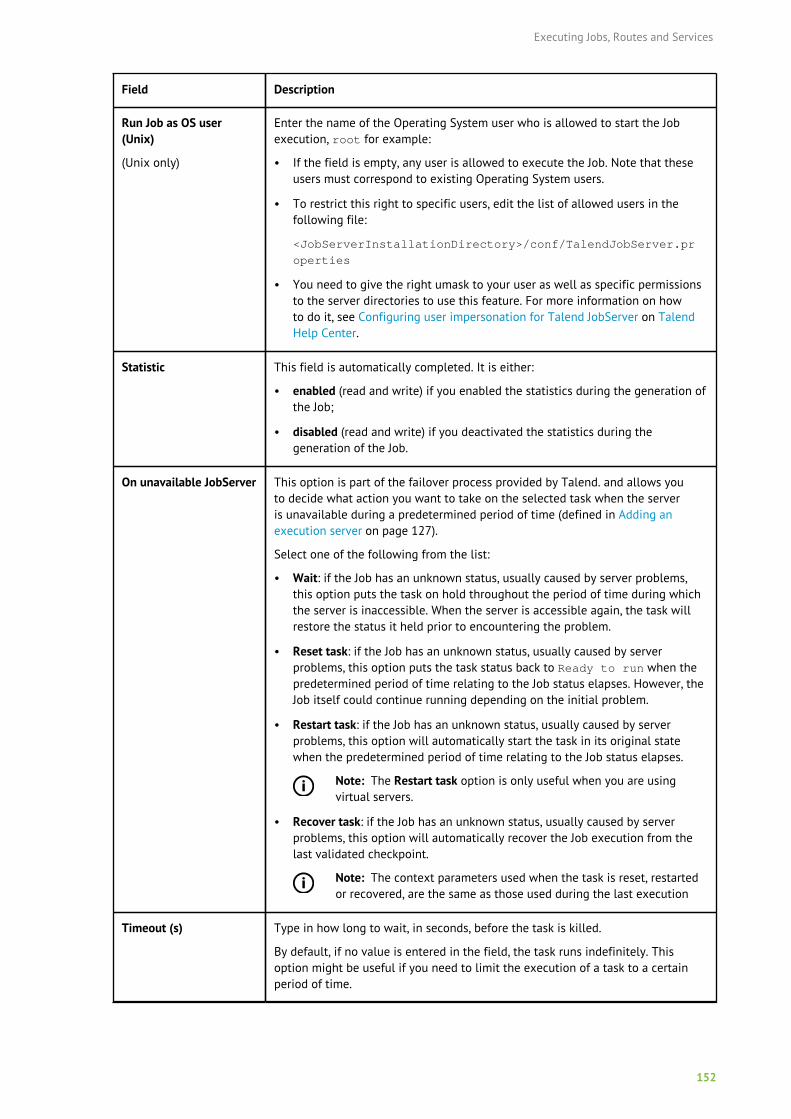
Executing Jobs, Routes and Services
152
Field Description
Run Job as OS user(Unix)
(Unix only)
Enter the name of the Operating System user who is allowed to start the Jobexecution, root for example:
• If the field is empty, any user is allowed to execute the Job. Note that theseusers must correspond to existing Operating System users.
• To restrict this right to specific users, edit the list of allowed users in thefollowing file:
<JobServerInstallationDirectory>/conf/TalendJobServer.pr
operties
• You need to give the right umask to your user as well as specific permissionsto the server directories to use this feature. For more information on howto do it, see Configuring user impersonation for Talend JobServer on TalendHelp Center.
Statistic This field is automatically completed. It is either:
• enabled (read and write) if you enabled the statistics during the generation ofthe Job;
• disabled (read and write) if you deactivated the statistics during thegeneration of the Job.
On unavailable JobServer This option is part of the failover process provided by Talend. and allows youto decide what action you want to take on the selected task when the serveris unavailable during a predetermined period of time (defined in Adding anexecution server on page 127).
Select one of the following from the list:
• Wait: if the Job has an unknown status, usually caused by server problems,this option puts the task on hold throughout the period of time during whichthe server is inaccessible. When the server is accessible again, the task willrestore the status it held prior to encountering the problem.
• Reset task: if the Job has an unknown status, usually caused by serverproblems, this option puts the task status back to Ready to run when thepredetermined period of time relating to the Job status elapses. However, theJob itself could continue running depending on the initial problem.
• Restart task: if the Job has an unknown status, usually caused by serverproblems, this option will automatically start the task in its original statewhen the predetermined period of time relating to the Job status elapses.
Note: The Restart task option is only useful when you are usingvirtual servers.
• Recover task: if the Job has an unknown status, usually caused by serverproblems, this option will automatically recover the Job execution from thelast validated checkpoint.
Note: The context parameters used when the task is reset, restartedor recovered, are the same as those used during the last execution
Timeout (s) Type in how long to wait, in seconds, before the task is killed.
By default, if no value is entered in the field, the task runs indefinitely. Thisoption might be useful if you need to limit the execution of a task to a certainperiod of time.
Executing Jobs, Routes and Services
153
Field Description
Pause triggers on error Select the check box in order to pause the trigger(s) if an error occurs during theexecution of the task.
3. Click Save to validate the configuration or Cancel to cancel the creation of the task.
Once the task has been created, you can still edit its properties, manually or using the Metaservletapplication. For more information, see Editing a task on page 157.
Adding an execution task to an artifact
The Talend Administration Center also allows you to add execution tasks to Jobs that are retrievedon the Nexus artifact repository at execution time, or pre-published via the Publisher page.
Before you begin
• The parameters to connect to the Nexus artifact repository are filled in the Artifact Repositorynode of the Configuration page. For more information, see Setting up the artifact repositoryparameters on page 36.
• The Job you want to add has been previously published to the Nexus artifact repository from theStudio.
• Unix only: If you want to execute the Job as a specific Operating System user (Run Job as OS useroption), this user must already exist in the system, he must have the right umask and some serverdirectories must have been given specific permissions. For more information, see Configuring userimpersonation for Talend JobServer on Talend Help Center.
Procedure
1. From the toolbar on the Job Conductor page, click Add > Artifact Task to display the Execution taskconfiguration panel.
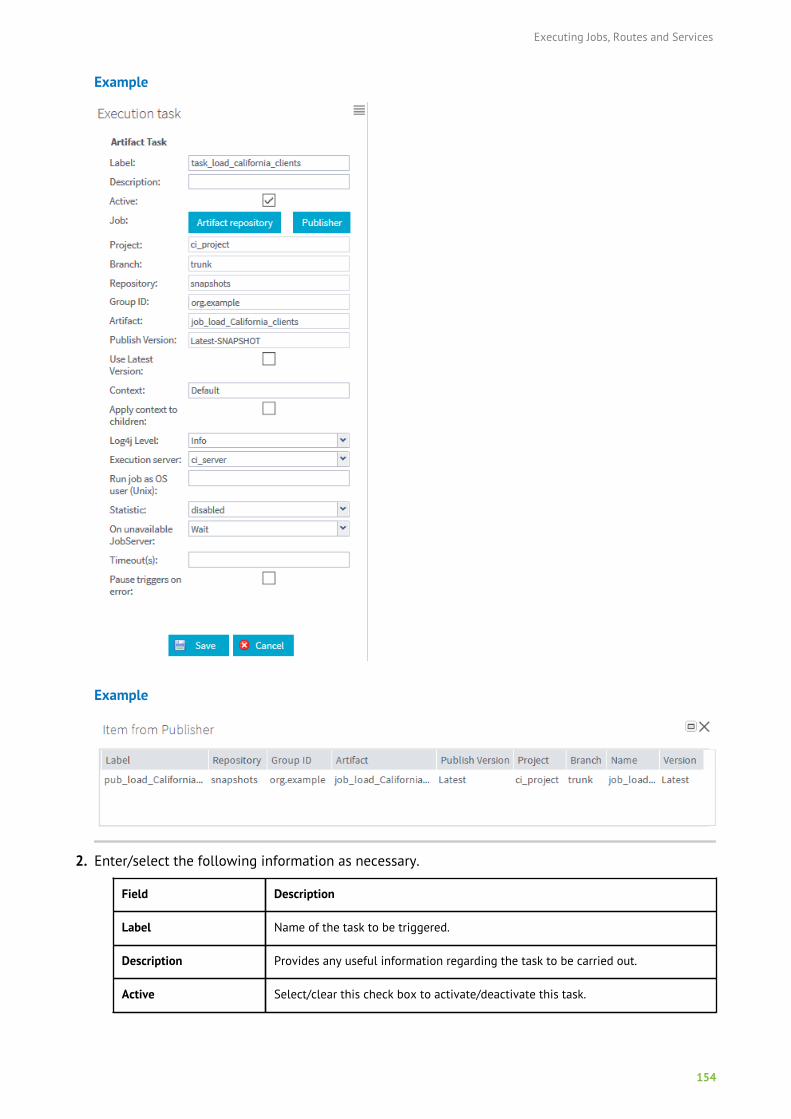
Executing Jobs, Routes and Services
154
Example
Example
2. Enter/select the following information as necessary.
Field Description
Label Name of the task to be triggered.
Description Provides any useful information regarding the task to be carried out.
Active Select/clear this check box to activate/deactivate this task.
Executing Jobs, Routes and Services
155
Field Description
Job Click the Artifact repository button icon to open the Select artifact from Artifactrepository window. This window allows you to link dynamically the Job artifactand to associate it to the task, knowing that this artifact is only retrieved atexecution time.
In the Repository list, select the repository in which the Job is published. In theBrowse panel, browse to the Job you want to associate with the task then clickOK to close the window.
OR:
Click the Publisher button to retrieve the publishing task created from thePublisher page. Details of the artifact are then automatically completed in theform. For more information on publishing tasks, see Working with publishingtasks on page 192.
Project The project containing the artifact to be executed. This field is automaticallycompleted and is read-only.
Branch The SVN/GIT branch/tag, if any is created, of the project containing the artifactto be executed. For more information about projects stored on SVN or GIT, seeManaging SVN/Git branches and tags for a project on page 77. This field isautomatically completed and is read-only.
Repository Repository in which the artifact is published. This field is automaticallycompleted and is read-only.
Group ID Name of the group in which the artifact is published. This field is automaticallycompleted and is read-only.
Artifact Name of the artifact item. This field is automatically completed and is read-only.
From this field, you can select both Standard and Big Data Batch Jobs (Map/Reduce and Spark), according to your license.
Publish Version Version of the artifact to be executed. This field is automatically completed andis read-only.
Use Latest Version If there are several versions of the same artifact, select this check box in order toautomatically execute the latest version of the selected artifact.
Context Context to be applied to the execution task. This field is automaticallycompleted.
Apply context to children This field is automatically completed and is read-only. It can be set when the Jobis published from the Studio as a standalone Job.
Log4j Level Select the level of log you want to apply to the execution task. The levels areranked in increasing order of severity, from TRACE (most detailed information) toOFF (logs turned off). For more information on how to enable and customize thelog4j feature from the Studio, see Configuring Log4j on Talend Help Center.
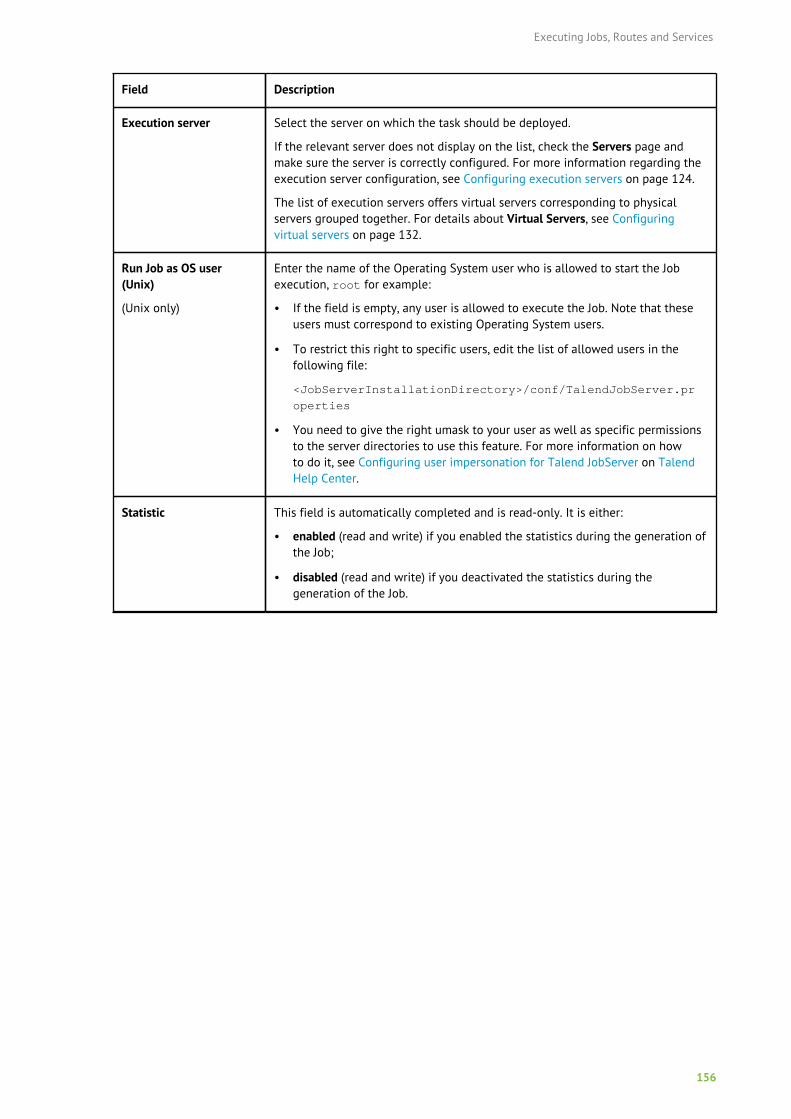
Executing Jobs, Routes and Services
156
Field Description
Execution server Select the server on which the task should be deployed.
If the relevant server does not display on the list, check the Servers page andmake sure the server is correctly configured. For more information regarding theexecution server configuration, see Configuring execution servers on page 124.
The list of execution servers offers virtual servers corresponding to physicalservers grouped together. For details about Virtual Servers, see Configuringvirtual servers on page 132.
Run Job as OS user(Unix)
(Unix only)
Enter the name of the Operating System user who is allowed to start the Jobexecution, root for example:
• If the field is empty, any user is allowed to execute the Job. Note that theseusers must correspond to existing Operating System users.
• To restrict this right to specific users, edit the list of allowed users in thefollowing file:
<JobServerInstallationDirectory>/conf/TalendJobServer.pr
operties
• You need to give the right umask to your user as well as specific permissionsto the server directories to use this feature. For more information on howto do it, see Configuring user impersonation for Talend JobServer on TalendHelp Center.
Statistic This field is automatically completed and is read-only. It is either:
• enabled (read and write) if you enabled the statistics during the generation ofthe Job;
• disabled (read and write) if you deactivated the statistics during thegeneration of the Job.
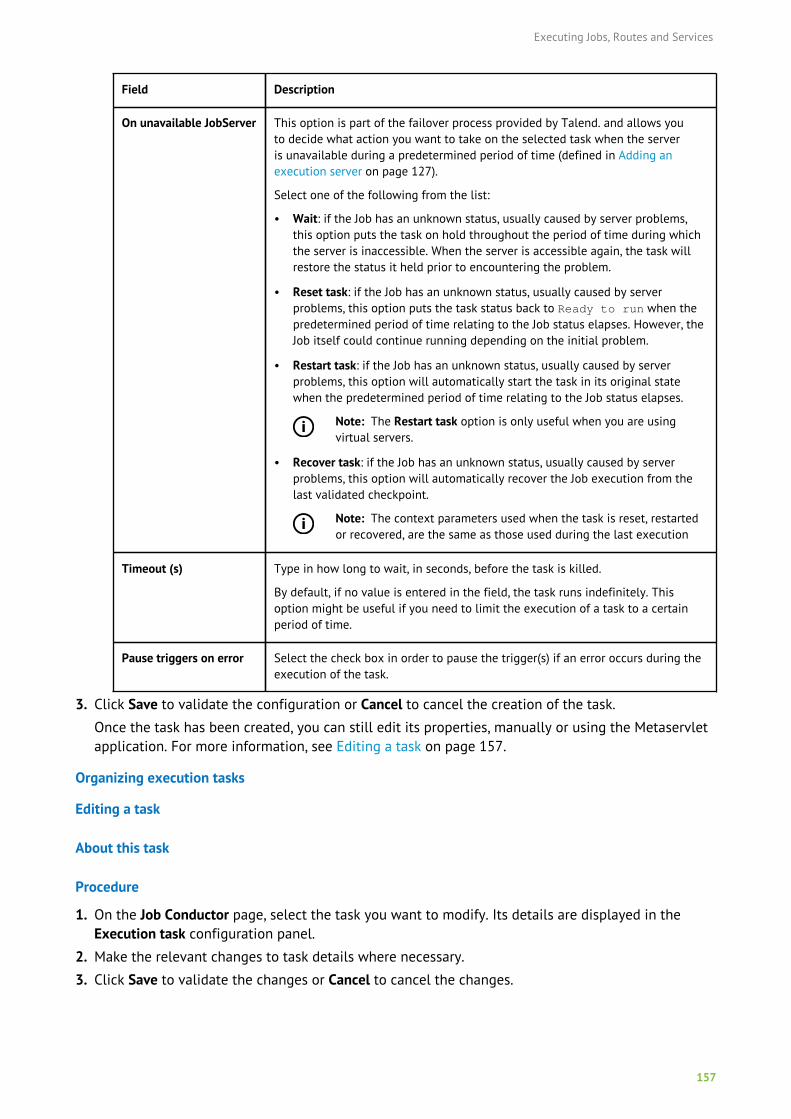
Executing Jobs, Routes and Services
157
Field Description
On unavailable JobServer This option is part of the failover process provided by Talend. and allows youto decide what action you want to take on the selected task when the serveris unavailable during a predetermined period of time (defined in Adding anexecution server on page 127).
Select one of the following from the list:
• Wait: if the Job has an unknown status, usually caused by server problems,this option puts the task on hold throughout the period of time during whichthe server is inaccessible. When the server is accessible again, the task willrestore the status it held prior to encountering the problem.
• Reset task: if the Job has an unknown status, usually caused by serverproblems, this option puts the task status back to Ready to run when thepredetermined period of time relating to the Job status elapses. However, theJob itself could continue running depending on the initial problem.
• Restart task: if the Job has an unknown status, usually caused by serverproblems, this option will automatically start the task in its original statewhen the predetermined period of time relating to the Job status elapses.
Note: The Restart task option is only useful when you are usingvirtual servers.
• Recover task: if the Job has an unknown status, usually caused by serverproblems, this option will automatically recover the Job execution from thelast validated checkpoint.
Note: The context parameters used when the task is reset, restartedor recovered, are the same as those used during the last execution
Timeout (s) Type in how long to wait, in seconds, before the task is killed.
By default, if no value is entered in the field, the task runs indefinitely. Thisoption might be useful if you need to limit the execution of a task to a certainperiod of time.
Pause triggers on error Select the check box in order to pause the trigger(s) if an error occurs during theexecution of the task.
3. Click Save to validate the configuration or Cancel to cancel the creation of the task.
Once the task has been created, you can still edit its properties, manually or using the Metaservletapplication. For more information, see Editing a task on page 157.
Organizing execution tasks
Editing a task
About this task
Procedure
1. On the Job Conductor page, select the task you want to modify. Its details are displayed in theExecution task configuration panel.
2. Make the relevant changes to task details where necessary.
3. Click Save to validate the changes or Cancel to cancel the changes.
Executing Jobs, Routes and Services
158
Note that you can also edit a task (name, context values, Job .zip file, etc.) via the MetaServletapplication using the updateTask command. For more information about the MetaServletparameters, see Parameters and actions in metaServlet on page 400.
Duplicating a task
About this task
To avoid creating a new task from scratch, you can duplicate an existing one and work around itsmetadata to have a new task in the list.
Procedure
1. On the Job Conductor page, select the task you want to duplicate.
2. On the toolbar, click Duplicate. The panel to the right shows the metadata of the selected task.
3. Modify the metadata as needed in order to create a new task.
4. Click Save to validate the operation or Cancel to cancel it.
ResultsThe new task is listed in the Execution tasks list.Deleting a task
About this task
To delete one or more tasks from the task list, follow the procedure below.
To perform this action via the MetaServlet application, use the deleteTask command. For moreinformation about the MetaServlet parameters, see Parameters and actions in metaServlet on page400.
Procedure
1. On the Job Conductor page, select the task you want to delete. Its details display in the Executiontask configuration panel.
2. On the toolbar, click Delete. A confirmation dialog box appears.
3. Click OK to remove the task from the task list.
Searching a task
If you have a great number of tasks and want to filter them, you can do so by typing key words or byselecting some check boxes in the Filters fields of the columns listed below:
• Active
• Branch
• CommandLine version
• Context
• Description
• Error status
• Label
• Last deployment
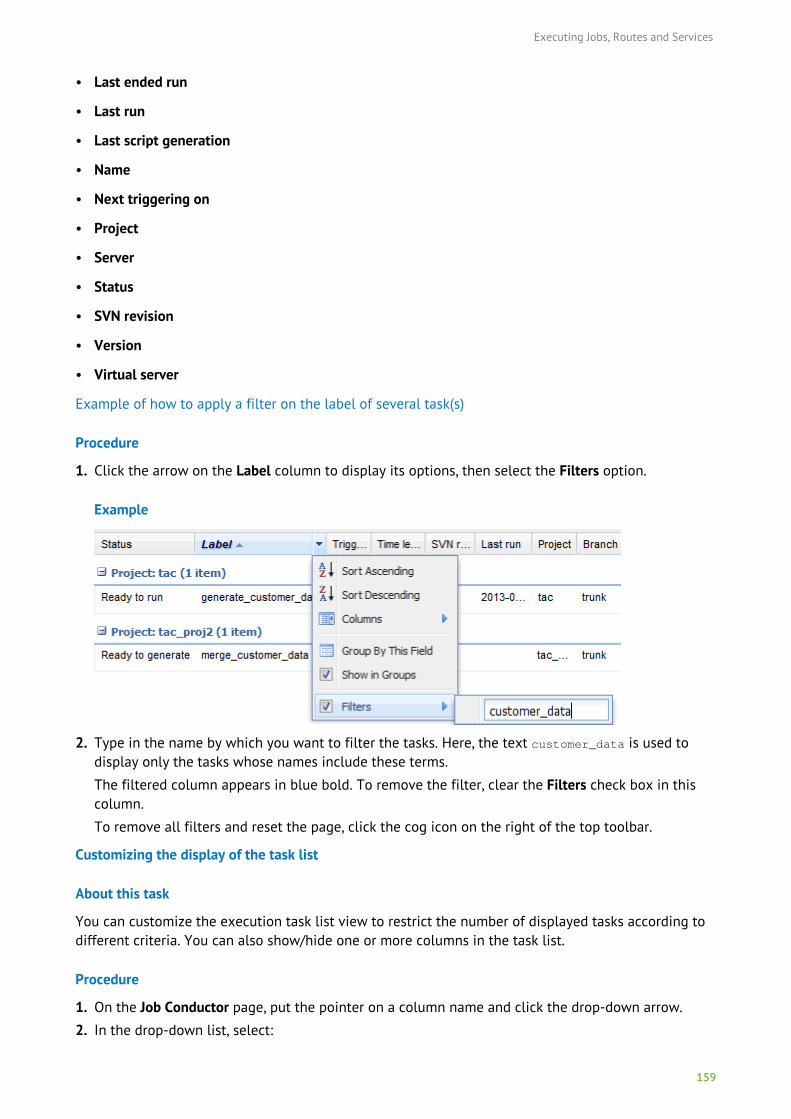
Executing Jobs, Routes and Services
159
• Last ended run
• Last run
• Last script generation
• Name
• Next triggering on
• Project
• Server
• Status
• SVN revision
• Version
• Virtual server
Example of how to apply a filter on the label of several task(s)
Procedure
1. Click the arrow on the Label column to display its options, then select the Filters option.
Example
2. Type in the name by which you want to filter the tasks. Here, the text customer_data is used todisplay only the tasks whose names include these terms.
The filtered column appears in blue bold. To remove the filter, clear the Filters check box in thiscolumn.
To remove all filters and reset the page, click the cog icon on the right of the top toolbar.
Customizing the display of the task list
About this task
You can customize the execution task list view to restrict the number of displayed tasks according todifferent criteria. You can also show/hide one or more columns in the task list.
Procedure
1. On the Job Conductor page, put the pointer on a column name and click the drop-down arrow.
2. In the drop-down list, select:
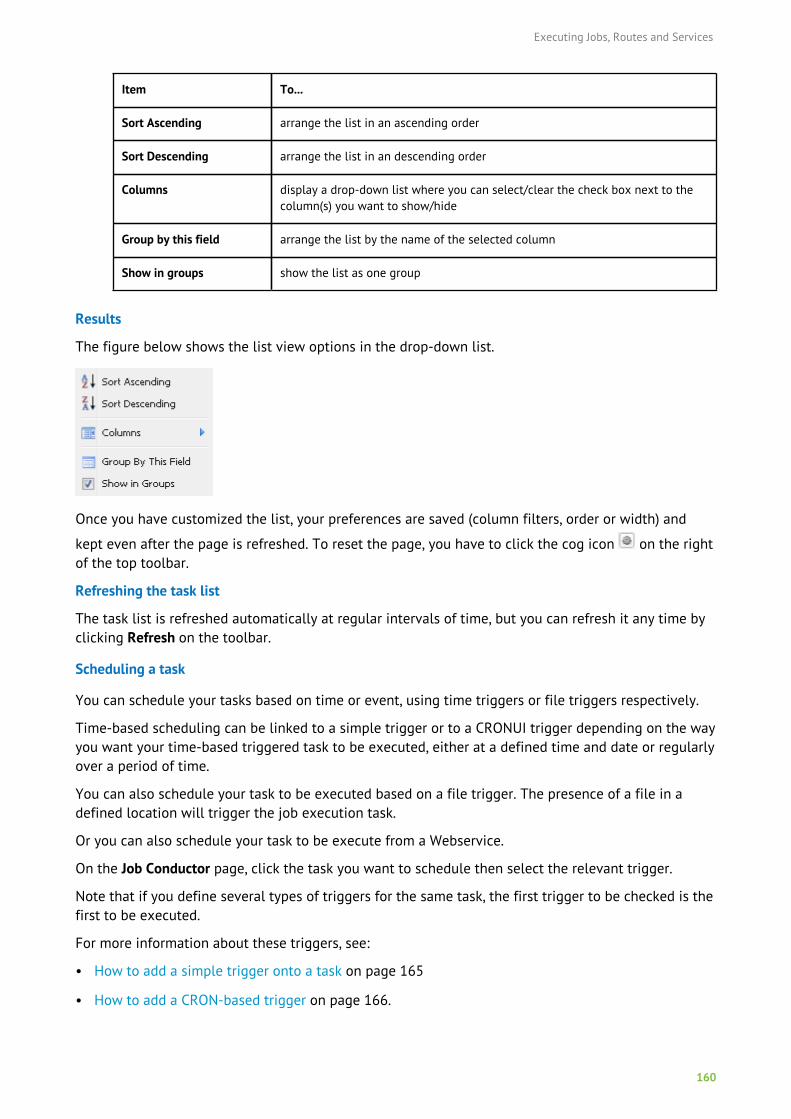
Executing Jobs, Routes and Services
160
Item To...
Sort Ascending arrange the list in an ascending order
Sort Descending arrange the list in an descending order
Columns display a drop-down list where you can select/clear the check box next to thecolumn(s) you want to show/hide
Group by this field arrange the list by the name of the selected column
Show in groups show the list as one group
Results
The figure below shows the list view options in the drop-down list.
Once you have customized the list, your preferences are saved (column filters, order or width) and
kept even after the page is refreshed. To reset the page, you have to click the cog icon on the rightof the top toolbar.
Refreshing the task list
The task list is refreshed automatically at regular intervals of time, but you can refresh it any time byclicking Refresh on the toolbar.
Scheduling a task
You can schedule your tasks based on time or event, using time triggers or file triggers respectively.
Time-based scheduling can be linked to a simple trigger or to a CRONUI trigger depending on the wayyou want your time-based triggered task to be executed, either at a defined time and date or regularlyover a period of time.
You can also schedule your task to be executed based on a file trigger. The presence of a file in adefined location will trigger the job execution task.
Or you can also schedule your task to be execute from a Webservice.
On the Job Conductor page, click the task you want to schedule then select the relevant trigger.
Note that if you define several types of triggers for the same task, the first trigger to be checked is thefirst to be executed.
For more information about these triggers, see:
• How to add a simple trigger onto a task on page 165
• How to add a CRON-based trigger on page 166.

Executing Jobs, Routes and Services
161
• How to add a File trigger on page 169
Recovering the last execution of a task
About this task
From the Job conductor page, you can open the Error recovery management page which is designedto help the recovery of erroneous Jobs. It displays the graphical and analytical details of the Jobexecution. To access Error recovery management, do the following:
Procedure
1. On the Job Conductor page, select the task you want to recover.
2. On the toolbar, click the Recover last execution button.
Example
Results
The page switches to Error recovery management. Note that at the moment, the page only displaysthe details of the last execution of your selected task.
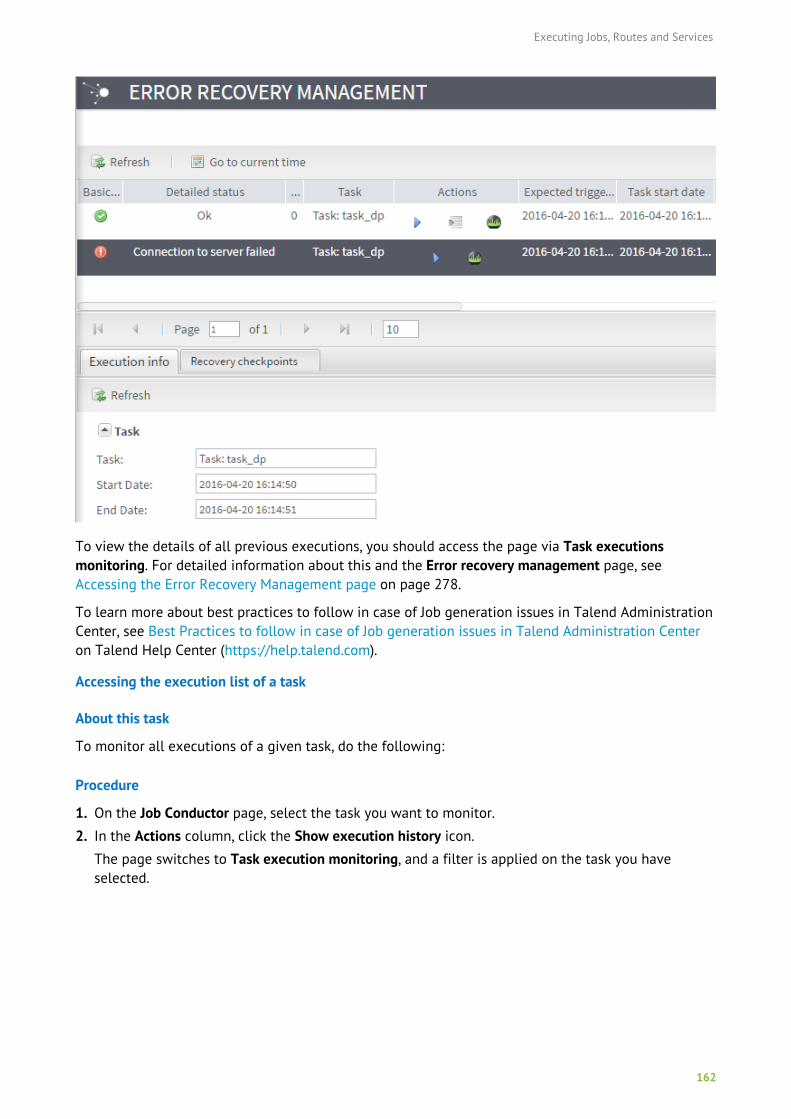
Executing Jobs, Routes and Services
162
To view the details of all previous executions, you should access the page via Task executionsmonitoring. For detailed information about this and the Error recovery management page, seeAccessing the Error Recovery Management page on page 278.
To learn more about best practices to follow in case of Job generation issues in Talend AdministrationCenter, see Best Practices to follow in case of Job generation issues in Talend Administration Centeron Talend Help Center (https://help.talend.com).
Accessing the execution list of a task
About this task
To monitor all executions of a given task, do the following:
Procedure
1. On the Job Conductor page, select the task you want to monitor.
2. In the Actions column, click the Show execution history icon.
The page switches to Task execution monitoring, and a filter is applied on the task you haveselected.
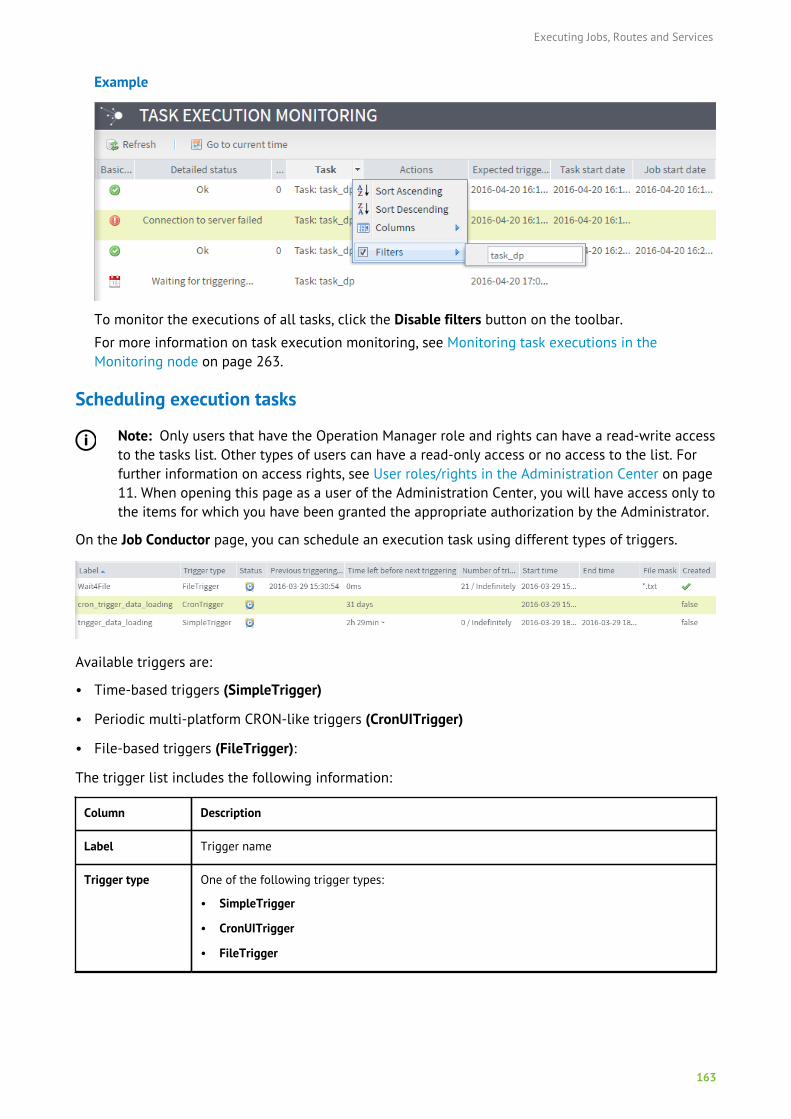
Executing Jobs, Routes and Services
163
Example
To monitor the executions of all tasks, click the Disable filters button on the toolbar.
For more information on task execution monitoring, see Monitoring task executions in theMonitoring node on page 263.
Scheduling execution tasks
Note: Only users that have the Operation Manager role and rights can have a read-write accessto the tasks list. Other types of users can have a read-only access or no access to the list. Forfurther information on access rights, see User roles/rights in the Administration Center on page11. When opening this page as a user of the Administration Center, you will have access only tothe items for which you have been granted the appropriate authorization by the Administrator.
On the Job Conductor page, you can schedule an execution task using different types of triggers.
Available triggers are:
• Time-based triggers (SimpleTrigger)
• Periodic multi-platform CRON-like triggers (CronUITrigger)
• File-based triggers (FileTrigger):
The trigger list includes the following information:
Column Description
Label Trigger name
Trigger type One of the following trigger types:
• SimpleTrigger
• CronUITrigger
• FileTrigger
Executing Jobs, Routes and Services
164
Column Description
Status Status of the current trigger.
• Normal: The trigger is ready to be launched
• Waiting for the task to end: The triggering has taken place, the task execution is in
progress
• Paused: The trigger is disabled
• Completed: The trigger execution is complete
• Error/Invalid: The trigger execution has failed or is invalid
Previoustriggering on
Date and time when the previous triggering took place
Number oftriggerings
Estimated number of triggering that will take place over the selected period of time and/or forthe number of triggering repetition set.
Time left beforenext triggering
Time to elapse before the next triggering starts.
Next triggering on Date and time when the next triggering will take place.
Final triggering on Estimated or set triggering end time.
Start time Date and time when the first triggering takes place.
End time Actual time when the last triggering ended.
File mask In case of file-based trigger, enter the file name extension for the relevant file
Id Trigger identification
On the Triggers view at the bottom half of the Job Conductor page, you can add triggers, edit triggers,enable/disable triggers, delete triggers and customize the trigger list.
Adding triggers
To schedule the execution of your tasks, you can set time-based triggers (simple or CRON) or event-based triggers (file) onto a task that will start its execution.
If you want to schedule one or several execution of a task at a precise moment, you can use thesimple trigger. For more information on how to use simple triggers, see How to add a simple triggeronto a task on page 165.
If you want to schedule one execution of a task on a regular basis (daily, weekly, monthly etc.), youcan use the CRON-based trigger. For more information on how to use CRON triggers, see How to add aCRON-based trigger on page 166.
If you want to execute a task on a file-based event, such as the presence, creation, modification of thefile, you can use the File trigger. For more information on how to use File triggers, see How to add aFile trigger on page 169.
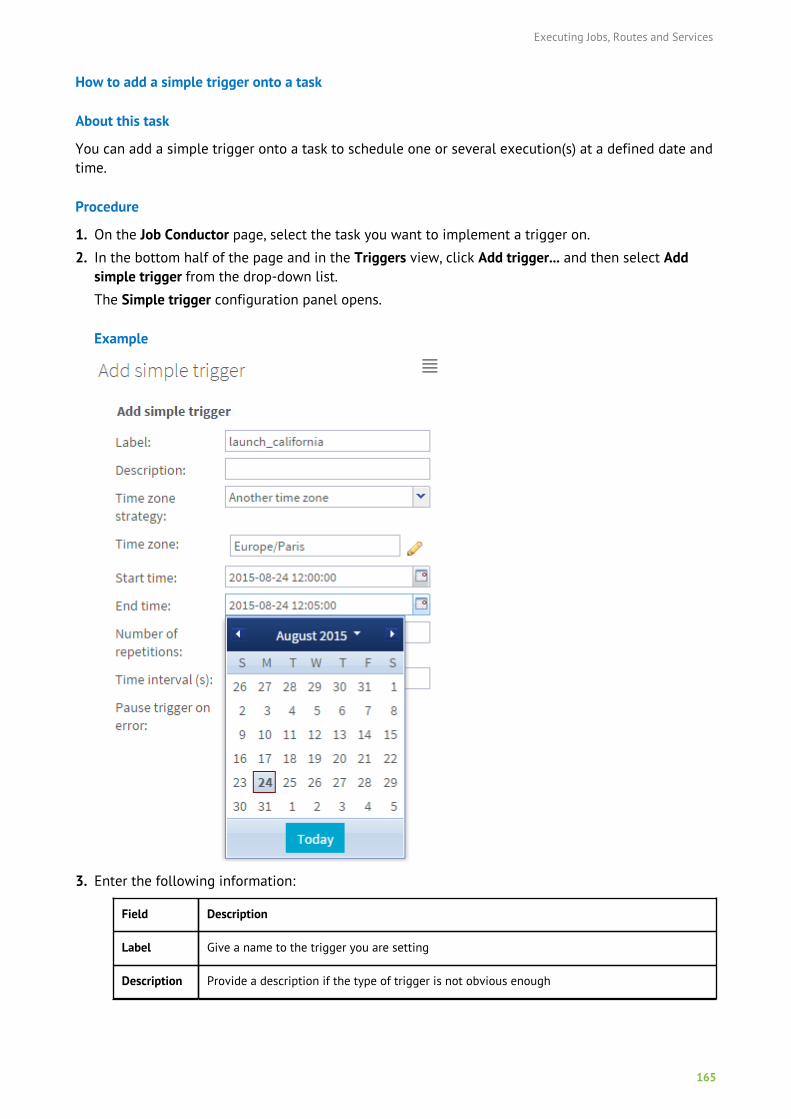
Executing Jobs, Routes and Services
165
How to add a simple trigger onto a task
About this task
You can add a simple trigger onto a task to schedule one or several execution(s) at a defined date andtime.
Procedure
1. On the Job Conductor page, select the task you want to implement a trigger on.
2. In the bottom half of the page and in the Triggers view, click Add trigger... and then select Addsimple trigger from the drop-down list.
The Simple trigger configuration panel opens.
Example
3. Enter the following information:
Field Description
Label Give a name to the trigger you are setting
Description Provide a description if the type of trigger is not obvious enough
Executing Jobs, Routes and Services
166
Field Description
Time zone In the dialog box, select the time zone of the triggering time in the list. It can be theexecution server time, the Web application time or another time zone you define.
To take advantage of the autocomplete feature, type the first three letters of the time zoneyou are searching for.
Start time Click the calendar button to open a calender. Click the date and set the exact time for thetrigger to be executed. The time format must be HH:MM:SS
If you do not fill this field, the triggering is immediate
Note: For immediate triggering, we advise you to click the execute button on thetable.
End time Click the calendar button to open a calendar. Click the date and set the exact time for thetrigger to be executed. The time format must be HH:MM:SS.
If you do not fill this field: the Job will be executed indefinitely (until the number ofrepetitions is reached, if any)
Number ofrepetitions
Type in the number of execution that should occur in addition to the first execution.
If you do not fill this field: as many executions as possible within the time frame given
0: only the first execution is carried out.
n: n extra execution is carried out in addition to the first one.
Timeinterval
Type in (in sec) the time interval between triggerings. For long interval, use CRON-basedtriggers.
Pausetrigger onerror
Select the check box in order to pause the trigger if an error occurs during the execution ofthe task.
Note: Fields marked with exclamation mark are mandatory.
4. Click Save to validate the simple trigger configuration or Cancel to cancel the operation.
Results
The Trigger Status icon for the selected task changes from No Trigger to At least one trigger isrunning.
Note that, if the task is already running when the task is triggered, the Job Conductor will wait for thecurrent task to finish. If the task is not finished after 60 seconds, then the status of the task executionchanges to 'misfired'. A misfired event also occurs if the trigger misses its firing time because ofTalend Administration Center is shut down. For more information on task execution status andmonitoring, see Monitoring task executions in the Monitoring node on page 263.
How to add a CRON-based trigger
About this task
If you need to execute a task on a regular basis over a period of time, then use a CRON-based trigger.
Procedure
1. On the Job Conductor page, select the task you want to implement a trigger on.
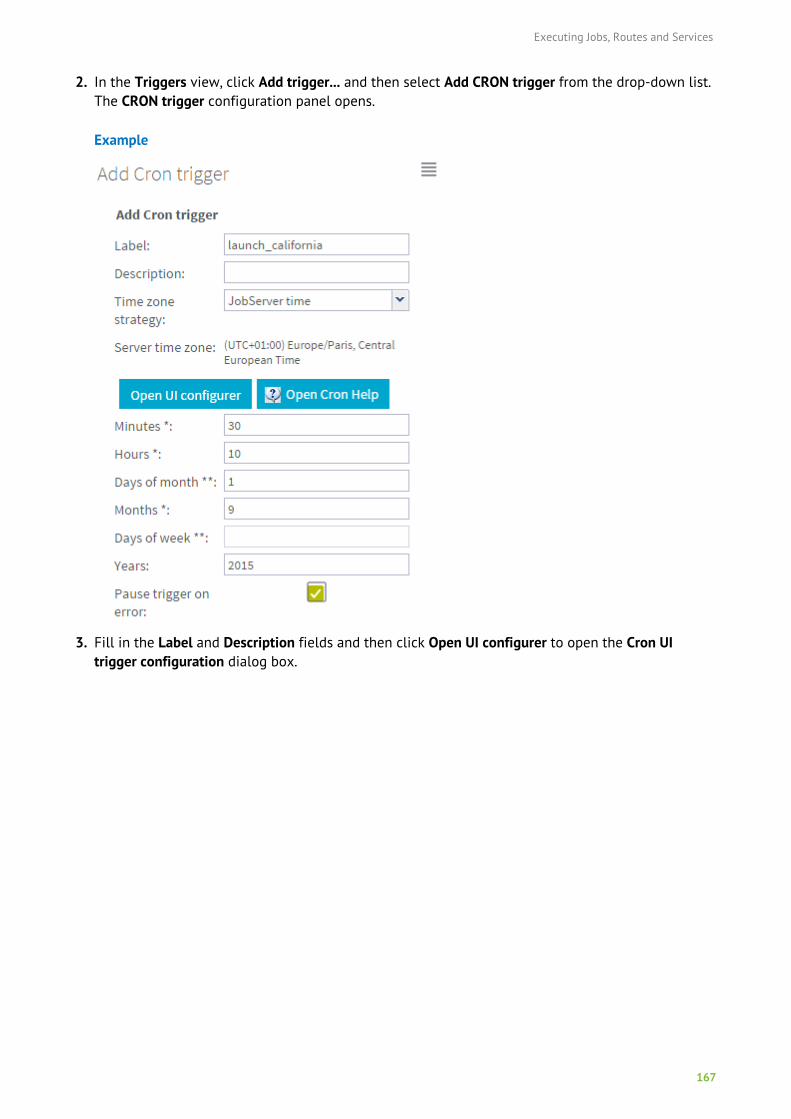
Executing Jobs, Routes and Services
167
2. In the Triggers view, click Add trigger... and then select Add CRON trigger from the drop-down list.The CRON trigger configuration panel opens.
Example
3. Fill in the Label and Description fields and then click Open UI configurer to open the Cron UItrigger configuration dialog box.
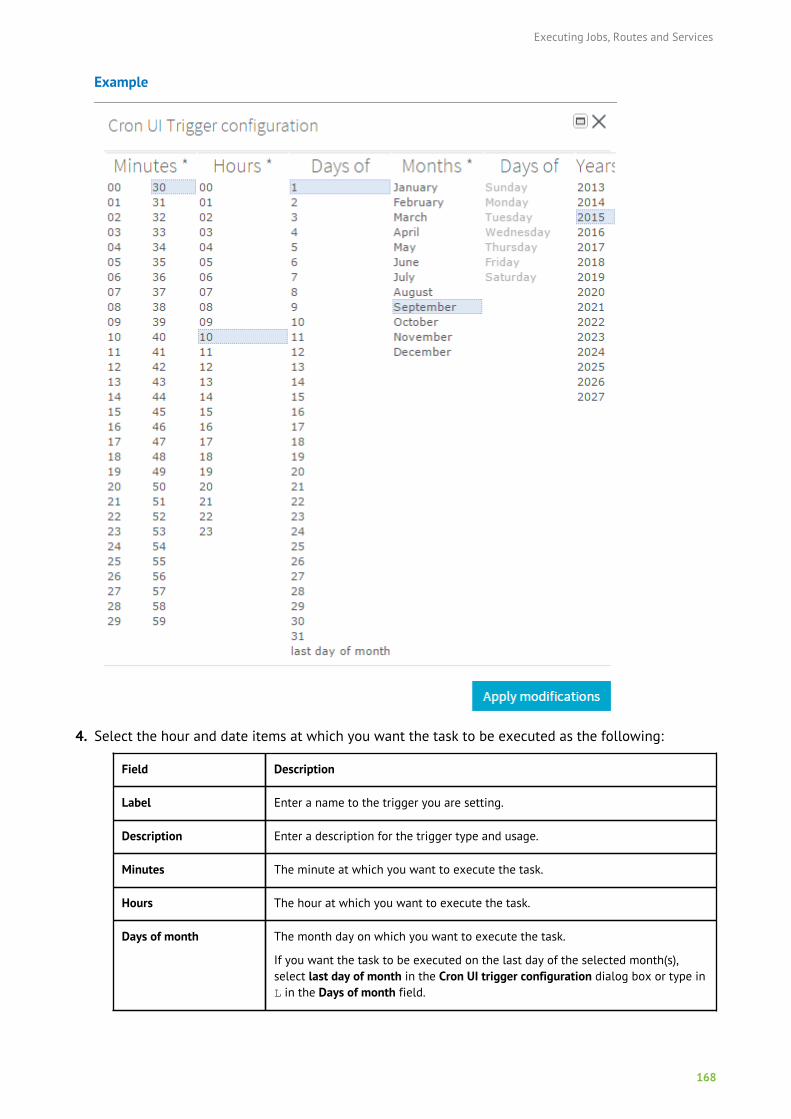
Executing Jobs, Routes and Services
168
Example
4. Select the hour and date items at which you want the task to be executed as the following:
Field Description
Label Enter a name to the trigger you are setting.
Description Enter a description for the trigger type and usage.
Minutes The minute at which you want to execute the task.
Hours The hour at which you want to execute the task.
Days of month The month day on which you want to execute the task.
If you want the task to be executed on the last day of the selected month(s),select last day of month in the Cron UI trigger configuration dialog box or type inL in the Days of month field.
Executing Jobs, Routes and Services
169
Field Description
Months The month in which you want to execute the task.
Days of week The week day on which you want to execute the task.
Years The year in which you want to execute the task.
Fields marked with **: Select one or more week day OR one or more dates.
Fields marked with *: mandatory information.
For multiple selection, press Ctrl + click.
5. Click Apply modifications. The dialog box closes and the selected data is displayed in the CRON UItrigger configuration panel.
6. Click Save to validate the CRON-based trigger configuration or Cancel to cancel the operation.
Results
The Trigger Status for the selected task changes from No Trigger to At least one trigger is running.
Note that, if the task is already running when the task is triggered, the Job Conductor will wait for thecurrent task to finish. If the task is not finished after 60 seconds, then the status of the task executionchanges to 'misfired'. A misfired event also occurs if the trigger misses its firing time because ofTalend Administration Center is shut down. For more information on task execution status andmonitoring, see Monitoring task executions in the Monitoring node on page 263.
How to add a File trigger
About this task
You can use a file to trigger Job execution tasks. The presence of this file in a defined location willtrigger the Job execution task. This file becomes then a job trigger with no other purpose.
For more information on how file triggers work in Talend Administration Center, see How file triggerswork in Talend Administration Centeron Talend Help Center (https://help.talend.com).
Note: If a context has been defined and that you intend to use the trigger file in the Job toexecute, then make sure to define the following context parameters in the Contexts view inTalend Studio: folderPath, filePath and fileName. Thus, the Job Conductor passes these valuesto the Job during its execution.
To schedule an execution task based on the presence of a file in a defined location:
Procedure
1. On the Job Conductor page, select the task you want to implement a trigger on.
2. In the Triggers view, click Add trigger... and then select Add file trigger from the drop-down list.The File trigger configuration panel opens.
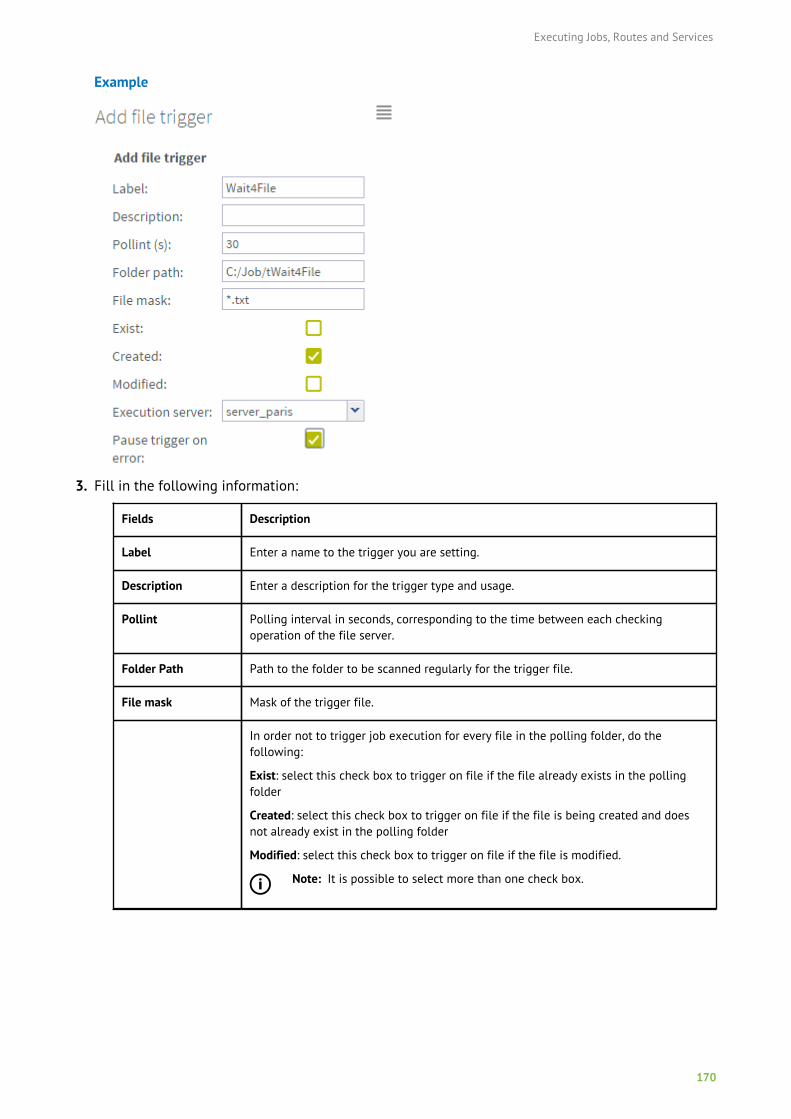
Executing Jobs, Routes and Services
170
Example
3. Fill in the following information:
Fields Description
Label Enter a name to the trigger you are setting.
Description Enter a description for the trigger type and usage.
Pollint Polling interval in seconds, corresponding to the time between each checkingoperation of the file server.
Folder Path Path to the folder to be scanned regularly for the trigger file.
File mask Mask of the trigger file.
In order not to trigger job execution for every file in the polling folder, do thefollowing:
Exist: select this check box to trigger on file if the file already exists in the pollingfolder
Created: select this check box to trigger on file if the file is being created and doesnot already exist in the polling folder
Modified: select this check box to trigger on file if the file is modified.
Note: It is possible to select more than one check box.
Executing Jobs, Routes and Services
171
Fields Description
Execution server Select the server where the trigger file is put.
Note: If you select a virtual server, then the trigger file will be deployedin each of the Job servers that are grouped in the virtual server. If the Jobservers grouped in the virtual server monitor the same file in the samelocation, then only one event will be processed by Talend AdministrationCenter, otherwise Talend Administration Center will consider the filesdifferent and process each event separately.
4. Click Save to validate the File trigger configuration or Cancel to cancel the operation.
Results
The Trigger Status icon for the selected task changes from No Trigger to At least one trigger isrunning.
Editing a trigger
About this task
To edit a trigger entry, do the following:
Procedure
1. On the Job Conductor page, select the relevant task to display the corresponding triggers in thetrigger list.
2. Select the trigger entry you want to modify. Its details are displayed in the configuration panel tothe right.
3. Make the relevant changes to trigger details where necessary.
4. Click Save to validate the changes or click Cancel to cancel.
Disabling/Enabling a trigger
About this task
To disable or enable a trigger, do the following:
Procedure
1. On the Job Conductor page, select the relevant task to display the corresponding triggers and theirdetails in the trigger list.
2. Select the trigger entry you want to disable/enable.
3. From the toolbar in the Triggers panel, click Pause trigger/Resume trigger.
Note: You cannot disable/enable a trigger if its status is Completed.
Results
The selected trigger icon displays as disabled/enabled.
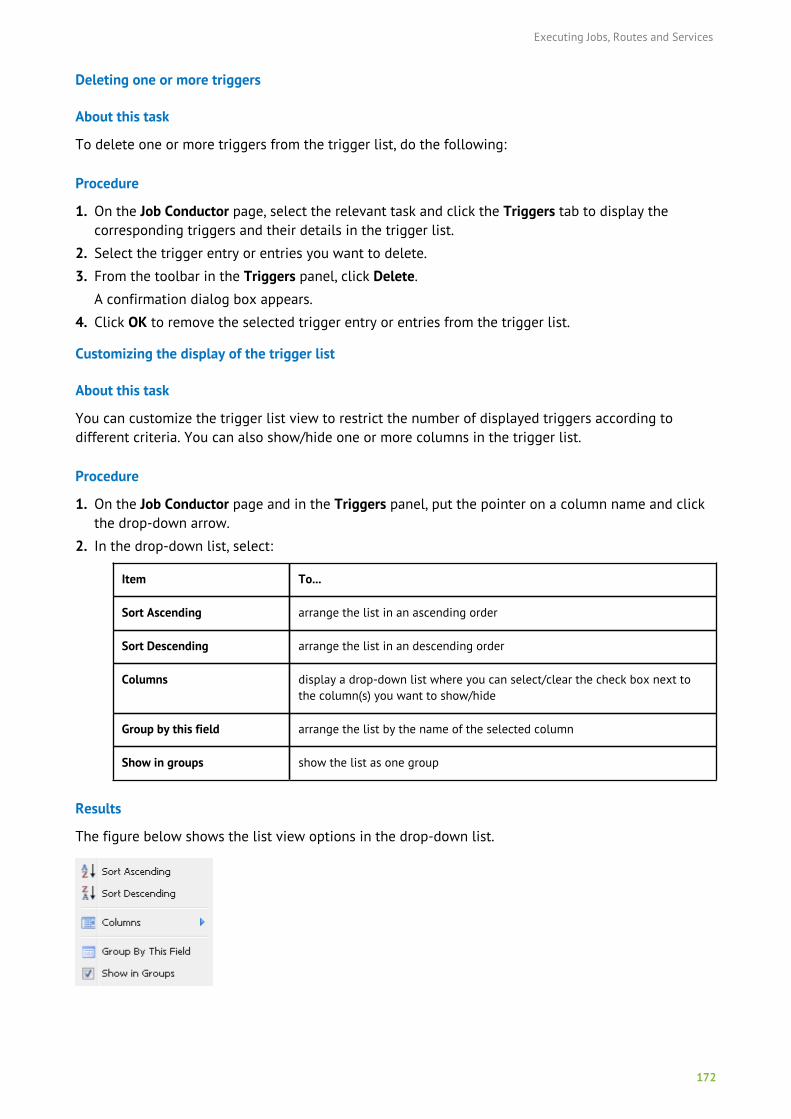
Executing Jobs, Routes and Services
172
Deleting one or more triggers
About this task
To delete one or more triggers from the trigger list, do the following:
Procedure
1. On the Job Conductor page, select the relevant task and click the Triggers tab to display thecorresponding triggers and their details in the trigger list.
2. Select the trigger entry or entries you want to delete.
3. From the toolbar in the Triggers panel, click Delete.
A confirmation dialog box appears.
4. Click OK to remove the selected trigger entry or entries from the trigger list.
Customizing the display of the trigger list
About this task
You can customize the trigger list view to restrict the number of displayed triggers according todifferent criteria. You can also show/hide one or more columns in the trigger list.
Procedure
1. On the Job Conductor page and in the Triggers panel, put the pointer on a column name and clickthe drop-down arrow.
2. In the drop-down list, select:
Item To...
Sort Ascending arrange the list in an ascending order
Sort Descending arrange the list in an descending order
Columns display a drop-down list where you can select/clear the check box next tothe column(s) you want to show/hide
Group by this field arrange the list by the name of the selected column
Show in groups show the list as one group
Results
The figure below shows the list view options in the drop-down list.
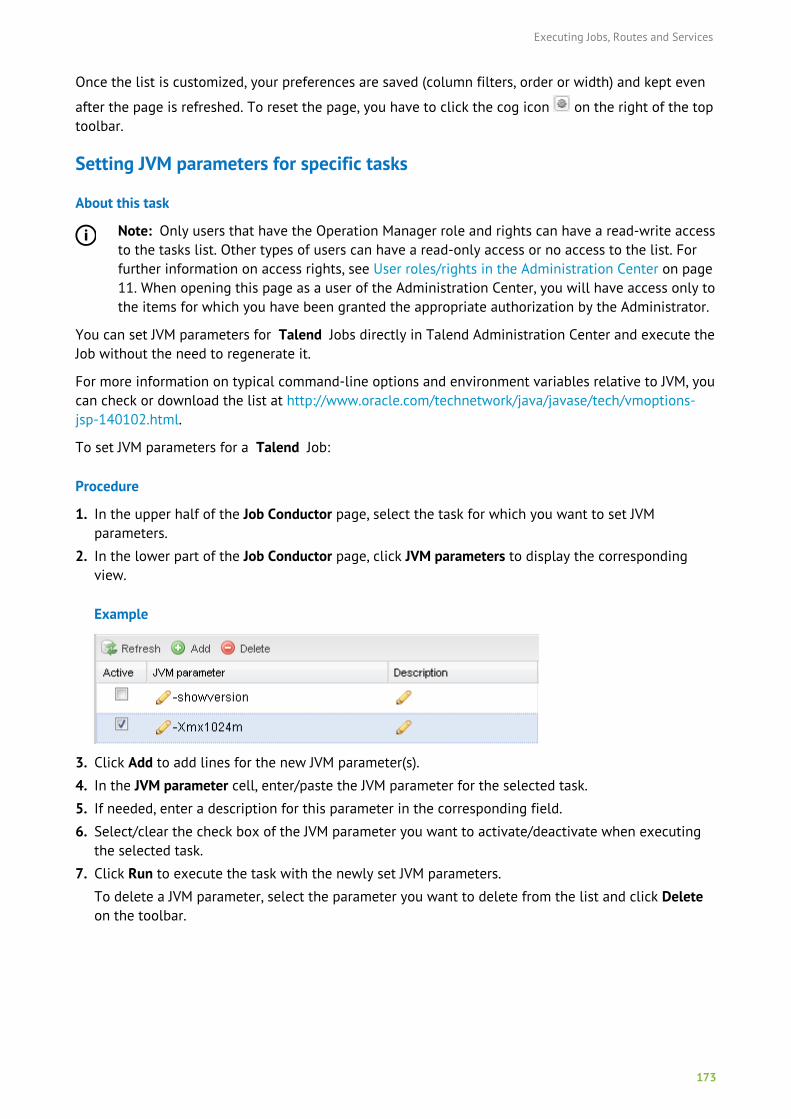
Executing Jobs, Routes and Services
173
Once the list is customized, your preferences are saved (column filters, order or width) and kept even
after the page is refreshed. To reset the page, you have to click the cog icon on the right of the toptoolbar.
Setting JVM parameters for specific tasks
About this task
Note: Only users that have the Operation Manager role and rights can have a read-write accessto the tasks list. Other types of users can have a read-only access or no access to the list. Forfurther information on access rights, see User roles/rights in the Administration Center on page11. When opening this page as a user of the Administration Center, you will have access only tothe items for which you have been granted the appropriate authorization by the Administrator.
You can set JVM parameters for Talend Jobs directly in Talend Administration Center and execute theJob without the need to regenerate it.
For more information on typical command-line options and environment variables relative to JVM, youcan check or download the list at http://www.oracle.com/technetwork/java/javase/tech/vmoptions-jsp-140102.html.
To set JVM parameters for a Talend Job:
Procedure
1. In the upper half of the Job Conductor page, select the task for which you want to set JVMparameters.
2. In the lower part of the Job Conductor page, click JVM parameters to display the correspondingview.
Example
3. Click Add to add lines for the new JVM parameter(s).
4. In the JVM parameter cell, enter/paste the JVM parameter for the selected task.
5. If needed, enter a description for this parameter in the corresponding field.
6. Select/clear the check box of the JVM parameter you want to activate/deactivate when executingthe selected task.
7. Click Run to execute the task with the newly set JVM parameters.
To delete a JVM parameter, select the parameter you want to delete from the list and click Deleteon the toolbar.
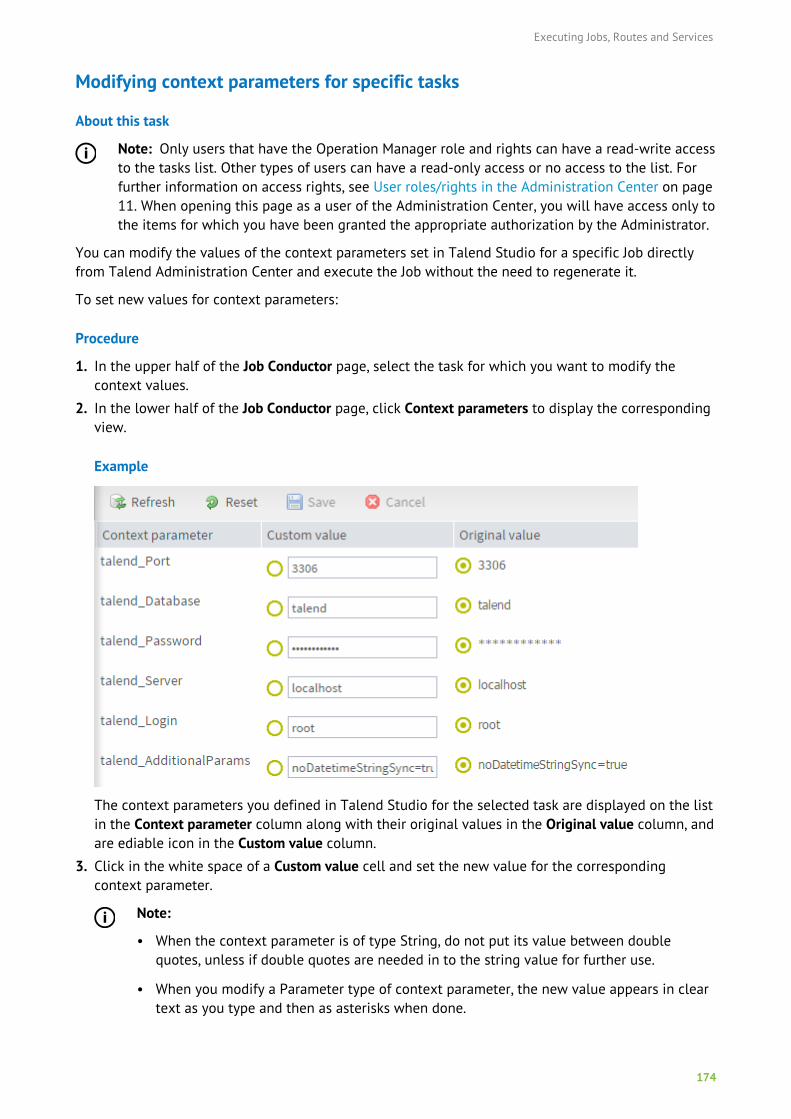
Executing Jobs, Routes and Services
174
Modifying context parameters for specific tasks
About this task
Note: Only users that have the Operation Manager role and rights can have a read-write accessto the tasks list. Other types of users can have a read-only access or no access to the list. Forfurther information on access rights, see User roles/rights in the Administration Center on page11. When opening this page as a user of the Administration Center, you will have access only tothe items for which you have been granted the appropriate authorization by the Administrator.
You can modify the values of the context parameters set in Talend Studio for a specific Job directlyfrom Talend Administration Center and execute the Job without the need to regenerate it.
To set new values for context parameters:
Procedure
1. In the upper half of the Job Conductor page, select the task for which you want to modify thecontext values.
2. In the lower half of the Job Conductor page, click Context parameters to display the correspondingview.
Example
The context parameters you defined in Talend Studio for the selected task are displayed on the listin the Context parameter column along with their original values in the Original value column, andare ediable icon in the Custom value column.
3. Click in the white space of a Custom value cell and set the new value for the correspondingcontext parameter.
Note:
• When the context parameter is of type String, do not put its value between doublequotes, unless if double quotes are needed in to the string value for further use.
• When you modify a Parameter type of context parameter, the new value appears in cleartext as you type and then as asterisks when done.

Executing Jobs, Routes and Services
175
4. Select/clear the check box of the context parameter you want to activate/deactivate the customvalue of when executing the selected task, then click Save to save your changes or Cancel to resetall fields to their original values.
5. Click Run to execute the task with the newly set values of the context parameters.
You can click Reset on the toolbar to go back to the values defined in Talend Studio.
Note: The Prompt feature, which allows the developer to set the value of a context variableat execution time, is only available in Talend Studio.
Sequence of task execution
Note: Only users that have the Operation Manager role and rights can have a read-write accessto the tasks list. Other types of users can have a read-only access or no access to the list. Forfurther information on access rights, see User roles/rights in the Administration Center on page11. When opening this page as a user of the Administration Center, you will have access only tothe items for which you have been granted the appropriate authorization by the Administrator.
Once the task triggering is launched, you can follow every stage of the task sequence on the JobConductor page of Talend Administration Center.
You have full control over the sequencing, as you have the possibility to launch, pause or kill a taskexecution at any time even though the trigger you possibly have set has already started. For moreinformation regarding the controls over the execution, see Working with Job execution tasks on page138.
The task execution sequence is made of various phases including: script generation, Job deployment,Job execution and log or error.
The Status changes at every stage of the task execution.
The execution and error status is refreshed automatically, but you can refresh the display any time byclicking Refresh on the toolbar.
Generating scripts
As defined in Talend Administration Center, the task fetches the relevant Job script in the relevantproject from the Talend Studio Repository and generates the code.
On the Job Conductor page, the Status column shows the Job script generating status.
Once the generation is complete, the status changes to Ready to deploy. The code generated is nowready to be deployed on the execution server(s).
Executing Jobs, Routes and Services
176
If you want to manually launch the generation phase, click on the relevant button on the top toolbar.For more information about the controls, see Working with Job execution tasks on page 138.
Deploying and preparing Job execution
Once the Job script is generated, you can deploy the Job on the execution servers.
Note: Make sure the agent provided is running on the Job sever as described in the relevantreadme.txt.
On the Job Conductor page, you can view the task status changing from Ready to deploy toRequesting deployment.
If you want to manually launch the deployment phase, click on the relevant button on the top toolbar.For more information about the controls, see Working with Job execution tasks on page 138.
Once the deployment is complete, the status changes to Ready to install. This means that the serverhas received the Job and is now ready to execute it.
Running Jobs
Once the Job is deployed and installed on the relevant execution servers, the Job can thus beexecuted just like you would run it within Talend Studio.
On the Job Conductor page, you can view the Job status changing from Ready to run to Requestingrun.
If you want to manually launch the run phase, click on the relevant button on the top toolbar. Formore information about the controls, see Working with Job execution tasks on page 138.
Once the execution is complete, the status switches back to Ready to run. The Job can be executedagain if needed.
In case the task did not complete properly, check the Error Status column as well as the task log forthe Job completion information.
Note: If the statistics mode is enabled for your Job, the Real time statistics window displaysin front of the Job conductor page, once you click Run to execute it. For more information, seeRecovering job execution on page 284.
Errors and Logs
How to check for error messages
If an error is generated during the task triggering, the message is displayed in the Error Statuscolumn.
Check the connections and settings before triggering again the task or executing it directly from theJob Conductor page.
How to display log information
About this task
To display log information for a given task:
Executing Jobs, Routes and Services
177
Procedure
1. From the Job Conductor page, select the task from the task list.
2. In the Actions column, click the Display last execution details icon.
A pop-up window opens with the last execution details of the selected task. From this window, youcan visualize the logs, the context values and the advanced information of the task.
3. Depending on the size of the task log, you can either watch a preview directly in the Log tab ordownload the complete log file by clicking the Download entire log button.
Note that log files are stored in a folder for which the path has been defined in the Job Conductornode of the Configuration page. For more information, see the section about the Job Conductorparameters in Configuring Talend Administration Center on page 27.
Executing data integration Jobs on a server based onAmazon EC2Talend Administration Center allows you to add servers hosted on an Amazon EC2 instance, toschedule Job executions on this instance and to manage the instance start-up and shutdown.
Adding a server hosted on an Amazon EC2 instance
You can add a server hosted on Amazon EC2 on the Servers page.
For more information on how to add a simple execution server (JobServer or Talend Runtime type) ,see Adding an execution server on page 127.
To perform this action via the MetaServlet application, use the addServer command. For moreinformation about the MetaServlet parameters, see Parameters and actions in metaServlet on page400.
Before you begin
If you want to add a server hosted on Amazon EC2:
• You need to have an Amazon EC2 account with the corresponding key pair and security group. Formore information, see the online Amazon EC2 documentation.
• If you wish to use your own Amazon Machine Images (AMI), it must include an Oracle JDK orOpenJDK, Unzip as well as a JobServer installed as a service to enable task deployment on theAmazon cloud.
• It is recommended to increase the Tomcat memory. For more information on how to increase thememory of Tomcat, see Increasing the memory of Tomcat on Talend Help Center.
Procedure
1. From the toolbar on the Servers page, click Add > Add EC2 to open the Execution serverconfiguration panel.
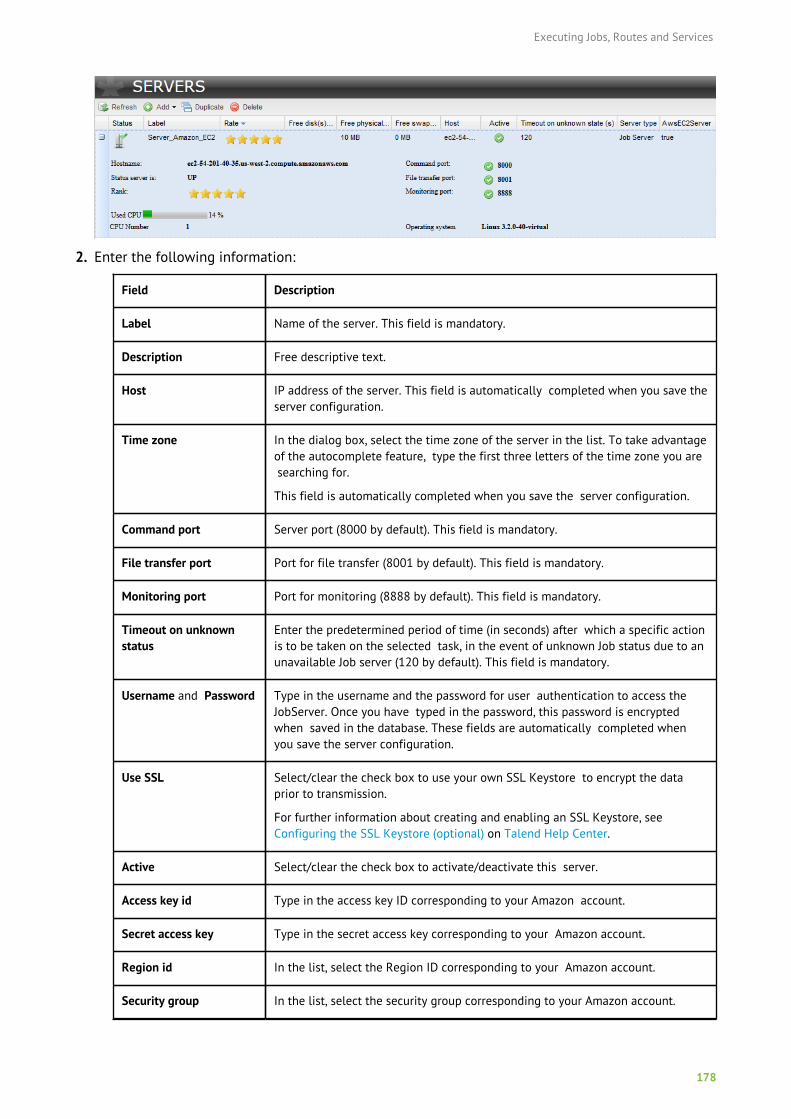
Executing Jobs, Routes and Services
178
2. Enter the following information:
Field Description
Label Name of the server. This field is mandatory.
Description Free descriptive text.
Host IP address of the server. This field is automatically completed when you save theserver configuration.
Time zone In the dialog box, select the time zone of the server in the list. To take advantageof the autocomplete feature, type the first three letters of the time zone you are searching for.
This field is automatically completed when you save the server configuration.
Command port Server port (8000 by default). This field is mandatory.
File transfer port Port for file transfer (8001 by default). This field is mandatory.
Monitoring port Port for monitoring (8888 by default). This field is mandatory.
Timeout on unknownstatus
Enter the predetermined period of time (in seconds) after which a specific actionis to be taken on the selected task, in the event of unknown Job status due to an unavailable Job server (120 by default). This field is mandatory.
Username and Password Type in the username and the password for user authentication to access theJobServer. Once you have typed in the password, this password is encryptedwhen saved in the database. These fields are automatically completed whenyou save the server configuration.
Use SSL Select/clear the check box to use your own SSL Keystore to encrypt the dataprior to transmission.
For further information about creating and enabling an SSL Keystore, seeConfiguring the SSL Keystore (optional) on Talend Help Center.
Active Select/clear the check box to activate/deactivate this server.
Access key id Type in the access key ID corresponding to your Amazon account.
Secret access key Type in the secret access key corresponding to your Amazon account.
Region id In the list, select the Region ID corresponding to your Amazon account.
Security group In the list, select the security group corresponding to your Amazon account.
Executing Jobs, Routes and Services
179
Field Description
Select AMI and AMI/Image id
Select the check box to look into your Amazon account the existing AmazonMachine Image IDs (AMIs) and to select the desired AMI in the AMI list. Note that if you select an AMI in the list, Unzip as well as a JobServer areautomatically deployed on this AMI.
Clear the check box to use your own AMI and to and type in your AMI in the Image id field. Note that if you use your own AMI, you need to have on it a JDK Oracle or OpenJDK, Unzip as well as a JobServer installed as a service to enabletask deployment on the Amazon cloud.
After execution In the list, select the action to perform once the task is executed on the server:Stop to stop the instance, Terminate to remove the instance from Amazon orKeep running to keep it active.
Instance type In the list, select the Amazon instance type.
Instance login Type in the login to connect to your Amazon account.
Key pair In the list, select the key pair corresponding to your Amazon account.
Private key In this field, paste the content of your Amazon private key (.pem file). Note thatyou have to copy the content from the very beginning of the file, including-----BEGIN RSA PRIVATE KEY----- and -----END RSA PRIVATE KEY-----.
3. Click Save to validate the configuration or click Cancel to cancel the configuration. The newlycreated server appears on the list.
4. Once saved, select the server from the server list then click one of the following buttons in theright panel:
• Start instance: to create (if it is not already created) and start the Amazon instance with theembedded execution server.
• Stop instance: to stop the Amazon instance.
• Terminate: to stop the instance and remove it from your Amazon account.
If you want to be informed of the server change of status, you can add a notification on this server.For more information, see How to add a server-based notification on page 102.
For more information on how to edit, duplicate or delete an execution server, see Editing anexecution server on page 130, Duplicating an execution server on page 130 and Deleting anexecution server on page 131.
Scheduling/Executing tasks on a server hosted on an Amazon EC2 instance
About this task
Once you have configured your server hosted on Amazon and started the corresponding instance,you are able to execute one or more Jobs on this server, either by scheduling the Job execution with atrigger, or by running it manually.
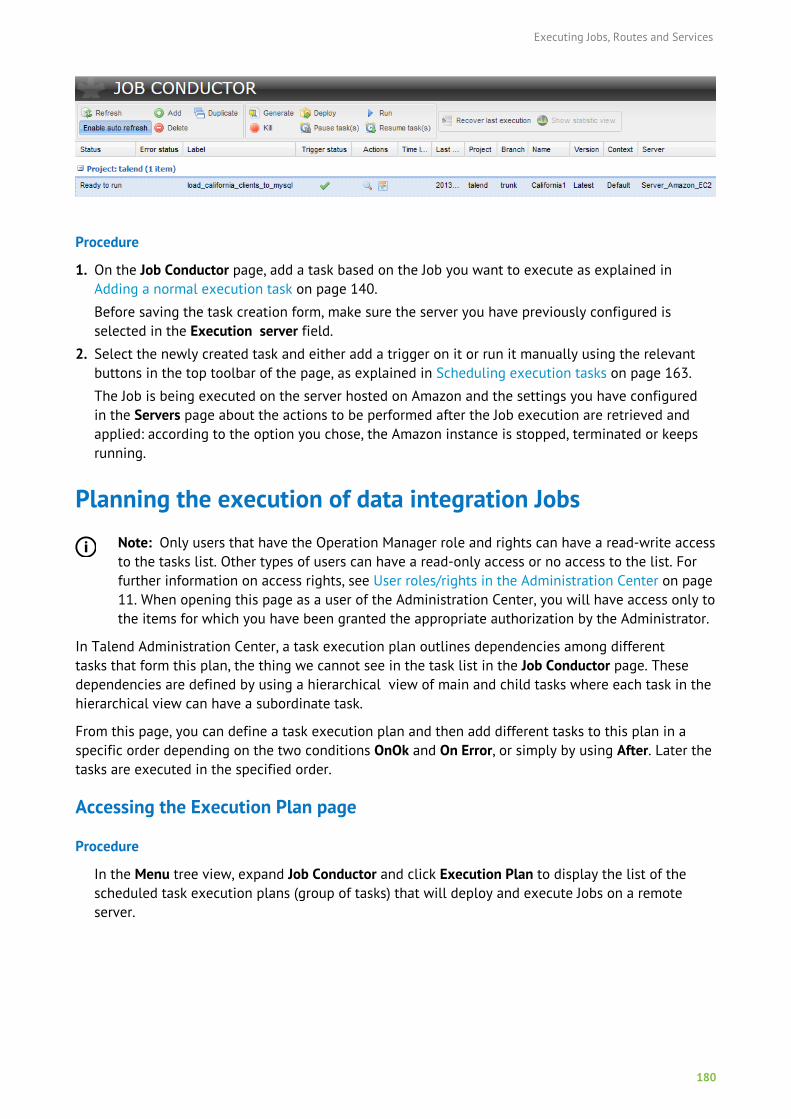
Executing Jobs, Routes and Services
180
Procedure
1. On the Job Conductor page, add a task based on the Job you want to execute as explained inAdding a normal execution task on page 140.
Before saving the task creation form, make sure the server you have previously configured isselected in the Execution server field.
2. Select the newly created task and either add a trigger on it or run it manually using the relevantbuttons in the top toolbar of the page, as explained in Scheduling execution tasks on page 163.
The Job is being executed on the server hosted on Amazon and the settings you have configuredin the Servers page about the actions to be performed after the Job execution are retrieved andapplied: according to the option you chose, the Amazon instance is stopped, terminated or keepsrunning.
Planning the execution of data integration JobsNote: Only users that have the Operation Manager role and rights can have a read-write accessto the tasks list. Other types of users can have a read-only access or no access to the list. Forfurther information on access rights, see User roles/rights in the Administration Center on page11. When opening this page as a user of the Administration Center, you will have access only tothe items for which you have been granted the appropriate authorization by the Administrator.
In Talend Administration Center, a task execution plan outlines dependencies among differenttasks that form this plan, the thing we cannot see in the task list in the Job Conductor page. Thesedependencies are defined by using a hierarchical view of main and child tasks where each task in thehierarchical view can have a subordinate task.
From this page, you can define a task execution plan and then add different tasks to this plan in aspecific order depending on the two conditions OnOk and On Error, or simply by using After. Later thetasks are executed in the specified order.
Accessing the Execution Plan page
Procedure
In the Menu tree view, expand Job Conductor and click Execution Plan to display the list of thescheduled task execution plans (group of tasks) that will deploy and execute Jobs on a remoteserver.

Executing Jobs, Routes and Services
181
When you access this list for the first time, no task execution plan shows on the list.
The default Execution Plan page provides the following information:
Column Description
State State of the task execution plans that are not yet executed. It can be: awaitingexecution or frozen exec.
Note: Frozen exec will require a manual resume operation.
Warning: If the threshold for simultaneous executions is exceeded (bydefault more than 20 executions at the time), all simultaneous executionsabove the threshold will have the status "awaiting execution".
To reset the threshold according to your needs, look for quartz.properties inthe installation folders of Talend Administration Center and change the threshold accordingly in the following parameter: org.quartz.threadPool.threadCount = 20.
Status Status of the current task execution plan. It can be: Ready to generate, Ready todeploy, Ready to run, Deployed, Killed or Incomplete configuration.
Error status Error message is displayed if the task execution plan does not complete properly.
Label Name of the task execution plan to be executed.
Time left before nexttriggering
Time before the next triggering occurs.
Trigger status Triggering state:
• No trigger: no trigger has been set for this plan;
• Running: the trigger is activated and the plan execution will start;
• Completed: the plan is complete;
• All triggers paused: the trigger has been paused and needs to be resumed manually.
Actions Actions you can do:
•: opens a pop-up window with the last execution details of the selected
plan. From this window, you can visualize the logs, the context values and theadvanced information of a task, as well as navigate between the different task executions.
•: opens the execution history of the selected plan.
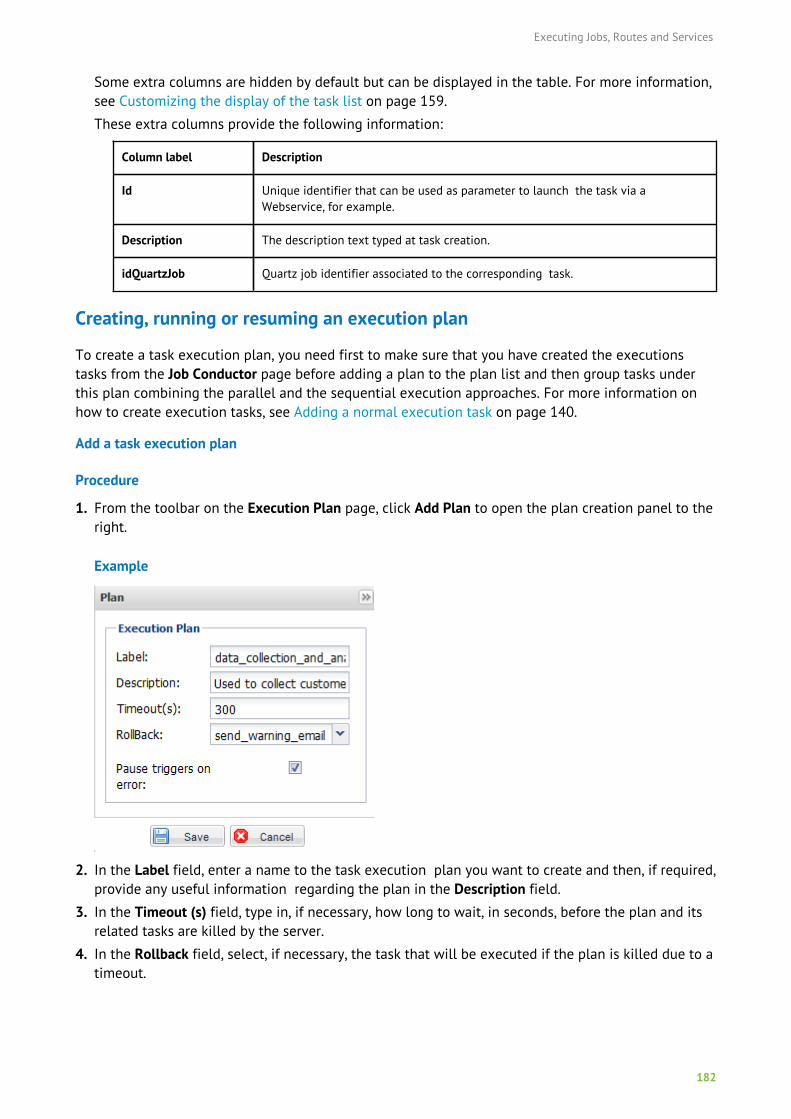
Executing Jobs, Routes and Services
182
Some extra columns are hidden by default but can be displayed in the table. For more information,see Customizing the display of the task list on page 159.
These extra columns provide the following information:
Column label Description
Id Unique identifier that can be used as parameter to launch the task via aWebservice, for example.
Description The description text typed at task creation.
idQuartzJob Quartz job identifier associated to the corresponding task.
Creating, running or resuming an execution plan
To create a task execution plan, you need first to make sure that you have created the executionstasks from the Job Conductor page before adding a plan to the plan list and then group tasks underthis plan combining the parallel and the sequential execution approaches. For more information onhow to create execution tasks, see Adding a normal execution task on page 140.
Add a task execution plan
Procedure
1. From the toolbar on the Execution Plan page, click Add Plan to open the plan creation panel to theright.
Example
2. In the Label field, enter a name to the task execution plan you want to create and then, if required,provide any useful information regarding the plan in the Description field.
3. In the Timeout (s) field, type in, if necessary, how long to wait, in seconds, before the plan and itsrelated tasks are killed by the server.
4. In the Rollback field, select, if necessary, the task that will be executed if the plan is killed due to atimeout.
Executing Jobs, Routes and Services
183
Example
For example, you can set a task that will warn the administrator (by email) that the plan has beenkilled, or that will perform the same action as the last task of the plan that could not be executed.
5. Select the Pause triggers on error check box to pause in order to pause the trigger if an erroroccurs during the execution of a task.
6. Click Save to validate the configuration or Cancel to cancel the creation of the task execution plan.
The newly created plan is listed in the Execution Plan list.
Group tasks under the plan based on OnOK, OnError or After conditions
Procedure
1. In the Execution Plan list, select the plan to which you want to add tasks.
2. Click Root: please configure this node in the right panel.
The Edit planned task panel opens.
3. To define multiple tasks for parallel execution at the root node, select the Use parallel executioncheck box.
The configuration options for parallel execution appear.
Example
4. Click the Add Task button repeatedly to add as many task selection lists as needed, and select thedesired tasks from the lists.
Note that the same task cannot be added several times in the same node for parallel execution.
5. Select the number of tasks for parallel execution from the Simultaneous exec. list, MAX chosen hereto run all the selected tasks in parallel.
Note:
• MAX means all the selected tasks will be executed simultaneously.
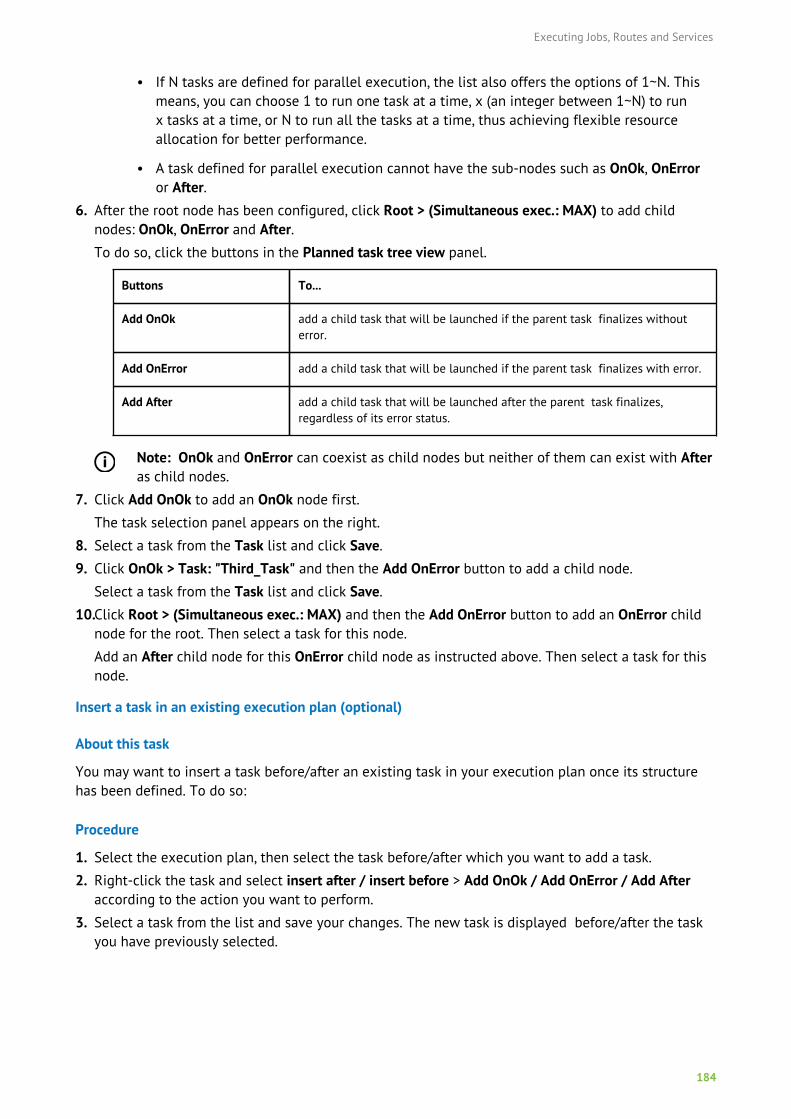
Executing Jobs, Routes and Services
184
• If N tasks are defined for parallel execution, the list also offers the options of 1~N. Thismeans, you can choose 1 to run one task at a time, x (an integer between 1~N) to runx tasks at a time, or N to run all the tasks at a time, thus achieving flexible resourceallocation for better performance.
• A task defined for parallel execution cannot have the sub-nodes such as OnOk, OnErroror After.
6. After the root node has been configured, click Root > (Simultaneous exec.: MAX) to add childnodes: OnOk, OnError and After.To do so, click the buttons in the Planned task tree view panel.
Buttons To...
Add OnOk add a child task that will be launched if the parent task finalizes withouterror.
Add OnError add a child task that will be launched if the parent task finalizes with error.
Add After add a child task that will be launched after the parent task finalizes,regardless of its error status.
Note: OnOk and OnError can coexist as child nodes but neither of them can exist with Afteras child nodes.
7. Click Add OnOk to add an OnOk node first.
The task selection panel appears on the right.
8. Select a task from the Task list and click Save.
9. Click OnOk > Task: "Third_Task" and then the Add OnError button to add a child node.
Select a task from the Task list and click Save.
10.Click Root > (Simultaneous exec.: MAX) and then the Add OnError button to add an OnError childnode for the root. Then select a task for this node.
Add an After child node for this OnError child node as instructed above. Then select a task for thisnode.
Insert a task in an existing execution plan (optional)
About this task
You may want to insert a task before/after an existing task in your execution plan once its structurehas been defined. To do so:
Procedure
1. Select the execution plan, then select the task before/after which you want to add a task.
2. Right-click the task and select insert after / insert before > Add OnOk / Add OnError / Add Afteraccording to the action you want to perform.
3. Select a task from the list and save your changes. The new task is displayed before/after the taskyou have previously selected.
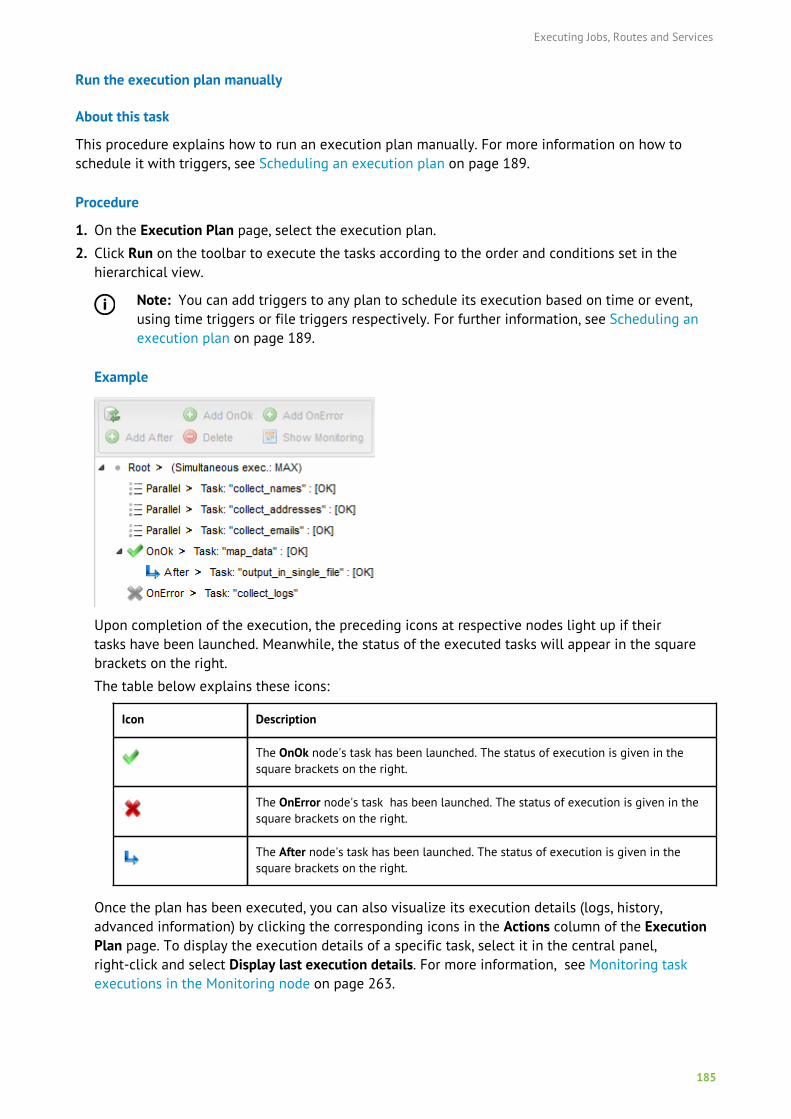
Executing Jobs, Routes and Services
185
Run the execution plan manually
About this task
This procedure explains how to run an execution plan manually. For more information on how toschedule it with triggers, see Scheduling an execution plan on page 189.
Procedure
1. On the Execution Plan page, select the execution plan.
2. Click Run on the toolbar to execute the tasks according to the order and conditions set in thehierarchical view.
Note: You can add triggers to any plan to schedule its execution based on time or event,using time triggers or file triggers respectively. For further information, see Scheduling anexecution plan on page 189.
Example
Upon completion of the execution, the preceding icons at respective nodes light up if theirtasks have been launched. Meanwhile, the status of the executed tasks will appear in the squarebrackets on the right.
The table below explains these icons:
Icon Description
The OnOk node's task has been launched. The status of execution is given in the square brackets on the right.
The OnError node's task has been launched. The status of execution is given in the square brackets on the right.
The After node's task has been launched. The status of execution is given in the square brackets on the right.
Once the plan has been executed, you can also visualize its execution details (logs, history,advanced information) by clicking the corresponding icons in the Actions column of the ExecutionPlan page. To display the execution details of a specific task, select it in the central panel,right-click and select Display last execution details. For more information, see Monitoring taskexecutions in the Monitoring node on page 263.
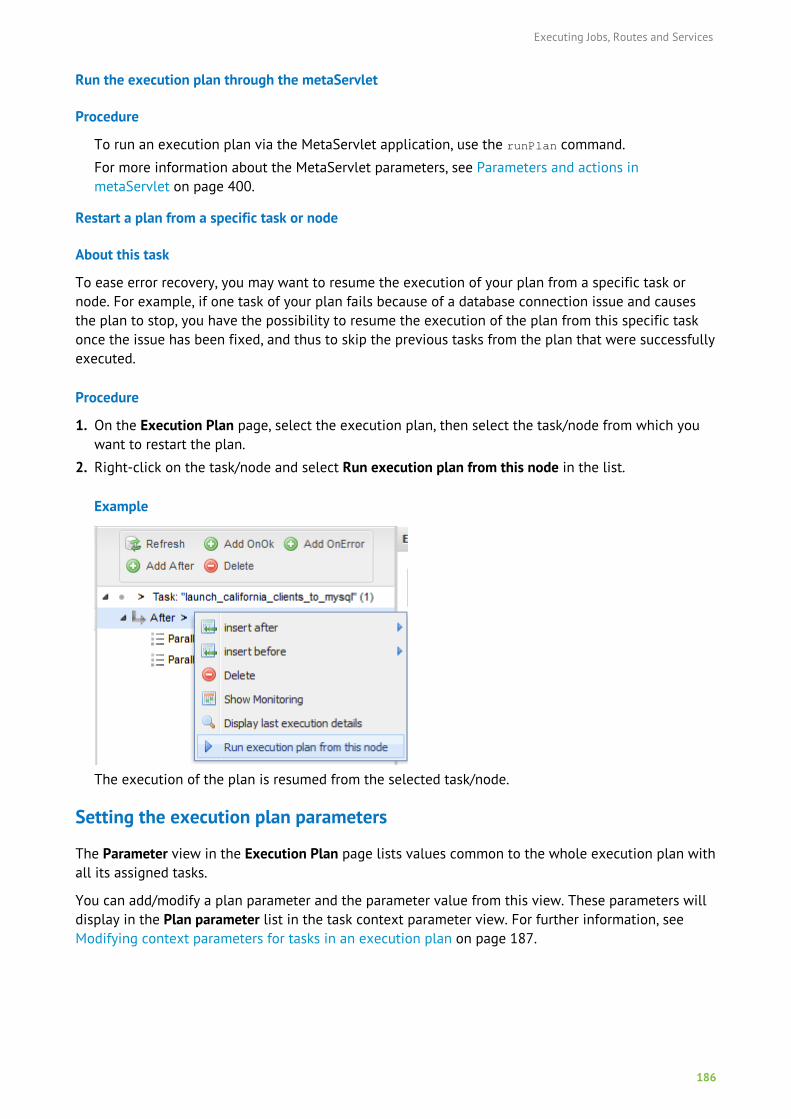
Executing Jobs, Routes and Services
186
Run the execution plan through the metaServlet
Procedure
To run an execution plan via the MetaServlet application, use the runPlan command.
For more information about the MetaServlet parameters, see Parameters and actions inmetaServlet on page 400.
Restart a plan from a specific task or node
About this task
To ease error recovery, you may want to resume the execution of your plan from a specific task ornode. For example, if one task of your plan fails because of a database connection issue and causesthe plan to stop, you have the possibility to resume the execution of the plan from this specific taskonce the issue has been fixed, and thus to skip the previous tasks from the plan that were successfullyexecuted.
Procedure
1. On the Execution Plan page, select the execution plan, then select the task/node from which youwant to restart the plan.
2. Right-click on the task/node and select Run execution plan from this node in the list.
Example
The execution of the plan is resumed from the selected task/node.
Setting the execution plan parameters
The Parameter view in the Execution Plan page lists values common to the whole execution plan withall its assigned tasks.
You can add/modify a plan parameter and the parameter value from this view. These parameters willdisplay in the Plan parameter list in the task context parameter view. For further information, seeModifying context parameters for tasks in an execution plan on page 187.
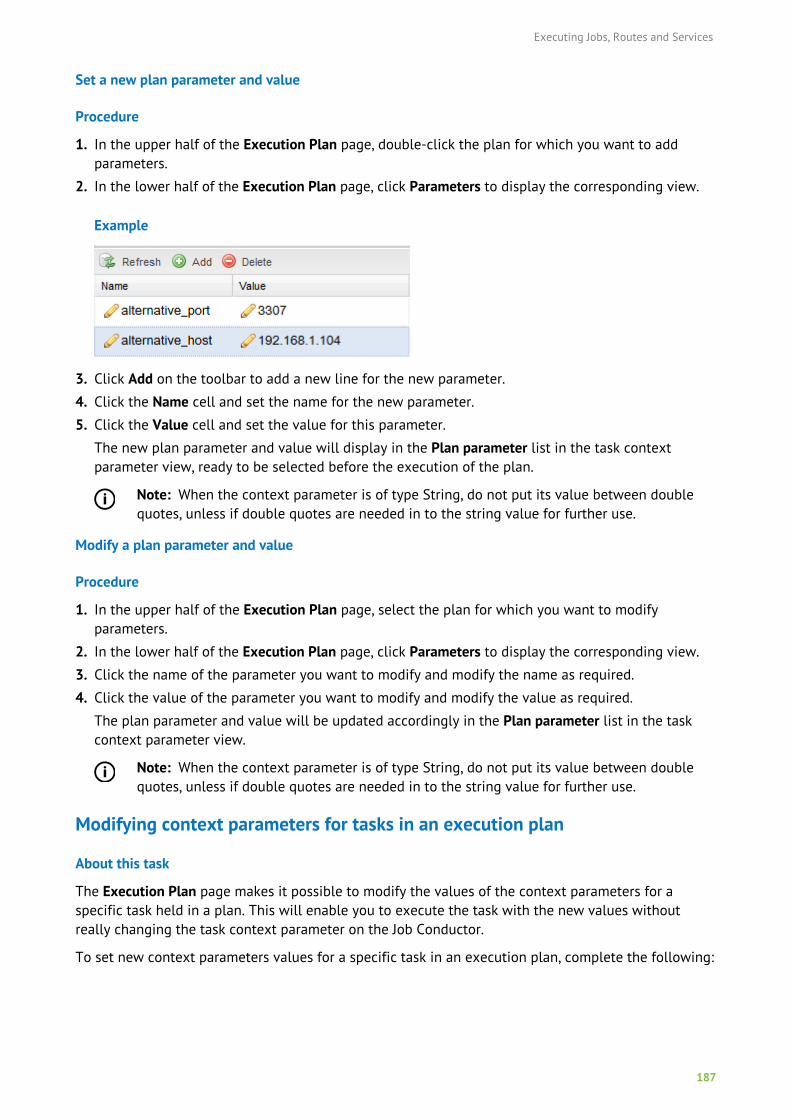
Executing Jobs, Routes and Services
187
Set a new plan parameter and value
Procedure
1. In the upper half of the Execution Plan page, double-click the plan for which you want to addparameters.
2. In the lower half of the Execution Plan page, click Parameters to display the corresponding view.
Example
3. Click Add on the toolbar to add a new line for the new parameter.
4. Click the Name cell and set the name for the new parameter.
5. Click the Value cell and set the value for this parameter.
The new plan parameter and value will display in the Plan parameter list in the task contextparameter view, ready to be selected before the execution of the plan.
Note: When the context parameter is of type String, do not put its value between doublequotes, unless if double quotes are needed in to the string value for further use.
Modify a plan parameter and value
Procedure
1. In the upper half of the Execution Plan page, select the plan for which you want to modifyparameters.
2. In the lower half of the Execution Plan page, click Parameters to display the corresponding view.
3. Click the name of the parameter you want to modify and modify the name as required.
4. Click the value of the parameter you want to modify and modify the value as required.
The plan parameter and value will be updated accordingly in the Plan parameter list in the taskcontext parameter view.
Note: When the context parameter is of type String, do not put its value between doublequotes, unless if double quotes are needed in to the string value for further use.
Modifying context parameters for tasks in an execution plan
About this task
The Execution Plan page makes it possible to modify the values of the context parameters for aspecific task held in a plan. This will enable you to execute the task with the new values withoutreally changing the task context parameter on the Job Conductor.
To set new context parameters values for a specific task in an execution plan, complete the following:
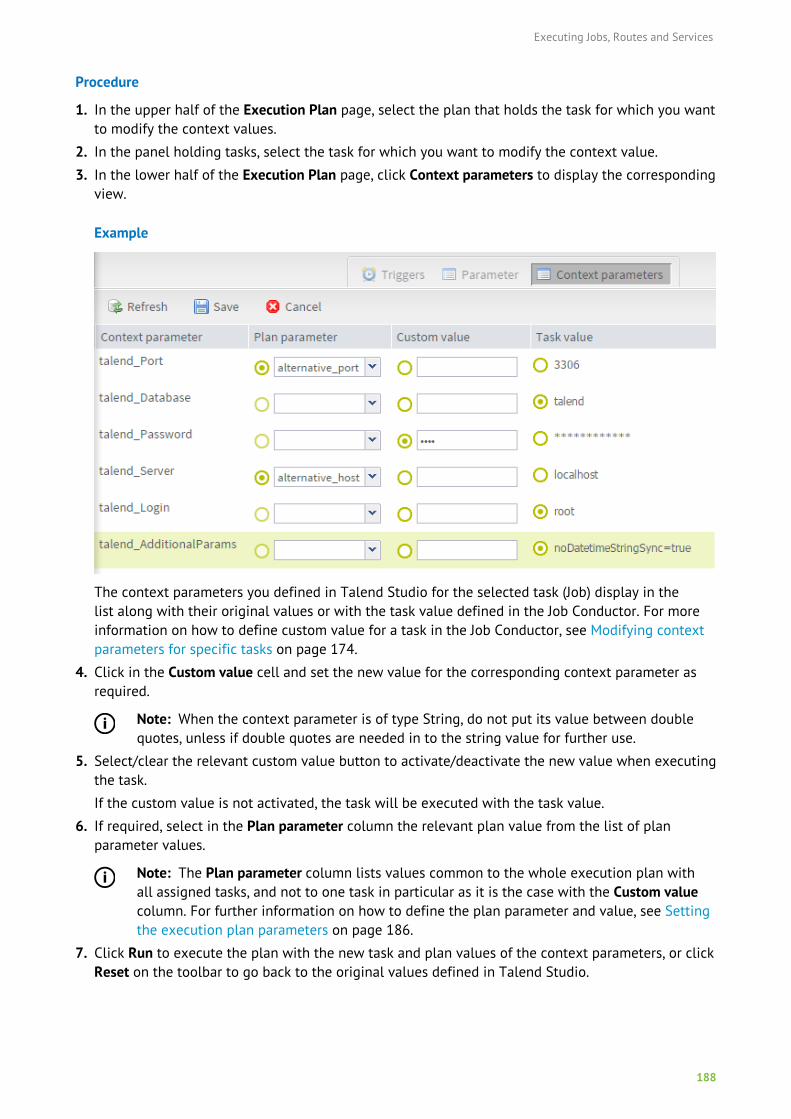
Executing Jobs, Routes and Services
188
Procedure
1. In the upper half of the Execution Plan page, select the plan that holds the task for which you wantto modify the context values.
2. In the panel holding tasks, select the task for which you want to modify the context value.
3. In the lower half of the Execution Plan page, click Context parameters to display the correspondingview.
Example
The context parameters you defined in Talend Studio for the selected task (Job) display in thelist along with their original values or with the task value defined in the Job Conductor. For moreinformation on how to define custom value for a task in the Job Conductor, see Modifying contextparameters for specific tasks on page 174.
4. Click in the Custom value cell and set the new value for the corresponding context parameter asrequired.
Note: When the context parameter is of type String, do not put its value between doublequotes, unless if double quotes are needed in to the string value for further use.
5. Select/clear the relevant custom value button to activate/deactivate the new value when executingthe task.
If the custom value is not activated, the task will be executed with the task value.
6. If required, select in the Plan parameter column the relevant plan value from the list of planparameter values.
Note: The Plan parameter column lists values common to the whole execution plan withall assigned tasks, and not to one task in particular as it is the case with the Custom valuecolumn. For further information on how to define the plan parameter and value, see Settingthe execution plan parameters on page 186.
7. Click Run to execute the plan with the new task and plan values of the context parameters, or clickReset on the toolbar to go back to the original values defined in Talend Studio.
Executing Jobs, Routes and Services
189
Scheduling an execution plan
You can schedule your execution plans based on time or event, using time triggers or file triggersrespectively.
Time-based scheduling can be linked to a simple trigger or to a CRONUI trigger depending on theway you want your time-based triggered plan to be executed, either at a defined time and date orregularly over a period of time.
You can also schedule your plan to be executed based on a file trigger. The presence of a file in adefined location will trigger the job execution plan.
Or you can also schedule your plan to be execute from a Webservice.
Procedure
1. On the Execution Plan page, click the plan you want to schedule then click Add trigger in the lowerpart of the page.
2. Select from the contextual menu the type of trigger you want to add.
A relevant panel opens to the right to enable you creating the relevant trigger.
The procedure to add any of the trigger types to an execution plan is exactly the same as that ofadding a trigger to a task. For more information about adding triggers to an execution plan, see:
• How to add a simple trigger onto a task on page 165.
• How to add a CRON-based trigger on page 166.
• How to add a File trigger on page 169.
Note: If you define several types of triggers for the same task, the first trigger to be checkedis the first to be executed.
For further information about triggers and trigger management, see Scheduling execution tasks onpage 163.
Editing an execution plan
About this task
To edit an execution plan, do the following:
Procedure
1. On the Execution Plan page, select the plan you want to modify.
Its details are displayed in the Information view in the Execution Plan panel to the right.
2. In the Edition view, make the relevant changes to the selected plan.
3. Click Save to validate the modifications or Cancel to cancel them.
Stopping an execution plan
About this task
To stop an execution plan, do the following:
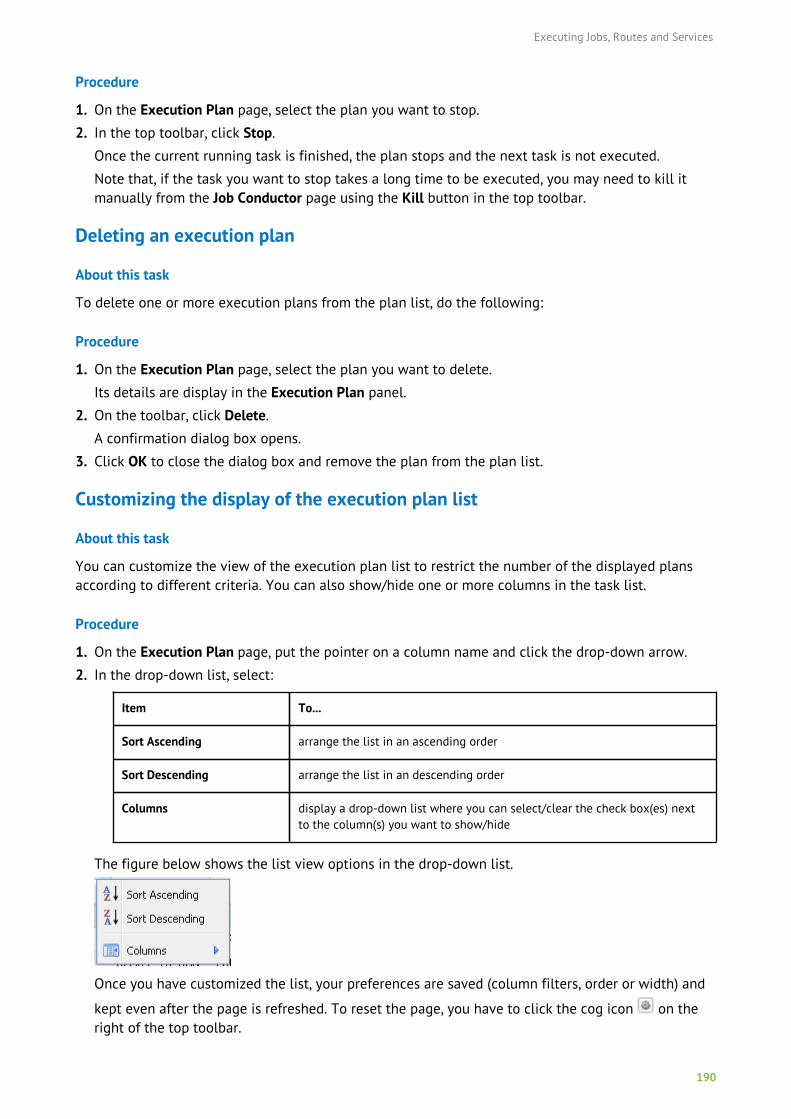
Executing Jobs, Routes and Services
190
Procedure
1. On the Execution Plan page, select the plan you want to stop.
2. In the top toolbar, click Stop.
Once the current running task is finished, the plan stops and the next task is not executed.
Note that, if the task you want to stop takes a long time to be executed, you may need to kill itmanually from the Job Conductor page using the Kill button in the top toolbar.
Deleting an execution plan
About this task
To delete one or more execution plans from the plan list, do the following:
Procedure
1. On the Execution Plan page, select the plan you want to delete.
Its details are display in the Execution Plan panel.
2. On the toolbar, click Delete.
A confirmation dialog box opens.
3. Click OK to close the dialog box and remove the plan from the plan list.
Customizing the display of the execution plan list
About this task
You can customize the view of the execution plan list to restrict the number of the displayed plansaccording to different criteria. You can also show/hide one or more columns in the task list.
Procedure
1. On the Execution Plan page, put the pointer on a column name and click the drop-down arrow.
2. In the drop-down list, select:
Item To...
Sort Ascending arrange the list in an ascending order
Sort Descending arrange the list in an descending order
Columns display a drop-down list where you can select/clear the check box(es) nextto the column(s) you want to show/hide
The figure below shows the list view options in the drop-down list.
Once you have customized the list, your preferences are saved (column filters, order or width) and
kept even after the page is refreshed. To reset the page, you have to click the cog icon on theright of the top toolbar.
Executing Jobs, Routes and Services
191
Refreshing the execution plan list
The plan list is refreshed automatically at regular intervals of time, but you can refresh it any time byclicking Refresh on the toolbar.
Executing Big Data Streaming Jobs from Big Data StreamingConductorIn the Big Data Streaming page of Talend Administration Center, an execution task gathers the scriptgeneration, deployment and execution phases of Big Data Streaming Jobs, that is to say, the SparkStreaming Jobs and the Storm Jobs. You can launch this task, from this single web-based application.
This module is used almost the same way as the Job Conductor module. Therefore, you arerecommended to refer to Executing data integration Jobs from Job Conductor on page 138 todiscover how to use this Big Data Streaming Conductor module while the current section outlinesonly the distinct capability differences of Big Data Streaming Conductor from the capabilities of JobConductor:
• This Conductor is used to manage the Spark Streaming Jobs and the Storm Jobs only.
• The Triggers feature is not available to Big Data Streaming Conductor, because once a streamingJob has launched, it continuously runs and processes each incoming message as long as it ispublished.
• When this Conductor is used to manage a Storm Job, the Monitor button in the Big Data Streamingpage directs you to the Storm UI web console provided by the Storm system itself.
• Since a Storm topology cannot be paused or resumed, you cannot pause or resume a Storm taskfrom the Big Data Streaming page, either.
• When executing a Storm task from this Big Data Streaming Conductor, the Conductor kills andremoves any topology that has the same name as this topology you want to execute in the Stormcluster, and then submits this new topology to the cluster. This feature overrides the way you havedefined to run this topology in the Storm configuration tab of the corresponding Storm Job in theStudio.
• Killing a Storm task from the Big Data Streaming page using the Kill button kills and removes theStorm topology running in the Storm cluster. This feature overrides the way you have defined tokill this topology in the Storm configuration tab of the corresponding Storm Job in the Studio.
For further information about how the Storm configuration tab is used, see Scenario: analyzingpeople's activities using a Storm topology on Talend Help Center.
• The JVM parameters feature is not available to the Big Data Streaming Conductor module.
Publishing Services, Routes, and JobsNote: The Publisher page is deprecated in Talend Administration Center. It is recommended touse a Maven build as the equivalent of this feature.
In Talend Administration Center, the Publisher allows you to publish your Route, Service, or Job itemthat is designed in Talend Studio into the Nexus Artifact repository. This Artifact repository will allowyou to centralize, manage and register all the items created and to be deployed on your executionserver.

Executing Jobs, Routes and Services
192
Access to the Publisher page depends on your license. For more information, please refer to Whatmodules and features are available depending on your license on page 9.
Working with publishing tasks
Note: Only users that have the Operation Manager role and rights can have a read-write accessto the tasks list. Other types of users can have a read-only access or no access to the list. Forfurther information on access rights, see User roles/rights in the Administration Center on page11. When opening this page as a user of the Administration Center, you will have access only tothe items for which you have been granted the appropriate authorization by the Administrator.
The Publisher page allows you to work with publishing tasks to publish your Route, Service or Jobitem that is designed in Talend Studio into the Nexus (version 2) artifact repository.
Note: To publish the Route, Service or Job item into the artifact repository, you can also usethe Commandline. Type in help to show the list of commands and their respective description.For more information about Commandline, see CommandLine features on page 391.
Accessing the publishing task list
Before you begin
• the CommandLine application is started.
• Nexus artifact repository is started and its connection parameters are filled in the ArtifactRepository node of the Configuration page. For more information, see Setting up the artifactrepository parameters on page 36.
Procedure
To access the publishing task list, complete the following:
In the Menu tree view, click Conductor, then Publisher to display the list of tasks that will publishyour Route, Service or Job item into the artifact repository.
When you access this list for the first time, no task shows on the list.
The default Publisher page provides the following information:
Column label Description
Status Status of the current task. It can be: Ready to publish, Publishing, Published,Unknown, Incomplete configuration.
Error status Error message is displayed if the task does not complete properly.
Label Name of the task to be executed.
Active True or false indicating if the publishing task is active or not. If a task isdeactivated, it can not be published.
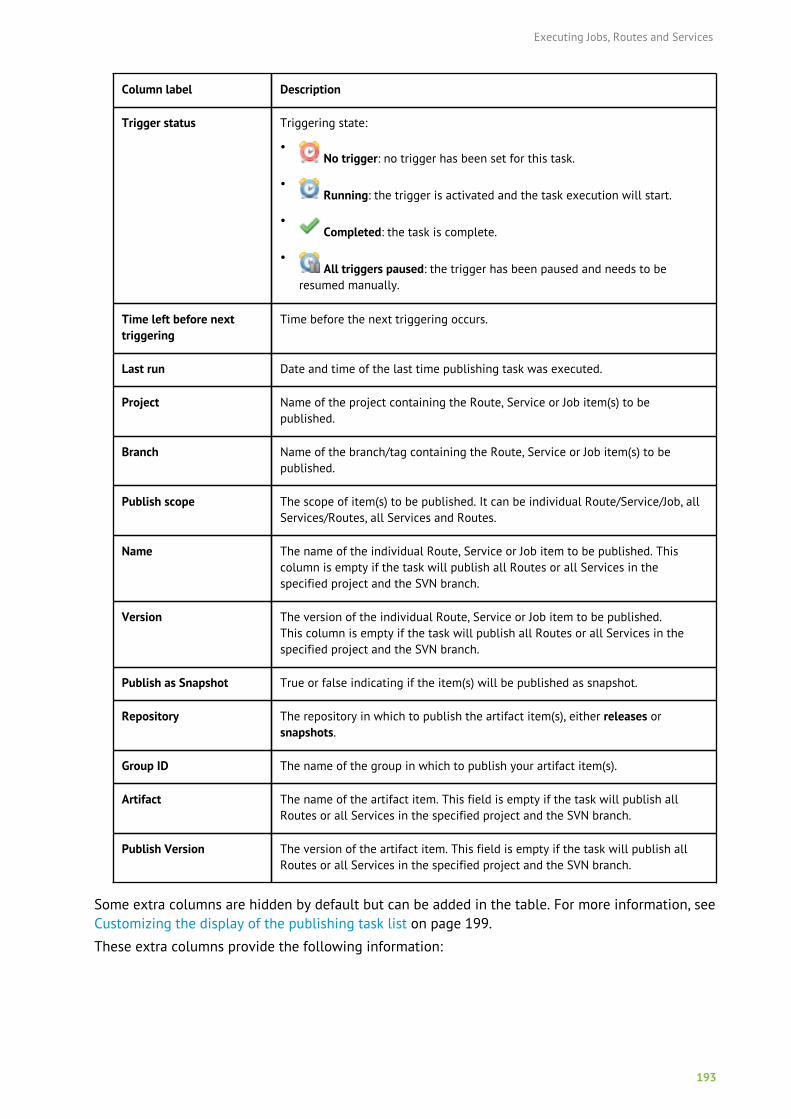
Executing Jobs, Routes and Services
193
Column label Description
Trigger status Triggering state:
• No trigger: no trigger has been set for this task.
• Running: the trigger is activated and the task execution will start.
• Completed: the task is complete.
• All triggers paused: the trigger has been paused and needs to be
resumed manually.
Time left before nexttriggering
Time before the next triggering occurs.
Last run Date and time of the last time publishing task was executed.
Project Name of the project containing the Route, Service or Job item(s) to bepublished.
Branch Name of the branch/tag containing the Route, Service or Job item(s) to bepublished.
Publish scope The scope of item(s) to be published. It can be individual Route/Service/Job, allServices/Routes, all Services and Routes.
Name The name of the individual Route, Service or Job item to be published. Thiscolumn is empty if the task will publish all Routes or all Services in thespecified project and the SVN branch.
Version The version of the individual Route, Service or Job item to be published.This column is empty if the task will publish all Routes or all Services in thespecified project and the SVN branch.
Publish as Snapshot True or false indicating if the item(s) will be published as snapshot.
Repository The repository in which to publish the artifact item(s), either releases orsnapshots.
Group ID The name of the group in which to publish your artifact item(s).
Artifact The name of the artifact item. This field is empty if the task will publish allRoutes or all Services in the specified project and the SVN branch.
Publish Version The version of the artifact item. This field is empty if the task will publish allRoutes or all Services in the specified project and the SVN branch.
Some extra columns are hidden by default but can be added in the table. For more information, seeCustomizing the display of the publishing task list on page 199.
These extra columns provide the following information:
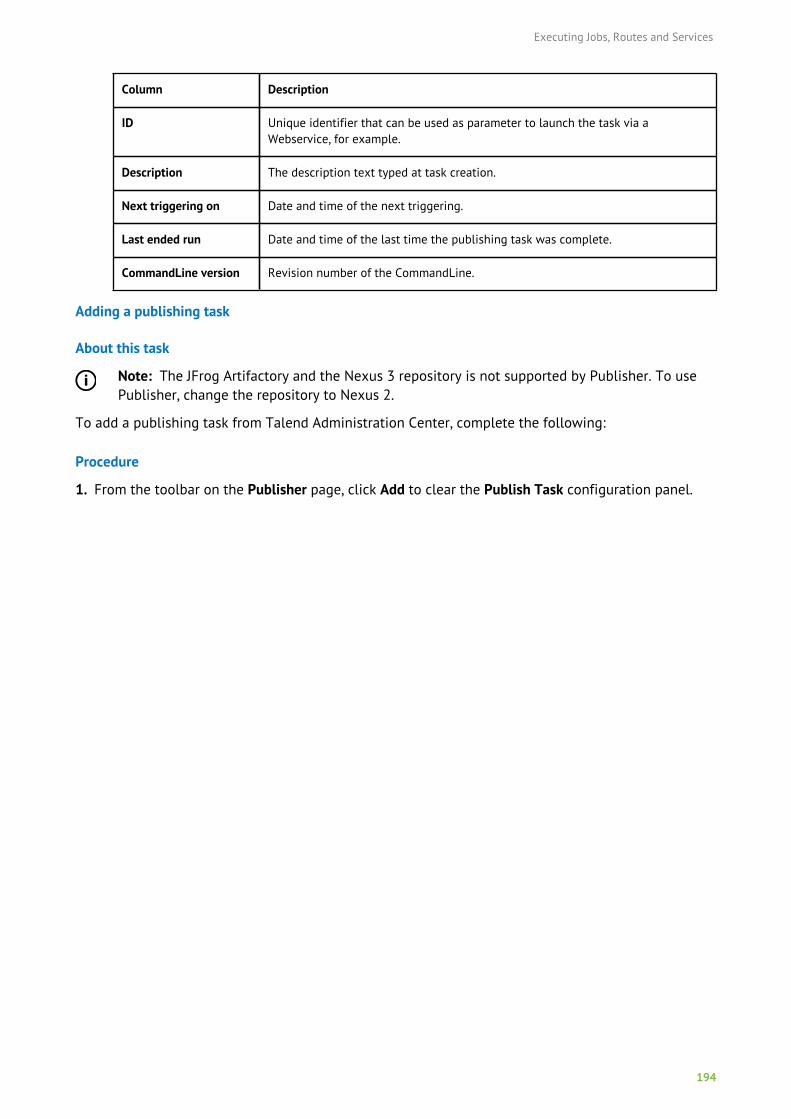
Executing Jobs, Routes and Services
194
Column Description
ID Unique identifier that can be used as parameter to launch the task via aWebservice, for example.
Description The description text typed at task creation.
Next triggering on Date and time of the next triggering.
Last ended run Date and time of the last time the publishing task was complete.
CommandLine version Revision number of the CommandLine.
Adding a publishing task
About this task
Note: The JFrog Artifactory and the Nexus 3 repository is not supported by Publisher. To usePublisher, change the repository to Nexus 2.
To add a publishing task from Talend Administration Center, complete the following:
Procedure
1. From the toolbar on the Publisher page, click Add to clear the Publish Task configuration panel.
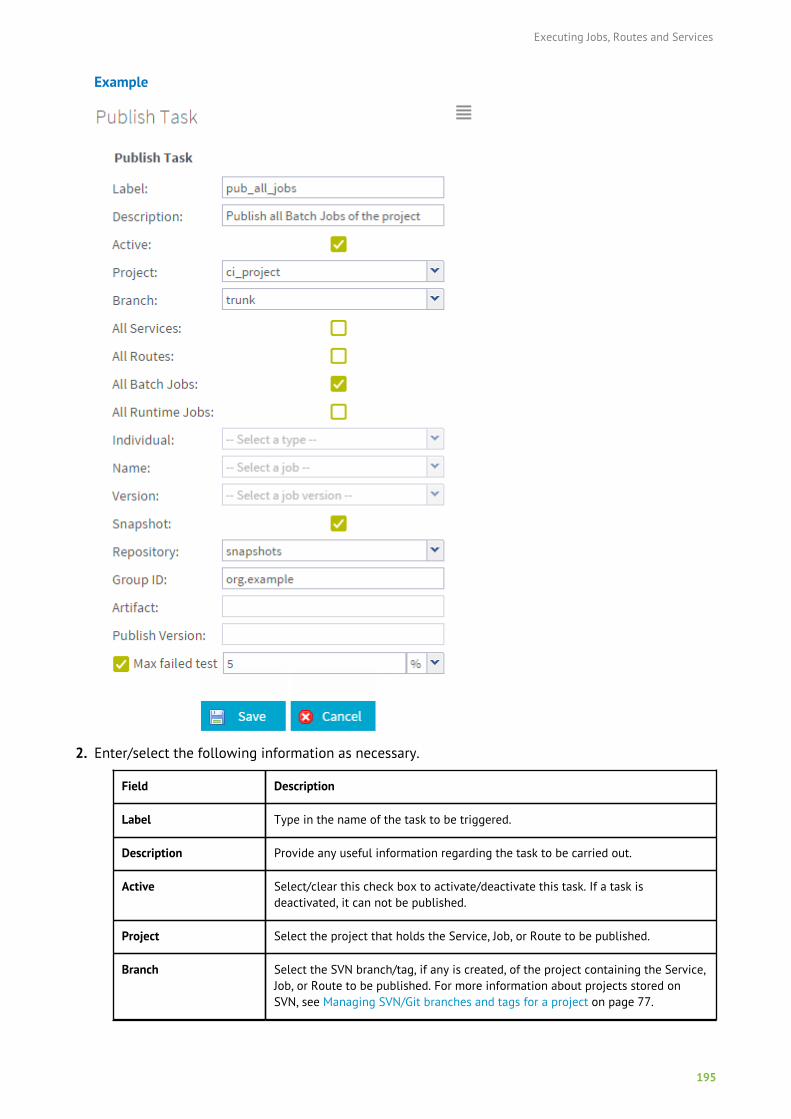
Executing Jobs, Routes and Services
195
Example
2. Enter/select the following information as necessary.
Field Description
Label Type in the name of the task to be triggered.
Description Provide any useful information regarding the task to be carried out.
Active Select/clear this check box to activate/deactivate this task. If a task isdeactivated, it can not be published.
Project Select the project that holds the Service, Job, or Route to be published.
Branch Select the SVN branch/tag, if any is created, of the project containing the Service,Job, or Route to be published. For more information about projects stored onSVN, see Managing SVN/Git branches and tags for a project on page 77.
Executing Jobs, Routes and Services
196
Field Description
All Services Select this check box to publish all the Services in the project and branchdefined above at execution.
Note: When you publish a task of All Services type, the services willalways get updated with all last versions and new developed serviceswill be added automatically.
All Routes Select this check box to publish all the Routes in the project and branch definedabove at execution.
All Batch Jobs Select this check box to publish all the Standard Jobs in the project and branchdefined above at execution.
All Runtime Jobs Select this check box to publish all the OSGI Jobs in the project and branchdefined above at execution.
Individual Select from Route, Service, Job - Runtime (.kar file) or Job - Batch (.jar file) inthe list to publish. This field is disabled when All Services, All Routes, All BatchJobs or All Runtime Jobs check box is selected.
Note: Note that Individual Job is the option to be used to publish theREST service because Individual Service and All Services only concernSOAP services.
Name All the items of the Individual from the selected project are shown in the list.Select the item you want to publish. This field is disabled when All Services, AllRoutes, All Batch Jobs or All Runtime Jobs check box is selected.
Version The versions of the item are automatically retrieved. Select Latest or one of theexisting versions in the SVN project from the list. This field is disabled when AllServices, All Routes, All Batch Jobs or All Runtime Jobs check box is selected.
Publish as Snapshot Select this check box to publish the item(s) as snapshot.
Repository Select releases or snapshots. By default, the release or snapshot repository isselected depending on the Publish as Snapshot check box.
Group ID By default this field is automatically filled in with the org.example group ID.Change it by typing in the name of the group in which to publish your artifactitem.
Artifact This field is automatically filled in with the name of the item to publish. Changeit according to your need. This field is disabled when All Services, All Routes, AllBatch Jobs or All Runtime Jobs check box is selected.
Publish Version This field is automatically filled in with the version of the item to publish.Change it according to your need. This field is disabled when All Services, AllRoutes, All Batch Jobs or All Runtime Jobs check box is selected.

Executing Jobs, Routes and Services
197
Field Description
Max failed test This option appears when the All Routes or All Batch Jobs check box is selected,or when Route or Job - Batch is selected in the Individual list. Select this checkbox and enter the maximum number or percentage of failed tests associatedwith Jobs or Routes. When launching the publish task, if the actual failed testsexceed this value, the Jobs or Routes will not be published and an error messageTest failed exceeded the threshold will be shown in the Error statuscolumn of the Publisher page. For more information on how to create andexecute tests associated with Jobs and Routes, see the Talend Studio User Guideand the Talend Software Development Life Cycle Best Practices Guide.
3. Click Save to validate the configuration or Cancel to cancel the creation of the task.
Editing a publishing task
About this task
To edit a task:
Procedure
1. On the Publisher page, select the task you want to modify.
Its details are displayed in the publishing task configuration panel.
2. Make the relevant changes to the task details where necessary.
3. Click Save to validate the changes or Cancel to cancel the changes.
Duplicating a publishing task
About this task
To avoid creating a new task from scratch, you can duplicate an existing one and work around itsmetadata to have a new task in the list.
To duplicate a task, complete the following:
Procedure
1. On the Publisher page, select the task you want to duplicate.
2. On the toolbar, click Duplicate.
The panel to the right shows the metadata of the selected task.
3. Modify the metadata as needed in order to create a new task.
4. Click Save to validate the operation or Cancel to cancel it.
The new task is listed in the Execution tasks list.
Deleting a publishing task
About this task
To delete one or more tasks from the task list, complete the following:
Procedure
1. On the Publisher page, select the task you want to delete.
Its details are displayed in the publishing task configuration panel.

Executing Jobs, Routes and Services
198
2. On the toolbar, click Delete.
A confirmation dialog box appears.
3. Click OK to remove the task from the task list.
Searching a publishing task
If you have a great number of tasks and want to filter them, you can do so by typing key words or byselecting some check boxes in the Filters fields of the columns listed below:
• Active
• Artifact
• Branch
• CommandLine version
• Description
• Error status
• Group ID
• ID
• Label
• Last ended run
• Last run
• Name
• Next triggering on
• Project
• Publish as Snapshot
• Publish scope
• Publish Version
• Repository
• Status
• Time left before next triggering
• Trigger status
• Version
Example of how to apply a filter on the label of several tasks
Procedure
1. Click the arrow on the Label column to display its options, then select the Filters option.
Executing Jobs, Routes and Services
199
Example
2. Type in the name by which you want to filter the tasks. Here, the text Service is used to displayonly the tasks whose names include these terms.
The filtered column appears in blue bold. To remove the filter, clear the Filters check box in thiscolumn.
To remove all filters and reset the page, click the cog icon on the right of the top toolbar.
Customizing the display of the publishing task list
About this task
You can customize the publishing task list view to restrict the number of displayed tasks according todifferent criteria. You can also show/hide one or more columns in the task list.
Procedure
1. On the Publisher page, put the pointer on a column name and click the drop-down arrow.
2. In the drop-down list, select:
Item To...
Sort Ascending arrange the list in an ascending order
Sort Descending arrange the list in an descending order
Columns display a list where you can select/clear the check box next to the column(s)you want to show/hide
Filters display a list where you can select/clear the check box next to the filter(s) bywhich you want to filter the tasks
The below figure shows the list view options in the drop-down list.
Once you have customized the list, your preferences are saved (column filters, order or width). Toreset the page, you have to click the cog icon on the right of the top toolbar.
Executing Jobs, Routes and Services
200
Refreshing the publishing task list
The task list is refreshed automatically at regular intervals of time, but you can refresh it any time byclicking Refresh on the toolbar.
Launching a publishing task
About this task
Once the task is created and listed in the publishing task list, you will be able to launch it via thetoolbar at the top of the Publisher page. To do so:
Procedure
1. Select the task in the publishing task list.
2. Click the Publish button of the toolbar.
The status of the task changes from Ready to publish to Publishing and then Published.
Note: If you select a task that is not active and click the Publish button of the toolbar,a dialog box appears asking if you want to activate the task before publish. Click OK toactivate the task and publish it or click Cancel to cancel it.
You can also define a trigger to launch a publishing task. For further information, see Schedulingpublishing tasks on page 200.
Accessing the artifact repository
From the Publisher page of Talend Administration Center, you can access at any time the Nexusartifact repository containing the two snapshots and releases artifact repositories on which all theartifacts to be deployed and started in Talend Runtime are published. To do so, simply click the OpenArtifact repository button in the toolbar of the Publisher.
Once connected to your artifact repository, you will be able to access all the available repositories andbrowse to all the artifacts published in them.
For more information on how to install these artifact repositories, see Installing and configuringTalend Artifact Repository on Talend Help Center.
Nexus is based on Sonatype Nexus: for more information on how to use it, see Sonatype Nexus'sdocumentation on http://www.sonatype.org/nexus.
Scheduling publishing tasks
Note: Only users that have the Operation Manager role and rights can have a read-write accessto the tasks list. Other types of users can have a read-only access or no access to the list. Forfurther information on access rights, see User roles/rights in the Administration Center on page11. When opening this page as a user of the Administration Center, you will have access only tothe items for which you have been granted the appropriate authorization by the Administrator.
On the Publisher page, you can schedule a task using simple or periodic multi-platform CRON-liketriggers (CronTrigger).
On the Triggers view at the bottom half of the Publisher page, you can add triggers, edit triggers,enable/disable triggers, delete triggers and customize the trigger list.
The trigger list includes the following information:
Executing Jobs, Routes and Services
201
Column Description
Label Trigger name
Description Provide any useful information regarding the trigger
Trigger type CronTrigger
Status Status of the current trigger.
• Normal: The trigger is ready to be launched
• Waiting for the task to end: The triggering has taken place, the task execution is in
progress
• Paused: The trigger is disabled
• Completed: The trigger execution is complete
• Error/Invalid: The trigger execution has failed or is invalid
Previoustriggering on
Date and time when the previous triggering took place
Time left beforenext triggering
Time to elapse before the next triggering starts.
Next triggering on Date and time when the next triggering will take place.
Number oftriggerings
Estimated number of triggering that will take place over the selected period of time and/or forthe number of triggering repetition set.
Final triggering on Estimated or set triggering end time.
Start time Date and time when the first triggering takes place.
End time Actual time when the last triggering ended.
Adding a trigger for a publishing task
About this task
To schedule the execution of your tasks, you can set CRON-based triggers onto a task which will startits execution on a regular basis (daily, weekly, monthly and so on). To do that:
Procedure
1. On the Publisher page, select the task you want to implement a trigger on.
2. In the Triggers view, click Add trigger... and then select Add CRON trigger from the drop-down list.
The CRON trigger configuration panel opens.
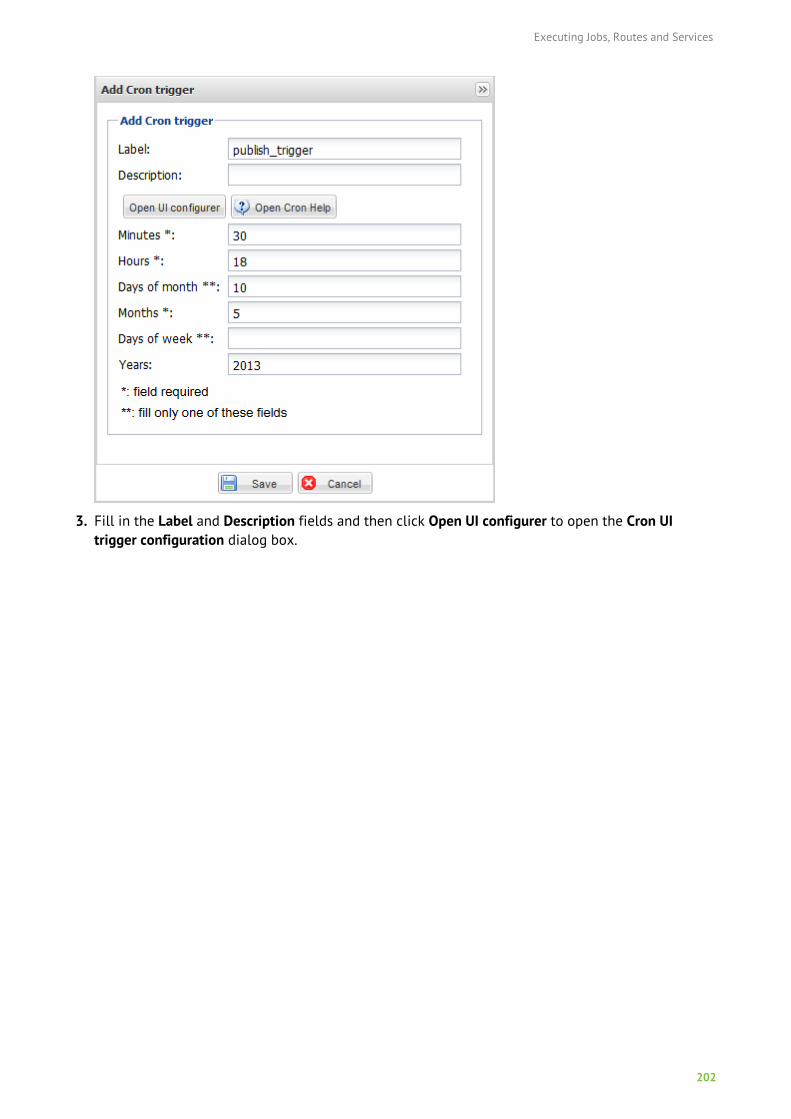
Executing Jobs, Routes and Services
202
3. Fill in the Label and Description fields and then click Open UI configurer to open the Cron UItrigger configuration dialog box.
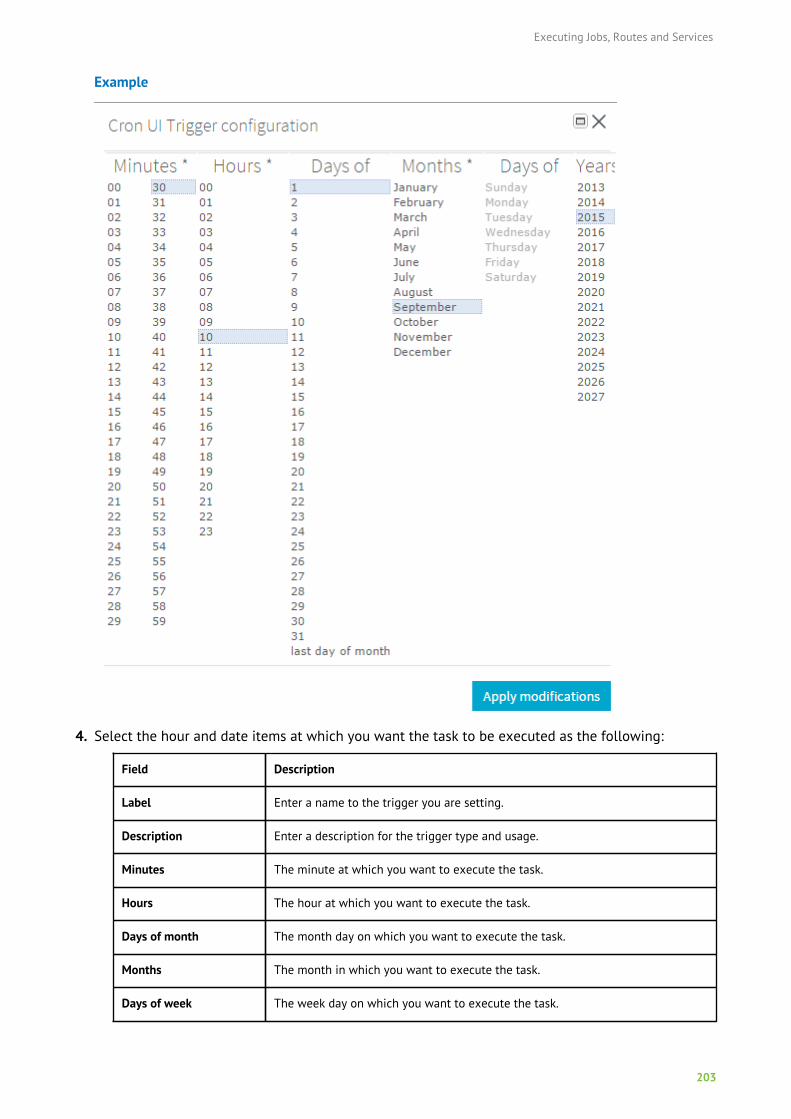
Executing Jobs, Routes and Services
203
Example
4. Select the hour and date items at which you want the task to be executed as the following:
Field Description
Label Enter a name to the trigger you are setting.
Description Enter a description for the trigger type and usage.
Minutes The minute at which you want to execute the task.
Hours The hour at which you want to execute the task.
Days of month The month day on which you want to execute the task.
Months The month in which you want to execute the task.
Days of week The week day on which you want to execute the task.
Executing Jobs, Routes and Services
204
Field Description
Years The year in which you want to execute the task.
Fields marked with **: Select one or more week day OR one or more dates.
Fields marked with *: mandatory information.
For multiple selection, press Ctrl + click.
5. Click Apply modifications.
The dialog box closes and the selected data is displayed in the Add Cron trigger configurationpanel.
6. Click Save to validate the CRON-based trigger configuration or Cancel to cancel the operation.
Results
The Trigger Status for the selected task changes from No Trigger to At least one trigger is running.
Editing the trigger of a publishing task
About this task
To edit a trigger entry, do the following:
Procedure
1. On the Publisher page, select the relevant task to display the corresponding triggers in the triggerlist.
2. Select the trigger entry you want to modify.
Its details are displayed in the configuration panel to the right.
3. Make the relevant changes to trigger details where necessary.
4. Click Save to validate the changes or click Cancel to cancel.
Disabling/Enabling the trigger of a publishing task
About this task
To disable or enable a trigger, do the following:
Procedure
1. On the Publisher page, select the relevant task to display the corresponding triggers and theirdetails in the trigger list.
2. Select the trigger entry you want to disable/enable.
3. From the toolbar in the Triggers panel, click Pause trigger/Resume trigger.The selected trigger icon displays as disabled/enabled.
Note: You cannot disable/enable a trigger if its status is Completed.
Deleting one or more triggers of a publishing task
About this task
To delete one or more triggers from the trigger list, do the following:
Executing Jobs, Routes and Services
205
Procedure
1. On the Publisher page, select the relevant task and click the Triggers tab to display thecorresponding triggers and their details in the trigger list.
2. Select the trigger entry or entries you want to delete.
3. From the toolbar in the Triggers panel, click Delete.
A confirmation dialog box appears.
4. Click OK to remove the selected trigger entry or entries from the trigger list.
Sorting the triggers
About this task
You can customize the trigger list view to restrict the number of displayed triggers according todifferent criteria. You can also show/hide one or more columns in the trigger list.
Procedure
1. On the Publisher page and in the Triggers panel, put the pointer on a column name and click thedrop-down arrow.
2. In the drop-down list, select:
Item To...
Sort Ascending arrange the list in an ascending order
Sort Descending arrange the list in an descending order
Columns display a drop-down list where you can select/clear the check box next tothe column(s) you want to show/hide
The figure below shows the list view options in the drop-down list.
Once the list is customized, your preferences are saved (column filters, order or width) and kept
even after the page is refreshed. To reset the page, you have to click the cog icon on the rightof the top toolbar.
Executing Services, Routes, and data service Jobs, andapplying Profiles from ESB ConductorIn the ESB Conductor page of Talend Administration Center, you can manage ESB execution tasks,including the deployment and execution phases of Services, Routes, data service Jobs and othergeneric OSGi features. For more information, see Working with ESB execution tasks on page 206.You can also apply profiles holding resources and/or configurations throughout all your TalendRuntime s. All these actions can be performed from this single Web-based application. For moreinformation, see Applying a profile from the ESB Conductor on page 216.
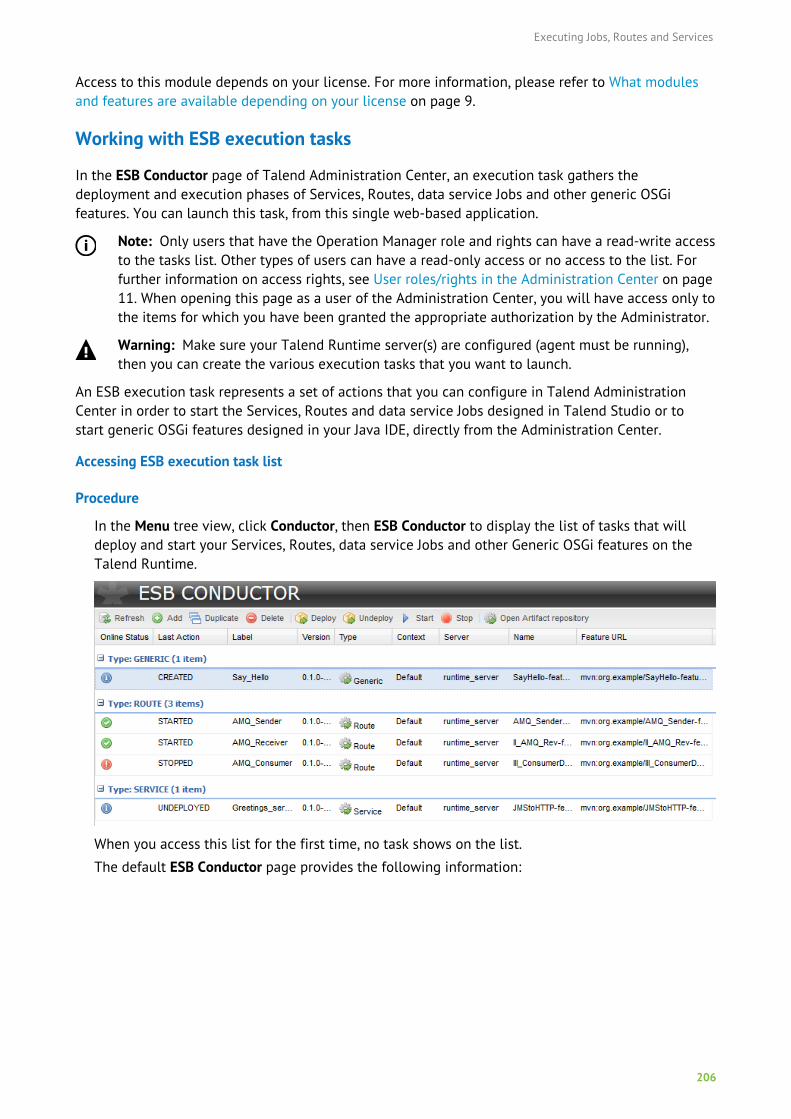
Executing Jobs, Routes and Services
206
Access to this module depends on your license. For more information, please refer to What modulesand features are available depending on your license on page 9.
Working with ESB execution tasks
In the ESB Conductor page of Talend Administration Center, an execution task gathers thedeployment and execution phases of Services, Routes, data service Jobs and other generic OSGifeatures. You can launch this task, from this single web-based application.
Note: Only users that have the Operation Manager role and rights can have a read-write accessto the tasks list. Other types of users can have a read-only access or no access to the list. Forfurther information on access rights, see User roles/rights in the Administration Center on page11. When opening this page as a user of the Administration Center, you will have access only tothe items for which you have been granted the appropriate authorization by the Administrator.
Warning: Make sure your Talend Runtime server(s) are configured (agent must be running),then you can create the various execution tasks that you want to launch.
An ESB execution task represents a set of actions that you can configure in Talend AdministrationCenter in order to start the Services, Routes and data service Jobs designed in Talend Studio or tostart generic OSGi features designed in your Java IDE, directly from the Administration Center.
Accessing ESB execution task list
Procedure
In the Menu tree view, click Conductor, then ESB Conductor to display the list of tasks that willdeploy and start your Services, Routes, data service Jobs and other Generic OSGi features on theTalend Runtime.
When you access this list for the first time, no task shows on the list.
The default ESB Conductor page provides the following information:
Executing Jobs, Routes and Services
207
Column label Description
Online Status The real-time status of the task Feature. It depends on the status of all thebundles the Feature contains.
• : all bundles are active.
•: there are both active and inactive bundles in the Feature.
• : all bundles are not active or the Runtime is down.
•: the Feature is not selected in the list.
•: the Feature is just created and has not been deployed, or just
undeployed.
Last Action Last action performed on the task, it can be: CREATED, UPDATED, STARTED,STOPPED, DEPLOYED, or UNDEPLOYED.
Label Name of the task to be deployed and executed.
Name Name of the Feature to be deployed and executed.
Version Version of the Feature as defined in the artifacts designed in Talend Studio oras defined in the Features file of your generic OSGi feature build in Java.
Type Type of the artifact to be deployed and started. It can be: Route, Service,Generic.
Context Name of the context as defined for the Feature.
Server Name of the server on which the task was last deployed.
Tag Name of a group gathering several tasks.
Feature URL Maven URL of the feature to be deployed.
Some extra columns are hidden by default but can be added to the table. For more information, seeCustomizing the display of the ESB execution task list on page 211
Adding an ESB execution task
About this task
To add an execution task from Talend Administration Center, complete the following:
Procedure
1. From the toolbar on the ESB Conductor page, click Add to clear the Edition configuration panel.
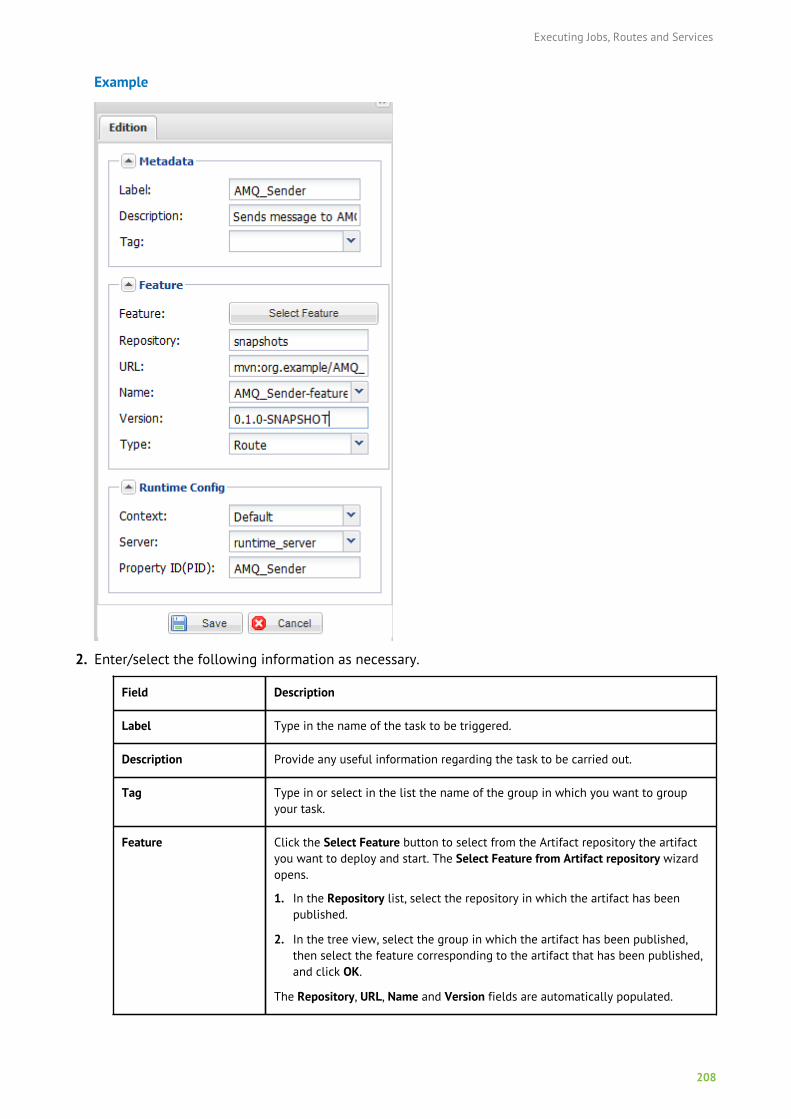
Executing Jobs, Routes and Services
208
Example
2. Enter/select the following information as necessary.
Field Description
Label Type in the name of the task to be triggered.
Description Provide any useful information regarding the task to be carried out.
Tag Type in or select in the list the name of the group in which you want to groupyour task.
Feature Click the Select Feature button to select from the Artifact repository the artifactyou want to deploy and start. The Select Feature from Artifact repository wizardopens.
1. In the Repository list, select the repository in which the artifact has beenpublished.
2. In the tree view, select the group in which the artifact has been published,then select the feature corresponding to the artifact that has been published,and click OK.
The Repository, URL, Name and Version fields are automatically populated.
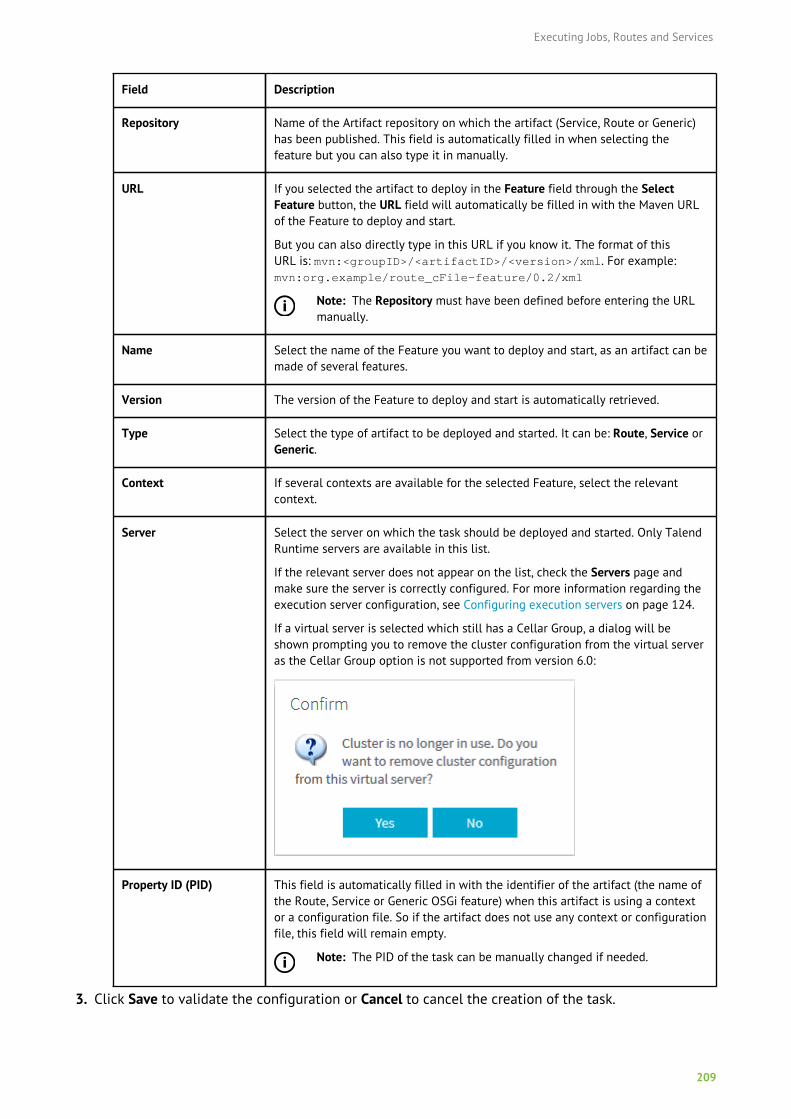
Executing Jobs, Routes and Services
209
Field Description
Repository Name of the Artifact repository on which the artifact (Service, Route or Generic)has been published. This field is automatically filled in when selecting thefeature but you can also type it in manually.
URL If you selected the artifact to deploy in the Feature field through the SelectFeature button, the URL field will automatically be filled in with the Maven URLof the Feature to deploy and start.
But you can also directly type in this URL if you know it. The format of thisURL is: mvn:<groupID>/<artifactID>/<version>/xml. For example:mvn:org.example/route_cFile-feature/0.2/xml
Note: The Repository must have been defined before entering the URLmanually.
Name Select the name of the Feature you want to deploy and start, as an artifact can bemade of several features.
Version The version of the Feature to deploy and start is automatically retrieved.
Type Select the type of artifact to be deployed and started. It can be: Route, Service orGeneric.
Context If several contexts are available for the selected Feature, select the relevantcontext.
Server Select the server on which the task should be deployed and started. Only TalendRuntime servers are available in this list.
If the relevant server does not appear on the list, check the Servers page andmake sure the server is correctly configured. For more information regarding theexecution server configuration, see Configuring execution servers on page 124.
If a virtual server is selected which still has a Cellar Group, a dialog will beshown prompting you to remove the cluster configuration from the virtual serveras the Cellar Group option is not supported from version 6.0:
Property ID (PID) This field is automatically filled in with the identifier of the artifact (the name ofthe Route, Service or Generic OSGi feature) when this artifact is using a contextor a configuration file. So if the artifact does not use any context or configurationfile, this field will remain empty.
Note: The PID of the task can be manually changed if needed.
3. Click Save to validate the configuration or Cancel to cancel the creation of the task.
Executing Jobs, Routes and Services
210
Tip: If you click on any of the tasks in the list before finalizing the creation or modification of thecurrent task, a dialog box pops up prompting you to save the parameters in the configuration panelbefore switching to another task. Click Cancel to return to the configuration panel and save theparameters.
Editing an ESB execution task
About this task
To edit a task:
Procedure
1. On the ESB Conductor page, select the task you want to modify.
Its details are displayed in the Edition configuration panel.
2. Make the relevant changes to the task details where necessary.
Note that if you update the task to a different version, the feature will be undeployed from TalendRuntime automatically if it is already deployed.
3. Click Save to validate the changes or Cancel to cancel the changes.
Note: If you click on any of the tasks in the list before finalizing the creation or modificationof the current task, a dialog box pops up prompting you to save the parameters in theconfiguration panel before switching to another task. Click Cancel to return to theconfiguration panel and save the parameters.
Duplicating an ESB execution task
About this task
To avoid creating a new task from scratch, you can duplicate an existing one and work around itsmetadata to have a new task in the list.
To duplicate a task, complete the following:
Procedure
1. On the ESB Conductor page, select the task you want to duplicate.
2. On the toolbar, click Duplicate.
The panel to the right shows the metadata of the selected task.
3. Modify the metadata as needed in order to create a new task.
4. Click Save to validate the operation or Cancel to cancel it.
The new task is listed in the Execution tasks list.
Note: If you click on any of the tasks in the list before finalizing the creation or modificationof the current task, a dialog box pops up prompting you to save the parameters in theconfiguration panel before switching to another task. Click Cancel to return to theconfiguration panel and save the parameters.
Deleting an ESB execution task
About this task
To delete one or more tasks from the task list, complete the following:
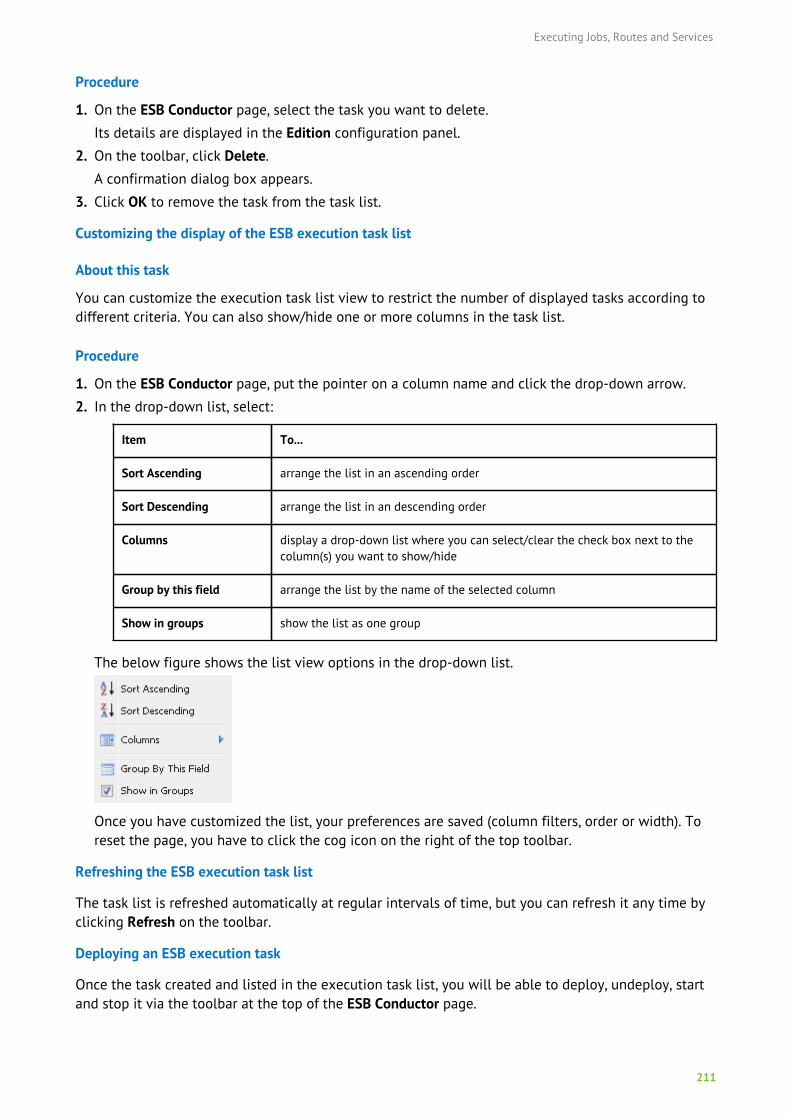
Executing Jobs, Routes and Services
211
Procedure
1. On the ESB Conductor page, select the task you want to delete.
Its details are displayed in the Edition configuration panel.
2. On the toolbar, click Delete.
A confirmation dialog box appears.
3. Click OK to remove the task from the task list.
Customizing the display of the ESB execution task list
About this task
You can customize the execution task list view to restrict the number of displayed tasks according todifferent criteria. You can also show/hide one or more columns in the task list.
Procedure
1. On the ESB Conductor page, put the pointer on a column name and click the drop-down arrow.
2. In the drop-down list, select:
Item To...
Sort Ascending arrange the list in an ascending order
Sort Descending arrange the list in an descending order
Columns display a drop-down list where you can select/clear the check box next to thecolumn(s) you want to show/hide
Group by this field arrange the list by the name of the selected column
Show in groups show the list as one group
The below figure shows the list view options in the drop-down list.
Once you have customized the list, your preferences are saved (column filters, order or width). Toreset the page, you have to click the cog icon on the right of the top toolbar.
Refreshing the ESB execution task list
The task list is refreshed automatically at regular intervals of time, but you can refresh it any time byclicking Refresh on the toolbar.
Deploying an ESB execution task
Once the task created and listed in the execution task list, you will be able to deploy, undeploy, startand stop it via the toolbar at the top of the ESB Conductor page.
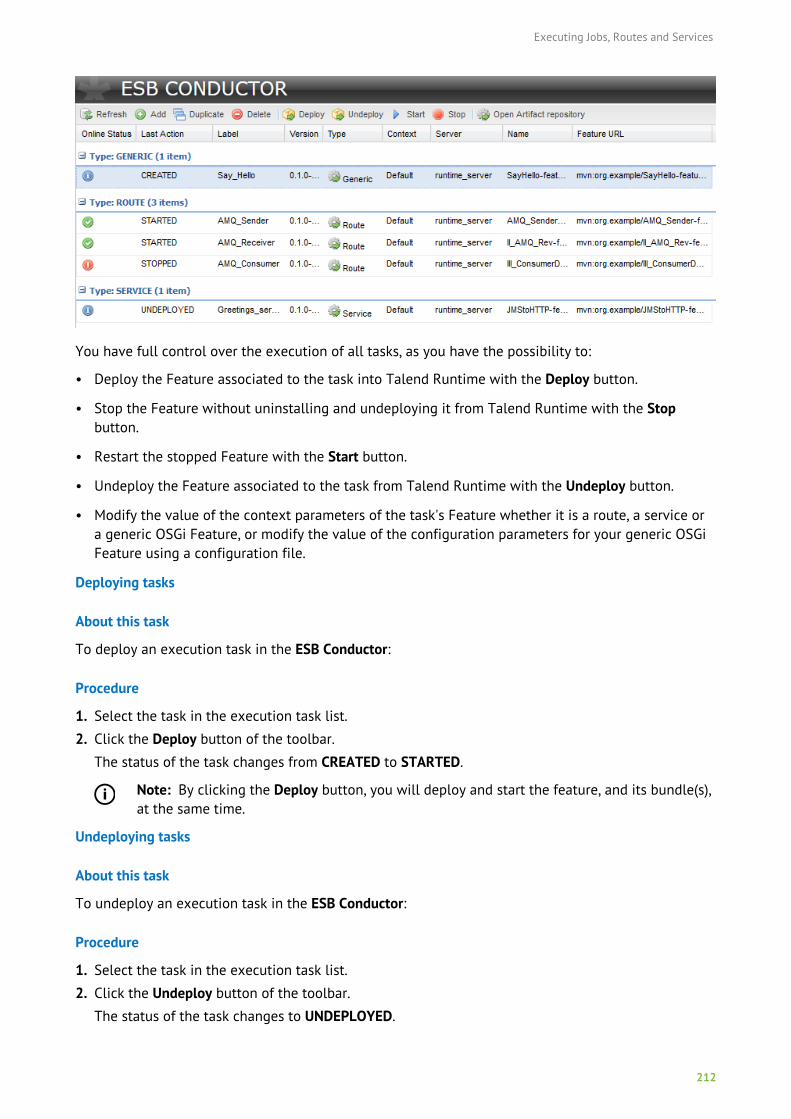
Executing Jobs, Routes and Services
212
You have full control over the execution of all tasks, as you have the possibility to:
• Deploy the Feature associated to the task into Talend Runtime with the Deploy button.
• Stop the Feature without uninstalling and undeploying it from Talend Runtime with the Stopbutton.
• Restart the stopped Feature with the Start button.
• Undeploy the Feature associated to the task from Talend Runtime with the Undeploy button.
• Modify the value of the context parameters of the task's Feature whether it is a route, a service ora generic OSGi Feature, or modify the value of the configuration parameters for your generic OSGiFeature using a configuration file.
Deploying tasks
About this task
To deploy an execution task in the ESB Conductor:
Procedure
1. Select the task in the execution task list.
2. Click the Deploy button of the toolbar.
The status of the task changes from CREATED to STARTED.
Note: By clicking the Deploy button, you will deploy and start the feature, and its bundle(s),at the same time.
Undeploying tasks
About this task
To undeploy an execution task in the ESB Conductor:
Procedure
1. Select the task in the execution task list.
2. Click the Undeploy button of the toolbar.
The status of the task changes to UNDEPLOYED.
Executing Jobs, Routes and Services
213
Note: This will uninstall the Feature from Talend Runtime, it will not longer be startableunless you redeploy it.
Starting tasks
About this task
To start an execution task in the ESB Conductor:
Procedure
1. Select the task in the execution task list.
2. Click the Start button of the toolbar.
The status of the task changes to STARTED.
Stopping tasks
About this task
To stop an execution task in the ESB Conductor:
Procedure
1. Select the task in the execution task list.
2. Click the Stop button of the toolbar.
The status of the task changes to STOPPED.
Note: This option is only available if you filled in the Bundle Name field of the task to bestarted. As this will identify the main bundle composing the feature, it will allow to killthe Feature by stopping its main bundle without undeploying it. For more information, seeAdding an ESB execution task on page 207
Modifying execution parameters
About this task
You can modify the value of the context parameters of the task's Feature whether it is a Route, aService or a generic OSGi Feature, or modify the value of the configuration parameters for yourgeneric OSGi Features using a configuration file directly from Talend Administration Center andexecute the task with those new values without the need to republish the Feature in Talend Runtime.
To set new values for context parameters:
Procedure
1. In the upper half of the ESB Conductor page, select the task for which you want to modify thecontext values.
2. Go to the Config properties view in the lower half of the ESB Conductor page to display thecorresponding view.
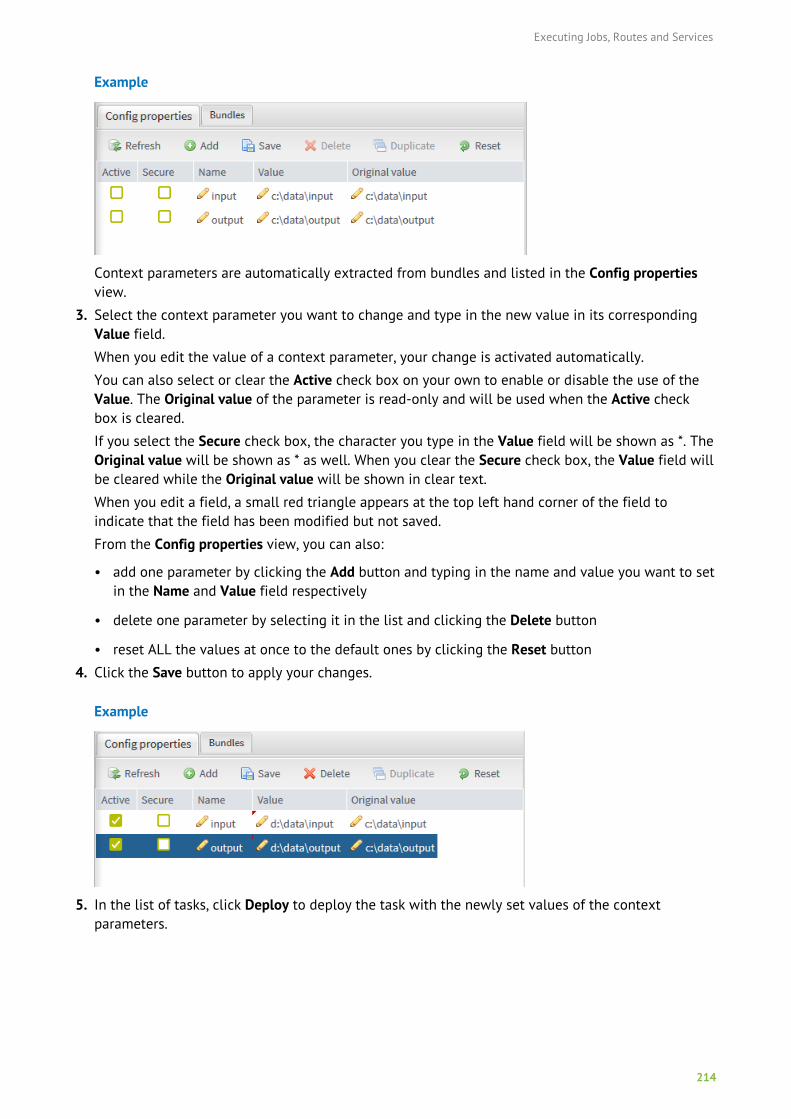
Executing Jobs, Routes and Services
214
Example
Context parameters are automatically extracted from bundles and listed in the Config propertiesview.
3. Select the context parameter you want to change and type in the new value in its correspondingValue field.
When you edit the value of a context parameter, your change is activated automatically.
You can also select or clear the Active check box on your own to enable or disable the use of theValue. The Original value of the parameter is read-only and will be used when the Active checkbox is cleared.
If you select the Secure check box, the character you type in the Value field will be shown as *. TheOriginal value will be shown as * as well. When you clear the Secure check box, the Value field willbe cleared while the Original value will be shown in clear text.
When you edit a field, a small red triangle appears at the top left hand corner of the field toindicate that the field has been modified but not saved.
From the Config properties view, you can also:
• add one parameter by clicking the Add button and typing in the name and value you want to setin the Name and Value field respectively
• delete one parameter by selecting it in the list and clicking the Delete button
• reset ALL the values at once to the default ones by clicking the Reset button
4. Click the Save button to apply your changes.
Example
5. In the list of tasks, click Deploy to deploy the task with the newly set values of the contextparameters.
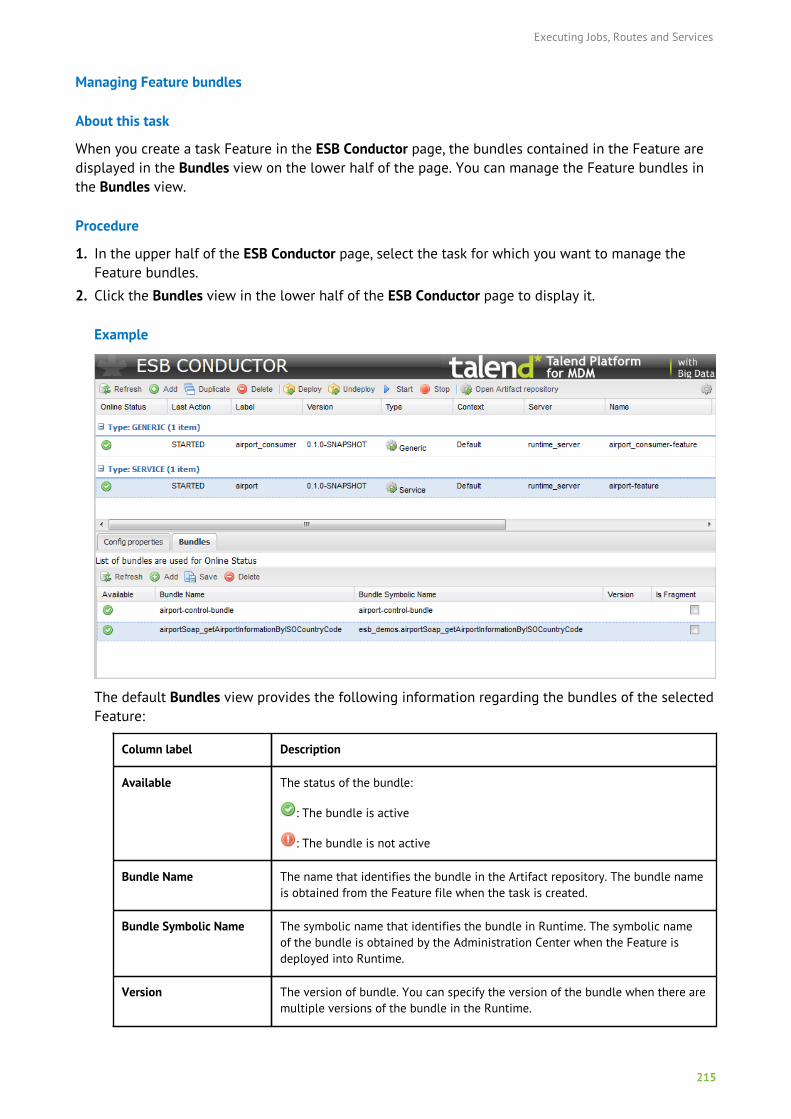
Executing Jobs, Routes and Services
215
Managing Feature bundles
About this task
When you create a task Feature in the ESB Conductor page, the bundles contained in the Feature aredisplayed in the Bundles view on the lower half of the page. You can manage the Feature bundles inthe Bundles view.
Procedure
1. In the upper half of the ESB Conductor page, select the task for which you want to manage theFeature bundles.
2. Click the Bundles view in the lower half of the ESB Conductor page to display it.
Example
The default Bundles view provides the following information regarding the bundles of the selectedFeature:
Column label Description
Available The status of the bundle:
: The bundle is active
: The bundle is not active
Bundle Name The name that identifies the bundle in the Artifact repository. The bundle nameis obtained from the Feature file when the task is created.
Bundle Symbolic Name The symbolic name that identifies the bundle in Runtime. The symbolic nameof the bundle is obtained by the Administration Center when the Feature isdeployed into Runtime.
Version The version of bundle. You can specify the version of the bundle when there aremultiple versions of the bundle in the Runtime.
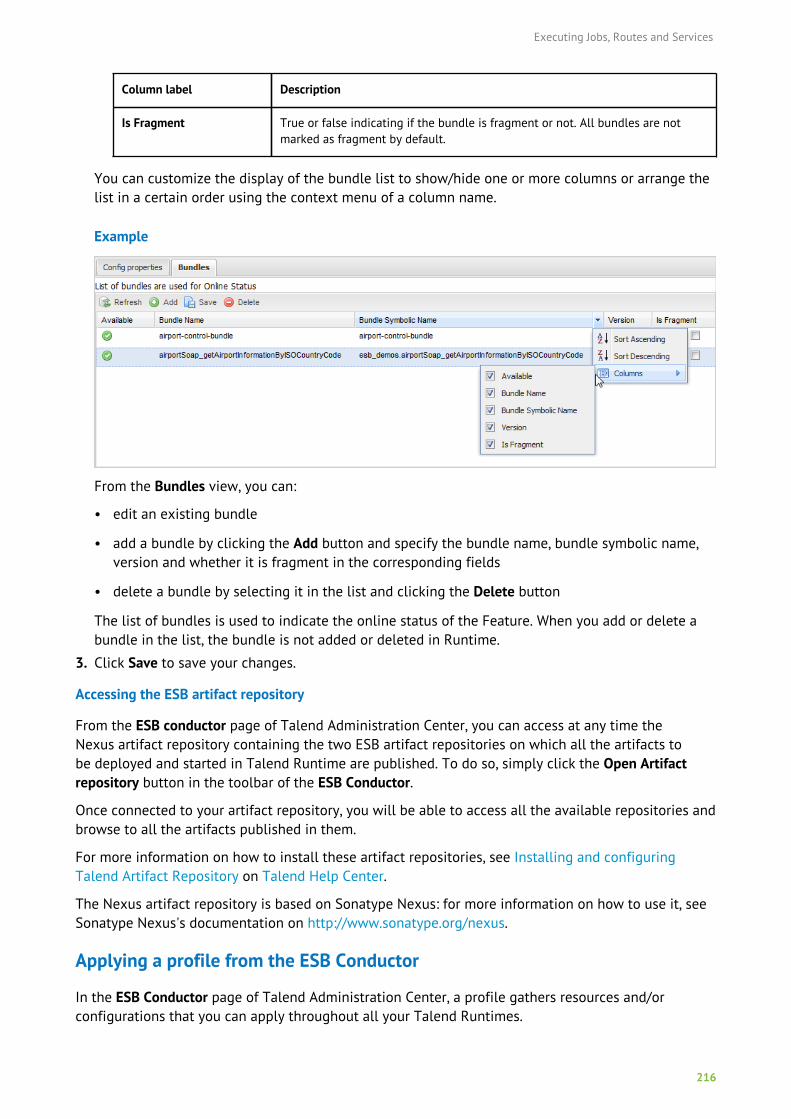
Executing Jobs, Routes and Services
216
Column label Description
Is Fragment True or false indicating if the bundle is fragment or not. All bundles are notmarked as fragment by default.
You can customize the display of the bundle list to show/hide one or more columns or arrange thelist in a certain order using the context menu of a column name.
Example
From the Bundles view, you can:
• edit an existing bundle
• add a bundle by clicking the Add button and specify the bundle name, bundle symbolic name,version and whether it is fragment in the corresponding fields
• delete a bundle by selecting it in the list and clicking the Delete button
The list of bundles is used to indicate the online status of the Feature. When you add or delete abundle in the list, the bundle is not added or deleted in Runtime.
3. Click Save to save your changes.
Accessing the ESB artifact repository
From the ESB conductor page of Talend Administration Center, you can access at any time theNexus artifact repository containing the two ESB artifact repositories on which all the artifacts tobe deployed and started in Talend Runtime are published. To do so, simply click the Open Artifactrepository button in the toolbar of the ESB Conductor.
Once connected to your artifact repository, you will be able to access all the available repositories andbrowse to all the artifacts published in them.
For more information on how to install these artifact repositories, see Installing and configuringTalend Artifact Repository on Talend Help Center.
The Nexus artifact repository is based on Sonatype Nexus: for more information on how to use it, seeSonatype Nexus's documentation on http://www.sonatype.org/nexus.
Applying a profile from the ESB Conductor
In the ESB Conductor page of Talend Administration Center, a profile gathers resources and/orconfigurations that you can apply throughout all your Talend Runtimes.
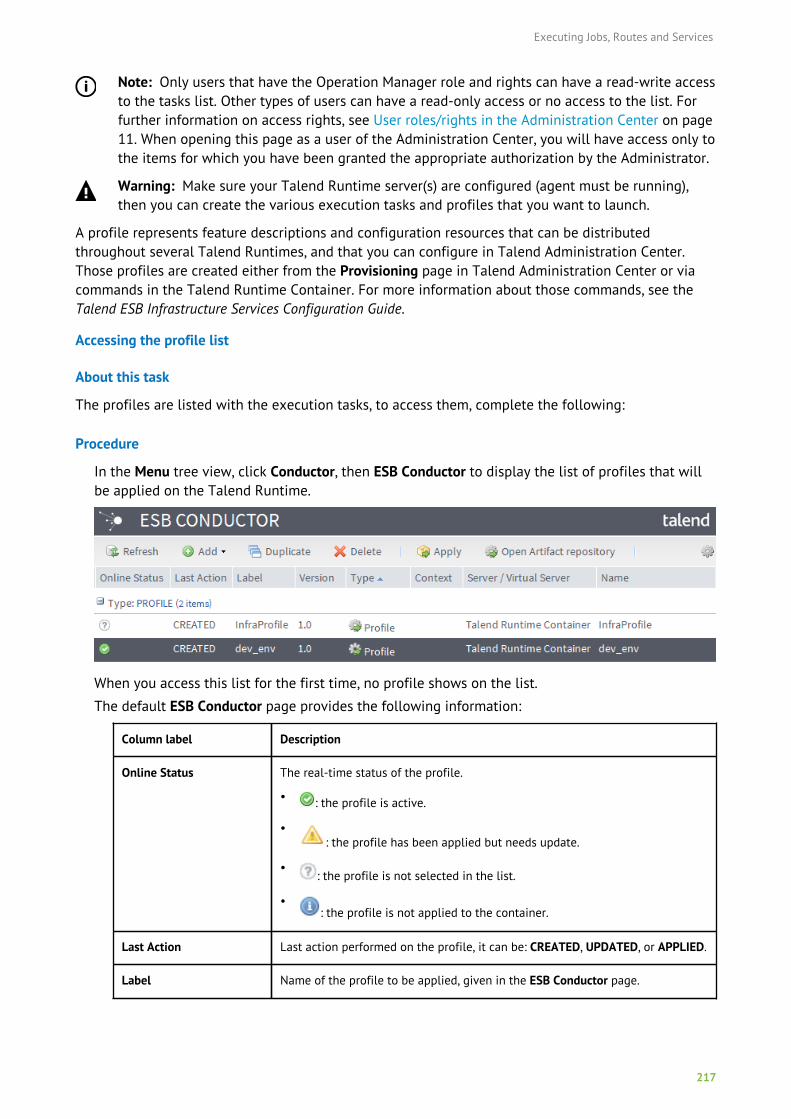
Executing Jobs, Routes and Services
217
Note: Only users that have the Operation Manager role and rights can have a read-write accessto the tasks list. Other types of users can have a read-only access or no access to the list. Forfurther information on access rights, see User roles/rights in the Administration Center on page11. When opening this page as a user of the Administration Center, you will have access only tothe items for which you have been granted the appropriate authorization by the Administrator.
Warning: Make sure your Talend Runtime server(s) are configured (agent must be running),then you can create the various execution tasks and profiles that you want to launch.
A profile represents feature descriptions and configuration resources that can be distributedthroughout several Talend Runtimes, and that you can configure in Talend Administration Center.Those profiles are created either from the Provisioning page in Talend Administration Center or viacommands in the Talend Runtime Container. For more information about those commands, see theTalend ESB Infrastructure Services Configuration Guide.
Accessing the profile list
About this task
The profiles are listed with the execution tasks, to access them, complete the following:
Procedure
In the Menu tree view, click Conductor, then ESB Conductor to display the list of profiles that willbe applied on the Talend Runtime.
When you access this list for the first time, no profile shows on the list.
The default ESB Conductor page provides the following information:
Column label Description
Online Status The real-time status of the profile.
• : the profile is active.
•: the profile has been applied but needs update.
•: the profile is not selected in the list.
•: the profile is not applied to the container.
Last Action Last action performed on the profile, it can be: CREATED, UPDATED, or APPLIED.
Label Name of the profile to be applied, given in the ESB Conductor page.
Executing Jobs, Routes and Services
218
Column label Description
Name Name of the profile to be applied, as defined in the Provisioning page or in theTalend Runtime Container.
Version Version of the profile released in the container.
Type Type of the profile to be applied.
Context N/A
Server Name of the server on which the profile is or will be applied.
Tag Name of a group gathering several profiles.
Feature URL Maven URL of the feature to be deployed, if any.
Some extra columns are hidden by default but can be added to the table. For more information, seeCustomizing the display of the ESB execution task list on page 211.
Adding a profile
Procedure
1. From the toolbar on the ESB Conductor page, click Add and select Profile in the list to display theProfile configuration panel.
Example
2. Enter/select the following information as necessary.
Executing Jobs, Routes and Services
219
Field Description
Label Type in the name of the profile to be applied.
Description Provide any useful information regarding the profile to be carried out.
Profile Click the Select Profile button to select from the Provisioning page the profileyou want to apply. The Select Profile wizard opens.
1. Browse the list of categories and profiles released onto your Talend RuntimeContainer(s).
2. In the tree view, select the version of the profile to be applied to your TalendRuntime Container(s).
3. Click OK.
The Profile Name and Version fields are automatically populated.
Profile Name The name of the profile as defined in the Provisioning page is automaticallyretrieved.
Version The version of the profile to apply is automatically retrieved.
Server Select the server on which the profile should be applied. Only Talend Runtimeservers are available in this list.
If the relevant server does not appear on the list, check the Servers page andmake sure the server is correctly configured. For more information regarding theexecution server configuration, see Configuring execution servers on page 124.
If a virtual server is selected which still has a Cellar Group, a dialog will beshown prompting you to remove the cluster configuration from the virtual serveras the Cellar Group option is not supported from version 6.0:
3. Click Save to validate the configuration or Cancel to cancel the creation of the task.
Note: If you click on any of the tasks or profiles in the list before finalizing the creationor modification of the current profile, a dialog box pops up prompting you to save theparameters in the configuration panel before switching to another task or profile. ClickCancel to return to the configuration panel and save the parameters.
Once created, the new profile appears in the list. If you select it, a Servers tab is displayed lowerhalf of the ESB Conductor page:
Executing Jobs, Routes and Services
220
The Servers tab shows, for the profile you selected on the list, the server on which this profile hasbeen applied, as well as the other profiles and their version applied to this server.
Editing a profile
About this task
To edit a profile:
Procedure
1. On the ESB Conductor page, select the profile you want to modify.
Its details are displayed in the Profile configuration panel.
2. Make the relevant changes to the profile details where necessary.
3. Click Save to validate the changes or Cancel to cancel the changes.
Note: If you click on any of the tasks or profiles in the list before finalizing the creationor modification of the current profile, a dialog box pops up prompting you to save theparameters in the configuration panel before switching to another task or profile. ClickCancel to return to the configuration panel and save the parameters.
Duplicating a profile
About this task
To avoid creating a new profile from scratch, you can duplicate an existing one and work around itsmetadata to have a new task in the list.
To duplicate a profile, complete the following:
Procedure
1. On the ESB Conductor page, select the profile you want to duplicate.
2. On the toolbar, click Duplicate.
The panel to the right shows the metadata of the selected profile.
3. Modify the metadata as needed in order to create a new profile.
4. Click Save to validate the operation or Cancel to cancel it.
The new profile is listed in the list.
Note: If you click on any of the tasks or profiles in the list before finalizing the creationor modification of the current profile, a dialog box pops up prompting you to save the
Executing Jobs, Routes and Services
221
parameters in the configuration panel before switching to another task or profile. ClickCancel to return to the configuration panel and save the parameters.
Deleting a profile
About this task
To delete one or more profiles from the list, complete the following:
Procedure
1. On the ESB Conductor page, select the profile you want to delete.
Its details are displayed in the Profile configuration panel.
2. On the toolbar, click Delete.
A confirmation dialog box appears.
3. Click OK to remove the profile from the profile list.
Applying a profile
About this task
Once the profile created and listed, you will be able to apply it to the Talend Runtime Container(s) viathe toolbar at the top of the ESB Conductor page.
To apply a profile in a Talend Runtime Container from the ESB Conductor:
Procedure
1. Select the profile in the list.
2. Click the Apply button of the toolbar.
The status of the profile changes from CREATED to APPLIED.
Note: By clicking the Apply button, you will apply the profile and deploy and start thefeature, and its bundle(s), if any, at the same time.
Working in cluster mode
222
Working in cluster mode
This chapter aims at users of Talend Administration Center who want to know how to work withclustered servers. It introduces a basic scenario which should help you to understand the key conceptsof this working approach.
Clustering: Concepts and PrinciplesClustering is the process of grouping a set of similar physical systems (often servers).
In order to work in cluster mode, you must have previously set up high availability on your system.Below is a list of the main concepts associated with clustering:
• High availability is a design approach that ensures a level of operational continuity and minimisesthe risk of unplanned downtime. It is achieved through load balancing and failover.
Note: High availability with Talend refers only to the scheduling of task executions.
• Load balancing allows you to distribute work across the clustered Web servers. It is often combinedwith failover.
• Failover allows you to automatically switch to a standby server if the primary server is downor temporarily unreachable. For example, if a request to run a Job is sent to a server that isunreachable, it is automatically redirected to the backup server which will perform the desiredoperation.
Prerequisites and configurationBefore starting to work in cluster mode, make sure that:
• two instances of the Tomcat application server are installed and started.
• two CommandLine applications are started and registered on the Configuration page.
For more information, see Setting up the Job Conductor parameters on page 32,
• several execution servers are grouped in a virtual server and are up and running.
For more information on how to group physical servers in a virtual server, see Configuring virtualservers on page 132.
For more information on how to set up high availability, see Setting up High Availability on TalendHelp Center.
Best practice:
In the Job conductor node of the Configuration page, you should use the same folders to storethe generated Jobs and the same folders to store the logs. To synchronize these folders, it isrecommended to use a file-synchronization tool like Unison to propagate the changes to the twofolders, or you should at least use a shared directory to store these folders.
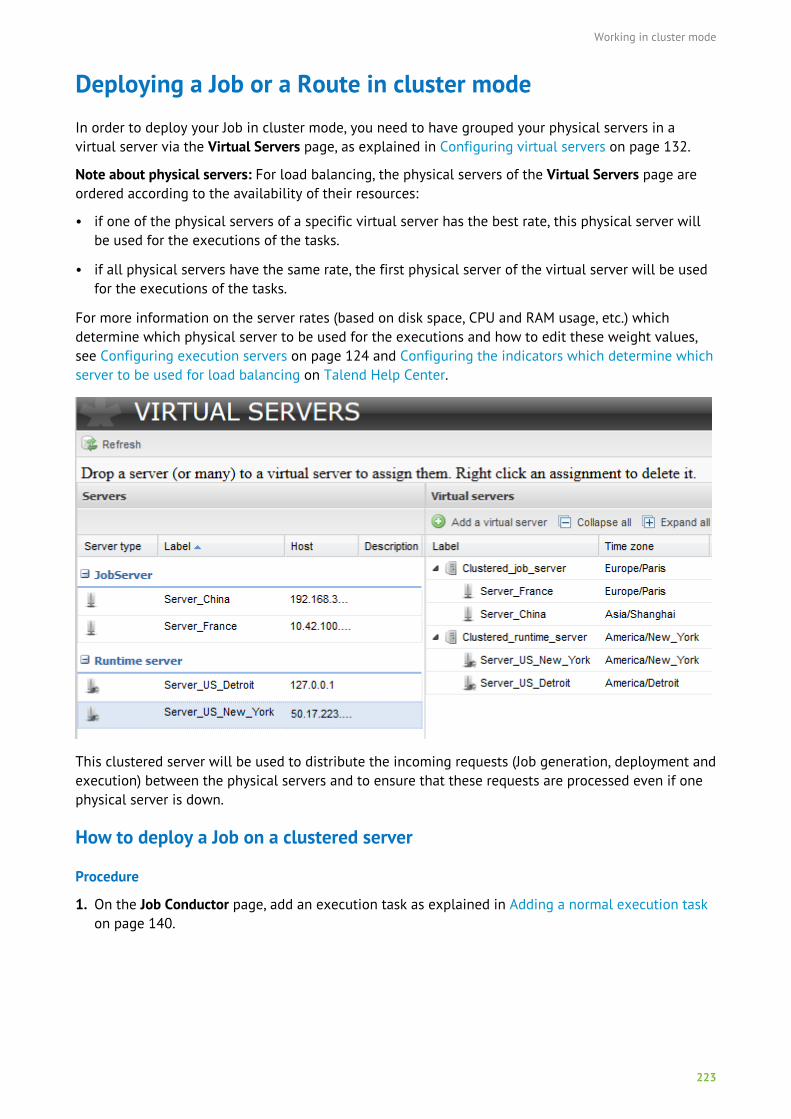
Working in cluster mode
223
Deploying a Job or a Route in cluster modeIn order to deploy your Job in cluster mode, you need to have grouped your physical servers in avirtual server via the Virtual Servers page, as explained in Configuring virtual servers on page 132.
Note about physical servers: For load balancing, the physical servers of the Virtual Servers page areordered according to the availability of their resources:
• if one of the physical servers of a specific virtual server has the best rate, this physical server willbe used for the executions of the tasks.
• if all physical servers have the same rate, the first physical server of the virtual server will be usedfor the executions of the tasks.
For more information on the server rates (based on disk space, CPU and RAM usage, etc.) whichdetermine which physical server to be used for the executions and how to edit these weight values,see Configuring execution servers on page 124 and Configuring the indicators which determine whichserver to be used for load balancing on Talend Help Center.
This clustered server will be used to distribute the incoming requests (Job generation, deployment andexecution) between the physical servers and to ensure that these requests are processed even if onephysical server is down.
How to deploy a Job on a clustered server
Procedure
1. On the Job Conductor page, add an execution task as explained in Adding a normal execution taskon page 140.
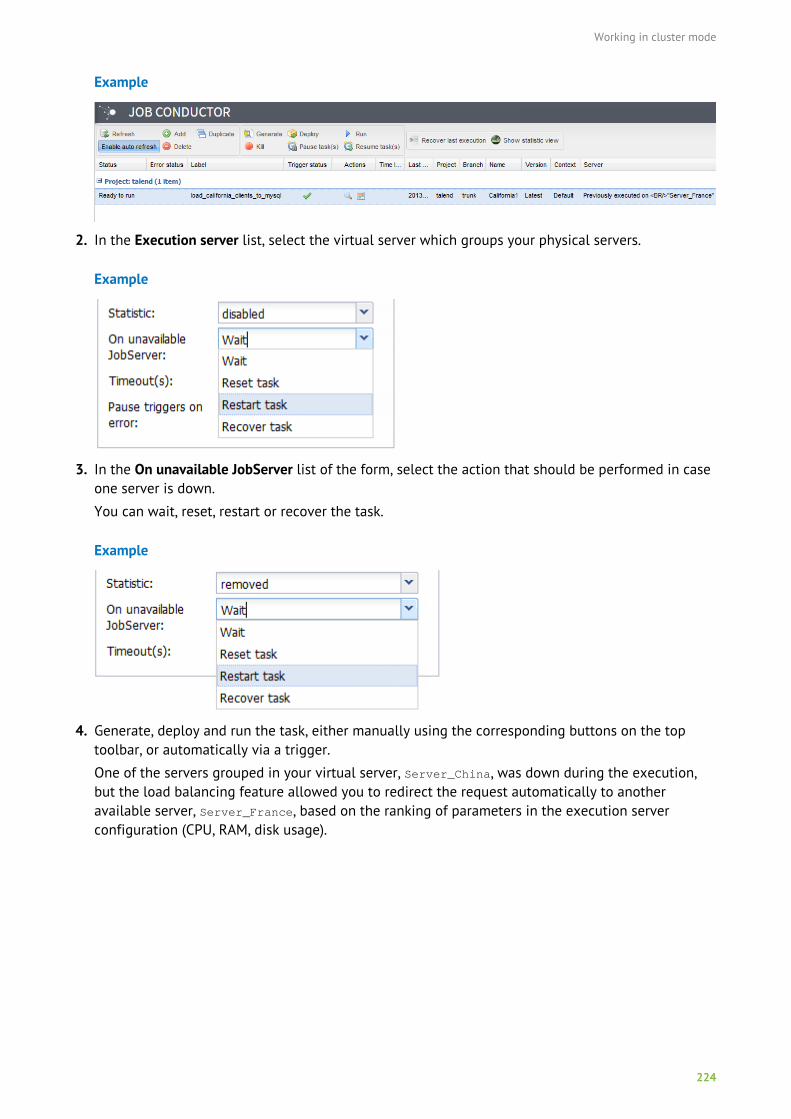
Working in cluster mode
224
Example
2. In the Execution server list, select the virtual server which groups your physical servers.
Example
3. In the On unavailable JobServer list of the form, select the action that should be performed in caseone server is down.
You can wait, reset, restart or recover the task.
Example
4. Generate, deploy and run the task, either manually using the corresponding buttons on the toptoolbar, or automatically via a trigger.
One of the servers grouped in your virtual server, Server_China, was down during the execution,but the load balancing feature allowed you to redirect the request automatically to anotheravailable server, Server_France, based on the ranking of parameters in the execution serverconfiguration (CPU, RAM, disk usage).

Working in cluster mode
225
If no servers are available when the request is sent but you have initiated as "checkpoints" one orseveral OnSubjobOk trigger connections, you can access the Error recovery Management page inTalend Administration Center and recover the Job execution at a selected checkpoint. For moreinformation, see Recovering the execution of a Job on page 277.
How to deploy a Route or a Service on a clustered server
About this taskThe Virtual servers can be used to deploy ESB artifacts to clustered containers.
Procedure
On the ESB Conductor page, add the Route or Service you want to deploy as explained in Addingan ESB execution task on page 207, and deploy it in the virtual server which groups your physicalcontainers.
Example
Managing Repository items
226
Managing Repository items
Note: The Repository Browser is deprecated in Talend Administration Center.
Talend Administration Center provides a Repository Browser. This Repository Browser module allowsyou to:
• Visualize the content of the Studio Repository tree view as if you were logged on to the Studio. Formore information, see Accessing the Repository Browser page on page 226 and Getting startedwith the Repository Browser on page 227.
• Manage and edit some Repository items such as the Business Models or the documentations. Formore information, see Managing and editing repository items on page 233.
• Search Repository items. For more information, see Searching repository items on page 247.
Prior to using this Repository Browser, it is recommended to read Talend Studio User Guide to knowmore about the different items hold in the Repository.
Note that the access to this module depends on your license. For more information, see What modulesand features are available depending on your license on page 9.
Accessing the Repository Browser pageNote: The types of actions you can perform depend on the role defined for your user. Forfurther information on access rights, see User roles/rights in the Administration Center on page11.
On Talend Administration Center's home page and from the Menu tree view, click Repository Browserto display the corresponding page.
The figure below illustrates an example of the Repository Browser page.
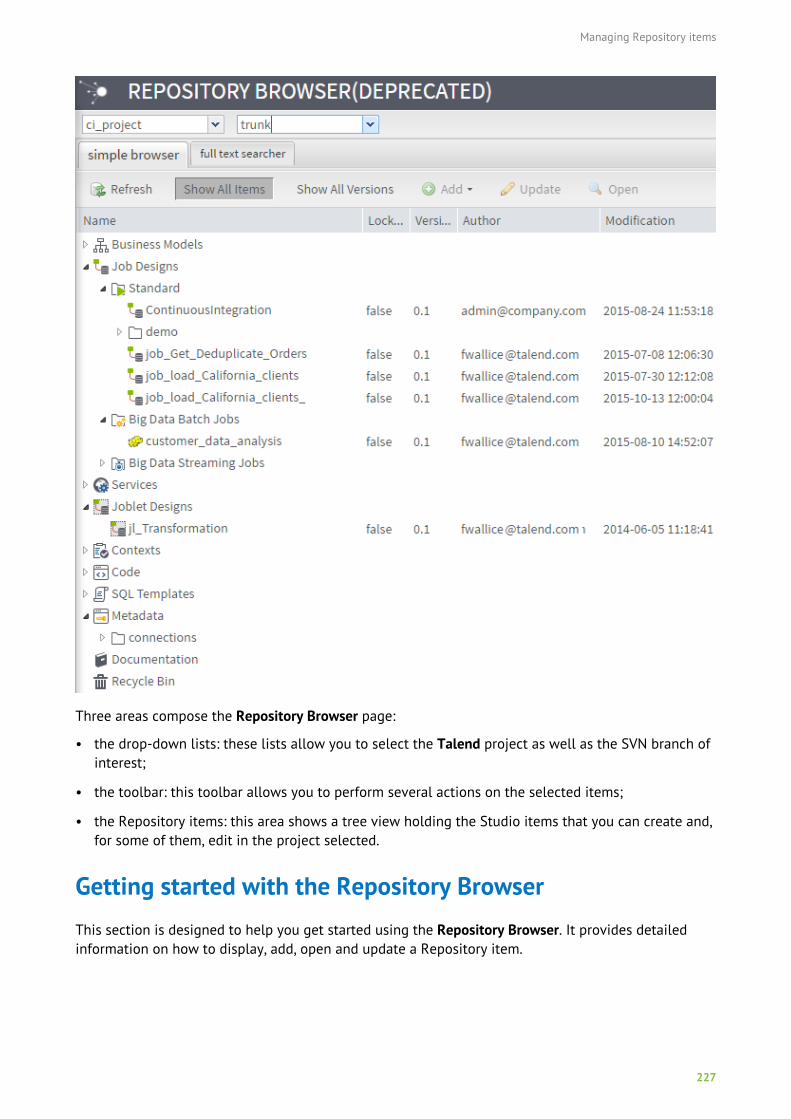
Managing Repository items
227
Three areas compose the Repository Browser page:
• the drop-down lists: these lists allow you to select the Talend project as well as the SVN branch ofinterest;
• the toolbar: this toolbar allows you to perform several actions on the selected items;
• the Repository items: this area shows a tree view holding the Studio items that you can create and,for some of them, edit in the project selected.
Getting started with the Repository BrowserThis section is designed to help you get started using the Repository Browser. It provides detailedinformation on how to display, add, open and update a Repository item.
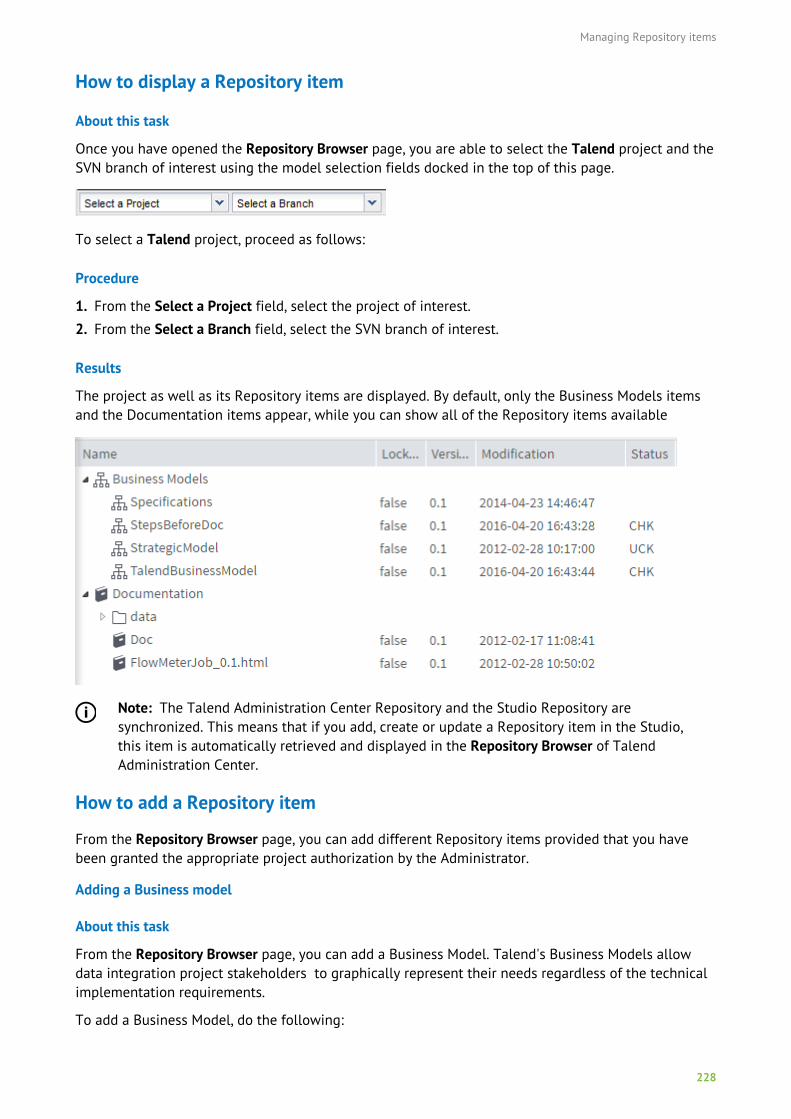
Managing Repository items
228
How to display a Repository item
About this task
Once you have opened the Repository Browser page, you are able to select the Talend project and theSVN branch of interest using the model selection fields docked in the top of this page.
To select a Talend project, proceed as follows:
Procedure
1. From the Select a Project field, select the project of interest.
2. From the Select a Branch field, select the SVN branch of interest.
Results
The project as well as its Repository items are displayed. By default, only the Business Models itemsand the Documentation items appear, while you can show all of the Repository items available
Note: The Talend Administration Center Repository and the Studio Repository aresynchronized. This means that if you add, create or update a Repository item in the Studio,this item is automatically retrieved and displayed in the Repository Browser of TalendAdministration Center.
How to add a Repository item
From the Repository Browser page, you can add different Repository items provided that you havebeen granted the appropriate project authorization by the Administrator.
Adding a Business model
About this task
From the Repository Browser page, you can add a Business Model. Talend's Business Models allowdata integration project stakeholders to graphically represent their needs regardless of the technicalimplementation requirements.
To add a Business Model, do the following:
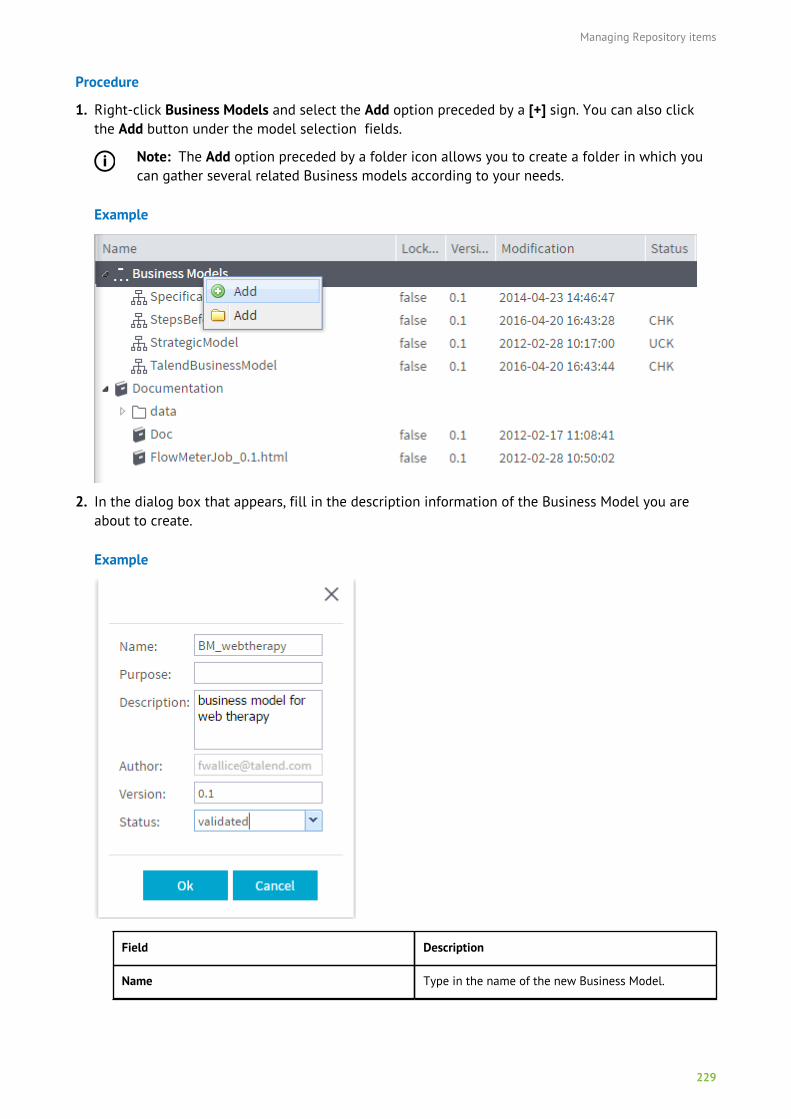
Managing Repository items
229
Procedure
1. Right-click Business Models and select the Add option preceded by a [+] sign. You can also clickthe Add button under the model selection fields.
Note: The Add option preceded by a folder icon allows you to create a folder in which youcan gather several related Business models according to your needs.
Example
2. In the dialog box that appears, fill in the description information of the Business Model you areabout to create.
Example
Field Description
Name Type in the name of the new Business Model.
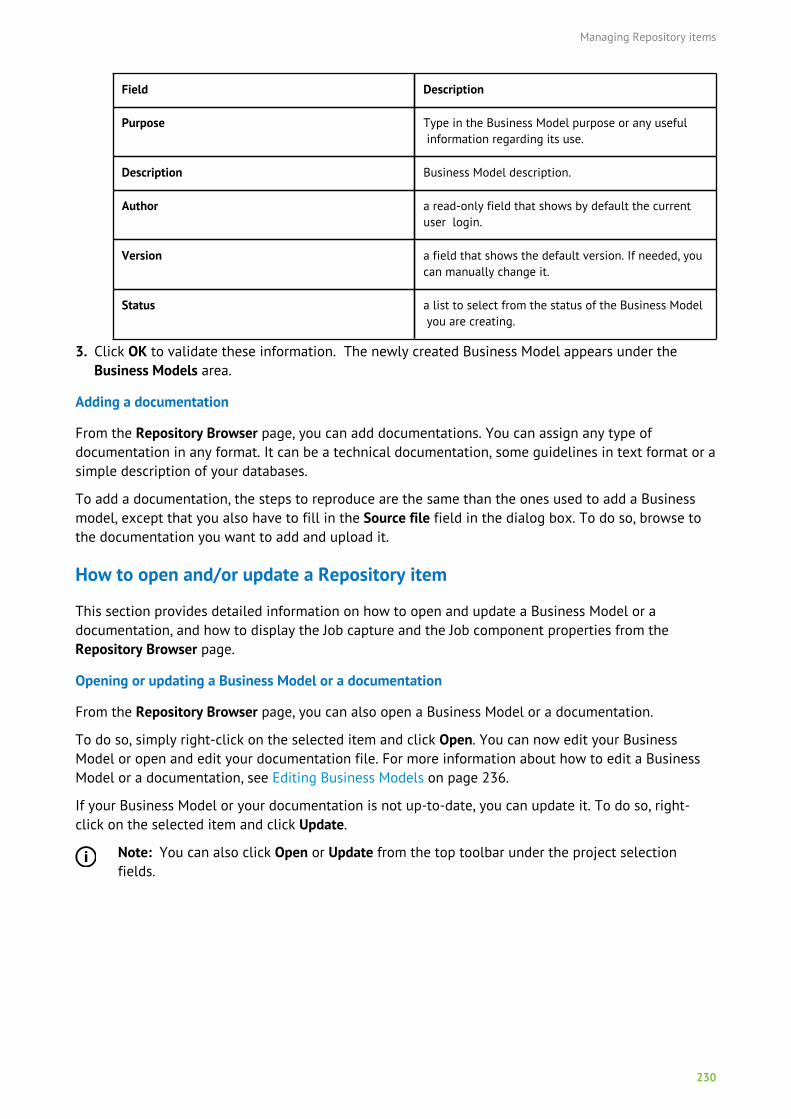
Managing Repository items
230
Field Description
Purpose Type in the Business Model purpose or any useful information regarding its use.
Description Business Model description.
Author a read-only field that shows by default the currentuser login.
Version a field that shows the default version. If needed, you can manually change it.
Status a list to select from the status of the Business Model you are creating.
3. Click OK to validate these information. The newly created Business Model appears under theBusiness Models area.
Adding a documentation
From the Repository Browser page, you can add documentations. You can assign any type ofdocumentation in any format. It can be a technical documentation, some guidelines in text format or asimple description of your databases.
To add a documentation, the steps to reproduce are the same than the ones used to add a Businessmodel, except that you also have to fill in the Source file field in the dialog box. To do so, browse tothe documentation you want to add and upload it.
How to open and/or update a Repository item
This section provides detailed information on how to open and update a Business Model or adocumentation, and how to display the Job capture and the Job component properties from theRepository Browser page.
Opening or updating a Business Model or a documentation
From the Repository Browser page, you can also open a Business Model or a documentation.
To do so, simply right-click on the selected item and click Open. You can now edit your BusinessModel or open and edit your documentation file. For more information about how to edit a BusinessModel or a documentation, see Editing Business Models on page 236.
If your Business Model or your documentation is not up-to-date, you can update it. To do so, right-click on the selected item and click Update.
Note: You can also click Open or Update from the top toolbar under the project selectionfields.
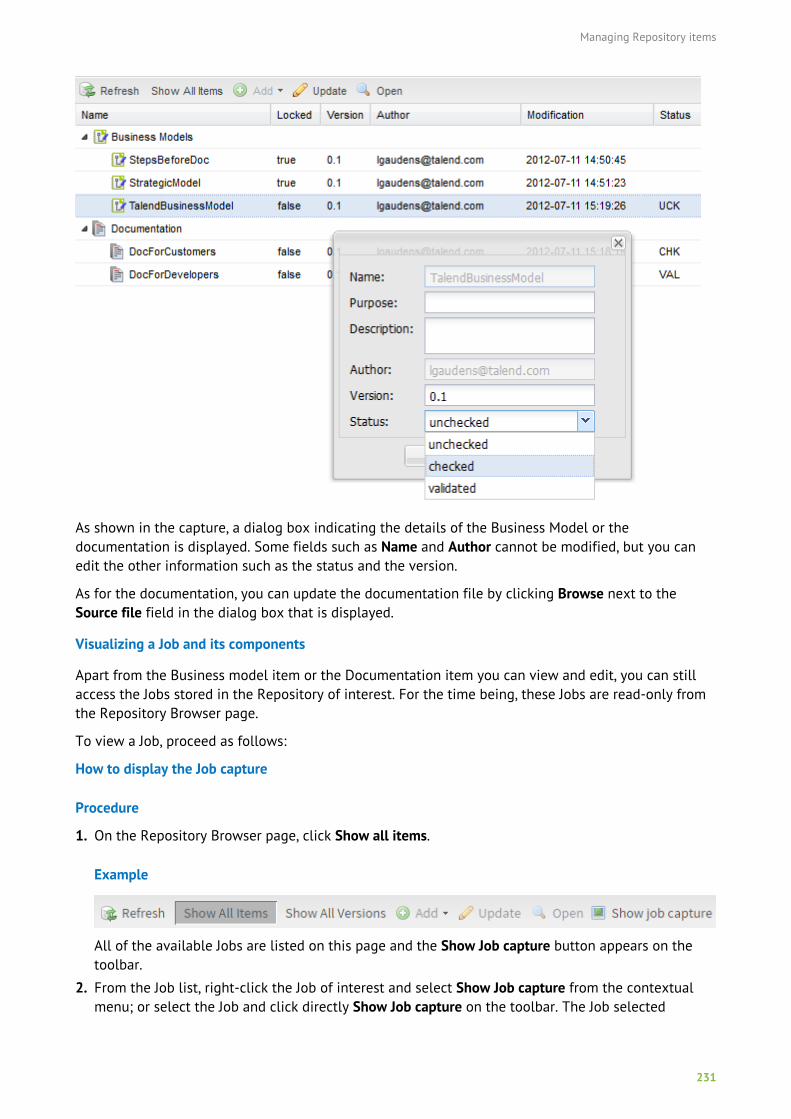
Managing Repository items
231
As shown in the capture, a dialog box indicating the details of the Business Model or thedocumentation is displayed. Some fields such as Name and Author cannot be modified, but you canedit the other information such as the status and the version.
As for the documentation, you can update the documentation file by clicking Browse next to theSource file field in the dialog box that is displayed.
Visualizing a Job and its components
Apart from the Business model item or the Documentation item you can view and edit, you can stillaccess the Jobs stored in the Repository of interest. For the time being, these Jobs are read-only fromthe Repository Browser page.
To view a Job, proceed as follows:
How to display the Job capture
Procedure
1. On the Repository Browser page, click Show all items.
Example
All of the available Jobs are listed on this page and the Show Job capture button appears on thetoolbar.
2. From the Job list, right-click the Job of interest and select Show Job capture from the contextualmenu; or select the Job and click directly Show Job capture on the toolbar. The Job selected

Managing Repository items
232
is displayed graphically in a pop-up window. The following figure presents an example of Jobcapture.
Example
How to display the Job component properties
Procedure
1. On the Repository Browser page, click Show all items, right-click your Job and select Show Jobcapture to open the Job capture.
2. Mouse over the components to display their properties. The following figure presents an exampleof Job component properties.
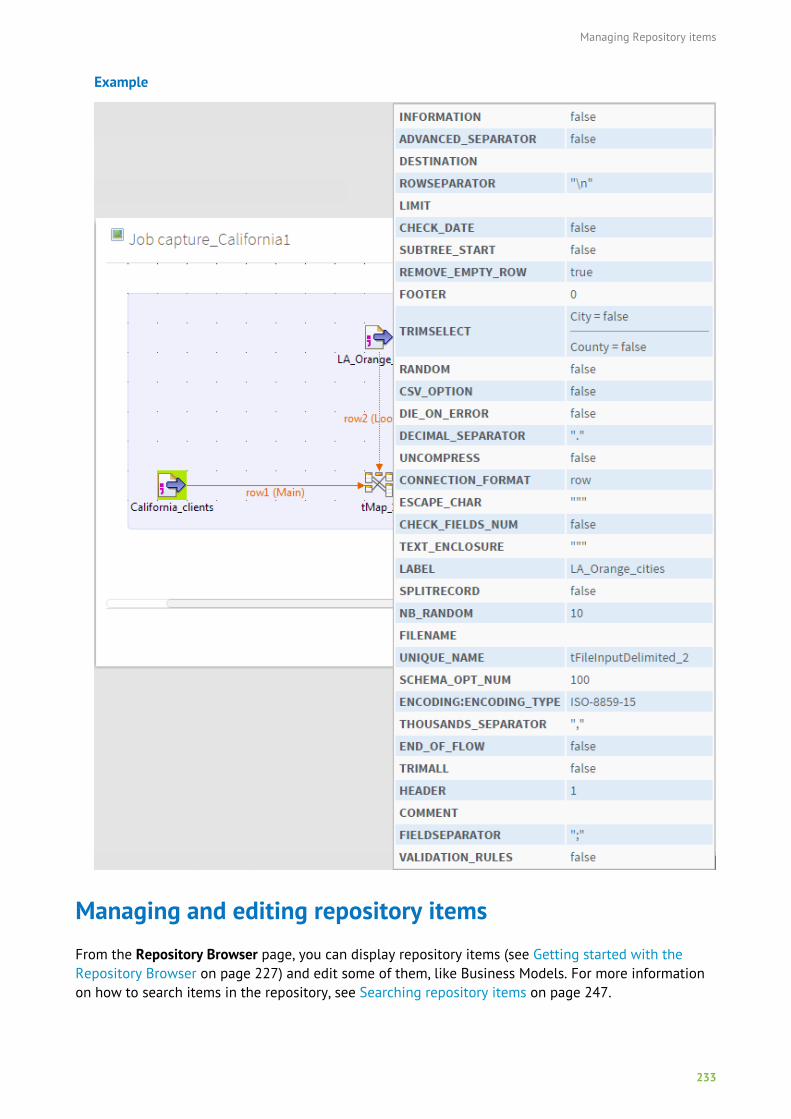
Managing Repository items
233
Example
Managing and editing repository itemsFrom the Repository Browser page, you can display repository items (see Getting started with theRepository Browser on page 227) and edit some of them, like Business Models. For more informationon how to search items in the repository, see Searching repository items on page 247.
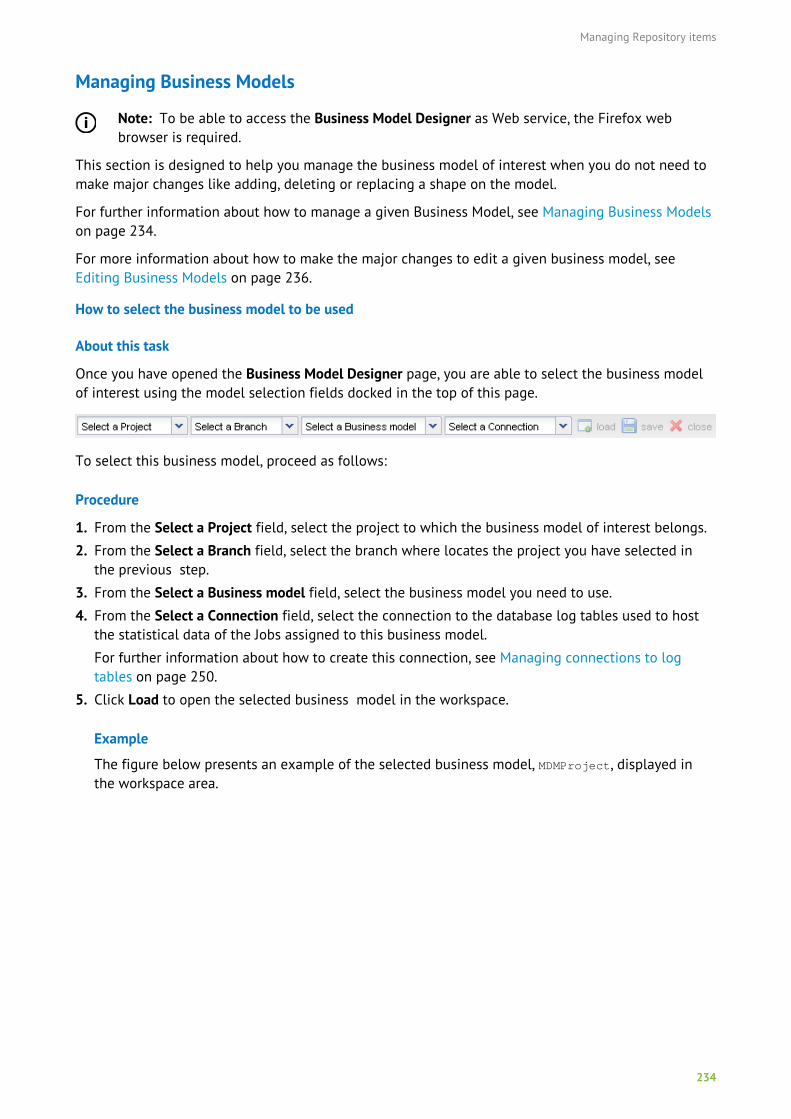
Managing Repository items
234
Managing Business Models
Note: To be able to access the Business Model Designer as Web service, the Firefox webbrowser is required.
This section is designed to help you manage the business model of interest when you do not need tomake major changes like adding, deleting or replacing a shape on the model.
For further information about how to manage a given Business Model, see Managing Business Modelson page 234.
For more information about how to make the major changes to edit a given business model, seeEditing Business Models on page 236.
How to select the business model to be used
About this task
Once you have opened the Business Model Designer page, you are able to select the business modelof interest using the model selection fields docked in the top of this page.
To select this business model, proceed as follows:
Procedure
1. From the Select a Project field, select the project to which the business model of interest belongs.
2. From the Select a Branch field, select the branch where locates the project you have selected inthe previous step.
3. From the Select a Business model field, select the business model you need to use.
4. From the Select a Connection field, select the connection to the database log tables used to hostthe statistical data of the Jobs assigned to this business model.
For further information about how to create this connection, see Managing connections to logtables on page 250.
5. Click Load to open the selected business model in the workspace.
Example
The figure below presents an example of the selected business model, MDMProject, displayed inthe workspace area.
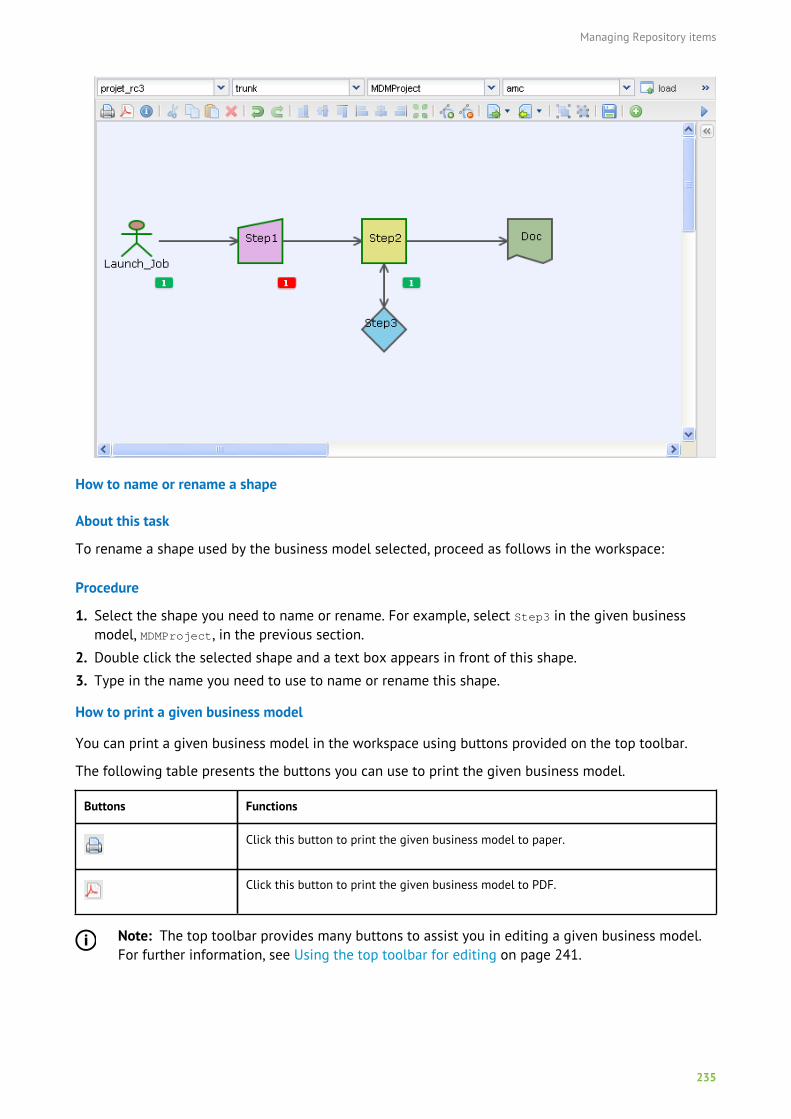
Managing Repository items
235
How to name or rename a shape
About this task
To rename a shape used by the business model selected, proceed as follows in the workspace:
Procedure
1. Select the shape you need to name or rename. For example, select Step3 in the given businessmodel, MDMProject, in the previous section.
2. Double click the selected shape and a text box appears in front of this shape.
3. Type in the name you need to use to name or rename this shape.
How to print a given business model
You can print a given business model in the workspace using buttons provided on the top toolbar.
The following table presents the buttons you can use to print the given business model.
Buttons Functions
Click this button to print the given business model to paper.
Click this button to print the given business model to PDF.
Note: The top toolbar provides many buttons to assist you in editing a given business model.For further information, see Using the top toolbar for editing on page 241.
Managing Repository items
236
How to save a given business model
To save a business model you have selected and loaded in the workspace, click the Save button nextto the Load button described in the earlier section.
For further information about this Load button, see How to select the business model to be used onpage 234.
How to close a given business model without saving changes
To close a business model loaded in the workspace without saving any changes on this model, clickthe Close button next to the Save button described in the previous section.
Editing Business Models
Note: Before editing the selected business model, ensure that you have the related read-write right and meanwhile, that this business model is not used concurrently by the connected Studio so as to avoid that your editing cannot be saved or any inconsistent error is caused. Ifbeing used concurrently, close it in the connected Studio and reload it in this Business ModelDesigner page.
The Business Model Designer page is equipped with the Shape Repository, the contextual toolbox andthe top toolbar that help you to edit the selected business model easily.
Using the Shape Repository for editing
This Shape Repository is composed of two classes of shapes: Interaction shapes and Relationshipshapes.
Managing Repository items
237
Note: If it is hidden, display the Shape Repository by clicking the icon in the up-rightcorner.
This Shape Repository holds the same shapes as the Palette does in your Studio: the Interactionshapes in this page correspond to the Business shapes in the Palette and the Relationship shapes correspond to the connecting shapes in the Palette.
These shapes from either the Shape Repository or the Palette are used in the same approach to edit abusiness model.
For further information about these shapes, see Talend Studio User Guide.
Using the contextual toolbox for editing
The contextual toolbox is provided to simplify further the editing of the selected business model.
To display a contextual toolbox, simply click any of the shapes used as a step by the selected businessmodel in the workspace of this page.
The figure below shows an example of the contextual toolbox around the Doc step in the MDMProjectbusiness model.
From this contextual toolbox, all of the shapes held in the side-located Shape Repository areavailable immediately for editing the current model.
In addition, two more icons appear in this contextual toolbox. They are:
• : it provides shapes used to replace the selected shape this toolbox depends on. For further
information about this replacement, see How to replace a shape on page 238.
• : it opens the monitoring window where you can view the status evolution of the item(s)
assigned to the selected shape this toolbox depends on. For further information about thismonitoring window, see How to monitor the status evolution of the assigned item(s) on page239.
Then you are able to add shapes to this business model or to replace shapes in this business modelby means of the contextual toolbox. And if need be, you can as well view the status evolution of theassigned item(s).
The following sections take as example this MDMProject business model presented in the figure toshow the details about how to add or replace a shape used therein and how to use the monitoringwindow.
Managing Repository items
238
How to add a shape
About this task
To add, for instance, an Actor shape to the Doc step in this example business model, proceed asfollows:
Procedure
1. In the workspace of the Business Modeler page, click the Doc step to display the contextualtoolbox.
2. On the contextual toolbox, move the pointer to the Actor shape.
3. Click this shape and a new step is added to the Doc step using the Actor shape.
Example
By default, a Directional Relationship connecting shape is used to connect the Doc step to thenewly added step represented by the Actor shape. Then if need be, you can replace this connectingshape with another shape required.
How to replace a shape
About this task
To replace, for instance, the newly added Directional Relationship connecting shape with another
one, for example, an Bidirectional Relationship connecting shape , proceed as follows:
Procedure
1. In the workspace of the Business Modeler page, click the Directional Relationship connectingshape between the Doc step and the newly added Actor shape to display the contextual toolbox.
2.On the contextual toolbox, move the pointer to the icon to display the available shapes usedfor this replacement.
Managing Repository items
239
Example
3. Click the Bidirectional Relationship connecting shape and then the Directional Relationship shapeis replaced with this connecting shape.
Example
How to monitor the status evolution of the assigned item(s)
About this task
When there is(are) item(s) assigned to a shape used by a step or a connection of a business model, agrey icon, a green icon and a red icon may appear either alternatively or concurrently along with thisshape.
The following figure presents an example of these icons:
• The grey icon appears to indicate the number of the assigned item(s) never executed;
• the green icon appears to indicate the number of the assigned item(s) whose last execution(s)succeed(s);
• the red icon appears to indicate the number of the assigned item(s) whose last execution(s) fail(s).
For each of them, when the corresponding items do not exist, this icon does not appear.
Then if need be, you can view the assigned item(s) easily using the monitoring window accessed fromthe contextual toolbox.
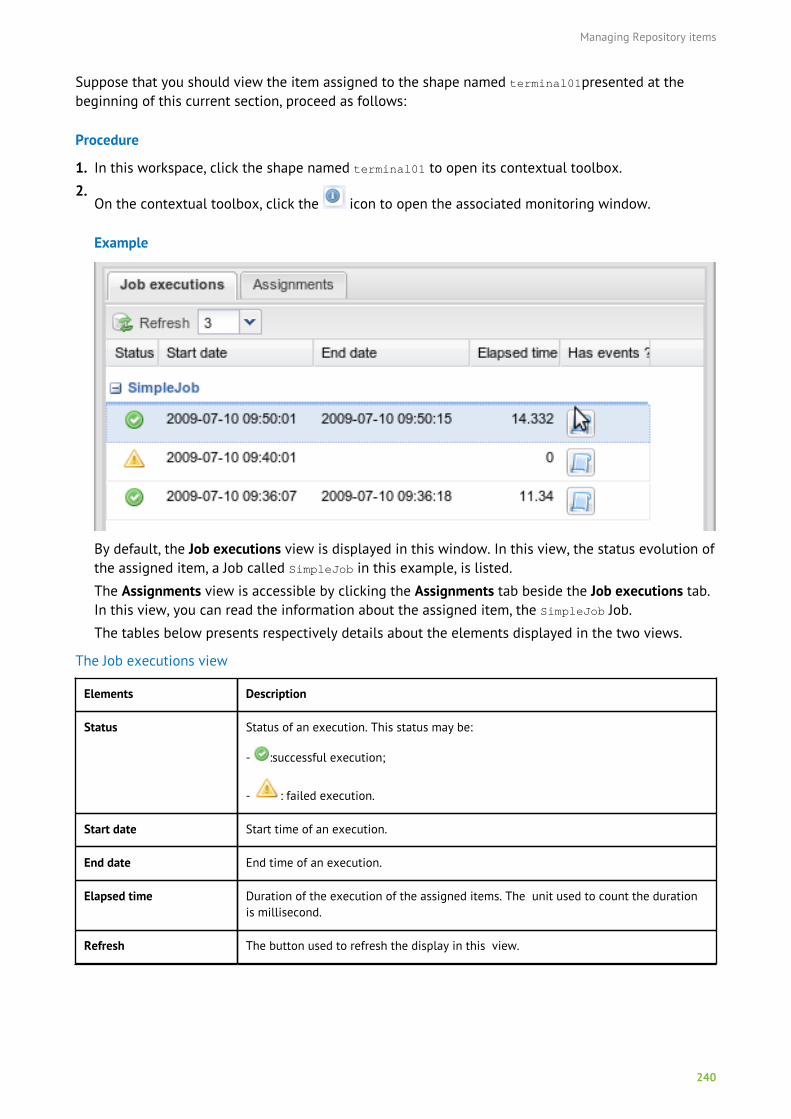
Managing Repository items
240
Suppose that you should view the item assigned to the shape named terminal01presented at thebeginning of this current section, proceed as follows:
Procedure
1. In this workspace, click the shape named terminal01 to open its contextual toolbox.
2.On the contextual toolbox, click the icon to open the associated monitoring window.
Example
By default, the Job executions view is displayed in this window. In this view, the status evolution ofthe assigned item, a Job called SimpleJob in this example, is listed.
The Assignments view is accessible by clicking the Assignments tab beside the Job executions tab.In this view, you can read the information about the assigned item, the SimpleJob Job.
The tables below presents respectively details about the elements displayed in the two views.
The Job executions view
Elements Description
Status Status of an execution. This status may be:
- :successful execution;
- : failed execution.
Start date Start time of an execution.
End date End time of an execution.
Elapsed time Duration of the execution of the assigned items. The unit used to count the durationis millisecond.
Refresh The button used to refresh the display in this view.
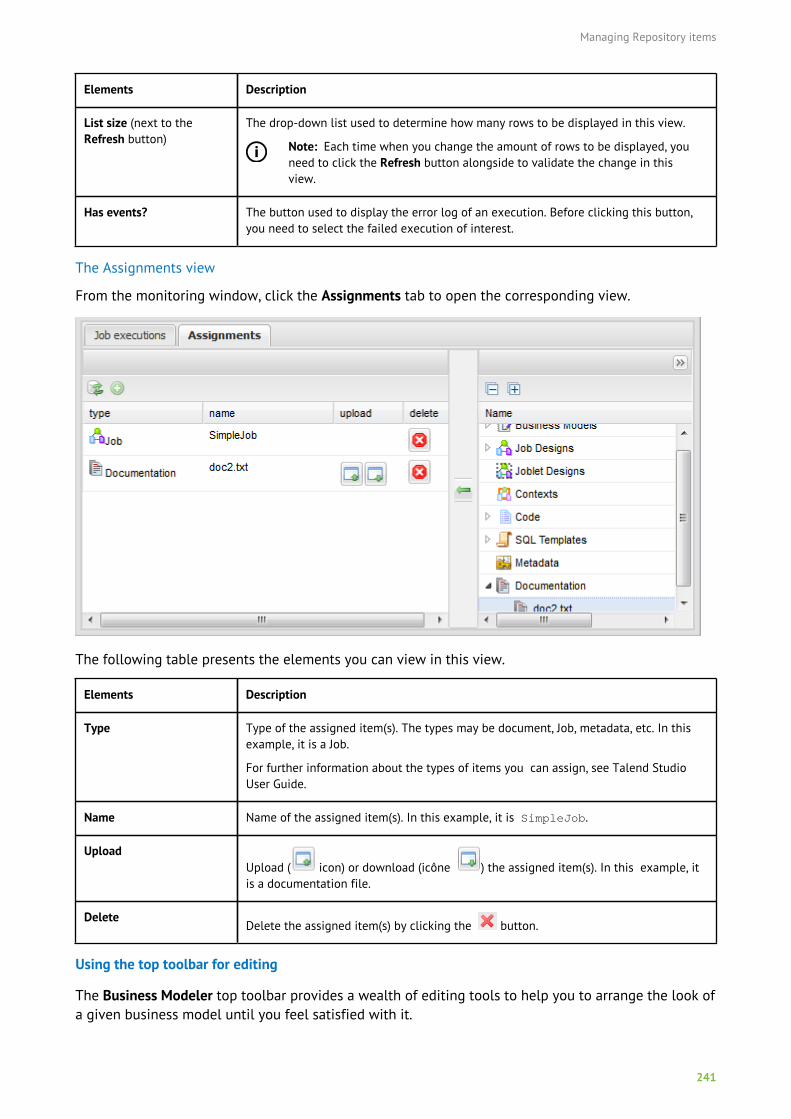
Managing Repository items
241
Elements Description
List size (next to theRefresh button)
The drop-down list used to determine how many rows to be displayed in this view.
Note: Each time when you change the amount of rows to be displayed, youneed to click the Refresh button alongside to validate the change in thisview.
Has events? The button used to display the error log of an execution. Before clicking this button,you need to select the failed execution of interest.
The Assignments view
From the monitoring window, click the Assignments tab to open the corresponding view.
The following table presents the elements you can view in this view.
Elements Description
Type Type of the assigned item(s). The types may be document, Job, metadata, etc. In thisexample, it is a Job.
For further information about the types of items you can assign, see Talend StudioUser Guide.
Name Name of the assigned item(s). In this example, it is SimpleJob.
UploadUpload ( icon) or download (icône ) the assigned item(s). In this example, itis a documentation file.
DeleteDelete the assigned item(s) by clicking the button.
Using the top toolbar for editing
The Business Modeler top toolbar provides a wealth of editing tools to help you to arrange the look ofa given business model until you feel satisfied with it.
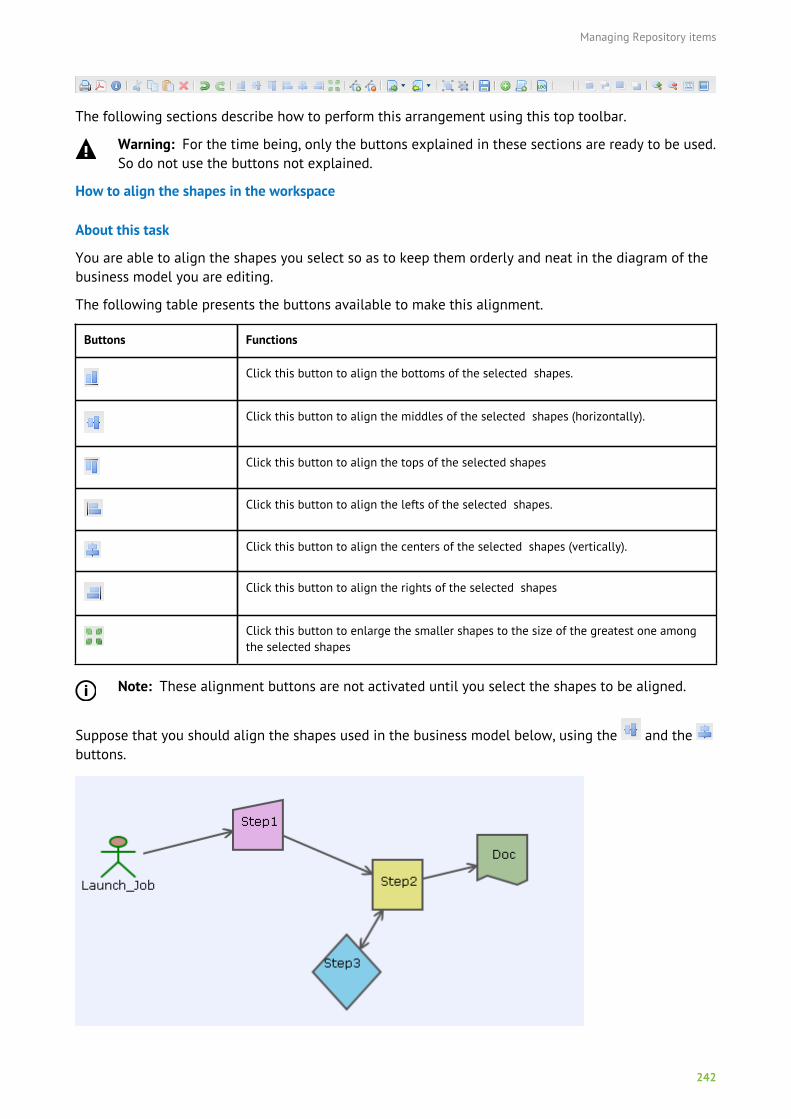
Managing Repository items
242
The following sections describe how to perform this arrangement using this top toolbar.
Warning: For the time being, only the buttons explained in these sections are ready to be used.So do not use the buttons not explained.
How to align the shapes in the workspace
About this task
You are able to align the shapes you select so as to keep them orderly and neat in the diagram of thebusiness model you are editing.
The following table presents the buttons available to make this alignment.
Buttons Functions
Click this button to align the bottoms of the selected shapes.
Click this button to align the middles of the selected shapes (horizontally).
Click this button to align the tops of the selected shapes
Click this button to align the lefts of the selected shapes.
Click this button to align the centers of the selected shapes (vertically).
Click this button to align the rights of the selected shapes
Click this button to enlarge the smaller shapes to the size of the greatest one amongthe selected shapes
Note: These alignment buttons are not activated until you select the shapes to be aligned.
Suppose that you should align the shapes used in the business model below, using the and the buttons.

Managing Repository items
243
To do this, proceed as follows:
Procedure
1. Select the row of shapes named Launch_Job, Setp1, Step2, Doc and the relationship shapesbetween them.
Example
2.In the top toolbar, click the button.
3. Then select the line of shapes named Step2 and Step3.
4. In the top toolbar, click the button.
Results
Then this diagram of this business model is aligned.
How to bend the given relationship shapes
Using the top toolbar, you can add docks to or delete them from the selected relationship shapes usedby a given business model. This way, you can easily bend the relationship shapes as you need.
The table below presents the buttons you can use to perform these operations.
Buttons Functions
Click this button in order to add docks to given relationship shapes.
Click this button in order to delete docks from given relationship shapes.
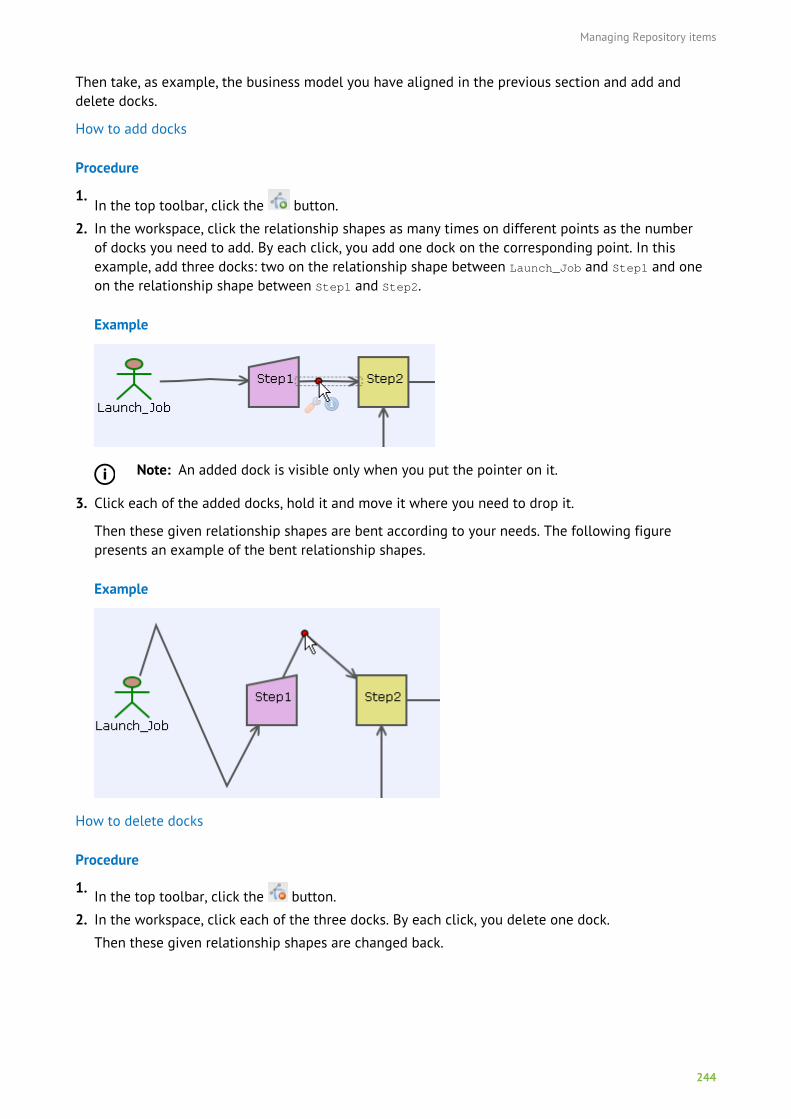
Managing Repository items
244
Then take, as example, the business model you have aligned in the previous section and add anddelete docks.
How to add docks
Procedure
1.In the top toolbar, click the button.
2. In the workspace, click the relationship shapes as many times on different points as the numberof docks you need to add. By each click, you add one dock on the corresponding point. In thisexample, add three docks: two on the relationship shape between Launch_Job and Step1 and oneon the relationship shape between Step1 and Step2.
Example
Note: An added dock is visible only when you put the pointer on it.
3. Click each of the added docks, hold it and move it where you need to drop it.
Then these given relationship shapes are bent according to your needs. The following figurepresents an example of the bent relationship shapes.
Example
How to delete docks
Procedure
1. In the top toolbar, click the button.
2. In the workspace, click each of the three docks. By each click, you delete one dock.
Then these given relationship shapes are changed back.
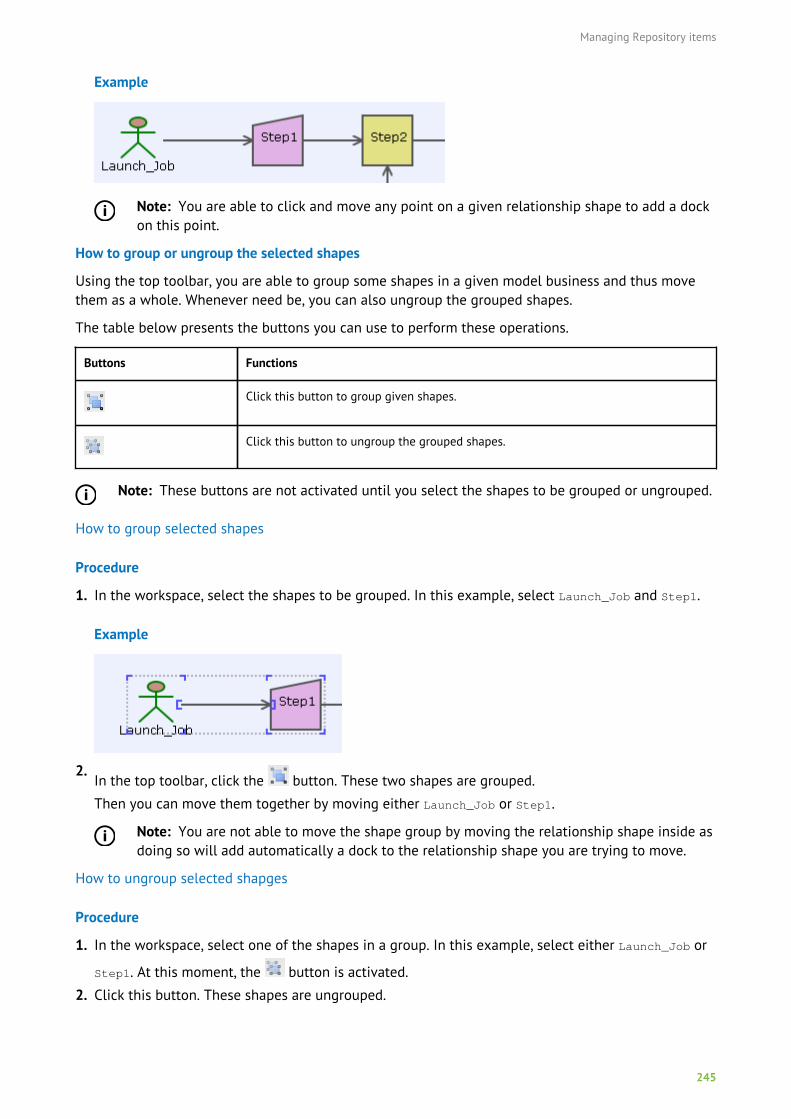
Managing Repository items
245
Example
Note: You are able to click and move any point on a given relationship shape to add a dockon this point.
How to group or ungroup the selected shapes
Using the top toolbar, you are able to group some shapes in a given model business and thus movethem as a whole. Whenever need be, you can also ungroup the grouped shapes.
The table below presents the buttons you can use to perform these operations.
Buttons Functions
Click this button to group given shapes.
Click this button to ungroup the grouped shapes.
Note: These buttons are not activated until you select the shapes to be grouped or ungrouped.
How to group selected shapes
Procedure
1. In the workspace, select the shapes to be grouped. In this example, select Launch_Job and Step1.
Example
2.In the top toolbar, click the button. These two shapes are grouped.
Then you can move them together by moving either Launch_Job or Step1.
Note: You are not able to move the shape group by moving the relationship shape inside asdoing so will add automatically a dock to the relationship shape you are trying to move.
How to ungroup selected shapges
Procedure
1. In the workspace, select one of the shapes in a group. In this example, select either Launch_Job or
Step1. At this moment, the button is activated.
2. Click this button. These shapes are ungrouped.
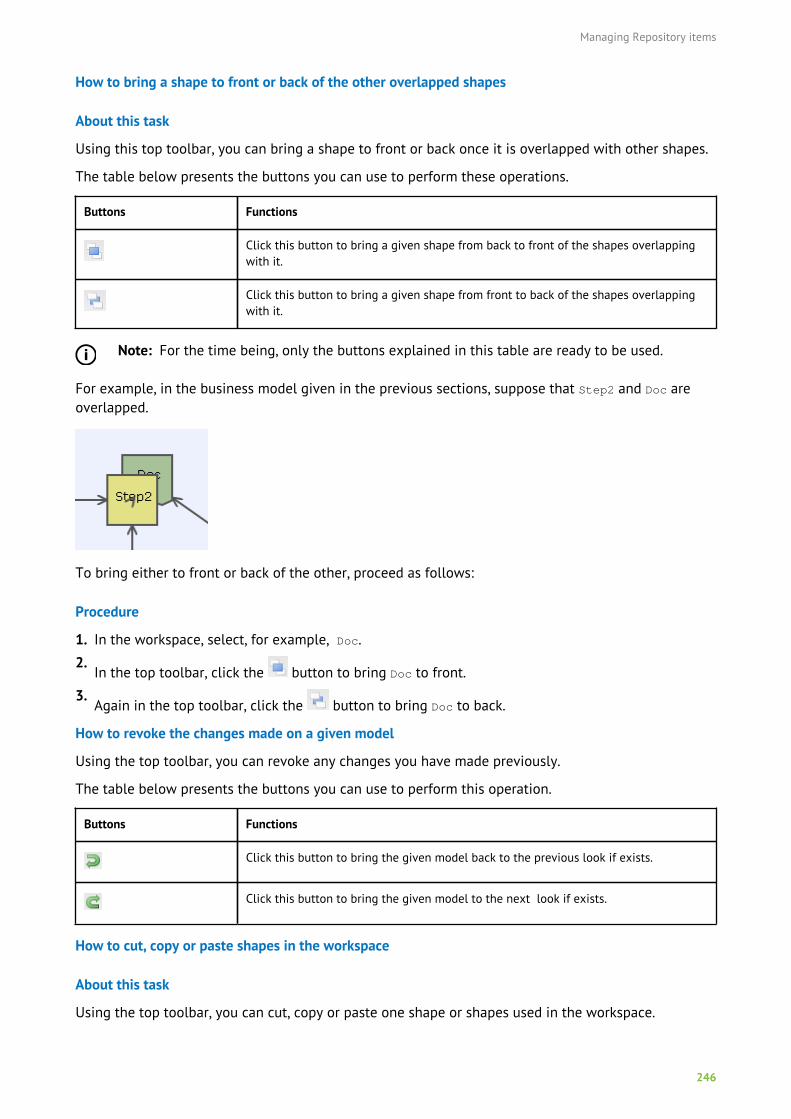
Managing Repository items
246
How to bring a shape to front or back of the other overlapped shapes
About this task
Using this top toolbar, you can bring a shape to front or back once it is overlapped with other shapes.
The table below presents the buttons you can use to perform these operations.
Buttons Functions
Click this button to bring a given shape from back to front of the shapes overlappingwith it.
Click this button to bring a given shape from front to back of the shapes overlappingwith it.
Note: For the time being, only the buttons explained in this table are ready to be used.
For example, in the business model given in the previous sections, suppose that Step2 and Doc areoverlapped.
To bring either to front or back of the other, proceed as follows:
Procedure
1. In the workspace, select, for example, Doc.
2.In the top toolbar, click the button to bring Doc to front.
3.Again in the top toolbar, click the button to bring Doc to back.
How to revoke the changes made on a given model
Using the top toolbar, you can revoke any changes you have made previously.
The table below presents the buttons you can use to perform this operation.
Buttons Functions
Click this button to bring the given model back to the previous look if exists.
Click this button to bring the given model to the next look if exists.
How to cut, copy or paste shapes in the workspace
About this task
Using the top toolbar, you can cut, copy or paste one shape or shapes used in the workspace.
Managing Repository items
247
The table below presents the buttons you can use to perform this operation.
Buttons Functions
Click this button to cut the selected shape or shapes in the workspace.
Click this button to copy the selected shape or shapes in the workspace.
Click this button to paste the copied shape or shapes to the workspace.
To perform the cut, copy or paste operation on the shape or shapes of interest used in the workspace,proceed as follows:
Procedure
1. In the workspace, select the shape or shapes of interest from the given business model.
2. In the workspace, click the corresponding buttons.
How to delete shapes from the workspace
About this task
Using the top toolbar, you can delete any shape or shapes from the workspace.
The table below presents the button you can use to perform this operation.
Buttons Functions
Click this button to delete the selected shape or shapes from the workspace.
To delete any shape or shapes from the workspace, proceed as follows:
Procedure
1. In the workspace, select the shape or shapes to be deleted.
2. In the top toolbar, click the button.
Results
The selected shape or shapes are then deleted from the workspace.
Searching repository itemsAbout this task
From the Repository Browser page, you can search repository items, such as strings, context values orcontext parameters.
Procedure
1. On the Repository Browser page, select the project and branch in which you want to search items.
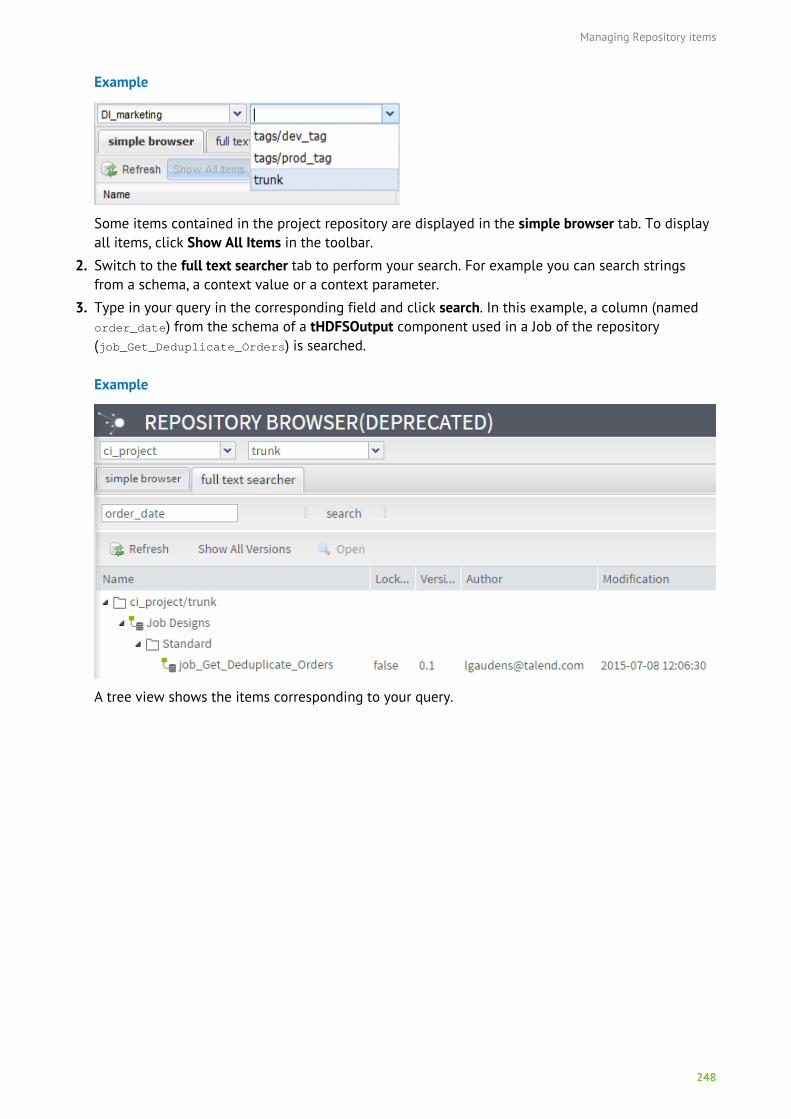
Managing Repository items
248
Example
Some items contained in the project repository are displayed in the simple browser tab. To displayall items, click Show All Items in the toolbar.
2. Switch to the full text searcher tab to perform your search. For example you can search stringsfrom a schema, a context value or a context parameter.
3. Type in your query in the corresponding field and click search. In this example, a column (namedorder_date) from the schema of a tHDFSOutput component used in a Job of the repository(job_Get_Deduplicate_Orders) is searched.
Example
A tree view shows the items corresponding to your query.
Monitoring task execution and accessing logs
249
Monitoring task execution and accessing logs
Talend Administration Center gives access to the Monitoring node which provides detailed monitoringcapabilities that can be used to:
• consolidate log information collected,
• understand the underlying component and job interaction,
• provide task execution information in a timely manner,
• prevent faults that could be unexpectedly generated,
• support the system management decisions.
For a real-life use case of these features, see Theory into practice: Executing and monitoring a dataintegration Job on page 416.
Access to the different Monitoring pages depends on your license. For more information, refer to Whatmodules and features are available depending on your license on page 9.
Prerequisites to accessing the Monitoring pagesTo access the Monitoring page, you need to have the relevant rights defined by the Administratorduring your user account creation in Talend Administration Center.
If the Monitoring node does not show in the Menu tree view of Talend Administration Center, contactyour Administrator.
Note: Only the Jobs including the relevant log components can gather the information datathat will then be aggregated and shown on the Monitoring console. For detailed informationregarding the log components to be used in your Jobs developed in Talend Studio, see theTalend Components Reference Guide.
Accessing the Monitoring nodeOn Talend Administration Center's home page and from the Menu tree view, expand Monitoring andclick:
• Activity Monitoring Console to access the collected log information as well as the list of databaseconnections to log tables.
For more information, see Monitoring Jobs with Talend Activity Monitoring Console on page 250.
• CommandLine to access list of all the commands executed in the CommandLine.
For more information, see Displaying the commands executed in the CommandLine on page 253.
• Execution history and Timeline to access the list of all triggered tasks and a graphical summary oftask executions.
For more information, see Monitoring task executions in the Monitoring node on page 263.
Monitoring task execution and accessing logs
250
Monitoring Jobs with Talend Activity Monitoring ConsoleFrom Talend Administration Center, you can also monitor your Jobs and your projects with TalendActivity Monitoring Console.
Talend Activity Monitoring Console provides detailed monitoring capabilities that can be used toconsolidate the collected log information, understand the underlying component and Job interaction,prevent faults that could be unexpectedly generated and support system management decisions. Formore information, see the Talend Activity Monitoring Console User Guide.
Access to the Activity Monitoring Console page depends on your license. For more information, referto What modules and features are available depending on your license on page 9 .
Prerequisites to monitoring Jobs with Talend Activity Monitoring Console
• the Talend Activity Monitoring Console Web application is deployed in the Tomcat server and theapplication URL is set up in the Configuration page of Talend Administration Center. For moreinformation, see Installing the Talend Activity Monitoring Console web application on Talend HelpCenter.
• the database where you save the logs is added to the connections list on top of the page of theActivity Monitoring Console page of Talend Administration Center.
Managing connections to log tables
Note: Only users that have the Operation Manager role and rights can create connections.Other users, depending on their roles, can have either read-only access or no access to thispage. For further information on access rights, see User roles/rights in the AdministrationCenter on page 11. When a user of the Administration Center opens this page, he/she will haveaccess only to the items for which the user has been granted the right authorization by theAdministrator.
To be able to view the log information relative to the monitored Jobs, you need to connect to therelevant tables that hold the data caught by the tStatCatcher and tLogCatcher components (or therelevant log options in your Job).
From the Activity Monitoring Console page, you can add, edit or remove a connection to the logtables.
Adding a new database connection
Before you begin
To establish a connection to a database in the Monitoring node, you must first put the corresponding.jar file in the Tomcat lib folder, otherwise your database connection can not be initialized. Formore information about the databases compatible with Talend Activity Monitoring Console, seeCompatible databases on Talend Help Center.
About this task
To add a new database connection to a log table:
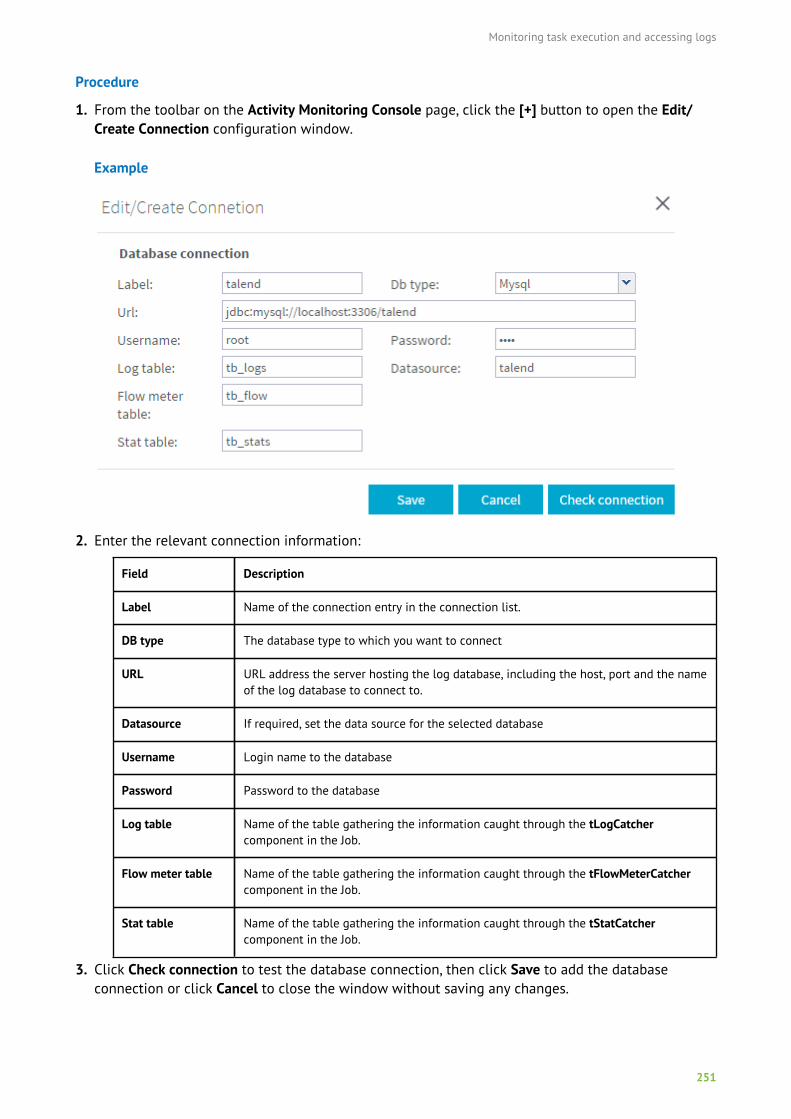
Monitoring task execution and accessing logs
251
Procedure
1. From the toolbar on the Activity Monitoring Console page, click the [+] button to open the Edit/Create Connection configuration window.
Example
2. Enter the relevant connection information:
Field Description
Label Name of the connection entry in the connection list.
DB type The database type to which you want to connect
URL URL address the server hosting the log database, including the host, port and the nameof the log database to connect to.
Datasource If required, set the data source for the selected database
Username Login name to the database
Password Password to the database
Log table Name of the table gathering the information caught through the tLogCatchercomponent in the Job.
Flow meter table Name of the table gathering the information caught through the tFlowMeterCatchercomponent in the Job.
Stat table Name of the table gathering the information caught through the tStatCatchercomponent in the Job.
3. Click Check connection to test the database connection, then click Save to add the databaseconnection or click Cancel to close the window without saving any changes.
Monitoring task execution and accessing logs
252
To access the Talend Activity Monitoring Console Web application, the same connection you haveconfigured in the Studio preferences (Preferences > AMC > Datasource Type) should be added inthis window.
Editing/Deleting a database connection
Note: You cannot delete a connection that is being used by another user.
How to edit the details of a database connection
Procedure
1. On the Connections field of the Activity Monitoring Console page, select the database connection
you want to modify and click the icon.
Its details display in the Edit/Create Connection configuration window.
2. Make the relevant changes to the database connection details where necessary.
3. Check the connection and click Save to validate the changes.
How to delete a database connection
Procedure
On the Connections field of the Activity Monitoring Console page, select the database connection
you want to delete and click the icon.The connection is removed from the connection list.
Displaying the collected activity monitoring information
Procedure
1. In the Menu tree view, click Activity Monitoring Console to display the corresponding page.
Monitoring task execution and accessing logs
253
Example
2. On the Activity Monitoring Console page, select the active connection of the database where yousave the log tables.
Once the connection to the applicable database table is set up, you can view the various Jobs beingmonitored.
Note: This log database will be connected to your active session on the Monitoring pagesand any future session on the Monitoring pages will be directly connected to this database.You can load a different database when needed.
For more information about the various monitoring views, see the section about the Graphical UserInterface in the Talend Activity Monitoring Console User Guide.
Displaying the commands executed in the CommandLineTalend Administration Center provides you with a direct access to an exhaustive list of all thecommands executed in the CommandLine and their respective description.
Note: Only users that have the Operation manager and Designer role and rights can have aread only access to this page. Other users do not have access to this page at all. For furtherinformation on access rights, see User roles/rights in the Administration Center on page 11.When a user of the Administration Center opens this page, he/she will have access only to theitems for which the user has been granted the appropriate authorization by the Administrator.
This list includes all the commands sent to the CommandLine via Talend Administration Center andalso the commands that are directly entered in the CommandLine or any other program.
Note that the access to the CommandLine page depends on your license. For more information, referto What modules and features are available depending on your license on page 9.
Monitoring task execution and accessing logs
254
About this task
To access the executed commands on the CommandLine, complete the following:
Procedure
1. In the Menu tree view, expand Monitoring and then click CommandLine.
A list of all the commands executed in the CommandLine appears.
Example
The command list provides the following information:
Column label Description
Id The executed command ID that also includes the parent-child relation.
Origin The process that initiated the command.
Note: This column can be empty sometimes. For further information about theCommandLine usage, see CommandLine features on page 391.
Status Command execution status:
• : a command that is being executed;
• : a command that has been successfully executed;
• : a command that has fallen in error and could not be executed;
• : a command that is still waiting to be executed.
Command Command name
Detail All possible details of the command execution
Monitoring task execution and accessing logs
255
Column label Description
Time Date and time of the command execution
Info Details of the command execution that failed in error
2. Click any command in the command list to display all execution information in the right handpanel.
If you select a command that failed in error, all traces of the failure will display under Info in theright hand panel. The figure below illustrates an example.
For further information about the CommandLine usage, see CommandLine features on page 391.
Displaying log eventsNote: If you want to collect and display logs from Data Integration, ESB, or MDM in an externalElastic stack, refer to Configuring Talend logging modules with an external Elastic stack withX-Pack on Talend Help Center for more information.
From Talend Administration Center, you can access an extended event logging module. This Loggingpage allows you to collect and classify time-stamped logs related to Data Integration, ESB, or MDMevents and make them easy to explore.
Monitoring task execution and accessing logs
256
Note that you can adapt the dashboard to your needs by adding/removing filters (Filters panel),display specific events by playing with dates (Time Picker panel) and zooming on specific events(Timeline panel), you can also change the log severity at any time in the Logging node of theConfiguration page. When you change this level, the data displayed in the Logging page is reloadedaccordingly and you can navigate easily between the logged events.
Access to the Logging page depends on your license. For more information, refer to What modulesand features are available depending on your license on page 9.
Displaying the time-stamped log events
Before you begin
• The Kibana Web application is deployed in the Tomcat server and the application URL is set upin the Monitoring node of the Configuration page of Talend Administration Center. For moreinformation, see Setting up the link to the Monitoring modules on page 37 and Installing theTalend logging modules on Talend Help Center. As Kibana is combined with Elasticsearch, you canvisit https://www.elastic.co/ to get more information on this application.
Note: Kibana is not supported on IE11.
• The Technical log file path field is correctly set up in the Logging node of the Configuration pageof Talend Administration Center. For more information, see Setting up the Logging parameters onpage 37.
Procedure
In the Menu tree view, click Logging to display the corresponding page.
The default dashboard of the logging module displays graphically the events and classifies themaccording to the log threshold defined on the Configuration page.
In the Middleware Navigation panel, you can switch to other pre-configured dashboards by clickingthe corresponding link. The available dashboards are:
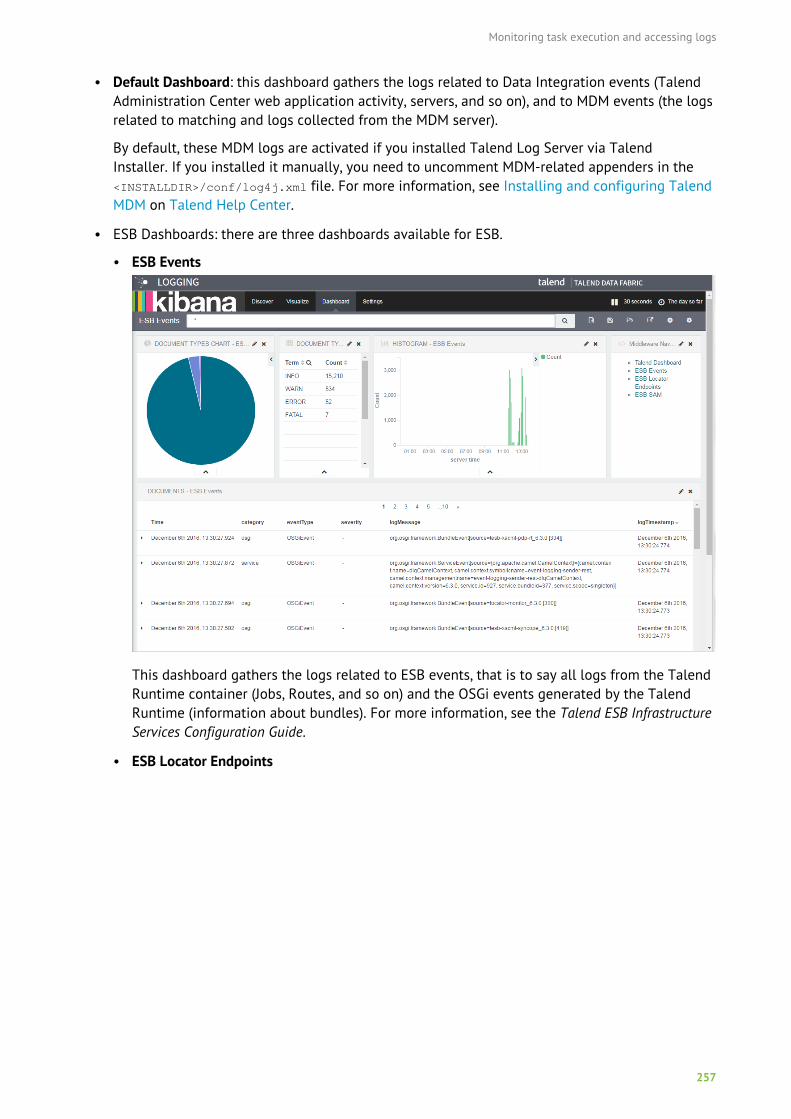
Monitoring task execution and accessing logs
257
• Default Dashboard: this dashboard gathers the logs related to Data Integration events (TalendAdministration Center web application activity, servers, and so on), and to MDM events (the logsrelated to matching and logs collected from the MDM server).
By default, these MDM logs are activated if you installed Talend Log Server via TalendInstaller. If you installed it manually, you need to uncomment MDM-related appenders in the<INSTALLDIR>/conf/log4j.xml file. For more information, see Installing and configuring TalendMDM on Talend Help Center.
• ESB Dashboards: there are three dashboards available for ESB.
• ESB Events
This dashboard gathers the logs related to ESB events, that is to say all logs from the TalendRuntime container (Jobs, Routes, and so on) and the OSGi events generated by the TalendRuntime (information about bundles). For more information, see the Talend ESB InfrastructureServices Configuration Guide.
• ESB Locator Endpoints
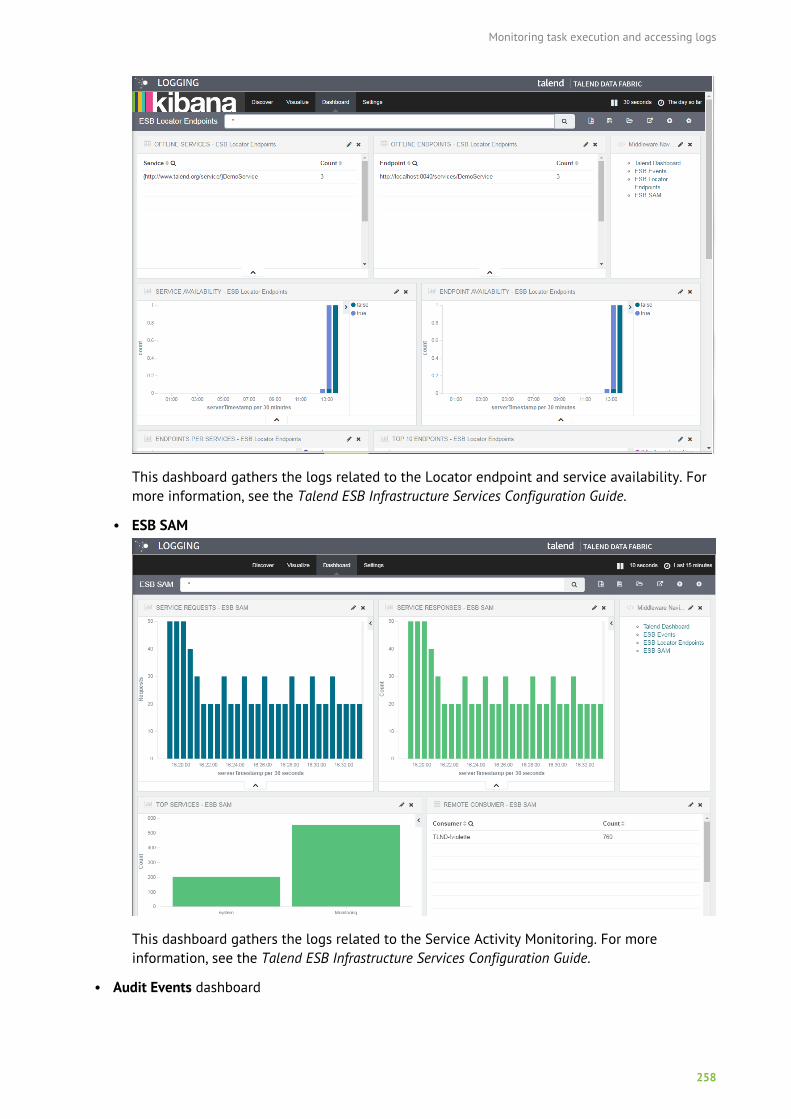
Monitoring task execution and accessing logs
258
This dashboard gathers the logs related to the Locator endpoint and service availability. Formore information, see the Talend ESB Infrastructure Services Configuration Guide.
• ESB SAM
This dashboard gathers the logs related to the Service Activity Monitoring. For moreinformation, see the Talend ESB Infrastructure Services Configuration Guide.
• Audit Events dashboard
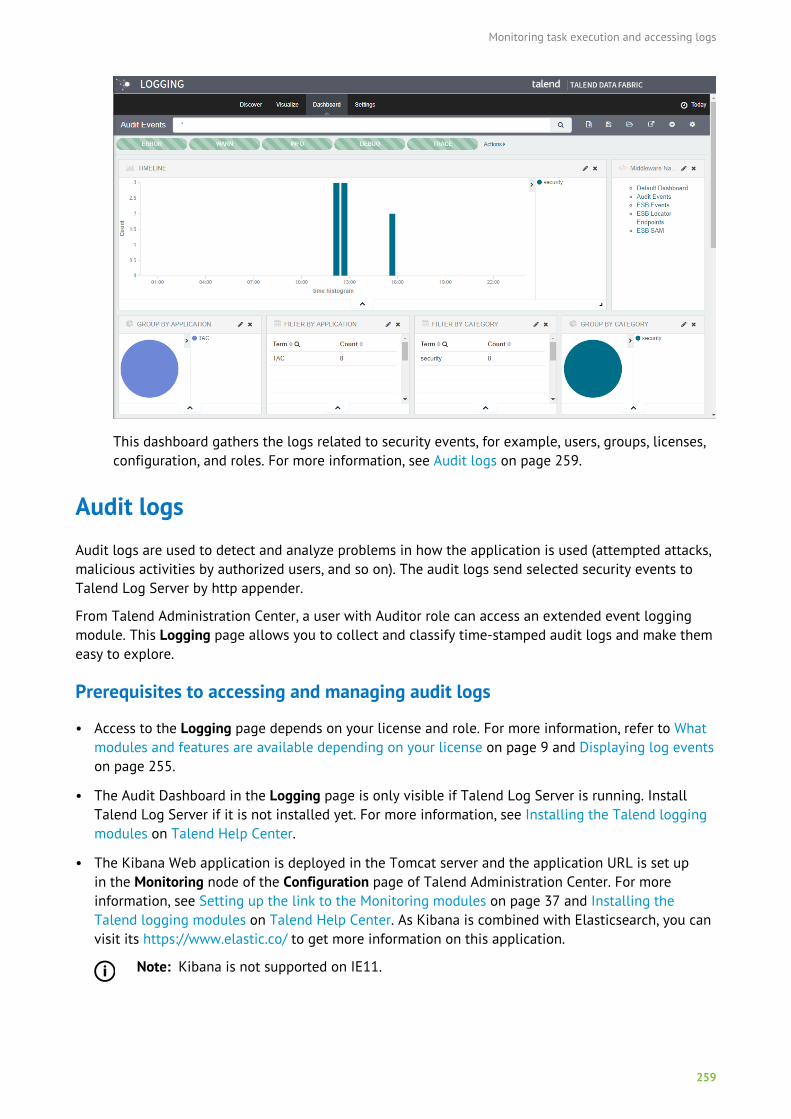
Monitoring task execution and accessing logs
259
This dashboard gathers the logs related to security events, for example, users, groups, licenses,configuration, and roles. For more information, see Audit logs on page 259.
Audit logsAudit logs are used to detect and analyze problems in how the application is used (attempted attacks,malicious activities by authorized users, and so on). The audit logs send selected security events toTalend Log Server by http appender.
From Talend Administration Center, a user with Auditor role can access an extended event loggingmodule. This Logging page allows you to collect and classify time-stamped audit logs and make themeasy to explore.
Prerequisites to accessing and managing audit logs
• Access to the Logging page depends on your license and role. For more information, refer to Whatmodules and features are available depending on your license on page 9 and Displaying log eventson page 255.
• The Audit Dashboard in the Logging page is only visible if Talend Log Server is running. InstallTalend Log Server if it is not installed yet. For more information, see Installing the Talend loggingmodules on Talend Help Center.
• The Kibana Web application is deployed in the Tomcat server and the application URL is set upin the Monitoring node of the Configuration page of Talend Administration Center. For moreinformation, see Setting up the link to the Monitoring modules on page 37 and Installing theTalend logging modules on Talend Help Center. As Kibana is combined with Elasticsearch, you canvisit its https://www.elastic.co/ to get more information on this application.
Note: Kibana is not supported on IE11.
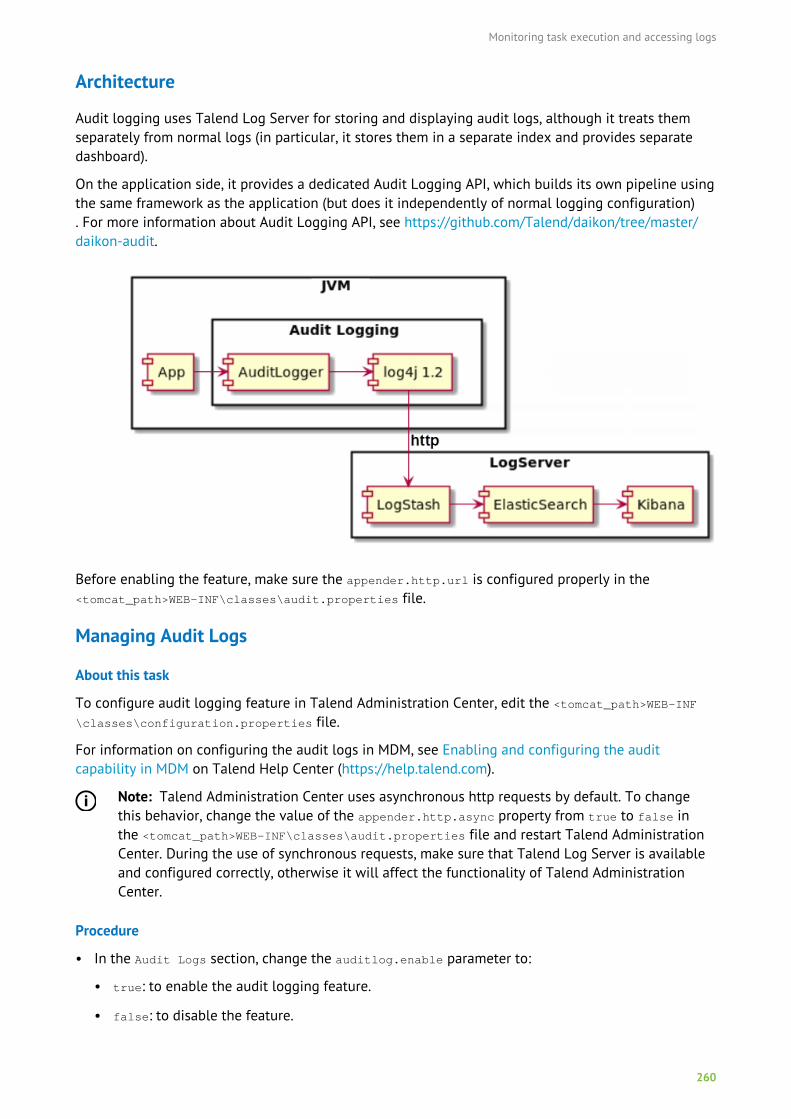
Monitoring task execution and accessing logs
260
Architecture
Audit logging uses Talend Log Server for storing and displaying audit logs, although it treats themseparately from normal logs (in particular, it stores them in a separate index and provides separatedashboard).
On the application side, it provides a dedicated Audit Logging API, which builds its own pipeline usingthe same framework as the application (but does it independently of normal logging configuration). For more information about Audit Logging API, see https://github.com/Talend/daikon/tree/master/daikon-audit.
Before enabling the feature, make sure the appender.http.url is configured properly in the<tomcat_path>WEB-INF\classes\audit.properties file.
Managing Audit Logs
About this task
To configure audit logging feature in Talend Administration Center, edit the <tomcat_path>WEB-INF\classes\configuration.properties file.
For information on configuring the audit logs in MDM, see Enabling and configuring the auditcapability in MDM on Talend Help Center (https://help.talend.com).
Note: Talend Administration Center uses asynchronous http requests by default. To changethis behavior, change the value of the appender.http.async property from true to false inthe <tomcat_path>WEB-INF\classes\audit.properties file and restart Talend AdministrationCenter. During the use of synchronous requests, make sure that Talend Log Server is availableand configured correctly, otherwise it will affect the functionality of Talend AdministrationCenter.
Procedure
• In the Audit Logs section, change the auditlog.enable parameter to:
• true: to enable the audit logging feature.
• false: to disable the feature.
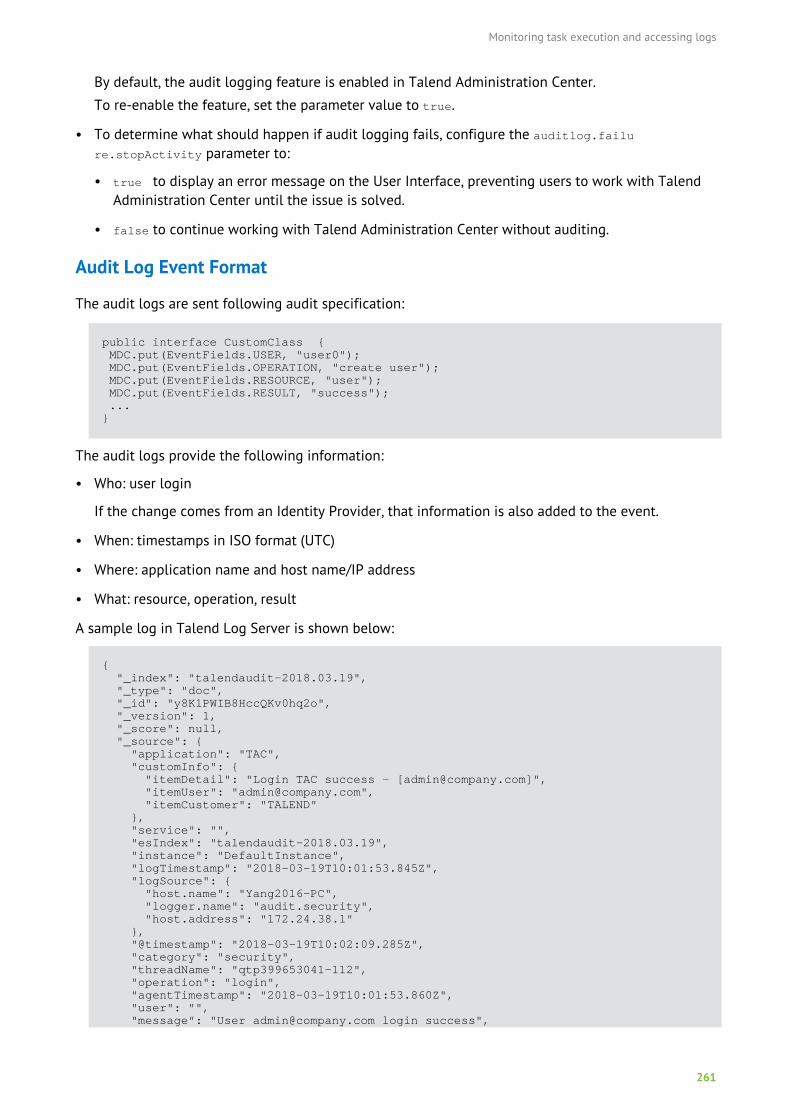
Monitoring task execution and accessing logs
261
By default, the audit logging feature is enabled in Talend Administration Center.
To re-enable the feature, set the parameter value to true.
• To determine what should happen if audit logging fails, configure the auditlog.failure.stopActivity parameter to:
• true to display an error message on the User Interface, preventing users to work with TalendAdministration Center until the issue is solved.
• false to continue working with Talend Administration Center without auditing.
Audit Log Event Format
The audit logs are sent following audit specification:
public interface CustomClass { MDC.put(EventFields.USER, "user0"); MDC.put(EventFields.OPERATION, "create user"); MDC.put(EventFields.RESOURCE, "user"); MDC.put(EventFields.RESULT, "success"); ...}
The audit logs provide the following information:
• Who: user login
If the change comes from an Identity Provider, that information is also added to the event.
• When: timestamps in ISO format (UTC)
• Where: application name and host name/IP address
• What: resource, operation, result
A sample log in Talend Log Server is shown below:
{ "_index": "talendaudit-2018.03.19", "_type": "doc", "_id": "y8K1PWIB8HccQKv0hq2o", "_version": 1, "_score": null, "_source": { "application": "TAC", "customInfo": { "itemDetail": "Login TAC success - [[email protected]]", "itemUser": "[email protected]", "itemCustomer": "TALEND" }, "service": "", "esIndex": "talendaudit-2018.03.19", "instance": "DefaultInstance", "logTimestamp": "2018-03-19T10:01:53.845Z", "logSource": { "host.name": "Yang2016-PC", "logger.name": "audit.security", "host.address": "172.24.38.1" }, "@timestamp": "2018-03-19T10:02:09.285Z", "category": "security", "threadName": "qtp399653041-112", "operation": "login", "agentTimestamp": "2018-03-19T10:01:53.860Z", "user": "", "message": "User [email protected] login success",
Monitoring task execution and accessing logs
262
"headers": { "http_connection": "keep-alive", "http_host": "192.168.30.202:8057", "request_uri": "/", "http_version": "HTTP/1.1", "http_cache_control": "no-cache", "content_length": "643", "http_user_agent": "Java/1.8.0_60", "http_accept": "text/html, image/gif, image/jpeg, *; q=.2, */*; q=.2", "request_method": "POST", "http_pragma": "no-cache", "content_type": "application/x-www-form-urlencoded", "request_path": "/" }, "resource": "user", "eventid": "59f9ff26-05a6-4328-826c-c665724046d9", "result": "success", "priority": "INFO", "@version": 1, "type": "Audit", "audit": "true" }, "fields": { "@timestamp": [ "2018-03-19T10:02:09.285Z" ] }, "sort": [ 1521453729285 ]}
This log shows the following properties:
• "application": "TAC"
• "instance": "DefaultInstance"
• "user": ""
• "operation": "login"
• "resource": "user"
• "result": "success"
• "message": "User [email protected] login success"
• "customInfo": "itemDetail"
For information on the MDM audit log format, see Enabling and configuring the audit capability inMDM on Talend Help Center (https://help.talend.com).
Audit Log Details
The audit log feature keeps track of the following events:
Category Resource Operation Result
security user create / update / delete /import / login / logout
success or failure
security group create / update / delete success or failure
security license add / reactivate /deactivate
success or failure
Monitoring task execution and accessing logs
263
Category Resource Operation Result
security configuration change / finalize success or failure
security role update / enable / disable success or failure
operations metaservlet command name success or failure
operations execution task create / update / delete /request generate / requestdeploy / request run / etc
success or failure
operations execution plan create / delete / run /stop / recover / requestgenerate / requestdeploy / etc
success or failure
operations jobserver create / update / delete /etc
success or failure
operations virtual server create / update / delete /add affectation / deleteaffectation
success or failure
operations project create / update / delete /etc
success or failure
operations project authorization add authorization / deleteauthorization
success or failure
operations trigger save / resume / pause /delete
success or failure
For information on the MDM audit log details, see Enabling and configuring the audit capability inMDM Talend Help Center (https://help.talend.com).
Monitoring task executions in the Monitoring nodeNote: Only users that have the Operation manager and Designer role and rights can haveread only access to this page. Other users do not have access to this page at all. For furtherinformation on access rights, see User roles/rights in the Administration Center on page 11.When a user of the Administration Center opens this page, he/she will have access only to theitems for which the user has been granted the appropriate authorization by the Administrator.
Monitoring of task executions in Talend Administration Center is a powerful functionality thatautomatically tracks task completion. It tracks in real-time the status of all triggered tasks or thosewaiting to be triggered. This way, monitoring can support rapid troubleshooting of issues.
The Execution History and Timeline pages provide you with timely updated execution information bytracking and monitoring task executions until their completion.
From these pages, you can also directly access the Error Recovery Management module and viewstatistic information about the execution status of a selected Job. For more information, see Accessingthe execution monitoring grid and examining collected data on page 264.
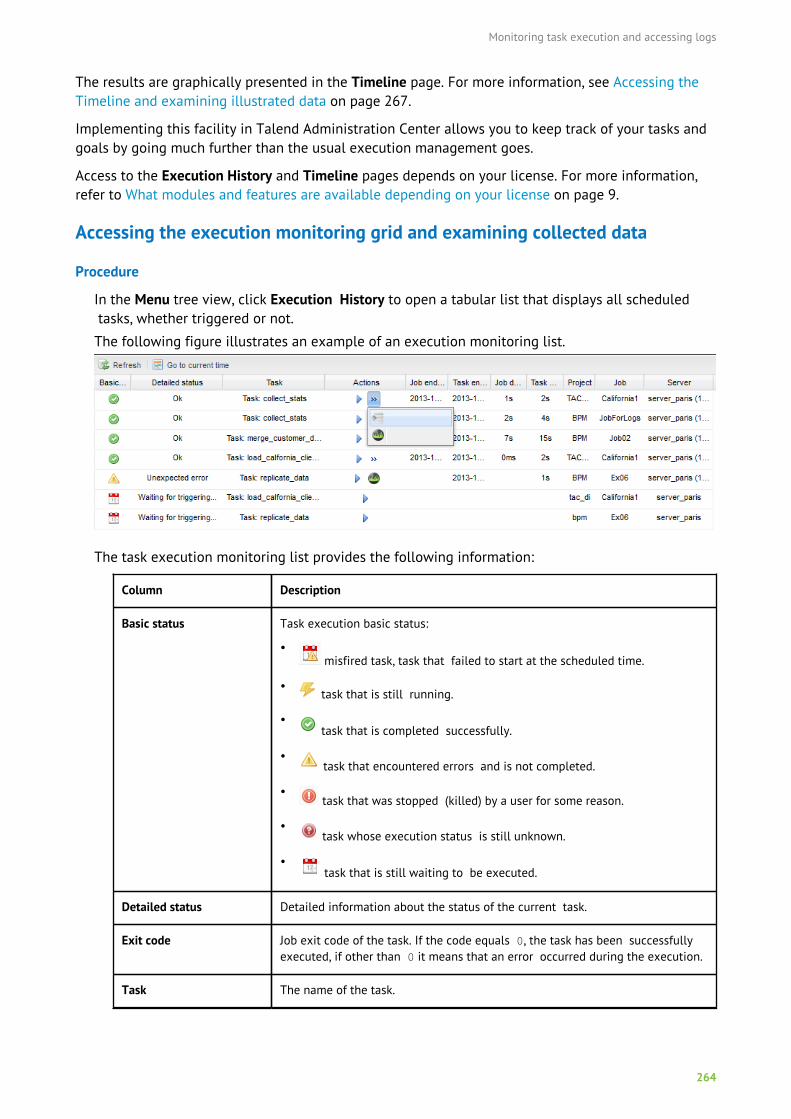
Monitoring task execution and accessing logs
264
The results are graphically presented in the Timeline page. For more information, see Accessing theTimeline and examining illustrated data on page 267.
Implementing this facility in Talend Administration Center allows you to keep track of your tasks andgoals by going much further than the usual execution management goes.
Access to the Execution History and Timeline pages depends on your license. For more information,refer to What modules and features are available depending on your license on page 9.
Accessing the execution monitoring grid and examining collected data
Procedure
In the Menu tree view, click Execution History to open a tabular list that displays all scheduled tasks, whether triggered or not.
The following figure illustrates an example of an execution monitoring list.
The task execution monitoring list provides the following information:
Column Description
Basic status Task execution basic status:
• misfired task, task that failed to start at the scheduled time.
• task that is still running.
• task that is completed successfully.
• task that encountered errors and is not completed.
• task that was stopped (killed) by a user for some reason.
• task whose execution status is still unknown.
• task that is still waiting to be executed.
Detailed status Detailed information about the status of the current task.
Exit code Job exit code of the task. If the code equals 0, the task has been successfullyexecuted, if other than 0 it means that an error occurred during the execution.
Task The name of the task.
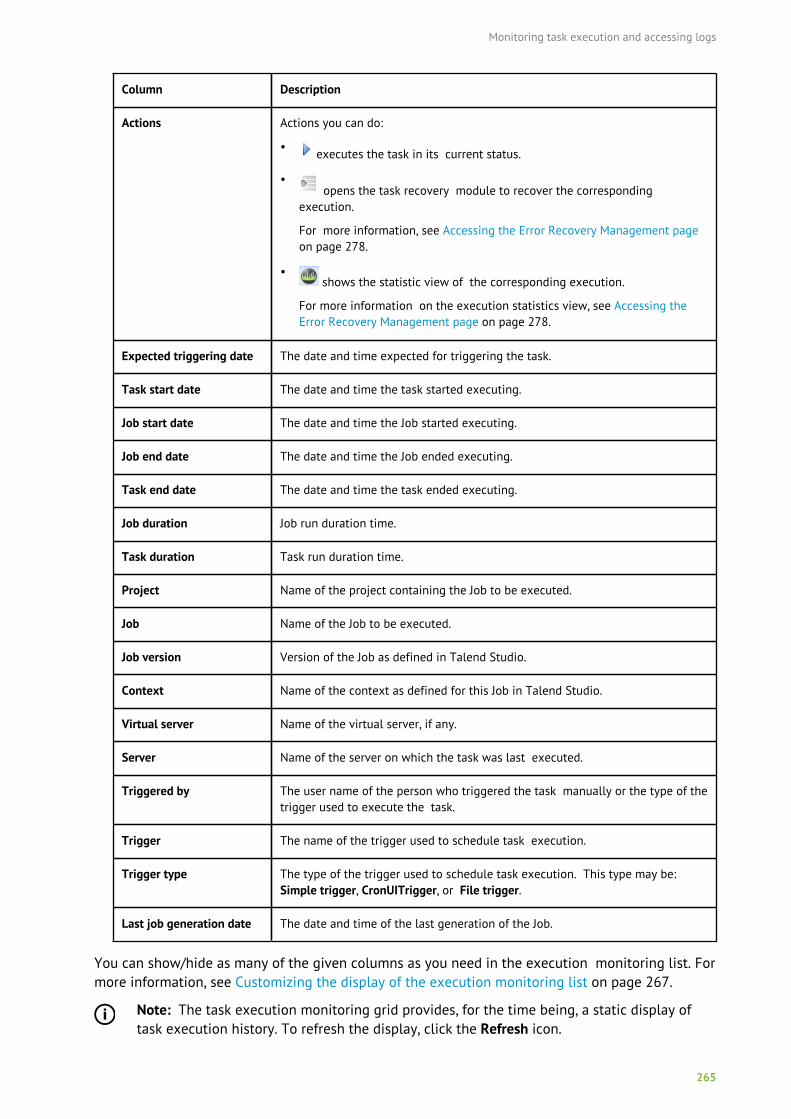
Monitoring task execution and accessing logs
265
Column Description
Actions Actions you can do:
• executes the task in its current status.
• opens the task recovery module to recover the corresponding
execution.
For more information, see Accessing the Error Recovery Management pageon page 278.
• shows the statistic view of the corresponding execution.
For more information on the execution statistics view, see Accessing theError Recovery Management page on page 278.
Expected triggering date The date and time expected for triggering the task.
Task start date The date and time the task started executing.
Job start date The date and time the Job started executing.
Job end date The date and time the Job ended executing.
Task end date The date and time the task ended executing.
Job duration Job run duration time.
Task duration Task run duration time.
Project Name of the project containing the Job to be executed.
Job Name of the Job to be executed.
Job version Version of the Job as defined in Talend Studio.
Context Name of the context as defined for this Job in Talend Studio.
Virtual server Name of the virtual server, if any.
Server Name of the server on which the task was last executed.
Triggered by The user name of the person who triggered the task manually or the type of thetrigger used to execute the task.
Trigger The name of the trigger used to schedule task execution.
Trigger type The type of the trigger used to schedule task execution. This type may be:Simple trigger, CronUITrigger, or File trigger.
Last job generation date The date and time of the last generation of the Job.
You can show/hide as many of the given columns as you need in the execution monitoring list. Formore information, see Customizing the display of the execution monitoring list on page 267.
Note: The task execution monitoring grid provides, for the time being, a static display oftask execution history. To refresh the display, click the Refresh icon.
Monitoring task execution and accessing logs
266
Limiting the number of tasks in the execution monitoring list
On the execution history list of the Execution History page, you can limit the number of the tasks thatare displayed by setting criteria for each column. For example, you can set criteria to display the tasksof a specific execution status, Job start date, task duration.
You can set filters in two different ways: selecting check boxes in a drop down list, or typing in a textin the filter box.
Note: You must clear every check box selected in the list and/or every entered filter text in thefilter box if you do not want to apply the filter to the execution list view.
Listing tasks being executed and those executed correctly
About this task
If you need to list only the tasks that are still being executed and those executed correctly, do thefollowing:
Procedure
1. On the Execution History page, put the pointer on a Basic status column and click the drop-downarrow to display the filter-option list.
2. Put the pointer on Filters and from the drop-down list select the Running... and the OK checkboxes.
A progress indicator shows the loading process of the data of interest and then the task executionlist is displayed depending on the filters you have set.
Listing execution instances of a task
About this task
To list only the execution instances of one specific task using the filter box, do the following:
Procedure
1. On the Execution History page, put the pointer on a Task column and click the drop-down arrow todisplay the filter-option list.
Monitoring task execution and accessing logs
267
2. Put the pointer on Filters and in the filter box, type in the name of the task whose executioninstances you need to display.
A progress indicator shows the loading process of the data of interest and in the end, the historylist displays the data collected depending on the filters you have set.
Customizing the display of the execution monitoring list
About this task
You can customize the view of the task execution monitoring list to restrict the number of the tasksto be displayed according to different criteria. You can also show/hide one or more columns in theexecution monitoring list.
Procedure
1. On the Execution History page, click the drop-down arrow next to any of the column names toshow the list options.
2. In the drop-down list, select:
Item To...
Sort Ascending Arrange the list in an ascending order.
Sort Descending Arrange the list in an descending order.
Columns Display a drop-down list where you can select/clear the check boxes next tothe column name(s) you need to show/hide.
Filters Filter the execution history information to display tasks according to criteriarelative to each column.
For more information, see Limiting the number of tasks in the executionmonitoring list on page 266.
Accessing the Timeline and examining illustrated data
The Timeline page allows you to access the chronology of task executions and provides you withinformation updated in real time.
Monitoring task execution and accessing logs
268
Procedure
1. In the Menu tree view, expand Monitoring and click Timeline to open the graphical view of theexecution history of your tasks.
The Timeline page offers you the possibility to display only the tasks launched or the tasksscheduled to be launched during a defined time range.
2. In the Displayed data list, select the time interval corresponding to the task executions you want tomonitor, considering that h corresponds to hours, d to days and w to weeks.
Note that these preferences are stored in your Web browser session.
• To put the time line at the current time, click Go to current time in the toolbar.
• To filter the executions according to their status, click the corresponding icons in the toolbarand refresh the page.
• To filter the executions according to the name of the task, enter the name of the task you wantto monitor in the Task(s) field of the toolbar and refresh the page to take the changes intoaccount.
In the graphic, the red line represents the "present" (the real time). On the left of this red line aredisplayed the task instances already launched and on the right are displayed the task instancesthat will be triggered.
Executions that are very close to each other might be represented by a single icon with a boldframe. Move your pointer over the icon to display their information.
By moving your pointer on a task row in the graphic, you display the icons corresponding to thedifferent execution status instances of that task along with tooltips providing some informationabout the task and the related Job.
If you click an icon on a task row, a pop-up window opens and display detailed information aboutthe selected execution, in which you can visualize the logs, the context values and the advancedinformation of the task, as well as navigate between the different task executions and downloadthe detailed logs.
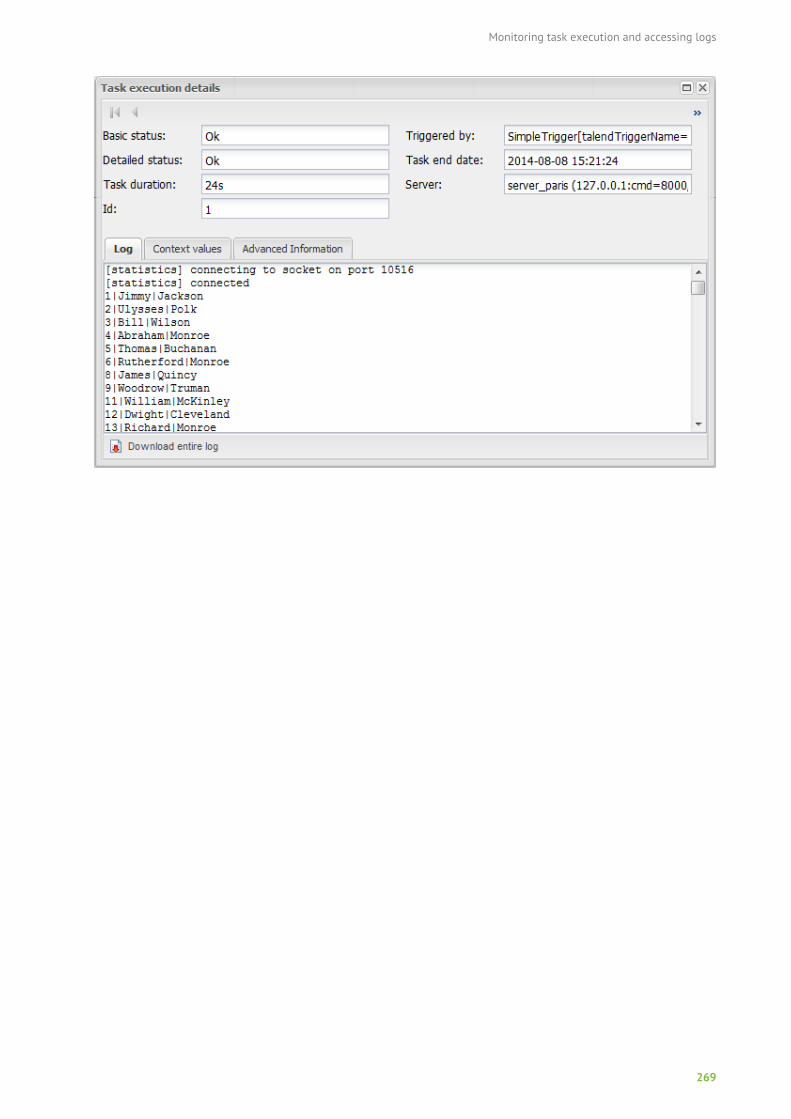
Monitoring task execution and accessing logs
269
Collecting the Job execution statistics
270
Collecting the Job execution statistics
Talend Administration Center offers the possibility to display and collect all Job execution statistics.
For a real-life use case of this feature, see Theory into practice: Executing and monitoring a dataintegration Job on page 416.
Access to this module depends on your license. For more information, refer to What modules andfeatures are available depending on your license on page 9.
What are real time statisticsTalend Administration Center provides the Real time statistics module which allows you to view thetask execution statistics directly in the Administration Center.
The Real-time Statistics feature tracks in real-time the execution status and performance of processesfrom Talend Administration Center during the execution of the Job. This feature takes up the Statisticsfeature available from Talend Studio. For more information about this feature in the Studio, seeTalend Studio User Guide.
The real-time statistics information consists of the execution time of each task and its correspondingJob, the number of rows processed in each data flow and the time taken to process them, and thenumber of rows processed per second. This can help you follow the progress of the Jobs of interestduring their execution and spot immediately any bottlenecks in the data processing flows.
Accessing real time statisticsWhen a Job is executed from Talend Administration Center, you can display and collect its executionstatistics.
Note that if you are using one of the subscription-based Talend solutions with Big Data, this featureis also applicable on the Map/Reduce Jobs you have designed in the Studio.
Prerequisites to using real time statistics
Certain conditions need to be met before being able to use this facility in Talend AdministrationCenter. You have to:
• create a task in Talend Administration Center to execute the previously designed Job by enablingthe Statistic option.
For more information, see Adding a normal execution task on page 140.
or,
• enable the Statistic option for a task already existing in Talend Administration Center.
For more information, see the section below.
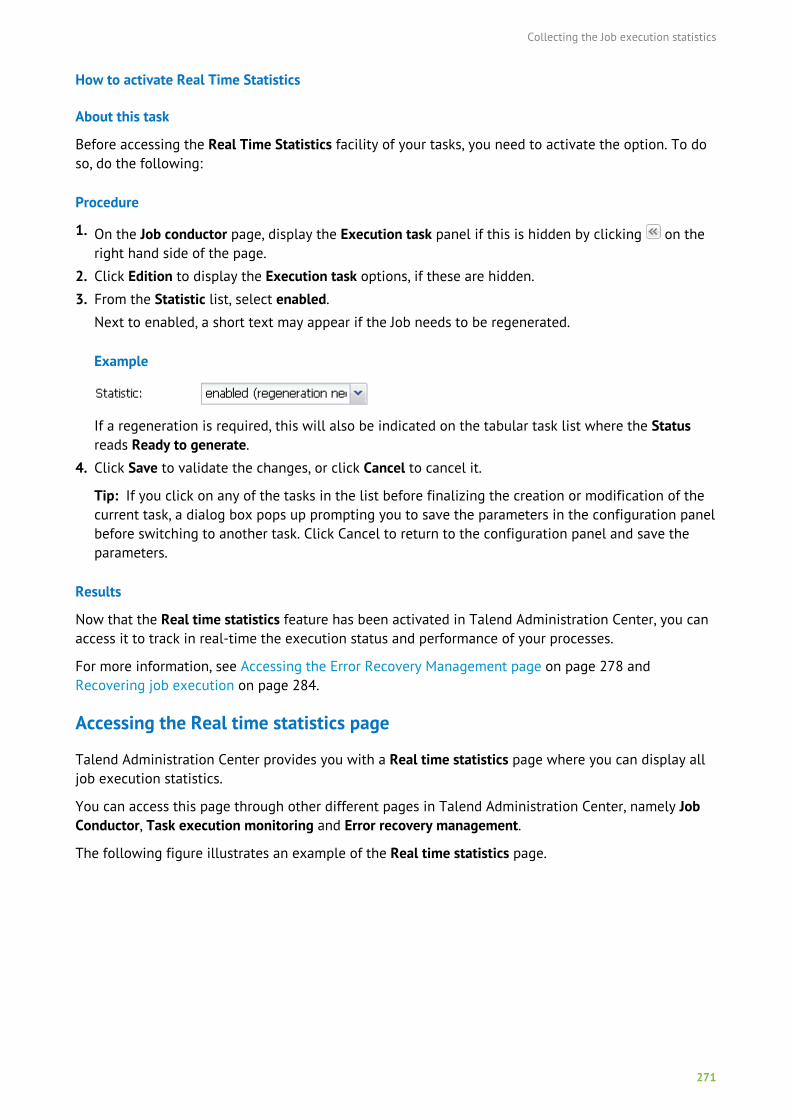
Collecting the Job execution statistics
271
How to activate Real Time Statistics
About this task
Before accessing the Real Time Statistics facility of your tasks, you need to activate the option. To doso, do the following:
Procedure
1. On the Job conductor page, display the Execution task panel if this is hidden by clicking on theright hand side of the page.
2. Click Edition to display the Execution task options, if these are hidden.
3. From the Statistic list, select enabled.
Next to enabled, a short text may appear if the Job needs to be regenerated.
Example
If a regeneration is required, this will also be indicated on the tabular task list where the Statusreads Ready to generate.
4. Click Save to validate the changes, or click Cancel to cancel it.
Tip: If you click on any of the tasks in the list before finalizing the creation or modification of thecurrent task, a dialog box pops up prompting you to save the parameters in the configuration panelbefore switching to another task. Click Cancel to return to the configuration panel and save theparameters.
Results
Now that the Real time statistics feature has been activated in Talend Administration Center, you canaccess it to track in real-time the execution status and performance of your processes.
For more information, see Accessing the Error Recovery Management page on page 278 andRecovering job execution on page 284.
Accessing the Real time statistics page
Talend Administration Center provides you with a Real time statistics page where you can display alljob execution statistics.
You can access this page through other different pages in Talend Administration Center, namely JobConductor, Task execution monitoring and Error recovery management.
The following figure illustrates an example of the Real time statistics page.
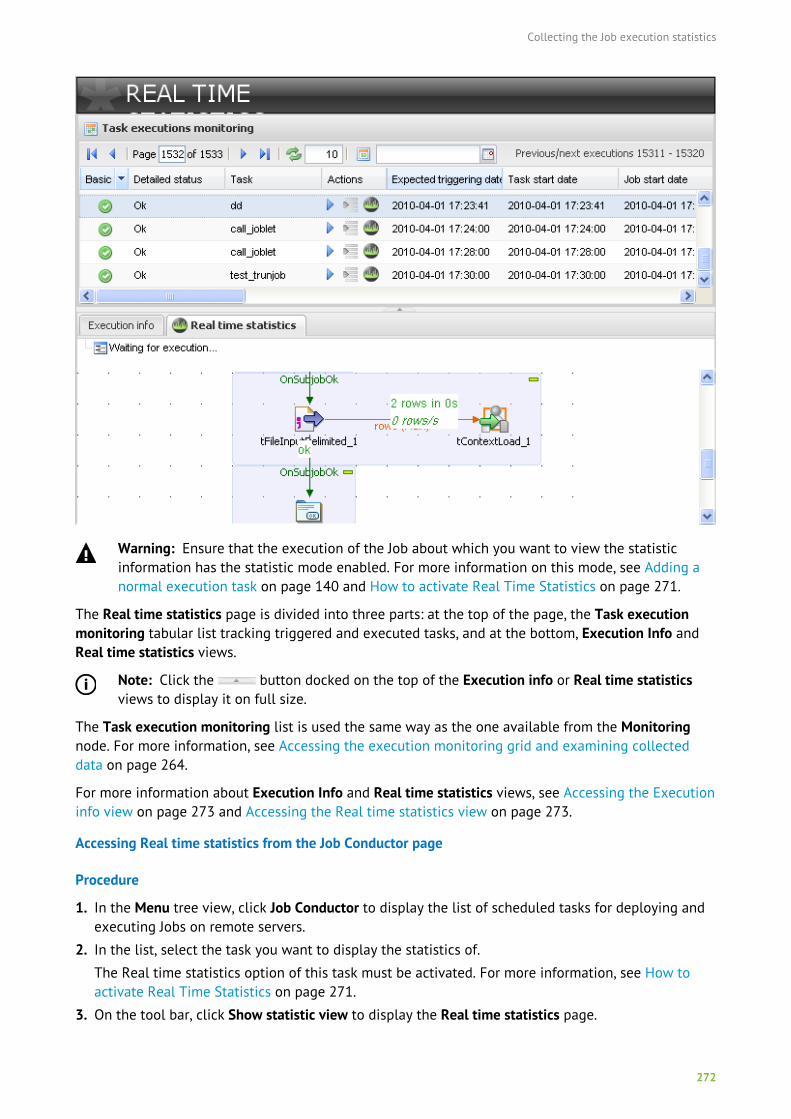
Collecting the Job execution statistics
272
Warning: Ensure that the execution of the Job about which you want to view the statisticinformation has the statistic mode enabled. For more information on this mode, see Adding anormal execution task on page 140 and How to activate Real Time Statistics on page 271.
The Real time statistics page is divided into three parts: at the top of the page, the Task executionmonitoring tabular list tracking triggered and executed tasks, and at the bottom, Execution Info andReal time statistics views.
Note: Click the button docked on the top of the Execution info or Real time statisticsviews to display it on full size.
The Task execution monitoring list is used the same way as the one available from the Monitoringnode. For more information, see Accessing the execution monitoring grid and examining collecteddata on page 264.
For more information about Execution Info and Real time statistics views, see Accessing the Executioninfo view on page 273 and Accessing the Real time statistics view on page 273.
Accessing Real time statistics from the Job Conductor page
Procedure
1. In the Menu tree view, click Job Conductor to display the list of scheduled tasks for deploying andexecuting Jobs on remote servers.
2. In the list, select the task you want to display the statistics of.
The Real time statistics option of this task must be activated. For more information, see How toactivate Real Time Statistics on page 271.
3. On the tool bar, click Show statistic view to display the Real time statistics page.
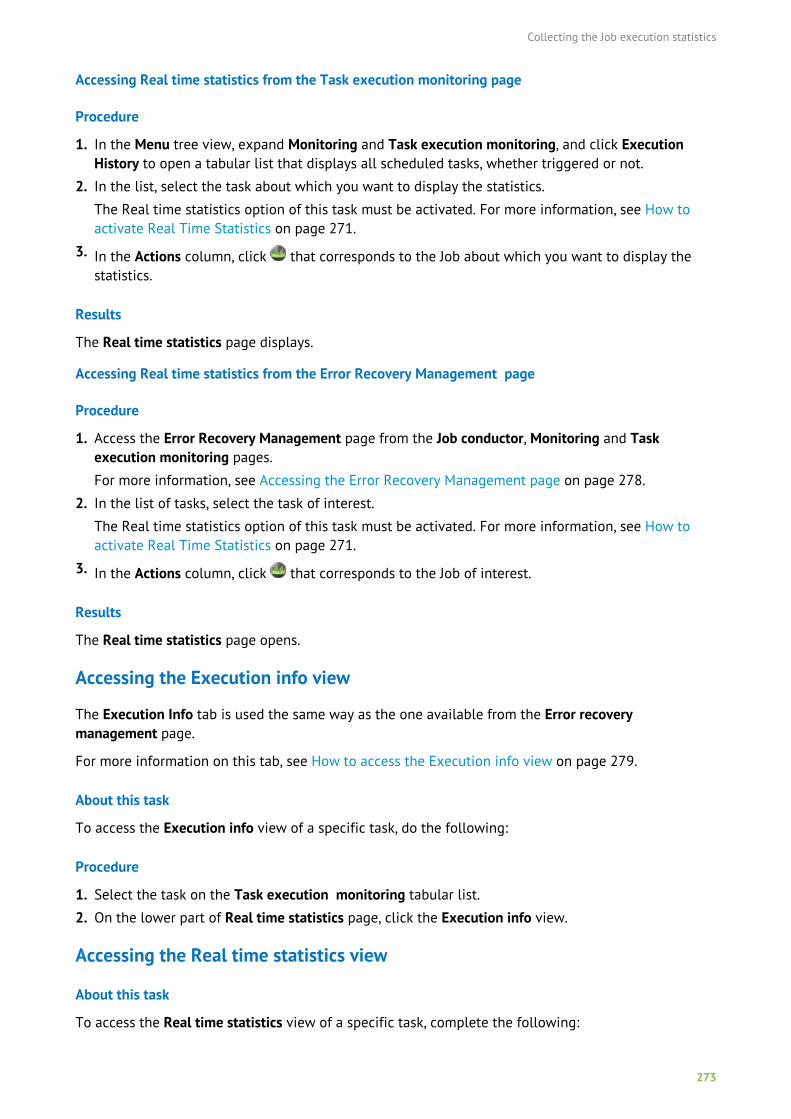
Collecting the Job execution statistics
273
Accessing Real time statistics from the Task execution monitoring page
Procedure
1. In the Menu tree view, expand Monitoring and Task execution monitoring, and click ExecutionHistory to open a tabular list that displays all scheduled tasks, whether triggered or not.
2. In the list, select the task about which you want to display the statistics.
The Real time statistics option of this task must be activated. For more information, see How toactivate Real Time Statistics on page 271.
3. In the Actions column, click that corresponds to the Job about which you want to display thestatistics.
Results
The Real time statistics page displays.
Accessing Real time statistics from the Error Recovery Management page
Procedure
1. Access the Error Recovery Management page from the Job conductor, Monitoring and Taskexecution monitoring pages.
For more information, see Accessing the Error Recovery Management page on page 278.
2. In the list of tasks, select the task of interest.
The Real time statistics option of this task must be activated. For more information, see How toactivate Real Time Statistics on page 271.
3. In the Actions column, click that corresponds to the Job of interest.
Results
The Real time statistics page opens.
Accessing the Execution info view
The Execution Info tab is used the same way as the one available from the Error recoverymanagement page.
For more information on this tab, see How to access the Execution info view on page 279.
About this task
To access the Execution info view of a specific task, do the following:
Procedure
1. Select the task on the Task execution monitoring tabular list.
2. On the lower part of Real time statistics page, click the Execution info view.
Accessing the Real time statistics view
About this task
To access the Real time statistics view of a specific task, complete the following:
Collecting the Job execution statistics
274
Procedure
1. Select the task on the Task execution monitoring tabular list.
2. On the lower part of Real time statistics page, click the Real time statistics view.
The following figure presents an example of the Real time statistics tab.
Here you can see the statistical information of the selected job execution, along with its graphicalview.
The graphical Job view presents a capture of what the selected Job looks like at the end of theexecution.
If this Job contains child Jobs, a tree view appears above the Job capture showing you all its childJobs, along with their execution information. To display the parent job execution or the executionof one of its child, simply click the relevant node.
The same information are presented in real time in the Real time statistics window during thejob execution, when the Job is manually executed from Talend Administration Center. For moreinformation, see the following section.
Displaying real time statistics during remote execution
About this task
From Talend Administration Center, you can monitor in real time the execution status andperformance of your processes. This allows you to identify any bottleneck during the data processingand gives you a real-time visibility on the progress of your Jobs.
To display the Real time statistics window during remote execution, do the following:
Procedure
1. In the Menu tree view, click Job Conductor to display the list of scheduled tasks for deploying andexecuting Jobs on remote servers.
2. Ensure the task you want to execute and display the real time statistics related has the Statisticsoption enabled.
For more information about the activation of the statistics from Talend Administration Center, seeHow to activate Real Time Statistics on page 271.
3. Select it in the list of tasks and check its Status.
It can be Ready to generate, Ready to deploy or Ready to run.
Collecting the Job execution statistics
275
4. Depending on its status, click the appropriate button on the tool bar: Generate, Deploy or Run.
For further information about how to generate, deploy and run a Job on Talend AdministrationCenter, see Sequence of task execution on page 175.
Results
Once the Job begins to run, the Real time statistics window pops up.
The following figure is an example of the Real time statistics window.
Here, you can see the statistical information in real time as the checkpoints Job runs.
If the Job executed contains child Jobs, a tree view appears above the graphical view of the Jobshowing you all its child Jobs, along with their execution information. Here, the checkpoint job hasone child Job named end. To display the parent job execution or the execution of one of its childs,simply click the corresponding node.
In this example, you can click the child Job node, end, to view this child Job only.
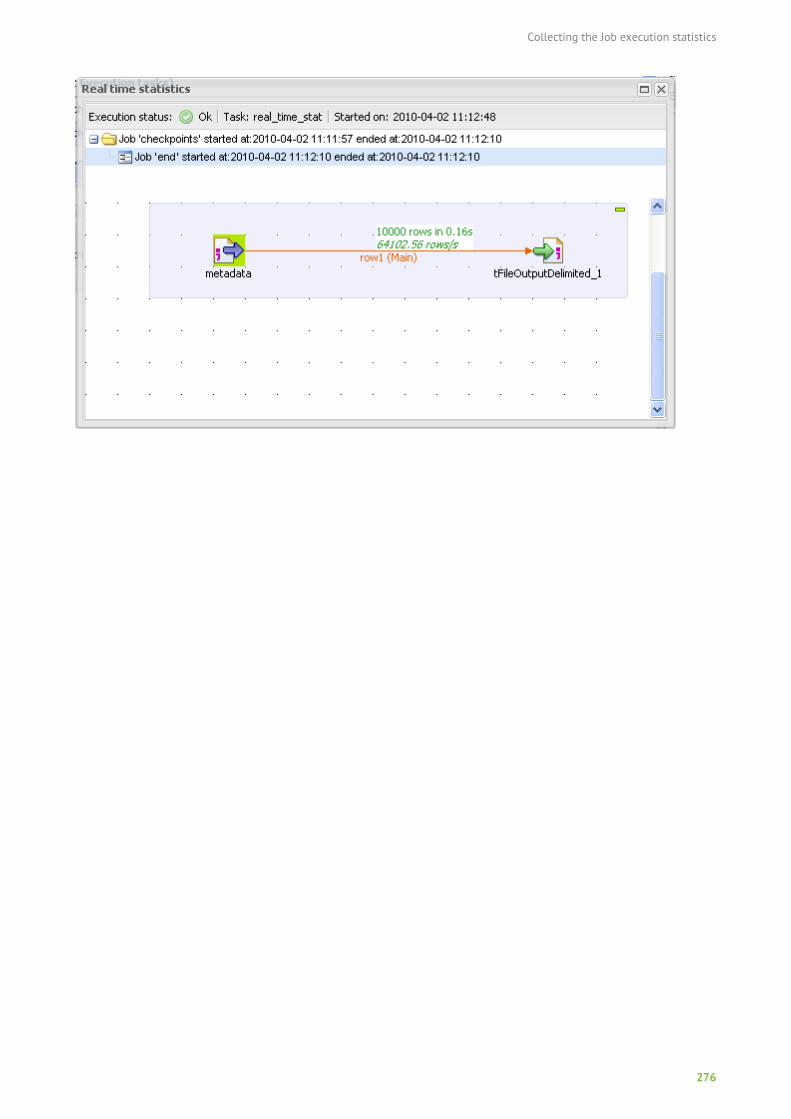
Collecting the Job execution statistics
276
Recovering the execution of a Job
277
Recovering the execution of a Job
Talend Administration Center offers the possibility to recover a Job execution process at a pointbeyond its beginning.
Access to this feature depends on your license. For more information, refer to What modules andfeatures are available depending on your license on page 9.
What are recovery checkpointsTalend Administration Center offers the concept of "recovery checkpoints" as an execution restorefacility for Jobs executed with errors. Checkpoints are taken in anticipation of the potential need torestart a job execution beyond its starting point.
Job execution processes can be time-consuming, as are backup and restore operations. Ifcheckpointing is possible, checkpoints are initiated at specified intervals (trigger connections) in termsof bulks of the data flow.
The purpose of checkpointing is to minimize the amount of time and effort wasted if you need torestart the process of job execution when this process is interrupted by a failure. With checkpointing,the process can be restarted from the latest checkpoint previous to the failure rather than from thebeginning of the job execution process.
Recovering job executionWhen job execution is interrupted by a failure, you can use Talend Administration Center to restartexecution from the latest checkpoint previous to the failure rather than from the beginning of theexecution process.
To learn more about best practices to follow in case of Job generation issues in Talend AdministrationCenter, see the documentation on Best Practices to follow in case of Job generation issues in TalendAdministration Center on Talend Help Center (https://help.talend.com).
Prerequisites to use checkpointing for Job execution recovery
Certain conditions needs to be met before being able to use this facility in Talend AdministrationCenter.
• When designing a Job in Talend Studio, you should initiate as "checkpoints" one or severalOnSubjobOk trigger connections. For more information about how to define checkpoints, seeSetting checkpoints on trigger connections on Talend Help Center.
• You have to create a task in Talend Administration Center to execute the previously designed Job.
For more information, see Adding a normal execution task on page 140.
Later, if there is a failure during this job execution, you can access the Error Recovery Managementpage in Talend Administration Center and recover Job execution at a selected checkpoint.
For more information, see Accessing the Error Recovery Management page on page 278 andRecovering job execution on page 284.
Recovering the execution of a Job
278
Accessing the Error Recovery Management page
Talend Administration Center provides you with an Error Recovery Management page where you canrecover all job executions ended in failure.
The following figure illustrates an example of the Error Recovery Management page.
This page presents two horizontal parts: on the upper part, the Task execution monitoring list and,on the lower part: Execution Info and Recovery checkpoints tabs. See the following sections for detaildescription of the views associated with these tabs.
Note: The Task execution monitoring list remains on the upper half unless you expand eitherof the two views using the button.
For more information about the Task execution monitoring list, see Accessing the executionmonitoring grid and examining collected data on page 264. For more information on how to changethe display and filter the Task execution monitoring list, see Limiting the number of tasks in theexecution monitoring list on page 266 and Customizing the display of the execution monitoring liston page 267.
You can access the Error Recovery Management page through other different pages in TalendAdministration Center, namely Job Conductor, Monitoring and Task execution monitoring.
Accessing Error Recovery Management from the Job Conductor page
Procedure
1. In the Menu tree view, expand Job Conductor and click Job Conductor to display the list ofscheduled tasks for deploying and executing Jobs on remote servers.
2. On the list, select the Job of which you want to recover the execution.
3. On the toolbar, click Recover last execution to display the Error Recovery Management page.
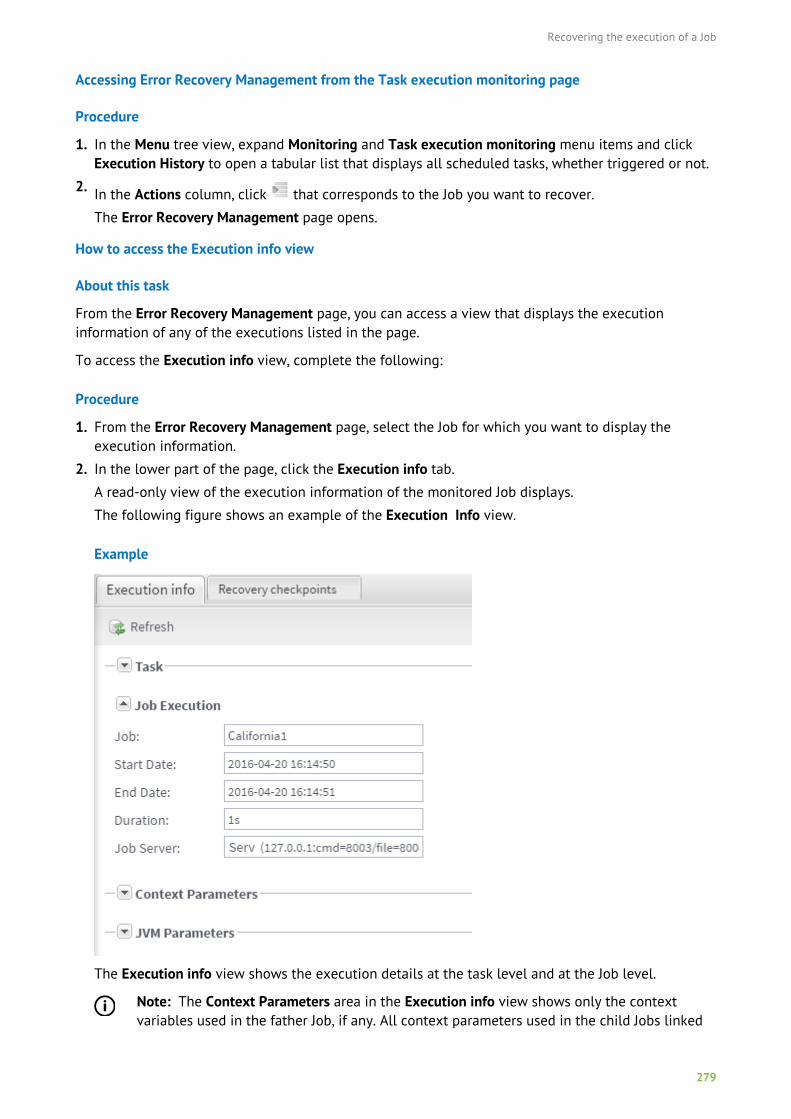
Recovering the execution of a Job
279
Accessing Error Recovery Management from the Task execution monitoring page
Procedure
1. In the Menu tree view, expand Monitoring and Task execution monitoring menu items and clickExecution History to open a tabular list that displays all scheduled tasks, whether triggered or not.
2. In the Actions column, click that corresponds to the Job you want to recover.
The Error Recovery Management page opens.
How to access the Execution info view
About this task
From the Error Recovery Management page, you can access a view that displays the executioninformation of any of the executions listed in the page.
To access the Execution info view, complete the following:
Procedure
1. From the Error Recovery Management page, select the Job for which you want to display theexecution information.
2. In the lower part of the page, click the Execution info tab.
A read-only view of the execution information of the monitored Job displays.
The following figure shows an example of the Execution Info view.
Example
The Execution info view shows the execution details at the task level and at the Job level.
Note: The Context Parameters area in the Execution info view shows only the context variables used in the father Job, if any. All context parameters used in the child Jobs linked
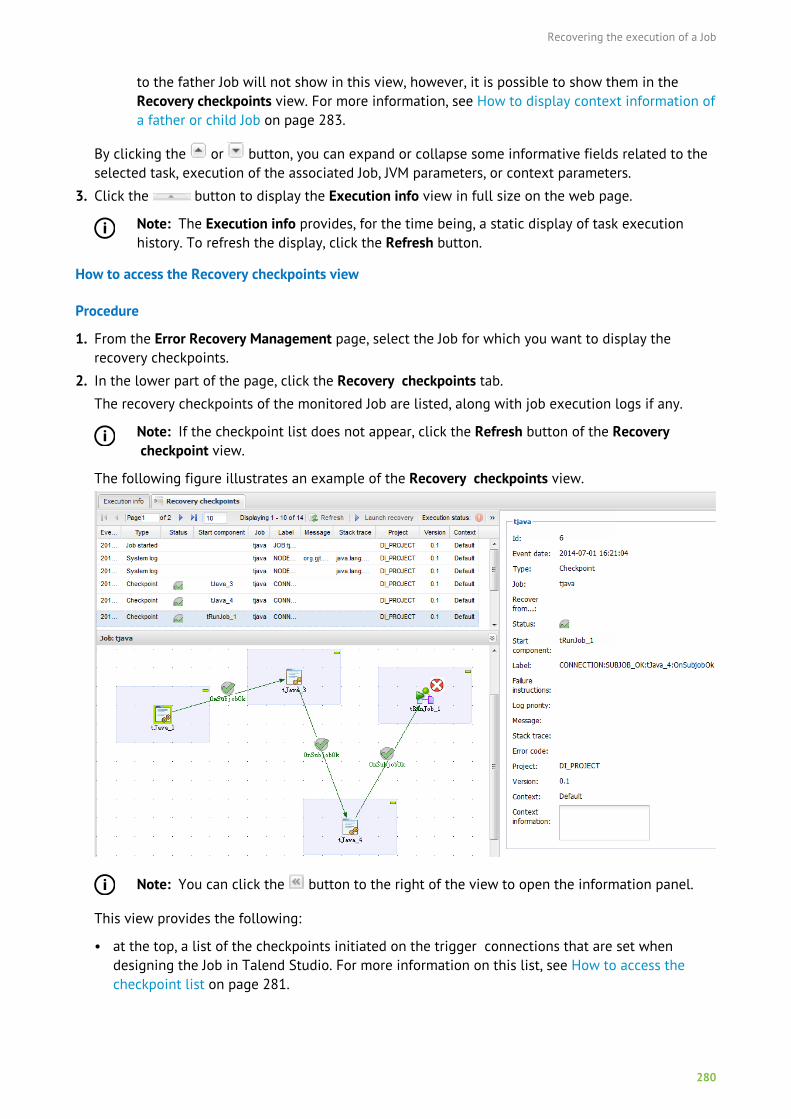
Recovering the execution of a Job
280
to the father Job will not show in this view, however, it is possible to show them in theRecovery checkpoints view. For more information, see How to display context information ofa father or child Job on page 283.
By clicking the or button, you can expand or collapse some informative fields related to theselected task, execution of the associated Job, JVM parameters, or context parameters.
3. Click the button to display the Execution info view in full size on the web page.
Note: The Execution info provides, for the time being, a static display of task executionhistory. To refresh the display, click the Refresh button.
How to access the Recovery checkpoints view
Procedure
1. From the Error Recovery Management page, select the Job for which you want to display therecovery checkpoints.
2. In the lower part of the page, click the Recovery checkpoints tab.
The recovery checkpoints of the monitored Job are listed, along with job execution logs if any.
Note: If the checkpoint list does not appear, click the Refresh button of the Recovery checkpoint view.
The following figure illustrates an example of the Recovery checkpoints view.
Note: You can click the button to the right of the view to open the information panel.
This view provides the following:
• at the top, a list of the checkpoints initiated on the trigger connections that are set whendesigning the Job in Talend Studio. For more information on this list, see How to access thecheckpoint list on page 281.
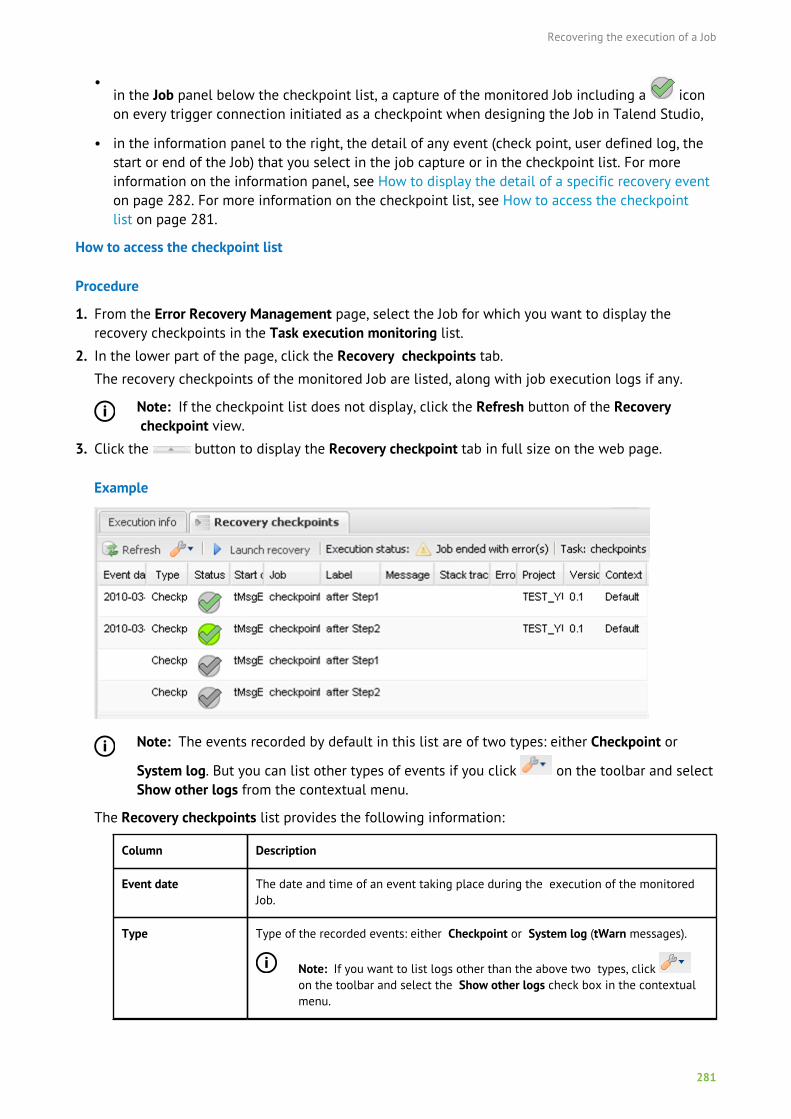
Recovering the execution of a Job
281
•in the Job panel below the checkpoint list, a capture of the monitored Job including a iconon every trigger connection initiated as a checkpoint when designing the Job in Talend Studio,
• in the information panel to the right, the detail of any event (check point, user defined log, thestart or end of the Job) that you select in the job capture or in the checkpoint list. For moreinformation on the information panel, see How to display the detail of a specific recovery eventon page 282. For more information on the checkpoint list, see How to access the checkpointlist on page 281.
How to access the checkpoint list
Procedure
1. From the Error Recovery Management page, select the Job for which you want to display therecovery checkpoints in the Task execution monitoring list.
2. In the lower part of the page, click the Recovery checkpoints tab.
The recovery checkpoints of the monitored Job are listed, along with job execution logs if any.
Note: If the checkpoint list does not display, click the Refresh button of the Recovery checkpoint view.
3. Click the button to display the Recovery checkpoint tab in full size on the web page.
Example
Note: The events recorded by default in this list are of two types: either Checkpoint or
System log. But you can list other types of events if you click on the toolbar and selectShow other logs from the contextual menu.
The Recovery checkpoints list provides the following information:
Column Description
Event date The date and time of an event taking place during the execution of the monitoredJob.
Type Type of the recorded events: either Checkpoint or System log (tWarn messages).
Note: If you want to list logs other than the above two types, click on the toolbar and select the Show other logs check box in the contextualmenu.
Recovering the execution of a Job
282
Column Description
Status Execution status of the event:
• : fatal error.
• : invalidated checkpoint.
• : validated checkpoint that is set as the start for the recovery operation.
Start component Name of the component at which job execution will be recovered.
Job Name of the executed Job.
Label Name of the checkpoint you entered in the Label field in Talend Studio. For moreinformation, see Talend Studio User Guide.
Failure instructions The information you typed in the corresponding field in Talend Studio. For moreinformation, see Talend Studio User Guide.
Log priority Status of the priority of the log:
• : Job that has fallen in fatal error.
• : Job that has fallen in error and not completed.
Message The message corresponding to the log priority icon.
Stack trace Detailed diagnostic message.
Error code The error code defined in the Basic settings of the tDie component in TalendStudio.
Project Name of the project containing the selected Job.
Version Version of the Job as defined in your Talend Studio.
Context Name of the context as defined for this Job in your studio.
Virtual server Name of the virtual server, if any
How to display the detail of a specific recovery event
About this task
The event information panel associated with the Recovery checkpoints view provides detailedinformation of each recovery event listed in the recovery checkpoint list. These events includecheckpoints, user defined log, job start or end.
Note: The events recorded by default in the Recovery checkpoints list are of two types: either
Checkpoint or System log. But you can list other types of events if you click on thetoolbar and select Show other logs from the contextual menu.
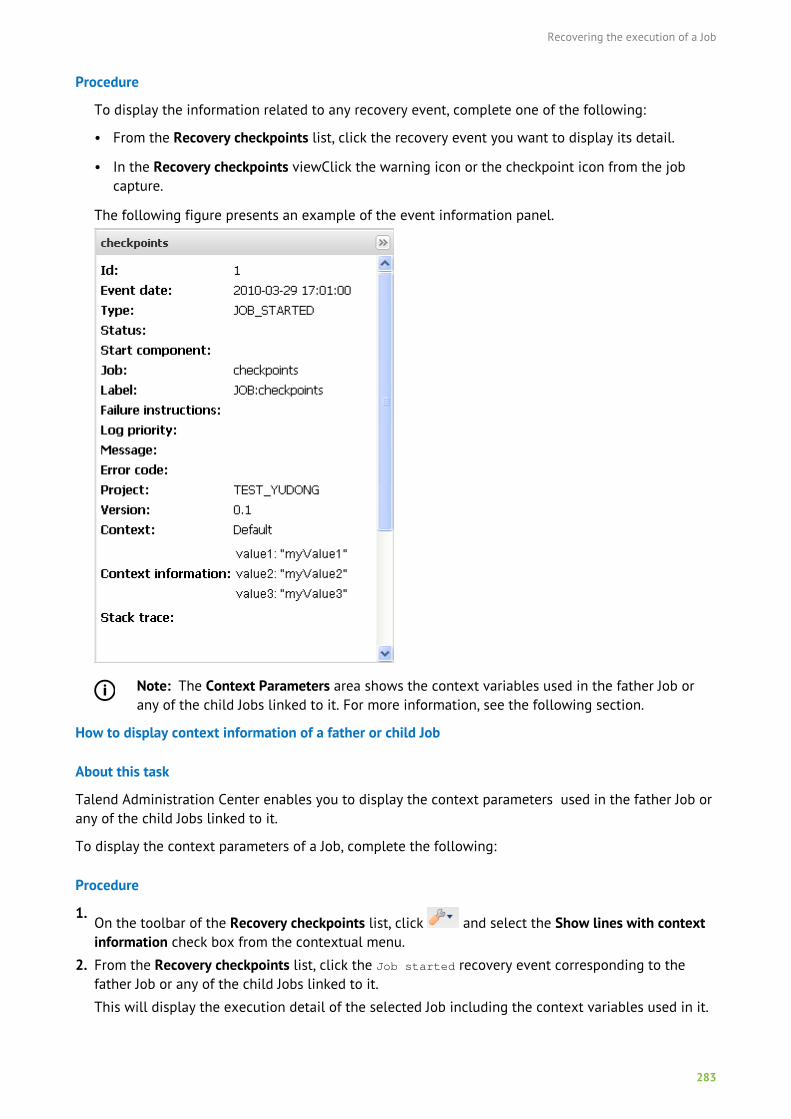
Recovering the execution of a Job
283
Procedure
To display the information related to any recovery event, complete one of the following:
• From the Recovery checkpoints list, click the recovery event you want to display its detail.
• In the Recovery checkpoints viewClick the warning icon or the checkpoint icon from the jobcapture.
The following figure presents an example of the event information panel.
Note: The Context Parameters area shows the context variables used in the father Job orany of the child Jobs linked to it. For more information, see the following section.
How to display context information of a father or child Job
About this task
Talend Administration Center enables you to display the context parameters used in the father Job orany of the child Jobs linked to it.
To display the context parameters of a Job, complete the following:
Procedure
1.On the toolbar of the Recovery checkpoints list, click and select the Show lines with contextinformation check box from the contextual menu.
2. From the Recovery checkpoints list, click the Job started recovery event corresponding to thefather Job or any of the child Jobs linked to it.
This will display the execution detail of the selected Job including the context variables used in it.
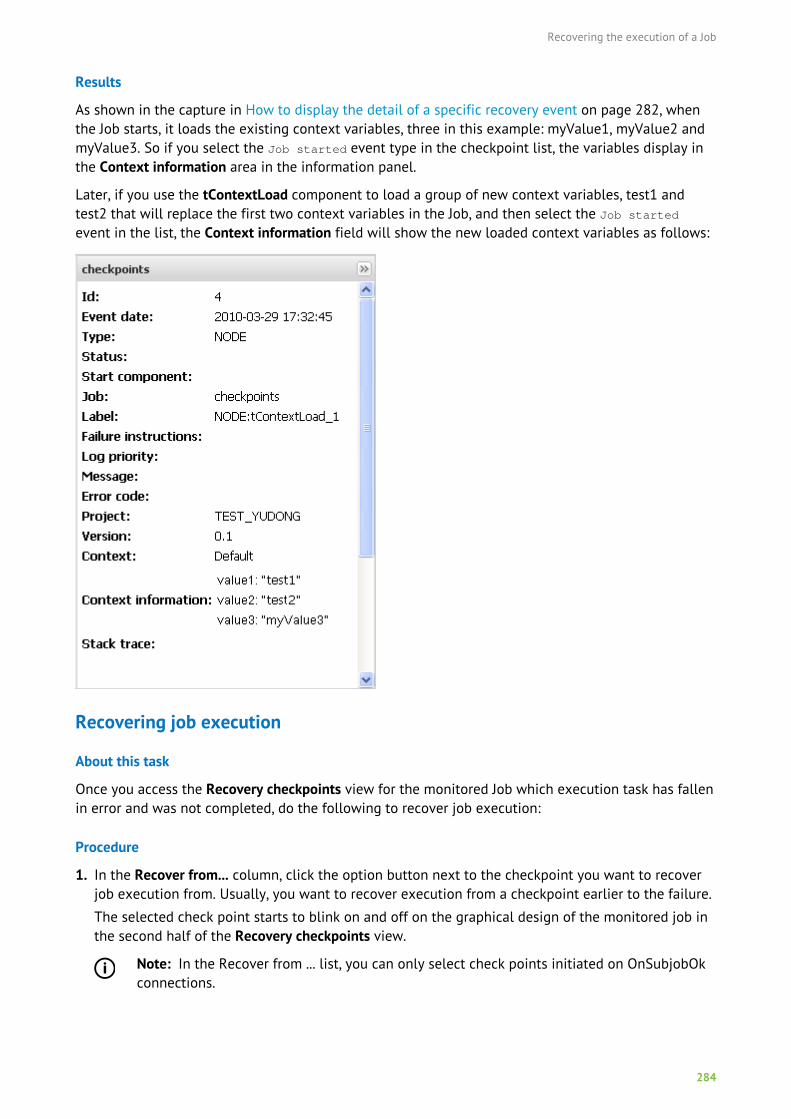
Recovering the execution of a Job
284
Results
As shown in the capture in How to display the detail of a specific recovery event on page 282, whenthe Job starts, it loads the existing context variables, three in this example: myValue1, myValue2 andmyValue3. So if you select the Job started event type in the checkpoint list, the variables display inthe Context information area in the information panel.
Later, if you use the tContextLoad component to load a group of new context variables, test1 andtest2 that will replace the first two context variables in the Job, and then select the Job startedevent in the list, the Context information field will show the new loaded context variables as follows:
Recovering job execution
About this task
Once you access the Recovery checkpoints view for the monitored Job which execution task has fallenin error and was not completed, do the following to recover job execution:
Procedure
1. In the Recover from... column, click the option button next to the checkpoint you want to recoverjob execution from. Usually, you want to recover execution from a checkpoint earlier to the failure.
The selected check point starts to blink on and off on the graphical design of the monitored job inthe second half of the Recovery checkpoints view.
Note: In the Recover from ... list, you can only select check points initiated on OnSubjobOkconnections.
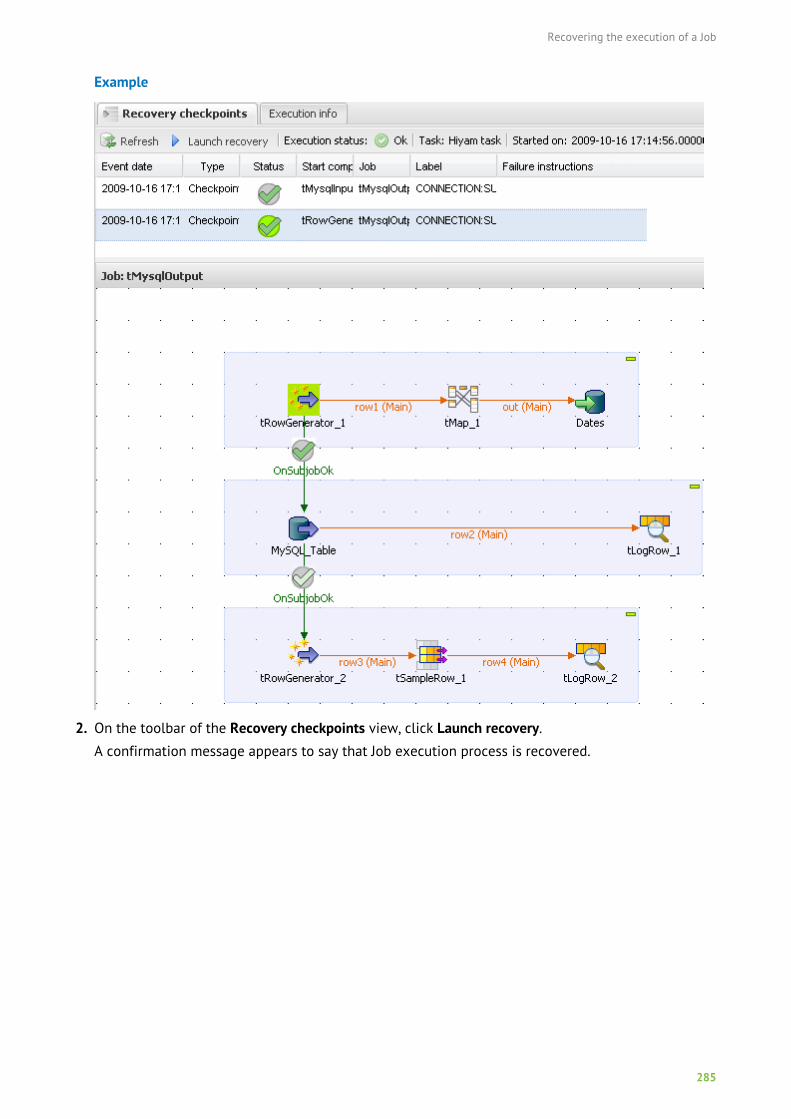
Recovering the execution of a Job
285
Example
2. On the toolbar of the Recovery checkpoints view, click Launch recovery.
A confirmation message appears to say that Job execution process is recovered.
Monitoring the Service endpoints
286
Monitoring the Service endpoints
The Service Locator is a service that provides consumers with a mechanism to discover serviceendpoints at runtime. The Service Locator consists of two parts: The endpoint repository and theServiceLocator feature divided between service provider and service consumer.
The provider side Locator Feature registers and deregisters service endpoints in the endpointrepository when the provider becomes available or unavailable. The consumer side Locator Featuretransparently retrieves service endpoint addresses from the endpoint repository when a service call toa provider is to be made.
Talend Administration Center gives access to the Service Locator in the ESB Infrastructure modulewhich helps you monitor service endpoint status as recorded in the endpoint repository.
Note that the access to the Service Locator page depends on your license. For more information, referto What modules and features are available depending on your license on page 9.
Using Service Locator in Talend Administration Center, you will be able to:
• monitor up and down times for a service endpoint,
• monitor live services,
• remove unavailable services.
Prerequisites to access the Service Locator pageTo access the Service Locator component of ESB Infrastructure module, you need to:
• have a licence that includes this module and also have the relevant rights defined by theAdministrator during your user account creation in Talend Administration Center,
• have previously entered the URL to the Apache Zookeeper server(s) and the credentials to accessthe Service Locator in the Configuration page. For more information, see Setting up the ESBService Locator and Service Activity Monitoring parameters on page 33,
• have properly set up the endpoint repository and the ServiceLocator feature. For more informationregarding how to set up the Service Locator module, please refer to Talend ESB InfrastructureServices Configuration Guide.
If your license allows the ESB Infrastructure module but it does not show in the Menu tree view ofTalend Administration Center, contact your Administrator.
Accessing Service LocatorAbout this task
On Talend Administration Center's home page and from the Menu tree view:
Procedure
1. Expand the ESB Infrastructure node
2. Click Service Locator to access the list of service endpoints.
The below figure illustrates an example of a list of service endpoints.
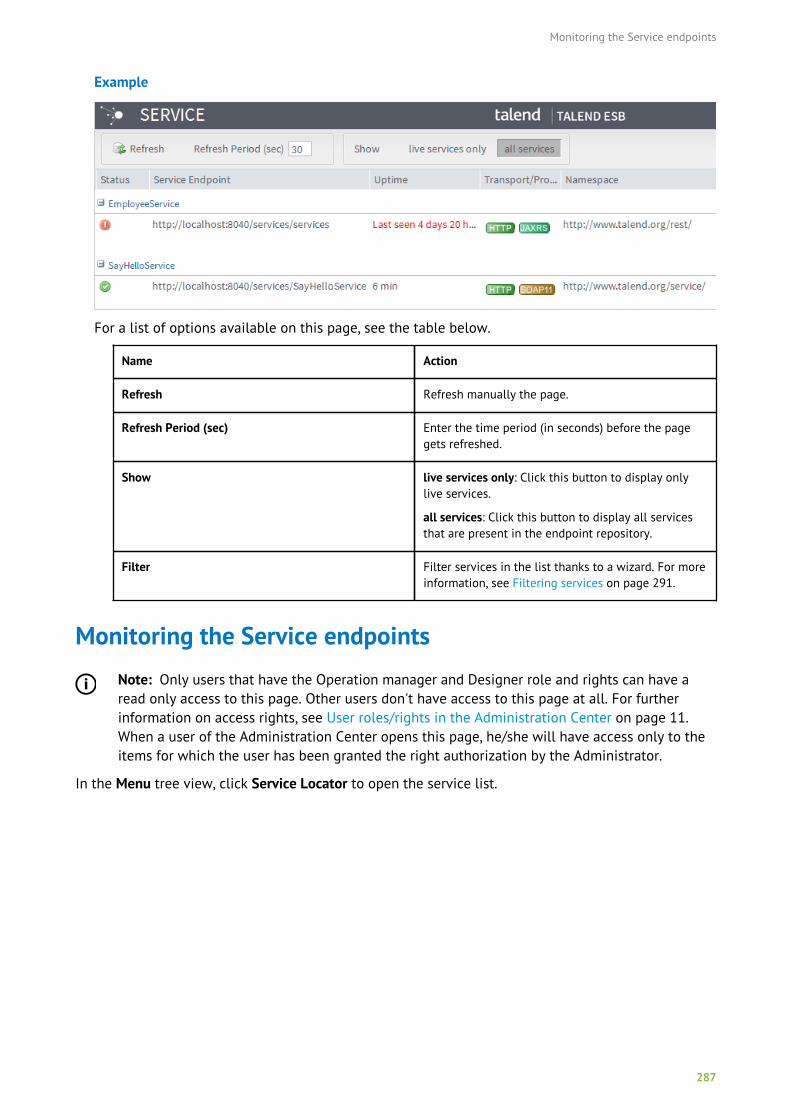
Monitoring the Service endpoints
287
Example
For a list of options available on this page, see the table below.
Name Action
Refresh Refresh manually the page.
Refresh Period (sec) Enter the time period (in seconds) before the pagegets refreshed.
Show live services only: Click this button to display onlylive services.
all services: Click this button to display all servicesthat are present in the endpoint repository.
Filter Filter services in the list thanks to a wizard. For moreinformation, see Filtering services on page 291.
Monitoring the Service endpointsNote: Only users that have the Operation manager and Designer role and rights can have aread only access to this page. Other users don't have access to this page at all. For furtherinformation on access rights, see User roles/rights in the Administration Center on page 11.When a user of the Administration Center opens this page, he/she will have access only to theitems for which the user has been granted the right authorization by the Administrator.
In the Menu tree view, click Service Locator to open the service list.
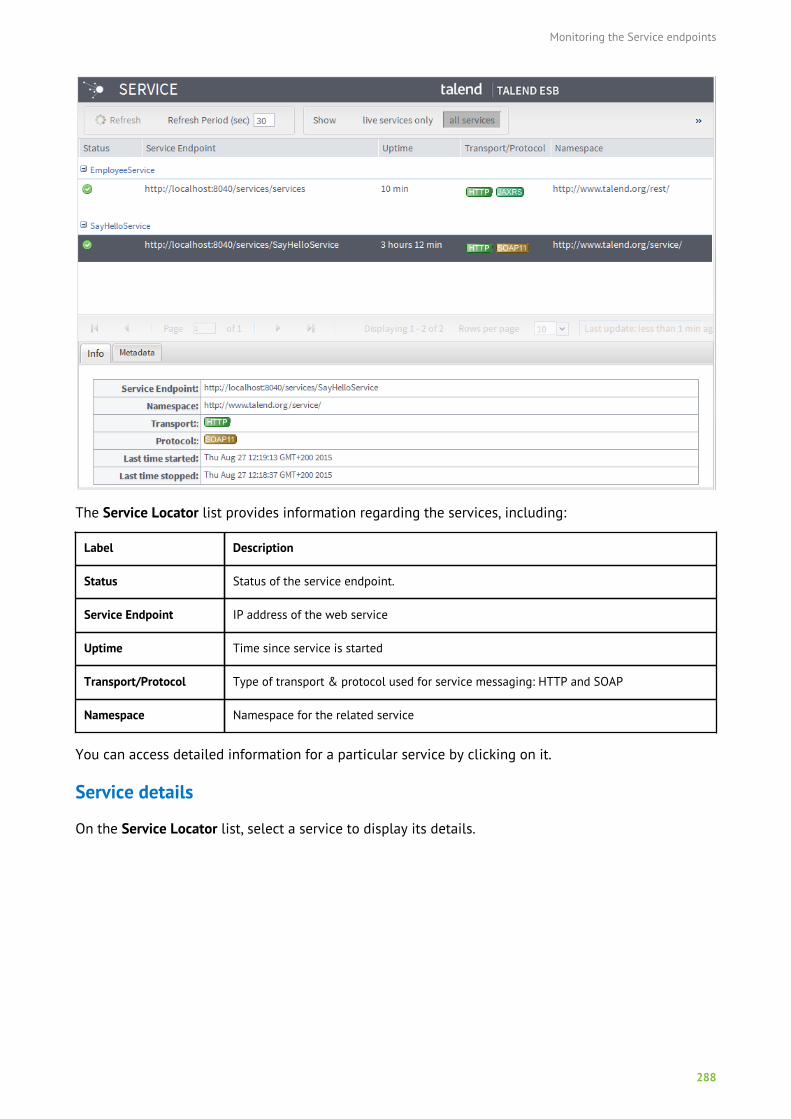
Monitoring the Service endpoints
288
The Service Locator list provides information regarding the services, including:
Label Description
Status Status of the service endpoint.
Service Endpoint IP address of the web service
Uptime Time since service is started
Transport/Protocol Type of transport & protocol used for service messaging: HTTP and SOAP
Namespace Namespace for the related service
You can access detailed information for a particular service by clicking on it.
Service details
On the Service Locator list, select a service to display its details.
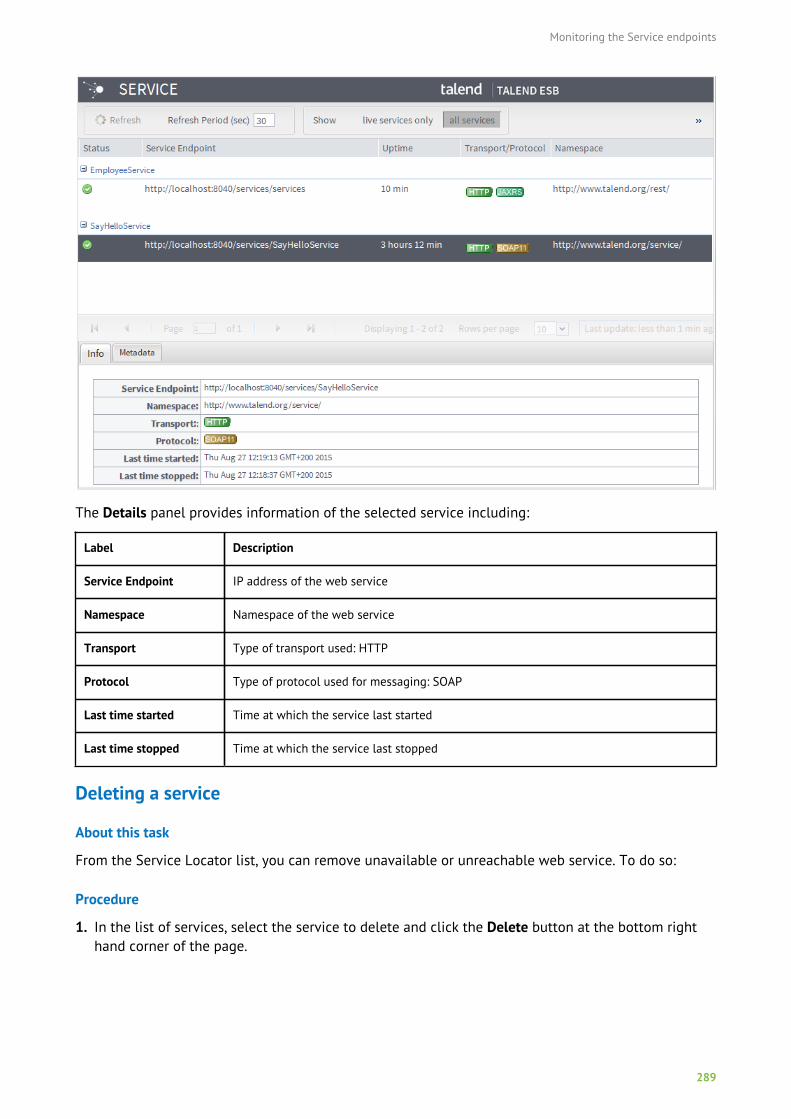
Monitoring the Service endpoints
289
The Details panel provides information of the selected service including:
Label Description
Service Endpoint IP address of the web service
Namespace Namespace of the web service
Transport Type of transport used: HTTP
Protocol Type of protocol used for messaging: SOAP
Last time started Time at which the service last started
Last time stopped Time at which the service last stopped
Deleting a service
About this task
From the Service Locator list, you can remove unavailable or unreachable web service. To do so:
Procedure
1. In the list of services, select the service to delete and click the Delete button at the bottom righthand corner of the page.
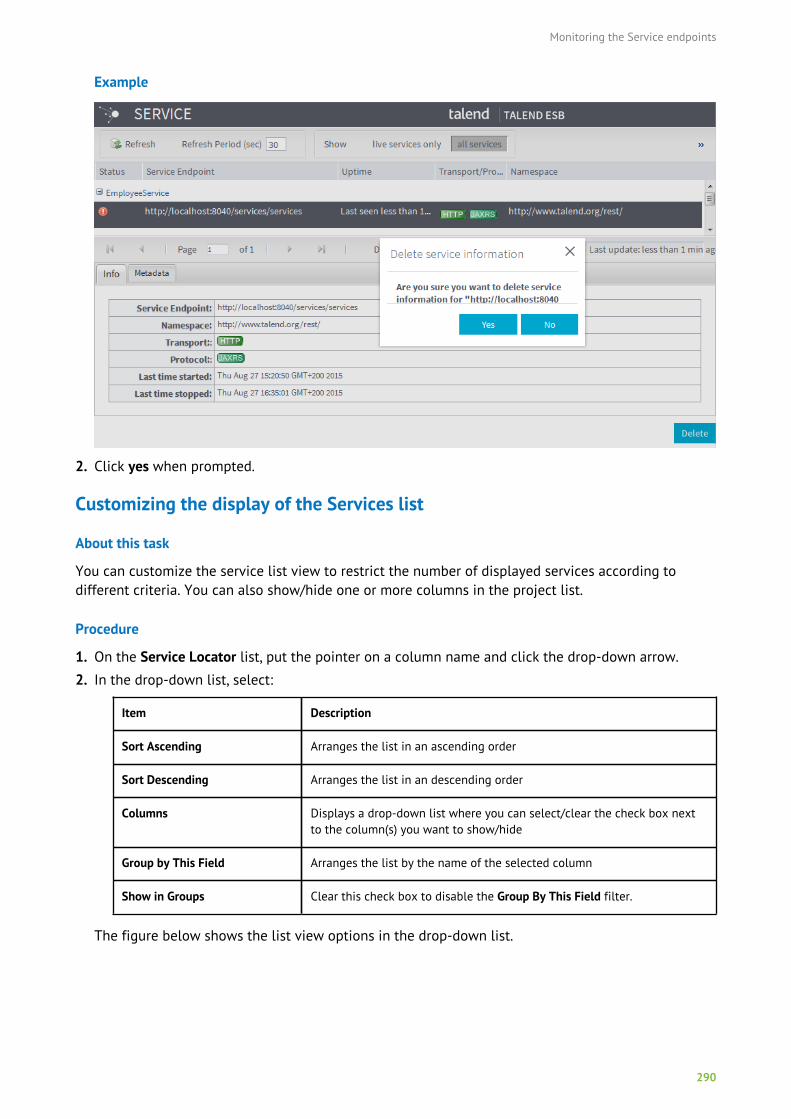
Monitoring the Service endpoints
290
Example
2. Click yes when prompted.
Customizing the display of the Services list
About this task
You can customize the service list view to restrict the number of displayed services according todifferent criteria. You can also show/hide one or more columns in the project list.
Procedure
1. On the Service Locator list, put the pointer on a column name and click the drop-down arrow.
2. In the drop-down list, select:
Item Description
Sort Ascending Arranges the list in an ascending order
Sort Descending Arranges the list in an descending order
Columns Displays a drop-down list where you can select/clear the check box nextto the column(s) you want to show/hide
Group by This Field Arranges the list by the name of the selected column
Show in Groups Clear this check box to disable the Group By This Field filter.
The figure below shows the list view options in the drop-down list.
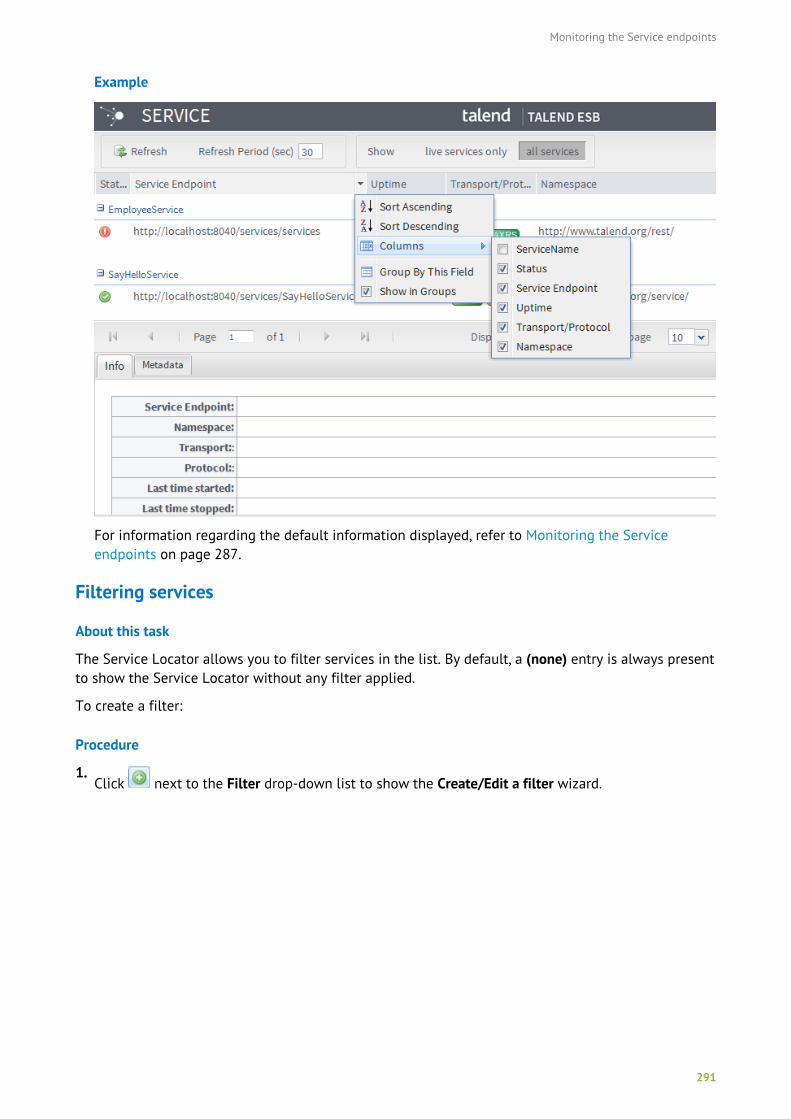
Monitoring the Service endpoints
291
Example
For information regarding the default information displayed, refer to Monitoring the Serviceendpoints on page 287.
Filtering services
About this task
The Service Locator allows you to filter services in the list. By default, a (none) entry is always presentto show the Service Locator without any filter applied.
To create a filter:
Procedure
1.Click next to the Filter drop-down list to show the Create/Edit a filter wizard.

Monitoring the Service endpoints
292
Example
2. Define the filter as detailed below.
Label Description
Filter name The name of the filter
Shared Select this check box to share the filter with all users.
Monitoring the Service endpoints
293
Label Description
Column The following filter columns are supported.
QualifiedServicename: Select this column to filter the services using the namespaceand service name combination.
For example, if the filter is defined with the query condition [QualifiedServiceName] = '{org.talend.example.demoservice}Demo*', the filter willshow all services with the namespace {org.talend.examples.demoservice}and service name starting with Demo.
Namespace: Select this column to filter the services using the namespace.
For example, the filter with the query condition [Namespace] ='org.talend.examples.*' will show all services that the namespace startswith org.talend.examples..
Servicename: Select this column to filter the services using the service name.
For example, the filter with the query condition [ServiceName] in('DemoService', 'CRMService', 'ReservationService') will showall services with the service name equals to DemoService, CRMService, orReservationService.
ServiceEndpoint: Select this column to filter the services using the serviceendpoint.
For example, the filter with the query condition [ServiceEndpoint] ='*.talend.com' will shows all services hosted on talend.com.
Operator Select between = and in.
Condition Enter the query condition as needed.
3. Click Save to validate the creation of the filter or click Cancel to cancel it.
Once created, you can select the filter from the Filter list to apply it and click the button to
edit it, or the button to delete it.
The filter drop-down list shows all shared filters and all individual filters for the current user in analphabetical order.
Monitoring the Service activity
294
Monitoring the Service activity
The ESB Infrastructure module helps you monitor all events related to requests for services andreplies handled through the Service Activity Monitoring agent and server.
These events are service calls made with the Apache CXF Framework and the related replies whichhave been logged into a database. The event is also called a message exchange. Typical use cases are:collecting usage statistics and fault monitoring.
Using Service Activity Monitoring in Talend Administration Center, you will be able to:
• monitor consolidated event information,
• understand the underlying requests and replies (message exchange) that compose the event,
• monitor faults that may be unexpectedly generated,
• support the system management decisions.
Access to Service Activity Monitoring depends on your license. For more information, refer to Whatmodules and features are available depending on your license on page 9.
Prerequisites to access Service Activity MonitoringTo access the Service Activity Monitoring component of ESB Infrastructure module, you need to:
• have a licence that includes this module and also to have the relevant rights defined by theAdministrator during your user account creation in Talend Administration Center,
• have entered the URL to the Service Activity Monitoring server in the Configuration page. For moreinformation, see Setting up the ESB Service Locator and Service Activity Monitoring parameters onpage 33,
• have properly set up the Agent and Monitoring Server, in order for the Service Activity Monitoringmodule to be fed with event information. For more information regarding how to set up theService Activity Monitoring server and agent, please refer to the Talend ESB Infrastructure ServicesConfiguration Guide.
If your license allows the ESB Infrastructure module but it does not show in the Menu tree view ofTalend Administration Center, contact your Administrator.
Accessing Service Activity MonitoringAbout this task
On Talend Administration Center's home page and from the Menu tree view:
Procedure
1. Expand the ESB Infrastructure node.
2. Click Service Activity Monitoring to access the list of logged message exchanges.
Results
The below figure illustrates an example of a list of monitored Service events.
Monitoring the Service activity
295
Monitoring the Service eventsNote: Only users that have the Operation manager and Designer role and rights can have aread only access to this page. Other users don't have access to this page at all. For furtherinformation on access rights, see User roles/rights in the Administration Center on page 11.When a user of the Administration Center opens this page, he/she will have access only to theitems for which the user has been granted the right authorization by the Administrator.
In the Menu tree view, click Service Activity Monitoring to open the Service list.
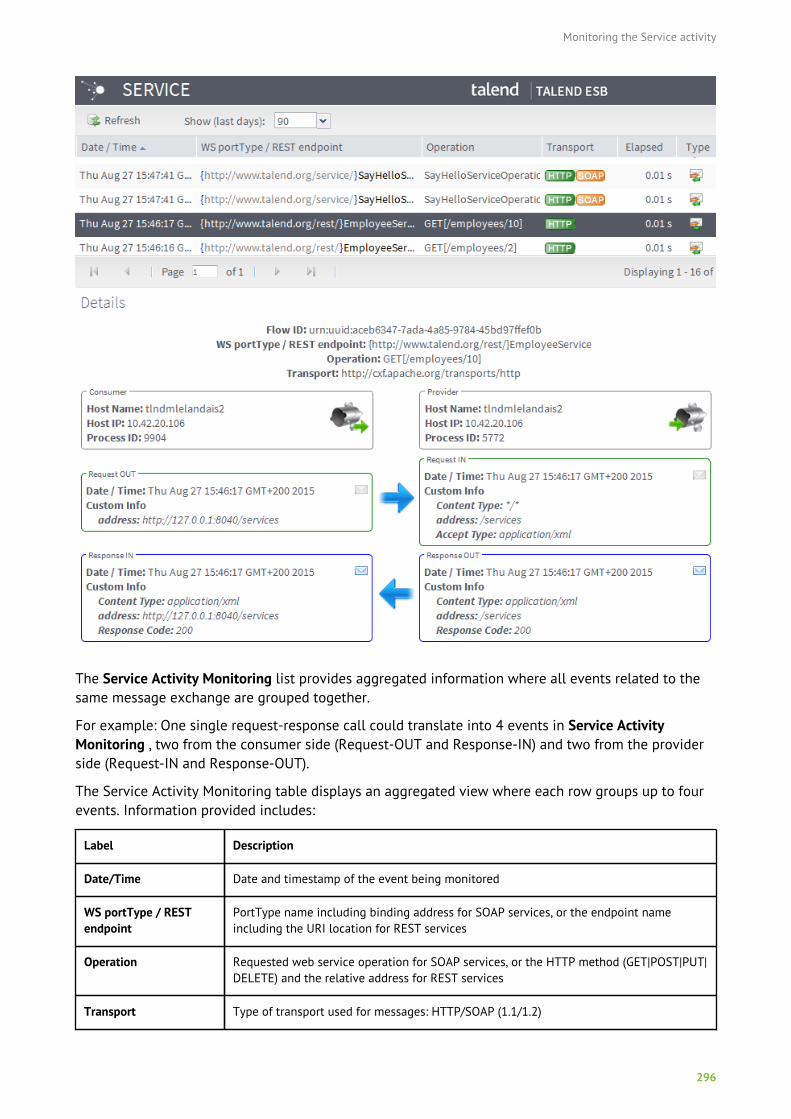
Monitoring the Service activity
296
The Service Activity Monitoring list provides aggregated information where all events related to thesame message exchange are grouped together.
For example: One single request-response call could translate into 4 events in Service ActivityMonitoring , two from the consumer side (Request-OUT and Response-IN) and two from the providerside (Request-IN and Response-OUT).
The Service Activity Monitoring table displays an aggregated view where each row groups up to fourevents. Information provided includes:
Label Description
Date/Time Date and timestamp of the event being monitored
WS portType / RESTendpoint
PortType name including binding address for SOAP services, or the endpoint nameincluding the URI location for REST services
Operation Requested web service operation for SOAP services, or the HTTP method (GET|POST|PUT|DELETE) and the relative address for REST services
Transport Type of transport used for messages: HTTP/SOAP (1.1/1.2)
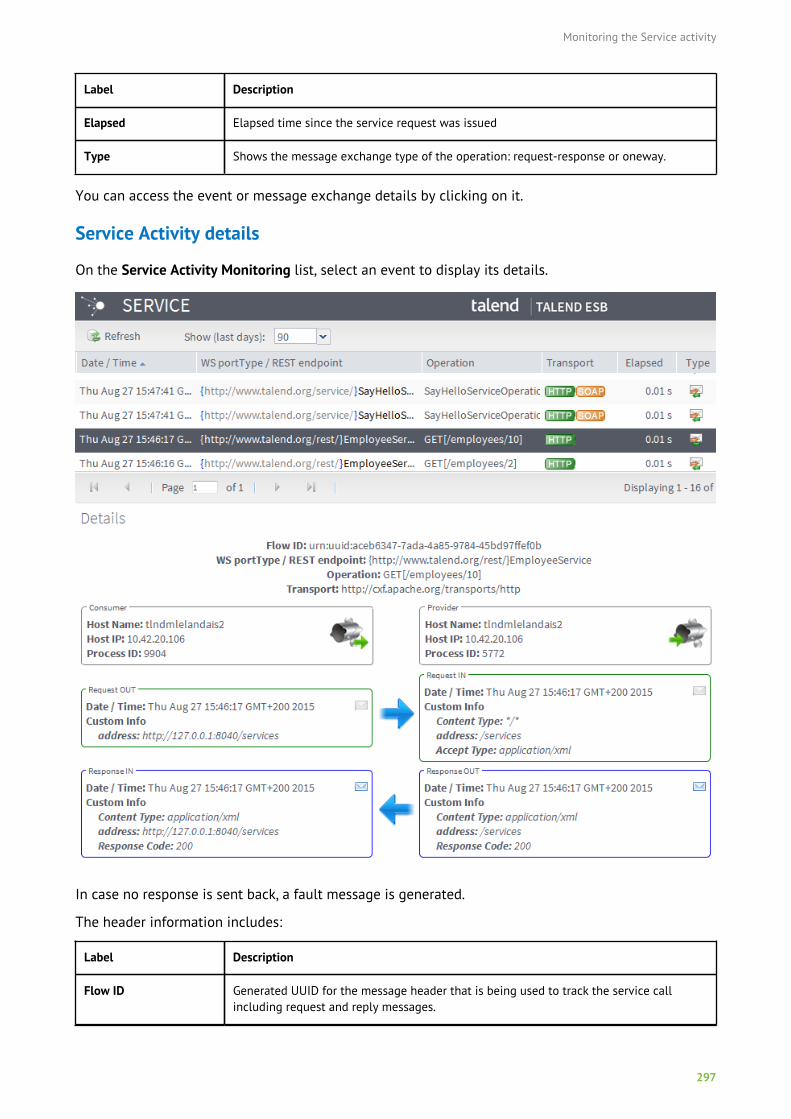
Monitoring the Service activity
297
Label Description
Elapsed Elapsed time since the service request was issued
Type Shows the message exchange type of the operation: request-response or oneway.
You can access the event or message exchange details by clicking on it.
Service Activity details
On the Service Activity Monitoring list, select an event to display its details.
In case no response is sent back, a fault message is generated.
The header information includes:
Label Description
Flow ID Generated UUID for the message header that is being used to track the service callincluding request and reply messages.

Monitoring the Service activity
298
Label Description
WS portType / RESTendpoint
PortType name including binding address for SOAP services, or the endpoint nameincluding the URI location for REST services.
Operation Requested web service operation for SOAP services, or the HTTP method (GET|POST|PUT|DELETE) and the relative address for REST services.
Transport Type of transport used for messages: HTTP/SOAP (1.1/1.2)
The rest of the message exchange details is divided between service consumer and provider.
Consumer details
The consumer information includes:
Label Description
Host Name Name of the service consumer machine
Host IP IP address of the service consumer machine
Process ID Local process ID
The Request OUT information includes:
Label Description
Date/Time Timestamp the request has been sent out by the consumer application
Message ID UUID for the request OUT message
Principal User name or credential where applicable. If no principal used, null displays.
Custom Info Provides custom information regarding the message being handled, including consumerapplication name and address, and any other custom information configured/provided bythe consumer.
Can be used as arbitrary key for tracking purpose, such as a specific value pair associatedto one particular event.
The Response/Fault IN information includes:
Label Description
Date/Time Timestamp the response or fault has been received by the consumer application
Message ID UUID for the response IN message
Principal User name or credential where applicable. If no principal used, null displays.
Custom Info Provides information regarding the message being handled, including consumerapplication name and address, and any other custom information configured/provided bythe consumer.
Can be used as arbitrary key for tracking purpose, such as a specific value pair associatedto one particular event.
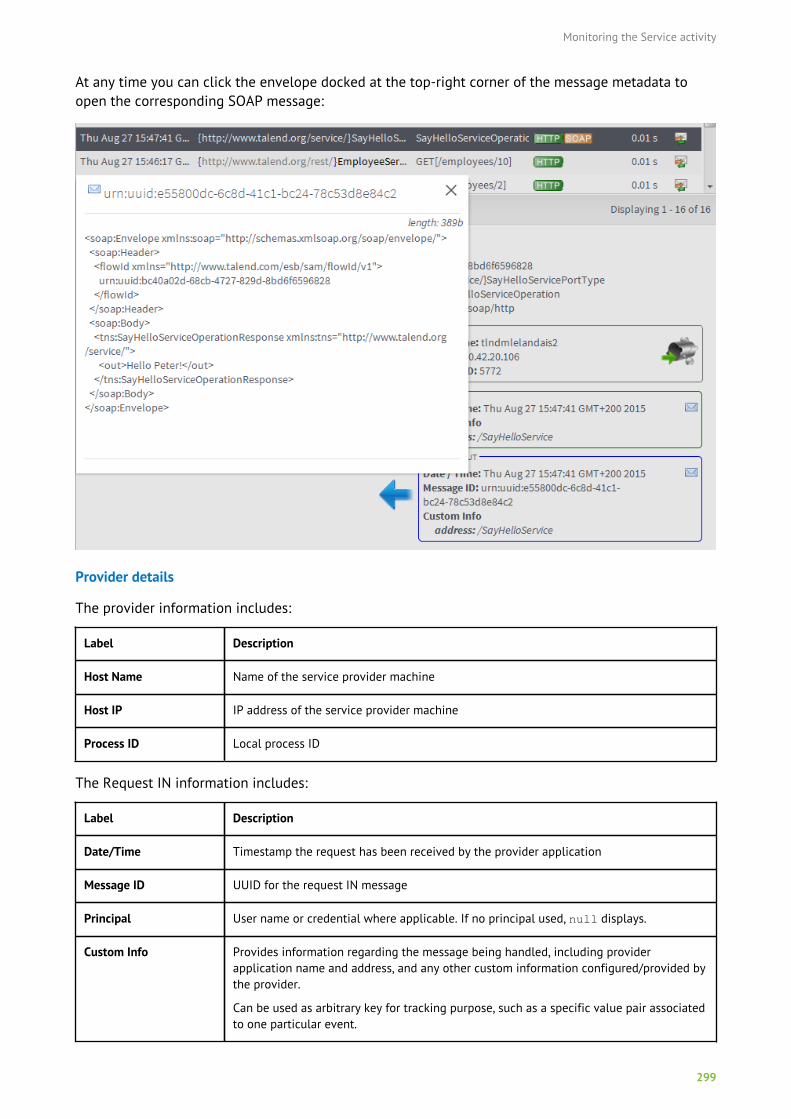
Monitoring the Service activity
299
At any time you can click the envelope docked at the top-right corner of the message metadata toopen the corresponding SOAP message:
Provider details
The provider information includes:
Label Description
Host Name Name of the service provider machine
Host IP IP address of the service provider machine
Process ID Local process ID
The Request IN information includes:
Label Description
Date/Time Timestamp the request has been received by the provider application
Message ID UUID for the request IN message
Principal User name or credential where applicable. If no principal used, null displays.
Custom Info Provides information regarding the message being handled, including providerapplication name and address, and any other custom information configured/provided bythe provider.
Can be used as arbitrary key for tracking purpose, such as a specific value pair associatedto one particular event.
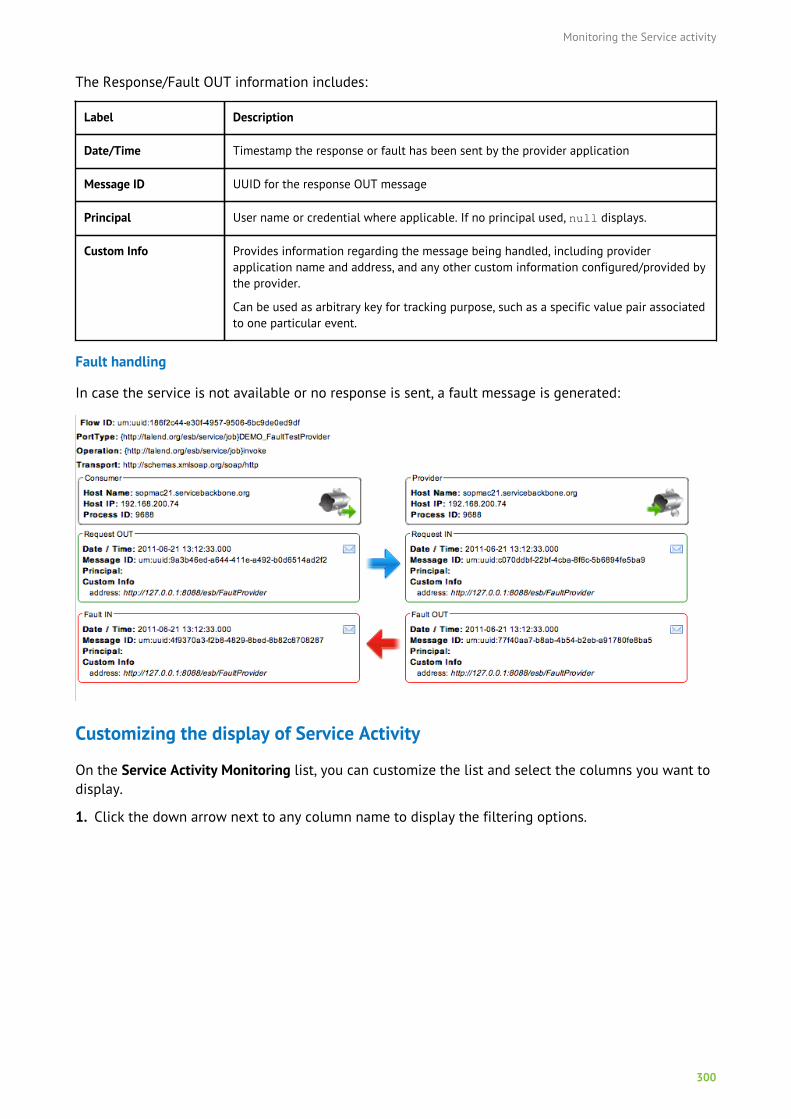
Monitoring the Service activity
300
The Response/Fault OUT information includes:
Label Description
Date/Time Timestamp the response or fault has been sent by the provider application
Message ID UUID for the response OUT message
Principal User name or credential where applicable. If no principal used, null displays.
Custom Info Provides information regarding the message being handled, including providerapplication name and address, and any other custom information configured/provided bythe provider.
Can be used as arbitrary key for tracking purpose, such as a specific value pair associatedto one particular event.
Fault handling
In case the service is not available or no response is sent, a fault message is generated:
Customizing the display of Service Activity
On the Service Activity Monitoring list, you can customize the list and select the columns you want todisplay.
1. Click the down arrow next to any column name to display the filtering options.
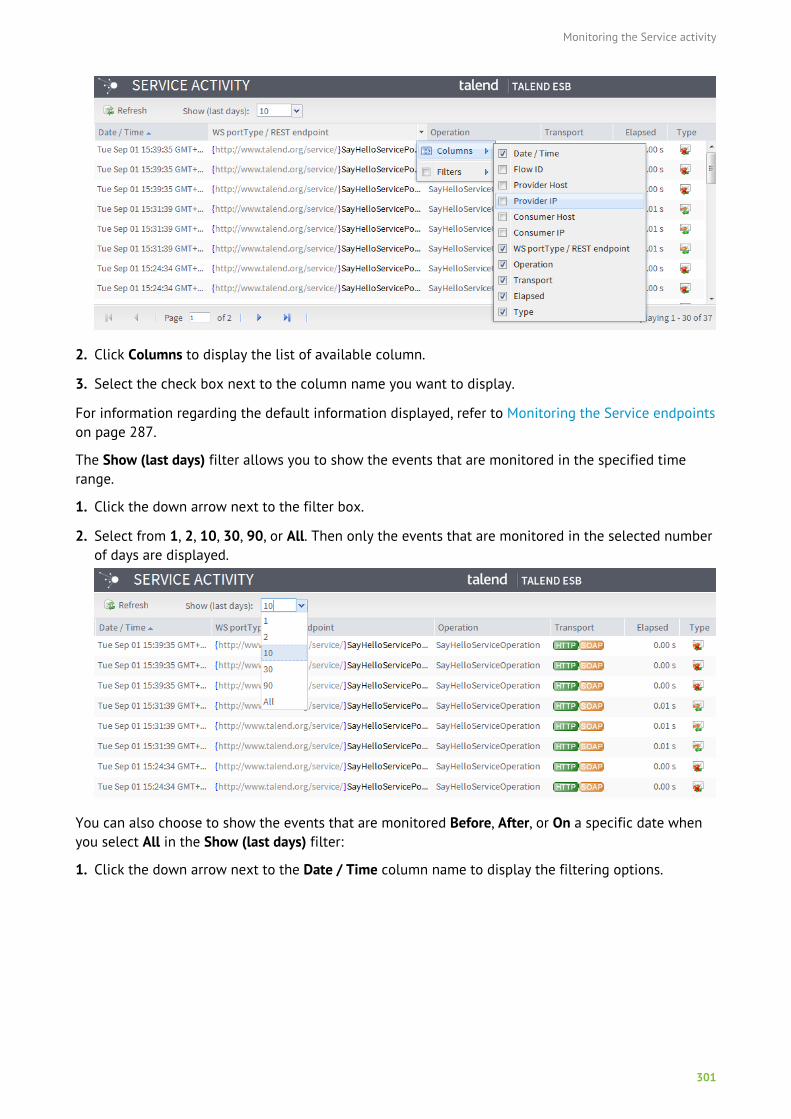
Monitoring the Service activity
301
2. Click Columns to display the list of available column.
3. Select the check box next to the column name you want to display.
For information regarding the default information displayed, refer to Monitoring the Service endpointson page 287.
The Show (last days) filter allows you to show the events that are monitored in the specified timerange.
1. Click the down arrow next to the filter box.
2. Select from 1, 2, 10, 30, 90, or All. Then only the events that are monitored in the selected numberof days are displayed.
You can also choose to show the events that are monitored Before, After, or On a specific date whenyou select All in the Show (last days) filter:
1. Click the down arrow next to the Date / Time column name to display the filtering options.
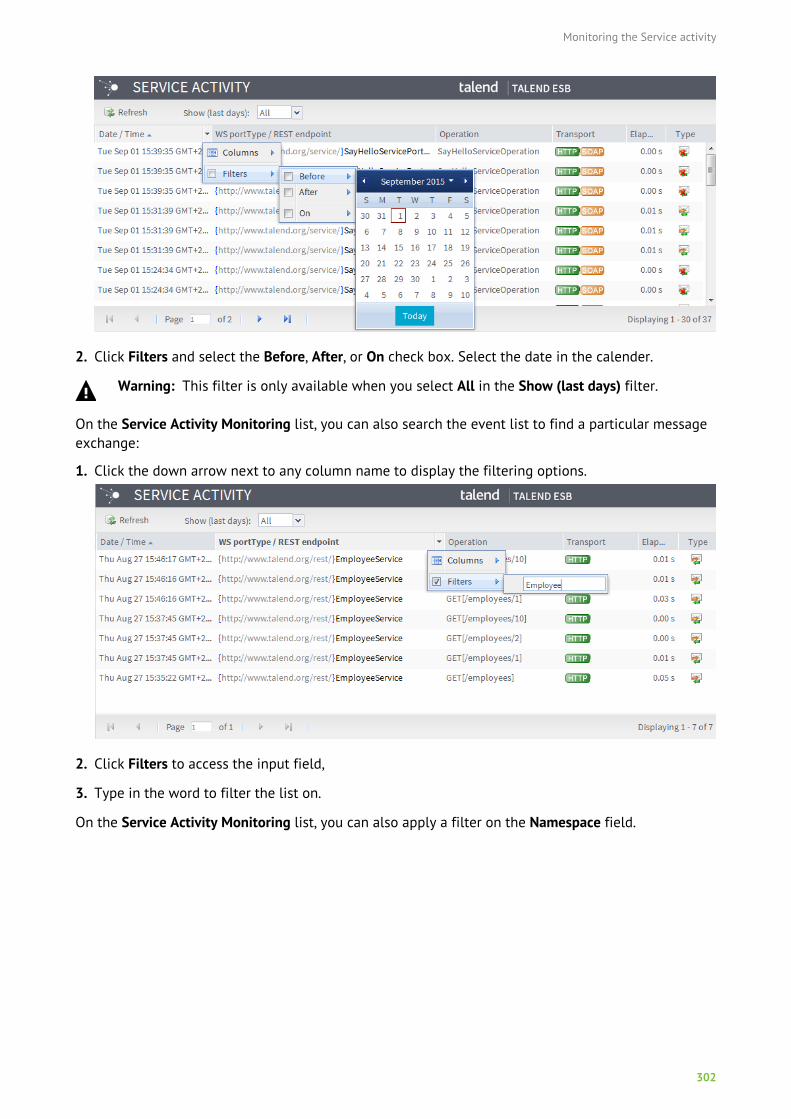
Monitoring the Service activity
302
2. Click Filters and select the Before, After, or On check box. Select the date in the calender.
Warning: This filter is only available when you select All in the Show (last days) filter.
On the Service Activity Monitoring list, you can also search the event list to find a particular messageexchange:
1. Click the down arrow next to any column name to display the filtering options.
2. Click Filters to access the input field,
3. Type in the word to filter the list on.
On the Service Activity Monitoring list, you can also apply a filter on the Namespace field.
Managing ESB Resources and authorizations
303
Managing ESB Resources and authorizations
The Authorization page helps you to authorize ESB Resources to Roles and Users defined in theTalend Identity and Access Management.
To access the Authorization page, you need to have a licence that includes the Authorizationcomponent of the ESB Infrastructure module, and also have the relevant rights defined by theAdministrator during your user account creation in Talend Administration Center. For moreinformation about the modules and features ship with each license, refer to What modules andfeatures are available depending on your license on page 9.
If your license allows the ESB Infrastructure module but it does not show in the Menu tree view ofTalend Administration Center, contact your Administrator.
Using Authorization in Talend Administration Center, you will be able to:
• manage ESB Resources
• set assignments to Roles
• view Roles and Users defined in the Talend Identity and Access Management
PrerequisitesIn order for the Authorization page to operate, you need to have properly:
• installed Talend Identity and Access Management. For more information regarding how to installTalend Identity and Access Management, refer to the Talend Installation and Upgrade Guide.
• created Users and Roles in Talend Identity and Access Management. For more information onhow to use Talend Identity and Access Management, refer to Talend ESB Infrastructure ServicesConfiguration Guide.
• set up the XACML Policy registry. For how to set up the XACML Policy registry, refer to Talend ESBInfrastructure Services Configuration Guide.
• entered the URL and credentials to access your Identity Service, in the Configuration page. Formore information, see Setting up the ESB Identity and Access Management on page 34.
Accessing the Authorization pageTo display the Authorization page:
In the Menu tree view, expand the ESB Infrastructure node and click Authorization.
The list of Resources is displayed in the Resource panel. The Roles, Users and their assignment arealso displayed in the Role, User, Resource/Role assignment panels respectively.
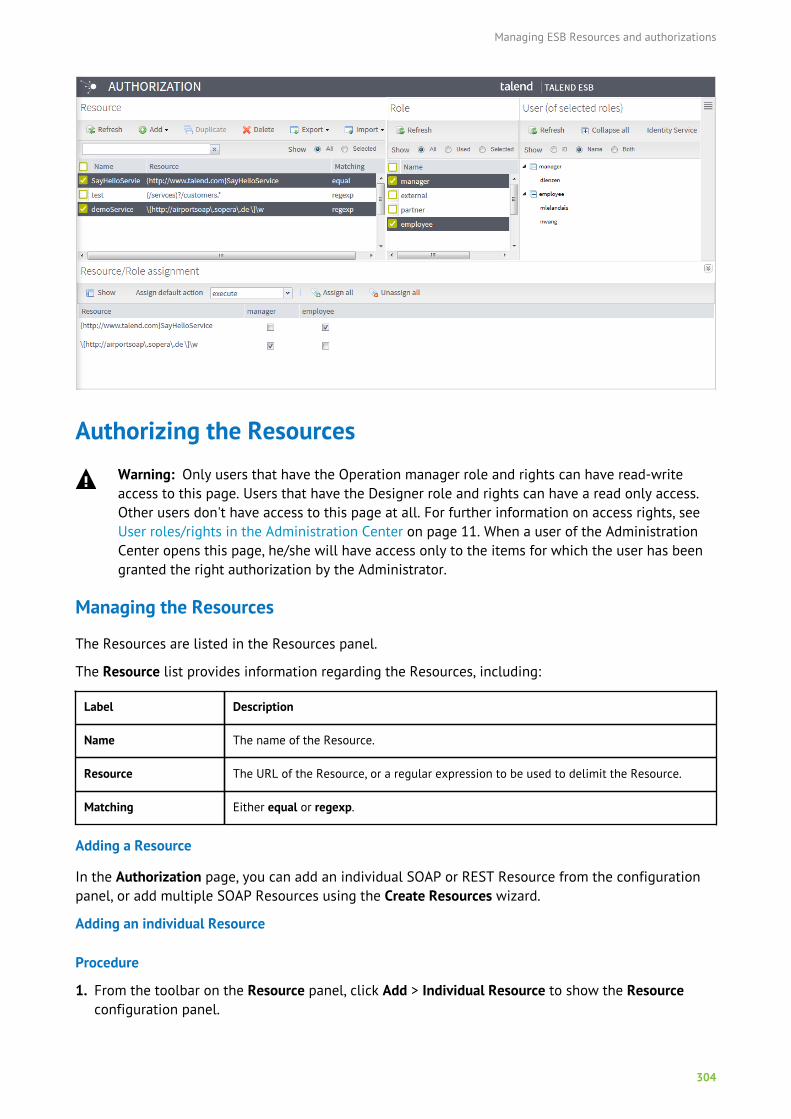
Managing ESB Resources and authorizations
304
Authorizing the ResourcesWarning: Only users that have the Operation manager role and rights can have read-writeaccess to this page. Users that have the Designer role and rights can have a read only access.Other users don't have access to this page at all. For further information on access rights, seeUser roles/rights in the Administration Center on page 11. When a user of the AdministrationCenter opens this page, he/she will have access only to the items for which the user has beengranted the right authorization by the Administrator.
Managing the Resources
The Resources are listed in the Resources panel.
The Resource list provides information regarding the Resources, including:
Label Description
Name The name of the Resource.
Resource The URL of the Resource, or a regular expression to be used to delimit the Resource.
Matching Either equal or regexp.
Adding a Resource
In the Authorization page, you can add an individual SOAP or REST Resource from the configurationpanel, or add multiple SOAP Resources using the Create Resources wizard.
Adding an individual Resource
Procedure
1. From the toolbar on the Resource panel, click Add > Individual Resource to show the Resourceconfiguration panel.
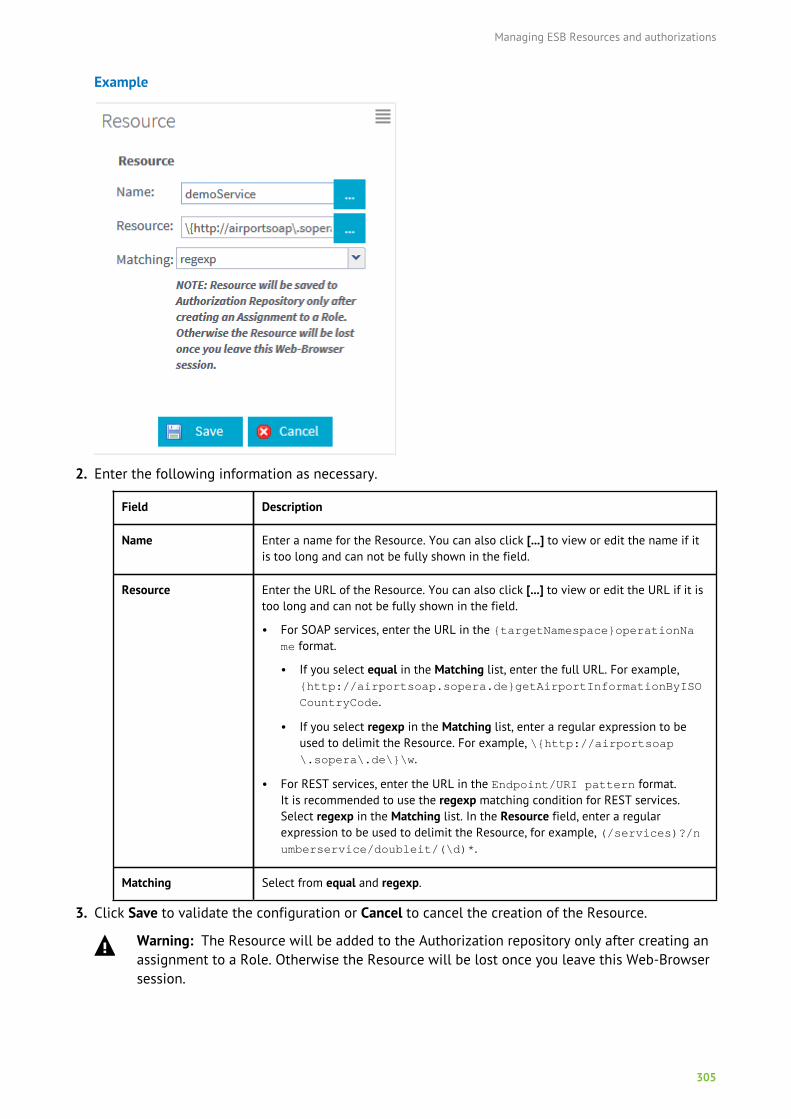
Managing ESB Resources and authorizations
305
Example
2. Enter the following information as necessary.
Field Description
Name Enter a name for the Resource. You can also click [...] to view or edit the name if itis too long and can not be fully shown in the field.
Resource Enter the URL of the Resource. You can also click [...] to view or edit the URL if it istoo long and can not be fully shown in the field.
• For SOAP services, enter the URL in the {targetNamespace}operationName format.
• If you select equal in the Matching list, enter the full URL. For example,{http://airportsoap.sopera.de}getAirportInformationByISO
CountryCode.
• If you select regexp in the Matching list, enter a regular expression to beused to delimit the Resource. For example, \{http://airportsoap\.sopera\.de\}\w.
• For REST services, enter the URL in the Endpoint/URI pattern format.It is recommended to use the regexp matching condition for REST services.Select regexp in the Matching list. In the Resource field, enter a regularexpression to be used to delimit the Resource, for example, (/services)?/numberservice/doubleit/(\d)*.
Matching Select from equal and regexp.
3. Click Save to validate the configuration or Cancel to cancel the creation of the Resource.
Warning: The Resource will be added to the Authorization repository only after creating anassignment to a Role. Otherwise the Resource will be lost once you leave this Web-Browsersession.
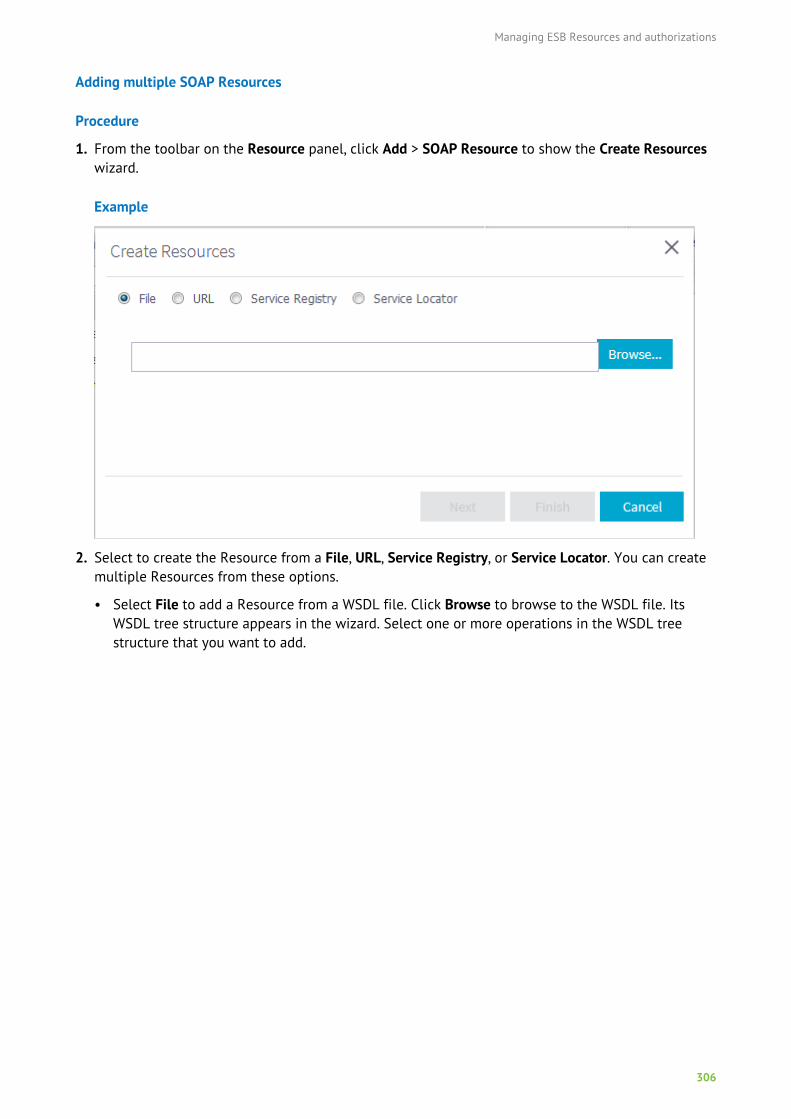
Managing ESB Resources and authorizations
306
Adding multiple SOAP Resources
Procedure
1. From the toolbar on the Resource panel, click Add > SOAP Resource to show the Create Resourceswizard.
Example
2. Select to create the Resource from a File, URL, Service Registry, or Service Locator. You can createmultiple Resources from these options.
• Select File to add a Resource from a WSDL file. Click Browse to browse to the WSDL file. ItsWSDL tree structure appears in the wizard. Select one or more operations in the WSDL treestructure that you want to add.
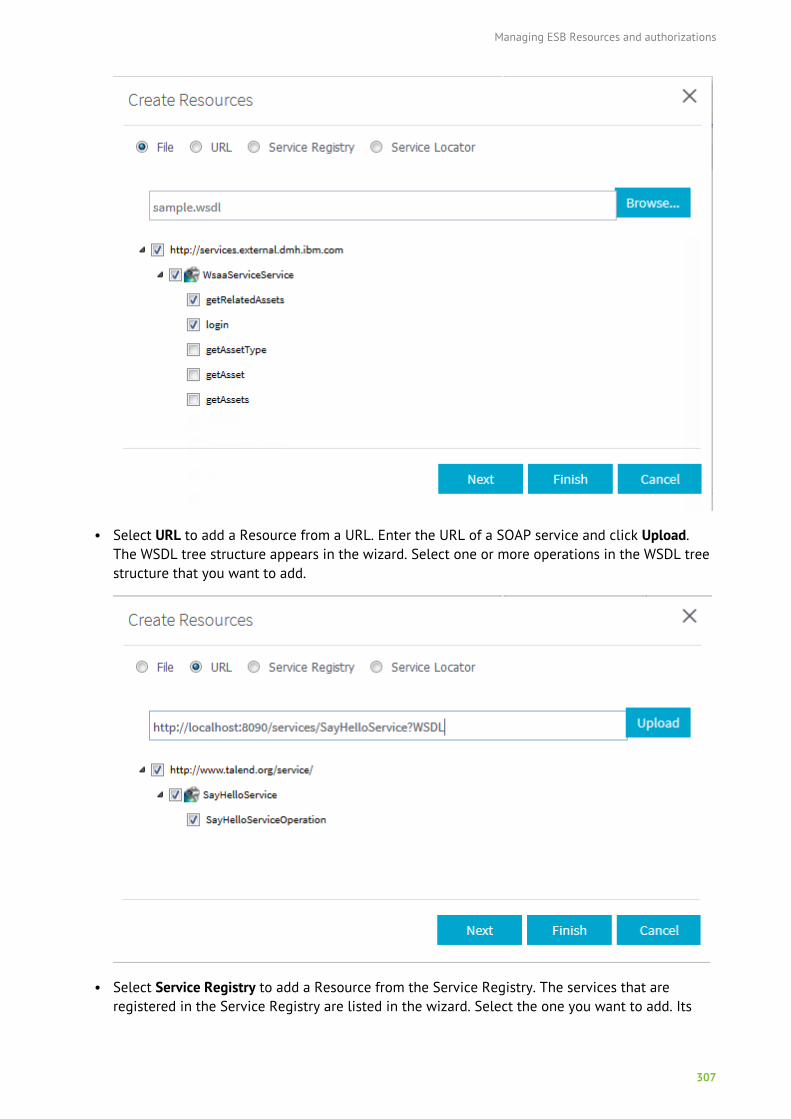
Managing ESB Resources and authorizations
307
• Select URL to add a Resource from a URL. Enter the URL of a SOAP service and click Upload.The WSDL tree structure appears in the wizard. Select one or more operations in the WSDL treestructure that you want to add.
• Select Service Registry to add a Resource from the Service Registry. The services that areregistered in the Service Registry are listed in the wizard. Select the one you want to add. Its
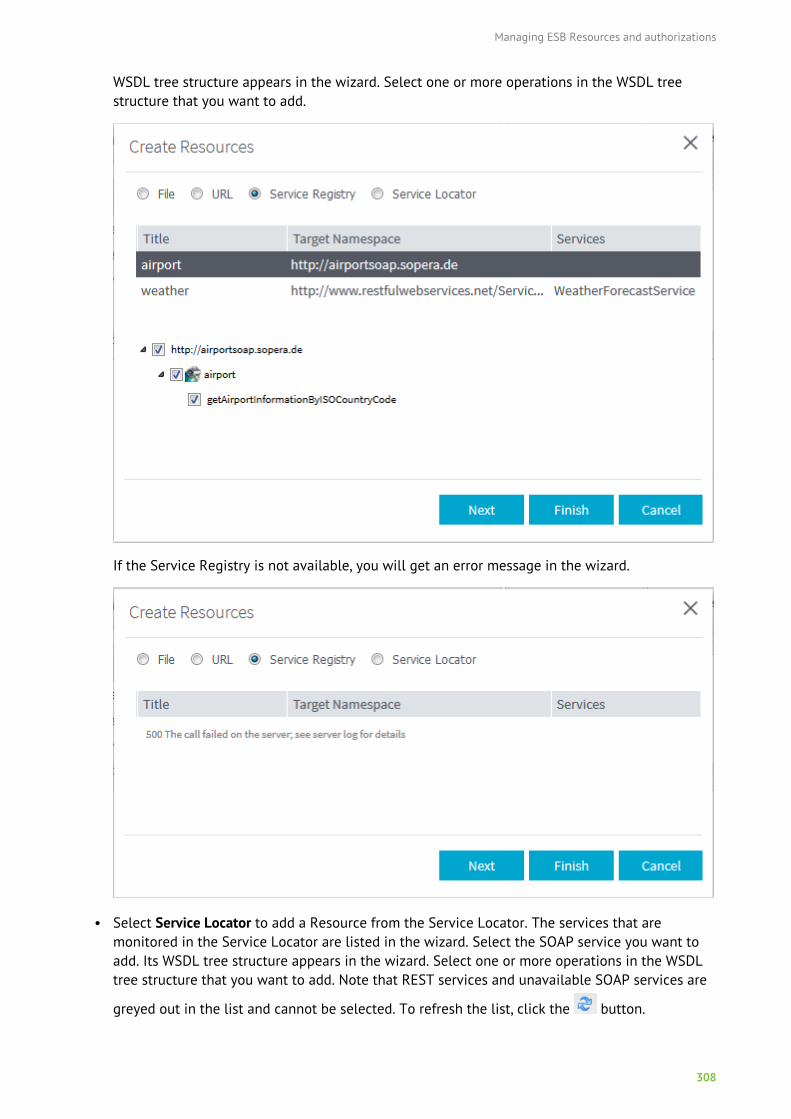
Managing ESB Resources and authorizations
308
WSDL tree structure appears in the wizard. Select one or more operations in the WSDL treestructure that you want to add.
If the Service Registry is not available, you will get an error message in the wizard.
• Select Service Locator to add a Resource from the Service Locator. The services that aremonitored in the Service Locator are listed in the wizard. Select the SOAP service you want toadd. Its WSDL tree structure appears in the wizard. Select one or more operations in the WSDLtree structure that you want to add. Note that REST services and unavailable SOAP services are
greyed out in the list and cannot be selected. To refresh the list, click the button.
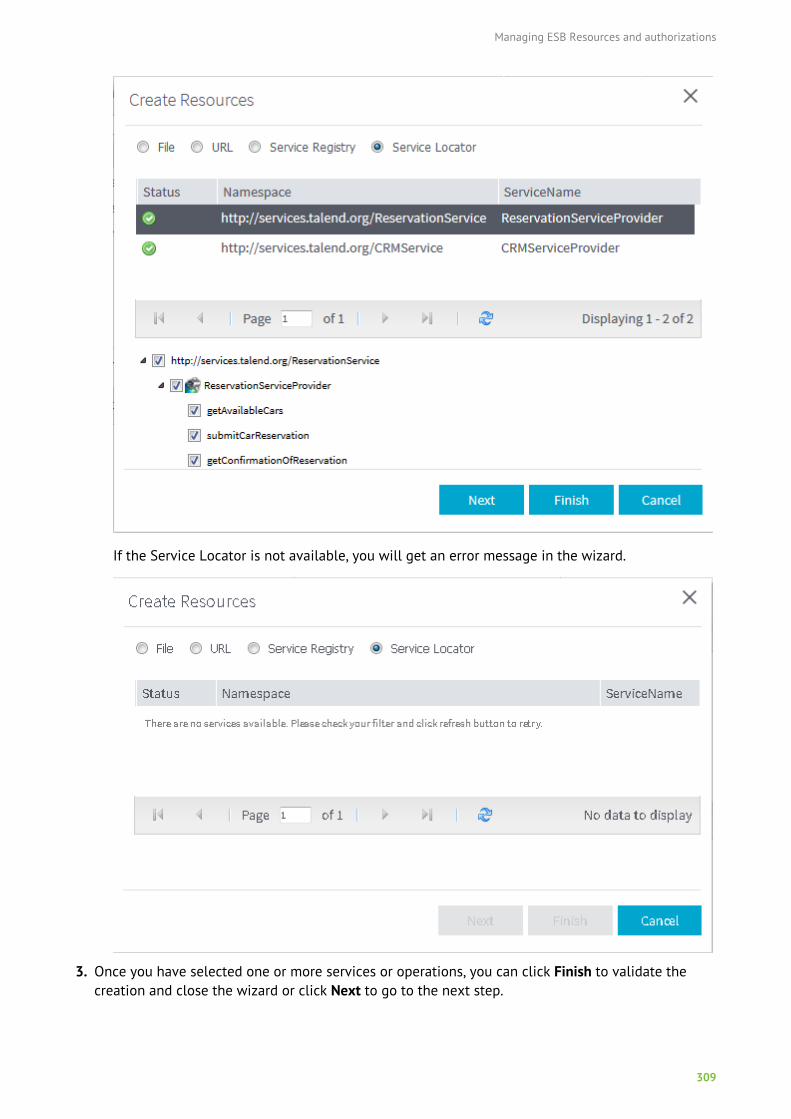
Managing ESB Resources and authorizations
309
If the Service Locator is not available, you will get an error message in the wizard.
3. Once you have selected one or more services or operations, you can click Finish to validate thecreation and close the wizard or click Next to go to the next step.
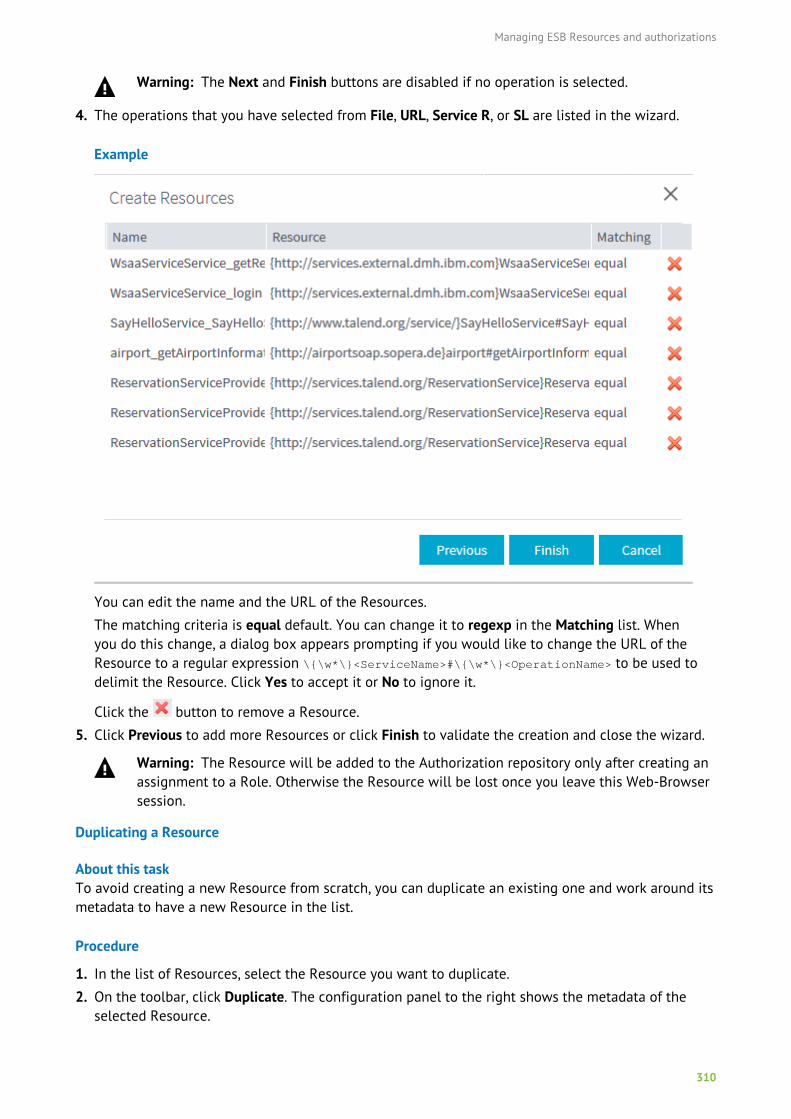
Managing ESB Resources and authorizations
310
Warning: The Next and Finish buttons are disabled if no operation is selected.
4. The operations that you have selected from File, URL, Service R, or SL are listed in the wizard.
Example
You can edit the name and the URL of the Resources.
The matching criteria is equal default. You can change it to regexp in the Matching list. Whenyou do this change, a dialog box appears prompting if you would like to change the URL of theResource to a regular expression \{\w*\}<ServiceName>#\{\w*\}<OperationName> to be used todelimit the Resource. Click Yes to accept it or No to ignore it.
Click the button to remove a Resource.
5. Click Previous to add more Resources or click Finish to validate the creation and close the wizard.
Warning: The Resource will be added to the Authorization repository only after creating anassignment to a Role. Otherwise the Resource will be lost once you leave this Web-Browsersession.
Duplicating a Resource
About this taskTo avoid creating a new Resource from scratch, you can duplicate an existing one and work around itsmetadata to have a new Resource in the list.
Procedure
1. In the list of Resources, select the Resource you want to duplicate.
2. On the toolbar, click Duplicate. The configuration panel to the right shows the metadata of theselected Resource.
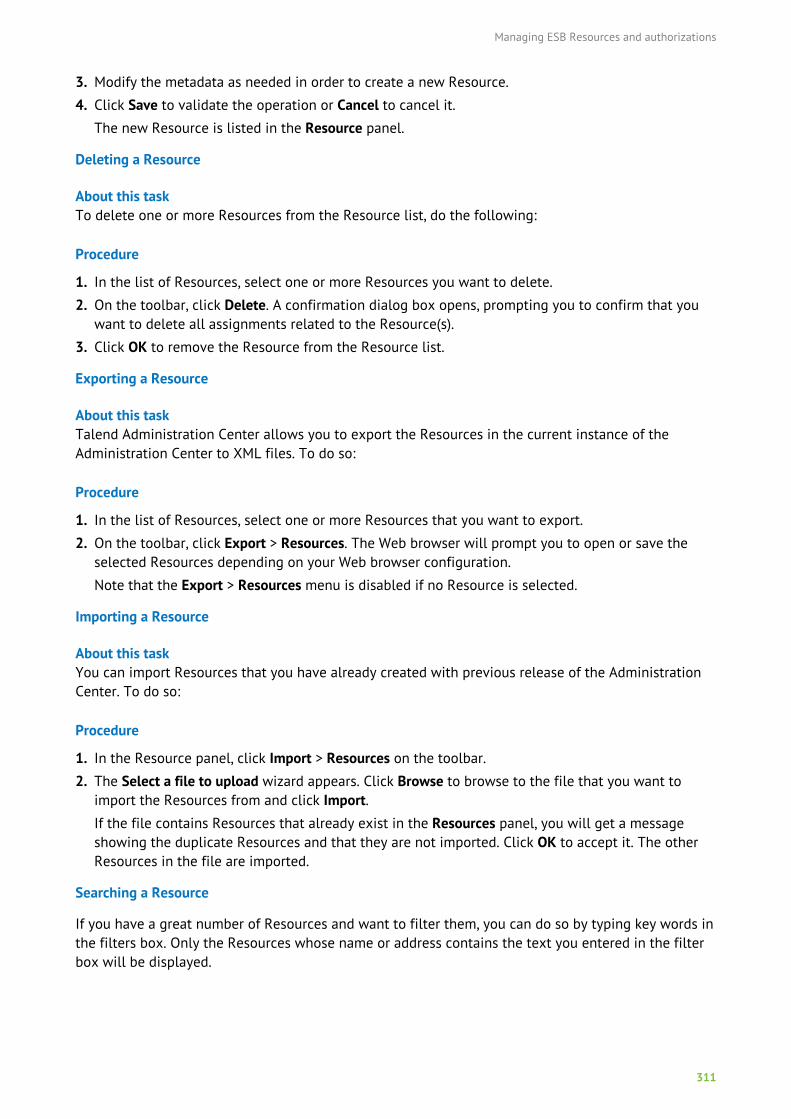
Managing ESB Resources and authorizations
311
3. Modify the metadata as needed in order to create a new Resource.
4. Click Save to validate the operation or Cancel to cancel it.
The new Resource is listed in the Resource panel.
Deleting a Resource
About this taskTo delete one or more Resources from the Resource list, do the following:
Procedure
1. In the list of Resources, select one or more Resources you want to delete.
2. On the toolbar, click Delete. A confirmation dialog box opens, prompting you to confirm that youwant to delete all assignments related to the Resource(s).
3. Click OK to remove the Resource from the Resource list.
Exporting a Resource
About this taskTalend Administration Center allows you to export the Resources in the current instance of theAdministration Center to XML files. To do so:
Procedure
1. In the list of Resources, select one or more Resources that you want to export.
2. On the toolbar, click Export > Resources. The Web browser will prompt you to open or save theselected Resources depending on your Web browser configuration.
Note that the Export > Resources menu is disabled if no Resource is selected.
Importing a Resource
About this taskYou can import Resources that you have already created with previous release of the AdministrationCenter. To do so:
Procedure
1. In the Resource panel, click Import > Resources on the toolbar.
2. The Select a file to upload wizard appears. Click Browse to browse to the file that you want toimport the Resources from and click Import.If the file contains Resources that already exist in the Resources panel, you will get a messageshowing the duplicate Resources and that they are not imported. Click OK to accept it. The otherResources in the file are imported.
Searching a Resource
If you have a great number of Resources and want to filter them, you can do so by typing key words inthe filters box. Only the Resources whose name or address contains the text you entered in the filterbox will be displayed.
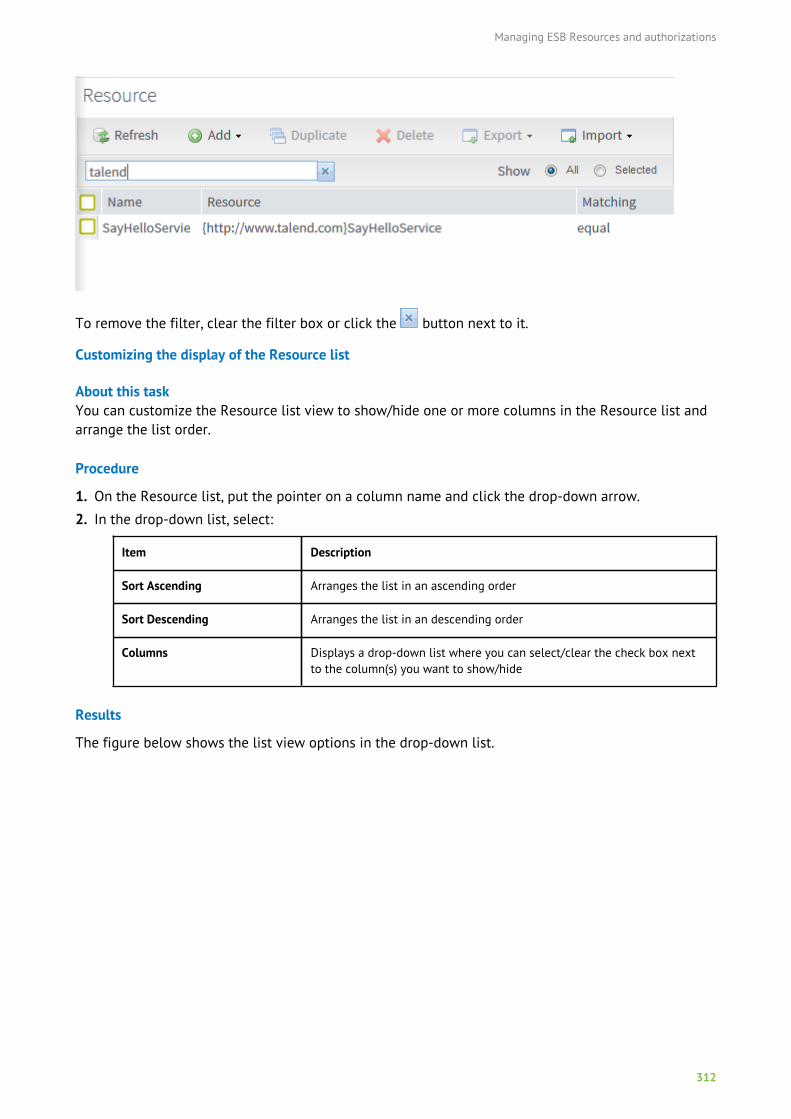
Managing ESB Resources and authorizations
312
To remove the filter, clear the filter box or click the button next to it.
Customizing the display of the Resource list
About this taskYou can customize the Resource list view to show/hide one or more columns in the Resource list andarrange the list order.
Procedure
1. On the Resource list, put the pointer on a column name and click the drop-down arrow.
2. In the drop-down list, select:
Item Description
Sort Ascending Arranges the list in an ascending order
Sort Descending Arranges the list in an descending order
Columns Displays a drop-down list where you can select/clear the check box nextto the column(s) you want to show/hide
Results
The figure below shows the list view options in the drop-down list.

Managing ESB Resources and authorizations
313
You can also choose to show all or the selected Resources by clicking the All or Selected radio button.
Refreshing the Resource list
To refresh the Resource list, click the Refresh button on the toolbar.
Viewing Roles and Users
The Roles and the Users stored in the Identity Management service can be viewed in the Role andUser panel respectively.
For more information about how to create Roles, Users, and how to assign a Role to a User, refer tothe chapter about the Talend Identity and Access Management in Talend ESB Infrastructure ServicesConfiguration Guide. For how to connect to the Identity Management service, see Setting up the ESBIdentity and Access Management on page 34.
You can choose to view All, Used, or Selected Roles in the Role panel. By default, when you open theAuthorization page, this view is populated with Used roles.
• All: all Roles stored in the Identity Management service
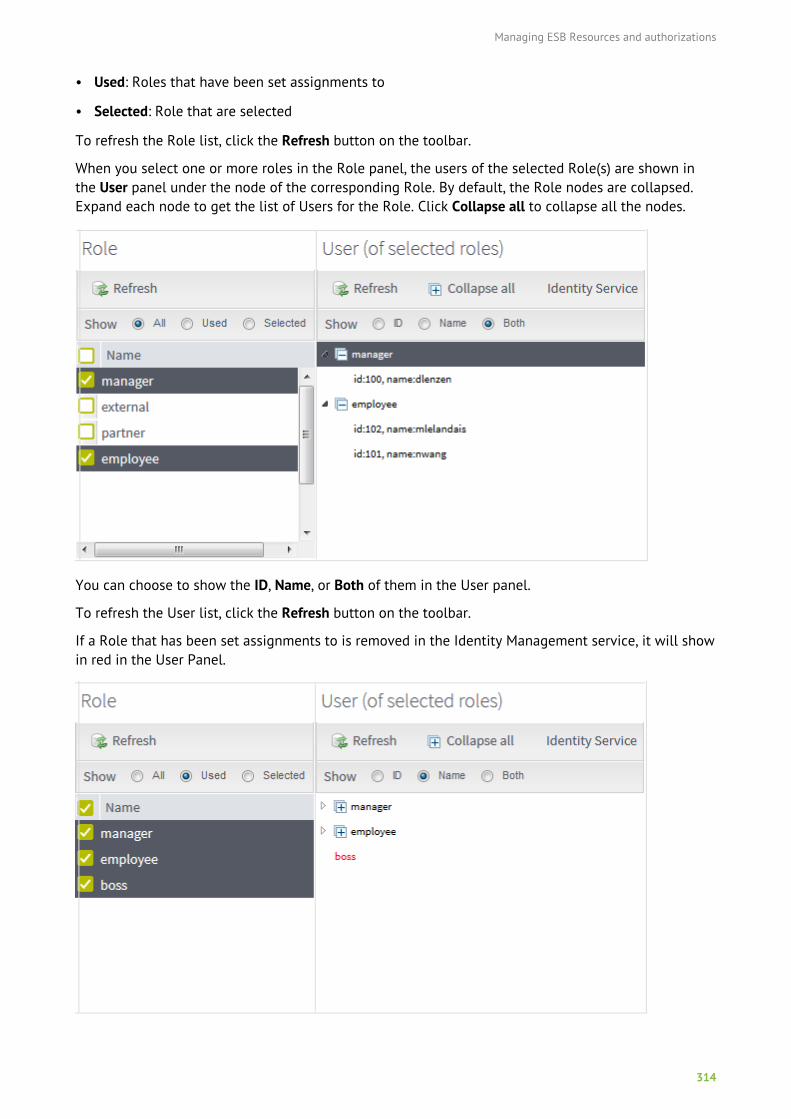
Managing ESB Resources and authorizations
314
• Used: Roles that have been set assignments to
• Selected: Role that are selected
To refresh the Role list, click the Refresh button on the toolbar.
When you select one or more roles in the Role panel, the users of the selected Role(s) are shown inthe User panel under the node of the corresponding Role. By default, the Role nodes are collapsed.Expand each node to get the list of Users for the Role. Click Collapse all to collapse all the nodes.
You can choose to show the ID, Name, or Both of them in the User panel.
To refresh the User list, click the Refresh button on the toolbar.
If a Role that has been set assignments to is removed in the Identity Management service, it will showin red in the User Panel.
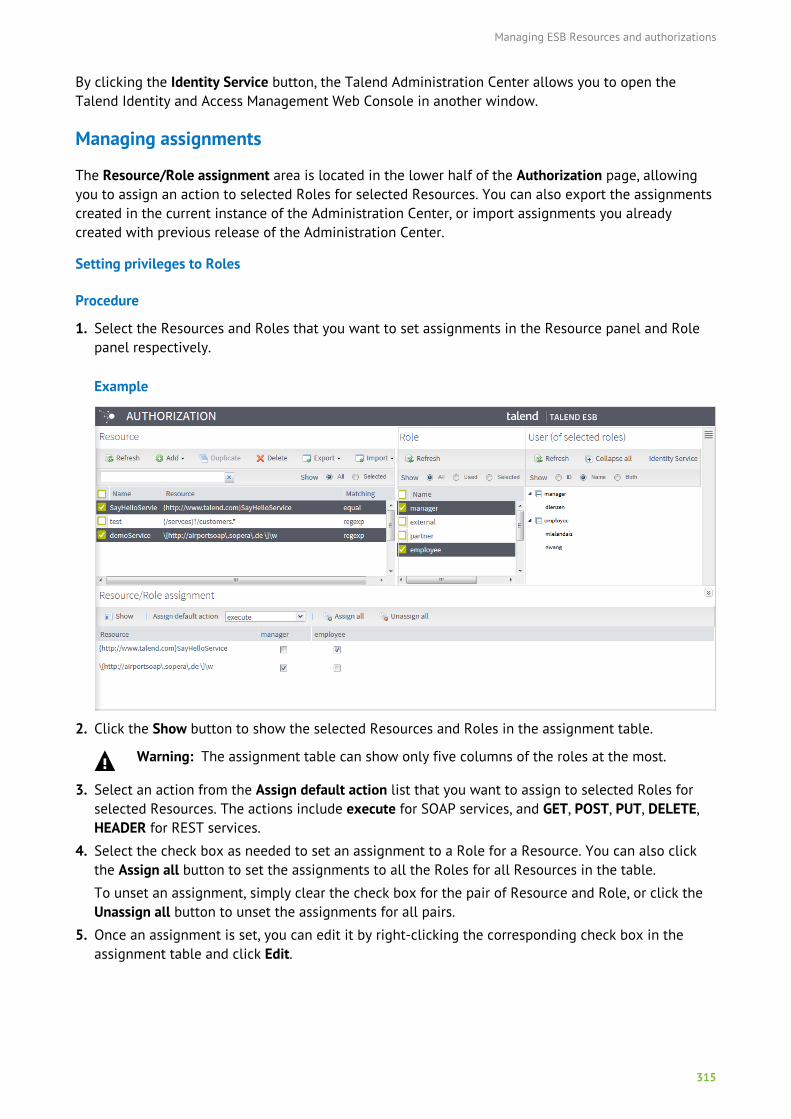
Managing ESB Resources and authorizations
315
By clicking the Identity Service button, the Talend Administration Center allows you to open theTalend Identity and Access Management Web Console in another window.
Managing assignments
The Resource/Role assignment area is located in the lower half of the Authorization page, allowingyou to assign an action to selected Roles for selected Resources. You can also export the assignmentscreated in the current instance of the Administration Center, or import assignments you alreadycreated with previous release of the Administration Center.
Setting privileges to Roles
Procedure
1. Select the Resources and Roles that you want to set assignments in the Resource panel and Rolepanel respectively.
Example
2. Click the Show button to show the selected Resources and Roles in the assignment table.
Warning: The assignment table can show only five columns of the roles at the most.
3. Select an action from the Assign default action list that you want to assign to selected Roles forselected Resources. The actions include execute for SOAP services, and GET, POST, PUT, DELETE,HEADER for REST services.
4. Select the check box as needed to set an assignment to a Role for a Resource. You can also clickthe Assign all button to set the assignments to all the Roles for all Resources in the table.
To unset an assignment, simply clear the check box for the pair of Resource and Role, or click theUnassign all button to unset the assignments for all pairs.
5. Once an assignment is set, you can edit it by right-clicking the corresponding check box in theassignment table and click Edit.
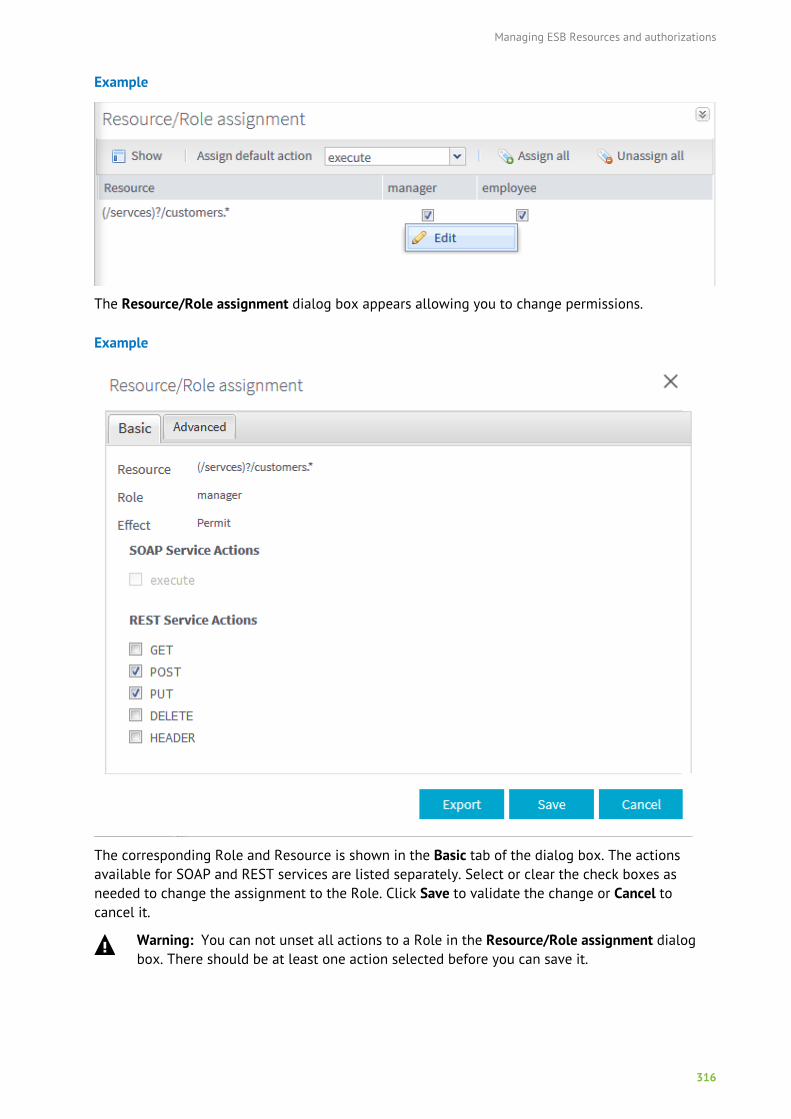
Managing ESB Resources and authorizations
316
Example
The Resource/Role assignment dialog box appears allowing you to change permissions.
Example
The corresponding Role and Resource is shown in the Basic tab of the dialog box. The actionsavailable for SOAP and REST services are listed separately. Select or clear the check boxes asneeded to change the assignment to the Role. Click Save to validate the change or Cancel tocancel it.
Warning: You can not unset all actions to a Role in the Resource/Role assignment dialogbox. There should be at least one action selected before you can save it.
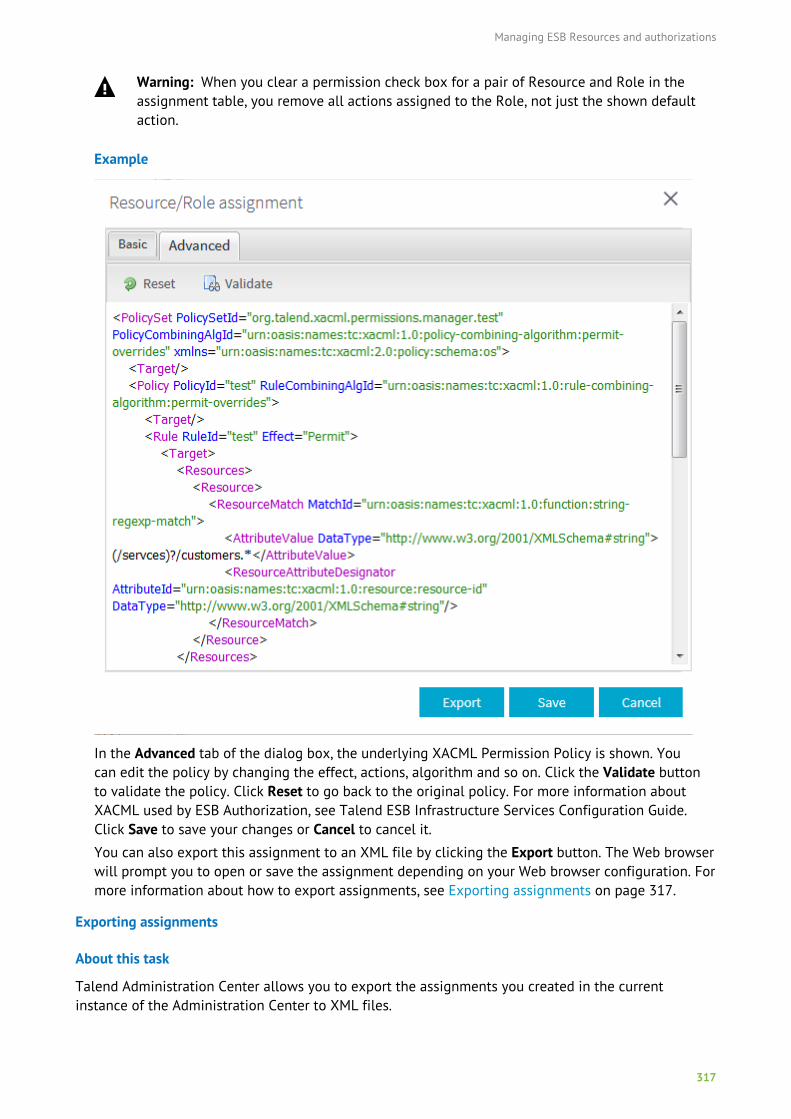
Managing ESB Resources and authorizations
317
Warning: When you clear a permission check box for a pair of Resource and Role in theassignment table, you remove all actions assigned to the Role, not just the shown defaultaction.
Example
In the Advanced tab of the dialog box, the underlying XACML Permission Policy is shown. Youcan edit the policy by changing the effect, actions, algorithm and so on. Click the Validate buttonto validate the policy. Click Reset to go back to the original policy. For more information aboutXACML used by ESB Authorization, see Talend ESB Infrastructure Services Configuration Guide.Click Save to save your changes or Cancel to cancel it.
You can also export this assignment to an XML file by clicking the Export button. The Web browserwill prompt you to open or save the assignment depending on your Web browser configuration. Formore information about how to export assignments, see Exporting assignments on page 317.
Exporting assignments
About this task
Talend Administration Center allows you to export the assignments you created in the currentinstance of the Administration Center to XML files.
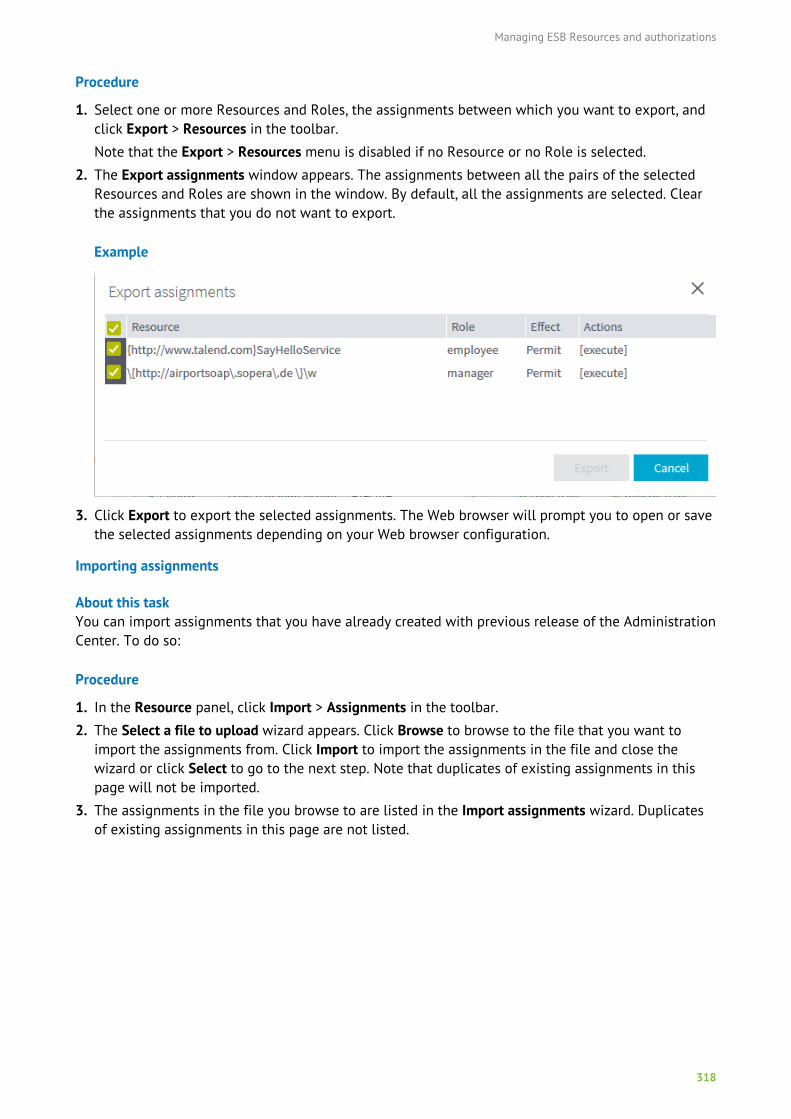
Managing ESB Resources and authorizations
318
Procedure
1. Select one or more Resources and Roles, the assignments between which you want to export, andclick Export > Resources in the toolbar.
Note that the Export > Resources menu is disabled if no Resource or no Role is selected.
2. The Export assignments window appears. The assignments between all the pairs of the selectedResources and Roles are shown in the window. By default, all the assignments are selected. Clearthe assignments that you do not want to export.
Example
3. Click Export to export the selected assignments. The Web browser will prompt you to open or savethe selected assignments depending on your Web browser configuration.
Importing assignments
About this taskYou can import assignments that you have already created with previous release of the AdministrationCenter. To do so:
Procedure
1. In the Resource panel, click Import > Assignments in the toolbar.
2. The Select a file to upload wizard appears. Click Browse to browse to the file that you want toimport the assignments from. Click Import to import the assignments in the file and close thewizard or click Select to go to the next step. Note that duplicates of existing assignments in thispage will not be imported.
3. The assignments in the file you browse to are listed in the Import assignments wizard. Duplicatesof existing assignments in this page are not listed.
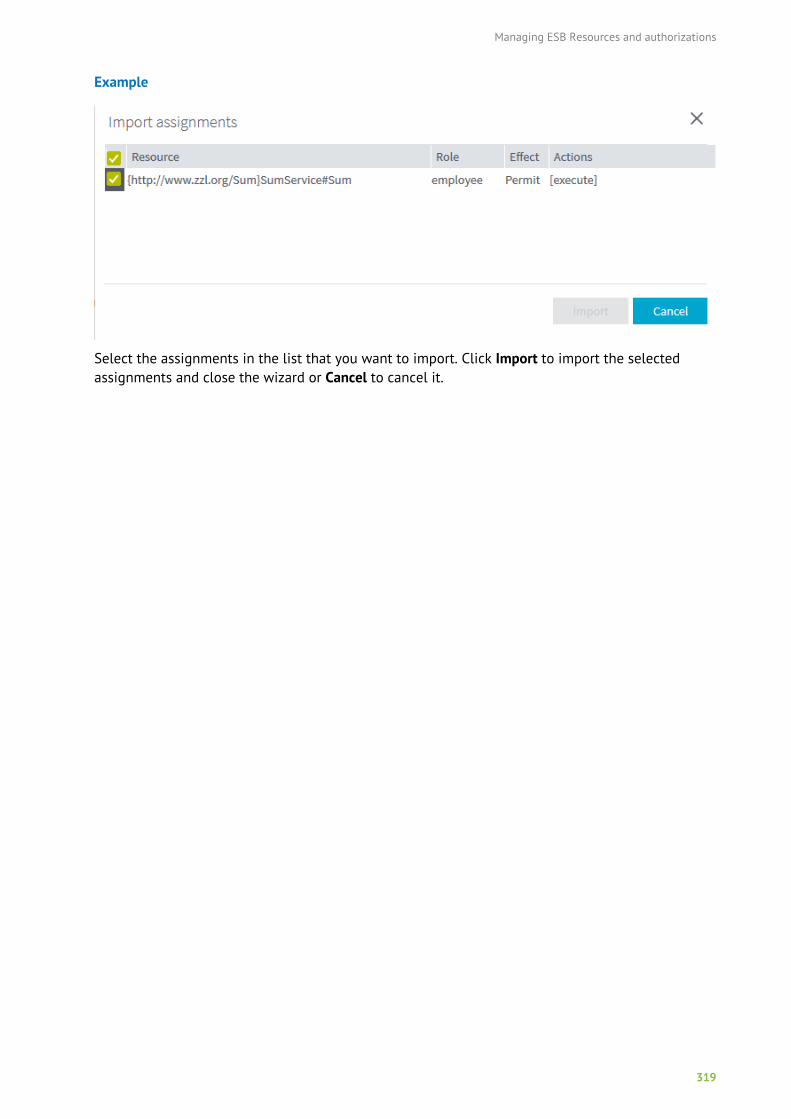
Managing ESB Resources and authorizations
319
Example
Select the assignments in the list that you want to import. Click Import to import the selectedassignments and close the wizard or Cancel to cancel it.
Managing Services and Policies
320
Managing Services and Policies
The Service Registry provides a repository for storing service WSDL and WS-Policy files. It helpsmaintain consistency for your services and the Policy-based security and reliability requirements forthem.
To access the Service Registry page, you need to have a licence that includes the Service Registrycomponent of the ESB Infrastructure module, and also have the relevant rights defined by theAdministrator during your user account creation in Talend Administration Center. For moreinformation about the modules and features ship with each license, refer to What modules andfeatures are available depending on your license on page 9.
If your license allows the ESB Infrastructure module but it does not show in the Menu tree view ofTalend Administration Center, contact your Administrator.
Using Service Registry in Talend Administration Center, you will be able to:
• manage services
• manage policies
• manage the relations between services and policies
Prerequisites to access the Service Registry pageIn order for the Service Registry page to operate, you need to:
• have entered the URL and credentials to access the Service Registry interface, in the Configurationpage. For more information, see Setting up the ESB Service Registry on page 35 ,
• have properly set up the registry and the Service Registry feature. For more information onhow to set up the Service Registry within Talend ESB, refer to Talend ESB Infrastructure ServicesConfiguration Guide.
Accessing the Service Registry pageTo display the Service Registry page:
In the Menu tree view, expand the ESB Infrastructure node and click Service Registry.
The list of services and policies is displayed in the Services and Policies tab respectively. The contentand relations of the services and policies are shown on the lower half of the Service Registry page.
Managing Services and Policies
321
Registering the servicesNote: Only users that have the Operation manager role and rights can have read-write accessto this page. Users that have the Designer role and rights can have a read only access. Otherusers don't have access to this page at all. For further information on access rights, see Userroles/rights in the Administration Center on page 11. When a user of the Administration Centeropens this page, he/she will have access only to the items for which the user has been grantedthe right authorization by the Administrator.
The below figure illustrates an example of the Service Registry page.
Managing Services and Policies
322
Managing services
The services are listed in the Services tab, providing information regarding the services, including:
Label Description
Title The name that identifies the service in the Administration Center.
Target Namespace The namespace of the web service.
Services The name of the service.
Modified Date The date on which the service is modified.
Some extra columns are hidden by default but can be added in the table. For more information, seeCustomizing the display of the service list on page 330.
These extra columns provide the following information:
Label Description
ID Unique identifier of the service given by the Administration Center automatically.
Create Date The date on which the service is created.
You can export the services listed in this tab to XML files, or import services that you already createdwith previous release of the Administration Center. For more information, see Exporting and importingservices and polices on page 344.
Managing Services and Policies
323
Adding a service
About this task
To add a service from Talend Administration Center, complete the following:
Procedure
1. From the toolbar on the Service tab, click Add to show the configuration panel to the right.
Example
2. Enter the following information as necessary.
Field Description
Title Type in a name that identifies the service in the Administration Center.
Description Provide any useful information regarding the service.
3. Click the Upload content button upload the content of a WSDL file. The Upload Content dialog boxappears, allowing you to upload the content from a File or a URL.
Managing Services and Policies
324
Example
To upload the content from a file, browse to or enter the path where the file is located.
To upload the content from a URL, enter the URL in the field.
Click Upload to upload the content or Cancel to cancel it.
4. The WSDL tree structure appears in the configuration panel. The content of it is shown in theContent tab on the lower half of the Service Registry page.
Click Save to validate the creation or Cancel to cancel it.
Example
Managing Services and Policies
325
Validating a service
About this task
You can check the consistency of the service WSDL file and the policy files assigned to the serviceusing the Validate button on the tool bar. For more information about how to assign a policy to aservice, see Assigning a policy to a service on page 340.
To validate a service:
Procedure
1. In the list of services, select the one you want to validate.
2. On the toolbar, click Validate. A dialog box appears, showing if the service WSDL file and theassigned policy files are consistent, and if the assigned policies are available.
The following screenshot shows the result of a consistent service:
Example
Below is an example result of an inconsistent service due to the unavailability of the assignedpolicy.
Example
3. Click OK to close the dialog box.
Editing a service
On the lower half of the Service Registry page, you can edit the service WSDL file in the Content tabor change the endpoint of the service in the Endpoints tab.
Managing Services and Policies
326
Editing the service WSDL file
Procedure
1. Select a service in the service list and click the Content tab on the lower half of the ServiceRegistry page. The service WSDL file is shown in the Content tab.
You can select the Highlight check box to highlight the WSDL element names.
2. Click Edit in the Content tab and edit the content as needed.
Example
3. Click Save to save your changes or Cancel to cancel it.
Managing Services and Policies
327
Editing the service metadata
Procedure
1. Select a service in the service list and click the Metadata tab on the lower half of the ServiceRegistry page.The service metadata is shown in grid mode.
2. You can change the value of the metadata items in the Value field.
When you edit the value of a metadata item, a small red triangle appears at the top left handcorner of the Value field to indicate that the field has been modified but not saved. Click the Savebutton if you want to apply your changes.
Example
Alternatively you can select the Advanced Edit check box in the Metadata tab to edit the servicemetadata in text mode, for example, to add or delete a metadata item, which can not be done ingrid mode. Validation errors are highlighted automatically when you edit. An exception will bereported when you save the service metadata with validation errors.
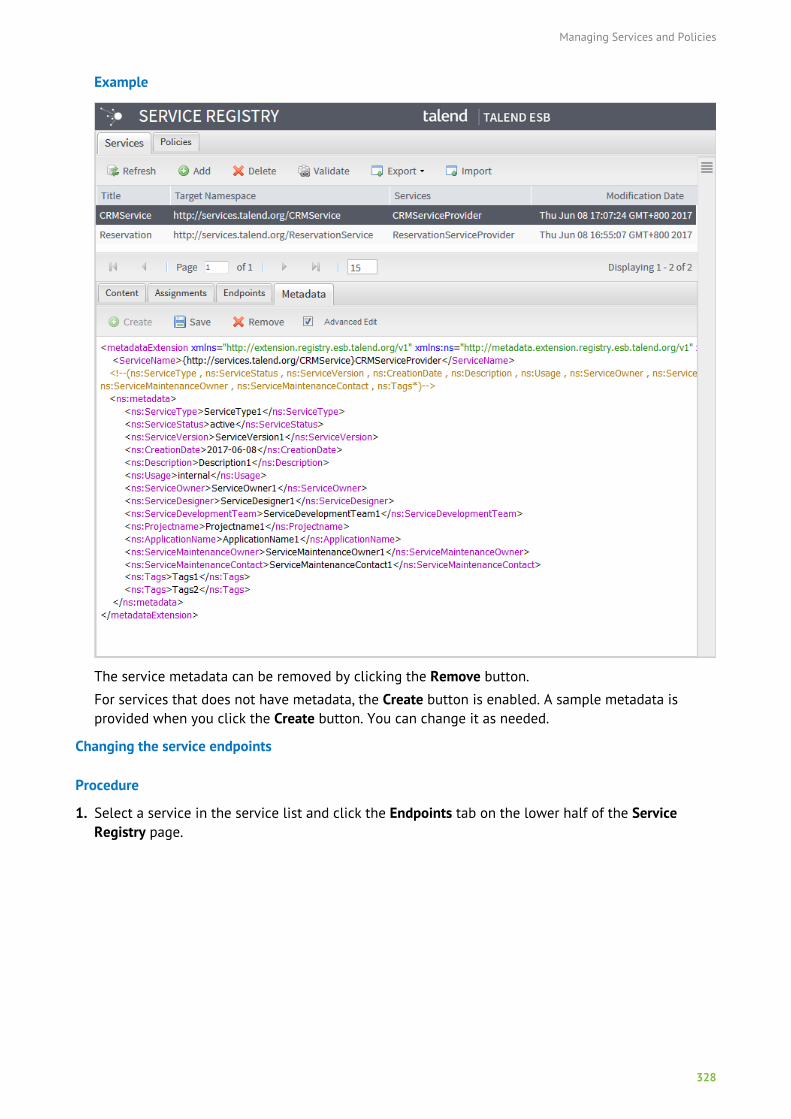
Managing Services and Policies
328
Example
The service metadata can be removed by clicking the Remove button.
For services that does not have metadata, the Create button is enabled. A sample metadata isprovided when you click the Create button. You can change it as needed.
Changing the service endpoints
Procedure
1. Select a service in the service list and click the Endpoints tab on the lower half of the ServiceRegistry page.
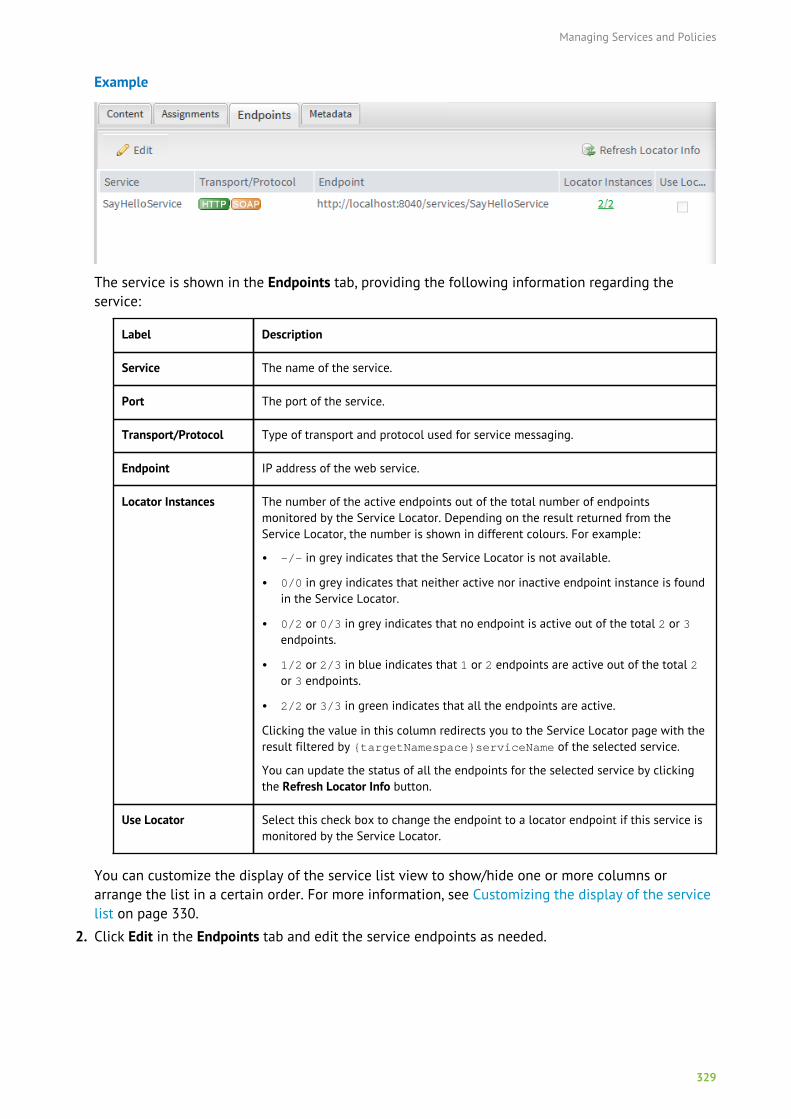
Managing Services and Policies
329
Example
The service is shown in the Endpoints tab, providing the following information regarding theservice:
Label Description
Service The name of the service.
Port The port of the service.
Transport/Protocol Type of transport and protocol used for service messaging.
Endpoint IP address of the web service.
Locator Instances The number of the active endpoints out of the total number of endpointsmonitored by the Service Locator. Depending on the result returned from theService Locator, the number is shown in different colours. For example:
• -/- in grey indicates that the Service Locator is not available.
• 0/0 in grey indicates that neither active nor inactive endpoint instance is foundin the Service Locator.
• 0/2 or 0/3 in grey indicates that no endpoint is active out of the total 2 or 3endpoints.
• 1/2 or 2/3 in blue indicates that 1 or 2 endpoints are active out of the total 2or 3 endpoints.
• 2/2 or 3/3 in green indicates that all the endpoints are active.
Clicking the value in this column redirects you to the Service Locator page with theresult filtered by {targetNamespace}serviceName of the selected service.
You can update the status of all the endpoints for the selected service by clickingthe Refresh Locator Info button.
Use Locator Select this check box to change the endpoint to a locator endpoint if this service ismonitored by the Service Locator.
You can customize the display of the service list view to show/hide one or more columns orarrange the list in a certain order. For more information, see Customizing the display of the servicelist on page 330.
2. Click Edit in the Endpoints tab and edit the service endpoints as needed.
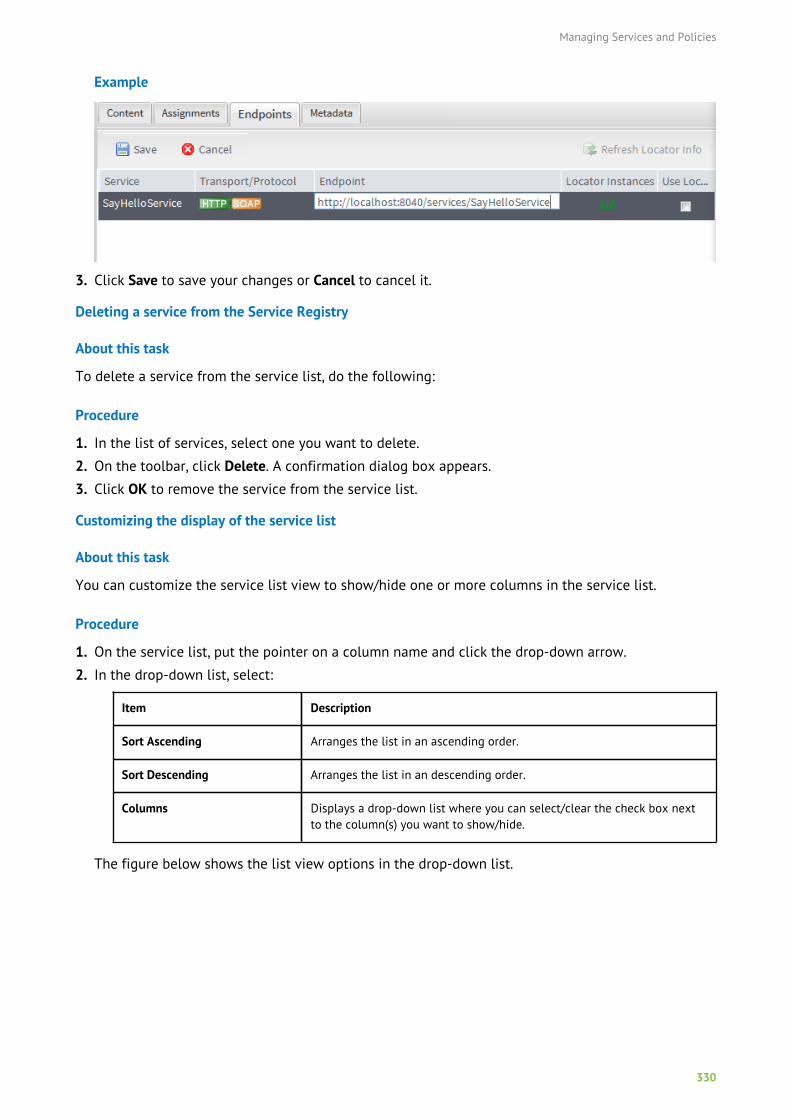
Managing Services and Policies
330
Example
3. Click Save to save your changes or Cancel to cancel it.
Deleting a service from the Service Registry
About this task
To delete a service from the service list, do the following:
Procedure
1. In the list of services, select one you want to delete.
2. On the toolbar, click Delete. A confirmation dialog box appears.
3. Click OK to remove the service from the service list.
Customizing the display of the service list
About this task
You can customize the service list view to show/hide one or more columns in the service list.
Procedure
1. On the service list, put the pointer on a column name and click the drop-down arrow.
2. In the drop-down list, select:
Item Description
Sort Ascending Arranges the list in an ascending order.
Sort Descending Arranges the list in an descending order.
Columns Displays a drop-down list where you can select/clear the check box nextto the column(s) you want to show/hide.
The figure below shows the list view options in the drop-down list.
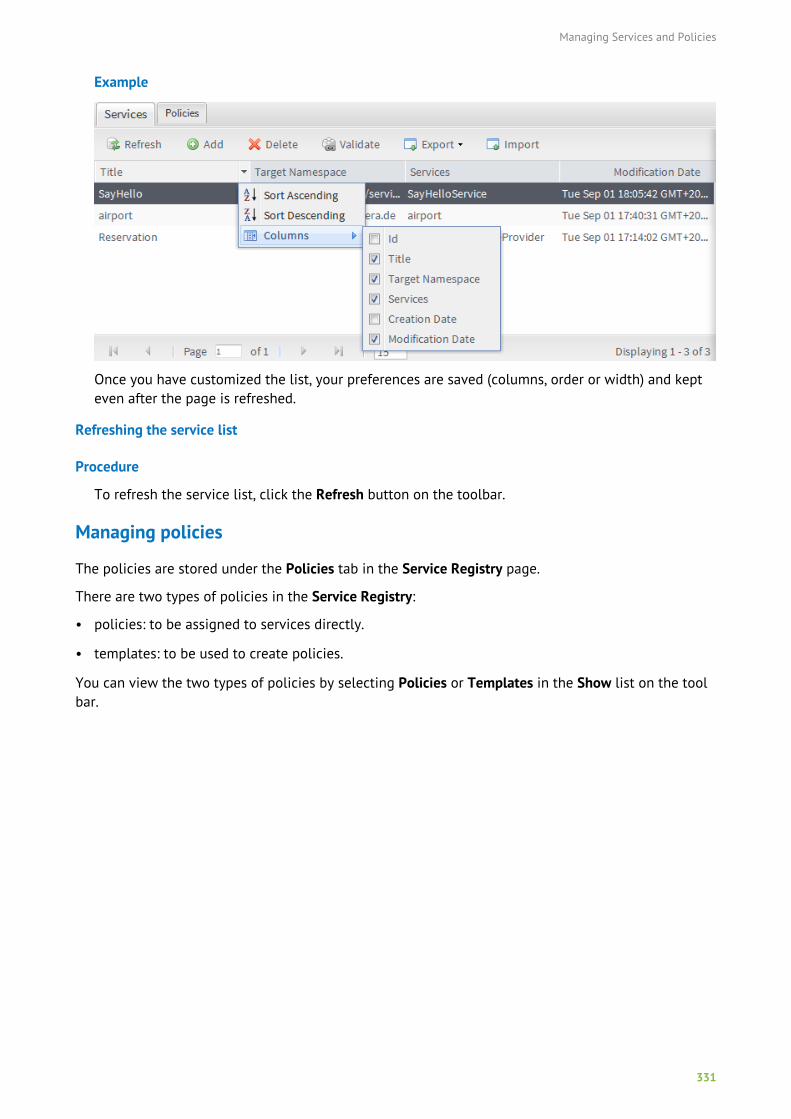
Managing Services and Policies
331
Example
Once you have customized the list, your preferences are saved (columns, order or width) and kepteven after the page is refreshed.
Refreshing the service list
Procedure
To refresh the service list, click the Refresh button on the toolbar.
Managing policies
The policies are stored under the Policies tab in the Service Registry page.
There are two types of policies in the Service Registry:
• policies: to be assigned to services directly.
• templates: to be used to create policies.
You can view the two types of policies by selecting Policies or Templates in the Show list on the toolbar.
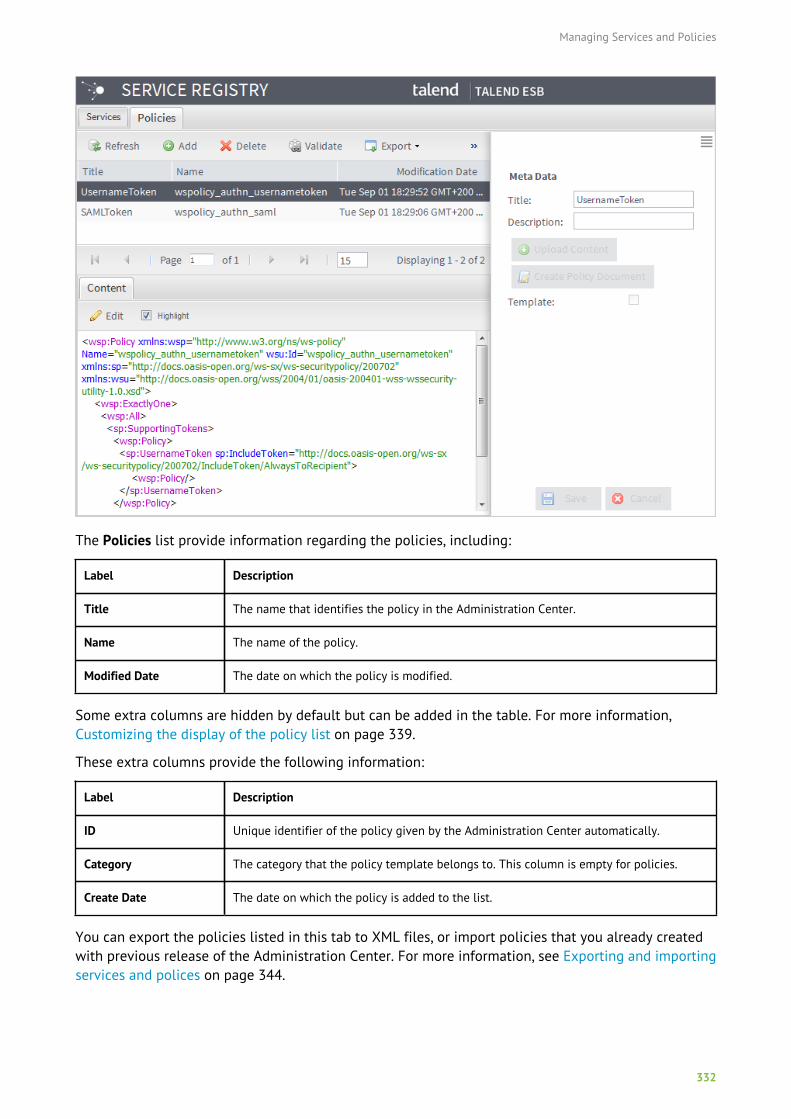
Managing Services and Policies
332
The Policies list provide information regarding the policies, including:
Label Description
Title The name that identifies the policy in the Administration Center.
Name The name of the policy.
Modified Date The date on which the policy is modified.
Some extra columns are hidden by default but can be added in the table. For more information,Customizing the display of the policy list on page 339.
These extra columns provide the following information:
Label Description
ID Unique identifier of the policy given by the Administration Center automatically.
Category The category that the policy template belongs to. This column is empty for policies.
Create Date The date on which the policy is added to the list.
You can export the policies listed in this tab to XML files, or import policies that you already createdwith previous release of the Administration Center. For more information, see Exporting and importingservices and polices on page 344.
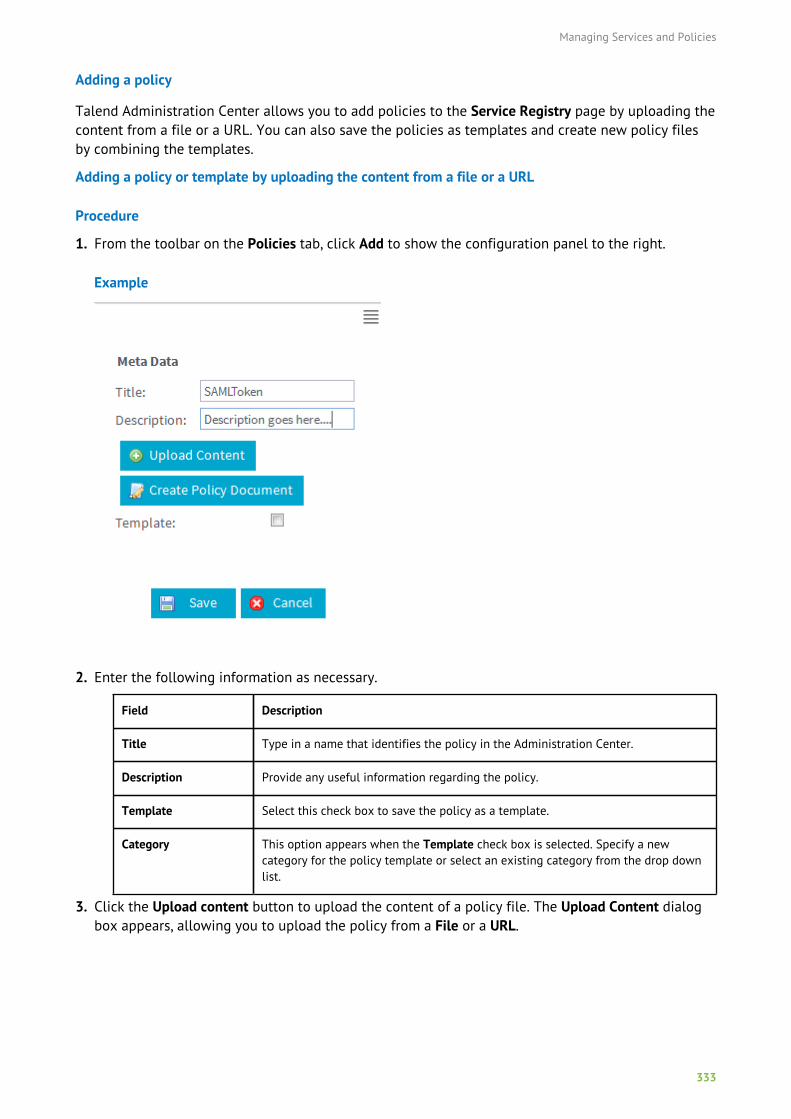
Managing Services and Policies
333
Adding a policy
Talend Administration Center allows you to add policies to the Service Registry page by uploading thecontent from a file or a URL. You can also save the policies as templates and create new policy filesby combining the templates.
Adding a policy or template by uploading the content from a file or a URL
Procedure
1. From the toolbar on the Policies tab, click Add to show the configuration panel to the right.
Example
2. Enter the following information as necessary.
Field Description
Title Type in a name that identifies the policy in the Administration Center.
Description Provide any useful information regarding the policy.
Template Select this check box to save the policy as a template.
Category This option appears when the Template check box is selected. Specify a newcategory for the policy template or select an existing category from the drop downlist.
3. Click the Upload content button to upload the content of a policy file. The Upload Content dialogbox appears, allowing you to upload the policy from a File or a URL.
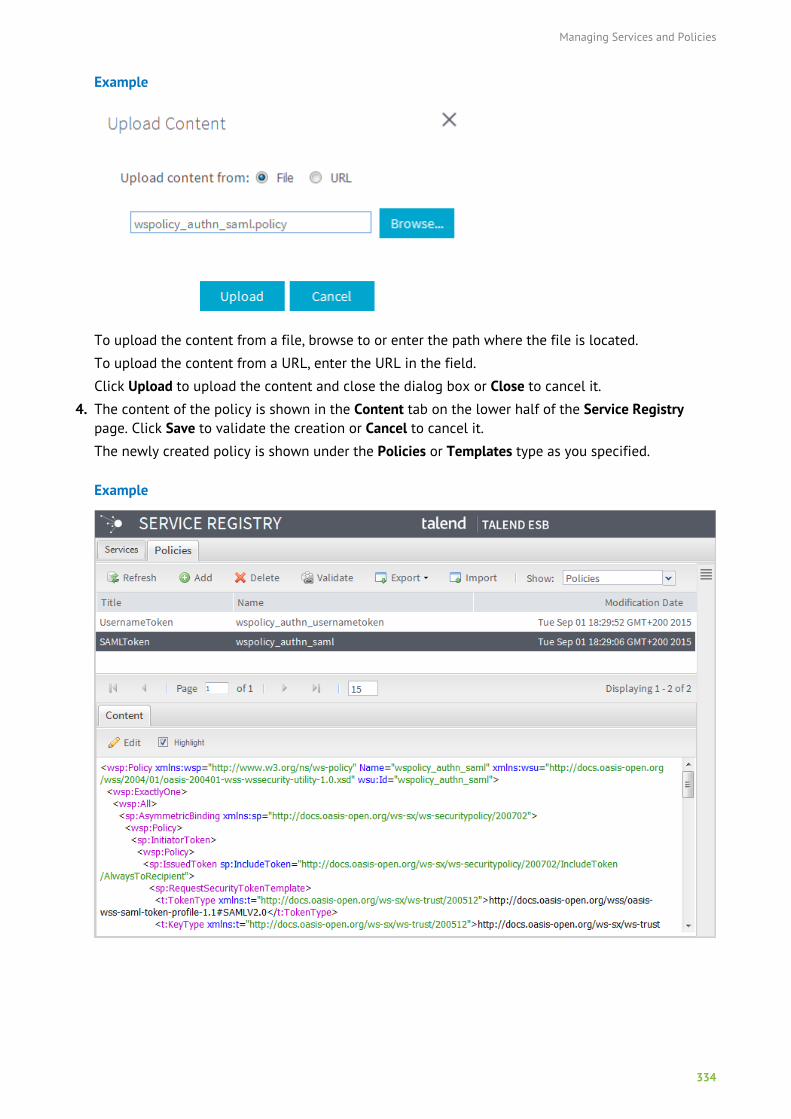
Managing Services and Policies
334
Example
To upload the content from a file, browse to or enter the path where the file is located.
To upload the content from a URL, enter the URL in the field.
Click Upload to upload the content and close the dialog box or Close to cancel it.
4. The content of the policy is shown in the Content tab on the lower half of the Service Registrypage. Click Save to validate the creation or Cancel to cancel it.
The newly created policy is shown under the Policies or Templates type as you specified.
Example
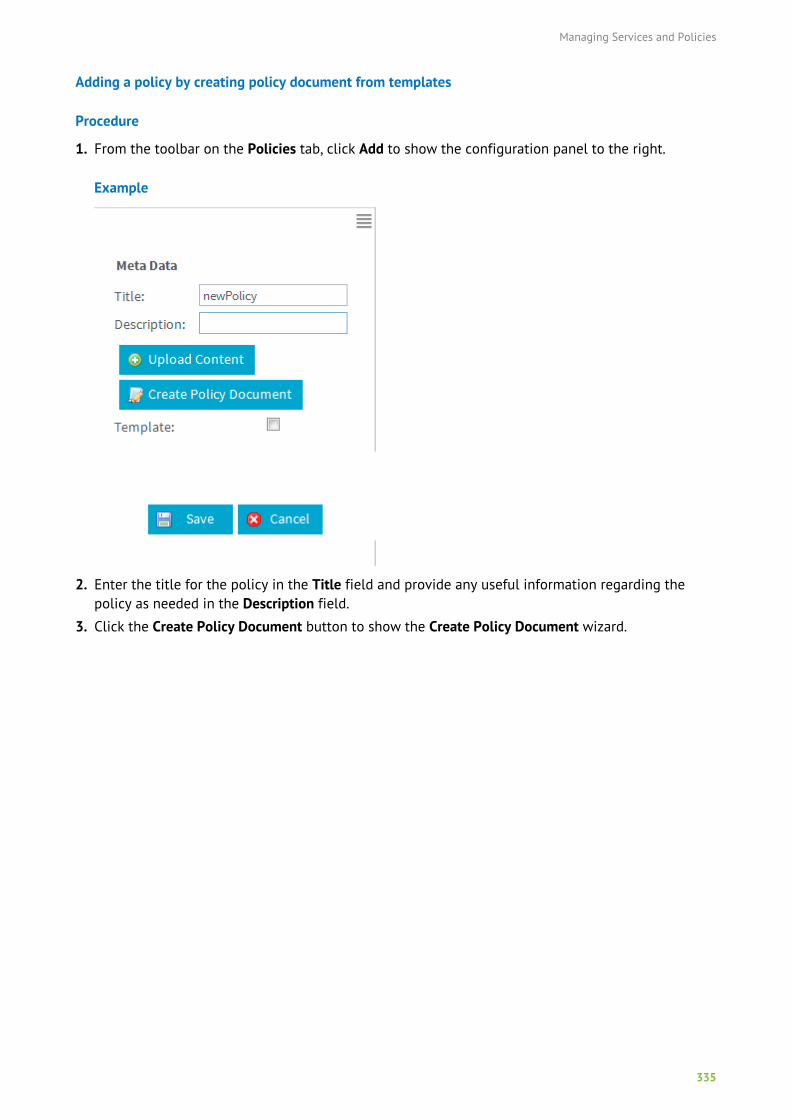
Managing Services and Policies
335
Adding a policy by creating policy document from templates
Procedure
1. From the toolbar on the Policies tab, click Add to show the configuration panel to the right.
Example
2. Enter the title for the policy in the Title field and provide any useful information regarding thepolicy as needed in the Description field.
3. Click the Create Policy Document button to show the Create Policy Document wizard.
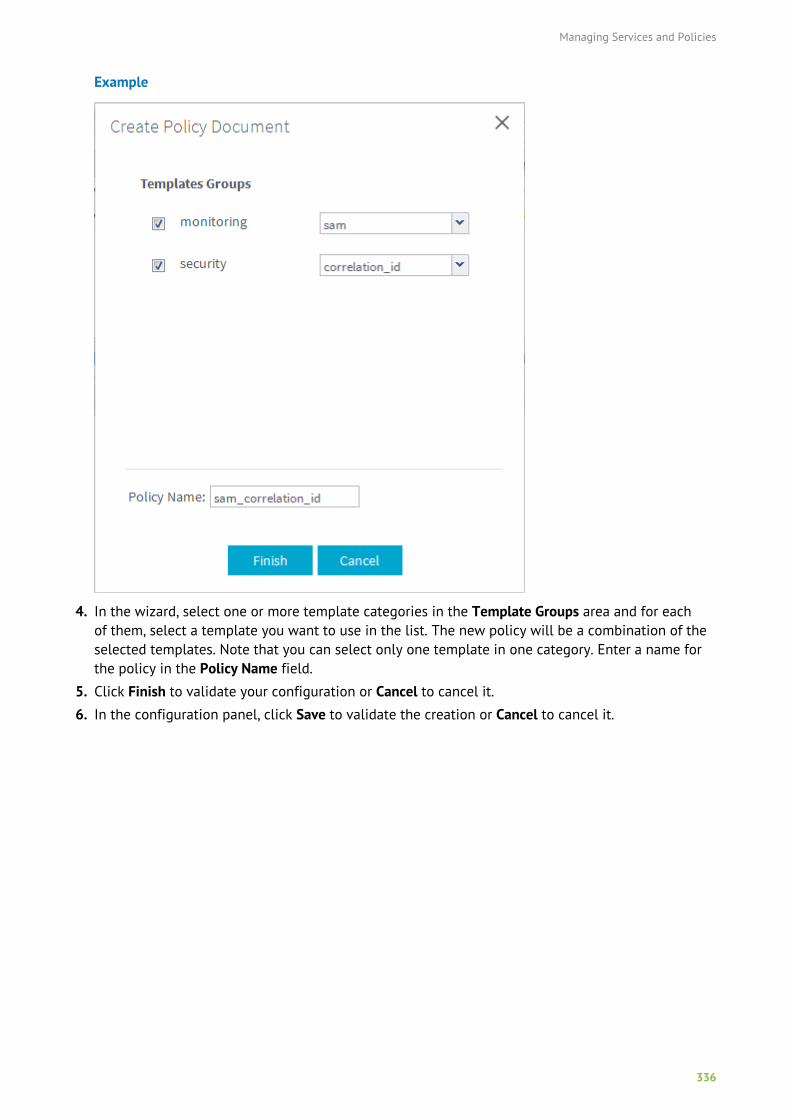
Managing Services and Policies
336
Example
4. In the wizard, select one or more template categories in the Template Groups area and for eachof them, select a template you want to use in the list. The new policy will be a combination of theselected templates. Note that you can select only one template in one category. Enter a name forthe policy in the Policy Name field.
5. Click Finish to validate your configuration or Cancel to cancel it.
6. In the configuration panel, click Save to validate the creation or Cancel to cancel it.
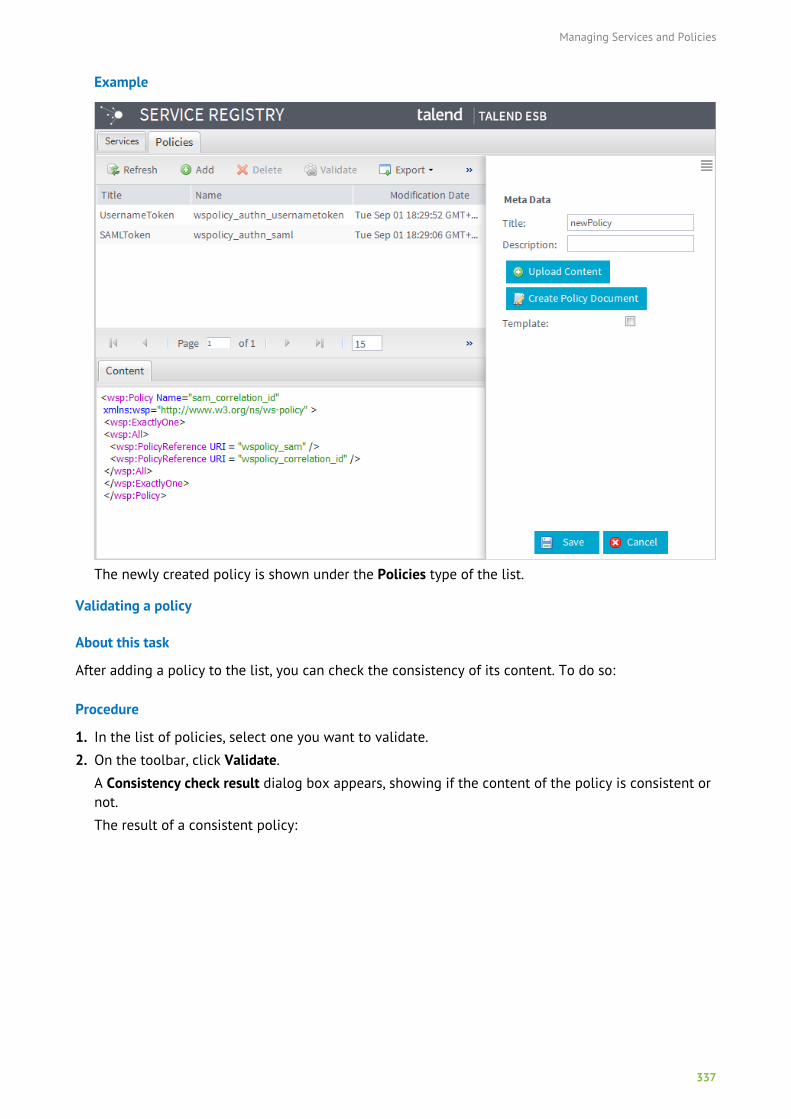
Managing Services and Policies
337
Example
The newly created policy is shown under the Policies type of the list.
Validating a policy
About this task
After adding a policy to the list, you can check the consistency of its content. To do so:
Procedure
1. In the list of policies, select one you want to validate.
2. On the toolbar, click Validate.
A Consistency check result dialog box appears, showing if the content of the policy is consistent ornot.
The result of a consistent policy:
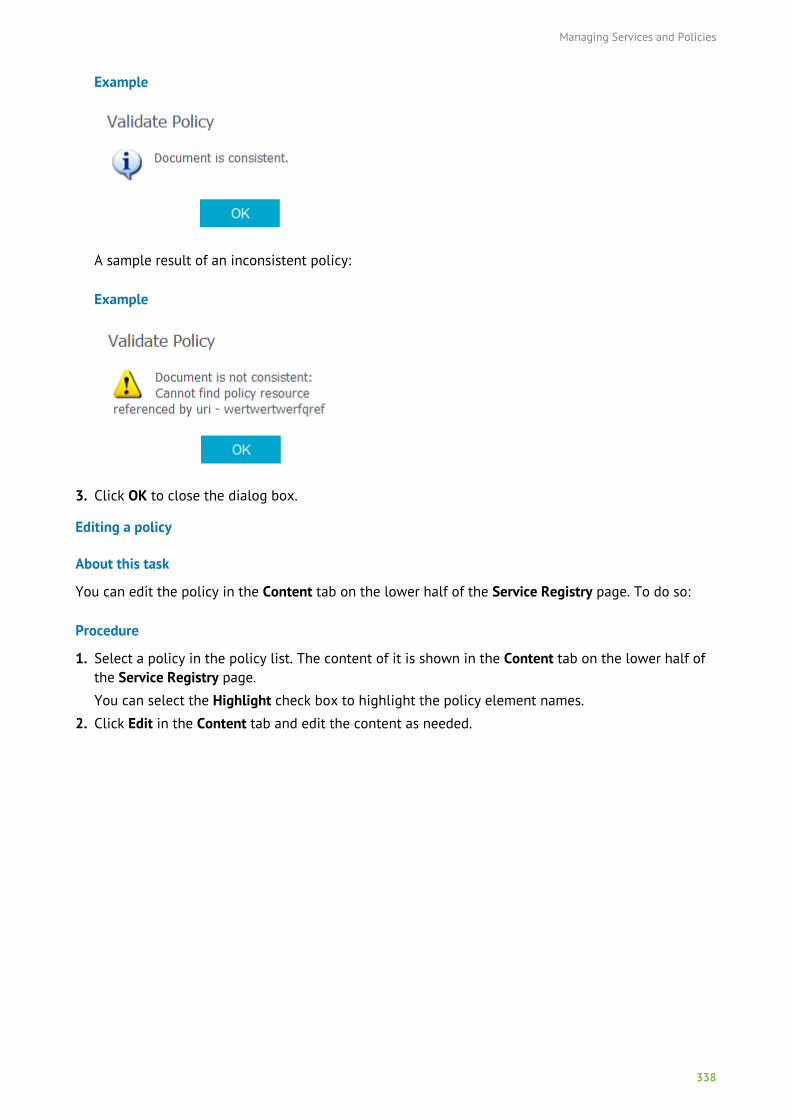
Managing Services and Policies
338
Example
A sample result of an inconsistent policy:
Example
3. Click OK to close the dialog box.
Editing a policy
About this task
You can edit the policy in the Content tab on the lower half of the Service Registry page. To do so:
Procedure
1. Select a policy in the policy list. The content of it is shown in the Content tab on the lower half ofthe Service Registry page.
You can select the Highlight check box to highlight the policy element names.
2. Click Edit in the Content tab and edit the content as needed.
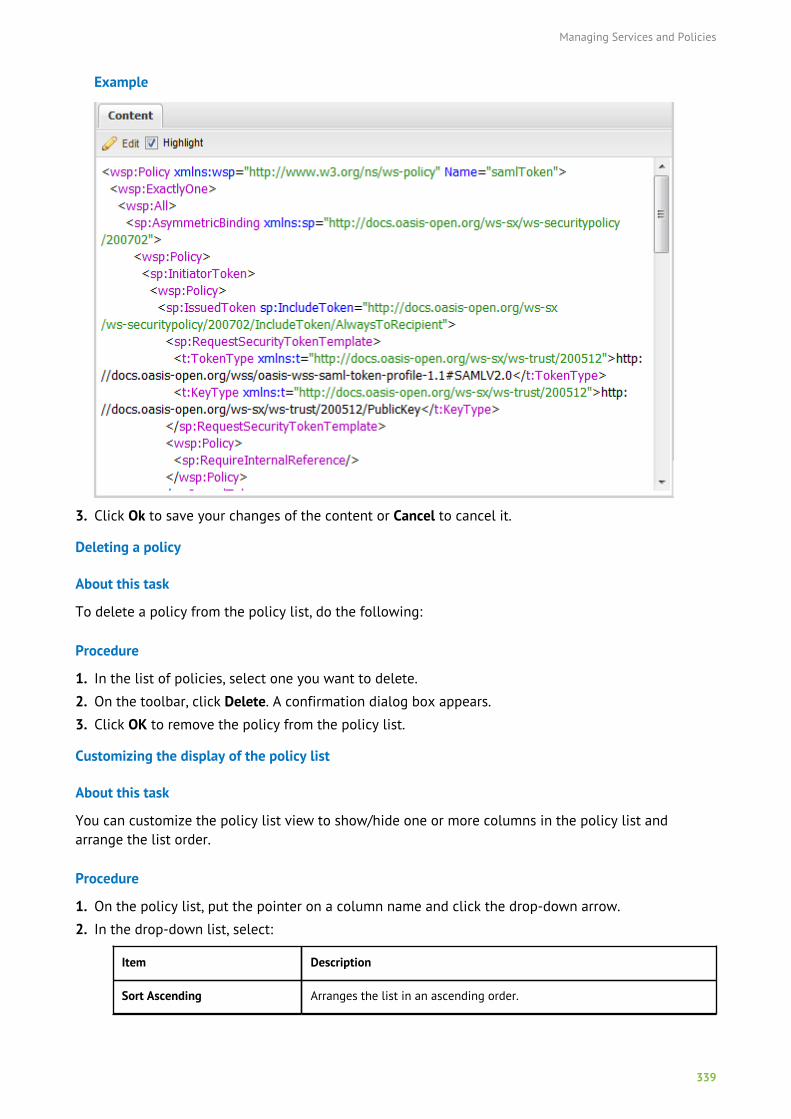
Managing Services and Policies
339
Example
3. Click Ok to save your changes of the content or Cancel to cancel it.
Deleting a policy
About this task
To delete a policy from the policy list, do the following:
Procedure
1. In the list of policies, select one you want to delete.
2. On the toolbar, click Delete. A confirmation dialog box appears.
3. Click OK to remove the policy from the policy list.
Customizing the display of the policy list
About this task
You can customize the policy list view to show/hide one or more columns in the policy list andarrange the list order.
Procedure
1. On the policy list, put the pointer on a column name and click the drop-down arrow.
2. In the drop-down list, select:
Item Description
Sort Ascending Arranges the list in an ascending order.
Managing Services and Policies
340
Item Description
Sort Descending Arranges the list in an descending order.
Columns Displays a drop-down list where you can select/clear the check box nextto the column(s) you want to show/hide.
The figure below shows the list view options in the drop-down list.
Example
Once you have customized the list, your preferences are saved (columns, order or width) and kepteven after the page is refreshed.
Refreshing the policy list
Procedure
To refresh the policy list, click the Refresh button on the toolbar.
Assigning a policy to a service
About this task
After creating the services and policies to the Service Registry page, you can now assign provider andconsumer policies to a service. To do so:
Procedure
1. In the Services list, select a service in the list and click the Assignments tab on the lower half ofthe page.
The WSDL tree view of the service is displayed in the Assignments tab, with the available policieslisted to the right.
You can customize the display of the service and policy list view to show or hide the policy title.To do so, put the pointer on a column name and click the drop-down arrow. In the drop-down list,select Columns and select or clear the Policy Title check box.
You can also filter the available policies by typing in a search string in the Filter box.
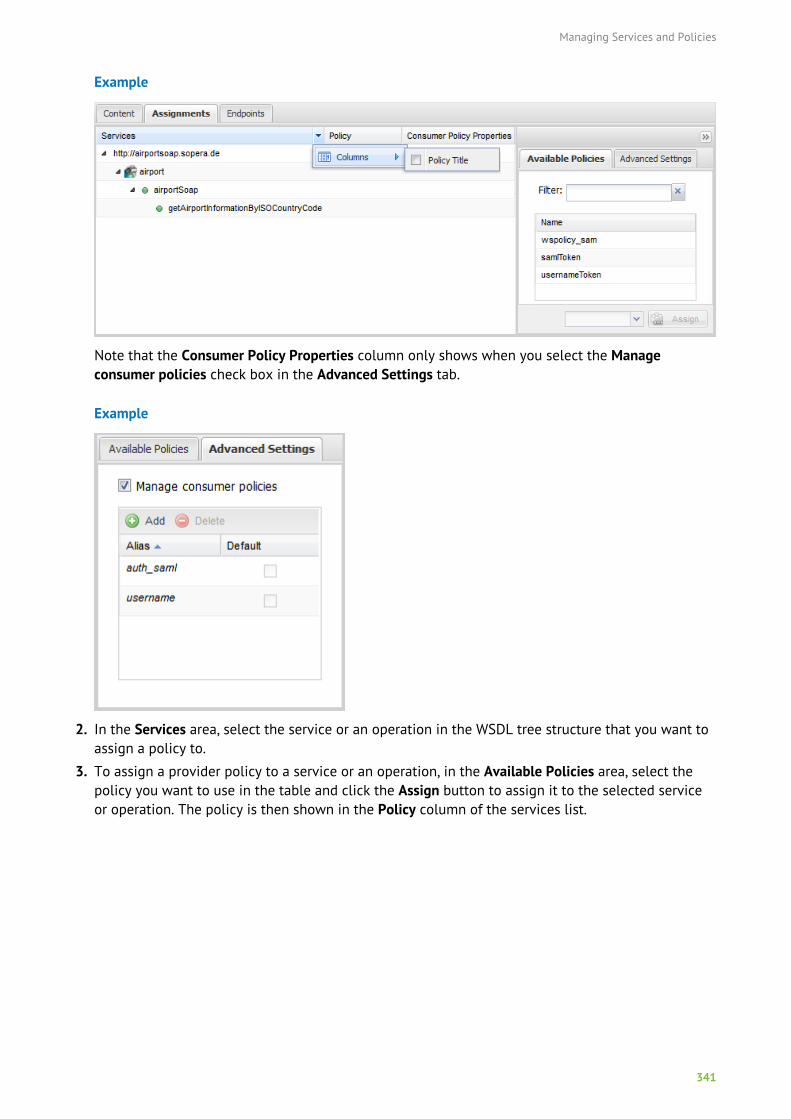
Managing Services and Policies
341
Example
Note that the Consumer Policy Properties column only shows when you select the Manageconsumer policies check box in the Advanced Settings tab.
Example
2. In the Services area, select the service or an operation in the WSDL tree structure that you want toassign a policy to.
3. To assign a provider policy to a service or an operation, in the Available Policies area, select thepolicy you want to use in the table and click the Assign button to assign it to the selected serviceor operation. The policy is then shown in the Policy column of the services list.
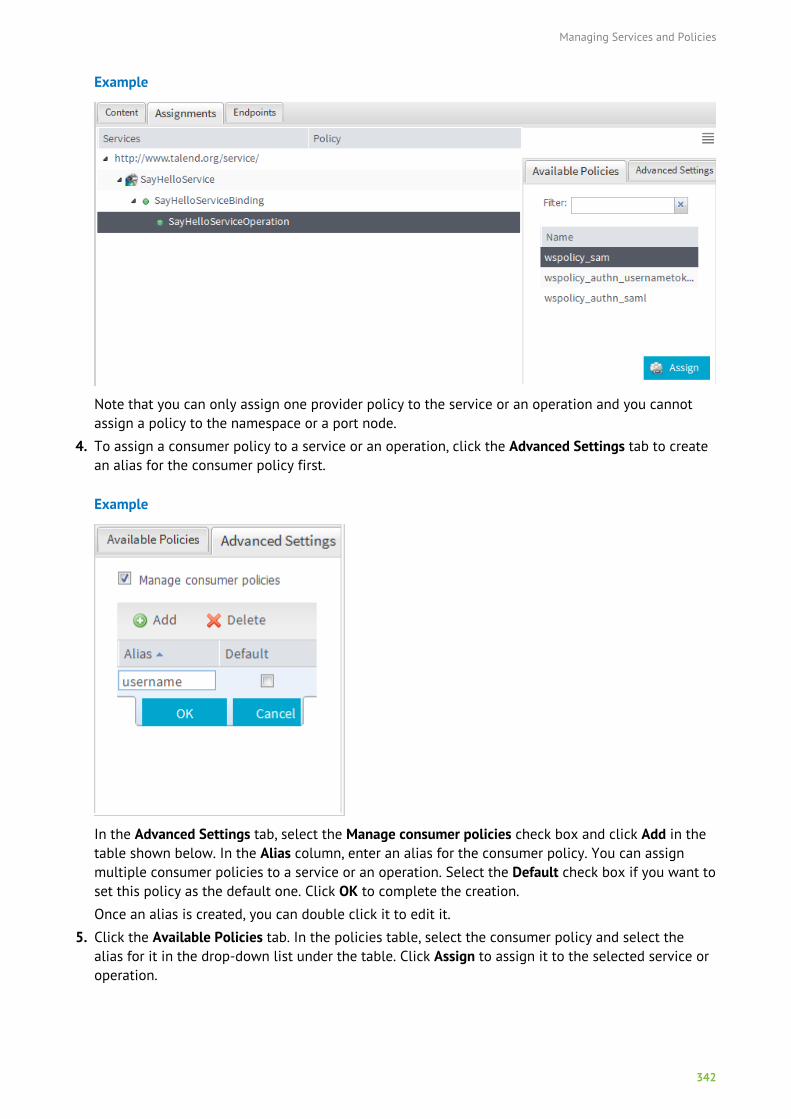
Managing Services and Policies
342
Example
Note that you can only assign one provider policy to the service or an operation and you cannotassign a policy to the namespace or a port node.
4. To assign a consumer policy to a service or an operation, click the Advanced Settings tab to createan alias for the consumer policy first.
Example
In the Advanced Settings tab, select the Manage consumer policies check box and click Add in thetable shown below. In the Alias column, enter an alias for the consumer policy. You can assignmultiple consumer policies to a service or an operation. Select the Default check box if you want toset this policy as the default one. Click OK to complete the creation.
Once an alias is created, you can double click it to edit it.
5. Click the Available Policies tab. In the policies table, select the consumer policy and select thealias for it in the drop-down list under the table. Click Assign to assign it to the selected service oroperation.
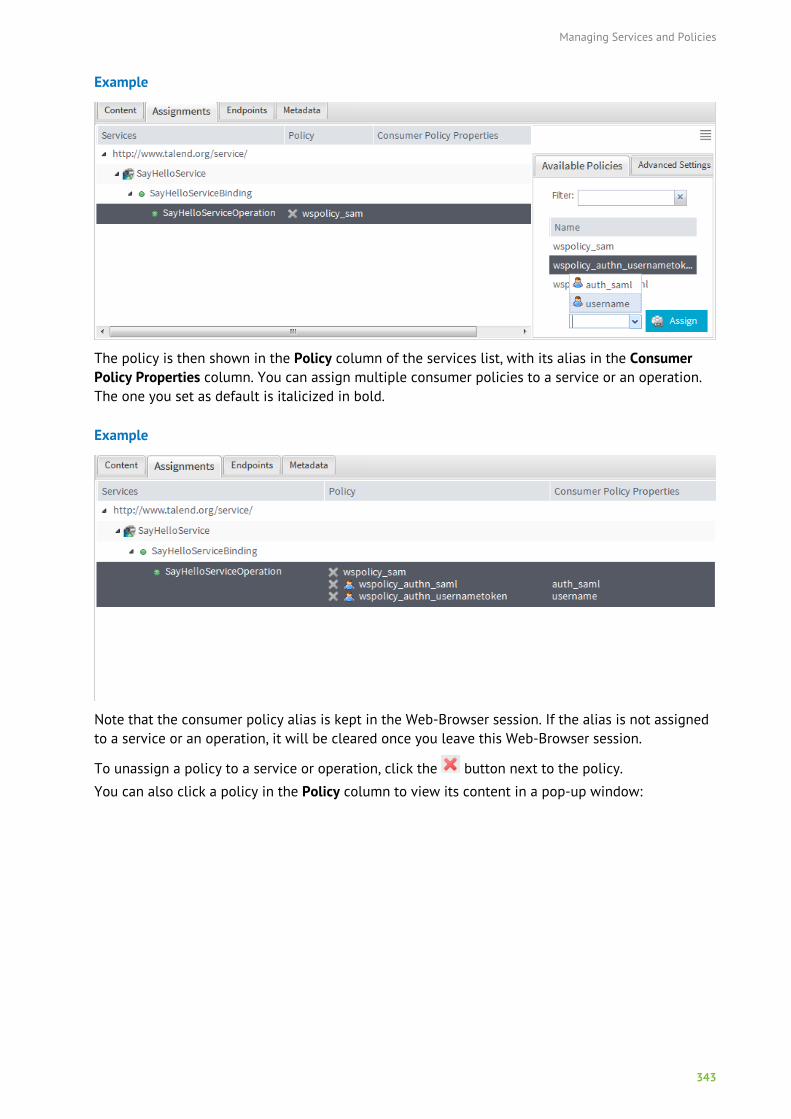
Managing Services and Policies
343
Example
The policy is then shown in the Policy column of the services list, with its alias in the ConsumerPolicy Properties column. You can assign multiple consumer policies to a service or an operation.The one you set as default is italicized in bold.
Example
Note that the consumer policy alias is kept in the Web-Browser session. If the alias is not assignedto a service or an operation, it will be cleared once you leave this Web-Browser session.
To unassign a policy to a service or operation, click the button next to the policy.
You can also click a policy in the Policy column to view its content in a pop-up window:
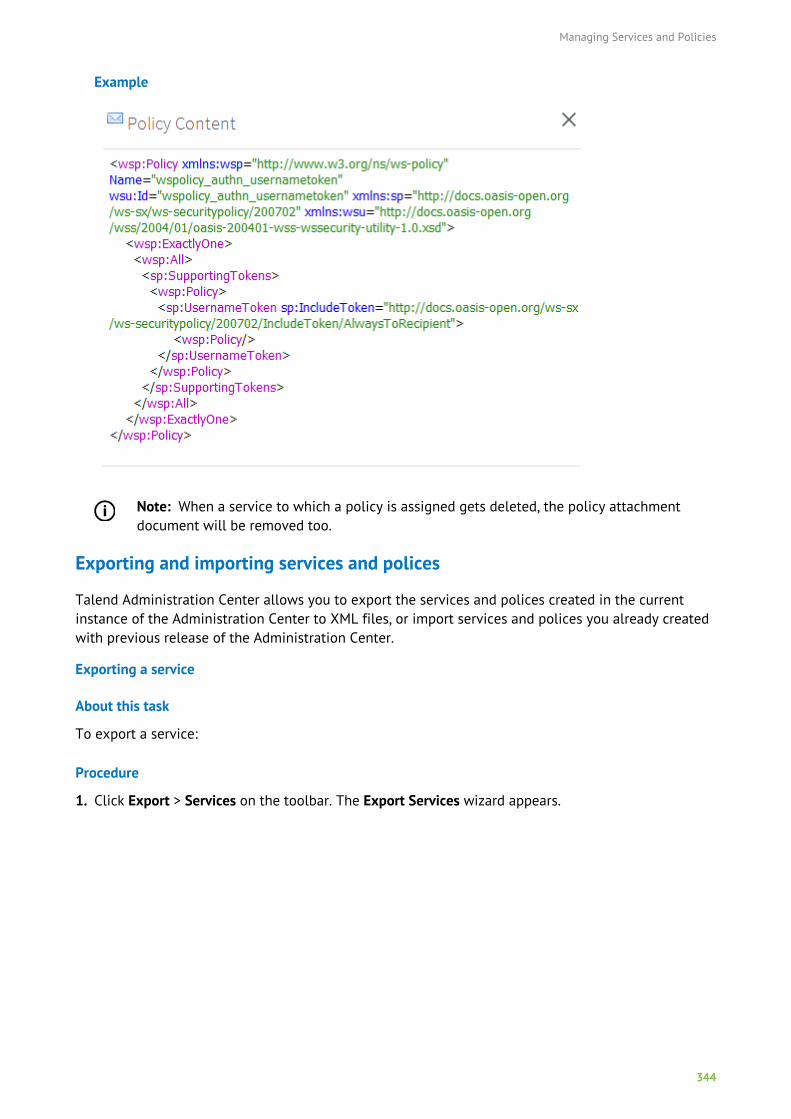
Managing Services and Policies
344
Example
Note: When a service to which a policy is assigned gets deleted, the policy attachmentdocument will be removed too.
Exporting and importing services and polices
Talend Administration Center allows you to export the services and polices created in the currentinstance of the Administration Center to XML files, or import services and polices you already createdwith previous release of the Administration Center.
Exporting a service
About this task
To export a service:
Procedure
1. Click Export > Services on the toolbar. The Export Services wizard appears.
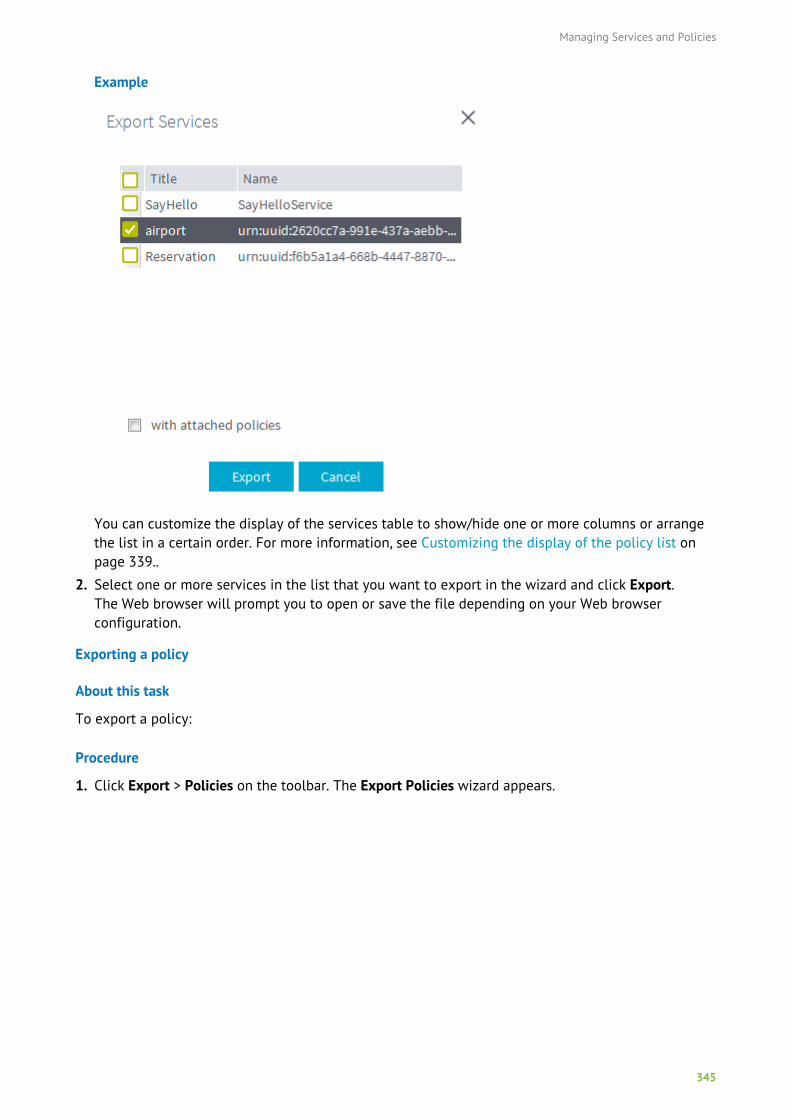
Managing Services and Policies
345
Example
You can customize the display of the services table to show/hide one or more columns or arrangethe list in a certain order. For more information, see Customizing the display of the policy list onpage 339..
2. Select one or more services in the list that you want to export in the wizard and click Export.The Web browser will prompt you to open or save the file depending on your Web browserconfiguration.
Exporting a policy
About this task
To export a policy:
Procedure
1. Click Export > Policies on the toolbar. The Export Policies wizard appears.
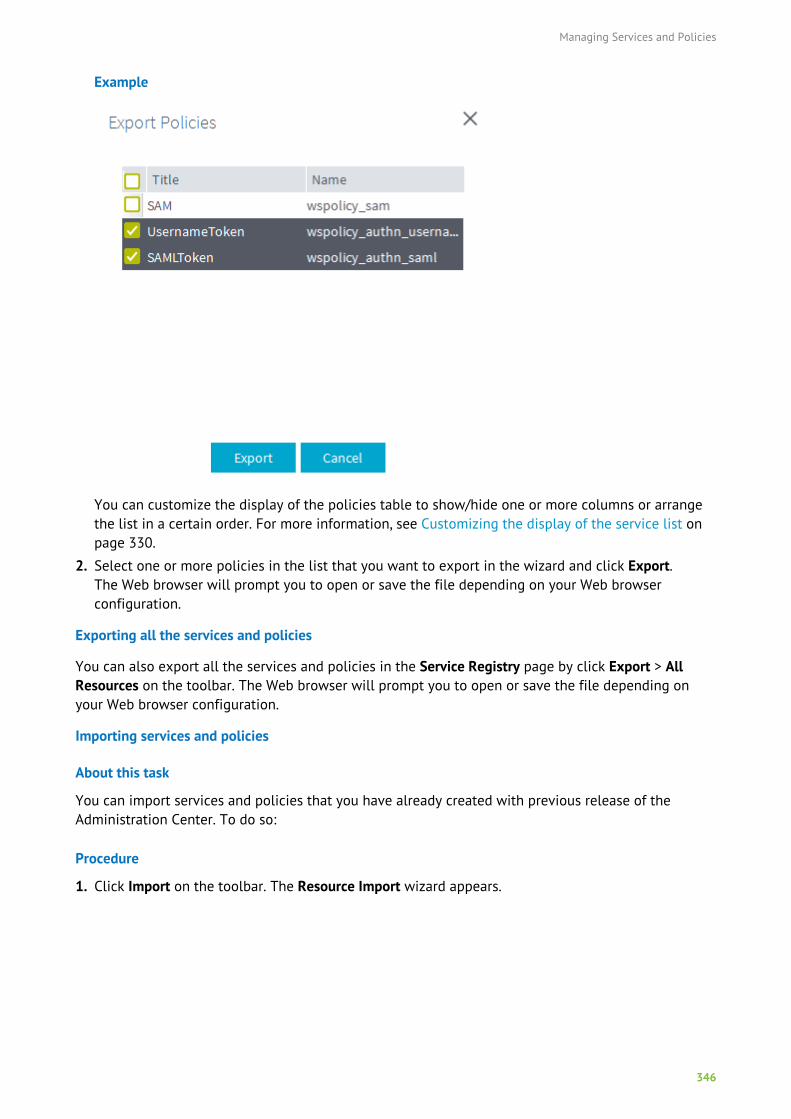
Managing Services and Policies
346
Example
You can customize the display of the policies table to show/hide one or more columns or arrangethe list in a certain order. For more information, see Customizing the display of the service list onpage 330.
2. Select one or more policies in the list that you want to export in the wizard and click Export.The Web browser will prompt you to open or save the file depending on your Web browserconfiguration.
Exporting all the services and policies
You can also export all the services and policies in the Service Registry page by click Export > AllResources on the toolbar. The Web browser will prompt you to open or save the file depending onyour Web browser configuration.
Importing services and policies
About this task
You can import services and policies that you have already created with previous release of theAdministration Center. To do so:
Procedure
1. Click Import on the toolbar. The Resource Import wizard appears.
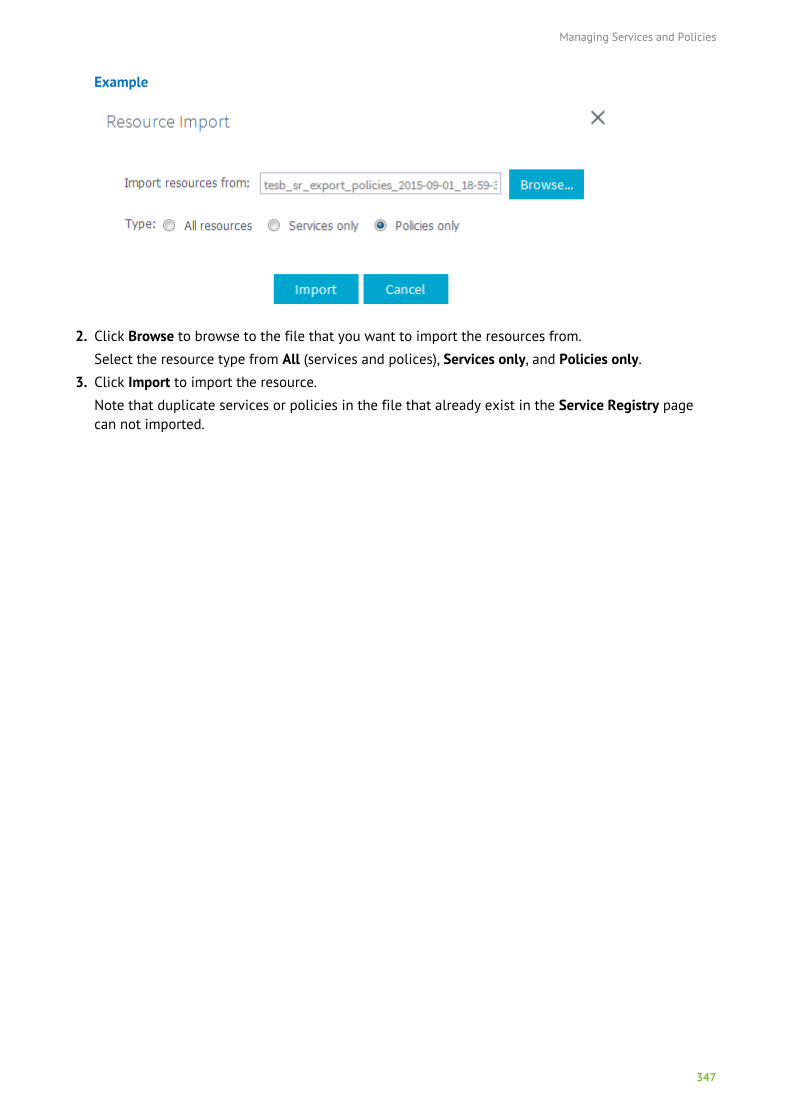
Managing Services and Policies
347
Example
2. Click Browse to browse to the file that you want to import the resources from.
Select the resource type from All (services and polices), Services only, and Policies only.
3. Click Import to import the resource.
Note that duplicate services or policies in the file that already exist in the Service Registry pagecan not imported.
Managing the Provisioning Service
348
Managing the Provisioning Service
The Provisioning Service is used to centralize and distribute feature descriptions and configurationresources throughout several Talend Runtimes, via system and application profiles. System profilescan be used to configure your system. Application profiles can be used to configure your applications.It helps maintain consistency for your resources and configurations throughout all your TalendRuntime Containers.
To access the Provisioning page, you need to have a license that includes the Provisioning componentof the ESB Infrastructure module, and also have the relevant rights defined by the Administratorduring your user account creation in Talend Administration Center. For more information aboutthe modules and features ship with each license, refer to What modules and features are availabledepending on your license on page 9.
If your license allows the ESB Infrastructure module but it does not show in the Menu tree view ofTalend Administration Center, contact your Administrator.
Using Provisioning in Talend Administration Center, you will be able to:
• manage profiles to handle features and resources,
• manage placeholders.
Prerequisites to access the Provisioning of ESBInfrastructure moduleYou need to:
• have a licence that includes this module and also have the relevant rights defined by theAdministrator during your user account creation in Talend Administration Center,
• have started Talend Runtime Container and the Provisioning Server and Agent on it. For moreinformation about starting the container and the Provisioning features, please refer to Talend ESBInfrastructure Services Configuration Guide,
• have previously entered the URL to the Provisioning Service and the credentials to access it in theConfiguration page. For more information, see Setting up the ESB Provisioning Service on page 35.
If your license allows the ESB Infrastructure module but it does not show in the Menu tree view ofTalend Administration Center, contact your Administrator.
Accessing the Provisioning pageNote: Only users that have the Operation manager role and rights can have read-write accessto this page. Users that have the Designer role and rights can have a read only access. Otherusers have a read only access, or do not have access to this page at all. For further informationon access rights, see User roles/rights in the Administration Center on page 11. When a user ofthe Administration Center opens this page, he/she will have access only to the items for whichthe user has been granted the right authorization by the Administrator.
To display the Provisioning page:
In the Menu tree view, expand the ESB Infrastructure node and click Provisioning.

Managing the Provisioning Service
349
On the upper half of the Provisioning page, the list of profiles and placeholder is displayed in theProfiles and Placeholders tab respectively. And when the Profiles tab is selected, the Resources andFeatures tabs display on the lower half of the page to be able to add those in your profile.
Managing provisionsProvisions can be managed throughout all your containers via profiles and placeholders. The profileswill help you centralize and distribute features and resources, whereas placeholders will help youvariabilize settings.
To manage provisions, you need to:
1. Creating a profile on page 350
2. Adding a feature to the profile on page 352
3. Adding a resource to the profile on page 354
4. Creating a placeholder on page 356
5. Releasing a placeholder on page 357
6. Releasing a profile on page 358
7. Applying a profile on provisions on page 358
The below figure illustrates an example of the Provisioning page.
Managing the Provisioning Service
350
The profiles are listed in the Profiles tab, providing information regarding the profiles, including:
Label Description
Category/Name/Version The name of the profile created in the Talend Runtime Container.
Placeholders Category The category of the placeholder.
Placeholders version The version of the placeholder.
Extra columns are hidden by default but can be added in the table. For more information, seeCustomizing the display of the service list on page 330.
The extra column provides the following information:
Label Description
ID Unique identifier of the profile, given by the Administration Center automatically.
You can export the profiles listed in this tab to XML files, or import profiles that you already createdwith previous release of the Administration Center. For more information, see Exporting and importingprofiles and placeholders on page 360.
Creating a profile
About this task
According to the profile you need to create, you will have to add resources and/or features to it,before releasing it to your Talend Runtime Container(s). To create a new profile, complete thefollowing:
Managing the Provisioning Service
351
Procedure
1. On the upper half of the Provisioning page, click the Profiles tab.
2. From the toolbar on the Profiles tab, click Add to show the configuration panel to the right.
Example
3. Enter the following information as necessary.
Field Description
Name Type in a name for the profile to be created in the Talend Runtime Container.
Category Type in a category of the profile. (The category of the profile should be the same asthe one of the placeholder to be used with that profile.)
4. Click Save to validate the creation or Cancel to cancel it.
Managing the Provisioning Service
352
Example
Once the profile created, you need to add features and/or resources to it. For more information,see Adding a feature to the profile on page 352 and Adding a resource to the profile on page354. When the profile is complete, release it directly if you are not using any placeholder incombination with it. For more information, see Releasing a profile on page 358. But if you areusing a placeholder with your profile, you need to release the placeholder before releasing theprofile. For more information about the creation of placeholders, see Creating a placeholder onpage 356, and for more information about releasing a placeholder, see Releasing a placeholderon page 357.
Adding a feature to the profile
Procedure
1. Select the unreleased version of the profile you want to add a feature to.
2. On the lower half of the Profiles tab, click the Features tab.
3. Click Add to open the Add Feature wizard:
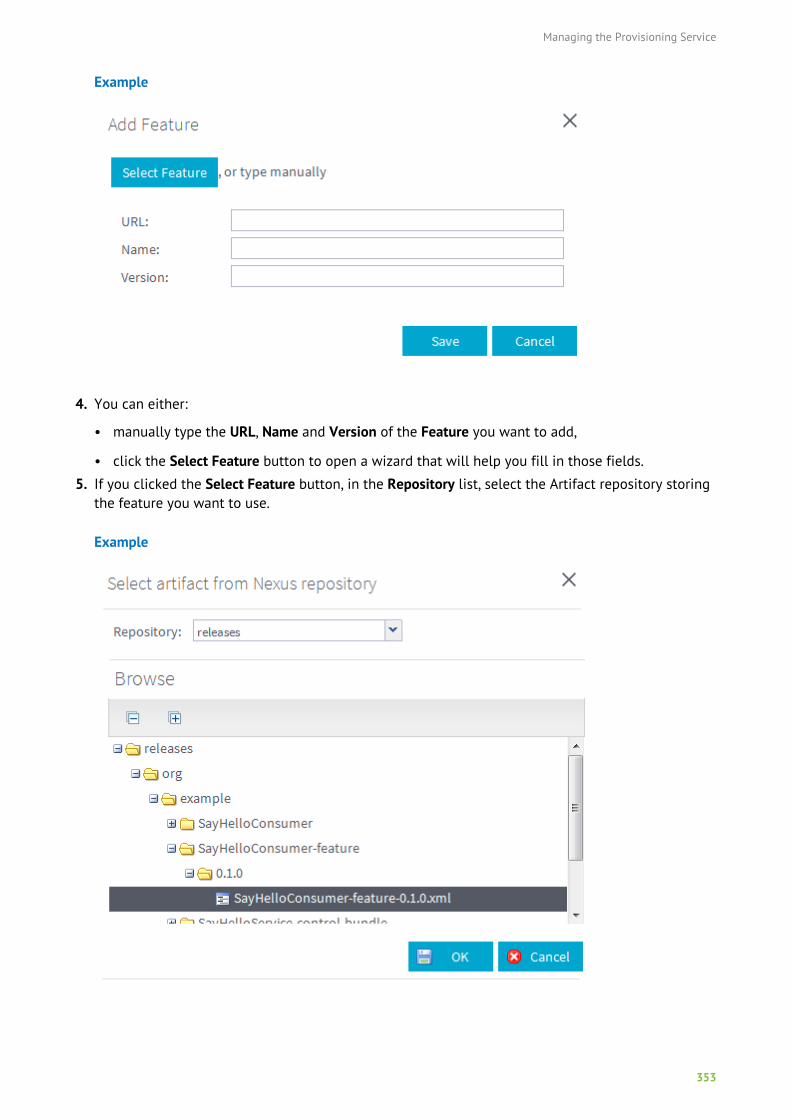
Managing the Provisioning Service
353
Example
4. You can either:
• manually type the URL, Name and Version of the Feature you want to add,
• click the Select Feature button to open a wizard that will help you fill in those fields.
5. If you clicked the Select Feature button, in the Repository list, select the Artifact repository storingthe feature you want to use.
Example

Managing the Provisioning Service
354
6. In the Browse area, browse to the feature to add to your profile, and click OK.
The URL, Name and Version fields get automatically filled in.
7. Click Save to validate the creation or Cancel to cancel it.
Example
Once added, you can update the feature, at anytime, by clicking Edit.As the order of the features in the Features tab is the order in which they would be started in theTalend Runtime Container(s), if you have several features in a profil, click the Reorder button toreorder them if needed.
Adding a resource to the profile
Procedure
1. Select the unreleased version of the profile you want to add a resource to.
2. On the lower half of the Profiles tab, click the Resources tab.
3. Click Add to open the Add Resource wizard:
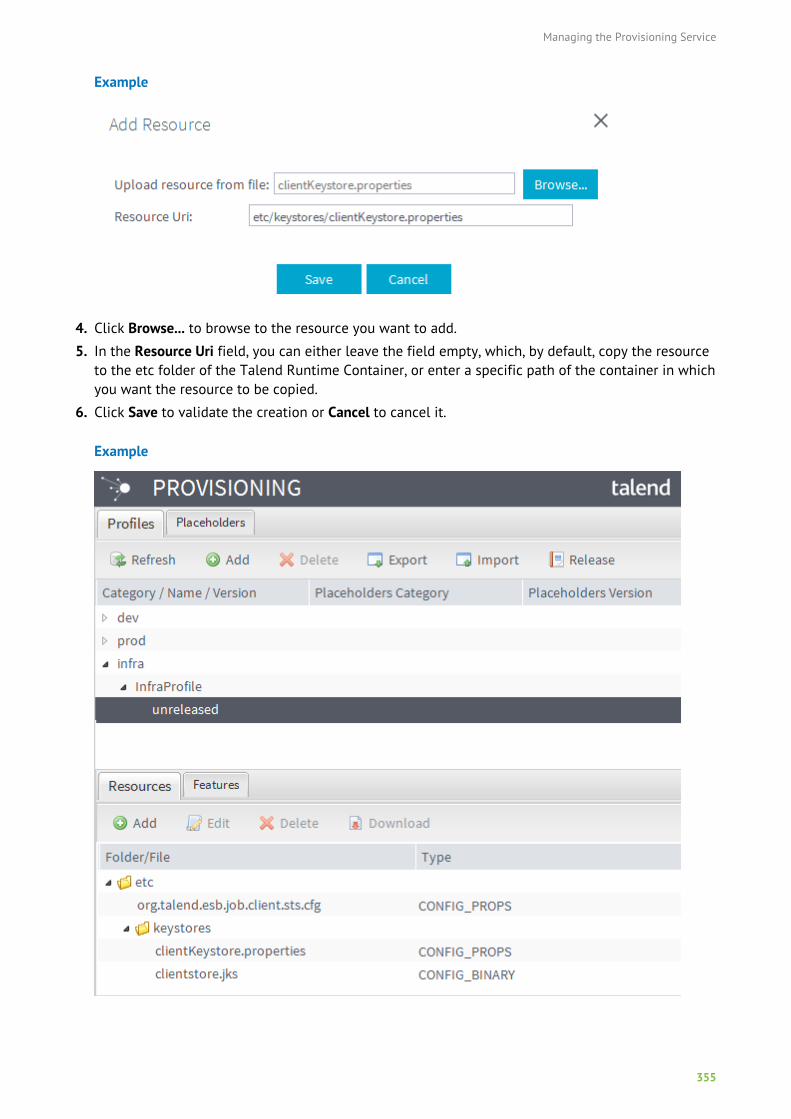
Managing the Provisioning Service
355
Example
4. Click Browse... to browse to the resource you want to add.
5. In the Resource Uri field, you can either leave the field empty, which, by default, copy the resourceto the etc folder of the Talend Runtime Container, or enter a specific path of the container in whichyou want the resource to be copied.
6. Click Save to validate the creation or Cancel to cancel it.
Example
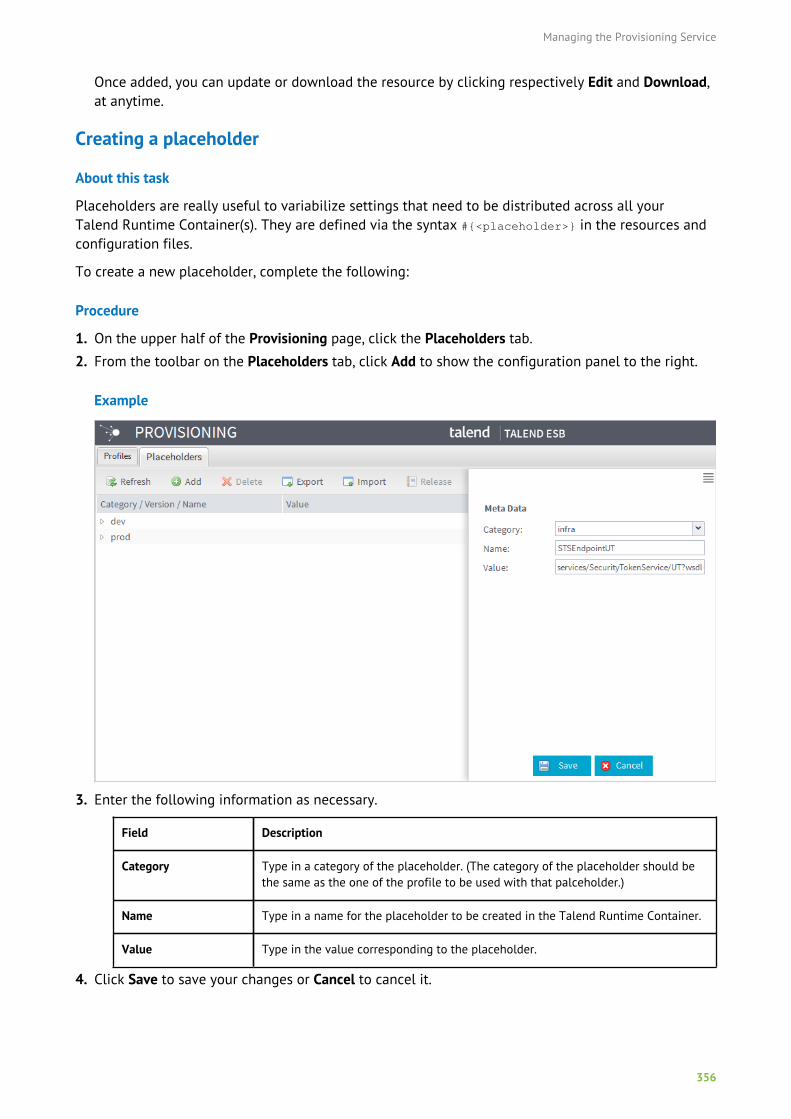
Managing the Provisioning Service
356
Once added, you can update or download the resource by clicking respectively Edit and Download,at anytime.
Creating a placeholder
About this task
Placeholders are really useful to variabilize settings that need to be distributed across all yourTalend Runtime Container(s). They are defined via the syntax #{<placeholder>} in the resources andconfiguration files.
To create a new placeholder, complete the following:
Procedure
1. On the upper half of the Provisioning page, click the Placeholders tab.
2. From the toolbar on the Placeholders tab, click Add to show the configuration panel to the right.
Example
3. Enter the following information as necessary.
Field Description
Category Type in a category of the placeholder. (The category of the placeholder should bethe same as the one of the profile to be used with that palceholder.)
Name Type in a name for the placeholder to be created in the Talend Runtime Container.
Value Type in the value corresponding to the placeholder.
4. Click Save to save your changes or Cancel to cancel it.
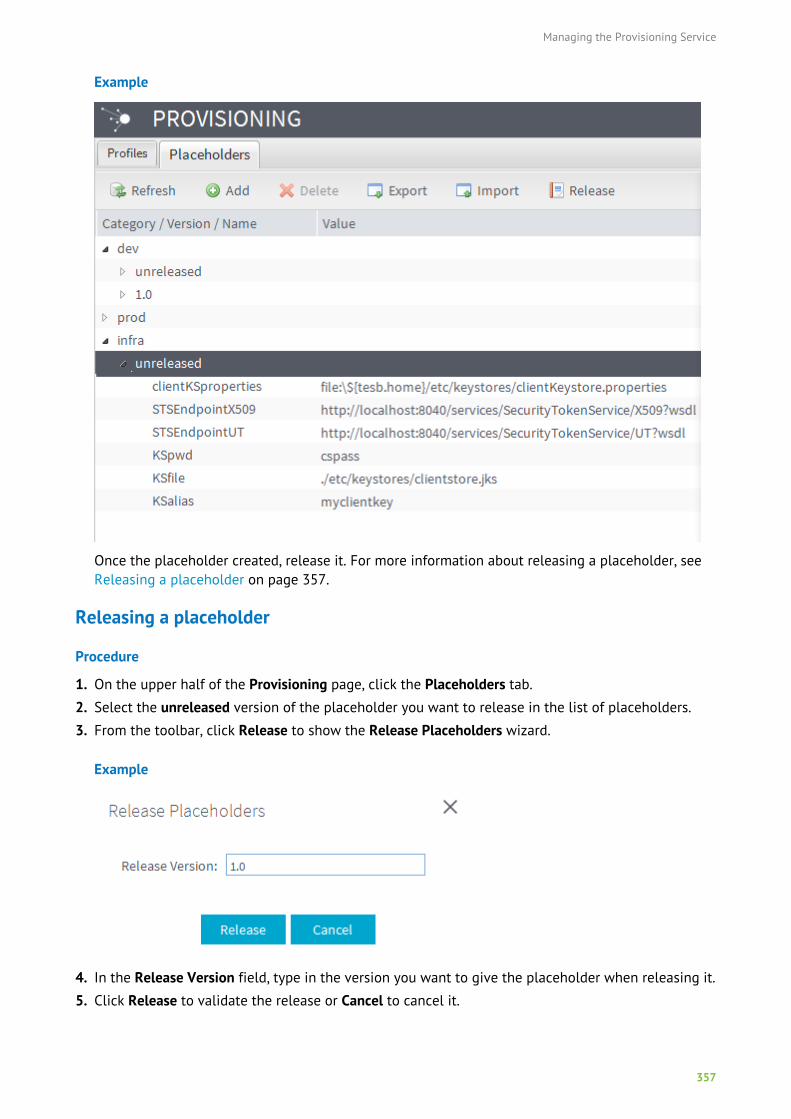
Managing the Provisioning Service
357
Example
Once the placeholder created, release it. For more information about releasing a placeholder, seeReleasing a placeholder on page 357.
Releasing a placeholder
Procedure
1. On the upper half of the Provisioning page, click the Placeholders tab.
2. Select the unreleased version of the placeholder you want to release in the list of placeholders.
3. From the toolbar, click Release to show the Release Placeholders wizard.
Example
4. In the Release Version field, type in the version you want to give the placeholder when releasing it.
5. Click Release to validate the release or Cancel to cancel it.
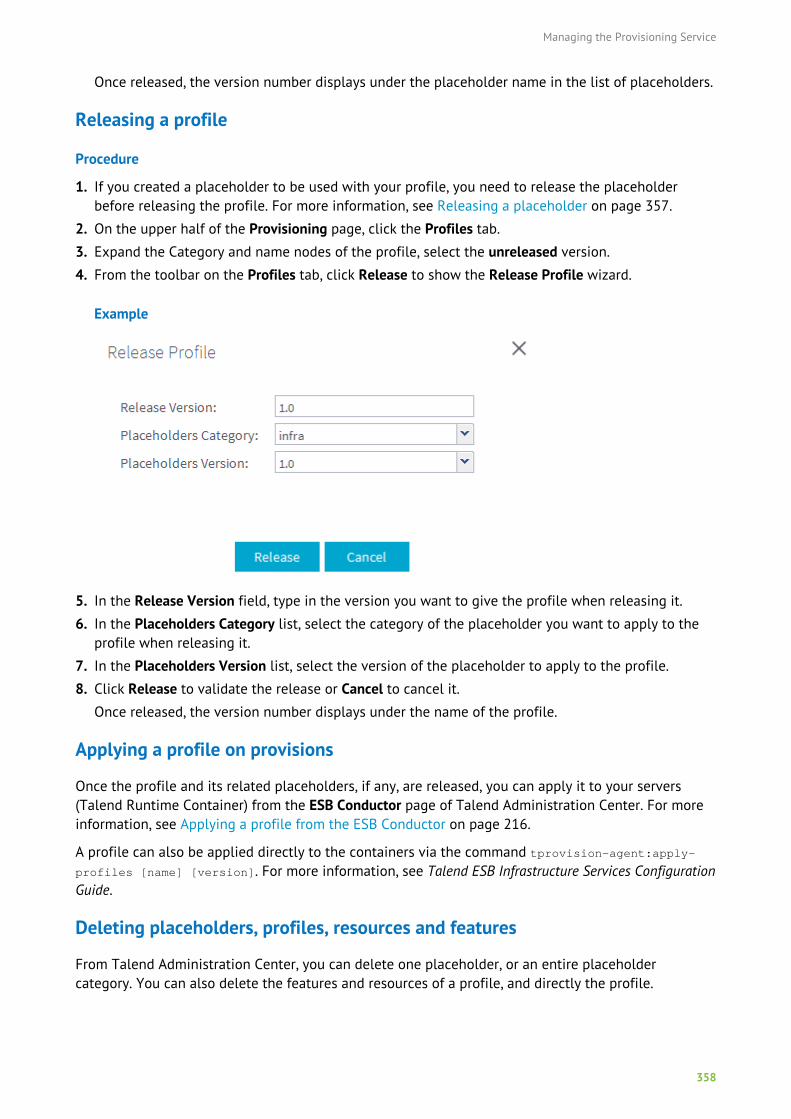
Managing the Provisioning Service
358
Once released, the version number displays under the placeholder name in the list of placeholders.
Releasing a profile
Procedure
1. If you created a placeholder to be used with your profile, you need to release the placeholderbefore releasing the profile. For more information, see Releasing a placeholder on page 357.
2. On the upper half of the Provisioning page, click the Profiles tab.
3. Expand the Category and name nodes of the profile, select the unreleased version.
4. From the toolbar on the Profiles tab, click Release to show the Release Profile wizard.
Example
5. In the Release Version field, type in the version you want to give the profile when releasing it.
6. In the Placeholders Category list, select the category of the placeholder you want to apply to theprofile when releasing it.
7. In the Placeholders Version list, select the version of the placeholder to apply to the profile.
8. Click Release to validate the release or Cancel to cancel it.
Once released, the version number displays under the name of the profile.
Applying a profile on provisions
Once the profile and its related placeholders, if any, are released, you can apply it to your servers(Talend Runtime Container) from the ESB Conductor page of Talend Administration Center. For moreinformation, see Applying a profile from the ESB Conductor on page 216.
A profile can also be applied directly to the containers via the command tprovision-agent:apply-profiles [name] [version]. For more information, see Talend ESB Infrastructure Services ConfigurationGuide.
Deleting placeholders, profiles, resources and features
From Talend Administration Center, you can delete one placeholder, or an entire placeholdercategory. You can also delete the features and resources of a profile, and directly the profile.
Managing the Provisioning Service
359
When deleting an entire placeholder category, all its placeholders will be deleted as well, and whendeleting an entire profile, all its resources and features will be deleted as well.
Deleting placeholders
You can either delete an entire placeholder category, or delete individual placeholders.Deleting one placeholder
Procedure
1. On the upper half of the Provisioning page, click the Placeholders tab.
2. In the list of placeholders, expand the category, and the unreleased version.
3. Select one placeholder in the list and click the Delete button.A confirmation dialog box appears.
4. Click Yes to remove the placeholder.
Deleting a category of placeholders
Procedure
1. On the upper half of the Provisioning page, click the Placeholders tab.
2. In the list of placeholders, select the category to delete.
3. On the toolbar, click Delete.A confirmation dialog box appears.
4. Click Yes to remove the placeholder category from the list.
Deleting features
Procedure
1. On the upper half of the Provisioning page, click the Profile tab.
2. In the list of profiles, select one you want to delete a feature from.
3. Expand the category and the profile name, and select unreleased.
4. On the lower half of the Provisioning page, click the Features tab.
5. Select the feature and click Delete in the Features tab toolbar.
A confirmation dialog box appears.
6. Click Yes to remove the feature.
Deleting resources
Procedure
1. On the upper half of the Provisioning page, click the Profile tab.
2. In the list of profiles, select one you want to delete a resource from.
3. Expand the category and the profile name, and select unreleased.
4. On the lower half of the Provisioning page, click the Resources tab.
5. Select the resource and click Delete in the Resources tab toolbar.
A confirmation dialog box appears.
6. Click Yes to remove the resource.
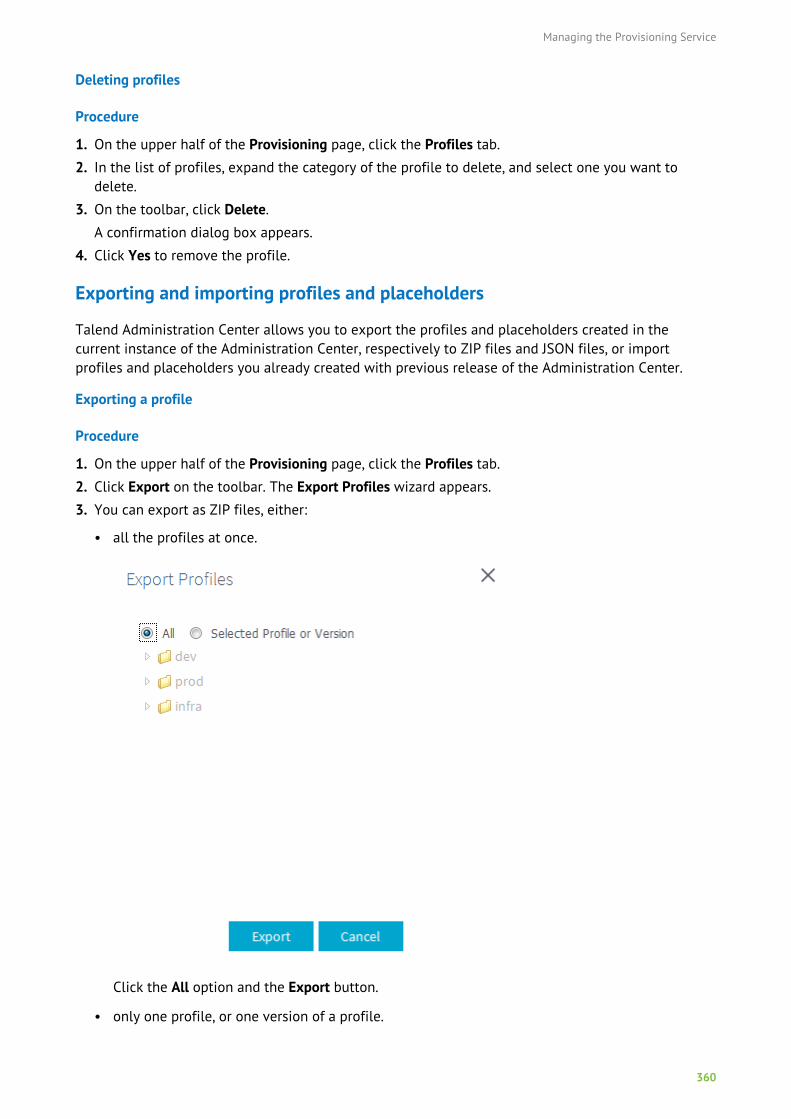
Managing the Provisioning Service
360
Deleting profiles
Procedure
1. On the upper half of the Provisioning page, click the Profiles tab.
2. In the list of profiles, expand the category of the profile to delete, and select one you want todelete.
3. On the toolbar, click Delete.
A confirmation dialog box appears.
4. Click Yes to remove the profile.
Exporting and importing profiles and placeholders
Talend Administration Center allows you to export the profiles and placeholders created in thecurrent instance of the Administration Center, respectively to ZIP files and JSON files, or importprofiles and placeholders you already created with previous release of the Administration Center.
Exporting a profile
Procedure
1. On the upper half of the Provisioning page, click the Profiles tab.
2. Click Export on the toolbar. The Export Profiles wizard appears.
3. You can export as ZIP files, either:
• all the profiles at once.
Click the All option and the Export button.
• only one profile, or one version of a profile.
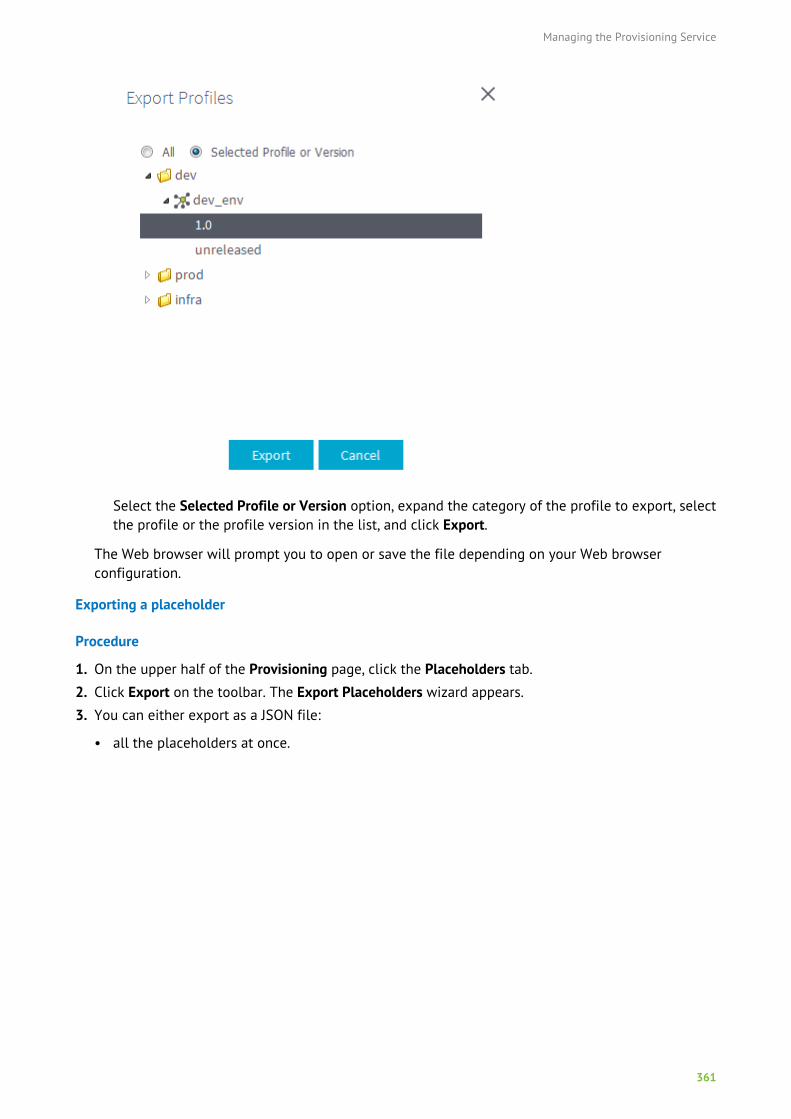
Managing the Provisioning Service
361
Select the Selected Profile or Version option, expand the category of the profile to export, selectthe profile or the profile version in the list, and click Export.
The Web browser will prompt you to open or save the file depending on your Web browserconfiguration.
Exporting a placeholder
Procedure
1. On the upper half of the Provisioning page, click the Placeholders tab.
2. Click Export on the toolbar. The Export Placeholders wizard appears.
3. You can either export as a JSON file:
• all the placeholders at once.
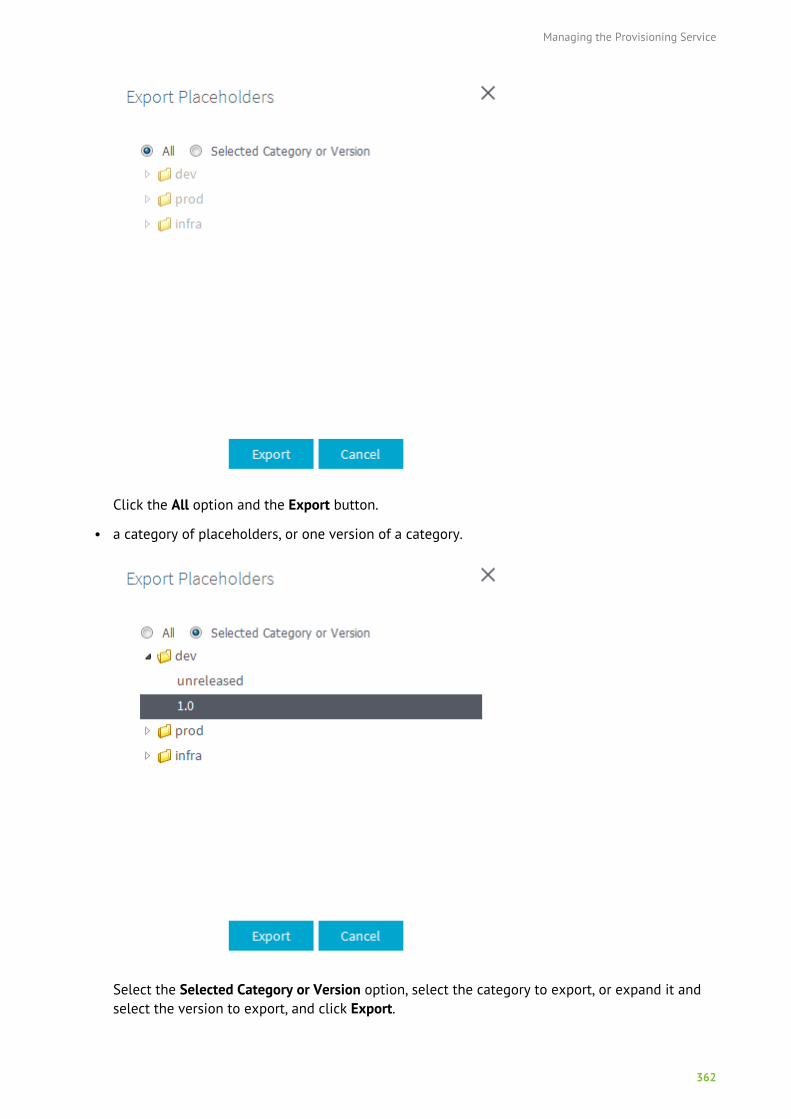
Managing the Provisioning Service
362
Click the All option and the Export button.
• a category of placeholders, or one version of a category.
Select the Selected Category or Version option, select the category to export, or expand it andselect the version to export, and click Export.
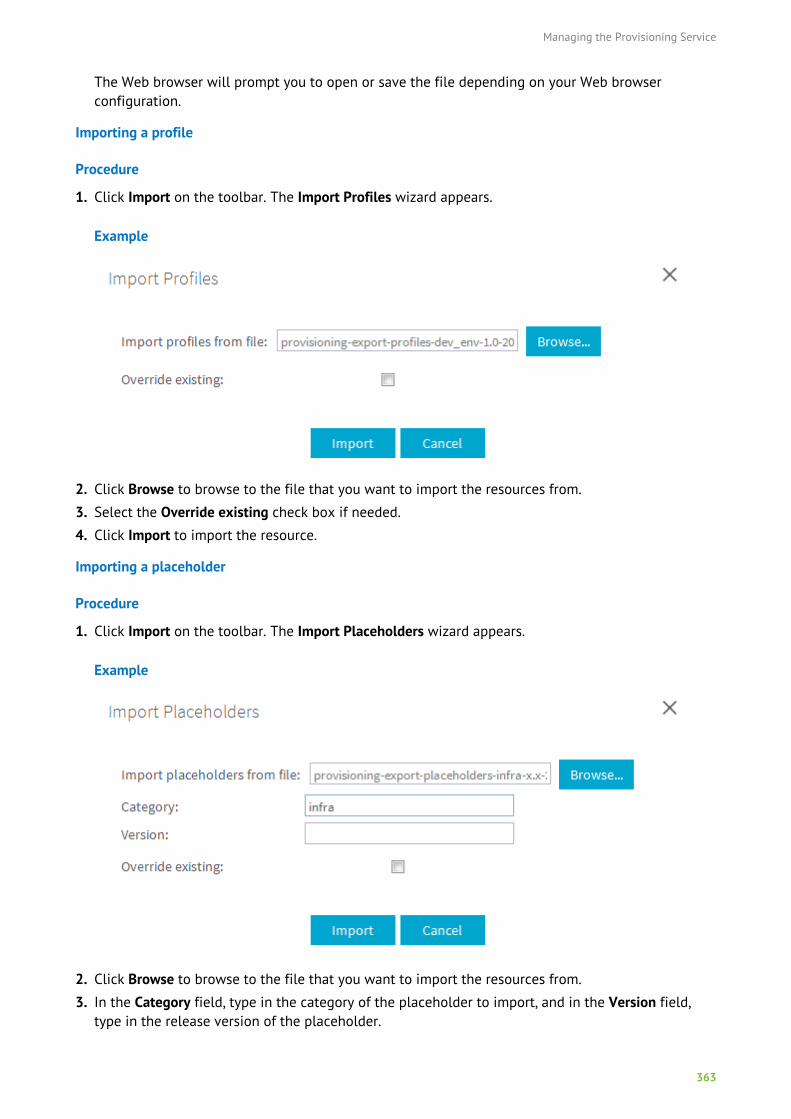
Managing the Provisioning Service
363
The Web browser will prompt you to open or save the file depending on your Web browserconfiguration.
Importing a profile
Procedure
1. Click Import on the toolbar. The Import Profiles wizard appears.
Example
2. Click Browse to browse to the file that you want to import the resources from.
3. Select the Override existing check box if needed.
4. Click Import to import the resource.
Importing a placeholder
Procedure
1. Click Import on the toolbar. The Import Placeholders wizard appears.
Example
2. Click Browse to browse to the file that you want to import the resources from.
3. In the Category field, type in the category of the placeholder to import, and in the Version field,type in the release version of the placeholder.

Managing the Provisioning Service
364
If you leave the Version field empty, all the version available in the file will be imported.
4. Select the Override existing check box if needed.
5. Click Import to import the resource.
Business rules
365
Business rules
The Drools web application integrated in Talend Administration Center is deprecated from Talend7.1 onwards. You can migrate the repository from the Drools web application integrated in TalendAdministration Center to a standalone KIE Drools Workbench (6.2.0 Final). For more information, seeMigrating from the integrated Drools Web application to a standalone KIE Drools Workbench on page386.
Drools web application is a BRMS (Business Rule Management System) used to define, deploy,execute, monitor and maintain the variety and complexity of business rules that are used byoperational systems within an enterprise.
It includes a fast and highly efficient rule engine and easy to use rule management system andrepository.
This chapter describes the basic usage of Drools to enable you to get started with this webapplication integrated in Talend Administration Center. For detailed Drools documentation, see DroolsDocumentation.
Access to this application depends on your license. For more information, refer to What modules andfeatures are available depending on your license on page 9.
Drools and TalendDrools is a Business Rules Management System, BRMS solution, that enables business experts tocreate business rules and customize them on the run. Talend Administration Center integrates theDrools workbench 6.2.0.FINAL to allow for a centralized definition and administration of businessrules.
Your Talend Administration Center must have internet access, otherwise you may have an error whenyou try to use the Drools server. Another way to avoid this error is to add -Dorg.kie.demo=false and-Dorg.kie.example=false into the setenv.sh file in the apache-tomcat/bin folder.
Only users that have the role and rights of Operation manager or Designer can access Drools fromTalend Administration Center. By default, those two types of users are defined as administrators inDrools but they can lock down the access to the business experts per package or per category. Formore information on defining a user, see Managing Users on page 50.
From the Drools page in the Administration Center, you can use graphical editors to create and editrules quickly and easily.
The Drools web application is structured with:
• Organization units which are used to mirror business structure (departments and divisions). Anorganization unit can hold multiple repositories.
• Repositories which are the place where assets are stored and each repository is organized byprojects and belongs to a single organization unit. You can create a new repository from scratch orclone it from an existing repository.
• Projects which are the place where you can create and store business rules.
After creating and deploying business rules using the Drools page, you can use them in productionenvironments such as the tBRMS component which integrate business rules to process data flows.
Business rules
366
Git is used with Drools to store rules. This usage of Git allows you to take full advantage of featureslike versioning, branching and also cloning repositories. For further information about Droolsconfiguration with GIT, see Drools Workbench. For further information on how to manually install theDrools Workbench, see Installing manually the Drools Business Rules Management System (BRMS) onTalend Help Center.
Apart from the Drools BRMS embedded into Talend Administration Center, you can also install anduse Red Hat BRMS or JBoss BRMS to manage business rules. For further information, see Red HatJBoss BRMS documentation.
Business rule toolsYou can use the Drools web application integrated in Talend Administration Center to define businessrules using any of the following formats:
• Business Process: a workflow which describes the order in which a series of steps need to beexecuted, using a flow chart. It allows users to specify, execute and monitor their business logicusing these processes.
• DSL Business Rule: technical rules that use the Domain Specific Language in a sentence that mapsto a condition or action statement to be used in a rule. Variables can be defined in the sentence,and then used in the rule statement. For more information, see Authering Assets.
• DRL Rule: technical rules that use the Drools Rule Language which provides, via mappingproperties file, support for natural language. For more information, see Authering Assets.
• Decision Table: another way of creating and modifying rules on the run via the Decision Tableview.
Decision tables are a tool that defines rules that are represented as tables. Non-technical users cansee the steps of a decision laid out graphically.
• Decision Table (spreadsheet): Users may also author Decision Tables using Microsoft Excelspreadsheets.
• Guided Rule: rules created using the traditional rule syntax (statements). For more information, seeCreating business rules on page 370.
Steps to follow when using DroolsBefore you begin
Your Talend Administration Center must have internet access, otherwise you may have an error whenyou try to use the Drools server.
About this task
Another way to avoid this error is to add -Dorg.kie.demo=false and -Dorg.kie.example=false intothe setenv.sh file in the apache-tomcat/bin folder.
To use the Drools web application integrated in Talend Administration Center, proceed as thefollowing:
Business rules
367
Procedure
1. Create an organizational unit, add a repository in the unit and then add a project in the repository.
For detail information about using Drools, check Drools Workbench.
2. Create one or more data objects for the business rules.
3. Create new business rules.
For more information about managing business rules, see Working with business rules on page368.
4. Test the rules to ensure that they meet the requirements. For more information, see How to test arule on page 380.
5. Build and deploy the rules.
For further information, see Building and deploying business rules on page 384.
Results
Your rules are now ready to be used in business environment. For example, use your studio to create aJob with the tBRMS component, set the connection between the studio and the Drools repository fromwhich you want to retrieve a business rule and apply it to the data flow in a Job.
For further information about the tBRMS component, see tBRMS on Talend Help Center.
For further information about how to centralize BRMS connections in the studio, see Talend StudioUser Guide.
Accessing Drools web applicationAll users that are defined in Talend Administration Center have by default the right to access theDrools web application. However, an Administrator can lock down the access to the business rules perpackage or per category.
The Drools interface is divided into:
• a banner on top of the page which shows the login of the current user of Talend AdministrationCenter.
• Three main panels in the workspace to give quick access to all features accessible also from themenu bar.
Once the Drools web application is open, you can navigate around, open multiple tabs, view and editvarious assets simply as you do with any application.
You can also access the Drools Workbench directly, not from within Talend Administration Center, if itis installed manually.
Accessing the Drools web application in Talend Administration Center
Before you begin
• You have already set correctly the Drools web application URL in the Configuration page of TalendAdministration Center and your licence must allow the application. For more information, seeSetting up links to other Talend suite Web applications on page 48
• Your Talend Administration Center must have internet access, otherwise you may have an errorwhen you try to use the Drools server.
Business rules
368
Another way to avoid this error is to add -Dorg.kie.demo=false and -Dorg.kie.example=falseinto the setenv.sh file in the apache-tomcat/bin folder.
Procedure
1. Log in to Talend Administration Center.
2. On Talend Administration Center home page and from the Menu tree view, click Drools.
Example
ResultsYou log in to Drools web application using your Talend Administration Center account by default.
Accessing the Drools web application outside Talend Administration Center
About this task
To log in to the Drools web application outside Talend Administration Center in full screen mode:
Procedure
1. Log in to Talend Administration Center.
2. In a new page in the same browser, type http://<host name>:<port name>/kie-drools-wb.
You cannot use the same login/password of the Administration Center to access the Drools page infull screen mode.
Working with business rulesThe Drools web application integrated in Talend Administration Center enables you to visually createor modify business rules.
Business rules
369
Prerequisites to using the Drools web application
About this task
To use the Drools web application, you must start by doing the following:
Procedure
1. From the Drools page, create a new organization unit via Authoring > Administration >Organizational Unites > Manage Organizational Unites > Add.
Example
2. For the repository, either:
• Create a new repository via Authoring > Administration > Repository > New repository.
• Clone a repository via Authoring > Administration > Repository > Clone repository.
3. Select the repository where to create the new project from the Project Explorer panel.
4. Create a project via Authoring > Project Authoring > New Project.5. Create one or more data objects for the business rules via Authoring > Project Authoring > New
Item > Data Object.6. Create a package.
A packages is used as a parent folder that groups all rule assets. For further information aboutpackages, check Creating a package.
Results
After finalizing the above steps, you can start by creating business rules. For more information, seeWorking with business rules on page 368.
For detail information about using Drools, check Drools Workbench.
Business rules
370
Creating business rules
These sections explain in detail how to use the Drools page to define business rules. However, keepin mind that you must deploy the rule before being able to use it in any production environment. Forfurther information, see Building and deploying business rules on page 384.
How to add a rule
From Talend Administration Center, you can create rules using WHEN-THEN statements with conditionsthat are logical groupings of logical operators.
Based on data that comes from a variety of sources and departments, the business expert can thendefine actions, to be executed if the rule condition evaluates to true.
In the following example, you will create a Guided Rule named CheckYoungAge that will be used totrigger loan agreement decisions based on the age of the people who apply for bank loans.
Before you begin
You have already defined an organizational unit, a repository and a project in Drools web application.For further information see Steps to follow when using Drools on page 366, and for detailinformation about using Drools, check Drools Workbench.
About this task
To create a business rule:
Procedure
1. From the Drools page, click Authoring and select Project Authoring.
2. From the New Items list, select Guided Rule.
The Create new Guided Rule dialog box opens.
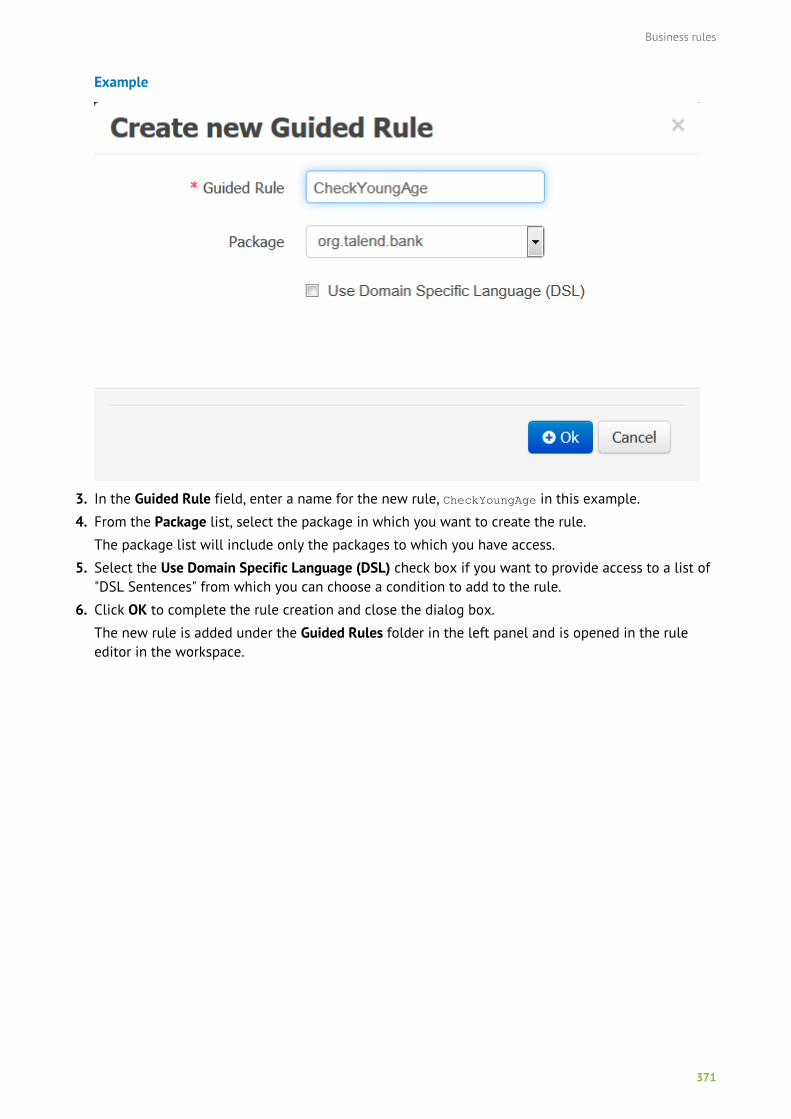
Business rules
371
Example
3. In the Guided Rule field, enter a name for the new rule, CheckYoungAge in this example.
4. From the Package list, select the package in which you want to create the rule.
The package list will include only the packages to which you have access.
5. Select the Use Domain Specific Language (DSL) check box if you want to provide access to a list of"DSL Sentences" from which you can choose a condition to add to the rule.
6. Click OK to complete the rule creation and close the dialog box.
The new rule is added under the Guided Rules folder in the left panel and is opened in the ruleeditor in the workspace.
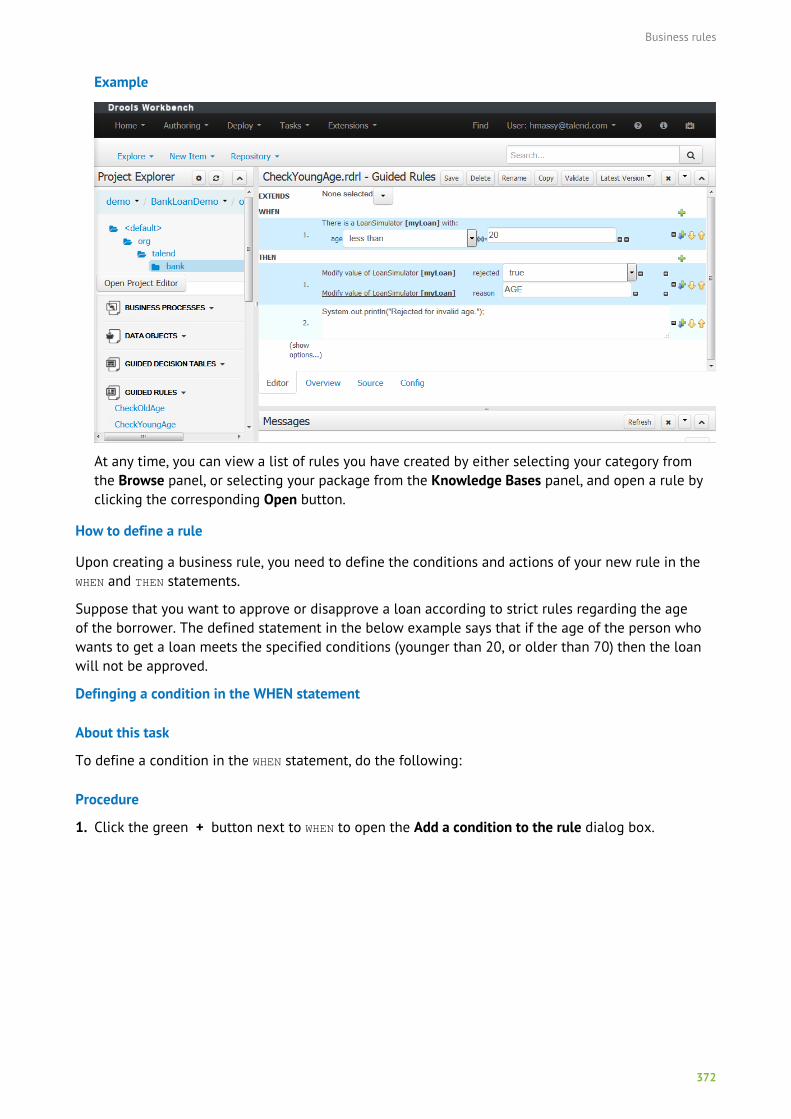
Business rules
372
Example
At any time, you can view a list of rules you have created by either selecting your category fromthe Browse panel, or selecting your package from the Knowledge Bases panel, and open a rule byclicking the corresponding Open button.
How to define a rule
Upon creating a business rule, you need to define the conditions and actions of your new rule in theWHEN and THEN statements.
Suppose that you want to approve or disapprove a loan according to strict rules regarding the ageof the borrower. The defined statement in the below example says that if the age of the person whowants to get a loan meets the specified conditions (younger than 20, or older than 70) then the loanwill not be approved.
Definging a condition in the WHEN statement
About this task
To define a condition in the WHEN statement, do the following:
Procedure
1. Click the green + button next to WHEN to open the Add a condition to the rule dialog box.
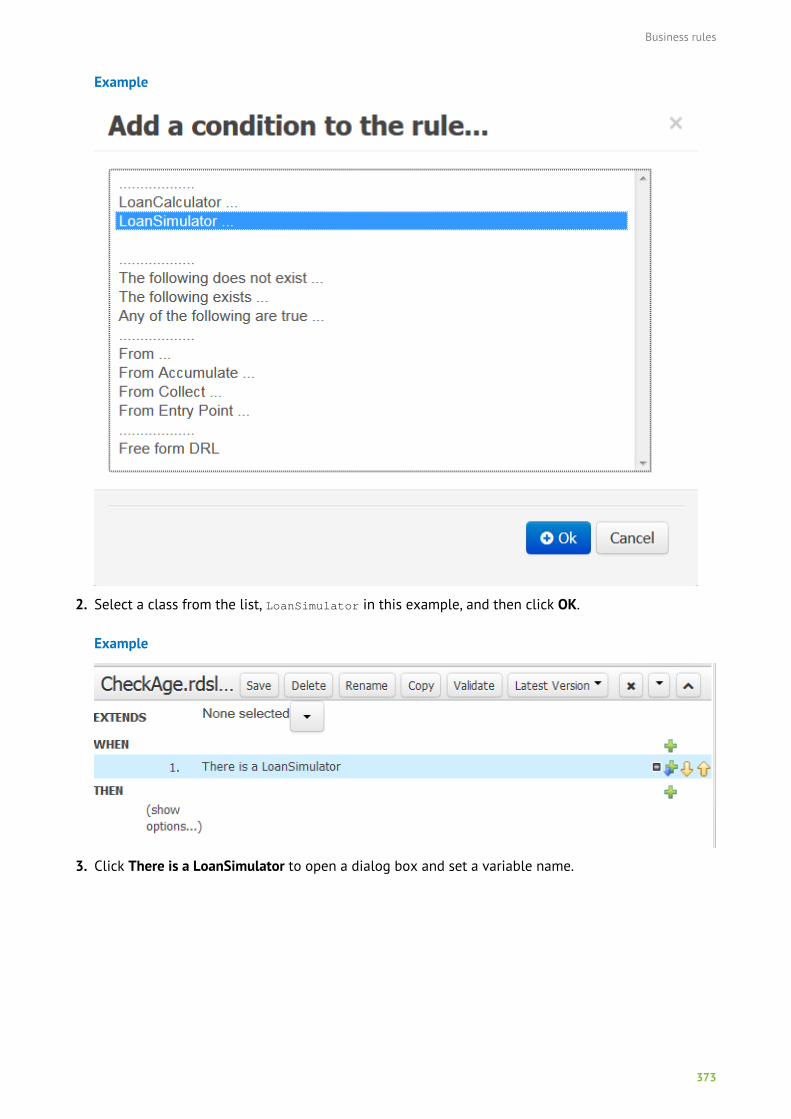
Business rules
373
Example
2. Select a class from the list, LoanSimulator in this example, and then click OK.
Example
3. Click There is a LoanSimulator to open a dialog box and set a variable name.
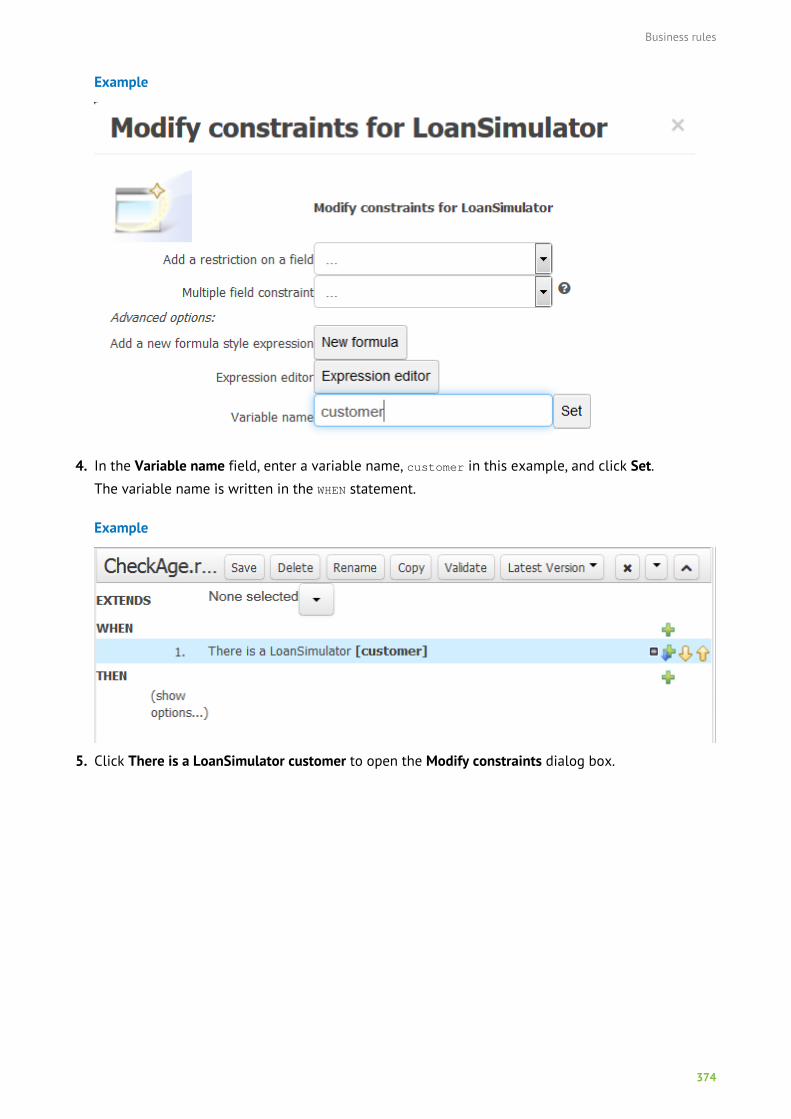
Business rules
374
Example
4. In the Variable name field, enter a variable name, customer in this example, and click Set.The variable name is written in the WHEN statement.
Example
5. Click There is a LoanSimulator customer to open the Modify constraints dialog box.
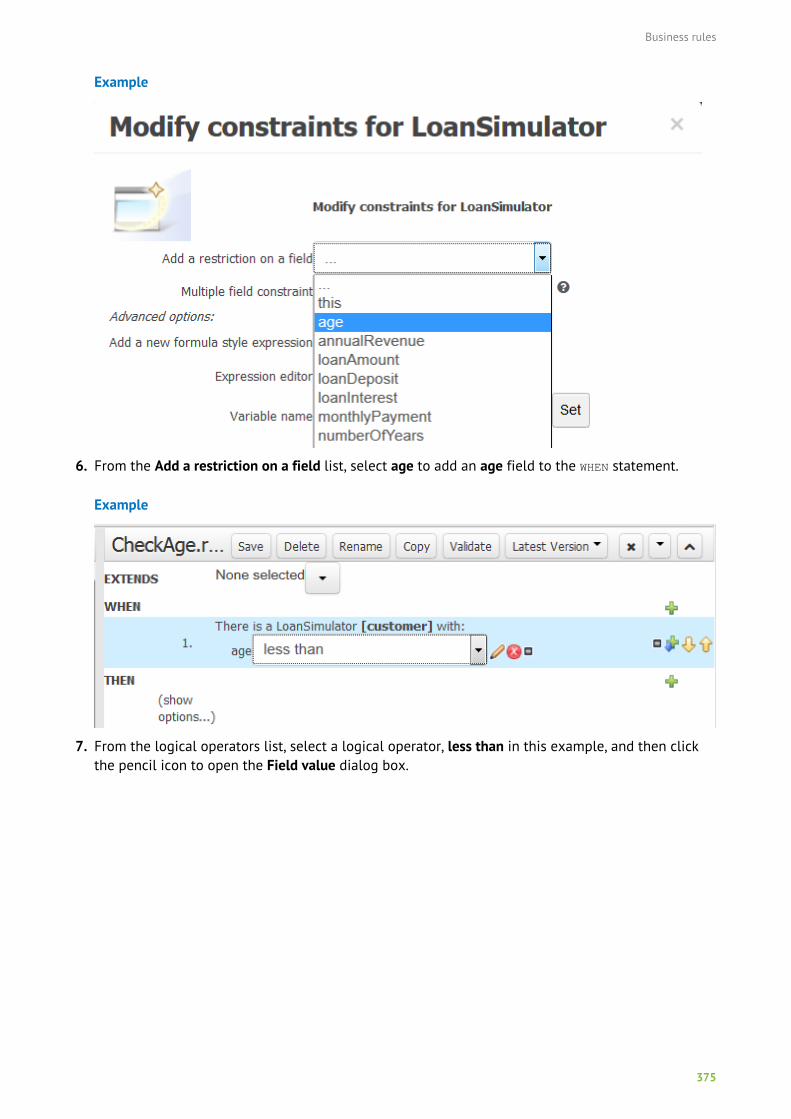
Business rules
375
Example
6. From the Add a restriction on a field list, select age to add an age field to the WHEN statement.
Example
7. From the logical operators list, select a logical operator, less than in this example, and then clickthe pencil icon to open the Field value dialog box.
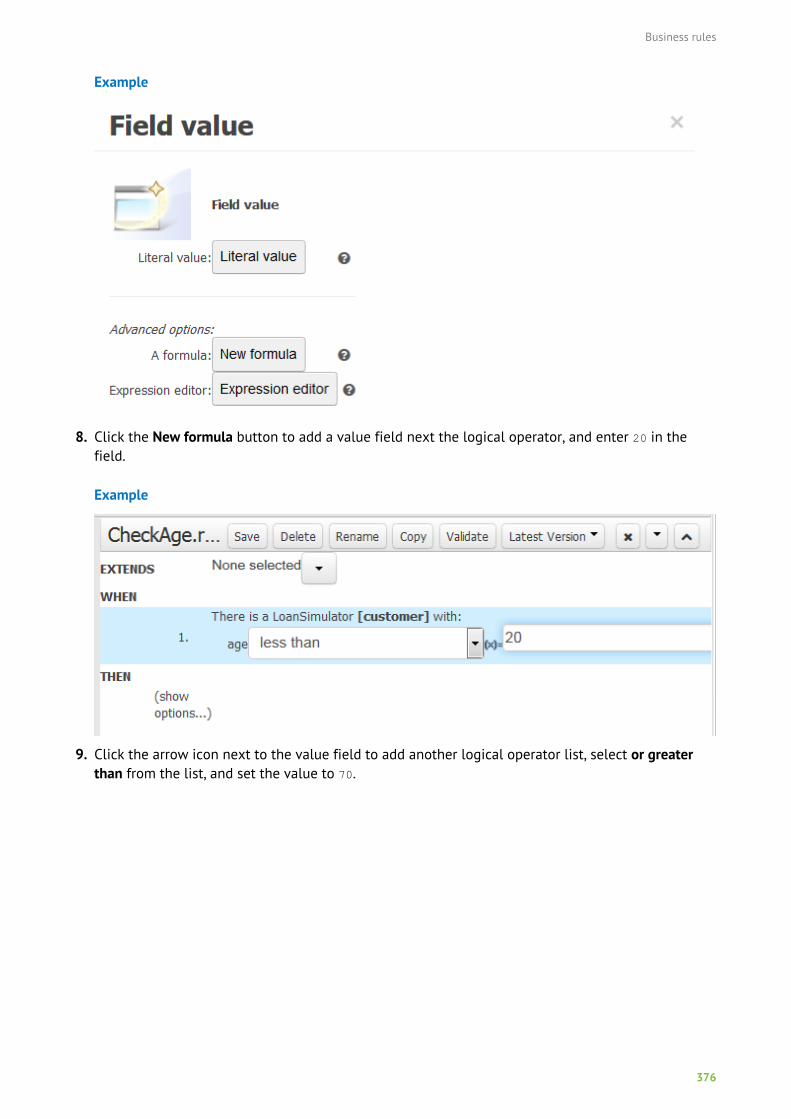
Business rules
376
Example
8. Click the New formula button to add a value field next the logical operator, and enter 20 in thefield.
Example
9. Click the arrow icon next to the value field to add another logical operator list, select or greaterthan from the list, and set the value to 70.
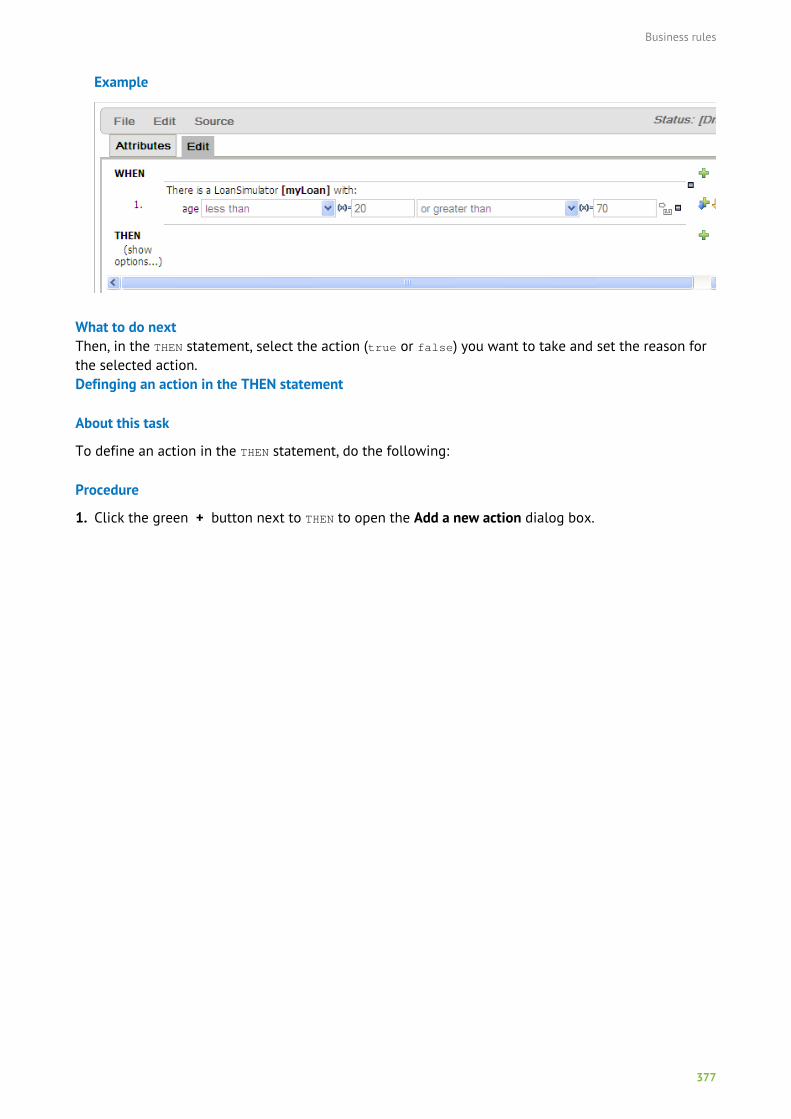
Business rules
377
Example
What to do nextThen, in the THEN statement, select the action (true or false) you want to take and set the reason forthe selected action.Definging an action in the THEN statement
About this task
To define an action in the THEN statement, do the following:
Procedure
1. Click the green + button next to THEN to open the Add a new action dialog box.
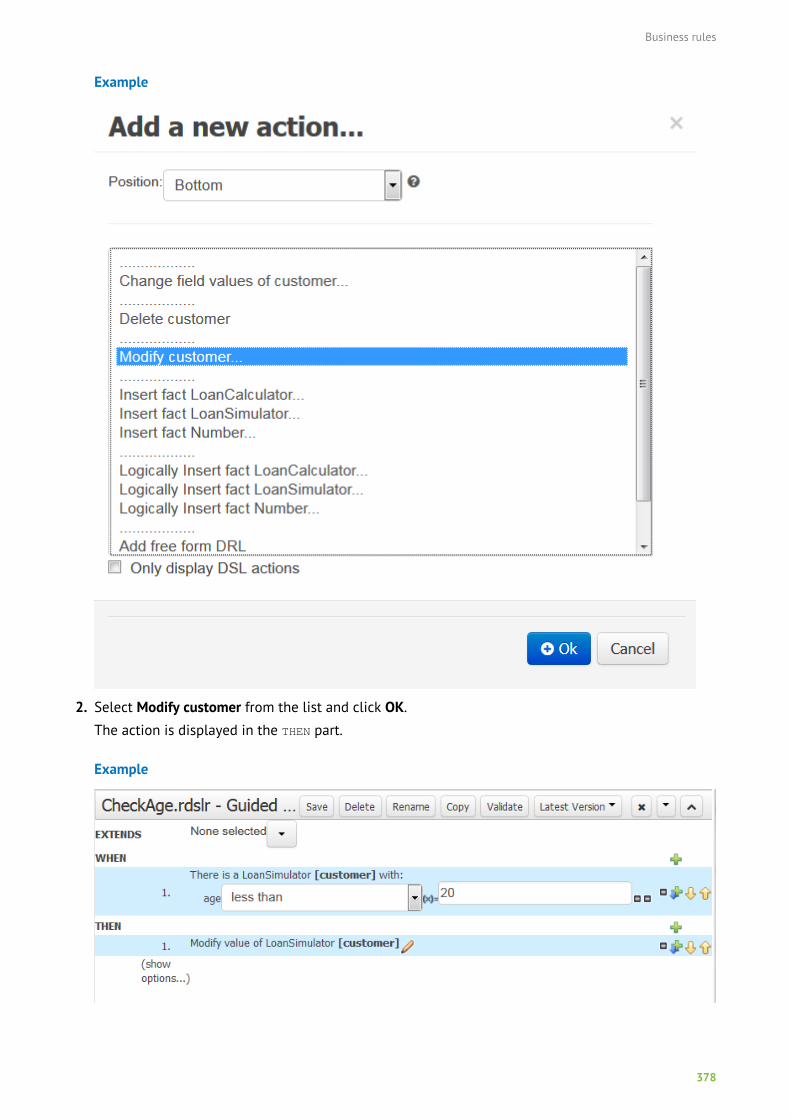
Business rules
378
Example
2. Select Modify customer from the list and click OK.
The action is displayed in the THEN part.
Example
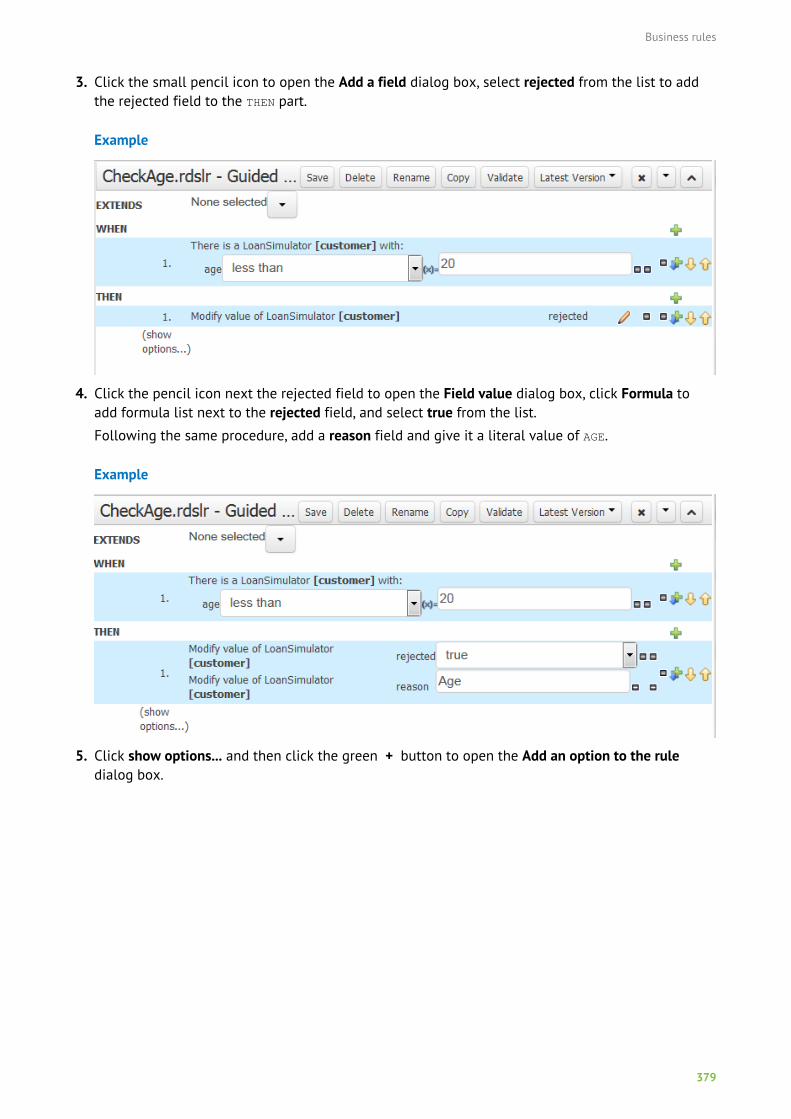
Business rules
379
3. Click the small pencil icon to open the Add a field dialog box, select rejected from the list to addthe rejected field to the THEN part.
Example
4. Click the pencil icon next the rejected field to open the Field value dialog box, click Formula toadd formula list next to the rejected field, and select true from the list.
Following the same procedure, add a reason field and give it a literal value of AGE.
Example
5. Click show options... and then click the green + button to open the Add an option to the ruledialog box.
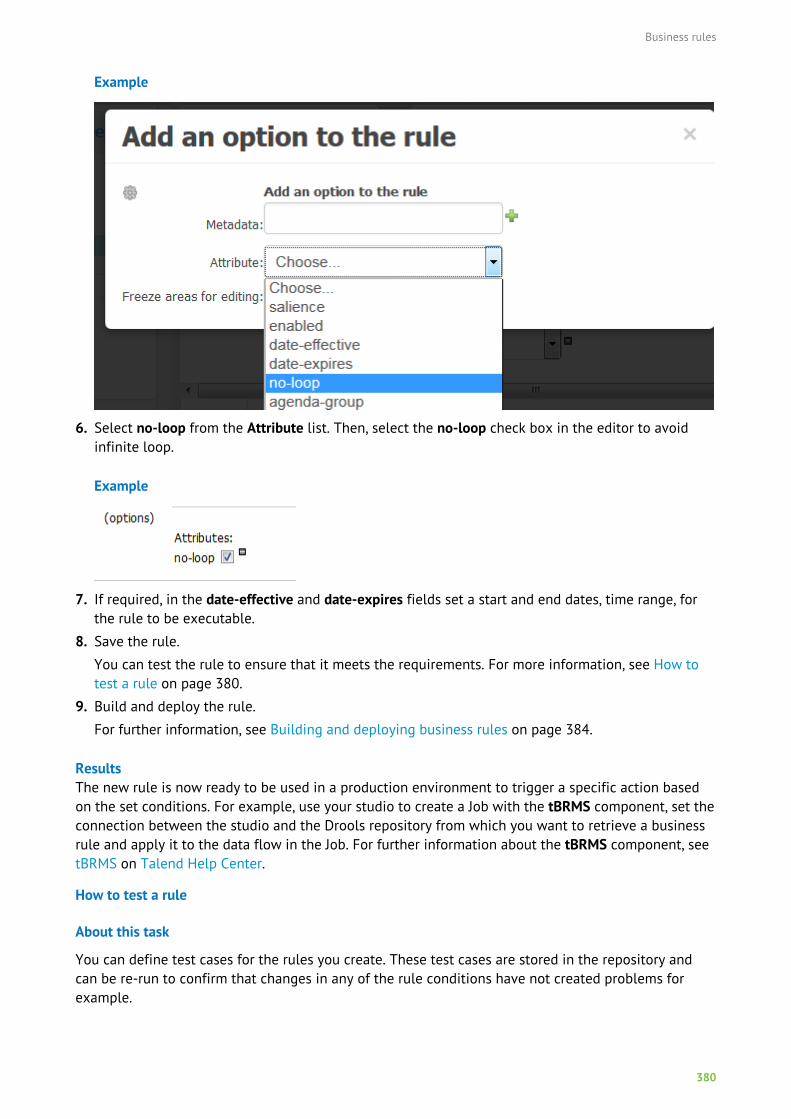
Business rules
380
Example
6. Select no-loop from the Attribute list. Then, select the no-loop check box in the editor to avoidinfinite loop.
Example
7. If required, in the date-effective and date-expires fields set a start and end dates, time range, forthe rule to be executable.
8. Save the rule.
You can test the rule to ensure that it meets the requirements. For more information, see How totest a rule on page 380.
9. Build and deploy the rule.
For further information, see Building and deploying business rules on page 384.
ResultsThe new rule is now ready to be used in a production environment to trigger a specific action basedon the set conditions. For example, use your studio to create a Job with the tBRMS component, set theconnection between the studio and the Drools repository from which you want to retrieve a businessrule and apply it to the data flow in the Job. For further information about the tBRMS component, seetBRMS on Talend Help Center.
How to test a rule
About this task
You can define test cases for the rules you create. These test cases are stored in the repository andcan be re-run to confirm that changes in any of the rule conditions have not created problems forexample.
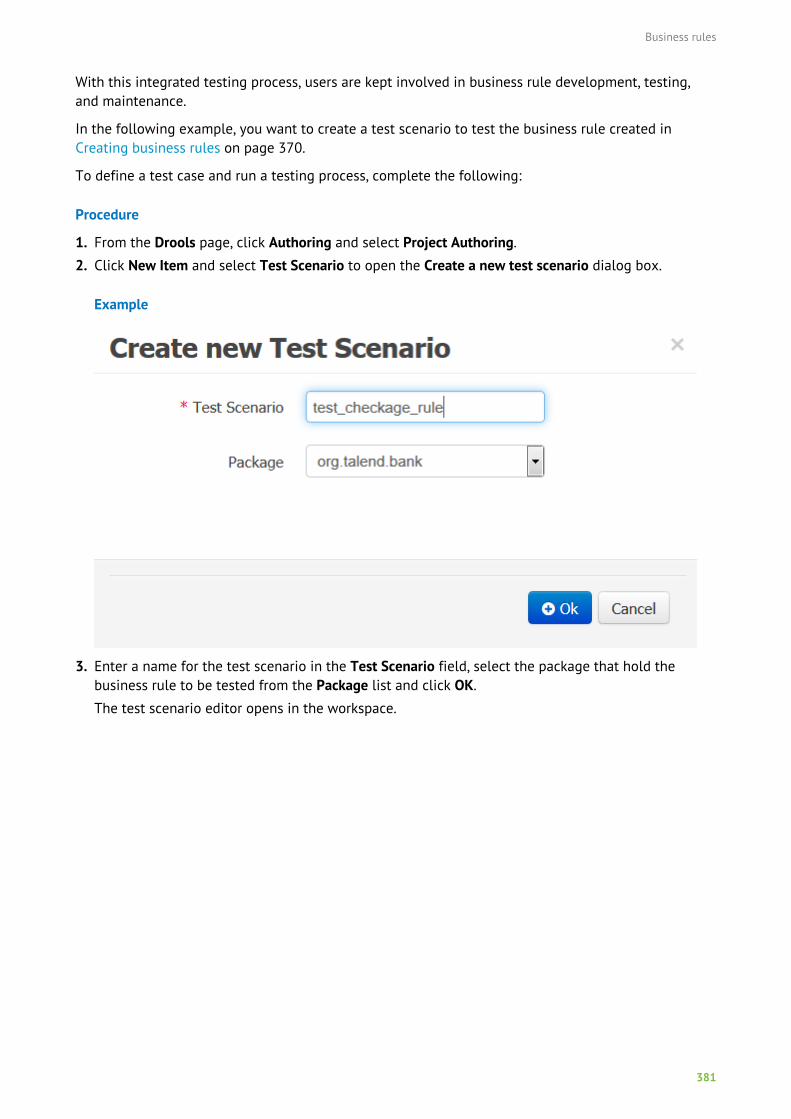
Business rules
381
With this integrated testing process, users are kept involved in business rule development, testing,and maintenance.
In the following example, you want to create a test scenario to test the business rule created inCreating business rules on page 370.
To define a test case and run a testing process, complete the following:
Procedure
1. From the Drools page, click Authoring and select Project Authoring.
2. Click New Item and select Test Scenario to open the Create a new test scenario dialog box.
Example
3. Enter a name for the test scenario in the Test Scenario field, select the package that hold thebusiness rule to be tested from the Package list and click OK.
The test scenario editor opens in the workspace.
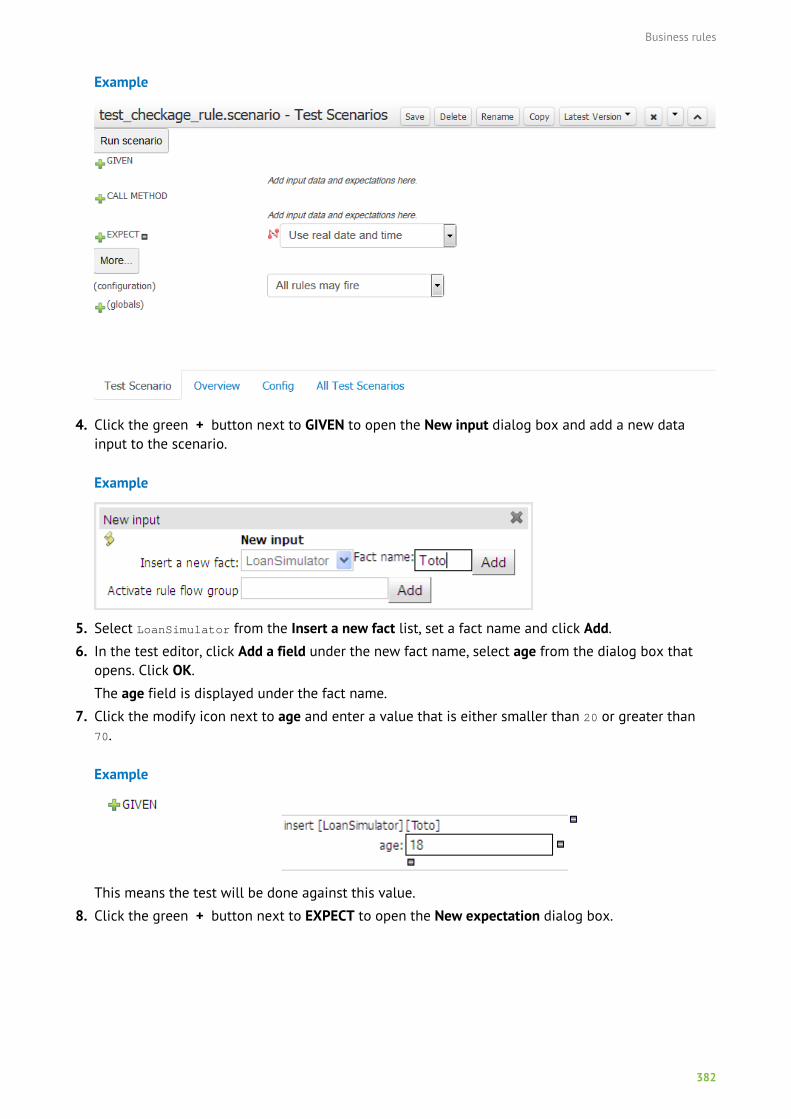
Business rules
382
Example
4. Click the green + button next to GIVEN to open the New input dialog box and add a new datainput to the scenario.
Example
5. Select LoanSimulator from the Insert a new fact list, set a fact name and click Add.
6. In the test editor, click Add a field under the new fact name, select age from the dialog box thatopens. Click OK.
The age field is displayed under the fact name.
7. Click the modify icon next to age and enter a value that is either smaller than 20 or greater than70.
Example
This means the test will be done against this value.
8. Click the green + button next to EXPECT to open the New expectation dialog box.
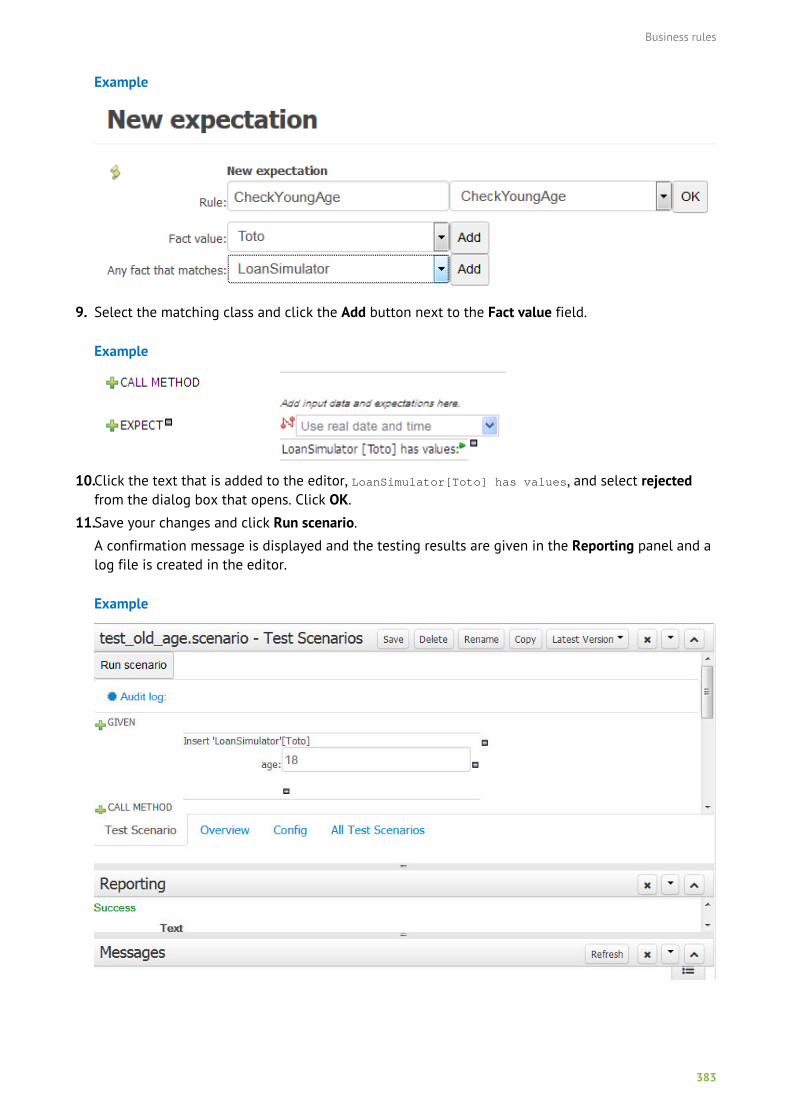
Business rules
383
Example
9. Select the matching class and click the Add button next to the Fact value field.
Example
10.Click the text that is added to the editor, LoanSimulator[Toto] has values, and select rejectedfrom the dialog box that opens. Click OK.
11.Save your changes and click Run scenario.
A confirmation message is displayed and the testing results are given in the Reporting panel and alog file is created in the editor.
Example
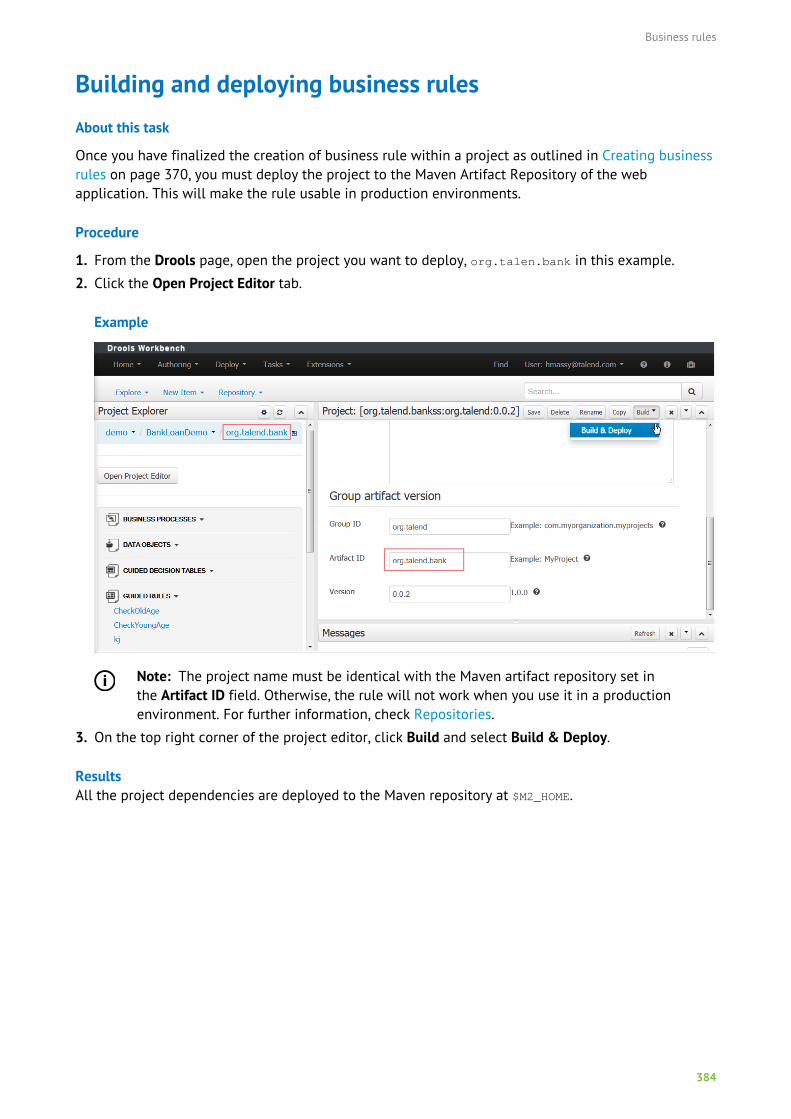
Business rules
384
Building and deploying business rulesAbout this task
Once you have finalized the creation of business rule within a project as outlined in Creating businessrules on page 370, you must deploy the project to the Maven Artifact Repository of the webapplication. This will make the rule usable in production environments.
Procedure
1. From the Drools page, open the project you want to deploy, org.talen.bank in this example.
2. Click the Open Project Editor tab.
Example
Note: The project name must be identical with the Maven artifact repository set inthe Artifact ID field. Otherwise, the rule will not work when you use it in a productionenvironment. For further information, check Repositories.
3. On the top right corner of the project editor, click Build and select Build & Deploy.
ResultsAll the project dependencies are deployed to the Maven repository at $M2_HOME.
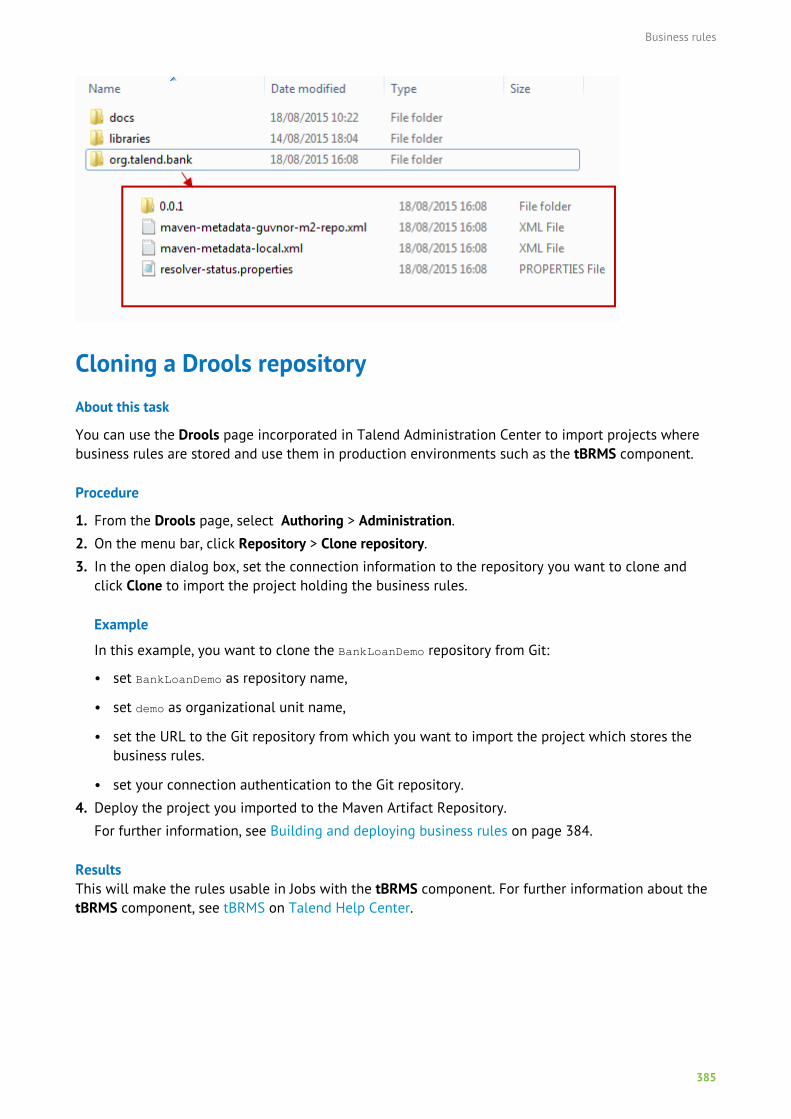
Business rules
385
Cloning a Drools repositoryAbout this task
You can use the Drools page incorporated in Talend Administration Center to import projects wherebusiness rules are stored and use them in production environments such as the tBRMS component.
Procedure
1. From the Drools page, select Authoring > Administration.
2. On the menu bar, click Repository > Clone repository.
3. In the open dialog box, set the connection information to the repository you want to clone andclick Clone to import the project holding the business rules.
Example
In this example, you want to clone the BankLoanDemo repository from Git:
• set BankLoanDemo as repository name,
• set demo as organizational unit name,
• set the URL to the Git repository from which you want to import the project which stores thebusiness rules.
• set your connection authentication to the Git repository.
4. Deploy the project you imported to the Maven Artifact Repository.
For further information, see Building and deploying business rules on page 384.
ResultsThis will make the rules usable in Jobs with the tBRMS component. For further information about thetBRMS component, see tBRMS on Talend Help Center.
Business rules
386
Migrating from the integrated Drools Web application to astandalone KIE Drools WorkbenchThis procedure describes how to migrate a repository from the Drools Web application integrated toTalend Administration Center to a standalone KIE Drools Workbench (6.2.0 Final).
Procedure
1. Go to the git repository folder on the Talend Administration Center server.
Example
<Talend Administration Center Installation Path>/apache-tomcat/bin/.niogit
2. Copy the REPOSITORY_NAME.git folder to the location of your choice.
3. From the standalone KIE Drools Workbench, go to Authoring > Administration.
4. On the menu bar, click Repository > Clone repository.
5. In the open dialog box, set the connection information to the repository copied earlier and clickClone to import the project holding the business rules.
The Git URL uses the following syntax: file:///PATH_TO_REPOSITORY/REPOSITORY_NAME
Results
A confirmation prompt opens.
You can view the cloned repository in the File Explorer.
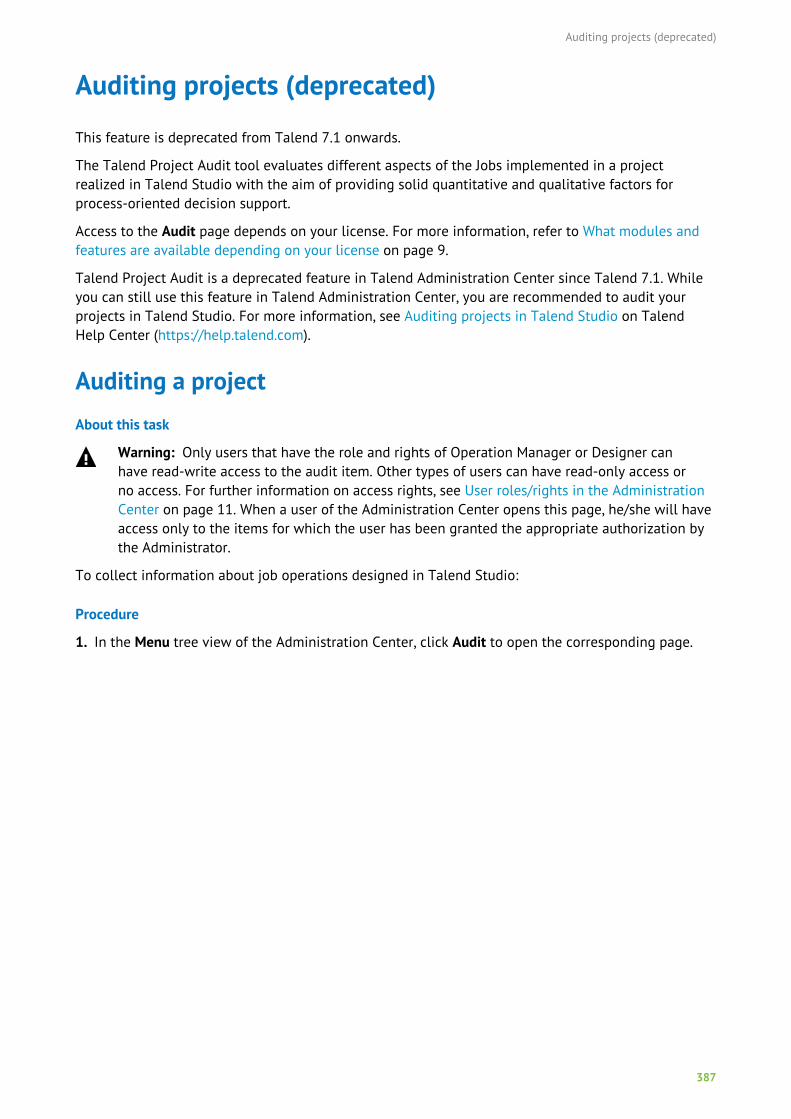
Auditing projects (deprecated)
387
Auditing projects (deprecated)
This feature is deprecated from Talend 7.1 onwards.
The Talend Project Audit tool evaluates different aspects of the Jobs implemented in a projectrealized in Talend Studio with the aim of providing solid quantitative and qualitative factors forprocess-oriented decision support.
Access to the Audit page depends on your license. For more information, refer to What modules andfeatures are available depending on your license on page 9.
Talend Project Audit is a deprecated feature in Talend Administration Center since Talend 7.1. Whileyou can still use this feature in Talend Administration Center, you are recommended to audit yourprojects in Talend Studio. For more information, see Auditing projects in Talend Studio on TalendHelp Center (https://help.talend.com).
Auditing a projectAbout this task
Warning: Only users that have the role and rights of Operation Manager or Designer canhave read-write access to the audit item. Other types of users can have read-only access orno access. For further information on access rights, see User roles/rights in the AdministrationCenter on page 11. When a user of the Administration Center opens this page, he/she will haveaccess only to the items for which the user has been granted the appropriate authorization bythe Administrator.
To collect information about job operations designed in Talend Studio:
Procedure
1. In the Menu tree view of the Administration Center, click Audit to open the corresponding page.
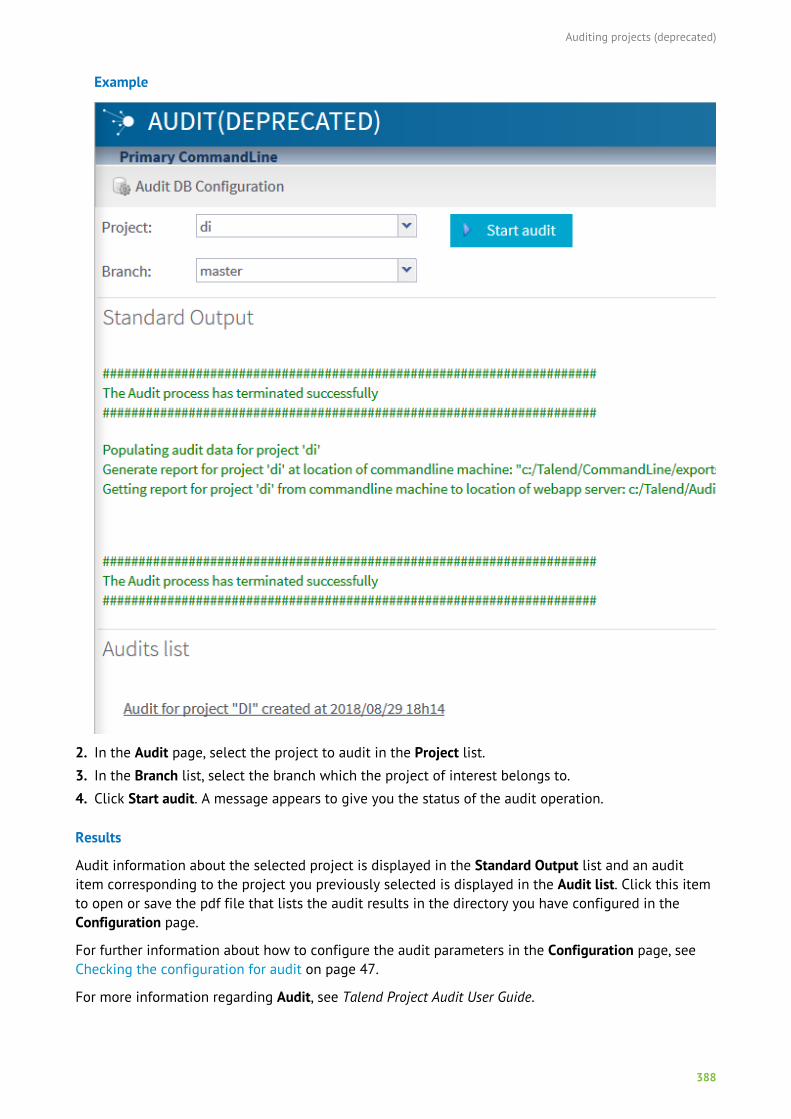
Auditing projects (deprecated)
388
Example
2. In the Audit page, select the project to audit in the Project list.
3. In the Branch list, select the branch which the project of interest belongs to.
4. Click Start audit. A message appears to give you the status of the audit operation.
Results
Audit information about the selected project is displayed in the Standard Output list and an audititem corresponding to the project you previously selected is displayed in the Audit list. Click this itemto open or save the pdf file that lists the audit results in the directory you have configured in theConfiguration page.
For further information about how to configure the audit parameters in the Configuration page, seeChecking the configuration for audit on page 47.
For more information regarding Audit, see Talend Project Audit User Guide.
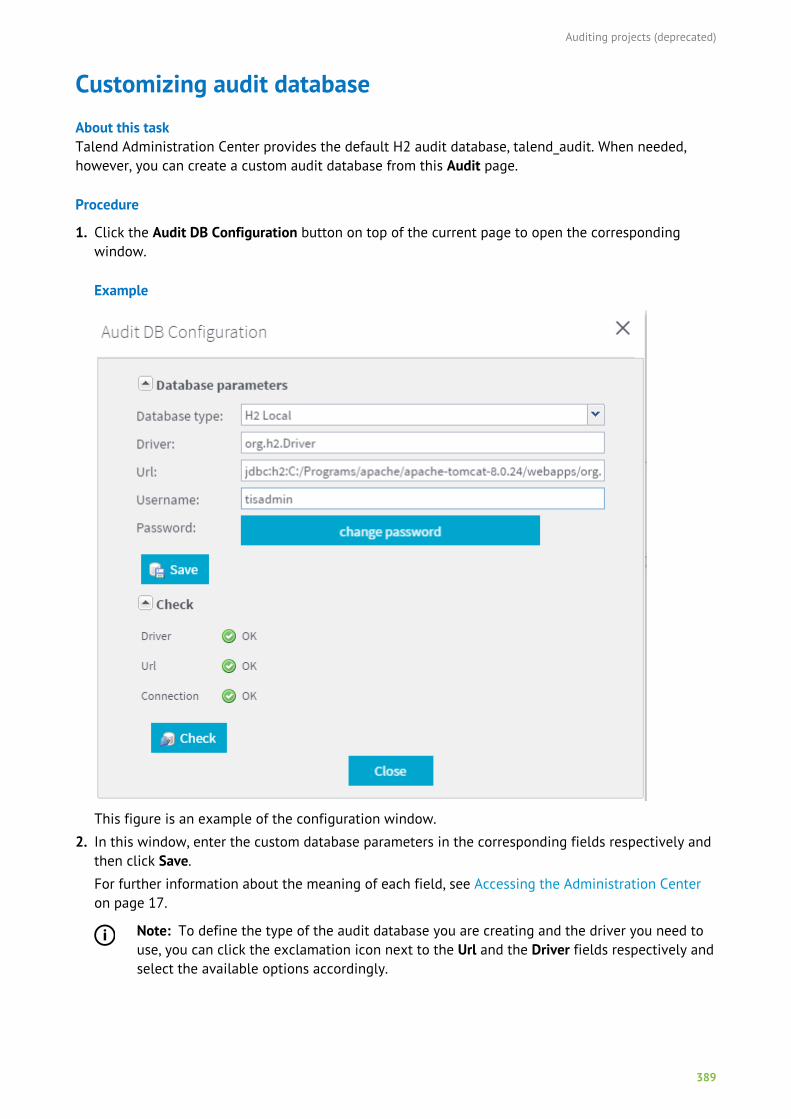
Auditing projects (deprecated)
389
Customizing audit databaseAbout this taskTalend Administration Center provides the default H2 audit database, talend_audit. When needed,however, you can create a custom audit database from this Audit page.
Procedure
1. Click the Audit DB Configuration button on top of the current page to open the correspondingwindow.
Example
This figure is an example of the configuration window.
2. In this window, enter the custom database parameters in the corresponding fields respectively andthen click Save.
For further information about the meaning of each field, see Accessing the Administration Centeron page 17.
Note: To define the type of the audit database you are creating and the driver you need touse, you can click the exclamation icon next to the Url and the Driver fields respectively andselect the available options accordingly.

Auditing projects (deprecated)
390
Results
Your custom audit database is created at the address you have defined in the Url field of this window.
CommandLine features
391
CommandLine features
CommandLine is the equivalent of Talend Studio without GUI. It also helps executing Jobs in batchmode for example.
At any time, and in any mode, you can display the full Help by typing in help. The Help contentprovides an exhaustive list of commands and their respective description.
CommandLine has three operating modes accessible from the standalone/basic mode:
• Shell mode, see Shell mode on page 393.
• Server mode, see Server mode (deprecated) on page 393.
• Script mode, see Script mode on page 394.
For examples of use, see:
• Generating a Job created with a Job creation API using the CommandLine on page 395.
• Executing a Job on a server with SSL enabled using the CommandLine on page 396.
• Building a Job using the CommandLine on page 396.
• Publishing a Service, a Route or a data service Job into an Artifact repository using theCommandLine on page 397.
For a list of all the commands that can be used in the CommandLine, see the related APIdocumentation on Talend Help Center (https://help.talend.com).
CommandLine overviewThe CommandLine offers the same basic functionalities as Talend Studio and it is used to generateand export the Jobs developed with Talend Studio onto the Job servers, or export Services, Routes anddata service Jobs onto Runtime servers. To launch the CommandLine on Linux, you have to run thecommandline.sh file. To launch the CommandLine on Windows, you have to run the commandline.batfile.
The commandline file contains three different parts:
• the name of the Talend Studio executable corresponding to your OS, for example: ./Talend-Studio-linux-gtk-x86
• operating options, for example:
-nosplash, no interface is displayed.
-application org.talend.commandline.CommandLine, the application is launched in commandlinemode.
-consoleLog, the logs are displayed in the console.
-data commandline-workspace, specify the path and name of the commandline workspace.
• the operating mode, for example: startServer -p 8002
If you want to modify the default settings, you can edit the file, and set it according to your need.
Warning:

CommandLine features
392
If you want to run your CommandLine in background on Linux, you first need to disable theshell. To do so:
1. Edit the commandline.sh file.
2. Add the --disableShellInput command.
3. Save your file.
Example of use of this command:
./Talend-Studio-linux-gtk-x86 --disableShellInput -nosplash-application org.talend.commandline.CommandLine -consoleLog -data commandline-workspacestartServer -p 8002
Then you can execute your CommandLine in background. To do so, do the following:
1. Switch to the <CommandlinePath>.
2. Enter the command:
./commandline.sh &
Once the commands have been executed, you can close the CommandLine window and it will not exitthe service.
The CommandLine can be executed in four different modes, according to your need:
• Standalone/Basic mode, see Standalone/Basic mode on page 392.
• Shell, see Shell mode on page 393.
• Server, see Server mode (deprecated) on page 393.
• Script, see Script mode on page 394.
The most common mode used is the Server mode.
Operating modesIf your operating system shell provides a graphical user interface, you just have to double-click thecommandline.bat or commandline.sh file (according to your OS) to run the CommandLine. If youroperating system shell provides a command-line interface, switch to the CommandLine path and enterthe command: ./commandline.sh to run the CommandLine.
To switch between the different operating modes and execute any command, you can either edit thecommandline file if you are using a graphical shell or you can do it directly from the command-line ifyou are using a command-line shell.
Standalone/Basic mode
About this task
Standalone/basic is CommandLine's default mode. This mode allows you to execute a singlecommand.
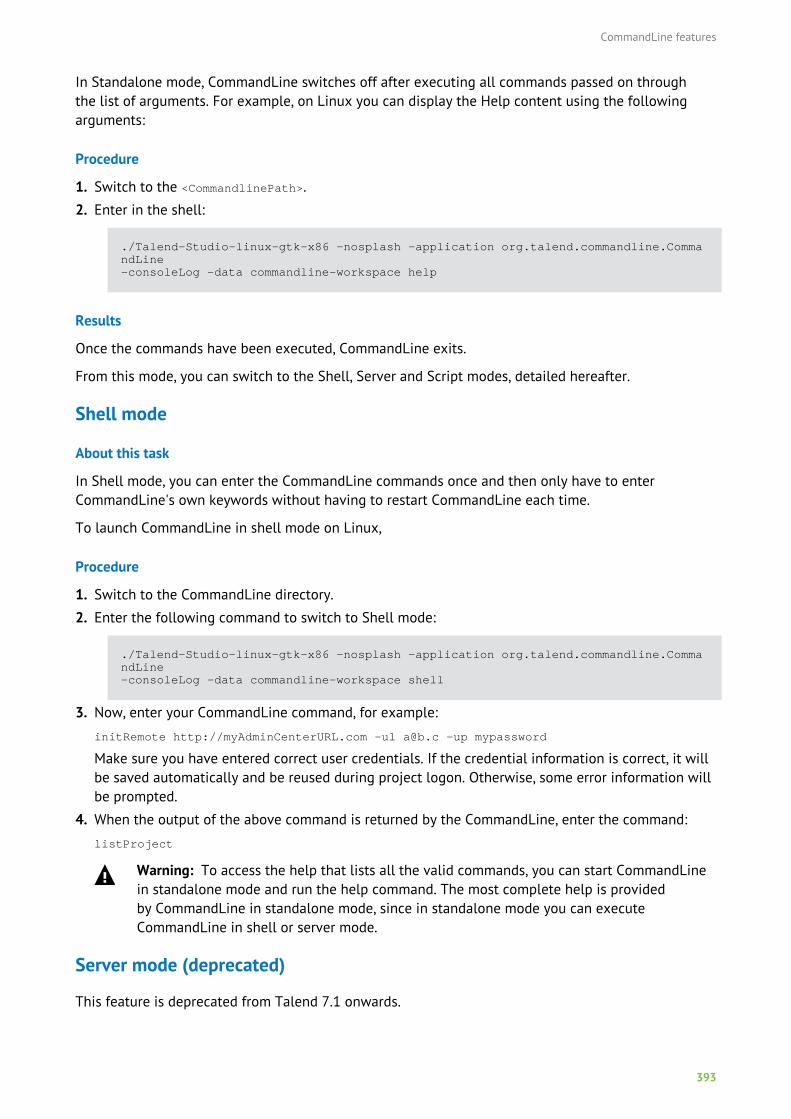
CommandLine features
393
In Standalone mode, CommandLine switches off after executing all commands passed on throughthe list of arguments. For example, on Linux you can display the Help content using the followingarguments:
Procedure
1. Switch to the <CommandlinePath>.
2. Enter in the shell:
./Talend-Studio-linux-gtk-x86 -nosplash -application org.talend.commandline.CommandLine-consoleLog -data commandline-workspace help
Results
Once the commands have been executed, CommandLine exits.
From this mode, you can switch to the Shell, Server and Script modes, detailed hereafter.
Shell mode
About this task
In Shell mode, you can enter the CommandLine commands once and then only have to enterCommandLine's own keywords without having to restart CommandLine each time.
To launch CommandLine in shell mode on Linux,
Procedure
1. Switch to the CommandLine directory.
2. Enter the following command to switch to Shell mode:
./Talend-Studio-linux-gtk-x86 -nosplash -application org.talend.commandline.CommandLine-consoleLog -data commandline-workspace shell
3. Now, enter your CommandLine command, for example:
initRemote http://myAdminCenterURL.com -ul [email protected] -up mypassword
Make sure you have entered correct user credentials. If the credential information is correct, it willbe saved automatically and be reused during project logon. Otherwise, some error information willbe prompted.
4. When the output of the above command is returned by the CommandLine, enter the command:
listProject
Warning: To access the help that lists all the valid commands, you can start CommandLinein standalone mode and run the help command. The most complete help is providedby CommandLine in standalone mode, since in standalone mode you can executeCommandLine in shell or server mode.
Server mode (deprecated)
This feature is deprecated from Talend 7.1 onwards.
CommandLine features
394
In Server mode, CommandLine can be accessed from the network for the purpose of executingcommands. You do not have to wait the execution of a command to enter another one, you can enterseveral commands that will be executed in the same order you requested them.
To start the CommandLine in Server mode, just enter:
./Talend-Studio-linux-gtk-x86 -nosplash -application org.talend.commandline.CommandLine-consoleLog -data commandline-workspace startServer -p 8002
If needed, you can add the parameter --disableLocalMode to disable the local mode of theCommandLine. After that, only the commands help and initRemote are allowed.
To stop the server, enter:
echo "stopServer" | telnet localhost 8002
To access a Remote CommandLine, open your OS commandline and enter the following command:
telnet localhost 8002
You should replace localhost by the IP address of the system on which you wish to stop the serverremotely, and replace the default installation port 8002 by the port in your configuration.
Script mode
In Script mode, CommandLine reads a script file containing a list of commands and executes them. Todo so, type in the following command in the commandline.sh:
./Talend-Studio-linux-gtk-x86 -nosplash -application org.talend.commandline.CommandLine-consoleLog -data commandline-workspace scriptFile /tmp/myscript
If needed, you can add the parameter --disableLocalMode to disable the local mode of theCommandLine. After that, only the commands help and initRemote are allowed.
Example of script file read by the CommandLine:
initRemote http://localhost:8888/org.talend.administrator -ul [email protected] -up passwdlogonProject -pn myProjectexportItems /tmp/myitems.zip
Updating your license using the CommandLineAbout this taskBefore you begin, you have downloaded the license file to the local Nexus server.
Procedure
1. Launch your CommandLine. For more information on how to launch the CommandLine, seeOperating modes on page 392.
2. Run the following command to connect to your repository:
initRemote {tac_url} -ul {TAC login username} -up {TAC login password}

CommandLine features
395
3. Run the following command to update the license:
checkAndUpdate -tu checkAndUpdate -tu {TAC login username} -tup {TAC login password}
The CommandLine updates the license, downloads and applies the available patch, if necessary,and automatically restarts.
Generating a Job created with a Job creation API using theCommandLineAbout this taskTalend offers you the possibility to create a data integration process without any user interface.You can write a script describing the properties of all the elements of your process: components,connections, contexts, etc. in a jobscript file and generate the corresponding job via theCommandLine.
To do so:
Procedure
1. Launch your CommandLine. For more information on how to launch the CommandLine, seeOperating modes on page 392.
2. Connect to your repository with the initLocal or initRemote commands. Example:
initRemote http://localhost:8080/org.talend.administrator -ul [email protected] -up admin
The parameter values are given as examples and need to be replaced with your actual information(port, credentials). For more information on how to use these commands, see the help provided inthe CommandLine.
3. Connect to your project and branch/tag with the logonProject command. If you do not know thename of your project or branch/tag, type in the listProject -b command first. Example:
logonProject -pn di_project -ul [email protected] -up admin -br branches/v1.0.0
The parameter values are given as examples and need to be replaced with your actual information(project/branch/tag name, credentials). For more information on how to use this command, see thehelp provided in the CommandLine.
4. Type in the following command to generate a Job from your Job script:
createJob NameOfJob -sf path\yourJobscript.jobscript
The Job is created in your CommandLine workspace in the process folder: commandline-workspace\YourProjectName\process.
If you want to open this Job in Talend Studio, you will have to import it in the Talend Studioworkspace first.
For more information on how to import items in Talend Studio, see the Talend Studio User Guide.
CommandLine features
396
The creation of job scripts and the generation of its corresponding Job design can also be donefrom Talend Studio which provides a user-friendly Job script API Editor. For more information onJob script creation, see the Talend Studio User Guide.
Executing a Job on a server with SSL enabled using theCommandLineAbout this taskTalend offers you the possibility to execute a Job on a server via the CommandLine with SSLenabled . SSL allows you to encrypt data prior to transmission.
For more information on how to generate a Job via the CommandLine, see Generating a Job createdwith a Job creation API using the CommandLine on page 395.
To launch a Job on a JobServer with SSL enabled:
Procedure
1. Launch your CommandLine. For more information on how to launch the CommandLine, seeOperating modes on page 392.
2. Connect to your repository with the iniLocal or initRemote commands. For more information onhow to use these commands, see the help provided in the CommandLine.
3. Connect to your project with the logonProject command. For more information on how to use thiscommand, see the help provided in the CommandLine.
4. Type in the following command to launch a Job (named jobName) on the server named myServer:
executeJobOnServer jobName --execution-server myServer --job-version 0.1 --job-context myJobContext -useSSL
You can enter either -useSSL or -use-ssl-option as both commands result in enabling SSL.
You also have the possibility to enable SSL on your JobServer on the Studio's side. For moreinformation, see the Talend Studio User Guide.
Building a Job using the CommandLineAbout this task
Building a Job allows you to generate an archive of a specific Job along with all of the files requiredto execute the Job, including the .bat and .sh as well as any context-parameter files or other relatedfiles. This archive can then be used to deploy and execute the Job on a server without having togenerate it via the CommandLine first.
For more information, see Adding an execution task to a pre-generated Job on page 145 and theTalend Studio User Guide.
Procedure
1. Launch your CommandLine. For more information on how to launch the CommandLine, seeOperating modes on page 392.
CommandLine features
397
2. Connect to your repository with the initLocal or initRemote commands. Example:
initRemote http://localhost:8080/org.talend.administrator -ul [email protected] -up admin
The parameter values are given as examples and need to be replaced with your actual information(port, credentials). For more information on how to use these commands, see the help provided inthe CommandLine.
3. Connect to your project and branch/tag with the logonProject command. If you do not know thename of your project or branch/tag, type in the listProject -b command first. Example:
logonProject -pn di_project -ul [email protected] -up admin -br branches/v1.0.0
The parameter values are given as examples and need to be replaced with your actual information(project/branch/tag name, credentials). For more information on how to use this command, see thehelp provided in the CommandLine.
4. (Optional) If you are using user components, copy them in a folder on your CommandLine server,then type in the following command with the path to this folder:
setUserComponentPath -up C:/components
The parameter values are given as examples and need to be replaced with your actual information(folder path). For more information on how to use this command, see the help provided in theCommandLine.
5. Type in the following command to build your Job archive in the folder of your choice:
buildJob MyJob -dd C:/tac/builds -af MyJob_0.1 -jc Default -jv 0.1
The parameter values are given as examples and need to be replaced with your actual information(Job name/context/version, target archive directory, archive name). In this example, a Job namedMyJob is built in the archive named MyJob_0.1.zip, in the C:/tac/builds folder. The best practiceis to put the archive file in the Job archive folder, which path is defined in the Job Conductor nodeof the Configuration page.
For more information on how to use this command, see the help provided in the CommandLine.
You can build a Route in the same way using the buildRoute command.
Publishing a Service, a Route or a data service Job into anArtifact repository using the CommandLineAbout this taskTalend offers you the possibility to publish a Service, a Route or a data service Job into an Artifactrepository via the CommandLine.
To publish a Service into an Artifact repository:
Procedure
1. Launch your CommandLine. For more information on how to launch the CommandLine, seeOperating modes on page 392.
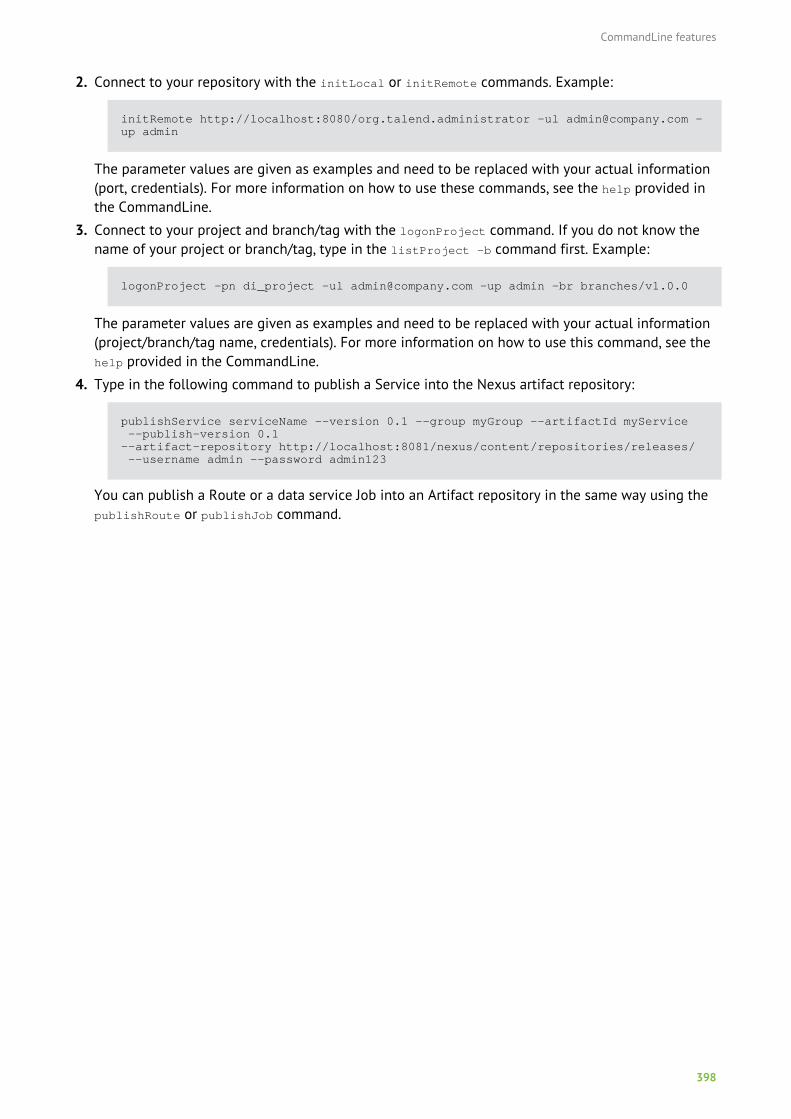
CommandLine features
398
2. Connect to your repository with the initLocal or initRemote commands. Example:
initRemote http://localhost:8080/org.talend.administrator -ul [email protected] -up admin
The parameter values are given as examples and need to be replaced with your actual information(port, credentials). For more information on how to use these commands, see the help provided inthe CommandLine.
3. Connect to your project and branch/tag with the logonProject command. If you do not know thename of your project or branch/tag, type in the listProject -b command first. Example:
logonProject -pn di_project -ul [email protected] -up admin -br branches/v1.0.0
The parameter values are given as examples and need to be replaced with your actual information(project/branch/tag name, credentials). For more information on how to use this command, see thehelp provided in the CommandLine.
4. Type in the following command to publish a Service into the Nexus artifact repository:
publishService serviceName --version 0.1 --group myGroup --artifactId myService --publish-version 0.1 --artifact-repository http://localhost:8081/nexus/content/repositories/releases/ --username admin --password admin123
You can publish a Route or a data service Job into an Artifact repository in the same way using thepublishRoute or publishJob command.
Non-GUI operation in metaServlet
399
Non-GUI operation in metaServlet
MetaServlet is a REST webservice that allows you to administrate Talend Administration Centerprogrammatically. You can connect to Talend Administration Center and perform actions there, forexample, launching a Job, by calling the metaServlet from an external scheduler.
For information about how to launch metaServlet, the JSON parameters and the help command, see:
• Calling metaServlet on page 399.
• Parameters and actions in metaServlet on page 400.
For examples of use, see:
• Using Scripts to Call MetaServlet Actions on page 402.
• Using MetaServlet to print the log file of a task on page 403.
• Running a task with context parameters using MetaServlet on page 404.
• Executing a task and returning its status using MetaServlet on page 406.
• Using MetaServlet to handle ESB execution tasks on page 409.
Calling metaServletAbout this task
MetaServlet is a REST webservice that allows you to administrate Talend Administration Centerprogrammatically.
You can connect to Talend Administration Center and perform actions there by calling themetaServlet from an external scheduler. To do so:
Procedure
1. Open the Windows command line or Linux terminal, and go to the following directory: ./org.talend.administrator/WEB-INF/classes.
2. Run :
• MetaServletCaller.bat to call the metaServlet on Windows.
• MetaServletCaller.sh to call the metaServlet on Linux.
For users who want to use metaServlet as a Web API, note that the typical URL generated by yourrequests reads as follows:
localhost:8080/<ApplicationPath>/metaServlet?<UserRequest>
For example:
http://localhost:8080/org.talend.administrator/metaServlet?eyJhY3Rpb25OYW1lIjoiaGVscCIsImNvbW1hbmROYW1lIjoidXNlckV4aXN0In0=
Note that you first need to encode your <User Request> (JSON arguments) in Base64. For moreinformation on how to use the Talend Administration Center API, see the related documentation onTalend Help Center (https://help.talend.com).
Non-GUI operation in metaServlet
400
Parameters and actions in metaServletThe following sections describe the functions of the JSON parameters used in metaServlet and how touse the help command to display all metaServlet commands with their use examples and error codes.
For a list of all the commands that can be used in metaServlet, see the Talend Administration CenterMetaServlet API documentation on Talend Help Center (https://help.talend.com).
Parameters
The following table provides detailed information about all JSON parameters used in metaServlet:
Parameter Function Example value
actionName The name of the action "taskLog"
active The status of a task Either true or false
addStatisticsCodeEnabled Enable or disable using the statistics code Either true or false
applyContextToChildren Enable or disable applying context to children Either true or false
authUser The username of the administrator "[email protected]"
authPass The password of the administrator "admin"
branch The name of the branch "trunk"
contextName The name of context parameters "var1"
description The description for the task, project or server youcreated
"the first task I created"
execStatisticsEnabled Enable or disable the execution of statistics Either true or false
executionServerName The name of the server in which the task is deployed "job_server_1"
jobName The name of the job to be executed in the task "job_1"
jobVersion The version of the job to be executed in the task "1.0"
onUnknownStateJob Responsive action to the job of which the state isunknown
"KILL_TASK", "WAIT"
projectName The name of the project "project1"
regenerateJobOnChange Enable or disable regenerating the job on change Either true or false
taskName The name of the task "task1"
taskId The Id of the task 1
mode The mode of task execution Either "synchronous" or"asynchronous"
lable The label for the task "for_demo_only"
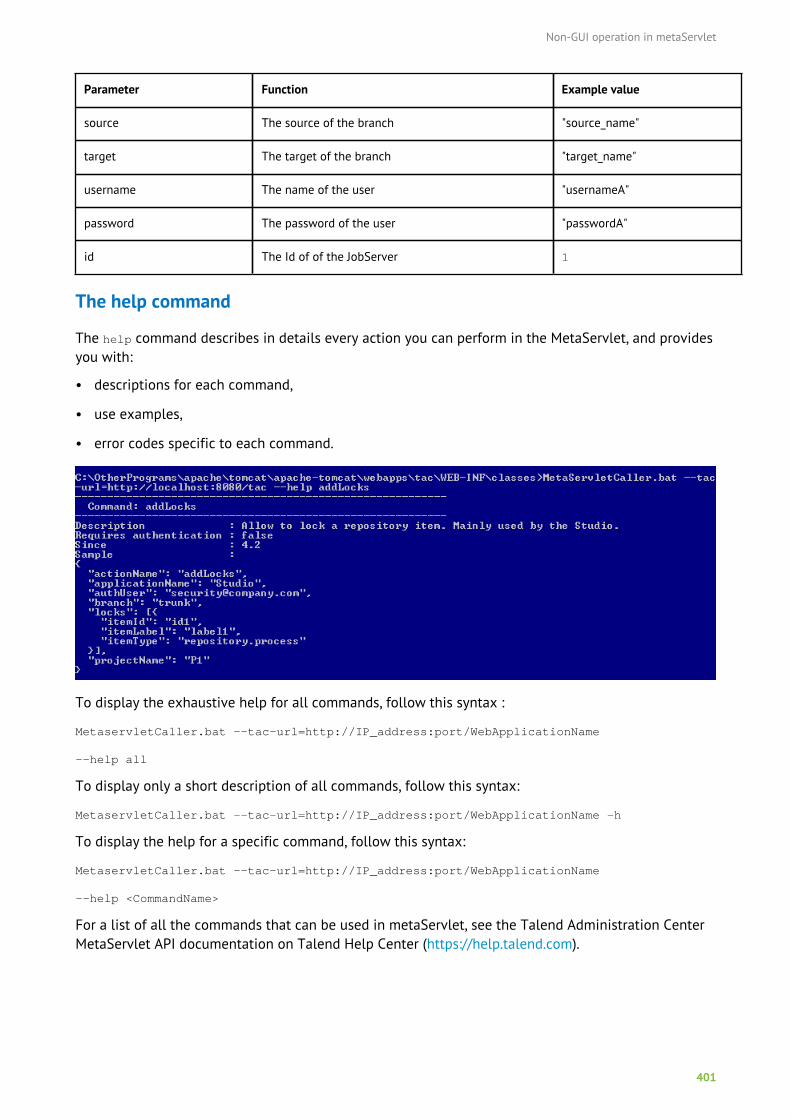
Non-GUI operation in metaServlet
401
Parameter Function Example value
source The source of the branch "source_name"
target The target of the branch "target_name"
username The name of the user "usernameA"
password The password of the user "passwordA"
id The Id of of the JobServer 1
The help command
The help command describes in details every action you can perform in the MetaServlet, and providesyou with:
• descriptions for each command,
• use examples,
• error codes specific to each command.
To display the exhaustive help for all commands, follow this syntax :
MetaservletCaller.bat --tac-url=http://IP_address:port/WebApplicationName
--help all
To display only a short description of all commands, follow this syntax:
MetaservletCaller.bat --tac-url=http://IP_address:port/WebApplicationName -h
To display the help for a specific command, follow this syntax:
MetaservletCaller.bat --tac-url=http://IP_address:port/WebApplicationName
--help <CommandName>
For a list of all the commands that can be used in metaServlet, see the Talend Administration CenterMetaServlet API documentation on Talend Help Center (https://help.talend.com).
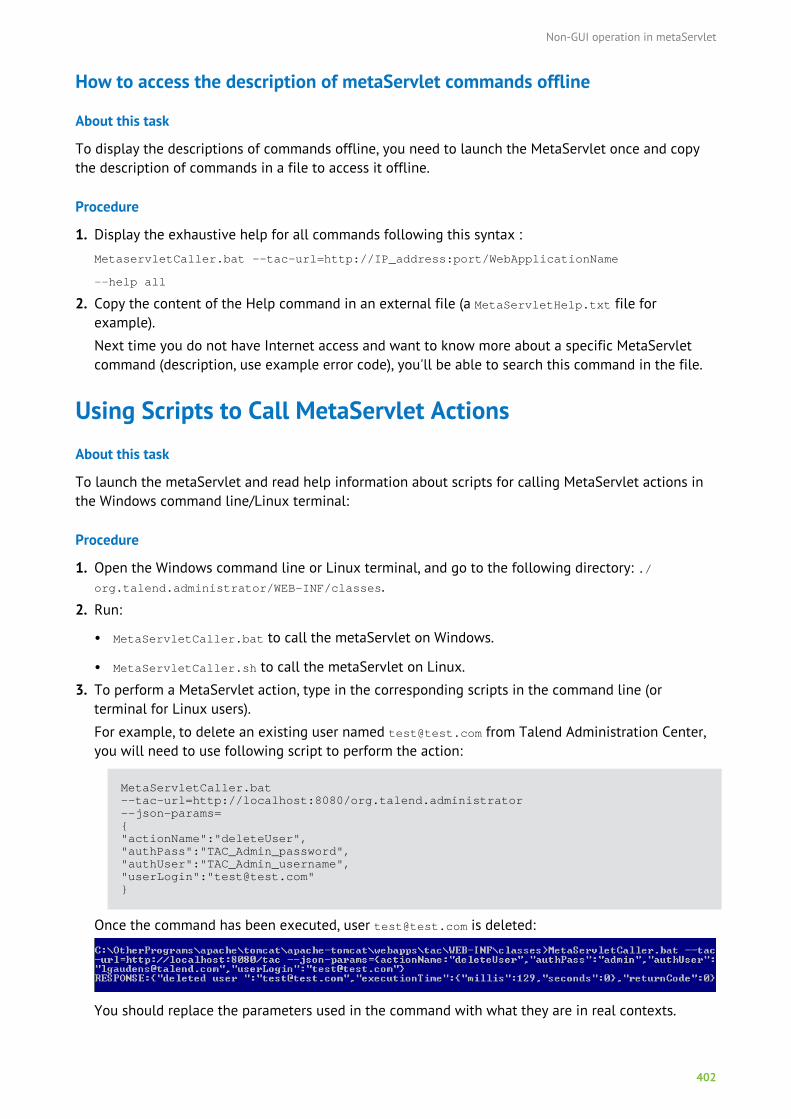
Non-GUI operation in metaServlet
402
How to access the description of metaServlet commands offline
About this task
To display the descriptions of commands offline, you need to launch the MetaServlet once and copythe description of commands in a file to access it offline.
Procedure
1. Display the exhaustive help for all commands following this syntax :
MetaservletCaller.bat --tac-url=http://IP_address:port/WebApplicationName
--help all
2. Copy the content of the Help command in an external file (a MetaServletHelp.txt file forexample).
Next time you do not have Internet access and want to know more about a specific MetaServletcommand (description, use example error code), you'll be able to search this command in the file.
Using Scripts to Call MetaServlet ActionsAbout this task
To launch the metaServlet and read help information about scripts for calling MetaServlet actions inthe Windows command line/Linux terminal:
Procedure
1. Open the Windows command line or Linux terminal, and go to the following directory: ./org.talend.administrator/WEB-INF/classes.
2. Run:
• MetaServletCaller.bat to call the metaServlet on Windows.
• MetaServletCaller.sh to call the metaServlet on Linux.
3. To perform a MetaServlet action, type in the corresponding scripts in the command line (orterminal for Linux users).
For example, to delete an existing user named [email protected] from Talend Administration Center,you will need to use following script to perform the action:
MetaServletCaller.bat --tac-url=http://localhost:8080/org.talend.administrator --json-params={"actionName":"deleteUser","authPass":"TAC_Admin_password","authUser":"TAC_Admin_username","userLogin":"[email protected]"}
Once the command has been executed, user [email protected] is deleted:
You should replace the parameters used in the command with what they are in real contexts.
Non-GUI operation in metaServlet
403
Using MetaServlet to print the log file of a taskAbout this task
In the following scenario, the log file of a task is retrieved from Talend Administration Center andprinted in the command lines.
Prerequisite: Make sure an existing task is available in the Job Conductor in Talend AdministrationCenter before you proceed the following steps.
Procedure
1. Open the Windows command line or Linux terminal, and go to the following directory: ./org.talend.administrator/WEB-INF/classes.
2. Run:
• MetaServletCaller.bat to call the metaServlet on Windows.
• MetaServletCaller.sh to call the metaServlet on Linux.
3. To perform a MetaServlet action, type in corresponding scripts in the command line (or terminal forLinux users).
In this example, to retrieve the log file of a task by the given name from Talend AdministrationCenter, use the following script to perform the action:
MetaServletCaller.bat --tac-url=http://localhost:8080/org.talend.administrator --json-params={"actionName":"taskLog","taskId":1,"authPass":"TAC_Admin_password","authUser":"TAC_Admin_username"}
Once the command has been executed, the information in the log file of task 1 will be retrievedand printed in the command lines.
Example
The execution information is displayed in the Task execution monitoring console of the TalendAdministration Center.
You should replace the parameters used in the command with what they are in real contexts.

Non-GUI operation in metaServlet
404
Running a task with context parameters using MetaServletIn the following scenario, an established task in Talend Administration Center is executed usingmetaServlet with context parameters.
Prerequisites:
• Make sure an existing task is available on the Job Conductor page of Talend Administration Centerbefore you proceed the following steps.
• The Job below is pre-established in the Studio with context variables: context.firstname andcontext.lastname.
Deploying a pre-established task on the Job Conductor page
Procedure
Deploy the pre-established Job on an execution server from the Job Conductor page:
For more information about how to deploy a Job from the Job Conductor page, see Adding a normalexecution task on page 140.
Non-GUI operation in metaServlet
405
Example
Executing a task with context parameters using metaServlet
Procedure
1. Open the Windows command line or Linux terminal, and go to the following directory: ./org.talend.administrator/WEB-INF/classes.
2. Run:
• MetaServletCaller.bat to call the metaServlet on Windows.
• MetaServletCaller.sh to call the metaServlet on Linux.
3. Type in the following script to execute task 1 with the context values of your choice :
MetaServletCaller.bat --tac-url=http://localhost:8080/org.talend.administrator --json-params={"actionName":"runTask","authPass":"TAC_Admin_password","authUser":"TAC_Admin_username","taskId":1,"mode":"synchronous","context":{"firstname":"Robert","lastname":"Durst"}}
Non-GUI operation in metaServlet
406
The response from the Talend Administration Center server is displayed in the command lines:
Example
The execution information is displayed in the Task execution details console of TalendAdministration Center:
Example
"context":{"firstname":"Kimmy","lastname":"Schmidt"} in the script above specifies the valuesfor the context parameters: firstname and lastname, you must follow the syntax below:
"context":{"varname1":"varvalue"}
Multiple context parameters should be separated by comma(s). You should replace the parametersused in the command with what they are in real contexts.
Executing a task and returning its status using MetaServletIn the following scenario, a task is executed using MetaServlet and its status and Job exit codes arereturned in the application.
Prerequisites:
• An existing task is created on the Job Conductor page of Talend Administration Center.
• you know the ID of this task (if not, you can use the getTaskIdByName command to retrieve the IDof the task).
Returning the status of a task executed in synchronous mode
Procedure
Use the runTask MetaServlet command to run the execution task.
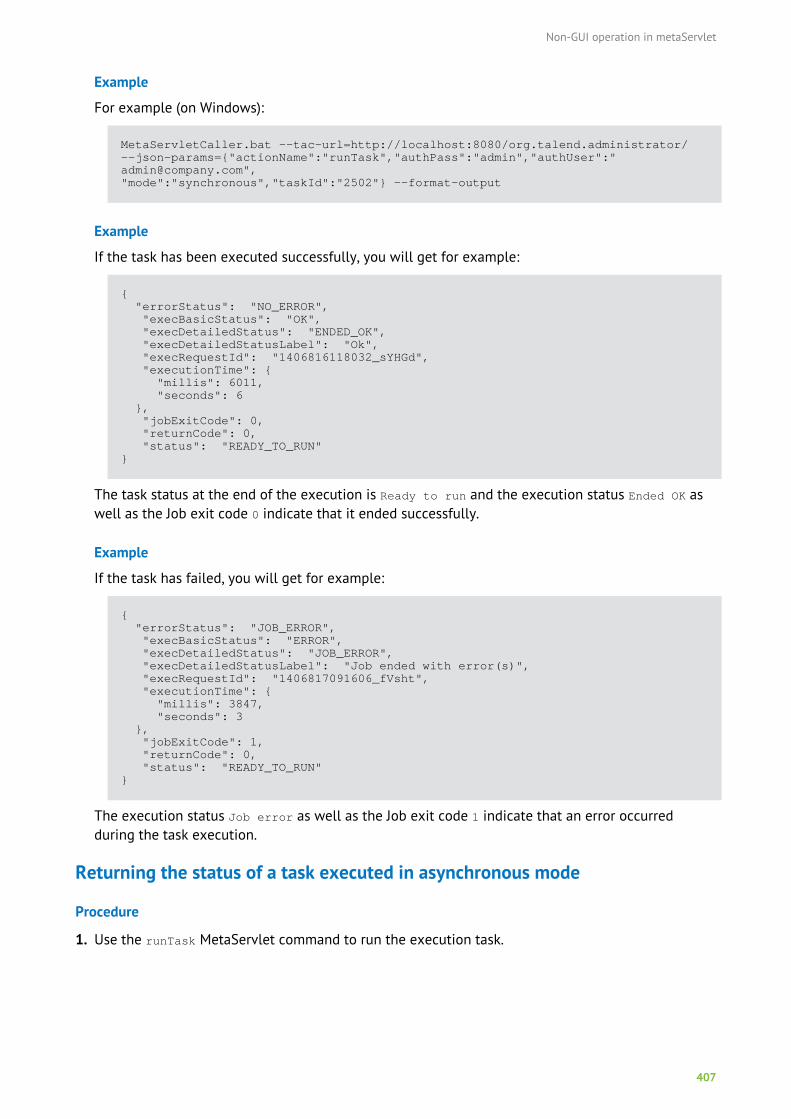
Non-GUI operation in metaServlet
407
Example
For example (on Windows):
MetaServletCaller.bat --tac-url=http://localhost:8080/org.talend.administrator/ --json-params={"actionName":"runTask","authPass":"admin","authUser":"[email protected]", "mode":"synchronous","taskId":"2502"} --format-output
Example
If the task has been executed successfully, you will get for example:
{ "errorStatus": "NO_ERROR", "execBasicStatus": "OK", "execDetailedStatus": "ENDED_OK", "execDetailedStatusLabel": "Ok", "execRequestId": "1406816118032_sYHGd", "executionTime": { "millis": 6011, "seconds": 6 }, "jobExitCode": 0, "returnCode": 0, "status": "READY_TO_RUN"}
The task status at the end of the execution is Ready to run and the execution status Ended OK aswell as the Job exit code 0 indicate that it ended successfully.
Example
If the task has failed, you will get for example:
{ "errorStatus": "JOB_ERROR", "execBasicStatus": "ERROR", "execDetailedStatus": "JOB_ERROR", "execDetailedStatusLabel": "Job ended with error(s)", "execRequestId": "1406817091606_fVsht", "executionTime": { "millis": 3847, "seconds": 3 }, "jobExitCode": 1, "returnCode": 0, "status": "READY_TO_RUN"}
The execution status Job error as well as the Job exit code 1 indicate that an error occurredduring the task execution.
Returning the status of a task executed in asynchronous mode
Procedure
1. Use the runTask MetaServlet command to run the execution task.

Non-GUI operation in metaServlet
408
Example
For example (on Windows):
MetaServletCaller.bat --tac-url=http://localhost:8080/org.talend.administrator/ --json-params={"actionName":"runTask","authPass":"admin","authUser":"[email protected]", "mode":"asynchronous","taskId":"2502"} --format-output
Example
You will get for example:
{ "execRequestId": "1406817216723_97nsV", "executionTime": { "millis": 1069, "seconds": 1 }, "returnCode": 0}
2. Execute the command getTaskExecutionStatus to follow the execution state.
Example
For example (on Windows):
MetaServletCaller.bat --tac-url=http://localhost:8080/org.talend.administrator/ --json-params={"actionName":"getTaskExecutionStatus","authPass":"admin","authUser":"[email protected]","execRequestId": "1406817216723_97nsV"} --format-output
Example
If the task is still running during the request, you will get for example:
{ "execBasicStatus": "RUNNING", "execDetailedStatus": "RUNNING", "execDetailedStatusLabel": "Running...", "executionTime": { "millis": 309, "seconds": 0 }, "returnCode": 0}
The task execution status is Running.
Example
If the task execution has ended, you will get for example:
{ "execBasicStatus": "ERROR", "execDetailedStatus": "JOB_ERROR", "execDetailedStatusLabel": "Job ended with error(s)", "executionTime": { "millis": 300, "seconds": 0
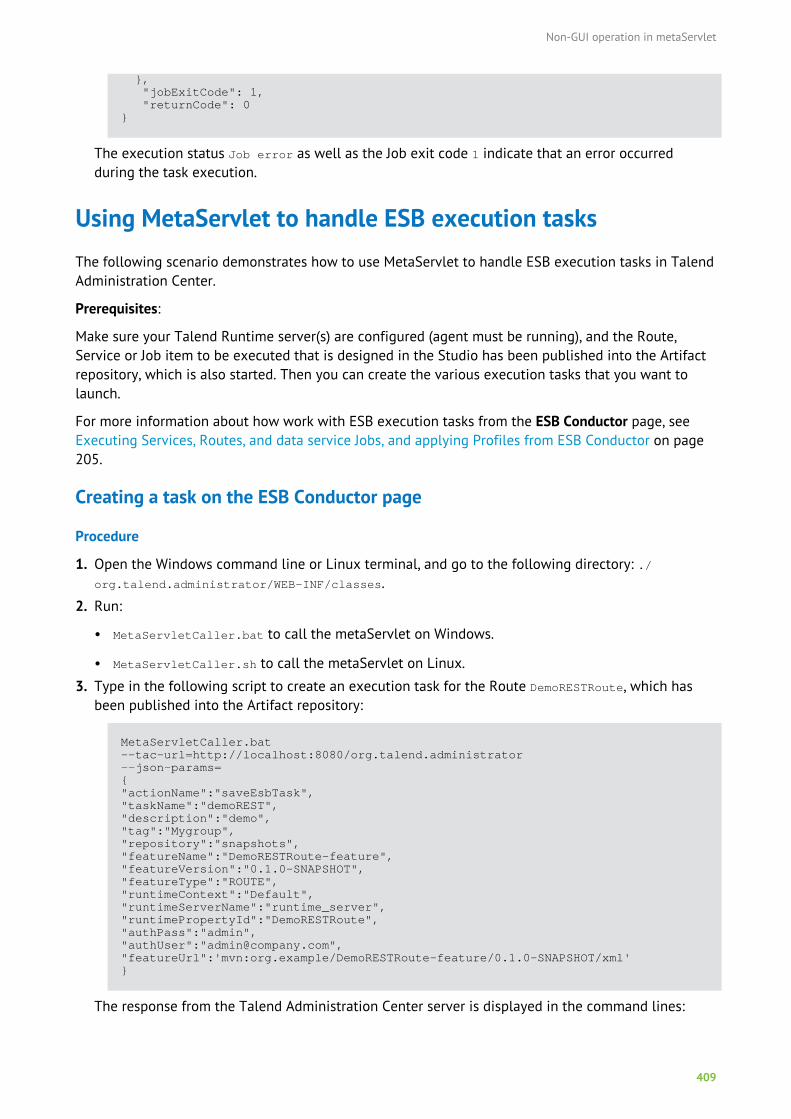
Non-GUI operation in metaServlet
409
}, "jobExitCode": 1, "returnCode": 0}
The execution status Job error as well as the Job exit code 1 indicate that an error occurredduring the task execution.
Using MetaServlet to handle ESB execution tasksThe following scenario demonstrates how to use MetaServlet to handle ESB execution tasks in TalendAdministration Center.
Prerequisites:
Make sure your Talend Runtime server(s) are configured (agent must be running), and the Route,Service or Job item to be executed that is designed in the Studio has been published into the Artifactrepository, which is also started. Then you can create the various execution tasks that you want tolaunch.
For more information about how work with ESB execution tasks from the ESB Conductor page, seeExecuting Services, Routes, and data service Jobs, and applying Profiles from ESB Conductor on page205.
Creating a task on the ESB Conductor page
Procedure
1. Open the Windows command line or Linux terminal, and go to the following directory: ./org.talend.administrator/WEB-INF/classes.
2. Run:
• MetaServletCaller.bat to call the metaServlet on Windows.
• MetaServletCaller.sh to call the metaServlet on Linux.
3. Type in the following script to create an execution task for the Route DemoRESTRoute, which hasbeen published into the Artifact repository:
MetaServletCaller.bat--tac-url=http://localhost:8080/org.talend.administrator --json-params={"actionName":"saveEsbTask","taskName":"demoREST","description":"demo","tag":"Mygroup","repository":"snapshots","featureName":"DemoRESTRoute-feature","featureVersion":"0.1.0-SNAPSHOT","featureType":"ROUTE","runtimeContext":"Default","runtimeServerName":"runtime_server","runtimePropertyId":"DemoRESTRoute","authPass":"admin","authUser":"[email protected]","featureUrl":'mvn:org.example/DemoRESTRoute-feature/0.1.0-SNAPSHOT/xml'}
The response from the Talend Administration Center server is displayed in the command lines:
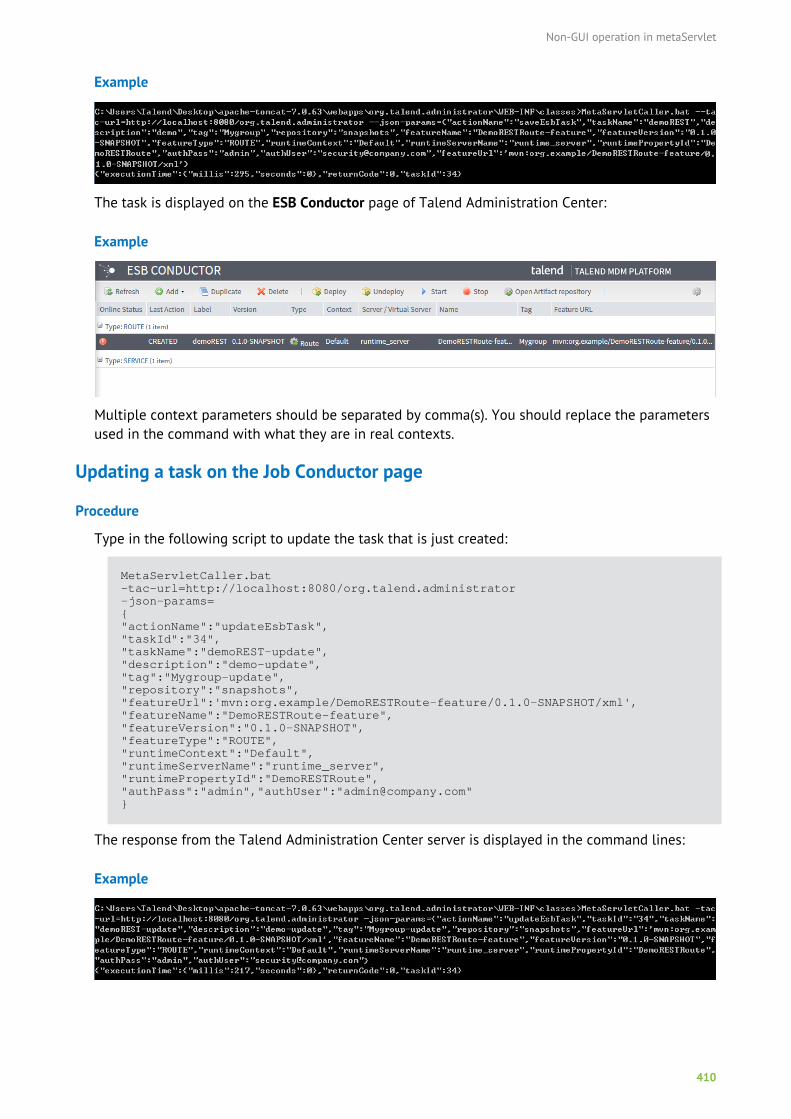
Non-GUI operation in metaServlet
410
Example
The task is displayed on the ESB Conductor page of Talend Administration Center:
Example
Multiple context parameters should be separated by comma(s). You should replace the parametersused in the command with what they are in real contexts.
Updating a task on the Job Conductor page
Procedure
Type in the following script to update the task that is just created:
MetaServletCaller.bat-tac-url=http://localhost:8080/org.talend.administrator -json-params={"actionName":"updateEsbTask","taskId":"34","taskName":"demoREST-update","description":"demo-update","tag":"Mygroup-update","repository":"snapshots","featureUrl":'mvn:org.example/DemoRESTRoute-feature/0.1.0-SNAPSHOT/xml',"featureName":"DemoRESTRoute-feature","featureVersion":"0.1.0-SNAPSHOT","featureType":"ROUTE","runtimeContext":"Default","runtimeServerName":"runtime_server","runtimePropertyId":"DemoRESTRoute","authPass":"admin","authUser":"[email protected]"}
The response from the Talend Administration Center server is displayed in the command lines:
Example
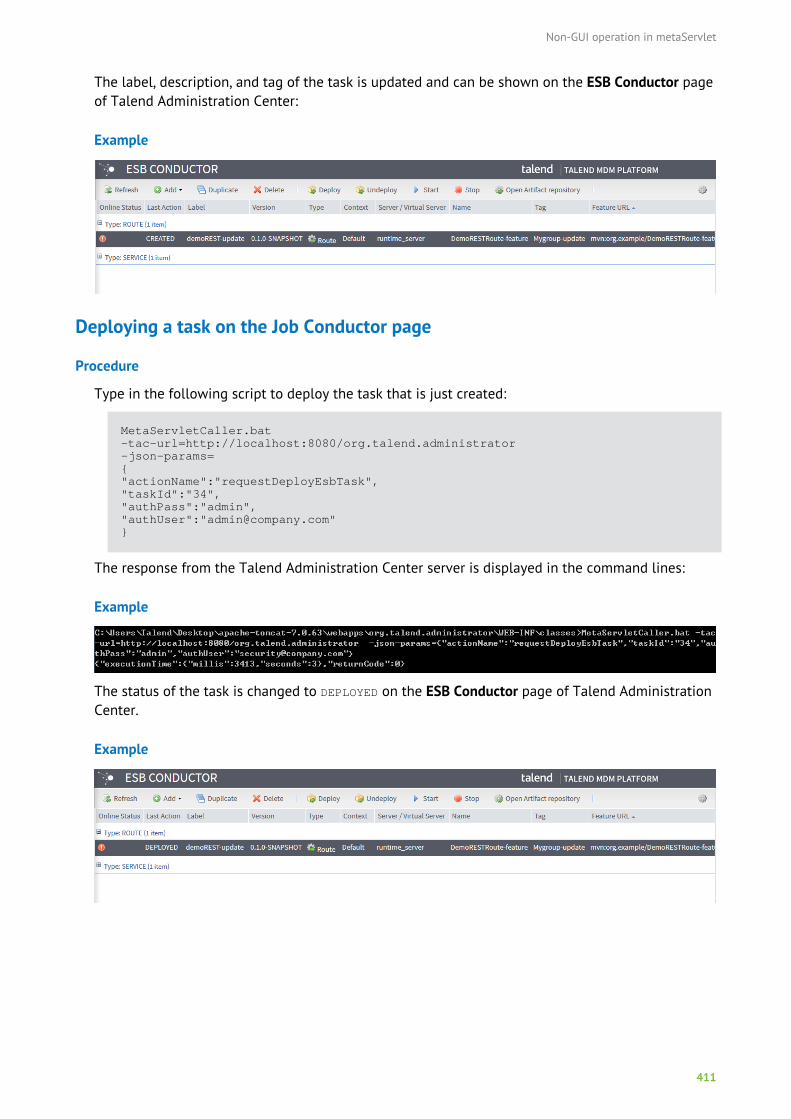
Non-GUI operation in metaServlet
411
The label, description, and tag of the task is updated and can be shown on the ESB Conductor pageof Talend Administration Center:
Example
Deploying a task on the Job Conductor page
Procedure
Type in the following script to deploy the task that is just created:
MetaServletCaller.bat-tac-url=http://localhost:8080/org.talend.administrator -json-params={"actionName":"requestDeployEsbTask","taskId":"34","authPass":"admin","authUser":"[email protected]"}
The response from the Talend Administration Center server is displayed in the command lines:
Example
The status of the task is changed to DEPLOYED on the ESB Conductor page of Talend AdministrationCenter.
Example
Non-GUI operation in metaServlet
412
Starting a task on the Job Conductor page
Procedure
Type in the following script to start the task that has been deployed in to Talend Runtime:
MetaServletCaller.bat-tac-url=http://localhost:8080/org.talend.administrator -json-params={"actionName":"startEsbTask","taskId":"34","authPass":"admin","authUser":"[email protected]"}
The response from the Talend Administration Center server is displayed in the command lines:
Example
The status of the task is changed to STARTED on the ESB Conductor page of Talend AdministrationCenter.
Example
Stopping a task on the Job Conductor page
Procedure
Type in the following script to stop the task that has been started:
MetaServletCaller.bat-tac-url=http://localhost:8080/org.talend.administrator -json-params={"actionName":"stopEsbTask","taskId":"34","authPass":"admin","authUser":"[email protected]"}
The response from the Talend Administration Center server is displayed in the command lines:
Non-GUI operation in metaServlet
413
Example
The status of the task is changed to STOPPED on the ESB Conductor page of Talend AdministrationCenter.
Example
Getting the status of a task on the Job Conductor page
Procedure
Type in the following script to show the status of the task:
MetaServletCaller.bat-tac-url=http://localhost:8080/org.talend.administrator -json-params={"actionName":"getEsbTaskStatus","taskId":"34","authPass":"admin","authUser":"[email protected]"}
The status of the task is displayed in the command lines:
Example
Getting the task ID by its name
Procedure
Type in the following script to show the status of the task:
MetaServletCaller.bat-tac-url=http://localhost:8080/org.talend.administrator -json-params={"actionName":"getEsbTaskIdByName","taskName":"demoREST-update","authPass":"admin","authUser":"[email protected]"
Non-GUI operation in metaServlet
414
}
The ID of the task is displayed in the command lines:
Example
Undeploying a task on the Job Conductor page
Procedure
Type in the following to undeploy the task that has been stopped:
MetaServletCaller.bat-tac-url=http://localhost:8080/org.talend.administrator -json-params={"actionName":"requestUndeployEsbTask","taskId":"34","authPass":"admin","authUser":"[email protected]"}
The response from the Talend Administration Center server is displayed in the command lines:
Example
The status of the task is changed to UNDEPLOYED on the ESB Conductor page of TalendAdministration Center.
Example
Deleting a task on the Job Conductor page
Procedure
Type in the following script to delete the task that has been undeployed:
MetaServletCaller.bat-tac-url=http://localhost:8080/org.talend.administrator -json-params={"actionName":"deleteEsbTask",
Non-GUI operation in metaServlet
415
"taskId":"34","authPass":"admin","authUser":"[email protected]"}
The response from the Talend Administration Center server is displayed in the command lines:
Example
The task deleted from the ESB Conductor page of Talend Administration Center.
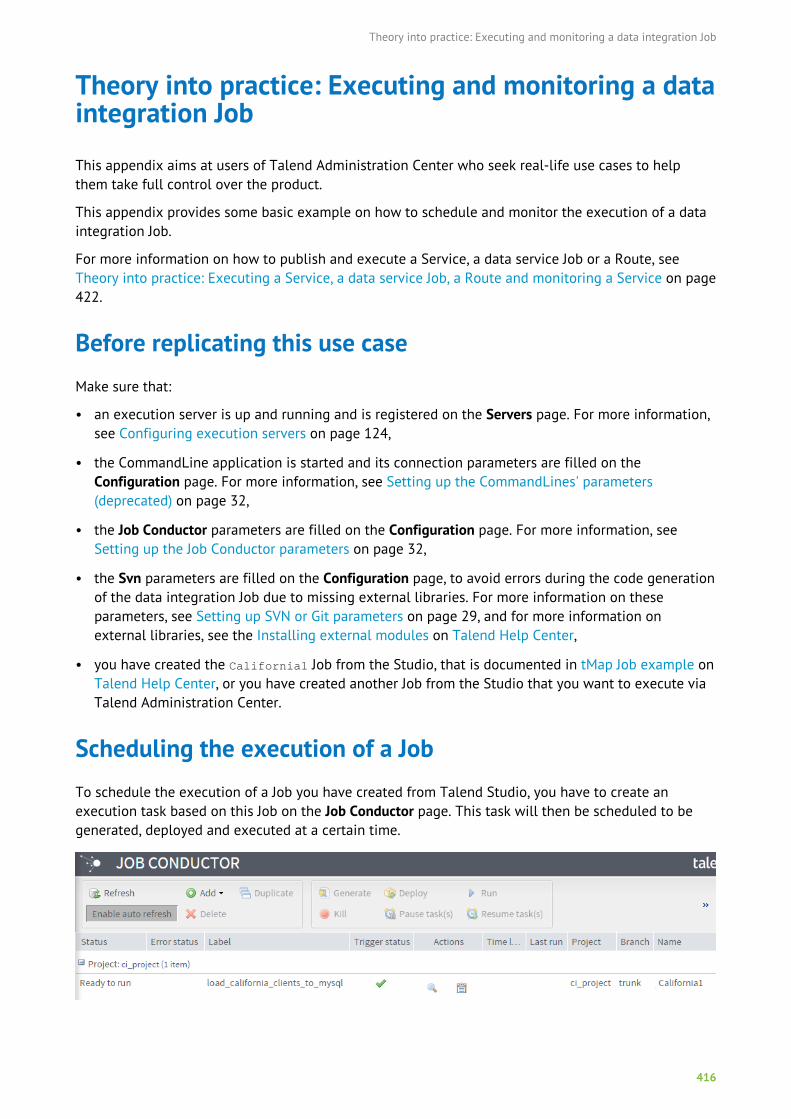
Theory into practice: Executing and monitoring a data integration Job
416
Theory into practice: Executing and monitoring a dataintegration Job
This appendix aims at users of Talend Administration Center who seek real-life use cases to helpthem take full control over the product.
This appendix provides some basic example on how to schedule and monitor the execution of a dataintegration Job.
For more information on how to publish and execute a Service, a data service Job or a Route, seeTheory into practice: Executing a Service, a data service Job, a Route and monitoring a Service on page422.
Before replicating this use caseMake sure that:
• an execution server is up and running and is registered on the Servers page. For more information,see Configuring execution servers on page 124,
• the CommandLine application is started and its connection parameters are filled on theConfiguration page. For more information, see Setting up the CommandLines' parameters(deprecated) on page 32,
• the Job Conductor parameters are filled on the Configuration page. For more information, seeSetting up the Job Conductor parameters on page 32,
• the Svn parameters are filled on the Configuration page, to avoid errors during the code generationof the data integration Job due to missing external libraries. For more information on theseparameters, see Setting up SVN or Git parameters on page 29, and for more information onexternal libraries, see the Installing external modules on Talend Help Center,
• you have created the California1 Job from the Studio, that is documented in tMap Job example onTalend Help Center, or you have created another Job from the Studio that you want to execute viaTalend Administration Center.
Scheduling the execution of a JobTo schedule the execution of a Job you have created from Talend Studio, you have to create anexecution task based on this Job on the Job Conductor page. This task will then be scheduled to begenerated, deployed and executed at a certain time.
Theory into practice: Executing and monitoring a data integration Job
417
For more information on how to monitor the executions of your Job, see Monitoring the execution of aJob on page 418.
How to add a task on a Job
Procedure
1. On the top toolbar of the Job Conductor page, click Add to display the configuration panel of thetask.
2. In the Label field of the panel, type in the name of the task, here it is load_california_clients_to_mysql.
3.Click the icon and select the Job you created in the Talend Studio, here it is California1.
4. In the Execution server field, select the server you registered on the Servers page.
5. In the Timeout (s) field, type in how long to wait, in seconds, before the task is being killed, here itis 240 (4 minutes).
6. Fill in other fields if needed then save your task.
To perform this action via the MetaServlet application, use the createTask command. For moreinformation about the MetaServlet parameters, see Parameters and actions in metaServlet on page400.
ResultsThe load_california_clients_to_mysql task is created.
How to add a trigger on a task
Procedure
1. In the task list of the Job Conductor, select the task to which you want to add a trigger, here it isload_california_clients_to_mysql.
2. Click the Triggers button at the bottom of the page. The corresponding panel opens.
3. Click Add trigger, then select Add simple trigger in the list to add a time-based trigger on the task.
4. In the Add simple trigger panel that opens on the right, fill in the relevant information:
a) In the Label field, type in the name of your trigger, here it is trigger_california_job.
b) Fill in a description in needed.
c) Select the time at which the triggering takes place and is ended in the Start time and End timefields.
d) In the Number of repetitions field, type in the number of executions that should occur inaddition to the first execution. Type in 3 in order to trigger three executions: one to generatethe code of your Job, one to deploy your Job and one to run your Job.
e) In the Time interval (s) field, type in (in seconds) the time interval between triggerings, here it is240 (4 minutes).
5. Save your changes. In the Trigger status column.
ResultsYou can see that the trigger is added and is ready to be launched at the specified time.
Theory into practice: Executing and monitoring a data integration Job
418
How to generate, deploy and run your Job manually
About this task
Alternatively, if you did not add a trigger to your execution task, you can execute it manually.
Procedure
1. In the task list of the Job Conductor, select the task you want to execute, here it is load_california_clients_to_mysql.
2. Click Generate on the top toolbar and wait a few seconds.
To perform this action via the MetaServlet application, use the requestGenerate command. Formore information on the MetaServlet parameters, see Parameters and actions in metaServlet onpage 400.
The code of your Job is generated with the CommandLine application and the task status changesfrom Ready to generate to Ready to deploy.
3. Click Deploy on the top toolbar and wait a few seconds.
To perform this action via the MetaServlet application, use the requestDeploy command. For moreinformation on the MetaServlet parameters, see Parameters and actions in metaServlet on page400.
The Job is deployed and the task status changes from Ready to deploy to Ready to run.
4. Click Run on the top toolbar and wait a few seconds.
To perform this action via the MetaServlet application, use the runTask command. For moreinformation on the MetaServlet parameters, see Parameters and actions in metaServlet on page400.
ResultsThe Job is executed on the server that you registered on the Servers page.
Monitoring the execution of a JobOnce you have executed your Job several times via the Job Conductor page of Talend AdministrationCenter, you can monitor its executions (monitoring grid, statistic information and execution logs).
How to display the Job execution history
Procedure
1. In the task list of the Job Conductor, select the task you want to monitor, here it is load_california_clients_to_mysql.
2. In the Actions column, click the icon to open the Execution History page which is filtered onthe selected task.
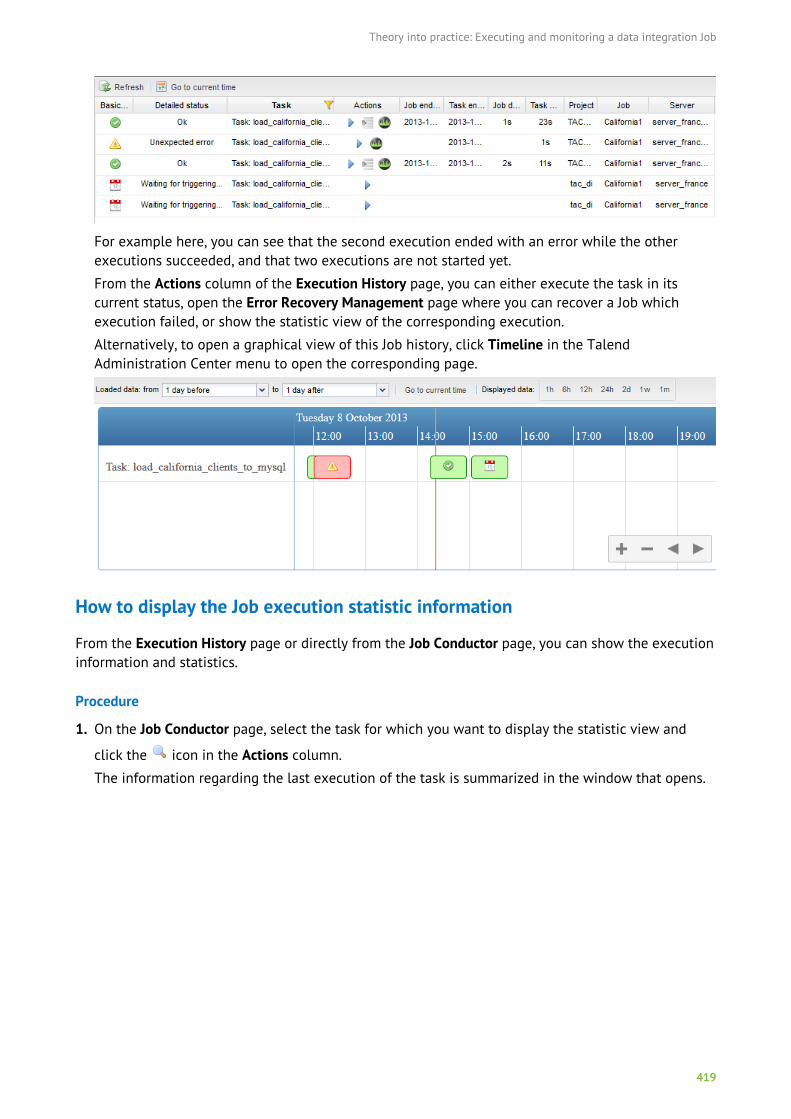
Theory into practice: Executing and monitoring a data integration Job
419
For example here, you can see that the second execution ended with an error while the otherexecutions succeeded, and that two executions are not started yet.
From the Actions column of the Execution History page, you can either execute the task in itscurrent status, open the Error Recovery Management page where you can recover a Job whichexecution failed, or show the statistic view of the corresponding execution.
Alternatively, to open a graphical view of this Job history, click Timeline in the TalendAdministration Center menu to open the corresponding page.
How to display the Job execution statistic information
From the Execution History page or directly from the Job Conductor page, you can show the executioninformation and statistics.
Procedure
1. On the Job Conductor page, select the task for which you want to display the statistic view and
click the icon in the Actions column.
The information regarding the last execution of the task is summarized in the window that opens.
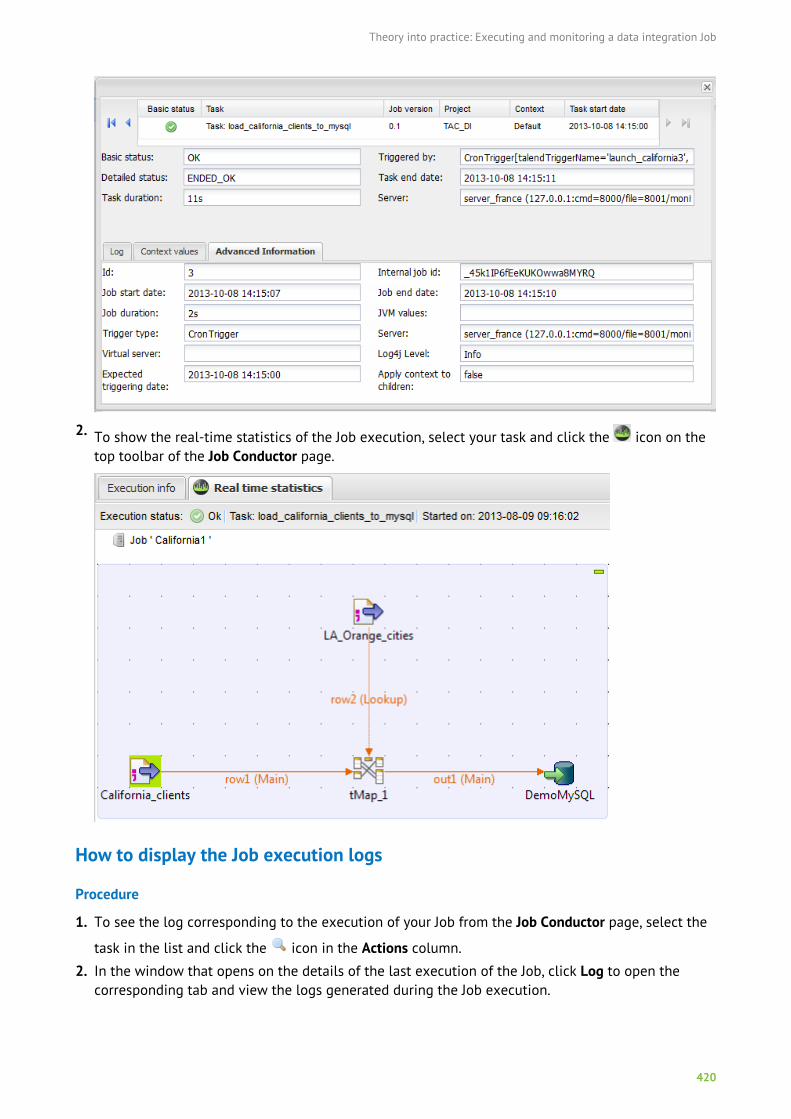
Theory into practice: Executing and monitoring a data integration Job
420
2. To show the real-time statistics of the Job execution, select your task and click the icon on thetop toolbar of the Job Conductor page.
How to display the Job execution logs
Procedure
1. To see the log corresponding to the execution of your Job from the Job Conductor page, select the
task in the list and click the icon in the Actions column.
2. In the window that opens on the details of the last execution of the Job, click Log to open thecorresponding tab and view the logs generated during the Job execution.

Theory into practice: Executing and monitoring a data integration Job
421
To display the log via the MetaServlet application, use the taskLog command. For moreinformation about the MetaServlet parameters, see Parameters and actions in metaServlet on page400.

Theory into practice: Executing a Service, a data service Job, a Route and monitoring a Service
422
Theory into practice: Executing a Service, a dataservice Job, a Route and monitoring a Service
This appendix aims at users of Talend Administration Center who seek real-life use cases to helpthem take full control over the product.
This appendix provides some basic examples on how to publish and execute of a Service, a dataservice Job and a Route, and how to monitor the Service endpoints and Service activities.
For more information on how to execute and monitor a Job, see Theory into practice: Executing andmonitoring a data integration Job on page 416.
Before starting the use caseMake sure that:
• an execution server is up and running and is registered on the Servers page. For more information,see Configuring execution servers on page 124,
• the CommandLine application is started and its connection parameters are filled on theConfiguration page. For more information, see Setting up the CommandLines' parameters(deprecated) on page 32,
• the Nexus Artifact Repository is started (ships with Talend Administration Center). For moreinformation on how to install the artifact repository, see the Talend Installation and Upgrade Guide.
• the Artifact Repository parameters are filled on the Configuration page. For more information, seeSetting up the artifact repository parameters on page 36 ,
• the endpoint repository and the Service Locator feature are set up. For more information regardinghow to set up the Service Locator module, please refer to the Talend ESB Infrastructure ServicesConfiguration Guide.
• the Agent and Monitoring Server are set up in order for the Service Activity Monitoring module tobe fed with event information. For more information regarding how to set up the Service ActivityMonitoring server and agent, please refer to the Talend ESB Infrastructure Services ConfigurationGuide.
• the ESB Service Locator and SAM parameters are filled on the Configuration page. For moreinformation, see Setting up the ESB Service Locator and Service Activity Monitoring parameters onpage 33 .
• the Svn parameters are filled on the Configuration page, to avoid errors during the code generationof the data service Job due to missing external libraries. For more information on these parameters,see Setting up SVN or Git parameters on page 29, and for more information on external libraries,see the Talend Installation and Upgrade Guide Talend Installation and Upgrade Guide TalendInstallation and Upgrade Guide,
• you have created the airport service, the airportJob Job, and the airportRoute Route from theStudio, that are documented in the Appendix Theory into practice: Data service and routingexamples of the Talend Studio User Guide, or you have created other Service, data service Job andRoute from the Studio that you want to execute via Talend Administration Center.
Theory into practice: Executing a Service, a data service Job, a Route and monitoring a Service
423
Publishing a Service, a data service Job and a RouteBefore you can execute any Service, data service Job or Route you have created in Talend Studio fromTalend Administration Center, you need to publish them from Talend Studio to an Artifact Repository.To publish a Service, a data service Job and a Route you have created from Talend Studio into anArtifact Repository, you have to create a publishing task based on each of them on the Publisher page.This task can be scheduled to be published at a certain time or executed manually.
How to add publishing tasks on the Service, the data service Job and the Route
About this task
Follow these steps to add a publishing task on the Service first.
Procedure
1. On the top toolbar of the Publisher page, click Add to display the configuration panel of the task.
Example
2. In the Label field of the panel, type in the name of the task. Here it is airport. Fill a description inthe Description field if needed.
3. Select the project and the branch that holds the service in the Project and the Branch fields.
4. Select Service in the Individual list and then in the Name list select the service you created in theTalend Studio, here it is airport. Select Latest in the Version list.
5. Select the Publish as Snapshot check box.
6. Keep the default settings of the other fields and save your task. The airport task is created.
Repeat these steps to add a publishing task on the data service Job and the Route in the same way.When creating the publishing task on the data service Job, select Job in the Individual list, For theRoute, select Route.
How to add triggers on the publishing tasks
About this task
Follow these steps to add a trigger on the Service first.
Procedure
1. In the task list of the Publisher, select the task you created for the Service, here it is airport.
2. In the Trigger view at the bottom of the page, click Add trigger... and then select Add CRON triggerin the list. The configuration panel opens.
3. In the Add CRON trigger panel that opens on the right, fill in the relevant information:
In the Label field, type in the name of your trigger, here it is trigger_airport_service.
Fill in a description if needed.
Theory into practice: Executing a Service, a data service Job, a Route and monitoring a Service
424
Click Open UI configurer to open the Cron UI trigger configuration dialog box.
Select time items at which you want the task to be executed. For the Days of Month and Days ofweek fields, select one or more week days OR one or more dates. The other fields are mandatory.For multiple selection, press Ctrl + click.
4. Save your changes. In the Trigger status column, you can see that the trigger is added and is readyto be launched at the specified time.
Repeat these steps to add a trigger on the data service Job and the Route.
How to execute the publishing tasks manually
About this task
Alternatively, if you did not add triggers to the publishing tasks, you can execute them manually.
To execute the publishing task on the Service:
Procedure
1. In the task list of the Publisher, select the task you created for the Service, here it is airport.
2. Click the Publish button on the top toolbar and wait a few seconds. The code of your Service isgenerated with the CommandLine application and the task status changes from Ready to publishto Publishing and then Published.
Repeat these steps to publish the data service Job and the Route.
For more information on how to execute the Service, the data service Job and the Route, seeExecuting a Service, a data service Job and a Route on page 424.
Executing a Service, a data service Job and a RouteTo execute the Service, the data service Job and the Route you have created from Talend Studio andpublished into an Artifact Repository, you have to create an execution task based on each of themon the ESB Conductor page. This task will then be launched to deploy and start the Service, the dataservice Job and the Route.
For more information on how to publish the Service, the data service Job and the Route, seePublishing a Service, a data service Job and a Route on page 423.
How to add execution tasks on the Service, the data service Job and the Route
About this task
Follow these steps to add an execution task on the Service first.
Procedure
1. On the top toolbar of the ESB Conductor page, click Add to display the configuration panel of thetask.
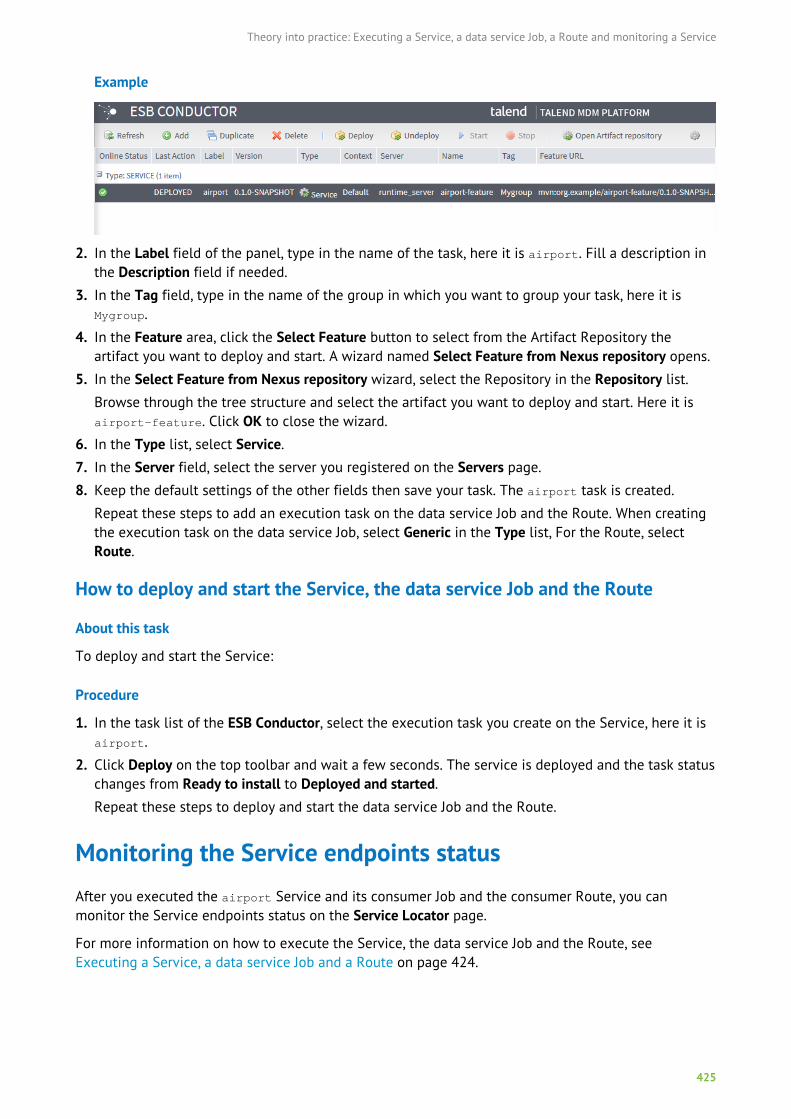
Theory into practice: Executing a Service, a data service Job, a Route and monitoring a Service
425
Example
2. In the Label field of the panel, type in the name of the task, here it is airport. Fill a description inthe Description field if needed.
3. In the Tag field, type in the name of the group in which you want to group your task, here it isMygroup.
4. In the Feature area, click the Select Feature button to select from the Artifact Repository theartifact you want to deploy and start. A wizard named Select Feature from Nexus repository opens.
5. In the Select Feature from Nexus repository wizard, select the Repository in the Repository list.
Browse through the tree structure and select the artifact you want to deploy and start. Here it isairport-feature. Click OK to close the wizard.
6. In the Type list, select Service.
7. In the Server field, select the server you registered on the Servers page.
8. Keep the default settings of the other fields then save your task. The airport task is created.
Repeat these steps to add an execution task on the data service Job and the Route. When creatingthe execution task on the data service Job, select Generic in the Type list, For the Route, selectRoute.
How to deploy and start the Service, the data service Job and the Route
About this task
To deploy and start the Service:
Procedure
1. In the task list of the ESB Conductor, select the execution task you create on the Service, here it isairport.
2. Click Deploy on the top toolbar and wait a few seconds. The service is deployed and the task statuschanges from Ready to install to Deployed and started.
Repeat these steps to deploy and start the data service Job and the Route.
Monitoring the Service endpoints statusAfter you executed the airport Service and its consumer Job and the consumer Route, you canmonitor the Service endpoints status on the Service Locator page.
For more information on how to execute the Service, the data service Job and the Route, seeExecuting a Service, a data service Job and a Route on page 424.
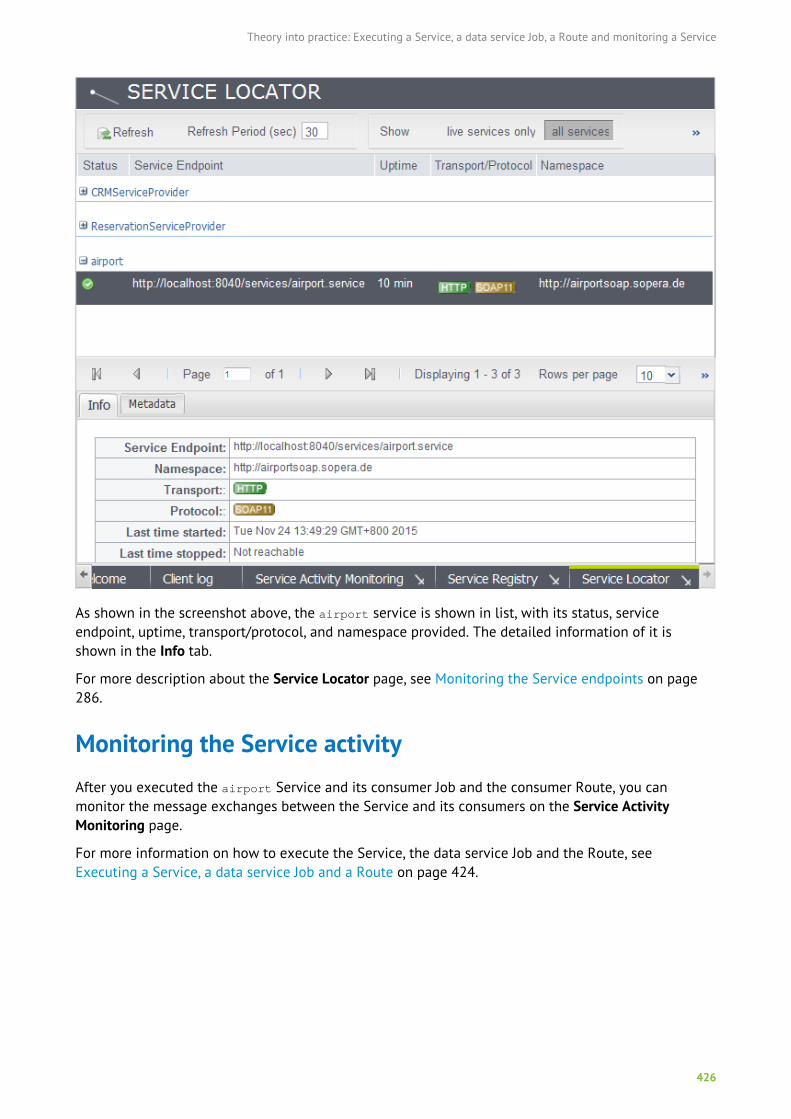
Theory into practice: Executing a Service, a data service Job, a Route and monitoring a Service
426
As shown in the screenshot above, the airport service is shown in list, with its status, serviceendpoint, uptime, transport/protocol, and namespace provided. The detailed information of it isshown in the Info tab.
For more description about the Service Locator page, see Monitoring the Service endpoints on page286.
Monitoring the Service activityAfter you executed the airport Service and its consumer Job and the consumer Route, you canmonitor the message exchanges between the Service and its consumers on the Service ActivityMonitoring page.
For more information on how to execute the Service, the data service Job and the Route, seeExecuting a Service, a data service Job and a Route on page 424.

Theory into practice: Executing a Service, a data service Job, a Route and monitoring a Service
427
The Service Activity Monitoring list provides aggregated information where all events related to thesame message exchange are grouped together. The details of the selected event is shown on thelower half of the page.
A single request-response call is translated into 4 events, two from the consumer side (Request-OUTand Response-IN) and two from the provider side (Request-IN and Response-OUT).
For more description about the information shown in the Service Activity Monitoring page, seeMonitoring the Service events on page 295.


