Embed Size (px)
Citation preview
TIBCO Enterprise Message Service™
Central Administration Software Release 8.5May 2019Document Updated: August 2020

Important Information
SOME TIBCO SOFTWARE EMBEDS OR BUNDLES OTHER TIBCO SOFTWARE. USE OF SUCHEMBEDDED OR BUNDLED TIBCO SOFTWARE IS SOLELY TO ENABLE THE FUNCTIONALITY (ORPROVIDE LIMITED ADD-ON FUNCTIONALITY) OF THE LICENSED TIBCO SOFTWARE. THEEMBEDDED OR BUNDLED SOFTWARE IS NOT LICENSED TO BE USED OR ACCESSED BY ANYOTHER TIBCO SOFTWARE OR FOR ANY OTHER PURPOSE.
USE OF TIBCO SOFTWARE AND THIS DOCUMENT IS SUBJECT TO THE TERMS ANDCONDITIONS OF A LICENSE AGREEMENT FOUND IN EITHER A SEPARATELY EXECUTEDSOFTWARE LICENSE AGREEMENT, OR, IF THERE IS NO SUCH SEPARATE AGREEMENT, THECLICKWRAP END USER LICENSE AGREEMENT WHICH IS DISPLAYED DURING DOWNLOADOR INSTALLATION OF THE SOFTWARE (AND WHICH IS DUPLICATED IN THE LICENSE FILE)OR IF THERE IS NO SUCH SOFTWARE LICENSE AGREEMENT OR CLICKWRAP END USERLICENSE AGREEMENT, THE LICENSE(S) LOCATED IN THE “LICENSE” FILE(S) OF THESOFTWARE. USE OF THIS DOCUMENT IS SUBJECT TO THOSE TERMS AND CONDITIONS, ANDYOUR USE HEREOF SHALL CONSTITUTE ACCEPTANCE OF AND AN AGREEMENT TO BEBOUND BY THE SAME.
This document is subject to U.S. and international copyright laws and treaties. No part of thisdocument may be reproduced in any form without the written authorization of TIBCO Software Inc.
TIBCO, the TIBCO logo, the TIBCO O logo, Two-Second Advantage, TIBCO Cloud Integration, TIBCOFlogo Apps, TIBCO Flogo, TIB, Information Bus, TIBCO Enterprise Message Service, Rendezvous, andTIBCO Rendezvous are either registered trademarks or trademarks of TIBCO Software Inc. in theUnited States and/or other countries.
Enterprise Java Beans (EJB), Java Platform Enterprise Edition (Java EE), Java 2 Platform EnterpriseEdition (J2EE), and all Java-based trademarks and logos are trademarks or registered trademarks ofOracle Corporation in the U.S. and other countries.
All other product and company names and marks mentioned in this document are the property of theirrespective owners and are mentioned for identification purposes only.
This software may be available on multiple operating systems. However, not all operating systemplatforms for a specific software version are released at the same time. Please see the readme.txt file forthe availability of this software version on a specific operating system platform.
THIS DOCUMENT IS PROVIDED “AS IS” WITHOUT WARRANTY OF ANY KIND, EITHER EXPRESSOR IMPLIED, INCLUDING, BUT NOT LIMITED TO, THE IMPLIED WARRANTIES OFMERCHANTABILITY, FITNESS FOR A PARTICULAR PURPOSE, OR NON-INFRINGEMENT.
THIS DOCUMENT COULD INCLUDE TECHNICAL INACCURACIES OR TYPOGRAPHICALERRORS. CHANGES ARE PERIODICALLY ADDED TO THE INFORMATION HEREIN; THESECHANGES WILL BE INCORPORATED IN NEW EDITIONS OF THIS DOCUMENT. TIBCOSOFTWARE INC. MAY MAKE IMPROVEMENTS AND/OR CHANGES IN THE PRODUCT(S)AND/OR THE PROGRAM(S) DESCRIBED IN THIS DOCUMENT AT ANY TIME.
THE CONTENTS OF THIS DOCUMENT MAY BE MODIFIED AND/OR QUALIFIED, DIRECTLY ORINDIRECTLY, BY OTHER DOCUMENTATION WHICH ACCOMPANIES THIS SOFTWARE,INCLUDING BUT NOT LIMITED TO ANY RELEASE NOTES AND "READ ME" FILES.
This and other products of TIBCO Software Inc. may be covered by registered patents. Please refer toTIBCO's Virtual Patent Marking document (https://www.tibco.com/patents) for details.
Copyright © 1997-2020. TIBCO Software Inc. All Rights Reserved.
2
TIBCO Enterprise Message Service™ Central Administration
Contents
About this Product . . . . . . . . . . . . . . . . . . . . . . . . . . . . . . . . . . . . . . . . . . . . . . . . . . . . . . . . . . . . . . . . . . . . . . . . . . . . . . . . . 6
TIBCO Documentation and Support Services . . . . . . . . . . . . . . . . . . . . . . . . . . . . . . . . . . . . . . . . . . . . . . . . . . . . . . . . .7
Introduction . . . . . . . . . . . . . . . . . . . . . . . . . . . . . . . . . . . . . . . . . . . . . . . . . . . . . . . . . . . . . . . . . . . . . . . . . . . . . . . . . . . . . . . 9
Requirements . . . . . . . . . . . . . . . . . . . . . . . . . . . . . . . . . . . . . . . . . . . . . . . . . . . . . . . . . . . . . . . . . . . . . . . . . . . . . . . . . . . . . . . . . . . . . . . . . . . . . . . . . 9
Structure . . . . . . . . . . . . . . . . . . . . . . . . . . . . . . . . . . . . . . . . . . . . . . . . . . . . . . . . . . . . . . . . . . . . . . . . . . . . . . . . . . . . . . . . . . . . . . . . . . . . . . . . . . . . . . 9
How Configuration Changes are Saved and Deployed . . . . . . . . . . . . . . . . . . . . . . . . . . . . . . . . . . . . . . . . . . . . . . . . . . . . . . . . . . . . 10
JSON Configuration Files . . . . . . . . . . . . . . . . . . . . . . . . . . . . . . . . . . . . . . . . . . . . . . . . . . . . . . . . . . . . . . . . . . . . . . . . . . . . . . . . . . . . . . . . . . . . .11
Central Administration Server Set Up and Configuration . . . . . . . . . . . . . . . . . . . . . . . . . . . . . . . . . . . . . . . . . . . . . 12
Starting and Stopping the Central Administration Server . . . . . . . . . . . . . . . . . . . . . . . . . . . . . . . . . . . . . . . . . . . . . . . . . . . . . . . . . . . . . . .12
Create a Data Directory . . . . . . . . . . . . . . . . . . . . . . . . . . . . . . . . . . . . . . . . . . . . . . . . . . . . . . . . . . . . . . . . . . . . . . . . . . . . . . . . . . . . . . . . . . 12
Create a Configuration File . . . . . . . . . . . . . . . . . . . . . . . . . . . . . . . . . . . . . . . . . . . . . . . . . . . . . . . . . . . . . . . . . . . . . . . . . . . . . . . . . . . . . . .12
Starting and Configuring the Central Administration Server . . . . . . . . . . . . . . . . . . . . . . . . . . . . . . . . . . . . . . . . . . . . . . . . . . . . . . . .12
Central Administration Server Options . . . . . . . . . . . . . . . . . . . . . . . . . . . . . . . . . . . . . . . . . . . . . . . . . . . . . . . . . . . . . . . . . . . . . . . 13
Stopping the Central Administration Server . . . . . . . . . . . . . . . . . . . . . . . . . . . . . . . . . . . . . . . . . . . . . . . . . . . . . . . . . . . . . . . . . . . . . . . 18
Running the Central Administration Server as a Windows Service . . . . . . . . . . . . . . . . . . . . . . . . . . . . . . . . . . . . . . . . . . . . . . . . . . . . . 18
Removing the Central Administration Server Windows Service . . . . . . . . . . . . . . . . . . . . . . . . . . . . . . . . . . . . . . . . . . . . . . . . . . . 19
Security Considerations . . . . . . . . . . . . . . . . . . . . . . . . . . . . . . . . . . . . . . . . . . . . . . . . . . . . . . . . . . . . . . . . . . . . . . . . . . . . . . . . . . . . . . . . . . . . . . 19
Configuration of JAAS Authentication . . . . . . . . . . . . . . . . . . . . . . . . . . . . . . . . . . . . . . . . . . . . . . . . . . . . . . . . . . . . . . . . . . . . . . . . . . . . .20
Configuration of SSL Connections with EMS Servers . . . . . . . . . . . . . . . . . . . . . . . . . . . . . . . . . . . . . . . . . . . . . . . . . . . . . . . . . . . . . 21
Configuration of HTTPS Connections with Web Browsers . . . . . . . . . . . . . . . . . . . . . . . . . . . . . . . . . . . . . . . . . . . . . . . . . . . . . . . . . 21
Configuration of Cipher Suites . . . . . . . . . . . . . . . . . . . . . . . . . . . . . . . . . . . . . . . . . . . . . . . . . . . . . . . . . . . . . . . . . . . . . . . . . . . . . . . . . . . .22
Central Administration Navigation . . . . . . . . . . . . . . . . . . . . . . . . . . . . . . . . . . . . . . . . . . . . . . . . . . . . . . . . . . . . . . . . . .23
Central Administration Web Interface Access . . . . . . . . . . . . . . . . . . . . . . . . . . . . . . . . . . . . . . . . . . . . . . . . . . . . . . . . . . . . . . . . . . . . . . . . . .23
Navigation Through the Web Interface . . . . . . . . . . . . . . . . . . . . . . . . . . . . . . . . . . . . . . . . . . . . . . . . . . . . . . . . . . . . . . . . . . . . . . . . . . . . . . . . 23
Server List Page . . . . . . . . . . . . . . . . . . . . . . . . . . . . . . . . . . . . . . . . . . . . . . . . . . . . . . . . . . . . . . . . . . . . . . . . . . . . . . . . . . . . . . . . . . . . . . . . . 23
Server Overview Page . . . . . . . . . . . . . . . . . . . . . . . . . . . . . . . . . . . . . . . . . . . . . . . . . . . . . . . . . . . . . . . . . . . . . . . . . . . . . . . . . . . . . . . . . . . 24
Deployments Page . . . . . . . . . . . . . . . . . . . . . . . . . . . . . . . . . . . . . . . . . . . . . . . . . . . . . . . . . . . . . . . . . . . . . . . . . . . . . . . . . . . . . . . . . . . . . . .24
Common Navigation Tools . . . . . . . . . . . . . . . . . . . . . . . . . . . . . . . . . . . . . . . . . . . . . . . . . . . . . . . . . . . . . . . . . . . . . . . . . . . . . . . . . . . . . . . 25
Using Central Administration . . . . . . . . . . . . . . . . . . . . . . . . . . . . . . . . . . . . . . . . . . . . . . . . . . . . . . . . . . . . . . . . . . . . . . 28
Add EMS Servers to Central Administration . . . . . . . . . . . . . . . . . . . . . . . . . . . . . . . . . . . . . . . . . . . . . . . . . . . . . . . . . . . . . . . . . . . . . . . . . . . 28
Adding a Server . . . . . . . . . . . . . . . . . . . . . . . . . . . . . . . . . . . . . . . . . . . . . . . . . . . . . . . . . . . . . . . . . . . . . . . . . . . . . . . . . . . . . . . . . . . . . . . . . 28
Duplicating an Existing Server . . . . . . . . . . . . . . . . . . . . . . . . . . . . . . . . . . . . . . . . . . . . . . . . . . . . . . . . . . . . . . . . . . . . . . . . . . . . . . . . . . . .28
Renaming a Server Configuration . . . . . . . . . . . . . . . . . . . . . . . . . . . . . . . . . . . . . . . . . . . . . . . . . . . . . . . . . . . . . . . . . . . . . . . . . . . . . . . . 29
Removing a Server from Central Administration . . . . . . . . . . . . . . . . . . . . . . . . . . . . . . . . . . . . . . . . . . . . . . . . . . . . . . . . . . . . . . . . . . .29
View the Server Configuration . . . . . . . . . . . . . . . . . . . . . . . . . . . . . . . . . . . . . . . . . . . . . . . . . . . . . . . . . . . . . . . . . . . . . . . . . . . . . . . . . . . . . . . . 30
Locking the Server . . . . . . . . . . . . . . . . . . . . . . . . . . . . . . . . . . . . . . . . . . . . . . . . . . . . . . . . . . . . . . . . . . . . . . . . . . . . . . . . . . . . . . . . . . . . . . . . . . . 30
3
TIBCO Enterprise Message Service™ Central Administration
Lock Conflicts . . . . . . . . . . . . . . . . . . . . . . . . . . . . . . . . . . . . . . . . . . . . . . . . . . . . . . . . . . . . . . . . . . . . . . . . . . . . . . . . . . . . . . . . . . . . . . . . . . . .30
Reverting — Releasing a Lock . . . . . . . . . . . . . . . . . . . . . . . . . . . . . . . . . . . . . . . . . . . . . . . . . . . . . . . . . . . . . . . . . . . . . . . . . . . . . . . . . . . 30
Editing Server Configurations . . . . . . . . . . . . . . . . . . . . . . . . . . . . . . . . . . . . . . . . . . . . . . . . . . . . . . . . . . . . . . . . . . . . . . . . . . . . . . . . . . . . . . . . . 31
Overview of the Editing Process . . . . . . . . . . . . . . . . . . . . . . . . . . . . . . . . . . . . . . . . . . . . . . . . . . . . . . . . . . . . . . . . . . . . . . . . . . . . . . . . . .31
Index Pages . . . . . . . . . . . . . . . . . . . . . . . . . . . . . . . . . . . . . . . . . . . . . . . . . . . . . . . . . . . . . . . . . . . . . . . . . . . . . . . . . . . . . . . . . . . . . . . . . . . . . 31
Configuration Deployment . . . . . . . . . . . . . . . . . . . . . . . . . . . . . . . . . . . . . . . . . . . . . . . . . . . . . . . . . . . . . . . . . . . . . . . . . . . . . . . . . . . . . . . . . . . . 32
Deploying All Locked Servers . . . . . . . . . . . . . . . . . . . . . . . . . . . . . . . . . . . . . . . . . . . . . . . . . . . . . . . . . . . . . . . . . . . . . . . . . . . . . . . . . . . . 34
Redeploying a Previous Configuration . . . . . . . . . . . . . . . . . . . . . . . . . . . . . . . . . . . . . . . . . . . . . . . . . . . . . . . . . . . . . . . . . . . . . . . . . . . . 35
Reviewing the Deployment Logs . . . . . . . . . . . . . . . . . . . . . . . . . . . . . . . . . . . . . . . . . . . . . . . . . . . . . . . . . . . . . . . . . . . . . . . . . . . . . . . . . .35
EMS Server Configuration Modified Locally . . . . . . . . . . . . . . . . . . . . . . . . . . . . . . . . . . . . . . . . . . . . . . . . . . . . . . . . . . . . . . . . . . 36
Deleting a Deployment Record . . . . . . . . . . . . . . . . . . . . . . . . . . . . . . . . . . . . . . . . . . . . . . . . . . . . . . . . . . . . . . . . . . . . . . . . . . . . . . .36
Refreshing the Server Configuration . . . . . . . . . . . . . . . . . . . . . . . . . . . . . . . . . . . . . . . . . . . . . . . . . . . . . . . . . . . . . . . . . . . . . . . . . . . . . . . . . . 37
Monitor the Servers . . . . . . . . . . . . . . . . . . . . . . . . . . . . . . . . . . . . . . . . . . . . . . . . . . . . . . . . . . . . . . . . . . . . . . . . . . . . . . . . . . . . . . . . . . . . . . . . . . 37
Configuring Temporary Server Tracing Options . . . . . . . . . . . . . . . . . . . . . . . . . . . . . . . . . . . . . . . . . . . . . . . . . . . . . . . . . . . . . . . . . . . 38
Monitor Destination Activity . . . . . . . . . . . . . . . . . . . . . . . . . . . . . . . . . . . . . . . . . . . . . . . . . . . . . . . . . . . . . . . . . . . . . . . . . . . . . . . . . . . . . . 38
Detail Pages . . . . . . . . . . . . . . . . . . . . . . . . . . . . . . . . . . . . . . . . . . . . . . . . . . . . . . . . . . . . . . . . . . . . . . . . . . . . . . . . . . . . . . . . . . . . . . . . . . . . . 39
Properties Pages . . . . . . . . . . . . . . . . . . . . . . . . . . . . . . . . . . . . . . . . . . . . . . . . . . . . . . . . . . . . . . . . . . . . . . . . . . . . . . . . . .40
Destinations . . . . . . . . . . . . . . . . . . . . . . . . . . . . . . . . . . . . . . . . . . . . . . . . . . . . . . . . . . . . . . . . . . . . . . . . . . . . . . . . . . . . . . . . . . . . . . . . . . . . . . . . . .40
Topics . . . . . . . . . . . . . . . . . . . . . . . . . . . . . . . . . . . . . . . . . . . . . . . . . . . . . . . . . . . . . . . . . . . . . . . . . . . . . . . . . . . . . . . . . . . . . . . . . . . . . . . . . . . 40
Queues . . . . . . . . . . . . . . . . . . . . . . . . . . . . . . . . . . . . . . . . . . . . . . . . . . . . . . . . . . . . . . . . . . . . . . . . . . . . . . . . . . . . . . . . . . . . . . . . . . . . . . . . . .40
Durables . . . . . . . . . . . . . . . . . . . . . . . . . . . . . . . . . . . . . . . . . . . . . . . . . . . . . . . . . . . . . . . . . . . . . . . . . . . . . . . . . . . . . . . . . . . . . . . . . . . . . . . . .40
Bridges . . . . . . . . . . . . . . . . . . . . . . . . . . . . . . . . . . . . . . . . . . . . . . . . . . . . . . . . . . . . . . . . . . . . . . . . . . . . . . . . . . . . . . . . . . . . . . . . . . . . . . . . . . 40
Connections . . . . . . . . . . . . . . . . . . . . . . . . . . . . . . . . . . . . . . . . . . . . . . . . . . . . . . . . . . . . . . . . . . . . . . . . . . . . . . . . . . . . . . . . . . . . . . . . . . . . . . . . . .40
Transports . . . . . . . . . . . . . . . . . . . . . . . . . . . . . . . . . . . . . . . . . . . . . . . . . . . . . . . . . . . . . . . . . . . . . . . . . . . . . . . . . . . . . . . . . . . . . . . . . . . . . . . 40
Factories . . . . . . . . . . . . . . . . . . . . . . . . . . . . . . . . . . . . . . . . . . . . . . . . . . . . . . . . . . . . . . . . . . . . . . . . . . . . . . . . . . . . . . . . . . . . . . . . . . . . . . . . 41
RVCM . . . . . . . . . . . . . . . . . . . . . . . . . . . . . . . . . . . . . . . . . . . . . . . . . . . . . . . . . . . . . . . . . . . . . . . . . . . . . . . . . . . . . . . . . . . . . . . . . . . . . . . . . . . 41
Routes . . . . . . . . . . . . . . . . . . . . . . . . . . . . . . . . . . . . . . . . . . . . . . . . . . . . . . . . . . . . . . . . . . . . . . . . . . . . . . . . . . . . . . . . . . . . . . . . . . . . . . . . . . 41
Server . . . . . . . . . . . . . . . . . . . . . . . . . . . . . . . . . . . . . . . . . . . . . . . . . . . . . . . . . . . . . . . . . . . . . . . . . . . . . . . . . . . . . . . . . . . . . . . . . . . . . . . . . . . . . . . 41
Server Properties . . . . . . . . . . . . . . . . . . . . . . . . . . . . . . . . . . . . . . . . . . . . . . . . . . . . . . . . . . . . . . . . . . . . . . . . . . . . . . . . . . . . . . . . . . . . . . . . 42
Stores . . . . . . . . . . . . . . . . . . . . . . . . . . . . . . . . . . . . . . . . . . . . . . . . . . . . . . . . . . . . . . . . . . . . . . . . . . . . . . . . . . . . . . . . . . . . . . . . . . . . . . . . . . . 42
Fault Tolerance . . . . . . . . . . . . . . . . . . . . . . . . . . . . . . . . . . . . . . . . . . . . . . . . . . . . . . . . . . . . . . . . . . . . . . . . . . . . . . . . . . . . . . . . . . . . . . . . . . 42
Trace/Log . . . . . . . . . . . . . . . . . . . . . . . . . . . . . . . . . . . . . . . . . . . . . . . . . . . . . . . . . . . . . . . . . . . . . . . . . . . . . . . . . . . . . . . . . . . . . . . . . . . . . . . .43
Validation . . . . . . . . . . . . . . . . . . . . . . . . . . . . . . . . . . . . . . . . . . . . . . . . . . . . . . . . . . . . . . . . . . . . . . . . . . . . . . . . . . . . . . . . . . . . . . . . . . . . . . . . 43
JSON Source . . . . . . . . . . . . . . . . . . . . . . . . . . . . . . . . . . . . . . . . . . . . . . . . . . . . . . . . . . . . . . . . . . . . . . . . . . . . . . . . . . . . . . . . . . . . . . . . . . . . 43
Security . . . . . . . . . . . . . . . . . . . . . . . . . . . . . . . . . . . . . . . . . . . . . . . . . . . . . . . . . . . . . . . . . . . . . . . . . . . . . . . . . . . . . . . . . . . . . . . . . . . . . . . . . . . . . . 43
Users . . . . . . . . . . . . . . . . . . . . . . . . . . . . . . . . . . . . . . . . . . . . . . . . . . . . . . . . . . . . . . . . . . . . . . . . . . . . . . . . . . . . . . . . . . . . . . . . . . . . . . . . . . . .43
Groups . . . . . . . . . . . . . . . . . . . . . . . . . . . . . . . . . . . . . . . . . . . . . . . . . . . . . . . . . . . . . . . . . . . . . . . . . . . . . . . . . . . . . . . . . . . . . . . . . . . . . . . . . . 43
ACLs . . . . . . . . . . . . . . . . . . . . . . . . . . . . . . . . . . . . . . . . . . . . . . . . . . . . . . . . . . . . . . . . . . . . . . . . . . . . . . . . . . . . . . . . . . . . . . . . . . . . . . . . . . . . 44
LDAP . . . . . . . . . . . . . . . . . . . . . . . . . . . . . . . . . . . . . . . . . . . . . . . . . . . . . . . . . . . . . . . . . . . . . . . . . . . . . . . . . . . . . . . . . . . . . . . . . . . . . . . . . . . . 44
4
TIBCO Enterprise Message Service™ Central Administration
SSL . . . . . . . . . . . . . . . . . . . . . . . . . . . . . . . . . . . . . . . . . . . . . . . . . . . . . . . . . . . . . . . . . . . . . . . . . . . . . . . . . . . . . . . . . . . . . . . . . . . . . . . . . . . . . 44
Conversion of Server Configuration Files to JSON . . . . . . . . . . . . . . . . . . . . . . . . . . . . . . . . . . . . . . . . . . . . . . . . . . .45
5
TIBCO Enterprise Message Service™ Central Administration
About this Product
TIBCO is proud to announce the latest release of TIBCO Enterprise Message Service™ software.
This release is the latest in a long history of TIBCO products that leverage the power of the InformationBus® technology to enable truly event-driven IT environments. To find out more about how TIBCOEnterprise Message Service software and other TIBCO products are powered by TIB® technology,please visit us at www.tibco.com.
TIBCO Enterprise Message Service software lets application programs send and receive messagesaccording to the Java Message Service (JMS) protocol. It also integrates with TIBCO FTL, TIBCORendezvous, and TIBCO SmartSockets messaging products.
TIBCO EMS software is part of TIBCO® Messaging.
Product Editions
TIBCO Messaging is available in a community edition and an enterprise edition.
TIBCO Messaging - Community Edition is ideal for getting started with TIBCO Messaging, forimplementing application projects (including proof of concept efforts), for testing, and for deployingapplications in a production environment. Although the community license limits the number ofproduction clients, you can easily upgrade to the enterprise edition as your use of TIBCO Messagingexpands.
The community edition is available free of charge. It is a full installation of the TIBCO Messagingsoftware, with the following limitations and exclusions:
● Users may run up to 100 application instances or 1000 web/mobile instances in a productionenvironment.
● Users do not have access to TIBCO Support, but you can use TIBCO Community as a resource(https://community.tibco.com).
● Available on Red Hat Enterprise Linux Server, Microsoft Windows & Windows Server and ApplemacOS.
TIBCO Messaging - Community Edition has the following additional limitations and exclusions:
● Excludes Fault Tolerance of the server.
● Excludes Unshared State Failover.
● Excludes Routing of messages between servers.
● Excludes Central Administration.
● Excludes JSON configuration files.
TIBCO Messaging - Enterprise Edition is ideal for all application development projects, and fordeploying and managing applications in an enterprise production environment. It includes all featurespresented in this documentation set, as well as access to TIBCO Support.
6
TIBCO Enterprise Message Service™ Central Administration
TIBCO Documentation and Support Services
How to Access TIBCO Documentation
Documentation for TIBCO products is available on the TIBCO Product Documentation website, mainlyin HTML and PDF formats.
The TIBCO Product Documentation website is updated frequently and is more current than any otherdocumentation included with the product. To access the latest documentation, visit https://docs.tibco.com.
TIBCO Enterprise Message Service Documentation
The following documents for this product can be found on the TIBCO Enterprise Message Service ™product documentation page:
● TIBCO Enterprise Message Service User’s Guide Read this manual to gain an overall understanding ofthe product, its features, and configuration.
● TIBCO Enterprise Message Service Central Administration Read this manual for information on thecentral administration interface.
● TIBCO Enterprise Message Service Installation Read the relevant sections of this manual beforeinstalling this product.
● TIBCO Enterprise Message Service C & COBOL Reference The C API reference is available in HTMLand PDF formats.
● TIBCO Enterprise Message Service Java API Reference The Java API reference can be accessed onlythrough the HTML documentation interface.
● TIBCO Enterprise Message Service .NET API Reference The .NET API reference can be accessed onlythrough the HTML documentation interface.
● TIBCO Enterprise Message Service Installation on Red Hat OpenShift Container Platform This manualdescribes how to run TIBCO Enterprise Message Service servers on the Red Hat® OpenShiftContainer Platform.
● TIBCO Enterprise Message Service Release Notes Read the release notes for a list of new and changedfeatures. This document also contains lists of known issues and closed issues for this release. Thisdocument is available only in PDF format.
Other TIBCO Product Documentation
You may find it useful to read the documentation for the following TIBCO products:
● TIBCO FTL®
● TIBCO Rendezvous®
● TIBCO SmartSockets®
● TIBCO EMS® Client for z/OS (CICS)
● TIBCO EMS® Client for z/OS (MVS)
● TIBCO EMS® Client for IBM i
Third-Party Documentation
● Java™ Message Service specification, available through http://www.oracle.com/technetwork/java/jms/index.html.
7
TIBCO Enterprise Message Service™ Central Administration
● Java™ Message Service by Richard Monson-Haefel and David A. Chappell, O’Reilly and Associates,Sebastopol, California, 2001.
● Java™ Authentication and Authorization Service (JAAS) LoginModule Developer's Guide andReference Guide, available through http://www.oracle.com/technetwork/java/javase/jaas/index.html.
How to Contact TIBCO Support
You can contact TIBCO Support in the following ways:
● For an overview of TIBCO Support, visit http://www.tibco.com/services/support.
● For accessing the Support Knowledge Base and getting personalized content about products you areinterested in, visit the TIBCO Support portal at https://support.tibco.com.
● For creating a Support case, you must have a valid maintenance or support contract with TIBCO.You also need a user name and password to log in to https://support.tibco.com. If you do not have auser name, you can request one by clicking Register on the website.
How to Join TIBCO Community
TIBCO Community is the official channel for TIBCO customers, partners, and employee subject matterexperts to share and access their collective experience. TIBCO Community offers access to Q&A forums,product wikis, and best practices. It also offers access to extensions, adapters, solution accelerators, andtools that extend and enable customers to gain full value from TIBCO products. In addition, users cansubmit and vote on feature requests from within the TIBCO Ideas Portal. For a free registration, go to https://community.tibco.com.
8
TIBCO Enterprise Message Service™ Central Administration
Introduction
Central Administration for TIBCO Enterprise Message Service is a tool that allows administrators tomake changes to multiple EMS server configurations and deploy those as a single action.
The major benefits of Central Configuration are:
● Graphical User Interface: Central Administration provides a web-based graphical user interface(GUI) for configuring TIBCO Enterprise Message Service servers.
● Centralized Configuration: You can also apply configuration changes across multiple TIBCOEnterprise Message Service servers from a single location.
Requirements
In order to use Central Administration, you must meet these requirements:
● Administrative Privileges: The Central Administration user who deploys changes to an EMS servermust have administrative permissions to modify any EMS server setting.
The same username and password used to log in to the Central Administration web interface isused to log on to the EMS server. When JAAS authentication is not configured, the CentralAdministration server uses the default credentials of user admin with no password.
See Central Administration Server Connection to the EMS Server for more information.
● JSON Configuration Files: The EMS server configuration method relies either on a set of text-based .conf files or a JSON configuration file. Central Administration only supports the latter.
See JSON Configuration Files for information about JSON files and steps to convert old serverconfiguration files to JSON.
● Supported Browser: The Central Administration web interface can be accessed using browserssupported by their respective vendors at the time of writing. HTML 5-compliant browsers withJavaScript enabled are supported. See the readme file for a full list of supported browsers.
StructureCentral Administration offers a simple architecture. The Central Administration server connects toTIBCO Enterprise Message Service servers and stores a snapshot of the configuration from the runningEMS server.
Be aware that the snapshot of the EMS server may not reflect its current running configuration. Becauseit’s possible to modify the running EMS server with direct edits to the JSON configuration file,programming API calls, or commands issued through the administration tool, Central Administrationmay be out-of-sync with the running configuration.
Administrators connect to the Central Administration server through the web interface, and from therecan view the snapshot server configurations, make changes, and deploy the new configurations.
9
TIBCO Enterprise Message Service™ Central Administration
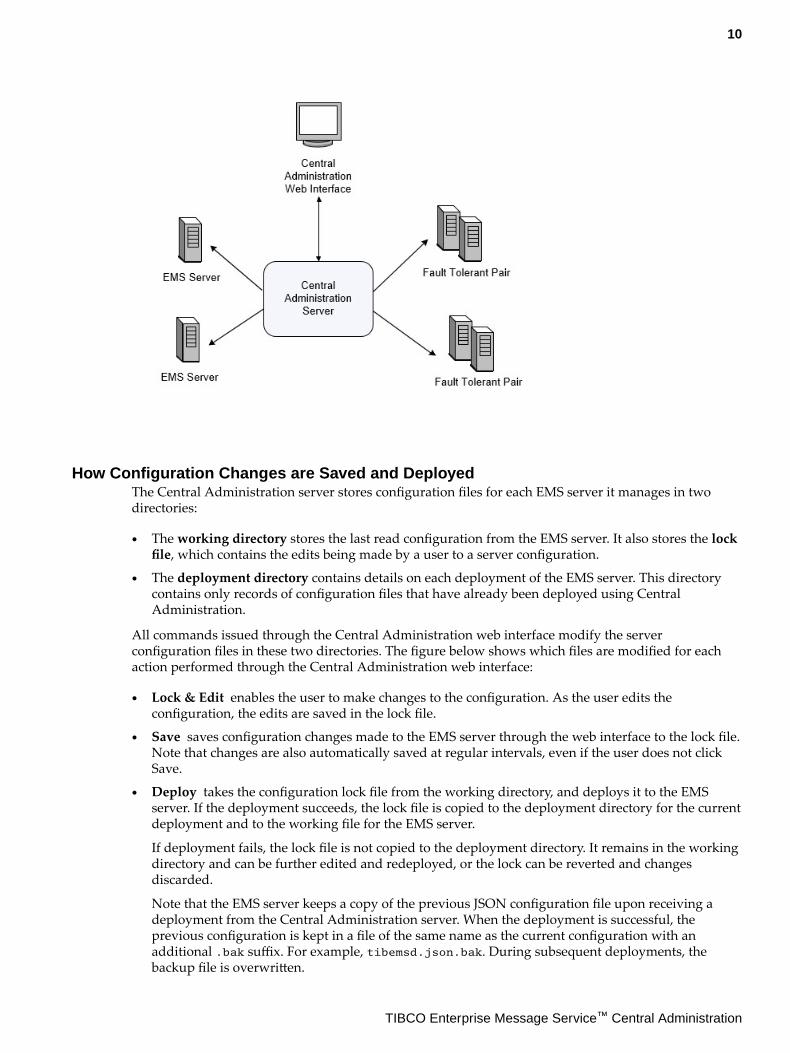
How Configuration Changes are Saved and DeployedThe Central Administration server stores configuration files for each EMS server it manages in twodirectories:
● The working directory stores the last read configuration from the EMS server. It also stores the lockfile, which contains the edits being made by a user to a server configuration.
● The deployment directory contains details on each deployment of the EMS server. This directorycontains only records of configuration files that have already been deployed using CentralAdministration.
All commands issued through the Central Administration web interface modify the serverconfiguration files in these two directories. The figure below shows which files are modified for eachaction performed through the Central Administration web interface:
● Lock & Edit enables the user to make changes to the configuration. As the user edits theconfiguration, the edits are saved in the lock file.
● Save saves configuration changes made to the EMS server through the web interface to the lock file.Note that changes are also automatically saved at regular intervals, even if the user does not clickSave.
● Deploy takes the configuration lock file from the working directory, and deploys it to the EMSserver. If the deployment succeeds, the lock file is copied to the deployment directory for the currentdeployment and to the working file for the EMS server.
If deployment fails, the lock file is not copied to the deployment directory. It remains in the workingdirectory and can be further edited and redeployed, or the lock can be reverted and changesdiscarded.
Note that the EMS server keeps a copy of the previous JSON configuration file upon receiving adeployment from the Central Administration server. When the deployment is successful, theprevious configuration is kept in a file of the same name as the current configuration with anadditional .bak suffix. For example, tibemsd.json.bak. During subsequent deployments, thebackup file is overwritten.
10
TIBCO Enterprise Message Service™ Central Administration
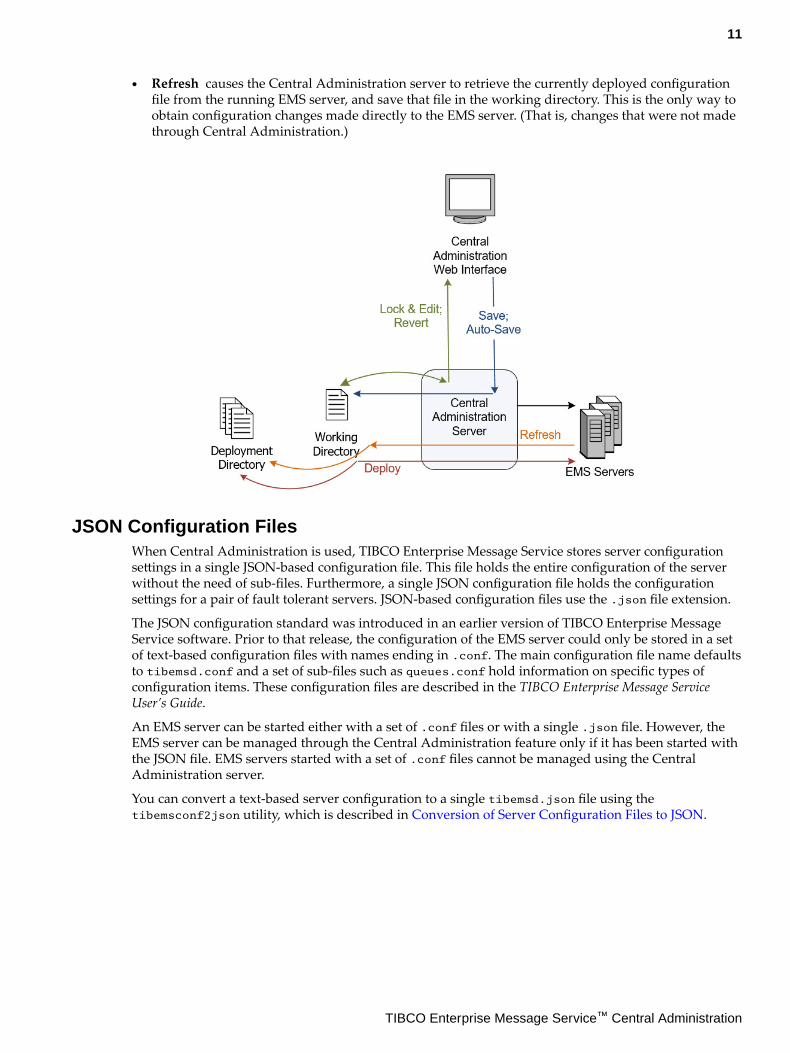
● Refresh causes the Central Administration server to retrieve the currently deployed configurationfile from the running EMS server, and save that file in the working directory. This is the only way toobtain configuration changes made directly to the EMS server. (That is, changes that were not madethrough Central Administration.)
JSON Configuration FilesWhen Central Administration is used, TIBCO Enterprise Message Service stores server configurationsettings in a single JSON-based configuration file. This file holds the entire configuration of the serverwithout the need of sub-files. Furthermore, a single JSON configuration file holds the configurationsettings for a pair of fault tolerant servers. JSON-based configuration files use the .json file extension.
The JSON configuration standard was introduced in an earlier version of TIBCO Enterprise MessageService software. Prior to that release, the configuration of the EMS server could only be stored in a setof text-based configuration files with names ending in .conf. The main configuration file name defaultsto tibemsd.conf and a set of sub-files such as queues.conf hold information on specific types ofconfiguration items. These configuration files are described in the TIBCO Enterprise Message ServiceUser’s Guide.
An EMS server can be started either with a set of .conf files or with a single .json file. However, theEMS server can be managed through the Central Administration feature only if it has been started withthe JSON file. EMS servers started with a set of .conf files cannot be managed using the CentralAdministration server.
You can convert a text-based server configuration to a single tibemsd.json file using thetibemsconf2json utility, which is described in Conversion of Server Configuration Files to JSON.
11
TIBCO Enterprise Message Service™ Central Administration
Central Administration Server Set Up and Configuration
The following topics describe the basic set up and configuration of the Central Administration server.
Starting and Stopping the Central Administration ServerThe following topics describe how to start and stop the Central Administration server.
Create a Data DirectoryBefore starting the Central Administration server for the first time, you must create a data directory forthe server. This directory is where the server stores deployment and working directories for each EMSserver it manages.
You cannot share the data directory between Central Administration server instances. That is, eachrunning Central Administration server requires its own data directory.
On startup, the Central Administration server looks for a data directory named emsca_data in theworking directory. If you wish to specify a different name or location, use the --data command lineoption or related configuration file property to point the server to the correct location.
Create a Configuration FileYou can optionally create a configuration file to hold Central Administration server options, and passthis file to the server at startup.
The properties that can be specified in the configuration file correspond to the startup options, and aredescribed in Central Administration Server Options.
The configuration file takes the form of a typical Java properties file and must use the .properties fileextension. In a text-based file, specify one property on each line, using the format:property=value
For example:com.tibco.emsca.data.dir=/emsca_datacom.tibco.emsca.http.hostport=*:8080com.tibco.emsca.jaas=/emsca_security/emsca.jaas
By default, the Central Administration server looks for a file namedemsca.properties
in the current directory. However, you can direct the server to a different file using the --configcommand line option.
If an argument is passed to the Central Administration executable that is also configured in the file, thevalue provided in the command line overrides the value in the configuration file.
Starting and Configuring the Central Administration Server
Before starting the Central Administration Server, you should create a Data Directory and a Configuration File.
To start the Central Administration server from the command line, navigate to EMS_HOME/bin andrun the script:
On UNIX:
tibemsca [options]
On Windows:
tibemsca.bat [options]
12
TIBCO Enterprise Message Service™ Central Administration
If the Central Administration server cannot locate the data directory, the startup process is suspended.For more information see Data Directory.
To configure Central Administration server settings, use the command line arguments in CentralAdministration Server Options.
The command options to Central Administration server can also be passed using a configuration filedescribed in Configuration File. However, the command options override any value specified in theconfiguration file
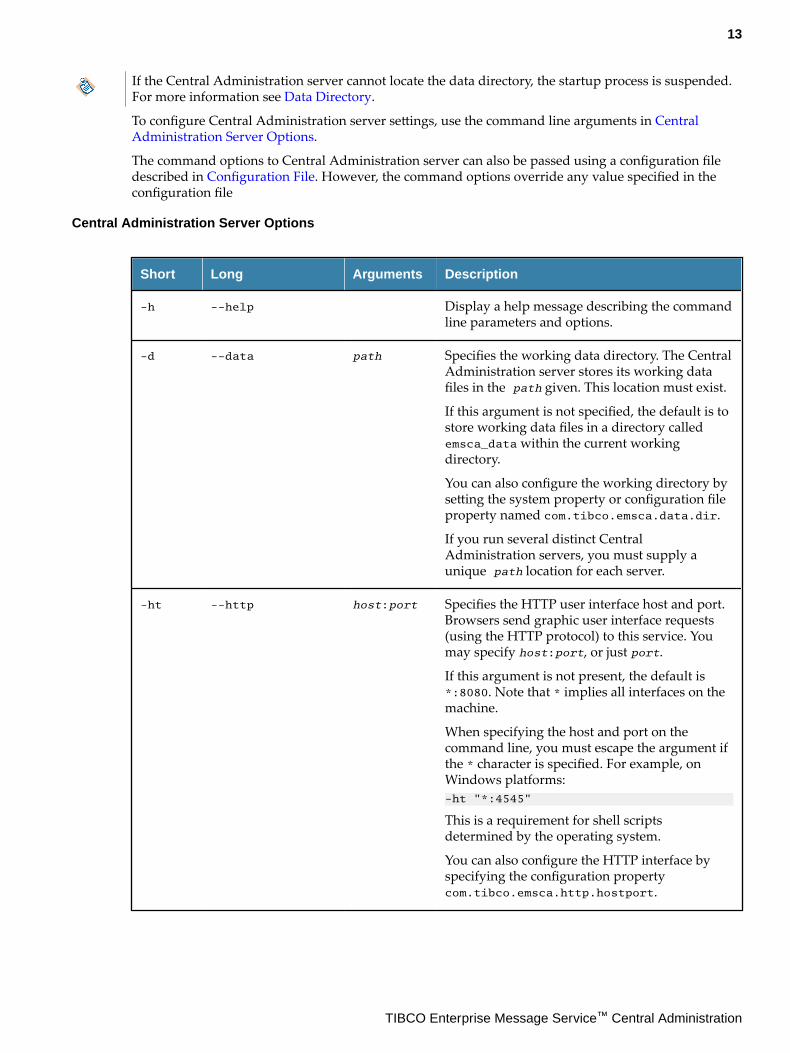
Central Administration Server Options
Short Long Arguments Description
-h --help Display a help message describing the commandline parameters and options.
-d --data path Specifies the working data directory. The CentralAdministration server stores its working datafiles in the path given. This location must exist.
If this argument is not specified, the default is tostore working data files in a directory calledemsca_data within the current workingdirectory.
You can also configure the working directory bysetting the system property or configuration fileproperty named com.tibco.emsca.data.dir.
If you run several distinct CentralAdministration servers, you must supply aunique path location for each server.
-ht --http host:port Specifies the HTTP user interface host and port.Browsers send graphic user interface requests(using the HTTP protocol) to this service. Youmay specify host:port, or just port.
If this argument is not present, the default is*:8080. Note that * implies all interfaces on themachine.
When specifying the host and port on thecommand line, you must escape the argument ifthe * character is specified. For example, onWindows platforms:-ht "*:4545"
This is a requirement for shell scriptsdetermined by the operating system.
You can also configure the HTTP interface byspecifying the configuration propertycom.tibco.emsca.http.hostport.
13
TIBCO Enterprise Message Service™ Central Administration

Short Long Arguments Description
-c --config path Points the Central Administration server to a filecontaining configuration properties. For moreinformation see Configuration File.
By default, the server looks for the fileemsca.properties in the current directory.
-j --jaas path Configures the Central Administration server toconfigure security using the Java Authenticationand Authorization Service (JAAS).
When present, the Central Administration serverconfigures security using the JAAS configurationfile at path. When absent, the server neitherrequires nor verifies credentials.
You can also configure JAAS using the propertycom.tibco.emsca.jaas.
For more information on JAAS security, see Configuration of JAAS Authentication.
-ja --jaas-admins names Replaces the default JAAS emsca-admin groupwith one or more admin group names.Administrators running Central Administrationutility executables must be in one of these admingroups.
Group names should not contain spaces orcommas. Specify multiple admin groups in acomma-separated list.
This parameter can also be specified in aconfiguration file as the propertycom.tibco.emsca.jaas.admin.roles.
-jg --jaas-guests names Replaces the default emsca-guest group withone or more guest group names. JAAS guestscan browse configurations, but are not able tomodify, monitor, or deploy configurations.
Group names should not contain spaces orcommas. Specify multiple guest groups in acomma-separated list.
This parameter can also be specified in aconfiguration file as the propertycom.tibco.emsca.jaas.guest.roles.
14
TIBCO Enterprise Message Service™ Central Administration
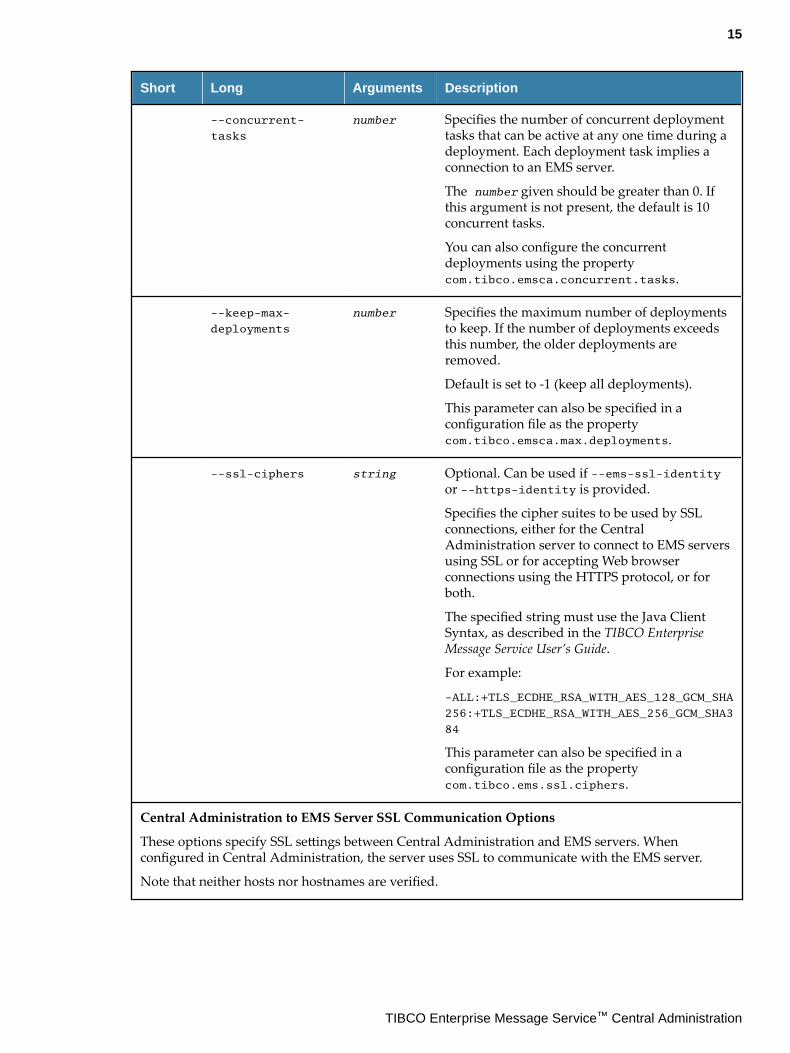
Short Long Arguments Description
--concurrent-
tasks
number Specifies the number of concurrent deploymenttasks that can be active at any one time during adeployment. Each deployment task implies aconnection to an EMS server.
The number given should be greater than 0. Ifthis argument is not present, the default is 10concurrent tasks.
You can also configure the concurrentdeployments using the propertycom.tibco.emsca.concurrent.tasks.
--keep-max-
deployments
number Specifies the maximum number of deploymentsto keep. If the number of deployments exceedsthis number, the older deployments areremoved.
Default is set to -1 (keep all deployments).
This parameter can also be specified in aconfiguration file as the propertycom.tibco.emsca.max.deployments.
--ssl-ciphers string Optional. Can be used if --ems-ssl-identityor --https-identity is provided.
Specifies the cipher suites to be used by SSLconnections, either for the CentralAdministration server to connect to EMS serversusing SSL or for accepting Web browserconnections using the HTTPS protocol, or forboth.
The specified string must use the Java ClientSyntax, as described in the TIBCO EnterpriseMessage Service User’s Guide.
For example:
-ALL:+TLS_ECDHE_RSA_WITH_AES_128_GCM_SHA
256:+TLS_ECDHE_RSA_WITH_AES_256_GCM_SHA3
84
This parameter can also be specified in aconfiguration file as the propertycom.tibco.ems.ssl.ciphers.
Central Administration to EMS Server SSL Communication Options
These options specify SSL settings between Central Administration and EMS servers. Whenconfigured in Central Administration, the server uses SSL to communicate with the EMS server.
Note that neither hosts nor hostnames are verified.
15
TIBCO Enterprise Message Service™ Central Administration
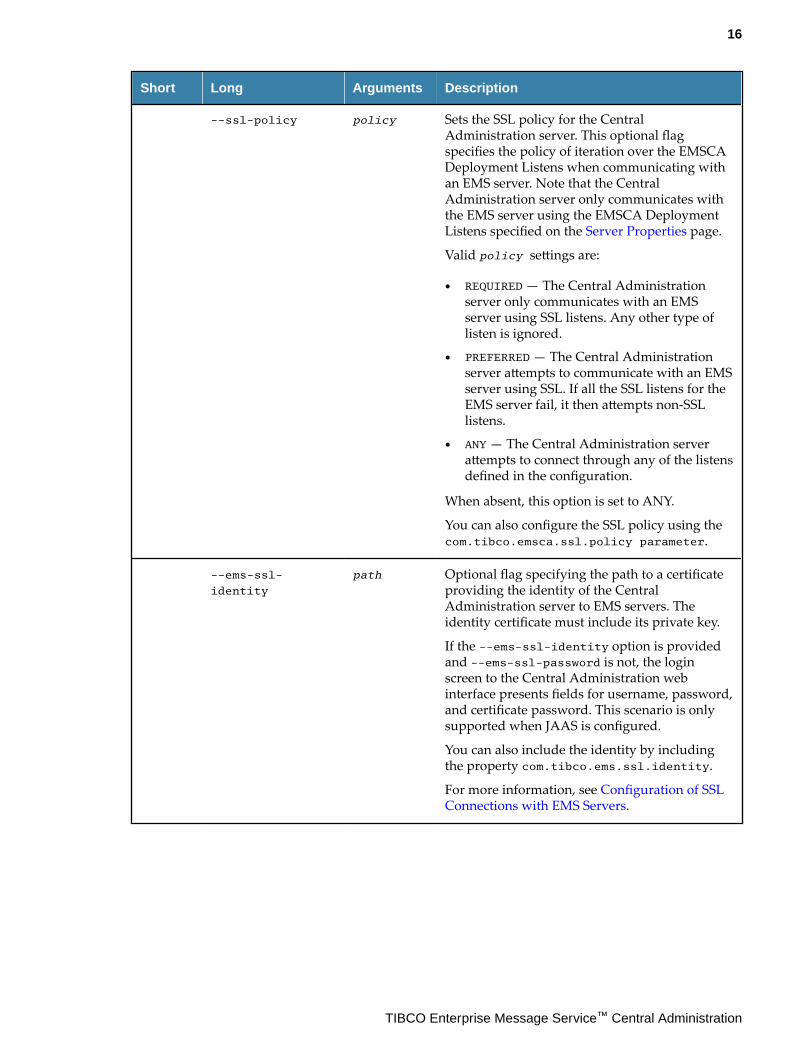
Short Long Arguments Description
--ssl-policy policy Sets the SSL policy for the CentralAdministration server. This optional flagspecifies the policy of iteration over the EMSCADeployment Listens when communicating withan EMS server. Note that the CentralAdministration server only communicates withthe EMS server using the EMSCA DeploymentListens specified on the Server Properties page.
Valid policy settings are:
● REQUIRED — The Central Administrationserver only communicates with an EMSserver using SSL listens. Any other type oflisten is ignored.
● PREFERRED — The Central Administrationserver attempts to communicate with an EMSserver using SSL. If all the SSL listens for theEMS server fail, it then attempts non-SSLlistens.
● ANY — The Central Administration serverattempts to connect through any of the listensdefined in the configuration.
When absent, this option is set to ANY.
You can also configure the SSL policy using thecom.tibco.emsca.ssl.policy parameter.
--ems-ssl-
identity
path Optional flag specifying the path to a certificateproviding the identity of the CentralAdministration server to EMS servers. Theidentity certificate must include its private key.
If the --ems-ssl-identity option is providedand --ems-ssl-password is not, the loginscreen to the Central Administration webinterface presents fields for username, password,and certificate password. This scenario is onlysupported when JAAS is configured.
You can also include the identity by includingthe property com.tibco.ems.ssl.identity.
For more information, see Configuration of SSLConnections with EMS Servers.
16
TIBCO Enterprise Message Service™ Central Administration
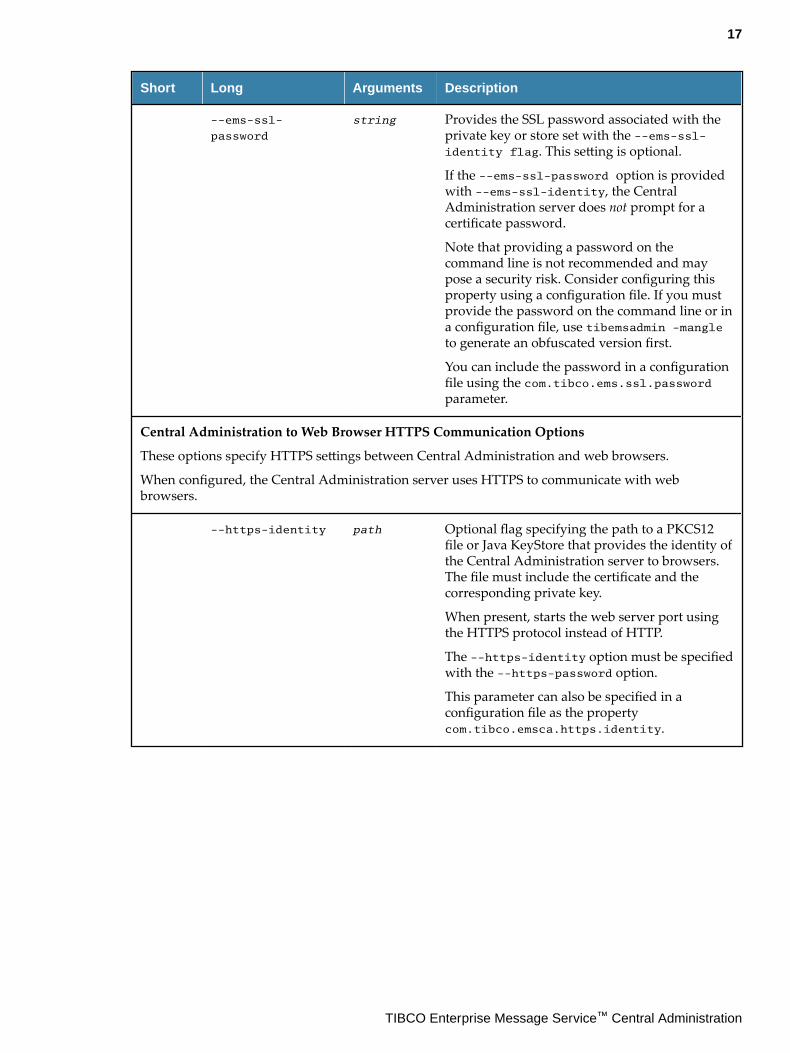
Short Long Arguments Description
--ems-ssl-
password
string Provides the SSL password associated with theprivate key or store set with the --ems-ssl-identity flag. This setting is optional.
If the --ems-ssl-password option is providedwith --ems-ssl-identity, the CentralAdministration server does not prompt for acertificate password.
Note that providing a password on thecommand line is not recommended and maypose a security risk. Consider configuring thisproperty using a configuration file. If you mustprovide the password on the command line or ina configuration file, use tibemsadmin -mangleto generate an obfuscated version first.
You can include the password in a configurationfile using the com.tibco.ems.ssl.passwordparameter.
Central Administration to Web Browser HTTPS Communication Options
These options specify HTTPS settings between Central Administration and web browsers.
When configured, the Central Administration server uses HTTPS to communicate with webbrowsers.
--https-identity path Optional flag specifying the path to a PKCS12file or Java KeyStore that provides the identity ofthe Central Administration server to browsers.The file must include the certificate and thecorresponding private key.
When present, starts the web server port usingthe HTTPS protocol instead of HTTP.
The --https-identity option must be specifiedwith the --https-password option.
This parameter can also be specified in aconfiguration file as the propertycom.tibco.emsca.https.identity.
17
TIBCO Enterprise Message Service™ Central Administration

Short Long Arguments Description
--https-password string Optional flag specifying the password to theidentity file specified through --https-identity.
Note that providing a password on thecommand line is not recommended and maypose a security risk. Consider configuring thisproperty using a configuration file. If you mustprovide the password on the command line or ina configuration file, use tibemsadmin -mangleto generate an obfuscated version first.
This parameter can also be specified in aconfiguration file as the propertycom.tibco.emsca.https.password.
Stopping the Central Administration ServerYou can stop the Central Administration server by ending the process using tools provided by youroperating system.
Running the Central Administration Server as a Windows ServiceYou can register the Central Administration server to run as a Windows service, enabling the server tostart automatically.Tasks have been converted into Steps.
Procedure
1. Create an EMS Central Administration configuration file.
The configuration file is described in Configuration File.
For example, create a file C:\directory\emsca.properties with this content:com.tibco.emsca.data.dir=C:/directory/emsca/datacom.tibco.emsca.http.hostport=*:8888
2. Register the Windows Service.Use the prunsrv utility to register the Windows Service. The prunsrv utility is included in the bindirectory of your EMS installation:EMS_HOME\bin\prunsrv.exe
Model your command line on this template:prunsrv install service-name--DisplayName="TIBCO EMS Central Administration"--Description="Allows administrators to make changes to multiple EMS server configurations and deploy those as a single action."--Install="EMS_HOME\bin\prunsrv.exe"--Jvm="path-to-jvm.dll"--StartMode=jvm--StopMode=jvm--StartClass=com.tibco.messaging.emsca.internal.CentralAdminServer--StopClass=com.tibco.messaging.emsca.internal.CentralAdminServer--StartParams=-c;"C:\directory\emsca.properties"--StopMethod stop--Classpath="EMS_HOME\bin\tibemsca.jar;EMS_HOME\lib\jms-2.0.jar;EMS_HOME\lib\tibjms.jar;EMS_HOME\lib\tibjmsadmin.jar;EMS_HOME\bin\jetty-all.jar;EMS_HOME\bin\json_simple-1.1.jar"
Note the following aspects of this command line template:
18
TIBCO Enterprise Message Service™ Central Administration

● You need the service-name that you chose when you use the Windows sc command. For example,sc start service-name.
● --Install is the full path of the prunsrv executable.● --Jvm is the full path to version 1.8 or later of jvm.dll. For example, "C:\jre1.8.0\bin
\server\jvm.dll".● Specify --StartMode, --StopMode, --StartClass, --StopClass, and --StopMethod exactly as
shown in this template.● --StartParams contains the command line parameters for EMS Central Administration, which
you can adjust to your specification. Use a semicolon (;) to separate parameters. You mustinclude the Central Administration configuration file that you created in Step 1 .
● --Classpath lists the JAR files that EMS Central Administration requires. You must specify allof these files and replace EMS_HOME with the actual path.
3. (Optional) Modify the parameters of the service as needed.
Once the Central Administration server has been registered through prunsrv, you can modify theparameters of the service using the prunmgr utility:prunmgr //ES/service-name
The prunmgr utility is included in the bin directory of your EMS installation.
More information about prunsrv and prunmgr is available through http://commons.apache.org/proper/commons-daemon/.
Removing the Central Administration Server Windows ServiceTo remove the Central Administration server from the Windows Service registry, run the followingcommand:
prunsrv delete service-name
where service-name is the name given when the service was installed.
Security ConsiderationsBy default, the Central Administration server does not impose security restrictions. That is, it is notautomatically configured to use SSL connections or to require login credentials from users. However,you can configure the server to require user credentials, to use SSL when connecting with EMS servers,and to use HTTPS when accepting web browser connections.
The Central Administration server uses the same username and password to log in to the EMS server aswas used to log in to the Central Administration web interface. When JAAS authentication is notconfigured, the Central Administration server uses the default credentials of user admin with nopassword.
Central Administration Server Connection to the EMS Server
The Central Administration server connects to the EMS server when:
● The EMS server is added to Central Administration.● A user refreshes the EMS server configuration stored in Central Administration.● A user deploys a configuration change.
The margin headings are now section headings/ titles in the body of the page.
Credentials
Each time it connects to the EMS server, the Central Administration server presents the credentialspassed to it by the user when he or she logged on to the web interface.
19
TIBCO Enterprise Message Service™ Central Administration
● If JAAS authentication is not configured, the Central Administration server uses the admin user,with no password, to authenticate with all the EMS servers.
● If JAAS authentication is configured, the Central Administration server presents the user ID andpassword presented when the current user logged on. If the user is attempting to deployconfiguration changes but does not have the necessary administrative privileges for the EMS server,the deployment fails.
SSL
When SSL is configured on the EMS server, the Central Administration server can optionally use SSL tocommunicate with the EMS server. In addition, the Central Administration server can use an identitycertificate to authenticate itself to the EMS server.
When Central Administration uses SSL connections to communicate with an EMS server, neither thehost nor hostname are validated by Central Administration.
Configuration of JAAS AuthenticationYou can configure the Central Administration server to use Java Authentication and AuthorizationService (JAAS) authentication. JAAS authentication has two purposes:
● Authenticate users logging into the Central Administration server.
When JAAS is configured, users must enter credentials when logging into the CentralAdministration web interface. Central Administration users must be in one of these JAAS groups:
— emsca-admin — Grants administrative privileges to members. Administrators may lock andedit an EMS server in Central Administration, and deploy an updated server configuration.However, note that the user must also have administrative privileges for the EMS server beforedeploying.
You can change the group names with administrative privileges using the --jaas-adminoption.
— emsca-guest — Grants read-only privileges to members. Guest users are not able to makechanges or deploy configurations through Central Administration.
You can change the group names with guest privileges using the --jaas-guests option.
● Authenticate the Central Administration server to EMS servers.
When JAAS is configured, each time a user attempts to add or refresh an EMS server or deployconfiguration changes, the Central Administration server uses the JAAS user ID and passwordpresented by the user to authenticate with the EMS server. If the user does not have sufficientprivileges, the action fails.
When using JAAS, you should not create a user name that has the same name as a JAAS group.Depending on the JAAS implementation, it is possible for a user name matching a group name to beincluded in the group.
Additionally, assigning conflicting JAAS roles (such as guest and admin) to the same user grants adminprivileges.
To enable JAAS authentication, set the --jaas option at the command line, or through the relatedsetting in the Central Administration configuration file.
JAAS can be configured to fetch user credentials from a property file or from an LDAP server. WithLDAP, changes made to Central Administration user credentials are taken into account dynamically.With a property file, it is required to restart the Central Administration server upon altering usercredentials.
For more information on JAAS security, see the sample configuration files in EMS_HOME\samples\emsca\jaas.
20
TIBCO Enterprise Message Service™ Central Administration
Configuration of SSL Connections with EMS ServersYou can configure the Central Administration server to use SSL when connecting to EMS servers.
The Central Administration server does not verify hostnames or hosts.
There are two supported configuration scenarios: when the EMS server requires an identity certificatefrom the Central Administration server, and when the EMS server does not require an identity. All EMSservers managed by Central Administration should use the same SSL configuration scenario.
The SSL scenario is determined by EMS server requirements. Depending on these requirements, furtherSSL settings are configured either through command line options when the Central Administrationserver is started, or by setting configuration parameters in the Central Administration configurationfile:
● SSL without Central Administration Identity
The Central Administration server uses SSL to connect to the EMS server. This option is onlyavailable if EMS servers do not require an identity from connecting services.
This SSL configuration is determined entirely by the EMS server. No options or parameters are set inthe Central Administration server.
● SSL with Central Administration Identity
If the EMS server requires an identity, the Central Administration server can be configured tosupply an identity certificate and certificate password.
The syntax and use of these SSL configuration options are further documented in CentralAdministration Server Options:
— Enable SSL using the --ems-ssl-identity command line option, or through the related settingin the Central Administration configuration file. This option sets the path to the identitycertificate and private key that the Central Administration server uses when identifying itself tothe EMS servers.
— Provide the SSL password associated with the private key by setting thecom.tibco.ems.ssl.password parameter. The command line option --ems-ssl-password isalso available, but providing a password on the command line is not recommended and maypose a security risk. Use tibemsadmin -mangle to generate an obfuscated version beforeproviding the password in either configuration file or command line.
If you do not provide the password using the parameter or flag, the Central Administrationserver requires the SSL decryption password when you log in. Note that this option is onlyavailable if JAAS is configured.
— Specify an SSL policy using the --ssl-policy command line option, or through the relatedsetting in the Central Administration configuration file. By default, the Central Administrationserver attempts to connect through any of the listens defined in the EMS server configuration,regardless of whether they are SSL connections or not. Alternately, you can either "require" or"prefer" an SSL connection. If you require SSL, the server will not communicate with the EMSthrough a non-SSL connection. If you prefer SSL, SSL connections are attempted first.
For more information on using SSL in TIBCO Enterprise Message Service, see "SSL Protocol" intheTIBCO Enterprise Message Service User’s Guide
Configuration of HTTPS Connections with Web BrowsersYou can configure the Central Administration server to accept HTTPS connections from web browsers.
To configure this, provide Central Administration with an identity certificate and certificate passwordeither through command line options when the Central Administration server is started or by settingconfiguration parameters in the Central Administration configuration file.
21
TIBCO Enterprise Message Service™ Central Administration
The syntax and use of these SSL configuration options are documented in Central AdministrationServer Options:
● Enable HTTPS using the --http-identity command line option, or through the related setting inthe Central Administration configuration file. This option sets the path to a PKCS12 file or JavaKeyStore providing the identity of the Central Administration server to browsers. When HTTPS isenabled, it replaces HTTP on the same port number.
● Provide the SSL password associated with the private key by setting thecom.tibco.emsca.https.password parameter. The command line option --https-password isalso available, but providing a password on the command line is not recommended and may pose asecurity risk. Use tibemsadmin -mangle to generate an obfuscated version before providing thepassword in either configuration file or command line.
For testing purposes, you can configure Central Administration with the identity fileemsca_https_identity.p12 that is provided in the samples/certs directory and use thecorresponding self-signed root certificate with your web browser. For restrictions and details, see thereadme.txt file in the same directory.
Configuration of Cipher SuitesIf needed, you can specify the cipher suites to be used when the Central Administration server uses SSLto connect to EMS servers or accepts web browsers connections with the HTTPS protocol.
To configure this feature, you can either provide a cipher suite specification with the --ssl-cipherscommand line option when the Central Administration server is started, or set a configurationparameter in the Central Administration configuration file. Both methods accept the Java Client Syntaxdescribed in the TIBCO Enterprise Message Service User’s Guide. This is further documented in CentralAdministration Server Options.
22
TIBCO Enterprise Message Service™ Central Administration
Central Administration Navigation
The following topics describe the Central Administration web interface. This includes the layout andnavigation of the interface, as well as common navigational tools and icons.
Central Administration Web Interface AccessOnce the Central Administration server is running, you can access it from a web browser. The locationof the web interface is:
http://host:port
where host and port are specified when the Central Administration server is configured, either throughthe command line or in the configuration files. If no host or port are specified, the default is:
http://localhost:8080
Login
If the Central Administration server has been configured to use JAAS security, you will need to log in.Enter your User Name and Password, and click Login.
Browser Support
HTML 5-compliant browsers with JavaScript enabled are supported. For a list of supported browsers,see the readme file.
Navigation Through the Web InterfaceThe Central Administration web interface is designed to be intuitive and easy to navigate.
Upon login, you are presented with the Server List Page, which shows a list of all EMS servers managedby this Central Administration instance. To view or edit the configuration settings for an EMS server,click the server name and you are taken to the Server Overview Page. This page is a gateway to allconfiguration options for that server.
The Deployments Page is also accessed from the Server List page. This page provides details aboutevery deployment executed from Central Administration. Common Navigation Tools, such asbreadcrumbs and sidebars, provide quick access to top-level pages from sub-pages.
The sections below describe each of these primary pages and the tasks you can perform from the page.
Server List PageThe Server List page is the home page of the Central Administration web interface. Its main content is acomplete list of EMS servers managed by the Central Administration server.
From this page, you can:
● Create or add new servers to Central Administration, and remove existing servers. See Add EMSServers to Central Administration.
● Change the name used to identify an EMS server in Central Administration. See Renaming a ServerConfiguration.
● Refresh an EMS server’s JSON configuration file that is stored in Central Administration. See Refreshing the Server Configuration.
● Navigate to an EMS server’s overview page, from which edits to the server configuration can bemade. See Server Overview Page.
● Navigate to the Deployments page. From here, you can view details about deployments, and revertto an earlier deployment if needed. See Deployments Page.
23
TIBCO Enterprise Message Service™ Central Administration
● Navigate to the monitoring page for a listed server. To view the monitoring page for a server, click
the icon. See Monitor the Servers for details about monitoring.
Server Overview PageTo access the overview page for an EMS server, locate the server in the Server List page and click theserver name. You are taken to that server’s overview page.
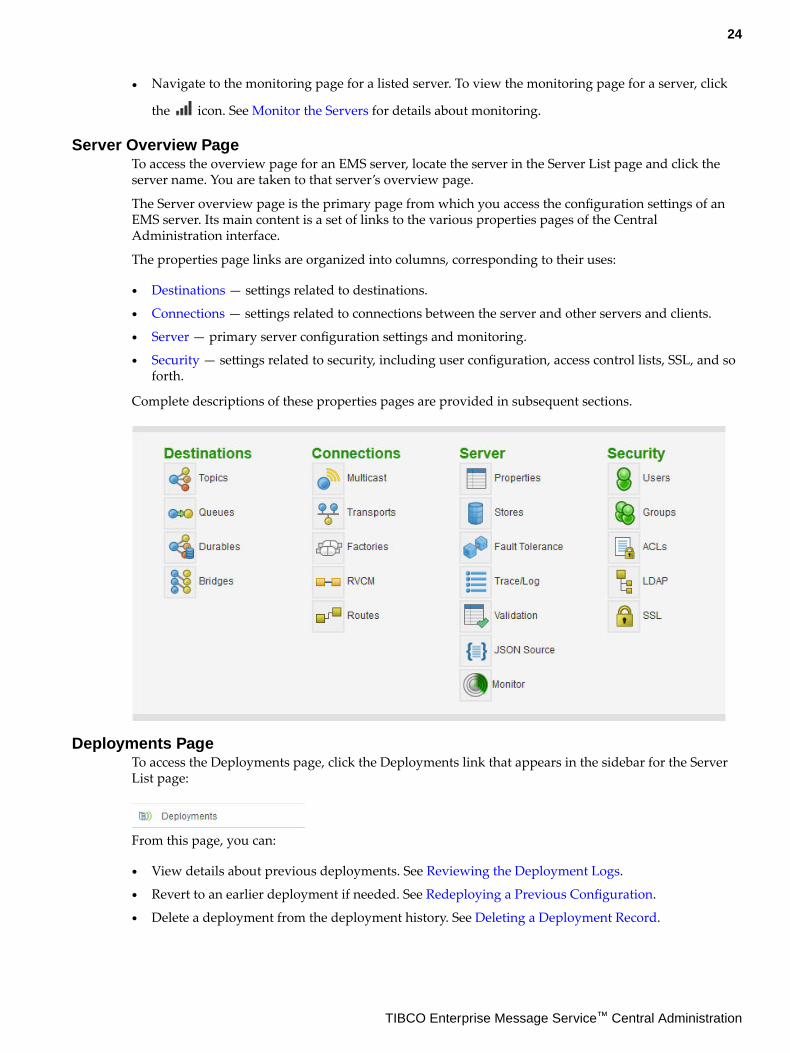
The Server overview page is the primary page from which you access the configuration settings of anEMS server. Its main content is a set of links to the various properties pages of the CentralAdministration interface.
The properties page links are organized into columns, corresponding to their uses:
● Destinations — settings related to destinations.
● Connections — settings related to connections between the server and other servers and clients.
● Server — primary server configuration settings and monitoring.
● Security — settings related to security, including user configuration, access control lists, SSL, and soforth.
Complete descriptions of these properties pages are provided in subsequent sections.
Deployments PageTo access the Deployments page, click the Deployments link that appears in the sidebar for the ServerList page:
From this page, you can:
● View details about previous deployments. See Reviewing the Deployment Logs.
● Revert to an earlier deployment if needed. See Redeploying a Previous Configuration.
● Delete a deployment from the deployment history. See Deleting a Deployment Record.
24
TIBCO Enterprise Message Service™ Central Administration
Common Navigation Tools
Home Logo
Clicking the TIBCO EMSCA logo at the top of each page returns to the main Server List page.
Page Name and Breadcrumbs
The large titles at the top of each page indicate where you are within the server configuration. The blacktitle indicates the name of the current page or object configuration being viewed. The green titlessummarize the context of the page you are on, and let you return to pages you have recently viewed.
Sidebar
The sidebar (visible on most pages) speeds navigation to other pages. The content of the sidebar isdependent on your current location.
● On the Server List and Deployments pages, the sidebar provides links between these two pages.
● On the EMS server property pages, the sidebar provides links to the other property pages, as well as
a link back to the Server Overview page. Click the server name that appears next to the home icon.
In addition, a Servers link is available to return you to the Server List page.
● On all pages, a Logout username link logs the current user out of Central Administration. Note thatthis feature is only visible when JAAS authentication is configured.
Icons
Icons are used throughout the Central Administration web interface to give access to commonly usedcommands and tasks. These icons are divided into two general categories, and are described in thefollowing tables:
● Command Icons
Icons in the upper right corner denote commands. The available set of command icons variesdepending on the state and location within the Central Administration web interface. These iconsare described in Common Icons below.
● Manipulating Items Icons
These general-use icons can appear in several contexts within the Central Administration webinterface. These icons are described in Manipulating Items Icons below.
Icon Name Description
Command Icons
25
TIBCO Enterprise Message Service™ Central Administration

Icon Name Description
Lock & Edit Grab the lock and start editing.
● Create a modifiable copy of the EMS server configuration file, andstore it in the working directory.
● Lock the EMS server configuration file so only the current user canmodify it.
If another user holds the lock, the Lock Conflicts page opens.
Deploy Finish editing and deploy all modified EMS server configurations.
● Auto-save the modified configuration files of all EMS servers lockedby the user to the working directory, and package them as adeployment.
● Send the deployment package to EMS servers.
● If the deployment succeeds, the web interface releases the lock, anddisplays the Deployments Page.
Refresh Discard all modifications and retrieve the current configuration filefrom the EMS server.
This command replaces the copy of the EMS server configuration filethat is stored in the working directory with the file it retrieves from theEMS server.
Revert Undo modifications and stop editing.
● Discard undeployed modifications; display the current EMS serverconfiguration.
● Release the lock.
Save Save modifications to the working directory.
Note that the Central Administration web interface frequently auto-saves your modifications to the working directory. This command letsyou force a save.
Download Download the server’s JSON configuration file.
Note that the download icon is only available from the JSON Sourcepage.
Manipulating Items Icons
Add Add or define a new item.
Delete Delete an item.
View View more details.
26
TIBCO Enterprise Message Service™ Central Administration
Icon Name Description
Duplicate Make a copy of an item (as a starting point for defining a similar item).
Rename Change the name of the item.
Undo Undo the previous modification.
Index Pages
Index pages present a list of the items that are defined for a page. For example, Server List pageincludes an index of servers that are defined in the Central Administration server. Similarly, the Queuesproperties page offers an index of queues that are defined for the EMS server. To view details about anyitem in the list, click the item name.
For more information, see Index Pages.
27
TIBCO Enterprise Message Service™ Central Administration
Using Central Administration
The following topics describe the steps to add servers to Central Administration and make and deployconfiguration changes.
Add EMS Servers to Central AdministrationThe following topics describe the steps needed to add a running EMS server to Central Administration,duplicate an existing EMS server, or remove an EMS server from Central Administration.
Adding a ServerTo add a running, JSON-configured tibemsd to Central Administration:
Procedure
1. Open the Central Administration web interface. For details, see Central Administration WebInterface Access.
2. Navigate to the main Server List page in Central Administration by clicking the Servers link.
3. In the filter box, enter a name to identify the server. For example, server1. The server name enteredhere is used only in Central Administration and must be unique.
Names can only contain letters, digits, dashes and underscores. Spaces are not allowed.
4. Click Create.
5. In the box that appears, enter the URL on which the Central Administration server will connect tothe EMS server. For example, tcp://localhost:7222.
6. Click Add Server.
Result
The Central Administration server attempts to connect to the EMS server using the URL provided.After successfully connecting, the new server appears in the list of managed servers and can beaccessed and configured through the web interface. The server configuration file is saved to thedeployment archive.
Duplicating an Existing ServerYou can create and deploy a new EMS server by duplicating the configuration of an existing server.Duplicating a server can be used to clone a configuration, perform some changes, and deploy it to adifferent server. Duplicating a server is also the easiest method to change the name identifying the EMSserver in the Central Administration server list. Simply provide the duplicate server with the desiredname, and delete the source server after the duplication.
Procedure
1. Navigate to the main Server List page in Central Administration.
2. Locate the existing server that you wish to clone. You can quickly find the server by entering itsname in the Filter or Create box.
3. Click Options .
4. Click Duplicate .
5. Enter an identifying name for the new server and click Duplicate.
The server name entered here is used only in Central Administration and must be unique.
28
TIBCO Enterprise Message Service™ Central Administration
Result
Central Administration creates a copy of the server’s JSON configuration file. This copy can then beedited and deployed.
The duplicate action creates an exact copy of the source EMS server configuration. All settings matchthe source file, including the Central Administration listen parameters. Deploying the new serverwithout first editing these fields causes any configuration changes to be applied to the source server.
Renaming a Server ConfigurationYou can rename an existing EMS server configuration from the Server List page. This changes the namethat is used to identify the server in Central Administration.
Procedure
1. Navigate to the main Server List page in Central Administration.
2. Locate the server. You can quickly find the server by entering its current name in the Filter or Createbox.
3. Click Options .
4. Click Rename .
5. Enter a new name for the server and click Rename.
The server name entered here is used only in Central Administration and must be unique.
Removing a Server from Central AdministrationYou can also remove an EMS server from Central Administration by deleting it from the Server Listpage. This removes the EMS server configuration file from Central Administration.
Removing an EMS server from Central Administration does not stop or otherwise change the runningEMS server. The EMS server continues operating outside of Central Administration.
Procedure
1. Navigate to the main Server List page.
2. Locate the existing server that you wish to remove. You can quickly find the server by entering itsname in the Filter or Create box.
3. Click Options .
4. Click Delete .
5. In the confirmation dialog that opens, click Delete to remove the server or Cancel to leave theserver in Central Administration.
Result
When you click Delete, the server is removed from Central Administration.
29
TIBCO Enterprise Message Service™ Central Administration
View the Server ConfigurationWhen JAAS is not configured in Central Administration, all users access the web interface using thesame administrative credentials. As a result, if a user locks and edits the configuration, any other usercan see and modify the edited configuration.
If JAAS is configured, all users can view the current configuration settings for an EMS server, althoughonly administrators can edit the server’s settings. If a configuration is locked, only the user with thelock sees the changes in progress. All other users see the current "snapshot" of the deployed EMSserver.
Locking the ServerIn order to prevent conflicts, an administrator must obtain a lock on an EMS server before it can beedited. Only administrators may lock and edit servers. Guest users have view privileges only.
Procedure
1. Navigate to the Server Overview Page for the selected EMS server.
2. Click Lock & Edit .
Result
You may now make changes to the EMS server configuration.
Lock ConflictsIf you attempt to lock an EMS server that has already been locked by another user, the Lock Conflictpage appears.
● Break the Lock
Clicking this option removes any edits made by the current lock owner and reverts the file to theconfiguration current in the deployment archive.
● Take the Lock
Clicking this option retains edits made by the current lock owner, but transfers the lock to you.
To leave the lock in place with the current lock owner, click Cancel Lock to return to the serveroverview page.
Reverting — Releasing a LockIf you have locked an EMS server, you can release the lock using the Revert icon. This commanddiscards all your configuration edits and releases the lock.
Releasing a lock without first deploying configuration changes causes Central Administration todiscard all edits.
Procedure
1. Navigate to the Server Overview Page, or any properties page for the server.
2. Click Revert .
3. In the dialog box that appears, click Yes to discard your configuration changes or No to cancel theaction and keep the lock.
30
TIBCO Enterprise Message Service™ Central Administration
Editing Server ConfigurationsTo make edits to the EMS server configuration using Central Administration, you must haveadministrative privileges.
● If JAAS authentication is enabled, administrative users are determined by the JAAS authenticationmodule. See Configuration of JAAS Authentication for details.
● If JAAS is not configured, all users have administrative privileges.
Users without administrative privileges can view configuration settings, but may not make changes.
Overview of the Editing Process
The EMS server configuration stored in the working directory can be out-of-sync with the runningconfiguration. This happens when the EMS server's configuration has changed as a result of direct editsto the JSON configuration file, programming API calls, or commands issued through the administrationtool. The Refresh command directs the Central Administration server to update its snapshot of the EMSserver. See Refreshing the Server Configuration for more information.
Procedure
1. Navigate to the Server Overview Page for the EMS server you wish to edit.
2. Obtain the lock for the server. See Locking the Server for more information.
3. Make the desired edits to the configuration settings from the server properties pages. These pagesare described in Properties Pages.
4. Review the Validation Results to locate and correct any errors in the configuration. For details, see Validation.
5. Deploy the new configuration. For details, see Configuration Deployment.
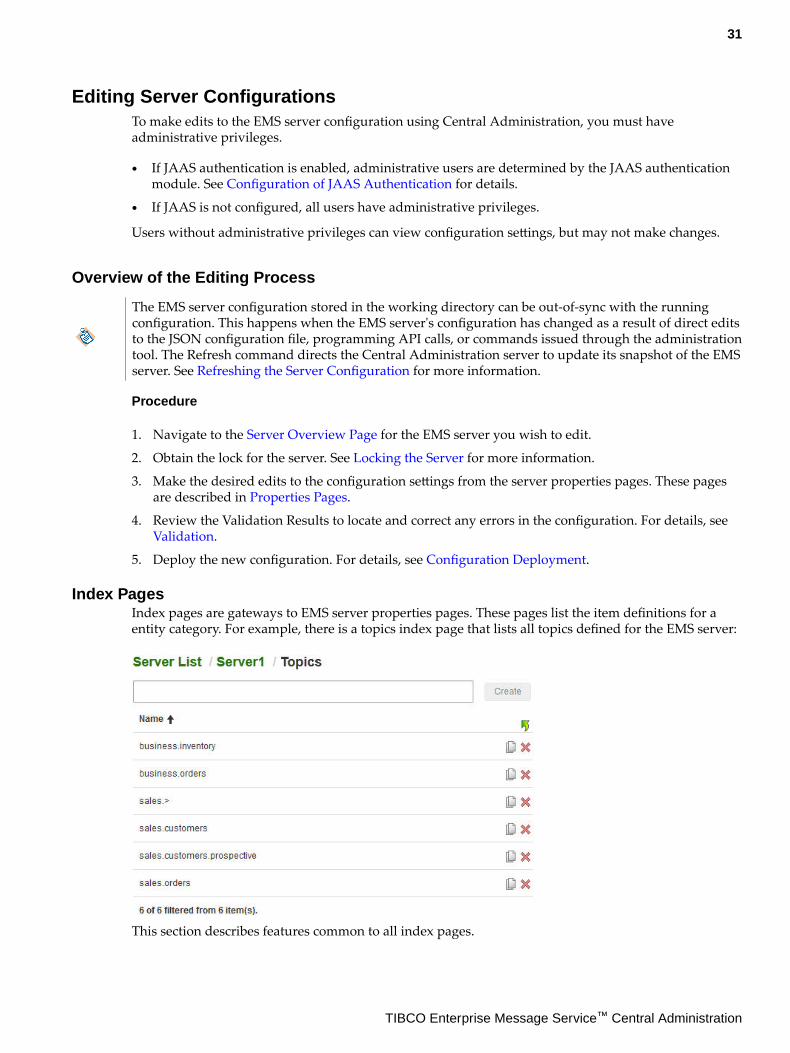
Index PagesIndex pages are gateways to EMS server properties pages. These pages list the item definitions for aentity category. For example, there is a topics index page that lists all topics defined for the EMS server:
This section describes features common to all index pages.
31
TIBCO Enterprise Message Service™ Central Administration
Viewing an Item
To view an item in the list, click its name.
Filtering the List
To view a subset of the items, type characters in the Filter or Create field. The list narrows to displayonly those items that contain the character sequence in their names.
Filters accept standard Java regular expressions using standard JavaScript regular expressions (wepresent a subset of the details in the following table).
Syntax Description
JavaScript Regular Expression Filtering
. (dot) Match any single character.
* (star) Match zero or more instances of the preceding element.
+ (plus) Match one or more instances of the preceding element.
\w Match any word character.
[chars] Match any single instance of the characters within square brackets.
Creating a New Item
To create a new item, type its name in the Filter or Create field, then click the Create button or type theEnter key. The new item is created, and the relevant properties page opens. (This operation is availableonly when you own the lock for the EMS server; see Locking the Server)
Duplicating an Item
To duplicate a definition (as a starting point for defining a similar item) click Duplicate . Thebrowser immediately displays the duplicate item in the relevant properties page for editing. (Thisoperation is available only when you own the lock for the EMS server.)
Deleting a Item
To delete a definition, click Delete corresponding to the definition. (This operation is available onlywhen you own the lock for the EMS server.)
Configuration DeploymentCentral Administration enables users to quickly update all modified servers by deploying all serversfor which the user owns the lock with one action. In other words, the deploy action deploys every EMSserver locked by the current user.
The Central Administration server does not automatically update its configuration snapshot for anEMS server. If configuration changes were made directly to the EMS server, such as through API calls,you should refresh the server configuration in Central Administration before deploying. See Refreshingthe Server Configuration for details.
32
TIBCO Enterprise Message Service™ Central Administration
Permission Requirements
To deploy, the current user must have administrative credentials for each EMS server in thedeployment. If you do not have adequate permissions to modify an EMS server, the deployment of thatserver fails.
If the user who owns the lock does not have the necessary permissions to deploy the changes, anotheruser with administrative permissions can take the lock and deploy. See Take the Lock for moreinformation.
Deployment Errors
Deployment of an EMS server fails if the Central Administration encounters any errors whileconnecting to and updating the server. Errors include:
● Failure to connect to the EMS server.
● Inadequate permissions for the user initiating the deployment.
● Invalid settings in the new EMS server configuration.
● The configuration currently held by the EMS server was modified either through the AdministrationTool or the administration API.
Each deployment can affect a number of EMS servers, but there is no dependency between the servers.That is, some EMS servers may deploy correctly while some fail. Those servers that did not deploy canattempt redeployment later. The server lock file remains in its edited state.
Deployment Results
Following a deployment, you can check its status in the deployment log. Review the status of eachserver:
● Deployment succeeded.
— The server accepted the changes.
— All changes have been activated.
● Deployment succeeded. Restart required.
— The server accepted the changes.
— The server requires a restart to activate the changes.
● Deployment failed.
— The server rejected the changes.
— Central Administration could not connect to the server.
Because deployment succeeds or fails for each EMS server individually, deployment results may differfor each server. If deployment to an EMS server fails, that server remains locked and editable by theuser.
33
TIBCO Enterprise Message Service™ Central Administration
Fault Tolerant Configurations
When a server that is a member of a fault-tolerant pair requires a restart, both servers must be restartedto activate the change. When the active server of the fault tolerant pair is shut down, the standby serverdoes not reinitialize its properties (such as listens, heartbeats, timeouts, and so on) during activation. Itdoes reinitialize objects such as queues, topics, factories, routes, and so on. It also takes into account theaddition, deletion, or modification of stores of type File Store.
The correct sequence when a deployment requires a restart is to:
1. Shutdown the active server.
2. Let the standby fully activate.
3. Restart the server shutdown in Step 1.
4. Let the restarted server reach the standby state.
5. Shutdown the server activated in Step 2.
6. Let the standby fully activate.
7. Restart the server shutdown in Step 5.
If restart can wait until a period when the servers can both remain offline for the recovery period,shutdown both servers and restart them simultaneously. In the particular case of the addition ordeletion of stores of type File Store, only steps 1 to 3 are necessary.
Deploying All Locked Servers
The deploy action deploys not only the selected server, but all servers for which the current user holdsthe lock. For example, if you have the lock on five servers, all five servers are updated when the deploycommand is issued.
Procedure
1. Navigate to the Server Overview Page, or any properties page for an EMS server.
2. Click Deploy .
3. In the dialog box that appears, enter an identifying name for the deployment. This name is used inthe deployment archive, and will help you identify this deployment when you view its log, orshould you need to redeploy at a future date.
By default, the deployment name is the date and time of the deployment: year-month-day-hour-minute-second-milisecond. For example, 2017-09-08-17-11-06-73 indicates a deployment onSeptember 8, 2017 at 5:11:06:73 in the afternoon.
4. Click Deploy. If you wish to continue editing, click Cancel.
Once Deploy is clicked, the Central Administration server:
● deploys the working copy of the JSON configuration file to the EMS server,
● updates the deployment archive with the new current configuration,
● releases the lock on the EMS server, and
● opens the Deployments page.
5. To view details about the deployment, including any errors, click View next to the deploymentname.
If some cases, the EMS server requires a restart before the configuration changes take effect. If suchcases, the server deployment log notes this requirement.
34
TIBCO Enterprise Message Service™ Central Administration
6. If required, restart the EMS server. This task cannot be completed using the Central Administrationweb interface.
Redeploying a Previous ConfigurationIf a deployment fails, you can easily roll back to a successful earlier deployment.
Only successful deployments can be redeployed. Any EMS servers that failed in the initial deploymentare excluded from a redeployment. If only some of the EMS servers included in a deployment weresuccessfully deployed, only those EMS servers are redeployed. If the initial deployment was whollyunsuccessful—none of the EMS servers deployed—the deployment in unavailable for redeployment.
Procedure
1. Navigate to the Deployments page.
2. Locate the deployment that you wish to redeploy in the Recent Deployments list.
3. Click Redeploy .
4. Click Yes to redeploy this version of the configuration, or No to retain the current configuration.
5. To view details about the deployment, including any errors, click View next to the deploymentname.
If some cases, an EMS server requires a restart before the configuration changes take effect. If suchcases, the server deployment log notes this requirement.
6. If required, restart the EMS servers. This task cannot be completed using the Central Administrationweb interface.
Result
The Central Administration server reverts all EMS servers deployed in the selected previousdeployment.
Redeploying updates the EMS server but does not affect the working directory or lock file. As a result,the working copy and lock files in Central Administration are out of sync with the running EMS server.
This allows you to retain the configuration changes made prior to the redeploy. To obtain the currentconfiguration, refresh the EMS server configuration. See Refreshing the Server Configuration fordetails.
Reviewing the Deployment Logs
A record of all deployments is maintained on the Deployments Page. A log is kept for eachdeployment, showing providing useful details about the deployment.
Procedure
1. Navigate to the Deployments page.
2. Locate the deployment in the Recent Deployments list.
3. Click View next to the deployment name to view a summary of the deployment.
4. Click the arrow next to the server name in the Deployment Server Log section.
5. To view the full log, click Full server deployment log available here. The full log includes alldetails about the deployment, including:
35
TIBCO Enterprise Message Service™ Central Administration
● Configuration changes made.
● Status of each edit made to the server.
If the deployment was redeployed, each server log for each deployment is separated by a line ofhash marks: #######.
It is best to regularly review your Recent Deployment list and delete records fordeployments that are insignificant and unlikely to be redeployed. This practice ensuresthat the list is not over-crowded, and that essential deployment records can be easilylocated.
EMS Server Configuration Modified Locally
If changes were made directly to the EMS server configuration using the Administration Tool or theadministration API and the corresponding configuration in Central Administration was not refreshed,you receive the following error when you attempt a deployment:The deployment was rejected due to local changes
If this occurs, you can view the differences between the base configuration stored in CentralAdministration and the one held by the running EMS server, as well as between the base configurationand the configuration with the latest edits saved in the lock file that resulted in a rejected deployment.From there, you can choose which configuration to keep. This functionality is available through theActions drop-down menu on the server deployment log page. Note that this menu is available only fordeployments that have been rejected due to local changes.
You can choose the following actions from the Actions menu:
● View changes made in the EMS server since the last refresh. This action shows differences betweenthe base configuration stored in Central Administration and the one held by the EMS server.
● View changes made in Central Administration since the last refresh. This action shows differencesbetween the base configuration stored in Central Administration and the configuration with thelatest edits saved in the lock file, which resulted in a rejected deployment.
● Refresh the Central Administration configuration with this server's configuration. This actiondiscards all changes you have made in Central Administration.
If the configuration is locked, this action affects both the lock file stored in the workingdirectory and the base configuration. Any changes you have made in CentralAdministration since locking the file are lost.
● Overwrite the EMS server configuration with Central Administration's configuration. This actionforces the Central Administration deployment, and disregards local changes in the EMS server. Youwill lose changes made in the EMS server.
See Refreshing the Server Configuration for more information on updating Central Administrationwith changes made to an EMS server using the Administration Tool, administration API calls, or bydirectly editing the configuration file.
Deleting a Deployment Record
If desired, you can remove a failed or otherwise unwanted deployment from the Recent Deploymentslist. Once a deployment is deleted, you no longer have access to its logs, and cannot redeploy it.
Procedure
1. Navigate to the Deployments page.
2. Locate the deployment that you wish to remove from the Recent Deployments list.
36
TIBCO Enterprise Message Service™ Central Administration
3. Click Delete .
4. Click Yes to the deployment record, or No to cancel and keep the record.
Refreshing the Server ConfigurationThe Central Administration server does not automatically detect configuration changes made directlyto the EMS server. That is, if changes have been made to the server configuration using theAdministration Tool, API calls, or by directly editing the configuration file, the Central Administrationserver must be instructed to retrieve these changes from the server.
You can instruct the Central Administration server to connect to the running EMS server and retrieveits current configuration.
This configuration replaces the JSON configuration file stored for the server in the working directory.
Procedure
1. If the server is locked, discard any changes and stop editing.
If you own the lock, click Revert to discard your changes and stop editing.If another user has the lock, you may wish to break the lock. See Break the Lock for details.
2. On the Server List page, locate the server in the list of managed servers.
3. Click Refresh.
To ensure that Central Administration has the latest EMS server configuration settings,always refresh before editing a server.
4. In the dialog box that opens, click Yes to update the configuration from the EMS server, or No tocancel.
Monitor the ServersThe monitoring feature, available from the Server overview page, allows you to interact with and viewstatistics related to a live EMS server.
Statistics and details available through this interface reflect the monitoring and tracing settingsconfigured for the server, as described in the TIBCO Enterprise Message Service User’s GuideTIBCOEnterprise Message Service User’s Guide.
Because monitoring interacts with a live server, some monitoring activities can impact serverperformance.
Query Results
On any monitoring page, you can refine the results by entering a name in the Query field. Use partialnames or patterns to limit the records shown. The Query field supports * and > patterns.
Sort Results
You can change the sort order of the displayed records by clicking any of the column heading for any ofthe displayed fields.
Clicking a header performs a local sort on the data already retrieved by the browser. It does not refreshthe query.
37
TIBCO Enterprise Message Service™ Central Administration
Configuring Temporary Server Tracing OptionsYou can configure temporary client tracing options for a server. These options remain active untilchanged, or until the server is restarted.
Procedure
1. Navigate to the desired Server overview page.
2. Select the Monitor option.
3. Select the Server category.
4. From the Manage Server tab, select Client Tracing....5. Select the desired Output Target and Filter Type, then click Set Options.
Result
These options remain active until changed, or until the server is restarted. For details about theavailable target and filter types, see the client_trace parameter.
Monitor Destination ActivityMonitoring activities that report on destinations, including topics, queues and durables, can place aheavy burden on the EMS server. To minimize any negative impact on performance, a limit is placed onthe number of entries that the server reviews.
If the EMS server has more than 200 destinations in the particular results screen, no data is immediatelyreturned. Instead, you must use the query tools to refine the monitoring results:
● Destination Name Filter
In the Query box, enter a destination name or partial name with pattern. This field supports thestandard * and > patterns.
If query results are already visible on the page, entering text in the Query box immediately filtersthose results. A server-side query is performed only after the Query button is clicked.
● Order
Choose an order preference from this drop-down box. For example, you can chose to order resultsby name, subscriber count, size, or several other criterion. If you choose to order based on a numericfield, destinations with the largest value are returned first. That is, Central Administrationdetermines the results by collecting the records with the greatest value for the specified field.
● Retrieve Count
This tool allows you to control the number of results that are returned. The options available are:
— Retrieve By Page — (Available for topics and queues only.) Retrieves a page of 50 filtered butunsorted records at a time. Use the Next and Previous buttons to retrieve additional pages orreturn to a previously retrieved page of results. There is no limit on the number of pages thatcan be requested.
— Retrieve Default Count — Retrieves matching records up to the default limit of 200 items.— Retrieve Max Count— Retrieves up to 5,000 matching records.— Customize — Select this option to input the number of records you would like to retrieve. Any
integer from 1 to 5000 may be entered. Note that this custom value does not apply to theRetrieve By Page option, which always retrieves 50 records per page.
Click Query to retrieve the list of matching records.
Note that to rank the results, Central Administration has to read and process each element. As a result,these queries can put a heavy burden on the EMS server.
38
TIBCO Enterprise Message Service™ Central Administration
Detail PagesCentral Administration presents query results in a table. In may cases, objects in the table are linked todetailed summary pages which show monitoring statistics and runtime configuration for the inspectedobject. For example, on the Consumer monitoring page, each consumer entry offers a link to the relatedconsumer ID, connection ID, and destination.
In some cases, you will need to enable the statistics parameter and configure detailed statisticsbefore the EMS server will collect the desired information.
See Detailed Statistics in the TIBCO Enterprise Message Service User’s Guide
Manage Objects
These detail pages typically provide a Manage menu, which provides the ability to managethe specified object. For example, depending on the object you may be able to refresh the data, compact,purge, or delete the object.
These commands operate on a live EMS server and their execution is not reversible. In cases where thecommand purges or destroys, the data in question is lost forever.
39
TIBCO Enterprise Message Service™ Central Administration
Properties Pages
This section provides a reference to the EMS server properties pages accessed through the CentralAdministration web interface.
Links to the TIBCO Enterprise Message Service User’s Guide provide easy navigation to parameterdescriptions and usage guidelines.
DestinationsThe properties pages in the Destinations category configure EMS server destinations.
TopicsUse the index screen to access existing topics or create a new topic.
Restrictions and rules on topic names are described in Destination Name Syntax in the TIBCO EnterpriseMessage Service User’s Guide.
The fields on the properties page for each topic configure its destination properties.
See Destination Properties in the TIBCO Enterprise Message Service User’s Guide.
QueuesUse the index screen to access existing queues or create a new queue.
Restrictions and rules on queue names are described in Destination Name Syntax in the TIBCOEnterprise Message Service User’s Guide.
The fields on the properties page for each queue configure its destination properties.
See Destination Properties in the TIBCO Enterprise Message Service User’s Guide.
DurablesUse the index screen to access existing durable subscribers or create a new durable subscriber.
The fields on the Durable properties page correspond to the parameters in the durables.confconfiguration file.
BridgesUse the index screen to access existing bridges or create a new bridge between destinations.
The fields on the Bridge properties page correspond to the parameters in the bridges.confconfiguration file.
ConnectionsThe properties pages in the Connections category configure the connections between the EMS serverand other servers, clients, and messaging systems.
TransportsEnable or disable transports between the TIBCO Enterprise Message Service server and TIBCO FTL,TIBCO Rendezvous, and TIBCO SmartSockets by clicking the relevant check boxes.
In order to enable a transport type, you must also set the Module Path field on the Server Propertiespage.
Transport configuration fields, including the Configured Transports index screen, are available onlywhen transports are enabled.
40
TIBCO Enterprise Message Service™ Central Administration
FTL Transports
Check the Enable FTL Transports check box to enable these transport types, then use the ConfiguredTransports index screen to edit or create a new FTL transport definition.
When adding or editing a transport definition in the Configured Transports index screen, the fieldsavailable on the Transport properties page change depending on the Transport Type selected. WhenFTL is selected for this field, the fields shown correspond to the relevant parameters in thetransports.conf configuration file.
See also TIBCO FTL Transport Parameters in the TIBCO Enterprise Message Service User’s Guide.
RV and RVCM Transports
Check the Enable RV and RVCM Transports check box to enable these transport types, then use theConfigured Transports index screen to edit or create a new RV transport definition.
The fields available on the Transport properties page change depending on the Transport Type selected.When RV or RVCM are selected for this field, the fields shown correspond to the relevant parameters inthe transports.conf configuration file.
See also Transport Definitions in the TIBCO Enterprise Message Service User’s Guide.
SmartSockets Transports
Check the Enable SmartSockets Transports check box to enable these transport types.
When adding or editing a transport definition in the Configured Transports index screen, the fieldsavailable on the Transport properties page change depending on the Transport Type selected. WhenSmartSockets is selected for this field, the fields shown correspond to the relevant parameters in thetransports.conf configuration file.
See also Transport Definitions in the TIBCO Enterprise Message Service User’s Guide.
The SmartSockets Config Directory field that appears corresponds to the related TIBCO FTL TransportParameters setting in the tibemsd.conf configuration file.
FactoriesUse the index screen to access existing connection factory definitions or create a new connection factory.
The fields on the Factory properties page correspond to the parameters in the factories.confconfiguration file.
RVCMUse the index screen to access existing TIBCO Rendezvous certified messaging (RVCM) listeners orcreate a new listener.
The fields on the RVCM Listener properties page correspond to the parameters in the tibrvcm.confconfiguration file.
RoutesEnable or disable routes using the Enable Routing check box. The route index screen is visible onlywhen routes are enabled.
The fields on the Route properties page correspond to the parameters in the routes.conf configurationfile.
ServerThe properties pages in the Server category configure the basic operation of the EMS server.
41
TIBCO Enterprise Message Service™ Central Administration
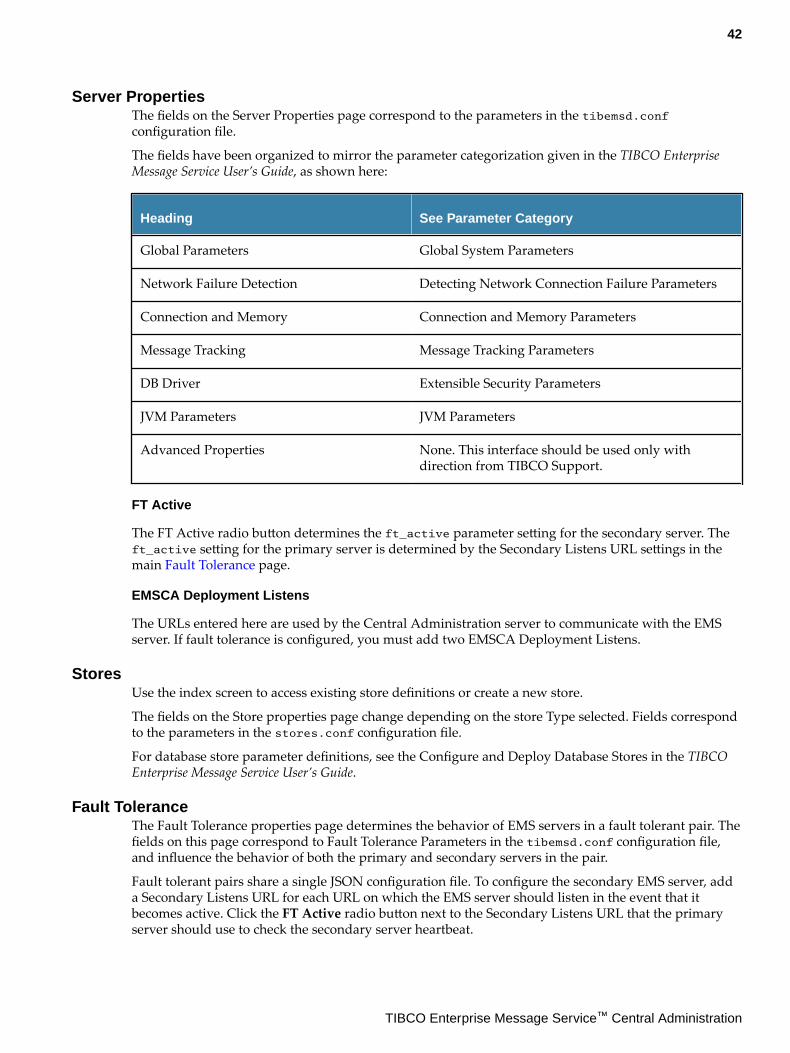
Server PropertiesThe fields on the Server Properties page correspond to the parameters in the tibemsd.confconfiguration file.
The fields have been organized to mirror the parameter categorization given in the TIBCO EnterpriseMessage Service User’s Guide, as shown here:
Heading See Parameter Category
Global Parameters Global System Parameters
Network Failure Detection Detecting Network Connection Failure Parameters
Connection and Memory Connection and Memory Parameters
Message Tracking Message Tracking Parameters
DB Driver Extensible Security Parameters
JVM Parameters JVM Parameters
Advanced Properties None. This interface should be used only withdirection from TIBCO Support.
FT Active
The FT Active radio button determines the ft_active parameter setting for the secondary server. Theft_active setting for the primary server is determined by the Secondary Listens URL settings in themain Fault Tolerance page.
EMSCA Deployment Listens
The URLs entered here are used by the Central Administration server to communicate with the EMSserver. If fault tolerance is configured, you must add two EMSCA Deployment Listens.
StoresUse the index screen to access existing store definitions or create a new store.
The fields on the Store properties page change depending on the store Type selected. Fields correspondto the parameters in the stores.conf configuration file.
For database store parameter definitions, see the Configure and Deploy Database Stores in the TIBCOEnterprise Message Service User’s Guide.
Fault ToleranceThe Fault Tolerance properties page determines the behavior of EMS servers in a fault tolerant pair. Thefields on this page correspond to Fault Tolerance Parameters in the tibemsd.conf configuration file,and influence the behavior of both the primary and secondary servers in the pair.
Fault tolerant pairs share a single JSON configuration file. To configure the secondary EMS server, adda Secondary Listens URL for each URL on which the EMS server should listen in the event that itbecomes active. Click the FT Active radio button next to the Secondary Listens URL that the primaryserver should use to check the secondary server heartbeat.
42
TIBCO Enterprise Message Service™ Central Administration
The FT Active radio button determines the ft_active parameter setting for the primary server. Theft_active setting for the secondary server is determined by the Primary Listens settings in the main Server Properties page.
For more information, see Fault Tolerance in Central Administration in the TIBCO Enterprise MessageService User’s Guide.
Trace/LogThe fields on the Tracing and Logging properties page correspond to the Tracing and Log FileParameters in the tibemsd.conf configuration file.
ValidationThe Validation Results page shows a list of any validation errors in the current server configuration.Each time you edit a field, the Central Administration validates the revised server configuration andreports any errors in the Validation Results page. Immediate feedback is provided through theValidation Results link in the sidebar. The number of errors, if any are present in the serverconfiguration, appears to the right of the link name.
A description of each validation issue is listed on the Validation Results page. Click the View icon tonavigate to the properties page where the issue is located.
JSON SourceThe JSON Source page displays a read-only copy of the server configuration file that is currently storedin the working directory. This file contains any edits that have been made but not yet deployed to theserver.
If the source file is too large to display quickly, you are prompted to use the Download iconinstead. You can either left-click that icon to display an unformatted version of the source or right-clickon the icon to download and save the source as a JSON file.
SecurityThe properties pages in the Security category configure access to the EMS server.
UsersUse the index screen to access existing user definitions or create a new user.
The fields on the User properties page correspond to the parameters in the users.conf configurationfile.
You can assign permissions to the user from the User properties page by adding Access Control Lists(ACLs) for individual destinations. This provides a very granular level of control. Use the Groupsproperty page to assign the same set of permissions to a group of people.
Similarly, you can grant administrative privileges to the user by adding an Admin ACL on the Userpage. You can also add the user to a group with administrative privileges.
Users configured here are local, and apply only to the current EMS server. Users that are definedthrough JAAS or LDAP do not appear on these pages. To add permissions to externally sourced users(those configured through the JAAS module), use the ACLs page.
GroupsUse the index screen to access existing group definitions or create a new group.
The fields on the Group properties page correspond to the parameters in the groups.confconfiguration file.
43
TIBCO Enterprise Message Service™ Central Administration
Groups configured here are local, and apply only to the current EMS server. Groups that are definedthrough JAAS or LDAP do not appear on these pages. To add permissions to externally sourced groups(those configured through the JAAS module), use the ACLs page.
ACLsUse the index screen to access existing Access Control List (ACL) definitions or create a new ACL. TheACLs page provides access to both locally and externally sourced users and groups. That is, users andgroups that are specific to this EMS server, and those that are configured through a JAAS or LDAPsystem.
The fields on the ACLs properties page correspond to the parameters in the acl.conf configurationfile.
LDAPThe fields on the LDAP properties page correspond to the LDAP Parameters in the tibemsd.confconfiguration file.
See Authentication and Permissions in the TIBCO Enterprise Message Service User’s Guide.
SSLThe fields on the SSL properties page correspond to the SSL Server Parameters in the tibemsd.confconfiguration file.
See SSL Protocol in the TIBCO Enterprise Message Service User’s Guide.
44
TIBCO Enterprise Message Service™ Central Administration
Conversion of Server Configuration Files to JSON
The tibemsconf2json utility is provided to convert a set of text-based EMS server configuration filesinto a single JSON configuration file. This tool is available on platforms that support CentralAdministration.
For a list of supported platforms for Central Administration, see Supported Platforms in the TIBCOEnterprise Message Service Installation guide.
When using the utility, keep in mind that:
● If there are any unsupported parameters in the source configuration file, the tibemsconf2jsonutility issues a warning but continues converting.
Review the TIBCO Enterprise Message Service Release Notes for details about any obsolete parametersthat were removed from the current release.
● To convert a fault tolerant pair, use the -secondaryconf option to merge the two tibemsd.conf files ofa fault tolerant pair of servers.
Syntax
To convert a EMS server configuration to JSON, use the command:tibemsconf2json -conf source-file [-secondaryconf ft-source-file] [-confencoding character-set-name] -json output-file | -console
where
● source-file is the path to the tibemsd.conf to be converted. Sub-file names and locations are derivedfrom the content of the tibemsd.conf file. When converting servers in a fault tolerant pair, specifythe configuration file for the primary server.
● ft-source-file is the path to the server configuration file for the second server in a fault tolerant pair.Specify this path with the -secondaryconf option to convert a fault tolerant pair.
● character-set-name is the name of the character set that was used to encode the source-file (and ft-source-file, if given). Any character encoding supported by the Java SE platform can be specified.Specify the encoding using the Canonical Name for java.lang API.
When omitted, the expected encoding is UTF-8. Note that the output JSON file is always encodedwith UTF-8.
● output-file is the name and location of the new JSON file. This file must have the .json extension.For example, tibemsd.json. If no path is specified, the file is created in the current workingdirectory.
● Alternately, specify -console to display the JSON output to the screen rather than saving to file.
The tibemsconf2json utility converts the .conf file to a JSON-based configuration.
If -json output-file is specified, the file is created and saved in the location specified, or the currentworking directory if no path is given. You can then start the EMS server using the JSON configuration,and access the server through the Central Administration web interface.
Convert a Fault Tolerant Pair
If a -secondaryconf ft-source-file is specified, the tibemsconf2json utility first converts the primaryconfiguration to JSON, then uses the secondary configuration to complete the fault tolerant setup,deciding which one of the primary listen URLs must be marked as FT Active and adding extrasecondary listen URLs, if any.
45
TIBCO Enterprise Message Service™ Central Administration

Note that the secondary configuration is used only for the purpose of completing the fault tolerantsetup. With the only exception of the logfile property, any differences and discrepancies between thetwo initial sets of configuration files that are outside fault tolerance parameters are ignored.
46
TIBCO Enterprise Message Service™ Central Administration