Embed Size (px)
Citation preview
Talend Data IntegrationInstallation Guide forWindows
7.1.1
ContentsCopyright.............................................................................................................................................. 3Talend Data Integration: Prerequisites............................................................................................ 4
Preparing your installation.........................................................................................................................................................4Hardware requirements............................................................................................................................................................... 6Software requirements.................................................................................................................................................................7Database Privileges.................................................................................................................................................................... 25Setting up JAVA_HOME............................................................................................................................................................. 25
Installing your Talend Data Integration using Talend Installer................................................. 27Introducing Talend Installers..................................................................................................................................................27Installation modes of Talend Installer and Talend Studio Installer........................................................................27Installing Talend Studio with the Talend Studio Installer..........................................................................................28Talend Installer specific prerequisites................................................................................................................................ 28Using Talend Installer graphical installation mode...................................................................................................... 29
Installing your Talend Data Integration manually....................................................................... 42Manual installation order.........................................................................................................................................................42Setting up your version control system............................................................................................................................. 42Installing and configuring Talend Administration Center........................................................................................... 44Installing and configuring Talend Identity and Access Management..................................................................... 64Installing and configuring Talend Artifact Repository..................................................................................................74Installing and configuring your Talend JobServer..........................................................................................................78Installing Talend Runtime....................................................................................................................................................... 84Installing the Talend Activity Monitoring Console web application....................................................................... 86Installing and configuring the Drools Business Rules Management System (BRMS)........................................ 87Installing and configuring Talend logging modules..................................................................................................... 88Installing and configuring your Talend Studio................................................................................................................95Installing and configuring Talend CommandLine........................................................................................................109Installing and configuring Talend Data Preparation...................................................................................................111Installing and configuring Talend Data Stewardship................................................................................................. 120
Appendices.......................................................................................................................................132Introduction to the Talend products.................................................................................................................................132Architecture of the Talend products................................................................................................................................. 139Cheatsheet: start and stop commands for Talend server modules....................................................................... 141Installing Talend servers as services................................................................................................................................ 141H2 Database Administration & Maintenance................................................................................................................ 148Supported Third-Party System/Database/Business Application Versions............................................................152
Copyright
3
Copyright
Adapted for 7.1.1. Supersedes previous releases.
Publication date: November 12, 2018
Copyright © 2018 Talend. All rights reserved.
The content of this document is correct at the time of publication.
However, more recent updates may be available in the online version that can be found on TalendHelp Center.
Notices
Talend is a trademark of Talend, Inc.
All brands, product names, company names, trademarks and service marks are the properties of theirrespective owners.
End User License Agreement
The software described in this documentation is provided under Talend 's End User Software andSubscription Agreement ("Agreement") for commercial products. By using the software, you areconsidered to have fully understood and unconditionally accepted all the terms and conditions of theAgreement.
To read the Agreement now, visit http://www.talend.com/legal-terms/us-eula.
Talend Data Integration: Prerequisites
4
Talend Data Integration: Prerequisites
Preparing your installation
Installation modes
There are different methods to install your Talend product:
• the automatic mode, using Talend Installer. It is the recommended way of installing your Talendproduct. For more information, see Introducing Talend Installers on page 27.
• the manual installation. This method allows you to customize every step of your installation. Formore information, see Manual installation order on page 42.
Files to download
In order to install your Talend product, you need to download your license key file and the softwarepackages you need.
Here are the files you need to download:
• your personal license key that you received by email.
This file with no extension is mandatory to be able to access each module of Talend. Keep this fileat hand in a safe place.
• the software packages that correspond to the modules you want to install.
Software packages
This page details the software packages you need to download to install your Talend product.
In this page:
• YYYYMMDD_HHmm corresponds to the package timestamp
• A.B.C. corresponds to package version number (Major. Minor. Patch.)
The software modules must be all in the same versions/revisions. This means that bothYYYYMMDD_HHmm and A.B.C must match on both client side and server side.
The links to download these packages are listed in your licence email.

Talend Data Integration: Prerequisites
5
Talend Installer software package
File name Description
Talend-Tools-Installer-YYYYMMDD_HHmm-VA.B.
C-installer.zip + dist fileTalend Tools Installer: wizard-based application whichguides you step by step through the installation andconfiguration of the Talend Tools modules.
The Talend Tools Installer package includes twofiles (a .zip and a dist file) which should be bothdownloaded and stored in the same place.
The dist file is only required to install Talend products.Once the installation and configuration is complete, youcan remove it.
TalendToolsStudio-YYYYMMDD_HHmm-VA-B-C-win
dows-installer.exe
Talend Studio Installer: wizard-based application whichguides you step by step through the installation of yourTalend Studio.
This package comes with an embedded JavaEnvironment to make your installation easier.
Manual installation software packages
File name Description
Talend-Studio-YYYYMMDD_HHmm-VA.B.C.zip CommandLine interface to the IDE + Studio IDE (GUI)
Talend-AdministrationCenter-YYYYMMDD_HHmm-
VA.B.C.zip
Talend Administration Center: Web-based applicationused to administrate the Talend projects and users +Talend Artifact Repository
Talend-IAM-VA.B.C.zip The Talend Identity and Access Management server isused to enable Single Sign-On between Talend DataPreparation and Talend Data Stewardship.
Talend-JobServer-YYYYMMDD_HHmm-VA.B.C.zip Talend JobServer: Standalone execution server
Talend-AMC_Web-YYYYMMDD_HHmm-VA.B.C.zip Talend Activity Monitoring Console Web applicationused to monitor Talend Jobs and projects
Talend-BRMS-YYYYMMDD_HHmm-VA.B.C.zip Drools: Business Rules Management System based onDrools Workbench and Drools Expert
Talend-DataStewardship=VA.B.C.zip Talend Data Stewardship: a comprehensive tool you canuse to configure and manage data assets and organizethe interactions on data whenever human intervention isrequired.
Talend-DataPreparation-Server-VA.B.C.zip Talend Data Preparation enables information workersto cut hours out of their work day by simplifying andexpediting the laborious and time-consuming process ofpreparing data for analysis or other data-driven tasks.
Community and Support
There are several ways to get help and support for your Talend installation:
Talend Data Integration: Prerequisites
6
• Official Talend Documentation. Here you can find everything to help you install and use yourTalend product.
• Talend Community. This is the place where you can ask questions to the community, and getanswers.
• Talend Professional Support. If you are a Talend subscription customer, you can open a ticket tothe Talend Support.
• Talend Consulting Portal. If you are a Talend subscription customer, you can ask for a consultant tohelp through the installation of your Talend product.
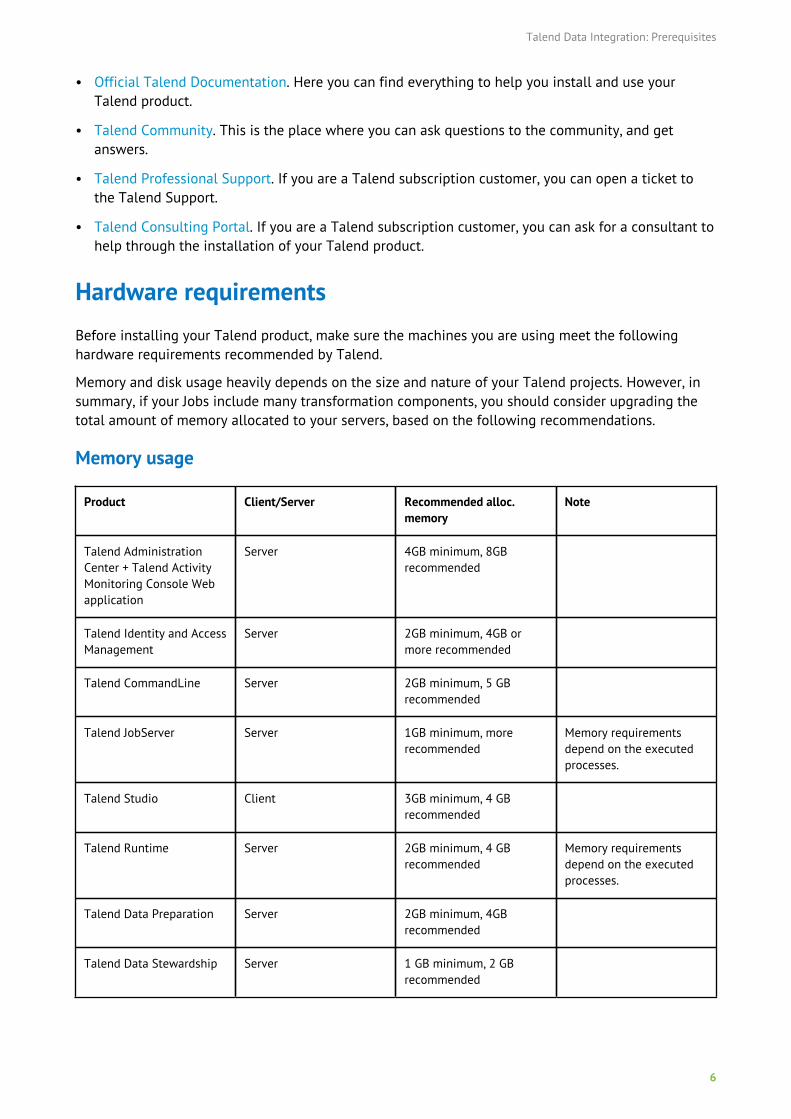
Hardware requirementsBefore installing your Talend product, make sure the machines you are using meet the followinghardware requirements recommended by Talend.
Memory and disk usage heavily depends on the size and nature of your Talend projects. However, insummary, if your Jobs include many transformation components, you should consider upgrading thetotal amount of memory allocated to your servers, based on the following recommendations.
Memory usage
Product Client/Server Recommended alloc.memory
Note
Talend AdministrationCenter + Talend ActivityMonitoring Console Webapplication
Server 4GB minimum, 8GBrecommended
Talend Identity and AccessManagement
Server 2GB minimum, 4GB ormore recommended
Talend CommandLine Server 2GB minimum, 5 GBrecommended
Talend JobServer Server 1GB minimum, morerecommended
Memory requirementsdepend on the executedprocesses.
Talend Studio Client 3GB minimum, 4 GBrecommended
Talend Runtime Server 2GB minimum, 4 GBrecommended
Memory requirementsdepend on the executedprocesses.
Talend Data Preparation Server 2GB minimum, 4GBrecommended
Talend Data Stewardship Server 1 GB minimum, 2 GBrecommended
Talend Data Integration: Prerequisites
7
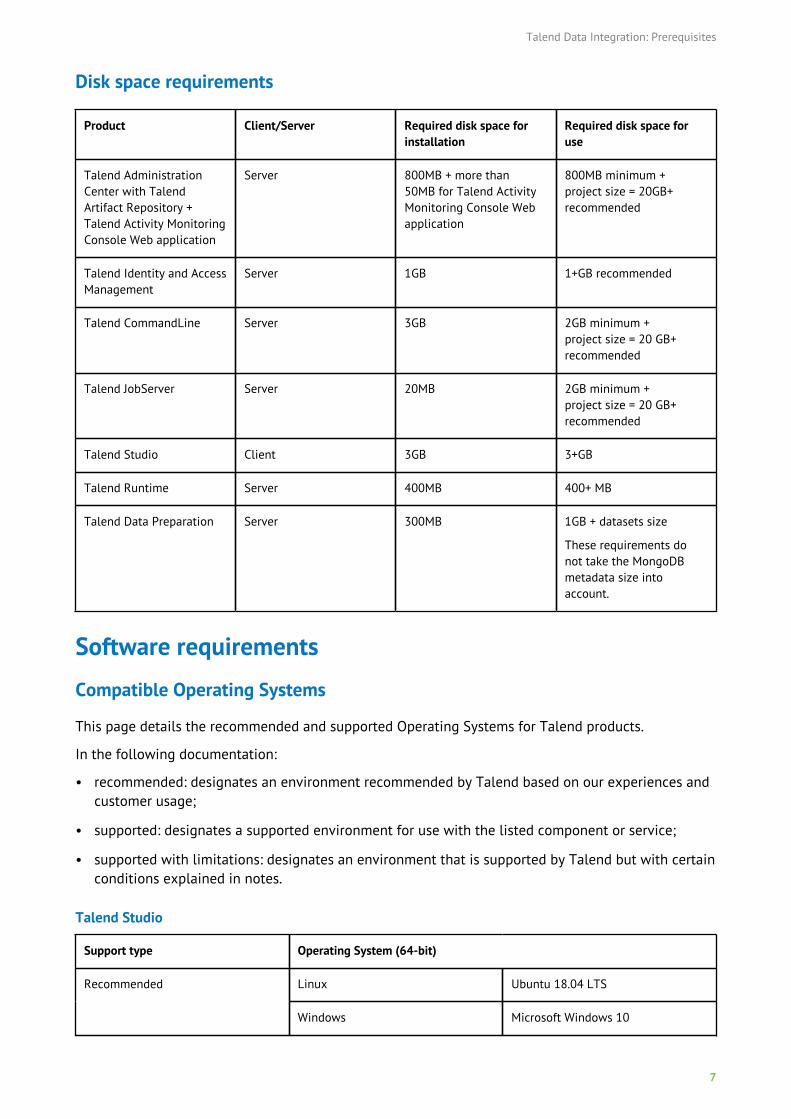
Disk space requirements
Product Client/Server Required disk space forinstallation
Required disk space foruse
Talend AdministrationCenter with TalendArtifact Repository +Talend Activity MonitoringConsole Web application
Server 800MB + more than50MB for Talend ActivityMonitoring Console Webapplication
800MB minimum +project size = 20GB+recommended
Talend Identity and AccessManagement
Server 1GB 1+GB recommended
Talend CommandLine Server 3GB 2GB minimum +project size = 20 GB+recommended
Talend JobServer Server 20MB 2GB minimum +project size = 20 GB+recommended
Talend Studio Client 3GB 3+GB
Talend Runtime Server 400MB 400+ MB
Talend Data Preparation Server 300MB 1GB + datasets size
These requirements donot take the MongoDBmetadata size intoaccount.
Software requirements
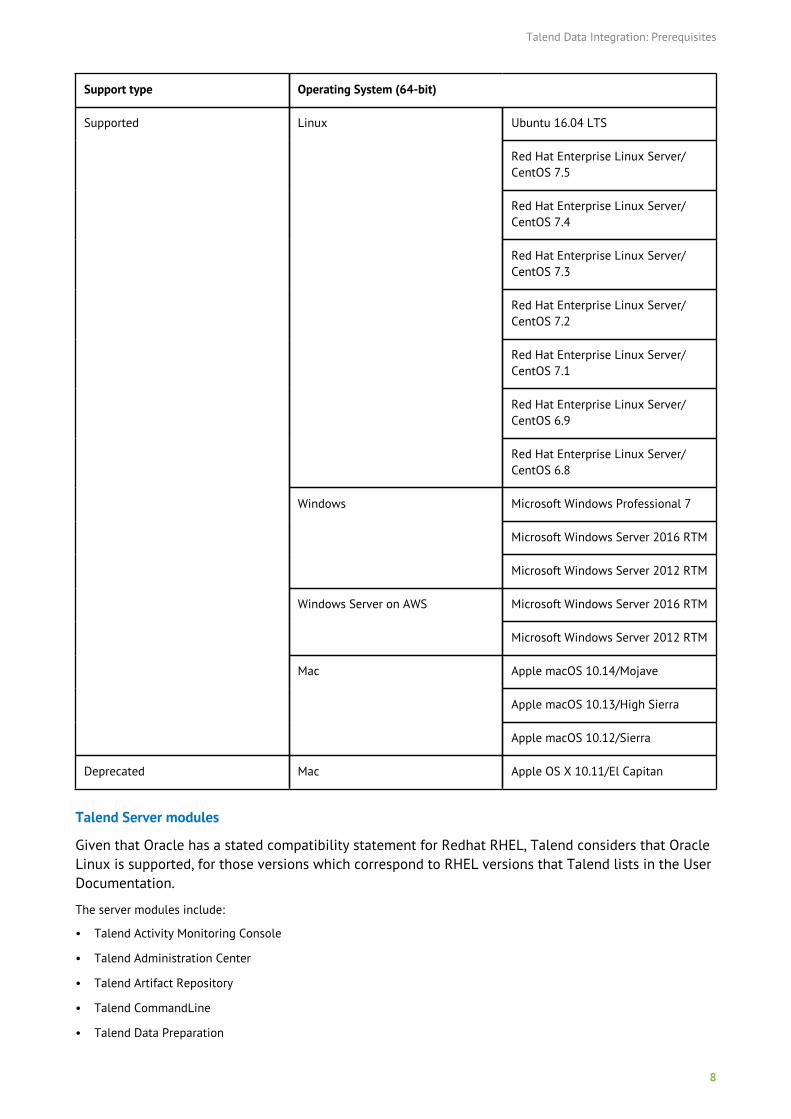
Compatible Operating Systems
This page details the recommended and supported Operating Systems for Talend products.
In the following documentation:
• recommended: designates an environment recommended by Talend based on our experiences andcustomer usage;
• supported: designates a supported environment for use with the listed component or service;
• supported with limitations: designates an environment that is supported by Talend but with certainconditions explained in notes.
Talend Studio
Support type Operating System (64-bit)
Linux Ubuntu 18.04 LTSRecommended
Windows Microsoft Windows 10
Talend Data Integration: Prerequisites
8
Support type Operating System (64-bit)
Ubuntu 16.04 LTS
Red Hat Enterprise Linux Server/CentOS 7.5
Red Hat Enterprise Linux Server/CentOS 7.4
Red Hat Enterprise Linux Server/CentOS 7.3
Red Hat Enterprise Linux Server/CentOS 7.2
Red Hat Enterprise Linux Server/CentOS 7.1
Red Hat Enterprise Linux Server/CentOS 6.9
Linux
Red Hat Enterprise Linux Server/CentOS 6.8
Microsoft Windows Professional 7
Microsoft Windows Server 2016 RTM
Windows
Microsoft Windows Server 2012 RTM
Microsoft Windows Server 2016 RTMWindows Server on AWS
Microsoft Windows Server 2012 RTM
Apple macOS 10.14/Mojave
Apple macOS 10.13/High Sierra
Supported
Mac
Apple macOS 10.12/Sierra
Deprecated Mac Apple OS X 10.11/El Capitan
Talend Server modules
Given that Oracle has a stated compatibility statement for Redhat RHEL, Talend considers that OracleLinux is supported, for those versions which correspond to RHEL versions that Talend lists in the UserDocumentation.
The server modules include:
• Talend Activity Monitoring Console
• Talend Administration Center
• Talend Artifact Repository
• Talend CommandLine
• Talend Data Preparation
Talend Data Integration: Prerequisites
9
• Talend Data Stewardship
• Talend JobServer
• Talend Log Server
• Talend Repository Manager
• Talend Runtime
Support type Operating System Processor
Linux Red Hat Enterprise LinuxServer/CentOS 7.5
64 bitsRecommended
Windows Microsoft Windows Server2016
64 bits
Ubuntu 18.04 LTS 64 bits
Ubuntu 16.04 LTS 64 bits
Red Hat Enterprise LinuxServer/CentOS 7.4
64 bits
Red Hat Enterprise LinuxServer/CentOS 7.3
64 bits
Red Hat Enterprise LinuxServer/CentOS 7.2
64 bits
Red Hat Enterprise LinuxServer/CentOS 7.1
64 bits
Red Hat Enterprise LinuxServer/CentOS 6.9
64 bits
Red Hat Enterprise LinuxServer/CentOS 6.8
64 bits
SUSE SLES 12 64 bits
Linux
SUSE SLES 11 64 bits
Microsoft Windows Server2012 R2
64 bits
Supported
Windows
Microsoft Windows Server2012
64 bits
Except for Talend DataPreparation.
Statement regarding Virtualization and Docker deployments
In general, Talend supports running on virtual machines and Docker containers. For bothVirtualization Systems and Linux based Docker containers, Talend relies on the vendors’ compatibilitystatements to ensure the proper running and execution of the Talend software.
Talend does not deliver prepackaged Docker Images or Dockerfile for Talend applications, Talend Jobsor Routes as Docker containers.
Talend Data Integration: Prerequisites
10
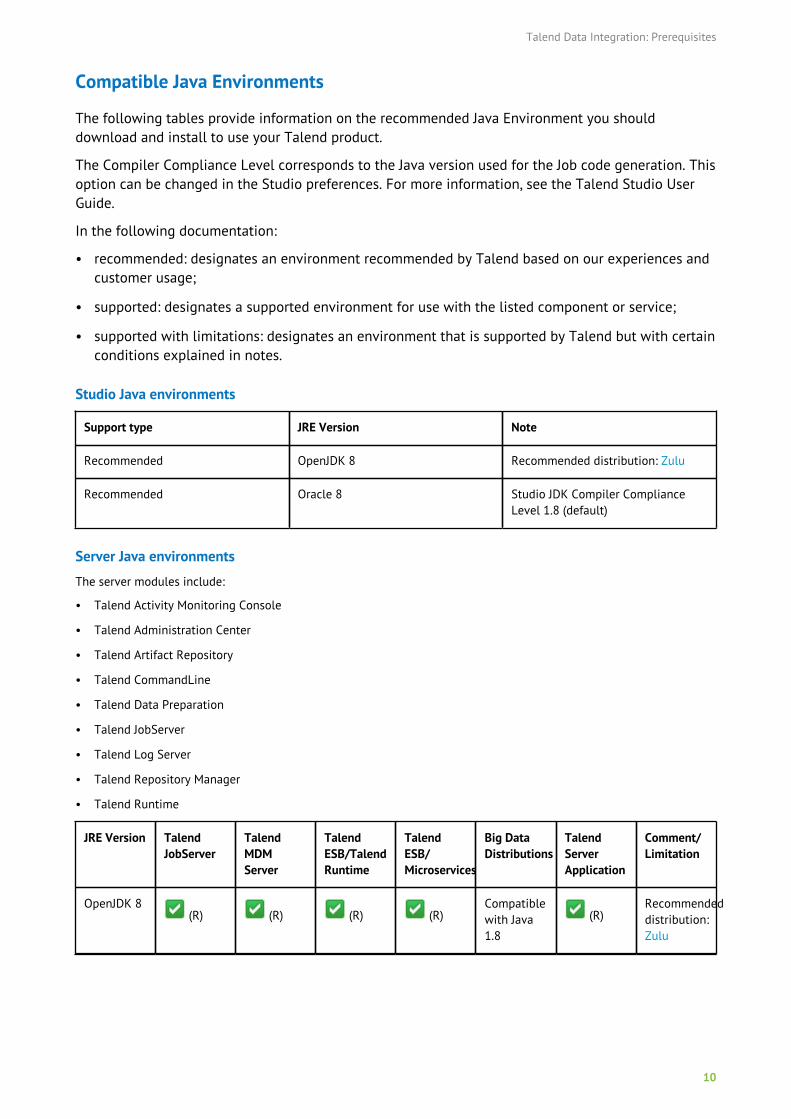
Compatible Java Environments
The following tables provide information on the recommended Java Environment you shoulddownload and install to use your Talend product.
The Compiler Compliance Level corresponds to the Java version used for the Job code generation. Thisoption can be changed in the Studio preferences. For more information, see the Talend Studio UserGuide.
In the following documentation:
• recommended: designates an environment recommended by Talend based on our experiences andcustomer usage;
• supported: designates a supported environment for use with the listed component or service;
• supported with limitations: designates an environment that is supported by Talend but with certainconditions explained in notes.
Studio Java environments
Support type JRE Version Note
Recommended OpenJDK 8 Recommended distribution: Zulu
Recommended Oracle 8 Studio JDK Compiler ComplianceLevel 1.8 (default)
Server Java environments
The server modules include:
• Talend Activity Monitoring Console
• Talend Administration Center
• Talend Artifact Repository
• Talend CommandLine
• Talend Data Preparation
• Talend JobServer
• Talend Log Server
• Talend Repository Manager
• Talend Runtime
JRE Version TalendJobServer
TalendMDMServer
TalendESB/TalendRuntime
TalendESB/Microservices
Big DataDistributions
TalendServerApplication
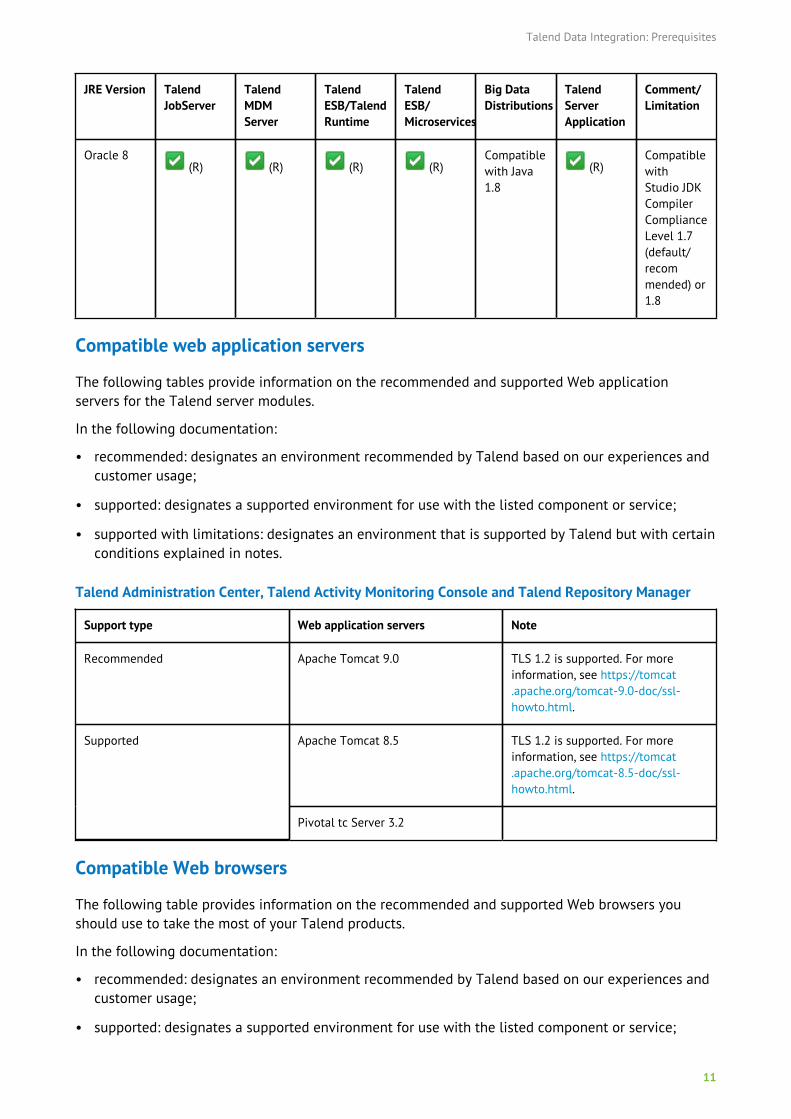
Comment/Limitation
OpenJDK 8 (R) (R) (R) (R)
Compatiblewith Java1.8
(R)Recommendeddistribution:Zulu
Talend Data Integration: Prerequisites
11
JRE Version TalendJobServer
TalendMDMServer
TalendESB/TalendRuntime
TalendESB/Microservices
Big DataDistributions
TalendServerApplication
Comment/Limitation
Oracle 8 (R) (R) (R) (R)
Compatiblewith Java1.8
(R)CompatiblewithStudio JDKCompilerComplianceLevel 1.7(default/recommended) or1.8
Compatible web application servers
The following tables provide information on the recommended and supported Web applicationservers for the Talend server modules.
In the following documentation:
• recommended: designates an environment recommended by Talend based on our experiences andcustomer usage;
• supported: designates a supported environment for use with the listed component or service;
• supported with limitations: designates an environment that is supported by Talend but with certainconditions explained in notes.
Talend Administration Center, Talend Activity Monitoring Console and Talend Repository Manager
Support type Web application servers Note
Recommended Apache Tomcat 9.0 TLS 1.2 is supported. For moreinformation, see https://tomcat.apache.org/tomcat-9.0-doc/ssl-howto.html.
Apache Tomcat 8.5 TLS 1.2 is supported. For moreinformation, see https://tomcat.apache.org/tomcat-8.5-doc/ssl-howto.html.
Supported
Pivotal tc Server 3.2
Compatible Web browsers
The following table provides information on the recommended and supported Web browsers youshould use to take the most of your Talend products.
In the following documentation:
• recommended: designates an environment recommended by Talend based on our experiences andcustomer usage;
• supported: designates a supported environment for use with the listed component or service;
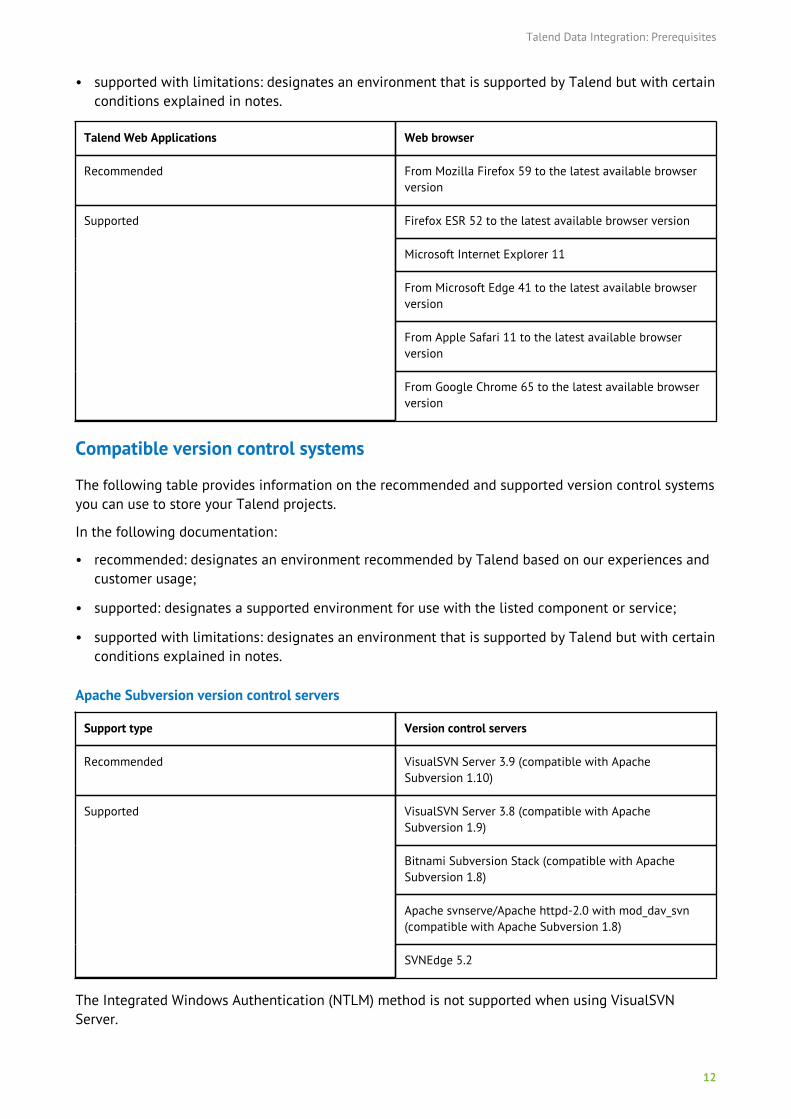
Talend Data Integration: Prerequisites
12
• supported with limitations: designates an environment that is supported by Talend but with certainconditions explained in notes.
Talend Web Applications Web browser
Recommended From Mozilla Firefox 59 to the latest available browserversion
Firefox ESR 52 to the latest available browser version
Microsoft Internet Explorer 11
From Microsoft Edge 41 to the latest available browserversion
From Apple Safari 11 to the latest available browserversion
Supported
From Google Chrome 65 to the latest available browserversion
Compatible version control systems
The following table provides information on the recommended and supported version control systemsyou can use to store your Talend projects.
In the following documentation:
• recommended: designates an environment recommended by Talend based on our experiences andcustomer usage;
• supported: designates a supported environment for use with the listed component or service;
• supported with limitations: designates an environment that is supported by Talend but with certainconditions explained in notes.
Apache Subversion version control servers
Support type Version control servers
Recommended VisualSVN Server 3.9 (compatible with ApacheSubversion 1.10)
VisualSVN Server 3.8 (compatible with ApacheSubversion 1.9)
Bitnami Subversion Stack (compatible with ApacheSubversion 1.8)
Apache svnserve/Apache httpd-2.0 with mod_dav_svn(compatible with Apache Subversion 1.8)
Supported
SVNEdge 5.2
The Integrated Windows Authentication (NTLM) method is not supported when using VisualSVNServer.
Talend Data Integration: Prerequisites
13
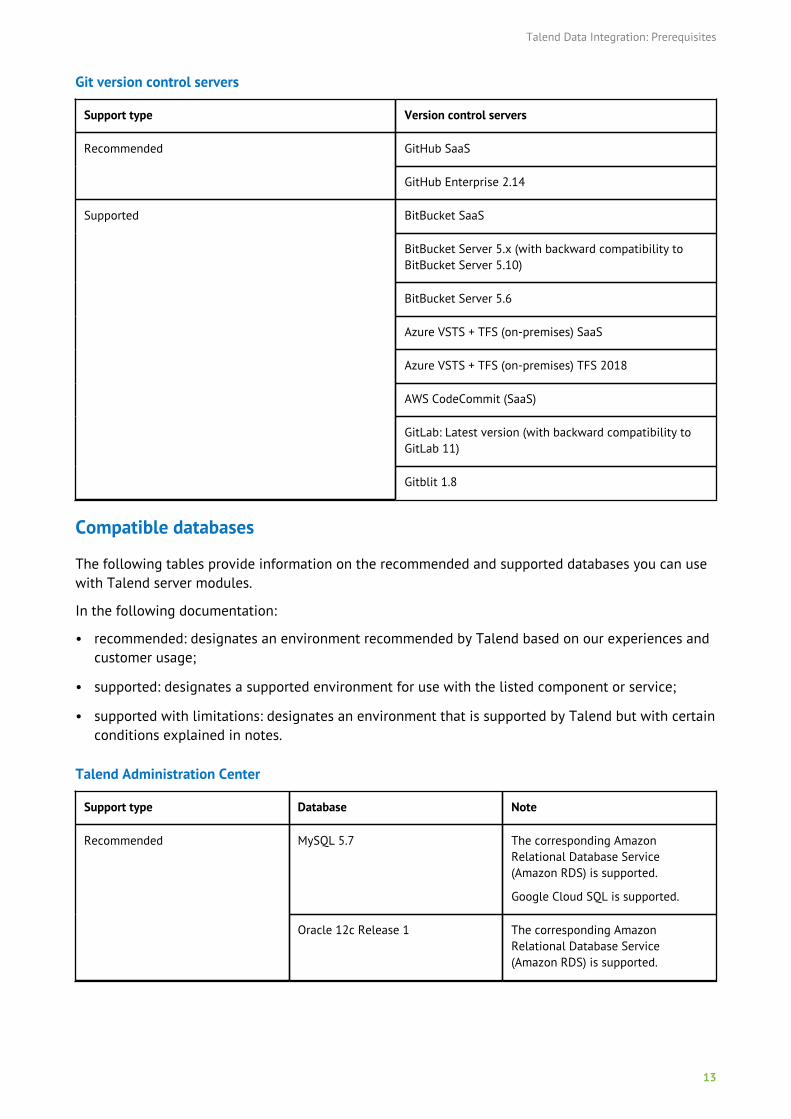
Git version control servers
Support type Version control servers
GitHub SaaSRecommended
GitHub Enterprise 2.14
BitBucket SaaS
BitBucket Server 5.x (with backward compatibility toBitBucket Server 5.10)
BitBucket Server 5.6
Azure VSTS + TFS (on-premises) SaaS
Azure VSTS + TFS (on-premises) TFS 2018
AWS CodeCommit (SaaS)
GitLab: Latest version (with backward compatibility toGitLab 11)
Supported
Gitblit 1.8
Compatible databases
The following tables provide information on the recommended and supported databases you can usewith Talend server modules.
In the following documentation:
• recommended: designates an environment recommended by Talend based on our experiences andcustomer usage;
• supported: designates a supported environment for use with the listed component or service;
• supported with limitations: designates an environment that is supported by Talend but with certainconditions explained in notes.
Talend Administration Center
Support type Database Note
MySQL 5.7 The corresponding AmazonRelational Database Service(Amazon RDS) is supported.
Google Cloud SQL is supported.
Recommended
Oracle 12c Release 1 The corresponding AmazonRelational Database Service(Amazon RDS) is supported.
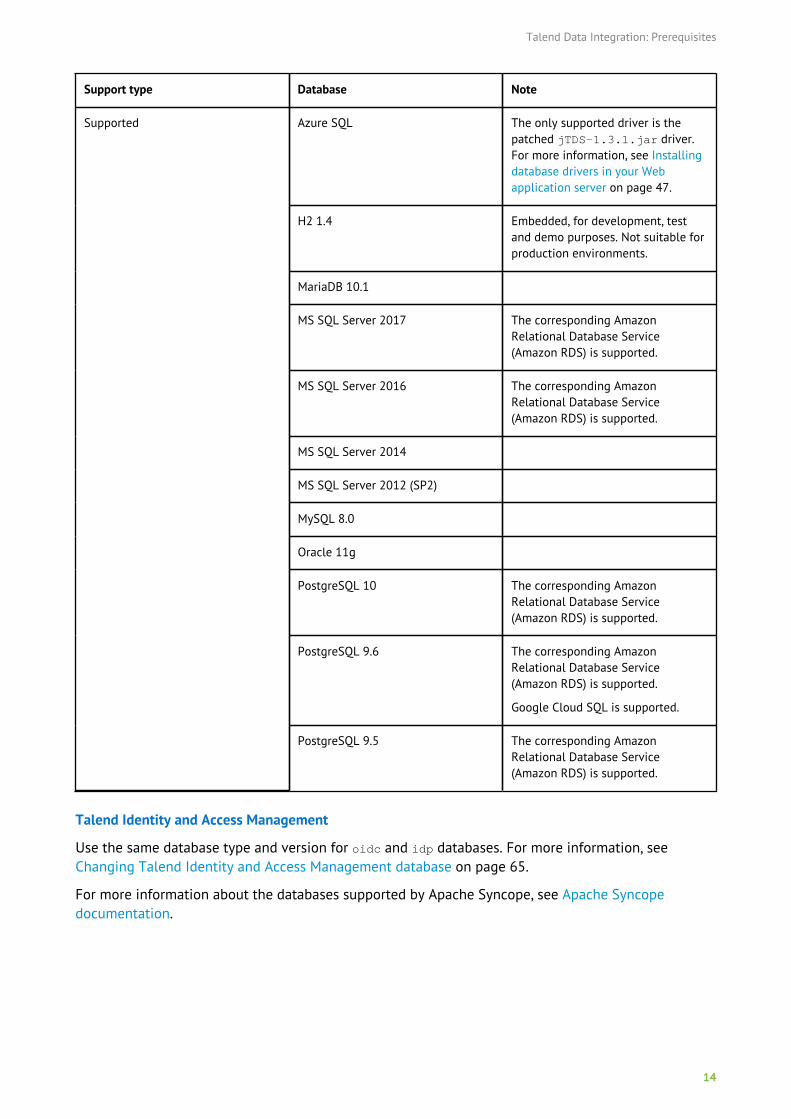
Talend Data Integration: Prerequisites
14
Support type Database Note
Azure SQL The only supported driver is thepatched jTDS-1.3.1.jar driver.For more information, see Installingdatabase drivers in your Webapplication server on page 47.
H2 1.4 Embedded, for development, testand demo purposes. Not suitable forproduction environments.
MariaDB 10.1
MS SQL Server 2017 The corresponding AmazonRelational Database Service(Amazon RDS) is supported.
MS SQL Server 2016 The corresponding AmazonRelational Database Service(Amazon RDS) is supported.
MS SQL Server 2014
MS SQL Server 2012 (SP2)
MySQL 8.0
Oracle 11g
PostgreSQL 10 The corresponding AmazonRelational Database Service(Amazon RDS) is supported.
PostgreSQL 9.6 The corresponding AmazonRelational Database Service(Amazon RDS) is supported.
Google Cloud SQL is supported.
Supported
PostgreSQL 9.5 The corresponding AmazonRelational Database Service(Amazon RDS) is supported.
Talend Identity and Access Management
Use the same database type and version for oidc and idp databases. For more information, seeChanging Talend Identity and Access Management database on page 65.
For more information about the databases supported by Apache Syncope, see Apache Syncopedocumentation.
Talend Data Integration: Prerequisites
15
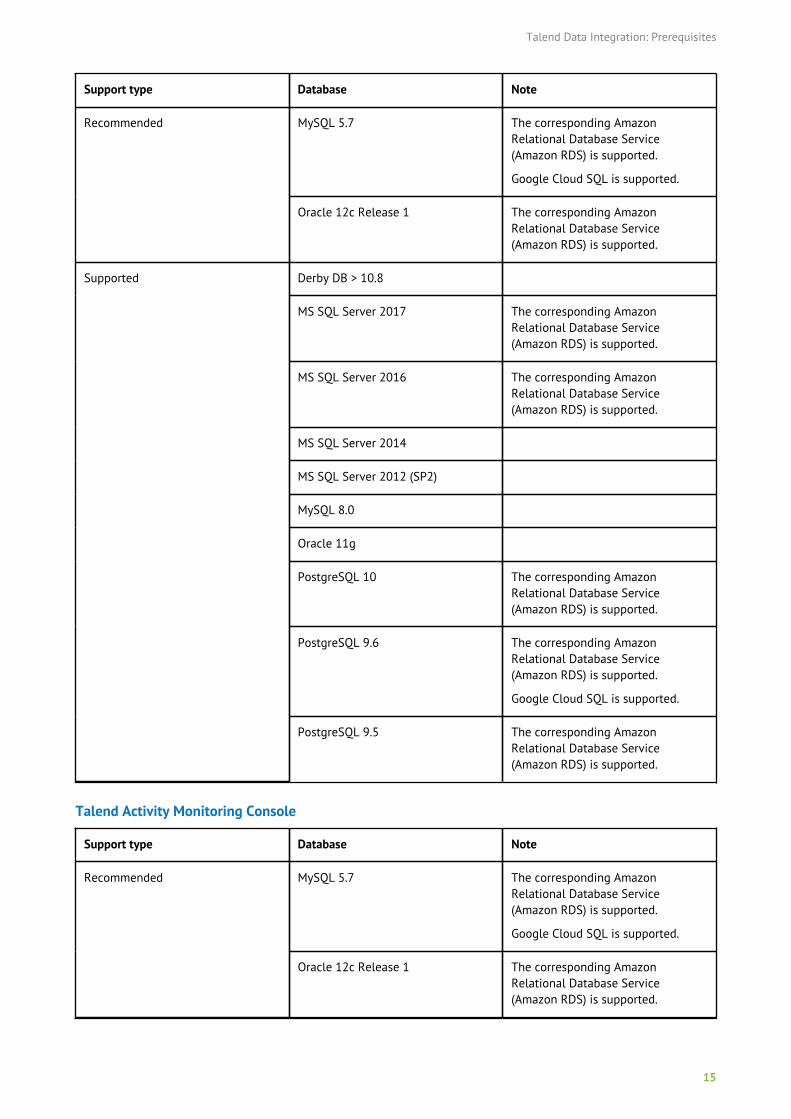
Support type Database Note
MySQL 5.7 The corresponding AmazonRelational Database Service(Amazon RDS) is supported.
Google Cloud SQL is supported.
Recommended
Oracle 12c Release 1 The corresponding AmazonRelational Database Service(Amazon RDS) is supported.
Derby DB > 10.8
MS SQL Server 2017 The corresponding AmazonRelational Database Service(Amazon RDS) is supported.
MS SQL Server 2016 The corresponding AmazonRelational Database Service(Amazon RDS) is supported.
MS SQL Server 2014
MS SQL Server 2012 (SP2)
MySQL 8.0
Oracle 11g
PostgreSQL 10 The corresponding AmazonRelational Database Service(Amazon RDS) is supported.
PostgreSQL 9.6 The corresponding AmazonRelational Database Service(Amazon RDS) is supported.
Google Cloud SQL is supported.
Supported
PostgreSQL 9.5 The corresponding AmazonRelational Database Service(Amazon RDS) is supported.
Talend Activity Monitoring Console
Support type Database Note
MySQL 5.7 The corresponding AmazonRelational Database Service(Amazon RDS) is supported.
Google Cloud SQL is supported.
Recommended
Oracle 12c Release 1 The corresponding AmazonRelational Database Service(Amazon RDS) is supported.
Talend Data Integration: Prerequisites
16
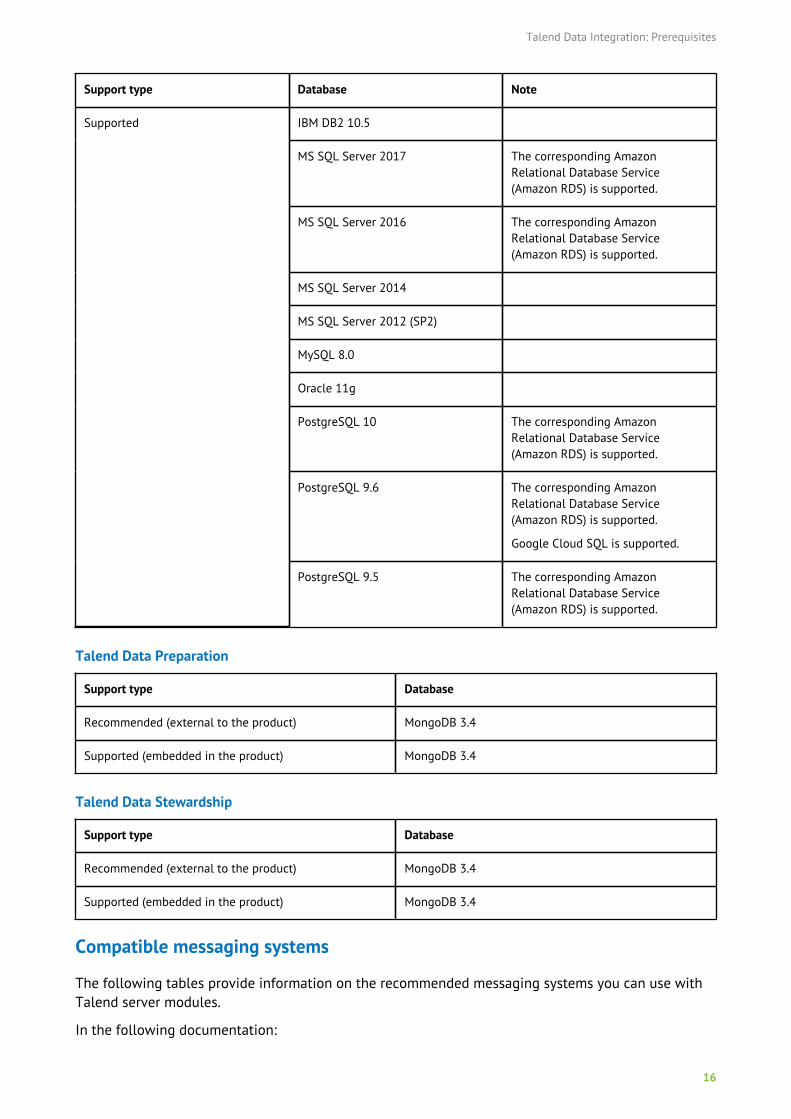
Support type Database Note
IBM DB2 10.5
MS SQL Server 2017 The corresponding AmazonRelational Database Service(Amazon RDS) is supported.
MS SQL Server 2016 The corresponding AmazonRelational Database Service(Amazon RDS) is supported.
MS SQL Server 2014
MS SQL Server 2012 (SP2)
MySQL 8.0
Oracle 11g
PostgreSQL 10 The corresponding AmazonRelational Database Service(Amazon RDS) is supported.
PostgreSQL 9.6 The corresponding AmazonRelational Database Service(Amazon RDS) is supported.
Google Cloud SQL is supported.
Supported
PostgreSQL 9.5 The corresponding AmazonRelational Database Service(Amazon RDS) is supported.
Talend Data Preparation
Support type Database
Recommended (external to the product) MongoDB 3.4
Supported (embedded in the product) MongoDB 3.4
Talend Data Stewardship
Support type Database
Recommended (external to the product) MongoDB 3.4
Supported (embedded in the product) MongoDB 3.4
Compatible messaging systems
The following tables provide information on the recommended messaging systems you can use withTalend server modules.
In the following documentation:

Talend Data Integration: Prerequisites
17
• recommended: designates an environment recommended by Talend based on our experiences andcustomer usage;
• supported: designates a supported environment for use with the listed component or service;
• supported with limitations: designates an environment that is supported by Talend but with certainconditions explained in notes.
Support type Messaging system
Talend Data Preparation and TalendData Stewardship
Recommended Apache Kafka 1.1.1
Compatible artifact repository
The following table provides information on the supported artifact repository you can use with Talendserver modules.
In the following documentation:
• recommended: designates an environment recommended by Talend based on our experiences andcustomer usage;
• supported: designates a supported environment for use with the listed component or service;
• supported with limitations: designates an environment that is supported by Talend but with certainconditions explained in notes.
Support type Artifact repository
Recommended Artifactory 6.0.1
Supported Sonatype Nexus 3.9 (embedded in the TalendAdministration Center archive file)
Sonatype Nexus 2.14
Compatible execution servers
Make sure the execution server version is compatible with Talend Administration Center, TalendCommandLine and Talend Studio versions.
Note that the information contained in this section is valid at the date of publication, but may besubject to change at a later date.
Talend Data Integration: Prerequisites
18
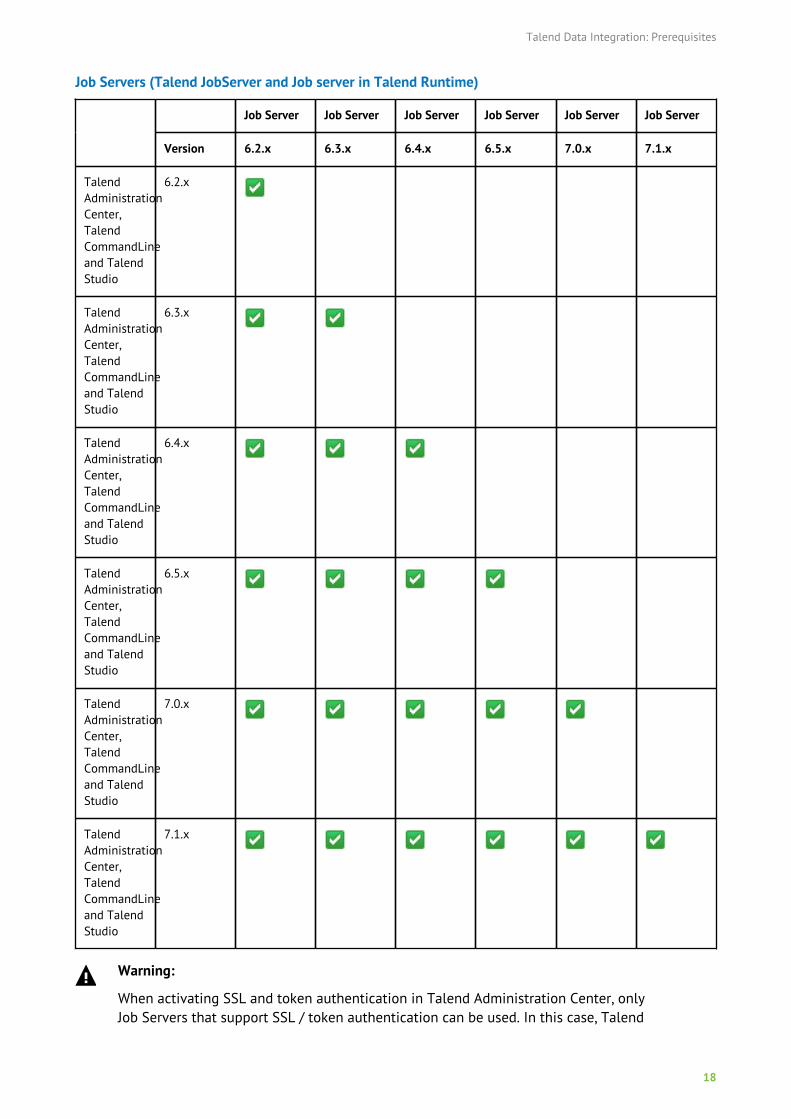
Job Servers (Talend JobServer and Job server in Talend Runtime)
Job Server Job Server Job Server Job Server Job Server Job Server
Version 6.2.x 6.3.x 6.4.x 6.5.x 7.0.x 7.1.x
TalendAdministrationCenter,TalendCommandLineand TalendStudio
6.2.x
TalendAdministrationCenter,TalendCommandLineand TalendStudio
6.3.x
TalendAdministrationCenter,TalendCommandLineand TalendStudio
6.4.x
TalendAdministrationCenter,TalendCommandLineand TalendStudio
6.5.x
TalendAdministrationCenter,TalendCommandLineand TalendStudio
7.0.x
TalendAdministrationCenter,TalendCommandLineand TalendStudio
7.1.x
Warning:
When activating SSL and token authentication in Talend Administration Center, onlyJob Servers that support SSL / token authentication can be used. In this case, Talend
Talend Data Integration: Prerequisites
19
Administration Center will not be able to monitor older Job Servers that do not supportencrypted communication.
For more information on configuring SSL and authentication for Talend JobServer, seeConfiguring SSL transport and authentication on Talend Help Center (https://help.talend.com).
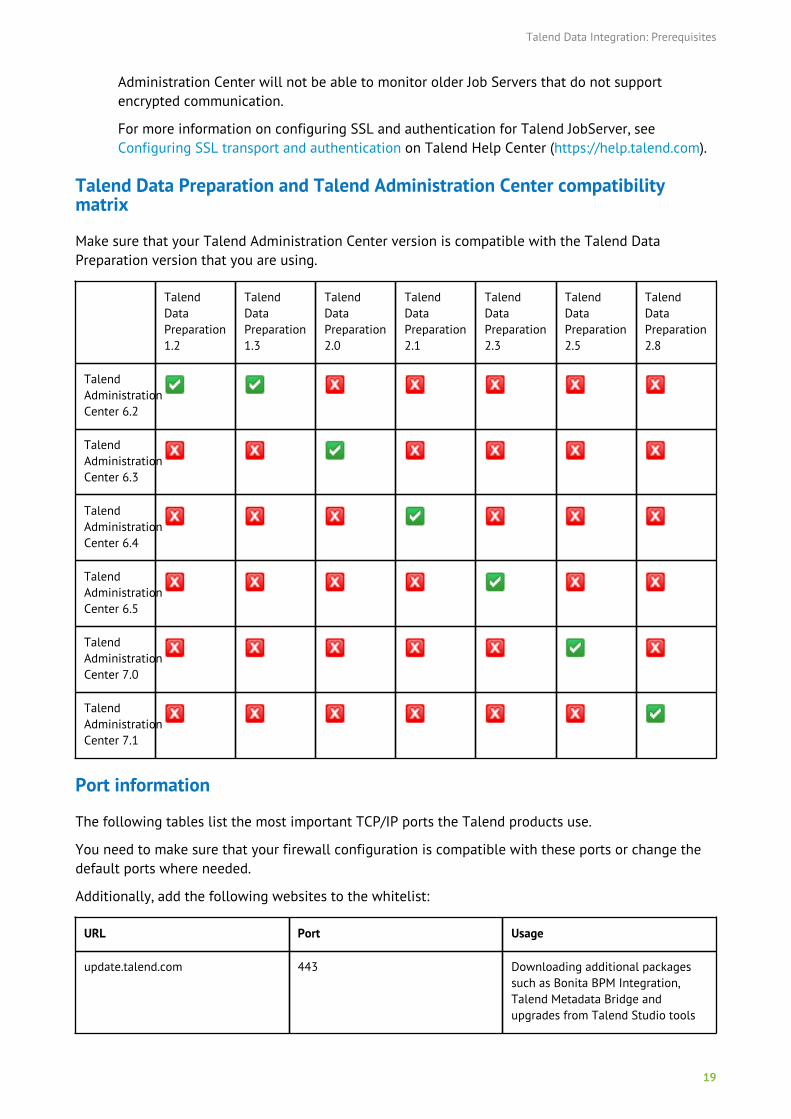
Talend Data Preparation and Talend Administration Center compatibilitymatrix
Make sure that your Talend Administration Center version is compatible with the Talend DataPreparation version that you are using.
TalendDataPreparation1.2
TalendDataPreparation1.3
TalendDataPreparation2.0
TalendDataPreparation2.1
TalendDataPreparation2.3
TalendDataPreparation2.5
TalendDataPreparation2.8
TalendAdministrationCenter 6.2
TalendAdministrationCenter 6.3
TalendAdministrationCenter 6.4
TalendAdministrationCenter 6.5
TalendAdministrationCenter 7.0
TalendAdministrationCenter 7.1
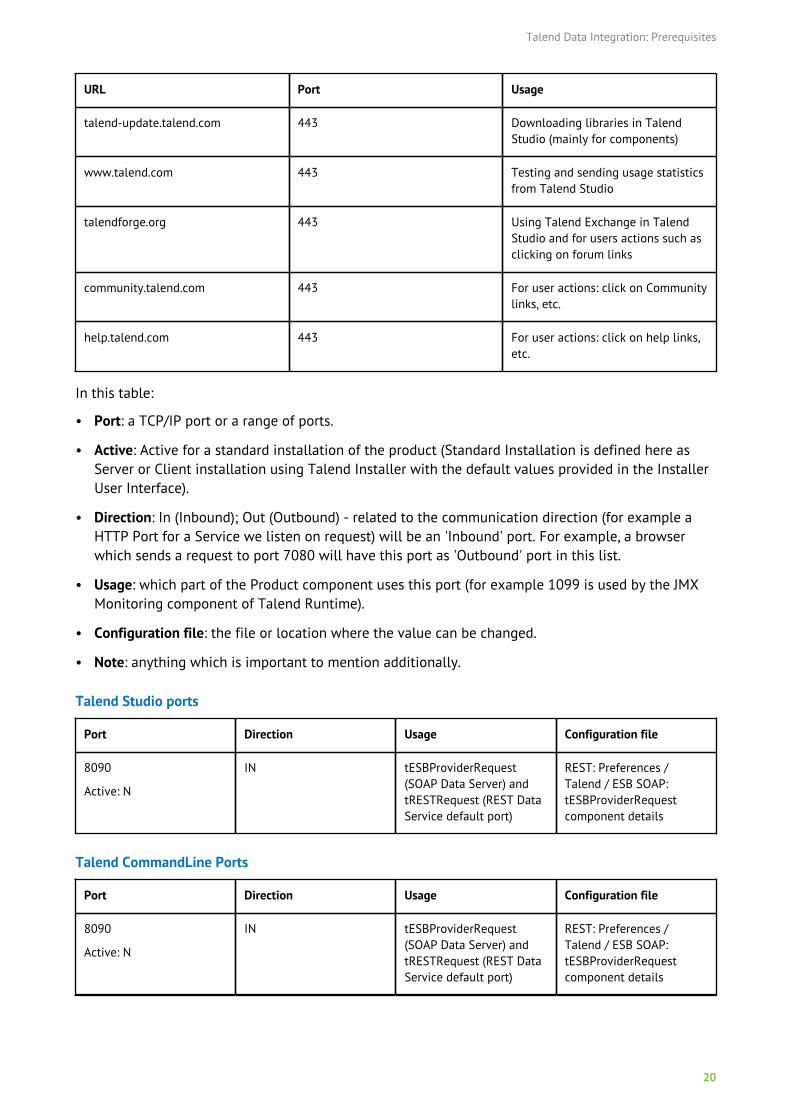
Port information
The following tables list the most important TCP/IP ports the Talend products use.
You need to make sure that your firewall configuration is compatible with these ports or change thedefault ports where needed.
Additionally, add the following websites to the whitelist:
URL Port Usage
update.talend.com 443 Downloading additional packagessuch as Bonita BPM Integration,Talend Metadata Bridge andupgrades from Talend Studio tools
Talend Data Integration: Prerequisites
20
URL Port Usage
talend-update.talend.com 443 Downloading libraries in TalendStudio (mainly for components)
www.talend.com 443 Testing and sending usage statisticsfrom Talend Studio
talendforge.org 443 Using Talend Exchange in TalendStudio and for users actions such asclicking on forum links
community.talend.com 443 For user actions: click on Communitylinks, etc.
help.talend.com 443 For user actions: click on help links,etc.
In this table:
• Port: a TCP/IP port or a range of ports.
• Active: Active for a standard installation of the product (Standard Installation is defined here asServer or Client installation using Talend Installer with the default values provided in the InstallerUser Interface).
• Direction: In (Inbound); Out (Outbound) - related to the communication direction (for example aHTTP Port for a Service we listen on request) will be an 'Inbound' port. For example, a browserwhich sends a request to port 7080 will have this port as 'Outbound' port in this list.
• Usage: which part of the Product component uses this port (for example 1099 is used by the JMXMonitoring component of Talend Runtime).
• Configuration file: the file or location where the value can be changed.
• Note: anything which is important to mention additionally.
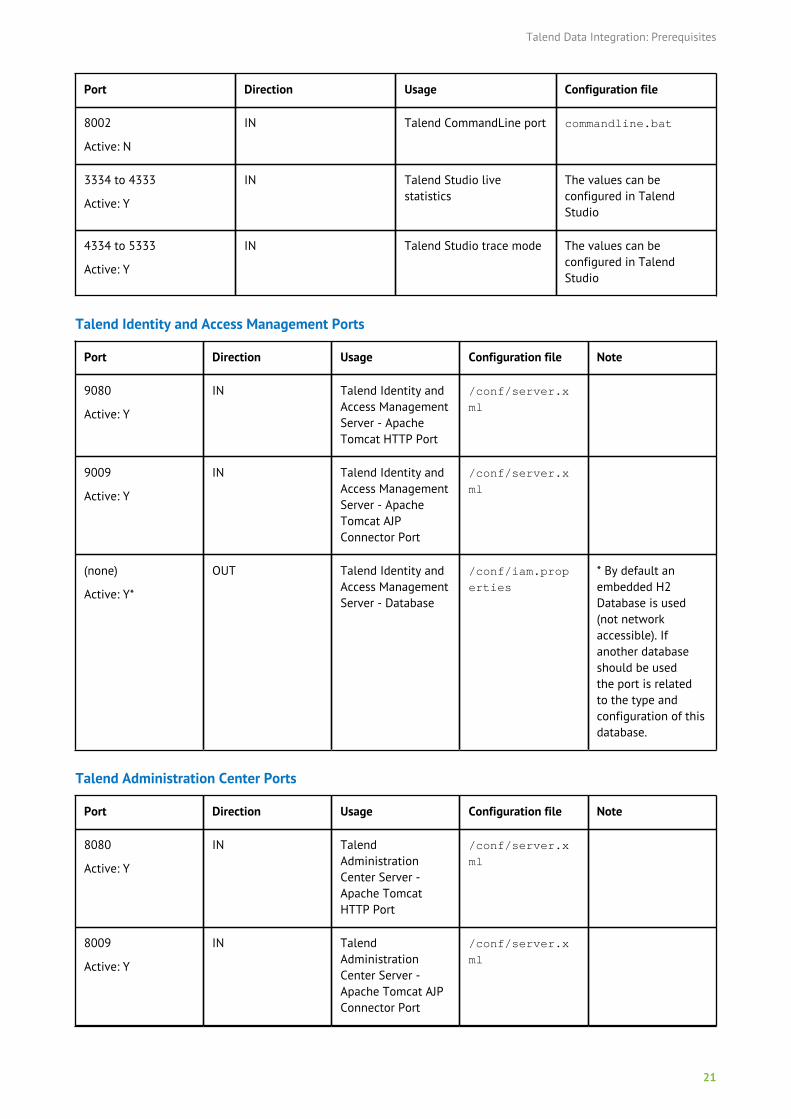
Talend Studio ports
Port Direction Usage Configuration file
8090
Active: N
IN tESBProviderRequest(SOAP Data Server) andtRESTRequest (REST DataService default port)
REST: Preferences /Talend / ESB SOAP:tESBProviderRequestcomponent details
Talend CommandLine Ports
Port Direction Usage Configuration file
8090
Active: N
IN tESBProviderRequest(SOAP Data Server) andtRESTRequest (REST DataService default port)
REST: Preferences /Talend / ESB SOAP:tESBProviderRequestcomponent details
Talend Data Integration: Prerequisites
21
Port Direction Usage Configuration file
8002
Active: N
IN Talend CommandLine port commandline.bat
3334 to 4333
Active: Y
IN Talend Studio livestatistics
The values can beconfigured in TalendStudio
4334 to 5333
Active: Y
IN Talend Studio trace mode The values can beconfigured in TalendStudio
Talend Identity and Access Management Ports
Port Direction Usage Configuration file Note
9080
Active: Y
IN Talend Identity andAccess ManagementServer - ApacheTomcat HTTP Port
/conf/server.x
ml
9009
Active: Y
IN Talend Identity andAccess ManagementServer - ApacheTomcat AJPConnector Port
/conf/server.x
ml
(none)
Active: Y*
OUT Talend Identity andAccess ManagementServer - Database
/conf/iam.prop
erties
* By default anembedded H2Database is used(not networkaccessible). Ifanother databaseshould be usedthe port is relatedto the type andconfiguration of thisdatabase.
Talend Administration Center Ports
Port Direction Usage Configuration file Note
8080
Active: Y
IN TalendAdministrationCenter Server -Apache TomcatHTTP Port
/conf/server.x
ml
8009
Active: Y
IN TalendAdministrationCenter Server -Apache Tomcat AJPConnector Port
/conf/server.x
ml
Talend Data Integration: Prerequisites
22
Port Direction Usage Configuration file Note
9419
Active: Y
IN OUT TalendAdministrationCenter Server -Drools WorkbenchGit Port (-Dorg.uberfire
.nio.git.daemo
n.port)
<ApacheTomcatP
ath>/bin/seten
v.sh
10000 - 11000
Active: N
IN TalendAdministrationCenter Server -External TalendJobServer
Addscheduler.conf
.statisticsRan
gePorts=10000-
11000 to /webapps/org.t
alend.administ
rator/WEB-INF/
classes/config
uration.proper
ties
A free port is chosenin the allotted rangeon the Administratormachine, wherethe job will sendthe statisticsinformation duringits execution.Default is10000-11000 but itcan be configured toanother port range.
The range of portsis only openedwhen real-timestatistics gatheringis activated for aJob.
(none)
Active: Y*
OUT TalendAdministrationCenter Server -Database
ConfigurationPage in TalendAdministrationCenter Web-UI
* By default anembedded H2Database is used(not networkaccessible). Ifanother databaseshould be usedthe port is relatedto the type andconfiguration of thisdatabase.
Talend Data Preparation Ports
Port Direction Usage Configuration file
9999
Active: Y
IN Talend Data PreparationUser Interface port
config/applica
tion.properties
8989
Active: Y
IN OUT Talend Data Preparationbackend port
config/applica
tion.properties
27017
Active: Y
IN OUT MongoDB port <MongoDB>/mong
od.cfg

Talend Data Integration: Prerequisites
23
Talend Data Stewardship Ports
Port Direction Usage Configuration file
19999
Active: Y
IN Apache Tomcat HTTP Port tomcat/conf/se
rver.xml
19924
Active: Y
IN Apache Tomcat ShutdownPort
tomcat/conf/se
rver.xml
19928
Active: Y
IN Apache Tomcat AJPConnector Port
tomcat/conf/se
rver.xml
27017
Active: Y
IN OUT MongoDB port <MongoDB>/mong
od.cfg
2181
Active: Y
IN OUT Apache Zookeeper port <Kafka>/config
/zookeeper.pro
perties
9092
Active: Y
IN OUT Apache Kafka port <Kafka>/config/
server.properties
Talend Log Server Ports
Port Direction Usage Configuration file
8050
Active: Y
IN Talend logging module- Talend AdministrationCenter log4j port
logstash-talen
d.conf
8052
Active: Y
IN Talend logging module -Talend Components log4jport
logstash-talen
d.conf
8053 and 8054
Active: Y
IN Talend logging module -MDM log4j ports
logstash-talen
d.conf
8055
Active: Y
IN Talend logging module- Talend JobServer log4jport
logstash-talen
d.conf
8056 and 8057
Active: Y
IN Talend logging module -Audit log4j ports
logstash-talen
d.conf
9200
Active: Y
IN Talend logging module -Elasticsearch port
<TalendLogServ
erPath>/elasti
csearch-X.X.X/
config/elastic
search.yml andlogstash-talen
d.conf
Talend Data Integration: Prerequisites
24
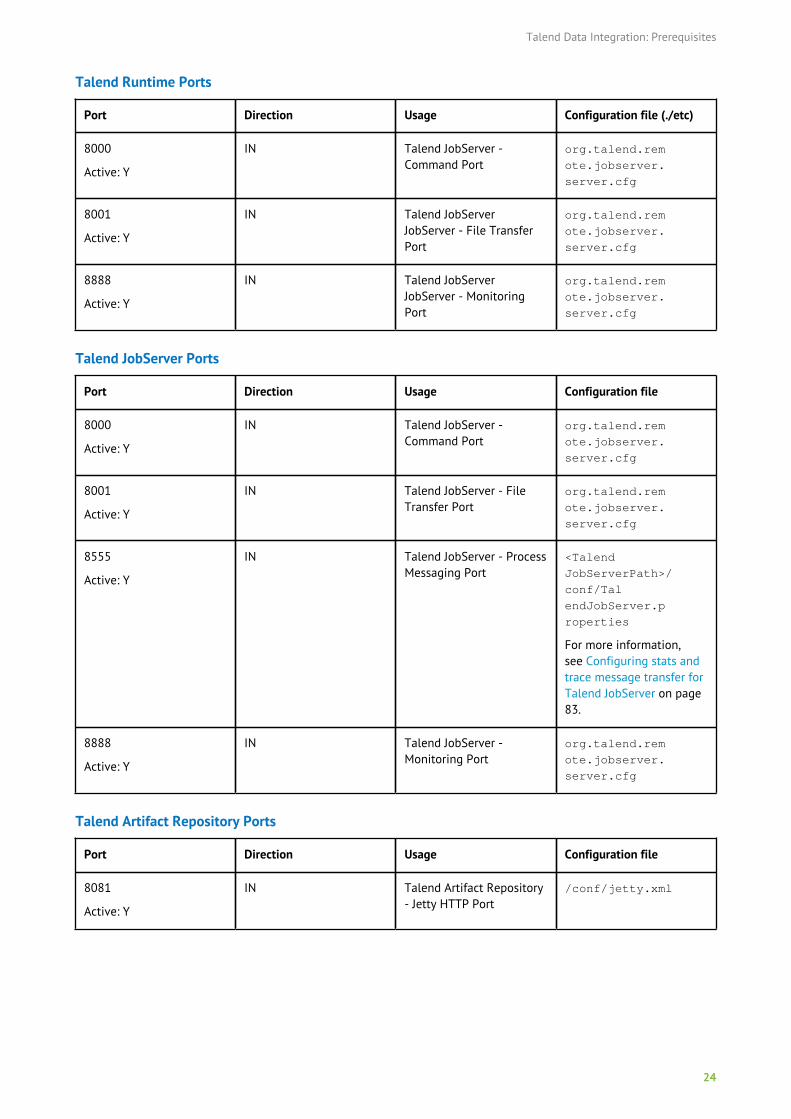
Talend Runtime Ports
Port Direction Usage Configuration file (./etc)
8000
Active: Y
IN Talend JobServer -Command Port
org.talend.rem
ote.jobserver.
server.cfg
8001
Active: Y
IN Talend JobServerJobServer - File TransferPort
org.talend.rem
ote.jobserver.
server.cfg
8888
Active: Y
IN Talend JobServerJobServer - MonitoringPort
org.talend.rem
ote.jobserver.
server.cfg
Talend JobServer Ports
Port Direction Usage Configuration file
8000
Active: Y
IN Talend JobServer -Command Port
org.talend.rem
ote.jobserver.
server.cfg
8001
Active: Y
IN Talend JobServer - FileTransfer Port
org.talend.rem
ote.jobserver.
server.cfg
8555
Active: Y
IN Talend JobServer - ProcessMessaging Port
<Talend
JobServerPath>/
conf/Tal
endJobServer.p
roperties
For more information,see Configuring stats andtrace message transfer forTalend JobServer on page83.
8888
Active: Y
IN Talend JobServer -Monitoring Port
org.talend.rem
ote.jobserver.
server.cfg
Talend Artifact Repository Ports
Port Direction Usage Configuration file
8081
Active: Y
IN Talend Artifact Repository- Jetty HTTP Port
/conf/jetty.xml
Talend Data Integration: Prerequisites
25
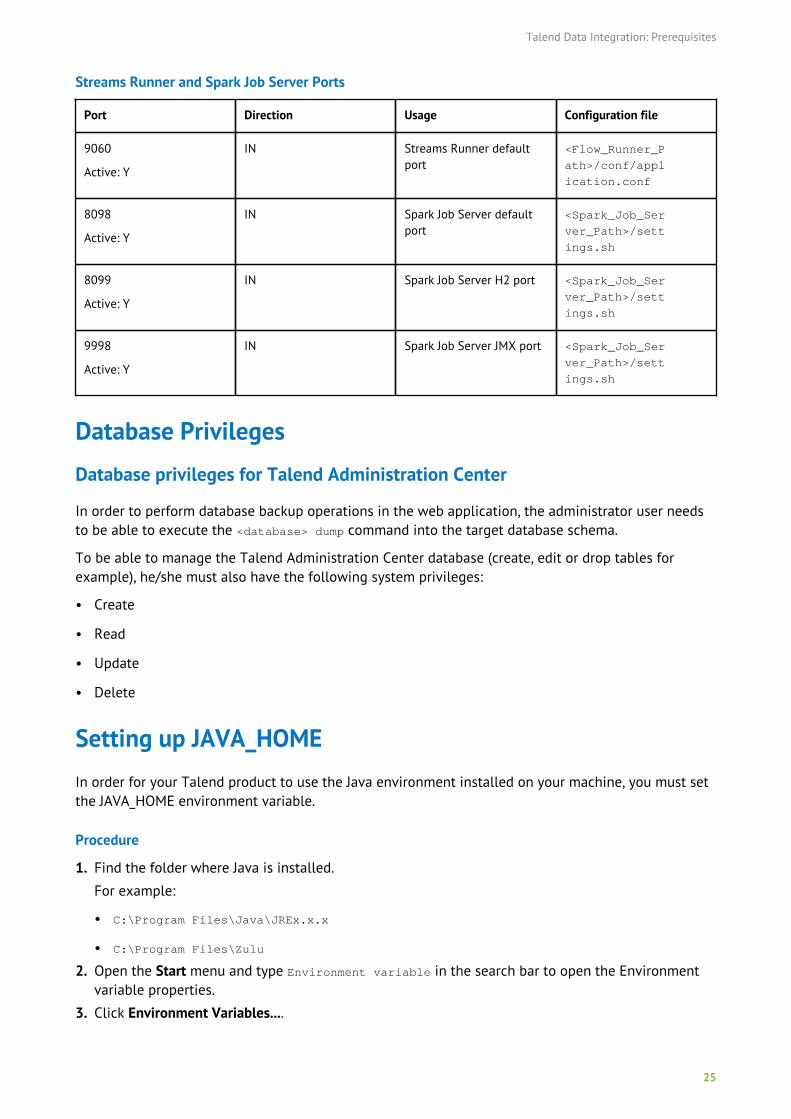
Streams Runner and Spark Job Server Ports
Port Direction Usage Configuration file
9060
Active: Y
IN Streams Runner defaultport
<Flow_Runner_P
ath>/conf/appl
ication.conf
8098
Active: Y
IN Spark Job Server defaultport
<Spark_Job_Ser
ver_Path>/sett
ings.sh
8099
Active: Y
IN Spark Job Server H2 port <Spark_Job_Ser
ver_Path>/sett
ings.sh
9998
Active: Y
IN Spark Job Server JMX port <Spark_Job_Ser
ver_Path>/sett
ings.sh
Database Privileges
Database privileges for Talend Administration Center
In order to perform database backup operations in the web application, the administrator user needsto be able to execute the <database> dump command into the target database schema.
To be able to manage the Talend Administration Center database (create, edit or drop tables forexample), he/she must also have the following system privileges:
• Create
• Read
• Update
• Delete
Setting up JAVA_HOMEIn order for your Talend product to use the Java environment installed on your machine, you must setthe JAVA_HOME environment variable.
Procedure
1. Find the folder where Java is installed.
For example:
• C:\Program Files\Java\JREx.x.x
• C:\Program Files\Zulu
2. Open the Start menu and type Environment variable in the search bar to open the Environmentvariable properties.
3. Click Environment Variables....

Talend Data Integration: Prerequisites
26
4. Under System Variables, click New... to create a variable. Name the variable JAVA_HOME, enter thepath to your Java environment, and click OK.
5. Under System Variables, select the Path variable, click Edit... and add the following variable at theend of the Path variable value: ;%JAVA_HOME%\bin
Installing your Talend Data Integration using Talend Installer
27
Installing your Talend Data Integration using TalendInstaller
Introducing Talend InstallersTalend provides different installers to install your product.
• Talend Studio Installer: This installer allows you to automatically install your Talend Studiowithout any prerequisites thanks to its embedded Java Environment. For more information seeInstalling Talend Studio with the Talend Studio Installer on page 28.
• Talend Installer: This installer allows you to automatically install your Talend Studio and allTalend Server modules. For more information see Using Talend Installer graphical installationmode on page 29.
Installation modes of Talend Installer and Talend StudioInstallerThis section provides information about the different installation modes that Talend Installer andTalend Studio Installer can run in.
Note that the log files generated during the installation can be found in <userprofile>\AppData\Local\Temp.
Note also that, once Talend Installer has completed the installation of the products, a directory (calledTalend by default) is created with sub-folders for each Talend product.
The following installation modes are available:
• Graphical mode: allows full interactivity through a graphical user interface.
• Unattended mode: is especially useful for automating the installation processes. This silent modewill perform an unattended installation that will not prompt the user for any information.
Procedure
1. To perform an Unattended installation, write a simple .txt script in which you will define theoptions values.
Note: For a complete list of values, use the help command or see the unattended modeavailable options documentation on Talend Help Center.
mode=unattendeddebugtrace=C:\debugInstall.txtlicenseFile=C:\licenses\licenseinstalldir=C:\TalendinstallType=fullinstallStyle=easy
In this example, the script details the silent installation of the Server type (full type).
The installation directory that will be created is called Talend and the license file used is locatedin the C:\licenses directory.
Installing your Talend Data Integration using Talend Installer
28
You can also create a script for a Custom type installation for example: in this case, specify inyour script the products and modules to install as well as the configuration information of theseproducts. For example, the enable-components parameter allows you to do a comma-separated listof these products, while the tacPort parameter allows you to specify the port to use for TalendAdministration Center. For more information about the available parameters and their values, enterhelp in the console.
2. Launch the silent installation using the --optionfile <filename> command, where <filename> isthe name of the script which contains the list of pairs <key>=<value>. An unattended installation isperformed.
To install Talend products as services via the Installer, you are required to run the applicationas Administrator OR to disable User Account Control. For more information on these installationmodes, please refer to the online Bitrock documentation.
Installing Talend Studio with the Talend Studio InstallerTalend Studio Installer is a convenient way of installing your Talend Studio. As it comes with anembedded Java Environment, you can install it without any prerequisites.
Warning: Make sure that the path of your installation directory and that of your workspacedirectory contain no space or special characters, which may cause Talend Studio to fail to workbecause of JVM compatibility issues.
Procedure
1. Download the TalendToolsStudio-A-B-C-windows-installer.exe file.
2. Download the TalendToolsStudio-A-B-C-osx-installer.app.tar file.
3. Double-click the TalendToolsStudio-A-B-C-windows-installer.exe file to launch Talend StudioInstaller.
4. Accept the License Agreement.
5. Choose the directory where you want your Talend product to be installed.
6. Add your license file.
7. Choose where you want the workspace directory to be located.
8. Launch the installation.
Talend Installer specific prerequisitesPrior to launching the Talend Installer, check that:
• you have downloaded a Talend-Tools-Installer-YYYYYYYY_YYYY-VA.B.C-installer.zip holdinga folder.
In the folder that you will extract, you will find a dist file and executable files corresponding tothe supported operating systems.
Use Talend-Tools-Installer-YYYYYYYY_YYYY-VA.B.C-windows-installer.exe
In the file name, YYYYYYYY_YYYY is the timestamp and A.B.C is the revision level (Major.Minor.Patch).
Installing your Talend Data Integration using Talend Installer
29
The dist file is only required to install Talend products. Once the installation and configuration iscomplete, you can remove it.
• the following software and modules are properly set up on the station where you are to install theTalend modules:
• JRE 1.8.0 or higher must be installed on your machine;
• (optional) a mail server (to send notifications by email).
Note: Make sure that your firewall is configured to authorize connection requests.
IMPORTANT:
Talend Installer allows you to get out-of-the-box Talend solutions that do not require any manualinstallation. However, these solutions are not provided in a production-ready environment as theymay require additional configurations or optimizations according to your specific needs.
For example, you may want to change the H2 database that is embedded by default in TalendAdministration Center with your own database (MySQL or Oracle for example).
Note: Talend Installer is used only for first installations of Talend solutions. Therefore, if youwant to know more about the migration and upgrade processes, please refer to the migrationprocedures.
Using Talend Installer graphical installation modeWhen using Talend Installer graphical installation mode, three installation types are available.
Installation type allows you to...
Server type install all Talend server components with default configuration. For more informationsee Installing Talend server modules using Talend Installer on page 29.
Client type install the Talend Studio. For more information, see Installing Talend client modulesusing Talend Installer on page 35.
Custom type select and configure the Talend modules you want to install. For more information, seeInstalling Talend server modules using Talend Installer on page 37.
Installing Talend server modules using Talend Installer
The Server installation type allows you to install Talend Studio and all Talend server components andconfigure them if required.
There are two different styles of Server installation:
• Performing an Easy Server installation with Talend Installer on page 34
• Performing an Advanced Server installation with Talend Installer on page 34
The following table shows the configuration options that are available in the different Serverinstallation styles.
For example, the Advanced Server installation lets you choose the Tomcat server and port youwant to use for Talend Administration Center whereas the Easy Server installation installs TalendAdministration Center on a new Tomcat server on the 8080 port.
Installing your Talend Data Integration using Talend Installer
30
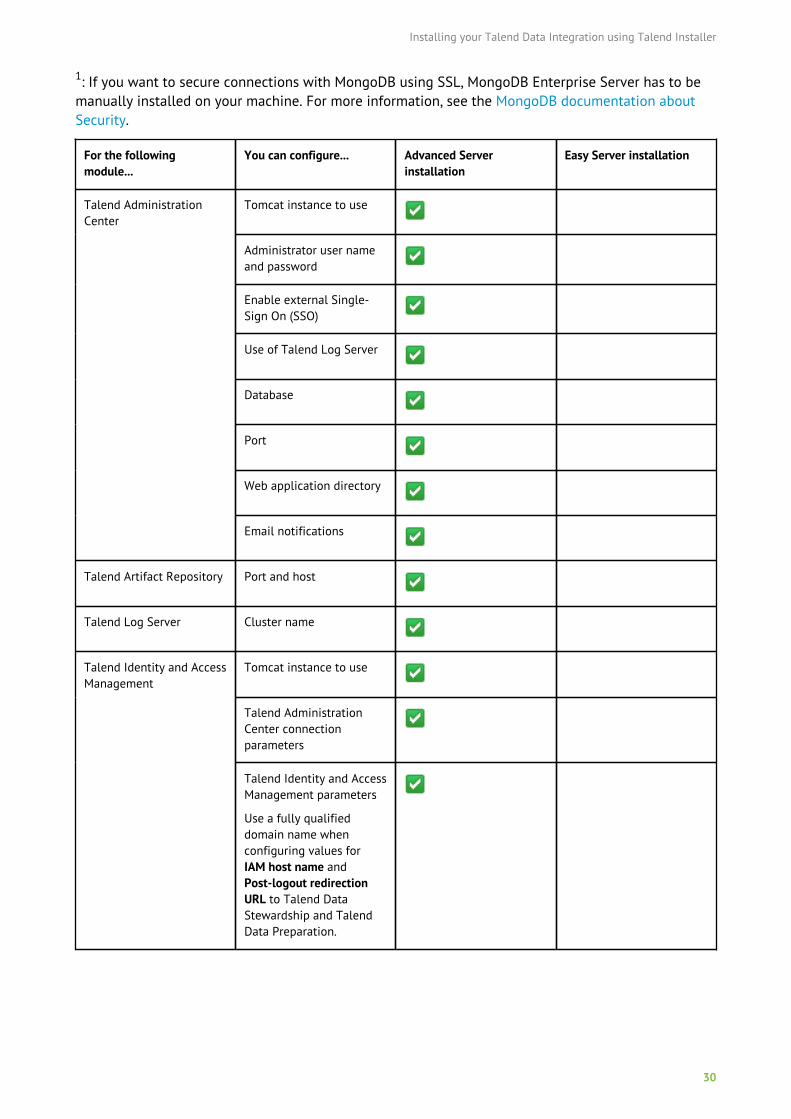
1: If you want to secure connections with MongoDB using SSL, MongoDB Enterprise Server has to bemanually installed on your machine. For more information, see the MongoDB documentation aboutSecurity.
For the followingmodule...
You can configure... Advanced Serverinstallation
Easy Server installation
Tomcat instance to use
Administrator user nameand password
Enable external Single-Sign On (SSO)
Use of Talend Log Server
Database
Port
Web application directory
Talend AdministrationCenter
Email notifications
Talend Artifact Repository Port and host
Talend Log Server Cluster name
Tomcat instance to use
Talend AdministrationCenter connectionparameters
Talend Identity and AccessManagement
Talend Identity and AccessManagement parameters
Use a fully qualifieddomain name whenconfiguring values forIAM host name andPost-logout redirectionURL to Talend DataStewardship and TalendData Preparation.

Installing your Talend Data Integration using Talend Installer
31
For the followingmodule...
You can configure... Advanced Serverinstallation
Easy Server installation
Language (English, French,Japanese or Chinese)
The selected language isused for Talend Identityand Access Management,Talend Data Stewardship,Talend Data Preparationand Talend DictionaryService.
Tomcat instance to use
Language (English, French,Japanese or Chinese)
The selected languageis used for Talend DataStewardship, Talend DataPreparation and TalendDictionary Service.
Audit logging
MongoDB database1
Kafka connectionparameters host
Zookeeper connectionparameters
Talend AdministrationCenter connectionparameters
Talend Data Stewardship
Talend Identity and AccessManagement parameters
Use a fully qualifieddomain name whenconfiguring IAM URL.
Talend CommandLine
Talend CommandLine as aServer is deprecated fromTalend 7.1 onwards.
Port
Talend Runtime Port configuration
Talend JobServer Ports
Installing your Talend Data Integration using Talend Installer
32
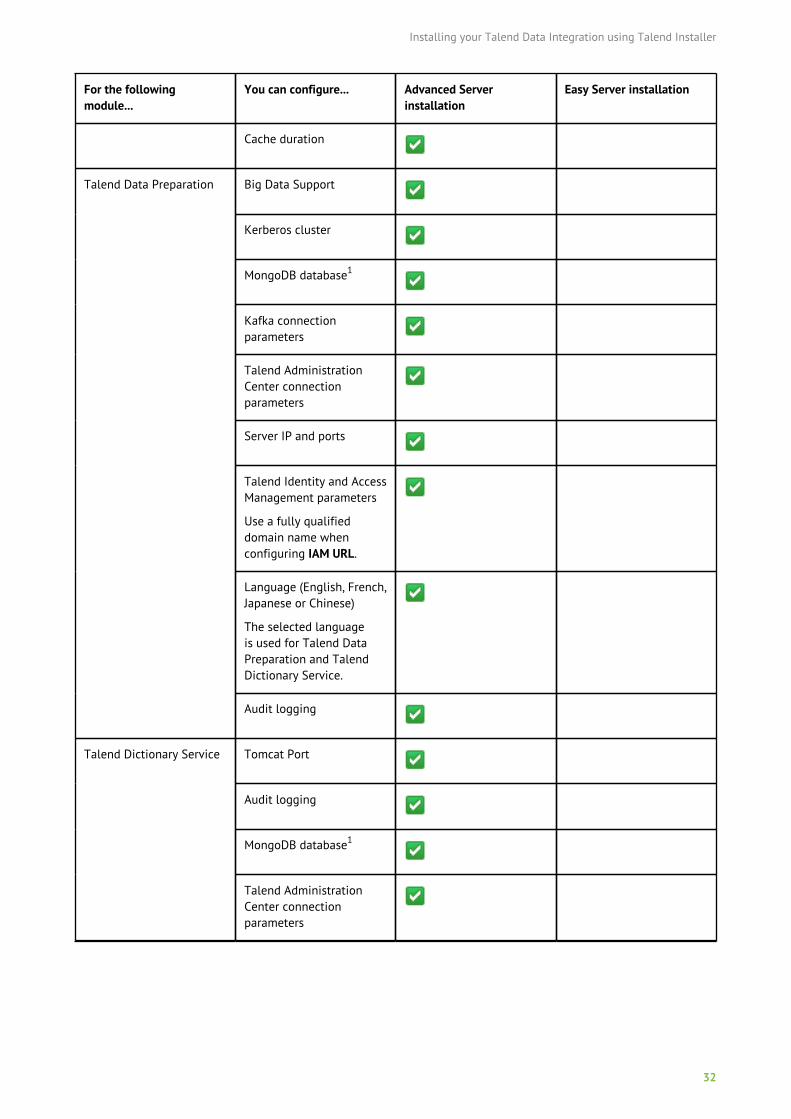
For the followingmodule...
You can configure... Advanced Serverinstallation
Easy Server installation
Cache duration
Big Data Support
Kerberos cluster
MongoDB database1
Kafka connectionparameters
Talend AdministrationCenter connectionparameters
Server IP and ports
Talend Identity and AccessManagement parameters
Use a fully qualifieddomain name whenconfiguring IAM URL.
Language (English, French,Japanese or Chinese)
The selected languageis used for Talend DataPreparation and TalendDictionary Service.
Talend Data Preparation
Audit logging
Tomcat Port
Audit logging
MongoDB database1
Talend Dictionary Service
Talend AdministrationCenter connectionparameters
Installing your Talend Data Integration using Talend Installer
33
For the followingmodule...
You can configure... Advanced Serverinstallation
Easy Server installation
Talend Identity and AccessManagement parameters
Use a fully qualifieddomain name whenconfiguring IAM URL.
Talend Kafka andZookeeper
Zookeeper data directory
SAP configuration
JMS Broker URL
Talend SAP RFC Server
Library
Talend Studio Workspace directorylocation
Filebeat (audit client) Talend Log Server hostand port
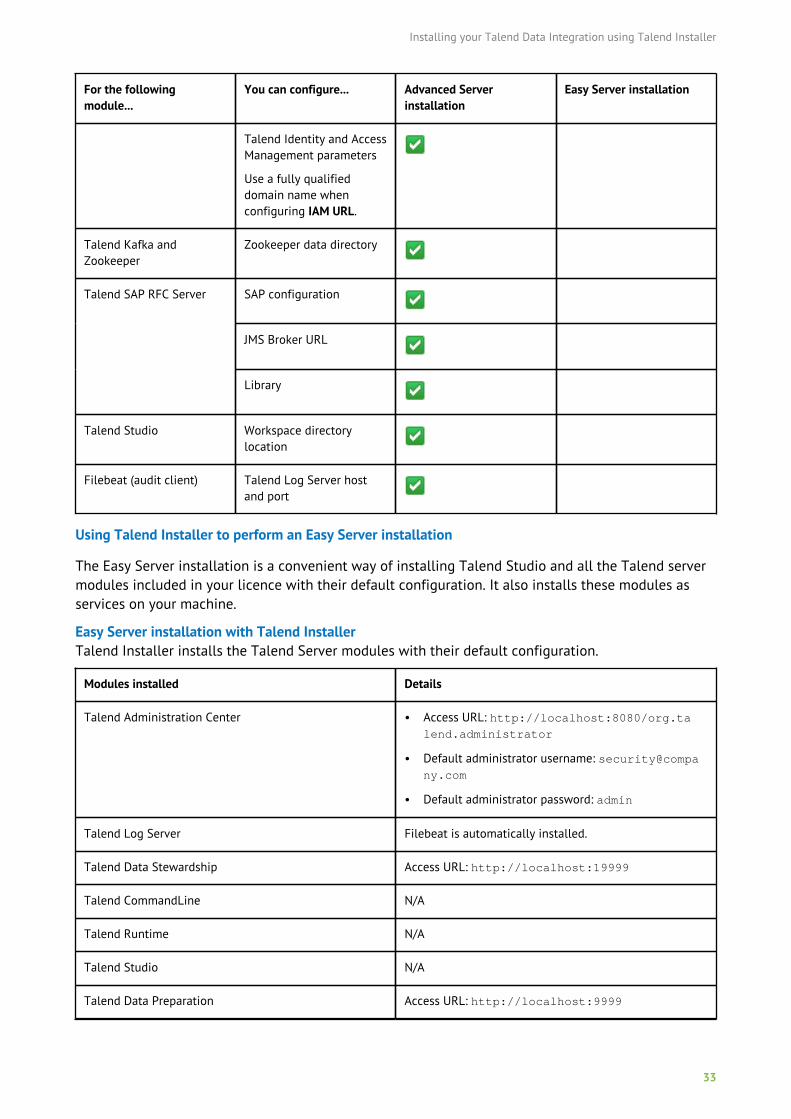
Using Talend Installer to perform an Easy Server installation
The Easy Server installation is a convenient way of installing Talend Studio and all the Talend servermodules included in your licence with their default configuration. It also installs these modules asservices on your machine.
Easy Server installation with Talend InstallerTalend Installer installs the Talend Server modules with their default configuration.
Modules installed Details
Talend Administration Center • Access URL: http://localhost:8080/org.talend.administrator
• Default administrator username: [email protected]
• Default administrator password: admin
Talend Log Server Filebeat is automatically installed.
Talend Data Stewardship Access URL: http://localhost:19999
Talend CommandLine N/A
Talend Runtime N/A
Talend Studio N/A
Talend Data Preparation Access URL: http://localhost:9999
Installing your Talend Data Integration using Talend Installer
34
Modules installed Details
Talend Identity and Access Management N/A
Talend Server Services N/A
Performing an Easy Server installation with Talend Installer
Before you begin
• All the required files are downloaded. For more information, see Talend Installer specificprerequisites on page 28.
• All the default ports are opened. For more informations, see Port information on page 19.
• If you want to use the embedded MongoDB database, make sure that there are no other instance ofMongoDB installed on your machine.
Procedure
1. Make sure the dist file is in the same folder as the Talend-Tools-Installer-YYYYYYYY_YYYY-VA.B.C-windows-installer.exe
2. Double-click the Talend-Tools-Installer-YYYYYYYY_YYYY-VA.B.C-windows-installer.exe file tolaunch Talend Installer
3. Accept the License Agreement.
4. Choose the directory where you want your Talend product to be installed.
5. Choose Easy Install in the installation style list and Server in the installation type list.
6. Add your license file.
7. Configure Talend DQ Portal according to the database you want to use.
8. Launch the installation.
9. Once the installation is complete, you can remove the dist file to save some space on your disk.
Results
The modules installed in English.
Talend Installer creates a usedports.txt file where all the ports used by Talend Server modules arelisted.
A user with tds-user as username and duser as password is automatically created in MongoDB forTalend Data Stewardship.
A user with dataprep-user as username and duser as password is automatically created in MongoDBfor Talend Data Preparation.
Talend Installer generates the AdminUser.txt file at the root of the MongoDB installation folder. Itcontains the credentials for a user with the administrator rights in clear text. It is recommended torestrict the access to this file.
Performing an Advanced Server installation with Talend Installer
The Advanced Server installation is a convenient way of installing Talend Studio and all the Talendserver modules included in your licence with custom configuration. It also installs these modules asservices on your machine.
Installing your Talend Data Integration using Talend Installer
35
For more information on the options you can customize using the Advanced Server installation, seeInstalling Talend server modules using Talend Installer on page 29.
Before you begin
• All the required files are downloaded. For more information, see Talend Installer specificprerequisites on page 28.
• All the default ports are opened. For more informations, see Port information on page 19.
• There are no other instance of MongoDB installed on your machine.
Procedure
1. Make sure the dist file is in the same folder as the Talend-Tools-Installer-YYYYYYYY_YYYY-VA.B.C-windows-installer.exe
2. Double-click the Talend-Tools-Installer-YYYYYYYY_YYYY-VA.B.C-windows-installer.exe file tolaunch Talend Installer
3. Accept the License Agreement.
4. Choose the directory where you want your Talend product to be installed.
5. Choose Advanced Install in the installation style list and Server in the installation type list.
6. Add your license file.
7. Follow the configuration steps.
8. Launch the installation.
9. Once the installation is complete, you can remove the dist file to save some space on your disk.
Results
Talend Installer creates a usedports.txt file where all the ports used by Talend Server modules arelisted.
A user with tds-user as username and duser as password is automatically created in MongoDB forTalend Data Stewardship.
A user with dataprep-user as username and duser as password is automatically created in MongoDBfor Talend Data Preparation.
If you chose to use the embedded MongoDB instance, Talend Installer generates the AdminUser.txtfile at the root of the MongoDB installation folder. It contains the credentials for a user with theadministrator rights in clear text. It is recommended to restrict the access to this file.
Installing Talend client modules using Talend Installer
The Client installation type allows you to install Talend Studio, Talend Data Stewardship and TalendRuntime and configure them if required.
There are two different styles of Client installation:
• Performing an Easy Client installation with Talend Installer on page 36
• Performing an Advanced Client installation with Talend Installer on page 37
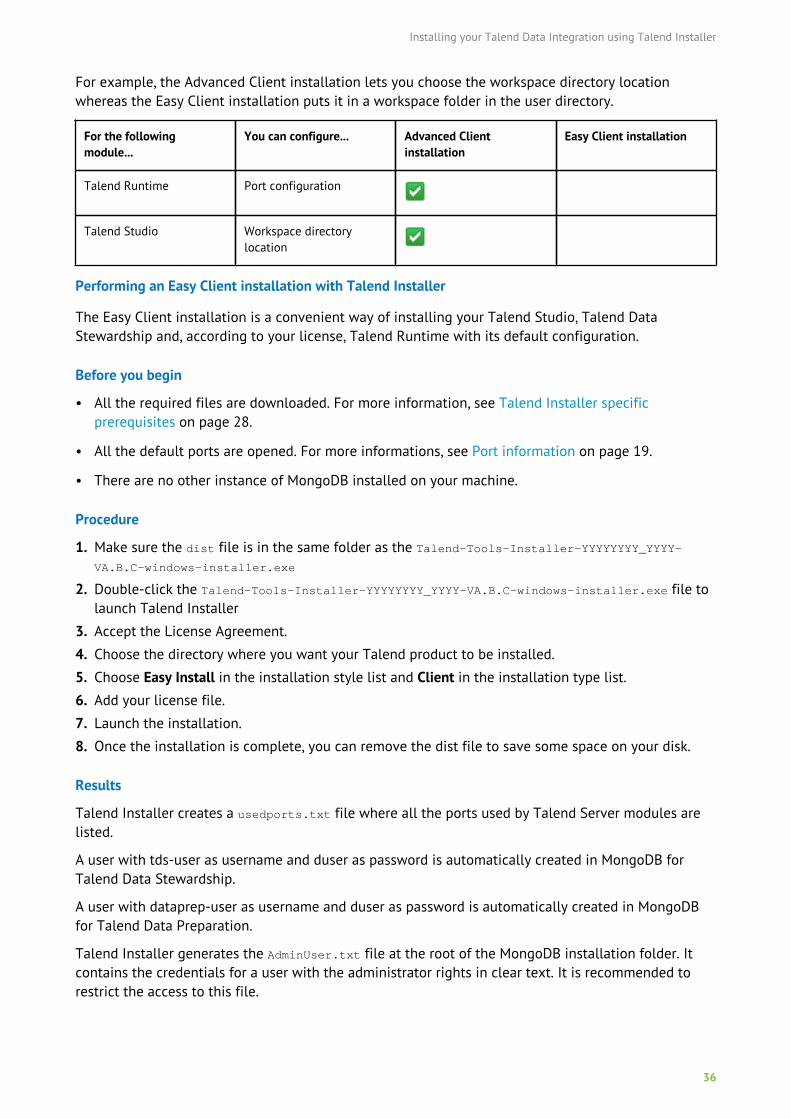
The following table shows the configuration options that are available in the different Clientinstallation styles.
Installing your Talend Data Integration using Talend Installer
36
For example, the Advanced Client installation lets you choose the workspace directory locationwhereas the Easy Client installation puts it in a workspace folder in the user directory.
For the followingmodule...
You can configure... Advanced Clientinstallation
Easy Client installation
Talend Runtime Port configuration
Talend Studio Workspace directorylocation
Performing an Easy Client installation with Talend Installer
The Easy Client installation is a convenient way of installing your Talend Studio, Talend DataStewardship and, according to your license, Talend Runtime with its default configuration.
Before you begin
• All the required files are downloaded. For more information, see Talend Installer specificprerequisites on page 28.
• All the default ports are opened. For more informations, see Port information on page 19.
• There are no other instance of MongoDB installed on your machine.
Procedure
1. Make sure the dist file is in the same folder as the Talend-Tools-Installer-YYYYYYYY_YYYY-VA.B.C-windows-installer.exe
2. Double-click the Talend-Tools-Installer-YYYYYYYY_YYYY-VA.B.C-windows-installer.exe file tolaunch Talend Installer
3. Accept the License Agreement.
4. Choose the directory where you want your Talend product to be installed.
5. Choose Easy Install in the installation style list and Client in the installation type list.
6. Add your license file.
7. Launch the installation.
8. Once the installation is complete, you can remove the dist file to save some space on your disk.
Results
Talend Installer creates a usedports.txt file where all the ports used by Talend Server modules arelisted.
A user with tds-user as username and duser as password is automatically created in MongoDB forTalend Data Stewardship.
A user with dataprep-user as username and duser as password is automatically created in MongoDBfor Talend Data Preparation.
Talend Installer generates the AdminUser.txt file at the root of the MongoDB installation folder. Itcontains the credentials for a user with the administrator rights in clear text. It is recommended torestrict the access to this file.
Installing your Talend Data Integration using Talend Installer
37
Performing an Advanced Client installation with Talend Installer
The Advanced Client installation is a convenient way of installing Talend Studio, Talend DataStewardship and, according to your license, Talend Runtime with custom configuration. It also installsthese modules as services on your machine and configures Talend SAP RFC Server.
For more information on the options you can customize using the Advanced Client installation, seeInstalling Talend client modules using Talend Installer on page 35.
Before you begin
• All the required files are downloaded. For more information, see Talend Installer specificprerequisites on page 28.
• All the default ports are opened. For more informations, see Port information on page 19.
• There are no other instance of MongoDB installed on your machine.
Procedure
1. Make sure the dist file is in the same folder as the Talend-Tools-Installer-YYYYYYYY_YYYY-VA.B.C-windows-installer.exe
2. Double-click the Talend-Tools-Installer-YYYYYYYY_YYYY-VA.B.C-windows-installer.exe file tolaunch Talend Installer
3. Accept the License Agreement.
4. Choose the directory where you want your Talend product to be installed.
5. Choose Advanced Install in the installation style list and Client in the installation type list.
6. Add your license file.
7. Launch the installation.
8. Once the installation is complete, you can remove the dist file to save some space on your disk.
Results
Talend Installer creates a usedports.txt file where all the ports used by Talend Server modules arelisted.
A user with tds-user as username and duser as password is automatically created in MongoDB forTalend Data Stewardship.
A user with dataprep-user as username and duser as password is automatically created in MongoDBfor Talend Data Preparation.
If you chose to use the embedded MongoDB instance, Talend Installer generates the AdminUser.txtfile at the root of the MongoDB installation folder. It contains the credentials for a user with theadministrator rights in clear text. It is recommended to restrict the access to this file.
Installing Talend server modules using Talend Installer
The Custom installation is the more customizable installation method with Talend Installer. It allowsyou to choose what to install, where and how. This way, you can fully customize your installationand choose, for example, to install Talend Administration Center on a machine and Talend Studio onanother.
Here are the modules you can install with Talend Installer Custom Installation:
Installing your Talend Data Integration using Talend Installer
38
• Talend Administration Center
• Talend Log Server
• Talend Identity and Access Management
• Talend Data Stewardship
• Talend CommandLine
• Talend Runtime
• Talend JobServer
• Talend Data Preparation
• Talend SAP RFC Server
• Talend Studio
• Talend Server Services
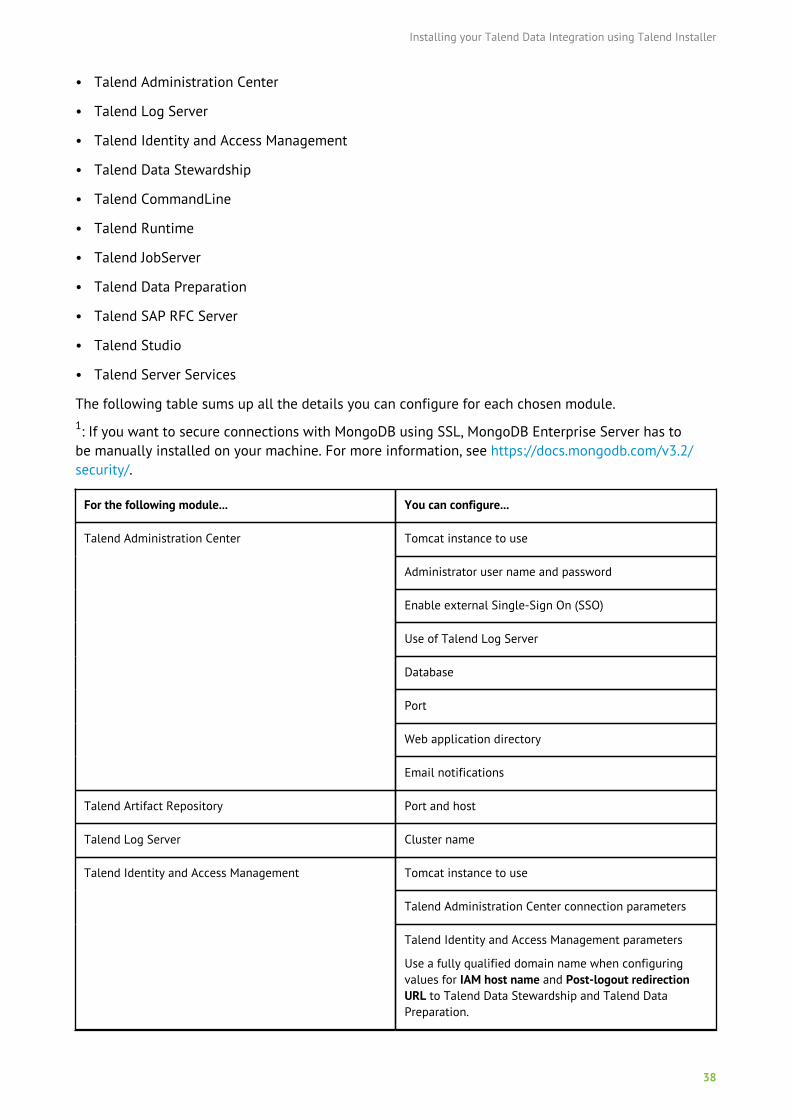
The following table sums up all the details you can configure for each chosen module.1: If you want to secure connections with MongoDB using SSL, MongoDB Enterprise Server has tobe manually installed on your machine. For more information, see https://docs.mongodb.com/v3.2/security/.
For the following module... You can configure...
Tomcat instance to use
Administrator user name and password
Enable external Single-Sign On (SSO)
Use of Talend Log Server
Database
Port
Web application directory
Talend Administration Center
Email notifications
Talend Artifact Repository Port and host
Talend Log Server Cluster name
Tomcat instance to use
Talend Administration Center connection parameters
Talend Identity and Access Management
Talend Identity and Access Management parameters
Use a fully qualified domain name when configuringvalues for IAM host name and Post-logout redirectionURL to Talend Data Stewardship and Talend DataPreparation.
Installing your Talend Data Integration using Talend Installer
39
For the following module... You can configure...
Language (English, French, Japanese or Chinese)
The selected language is used for Talend Identity andAccess Management, Talend Data Stewardship, TalendData Preparation and Talend Dictionary Service.
Tomcat instance to use
Language (English, French, Japanese or Chinese)
The selected language is used for Talend DataStewardship, Talend Data Preparation and TalendDictionary Service.
Audit logging
MongoDB database1
Kafka connection parameters host
Zookeeper connection parameters
Talend Administration Center connection parameters
Talend Data Stewardship
Talend Identity and Access Management parameters
Use a fully qualified domain name when configuring IAMURL.
Talend CommandLine
Talend CommandLine as a Server is deprecated fromTalend 7.1 onwards.
Port
Talend Runtime Port configuration
PortsTalend JobServer
Cache duration
Big Data Support
Kerberos cluster
MongoDB database1
Kafka connection parameters
Talend Administration Center connection parameters
Server IP and ports
Talend Data Preparation
Talend Identity and Access Management parameters
Use a fully qualified domain name when configuring IAMURL.
Installing your Talend Data Integration using Talend Installer
40
For the following module... You can configure...
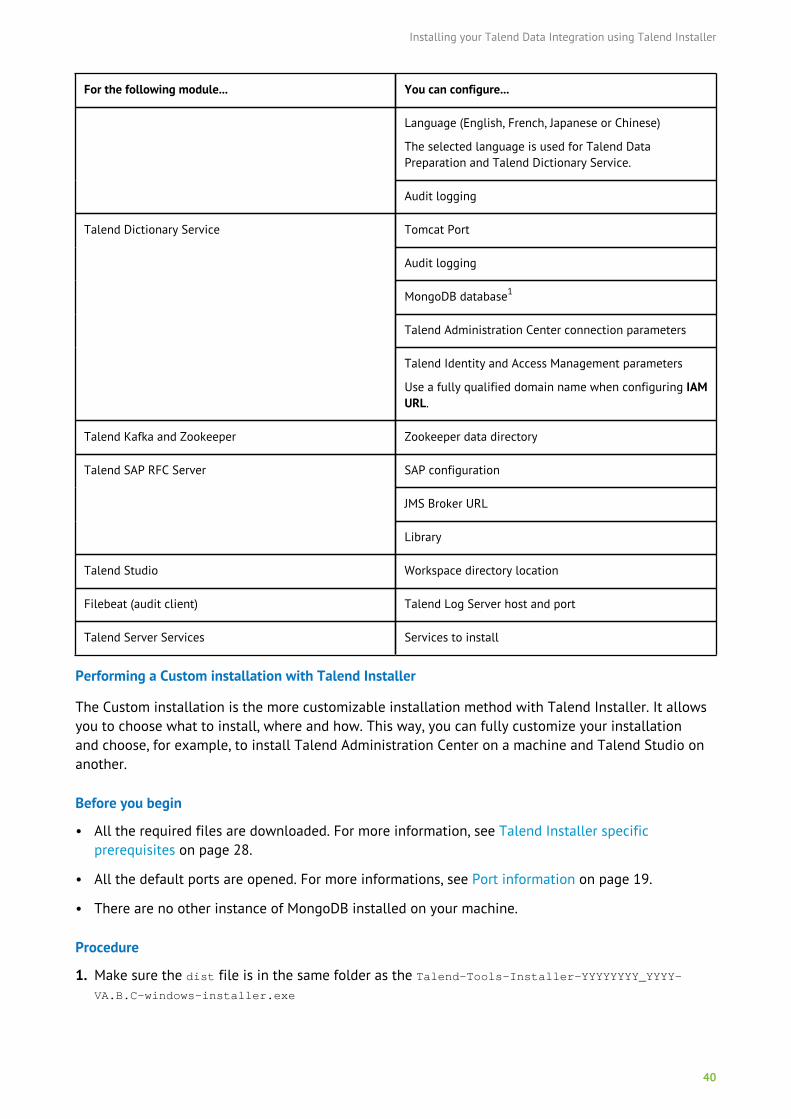
Language (English, French, Japanese or Chinese)
The selected language is used for Talend DataPreparation and Talend Dictionary Service.
Audit logging
Tomcat Port
Audit logging
MongoDB database1
Talend Administration Center connection parameters
Talend Dictionary Service
Talend Identity and Access Management parameters
Use a fully qualified domain name when configuring IAMURL.
Talend Kafka and Zookeeper Zookeeper data directory
SAP configuration
JMS Broker URL
Talend SAP RFC Server
Library
Talend Studio Workspace directory location
Filebeat (audit client) Talend Log Server host and port
Talend Server Services Services to install
Performing a Custom installation with Talend Installer
The Custom installation is the more customizable installation method with Talend Installer. It allowsyou to choose what to install, where and how. This way, you can fully customize your installationand choose, for example, to install Talend Administration Center on a machine and Talend Studio onanother.
Before you begin
• All the required files are downloaded. For more information, see Talend Installer specificprerequisites on page 28.
• All the default ports are opened. For more informations, see Port information on page 19.
• There are no other instance of MongoDB installed on your machine.
Procedure
1. Make sure the dist file is in the same folder as the Talend-Tools-Installer-YYYYYYYY_YYYY-VA.B.C-windows-installer.exe
Installing your Talend Data Integration using Talend Installer
41
2. Double-click the Talend-Tools-Installer-YYYYYYYY_YYYY-VA.B.C-windows-installer.exe file tolaunch Talend Installer
3. Accept the License Agreement.
4. Choose the directory where you want your Talend product to be installed.
5. Choose Advanced Install in the installation style list and Custom in the installation type list.
6. Add your license file.
7. Launch the installation.
8. Once the installation is complete, you can remove the dist file to save some space on your disk.
Results
Talend Installer creates a usedports.txt file where all the ports used by Talend Server modules arelisted.
Filebeat is automatically installed with Talend Log Server.
A user with tds-user as username and duser as password is automatically created in MongoDB forTalend Data Stewardship.
A user with dataprep-user as username and duser as password is automatically created in MongoDBfor Talend Data Preparation.
If you chose to use the embedded MongoDB instance, Talend Installer generates the AdminUser.txtfile at the root of the MongoDB installation folder. It contains the credentials for a user with theadministrator rights in clear text. It is recommended to restrict the access to this file.
Installing your Talend Data Integration manually
42
Installing your Talend Data Integration manually
Manual installation orderIn order for your Talend product to be installed correctly, the manual installation procedures must beexecuted in the following order:
1. Setting up your version control system on page 42
2. Installing and configuring Talend Administration Center on page 44
3. Installing and configuring Talend Identity and Access Management on page 64
4. Installing and configuring Talend logging modules on page 88
5. Installing and configuring your Talend Studio on page 95
6. Installing and configuring Talend CommandLine on page 109
7. Installing and configuring Talend Data Preparation on page 111
8. Installing and configuring Talend Data Stewardship on page 120
Setting up your version control system
Installing and configuring an Apache Subversion (SVN) server
This procedure describes how to install and configure an Apache Subversion (SVN) server in order tostore all your project data (Jobs, Database connections, Routines, Joblets, etc.) in the shared Repositoryof the Talend Studio.
Download and install VisualSVN
The following steps describe how to download and install VisualSVN, which is the recommendedApache Subversion server. For the list of Apache Subversion servers that are supported, seeCompatible version control systems on page 12.
Procedure
1. Download the VisualSVN installer from http://www.visualsvn.com/server/download/.
2. Launch the wizard.
3. Complete the installation process without changing the parameters.
In some configurations, the secure connection may not work if you select the Use secureconnection (https://) check box.
4. Launch VisualSVN.
Change the port in VisualSVN Server
Procedure
1. In the main window of VisualSVN Server Manager, check in the server URL that the port is 80. If itis already the case, go directly to Create a new repository in VisualSVN on page 43.
Installing your Talend Data Integration manually
43
2. Right-click on VisualSVN Server on the left tree view and select Properties.3. Click on the Network tab.
4. Change the port selection to 80.
5. Click Apply then OK.
Create a new repository in VisualSVN
Procedure
1. Right-click on Repositories in the main window of VisualSVN.
2. Click Create new repository....3. Name the repository newly created, for example: <my_repo>.
4. Click OK.
Create a new user and grant him read-write authorization in VisualSVN
Procedure
1. Click Create new user... in the main window of VisualSVN.
2. Then define a user name and his password.
3. Right-click on <my_repo>.
4. Select Properties.
5. Change the default user (everyone) permissions to no access.
6. Click Add.
7. Select your user name in the list displaying and click OK.
8. Check that the granted permissions are read/write.
Installing and configuring Git
This procedure describes how to install and configure Git in order to store all your project data (Jobs,Database connections, Routines, Joblets, etc.) in the shared Repository of the Talend Studio.
For more information on the supported Git servers, see Compatible version control systems on page12.
Procedure
1. Download the Git version corresponding to your system at https://git-scm.com/downloads andfollow the installation instructions.
2. Open the Git Bash program.
3. Create an SSH key using the following command:
ssh-keygen.exe
4. Put the generated key files in the C:\Users\User_Name\.ssh folder.
5. Add the generated public key to settings of your Git server.
6. Use the following command to create a known-hosts file:
ssh-keyscan.exe -H git_server_hostname >> known_hosts
7. Create a config file in your .ssh folder.
Installing your Talend Data Integration manually
44
8. Add the following content and adapt it to your configuration:
Hostname git_server_hostname IdentityFIle C:/users/username/.ssh/id_rsa
9. Add the connection information to the Talend Administration Center configuration. For moreinformation, see the Talend Administration Center User Guide.
Installing and configuring Talend Administration CenterTalend Administration Center is a Web-based administration application that allows Talend Studioproject managers to administrate users and projects and manage access to the remote repository.
For more detailed information regarding Talend Administration Center and Tomcat, see ApacheTomcat Server on page 132.
For more information on the scheduling management strategy in the Talend Administration Centerapplication, see the article about the Talend Administration Center recommendations aboutenvironment and configuration on Talend Help Center .
Deploying Talend Administration Center on an application server
Deploying Talend Administration Center on Tomcat
Procedure
1. Install the Apache Tomcat application server and stop the Tomcat service if it is automaticallystarted.
2. Using 7-zip, unzip the package delivered by Talend: Talend-AdministrationCenter-YYYYYYYY_YYYY-VA.B.C.zip.
This will give you access to the different components needed to benefit from all the TalendAdministration Center functionalities:
• org.talend.administrator.war, the archive containing the actual Talend Administration CenterWeb application.
• Artifact-Repository-Nexus-VA.B.C.D.zip, the archive containing an artifact repositorysoftware, based on Sonatype Nexus, that will be used to handle software updates and DIartifacts . For more information, see Introduction to the Talend products on page 132.
• Artifact-Repository-Artifactory.zip, the archive containing Talend scripts to initialize usersin JFrog Artifactory, that will be used to handle software updates and DI artifacts. For moreinformation, see Introduction to the Talend products on page 132.
3. Copy the Web application, org.talend.administrator.war, into the webapps directory of Tomcat.
Once you have copied this war file, you can either unzip it manually under the same directory, orlet Tomcat unzip the web application at startup.
4. Start Tomcat using the following command:
net start <TomcatServiceName>
Installing your Talend Data Integration manually
45
Results
Warning: The storage of log outputs is managed by Tomcat application server, by default, butyou are also able to define your own path for storing the logs. From 4.0, you can configurethe path directly from Talend Administration Center. For more information on manualconfiguration in prior versions, refer to Configuring the log storage mode on page 54.
For reasons of right management, make sure you launch Tomcat using the same administratoraccount as for Talend CommandLine. For example: Create a talend_admin account for both Tomcatand Talend CommandLine.
If you deploy a large number of applications on Tomcat, you should increase its memory to improveits performance. For more information on this process, see Increasing the memory of Tomcat on page47.
If you encounter performance issues during Tomcat startup, it may be due to the use of symbolic linksduring SVN checkout. For more information on how to solve these issues, see Talend Help Center .
Deploying Talend Administration Center on JBoss
Procedure
1. Install the JBoss application server and stop the JBoss service if it is automatically started.
2. Using 7-zip, unzip the archive delivered by Talend.
3. Move bcprov-jdk15on-1.51.jar from org.talend.administrator.war/WEB-INF/lib to<JBossPath>/modules/system/layers/base/org/bouncycastle/main.
4. In <JBossPath>/modules/system/layers/base/org/bouncycastle/main/, create a module.xml file.
5. Paste the following content:
<?xml version="1.0" encoding="UTF-8"?><module xmlns="urn:jboss:module:1.1" name="org.bouncycastle"><resources><resource-root path="bcprov-jdk15on-1.51.jar"/></resources><dependencies><module name="javax.api" slot="main" export="true"/></dependencies></module>
6. In org.talend.administrator.war/WEB-INF, create a jboss-deployment-structure.xml file.
7. Paste the following content:
<jboss-deployment-structure><deployment><dependencies><module name="org.bouncycastle" slot="main" export="true" /></dependencies></deployment></jboss-deployment-structure>
8. Move the org.talend.administrator.war file to <JBossPath>/standalone/deployments.
9. Start JBoss using the following command:
net start "JBoss"
Results
The storage of log outputs is managed by Tomcat application server, by default, but you are alsoable to define your own path for storing the logs. You can configure the path directly from Talend
Installing your Talend Data Integration manually
46
Administration Center. For more information on manual configuration in prior versions, refer toConfiguring the log storage mode on page 54.
For reasons of right management, make sure you launch JBoss using the same administrator accountas for Talend CommandLine. For example: Create a talend_admin account for both JBoss and TalendCommandLine.
Deploying Talend Administration Center on Pivotal tc Server
Procedure
1. Install Pivotal tc Server as explained in Pivotal documentation: https://tcserver.docs.pivotal.io/3x/docs-tcserver/topics/install-getting-started.html.
2. Create a Pivotal tc Server instance as explained in Pivotal documentation: https://tcserver.docs.pivotal.io/3x/docs-tcserver/topics/postinstall-getting-started.html.
3. Stop your Pivotal tc Server instance.
4. Using 7-zip, unzip the archive delivered by Talend.
5. Copy the Web application, org.talend.administrator.war, into the webapps folder of your Pivotaltc Server instance, for example:
C:\tcserver\pivotal-tc-server\myserver\webapps
6. Copy the .jar files contained in the endorsed folder to the lib folder of your Pivotal tc Serverinstance, for example:
C:\tcserver\pivotal-tc-server\myserver\lib
7. Start your Pivotal tc Server instance to automatically deploy Talend Administration Center.
Increasing the memory of Pivotal tc Server
Procedure
1. Go to <PivotalPath>\bin and edit the setenv.bat file.
2. Add the following line:
set JAVA_OPTS=%JAVA_OPTS% -XX:MaxMetaspaceSize=512m -Xmx1024m -Xms256m
Results
The Pivotal tc Server memory heap size is now increased and the server can hold several webapplications.
Deploying Talend Administration Center on WebLogic
Procedure
1. Create the endorsed folder, for instance C:\weblogic\endorsed.
2. Copy org.talend.administrator\WEB-INF\lib\joda-time-2.1.jar to the endorsed folder.
3. Edit <WebLogicPath>\user_projects\domains\base_domain\bin\setDomainEnv.cmd to referencethe endorsed folder, as follows:
JAVA_OPTIONS="${JAVA_OPTIONS} ${JAVA_PROPERTIES} -Djava.endorsed.dirs=C:\weblogic
\endorsed"
4. Depending on the version of WebLogic you are using:
• For a WebLogic 12.1.x server, extract the org.talend.administrator.war file to the location ofyour choice.
Installing your Talend Data Integration manually
47
• For a WebLogic 12.2.1 server:
1. Deploy the file jsf-1.2.war following the steps described at https://docs.oracle.com/cd/E24329_01/web.1211/e21049/configurejsfandjtsl.htm#WBAPP206 (Deploying JSF 1.2 and JSTLLibraries).
2. Extract the org.talend.administrator.war file to the location of your choice.
3. Copy the file weblogic.xml to <ExtractedWarPath>\WEB-INF.
4. Deploy the extracted org.talend.administrator.war file to WebLogic.
Talend Administration Center basic configuration
Increasing the memory of Tomcat
Procedure
1. Go to <TomcatPath>\bin, and edit the catalina.bat file.
2. Add the following line:
set JAVA_OPTS=%JAVA_OPTS% -XX:MaxMetaspaceSize=512m -Xmx1024m -Xms256m
3. If you are an Oracle user, add the following line in order to specify the catalog and schemadatabase parameters, and to avoid errors during Talend Administration Center startup:
Xmx<1G> -Dtalend.catalog=<catalogName> -Dtalend.schema=<schemaName>
Results
The Tomcat memory size is now increased and the server can hold several web applications.
Installing database drivers in your Web application server
If you are not using the embedded H2 database with Talend Administration Center or Talend ActivityMonitoring Console, you must install the driver for the database to use in your Web application server.
For more information regarding the databases compatible with Talend Administration Center andTalend Activity Monitoring Console, see Compatible databases on page 13.
Procedure
1. Stop your Web application server.
2. In case you use Apache Tomcat, clean the <apache-tomcat>\work\Catalina\localhost folder.
3. Make sure that the driver for the database you want to use does not exist in any of the followingfolders. If the driver already exists in one of these folders, skip the next step.
Web application Server used Folders to check
Apache Tomcat <apache-tomcat>\webapps\amc\WEB-INF
\plugins\org.talend.amc.libraries_v
A.B.C.YYYYMMDD_HHmm\lib\ext
JBoss <JBoss_installation_folder>\standalone
\lib\ext
<JBoss_installation_folder>\standalone
\lib\endorsed
Installing your Talend Data Integration manually
48
Web application Server used Folders to check
<JBoss_installation_folder>\standalone
\tmp\work\jboss.web\default-host\amc
\eclipse\plugins\org.talend.amc.librar
ies_X.X.X.XXXXXXXX_XXXX\lib\ext
4. Download the correct database driver(s) from the official provider website, according to the versionof the JVM you use to run your Web application server and the version of the database you want touse.
In case you use Oracle, use a copy of the ojdbcX.jar file from your Oracle installation.
Note that those drivers are specific and that you should only download the one(s) that you need.
Database used Driver to download
Azure SQL Download the patched jTDS driver from https://sourceforge.net/p/jtds/bugs/_discuss/thread/16113049/7594/attachment/jtds-1.3.1.jar.
For more information about the related bug, seehttps://sourceforge.net/p/jtds/bugs/725/?page=0. Notethat there is no official release that includes the fixyet.
MySQL http://dev.mysql.com/downloads/connector/j/
Oracle http://www.oracle.com/technetwork/database/features/jdbc/index-091264.html
MS SQL http://sourceforge.net/projects/jtds/files/jtds/
PostgreSQL http://jdbc.postgresql.org/download.html
Microsoft JDBC Drivers 6.0, 4.2, 4.1, and 4.0 for SQLServer
http://www.microsoft.com/en-us/download/details.aspx?id=11774
MariaDB https://downloads.mariadb.org/connector-java/
5. If the driver folder does not exist, create it:
• For Apache Tomcat 8.0, create an endorsed folder under <apache-tomcat>.
• For JBoss, create an ext folder under <JBoss_installation_folder>\standalone\tmp\work\jboss.web\default-host\amc\eclipse\plugins\org.talend.amc.libraries_X.X.X.XXXX
XXXX_XXXX\lib.
6. Place the driver(s) you need in the right folder:
• In the folder you created for Apache Tomcat 8.0 and JBoss
• In <apache-tomcat>\lib for Apache Tomcat 8.5.
7. In case you install the patched jTDS driver to work with Microsoft Azure database, in the databasesettings of Talend Administration Center fill in the information of the patched driver as follows:
database.url=jdbc:jtds:sqlserver://talendtac.database.windows.net:1433/tac;[email protected];password=yourpassword;ssl=require;database.driver=net.sourceforge.jtds.jdbc.Driverdatabase.username=tadmin
Installing your Talend Data Integration manually
49
database.password=yourpassword
ssl=require is a mandatory parameter, as stated in the Microsoft documentation: https://docs.microsoft.com/nl-nl/azure/sql-database/sql-database-develop-java-simple#Opmerking.
8. Restart your Web application server.
(Best Practice) Using VACUUM with PostgreSQL for Talend Administration Center users
When using Talend Administration Center to retrieve, schedule and/or execute Jobs, many update/delete database operations are performed, which may result in performance slowdown if you areusing PostgreSQL.
Indeed, it is recommended to execute the VACUUM command with PostgreSQL, as items that aredeleted or obsoleted by an update are not physically removed from their table.
For more information on the VACUUM command, see the PostgreSQL documentation.
For more information on how to set up automatic vacuuming (which is a process launched at regularintervals by the PostgreSQL server to execute VACUUM only on the tables that have been updated), seethe PostgreSQL documentation.
Configuring Tomcat to use a proxy server
Procedure
1. Stop your Tomcat server.
2. Go to <TomcatPath>\bin, and edit the setenv.bat file. If the file does not exist, create it.
3. Add the following lines, changing the parameters to match with your configuration:
[Tomcat Proxy Property]-Dhttp.proxySet=true-Dhttp.proxyHost=http(s)://proxy.server.com # Specify the host name or IP address of the proxy. You can use this parameter for http and https host names.-Dhttp.proxyPort=3128 # Specify the port number of the proxy server.-Dhttp.nonProxyHost=localhost|host.mydomain.com|192.168.0 # Specify a list of hosts separated by "|" that do not require access through the proxy server.
4. Restart your Tomcat server.
Synchronizing Web application and server time zones
To make sure that the DST change and the time zones are correctly taken into account, check thatyour OS includes an environment variable set as follows:
On Windows: TZ=Europe/Paris
On Linux: Export TZ="Europe/Paris"
Launching Talend Administration Center for the first time
The recommended way to configure the connection to the database and to the shared repository (Gitor SVN) is through the Web interface of Talend Administration Center.
Procedure
1. Start the application server on which Talend Administration Center is installed.
2. Open a Web browser and type in the following URL:
Installing your Talend Data Integration manually
50
http://localhost:8080/<ApplicationPath>
Replace localhost with the IP address or the hostname of the Web server if the Web browser IPis different from the machine you are on, and <ApplicationPath> with the Talend AdministrationCenter Web application path. For example, http://localhost:8080/org.talend.administrator.
Choose a port according to your environment. The default port 8080 may clash with anotherapplication.
3. Type in the default admin password. H2 database connection parameters are displayed and someautomatic checks are performed on driver, URL, connection, version information.
The administration database (storing users, rights, etc.) being an H2 embedded database, its accessinformation is automatically set. However, for security reasons and to improve performances,the ;MV_STORE=FALSE;MVCC=TRUE additional parameters must be added to the H2 default URL.The H2 database URL should thus looks like the following: jdbc:h2:~/talend_administrator;MV_STORE=FALSE;MVCC=TRUE;AUTO_SERVER=TRUE;LOCK_TIMEOUT=15000.
If you do not want to use the embedded H2 database, you can set up a different databaseserver (MySQL, MSSQL or Oracle) and set the corresponding connection parameters. For moreinformation, see Configuring Talend Administration Center to run on a different database than H2on page 50.
4. Click Set new license, then browse your system to the License file you received from Talend andclick Upload. A final License check is performed.
5. Click Go to Login.
6. On the Login page, type in the default connection login for your first access (login: [email protected], password: admin).
Those credentials correspond to the default user of the Web application. You can create a newone using the Users menu in Talend Administration Center, and then delete the [email protected] user after connecting with the credential you have created.
After the first connection, it is strongly recommended not to use the default user account to accessthe application for security reasons. You can either change the default credentials of this account([email protected]/admin) or create another administrator user and remove the defaultaccount. This account has only the role Security Administrator. Its type is No Project Access so itdoes not count in the license.
If your Web access is restricted, you may need to click Validate your license manually to performthe validation of your license key. Follow the instructions on screen.
Results
Once the license is validated, the navigation bar of Talend Administration Center opens with all thepages accessible for the default administrator user account.
For more information on which pages of Talend Administration Center an administrator user canaccess, see the Talend Administration Center User Guide.
Configuring Talend Administration Center to run on a different database than H2
By default, the Talend Administration Center Web application is configured to run with the default H2embedded database.
For more information on Talend Administration Center database, see Database on page 133.
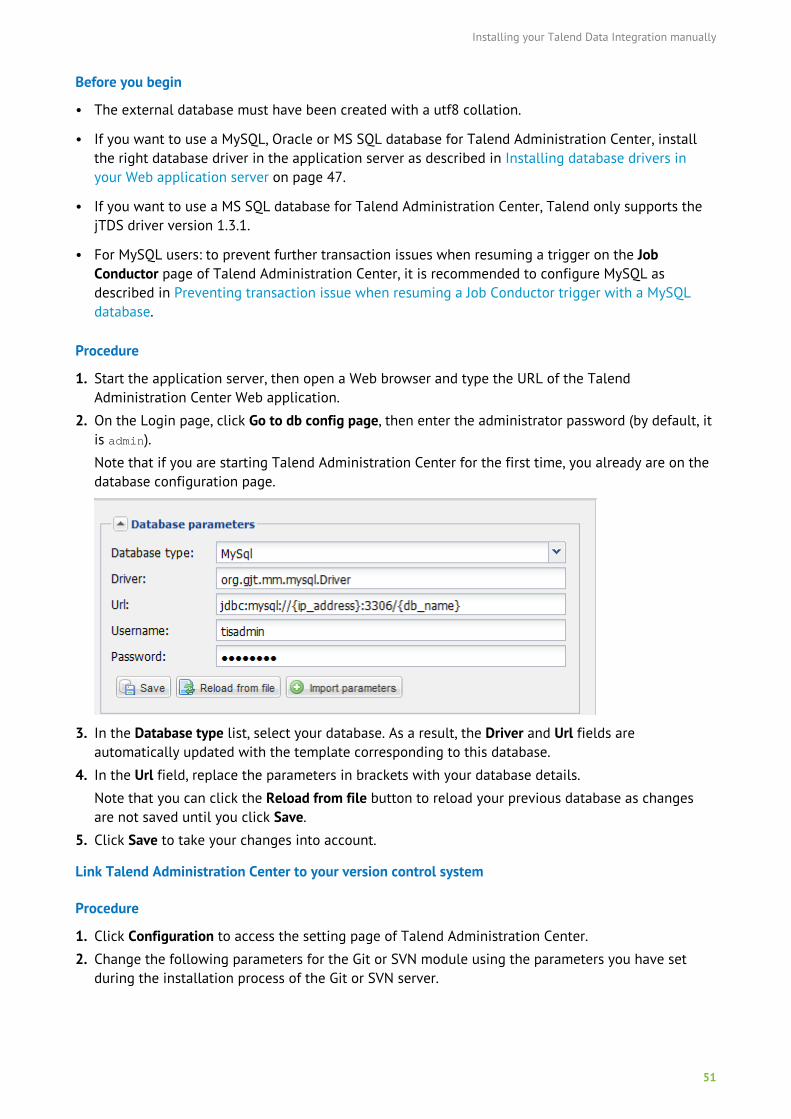
Installing your Talend Data Integration manually
51
Before you begin
• The external database must have been created with a utf8 collation.
• If you want to use a MySQL, Oracle or MS SQL database for Talend Administration Center, installthe right database driver in the application server as described in Installing database drivers inyour Web application server on page 47.
• If you want to use a MS SQL database for Talend Administration Center, Talend only supports thejTDS driver version 1.3.1.
• For MySQL users: to prevent further transaction issues when resuming a trigger on the JobConductor page of Talend Administration Center, it is recommended to configure MySQL asdescribed in Preventing transaction issue when resuming a Job Conductor trigger with a MySQLdatabase.
Procedure
1. Start the application server, then open a Web browser and type the URL of the TalendAdministration Center Web application.
2. On the Login page, click Go to db config page, then enter the administrator password (by default, itis admin).
Note that if you are starting Talend Administration Center for the first time, you already are on thedatabase configuration page.
3. In the Database type list, select your database. As a result, the Driver and Url fields areautomatically updated with the template corresponding to this database.
4. In the Url field, replace the parameters in brackets with your database details.
Note that you can click the Reload from file button to reload your previous database as changesare not saved until you click Save.
5. Click Save to take your changes into account.
Link Talend Administration Center to your version control system
Procedure
1. Click Configuration to access the setting page of Talend Administration Center.
2. Change the following parameters for the Git or SVN module using the parameters you have setduring the installation process of the Git or SVN server.

Installing your Talend Data Integration manually
52
Parameter name Description
Server Location URL Git or SVN repository URL.
Username Git or SVN repository user.
Password Git or SVN repository password.
For examples of Git or SVN URLs, and more details, see Installing and configuring an ApacheSubversion (SVN) server on page 42 and Installing and configuring Git on page 43.
If you use several Git or SVN repositories to store your projects, refer to the User Guide of TalendAdministration Center and check the Advanced settings procedure.
Results
The link to Git or SVN is now established, you can thus create a new project in order for the Talendclients to have at least one project in their workspace.
Next steps:
• Create one or more users from the Users page.
• Create a new, remote, collaborative project from the Projects page.
• Associate the user(s) with the project from the Project authorizations page.
For more details, see the Talend Administration Center User Guide.
Configuring Talend Administration Center to handle multiple Git repositoriesYou might need to connect Talend Administration Center to another Git repository than the one youentered on the Configuration page of the web application, for example when you are creating newprojects. If so, you need to update a configuration file.
Procedure
1. Stop Tomcat.
2. Open the following file to edit it:
<tomcat_path>WEB-INF\classes\configuration.properties
3. Add the following:
git.conf.enableHashRepositoryUrl=true
Note that this configuration may increase disk space usage if you use different protocols (http /https / ssh, etc.) to access the same repository.
4. Restart Tomcat.
Results
Now a separate local folder will be created for each Git repository URL entered in TalendAdministration Center.
Installing your Talend Data Integration manually
53
Configuring Talend Administration Center to improve performance when creating execution tasks (Gitonly)When creating execution tasks on the Job Conductor page of Talend Administration Center, you mightnotice some slowness when retrieving the Jobs stored on the Git repository.
If so, you have the possibility to update a configuration file in order to prevent Git from refreshing therepository and thus to improve speed of item selection.
Procedure
1. Stop Tomcat.
2. Open the following file to edit it:
<tomcat_path>\WEB-INF\classes\configuration.properties
3. Add the following:
git.conf.refreshDataProjectWhenSelectJob.enable=false
Note that the recommended parameter value is true, and that you should only disable to preventrefresh of local Git repositories.
4. Restart Tomcat.
Results
Now the selection of Git items from the Job Conductor page of Talend Administration Center will bequicker.
Applying scripts to Sonatype Nexus 3
If you have downloaded Nexus 3 from the Sonatype website, you need to run Talend scripts to fullyaccess its features with Talend Administration Center.
Before you begin
Talend Administration Center must be installed on your machine to access the necessary files.
Procedure
1. Log in to your Nexus 3 Repository Manager as an administrator.
2.Click the icon in the header to access the Administration page.
3. Select System > API from the menu tree.
4. Scroll down to the script section and click POST to add a new script.
5. Add the Talend scripts to Nexus.
The JSON files are located:
• in the Nexus3TalendScripts.zip file located in the <TalendAdministrationCenterInstallationDirectory>/repository/nexus folder.
• inside the migration-<version>/Nexus3TalendScripts.zip file after you unzip Artifact-Repository-Nexus-<version>.zip from the Talend Administration Center package.
The zip file contains 3 JSON files:
• healthCheck.json
Installing your Talend Data Integration manually
54
• repositoriesList.json
• search.json
6. In the body field, paste the content of the first JSON file then click Try it out.
Repeat this step with the remaining two files.
For more information on managing and running scripts in Nexus 3, refer to the Sonatype website.
Configuring the log storage mode
The log outputs are stored by default in the server application standard log file (STDOUT) as definedin the Log4j.xml file located in the <ApplicationPath>/WEB-INF/classes folder. However you canstore the log in a different file by setting the path to this file in the Log4j.xml file.
Procedure
To do so, simply set the path in the Configuration page in Talend Administration Center.
For more information, refer to your Talend Administration Center User Guide. If you leave the pathfield blank in the Configuration page, then you can also customize the Log4j.xml to address yourcustom needs.
Reduce the number of unauthenticated calls to your Git server
When using the Git HTTP protocol, you can force the use of username/password authentication for allpull, push, fetch and ls-remote operations.
Procedure
1. Stop your Tomcat server.
2. Open the following file to edit it:
<tomcat_path>\WEB-INF\classes\configuration.properties
3. Add the following line:
git.conf.http.onlyUsernamePasswordAuth=true
4. Restart your Apache Tomcat server.
Talend Administration Center advanced configuration
Most of the configuration parameters are stored in the Talend Administration Center database, likebackup-related settings, port information, timeout duration, security settings, login delay and so on.
Some parameters can be updated, activated or deactivated from the Configuration page of the Webapplication or directly in the configuration.properties file, but you might need to edit some ofthem manually in the configuration table of the Talend Administration Center database. To accessthis database, open the database web console. To edit this database, open its web console which isaccessible from the Database node of the Configuration page of Talend Administration Center.
Setting up Talend Administration Center Single Sign-On (SSO)
You have the possibility to implement a unified sign-on and authentication to access TalendAdministration Center through different Identity provider systems (IdP) and to manage the roles andproject types of the application users.
Installing your Talend Data Integration manually
55
Procedure
1. Enable SSO for Talend Administration Center during installation, either via Talend Installer or froma configuration file, see Enabling Single-Sign On for Talend Administration Center on page 55.
2. Set up SSO and user roles and project types from your Identity Provider system.
3. (Optional) You can create an "emergency user" in Talend Administration Center in case yourIdentity Provider is temporarily unavailable, see Defining an emergency user for TalendAdministration Center on page 58.
Results
Setting up SSO in your Identity Provider system allows users to access all their applications, includingTalend Administration Center, by signing in one time for all services. If a user tries to sign in to TalendAdministration Center when SSO is set up, he or she is redirected to the SSO sign-in page.
Enabling Single-Sign On for Talend Administration Center
To activate SSO for Talend Administration Center during installation, you can:
• activate SSO via Talend Installer (recommended)
• activate SSO by editing a configuration file
Note that, if you do not activate SSO during installation, you still have the possibility to do so on theConfiguration page once you are logged in the web application. For more information, see the TalendAdministration Center User Guide.
For information on configuring the Identity Providers, see the following documents:
• Configuring Talend Administration Center SSO with Okta
• Configuring Talend Administration Center SSO with Siteminder
• Configuring Talend Administration Center SSO with PingFederate
• Configuring Talend Administration Center SSO with AD FS 2.0
• Configuring Talend Administration Center SSO with AD FS 3.0
Enabling Single-Sign On for Talend Administration Center via Talend Installer
Before you begin
You have chosen to perform an Advanced installation and a Server or a Custom installation type, thatallows you to customize settings during installation. See Installation modes of Talend Installer andTalend Studio Installer on page 27 and Using Talend Installer graphical installation mode on page 29for more information.
Procedure
In the Talend Administration Center Configuration step of the Installer, select the Enable SSOcheck box to activate SSO during installation and continue the installation process.
Results
SSO is activated, which means the first time the administrator logs in Talend Administration Center,he or she will be able to configure the link between the application and his or her Identity providersystem directly from the Talend Administration Center Database Configuration page.
Installing your Talend Data Integration manually
56
For more information, see Talend Administration Center User Guide.
Enabling Single-Sign On for Talend Administration Center in the configuration file
Procedure
1. Open the <tomcat_path>\WEB-INF\classes\configuration.properties file to edit it.
2. Set the sso.field.useSSOLogin parameter value to true and save your changes.
Results
SSO is activated, which means the first time the administrator logs in Talend Administration Center,he or she will be able to configure the link between the application and his or her Identity providersystem directly from the Talend Administration Center Database Configuration page.
For more information, see Talend Administration Center User Guide.
Linking Talend Administration Center to an Identity Provider
Procedure
1. Log in to Talend Administration Center.
2. From the Configuration page, expand the SSO node.
3. If SSO has not been enabled yet, select true in the Use SSO Login field.
4. Click Launch Upload in the IDP metadata field and upload the Identity Provider (IdP) metadata fileyou have previously downloaded from your Identity Provider system.
5. In the Service Provider Entity ID field, enter the Entity ID of your Service Provider (available in theconfiguration of the IdP).
For example, http://<host>:<port>/org.talend.administrator/ssologin in Okta and ADFS, or<Connection ID> in PingFederate.
6. Click Launch Upload in the IDP Authentication Plugin field and upload the Identity Providermetadata file you have previously downloaded from the Identity Provider system.
The jar files provided by Talend are located in the <TomcatPath>/webapps/org.talend.administrator/idp/plugins directory.
It is possible to rewrite the authentication code if necessary.
The Identity Provider System field changes automatically depending on your Identity Providersystem.
7. Click Identity Provider Configuration and fill out the required information.
PingFederate
• PingFederate SSO URL: https://win-350n8gtg2af:9031/idp/startSSO.ping?PartnerSpld=TAC701
• Basic Adapter Instance ID: BasicAdapter
Okta
• Okta Organization URL: https://dev-515956.oktapreview.com
• Okta Embedded Url: https://dev-515956.oktapreview.com/home/ talenddev515956_talendadministrationcenter_1/0oacvlcac5j52hFhP0h7/ alncvlmpk1VXbYAGu0h7
AD FS 2
Installing your Talend Data Integration manually
57
• Adfs SSO Url: https://<host>/adfs/ls
• Adfs Basic Auth Path: auth/basic
• Adfs SP Entity Id: https://<host>:<port>/org.talend.administrator/ssologin
AD FS 3
• Adfs 3 SP Entity Id: https://<host>:<port>/org.talend.administrator/ssologin
• Adfs 2 SSO Url: https://<host>/adfs/ls8. Set the Use Role Mapping field to true to map the application project types and the user roles with
those defined in the Identity Provider system.
Once you have defined project types/roles at the Identity Provider side, you cannot to edit themfrom Talend Administration Center.
9. Click Mapping Configuration and fill in the role/project type fields with the corresponding SAMLattributes previously set in the Identity Provider system.
Project type examples:
• MDM = MDM
• DI = DI
• DM = DM
• NPA = NPA
Role examples:
• Talend Administration Center roles
• Administrator = tac_admin
• Operation Manager = tac_om
Setting the Talend Administration Center roles is mandatory.
• Talend Data Preparation roles
• Administrator = dp_admin
• Data Preparator = dp_dp
• Talend Data Stewardship roles
• Data Steward = tds_ds
The project types and roles set in the Identity Provider will override the roles set in TalendAdministration Center.
The project types and roles set in the Identity Provider override the roles set in TalendAdministration Center at user login.
If your organization does not accept custom attributes in the SAML token, either:
a) Select Show Advanced Configuration in the wizard and, in Path to Value, enter the XPathexpression to target the SAML value to map to the corresponding Talend Administration Centerobject (Project Types, Roles, Email, First Name, Last Name).
Example: /saml2p:Response/saml2:Assertion/saml2:AttributeStatement/saml2:Attribute[@Name='tac.projectType']/saml2:AttributeValue/text()
Installing your Talend Data Integration manually
58
b) Set Use Role Mapping to false.
In this case, you cannot create users manually, but the user type and the user roles can beedited in Talend Administration Center.
When users log in for the first time, their type is No Project Access.
The default login timeout is set to 120 seconds, which you can change by adding the sso.config.clientLoginTimeout parameter with the desired timeout to the <ApplicationPath>/WEB-INF/classes/configuration.properties file.
Results
You are able to log in to Talend Administration Center through your Identity Provider.
Defining an emergency user for Talend Administration CenterIn case your Identity Provider is temporarily unavailable and you need to connect to TalendAdministration Center, you have the possibility to create a temporary emergency user.
Procedure
1. Open the following file to edit it:
<tomcat_path>WEB-INF\classes\configuration.properties
2. Uncomment the parameters sso.emergency.username and sso.emergency.password, edit thecredentials of the emergency user if needed then save your changes.
3. Restart Tomcat.
4. Log into Talend Administration Center using the previously defined credentials. After logging outfrom the current session, this user account will be removed.
Setting up High Availability
Installing Tomcat in cluster mode
Procedure
1. Install one Tomcat server as described in Deploying Talend Administration Center on Tomcat onpage 44.
2. Edit the <ApplicationPath>\WEB-INF\classes\quartz.properties file.
3. Uncomment the following lines by removing the hash character preceding the command:
#org.quartz.scheduler.instanceName = MyClusteredScheduler#org.quartz.scheduler.instanceId = AUTO#org.quartz.jobStore.isClustered = true#org.quartz.jobStore.clusterCheckinInterval = 20000
4. Start Tomcat to deploy Talend Administration Center.
Duplicating Tomcat and the TAC web application
Procedure
1. Duplicate this Tomcat instance on different servers, as many times as needed.
Warning: Make sure that all system clocks are synchronized (the clocks must be withina second of each other). For more information on time-sync services, please refer to the
Installing your Talend Data Integration manually
59
appropriate Microsoft documentation about SNTP, Windows Time Service tools and NetworkClocks.
2. Duplicate the org.talend.administrator Web application to all Tomcat instances. Make sure thatall Web application configurations are identical.
3. Launch one Tomcat instance following the commands given in Deploying Talend AdministrationCenter on Tomcat on page 44.
4. Launch the other instances of Tomcat following the same procedure.
Results
Fail-over will occur when one of the multiple execution servers fails while in the midst of executingone or more tasks. When a server fails, the other servers of the cluster detect the condition andidentify the tasks in the database that were in progress within the failed server. Any tasks marked forrecovery will be taken over by another server.
Note that the ranking of servers to be used for load balancing is based on indicators, whose bounds(such as free disk space limits) and weight are defined in the file: monitoring_client.properties which is located in <ApplicationPath>\WEB-INF\lib\org.talend.monitoring.client-A.B.C.jar.These values can be edited according to your needs. For more information, see Configuring theindicators which determine which server to be used for load balancing on page 62.
You can also deploy Talend Administration Center on a JBoss application server (instead of a Tomcat).So, you can follow the same above instructions for Jboss. For more information on how to deploy theWeb application on JBoss, see Deploying Talend Administration Center on JBoss on page 45.
Note: One known minor issue related to the DST change might prevent the failover to operateproperly. However as a simple workaround, simply restart Tomcat after the time change. Thisshould have no impact on executions.
Migrating database X to database Y
If you want to migrate from one database to another, for example from H2 to MySQL, you need to usethe MetaServlet command called migrateDatabase.
As the source database is updated during the migration process, it is mandatory to back it up beforemigrating it.
The MetaServlet application is located in <TomcatPath>\webapps\<TalendAdministrationCenter>\WEB-INF\classes folder.
To display the help of this command (with related parameters), you need to enter the following in theMetaServlet application:
MetaServletCaller.bat --tac-url=<yourApplicationURL> -h migrateDatabase
For more information on the MetaServlet application, see the Talend Administration Center UserGuide.
See below an example of migration between H2 and MySQL databases.
To be able to use this command, you need to put it on one single line first.
MetaServletCaller.bat --tac-url http://localhost:8080/org.talend.administrator --json-params='{"actionName":"migrateDatabase","dbConfigPassword":"admin","mode":"synchronous","sourcePasswd":"tisadmin","sourceUrl":"'jdbc:h2:C:/Talend/6.4.1/tac/apache-tomcat-8.0.20/webapps/org.talend.administrator/WEB-INF/database/talend_administrat
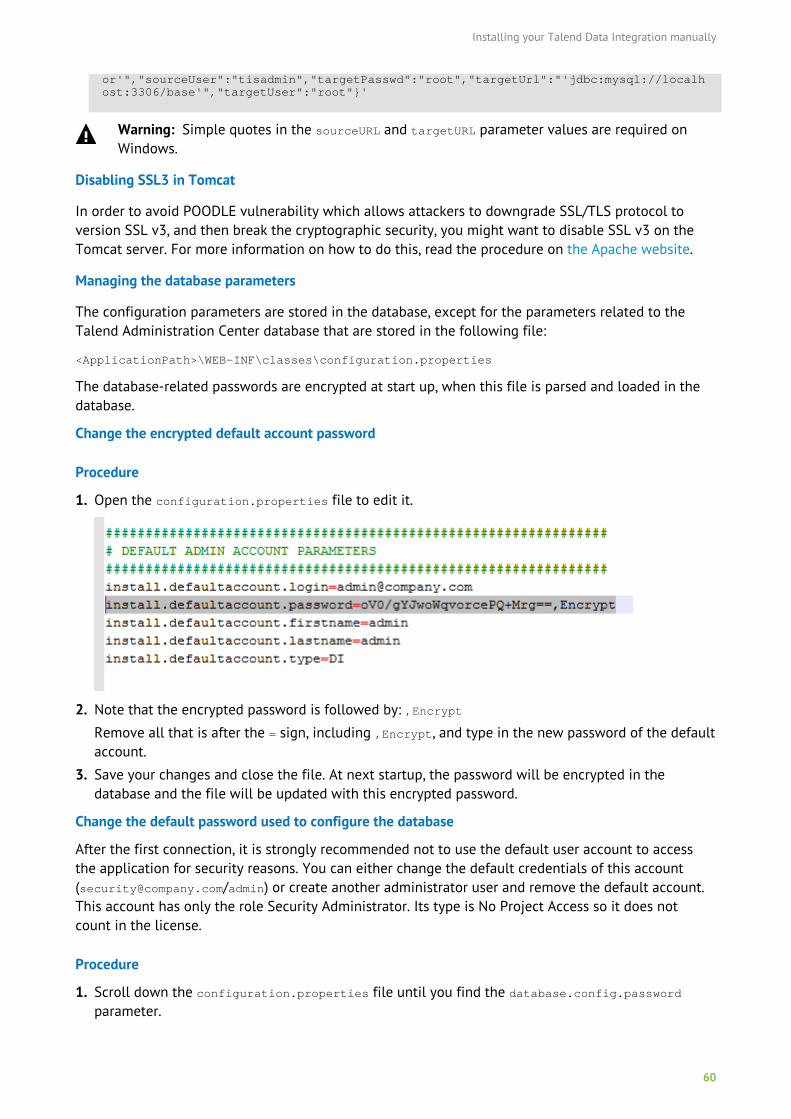
Installing your Talend Data Integration manually
60
or'","sourceUser":"tisadmin","targetPasswd":"root","targetUrl":"'jdbc:mysql://localhost:3306/base'","targetUser":"root"}'
Warning: Simple quotes in the sourceURL and targetURL parameter values are required onWindows.
Disabling SSL3 in Tomcat
In order to avoid POODLE vulnerability which allows attackers to downgrade SSL/TLS protocol toversion SSL v3, and then break the cryptographic security, you might want to disable SSL v3 on theTomcat server. For more information on how to do this, read the procedure on the Apache website.
Managing the database parameters
The configuration parameters are stored in the database, except for the parameters related to theTalend Administration Center database that are stored in the following file:
<ApplicationPath>\WEB-INF\classes\configuration.properties
The database-related passwords are encrypted at start up, when this file is parsed and loaded in thedatabase.
Change the encrypted default account password
Procedure
1. Open the configuration.properties file to edit it.
2. Note that the encrypted password is followed by: ,Encrypt
Remove all that is after the = sign, including ,Encrypt, and type in the new password of the defaultaccount.
3. Save your changes and close the file. At next startup, the password will be encrypted in thedatabase and the file will be updated with this encrypted password.
Change the default password used to configure the database
After the first connection, it is strongly recommended not to use the default user account to accessthe application for security reasons. You can either change the default credentials of this account([email protected]/admin) or create another administrator user and remove the default account.This account has only the role Security Administrator. Its type is No Project Access so it does notcount in the license.
Procedure
1. Scroll down the configuration.properties file until you find the database.config.passwordparameter.
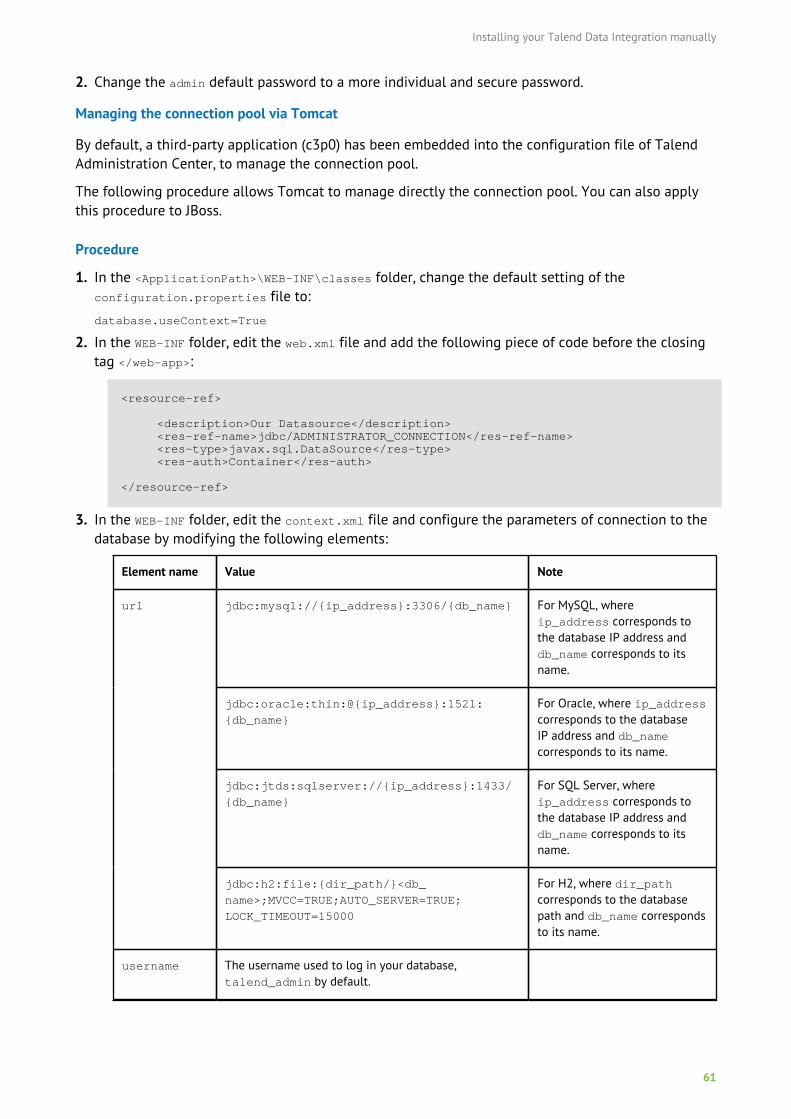
Installing your Talend Data Integration manually
61
2. Change the admin default password to a more individual and secure password.
Managing the connection pool via Tomcat
By default, a third-party application (c3p0) has been embedded into the configuration file of TalendAdministration Center, to manage the connection pool.
The following procedure allows Tomcat to manage directly the connection pool. You can also applythis procedure to JBoss.
Procedure
1. In the <ApplicationPath>\WEB-INF\classes folder, change the default setting of theconfiguration.properties file to:
database.useContext=True
2. In the WEB-INF folder, edit the web.xml file and add the following piece of code before the closingtag </web-app>:
<resource-ref>
<description>Our Datasource</description> <res-ref-name>jdbc/ADMINISTRATOR_CONNECTION</res-ref-name> <res-type>javax.sql.DataSource</res-type> <res-auth>Container</res-auth>
</resource-ref>
3. In the WEB-INF folder, edit the context.xml file and configure the parameters of connection to thedatabase by modifying the following elements:
Element name Value Note
jdbc:mysql://{ip_address}:3306/{db_name} For MySQL, whereip_address corresponds tothe database IP address anddb_name corresponds to itsname.
jdbc:oracle:thin:@{ip_address}:1521:
{db_name}
For Oracle, where ip_addresscorresponds to the databaseIP address and db_namecorresponds to its name.
jdbc:jtds:sqlserver://{ip_address}:1433/
{db_name}
For SQL Server, whereip_address corresponds tothe database IP address anddb_name corresponds to itsname.
url
jdbc:h2:file:{dir_path/}<db_
name>;MVCC=TRUE;AUTO_SERVER=TRUE;
LOCK_TIMEOUT=15000
For H2, where dir_pathcorresponds to the databasepath and db_name correspondsto its name.
username The username used to log in your database,talend_admin by default.
Installing your Talend Data Integration manually
62
Element name Value Note
password The password used to log in your database,talend_admin by default.
org.gjt.mm.mysql.Driver For MySQL.
oracle.jdbc.driver.OracleDriver For Oracle.
net.sourceforge.jtds.jdbc.Driver For SQL Server.
driverClassNam
e
org.h2.Driver For H2.
4. Copy the relevant .jar file corresponding to the database in which your data is stored in<TomcatPath>\lib.
Configuring the indicators which determine which server to be used for load balancing
You can edit and overwrite the default configuration used to determine which server to be used forload balancing in cluster mode.
Procedure
1. Open the monitoring_client.properties file which is located in the following .jar file:
<ApplicationPath>\WEB-INF\lib\org.talend.monitoring.client-x.y.z.rabcd.jar
2. The weight values defined in this file will impact the server to be used to process data. Edit thevalues according to your needs and save your modifications.
3. Copy the edited file in the following directory to overwrite the one located in the .jar file:
<ApplicationPath>\WEB-INF\classes
For more information on how to calculate the Job server rate, see the documentation on TalendHelp Center.
Customizing the Talend Administration Center Menu tree view
You have the possibility to customize the Menu tree view of the Talend Administration Center Webapplication by adding dynamic links to the website of your choice.
Procedure
1. Open the following file:
<ApplicationPath>\WEB-INF\classes\configuration.properties
2. At the end of the file, enter the dynamic link to the website of your choice using the followingsyntax: dynamiclink.<key>=<label>#<url>#<order>.
For example, you can create the link to http://www.talend.com by entering: dynamiclink.talendcom=Talend#http://www.talend.com#8.
In this syntax, <key> indicates the technical key of this link configured, <label> is the link namedisplayed on the Menu tree view, <url> is the website address you need to link to and <order>specifies the position of this link on the Menu tree view.
Note: For further information about the order numbers used by Talend AdministrationCenter to arrange the Menu items, check the menuentries.properties file provided in thesame classes folder.
3. Save the configuration.properties file edited.
Installing your Talend Data Integration manually
63
For more information on how these links are displayed in the Menu tree view of the TalendAdministration Center Web application, see the Talend Administration Center User Guide.
Configuring Talend Administration Center login delay
Setting up a login delay allow you to improve the security of your Web application by slowing bruteforce attacks.
Procedure
In the configuration table of the Talend Administration Center database, change the value of theuseLoginDelay parameter to true.
Results
Failed login attempts will now generate a time delay which increases exponentially with each failedattempt.
Configuring LDAP(S) for Talend Administration Center
Generate a key
Procedure
1. Create a folder where you want to store your Keystore.
2. Open a command prompt.
3. Using the cd command, go to the folder you created.
4. Enter the following command:
<JAVA_HOME>\bin\keytool.exe -genkey -keystore <myKeystoreName> -keyalg RSA
Replace <JAVA_HOME> with the path to the folder where Java is installed and <myKeystoreName>with the name of your Keystore.
5. Enter the password you want to create for your Keystore twice. Then, if needed, enter otheroptional information, such as your name or the name of your organization.
6. Enter yes to confirm the information you provided.
7. Enter the password you have previously defined.
Configure LDAP(S) for Talend Administration CenterTo set the new Keystore location, edit the JAVA_OPTS environment variable.
Procedure
To edit the JAVA_OPTS environment variable, add the following lines to your JAVA_OPTSenvironment variable:
-Djavax.net.ssl.keyStore=/<myDirectory>/<myKeystore>-Djavax.net.ssl.keyStorePassword=<myPassword>
In this example, <myDirectory> is the installation directory of your Keystore, <myKeystore> is thename of your Keystore and <myPassword> is the password you have previously defined for yourKeystore.
Installing your Talend Data Integration manually
64
Defining an SSL connection
You can define an SSL connection for Talend Administration Center using the configuration.properties file.
Procedure
1. Stop your Tomcat server.
2. Open the following file:
<ApplicationPath>\WEB-INF\classes\configuration.properties
3. Uncomment and edit the following lines to define your keystore path, keystore password, truststorepath, and truststore password:
#keystore.path=c://keystore#keystore.password=changekeystorepass#truststore.path=c://truststore#truststore.password=changetruststorepass
4. Save your changes and restart your Tomcat server.
Once the passwords are read by Talend Administration Center, they will be replaced by encryptedones.
Installing and configuring Talend Identity and AccessManagementThis section describes the installation and configuration of Talend Identity and Access Managementthat allow you to manage the user access to Talend Data Preparation and Talend Data Stewardship.
The recommended installation method for Talend Identity and Access Management is the automaticinstallation with Talend Installer.
Installing Talend Identity and Access Management
Procedure
1. Copy and extract the iam-A.B.C-distribution.zip archive file in the directory of your choice.
2. Go to iam-A.B.C\apache-tomcat-x.x.xx\bin.
3. Start Talend Identity and Access Management by executing the startup.bat file.
Results
Now that Talend Identity and Access Management is installed, it is strongly recommended not touse the default Apache Syncope user account to access the application for security reasons. Youcan change the default credentials of this account (admin/password) by editing the adminPasswordparameter in the iam-A.B.C\apache-tomcat-x.x.xx\webapps\syncope\WEB-INF\classes\security.properties file. For more information, see https://syncope.apache.org/docs/reference-guide.html#set-admin-credentials.
You can now access the Talend Identity and Access Management Apache Syncope Console with thefollowing URL: http://localhost:9080/syncope-console/.
You can now access the list of registered OIDC clients with the following URL: http://localhost:9080/oidc/console/clients.
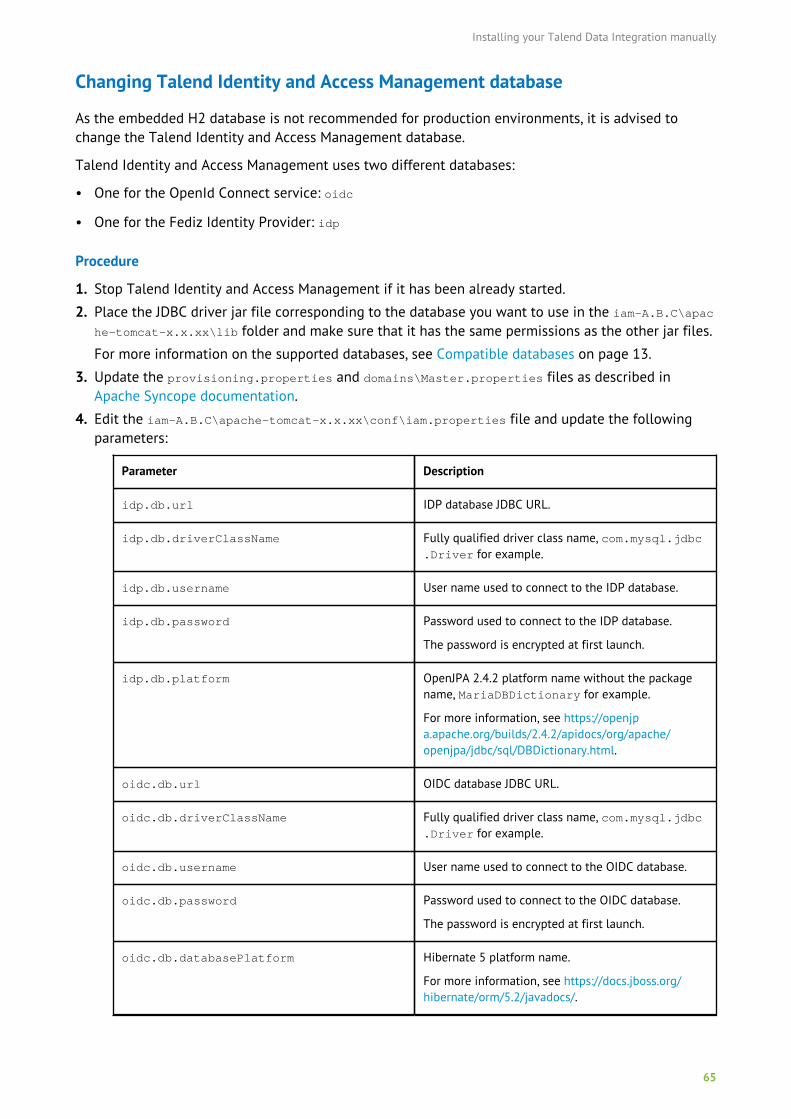
Installing your Talend Data Integration manually
65
Changing Talend Identity and Access Management database
As the embedded H2 database is not recommended for production environments, it is advised tochange the Talend Identity and Access Management database.
Talend Identity and Access Management uses two different databases:
• One for the OpenId Connect service: oidc
• One for the Fediz Identity Provider: idp
Procedure
1. Stop Talend Identity and Access Management if it has been already started.
2. Place the JDBC driver jar file corresponding to the database you want to use in the iam-A.B.C\apache-tomcat-x.x.xx\lib folder and make sure that it has the same permissions as the other jar files.
For more information on the supported databases, see Compatible databases on page 13.
3. Update the provisioning.properties and domains\Master.properties files as described inApache Syncope documentation.
4. Edit the iam-A.B.C\apache-tomcat-x.x.xx\conf\iam.properties file and update the followingparameters:
Parameter Description
idp.db.url IDP database JDBC URL.
idp.db.driverClassName Fully qualified driver class name, com.mysql.jdbc.Driver for example.
idp.db.username User name used to connect to the IDP database.
idp.db.password Password used to connect to the IDP database.
The password is encrypted at first launch.
idp.db.platform OpenJPA 2.4.2 platform name without the packagename, MariaDBDictionary for example.
For more information, see https://openjpa.apache.org/builds/2.4.2/apidocs/org/apache/openjpa/jdbc/sql/DBDictionary.html.
oidc.db.url OIDC database JDBC URL.
oidc.db.driverClassName Fully qualified driver class name, com.mysql.jdbc.Driver for example.
oidc.db.username User name used to connect to the OIDC database.
oidc.db.password Password used to connect to the OIDC database.
The password is encrypted at first launch.
oidc.db.databasePlatform Hibernate 5 platform name.
For more information, see https://docs.jboss.org/hibernate/orm/5.2/javadocs/.
Installing your Talend Data Integration manually
66
Parameter Description
oidc.db.dialect Hibernate 5 dialect for the database.
For more information, see https://docs.jboss.org/hibernate/orm/5.2/javadocs/.
5. Start Talend Identity and Access Management by executing the startup.bat file.
Changing Talend Identity and Access Management URL
You can change Talend Identity and Access Management URL if you do not wish to use the defaultlocalhost URL.
Before you begin
Before proceeding, make sure that Talend Identity and Access Management and all the moduleslinked to it are stopped.
Procedure
1. Go to the apache-tomcat folder of your Talend Identity and Access Management installation.
2. Open the conf\iam.properties file.
3. Edit the iam.host parameter value with the URL you want to use for Talend Identity and AccessManagement.
For example, replace localhost with mycompany-iam.com.
4. Open the conf\fediz_config.xml file.
5. Edit the issuer tag value with the URL you want to use for Talend Identity and Access Management.
For example, replace http://localhost:9080/idp/federation with http://mycompany-iam.com:9080/idp/federation.
6. Drop the OIDP and the IDP databases.
• If you are using the default database, back up and delete the idp and oidc folders.
• If you are using another database, back up the database and delete all the tables.
7. Edit the configuration files of all the modules linked to Talend Identity and Access Management toupdate the URL of the service.
• For Talend Data Preparation, edit the <data_prep>\config\application.propertiesconfiguration file.
• For Talend Data Stewardship, edit the <tds>\apache-tomcat\conf\data-stewardship.properties configuration file.
8. Restart all the services.
Linking Talend Identity and Access Management with Talend Data Preparation
If you have installed Talend Identity and Access Management manually, you need to create an OIDCclient in order to link Talend Identity and Access Management with Talend Data Preparation. Notethat this operation is automatically done if you install Talend Identity and Access Management usingTalend Installer.

Installing your Talend Data Integration manually
67
Procedure
1. Stop Talend Identity and Access Management and Talend Data Preparation if they have beenalready started.
2. Go to iam-A.B.C\apache-tomcat-x.x.xx\clients.
3. Create a tdp-client.json file.
4. Paste the following content:
{"post_logout_redirect_uris" : [ "http://my-machine:9999", "http://localhost:9999", "http://127.0.0.1:9999" ],"grant_types" : [ "authorization_code", "refresh_token", "password" ],"scope" : "openid refreshToken","client_secret" : "+1/7vegEOVHeQD9JKmtz8I9s4tgVuRMqC2ja7efFHro=","redirect_uris" : [ "http://my-machine:9999/signIn", "http://localhost:9999/signIn", "http://127.0.0.1:9999/signIn" ],"client_name" : "TDP DataPrep","client_id" : "64xIVPxviKWSog"}
5. Adapt the parameters to your needs:
Parameter Description
post_logout_redirect_uris URI to which the user is redirected after logging out.
If Talend Identity and Access Management andTalend Data Preparation are located on the samemachine, be sure to put the name of the machine inaddition to localhost and 127.0.0.1 as shown inthe example.
grant_types The OAuth specification has different grant types.These authorizations allow the client applicationto obtain an access token. This token representsthe client permission to access user data. Set thegrant_types to the values shown in the example.
scope OpenID defined scopes. Set it to the value shown inthe example.
client_secret Client password.
This parameter needs to be set to the samevalue as security.oauth2.client.clientSecret in theapplication.properties configuration file ofTalend Data Preparation.
The client password is encrypted at first launch.
redirect_uris URI to which the user is redirected after logging in.The /signIn part of the URI is mandatory.
If Talend Identity and Access Management andTalend Data Preparation are located on the samemachine, be sure to put the name of the machine inaddition to localhost and 127.0.0.1 as shown inthe example.
client_name Name of the OIDC client. The TDP part of the clientname (with the trailing space) is mandatory.
Installing your Talend Data Integration manually
68
Parameter Description
client_id Identifier of the OIDC client.
This parameter needs to be set to the samevalue as security.oauth2.client.clientId in theapplication.properties configuration file ofTalend Data Preparation.
6. Start Talend Identity and Access Management and Talend Data Preparation.
Linking Talend Identity and Access Management with Talend DataStewardship
If you have installed Talend Identity and Access Management manually, you need to create an OIDCclient in order to link Talend Identity and Access Management with Talend Data Stewardship. Notethat this operation is automatically done if you install Talend Identity and Access Management usingTalend Installer.
Procedure
1. Stop Talend Identity and Access Management and Talend Data Stewardship if they have beenalready started.
2. Go to iam-A.B.C\apache-tomcat-x.x.xx\clients.
3. Create a tds-client.json file.
4. Paste the following content:
{"post_logout_redirect_uris" : [ "http://my-machine:19999/", "http://localhost:19999/", "http://127.0.0.1:19999/" ],"grant_types" : [ "password", "authorization_code", "refresh_token" ],"scope" : "openid refreshToken","client_secret" : "cB/gNxe2SXR3SPDbhshZXzErZoxVy8yUcs/f6K39rsg=","redirect_uris" : [ "http://my-machine:19999/login", "http://localhost:19999/login", "http://127.0.0.1:19999/login" ],"client_name" : "TDS OIDC Gateway","client_id" : "tl6K6ac7tSE-LQ"}
5. Adapt the parameters to your needs:
Parameter Description
post_logout_redirect_uris URI to which the user is redirected after logging out.
If Talend Identity and Access Management andTalend Data Stewardship are located on the samemachine, be sure to put the name of the machine inaddition to localhost and 127.0.0.1 as shown inthe example.
grant_types The OAuth specification has different grant types.These authorizations allow the client applicationto obtain an access token. This token representsthe client permission to access user data. Set thegrant_types to the values shown in the example.
Installing your Talend Data Integration manually
69
Parameter Description
scope OpenID defined scopes. Set it to the value shown inthe example.
client_secret Client password.
This parameter needs to be set to the samevalue as oidc.tds.secret in the data-stewardship.properties configuration file of Talend DataStewardship.
The client password is encrypted at first launch.
redirect_uris URI to which the user is redirected after logging in.The /login part of the URI is mandatory.
If Talend Identity and Access Management andTalend Data Stewardship are located on the samemachine, be sure to put the name of the machine inaddition to localhost and 127.0.0.1 as shown inthe example.
client_name Name of the OIDC client. The TDS part of the clientname (with the trailing space) is mandatory.
client_id Identifier of the OIDC client.
This parameter needs to be set to the samevalue as oidc.tds.id in the data-stewardship.properties configuration file of Talend DataStewardship.
6. Start Talend Identity and Access Management and Talend Data Stewardship.
Securing connections for Talend Identity and Access Management
Procedure
1. Open the <installation_path>\iam\apache-tomcat\conf\server.xml file.
2. Comment the non-SSL part:
<!-- <Connector port="9080" protocol="HTTP/1.1" connectionTimeout="20000" redirectPort="9443" /> -->
3. Uncomment the following lines:
<!-- <Connector port="9443"protocol="org.apache.coyote.http11.Http11NioProtocol"maxThreads="150"SSLEnabled="true"Scheme="https" secure="true"clientAuth="false"sslProtocol="TLS"/> -->
keystoreFile="/home/tdsqa01/Talend-6.4.1/certs-single/server.keystore.jks"keystorePass="tomcat"/>
4. Add the following lines:
keystoreFile="<certificate_path>/server.keystore.jks"
Installing your Talend Data Integration manually
70
keystorePass="<certificate_password>"
5. Open the <installation_path>\iam\apache-tomcat\conf\iam.properties file and change thebelow URLs from http to https:
iam.url=https://${iam.host}:<port>tac.url=https://<host_name>:<port>/org.talend.administrator
6. In the <installation_path>\iam\apache-tomcat\conf\iam.properties file, set the valuesfor the below parameters to the username and the password of the user with the role SecurityAdministrator in Talend Administration Center:
tac.user-name=<security_administrator_username>tac.password=<security_administrator_password>
7. Delete the oidc and idp folders so that Talend Identity and Access Management can recreate themon the next startup.
8. Open the <installation_path>\iam\apache-tomcat\conf\fediz_config.xml file and change thebelow URL from http to https:
<issuer>https://<iam_url:port>/idp/federation</issuer>
Installing Talend Identity and Access Management in cluster mode
You can install several instances of Talend Identity and Access Management in cluster mode if youwant to benefit from a high availability and a better scalability with your product.
Clustering is the process of grouping together a set of similar physical systems in order to ensure alevel of operational continuity and minimize the risk of unplanned downtime, in particular by takingadvantage of load balancing and failover features.
To enable high-availability support for Talend Identity and Access Management, you need to:
1. Install different instances of Talend Identity and Access Management.
2. Create a database in MongoDB server to store users' session data.
3. Configure Talend Identity and Access Management to share session data between differentinstances.
Architecture of Talend Identity and Access Management in cluster mode
The following diagram illustrates the architecture behind Talend Identity and Access Managementwhen set up in cluster mode.
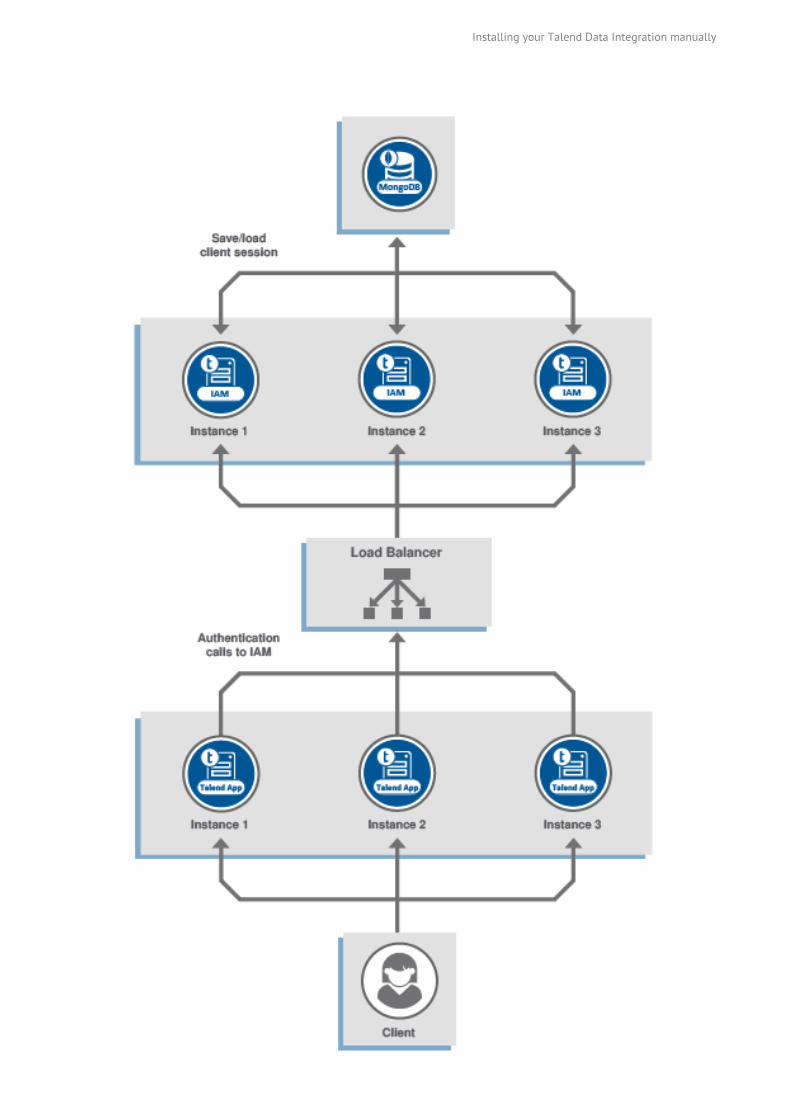
Installing your Talend Data Integration manually
71

Installing your Talend Data Integration manually
72
This architecture is composed of several functional blocks:
• A client connects to any running instance of a Talend application.
• A Load Balancer accepts incoming traffic from Talend application instances and routes requests toany running instance of Talend Identity and Access Management in the cluster.
• Talend Identity and Access Management securely authenticate users, authorize users to accessTalend applications and save users' session data in MongoDB.
• MongoDB stores and loads users' session data. You can configure MongoDB in cluster mode. Formore information, see MongoDB documentation.
Installing Talend Identity and Access Management in cluster mode
To perform this installation, you need to install and configure as many instances of Talend Identityand Access Management and its dependencies as necessary.
Before you begin
• You have configured a Load Balancer for Talend Identity and Access Management.
About this taskAll nodes within the same Talend Identity and Access Management high availability installation mustbe running the same Talend Identity and Access Management version.
Procedure
1. Install a first Talend Identity and Access Management instance.
For more information on the installation procedure, see Installing Talend Identity and AccessManagement on page 64.
2. Repeat the installation steps and configure other instances of Talend Identity and AccessManagement.
Creating the database for session data storage in MongoDB
You need to create a database for storing session data in MongoDB.
Before you beginYou must have admin rights to be able to create the database.
Procedure
1. Create a database in MongoDB to store session data, using the following command:
use <databasename>
Example
use sessions
2. Create a user in this database, using the following command:
use <databasename>
Installing your Talend Data Integration manually
73
db.createUser( { user: "<username>", pwd: "<password>", roles: [ { role: "dbOwner", db: "<databasename>" } ] } )
The command can take the following fields:
Field Description
<databasename> The name of the database for session data storage.
<username> The name for the created user.
<password> The password for the created user.
This user must be granted with the dbOwner role to be able to perform any administrative action onthe database.
Example
To create a user named session-user with the password suser in the database named sessions,use the following command:
use sessionsdb.createUser( { user: "session-user", pwd: "suser", roles: [ { role: "dbOwner", db: "sessions" } ] } )
3. Stop Talend Identity and Access Management.
Configuring session data storage for Talend Identity and Access Management
Configure Talend Identity and Access Management to share session data between different instances.
Before you begin
• You stopped Talend Identity and Access Management.
• You created a database for session data storage in MongoDB. For more information, see Creatingthe database for session data storage in MongoDB on page 72.
Procedure
1. Open the <InstallationPath>\iam\apache-tomcat\bin\setenv.bat file.
2. To set the SPRING_SESSION_STORE_TYPE environment variable and specify the backend for storingsession data, add the following line:
set SPRING_SESSION_STORE_TYPE=mongo
3. Set the SPRING_DATA_MONGODB_URI environment variable to the connection string of your MongoDBinstances, using the following syntax:
set SPRING_DATA_MONGODB_URI=mongodb://<username>:<password>@<mongo-host1>:<mongo-port1>,<mongo-host2>:<mongo-port2>,...,<mongo-hostN>:<mongo-portN>/<database-name>
The components of the URI are:
Installing your Talend Data Integration manually
74
Component Description
mongodb:// This prefix is required.
username
password
Optional: The client will attempt to log in to thedatabase using these authentication credentials afterconnecting to the MongoDB instances.
mongo-host Server address (hostname or IP address) to connect to.
mongo-port The default value is 27017.
database-name The name of the database for session data storage.
If you configured MongoDB in cluster mode, <mongo-host1> is the name of the first host in thecluster, using <mongo-port1>, and so on.
Example
To describe a connection to a MongoDB database named sessions hosted on example.talend.comwith the port number 27017, add the following line:
set SPRING_DATA_MONGODB_URI=mongodb://example.talend.com:27017/sessions
4. Start Talend Identity and Access Management.
What to do next
Start your Talend application and login.
Access the database created for session data storage in MongoDB. The database contains the currentsession data.
Installing and configuring Talend Artifact RepositoryTalend Administration Center is provided together with Nexus artifact repository and an archive ofTalend scripts to initialize the Artifactory repository. It is used to store software updates and DataIntegration Job artifacts.
This tool is used for the Software Update feature and its instance holds the talend-updates repositorywhere the updates are retrieved by the user.
It can also be used as a catalog for the Jobs created from Talend Studio or any other Java IDE. Forthis, two repositories are available: repo-snapshot for development purposes and repo-release forproduction purposes.
This instance is embedded in the .zip file of Talend Administration Center Web application andit allows you to store artifacts designed from Talend Studio or any other Java IDE and ready to bedeployed and executed in an execution server. For more information, see the Talend AdministrationCenter User Guide.
So when unzipping Talend Administration Center zip file, you will find two archive files. One is calledArtifact-Repository-Nexus-VA.B.C.D.E containing a ready-to-be-used Talend Artifact Repository.
Installing your Talend Data Integration manually
75
The other is called Artifact-Repository-Artifactory containing Talend scripts to initialize theArtifactory repository.
Nexus is based on Sonatype Nexus. For more information on how to use it, see Artifact Repository onpage 133 and Sonatype Nexus documentation on http://www.sonatype.org/nexus.
Note: Nexus 3, the version of Nexus shipped with Talend 7.x, is not supported by Publisher. Touse Publisher, install Nexus 2 and configure Talend Administration Center to use the Nexus 2instance.
For more information on how to use the Artifactory repository, see https://jfrog.com/artifactory/.
For more information on how to configure Talend Artifact Repository in Talend Runtime , seeConfiguring Talend Artifact Repository in Talend Runtime on page 86.
Installing Nexus
Procedure
1. Unzip the Artifact-Repository-Nexus-VA.B.C.D.E archive file in a dedicated folder.
2. From the <ApplicationFolder>/bin folder, launch the Talend Artifact Repository instance usingthe command nexus.exe /run.
If you installed Talend Artifact Repository as a service, run the /start command to launch it.
3. Log in the Talend Artifact Repository Web application (default login information: admin/Talend123).Make sure you have the relevant rights to access the releases and snapshots repositories.
After the first connection, it is strongly recommended to change the default credentials of the defaultadministrator account.
4. Change the default credentials of the admin user:
a) In the left panel of the Talend Artifact Repository Web application, select Security > Users.
b) Right-click the admin user and select Set Password.
c) Enter a new password for the admin user.
Configuring Nexus
If you do not use Talend Artifact Repository embedded with your Talend product but a supportedversion of Nexus, you need to create and configure the required repositories in Nexus.
Before you begin
Nexus is launched.
Procedure
1. Open the Nexus Repository Manager.
2. Create the following maven2 (hosted) repositories:
• Releases
• Snapshots
• talend-custom-libs
• talend-custom-libs-release
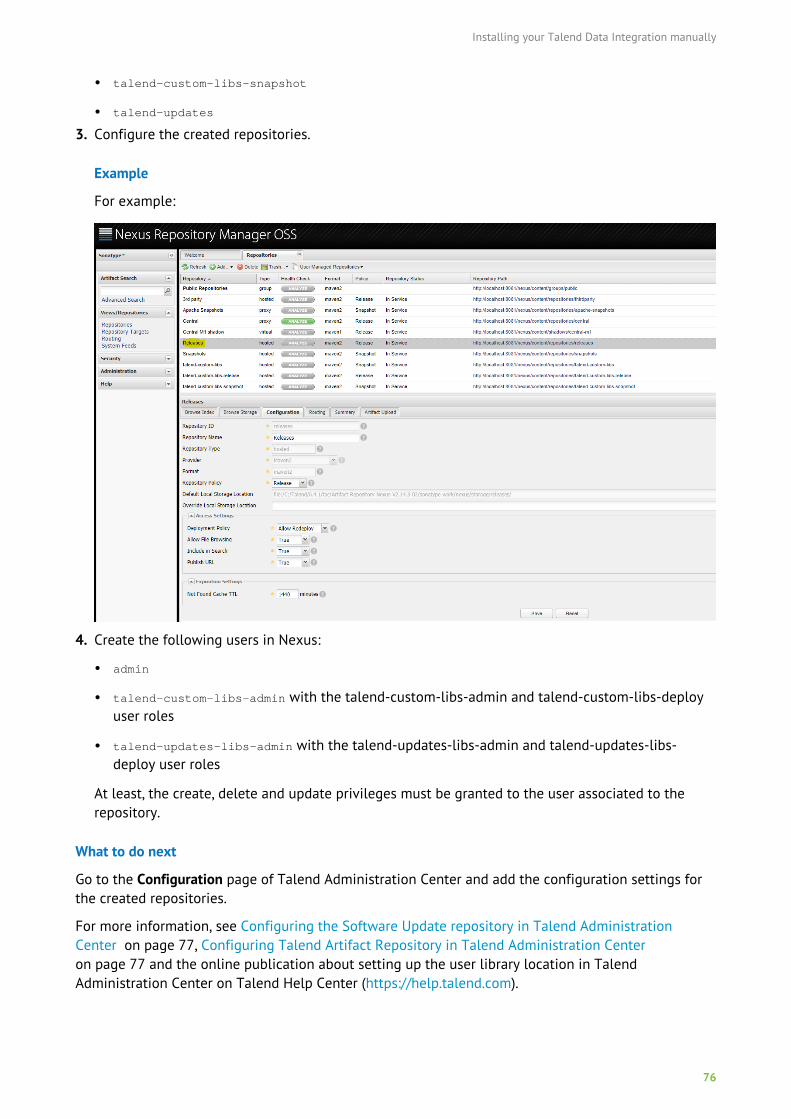
Installing your Talend Data Integration manually
76
• talend-custom-libs-snapshot
• talend-updates
3. Configure the created repositories.
Example
For example:
4. Create the following users in Nexus:
• admin
• talend-custom-libs-admin with the talend-custom-libs-admin and talend-custom-libs-deployuser roles
• talend-updates-libs-admin with the talend-updates-libs-admin and talend-updates-libs-deploy user roles
At least, the create, delete and update privileges must be granted to the user associated to therepository.
What to do next
Go to the Configuration page of Talend Administration Center and add the configuration settings forthe created repositories.
For more information, see Configuring the Software Update repository in Talend AdministrationCenter on page 77, Configuring Talend Artifact Repository in Talend Administration Center on page 77 and the online publication about setting up the user library location in TalendAdministration Center on Talend Help Center (https://help.talend.com).
Installing your Talend Data Integration manually
77
Configuring Artifactory
Make sure that the Artifactory repository is already installed and launched. For more information, seehttps://jfrog.com/artifactory/.
Note: It is recommended to change the port of the Artifactory repository to 8045, as thedefault port 8040 is in conflict with Talend Runtime.
If you are using an enterprise version of the Artifactory, unzip the Artifact-Repository-Artifactory archive file in a dedicated folder, and run the artifactory-init-VA.B.C.D.E.jar to initializethe Artifactory repository with repositories and users created and permissions set for the TalendAdministration Center.
If you are using an open source version of the Artifactory, you need to create manually the users andrepositories as for the Nexus repository. For more information, see Configuring Nexus on page 75.
Configuring the Software Update repository in Talend Administration Center
Once you installed Talend Artifact Repository and started it, you can configure it to use TalendSoftware Update.
Once you have launched and configured the Software Update repository, go to the Configuration pageof Talend Administration Center and fill in the following information in the Software Update group:
• Talend update url: Location URL to the Talend remote repository from which software updates areretrieved, this field is filled by default.
• Talend update username et Talend update password: Type in the credentials of the softwareupdate repository user that you received from Talend.
• Local repository url: Type in the location URL to the repository where software updates are stored.By default, it is http://localhost:8081/.
• Local deployment username and Local deployment password: Type in the credentials of the userwith deployment rights to the local repository. By default, it is talend-updates-admin/talend-updates-admin.
• Local reader username and Local reader password: Type in the credentials of the user with readrights to the local repository. By default, no credentials are required but you are free to definethem if you want to disable public access to the repository.
• Local repository ID: Type in the ID of the repository in which software updates are published. Bydefault, it is talend-updates.
In the Software Update page of Talend Administration Center, you can now see the versions andpatches available and download them according to your needs.
Configuring Talend Artifact Repository in Talend Administration Center
Before you begin
Talend Artifact Repository is launched.
Procedure
1. Go to the Configuration page of Talend Administration Center.
2. Fill in the following information in the Artifact Repository node:
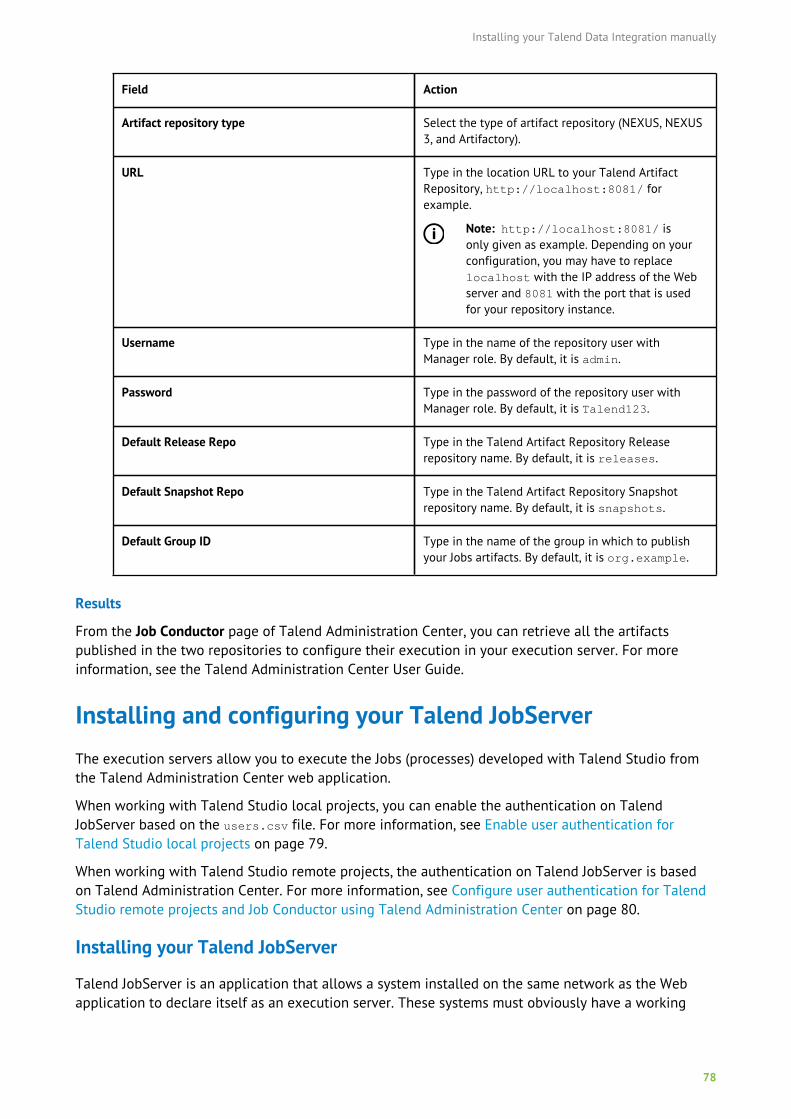
Installing your Talend Data Integration manually
78
Field Action
Artifact repository type Select the type of artifact repository (NEXUS, NEXUS3, and Artifactory).
URL Type in the location URL to your Talend ArtifactRepository, http://localhost:8081/ forexample.
Note: http://localhost:8081/ isonly given as example. Depending on yourconfiguration, you may have to replacelocalhost with the IP address of the Webserver and 8081 with the port that is usedfor your repository instance.
Username Type in the name of the repository user withManager role. By default, it is admin.
Password Type in the password of the repository user withManager role. By default, it is Talend123.
Default Release Repo Type in the Talend Artifact Repository Releaserepository name. By default, it is releases.
Default Snapshot Repo Type in the Talend Artifact Repository Snapshotrepository name. By default, it is snapshots.
Default Group ID Type in the name of the group in which to publishyour Jobs artifacts. By default, it is org.example.
Results
From the Job Conductor page of Talend Administration Center, you can retrieve all the artifactspublished in the two repositories to configure their execution in your execution server. For moreinformation, see the Talend Administration Center User Guide.
Installing and configuring your Talend JobServerThe execution servers allow you to execute the Jobs (processes) developed with Talend Studio fromthe Talend Administration Center web application.
When working with Talend Studio local projects, you can enable the authentication on TalendJobServer based on the users.csv file. For more information, see Enable user authentication forTalend Studio local projects on page 79.
When working with Talend Studio remote projects, the authentication on Talend JobServer is basedon Talend Administration Center. For more information, see Configure user authentication for TalendStudio remote projects and Job Conductor using Talend Administration Center on page 80.
Installing your Talend JobServer
Talend JobServer is an application that allows a system installed on the same network as the Webapplication to declare itself as an execution server. These systems must obviously have a working
Installing your Talend Data Integration manually
79
JVM. For more information about the prerequisites of Talend JobServer, see Compatible OperatingSystems on page 7.
Information about Talend JobServer resources
Once you have declared these execution servers in the Servers page of the Talend AdministrationCenter Web application, their resources (CPU, RAM, etc.) are displayed. For more information on howto do this, see your Talend Administration Center User Guide.
For some operating systems, the CPU information may not be available. You can test your system bysetting up the following variable as true:
org.talend.monitoring.jmx.api.OsInfoRetriever.FORCE_LOAD in the file TalendJobServer.properties.
Unzip the archive file
Procedure
1. First select the servers that will be used to execute the Jobs developed with Talend Studio.
2. Then, on each server, uncompress the archive file containing the Talend JobServer applicationmatching your version of Talend Studio.
The archive file name for example reads: Talend-JobServer-YYYYMMDD_HHmm-VA.B.C.zip
3. In the uncompressed file you need to configure the file TalendJobServer.properties that you canfind in the directory <root>\conf where <root> is the Talend JobServer path.
For example, if you want to change the directory where Talend JobServer stores its data, changethe org.talend.remote.jobserver.commons.config.JobServerConfiguration.ROOT_PATHparameter.
4. Modify the installation directory of Talend JobServer and check that the 8000, 8001 and 8888 portsare available.
User authentication on Talend JobServer
Two user authentication modes exist: the authentication based on a .csv file and the authenticationbased on Talend Administration Center.
There can be only one authentication mode configured on Talend JobServer at a time.
It is highly recommended to use authentication while using Talend Studio remote projects. Theauthentication based on Talend Administration Center is the only authentication mode available forremote projects.
The authentication based on a .csv file is not supported for remote projects. This is the onlyauthentication mode available for Talend Studio local projects.
Enable user authentication for Talend Studio local projects
Procedure
1. To enable user authentication on Talend JobServer, you need to define one or more lines ofusername and password pairs in the users.csv file that you can find in the <root>\conf directorywhere <root> is the Talend JobServer path.
2. In the directory you have unzipped, you will find the start_rs.bat and the stop_rs.bat files thatwill let you respectively start and stop Talend JobServer.
Installing your Talend Data Integration manually
80
Configure user authentication for Talend Studio remote projects and Job Conductor using TalendAdministration CenterTalend JobServer uses Talend Administration Center based authentication for Talend Studio remoteprojects and for the Job Conductor in Talend Administration Center.
The authentication mode based on Talend Administration Center replaces the user authenticationbased on the users.csv file.
Talend Administration Center checks:
• whether the user is authorized to work with the project the job belongs to, and
• if this project is associated to the specific Talend JobServer.
Procedure
1. Open TalendJobServer.properties and uncomment the following line:
#org.talend.remote.jobserver.commons.config.JobServerConfiguration.TAC_URLS=http://h
ost1:8080/org.talend.administrator,http://host2:8080/org.talend.administrator
If the line is commented out, you will not be able to authenticate.
2. Specify the Talend Administration Center URL of the Talend Administration Center instance to usefor authorization.
If you have set up a cluster involving multiple Talend Administration Center instances inyour Talend system to provide high availability, specify a comma-separated list of TalendAdministration Center instances.
Talend JobServer will randomly choose an instance from this list and perform an automatic failover in case of a connection problem.
If the specified Talend Administration Center instances run in https, configure secure connections toTalend Administration Center.
3. Configure TLS/SSL in Talend Administration Center.
For more information, see https://tomcat.apache.org/tomcat-8.0-doc/ssl-howto.html.
4. Generate a KeyStore in .jks format:
a) Connect to Talend Administration Center in a browser using https.
b) Click on the HTTPS certificate chain > lock icon > Certificate Details.
c) Export the server's certificate from the server KeyStore to a tacCert.cert certificate file.
d) Use the following command to import the certificate into the KeyStore tacTrustStore.jks:
keytool -import -noprompt -file <path_to_tacCert.cert> -alias tacCert -keystore tacTrustStore.jks -storepass password
5. Edit the Talend JobServer start script start_rs.bat to set the JVM arguments to trust the TalendAdministration Center certificate:
MY_JMV_ARGS="-Djavax.net.ssl.trustStore=/path/tacTrustStore.jks -Djavax.net.ssl.trustStorePassword=password"
Configuring the JVM for your Talend JobServer (optional)
Talend JobServer allows you to choose another JVM than the one used by default to launch your Jobs.
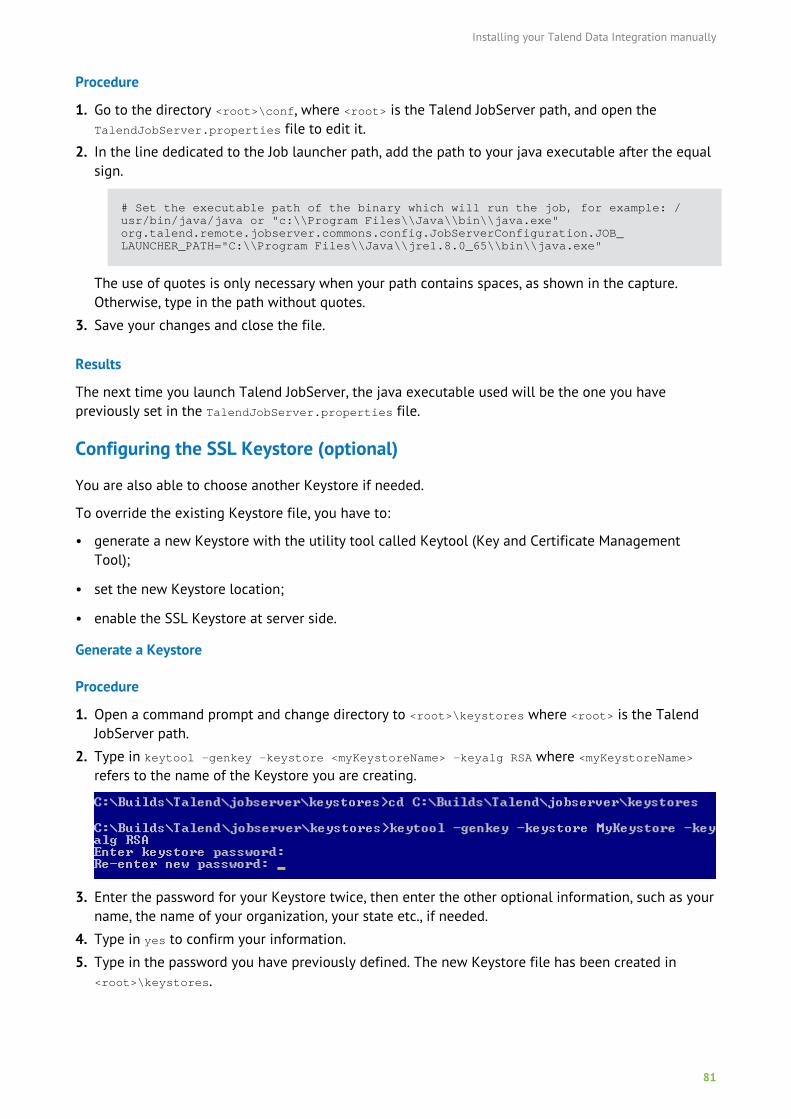
Installing your Talend Data Integration manually
81
Procedure
1. Go to the directory <root>\conf, where <root> is the Talend JobServer path, and open theTalendJobServer.properties file to edit it.
2. In the line dedicated to the Job launcher path, add the path to your java executable after the equalsign.
# Set the executable path of the binary which will run the job, for example: /usr/bin/java/java or "c:\\Program Files\\Java\\bin\\java.exe"org.talend.remote.jobserver.commons.config.JobServerConfiguration.JOB_LAUNCHER_PATH="C:\\Program Files\\Java\\jre1.8.0_65\\bin\\java.exe"
The use of quotes is only necessary when your path contains spaces, as shown in the capture.Otherwise, type in the path without quotes.
3. Save your changes and close the file.
Results
The next time you launch Talend JobServer, the java executable used will be the one you havepreviously set in the TalendJobServer.properties file.
Configuring the SSL Keystore (optional)
You are also able to choose another Keystore if needed.
To override the existing Keystore file, you have to:
• generate a new Keystore with the utility tool called Keytool (Key and Certificate ManagementTool);
• set the new Keystore location;
• enable the SSL Keystore at server side.
Generate a Keystore
Procedure
1. Open a command prompt and change directory to <root>\keystores where <root> is the TalendJobServer path.
2. Type in keytool -genkey -keystore <myKeystoreName> -keyalg RSA where <myKeystoreName>refers to the name of the Keystore you are creating.
3. Enter the password for your Keystore twice, then enter the other optional information, such as yourname, the name of your organization, your state etc., if needed.
4. Type in yes to confirm your information.
5. Type in the password you have previously defined. The new Keystore file has been created in<root>\keystores.
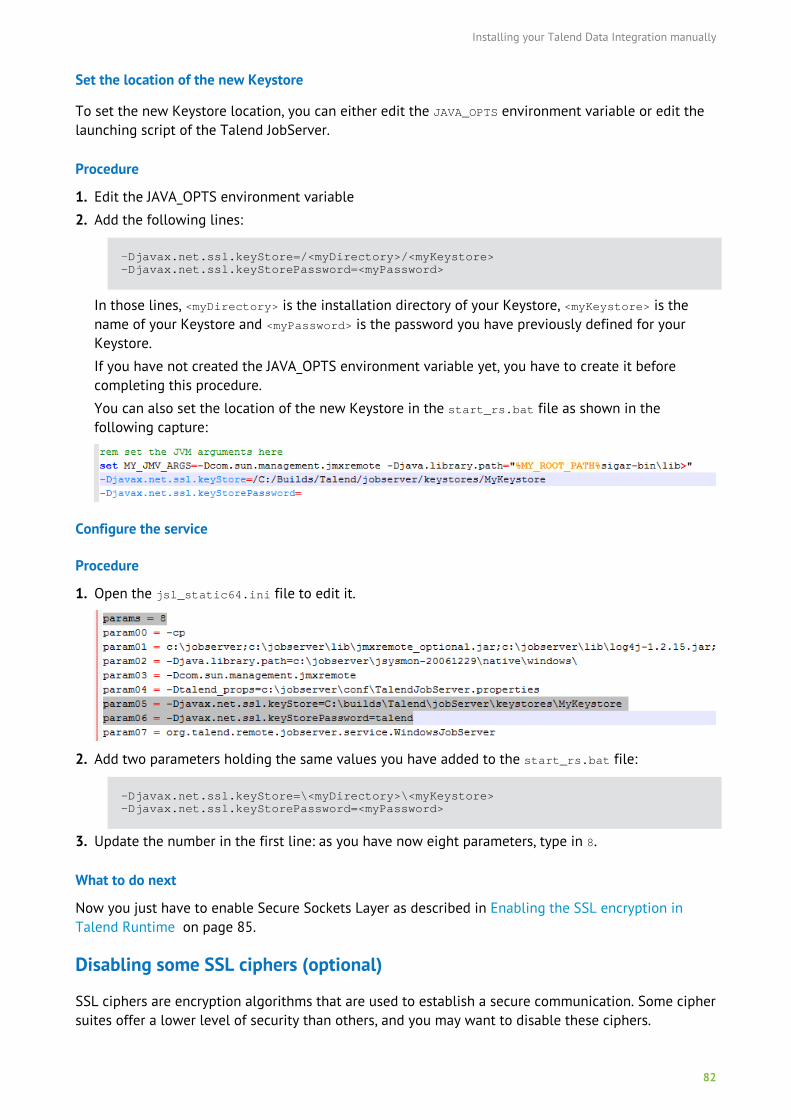
Installing your Talend Data Integration manually
82
Set the location of the new Keystore
To set the new Keystore location, you can either edit the JAVA_OPTS environment variable or edit thelaunching script of the Talend JobServer.
Procedure
1. Edit the JAVA_OPTS environment variable
2. Add the following lines:
-Djavax.net.ssl.keyStore=/<myDirectory>/<myKeystore>-Djavax.net.ssl.keyStorePassword=<myPassword>
In those lines, <myDirectory> is the installation directory of your Keystore, <myKeystore> is thename of your Keystore and <myPassword> is the password you have previously defined for yourKeystore.
If you have not created the JAVA_OPTS environment variable yet, you have to create it beforecompleting this procedure.
You can also set the location of the new Keystore in the start_rs.bat file as shown in thefollowing capture:
Configure the service
Procedure
1. Open the jsl_static64.ini file to edit it.
2. Add two parameters holding the same values you have added to the start_rs.bat file:
-Djavax.net.ssl.keyStore=\<myDirectory>\<myKeystore>-Djavax.net.ssl.keyStorePassword=<myPassword>
3. Update the number in the first line: as you have now eight parameters, type in 8.
What to do next
Now you just have to enable Secure Sockets Layer as described in Enabling the SSL encryption inTalend Runtime on page 85.
Disabling some SSL ciphers (optional)
SSL ciphers are encryption algorithms that are used to establish a secure communication. Some ciphersuites offer a lower level of security than others, and you may want to disable these ciphers.
Installing your Talend Data Integration manually
83
Procedure
1. Go to the directory <root>\conf and open the TalendJobServer.properties file.
2. Add to the following parameter the list of ciphers that you want to disable:
org.talend.remote.jobserver.server.TalendJobServer.DISABLED_CIPHER_SUITES
Here is the list of the ciphers supported by Talend JobServer:
TLS_KRB5_WITH_3DES_EDE_CBC_MD5TLS_KRB5_WITH_RC4_128_SHASSL_DH_anon_WITH_DES_CBC_SHATLS_DH_anon_WITH_AES_128_CBC_SHATLS_DHE_RSA_WITH_AES_128_CBC_SHASSL_DHE_RSA_EXPORT_WITH_DES40_CBC_SHASSL_RSA_EXPORT_WITH_RC4_40_MD5SSL_DHE_RSA_WITH_3DES_EDE_CBC_SHATLS_KRB5_WITH_3DES_EDE_CBC_SHASSL_RSA_WITH_RC4_128_SHATLS_KRB5_WITH_DES_CBC_MD5TLS_KRB5_EXPORT_WITH_RC4_40_MD5TLS_KRB5_EXPORT_WITH_DES_CBC_40_MD5SSL_DHE_DSS_EXPORT_WITH_DES40_CBC_SHATLS_KRB5_EXPORT_WITH_RC4_40_SHASSL_DH_anon_EXPORT_WITH_RC4_40_MD5SSL_DHE_DSS_WITH_DES_CBC_SHATLS_KRB5_WITH_DES_CBC_SHASSL_RSA_WITH_NULL_MD5SSL_DH_anon_WITH_3DES_EDE_CBC_SHATLS_RSA_WITH_AES_128_CBC_SHASSL_DHE_RSA_WITH_DES_CBC_SHATLS_KRB5_EXPORT_WITH_DES_CBC_40_SHASSL_DH_anon_EXPORT_WITH_DES40_CBC_SHASSL_RSA_WITH_NULL_SHATLS_KRB5_WITH_RC4_128_MD5SSL_RSA_WITH_DES_CBC_SHATLS_EMPTY_RENEGOTIATION_INFO_SCSVSSL_RSA_EXPORT_WITH_DES40_CBC_SHASSL_DH_anon_WITH_RC4_128_MD5SSL_RSA_WITH_RC4_128_MD5TLS_DHE_DSS_WITH_AES_128_CBC_SHASSL_DHE_DSS_WITH_3DES_EDE_CBC_SHASSL_RSA_WITH_3DES_EDE_CBC_SHA
Configuring stats and trace message transfer for Talend JobServer
You can specify a port through which the Talend Studio fetches the latest stats and trace messagesfrom the Talend JobServer for Jobs being executed remotely.
Procedure
1. Go to the directory <root>\conf, where <root> is the Talend JobServer path, and open theTalendJobServer.properties file to edit it.
2. In the line dedicated to the configuration of the message transfer port, specify a port number.
org.talend.remote.jobserver.server.TalendJobServer.PROCESS_MESSAGE_PORT=<port_number>
The default port is 8555. You can specify any port that's available in the system.
3. To enable stats and trace message transfer, set the following parameter to true.
org.talend.remote.jobserver.server.TalendJobServer.ENABLED_PROCESS_MESSAGE=true

Installing your Talend Data Integration manually
84
If the Talend JobServer is deployed on the same machine with the Talend Studio, you can set thisparameter to false to disable the service and save your port resources.
4. Save your changes and restart the Talend JobServer so that the configuration takes effect.
Installing Talend RuntimeIf you are willing to use both Talend Runtime and Talend JobServer on the same machine, you arerequired to change the port numbers because, by default, both servers are using the same ports.
Talend Runtime is an OSGi container, based on Apache Karaf, allowing you to deploy and executevarious components and applications inside its deploy folder.
Installing the Talend Runtime containers
Procedure
1. Select the servers that will be used for the execution.
2. On each server, unzip the archive file containing the Talend Runtime application matching yourrelease version of Talend Studio.
The archive file name for example reads: Talend-Runtime-V6.4.1.zip
3. In the unzipped file, you might need to configure the org.ops4j.pax.web.cfg file to change theHTTP listening port that you can find in the directory Talend-Runtime-VA.B.C\etc. Note that thisfile also allows you to define the artifact repository URL.
4. Browse to the bin directory and run the trun.bat file to launch Talend Runtime.
5. Go to the Servers page of Talend Administration Center.
Only users that have Operation Manager role and rights can have a read-write access to this page.For more information on access rights, see your Talend Administration Center User Guide. So, youhave to connect to Talend Administration Center as an Operation Manager to be able to configureyour servers.
6. Define the server as follows:
Field Description
Label TestingServer
Description Type in the description of server.
Host localhost
Command port 8000
File transfer port 8001
Monitoring port 8888
Timeout on unknown status(s) 120
Username Type in the username for user authentication toaccess a Job server.
Installing your Talend Data Integration manually
85
Field Description
Password Type in the password for user authentication toaccess a Job server.
Active Select/clear the check box to activate/deactivate thisserver
Use SSL Select/clear the check box to use or not yourown SSL Keystore to encrypt the data prior totransmission.
For more information about how to enable SSL, seeEnabling the SSL encryption in Talend Runtime onpage 85.
Talend Runtime By default, servers created are Job servers.
To deploy and execute your Jobs tasks into TalendRuntime, select the Talend Runtime check box.The following fields will display: Mgmt-Server port,Mgmt-Reg port, Admin Console port and Instance.
Mgmt-Server port RMI Server Port (44444 by default). This field ismandatory.
Mgmt-Reg port RMI Registry Port (1099 by default). This field ismandatory.
Admin Console port Port of the Administration Web Console (8040by default). This field is mandatory and allows toactivate the Admin server button allowing you toaccess the Administration Web console.
Instance Type in the name of the container instance in whichyou will deploy and execute your Jobs tasks, trun bydefault.
This corresponds to the configuration of a Talend Runtime on the system that hosts the Webapplication. For any other system, the Host field should contain the IP address of the system. Checkalso that the ports 8000, 8001 and 8888 are available. These ports must be the same as defined inthe TalendJobServer.properties defined above. Note that if no username and password pairs aredefined in the file users.csv in the directory <root>\conf where <root> is the Talend JobServerpath, then you do not have to set the Username and the Password.
7. Click the Servers page again so that the Talend Runtime servers appear with their properties.
Enabling the SSL encryption in Talend Runtime
The execution servers provided by Talend allows you to encrypt data prior to transmission via anexisting SSL Keystore.
Procedure
1. Go to the etc directory and open the org.talend.remote.jobserver.server.cfg file to edit it.
2. In theorg.talend.remote.jobserver.server.TalendJobServer.USE_SSL=false line, replace falsewith true.
Installing your Talend Data Integration manually
86
The next time you launch your execution server, the SSL protocol will be used to secure thecommunication between servers and clients.
3. In Talend Administration Center, select the Use SSL check box to enable the encryption.
Configuring Talend Artifact Repository in Talend Runtime
The default Talend Artifact Repository URL is described in the etc\org.ops4j.pax.url.mvn.cfg file.
If your artifact repository has been installed on another URL, edit the org.ops4j.pax.url.mvn.repositories part of the file.
Installing the Talend Activity Monitoring Console webapplicationThe Talend Activity Monitoring Console Web application we are talking about in this section isavailable in Talend Activity Monitoring Console. However, AMC is also a perspective available inTalend Studio. For more information about this perspective, see the Talend Activity MonitoringConsole User Guide.
For more information on Talend Activity Monitoring Console, see Talend Activity Monitoring Consolelog database on page 138.
Deploying the Talend Activity Monitoring Console Web application
Procedure
1. Unzip the Talend-AMC_Web-YYYYYYYY_YYYY-VA.B.C.zip archive file containing the amc.war file onthe same machine as Talend Administration Center Web application.
2. Paste the amc.war file in the same webapps folder as the one where Talend Administration Centeris located, for example <TomcatPath>\webapps.
3. Restart your Web application server.
Results
If you want to install Talend Activity Monitoring Console on other Web application server than theone where Talend Administration Center is installed, follow the same procedure as Deploying TalendAdministration Center on Tomcat on page 44.
If you do not want Talend Activity Monitoring Console to use the default H2 database, see Installingdatabase drivers in your Web application server on page 47.
Configuring the Talend Activity Monitoring Console in Talend AdministrationCenter
In the Talend Administration Center web application, you have to set up the link to the Talend ActivityMonitoring Console.
Procedure
1. Go to the Monitoring group of the Configuration page of Talend Administration Center.
2. In the AMC url field, type in the URL address of the Talend Activity Monitoring Console application,http://localhost:8080/amc/rap?startup=amc&dbservlet=http://localhost:8080/org.talend
Installing your Talend Data Integration manually
87
.administrator/metaServlet%3FactionName=listConnection, which fetches connection data fromTalend Administration Center, or http://localhost:8080/amc/rap?startup=amc, which does notfetch connection data from Talend Administration Center, for example.
http://localhost:8080/amc/rap?startup=amc&dbservlet=http://localhost:8080/org.talend
.administrator/metaServlet%3FactionName=listConnection and http://localhost:8080/amc/rap?startup=amc are only given as examples. Depending on your configuration, you may haveto replace localhost with the IP address of the Web server and 8080 with the actual port of theTalend Activity Monitoring Console.
You also have to configure three database tables that will store statistics and log information.
For more information about this application, see the Talend Activity Monitoring Console UserGuide.
Installing and configuring the Drools Business RulesManagement System (BRMS)
Installing manually the Drools Business Rules Management System (BRMS)
Procedure
1. Download the Talend-BRMS-YYYYMMDD_HHmm-VA.B.C.zip file and unzip it.
2. Stop your Tomcat server.
3. Go to the Talend-BRMS-Webapp-A.B.C folder.
4. Copy the talend-brms-A.B.C.war file to <TomcatPath>\webapps.
5. Unzip the WorkbenchInstallationResources.zip file.
6. Copy the content of the WorkbenchInstallationResources\lib folder to <TomcatPath>\lib.
7. Go to the WorkbenchInstallationResources/conf folder.
8. Copy the btm-config.properties and resources.properties files to <TomcatPath>\conf.
9. Create a backup copy of your <TomcatPath>\bin\setenv.bat file.
10.Copy the WorkbenchInstallationResources\bin\setenv.bat file to <TomcatPath>\bin.
11.Restart Tomcat to deploy the Drools Business Rules Management System (BRMS).
Configuring the Drools Business Rules Management System (BRMS) in TalendAdministration Center
Before being able to use Drools BRMS in Talend Administration Center web application, you willneed to configure its URL in the Configuration page. For more information about configuring the Webapplication, first read Installing and configuring Talend Administration Center on page 44.
Then after you access Talend Administration Center Configuration page, set Drools URL,http://10.42.10.84:8080/kie-drools-wb/ for example.
For more information about the actual data contained on the Configuration page of TalendAdministration Center, check out the Talend Administration Center User Guide.
When Drools Guvnor URL is correctly set up, the application can be accessed through the menu treeview of Talend Administration Center:
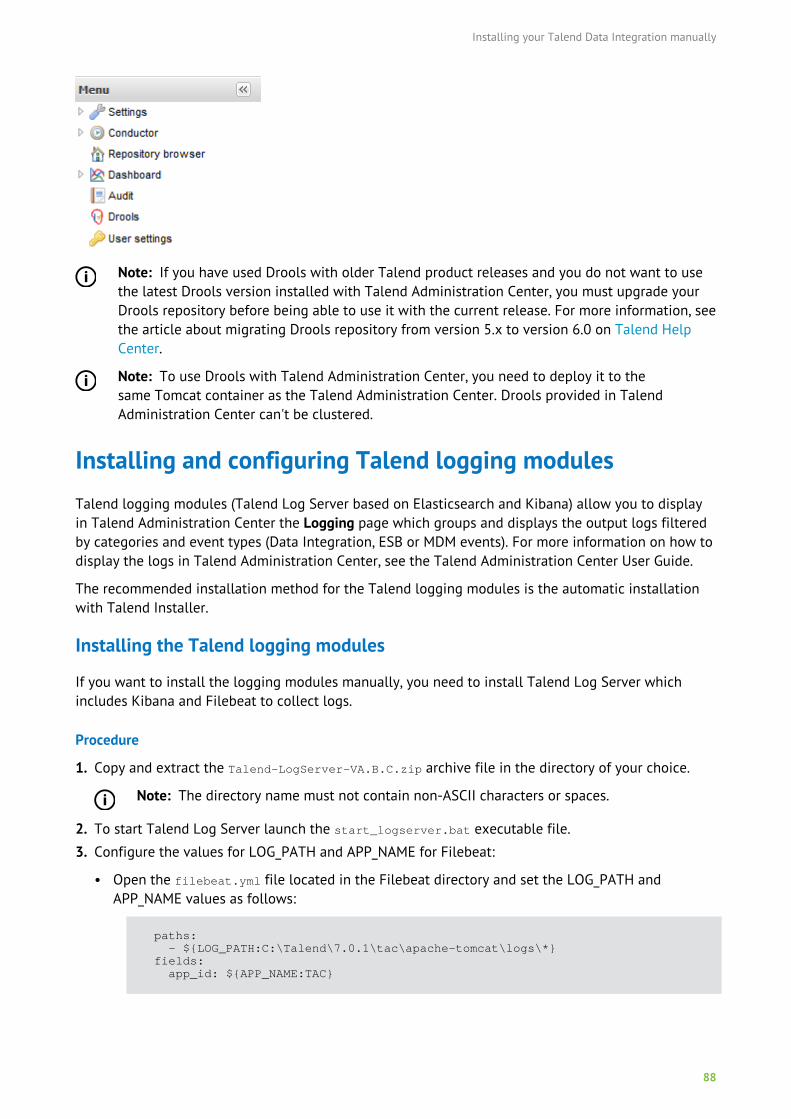
Installing your Talend Data Integration manually
88
Note: If you have used Drools with older Talend product releases and you do not want to usethe latest Drools version installed with Talend Administration Center, you must upgrade yourDrools repository before being able to use it with the current release. For more information, seethe article about migrating Drools repository from version 5.x to version 6.0 on Talend HelpCenter.
Note: To use Drools with Talend Administration Center, you need to deploy it to thesame Tomcat container as the Talend Administration Center. Drools provided in TalendAdministration Center can't be clustered.
Installing and configuring Talend logging modulesTalend logging modules (Talend Log Server based on Elasticsearch and Kibana) allow you to displayin Talend Administration Center the Logging page which groups and displays the output logs filteredby categories and event types (Data Integration, ESB or MDM events). For more information on how todisplay the logs in Talend Administration Center, see the Talend Administration Center User Guide.
The recommended installation method for the Talend logging modules is the automatic installationwith Talend Installer.
Installing the Talend logging modules
If you want to install the logging modules manually, you need to install Talend Log Server whichincludes Kibana and Filebeat to collect logs.
Procedure
1. Copy and extract the Talend-LogServer-VA.B.C.zip archive file in the directory of your choice.
Note: The directory name must not contain non-ASCII characters or spaces.
2. To start Talend Log Server launch the start_logserver.bat executable file.
3. Configure the values for LOG_PATH and APP_NAME for Filebeat:
• Open the filebeat.yml file located in the Filebeat directory and set the LOG_PATH andAPP_NAME values as follows:
paths: - ${LOG_PATH:C:\Talend\7.0.1\tac\apache-tomcat\logs\*} fields: app_id: ${APP_NAME:TAC}
Installing your Talend Data Integration manually
89
• Or, set the LOG_PATH and APP_NAME environment variables:
SET LOG_PATH=c:\Talend\7.0.1\tac\apache-tomcat\logs\*SET APP_NAME=TAC
4. Start Filebeat:
filebeat -e -c filebeat.yml
Results
You can now access Talend Log Server with the following URL: http://localhost:5601/app/kibana#/dashboard/Default-Dashboard.
Configuring Talend logging modules with an external Elastic stack with X-Pack
You can deploy Transport Layer Security to the whole Elastic stack (Elasticsearch, Kibana, Filebeat andLogstash).
Configuring Elasticsearch with X-Pack
Installing X-Pack in Elasticsearch
Before you begin
Stop Talend Log Server.
Procedure
Install X-Pack in Elasticsearch:
a) If your server does not have internet access, download the X-Pack zip file: https://artifacts.elastic.co/downloads/packs/x-pack/x-pack-6.1.2.zip.
b) Run the command bin/elasticsearch-plugin install on each node in your cluster:
•bin/elasticsearch-plugin install x-pack
• If your server does not have internet access, specify the location of the X-Pack zip file that youdownloaded to a temporary directory:
elasticsearch-6.1.2/bin/elasticsearch-plugin install file:///path/to/file/x-pack-6.1.2.zip
Configuring Transport Layer Security (TLS/SSL) in Elasticsearch
If you have a non-trial license and you want to use X-Pack security, you must configure TLS forinternode-communication.
Procedure
1. Create a Certificate Authority / Signing Authority:
a) For example, run the following command:
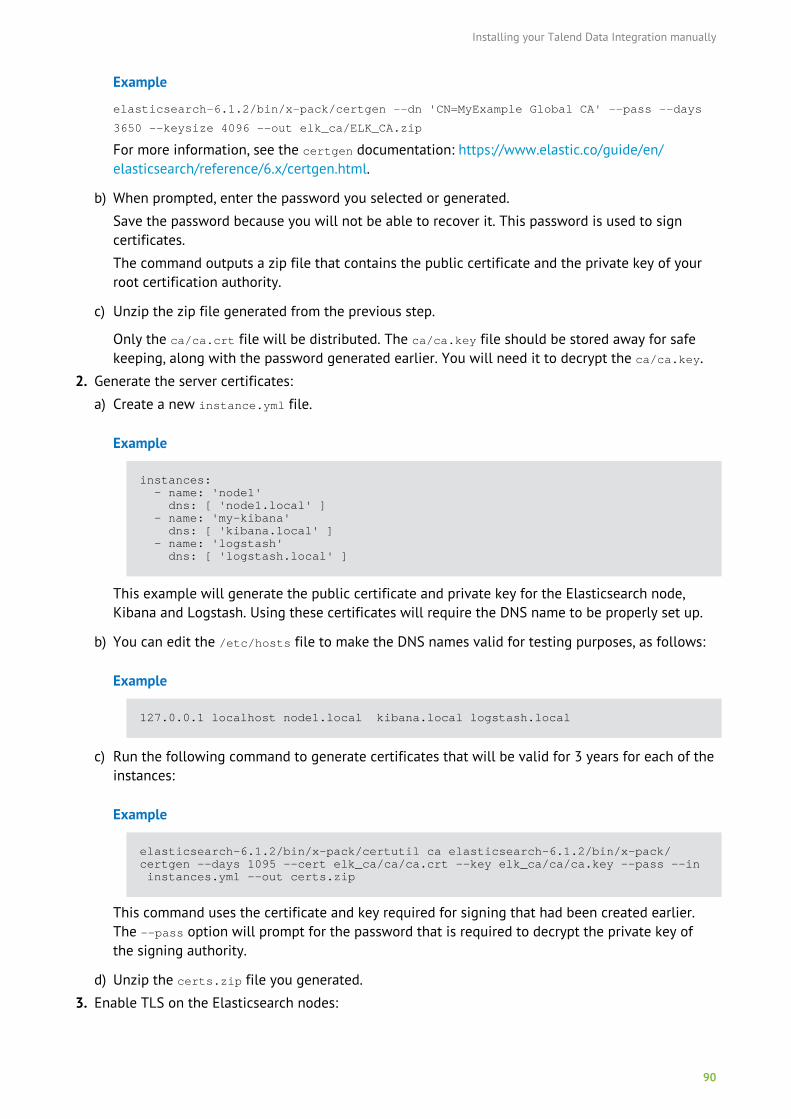
Installing your Talend Data Integration manually
90
Example
elasticsearch-6.1.2/bin/x-pack/certgen --dn 'CN=MyExample Global CA' --pass --days
3650 --keysize 4096 --out elk_ca/ELK_CA.zip
For more information, see the certgen documentation: https://www.elastic.co/guide/en/elasticsearch/reference/6.x/certgen.html.
b) When prompted, enter the password you selected or generated.
Save the password because you will not be able to recover it. This password is used to signcertificates.
The command outputs a zip file that contains the public certificate and the private key of yourroot certification authority.
c) Unzip the zip file generated from the previous step.
Only the ca/ca.crt file will be distributed. The ca/ca.key file should be stored away for safekeeping, along with the password generated earlier. You will need it to decrypt the ca/ca.key.
2. Generate the server certificates:
a) Create a new instance.yml file.
Example
instances: - name: 'node1' dns: [ 'node1.local' ] - name: 'my-kibana' dns: [ 'kibana.local' ] - name: 'logstash' dns: [ 'logstash.local' ]
This example will generate the public certificate and private key for the Elasticsearch node,Kibana and Logstash. Using these certificates will require the DNS name to be properly set up.
b) You can edit the /etc/hosts file to make the DNS names valid for testing purposes, as follows:
Example
127.0.0.1 localhost node1.local kibana.local logstash.local
c) Run the following command to generate certificates that will be valid for 3 years for each of theinstances:
Example
elasticsearch-6.1.2/bin/x-pack/certutil ca elasticsearch-6.1.2/bin/x-pack/certgen --days 1095 --cert elk_ca/ca/ca.crt --key elk_ca/ca/ca.key --pass --in instances.yml --out certs.zip
This command uses the certificate and key required for signing that had been created earlier.The --pass option will prompt for the password that is required to decrypt the private key ofthe signing authority.
d) Unzip the certs.zip file you generated.
3. Enable TLS on the Elasticsearch nodes:
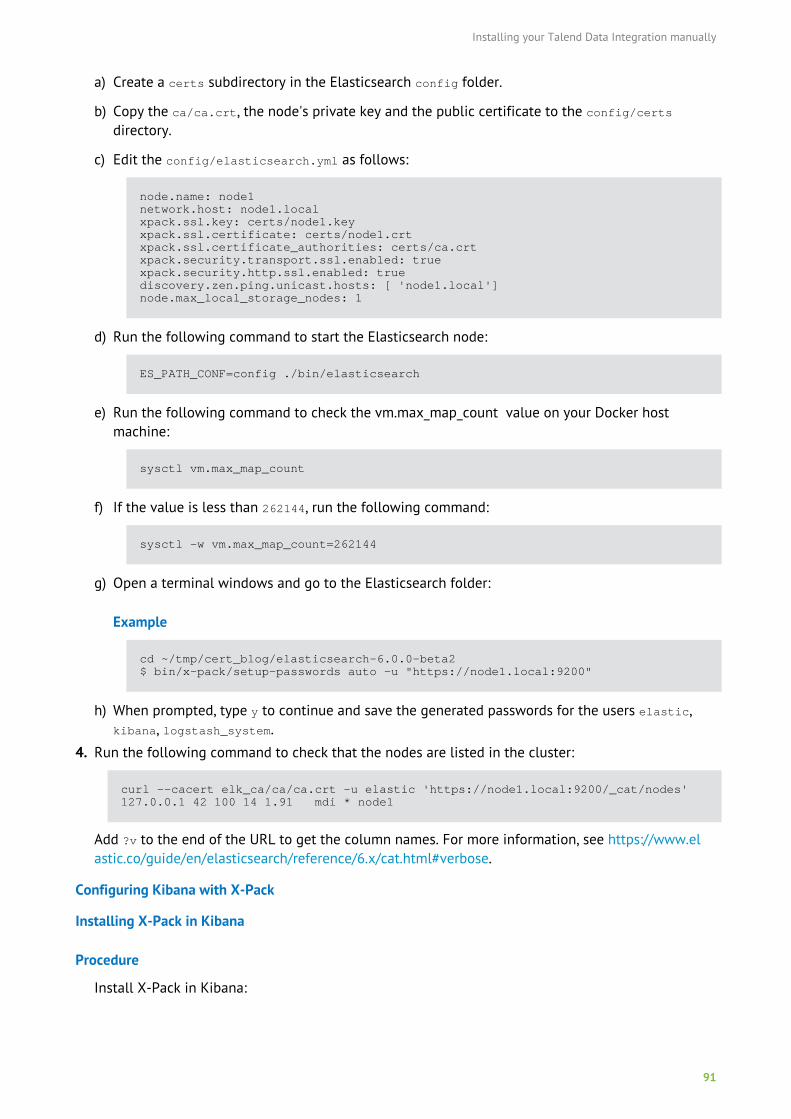
Installing your Talend Data Integration manually
91
a) Create a certs subdirectory in the Elasticsearch config folder.
b) Copy the ca/ca.crt, the node's private key and the public certificate to the config/certsdirectory.
c) Edit the config/elasticsearch.yml as follows:
node.name: node1network.host: node1.localxpack.ssl.key: certs/node1.keyxpack.ssl.certificate: certs/node1.crtxpack.ssl.certificate_authorities: certs/ca.crtxpack.security.transport.ssl.enabled: truexpack.security.http.ssl.enabled: truediscovery.zen.ping.unicast.hosts: [ 'node1.local']node.max_local_storage_nodes: 1
d) Run the following command to start the Elasticsearch node:
ES_PATH_CONF=config ./bin/elasticsearch
e) Run the following command to check the vm.max_map_count value on your Docker hostmachine:
sysctl vm.max_map_count
f) If the value is less than 262144, run the following command:
sysctl -w vm.max_map_count=262144
g) Open a terminal windows and go to the Elasticsearch folder:
Example
cd ~/tmp/cert_blog/elasticsearch-6.0.0-beta2$ bin/x-pack/setup-passwords auto -u "https://node1.local:9200"
h) When prompted, type y to continue and save the generated passwords for the users elastic,kibana, logstash_system.
4. Run the following command to check that the nodes are listed in the cluster:
curl --cacert elk_ca/ca/ca.crt -u elastic 'https://node1.local:9200/_cat/nodes'127.0.0.1 42 100 14 1.91 mdi * node1
Add ?v to the end of the URL to get the column names. For more information, see https://www.elastic.co/guide/en/elasticsearch/reference/6.x/cat.html#verbose.
Configuring Kibana with X-Pack
Installing X-Pack in Kibana
Procedure
Install X-Pack in Kibana:
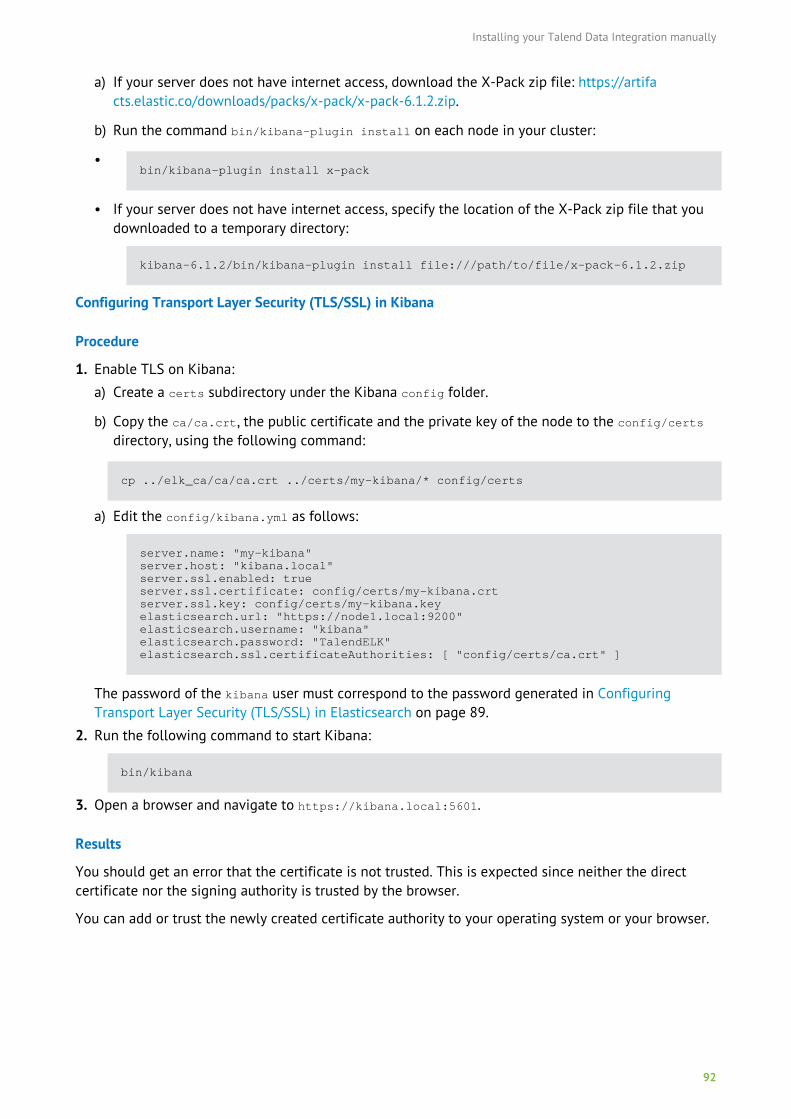
Installing your Talend Data Integration manually
92
a) If your server does not have internet access, download the X-Pack zip file: https://artifacts.elastic.co/downloads/packs/x-pack/x-pack-6.1.2.zip.
b) Run the command bin/kibana-plugin install on each node in your cluster:
•bin/kibana-plugin install x-pack
• If your server does not have internet access, specify the location of the X-Pack zip file that youdownloaded to a temporary directory:
kibana-6.1.2/bin/kibana-plugin install file:///path/to/file/x-pack-6.1.2.zip
Configuring Transport Layer Security (TLS/SSL) in Kibana
Procedure
1. Enable TLS on Kibana:
a) Create a certs subdirectory under the Kibana config folder.
b) Copy the ca/ca.crt, the public certificate and the private key of the node to the config/certsdirectory, using the following command:
cp ../elk_ca/ca/ca.crt ../certs/my-kibana/* config/certs
a) Edit the config/kibana.yml as follows:
server.name: "my-kibana"server.host: "kibana.local"server.ssl.enabled: trueserver.ssl.certificate: config/certs/my-kibana.crtserver.ssl.key: config/certs/my-kibana.keyelasticsearch.url: "https://node1.local:9200"elasticsearch.username: "kibana"elasticsearch.password: "TalendELK"elasticsearch.ssl.certificateAuthorities: [ "config/certs/ca.crt" ]
The password of the kibana user must correspond to the password generated in ConfiguringTransport Layer Security (TLS/SSL) in Elasticsearch on page 89.
2. Run the following command to start Kibana:
bin/kibana
3. Open a browser and navigate to https://kibana.local:5601.
Results
You should get an error that the certificate is not trusted. This is expected since neither the directcertificate nor the signing authority is trusted by the browser.
You can add or trust the newly created certificate authority to your operating system or your browser.
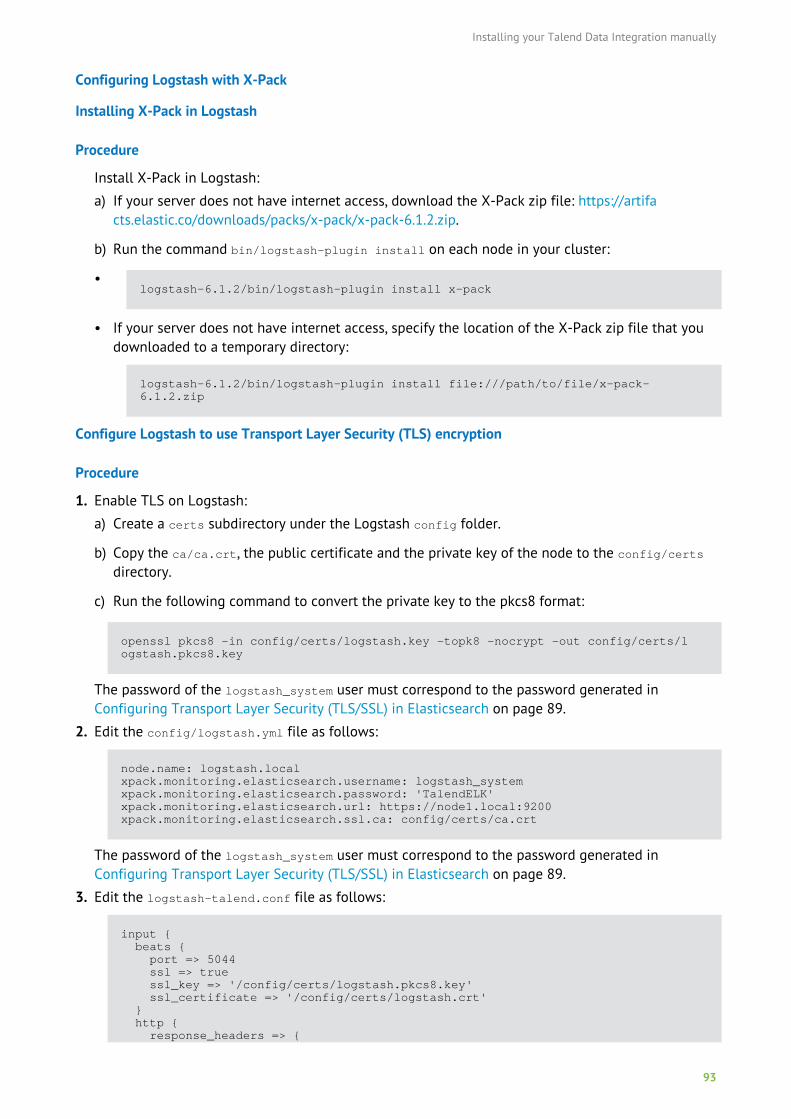
Installing your Talend Data Integration manually
93
Configuring Logstash with X-Pack
Installing X-Pack in Logstash
Procedure
Install X-Pack in Logstash:
a) If your server does not have internet access, download the X-Pack zip file: https://artifacts.elastic.co/downloads/packs/x-pack/x-pack-6.1.2.zip.
b) Run the command bin/logstash-plugin install on each node in your cluster:
•logstash-6.1.2/bin/logstash-plugin install x-pack
• If your server does not have internet access, specify the location of the X-Pack zip file that youdownloaded to a temporary directory:
logstash-6.1.2/bin/logstash-plugin install file:///path/to/file/x-pack-6.1.2.zip
Configure Logstash to use Transport Layer Security (TLS) encryption
Procedure
1. Enable TLS on Logstash:
a) Create a certs subdirectory under the Logstash config folder.
b) Copy the ca/ca.crt, the public certificate and the private key of the node to the config/certsdirectory.
c) Run the following command to convert the private key to the pkcs8 format:
openssl pkcs8 -in config/certs/logstash.key -topk8 -nocrypt -out config/certs/logstash.pkcs8.key
The password of the logstash_system user must correspond to the password generated inConfiguring Transport Layer Security (TLS/SSL) in Elasticsearch on page 89.
2. Edit the config/logstash.yml file as follows:
node.name: logstash.localxpack.monitoring.elasticsearch.username: logstash_systemxpack.monitoring.elasticsearch.password: 'TalendELK'xpack.monitoring.elasticsearch.url: https://node1.local:9200xpack.monitoring.elasticsearch.ssl.ca: config/certs/ca.crt
The password of the logstash_system user must correspond to the password generated inConfiguring Transport Layer Security (TLS/SSL) in Elasticsearch on page 89.
3. Edit the logstash-talend.conf file as follows:
input { beats { port => 5044 ssl => true ssl_key => '/config/certs/logstash.pkcs8.key' ssl_certificate => '/config/certs/logstash.crt' } http { response_headers => {
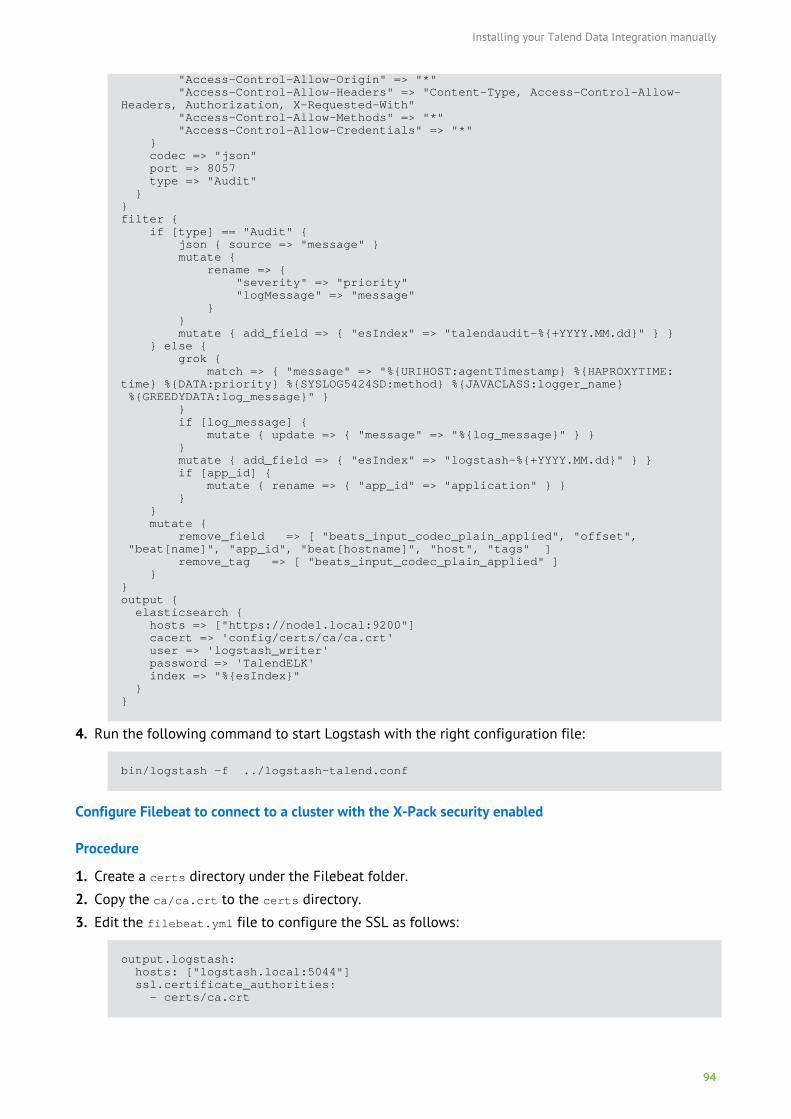
Installing your Talend Data Integration manually
94
"Access-Control-Allow-Origin" => "*" "Access-Control-Allow-Headers" => "Content-Type, Access-Control-Allow-Headers, Authorization, X-Requested-With" "Access-Control-Allow-Methods" => "*" "Access-Control-Allow-Credentials" => "*" } codec => "json" port => 8057 type => "Audit" }}filter { if [type] == "Audit" { json { source => "message" } mutate { rename => { "severity" => "priority" "logMessage" => "message" } } mutate { add_field => { "esIndex" => "talendaudit-%{+YYYY.MM.dd}" } } } else { grok { match => { "message" => "%{URIHOST:agentTimestamp} %{HAPROXYTIME:time} %{DATA:priority} %{SYSLOG5424SD:method} %{JAVACLASS:logger_name} %{GREEDYDATA:log_message}" } } if [log_message] { mutate { update => { "message" => "%{log_message}" } } } mutate { add_field => { "esIndex" => "logstash-%{+YYYY.MM.dd}" } } if [app_id] { mutate { rename => { "app_id" => "application" } } } } mutate { remove_field => [ "beats_input_codec_plain_applied", "offset", "beat[name]", "app_id", "beat[hostname]", "host", "tags" ] remove_tag => [ "beats_input_codec_plain_applied" ] }}output { elasticsearch { hosts => ["https://node1.local:9200"] cacert => 'config/certs/ca/ca.crt' user => 'logstash_writer' password => 'TalendELK' index => "%{esIndex}" }}
4. Run the following command to start Logstash with the right configuration file:
bin/logstash -f ../logstash-talend.conf
Configure Filebeat to connect to a cluster with the X-Pack security enabled
Procedure
1. Create a certs directory under the Filebeat folder.
2. Copy the ca/ca.crt to the certs directory.
3. Edit the filebeat.yml file to configure the SSL as follows:
output.logstash: hosts: ["logstash.local:5044"] ssl.certificate_authorities: - certs/ca.crt
Installing your Talend Data Integration manually
95
4. Run the following command to start Filebeat with the right configuration file:
./filebeat -e -c ../filebeat.yml
Importing Talend dashboards in an external Elastic stack with X-Pack
Talend provides the following Kibana dashboard templates as part of the open-source Elastic stackshipped with the Talend Log Server. You can also import these dashboard templates in Kibana.
Before you begin
Procedure
1. Open a shell or prompt window and navigate to the directory where Talend Log Server is installed.
2. Create .kibana template using the following command:
curl -H "Content-Type: application/json" --cacert certs/ca/ca.crt -u elastic:TalendELK -s -XPUT https://node1.local:9200/.kibana -d @template_kibana.json
3. Start Kibana.
4. Go to Dashboard > Saved Objects.
5. Within each sub-tab, import the templates using the Import/Export buttons:
Kibana UI tab Location of file(s) to upload
Dashboards Under Talend-LogServer\dashboards-xpack\dashboard:
• default.json
Searches Under Talend-LogServer\dashboards-xpack\search:
• TABLE.json
Visualizations Under Talend-LogServer\dashboards-xpack\visualization:
• DASHBOARDS.json
• FILTER-BY-SEVERITY.json
• FILTER-BY-SOURCE.json
• GROUP-BY-SEVERITY.json
• GROUP-BY-SOURCE.json
• Middleware-Navigation.json
• TIMELINE.json
Installing and configuring your Talend Studio
Installing your Talend Data Integration manually
96
Unzip the archive
Procedure
1. Copy the Talend-Tools-Studio-YYYYYYYY_YYYY-VA.B.C.zip archive to a directory of your choice.
Warning: Make sure that installation path contains no space or special characters, whichmay cause Talend Studio to fail to work because of JVM compatibility issues.
2. Unzip it using 7-zip.
3. Create a file (without extension) named license containing your license key (found in your email),and paste the file at the root of the extracted directory.
Editing the memory and JVM settings
To gain in performance at runtime and when launching Talend Studio, proceed as follows: you canedit the memory settings in the .ini.
Procedure
1. Edit the Talend-Studio-win-x86_64.ini file.
2. Edit the memory attributes. For example:
-vmargs -Xms40m -Xmx500m -XX:MaxMetaspaceSize=256m
For more details, see http://www.oracle.com/technetwork/java/hotspotfaq-138619.html.
Launching your Talend Studio
Procedure
1. Double-click the Talend-Studio-win-x86_64.exe executable to launch your Talend Studio.
2. In the dialog box that appears, perform one of the following actions:
• If your license and project have been set in Talend Administration Center and you want toretrieve this license, select the My product license is on a remote server option, select ServerURL from the list, enter the server URL and the login credentials, and then click Fetch to retrievethe license.
• If your license and project have been set in Talend Cloud Management Console and you want toretrieve this license, select the My product license is on a remote server option, select a TalendIntegration Cloud server or Cloud Custom from the list, and then enter the login credentials andclick Fetch to retrieve the license.
If you select Cloud Custom, you can edit, if needed, the server URL automatically filled in theServer URL field.
• Click My product license is on the local file system to browse and select your license file.
3. If needed, set a migration token to allow importing projects or project items exported from earlierversions of Talend Studio.
For more information see Setting a migration token in Talend Studio.
4. Click Next to launch your Talend Studio.
If you have installed your Talend product via the Talend Installer, see the Launching the Studiofor the first time and Logging in to the Studio sections of the Getting Started Guide for more
Installing your Talend Data Integration manually
97
information on how to launch Talend Studio and set up a connection to Talend AdministrationCenter.
Tip: If your Talend Studio fails to connect to the remote server, a dialog box is displayed to allowyou to:
• Retry connecting to the remote server.
• Modify the connection timeout time to allow more retries. The value 0 means no connectiontimeout.
If needed, click Cancel to close the dialog box and check your connection details.
Setting up a local connection in Talend Studio
Talend Studio allows you to create a local connection so that you can work on your projects locally.
Procedure
1. Launch Talend Studio.
2. In the Talend Studio login window, click the Manage Connections button to open the Connectionswindow.
3. In the Connections window, click the + button to create a new connection.
4. Select Local from the Repository list and enter a Name and Description for the connection.
5. Enter the user account in the User E-mail field.
6. Specify the directory for your local workspace.
Warning: Make sure that the path of your workspace directory contains no space or specialcharacters, which may cause Talend Studio to fail to work because of JVM compatibilityissues.
7. Click OK.
Results
You can now select the newly created connection in the Talend Studio login window to connect toyour local projects.
Setting up a remote connection in Talend Studio
You can set up a connection to Talend Administration Center or to Talend Integration Cloud.
Procedure
1. Launch Talend Studio.
2. In the Talend Studio login window, click the Manage Connections button to open the Connectionswindow.
3. In the Connections window that opens, click the + button to create a new connection.
4. From the Repository list, select:
• Remote TAC to create a connection to Talend Administration Center.
• a Talend Cloud server or Cloud Custom to create a connection to Talend Integration Cloud.
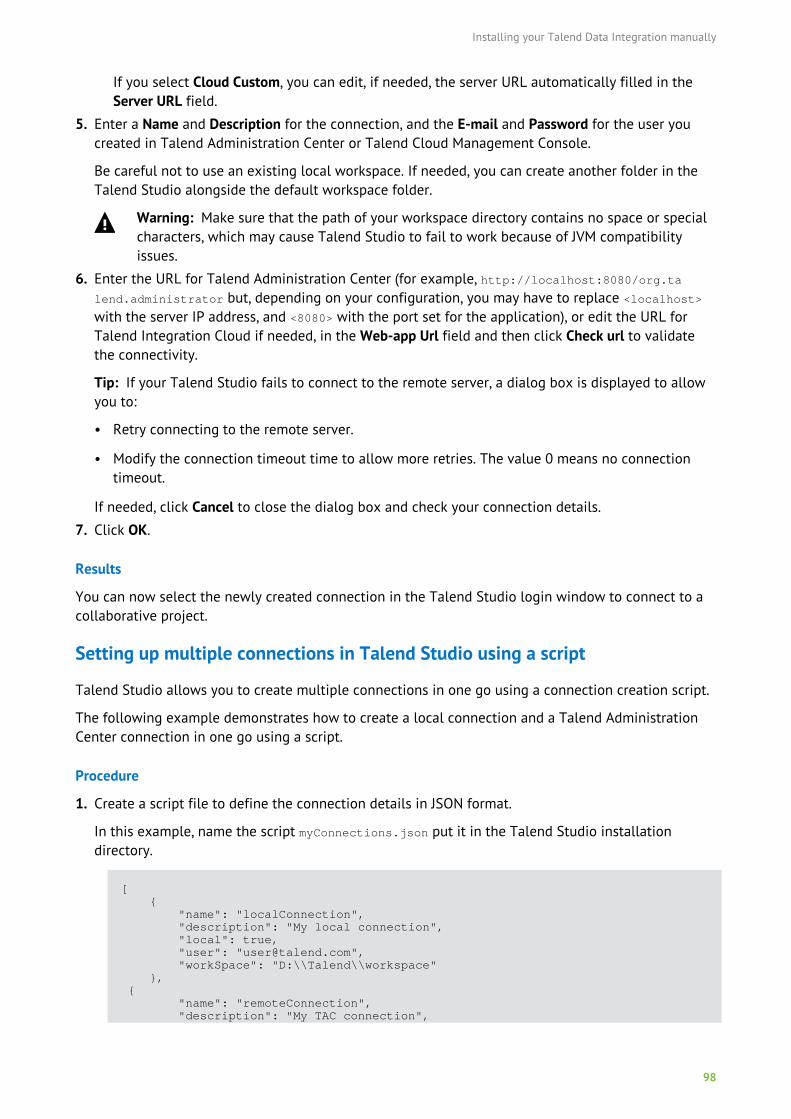
Installing your Talend Data Integration manually
98
If you select Cloud Custom, you can edit, if needed, the server URL automatically filled in theServer URL field.
5. Enter a Name and Description for the connection, and the E-mail and Password for the user youcreated in Talend Administration Center or Talend Cloud Management Console.
Be careful not to use an existing local workspace. If needed, you can create another folder in theTalend Studio alongside the default workspace folder.
Warning: Make sure that the path of your workspace directory contains no space or specialcharacters, which may cause Talend Studio to fail to work because of JVM compatibilityissues.
6. Enter the URL for Talend Administration Center (for example, http://localhost:8080/org.talend.administrator but, depending on your configuration, you may have to replace <localhost>with the server IP address, and <8080> with the port set for the application), or edit the URL forTalend Integration Cloud if needed, in the Web-app Url field and then click Check url to validatethe connectivity.
Tip: If your Talend Studio fails to connect to the remote server, a dialog box is displayed to allowyou to:
• Retry connecting to the remote server.
• Modify the connection timeout time to allow more retries. The value 0 means no connectiontimeout.
If needed, click Cancel to close the dialog box and check your connection details.
7. Click OK.
Results
You can now select the newly created connection in the Talend Studio login window to connect to acollaborative project.
Setting up multiple connections in Talend Studio using a script
Talend Studio allows you to create multiple connections in one go using a connection creation script.
The following example demonstrates how to create a local connection and a Talend AdministrationCenter connection in one go using a script.
Procedure
1. Create a script file to define the connection details in JSON format.
In this example, name the script myConnections.json put it in the Talend Studio installationdirectory.
[ { "name": "localConnection", "description": "My local connection", "local": true, "user": "[email protected]", "workSpace": "D:\\Talend\\workspace" }, { "name": "remoteConnection", "description": "My TAC connection",
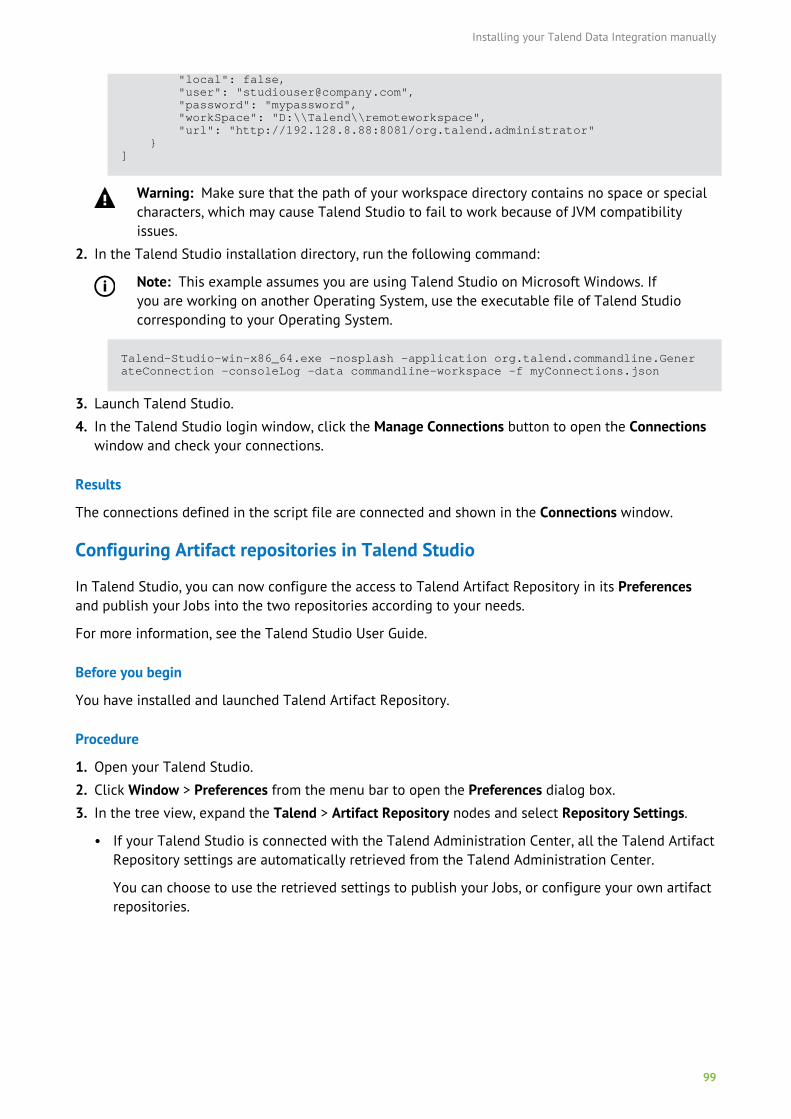
Installing your Talend Data Integration manually
99
"local": false, "user": "[email protected]", "password": "mypassword", "workSpace": "D:\\Talend\\remoteworkspace", "url": "http://192.128.8.88:8081/org.talend.administrator" }]
Warning: Make sure that the path of your workspace directory contains no space or specialcharacters, which may cause Talend Studio to fail to work because of JVM compatibilityissues.
2. In the Talend Studio installation directory, run the following command:
Note: This example assumes you are using Talend Studio on Microsoft Windows. Ifyou are working on another Operating System, use the executable file of Talend Studiocorresponding to your Operating System.
Talend-Studio-win-x86_64.exe -nosplash -application org.talend.commandline.GenerateConnection -consoleLog -data commandline-workspace -f myConnections.json
3. Launch Talend Studio.
4. In the Talend Studio login window, click the Manage Connections button to open the Connectionswindow and check your connections.
Results
The connections defined in the script file are connected and shown in the Connections window.
Configuring Artifact repositories in Talend Studio
In Talend Studio, you can now configure the access to Talend Artifact Repository in its Preferencesand publish your Jobs into the two repositories according to your needs.
For more information, see the Talend Studio User Guide.
Before you begin
You have installed and launched Talend Artifact Repository.
Procedure
1. Open your Talend Studio.
2. Click Window > Preferences from the menu bar to open the Preferences dialog box.
3. In the tree view, expand the Talend > Artifact Repository nodes and select Repository Settings.
• If your Talend Studio is connected with the Talend Administration Center, all the Talend ArtifactRepository settings are automatically retrieved from the Talend Administration Center.
You can choose to use the retrieved settings to publish your Jobs, or configure your own artifactrepositories.
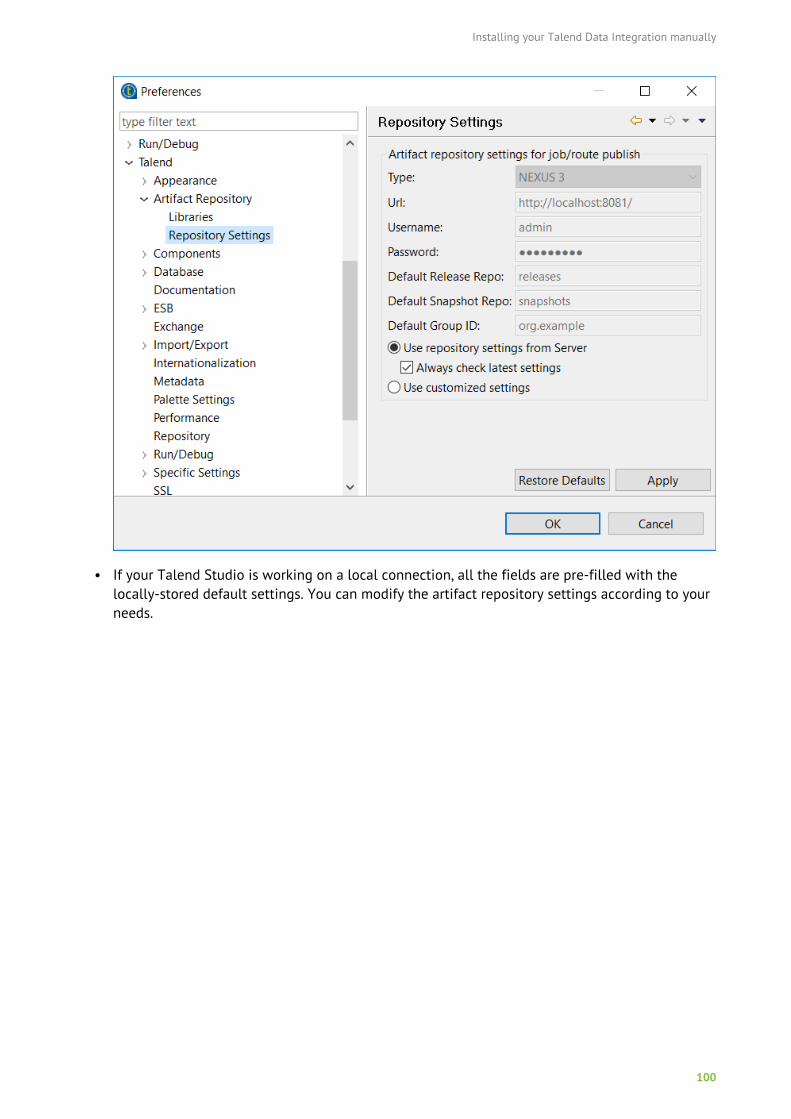
Installing your Talend Data Integration manually
100
• If your Talend Studio is working on a local connection, all the fields are pre-filled with thelocally-stored default settings. You can modify the artifact repository settings according to yourneeds.
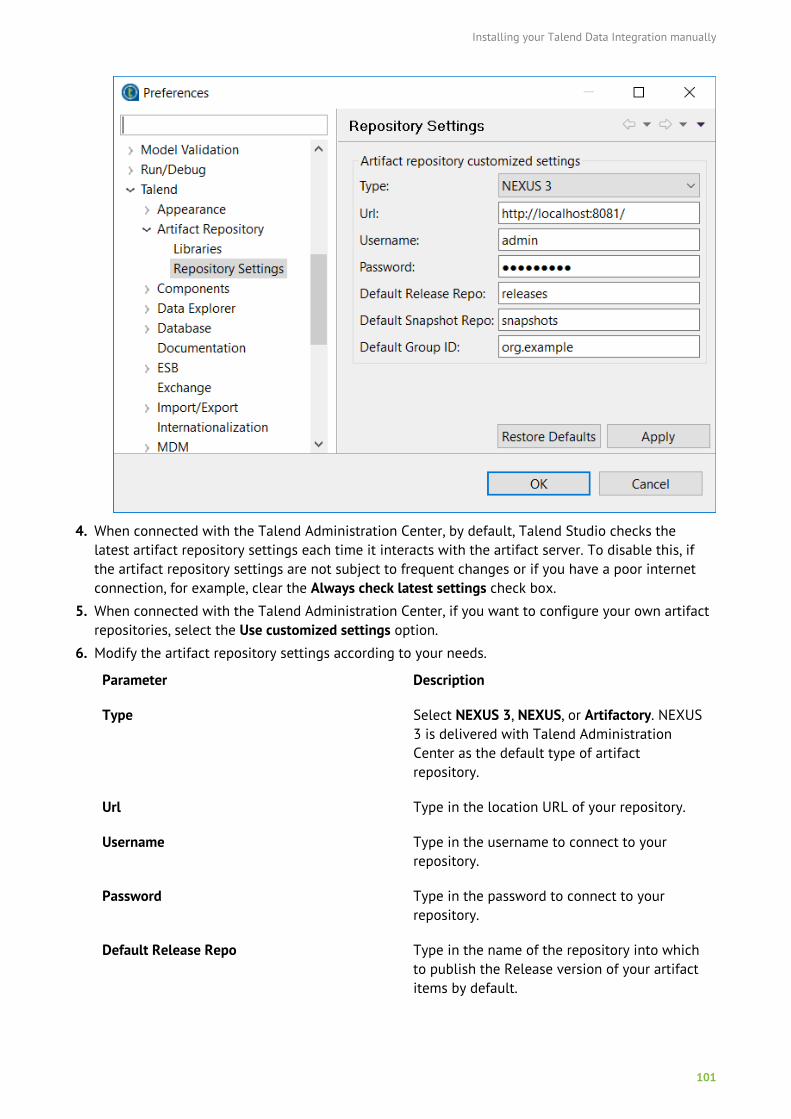
Installing your Talend Data Integration manually
101
4. When connected with the Talend Administration Center, by default, Talend Studio checks thelatest artifact repository settings each time it interacts with the artifact server. To disable this, ifthe artifact repository settings are not subject to frequent changes or if you have a poor internetconnection, for example, clear the Always check latest settings check box.
5. When connected with the Talend Administration Center, if you want to configure your own artifactrepositories, select the Use customized settings option.
6. Modify the artifact repository settings according to your needs.
Parameter Description
Type Select NEXUS 3, NEXUS, or Artifactory. NEXUS3 is delivered with Talend AdministrationCenter as the default type of artifactrepository.
Url Type in the location URL of your repository.
Username Type in the username to connect to yourrepository.
Password Type in the password to connect to yourrepository.
Default Release Repo Type in the name of the repository into whichto publish the Release version of your artifactitems by default.
Installing your Talend Data Integration manually
102
Parameter Description
Default Snapshot Repo Type in the name of the repository into whichto publish the Snapshot version of your artifactitems by default.
Default Group ID Type in the name of the group in which topublish your artifact items by default.
7. Click Apply to apply your changes and OK to close the wizard.
Results
Now, you will be able to publish your Jobs onto Talend Artifact Repository. For more information onhow to publish Jobs, see the Talend Studio User Guide.
Configuring SVN polling in Talend Studio
When working in an SVN managed project, you can configure whether to allow Talend Studio toautomatically check for new commits on the SVN at a certain time interval using the configuration fileof your Talend Studio.
This way, you can easily share your settings with others.
Procedure
1. Open the configuration file \configuration\config.ini under the installation directory of yourTalend Studio.
2. Add the following two lines:
svn.update.info.check=true/falsesvn.update.info.interval=<value>
Tip: If you set svn.update.info.check to false, the time interval setting will not work, andTalend Studio updates the SVN for each operation it makes. This slows down Talend Studio butreduces the number of requests on the SVN server. When svn.update.info.check is set to true, itis recommended to limit the time interval to 30 (seconds) to avoid possible issues with the SVN.
3. Restart your Talend Studio for the configuration to take effect.
ResultsOnce these properties are set in the config.ini file, these settings will replace the correspondingpreference settings at every start of Talend Studio.
For more information on configuring SVN polling in the Preferences dialog box, see Performancepreferences (Talend > Performance) on https://help.talend.com.
Installing external modules
Talend Studio requires specific third-party Java libraries or database drivers (.jar files) to be installedto connect to sources and targets.
Those libraries or database drivers, known as external modules, may be required by some of Talendcomponents or by some connection wizards or by both. Due to license restrictions, Talend may not be
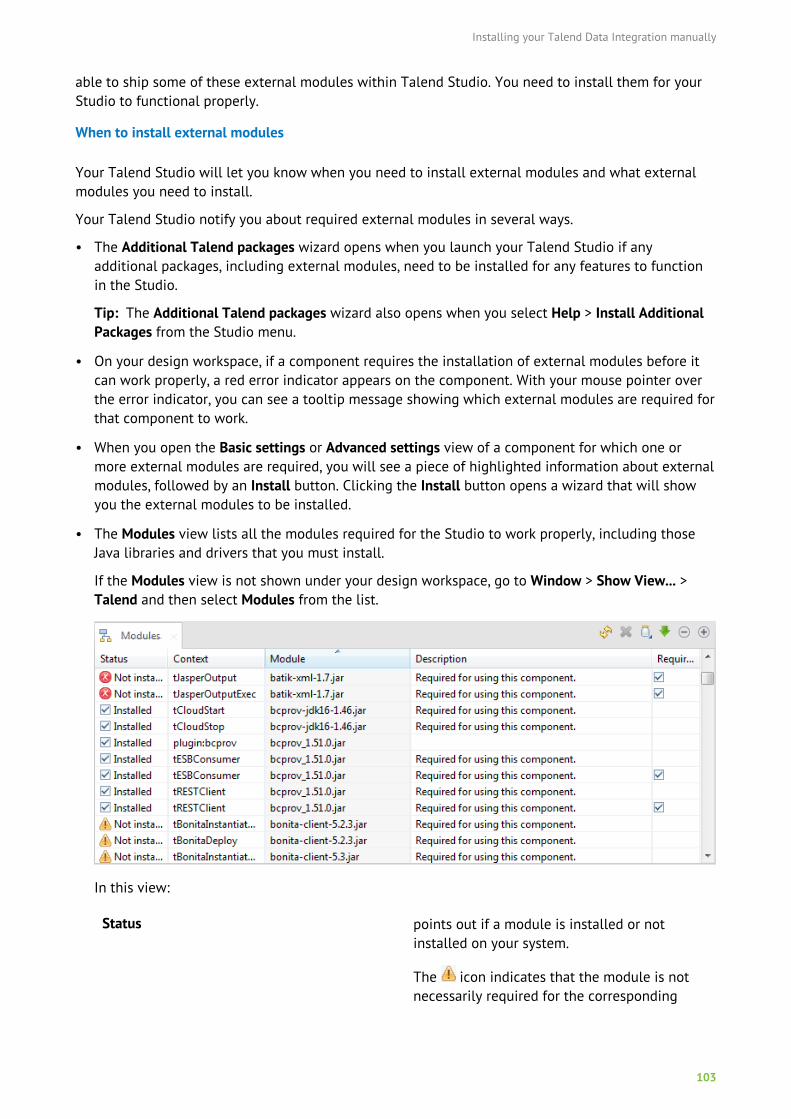
Installing your Talend Data Integration manually
103
able to ship some of these external modules within Talend Studio. You need to install them for yourStudio to functional properly.
When to install external modules
Your Talend Studio will let you know when you need to install external modules and what externalmodules you need to install.
Your Talend Studio notify you about required external modules in several ways.
• The Additional Talend packages wizard opens when you launch your Talend Studio if anyadditional packages, including external modules, need to be installed for any features to functionin the Studio.
Tip: The Additional Talend packages wizard also opens when you select Help > Install AdditionalPackages from the Studio menu.
• On your design workspace, if a component requires the installation of external modules before itcan work properly, a red error indicator appears on the component. With your mouse pointer overthe error indicator, you can see a tooltip message showing which external modules are required forthat component to work.
• When you open the Basic settings or Advanced settings view of a component for which one ormore external modules are required, you will see a piece of highlighted information about externalmodules, followed by an Install button. Clicking the Install button opens a wizard that will showyou the external modules to be installed.
• The Modules view lists all the modules required for the Studio to work properly, including thoseJava libraries and drivers that you must install.
If the Modules view is not shown under your design workspace, go to Window > Show View... >Talend and then select Modules from the list.
In this view:
Status points out if a module is installed or notinstalled on your system.
The icon indicates that the module is notnecessarily required for the corresponding
Installing your Talend Data Integration manually
104
component or Metadata connection listed inthis column.
The icon indicates that the module isabsolutely required for the correspondingcomponent or Metadata connection.
Context gives the name of the component or Metadataconnection using the module. If this columnis empty, the module is then required for thegeneral use of your Talend Studio.
Module gives the exact name of the module.
Description explains why the module/library is required.
Required the selected check box indicates that themodule is required.
refreshes this view to reflect the latest moduleinstallation status.
In case of collaborative work, once a requiredmodule is installed in one user's studio, theother users can simply refresh their Modulesview to add this module to their own studio(s).
allows you to install an already downloadedexternal module into your Studio. For details,see Installing external modules manuallyusing the Modules view on page 106
opens the Jar download and installationwizard, which will list all the required externalmodules that are not integrated in the Studio.
• A Jar installation wizard appears when you:
• drop a component from the Palette if one or more external modules required for thatcomponent to work are missing in the Studio.
• click the Check button in a Metadata connection setup wizard in the Studio if one or moreexternal modules required for the connection are missing in the Studio.
• click the Guess schema button in the Component view of a component if one or more externalmodules required for that component to work are missing in the Studio.
• click Install on the top of the Basic settings or Advanced settings view of a component for whichone or more required external modules are missing.
• run a Job that involves components or Metadata connections for which one or more requiredexternal modules are missing.
• click the button in the Modules view.
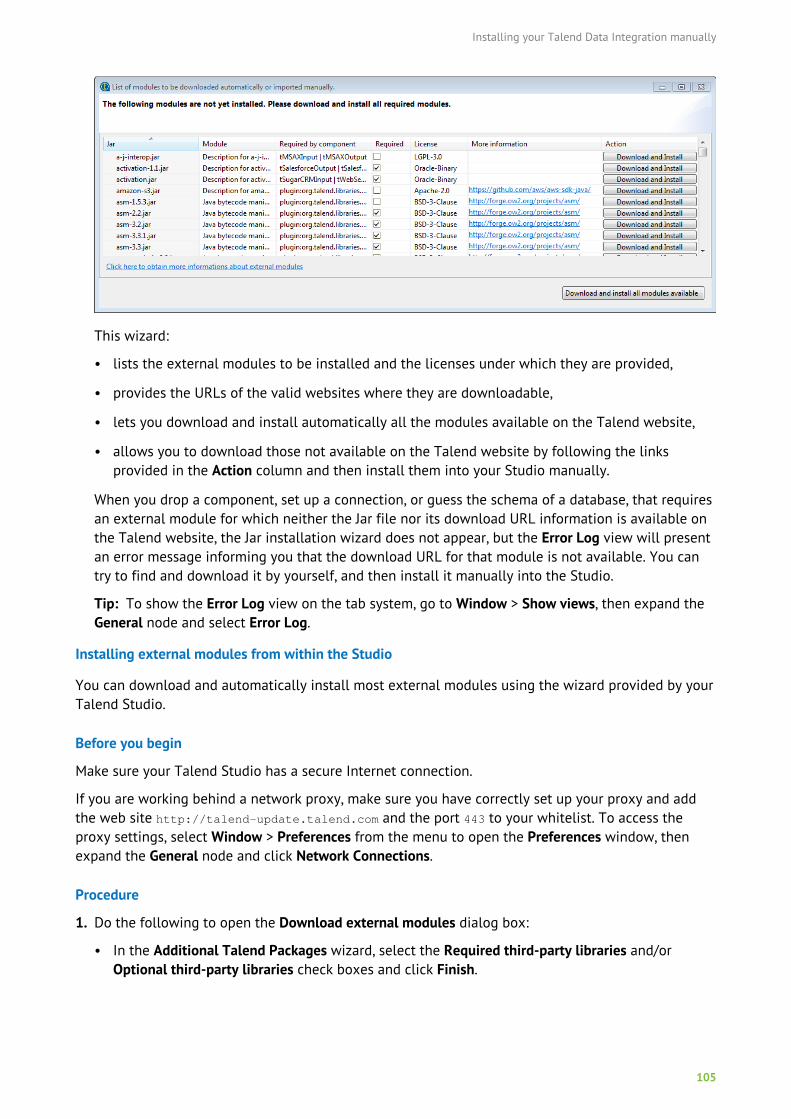
Installing your Talend Data Integration manually
105
This wizard:
• lists the external modules to be installed and the licenses under which they are provided,
• provides the URLs of the valid websites where they are downloadable,
• lets you download and install automatically all the modules available on the Talend website,
• allows you to download those not available on the Talend website by following the linksprovided in the Action column and then install them into your Studio manually.
When you drop a component, set up a connection, or guess the schema of a database, that requiresan external module for which neither the Jar file nor its download URL information is available onthe Talend website, the Jar installation wizard does not appear, but the Error Log view will presentan error message informing you that the download URL for that module is not available. You cantry to find and download it by yourself, and then install it manually into the Studio.
Tip: To show the Error Log view on the tab system, go to Window > Show views, then expand theGeneral node and select Error Log.
Installing external modules from within the Studio
You can download and automatically install most external modules using the wizard provided by yourTalend Studio.
Before you begin
Make sure your Talend Studio has a secure Internet connection.
If you are working behind a network proxy, make sure you have correctly set up your proxy and addthe web site http://talend-update.talend.com and the port 443 to your whitelist. To access theproxy settings, select Window > Preferences from the menu to open the Preferences window, thenexpand the General node and click Network Connections.
Procedure
1. Do the following to open the Download external modules dialog box:
• In the Additional Talend Packages wizard, select the Required third-party libraries and/orOptional third-party libraries check boxes and click Finish.
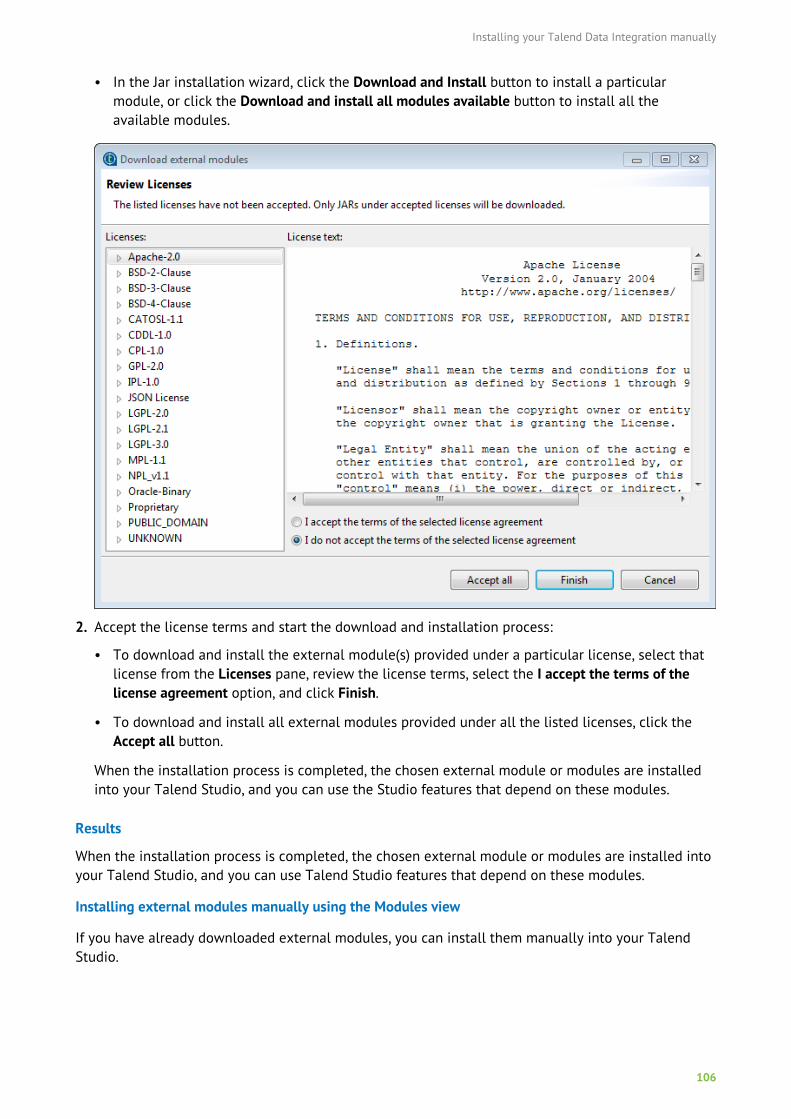
Installing your Talend Data Integration manually
106
• In the Jar installation wizard, click the Download and Install button to install a particularmodule, or click the Download and install all modules available button to install all theavailable modules.
2. Accept the license terms and start the download and installation process:
• To download and install the external module(s) provided under a particular license, select thatlicense from the Licenses pane, review the license terms, select the I accept the terms of thelicense agreement option, and click Finish.
• To download and install all external modules provided under all the listed licenses, click theAccept all button.
When the installation process is completed, the chosen external module or modules are installedinto your Talend Studio, and you can use the Studio features that depend on these modules.
Results
When the installation process is completed, the chosen external module or modules are installed intoyour Talend Studio, and you can use Talend Studio features that depend on these modules.
Installing external modules manually using the Modules view
If you have already downloaded external modules, you can install them manually into your TalendStudio.
Installing your Talend Data Integration manually
107
Before you begin
If you are going to install the JDBC driver for Oracle 9i into your Talend Studio, change the file namefrom ojdbc14.jar to ojdbc14-9i.jar first.
Procedure
1. Click the button in the upper right corner of the Modules view or in the Jar installation wizardto browse your local file system.
2. In the Open dialog box of your file system, browse to the module you want to install, double-clickthe .jar file, or select it and then click Open to install it into your Talend Studio.
Results
The dialog box closes and the selected module is installed in the library folder of the current TalendStudio.
Installing external modules in the Talend CommandLine
If you use Talend Studio and Talend CommandLine on different machines, you need to retrieve thedownloaded .jar files and add them in Talend CommandLine.
Before you begin
• Make sure your system is configured to show hidden files and folders.
• Check that the .jar files to be installed have been downloaded.
• Make sure the <CommandLinePath>/configuration/.m2 folder already exists. This folder is createdthe first time you start the Talend CommandLine application.
Procedure
1. Shut down your Talend CommandLine if it is started.
2. Copy the downloaded .jar files from <StudioPath>/configuration/.m2 and paste them into<CommandLinePath>/configuration/.m2, where <StudioPath> and <CommandLinePath> are theinstallation directories of Talend Studio and Talend CommandLine respectively.
3. Restart your Talend CommandLine.
Results
You can now use the features dependent on these modules.
Installing external modules manually for Talend Web applications
Some modules required for a Talend Web application to work are not available on the Talend websitebut can be downloaded directly from external websites. Once downloaded, these modules must beplaced in specific folders.
Procedure
• For the Talend MDM Server, place the downloaded JDBC drivers for the Oracle and MySQLdatabases in the following folder:
<TomcatPath>/webapps/talendmdm/WEB-INF/lib
Installing your Talend Data Integration manually
108
• For Talend Administration Center, place the downloaded modules in the following folder:
<TomcatPath>/webapps/org.talend.administrator/WEB-INF/lib
Installing additional Talend packages
You can install additional Talend packages to extend the capabilities of your Talend Studio.
Depending the license you are using, such additional Talend packages may include:
• Language pack
• Talend MDM - Bonita BPM Integration
• Talend Data Mapper packages
• Talend ESB packages
• Talend Metadata Bridge
Warning:
In a multi-user environment, before installing an additional Talend package, comment out thefollowing lines in the configuration file config.ini and then restart your Talend Studio. Afterthe installation, uncomment these lines and restart the Studio again.
[email protected]/[email protected]/workspaceTalend
Procedure
1. Select Help > Install Additional Packages from the menu to open the Additional Talend Packageswizard.
2. Select the additional package or packages you want to install.
In the wizard, some packages are grouped by category. You can expand a category and select oneor more individual packages, or directly select the category if you want to install all the packagesunder it.
3. Choose an option:
• Click Next, specify the download site or a local folder, and click Finish to proceed with theinstallation.
Note: The Next button is available only if you have selected a single package.
• Click Finish to download and install the package(s) from the default Talend update site.
4. When prompted, restart your Talend Studio.
Configuring Talend Studio to enable connection with Talend AdministrationCenter via a proxy server with basic authentication
When working on a remote project behind a proxy server with basic authentication, you need tocomplete some specific settings in your Talend Studio to enable a secure connection with the remoteTalend Administration Center.
Note: This documentation provides settings for both HTTP and HTTPS proxy servers. You canmake your own choice based on the type of your proxy server.

Installing your Talend Data Integration manually
109
Procedure
1. In your Talend Studio, select Window > Preferences > from the menu to open the Preferenceswindow, expand the General > Network Connections nodes, and define your proxy settings.
Alternatively, or if you are using Talend CommandLine, set your proxy by adding the followinglines to the .ini file under the root of the Studio installation directory:
-Dhttp.proxySet=true -Dhttp.proxyHost=<proxy_server_host>-Dhttp.proxyPort=<proxy_server_port>-Dhttp.nonProxyHosts=localhost-Dhttp.proxyUser=<proxy_server_user>-Dhttp.proxyPassword=<proxy_server_password>-Dhttps.proxyHost=<proxy_server_host>-Dhttps.proxyPort=<proxy_server_port>-Dhttps.proxyUser=<proxy_server_user>-Dhttps.proxyPassword=<proxy_server_password>
2. Depending on whether you are going to work on an SVN or a Git project, do the following:
• If you need to work on an SVN project, define the following properties in the file C:\Users\<user>\AppData\Roaming\Subversion\servers (assuming C: is the system drive):
http-proxy-host = <proxy_server_host>http-proxy-port = <proxy_server_port>http-proxy-username = <proxy_server_username>http-proxy-password = <proxy_server_password>
• If you need to work on a Git project, update the .gitconfig file as follows:
git config --global http.proxy http://<git_username>:<git_password>@<proxy_server_host>git config --global https.proxy http://<git_username>:<git_password>@<proxy_server_host>
ResultsAfter restarting your Talend Studio, you will be able to connect to Talend Administration Center via aproxy server with basic authentication.
Installing and configuring Talend CommandLineTalend CommandLine as a Server is deprecated from Talend 7.1 onwards.
Talend CommandLine is required for generating and deploying the processes (Job) developed withTalend Studio onto the Job servers. This application allows the JAVA code to be generated for the Jobson the basis of the XML files contained in the database, and must be started in order to allow Jobs tobe started and deployed remotely.
Installing Talend CommandLine
Procedure
1. Copy the Talend-Studio-YYYYMMDD_HHmm-VA.B.C.zip archive file onto the machine where youwant to install Talend CommandLine. This machine can be the same as your Web application,Talend Administration Center, but not necessarily.
2. Using 7-zip, unzip it under a folder the name of which does not contain any space character.
Installing your Talend Data Integration manually
110
3. If needed, rename the decompressed folder to CmdLine for more clarity.
Warning: Renaming the folder of your Talend CommandLine into CommandLine is causingproblems, so it is recommended to rename it differently or not to rename it at all.
In this directory, the commandline.bat file lets you launch the Talend CommandLine program.
4. By default, after the first connection to the Studio, the license file is automatically put at the rootof the Talend CommandLine installation directory. If not, put the license file provided by Talend atthe root of this directory.
Note that, during the first connection to the remote repository via Talend Administration Center,the external libraries required by some components and connection metadata are retrieved fromthe Git or SVN directory defined on the Configuration page of Talend Administration Center.Therefore, it is important that you first install Talend Administration Center, you configure it andyou connect the Studio to the remote repository before you launch CommandLine in order toavoid errors during code generation of Jobs related to these required external libraries. For moreinformation about how to set up the Git or SVN directory where the external libraries are stored,see the Talend Administration Center User Guide.
5. Run the commandline.bat file.
Note: If you need to change the port number (by default 8002), simply edit thecommandline.bat file and change the port number.
6. You can stop Talend CommandLine execution by pressing Ctrl+C.
7. If you chose to install Talend CommandLine on a different machine than Talend AdministrationCenter, then you need to configure the Talend CommandLine access parameters in theConfiguration page of Talend Administration Center Web application. For more information, seethe Talend Administration Center User Guide.
Results
For more information about Talend CommandLine usage, see Appendix A of the TalendAdministration Center User Guide.
To install Talend CommandLine as a service, see Installing Talend CommandLine as a service on page141.
Editing the memory and JVM settings for Talend CommandLine
Talend CommandLine as a Server is deprecated from Talend 7.1 onwards.
To gain in performance at runtime and when launching Talend CommandLine, you can edit thememory settings in the corresponding .ini file.
Procedure
1. Edit the Talend-Studio-win-x86_64.ini file.
2. Edit the memory attributes. For example:
-vmargs -Xms40m -Xmx500m -XX:MaxMetaspaceSize=256m
For more details, see http://www.oracle.com/technetwork/java/hotspotfaq-138619.html.
Installing your Talend Data Integration manually
111
Accessing user-defined components from Talend CommandLine
If you need to install user-defined components (that you developed locally or downloaded fromTalend Exchange for example), then you need to notify Talend CommandLine with the usercomponent folder.
To configure the path to these components, simply use the following command:
setUserComponentPath -up <UserComponentPath>
To clear this path, type in the command:
setUserComponentPath -c
Note: You can also configure the user component path directly from the Configuration page ofTalend Administration Center. For more information, see the Talend Administration Center UserGuide.
Installing and configuring Talend Data PreparationUsing Talend Installer is the recommended way to install Talend Data Preparation but you canperform a manual installation if needed.
Installing Talend Data Preparation manually
This procedure contains the steps to manually install Talend Data Preparation on your machine. Forthe automatic installation procedure using Talend Installer, see Using Talend Installer graphicalinstallation mode on page 29.
Before you begin
• Talend Administration Center is installed and running. For more information on TalendAdministration Center installation, see Using Talend Installer graphical installation mode on page29 for the automatic installation or Installing and configuring Talend Administration Center onpage 44 for the manual installation.
• Talend Identity and Access Management is installed and running. For more information on TalendIdentity and Access Management installation, see Installing and configuring Talend Identity andAccess Management on page 64.
• A Talend Data Preparation user exists in Talend Administration Center. For more information, seeTalend Administration Center User Guide.
• There are no other instances of MongoDB installed on your machine.
• To use Talend Data Preparation with Big Data, use one of the supported Hadoop distribution. Formore information, see Supported Hadoop distribution versions for Talend Data Preparation withBig Data on page 157.
• Before installing Talend Data Preparation, make sure that you fulfill the hardware and softwarerequirements. For more information, see Hardware requirements on page 6 and Softwarerequirements on page 7.
• When installing your Talend product manually, the installation procedures must be executed in aparticular order. For more information, see Manual installation order on page 42.
Installing your Talend Data Integration manually
112
Procedure
1. Download a MongoDB 3.4 instance from https://www.mongodb.com/download-center and installit.
For more information on the supported MongoDB databases, see Compatible databases on page13.
For more information on how to install it, see MongoDB documentation.
If you want to secure connections with MongoDB using SSL, MongoDB Enterprise Server has to bemanually installed on your machine. For more information, see https://docs.mongodb.com/v3.4/security/.
2. Unzip the Talend-DataPreparation-Server-VA.B.C.zip file where you want Talend DataPreparation to be installed.
3. Unzip the <Data_Preparation_Path>\services\components-api-service-rest-all-components-VA.B.C.zip file where you want Components Catalog to be installed.
4. To use Talend Data Preparation in a Big Data context, you need to install two additional tools,Streams Runner and Spark Job Server.
Note that Streams Runner and Spark Job Server must be installed on a Linux machine.
5. Add mongo to the PATH environment variable.
6. Create the dataprep database in MongoDB using the following command:
use dataprep
7. Create the following user for the dataprep database in MongoDB:
• Username: dataprep-user
• Password: duser
To do this, you can use the following command:
db.createUser( { user: "dataprep-user", pwd: "duser", roles: [{ role: "readWrite", db: "dataprep"}]})
Configuring the Components Catalog server
Procedure
1. Open the <Components_Catalog_Path>\config\application.properties file.
2. To change the default port exposed for the Components Catalog endpoints, edit the following line:
server.port=8989
3. To change the context path for the Components Catalog endpoints, edit the following line:
server.contextPath=/tcomp
Note that the server.contextpath and server.port properties must match the properties definedfor tcomp.server.url in the <Data_Preparation_Path>\config\application.properties file.
4. To enable the Components Catalog server for use with Talend Data Preparation in a Big Datacontext, add the following line to the file:
hadoop.conf.dir=/path/to/Hadoop/configuration/directory
This property can also be set as an environment variable. Environment variables take precedenceover values set in the application.properties file.
5. To use the Components Catalog server with a secure Hadoop cluster (using Kerberos), add thefollowing line to the file:
Installing your Talend Data Integration manually
113
krb5.config=/path/to/Kerberos/configuration/file/krb5.conf
This property can also be set as an environment variable. Environment variables take precedenceover values set in the application.properties file.
6. Save your changes to the properties file.
7. Restart Components Catalog for your changes to be taken into account.
Configuring Talend Data Preparation
Configuring Talend Data Preparation after installation
Procedure
1. Open the <Data_Preparation_Path>/config/application.properties file and edit the followingTalend Data Preparation properties:
Field Action
tac.url Enter the URL to your Talend Administration Centerfollowed by a /.
public.ip Enter the URL you want to use to access Talend DataPreparation.
server.port Enter the port you want to use for Talend DataPreparation user interface.
iam.ip Enter the URL to your Talend Identity and AccessManagement instance.
tac.user-name Enter the username of your Data Preparation user inTalend Administration Center.
tac.password Enter the password of your Data Preparation user inTalend Administration Center.
security.oauth2.client.clientId Enter the Talend Identity and Access ManagementOIDC client identifier.
security.oauth2.client.clientSecret Enter the Talend Identity and Access ManagementOIDC client password.
iam.scim.url Make sure that Talend Identity and AccessManagement port is correct.
apps.tds.url Enter the URL to your Talend Data Stewardshipinstance.
All the passwords entered in the properties file are encrypted when you start your Talend DataPreparation instance.
2. Update the following fields with your MongoDB settings:
Field Description
mongodb.host Host name of your MongoDB instance
Installing your Talend Data Integration manually
114
Field Description
mongodb.port Port number of your MongoDB instance
mongodb.database Name of the database on which Talend DataPreparation is connected, dataprep by default. Thedatabase is created when you first launch Talend DataPreparation.
mongodb.user Username used to connect to the database
mongodb.password Password used to connect to the database
3. To enable the interaction between Talend Data Preparation and the Components Catalog service,edit the following line with your Components Catalog server host and port:
tcomp.server.url=http://<tcomp_host>:<tcomp_port>/tcomp
4. To enable the app switcher after installing Talend Data Preparation and Talend Data Stewardship,uncomment the following line and add the URL to your Talend Data Stewardship instance:
apps.tds.url=<Talend_Data_Stewardship_URL>
You must also add the URL to your Talend Data Preparation instance to the configuration file forTalend Data Stewardship. For more information, see Configuring Talend Data Stewardship afterinstallation on page 121.
5. Execute the start.bat file to start your Talend Data Preparation instance.
Configuring logs for Talend Data Preparation
Talend Data Preparation logs allows you to analyze and debug the activity of Talend DataPreparation.
Talend Data Preparation logs are located in <Data_Preparation_Path>\data\logs\app.log.
To configure the settings of your log files, edit the <Data_Preparation_Path>\config\log4j2.xml file:
• For more information on how to set the log4j information level, see http://logging.apache.org/log4j/1.2/apidocs/org/apache/log4j/Level.html.
• For more information on how to set the log rotation, see https://logging.apache.org/log4j/2.x/manual/configuration.html#AutomaticReconfiguration.
Configuring an HTTPS connection for Talend Data Preparation and itsdependencies
Configuring an HTTPS connection for Talend Data Preparation
To set up an HTTPS secure connection between the different services, as well as with the MongoDBserver, you need to edit the application.properties file.
Note that securing the MongoDB connection is not possible if you selected the embedded MongoDBinstance during the installation process.
If you want to secure connections with MongoDB using SSL, MongoDB Enterprise Server has to bemanually installed on your machine. For more information, see https://docs.mongodb.com/v3.2/security/.
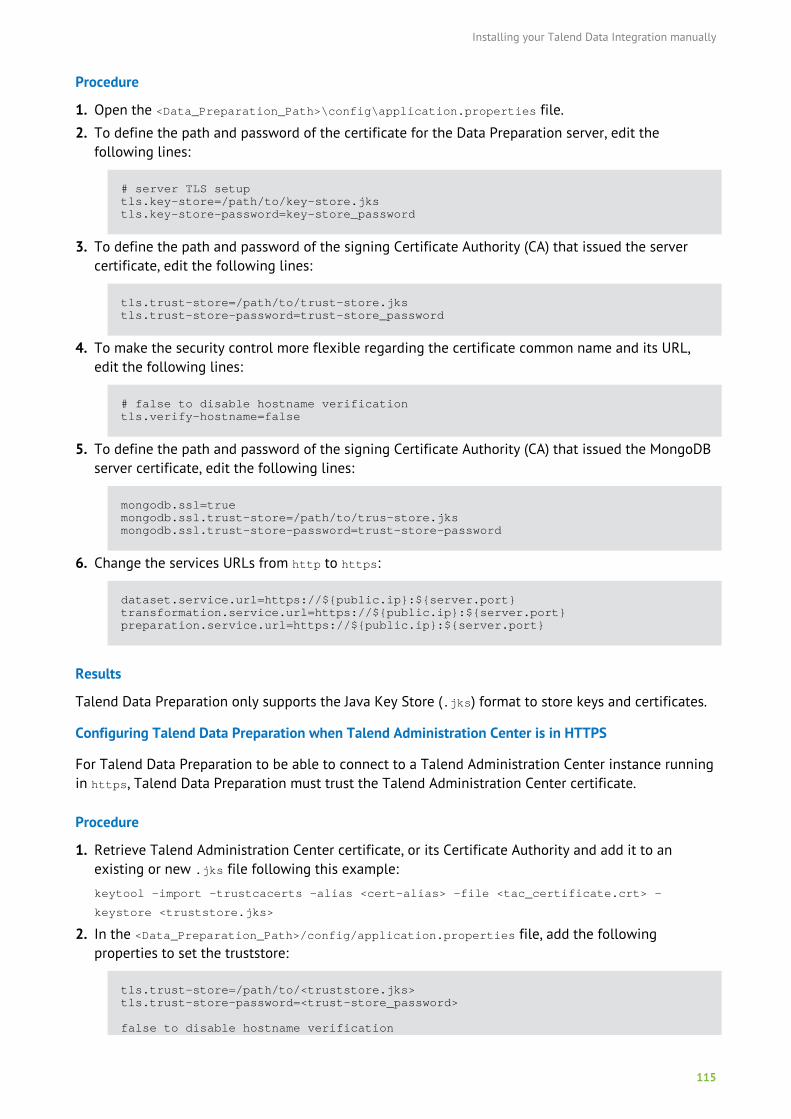
Installing your Talend Data Integration manually
115
Procedure
1. Open the <Data_Preparation_Path>\config\application.properties file.
2. To define the path and password of the certificate for the Data Preparation server, edit thefollowing lines:
# server TLS setuptls.key-store=/path/to/key-store.jkstls.key-store-password=key-store_password
3. To define the path and password of the signing Certificate Authority (CA) that issued the servercertificate, edit the following lines:
tls.trust-store=/path/to/trust-store.jkstls.trust-store-password=trust-store_password
4. To make the security control more flexible regarding the certificate common name and its URL,edit the following lines:
# false to disable hostname verificationtls.verify-hostname=false
5. To define the path and password of the signing Certificate Authority (CA) that issued the MongoDBserver certificate, edit the following lines:
mongodb.ssl=truemongodb.ssl.trust-store=/path/to/trus-store.jksmongodb.ssl.trust-store-password=trust-store-password
6. Change the services URLs from http to https:
dataset.service.url=https://${public.ip}:${server.port}transformation.service.url=https://${public.ip}:${server.port}preparation.service.url=https://${public.ip}:${server.port}
Results
Talend Data Preparation only supports the Java Key Store (.jks) format to store keys and certificates.
Configuring Talend Data Preparation when Talend Administration Center is in HTTPS
For Talend Data Preparation to be able to connect to a Talend Administration Center instance runningin https, Talend Data Preparation must trust the Talend Administration Center certificate.
Procedure
1. Retrieve Talend Administration Center certificate, or its Certificate Authority and add it to anexisting or new .jks file following this example:
keytool -import -trustcacerts -alias <cert-alias> -file <tac_certificate.crt> -
keystore <truststore.jks>
2. In the <Data_Preparation_Path>/config/application.properties file, add the followingproperties to set the truststore:
tls.trust-store=/path/to/<truststore.jks>tls.trust-store-password=<trust-store_password>
false to disable hostname verification

Installing your Talend Data Integration manually
116
tls.verify-hostname=false
3. Restart Talend Data Preparation.
Configuring an HTTPS connection with Talend Dictionary Service
Securing the connection between Talend Data Preparation and Talend Dictionary Service requiresediting their corresponding configuration files.
You will first have to configure Talend Dictionary Service as a service in HTTPS. Then, you will enableSSL communication between Talend Data Preparation and Talend Dictionary Service running inHTTPS.
Before you begin
• Talend Data Preparation has been configured as a service in HTTPS. For more information, seeConfiguring an HTTPS connection for Talend Data Preparation on page 114.
• Talend Dictionary Service has been configured as a service in HTTPS. For more information, seeSecuring connections for Talend Dictionary Service.
• You have generated a certificate for Talend Data Preparation and Talend Dictionary Service, andadded it to your Web browser truststore.
Procedure
1. To enable SSL communication between Talend Data Preparation and Talend Dictionary Servicerunning in HTTPS, retrieve the Talend Dictionary Service certificate, or its Certificate Authority, andadd it to the Talend Data Preparation truststore using the following command:
keytool -import -trustcacerts -alias <cert-alias> -file <dictionary-service_certific
ate.crt> -keystore <truststore.jks>
2. In the <Data_Preparation_Path>/config/application.properties file, add the followingproperties to set the truststore:
tls.trust-store=/path/to/<truststore.jks>tls.trust-store-password=<trust-store_password>
false to disable hostname verificationtls.verify-hostname=false
3. Restart the services.
Results
Your Talend Data Preparation instance running in HTTPS can now communicate with TalendDictionary Service, also running with a secured HTTPS connection.
Configuring an HTTPS connection between Talend Data Preparation, Streams Runner and Spark JobServer
Securing the connections between Talend Data Preparation, Streams Runner and Spark Job Serverrequires editing their corresponding configuration files.
Any security configuration in the Streams Runner configuration file should be done at the end of thefile, in the Append section, after the Include section, to avoid being overwritten.
The first step will be to configure Spark Job Server as a service in HTTPS. Then, you will need toenable SSL communication between Streams Runner and Spark Job Server running in HTTPS. After
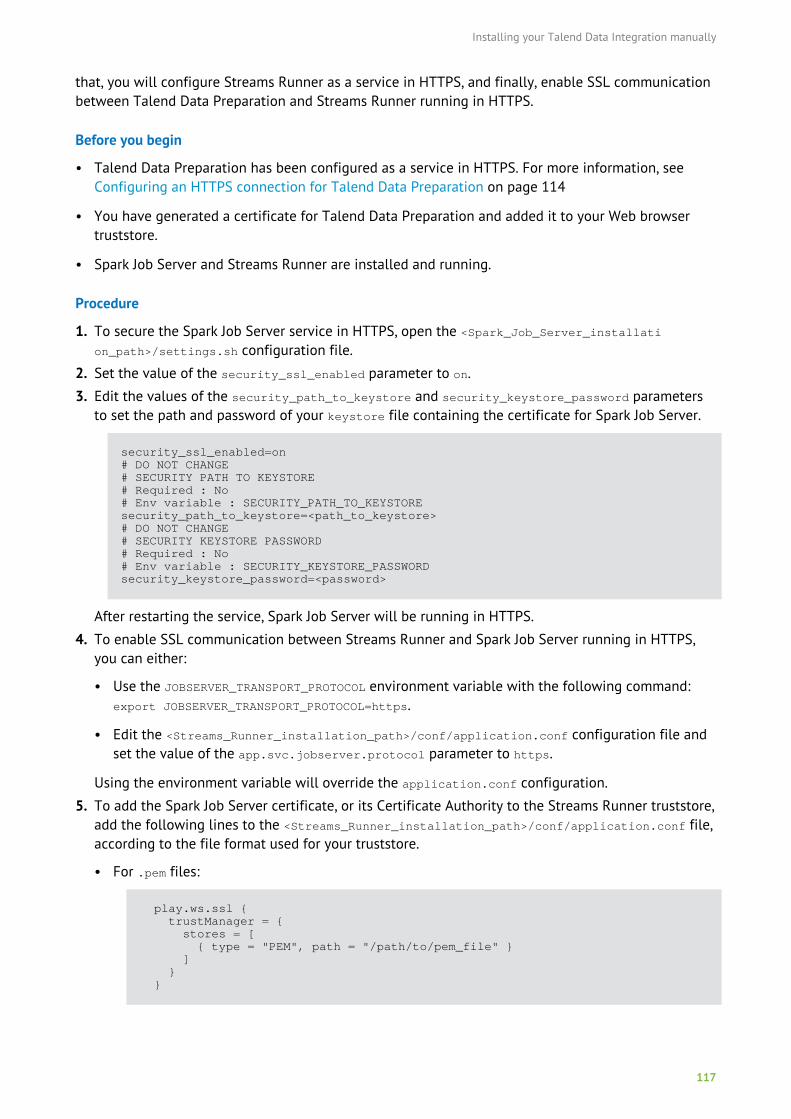
Installing your Talend Data Integration manually
117
that, you will configure Streams Runner as a service in HTTPS, and finally, enable SSL communicationbetween Talend Data Preparation and Streams Runner running in HTTPS.
Before you begin
• Talend Data Preparation has been configured as a service in HTTPS. For more information, seeConfiguring an HTTPS connection for Talend Data Preparation on page 114
• You have generated a certificate for Talend Data Preparation and added it to your Web browsertruststore.
• Spark Job Server and Streams Runner are installed and running.
Procedure
1. To secure the Spark Job Server service in HTTPS, open the <Spark_Job_Server_installation_path>/settings.sh configuration file.
2. Set the value of the security_ssl_enabled parameter to on.
3. Edit the values of the security_path_to_keystore and security_keystore_password parametersto set the path and password of your keystore file containing the certificate for Spark Job Server.
security_ssl_enabled=on# DO NOT CHANGE# SECURITY PATH TO KEYSTORE# Required : No# Env variable : SECURITY_PATH_TO_KEYSTOREsecurity_path_to_keystore=<path_to_keystore># DO NOT CHANGE# SECURITY KEYSTORE PASSWORD# Required : No# Env variable : SECURITY_KEYSTORE_PASSWORDsecurity_keystore_password=<password>
After restarting the service, Spark Job Server will be running in HTTPS.
4. To enable SSL communication between Streams Runner and Spark Job Server running in HTTPS,you can either:
• Use the JOBSERVER_TRANSPORT_PROTOCOL environment variable with the following command:export JOBSERVER_TRANSPORT_PROTOCOL=https.
• Edit the <Streams_Runner_installation_path>/conf/application.conf configuration file andset the value of the app.svc.jobserver.protocol parameter to https.
Using the environment variable will override the application.conf configuration.
5. To add the Spark Job Server certificate, or its Certificate Authority to the Streams Runner truststore,add the following lines to the <Streams_Runner_installation_path>/conf/application.conf file,according to the file format used for your truststore.
• For .pem files:
play.ws.ssl { trustManager = { stores = [ { type = "PEM", path = "/path/to/pem_file" } ] } }
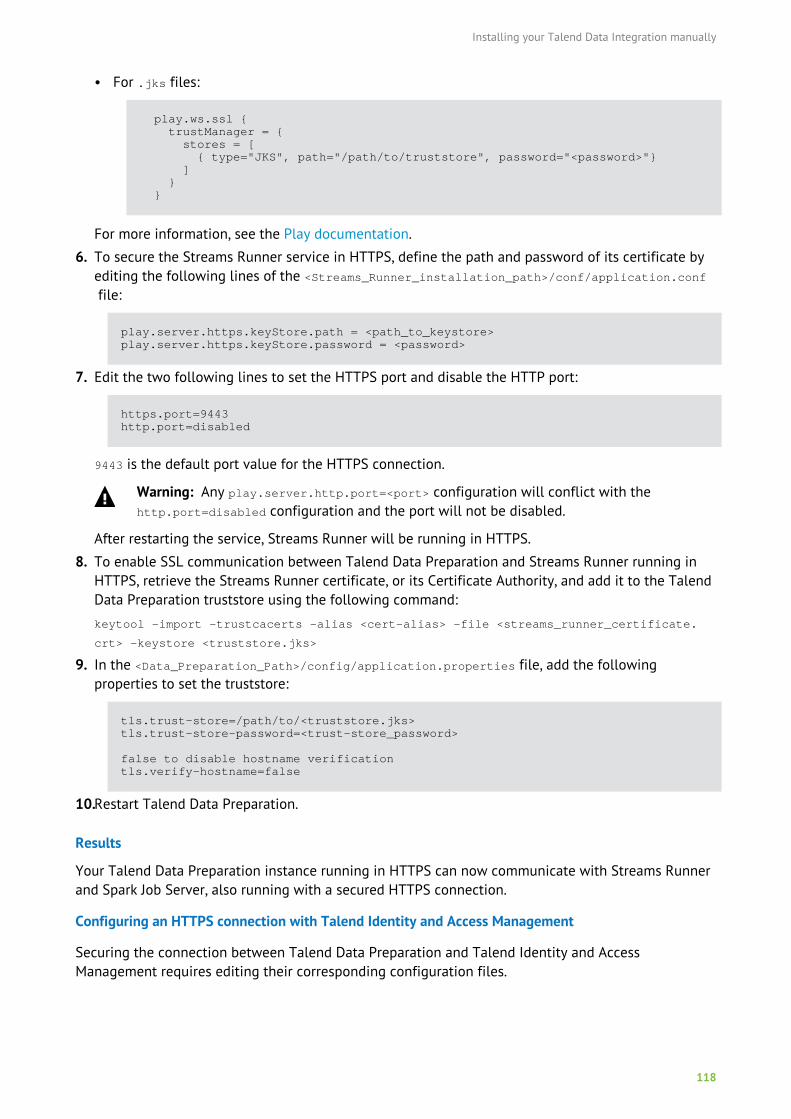
Installing your Talend Data Integration manually
118
• For .jks files:
play.ws.ssl { trustManager = { stores = [ { type="JKS", path="/path/to/truststore", password="<password>"} ] } }
For more information, see the Play documentation.
6. To secure the Streams Runner service in HTTPS, define the path and password of its certificate byediting the following lines of the <Streams_Runner_installation_path>/conf/application.conf file:
play.server.https.keyStore.path = <path_to_keystore>play.server.https.keyStore.password = <password>
7. Edit the two following lines to set the HTTPS port and disable the HTTP port:
https.port=9443http.port=disabled
9443 is the default port value for the HTTPS connection.
Warning: Any play.server.http.port=<port> configuration will conflict with thehttp.port=disabled configuration and the port will not be disabled.
After restarting the service, Streams Runner will be running in HTTPS.
8. To enable SSL communication between Talend Data Preparation and Streams Runner running inHTTPS, retrieve the Streams Runner certificate, or its Certificate Authority, and add it to the TalendData Preparation truststore using the following command:
keytool -import -trustcacerts -alias <cert-alias> -file <streams_runner_certificate.
crt> -keystore <truststore.jks>
9. In the <Data_Preparation_Path>/config/application.properties file, add the followingproperties to set the truststore:
tls.trust-store=/path/to/<truststore.jks>tls.trust-store-password=<trust-store_password>
false to disable hostname verificationtls.verify-hostname=false
10.Restart Talend Data Preparation.
Results
Your Talend Data Preparation instance running in HTTPS can now communicate with Streams Runnerand Spark Job Server, also running with a secured HTTPS connection.
Configuring an HTTPS connection with Talend Identity and Access Management
Securing the connection between Talend Data Preparation and Talend Identity and AccessManagement requires editing their corresponding configuration files.
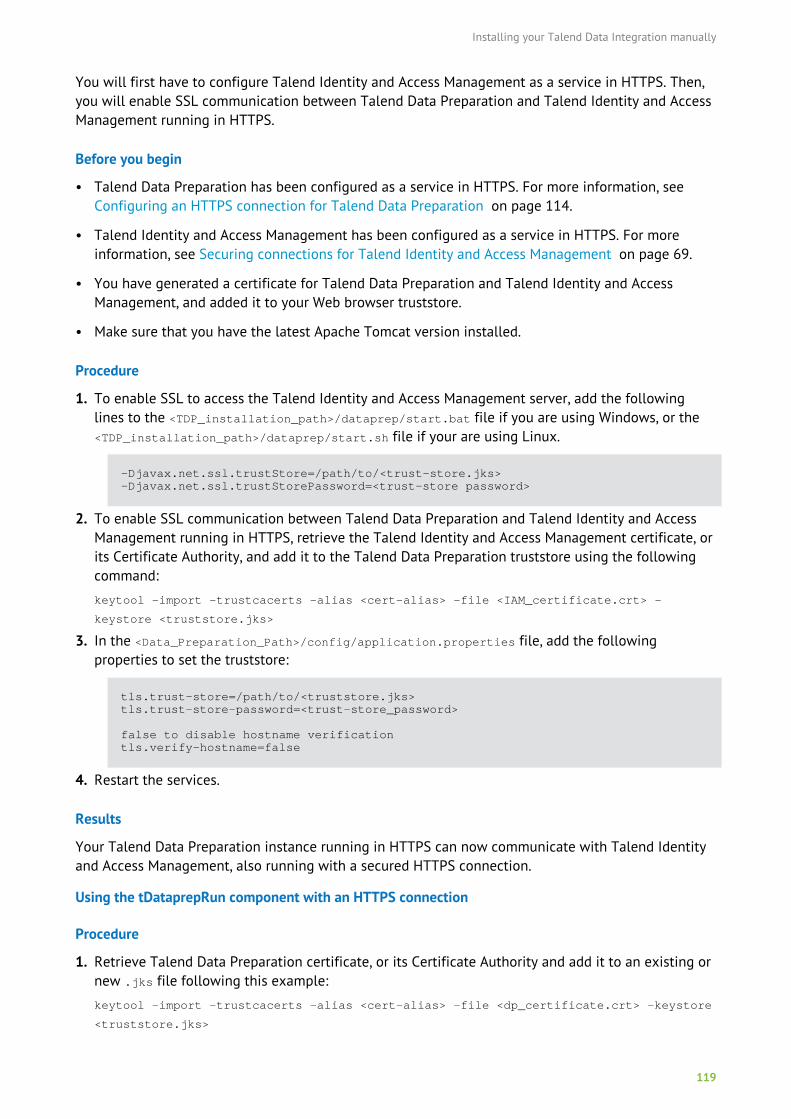
Installing your Talend Data Integration manually
119
You will first have to configure Talend Identity and Access Management as a service in HTTPS. Then,you will enable SSL communication between Talend Data Preparation and Talend Identity and AccessManagement running in HTTPS.
Before you begin
• Talend Data Preparation has been configured as a service in HTTPS. For more information, seeConfiguring an HTTPS connection for Talend Data Preparation on page 114.
• Talend Identity and Access Management has been configured as a service in HTTPS. For moreinformation, see Securing connections for Talend Identity and Access Management on page 69.
• You have generated a certificate for Talend Data Preparation and Talend Identity and AccessManagement, and added it to your Web browser truststore.
• Make sure that you have the latest Apache Tomcat version installed.
Procedure
1. To enable SSL to access the Talend Identity and Access Management server, add the followinglines to the <TDP_installation_path>/dataprep/start.bat file if you are using Windows, or the<TDP_installation_path>/dataprep/start.sh file if your are using Linux.
-Djavax.net.ssl.trustStore=/path/to/<trust-store.jks>-Djavax.net.ssl.trustStorePassword=<trust-store password>
2. To enable SSL communication between Talend Data Preparation and Talend Identity and AccessManagement running in HTTPS, retrieve the Talend Identity and Access Management certificate, orits Certificate Authority, and add it to the Talend Data Preparation truststore using the followingcommand:
keytool -import -trustcacerts -alias <cert-alias> -file <IAM_certificate.crt> -
keystore <truststore.jks>
3. In the <Data_Preparation_Path>/config/application.properties file, add the followingproperties to set the truststore:
tls.trust-store=/path/to/<truststore.jks>tls.trust-store-password=<trust-store_password>
false to disable hostname verificationtls.verify-hostname=false
4. Restart the services.
Results
Your Talend Data Preparation instance running in HTTPS can now communicate with Talend Identityand Access Management, also running with a secured HTTPS connection.
Using the tDataprepRun component with an HTTPS connection
Procedure
1. Retrieve Talend Data Preparation certificate, or its Certificate Authority and add it to an existing ornew .jks file following this example:
keytool -import -trustcacerts -alias <cert-alias> -file <dp_certificate.crt> -keystore
<truststore.jks>
Installing your Talend Data Integration manually
120
2. To make the Studio trust the Talend Data Preparation certificate, edit the .ini file used to start theStudio:
-Djavax.net.ssl.trustStore=/path/to/<trust-store.jks>-Djavax.net.ssl.trustStorePassword=<trust-store password>
3. When designing your Job in the Studio, connect a tSetKeystore component to the data inputcomponent with an OnSubjobOk link in order for the Job to trust the Talend Data Preparationcertificate. For more information on how to configure the tSetKeystore, see Talend ComponentsReference Guide.
Results
For more information on how to use the tDataprepRun component and how to operationalize a recipein a Talend Job, see Talend Help Center (https://help.talend.com).
Creating a live dataset with an HTTPS connection
Procedure
1. Retrieve Talend Data Preparation certificate, or its Certificate Authority and add it to an existing ornew .jks file following this example:
keytool -import -trustcacerts -alias <cert-alias> -file <dp_certificate.crt> -keystore
<truststore.jks>
2. When designing your Job in the Studio, connect a tSetKeystore component to the data inputcomponent with an OnSubjobOk link in order for the Job to trust the Talend Data Preparationcertificate. For more information on how to configure the tSetKeystore, see Talend ComponentsReference Guide.
Results
For more information on how to create a live dataset, see Talend Help Center (https://help.talend.com).
Installing and configuring Talend Data StewardshipUsing Talend Installer is the recommended way to install Talend Data Stewardship but you canperform a manual installation if needed.
Installing Talend Data Stewardship manually
This procedure contains the steps to manually install Talend Data Stewardship on your machine.For the automatic installation procedure using Talend Installer, see Using Talend Installer graphicalinstallation mode on page 29.
Before you begin
• Talend Identity and Access Management is installed and running. For more information on TalendIdentity and Access Management installation, see Using Talend Installer graphical installationmode on page 29 for the automatic installation or Installing and configuring Talend Identity andAccess Management on page 64 for the manual installation.
Installing your Talend Data Integration manually
121
• Talend Administration Center is installed and running. For more information on TalendAdministration Center installation, see Using Talend Installer graphical installation mode on page29 for the automatic installation or Installing and configuring Talend Administration Center onpage 44 for the manual installation.
• A Talend Data Stewardship user exists in Talend Administration Center. For more information, seeTalend Administration Center User Guide.
• There are no other instance of MongoDB installed on your machine.
Procedure
1. Download Apache Kafka from https://kafka.apache.org/downloads and install it. For moreinformation on how to install it, see Apache Kafka documentation.
For more information on the supported Apache Kafka version, see Compatible messaging systemson page 16.
2. Download a MongoDB 3.4 instance from https://www.mongodb.com/download-center and installit. For more information on how to install it, see MongoDB documentation.
For more information on the supported MongoDB databases, see Compatible databases on page13.
If you want to secure connections with MongoDB using SSL, MongoDB Enterprise Server has to bemanually installed on your machine. For more information, see https://docs.mongodb.com/v3.4/security/.
3. Add mongo to the PATH environment variable.
4. Create the tds database in MongoDB.
5. Create the following user for the tds database in MongoDB:
• Username: tds-user
• Password: duser
6. Download Apache Tomcat from http://tomcat.apache.org/download-80.cgi and install it. For moreinformation on how to install it, see Apache Tomcat documentation.
For production environments, it is recommended to use a separate Tomcat instance for TalendData Stewardship.
7. Stop your Tomcat instance if it was automatically started.
8. Unzip the Talend-IAM-VA.B.C.zip to a TDS_files folder.
9. Remove the <Tomcat>\webapps\ROOT.war file.
10.Create a <Tomcat>\app folder and copy the .war files from TDS_files.
11.Copy the files contained in TDS_files\context to <Tomcat>\conf\Catalina\localhost.
12.Copy the configuration file contained in TDS_files\config to <Tomcat>\conf.
Configuring Talend Data Stewardship
Configuring Talend Data Stewardship after installation
Procedure
1. Open the <Tomcat>\conf\data-stewardship.properties file and edit the following Talend DataStewardship properties for MongoDB:
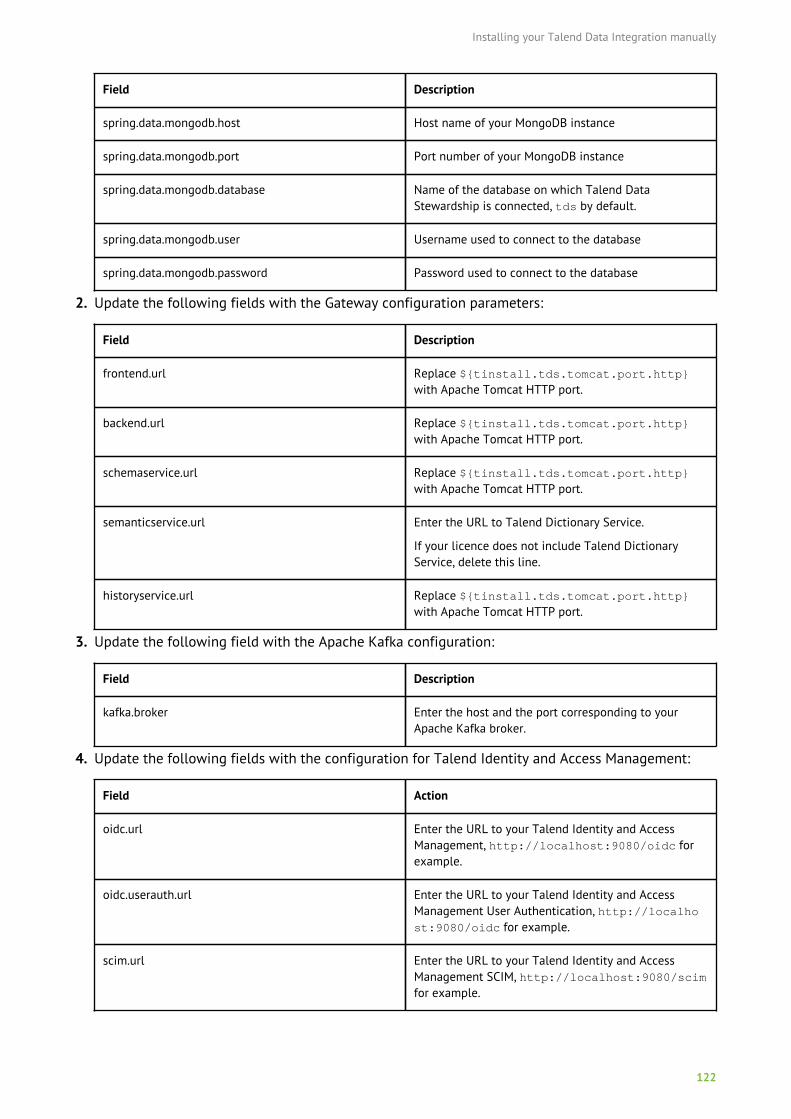
Installing your Talend Data Integration manually
122
Field Description
spring.data.mongodb.host Host name of your MongoDB instance
spring.data.mongodb.port Port number of your MongoDB instance
spring.data.mongodb.database Name of the database on which Talend DataStewardship is connected, tds by default.
spring.data.mongodb.user Username used to connect to the database
spring.data.mongodb.password Password used to connect to the database
2. Update the following fields with the Gateway configuration parameters:
Field Description
frontend.url Replace ${tinstall.tds.tomcat.port.http}with Apache Tomcat HTTP port.
backend.url Replace ${tinstall.tds.tomcat.port.http}with Apache Tomcat HTTP port.
schemaservice.url Replace ${tinstall.tds.tomcat.port.http}with Apache Tomcat HTTP port.
semanticservice.url Enter the URL to Talend Dictionary Service.
If your licence does not include Talend DictionaryService, delete this line.
historyservice.url Replace ${tinstall.tds.tomcat.port.http}with Apache Tomcat HTTP port.
3. Update the following field with the Apache Kafka configuration:
Field Description
kafka.broker Enter the host and the port corresponding to yourApache Kafka broker.
4. Update the following fields with the configuration for Talend Identity and Access Management:
Field Action
oidc.url Enter the URL to your Talend Identity and AccessManagement, http://localhost:9080/oidc forexample.
oidc.userauth.url Enter the URL to your Talend Identity and AccessManagement User Authentication, http://localhost:9080/oidc for example.
scim.url Enter the URL to your Talend Identity and AccessManagement SCIM, http://localhost:9080/scimfor example.
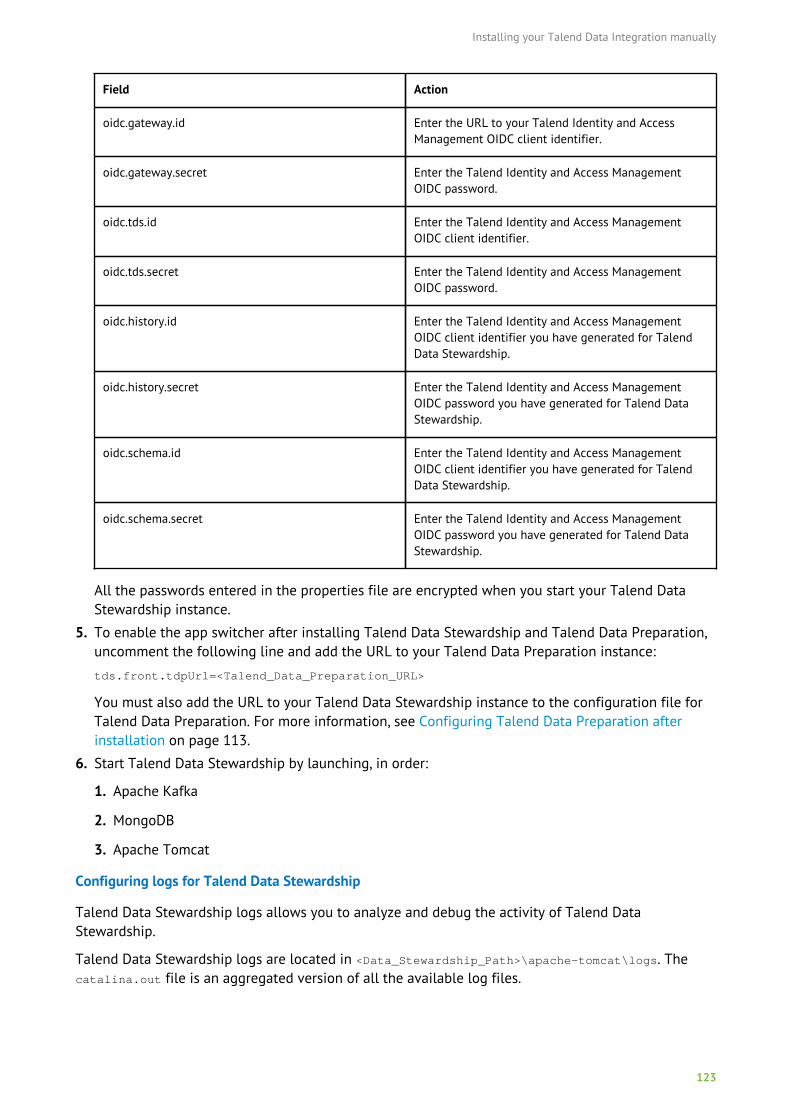
Installing your Talend Data Integration manually
123
Field Action
oidc.gateway.id Enter the URL to your Talend Identity and AccessManagement OIDC client identifier.
oidc.gateway.secret Enter the Talend Identity and Access ManagementOIDC password.
oidc.tds.id Enter the Talend Identity and Access ManagementOIDC client identifier.
oidc.tds.secret Enter the Talend Identity and Access ManagementOIDC password.
oidc.history.id Enter the Talend Identity and Access ManagementOIDC client identifier you have generated for TalendData Stewardship.
oidc.history.secret Enter the Talend Identity and Access ManagementOIDC password you have generated for Talend DataStewardship.
oidc.schema.id Enter the Talend Identity and Access ManagementOIDC client identifier you have generated for TalendData Stewardship.
oidc.schema.secret Enter the Talend Identity and Access ManagementOIDC password you have generated for Talend DataStewardship.
All the passwords entered in the properties file are encrypted when you start your Talend DataStewardship instance.
5. To enable the app switcher after installing Talend Data Stewardship and Talend Data Preparation,uncomment the following line and add the URL to your Talend Data Preparation instance:
tds.front.tdpUrl=<Talend_Data_Preparation_URL>
You must also add the URL to your Talend Data Stewardship instance to the configuration file forTalend Data Preparation. For more information, see Configuring Talend Data Preparation afterinstallation on page 113.
6. Start Talend Data Stewardship by launching, in order:
1. Apache Kafka
2. MongoDB
3. Apache Tomcat
Configuring logs for Talend Data Stewardship
Talend Data Stewardship logs allows you to analyze and debug the activity of Talend DataStewardship.
Talend Data Stewardship logs are located in <Data_Stewardship_Path>\apache-tomcat\logs. Thecatalina.out file is an aggregated version of all the available log files.
Installing your Talend Data Integration manually
124
Procedure
1. Open the following files:
• <Data_Stewardship_Path>\apache-tomcat\conf\data-stewardship-core-logback.xml for thecore backend service log
• <Data_Stewardship_Path>\apache-tomcat\conf\data-stewardship-history-logback.xml forthe history service log
• <Data_Stewardship_Path>\apache-tomcat\conf\data-stewardship-schema-logback.xml forthe schemas management service log
2. Add the following line before the <root> element:
<logger name="org.talend" level="DEBUG"/>
Results
The log information level is now set to DEBUG, but you can set it to another value. For moreinformation on log levels, see http://logging.apache.org/log4j/1.2/apidocs/org/apache/log4j/Level.html.
Configuring the Apache Kafka topic names for Talend Data Stewardship
You can enable the configuration of the Apache Kafka topic names for Talend Data Stewardshipby adding extra parameters to the data-stewardship.properties file and changing their valuesaccordingly.
Procedure
1. Open the <Tomcat>/conf/data-stewardship.properties file.
2. Add the following lines:
tds.taskBatch.topic=impact-analysis-batchschema.crud.topic=schemasschema.references.topic=schemas-referencesdq.dictionary.topic=dqDictionary
This example shows the default values of the parameters which you can change according to yourneeds.
However, if you change the value of dq.dictionary.topic, you should also change it inspring.cloud.stream.bindings.dqDictionary.destination in the tdqdict.properties file.
Configuring Talend Data Stewardship to support Kerberized Apache Kafka
You can set up Talend Data Stewardship to work with an external Kerberized Apache Kafka.
Before you begin
Make sure you have the following resources:
• Client Kerberos configuration file: krb5.conf
• JAAS Kerberos configuration file: kafka_client_jaas.conf
• Kerberos keytab file: hostname.keyTab
• JKS truststore: krb5.truststore
Installing your Talend Data Integration manually
125
Procedure
1. Create an <install_dir>/kafka-kerberos/ directory and copy the below files into it:
• krb5.conf
• kafka_client_jaas.conf
• hostname.keyTab
• krb5.truststore
2. Add the below java options to the <install_dir>/tds/apache-tomcat/bin/setenv.sh file:
-Djava.security.auth.login.config=<install_dir>/kafka-kerberos/kafka_client_jaas.conf-Djava.security.krb5.conf=<install_dir>/kafka-kerberos/krb5.conf
3. Open the <install_dir>/kafka-kerberos/kafka_client_jaas.conf file and check that the keyTabproperty is as below:
keyTab=<install_dir>/kafka-kerberos/hostname.keyTab
4. Edit the <install_dir>/tds/apache-tomcat/bin/conf/data-stewardship.properties file to addor edit the following lines:
kafka.ssl.truststore.location=<install_dir>/kafka-kerberos/krk5.truststorekafka.ssl.truststore.password=<your_truststore_password>spring.cloud.stream.kafka.binder.configuration.ssl.truststore.location=${kafka.ssl.truststore.location}spring.cloud.stream.kafka.binder.configuration.ssl.truststore.password=${kafka.ssl.truststore.password}spring.kafka.properties.ssl.truststore.location=${kafka.ssl.truststore.location}spring.kafka.properties.ssl.truststore.password=${kafka.ssl.truststore.password}
Configuring an HTTPS connection for Talend Data Stewardship and itsdependencies
Generating an SSL certificate
To configure Talend Data Stewardship to run securely using the Secure Sockets Layer (SSL) protocol,you need to start by generating a trusted signed certificate.
Procedure
1. Generate an SSL certificate.
For more information about how to generate a keystore file, see How to generate a keystore file.
2. As an administrator, import the certificate into your JVM using the command:
keytool -import -trustcacerts -file <certificate_path> -alias <certificate_name> -
keystore "%JAVA_HOME%/jre/lib/security/cacerts".
Results
Talend Data Stewardship only supports the Java Key Store (.jks) format to store keys and certificates.
Securing connections for Talend Data Stewardship
To secure connections between Talend Data Stewardship, the MongoDB server and Apache Kafka, youneed to edit the application.properties file.

Installing your Talend Data Integration manually
126
Note that securing the MongoDB connection is not possible if you select the embedded MongoDBinstance during the installation process.
If you want to secure connections with MongoDB using SSL, MongoDB Enterprise Server has to bemanually installed on your machine. For more information, see https://docs.mongodb.com/v3.2/security/.
Procedure
1. Open the <Data_Stewardship_Path>\config\data-stewardship.properties file.
2. To trust the server certificate used by Talend Data Stewardship, edit the following lines:
http.ssl.truststore.location=<path_to_truststore>http.ssl.truststore.password=<truststore_password>
3. By default, Talend Data Stewardship will not verify that the hostname matches the certificatecommon name.
To enable this verification, change the value of the following field to true:
http.ssl.verify.hostname=true
4. To allow Talend Data Stewardship to use private key authentication, edit the following lines:
http.ssl.keystore.location=<path_to_keystore>http.ssl.keystore.password=<keystore_password>http.ssl.key.password=<key_password>
5. To secure connections with MongoDB, edit the following lines:
spring.data.mongodb.ssl=truespring.data.mongodb.ssl.trust-store=<path_to_truststore>spring.data.mongodb.ssl.trust-store-password=<truststore_password>
6. To secure connections with Kafka using communication encryption only, edit the following lines:
kafka.security.protocol=SSLkafka.ssl.truststore.location=<path_to_truststore>kafka.ssl.truststore.password=<truststore_password>
7. To secure connections with Kafka using authentication, edit the following lines:
kafka.ssl.keystore.location=<path_to_keystore>kafka.ssl.keystore.password=<keystore_password>kafka.ssl.key.password=<key_password>
Note that the communication encryption parameters must also be defined to use authentication.
8. To secure connections with the message broker, edit the following lines:
spring.cloud.stream.kafka.binder.configuration.security.protocol=SSLspring.cloud.stream.kafka.binder.configuration.ssl.truststore.location=<path_to_truststore>spring.cloud.stream.kafka.binder.configuration.ssl.truststore.password=<truststore_password>spring.cloud.stream.kafka.binder.configuration.ssl.keystore.location=<path_to_keystore>spring.cloud.stream.kafka.binder.configuration.ssl.keystore.password=<keystore_password>spring.cloud.stream.kafka.binder.configuration.ssl.key.password=<key_password>spring.kafka.properties.security.protocol=SSLspring.kafka.properties.ssl.truststore.location=<path_to_truststore>
Installing your Talend Data Integration manually
127
spring.kafka.properties.ssl.truststore.password=<truststore_password>spring.kafka.properties.ssl.keystore.location=<path_to_keystore>spring.kafka.properties.ssl.keystore.password=<keystore_password>spring.kafka.properties.ssl.key.password=<key_password>
9. To secure connection with Talend Identity and Access Management, edit the following lines:
tds.security=iamoidc.url=https://<host_name:port>/oidcoidc.userauth.url=https://<host_name:port>/oidcscim.url=https://<host_name:port>/scim
10.Change the services URLs from http to https:
tds.history.service.url==https://${public.ip}:${server.port}/data-history-serviceschema.service.url=https://${public.ip}:${server.port}/schemaservice
11.Change the gateway URLs from http to https:
frontend.url=https://<datastewardship_server:port>/internal/frontendbackend.url=https://<datastewardship_server:port>/internal/data-stewardshipschemaservice.url=https://<datastewardship_server:port>/internal/schemaservicehistoryservice.url=https://<datastewardship_server:port>/internal/data-history-service
12.Open the <Data_Stewardship_Path>/iam/apache_tomcat/clients/tds-client.json file andupdate the URL for Talend Data Stewardship:
{ "client_name": "TDS OIDC Gateway", "client_id": "tl6K6ac7tSE-LQ", "client_secret": "cB/gNxe2SXR3SPDbhshZXzErZoxVy8yUcs/f6K39rsg=", "redirect_uris": [ "https://<datastewardship_url:port>/login", "https://localhost:<ssl_port>/login", "https://127.0.0.1:<ssl_port>/login" ], "post_logout_redirect_uris": [ "https://<datastewardship_url:port>/", "https://localhost:<ssl_port>/", "https://127.0.0.1:<ssl_port>/" ], "grant_types": [ "password", "authorization_code", "refresh_token" ], "scope": "openid refreshToken"}
What to do next
To enable HTTPS support on Tomcat, see https://tomcat.apache.org/tomcat-8.0-doc/ssl-howto.html.
To enable SSL support on MongoDB, see https://docs.mongodb.com/v3.0/tutorial/configure-ssl/.
To enable SSL support on Kafka, see http://kafka.apache.org/documentation.html#security_ssl.
To enable SSL support on Talend Identity and Access Management, see Securing connections forTalend Identity and Access Management on page 69.
Installing your Talend Data Integration manually
128
Securing connections for Talend Administration Center
Procedure
1. Open the <Data_Stewardship_Path>/tac/apache-tomcat/conf/server.xml file and comment thenon-SSL part:
<!-- <Connector port="8080" protocol="HTTP/1.1" connectionTimeout="20000" redirectPort="8443" /> -->
2. Uncomment the following lines:
<!-- <Connector port="8443" protocol="org.apache.coyote.http11.Http11NioProtocol" maxThreads="150" SSLEnabled="true" scheme="https" secure="true" clientAuth="false" sslProtocol="TLS"/> -->
3. Add the following lines:
keystoreFile="<certificate_path>/server.keystore.jks" keystorePass="<certificate_password>"
Talend Data Stewardship in cluster mode
You can install several instances of Talend Data Stewardship in cluster mode if you want to benefitfrom a high availability and a better scalability with your product.
Clustering is the process of grouping together a set of similar physical systems in order to ensure alevel of operational continuity and minimize the risk of unplanned downtime, in particular by takingadvantage of load balancing and failover features.
Architecture of Talend Data Stewardship in cluster mode
The following diagram illustrates the architecture behind Talend Data Stewardship and TalendDictionary Service when set up in cluster mode.
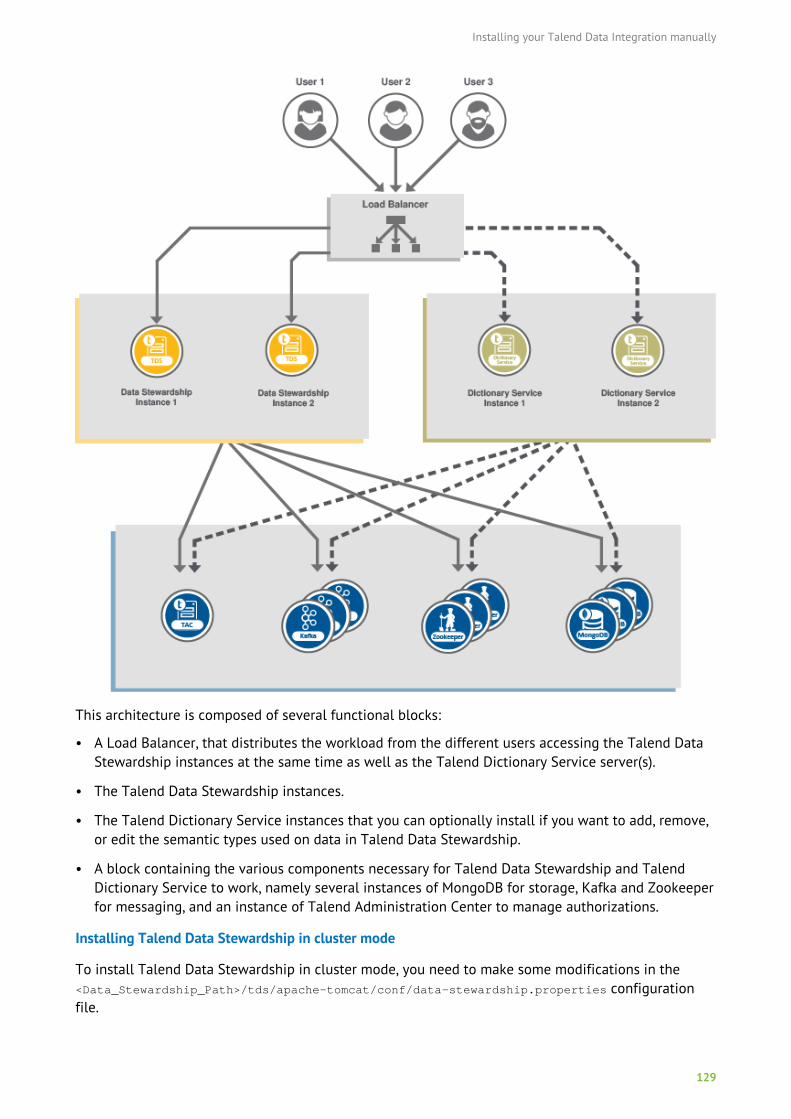
Installing your Talend Data Integration manually
129
This architecture is composed of several functional blocks:
• A Load Balancer, that distributes the workload from the different users accessing the Talend DataStewardship instances at the same time as well as the Talend Dictionary Service server(s).
• The Talend Data Stewardship instances.
• The Talend Dictionary Service instances that you can optionally install if you want to add, remove,or edit the semantic types used on data in Talend Data Stewardship.
• A block containing the various components necessary for Talend Data Stewardship and TalendDictionary Service to work, namely several instances of MongoDB for storage, Kafka and Zookeeperfor messaging, and an instance of Talend Administration Center to manage authorizations.
Installing Talend Data Stewardship in cluster mode
To install Talend Data Stewardship in cluster mode, you need to make some modifications in the<Data_Stewardship_Path>/tds/apache-tomcat/conf/data-stewardship.properties configurationfile.
Installing your Talend Data Integration manually
130
To perform this installation, you need to install and configure as many instances of Talend DataStewardship and its dependencies as necessary.
Before you begin
• You have configured a Load Balancer for Talend Data Stewardship.
• You have configured MongoDB in cluster mode. For more information, seeMongoDBdocumentation.
• You have configured Kafka and Zookeeper in cluster mode. For more information, see Zookeeperdocumentation and Kafka documentation
• You have configured Talend Identity and Access Management in cluster mode. For moreinformation, see Installing Talend Identity and Access Management in cluster mode on page 70.
Procedure
1. Install a first Talend Data Stewardship instance.
For more information on the installation procedure, see Installing and configuring Talend DataStewardship on page 120.
2. In the <Data_Stewardship_Path>/tds/apache-tomcat/conf/data-stewardship.properties file,edit the mongodb.host property to specify the hosts and ports of the several MongoDB instances.
Use the following syntax:
spring.data.mongodb.host=<host1>:<port1>,<host2>:<port2>,...,<hostN>
The hosts and ports for the different URLs must be concatenated, except for the last host, that willinherit the value of the mongodb.port property. For example:
spring.data.mongodb.host=mongorep-mongodb-replica-1.mongorep-mongodbreplica.default.svc.cluster.local:27017,mongorep-mongodb-replica-0.mongorep-mongodbreplica.default.svc.cluster.local:27017,mongorep-mongodb-replica-2.mongorep-mongodbreplica.default.svc.cluster.local:27017,mongorep-mongodb-replica-3.mongorep-mongodbreplica.default.svc.cluster.localspring.data.mongodb.host=27017
3. Edit the properties specifying the hosts and ports for the Kafka and Zookeeper instances.
In the same way as the MongoDB URLs, the Kafka and Zookeeper hosts and ports must beconcatenated, except for the last port, that is inherited from the dedicated properties.
talend.kafka.brokers=host1:9092,host2:9092,host3talend.kafka.port=9092talend.zookeeper.nodes=host1:2181,host2:2181,host3talend.zookeeper.port=2181
Specify also the below peer port parameters which identify the host name with the port number.
kafka.broker=host1:9092,host2:9092,host3:9092schema.kafka.broker=host1:9092,host2:9092,host3:9092
Installing your Talend Data Integration manually
131
4. To increase the session duration and reduce the risk of unexpected logouts, add the followinglines:
security.token.renew-after=600security.token.invalid-after=3600
5. Repeat the above steps to install and configure other instances of Talend Data Stewardship.Increment the value in the service.instance.id parameter at <Data_Stewardship_Path>/tds/apache-tomcat/conf/data-stewardship.properties to use a unique identifier per instance.
6. Edit the <Data_Stewardship_Path>/iam/apache-tomcat/clients/tds-client.json files to add theredirection URLs in the post_logout_redirect_uris and redirect_uris fields specifying the loadbalancer ports.
Optionally, to access directly one of the Talend Data Stewardship instances add the redirectionURLs of the other instances in the fields.
7. Create partitions for Kafka topics in each Talend Data Stewardship instance:
a) Launch a Talend Data Stewardship instance. This automatically creates several Kafka topics.
b) Stop the instance and define the partitions per topics manually. You need to define as manypartitions as Kafka nodes.
For more information, see Kafka documentation.
c) Restart the instance.
Results
You have installed several Talend Data Stewardship instances and configured them to work in clustermode.
Note: If your license includes Talend Dictionary Service, you may want to install it in clustermode as well. For more information, see Installing Talend Dictionary Service in cluster mode.
Appendices
132
Appendices
Introduction to the Talend productsThe present section lists all the elements required for using the Talend products. To ease theirmanagement, we recommend that you centralize all the server modules on one single system.
Note: All Talend applications to be installed must be the same version.
• An application server (Apache Tomcat server) that hosts Talend Administration Center.
• A database server storing the administration metadata of Talend Administration Center (by default,an embedded H2 database is used).
• A version control system for Project metadata.
• A Web browser to access Web application:
• Talend Administration Center where projects, users and processes can be managed andadministrated. For more information, see the Talend Administration Center User Guide.
• An artifact repository in which are stored software updates, external libraries and artifacts.
• Execution servers (JobServers) or Talend Runtime execution containers (based on Apache Karaf) todeploy and execute processes.
• A Studio API to carry out technical processes. For more information, see the Talend Studio UserGuide.
• A Talend Activity Monitoring Console, providing detailed monitoring capabilities that can beused to consolidate the collected log information. For more information, see the Talend ActivityMonitoring Console User Guide.
Each of these elements is detailed in the following sub-sections.
Apache Tomcat Server
The Apache Tomcat server is an application server that hosts Talend Administration Center. ThisWeb application gives access to all management and administration functionalities for an integrationproject, allowing users to (depending on their role):
• Create and manage projects.
• Create and manage user accounts and roles/rights.
• Access the Publisher to publish and schedule artifact publishing on the artifact repository.
• Access the Job Conductor to schedule, deploy and execute Jobs.
• Access the Monitoring node to monitor the execution of Jobs and visualize the logs.
Note: Talend Administration Center can also be hosted by JBoss or Pivotal tc applicationservers.
For more information on how to install Talend Administration Center manually, see Installing andconfiguring Talend Administration Center on page 44.
Appendices
133
Database
The administration database server is used to store administration information and manage thepersistence in Talend Administration Center. By default an embedded H2 database is used, butyou can also use MySQL, MS SQL Server, or Oracle to store all cross-project data (users, projects,authorization, license, tasks, triggers, monitoring).
The administration database will be named <talend_administrator> in the rest of this document.
The <talend_administrator> administration database will contain all the data related to projectinformation and administration including: administration data, project declaration, user declarationand authorization, task list, etc.
The tables in this database are automatically created when connecting for the first time to TalendAdministration Center. The created tables include (among others):
• a Users table,
• a Projects table,
• a Rights table.
Warning: These tables are created, populated and managed automatically by Talend, users donot need to take any action.
For more information on how to run Talend Administration Center on another database than theembedded H2, see Configuring Talend Administration Center to run on a different database than H2on page 50.
Version control system
We recommend you to store several projects per repository, simply in order not to have too manyrepositories to deal with. However you can choose to store only one project per Git or SVN repository,if you prefer so.
For more information on how to configure your version control systems, see Setting up your versioncontrol system on page 42.
You can also have several version control repositories each containing several projects. For moreinformation on how to create projects and store them in Git or SVN, see the Talend AdministrationCenter User Guide.
Artifact Repository
The artifact repository delivered by Talend and based on Sonatype Nexus is a preconfiguredapplication centralizing the management and usage of the Software Update, User libraries andsnapshots and releases repositories:
• Software Update is used to manage application updates (patches) distributed by Talend. By defaultthe talend-updates repository is embedded within Software Update and retrieves the updatespublished by Talend. This repository allows the user to visualize the updates available.
For detailed information, seeSoftware update repository on page 134 .
• The User libraries repository is used to store all external libraries. These libraries are retrieved byTalend Studio at start-up and shared with Talend Administration Center via the talend-custom-libs repository.
Appendices
134
For detailed information, see User Libraries repository on page 136.
• The snapshots and releases repositories are used as a catalog in which all artifacts to be deployedand executed are stored. These artifacts are designed by the user from Talend Studio or any otherJava IDE. By default, the snapshots repository is used for development purposes and the releasesrepository is used for production. These repositories make artifacts available for deployment and orexecution in an execution server.
For detailed information, see Snapshots and Releases artifact repositories on page 137.
Talend also support JFrog Artifactory to be used with Talend server modules. An archive containingTalend scripts to initialize the Artifact repository is delivered in the Talend Administration Centerpackage.
For more information on how to install and configure Talend Artifact Repository, see Installing andconfiguring Talend Artifact Repository on page 74.
Software update repository
The following image shows the architecture of Software Update linked to Talend AdministrationCenter and to the Talend Studio.
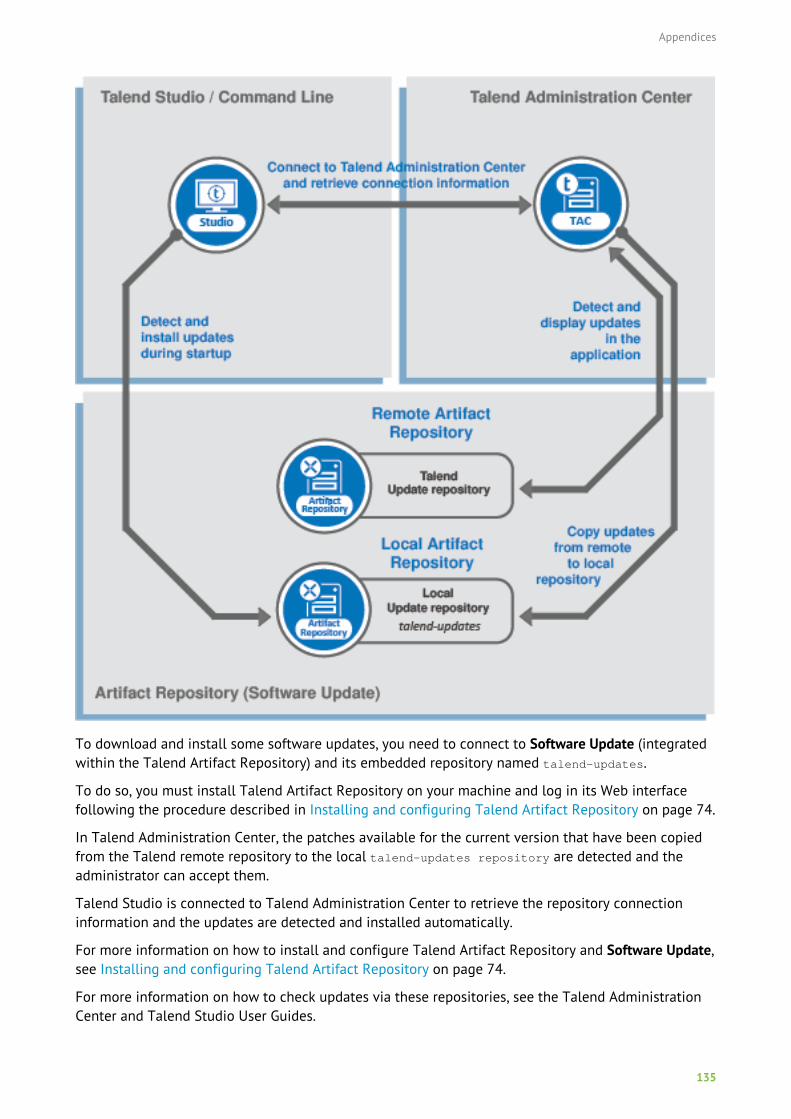
Appendices
135
To download and install some software updates, you need to connect to Software Update (integratedwithin the Talend Artifact Repository) and its embedded repository named talend-updates.
To do so, you must install Talend Artifact Repository on your machine and log in its Web interfacefollowing the procedure described in Installing and configuring Talend Artifact Repository on page 74.
In Talend Administration Center, the patches available for the current version that have been copiedfrom the Talend remote repository to the local talend-updates repository are detected and theadministrator can accept them.
Talend Studio is connected to Talend Administration Center to retrieve the repository connectioninformation and the updates are detected and installed automatically.
For more information on how to install and configure Talend Artifact Repository and Software Update,see Installing and configuring Talend Artifact Repository on page 74.
For more information on how to check updates via these repositories, see the Talend AdministrationCenter and Talend Studio User Guides.
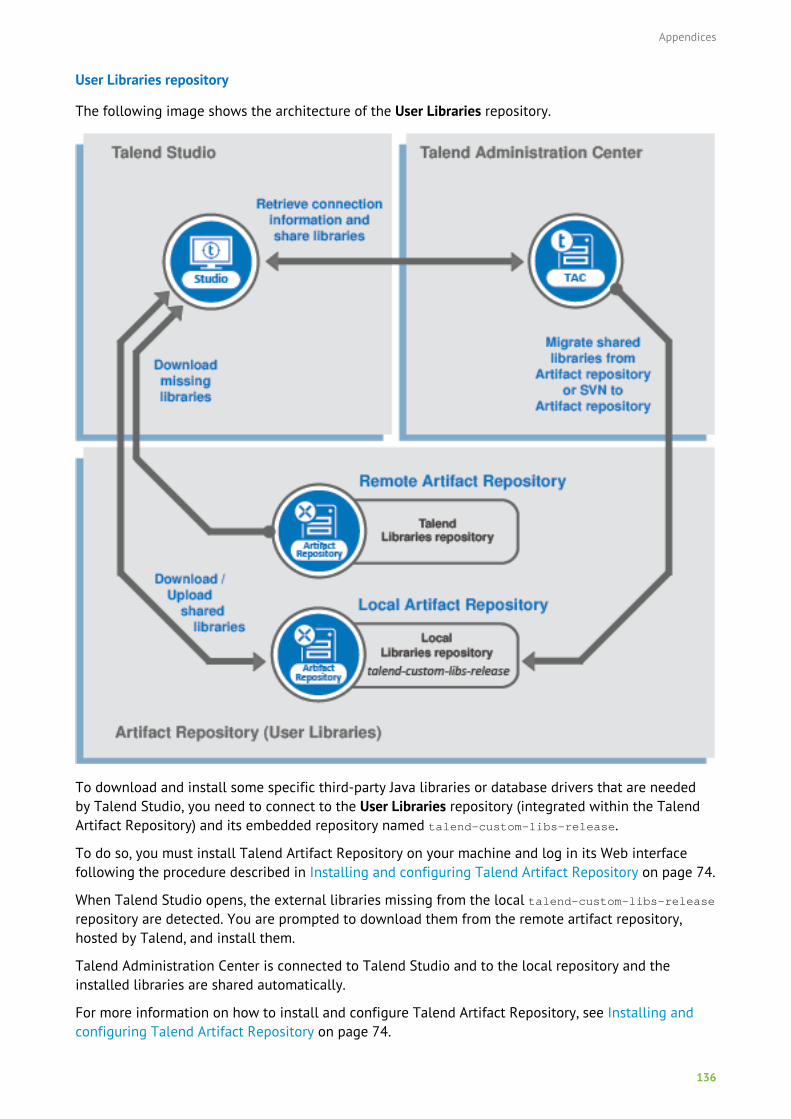
Appendices
136
User Libraries repository
The following image shows the architecture of the User Libraries repository.
To download and install some specific third-party Java libraries or database drivers that are neededby Talend Studio, you need to connect to the User Libraries repository (integrated within the TalendArtifact Repository) and its embedded repository named talend-custom-libs-release.
To do so, you must install Talend Artifact Repository on your machine and log in its Web interfacefollowing the procedure described in Installing and configuring Talend Artifact Repository on page 74.
When Talend Studio opens, the external libraries missing from the local talend-custom-libs-releaserepository are detected. You are prompted to download them from the remote artifact repository,hosted by Talend, and install them.
Talend Administration Center is connected to Talend Studio and to the local repository and theinstalled libraries are shared automatically.
For more information on how to install and configure Talend Artifact Repository, see Installing andconfiguring Talend Artifact Repository on page 74.
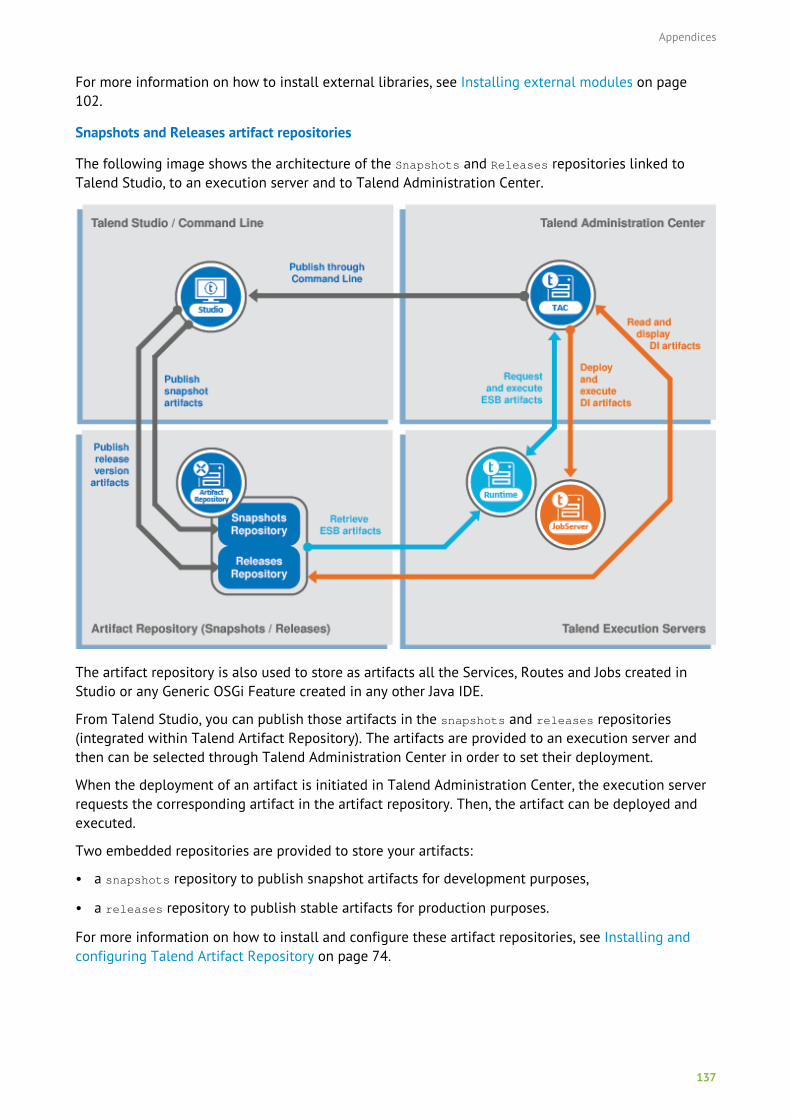
Appendices
137
For more information on how to install external libraries, see Installing external modules on page102.
Snapshots and Releases artifact repositories
The following image shows the architecture of the Snapshots and Releases repositories linked toTalend Studio, to an execution server and to Talend Administration Center.
The artifact repository is also used to store as artifacts all the Services, Routes and Jobs created inStudio or any Generic OSGi Feature created in any other Java IDE.
From Talend Studio, you can publish those artifacts in the snapshots and releases repositories(integrated within Talend Artifact Repository). The artifacts are provided to an execution server andthen can be selected through Talend Administration Center in order to set their deployment.
When the deployment of an artifact is initiated in Talend Administration Center, the execution serverrequests the corresponding artifact in the artifact repository. Then, the artifact can be deployed andexecuted.
Two embedded repositories are provided to store your artifacts:
• a snapshots repository to publish snapshot artifacts for development purposes,
• a releases repository to publish stable artifacts for production purposes.
For more information on how to install and configure these artifact repositories, see Installing andconfiguring Talend Artifact Repository on page 74.
Appendices
138
Talend Runtime
Talend Runtime (based on Apache Karaf) is an execution container in which you can deploy andexecute all your Jobs stored on your Git or SVN repository.
For more information on the installation of Talend Runtime, see Installing Talend Runtime on page84.
Talend JobServer
Talend JobServer is an application that allows a system installed on the same network as TalendAdministration Center to declare itself as an execution server. These systems must obviously havea working JVM. For more information on the installation of Talend JobServer, see Installing andconfiguring your Talend JobServer on page 78.
Talend Studio
Talend Studio is a rich client that allows the user (such as a project manager, a developer or a DBA) towork on any Talend project for which he has authorization.
Talend Studio offers a comprehensive set of tools and functions for all its key capabilities including:
• Integration
• Activity monitoring Console
These tools are ALL accessible in different perspectives from one Talend Studio.
Note: The availability of perspectives in your Talend Studio depends either on the license youhave when you are working in a local project, or on the type of the remote project itself whenyou are working in remote projects.
For further information on user authorization on remote project, see the Talend Administration CenterUser Guide.
For further information about the different perspectives available in the studio, see the Talend StudioUser Guide.
For more information on how to install Talend Studio, see Installing and configuring your TalendStudio on page 95.
Talend Activity Monitoring Console log database
If you want to use the Talend Activity Monitoring Console, an <AMC> log database must be created,which can be installed on any server. This <AMC> database will initially be empty. Its name may bemodified, but you must take into account this modification in the rest of this document.
The <AMC> database will contain three tables that collect data allowing users to monitor Jobs. Thethree tables will collect data from the following components:
• tFlowMeterCatcher,
• tLogCatcher,
• tStatCatcher.
Instructions on how to create these tables and their structure is provided in the Talend ActivityMonitoring Console User Guide.
Appendices
139
A corresponding SQL user must be created and thus mapped to have access to this database. This usershould be granted the "create" and "update" rights.
For more information on how to install Talend Activity Monitoring Console, see Installing the TalendActivity Monitoring Console web application on page 86.
Architecture of the Talend productsThe operating principles of the Talend products could be summarized as briefly as the followingtopics:
• building technical or business-related processes,
• administrating users, projects, access rights and processes and their dependencies,
• deploying and executing technical processes,
• monitoring the execution of technical processes.
Note: Depending on your license, some of the functional blocks may not be available to you.
Each of the above topics can be isolated in different functional blocks and the different types ofblocks and their interoperability can be described as in the following architecture diagram :
Building and administrating
The CLIENTS block includes one or more Talend Studio APIs and Web browsers that could be on thesame or on different machines.
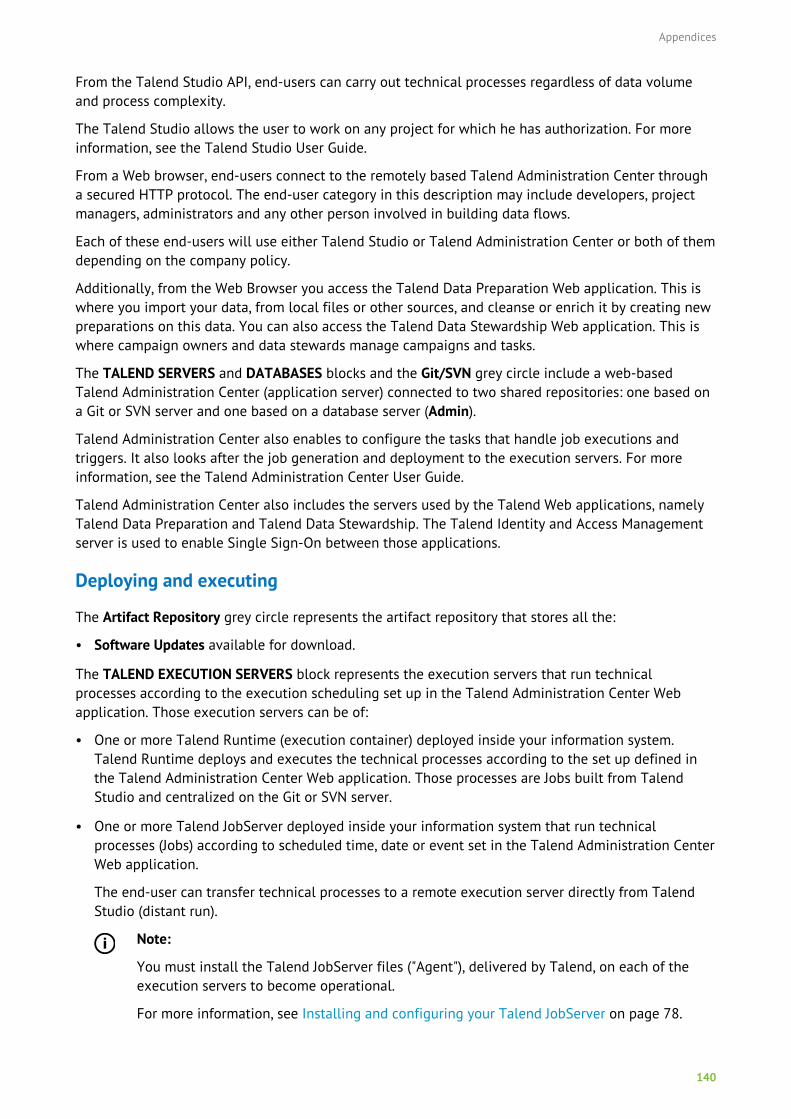
Appendices
140
From the Talend Studio API, end-users can carry out technical processes regardless of data volumeand process complexity.
The Talend Studio allows the user to work on any project for which he has authorization. For moreinformation, see the Talend Studio User Guide.
From a Web browser, end-users connect to the remotely based Talend Administration Center througha secured HTTP protocol. The end-user category in this description may include developers, projectmanagers, administrators and any other person involved in building data flows.
Each of these end-users will use either Talend Studio or Talend Administration Center or both of themdepending on the company policy.
Additionally, from the Web Browser you access the Talend Data Preparation Web application. This iswhere you import your data, from local files or other sources, and cleanse or enrich it by creating newpreparations on this data. You can also access the Talend Data Stewardship Web application. This iswhere campaign owners and data stewards manage campaigns and tasks.
The TALEND SERVERS and DATABASES blocks and the Git/SVN grey circle include a web-basedTalend Administration Center (application server) connected to two shared repositories: one based ona Git or SVN server and one based on a database server (Admin).
Talend Administration Center also enables to configure the tasks that handle job executions andtriggers. It also looks after the job generation and deployment to the execution servers. For moreinformation, see the Talend Administration Center User Guide.
Talend Administration Center also includes the servers used by the Talend Web applications, namelyTalend Data Preparation and Talend Data Stewardship. The Talend Identity and Access Managementserver is used to enable Single Sign-On between those applications.
Deploying and executing
The Artifact Repository grey circle represents the artifact repository that stores all the:
• Software Updates available for download.
The TALEND EXECUTION SERVERS block represents the execution servers that run technicalprocesses according to the execution scheduling set up in the Talend Administration Center Webapplication. Those execution servers can be of:
• One or more Talend Runtime (execution container) deployed inside your information system.Talend Runtime deploys and executes the technical processes according to the set up defined inthe Talend Administration Center Web application. Those processes are Jobs built from TalendStudio and centralized on the Git or SVN server.
• One or more Talend JobServer deployed inside your information system that run technicalprocesses (Jobs) according to scheduled time, date or event set in the Talend Administration CenterWeb application.
The end-user can transfer technical processes to a remote execution server directly from TalendStudio (distant run).
Note:
You must install the Talend JobServer files ("Agent"), delivered by Talend, on each of theexecution servers to become operational.
For more information, see Installing and configuring your Talend JobServer on page 78.
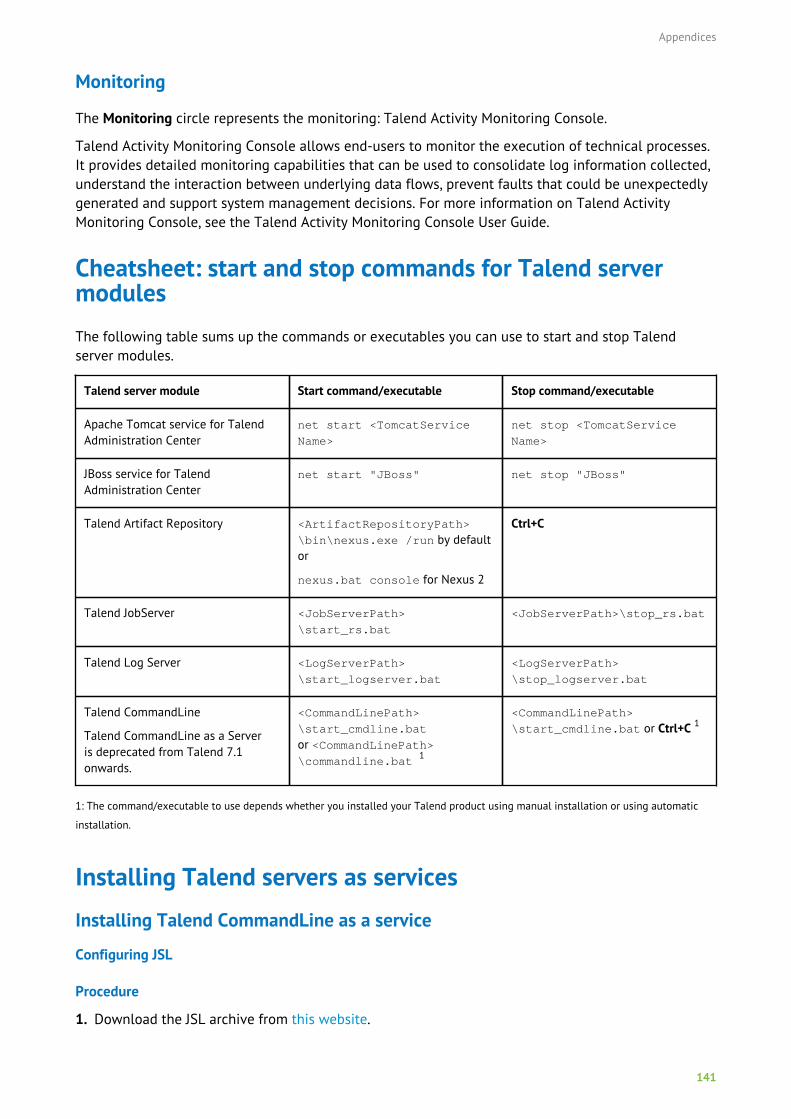
Appendices
141
Monitoring
The Monitoring circle represents the monitoring: Talend Activity Monitoring Console.
Talend Activity Monitoring Console allows end-users to monitor the execution of technical processes.It provides detailed monitoring capabilities that can be used to consolidate log information collected,understand the interaction between underlying data flows, prevent faults that could be unexpectedlygenerated and support system management decisions. For more information on Talend ActivityMonitoring Console, see the Talend Activity Monitoring Console User Guide.
Cheatsheet: start and stop commands for Talend servermodulesThe following table sums up the commands or executables you can use to start and stop Talendserver modules.
Talend server module Start command/executable Stop command/executable
Apache Tomcat service for TalendAdministration Center
net start <TomcatService
Name>
net stop <TomcatService
Name>
JBoss service for TalendAdministration Center
net start "JBoss" net stop "JBoss"
Talend Artifact Repository <ArtifactRepositoryPath>
\bin\nexus.exe /run by defaultor
nexus.bat console for Nexus 2
Ctrl+C
Talend JobServer <JobServerPath>
\start_rs.bat
<JobServerPath>\stop_rs.bat
Talend Log Server <LogServerPath>
\start_logserver.bat
<LogServerPath>
\stop_logserver.bat
Talend CommandLine
Talend CommandLine as a Serveris deprecated from Talend 7.1onwards.
<CommandLinePath>
\start_cmdline.bat
or <CommandLinePath>\commandline.bat 1
<CommandLinePath>
\start_cmdline.bat or Ctrl+C 1
1: The command/executable to use depends whether you installed your Talend product using manual installation or using automatic
installation.
Installing Talend servers as services
Installing Talend CommandLine as a service
Configuring JSL
Procedure
1. Download the JSL archive from this website.
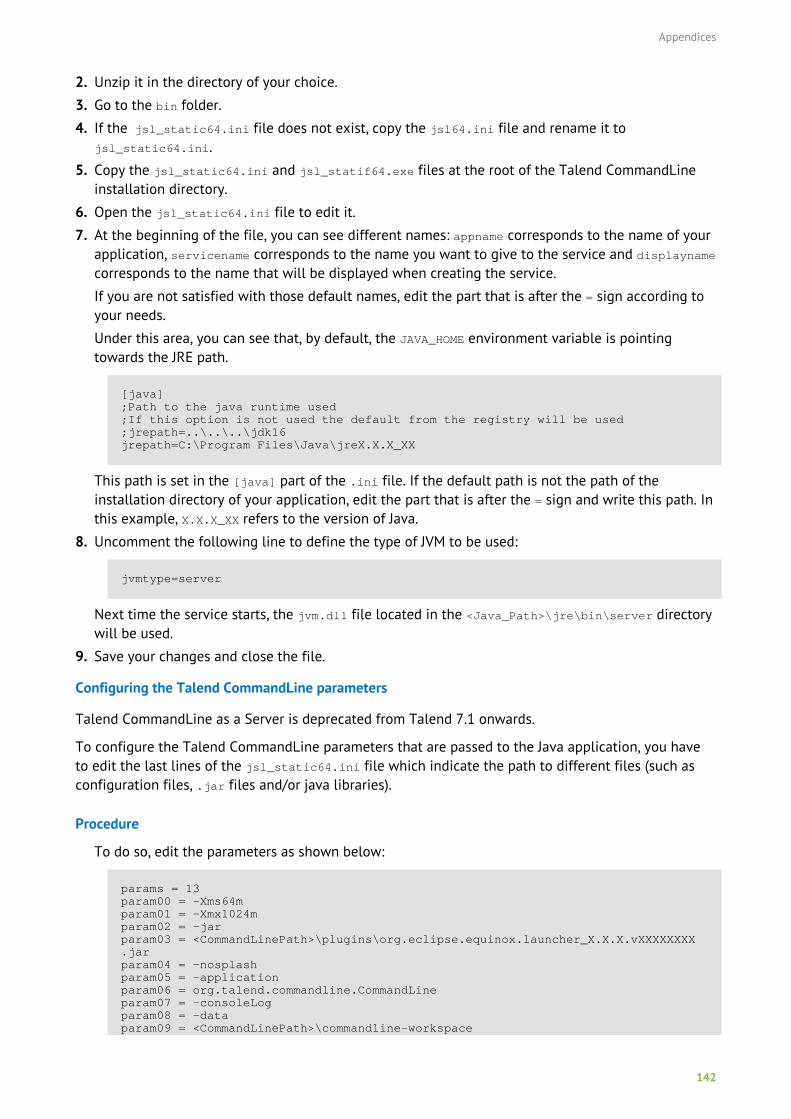
Appendices
142
2. Unzip it in the directory of your choice.
3. Go to the bin folder.
4. If the jsl_static64.ini file does not exist, copy the jsl64.ini file and rename it tojsl_static64.ini.
5. Copy the jsl_static64.ini and jsl_statif64.exe files at the root of the Talend CommandLineinstallation directory.
6. Open the jsl_static64.ini file to edit it.
7. At the beginning of the file, you can see different names: appname corresponds to the name of yourapplication, servicename corresponds to the name you want to give to the service and displaynamecorresponds to the name that will be displayed when creating the service.
If you are not satisfied with those default names, edit the part that is after the = sign according toyour needs.
Under this area, you can see that, by default, the JAVA_HOME environment variable is pointingtowards the JRE path.
[java];Path to the java runtime used;If this option is not used the default from the registry will be used;jrepath=..\..\..\jdk16jrepath=C:\Program Files\Java\jreX.X.X_XX
This path is set in the [java] part of the .ini file. If the default path is not the path of theinstallation directory of your application, edit the part that is after the = sign and write this path. Inthis example, X.X.X_XX refers to the version of Java.
8. Uncomment the following line to define the type of JVM to be used:
jvmtype=server
Next time the service starts, the jvm.dll file located in the <Java_Path>\jre\bin\server directorywill be used.
9. Save your changes and close the file.
Configuring the Talend CommandLine parameters
Talend CommandLine as a Server is deprecated from Talend 7.1 onwards.
To configure the Talend CommandLine parameters that are passed to the Java application, you haveto edit the last lines of the jsl_static64.ini file which indicate the path to different files (such asconfiguration files, .jar files and/or java libraries).
Procedure
To do so, edit the parameters as shown below:
params = 13param00 = -Xms64mparam01 = -Xmx1024mparam02 = -jarparam03 = <CommandLinePath>\plugins\org.eclipse.equinox.launcher_X.X.X.vXXXXXXXX.jarparam04 = -nosplashparam05 = -applicationparam06 = org.talend.commandline.CommandLineparam07 = -consoleLogparam08 = -dataparam09 = <CommandLinePath>\commandline-workspace
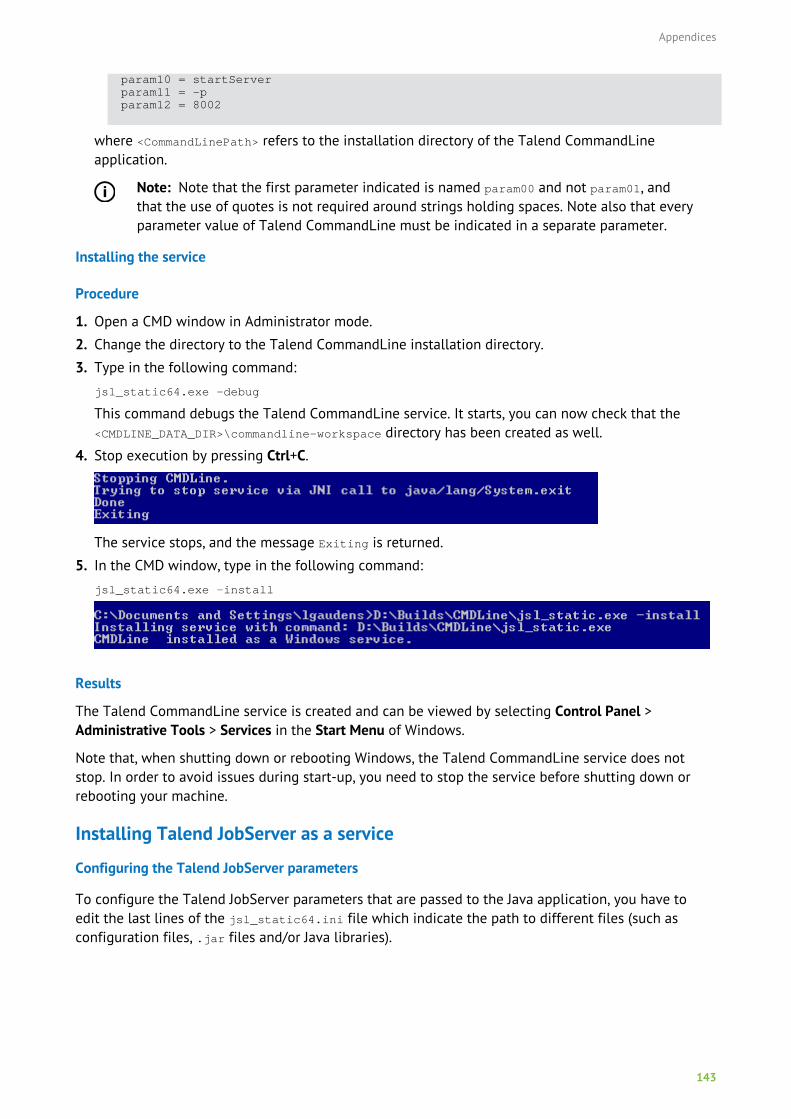
Appendices
143
param10 = startServerparam11 = -pparam12 = 8002
where <CommandLinePath> refers to the installation directory of the Talend CommandLineapplication.
Note: Note that the first parameter indicated is named param00 and not param01, andthat the use of quotes is not required around strings holding spaces. Note also that everyparameter value of Talend CommandLine must be indicated in a separate parameter.
Installing the service
Procedure
1. Open a CMD window in Administrator mode.
2. Change the directory to the Talend CommandLine installation directory.
3. Type in the following command:
jsl_static64.exe -debug
This command debugs the Talend CommandLine service. It starts, you can now check that the<CMDLINE_DATA_DIR>\commandline-workspace directory has been created as well.
4. Stop execution by pressing Ctrl+C.
The service stops, and the message Exiting is returned.
5. In the CMD window, type in the following command:
jsl_static64.exe -install
Results
The Talend CommandLine service is created and can be viewed by selecting Control Panel >Administrative Tools > Services in the Start Menu of Windows.
Note that, when shutting down or rebooting Windows, the Talend CommandLine service does notstop. In order to avoid issues during start-up, you need to stop the service before shutting down orrebooting your machine.
Installing Talend JobServer as a service
Configuring the Talend JobServer parameters
To configure the Talend JobServer parameters that are passed to the Java application, you have toedit the last lines of the jsl_static64.ini file which indicate the path to different files (such asconfiguration files, .jar files and/or Java libraries).
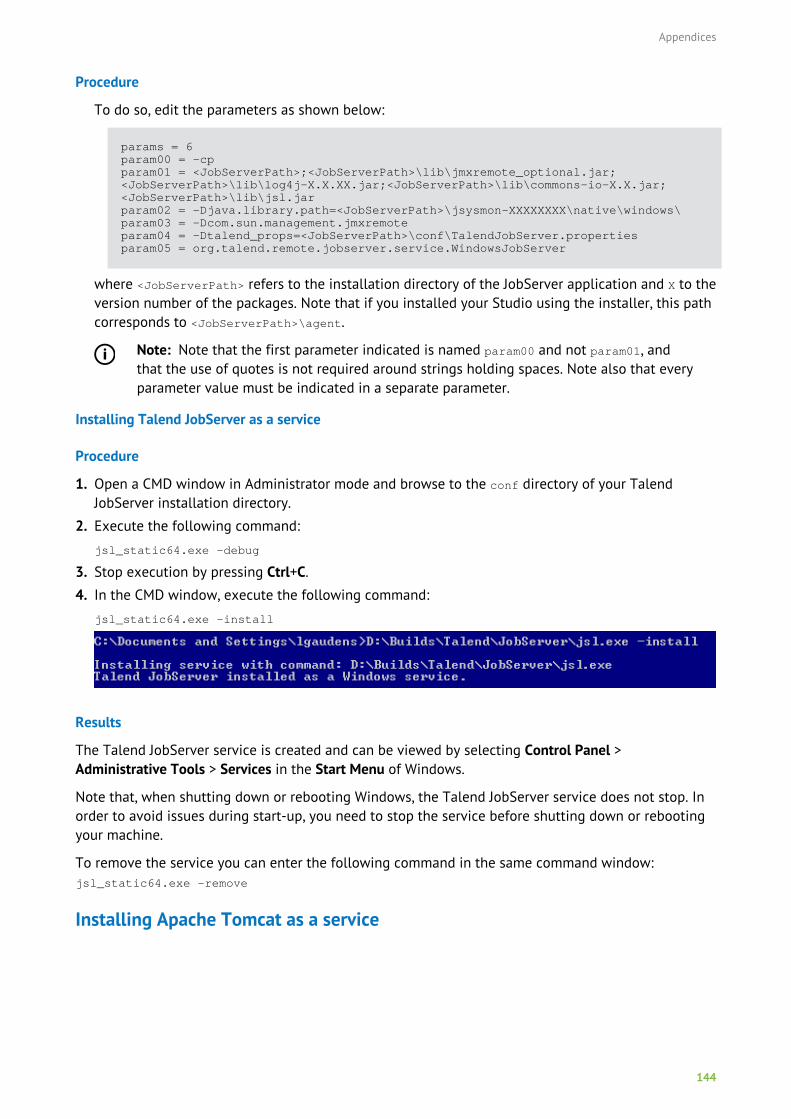
Appendices
144
Procedure
To do so, edit the parameters as shown below:
params = 6param00 = -cpparam01 = <JobServerPath>;<JobServerPath>\lib\jmxremote_optional.jar;<JobServerPath>\lib\log4j-X.X.XX.jar;<JobServerPath>\lib\commons-io-X.X.jar;<JobServerPath>\lib\jsl.jarparam02 = -Djava.library.path=<JobServerPath>\jsysmon-XXXXXXXX\native\windows\param03 = -Dcom.sun.management.jmxremoteparam04 = -Dtalend_props=<JobServerPath>\conf\TalendJobServer.propertiesparam05 = org.talend.remote.jobserver.service.WindowsJobServer
where <JobServerPath> refers to the installation directory of the JobServer application and X to theversion number of the packages. Note that if you installed your Studio using the installer, this pathcorresponds to <JobServerPath>\agent.
Note: Note that the first parameter indicated is named param00 and not param01, andthat the use of quotes is not required around strings holding spaces. Note also that everyparameter value must be indicated in a separate parameter.
Installing Talend JobServer as a service
Procedure
1. Open a CMD window in Administrator mode and browse to the conf directory of your TalendJobServer installation directory.
2. Execute the following command:
jsl_static64.exe -debug
3. Stop execution by pressing Ctrl+C.
4. In the CMD window, execute the following command:
jsl_static64.exe -install
Results
The Talend JobServer service is created and can be viewed by selecting Control Panel >Administrative Tools > Services in the Start Menu of Windows.
Note that, when shutting down or rebooting Windows, the Talend JobServer service does not stop. Inorder to avoid issues during start-up, you need to stop the service before shutting down or rebootingyour machine.
To remove the service you can enter the following command in the same command window:jsl_static64.exe -remove
Installing Apache Tomcat as a service
Appendices
145
Installing Apache Tomcat as a service
Before you begin
Before starting this service installation, make sure that you have the following files in the ApacheTomcat installation directory :
• tomcatX.exe where X refers to the version number of Apache Tomcat;
• tomcatXw.exe where X refers to the version number of Apache Tomcat;
• service.bat.
These files allow you to monitor and configure Apache Tomcat services. If you do not have these files,go to the http://tomcat.apache.org/ website, download them and put them under the bin folder ofyour Apache Tomcat installation directory.
Procedure
1. Open a CMD window in Administrator mode.
2. Browse to the bin folder of the Apache Tomcat installation directory, then type in the followingcommand:
service.bat install
Results
The Apache Tomcat service is created and can be viewed by selecting Control Panel > AdministrativeTools > Services in the Start Menu of Windows.
To remove the Apache Tomcat service you can enter the following command in the same commandwindow: service.bat remove
Installing Talend Runtime as a service
The Talend Runtime Container is based on Apache Karaf. Karaf Wrapper (for service wrapper) makes itpossible to install the Talend Runtime Container as a service.
Installing the wrapper
Procedure
1. Browse to the container\bin folder of the Talend Runtime installation directory, then launch thecontainer by executing the trun.bat file in Administrator mode.
2. To install the wrapper feature, type:
karaf@trun> feature:install wrapper
Once installed, wrapper feature will provide wrapper:install new command in the trun, whichallows you to install Talend Runtime as a service.
3. To install the service, type in the following command:
karaf@trun> wrapper:install
Alternatively, to register the container as a service in automatic start mode, simply type:
karaf@trun> wrapper:install -s AUTO_START -n TALEND-CONTAINER -d Talend-Container -D
"Talend Container Service"
where TALEND-CONTAINER is the name of the service, Talend-Container is the display name of theservice and "Talend Container Service" is the description of the service.
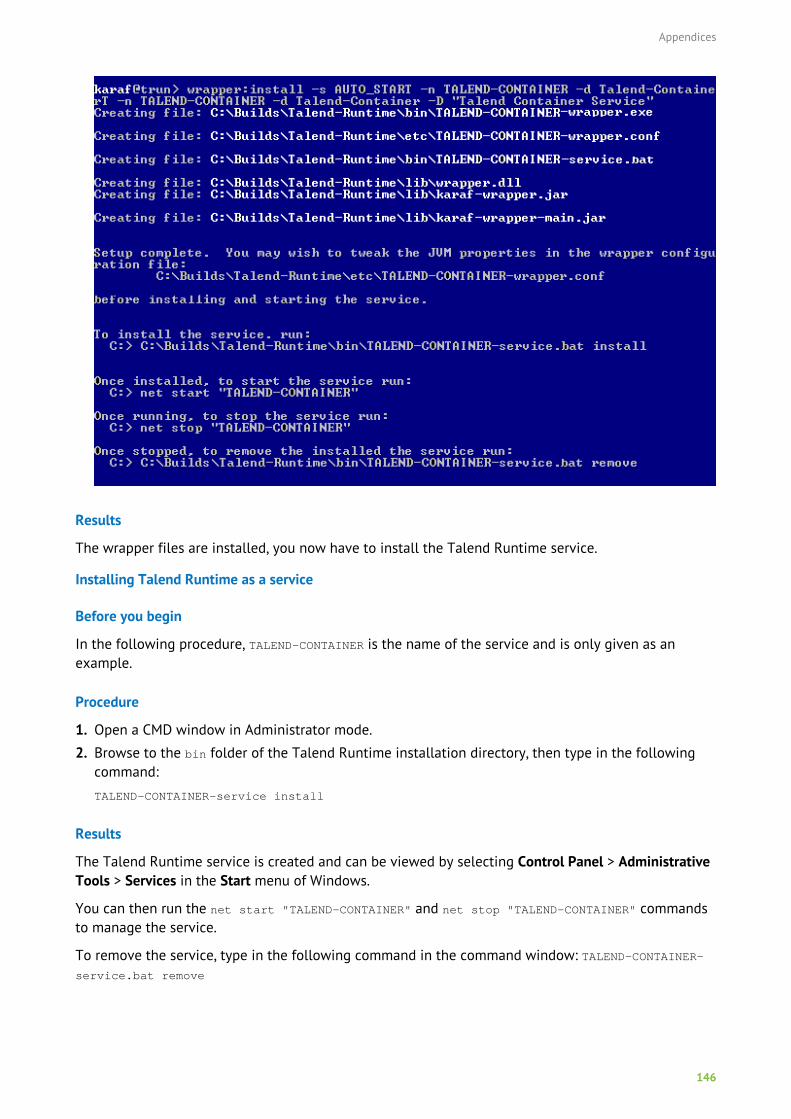
Appendices
146
Results
The wrapper files are installed, you now have to install the Talend Runtime service.
Installing Talend Runtime as a service
Before you begin
In the following procedure, TALEND-CONTAINER is the name of the service and is only given as anexample.
Procedure
1. Open a CMD window in Administrator mode.
2. Browse to the bin folder of the Talend Runtime installation directory, then type in the followingcommand:
TALEND-CONTAINER-service install
Results
The Talend Runtime service is created and can be viewed by selecting Control Panel > AdministrativeTools > Services in the Start menu of Windows.
You can then run the net start "TALEND-CONTAINER" and net stop "TALEND-CONTAINER" commandsto manage the service.
To remove the service, type in the following command in the command window: TALEND-CONTAINER-service.bat remove
Appendices
147
Installing Talend Artifact Repository as a service
Installing Talend Artifact Repository as a service
Procedure
1. Open a CMD window in Administrator mode.
2. Browse to the bin directory of the Talend Artifact Repository installation directory.
3. Enter the following command:
nexus.exe /install
Results
The Talend Artifact Repository service is created and can be viewed by selecting Control Panel >Administrative Tools > Services in the Start Menu of Windows.
You can then use the /start and /stop commands to manage the service.
For more information about the launching of Nexus artifact repository via these commands, seeInstalling and configuring Talend Artifact Repository on page 74.
To remove the service, enter the following command in the command window: nexus.exe /uninstall
Installing Talend Log Server as a service
Installing Talend Log Server as a service
Procedure
1. Download the nssm service wrapper archive file from this website and extract it to the directory ofyour choice. It holds a service wrapper for Windows.
2. At the root of the Talend Log Server installation directory, put the nssm.exe file corresponding toyour operating system.
3. Create a directory called sincedb.
4. Open a CMD window in Administrator mode.
5. Browse to the Talend Log Server installation directory and execute the following command:
nssm.exe install TalendLogserver start_logserver.bat
6. Use the following command to define the location of the start_logserver.bat file:
nssm.exe set TalendLogserver AppDirectory <path_to_start_logserver.bat>
Results
The Talend Log Server service is created.
Filebeat is automatically installed and started as a service.
Installing the Components Catalog as a service
Installing the Components Catalog as a service
Procedure
1. Download the nssm service wrapper archive file from this website and extract it to the directory ofyour choice. It holds a service wrapper for Windows.
Appendices
148
2. At the root of the Components Catalog installation directory, put the nssm.exe file correspondingto your operating system.
3. Open a CMD window in Administrator mode.
4. Browse to the Components Catalog installation directory and execute the following command:
nssm.exe install talend-tcomp-${product_version} start.bat
5. Use the following command to define the location of the start.bat file:
nssm.exe set talend-tcomp-${product_version} AppDirectory <path_to_start.bat>
6. Use the following command to define Components Catalog's display name shown in service.msc:
nssm.exe set talend-tcomp-${product_version} DisplayName Talend Components Catalog
Service ${product_version}
7. Use the following command to define Components Catalog's description:
nssm.exe set talend-tcomp-${product_version} Description Talend Components Catalog
Service ${product_version}
H2 Database Administration & MaintenanceThis Chapter provides information about how to manage and back up the H2 embedded database.
For more information about how to use the H2 database and web console, refer to the H2 databasedocumentation at http://www.h2database.com.
About H2 embedded database
H2 is a relational database management system written in Java. It can be embedded in Javaapplications or run in the client-server mode.
This database is the default solution embedded in Talend Administration Center to store all cross-project information such as users, authorizations, projects...
If you do not want to use this default database, you can set up a database server (MySQL, MSSQL orOracle).
The benefits of using this H2 embedded database is that it simplifies the installation process.
Administrating the H2 database through the Web console
To help you administrate the H2 embedded database, a dedicated Web console is available directlyfrom Talend Administration Center.
Connecting to the H2 Web Console
From Talend Administration Center, you can access the H2 administration console.
For more information about H2 use and troubleshooting, please refer to the H2 online documentationon http://www.h2database.com.
Procedure
1. From the main Menu, click Configuration to access the Configuration page.
2. On the Configuration page, expand the Database node to display the parameters.
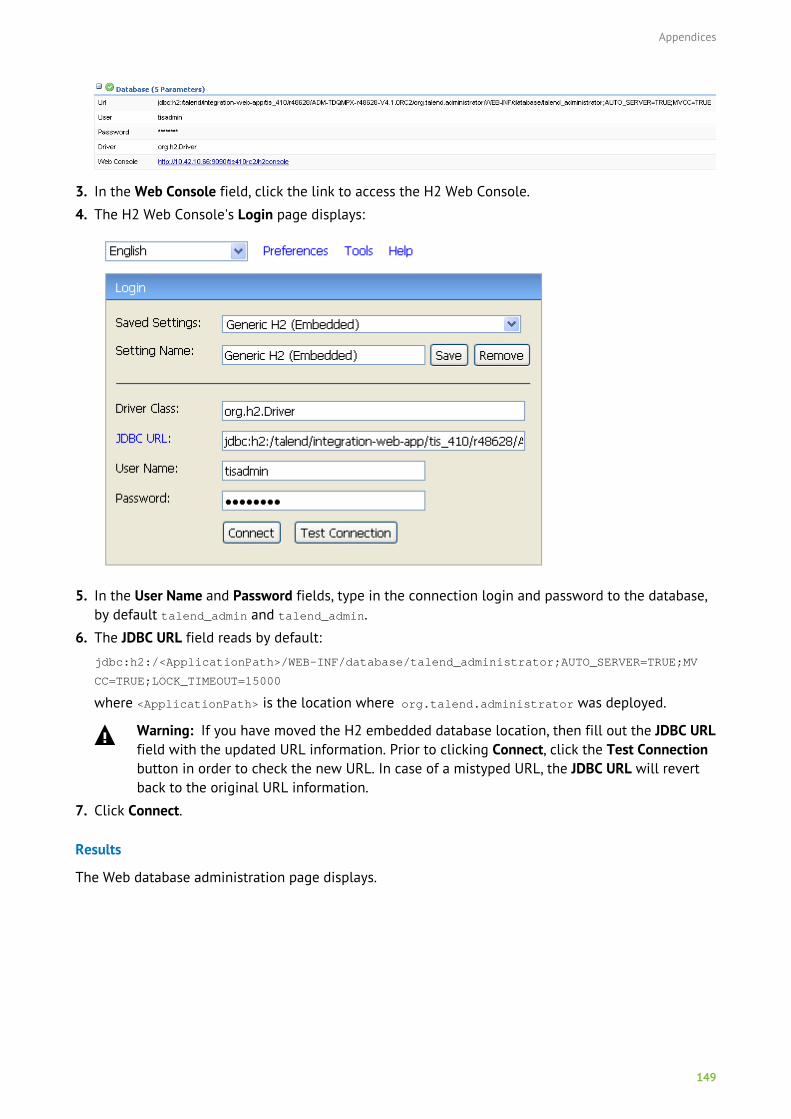
Appendices
149
3. In the Web Console field, click the link to access the H2 Web Console.
4. The H2 Web Console's Login page displays:
5. In the User Name and Password fields, type in the connection login and password to the database,by default talend_admin and talend_admin.
6. The JDBC URL field reads by default:
jdbc:h2:/<ApplicationPath>/WEB-INF/database/talend_administrator;AUTO_SERVER=TRUE;MV
CC=TRUE;LOCK_TIMEOUT=15000
where <ApplicationPath> is the location where org.talend.administrator was deployed.
Warning: If you have moved the H2 embedded database location, then fill out the JDBC URLfield with the updated URL information. Prior to clicking Connect, click the Test Connectionbutton in order to check the new URL. In case of a mistyped URL, the JDBC URL will revertback to the original URL information.
7. Click Connect.
Results
The Web database administration page displays.
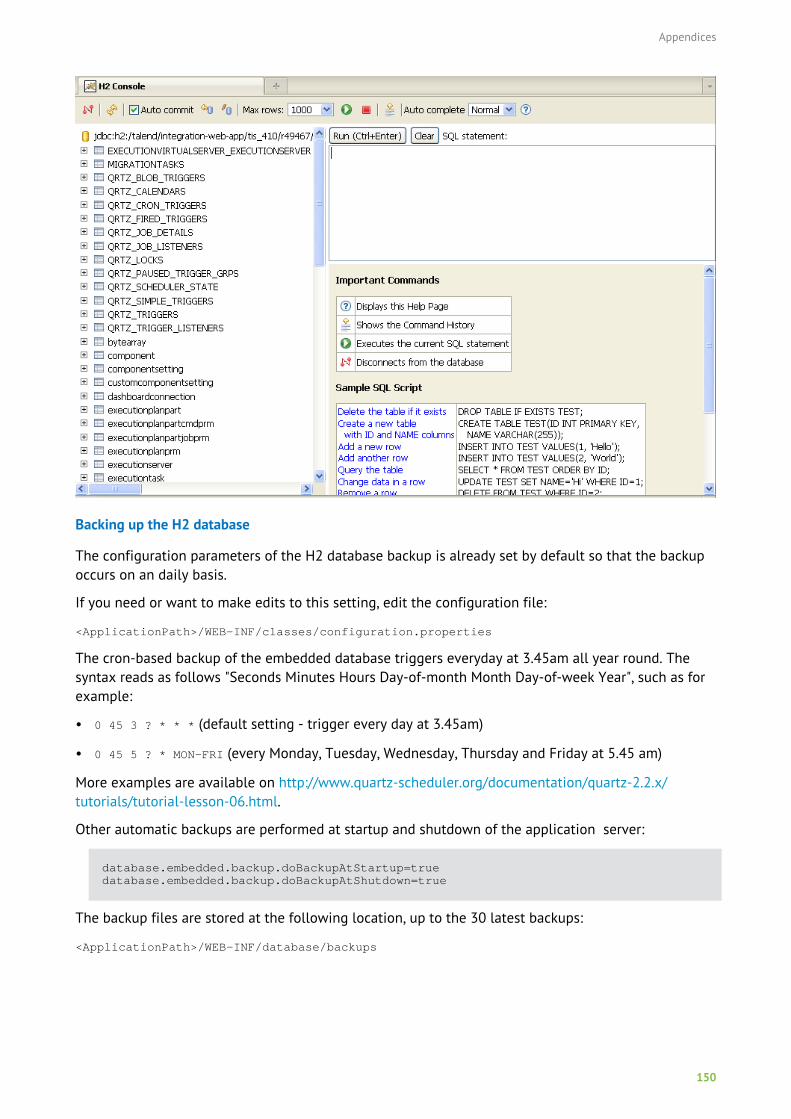
Appendices
150
Backing up the H2 database
The configuration parameters of the H2 database backup is already set by default so that the backupoccurs on an daily basis.
If you need or want to make edits to this setting, edit the configuration file:
<ApplicationPath>/WEB-INF/classes/configuration.properties
The cron-based backup of the embedded database triggers everyday at 3.45am all year round. Thesyntax reads as follows "Seconds Minutes Hours Day-of-month Month Day-of-week Year", such as forexample:
• 0 45 3 ? * * * (default setting - trigger every day at 3.45am)
• 0 45 5 ? * MON-FRI (every Monday, Tuesday, Wednesday, Thursday and Friday at 5.45 am)
More examples are available on http://www.quartz-scheduler.org/documentation/quartz-2.2.x/tutorials/tutorial-lesson-06.html.
Other automatic backups are performed at startup and shutdown of the application server:
database.embedded.backup.doBackupAtStartup=truedatabase.embedded.backup.doBackupAtShutdown=true
The backup files are stored at the following location, up to the 30 latest backups:
<ApplicationPath>/WEB-INF/database/backups
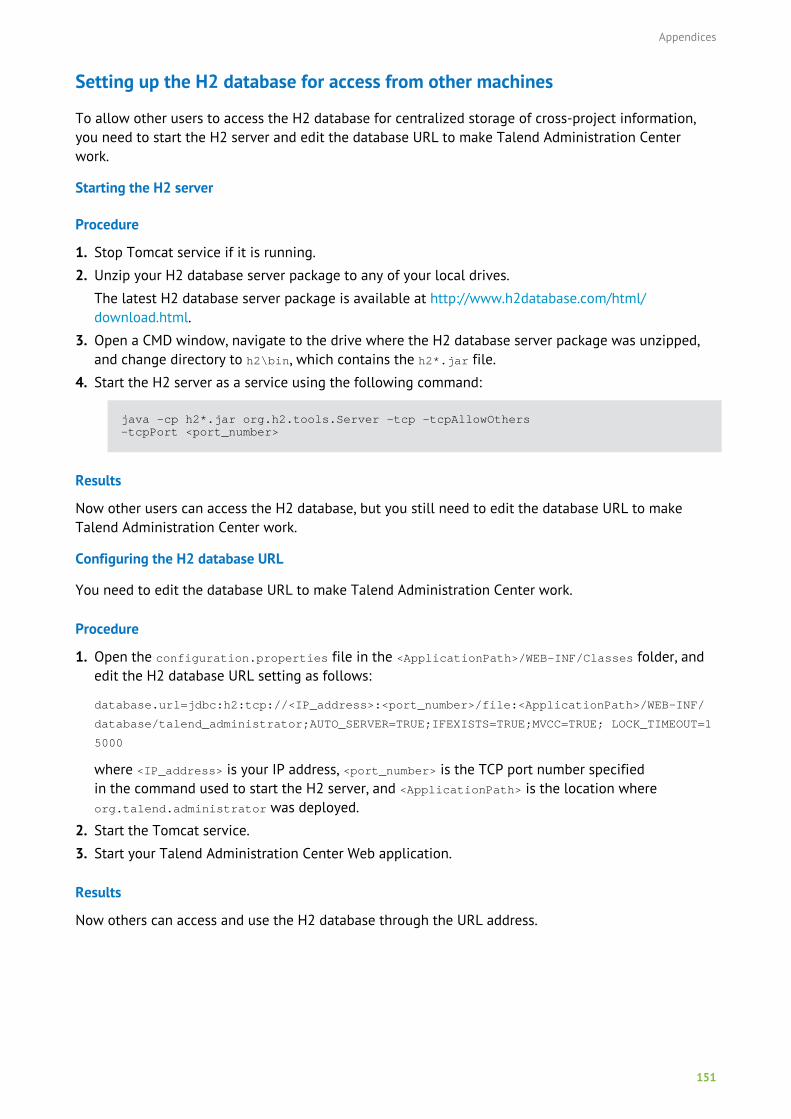
Appendices
151
Setting up the H2 database for access from other machines
To allow other users to access the H2 database for centralized storage of cross-project information,you need to start the H2 server and edit the database URL to make Talend Administration Centerwork.
Starting the H2 server
Procedure
1. Stop Tomcat service if it is running.
2. Unzip your H2 database server package to any of your local drives.
The latest H2 database server package is available at http://www.h2database.com/html/download.html.
3. Open a CMD window, navigate to the drive where the H2 database server package was unzipped,and change directory to h2\bin, which contains the h2*.jar file.
4. Start the H2 server as a service using the following command:
java -cp h2*.jar org.h2.tools.Server -tcp -tcpAllowOthers-tcpPort <port_number>
Results
Now other users can access the H2 database, but you still need to edit the database URL to makeTalend Administration Center work.
Configuring the H2 database URL
You need to edit the database URL to make Talend Administration Center work.
Procedure
1. Open the configuration.properties file in the <ApplicationPath>/WEB-INF/Classes folder, andedit the H2 database URL setting as follows:
database.url=jdbc:h2:tcp://<IP_address>:<port_number>/file:<ApplicationPath>/WEB-INF/
database/talend_administrator;AUTO_SERVER=TRUE;IFEXISTS=TRUE;MVCC=TRUE; LOCK_TIMEOUT=1
5000
where <IP_address> is your IP address, <port_number> is the TCP port number specifiedin the command used to start the H2 server, and <ApplicationPath> is the location whereorg.talend.administrator was deployed.
2. Start the Tomcat service.
3. Start your Talend Administration Center Web application.
Results
Now others can access and use the H2 database through the URL address.
Appendices
152
Supported Third-Party System/Database/BusinessApplication VersionsThis document provides the information about the versions of the systems or databases or businessapplications supported by Talend Studio.
Supported systems, databases and business applications by Talendcomponents
The access to these systems, databases and business applications varies depending on the Studio youare using.
Systems/Databases Versions OS Note
Amazon Aurora N/A
Amazon RDS for MicrosoftSQL Server
N/A
Amazon Redshift Initial release of Amazon Redshift N/A
AS/400 v7R2/7.2
v7R3/7.3
(Deprecated versions: V5R2 to V5R4/V5R3 to V6R1/V6R1/V7R1)
N/A
Access 2003
2007
Windows When working withJava 8, only theGeneral collationmode is supported.
Bonita 6.5.2
7.2.4
(Deprecated versions: 5.2.3/5.3.1/5.6.1/5.10.1)
N/A
Cassandra 5.0.x
5.1.x
6.0.x
(Deprecated versions: 2.0.0/3.0/3.1/3.2/3.3/3.4)
Windows + Linux
CouchBase 5.x
(Deprecated versions: 2.0/4.x)
Windows
CouchDB 1.0.2 Windows
DB Generic ODBC Windows
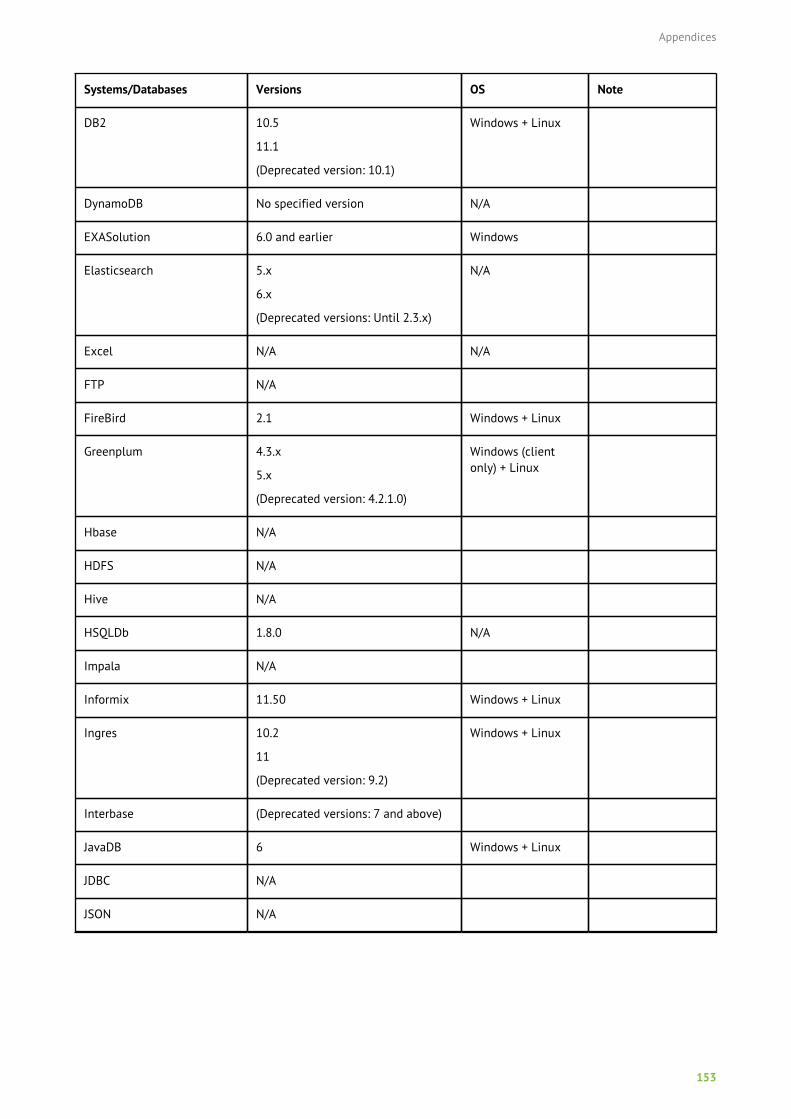
Appendices
153
Systems/Databases Versions OS Note
DB2 10.5
11.1
(Deprecated version: 10.1)
Windows + Linux
DynamoDB No specified version N/A
EXASolution 6.0 and earlier Windows
Elasticsearch 5.x
6.x
(Deprecated versions: Until 2.3.x)
N/A
Excel N/A N/A
FTP N/A
FireBird 2.1 Windows + Linux
Greenplum 4.3.x
5.x
(Deprecated version: 4.2.1.0)
Windows (clientonly) + Linux
Hbase N/A
HDFS N/A
Hive N/A
HSQLDb 1.8.0 N/A
Impala N/A
Informix 11.50 Windows + Linux
Ingres 10.2
11
(Deprecated version: 9.2)
Windows + Linux
Interbase (Deprecated versions: 7 and above)
JavaDB 6 Windows + Linux
JDBC N/A
JSON N/A
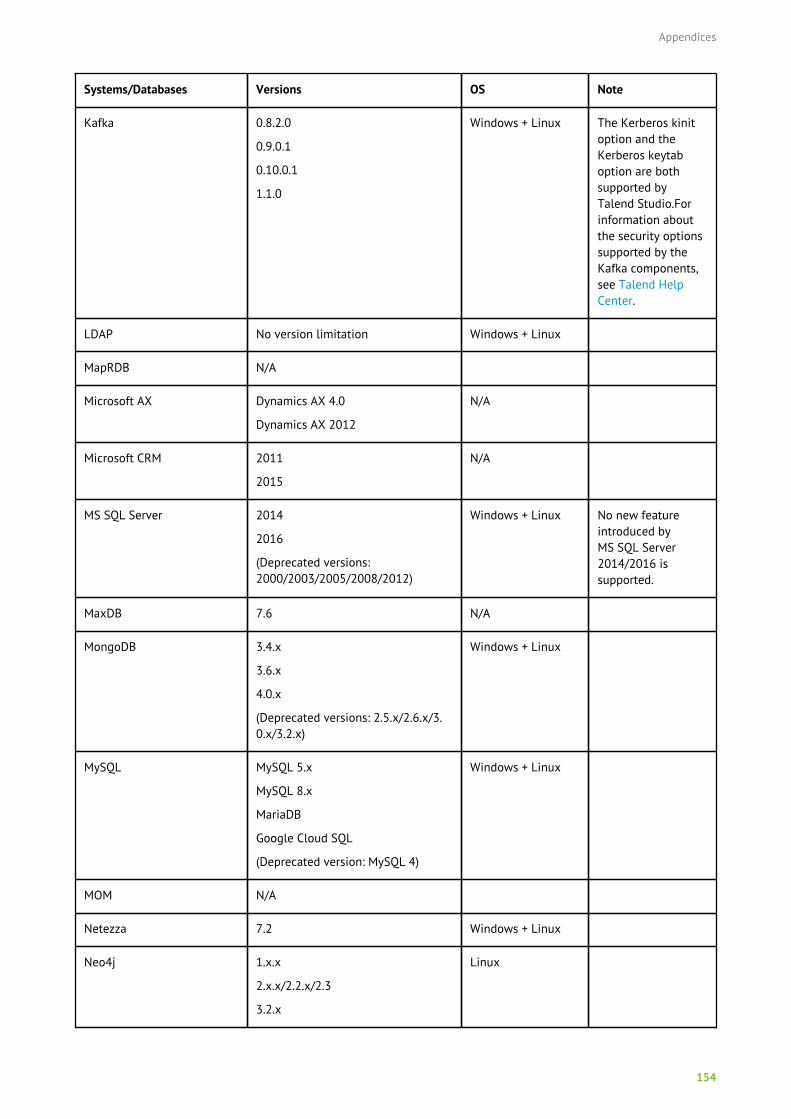
Appendices
154
Systems/Databases Versions OS Note
Kafka 0.8.2.0
0.9.0.1
0.10.0.1
1.1.0
Windows + Linux The Kerberos kinitoption and theKerberos keytaboption are bothsupported byTalend Studio.Forinformation aboutthe security optionssupported by theKafka components,see Talend HelpCenter.
LDAP No version limitation Windows + Linux
MapRDB N/A
Microsoft AX Dynamics AX 4.0
Dynamics AX 2012
N/A
Microsoft CRM 2011
2015
N/A
MS SQL Server 2014
2016
(Deprecated versions:2000/2003/2005/2008/2012)
Windows + Linux No new featureintroduced byMS SQL Server2014/2016 issupported.
MaxDB 7.6 N/A
MongoDB 3.4.x
3.6.x
4.0.x
(Deprecated versions: 2.5.x/2.6.x/3.0.x/3.2.x)
Windows + Linux
MySQL MySQL 5.x
MySQL 8.x
MariaDB
Google Cloud SQL
(Deprecated version: MySQL 4)
Windows + Linux
MOM N/A
Netezza 7.2 Windows + Linux
Neo4j 1.x.x
2.x.x/2.2.x/2.3
3.2.x
Linux
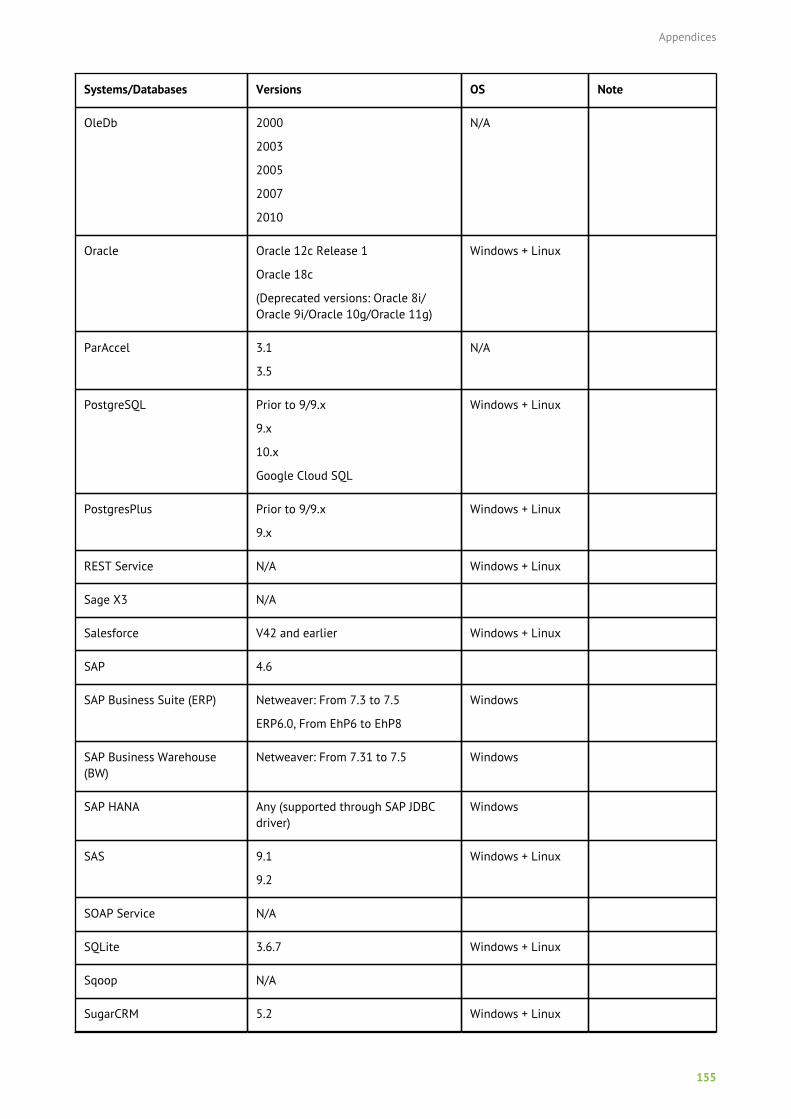
Appendices
155
Systems/Databases Versions OS Note
OleDb 2000
2003
2005
2007
2010
N/A
Oracle Oracle 12c Release 1
Oracle 18c
(Deprecated versions: Oracle 8i/Oracle 9i/Oracle 10g/Oracle 11g)
Windows + Linux
ParAccel 3.1
3.5
N/A
PostgreSQL Prior to 9/9.x
9.x
10.x
Google Cloud SQL
Windows + Linux
PostgresPlus Prior to 9/9.x
9.x
Windows + Linux
REST Service N/A Windows + Linux
Sage X3 N/A
Salesforce V42 and earlier Windows + Linux
SAP 4.6
SAP Business Suite (ERP) Netweaver: From 7.3 to 7.5
ERP6.0, From EhP6 to EhP8
Windows
SAP Business Warehouse(BW)
Netweaver: From 7.31 to 7.5 Windows
SAP HANA Any (supported through SAP JDBCdriver)
Windows
SAS 9.1
9.2
Windows + Linux
SOAP Service N/A
SQLite 3.6.7 Windows + Linux
Sqoop N/A
SugarCRM 5.2 Windows + Linux
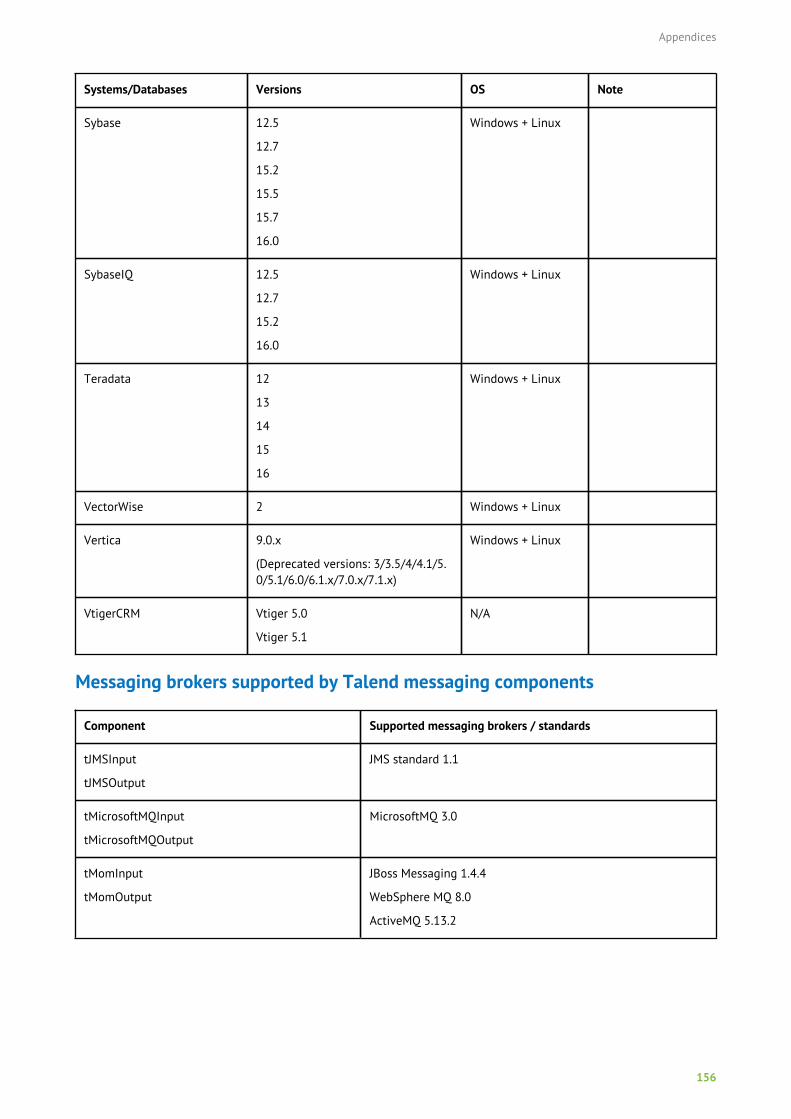
Appendices
156
Systems/Databases Versions OS Note
Sybase 12.5
12.7
15.2
15.5
15.7
16.0
Windows + Linux
SybaseIQ 12.5
12.7
15.2
16.0
Windows + Linux
Teradata 12
13
14
15
16
Windows + Linux
VectorWise 2 Windows + Linux
Vertica 9.0.x
(Deprecated versions: 3/3.5/4/4.1/5.0/5.1/6.0/6.1.x/7.0.x/7.1.x)
Windows + Linux
VtigerCRM Vtiger 5.0
Vtiger 5.1
N/A
Messaging brokers supported by Talend messaging components
Component Supported messaging brokers / standards
tJMSInput
tJMSOutput
JMS standard 1.1
tMicrosoftMQInput
tMicrosoftMQOutput
MicrosoftMQ 3.0
tMomInput
tMomOutput
JBoss Messaging 1.4.4
WebSphere MQ 8.0
ActiveMQ 5.13.2
Appendices
157
Supported Hadoop distribution versions for Talend Data Preparation with BigData
In general, Talend certifies a specific release version for a given Big Data (Hadoop) Distributionvendor. These are typically what is recommended for use for that vendor. For incremental upgradesand service packs by a given vendor, Talend relies on the vendors' compatibility statements to ensurethe proper running and execution of the Talend software. Where compatibility is stated, Talend alsosupports that version under our Support SLA. If an incompatibility should be verified by the Hadoopvendor, then Talend considers that a re-test and upgrade may be necessary.
The following table lists the supported Hadoop distributions for Talend Data Preparation with BigData.
Distribution Supported version
HDP 2.4 and above
Cloudera 5.7 and above
EMR 4.5 and above
Hadoop 2.7 and above


