Embed Size (px)
Citation preview
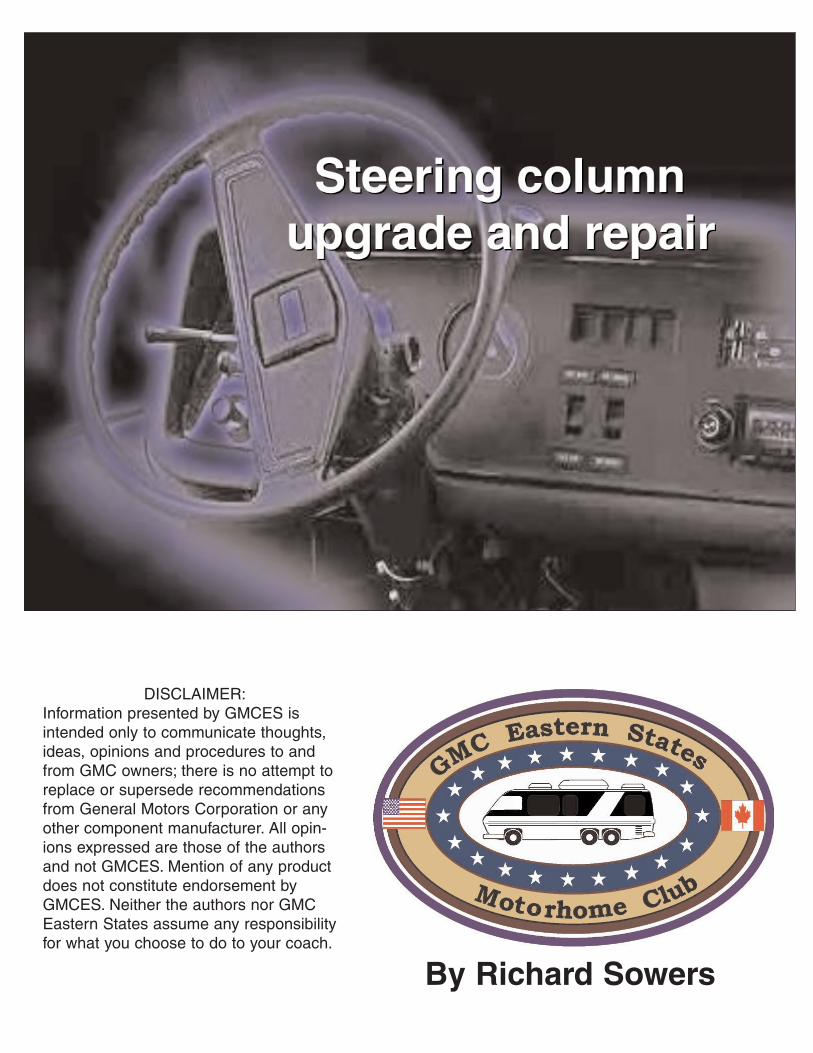
By Richard Sowers
DISCLAIMER:Information presented by GMCES isintended only to communicate thoughts,ideas, opinions and procedures to andfrom GMC owners; there is no attempt toreplace or supersede recommendationsfrom General Motors Corporation or anyother component manufacturer. All opin-ions expressed are those of the authorsand not GMCES. Mention of any productdoes not constitute endorsement byGMCES. Neither the authors nor GMCEastern States assume any responsibilityfor what you choose to do to your coach.
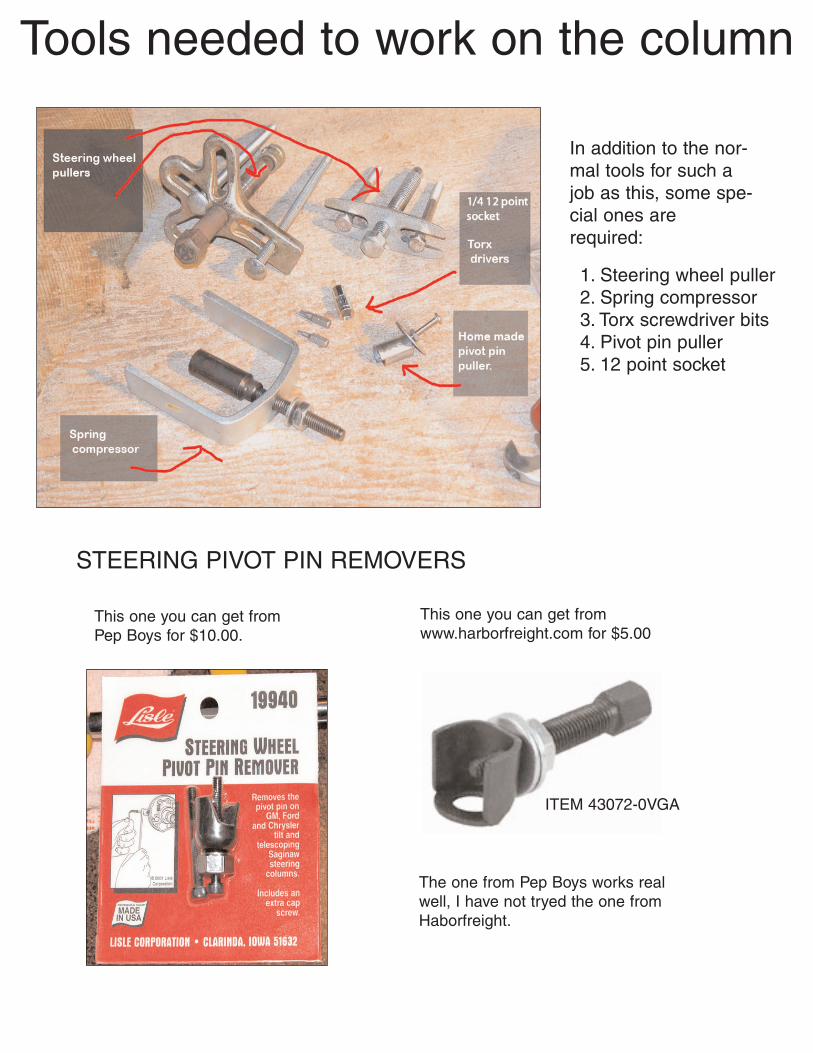
In addition to the nor-mal tools for such ajob as this, some spe-cial ones arerequired:
Tools needed to work on the column
1. Steering wheel puller2. Spring compressor3. Torx screwdriver bits4. Pivot pin puller5. 12 point socket
STEERING PIVOT PIN REMOVERS
ITEM 43072-0VGA
This one you can get fromwww.harborfreight.com for $5.00
This one you can get fromPep Boys for $10.00.
The one from Pep Boys works realwell, I have not tryed the one fromHaborfreight.
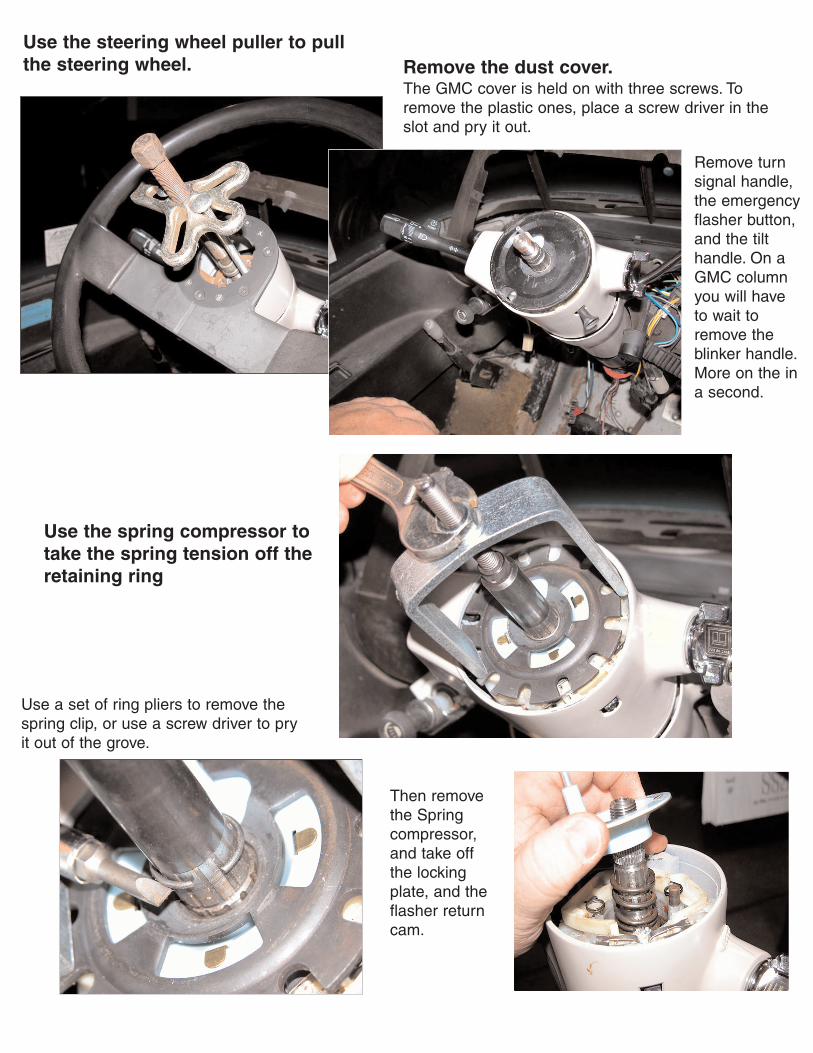
Use the steering wheel puller to pullthe steering wheel. Remove the dust cover.
The GMC cover is held on with three screws. Toremove the plastic ones, place a screw driver in theslot and pry it out.
Remove turnsignal handle,the emergencyflasher button,and the tilthandle. On aGMC columnyou will haveto wait toremove theblinker handle.More on the ina second.
Use the spring compressor totake the spring tension off theretaining ring
Use a set of ring pliers to remove thespring clip, or use a screw driver to pryit out of the grove.
Then removethe Springcompressor,and take offthe lockingplate, and theflasher returncam.
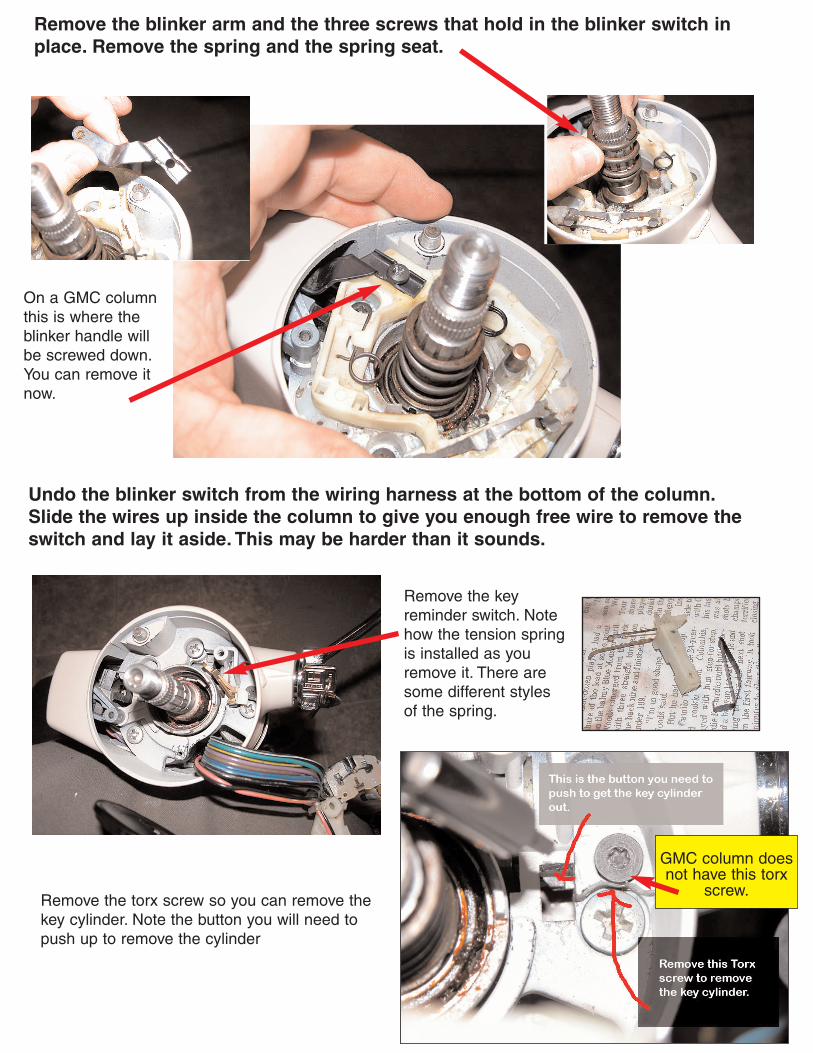
Remove the blinker arm and the three screws that hold in the blinker switch inplace. Remove the spring and the spring seat.
On a GMC columnthis is where the blinker handle willbe screwed down.You can remove itnow.
Undo the blinker switch from the wiring harness at the bottom of the column.Slide the wires up inside the column to give you enough free wire to remove theswitch and lay it aside. This may be harder than it sounds.
Remove the keyreminder switch. Notehow the tension springis installed as youremove it. There aresome different stylesof the spring.
Remove the torx screw so you can remove thekey cylinder. Note the button you will need topush up to remove the cylinder
GMC column doesnot have this torx
screw.
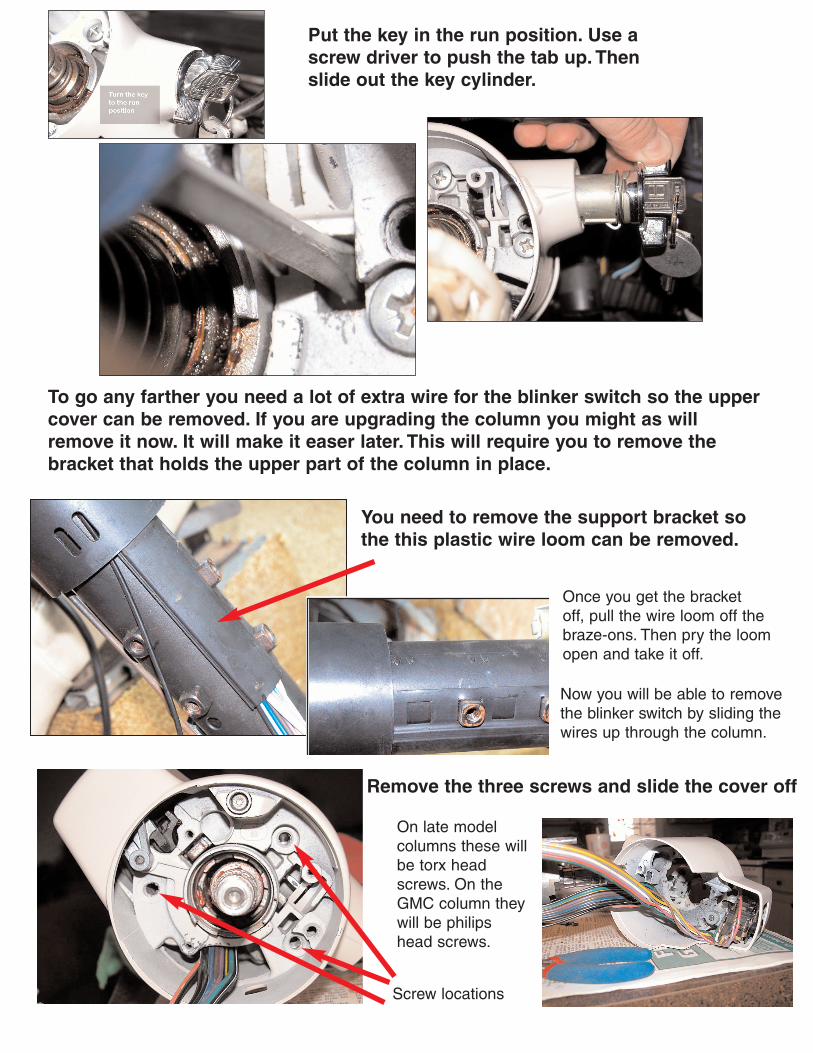
Put the key in the run position. Use ascrew driver to push the tab up. Thenslide out the key cylinder.
To go any farther you need a lot of extra wire for the blinker switch so the uppercover can be removed. If you are upgrading the column you might as willremove it now. It will make it easer later. This will require you to remove thebracket that holds the upper part of the column in place.
You need to remove the support bracket sothe this plastic wire loom can be removed.
Once you get the bracketoff, pull the wire loom off the braze-ons. Then pry the loomopen and take it off.
Now you will be able to removethe blinker switch by sliding thewires up through the column.
Remove the three screws and slide the cover off
Screw locations
On late modelcolumns these willbe torx headscrews. On theGMC column theywill be philipshead screws.
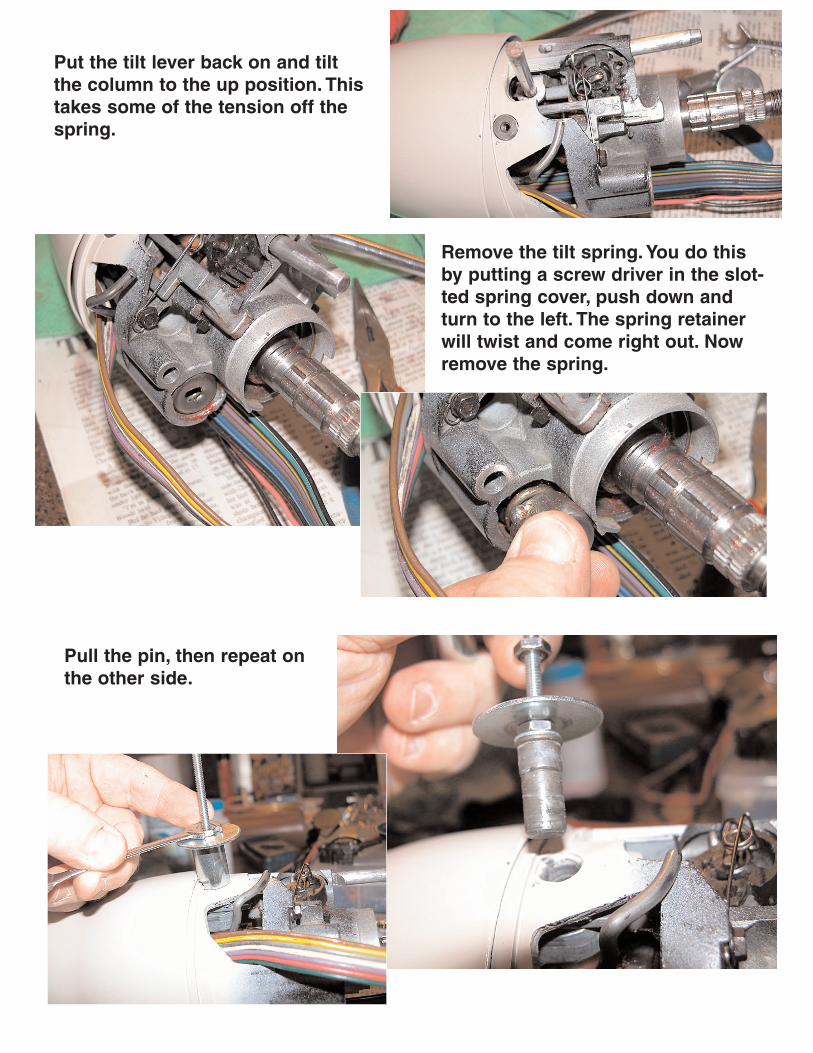
Put the tilt lever back on and tiltthe column to the up position. Thistakes some of the tension off thespring.
Remove the tilt spring. You do thisby putting a screw driver in the slot-ted spring cover, push down andturn to the left. The spring retainerwill twist and come right out. Nowremove the spring.
Pull the pin, then repeat onthe other side.
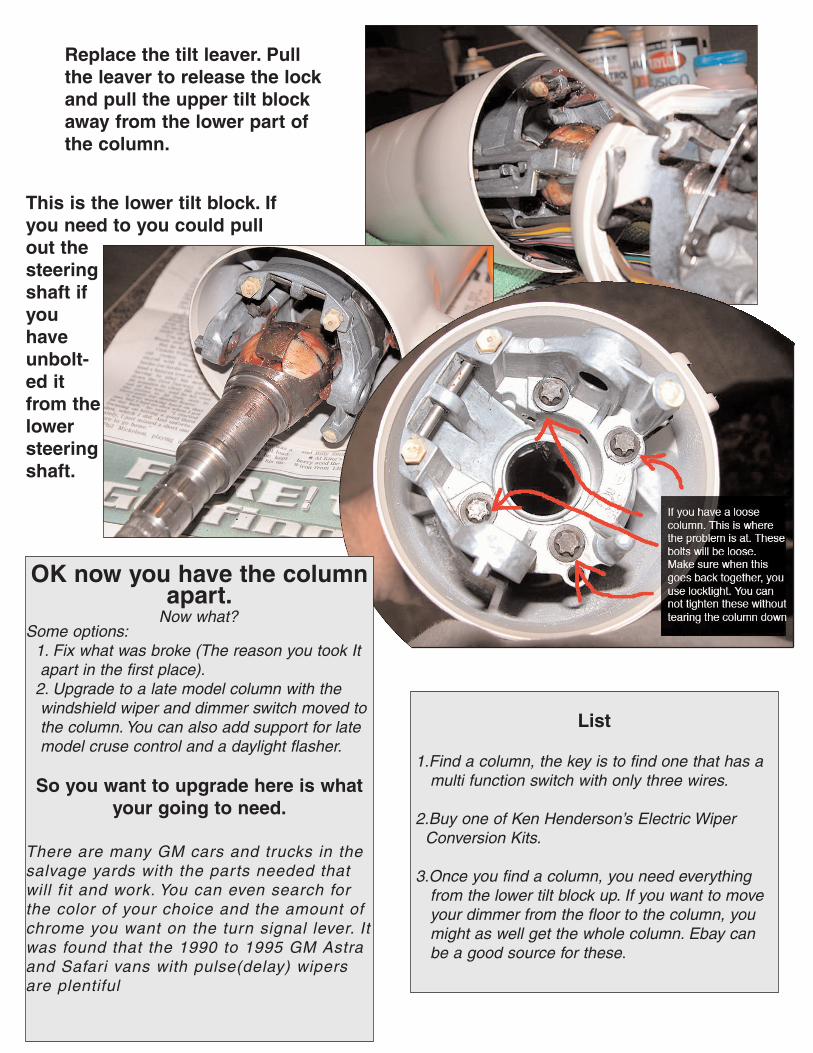
Replace the tilt leaver. Pullthe leaver to release the lockand pull the upper tilt blockaway from the lower part ofthe column.
This is the lower tilt block. Ifyou need to you could pullout thesteeringshaft ifyouhaveunbolt-ed itfrom thelowersteeringshaft.
OK now you have the columnapart.
Now what?Some options:
1. Fix what was broke (The reason you took Itapart in the first place).
2. Upgrade to a late model column with thewindshield wiper and dimmer switch moved tothe column. You can also add support for late model cruse control and a daylight flasher.
So you want to upgrade here is whatyour going to need.
There are many GM cars and trucks in thesalvage yards with the parts needed thatwill fit and work. You can even search forthe color of your choice and the amount ofchrome you want on the turn signal lever. Itwas found that the 1990 to 1995 GM Astraand Safari vans with pulse(delay) wipersare plentiful
List
1.Find a column, the key is to find one that has amulti function switch with only three wires.
2.Buy one of Ken Henderson’s Electric Wiper Conversion Kits.
3.Once you find a column, you need everything from the lower tilt block up. If you want to move your dimmer from the floor to the column, you might as well get the whole column. Ebay canbe a good source for these.
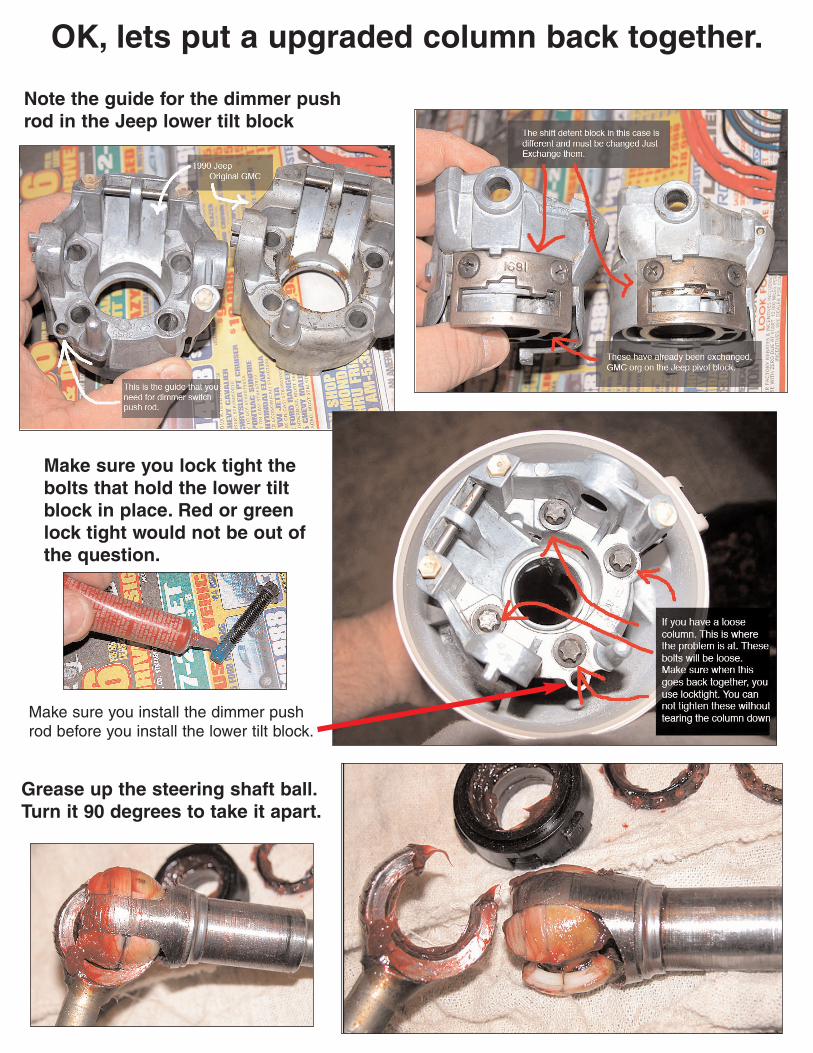
OK, lets put a upgraded column back together.
Note the guide for the dimmer pushrod in the Jeep lower tilt block
Make sure you lock tight thebolts that hold the lower tiltblock in place. Red or greenlock tight would not be out ofthe question.
Make sure you install the dimmer pushrod before you install the lower tilt block.
Grease up the steering shaft ball.Turn it 90 degrees to take it apart.
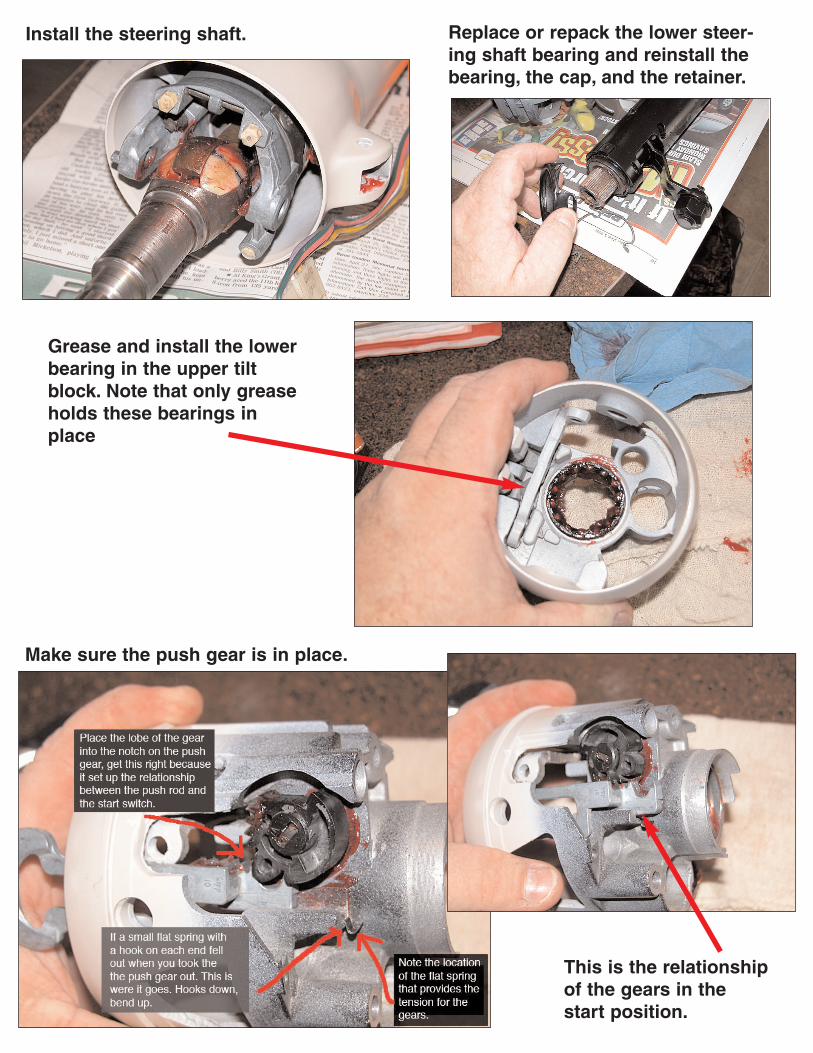
Install the steering shaft. Replace or repack the lower steer-ing shaft bearing and reinstall thebearing, the cap, and the retainer.
Grease and install the lowerbearing in the upper tiltblock. Note that only greaseholds these bearings inplace
Make sure the push gear is in place.
This is the relationshipof the gears in thestart position.
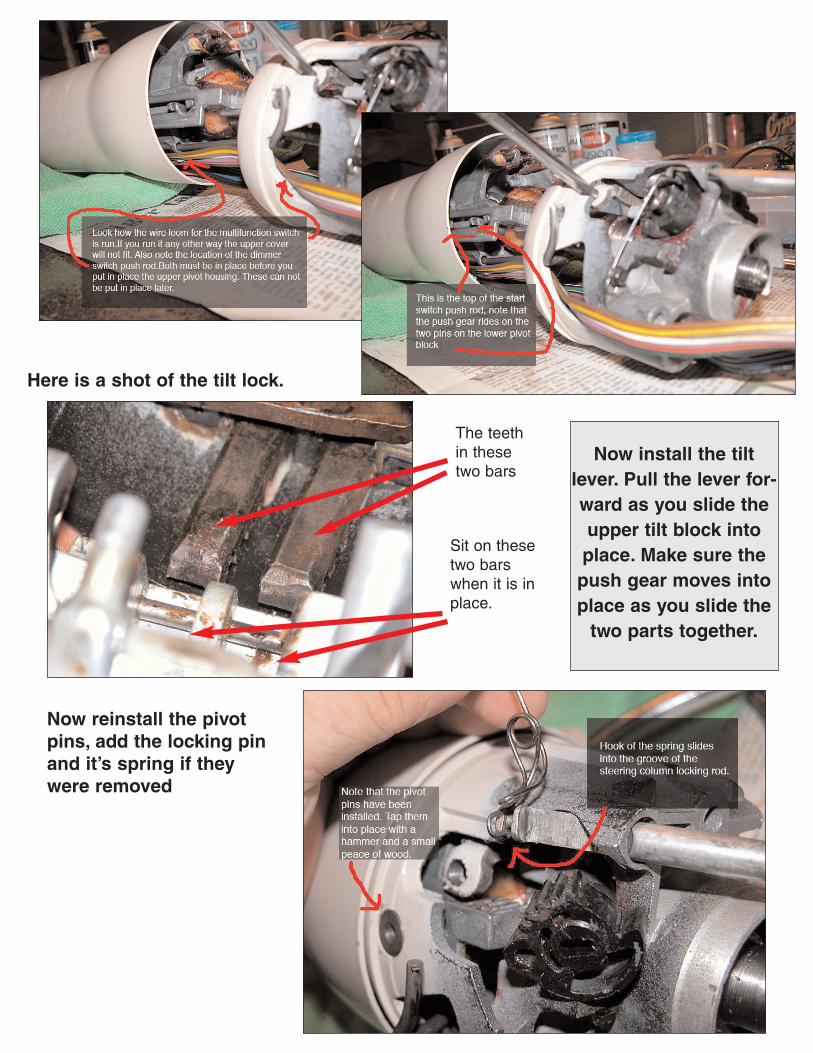
Here is a shot of the tilt lock.
The teethin thesetwo bars
Sit on thesetwo barswhen it is inplace.
Now install the tiltlever. Pull the lever for-ward as you slide theupper tilt block intoplace. Make sure the
push gear moves intoplace as you slide the
two parts together.
Now reinstall the pivotpins, add the locking pinand it’s spring if theywere removed
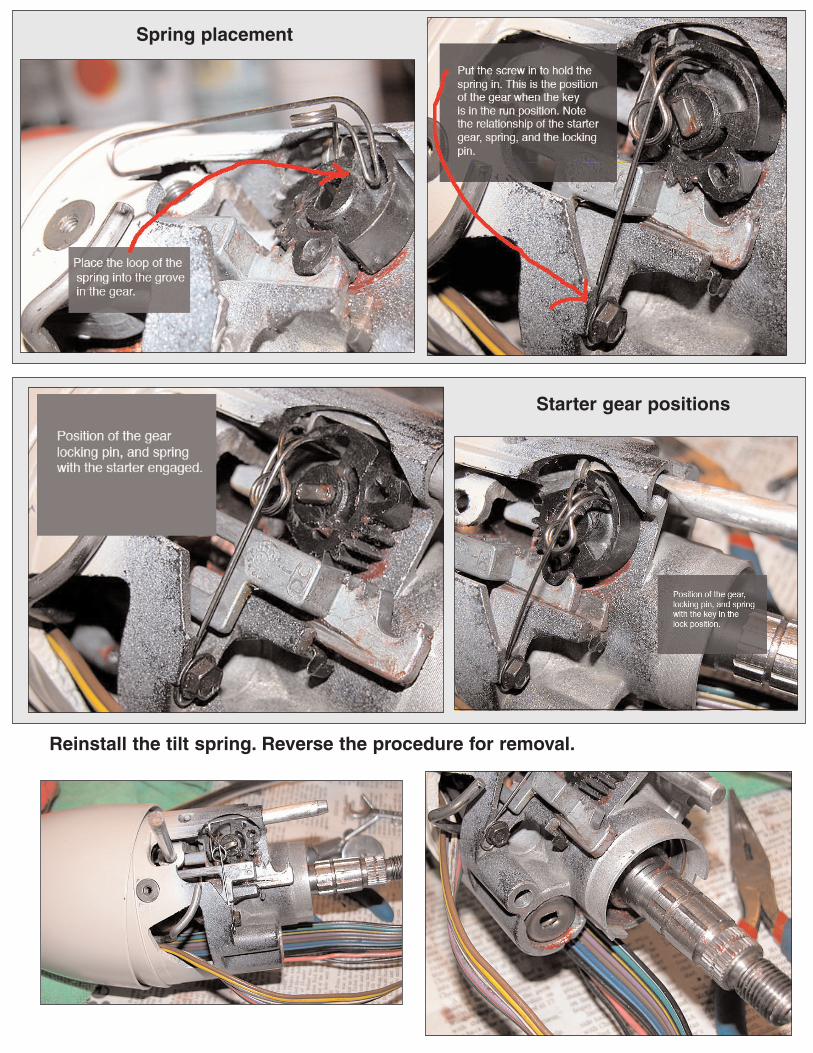
Spring placement
Starter gear positions
Reinstall the tilt spring. Reverse the procedure for removal.

This is what we are after,the multi function switch.
Note the the switch shonein this photo in the wrongswitch. The switch we areafter has only three wires.See Ken Hinderson’swiper documentation formore info on the correctswitch.
The upper dimmerswitch push rod.
This is the pin itrides on. Notethe position.
Slide the upper cover on, make sure to guide the wires andthe dimmer push rod into place

Reinstall the key cylinder, key reminder and the blinker switch. All thein reverse of the way you took them apart.
Install the blinker arm.
Slide the pin that ison the arm down theunderside of the armon the multi functionswitch.
Then screw intoplace.
Now install the upperbearing and race.
Install the spring seat.Note how it is placed,with the slits goingdown.
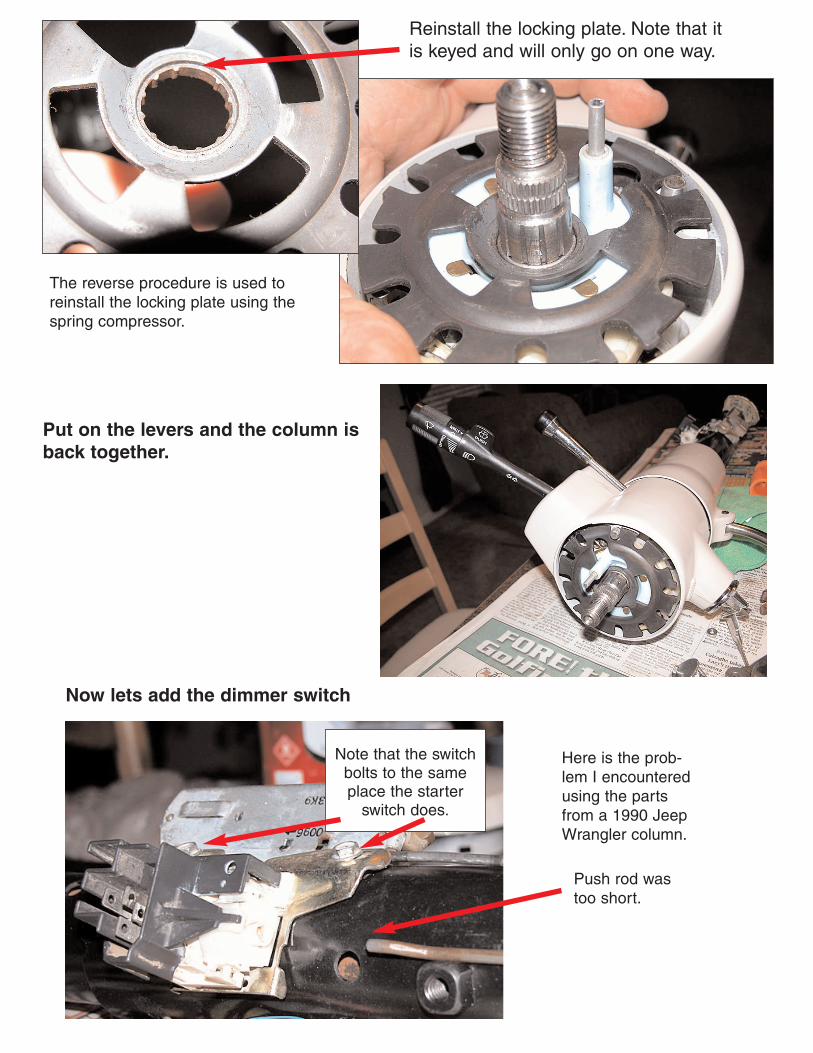
Reinstall the locking plate. Note that itis keyed and will only go on one way.
The reverse procedure is used toreinstall the locking plate using thespring compressor.
Put on the levers and the column isback together.
Now lets add the dimmer switch
Here is the prob-lem I encounteredusing the partsfrom a 1990 JeepWrangler column.
Push rod wastoo short.
Note that the switchbolts to the sameplace the starter
switch does.
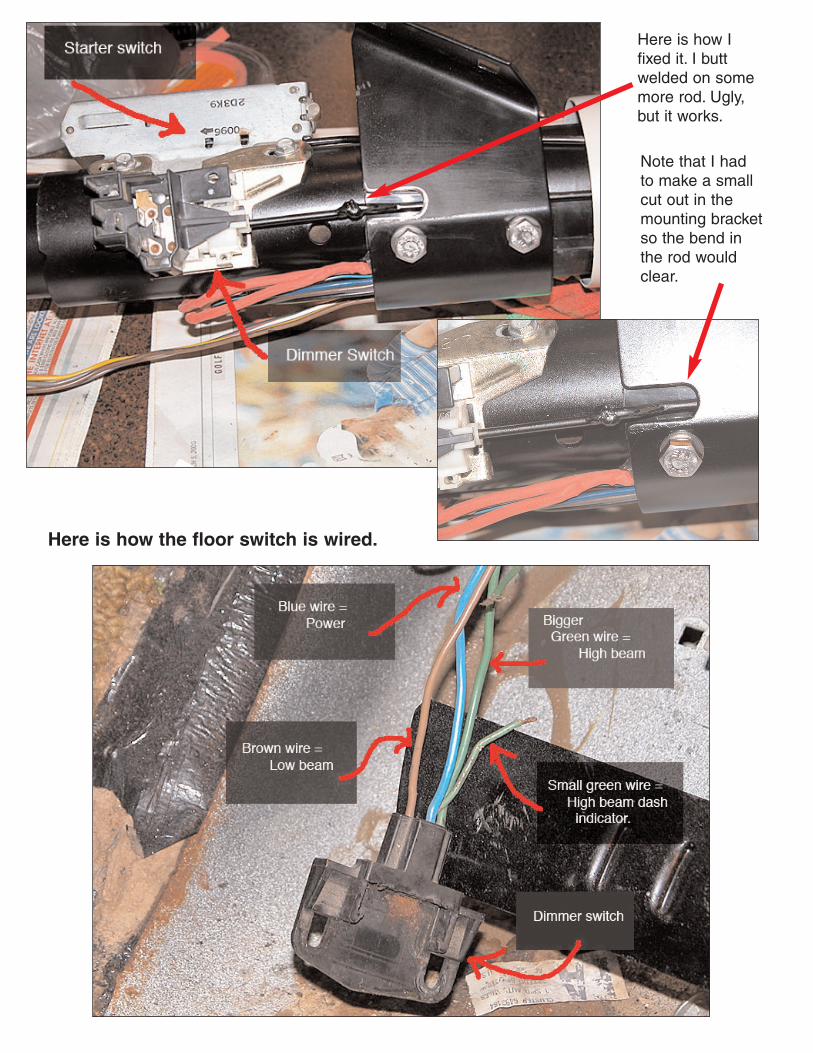
Here is how Ifixed it. I buttwelded on somemore rod. Ugly,but it works.
Note that I hadto make a smallcut out in themounting bracketso the bend inthe rod wouldclear.
Here is how the floor switch is wired.

Here is howyou wire thedimmerswitch. Thisswitch pro-vides for adaylightflasher.
Please look to the instructions that KenHenderson provides with his wiper kit on how
to wire the multi function switch for wipersand cruse.
DISCLAIMER:Information presented by GMCES is intended only to communicate thoughts,
ideas, opinions and procedures to and from GMC owners; there is no attempt toreplace or supersede recommendations from General Motors Corporation or anyother component manufacturer. All opinions expressed are those of the authorsand not GMCES. Mention of any product does not constitute endorsement by
GMCES. Neither the authors nor GMC Eastern States assume any responsibilityfor what you choose to do to your coach.


