Embed Size (px)
Citation preview
Programs
has this page or content because this extension is no longer in development.chefkoch deprecated
OverviewThis document describes myPrograms, the MediaPortal plugin that can launch all kinds of programs. The first version of myPrograms (v0.1) was written by
, and did an extended new version that is still growing.domi_fan waeberd
Although this document is quite game / emulator oriented, myPrograms is flexible enough to launch any kind of programs and open an associated file (like "open a file in the browser"). To show its flexibility, some step-by-step examples are provided at the second part of this document.
Plugin InfoPlugin Type: Windows
Developer: weabeard
Forum discussion: //forum.team-mediaportal.com/plugins-47/myprograms-original-2036/
Source Code: http://mp-plugins.svn.sourceforge.net/viewvc/mp-plugins/trunk/plugins/MyPrograms/
Program Configuration
General
myPrograms basically works on two different levels:
First of all, a -entry must be defined. Each program entry will create a entry in the application-tree (see below).programOn program-item, you can attach launchable . These files will appear as subitems of the program-item folder. There are several different filesways, how the plugin looks for those file items. Each way will be described below.
Example MAME: The application item is the executable, and you wish to display in the MediaPortal screen generates a file-item.mame32.exe every rom
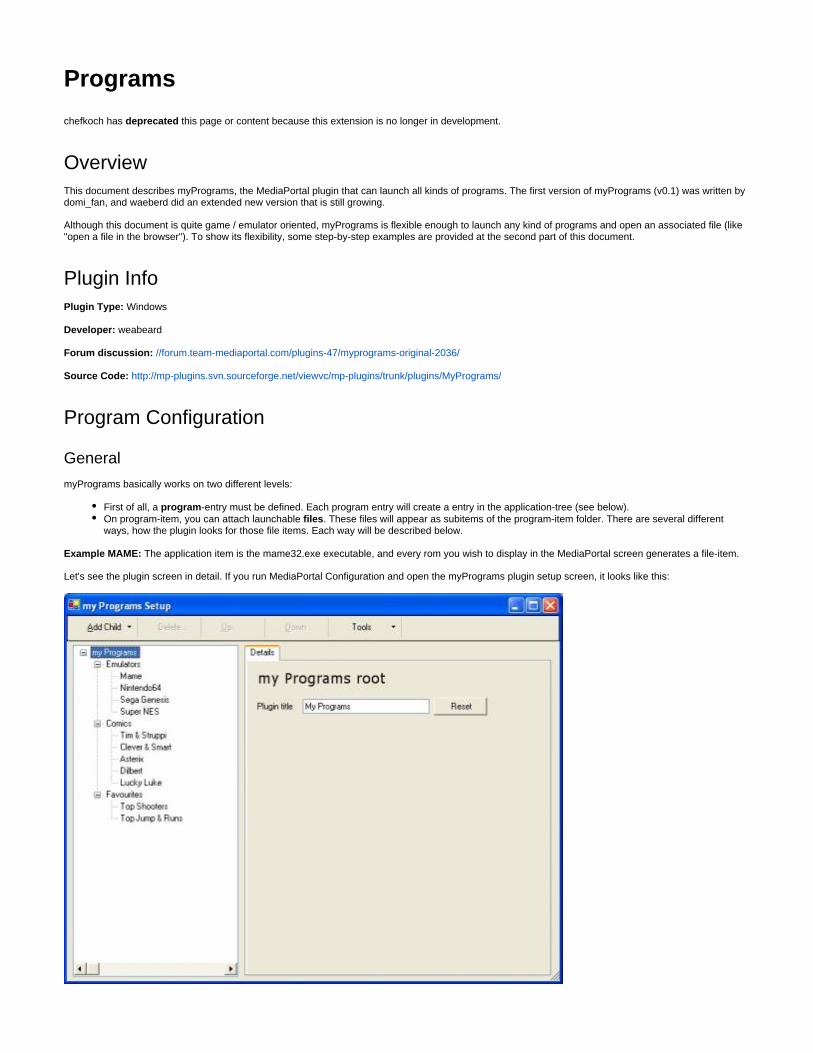
Let's see the plugin screen in detail. If you run MediaPortal Configuration and open the myPrograms plugin setup screen, it looks like this:

You can see that the setup-screen is roughly divided in three parts: the Menubar on top, the program-tree on the left side and the details-screen which always displays data of the selected tree-item.
The Menubar
On the top of the setup screen you can see some buttons that allow you to do the following operations:
: The most important button, if you click this, a dropdown menu will appear where you must decide what kind of program-item you Add Childwould like to add. Each type will be explained below, for now just keep in mind that the item will be attached to the currently selected item in the program tree (this can be the ROOT item - "my Programs" or any GROUPER-item). If this button is disabled, then you have selected a program-item in the tree that cannot have children.
: This button will delete the selected program-item from the tree. The root item is undeletable, as well as any program-item that has Delete....children.
/ : These two buttons will move the selected item one position up / down in the program tree. Of course, program-items with children will Up Downbe moved as one unit. Use this function to determine the order in which the items will appear in MediaPortal.
-> : Use this function to change the type of the selected program-item.Tools Change Source Type -> : Use this function to fill the selected detail screen with predefined settings. Currently there are profiles available for a Tools Read From Profile
bunch of emulators. This function can save you some time setting the right parameters (see the emulator examples below for details).
The Program-Tree
The left part of the plugin setup screen displays all the program-entries in the order they will be displayed in MediaPortal. Select one program-item to display the details in the right part of the screen. There are some not-so-obvious operations that can be done in the tree directly:
: Click again on a selected program-item to edit the caption. This text will be displayed in MediaPortal.Rename a program item: To attach a program item to a different father-item, click the program-item and drag it to the new father-item. The father-Move a program item
item must be a GROUPER or the ROOT item itself.: To duplicate an existing program-item, click the program-item and drag it to Duplicate an existing program item with the right mouse button
the father-item. This will create a copy of the program-item that you can use for defining a similar new item. (this is very handy and very hidden! ).
The Details-Screen
On the right part of the screen you can see details for the selected program-item. The exact display depends heavily on the program-type you've chosen, so each type will be described separately. On some program-types, there is also a "FILES"-tab which makes it possible to handle and test your settings.
For some small hints, use the tool tips provided for most of the controls by simply moving over the button / editfield.
Details: ROOT item
There's not much you can do on the root item itself, just one function:
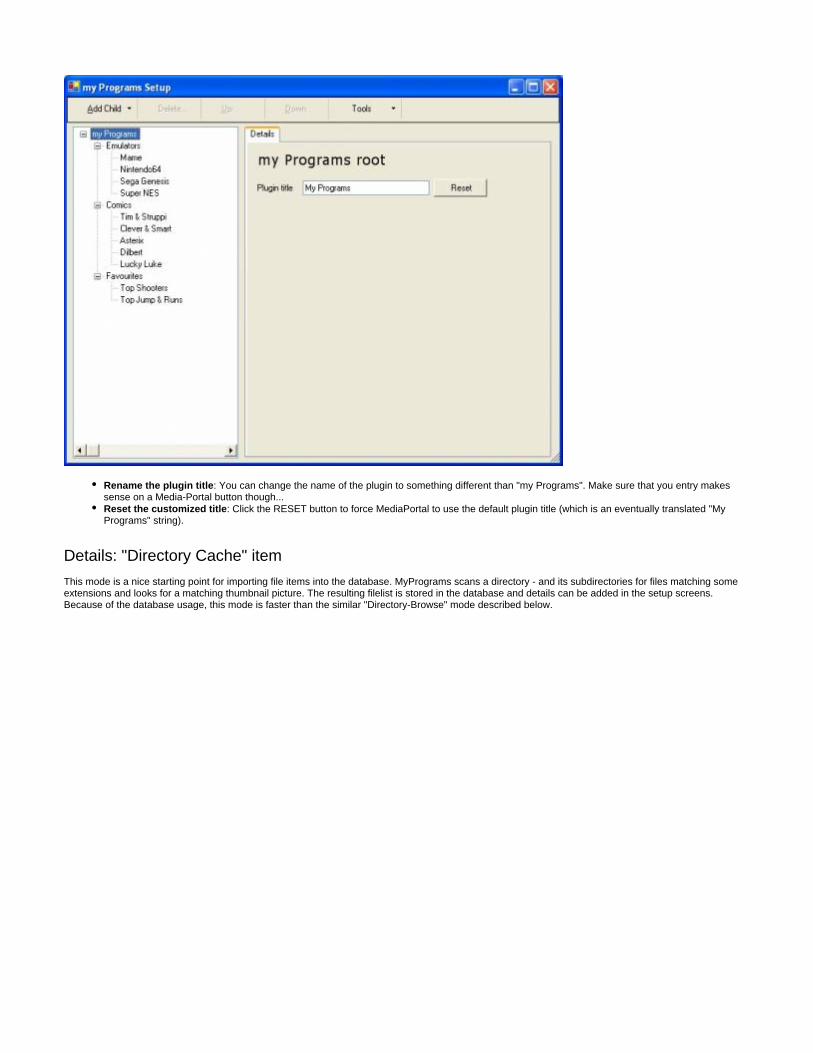
: You can change the name of the plugin to something different than "my Programs". Make sure that you entry makes Rename the plugin titlesense on a Media-Portal button though...
: Click the RESET button to force MediaPortal to use the default plugin title (which is an eventually translated "My Reset the customized titlePrograms" string).
Details: "Directory Cache" item
This mode is a nice starting point for importing file items into the database. MyPrograms scans a directory - and its subdirectories for files matching some extensions and looks for a matching thumbnail picture. The resulting filelist is stored in the database and details can be added in the setup screens. Because of the database usage, this mode is faster than the similar "Directory-Browse" mode described below.

You can enter the following information in this mode:
Uncheck this item if you don't want this program to appear in MediaPortal.Enabled: The name of the program that will be listed in MediaPortal.Title:
The complete filename to the executable. This field can be empty, but only if the "use ShellExecute" option is activated.Launching Application: If you check this option, launching a file-item will have the same effect as if you doubleclicked this item in windows-Startup using ShellExecute:
explorer. This also means that you can launch any file type that has a registered application in windows without having to define the application itself. (Example: if your file-items are *.html files, the ShellExecute is on and no launching application is specified, MediaPortal will start your default browser and display the *.html file). Very handy and it's recommended to check this option ON. In case of a problem try to switch it off - windows launches the application in a slightly different way if ShellExecute is turned off.
Enter a 4-digit pincode here to protect this program-item. MediaPortal will ask for a correct code before opening this program-item. Pin-Code:Leave the field empty if you do not wish any protection.
An optional filename of an image that MediaPortal will use for displaying the program-item.Imagefile: Optional arguments that will be added to the launch command. The default syntax used for calling an application is Arguments: <app_filename>
. Sometimes this order is not appropriate and you need to place the somewhere else in the <arguments> <item_filename> <item_filename>arguments list. To do this, simply add the placeholder (typed exactly like this, uppercase matters!) in the correct place.%FILE%
Determines how the launched application will be displayed. This can be used to achieve a "clean" integration into MediaPortal. Window-Style:Possible values are: (no special treatment), (start the application window in minimized mode), (start the application normal minimized maximizedin maximized mode) or (start the application window in invisible mode).hidden
Optional directory, in which the application will be launched. Some programs need to be launched in their home-directory, so Startup Directory:with this setting you can do this and this little option very often saves you from having to use a BATCH file! In some situations, it is handy to launch the application in the directory of the file-item. In this case, use the placeholder as a working directory. This will be %FILEDIR%dynamically replaced by MediaPortal at runtime.
if a FILE-Item is launched, it's filename is usually enclosed by quotes (windows standard for filenames that contain Quotes around Filenames:spaces). Some programs (like the N64 emulator Project64) don't allow quotes, so I suggest you try to use the default setting (checked) and if you should always get "file not found" or "invalid filename" messages, try to switch this option off.
The directory where myPrograms starts searching for files to import into the databaseFile Directory: Only file-items with one of those extensions will be displayed in MediaPortal. Multiple extensions must be separated by a coma File-Extensions:
(example: ".bmp, .jpg"). If you click the small "?" button on the right, myPrograms will scan the entered "FileDirectory" and display all the found extensions.
Directories containing the imagefiles for every file-item. You can add more than one directory. MediaPortal will always use the Image Directories:first entry as the main image directory and use all other directories when looking for additional images (this is used in the info-screen where a slideshow is started if more than one image exists for a single file-item).
Check this option if you would like to be able to import the filelist in MediaPortal directly. If you disable this option, Allow refresh in MediaPortal:you have to import the filelist in the plugin-setup before launching MediaPortal (see "The Files Screen" -> "Update Database")
Details: "Directory Browse" item
The "Directory Browse" works like the "Directory-Cache" mode with the big exception that no database is used to load the data. This means that the file-item list is always built on runtime.
This can slow down the list-display for big filelists, but has the advantage that the list is always on sync with the available files.

All entries are explained in the "Directory-Cache" mode.
Details: "*.mlf-File" item
As an alternative, you can link a *.mlf file to the program-item by selecting the file in the field.Source
The *.mlf file has to be in the output format of the tool (use the "save to meedio" menu-item). myGames is well known in the myHTPC scene myGamesand was written by reverson1 (see for details).http://www.getmygames.com
Most of the fields are identical to the "Directory-Cache" mode, the additional fields:
Enter the complete path to the *.mlf file that has been exported by the myGames tool.Source: Check this if you only want to import items where myPrograms finds a matching imagefile in the first Only import files with valid images:
directory listed in the "Image directories" field. This can be a nice way to easily filter huge file-lists and it ensures you don't have items without thumbnails in MediaPortal.
Details: "*.my-File" item
As another alternative, you can link a *.my file to the program-item by selecting the file in the Source field.
The *.my file has to be in the output format of the tool (use the "save to *.my" menu-item).myGames
Most of the fields are identical to the "Directory-Cache" mode, the additional fields:
Enter the complete path to the *.my file that has been exported by the myGames tool.Source: Check this if you only want to import items where myPrograms finds a matching imagefile in the first Only import files with valid images:
directory listed in the "Image directories" field. This can be a nice way to easily filter huge file-lists and it ensures you don't have items without thumbnails in MediaPortal.
Details: "Grouper" item
The few entries that are possible in this mode are all explained in the "Directory-Cache" section.
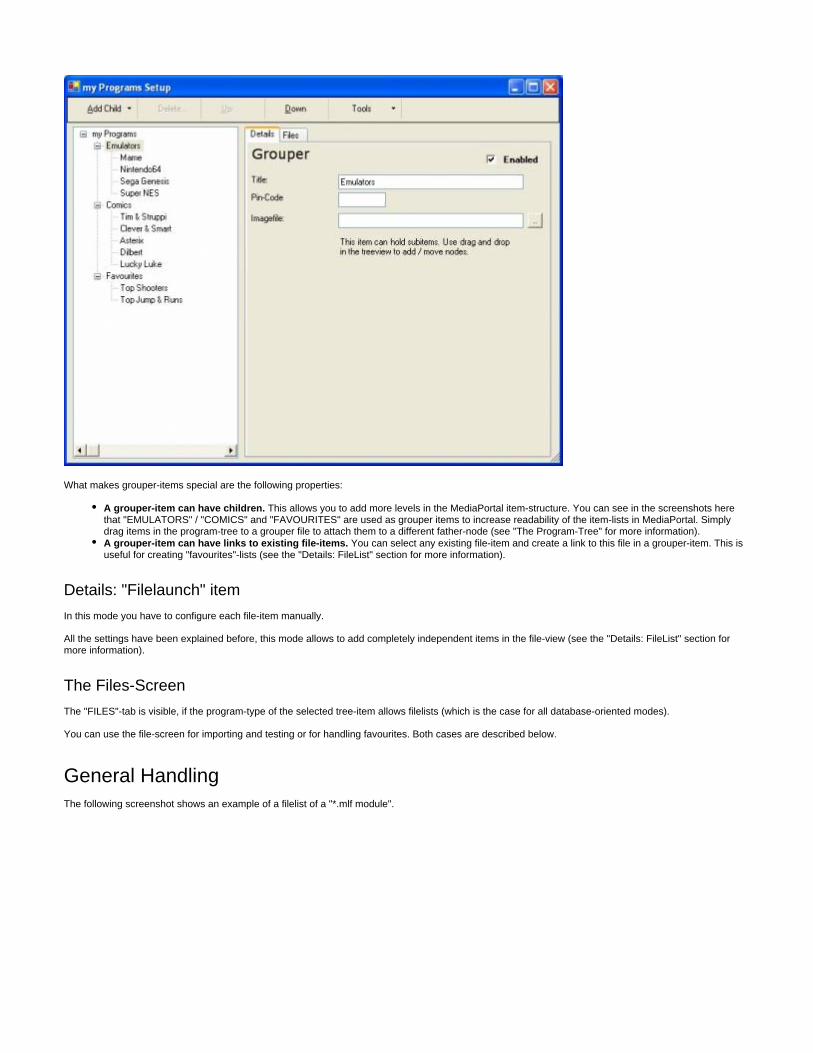
What makes grouper-items special are the following properties:
This allows you to add more levels in the MediaPortal item-structure. You can see in the screenshots here A grouper-item can have children.that "EMULATORS" / "COMICS" and "FAVOURITES" are used as grouper items to increase readability of the item-lists in MediaPortal. Simply drag items in the program-tree to a grouper file to attach them to a different father-node (see "The Program-Tree" for more information).
You can select any existing file-item and create a link to this file in a grouper-item. This is A grouper-item can have links to existing file-items.useful for creating "favourites"-lists (see the "Details: FileList" section for more information).
Details: "Filelaunch" item
In this mode you have to configure each file-item manually.
All the settings have been explained before, this mode allows to add completely independent items in the file-view (see the "Details: FileList" section for more information).
The Files-Screen
The "FILES"-tab is visible, if the program-type of the selected tree-item allows filelists (which is the case for all database-oriented modes).
You can use the file-screen for importing and testing or for handling favourites. Both cases are described below.
General HandlingThe following screenshot shows an example of a filelist of a "*.mlf module".

The following operations are possible in this screen:
: Click the "New..." button to manually add a file item. Be aware that reimporting a file list will delete manually added items (so use Add a new filethis mainly in the FILELAUNCH mode).
: Select the item and click "Edit..." to change the settings for this fileitem. Again, only really useful for FILELAUNCH items.Edit a file item: Select the item(s) and click "Delete..." to remove them from the database. If the items are LINKS, then only the link is deleted Delete a file item
(this is the case for favourites, see below).: Select the files you wish to add to a favourite list and click the "Add to favourites" button. A dropdown menu will appear Add to favourites
showing every defined GROUPER-item. Select the target grouper item which will get LINKS to the selected items. Of course there must be at least one GROUPER item before you can use this function. See below for details.
: Select the file you wish to start and click the LAUNCH button. This will use the current settings and simulates a click on the item Launch an itemin MediaPortal. If there is an error while calling the item, it will be displayed (and logged) in a message dialog. Sometimes the call itself is correct but some wrong arguments can cause some unwanted results. Always think if the error is in the myPrograms call or in the launched application. The LOG-file can provide you more details - details to every program call are logged, whether the call was successful or not.
: Click this button to import fileitems into the database. You can also do this in MediaPortal itself (if you have checked the Update database"ALLOW REFRESH IN MP" option), but sometimes it's safer to prepare the filelist in setup and simply block the import in MediaPortal.
Handling FavouritesA grouper item can also be used to collect some favourite items. See the following screenshot for an example:

This shows some shooter games that are grouped together using the "Add to favourites" function described in the previous section.
Some particularities:
If you click the DELETE button, only the link in the grouper item is removed, the original fileitem remains in the Delete only affects the link:database.
In the example above I have mixed some shooter games from different systems - the "R-Type" You can group items from different programs:items are MAME games and the "Thunder Force" are Sega Genesis games. If you launch the item, myPrograms will find out the correct application and use the settings from there... So feel free to mix games from different systems/emulators in one single favourites-list ("Final Fantasy 1 to 9" in one single list launchable by a simple remote control.... should be possible!! ).
Using the plugin
The Filelist screen
When a program item is clicked, MediaPortal looks for the associated files (with a method that is depending on the source-type) and displays the list:
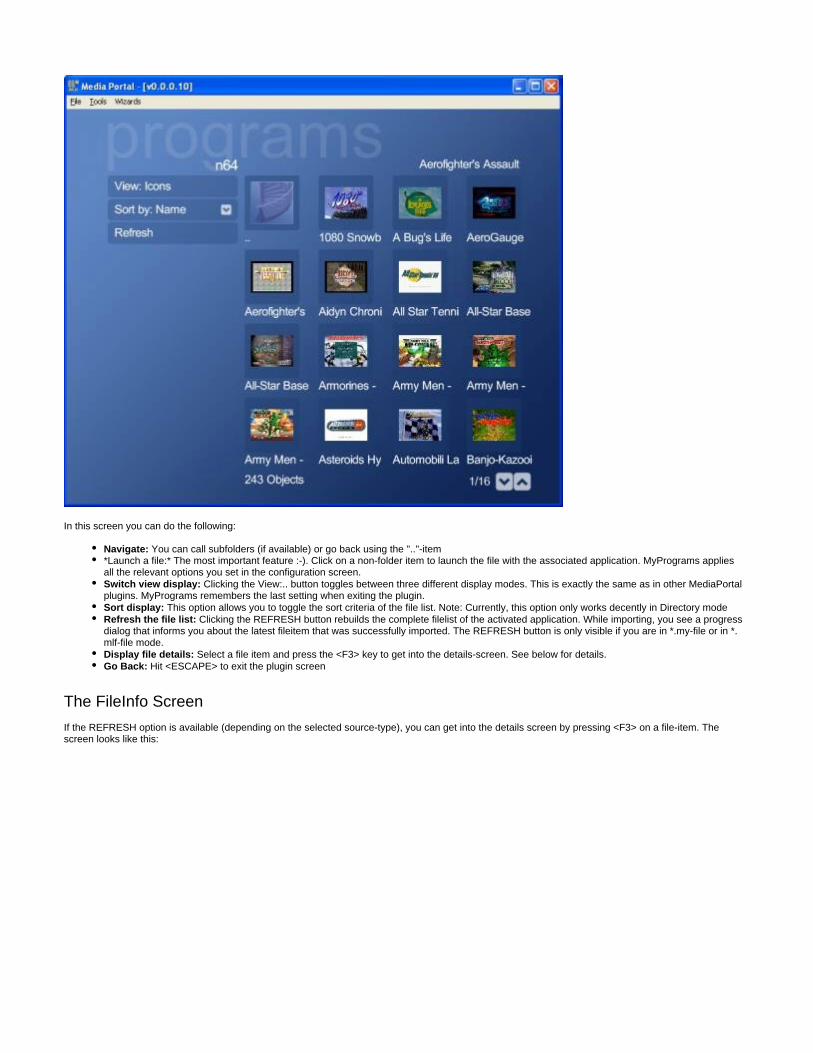
In this screen you can do the following:
You can call subfolders (if available) or go back using the ".."-itemNavigate:*Launch a file:* The most important feature :-). Click on a non-folder item to launch the file with the associated application. MyPrograms applies all the relevant options you set in the configuration screen.
Clicking the button toggles between three different display modes. This is exactly the same as in other MediaPortal Switch view display: View:..plugins. MyPrograms remembers the last setting when exiting the plugin.
This option allows you to toggle the sort criteria of the file list. Directory modeSort display: Note: Currently, this option only works decently in Clicking the REFRESH button rebuilds the complete filelist of the activated application. While importing, you see a progress Refresh the file list:
dialog that informs you about the latest fileitem that was successfully imported. The REFRESH button is only visible if you are in or in *.my-file *. mode.mlf-file
Select a file item and press the <F3> key to get into the details-screen. See below for details.Display file details: Hit <ESCAPE> to exit the plugin screenGo Back:
The FileInfo Screen
If the REFRESH option is available (depending on the selected source-type), you can get into the details screen by pressing <F3> on a file-item. The screen looks like this:

In this screen you can see the file-details that were imported into the myPrograms database. (You can of course modify the source-file and re-refresh to have a decent display.) MyPrograms also tracks the number of times a file has been launched. If you look at a file-item that has already been started at least once, an additional line appears at the bottom of the screen informing you about the last time launched and the number of launches.
You can do the following operations here:
Click the or buttons to browse through the list. myPrograms respects the file-order that has been Navigate through the file-list: Previous Nextset in the file-list screen.
As I said... the most important feature and it should not be missed in this screen!Launch the game: Click the button to exit the detail-screen.Go back to the file-list: back
As usual, hit <ESCAPE> to exit the plugin completely.Go back to the main-menu:
Example: EmulatorsIn this section, I will list some of the best known emulators and how they can be integrated into myPrograms. The guidelines:
it should be possible to directly launch the emulator using the implemented options.Avoid batch files: launching the emulator should be as invisible as possible. If the emulator supports it, forcing it to always run in Avoid popups and flickering:
your desktop resolution can help considerably here. the nicest emulators are those where you just need the remote-control and a game-controller. (This is of course Avoid using the keyboard:
nearly impossible with computer emulators like C-64 or AMIGA).
Some general hints:
before trying to integrate it into MediaPortal. Check joystick settings, check how you Make sure the emulator works fine in stand-alone modecan launch the emulator in full-screen mode etc.
in plugin setup to import the roms.Use the "Update Database" button. These two points are a real timesaver and you don't have to do the Use the "Launch" button in the setup screen to test your configuration
boring setup / MediaPortal switching to see if the latest changes were correct! by selecting the "Tools -> Read From Profile" function in the menubar on top of the screen. This will fill an existing Use the predefined profiles
detail screen with working settings for a bunch of emulators.For big romlists, them! You can for example import all your Mame32 roms in one program, create one or more favourite use favourites to filteritems and add the games you'd like to play to the favourite lists. After that you can even disable the original Mame program-item, so that in MediaPortal, only the favourites will appear.
Arcade: MAME

Here are the settings for the "mother" of all emulators:
MAMETitle: <mame_directory>\Mame32.exeLaunching Application:
Arguments: -joy -skip_disclaimer -skip_gameinfo Window-Style: Minimized
<don't bother>Startup Directory: YESQuotes around Filenames:
YESStartup using ShellExecute: <mame_directory>\romsFile Directory:
: <mame_directory>\snap <mame_directory>\titles Image Directories (put each of the following directories on one line)<mame_directory>\marquees <mame_directory>\flyers <mame_directory>\cabinets
File-Extensions: .zip the skip_disclaimer and skip_gameinfo arguments make sure you don't have to write "OK" before starting the game up (newer Remarks:
versions of MAME do not accept the skip_disclaimer switch anymore). There are cases where MAME still asks you to write "O" "K" to continue (for example in the "there are problems with this game"-screen). In this case, you can move the joystick <LEFT> and <RIGHT> (for 'O' and 'K'... obviously).
If you enter more than one image directory, MediaPortal will start a small slideshow in the FileInfo screen with all the image files Remarks (2):found for one single game!
MAME32 supports all features packed into one single ZIP file (i.e. you have one huge SNAP.ZIP file containing all screenshots. Remarks (3):myPrograms does not support ZIP archives, so if you want pictures in MediaPortal, you need to unzip those archives!
Links: //www.classicgaming.com/mame32 http://www.mame.net
Nintendo64: Project64
Project 64Title: <proj64_directory>\Project64.exeLaunching Application:
<leave empty>Arguments: Window-Style: Hidden
<don't bother>Startup Directory: Quotes around Filenames: NO
Startup using ShellExecute: YES <proj64_directory>\romsFile Directory:
<proj64_directory>\imgImage Directory: File-Extensions: .zip,.usa
Links: http://www.pj64.net
Sony Playstation 1: ePSXe
ePSXeTitle: <epsxe_directory>\ePSXe.exeLaunching Application:
Arguments: -nogui -loadbin Window-Style: Minimized
<don't bother>Startup Directory: YESQuotes around Filenames:
YESStartup using ShellExecute: <epsxe_directory>\romsFile Directory:
<epsxe_directory>\imgImage Directory: File-Extensions: .bin,.iso
You need to quit ePSXe with the <ESCAPE> key. ePSXe does not like to be left with <ALT-F4> .Remarks: at all Links: http://www.epsxe.com
Super NES: zSNESw
zSNESwTitle: <zsnesw_directory>\zsnesw.exeLaunching Application:
<none>Arguments: Window-Style: Minimized
<don't bother>Startup Directory: YESQuotes around Filenames:
YESStartup using ShellExecute: <zsnesw_directory>\romsFile Directory:
<zsnesw_directory>\imgImage Directory: File-Extensions: .zip
Exiting the emulator with the remote is impossible! Make sure you map an EXIT-key in the zsnes configuration to a unused joystick Remarks:button!
Links: http://www.zsnes.com
Super NES: SNES9x
SNES9xTitle: <SNES9x_directory>\snes9xw.exeLaunching Application:

<none>Arguments: Window-Style: Maximized
<SNES9x_directory\>Startup Directory: YESQuotes around Filenames:
YESStartup using ShellExecute: <SNES9x_directory>\romsFile Directory:
<SNES9x_directory>\imgImage Directory: File-Extensions: .zip .sfc .smc
Links: http://www.snes9x.com
Sega Genesis: Gens
GENSTitle: <gens_directory>\gens.exeLaunching Application:
<none>Arguments: Window-Style: Minimized
Startup Directory: <gens_directory> YESQuotes around Filenames:
NOStartup using ShellExecute: <gens_directory>\romsFile Directory:
<gens_directory>\imgsImage Directory: File-Extensions: .zip
Links: http://gens.consolemul.com
Sega Genesis(2): Kega Fusion
Kega FusionTitle: <kega_directory>\fusion.exeLaunching Application:
Arguments: %FILE% -fullscreen Window-Style: Hidden
<kega_directory>Startup Directory: YESQuotes around Filenames:
YESStartup using ShellExecute: <kega_directory>\romsFile Directory:
<kega_directory>\imgsImage Directory: File-Extensions: .zip
Links: http://www.eidolons-inn.net/tiki-index.php?page=Kega
Sega Master System: Kega Fusion
Kega Fusion (Master System)Title: <kega_directory>\fusion.exeLaunching Application:
Arguments: %FILE% -sms -fullscreen Window-Style: Hidden
Startup Directory: <gens_directory> YESQuotes around Filenames:
YESStartup using ShellExecute: <kega_directory>\romsFile Directory:
<kega_directory>\imgsImage Directory: File-Extensions: .zip
Links: http://www.eidolons-inn.net/tiki-index.php?page=Kega
Sega Game Gear: Kega Fusion
Kega Fusion (Game Gear)Title: <kega_directory>\fusion.exeLaunching Application:
Arguments: %FILE% -gg -fullscreen Window-Style: Hidden
Startup Directory: <gens_directory> YESQuotes around Filenames:
YESStartup using ShellExecute: <kega_directory>\romsFile Directory:
<kega_directory>\imgsImage Directory: File-Extensions: .zip
Links: http://www.eidolons-inn.net/tiki-index.php?page=Kega
Nintendo NES: Nestopia
NestopiaTitle: <nestopia_directory>\nestopia.exeLaunching Application:
<none>Arguments: Window-Style: Minimized
<nestopia_directory>Startup Directory: YESQuotes around Filenames:
NOStartup using ShellExecute: <nestopia_directory>\romsFile Directory:
<nestopia_directory>\imgsImage Directory: File-Extensions: .nes,.zip
There is a bug in Nestopia v1.09 preventing the title bar to disappear at startup. You need to press <ESC> to really go fullscreen.Remarks: Links: http://sourceforge.net/projects/nestopia/
PC Engine: Magic Engine
Magic EngineTitle: <magic_engine_directory>\pce.exeLaunching Application:
<none>Arguments: Window-Style: Minimized
<none>Startup Directory: YESQuotes around Filenames:
NOStartup using ShellExecute: <magic_engine_directory>\romsFile Directory:
<magic_engine_directory>\imgsImage Directory: File-Extensions: .pce
Magic Engine is SharewareRemarks: Links: http://www.magicengine.com
Game Boy Advance: Visual Boy Advance
Visual Boy AdvanceTitle: <vba_directory>\VisualBoyAdvance.exeLaunching Application:
<none>Arguments: Window-Style: Minimized
<none>Startup Directory: YESQuotes around Filenames:
YESStartup using ShellExecute: <vba_directory>\romsFile Directory:
<vba_directory>\imgsImage Directory: File-Extensions: .gba
Startup VisualBoyAdvance first, setup for fullscreen use and quit. This will leave a "vba.ini" file in the vba-directory. I had to change Remarks:"autoHideMenu=1" manually because I didn't find this in the menus.
Links: http://vba.ngemu.com
Commodore 64: WinVICE
WinVICETitle: <WinVICE_directory>\x64.exeLaunching Application:
<none>Arguments: Window-Style: Minimized
<none>Startup Directory: YESQuotes around Filenames:
NOStartup using ShellExecute: <WinVICE_directory>\romsFile Directory:
<WinVICE_directory>\imgsImage Directory: File-Extensions: .d64,.t64
Links: http://www.viceteam.org
Commodore Amiga: WinUAE
WinUAETitle: <WinUAE_directory>\winuae.exeLaunching Application:
Arguments: -config=e:\media\emu\Amiga\winuae\configurations\my_nogui.uae -0 Window-Style: Minimized
Startup Directory: <WinUAE_directory> Quotes around Filenames: NO
NOStartup using ShellExecute: <WinUAE_directory>\romsFile Directory:
<WinUAE_directory>\imgsImage Directory: File-Extensions: .adf
This is slightly more tricky than the rest. You must save a configuration file first and set all the paths correctly (for kickstart rom image Remarks:etc.). Also set the "use_gui = no" parameter in the configuration file. In the example above the configuration file is called "my_nogui.uae"
Links: http://www.winuae.net
Example: PC-Applications
There are several possibilities to launch PC-Applications. One easy way works like this:
- In myPrograms configuration, create an application item with the parameters listed below and save this item.- Select the freshly created item in the application list and click the FILES-Button on the lower right. An editor window will appear where you can enter all the items you wish to launch. The of each item can either be an executable (with arguments) or simply an existing filename with filenamean associated application treating its file extension. [Note: if you use the browse function to find an filename, you will need to add quotes around any paths which contain spaces for them to launch correctly.]
PC-ApplicationsTitle: Launching Application: <none>
<none>Arguments: Window-Style: Normal
<none>Startup Directory: YESQuotes around Filenames:
Startup using ShellExecute: YESSource-Type: Filelauncher
Example: PC-Applications as background applicationUsing the previous method, MediaPortal will be frozen and wait until the application is terminated. If MediaPortal is supposed to continue to run, and the PC-Application is only supposed to be started in addition to MediaPortal, a small script file is needed, that can be used as an application laucher.
- Create the spawn script file with the notepad and and store it. An exmple for this script is given below. - In myPrograms configuration, create an application item with the parameters listed below and save this item. The newly created script will be used as launching application.- Select the freshly created item in the application list and click the FILES-Button on the lower right. An editor window will appear where you can enter all the items you wish to launch as background applications. The of each item can either be an executable (with arguments) or filenamesimply an existing filename with an associated application treating its file extension. But remember to use Quotes in the (for example: filename "C:
)!\XMLTV\update listings.bat" -auto PC-ApplicationsTitle:
Launching Application: Spawn.js <none>Arguments:
Window-Style: Minimized <none>Startup Directory:
YESQuotes around Filenames: Startup using ShellExecute: YES
Source-Type: Filelauncher
Spawn.js
var arguments =""objArgs = WScript.Argumentsarguments='"'for (i = 0; i < objArgs.length; i++){ if (i > 0) {arguments = arguments + " "; arguments = arguments + objArgs(i)} else {arguments = arguments + objArgs(i) + '"'};}WshShell = WScript.CreateObject("WScript.Shell");Return = WshShell.Run(arguments, 7, false);
To control the appearance of the application window, the second argument of the WshShell.Run command can be modified.
A value of 7 displays the new application window as a minimized window. The MediaPortal window remains active.A value of 1 activates the new application and displays it in front of MediaPortal.
More details on the possible settings can be found at:
http://msdn.microsoft.com/library/default.asp?url=/library/en-us/script56/html/wsmthrun.asp
Example: Comic ReaderAnd finally a "non-gaming" example for our comic-friends. Here's how to integrate the freeware comic-reader http://www.geocities.com/davidayton/CDisplay
- Install and configure CDisplay - Organize your comics in a logical folder structure. Save the cbz files and if you want to have title pictures, save a thumbnail picture with exactly the same filename as the cbz. - In myPrograms, create a new application item with the following settings:
ComicsTitle: Launching Application: <none>
<none>Arguments: Window-Style: Minimized
<none>Startup Directory:

YESQuotes around Filenames: Startup using ShellExecute: YES
Source-Type: Directory (Cache-Mode) <your_comic_root_directory>File Directory:
<some_directory_with_thumbnails>Image Directory: File-Extensions: .cbz
Click the FILES tab and click "Update Database" to import the available comic books. Select one comic book and click "Launch" to verify if your configuration is correct.
Example: Web browser(Simply copied from )https://forum.team-mediaportal.com/showthread.php?p=84503#post84503
In the MP setup screen go to plugins, right click My Programs and make sure the My Programs is enabled, if so enter the configuration for My Programs. This will open the My Programs Setup window.
Next click 'add child' and choose file launcher. On the new area that opens, (there will be two tabs one labelled details and the other files) called details - In the title box enter a suitable name such as 'web pages', and then in the launching application use the wee folder icon to the right to find the path to your web browser. The only other area i changed on this screen was to make the window style 'maximised' and i have my web browser set to open in full screen. In this example i used MS Intenet Explorer but i have tested it using Opera instead in the fie path and it works fine.
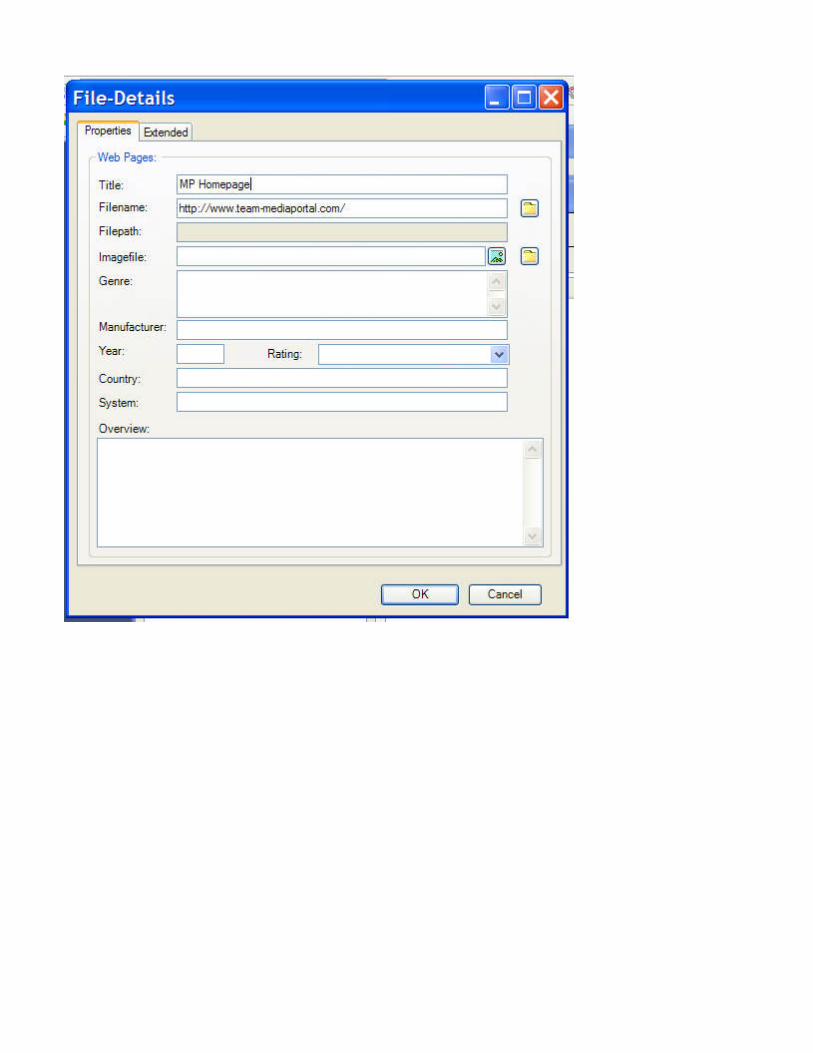
Next click the tab labelled files and then the option 'new..' another window labelled 'file details' will open and there are 2 entries you have to make, in the title call it whatever you like, i have use 'MP Homepage' in this example. Then in the box labelled filename enter the address of the webpage you want to open. In this example i used then click 'ok' and the file details window should close, add any further webpages by the https://www.team-mediaportal.com/same process and once you are complete close the 'my programs setup' window.
Finally click OK on the MP setup screen and it should close, this should be Job Done.
My Programs will be found in MP either under its own heading or under My plugins depending on the version of MP you use , there should be a folder called web pages and then inside that the web pages list, click on any of those and your broswer should open.
I use HIP and have allocated ctrl-w to the back button on the remote, this means when http://www.byremote.com.au/downloads/default.asp?SCLASS=HIPi press back on my mce remote after viewing a web page the internet explorer screen closes and i am returned to MP, pretty smooth solution.
I hope this helps, any questions just ask
Cheers m