Embed Size (px)
Citation preview
POSITIONING FOR PLAY Interactive Activities to Enhance Movement
and Sensory Exploration
SECOND EDITION
Activity Sheets
Rachel B. Diamant, MS, OTR/L, BCP Allison Whiteside, PT
Illustrated by
Rachel B. Diamant, MS, OTR/L, BCP
8700 Shoal Creek Boulevard Austin, Texas 78757-6897
800/897-3202 Fax 800/397-7633 www.proedinc.com
© 1992, 2010 by PRO-ED, Inc. 8700 Shoal Creek Boulevard Austin, Texas 78757-6897 800/897-3202 Fax 800/397-7633 www.proedinc.com
All rights reserved. No part of the material protected by this copyright notice may be reproduced or used in any form or by any means, electronic or mechanical, including photocopying, recording, or by any information storage and retrieval system, without prior written permission of the copyright owner.
Notice: PRO-ED grants permission to the user of this material to make unlimited copies of the activity sheets for teaching or clinical purposes. Duplication of this material for commercial use is prohibited.
ISBN: 978-1-4164-0431-6
Originally published as Positioning for Play: Home Activities for Parents of Young Children.
Contents
Carrying
C C1: Carrying a Child in Front of Your Body C2: Carrying a Child on One Hip C3: Carrying a Child With Legs Separated C4: Carrying a Child in Front of Your Body in a Seated Position C5: Carrying a Child in Front of Your Body, Lengthening One Leg C6: Carrying a Child in Front of Your Body, One Leg Bent C7: Carrying a Child With Legs Straddling One of Your Hips
Back-Lying (Supine)
BL BL1: Child on Your Lap BL2: Child Lying on Back, Facing You BL3: Child Lying on Back, Reaching Hands to Feet With Support at Shoulders BL4: Child Lying on Back, Playing With Hands BL5: Child Lying on Back, Reaching for Toy With Two Hands BL6: Child Lying on Back With Legs Straight, in Front of You BL7: Child Lifting Hips and Legs BL8: Child Lying on Back With Hands on Knees BL9: Child Lifting Hips and Legs With Legs Straight BL10: Child Lying on Back With Legs Straight, Looking at Feet BL11: Child Lying on Back, Reaching Toward Feet BL12: Child Lying on Back, Reaching Two Hands to One Foot BL13: Child Lying on Back, Leg Bicycles BL14: Child Lying on Back, Propped With Towels BL15: Child Lying on Back in an Inner Tube, Swim Ring, or Ring-Shaped Pillow
Tummy-Lying (Prone)
TL TL1: Child Lying on Tummy Across Your Lap on a Pillow TL2: Child Lying on Tummy Across Your Lap and Balancing While You Move
Your Legs TL3: Child Lying on Tummy on Your Chest TL4: Child Lying on Tummy on Your Chest, While You Sit in a Recliner
Chair or on a Couch TL5: Child Lying on Tummy Across Your Lap, While You Are Seated With Legs Crossed
TL6: Child Lying on Tummy, One Leg Bent and One Leg Straight (Runner’s Stretch) TL7: Child Lying on Tummy, Supported by Your Hands TL8: Child Lying on Tummy, Supported With a Towel Roll TL9: Child Lying on Tummy Across Your Lap, Arms Straight TL10: Child Lying on Tummy, Supported on Straight Arms TL11: Child Lying on Tummy, Traction at the Legs TL12: Child on Tummy Reaching for Toys With One Arm, Supporting
on a Bent Arm TL13: Child on Tummy Reaching for Toys With One Arm, Supporting
on a Straight Arm TL14: Child Pivoting on the Tummy to Reach a Toy TL15: Wheelbarrow Position TL16: Wheelbarrow Walking
Side-Lying
SL SL1: Child Side-Lying on Your Lap While You Sit in a Chair SL2: Child Side-Lying, Supported by Your Leg SL3: Child Side-Lying, Supporting on Elbow SL4: Child Side-Lying, Reaching Out for Toys Placed in Front SL5: Child Side-Lying, Supporting on Straight Arm SL6: Child Side-Lying, With Support at Shoulder for Head and Body Control SL7: Child Side-Lying, Moving Front to Back Over the Foot SL8: Child Side-Lying, Propped With Towels
Hands and Knees/Crawling
HK HK1: Child on Hands and Knees, Supported by Your Leg While on the Couch HK2: Child on Hands and Knees, Supported by Your Leg HK3: Child on Hands and Knees, Propped on a Couch Cushion HK4: Child on Hands and Knees, Supported by Your Hands HK5: Child Assuming Hands and Knees, Arms Straight and Legs Tucked HK6: Child Assuming Hands and Knees, Supporting Opposite Arm and Leg HK7: Choo-Choo Train HK8: Child Crawling Over Your Legs HK9: Child Crawling In and Out of a Box HK10: Child Crawling Over Pillows HK11: Child Crawling Up Steps/Stairs With Assistance HK12: Child Climbing Up Steps/Stairs Under Your Supervision
Sitting
S S1: Child Sitting on Your Leg While You Are Sitting on a Couch or a Chair S2: Child Long-Sitting Between Your Legs While Sitting on a Couch S3: Child Sitting on Your Stomach S4: Child Sitting on Your Lap With Your Legs Crossed S5: Child Long-Sitting on Your Lap, Supported at the Arms S6: Child Long-Sitting Across Your Lap, With Support at the Shoulders S7: Child Long-Sitting on a Table, With Support at Arms and Body, Facing You S8: Child Long-Sitting on a Table, With Support at the Shoulders, Facing You S9: Child Long-Sitting on Your Lap, With Support at the Shoulders, Facing You S10: Child Bench-Sitting on Your Lap, With Support at the Shoulders S11: Child Long-Sitting on Your Lap, With Support at Arms and Body, Facing Away S12: Child Bench-Sitting on Your Lap, With Support at the Ribs S13: Child Bench-Sitting on Your Leg While You Are Sitting on the Floor S14: Child Bench-Sitting Across Your Legs, With Support at the Hips S15: Child Long-Sitting Across Your Lap, With Support at the Hips S16: Child Long-Sitting on Your Lap, With Support at the Legs, Facing Away S17: S18: Child Bench-Sitting Between Your Legs While Sitting on a Couch or Chair, With
Support at the Hips, Facing Away S19: Child Long-Sitting on Table, With Support at Hips, Facing You S20: Child Long-Sitting on Couch, With Support at Hips, Facing Away S21: Child Long-Sitting on the Floor, With Support at Hips S22: Child Long-Sitting on a Couch or Chair, With Support at Legs, Facing Away S23: Child Long-Sitting on Floor, Between Your Upper Legs, Facing Away S24: Child Long-Sitting on Floor, Between Your Lower Legs, Facing Away S25: Child Long-Sitting on Floor, Between Your Lower Legs, Facing You S26: Child Long-Sitting on Couch, Traction to Legs S27: Child Sitting on Your Lap, With Support at Hips, in Front of Table S28: Child Bench-Sitting in a Chair With You, Playing a Sensory Game S29: Child Long-Sitting on Your Lap, Facing You S30: S31: S32: Child Sitting on the Floor, Against Couch, Reaching Forward S33: Child Half-Long-Sitting on the Floor, Reaching to Side S34: Child Long-Sitting, Reaching for Toy S35: Child Half-Long-Sitting on Floor, Supported on One Arm, Reaching Across Body S36: S37: Child Side-Sitting, Supported on Straight Arm S38: Child Bench-Sitting Across Your Lap, Learning to Balance Front to Back
Child Bench-Sitting on Your Lap, With Support at the Hips, Facing Away
Child Bench-Sitting on Table, With Support at Hips, Facing You Child Long-Sitting on a Chair or Couch, With Support at Hips, Facing You
Child Side-Sitting, Arm Supported on Your Leg
S39: Child Sitting on Your Lap, Balancing Side to Side, With Support at Arms S40: Child Sitting on a Chair or Couch, Facing You, Learning to Balance Sideways S41: Child Sitting on Your Lap, Balancing Side to Side, With Support at Hips S42: Child Long-Sitting on Floor, Learning to Use Arms to Balance, With Support at Arms S43: Child Long-Sitting on Floor, Learning to Use Arms to Balance, With Support at Hips S44: Child Bench-Sitting on Telephone Book or Booster Seat, With Support at Hips S45: Child Sitting on Bench, Reaching Forward S46: Child Sitting on Bench, Reaching to the Side S47: Child Sitting on Bench, Reaching Down to Floor S48: Child Sitting in a Laundry Basket/Box/Inner Tube S49: Child Long-Sitting on Floor, Supported by Pillows S50: Child Long-Sitting on Floor Against Couch, Using a Box as a Table S51: Child Sitting in an Infant Seat/Carrier S52:
Kneeling
KN KN1: Child Kneeling by Your Body KN2: Child Kneeling, Supported by Your Leg KN3: Child Kneeling at the Arm of a Couch KN4: Child Kneeling in Front of a Coffee Table/Chair/Stool KN5: Child Kneeling in Front of a Stool/Inverted Box/Laundry Basket
Standing
ST1: Child Standing, Supported by You ST ST2: Child Standing, Supported Between Your Legs ST3: Child Standing, Leaning on Back of Couch ST4: Child Standing With the Assistance of Two Adults ST5: Child Standing in Front of Coffee Table/Chair With Your Support ST6: Child Standing in Front of a Stool/Inverted Box/Laundry Basket ST7: Child Standing in Front of a Refrigerator or Wall ST8: Child Standing on Floor, Holding Onto Couch ST9: Child Learning to Stand Independently, Supported at Shoulders ST10: Child Standing, Supported at Hips, Downward Pressure Toward the Feet ST11: Child Standing, Back and Bottom Against the Wall ST12: Child Standing, Bottom Against Couch ST13: Child Standing in a Box ST14: Child Standing in Crib/Playpen, Squatting to Play ST15: Child Standing at Couch, Squatting to Pick Up Toys ST16: Child Standing on Your Lap
Child Sitting in a High Chair
KN6: Child Tall-Kneeling, Moving From Side to Side
ST17: Child Standing on Your Lap, Learning to Balance Side to Side ST18: Child Standing, Learning to Balance by Stepping on Pillow/Book ST19: Child Standing, Holding Onto Couch, Assisted to Take Steps Sideways ST20: Child Standing, Holding Onto Couch, Stepping Sideways on and Over a Book ST21: Child Standing, Stepping Between Furniture ST22: Child Standing to Learn to Dress—Pants ST23: Child Standing to Learn to Dress—Shoes
Walking
W W1: Child Walking on Knees, Pushing a Box or an Inverted Laundry Basket W2: Child Walking While Pushing a Chair W3: Child Walking While Pushing a Cart/Push Toy W4: Child Walking Between the Arms of Two Adults W5: Child Walking While Holding Onto a Broom Handle or a Towel W6: Child Walking With Two Hands Held at Shoulder Height W7: Child Walking With One Arm Held at Shoulder Height W8: Child Walking While Holding Onto a Wooden Spoon or Dowel W9: Child Learning to Walk Around, Over, or on Obstacles W10: Child Walking While Carrying a Large Object W11: Child Walking on Uneven Ground W12: Child Stepping Up and Down One Step, Walking Forward W13: Child Walking and Learning to Step Up and Down and to Balance W14: Child Side-Stepping Up and Down One Step W15: Child Learning to Kick a Ball With One Foot W16: Child Learning to Walk Backward
Transitions
TR TR1: Child Learning to Roll From Back to Side TR2: Child Learning to Roll From Back to Side, Holding Onto Feet TR3: Child Learning to Roll From Back to Stomach TR4: Child Learning to Sit Up From Lying on Back TR5: Child Learning to Sit Up From Lying on Tummy TR6: Child Learning to Move From Long-Sitting to Tummy TR7: Child Learning to Move From Side-Sit to Hands and Knees, Over Your Leg TR8: Child Learning to Move From Side-Sit to Hands and Knees TR9: Child Learning to Move From Partial Long-Sit Onto Hands and Knees TR10: Child Learning to Climb Down From a Couch TR11: Child Learning to Climb Onto a Couch Using Cushions TR12: Child Climbing Onto a Couch TR13: Child Learning to Move From Hands and Knees to Tall-Kneeling With Assistance
TR14: Child Moving From Kneel-Sit to Kneeling With Assistance TR15: Child Moving From Kneel-Sit to Kneeling Independently TR16: Child Learning to Squat and Play With Assistance TR17: Child Learning to Stand From Sitting on Your Lap TR18: Child Learning to Sit on the Floor From Standing Position TR19: Child Moving From Kneel to Half-Kneel to Stand While Holding Onto Furniture TR20: Child Climbing In and Out of a Box or a Washtub TR21: Child Learning to Climb Onto and Sit in a Child-Sized Chair TR22: Child Learning to Climb On and Off a Scooter or Tricycle TR23: Child Learning to Walk Up Stairs TR24: Child Learning to Walk Down Stairs TR25: Child Learning to Jump and Bounce on a Cushion TR26: Child Learning to Do More Challenging Motor Skills
Car
ryin
g
Carrying a Child in Front of Your Body
C1
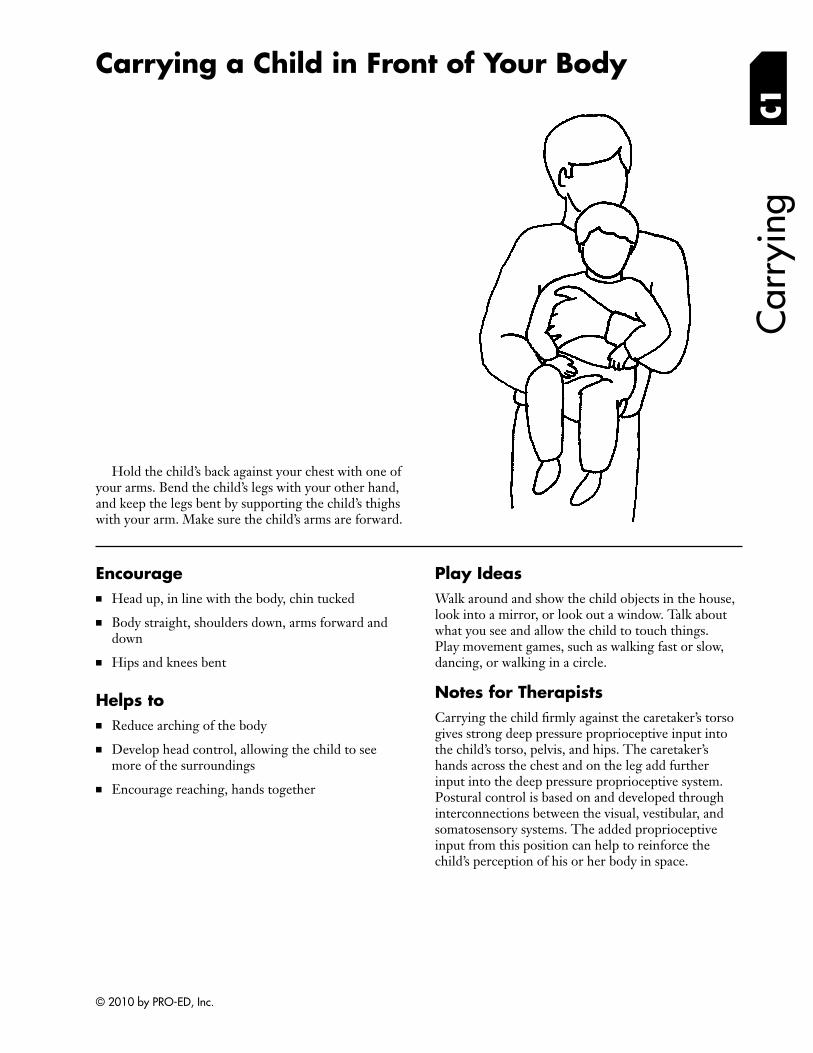
Hold the child’s back against your chest with one of your arms. Bend the child’s legs with your other hand, and keep the legs bent by supporting the child’s thighs with your arm. Make sure the child’s arms are forward.
Encourage ■ Head up, in line with the body, chin tucked
■ Body straight, shoulders down, arms forward and down
■ Hips and knees bent
Helps to ■ Reduce arching of the body
■ Develop head control, allowing the child to see more of the surroundings
■ Encourage reaching, hands together
Play Ideas Walk around and show the child objects in the house, look into a mirror, or look out a window. Talk about what you see and allow the child to touch things. Play movement games, such as walking fast or slow, dancing, or walking in a circle.
Notes for Therapists Carrying the child firmly against the caretaker’s torso gives strong deep pressure proprioceptive input into the child’s torso, pelvis, and hips. The caretaker’s hands across the chest and on the leg add further input into the deep pressure proprioceptive system. Postural control is based on and developed through interconnections between the visual, vestibular, and somatosensory systems. The added proprioceptive input from this position can help to reinforce the child’s perception of his or her body in space.
© 2010 by PRO-ED, Inc.
C2
Carrying a Child on One Hip
Car
ryin
g
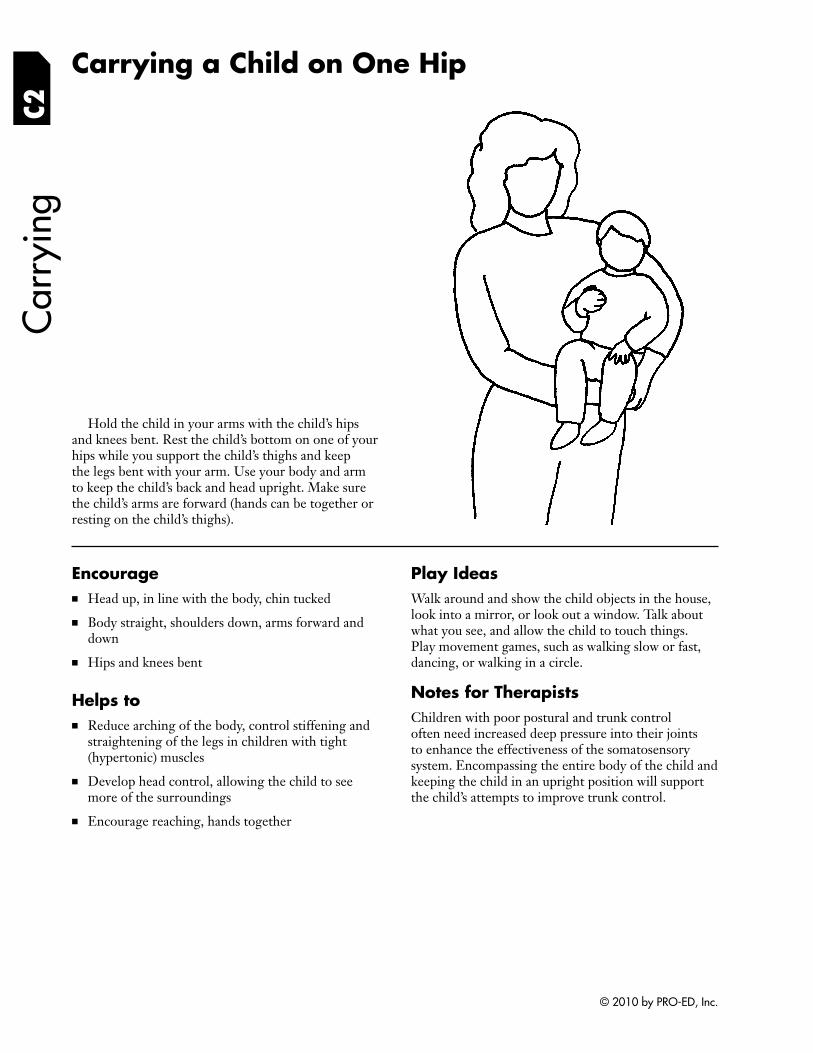
Hold the child in your arms with the child’s hips and knees bent. Rest the child’s bottom on one of your hips while you support the child’s thighs and keep the legs bent with your arm. Use your body and arm to keep the child’s back and head upright. Make sure the child’s arms are forward (hands can be together or resting on the child’s thighs).
Encourage ■ Head up, in line with the body, chin tucked
■ Body straight, shoulders down, arms forward and down
■ Hips and knees bent
Helps to ■ Reduce arching of the body, control stiffening and
straightening of the legs in children with tight (hypertonic) muscles
■ Develop head control, allowing the child to see more of the surroundings
■ Encourage reaching, hands together
Play Ideas Walk around and show the child objects in the house, look into a mirror, or look out a window. Talk about what you see, and allow the child to touch things. Play movement games, such as walking slow or fast, dancing, or walking in a circle.
Notes for Therapists Children with poor postural and trunk control often need increased deep pressure into their joints to enhance the effectiveness of the somatosensory system. Encompassing the entire body of the child and keeping the child in an upright position will support the child’s attempts to improve trunk control.
© 2010 by PRO-ED, Inc.
Carrying a Child With Legs Separated
C3
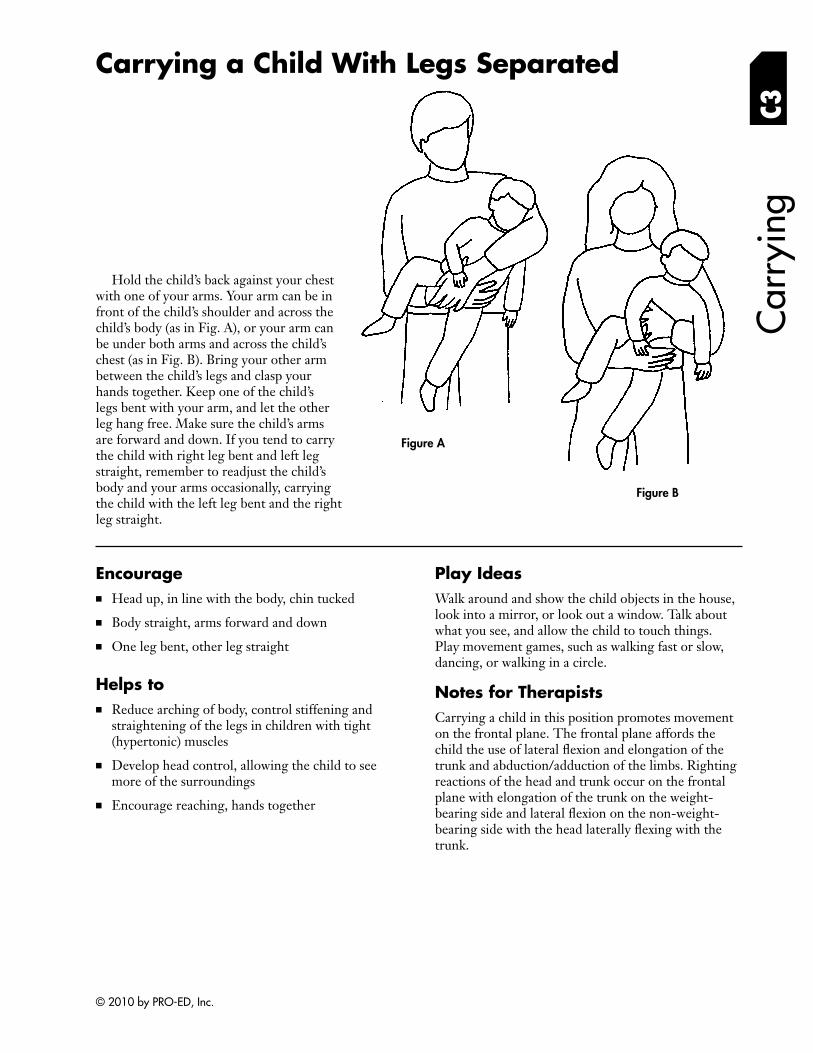
Hold the child’s back against your chest with one of your arms. Your arm can be in front of the child’s shoulder and across the child’s body (as in Fig. A), or your arm can be under both arms and across the child’s chest (as in Fig. B). Bring your other arm between the child’s legs and clasp your hands together. Keep one of the child’s legs bent with your arm, and let the other leg hang free. Make sure the child’s arms are forward and down. If you tend to carry the child with right leg bent and left leg straight, remember to readjust the child’s body and your arms occasionally, carrying the child with the left leg bent and the right leg straight.
Car
ryin
g
Figure A
Figure B
Encourage ■ Head up, in line with the body, chin tucked
■ Body straight, arms forward and down
■ One leg bent, other leg straight
Helps to ■ Reduce arching of body, control stiffening and
straightening of the legs in children with tight (hypertonic) muscles
■ Develop head control, allowing the child to see more of the surroundings
■ Encourage reaching, hands together
Play Ideas Walk around and show the child objects in the house, look into a mirror, or look out a window. Talk about what you see, and allow the child to touch things. Play movement games, such as walking fast or slow, dancing, or walking in a circle.
Notes for Therapists Carrying a child in this position promotes movement on the frontal plane. The frontal plane affords the child the use of lateral flexion and elongation of the trunk and abduction/adduction of the limbs. Righting reactions of the head and trunk occur on the frontal plane with elongation of the trunk on the weight-bearing side and lateral flexion on the non-weightbearing side with the head laterally flexing with the trunk.
© 2010 by PRO-ED, Inc.
Carrying a Child in Front of Your Body C4
Car
ryin
g
in a Seated Position
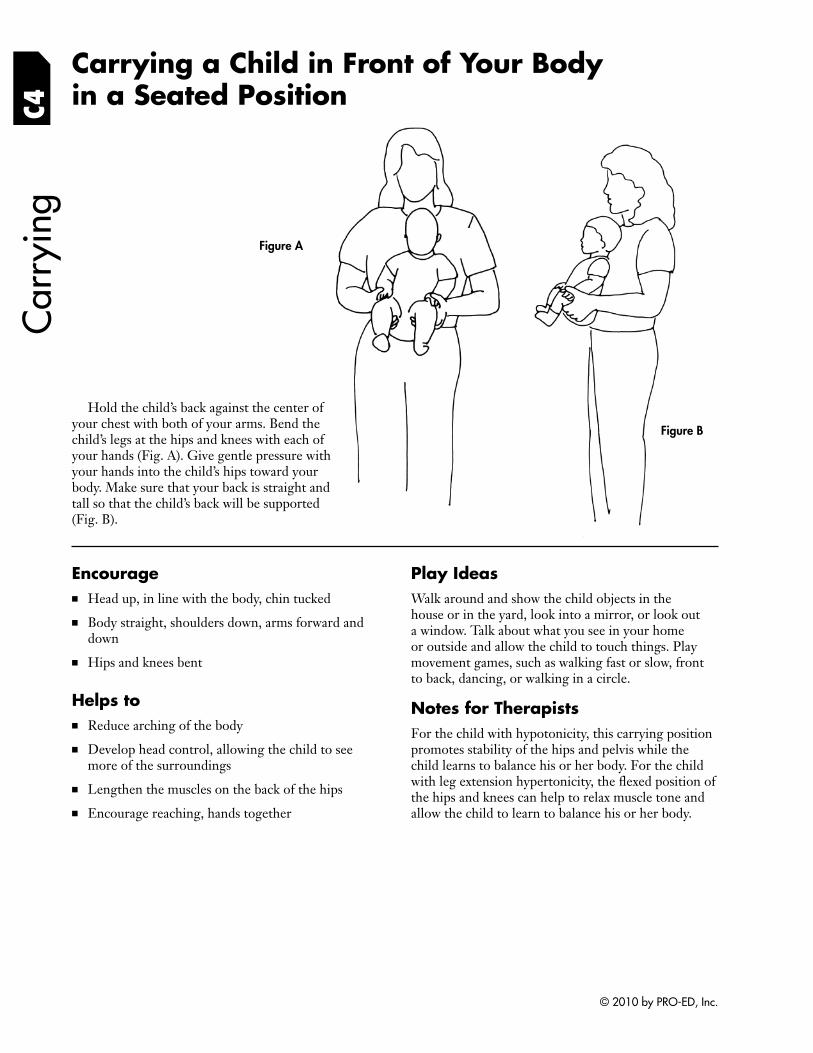
Hold the child’s back against the center of your chest with both of your arms. Bend the child’s legs at the hips and knees with each of your hands (Fig. A). Give gentle pressure with your hands into the child’s hips toward your body. Make sure that your back is straight and tall so that the child’s back will be supported (Fig. B).
Figure A
Figure B
Encourage ■ Head up, in line with the body, chin tucked
■ Body straight, shoulders down, arms forward and down
■ Hips and knees bent
Helps to ■ Reduce arching of the body
■ Develop head control, allowing the child to see more of the surroundings
■ Lengthen the muscles on the back of the hips
■ Encourage reaching, hands together
Play Ideas Walk around and show the child objects in the house or in the yard, look into a mirror, or look out a window. Talk about what you see in your home or outside and allow the child to touch things. Play movement games, such as walking fast or slow, front to back, dancing, or walking in a circle.
Notes for Therapists For the child with hypotonicity, this carrying position promotes stability of the hips and pelvis while the child learns to balance his or her body. For the child with leg extension hypertonicity, the flexed position of the hips and knees can help to relax muscle tone and allow the child to learn to balance his or her body.
© 2010 by PRO-ED, Inc.
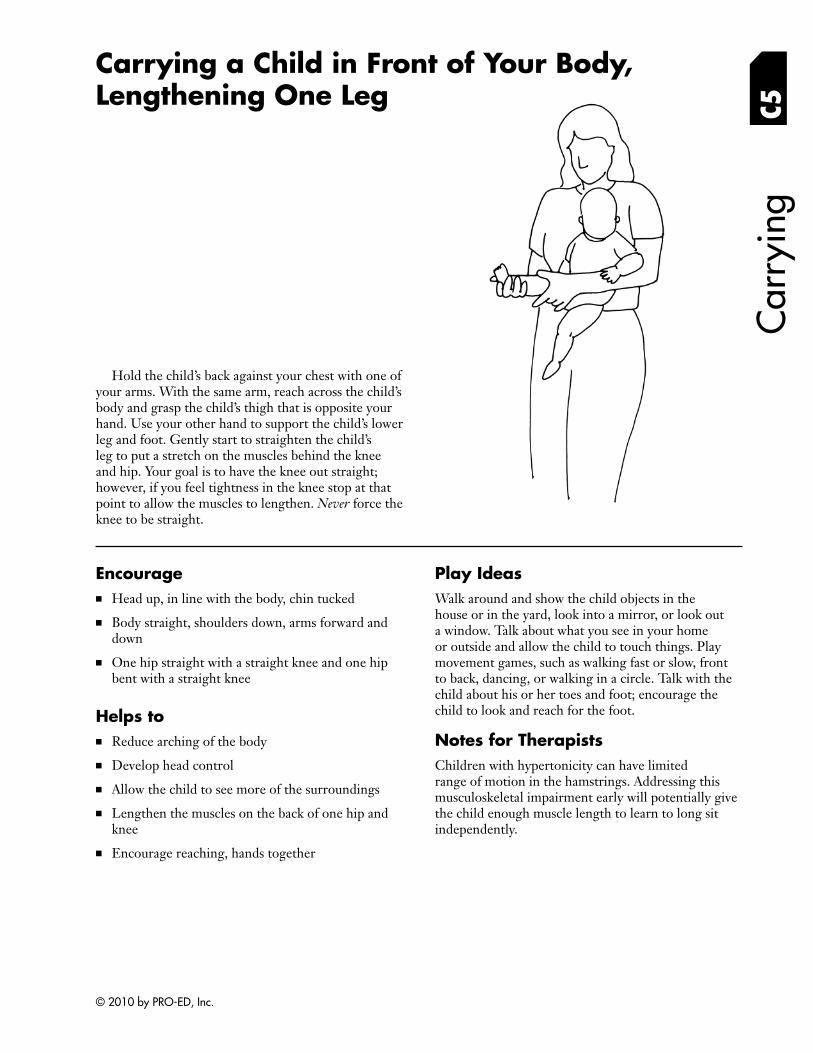
Lengthening One Leg
Car
ryin
g
Carrying a Child in Front of Your Body,
C5
Hold the child’s back against your chest with one of your arms. With the same arm, reach across the child’s body and grasp the child’s thigh that is opposite your hand. Use your other hand to support the child’s lower leg and foot. Gently start to straighten the child’s leg to put a stretch on the muscles behind the knee and hip. Your goal is to have the knee out straight; however, if you feel tightness in the knee stop at that point to allow the muscles to lengthen. Never force the knee to be straight.
Encourage ■ Head up, in line with the body, chin tucked
■ Body straight, shoulders down, arms forward and down
■ One hip straight with a straight knee and one hip bent with a straight knee
Helps to ■ Reduce arching of the body
■ Develop head control
■ Allow the child to see more of the surroundings
■ Lengthen the muscles on the back of one hip and knee
■ Encourage reaching, hands together
Play Ideas Walk around and show the child objects in the house or in the yard, look into a mirror, or look out a window. Talk about what you see in your home or outside and allow the child to touch things. Play movement games, such as walking fast or slow, front to back, dancing, or walking in a circle. Talk with the child about his or her toes and foot; encourage the child to look and reach for the foot.
Notes for Therapists Children with hypertonicity can have limited range of motion in the hamstrings. Addressing this musculoskeletal impairment early will potentially give the child enough muscle length to learn to long sit independently.
© 2010 by PRO-ED, Inc.
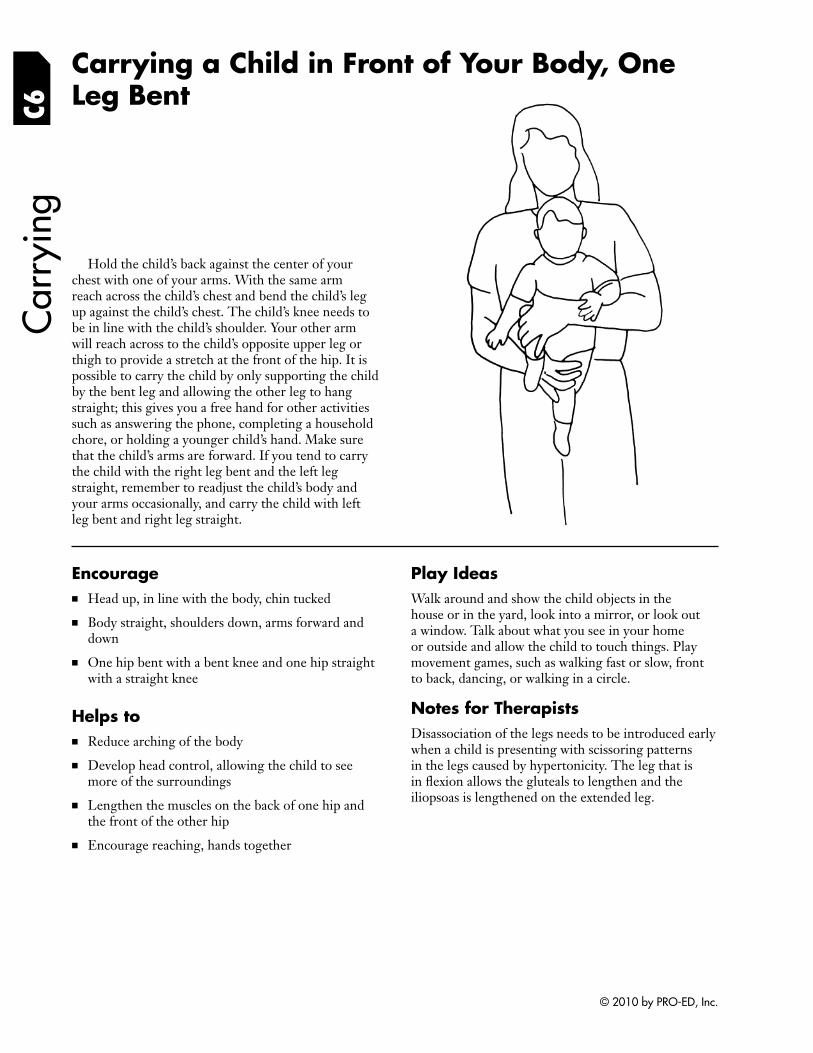
C6
Carrying a Child in Front of Your Body, One Leg Bent
Car
ryin
g
Hold the child’s back against the center of your chest with one of your arms. With the same arm reach across the child’s chest and bend the child’s leg up against the child’s chest. The child’s knee needs to be in line with the child’s shoulder. Your other arm will reach across to the child’s opposite upper leg or thigh to provide a stretch at the front of the hip. It is possible to carry the child by only supporting the child by the bent leg and allowing the other leg to hang straight; this gives you a free hand for other activities such as answering the phone, completing a household chore, or holding a younger child’s hand. Make sure that the child’s arms are forward. If you tend to carry the child with the right leg bent and the left leg straight, remember to readjust the child’s body and your arms occasionally, and carry the child with left leg bent and right leg straight.
Encourage ■ Head up, in line with the body, chin tucked
■ Body straight, shoulders down, arms forward and down
■ One hip bent with a bent knee and one hip straight with a straight knee
Helps to ■ Reduce arching of the body
■ Develop head control, allowing the child to see more of the surroundings
■ Lengthen the muscles on the back of one hip and the front of the other hip
■ Encourage reaching, hands together
Play Ideas Walk around and show the child objects in the house or in the yard, look into a mirror, or look out a window. Talk about what you see in your home or outside and allow the child to touch things. Play movement games, such as walking fast or slow, front to back, dancing, or walking in a circle.
Notes for Therapists Disassociation of the legs needs to be introduced early when a child is presenting with scissoring patterns in the legs caused by hypertonicity. The leg that is in flexion allows the gluteals to lengthen and the iliopsoas is lengthened on the extended leg.
© 2010 by PRO-ED, Inc.
of Your Hips
Car
ryin
g
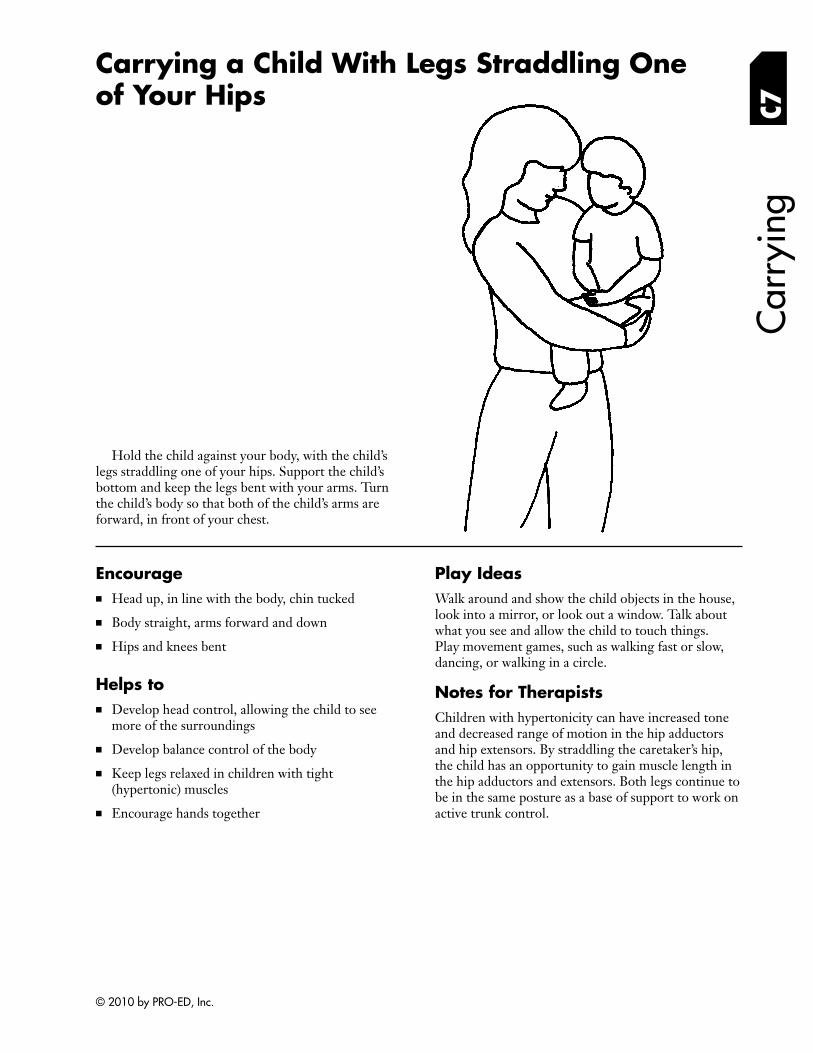
Carrying a Child With Legs Straddling One
C7
Hold the child against your body, with the child’s legs straddling one of your hips. Support the child’s bottom and keep the legs bent with your arms. Turn the child’s body so that both of the child’s arms are forward, in front of your chest.
Encourage ■ Head up, in line with the body, chin tucked
■ Body straight, arms forward and down
■ Hips and knees bent
Helps to ■ Develop head control, allowing the child to see
more of the surroundings
■ Develop balance control of the body
■ Keep legs relaxed in children with tight (hypertonic) muscles
■ Encourage hands together
Play Ideas Walk around and show the child objects in the house, look into a mirror, or look out a window. Talk about what you see and allow the child to touch things. Play movement games, such as walking fast or slow, dancing, or walking in a circle.
Notes for Therapists Children with hypertonicity can have increased tone and decreased range of motion in the hip adductors and hip extensors. By straddling the caretaker’s hip, the child has an opportunity to gain muscle length in the hip adductors and extensors. Both legs continue to be in the same posture as a base of support to work on active trunk control.
© 2010 by PRO-ED, Inc.
Back
-Lyi
ng
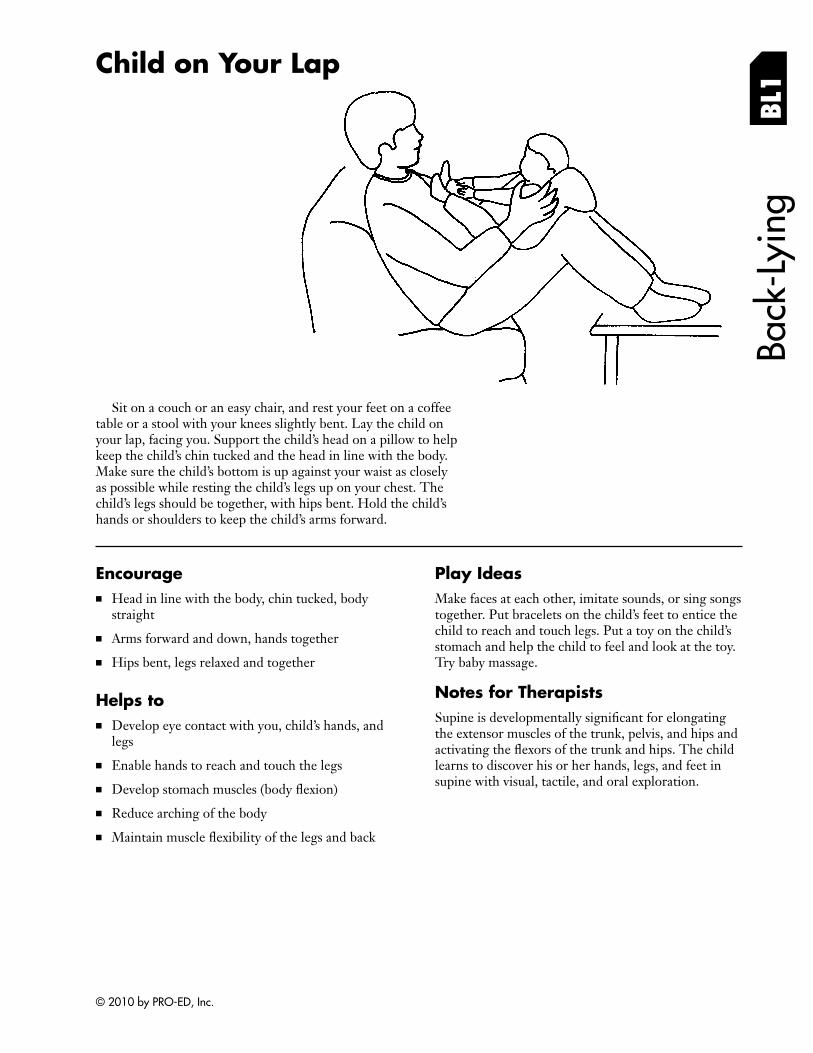
Child on Your Lap
BL1
Sit on a couch or an easy chair, and rest your feet on a coffee table or a stool with your knees slightly bent. Lay the child on your lap, facing you. Support the child’s head on a pillow to help keep the child’s chin tucked and the head in line with the body. Make sure the child’s bottom is up against your waist as closely as possible while resting the child’s legs up on your chest. The child’s legs should be together, with hips bent. Hold the child’s hands or shoulders to keep the child’s arms forward.
Encourage ■ Head in line with the body, chin tucked, body
straight
■ Arms forward and down, hands together
■ Hips bent, legs relaxed and together
Helps to ■ Develop eye contact with you, child’s hands, and
legs
■ Enable hands to reach and touch the legs
■ Develop stomach muscles (body fl exion)
■ Reduce arching of the body
■ Maintain muscle flexibility of the legs and back
Play Ideas Make faces at each other, imitate sounds, or sing songs together. Put bracelets on the child’s feet to entice the child to reach and touch legs. Put a toy on the child’s stomach and help the child to feel and look at the toy. Try baby massage.
Notes for Therapists Supine is developmentally significant for elongating the extensor muscles of the trunk, pelvis, and hips and activating the flexors of the trunk and hips. The child learns to discover his or her hands, legs, and feet in supine with visual, tactile, and oral exploration.
© 2010 by PRO-ED, Inc.
BL2
Child Lying on Back, Facing You Ba
ck-L
ying
Figure A
Figure B
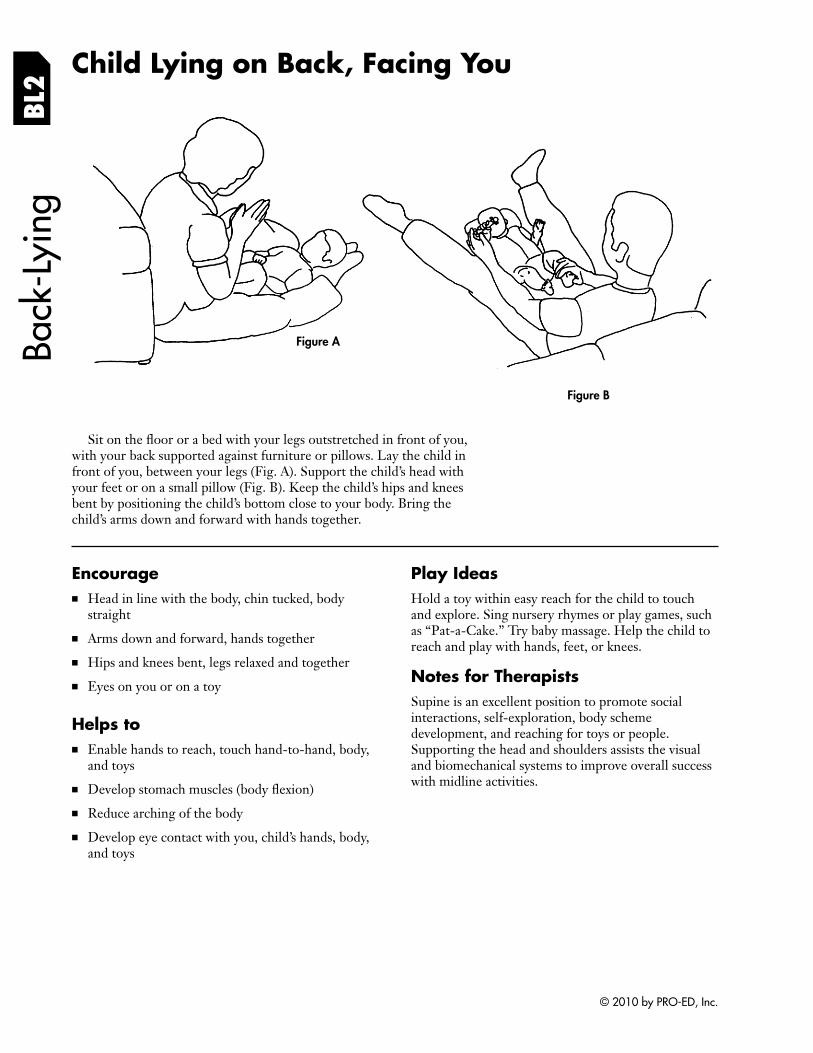
Sit on the floor or a bed with your legs outstretched in front of you, with your back supported against furniture or pillows. Lay the child in front of you, between your legs (Fig. A). Support the child’s head with your feet or on a small pillow (Fig. B). Keep the child’s hips and knees bent by positioning the child’s bottom close to your body. Bring the child’s arms down and forward with hands together.
Encourage ■ Head in line with the body, chin tucked, body
straight
■ Arms down and forward, hands together
■ Hips and knees bent, legs relaxed and together
■ Eyes on you or on a toy
Helps to ■ Enable hands to reach, touch hand-to-hand, body,
and toys
■ Develop stomach muscles (body fl exion)
■ Reduce arching of the body
■ Develop eye contact with you, child’s hands, body, and toys
Play Ideas Hold a toy within easy reach for the child to touch and explore. Sing nursery rhymes or play games, such as “Pat-a-Cake.” Try baby massage. Help the child to reach and play with hands, feet, or knees.
Notes for Therapists Supine is an excellent position to promote social interactions, self-exploration, body scheme development, and reaching for toys or people. Supporting the head and shoulders assists the visual and biomechanical systems to improve overall success with midline activities.
© 2010 by PRO-ED, Inc.
Back
-Lyi
ng
Child Lying on Back, Reaching Hands to Feet With Support at Shoulders BL
3
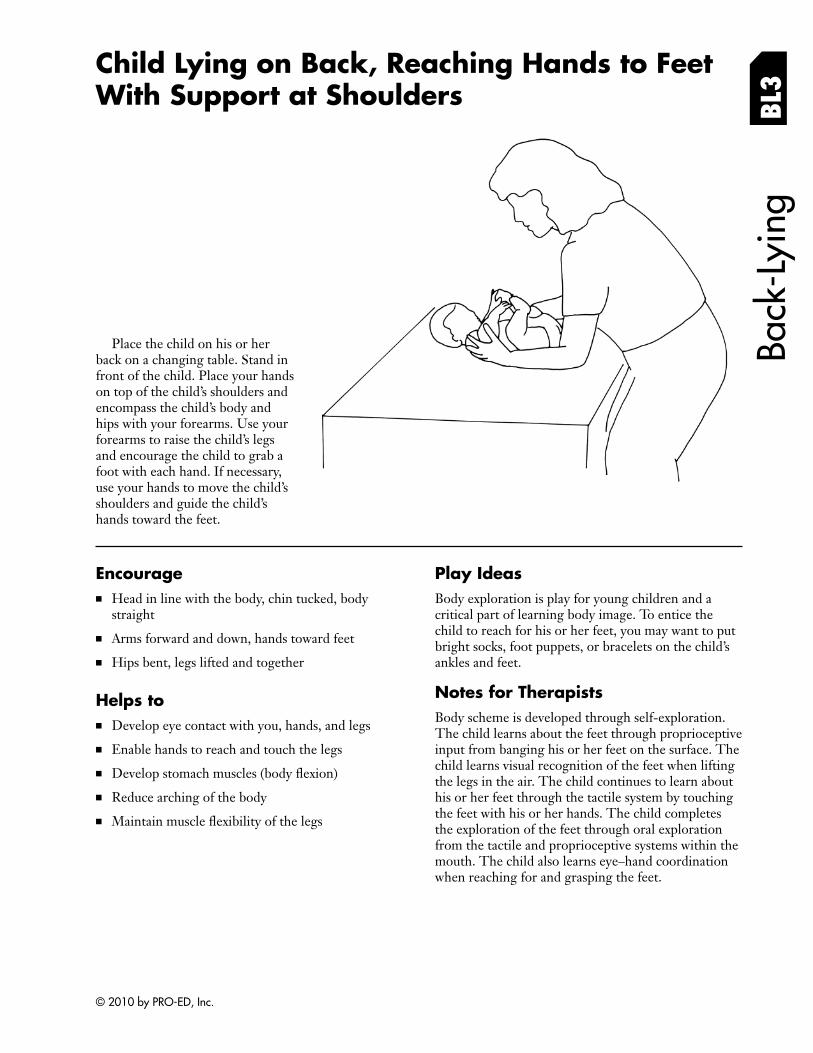
Place the child on his or her back on a changing table. Stand in front of the child. Place your hands on top of the child’s shoulders and encompass the child’s body and hips with your forearms. Use your forearms to raise the child’s legs and encourage the child to grab a foot with each hand. If necessary, use your hands to move the child’s shoulders and guide the child’s hands toward the feet.
Encourage ■ Head in line with the body, chin tucked, body
straight
■ Arms forward and down, hands toward feet
■ Hips bent, legs lifted and together
Helps to ■ Develop eye contact with you, hands, and legs
■ Enable hands to reach and touch the legs
■ Develop stomach muscles (body fl exion)
■ Reduce arching of the body
■ Maintain muscle flexibility of the legs
Play Ideas Body exploration is play for young children and a critical part of learning body image. To entice the child to reach for his or her feet, you may want to put bright socks, foot puppets, or bracelets on the child’s ankles and feet.
Notes for Therapists Body scheme is developed through self-exploration. The child learns about the feet through proprioceptive input from banging his or her feet on the surface. The child learns visual recognition of the feet when lifting the legs in the air. The child continues to learn about his or her feet through the tactile system by touching the feet with his or her hands. The child completes the exploration of the feet through oral exploration from the tactile and proprioceptive systems within the mouth. The child also learns eye –hand coordination when reaching for and grasping the feet.
© 2010 by PRO-ED, Inc.
BL4
Child Lying on Back, Playing With Hands Ba
ck-L
ying
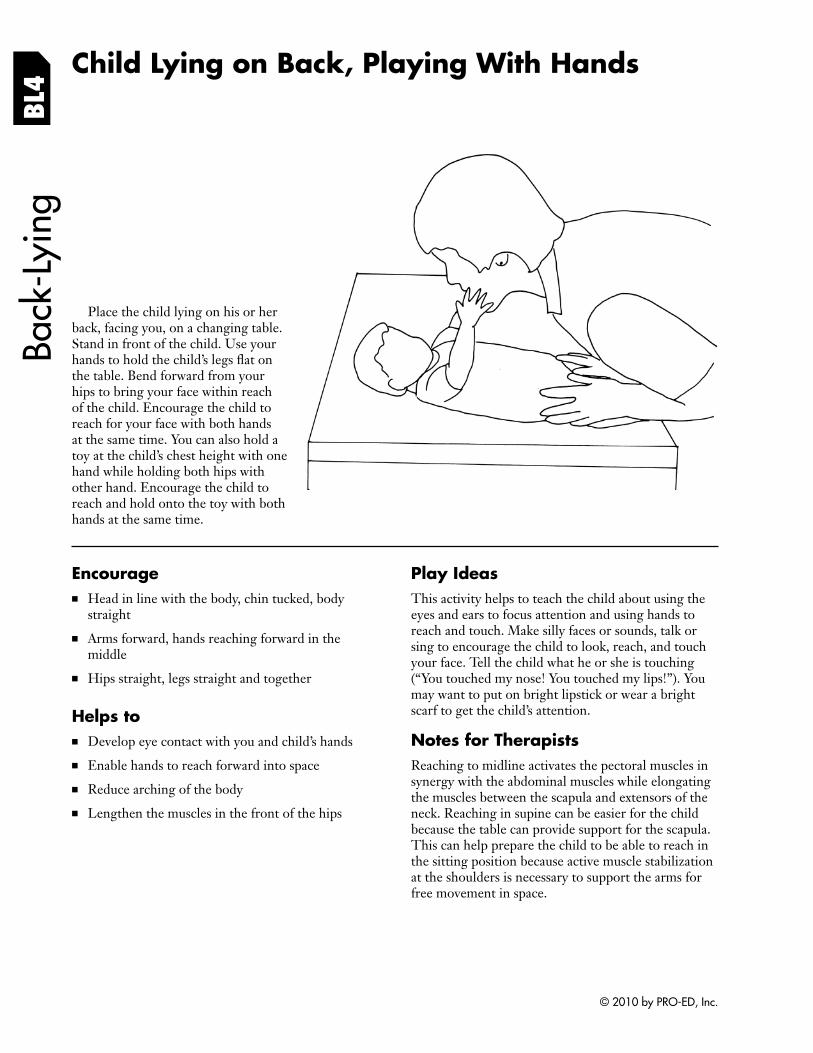
Place the child lying on his or her back, facing you, on a changing table. Stand in front of the child. Use your hands to hold the child’s legs fl at on the table. Bend forward from your hips to bring your face within reach of the child. Encourage the child to reach for your face with both hands at the same time. You can also hold a toy at the child’s chest height with one hand while holding both hips with other hand. Encourage the child to reach and hold onto the toy with both hands at the same time.
Encourage ■ Head in line with the body, chin tucked, body
straight
■ Arms forward, hands reaching forward in the middle
■ Hips straight, legs straight and together
Helps to ■ Develop eye contact with you and child’s hands
■ Enable hands to reach forward into space
■ Reduce arching of the body
■ Lengthen the muscles in the front of the hips
Play Ideas This activity helps to teach the child about using the eyes and ears to focus attention and using hands to reach and touch. Make silly faces or sounds, talk or sing to encourage the child to look, reach, and touch your face. Tell the child what he or she is touching (“You touched my nose! You touched my lips!”). You may want to put on bright lipstick or wear a bright scarf to get the child’s attention.
Notes for Therapists Reaching to midline activates the pectoral muscles in synergy with the abdominal muscles while elongating the muscles between the scapula and extensors of the neck. Reaching in supine can be easier for the child because the table can provide support for the scapula. This can help prepare the child to be able to reach in the sitting position because active muscle stabilization at the shoulders is necessary to support the arms for free movement in space.
© 2010 by PRO-ED, Inc.
Child Lying on Back, Reaching for Toy With Two Hands BL
5Ba
ck-L
ying
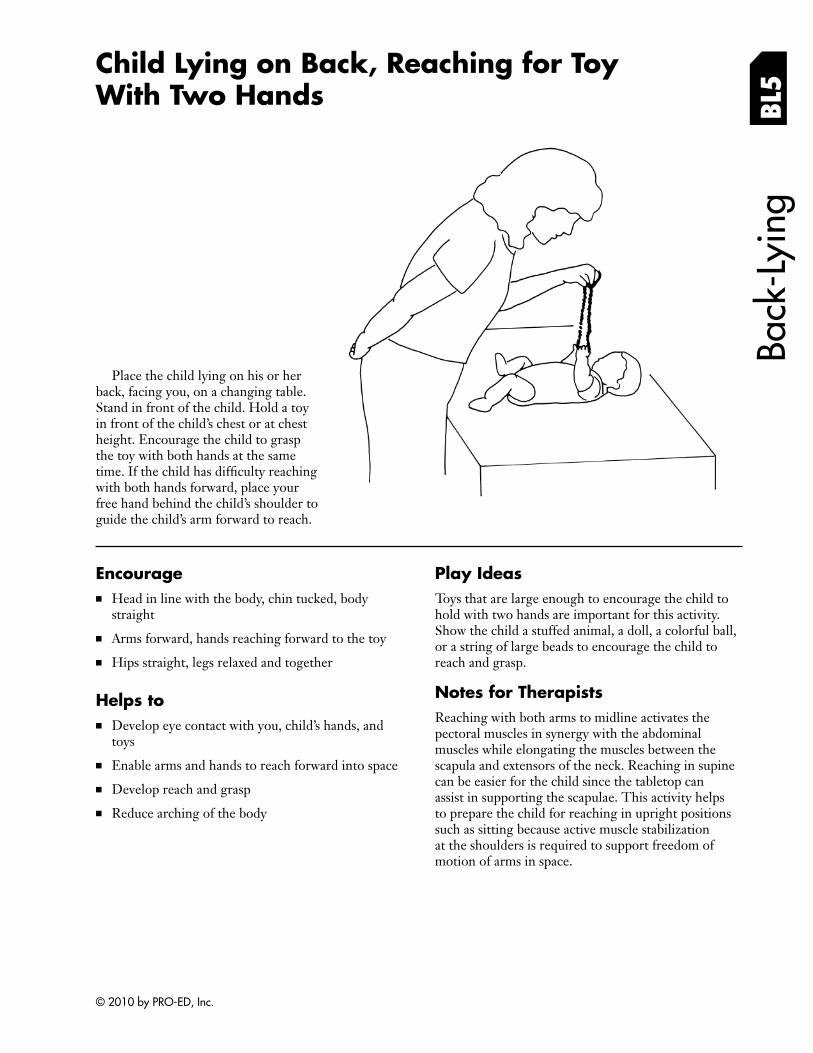
Place the child lying on his or her back, facing you, on a changing table. Stand in front of the child. Hold a toy in front of the child’s chest or at chest height. Encourage the child to grasp the toy with both hands at the same time. If the child has diffi culty reaching with both hands forward, place your free hand behind the child’s shoulder to guide the child’s arm forward to reach.
Encourage ■ Head in line with the body, chin tucked, body
straight
■ Arms forward, hands reaching forward to the toy
■ Hips straight, legs relaxed and together
Helps to ■ Develop eye contact with you, child’s hands, and
toys
■ Enable arms and hands to reach forward into space
■ Develop reach and grasp
■ Reduce arching of the body
Play Ideas Toys that are large enough to encourage the child to hold with two hands are important for this activity. Show the child a stuffed animal, a doll, a colorful ball, or a string of large beads to encourage the child to reach and grasp.
Notes for Therapists Reaching with both arms to midline activates the pectoral muscles in synergy with the abdominal muscles while elongating the muscles between the scapula and extensors of the neck. Reaching in supine can be easier for the child since the tabletop can assist in supporting the scapulae. This activity helps to prepare the child for reaching in upright positions such as sitting because active muscle stabilization at the shoulders is required to support freedom of motion of arms in space.
© 2010 by PRO-ED, Inc.
BL6
Child Lying on Back With Legs Straight, in Front of You
Back
-Lyi
ng
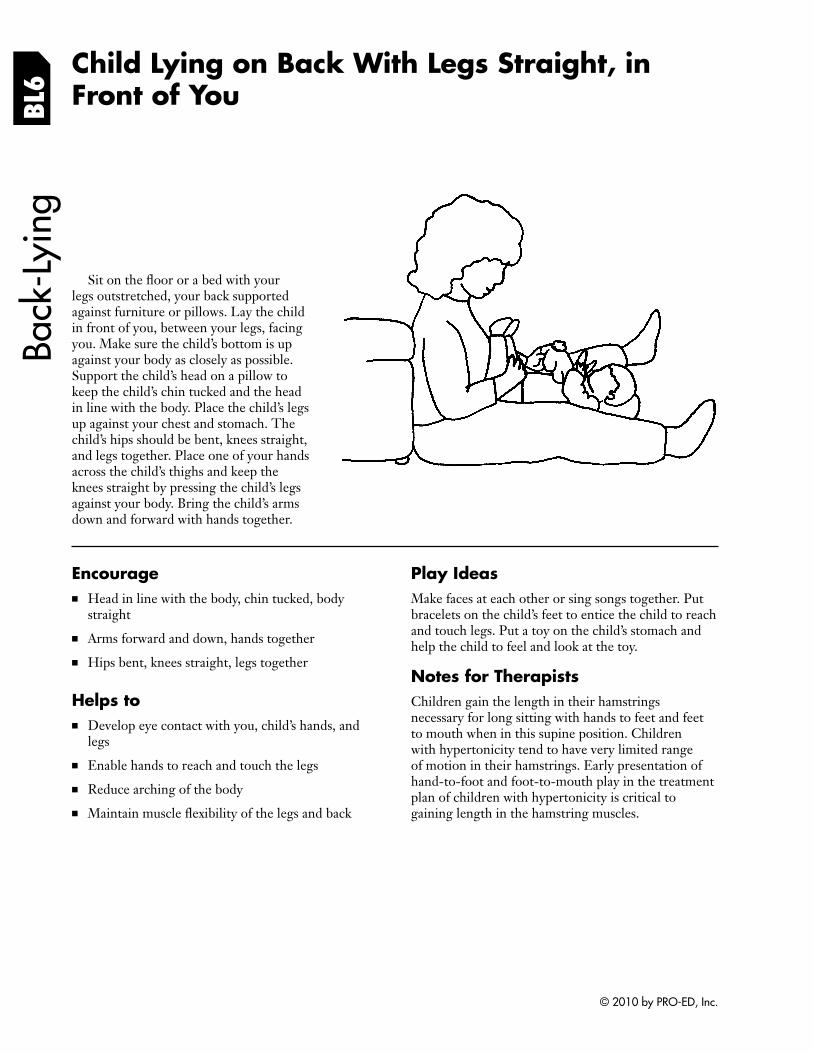
Sit on the floor or a bed with your legs outstretched, your back supported against furniture or pillows. Lay the child in front of you, between your legs, facing you. Make sure the child’s bottom is up against your body as closely as possible. Support the child’s head on a pillow to keep the child’s chin tucked and the head in line with the body. Place the child’s legs up against your chest and stomach. The child’s hips should be bent, knees straight, and legs together. Place one of your hands across the child’s thighs and keep the knees straight by pressing the child’s legs against your body. Bring the child’s arms down and forward with hands together.
Encourage ■ Head in line with the body, chin tucked, body
straight
■ Arms forward and down, hands together
■ Hips bent, knees straight, legs together
Helps to ■ Develop eye contact with you, child’s hands, and
legs
■ Enable hands to reach and touch the legs
■ Reduce arching of the body
■ Maintain muscle flexibility of the legs and back
Play Ideas Make faces at each other or sing songs together. Put bracelets on the child’s feet to entice the child to reach and touch legs. Put a toy on the child’s stomach and help the child to feel and look at the toy.
Notes for Therapists Children gain the length in their hamstrings necessary for long sitting with hands to feet and feet to mouth when in this supine position. Children with hypertonicity tend to have very limited range of motion in their hamstrings. Early presentation of hand-to-foot and foot-to-mouth play in the treatment plan of children with hypertonicity is critical to gaining length in the hamstring muscles.
© 2010 by PRO-ED, Inc.
Child Lifting Hips and Legs
BL7
Back
-Lyi
ng
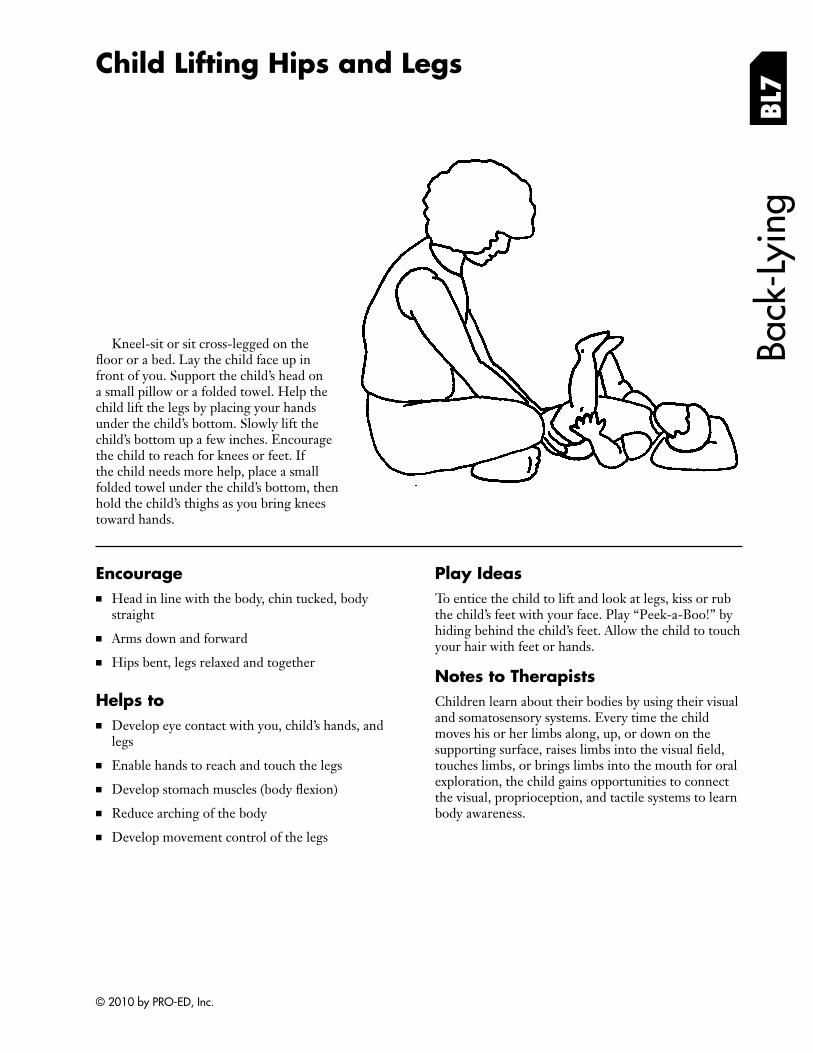
Kneel-sit or sit cross-legged on the floor or a bed. Lay the child face up in front of you. Support the child’s head on a small pillow or a folded towel. Help the child lift the legs by placing your hands under the child’s bottom. Slowly lift the child’s bottom up a few inches. Encourage the child to reach for knees or feet. If the child needs more help, place a small folded towel under the child’s bottom, then hold the child’s thighs as you bring knees toward hands.
Encourage ■ Head in line with the body, chin tucked, body
straight
■ Arms down and forward
■ Hips bent, legs relaxed and together
Helps to ■ Develop eye contact with you, child’s hands, and
legs
■ Enable hands to reach and touch the legs
■ Develop stomach muscles (body fl exion)
■ Reduce arching of the body
■ Develop movement control of the legs
Play Ideas To entice the child to lift and look at legs, kiss or rub the child’s feet with your face. Play “Peek-a-Boo!” by hiding behind the child’s feet. Allow the child to touch your hair with feet or hands.
Notes to Therapists Children learn about their bodies by using their visual and somatosensory systems. Every time the child moves his or her limbs along, up, or down on the supporting surface, raises limbs into the visual fi eld, touches limbs, or brings limbs into the mouth for oral exploration, the child gains opportunities to connect the visual, proprioception, and tactile systems to learn body awareness.
© 2010 by PRO-ED, Inc.
BL8
Child Lying on Back With Hands on Knees Ba
ck-L
ying
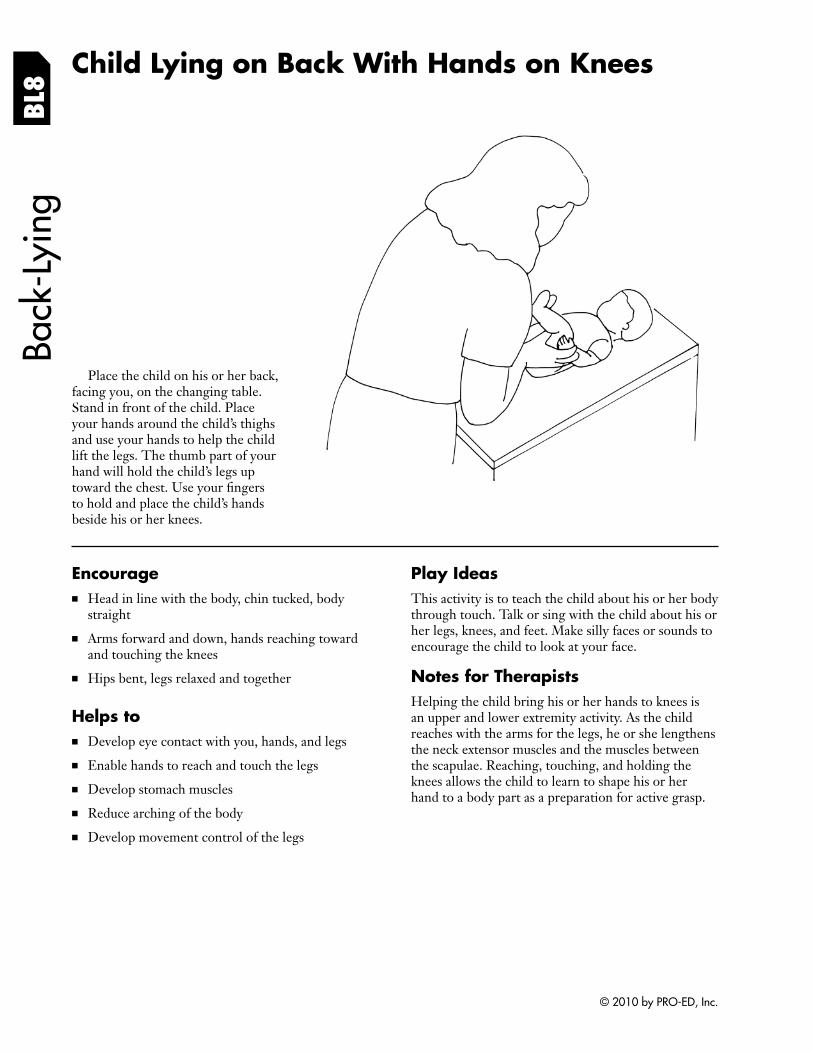
Place the child on his or her back, facing you, on the changing table. Stand in front of the child. Place your hands around the child’s thighs and use your hands to help the child lift the legs. The thumb part of your hand will hold the child’s legs up toward the chest. Use your fi ngers to hold and place the child’s hands beside his or her knees.
Encourage ■ Head in line with the body, chin tucked, body
straight
■ Arms forward and down, hands reaching toward and touching the knees
■ Hips bent, legs relaxed and together
Helps to ■ Develop eye contact with you, hands, and legs
■ Enable hands to reach and touch the legs
■ Develop stomach muscles
■ Reduce arching of the body
■ Develop movement control of the legs
Play Ideas This activity is to teach the child about his or her body through touch. Talk or sing with the child about his or her legs, knees, and feet. Make silly faces or sounds to encourage the child to look at your face.
Notes for Therapists Helping the child bring his or her hands to knees is an upper and lower extremity activity. As the child reaches with the arms for the legs, he or she lengthens the neck extensor muscles and the muscles between the scapulae. Reaching, touching, and holding the knees allows the child to learn to shape his or her hand to a body part as a preparation for active grasp.
© 2010 by PRO-ED, Inc.
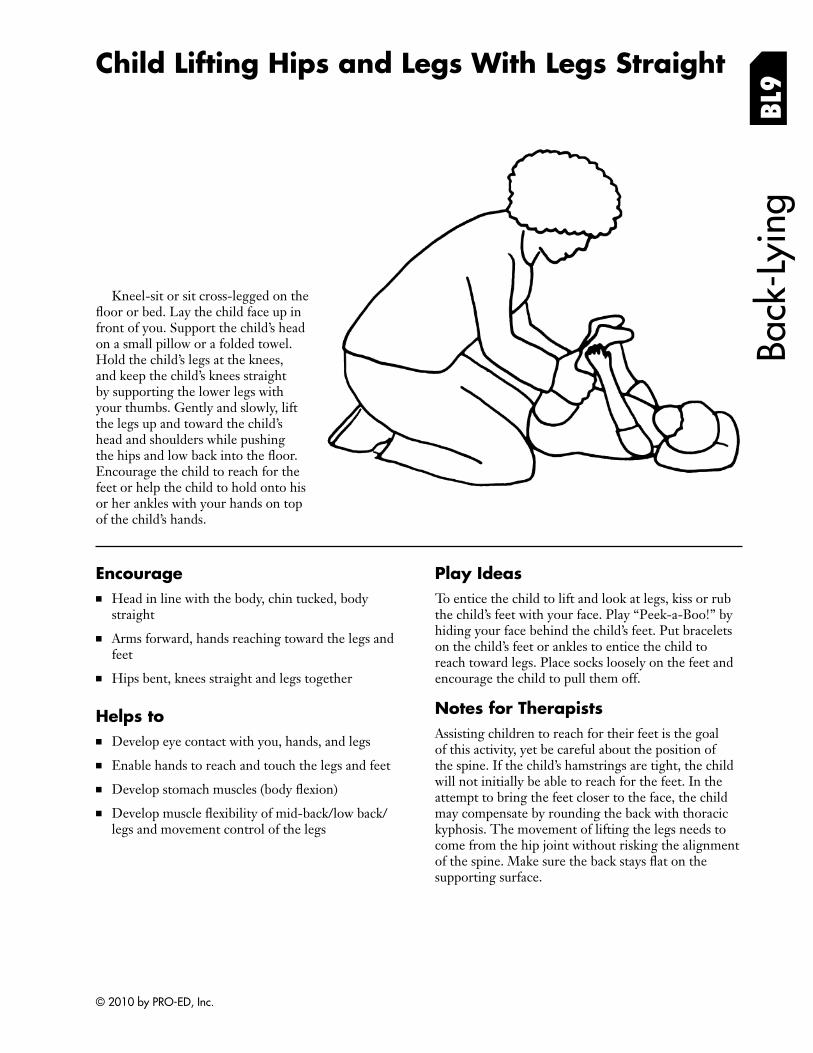
Child Lifting Hips and Legs With Legs Straight
Kneel-sit or sit cross-legged on the floor or bed. Lay the child face up in front of you. Support the child’s head on a small pillow or a folded towel. Hold the child’s legs at the knees, and keep the child’s knees straight by supporting the lower legs with your thumbs. Gently and slowly, lift the legs up and toward the child’s head and shoulders while pushing the hips and low back into the fl oor. Encourage the child to reach for the feet or help the child to hold onto his or her ankles with your hands on top of the child’s hands.
Back
-Lyi
ng
BL9
Encourage ■ Head in line with the body, chin tucked, body
straight
■ Arms forward, hands reaching toward the legs and feet
■ Hips bent, knees straight and legs together
Helps to ■ Develop eye contact with you, hands, and legs
■ Enable hands to reach and touch the legs and feet
■ Develop stomach muscles (body fl exion)
■ Develop muscle flexibility of mid-back/low back/ legs and movement control of the legs
Play Ideas To entice the child to lift and look at legs, kiss or rub the child’s feet with your face. Play “Peek-a-Boo!” by hiding your face behind the child’s feet. Put bracelets on the child’s feet or ankles to entice the child to reach toward legs. Place socks loosely on the feet and encourage the child to pull them off.
Notes for Therapists Assisting children to reach for their feet is the goal of this activity, yet be careful about the position of the spine. If the child’s hamstrings are tight, the child will not initially be able to reach for the feet. In the attempt to bring the feet closer to the face, the child may compensate by rounding the back with thoracic kyphosis. The movement of lifting the legs needs to come from the hip joint without risking the alignment of the spine. Make sure the back stays flat on the supporting surface.
© 2010 by PRO-ED, Inc.
BL10
Child Lying on Back With Legs Straight, Looking at Feet
Back
-Lyi
ng
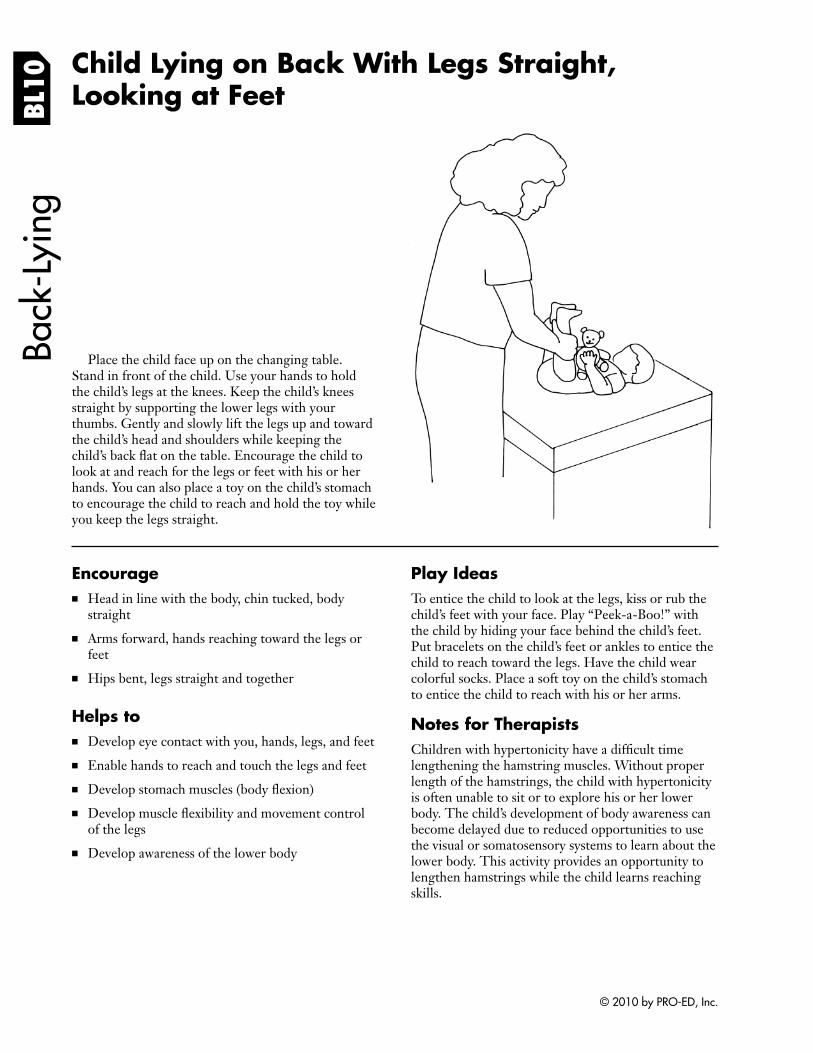
Place the child face up on the changing table. Stand in front of the child. Use your hands to hold the child’s legs at the knees. Keep the child’s knees straight by supporting the lower legs with your thumbs. Gently and slowly lift the legs up and toward the child’s head and shoulders while keeping the child’s back flat on the table. Encourage the child to look at and reach for the legs or feet with his or her hands. You can also place a toy on the child’s stomach to encourage the child to reach and hold the toy while you keep the legs straight.
Encourage ■ Head in line with the body, chin tucked, body
straight
■ Arms forward, hands reaching toward the legs or feet
■ Hips bent, legs straight and together
Helps to ■ Develop eye contact with you, hands, legs, and feet
■ Enable hands to reach and touch the legs and feet
■ Develop stomach muscles (body fl exion)
■ Develop muscle flexibility and movement control of the legs
■ Develop awareness of the lower body
Play Ideas To entice the child to look at the legs, kiss or rub the child’s feet with your face. Play “Peek-a-Boo!” with the child by hiding your face behind the child’s feet. Put bracelets on the child’s feet or ankles to entice the child to reach toward the legs. Have the child wear colorful socks. Place a soft toy on the child’s stomach to entice the child to reach with his or her arms.
Notes for Therapists Children with hypertonicity have a diffi cult time lengthening the hamstring muscles. Without proper length of the hamstrings, the child with hypertonicity is often unable to sit or to explore his or her lower body. The child’s development of body awareness can become delayed due to reduced opportunities to use the visual or somatosensory systems to learn about the lower body. This activity provides an opportunity to lengthen hamstrings while the child learns reaching skills.
© 2010 by PRO-ED, Inc.
Child Lying on Back, Reaching Toward Feet BL
11
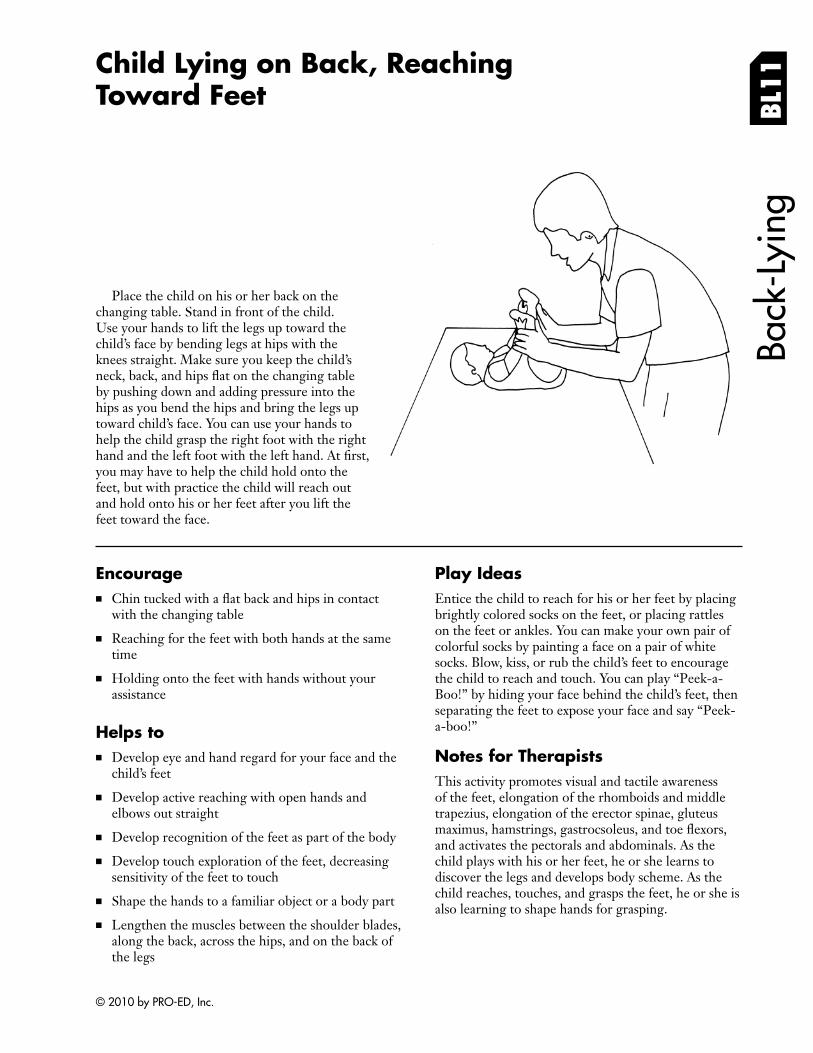
Place the child on his or her back on the changing table. Stand in front of the child. Use your hands to lift the legs up toward the child’s face by bending legs at hips with the knees straight. Make sure you keep the child’s neck, back, and hips flat on the changing table by pushing down and adding pressure into the hips as you bend the hips and bring the legs up toward child’s face. You can use your hands to help the child grasp the right foot with the right hand and the left foot with the left hand. At fi rst, you may have to help the child hold onto the feet, but with practice the child will reach out and hold onto his or her feet after you lift the feet toward the face.
Back
-Lyi
ng
Encourage ■ Chin tucked with a flat back and hips in contact
with the changing table
■ Reaching for the feet with both hands at the same time
■ Holding onto the feet with hands without your assistance
Helps to ■ Develop eye and hand regard for your face and the
child’s feet
■ Develop active reaching with open hands and elbows out straight
■ Develop recognition of the feet as part of the body
■ Develop touch exploration of the feet, decreasing sensitivity of the feet to touch
■ Shape the hands to a familiar object or a body part
■ Lengthen the muscles between the shoulder blades, along the back, across the hips, and on the back of the legs
Play Ideas Entice the child to reach for his or her feet by placing brightly colored socks on the feet, or placing rattles on the feet or ankles. You can make your own pair of colorful socks by painting a face on a pair of white socks. Blow, kiss, or rub the child’s feet to encourage the child to reach and touch. You can play “Peek-a-Boo!” by hiding your face behind the child’s feet, then separating the feet to expose your face and say “Peeka-boo!”
Notes for Therapists This activity promotes visual and tactile awareness of the feet, elongation of the rhomboids and middle trapezius, elongation of the erector spinae, gluteus maximus, hamstrings, gastrocsoleus, and toe fl exors, and activates the pectorals and abdominals. As the child plays with his or her feet, he or she learns to discover the legs and develops body scheme. As the child reaches, touches, and grasps the feet, he or she is also learning to shape hands for grasping.
© 2010 by PRO-ED, Inc.
BL12
Child Lying on Back, Reaching Two Hands to One Foot
Back
-Lyi
ng
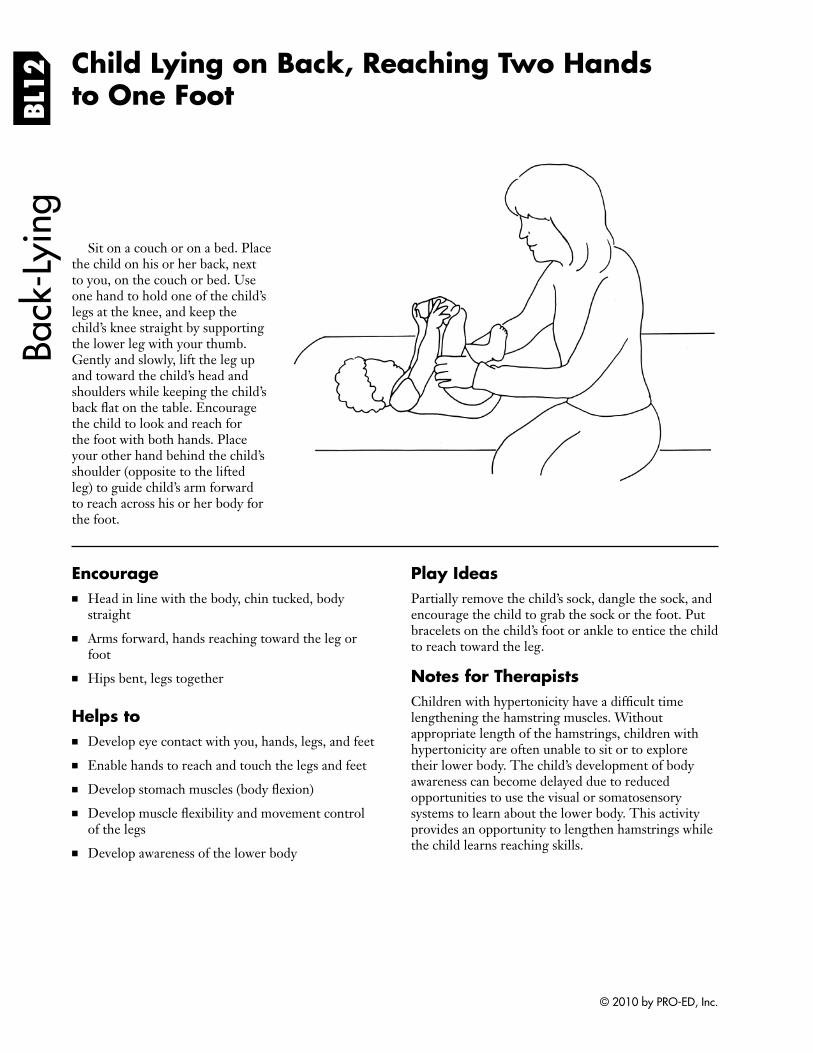
Sit on a couch or on a bed. Place the child on his or her back, next to you, on the couch or bed. Use one hand to hold one of the child’s legs at the knee, and keep the child’s knee straight by supporting the lower leg with your thumb. Gently and slowly, lift the leg up and toward the child’s head and shoulders while keeping the child’s back flat on the table. Encourage the child to look and reach for the foot with both hands. Place your other hand behind the child’s shoulder (opposite to the lifted leg) to guide child’s arm forward to reach across his or her body for the foot.
Encourage ■ Head in line with the body, chin tucked, body
straight
■ Arms forward, hands reaching toward the leg or foot
■ Hips bent, legs together
Helps to ■ Develop eye contact with you, hands, legs, and feet
■ Enable hands to reach and touch the legs and feet
■ Develop stomach muscles (body fl exion)
■ Develop muscle flexibility and movement control of the legs
■ Develop awareness of the lower body
Play Ideas Partially remove the child’s sock, dangle the sock, and encourage the child to grab the sock or the foot. Put bracelets on the child’s foot or ankle to entice the child to reach toward the leg.
Notes for Therapists Children with hypertonicity have a diffi cult time lengthening the hamstring muscles. Without appropriate length of the hamstrings, children with hypertonicity are often unable to sit or to explore their lower body. The child’s development of body awareness can become delayed due to reduced opportunities to use the visual or somatosensory systems to learn about the lower body. This activity provides an opportunity to lengthen hamstrings while the child learns reaching skills.
© 2010 by PRO-ED, Inc.
Back
-Lyi
ng
Child Lying on Back, Leg Bicycles
BL13
Figure A Figure B
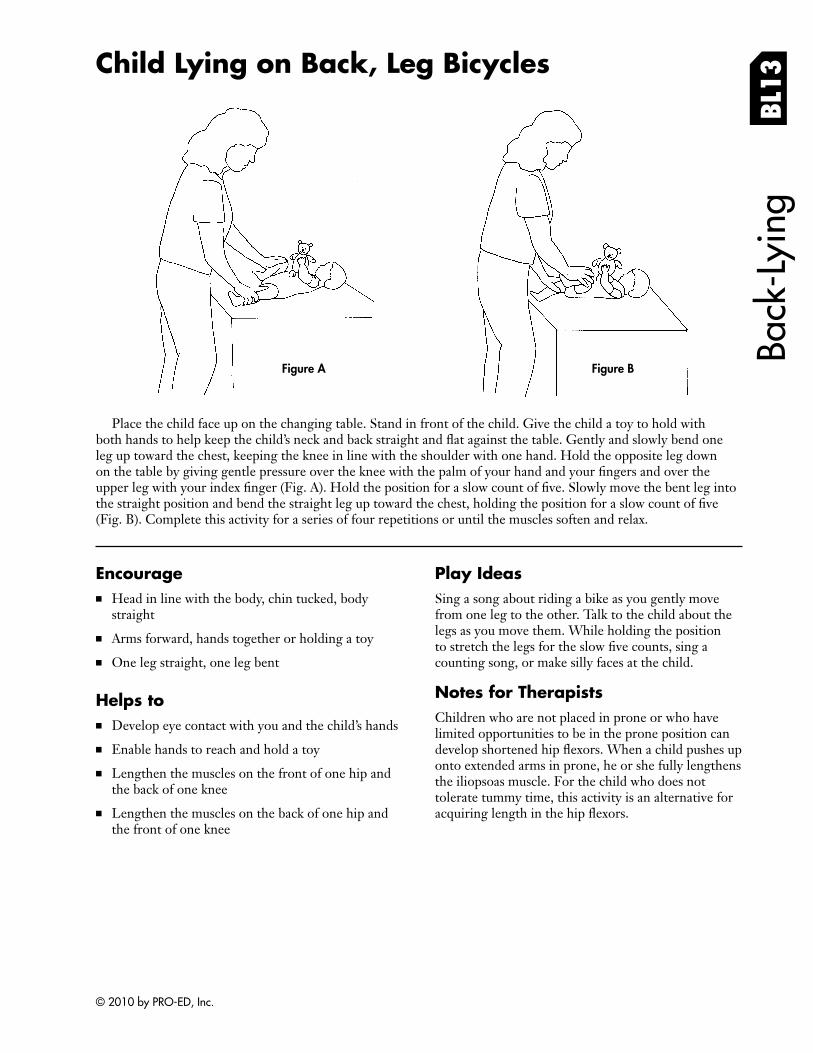
Place the child face up on the changing table. Stand in front of the child. Give the child a toy to hold with both hands to help keep the child’s neck and back straight and flat against the table. Gently and slowly bend one leg up toward the chest, keeping the knee in line with the shoulder with one hand. Hold the opposite leg down on the table by giving gentle pressure over the knee with the palm of your hand and your fingers and over the upper leg with your index finger (Fig. A). Hold the position for a slow count of five. Slowly move the bent leg into the straight position and bend the straight leg up toward the chest, holding the position for a slow count of fi ve (Fig. B). Complete this activity for a series of four repetitions or until the muscles soften and relax.
Encourage ■ Head in line with the body, chin tucked, body
straight
■ Arms forward, hands together or holding a toy
■ One leg straight, one leg bent
Helps to ■ Develop eye contact with you and the child’s hands
■ Enable hands to reach and hold a toy
■ Lengthen the muscles on the front of one hip and the back of one knee
■ Lengthen the muscles on the back of one hip and the front of one knee
Play Ideas Sing a song about riding a bike as you gently move from one leg to the other. Talk to the child about the legs as you move them. While holding the position to stretch the legs for the slow five counts, sing a counting song, or make silly faces at the child.
Notes for Therapists Children who are not placed in prone or who have limited opportunities to be in the prone position can develop shortened hip flexors. When a child pushes up onto extended arms in prone, he or she fully lengthens the iliopsoas muscle. For the child who does not tolerate tummy time, this activity is an alternative for acquiring length in the hip fl exors.
© 2010 by PRO-ED, Inc.
BL14
Child Lying on Back, Propped With Towels Ba
ck-L
ying
Figure A
Figure B
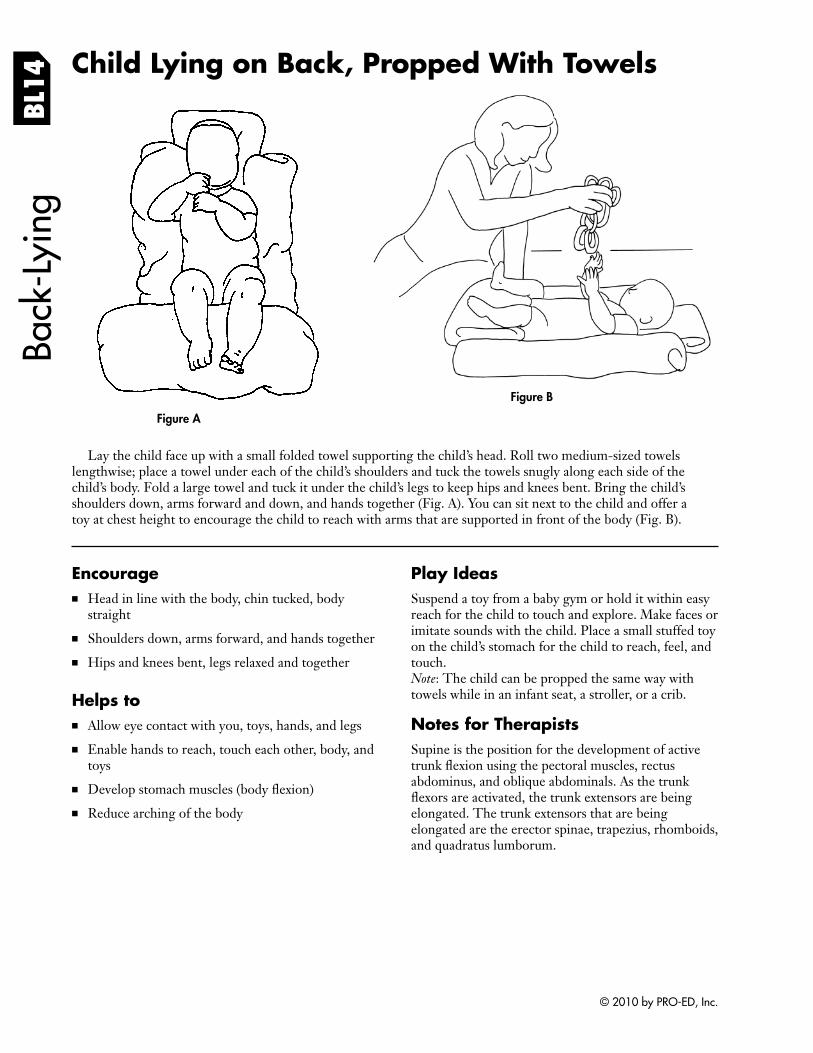
Lay the child face up with a small folded towel supporting the child’s head. Roll two medium-sized towels lengthwise; place a towel under each of the child’s shoulders and tuck the towels snugly along each side of the child’s body. Fold a large towel and tuck it under the child’s legs to keep hips and knees bent. Bring the child’s shoulders down, arms forward and down, and hands together (Fig. A). You can sit next to the child and offer a toy at chest height to encourage the child to reach with arms that are supported in front of the body (Fig. B).
Encourage ■ Head in line with the body, chin tucked, body
straight
■ Shoulders down, arms forward, and hands together
■ Hips and knees bent, legs relaxed and together
Helps to ■ Allow eye contact with you, toys, hands, and legs
■ Enable hands to reach, touch each other, body, and toys
■ Develop stomach muscles (body fl exion)
■ Reduce arching of the body
Play Ideas Suspend a toy from a baby gym or hold it within easy reach for the child to touch and explore. Make faces or imitate sounds with the child. Place a small stuffed toy on the child’s stomach for the child to reach, feel, and touch. Note: The child can be propped the same way with towels while in an infant seat, a stroller, or a crib.
Notes for Therapists Supine is the position for the development of active trunk flexion using the pectoral muscles, rectus abdominus, and oblique abdominals. As the trunk flexors are activated, the trunk extensors are being elongated. The trunk extensors that are being elongated are the erector spinae, trapezius, rhomboids, and quadratus lumborum.
© 2010 by PRO-ED, Inc.
Child Lying on Back in an Inner Tube, Swim Ring, or Ring-Shaped Pillow BL
15Ba
ck-L
ying
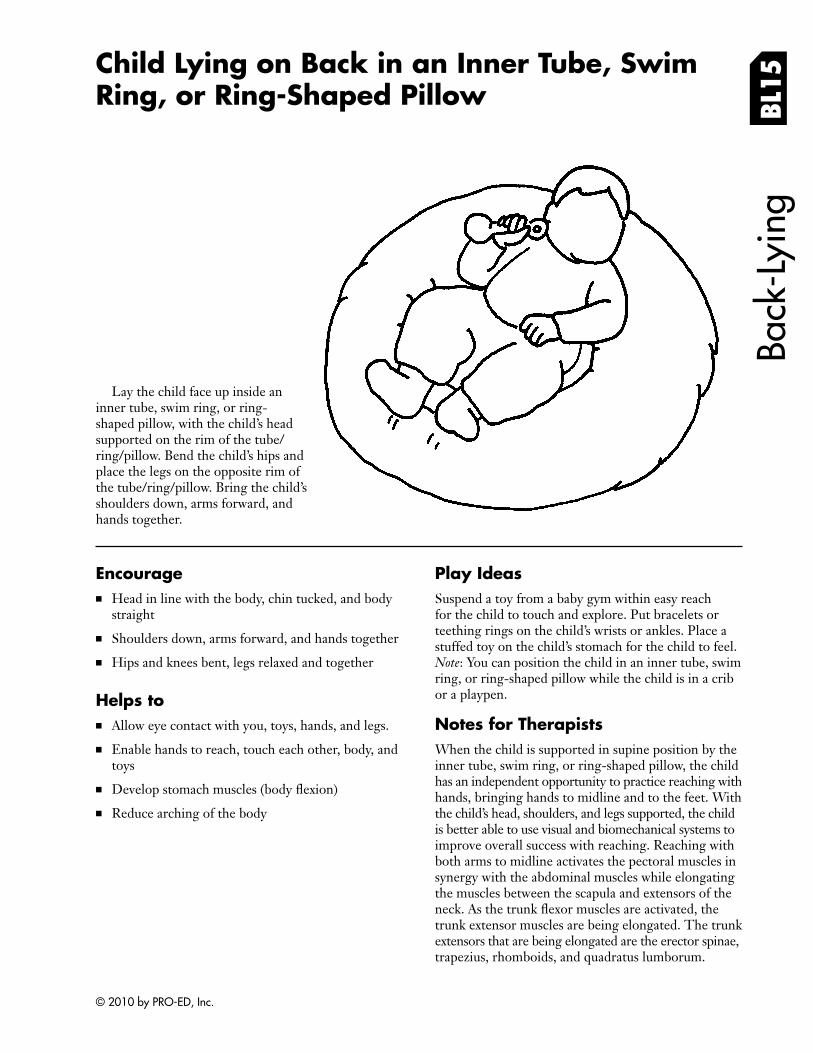
Lay the child face up inside an inner tube, swim ring, or ring-shaped pillow, with the child’s head supported on the rim of the tube/ ring/pillow. Bend the child’s hips and place the legs on the opposite rim of the tube/ring/pillow. Bring the child’s shoulders down, arms forward, and hands together.
Encourage ■ Head in line with the body, chin tucked, and body
straight
■ Shoulders down, arms forward, and hands together
■ Hips and knees bent, legs relaxed and together
Helps to ■ Allow eye contact with you, toys, hands, and legs.
■ Enable hands to reach, touch each other, body, and toys
■ Develop stomach muscles (body fl exion)
■ Reduce arching of the body
Play Ideas Suspend a toy from a baby gym within easy reach for the child to touch and explore. Put bracelets or teething rings on the child’s wrists or ankles. Place a stuffed toy on the child’s stomach for the child to feel. Note: You can position the child in an inner tube, swim ring, or ring-shaped pillow while the child is in a crib or a playpen.
Notes for Therapists When the child is supported in supine position by the inner tube, swim ring, or ring-shaped pillow, the child has an independent opportunity to practice reaching with hands, bringing hands to midline and to the feet. With the child’s head, shoulders, and legs supported, the child is better able to use visual and biomechanical systems to improve overall success with reaching. Reaching with both arms to midline activates the pectoral muscles in synergy with the abdominal muscles while elongating the muscles between the scapula and extensors of the neck. As the trunk flexor muscles are activated, the trunk extensor muscles are being elongated. The trunk extensors that are being elongated are the erector spinae, trapezius, rhomboids, and quadratus lumborum.
© 2010 by PRO-ED, Inc.
Child Lying on Tummy Across Your Lap on a Pillow
Figure A
Tum
my-
Lyin
g TL
1
Figure B
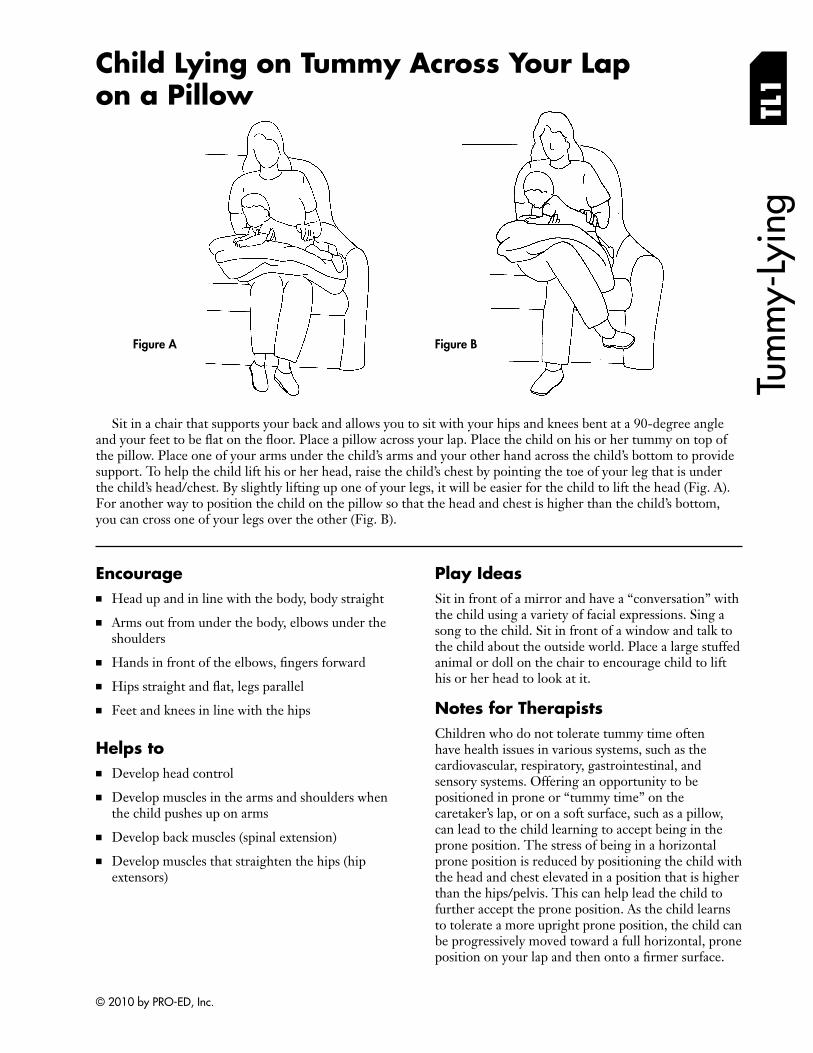
Sit in a chair that supports your back and allows you to sit with your hips and knees bent at a 90-degree angle and your feet to be flat on the floor. Place a pillow across your lap. Place the child on his or her tummy on top of the pillow. Place one of your arms under the child’s arms and your other hand across the child’s bottom to provide support. To help the child lift his or her head, raise the child’s chest by pointing the toe of your leg that is under the child’s head/chest. By slightly lifting up one of your legs, it will be easier for the child to lift the head (Fig. A). For another way to position the child on the pillow so that the head and chest is higher than the child’s bottom, you can cross one of your legs over the other (Fig. B).
Encourage ■ Head up and in line with the body, body straight
■ Arms out from under the body, elbows under the shoulders
■ Hands in front of the elbows, fi ngers forward
■ Hips straight and flat, legs parallel
■ Feet and knees in line with the hips
Helps to ■ Develop head control
■ Develop muscles in the arms and shoulders when the child pushes up on arms
■ Develop back muscles (spinal extension)
■ Develop muscles that straighten the hips (hip extensors)
Play Ideas Sit in front of a mirror and have a “conversation” with the child using a variety of facial expressions. Sing a song to the child. Sit in front of a window and talk to the child about the outside world. Place a large stuffed animal or doll on the chair to encourage child to lift his or her head to look at it.
Notes for Therapists Children who do not tolerate tummy time often have health issues in various systems, such as the cardiovascular, respiratory, gastrointestinal, and sensory systems. Offering an opportunity to be positioned in prone or “tummy time” on the caretaker’s lap, or on a soft surface, such as a pillow, can lead to the child learning to accept being in the prone position. The stress of being in a horizontal prone position is reduced by positioning the child with the head and chest elevated in a position that is higher than the hips/pelvis. This can help lead the child to further accept the prone position. As the child learns to tolerate a more upright prone position, the child can be progressively moved toward a full horizontal, prone position on your lap and then onto a fi rmer surface.
© 2010 by PRO-ED, Inc.
TL2
Tum
my-
Lyin
g
Child Lying on Tummy Across Your Lap and Balancing While You Move Your Legs
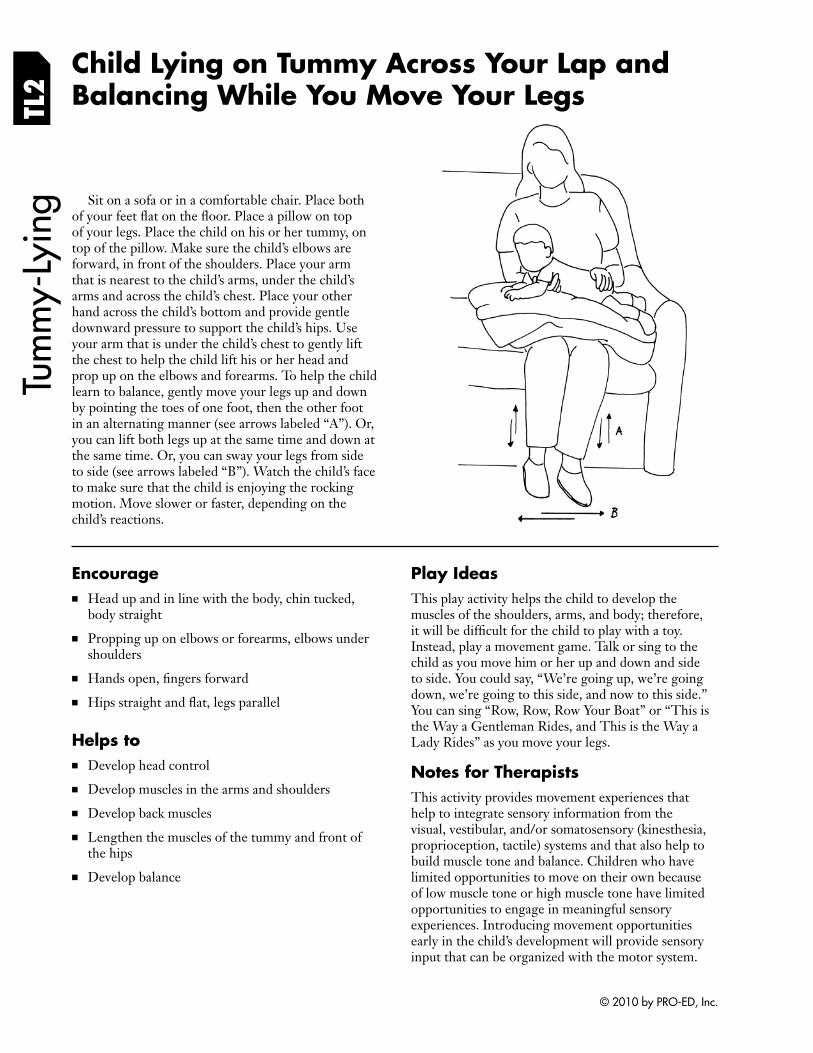
Sit on a sofa or in a comfortable chair. Place both of your feet flat on the floor. Place a pillow on top of your legs. Place the child on his or her tummy, on top of the pillow. Make sure the child’s elbows are forward, in front of the shoulders. Place your arm that is nearest to the child’s arms, under the child’s arms and across the child’s chest. Place your other hand across the child’s bottom and provide gentle downward pressure to support the child’s hips. Use your arm that is under the child’s chest to gently lift the chest to help the child lift his or her head and prop up on the elbows and forearms. To help the child learn to balance, gently move your legs up and down by pointing the toes of one foot, then the other foot in an alternating manner (see arrows labeled “A”). Or, you can lift both legs up at the same time and down at the same time. Or, you can sway your legs from side to side (see arrows labeled “B”). Watch the child’s face to make sure that the child is enjoying the rocking motion. Move slower or faster, depending on the child’s reactions.
Encourage ■ Head up and in line with the body, chin tucked,
body straight
■ Propping up on elbows or forearms, elbows under shoulders
■ Hands open, fi ngers forward
■ Hips straight and flat, legs parallel
Helps to ■ Develop head control
■ Develop muscles in the arms and shoulders
■ Develop back muscles
■ Lengthen the muscles of the tummy and front of the hips
■ Develop balance
Play Ideas This play activity helps the child to develop the muscles of the shoulders, arms, and body; therefore, it will be difficult for the child to play with a toy. Instead, play a movement game. Talk or sing to the child as you move him or her up and down and side to side. You could say, “We’re going up, we’re going down, we’re going to this side, and now to this side.” You can sing “Row, Row, Row Your Boat” or “This is the Way a Gentleman Rides, and This is the Way a Lady Rides” as you move your legs.
Notes for Therapists This activity provides movement experiences that help to integrate sensory information from the visual, vestibular, and/or somatosensory (kinesthesia, proprioception, tactile) systems and that also help to build muscle tone and balance. Children who have limited opportunities to move on their own because of low muscle tone or high muscle tone have limited opportunities to engage in meaningful sensory experiences. Introducing movement opportunities early in the child’s development will provide sensory input that can be organized with the motor system.
© 2010 by PRO-ED, Inc.
Tum
my-
Lyin
g
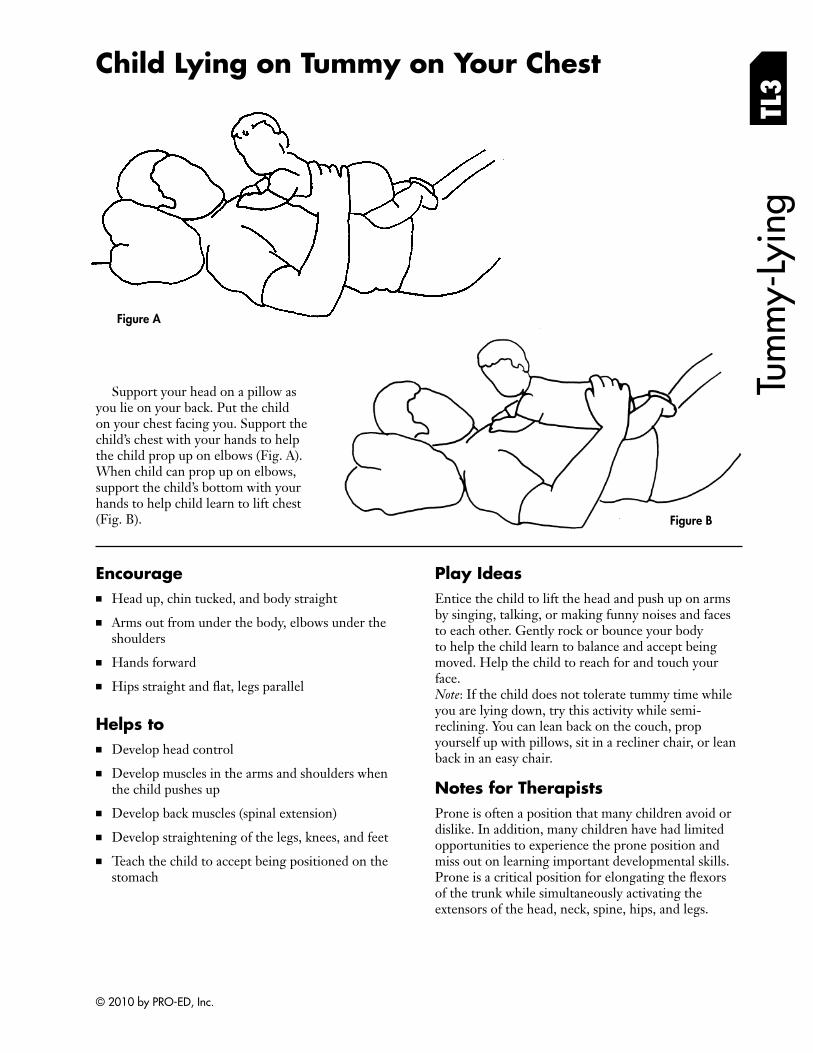
Support your head on a pillow as you lie on your back. Put the child on your chest facing you. Support the child’s chest with your hands to help the child prop up on elbows (Fig. A). When child can prop up on elbows, support the child’s bottom with your hands to help child learn to lift chest (Fig. B).
Child Lying on Tummy on Your Chest
TL3
Figure A
Figure B
Encourage ■ Head up, chin tucked, and body straight
■ Arms out from under the body, elbows under the shoulders
■ Hands forward
■ Hips straight and flat, legs parallel
Helps to ■ Develop head control
■ Develop muscles in the arms and shoulders when the child pushes up
■ Develop back muscles (spinal extension)
■ Develop straightening of the legs, knees, and feet
■ Teach the child to accept being positioned on the stomach
Play Ideas Entice the child to lift the head and push up on arms by singing, talking, or making funny noises and faces to each other. Gently rock or bounce your body to help the child learn to balance and accept being moved. Help the child to reach for and touch your face. Note: If the child does not tolerate tummy time while you are lying down, try this activity while semi-reclining. You can lean back on the couch, prop yourself up with pillows, sit in a recliner chair, or lean back in an easy chair.
Notes for Therapists Prone is often a position that many children avoid or dislike. In addition, many children have had limited opportunities to experience the prone position and miss out on learning important developmental skills. Prone is a critical position for elongating the fl exors of the trunk while simultaneously activating the extensors of the head, neck, spine, hips, and legs.
© 2010 by PRO-ED, Inc.
TL4
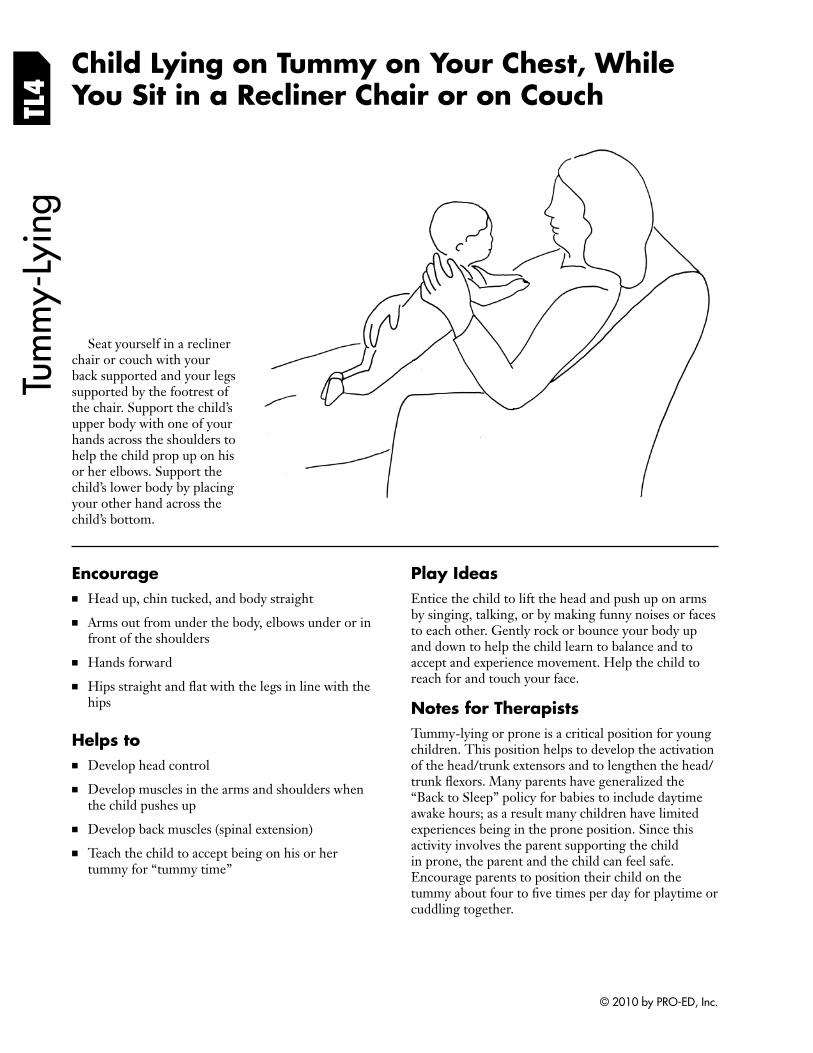
Child Lying on Tummy on Your Chest, While You Sit in a Recliner Chair or on Couch
Tum
my-
Lyin
g
Seat yourself in a recliner chair or couch with your back supported and your legs supported by the footrest of the chair. Support the child’s upper body with one of your hands across the shoulders to help the child prop up on his or her elbows. Support the child’s lower body by placing your other hand across the child’s bottom.
Encourage ■ Head up, chin tucked, and body straight
■ Arms out from under the body, elbows under or in front of the shoulders
■ Hands forward
■ Hips straight and flat with the legs in line with the hips
Helps to ■ Develop head control
■ Develop muscles in the arms and shoulders when the child pushes up
■ Develop back muscles (spinal extension)
■ Teach the child to accept being on his or her tummy for “tummy time”
Play Ideas Entice the child to lift the head and push up on arms by singing, talking, or by making funny noises or faces to each other. Gently rock or bounce your body up and down to help the child learn to balance and to accept and experience movement. Help the child to reach for and touch your face.
Notes for Therapists Tummy-lying or prone is a critical position for young children. This position helps to develop the activation of the head/trunk extensors and to lengthen the head/ trunk flexors. Many parents have generalized the “Back to Sleep” policy for babies to include daytime awake hours; as a result many children have limited experiences being in the prone position. Since this activity involves the parent supporting the child in prone, the parent and the child can feel safe. Encourage parents to position their child on the tummy about four to five times per day for playtime or cuddling together.
© 2010 by PRO-ED, Inc.
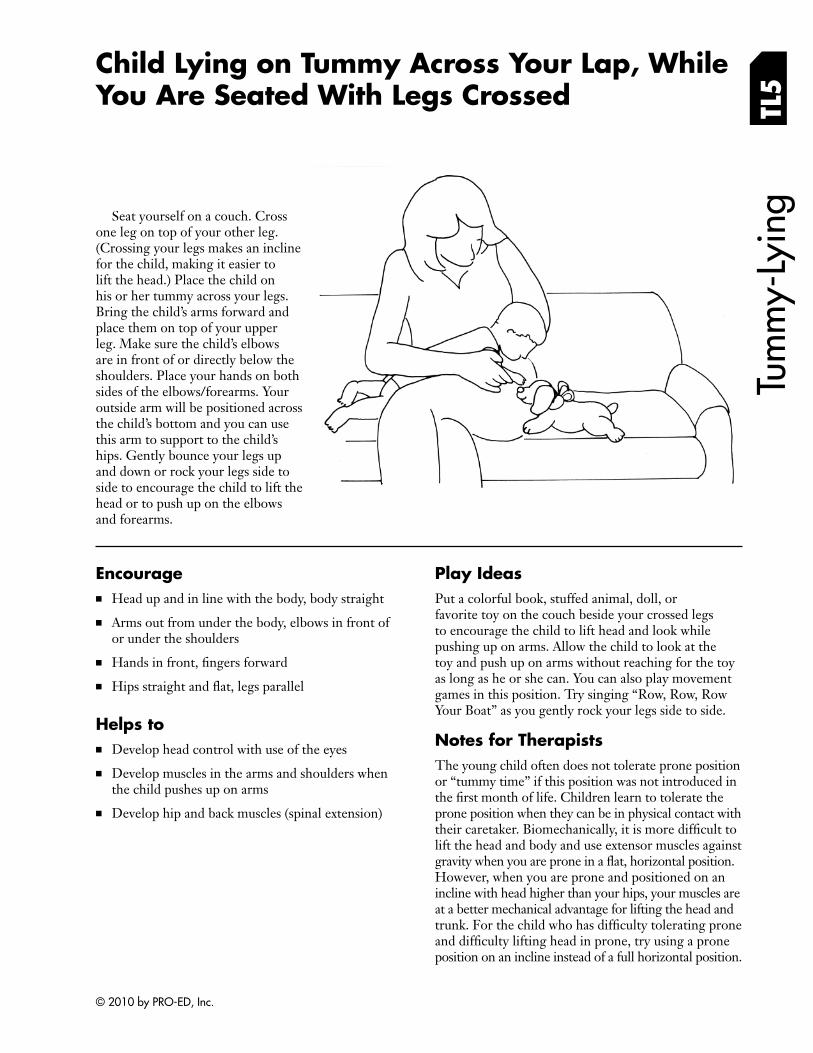
Child Lying on Tummy Across Your Lap, While You Are Seated With Legs Crossed TL
5
Seat yourself on a couch. Cross one leg on top of your other leg. (Crossing your legs makes an incline for the child, making it easier to lift the head.) Place the child on his or her tummy across your legs. Bring the child’s arms forward and place them on top of your upper leg. Make sure the child’s elbows are in front of or directly below the shoulders. Place your hands on both sides of the elbows/forearms. Your outside arm will be positioned across the child’s bottom and you can use this arm to support to the child’s hips. Gently bounce your legs up and down or rock your legs side to side to encourage the child to lift the head or to push up on the elbows and forearms.
Tum
my-
Lyin
g
Encourage ■ Head up and in line with the body, body straight
■ Arms out from under the body, elbows in front of or under the shoulders
■ Hands in front, fi ngers forward
■ Hips straight and flat, legs parallel
Helps to ■ Develop head control with use of the eyes
■ Develop muscles in the arms and shoulders when the child pushes up on arms
■ Develop hip and back muscles (spinal extension)
Play Ideas Put a colorful book, stuffed animal, doll, or favorite toy on the couch beside your crossed legs to encourage the child to lift head and look while pushing up on arms. Allow the child to look at the toy and push up on arms without reaching for the toy as long as he or she can. You can also play movement games in this position. Try singing “Row, Row, Row Your Boat” as you gently rock your legs side to side.
Notes for Therapists The young child often does not tolerate prone position or “tummy time” if this position was not introduced in the first month of life. Children learn to tolerate the prone position when they can be in physical contact with their caretaker. Biomechanically, it is more diffi cult to lift the head and body and use extensor muscles against gravity when you are prone in a flat, horizontal position. However, when you are prone and positioned on an incline with head higher than your hips, your muscles are at a better mechanical advantage for lifting the head and trunk. For the child who has difficulty tolerating prone and difficulty lifting head in prone, try using a prone position on an incline instead of a full horizontal position.
© 2010 by PRO-ED, Inc.
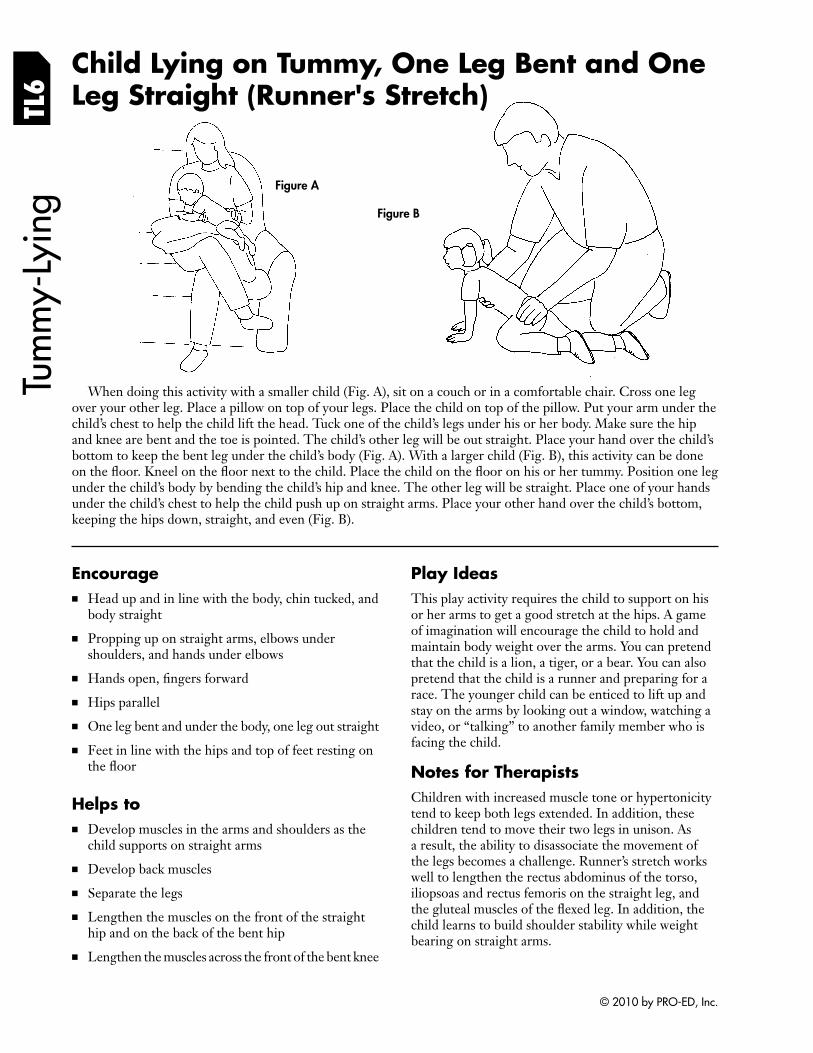
Figure B
TL6
Child Lying on Tummy, One Leg Bent and One Leg Straight (Runner's Stretch)
When doing this activity with a smaller child (Fig. A), sit on a couch or in a comfortable chair. Cross one leg over your other leg. Place a pillow on top of your legs. Place the child on top of the pillow. Put your arm under the child’s chest to help the child lift the head. Tuck one of the child’s legs under his or her body. Make sure the hip and knee are bent and the toe is pointed. The child’s other leg will be out straight. Place your hand over the child’s bottom to keep the bent leg under the child’s body (Fig. A). With a larger child (Fig. B), this activity can be done on the floor. Kneel on the floor next to the child. Place the child on the floor on his or her tummy. Position one leg under the child’s body by bending the child’s hip and knee. The other leg will be straight. Place one of your hands under the child’s chest to help the child push up on straight arms. Place your other hand over the child’s bottom, keeping the hips down, straight, and even (Fig. B).
Figure A
Tum
my-
Lyin
g
Encourage ■ Head up and in line with the body, chin tucked, and
body straight
■ Propping up on straight arms, elbows under shoulders, and hands under elbows
■ Hands open, fi ngers forward
■ Hips parallel
■ One leg bent and under the body, one leg out straight
■ Feet in line with the hips and top of feet resting on the fl oor
Helps to ■ Develop muscles in the arms and shoulders as the
child supports on straight arms
■ Develop back muscles
■ Separate the legs
■ Lengthen the muscles on the front of the straight hip and on the back of the bent hip
■ Lengthen the muscles across the front of the bent knee
Play Ideas This play activity requires the child to support on his or her arms to get a good stretch at the hips. A game of imagination will encourage the child to hold and maintain body weight over the arms. You can pretend that the child is a lion, a tiger, or a bear. You can also pretend that the child is a runner and preparing for a race. The younger child can be enticed to lift up and stay on the arms by looking out a window, watching a video, or “talking” to another family member who is facing the child.
Notes for Therapists Children with increased muscle tone or hypertonicity tend to keep both legs extended. In addition, these children tend to move their two legs in unison. As a result, the ability to disassociate the movement of the legs becomes a challenge. Runner’s stretch works well to lengthen the rectus abdominus of the torso, iliopsoas and rectus femoris on the straight leg, and the gluteal muscles of the flexed leg. In addition, the child learns to build shoulder stability while weight bearing on straight arms.
© 2010 by PRO-ED, Inc.
Child Lying on Tummy, Supported by Your Hands TL
7
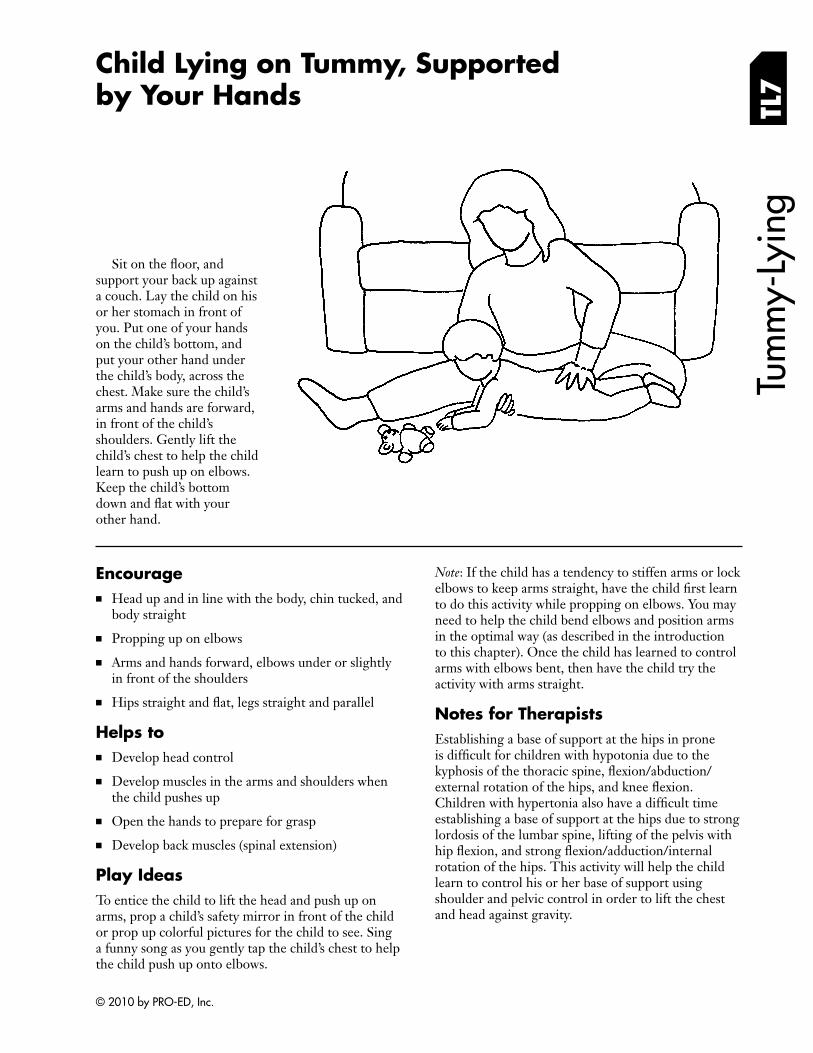
Sit on the fl oor, and support your back up against a couch. Lay the child on his or her stomach in front of you. Put one of your hands on the child’s bottom, and put your other hand under the child’s body, across the chest. Make sure the child’s arms and hands are forward, in front of the child’s shoulders. Gently lift the child’s chest to help the child learn to push up on elbows. Keep the child’s bottom down and flat with your other hand.
Tum
my-
Lyin
g
Encourage ■ Head up and in line with the body, chin tucked, and
body straight
■ Propping up on elbows
■ Arms and hands forward, elbows under or slightly in front of the shoulders
■ Hips straight and flat, legs straight and parallel
Helps to ■ Develop head control
■ Develop muscles in the arms and shoulders when the child pushes up
■ Open the hands to prepare for grasp
■ Develop back muscles (spinal extension)
Play Ideas To entice the child to lift the head and push up on arms, prop a child’s safety mirror in front of the child or prop up colorful pictures for the child to see. Sing a funny song as you gently tap the child’s chest to help the child push up onto elbows.
Note: If the child has a tendency to stiffen arms or lock elbows to keep arms straight, have the child fi rst learn to do this activity while propping on elbows. You may need to help the child bend elbows and position arms in the optimal way (as described in the introduction to this chapter). Once the child has learned to control arms with elbows bent, then have the child try the activity with arms straight.
Notes for Therapists Establishing a base of support at the hips in prone is difficult for children with hypotonia due to the kyphosis of the thoracic spine, fl exion/abduction/ external rotation of the hips, and knee fl exion. Children with hypertonia also have a diffi cult time establishing a base of support at the hips due to strong lordosis of the lumbar spine, lifting of the pelvis with hip flexion, and strong fl exion/adduction/internal rotation of the hips. This activity will help the child learn to control his or her base of support using shoulder and pelvic control in order to lift the chest and head against gravity.
© 2010 by PRO-ED, Inc.
Child Lying on Tummy, Supported With a Towel Roll
Tum
my-
Lyin
g TL
8
Figure A
Figure B
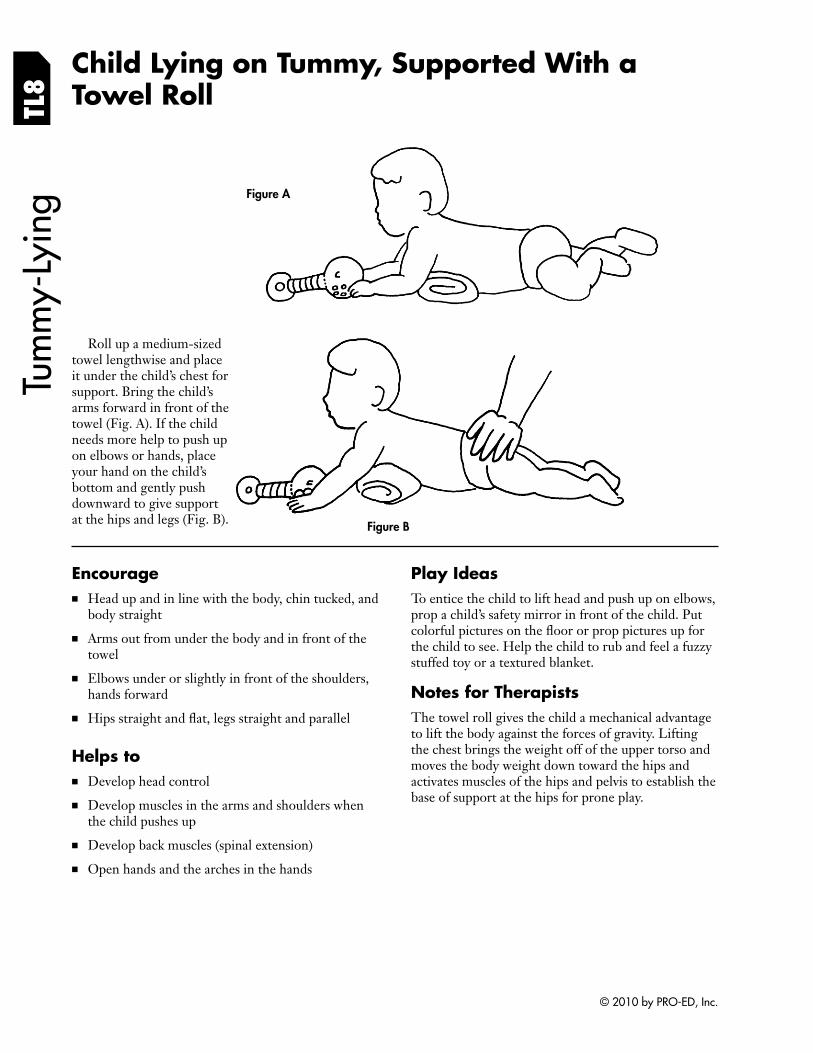
Roll up a medium-sized towel lengthwise and place it under the child’s chest for support. Bring the child’s arms forward in front of the towel (Fig. A). If the child needs more help to push up on elbows or hands, place your hand on the child’s bottom and gently push downward to give support at the hips and legs (Fig. B).
Encourage ■ Head up and in line with the body, chin tucked, and
body straight
■ Arms out from under the body and in front of the towel
■ Elbows under or slightly in front of the shoulders, hands forward
■ Hips straight and flat, legs straight and parallel
Helps to ■ Develop head control
■ Develop muscles in the arms and shoulders when the child pushes up
■ Develop back muscles (spinal extension)
■ Open hands and the arches in the hands
Play Ideas To entice the child to lift head and push up on elbows, prop a child’s safety mirror in front of the child. Put colorful pictures on the floor or prop pictures up for the child to see. Help the child to rub and feel a fuzzy stuffed toy or a textured blanket.
Notes for Therapists The towel roll gives the child a mechanical advantage to lift the body against the forces of gravity. Lifting the chest brings the weight off of the upper torso and moves the body weight down toward the hips and activates muscles of the hips and pelvis to establish the base of support at the hips for prone play.
© 2010 by PRO-ED, Inc.
Tum
my-
Lyin
g
Child Lying on Tummy Across Your Lap, Arms Straight TL
9
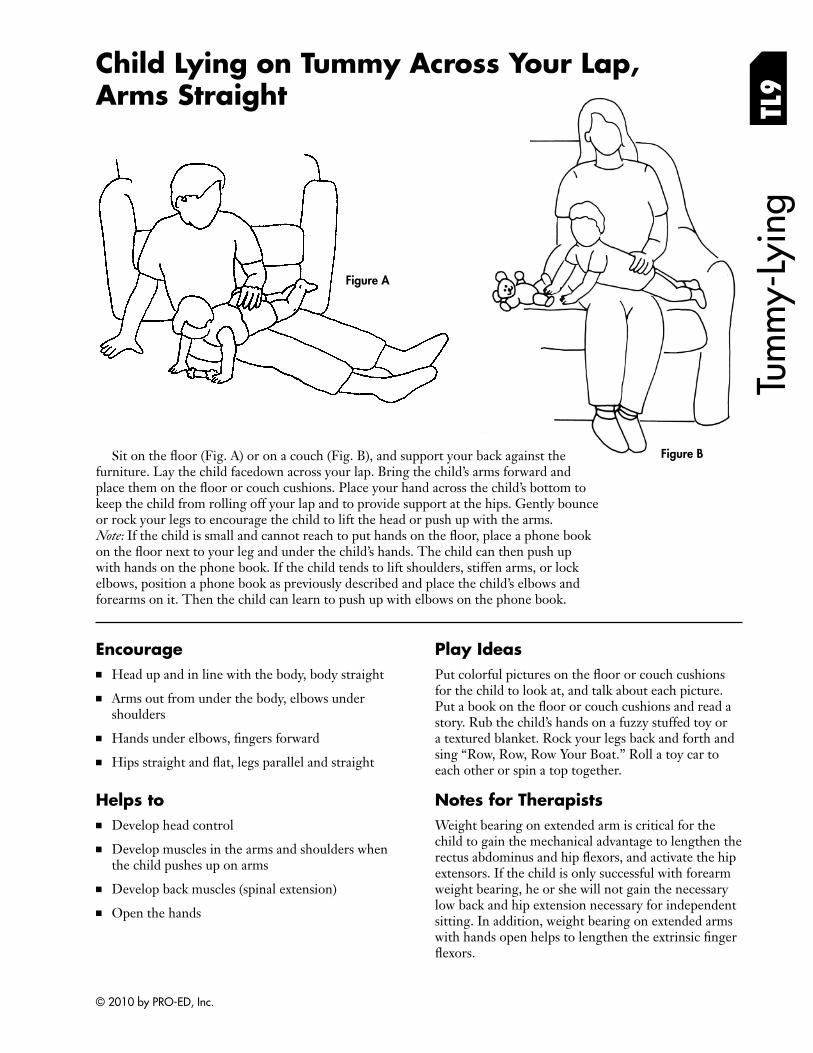
Sit on the floor (Fig. A) or on a couch (Fig. B), and support your back against the furniture. Lay the child facedown across your lap. Bring the child’s arms forward and place them on the floor or couch cushions. Place your hand across the child’s bottom to
Figure A
Figure B
keep the child from rolling off your lap and to provide support at the hips. Gently bounce or rock your legs to encourage the child to lift the head or push up with the arms. Note: If the child is small and cannot reach to put hands on the floor, place a phone book on the floor next to your leg and under the child’s hands. The child can then push up with hands on the phone book. If the child tends to lift shoulders, stiffen arms, or lock elbows, position a phone book as previously described and place the child’s elbows and forearms on it. Then the child can learn to push up with elbows on the phone book.
Encourage ■ Head up and in line with the body, body straight
■ Arms out from under the body, elbows under shoulders
■ Hands under elbows, fi ngers forward
■ Hips straight and flat, legs parallel and straight
Helps to ■ Develop head control
■ Develop muscles in the arms and shoulders when the child pushes up on arms
■ Develop back muscles (spinal extension)
■ Open the hands
Play Ideas Put colorful pictures on the floor or couch cushions for the child to look at, and talk about each picture. Put a book on the floor or couch cushions and read a story. Rub the child’s hands on a fuzzy stuffed toy or a textured blanket. Rock your legs back and forth and sing “Row, Row, Row Your Boat.” Roll a toy car to each other or spin a top together.
Notes for Therapists Weight bearing on extended arm is critical for the child to gain the mechanical advantage to lengthen the rectus abdominus and hip flexors, and activate the hip extensors. If the child is only successful with forearm weight bearing, he or she will not gain the necessary low back and hip extension necessary for independent sitting. In addition, weight bearing on extended arms with hands open helps to lengthen the extrinsic fi nger fl exors.
© 2010 by PRO-ED, Inc.
Tum
my-
Lyin
g
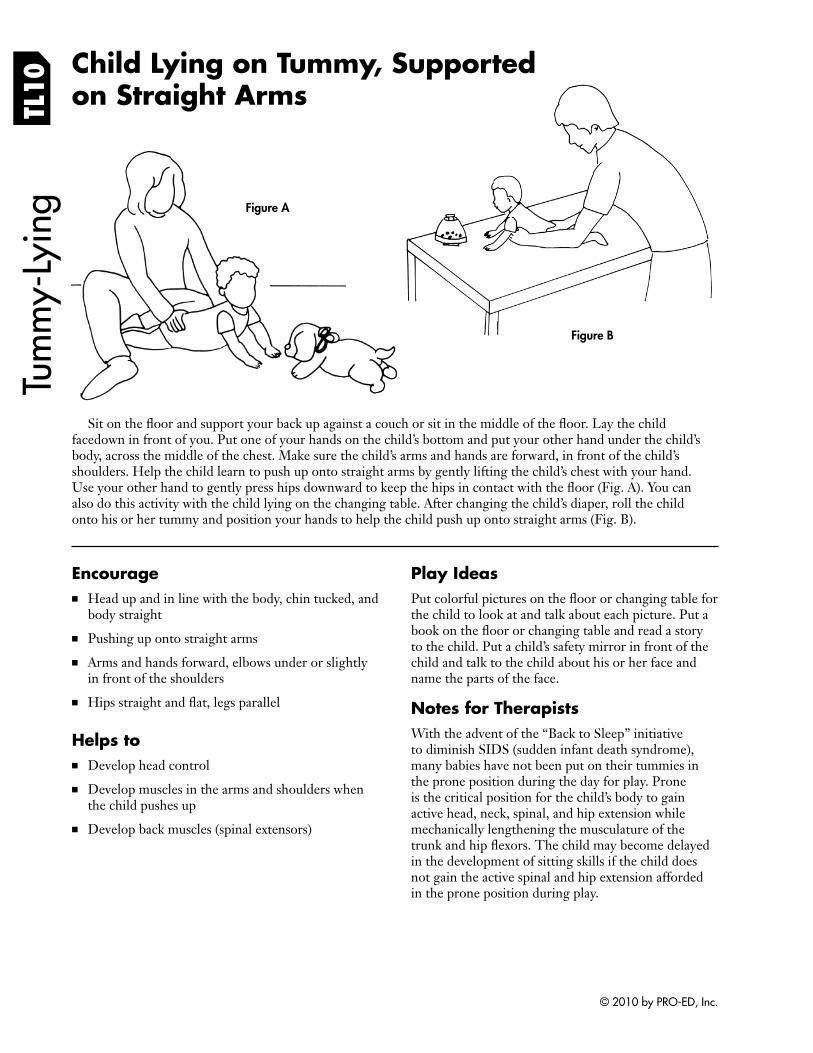
Sit on the floor and support your back up against a couch or sit in the middle of the floor. Lay the child facedown in front of you. Put one of your hands on the child’s bottom and put your other hand under the child’s body, across the middle of the chest. Make sure the child’s arms and hands are forward, in front of the child’s shoulders. Help the child learn to push up onto straight arms by gently lifting the child’s chest with your hand. Use your other hand to gently press hips downward to keep the hips in contact with the floor (Fig. A). You can also do this activity with the child lying on the changing table. After changing the child’s diaper, roll the child onto his or her tummy and position your hands to help the child push up onto straight arms (Fig. B).
Child Lying on Tummy, Supported on Straight ArmsTL
10
Figure A
Figure B
Encourage ■ Head up and in line with the body, chin tucked, and
body straight
■ Pushing up onto straight arms
■ Arms and hands forward, elbows under or slightly in front of the shoulders
■ Hips straight and flat, legs parallel
Helps to ■ Develop head control
■ Develop muscles in the arms and shoulders when the child pushes up
■ Develop back muscles (spinal extensors)
Play Ideas Put colorful pictures on the floor or changing table for the child to look at and talk about each picture. Put a book on the floor or changing table and read a story to the child. Put a child’s safety mirror in front of the child and talk to the child about his or her face and name the parts of the face.
Notes for Therapists With the advent of the “Back to Sleep” initiative to diminish SIDS (sudden infant death syndrome), many babies have not been put on their tummies in the prone position during the day for play. Prone is the critical position for the child’s body to gain active head, neck, spinal, and hip extension while mechanically lengthening the musculature of the trunk and hip flexors. The child may become delayed in the development of sitting skills if the child does not gain the active spinal and hip extension afforded in the prone position during play.
© 2010 by PRO-ED, Inc.
Tum
my-
Lyin
g
Child Lying on Tummy, Traction at the Legs
TL11
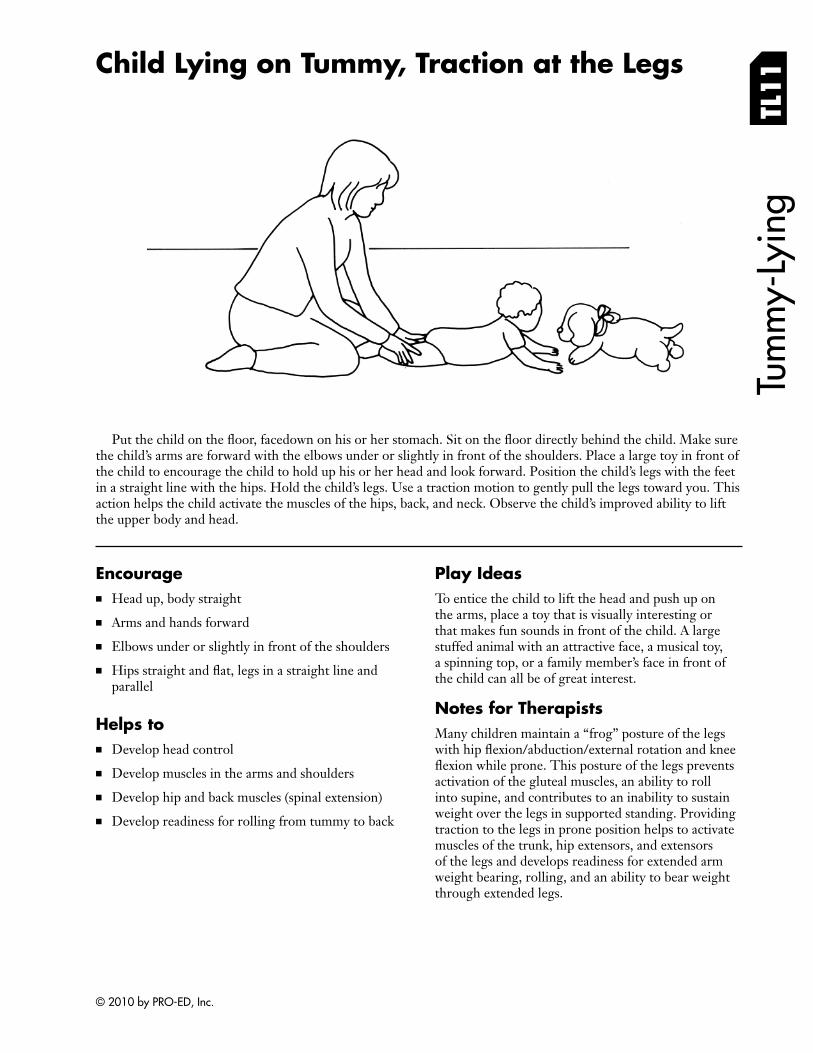
Put the child on the floor, facedown on his or her stomach. Sit on the floor directly behind the child. Make sure the child’s arms are forward with the elbows under or slightly in front of the shoulders. Place a large toy in front of the child to encourage the child to hold up his or her head and look forward. Position the child’s legs with the feet in a straight line with the hips. Hold the child’s legs. Use a traction motion to gently pull the legs toward you. This action helps the child activate the muscles of the hips, back, and neck. Observe the child’s improved ability to lift the upper body and head.
Encourage ■ Head up, body straight
■ Arms and hands forward
■ Elbows under or slightly in front of the shoulders
■ Hips straight and flat, legs in a straight line and parallel
Helps to ■ Develop head control
■ Develop muscles in the arms and shoulders
■ Develop hip and back muscles (spinal extension)
■ Develop readiness for rolling from tummy to back
Play Ideas To entice the child to lift the head and push up on the arms, place a toy that is visually interesting or that makes fun sounds in front of the child. A large stuffed animal with an attractive face, a musical toy, a spinning top, or a family member’s face in front of the child can all be of great interest.
Notes for Therapists Many children maintain a “frog” posture of the legs with hip flexion/abduction/external rotation and knee flexion while prone. This posture of the legs prevents activation of the gluteal muscles, an ability to roll into supine, and contributes to an inability to sustain weight over the legs in supported standing. Providing traction to the legs in prone position helps to activate muscles of the trunk, hip extensors, and extensors of the legs and develops readiness for extended arm weight bearing, rolling, and an ability to bear weight through extended legs.
© 2010 by PRO-ED, Inc.
TL12
Child on Tummy Reaching for Toys With One Arm, Supporting on a Bent Arm
Tum
my-
Lyin
g
Figure A Figure B
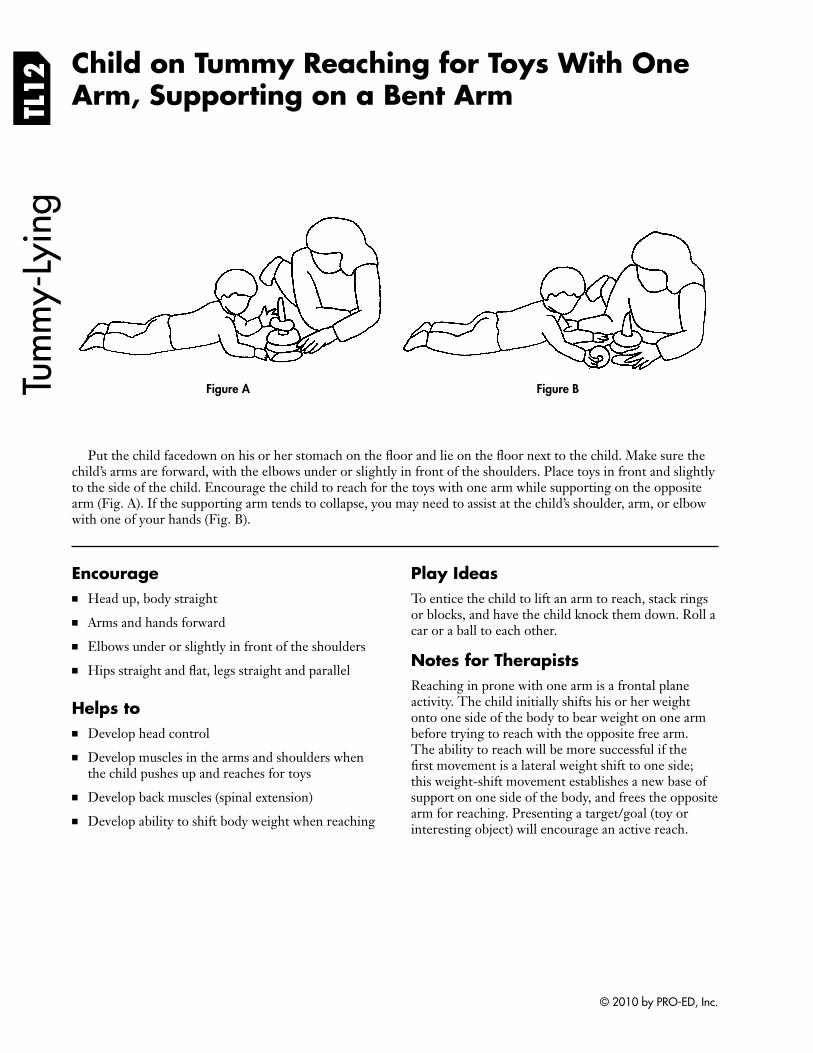
Put the child facedown on his or her stomach on the floor and lie on the floor next to the child. Make sure the child’s arms are forward, with the elbows under or slightly in front of the shoulders. Place toys in front and slightly to the side of the child. Encourage the child to reach for the toys with one arm while supporting on the opposite arm (Fig. A). If the supporting arm tends to collapse, you may need to assist at the child’s shoulder, arm, or elbow with one of your hands (Fig. B).
Encourage ■ Head up, body straight
■ Arms and hands forward
■ Elbows under or slightly in front of the shoulders
■ Hips straight and flat, legs straight and parallel
Helps to ■ Develop head control
■ Develop muscles in the arms and shoulders when the child pushes up and reaches for toys
■ Develop back muscles (spinal extension)
■ Develop ability to shift body weight when reaching
Play Ideas To entice the child to lift an arm to reach, stack rings or blocks, and have the child knock them down. Roll a car or a ball to each other.
Notes for Therapists Reaching in prone with one arm is a frontal plane activity. The child initially shifts his or her weight onto one side of the body to bear weight on one arm before trying to reach with the opposite free arm. The ability to reach will be more successful if the first movement is a lateral weight shift to one side; this weight-shift movement establishes a new base of support on one side of the body, and frees the opposite arm for reaching. Presenting a target/goal (toy or interesting object) will encourage an active reach.
© 2010 by PRO-ED, Inc.
Child on Tummy Reaching for Toys With One Arm, Supporting on a Straight Arm TL
13
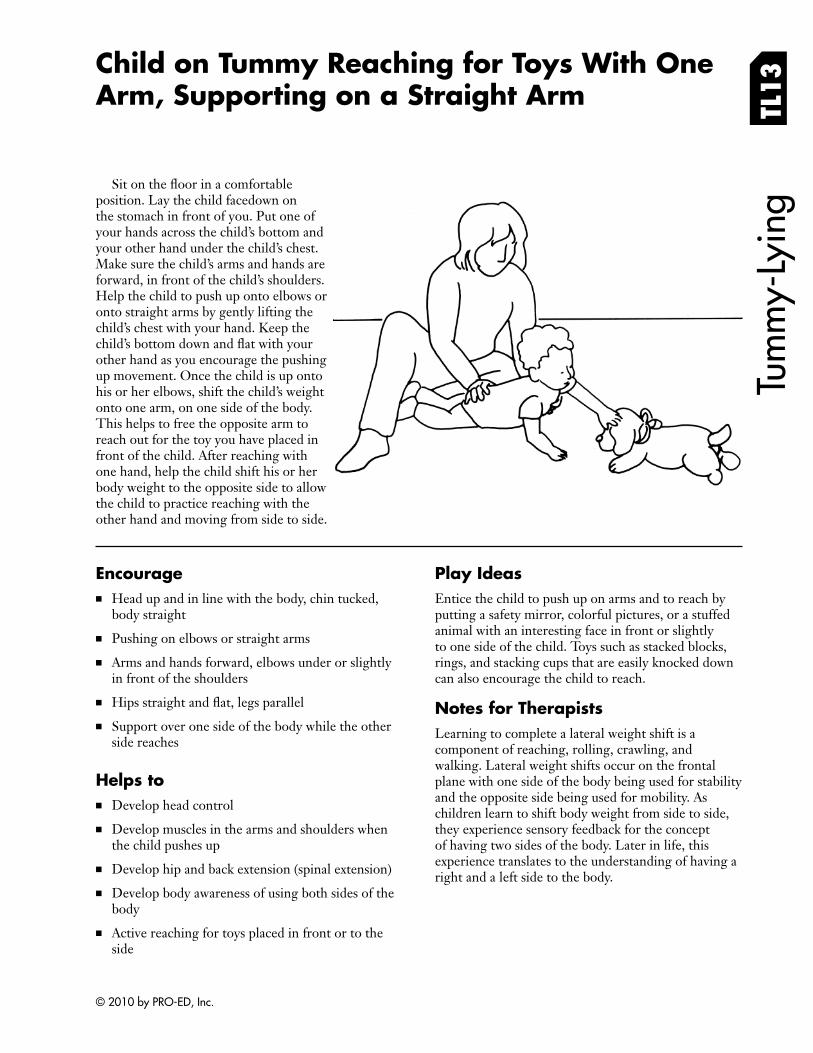
Sit on the floor in a comfortable position. Lay the child facedown on the stomach in front of you. Put one of your hands across the child’s bottom and your other hand under the child’s chest. Make sure the child’s arms and hands are forward, in front of the child’s shoulders. Help the child to push up onto elbows or onto straight arms by gently lifting the child’s chest with your hand. Keep the child’s bottom down and flat with your other hand as you encourage the pushing up movement. Once the child is up onto his or her elbows, shift the child’s weight onto one arm, on one side of the body. This helps to free the opposite arm to reach out for the toy you have placed in front of the child. After reaching with one hand, help the child shift his or her body weight to the opposite side to allow the child to practice reaching with the other hand and moving from side to side.
Tum
my-
Lyin
g
Encourage ■ Head up and in line with the body, chin tucked,
body straight
■ Pushing on elbows or straight arms
■ Arms and hands forward, elbows under or slightly in front of the shoulders
■ Hips straight and flat, legs parallel
■ Support over one side of the body while the other side reaches
Helps to ■ Develop head control
■ Develop muscles in the arms and shoulders when the child pushes up
■ Develop hip and back extension (spinal extension)
■ Develop body awareness of using both sides of the body
■ Active reaching for toys placed in front or to the side
Play Ideas Entice the child to push up on arms and to reach by putting a safety mirror, colorful pictures, or a stuffed animal with an interesting face in front or slightly to one side of the child. Toys such as stacked blocks, rings, and stacking cups that are easily knocked down can also encourage the child to reach.
Notes for Therapists Learning to complete a lateral weight shift is a component of reaching, rolling, crawling, and walking. Lateral weight shifts occur on the frontal plane with one side of the body being used for stability and the opposite side being used for mobility. As children learn to shift body weight from side to side, they experience sensory feedback for the concept of having two sides of the body. Later in life, this experience translates to the understanding of having a right and a left side to the body.
© 2010 by PRO-ED, Inc.
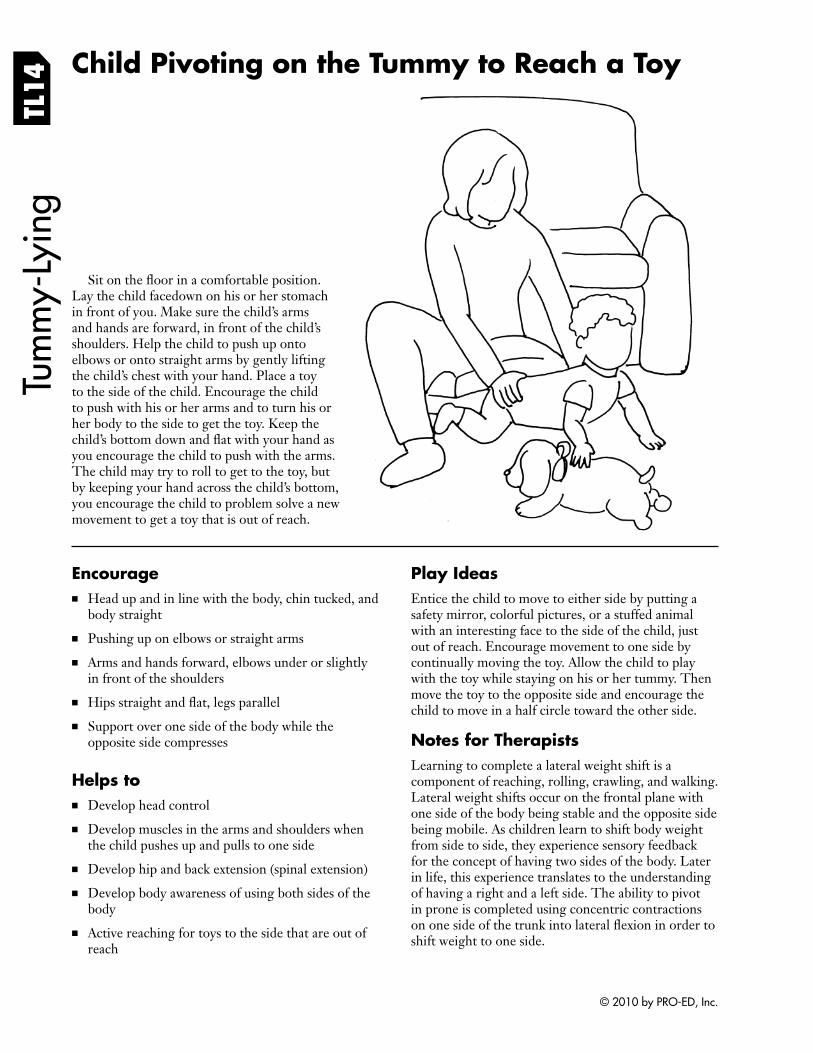
TL14
Tum
my-
Lyin
g
Child Pivoting on the Tummy to Reach a Toy
Sit on the floor in a comfortable position. Lay the child facedown on his or her stomach in front of you. Make sure the child’s arms and hands are forward, in front of the child’s shoulders. Help the child to push up onto elbows or onto straight arms by gently lifting the child’s chest with your hand. Place a toy to the side of the child. Encourage the child to push with his or her arms and to turn his or her body to the side to get the toy. Keep the child’s bottom down and flat with your hand as you encourage the child to push with the arms. The child may try to roll to get to the toy, but by keeping your hand across the child’s bottom, you encourage the child to problem solve a new movement to get a toy that is out of reach.
Encourage ■ Head up and in line with the body, chin tucked, and
body straight
■ Pushing up on elbows or straight arms
■ Arms and hands forward, elbows under or slightly in front of the shoulders
■ Hips straight and flat, legs parallel
■ Support over one side of the body while the opposite side compresses
Helps to ■ Develop head control
■ Develop muscles in the arms and shoulders when the child pushes up and pulls to one side
■ Develop hip and back extension (spinal extension)
■ Develop body awareness of using both sides of the body
■ Active reaching for toys to the side that are out of reach
Play Ideas Entice the child to move to either side by putting a safety mirror, colorful pictures, or a stuffed animal with an interesting face to the side of the child, just out of reach. Encourage movement to one side by continually moving the toy. Allow the child to play with the toy while staying on his or her tummy. Then move the toy to the opposite side and encourage the child to move in a half circle toward the other side.
Notes for Therapists Learning to complete a lateral weight shift is a component of reaching, rolling, crawling, and walking. Lateral weight shifts occur on the frontal plane with one side of the body being stable and the opposite side being mobile. As children learn to shift body weight from side to side, they experience sensory feedback for the concept of having two sides of the body. Later in life, this experience translates to the understanding of having a right and a left side. The ability to pivot in prone is completed using concentric contractions on one side of the trunk into lateral flexion in order to shift weight to one side.
© 2010 by PRO-ED, Inc.
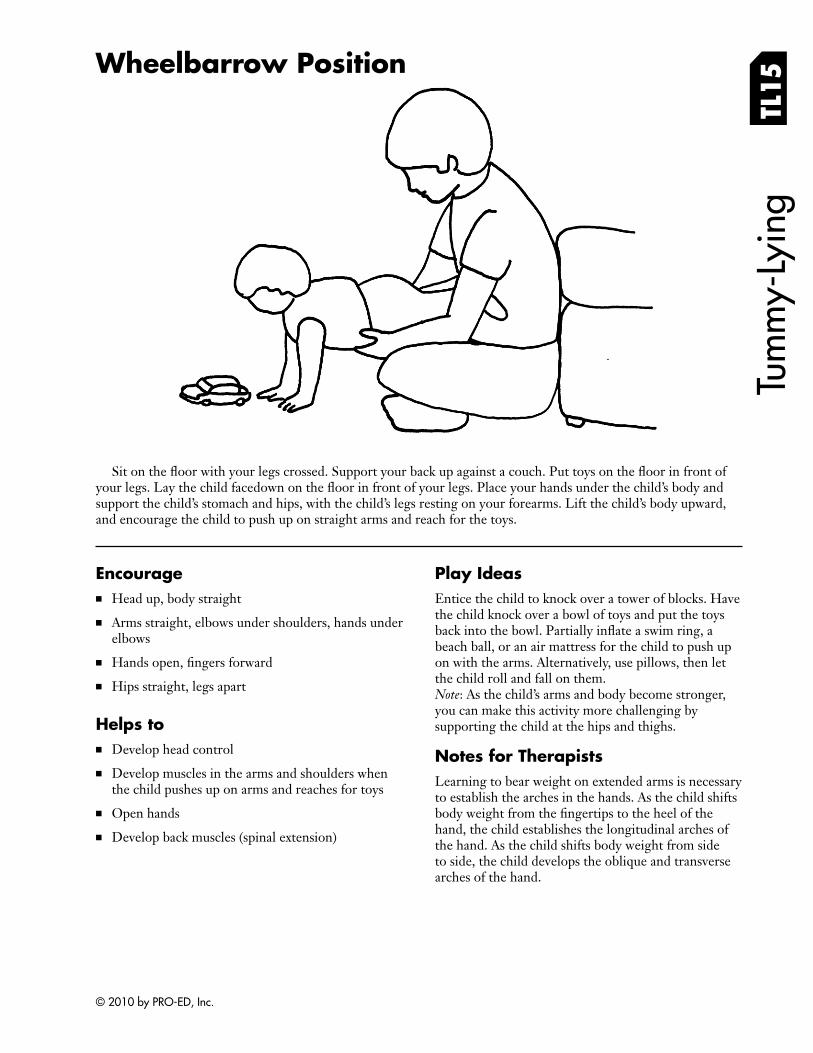
Wheelbarrow Position
TL15
Tum
my-
Lyin
g
Sit on the floor with your legs crossed. Support your back up against a couch. Put toys on the floor in front of your legs. Lay the child facedown on the floor in front of your legs. Place your hands under the child’s body and support the child’s stomach and hips, with the child’s legs resting on your forearms. Lift the child’s body upward, and encourage the child to push up on straight arms and reach for the toys.
Encourage ■ Head up, body straight
■ Arms straight, elbows under shoulders, hands under elbows
■ Hands open, fi ngers forward
■ Hips straight, legs apart
Helps to ■ Develop head control
■ Develop muscles in the arms and shoulders when the child pushes up on arms and reaches for toys
■ Open hands
■ Develop back muscles (spinal extension)
Play Ideas Entice the child to knock over a tower of blocks. Have the child knock over a bowl of toys and put the toys back into the bowl. Partially inflate a swim ring, a beach ball, or an air mattress for the child to push up on with the arms. Alternatively, use pillows, then let the child roll and fall on them. Note: As the child’s arms and body become stronger, you can make this activity more challenging by supporting the child at the hips and thighs.
Notes for Therapists Learning to bear weight on extended arms is necessary to establish the arches in the hands. As the child shifts body weight from the fingertips to the heel of the hand, the child establishes the longitudinal arches of the hand. As the child shifts body weight from side to side, the child develops the oblique and transverse arches of the hand.
© 2010 by PRO-ED, Inc.
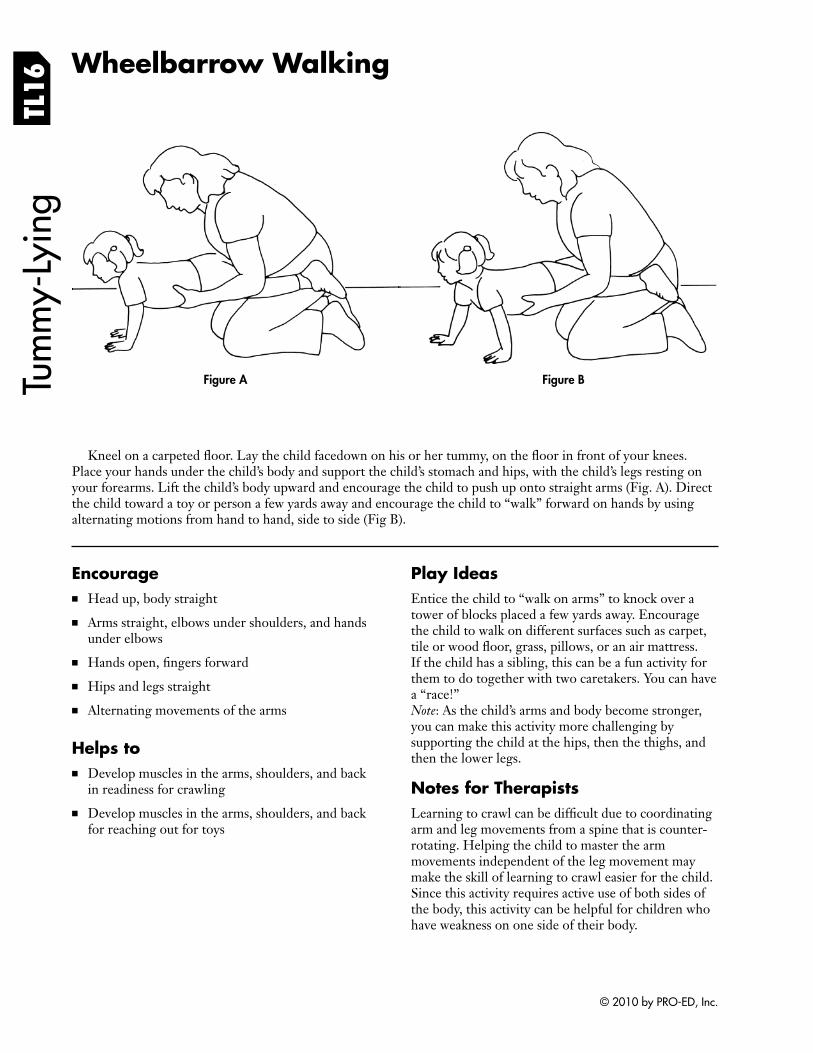
Tum
my-
Lyin
g Wheelbarrow Walking
TL16
Figure A Figure B
Kneel on a carpeted floor. Lay the child facedown on his or her tummy, on the floor in front of your knees. Place your hands under the child’s body and support the child’s stomach and hips, with the child’s legs resting on your forearms. Lift the child’s body upward and encourage the child to push up onto straight arms (Fig. A). Direct the child toward a toy or person a few yards away and encourage the child to “walk” forward on hands by using alternating motions from hand to hand, side to side (Fig B).
Encourage ■ Head up, body straight
■ Arms straight, elbows under shoulders, and hands under elbows
■ Hands open, fi ngers forward
■ Hips and legs straight
■ Alternating movements of the arms
Helps to ■ Develop muscles in the arms, shoulders, and back
in readiness for crawling
■ Develop muscles in the arms, shoulders, and back for reaching out for toys
Play Ideas Entice the child to “walk on arms” to knock over a tower of blocks placed a few yards away. Encourage the child to walk on different surfaces such as carpet, tile or wood floor, grass, pillows, or an air mattress. If the child has a sibling, this can be a fun activity for them to do together with two caretakers. You can have a “race!” Note: As the child’s arms and body become stronger, you can make this activity more challenging by supporting the child at the hips, then the thighs, and then the lower legs.
Notes for Therapists Learning to crawl can be difficult due to coordinating arm and leg movements from a spine that is counter-rotating. Helping the child to master the arm movements independent of the leg movement may make the skill of learning to crawl easier for the child. Since this activity requires active use of both sides of the body, this activity can be helpful for children who have weakness on one side of their body.
© 2010 by PRO-ED, Inc.
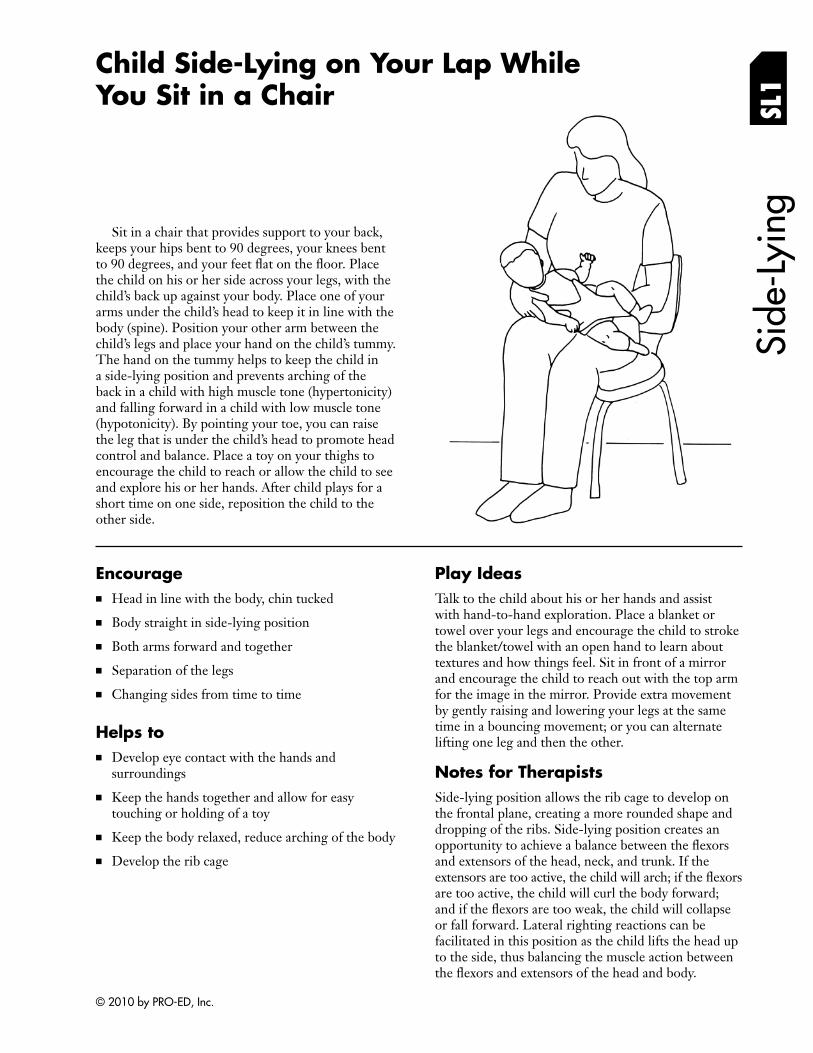
You Sit in a Chair
Side
-Lyi
ng
Child Side-Lying on Your Lap While
SL1
Sit in a chair that provides support to your back, keeps your hips bent to 90 degrees, your knees bent to 90 degrees, and your feet flat on the fl oor. Place the child on his or her side across your legs, with the child’s back up against your body. Place one of your arms under the child’s head to keep it in line with the body (spine). Position your other arm between the child’s legs and place your hand on the child’s tummy. The hand on the tummy helps to keep the child in a side-lying position and prevents arching of the back in a child with high muscle tone (hypertonicity) and falling forward in a child with low muscle tone (hypotonicity). By pointing your toe, you can raise the leg that is under the child’s head to promote head control and balance. Place a toy on your thighs to encourage the child to reach or allow the child to see and explore his or her hands. After child plays for a short time on one side, reposition the child to the other side.
Encourage ■ Head in line with the body, chin tucked
■ Body straight in side-lying position
■ Both arms forward and together
■ Separation of the legs
■ Changing sides from time to time
Helps to ■ Develop eye contact with the hands and
surroundings
■ Keep the hands together and allow for easy touching or holding of a toy
■ Keep the body relaxed, reduce arching of the body
■ Develop the rib cage
Play Ideas Talk to the child about his or her hands and assist with hand-to-hand exploration. Place a blanket or towel over your legs and encourage the child to stroke the blanket/towel with an open hand to learn about textures and how things feel. Sit in front of a mirror and encourage the child to reach out with the top arm for the image in the mirror. Provide extra movement by gently raising and lowering your legs at the same time in a bouncing movement; or you can alternate lifting one leg and then the other.
Notes for Therapists Side-lying position allows the rib cage to develop on the frontal plane, creating a more rounded shape and dropping of the ribs. Side-lying position creates an opportunity to achieve a balance between the fl exors and extensors of the head, neck, and trunk. If the extensors are too active, the child will arch; if the fl exors are too active, the child will curl the body forward; and if the flexors are too weak, the child will collapse or fall forward. Lateral righting reactions can be facilitated in this position as the child lifts the head up to the side, thus balancing the muscle action between the flexors and extensors of the head and body.
© 2010 by PRO-ED, Inc.
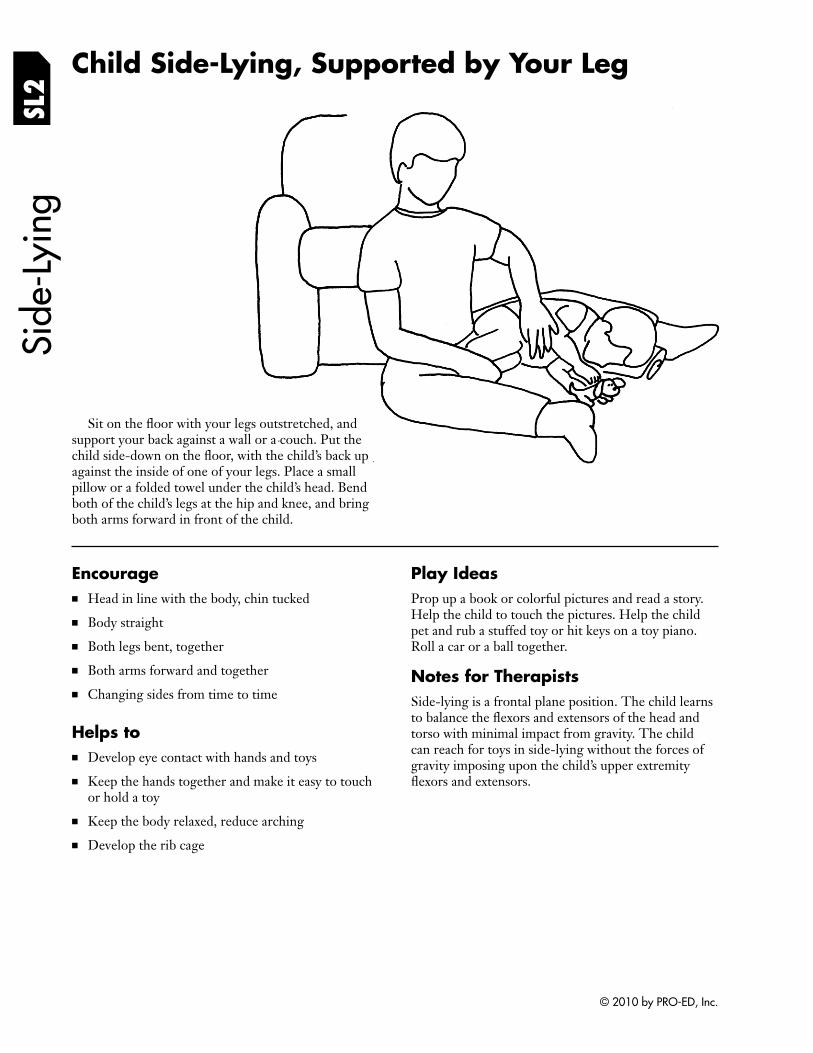
SL2
Child Side-Lying, Supported by Your Leg Si
de-L
ying
Sit on the floor with your legs outstretched, and support your back against a wall or a couch. Put the child side-down on the floor, with the child’s back up against the inside of one of your legs. Place a small pillow or a folded towel under the child’s head. Bend both of the child’s legs at the hip and knee, and bring both arms forward in front of the child.
Encourage ■ Head in line with the body, chin tucked
■ Body straight
■ Both legs bent, together
■ Both arms forward and together
■ Changing sides from time to time
Helps to ■ Develop eye contact with hands and toys
■ Keep the hands together and make it easy to touch or hold a toy
■ Keep the body relaxed, reduce arching
■ Develop the rib cage
Play Ideas Prop up a book or colorful pictures and read a story. Help the child to touch the pictures. Help the child pet and rub a stuffed toy or hit keys on a toy piano. Roll a car or a ball together.
Notes for Therapists Side-lying is a frontal plane position. The child learns to balance the flexors and extensors of the head and torso with minimal impact from gravity. The child can reach for toys in side-lying without the forces of gravity imposing upon the child’s upper extremity flexors and extensors.
© 2010 by PRO-ED, Inc.
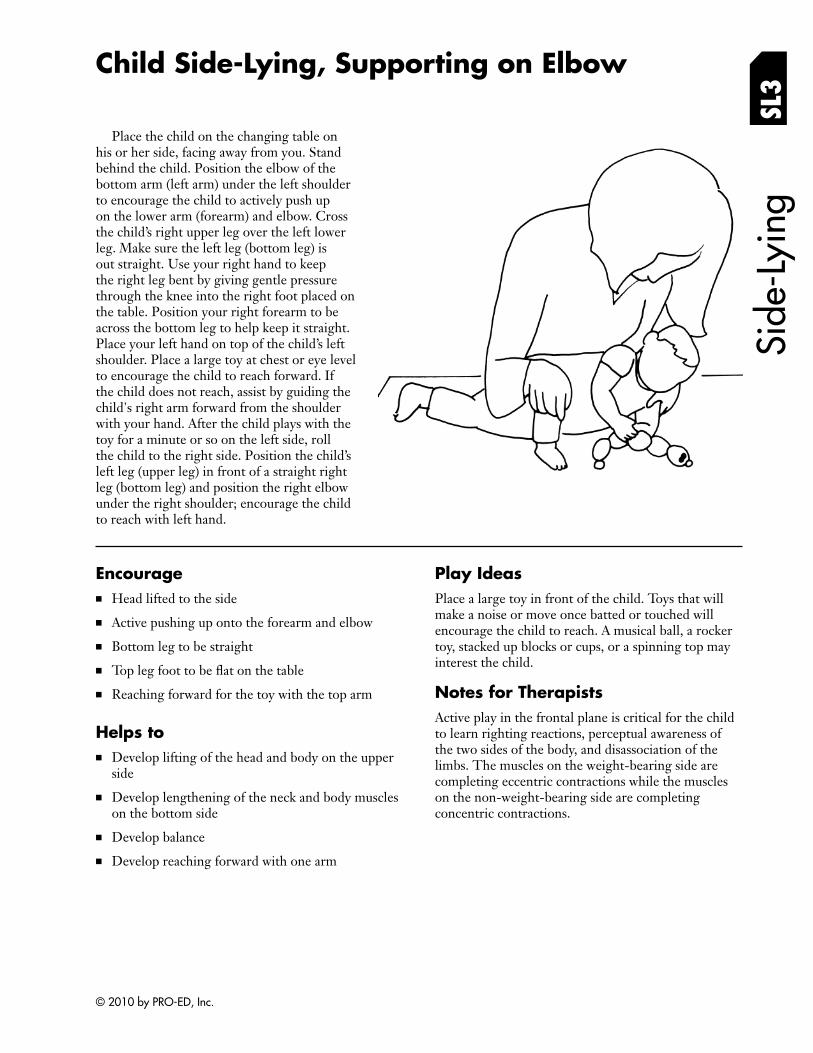
Child Side-Lying, Supporting on Elbow
SL3
Place the child on the changing table on his or her side, facing away from you. Stand behind the child. Position the elbow of the bottom arm (left arm) under the left shoulder to encourage the child to actively push up on the lower arm (forearm) and elbow. Cross the child’s right upper leg over the left lower leg. Make sure the left leg (bottom leg) is out straight. Use your right hand to keep the right leg bent by giving gentle pressure through the knee into the right foot placed on the table. Position your right forearm to be across the bottom leg to help keep it straight. Place your left hand on top of the child’s left shoulder. Place a large toy at chest or eye level to encourage the child to reach forward. If the child does not reach, assist by guiding the child's right arm forward from the shoulder with your hand. After the child plays with the toy for a minute or so on the left side, roll the child to the right side. Position the child’s left leg (upper leg) in front of a straight right leg (bottom leg) and position the right elbow under the right shoulder; encourage the child to reach with left hand.
Side
-Lyi
ng
Encourage ■ Head lifted to the side
■ Active pushing up onto the forearm and elbow
■ Bottom leg to be straight
■ Top leg foot to be flat on the table
■ Reaching forward for the toy with the top arm
Helps to ■ Develop lifting of the head and body on the upper
side
■ Develop lengthening of the neck and body muscles on the bottom side
■ Develop balance
■ Develop reaching forward with one arm
Play Ideas Place a large toy in front of the child. Toys that will make a noise or move once batted or touched will encourage the child to reach. A musical ball, a rocker toy, stacked up blocks or cups, or a spinning top may interest the child.
Notes for Therapists Active play in the frontal plane is critical for the child to learn righting reactions, perceptual awareness of the two sides of the body, and disassociation of the limbs. The muscles on the weight-bearing side are completing eccentric contractions while the muscles on the non-weight-bearing side are completing concentric contractions.
© 2010 by PRO-ED, Inc.
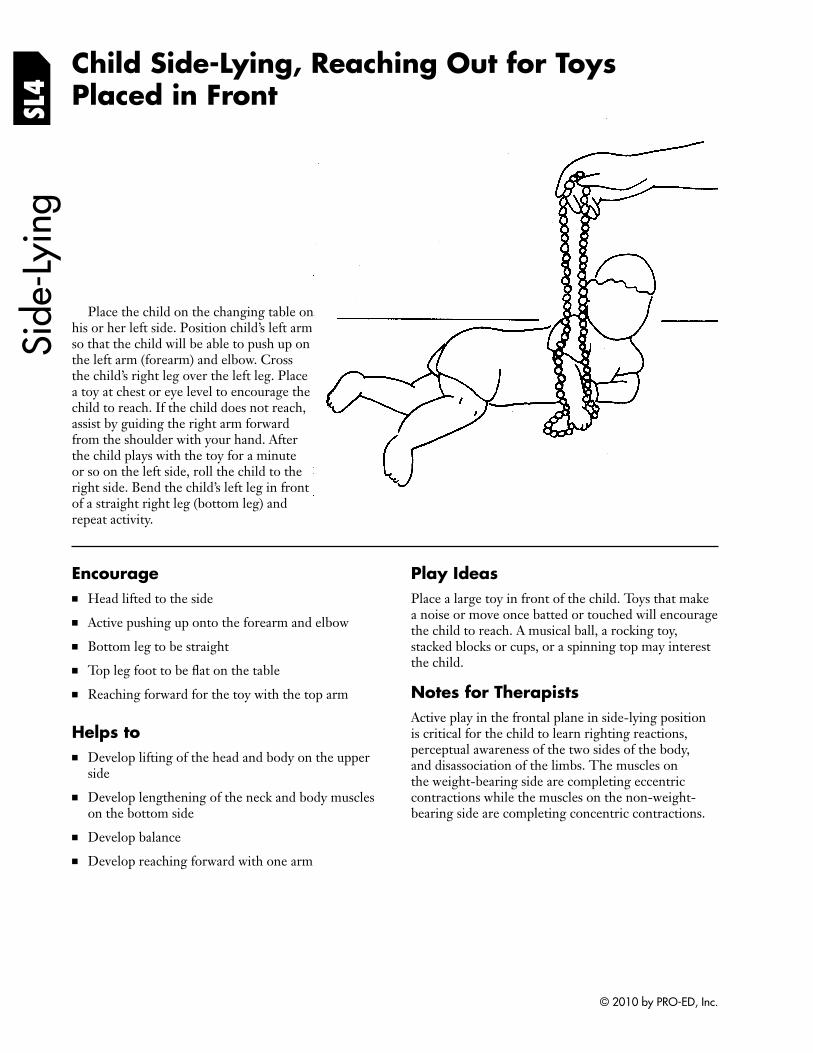
SL4
Child Side-Lying, Reaching Out for Toys Placed in Front
Side
-Lyi
ng
Place the child on the changing table on his or her left side. Position child’s left arm so that the child will be able to push up on the left arm (forearm) and elbow. Cross the child’s right leg over the left leg. Place a toy at chest or eye level to encourage the child to reach. If the child does not reach, assist by guiding the right arm forward from the shoulder with your hand. After the child plays with the toy for a minute or so on the left side, roll the child to the right side. Bend the child’s left leg in front of a straight right leg (bottom leg) and repeat activity.
Encourage ■ Head lifted to the side
■ Active pushing up onto the forearm and elbow
■ Bottom leg to be straight
■ Top leg foot to be flat on the table
■ Reaching forward for the toy with the top arm
Helps to ■ Develop lifting of the head and body on the upper
side
■ Develop lengthening of the neck and body muscles on the bottom side
■ Develop balance
■ Develop reaching forward with one arm
Play Ideas Place a large toy in front of the child. Toys that make a noise or move once batted or touched will encourage the child to reach. A musical ball, a rocking toy, stacked blocks or cups, or a spinning top may interest the child.
Notes for Therapists Active play in the frontal plane in side-lying position is critical for the child to learn righting reactions, perceptual awareness of the two sides of the body, and disassociation of the limbs. The muscles on the weight-bearing side are completing eccentric contractions while the muscles on the non-weightbearing side are completing concentric contractions.
© 2010 by PRO-ED, Inc.
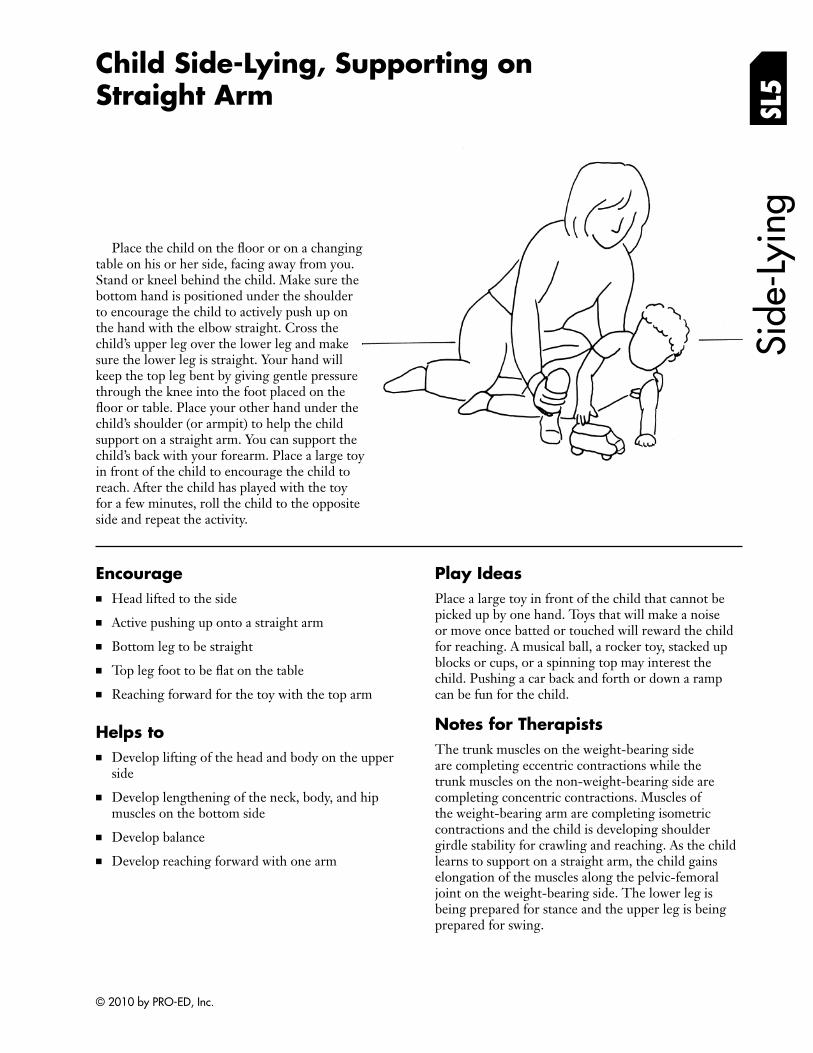
Child Side-Lying, Supporting on Straight Arm SL
5
Place the child on the floor or on a changing table on his or her side, facing away from you. Stand or kneel behind the child. Make sure the bottom hand is positioned under the shoulder to encourage the child to actively push up on the hand with the elbow straight. Cross the child’s upper leg over the lower leg and make sure the lower leg is straight. Your hand will keep the top leg bent by giving gentle pressure through the knee into the foot placed on the floor or table. Place your other hand under the child’s shoulder (or armpit) to help the child support on a straight arm. You can support the child’s back with your forearm. Place a large toy in front of the child to encourage the child to reach. After the child has played with the toy for a few minutes, roll the child to the opposite side and repeat the activity.
Side
-Lyi
ng
Encourage ■ Head lifted to the side
■ Active pushing up onto a straight arm
■ Bottom leg to be straight
■ Top leg foot to be flat on the table
■ Reaching forward for the toy with the top arm
Helps to ■ Develop lifting of the head and body on the upper
side
■ Develop lengthening of the neck, body, and hip muscles on the bottom side
■ Develop balance
■ Develop reaching forward with one arm
Play Ideas Place a large toy in front of the child that cannot be picked up by one hand. Toys that will make a noise or move once batted or touched will reward the child for reaching. A musical ball, a rocker toy, stacked up blocks or cups, or a spinning top may interest the child. Pushing a car back and forth or down a ramp can be fun for the child.
Notes for Therapists The trunk muscles on the weight-bearing side are completing eccentric contractions while the trunk muscles on the non-weight-bearing side are completing concentric contractions. Muscles of the weight-bearing arm are completing isometric contractions and the child is developing shoulder girdle stability for crawling and reaching. As the child learns to support on a straight arm, the child gains elongation of the muscles along the pelvic-femoral joint on the weight-bearing side. The lower leg is being prepared for stance and the upper leg is being prepared for swing.
© 2010 by PRO-ED, Inc.
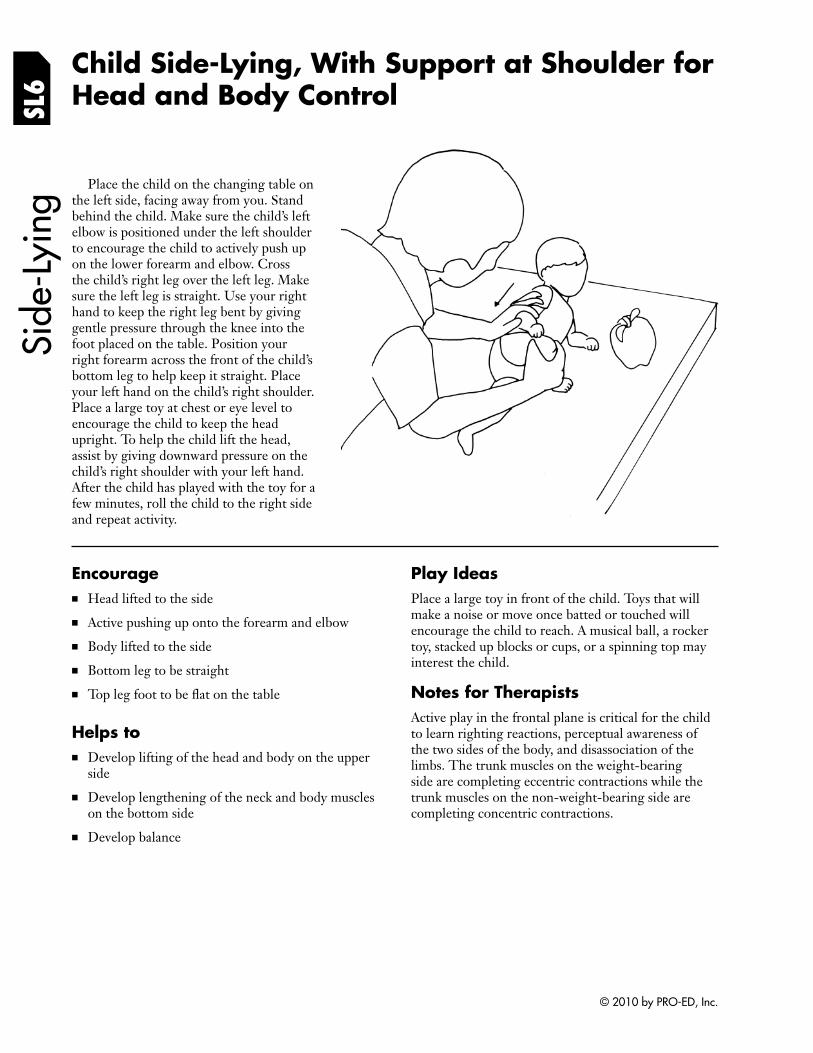
SL6
Child Side-Lying, With Support at Shoulder for Head and Body Control
Side
-Lyi
ng Place the child on the changing table on
the left side, facing away from you. Stand behind the child. Make sure the child’s left elbow is positioned under the left shoulder to encourage the child to actively push up on the lower forearm and elbow. Cross the child’s right leg over the left leg. Make sure the left leg is straight. Use your right hand to keep the right leg bent by giving gentle pressure through the knee into the foot placed on the table. Position your right forearm across the front of the child’s bottom leg to help keep it straight. Place your left hand on the child’s right shoulder. Place a large toy at chest or eye level to encourage the child to keep the head upright. To help the child lift the head, assist by giving downward pressure on the child’s right shoulder with your left hand. After the child has played with the toy for a few minutes, roll the child to the right side and repeat activity.
Encourage ■ Head lifted to the side
■ Active pushing up onto the forearm and elbow
■ Body lifted to the side
■ Bottom leg to be straight
■ Top leg foot to be flat on the table
Helps to ■ Develop lifting of the head and body on the upper
side
■ Develop lengthening of the neck and body muscles on the bottom side
■ Develop balance
Play Ideas Place a large toy in front of the child. Toys that will make a noise or move once batted or touched will encourage the child to reach. A musical ball, a rocker toy, stacked up blocks or cups, or a spinning top may interest the child.
Notes for Therapists Active play in the frontal plane is critical for the child to learn righting reactions, perceptual awareness of the two sides of the body, and disassociation of the limbs. The trunk muscles on the weight-bearing side are completing eccentric contractions while the trunk muscles on the non-weight-bearing side are completing concentric contractions.
© 2010 by PRO-ED, Inc.
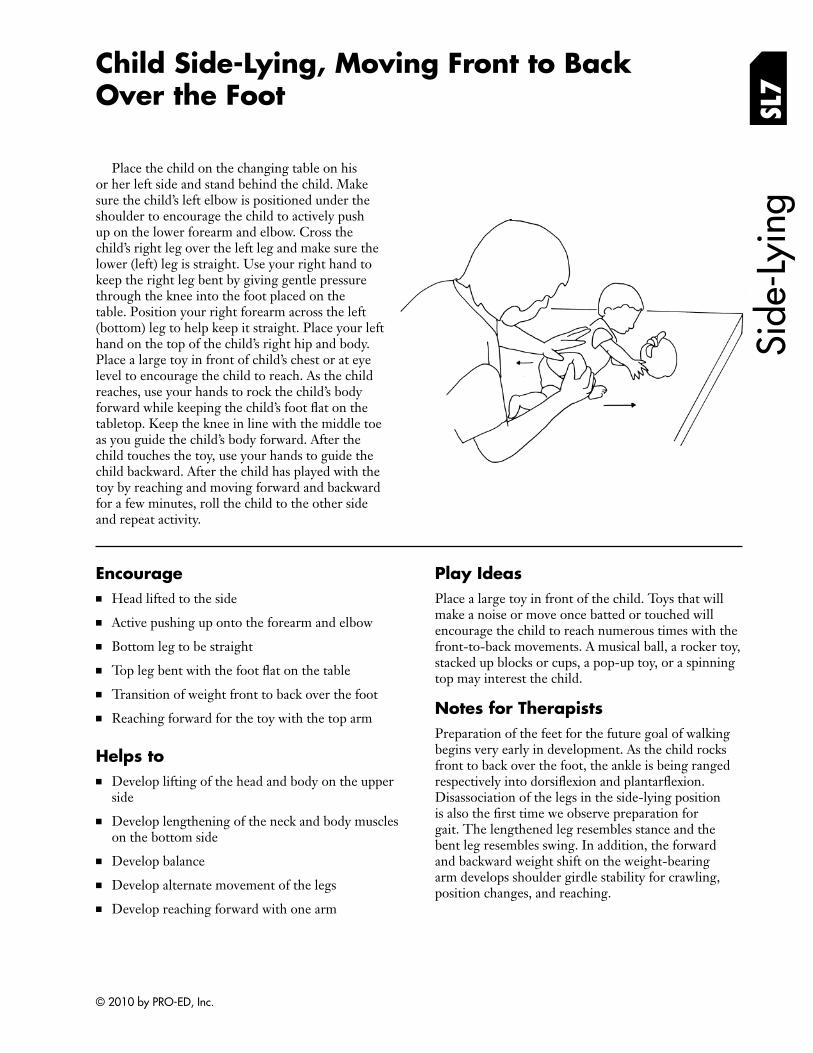
Child Side-Lying, Moving Front to Back Over the Foot SL
7
Place the child on the changing table on his or her left side and stand behind the child. Make sure the child’s left elbow is positioned under the shoulder to encourage the child to actively push up on the lower forearm and elbow. Cross the child’s right leg over the left leg and make sure the lower (left) leg is straight. Use your right hand to keep the right leg bent by giving gentle pressure through the knee into the foot placed on the table. Position your right forearm across the left (bottom) leg to help keep it straight. Place your left hand on the top of the child’s right hip and body. Place a large toy in front of child’s chest or at eye level to encourage the child to reach. As the child reaches, use your hands to rock the child’s body forward while keeping the child’s foot flat on the tabletop. Keep the knee in line with the middle toe as you guide the child’s body forward. After the child touches the toy, use your hands to guide the child backward. After the child has played with the toy by reaching and moving forward and backward for a few minutes, roll the child to the other side and repeat activity.
Side
-Lyi
ng
Encourage ■ Head lifted to the side
■ Active pushing up onto the forearm and elbow
■ Bottom leg to be straight
■ Top leg bent with the foot flat on the table
■ Transition of weight front to back over the foot
■ Reaching forward for the toy with the top arm
Helps to ■ Develop lifting of the head and body on the upper
side
■ Develop lengthening of the neck and body muscles on the bottom side
■ Develop balance
■ Develop alternate movement of the legs
■ Develop reaching forward with one arm
Play Ideas Place a large toy in front of the child. Toys that will make a noise or move once batted or touched will encourage the child to reach numerous times with the front-to-back movements. A musical ball, a rocker toy, stacked up blocks or cups, a pop-up toy, or a spinning top may interest the child.
Notes for Therapists Preparation of the feet for the future goal of walking begins very early in development. As the child rocks front to back over the foot, the ankle is being ranged respectively into dorsiflexion and plantarfl exion. Disassociation of the legs in the side-lying position is also the first time we observe preparation for gait. The lengthened leg resembles stance and the bent leg resembles swing. In addition, the forward and backward weight shift on the weight-bearing arm develops shoulder girdle stability for crawling, position changes, and reaching.
© 2010 by PRO-ED, Inc.
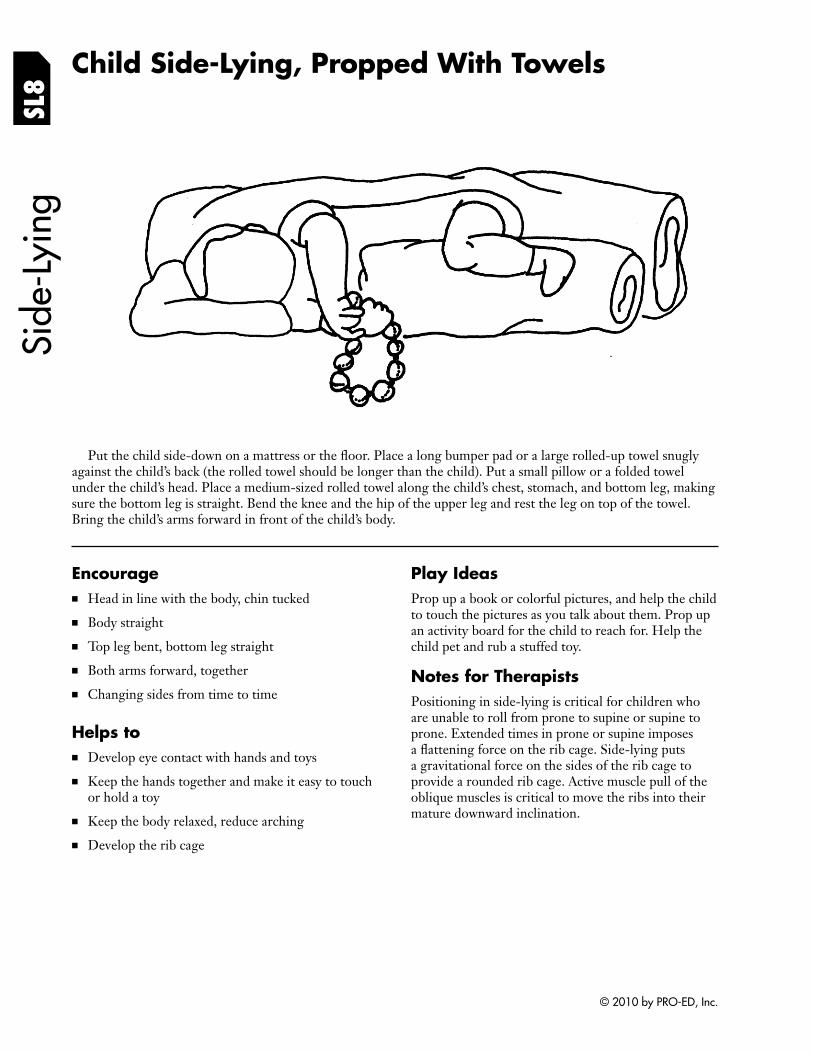
SL8
Child Side-Lying, Propped With Towels Si
de-L
ying
Put the child side-down on a mattress or the floor. Place a long bumper pad or a large rolled-up towel snugly against the child’s back (the rolled towel should be longer than the child). Put a small pillow or a folded towel under the child’s head. Place a medium-sized rolled towel along the child’s chest, stomach, and bottom leg, making sure the bottom leg is straight. Bend the knee and the hip of the upper leg and rest the leg on top of the towel. Bring the child’s arms forward in front of the child’s body.
Encourage ■ Head in line with the body, chin tucked
■ Body straight
■ Top leg bent, bottom leg straight
■ Both arms forward, together
■ Changing sides from time to time
Helps to ■ Develop eye contact with hands and toys
■ Keep the hands together and make it easy to touch or hold a toy
■ Keep the body relaxed, reduce arching
■ Develop the rib cage
Play Ideas Prop up a book or colorful pictures, and help the child to touch the pictures as you talk about them. Prop up an activity board for the child to reach for. Help the child pet and rub a stuffed toy.
Notes for Therapists Positioning in side-lying is critical for children who are unable to roll from prone to supine or supine to prone. Extended times in prone or supine imposes a flattening force on the rib cage. Side-lying puts a gravitational force on the sides of the rib cage to provide a rounded rib cage. Active muscle pull of the oblique muscles is critical to move the ribs into their mature downward inclination.
© 2010 by PRO-ED, Inc.

Child on Hands and Knees, Supported by Your Leg While on the Couch
Sit on the couch, and support your back against the back of the couch. Place the child facedown across one of your thighs. Bend the child’s legs so that the knees are under the hips. Use one of your hands to keep the hips and knees bent. Use your other hand to bring the child’s arms forward. Place the child’s hands on the couch cushions so the child can push up on the arms.
Encourage ■ Head in line with the body, chin tucked, and body
straight
■ Shoulders even, arms straight, and elbows under the shoulders
■ Hands under the elbows, hands open with fi ngers pointing forward
■ Knees under the hips, legs and feet parallel
Helps to ■ Develop muscles in the shoulders, arms, hands,
hips, and legs when the child pushes up
■ Develop muscles in the body and back (spine)
■ Develop balance
■ Prepare for crawling
Play Ideas Gently bounce or rock your leg from side to side while you sing a song or pretend to be a horse (this will help child experience the feeling of shifting body weight). Put a book or pictures on the couch in front of the child and read a story together. Help the child touch the pictures. Place a stuffed toy animal in front of the child’s hands and help the child rub or pet the toy. Help the child put toys into a bowl and dump them out again.
Notes for Therapists Bearing weight over extended arms allows the child to gain activation of the rhomboids and middle trapezius muscle groups, which help to stabilize the scapula and reinforce active spinal extension. Working with the child to develop the ability to weight bear over extended arms and develop shoulder and spinal stability assists in developing the skill of sitting with an extended spine.
HK
1H
ands
and
Kne
es/C
raw
ling
© 2010 by PRO-ED, Inc.
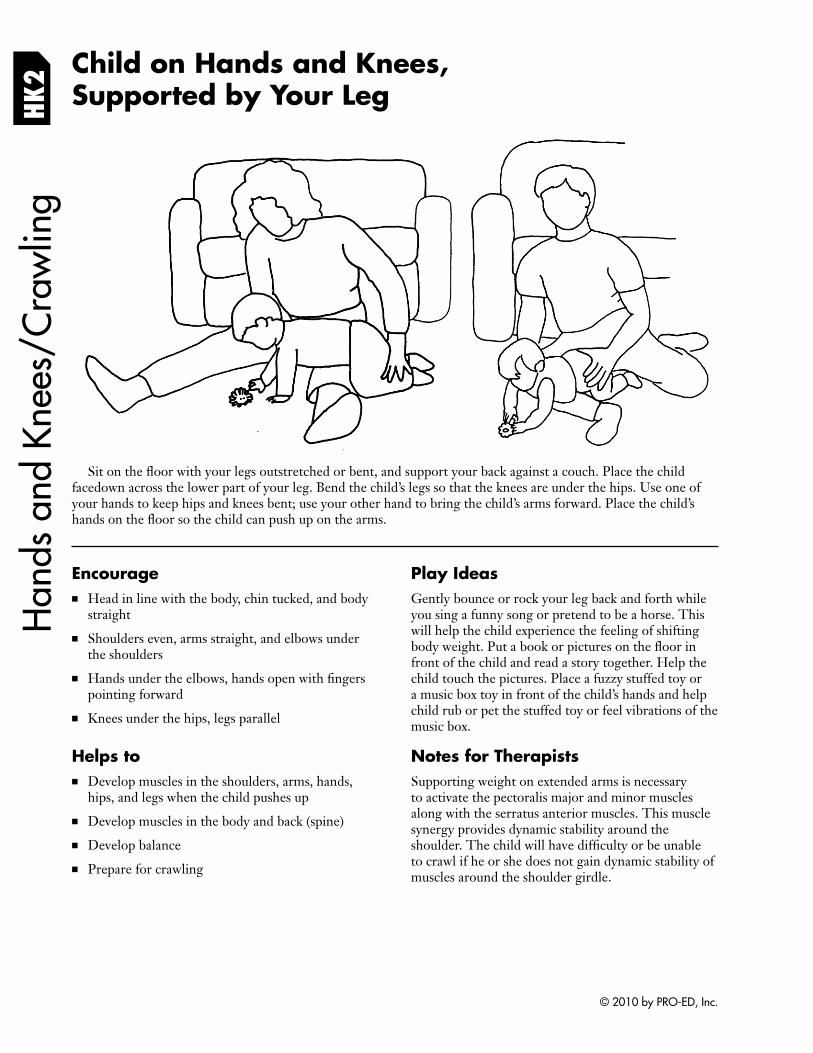
HK
2 Child on Hands and Knees, Supported by Your Leg
Han
ds a
nd K
nees
/Cra
wlin
g
Sit on the floor with your legs outstretched or bent, and support your back against a couch. Place the child facedown across the lower part of your leg. Bend the child’s legs so that the knees are under the hips. Use one of your hands to keep hips and knees bent; use your other hand to bring the child’s arms forward. Place the child’s hands on the floor so the child can push up on the arms.
Encourage ■ Head in line with the body, chin tucked, and body
straight
■ Shoulders even, arms straight, and elbows under the shoulders
■ Hands under the elbows, hands open with fi ngers pointing forward
■ Knees under the hips, legs parallel
Helps to ■ Develop muscles in the shoulders, arms, hands,
hips, and legs when the child pushes up
■ Develop muscles in the body and back (spine)
■ Develop balance
■ Prepare for crawling
Play Ideas Gently bounce or rock your leg back and forth while you sing a funny song or pretend to be a horse. This will help the child experience the feeling of shifting body weight. Put a book or pictures on the fl oor in front of the child and read a story together. Help the child touch the pictures. Place a fuzzy stuffed toy or a music box toy in front of the child’s hands and help child rub or pet the stuffed toy or feel vibrations of the music box.
Notes for Therapists Supporting weight on extended arms is necessary to activate the pectoralis major and minor muscles along with the serratus anterior muscles. This muscle synergy provides dynamic stability around the shoulder. The child will have difficulty or be unable to crawl if he or she does not gain dynamic stability of muscles around the shoulder girdle.
© 2010 by PRO-ED, Inc.
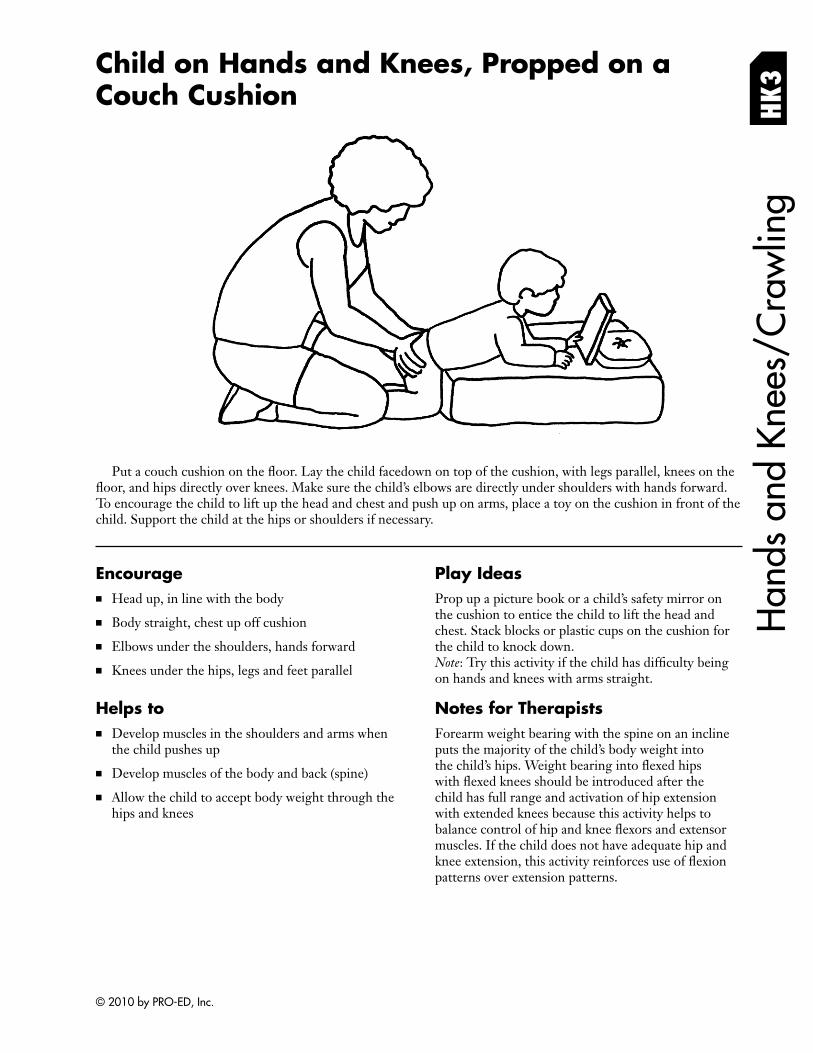
Child on Hands and Knees, Propped on a Couch Cushion H
K3
Put a couch cushion on the floor. Lay the child facedown on top of the cushion, with legs parallel, knees on the floor, and hips directly over knees. Make sure the child’s elbows are directly under shoulders with hands forward. To encourage the child to lift up the head and chest and push up on arms, place a toy on the cushion in front of the child. Support the child at the hips or shoulders if necessary.
Encourage ■ Head up, in line with the body
■ Body straight, chest up off cushion
■ Elbows under the shoulders, hands forward
■ Knees under the hips, legs and feet parallel
Helps to ■ Develop muscles in the shoulders and arms when
the child pushes up
■ Develop muscles of the body and back (spine)
■ Allow the child to accept body weight through the hips and knees
Play Ideas Prop up a picture book or a child’s safety mirror on the cushion to entice the child to lift the head and chest. Stack blocks or plastic cups on the cushion for the child to knock down. Note: Try this activity if the child has diffi culty being on hands and knees with arms straight.
Notes for Therapists Forearm weight bearing with the spine on an incline puts the majority of the child’s body weight into the child’s hips. Weight bearing into fl exed hips with flexed knees should be introduced after the child has full range and activation of hip extension with extended knees because this activity helps to balance control of hip and knee flexors and extensor muscles. If the child does not have adequate hip and knee extension, this activity reinforces use of fl exion patterns over extension patterns.
Han
ds a
nd K
nees
/Cra
wlin
g
© 2010 by PRO-ED, Inc.
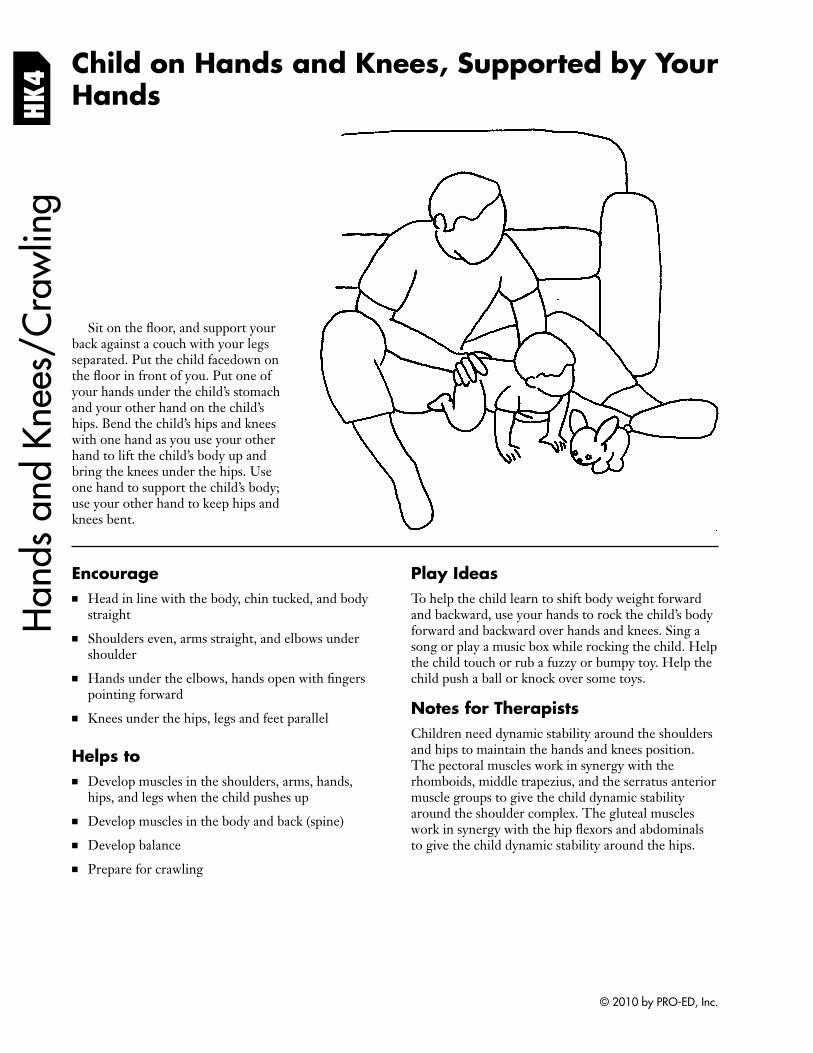
HK
4H
ands
and
Kne
es/C
raw
ling
Child on Hands and Knees, Supported by Your Hands
Sit on the floor, and support your back against a couch with your legs separated. Put the child facedown on the floor in front of you. Put one of your hands under the child’s stomach and your other hand on the child’s hips. Bend the child’s hips and knees with one hand as you use your other hand to lift the child’s body up and bring the knees under the hips. Use one hand to support the child’s body; use your other hand to keep hips and knees bent.
Encourage ■ Head in line with the body, chin tucked, and body
straight
■ Shoulders even, arms straight, and elbows under shoulder
■ Hands under the elbows, hands open with fi ngers pointing forward
■ Knees under the hips, legs and feet parallel
Helps to ■ Develop muscles in the shoulders, arms, hands,
hips, and legs when the child pushes up
■ Develop muscles in the body and back (spine)
■ Develop balance
■ Prepare for crawling
Play Ideas To help the child learn to shift body weight forward and backward, use your hands to rock the child’s body forward and backward over hands and knees. Sing a song or play a music box while rocking the child. Help the child touch or rub a fuzzy or bumpy toy. Help the child push a ball or knock over some toys.
Notes for Therapists Children need dynamic stability around the shoulders and hips to maintain the hands and knees position. The pectoral muscles work in synergy with the rhomboids, middle trapezius, and the serratus anterior muscle groups to give the child dynamic stability around the shoulder complex. The gluteal muscles work in synergy with the hip flexors and abdominals to give the child dynamic stability around the hips.
© 2010 by PRO-ED, Inc.
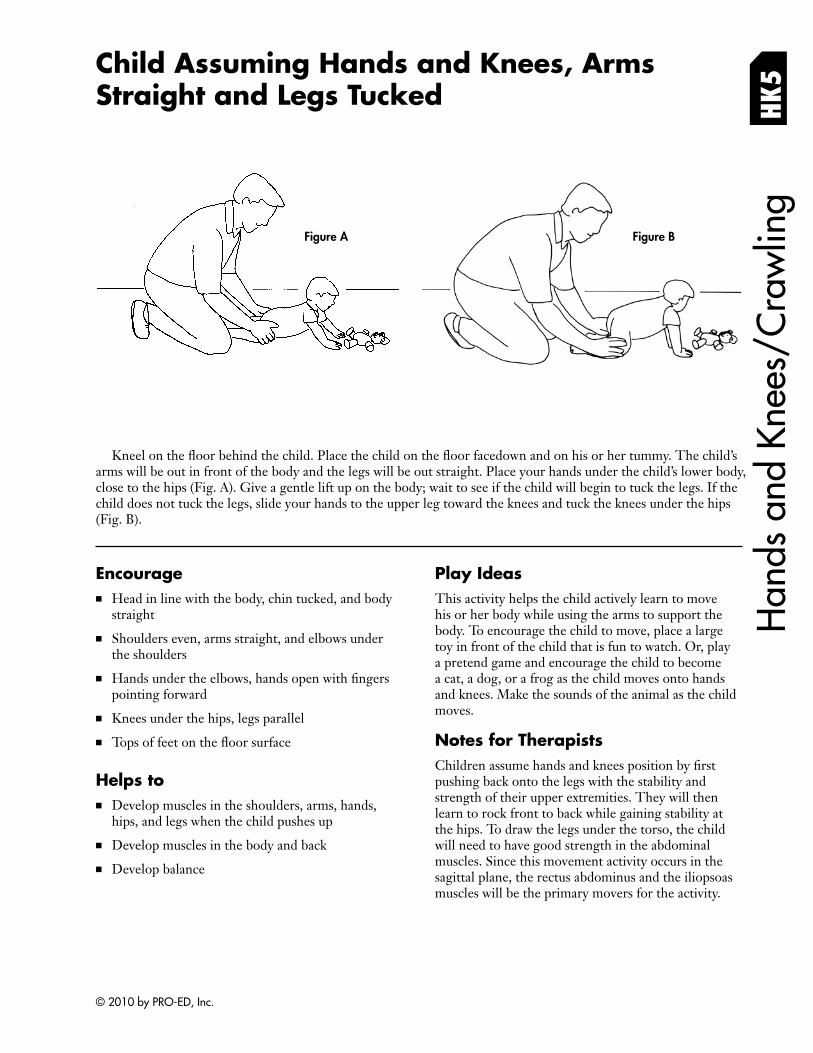
Child Assuming Hands and Knees, Arms Straight and Legs Tucked H
K5
Figure A Figure B
Kneel on the floor behind the child. Place the child on the floor facedown and on his or her tummy. The child’s arms will be out in front of the body and the legs will be out straight. Place your hands under the child’s lower body, close to the hips (Fig. A). Give a gentle lift up on the body; wait to see if the child will begin to tuck the legs. If the child does not tuck the legs, slide your hands to the upper leg toward the knees and tuck the knees under the hips (Fig. B).
Encourage ■ Head in line with the body, chin tucked, and body
straight
■ Shoulders even, arms straight, and elbows under the shoulders
■ Hands under the elbows, hands open with fi ngers pointing forward
■ Knees under the hips, legs parallel
■ Tops of feet on the fl oor surface
Helps to ■ Develop muscles in the shoulders, arms, hands,
hips, and legs when the child pushes up
■ Develop muscles in the body and back
■ Develop balance
Play Ideas This activity helps the child actively learn to move his or her body while using the arms to support the body. To encourage the child to move, place a large toy in front of the child that is fun to watch. Or, play a pretend game and encourage the child to become a cat, a dog, or a frog as the child moves onto hands and knees. Make the sounds of the animal as the child moves.
Notes for Therapists Children assume hands and knees position by fi rst pushing back onto the legs with the stability and strength of their upper extremities. They will then learn to rock front to back while gaining stability at the hips. To draw the legs under the torso, the child will need to have good strength in the abdominal muscles. Since this movement activity occurs in the sagittal plane, the rectus abdominus and the iliopsoas muscles will be the primary movers for the activity.
Han
ds a
nd K
nees
/Cra
wlin
g
© 2010 by PRO-ED, Inc.

HK
6 Child Assuming Hands and Knees, Supporting Opposite Arm and Leg
Han
ds a
nd K
nees
/Cra
wlin
g
Figure A Figure B Figure C
Kneel on the floor behind the child. Place the child on the floor facedown on his or her tummy. The child’s arms will be out in front of the body and the legs will be out straight. Place one hand under the child’s armpit and your other hand over the opposite mid leg, covering the knee (Fig. A). Use your hand that is under the child’s armpit to shift the child’s body toward that side; this will take the weight off of the opposite leg and will allow you to move the leg forward by bending the knee up toward the chest (Fig. B). Make sure both knees are bent with knees under the hips and body weight equally transferred over the hands and knees (Fig. C).
Encourage ■ Head in line with the body, chin tucked, and body
straight
■ Shoulders even, arms straight, and elbows under the shoulders
■ Hands under the elbows, hands open with fi ngers pointing forward
■ Knees under the hips, legs parallel
■ Tops of feet on the fl oor surface
Helps to ■ Develop muscles in the shoulders, arms, hands,
hips, and legs when the child pushes up
■ Develop muscles in the body and back
■ Develop balance
■ Learn how to alternate movements of the arms and legs
Play Ideas This activity helps the child actively learn to move his or her body while using the arms to support the body. To encourage the child to move, place a large toy in front of the child that is fun to watch. Or, play a pretend game and encourage the child to become a cat, a dog, or a frog as he or she moves onto hands and knees. Make the sounds of the animal as the child moves.
Notes for Therapists This activity helps the child learn to assume hands and knees position from prone by using movement on the frontal and transverse planes. The child initially completes a lateral weight shift on the frontal plane to support on the arm, freeing the opposite leg for movement. The child abducts the leg, followed by active adduction to place the leg under the hip. The ability to actively pull the leg under the torso allows the child to learn how to progress and move the leg forward for future crawling skills.
© 2010 by PRO-ED, Inc.
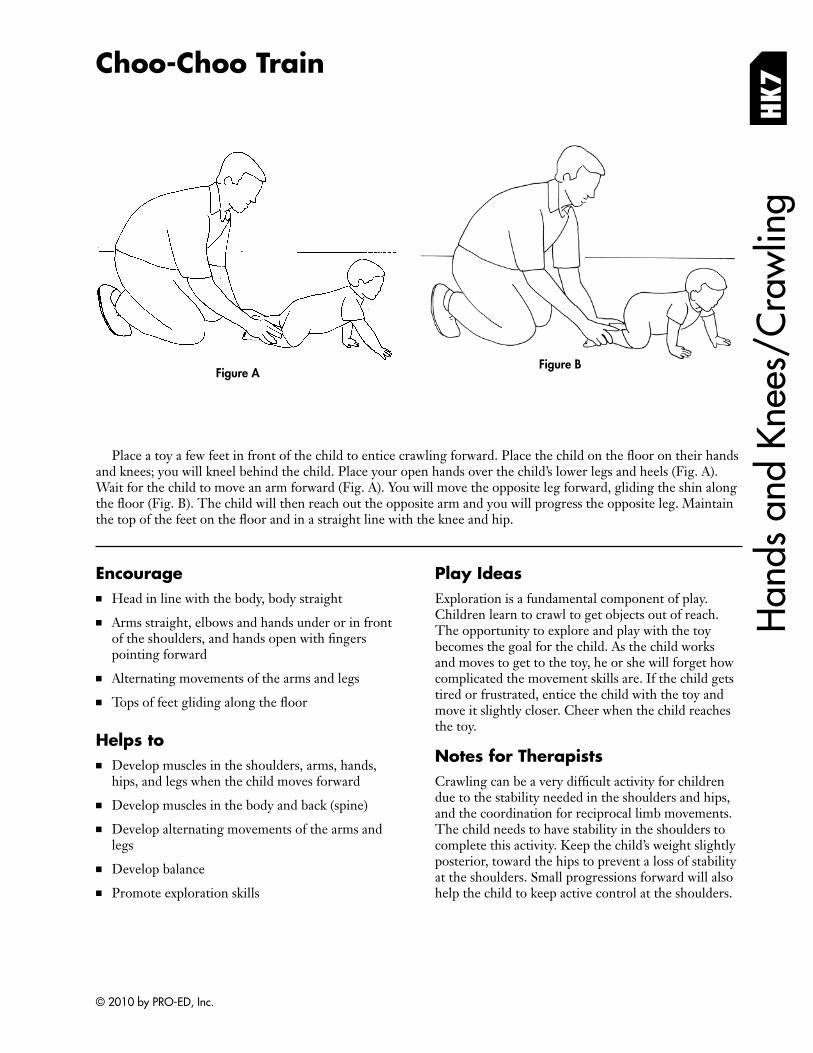
Choo-Choo Train
HK
7
Figure A Figure B
Place a toy a few feet in front of the child to entice crawling forward. Place the child on the floor on their hands and knees; you will kneel behind the child. Place your open hands over the child’s lower legs and heels (Fig. A). Wait for the child to move an arm forward (Fig. A). You will move the opposite leg forward, gliding the shin along the floor (Fig. B). The child will then reach out the opposite arm and you will progress the opposite leg. Maintain the top of the feet on the floor and in a straight line with the knee and hip.
Encourage ■ Head in line with the body, body straight
■ Arms straight, elbows and hands under or in front of the shoulders, and hands open with fi ngers pointing forward
■ Alternating movements of the arms and legs
■ Tops of feet gliding along the fl oor
Helps to ■ Develop muscles in the shoulders, arms, hands,
hips, and legs when the child moves forward
■ Develop muscles in the body and back (spine)
■ Develop alternating movements of the arms and legs
■ Develop balance
■ Promote exploration skills
Play Ideas Exploration is a fundamental component of play. Children learn to crawl to get objects out of reach. The opportunity to explore and play with the toy becomes the goal for the child. As the child works and moves to get to the toy, he or she will forget how complicated the movement skills are. If the child gets tired or frustrated, entice the child with the toy and move it slightly closer. Cheer when the child reaches the toy.
Notes for Therapists Crawling can be a very difficult activity for children due to the stability needed in the shoulders and hips, and the coordination for reciprocal limb movements. The child needs to have stability in the shoulders to complete this activity. Keep the child’s weight slightly posterior, toward the hips to prevent a loss of stability at the shoulders. Small progressions forward will also help the child to keep active control at the shoulders.
Han
ds a
nd K
nees
/Cra
wlin
g
© 2010 by PRO-ED, Inc.
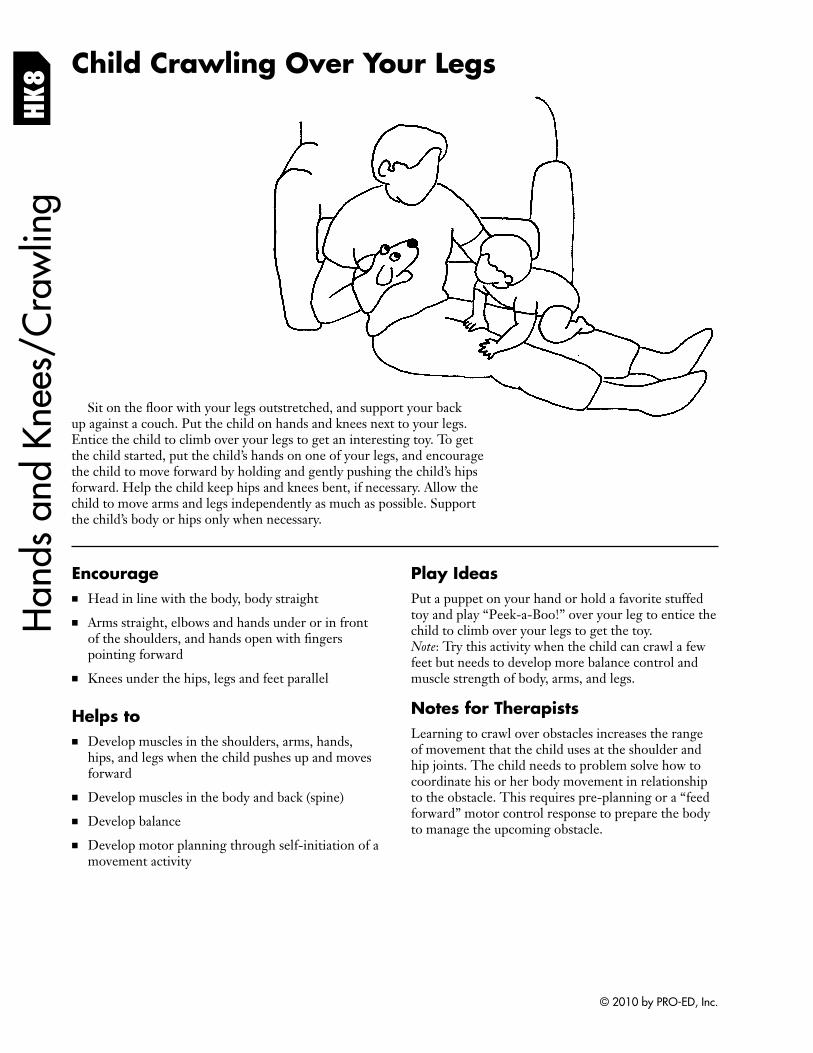
HK
8 Child Crawling Over Your Legs H
ands
and
Kne
es/C
raw
ling
Sit on the floor with your legs outstretched, and support your back up against a couch. Put the child on hands and knees next to your legs. Entice the child to climb over your legs to get an interesting toy. To get the child started, put the child’s hands on one of your legs, and encourage the child to move forward by holding and gently pushing the child’s hips forward. Help the child keep hips and knees bent, if necessary. Allow the child to move arms and legs independently as much as possible. Support the child’s body or hips only when necessary.
Encourage ■ Head in line with the body, body straight
■ Arms straight, elbows and hands under or in front of the shoulders, and hands open with fi ngers pointing forward
■ Knees under the hips, legs and feet parallel
Helps to ■ Develop muscles in the shoulders, arms, hands,
hips, and legs when the child pushes up and moves forward
■ Develop muscles in the body and back (spine)
■ Develop balance
■ Develop motor planning through self-initiation of a movement activity
Play Ideas Put a puppet on your hand or hold a favorite stuffed toy and play “Peek-a-Boo!” over your leg to entice the child to climb over your legs to get the toy. Note: Try this activity when the child can crawl a few feet but needs to develop more balance control and muscle strength of body, arms, and legs.
Notes for Therapists Learning to crawl over obstacles increases the range of movement that the child uses at the shoulder and hip joints. The child needs to problem solve how to coordinate his or her body movement in relationship to the obstacle. This requires pre-planning or a “feed forward” motor control response to prepare the body to manage the upcoming obstacle.
© 2010 by PRO-ED, Inc.
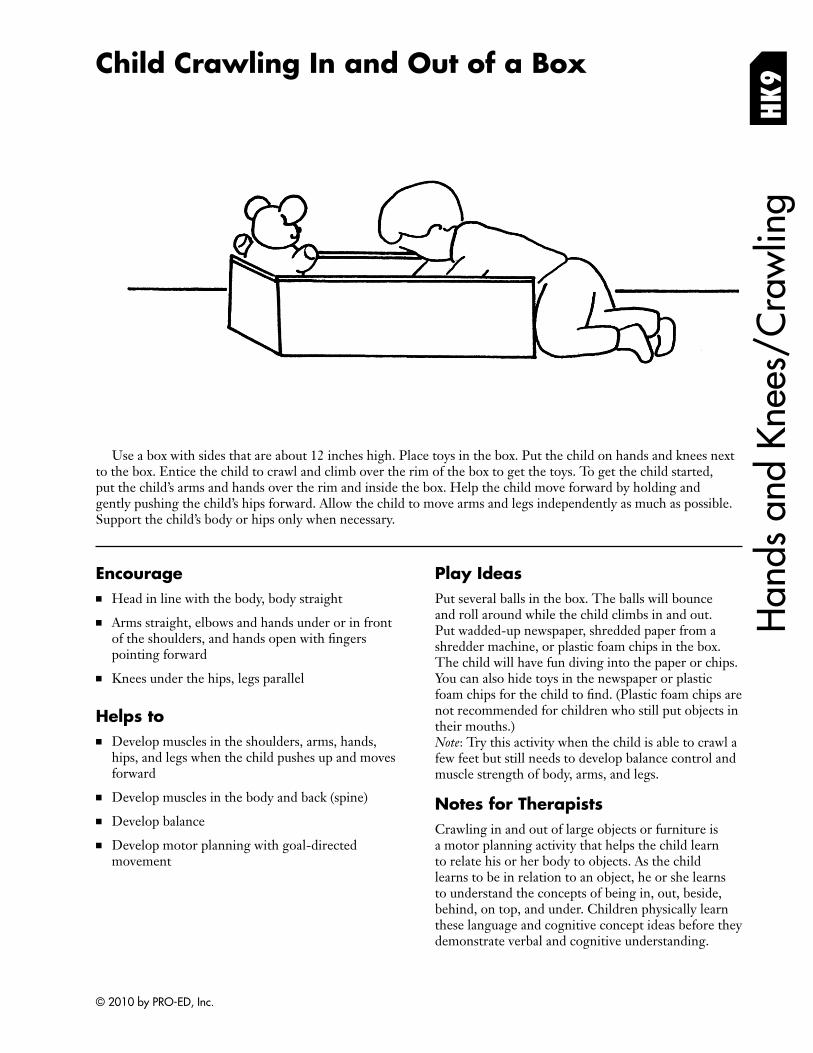
Child Crawling In and Out of a Box
HK
9
Use a box with sides that are about 12 inches high. Place toys in the box. Put the child on hands and knees next to the box. Entice the child to crawl and climb over the rim of the box to get the toys. To get the child started, put the child’s arms and hands over the rim and inside the box. Help the child move forward by holding and gently pushing the child’s hips forward. Allow the child to move arms and legs independently as much as possible. Support the child’s body or hips only when necessary.
Encourage ■ Head in line with the body, body straight
■ Arms straight, elbows and hands under or in front of the shoulders, and hands open with fi ngers pointing forward
■ Knees under the hips, legs parallel
Helps to ■ Develop muscles in the shoulders, arms, hands,
hips, and legs when the child pushes up and moves forward
■ Develop muscles in the body and back (spine)
■ Develop balance
■ Develop motor planning with goal-directed movement
Play Ideas Put several balls in the box. The balls will bounce and roll around while the child climbs in and out. Put wadded-up newspaper, shredded paper from a shredder machine, or plastic foam chips in the box. The child will have fun diving into the paper or chips. You can also hide toys in the newspaper or plastic foam chips for the child to find. (Plastic foam chips are not recommended for children who still put objects in their mouths.) Note: Try this activity when the child is able to crawl a few feet but still needs to develop balance control and muscle strength of body, arms, and legs.
Notes for Therapists Crawling in and out of large objects or furniture is a motor planning activity that helps the child learn to relate his or her body to objects. As the child learns to be in relation to an object, he or she learns to understand the concepts of being in, out, beside, behind, on top, and under. Children physically learn these language and cognitive concept ideas before they demonstrate verbal and cognitive understanding.
Han
ds a
nd K
nees
/Cra
wlin
g
© 2010 by PRO-ED, Inc.
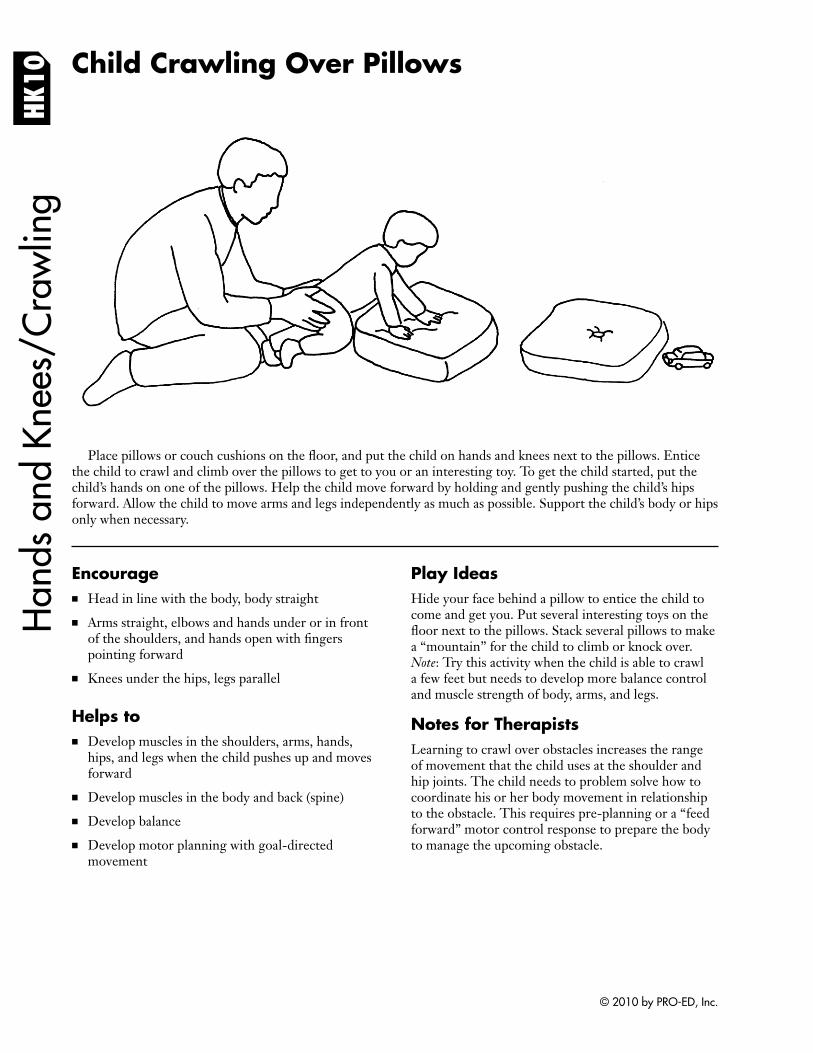
HK10
Han
ds a
nd K
nees
/Cra
wlin
g
Child Crawling Over Pillows
Place pillows or couch cushions on the floor, and put the child on hands and knees next to the pillows. Entice the child to crawl and climb over the pillows to get to you or an interesting toy. To get the child started, put the child’s hands on one of the pillows. Help the child move forward by holding and gently pushing the child’s hips forward. Allow the child to move arms and legs independently as much as possible. Support the child’s body or hips only when necessary.
Encourage ■ Head in line with the body, body straight
■ Arms straight, elbows and hands under or in front of the shoulders, and hands open with fi ngers pointing forward
■ Knees under the hips, legs parallel
Helps to ■ Develop muscles in the shoulders, arms, hands,
hips, and legs when the child pushes up and moves forward
■ Develop muscles in the body and back (spine)
■ Develop balance
■ Develop motor planning with goal-directed movement
Play Ideas Hide your face behind a pillow to entice the child to come and get you. Put several interesting toys on the floor next to the pillows. Stack several pillows to make a “mountain” for the child to climb or knock over. Note: Try this activity when the child is able to crawl a few feet but needs to develop more balance control and muscle strength of body, arms, and legs.
Notes for Therapists Learning to crawl over obstacles increases the range of movement that the child uses at the shoulder and hip joints. The child needs to problem solve how to coordinate his or her body movement in relationship to the obstacle. This requires pre-planning or a “feed forward” motor control response to prepare the body to manage the upcoming obstacle.
© 2010 by PRO-ED, Inc.
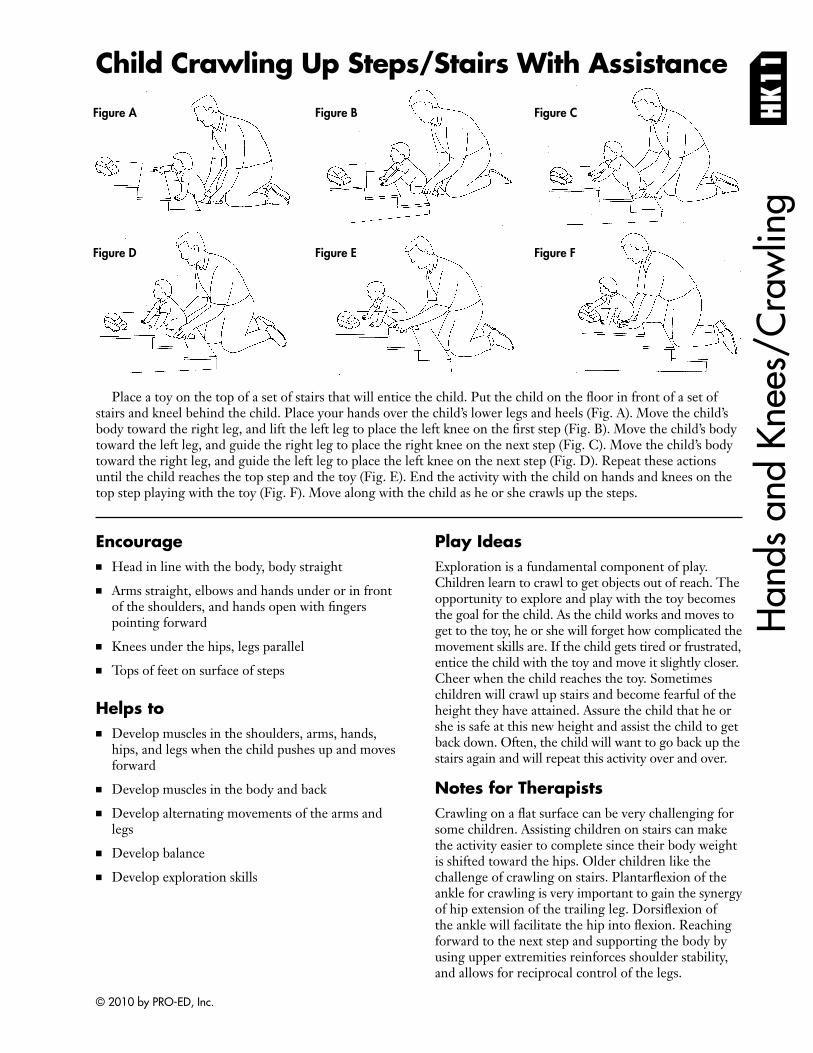
Han
ds a
nd K
nees
/Cra
wlin
g
Child Crawling Up Steps/Stairs With Assistance
HK
11
Figure A Figure B Figure C
Figure D Figure E Figure F
Place a toy on the top of a set of stairs that will entice the child. Put the child on the floor in front of a set of stairs and kneel behind the child. Place your hands over the child’s lower legs and heels (Fig. A). Move the child’s body toward the right leg, and lift the left leg to place the left knee on the first step (Fig. B). Move the child’s body toward the left leg, and guide the right leg to place the right knee on the next step (Fig. C). Move the child’s body toward the right leg, and guide the left leg to place the left knee on the next step (Fig. D). Repeat these actions until the child reaches the top step and the toy (Fig. E). End the activity with the child on hands and knees on the top step playing with the toy (Fig. F). Move along with the child as he or she crawls up the steps.
Encourage ■ Head in line with the body, body straight
■ Arms straight, elbows and hands under or in front of the shoulders, and hands open with fi ngers pointing forward
■ Knees under the hips, legs parallel
■ Tops of feet on surface of steps
Helps to ■ Develop muscles in the shoulders, arms, hands,
hips, and legs when the child pushes up and moves forward
■ Develop muscles in the body and back
■ Develop alternating movements of the arms and legs
■ Develop balance
■ Develop exploration skills
© 2010 by PRO-ED, Inc.
Play Ideas Exploration is a fundamental component of play. Children learn to crawl to get objects out of reach. The opportunity to explore and play with the toy becomes the goal for the child. As the child works and moves to get to the toy, he or she will forget how complicated the movement skills are. If the child gets tired or frustrated, entice the child with the toy and move it slightly closer. Cheer when the child reaches the toy. Sometimes children will crawl up stairs and become fearful of the height they have attained. Assure the child that he or she is safe at this new height and assist the child to get back down. Often, the child will want to go back up the stairs again and will repeat this activity over and over.
Notes for Therapists Crawling on a flat surface can be very challenging for some children. Assisting children on stairs can make the activity easier to complete since their body weight is shifted toward the hips. Older children like the challenge of crawling on stairs. Plantarflexion of the ankle for crawling is very important to gain the synergy of hip extension of the trailing leg. Dorsifl exion of the ankle will facilitate the hip into fl exion. Reaching forward to the next step and supporting the body by using upper extremities reinforces shoulder stability, and allows for reciprocal control of the legs.
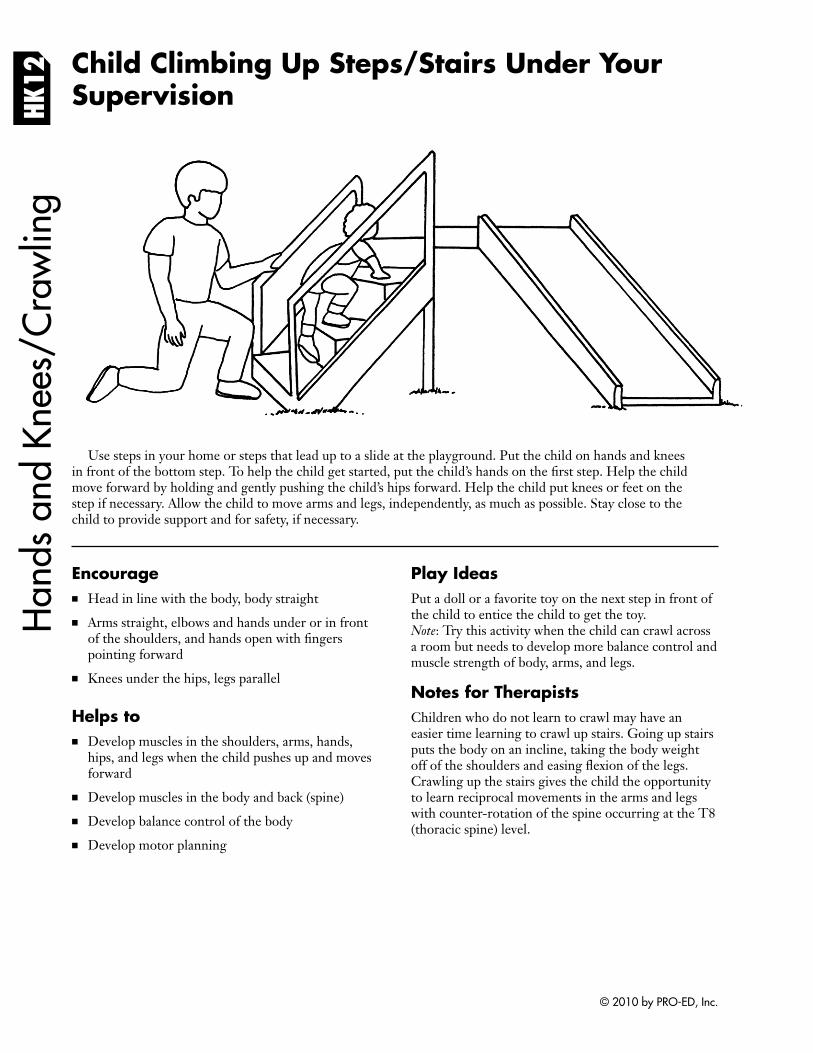
HK12 Child Climbing Up Steps/Stairs Under Your
Supervision
Han
ds a
nd K
nees
/Cra
wlin
g
Use steps in your home or steps that lead up to a slide at the playground. Put the child on hands and knees in front of the bottom step. To help the child get started, put the child’s hands on the first step. Help the child move forward by holding and gently pushing the child’s hips forward. Help the child put knees or feet on the step if necessary. Allow the child to move arms and legs, independently, as much as possible. Stay close to the child to provide support and for safety, if necessary.
Encourage ■ Head in line with the body, body straight
■ Arms straight, elbows and hands under or in front of the shoulders, and hands open with fi ngers pointing forward
■ Knees under the hips, legs parallel
Helps to ■ Develop muscles in the shoulders, arms, hands,
hips, and legs when the child pushes up and moves forward
■ Develop muscles in the body and back (spine)
■ Develop balance control of the body
■ Develop motor planning
Play Ideas Put a doll or a favorite toy on the next step in front of the child to entice the child to get the toy. Note: Try this activity when the child can crawl across a room but needs to develop more balance control and muscle strength of body, arms, and legs.
Notes for Therapists Children who do not learn to crawl may have an easier time learning to crawl up stairs. Going up stairs puts the body on an incline, taking the body weight off of the shoulders and easing flexion of the legs. Crawling up the stairs gives the child the opportunity to learn reciprocal movements in the arms and legs with counter-rotation of the spine occurring at the T8 (thoracic spine) level.
© 2010 by PRO-ED, Inc.
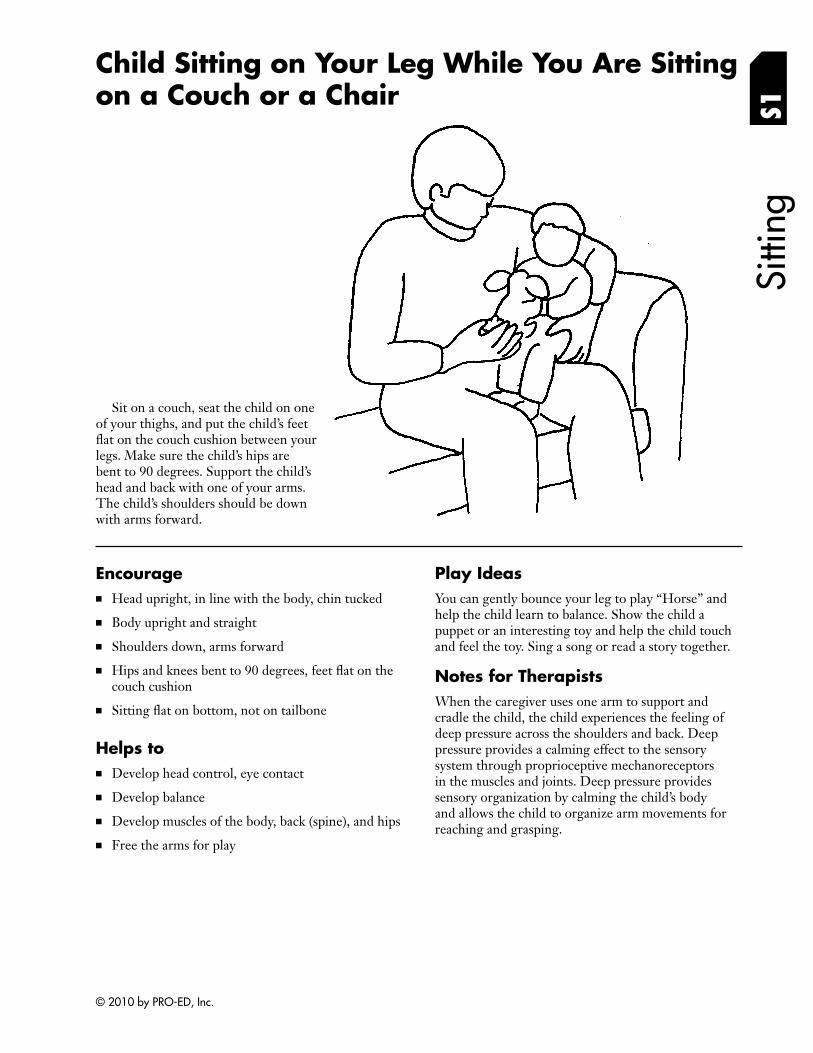
Sitti
ng
Child Sitting on Your Leg While You Are Sitting on a Couch or a Chair S1
Sit on a couch, seat the child on one of your thighs, and put the child’s feet flat on the couch cushion between your legs. Make sure the child’s hips are bent to 90 degrees. Support the child’s head and back with one of your arms. The child’s shoulders should be down with arms forward.
Encourage ■ Head upright, in line with the body, chin tucked
■ Body upright and straight
■ Shoulders down, arms forward
■ Hips and knees bent to 90 degrees, feet flat on the couch cushion
■ Sitting flat on bottom, not on tailbone
Helps to ■ Develop head control, eye contact
■ Develop balance
■ Develop muscles of the body, back (spine), and hips
■ Free the arms for play
Play Ideas You can gently bounce your leg to play “Horse” and help the child learn to balance. Show the child a puppet or an interesting toy and help the child touch and feel the toy. Sing a song or read a story together.
Notes for Therapists When the caregiver uses one arm to support and cradle the child, the child experiences the feeling of deep pressure across the shoulders and back. Deep pressure provides a calming effect to the sensory system through proprioceptive mechanoreceptors in the muscles and joints. Deep pressure provides sensory organization by calming the child’s body and allows the child to organize arm movements for reaching and grasping.
© 2010 by PRO-ED, Inc.
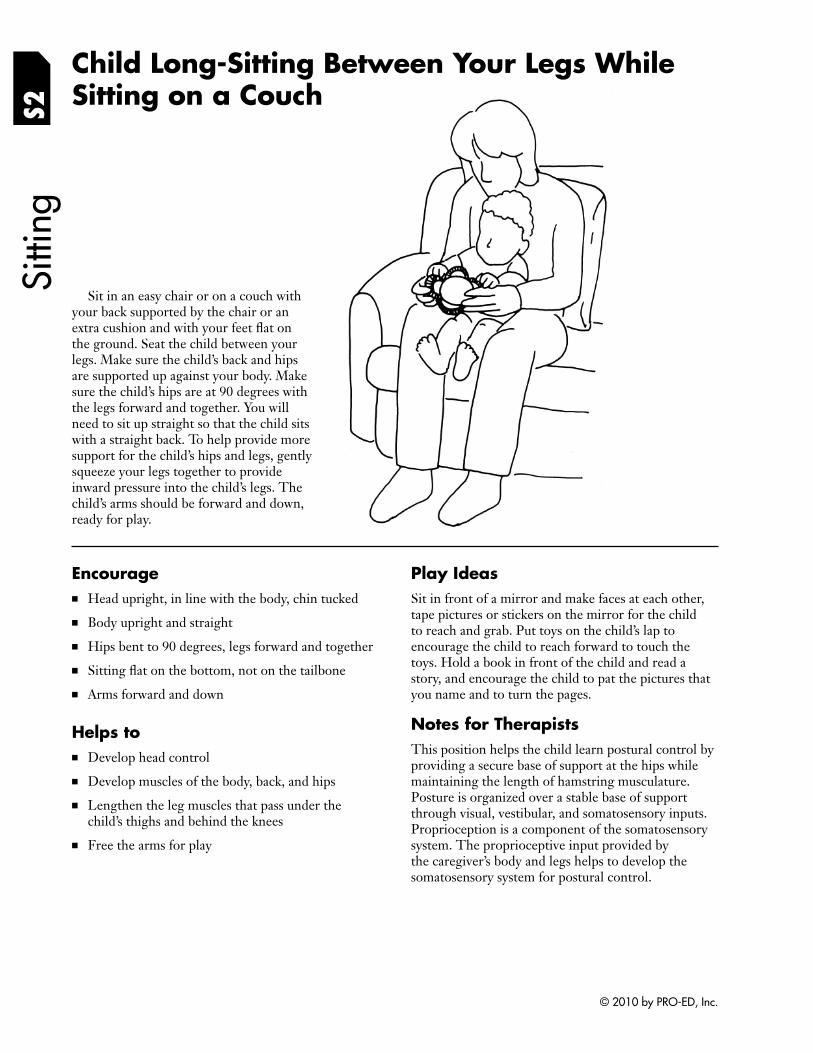
S2Si
tting
Child Long-Sitting Between Your Legs While Sitting on a Couch
Sit in an easy chair or on a couch with your back supported by the chair or an extra cushion and with your feet fl at on the ground. Seat the child between your legs. Make sure the child’s back and hips are supported up against your body. Make sure the child’s hips are at 90 degrees with the legs forward and together. You will need to sit up straight so that the child sits with a straight back. To help provide more support for the child’s hips and legs, gently squeeze your legs together to provide inward pressure into the child’s legs. The child’s arms should be forward and down, ready for play.
Encourage ■ Head upright, in line with the body, chin tucked
■ Body upright and straight
■ Hips bent to 90 degrees, legs forward and together
■ Sitting flat on the bottom, not on the tailbone
■ Arms forward and down
Helps to ■ Develop head control
■ Develop muscles of the body, back, and hips
■ Lengthen the leg muscles that pass under the child’s thighs and behind the knees
■ Free the arms for play
Play Ideas Sit in front of a mirror and make faces at each other, tape pictures or stickers on the mirror for the child to reach and grab. Put toys on the child’s lap to encourage the child to reach forward to touch the toys. Hold a book in front of the child and read a story, and encourage the child to pat the pictures that you name and to turn the pages.
Notes for Therapists This position helps the child learn postural control by providing a secure base of support at the hips while maintaining the length of hamstring musculature. Posture is organized over a stable base of support through visual, vestibular, and somatosensory inputs. Proprioception is a component of the somatosensory system. The proprioceptive input provided by the caregiver’s body and legs helps to develop the somatosensory system for postural control.
© 2010 by PRO-ED, Inc.
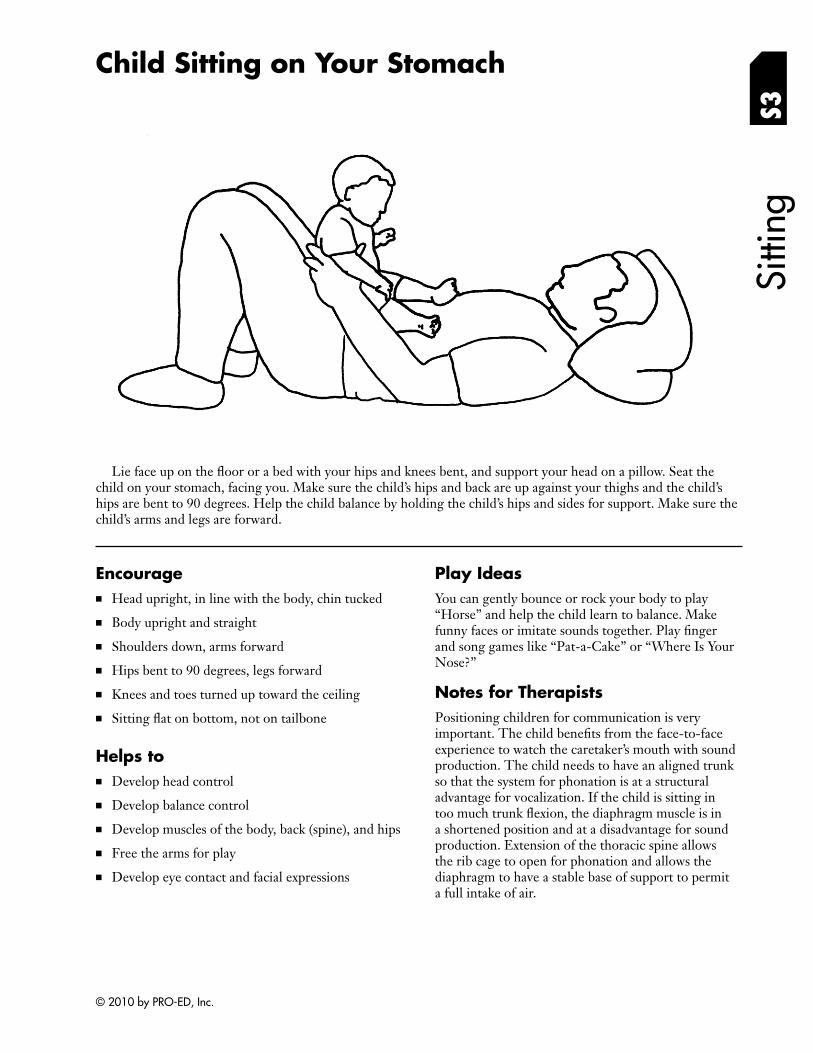
Sitti
ng
Child Sitting on Your Stomach
S3
Lie face up on the floor or a bed with your hips and knees bent, and support your head on a pillow. Seat the child on your stomach, facing you. Make sure the child’s hips and back are up against your thighs and the child’s hips are bent to 90 degrees. Help the child balance by holding the child’s hips and sides for support. Make sure the child’s arms and legs are forward.
Encourage ■ Head upright, in line with the body, chin tucked
■ Body upright and straight
■ Shoulders down, arms forward
■ Hips bent to 90 degrees, legs forward
■ Knees and toes turned up toward the ceiling
■ Sitting flat on bottom, not on tailbone
Helps to ■ Develop head control
■ Develop balance control
■ Develop muscles of the body, back (spine), and hips
■ Free the arms for play
■ Develop eye contact and facial expressions
Play Ideas You can gently bounce or rock your body to play “Horse” and help the child learn to balance. Make funny faces or imitate sounds together. Play fi nger and song games like “Pat-a-Cake” or “Where Is Your Nose?”
Notes for Therapists Positioning children for communication is very important. The child benefits from the face-to-face experience to watch the caretaker’s mouth with sound production. The child needs to have an aligned trunk so that the system for phonation is at a structural advantage for vocalization. If the child is sitting in too much trunk flexion, the diaphragm muscle is in a shortened position and at a disadvantage for sound production. Extension of the thoracic spine allows the rib cage to open for phonation and allows the diaphragm to have a stable base of support to permit a full intake of air.
© 2010 by PRO-ED, Inc.
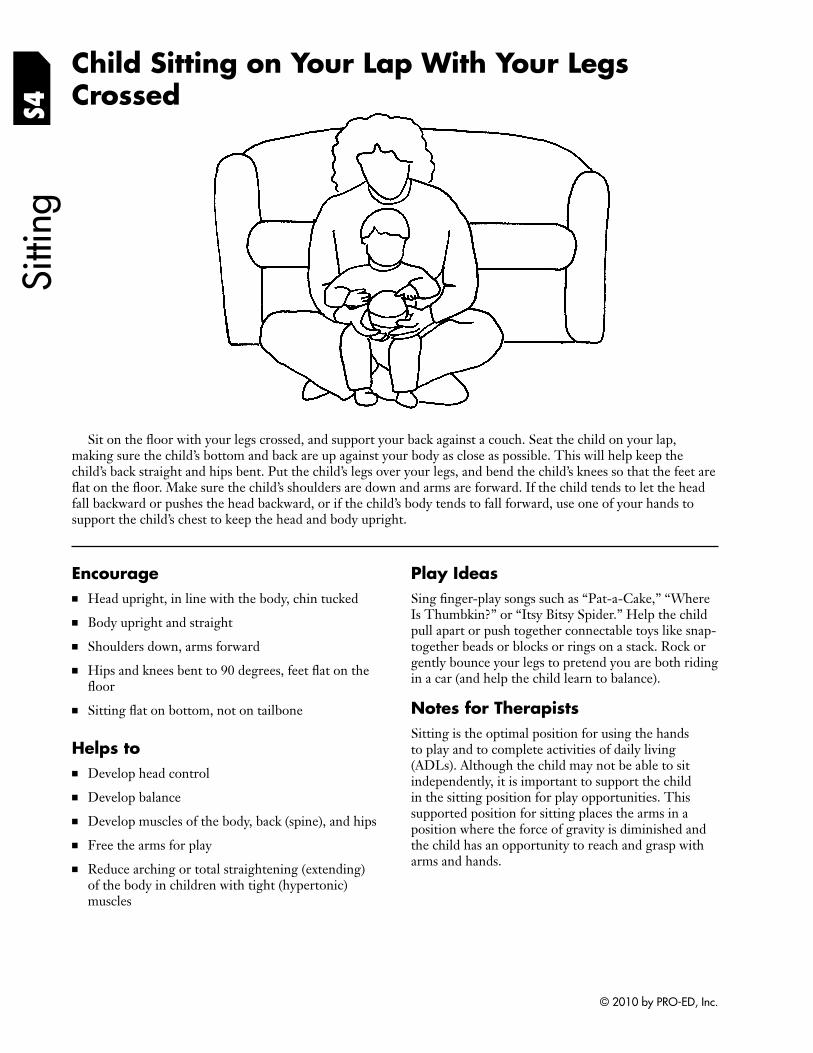
S4
Child Sitting on Your Lap With Your Legs Crossed
Sitti
ng
Sit on the floor with your legs crossed, and support your back against a couch. Seat the child on your lap, making sure the child’s bottom and back are up against your body as close as possible. This will help keep the child’s back straight and hips bent. Put the child’s legs over your legs, and bend the child’s knees so that the feet are flat on the floor. Make sure the child’s shoulders are down and arms are forward. If the child tends to let the head fall backward or pushes the head backward, or if the child’s body tends to fall forward, use one of your hands to support the child’s chest to keep the head and body upright.
Encourage ■ Head upright, in line with the body, chin tucked
■ Body upright and straight
■ Shoulders down, arms forward
■ Hips and knees bent to 90 degrees, feet flat on the fl oor
■ Sitting flat on bottom, not on tailbone
Helps to ■ Develop head control
■ Develop balance
■ Develop muscles of the body, back (spine), and hips
■ Free the arms for play
■ Reduce arching or total straightening (extending) of the body in children with tight (hypertonic) muscles
Play Ideas Sing finger-play songs such as “Pat-a-Cake,” “Where Is Thumbkin?” or “Itsy Bitsy Spider.” Help the child pull apart or push together connectable toys like snap-together beads or blocks or rings on a stack. Rock or gently bounce your legs to pretend you are both riding in a car (and help the child learn to balance).
Notes for Therapists Sitting is the optimal position for using the hands to play and to complete activities of daily living (ADLs). Although the child may not be able to sit independently, it is important to support the child in the sitting position for play opportunities. This supported position for sitting places the arms in a position where the force of gravity is diminished and the child has an opportunity to reach and grasp with arms and hands.
© 2010 by PRO-ED, Inc.
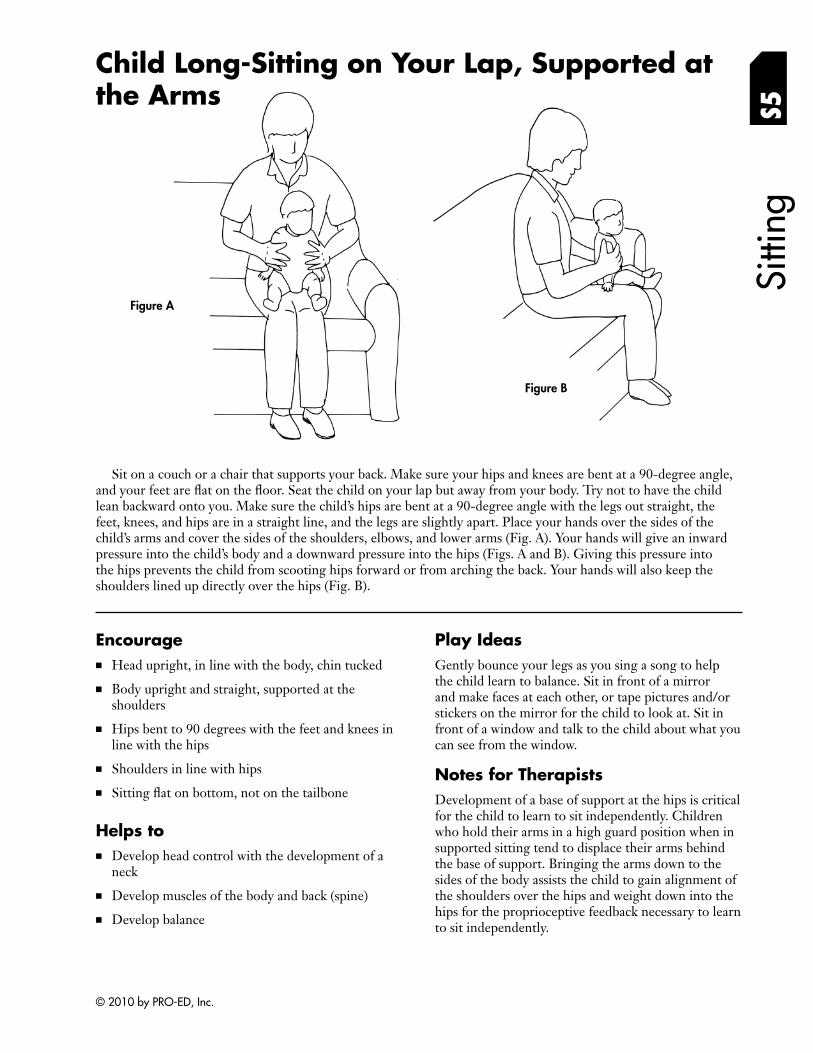
Sitti
ng
Child Long-Sitting on Your Lap, Supported at the Arms S5
Figure A
Figure B
Sit on a couch or a chair that supports your back. Make sure your hips and knees are bent at a 90-degree angle, and your feet are flat on the floor. Seat the child on your lap but away from your body. Try not to have the child lean backward onto you. Make sure the child’s hips are bent at a 90-degree angle with the legs out straight, the feet, knees, and hips are in a straight line, and the legs are slightly apart. Place your hands over the sides of the child’s arms and cover the sides of the shoulders, elbows, and lower arms (Fig. A). Your hands will give an inward pressure into the child’s body and a downward pressure into the hips (Figs. A and B). Giving this pressure into the hips prevents the child from scooting hips forward or from arching the back. Your hands will also keep the shoulders lined up directly over the hips (Fig. B).
Encourage ■ Head upright, in line with the body, chin tucked
■ Body upright and straight, supported at the shoulders
■ Hips bent to 90 degrees with the feet and knees in line with the hips
■ Shoulders in line with hips
■ Sitting flat on bottom, not on the tailbone
Helps to ■ Develop head control with the development of a
neck
■ Develop muscles of the body and back (spine)
■ Develop balance
Play Ideas Gently bounce your legs as you sing a song to help the child learn to balance. Sit in front of a mirror and make faces at each other, or tape pictures and/or stickers on the mirror for the child to look at. Sit in front of a window and talk to the child about what you can see from the window.
Notes for Therapists Development of a base of support at the hips is critical for the child to learn to sit independently. Children who hold their arms in a high guard position when in supported sitting tend to displace their arms behind the base of support. Bringing the arms down to the sides of the body assists the child to gain alignment of the shoulders over the hips and weight down into the hips for the proprioceptive feedback necessary to learn to sit independently.
© 2010 by PRO-ED, Inc.
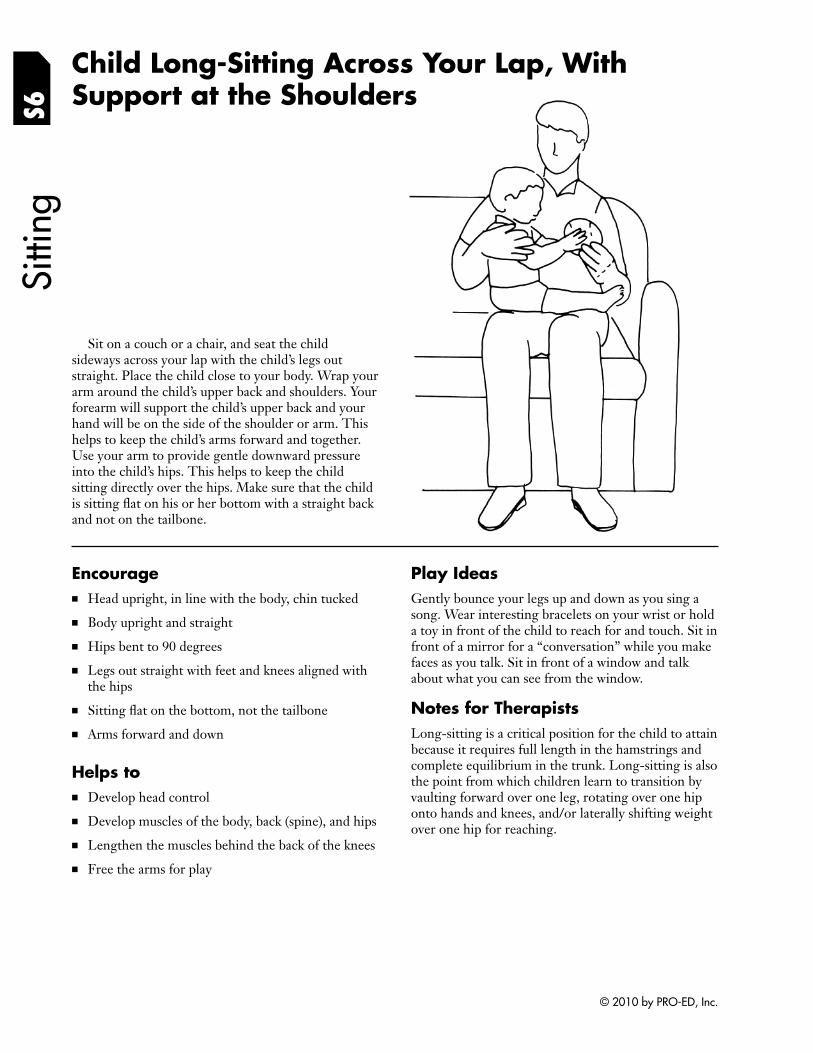
S6Si
tting
Child Long-Sitting Across Your Lap, With Support at the Shoulders
Sit on a couch or a chair, and seat the child sideways across your lap with the child’s legs out straight. Place the child close to your body. Wrap your arm around the child’s upper back and shoulders. Your forearm will support the child’s upper back and your hand will be on the side of the shoulder or arm. This helps to keep the child’s arms forward and together. Use your arm to provide gentle downward pressure into the child’s hips. This helps to keep the child sitting directly over the hips. Make sure that the child is sitting flat on his or her bottom with a straight back and not on the tailbone.
Encourage ■ Head upright, in line with the body, chin tucked
■ Body upright and straight
■ Hips bent to 90 degrees
■ Legs out straight with feet and knees aligned with the hips
■ Sitting flat on the bottom, not the tailbone
■ Arms forward and down
Helps to ■ Develop head control
■ Develop muscles of the body, back (spine), and hips
■ Lengthen the muscles behind the back of the knees
■ Free the arms for play
Play Ideas Gently bounce your legs up and down as you sing a song. Wear interesting bracelets on your wrist or hold a toy in front of the child to reach for and touch. Sit in front of a mirror for a “conversation” while you make faces as you talk. Sit in front of a window and talk about what you can see from the window.
Notes for Therapists Long-sitting is a critical position for the child to attain because it requires full length in the hamstrings and complete equilibrium in the trunk. Long-sitting is also the point from which children learn to transition by vaulting forward over one leg, rotating over one hip onto hands and knees, and/or laterally shifting weight over one hip for reaching.
© 2010 by PRO-ED, Inc.
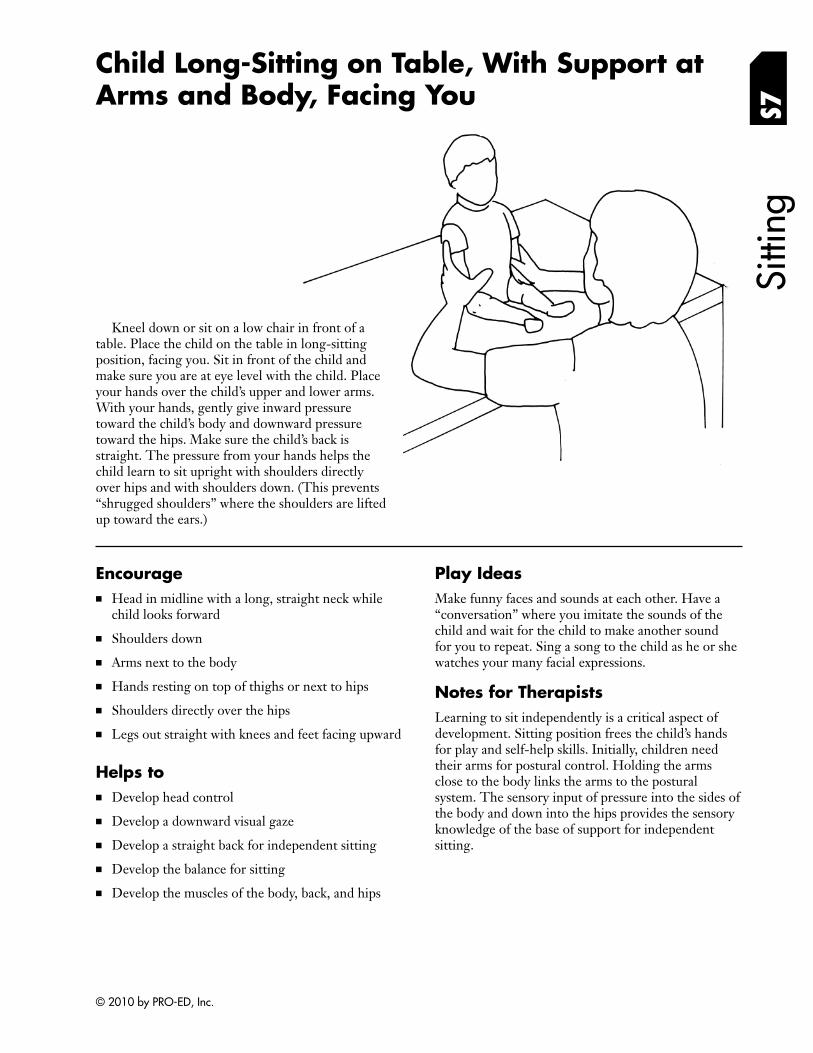
Child Long-Sitting on Table, With Support at Arms and Body, Facing You S7
Sitti
ng
Kneel down or sit on a low chair in front of a table. Place the child on the table in long-sitting position, facing you. Sit in front of the child and make sure you are at eye level with the child. Place your hands over the child’s upper and lower arms. With your hands, gently give inward pressure toward the child’s body and downward pressure toward the hips. Make sure the child’s back is straight. The pressure from your hands helps the child learn to sit upright with shoulders directly over hips and with shoulders down. (This prevents “shrugged shoulders” where the shoulders are lifted up toward the ears.)
Encourage ■ Head in midline with a long, straight neck while
child looks forward
■ Shoulders down
■ Arms next to the body
■ Hands resting on top of thighs or next to hips
■ Shoulders directly over the hips
■ Legs out straight with knees and feet facing upward
Helps to ■ Develop head control
■ Develop a downward visual gaze
■ Develop a straight back for independent sitting
■ Develop the balance for sitting
■ Develop the muscles of the body, back, and hips
Play Ideas Make funny faces and sounds at each other. Have a “conversation” where you imitate the sounds of the child and wait for the child to make another sound for you to repeat. Sing a song to the child as he or she watches your many facial expressions.
Notes for Therapists Learning to sit independently is a critical aspect of development. Sitting position frees the child’s hands for play and self-help skills. Initially, children need their arms for postural control. Holding the arms close to the body links the arms to the postural system. The sensory input of pressure into the sides of the body and down into the hips provides the sensory knowledge of the base of support for independent sitting.
© 2010 by PRO-ED, Inc.
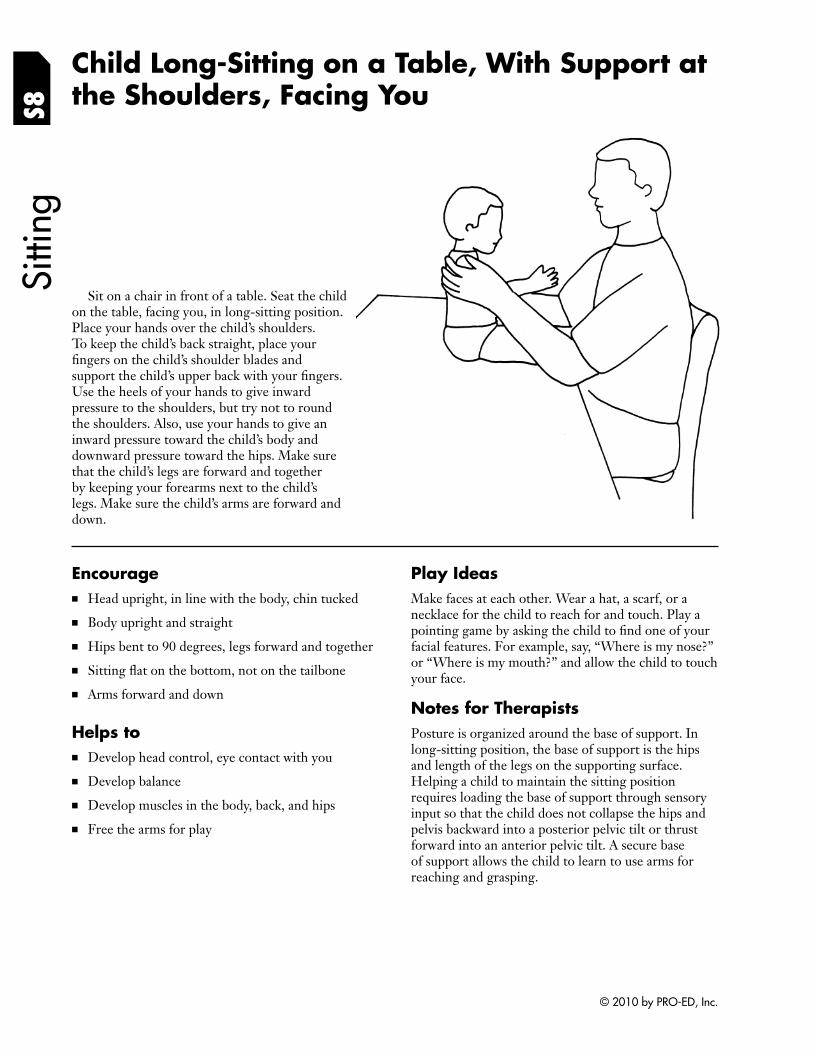
S8Si
tting
Child Long-Sitting on a Table, With Support at the Shoulders, Facing You
Sit on a chair in front of a table. Seat the child on the table, facing you, in long-sitting position. Place your hands over the child’s shoulders. To keep the child’s back straight, place your fingers on the child’s shoulder blades and support the child’s upper back with your fi ngers. Use the heels of your hands to give inward pressure to the shoulders, but try not to round the shoulders. Also, use your hands to give an inward pressure toward the child’s body and downward pressure toward the hips. Make sure that the child’s legs are forward and together by keeping your forearms next to the child’s legs. Make sure the child’s arms are forward and down.
Encourage ■ Head upright, in line with the body, chin tucked
■ Body upright and straight
■ Hips bent to 90 degrees, legs forward and together
■ Sitting flat on the bottom, not on the tailbone
■ Arms forward and down
Helps to ■ Develop head control, eye contact with you
■ Develop balance
■ Develop muscles in the body, back, and hips
■ Free the arms for play
Play Ideas Make faces at each other. Wear a hat, a scarf, or a necklace for the child to reach for and touch. Play a pointing game by asking the child to find one of your facial features. For example, say, “Where is my nose?” or “Where is my mouth?” and allow the child to touch your face.
Notes for Therapists Posture is organized around the base of support. In long-sitting position, the base of support is the hips and length of the legs on the supporting surface. Helping a child to maintain the sitting position requires loading the base of support through sensory input so that the child does not collapse the hips and pelvis backward into a posterior pelvic tilt or thrust forward into an anterior pelvic tilt. A secure base of support allows the child to learn to use arms for reaching and grasping.
© 2010 by PRO-ED, Inc.
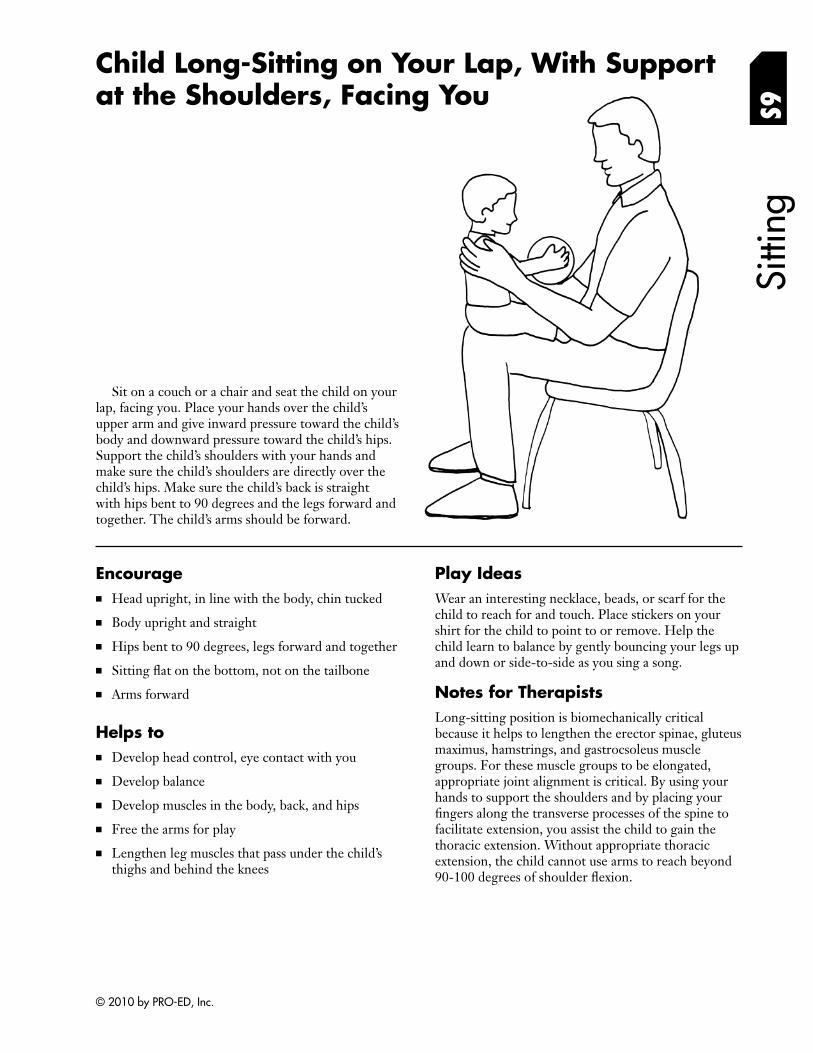
at the Shoulders, Facing You
Sit on a couch or a chair and seat the child on your lap, facing you. Place your hands over the child’s upper arm and give inward pressure toward the child’s body and downward pressure toward the child’s hips. Support the child’s shoulders with your hands and make sure the child’s shoulders are directly over the child’s hips. Make sure the child’s back is straight with hips bent to 90 degrees and the legs forward and together. The child’s arms should be forward.
Sitti
ng
Child Long-Sitting on Your Lap, With Support
S9
Encourage ■ Head upright, in line with the body, chin tucked
■ Body upright and straight
■ Hips bent to 90 degrees, legs forward and together
■ Sitting flat on the bottom, not on the tailbone
■ Arms forward
Helps to ■ Develop head control, eye contact with you
■ Develop balance
■ Develop muscles in the body, back, and hips
■ Free the arms for play
■ Lengthen leg muscles that pass under the child’s thighs and behind the knees
Play Ideas Wear an interesting necklace, beads, or scarf for the child to reach for and touch. Place stickers on your shirt for the child to point to or remove. Help the child learn to balance by gently bouncing your legs up and down or side-to-side as you sing a song.
Notes for Therapists Long-sitting position is biomechanically critical because it helps to lengthen the erector spinae, gluteus maximus, hamstrings, and gastrocsoleus muscle groups. For these muscle groups to be elongated, appropriate joint alignment is critical. By using your hands to support the shoulders and by placing your fingers along the transverse processes of the spine to facilitate extension, you assist the child to gain the thoracic extension. Without appropriate thoracic extension, the child cannot use arms to reach beyond 90-100 degrees of shoulder fl exion.
© 2010 by PRO-ED, Inc.
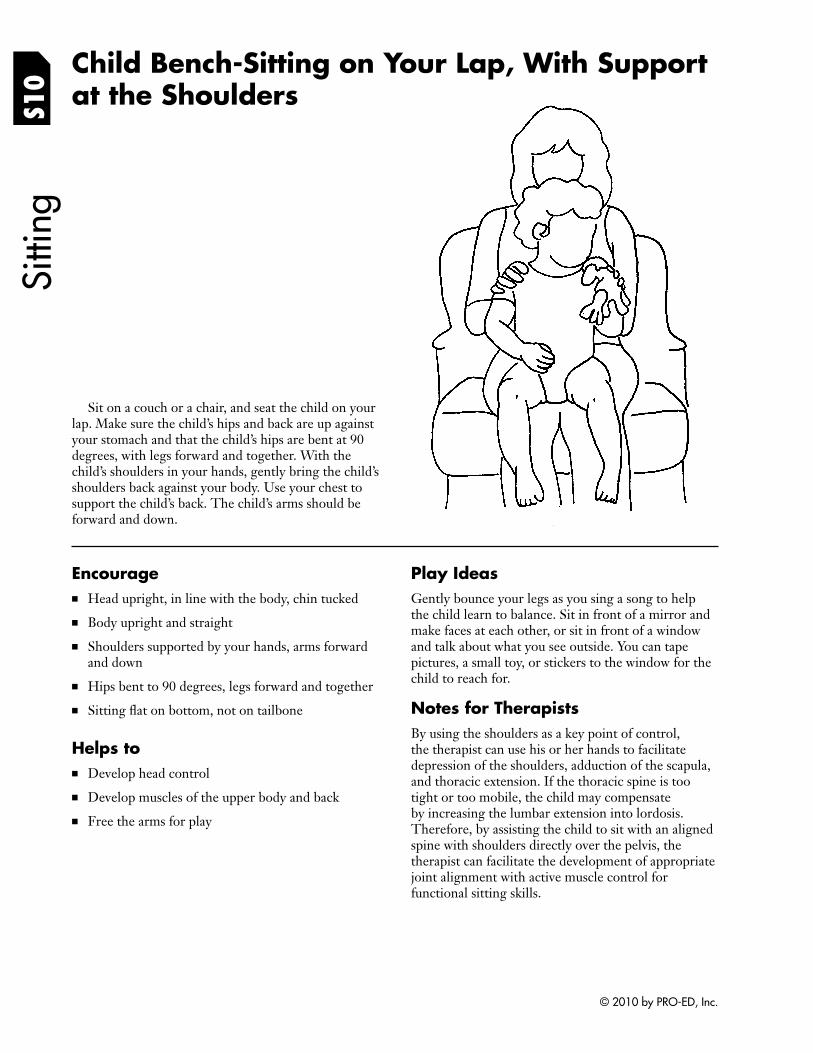
S10
Child Bench-Sitting on Your Lap, With Support at the Shoulders
Sitti
ng
Sit on a couch or a chair, and seat the child on your lap. Make sure the child’s hips and back are up against your stomach and that the child’s hips are bent at 90 degrees, with legs forward and together. With the child’s shoulders in your hands, gently bring the child’s shoulders back against your body. Use your chest to support the child’s back. The child’s arms should be forward and down.
Encourage ■ Head upright, in line with the body, chin tucked
■ Body upright and straight
■ Shoulders supported by your hands, arms forward and down
■ Hips bent to 90 degrees, legs forward and together
■ Sitting flat on bottom, not on tailbone
Helps to ■ Develop head control
■ Develop muscles of the upper body and back
■ Free the arms for play
Play Ideas Gently bounce your legs as you sing a song to help the child learn to balance. Sit in front of a mirror and make faces at each other, or sit in front of a window and talk about what you see outside. You can tape pictures, a small toy, or stickers to the window for the child to reach for.
Notes for Therapists By using the shoulders as a key point of control, the therapist can use his or her hands to facilitate depression of the shoulders, adduction of the scapula, and thoracic extension. If the thoracic spine is too tight or too mobile, the child may compensate by increasing the lumbar extension into lordosis. Therefore, by assisting the child to sit with an aligned spine with shoulders directly over the pelvis, the therapist can facilitate the development of appropriate joint alignment with active muscle control for functional sitting skills.
© 2010 by PRO-ED, Inc.
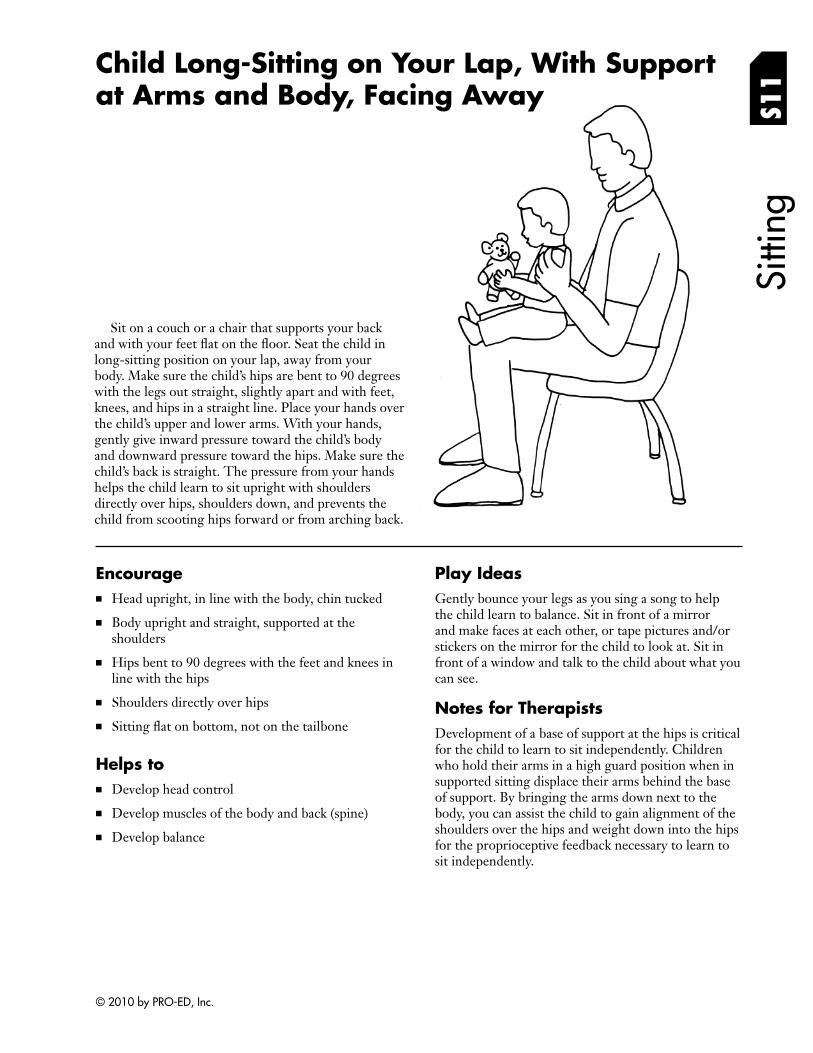
Child Long-Sitting on Your Lap, With Support at Arms and Body, Facing Away
Sit on a couch or a chair that supports your back and with your feet flat on the floor. Seat the child in long-sitting position on your lap, away from your body. Make sure the child’s hips are bent to 90 degrees with the legs out straight, slightly apart and with feet, knees, and hips in a straight line. Place your hands over the child’s upper and lower arms. With your hands, gently give inward pressure toward the child’s body and downward pressure toward the hips. Make sure the child’s back is straight. The pressure from your hands helps the child learn to sit upright with shoulders directly over hips, shoulders down, and prevents the child from scooting hips forward or from arching back.
S11
Sitti
ng
Encourage ■ Head upright, in line with the body, chin tucked
■ Body upright and straight, supported at the shoulders
■ Hips bent to 90 degrees with the feet and knees in line with the hips
■ Shoulders directly over hips
■ Sitting flat on bottom, not on the tailbone
Helps to ■ Develop head control
■ Develop muscles of the body and back (spine)
■ Develop balance
Play Ideas Gently bounce your legs as you sing a song to help the child learn to balance. Sit in front of a mirror and make faces at each other, or tape pictures and/or stickers on the mirror for the child to look at. Sit in front of a window and talk to the child about what you can see.
Notes for Therapists Development of a base of support at the hips is critical for the child to learn to sit independently. Children who hold their arms in a high guard position when in supported sitting displace their arms behind the base of support. By bringing the arms down next to the body, you can assist the child to gain alignment of the shoulders over the hips and weight down into the hips for the proprioceptive feedback necessary to learn to sit independently.
© 2010 by PRO-ED, Inc.
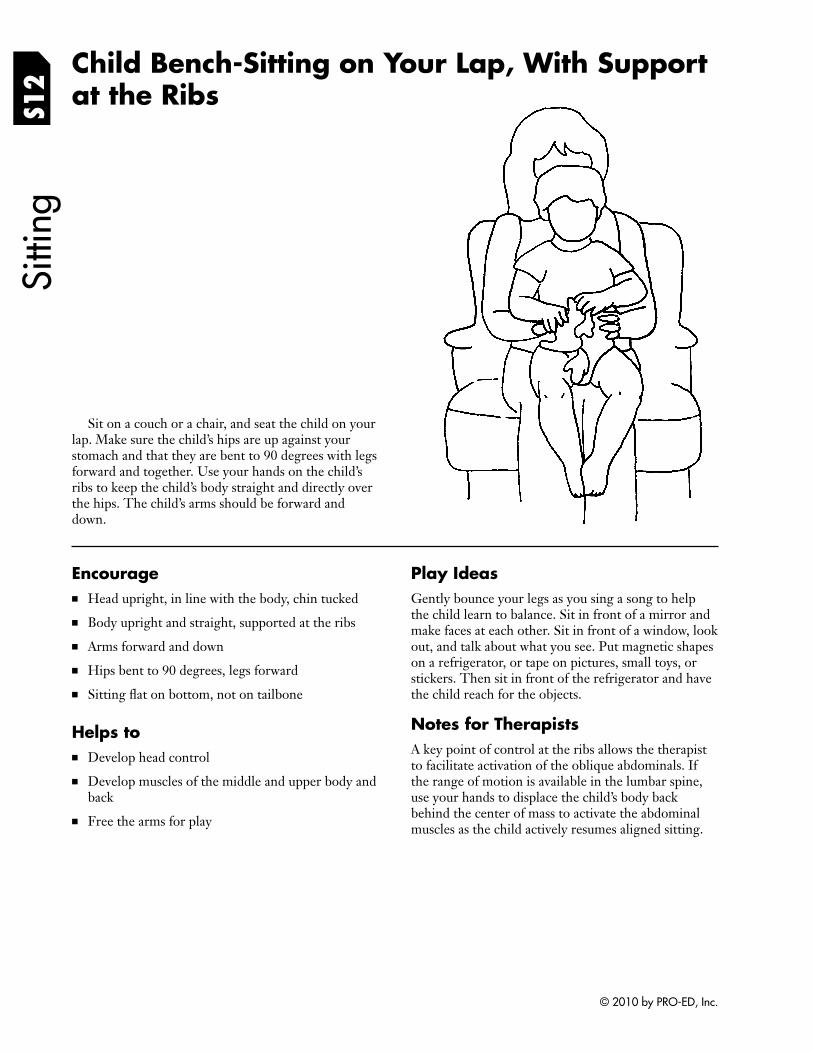
S12
Child Bench-Sitting on Your Lap, With Support at the Ribs
Sitti
ng
Sit on a couch or a chair, and seat the child on your lap. Make sure the child’s hips are up against your stomach and that they are bent to 90 degrees with legs forward and together. Use your hands on the child’s ribs to keep the child’s body straight and directly over the hips. The child’s arms should be forward and down.
Encourage ■ Head upright, in line with the body, chin tucked
■ Body upright and straight, supported at the ribs
■ Arms forward and down
■ Hips bent to 90 degrees, legs forward
■ Sitting flat on bottom, not on tailbone
Helps to ■ Develop head control
■ Develop muscles of the middle and upper body and back
■ Free the arms for play
Play Ideas Gently bounce your legs as you sing a song to help the child learn to balance. Sit in front of a mirror and make faces at each other. Sit in front of a window, look out, and talk about what you see. Put magnetic shapes on a refrigerator, or tape on pictures, small toys, or stickers. Then sit in front of the refrigerator and have the child reach for the objects.
Notes for Therapists A key point of control at the ribs allows the therapist to facilitate activation of the oblique abdominals. If the range of motion is available in the lumbar spine, use your hands to displace the child’s body back behind the center of mass to activate the abdominal muscles as the child actively resumes aligned sitting.
© 2010 by PRO-ED, Inc.
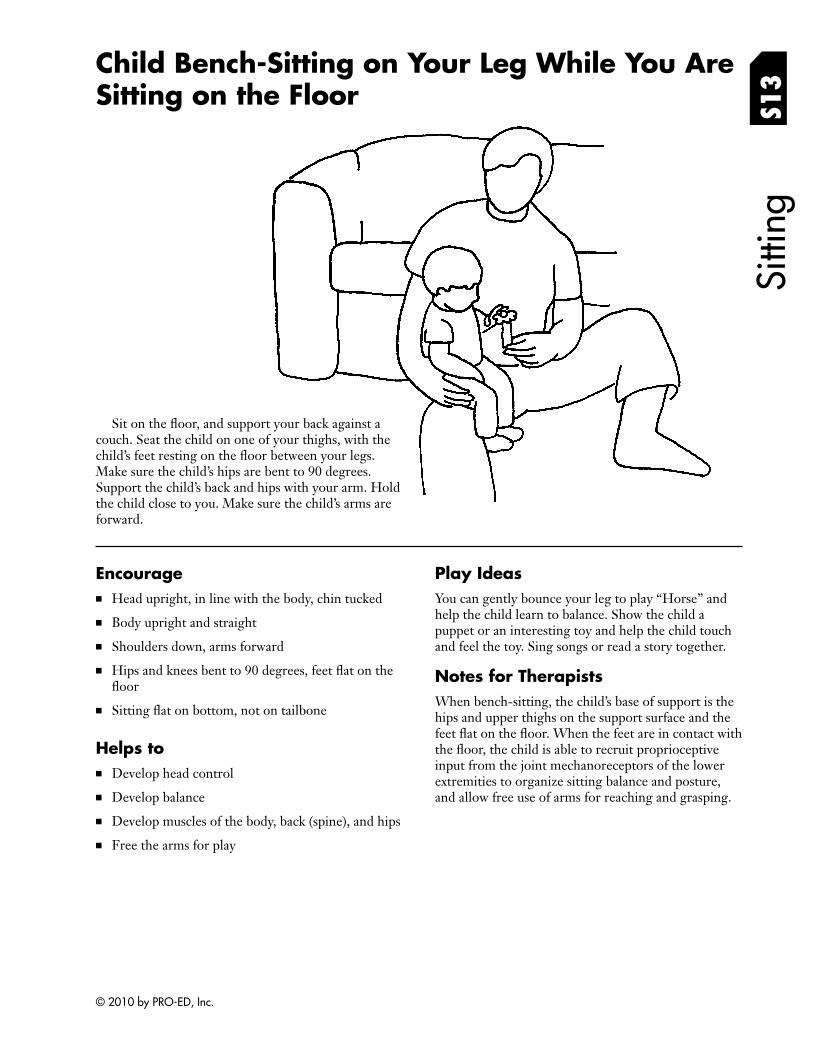
Sitti
ng
Sit on the floor, and support your back against a couch. Seat the child on one of your thighs, with the child’s feet resting on the floor between your legs. Make sure the child’s hips are bent to 90 degrees. Support the child’s back and hips with your arm. Hold the child close to you. Make sure the child’s arms are forward.
Child Bench-Sitting on Your Leg While You Are Sitting on the Floor S1
3
Encourage ■ Head upright, in line with the body, chin tucked
■ Body upright and straight
■ Shoulders down, arms forward
■ Hips and knees bent to 90 degrees, feet flat on the fl oor
■ Sitting flat on bottom, not on tailbone
Helps to ■ Develop head control
■ Develop balance
■ Develop muscles of the body, back (spine), and hips
■ Free the arms for play
Play Ideas You can gently bounce your leg to play “Horse” and help the child learn to balance. Show the child a puppet or an interesting toy and help the child touch and feel the toy. Sing songs or read a story together.
Notes for Therapists When bench-sitting, the child’s base of support is the hips and upper thighs on the support surface and the feet flat on the floor. When the feet are in contact with the floor, the child is able to recruit proprioceptive input from the joint mechanoreceptors of the lower extremities to organize sitting balance and posture, and allow free use of arms for reaching and grasping.
© 2010 by PRO-ED, Inc.
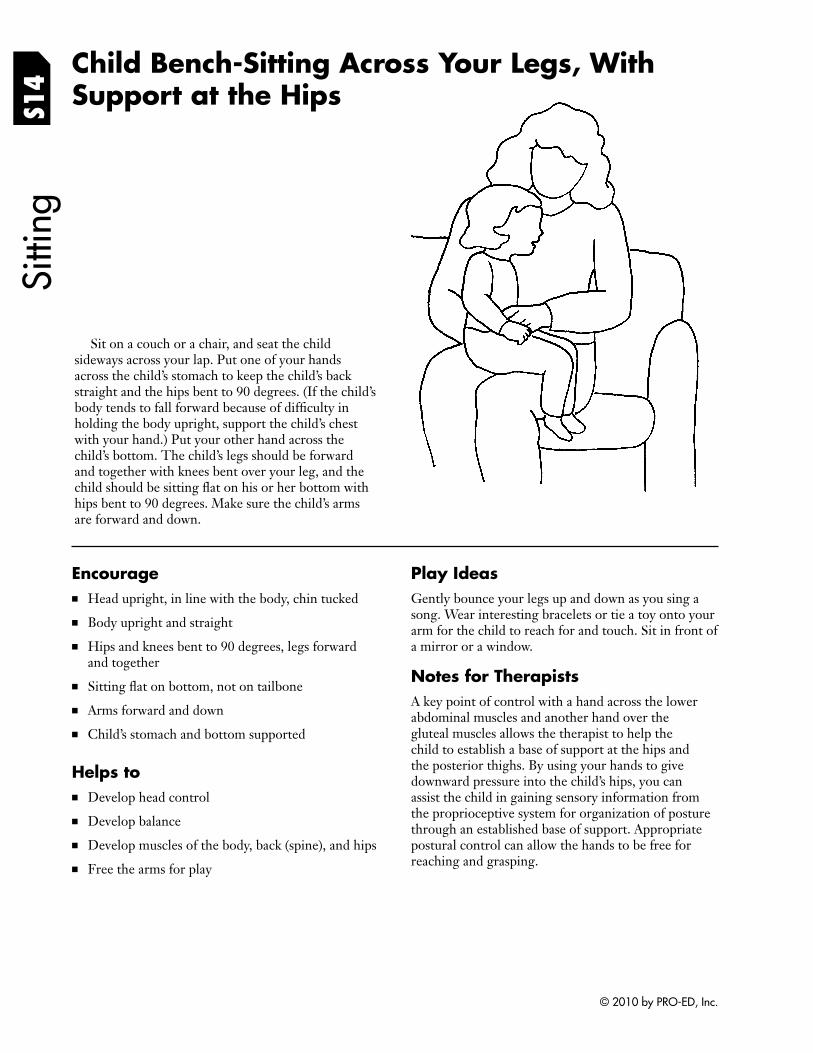
S14
Child Bench-Sitting Across Your Legs, With Support at the Hips
Sitti
ng
Sit on a couch or a chair, and seat the child sideways across your lap. Put one of your hands across the child’s stomach to keep the child’s back straight and the hips bent to 90 degrees. (If the child’s body tends to fall forward because of diffi culty in holding the body upright, support the child’s chest with your hand.) Put your other hand across the child’s bottom. The child’s legs should be forward and together with knees bent over your leg, and the child should be sitting flat on his or her bottom with hips bent to 90 degrees. Make sure the child’s arms are forward and down.
Encourage ■ Head upright, in line with the body, chin tucked
■ Body upright and straight
■ Hips and knees bent to 90 degrees, legs forward and together
■ Sitting flat on bottom, not on tailbone
■ Arms forward and down
■ Child’s stomach and bottom supported
Helps to ■ Develop head control
■ Develop balance
■ Develop muscles of the body, back (spine), and hips
■ Free the arms for play
Play Ideas Gently bounce your legs up and down as you sing a song. Wear interesting bracelets or tie a toy onto your arm for the child to reach for and touch. Sit in front of a mirror or a window.
Notes for Therapists A key point of control with a hand across the lower abdominal muscles and another hand over the gluteal muscles allows the therapist to help the child to establish a base of support at the hips and the posterior thighs. By using your hands to give downward pressure into the child’s hips, you can assist the child in gaining sensory information from the proprioceptive system for organization of posture through an established base of support. Appropriate postural control can allow the hands to be free for reaching and grasping.
© 2010 by PRO-ED, Inc.
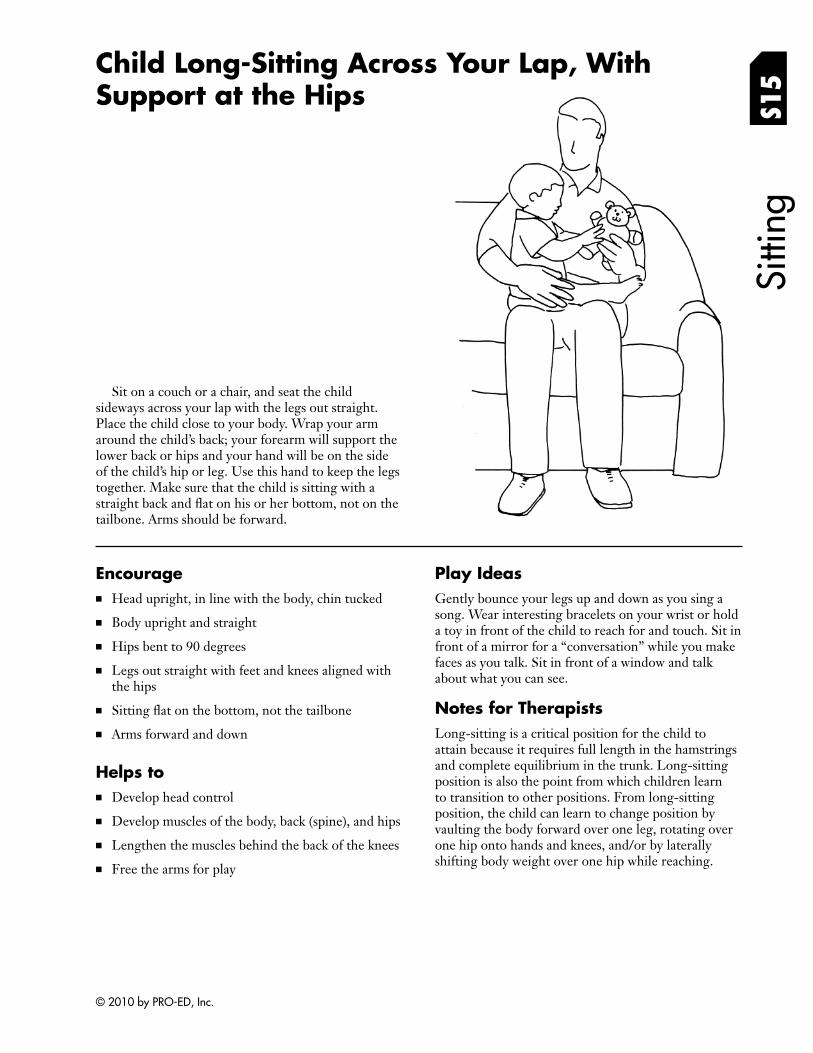
Support at the Hips
Sitti
ng
Child Long-Sitting Across Your Lap, With
S15
Sit on a couch or a chair, and seat the child sideways across your lap with the legs out straight. Place the child close to your body. Wrap your arm around the child’s back; your forearm will support the lower back or hips and your hand will be on the side of the child’s hip or leg. Use this hand to keep the legs together. Make sure that the child is sitting with a straight back and flat on his or her bottom, not on the tailbone. Arms should be forward.
Encourage ■ Head upright, in line with the body, chin tucked
■ Body upright and straight
■ Hips bent to 90 degrees
■ Legs out straight with feet and knees aligned with the hips
■ Sitting flat on the bottom, not the tailbone
■ Arms forward and down
Helps to ■ Develop head control
■ Develop muscles of the body, back (spine), and hips
■ Lengthen the muscles behind the back of the knees
■ Free the arms for play
Play Ideas Gently bounce your legs up and down as you sing a song. Wear interesting bracelets on your wrist or hold a toy in front of the child to reach for and touch. Sit in front of a mirror for a “conversation” while you make faces as you talk. Sit in front of a window and talk about what you can see.
Notes for Therapists Long-sitting is a critical position for the child to attain because it requires full length in the hamstrings and complete equilibrium in the trunk. Long-sitting position is also the point from which children learn to transition to other positions. From long-sitting position, the child can learn to change position by vaulting the body forward over one leg, rotating over one hip onto hands and knees, and/or by laterally shifting body weight over one hip while reaching.
© 2010 by PRO-ED, Inc.

S16
Child Long-Sitting on Your Lap, With Support at the Legs, Facing Away
Figure A
Figure B
Sit on a couch or a chair and seat the child on your lap facing away from you. To keep the child’s hips bent to 90 degrees and the back straight, make sure the child’s back is up against your stomach. Use your hands and forearms along the entire length of the child’s legs to support the child’s hips and legs (Fig. A). The child’s arms should be forward and ready to play with a toy. As the child gains balance in the body for sitting, you can move the child away from your body, and allow the child to sit independently without back support from your body (Fig. B).
Sitti
ng
Encourage ■ Head upright, in line with the body, chin tucked
■ Body upright and straight, supported at the hips
■ Hips bent to 90 degrees, legs parallel
■ Sitting flat on the bottom, not on the tailbone
■ Arms forward and down
Helps to ■ Develop head control
■ Develop muscles of the body, back, and hips
■ Lengthen leg muscles that pass under the child’s thighs and behind the knees
■ Develop balance
■ Free the arms for play
Play Ideas Gently bounce your legs as you sing a song to help the child learn to balance. Sit in front of a mirror and make faces at each other or tape pictures and/or stickers on the mirror for the child to reach for and touch. Put magnetic shapes on a refrigerator, sit in front of it, and let the child reach for the magnets. You can also tape a large piece of paper on the refrigerator and have the child color or draw.
Notes for Therapists Long-sitting position provides an opportunity for the gluteus maximus, hamstrings, and gastrocsoleus muscles to be in a lengthened position. If these muscles do not lengthen, the child will maintain a posterior pelvic tilt with fl exion/abduction/external rotation of the hips and knee flexion when attempting to sit. The child must be able to extend the legs out in front of the body to allow the child to use rotation of the spine and hips to transition out of sitting onto hands and knees.
© 2010 by PRO-ED, Inc.
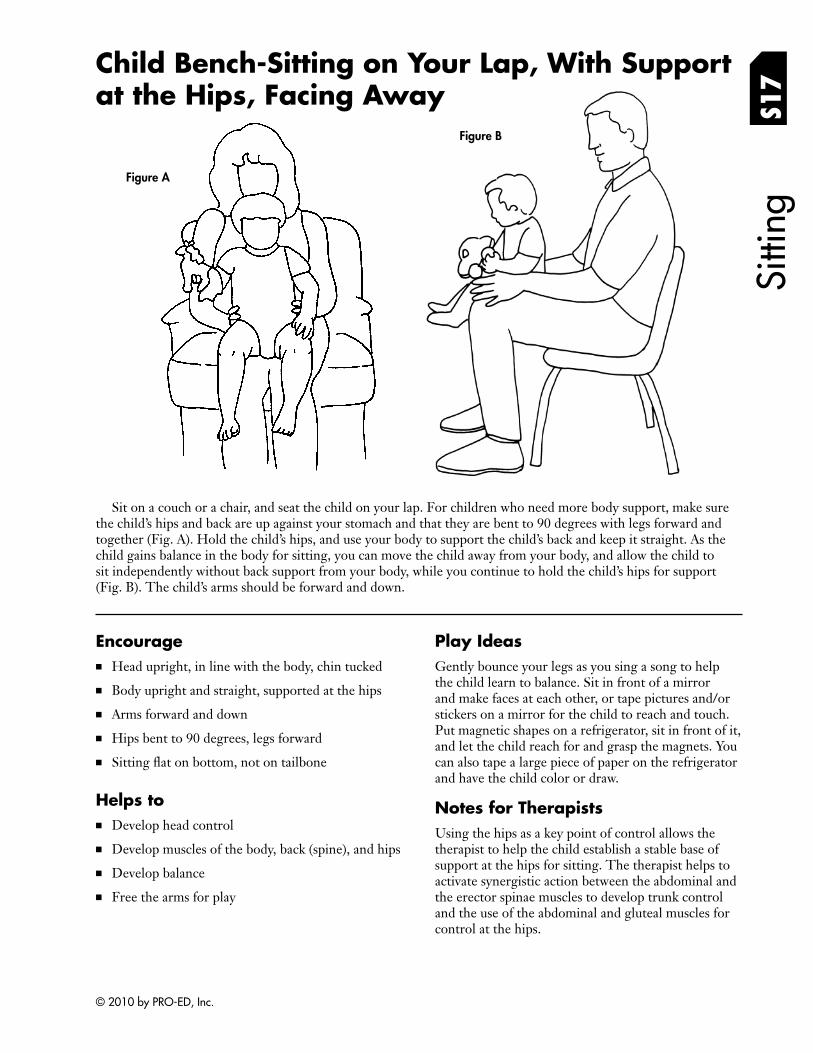
Sitti
ng
S17
Figure B
Child Bench-Sitting on Your Lap, With Support at the Hips, Facing Away
Figure A
Sit on a couch or a chair, and seat the child on your lap. For children who need more body support, make sure the child’s hips and back are up against your stomach and that they are bent to 90 degrees with legs forward and together (Fig. A). Hold the child’s hips, and use your body to support the child’s back and keep it straight. As the child gains balance in the body for sitting, you can move the child away from your body, and allow the child to sit independently without back support from your body, while you continue to hold the child’s hips for support (Fig. B). The child’s arms should be forward and down.
Encourage ■ Head upright, in line with the body, chin tucked
■ Body upright and straight, supported at the hips
■ Arms forward and down
■ Hips bent to 90 degrees, legs forward
■ Sitting flat on bottom, not on tailbone
Helps to ■ Develop head control
■ Develop muscles of the body, back (spine), and hips
■ Develop balance
■ Free the arms for play
Play Ideas Gently bounce your legs as you sing a song to help the child learn to balance. Sit in front of a mirror and make faces at each other, or tape pictures and/or stickers on a mirror for the child to reach and touch. Put magnetic shapes on a refrigerator, sit in front of it, and let the child reach for and grasp the magnets. You can also tape a large piece of paper on the refrigerator and have the child color or draw.
Notes for Therapists Using the hips as a key point of control allows the therapist to help the child establish a stable base of support at the hips for sitting. The therapist helps to activate synergistic action between the abdominal and the erector spinae muscles to develop trunk control and the use of the abdominal and gluteal muscles for control at the hips.
© 2010 by PRO-ED, Inc.

S18
Child Bench-Sitting Between Your Legs While Sitting on a Couch or Chair, With Support at the Hips, Facing Away
Sitti
ng
Sit on a chair or couch with your back supported by the chair/couch and your feet flat on the ground. Seat the child between your legs. Make sure the child’s back and hips are supported up against your body with the child’s hips at 90 degrees, legs together, and knees bent. Sit up straight so that the child sits with a straight back. Use your legs to give inward pressure toward the child’s hips and legs to provide stability for the child’s sitting posture. You can also put your hands on top of the child’s legs/knees to provide security and stability in this position. The child’s arms should be forward and down, ready for play.
Encourage ■ Head upright, in line with the body, chin tucked
■ Body upright and straight
■ Hips and knees bent to 90 degrees, legs forward and together
■ Sitting flat on the bottom, not on the tailbone
■ Arms forward and down
Helps to ■ Develop head control
■ Develop muscles of the body, back, and hips
■ Lengthen the leg muscles that pass under the child’s thighs and behind the knees
■ Free the arms for play
Play Ideas Sit in front of a mirror and make faces at each other, or tape pictures and/or stickers on the mirror for the child to reach for and grab. Put toys on the child’s lap to encourage the child to reach forward to touch the toys. Hold a book in front of the child and read a story; encourage the child to pat the pictures that you name and to turn the pages. This is also a good position for watching an educational video or DVD together.
Notes for Therapists The ability to establish a base of support at the hips and upper legs in sitting is important for learning postural control. Posture is organized over a stable base of support through visual, vestibular, and somatosensory inputs. Proprioception is a component of the somatosensory system. By using your hands and legs to provide deep pressure into the sides, top, and bottom of the child’s hips and legs, you can enhance the child’s ability to receive and process proprioceptive information.
© 2010 by PRO-ED, Inc.
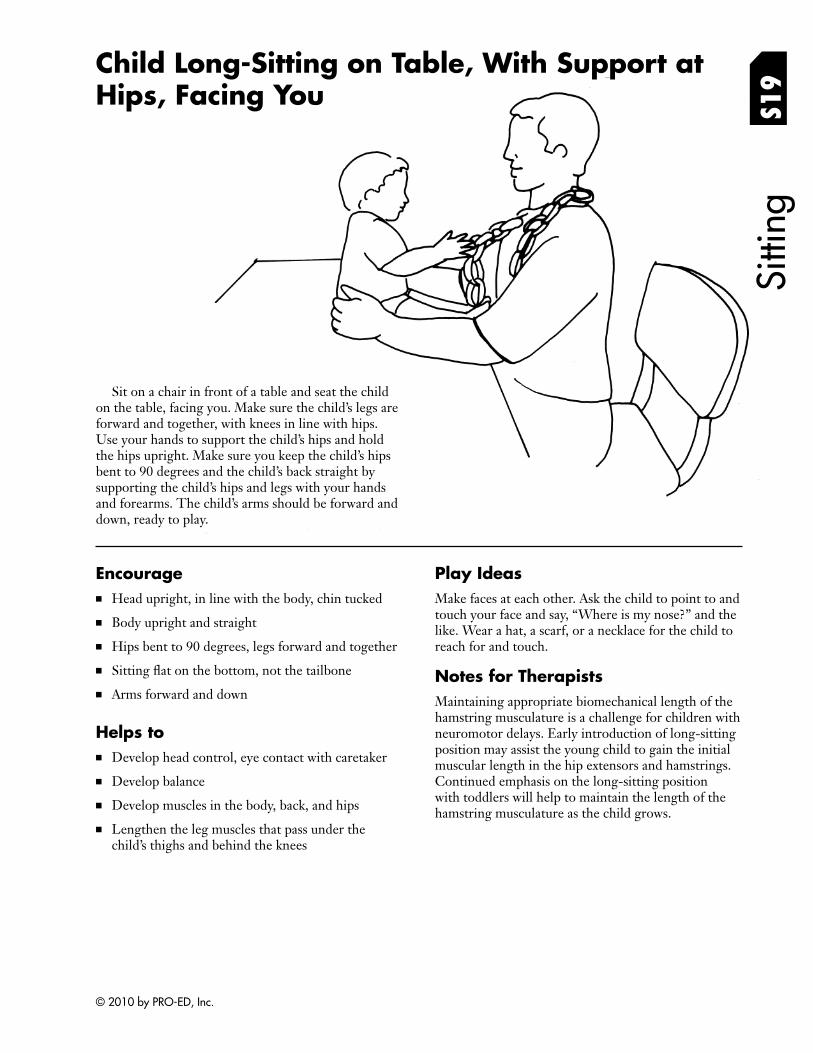
Sitti
ng
Sit on a chair in front of a table and seat the child on the table, facing you. Make sure the child’s legs are forward and together, with knees in line with hips. Use your hands to support the child’s hips and hold the hips upright. Make sure you keep the child’s hips bent to 90 degrees and the child’s back straight by supporting the child’s hips and legs with your hands and forearms. The child’s arms should be forward and down, ready to play.
Child Long-Sitting on Table, With Support at Hips, Facing You S1
9
Encourage ■ Head upright, in line with the body, chin tucked
■ Body upright and straight
■ Hips bent to 90 degrees, legs forward and together
■ Sitting flat on the bottom, not the tailbone
■ Arms forward and down
Helps to ■ Develop head control, eye contact with caretaker
■ Develop balance
■ Develop muscles in the body, back, and hips
■ Lengthen the leg muscles that pass under the child’s thighs and behind the knees
Play Ideas Make faces at each other. Ask the child to point to and touch your face and say, “Where is my nose?” and the like. Wear a hat, a scarf, or a necklace for the child to reach for and touch.
Notes for Therapists Maintaining appropriate biomechanical length of the hamstring musculature is a challenge for children with neuromotor delays. Early introduction of long-sitting position may assist the young child to gain the initial muscular length in the hip extensors and hamstrings. Continued emphasis on the long-sitting position with toddlers will help to maintain the length of the hamstring musculature as the child grows.
© 2010 by PRO-ED, Inc.
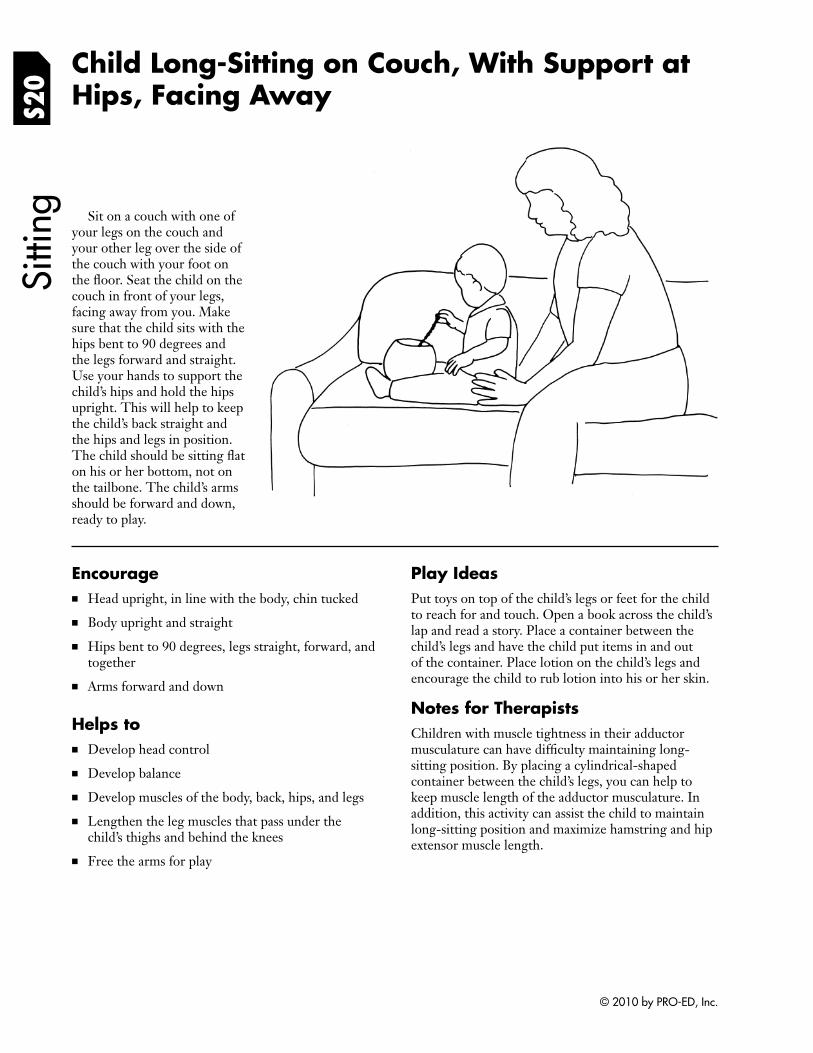
S20
Child Long-Sitting on Couch, With Support at Hips, Facing Away
Sitti
ng
Sit on a couch with one of your legs on the couch and your other leg over the side of the couch with your foot on the floor. Seat the child on the couch in front of your legs, facing away from you. Make sure that the child sits with the hips bent to 90 degrees and the legs forward and straight. Use your hands to support the child’s hips and hold the hips upright. This will help to keep the child’s back straight and the hips and legs in position. The child should be sitting fl at on his or her bottom, not on the tailbone. The child’s arms should be forward and down, ready to play.
Encourage ■ Head upright, in line with the body, chin tucked
■ Body upright and straight
■ Hips bent to 90 degrees, legs straight, forward, and together
■ Arms forward and down
Helps to ■ Develop head control
■ Develop balance
■ Develop muscles of the body, back, hips, and legs
■ Lengthen the leg muscles that pass under the child’s thighs and behind the knees
■ Free the arms for play
Play Ideas Put toys on top of the child’s legs or feet for the child to reach for and touch. Open a book across the child’s lap and read a story. Place a container between the child’s legs and have the child put items in and out of the container. Place lotion on the child’s legs and encourage the child to rub lotion into his or her skin.
Notes for Therapists Children with muscle tightness in their adductor musculature can have difficulty maintaining long-sitting position. By placing a cylindrical-shaped container between the child’s legs, you can help to keep muscle length of the adductor musculature. In addition, this activity can assist the child to maintain long-sitting position and maximize hamstring and hip extensor muscle length.
© 2010 by PRO-ED, Inc.
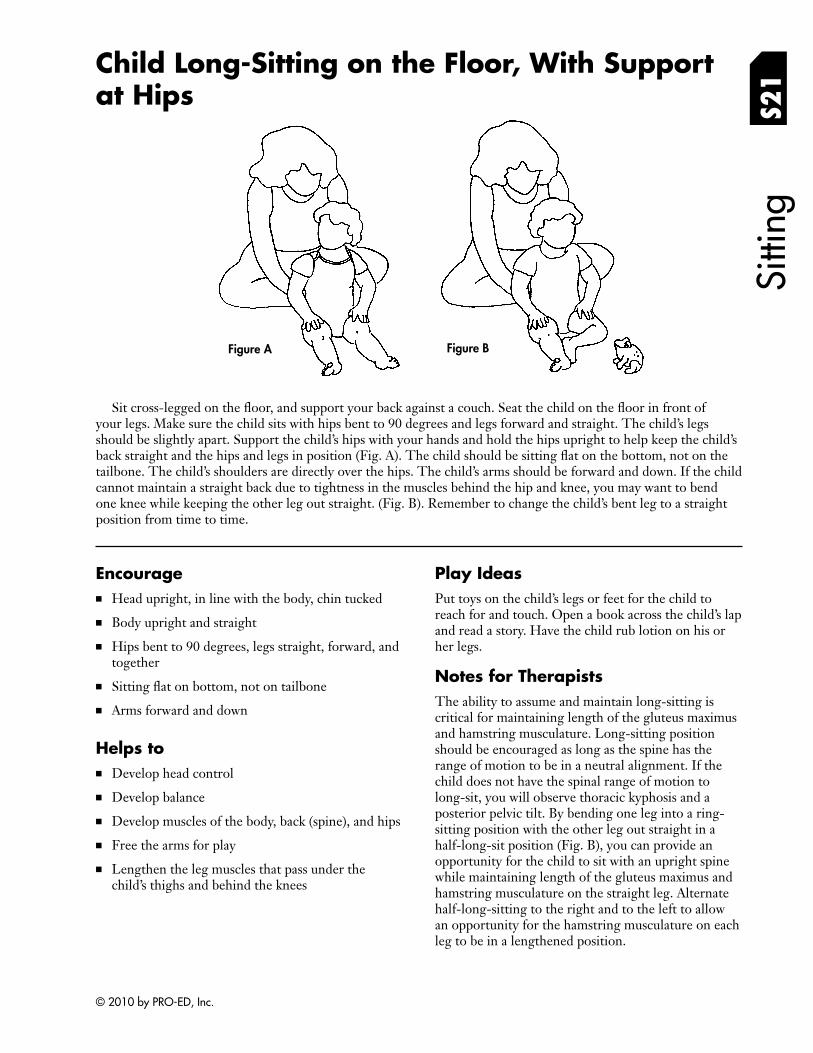
Sitti
ng
Child Long-Sitting on the Floor, With Support at Hips S2
1
Figure A Figure B
Sit cross-legged on the floor, and support your back against a couch. Seat the child on the floor in front of your legs. Make sure the child sits with hips bent to 90 degrees and legs forward and straight. The child’s legs should be slightly apart. Support the child’s hips with your hands and hold the hips upright to help keep the child’s back straight and the hips and legs in position (Fig. A). The child should be sitting flat on the bottom, not on the tailbone. The child’s shoulders are directly over the hips. The child’s arms should be forward and down. If the child cannot maintain a straight back due to tightness in the muscles behind the hip and knee, you may want to bend one knee while keeping the other leg out straight. (Fig. B). Remember to change the child’s bent leg to a straight position from time to time.
Encourage ■ Head upright, in line with the body, chin tucked
■ Body upright and straight
■ Hips bent to 90 degrees, legs straight, forward, and together
■ Sitting flat on bottom, not on tailbone
■ Arms forward and down
Helps to ■ Develop head control
■ Develop balance
■ Develop muscles of the body, back (spine), and hips
■ Free the arms for play
■ Lengthen the leg muscles that pass under the child’s thighs and behind the knees
Play Ideas Put toys on the child’s legs or feet for the child to reach for and touch. Open a book across the child’s lap and read a story. Have the child rub lotion on his or her legs.
Notes for Therapists The ability to assume and maintain long-sitting is critical for maintaining length of the gluteus maximus and hamstring musculature. Long-sitting position should be encouraged as long as the spine has the range of motion to be in a neutral alignment. If the child does not have the spinal range of motion to long-sit, you will observe thoracic kyphosis and a posterior pelvic tilt. By bending one leg into a ring-sitting position with the other leg out straight in a half-long-sit position (Fig. B), you can provide an opportunity for the child to sit with an upright spine while maintaining length of the gluteus maximus and hamstring musculature on the straight leg. Alternate half-long-sitting to the right and to the left to allow an opportunity for the hamstring musculature on each leg to be in a lengthened position.
© 2010 by PRO-ED, Inc.
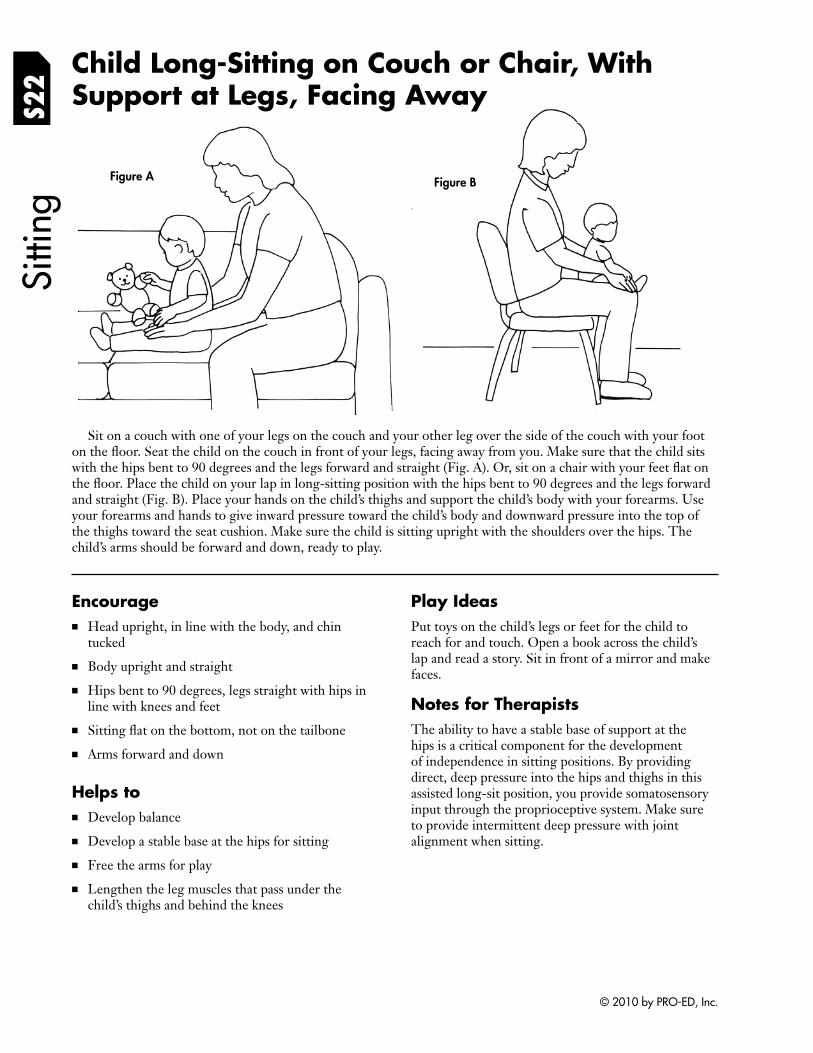
S22
Child Long-Sitting on Couch or Chair, With Support at Legs, Facing Away
Figure BFigure A
Sitti
ng
Sit on a couch with one of your legs on the couch and your other leg over the side of the couch with your foot on the floor. Seat the child on the couch in front of your legs, facing away from you. Make sure that the child sits with the hips bent to 90 degrees and the legs forward and straight (Fig. A). Or, sit on a chair with your feet fl at on the floor. Place the child on your lap in long-sitting position with the hips bent to 90 degrees and the legs forward and straight (Fig. B). Place your hands on the child’s thighs and support the child’s body with your forearms. Use your forearms and hands to give inward pressure toward the child’s body and downward pressure into the top of the thighs toward the seat cushion. Make sure the child is sitting upright with the shoulders over the hips. The child’s arms should be forward and down, ready to play.
Encourage ■ Head upright, in line with the body, and chin
tucked
■ Body upright and straight
■ Hips bent to 90 degrees, legs straight with hips in line with knees and feet
■ Sitting flat on the bottom, not on the tailbone
■ Arms forward and down
Helps to ■ Develop balance
■ Develop a stable base at the hips for sitting
■ Free the arms for play
■ Lengthen the leg muscles that pass under the child’s thighs and behind the knees
Play Ideas Put toys on the child’s legs or feet for the child to reach for and touch. Open a book across the child’s lap and read a story. Sit in front of a mirror and make faces.
Notes for Therapists The ability to have a stable base of support at the hips is a critical component for the development of independence in sitting positions. By providing direct, deep pressure into the hips and thighs in this assisted long-sit position, you provide somatosensory input through the proprioceptive system. Make sure to provide intermittent deep pressure with joint alignment when sitting.
© 2010 by PRO-ED, Inc.
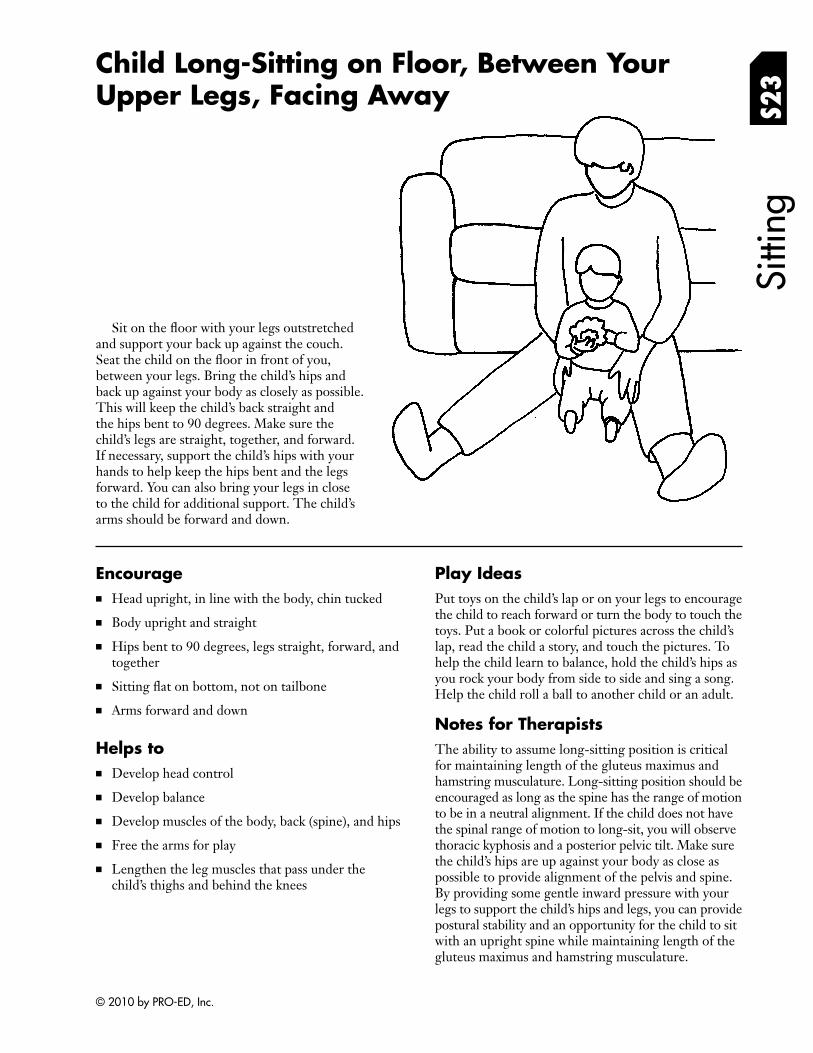
Upper Legs, Facing Away
Sitti
ng
Child Long-Sitting on Floor, Between Your
S23
Sit on the floor with your legs outstretched and support your back up against the couch. Seat the child on the floor in front of you, between your legs. Bring the child’s hips and back up against your body as closely as possible. This will keep the child’s back straight and the hips bent to 90 degrees. Make sure the child’s legs are straight, together, and forward. If necessary, support the child’s hips with your hands to help keep the hips bent and the legs forward. You can also bring your legs in close to the child for additional support. The child’s arms should be forward and down.
Encourage ■ Head upright, in line with the body, chin tucked
■ Body upright and straight
■ Hips bent to 90 degrees, legs straight, forward, and together
■ Sitting flat on bottom, not on tailbone
■ Arms forward and down
Helps to ■ Develop head control
■ Develop balance
■ Develop muscles of the body, back (spine), and hips
■ Free the arms for play
■ Lengthen the leg muscles that pass under the child’s thighs and behind the knees
Play Ideas Put toys on the child’s lap or on your legs to encourage the child to reach forward or turn the body to touch the toys. Put a book or colorful pictures across the child’s lap, read the child a story, and touch the pictures. To help the child learn to balance, hold the child’s hips as you rock your body from side to side and sing a song. Help the child roll a ball to another child or an adult.
Notes for Therapists The ability to assume long-sitting position is critical for maintaining length of the gluteus maximus and hamstring musculature. Long-sitting position should be encouraged as long as the spine has the range of motion to be in a neutral alignment. If the child does not have the spinal range of motion to long-sit, you will observe thoracic kyphosis and a posterior pelvic tilt. Make sure the child’s hips are up against your body as close as possible to provide alignment of the pelvis and spine. By providing some gentle inward pressure with your legs to support the child’s hips and legs, you can provide postural stability and an opportunity for the child to sit with an upright spine while maintaining length of the gluteus maximus and hamstring musculature.
© 2010 by PRO-ED, Inc.
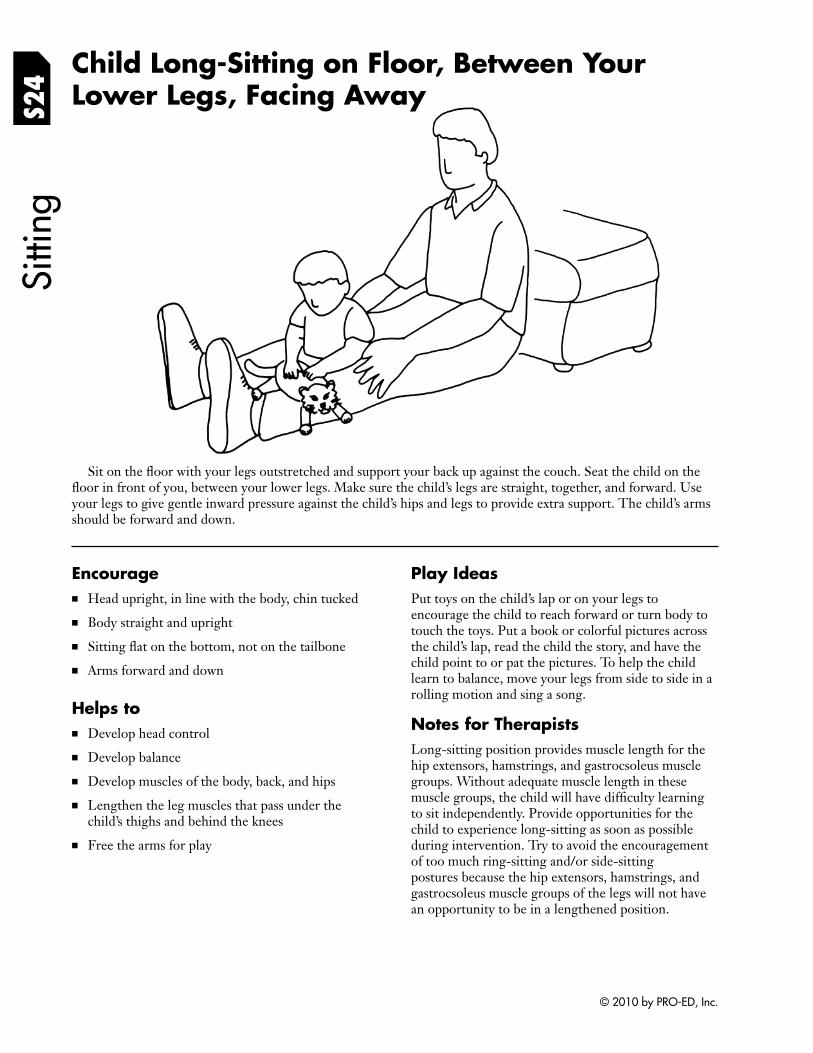
S24
Sitti
ng
Child Long-Sitting on Floor, Between Your Lower Legs, Facing Away
Sit on the floor with your legs outstretched and support your back up against the couch. Seat the child on the floor in front of you, between your lower legs. Make sure the child’s legs are straight, together, and forward. Use your legs to give gentle inward pressure against the child’s hips and legs to provide extra support. The child’s arms should be forward and down.
Encourage ■ Head upright, in line with the body, chin tucked
■ Body straight and upright
■ Sitting flat on the bottom, not on the tailbone
■ Arms forward and down
Helps to ■ Develop head control
■ Develop balance
■ Develop muscles of the body, back, and hips
■ Lengthen the leg muscles that pass under the child’s thighs and behind the knees
■ Free the arms for play
Play Ideas Put toys on the child’s lap or on your legs to encourage the child to reach forward or turn body to touch the toys. Put a book or colorful pictures across the child’s lap, read the child the story, and have the child point to or pat the pictures. To help the child learn to balance, move your legs from side to side in a rolling motion and sing a song.
Notes for Therapists Long-sitting position provides muscle length for the hip extensors, hamstrings, and gastrocsoleus muscle groups. Without adequate muscle length in these muscle groups, the child will have diffi culty learning to sit independently. Provide opportunities for the child to experience long-sitting as soon as possible during intervention. Try to avoid the encouragement of too much ring-sitting and/or side-sitting postures because the hip extensors, hamstrings, and gastrocsoleus muscle groups of the legs will not have an opportunity to be in a lengthened position.
© 2010 by PRO-ED, Inc.
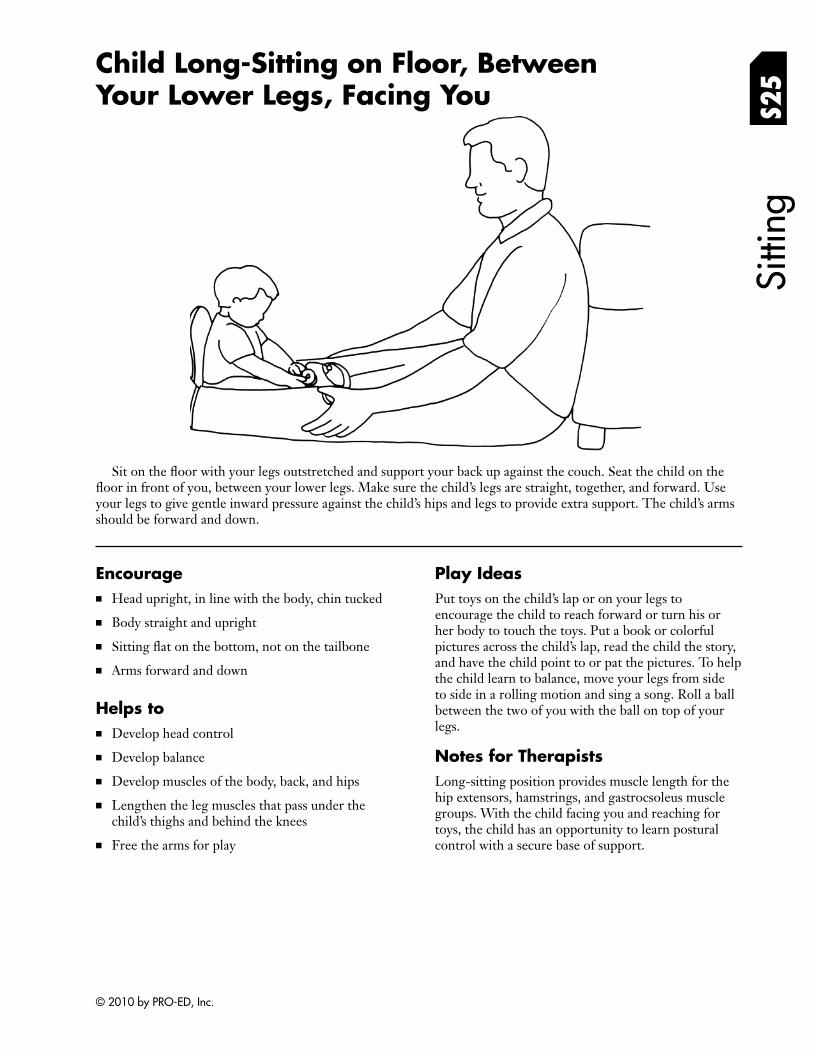
Sitti
ng
Child Long-Sitting on Floor, Between Your Lower Legs, Facing You S2
5
Sit on the floor with your legs outstretched and support your back up against the couch. Seat the child on the floor in front of you, between your lower legs. Make sure the child’s legs are straight, together, and forward. Use your legs to give gentle inward pressure against the child’s hips and legs to provide extra support. The child’s arms should be forward and down.
Encourage ■ Head upright, in line with the body, chin tucked
■ Body straight and upright
■ Sitting flat on the bottom, not on the tailbone
■ Arms forward and down
Helps to ■ Develop head control
■ Develop balance
■ Develop muscles of the body, back, and hips
■ Lengthen the leg muscles that pass under the child’s thighs and behind the knees
■ Free the arms for play
Play Ideas Put toys on the child’s lap or on your legs to encourage the child to reach forward or turn his or her body to touch the toys. Put a book or colorful pictures across the child’s lap, read the child the story, and have the child point to or pat the pictures. To help the child learn to balance, move your legs from side to side in a rolling motion and sing a song. Roll a ball between the two of you with the ball on top of your legs.
Notes for Therapists Long-sitting position provides muscle length for the hip extensors, hamstrings, and gastrocsoleus muscle groups. With the child facing you and reaching for toys, the child has an opportunity to learn postural control with a secure base of support.
© 2010 by PRO-ED, Inc.
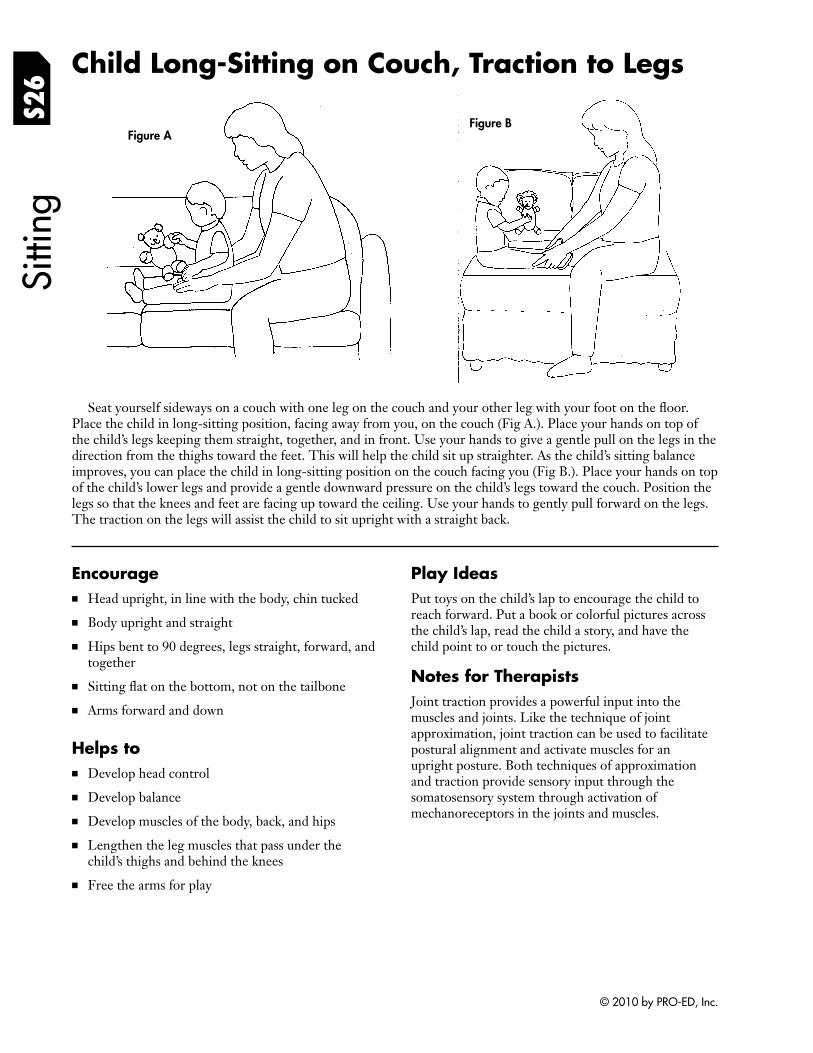
Sitti
ng
Child Long-Sitting on Couch, Traction to Legs S2
6
Figure A Figure B
Seat yourself sideways on a couch with one leg on the couch and your other leg with your foot on the fl oor. Place the child in long-sitting position, facing away from you, on the couch (Fig A.). Place your hands on top of the child’s legs keeping them straight, together, and in front. Use your hands to give a gentle pull on the legs in the direction from the thighs toward the feet. This will help the child sit up straighter. As the child’s sitting balance improves, you can place the child in long-sitting position on the couch facing you (Fig B.). Place your hands on top of the child’s lower legs and provide a gentle downward pressure on the child’s legs toward the couch. Position the legs so that the knees and feet are facing up toward the ceiling. Use your hands to gently pull forward on the legs. The traction on the legs will assist the child to sit upright with a straight back.
Encourage ■ Head upright, in line with the body, chin tucked
■ Body upright and straight
■ Hips bent to 90 degrees, legs straight, forward, and together
■ Sitting flat on the bottom, not on the tailbone
■ Arms forward and down
Helps to ■ Develop head control
■ Develop balance
■ Develop muscles of the body, back, and hips
■ Lengthen the leg muscles that pass under the child’s thighs and behind the knees
■ Free the arms for play
Play Ideas Put toys on the child’s lap to encourage the child to reach forward. Put a book or colorful pictures across the child’s lap, read the child a story, and have the child point to or touch the pictures.
Notes for Therapists Joint traction provides a powerful input into the muscles and joints. Like the technique of joint approximation, joint traction can be used to facilitate postural alignment and activate muscles for an upright posture. Both techniques of approximation and traction provide sensory input through the somatosensory system through activation of mechanoreceptors in the joints and muscles.
© 2010 by PRO-ED, Inc.
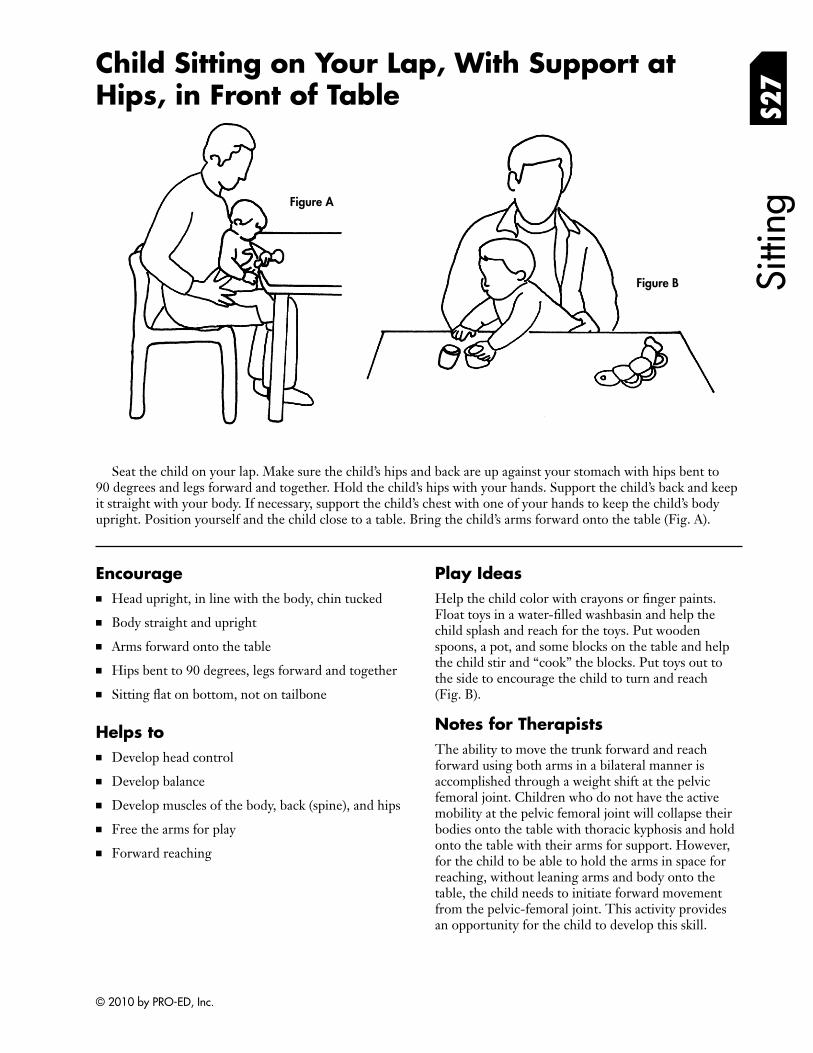
Child Sitting on Your Lap, With Support at Hips, in Front of Table S2
7Si
tting
Figure A
Figure B
Seat the child on your lap. Make sure the child’s hips and back are up against your stomach with hips bent to 90 degrees and legs forward and together. Hold the child’s hips with your hands. Support the child’s back and keep it straight with your body. If necessary, support the child’s chest with one of your hands to keep the child’s body upright. Position yourself and the child close to a table. Bring the child’s arms forward onto the table (Fig. A).
Encourage ■ Head upright, in line with the body, chin tucked
■ Body straight and upright
■ Arms forward onto the table
■ Hips bent to 90 degrees, legs forward and together
■ Sitting flat on bottom, not on tailbone
Helps to ■ Develop head control
■ Develop balance
■ Develop muscles of the body, back (spine), and hips
■ Free the arms for play
■ Forward reaching
Play Ideas Help the child color with crayons or fi nger paints. Float toys in a water-filled washbasin and help the child splash and reach for the toys. Put wooden spoons, a pot, and some blocks on the table and help the child stir and “cook” the blocks. Put toys out to the side to encourage the child to turn and reach (Fig. B).
Notes for Therapists The ability to move the trunk forward and reach forward using both arms in a bilateral manner is accomplished through a weight shift at the pelvic femoral joint. Children who do not have the active mobility at the pelvic femoral joint will collapse their bodies onto the table with thoracic kyphosis and hold onto the table with their arms for support. However, for the child to be able to hold the arms in space for reaching, without leaning arms and body onto the table, the child needs to initiate forward movement from the pelvic-femoral joint. This activity provides an opportunity for the child to develop this skill.
© 2010 by PRO-ED, Inc.
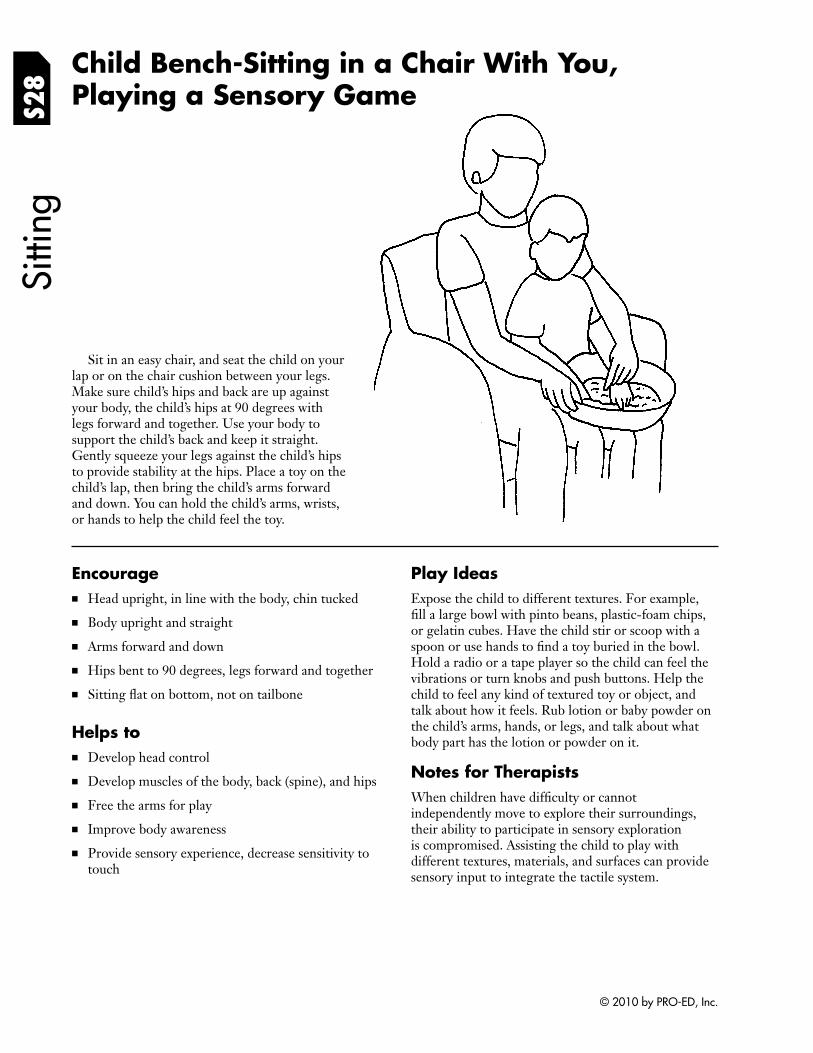
S28
Sitti
ng
Child Bench-Sitting in a Chair With You, Playing a Sensory Game
Sit in an easy chair, and seat the child on your lap or on the chair cushion between your legs. Make sure child’s hips and back are up against your body, the child’s hips at 90 degrees with legs forward and together. Use your body to support the child’s back and keep it straight. Gently squeeze your legs against the child’s hips to provide stability at the hips. Place a toy on the child’s lap, then bring the child’s arms forward and down. You can hold the child’s arms, wrists, or hands to help the child feel the toy.
Encourage ■ Head upright, in line with the body, chin tucked
■ Body upright and straight
■ Arms forward and down
■ Hips bent to 90 degrees, legs forward and together
■ Sitting flat on bottom, not on tailbone
Helps to ■ Develop head control
■ Develop muscles of the body, back (spine), and hips
■ Free the arms for play
■ Improve body awareness
■ Provide sensory experience, decrease sensitivity to touch
Play Ideas Expose the child to different textures. For example, fill a large bowl with pinto beans, plastic-foam chips, or gelatin cubes. Have the child stir or scoop with a spoon or use hands to find a toy buried in the bowl. Hold a radio or a tape player so the child can feel the vibrations or turn knobs and push buttons. Help the child to feel any kind of textured toy or object, and talk about how it feels. Rub lotion or baby powder on the child’s arms, hands, or legs, and talk about what body part has the lotion or powder on it.
Notes for Therapists When children have difficulty or cannot independently move to explore their surroundings, their ability to participate in sensory exploration is compromised. Assisting the child to play with different textures, materials, and surfaces can provide sensory input to integrate the tactile system.
© 2010 by PRO-ED, Inc.
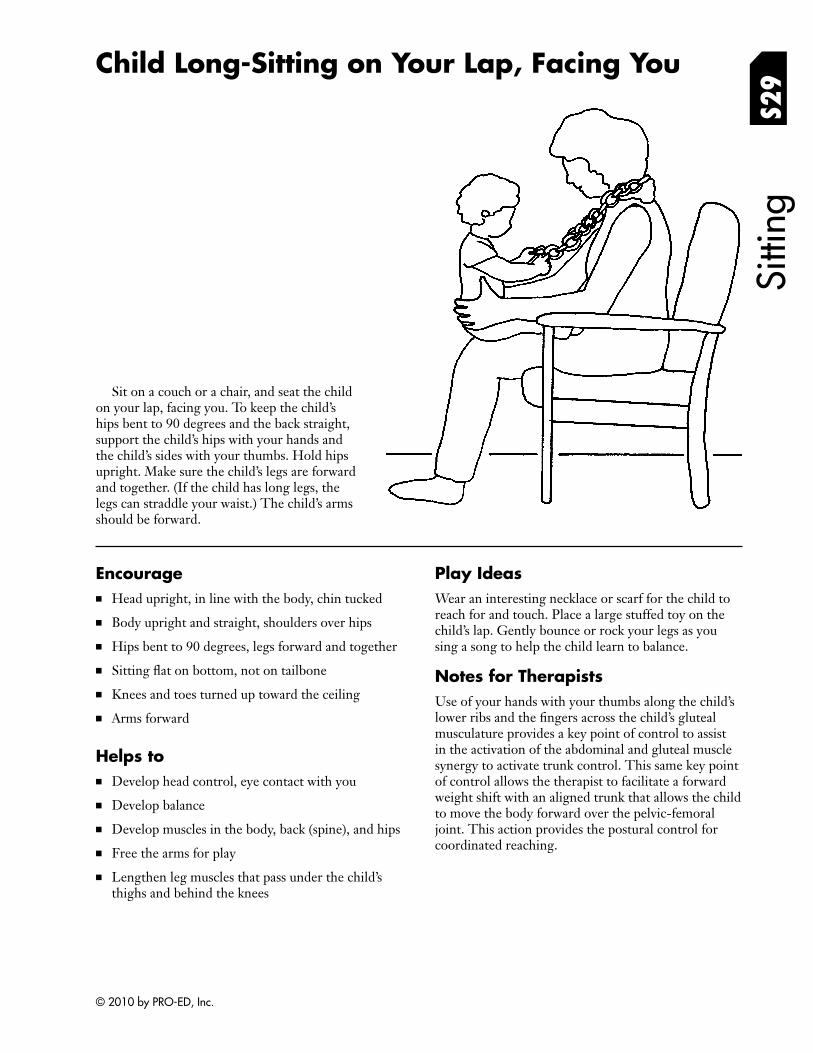
Child Long-Sitting on Your Lap, Facing You
Sitti
ng
S29
Sit on a couch or a chair, and seat the child on your lap, facing you. To keep the child’s hips bent to 90 degrees and the back straight, support the child’s hips with your hands and the child’s sides with your thumbs. Hold hips upright. Make sure the child’s legs are forward and together. (If the child has long legs, the legs can straddle your waist.) The child’s arms should be forward.
Encourage ■ Head upright, in line with the body, chin tucked
■ Body upright and straight, shoulders over hips
■ Hips bent to 90 degrees, legs forward and together
■ Sitting flat on bottom, not on tailbone
■ Knees and toes turned up toward the ceiling
■ Arms forward
Helps to ■ Develop head control, eye contact with you
■ Develop balance
■ Develop muscles in the body, back (spine), and hips
■ Free the arms for play
■ Lengthen leg muscles that pass under the child’s thighs and behind the knees
Play Ideas Wear an interesting necklace or scarf for the child to reach for and touch. Place a large stuffed toy on the child’s lap. Gently bounce or rock your legs as you sing a song to help the child learn to balance.
Notes for Therapists Use of your hands with your thumbs along the child’s lower ribs and the fingers across the child’s gluteal musculature provides a key point of control to assist in the activation of the abdominal and gluteal muscle synergy to activate trunk control. This same key point of control allows the therapist to facilitate a forward weight shift with an aligned trunk that allows the child to move the body forward over the pelvic-femoral joint. This action provides the postural control for coordinated reaching.
© 2010 by PRO-ED, Inc.
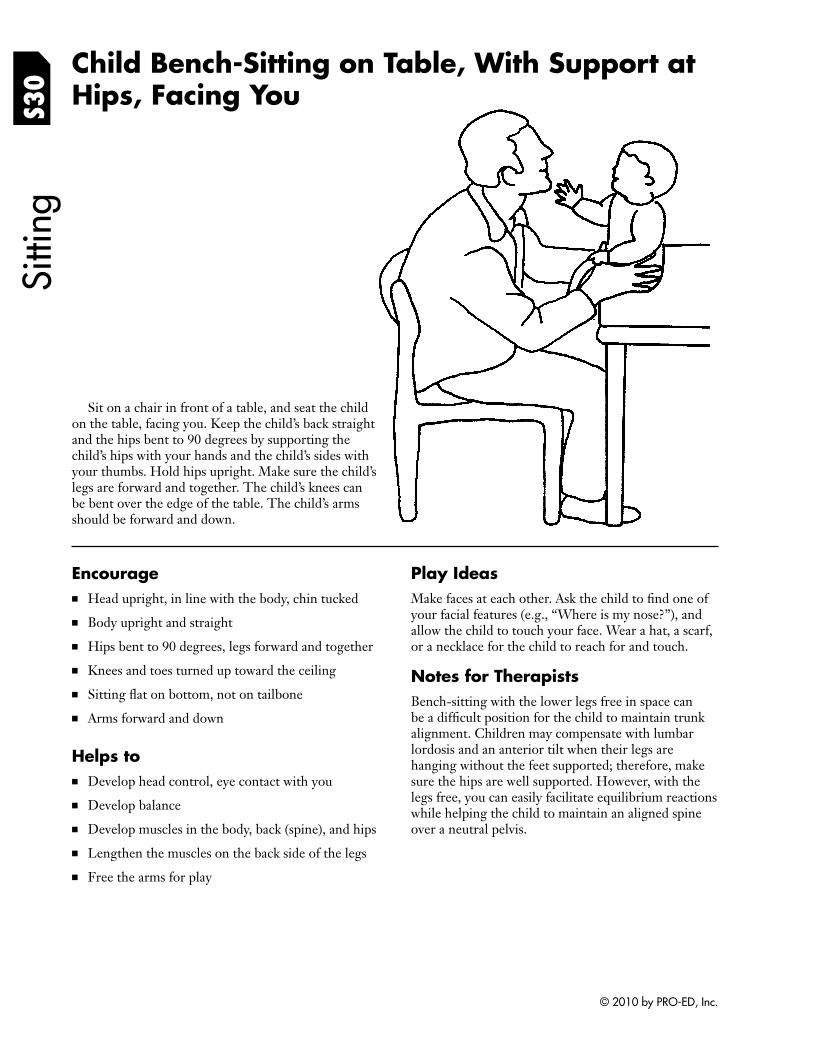
Child Bench-Sitting on Table, With Support at S3
0Si
tting
Hips, Facing You
Sit on a chair in front of a table, and seat the child on the table, facing you. Keep the child’s back straight and the hips bent to 90 degrees by supporting the child’s hips with your hands and the child’s sides with your thumbs. Hold hips upright. Make sure the child’s legs are forward and together. The child’s knees can be bent over the edge of the table. The child’s arms should be forward and down.
Encourage ■ Head upright, in line with the body, chin tucked
■ Body upright and straight
■ Hips bent to 90 degrees, legs forward and together
■ Knees and toes turned up toward the ceiling
■ Sitting flat on bottom, not on tailbone
■ Arms forward and down
Helps to ■ Develop head control, eye contact with you
■ Develop balance
■ Develop muscles in the body, back (spine), and hips
■ Lengthen the muscles on the back side of the legs
■ Free the arms for play
Play Ideas Make faces at each other. Ask the child to find one of your facial features (e.g., “Where is my nose?”), and allow the child to touch your face. Wear a hat, a scarf, or a necklace for the child to reach for and touch.
Notes for Therapists Bench-sitting with the lower legs free in space can be a difficult position for the child to maintain trunk alignment. Children may compensate with lumbar lordosis and an anterior tilt when their legs are hanging without the feet supported; therefore, make sure the hips are well supported. However, with the legs free, you can easily facilitate equilibrium reactions while helping the child to maintain an aligned spine over a neutral pelvis.
© 2010 by PRO-ED, Inc.
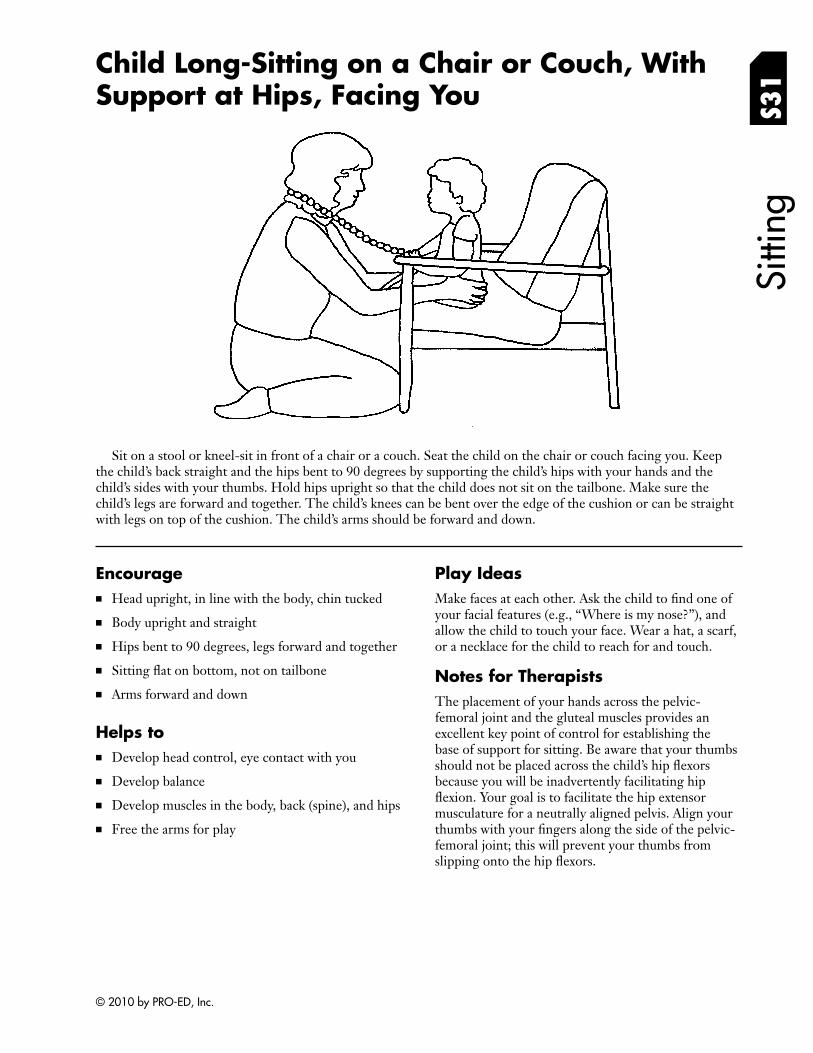
Child Long-Sitting on a Chair or Couch, With Support at Hips, Facing You S3
1Si
tting
Sit on a stool or kneel-sit in front of a chair or a couch. Seat the child on the chair or couch facing you. Keep the child’s back straight and the hips bent to 90 degrees by supporting the child’s hips with your hands and the child’s sides with your thumbs. Hold hips upright so that the child does not sit on the tailbone. Make sure the child’s legs are forward and together. The child’s knees can be bent over the edge of the cushion or can be straight with legs on top of the cushion. The child’s arms should be forward and down.
Encourage ■ Head upright, in line with the body, chin tucked
■ Body upright and straight
■ Hips bent to 90 degrees, legs forward and together
■ Sitting flat on bottom, not on tailbone
■ Arms forward and down
Helps to ■ Develop head control, eye contact with you
■ Develop balance
■ Develop muscles in the body, back (spine), and hips
■ Free the arms for play
Play Ideas Make faces at each other. Ask the child to find one of your facial features (e.g., “Where is my nose?”), and allow the child to touch your face. Wear a hat, a scarf, or a necklace for the child to reach for and touch.
Notes for Therapists The placement of your hands across the pelvic-femoral joint and the gluteal muscles provides an excellent key point of control for establishing the base of support for sitting. Be aware that your thumbs should not be placed across the child’s hip fl exors because you will be inadvertently facilitating hip flexion. Your goal is to facilitate the hip extensor musculature for a neutrally aligned pelvis. Align your thumbs with your fingers along the side of the pelvic-femoral joint; this will prevent your thumbs from slipping onto the hip fl exors.
© 2010 by PRO-ED, Inc.
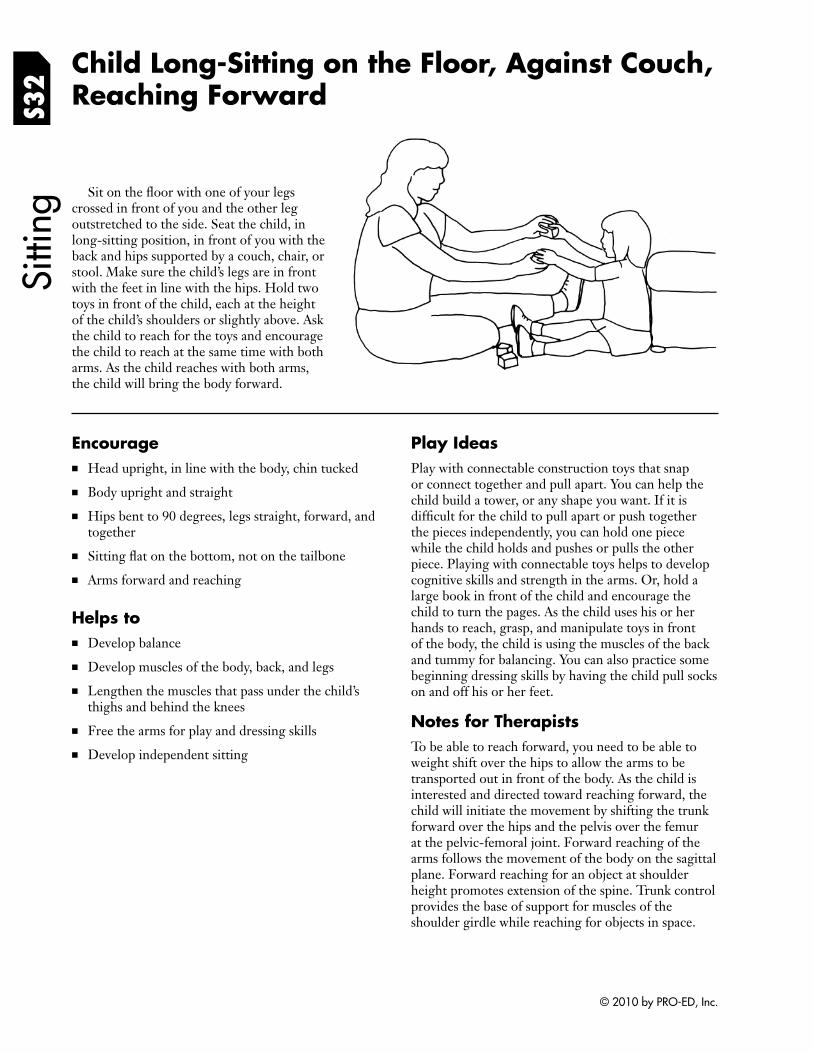
S32
Child Long-Sitting on the Floor, Against Couch, Reaching Forward
Sitti
ng Sit on the floor with one of your legs
crossed in front of you and the other leg outstretched to the side. Seat the child, in long-sitting position, in front of you with the back and hips supported by a couch, chair, or stool. Make sure the child’s legs are in front with the feet in line with the hips. Hold two toys in front of the child, each at the height of the child’s shoulders or slightly above. Ask the child to reach for the toys and encourage the child to reach at the same time with both arms. As the child reaches with both arms, the child will bring the body forward.
Encourage ■ Head upright, in line with the body, chin tucked
■ Body upright and straight
■ Hips bent to 90 degrees, legs straight, forward, and together
■ Sitting flat on the bottom, not on the tailbone
■ Arms forward and reaching
Helps to ■ Develop balance
■ Develop muscles of the body, back, and legs
■ Lengthen the muscles that pass under the child’s thighs and behind the knees
■ Free the arms for play and dressing skills
■ Develop independent sitting
Play Ideas Play with connectable construction toys that snap or connect together and pull apart. You can help the child build a tower, or any shape you want. If it is difficult for the child to pull apart or push together the pieces independently, you can hold one piece while the child holds and pushes or pulls the other piece. Playing with connectable toys helps to develop cognitive skills and strength in the arms. Or, hold a large book in front of the child and encourage the child to turn the pages. As the child uses his or her hands to reach, grasp, and manipulate toys in front of the body, the child is using the muscles of the back and tummy for balancing. You can also practice some beginning dressing skills by having the child pull socks on and off his or her feet.
Notes for Therapists To be able to reach forward, you need to be able to weight shift over the hips to allow the arms to be transported out in front of the body. As the child is interested and directed toward reaching forward, the child will initiate the movement by shifting the trunk forward over the hips and the pelvis over the femur at the pelvic-femoral joint. Forward reaching of the arms follows the movement of the body on the sagittal plane. Forward reaching for an object at shoulder height promotes extension of the spine. Trunk control provides the base of support for muscles of the shoulder girdle while reaching for objects in space.
© 2010 by PRO-ED, Inc.
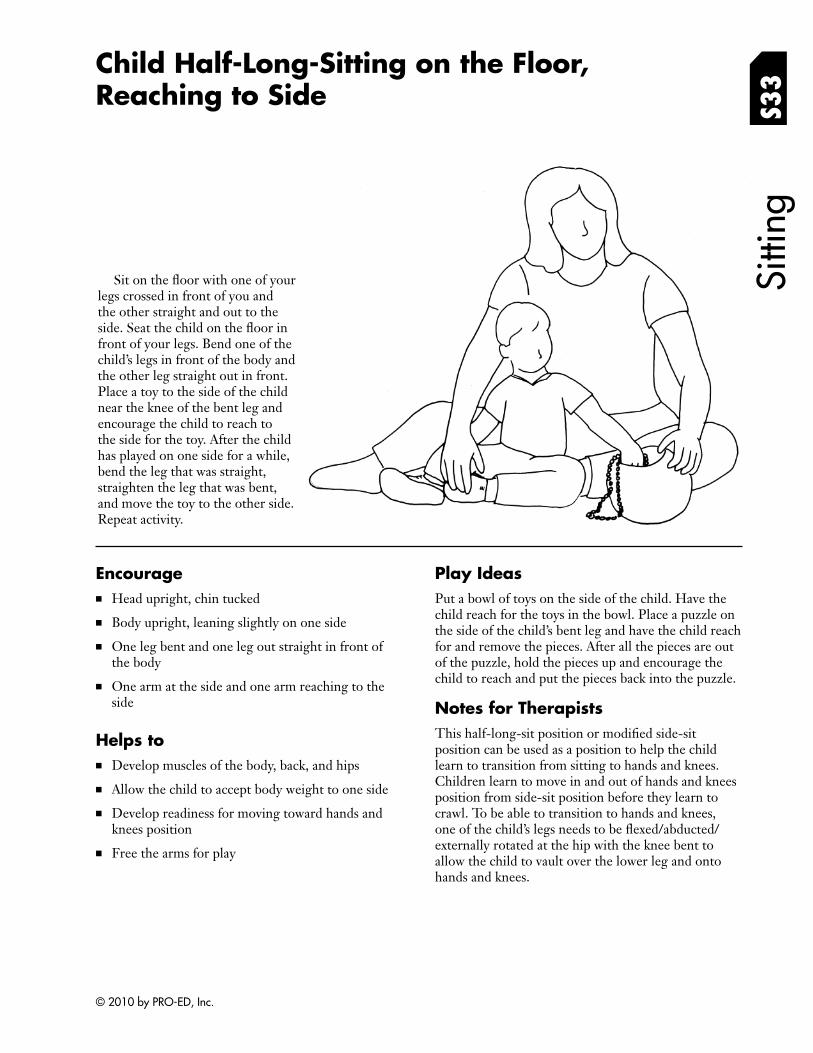
Child Half-Long-Sitting on the Floor, Reaching to Side S3
3
Sit on the floor with one of your legs crossed in front of you and the other straight and out to the side. Seat the child on the fl oor in front of your legs. Bend one of the child’s legs in front of the body and the other leg straight out in front. Place a toy to the side of the child near the knee of the bent leg and encourage the child to reach to the side for the toy. After the child has played on one side for a while, bend the leg that was straight, straighten the leg that was bent, and move the toy to the other side. Repeat activity.
Sitti
ng
Encourage ■ Head upright, chin tucked
■ Body upright, leaning slightly on one side
■ One leg bent and one leg out straight in front of the body
■ One arm at the side and one arm reaching to the side
Helps to ■ Develop muscles of the body, back, and hips
■ Allow the child to accept body weight to one side
■ Develop readiness for moving toward hands and knees position
■ Free the arms for play
Play Ideas Put a bowl of toys on the side of the child. Have the child reach for the toys in the bowl. Place a puzzle on the side of the child’s bent leg and have the child reach for and remove the pieces. After all the pieces are out of the puzzle, hold the pieces up and encourage the child to reach and put the pieces back into the puzzle.
Notes for Therapists This half-long-sit position or modifi ed side-sit position can be used as a position to help the child learn to transition from sitting to hands and knees. Children learn to move in and out of hands and knees position from side-sit position before they learn to crawl. To be able to transition to hands and knees, one of the child’s legs needs to be fl exed/abducted/ externally rotated at the hip with the knee bent to allow the child to vault over the lower leg and onto hands and knees.
© 2010 by PRO-ED, Inc.

S34
Child Long-Sitting, Reaching for Toy Si
tting
Sit cross-legged on the fl oor, and support your back against a couch. Seat the child on the floor in front of your legs. Make sure the child sits with hips bent to 90 degrees, with legs forward and straight. The child’s legs should be slightly apart. If necessary, support the child’s hips and hold the hips upright to keep the back straight and hips and legs in position. The child should be sitting flat on the bottom, not on the tailbone. The child’s arms should be forward and down. Put a toy next to the child, but out of reach, and entice the child to get the toy. Help the child move the body to reach the toy by gently tipping the child’s hips toward the toy, then help the child return to long-sitting by bringing the hips back to the upright position. Repeat to the other side.
Encourage ■ Head upright, chin tucked
■ Body upright and straight, then curved to the side when balancing
■ Hips bent to 90 degrees, legs straight, forward, and together
■ Sitting flat on bottom, not on tailbone
■ Arms forward and down
Helps to ■ Develop head control
■ Develop balance
■ Develop muscles of the body, back (spine), and hips
■ Free the arms for play
■ Develop reaching to the side
■ Lengthen the leg muscles that pass under the child’s thighs and behind the knees
Play Ideas Put a bowl of toys on each side of the child. Have the child reach for the toys in one bowl and put them in the other bowl. Have the child make a stuffed toy hop from one bowl to the other bowl. Put puzzle pieces on the child’s legs and the empty puzzle next to the child, and have the child put the puzzle together.
Notes for Therapists Reaching to the side develops the components of shoulder horizontal abduction, elbow extension, wrist extension, finger extension, trunk elongation on the side of the reaching arm, femoral external rotation, and pelvic femoral mobility. The ability to reach with full range of motion of the arm is dependent upon lateral pelvic mobility to allow the lateral weight shift.
© 2010 by PRO-ED, Inc.
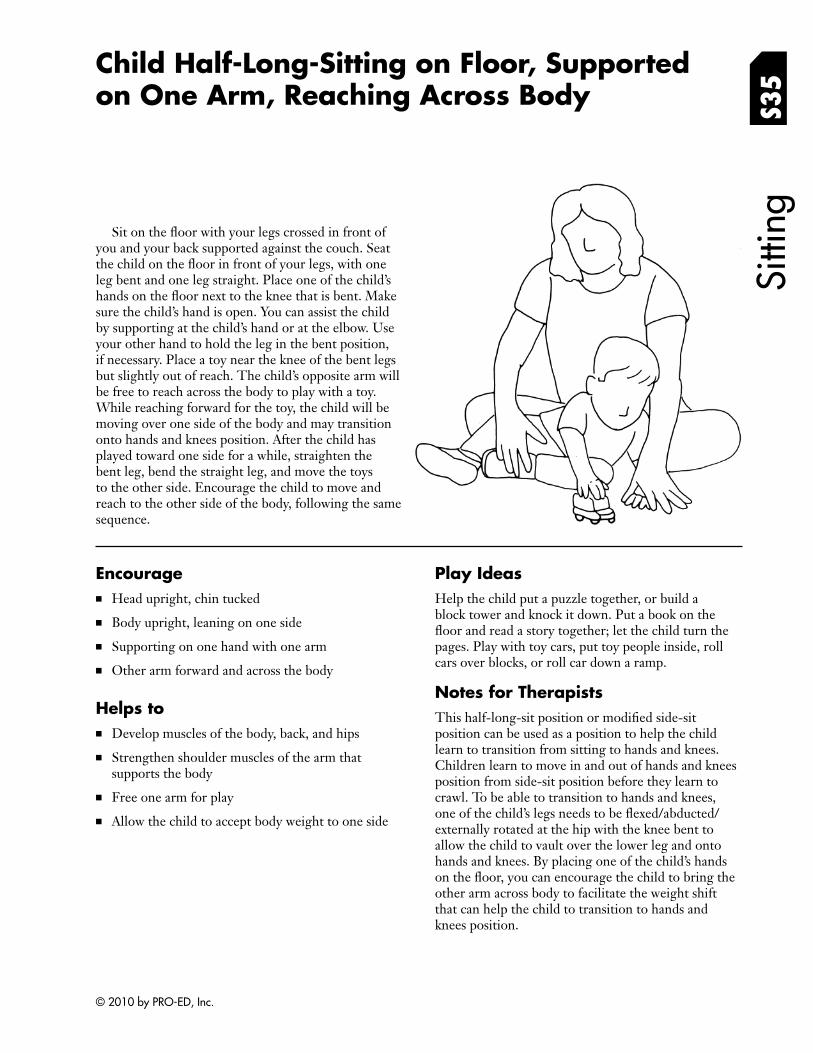
Child Half-Long-Sitting on Floor, Supported on One Arm, Reaching Across Body S3
5Si
tting
Sit on the floor with your legs crossed in front of you and your back supported against the couch. Seat the child on the floor in front of your legs, with one leg bent and one leg straight. Place one of the child’s hands on the floor next to the knee that is bent. Make sure the child’s hand is open. You can assist the child by supporting at the child’s hand or at the elbow. Use your other hand to hold the leg in the bent position, if necessary. Place a toy near the knee of the bent legs but slightly out of reach. The child’s opposite arm will be free to reach across the body to play with a toy. While reaching forward for the toy, the child will be moving over one side of the body and may transition onto hands and knees position. After the child has played toward one side for a while, straighten the bent leg, bend the straight leg, and move the toys to the other side. Encourage the child to move and reach to the other side of the body, following the same sequence.
Encourage ■ Head upright, chin tucked
■ Body upright, leaning on one side
■ Supporting on one hand with one arm
■ Other arm forward and across the body
Helps to ■ Develop muscles of the body, back, and hips
■ Strengthen shoulder muscles of the arm that supports the body
■ Free one arm for play
■ Allow the child to accept body weight to one side
Play Ideas Help the child put a puzzle together, or build a block tower and knock it down. Put a book on the floor and read a story together; let the child turn the pages. Play with toy cars, put toy people inside, roll cars over blocks, or roll car down a ramp.
Notes for Therapists This half-long-sit position or modifi ed side-sit position can be used as a position to help the child learn to transition from sitting to hands and knees. Children learn to move in and out of hands and knees position from side-sit position before they learn to crawl. To be able to transition to hands and knees, one of the child’s legs needs to be fl exed/abducted/ externally rotated at the hip with the knee bent to allow the child to vault over the lower leg and onto hands and knees. By placing one of the child’s hands on the floor, you can encourage the child to bring the other arm across body to facilitate the weight shift that can help the child to transition to hands and knees position.
© 2010 by PRO-ED, Inc.
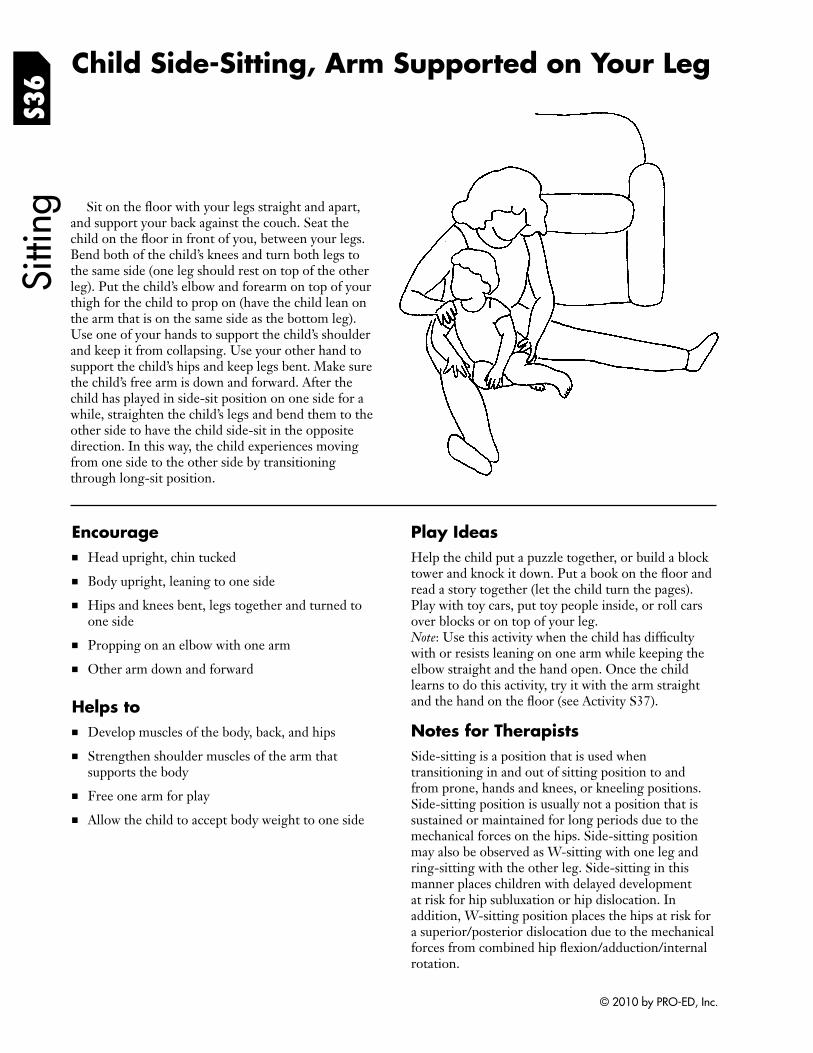
S36
Child Side-Sitting, Arm Supported on Your Leg Si
tting
Sit on the floor with your legs straight and apart, and support your back against the couch. Seat the child on the floor in front of you, between your legs. Bend both of the child’s knees and turn both legs to the same side (one leg should rest on top of the other leg). Put the child’s elbow and forearm on top of your thigh for the child to prop on (have the child lean on the arm that is on the same side as the bottom leg). Use one of your hands to support the child’s shoulder and keep it from collapsing. Use your other hand to support the child’s hips and keep legs bent. Make sure the child’s free arm is down and forward. After the child has played in side-sit position on one side for a while, straighten the child’s legs and bend them to the other side to have the child side-sit in the opposite direction. In this way, the child experiences moving from one side to the other side by transitioning through long-sit position.
Encourage ■ Head upright, chin tucked
■ Body upright, leaning to one side
■ Hips and knees bent, legs together and turned to one side
■ Propping on an elbow with one arm
■ Other arm down and forward
Helps to ■ Develop muscles of the body, back, and hips
■ Strengthen shoulder muscles of the arm that supports the body
■ Free one arm for play
■ Allow the child to accept body weight to one side
Play Ideas Help the child put a puzzle together, or build a block tower and knock it down. Put a book on the fl oor and read a story together (let the child turn the pages). Play with toy cars, put toy people inside, or roll cars over blocks or on top of your leg. Note: Use this activity when the child has diffi culty with or resists leaning on one arm while keeping the elbow straight and the hand open. Once the child learns to do this activity, try it with the arm straight and the hand on the floor (see Activity S37).
Notes for Therapists Side-sitting is a position that is used when transitioning in and out of sitting position to and from prone, hands and knees, or kneeling positions. Side-sitting position is usually not a position that is sustained or maintained for long periods due to the mechanical forces on the hips. Side-sitting position may also be observed as W-sitting with one leg and ring-sitting with the other leg. Side-sitting in this manner places children with delayed development at risk for hip subluxation or hip dislocation. In addition, W-sitting position places the hips at risk for a superior/posterior dislocation due to the mechanical forces from combined hip fl exion/adduction/internal rotation.
© 2010 by PRO-ED, Inc.
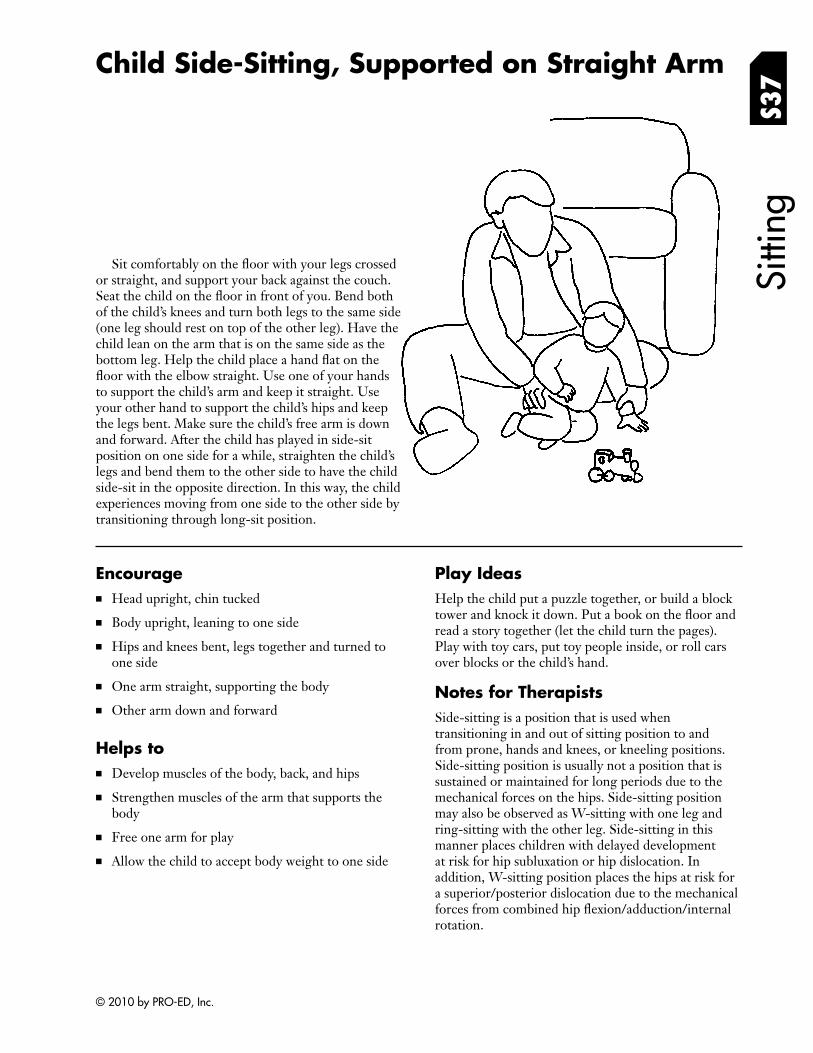
Child Side-Sitting, Supported on Straight Arm
S37
Sitti
ng
Sit comfortably on the floor with your legs crossed or straight, and support your back against the couch. Seat the child on the floor in front of you. Bend both of the child’s knees and turn both legs to the same side (one leg should rest on top of the other leg). Have the child lean on the arm that is on the same side as the bottom leg. Help the child place a hand flat on the floor with the elbow straight. Use one of your hands to support the child’s arm and keep it straight. Use your other hand to support the child’s hips and keep the legs bent. Make sure the child’s free arm is down and forward. After the child has played in side-sit position on one side for a while, straighten the child’s legs and bend them to the other side to have the child side-sit in the opposite direction. In this way, the child experiences moving from one side to the other side by transitioning through long-sit position.
Encourage ■ Head upright, chin tucked
■ Body upright, leaning to one side
■ Hips and knees bent, legs together and turned to one side
■ One arm straight, supporting the body
■ Other arm down and forward
Helps to ■ Develop muscles of the body, back, and hips
■ Strengthen muscles of the arm that supports the body
■ Free one arm for play
■ Allow the child to accept body weight to one side
Play Ideas Help the child put a puzzle together, or build a block tower and knock it down. Put a book on the fl oor and read a story together (let the child turn the pages). Play with toy cars, put toy people inside, or roll cars over blocks or the child’s hand.
Notes for Therapists Side-sitting is a position that is used when transitioning in and out of sitting position to and from prone, hands and knees, or kneeling positions. Side-sitting position is usually not a position that is sustained or maintained for long periods due to the mechanical forces on the hips. Side-sitting position may also be observed as W-sitting with one leg and ring-sitting with the other leg. Side-sitting in this manner places children with delayed development at risk for hip subluxation or hip dislocation. In addition, W-sitting position places the hips at risk for a superior/posterior dislocation due to the mechanical forces from combined hip fl exion/adduction/internal rotation.
© 2010 by PRO-ED, Inc.
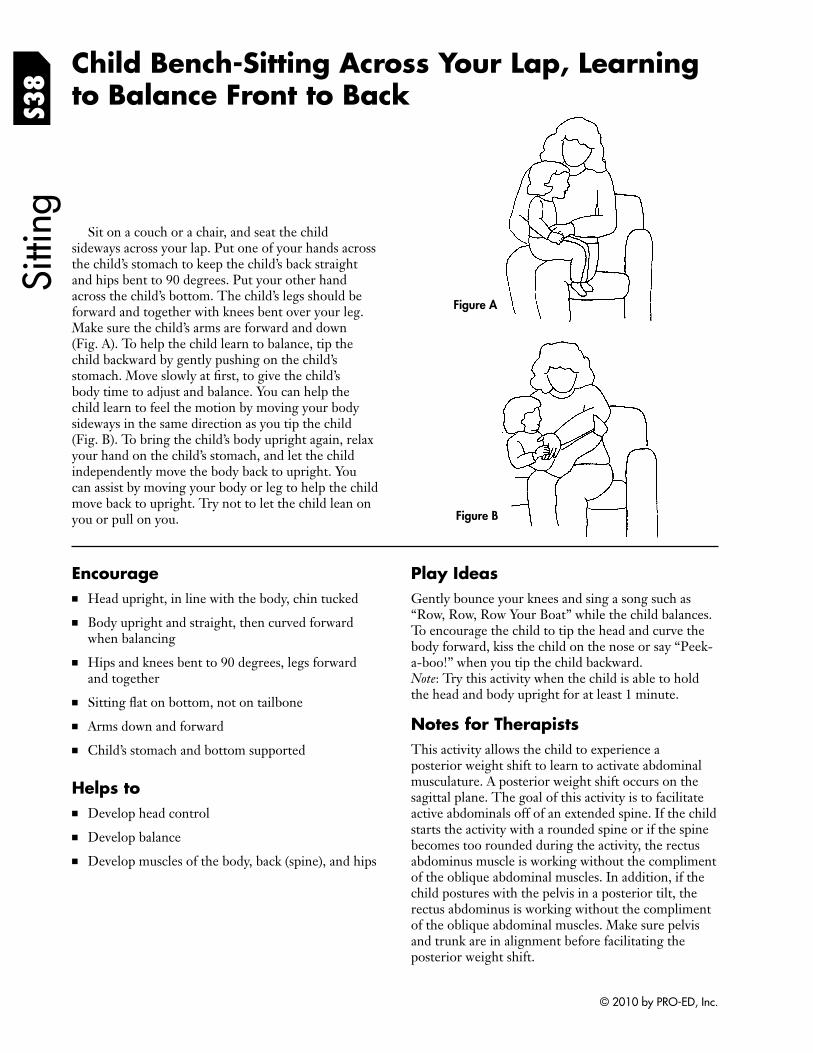
S38
Child Bench-Sitting Across Your Lap, Learning to Balance Front to Back
Figure A
Figure B
Sitti
ng
Sit on a couch or a chair, and seat the child sideways across your lap. Put one of your hands across the child’s stomach to keep the child’s back straight and hips bent to 90 degrees. Put your other hand across the child’s bottom. The child’s legs should be forward and together with knees bent over your leg. Make sure the child’s arms are forward and down (Fig. A). To help the child learn to balance, tip the child backward by gently pushing on the child’s stomach. Move slowly at first, to give the child’s body time to adjust and balance. You can help the child learn to feel the motion by moving your body sideways in the same direction as you tip the child (Fig. B). To bring the child’s body upright again, relax your hand on the child’s stomach, and let the child independently move the body back to upright. You can assist by moving your body or leg to help the child move back to upright. Try not to let the child lean on you or pull on you.
Encourage ■ Head upright, in line with the body, chin tucked
■ Body upright and straight, then curved forward when balancing
■ Hips and knees bent to 90 degrees, legs forward and together
■ Sitting flat on bottom, not on tailbone
■ Arms down and forward
■ Child’s stomach and bottom supported
Helps to ■ Develop head control
■ Develop balance
■ Develop muscles of the body, back (spine), and hips
Play Ideas Gently bounce your knees and sing a song such as “Row, Row, Row Your Boat” while the child balances. To encourage the child to tip the head and curve the body forward, kiss the child on the nose or say “Peeka-boo!” when you tip the child backward. Note: Try this activity when the child is able to hold the head and body upright for at least 1 minute.
Notes for Therapists This activity allows the child to experience a posterior weight shift to learn to activate abdominal musculature. A posterior weight shift occurs on the sagittal plane. The goal of this activity is to facilitate active abdominals off of an extended spine. If the child starts the activity with a rounded spine or if the spine becomes too rounded during the activity, the rectus abdominus muscle is working without the compliment of the oblique abdominal muscles. In addition, if the child postures with the pelvis in a posterior tilt, the rectus abdominus is working without the compliment of the oblique abdominal muscles. Make sure pelvis and trunk are in alignment before facilitating the posterior weight shift.
© 2010 by PRO-ED, Inc.
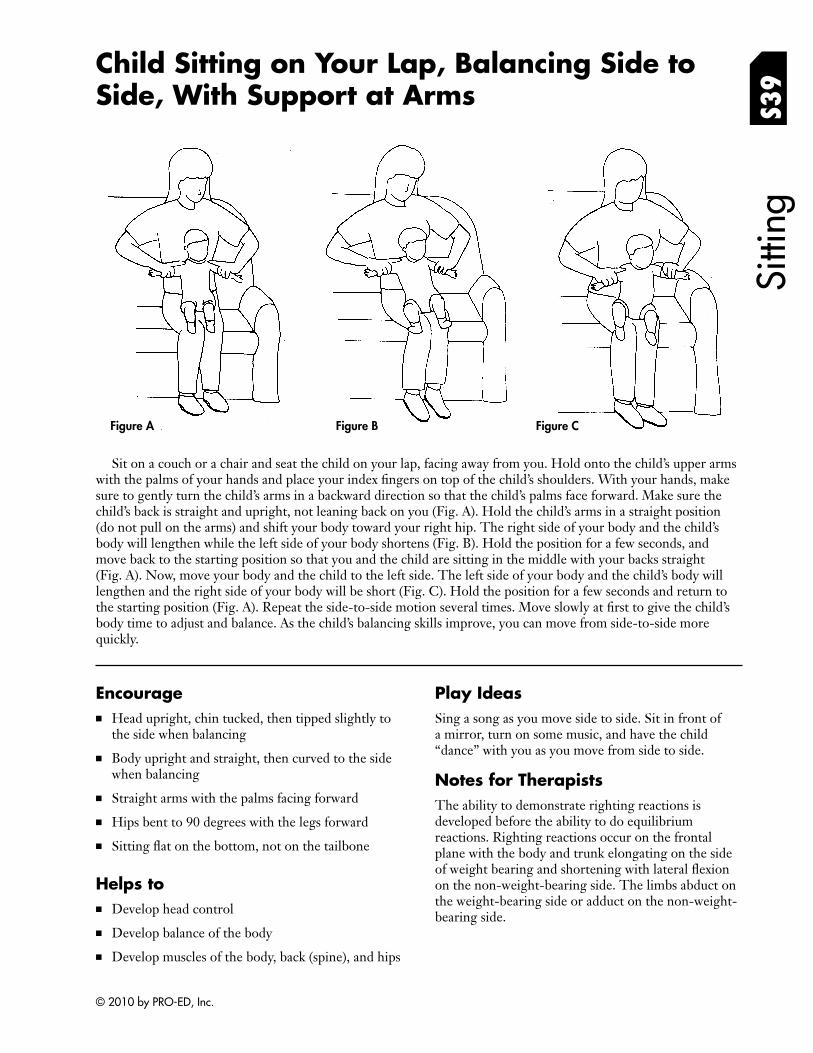
Child Sitting on Your Lap, Balancing Side to Side, With Support at Arms
Sitti
ng
S39
Figure A Figure B Figure C
Sit on a couch or a chair and seat the child on your lap, facing away from you. Hold onto the child’s upper arms with the palms of your hands and place your index fingers on top of the child’s shoulders. With your hands, make sure to gently turn the child’s arms in a backward direction so that the child’s palms face forward. Make sure the child’s back is straight and upright, not leaning back on you (Fig. A). Hold the child’s arms in a straight position (do not pull on the arms) and shift your body toward your right hip. The right side of your body and the child’s body will lengthen while the left side of your body shortens (Fig. B). Hold the position for a few seconds, and move back to the starting position so that you and the child are sitting in the middle with your backs straight (Fig. A). Now, move your body and the child to the left side. The left side of your body and the child’s body will lengthen and the right side of your body will be short (Fig. C). Hold the position for a few seconds and return to the starting position (Fig. A). Repeat the side-to-side motion several times. Move slowly at first to give the child’s body time to adjust and balance. As the child’s balancing skills improve, you can move from side-to-side more quickly.
Encourage ■ Head upright, chin tucked, then tipped slightly to
the side when balancing
■ Body upright and straight, then curved to the side when balancing
■ Straight arms with the palms facing forward
■ Hips bent to 90 degrees with the legs forward
■ Sitting flat on the bottom, not on the tailbone
Helps to ■ Develop head control
■ Develop balance of the body
■ Develop muscles of the body, back (spine), and hips
Play Ideas Sing a song as you move side to side. Sit in front of a mirror, turn on some music, and have the child “dance” with you as you move from side to side.
Notes for Therapists The ability to demonstrate righting reactions is developed before the ability to do equilibrium reactions. Righting reactions occur on the frontal plane with the body and trunk elongating on the side of weight bearing and shortening with lateral fl exion on the non-weight-bearing side. The limbs abduct on the weight-bearing side or adduct on the non-weightbearing side.
© 2010 by PRO-ED, Inc.
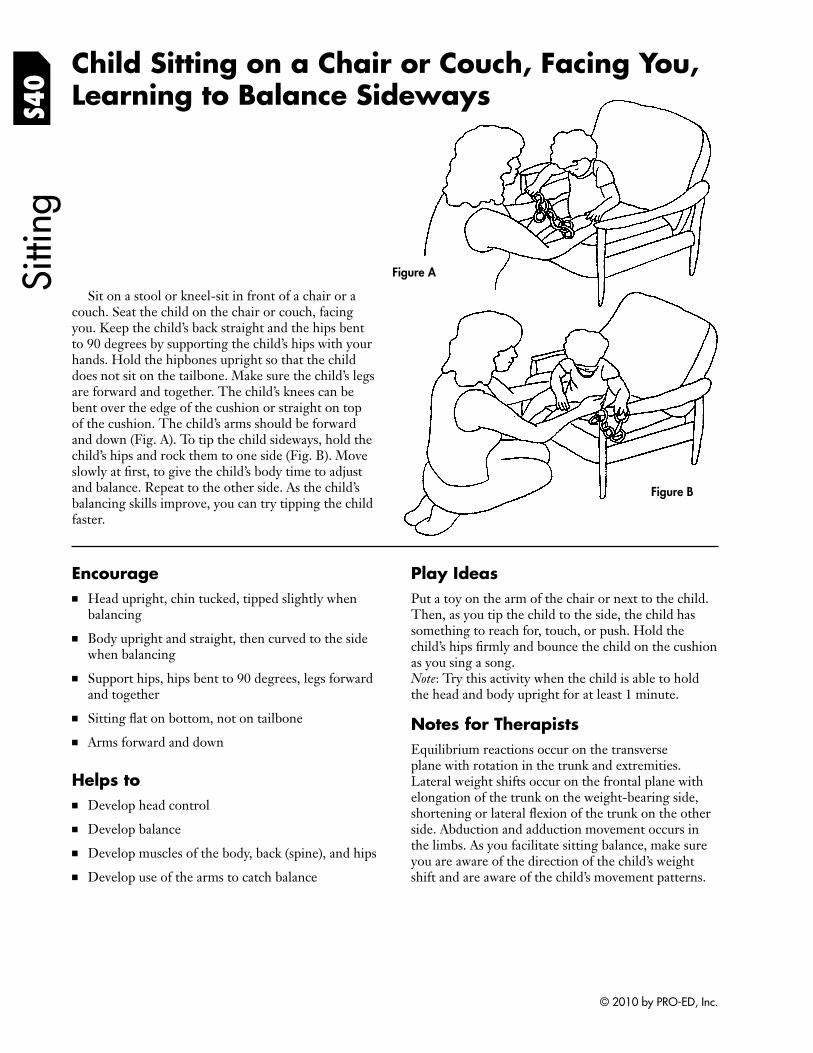
S40
Sitti
ng
Child Sitting on a Chair or Couch, Facing You, Learning to Balance Sideways
Sit on a stool or kneel-sit in front of a chair or a couch. Seat the child on the chair or couch, facing you. Keep the child’s back straight and the hips bent to 90 degrees by supporting the child’s hips with your hands. Hold the hipbones upright so that the child does not sit on the tailbone. Make sure the child’s legs are forward and together. The child’s knees can be bent over the edge of the cushion or straight on top of the cushion. The child’s arms should be forward and down (Fig. A). To tip the child sideways, hold the child’s hips and rock them to one side (Fig. B). Move slowly at first, to give the child’s body time to adjust and balance. Repeat to the other side. As the child’s balancing skills improve, you can try tipping the child faster.
Figure B
Figure A
Encourage ■ Head upright, chin tucked, tipped slightly when
balancing
■ Body upright and straight, then curved to the side when balancing
■ Support hips, hips bent to 90 degrees, legs forward and together
■ Sitting flat on bottom, not on tailbone
■ Arms forward and down
Helps to ■ Develop head control
■ Develop balance
■ Develop muscles of the body, back (spine), and hips
■ Develop use of the arms to catch balance
Play Ideas Put a toy on the arm of the chair or next to the child. Then, as you tip the child to the side, the child has something to reach for, touch, or push. Hold the child’s hips firmly and bounce the child on the cushion as you sing a song. Note: Try this activity when the child is able to hold the head and body upright for at least 1 minute.
Notes for Therapists Equilibrium reactions occur on the transverse plane with rotation in the trunk and extremities. Lateral weight shifts occur on the frontal plane with elongation of the trunk on the weight-bearing side, shortening or lateral flexion of the trunk on the other side. Abduction and adduction movement occurs in the limbs. As you facilitate sitting balance, make sure you are aware of the direction of the child’s weight shift and are aware of the child’s movement patterns.
© 2010 by PRO-ED, Inc.
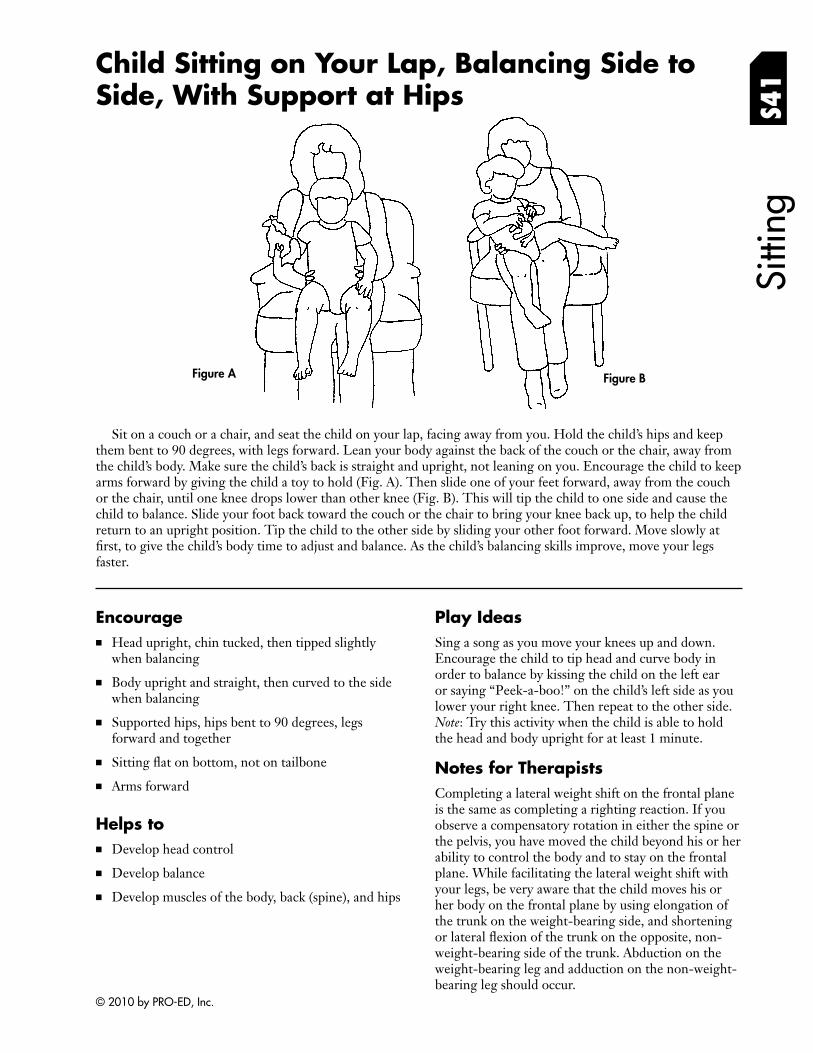
Sitti
ng
Child Sitting on Your Lap, Balancing Side to Side, With Support at Hips S4
1
Figure BFigure A
Sit on a couch or a chair, and seat the child on your lap, facing away from you. Hold the child’s hips and keep them bent to 90 degrees, with legs forward. Lean your body against the back of the couch or the chair, away from the child’s body. Make sure the child’s back is straight and upright, not leaning on you. Encourage the child to keep arms forward by giving the child a toy to hold (Fig. A). Then slide one of your feet forward, away from the couch or the chair, until one knee drops lower than other knee (Fig. B). This will tip the child to one side and cause the child to balance. Slide your foot back toward the couch or the chair to bring your knee back up, to help the child return to an upright position. Tip the child to the other side by sliding your other foot forward. Move slowly at first, to give the child’s body time to adjust and balance. As the child’s balancing skills improve, move your legs faster.
Encourage ■ Head upright, chin tucked, then tipped slightly
when balancing
■ Body upright and straight, then curved to the side when balancing
■ Supported hips, hips bent to 90 degrees, legs forward and together
■ Sitting flat on bottom, not on tailbone
■ Arms forward
Helps to ■ Develop head control
■ Develop balance
■ Develop muscles of the body, back (spine), and hips
Play Ideas Sing a song as you move your knees up and down. Encourage the child to tip head and curve body in order to balance by kissing the child on the left ear or saying “Peek-a-boo!” on the child’s left side as you lower your right knee. Then repeat to the other side. Note: Try this activity when the child is able to hold the head and body upright for at least 1 minute.
Notes for Therapists Completing a lateral weight shift on the frontal plane is the same as completing a righting reaction. If you observe a compensatory rotation in either the spine or the pelvis, you have moved the child beyond his or her ability to control the body and to stay on the frontal plane. While facilitating the lateral weight shift with your legs, be very aware that the child moves his or her body on the frontal plane by using elongation of the trunk on the weight-bearing side, and shortening or lateral flexion of the trunk on the opposite, nonweight-bearing side of the trunk. Abduction on the weight-bearing leg and adduction on the non-weightbearing leg should occur.
© 2010 by PRO-ED, Inc.
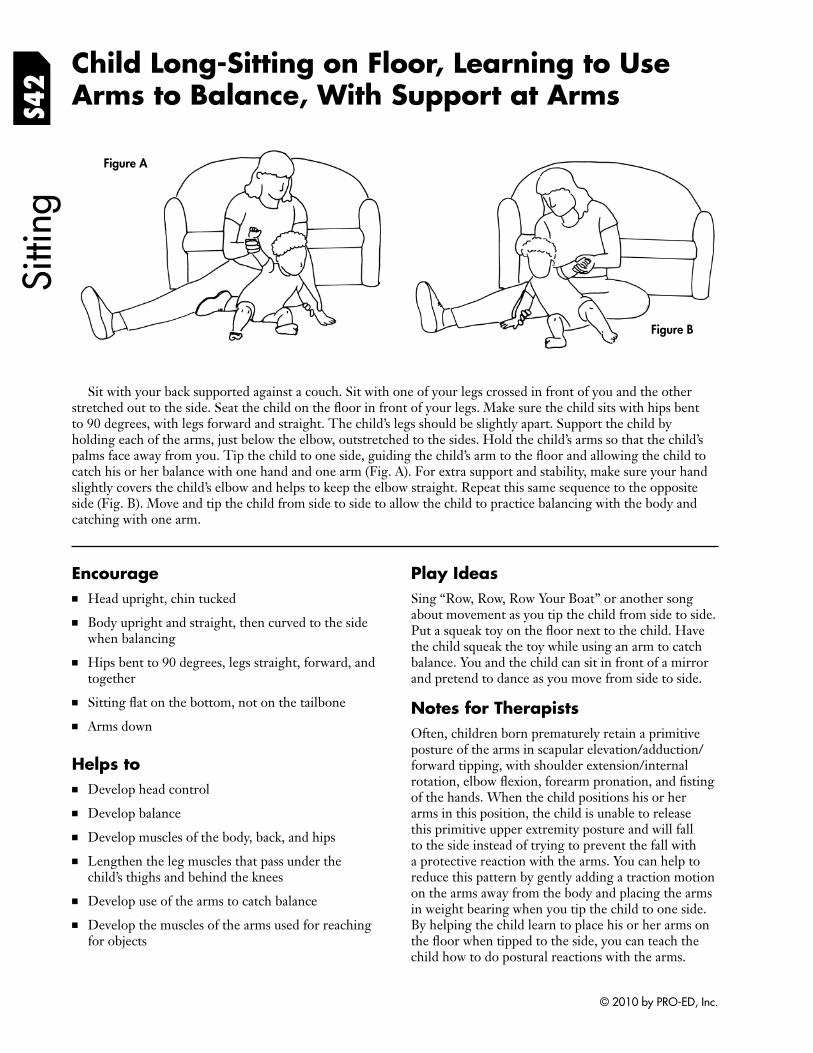
Child Long-Sitting on Floor, Learning to Use Arms to Balance, With Support at Arms
Sitti
ng
S42
Figure B
Figure A
Sit with your back supported against a couch. Sit with one of your legs crossed in front of you and the other stretched out to the side. Seat the child on the floor in front of your legs. Make sure the child sits with hips bent to 90 degrees, with legs forward and straight. The child’s legs should be slightly apart. Support the child by holding each of the arms, just below the elbow, outstretched to the sides. Hold the child’s arms so that the child’s palms face away from you. Tip the child to one side, guiding the child’s arm to the floor and allowing the child to catch his or her balance with one hand and one arm (Fig. A). For extra support and stability, make sure your hand slightly covers the child’s elbow and helps to keep the elbow straight. Repeat this same sequence to the opposite side (Fig. B). Move and tip the child from side to side to allow the child to practice balancing with the body and catching with one arm.
Encourage ■ Head upright, chin tucked
■ Body upright and straight, then curved to the side when balancing
■ Hips bent to 90 degrees, legs straight, forward, and together
■ Sitting flat on the bottom, not on the tailbone
■ Arms down
Helps to ■ Develop head control
■ Develop balance
■ Develop muscles of the body, back, and hips
■ Lengthen the leg muscles that pass under the child’s thighs and behind the knees
■ Develop use of the arms to catch balance
■ Develop the muscles of the arms used for reaching for objects
Play Ideas Sing “Row, Row, Row Your Boat” or another song about movement as you tip the child from side to side. Put a squeak toy on the floor next to the child. Have the child squeak the toy while using an arm to catch balance. You and the child can sit in front of a mirror and pretend to dance as you move from side to side.
Notes for Therapists Often, children born prematurely retain a primitive posture of the arms in scapular elevation/adduction/ forward tipping, with shoulder extension/internal rotation, elbow flexion, forearm pronation, and fi sting of the hands. When the child positions his or her arms in this position, the child is unable to release this primitive upper extremity posture and will fall to the side instead of trying to prevent the fall with a protective reaction with the arms. You can help to reduce this pattern by gently adding a traction motion on the arms away from the body and placing the arms in weight bearing when you tip the child to one side. By helping the child learn to place his or her arms on the floor when tipped to the side, you can teach the child how to do postural reactions with the arms.
© 2010 by PRO-ED, Inc.
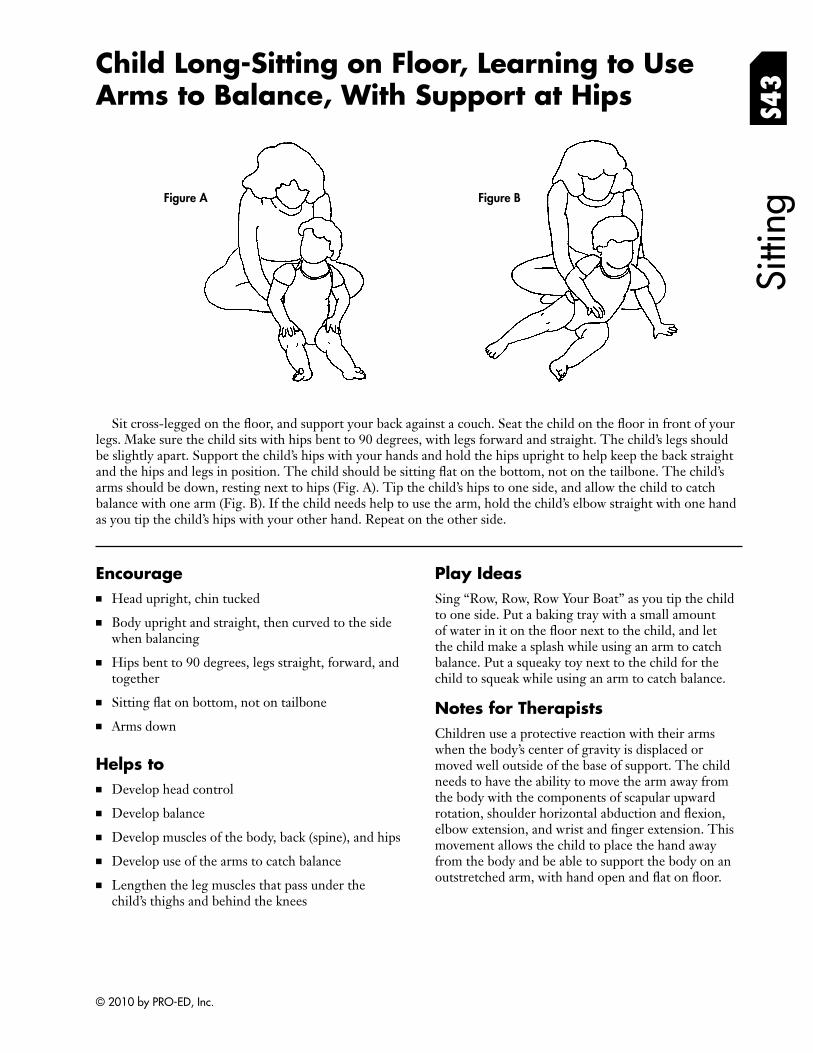
Child Long-Sitting on Floor, Learning to Use Arms to Balance, With Support at Hips
Sitti
ng
S43
Figure BFigure A
Sit cross-legged on the floor, and support your back against a couch. Seat the child on the floor in front of your legs. Make sure the child sits with hips bent to 90 degrees, with legs forward and straight. The child’s legs should be slightly apart. Support the child’s hips with your hands and hold the hips upright to help keep the back straight and the hips and legs in position. The child should be sitting flat on the bottom, not on the tailbone. The child’s arms should be down, resting next to hips (Fig. A). Tip the child’s hips to one side, and allow the child to catch balance with one arm (Fig. B). If the child needs help to use the arm, hold the child’s elbow straight with one hand as you tip the child’s hips with your other hand. Repeat on the other side.
Encourage ■ Head upright, chin tucked
■ Body upright and straight, then curved to the side when balancing
■ Hips bent to 90 degrees, legs straight, forward, and together
■ Sitting flat on bottom, not on tailbone
■ Arms down
Helps to ■ Develop head control
■ Develop balance
■ Develop muscles of the body, back (spine), and hips
■ Develop use of the arms to catch balance
■ Lengthen the leg muscles that pass under the child’s thighs and behind the knees
Play Ideas Sing “Row, Row, Row Your Boat” as you tip the child to one side. Put a baking tray with a small amount of water in it on the floor next to the child, and let the child make a splash while using an arm to catch balance. Put a squeaky toy next to the child for the child to squeak while using an arm to catch balance.
Notes for Therapists Children use a protective reaction with their arms when the body’s center of gravity is displaced or moved well outside of the base of support. The child needs to have the ability to move the arm away from the body with the components of scapular upward rotation, shoulder horizontal abduction and fl exion, elbow extension, and wrist and finger extension. This movement allows the child to place the hand away from the body and be able to support the body on an outstretched arm, with hand open and flat on fl oor.
© 2010 by PRO-ED, Inc.
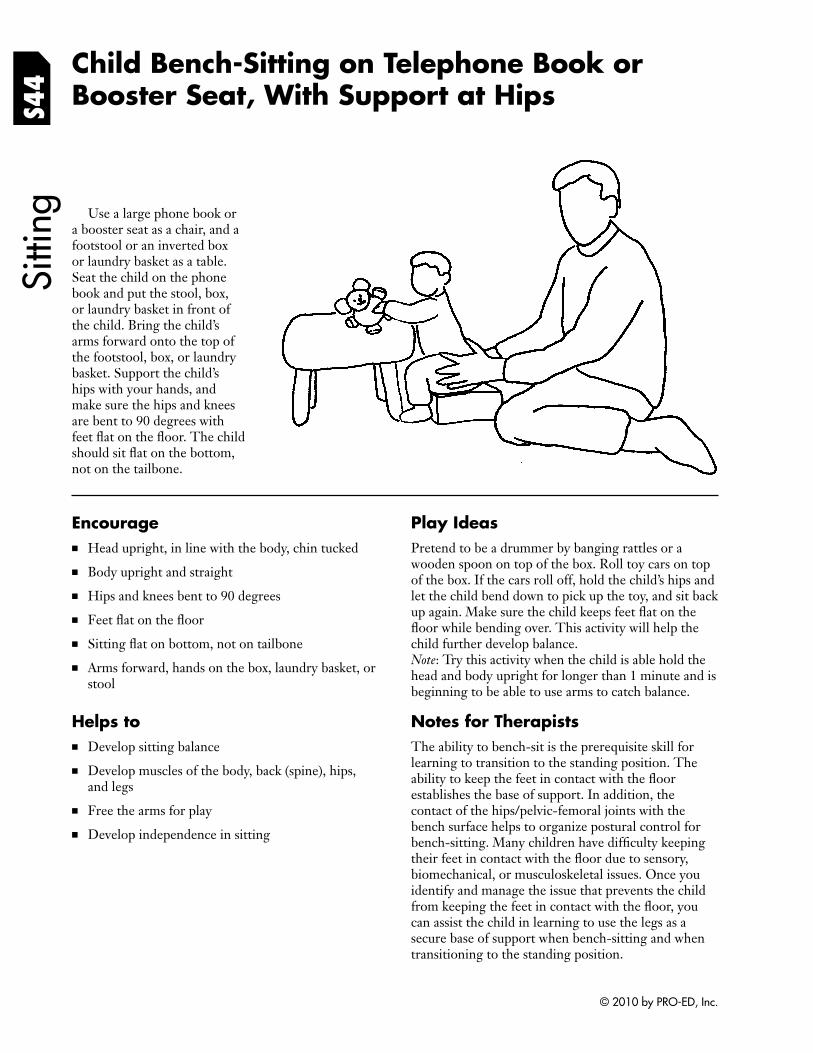
S44
Child Bench-Sitting on Telephone Book or Booster Seat, With Support at Hips
Sitti
ng
Use a large phone book or a booster seat as a chair, and a footstool or an inverted box or laundry basket as a table. Seat the child on the phone book and put the stool, box, or laundry basket in front of the child. Bring the child’s arms forward onto the top of the footstool, box, or laundry basket. Support the child’s hips with your hands, and make sure the hips and knees are bent to 90 degrees with feet flat on the floor. The child should sit flat on the bottom, not on the tailbone.
Encourage ■ Head upright, in line with the body, chin tucked
■ Body upright and straight
■ Hips and knees bent to 90 degrees
■ Feet flat on the fl oor
■ Sitting flat on bottom, not on tailbone
■ Arms forward, hands on the box, laundry basket, or stool
Helps to ■ Develop sitting balance
■ Develop muscles of the body, back (spine), hips, and legs
■ Free the arms for play
■ Develop independence in sitting
Play Ideas Pretend to be a drummer by banging rattles or a wooden spoon on top of the box. Roll toy cars on top of the box. If the cars roll off, hold the child’s hips and let the child bend down to pick up the toy, and sit back up again. Make sure the child keeps feet flat on the floor while bending over. This activity will help the child further develop balance. Note: Try this activity when the child is able hold the head and body upright for longer than 1 minute and is beginning to be able to use arms to catch balance.
Notes for Therapists The ability to bench-sit is the prerequisite skill for learning to transition to the standing position. The ability to keep the feet in contact with the fl oor establishes the base of support. In addition, the contact of the hips/pelvic-femoral joints with the bench surface helps to organize postural control for bench-sitting. Many children have diffi culty keeping their feet in contact with the floor due to sensory, biomechanical, or musculoskeletal issues. Once you identify and manage the issue that prevents the child from keeping the feet in contact with the fl oor, you can assist the child in learning to use the legs as a secure base of support when bench-sitting and when transitioning to the standing position.
© 2010 by PRO-ED, Inc.
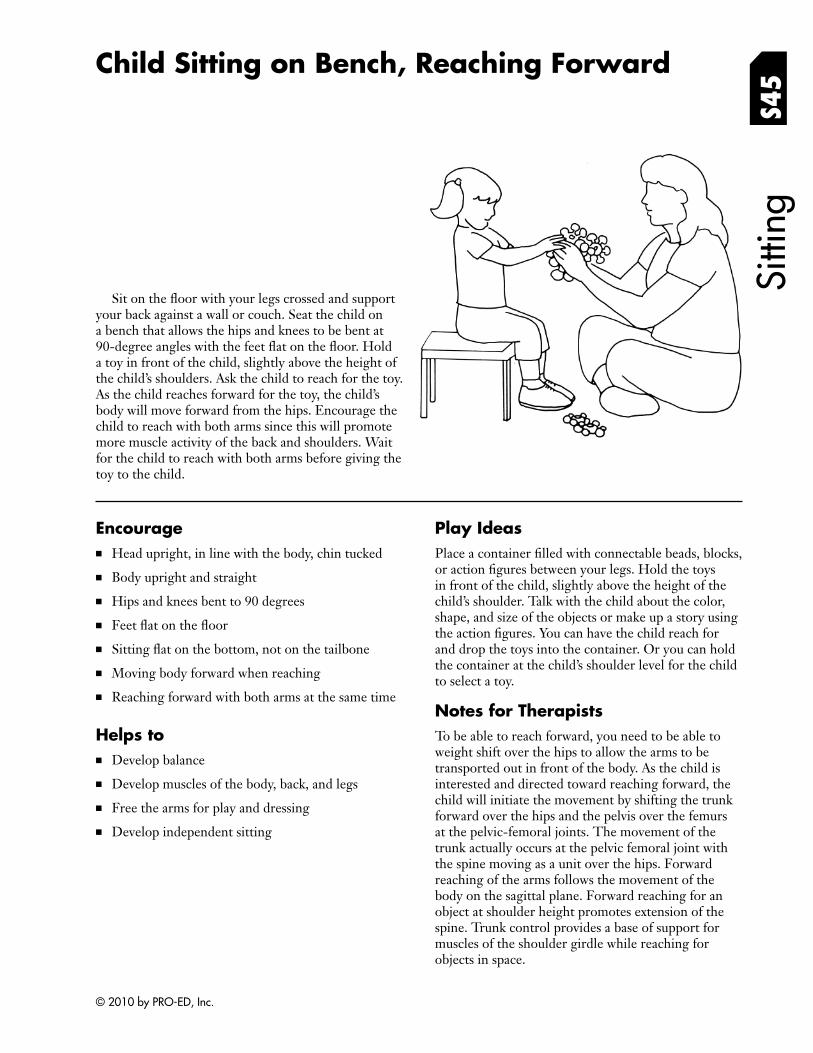
Child Sitting on Bench, Reaching Forward
S45
Sitti
ng
Sit on the floor with your legs crossed and support your back against a wall or couch. Seat the child on a bench that allows the hips and knees to be bent at 90-degree angles with the feet flat on the fl oor. Hold a toy in front of the child, slightly above the height of the child’s shoulders. Ask the child to reach for the toy. As the child reaches forward for the toy, the child’s body will move forward from the hips. Encourage the child to reach with both arms since this will promote more muscle activity of the back and shoulders. Wait for the child to reach with both arms before giving the toy to the child.
Encourage ■ Head upright, in line with the body, chin tucked
■ Body upright and straight
■ Hips and knees bent to 90 degrees
■ Feet flat on the fl oor
■ Sitting flat on the bottom, not on the tailbone
■ Moving body forward when reaching
■ Reaching forward with both arms at the same time
Helps to ■ Develop balance
■ Develop muscles of the body, back, and legs
■ Free the arms for play and dressing
■ Develop independent sitting
Play Ideas Place a container filled with connectable beads, blocks, or action figures between your legs. Hold the toys in front of the child, slightly above the height of the child’s shoulder. Talk with the child about the color, shape, and size of the objects or make up a story using the action figures. You can have the child reach for and drop the toys into the container. Or you can hold the container at the child’s shoulder level for the child to select a toy.
Notes for Therapists To be able to reach forward, you need to be able to weight shift over the hips to allow the arms to be transported out in front of the body. As the child is interested and directed toward reaching forward, the child will initiate the movement by shifting the trunk forward over the hips and the pelvis over the femurs at the pelvic-femoral joints. The movement of the trunk actually occurs at the pelvic femoral joint with the spine moving as a unit over the hips. Forward reaching of the arms follows the movement of the body on the sagittal plane. Forward reaching for an object at shoulder height promotes extension of the spine. Trunk control provides a base of support for muscles of the shoulder girdle while reaching for objects in space.
© 2010 by PRO-ED, Inc.
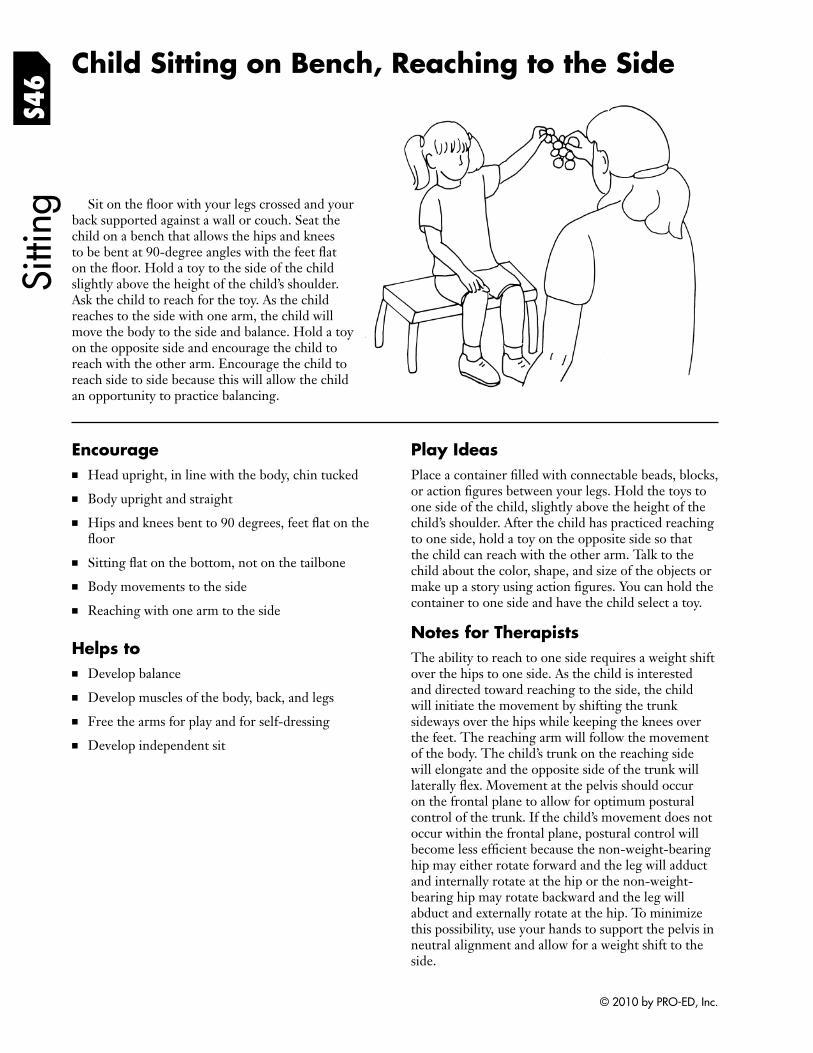
S46
Child Sitting on Bench, Reaching to the Side Si
tting
Sit on the floor with your legs crossed and your back supported against a wall or couch. Seat the child on a bench that allows the hips and knees to be bent at 90-degree angles with the feet fl at on the floor. Hold a toy to the side of the child slightly above the height of the child’s shoulder. Ask the child to reach for the toy. As the child reaches to the side with one arm, the child will move the body to the side and balance. Hold a toy on the opposite side and encourage the child to reach with the other arm. Encourage the child to reach side to side because this will allow the child an opportunity to practice balancing.
Encourage ■ Head upright, in line with the body, chin tucked
■ Body upright and straight
■ Hips and knees bent to 90 degrees, feet flat on the fl oor
■ Sitting flat on the bottom, not on the tailbone
■ Body movements to the side
■ Reaching with one arm to the side
Helps to ■ Develop balance
■ Develop muscles of the body, back, and legs
■ Free the arms for play and for self-dressing
■ Develop independent sit
Play Ideas Place a container filled with connectable beads, blocks, or action figures between your legs. Hold the toys to one side of the child, slightly above the height of the child’s shoulder. After the child has practiced reaching to one side, hold a toy on the opposite side so that the child can reach with the other arm. Talk to the child about the color, shape, and size of the objects or make up a story using action figures. You can hold the container to one side and have the child select a toy.
Notes for Therapists The ability to reach to one side requires a weight shift over the hips to one side. As the child is interested and directed toward reaching to the side, the child will initiate the movement by shifting the trunk sideways over the hips while keeping the knees over the feet. The reaching arm will follow the movement of the body. The child’s trunk on the reaching side will elongate and the opposite side of the trunk will laterally flex. Movement at the pelvis should occur on the frontal plane to allow for optimum postural control of the trunk. If the child’s movement does not occur within the frontal plane, postural control will become less efficient because the non-weight-bearing hip may either rotate forward and the leg will adduct and internally rotate at the hip or the non-weightbearing hip may rotate backward and the leg will abduct and externally rotate at the hip. To minimize this possibility, use your hands to support the pelvis in neutral alignment and allow for a weight shift to the side.
© 2010 by PRO-ED, Inc.
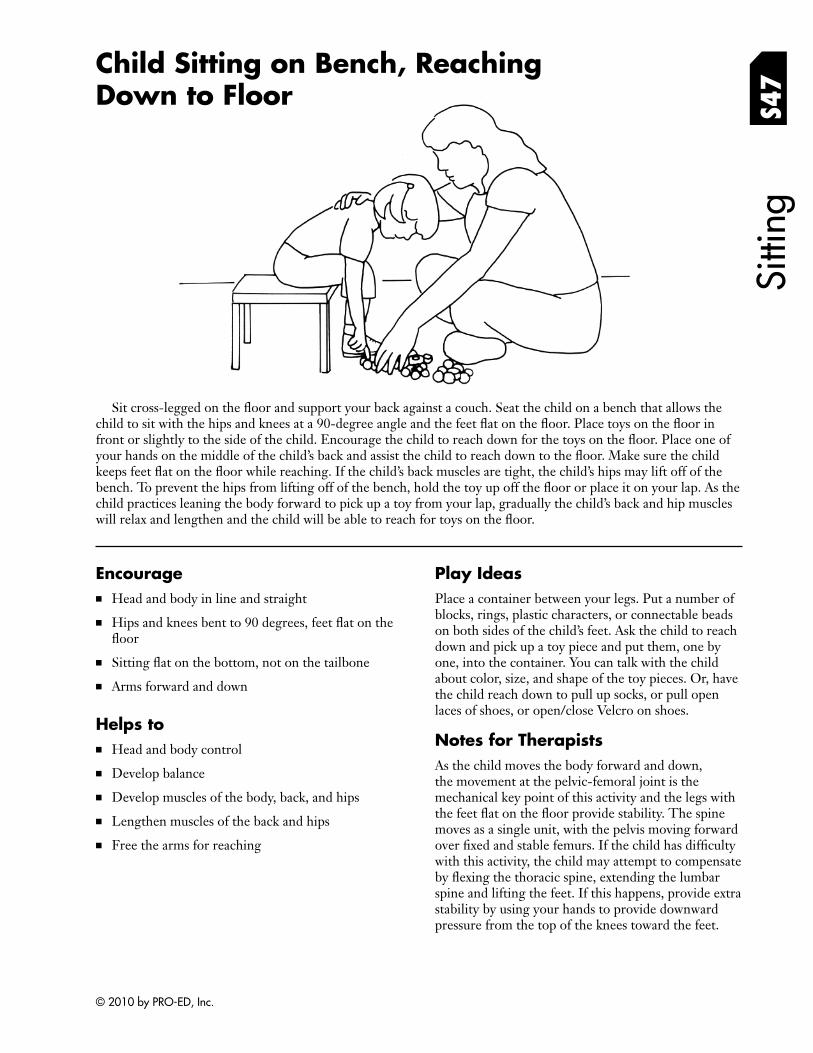
Sitti
ng
Child Sitting on Bench, Reaching Down to Floor S4
7
Sit cross-legged on the floor and support your back against a couch. Seat the child on a bench that allows the child to sit with the hips and knees at a 90-degree angle and the feet flat on the floor. Place toys on the fl oor in front or slightly to the side of the child. Encourage the child to reach down for the toys on the floor. Place one of your hands on the middle of the child’s back and assist the child to reach down to the floor. Make sure the child keeps feet flat on the floor while reaching. If the child’s back muscles are tight, the child’s hips may lift off of the bench. To prevent the hips from lifting off of the bench, hold the toy up off the floor or place it on your lap. As the child practices leaning the body forward to pick up a toy from your lap, gradually the child’s back and hip muscles will relax and lengthen and the child will be able to reach for toys on the fl oor.
Encourage ■ Head and body in line and straight
■ Hips and knees bent to 90 degrees, feet flat on the fl oor
■ Sitting flat on the bottom, not on the tailbone
■ Arms forward and down
Helps to ■ Head and body control
■ Develop balance
■ Develop muscles of the body, back, and hips
■ Lengthen muscles of the back and hips
■ Free the arms for reaching
Play Ideas Place a container between your legs. Put a number of blocks, rings, plastic characters, or connectable beads on both sides of the child’s feet. Ask the child to reach down and pick up a toy piece and put them, one by one, into the container. You can talk with the child about color, size, and shape of the toy pieces. Or, have the child reach down to pull up socks, or pull open laces of shoes, or open/close Velcro on shoes.
Notes for Therapists As the child moves the body forward and down, the movement at the pelvic-femoral joint is the mechanical key point of this activity and the legs with the feet flat on the floor provide stability. The spine moves as a single unit, with the pelvis moving forward over fixed and stable femurs. If the child has diffi culty with this activity, the child may attempt to compensate by flexing the thoracic spine, extending the lumbar spine and lifting the feet. If this happens, provide extra stability by using your hands to provide downward pressure from the top of the knees toward the feet.
© 2010 by PRO-ED, Inc.
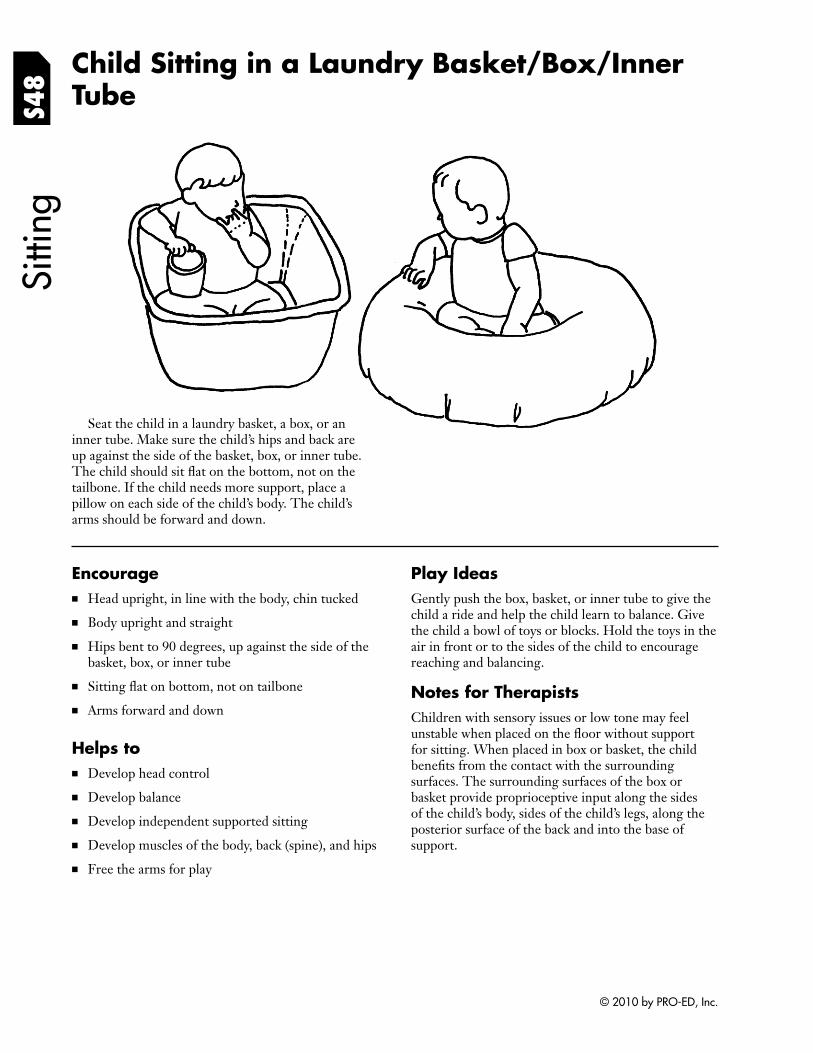
Sitti
ng
Seat the child in a laundry basket, a box, or an inner tube. Make sure the child’s hips and back are
Child Sitting in a Laundry Basket/Box/Inner Tube S4
8
up against the side of the basket, box, or inner tube. The child should sit flat on the bottom, not on the tailbone. If the child needs more support, place a pillow on each side of the child’s body. The child’s arms should be forward and down.
Encourage ■ Head upright, in line with the body, chin tucked
■ Body upright and straight
■ Hips bent to 90 degrees, up against the side of the basket, box, or inner tube
■ Sitting flat on bottom, not on tailbone
■ Arms forward and down
Helps to ■ Develop head control
■ Develop balance
■ Develop independent supported sitting
■ Develop muscles of the body, back (spine), and hips
■ Free the arms for play
Play Ideas Gently push the box, basket, or inner tube to give the child a ride and help the child learn to balance. Give the child a bowl of toys or blocks. Hold the toys in the air in front or to the sides of the child to encourage reaching and balancing.
Notes for Therapists Children with sensory issues or low tone may feel unstable when placed on the floor without support for sitting. When placed in box or basket, the child benefits from the contact with the surrounding surfaces. The surrounding surfaces of the box or basket provide proprioceptive input along the sides of the child’s body, sides of the child’s legs, along the posterior surface of the back and into the base of support.
© 2010 by PRO-ED, Inc.

Sitti
ng
Seat the child on the floor in front of the couch.
Child Long-Sitting on Floor, Supported by Pillows S4
9
Make sure the child’s hips and back are pushed up against the couch so that the back is straight and the hips are bent to 90 degrees. The child should sit flat on the bottom, not on the tailbone. The child’s legs should be forward. Support the child with large pillows on both sides to keep the child from falling over. The child’s arms should be forward and down.
Encourage ■ Head upright, in line with the body, chin tucked
■ Body upright and straight
■ Hips bent to 90 degrees, legs forward
■ Sitting flat on bottom, not on tailbone
■ Arms forward and down
Helps to ■ Develop balance
■ Develop muscles of the body, back (spine), and hips
■ Free the arms for play
■ Develop independent sitting
Play Ideas Sit in front of the child and roll a ball or a toy car back and forth to each other. Give the child a bowl of blocks and a wooden spoon for pretend “cooking.”
Notes for Therapists When children are learning to sit, they may need additional proprioceptive input to gain the postural control needed for independent sitting. To experience the tactile-proprioceptive input necessary for optimum sitting, the child needs to be sitting with the body upright, the shoulders over the hips, the spine in neutral alignment, and the hips in 90 degrees of flexion. This posture allows the mechanoreceptors in the joints, muscles, and ligaments to provide the proprioceptive information for learning postural control for independent sitting.
© 2010 by PRO-ED, Inc.
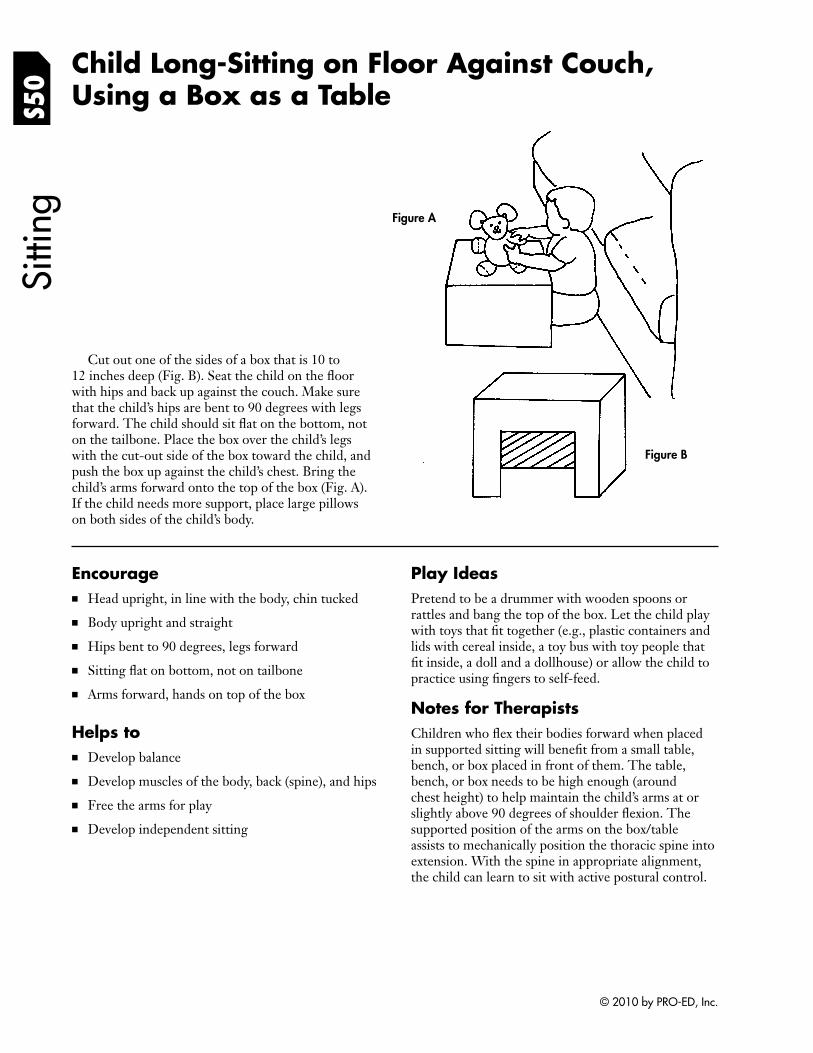
S50
Child Long-Sitting on Floor Against Couch, Using a Box as a Table
Sitti
ng
Cut out one of the sides of a box that is 10 to 12 inches deep (Fig. B). Seat the child on the fl oor with hips and back up against the couch. Make sure that the child’s hips are bent to 90 degrees with legs forward. The child should sit flat on the bottom, not on the tailbone. Place the box over the child’s legs with the cut-out side of the box toward the child, and push the box up against the child’s chest. Bring the child’s arms forward onto the top of the box (Fig. A). If the child needs more support, place large pillows on both sides of the child’s body.
Figure B
Figure A
Encourage ■ Head upright, in line with the body, chin tucked
■ Body upright and straight
■ Hips bent to 90 degrees, legs forward
■ Sitting flat on bottom, not on tailbone
■ Arms forward, hands on top of the box
Helps to ■ Develop balance
■ Develop muscles of the body, back (spine), and hips
■ Free the arms for play
■ Develop independent sitting
Play Ideas Pretend to be a drummer with wooden spoons or rattles and bang the top of the box. Let the child play with toys that fit together (e.g., plastic containers and lids with cereal inside, a toy bus with toy people that fit inside, a doll and a dollhouse) or allow the child to practice using fingers to self-feed.
Notes for Therapists Children who flex their bodies forward when placed in supported sitting will benefit from a small table, bench, or box placed in front of them. The table, bench, or box needs to be high enough (around chest height) to help maintain the child’s arms at or slightly above 90 degrees of shoulder fl exion. The supported position of the arms on the box/table assists to mechanically position the thoracic spine into extension. With the spine in appropriate alignment, the child can learn to sit with active postural control.
© 2010 by PRO-ED, Inc.
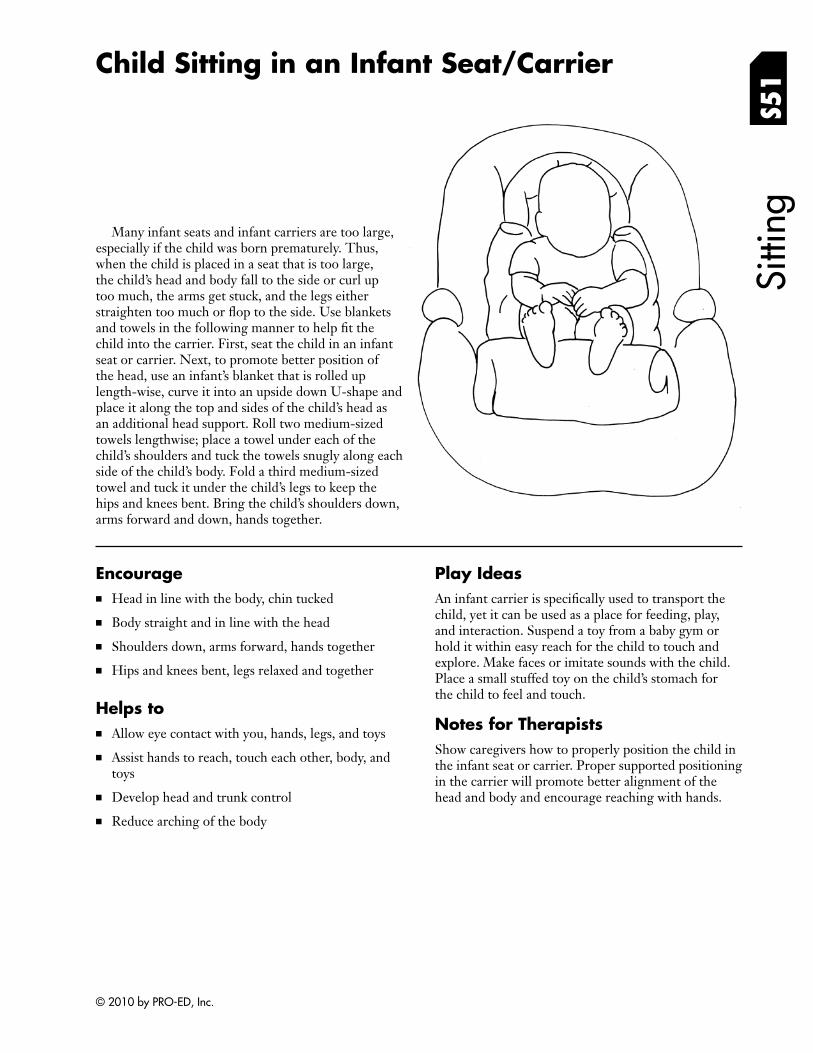
Sitti
ng
Child Sitting in an Infant Seat/Carrier
S51
Many infant seats and infant carriers are too large, especially if the child was born prematurely. Thus, when the child is placed in a seat that is too large, the child’s head and body fall to the side or curl up too much, the arms get stuck, and the legs either straighten too much or flop to the side. Use blankets and towels in the following manner to help fi t the child into the carrier. First, seat the child in an infant seat or carrier. Next, to promote better position of the head, use an infant’s blanket that is rolled up length-wise, curve it into an upside down U-shape and place it along the top and sides of the child’s head as an additional head support. Roll two medium-sized towels lengthwise; place a towel under each of the child’s shoulders and tuck the towels snugly along each side of the child’s body. Fold a third medium-sized towel and tuck it under the child’s legs to keep the hips and knees bent. Bring the child’s shoulders down, arms forward and down, hands together.
Encourage ■ Head in line with the body, chin tucked
■ Body straight and in line with the head
■ Shoulders down, arms forward, hands together
■ Hips and knees bent, legs relaxed and together
Helps to ■ Allow eye contact with you, hands, legs, and toys
■ Assist hands to reach, touch each other, body, and toys
■ Develop head and trunk control
■ Reduce arching of the body
Play Ideas An infant carrier is specifically used to transport the child, yet it can be used as a place for feeding, play, and interaction. Suspend a toy from a baby gym or hold it within easy reach for the child to touch and explore. Make faces or imitate sounds with the child. Place a small stuffed toy on the child’s stomach for the child to feel and touch.
Notes for Therapists Show caregivers how to properly position the child in the infant seat or carrier. Proper supported positioning in the carrier will promote better alignment of the head and body and encourage reaching with hands.
© 2010 by PRO-ED, Inc.
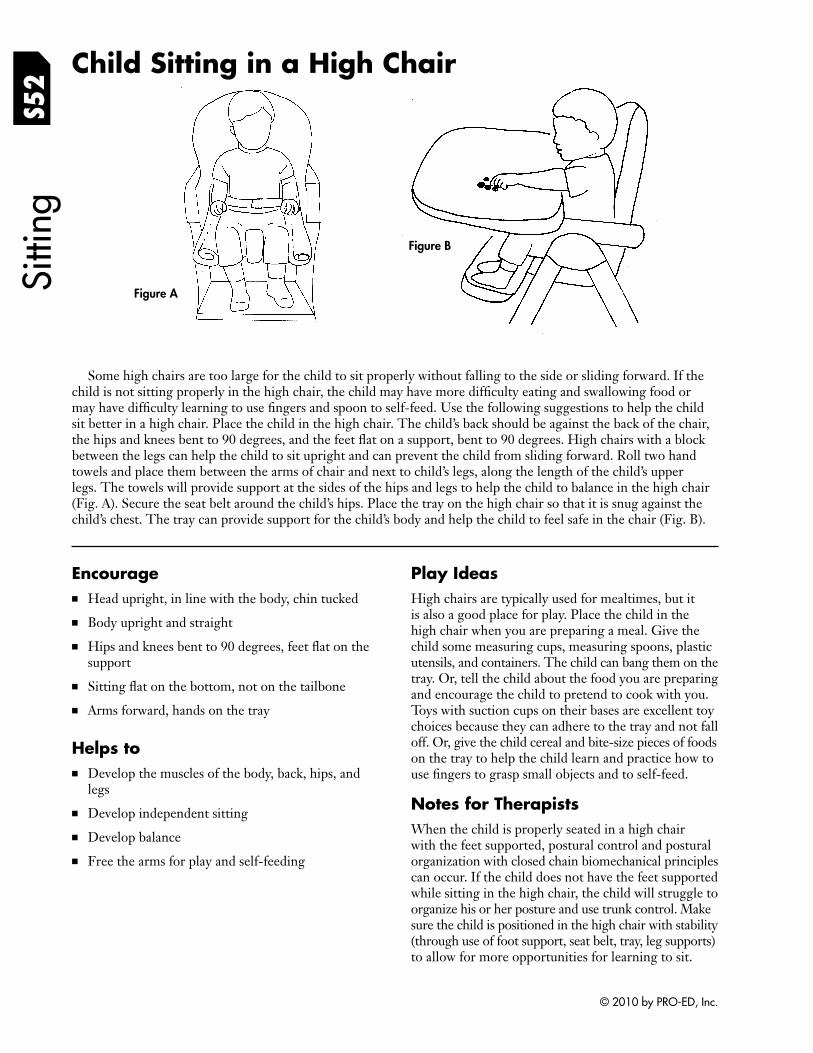
Child Sitting in a High Chair Si
tting
S5
2
Figure A
Figure B
Some high chairs are too large for the child to sit properly without falling to the side or sliding forward. If the child is not sitting properly in the high chair, the child may have more difficulty eating and swallowing food or may have difficulty learning to use fingers and spoon to self-feed. Use the following suggestions to help the child sit better in a high chair. Place the child in the high chair. The child’s back should be against the back of the chair, the hips and knees bent to 90 degrees, and the feet flat on a support, bent to 90 degrees. High chairs with a block between the legs can help the child to sit upright and can prevent the child from sliding forward. Roll two hand towels and place them between the arms of chair and next to child’s legs, along the length of the child’s upper legs. The towels will provide support at the sides of the hips and legs to help the child to balance in the high chair (Fig. A). Secure the seat belt around the child’s hips. Place the tray on the high chair so that it is snug against the child’s chest. The tray can provide support for the child’s body and help the child to feel safe in the chair (Fig. B).
Encourage ■ Head upright, in line with the body, chin tucked
■ Body upright and straight
■ Hips and knees bent to 90 degrees, feet flat on the support
■ Sitting flat on the bottom, not on the tailbone
■ Arms forward, hands on the tray
Helps to ■ Develop the muscles of the body, back, hips, and
legs
■ Develop independent sitting
■ Develop balance
■ Free the arms for play and self-feeding
Play Ideas High chairs are typically used for mealtimes, but it is also a good place for play. Place the child in the high chair when you are preparing a meal. Give the child some measuring cups, measuring spoons, plastic utensils, and containers. The child can bang them on the tray. Or, tell the child about the food you are preparing and encourage the child to pretend to cook with you. Toys with suction cups on their bases are excellent toy choices because they can adhere to the tray and not fall off. Or, give the child cereal and bite-size pieces of foods on the tray to help the child learn and practice how to use fingers to grasp small objects and to self-feed.
Notes for Therapists When the child is properly seated in a high chair with the feet supported, postural control and postural organization with closed chain biomechanical principles can occur. If the child does not have the feet supported while sitting in the high chair, the child will struggle to organize his or her posture and use trunk control. Make sure the child is positioned in the high chair with stability (through use of foot support, seat belt, tray, leg supports) to allow for more opportunities for learning to sit.
© 2010 by PRO-ED, Inc.
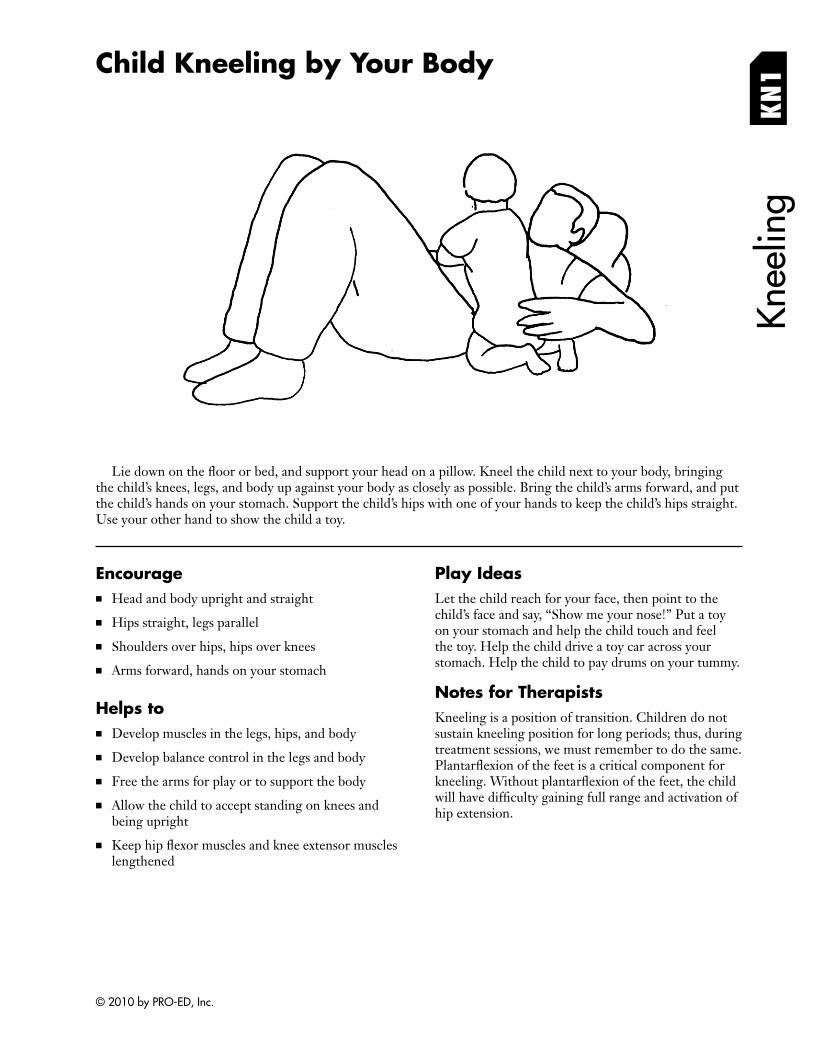
Child Kneeling by Your Body
Knee
ling
KN
1
Lie down on the floor or bed, and support your head on a pillow. Kneel the child next to your body, bringing the child’s knees, legs, and body up against your body as closely as possible. Bring the child’s arms forward, and put the child’s hands on your stomach. Support the child’s hips with one of your hands to keep the child’s hips straight. Use your other hand to show the child a toy.
Encourage ■ Head and body upright and straight
■ Hips straight, legs parallel
■ Shoulders over hips, hips over knees
■ Arms forward, hands on your stomach
Helps to ■ Develop muscles in the legs, hips, and body
■ Develop balance control in the legs and body
■ Free the arms for play or to support the body
■ Allow the child to accept standing on knees and being upright
■ Keep hip flexor muscles and knee extensor muscles lengthened
Play Ideas Let the child reach for your face, then point to the child’s face and say, “Show me your nose!” Put a toy on your stomach and help the child touch and feel the toy. Help the child drive a toy car across your stomach. Help the child to pay drums on your tummy.
Notes for Therapists Kneeling is a position of transition. Children do not sustain kneeling position for long periods; thus, during treatment sessions, we must remember to do the same. Plantarflexion of the feet is a critical component for kneeling. Without plantarflexion of the feet, the child will have difficulty gaining full range and activation of hip extension.
© 2010 by PRO-ED, Inc.
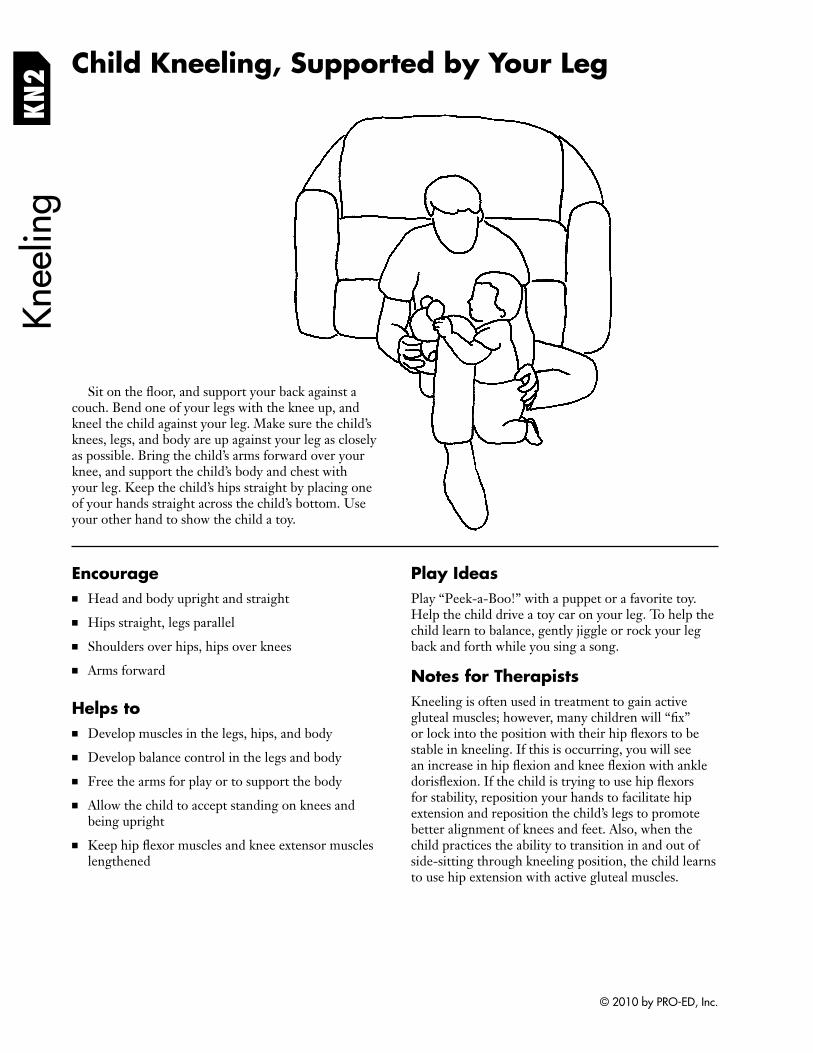
KN
2 Child Kneeling, Supported by Your Leg Kn
eelin
g
Sit on the floor, and support your back against a couch. Bend one of your legs with the knee up, and kneel the child against your leg. Make sure the child’s knees, legs, and body are up against your leg as closely as possible. Bring the child’s arms forward over your knee, and support the child’s body and chest with your leg. Keep the child’s hips straight by placing one of your hands straight across the child’s bottom. Use your other hand to show the child a toy.
Encourage ■ Head and body upright and straight
■ Hips straight, legs parallel
■ Shoulders over hips, hips over knees
■ Arms forward
Helps to ■ Develop muscles in the legs, hips, and body
■ Develop balance control in the legs and body
■ Free the arms for play or to support the body
■ Allow the child to accept standing on knees and being upright
■ Keep hip flexor muscles and knee extensor muscles lengthened
Play Ideas Play “Peek-a-Boo!” with a puppet or a favorite toy. Help the child drive a toy car on your leg. To help the child learn to balance, gently jiggle or rock your leg back and forth while you sing a song.
Notes for Therapists Kneeling is often used in treatment to gain active gluteal muscles; however, many children will “fi x” or lock into the position with their hip flexors to be stable in kneeling. If this is occurring, you will see an increase in hip flexion and knee flexion with ankle dorisflexion. If the child is trying to use hip fl exors for stability, reposition your hands to facilitate hip extension and reposition the child’s legs to promote better alignment of knees and feet. Also, when the child practices the ability to transition in and out of side-sitting through kneeling position, the child learns to use hip extension with active gluteal muscles.
© 2010 by PRO-ED, Inc.
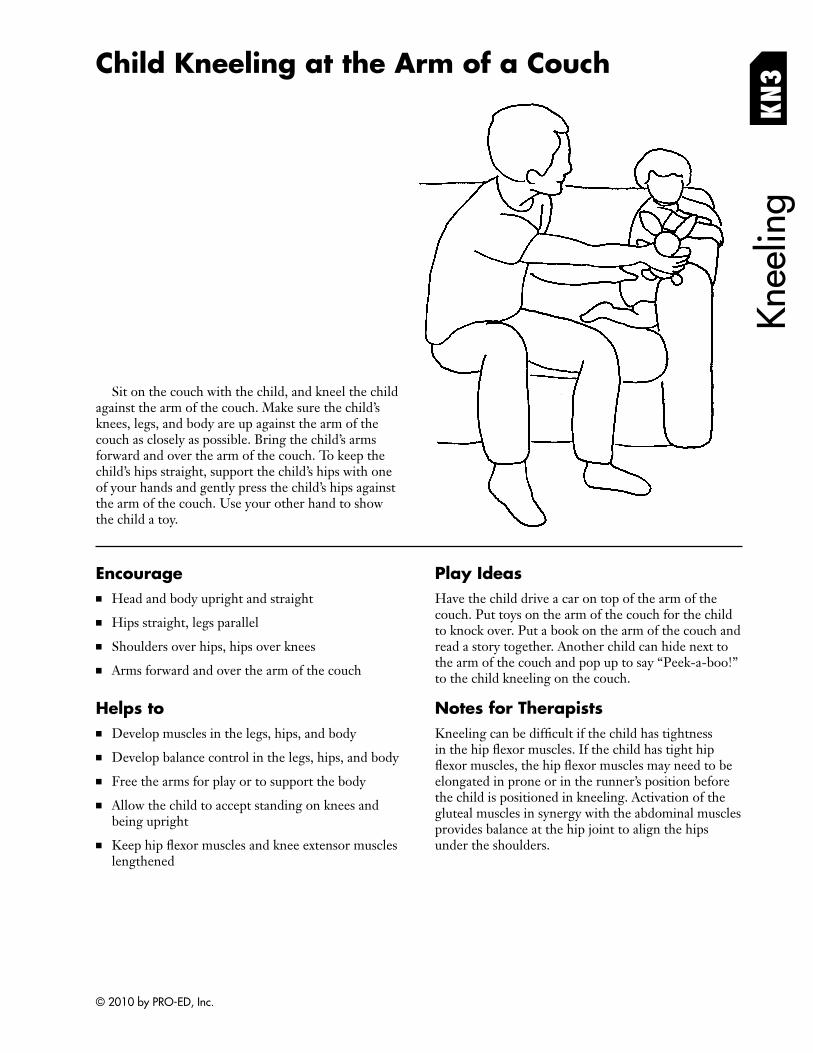
Kn
eelin
g
Child Kneeling at the Arm of a Couch
KN
3
Sit on the couch with the child, and kneel the child against the arm of the couch. Make sure the child’s knees, legs, and body are up against the arm of the couch as closely as possible. Bring the child’s arms forward and over the arm of the couch. To keep the child’s hips straight, support the child’s hips with one of your hands and gently press the child’s hips against the arm of the couch. Use your other hand to show the child a toy.
Encourage ■ Head and body upright and straight
■ Hips straight, legs parallel
■ Shoulders over hips, hips over knees
■ Arms forward and over the arm of the couch
Helps to ■ Develop muscles in the legs, hips, and body
■ Develop balance control in the legs, hips, and body
■ Free the arms for play or to support the body
■ Allow the child to accept standing on knees and being upright
■ Keep hip flexor muscles and knee extensor muscles lengthened
Play Ideas Have the child drive a car on top of the arm of the couch. Put toys on the arm of the couch for the child to knock over. Put a book on the arm of the couch and read a story together. Another child can hide next to the arm of the couch and pop up to say “Peek-a-boo!” to the child kneeling on the couch.
Notes for Therapists Kneeling can be difficult if the child has tightness in the hip flexor muscles. If the child has tight hip flexor muscles, the hip flexor muscles may need to be elongated in prone or in the runner’s position before the child is positioned in kneeling. Activation of the gluteal muscles in synergy with the abdominal muscles provides balance at the hip joint to align the hips under the shoulders.
© 2010 by PRO-ED, Inc.
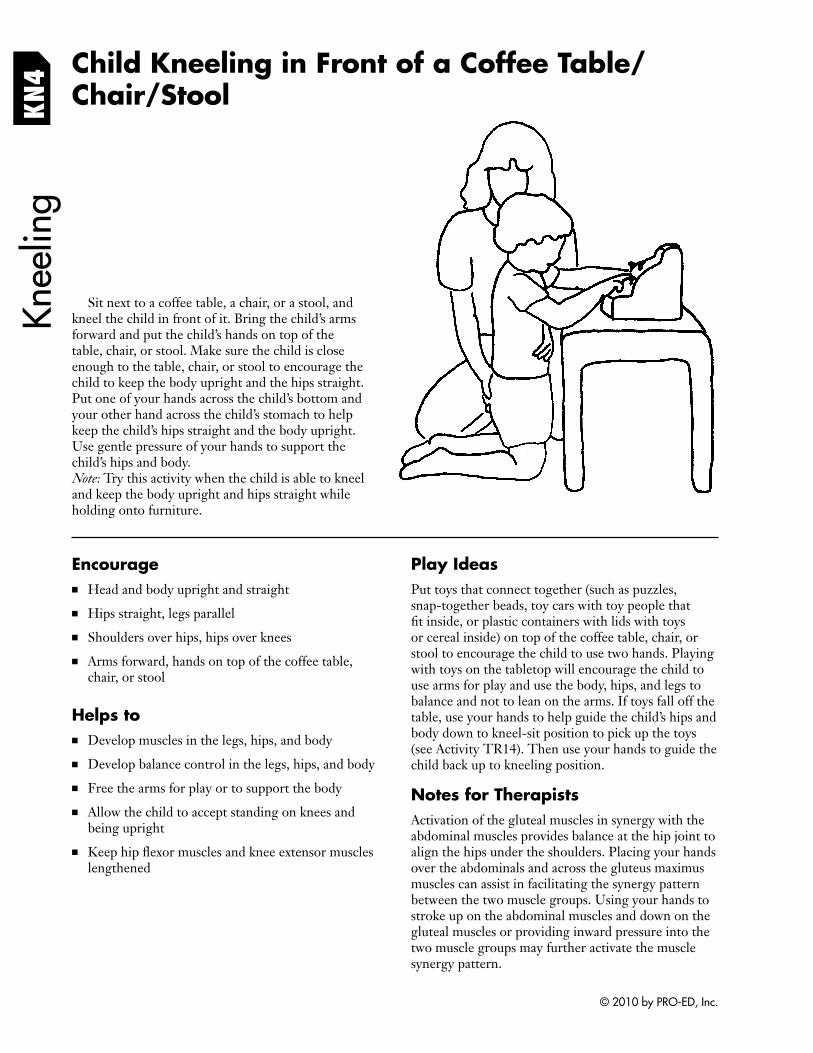
KN
4 Child Kneeling in Front of a Coffee Table/ Chair/Stool
Knee
ling
Sit next to a coffee table, a chair, or a stool, and kneel the child in front of it. Bring the child’s arms forward and put the child’s hands on top of the table, chair, or stool. Make sure the child is close enough to the table, chair, or stool to encourage the child to keep the body upright and the hips straight. Put one of your hands across the child’s bottom and your other hand across the child’s stomach to help keep the child’s hips straight and the body upright. Use gentle pressure of your hands to support the child’s hips and body. Note: Try this activity when the child is able to kneel and keep the body upright and hips straight while holding onto furniture.
Encourage ■ Head and body upright and straight
■ Hips straight, legs parallel
■ Shoulders over hips, hips over knees
■ Arms forward, hands on top of the coffee table, chair, or stool
Helps to ■ Develop muscles in the legs, hips, and body
■ Develop balance control in the legs, hips, and body
■ Free the arms for play or to support the body
■ Allow the child to accept standing on knees and being upright
■ Keep hip flexor muscles and knee extensor muscles lengthened
Play Ideas Put toys that connect together (such as puzzles, snap-together beads, toy cars with toy people that fit inside, or plastic containers with lids with toys or cereal inside) on top of the coffee table, chair, or stool to encourage the child to use two hands. Playing with toys on the tabletop will encourage the child to use arms for play and use the body, hips, and legs to balance and not to lean on the arms. If toys fall off the table, use your hands to help guide the child’s hips and body down to kneel-sit position to pick up the toys (see Activity TR14). Then use your hands to guide the child back up to kneeling position.
Notes for Therapists Activation of the gluteal muscles in synergy with the abdominal muscles provides balance at the hip joint to align the hips under the shoulders. Placing your hands over the abdominals and across the gluteus maximus muscles can assist in facilitating the synergy pattern between the two muscle groups. Using your hands to stroke up on the abdominal muscles and down on the gluteal muscles or providing inward pressure into the two muscle groups may further activate the muscle synergy pattern.
© 2010 by PRO-ED, Inc.

Child Kneeling in Front of a Stool/ Inverted Box/Laundry Basket K
N5
Knee
ling
Sit on the floor with the child next to a stool or an inverted box or laundry basket. Kneel the child close to the stool or box. Bring the child’s arms forward and put the hands on top of the stool or box. Use your hands to keep the child’s hips straight. Put toys on top of the stool or box. Note: Try this activity when the child is able to kneel and keep the body upright and hips straight while using arms to lean on furniture.
Encourage ■ Head and body upright and straight
■ Hips straight, legs parallel
■ Shoulders over hips, hips over knees
■ Arms forward
Helps to ■ Develop muscles in the legs, hips, and body
■ Develop balance control in the legs, hips, and body
■ Free the arms for play or to support the body
■ Allow the child to accept standing on knees and being upright
■ Keep hip flexor muscles and knee extensor muscles lengthened
Play Ideas Have the child pretend to be a drummer by banging a rattle or a wooden spoon on the stool. Put blocks or toy cars on top of the stool and have the child knock the toys off. Use your hands to help guide the child’s hips down to kneel-sit position to pick up the toys, and then guide the child back up to kneeling position (see Activity TR14). This will help to further develop the child’s balance control of hip muscles.
Notes for Therapists Placing the child’s hands on a surface (like the tabletop) can assist to mechanically align the shoulders over the child’s hips. By having the child’s hands on the surface, the pectoral muscles are activated to work in synergy with the abdominal muscles. This action also allows the child to have a greater advantage to activate the gluteal muscles for active hip extension when the arms are forward on the surface.
© 2010 by PRO-ED, Inc.
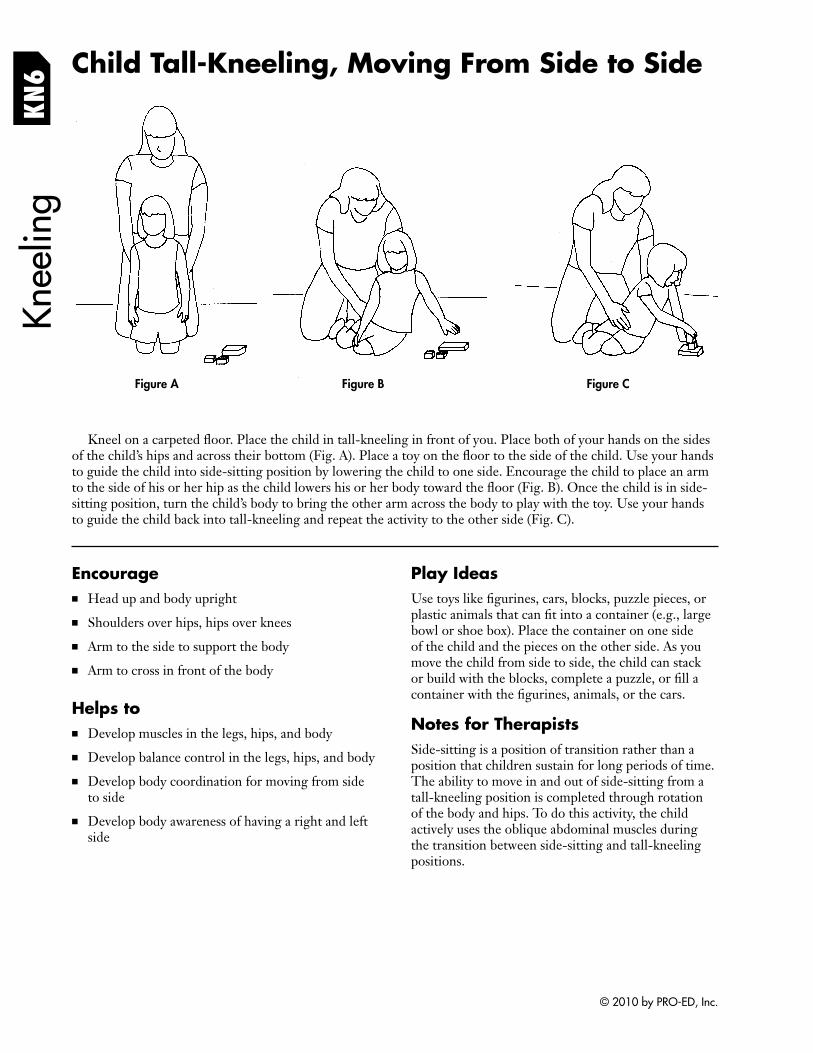
Child Tall-Kneeling, Moving From Side to Side K
N6
Knee
ling
Figure BFigure A Figure C
Kneel on a carpeted floor. Place the child in tall-kneeling in front of you. Place both of your hands on the sides of the child’s hips and across their bottom (Fig. A). Place a toy on the floor to the side of the child. Use your hands to guide the child into side-sitting position by lowering the child to one side. Encourage the child to place an arm to the side of his or her hip as the child lowers his or her body toward the floor (Fig. B). Once the child is in side-sitting position, turn the child’s body to bring the other arm across the body to play with the toy. Use your hands to guide the child back into tall-kneeling and repeat the activity to the other side (Fig. C).
Encourage ■ Head up and body upright
■ Shoulders over hips, hips over knees
■ Arm to the side to support the body
■ Arm to cross in front of the body
Helps to ■ Develop muscles in the legs, hips, and body
■ Develop balance control in the legs, hips, and body
■ Develop body coordination for moving from side to side
■ Develop body awareness of having a right and left side
Play Ideas Use toys like figurines, cars, blocks, puzzle pieces, or plastic animals that can fit into a container (e.g., large bowl or shoe box). Place the container on one side of the child and the pieces on the other side. As you move the child from side to side, the child can stack or build with the blocks, complete a puzzle, or fi ll a container with the figurines, animals, or the cars.
Notes for Therapists Side-sitting is a position of transition rather than a position that children sustain for long periods of time. The ability to move in and out of side-sitting from a tall-kneeling position is completed through rotation of the body and hips. To do this activity, the child actively uses the oblique abdominal muscles during the transition between side-sitting and tall-kneeling positions.
© 2010 by PRO-ED, Inc.
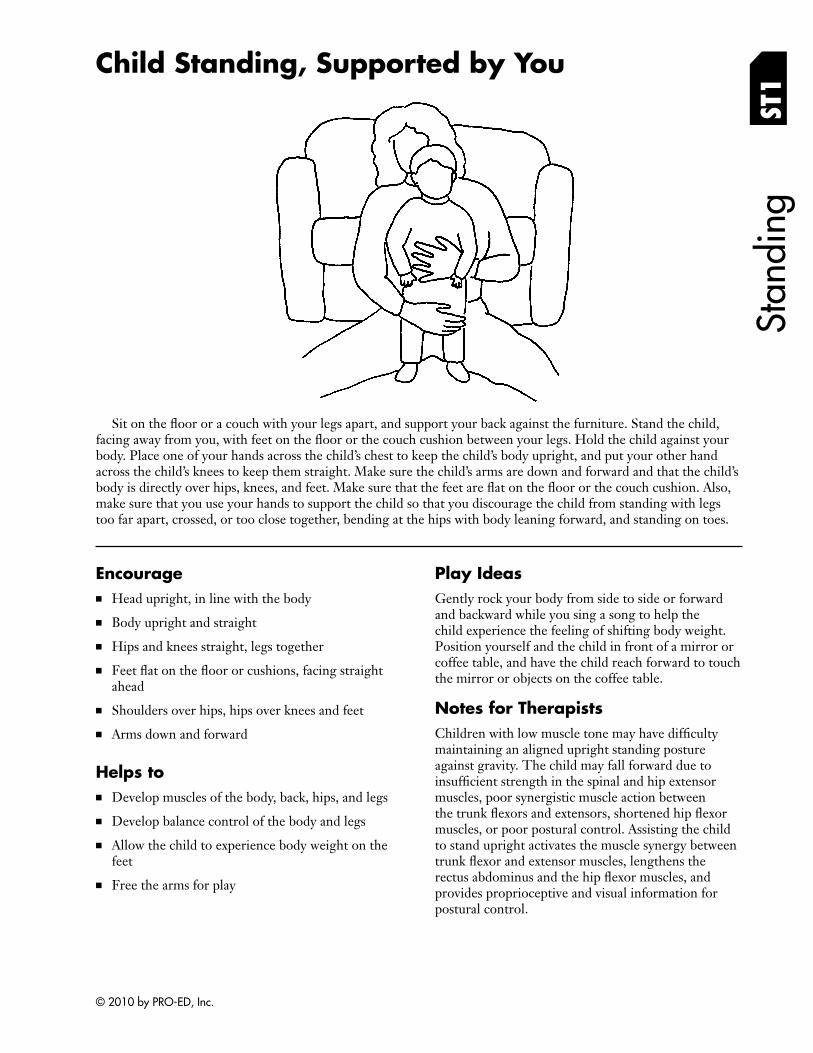
Child Standing, Supported by You
ST1
Stan
ding
Sit on the floor or a couch with your legs apart, and support your back against the furniture. Stand the child, facing away from you, with feet on the floor or the couch cushion between your legs. Hold the child against your body. Place one of your hands across the child’s chest to keep the child’s body upright, and put your other hand across the child’s knees to keep them straight. Make sure the child’s arms are down and forward and that the child’s body is directly over hips, knees, and feet. Make sure that the feet are flat on the floor or the couch cushion. Also, make sure that you use your hands to support the child so that you discourage the child from standing with legs too far apart, crossed, or too close together, bending at the hips with body leaning forward, and standing on toes.
Encourage ■ Head upright, in line with the body
■ Body upright and straight
■ Hips and knees straight, legs together
■ Feet flat on the floor or cushions, facing straight ahead
■ Shoulders over hips, hips over knees and feet
■ Arms down and forward
Helps to ■ Develop muscles of the body, back, hips, and legs
■ Develop balance control of the body and legs
■ Allow the child to experience body weight on the feet
■ Free the arms for play
Play Ideas Gently rock your body from side to side or forward and backward while you sing a song to help the child experience the feeling of shifting body weight. Position yourself and the child in front of a mirror or coffee table, and have the child reach forward to touch the mirror or objects on the coffee table.
Notes for Therapists Children with low muscle tone may have diffi culty maintaining an aligned upright standing posture against gravity. The child may fall forward due to insufficient strength in the spinal and hip extensor muscles, poor synergistic muscle action between the trunk flexors and extensors, shortened hip fl exor muscles, or poor postural control. Assisting the child to stand upright activates the muscle synergy between trunk flexor and extensor muscles, lengthens the rectus abdominus and the hip flexor muscles, and provides proprioceptive and visual information for postural control.
© 2010 by PRO-ED, Inc.
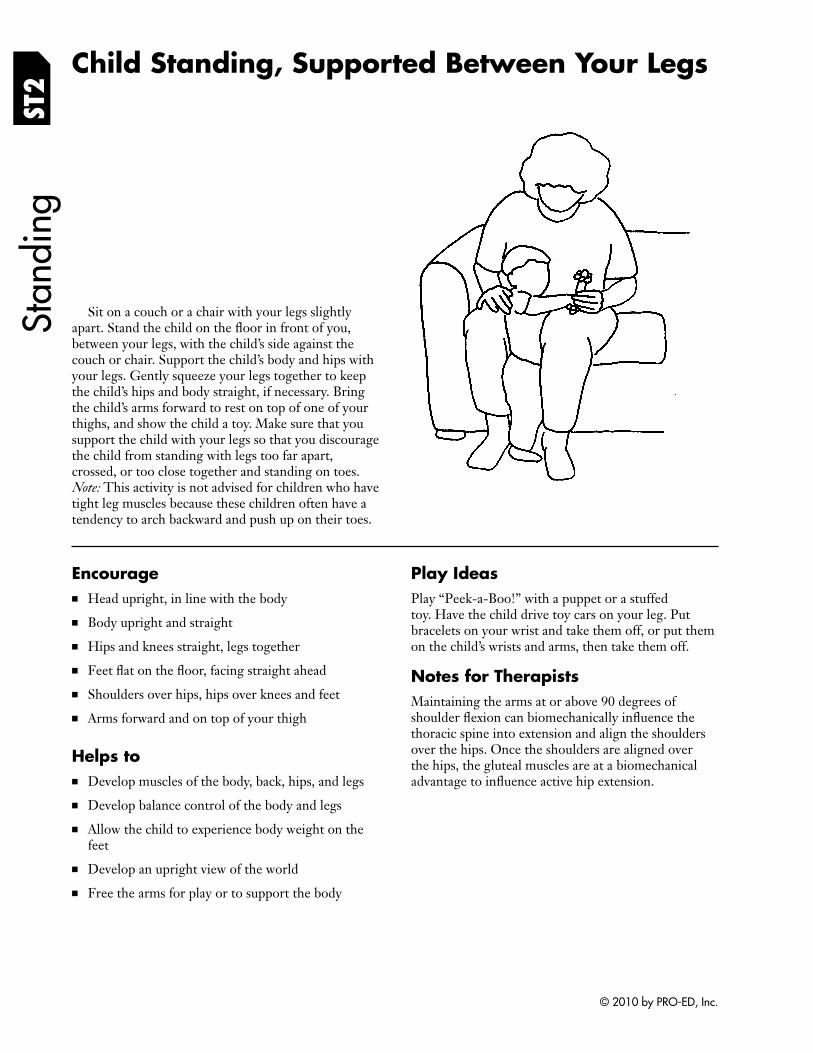
ST2
Child Standing, Supported Between Your Legs St
andi
ng
Sit on a couch or a chair with your legs slightly apart. Stand the child on the floor in front of you, between your legs, with the child’s side against the couch or chair. Support the child’s body and hips with your legs. Gently squeeze your legs together to keep the child’s hips and body straight, if necessary. Bring the child’s arms forward to rest on top of one of your thighs, and show the child a toy. Make sure that you support the child with your legs so that you discourage the child from standing with legs too far apart, crossed, or too close together and standing on toes. Note: This activity is not advised for children who have tight leg muscles because these children often have a tendency to arch backward and push up on their toes.
Encourage ■ Head upright, in line with the body
■ Body upright and straight
■ Hips and knees straight, legs together
■ Feet flat on the floor, facing straight ahead
■ Shoulders over hips, hips over knees and feet
■ Arms forward and on top of your thigh
Helps to ■ Develop muscles of the body, back, hips, and legs
■ Develop balance control of the body and legs
■ Allow the child to experience body weight on the feet
■ Develop an upright view of the world
■ Free the arms for play or to support the body
Play Ideas Play “Peek-a-Boo!” with a puppet or a stuffed toy. Have the child drive toy cars on your leg. Put bracelets on your wrist and take them off, or put them on the child’s wrists and arms, then take them off.
Notes for Therapists Maintaining the arms at or above 90 degrees of shoulder flexion can biomechanically infl uence the thoracic spine into extension and align the shoulders over the hips. Once the shoulders are aligned over the hips, the gluteal muscles are at a biomechanical advantage to influence active hip extension.
© 2010 by PRO-ED, Inc.
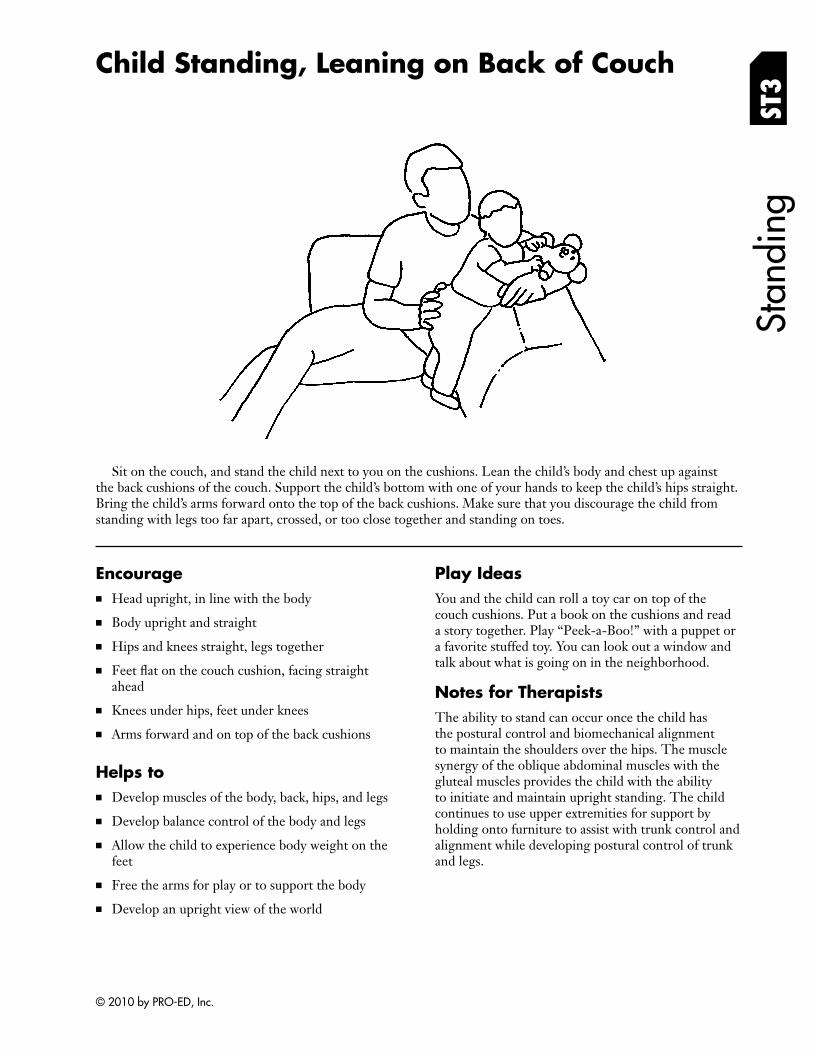
Child Standing, Leaning on Back of Couch
ST3
Stan
ding
Sit on the couch, and stand the child next to you on the cushions. Lean the child’s body and chest up against the back cushions of the couch. Support the child’s bottom with one of your hands to keep the child’s hips straight. Bring the child’s arms forward onto the top of the back cushions. Make sure that you discourage the child from standing with legs too far apart, crossed, or too close together and standing on toes.
Encourage ■ Head upright, in line with the body
■ Body upright and straight
■ Hips and knees straight, legs together
■ Feet flat on the couch cushion, facing straight ahead
■ Knees under hips, feet under knees
■ Arms forward and on top of the back cushions
Helps to ■ Develop muscles of the body, back, hips, and legs
■ Develop balance control of the body and legs
■ Allow the child to experience body weight on the feet
■ Free the arms for play or to support the body
■ Develop an upright view of the world
Play Ideas You and the child can roll a toy car on top of the couch cushions. Put a book on the cushions and read a story together. Play “Peek-a-Boo!” with a puppet or a favorite stuffed toy. You can look out a window and talk about what is going on in the neighborhood.
Notes for Therapists The ability to stand can occur once the child has the postural control and biomechanical alignment to maintain the shoulders over the hips. The muscle synergy of the oblique abdominal muscles with the gluteal muscles provides the child with the ability to initiate and maintain upright standing. The child continues to use upper extremities for support by holding onto furniture to assist with trunk control and alignment while developing postural control of trunk and legs.
© 2010 by PRO-ED, Inc.
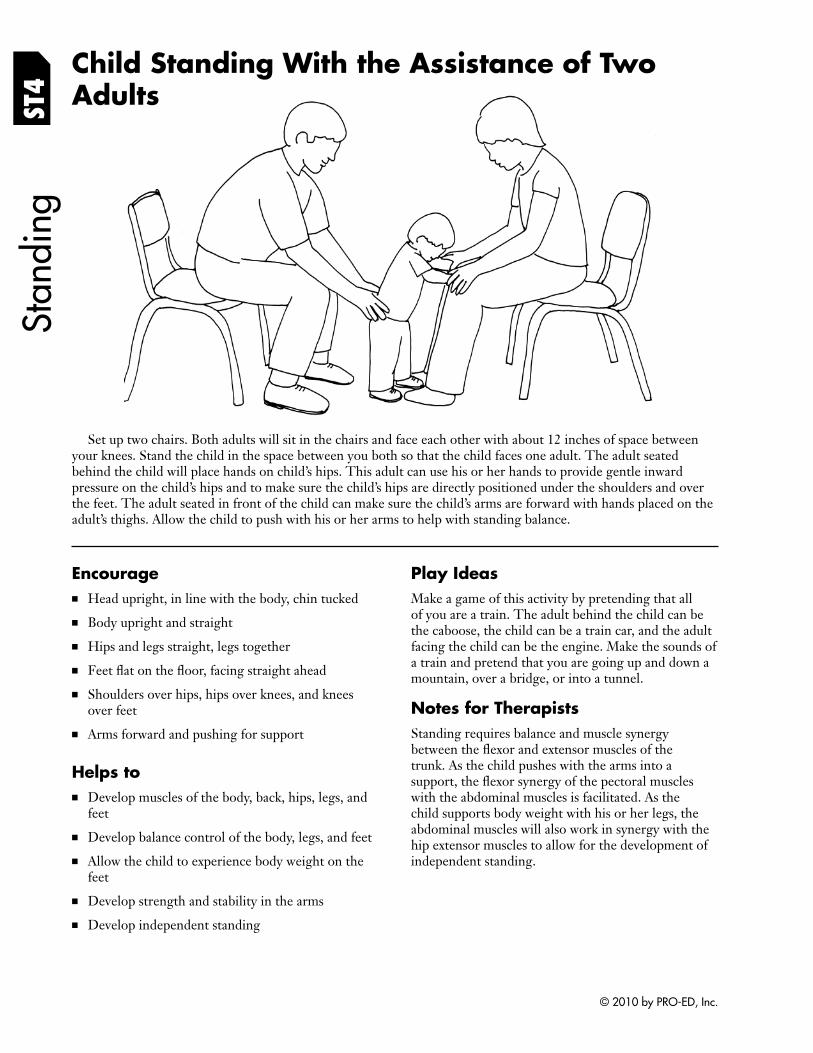
ST4
Stan
ding
Child Standing With the Assistance of Two Adults
Set up two chairs. Both adults will sit in the chairs and face each other with about 12 inches of space between your knees. Stand the child in the space between you both so that the child faces one adult. The adult seated behind the child will place hands on child’s hips. This adult can use his or her hands to provide gentle inward pressure on the child’s hips and to make sure the child’s hips are directly positioned under the shoulders and over the feet. The adult seated in front of the child can make sure the child’s arms are forward with hands placed on the adult’s thighs. Allow the child to push with his or her arms to help with standing balance.
Encourage ■ Head upright, in line with the body, chin tucked
■ Body upright and straight
■ Hips and legs straight, legs together
■ Feet flat on the floor, facing straight ahead
■ Shoulders over hips, hips over knees, and knees over feet
■ Arms forward and pushing for support
Helps to ■ Develop muscles of the body, back, hips, legs, and
feet
■ Develop balance control of the body, legs, and feet
■ Allow the child to experience body weight on the feet
■ Develop strength and stability in the arms
■ Develop independent standing
Play Ideas Make a game of this activity by pretending that all of you are a train. The adult behind the child can be the caboose, the child can be a train car, and the adult facing the child can be the engine. Make the sounds of a train and pretend that you are going up and down a mountain, over a bridge, or into a tunnel.
Notes for Therapists Standing requires balance and muscle synergy between the flexor and extensor muscles of the trunk. As the child pushes with the arms into a support, the flexor synergy of the pectoral muscles with the abdominal muscles is facilitated. As the child supports body weight with his or her legs, the abdominal muscles will also work in synergy with the hip extensor muscles to allow for the development of independent standing.
© 2010 by PRO-ED, Inc.
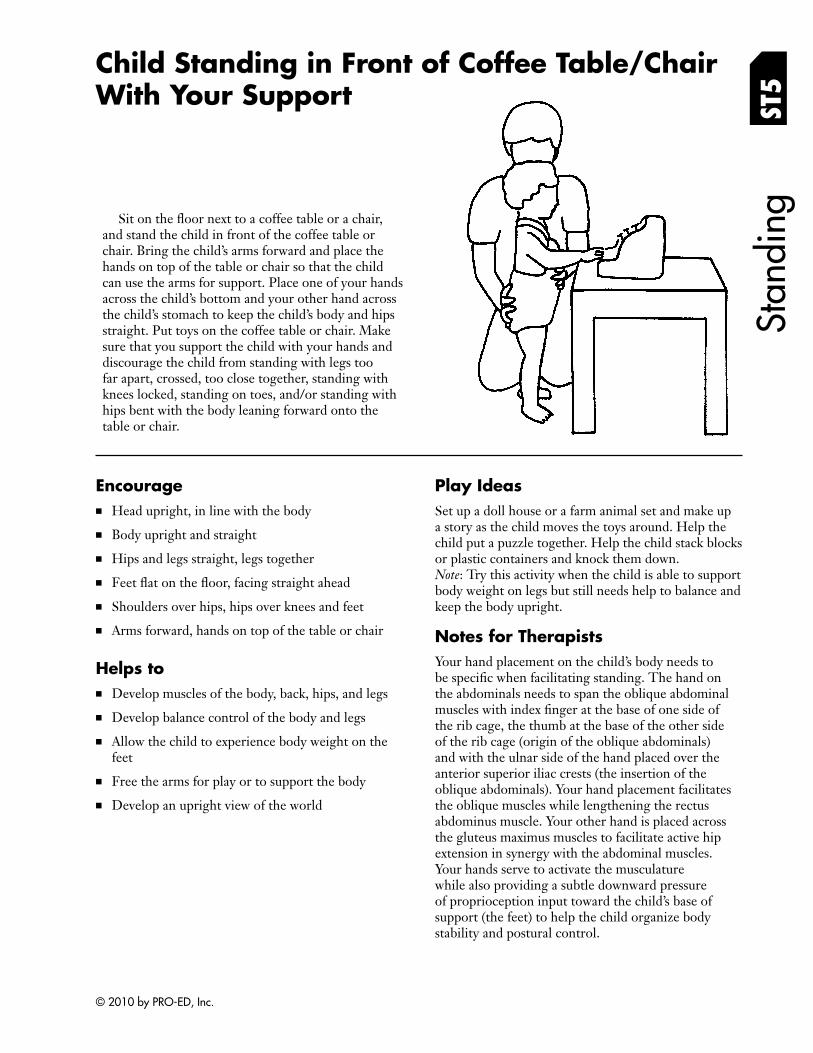
With Your Support
Stan
ding
Child Standing in Front of Coffee Table/Chair
ST5
Sit on the floor next to a coffee table or a chair, and stand the child in front of the coffee table or chair. Bring the child’s arms forward and place the hands on top of the table or chair so that the child can use the arms for support. Place one of your hands across the child’s bottom and your other hand across the child’s stomach to keep the child’s body and hips straight. Put toys on the coffee table or chair. Make sure that you support the child with your hands and discourage the child from standing with legs too far apart, crossed, too close together, standing with knees locked, standing on toes, and/or standing with hips bent with the body leaning forward onto the table or chair.
Encourage ■ Head upright, in line with the body
■ Body upright and straight
■ Hips and legs straight, legs together
■ Feet flat on the floor, facing straight ahead
■ Shoulders over hips, hips over knees and feet
■ Arms forward, hands on top of the table or chair
Helps to ■ Develop muscles of the body, back, hips, and legs
■ Develop balance control of the body and legs
■ Allow the child to experience body weight on the feet
■ Free the arms for play or to support the body
■ Develop an upright view of the world
Play Ideas Set up a doll house or a farm animal set and make up a story as the child moves the toys around. Help the child put a puzzle together. Help the child stack blocks or plastic containers and knock them down. Note: Try this activity when the child is able to support body weight on legs but still needs help to balance and keep the body upright.
Notes for Therapists Your hand placement on the child’s body needs to be specific when facilitating standing. The hand on the abdominals needs to span the oblique abdominal muscles with index finger at the base of one side of the rib cage, the thumb at the base of the other side of the rib cage (origin of the oblique abdominals) and with the ulnar side of the hand placed over the anterior superior iliac crests (the insertion of the oblique abdominals). Your hand placement facilitates the oblique muscles while lengthening the rectus abdominus muscle. Your other hand is placed across the gluteus maximus muscles to facilitate active hip extension in synergy with the abdominal muscles. Your hands serve to activate the musculature while also providing a subtle downward pressure of proprioception input toward the child’s base of support (the feet) to help the child organize body stability and postural control.
© 2010 by PRO-ED, Inc.
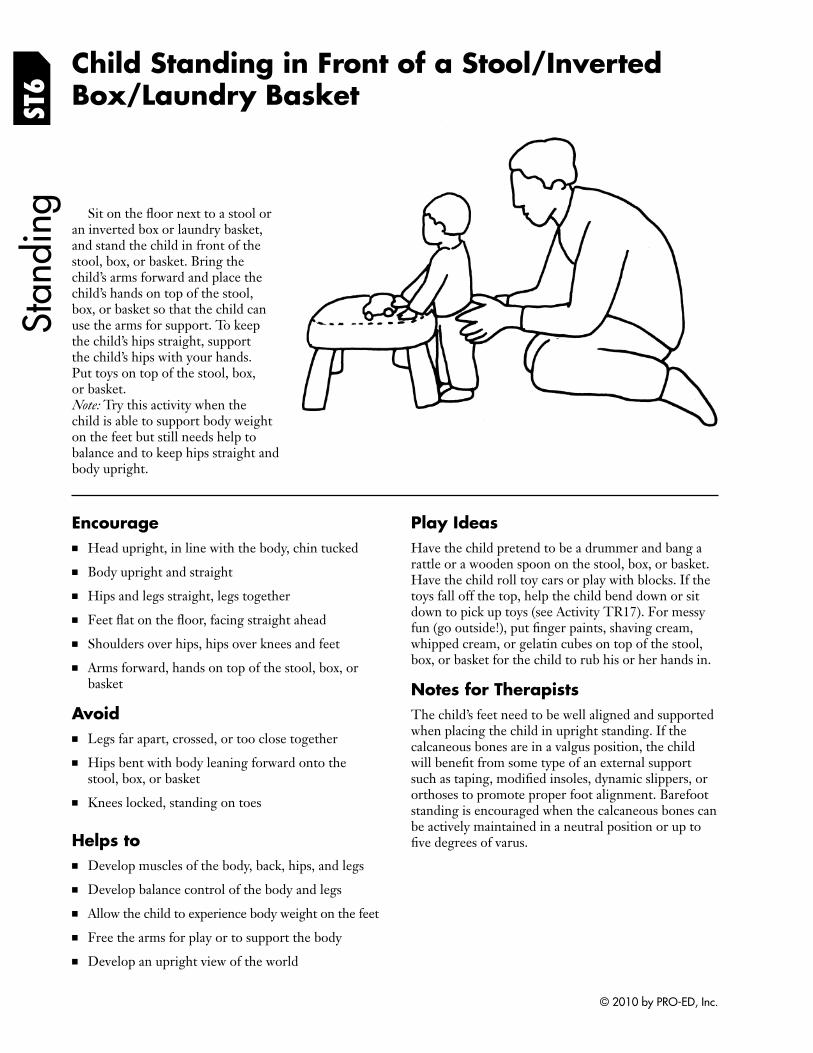
ST6
Stan
ding
Child Standing in Front of a Stool/Inverted Box/Laundry Basket
Sit on the floor next to a stool or an inverted box or laundry basket, and stand the child in front of the stool, box, or basket. Bring the child’s arms forward and place the child’s hands on top of the stool, box, or basket so that the child can use the arms for support. To keep the child’s hips straight, support the child’s hips with your hands. Put toys on top of the stool, box, or basket. Note: Try this activity when the child is able to support body weight on the feet but still needs help to balance and to keep hips straight and body upright.
Encourage ■ Head upright, in line with the body, chin tucked
■ Body upright and straight
■ Hips and legs straight, legs together
■ Feet flat on the floor, facing straight ahead
■ Shoulders over hips, hips over knees and feet
■ Arms forward, hands on top of the stool, box, or basket
Avoid ■ Legs far apart, crossed, or too close together
■ Hips bent with body leaning forward onto the stool, box, or basket
■ Knees locked, standing on toes
Helps to ■ Develop muscles of the body, back, hips, and legs
■ Develop balance control of the body and legs
■ Allow the child to experience body weight on the feet
■ Free the arms for play or to support the body
■ Develop an upright view of the world
Play Ideas Have the child pretend to be a drummer and bang a rattle or a wooden spoon on the stool, box, or basket. Have the child roll toy cars or play with blocks. If the toys fall off the top, help the child bend down or sit down to pick up toys (see Activity TR17). For messy fun (go outside!), put finger paints, shaving cream, whipped cream, or gelatin cubes on top of the stool, box, or basket for the child to rub his or her hands in.
Notes for Therapists The child’s feet need to be well aligned and supported when placing the child in upright standing. If the calcaneous bones are in a valgus position, the child will benefit from some type of an external support such as taping, modified insoles, dynamic slippers, or orthoses to promote proper foot alignment. Barefoot standing is encouraged when the calcaneous bones can be actively maintained in a neutral position or up to five degrees of varus.
© 2010 by PRO-ED, Inc.
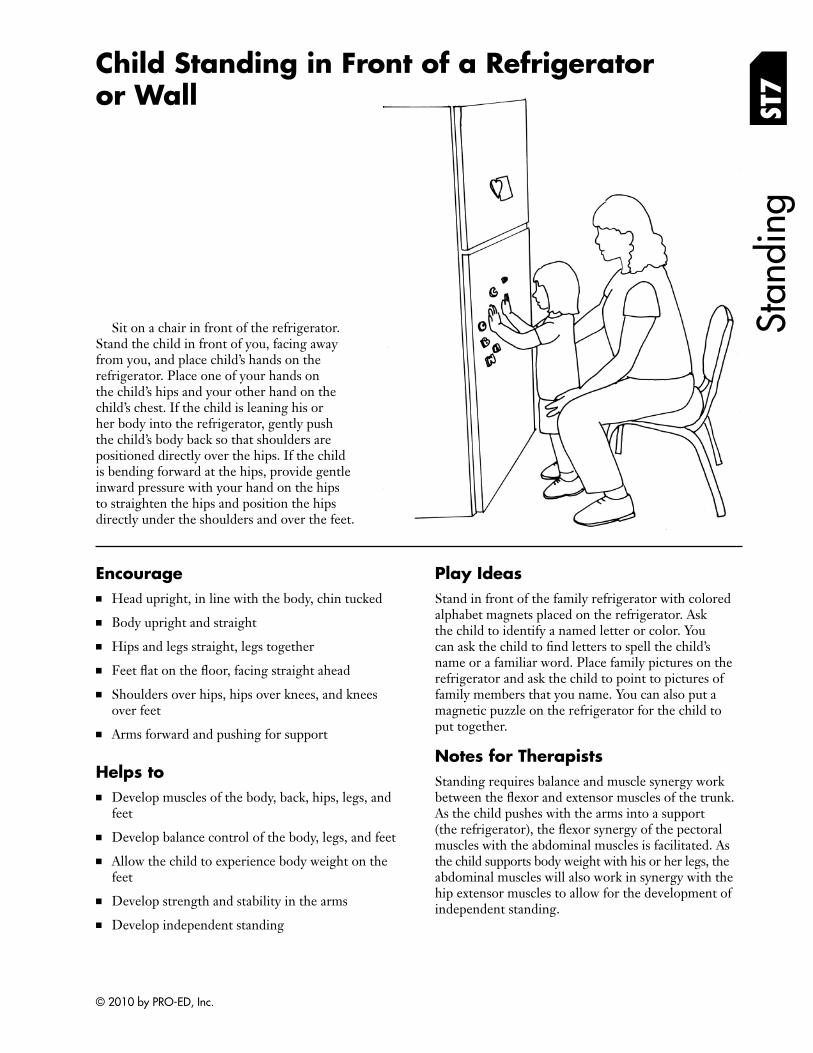
or Wall
Stan
ding
Child Standing in Front of a Refrigerator
ST7
Sit on a chair in front of the refrigerator. Stand the child in front of you, facing away from you, and place child’s hands on the refrigerator. Place one of your hands on the child’s hips and your other hand on the child’s chest. If the child is leaning his or her body into the refrigerator, gently push the child’s body back so that shoulders are positioned directly over the hips. If the child is bending forward at the hips, provide gentle inward pressure with your hand on the hips to straighten the hips and position the hips directly under the shoulders and over the feet.
Encourage ■ Head upright, in line with the body, chin tucked
■ Body upright and straight
■ Hips and legs straight, legs together
■ Feet flat on the floor, facing straight ahead
■ Shoulders over hips, hips over knees, and knees over feet
■ Arms forward and pushing for support
Helps to ■ Develop muscles of the body, back, hips, legs, and
feet
■ Develop balance control of the body, legs, and feet
■ Allow the child to experience body weight on the feet
■ Develop strength and stability in the arms
■ Develop independent standing
Play Ideas Stand in front of the family refrigerator with colored alphabet magnets placed on the refrigerator. Ask the child to identify a named letter or color. You can ask the child to find letters to spell the child’s name or a familiar word. Place family pictures on the refrigerator and ask the child to point to pictures of family members that you name. You can also put a magnetic puzzle on the refrigerator for the child to put together.
Notes for Therapists Standing requires balance and muscle synergy work between the flexor and extensor muscles of the trunk. As the child pushes with the arms into a support (the refrigerator), the flexor synergy of the pectoral muscles with the abdominal muscles is facilitated. As the child supports body weight with his or her legs, the abdominal muscles will also work in synergy with the hip extensor muscles to allow for the development of independent standing.
© 2010 by PRO-ED, Inc.
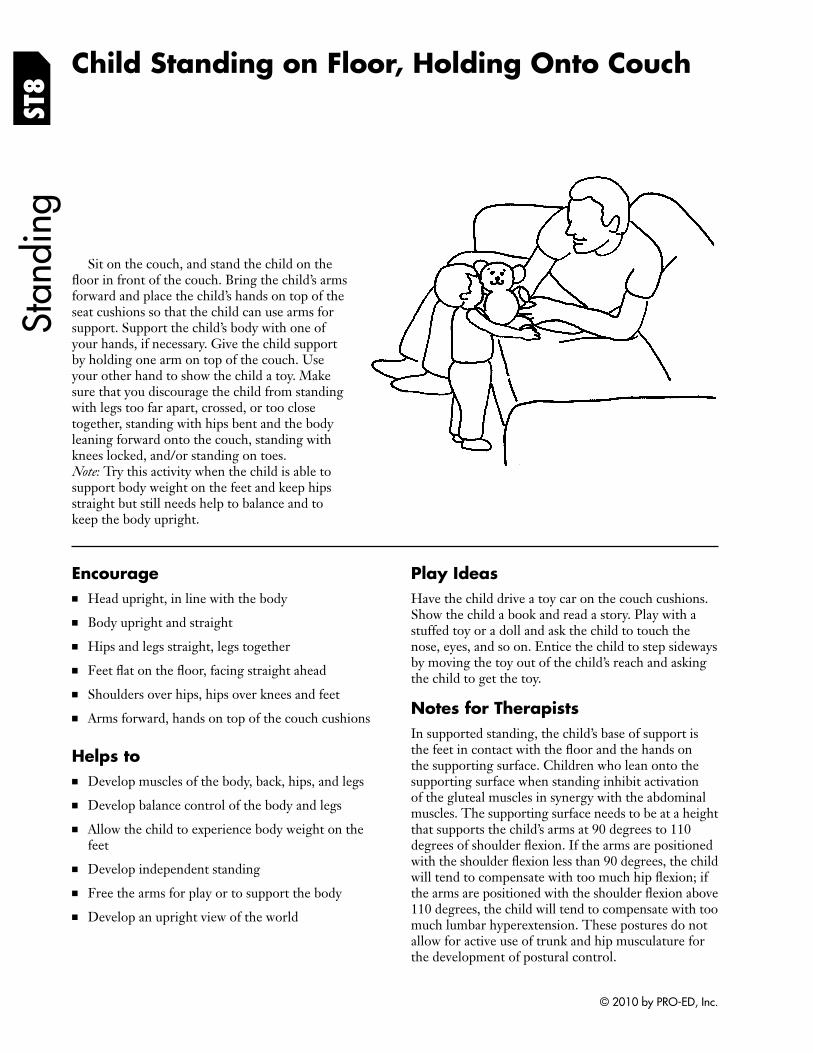
ST8
Child Standing on Floor, Holding Onto Couch St
andi
ng
Sit on the couch, and stand the child on the floor in front of the couch. Bring the child’s arms forward and place the child’s hands on top of the seat cushions so that the child can use arms for support. Support the child’s body with one of your hands, if necessary. Give the child support by holding one arm on top of the couch. Use your other hand to show the child a toy. Make sure that you discourage the child from standing with legs too far apart, crossed, or too close together, standing with hips bent and the body leaning forward onto the couch, standing with knees locked, and/or standing on toes. Note: Try this activity when the child is able to support body weight on the feet and keep hips straight but still needs help to balance and to keep the body upright.
Encourage ■ Head upright, in line with the body
■ Body upright and straight
■ Hips and legs straight, legs together
■ Feet flat on the floor, facing straight ahead
■ Shoulders over hips, hips over knees and feet
■ Arms forward, hands on top of the couch cushions
Helps to ■ Develop muscles of the body, back, hips, and legs
■ Develop balance control of the body and legs
■ Allow the child to experience body weight on the feet
■ Develop independent standing
■ Free the arms for play or to support the body
■ Develop an upright view of the world
Play Ideas Have the child drive a toy car on the couch cushions. Show the child a book and read a story. Play with a stuffed toy or a doll and ask the child to touch the nose, eyes, and so on. Entice the child to step sideways by moving the toy out of the child’s reach and asking the child to get the toy.
Notes for Therapists In supported standing, the child’s base of support is the feet in contact with the floor and the hands on the supporting surface. Children who lean onto the supporting surface when standing inhibit activation of the gluteal muscles in synergy with the abdominal muscles. The supporting surface needs to be at a height that supports the child’s arms at 90 degrees to 110 degrees of shoulder flexion. If the arms are positioned with the shoulder flexion less than 90 degrees, the child will tend to compensate with too much hip fl exion; if the arms are positioned with the shoulder fl exion above 110 degrees, the child will tend to compensate with too much lumbar hyperextension. These postures do not allow for active use of trunk and hip musculature for the development of postural control.
© 2010 by PRO-ED, Inc.
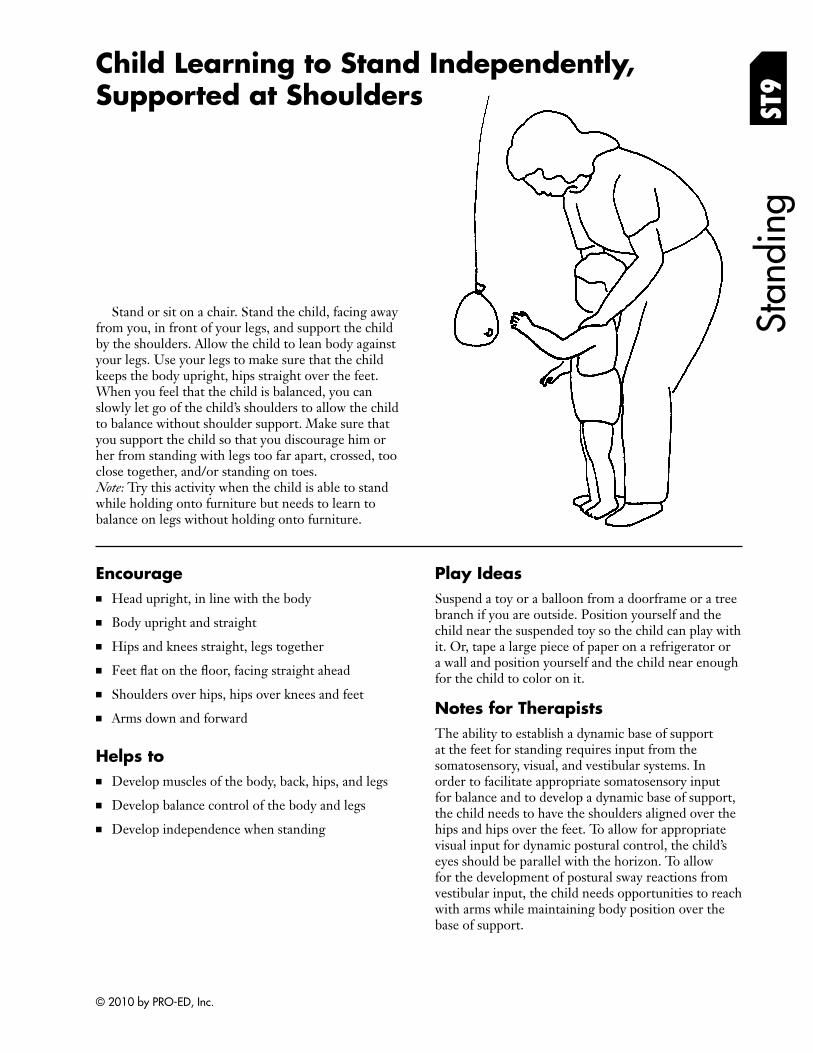
Supported at Shoulders
Stan
ding
Child Learning to Stand Independently,
ST9
Stand or sit on a chair. Stand the child, facing away from you, in front of your legs, and support the child by the shoulders. Allow the child to lean body against your legs. Use your legs to make sure that the child keeps the body upright, hips straight over the feet. When you feel that the child is balanced, you can slowly let go of the child’s shoulders to allow the child to balance without shoulder support. Make sure that you support the child so that you discourage him or her from standing with legs too far apart, crossed, too close together, and/or standing on toes. Note: Try this activity when the child is able to stand while holding onto furniture but needs to learn to balance on legs without holding onto furniture.
Encourage ■ Head upright, in line with the body
■ Body upright and straight
■ Hips and knees straight, legs together
■ Feet flat on the floor, facing straight ahead
■ Shoulders over hips, hips over knees and feet
■ Arms down and forward
Helps to ■ Develop muscles of the body, back, hips, and legs
■ Develop balance control of the body and legs
■ Develop independence when standing
Play Ideas Suspend a toy or a balloon from a doorframe or a tree branch if you are outside. Position yourself and the child near the suspended toy so the child can play with it. Or, tape a large piece of paper on a refrigerator or a wall and position yourself and the child near enough for the child to color on it.
Notes for Therapists The ability to establish a dynamic base of support at the feet for standing requires input from the somatosensory, visual, and vestibular systems. In order to facilitate appropriate somatosensory input for balance and to develop a dynamic base of support, the child needs to have the shoulders aligned over the hips and hips over the feet. To allow for appropriate visual input for dynamic postural control, the child’s eyes should be parallel with the horizon. To allow for the development of postural sway reactions from vestibular input, the child needs opportunities to reach with arms while maintaining body position over the base of support.
© 2010 by PRO-ED, Inc.
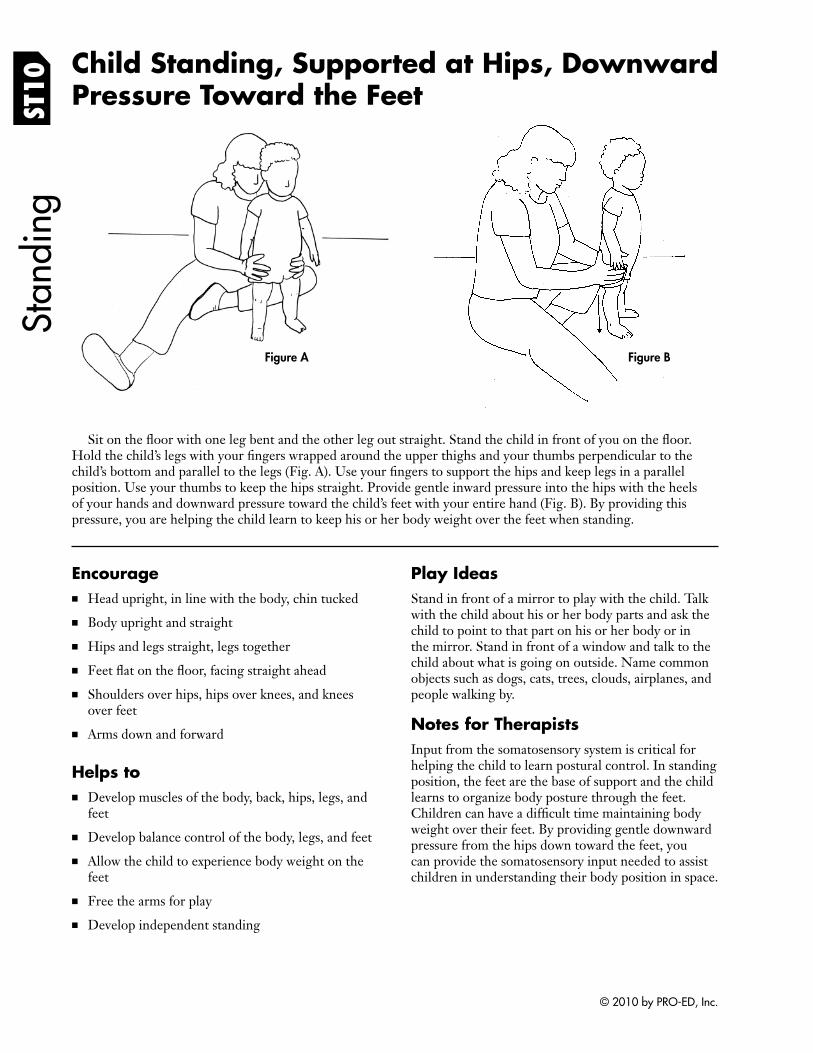
Stan
ding
Child Standing, Supported at Hips, Downward Pressure Toward the Feet ST
10
Figure BFigure A
Sit on the floor with one leg bent and the other leg out straight. Stand the child in front of you on the fl oor. Hold the child’s legs with your fingers wrapped around the upper thighs and your thumbs perpendicular to the child’s bottom and parallel to the legs (Fig. A). Use your fingers to support the hips and keep legs in a parallel position. Use your thumbs to keep the hips straight. Provide gentle inward pressure into the hips with the heels of your hands and downward pressure toward the child’s feet with your entire hand (Fig. B). By providing this pressure, you are helping the child learn to keep his or her body weight over the feet when standing.
Encourage ■ Head upright, in line with the body, chin tucked
■ Body upright and straight
■ Hips and legs straight, legs together
■ Feet flat on the floor, facing straight ahead
■ Shoulders over hips, hips over knees, and knees over feet
■ Arms down and forward
Helps to ■ Develop muscles of the body, back, hips, legs, and
feet
■ Develop balance control of the body, legs, and feet
■ Allow the child to experience body weight on the feet
■ Free the arms for play
■ Develop independent standing
Play Ideas Stand in front of a mirror to play with the child. Talk with the child about his or her body parts and ask the child to point to that part on his or her body or in the mirror. Stand in front of a window and talk to the child about what is going on outside. Name common objects such as dogs, cats, trees, clouds, airplanes, and people walking by.
Notes for Therapists Input from the somatosensory system is critical for helping the child to learn postural control. In standing position, the feet are the base of support and the child learns to organize body posture through the feet. Children can have a difficult time maintaining body weight over their feet. By providing gentle downward pressure from the hips down toward the feet, you can provide the somatosensory input needed to assist children in understanding their body position in space.
© 2010 by PRO-ED, Inc.
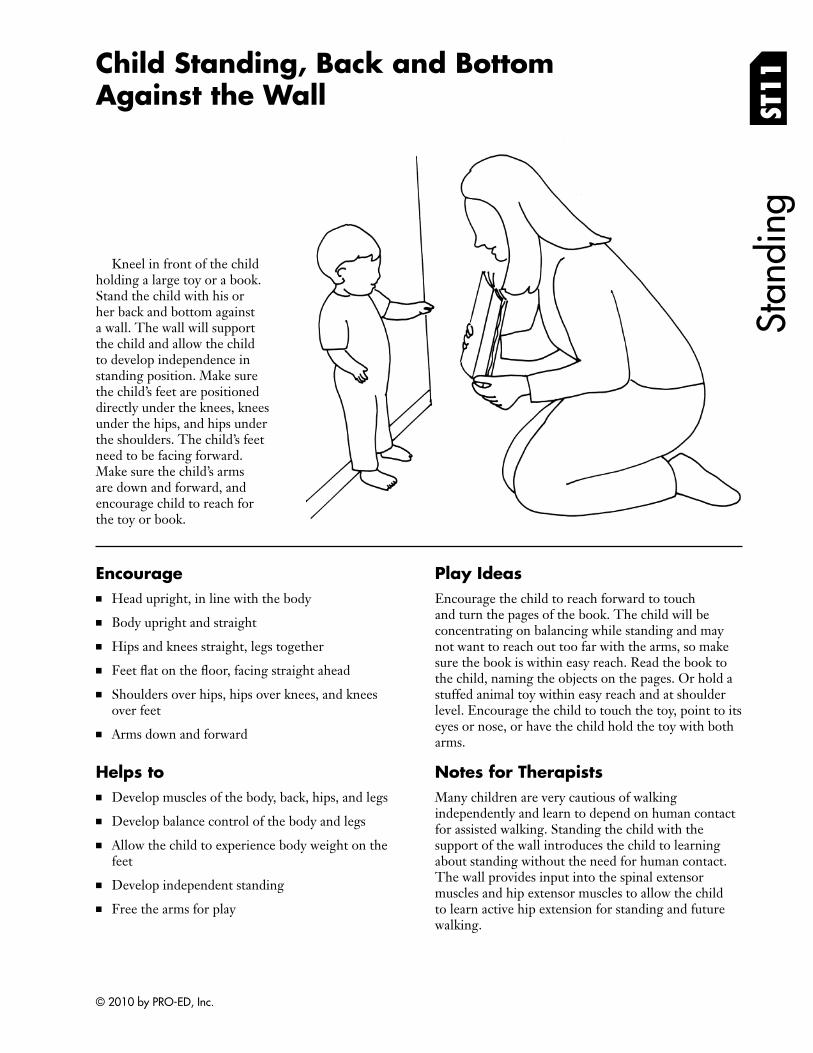
Stan
ding
Child Standing, Back and Bottom Against the Wall ST
11
Kneel in front of the child holding a large toy or a book. Stand the child with his or her back and bottom against a wall. The wall will support the child and allow the child to develop independence in standing position. Make sure the child’s feet are positioned directly under the knees, knees under the hips, and hips under the shoulders. The child’s feet need to be facing forward. Make sure the child’s arms are down and forward, and encourage child to reach for the toy or book.
Encourage ■ Head upright, in line with the body
■ Body upright and straight
■ Hips and knees straight, legs together
■ Feet flat on the floor, facing straight ahead
■ Shoulders over hips, hips over knees, and knees over feet
■ Arms down and forward
Helps to ■ Develop muscles of the body, back, hips, and legs
■ Develop balance control of the body and legs
■ Allow the child to experience body weight on the feet
■ Develop independent standing
■ Free the arms for play
Play Ideas Encourage the child to reach forward to touch and turn the pages of the book. The child will be concentrating on balancing while standing and may not want to reach out too far with the arms, so make sure the book is within easy reach. Read the book to the child, naming the objects on the pages. Or hold a stuffed animal toy within easy reach and at shoulder level. Encourage the child to touch the toy, point to its eyes or nose, or have the child hold the toy with both arms.
Notes for Therapists Many children are very cautious of walking independently and learn to depend on human contact for assisted walking. Standing the child with the support of the wall introduces the child to learning about standing without the need for human contact. The wall provides input into the spinal extensor muscles and hip extensor muscles to allow the child to learn active hip extension for standing and future walking.
© 2010 by PRO-ED, Inc.
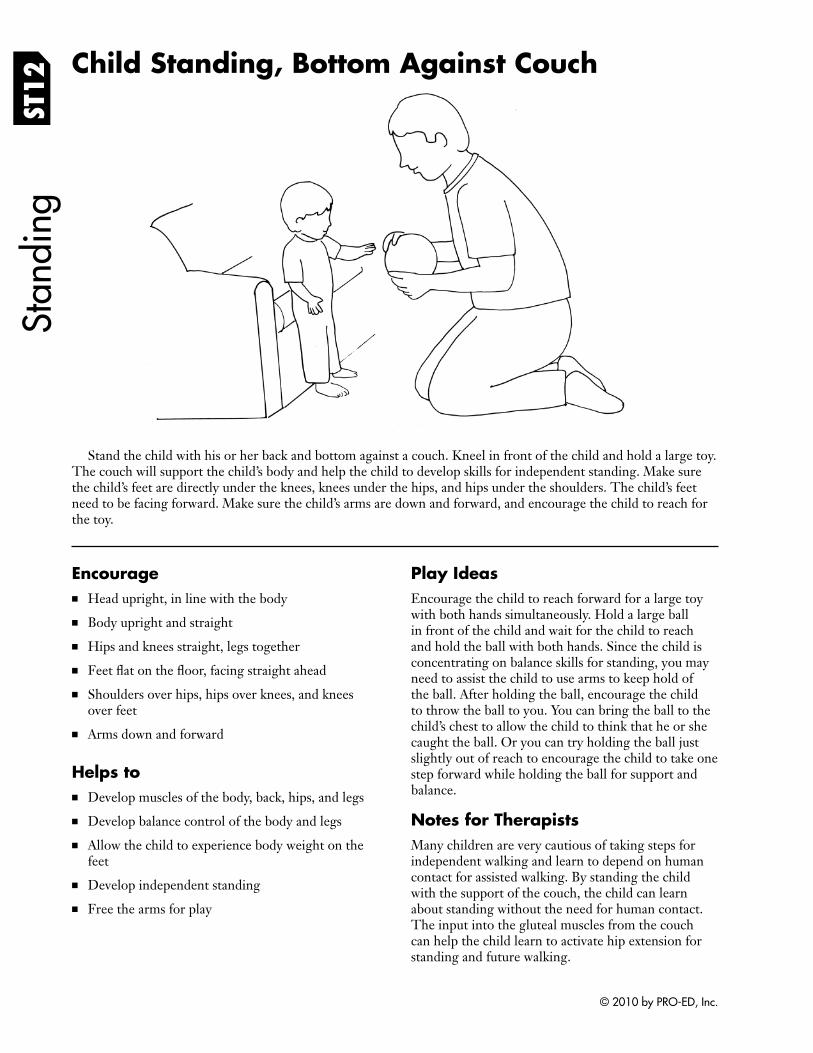
ST12
Stan
ding
Child Standing, Bottom Against Couch
Stand the child with his or her back and bottom against a couch. Kneel in front of the child and hold a large toy. The couch will support the child’s body and help the child to develop skills for independent standing. Make sure the child’s feet are directly under the knees, knees under the hips, and hips under the shoulders. The child’s feet need to be facing forward. Make sure the child’s arms are down and forward, and encourage the child to reach for the toy.
Encourage ■ Head upright, in line with the body
■ Body upright and straight
■ Hips and knees straight, legs together
■ Feet flat on the floor, facing straight ahead
■ Shoulders over hips, hips over knees, and knees over feet
■ Arms down and forward
Helps to ■ Develop muscles of the body, back, hips, and legs
■ Develop balance control of the body and legs
■ Allow the child to experience body weight on the feet
■ Develop independent standing
■ Free the arms for play
Play Ideas Encourage the child to reach forward for a large toy with both hands simultaneously. Hold a large ball in front of the child and wait for the child to reach and hold the ball with both hands. Since the child is concentrating on balance skills for standing, you may need to assist the child to use arms to keep hold of the ball. After holding the ball, encourage the child to throw the ball to you. You can bring the ball to the child’s chest to allow the child to think that he or she caught the ball. Or you can try holding the ball just slightly out of reach to encourage the child to take one step forward while holding the ball for support and balance.
Notes for Therapists Many children are very cautious of taking steps for independent walking and learn to depend on human contact for assisted walking. By standing the child with the support of the couch, the child can learn about standing without the need for human contact. The input into the gluteal muscles from the couch can help the child learn to activate hip extension for standing and future walking.
© 2010 by PRO-ED, Inc.
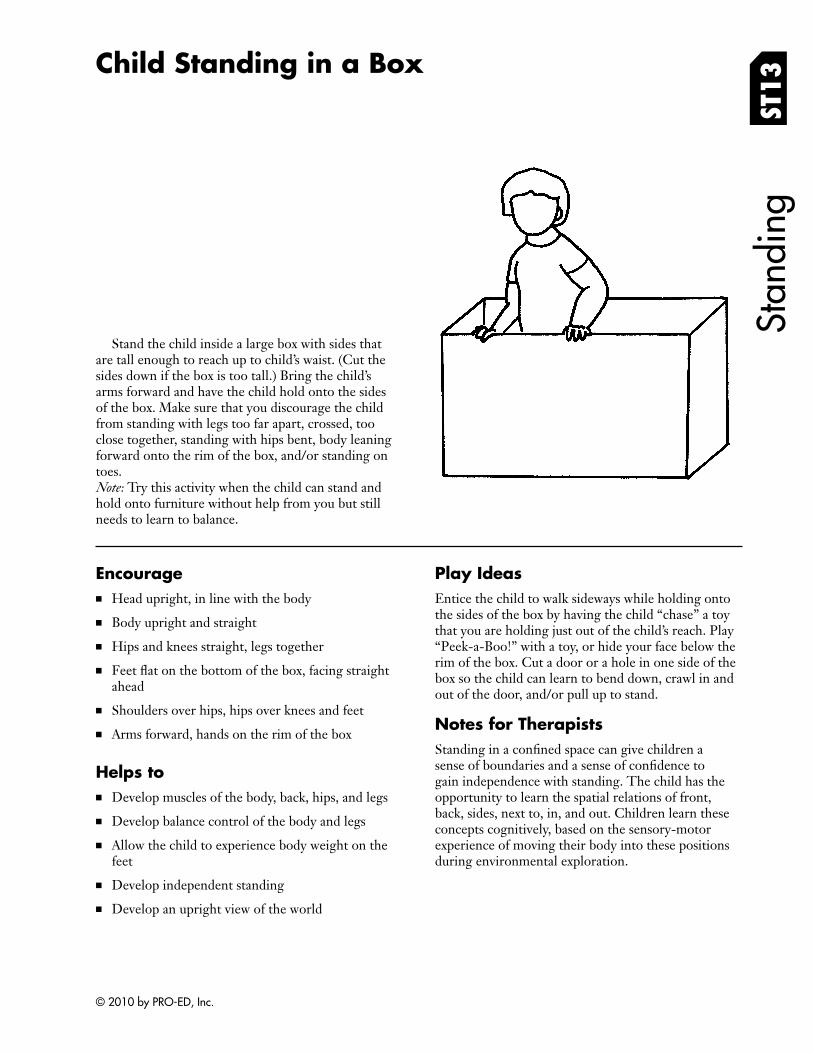
Child Standing in a Box
Stand the child inside a large box with sides that are tall enough to reach up to child’s waist. (Cut the sides down if the box is too tall.) Bring the child’s arms forward and have the child hold onto the sides of the box. Make sure that you discourage the child from standing with legs too far apart, crossed, too close together, standing with hips bent, body leaning forward onto the rim of the box, and/or standing on toes. Note: Try this activity when the child can stand and hold onto furniture without help from you but still needs to learn to balance.
Stan
ding
ST
13
Encourage ■ Head upright, in line with the body
■ Body upright and straight
■ Hips and knees straight, legs together
■ Feet flat on the bottom of the box, facing straight ahead
■ Shoulders over hips, hips over knees and feet
■ Arms forward, hands on the rim of the box
Helps to ■ Develop muscles of the body, back, hips, and legs
■ Develop balance control of the body and legs
■ Allow the child to experience body weight on the feet
■ Develop independent standing
■ Develop an upright view of the world
Play Ideas Entice the child to walk sideways while holding onto the sides of the box by having the child “chase” a toy that you are holding just out of the child’s reach. Play “Peek-a-Boo!” with a toy, or hide your face below the rim of the box. Cut a door or a hole in one side of the box so the child can learn to bend down, crawl in and out of the door, and/or pull up to stand.
Notes for Therapists Standing in a confined space can give children a sense of boundaries and a sense of confi dence to gain independence with standing. The child has the opportunity to learn the spatial relations of front, back, sides, next to, in, and out. Children learn these concepts cognitively, based on the sensory-motor experience of moving their body into these positions during environmental exploration.
© 2010 by PRO-ED, Inc.

ST14
Child Standing in Crib/Playpen, Squatting to Play
Stan
ding
Figure A Figure B
Figure C
Sit or kneel beside the child’s playpen or crib. Stand the child inside the playpen/crib and have the child hold onto the rim. Hold and show the child a toy (Fig. A). Bring the toy down toward the level of the child’s feet to entice the child to bend down while holding onto the rim of the playpen/crib (Fig. B). Keep holding the toy at the level of the child’s feet and wait until the child squats down to reach the toy (Fig. C). Allow the child to touch the toy with one hand while holding onto the rim with other hand. Bring the toy back up to the rim of the playpen/crib to encourage the child to stand up again.
Encourage ■ Head upright, in line with the body
■ Body upright and straight
■ Hips and knees straight with feet in line, under the hips
■ Feet flat on the mattress of playpen/crib, facing straight ahead
■ Shoulders over hips, hips over knees, and knees over feet
■ Smooth bending of the knees
Helps to ■ Develop muscles of the body, back, hips, knees, and
feet
■ Develop balance control of the body and legs
■ Develop independent standing
■ Develop independent squatting for play
Play Ideas You can use a stuffed animal toy, doll, or toy car and pretend to have the toy walk or drive down the side of the playpen or crib. You can play a word game with this activity by saying the words, “Going down!” when “walking” the doll or “driving” the car down the side of the playpen/crib. Say “Going up!” when bringing the toys back up to the top of the playpen/crib rim. You can also play a game of “Peek-a-Boo!” with the toy or your face.
Notes for Therapists Squatting is an excellent activity for children to learn how to grade muscle control for knee fl exion when moving down into squat position and how to grade knee extension when moving back up to standing position. When the child moves down into a squat position, the child is using knee flexion control with an eccentric muscle contraction. When the child moves back up into standing position, the child is using knee extension with a concentric muscle contraction. Have the child use hands to hold onto the rim of the playpen/crib to allow for body stability and control of leg movement.
© 2010 by PRO-ED, Inc.
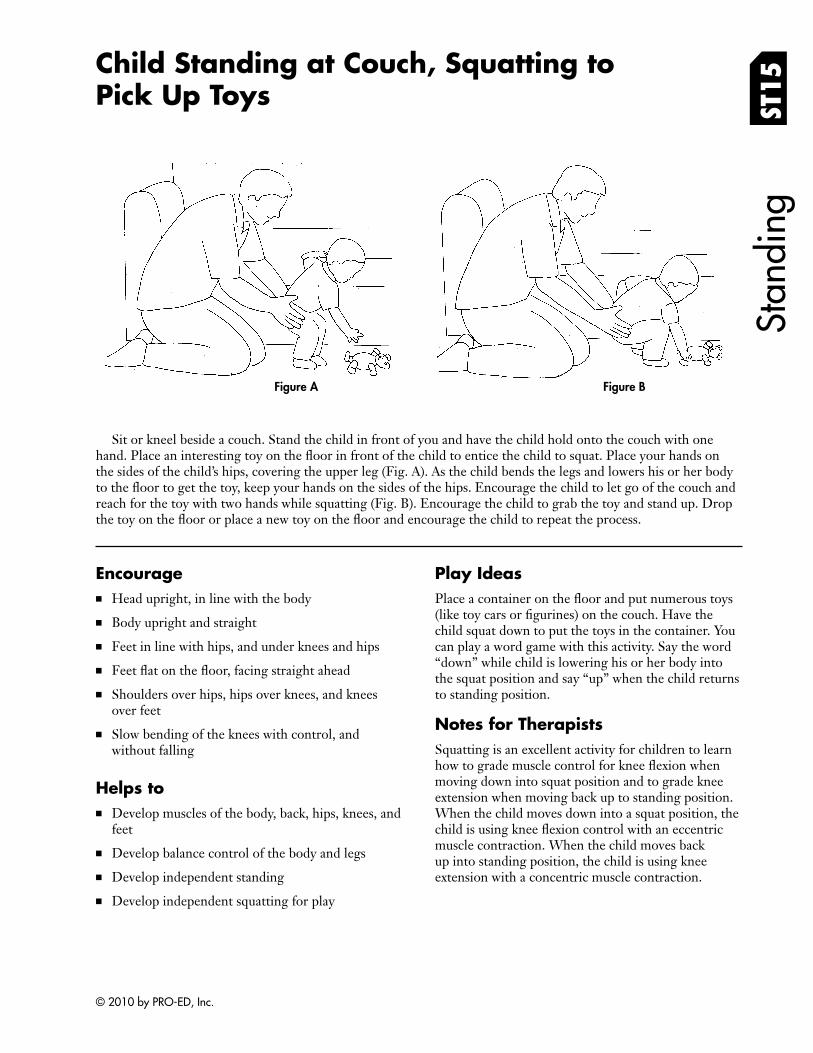
Child Standing at Couch, Squatting to Pick Up Toys ST
15St
andi
ng
Figure A Figure B
Sit or kneel beside a couch. Stand the child in front of you and have the child hold onto the couch with one hand. Place an interesting toy on the floor in front of the child to entice the child to squat. Place your hands on the sides of the child’s hips, covering the upper leg (Fig. A). As the child bends the legs and lowers his or her body to the floor to get the toy, keep your hands on the sides of the hips. Encourage the child to let go of the couch and reach for the toy with two hands while squatting (Fig. B). Encourage the child to grab the toy and stand up. Drop the toy on the floor or place a new toy on the floor and encourage the child to repeat the process.
Encourage ■ Head upright, in line with the body
■ Body upright and straight
■ Feet in line with hips, and under knees and hips
■ Feet flat on the floor, facing straight ahead
■ Shoulders over hips, hips over knees, and knees over feet
■ Slow bending of the knees with control, and without falling
Helps to ■ Develop muscles of the body, back, hips, knees, and
feet
■ Develop balance control of the body and legs
■ Develop independent standing
■ Develop independent squatting for play
Play Ideas Place a container on the floor and put numerous toys (like toy cars or figurines) on the couch. Have the child squat down to put the toys in the container. You can play a word game with this activity. Say the word “down” while child is lowering his or her body into the squat position and say “up” when the child returns to standing position.
Notes for Therapists Squatting is an excellent activity for children to learn how to grade muscle control for knee fl exion when moving down into squat position and to grade knee extension when moving back up to standing position. When the child moves down into a squat position, the child is using knee flexion control with an eccentric muscle contraction. When the child moves back up into standing position, the child is using knee extension with a concentric muscle contraction.
© 2010 by PRO-ED, Inc.
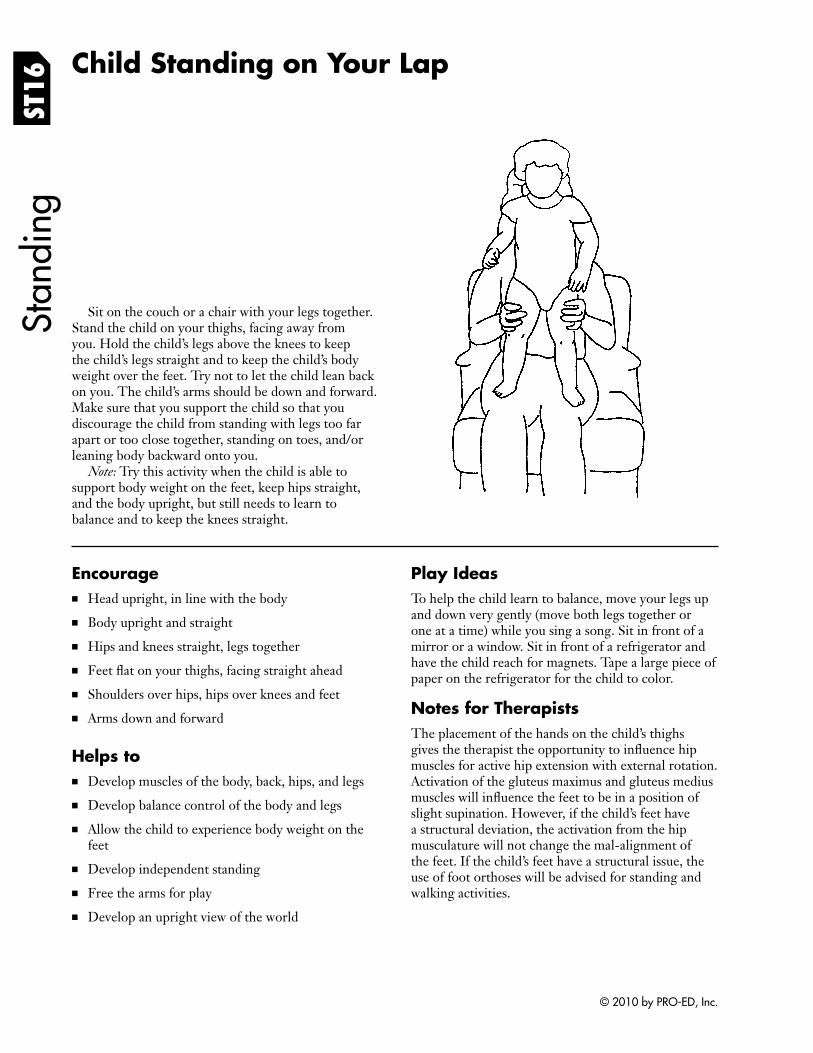
ST16
Child Standing on Your Lap St
andi
ng
Sit on the couch or a chair with your legs together. Stand the child on your thighs, facing away from you. Hold the child’s legs above the knees to keep the child’s legs straight and to keep the child’s body weight over the feet. Try not to let the child lean back on you. The child’s arms should be down and forward. Make sure that you support the child so that you discourage the child from standing with legs too far apart or too close together, standing on toes, and/or leaning body backward onto you.
Note: Try this activity when the child is able to support body weight on the feet, keep hips straight, and the body upright, but still needs to learn to balance and to keep the knees straight.
Encourage ■ Head upright, in line with the body
■ Body upright and straight
■ Hips and knees straight, legs together
■ Feet flat on your thighs, facing straight ahead
■ Shoulders over hips, hips over knees and feet
■ Arms down and forward
Helps to ■ Develop muscles of the body, back, hips, and legs
■ Develop balance control of the body and legs
■ Allow the child to experience body weight on the feet
■ Develop independent standing
■ Free the arms for play
■ Develop an upright view of the world
Play Ideas To help the child learn to balance, move your legs up and down very gently (move both legs together or one at a time) while you sing a song. Sit in front of a mirror or a window. Sit in front of a refrigerator and have the child reach for magnets. Tape a large piece of paper on the refrigerator for the child to color.
Notes for Therapists The placement of the hands on the child’s thighs gives the therapist the opportunity to infl uence hip muscles for active hip extension with external rotation. Activation of the gluteus maximus and gluteus medius muscles will influence the feet to be in a position of slight supination. However, if the child’s feet have a structural deviation, the activation from the hip musculature will not change the mal-alignment of the feet. If the child’s feet have a structural issue, the use of foot orthoses will be advised for standing and walking activities.
© 2010 by PRO-ED, Inc.
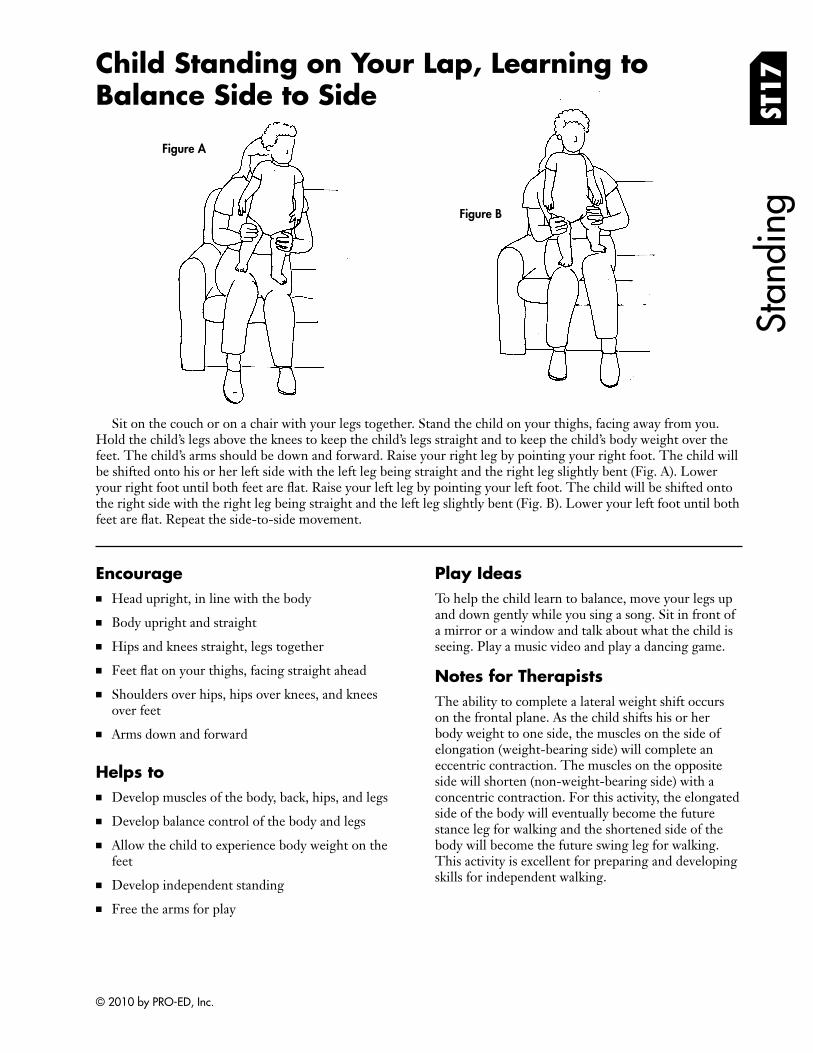
Child Standing on Your Lap, Learning to Balance Side to Side
Sit on the couch or on a chair with your legs together. Stand the child on your thighs, facing away from you. Hold the child’s legs above the knees to keep the child’s legs straight and to keep the child’s body weight over the feet. The child’s arms should be down and forward. Raise your right leg by pointing your right foot. The child will be shifted onto his or her left side with the left leg being straight and the right leg slightly bent (Fig. A). Lower your right foot until both feet are flat. Raise your left leg by pointing your left foot. The child will be shifted onto the right side with the right leg being straight and the left leg slightly bent (Fig. B). Lower your left foot until both feet are flat. Repeat the side-to-side movement.
Stan
ding
ST
17
Figure B
Figure A
Encourage ■ Head upright, in line with the body
■ Body upright and straight
■ Hips and knees straight, legs together
■ Feet flat on your thighs, facing straight ahead
■ Shoulders over hips, hips over knees, and knees over feet
■ Arms down and forward
Helps to ■ Develop muscles of the body, back, hips, and legs
■ Develop balance control of the body and legs
■ Allow the child to experience body weight on the feet
■ Develop independent standing
■ Free the arms for play
Play Ideas To help the child learn to balance, move your legs up and down gently while you sing a song. Sit in front of a mirror or a window and talk about what the child is seeing. Play a music video and play a dancing game.
Notes for Therapists The ability to complete a lateral weight shift occurs on the frontal plane. As the child shifts his or her body weight to one side, the muscles on the side of elongation (weight-bearing side) will complete an eccentric contraction. The muscles on the opposite side will shorten (non-weight-bearing side) with a concentric contraction. For this activity, the elongated side of the body will eventually become the future stance leg for walking and the shortened side of the body will become the future swing leg for walking. This activity is excellent for preparing and developing skills for independent walking.
© 2010 by PRO-ED, Inc.

ST18
Child Standing, Learning to Balance by Stepping on Pillow/Book
Figure BFigure A
Stan
ding
Sit on a couch with your legs apart, and stand the child on the floor in front of you. Put a large pillow, a couch cushion, or a book on the floor next to the child’s feet. Support the child by the hands as you encourage the child to step on and off the pillow or the book (Fig. A). If the child tends to pull on your hands, then support the child by the shoulders instead (Fig. B). Make sure that you discourage the child from standing with legs too far apart, crossed, too close together, standing on toes, standing with hips bent, and/or with body leaning forward onto couch cushions. Note: Try this activity when the child is able to support body weight on the feet with hips and knees straight and body upright, but still needs to develop balance control of body and legs.
Encourage ■ Head upright, in line with the body
■ Body upright and straight
■ Hips straight, legs together
■ Feet flat on the floor, facing straight ahead
■ Shoulders over hips, hips over knees and feet
■ Arms forward
Helps to ■ Develop muscles of the body, back, hips, and legs
■ Develop balance control of the body and legs
■ Allow the child to experience shifting of body weight on the feet
■ Develop independent standing
Play Ideas Make funny sounds as the child steps up and down. Have the child pretend to march. Say to the child, “You are SO big!” when the child steps up on the pillow/book.
Notes for Therapists Single limb stance allows the child to learn the components of the stance leg and the swing leg for the activity of walking. The emphasis in this activity is to gain a lateral weight shift onto the stance leg with elongation of the trunk, activation of hip extension, and a balance between the hip abductor and hip adductor musculature. Standing on a firm surface like a book increases the proprioceptive feedback when the child is stepping. Standing on a soft surface like a pillow allows for more postural sway and an increased need to make postural adjustments in feet, knees, hips, and body while stepping. Try using a fi rm surface first for stepping to develop proprioceptive feedback, then try a soft surface to practice refi ning postural adjustments.
© 2010 by PRO-ED, Inc.
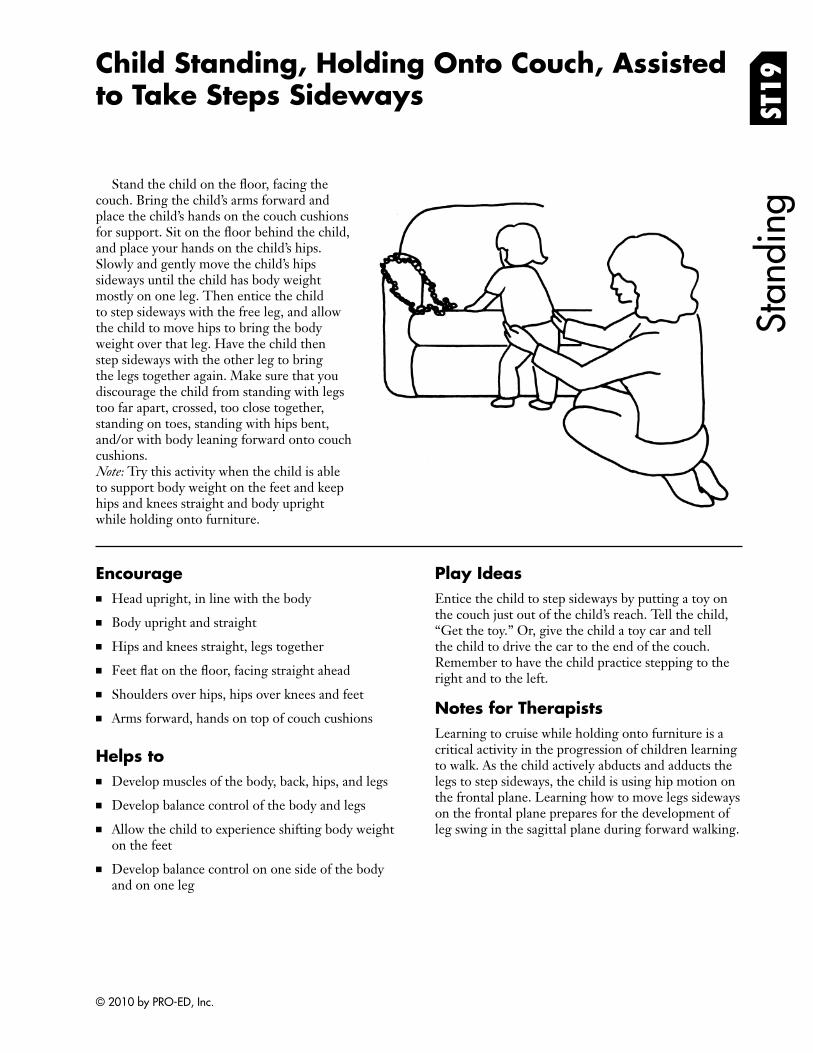
Child Standing, Holding Onto Couch, Assisted to Take Steps Sideways ST
19
Stand the child on the floor, facing the couch. Bring the child’s arms forward and place the child’s hands on the couch cushions for support. Sit on the floor behind the child, and place your hands on the child’s hips. Slowly and gently move the child’s hips sideways until the child has body weight mostly on one leg. Then entice the child to step sideways with the free leg, and allow the child to move hips to bring the body weight over that leg. Have the child then step sideways with the other leg to bring the legs together again. Make sure that you discourage the child from standing with legs too far apart, crossed, too close together, standing on toes, standing with hips bent, and/or with body leaning forward onto couch cushions. Note: Try this activity when the child is able to support body weight on the feet and keep hips and knees straight and body upright while holding onto furniture.
Stan
ding
Encourage ■ Head upright, in line with the body
■ Body upright and straight
■ Hips and knees straight, legs together
■ Feet flat on the floor, facing straight ahead
■ Shoulders over hips, hips over knees and feet
■ Arms forward, hands on top of couch cushions
Helps to ■ Develop muscles of the body, back, hips, and legs
■ Develop balance control of the body and legs
■ Allow the child to experience shifting body weight on the feet
■ Develop balance control on one side of the body and on one leg
Play Ideas Entice the child to step sideways by putting a toy on the couch just out of the child’s reach. Tell the child, “Get the toy.” Or, give the child a toy car and tell the child to drive the car to the end of the couch. Remember to have the child practice stepping to the right and to the left.
Notes for Therapists Learning to cruise while holding onto furniture is a critical activity in the progression of children learning to walk. As the child actively abducts and adducts the legs to step sideways, the child is using hip motion on the frontal plane. Learning how to move legs sideways on the frontal plane prepares for the development of leg swing in the sagittal plane during forward walking.
© 2010 by PRO-ED, Inc.
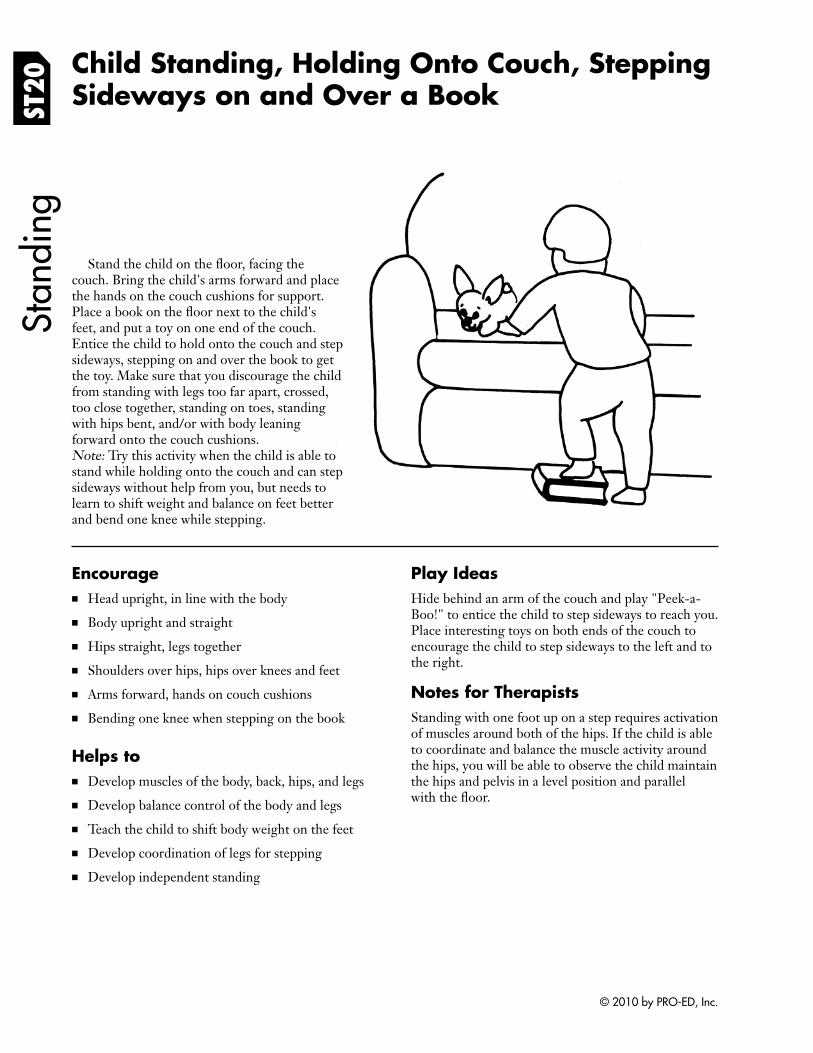
ST20
Child Standing, Holding Onto Couch, Stepping Sideways on and Over a Book
Stan
ding
Stand the child on the floor, facing the couch. Bring the child's arms forward and place the hands on the couch cushions for support. Place a book on the floor next to the child's feet, and put a toy on one end of the couch. Entice the child to hold onto the couch and step sideways, stepping on and over the book to get the toy. Make sure that you discourage the child from standing with legs too far apart, crossed, too close together, standing on toes, standing with hips bent, and/or with body leaning forward onto the couch cushions. Note: Try this activity when the child is able to stand while holding onto the couch and can step sideways without help from you, but needs to learn to shift weight and balance on feet better and bend one knee while stepping.
Encourage ■ Head upright, in line with the body
■ Body upright and straight
■ Hips straight, legs together
■ Shoulders over hips, hips over knees and feet
■ Arms forward, hands on couch cushions
■ Bending one knee when stepping on the book
Helps to ■ Develop muscles of the body, back, hips, and legs
■ Develop balance control of the body and legs
■ Teach the child to shift body weight on the feet
■ Develop coordination of legs for stepping
■ Develop independent standing
Play Ideas Hide behind an arm of the couch and play "Peek-a-Boo!" to entice the child to step sideways to reach you. Place interesting toys on both ends of the couch to encourage the child to step sideways to the left and to the right.
Notes for Therapists Standing with one foot up on a step requires activation of muscles around both of the hips. If the child is able to coordinate and balance the muscle activity around the hips, you will be able to observe the child maintain the hips and pelvis in a level position and parallel with the fl oor.
© 2010 by PRO-ED, Inc.
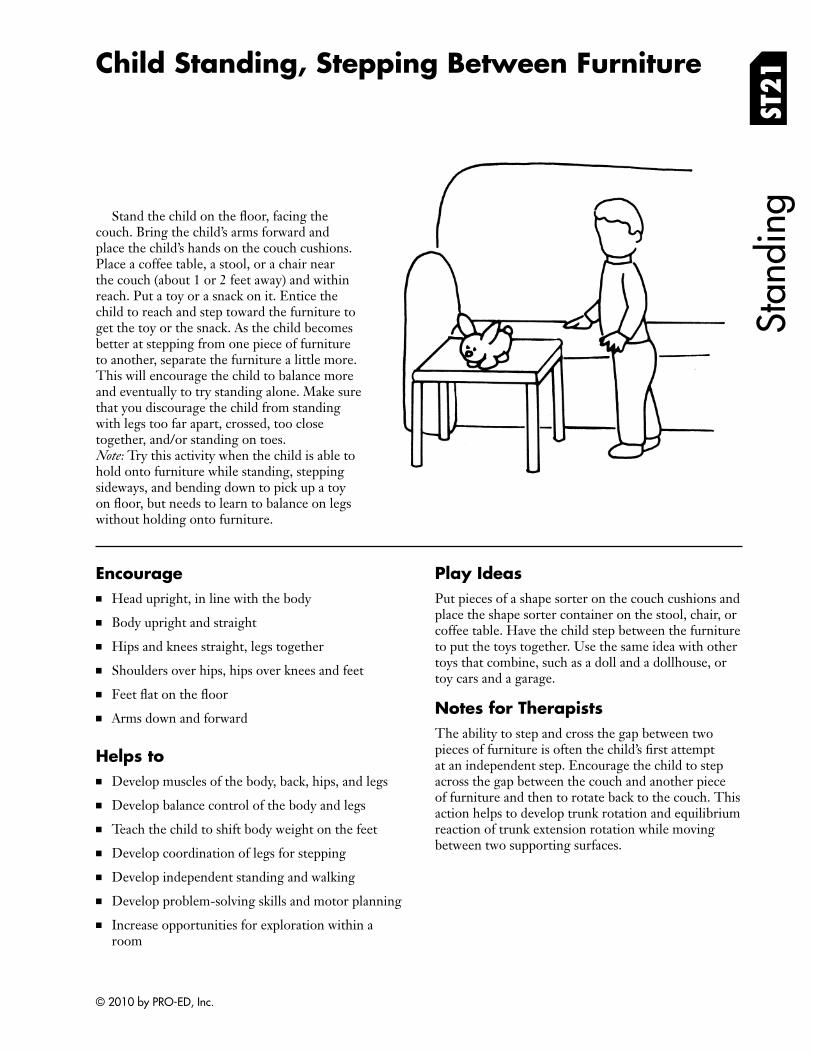
Child Standing, Stepping Between Furniture
ST21
Stand the child on the floor, facing the couch. Bring the child’s arms forward and place the child’s hands on the couch cushions. Place a coffee table, a stool, or a chair near the couch (about 1 or 2 feet away) and within reach. Put a toy or a snack on it. Entice the child to reach and step toward the furniture to get the toy or the snack. As the child becomes better at stepping from one piece of furniture to another, separate the furniture a little more. This will encourage the child to balance more and eventually to try standing alone. Make sure that you discourage the child from standing with legs too far apart, crossed, too close together, and/or standing on toes. Note: Try this activity when the child is able to hold onto furniture while standing, stepping sideways, and bending down to pick up a toy on floor, but needs to learn to balance on legs without holding onto furniture.
Stan
ding
Encourage ■ Head upright, in line with the body
■ Body upright and straight
■ Hips and knees straight, legs together
■ Shoulders over hips, hips over knees and feet
■ Feet flat on the fl oor
■ Arms down and forward
Helps to ■ Develop muscles of the body, back, hips, and legs
■ Develop balance control of the body and legs
■ Teach the child to shift body weight on the feet
■ Develop coordination of legs for stepping
■ Develop independent standing and walking
■ Develop problem-solving skills and motor planning
■ Increase opportunities for exploration within a room
Play Ideas Put pieces of a shape sorter on the couch cushions and place the shape sorter container on the stool, chair, or coffee table. Have the child step between the furniture to put the toys together. Use the same idea with other toys that combine, such as a doll and a dollhouse, or toy cars and a garage.
Notes for Therapists The ability to step and cross the gap between two pieces of furniture is often the child’s fi rst attempt at an independent step. Encourage the child to step across the gap between the couch and another piece of furniture and then to rotate back to the couch. This action helps to develop trunk rotation and equilibrium reaction of trunk extension rotation while moving between two supporting surfaces.
© 2010 by PRO-ED, Inc.
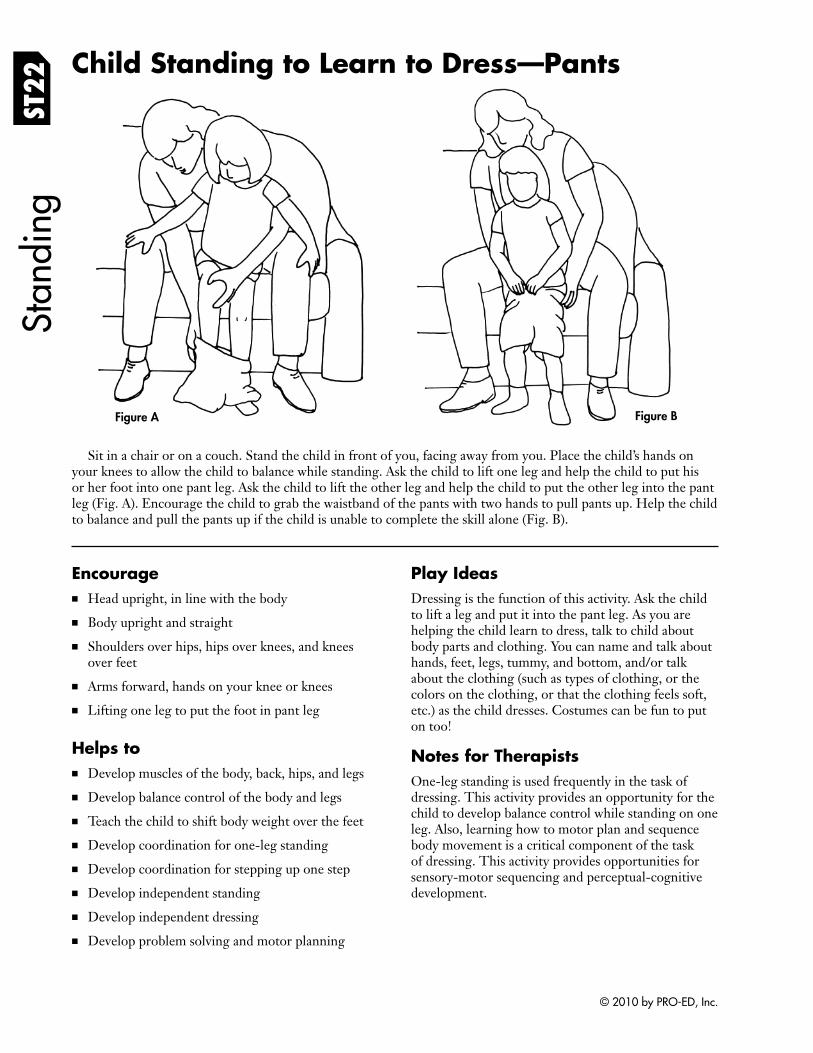
Stan
ding
Figure BFigure A
ST22
Child Standing to Learn to Dress—Pants
Sit in a chair or on a couch. Stand the child in front of you, facing away from you. Place the child’s hands on your knees to allow the child to balance while standing. Ask the child to lift one leg and help the child to put his or her foot into one pant leg. Ask the child to lift the other leg and help the child to put the other leg into the pant leg (Fig. A). Encourage the child to grab the waistband of the pants with two hands to pull pants up. Help the child to balance and pull the pants up if the child is unable to complete the skill alone (Fig. B).
Encourage ■ Head upright, in line with the body
■ Body upright and straight
■ Shoulders over hips, hips over knees, and knees over feet
■ Arms forward, hands on your knee or knees
■ Lifting one leg to put the foot in pant leg
Helps to ■ Develop muscles of the body, back, hips, and legs
■ Develop balance control of the body and legs
■ Teach the child to shift body weight over the feet
■ Develop coordination for one-leg standing
■ Develop coordination for stepping up one step
■ Develop independent standing
■ Develop independent dressing
■ Develop problem solving and motor planning
Play Ideas Dressing is the function of this activity. Ask the child to lift a leg and put it into the pant leg. As you are helping the child learn to dress, talk to child about body parts and clothing. You can name and talk about hands, feet, legs, tummy, and bottom, and/or talk about the clothing (such as types of clothing, or the colors on the clothing, or that the clothing feels soft, etc.) as the child dresses. Costumes can be fun to put on too!
Notes for Therapists One-leg standing is used frequently in the task of dressing. This activity provides an opportunity for the child to develop balance control while standing on one leg. Also, learning how to motor plan and sequence body movement is a critical component of the task of dressing. This activity provides opportunities for sensory-motor sequencing and perceptual-cognitive development.
© 2010 by PRO-ED, Inc.
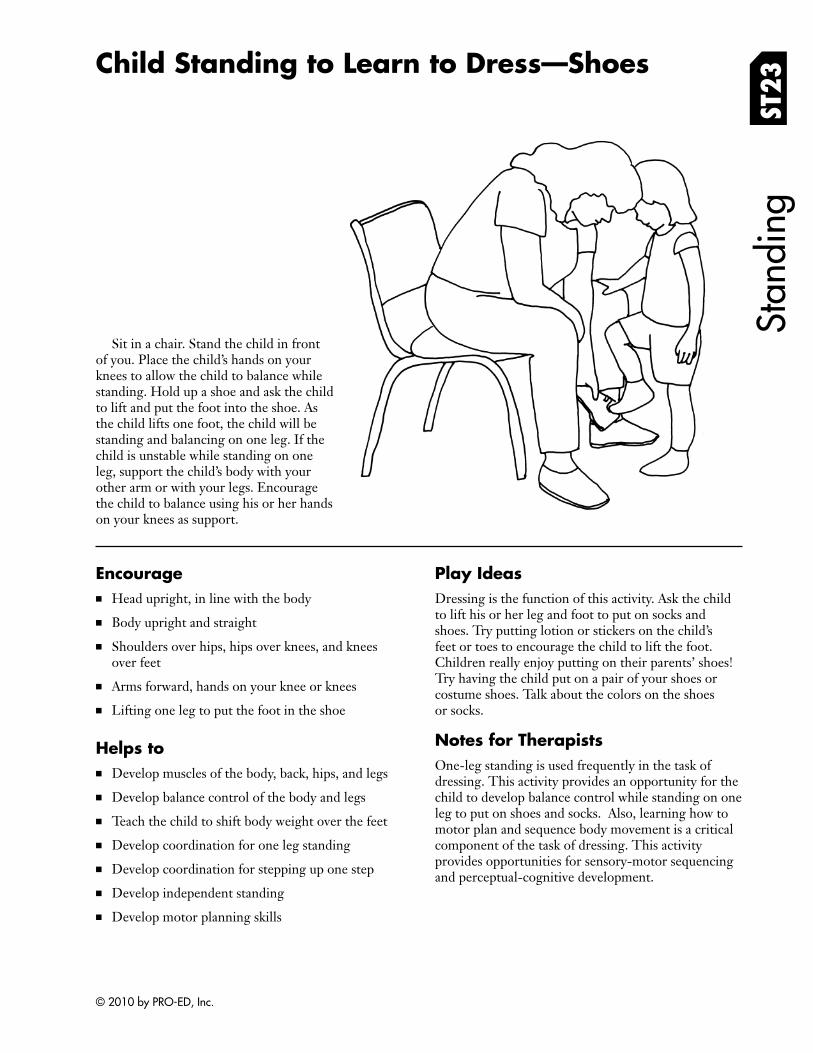
Stan
ding
Child Standing to Learn to Dress—Shoes
ST23
Sit in a chair. Stand the child in front of you. Place the child’s hands on your knees to allow the child to balance while standing. Hold up a shoe and ask the child to lift and put the foot into the shoe. As the child lifts one foot, the child will be standing and balancing on one leg. If the child is unstable while standing on one leg, support the child’s body with your other arm or with your legs. Encourage the child to balance using his or her hands on your knees as support.
Encourage ■ Head upright, in line with the body
■ Body upright and straight
■ Shoulders over hips, hips over knees, and knees over feet
■ Arms forward, hands on your knee or knees
■ Lifting one leg to put the foot in the shoe
Helps to ■ Develop muscles of the body, back, hips, and legs
■ Develop balance control of the body and legs
■ Teach the child to shift body weight over the feet
■ Develop coordination for one leg standing
■ Develop coordination for stepping up one step
■ Develop independent standing
■ Develop motor planning skills
Play Ideas Dressing is the function of this activity. Ask the child to lift his or her leg and foot to put on socks and shoes. Try putting lotion or stickers on the child’s feet or toes to encourage the child to lift the foot. Children really enjoy putting on their parents’ shoes! Try having the child put on a pair of your shoes or costume shoes. Talk about the colors on the shoes or socks.
Notes for Therapists One-leg standing is used frequently in the task of dressing. This activity provides an opportunity for the child to develop balance control while standing on one leg to put on shoes and socks. Also, learning how to motor plan and sequence body movement is a critical component of the task of dressing. This activity provides opportunities for sensory-motor sequencing and perceptual-cognitive development.
© 2010 by PRO-ED, Inc.
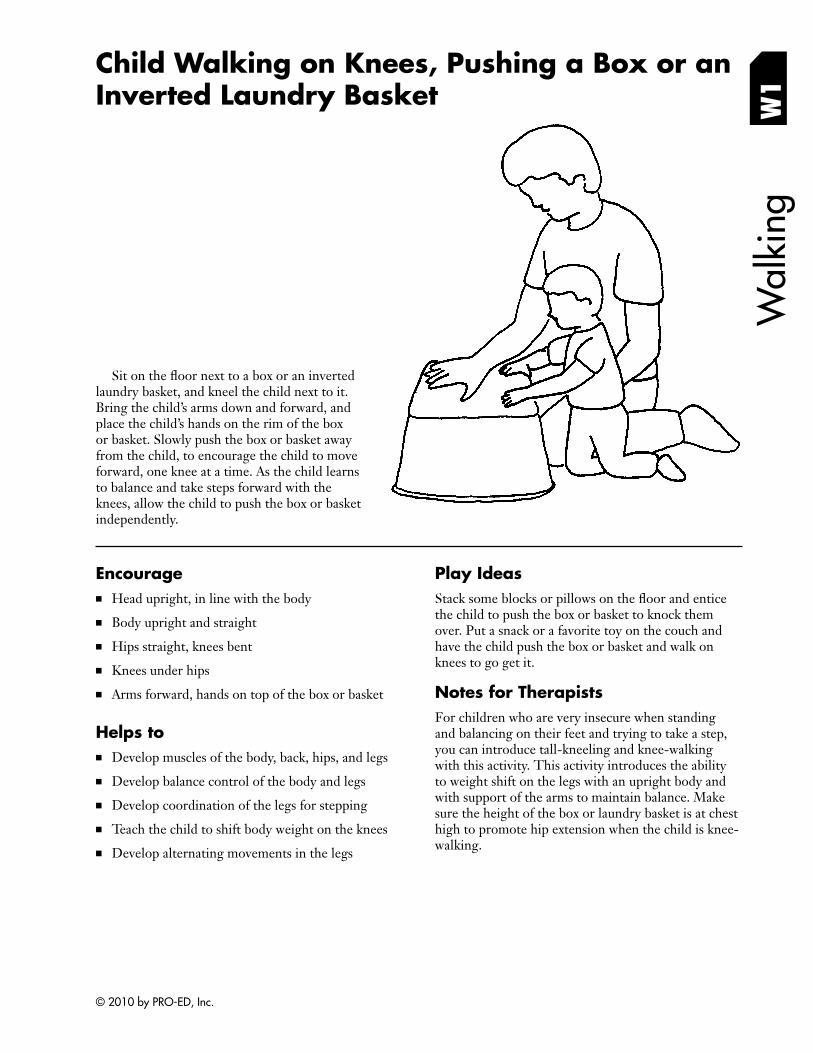
Wal
king
Child Walking on Knees, Pushing a Box or an
W1Inverted Laundry Basket
Sit on the floor next to a box or an inverted laundry basket, and kneel the child next to it. Bring the child’s arms down and forward, and place the child’s hands on the rim of the box or basket. Slowly push the box or basket away from the child, to encourage the child to move forward, one knee at a time. As the child learns to balance and take steps forward with the knees, allow the child to push the box or basket independently.
Encourage ■ Head upright, in line with the body
■ Body upright and straight
■ Hips straight, knees bent
■ Knees under hips
■ Arms forward, hands on top of the box or basket
Helps to ■ Develop muscles of the body, back, hips, and legs
■ Develop balance control of the body and legs
■ Develop coordination of the legs for stepping
■ Teach the child to shift body weight on the knees
■ Develop alternating movements in the legs
Play Ideas Stack some blocks or pillows on the floor and entice the child to push the box or basket to knock them over. Put a snack or a favorite toy on the couch and have the child push the box or basket and walk on knees to go get it.
Notes for Therapists For children who are very insecure when standing and balancing on their feet and trying to take a step, you can introduce tall-kneeling and knee-walking with this activity. This activity introduces the ability to weight shift on the legs with an upright body and with support of the arms to maintain balance. Make sure the height of the box or laundry basket is at chest high to promote hip extension when the child is knee-walking.
© 2010 by PRO-ED, Inc.

W2
Child Walking While Pushing a Chair W
alki
ng
Sit on the floor next to a chair, and stand the child next to it. Bring the child’s arms forward and place the child’s hands on the seat of the chair. To encourage the child to take a step forward, use one hand to push the chair slowly away from the child. Support the child’s hips with your other hand, if necessary. Allow the child to take a step independently. As the child learns to balance and take steps, allow the child to push the chair independently.
Encourage ■ Head upright, in line with the body
■ Body upright and straight
■ Hips and legs straight
■ Feet flat on the floor, facing straight ahead
■ Arms forward, hands on top of the box, basket, or seat of the chair
Helps to ■ Develop muscles of the body, back, and legs
■ Develop balance control of the body and legs
■ Develop coordination of the legs for stepping
■ Teach the child to shift body weight over the feet
Play Ideas Stack some blocks or pillows on the floor and entice the child to push the chair to knock them over. Put a snack or a favorite toy on the couch and have the child walk while pushing the chair over to the couch to get it. Pretend to be a truck or train and make truck or train noises as the child pushes the chair.
Notes for Therapists When children walk while pushing a large object with their arms at or slightly above 90 degrees of shoulder flexion, they are activating the pectoral/abdominal muscle synergy with dynamic stability around the shoulder girdle. Therapist’s hand placement across the child’s gluteal muscles will activate the gluteal/ abdominal muscle synergy that is necessary for independent walking.
© 2010 by PRO-ED, Inc.
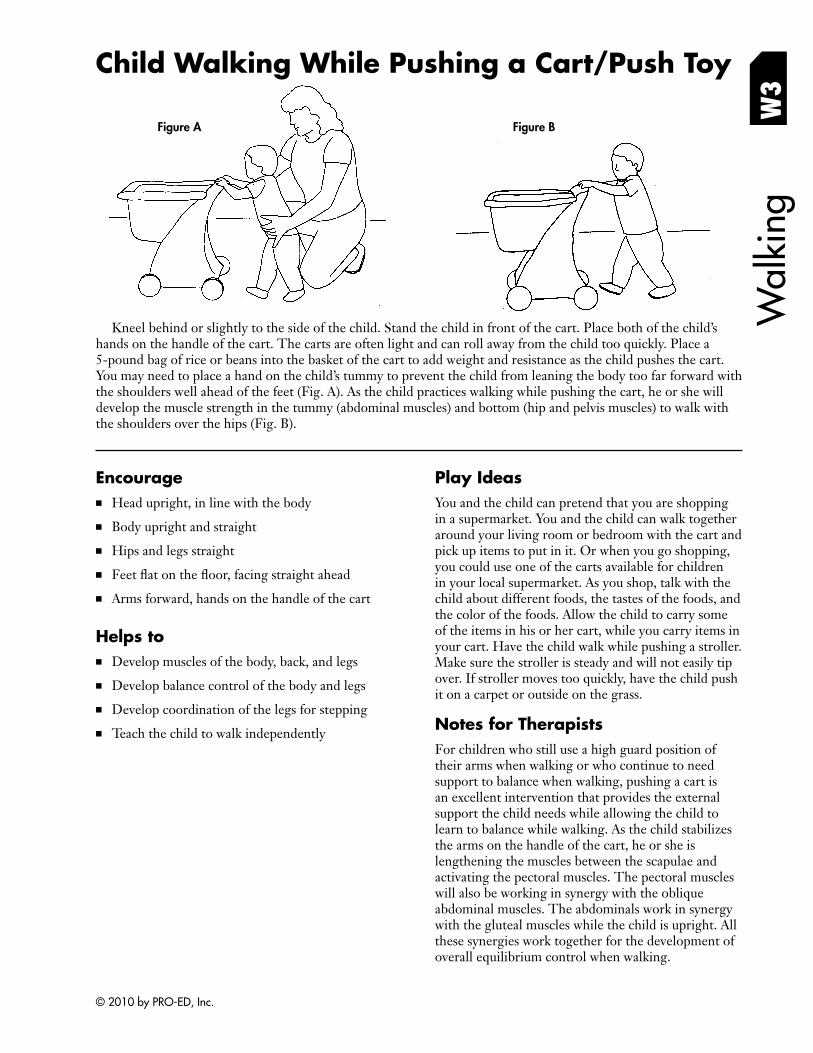
Child Walking While Pushing a Cart/Push Toy
Kneel behind or slightly to the side of the child. Stand the child in front of the cart. Place both of the child’s
Figure A
Wal
king
W
3
Figure B
hands on the handle of the cart. The carts are often light and can roll away from the child too quickly. Place a 5-pound bag of rice or beans into the basket of the cart to add weight and resistance as the child pushes the cart. You may need to place a hand on the child’s tummy to prevent the child from leaning the body too far forward with the shoulders well ahead of the feet (Fig. A). As the child practices walking while pushing the cart, he or she will develop the muscle strength in the tummy (abdominal muscles) and bottom (hip and pelvis muscles) to walk with the shoulders over the hips (Fig. B).
Encourage ■ Head upright, in line with the body
■ Body upright and straight
■ Hips and legs straight
■ Feet flat on the floor, facing straight ahead
■ Arms forward, hands on the handle of the cart
Helps to ■ Develop muscles of the body, back, and legs
■ Develop balance control of the body and legs
■ Develop coordination of the legs for stepping
■ Teach the child to walk independently
Play Ideas You and the child can pretend that you are shopping in a supermarket. You and the child can walk together around your living room or bedroom with the cart and pick up items to put in it. Or when you go shopping, you could use one of the carts available for children in your local supermarket. As you shop, talk with the child about different foods, the tastes of the foods, and the color of the foods. Allow the child to carry some of the items in his or her cart, while you carry items in your cart. Have the child walk while pushing a stroller. Make sure the stroller is steady and will not easily tip over. If stroller moves too quickly, have the child push it on a carpet or outside on the grass.
Notes for Therapists For children who still use a high guard position of their arms when walking or who continue to need support to balance when walking, pushing a cart is an excellent intervention that provides the external support the child needs while allowing the child to learn to balance while walking. As the child stabilizes the arms on the handle of the cart, he or she is lengthening the muscles between the scapulae and activating the pectoral muscles. The pectoral muscles will also be working in synergy with the oblique abdominal muscles. The abdominals work in synergy with the gluteal muscles while the child is upright. All these synergies work together for the development of overall equilibrium control when walking.
© 2010 by PRO-ED, Inc.
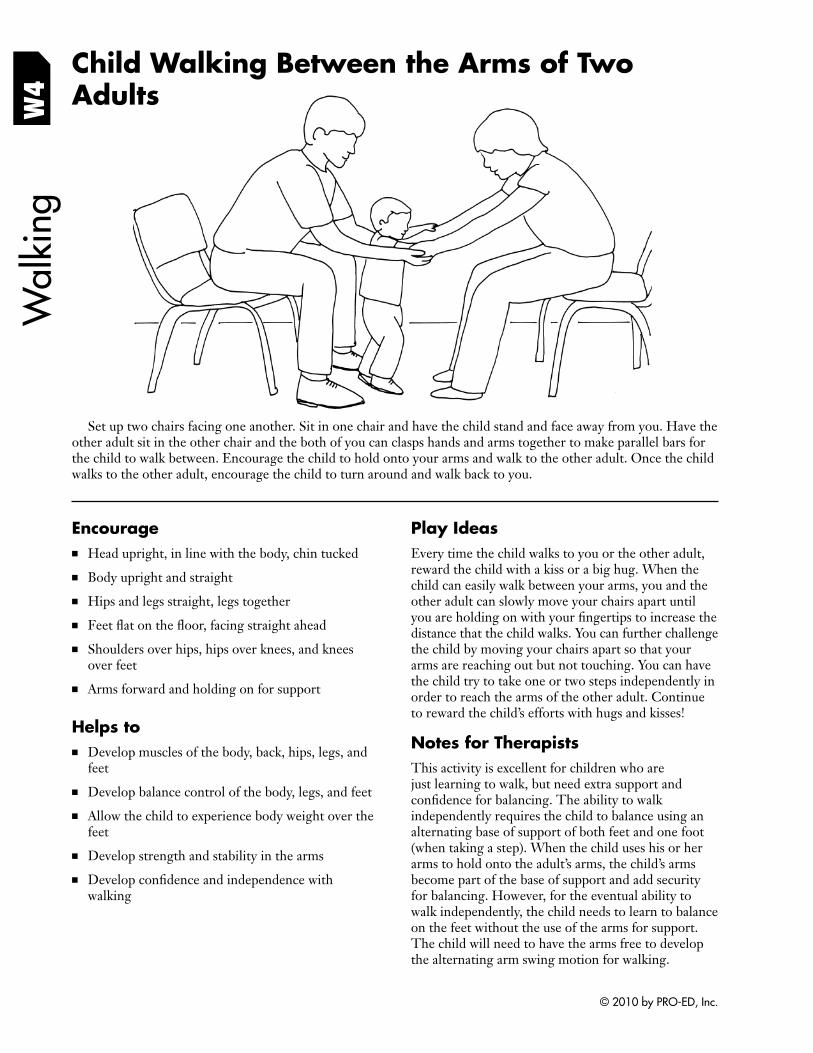
W4
Wal
king
Child Walking Between the Arms of Two Adults
Set up two chairs facing one another. Sit in one chair and have the child stand and face away from you. Have the other adult sit in the other chair and the both of you can clasps hands and arms together to make parallel bars for the child to walk between. Encourage the child to hold onto your arms and walk to the other adult. Once the child walks to the other adult, encourage the child to turn around and walk back to you.
Encourage ■ Head upright, in line with the body, chin tucked
■ Body upright and straight
■ Hips and legs straight, legs together
■ Feet flat on the floor, facing straight ahead
■ Shoulders over hips, hips over knees, and knees over feet
■ Arms forward and holding on for support
Helps to ■ Develop muscles of the body, back, hips, legs, and
feet
■ Develop balance control of the body, legs, and feet
■ Allow the child to experience body weight over the feet
■ Develop strength and stability in the arms
■ Develop confidence and independence with walking
Play Ideas Every time the child walks to you or the other adult, reward the child with a kiss or a big hug. When the child can easily walk between your arms, you and the other adult can slowly move your chairs apart until you are holding on with your fingertips to increase the distance that the child walks. You can further challenge the child by moving your chairs apart so that your arms are reaching out but not touching. You can have the child try to take one or two steps independently in order to reach the arms of the other adult. Continue to reward the child’s efforts with hugs and kisses!
Notes for Therapists This activity is excellent for children who are just learning to walk, but need extra support and confidence for balancing. The ability to walk independently requires the child to balance using an alternating base of support of both feet and one foot (when taking a step). When the child uses his or her arms to hold onto the adult’s arms, the child’s arms become part of the base of support and add security for balancing. However, for the eventual ability to walk independently, the child needs to learn to balance on the feet without the use of the arms for support. The child will need to have the arms free to develop the alternating arm swing motion for walking.
© 2010 by PRO-ED, Inc.
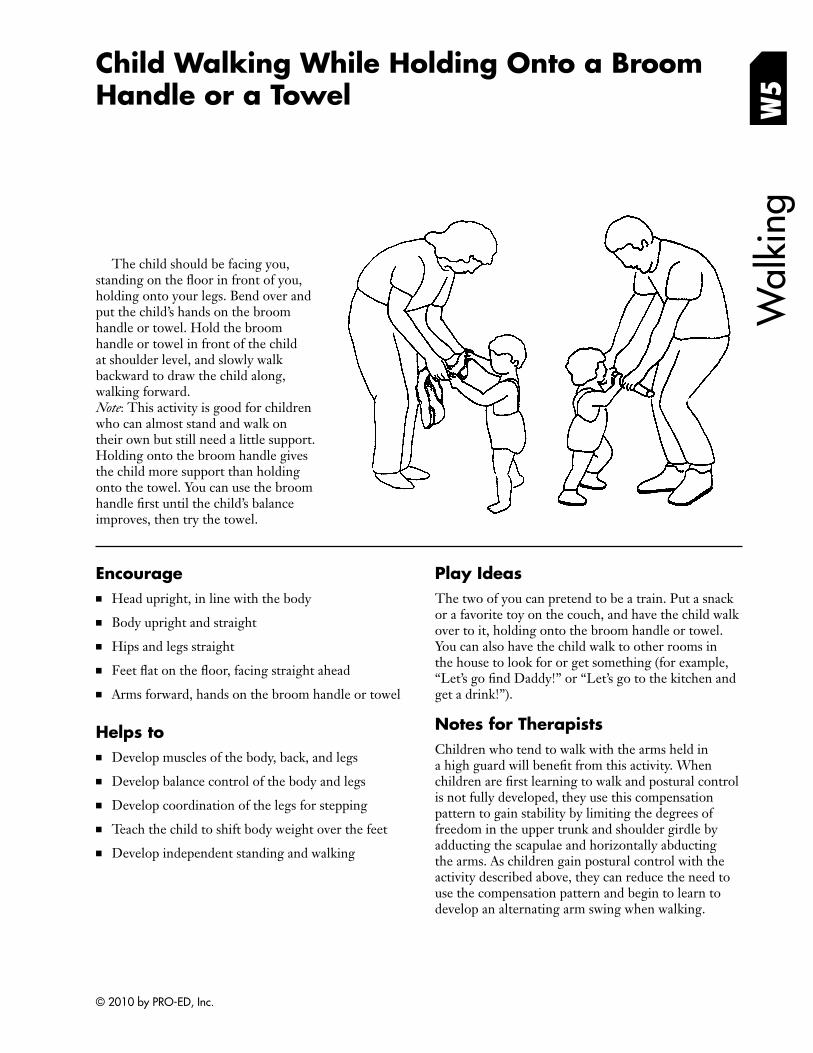
Child Walking While Holding Onto a Broom Handle or a Towel W
5W
alki
ng
The child should be facing you, standing on the floor in front of you, holding onto your legs. Bend over and put the child’s hands on the broom handle or towel. Hold the broom handle or towel in front of the child at shoulder level, and slowly walk backward to draw the child along, walking forward. Note: This activity is good for children who can almost stand and walk on their own but still need a little support. Holding onto the broom handle gives the child more support than holding onto the towel. You can use the broom handle first until the child’s balance improves, then try the towel.
Encourage ■ Head upright, in line with the body
■ Body upright and straight
■ Hips and legs straight
■ Feet flat on the floor, facing straight ahead
■ Arms forward, hands on the broom handle or towel
Helps to ■ Develop muscles of the body, back, and legs
■ Develop balance control of the body and legs
■ Develop coordination of the legs for stepping
■ Teach the child to shift body weight over the feet
■ Develop independent standing and walking
Play Ideas The two of you can pretend to be a train. Put a snack or a favorite toy on the couch, and have the child walk over to it, holding onto the broom handle or towel. You can also have the child walk to other rooms in the house to look for or get something (for example, “Let’s go find Daddy!” or “Let’s go to the kitchen and get a drink!”).
Notes for Therapists Children who tend to walk with the arms held in a high guard will benefit from this activity. When children are first learning to walk and postural control is not fully developed, they use this compensation pattern to gain stability by limiting the degrees of freedom in the upper trunk and shoulder girdle by adducting the scapulae and horizontally abducting the arms. As children gain postural control with the activity described above, they can reduce the need to use the compensation pattern and begin to learn to develop an alternating arm swing when walking.
© 2010 by PRO-ED, Inc.
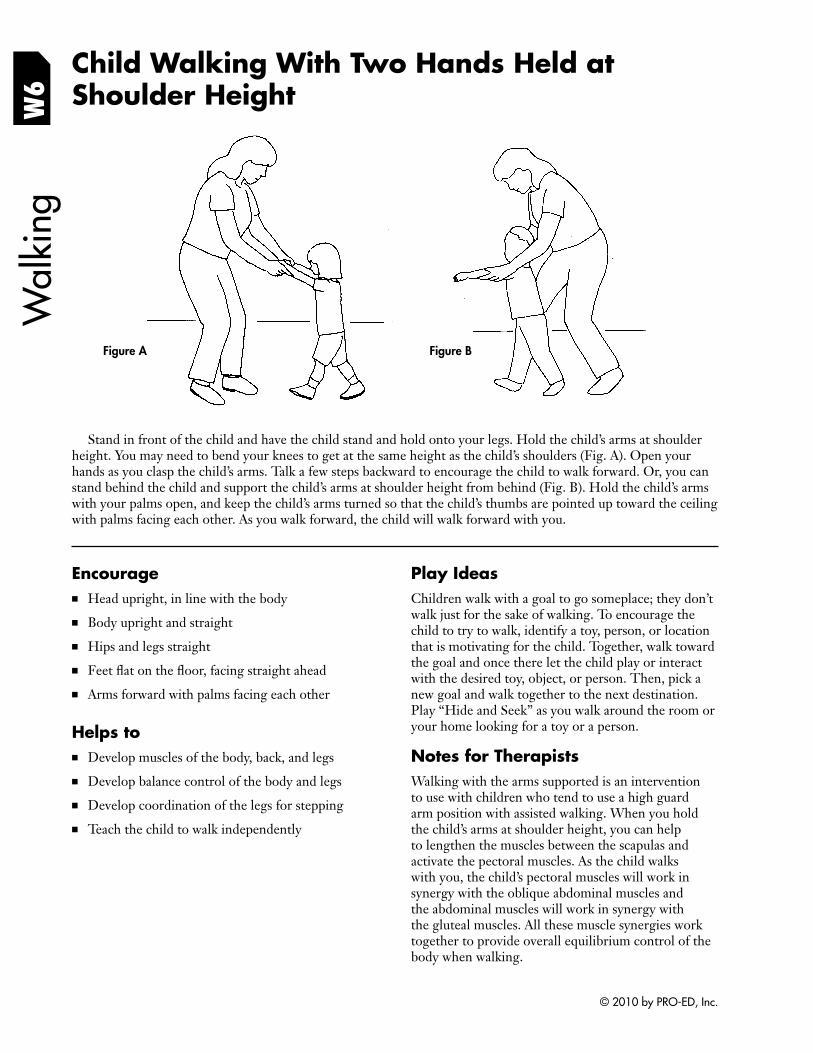
W6
Wal
king
Child Walking With Two Hands Held at Shoulder Height
Figure BFigure A
Stand in front of the child and have the child stand and hold onto your legs. Hold the child’s arms at shoulder height. You may need to bend your knees to get at the same height as the child’s shoulders (Fig. A). Open your hands as you clasp the child’s arms. Talk a few steps backward to encourage the child to walk forward. Or, you can stand behind the child and support the child’s arms at shoulder height from behind (Fig. B). Hold the child’s arms with your palms open, and keep the child’s arms turned so that the child’s thumbs are pointed up toward the ceiling with palms facing each other. As you walk forward, the child will walk forward with you.
Encourage ■ Head upright, in line with the body
■ Body upright and straight
■ Hips and legs straight
■ Feet flat on the floor, facing straight ahead
■ Arms forward with palms facing each other
Helps to ■ Develop muscles of the body, back, and legs
■ Develop balance control of the body and legs
■ Develop coordination of the legs for stepping
■ Teach the child to walk independently
Play Ideas Children walk with a goal to go someplace; they don’t walk just for the sake of walking. To encourage the child to try to walk, identify a toy, person, or location that is motivating for the child. Together, walk toward the goal and once there let the child play or interact with the desired toy, object, or person. Then, pick a new goal and walk together to the next destination. Play “Hide and Seek” as you walk around the room or your home looking for a toy or a person.
Notes for Therapists Walking with the arms supported is an intervention to use with children who tend to use a high guard arm position with assisted walking. When you hold the child’s arms at shoulder height, you can help to lengthen the muscles between the scapulas and activate the pectoral muscles. As the child walks with you, the child’s pectoral muscles will work in synergy with the oblique abdominal muscles and the abdominal muscles will work in synergy with the gluteal muscles. All these muscle synergies work together to provide overall equilibrium control of the body when walking.
© 2010 by PRO-ED, Inc.
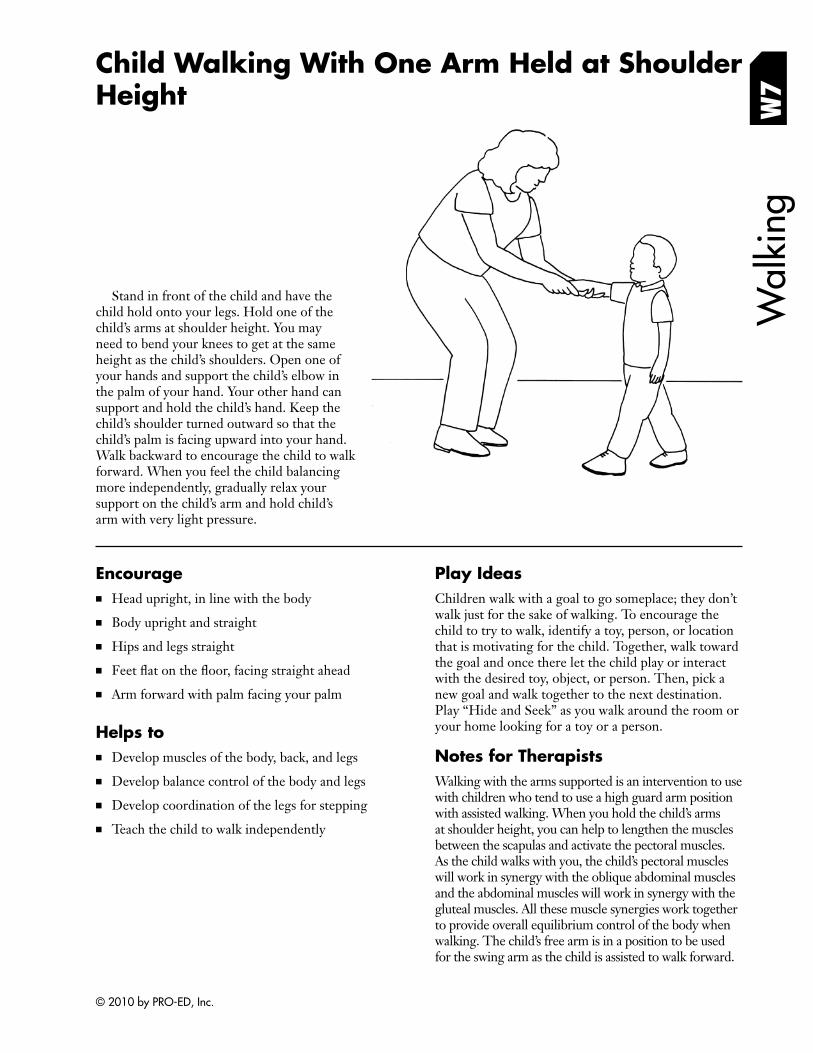
Child Walking With One Arm Held at Shoulder Height W
7
Stand in front of the child and have the child hold onto your legs. Hold one of the child’s arms at shoulder height. You may need to bend your knees to get at the same height as the child’s shoulders. Open one of your hands and support the child’s elbow in the palm of your hand. Your other hand can support and hold the child’s hand. Keep the child’s shoulder turned outward so that the child’s palm is facing upward into your hand. Walk backward to encourage the child to walk forward. When you feel the child balancing more independently, gradually relax your support on the child’s arm and hold child’s arm with very light pressure.
Wal
king
Encourage ■ Head upright, in line with the body
■ Body upright and straight
■ Hips and legs straight
■ Feet flat on the floor, facing straight ahead
■ Arm forward with palm facing your palm
Helps to ■ Develop muscles of the body, back, and legs
■ Develop balance control of the body and legs
■ Develop coordination of the legs for stepping
■ Teach the child to walk independently
Play Ideas Children walk with a goal to go someplace; they don’t walk just for the sake of walking. To encourage the child to try to walk, identify a toy, person, or location that is motivating for the child. Together, walk toward the goal and once there let the child play or interact with the desired toy, object, or person. Then, pick a new goal and walk together to the next destination. Play “Hide and Seek” as you walk around the room or your home looking for a toy or a person.
Notes for Therapists Walking with the arms supported is an intervention to use with children who tend to use a high guard arm position with assisted walking. When you hold the child’s arms at shoulder height, you can help to lengthen the muscles between the scapulas and activate the pectoral muscles. As the child walks with you, the child’s pectoral muscles will work in synergy with the oblique abdominal muscles and the abdominal muscles will work in synergy with the gluteal muscles. All these muscle synergies work together to provide overall equilibrium control of the body when walking. The child’s free arm is in a position to be used for the swing arm as the child is assisted to walk forward.
© 2010 by PRO-ED, Inc.
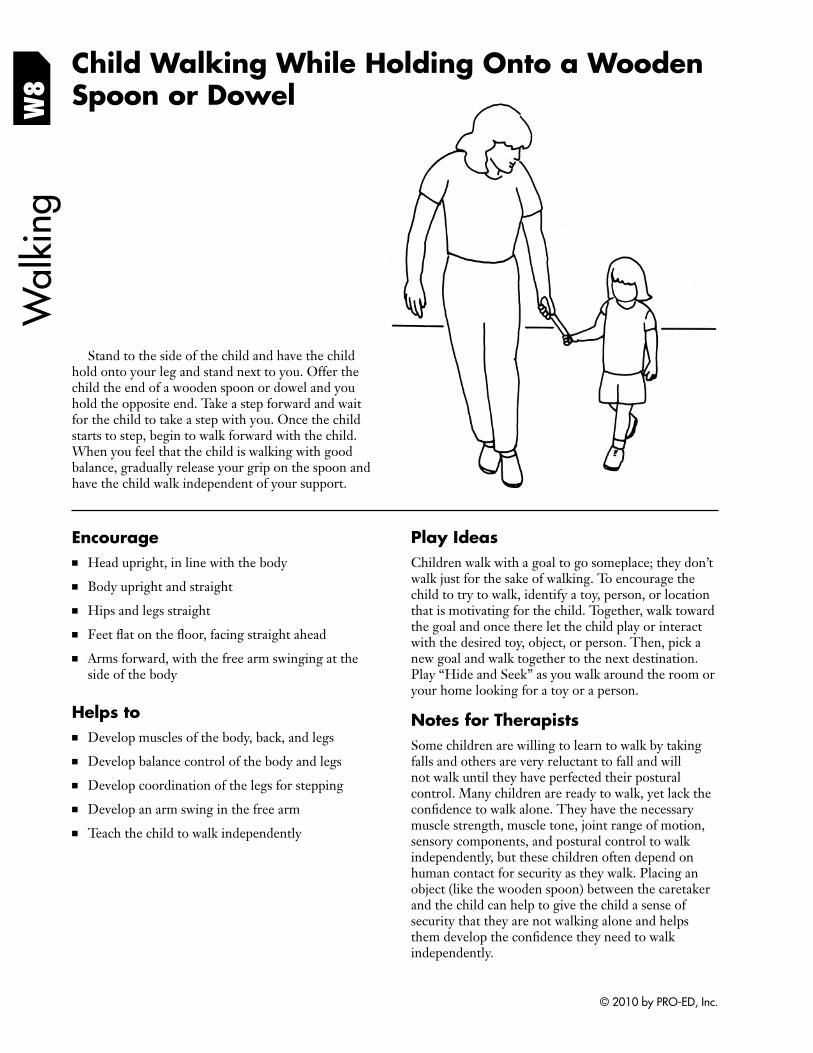
Child Walking While Holding Onto a Wooden W
8W
alki
ng
Spoon or Dowel
Stand to the side of the child and have the child hold onto your leg and stand next to you. Offer the child the end of a wooden spoon or dowel and you hold the opposite end. Take a step forward and wait for the child to take a step with you. Once the child starts to step, begin to walk forward with the child. When you feel that the child is walking with good balance, gradually release your grip on the spoon and have the child walk independent of your support.
Encourage ■ Head upright, in line with the body
■ Body upright and straight
■ Hips and legs straight
■ Feet flat on the floor, facing straight ahead
■ Arms forward, with the free arm swinging at the side of the body
Helps to ■ Develop muscles of the body, back, and legs
■ Develop balance control of the body and legs
■ Develop coordination of the legs for stepping
■ Develop an arm swing in the free arm
■ Teach the child to walk independently
Play Ideas Children walk with a goal to go someplace; they don’t walk just for the sake of walking. To encourage the child to try to walk, identify a toy, person, or location that is motivating for the child. Together, walk toward the goal and once there let the child play or interact with the desired toy, object, or person. Then, pick a new goal and walk together to the next destination. Play “Hide and Seek” as you walk around the room or your home looking for a toy or a person.
Notes for Therapists Some children are willing to learn to walk by taking falls and others are very reluctant to fall and will not walk until they have perfected their postural control. Many children are ready to walk, yet lack the confidence to walk alone. They have the necessary muscle strength, muscle tone, joint range of motion, sensory components, and postural control to walk independently, but these children often depend on human contact for security as they walk. Placing an object (like the wooden spoon) between the caretaker and the child can help to give the child a sense of security that they are not walking alone and helps them develop the confidence they need to walk independently.
© 2010 by PRO-ED, Inc.
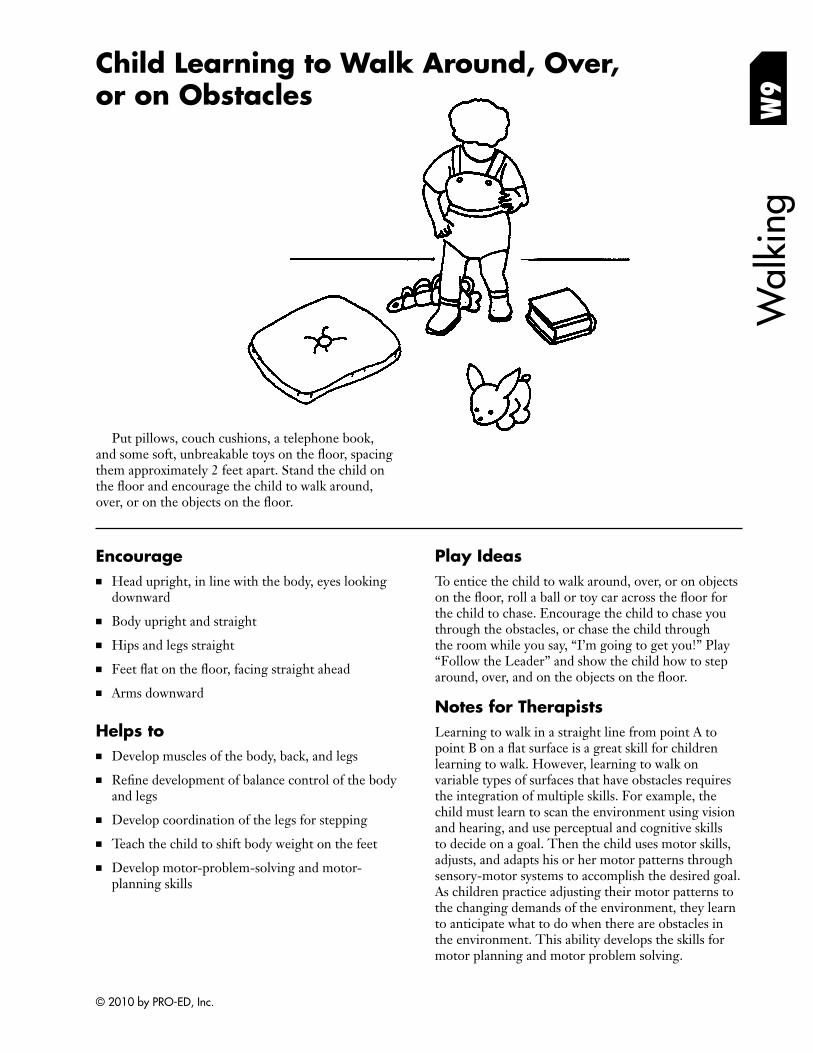
Child Learning to Walk Around, Over, or on Obstacles
Put pillows, couch cushions, a telephone book, and some soft, unbreakable toys on the fl oor, spacing them approximately 2 feet apart. Stand the child on the floor and encourage the child to walk around, over, or on the objects on the fl oor.
W9
Wal
king
Encourage ■ Head upright, in line with the body, eyes looking
downward
■ Body upright and straight
■ Hips and legs straight
■ Feet flat on the floor, facing straight ahead
■ Arms downward
Helps to ■ Develop muscles of the body, back, and legs
■ Refine development of balance control of the body and legs
■ Develop coordination of the legs for stepping
■ Teach the child to shift body weight on the feet
■ Develop motor-problem-solving and motor-planning skills
Play Ideas To entice the child to walk around, over, or on objects on the floor, roll a ball or toy car across the fl oor for the child to chase. Encourage the child to chase you through the obstacles, or chase the child through the room while you say, “I’m going to get you!” Play “Follow the Leader” and show the child how to step around, over, and on the objects on the fl oor.
Notes for Therapists Learning to walk in a straight line from point A to point B on a flat surface is a great skill for children learning to walk. However, learning to walk on variable types of surfaces that have obstacles requires the integration of multiple skills. For example, the child must learn to scan the environment using vision and hearing, and use perceptual and cognitive skills to decide on a goal. Then the child uses motor skills, adjusts, and adapts his or her motor patterns through sensory-motor systems to accomplish the desired goal. As children practice adjusting their motor patterns to the changing demands of the environment, they learn to anticipate what to do when there are obstacles in the environment. This ability develops the skills for motor planning and motor problem solving.
© 2010 by PRO-ED, Inc.
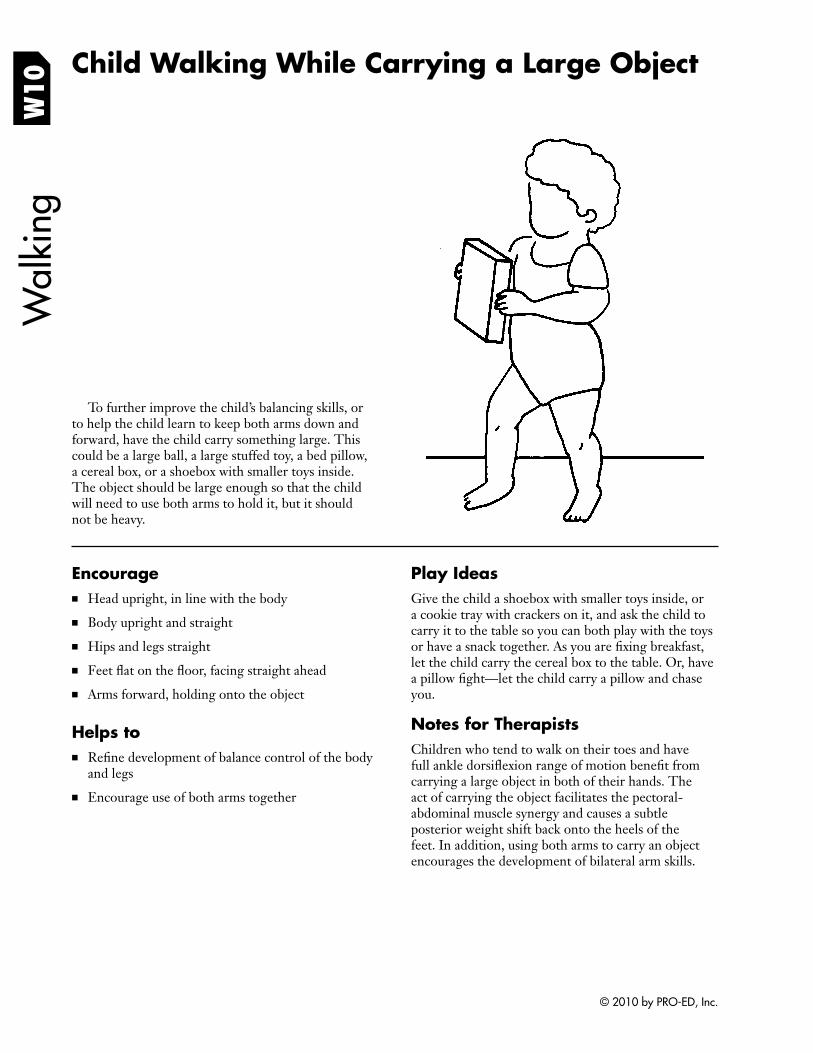
W10
Child Walking While Carrying a Large Object W
alki
ng
To further improve the child’s balancing skills, or to help the child learn to keep both arms down and forward, have the child carry something large. This could be a large ball, a large stuffed toy, a bed pillow, a cereal box, or a shoebox with smaller toys inside. The object should be large enough so that the child will need to use both arms to hold it, but it should not be heavy.
Encourage ■ Head upright, in line with the body
■ Body upright and straight
■ Hips and legs straight
■ Feet flat on the floor, facing straight ahead
■ Arms forward, holding onto the object
Helps to ■ Refine development of balance control of the body
and legs
■ Encourage use of both arms together
Play Ideas Give the child a shoebox with smaller toys inside, or a cookie tray with crackers on it, and ask the child to carry it to the table so you can both play with the toys or have a snack together. As you are fi xing breakfast, let the child carry the cereal box to the table. Or, have a pillow fight—let the child carry a pillow and chase you.
Notes for Therapists Children who tend to walk on their toes and have full ankle dorsiflexion range of motion benefi t from carrying a large object in both of their hands. The act of carrying the object facilitates the pectoral-abdominal muscle synergy and causes a subtle posterior weight shift back onto the heels of the feet. In addition, using both arms to carry an object encourages the development of bilateral arm skills.
© 2010 by PRO-ED, Inc.
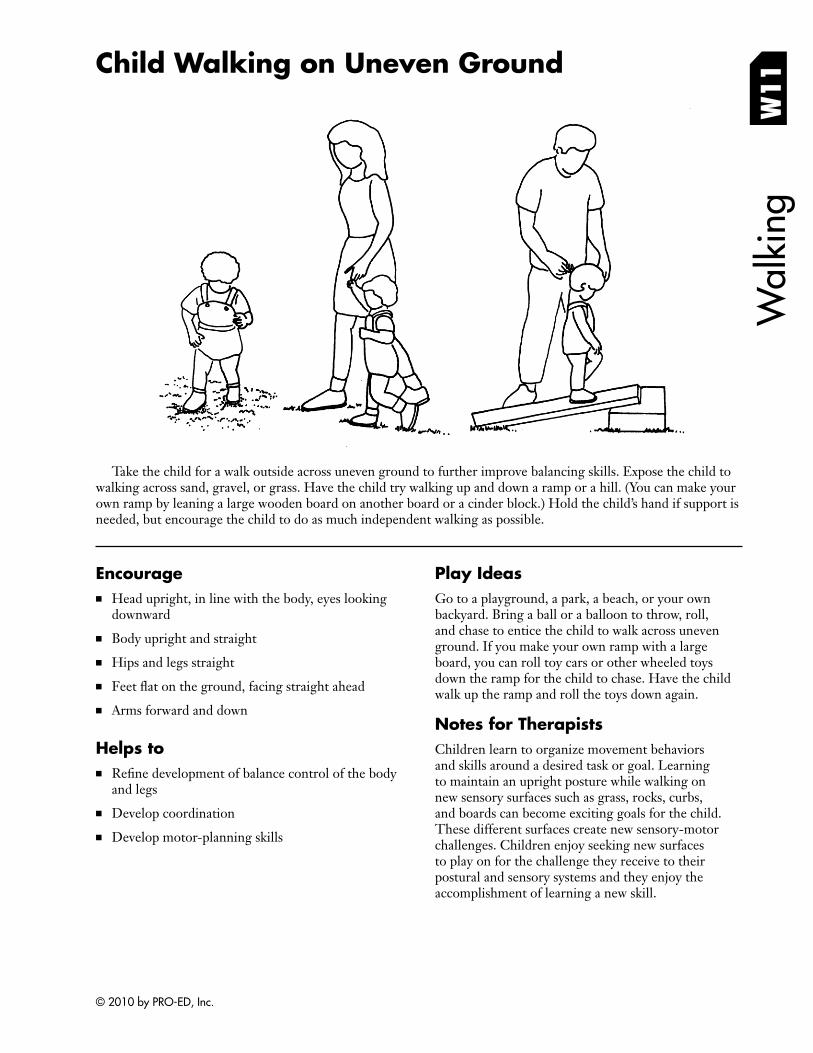
Child Walking on Uneven Ground
W11
Wal
king
Take the child for a walk outside across uneven ground to further improve balancing skills. Expose the child to walking across sand, gravel, or grass. Have the child try walking up and down a ramp or a hill. (You can make your own ramp by leaning a large wooden board on another board or a cinder block.) Hold the child’s hand if support is needed, but encourage the child to do as much independent walking as possible.
Encourage ■ Head upright, in line with the body, eyes looking
downward
■ Body upright and straight
■ Hips and legs straight
■ Feet flat on the ground, facing straight ahead
■ Arms forward and down
Helps to ■ Refine development of balance control of the body
and legs
■ Develop coordination
■ Develop motor-planning skills
Play Ideas Go to a playground, a park, a beach, or your own backyard. Bring a ball or a balloon to throw, roll, and chase to entice the child to walk across uneven ground. If you make your own ramp with a large board, you can roll toy cars or other wheeled toys down the ramp for the child to chase. Have the child walk up the ramp and roll the toys down again.
Notes for Therapists Children learn to organize movement behaviors and skills around a desired task or goal. Learning to maintain an upright posture while walking on new sensory surfaces such as grass, rocks, curbs, and boards can become exciting goals for the child. These different surfaces create new sensory-motor challenges. Children enjoy seeking new surfaces to play on for the challenge they receive to their postural and sensory systems and they enjoy the accomplishment of learning a new skill.
© 2010 by PRO-ED, Inc.
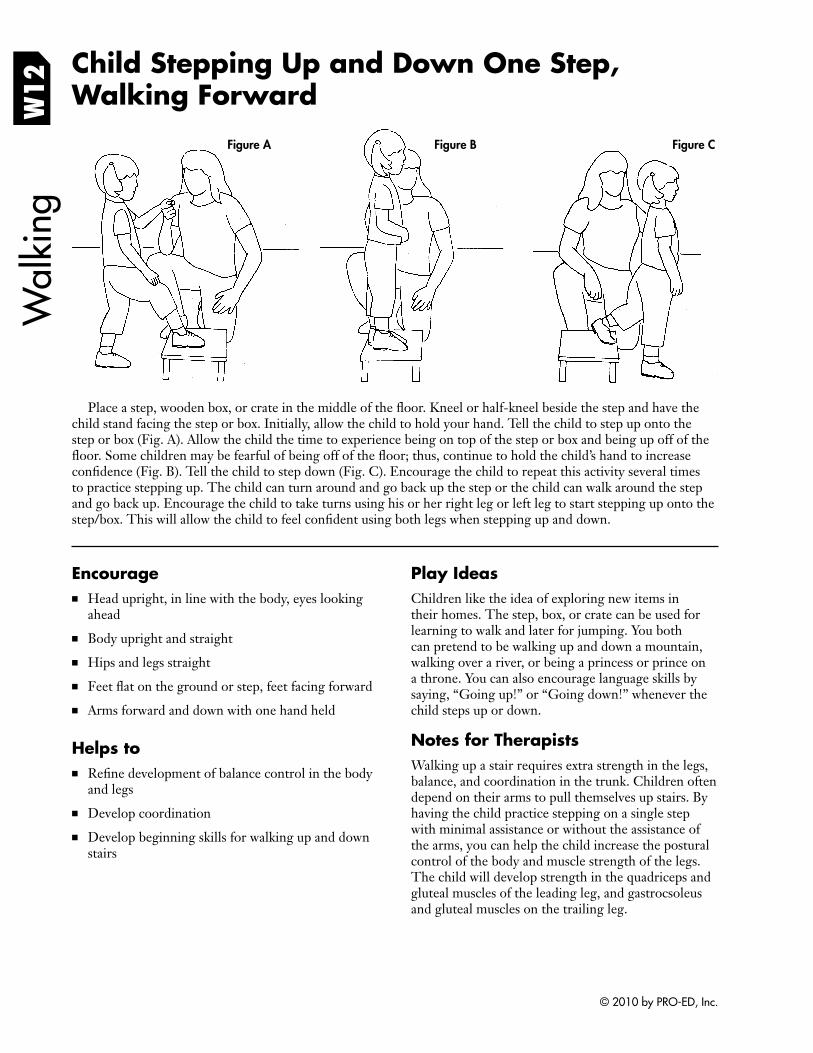
Wal
king
Child Stepping Up and Down One Step, Walking Forward W
12
Figure BFigure A Figure C
Place a step, wooden box, or crate in the middle of the floor. Kneel or half-kneel beside the step and have the child stand facing the step or box. Initially, allow the child to hold your hand. Tell the child to step up onto the step or box (Fig. A). Allow the child the time to experience being on top of the step or box and being up off of the floor. Some children may be fearful of being off of the floor; thus, continue to hold the child’s hand to increase confidence (Fig. B). Tell the child to step down (Fig. C). Encourage the child to repeat this activity several times to practice stepping up. The child can turn around and go back up the step or the child can walk around the step and go back up. Encourage the child to take turns using his or her right leg or left leg to start stepping up onto the step/box. This will allow the child to feel confident using both legs when stepping up and down.
Encourage ■ Head upright, in line with the body, eyes looking
ahead
■ Body upright and straight
■ Hips and legs straight
■ Feet flat on the ground or step, feet facing forward
■ Arms forward and down with one hand held
Helps to ■ Refine development of balance control in the body
and legs
■ Develop coordination
■ Develop beginning skills for walking up and down stairs
Play Ideas Children like the idea of exploring new items in their homes. The step, box, or crate can be used for learning to walk and later for jumping. You both can pretend to be walking up and down a mountain, walking over a river, or being a princess or prince on a throne. You can also encourage language skills by saying, “Going up!” or “Going down!” whenever the child steps up or down.
Notes for Therapists Walking up a stair requires extra strength in the legs, balance, and coordination in the trunk. Children often depend on their arms to pull themselves up stairs. By having the child practice stepping on a single step with minimal assistance or without the assistance of the arms, you can help the child increase the postural control of the body and muscle strength of the legs. The child will develop strength in the quadriceps and gluteal muscles of the leading leg, and gastrocsoleus and gluteal muscles on the trailing leg.
© 2010 by PRO-ED, Inc.
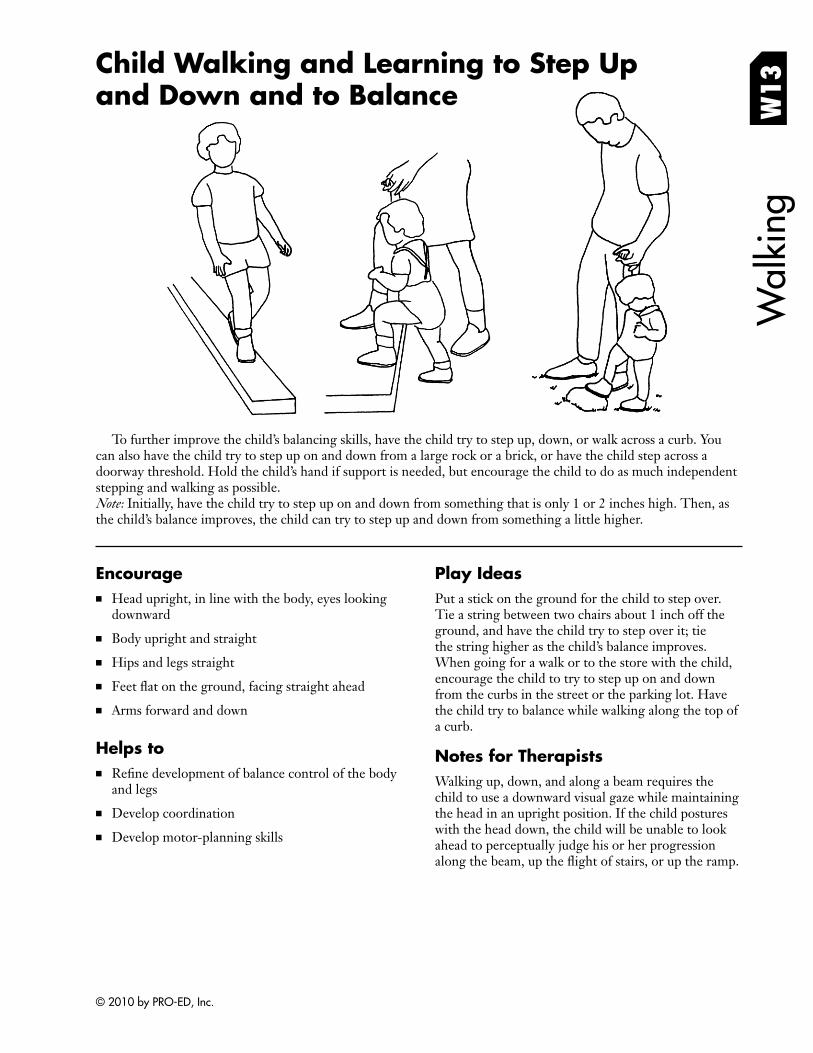
Child Walking and Learning to Step Up and Down and to Balance W
13W
alki
ng
To further improve the child’s balancing skills, have the child try to step up, down, or walk across a curb. You can also have the child try to step up on and down from a large rock or a brick, or have the child step across a doorway threshold. Hold the child’s hand if support is needed, but encourage the child to do as much independent stepping and walking as possible. Note: Initially, have the child try to step up on and down from something that is only 1 or 2 inches high. Then, as the child’s balance improves, the child can try to step up and down from something a little higher.
Encourage ■ Head upright, in line with the body, eyes looking
downward
■ Body upright and straight
■ Hips and legs straight
■ Feet flat on the ground, facing straight ahead
■ Arms forward and down
Helps to ■ Refine development of balance control of the body
and legs
■ Develop coordination
■ Develop motor-planning skills
Play Ideas Put a stick on the ground for the child to step over. Tie a string between two chairs about 1 inch off the ground, and have the child try to step over it; tie the string higher as the child’s balance improves. When going for a walk or to the store with the child, encourage the child to try to step up on and down from the curbs in the street or the parking lot. Have the child try to balance while walking along the top of a curb.
Notes for Therapists Walking up, down, and along a beam requires the child to use a downward visual gaze while maintaining the head in an upright position. If the child postures with the head down, the child will be unable to look ahead to perceptually judge his or her progression along the beam, up the flight of stairs, or up the ramp.
© 2010 by PRO-ED, Inc.
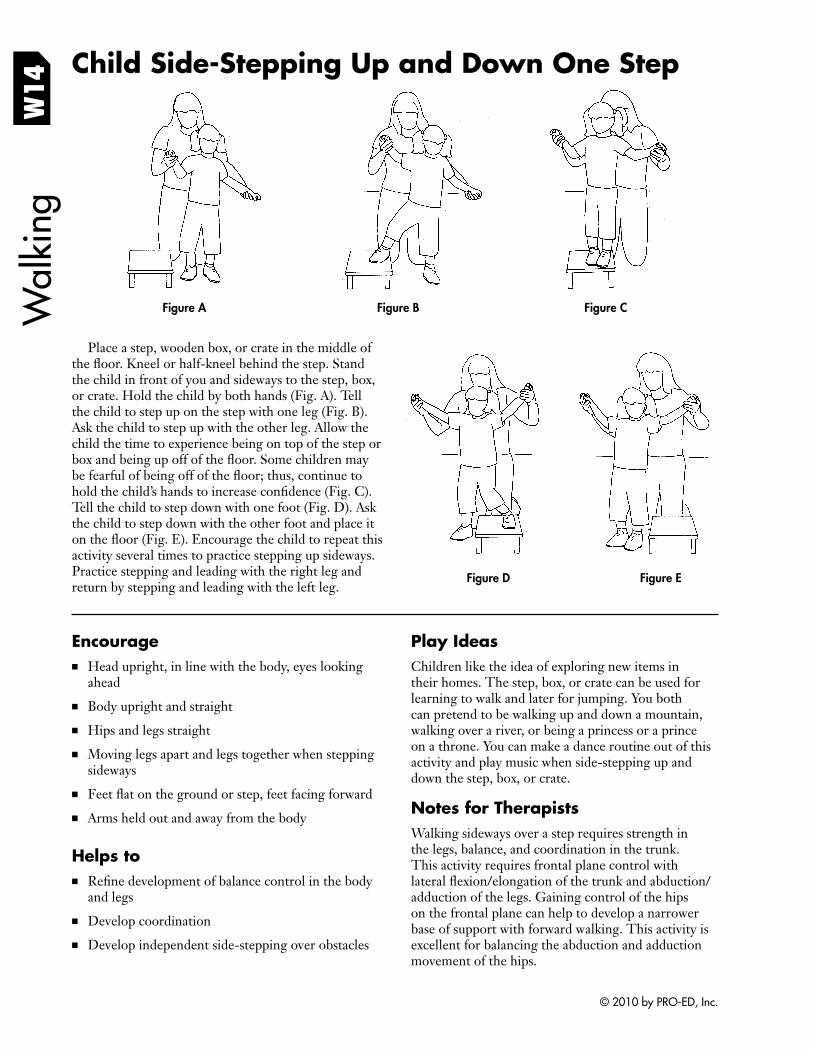
Wal
king
Child Side-Stepping Up and Down One Step
W14
Figure A Figure B Figure C
Place a step, wooden box, or crate in the middle of the floor. Kneel or half-kneel behind the step. Stand the child in front of you and sideways to the step, box, or crate. Hold the child by both hands (Fig. A). Tell the child to step up on the step with one leg (Fig. B). Ask the child to step up with the other leg. Allow the child the time to experience being on top of the step or box and being up off of the floor. Some children may be fearful of being off of the floor; thus, continue to hold the child’s hands to increase confidence (Fig. C). Tell the child to step down with one foot (Fig. D). Ask the child to step down with the other foot and place it on the floor (Fig. E). Encourage the child to repeat this activity several times to practice stepping up sideways. Practice stepping and leading with the right leg and Figure D Figure Ereturn by stepping and leading with the left leg.
Encourage ■ Head upright, in line with the body, eyes looking
ahead
■ Body upright and straight
■ Hips and legs straight
■ Moving legs apart and legs together when stepping sideways
■ Feet flat on the ground or step, feet facing forward
■ Arms held out and away from the body
Helps to ■ Refine development of balance control in the body
and legs
■ Develop coordination
■ Develop independent side-stepping over obstacles
Play Ideas Children like the idea of exploring new items in their homes. The step, box, or crate can be used for learning to walk and later for jumping. You both can pretend to be walking up and down a mountain, walking over a river, or being a princess or a prince on a throne. You can make a dance routine out of this activity and play music when side-stepping up and down the step, box, or crate.
Notes for Therapists Walking sideways over a step requires strength in the legs, balance, and coordination in the trunk. This activity requires frontal plane control with lateral flexion/elongation of the trunk and abduction/ adduction of the legs. Gaining control of the hips on the frontal plane can help to develop a narrower base of support with forward walking. This activity is excellent for balancing the abduction and adduction movement of the hips.
© 2010 by PRO-ED, Inc.
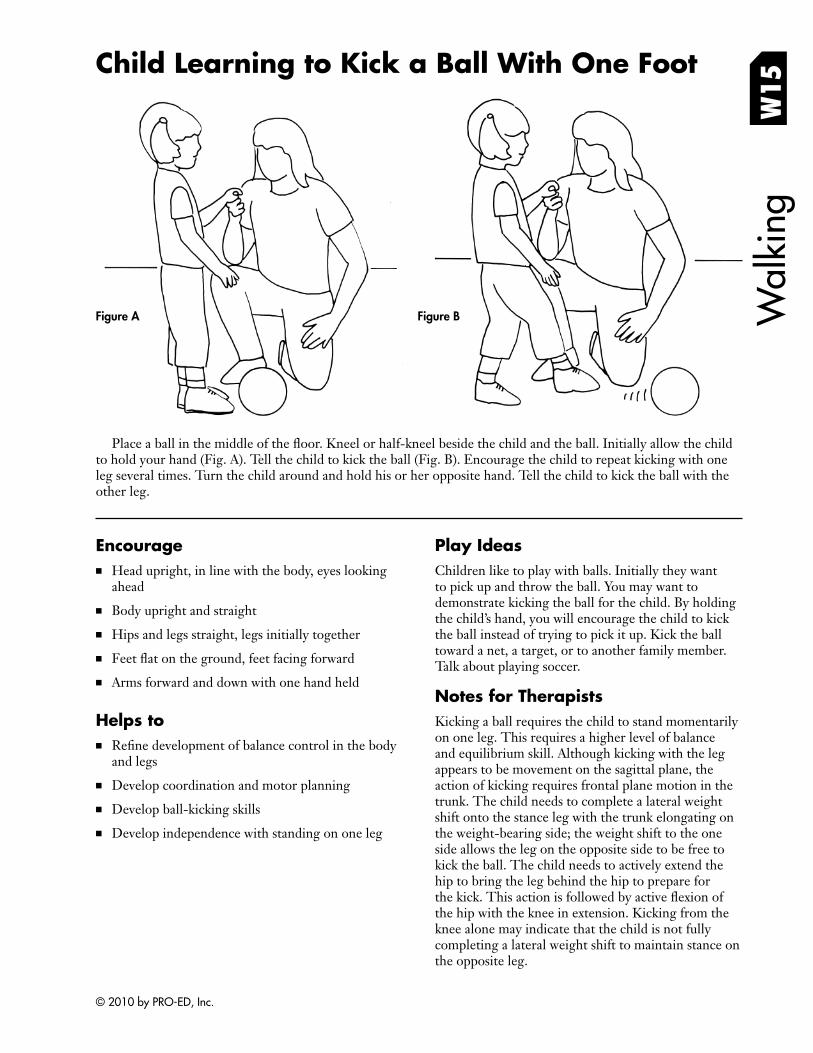
Child Learning to Kick a Ball With One Foot
W15
Wal
king
Place a ball in the middle of the floor. Kneel or half-kneel beside the child and the ball. Initially allow the child
Figure BFigure A
to hold your hand (Fig. A). Tell the child to kick the ball (Fig. B). Encourage the child to repeat kicking with one leg several times. Turn the child around and hold his or her opposite hand. Tell the child to kick the ball with the other leg.
Encourage ■ Head upright, in line with the body, eyes looking
ahead
■ Body upright and straight
■ Hips and legs straight, legs initially together
■ Feet flat on the ground, feet facing forward
■ Arms forward and down with one hand held
Helps to ■ Refine development of balance control in the body
and legs
■ Develop coordination and motor planning
■ Develop ball-kicking skills
■ Develop independence with standing on one leg
Play Ideas Children like to play with balls. Initially they want to pick up and throw the ball. You may want to demonstrate kicking the ball for the child. By holding the child’s hand, you will encourage the child to kick the ball instead of trying to pick it up. Kick the ball toward a net, a target, or to another family member. Talk about playing soccer.
Notes for Therapists Kicking a ball requires the child to stand momentarily on one leg. This requires a higher level of balance and equilibrium skill. Although kicking with the leg appears to be movement on the sagittal plane, the action of kicking requires frontal plane motion in the trunk. The child needs to complete a lateral weight shift onto the stance leg with the trunk elongating on the weight-bearing side; the weight shift to the one side allows the leg on the opposite side to be free to kick the ball. The child needs to actively extend the hip to bring the leg behind the hip to prepare for the kick. This action is followed by active fl exion of the hip with the knee in extension. Kicking from the knee alone may indicate that the child is not fully completing a lateral weight shift to maintain stance on the opposite leg.
© 2010 by PRO-ED, Inc.
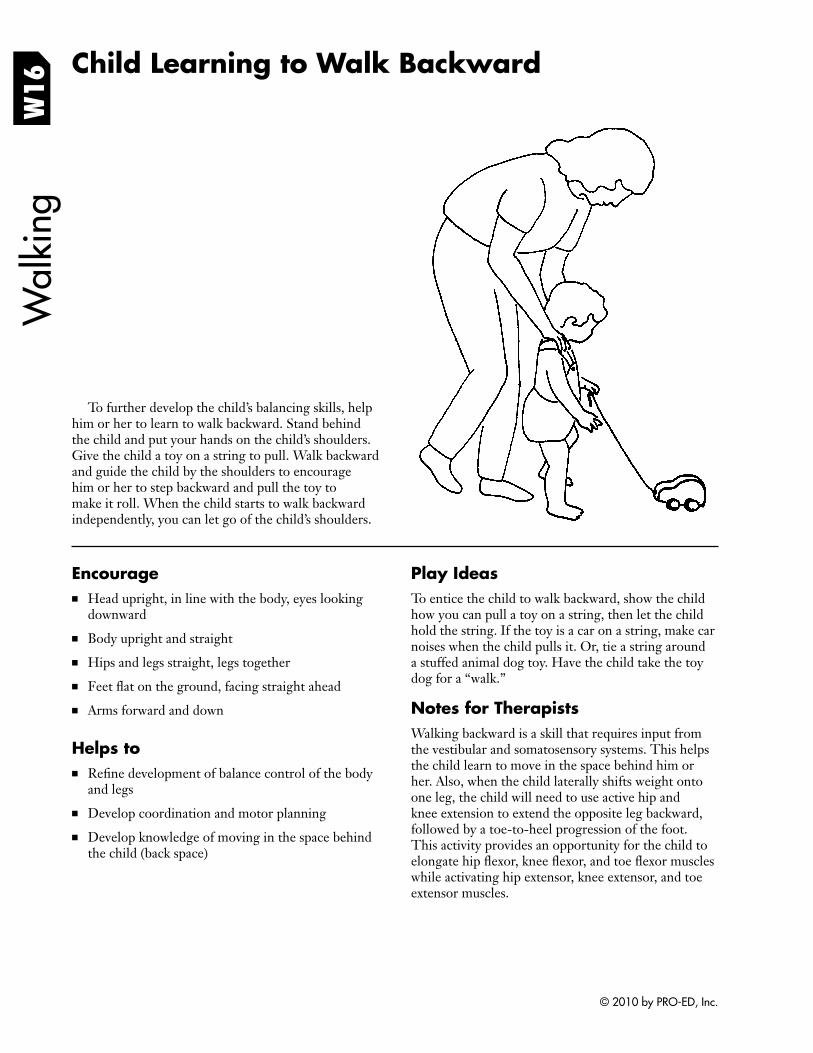
W16
Child Learning to Walk Backward W
alki
ng
To further develop the child’s balancing skills, help him or her to learn to walk backward. Stand behind the child and put your hands on the child’s shoulders. Give the child a toy on a string to pull. Walk backward and guide the child by the shoulders to encourage him or her to step backward and pull the toy to make it roll. When the child starts to walk backward independently, you can let go of the child’s shoulders.
Encourage ■ Head upright, in line with the body, eyes looking
downward
■ Body upright and straight
■ Hips and legs straight, legs together
■ Feet flat on the ground, facing straight ahead
■ Arms forward and down
Helps to ■ Refine development of balance control of the body
and legs
■ Develop coordination and motor planning
■ Develop knowledge of moving in the space behind the child (back space)
Play Ideas To entice the child to walk backward, show the child how you can pull a toy on a string, then let the child hold the string. If the toy is a car on a string, make car noises when the child pulls it. Or, tie a string around a stuffed animal dog toy. Have the child take the toy dog for a “walk.”
Notes for Therapists Walking backward is a skill that requires input from the vestibular and somatosensory systems. This helps the child learn to move in the space behind him or her. Also, when the child laterally shifts weight onto one leg, the child will need to use active hip and knee extension to extend the opposite leg backward, followed by a toe-to-heel progression of the foot. This activity provides an opportunity for the child to elongate hip flexor, knee flexor, and toe fl exor muscles while activating hip extensor, knee extensor, and toe extensor muscles.
© 2010 by PRO-ED, Inc.
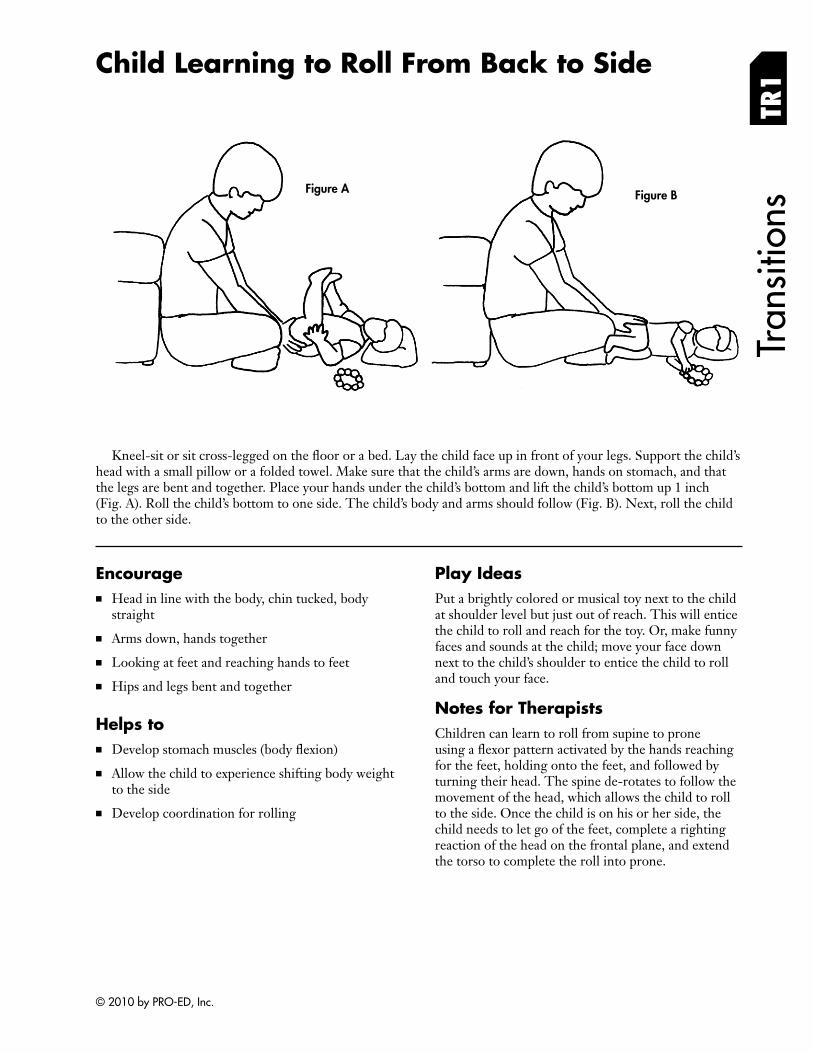
Tran
sitio
ns
Child Learning to Roll From Back to Side
TR1
Figure BFigure A
Kneel-sit or sit cross-legged on the floor or a bed. Lay the child face up in front of your legs. Support the child’s head with a small pillow or a folded towel. Make sure that the child’s arms are down, hands on stomach, and that the legs are bent and together. Place your hands under the child’s bottom and lift the child’s bottom up 1 inch (Fig. A). Roll the child’s bottom to one side. The child’s body and arms should follow (Fig. B). Next, roll the child to the other side.
Encourage ■ Head in line with the body, chin tucked, body
straight
■ Arms down, hands together
■ Looking at feet and reaching hands to feet
■ Hips and legs bent and together
Helps to ■ Develop stomach muscles (body fl exion)
■ Allow the child to experience shifting body weight to the side
■ Develop coordination for rolling
Play Ideas Put a brightly colored or musical toy next to the child at shoulder level but just out of reach. This will entice the child to roll and reach for the toy. Or, make funny faces and sounds at the child; move your face down next to the child’s shoulder to entice the child to roll and touch your face.
Notes for Therapists Children can learn to roll from supine to prone using a flexor pattern activated by the hands reaching for the feet, holding onto the feet, and followed by turning their head. The spine de-rotates to follow the movement of the head, which allows the child to roll to the side. Once the child is on his or her side, the child needs to let go of the feet, complete a righting reaction of the head on the frontal plane, and extend the torso to complete the roll into prone.
© 2010 by PRO-ED, Inc.
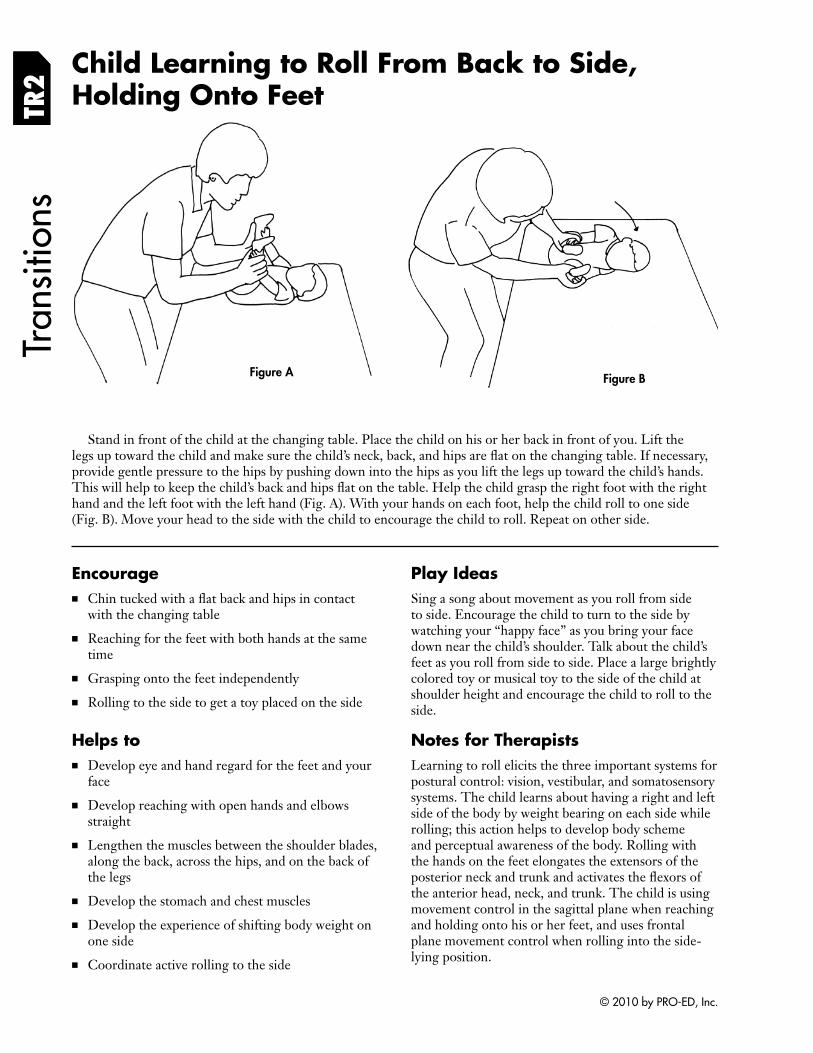
Tran
sitio
ns
Child Learning to Roll From Back to Side, Holding Onto FeetTR
2
Figure BFigure A
Stand in front of the child at the changing table. Place the child on his or her back in front of you. Lift the legs up toward the child and make sure the child’s neck, back, and hips are flat on the changing table. If necessary, provide gentle pressure to the hips by pushing down into the hips as you lift the legs up toward the child’s hands. This will help to keep the child’s back and hips flat on the table. Help the child grasp the right foot with the right hand and the left foot with the left hand (Fig. A). With your hands on each foot, help the child roll to one side (Fig. B). Move your head to the side with the child to encourage the child to roll. Repeat on other side.
Encourage ■ Chin tucked with a flat back and hips in contact
with the changing table
■ Reaching for the feet with both hands at the same time
■ Grasping onto the feet independently
■ Rolling to the side to get a toy placed on the side
Helps to ■ Develop eye and hand regard for the feet and your
face
■ Develop reaching with open hands and elbows straight
■ Lengthen the muscles between the shoulder blades, along the back, across the hips, and on the back of the legs
■ Develop the stomach and chest muscles
■ Develop the experience of shifting body weight on one side
■ Coordinate active rolling to the side
Play Ideas Sing a song about movement as you roll from side to side. Encourage the child to turn to the side by watching your “happy face” as you bring your face down near the child’s shoulder. Talk about the child’s feet as you roll from side to side. Place a large brightly colored toy or musical toy to the side of the child at shoulder height and encourage the child to roll to the side.
Notes for Therapists Learning to roll elicits the three important systems for postural control: vision, vestibular, and somatosensory systems. The child learns about having a right and left side of the body by weight bearing on each side while rolling; this action helps to develop body scheme and perceptual awareness of the body. Rolling with the hands on the feet elongates the extensors of the posterior neck and trunk and activates the fl exors of the anterior head, neck, and trunk. The child is using movement control in the sagittal plane when reaching and holding onto his or her feet, and uses frontal plane movement control when rolling into the side-lying position.
© 2010 by PRO-ED, Inc.
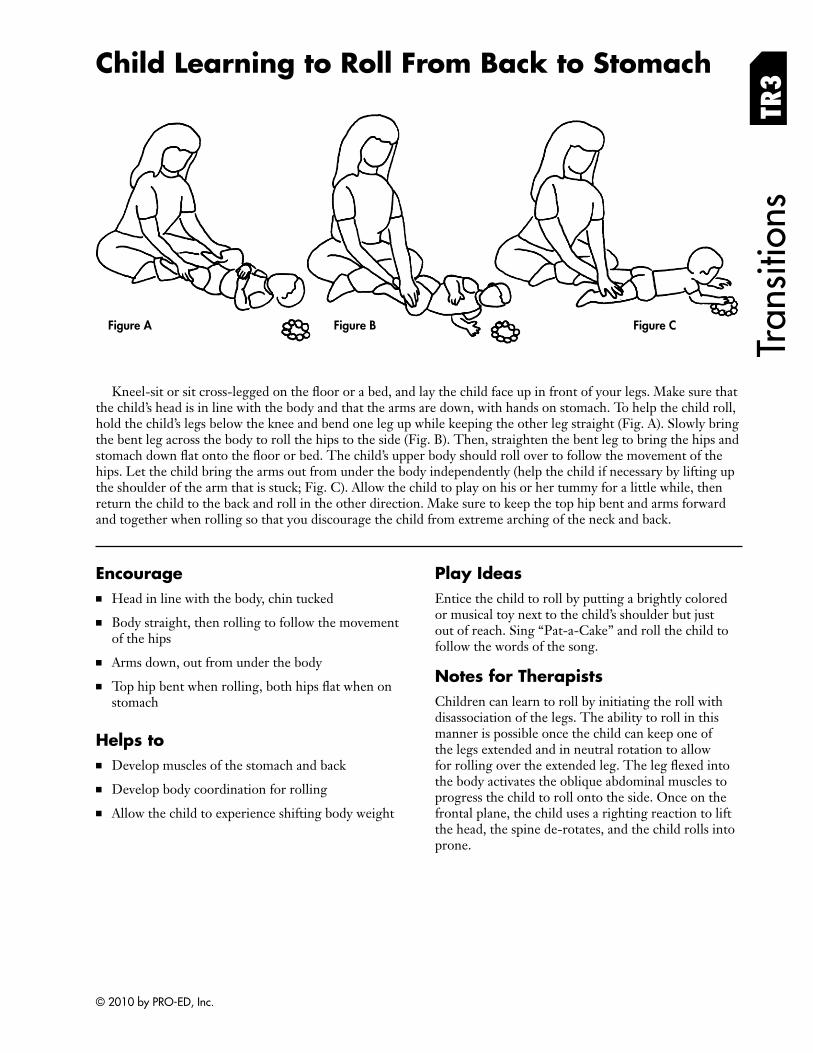
Tran
sitio
ns
Child Learning to Roll From Back to Stomach
TR3
Figure BFigure A Figure C
Kneel-sit or sit cross-legged on the floor or a bed, and lay the child face up in front of your legs. Make sure that the child’s head is in line with the body and that the arms are down, with hands on stomach. To help the child roll, hold the child’s legs below the knee and bend one leg up while keeping the other leg straight (Fig. A). Slowly bring the bent leg across the body to roll the hips to the side (Fig. B). Then, straighten the bent leg to bring the hips and stomach down flat onto the floor or bed. The child’s upper body should roll over to follow the movement of the hips. Let the child bring the arms out from under the body independently (help the child if necessary by lifting up the shoulder of the arm that is stuck; Fig. C). Allow the child to play on his or her tummy for a little while, then return the child to the back and roll in the other direction. Make sure to keep the top hip bent and arms forward and together when rolling so that you discourage the child from extreme arching of the neck and back.
Encourage ■ Head in line with the body, chin tucked
■ Body straight, then rolling to follow the movement of the hips
■ Arms down, out from under the body
■ Top hip bent when rolling, both hips flat when on stomach
Helps to ■ Develop muscles of the stomach and back
■ Develop body coordination for rolling
■ Allow the child to experience shifting body weight
Play Ideas Entice the child to roll by putting a brightly colored or musical toy next to the child’s shoulder but just out of reach. Sing “Pat-a-Cake” and roll the child to follow the words of the song.
Notes for Therapists Children can learn to roll by initiating the roll with disassociation of the legs. The ability to roll in this manner is possible once the child can keep one of the legs extended and in neutral rotation to allow for rolling over the extended leg. The leg fl exed into the body activates the oblique abdominal muscles to progress the child to roll onto the side. Once on the frontal plane, the child uses a righting reaction to lift the head, the spine de-rotates, and the child rolls into prone.
© 2010 by PRO-ED, Inc.
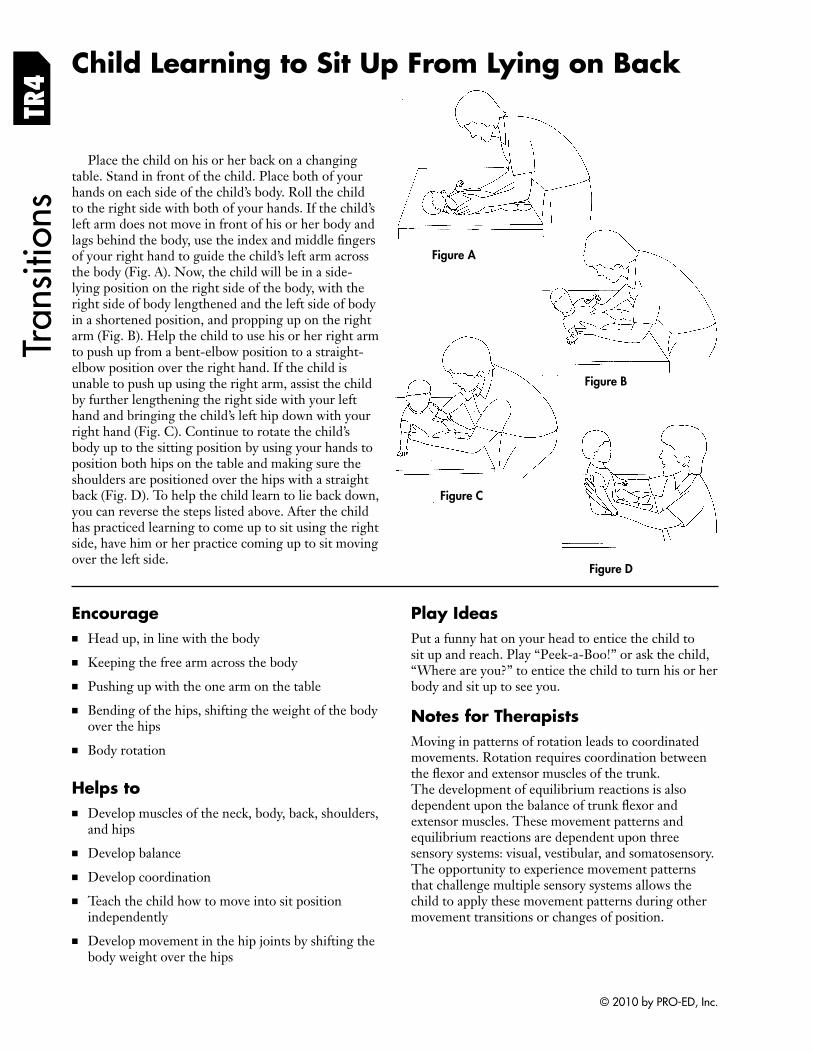
TR4
Child Learning to Sit Up From Lying on Back
Figure A
Place the child on his or her back on a changing table. Stand in front of the child. Place both of your hands on each side of the child’s body. Roll the child to the right side with both of your hands. If the child’s left arm does not move in front of his or her body and lags behind the body, use the index and middle fi ngers of your right hand to guide the child’s left arm across the body (Fig. A). Now, the child will be in a side-lying position on the right side of the body, with the right side of body lengthened and the left side of body in a shortened position, and propping up on the right arm (Fig. B). Help the child to use his or her right arm to push up from a bent-elbow position to a straight-elbow position over the right hand. If the child is unable to push up using the right arm, assist the child Figure B by further lengthening the right side with your left hand and bringing the child’s left hip down with your right hand (Fig. C). Continue to rotate the child’s body up to the sitting position by using your hands to position both hips on the table and making sure the shoulders are positioned over the hips with a straight back (Fig. D). To help the child learn to lie back down, you can reverse the steps listed above. After the child has practiced learning to come up to sit using the right side, have him or her practice coming up to sit moving over the left side.
Tran
sitio
ns
Figure C
Figure D
Encourage ■ Head up, in line with the body
■ Keeping the free arm across the body
■ Pushing up with the one arm on the table
■ Bending of the hips, shifting the weight of the body over the hips
■ Body rotation
Helps to ■ Develop muscles of the neck, body, back, shoulders,
and hips
■ Develop balance
■ Develop coordination
■ Teach the child how to move into sit position independently
■ Develop movement in the hip joints by shifting the body weight over the hips
Play Ideas Put a funny hat on your head to entice the child to sit up and reach. Play “Peek-a-Boo!” or ask the child, “Where are you?” to entice the child to turn his or her body and sit up to see you.
Notes for Therapists Moving in patterns of rotation leads to coordinated movements. Rotation requires coordination between the flexor and extensor muscles of the trunk. The development of equilibrium reactions is also dependent upon the balance of trunk fl exor and extensor muscles. These movement patterns and equilibrium reactions are dependent upon three sensory systems: visual, vestibular, and somatosensory. The opportunity to experience movement patterns that challenge multiple sensory systems allows the child to apply these movement patterns during other movement transitions or changes of position.
© 2010 by PRO-ED, Inc.
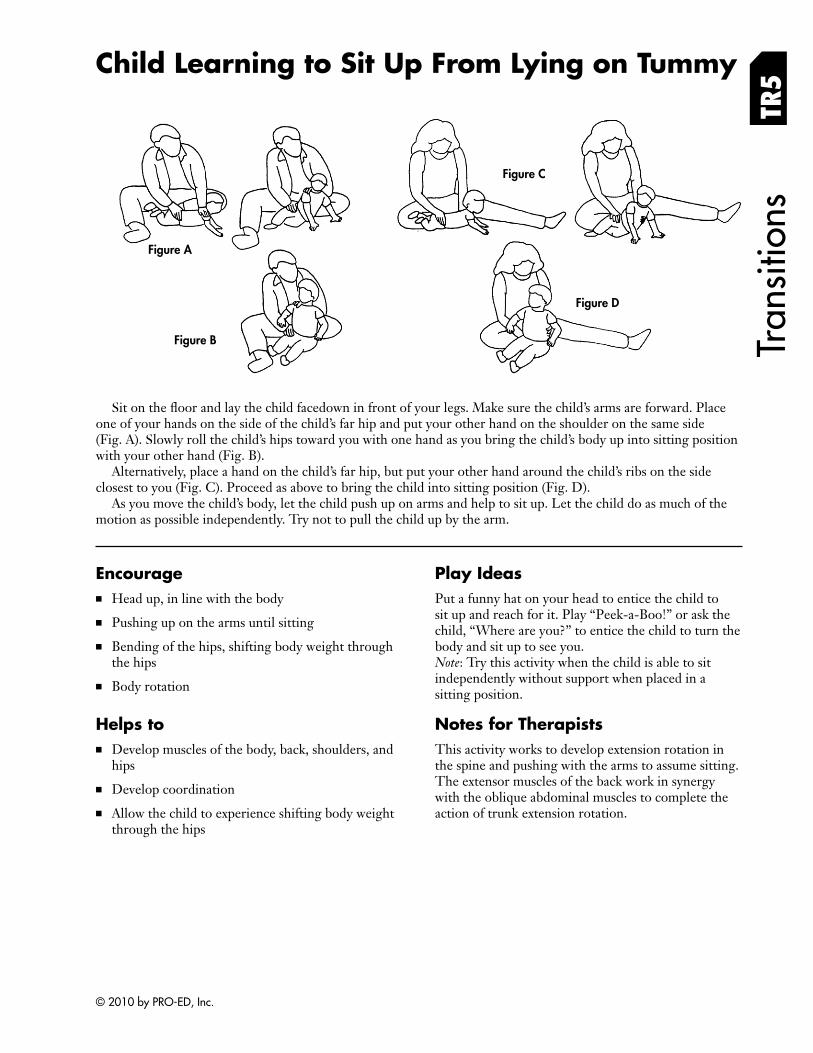
Tran
sitio
ns
Child Learning to Sit Up From Lying on Tummy
TR5
Figure B
Figure A
Figure C
Figure D
Sit on the floor and lay the child facedown in front of your legs. Make sure the child’s arms are forward. Place one of your hands on the side of the child’s far hip and put your other hand on the shoulder on the same side (Fig. A). Slowly roll the child’s hips toward you with one hand as you bring the child’s body up into sitting position with your other hand (Fig. B).
Alternatively, place a hand on the child’s far hip, but put your other hand around the child’s ribs on the side closest to you (Fig. C). Proceed as above to bring the child into sitting position (Fig. D).
As you move the child’s body, let the child push up on arms and help to sit up. Let the child do as much of the motion as possible independently. Try not to pull the child up by the arm.
Encourage ■ Head up, in line with the body
■ Pushing up on the arms until sitting
■ Bending of the hips, shifting body weight through the hips
■ Body rotation
Helps to ■ Develop muscles of the body, back, shoulders, and
hips
■ Develop coordination
■ Allow the child to experience shifting body weight through the hips
Play Ideas Put a funny hat on your head to entice the child to sit up and reach for it. Play “Peek-a-Boo!” or ask the child, “Where are you?” to entice the child to turn the body and sit up to see you. Note: Try this activity when the child is able to sit independently without support when placed in a sitting position.
Notes for Therapists This activity works to develop extension rotation in the spine and pushing with the arms to assume sitting. The extensor muscles of the back work in synergy with the oblique abdominal muscles to complete the action of trunk extension rotation.
© 2010 by PRO-ED, Inc.

Child Learning to Move From Long-Sitting to TR
6Tr
ansi
tions
Tummy
Figure A
Kneel on the floor with the child long-sitting in front of you. Put a toy to the side of the child, out of the child’s reach. Place one of your hands under the child’s arm and on the child’s chest (Fig. A). With the hand on the chest, rotate and guide the child’s body toward the toy. If the child has difficulty moving his or her legs independently, place your other hand on the side of the child’s hip to help the child to bring the leg across (Fig. B). As the child brings the leg across, slide your hand from the side of the hip to across the bottom to help give the child a point of stability at the hips once he or she is on the tummy. If the child needs help to prop up on his or her arms, use your hand that is across the child’s chest to provide support (Fig. C).
Figure B
Figure C
Encourage ■ Head up, in line with the body
■ Supporting on one arm while child changes position
■ Shifting body weight through the hips
■ Body rotation
Helps to ■ Develop muscles of the body, back, shoulders, and
hips
■ Develop coordination
■ Allow the child to experience shifting body weight through the hips
■ Allow the child to experience shifting body weight over the shoulders
Play Ideas Play a discovery game by asking the child to fi nd the object that you have placed out of reach and saying, “Where’s the teddy bear?” Wait for a moment and see if the child will initiate the movement and look toward the toy; then, you can guide the child’s body toward the toy. After a few times finding the toy, cover the toy with a towel. Say, “Where did it go?” and ask the child to find the toy. Have the child use one hand to reach and uncover the toy. Say, “Surprise!” or “You found it!” when the child finds the toy.
Notes for Therapists Rotation occurs on the transverse plane and is typically part of most movement transition patterns. As the child lowers his or her body to the floor, it is important that the child maintains the elongation on that side of the body. If the child laterally fl exes his or her body on the side that is being lowered, the movement for spinal rotation is blocked. Use your hand under the arm to help keep the side of the body elongated during the movement to allow segmental spinal rotation.
© 2010 by PRO-ED, Inc.
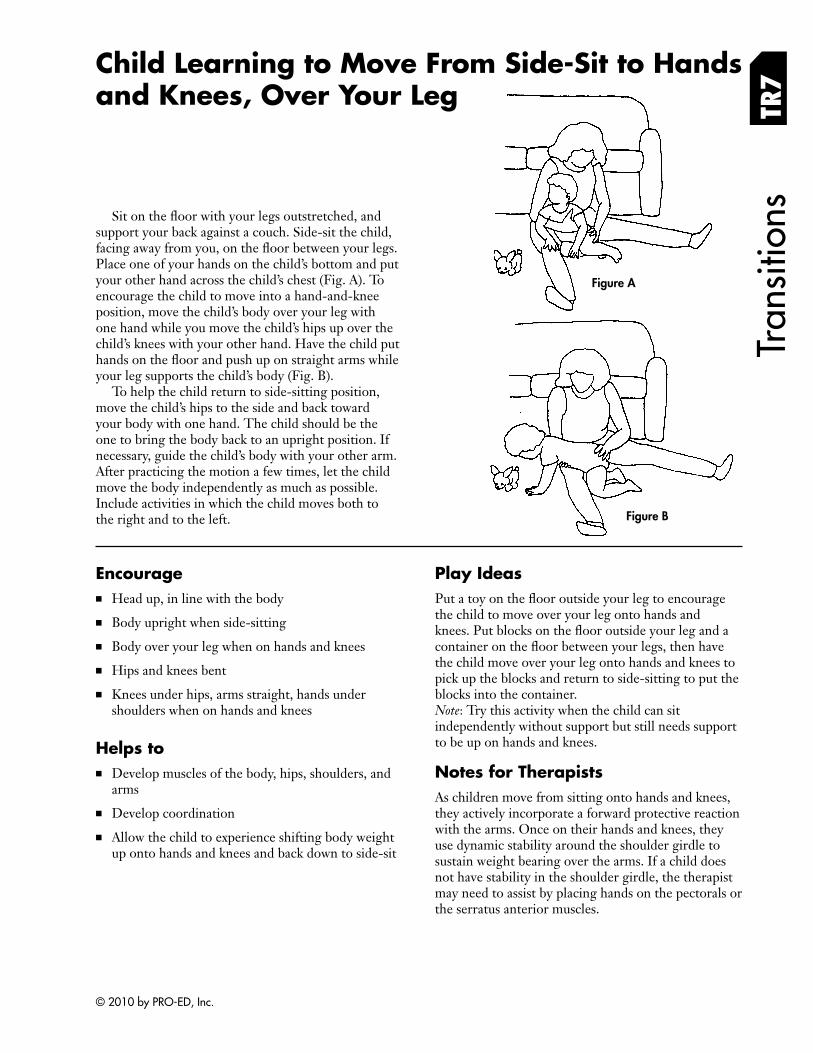
and Knees, Over Your Leg
Sit on the floor with your legs outstretched, and support your back against a couch. Side-sit the child, facing away from you, on the floor between your legs. Place one of your hands on the child’s bottom and put your other hand across the child’s chest (Fig. A). To encourage the child to move into a hand-and-knee position, move the child’s body over your leg with one hand while you move the child’s hips up over the child’s knees with your other hand. Have the child put hands on the floor and push up on straight arms while your leg supports the child’s body (Fig. B).
To help the child return to side-sitting position, move the child’s hips to the side and back toward your body with one hand. The child should be the one to bring the body back to an upright position. If necessary, guide the child’s body with your other arm. After practicing the motion a few times, let the child move the body independently as much as possible. Include activities in which the child moves both to the right and to the left.
Tran
sitio
ns
Child Learning to Move From Side-Sit to Hands
TR7
Figure B
Figure A
Encourage ■ Head up, in line with the body
■ Body upright when side-sitting
■ Body over your leg when on hands and knees
■ Hips and knees bent
■ Knees under hips, arms straight, hands under shoulders when on hands and knees
Helps to ■ Develop muscles of the body, hips, shoulders, and
arms
■ Develop coordination
■ Allow the child to experience shifting body weight up onto hands and knees and back down to side-sit
Play Ideas Put a toy on the floor outside your leg to encourage the child to move over your leg onto hands and knees. Put blocks on the floor outside your leg and a container on the floor between your legs, then have the child move over your leg onto hands and knees to pick up the blocks and return to side-sitting to put the blocks into the container. Note: Try this activity when the child can sit independently without support but still needs support to be up on hands and knees.
Notes for Therapists As children move from sitting onto hands and knees, they actively incorporate a forward protective reaction with the arms. Once on their hands and knees, they use dynamic stability around the shoulder girdle to sustain weight bearing over the arms. If a child does not have stability in the shoulder girdle, the therapist may need to assist by placing hands on the pectorals or the serratus anterior muscles.
© 2010 by PRO-ED, Inc.
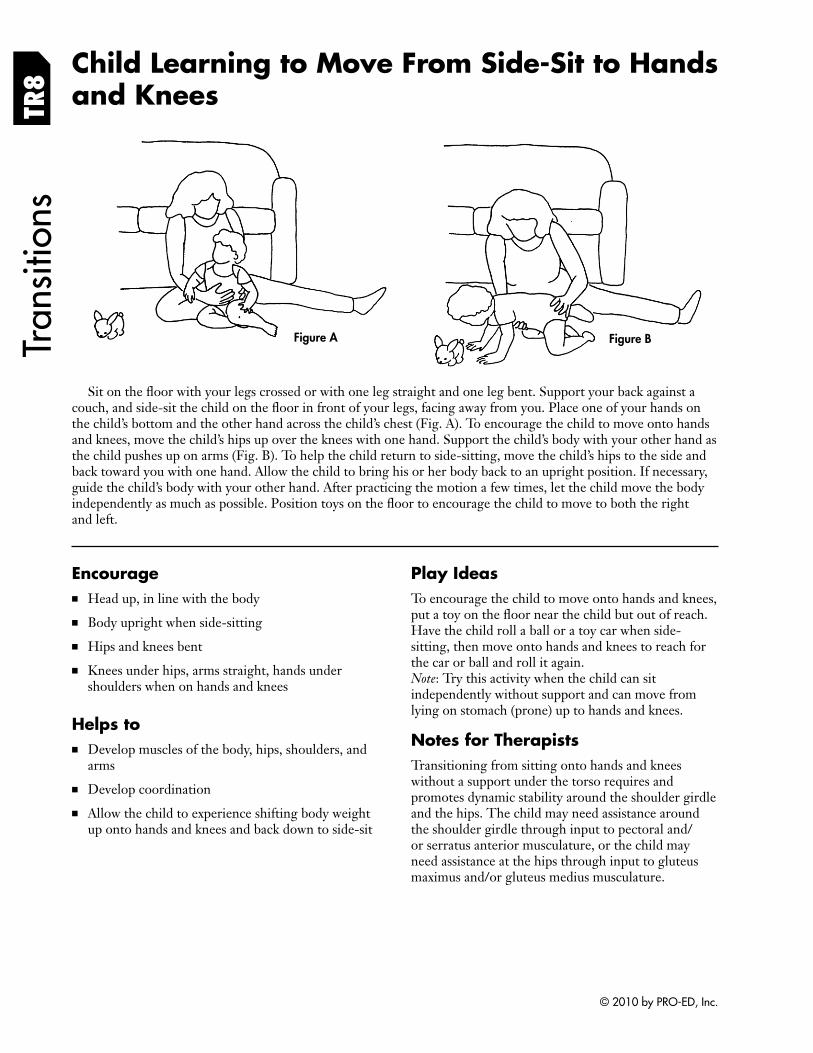
Tran
sitio
ns
Child Learning to Move From Side-Sit to Hands and KneesTR
8
Figure BFigure A
Sit on the floor with your legs crossed or with one leg straight and one leg bent. Support your back against a couch, and side-sit the child on the floor in front of your legs, facing away from you. Place one of your hands on the child’s bottom and the other hand across the child’s chest (Fig. A). To encourage the child to move onto hands and knees, move the child’s hips up over the knees with one hand. Support the child’s body with your other hand as the child pushes up on arms (Fig. B). To help the child return to side-sitting, move the child’s hips to the side and back toward you with one hand. Allow the child to bring his or her body back to an upright position. If necessary, guide the child’s body with your other hand. After practicing the motion a few times, let the child move the body independently as much as possible. Position toys on the floor to encourage the child to move to both the right and left.
Encourage ■ Head up, in line with the body
■ Body upright when side-sitting
■ Hips and knees bent
■ Knees under hips, arms straight, hands under shoulders when on hands and knees
Helps to ■ Develop muscles of the body, hips, shoulders, and
arms
■ Develop coordination
■ Allow the child to experience shifting body weight up onto hands and knees and back down to side-sit
Play Ideas To encourage the child to move onto hands and knees, put a toy on the floor near the child but out of reach. Have the child roll a ball or a toy car when side-sitting, then move onto hands and knees to reach for the car or ball and roll it again. Note: Try this activity when the child can sit independently without support and can move from lying on stomach (prone) up to hands and knees.
Notes for Therapists Transitioning from sitting onto hands and knees without a support under the torso requires and promotes dynamic stability around the shoulder girdle and the hips. The child may need assistance around the shoulder girdle through input to pectoral and/ or serratus anterior musculature, or the child may need assistance at the hips through input to gluteus maximus and/or gluteus medius musculature.
© 2010 by PRO-ED, Inc.
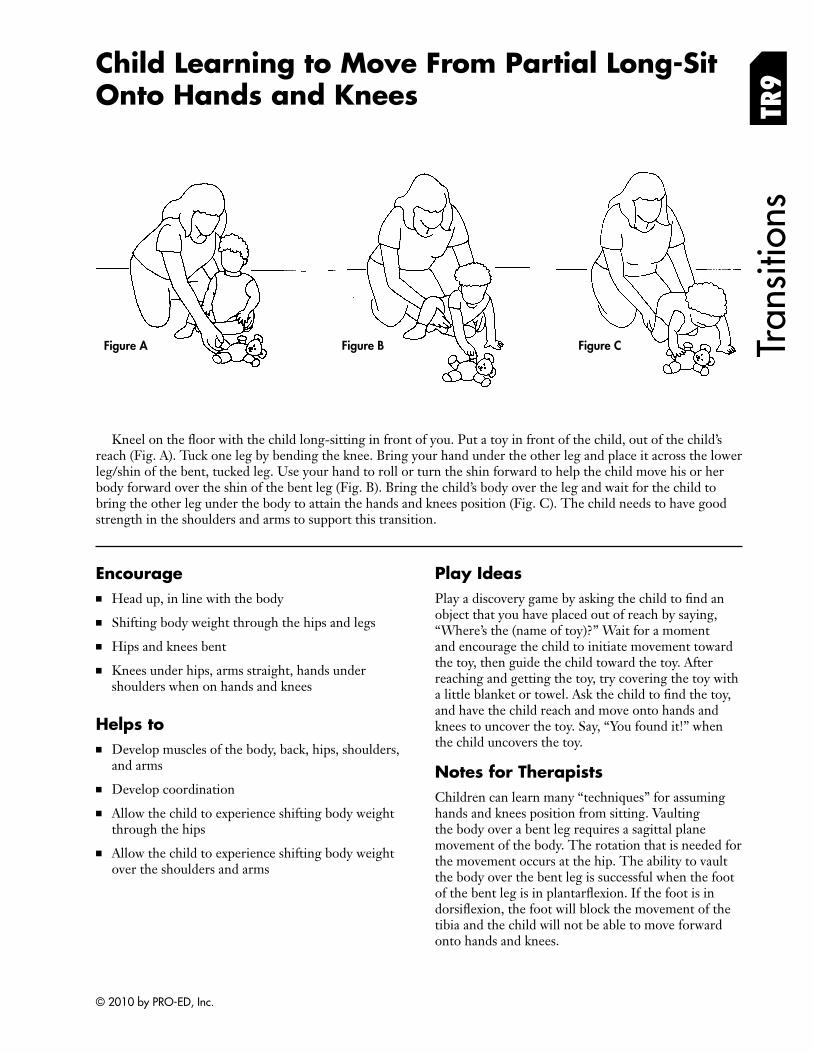
Child Learning to Move From Partial Long-Sit Onto Hands and Knees
Tran
sitio
ns
TR9
Figure BFigure A Figure C
Kneel on the floor with the child long-sitting in front of you. Put a toy in front of the child, out of the child’s reach (Fig. A). Tuck one leg by bending the knee. Bring your hand under the other leg and place it across the lower leg/shin of the bent, tucked leg. Use your hand to roll or turn the shin forward to help the child move his or her body forward over the shin of the bent leg (Fig. B). Bring the child’s body over the leg and wait for the child to bring the other leg under the body to attain the hands and knees position (Fig. C). The child needs to have good strength in the shoulders and arms to support this transition.
Encourage ■ Head up, in line with the body
■ Shifting body weight through the hips and legs
■ Hips and knees bent
■ Knees under hips, arms straight, hands under shoulders when on hands and knees
Helps to ■ Develop muscles of the body, back, hips, shoulders,
and arms
■ Develop coordination
■ Allow the child to experience shifting body weight through the hips
■ Allow the child to experience shifting body weight over the shoulders and arms
Play Ideas Play a discovery game by asking the child to fi nd an object that you have placed out of reach by saying, “Where’s the (name of toy)?” Wait for a moment and encourage the child to initiate movement toward the toy, then guide the child toward the toy. After reaching and getting the toy, try covering the toy with a little blanket or towel. Ask the child to find the toy, and have the child reach and move onto hands and knees to uncover the toy. Say, “You found it!” when the child uncovers the toy.
Notes for Therapists Children can learn many “techniques” for assuming hands and knees position from sitting. Vaulting the body over a bent leg requires a sagittal plane movement of the body. The rotation that is needed for the movement occurs at the hip. The ability to vault the body over the bent leg is successful when the foot of the bent leg is in plantarflexion. If the foot is in dorsiflexion, the foot will block the movement of the tibia and the child will not be able to move forward onto hands and knees.
© 2010 by PRO-ED, Inc.
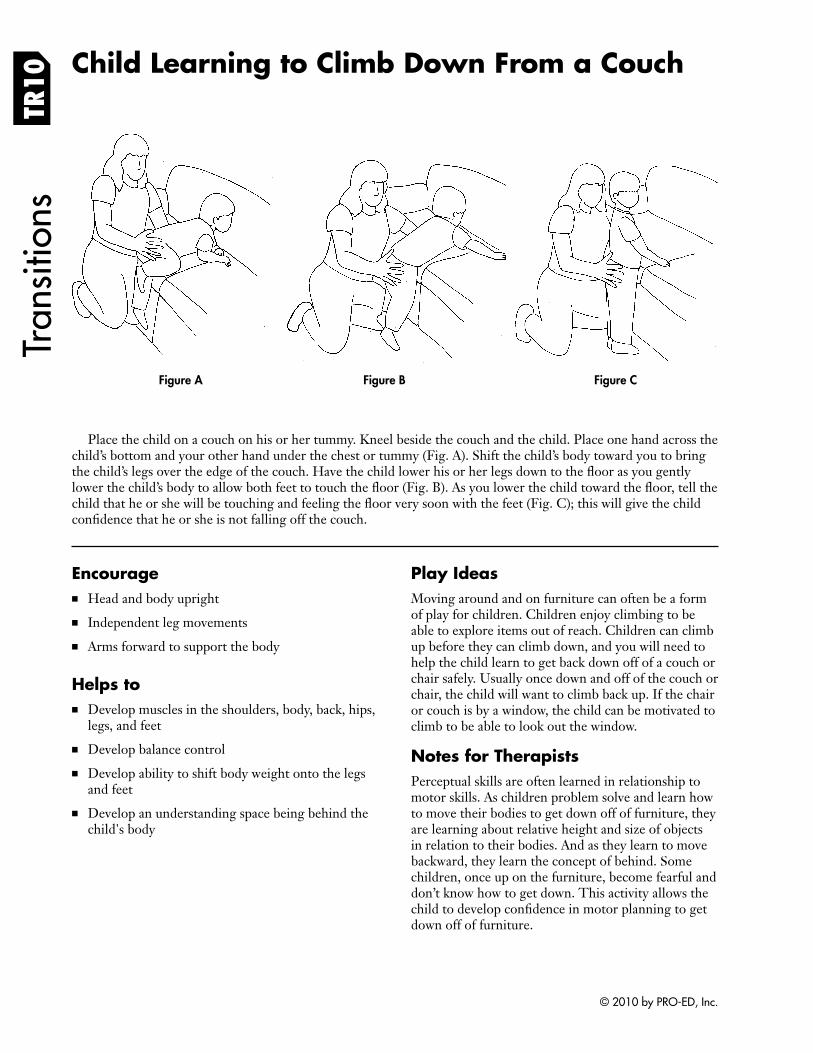
Tran
sitio
ns
Child Learning to Climb Down From a Couch TR
10
Figure A Figure B Figure C
Place the child on a couch on his or her tummy. Kneel beside the couch and the child. Place one hand across the child’s bottom and your other hand under the chest or tummy (Fig. A). Shift the child’s body toward you to bring the child’s legs over the edge of the couch. Have the child lower his or her legs down to the floor as you gently lower the child’s body to allow both feet to touch the floor (Fig. B). As you lower the child toward the floor, tell the child that he or she will be touching and feeling the floor very soon with the feet (Fig. C); this will give the child confidence that he or she is not falling off the couch.
Encourage ■ Head and body upright
■ Independent leg movements
■ Arms forward to support the body
Helps to ■ Develop muscles in the shoulders, body, back, hips,
legs, and feet
■ Develop balance control
■ Develop ability to shift body weight onto the legs and feet
■ Develop an understanding space being behind the child's body
Play Ideas Moving around and on furniture can often be a form of play for children. Children enjoy climbing to be able to explore items out of reach. Children can climb up before they can climb down, and you will need to help the child learn to get back down off of a couch or chair safely. Usually once down and off of the couch or chair, the child will want to climb back up. If the chair or couch is by a window, the child can be motivated to climb to be able to look out the window.
Notes for Therapists Perceptual skills are often learned in relationship to motor skills. As children problem solve and learn how to move their bodies to get down off of furniture, they are learning about relative height and size of objects in relation to their bodies. And as they learn to move backward, they learn the concept of behind. Some children, once up on the furniture, become fearful and don’t know how to get down. This activity allows the child to develop confidence in motor planning to get down off of furniture.
© 2010 by PRO-ED, Inc.
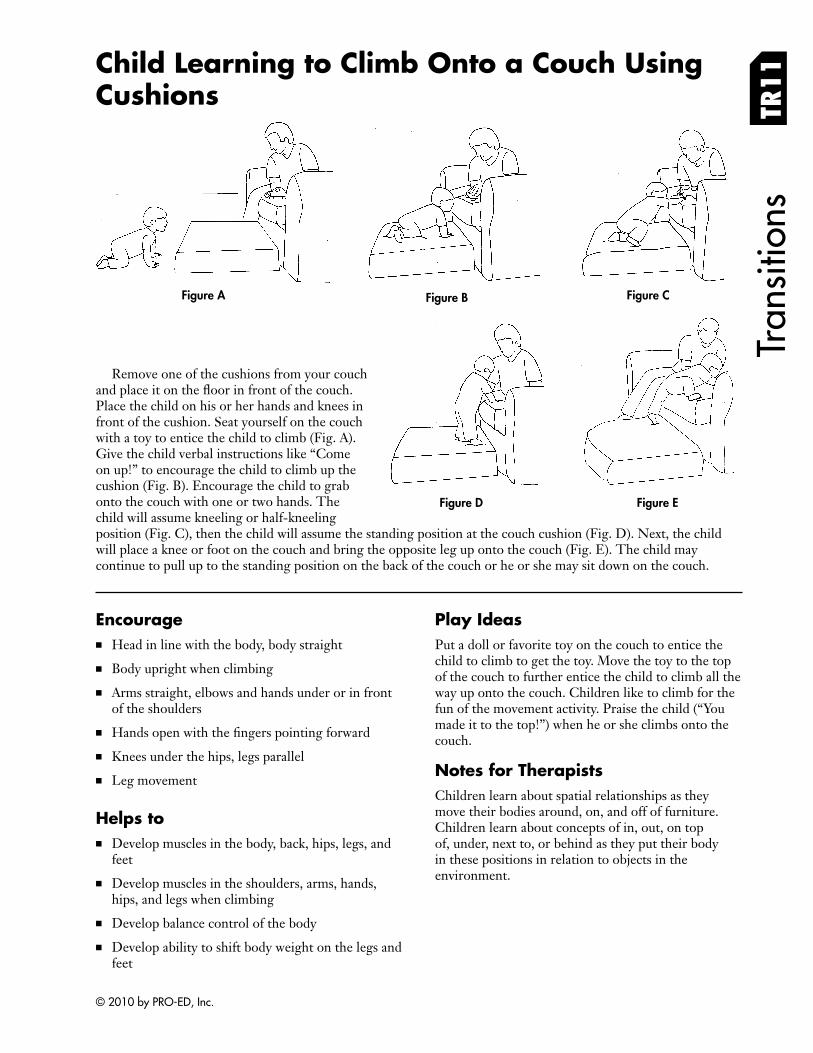
Tran
sitio
ns
Remove one of the cushions from your couch and place it on the floor in front of the couch. Place the child on his or her hands and knees in front of the cushion. Seat yourself on the couch with a toy to entice the child to climb (Fig. A). Give the child verbal instructions like “Come on up!” to encourage the child to climb up the cushion (Fig. B). Encourage the child to grab onto the couch with one or two hands. The
Child Learning to Climb Onto a Couch Using Cushions TR
11
Figure BFigure A Figure C
Figure D Figure E child will assume kneeling or half-kneeling position (Fig. C), then the child will assume the standing position at the couch cushion (Fig. D). Next, the child will place a knee or foot on the couch and bring the opposite leg up onto the couch (Fig. E). The child may continue to pull up to the standing position on the back of the couch or he or she may sit down on the couch.
Encourage ■ Head in line with the body, body straight
■ Body upright when climbing
■ Arms straight, elbows and hands under or in front of the shoulders
■ Hands open with the fingers pointing forward
■ Knees under the hips, legs parallel
■ Leg movement
Helps to ■ Develop muscles in the body, back, hips, legs, and
feet
■ Develop muscles in the shoulders, arms, hands, hips, and legs when climbing
■ Develop balance control of the body
■ Develop ability to shift body weight on the legs and feet
Play Ideas Put a doll or favorite toy on the couch to entice the child to climb to get the toy. Move the toy to the top of the couch to further entice the child to climb all the way up onto the couch. Children like to climb for the fun of the movement activity. Praise the child (“You made it to the top!”) when he or she climbs onto the couch.
Notes for Therapists Children learn about spatial relationships as they move their bodies around, on, and off of furniture. Children learn about concepts of in, out, on top of, under, next to, or behind as they put their body in these positions in relation to objects in the environment.
© 2010 by PRO-ED, Inc.
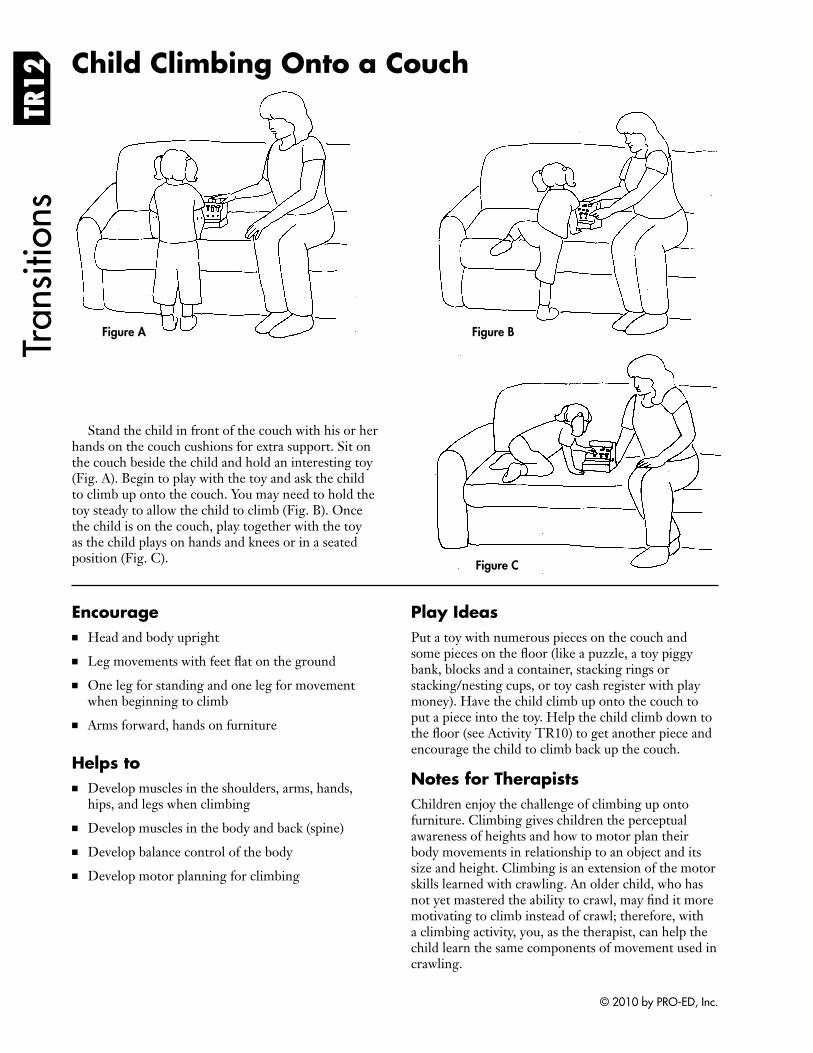
Child Climbing Onto a Couch Tr
ansi
tions
TR
12
Figure A Figure B
Figure C
Stand the child in front of the couch with his or her hands on the couch cushions for extra support. Sit on the couch beside the child and hold an interesting toy (Fig. A). Begin to play with the toy and ask the child to climb up onto the couch. You may need to hold the toy steady to allow the child to climb (Fig. B). Once the child is on the couch, play together with the toy as the child plays on hands and knees or in a seated position (Fig. C).
Encourage ■ Head and body upright
■ Leg movements with feet flat on the ground
■ One leg for standing and one leg for movement when beginning to climb
■ Arms forward, hands on furniture
Helps to ■ Develop muscles in the shoulders, arms, hands,
hips, and legs when climbing
■ Develop muscles in the body and back (spine)
■ Develop balance control of the body
■ Develop motor planning for climbing
Play Ideas Put a toy with numerous pieces on the couch and some pieces on the floor (like a puzzle, a toy piggy bank, blocks and a container, stacking rings or stacking/nesting cups, or toy cash register with play money). Have the child climb up onto the couch to put a piece into the toy. Help the child climb down to the floor (see Activity TR10) to get another piece and encourage the child to climb back up the couch.
Notes for Therapists Children enjoy the challenge of climbing up onto furniture. Climbing gives children the perceptual awareness of heights and how to motor plan their body movements in relationship to an object and its size and height. Climbing is an extension of the motor skills learned with crawling. An older child, who has not yet mastered the ability to crawl, may find it more motivating to climb instead of crawl; therefore, with a climbing activity, you, as the therapist, can help the child learn the same components of movement used in crawling.
© 2010 by PRO-ED, Inc.
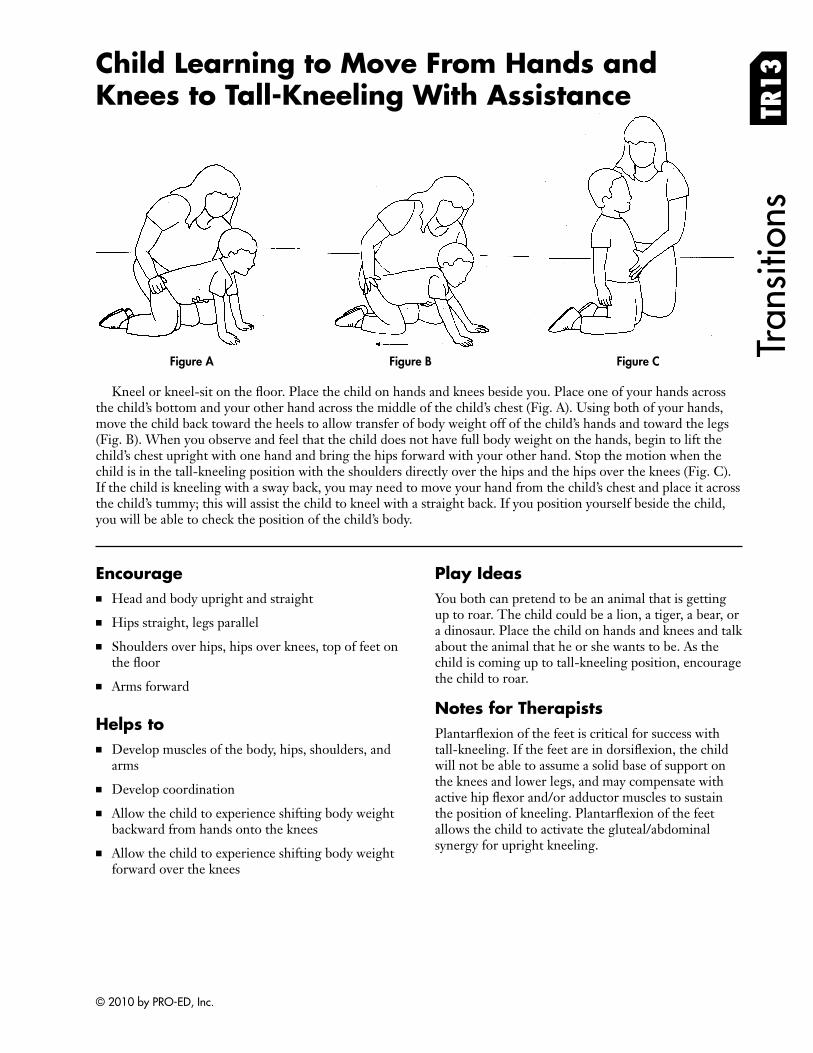
Tran
sitio
ns
Child Learning to Move From Hands and Knees to Tall-Kneeling With Assistance TR
13
Figure BFigure A Figure C
Kneel or kneel-sit on the floor. Place the child on hands and knees beside you. Place one of your hands across the child’s bottom and your other hand across the middle of the child’s chest (Fig. A). Using both of your hands, move the child back toward the heels to allow transfer of body weight off of the child’s hands and toward the legs (Fig. B). When you observe and feel that the child does not have full body weight on the hands, begin to lift the child’s chest upright with one hand and bring the hips forward with your other hand. Stop the motion when the child is in the tall-kneeling position with the shoulders directly over the hips and the hips over the knees (Fig. C). If the child is kneeling with a sway back, you may need to move your hand from the child’s chest and place it across the child’s tummy; this will assist the child to kneel with a straight back. If you position yourself beside the child, you will be able to check the position of the child’s body.
Encourage ■ Head and body upright and straight
■ Hips straight, legs parallel
■ Shoulders over hips, hips over knees, top of feet on the fl oor
■ Arms forward
Helps to ■ Develop muscles of the body, hips, shoulders, and
arms
■ Develop coordination
■ Allow the child to experience shifting body weight backward from hands onto the knees
■ Allow the child to experience shifting body weight forward over the knees
Play Ideas You both can pretend to be an animal that is getting up to roar. The child could be a lion, a tiger, a bear, or a dinosaur. Place the child on hands and knees and talk about the animal that he or she wants to be. As the child is coming up to tall-kneeling position, encourage the child to roar.
Notes for Therapists Plantarflexion of the feet is critical for success with tall-kneeling. If the feet are in dorsiflexion, the child will not be able to assume a solid base of support on the knees and lower legs, and may compensate with active hip flexor and/or adductor muscles to sustain the position of kneeling. Plantarflexion of the feet allows the child to activate the gluteal/abdominal synergy for upright kneeling.
© 2010 by PRO-ED, Inc.
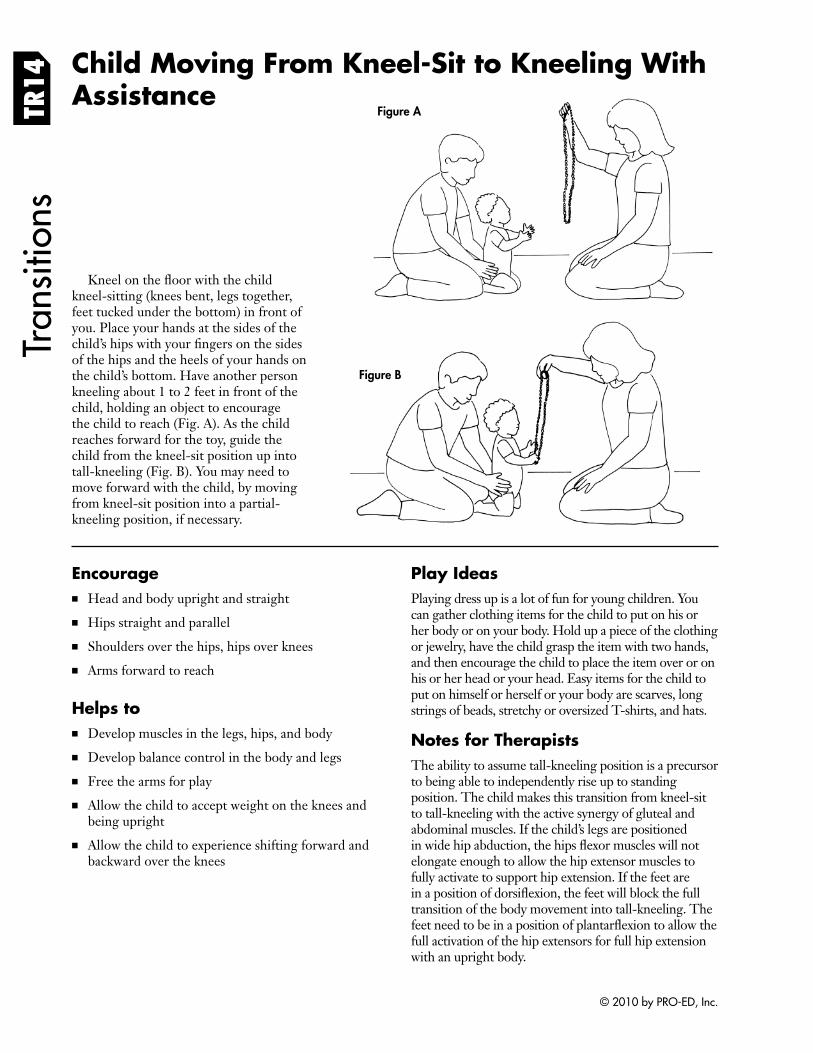
TR14
Tran
sitio
ns
Child Moving From Kneel-Sit to Kneeling With Assistance
Kneel on the floor with the child kneel-sitting (knees bent, legs together, feet tucked under the bottom) in front of you. Place your hands at the sides of the child’s hips with your fingers on the sides of the hips and the heels of your hands on the child’s bottom. Have another person kneeling about 1 to 2 feet in front of the child, holding an object to encourage the child to reach (Fig. A). As the child reaches forward for the toy, guide the child from the kneel-sit position up into tall-kneeling (Fig. B). You may need to move forward with the child, by moving from kneel-sit position into a partial-kneeling position, if necessary.
Figure B
Figure A
Encourage ■ Head and body upright and straight
■ Hips straight and parallel
■ Shoulders over the hips, hips over knees
■ Arms forward to reach
Helps to ■ Develop muscles in the legs, hips, and body
■ Develop balance control in the body and legs
■ Free the arms for play
■ Allow the child to accept weight on the knees and being upright
■ Allow the child to experience shifting forward and backward over the knees
Play Ideas Playing dress up is a lot of fun for young children. You can gather clothing items for the child to put on his or her body or on your body. Hold up a piece of the clothing or jewelry, have the child grasp the item with two hands, and then encourage the child to place the item over or on his or her head or your head. Easy items for the child to put on himself or herself or your body are scarves, long strings of beads, stretchy or oversized T-shirts, and hats.
Notes for Therapists The ability to assume tall-kneeling position is a precursor to being able to independently rise up to standing position. The child makes this transition from kneel-sit to tall-kneeling with the active synergy of gluteal and abdominal muscles. If the child’s legs are positioned in wide hip abduction, the hips flexor muscles will not elongate enough to allow the hip extensor muscles to fully activate to support hip extension. If the feet are in a position of dorsiflexion, the feet will block the full transition of the body movement into tall-kneeling. The feet need to be in a position of plantarflexion to allow the full activation of the hip extensors for full hip extension with an upright body.
© 2010 by PRO-ED, Inc.
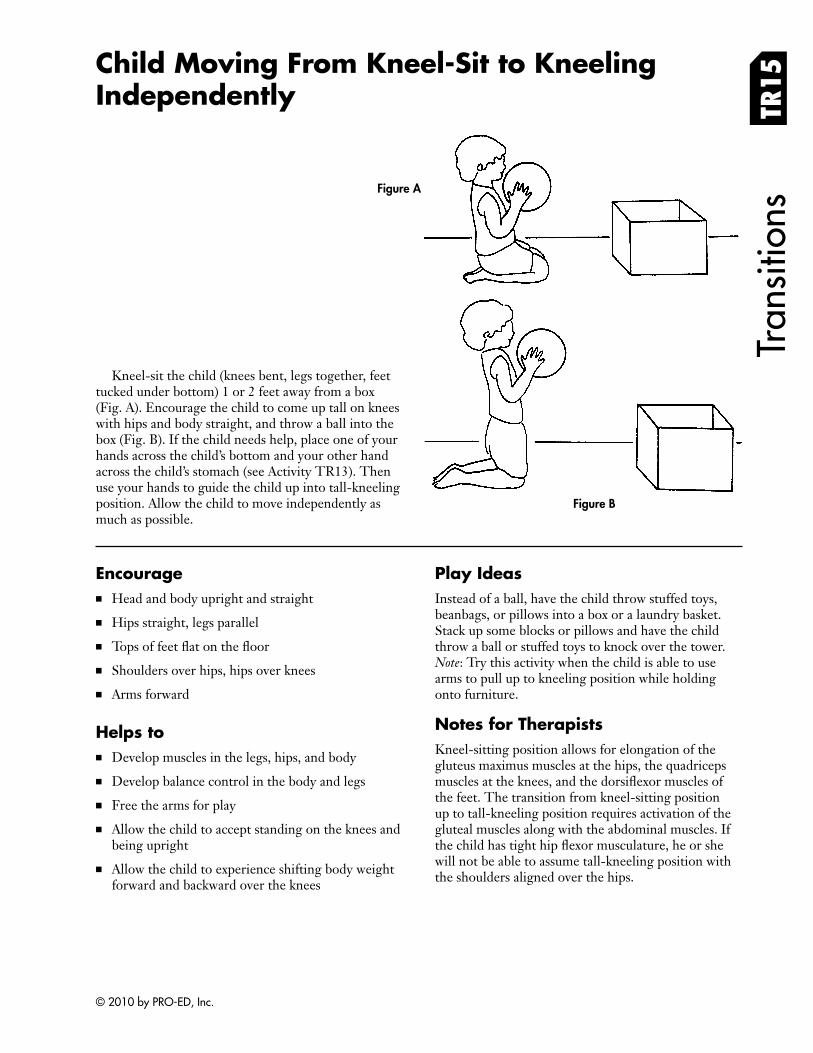
Child Moving From Kneel-Sit to Kneeling Independently
Tran
sitio
ns
TR15
Figure A
Kneel-sit the child (knees bent, legs together, feet tucked under bottom) 1 or 2 feet away from a box (Fig. A). Encourage the child to come up tall on knees with hips and body straight, and throw a ball into the box (Fig. B). If the child needs help, place one of your hands across the child’s bottom and your other hand across the child’s stomach (see Activity TR13). Then use your hands to guide the child up into tall-kneeling position. Allow the child to move independently as Figure B much as possible.
Encourage ■ Head and body upright and straight
■ Hips straight, legs parallel
■ Tops of feet flat on the fl oor
■ Shoulders over hips, hips over knees
■ Arms forward
Helps to ■ Develop muscles in the legs, hips, and body
■ Develop balance control in the body and legs
■ Free the arms for play
■ Allow the child to accept standing on the knees and being upright
■ Allow the child to experience shifting body weight forward and backward over the knees
Play Ideas Instead of a ball, have the child throw stuffed toys, beanbags, or pillows into a box or a laundry basket. Stack up some blocks or pillows and have the child throw a ball or stuffed toys to knock over the tower. Note: Try this activity when the child is able to use arms to pull up to kneeling position while holding onto furniture.
Notes for Therapists Kneel-sitting position allows for elongation of the gluteus maximus muscles at the hips, the quadriceps muscles at the knees, and the dorsiflexor muscles of the feet. The transition from kneel-sitting position up to tall-kneeling position requires activation of the gluteal muscles along with the abdominal muscles. If the child has tight hip flexor musculature, he or she will not be able to assume tall-kneeling position with the shoulders aligned over the hips.
© 2010 by PRO-ED, Inc.
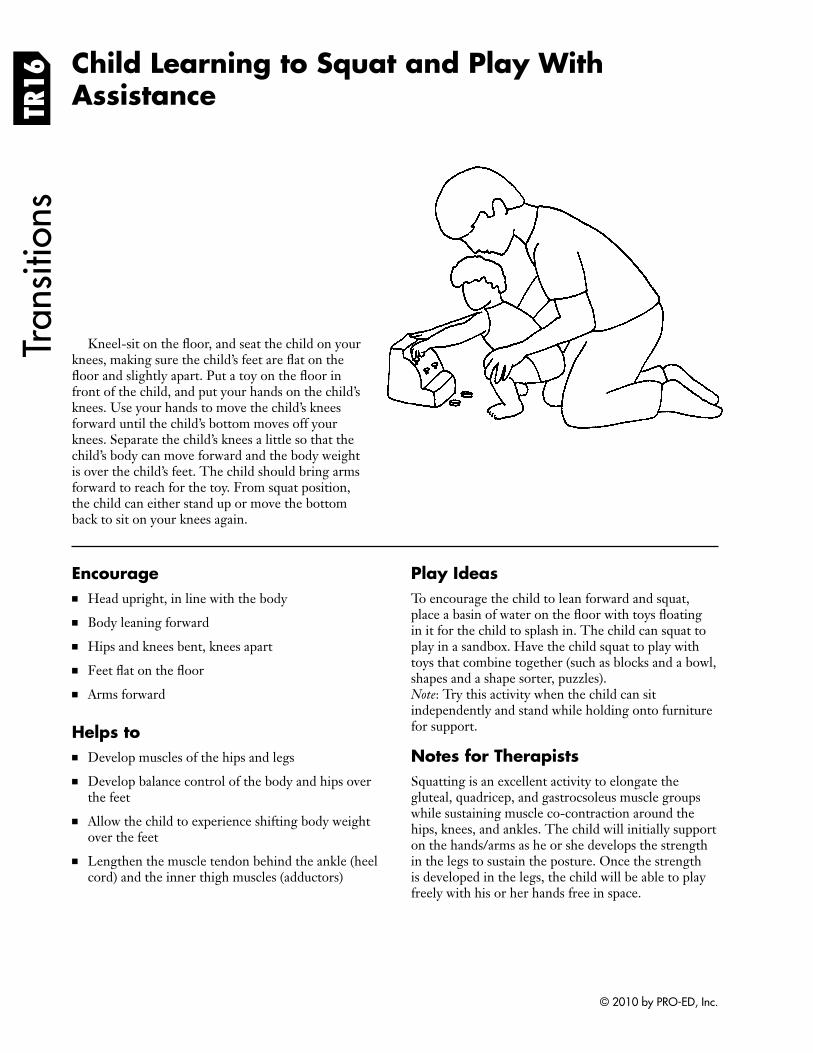
TR16
Child Learning to Squat and Play With Assistance
Tran
sitio
ns
Kneel-sit on the floor, and seat the child on your knees, making sure the child’s feet are flat on the floor and slightly apart. Put a toy on the fl oor in front of the child, and put your hands on the child’s knees. Use your hands to move the child’s knees forward until the child’s bottom moves off your knees. Separate the child’s knees a little so that the child’s body can move forward and the body weight is over the child’s feet. The child should bring arms forward to reach for the toy. From squat position, the child can either stand up or move the bottom back to sit on your knees again.
Encourage ■ Head upright, in line with the body
■ Body leaning forward
■ Hips and knees bent, knees apart
■ Feet flat on the fl oor
■ Arms forward
Helps to ■ Develop muscles of the hips and legs
■ Develop balance control of the body and hips over the feet
■ Allow the child to experience shifting body weight over the feet
■ Lengthen the muscle tendon behind the ankle (heel cord) and the inner thigh muscles (adductors)
Play Ideas To encourage the child to lean forward and squat, place a basin of water on the floor with toys fl oating in it for the child to splash in. The child can squat to play in a sandbox. Have the child squat to play with toys that combine together (such as blocks and a bowl, shapes and a shape sorter, puzzles). Note: Try this activity when the child can sit independently and stand while holding onto furniture for support.
Notes for Therapists Squatting is an excellent activity to elongate the gluteal, quadricep, and gastrocsoleus muscle groups while sustaining muscle co-contraction around the hips, knees, and ankles. The child will initially support on the hands/arms as he or she develops the strength in the legs to sustain the posture. Once the strength is developed in the legs, the child will be able to play freely with his or her hands free in space.
© 2010 by PRO-ED, Inc.
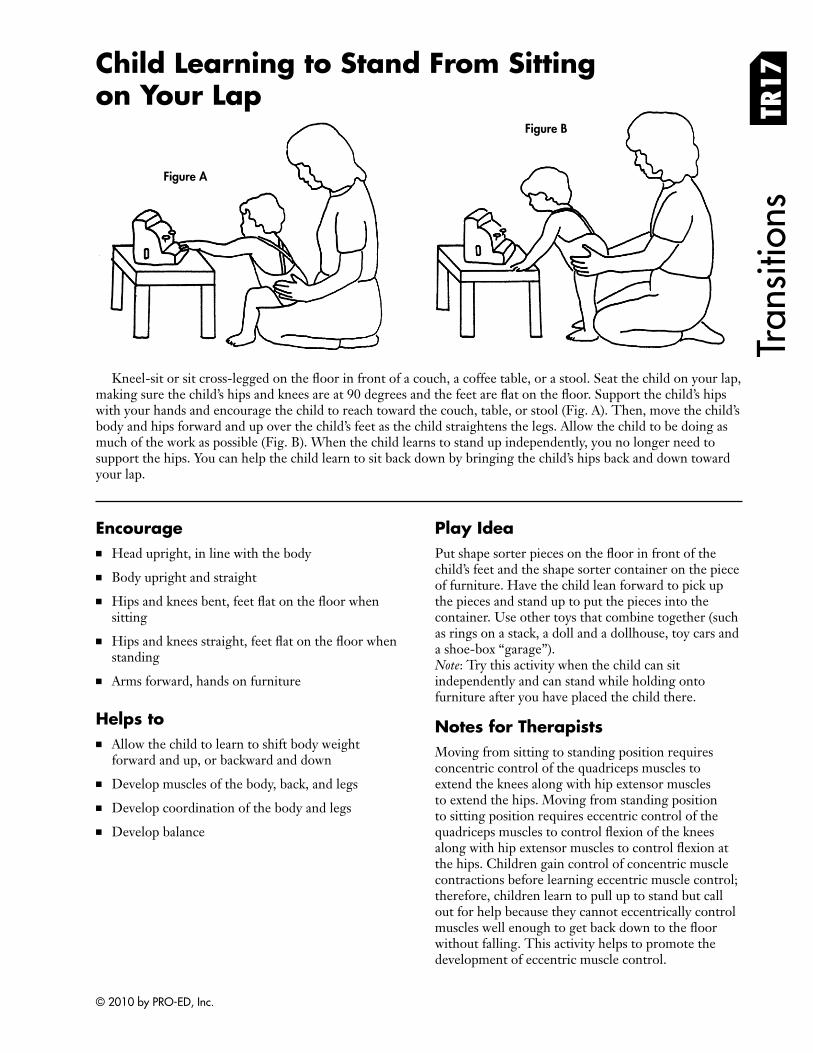
Tran
sitio
ns
Child Learning to Stand From Sitting on Your Lap TR
17
Figure B
Figure A
Kneel-sit or sit cross-legged on the floor in front of a couch, a coffee table, or a stool. Seat the child on your lap, making sure the child’s hips and knees are at 90 degrees and the feet are flat on the floor. Support the child’s hips with your hands and encourage the child to reach toward the couch, table, or stool (Fig. A). Then, move the child’s body and hips forward and up over the child’s feet as the child straightens the legs. Allow the child to be doing as much of the work as possible (Fig. B). When the child learns to stand up independently, you no longer need to support the hips. You can help the child learn to sit back down by bringing the child’s hips back and down toward your lap.
Encourage ■ Head upright, in line with the body
■ Body upright and straight
■ Hips and knees bent, feet flat on the fl oor when sitting
■ Hips and knees straight, feet flat on the fl oor when standing
■ Arms forward, hands on furniture
Helps to ■ Allow the child to learn to shift body weight
forward and up, or backward and down
■ Develop muscles of the body, back, and legs
■ Develop coordination of the body and legs
■ Develop balance
Play Idea Put shape sorter pieces on the floor in front of the child’s feet and the shape sorter container on the piece of furniture. Have the child lean forward to pick up the pieces and stand up to put the pieces into the container. Use other toys that combine together (such as rings on a stack, a doll and a dollhouse, toy cars and a shoe-box “garage”). Note: Try this activity when the child can sit independently and can stand while holding onto furniture after you have placed the child there.
Notes for Therapists Moving from sitting to standing position requires concentric control of the quadriceps muscles to extend the knees along with hip extensor muscles to extend the hips. Moving from standing position to sitting position requires eccentric control of the quadriceps muscles to control flexion of the knees along with hip extensor muscles to control fl exion at the hips. Children gain control of concentric muscle contractions before learning eccentric muscle control; therefore, children learn to pull up to stand but call out for help because they cannot eccentrically control muscles well enough to get back down to the fl oor without falling. This activity helps to promote the development of eccentric muscle control.
© 2010 by PRO-ED, Inc.
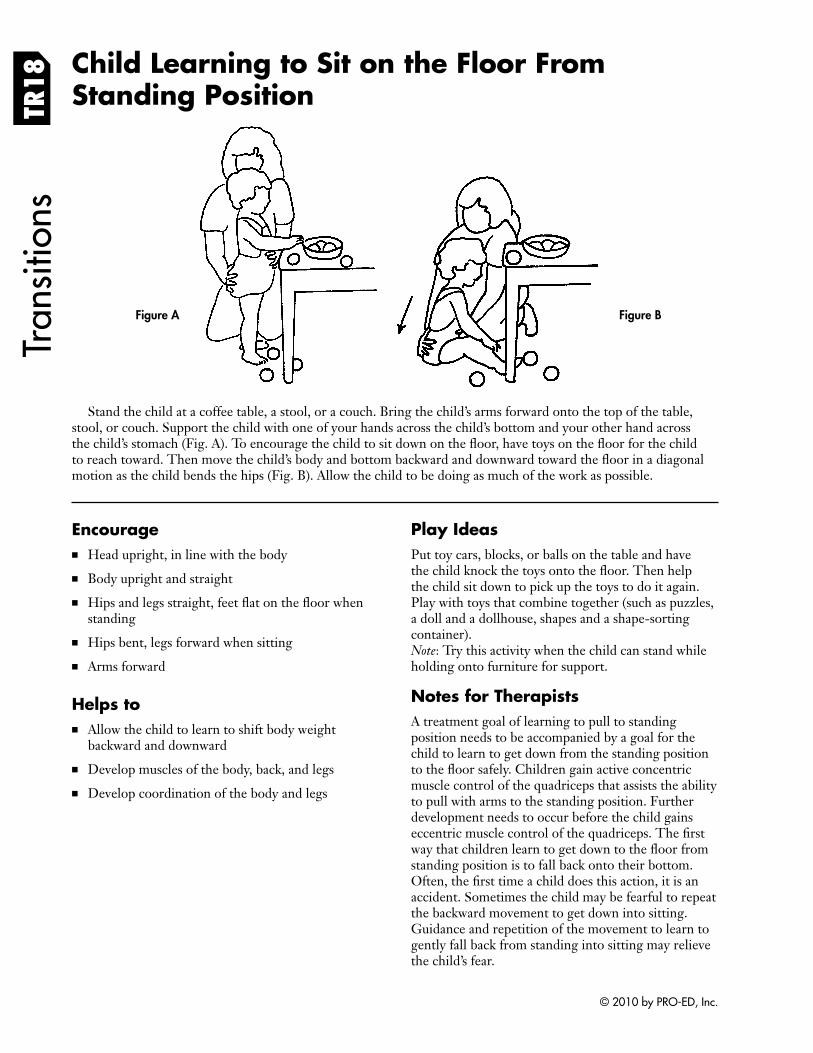
TR18
Tran
sitio
ns
Child Learning to Sit on the Floor From Standing Position
Figure A Figure B
Stand the child at a coffee table, a stool, or a couch. Bring the child’s arms forward onto the top of the table, stool, or couch. Support the child with one of your hands across the child’s bottom and your other hand across the child’s stomach (Fig. A). To encourage the child to sit down on the floor, have toys on the floor for the child to reach toward. Then move the child’s body and bottom backward and downward toward the floor in a diagonal motion as the child bends the hips (Fig. B). Allow the child to be doing as much of the work as possible.
Encourage ■ Head upright, in line with the body
■ Body upright and straight
■ Hips and legs straight, feet flat on the fl oor when standing
■ Hips bent, legs forward when sitting
■ Arms forward
Helps to ■ Allow the child to learn to shift body weight
backward and downward
■ Develop muscles of the body, back, and legs
■ Develop coordination of the body and legs
Play Ideas Put toy cars, blocks, or balls on the table and have the child knock the toys onto the floor. Then help the child sit down to pick up the toys to do it again. Play with toys that combine together (such as puzzles, a doll and a dollhouse, shapes and a shape-sorting container). Note: Try this activity when the child can stand while holding onto furniture for support.
Notes for Therapists A treatment goal of learning to pull to standing position needs to be accompanied by a goal for the child to learn to get down from the standing position to the floor safely. Children gain active concentric muscle control of the quadriceps that assists the ability to pull with arms to the standing position. Further development needs to occur before the child gains eccentric muscle control of the quadriceps. The fi rst way that children learn to get down to the fl oor from standing position is to fall back onto their bottom. Often, the first time a child does this action, it is an accident. Sometimes the child may be fearful to repeat the backward movement to get down into sitting. Guidance and repetition of the movement to learn to gently fall back from standing into sitting may relieve the child’s fear.
© 2010 by PRO-ED, Inc.
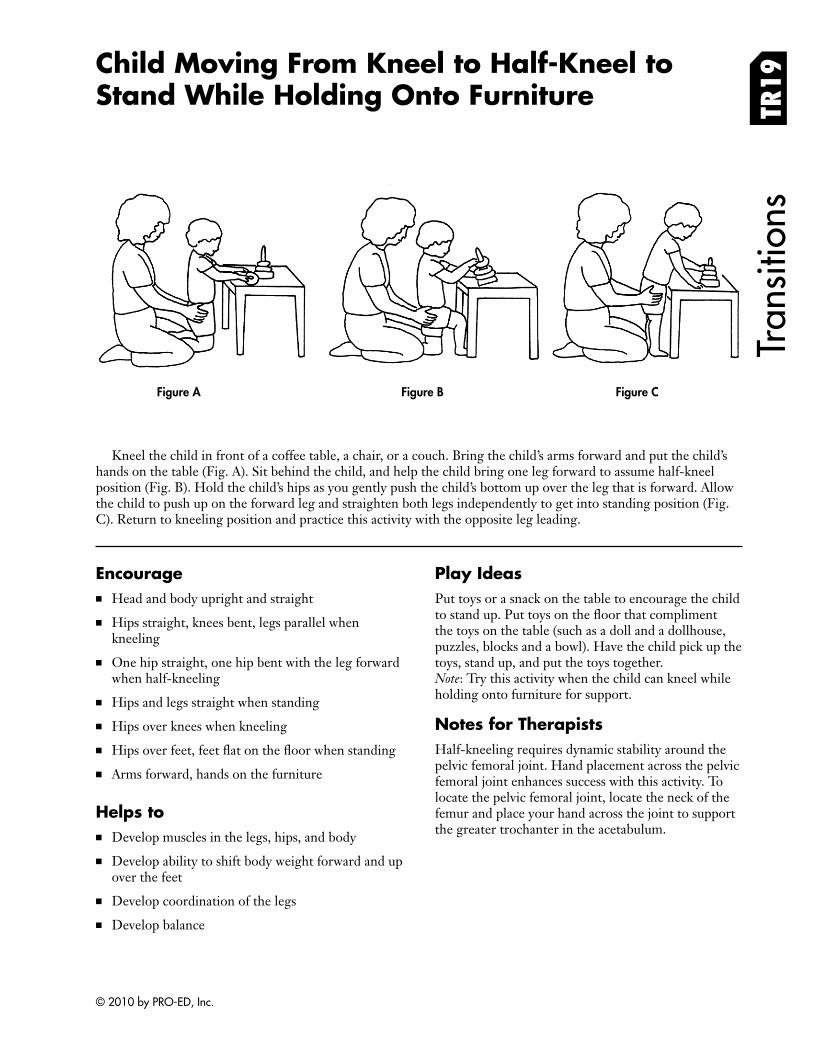
Child Moving From Kneel to Half-Kneel to Stand While Holding Onto Furniture TR
19Tr
ansi
tions
Figure A Figure B Figure C
Kneel the child in front of a coffee table, a chair, or a couch. Bring the child’s arms forward and put the child’s hands on the table (Fig. A). Sit behind the child, and help the child bring one leg forward to assume half-kneel position (Fig. B). Hold the child’s hips as you gently push the child’s bottom up over the leg that is forward. Allow the child to push up on the forward leg and straighten both legs independently to get into standing position (Fig. C). Return to kneeling position and practice this activity with the opposite leg leading.
Encourage ■ Head and body upright and straight
■ Hips straight, knees bent, legs parallel when kneeling
■ One hip straight, one hip bent with the leg forward when half-kneeling
■ Hips and legs straight when standing
■ Hips over knees when kneeling
■ Hips over feet, feet flat on the floor when standing
■ Arms forward, hands on the furniture
Helps to ■ Develop muscles in the legs, hips, and body
■ Develop ability to shift body weight forward and up over the feet
■ Develop coordination of the legs
■ Develop balance
Play Ideas Put toys or a snack on the table to encourage the child to stand up. Put toys on the floor that compliment the toys on the table (such as a doll and a dollhouse, puzzles, blocks and a bowl). Have the child pick up the toys, stand up, and put the toys together. Note: Try this activity when the child can kneel while holding onto furniture for support.
Notes for Therapists Half-kneeling requires dynamic stability around the pelvic femoral joint. Hand placement across the pelvic femoral joint enhances success with this activity. To locate the pelvic femoral joint, locate the neck of the femur and place your hand across the joint to support the greater trochanter in the acetabulum.
© 2010 by PRO-ED, Inc.
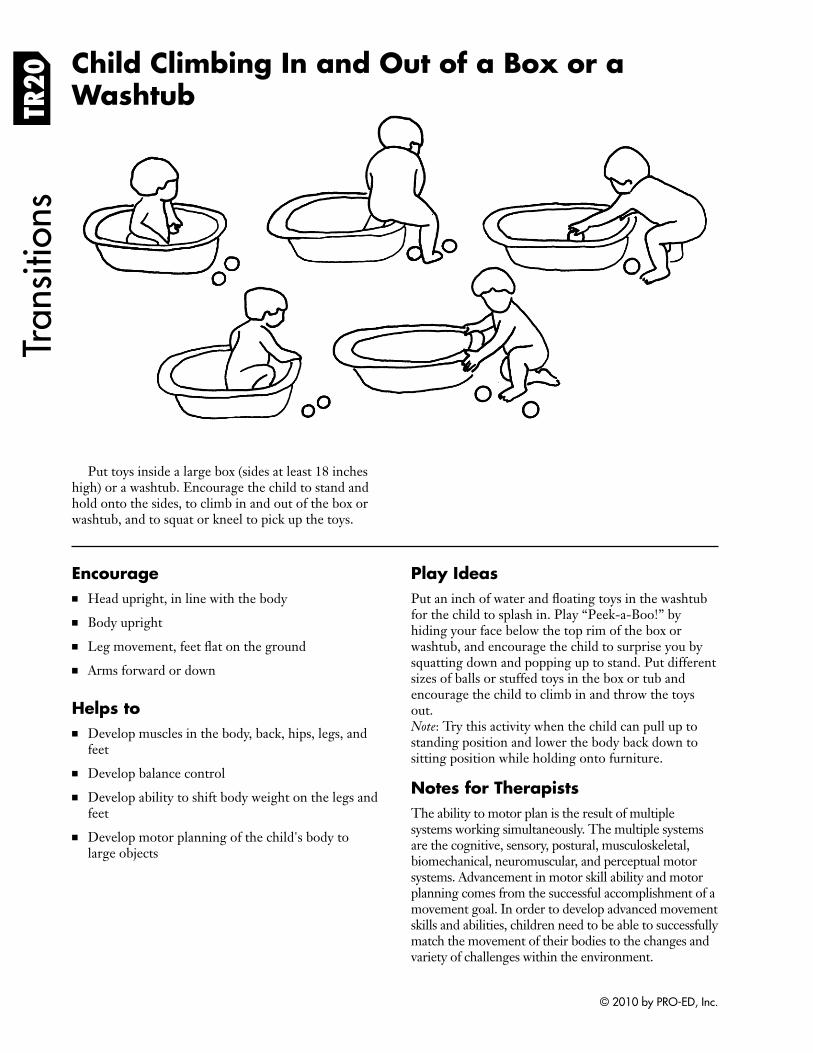
TR20
Tran
sitio
ns
Child Climbing In and Out of a Box or a Washtub
Put toys inside a large box (sides at least 18 inches high) or a washtub. Encourage the child to stand and hold onto the sides, to climb in and out of the box or washtub, and to squat or kneel to pick up the toys.
Encourage ■ Head upright, in line with the body
■ Body upright
■ Leg movement, feet flat on the ground
■ Arms forward or down
Helps to ■ Develop muscles in the body, back, hips, legs, and
feet
■ Develop balance control
■ Develop ability to shift body weight on the legs and feet
■ Develop motor planning of the child's body to large objects
Play Ideas Put an inch of water and floating toys in the washtub for the child to splash in. Play “Peek-a-Boo!” by hiding your face below the top rim of the box or washtub, and encourage the child to surprise you by squatting down and popping up to stand. Put different sizes of balls or stuffed toys in the box or tub and encourage the child to climb in and throw the toys out. Note: Try this activity when the child can pull up to standing position and lower the body back down to sitting position while holding onto furniture.
Notes for Therapists The ability to motor plan is the result of multiple systems working simultaneously. The multiple systems are the cognitive, sensory, postural, musculoskeletal, biomechanical, neuromuscular, and perceptual motor systems. Advancement in motor skill ability and motor planning comes from the successful accomplishment of a movement goal. In order to develop advanced movement skills and abilities, children need to be able to successfully match the movement of their bodies to the changes and variety of challenges within the environment.
© 2010 by PRO-ED, Inc.
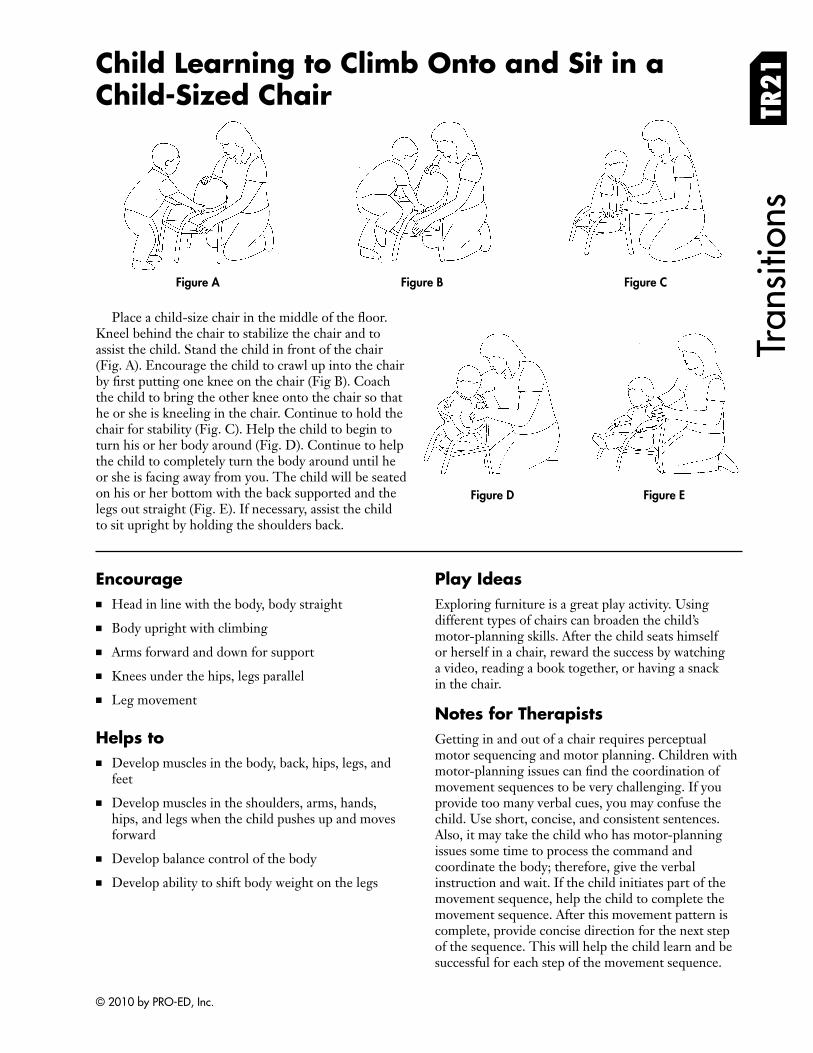
Tran
sitio
ns
Child Learning to Climb Onto and Sit in a Child-Sized Chair TR
21
Figure A Figure B Figure C
Place a child-size chair in the middle of the fl oor. Kneel behind the chair to stabilize the chair and to assist the child. Stand the child in front of the chair (Fig. A). Encourage the child to crawl up into the chair by first putting one knee on the chair (Fig B). Coach the child to bring the other knee onto the chair so that he or she is kneeling in the chair. Continue to hold the chair for stability (Fig. C). Help the child to begin to turn his or her body around (Fig. D). Continue to help the child to completely turn the body around until he or she is facing away from you. The child will be seated on his or her bottom with the back supported and the Figure D Figure E legs out straight (Fig. E). If necessary, assist the child to sit upright by holding the shoulders back.
Encourage ■ Head in line with the body, body straight
■ Body upright with climbing
■ Arms forward and down for support
■ Knees under the hips, legs parallel
■ Leg movement
Helps to ■ Develop muscles in the body, back, hips, legs, and
feet
■ Develop muscles in the shoulders, arms, hands, hips, and legs when the child pushes up and moves forward
■ Develop balance control of the body
■ Develop ability to shift body weight on the legs
Play Ideas Exploring furniture is a great play activity. Using different types of chairs can broaden the child’s motor-planning skills. After the child seats himself or herself in a chair, reward the success by watching a video, reading a book together, or having a snack in the chair.
Notes for Therapists Getting in and out of a chair requires perceptual motor sequencing and motor planning. Children with motor-planning issues can find the coordination of movement sequences to be very challenging. If you provide too many verbal cues, you may confuse the child. Use short, concise, and consistent sentences. Also, it may take the child who has motor-planning issues some time to process the command and coordinate the body; therefore, give the verbal instruction and wait. If the child initiates part of the movement sequence, help the child to complete the movement sequence. After this movement pattern is complete, provide concise direction for the next step of the sequence. This will help the child learn and be successful for each step of the movement sequence.
© 2010 by PRO-ED, Inc.
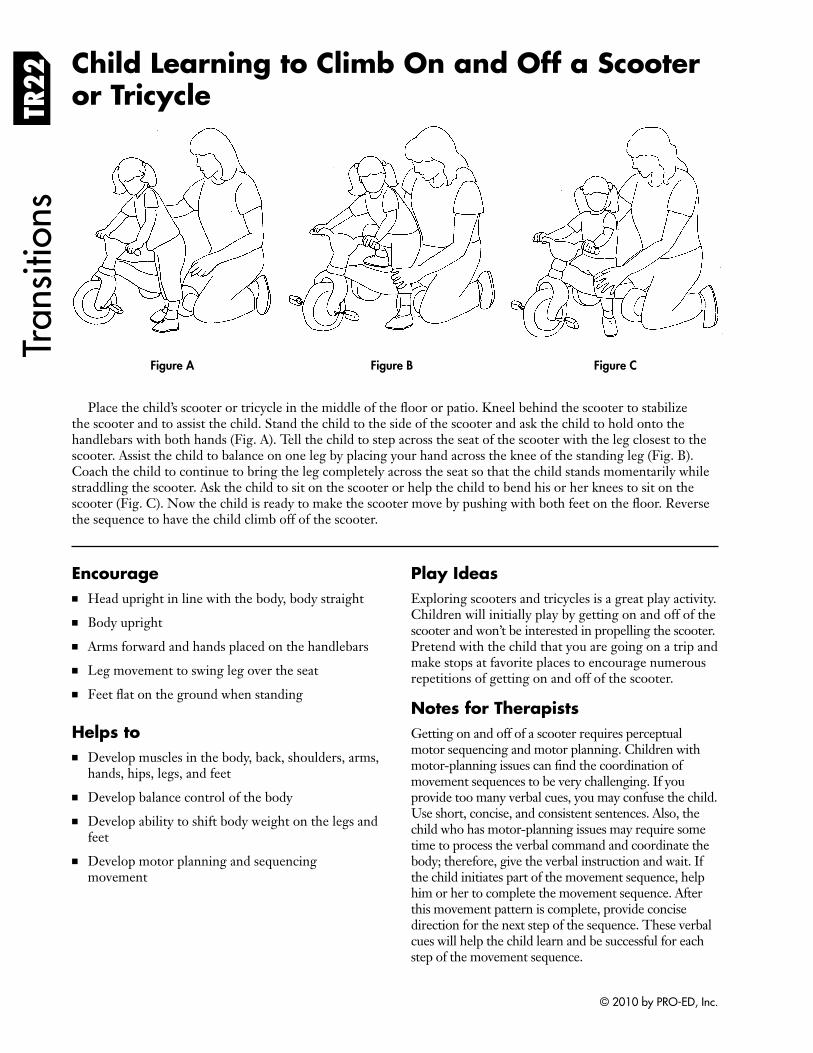
Tran
sitio
ns
Child Learning to Climb On and Off a Scooter or Tricycle TR
22
Figure A Figure B Figure C
Place the child’s scooter or tricycle in the middle of the floor or patio. Kneel behind the scooter to stabilize the scooter and to assist the child. Stand the child to the side of the scooter and ask the child to hold onto the handlebars with both hands (Fig. A). Tell the child to step across the seat of the scooter with the leg closest to the scooter. Assist the child to balance on one leg by placing your hand across the knee of the standing leg (Fig. B). Coach the child to continue to bring the leg completely across the seat so that the child stands momentarily while straddling the scooter. Ask the child to sit on the scooter or help the child to bend his or her knees to sit on the scooter (Fig. C). Now the child is ready to make the scooter move by pushing with both feet on the fl oor. Reverse the sequence to have the child climb off of the scooter.
Encourage ■ Head upright in line with the body, body straight
■ Body upright
■ Arms forward and hands placed on the handlebars
■ Leg movement to swing leg over the seat
■ Feet flat on the ground when standing
Helps to ■ Develop muscles in the body, back, shoulders, arms,
hands, hips, legs, and feet
■ Develop balance control of the body
■ Develop ability to shift body weight on the legs and feet
■ Develop motor planning and sequencing movement
Play Ideas Exploring scooters and tricycles is a great play activity. Children will initially play by getting on and off of the scooter and won’t be interested in propelling the scooter. Pretend with the child that you are going on a trip and make stops at favorite places to encourage numerous repetitions of getting on and off of the scooter.
Notes for Therapists Getting on and off of a scooter requires perceptual motor sequencing and motor planning. Children with motor-planning issues can find the coordination of movement sequences to be very challenging. If you provide too many verbal cues, you may confuse the child. Use short, concise, and consistent sentences. Also, the child who has motor-planning issues may require some time to process the verbal command and coordinate the body; therefore, give the verbal instruction and wait. If the child initiates part of the movement sequence, help him or her to complete the movement sequence. After this movement pattern is complete, provide concise direction for the next step of the sequence. These verbal cues will help the child learn and be successful for each step of the movement sequence.
© 2010 by PRO-ED, Inc.
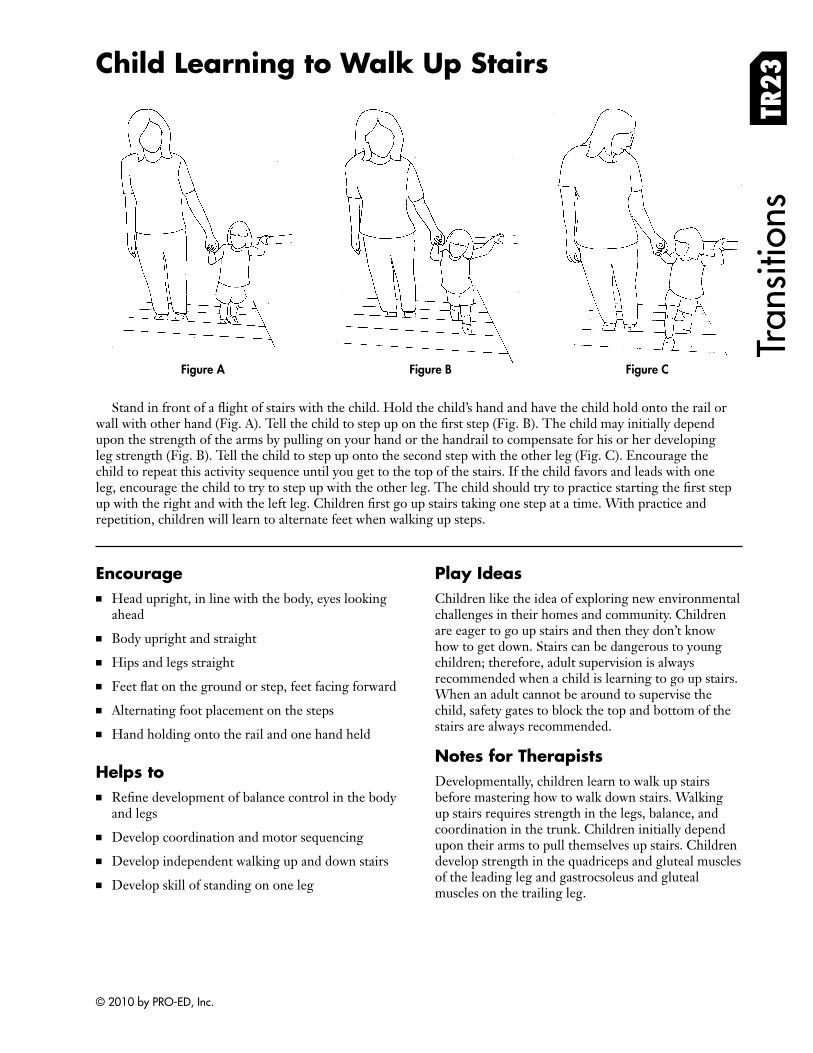
Child Learning to Walk Up Stairs
Figure B
TR23
Tran
sitio
ns
Figure A Figure C
Stand in front of a flight of stairs with the child. Hold the child’s hand and have the child hold onto the rail or wall with other hand (Fig. A). Tell the child to step up on the first step (Fig. B). The child may initially depend upon the strength of the arms by pulling on your hand or the handrail to compensate for his or her developing leg strength (Fig. B). Tell the child to step up onto the second step with the other leg (Fig. C). Encourage the child to repeat this activity sequence until you get to the top of the stairs. If the child favors and leads with one leg, encourage the child to try to step up with the other leg. The child should try to practice starting the fi rst step up with the right and with the left leg. Children first go up stairs taking one step at a time. With practice and repetition, children will learn to alternate feet when walking up steps.
Encourage ■ Head upright, in line with the body, eyes looking
ahead
■ Body upright and straight
■ Hips and legs straight
■ Feet flat on the ground or step, feet facing forward
■ Alternating foot placement on the steps
■ Hand holding onto the rail and one hand held
Helps to ■ Refine development of balance control in the body
and legs
■ Develop coordination and motor sequencing
■ Develop independent walking up and down stairs
■ Develop skill of standing on one leg
Play Ideas Children like the idea of exploring new environmental challenges in their homes and community. Children are eager to go up stairs and then they don’t know how to get down. Stairs can be dangerous to young children; therefore, adult supervision is always recommended when a child is learning to go up stairs. When an adult cannot be around to supervise the child, safety gates to block the top and bottom of the stairs are always recommended.
Notes for Therapists Developmentally, children learn to walk up stairs before mastering how to walk down stairs. Walking up stairs requires strength in the legs, balance, and coordination in the trunk. Children initially depend upon their arms to pull themselves up stairs. Children develop strength in the quadriceps and gluteal muscles of the leading leg and gastrocsoleus and gluteal muscles on the trailing leg.
© 2010 by PRO-ED, Inc.
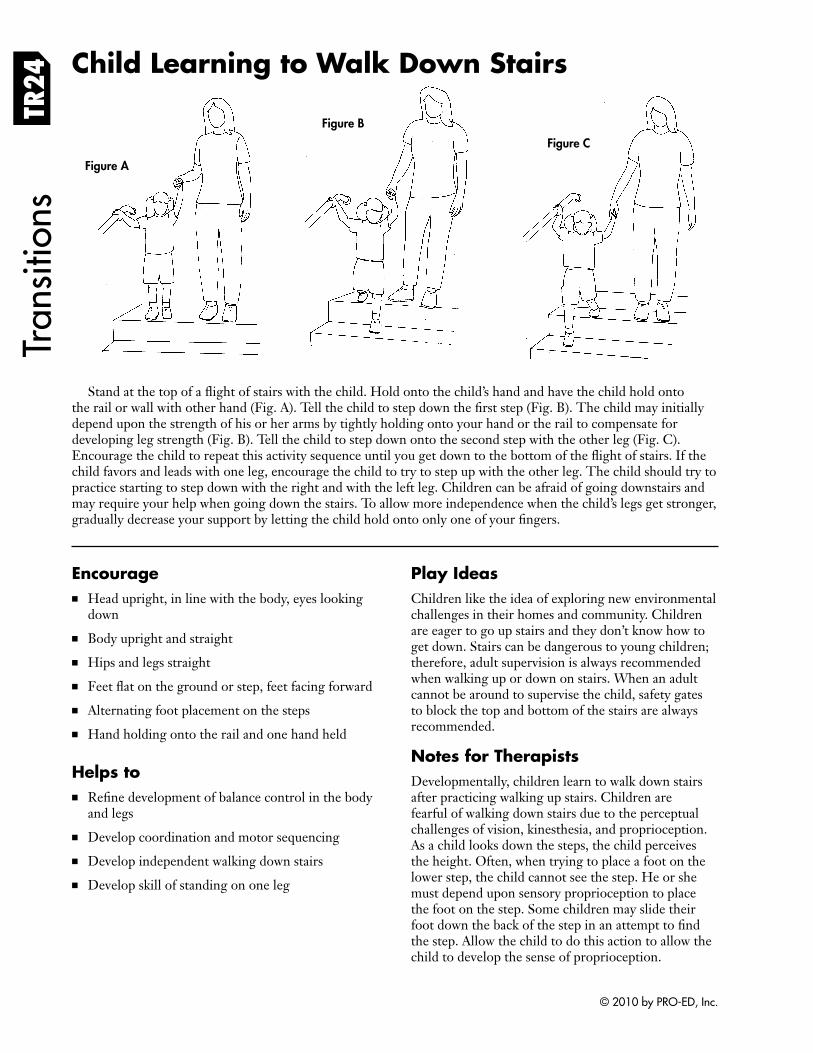
Tran
sitio
ns
Child Learning to Walk Down Stairs TR
24
Figure C
Figure A
Figure B
Stand at the top of a flight of stairs with the child. Hold onto the child’s hand and have the child hold onto the rail or wall with other hand (Fig. A). Tell the child to step down the first step (Fig. B). The child may initially depend upon the strength of his or her arms by tightly holding onto your hand or the rail to compensate for developing leg strength (Fig. B). Tell the child to step down onto the second step with the other leg (Fig. C). Encourage the child to repeat this activity sequence until you get down to the bottom of the flight of stairs. If the child favors and leads with one leg, encourage the child to try to step up with the other leg. The child should try to practice starting to step down with the right and with the left leg. Children can be afraid of going downstairs and may require your help when going down the stairs. To allow more independence when the child’s legs get stronger, gradually decrease your support by letting the child hold onto only one of your fi ngers.
Encourage ■ Head upright, in line with the body, eyes looking
down
■ Body upright and straight
■ Hips and legs straight
■ Feet flat on the ground or step, feet facing forward
■ Alternating foot placement on the steps
■ Hand holding onto the rail and one hand held
Helps to ■ Refine development of balance control in the body
and legs
■ Develop coordination and motor sequencing
■ Develop independent walking down stairs
■ Develop skill of standing on one leg
Play Ideas Children like the idea of exploring new environmental challenges in their homes and community. Children are eager to go up stairs and they don’t know how to get down. Stairs can be dangerous to young children; therefore, adult supervision is always recommended when walking up or down on stairs. When an adult cannot be around to supervise the child, safety gates to block the top and bottom of the stairs are always recommended.
Notes for Therapists Developmentally, children learn to walk down stairs after practicing walking up stairs. Children are fearful of walking down stairs due to the perceptual challenges of vision, kinesthesia, and proprioception. As a child looks down the steps, the child perceives the height. Often, when trying to place a foot on the lower step, the child cannot see the step. He or she must depend upon sensory proprioception to place the foot on the step. Some children may slide their foot down the back of the step in an attempt to fi nd the step. Allow the child to do this action to allow the child to develop the sense of proprioception.
© 2010 by PRO-ED, Inc.
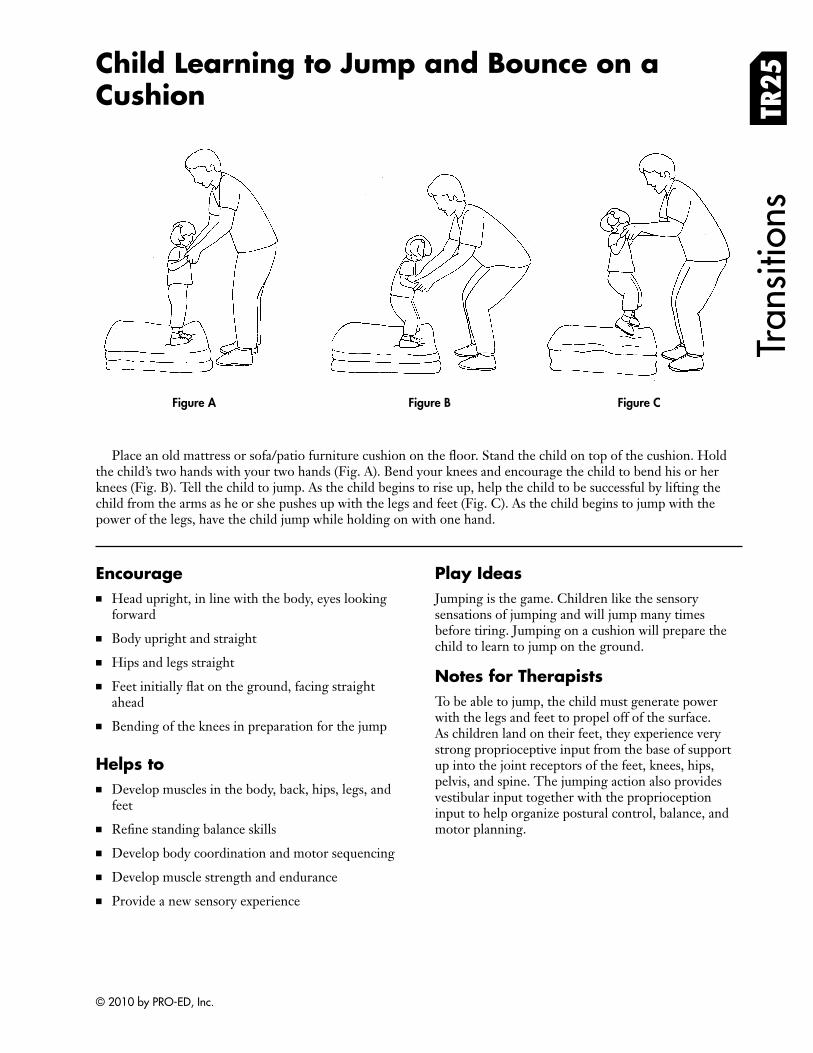
Child Learning to Jump and Bounce on a Cushion TR
25Tr
ansi
tions
Figure A Figure B Figure C
Place an old mattress or sofa/patio furniture cushion on the floor. Stand the child on top of the cushion. Hold the child’s two hands with your two hands (Fig. A). Bend your knees and encourage the child to bend his or her knees (Fig. B). Tell the child to jump. As the child begins to rise up, help the child to be successful by lifting the child from the arms as he or she pushes up with the legs and feet (Fig. C). As the child begins to jump with the power of the legs, have the child jump while holding on with one hand.
Encourage ■ Head upright, in line with the body, eyes looking
forward
■ Body upright and straight
■ Hips and legs straight
■ Feet initially flat on the ground, facing straight ahead
■ Bending of the knees in preparation for the jump
Helps to ■ Develop muscles in the body, back, hips, legs, and
feet
■ Refine standing balance skills
■ Develop body coordination and motor sequencing
■ Develop muscle strength and endurance
■ Provide a new sensory experience
Play Ideas Jumping is the game. Children like the sensory sensations of jumping and will jump many times before tiring. Jumping on a cushion will prepare the child to learn to jump on the ground.
Notes for Therapists To be able to jump, the child must generate power with the legs and feet to propel off of the surface. As children land on their feet, they experience very strong proprioceptive input from the base of support up into the joint receptors of the feet, knees, hips, pelvis, and spine. The jumping action also provides vestibular input together with the proprioception input to help organize postural control, balance, and motor planning.
© 2010 by PRO-ED, Inc.
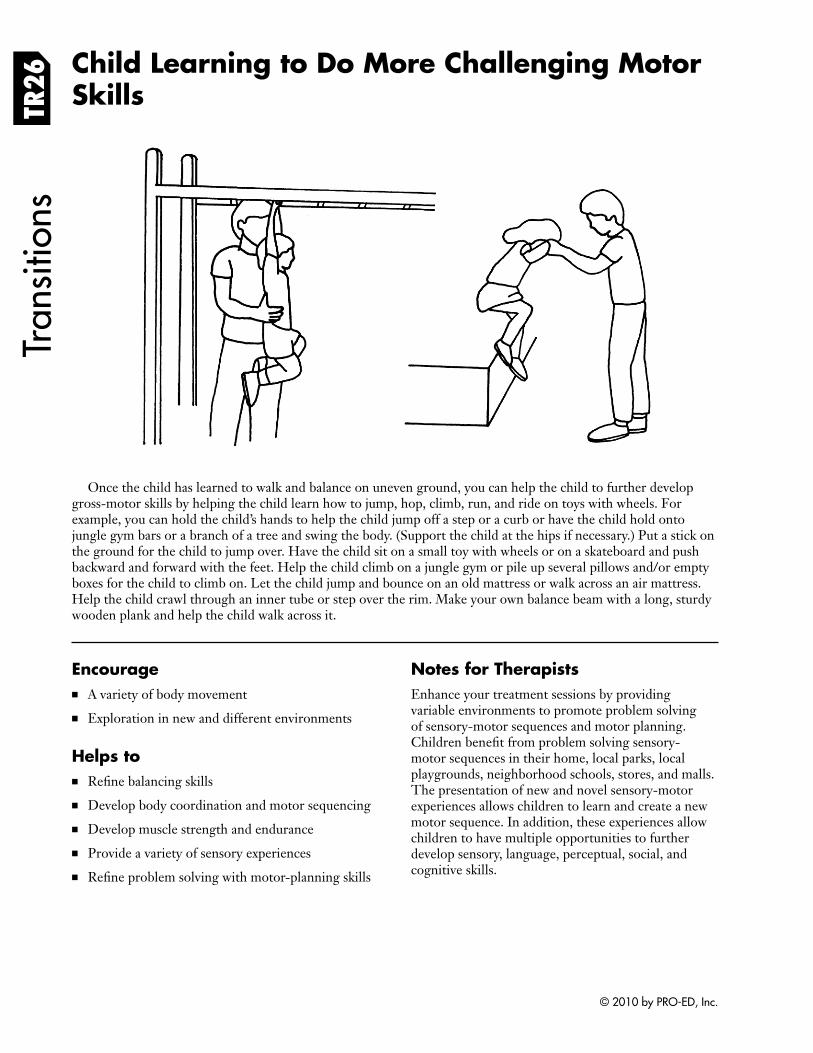
TR26
Child Learning to Do More Challenging Motor Skills
Tran
sitio
ns
Once the child has learned to walk and balance on uneven ground, you can help the child to further develop gross-motor skills by helping the child learn how to jump, hop, climb, run, and ride on toys with wheels. For example, you can hold the child’s hands to help the child jump off a step or a curb or have the child hold onto jungle gym bars or a branch of a tree and swing the body. (Support the child at the hips if necessary.) Put a stick on the ground for the child to jump over. Have the child sit on a small toy with wheels or on a skateboard and push backward and forward with the feet. Help the child climb on a jungle gym or pile up several pillows and/or empty boxes for the child to climb on. Let the child jump and bounce on an old mattress or walk across an air mattress. Help the child crawl through an inner tube or step over the rim. Make your own balance beam with a long, sturdy wooden plank and help the child walk across it.
Encourage ■ A variety of body movement
■ Exploration in new and different environments
Helps to ■ Refine balancing skills
■ Develop body coordination and motor sequencing
■ Develop muscle strength and endurance
■ Provide a variety of sensory experiences
■ Refine problem solving with motor-planning skills
Notes for Therapists Enhance your treatment sessions by providing variable environments to promote problem solving of sensory-motor sequences and motor planning. Children benefit from problem solving sensory-motor sequences in their home, local parks, local playgrounds, neighborhood schools, stores, and malls. The presentation of new and novel sensory-motor experiences allows children to learn and create a new motor sequence. In addition, these experiences allow children to have multiple opportunities to further develop sensory, language, perceptual, social, and cognitive skills.
© 2010 by PRO-ED, Inc.


