Embed Size (px)
Citation preview
FI Credit Proposal Initiation User Guide Oracle Banking Credit Facilities Process Management Release 14.5.4.0.0
Part No. F54270-01February 2022
Oracle Banking Credit Facilities Process Management User Guide Oracle Financial Services Software Limited Oracle Park Off Western Express Highway Goregaon (East Mumbai, Maharashtra 400 063 India
Worldwide Inquiries: Phone: +91 22 6718 3000 Fax: +91 22 6718 3001 www.oracle.com/financialservices/
Copyright © 2007, 2022, Oracle and/or its affiliates. All rights reserved.
Oracle and Java are registered trademarks of Oracle and/or its affiliates. Other names may be trademarks of their respective owners. U.S. GOVERNMENT END USERS: Oracle programs, including any operating system, integrated software, any programs installed on the hard-ware, and/or documentation, delivered to U.S. Government end users are “commercial computer software” pursuant to the applicable Federal Acquisition Regulation and agency-specific supplemental regulations. As such, use, duplication, disclosure, modification, and adaptation of the programs, including any operating system, integrated software, any programs installed on the hardware, and/or documentation, shall be subject to license terms and license restrictions applicable to the programs. No other rights are granted to the U.S. Government. This software or hardware is developed for general use in a variety of information management applications. It is not developed or intended for use in any inherently dangerous applications, including applications that may create a risk of personal injury. If you use this software or hardware in dangerous applications, then you shall be responsible to take all appropriate failsafe, backup, redundancy, and other measures to ensure its safe use. Oracle Corporation and its affiliates disclaim any liability for any damages caused by use of this software or hardware in dangerous applications.
This software and related documentation are provided under a license agreement containing restrictions on use and disclosure and are pro-tected by intellectual property laws. Except as expressly permitted in your license agreement or allowed by law, you may not use, copy, repro-duce, translate, broadcast, modify, license, transmit, distribute, exhibit, perform, publish or display any part, in any form, or by any means. Reverse engineering, disassembly, or decompilation of this software, unless required by law for interoperability, is prohibited. The information contained herein is subject to change without notice and is not warranted to be error-free. If you find any errors, please report them to us in writing.
This software or hardware and documentation may provide access to or information on content, products and services from third parties. Oracle Corporation and its affiliates are not responsible for and expressly disclaim all warranties of any kind with respect to third-party content, products, and services. Oracle Corporation and its affiliates will not be responsible for any loss, costs, or damages incurred due to your access to or use of third-party content, products, or services.

Table of Contents
Preface .............................................................................................................1
About this guide .......................................................................................................... 1
Intended Audience ..................................................................................................... 1
Conventions Used ...................................................................................................... 1
Common Icons in OBCFPM ....................................................................................... 1
About FI Credit Proposal Initiation ....................................................................3
Credit Initiation ..................................................................................................4
Creating Application ................................................................................................... 5
Enriching Application ................................................................................................ 10
Initiation .................................................................................................................... 11
KYC Evaluation ........................................................................................................ 40
Risk Evaluation ......................................................................................................... 42
Legal Evaluation ....................................................................................................... 43
Credit Evaluation ...................................................................................................... 44
Funding Requirement ............................................................................................... 52
Policy Exception ....................................................................................................... 79
Writeup ..................................................................................................................... 79
Comments ................................................................................................................ 83
Review and Recommendation ........................................................................86
Approval .........................................................................................................89
Draft Generation .............................................................................................93
Customer Acceptance ....................................................................................99
Handoff - Manual Retry ................................................................................104
Document Upload and Checklist ..................................................................110
Reference and Feedback .............................................................................113
References ............................................................................................................. 113
Feedback and Support ........................................................................................... 113
Chapter 1 - Preface
Copyright 2007 - 2021, Oracle and its affiliates. All rights reserved. 1
FI C
redi
t Pro
posa
l Use
r Gui
de
Preface
About this guide
This guide provides the user with all the information necessary to perform Financial Institution (FI) Credit Proposal Initiation process in OBCFPM.
Intended Audience
This document is intended for the banking personnel responsible for setting and managing credit limit for the FI customers.
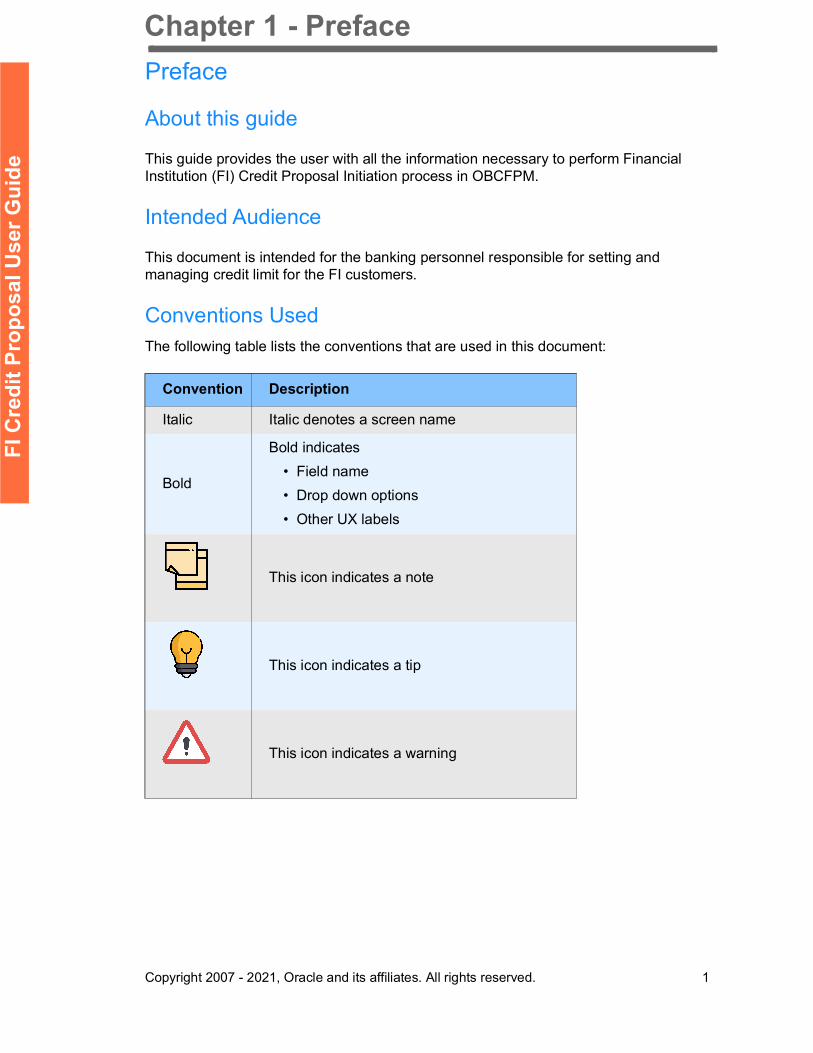
Conventions UsedThe following table lists the conventions that are used in this document:
Convention Description
Italic Italic denotes a screen name
Bold
Bold indicates • Field name• Drop down options• Other UX labels
This icon indicates a note
This icon indicates a tip
This icon indicates a warning
Chapter 1 - Preface
Copyright 2007 - 2021, Oracle and its affiliates. All rights reserved. 2
FI C
redi
t Pro
posa
l Use
r Gui
de
Common Icons in OBCFPM
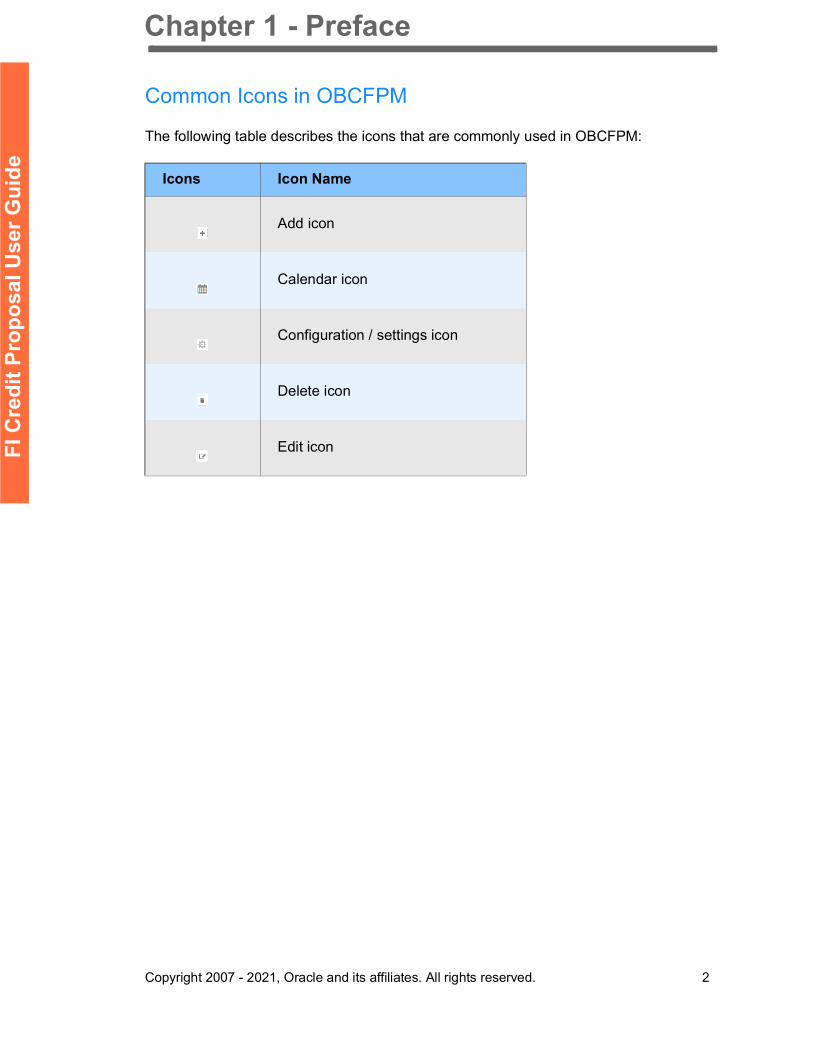
The following table describes the icons that are commonly used in OBCFPM:
Icons Icon Name
Add icon
Calendar icon
Configuration / settings icon
Delete icon
Edit icon
Chapter 2 - Overview
Copyright 2007 - 2021, Oracle and its affiliates. All rights reserved. 3
FI C
redi
t Pro
posa
l Use
r Gui
de
About FI Credit Proposal InitiationMost banks across the countries lend other Financial Institutions and Banks on regular basis. Thus, to support the banks in carefully evaluating the FI Customer’s strength and weaknesses and extend credit facilities, the FI Credit Proposal Initiation process is developed in OBCFPM.
The stages available in the FI Credit Proposal Initiation process are:
• Credit Initiation• Review and Recommendation• Approval• Draft Generation• Customer Acceptance• Handoff - Manual Retry (applicable only in case of automatic handoff failure)
Chapter 3 - Credit Initiation
Copyright 2007 - 2021, Oracle and its affiliates. All rights reserved. 4
FI C
redi
t Pro
posa
l Use
r Gui
de
Credit InitiationIn this stage, the Relationship Manager must capture basic information and the credit requirement of the Financial Institution, and perform evaluation to determine the credit worthiness of the Financial Institution.
To initiate credit proposal, perform the following steps:
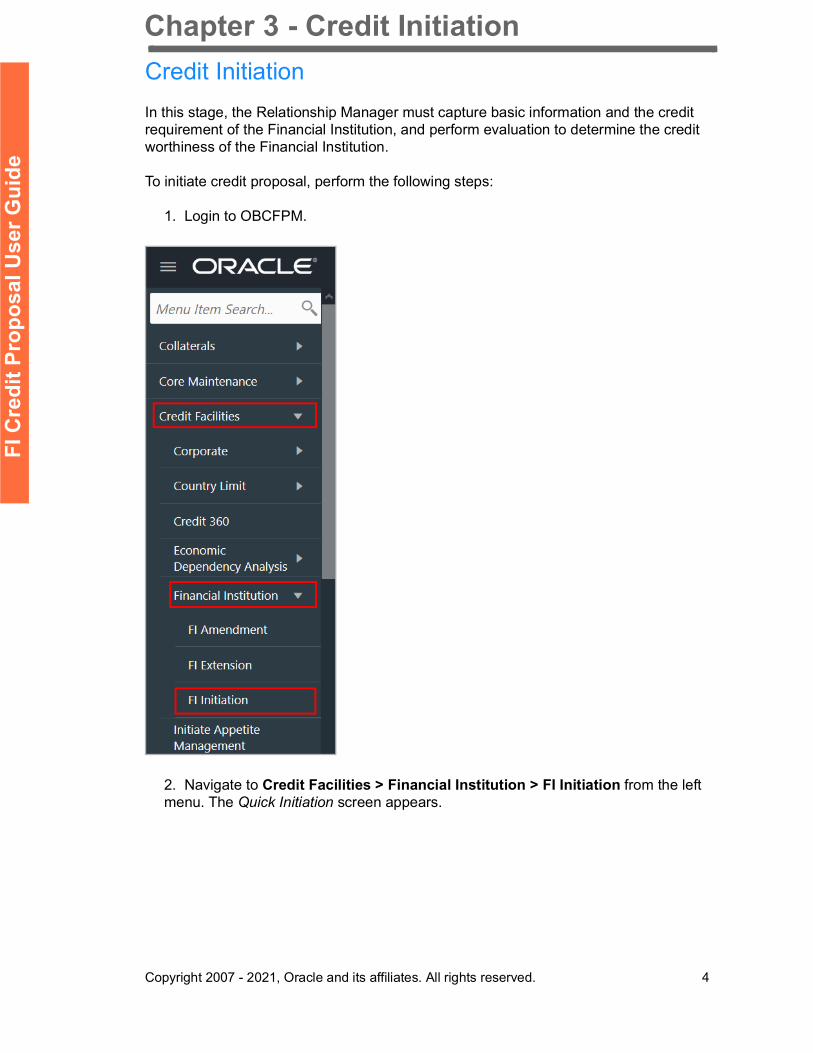
1. Login to OBCFPM.
2. Navigate to Credit Facilities > Financial Institution > FI Initiation from the left menu. The Quick Initiation screen appears.
Chapter 3 - Credit Initiation
Copyright 2007 - 2021, Oracle and its affiliates. All rights reserved. 5
FI C
redi
t Pro
posa
l Use
r Gui
de
Creating Application
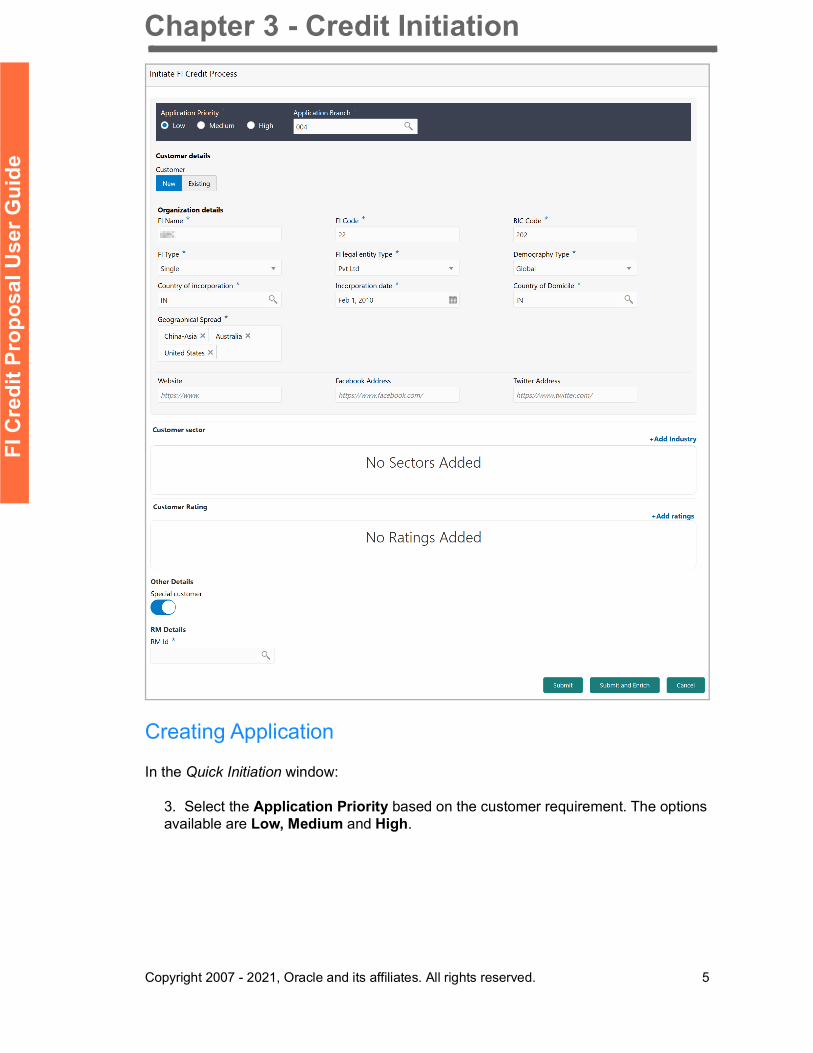
In the Quick Initiation window:
3. Select the Application Priority based on the customer requirement. The options available are Low, Medium and High.
Chapter 3 - Credit Initiation
Copyright 2007 - 2021, Oracle and its affiliates. All rights reserved. 6
FI C
redi
t Pro
posa
l Use
r Gui
de
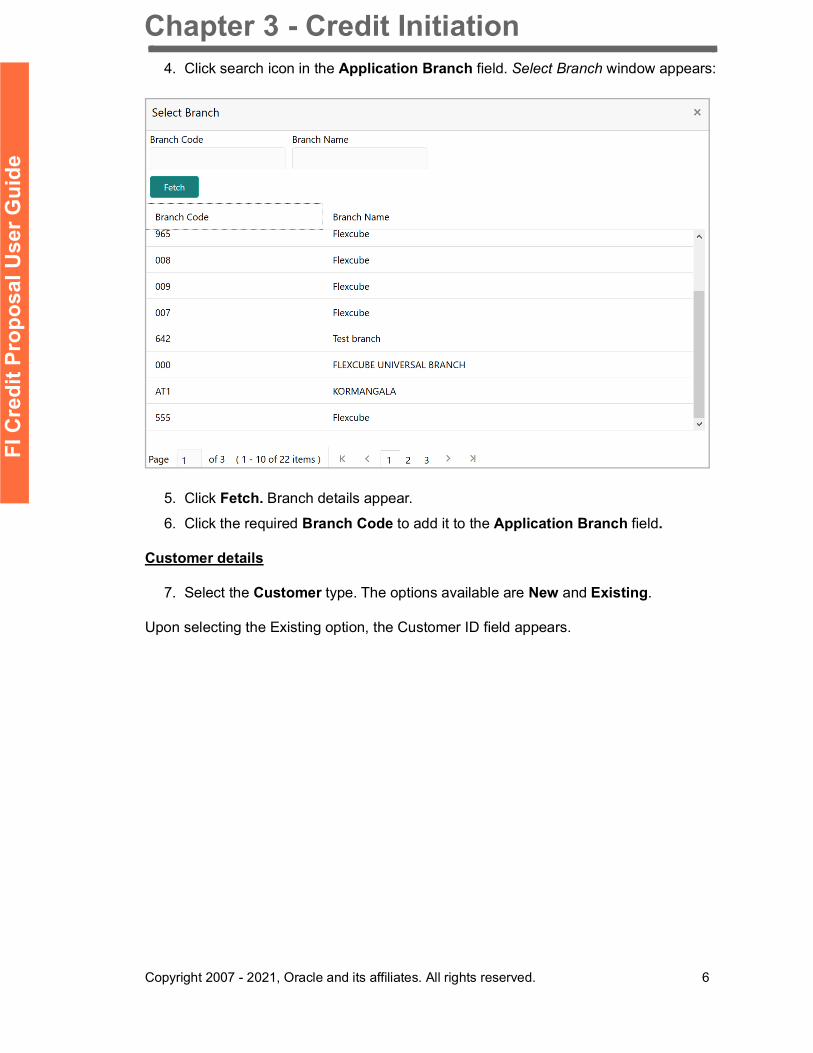
4. Click search icon in the Application Branch field. Select Branch window appears:
5. Click Fetch. Branch details appear.
6. Click the required Branch Code to add it to the Application Branch field.
Customer details
7. Select the Customer type. The options available are New and Existing.
Upon selecting the Existing option, the Customer ID field appears.
Chapter 3 - Credit Initiation
Copyright 2007 - 2021, Oracle and its affiliates. All rights reserved. 7
FI C
redi
t Pro
posa
l Use
r Gui
de
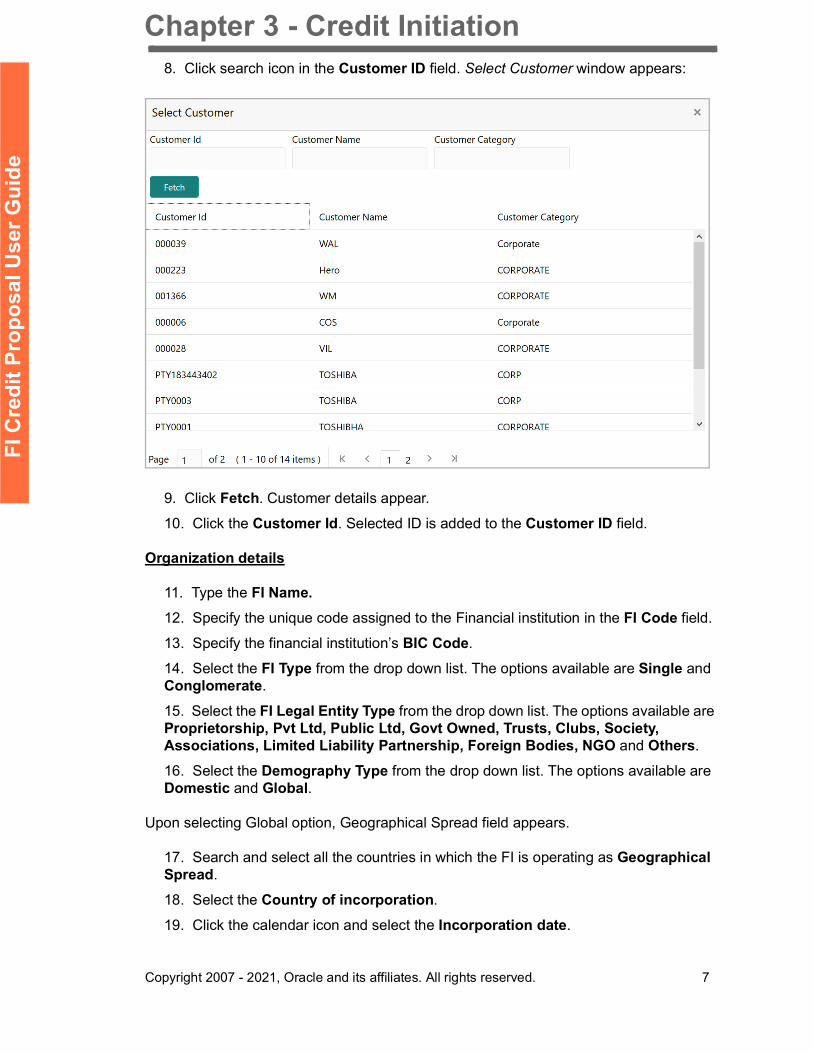
8. Click search icon in the Customer ID field. Select Customer window appears:
9. Click Fetch. Customer details appear.
10. Click the Customer Id. Selected ID is added to the Customer ID field.
Organization details
11. Type the FI Name.12. Specify the unique code assigned to the Financial institution in the FI Code field.
13. Specify the financial institution’s BIC Code.
14. Select the FI Type from the drop down list. The options available are Single and Conglomerate.
15. Select the FI Legal Entity Type from the drop down list. The options available are Proprietorship, Pvt Ltd, Public Ltd, Govt Owned, Trusts, Clubs, Society, Associations, Limited Liability Partnership, Foreign Bodies, NGO and Others.
16. Select the Demography Type from the drop down list. The options available are Domestic and Global.
Upon selecting Global option, Geographical Spread field appears.
17. Search and select all the countries in which the FI is operating as Geographical Spread.
18. Select the Country of incorporation.
19. Click the calendar icon and select the Incorporation date.
Chapter 3 - Credit Initiation
Copyright 2007 - 2021, Oracle and its affiliates. All rights reserved. 8
FI C
redi
t Pro
posa
l Use
r Gui
de
20. Select the Financial Institution’s Country of Domicile for organization from the drop down list.
21. Type the following addresses in respective fields:• Website Address• Facebook Address• Twitter Address
Customer Sector
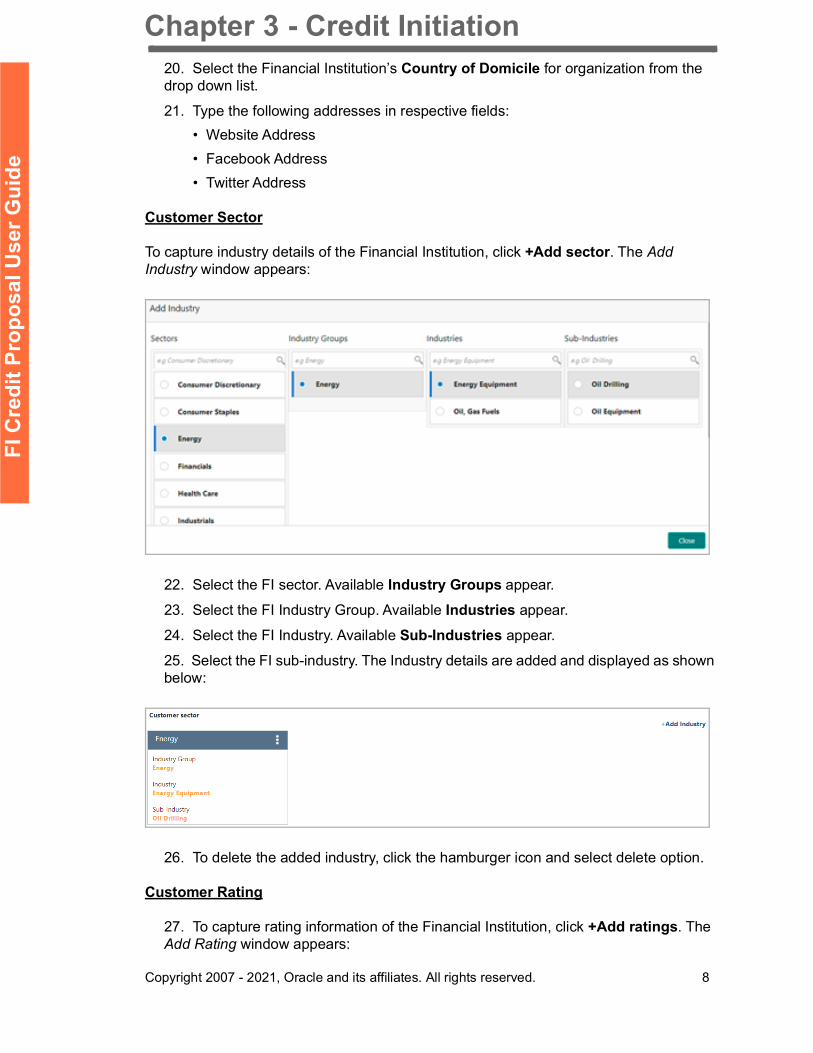
To capture industry details of the Financial Institution, click +Add sector. The Add Industry window appears:
22. Select the FI sector. Available Industry Groups appear.
23. Select the FI Industry Group. Available Industries appear.
24. Select the FI Industry. Available Sub-Industries appear.
25. Select the FI sub-industry. The Industry details are added and displayed as shown below:
26. To delete the added industry, click the hamburger icon and select delete option.
Customer Rating
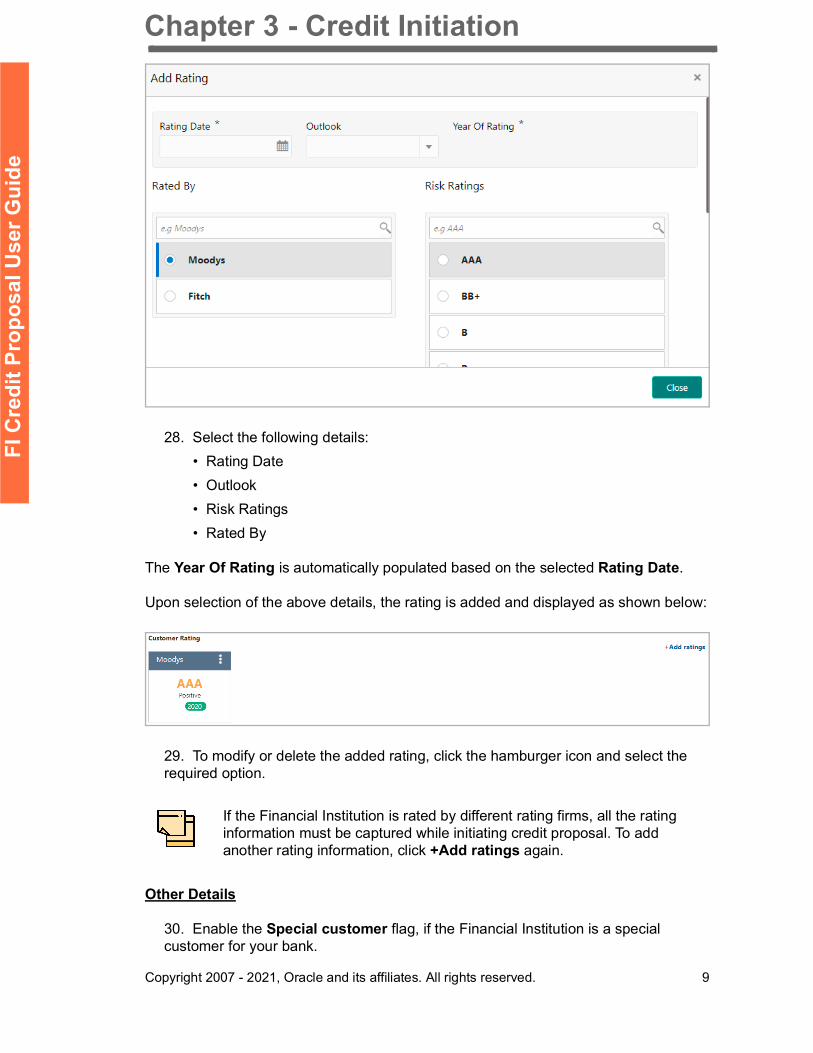
27. To capture rating information of the Financial Institution, click +Add ratings. The Add Rating window appears:
Chapter 3 - Credit Initiation
Copyright 2007 - 2021, Oracle and its affiliates. All rights reserved. 9
FI C
redi
t Pro
posa
l Use
r Gui
de
28. Select the following details:• Rating Date• Outlook• Risk Ratings• Rated By
The Year Of Rating is automatically populated based on the selected Rating Date.
Upon selection of the above details, the rating is added and displayed as shown below:
29. To modify or delete the added rating, click the hamburger icon and select the required option.
Other Details
30. Enable the Special customer flag, if the Financial Institution is a special customer for your bank.
If the Financial Institution is rated by different rating firms, all the rating information must be captured while initiating credit proposal. To add another rating information, click +Add ratings again.
Chapter 3 - Credit Initiation
Copyright 2007 - 2021, Oracle and its affiliates. All rights reserved. 10
FI C
redi
t Pro
posa
l Use
r Gui
de
RM Details
RM Id is automatically populated based on the login details.
31. To modify the RM Id, search and select the required user.
32. To submit the application for enrichment, click Submit. A unique application number is assigned to the application for easy identification, and the Initiation task is created.
33. To enrich the application right away, click Submit and Enrich.
34. To cancel and exit the Initiation window, click Cancel.
Enriching Application
The system allows to enrich the already submitted application at any time or enrich the credit application to be submitted during the application creation process itself.
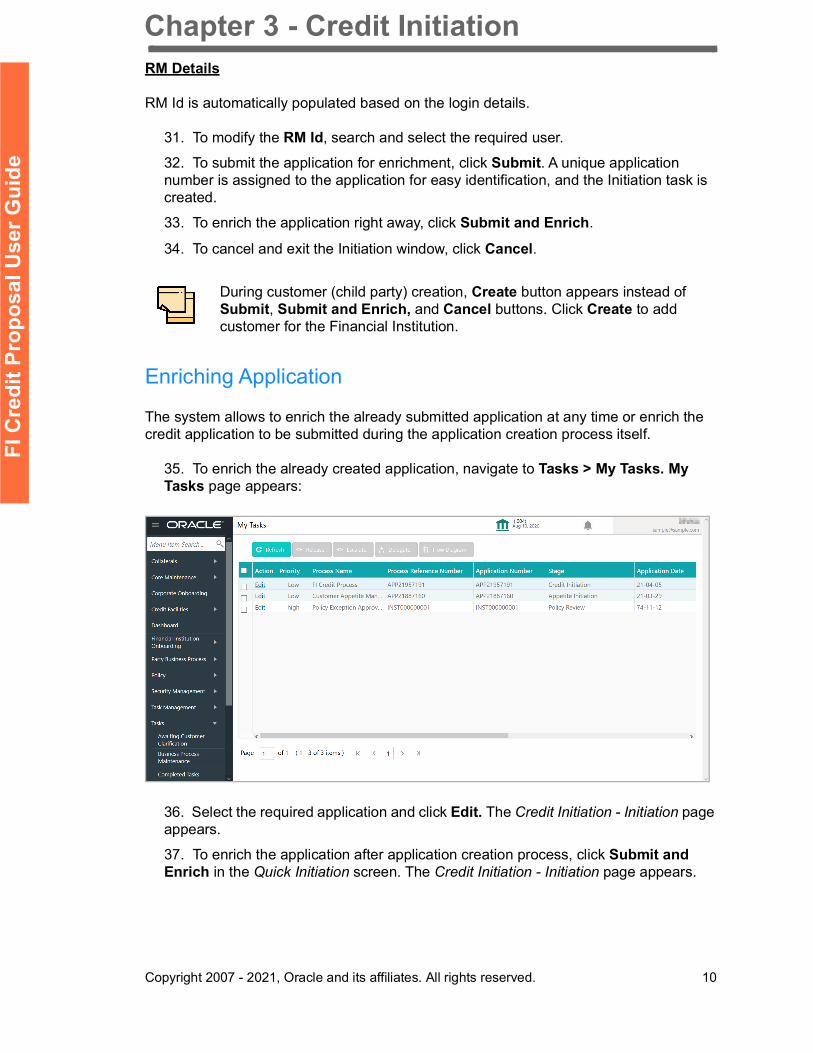
35. To enrich the already created application, navigate to Tasks > My Tasks. My Tasks page appears:
36. Select the required application and click Edit. The Credit Initiation - Initiation page appears.
37. To enrich the application after application creation process, click Submit and Enrich in the Quick Initiation screen. The Credit Initiation - Initiation page appears.
During customer (child party) creation, Create button appears instead of Submit, Submit and Enrich, and Cancel buttons. Click Create to add customer for the Financial Institution.

Chapter 3 - Credit Initiation
Copyright 2007 - 2021, Oracle and its affiliates. All rights reserved. 11
FI C
redi
t Pro
posa
l Use
r Gui
de
Initiation
This data segment allows to view and modify the basic information captured in the quick initiation screen and add child parties to the party (FI).
38. Mouse hovering on the party icon displays the basic information about the Financial Institution.
39. Right click on the party icon to perform the following actions:• Add Customer• View • Quick View• Configure
The following table describes the functionality of each actions listed above:
Actions Functionality
Add Customer
Displays the Customer Details window for adding customer of the Financial Institution
View Displays the Customer Details window for viewing Financial Institution details
Quick View Displays the View Entity Details window
Configure Displays the Customer Details window for modifying Financial Institution details
Chapter 3 - Credit Initiation
Copyright 2007 - 2021, Oracle and its affiliates. All rights reserved. 12
FI C
redi
t Pro
posa
l Use
r Gui
de
40. To add a customer (child party) of the Financial Institution (party), click Add Customer. The Customer Details window appears. Refer “Creating Application” on page 5 for information on adding customer.
41. To View, and Quick view the party information, right click the party icon and click the respective option.
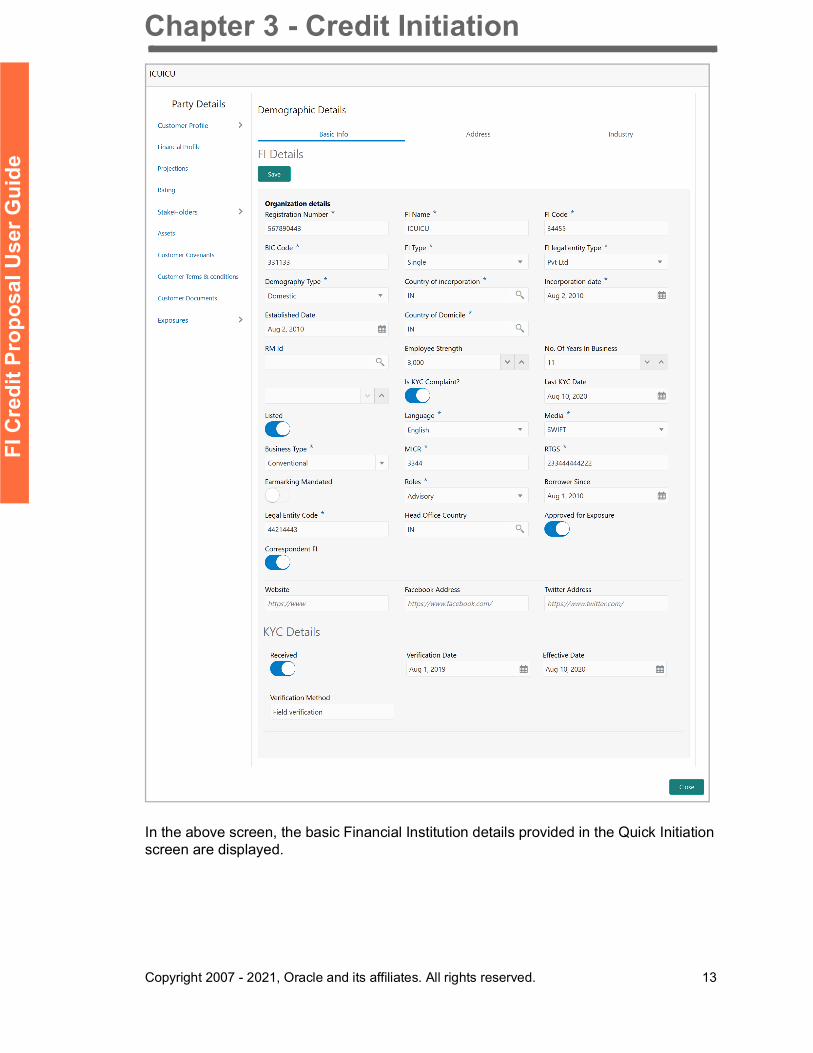
42. To Configure the Financial Institution details, right click the party icon and click Configure option. The following screen appears:
After creating the customer, right click the customer icon to Add Customer for the customer, View the customer details, Quick View the customer details, Configure the customer information and Delete the customer if required.
Chapter 3 - Credit Initiation
Copyright 2007 - 2021, Oracle and its affiliates. All rights reserved. 13
FI C
redi
t Pro
posa
l Use
r Gui
de
In the above screen, the basic Financial Institution details provided in the Quick Initiation screen are displayed.
Chapter 3 - Credit Initiation
Copyright 2007 - 2021, Oracle and its affiliates. All rights reserved. 14
FI C
redi
t Pro
posa
l Use
r Gui
de
Customer Profile
Company Details
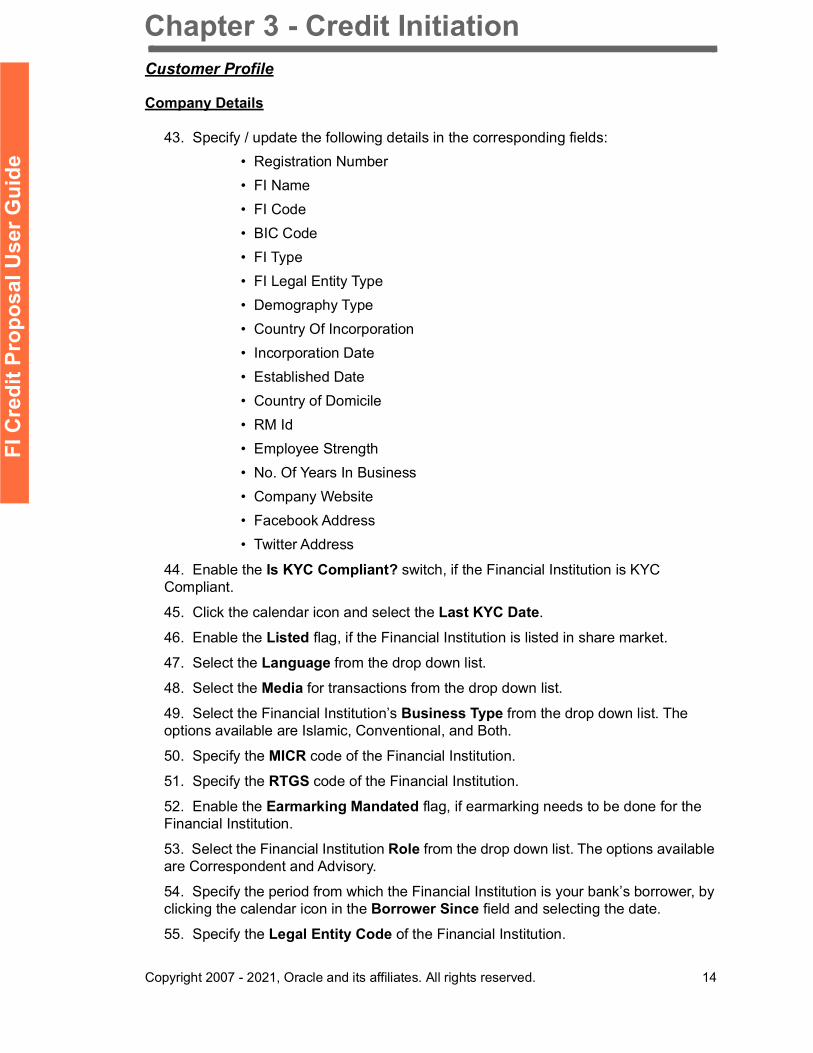
43. Specify / update the following details in the corresponding fields:• Registration Number• FI Name• FI Code• BIC Code• FI Type• FI Legal Entity Type• Demography Type• Country Of Incorporation• Incorporation Date• Established Date• Country of Domicile• RM Id• Employee Strength• No. Of Years In Business• Company Website• Facebook Address• Twitter Address
44. Enable the Is KYC Compliant? switch, if the Financial Institution is KYC Compliant.
45. Click the calendar icon and select the Last KYC Date.
46. Enable the Listed flag, if the Financial Institution is listed in share market.
47. Select the Language from the drop down list.
48. Select the Media for transactions from the drop down list.
49. Select the Financial Institution’s Business Type from the drop down list. The options available are Islamic, Conventional, and Both.
50. Specify the MICR code of the Financial Institution.
51. Specify the RTGS code of the Financial Institution.
52. Enable the Earmarking Mandated flag, if earmarking needs to be done for the Financial Institution.
53. Select the Financial Institution Role from the drop down list. The options available are Correspondent and Advisory.
54. Specify the period from which the Financial Institution is your bank’s borrower, by clicking the calendar icon in the Borrower Since field and selecting the date.
55. Specify the Legal Entity Code of the Financial Institution.
Chapter 3 - Credit Initiation
Copyright 2007 - 2021, Oracle and its affiliates. All rights reserved. 15
FI C
redi
t Pro
posa
l Use
r Gui
de
56. Search and select the Financial Institution’s Head Office Country.
57. Enable the Approved for Exposure flag, if the Financial Institution is approved for the exposure flow.
58. Enable the Correspondent FI flag, if the Financial Institution is a correspondence FI.
KYC Details
59. Enable the Received switch, if KYC verification details are received for the Financial Institution.
60. Click the calendar icon and select the KYC Verification Date and Effective Date.
61. Type the KYC Verification Method. For example: Field verification.
62. Click Save.
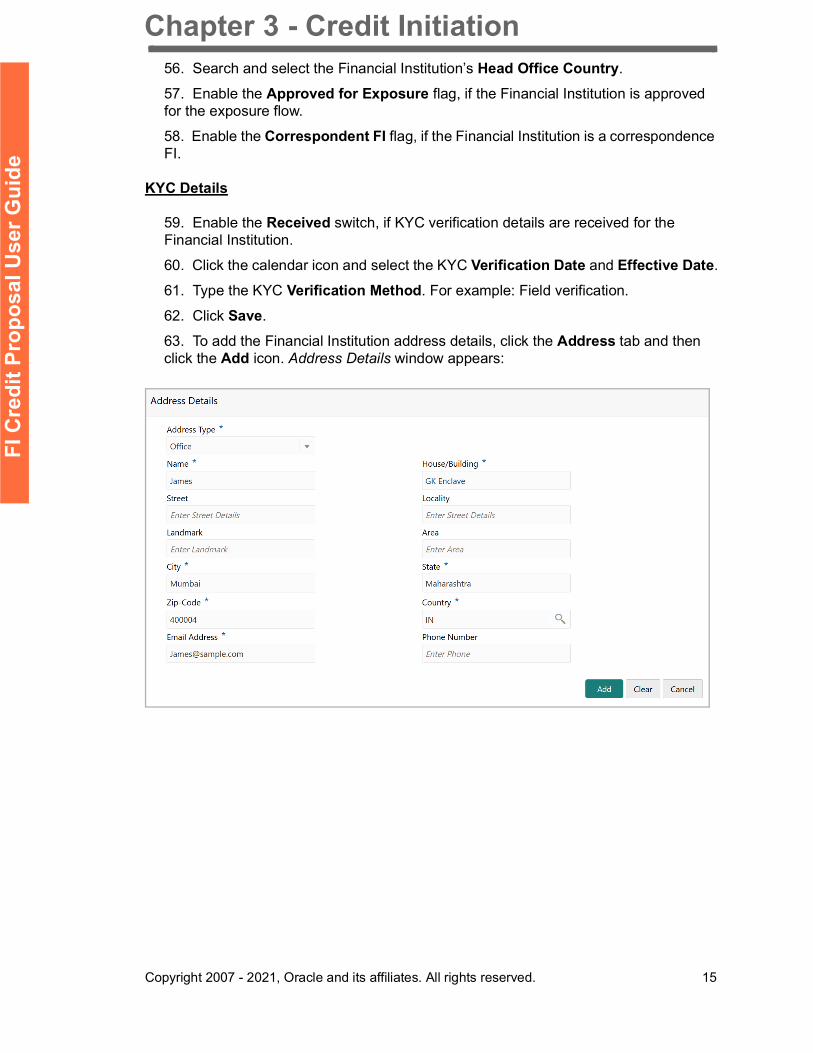
63. To add the Financial Institution address details, click the Address tab and then click the Add icon. Address Details window appears:
Chapter 3 - Credit Initiation
Copyright 2007 - 2021, Oracle and its affiliates. All rights reserved. 16
FI C
redi
t Pro
posa
l Use
r Gui
de
64. Type or select the following details in the corresponding fields:• Address Type• Name of the contact person• House/Building name• Street• Locality• Landmark• Area• City• State• Zip-Code• Country• Email Address• Phone Number
65. Click Add. Address details are added.
66. To add the industry details, click the Industry tab and select the required details.
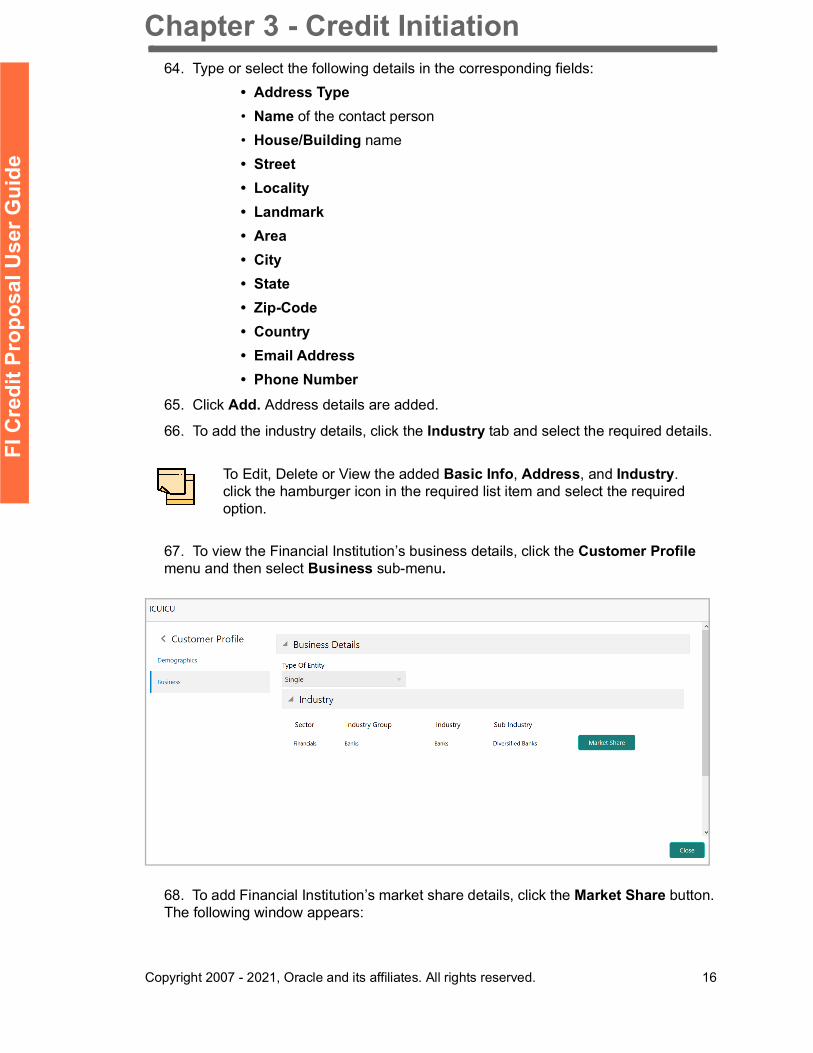
67. To view the Financial Institution’s business details, click the Customer Profile menu and then select Business sub-menu.
68. To add Financial Institution’s market share details, click the Market Share button. The following window appears:
To Edit, Delete or View the added Basic Info, Address, and Industry. click the hamburger icon in the required list item and select the required option.
Chapter 3 - Credit Initiation
Copyright 2007 - 2021, Oracle and its affiliates. All rights reserved. 17
FI C
redi
t Pro
posa
l Use
r Gui
de
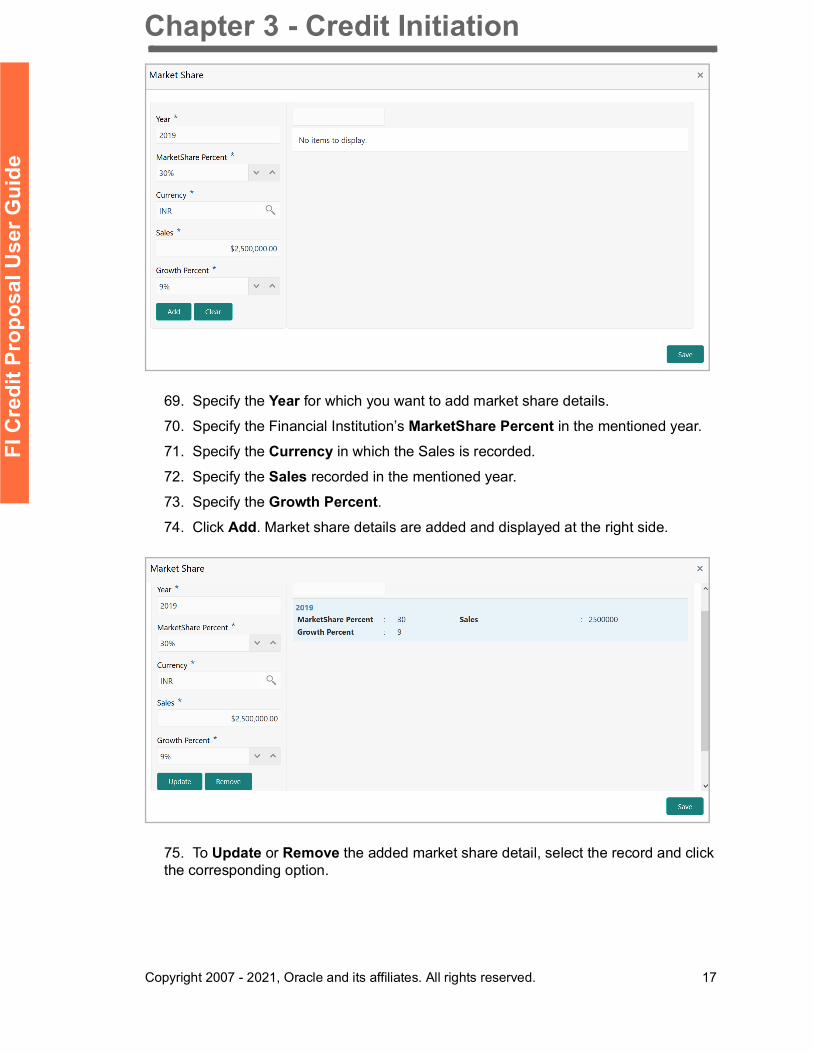
69. Specify the Year for which you want to add market share details.
70. Specify the Financial Institution’s MarketShare Percent in the mentioned year.
71. Specify the Currency in which the Sales is recorded.
72. Specify the Sales recorded in the mentioned year.
73. Specify the Growth Percent.74. Click Add. Market share details are added and displayed at the right side.
75. To Update or Remove the added market share detail, select the record and click the corresponding option.
Chapter 3 - Credit Initiation
Copyright 2007 - 2021, Oracle and its affiliates. All rights reserved. 18
FI C
redi
t Pro
posa
l Use
r Gui
de
Financial Profile
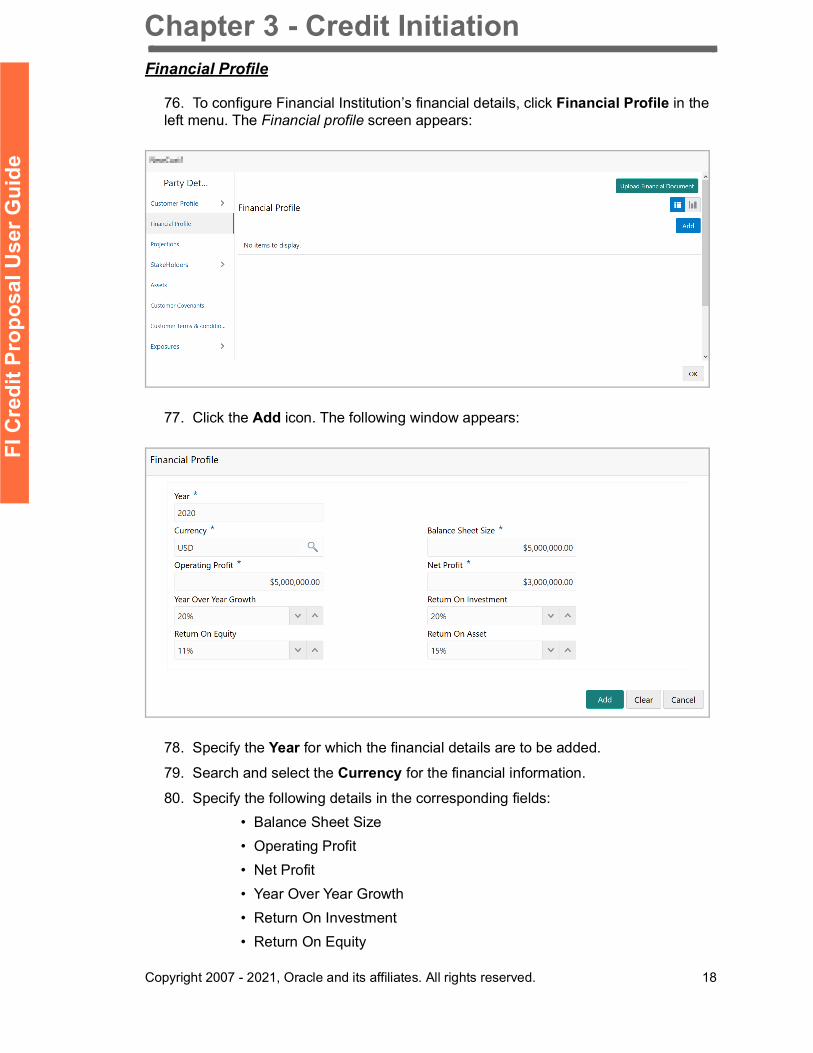
76. To configure Financial Institution’s financial details, click Financial Profile in the left menu. The Financial profile screen appears:
77. Click the Add icon. The following window appears:
78. Specify the Year for which the financial details are to be added.
79. Search and select the Currency for the financial information.
80. Specify the following details in the corresponding fields:• Balance Sheet Size• Operating Profit• Net Profit• Year Over Year Growth• Return On Investment• Return On Equity
Chapter 3 - Credit Initiation
Copyright 2007 - 2021, Oracle and its affiliates. All rights reserved. 19
FI C
redi
t Pro
posa
l Use
r Gui
de
• Return On Asset
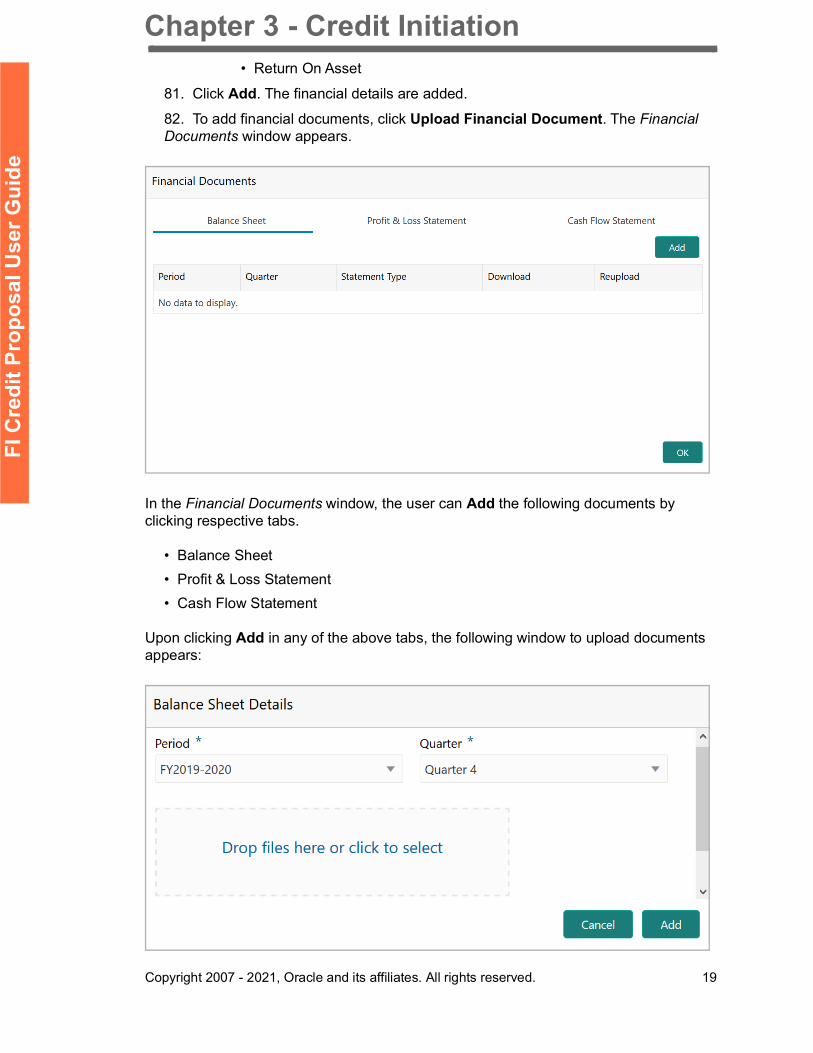
81. Click Add. The financial details are added.
82. To add financial documents, click Upload Financial Document. The Financial Documents window appears.
In the Financial Documents window, the user can Add the following documents by clicking respective tabs.
• Balance Sheet• Profit & Loss Statement• Cash Flow Statement
Upon clicking Add in any of the above tabs, the following window to upload documents appears:
Chapter 3 - Credit Initiation
Copyright 2007 - 2021, Oracle and its affiliates. All rights reserved. 20
FI C
redi
t Pro
posa
l Use
r Gui
de
83. Select the Period and Quarter for which the financial document is to be added.
84. In Drop files here or click to select section, drag and drop or click and upload the financial document.
85. Click Add. Document is added.
86. In the Financial Profile screen, click the Chart view icon to change the List view to Chart view.
Projections
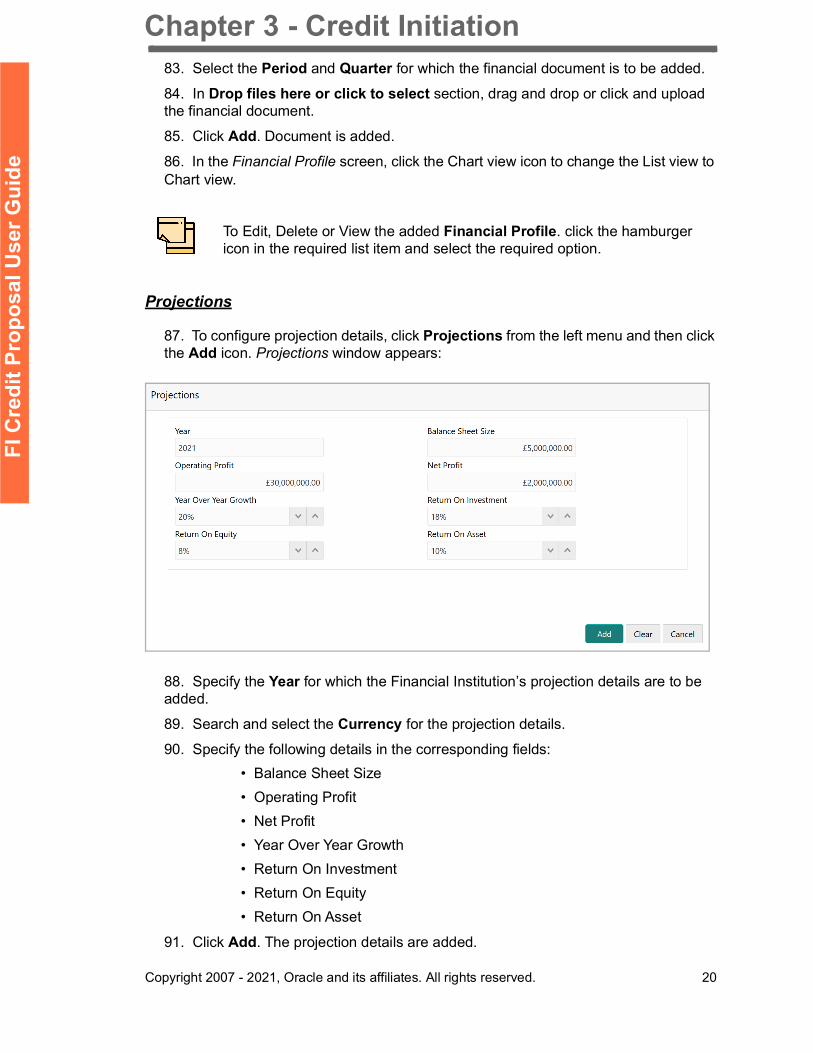
87. To configure projection details, click Projections from the left menu and then click the Add icon. Projections window appears:
88. Specify the Year for which the Financial Institution’s projection details are to be added.
89. Search and select the Currency for the projection details.
90. Specify the following details in the corresponding fields:• Balance Sheet Size• Operating Profit• Net Profit• Year Over Year Growth• Return On Investment• Return On Equity• Return On Asset
91. Click Add. The projection details are added.
To Edit, Delete or View the added Financial Profile. click the hamburger icon in the required list item and select the required option.
Chapter 3 - Credit Initiation
Copyright 2007 - 2021, Oracle and its affiliates. All rights reserved. 21
FI C
redi
t Pro
posa
l Use
r Gui
de
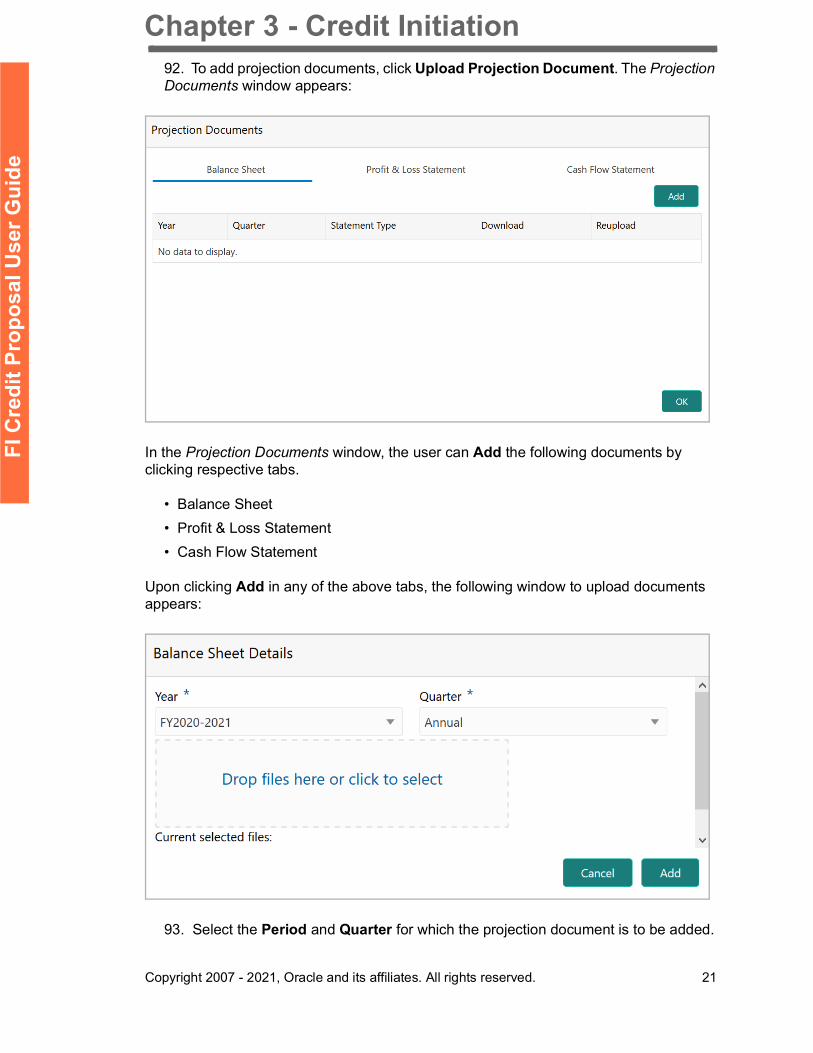
92. To add projection documents, click Upload Projection Document. The Projection Documents window appears:
In the Projection Documents window, the user can Add the following documents by clicking respective tabs.
• Balance Sheet• Profit & Loss Statement• Cash Flow Statement
Upon clicking Add in any of the above tabs, the following window to upload documents appears:
93. Select the Period and Quarter for which the projection document is to be added.

Chapter 3 - Credit Initiation
Copyright 2007 - 2021, Oracle and its affiliates. All rights reserved. 22
FI C
redi
t Pro
posa
l Use
r Gui
de
94. In Drop files here or click to select section, drag and drop or click and upload the projection document.
95. Click Add. Document is added.
96. In the Business Projection screen, click the Chart view icon to change the List view to Chart view.
Rating
97. To add rating information of the party, click Rating in the left menu and click +Add Ratings. The Add Ratings window appears:
98. Select the following details of the rating:• Rating Date• Outlook• Risk Ratings• Rated By
The Year Of Rating is automatically populated based on the selected Rating Date.
Upon selecting the Rated By organization, the rating is added and displayed as shown below.
To Edit, Delete or View the added Projections. click the hamburger icon in the required list item and select the required option.
Chapter 3 - Credit Initiation
Copyright 2007 - 2021, Oracle and its affiliates. All rights reserved. 23
FI C
redi
t Pro
posa
l Use
r Gui
de
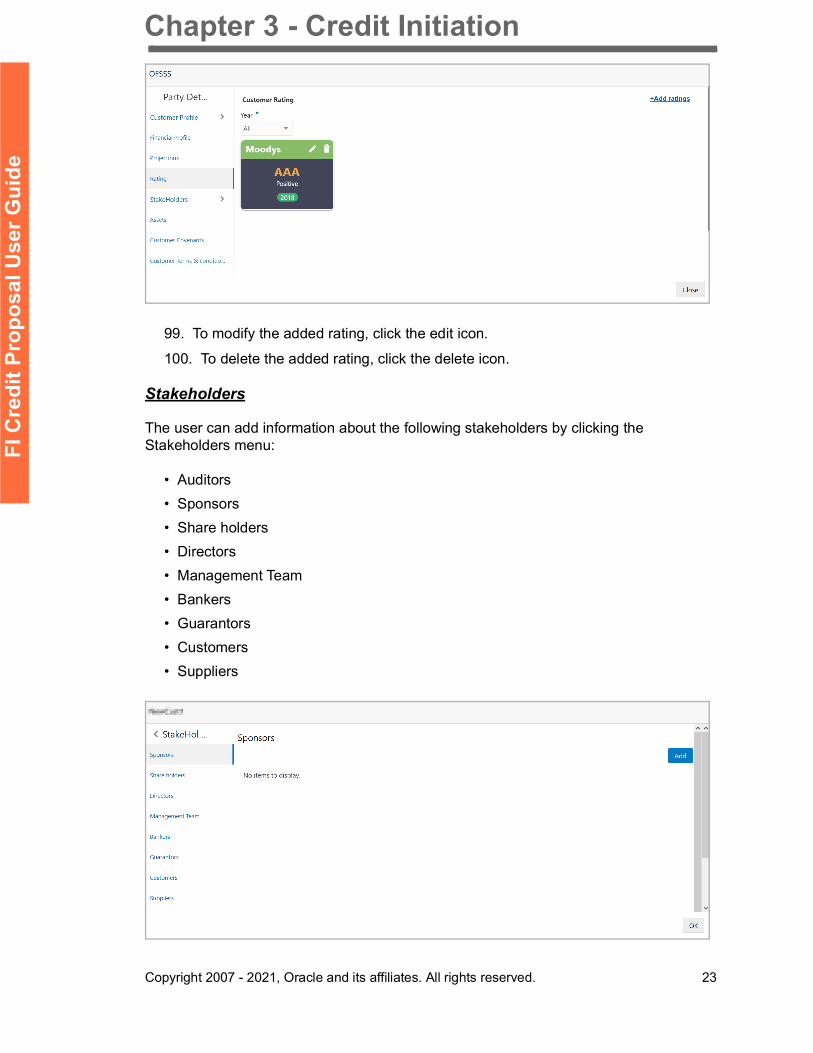
99. To modify the added rating, click the edit icon.
100. To delete the added rating, click the delete icon.
Stakeholders
The user can add information about the following stakeholders by clicking the Stakeholders menu:
• Auditors• Sponsors• Share holders• Directors• Management Team• Bankers• Guarantors• Customers• Suppliers
Chapter 3 - Credit Initiation
Copyright 2007 - 2021, Oracle and its affiliates. All rights reserved. 24
FI C
redi
t Pro
posa
l Use
r Gui
de
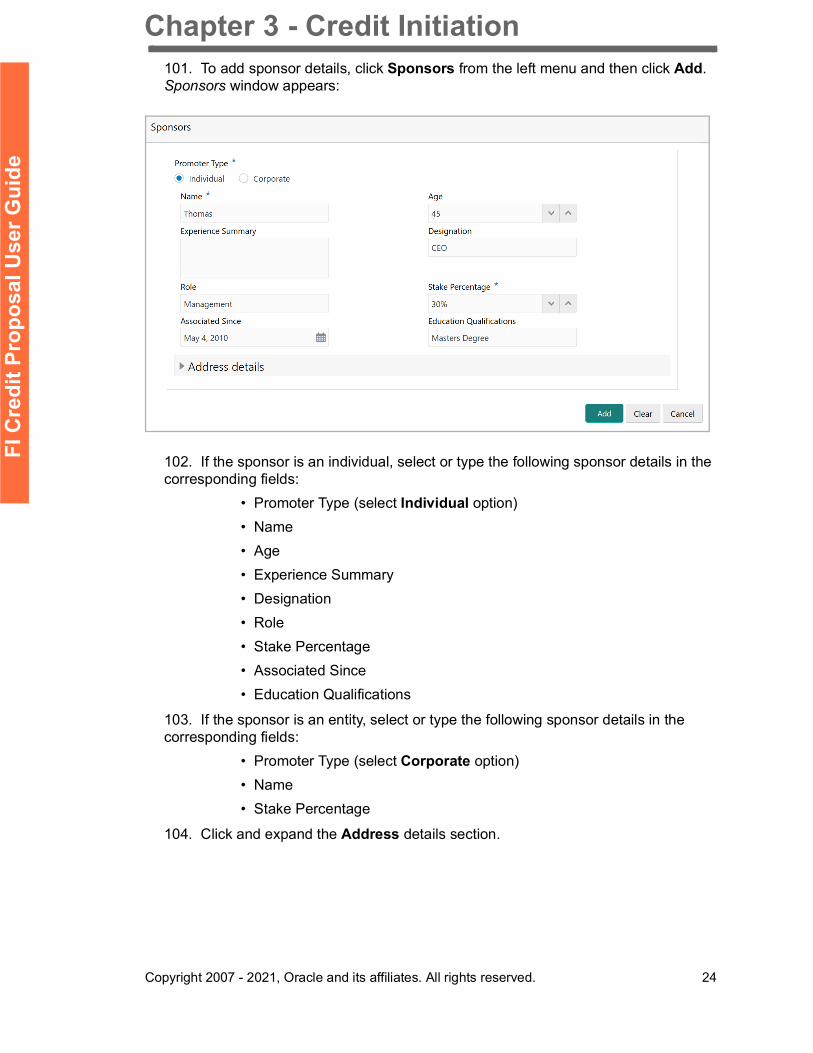
101. To add sponsor details, click Sponsors from the left menu and then click Add. Sponsors window appears:
102. If the sponsor is an individual, select or type the following sponsor details in the corresponding fields:
• Promoter Type (select Individual option)• Name• Age• Experience Summary• Designation• Role• Stake Percentage• Associated Since• Education Qualifications
103. If the sponsor is an entity, select or type the following sponsor details in the corresponding fields:
• Promoter Type (select Corporate option)• Name• Stake Percentage
104. Click and expand the Address details section.

Chapter 3 - Credit Initiation
Copyright 2007 - 2021, Oracle and its affiliates. All rights reserved. 25
FI C
redi
t Pro
posa
l Use
r Gui
de
105. Type or select the following details in the corresponding fields:• House/Building name• Street• Locality• Landmark• Area• City• State• Zip-Code• Country• Email Address• Phone Number
106. Click Add. Sponsor details are added.
To Edit, Delete or View the added Sponsors. click the hamburger icon in the required list item and select the required option.
For information on adding Share holders, Directors, Management Team, Bankers, Guarantors, Customers, and Suppliers detail, refer “Economic Dependency Analysis User Manual”.
Chapter 3 - Credit Initiation
Copyright 2007 - 2021, Oracle and its affiliates. All rights reserved. 26
FI C
redi
t Pro
posa
l Use
r Gui
de
Assets
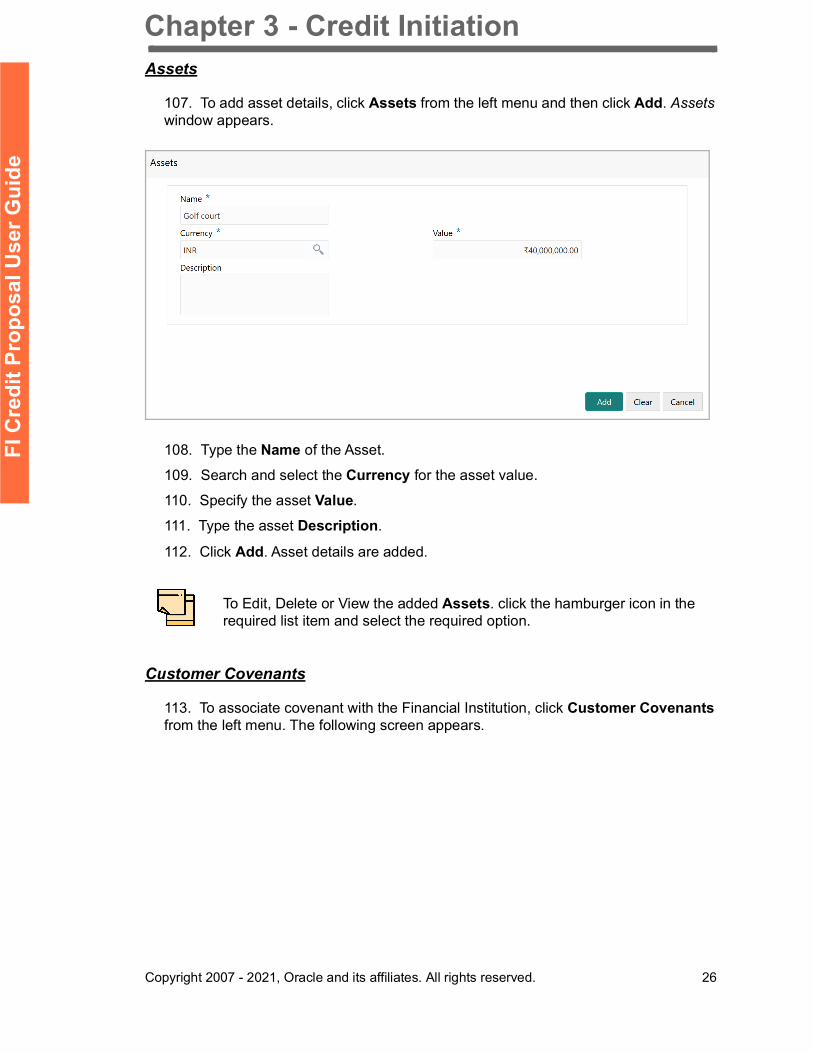
107. To add asset details, click Assets from the left menu and then click Add. Assets window appears.
108. Type the Name of the Asset.
109. Search and select the Currency for the asset value.
110. Specify the asset Value.
111. Type the asset Description.
112. Click Add. Asset details are added.
Customer Covenants
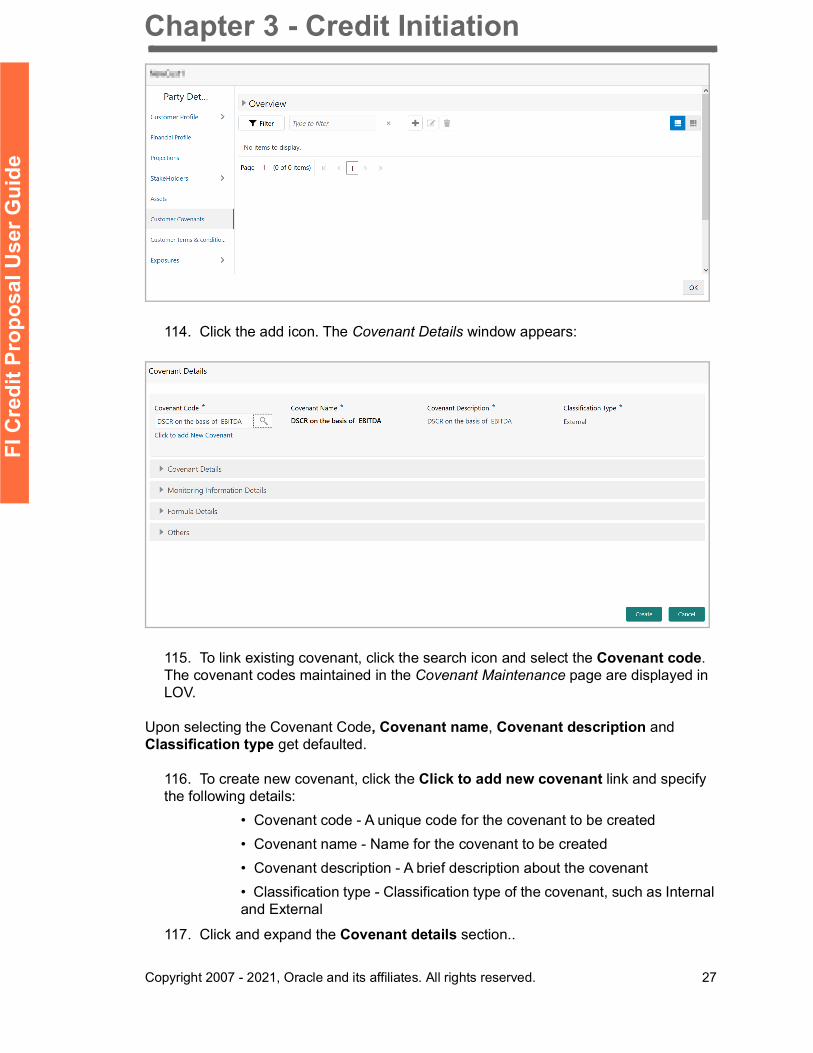
113. To associate covenant with the Financial Institution, click Customer Covenants from the left menu. The following screen appears.
To Edit, Delete or View the added Assets. click the hamburger icon in the required list item and select the required option.
Chapter 3 - Credit Initiation
Copyright 2007 - 2021, Oracle and its affiliates. All rights reserved. 27
FI C
redi
t Pro
posa
l Use
r Gui
de
114. Click the add icon. The Covenant Details window appears:
115. To link existing covenant, click the search icon and select the Covenant code. The covenant codes maintained in the Covenant Maintenance page are displayed in LOV.
Upon selecting the Covenant Code, Covenant name, Covenant description and Classification type get defaulted.
116. To create new covenant, click the Click to add new covenant link and specify the following details:
• Covenant code - A unique code for the covenant to be created• Covenant name - Name for the covenant to be created• Covenant description - A brief description about the covenant• Classification type - Classification type of the covenant, such as Internal and External
117. Click and expand the Covenant details section..
Chapter 3 - Credit Initiation
Copyright 2007 - 2021, Oracle and its affiliates. All rights reserved. 28
FI C
redi
t Pro
posa
l Use
r Gui
de
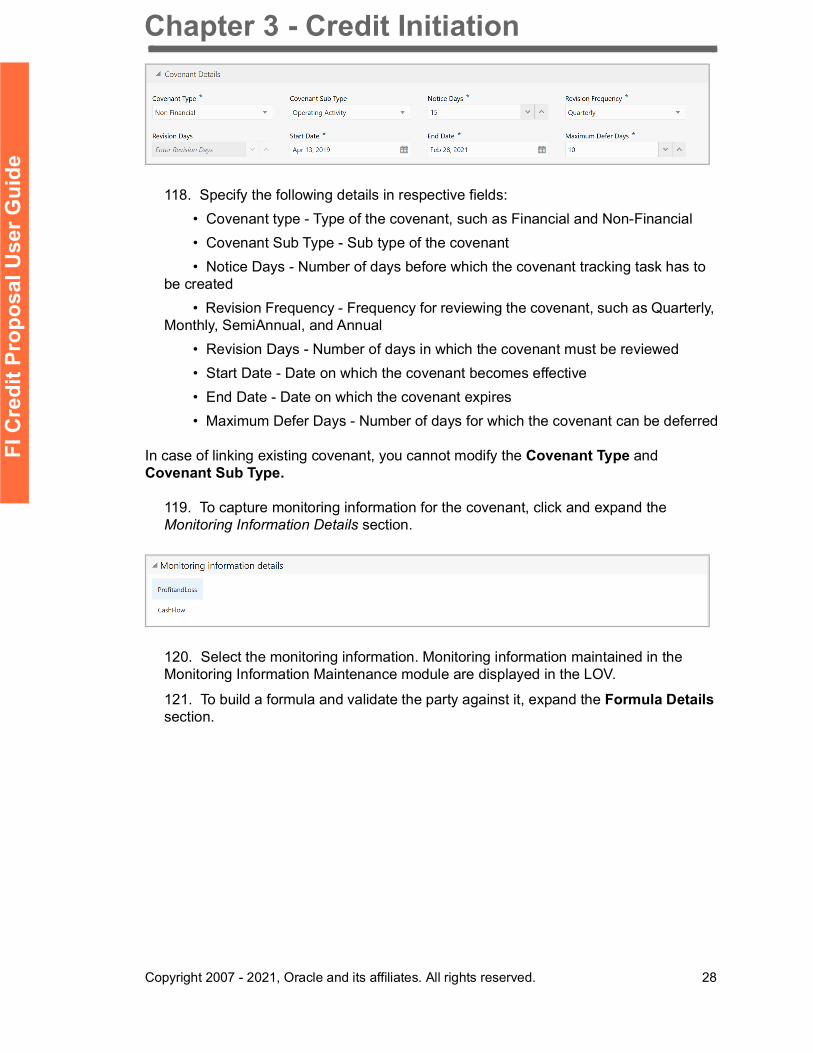
118. Specify the following details in respective fields:• Covenant type - Type of the covenant, such as Financial and Non-Financial • Covenant Sub Type - Sub type of the covenant• Notice Days - Number of days before which the covenant tracking task has to
be created • Revision Frequency - Frequency for reviewing the covenant, such as Quarterly,
Monthly, SemiAnnual, and Annual• Revision Days - Number of days in which the covenant must be reviewed• Start Date - Date on which the covenant becomes effective • End Date - Date on which the covenant expires• Maximum Defer Days - Number of days for which the covenant can be deferred
In case of linking existing covenant, you cannot modify the Covenant Type and Covenant Sub Type.
119. To capture monitoring information for the covenant, click and expand the Monitoring Information Details section.
120. Select the monitoring information. Monitoring information maintained in the Monitoring Information Maintenance module are displayed in the LOV.
121. To build a formula and validate the party against it, expand the Formula Details section.
Chapter 3 - Credit Initiation
Copyright 2007 - 2021, Oracle and its affiliates. All rights reserved. 29
FI C
redi
t Pro
posa
l Use
r Gui
de
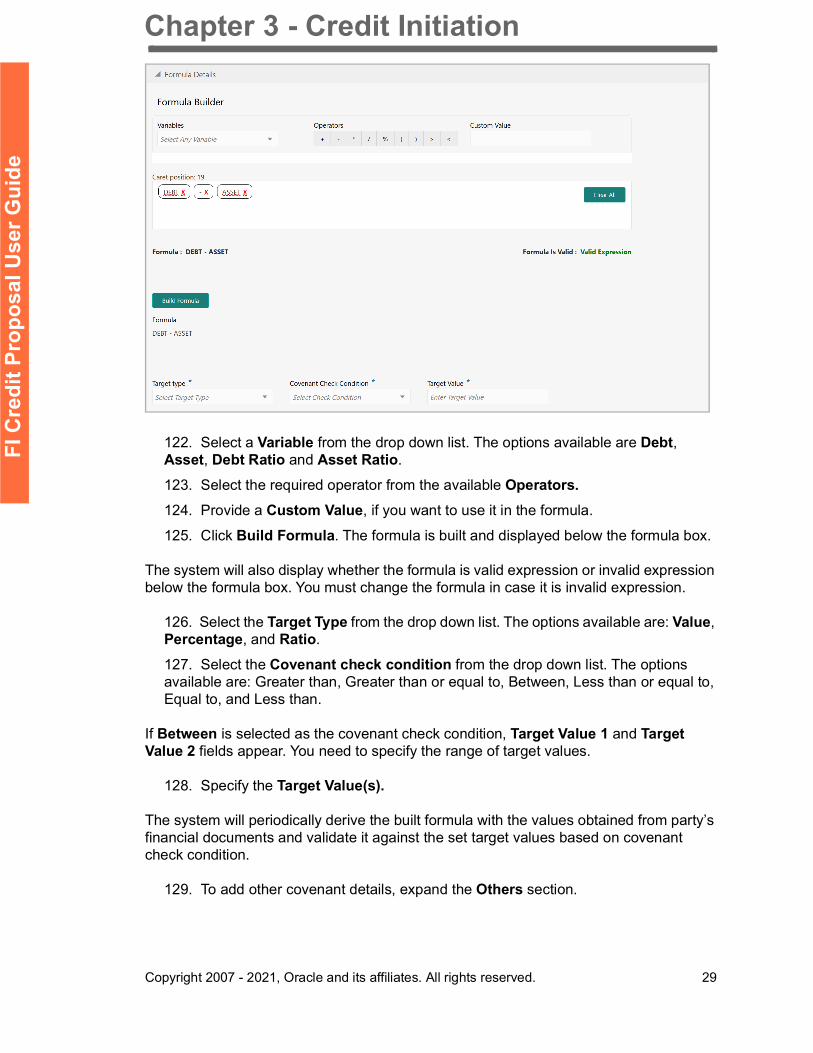
122. Select a Variable from the drop down list. The options available are Debt, Asset, Debt Ratio and Asset Ratio.
123. Select the required operator from the available Operators.124. Provide a Custom Value, if you want to use it in the formula.
125. Click Build Formula. The formula is built and displayed below the formula box.
The system will also display whether the formula is valid expression or invalid expression below the formula box. You must change the formula in case it is invalid expression.
126. Select the Target Type from the drop down list. The options available are: Value, Percentage, and Ratio.
127. Select the Covenant check condition from the drop down list. The options available are: Greater than, Greater than or equal to, Between, Less than or equal to, Equal to, and Less than.
If Between is selected as the covenant check condition, Target Value 1 and Target Value 2 fields appear. You need to specify the range of target values.
128. Specify the Target Value(s).
The system will periodically derive the built formula with the values obtained from party’s financial documents and validate it against the set target values based on covenant check condition.
129. To add other covenant details, expand the Others section.
Chapter 3 - Credit Initiation
Copyright 2007 - 2021, Oracle and its affiliates. All rights reserved. 30
FI C
redi
t Pro
posa
l Use
r Gui
de
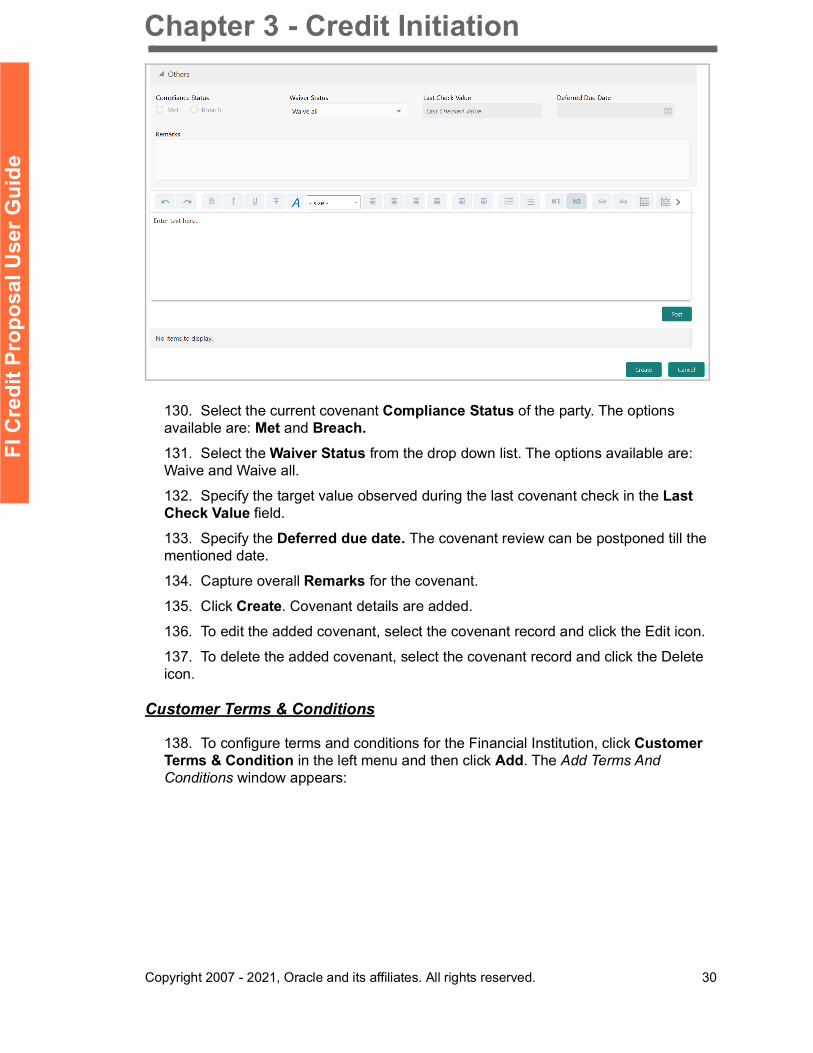
130. Select the current covenant Compliance Status of the party. The options available are: Met and Breach.131. Select the Waiver Status from the drop down list. The options available are: Waive and Waive all.
132. Specify the target value observed during the last covenant check in the Last Check Value field.
133. Specify the Deferred due date. The covenant review can be postponed till the mentioned date.
134. Capture overall Remarks for the covenant.
135. Click Create. Covenant details are added.
136. To edit the added covenant, select the covenant record and click the Edit icon.
137. To delete the added covenant, select the covenant record and click the Delete icon.
Customer Terms & Conditions
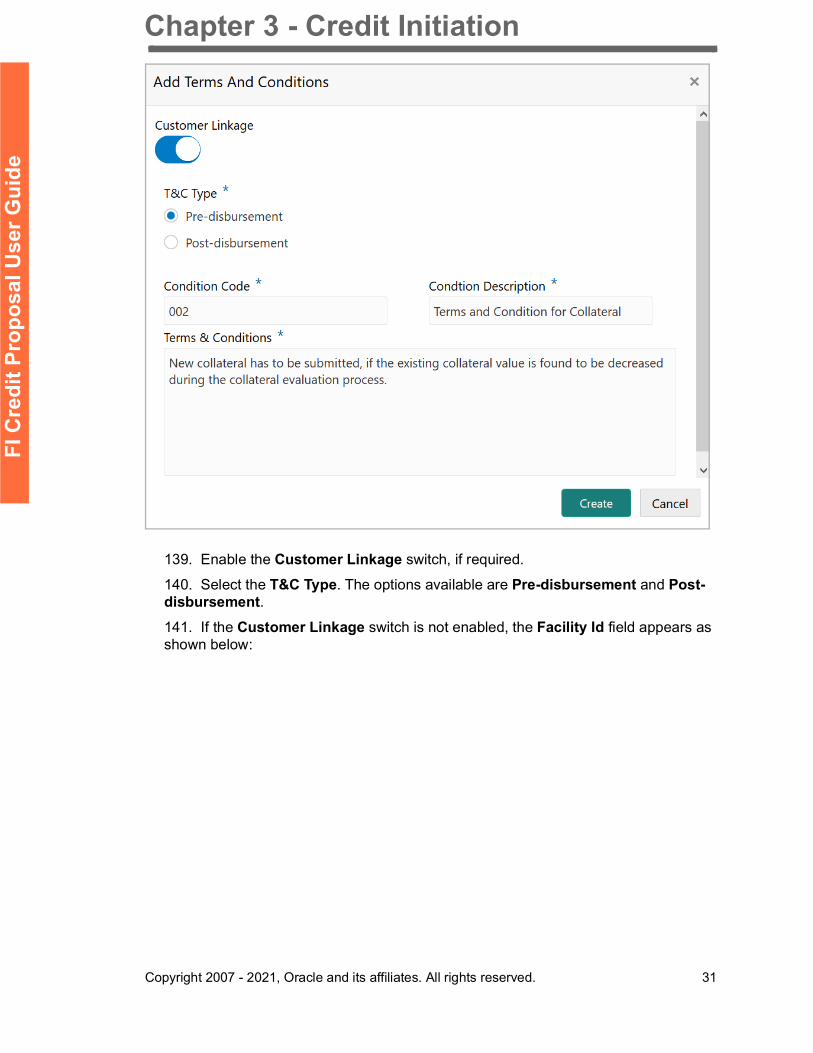
138. To configure terms and conditions for the Financial Institution, click Customer Terms & Condition in the left menu and then click Add. The Add Terms And Conditions window appears:
Chapter 3 - Credit Initiation
Copyright 2007 - 2021, Oracle and its affiliates. All rights reserved. 31
FI C
redi
t Pro
posa
l Use
r Gui
de
139. Enable the Customer Linkage switch, if required.
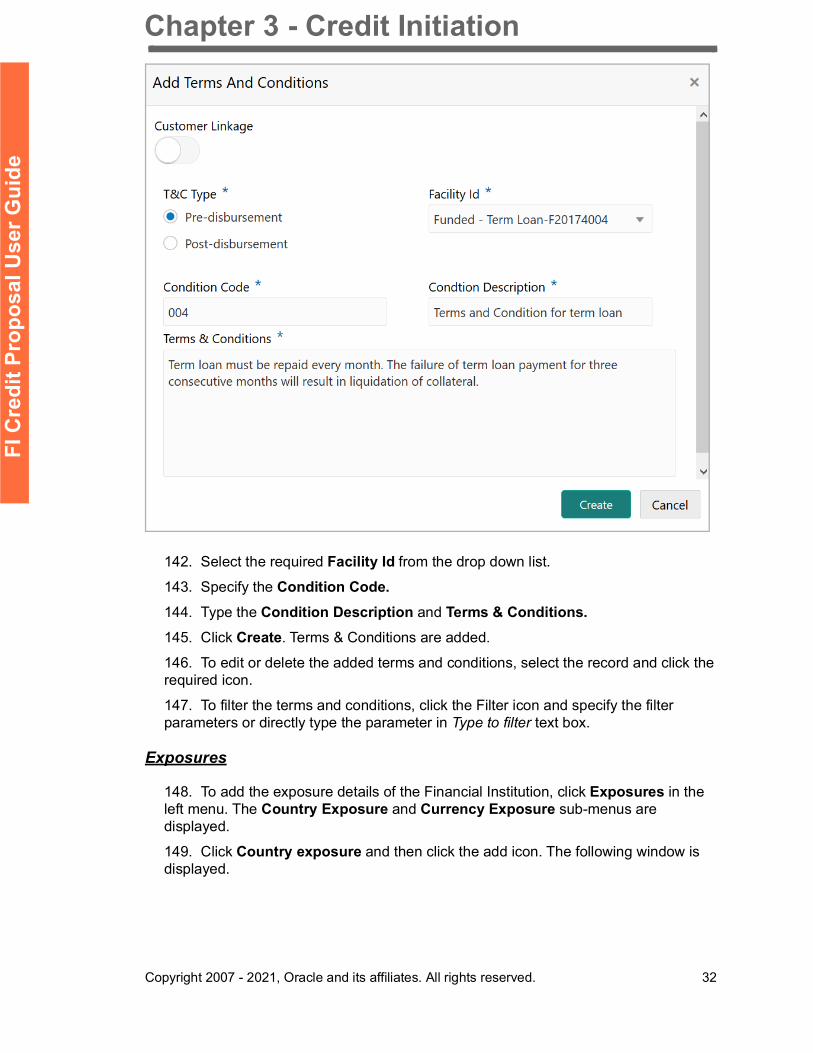
140. Select the T&C Type. The options available are Pre-disbursement and Post-disbursement.141. If the Customer Linkage switch is not enabled, the Facility Id field appears as shown below:
Chapter 3 - Credit Initiation
Copyright 2007 - 2021, Oracle and its affiliates. All rights reserved. 32
FI C
redi
t Pro
posa
l Use
r Gui
de
142. Select the required Facility Id from the drop down list.
143. Specify the Condition Code.144. Type the Condition Description and Terms & Conditions.145. Click Create. Terms & Conditions are added.
146. To edit or delete the added terms and conditions, select the record and click the required icon.
147. To filter the terms and conditions, click the Filter icon and specify the filter parameters or directly type the parameter in Type to filter text box.
Exposures
148. To add the exposure details of the Financial Institution, click Exposures in the left menu. The Country Exposure and Currency Exposure sub-menus are displayed.
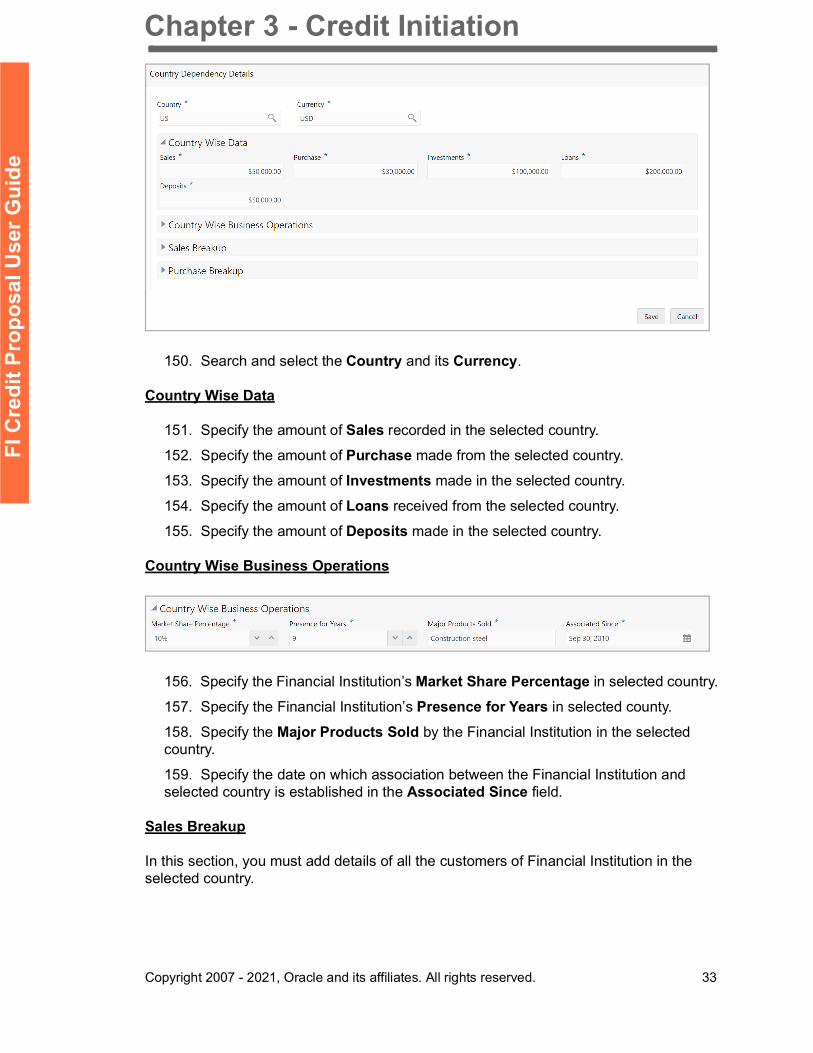
149. Click Country exposure and then click the add icon. The following window is displayed.
Chapter 3 - Credit Initiation
Copyright 2007 - 2021, Oracle and its affiliates. All rights reserved. 33
FI C
redi
t Pro
posa
l Use
r Gui
de
150. Search and select the Country and its Currency.
Country Wise Data
151. Specify the amount of Sales recorded in the selected country.
152. Specify the amount of Purchase made from the selected country.
153. Specify the amount of Investments made in the selected country.
154. Specify the amount of Loans received from the selected country.
155. Specify the amount of Deposits made in the selected country.
Country Wise Business Operations
156. Specify the Financial Institution’s Market Share Percentage in selected country.
157. Specify the Financial Institution’s Presence for Years in selected county.
158. Specify the Major Products Sold by the Financial Institution in the selected country.
159. Specify the date on which association between the Financial Institution and selected country is established in the Associated Since field.
Sales Breakup
In this section, you must add details of all the customers of Financial Institution in the selected country.
Chapter 3 - Credit Initiation
Copyright 2007 - 2021, Oracle and its affiliates. All rights reserved. 34
FI C
redi
t Pro
posa
l Use
r Gui
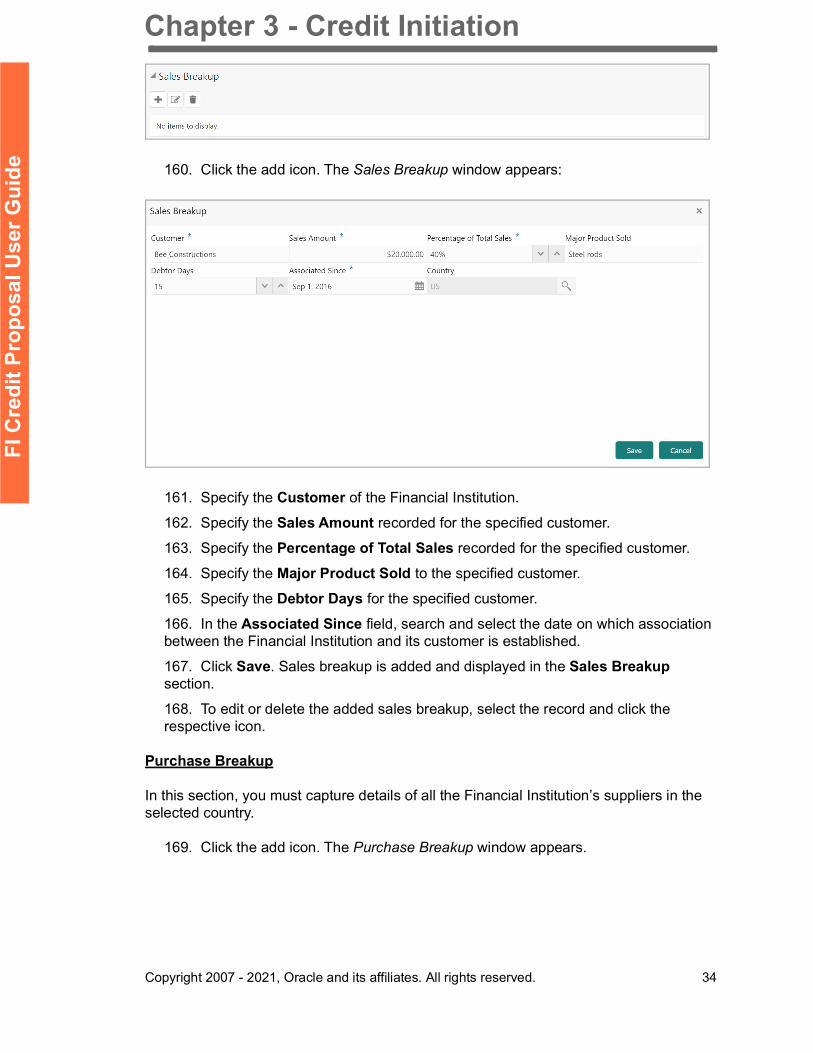
de 160. Click the add icon. The Sales Breakup window appears:
161. Specify the Customer of the Financial Institution.
162. Specify the Sales Amount recorded for the specified customer.
163. Specify the Percentage of Total Sales recorded for the specified customer.
164. Specify the Major Product Sold to the specified customer.
165. Specify the Debtor Days for the specified customer.
166. In the Associated Since field, search and select the date on which association between the Financial Institution and its customer is established.
167. Click Save. Sales breakup is added and displayed in the Sales Breakup section.
168. To edit or delete the added sales breakup, select the record and click the respective icon.
Purchase Breakup
In this section, you must capture details of all the Financial Institution’s suppliers in the selected country.
169. Click the add icon. The Purchase Breakup window appears.
Chapter 3 - Credit Initiation
Copyright 2007 - 2021, Oracle and its affiliates. All rights reserved. 35
FI C
redi
t Pro
posa
l Use
r Gui
de
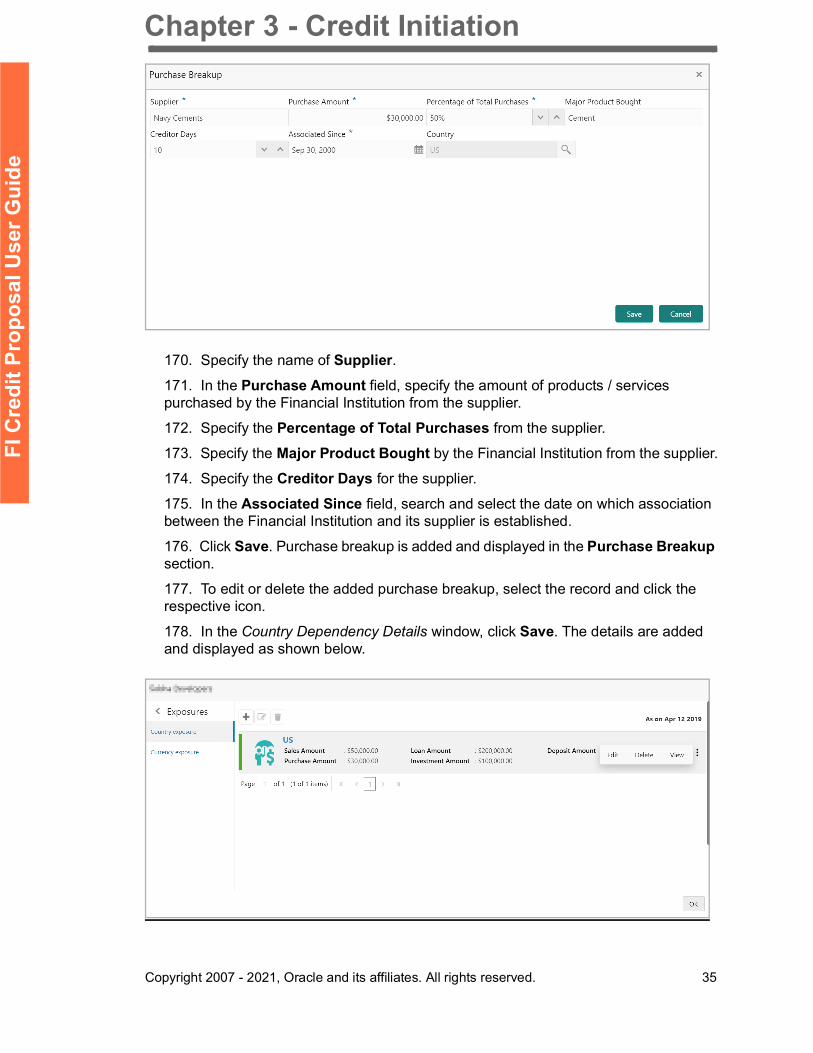
170. Specify the name of Supplier.171. In the Purchase Amount field, specify the amount of products / services purchased by the Financial Institution from the supplier.
172. Specify the Percentage of Total Purchases from the supplier.
173. Specify the Major Product Bought by the Financial Institution from the supplier.
174. Specify the Creditor Days for the supplier.
175. In the Associated Since field, search and select the date on which association between the Financial Institution and its supplier is established.
176. Click Save. Purchase breakup is added and displayed in the Purchase Breakup section.
177. To edit or delete the added purchase breakup, select the record and click the respective icon.
178. In the Country Dependency Details window, click Save. The details are added and displayed as shown below.
Chapter 3 - Credit Initiation
Copyright 2007 - 2021, Oracle and its affiliates. All rights reserved. 36
FI C
redi
t Pro
posa
l Use
r Gui
de
179. To Edit, Delete or View the added country dependency details, select the record and click the respective icon or click the hamburger icon and select the required option.
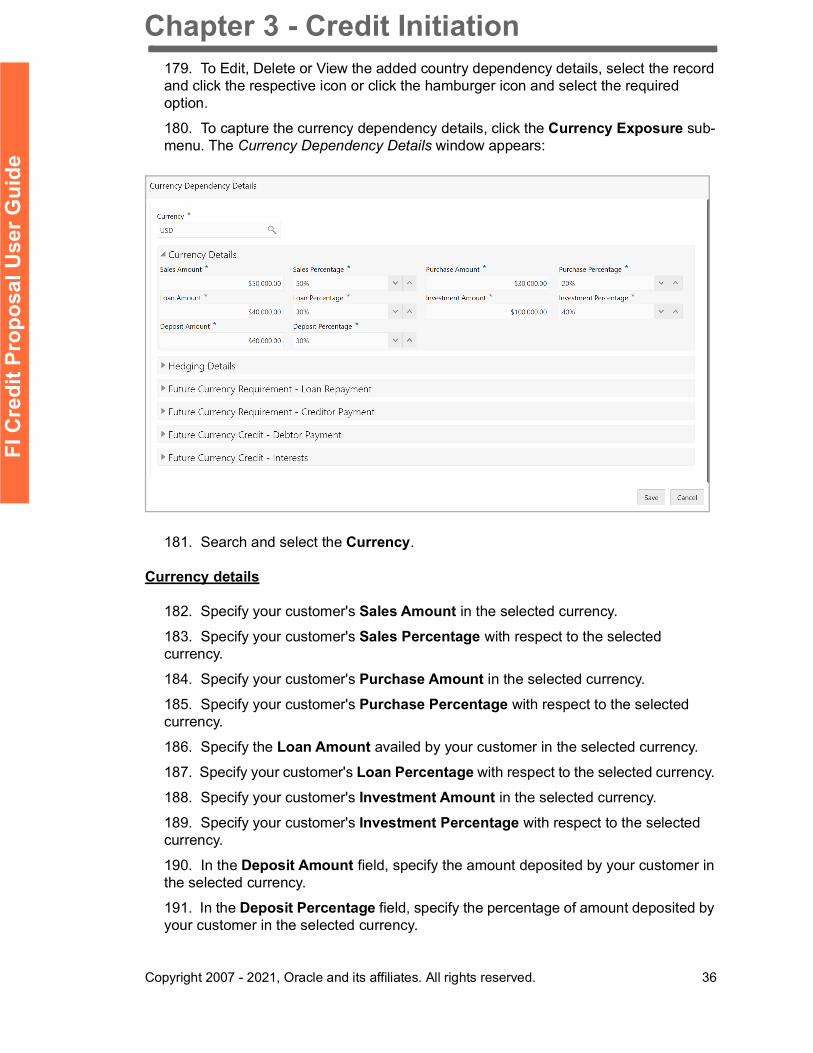
180. To capture the currency dependency details, click the Currency Exposure sub-menu. The Currency Dependency Details window appears:
181. Search and select the Currency.
Currency details
182. Specify your customer's Sales Amount in the selected currency.
183. Specify your customer's Sales Percentage with respect to the selected currency.
184. Specify your customer's Purchase Amount in the selected currency.
185. Specify your customer's Purchase Percentage with respect to the selected currency.
186. Specify the Loan Amount availed by your customer in the selected currency.
187. Specify your customer's Loan Percentage with respect to the selected currency.
188. Specify your customer's Investment Amount in the selected currency.
189. Specify your customer's Investment Percentage with respect to the selected currency.
190. In the Deposit Amount field, specify the amount deposited by your customer in the selected currency.
191. In the Deposit Percentage field, specify the percentage of amount deposited by your customer in the selected currency.
Chapter 3 - Credit Initiation
Copyright 2007 - 2021, Oracle and its affiliates. All rights reserved. 37
FI C
redi
t Pro
posa
l Use
r Gui
de
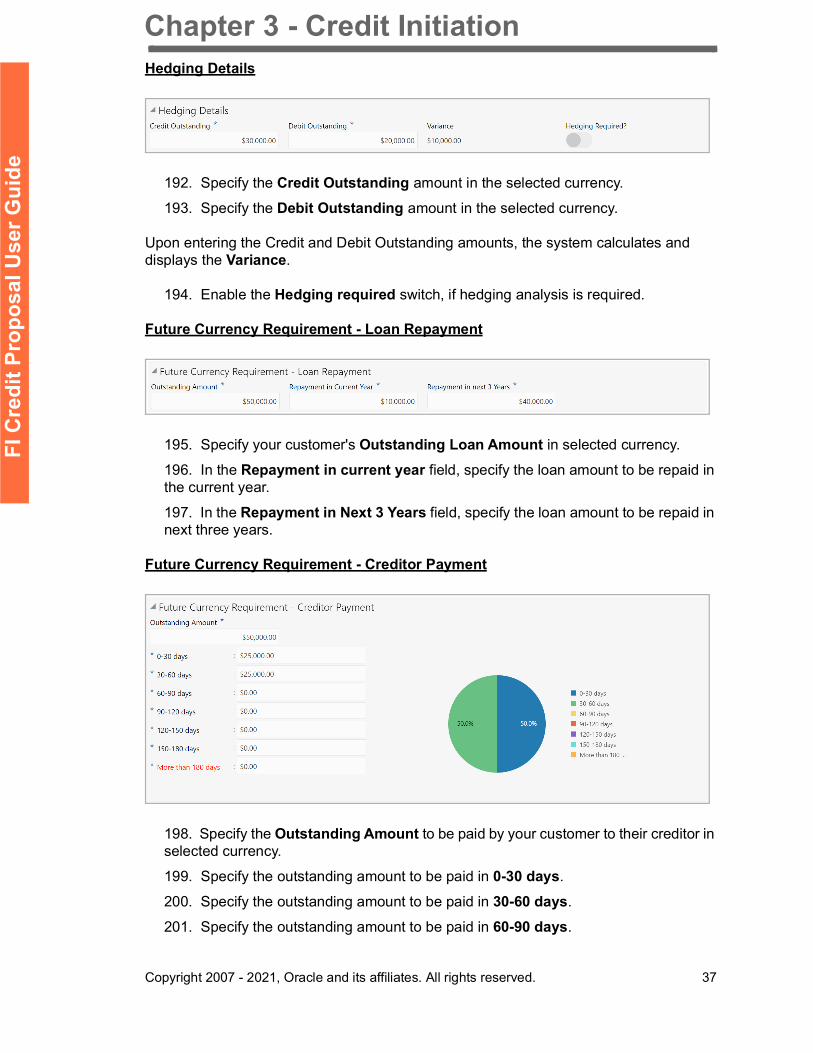
Hedging Details
192. Specify the Credit Outstanding amount in the selected currency.
193. Specify the Debit Outstanding amount in the selected currency.
Upon entering the Credit and Debit Outstanding amounts, the system calculates and displays the Variance.
194. Enable the Hedging required switch, if hedging analysis is required.
Future Currency Requirement - Loan Repayment
195. Specify your customer's Outstanding Loan Amount in selected currency.
196. In the Repayment in current year field, specify the loan amount to be repaid in the current year.
197. In the Repayment in Next 3 Years field, specify the loan amount to be repaid in next three years.
Future Currency Requirement - Creditor Payment
198. Specify the Outstanding Amount to be paid by your customer to their creditor in selected currency.
199. Specify the outstanding amount to be paid in 0-30 days.
200. Specify the outstanding amount to be paid in 30-60 days.
201. Specify the outstanding amount to be paid in 60-90 days.
Chapter 3 - Credit Initiation
Copyright 2007 - 2021, Oracle and its affiliates. All rights reserved. 38
FI C
redi
t Pro
posa
l Use
r Gui
de
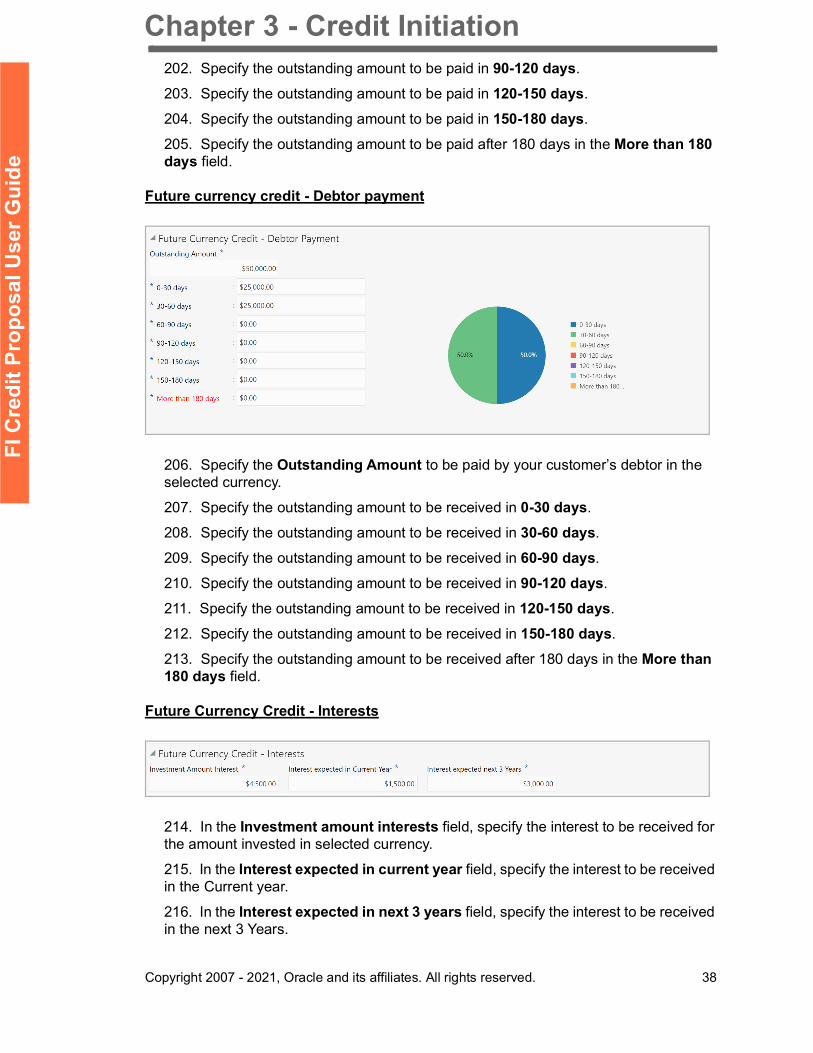
202. Specify the outstanding amount to be paid in 90-120 days.
203. Specify the outstanding amount to be paid in 120-150 days.
204. Specify the outstanding amount to be paid in 150-180 days.
205. Specify the outstanding amount to be paid after 180 days in the More than 180 days field.
Future currency credit - Debtor payment
206. Specify the Outstanding Amount to be paid by your customer’s debtor in the selected currency.
207. Specify the outstanding amount to be received in 0-30 days.
208. Specify the outstanding amount to be received in 30-60 days.
209. Specify the outstanding amount to be received in 60-90 days.
210. Specify the outstanding amount to be received in 90-120 days.
211. Specify the outstanding amount to be received in 120-150 days.
212. Specify the outstanding amount to be received in 150-180 days.
213. Specify the outstanding amount to be received after 180 days in the More than 180 days field.
Future Currency Credit - Interests
214. In the Investment amount interests field, specify the interest to be received for the amount invested in selected currency.
215. In the Interest expected in current year field, specify the interest to be received in the Current year.
216. In the Interest expected in next 3 years field, specify the interest to be received in the next 3 Years.
Chapter 3 - Credit Initiation
Copyright 2007 - 2021, Oracle and its affiliates. All rights reserved. 39
FI C
redi
t Pro
posa
l Use
r Gui
de
217. Click Save in the Currency Dependency Details window. The details are saved and displayed in Currency Dependency Details page.
218. To Edit, Delete and View the added currency exposure details, select the record and click the respective icons or click the hamburger icon and select the corresponding option.
219. Click Ok in the Party Details window.
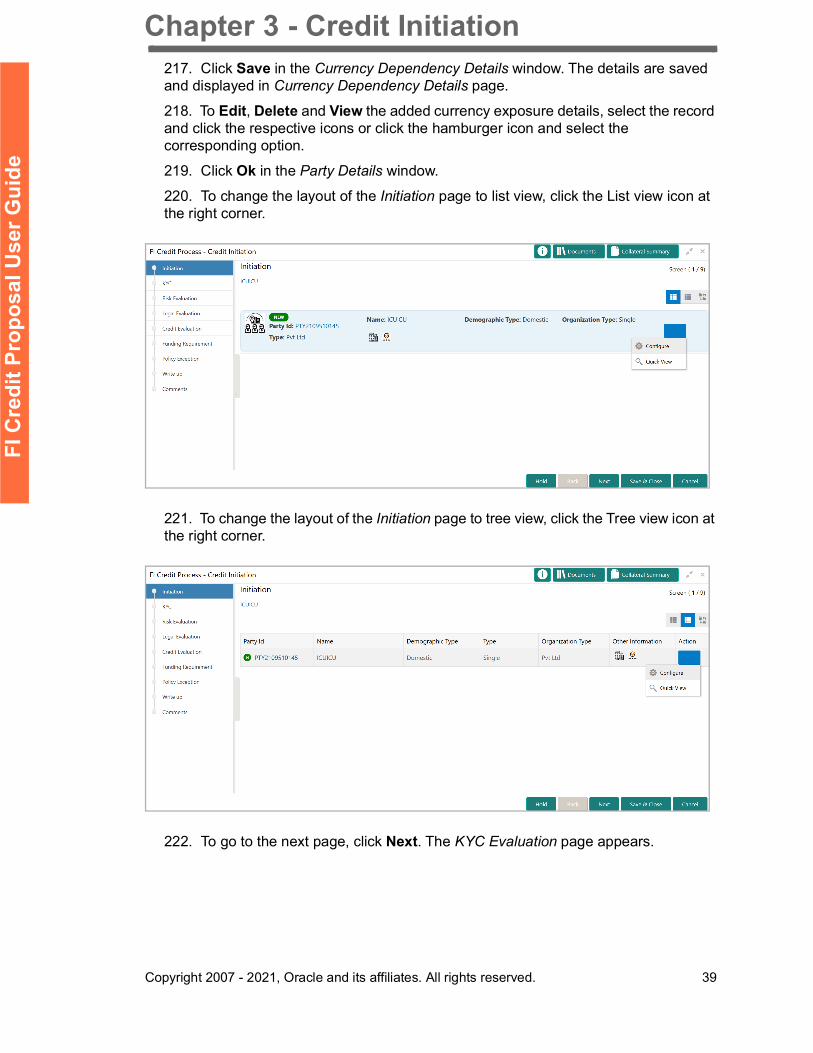
220. To change the layout of the Initiation page to list view, click the List view icon at the right corner.
221. To change the layout of the Initiation page to tree view, click the Tree view icon at the right corner.
222. To go to the next page, click Next. The KYC Evaluation page appears.
Chapter 3 - Credit Initiation
Copyright 2007 - 2021, Oracle and its affiliates. All rights reserved. 40
FI C
redi
t Pro
posa
l Use
r Gui
de
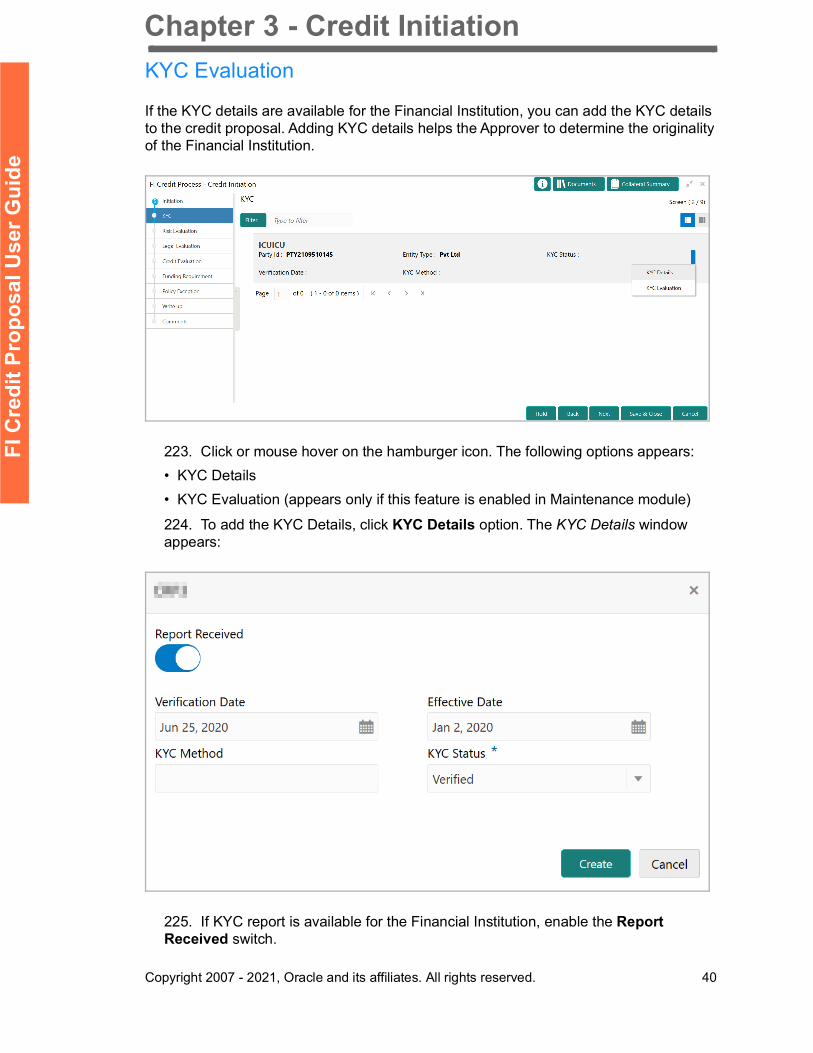
KYC Evaluation
If the KYC details are available for the Financial Institution, you can add the KYC details to the credit proposal. Adding KYC details helps the Approver to determine the originality of the Financial Institution.
223. Click or mouse hover on the hamburger icon. The following options appears:• KYC Details • KYC Evaluation (appears only if this feature is enabled in Maintenance module)
224. To add the KYC Details, click KYC Details option. The KYC Details window appears:
225. If KYC report is available for the Financial Institution, enable the Report Received switch.
Chapter 3 - Credit Initiation
Copyright 2007 - 2021, Oracle and its affiliates. All rights reserved. 41
FI C
redi
t Pro
posa
l Use
r Gui
de
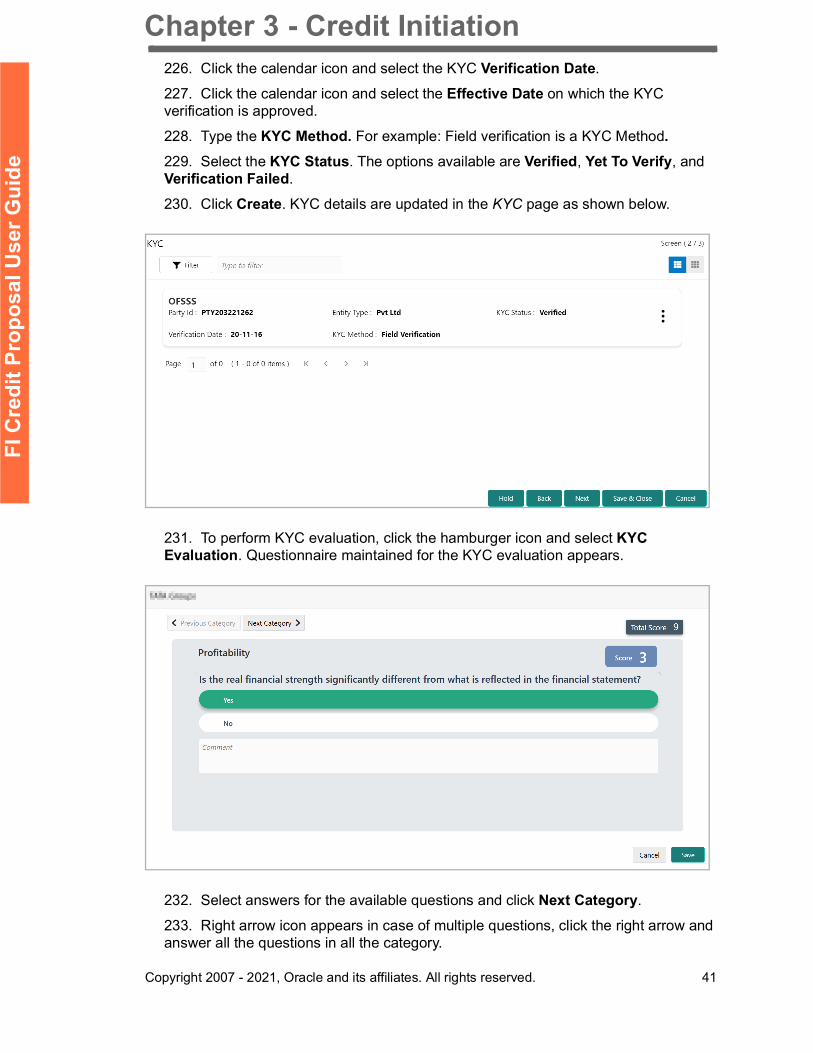
226. Click the calendar icon and select the KYC Verification Date.
227. Click the calendar icon and select the Effective Date on which the KYC verification is approved.
228. Type the KYC Method. For example: Field verification is a KYC Method. 229. Select the KYC Status. The options available are Verified, Yet To Verify, and Verification Failed.
230. Click Create. KYC details are updated in the KYC page as shown below.
231. To perform KYC evaluation, click the hamburger icon and select KYC Evaluation. Questionnaire maintained for the KYC evaluation appears.
232. Select answers for the available questions and click Next Category.
233. Right arrow icon appears in case of multiple questions, click the right arrow and answer all the questions in all the category.
Chapter 3 - Credit Initiation
Copyright 2007 - 2021, Oracle and its affiliates. All rights reserved. 42
FI C
redi
t Pro
posa
l Use
r Gui
de
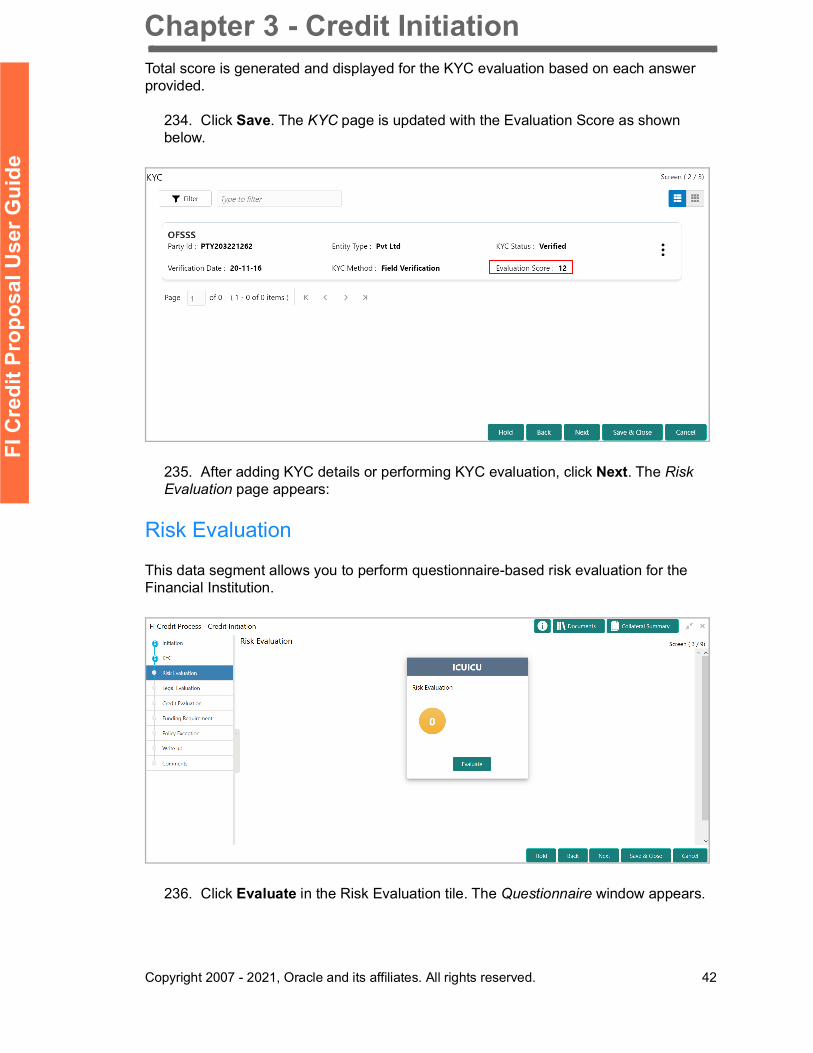
Total score is generated and displayed for the KYC evaluation based on each answer provided.
234. Click Save. The KYC page is updated with the Evaluation Score as shown below.
235. After adding KYC details or performing KYC evaluation, click Next. The Risk Evaluation page appears:
Risk Evaluation
This data segment allows you to perform questionnaire-based risk evaluation for the Financial Institution.
236. Click Evaluate in the Risk Evaluation tile. The Questionnaire window appears.
Chapter 3 - Credit Initiation
Copyright 2007 - 2021, Oracle and its affiliates. All rights reserved. 43
FI C
redi
t Pro
posa
l Use
r Gui
de
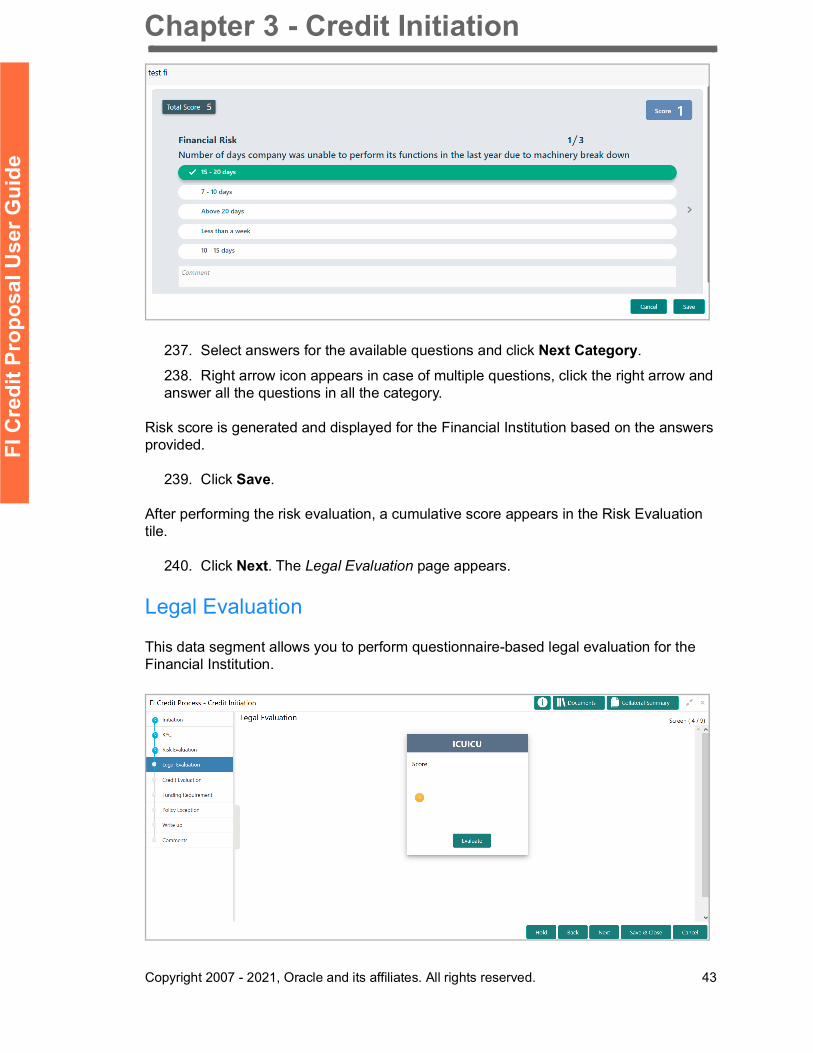
237. Select answers for the available questions and click Next Category.
238. Right arrow icon appears in case of multiple questions, click the right arrow and answer all the questions in all the category.
Risk score is generated and displayed for the Financial Institution based on the answers provided.
239. Click Save.
After performing the risk evaluation, a cumulative score appears in the Risk Evaluation tile.
240. Click Next. The Legal Evaluation page appears.
Legal Evaluation
This data segment allows you to perform questionnaire-based legal evaluation for the Financial Institution.
Chapter 3 - Credit Initiation
Copyright 2007 - 2021, Oracle and its affiliates. All rights reserved. 44
FI C
redi
t Pro
posa
l Use
r Gui
de
Legal Evaluation is similar to Risk Evaluation. Refer “Risk Evaluation” on page 42 for information on performing legal evaluation.
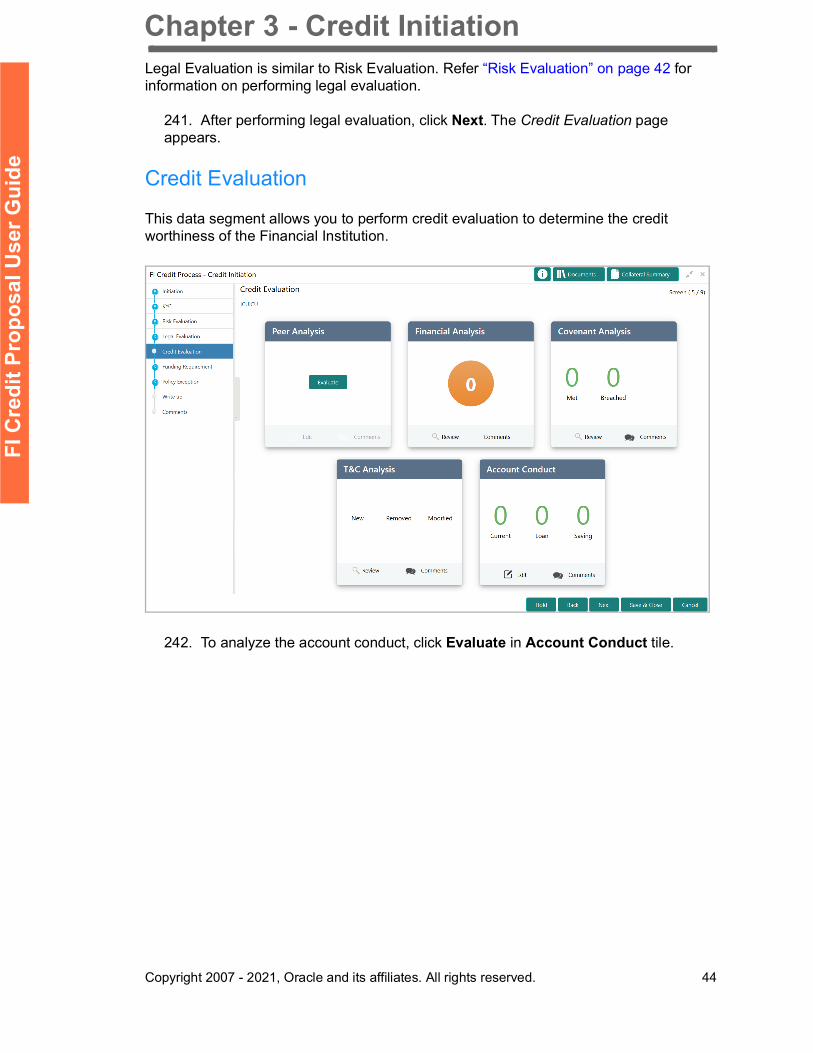
241. After performing legal evaluation, click Next. The Credit Evaluation page appears.
Credit Evaluation
This data segment allows you to perform credit evaluation to determine the credit worthiness of the Financial Institution.
242. To analyze the account conduct, click Evaluate in Account Conduct tile.
Chapter 3 - Credit Initiation
Copyright 2007 - 2021, Oracle and its affiliates. All rights reserved. 45
FI C
redi
t Pro
posa
l Use
r Gui
de
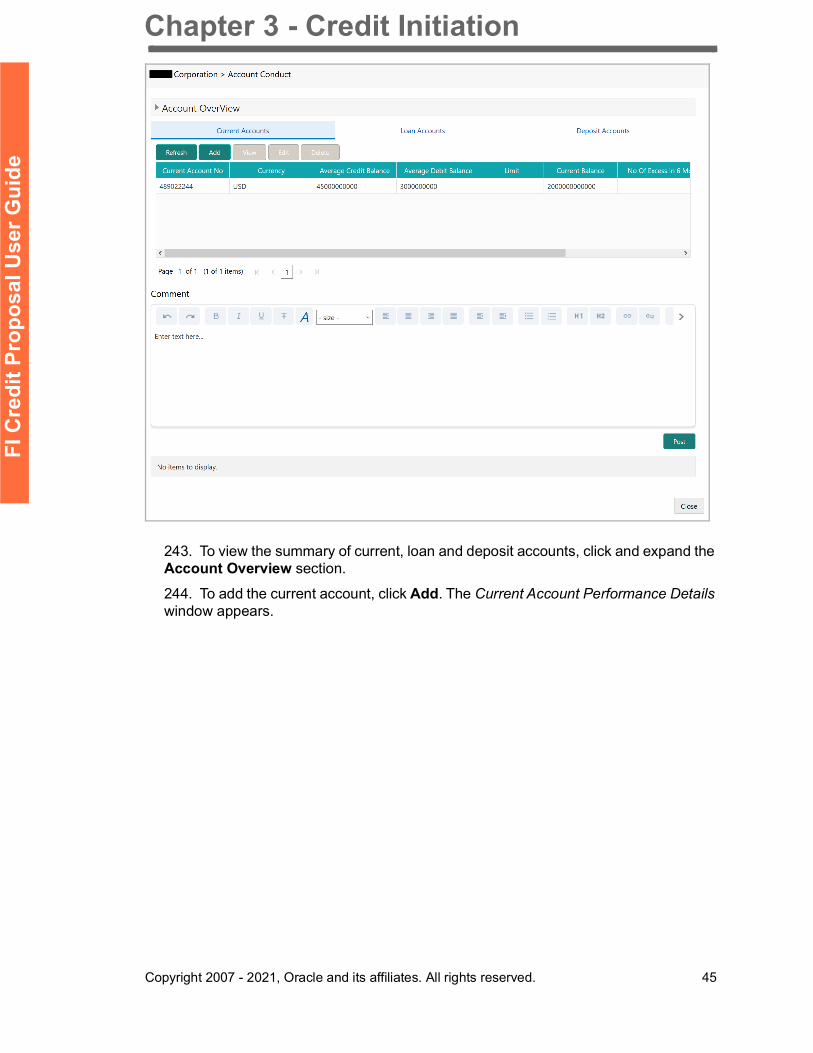
243. To view the summary of current, loan and deposit accounts, click and expand the Account Overview section.
244. To add the current account, click Add. The Current Account Performance Details window appears.
Chapter 3 - Credit Initiation
Copyright 2007 - 2021, Oracle and its affiliates. All rights reserved. 46
FI C
redi
t Pro
posa
l Use
r Gui
de
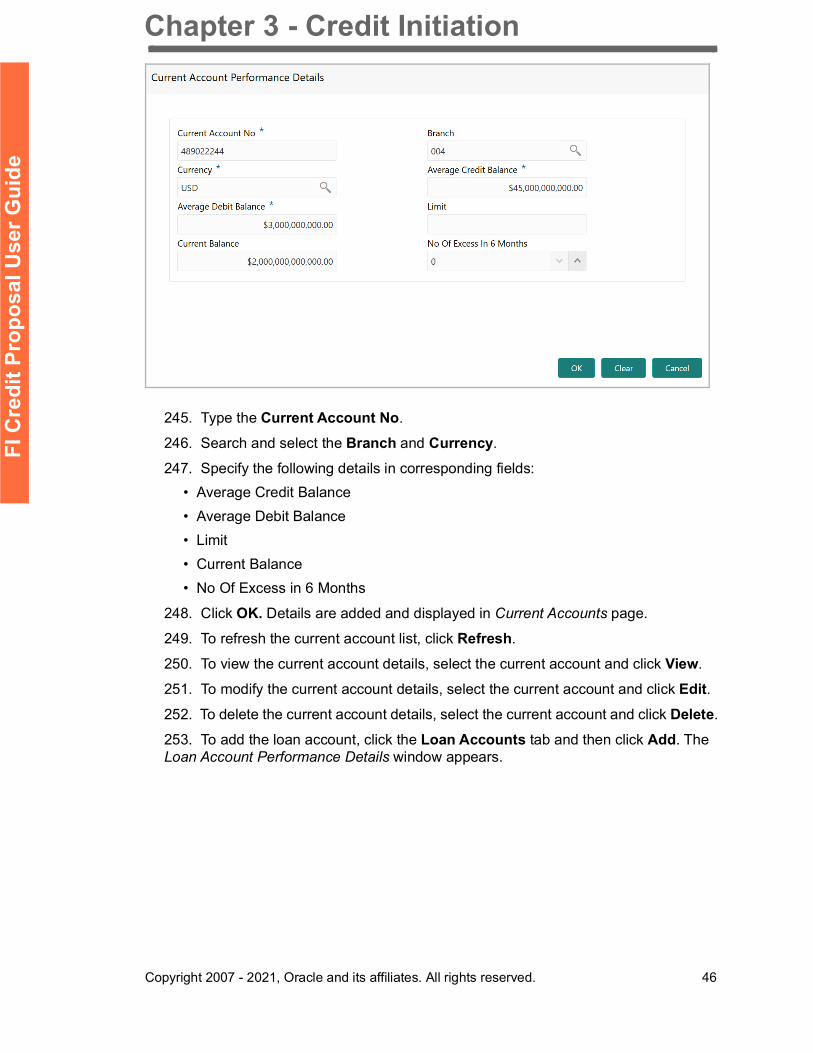
245. Type the Current Account No.
246. Search and select the Branch and Currency.
247. Specify the following details in corresponding fields:• Average Credit Balance• Average Debit Balance• Limit• Current Balance• No Of Excess in 6 Months
248. Click OK. Details are added and displayed in Current Accounts page.
249. To refresh the current account list, click Refresh.
250. To view the current account details, select the current account and click View.
251. To modify the current account details, select the current account and click Edit.252. To delete the current account details, select the current account and click Delete.
253. To add the loan account, click the Loan Accounts tab and then click Add. The Loan Account Performance Details window appears.
Chapter 3 - Credit Initiation
Copyright 2007 - 2021, Oracle and its affiliates. All rights reserved. 47
FI C
redi
t Pro
posa
l Use
r Gui
de
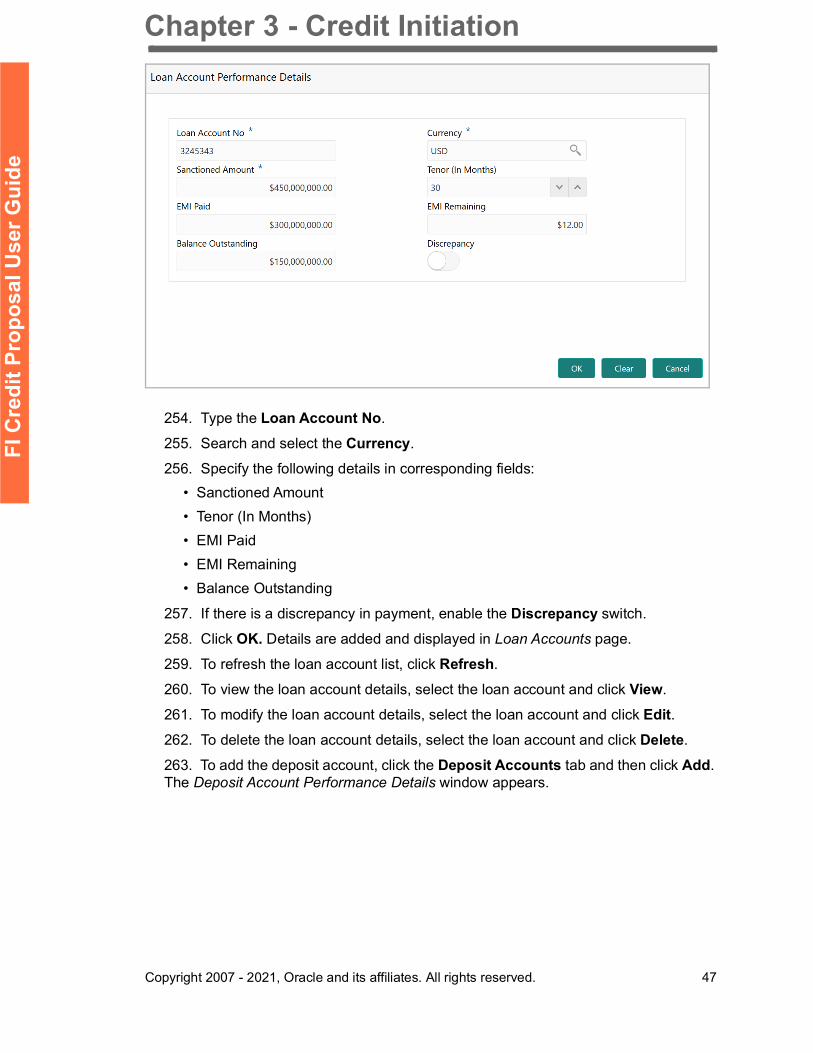
254. Type the Loan Account No.
255. Search and select the Currency.
256. Specify the following details in corresponding fields:• Sanctioned Amount• Tenor (In Months)• EMI Paid• EMI Remaining• Balance Outstanding
257. If there is a discrepancy in payment, enable the Discrepancy switch.
258. Click OK. Details are added and displayed in Loan Accounts page.
259. To refresh the loan account list, click Refresh.
260. To view the loan account details, select the loan account and click View.
261. To modify the loan account details, select the loan account and click Edit.262. To delete the loan account details, select the loan account and click Delete.
263. To add the deposit account, click the Deposit Accounts tab and then click Add. The Deposit Account Performance Details window appears.
Chapter 3 - Credit Initiation
Copyright 2007 - 2021, Oracle and its affiliates. All rights reserved. 48
FI C
redi
t Pro
posa
l Use
r Gui
de
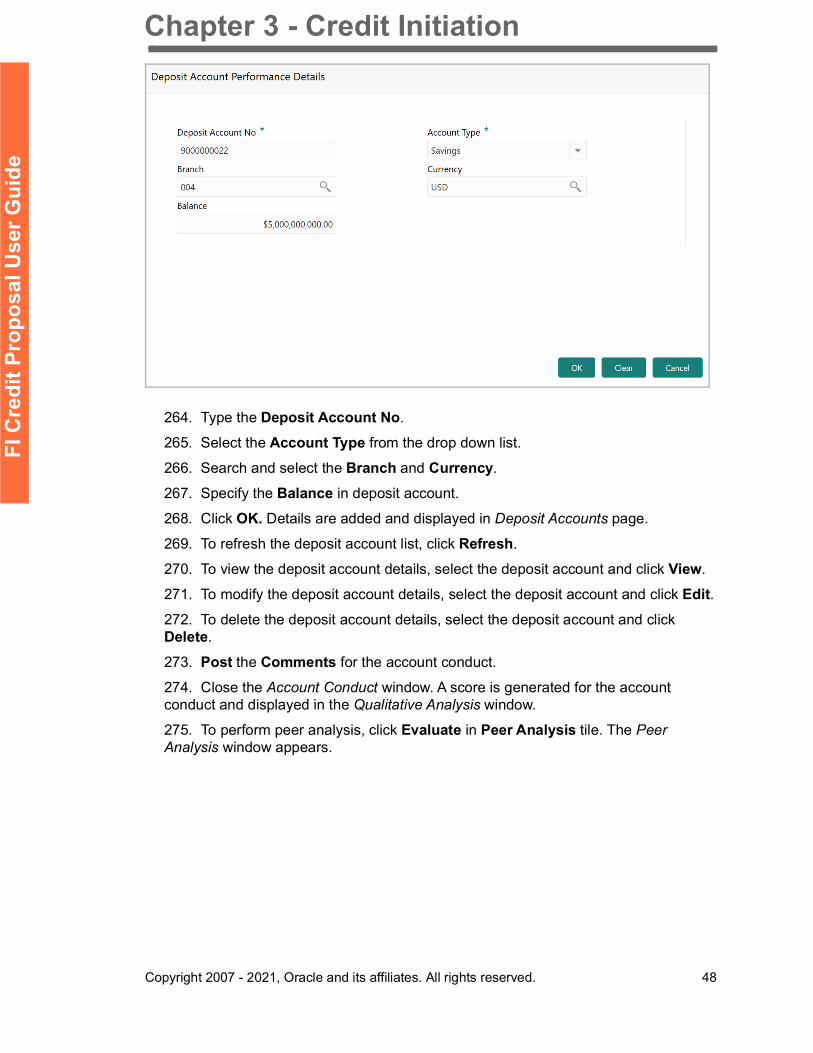
264. Type the Deposit Account No.
265. Select the Account Type from the drop down list.
266. Search and select the Branch and Currency.
267. Specify the Balance in deposit account.
268. Click OK. Details are added and displayed in Deposit Accounts page.
269. To refresh the deposit account list, click Refresh.
270. To view the deposit account details, select the deposit account and click View.
271. To modify the deposit account details, select the deposit account and click Edit.272. To delete the deposit account details, select the deposit account and click Delete.
273. Post the Comments for the account conduct.
274. Close the Account Conduct window. A score is generated for the account conduct and displayed in the Qualitative Analysis window.
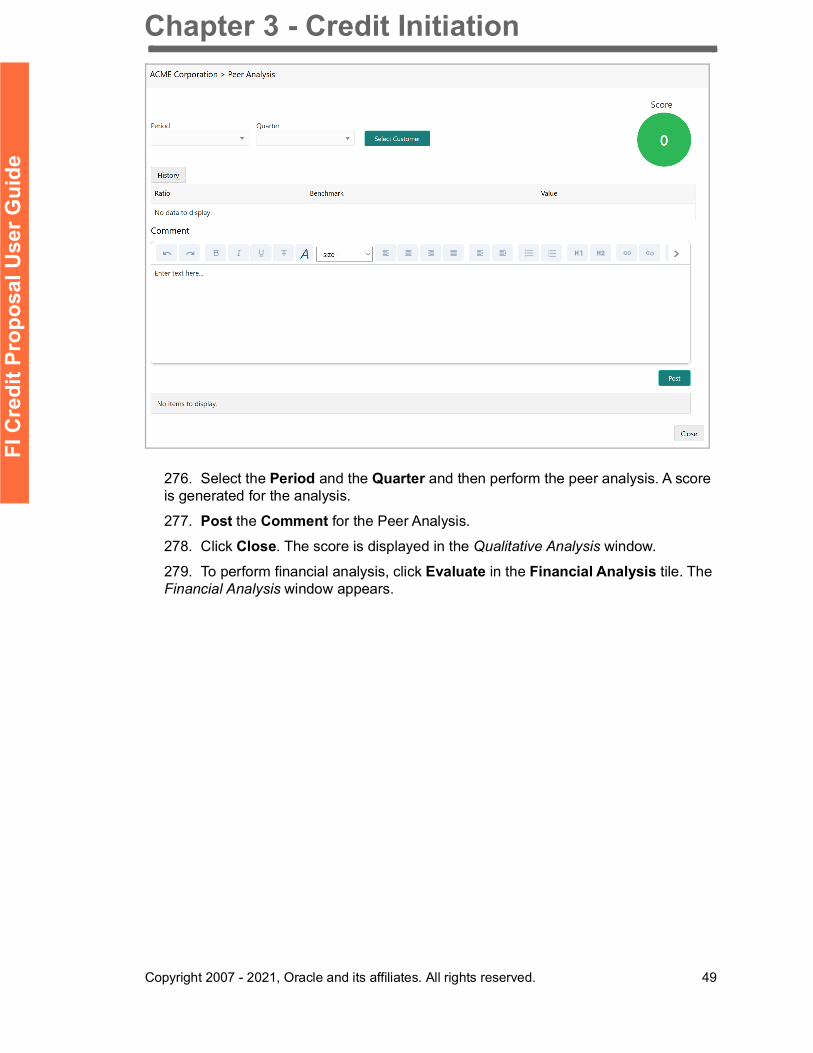
275. To perform peer analysis, click Evaluate in Peer Analysis tile. The Peer Analysis window appears.
Chapter 3 - Credit Initiation
Copyright 2007 - 2021, Oracle and its affiliates. All rights reserved. 49
FI C
redi
t Pro
posa
l Use
r Gui
de
276. Select the Period and the Quarter and then perform the peer analysis. A score is generated for the analysis.
277. Post the Comment for the Peer Analysis.
278. Click Close. The score is displayed in the Qualitative Analysis window.
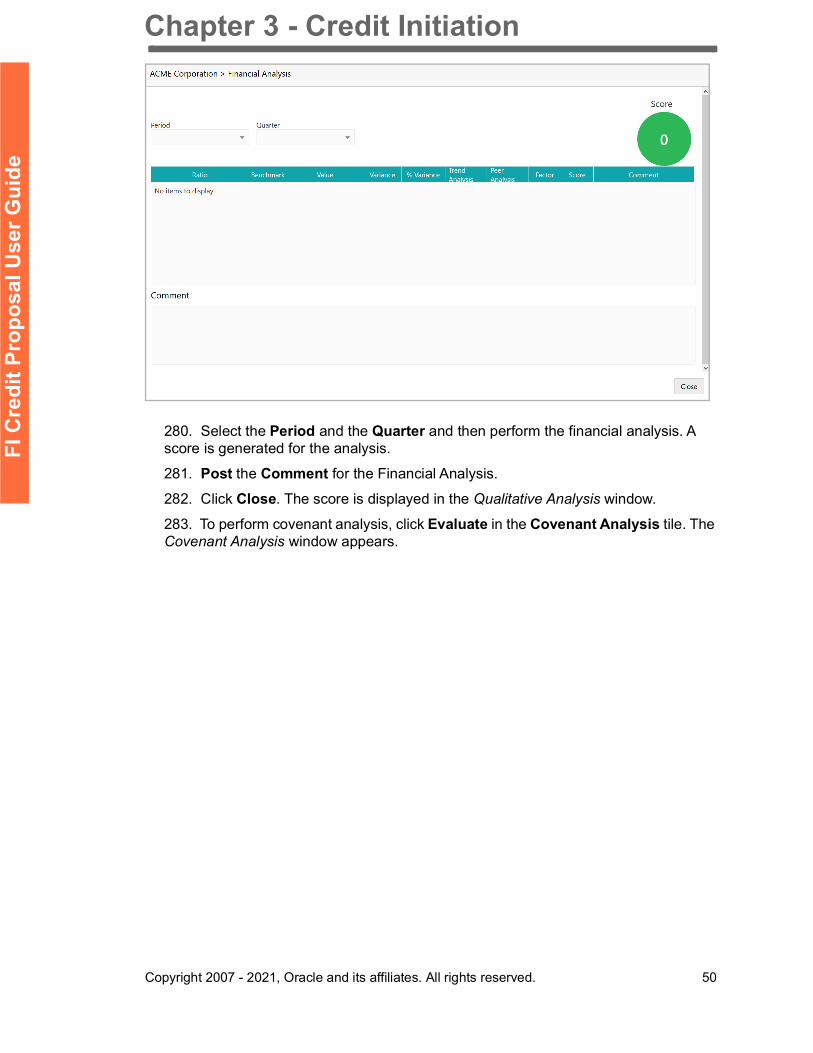
279. To perform financial analysis, click Evaluate in the Financial Analysis tile. The Financial Analysis window appears.
Chapter 3 - Credit Initiation
Copyright 2007 - 2021, Oracle and its affiliates. All rights reserved. 50
FI C
redi
t Pro
posa
l Use
r Gui
de
280. Select the Period and the Quarter and then perform the financial analysis. A score is generated for the analysis.
281. Post the Comment for the Financial Analysis.
282. Click Close. The score is displayed in the Qualitative Analysis window.
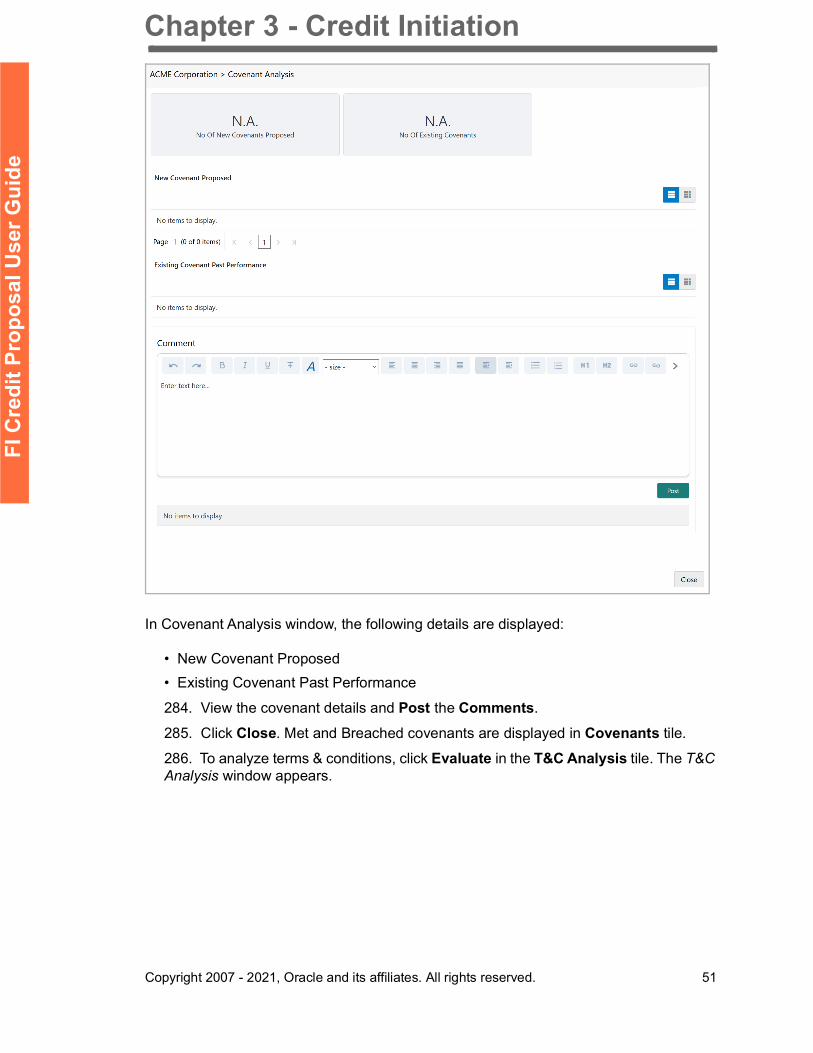
283. To perform covenant analysis, click Evaluate in the Covenant Analysis tile. The Covenant Analysis window appears.
Chapter 3 - Credit Initiation
Copyright 2007 - 2021, Oracle and its affiliates. All rights reserved. 51
FI C
redi
t Pro
posa
l Use
r Gui
de
In Covenant Analysis window, the following details are displayed:
• New Covenant Proposed• Existing Covenant Past Performance
284. View the covenant details and Post the Comments.
285. Click Close. Met and Breached covenants are displayed in Covenants tile.
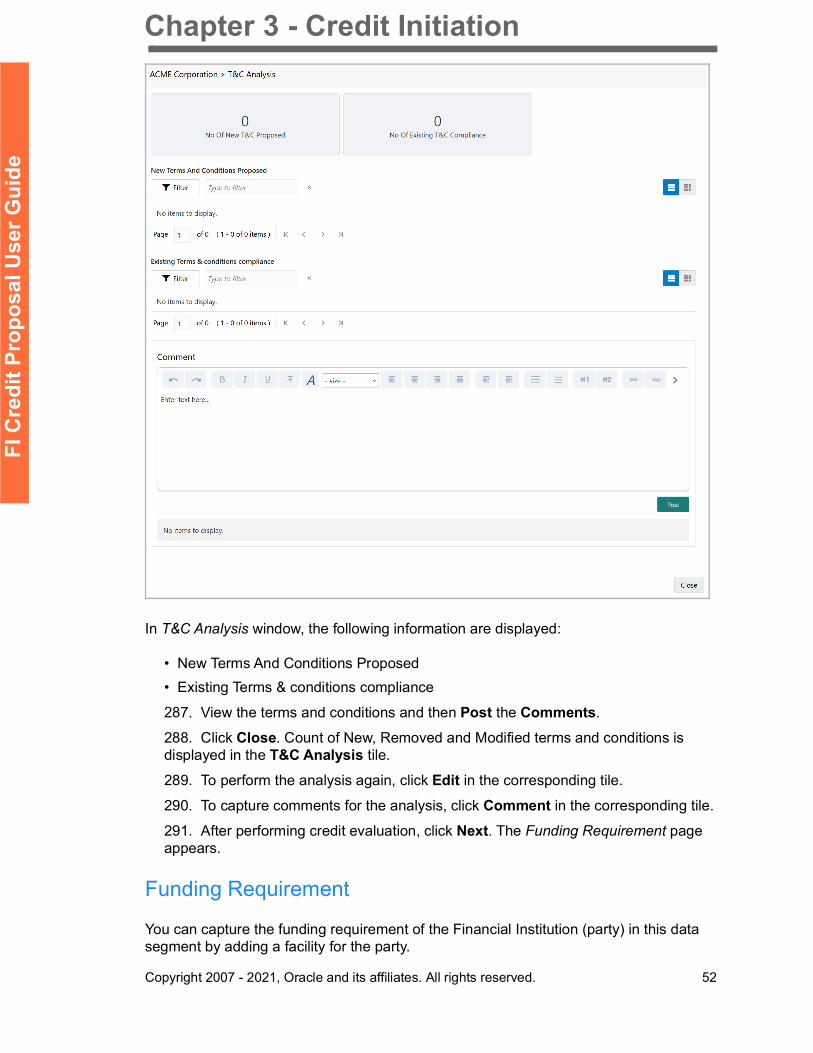
286. To analyze terms & conditions, click Evaluate in the T&C Analysis tile. The T&C Analysis window appears.
Chapter 3 - Credit Initiation
Copyright 2007 - 2021, Oracle and its affiliates. All rights reserved. 52
FI C
redi
t Pro
posa
l Use
r Gui
de
In T&C Analysis window, the following information are displayed:
• New Terms And Conditions Proposed• Existing Terms & conditions compliance
287. View the terms and conditions and then Post the Comments.
288. Click Close. Count of New, Removed and Modified terms and conditions is displayed in the T&C Analysis tile.
289. To perform the analysis again, click Edit in the corresponding tile.
290. To capture comments for the analysis, click Comment in the corresponding tile.
291. After performing credit evaluation, click Next. The Funding Requirement page appears.
Funding Requirement
You can capture the funding requirement of the Financial Institution (party) in this data segment by adding a facility for the party.
Chapter 3 - Credit Initiation
Copyright 2007 - 2021, Oracle and its affiliates. All rights reserved. 53
FI C
redi
t Pro
posa
l Use
r Gui
de
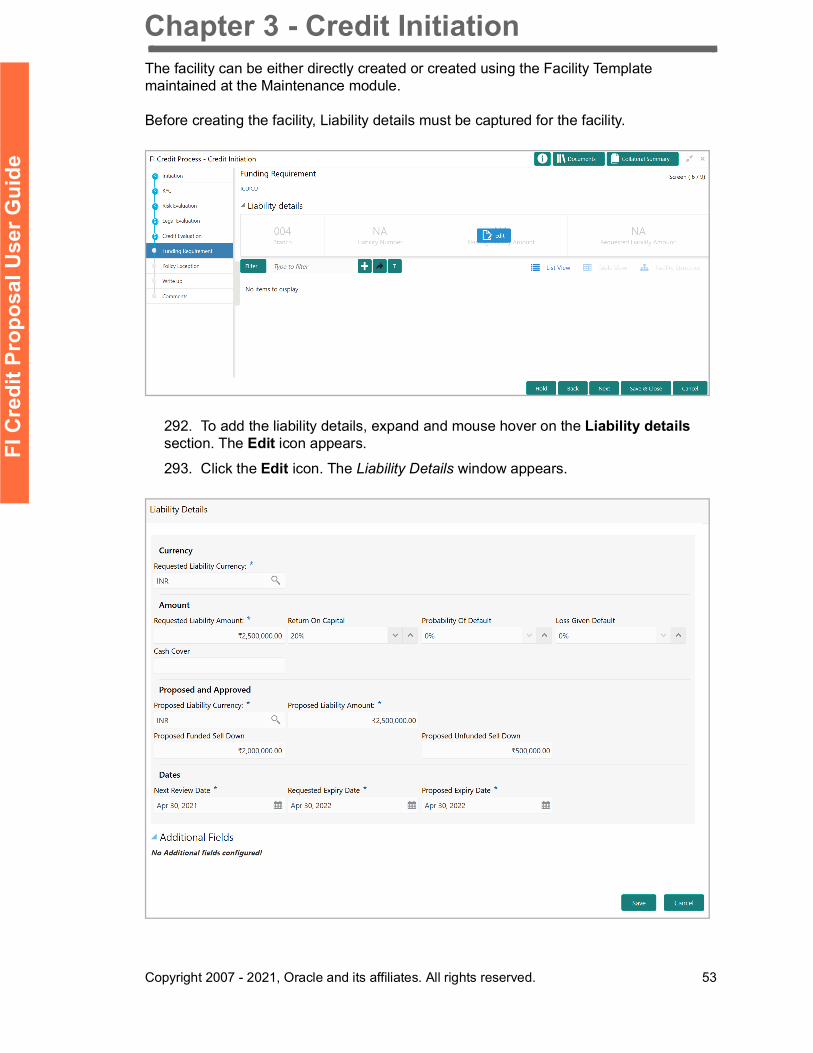
The facility can be either directly created or created using the Facility Template maintained at the Maintenance module.
Before creating the facility, Liability details must be captured for the facility.
292. To add the liability details, expand and mouse hover on the Liability details section. The Edit icon appears.
293. Click the Edit icon. The Liability Details window appears.
Chapter 3 - Credit Initiation
Copyright 2007 - 2021, Oracle and its affiliates. All rights reserved. 54
FI C
redi
t Pro
posa
l Use
r Gui
de
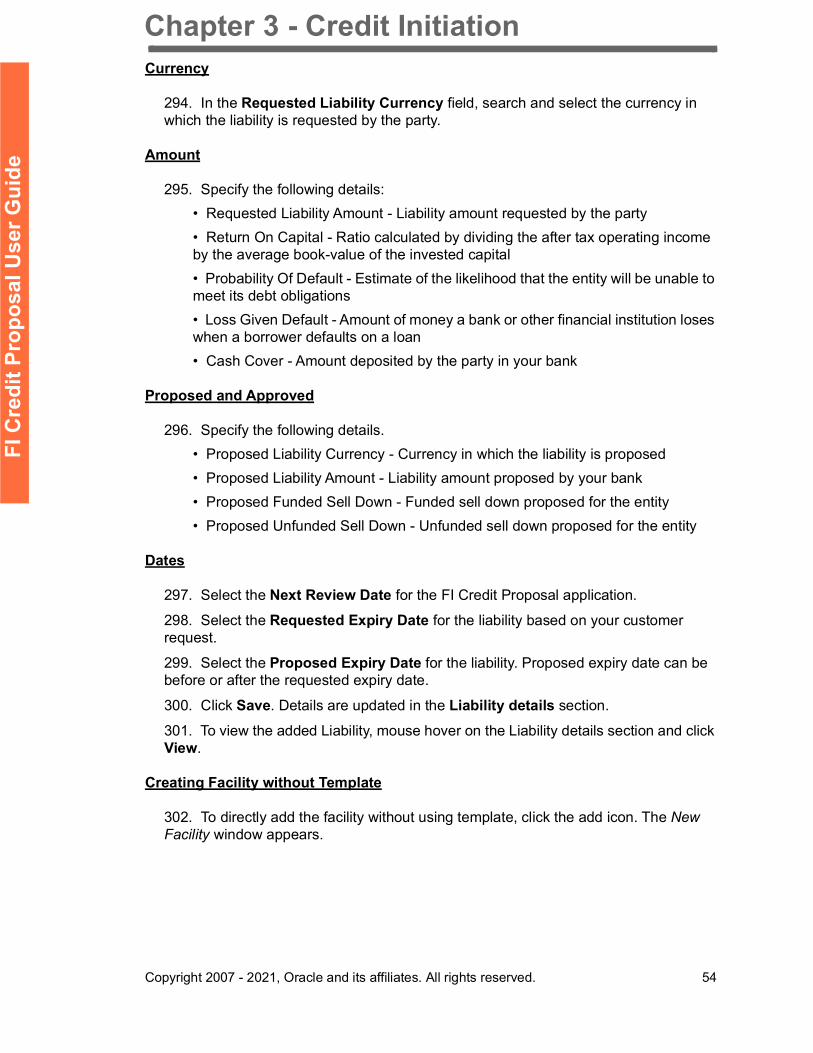
Currency
294. In the Requested Liability Currency field, search and select the currency in which the liability is requested by the party.
Amount
295. Specify the following details:• Requested Liability Amount - Liability amount requested by the party• Return On Capital - Ratio calculated by dividing the after tax operating income by the average book-value of the invested capital• Probability Of Default - Estimate of the likelihood that the entity will be unable to meet its debt obligations• Loss Given Default - Amount of money a bank or other financial institution loses when a borrower defaults on a loan• Cash Cover - Amount deposited by the party in your bank
Proposed and Approved
296. Specify the following details.• Proposed Liability Currency - Currency in which the liability is proposed • Proposed Liability Amount - Liability amount proposed by your bank• Proposed Funded Sell Down - Funded sell down proposed for the entity• Proposed Unfunded Sell Down - Unfunded sell down proposed for the entity
Dates
297. Select the Next Review Date for the FI Credit Proposal application.
298. Select the Requested Expiry Date for the liability based on your customer request.
299. Select the Proposed Expiry Date for the liability. Proposed expiry date can be before or after the requested expiry date.
300. Click Save. Details are updated in the Liability details section.
301. To view the added Liability, mouse hover on the Liability details section and click View.
Creating Facility without Template
302. To directly add the facility without using template, click the add icon. The New Facility window appears.
Chapter 3 - Credit Initiation
Copyright 2007 - 2021, Oracle and its affiliates. All rights reserved. 55
FI C
redi
t Pro
posa
l Use
r Gui
de
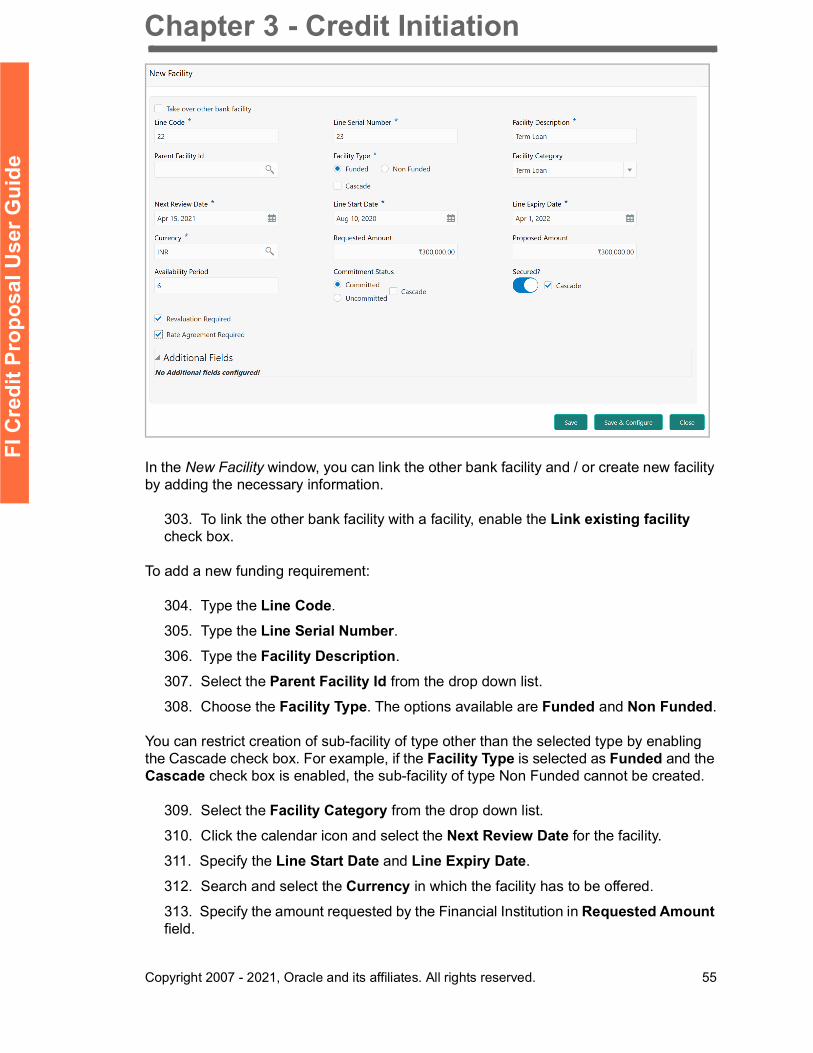
In the New Facility window, you can link the other bank facility and / or create new facility by adding the necessary information.
303. To link the other bank facility with a facility, enable the Link existing facility check box.
To add a new funding requirement:
304. Type the Line Code.
305. Type the Line Serial Number.306. Type the Facility Description.
307. Select the Parent Facility Id from the drop down list.
308. Choose the Facility Type. The options available are Funded and Non Funded.
You can restrict creation of sub-facility of type other than the selected type by enabling the Cascade check box. For example, if the Facility Type is selected as Funded and the Cascade check box is enabled, the sub-facility of type Non Funded cannot be created.
309. Select the Facility Category from the drop down list.
310. Click the calendar icon and select the Next Review Date for the facility.
311. Specify the Line Start Date and Line Expiry Date.
312. Search and select the Currency in which the facility has to be offered.
313. Specify the amount requested by the Financial Institution in Requested Amount field.
Chapter 3 - Credit Initiation
Copyright 2007 - 2021, Oracle and its affiliates. All rights reserved. 56
FI C
redi
t Pro
posa
l Use
r Gui
de
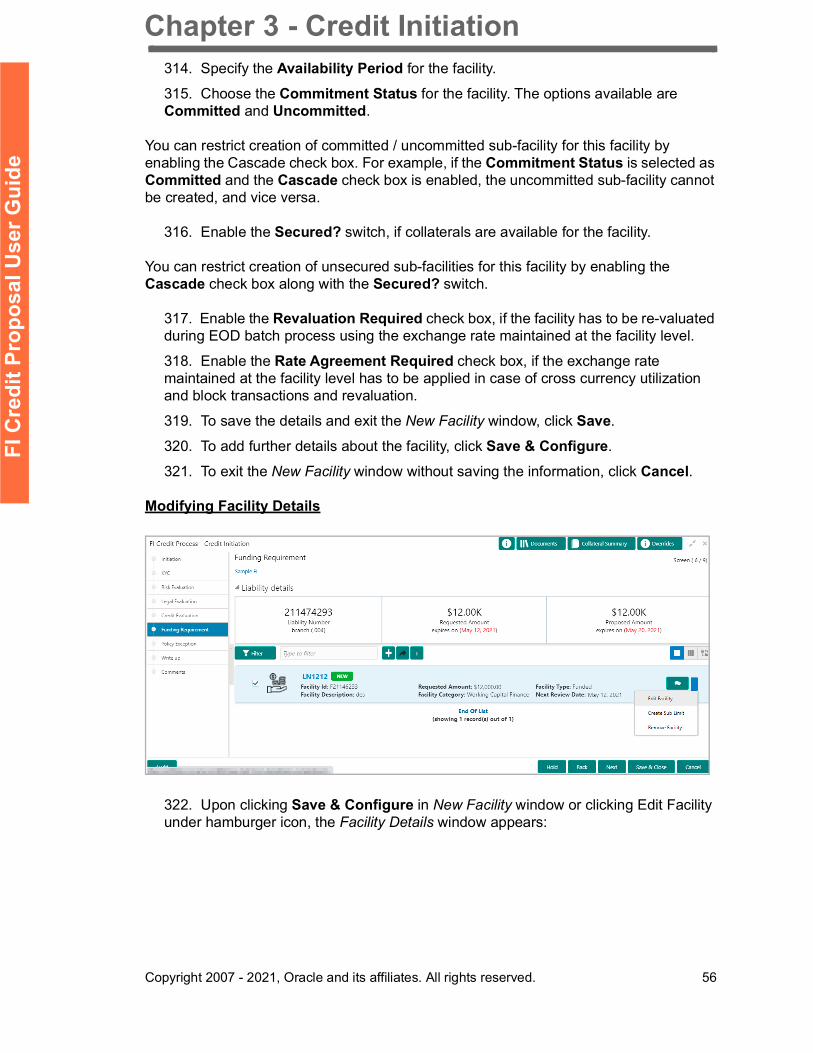
314. Specify the Availability Period for the facility.
315. Choose the Commitment Status for the facility. The options available are Committed and Uncommitted.
You can restrict creation of committed / uncommitted sub-facility for this facility by enabling the Cascade check box. For example, if the Commitment Status is selected as Committed and the Cascade check box is enabled, the uncommitted sub-facility cannot be created, and vice versa.
316. Enable the Secured? switch, if collaterals are available for the facility.
You can restrict creation of unsecured sub-facilities for this facility by enabling the Cascade check box along with the Secured? switch.
317. Enable the Revaluation Required check box, if the facility has to be re-valuated during EOD batch process using the exchange rate maintained at the facility level.
318. Enable the Rate Agreement Required check box, if the exchange rate maintained at the facility level has to be applied in case of cross currency utilization and block transactions and revaluation.
319. To save the details and exit the New Facility window, click Save.
320. To add further details about the facility, click Save & Configure.
321. To exit the New Facility window without saving the information, click Cancel.
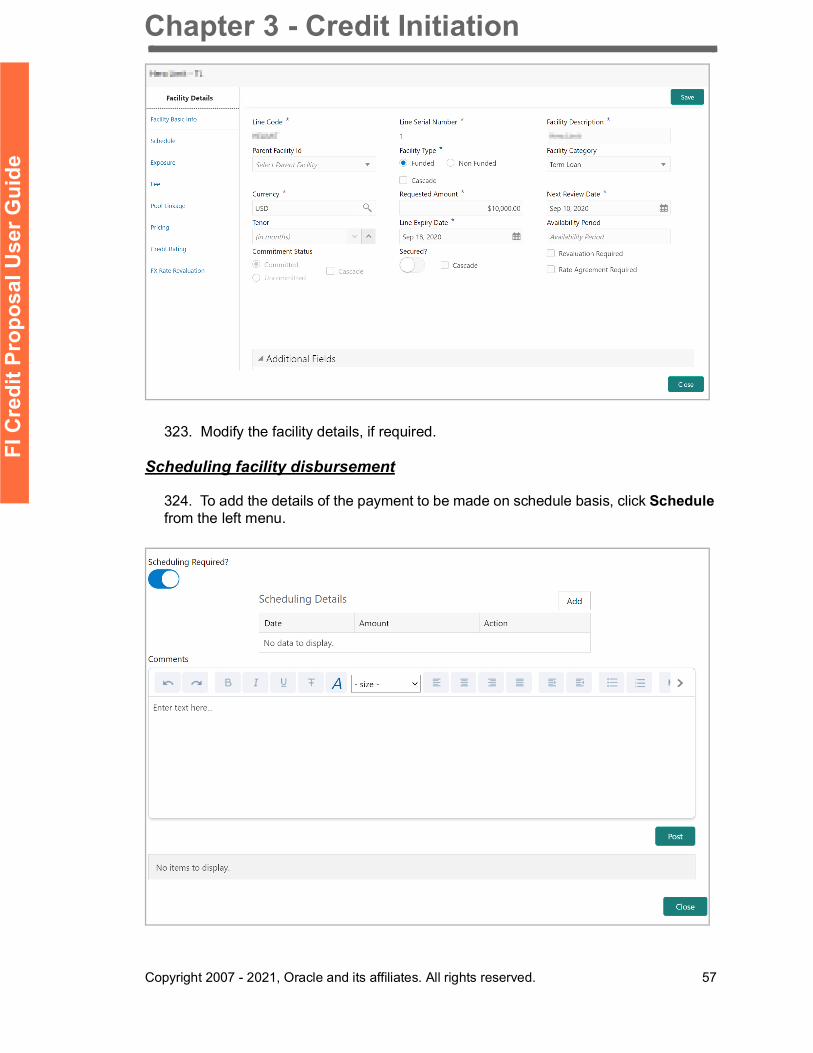
Modifying Facility Details
322. Upon clicking Save & Configure in New Facility window or clicking Edit Facility under hamburger icon, the Facility Details window appears:
Chapter 3 - Credit Initiation
Copyright 2007 - 2021, Oracle and its affiliates. All rights reserved. 57
FI C
redi
t Pro
posa
l Use
r Gui
de
323. Modify the facility details, if required.
Scheduling facility disbursement
324. To add the details of the payment to be made on schedule basis, click Schedule from the left menu.
Chapter 3 - Credit Initiation
Copyright 2007 - 2021, Oracle and its affiliates. All rights reserved. 58
FI C
redi
t Pro
posa
l Use
r Gui
de
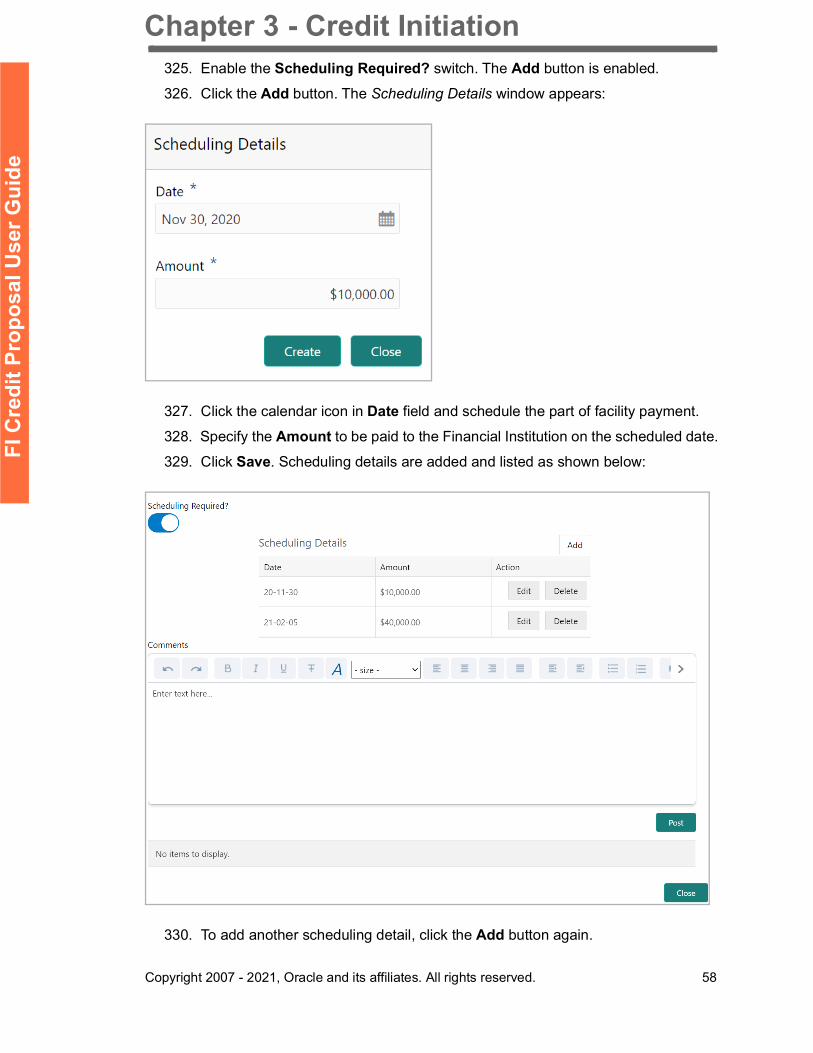
325. Enable the Scheduling Required? switch. The Add button is enabled.
326. Click the Add button. The Scheduling Details window appears:
327. Click the calendar icon in Date field and schedule the part of facility payment.
328. Specify the Amount to be paid to the Financial Institution on the scheduled date.
329. Click Save. Scheduling details are added and listed as shown below:
330. To add another scheduling detail, click the Add button again.
Chapter 3 - Credit Initiation
Copyright 2007 - 2021, Oracle and its affiliates. All rights reserved. 59
FI C
redi
t Pro
posa
l Use
r Gui
de
331. To edit the scheduling detail, click the Edit button.
332. To delete the scheduling detail, click the Delete button.
333. Specify remarks for the schedule, if any.
334. Click Post. Comment is posted below the Comments text box.
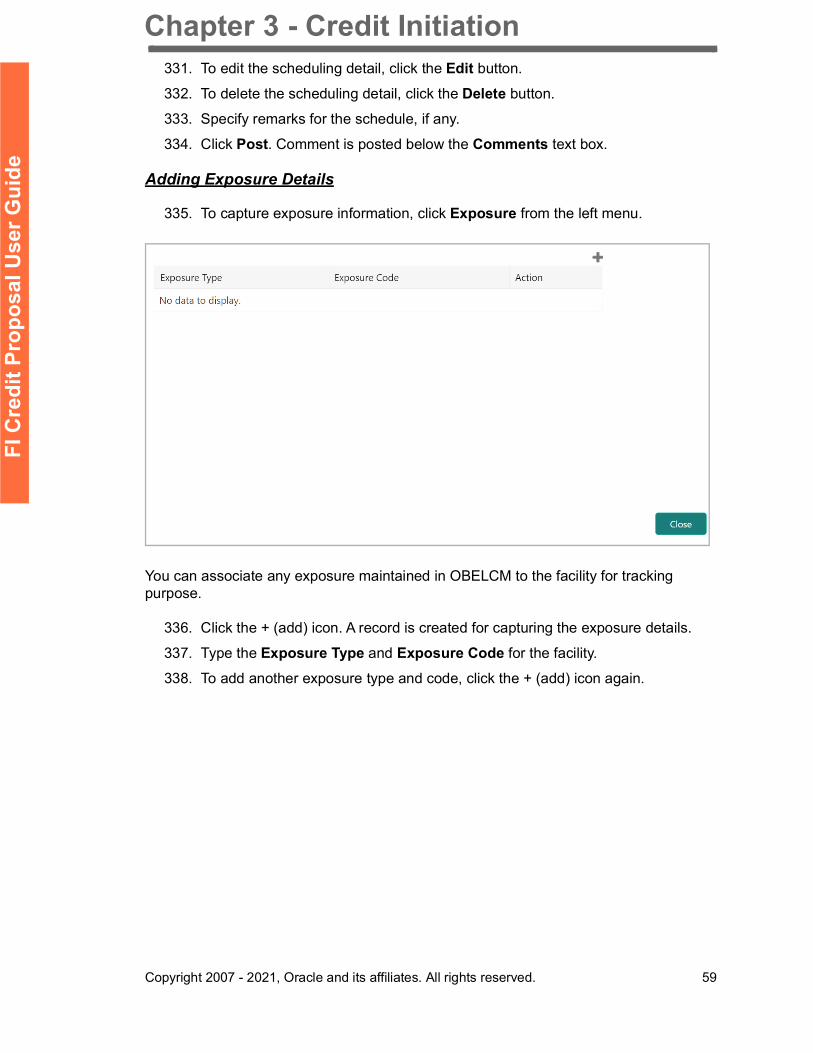
Adding Exposure Details
335. To capture exposure information, click Exposure from the left menu.
You can associate any exposure maintained in OBELCM to the facility for tracking purpose.
336. Click the + (add) icon. A record is created for capturing the exposure details.
337. Type the Exposure Type and Exposure Code for the facility.
338. To add another exposure type and code, click the + (add) icon again.
Chapter 3 - Credit Initiation
Copyright 2007 - 2021, Oracle and its affiliates. All rights reserved. 60
FI C
redi
t Pro
posa
l Use
r Gui
de
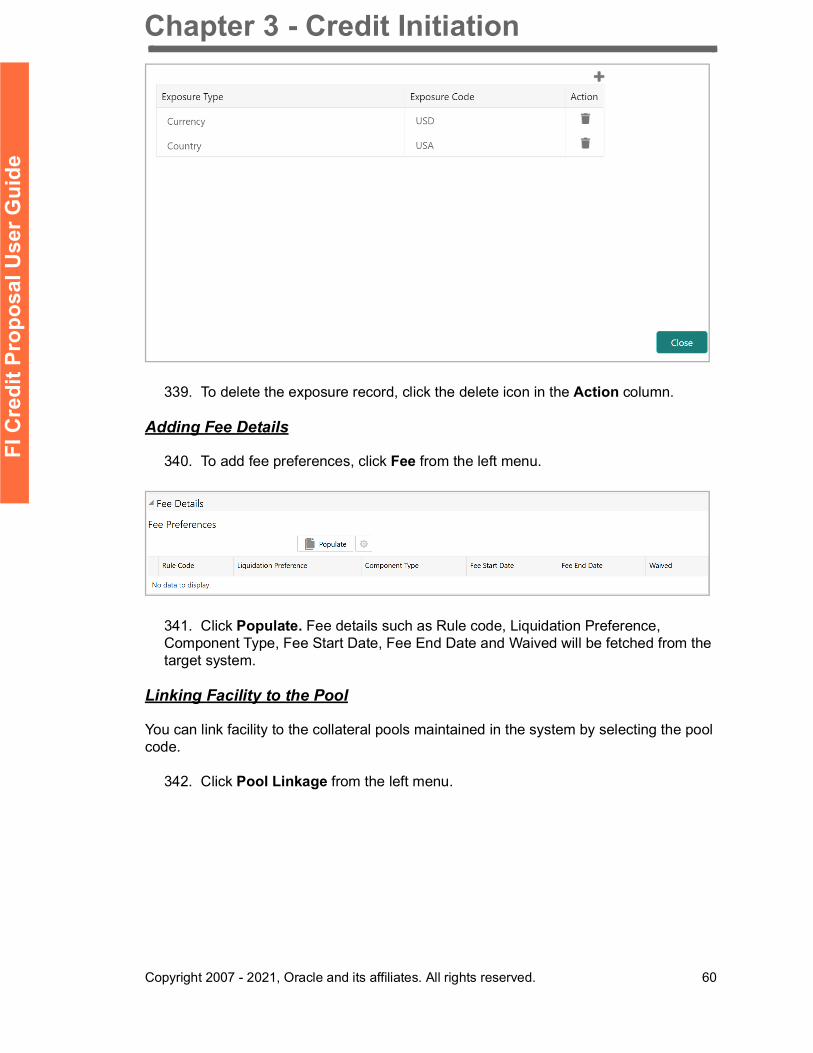
339. To delete the exposure record, click the delete icon in the Action column.
Adding Fee Details
340. To add fee preferences, click Fee from the left menu.
341. Click Populate. Fee details such as Rule code, Liquidation Preference, Component Type, Fee Start Date, Fee End Date and Waived will be fetched from the target system.
Linking Facility to the Pool
You can link facility to the collateral pools maintained in the system by selecting the pool code.
342. Click Pool Linkage from the left menu.
Chapter 3 - Credit Initiation
Copyright 2007 - 2021, Oracle and its affiliates. All rights reserved. 61
FI C
redi
t Pro
posa
l Use
r Gui
de
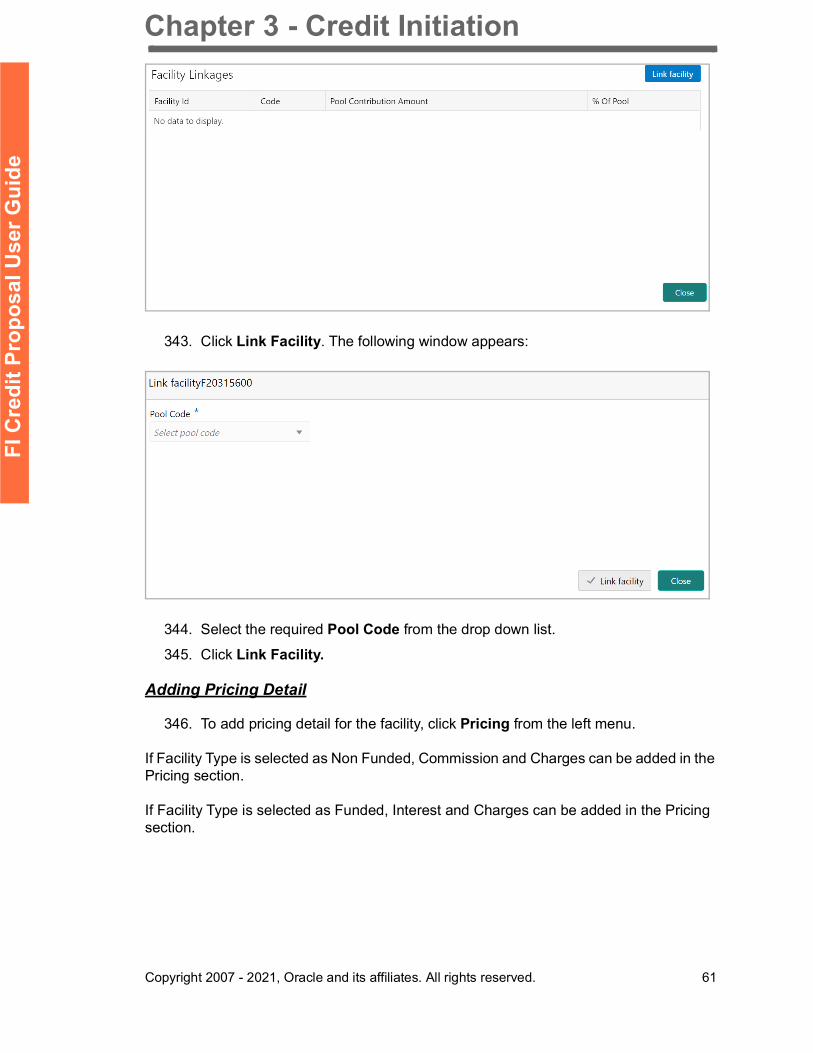
343. Click Link Facility. The following window appears:
344. Select the required Pool Code from the drop down list.
345. Click Link Facility.
Adding Pricing Detail
346. To add pricing detail for the facility, click Pricing from the left menu.
If Facility Type is selected as Non Funded, Commission and Charges can be added in the Pricing section.
If Facility Type is selected as Funded, Interest and Charges can be added in the Pricing section.

Chapter 3 - Credit Initiation
Copyright 2007 - 2021, Oracle and its affiliates. All rights reserved. 62
FI C
redi
t Pro
posa
l Use
r Gui
de
347. To add commission details, click the add icon. The Commission Details window appears:
348. Select the Rate Type from the drop down list.
349. Select the commission collection frequency from the Rate Basis drop down list.
350. Select the Commission Type from the drop down list.
351. Select the Collection Period from the drop down list.
352. Search and select the Currency in which the commission has to be collected from the party.
353. If “Fixed Rate” is selected as the Rate Type, specify the Minimum Commission Amount and the Commission Rate in the respective fields.
354. If “Flat Amount” is selected as the Rate Type, specify the Commission Amount.355. Click Save. Commission details are added and listed in Commission tab.
356. To cancel the operation, click Cancel.
Chapter 3 - Credit Initiation
Copyright 2007 - 2021, Oracle and its affiliates. All rights reserved. 63
FI C
redi
t Pro
posa
l Use
r Gui
de
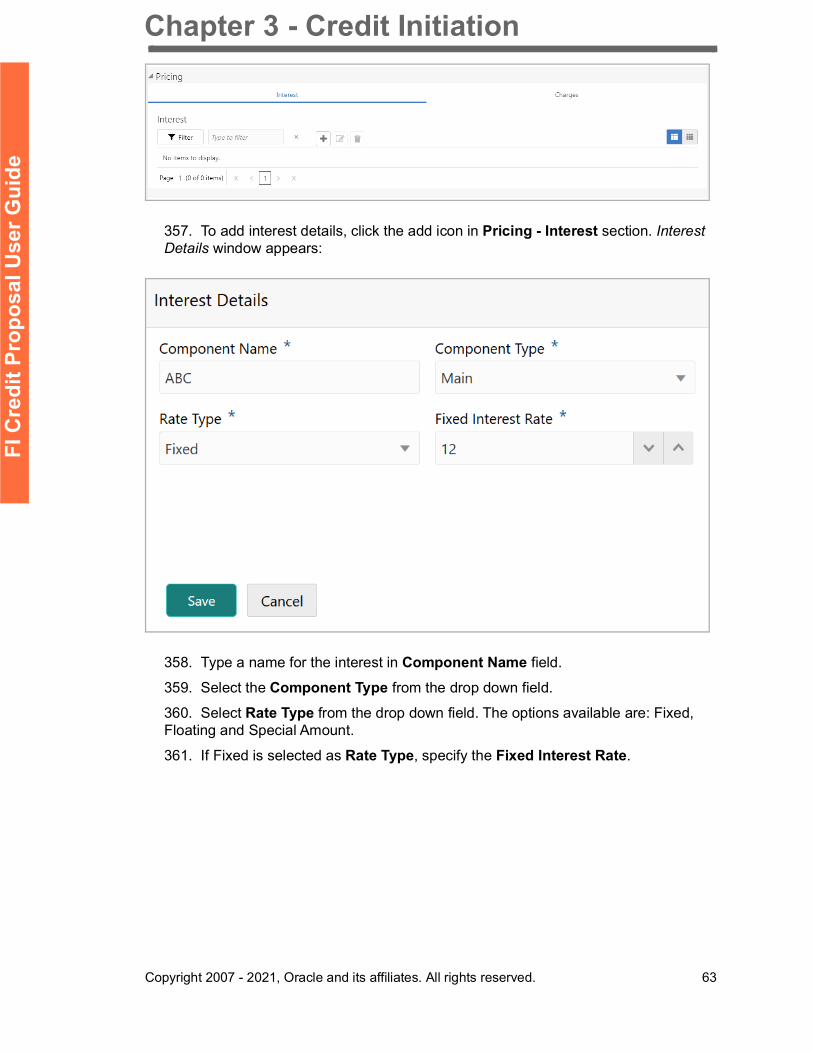
357. To add interest details, click the add icon in Pricing - Interest section. Interest Details window appears:
358. Type a name for the interest in Component Name field.
359. Select the Component Type from the drop down field.
360. Select Rate Type from the drop down field. The options available are: Fixed, Floating and Special Amount.
361. If Fixed is selected as Rate Type, specify the Fixed Interest Rate.
Chapter 3 - Credit Initiation
Copyright 2007 - 2021, Oracle and its affiliates. All rights reserved. 64
FI C
redi
t Pro
posa
l Use
r Gui
de
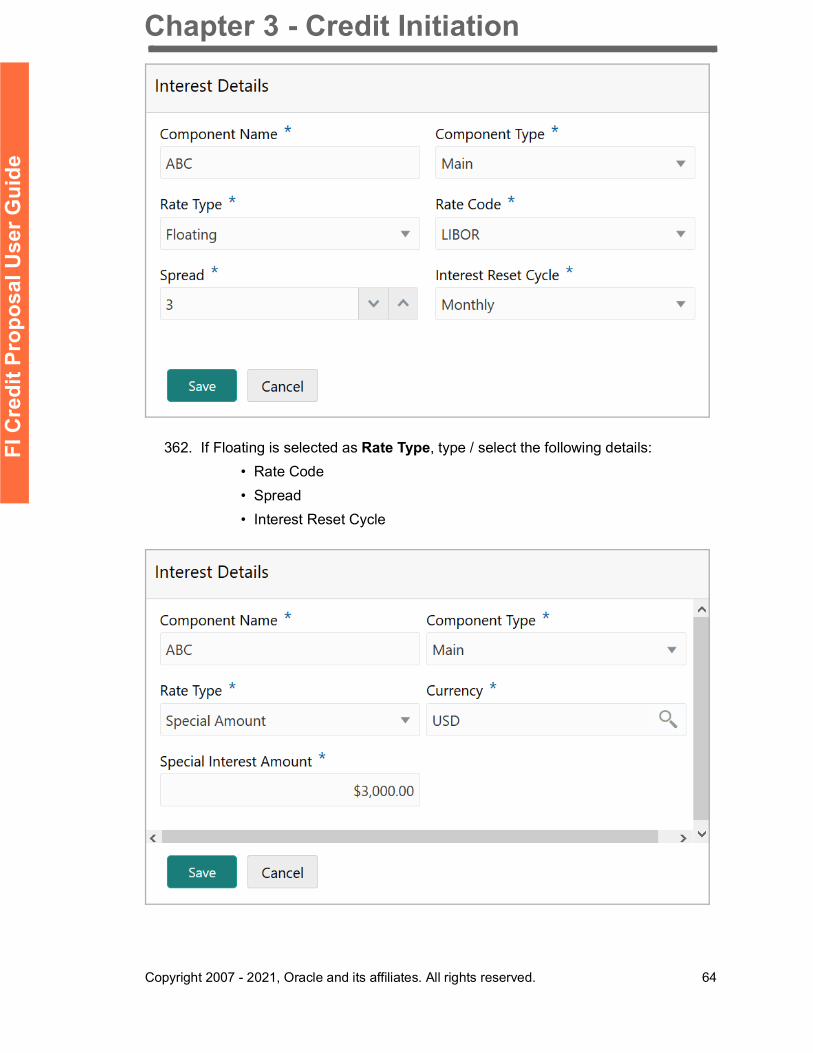
362. If Floating is selected as Rate Type, type / select the following details:• Rate Code• Spread• Interest Reset Cycle
Chapter 3 - Credit Initiation
Copyright 2007 - 2021, Oracle and its affiliates. All rights reserved. 65
FI C
redi
t Pro
posa
l Use
r Gui
de
363. If Special Amount is selected as Rate Type, search and select the Currency and then specify the Special Interest Amount.364. Click Save. Interest details are added and listed as shown below:
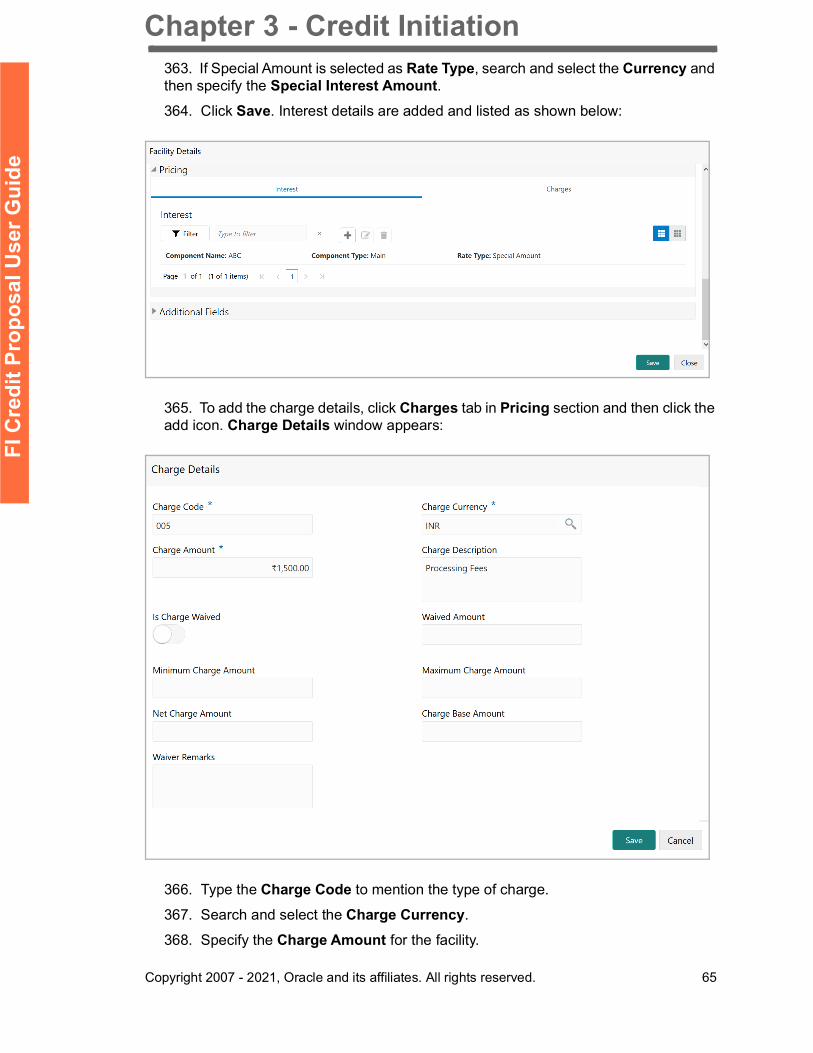
365. To add the charge details, click Charges tab in Pricing section and then click the add icon. Charge Details window appears:
366. Type the Charge Code to mention the type of charge.
367. Search and select the Charge Currency.
368. Specify the Charge Amount for the facility.
Chapter 3 - Credit Initiation
Copyright 2007 - 2021, Oracle and its affiliates. All rights reserved. 66
FI C
redi
t Pro
posa
l Use
r Gui
de
369. Type the Charge Description.
370. Enable Is Charge Waived switch, if waiver can be claimed for this charge.
371. Enter the following details in respective fields:• Waived Amount• Minimum Charge Amount• Maximum Charge Amount• Net Charge Amount• Charge Base Amount• Waiver Remarks
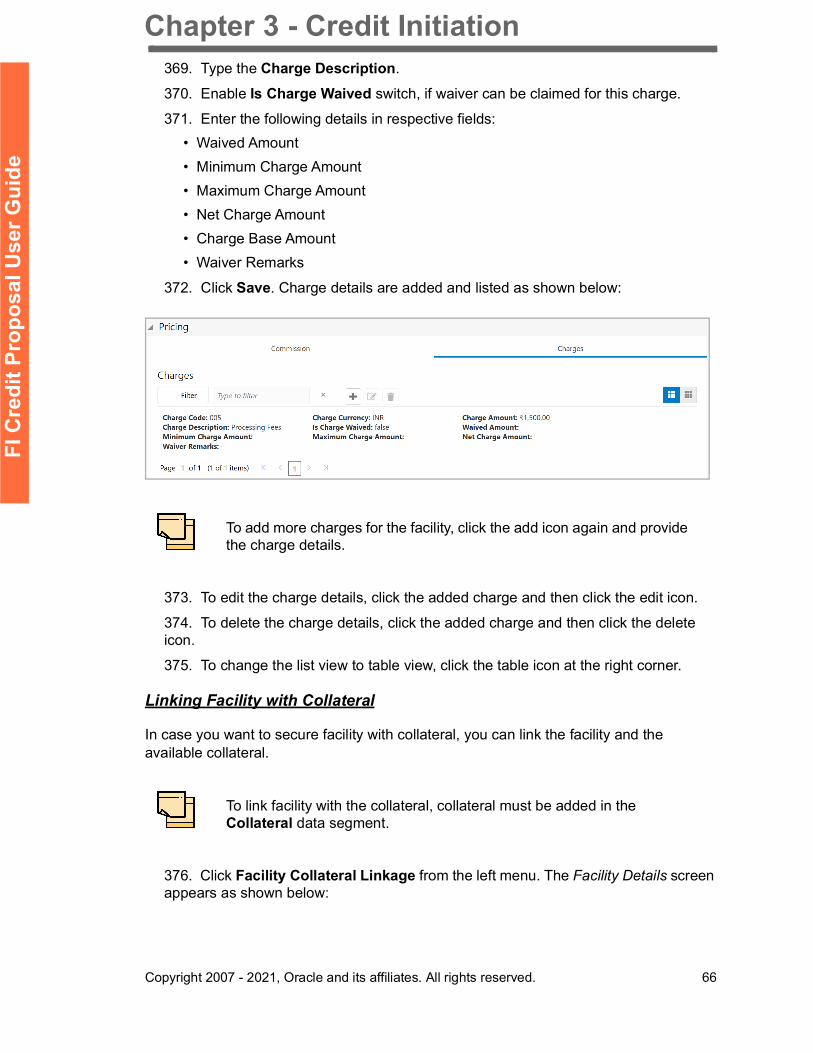
372. Click Save. Charge details are added and listed as shown below:
373. To edit the charge details, click the added charge and then click the edit icon.
374. To delete the charge details, click the added charge and then click the delete icon.
375. To change the list view to table view, click the table icon at the right corner.
Linking Facility with Collateral
In case you want to secure facility with collateral, you can link the facility and the available collateral.
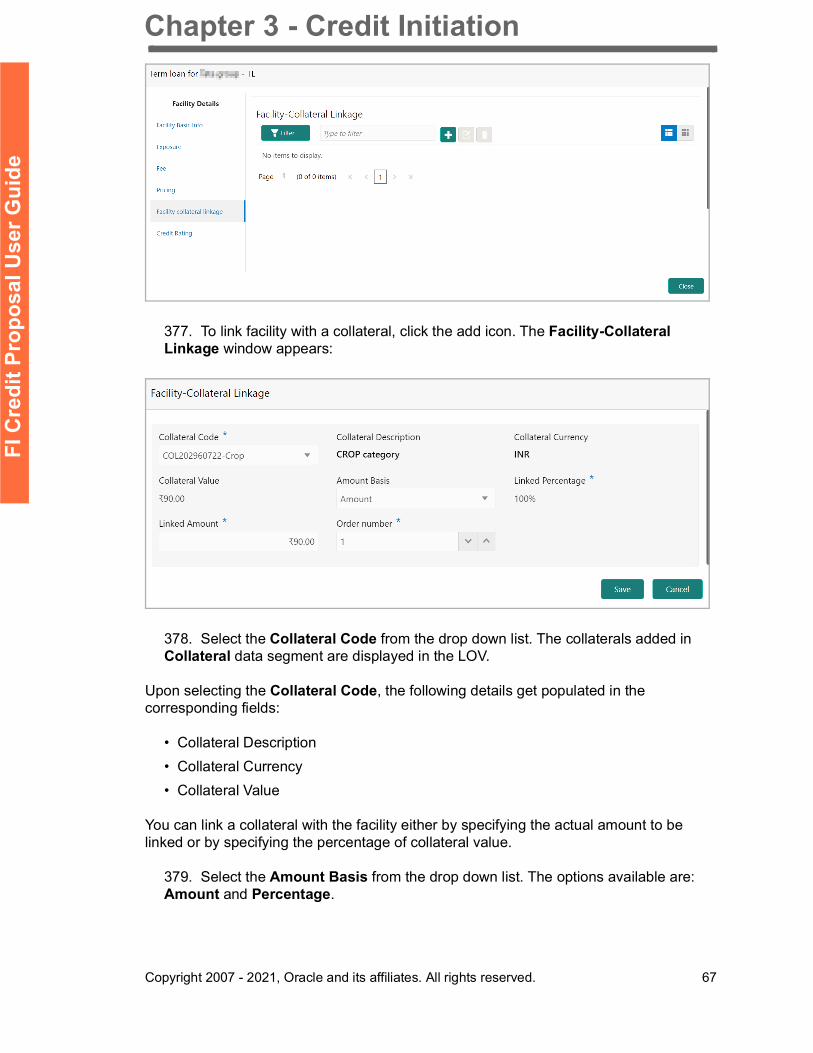
376. Click Facility Collateral Linkage from the left menu. The Facility Details screen appears as shown below:
To add more charges for the facility, click the add icon again and provide the charge details.
To link facility with the collateral, collateral must be added in the Collateral data segment.
Chapter 3 - Credit Initiation
Copyright 2007 - 2021, Oracle and its affiliates. All rights reserved. 67
FI C
redi
t Pro
posa
l Use
r Gui
de
377. To link facility with a collateral, click the add icon. The Facility-Collateral Linkage window appears:
378. Select the Collateral Code from the drop down list. The collaterals added in Collateral data segment are displayed in the LOV.
Upon selecting the Collateral Code, the following details get populated in the corresponding fields:
• Collateral Description• Collateral Currency• Collateral Value
You can link a collateral with the facility either by specifying the actual amount to be linked or by specifying the percentage of collateral value.
379. Select the Amount Basis from the drop down list. The options available are: Amount and Percentage.
Chapter 3 - Credit Initiation
Copyright 2007 - 2021, Oracle and its affiliates. All rights reserved. 68
FI C
redi
t Pro
posa
l Use
r Gui
de
380. If Amount is selected as Amount Basis, specify the Linked Amount. The system calculates and displays the Linked Percentage based on value provided in the Linked Amount field. 381. If Percentage is selected as Amount Basis, specify the Linked Percentage. The system calculates and displays the Linked Amount based on value provided in the Linked Percentage field. 382. In the Order number field, specify the collateral utilization order for e.g. 1, or 2.
If the collateral is contributing to the line, and the order number is mentioned as 2, collateral utilization will happen only after the other amount (e.g. Line amount) with order number 1 is utilized.
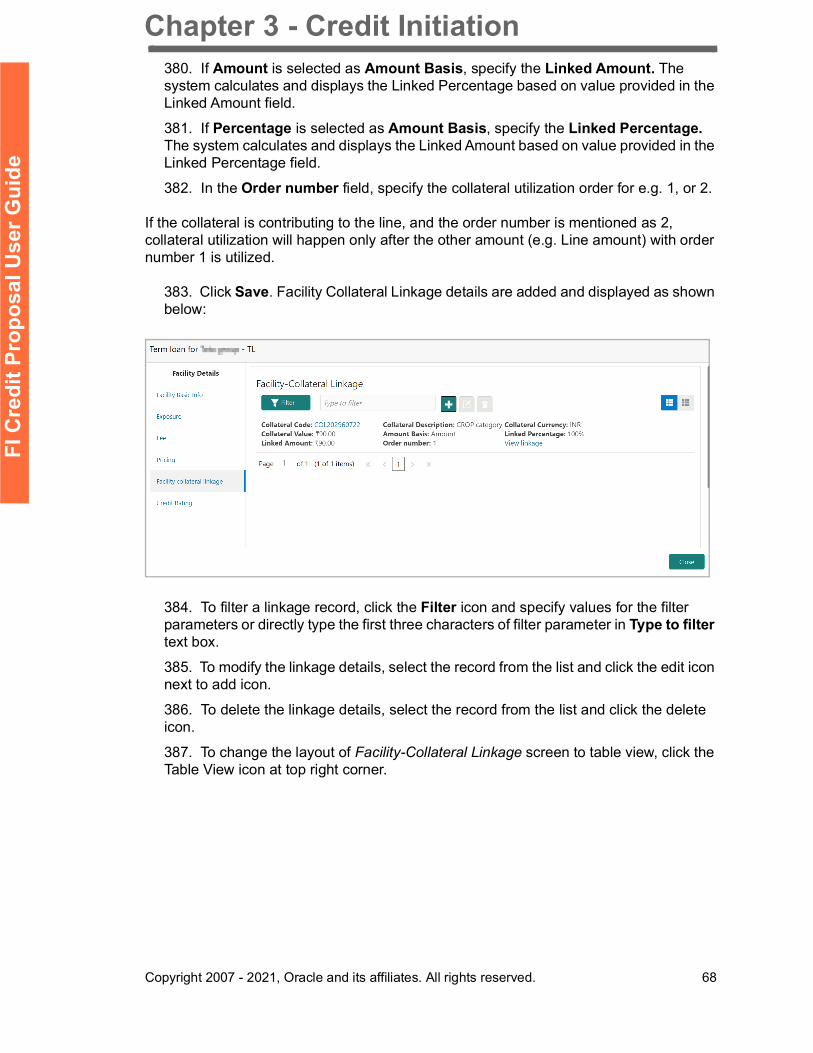
383. Click Save. Facility Collateral Linkage details are added and displayed as shown below:
384. To filter a linkage record, click the Filter icon and specify values for the filter parameters or directly type the first three characters of filter parameter in Type to filter text box.
385. To modify the linkage details, select the record from the list and click the edit icon next to add icon.
386. To delete the linkage details, select the record from the list and click the delete icon.
387. To change the layout of Facility-Collateral Linkage screen to table view, click the Table View icon at top right corner.
Chapter 3 - Credit Initiation
Copyright 2007 - 2021, Oracle and its affiliates. All rights reserved. 69
FI C
redi
t Pro
posa
l Use
r Gui
de
Adding Credit Rating
If the facility is rated by the rating organizations, you can add the ratings of facility under Credit Ratings menu.
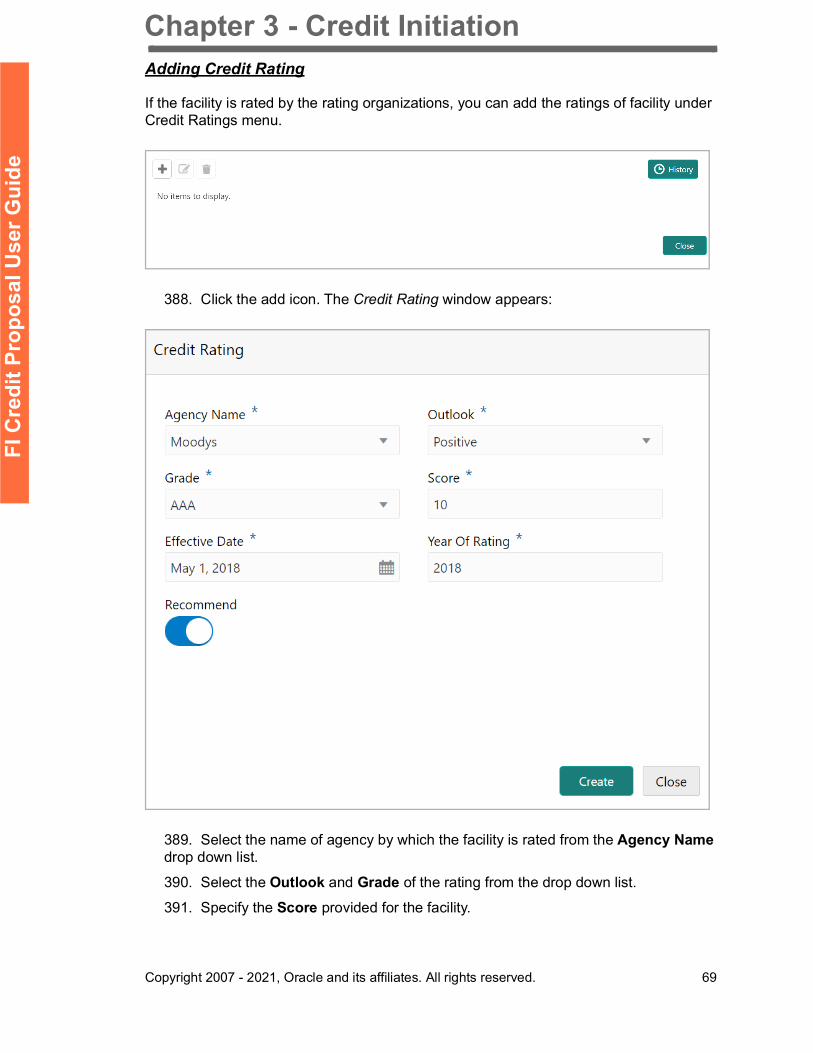
388. Click the add icon. The Credit Rating window appears:
389. Select the name of agency by which the facility is rated from the Agency Name drop down list.
390. Select the Outlook and Grade of the rating from the drop down list.
391. Specify the Score provided for the facility.
Chapter 3 - Credit Initiation
Copyright 2007 - 2021, Oracle and its affiliates. All rights reserved. 70
FI C
redi
t Pro
posa
l Use
r Gui
de
392. Click the calendar icon in the Effective Date field and select the date on which the rating is provided.
The Year Of Rating is automatically populated based on the selected Effective Date.
393. Enable the Recommend switch, if the facility is recommended by the rating agency.
394. Click Create. The rating is added and displayed in the Credit Rating page.
395. To view the history of credit ratings added during different processes, click the History icon.
396. To filter the credit ratings in the History window, click the Filter icon and select the Agency Name or directly type the agency name in Type to filter text box.
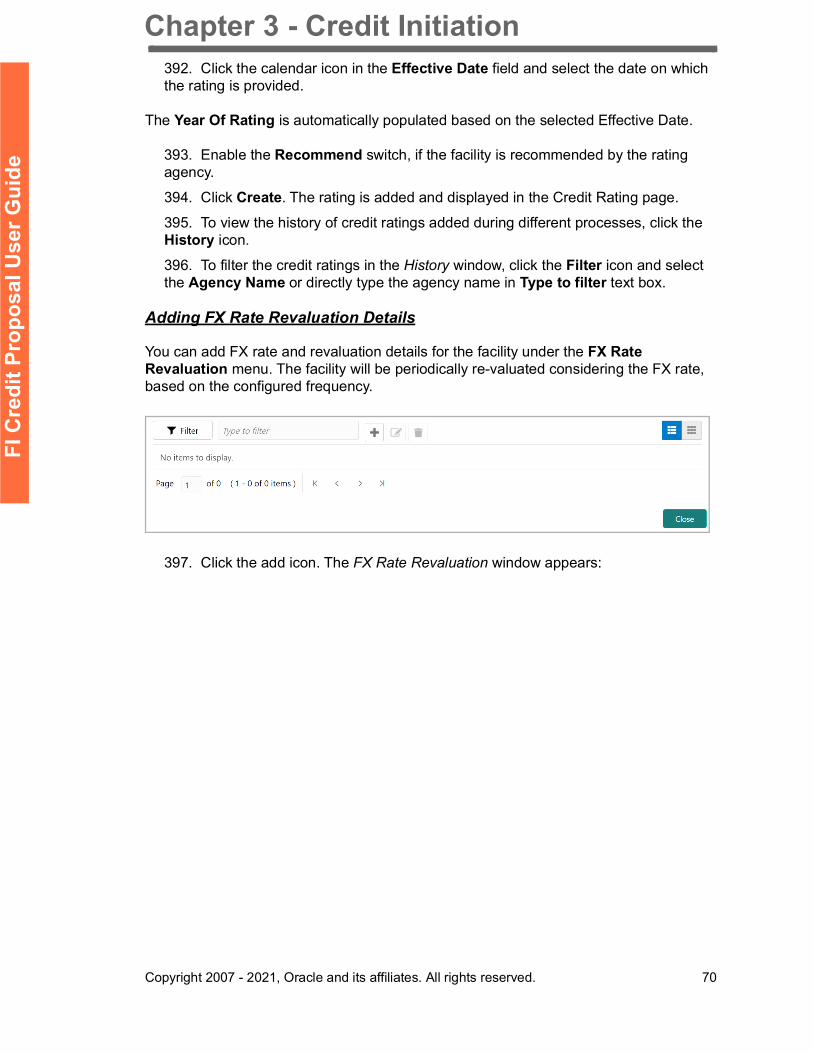
Adding FX Rate Revaluation Details
You can add FX rate and revaluation details for the facility under the FX Rate Revaluation menu. The facility will be periodically re-valuated considering the FX rate, based on the configured frequency.
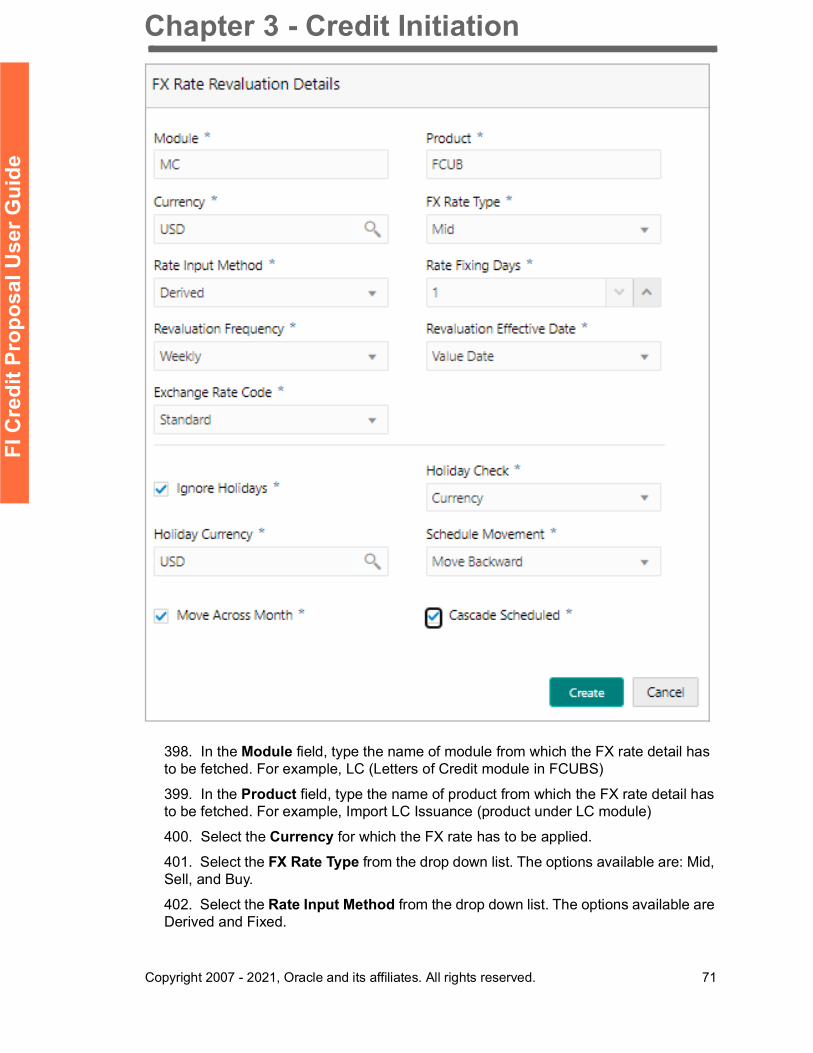
397. Click the add icon. The FX Rate Revaluation window appears:
Chapter 3 - Credit Initiation
Copyright 2007 - 2021, Oracle and its affiliates. All rights reserved. 71
FI C
redi
t Pro
posa
l Use
r Gui
de
398. In the Module field, type the name of module from which the FX rate detail has to be fetched. For example, LC (Letters of Credit module in FCUBS)
399. In the Product field, type the name of product from which the FX rate detail has to be fetched. For example, Import LC Issuance (product under LC module)
400. Select the Currency for which the FX rate has to be applied.
401. Select the FX Rate Type from the drop down list. The options available are: Mid, Sell, and Buy.
402. Select the Rate Input Method from the drop down list. The options available are Derived and Fixed.
Chapter 3 - Credit Initiation
Copyright 2007 - 2021, Oracle and its affiliates. All rights reserved. 72
FI C
redi
t Pro
posa
l Use
r Gui
de
If Rate Input Method is selected as Derived, the Exchange Rate Code field appears. You must select the required exchange rate code from the list of codes maintained in the mentioned Product.
If Rate Input Method is selected as Fixed, the Fixed Rate field appears. You must specify the fixed rate for the revaluation.
403. Specify the Rate Fixing Days. The value must be between 1 to 5.
If the Rate Fixing Days is set as 1, the system will pick up the rate from previous day i.e. current day - 1.
404. Select the Revaluation Frequency from the drop down list. The options available are: Daily, Weekly, Monthly, Quarterly, Half Yearly, Yearly, and None.
405. Select the Revaluation Effective Date from which the revaluation should happen. The options available are: Value Date and Calendar Date.
406. Enable the Ignore Holidays check box, if required. The revaluations that are due on holidays will not be performed on the holiday.
407. Select the Holiday Check option from the drop down list. The options available are Currency, Both, and Local.
The system will determine the holidays based on the selected Holiday Check option. For example, if Holiday Check is selected as Currency, then the system will refer the Currency Holiday Maintenance to determine holidays.
408. Select the Holiday Currency for which the holiday table must be checked.
409. Select the Schedule Movement option from the drop down list. The options available are: Move Backward and Move Forward.
If Move Backward option is selected, the system will schedule the revaluations that are due on holiday before the holiday.
If Move Forward option is selected, the system will schedule the revaluations that are due on holiday after the holiday.
410. Enable the Move Across Month check box, if required.
If you have chosen to move a schedule falling due on a holiday to the next working day, or the previous working day, and it crosses over into another month, the schedule date will be moved only if you indicate so. If not, the schedule date will be kept in the same month.
411. Enable the Cascade Schedule check box, if required. Next schedule will be fixed based on how the schedule date was moved for a holiday.
For example, if the Revaluation Frequency is Monthly and the schedule that is due on holiday (1st January) is moved forward to the next day (2nd January) based on selected Schedule Movement option, then from the next month (February), the schedule is shifted to 2nd of every month if the Cascade Schedule check box is enabled.
Chapter 3 - Credit Initiation
Copyright 2007 - 2021, Oracle and its affiliates. All rights reserved. 73
FI C
redi
t Pro
posa
l Use
r Gui
de
412. Click Create. The FX rate revaluation details are saved.
413. To modify the added FX rate revaluation details, select the record and click the edit icon.
414. To delete the added FX rate revaluation details, select the record and click the delete icon.
415. To exit the Facility Details window, click Close.
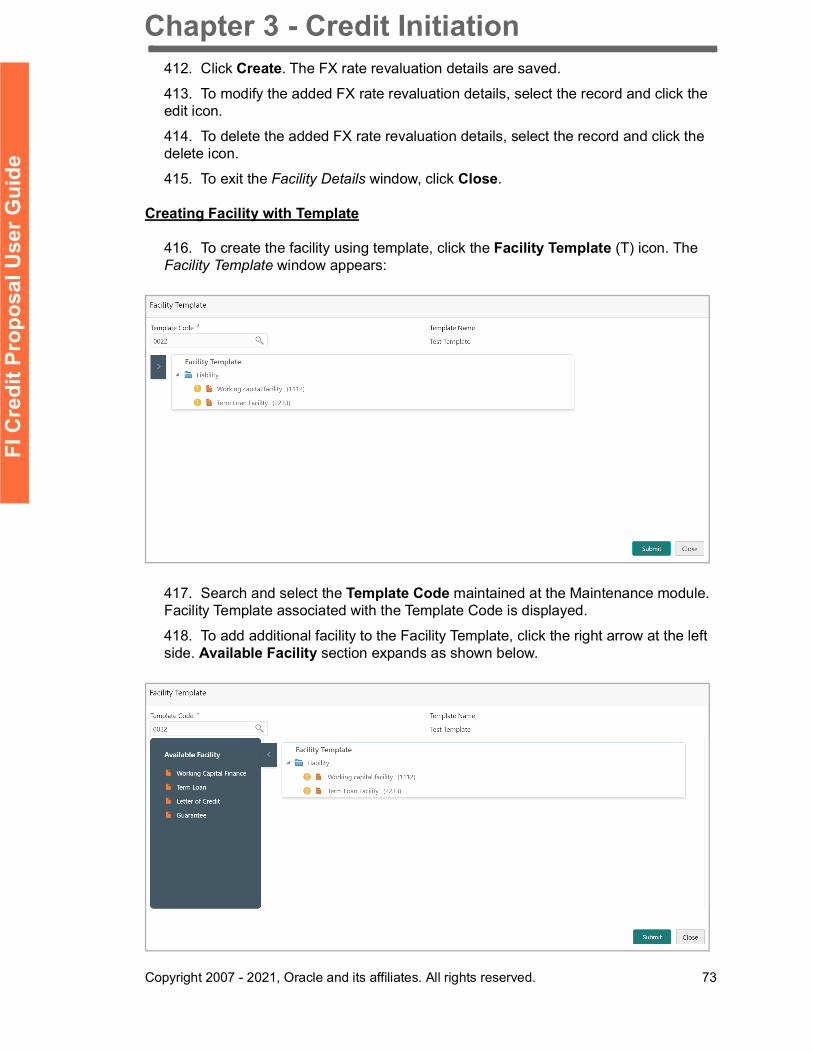
Creating Facility with Template
416. To create the facility using template, click the Facility Template (T) icon. The Facility Template window appears:
417. Search and select the Template Code maintained at the Maintenance module. Facility Template associated with the Template Code is displayed.
418. To add additional facility to the Facility Template, click the right arrow at the left side. Available Facility section expands as shown below.
Chapter 3 - Credit Initiation
Copyright 2007 - 2021, Oracle and its affiliates. All rights reserved. 74
FI C
redi
t Pro
posa
l Use
r Gui
de
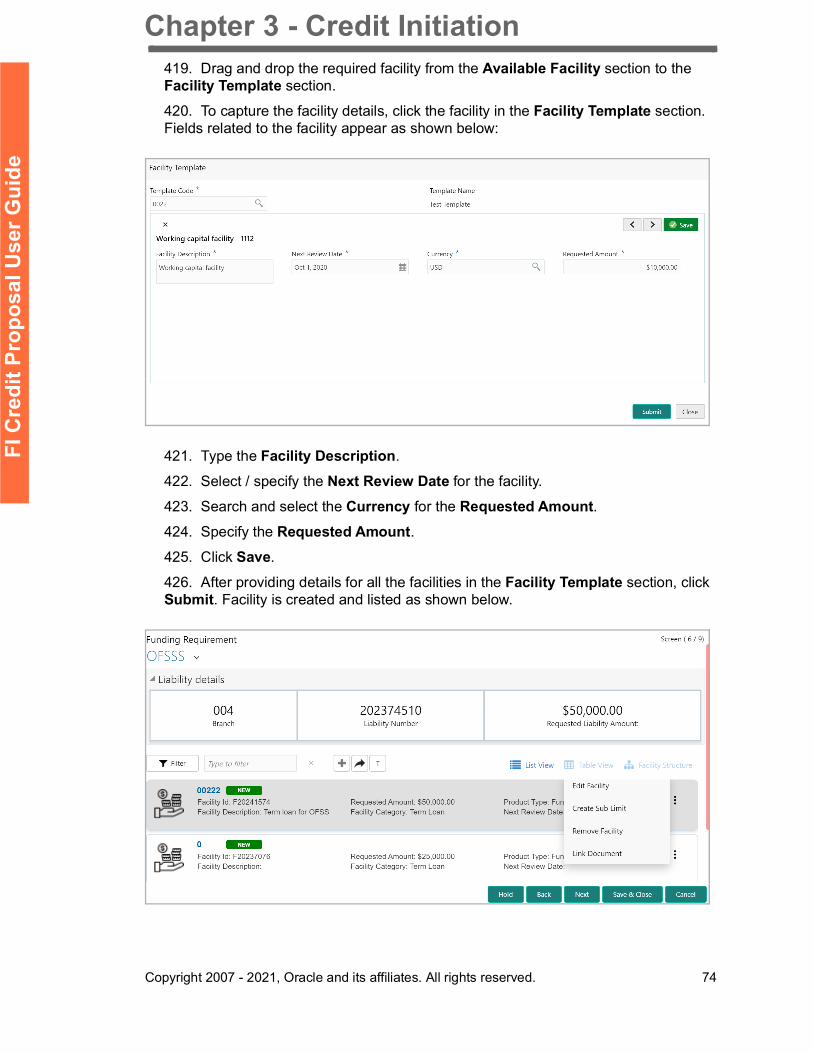
419. Drag and drop the required facility from the Available Facility section to the Facility Template section.
420. To capture the facility details, click the facility in the Facility Template section. Fields related to the facility appear as shown below:
421. Type the Facility Description.
422. Select / specify the Next Review Date for the facility.
423. Search and select the Currency for the Requested Amount.424. Specify the Requested Amount.425. Click Save.
426. After providing details for all the facilities in the Facility Template section, click Submit. Facility is created and listed as shown below.
Chapter 3 - Credit Initiation
Copyright 2007 - 2021, Oracle and its affiliates. All rights reserved. 75
FI C
redi
t Pro
posa
l Use
r Gui
de
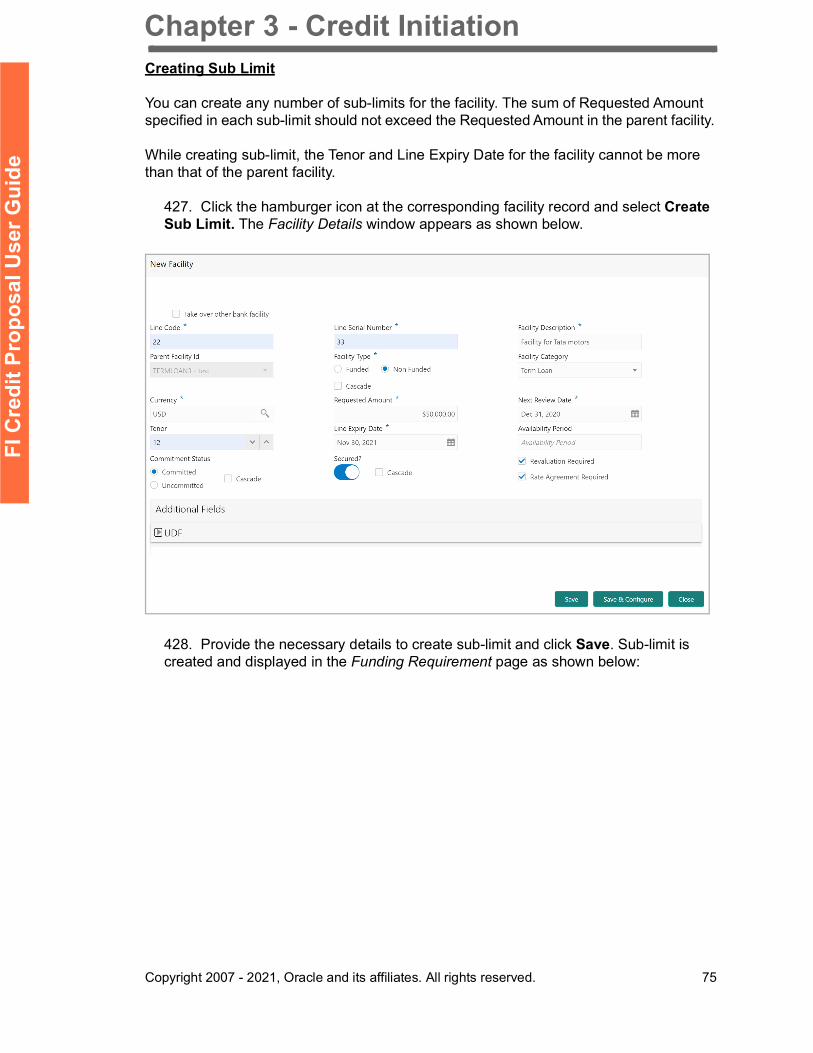
Creating Sub Limit
You can create any number of sub-limits for the facility. The sum of Requested Amount specified in each sub-limit should not exceed the Requested Amount in the parent facility.
While creating sub-limit, the Tenor and Line Expiry Date for the facility cannot be more than that of the parent facility.
427. Click the hamburger icon at the corresponding facility record and select Create Sub Limit. The Facility Details window appears as shown below.
428. Provide the necessary details to create sub-limit and click Save. Sub-limit is created and displayed in the Funding Requirement page as shown below:
Chapter 3 - Credit Initiation
Copyright 2007 - 2021, Oracle and its affiliates. All rights reserved. 76
FI C
redi
t Pro
posa
l Use
r Gui
de
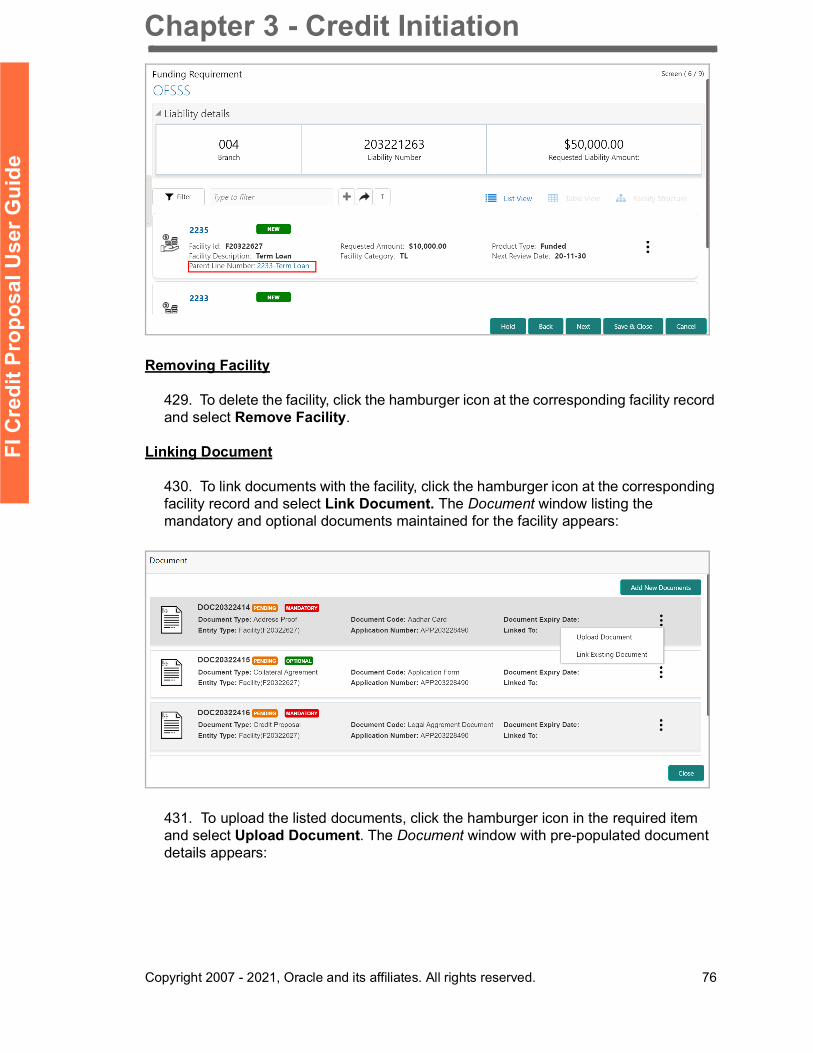
Removing Facility
429. To delete the facility, click the hamburger icon at the corresponding facility record and select Remove Facility.
Linking Document
430. To link documents with the facility, click the hamburger icon at the corresponding facility record and select Link Document. The Document window listing the mandatory and optional documents maintained for the facility appears:
431. To upload the listed documents, click the hamburger icon in the required item and select Upload Document. The Document window with pre-populated document details appears:
Chapter 3 - Credit Initiation
Copyright 2007 - 2021, Oracle and its affiliates. All rights reserved. 77
FI C
redi
t Pro
posa
l Use
r Gui
de
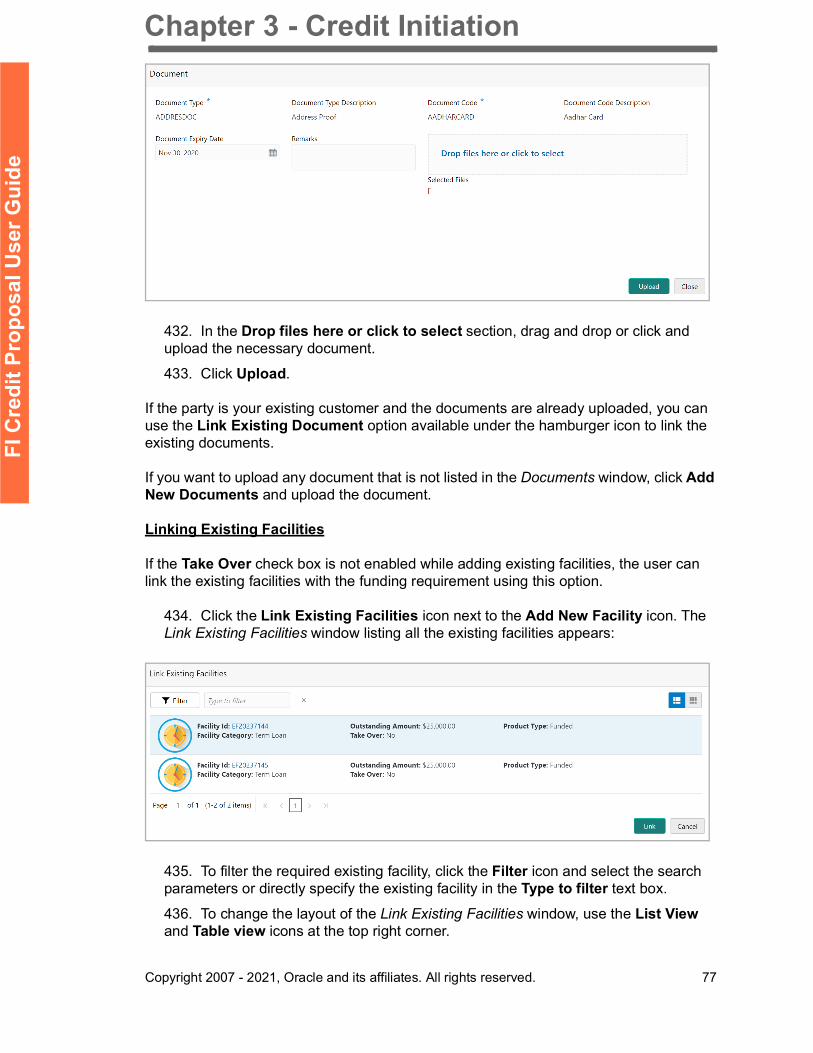
432. In the Drop files here or click to select section, drag and drop or click and upload the necessary document.
433. Click Upload.
If the party is your existing customer and the documents are already uploaded, you can use the Link Existing Document option available under the hamburger icon to link the existing documents.
If you want to upload any document that is not listed in the Documents window, click Add New Documents and upload the document.
Linking Existing Facilities
If the Take Over check box is not enabled while adding existing facilities, the user can link the existing facilities with the funding requirement using this option.
434. Click the Link Existing Facilities icon next to the Add New Facility icon. The Link Existing Facilities window listing all the existing facilities appears:
435. To filter the required existing facility, click the Filter icon and select the search parameters or directly specify the existing facility in the Type to filter text box.
436. To change the layout of the Link Existing Facilities window, use the List View and Table view icons at the top right corner.
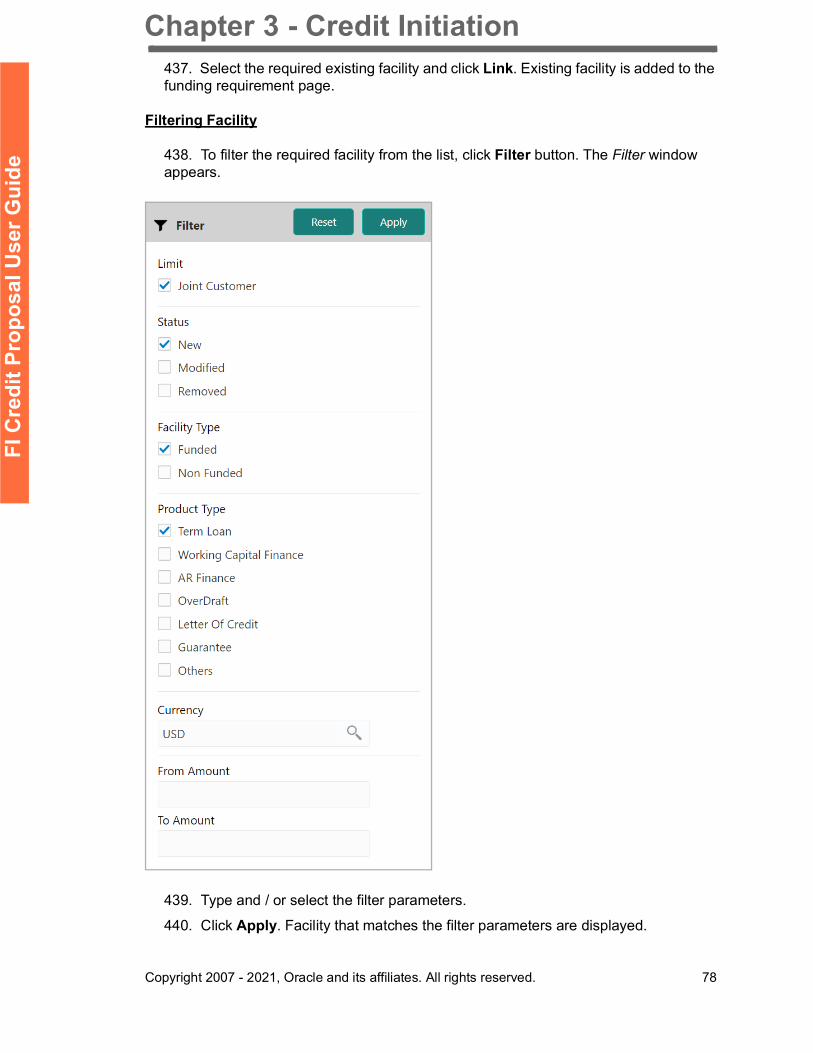
Chapter 3 - Credit Initiation
Copyright 2007 - 2021, Oracle and its affiliates. All rights reserved. 78
FI C
redi
t Pro
posa
l Use
r Gui
de
437. Select the required existing facility and click Link. Existing facility is added to the funding requirement page.
Filtering Facility
438. To filter the required facility from the list, click Filter button. The Filter window appears.
439. Type and / or select the filter parameters.
440. Click Apply. Facility that matches the filter parameters are displayed.
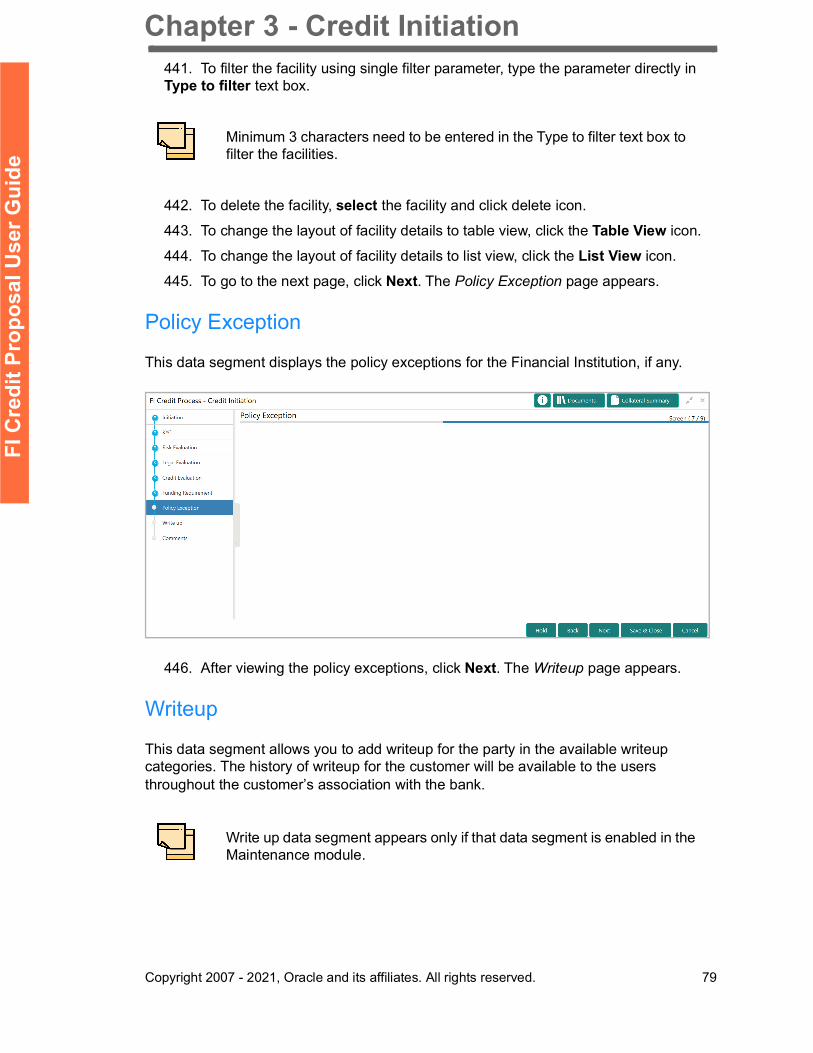
Chapter 3 - Credit Initiation
Copyright 2007 - 2021, Oracle and its affiliates. All rights reserved. 79
FI C
redi
t Pro
posa
l Use
r Gui
de
441. To filter the facility using single filter parameter, type the parameter directly in Type to filter text box.
442. To delete the facility, select the facility and click delete icon.
443. To change the layout of facility details to table view, click the Table View icon.
444. To change the layout of facility details to list view, click the List View icon.
445. To go to the next page, click Next. The Policy Exception page appears.
Policy Exception
This data segment displays the policy exceptions for the Financial Institution, if any.
446. After viewing the policy exceptions, click Next. The Writeup page appears.
Writeup
This data segment allows you to add writeup for the party in the available writeup categories. The history of writeup for the customer will be available to the users throughout the customer’s association with the bank.
Minimum 3 characters need to be entered in the Type to filter text box to filter the facilities.
Write up data segment appears only if that data segment is enabled in the Maintenance module.
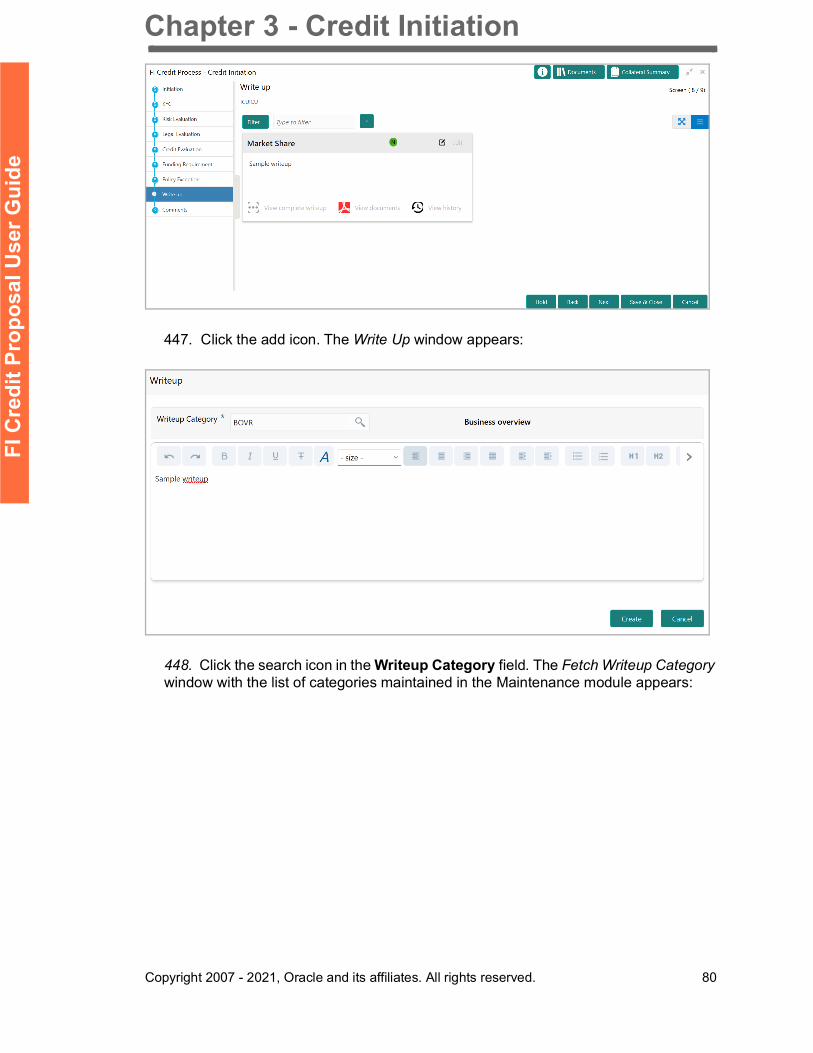
Chapter 3 - Credit Initiation
Copyright 2007 - 2021, Oracle and its affiliates. All rights reserved. 80
FI C
redi
t Pro
posa
l Use
r Gui
de
447. Click the add icon. The Write Up window appears:
448. Click the search icon in the Writeup Category field. The Fetch Writeup Category window with the list of categories maintained in the Maintenance module appears:

Chapter 3 - Credit Initiation
Copyright 2007 - 2021, Oracle and its affiliates. All rights reserved. 81
FI C
redi
t Pro
posa
l Use
r Gui
de
449. Click on the required category code. Selected code is displayed in the Writeup Category field.
450. Type the observations in the text box and click Create. The observations are added in the Write Up page as shown below:
451. To change the layout of Write up data segment to the expanded view, click the Expanded View icon at the top right corner. The write up is expanded as shown below:
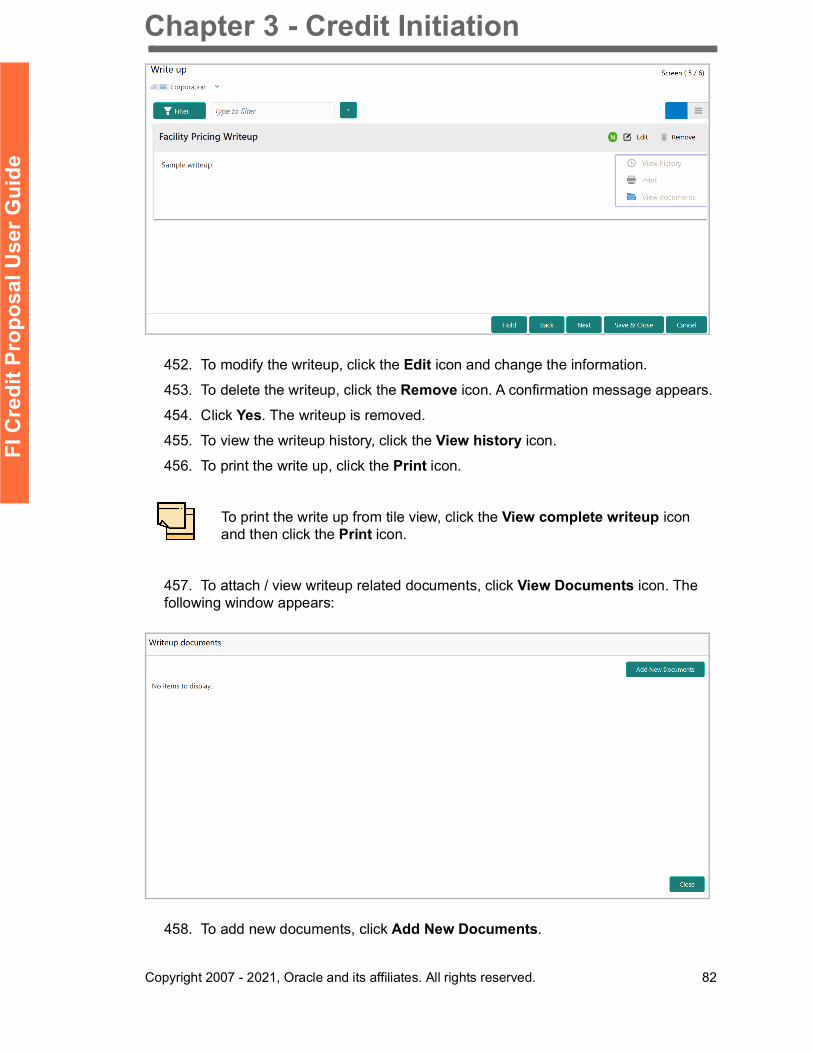
Chapter 3 - Credit Initiation
Copyright 2007 - 2021, Oracle and its affiliates. All rights reserved. 82
FI C
redi
t Pro
posa
l Use
r Gui
de
452. To modify the writeup, click the Edit icon and change the information.
453. To delete the writeup, click the Remove icon. A confirmation message appears.
454. Click Yes. The writeup is removed.
455. To view the writeup history, click the View history icon.
456. To print the write up, click the Print icon.
457. To attach / view writeup related documents, click View Documents icon. The following window appears:
458. To add new documents, click Add New Documents.
To print the write up from tile view, click the View complete writeup icon and then click the Print icon.
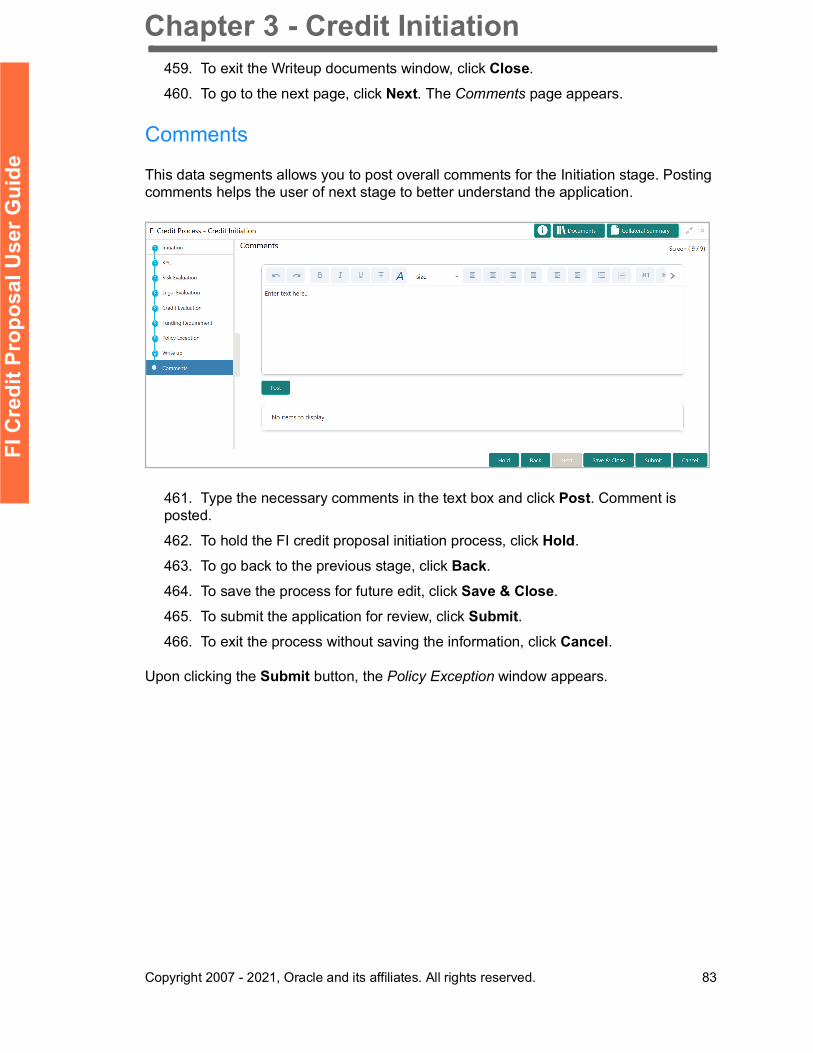
Chapter 3 - Credit Initiation
Copyright 2007 - 2021, Oracle and its affiliates. All rights reserved. 83
FI C
redi
t Pro
posa
l Use
r Gui
de
459. To exit the Writeup documents window, click Close.
460. To go to the next page, click Next. The Comments page appears.
Comments
This data segments allows you to post overall comments for the Initiation stage. Posting comments helps the user of next stage to better understand the application.
461. Type the necessary comments in the text box and click Post. Comment is posted.
462. To hold the FI credit proposal initiation process, click Hold.
463. To go back to the previous stage, click Back.
464. To save the process for future edit, click Save & Close.
465. To submit the application for review, click Submit. 466. To exit the process without saving the information, click Cancel.
Upon clicking the Submit button, the Policy Exception window appears.
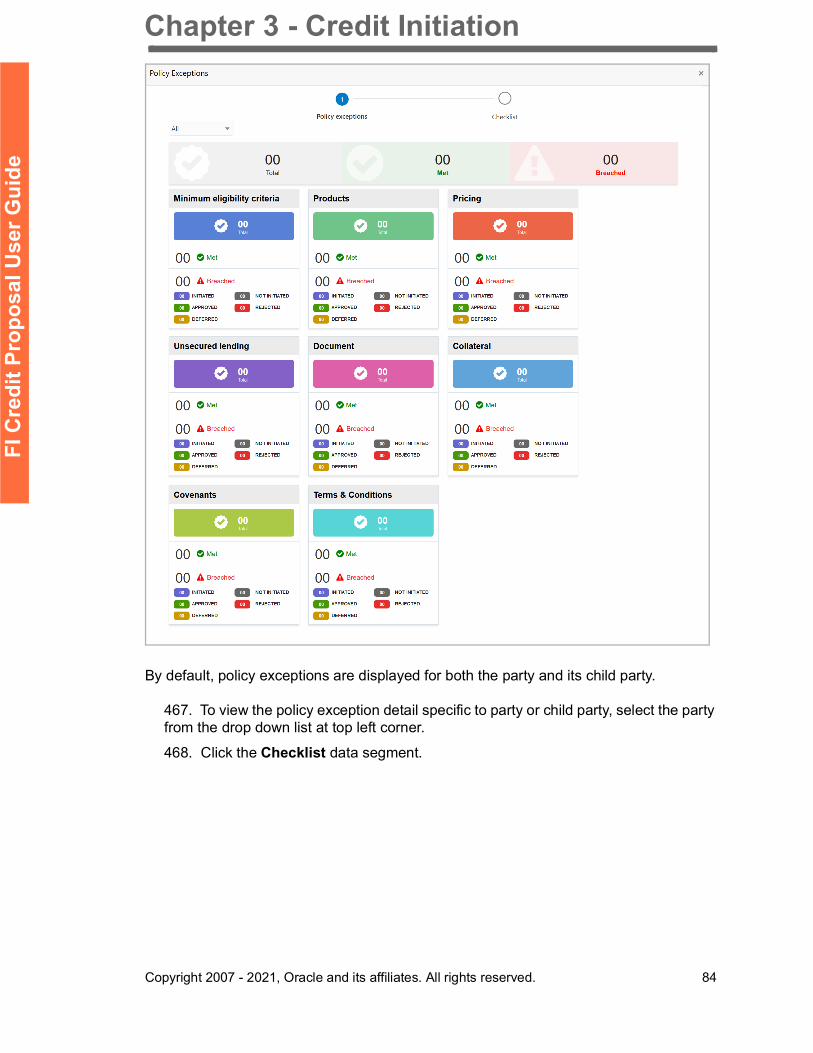
Chapter 3 - Credit Initiation
Copyright 2007 - 2021, Oracle and its affiliates. All rights reserved. 84
FI C
redi
t Pro
posa
l Use
r Gui
de
By default, policy exceptions are displayed for both the party and its child party.
467. To view the policy exception detail specific to party or child party, select the party from the drop down list at top left corner.
468. Click the Checklist data segment.

Chapter 3 - Credit Initiation
Copyright 2007 - 2021, Oracle and its affiliates. All rights reserved. 85
FI C
redi
t Pro
posa
l Use
r Gui
de
469. Select the Outcome as PROCEED.
470. Click Submit.
Upon submitting the FI credit proposal application, the application is moved to Review and Recommendation stage.
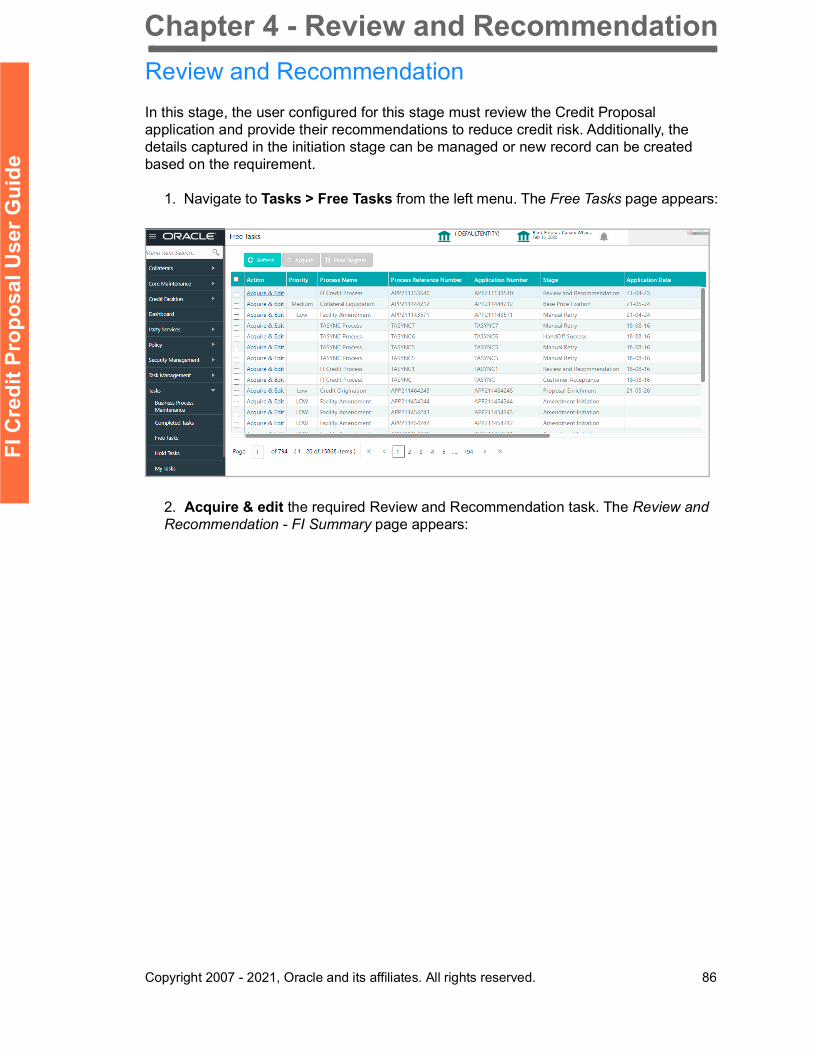
Chapter 4 - Review and Recommendation
Copyright 2007 - 2021, Oracle and its affiliates. All rights reserved. 86
FI C
redi
t Pro
posa
l Use
r Gui
de
Review and RecommendationIn this stage, the user configured for this stage must review the Credit Proposal application and provide their recommendations to reduce credit risk. Additionally, the details captured in the initiation stage can be managed or new record can be created based on the requirement.
1. Navigate to Tasks > Free Tasks from the left menu. The Free Tasks page appears:
2. Acquire & edit the required Review and Recommendation task. The Review and Recommendation - FI Summary page appears:
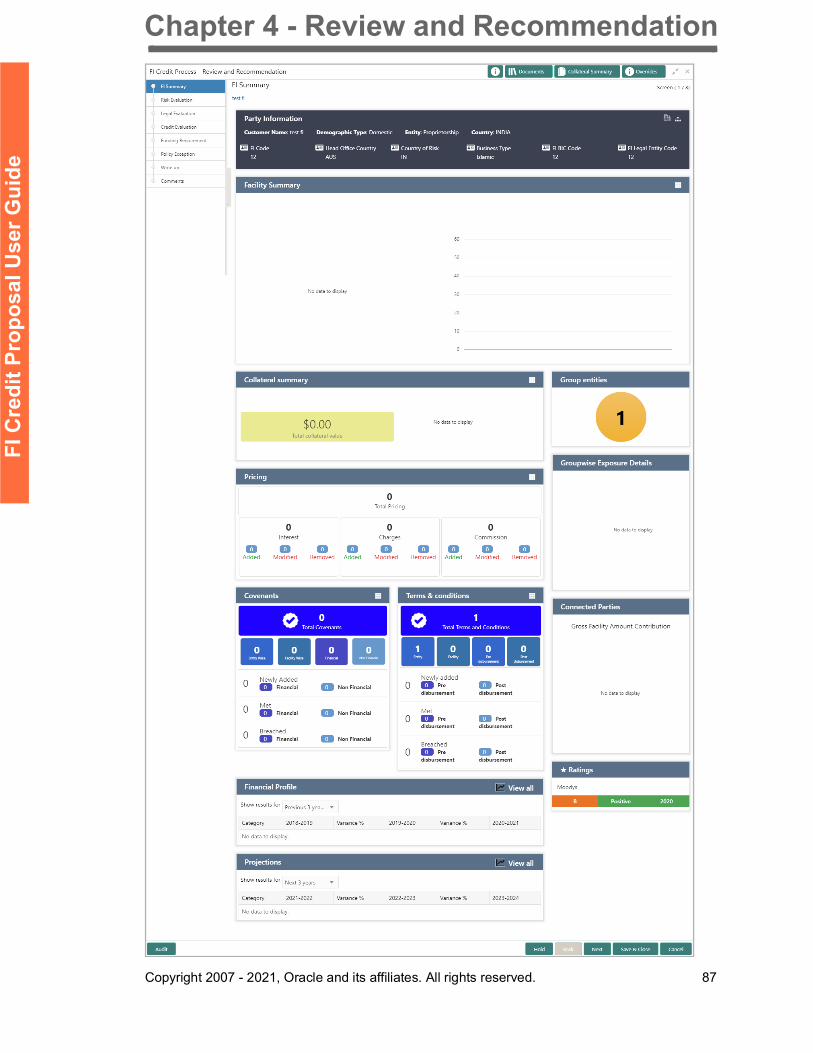
Chapter 4 - Review and Recommendation
Copyright 2007 - 2021, Oracle and its affiliates. All rights reserved. 87
FI C
redi
t Pro
posa
l Use
r Gui
de
Chapter 4 - Review and Recommendation
Copyright 2007 - 2021, Oracle and its affiliates. All rights reserved. 88
FI C
redi
t Pro
posa
l Use
r Gui
de
Review and Recommendation stage is similar to the Initiation stage. Refer Initiation chapter for field level explanation.
Upon selecting the Outcome as ‘Proceed’ and clicking Submit, the FI Credit Proposal application is moved to the Approval stage.
For information on actions that can be performed in the FI Summary page, refer Credit 360 User Manual Chapter.
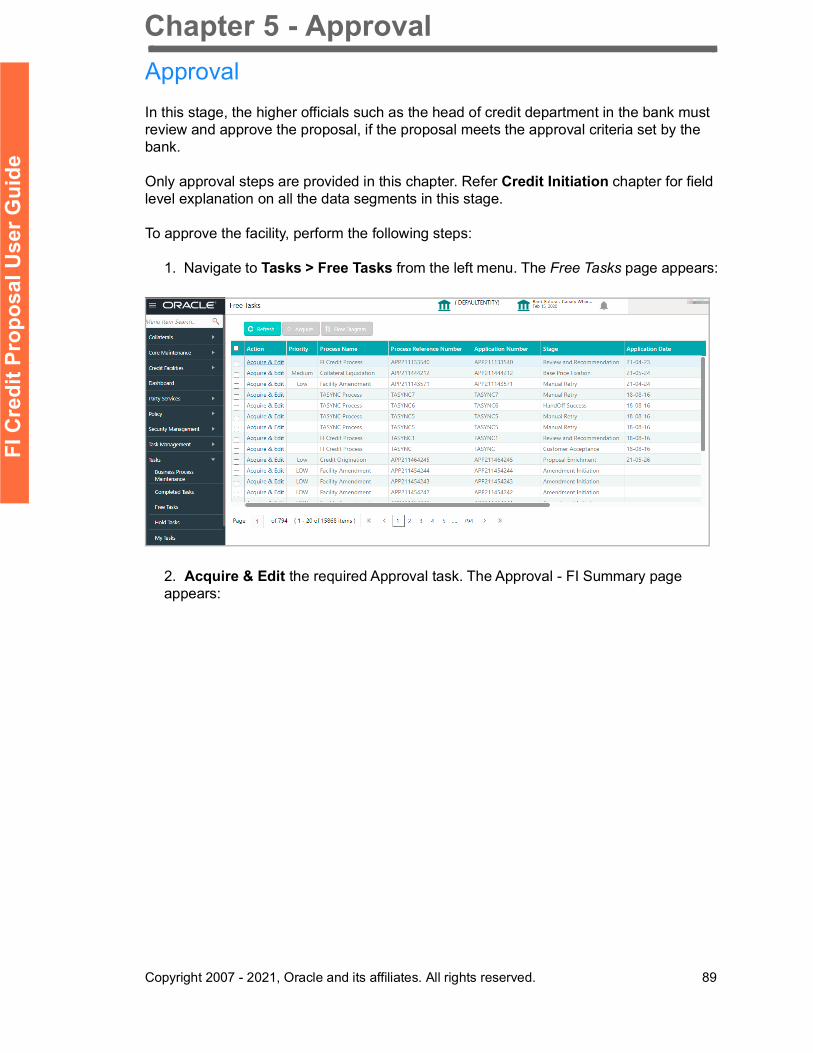
Chapter 5 - Approval
Copyright 2007 - 2021, Oracle and its affiliates. All rights reserved. 89
FI C
redi
t Pro
posa
l Use
r Gui
de
ApprovalIn this stage, the higher officials such as the head of credit department in the bank must review and approve the proposal, if the proposal meets the approval criteria set by the bank.
Only approval steps are provided in this chapter. Refer Credit Initiation chapter for field level explanation on all the data segments in this stage.
To approve the facility, perform the following steps:
1. Navigate to Tasks > Free Tasks from the left menu. The Free Tasks page appears:
2. Acquire & Edit the required Approval task. The Approval - FI Summary page appears:
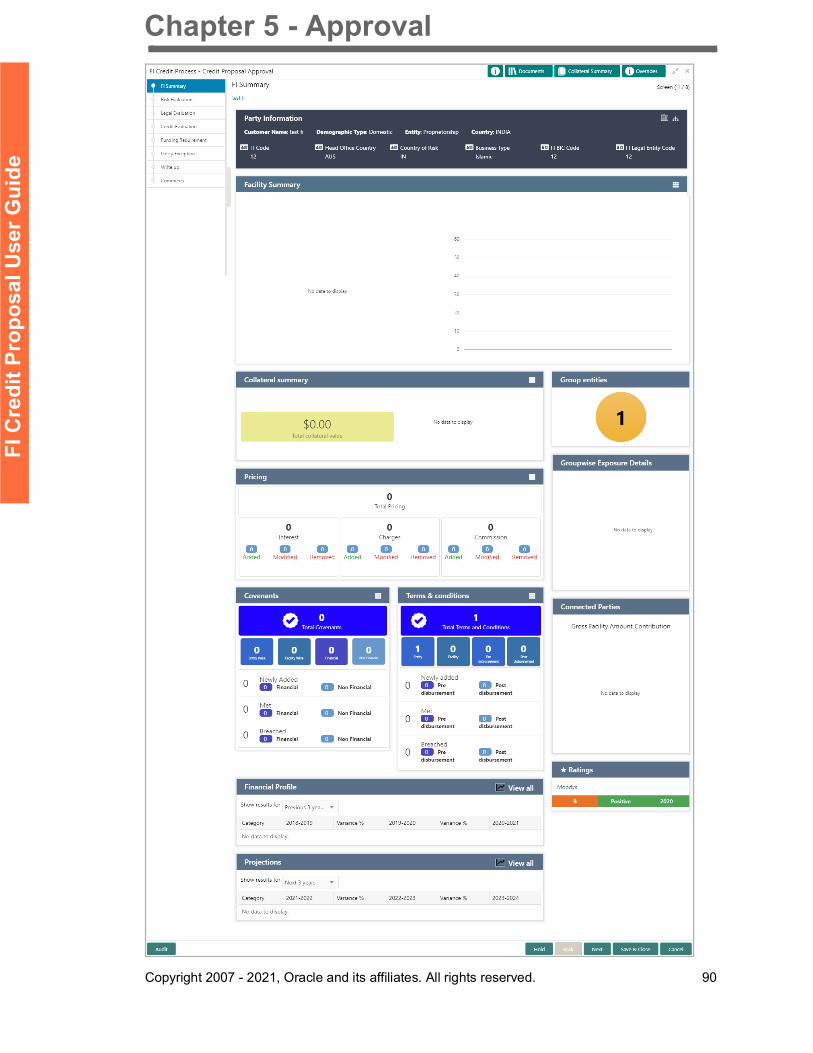
Chapter 5 - Approval
Copyright 2007 - 2021, Oracle and its affiliates. All rights reserved. 90
FI C
redi
t Pro
posa
l Use
r Gui
de
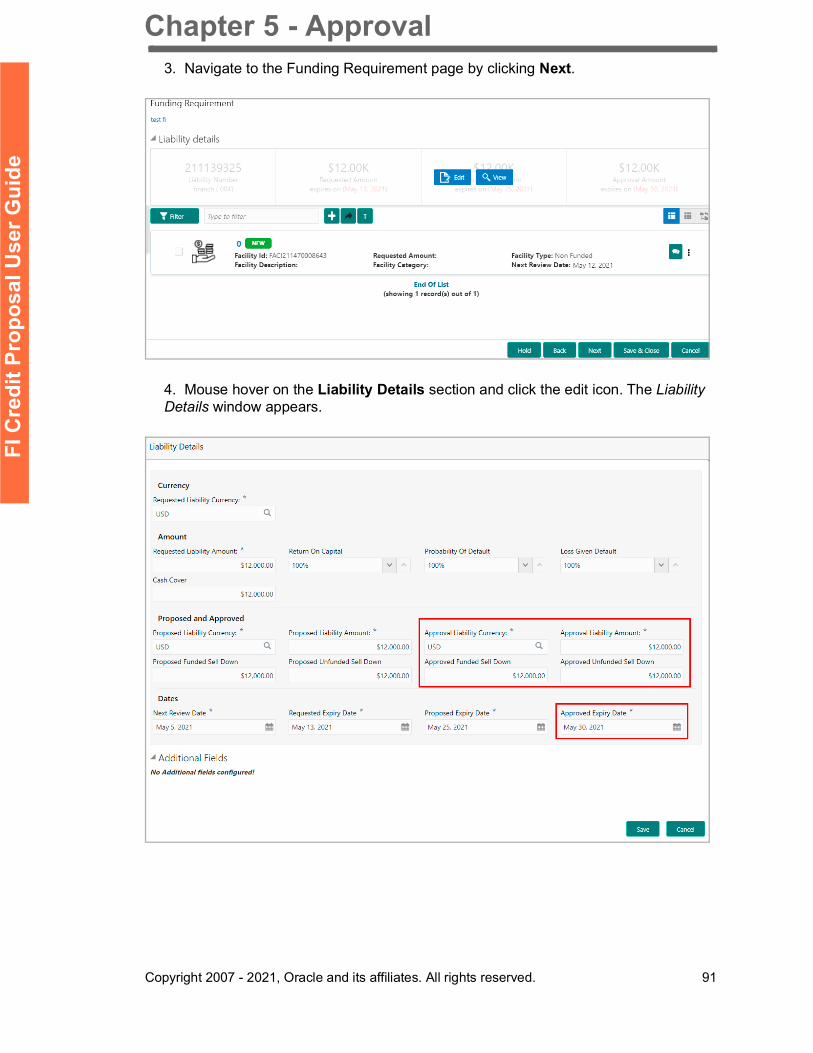
Chapter 5 - Approval
Copyright 2007 - 2021, Oracle and its affiliates. All rights reserved. 91
FI C
redi
t Pro
posa
l Use
r Gui
de
3. Navigate to the Funding Requirement page by clicking Next.
4. Mouse hover on the Liability Details section and click the edit icon. The Liability Details window appears.
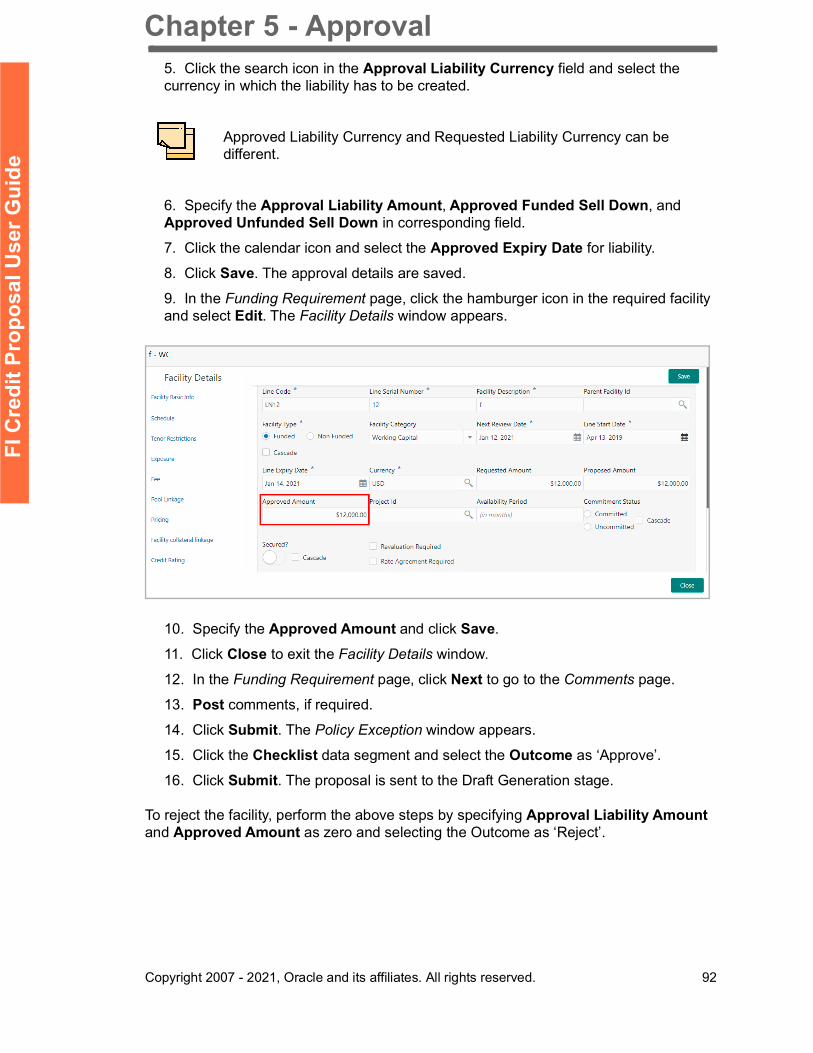
Chapter 5 - Approval
Copyright 2007 - 2021, Oracle and its affiliates. All rights reserved. 92
FI C
redi
t Pro
posa
l Use
r Gui
de
5. Click the search icon in the Approval Liability Currency field and select the currency in which the liability has to be created.
6. Specify the Approval Liability Amount, Approved Funded Sell Down, and Approved Unfunded Sell Down in corresponding field.
7. Click the calendar icon and select the Approved Expiry Date for liability.
8. Click Save. The approval details are saved.
9. In the Funding Requirement page, click the hamburger icon in the required facility and select Edit. The Facility Details window appears.
10. Specify the Approved Amount and click Save.
11. Click Close to exit the Facility Details window.
12. In the Funding Requirement page, click Next to go to the Comments page.
13. Post comments, if required.
14. Click Submit. The Policy Exception window appears.
15. Click the Checklist data segment and select the Outcome as ‘Approve’.
16. Click Submit. The proposal is sent to the Draft Generation stage.
To reject the facility, perform the above steps by specifying Approval Liability Amount and Approved Amount as zero and selecting the Outcome as ‘Reject’.
Approved Liability Currency and Requested Liability Currency can be different.
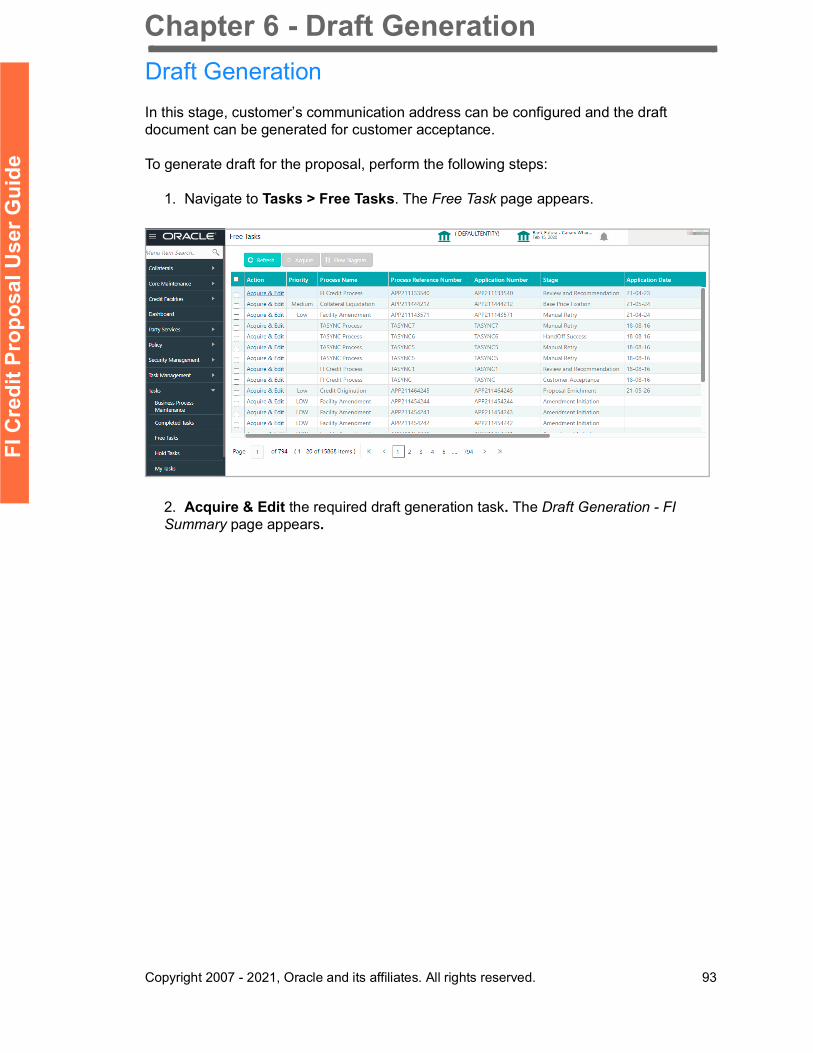
Chapter 6 - Draft Generation
Copyright 2007 - 2021, Oracle and its affiliates. All rights reserved. 93
FI C
redi
t Pro
posa
l Use
r Gui
de
Draft GenerationIn this stage, customer’s communication address can be configured and the draft document can be generated for customer acceptance.
To generate draft for the proposal, perform the following steps:
1. Navigate to Tasks > Free Tasks. The Free Task page appears.
2. Acquire & Edit the required draft generation task. The Draft Generation - FI Summary page appears.
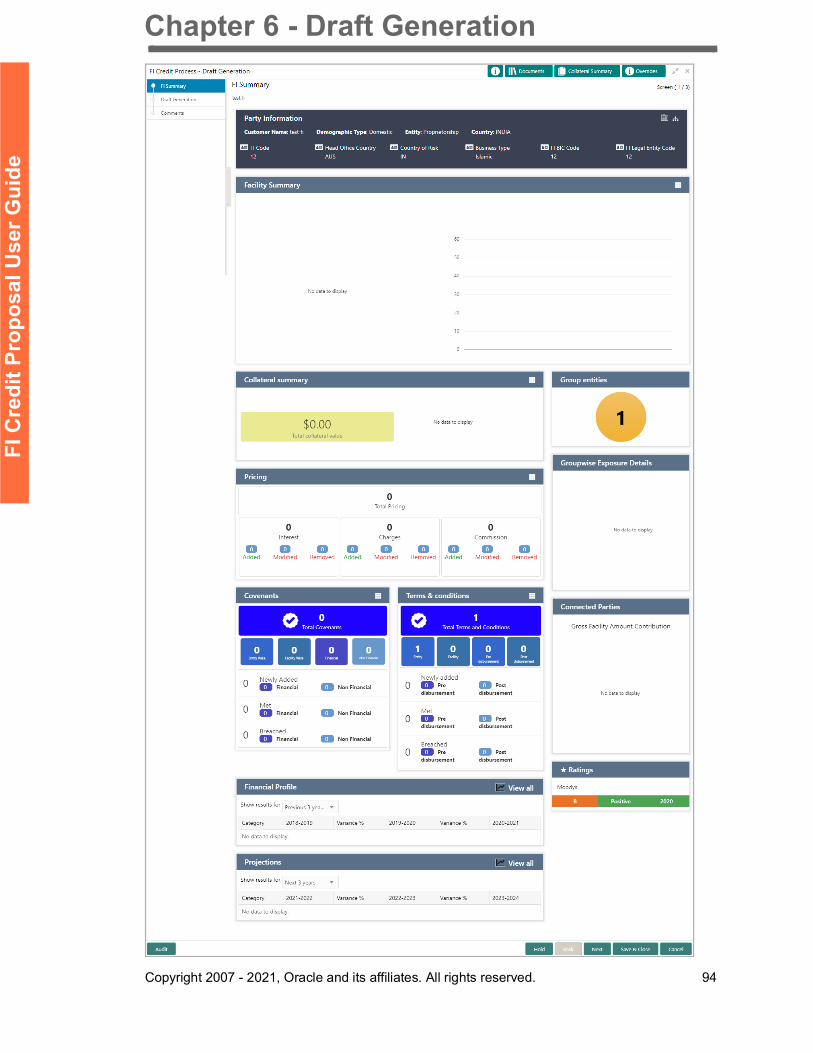
Chapter 6 - Draft Generation
Copyright 2007 - 2021, Oracle and its affiliates. All rights reserved. 94
FI C
redi
t Pro
posa
l Use
r Gui
de

Chapter 6 - Draft Generation
Copyright 2007 - 2021, Oracle and its affiliates. All rights reserved. 95
FI C
redi
t Pro
posa
l Use
r Gui
de
3. After performing necessary actions in the FI Summary page, click Next. The Draft Generation page appears.
4. Click Generate Document. The Draft Generation Details window appears.
5. In E-mail To field, type the E-mail address to which the proposal draft has to be sent.
6. In E-mail CC field, type the E-mail address which has to be in CC of draft proposal mail.
7. In Subject field, type the mail subject.
8. Click Generate. Proposal draft configured in the system is sent to the mail ID mentioned in E-Mail To field.
For information on actions that can be performed in the FI Summary page, refer Credit 360 User Manual.
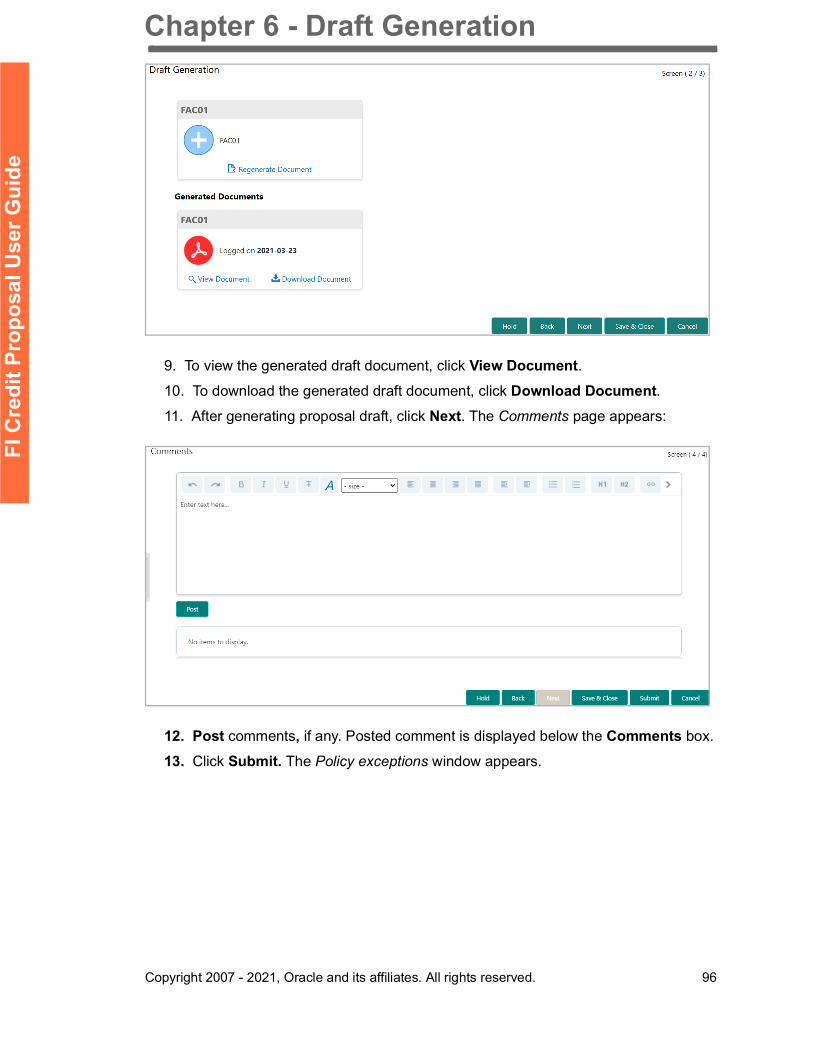
Chapter 6 - Draft Generation
Copyright 2007 - 2021, Oracle and its affiliates. All rights reserved. 96
FI C
redi
t Pro
posa
l Use
r Gui
de
9. To view the generated draft document, click View Document.10. To download the generated draft document, click Download Document.11. After generating proposal draft, click Next. The Comments page appears:
12. Post comments, if any. Posted comment is displayed below the Comments box.
13. Click Submit. The Policy exceptions window appears.
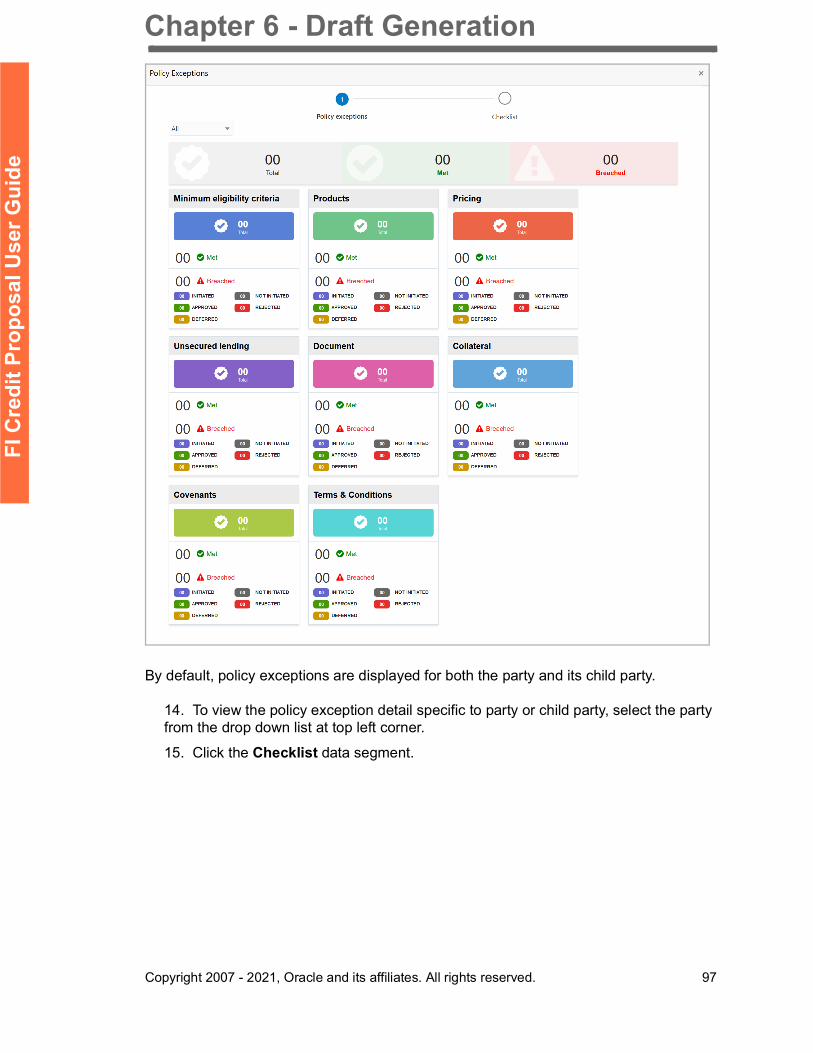
Chapter 6 - Draft Generation
Copyright 2007 - 2021, Oracle and its affiliates. All rights reserved. 97
FI C
redi
t Pro
posa
l Use
r Gui
de
By default, policy exceptions are displayed for both the party and its child party.
14. To view the policy exception detail specific to party or child party, select the party from the drop down list at top left corner.
15. Click the Checklist data segment.
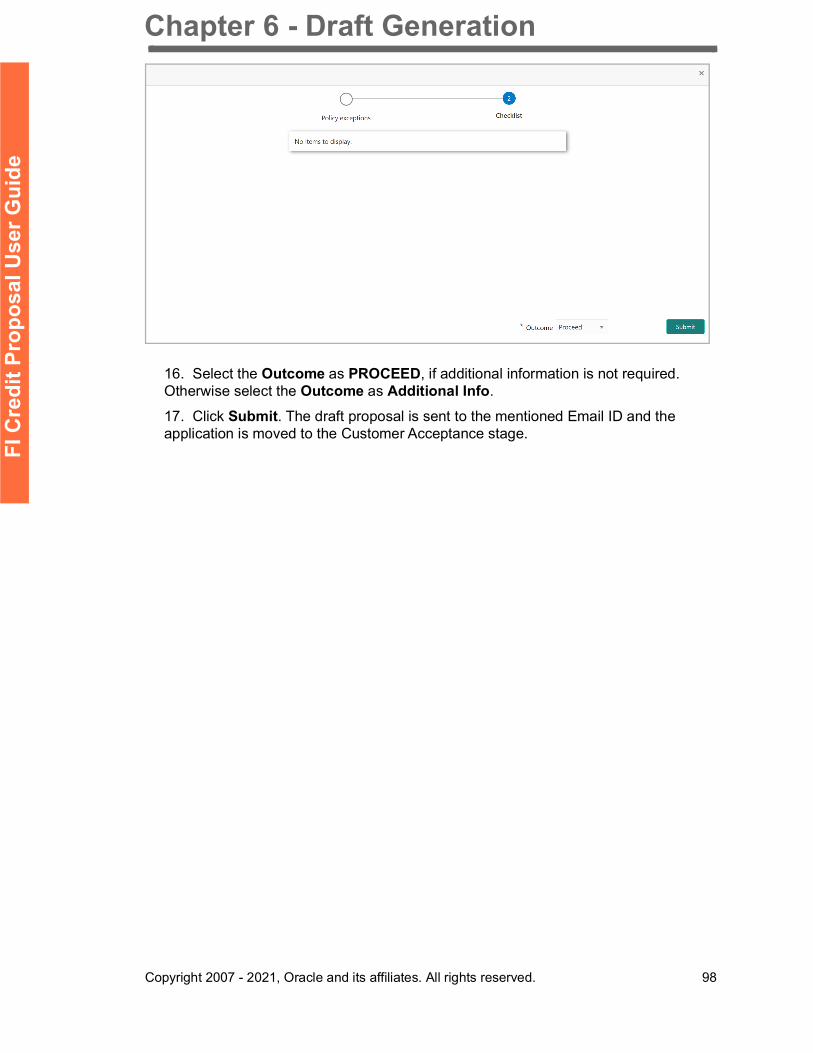
Chapter 6 - Draft Generation
Copyright 2007 - 2021, Oracle and its affiliates. All rights reserved. 98
FI C
redi
t Pro
posa
l Use
r Gui
de
16. Select the Outcome as PROCEED, if additional information is not required. Otherwise select the Outcome as Additional Info.
17. Click Submit. The draft proposal is sent to the mentioned Email ID and the application is moved to the Customer Acceptance stage.
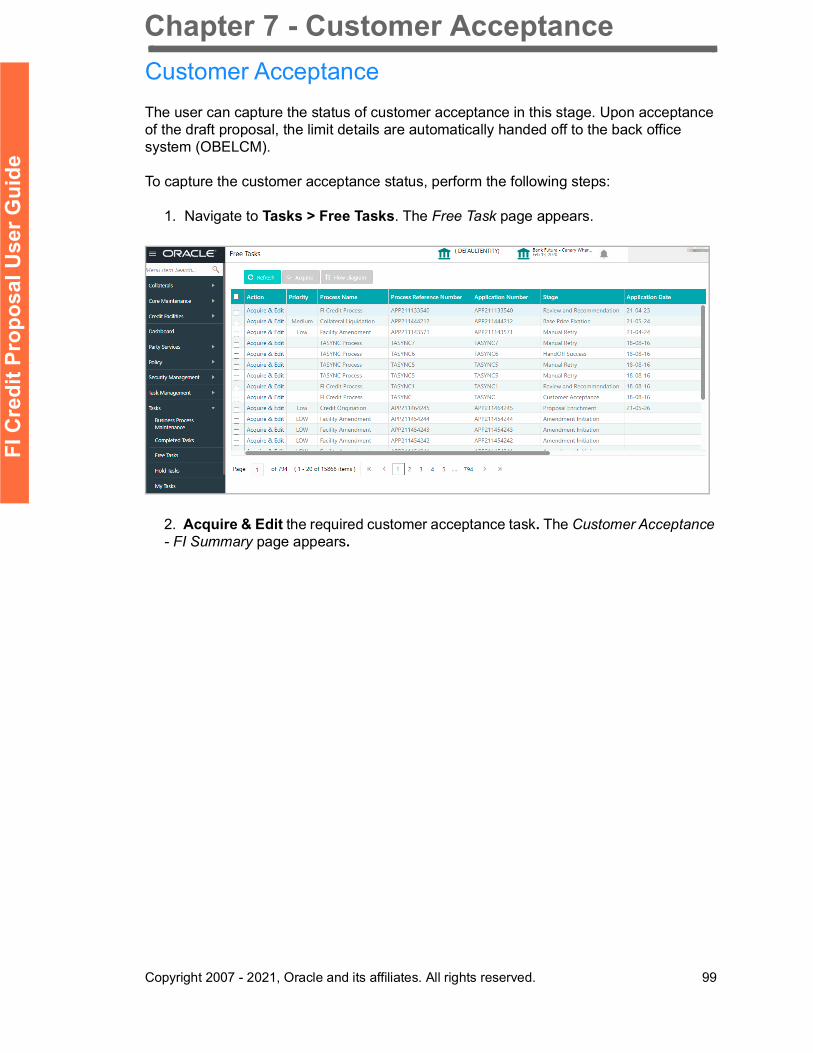
Chapter 7 - Customer Acceptance
Copyright 2007 - 2021, Oracle and its affiliates. All rights reserved. 99
FI C
redi
t Pro
posa
l Use
r Gui
de
Customer AcceptanceThe user can capture the status of customer acceptance in this stage. Upon acceptance of the draft proposal, the limit details are automatically handed off to the back office system (OBELCM).
To capture the customer acceptance status, perform the following steps:
1. Navigate to Tasks > Free Tasks. The Free Task page appears.
2. Acquire & Edit the required customer acceptance task. The Customer Acceptance - FI Summary page appears.
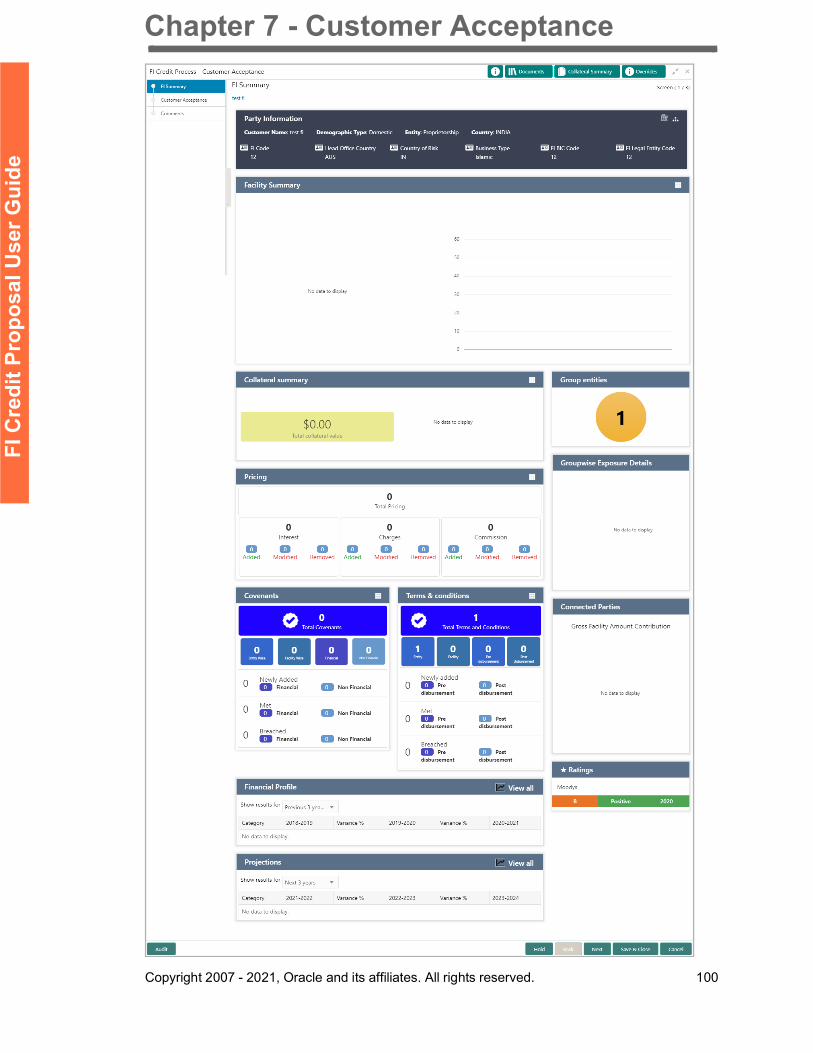
Chapter 7 - Customer Acceptance
Copyright 2007 - 2021, Oracle and its affiliates. All rights reserved. 100
FI C
redi
t Pro
posa
l Use
r Gui
de
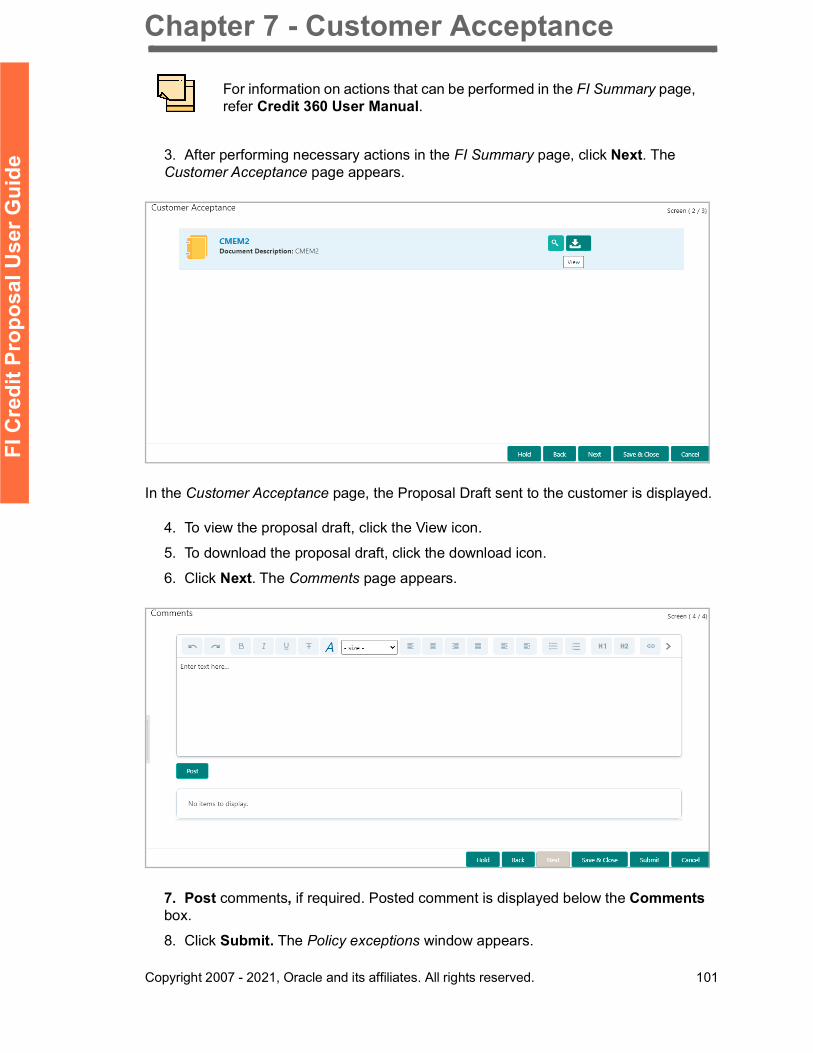
Chapter 7 - Customer Acceptance
Copyright 2007 - 2021, Oracle and its affiliates. All rights reserved. 101
FI C
redi
t Pro
posa
l Use
r Gui
de
3. After performing necessary actions in the FI Summary page, click Next. The Customer Acceptance page appears.
In the Customer Acceptance page, the Proposal Draft sent to the customer is displayed.
4. To view the proposal draft, click the View icon.
5. To download the proposal draft, click the download icon.
6. Click Next. The Comments page appears.
7. Post comments, if required. Posted comment is displayed below the Comments box.
8. Click Submit. The Policy exceptions window appears.
For information on actions that can be performed in the FI Summary page, refer Credit 360 User Manual.
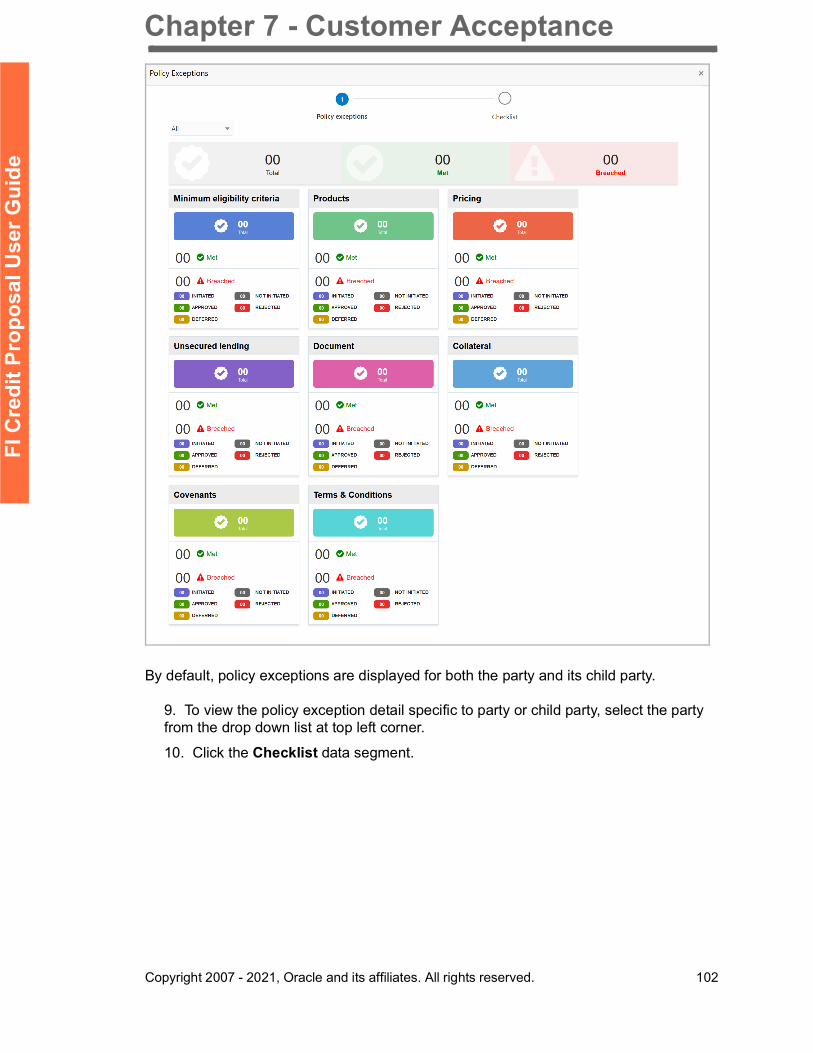
Chapter 7 - Customer Acceptance
Copyright 2007 - 2021, Oracle and its affiliates. All rights reserved. 102
FI C
redi
t Pro
posa
l Use
r Gui
de
By default, policy exceptions are displayed for both the party and its child party.
9. To view the policy exception detail specific to party or child party, select the party from the drop down list at top left corner.
10. Click the Checklist data segment.
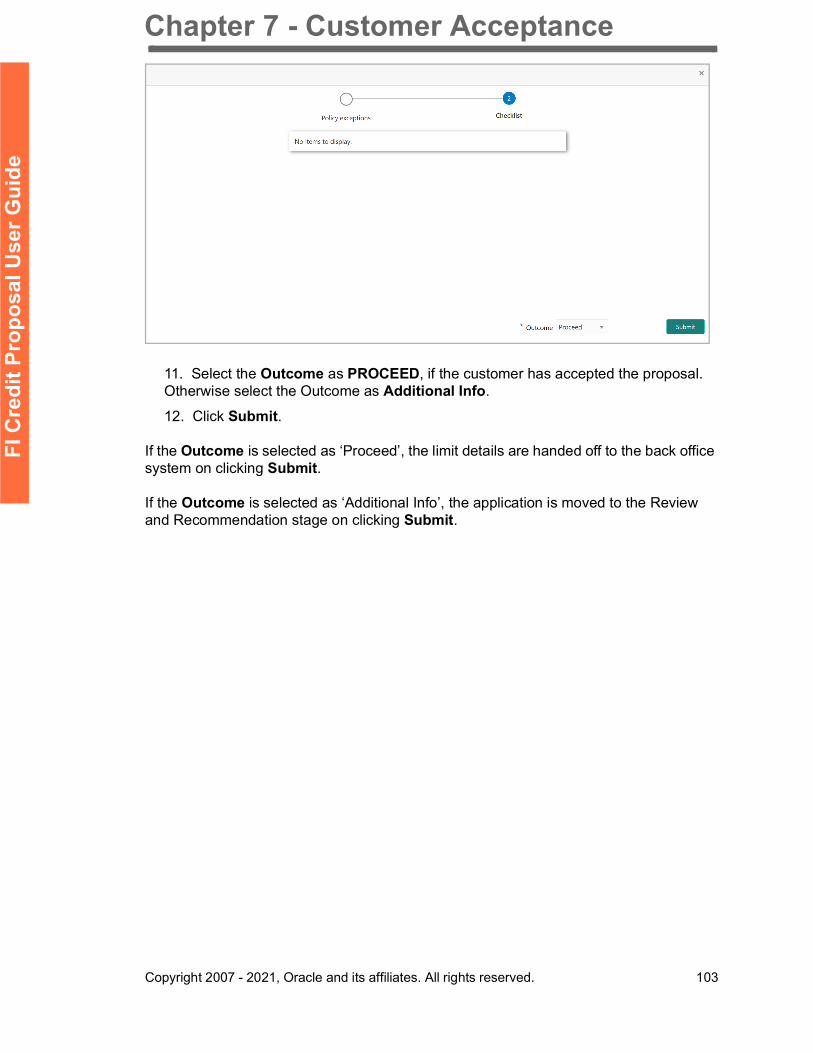
Chapter 7 - Customer Acceptance
Copyright 2007 - 2021, Oracle and its affiliates. All rights reserved. 103
FI C
redi
t Pro
posa
l Use
r Gui
de
11. Select the Outcome as PROCEED, if the customer has accepted the proposal. Otherwise select the Outcome as Additional Info.
12. Click Submit.
If the Outcome is selected as ‘Proceed’, the limit details are handed off to the back office system on clicking Submit.
If the Outcome is selected as ‘Additional Info’, the application is moved to the Review and Recommendation stage on clicking Submit.
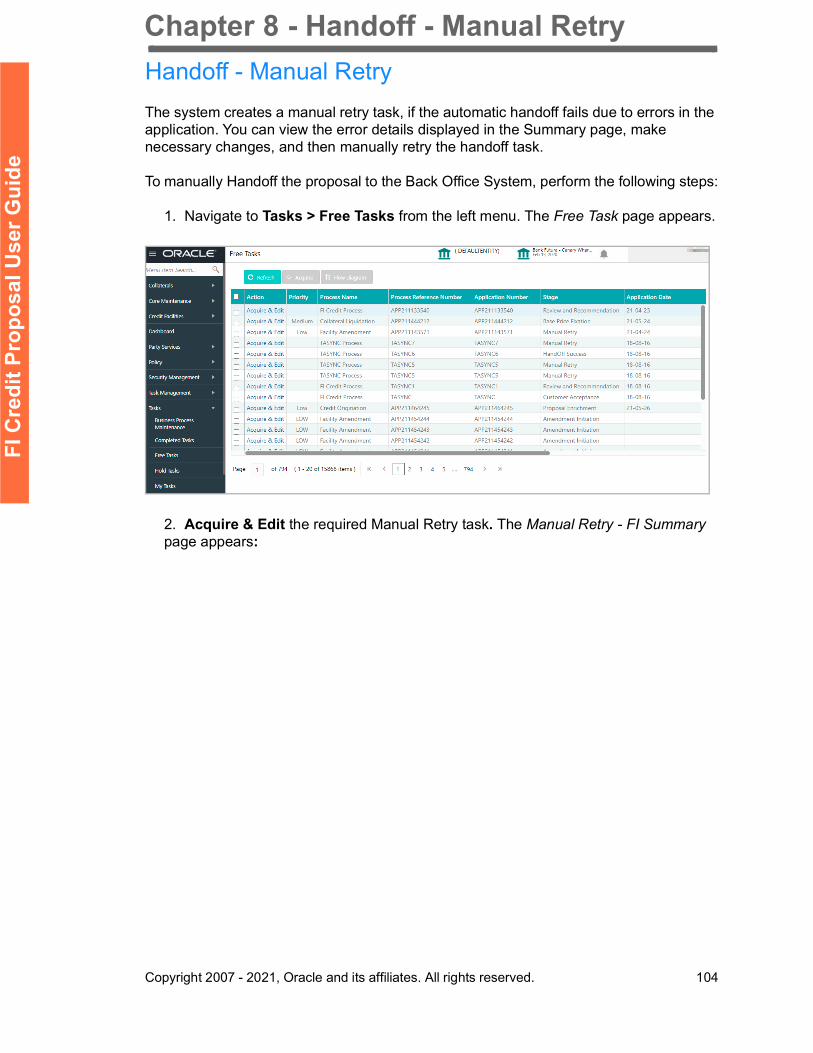
Chapter 8 - Handoff - Manual Retry
Copyright 2007 - 2021, Oracle and its affiliates. All rights reserved. 104
FI C
redi
t Pro
posa
l Use
r Gui
de
Handoff - Manual RetryThe system creates a manual retry task, if the automatic handoff fails due to errors in the application. You can view the error details displayed in the Summary page, make necessary changes, and then manually retry the handoff task.
To manually Handoff the proposal to the Back Office System, perform the following steps:
1. Navigate to Tasks > Free Tasks from the left menu. The Free Task page appears.
2. Acquire & Edit the required Manual Retry task. The Manual Retry - FI Summary page appears:
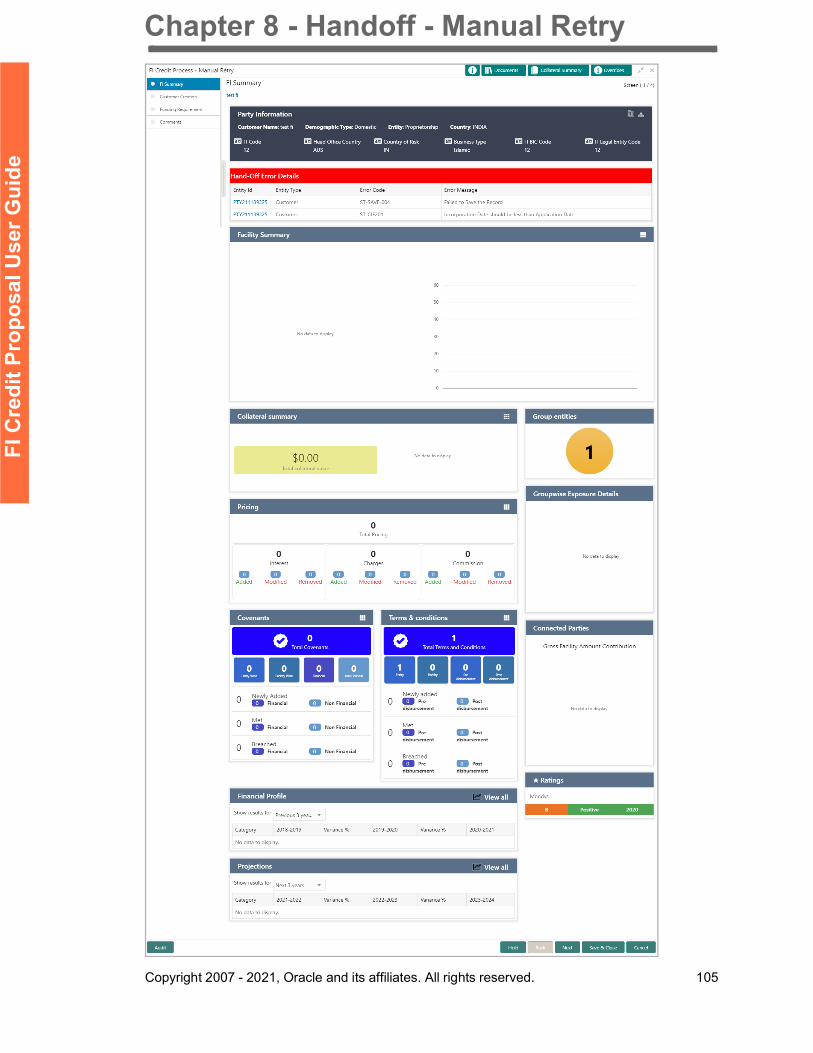
Chapter 8 - Handoff - Manual Retry
Copyright 2007 - 2021, Oracle and its affiliates. All rights reserved. 105
FI C
redi
t Pro
posa
l Use
r Gui
de

Chapter 8 - Handoff - Manual Retry
Copyright 2007 - 2021, Oracle and its affiliates. All rights reserved. 106
FI C
redi
t Pro
posa
l Use
r Gui
de
3. View the Hand-Off Error Details.
4. Click Next. The Customer Creation page appears.
5. Fix the errors in this page, if any.
6. Click Next. The Funding Requirement page appears:
7. Fix the errors in this page, if any.
8. Click Next. The Comments page appears:
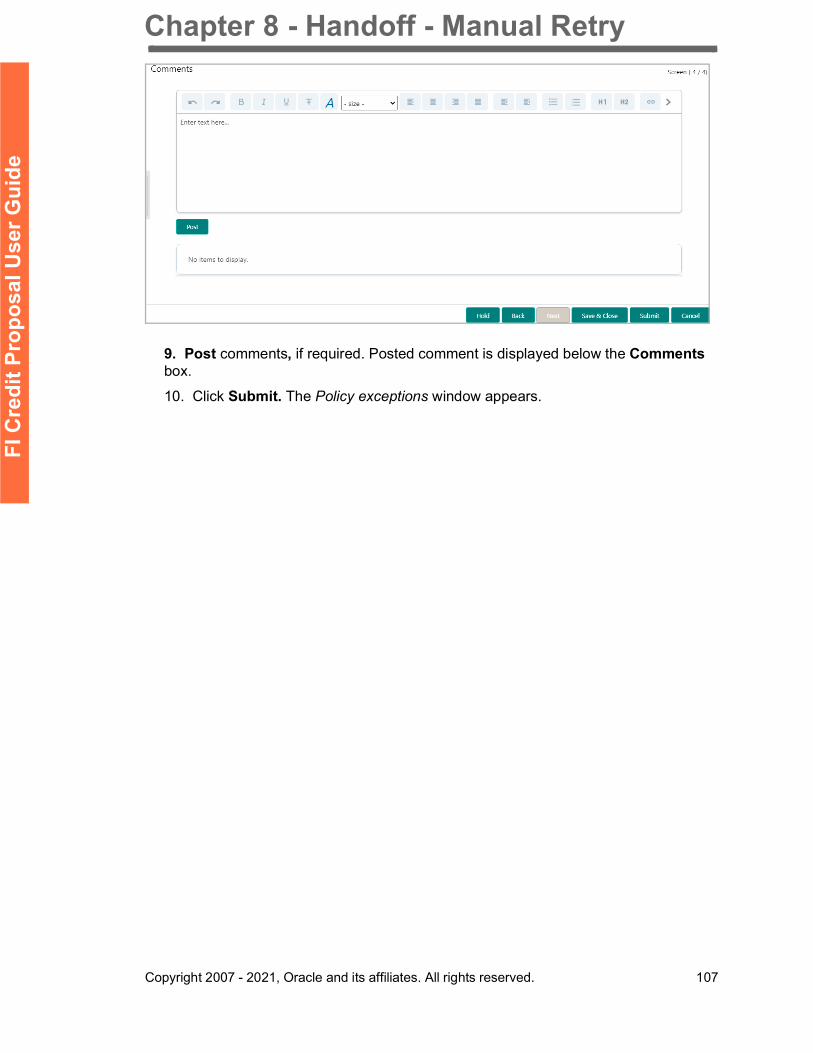
Chapter 8 - Handoff - Manual Retry
Copyright 2007 - 2021, Oracle and its affiliates. All rights reserved. 107
FI C
redi
t Pro
posa
l Use
r Gui
de
9. Post comments, if required. Posted comment is displayed below the Comments box.
10. Click Submit. The Policy exceptions window appears.
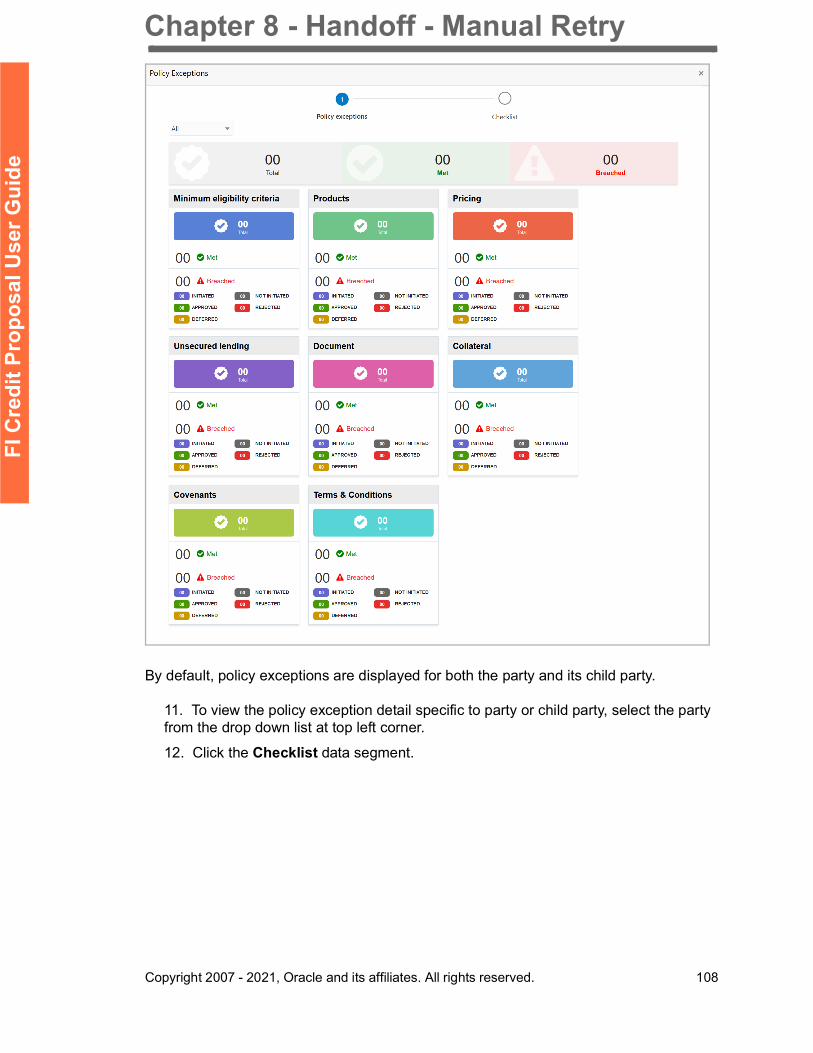
Chapter 8 - Handoff - Manual Retry
Copyright 2007 - 2021, Oracle and its affiliates. All rights reserved. 108
FI C
redi
t Pro
posa
l Use
r Gui
de
By default, policy exceptions are displayed for both the party and its child party.
11. To view the policy exception detail specific to party or child party, select the party from the drop down list at top left corner.
12. Click the Checklist data segment.
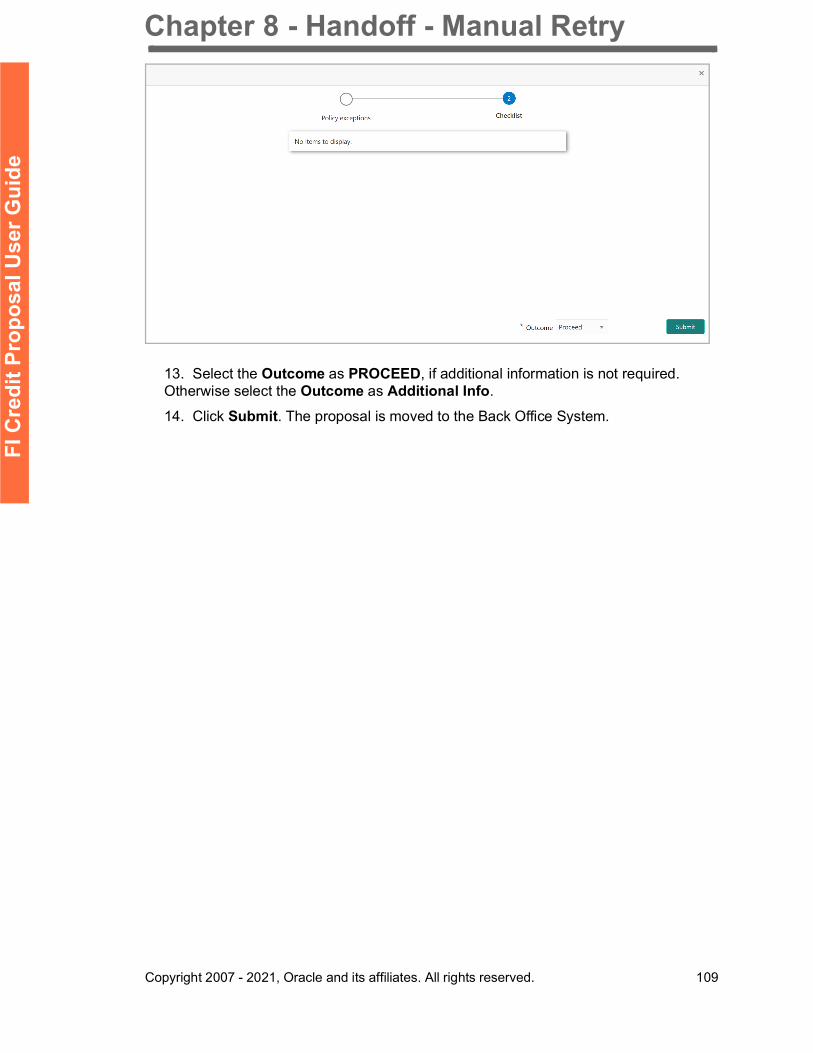
Chapter 8 - Handoff - Manual Retry
Copyright 2007 - 2021, Oracle and its affiliates. All rights reserved. 109
FI C
redi
t Pro
posa
l Use
r Gui
de
13. Select the Outcome as PROCEED, if additional information is not required. Otherwise select the Outcome as Additional Info.
14. Click Submit. The proposal is moved to the Back Office System.
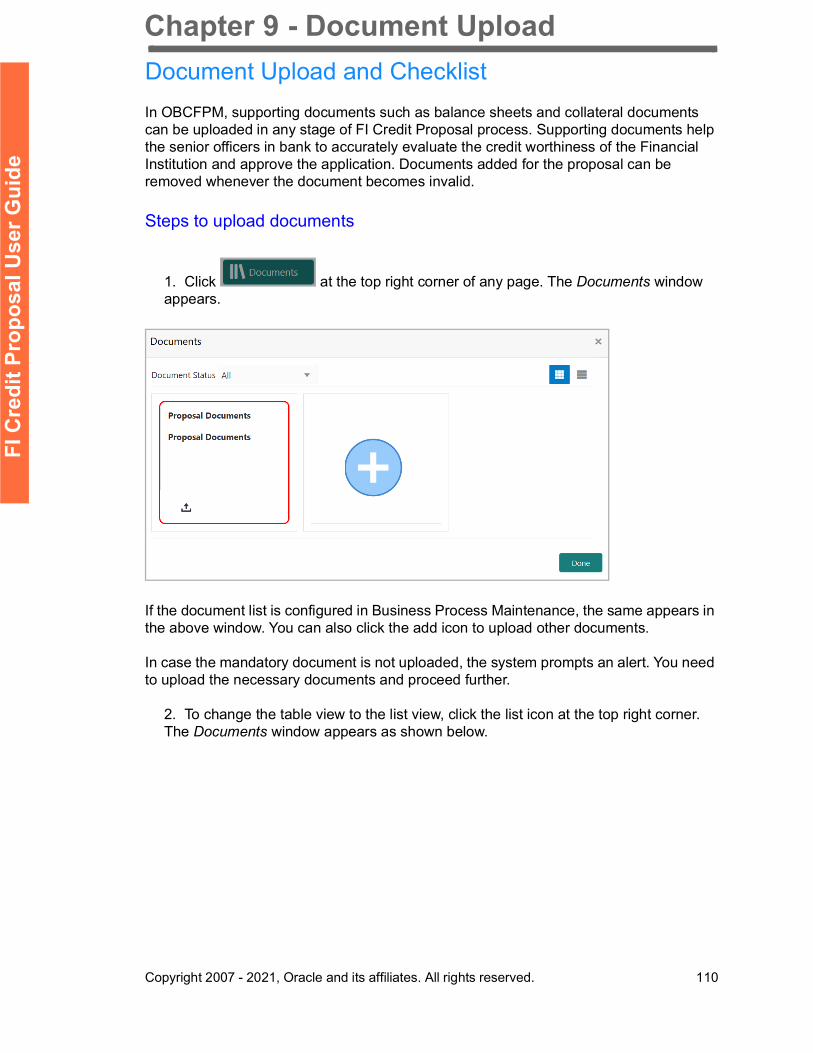
Chapter 9 - Document Upload
Copyright 2007 - 2021, Oracle and its affiliates. All rights reserved. 110
FI C
redi
t Pro
posa
l Use
r Gui
de
Document Upload and ChecklistIn OBCFPM, supporting documents such as balance sheets and collateral documents can be uploaded in any stage of FI Credit Proposal process. Supporting documents help the senior officers in bank to accurately evaluate the credit worthiness of the Financial Institution and approve the application. Documents added for the proposal can be removed whenever the document becomes invalid.
Steps to upload documents
1. Click at the top right corner of any page. The Documents window appears.
If the document list is configured in Business Process Maintenance, the same appears in the above window. You can also click the add icon to upload other documents.
In case the mandatory document is not uploaded, the system prompts an alert. You need to upload the necessary documents and proceed further.
2. To change the table view to the list view, click the list icon at the top right corner. The Documents window appears as shown below.
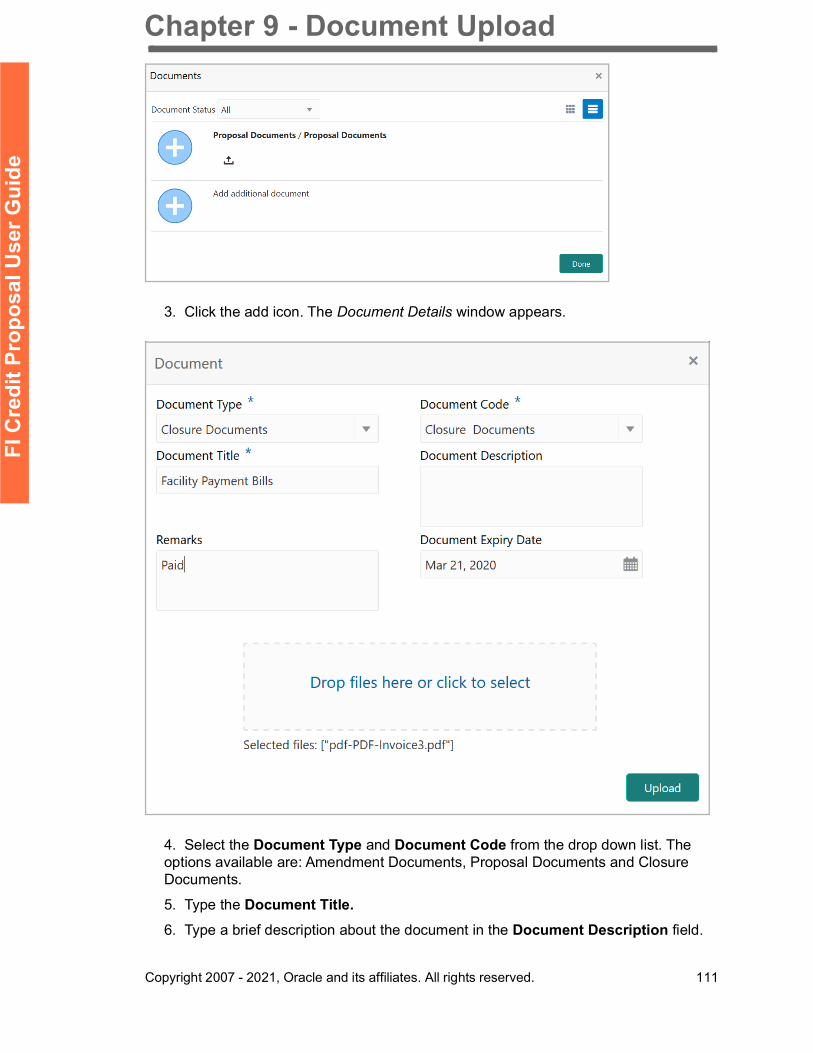
Chapter 9 - Document Upload
Copyright 2007 - 2021, Oracle and its affiliates. All rights reserved. 111
FI C
redi
t Pro
posa
l Use
r Gui
de
3. Click the add icon. The Document Details window appears.
4. Select the Document Type and Document Code from the drop down list. The options available are: Amendment Documents, Proposal Documents and Closure Documents.
5. Type the Document Title. 6. Type a brief description about the document in the Document Description field.
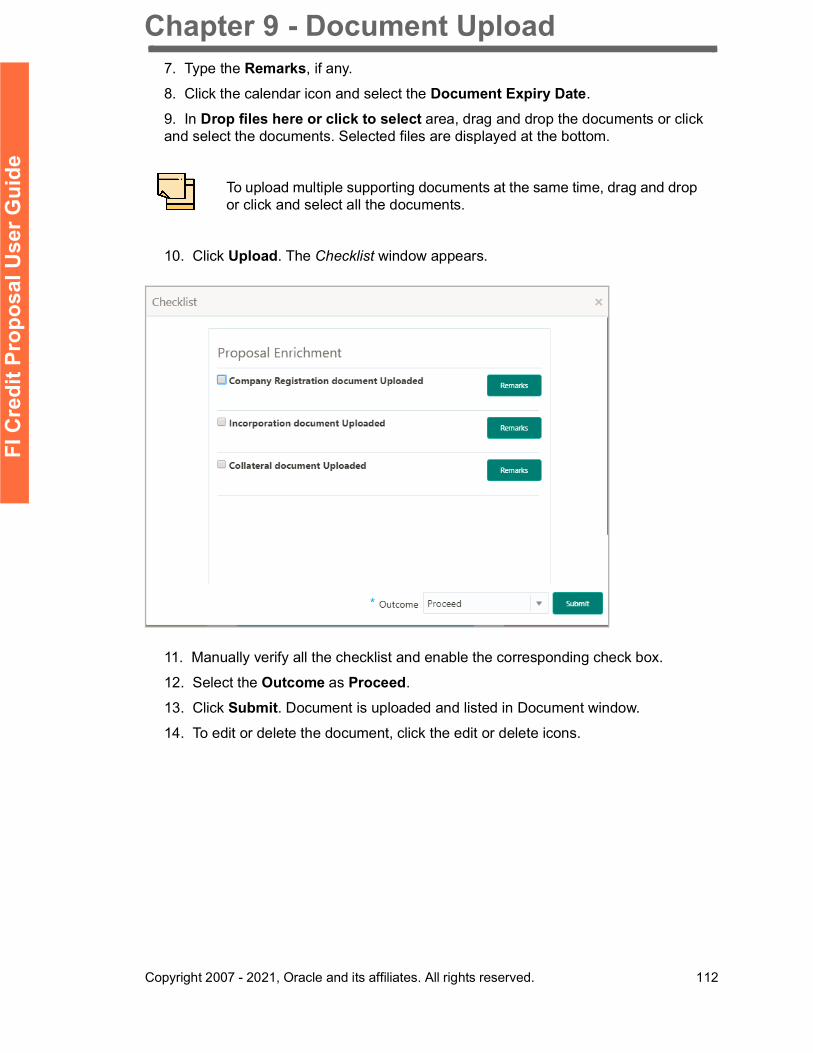
Chapter 9 - Document Upload
Copyright 2007 - 2021, Oracle and its affiliates. All rights reserved. 112
FI C
redi
t Pro
posa
l Use
r Gui
de
7. Type the Remarks, if any.
8. Click the calendar icon and select the Document Expiry Date.
9. In Drop files here or click to select area, drag and drop the documents or click and select the documents. Selected files are displayed at the bottom.
10. Click Upload. The Checklist window appears.
11. Manually verify all the checklist and enable the corresponding check box.
12. Select the Outcome as Proceed.
13. Click Submit. Document is uploaded and listed in Document window.
14. To edit or delete the document, click the edit or delete icons.
To upload multiple supporting documents at the same time, drag and drop or click and select all the documents.
Chapter 10 - Reference and Feedback
Copyright 2007 - 2021, Oracle and its affiliates. All rights reserved. 113
FI C
redi
t Pro
posa
l Use
r Gui
de
Reference and Feedback
References
For more information on any related features, you can refer to the following documents:
• Oracle Banking Procedure User Guide• Oracle Banking SMS User Guide• Oracle Banking Common Core• Oracle Banking Credit Facilities Process Management Installation Guides
Documentation Accessibility
For information about Oracle's commitment to accessibility, visit the Oracle Accessibility Program website at http://www.oracle.com/pls/topic/lookup?ctx=acc&id=docacc.
Feedback and Support
Oracle welcomes customer’s comments and suggestions on the quality and usefulness of the document. Your feedback is important to us. If you have a query that is not covered in this user guide or if you still need assistance, please contact documentation team.