Embed Size (px)
Citation preview
COMMUNICATIONS
Oracle SBC integration with Genesys
Pure Engage and Twilio Elastic Sip
Trunking
Technical Application Note
2 | P a g e
Disclaimer
The following is intended to outline our general product direction. It is intended for information purposes only, and may not be
incorporated into any contract. It is not a commitment to deliver any material, code, or functionality, and should not be relied
upon in making purchasing decisions. The development, release, and timing of any features or functionality described for
Oracle’s products remains at the sole discretion of Oracle.
Revision History
Version Description of Changes Date Revision Completed
1.0 Oracle SBC integration with Genesys Pure Engage and Twilio Elastic Sip Trunking
04th June 2021
3 | P a g e
Table of Contents
1. INTENDED AUDIENCE ........................................................................................................................... 4
2. DOCUMENT OVERVIEW ....................................................................................................................... 4 2.1. TWILIO ELASTIC SIP TRUNKING ............................................................................................................ 4 2.2. GENESYS PURE ENGAGE ........................................................................................................................ 4
3. INTRODUCTION ...................................................................................................................................... 5 3.1. AUDIENCE ............................................................................................................................................. 5 3.2. REQUIREMENTS ..................................................................................................................................... 5 3.3. ARCHITECTURE ...................................................................................................................................... 6
4. CONFIGURING THE GENESYS PURE ENGAGE ................................................................................ 7 4.1. CONFIGURING A NEW DN ....................................................................................................................... 7 4.2. CONFIGURE A NEW TRUNK FOR SBC. ..................................................................................................... 9
5. CONFIGURING THE SBC ..................................................................................................................... 11 5.1. VALIDATED ORACLE SBC VERSION ..................................................................................................... 11
6. NEW SBC CONFIGURATION ............................................................................................................... 11 6.1. ESTABLISHING A SERIAL CONNECTION TO THE SBC ............................................................................. 11 6.2. CONFIGURE SBC USING WEB GUI ....................................................................................................... 15 6.3. CONFIGURE SYSTEM-CONFIG................................................................................................................ 17 6.4. CONFIGURE PHYSICAL INTERFACE VALUES .......................................................................................... 18 6.5. CONFIGURE NETWORK INTERFACE VALUES ......................................................................................... 19 6.6. ENABLE MEDIA MANAGER.................................................................................................................... 21 6.7. ENABLE SIP-CONFIG ............................................................................................................................. 22 6.8. CONFIGURE REALMS ............................................................................................................................ 23 6.9. CONFIGURING A CERTIFICATE FOR SBC ............................................................................................... 25 6.10. TLS-PROFILE ..................................................................................................................................... 27 6.11. CONFIGURE SIP INTERFACES ............................................................................................................. 28 6.12. CONFIGURE SESSION-AGENT .............................................................................................................. 29 6.13. CONFIGURE LOCAL-POLICY ................................................................................................................ 30 6.14. CONFIGURE STEERING-POOL .............................................................................................................. 32 6.15. CONFIGURE PING RESPONSE .............................................................................................................. 33 6.16. CONFIGURE SDES PROFILE .................................................................................................................. 35 6.17. CONFIGURE MEDIA SECURITY PROFILE .............................................................................................. 35 6.18. CONFIGURE TRANSLATION RULES ..................................................................................................... 36 6.19. CONFIGURE SESSION TRANSLATION RULES........................................................................................ 37
7. SBC CONFIGURATION FOR GENESYS REMOTE WORKER......................................................... 39 7.1. CONFIGURE REALMS ............................................................................................................................ 40 7.2. ENABLE MEDIA MANAGER.................................................................................................................... 41 7.3. CONFIGURE SIP INTERFACES ............................................................................................................... 42 7.4. CONFIGURE STEERING-POOL ................................................................................................................ 43 7.5. CONFIGURE LOCAL-POLICY (OPTIONAL) .............................................................................................. 44
8. EXISTING SBC CONFIGURATION ..................................................................................................... 45
9. TWILIO ELASTIC SIP TRUNKING CONFIGURATION ................................................................... 45 9.1. CREATE AN IP-ACL RULE .................................................................................................................... 46 9.2. CREATE A NEW TRUNK ........................................................................................................................ 47 9.3. ASSOCIATE PHONE NUMBERS ON YOUR TRUNK ................................................................................... 50
4 | P a g e
10. VERIFICATION OF SAMPLE CALL FLOWS ................................................................................... 51
APPENDIX A ............................................................................................................................................... 55
1. Intended Audience
This document is intended for use by Oracle Systems Engineers, third party Systems Integrators, Oracle Enterprise customers and partners and end users of the Oracle Enterprise Session Border Controller (SBC). It is assumed that the reader is familiar with basic operations of the Oracle Enterprise
Session Border Controller platform along with Genesys Pure Engage.
2. Document Overview
This Oracle technical application note outlines how to configure the Oracle SBC to interwork between
Twilio Elastic Sip Trunk with on premises Genesys Pure Engage. The solution contained within this
document has been tested using Oracle Communication SBC with OS840p5
Please find the related documentation links below:
2.1. Twilio Elastic SIP Trunking
Twilio Elastic SIP Trunking is a cloud-based solution that provides connectivity for IP-based communications infrastructure to connect to the PSTN for making and receiving telephone calls to the rest of the world via any broadband internet connection. Twilio’s Elastic SIP Trunking service automatically scales, up or down, to meet your traffic needs with unlimited capacity. In just minutes you can deploy globally with Twilio’s easy-to-use self-service tools without having to rely on slow providers.
Sign up for a free Twilio trial and learn more about configuring your Twilio Elastic SIP Trunk.
2.2. Genesys Pure Engage
SIP Server is the Genesys software component that provides an interface between your telephony hardware and the rest of the Genesys software components in your enterprise. It translates and keeps track of events and requests that come from and are sent to the telephony device. SIP Server is a TCP/IP-based server that can also act as a messaging interface between SIP Server clients. It is the critical point in allowing your Genesys solution to facilitate and track the contacts that flow through your enterprise and this reduces the cost and complexity of extending an enterprise's telephony system outside its network borders. Genesys Pure Engage solution consists of the following components and the user should perform the configuration of the below servers. Testing is performed as per below product release version.
Genesys SIP Server, Version 8.1.1
Genesys Media Control Platform, Version 9.0.013.61
Genesys SIP Proxy Server, Version 8.1.100.76
Genesys SIP Feature Server, Version 8.1.202.1
5 | P a g e
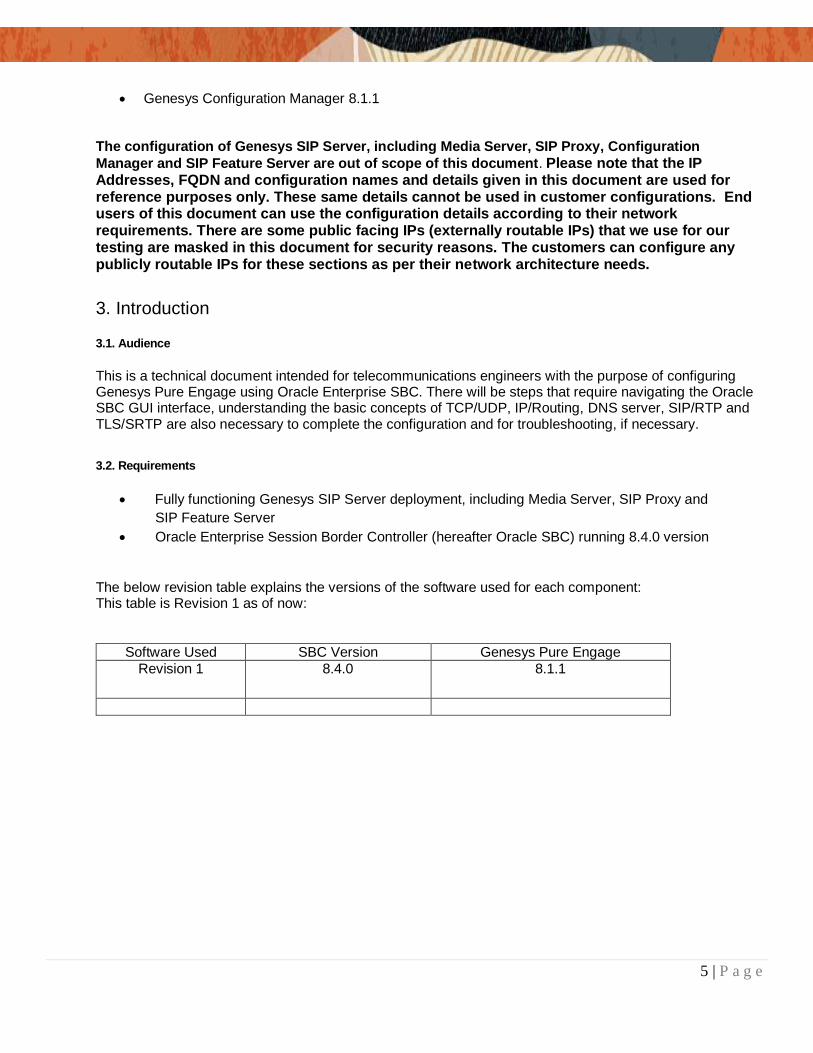
Genesys Configuration Manager 8.1.1
The configuration of Genesys SIP Server, including Media Server, SIP Proxy, Configuration
Manager and SIP Feature Server are out of scope of this document. Please note that the IP Addresses, FQDN and configuration names and details given in this document are used for reference purposes only. These same details cannot be used in customer configurations. End users of this document can use the configuration details according to their network requirements. There are some public facing IPs (externally routable IPs) that we use for our testing are masked in this document for security reasons. The customers can configure any publicly routable IPs for these sections as per their network architecture needs.
3. Introduction
3.1. Audience
This is a technical document intended for telecommunications engineers with the purpose of configuring Genesys Pure Engage using Oracle Enterprise SBC. There will be steps that require navigating the Oracle SBC GUI interface, understanding the basic concepts of TCP/UDP, IP/Routing, DNS server, SIP/RTP and TLS/SRTP are also necessary to complete the configuration and for troubleshooting, if necessary.
3.2. Requirements
Fully functioning Genesys SIP Server deployment, including Media Server, SIP Proxy and
SIP Feature Server
Oracle Enterprise Session Border Controller (hereafter Oracle SBC) running 8.4.0 version
The below revision table explains the versions of the software used for each component: This table is Revision 1 as of now:
Software Used SBC Version Genesys Pure Engage
Revision 1 8.4.0 8.1.1
6 | P a g e
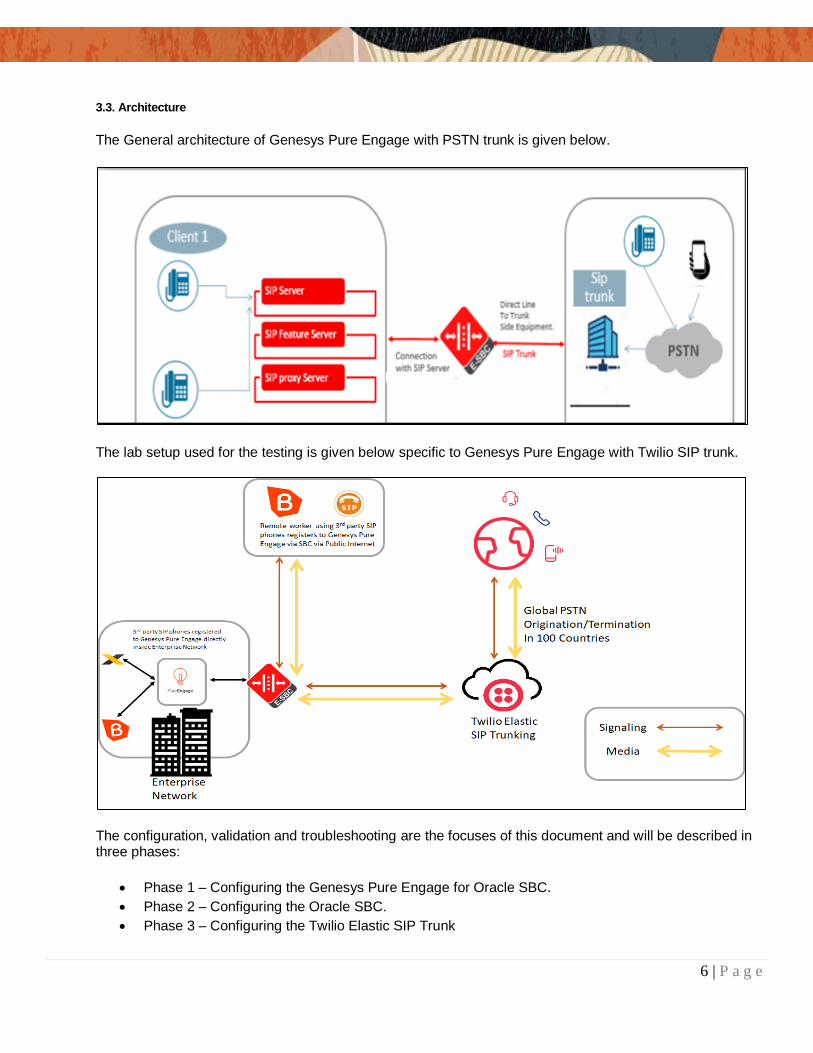
3.3. Architecture
The General architecture of Genesys Pure Engage with PSTN trunk is given below.
The lab setup used for the testing is given below specific to Genesys Pure Engage with Twilio SIP trunk.
The configuration, validation and troubleshooting are the focuses of this document and will be described in three phases:
Phase 1 – Configuring the Genesys Pure Engage for Oracle SBC.
Phase 2 – Configuring the Oracle SBC.
Phase 3 – Configuring the Twilio Elastic SIP Trunk
7 | P a g e
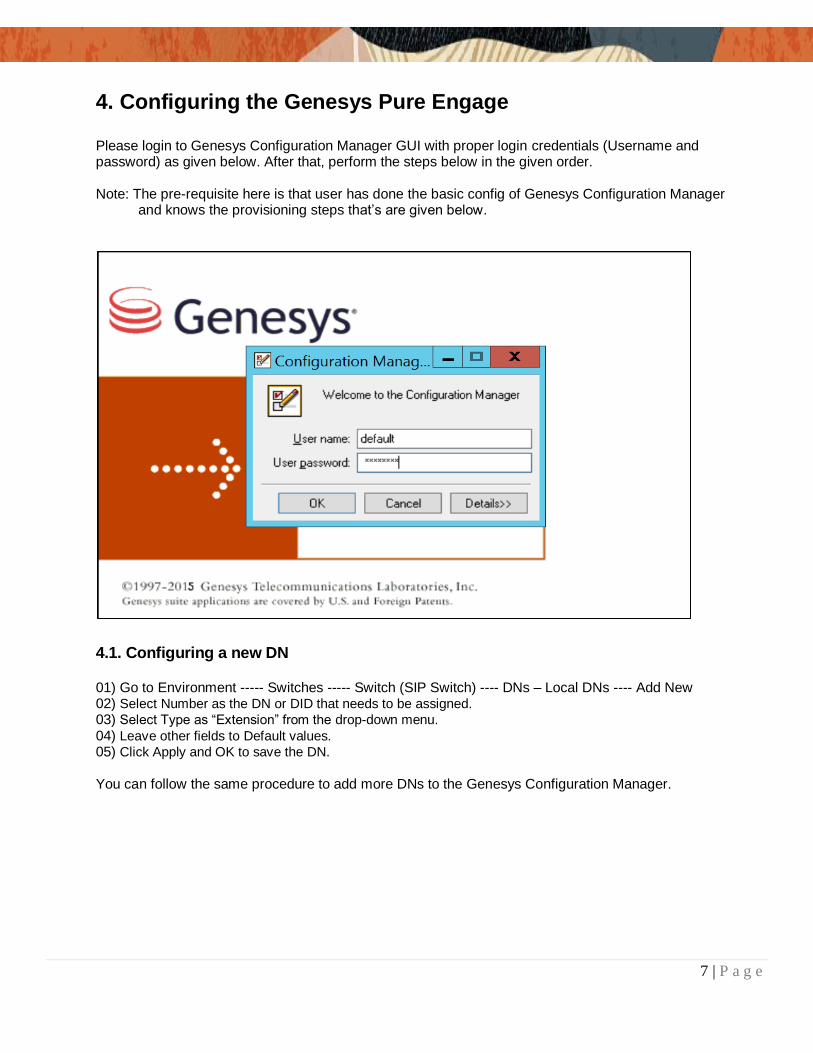
4. Configuring the Genesys Pure Engage
Please login to Genesys Configuration Manager GUI with proper login credentials (Username and password) as given below. After that, perform the steps below in the given order. Note: The pre-requisite here is that user has done the basic config of Genesys Configuration Manager and knows the provisioning steps that’s are given below.
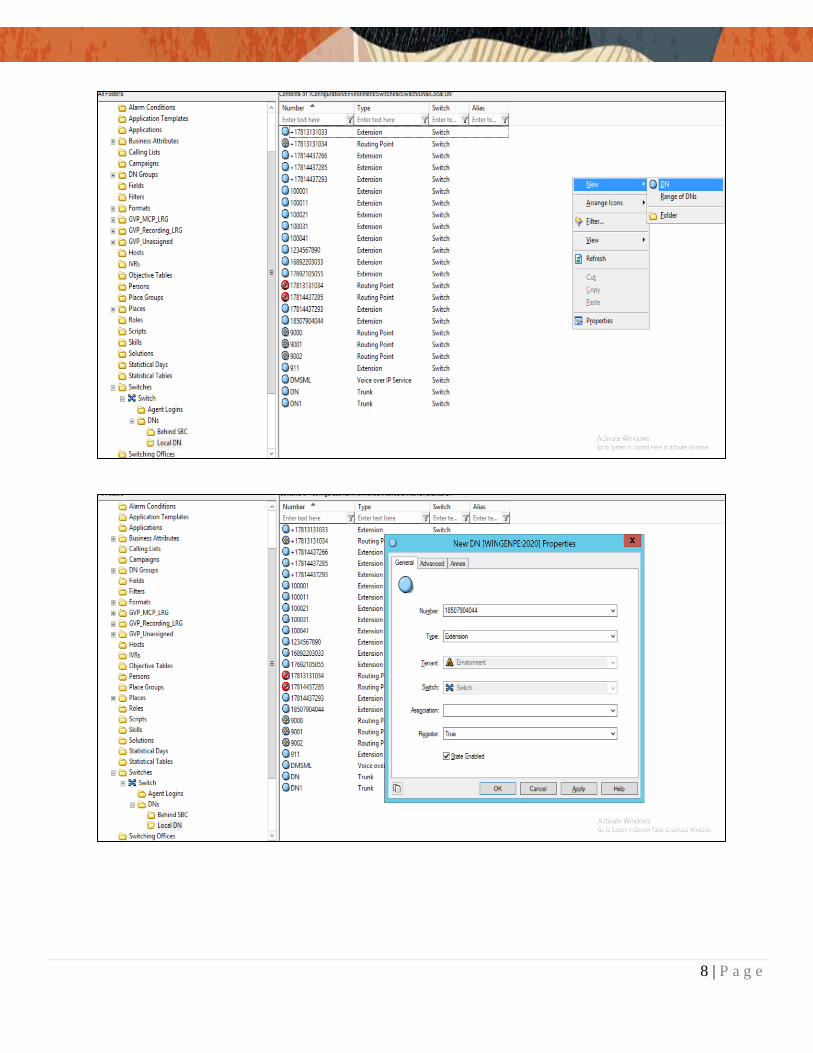
4.1. Configuring a new DN
01) Go to Environment ----- Switches ----- Switch (SIP Switch) ---- DNs – Local DNs ---- Add New 02) Select Number as the DN or DID that needs to be assigned. 03) Select Type as “Extension” from the drop-down menu. 04) Leave other fields to Default values. 05) Click Apply and OK to save the DN.
You can follow the same procedure to add more DNs to the Genesys Configuration Manager.
8 | P a g e
9 | P a g e
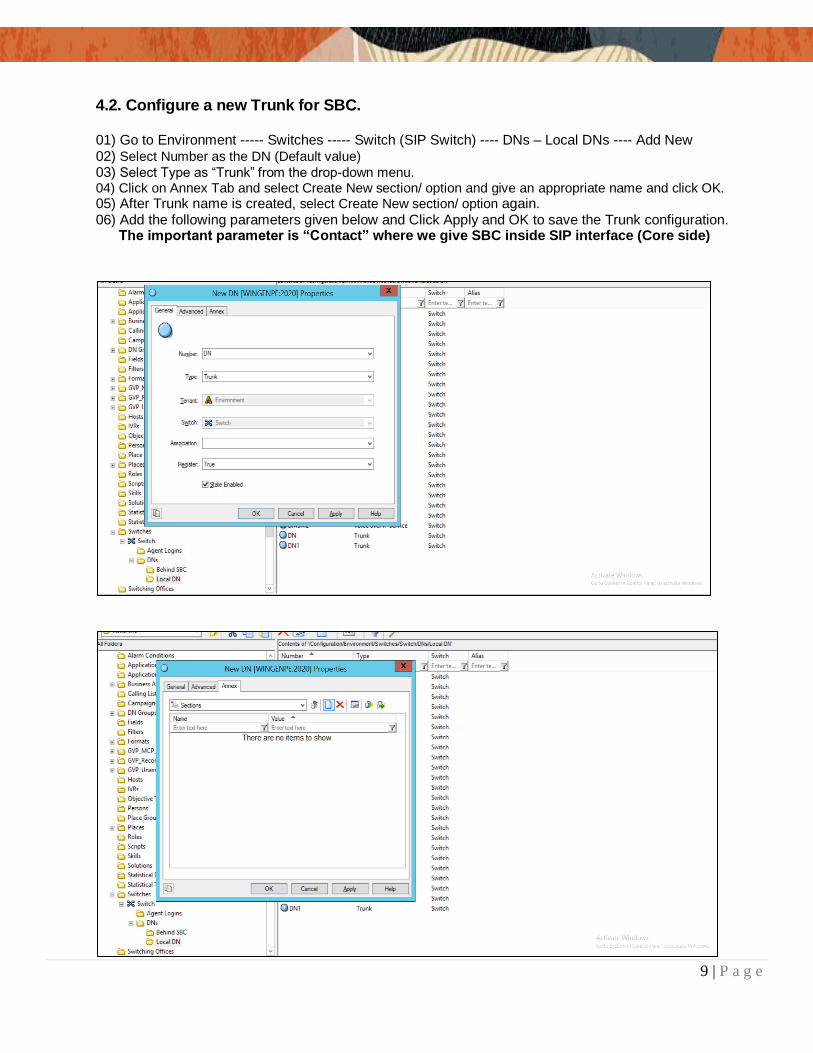
4.2. Configure a new Trunk for SBC.
01) Go to Environment ----- Switches ----- Switch (SIP Switch) ---- DNs – Local DNs ---- Add New
02) Select Number as the DN (Default value)
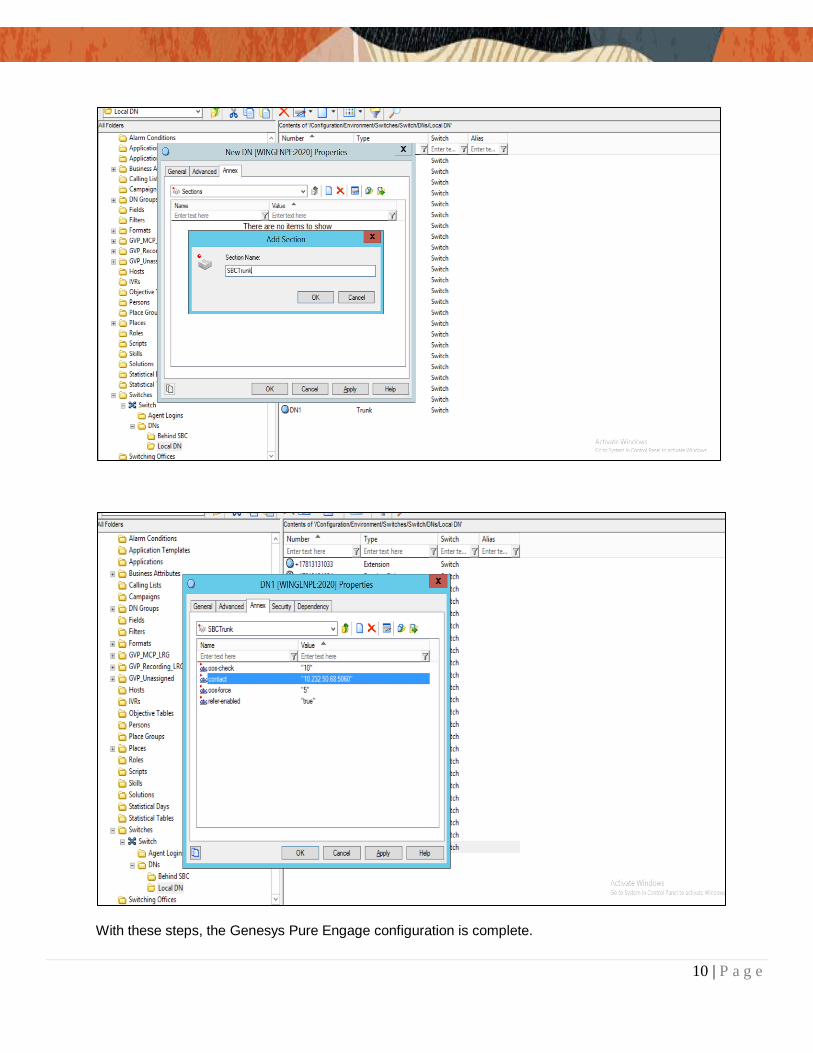
03) Select Type as “Trunk” from the drop-down menu. 04) Click on Annex Tab and select Create New section/ option and give an appropriate name and click OK. 05) After Trunk name is created, select Create New section/ option again. 06) Add the following parameters given below and Click Apply and OK to save the Trunk configuration. The important parameter is “Contact” where we give SBC inside SIP interface (Core side)
10 | P a g e
With these steps, the Genesys Pure Engage configuration is complete.
11 | P a g e
5. Configuring the SBC
This chapter provides step-by-step guidance on how to configure Oracle SBC for Genesys Pure Engage and Twilio Elastic SIP Trunking. In this SBC config, Twilio Elastic SIP trunk side is secure (TLS/SRTP) and Genesys Pure Engage Side is unsecure (UDP or TCP/RTP).
5.1. Validated Oracle SBC version
Oracle conducted tests with Oracle SBC 8.4 software – this software with the configuration listed below can run on any of the following products:
AP 1100
AP 3900
AP 4600
AP 6300
AP 6350
VME
6. New SBC configuration If the customer is looking to setup a new SBC from scratch, please follow the section below.
Please note that the setup of VM and Cloud is different from hardware SBC and the steps
below is to be used with hardware based SBC.
6.1. Establishing a serial connection to the SBC
Connect one end of a straight-through Ethernet cable to the front console port (which is active by
default) on the SBC and the other end to console adapter that ships with the SBC, connect the
console adapter (a DB-9 adapter) to the DB-9 port on a workstation, running a terminal emulator
application such as Putty. Start the terminal emulation application using the following settings:
Baud Rate=115200
Data Bits=8
Parity=None
Stop Bits=1
Flow Control=None
12 | P a g e
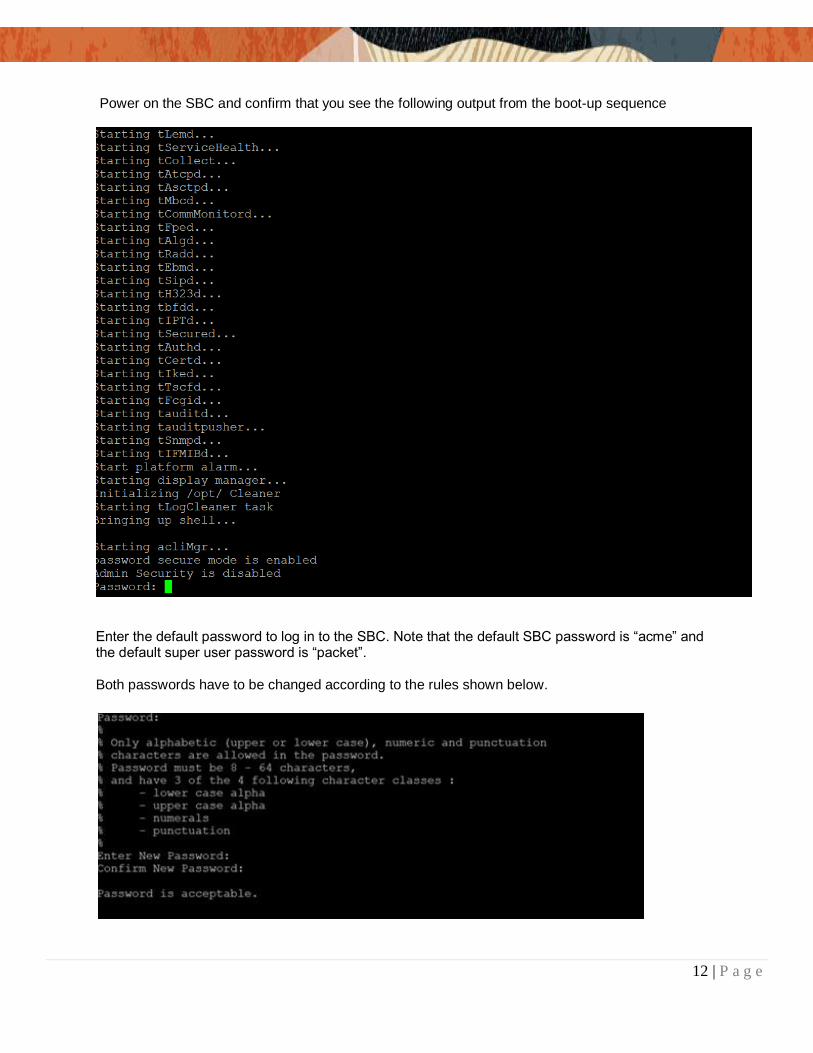
Power on the SBC and confirm that you see the following output from the boot-up sequence
Enter the default password to log in to the SBC. Note that the default SBC password is “acme” and the default super user password is “packet”. Both passwords have to be changed according to the rules shown below.
13 | P a g e
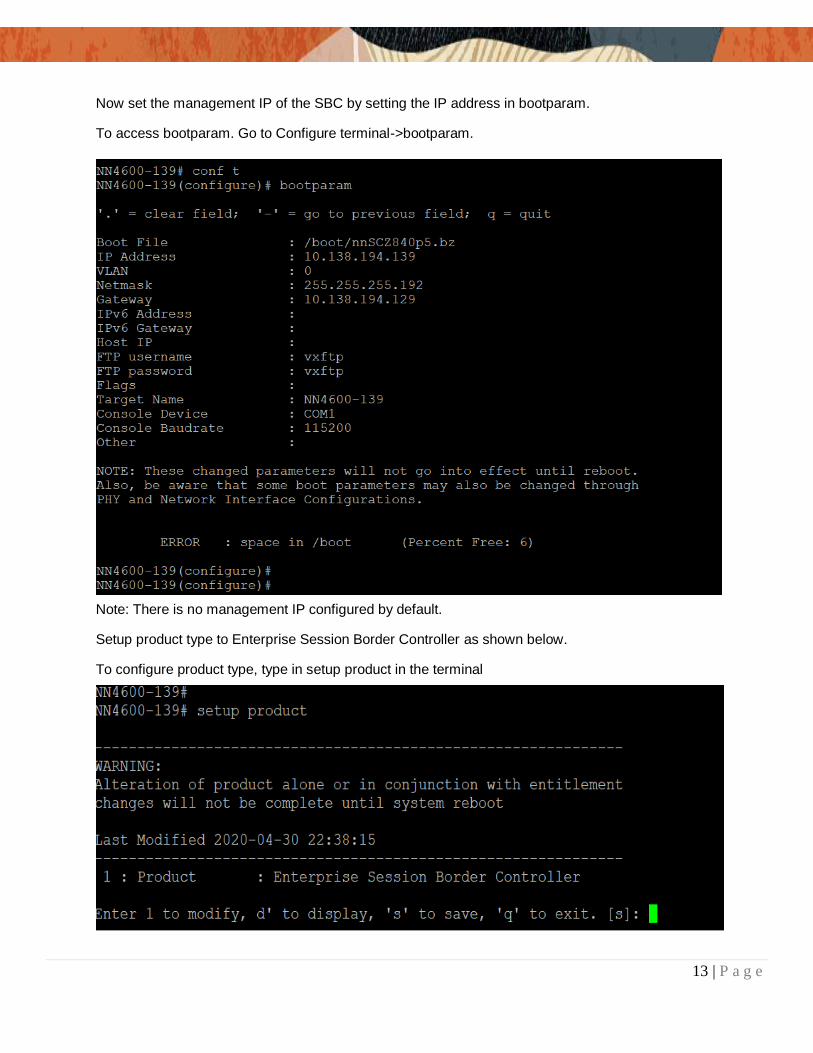
Now set the management IP of the SBC by setting the IP address in bootparam.
To access bootparam. Go to Configure terminal->bootparam.
Note: There is no management IP configured by default.
Setup product type to Enterprise Session Border Controller as shown below.
To configure product type, type in setup product in the terminal
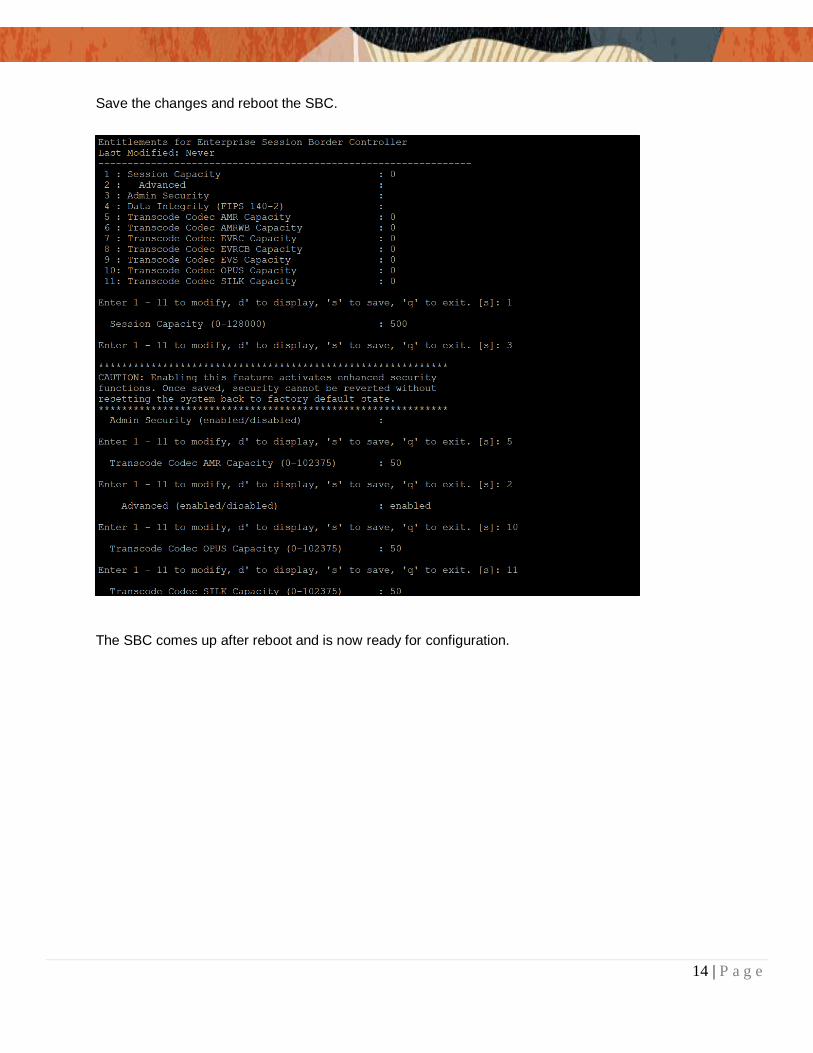
Enable the features for the ESBC using the setup entitlements command as shown
14 | P a g e
Save the changes and reboot the SBC.
The SBC comes up after reboot and is now ready for configuration.
15 | P a g e
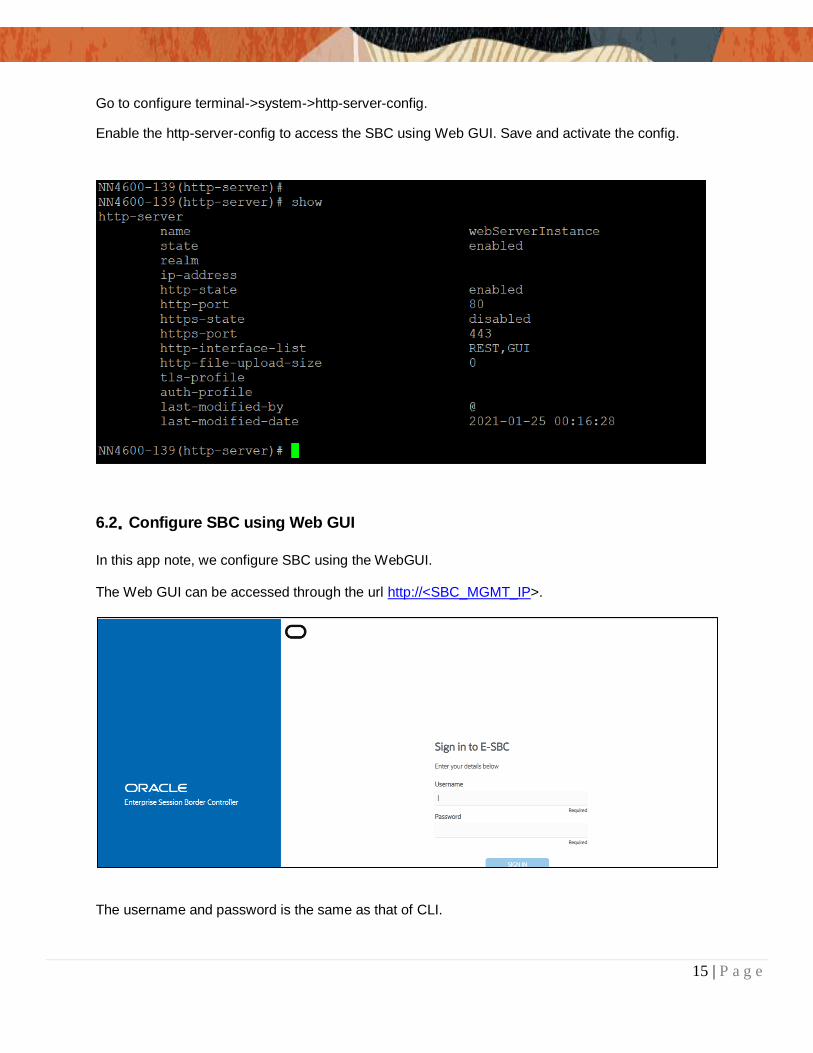
Go to configure terminal->system->http-server-config.
Enable the http-server-config to access the SBC using Web GUI. Save and activate the config.
6.2. Configure SBC using Web GUI
In this app note, we configure SBC using the WebGUI. The Web GUI can be accessed through the url http://<SBC_MGMT_IP>.
The username and password is the same as that of CLI.
16 | P a g e
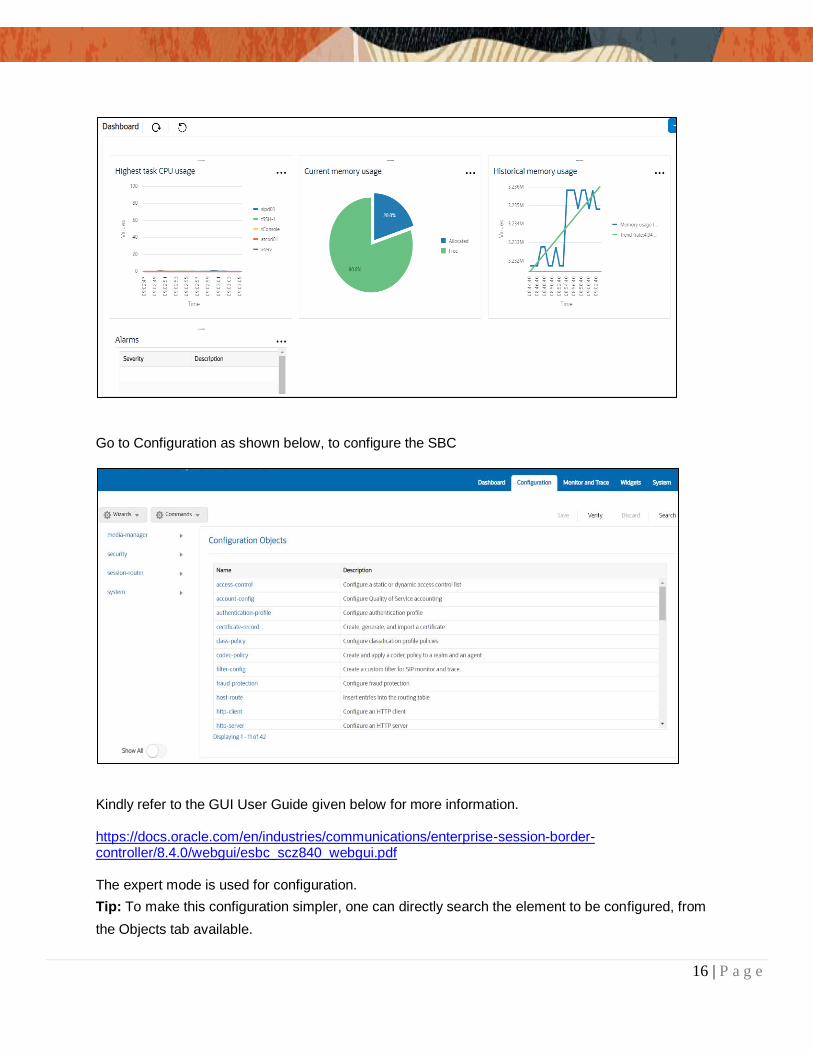
Go to Configuration as shown below, to configure the SBC
Kindly refer to the GUI User Guide given below for more information. https://docs.oracle.com/en/industries/communications/enterprise-session-border-controller/8.4.0/webgui/esbc_scz840_webgui.pdf The expert mode is used for configuration.
Tip: To make this configuration simpler, one can directly search the element to be configured, from
the Objects tab available.
17 | P a g e
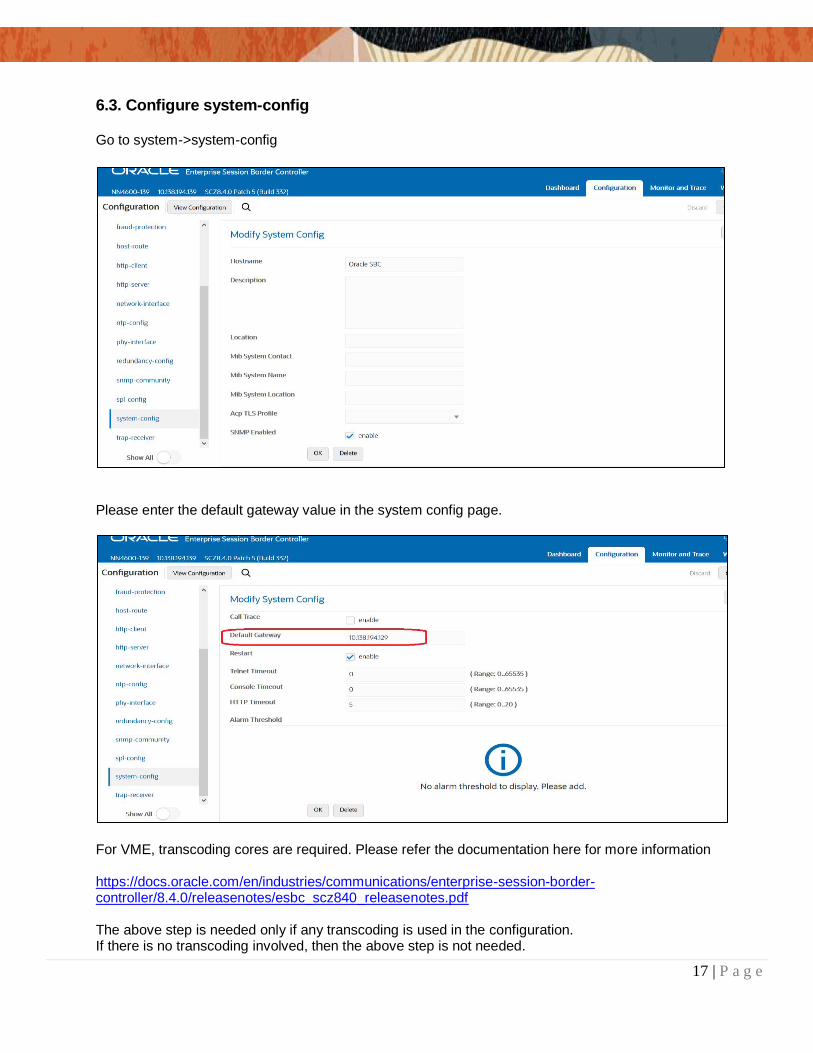
6.3. Configure system-config
Go to system->system-config
Please enter the default gateway value in the system config page.
For VME, transcoding cores are required. Please refer the documentation here for more information https://docs.oracle.com/en/industries/communications/enterprise-session-border-controller/8.4.0/releasenotes/esbc_scz840_releasenotes.pdf The above step is needed only if any transcoding is used in the configuration. If there is no transcoding involved, then the above step is not needed.
18 | P a g e
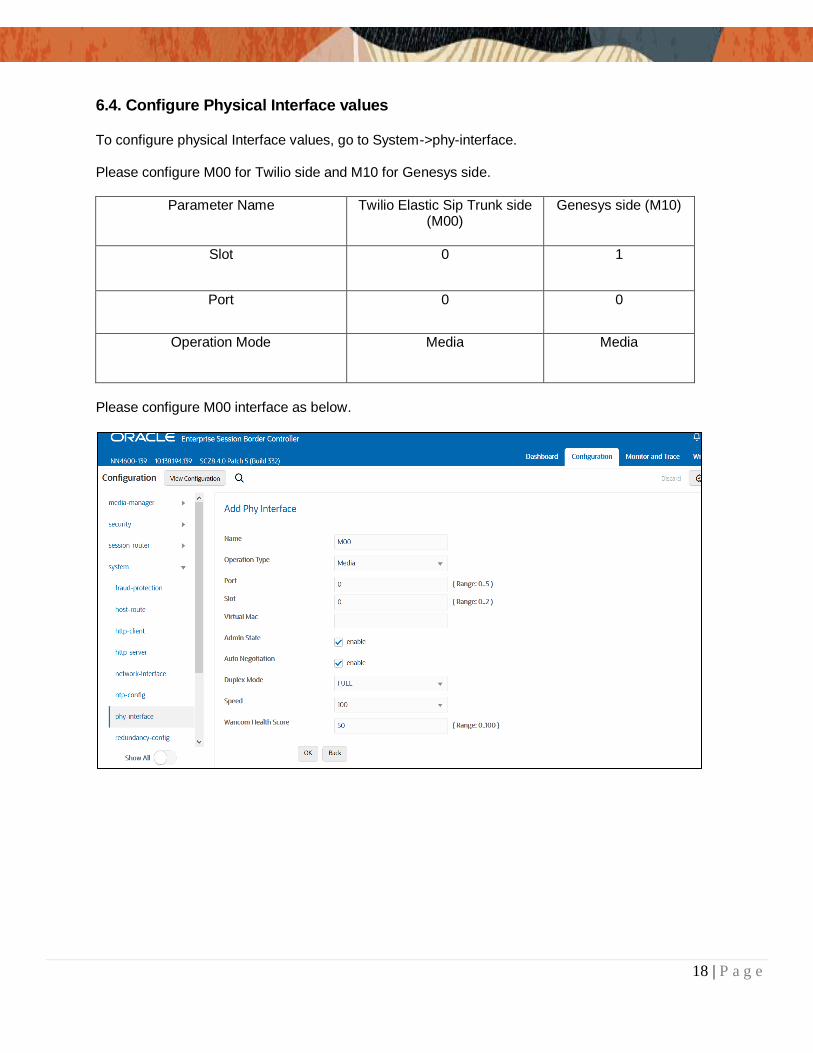
6.4. Configure Physical Interface values
To configure physical Interface values, go to System->phy-interface. Please configure M00 for Twilio side and M10 for Genesys side.
Parameter Name Twilio Elastic Sip Trunk side (M00)
Genesys side (M10)
Slot 0 1
Port 0 0
Operation Mode Media Media
Please configure M00 interface as below.
19 | P a g e
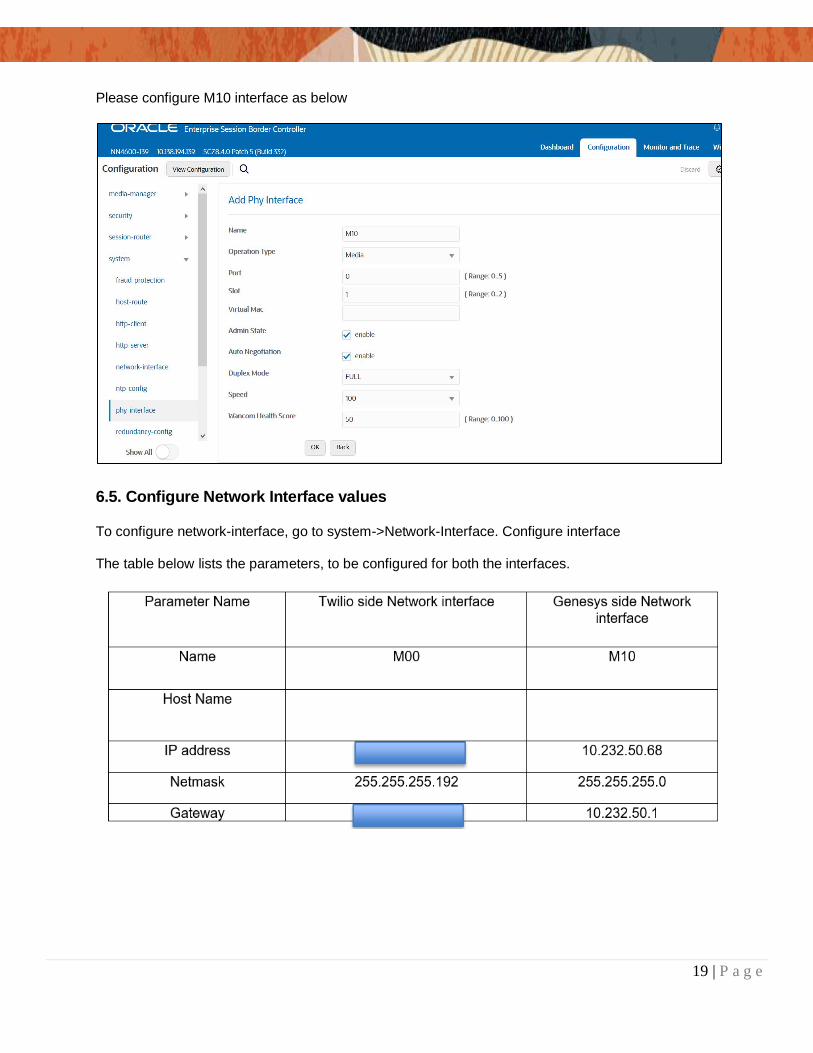
Please configure M10 interface as below
6.5. Configure Network Interface values
To configure network-interface, go to system->Network-Interface. Configure interface The table below lists the parameters, to be configured for both the interfaces.
20 | P a g e
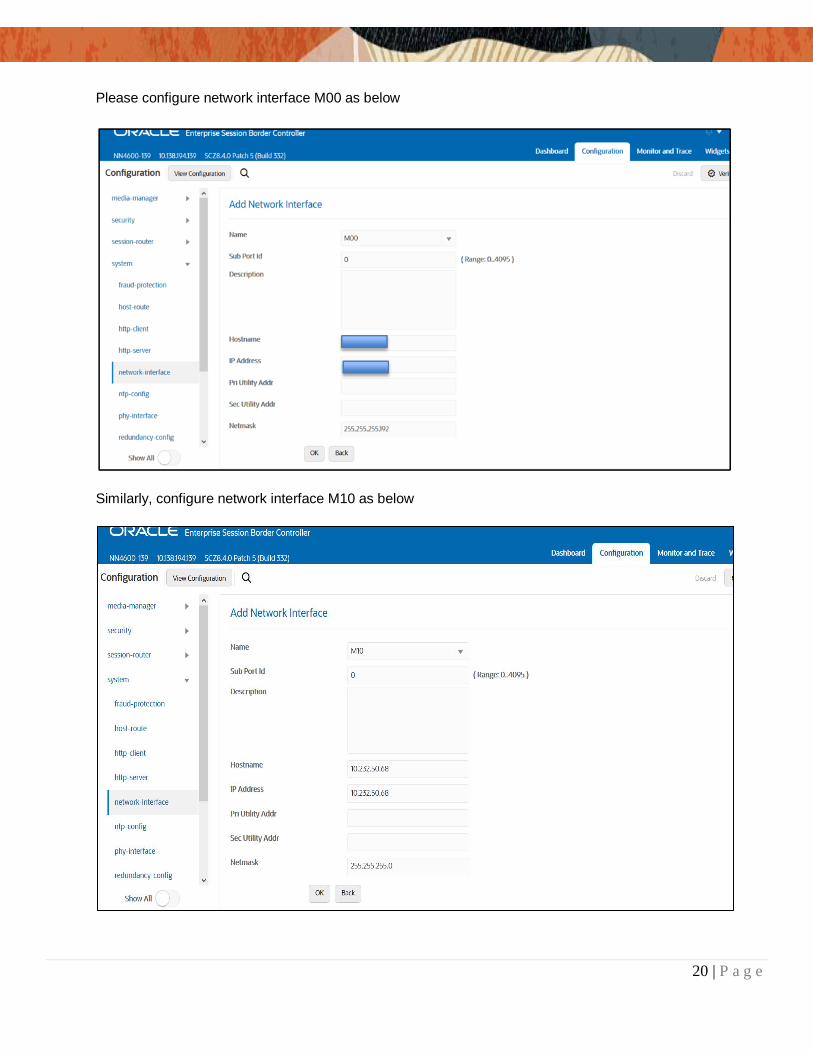
Please configure network interface M00 as below
Similarly, configure network interface M10 as below
21 | P a g e
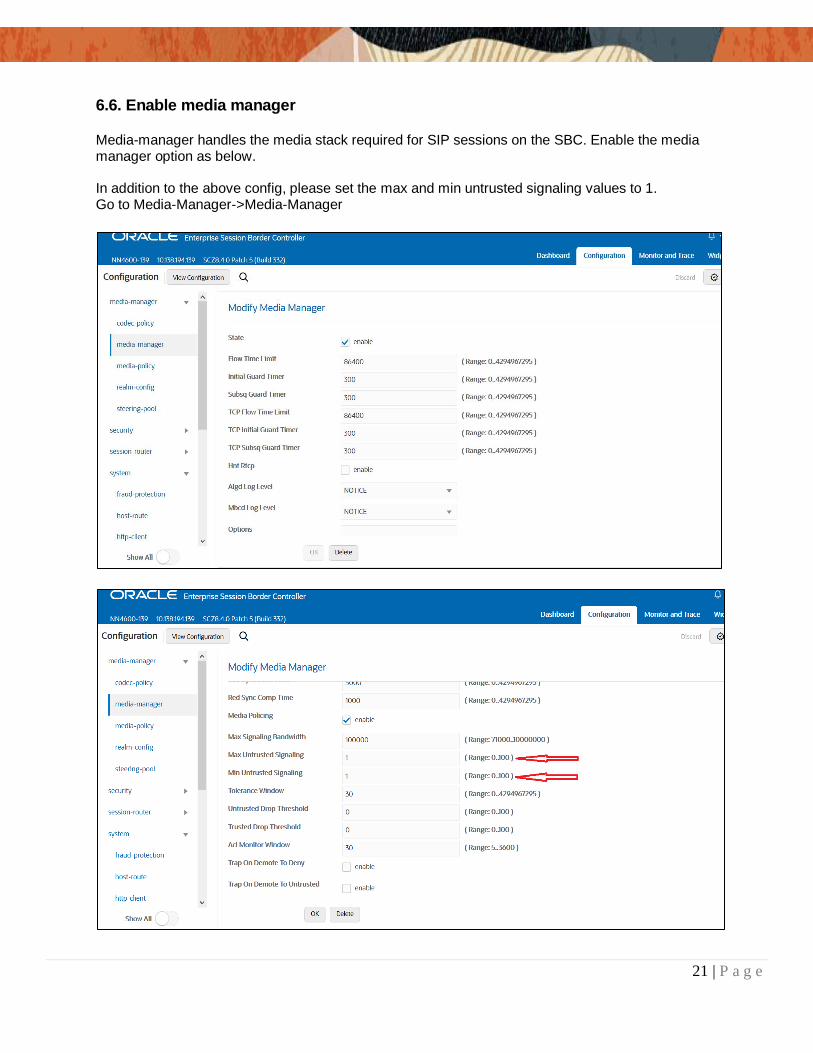
6.6. Enable media manager
Media-manager handles the media stack required for SIP sessions on the SBC. Enable the media manager option as below. In addition to the above config, please set the max and min untrusted signaling values to 1. Go to Media-Manager->Media-Manager
22 | P a g e
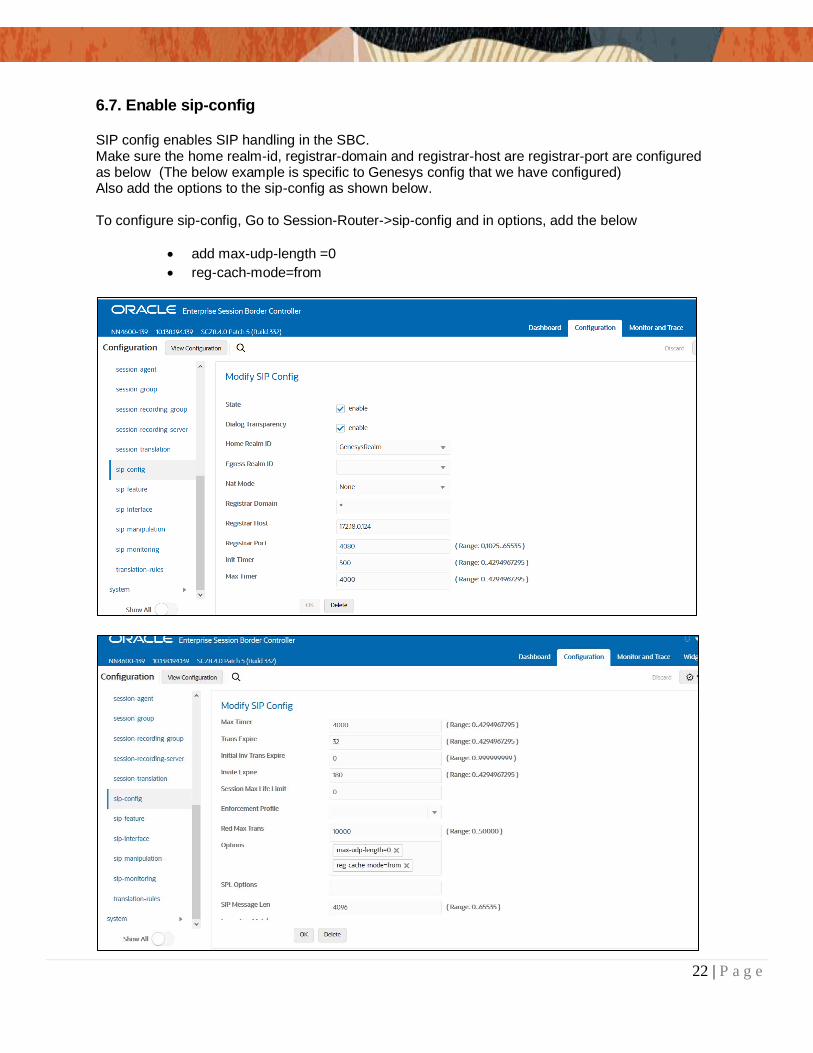
6.7. Enable sip-config
SIP config enables SIP handling in the SBC. Make sure the home realm-id, registrar-domain and registrar-host are registrar-port are configured as below (The below example is specific to Genesys config that we have configured) Also add the options to the sip-config as shown below. To configure sip-config, Go to Session-Router->sip-config and in options, add the below
add max-udp-length =0
reg-cach-mode=from
23 | P a g e
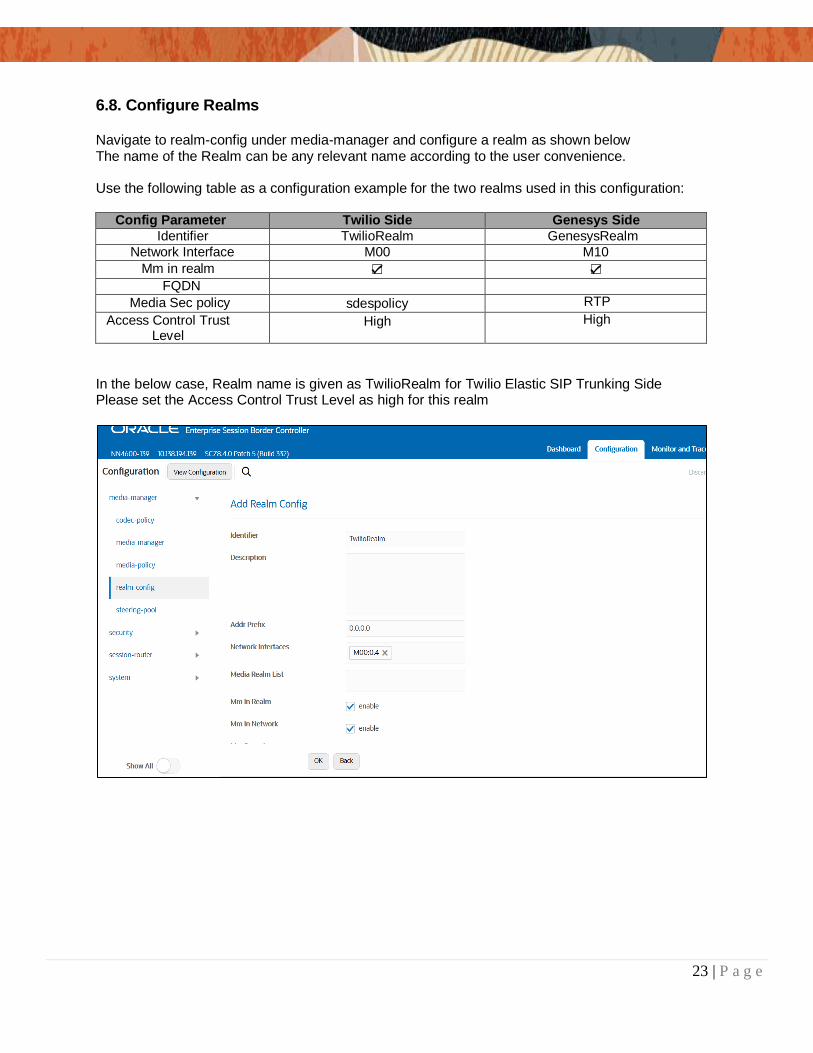
6.8. Configure Realms
Navigate to realm-config under media-manager and configure a realm as shown below The name of the Realm can be any relevant name according to the user convenience. Use the following table as a configuration example for the two realms used in this configuration:
Config Parameter Twilio Side Genesys Side
Identifier TwilioRealm GenesysRealm
Network Interface M00 M10
Mm in realm ☑ ☑ FQDN
Media Sec policy sdespolicy RTP
Access Control Trust Level
High High
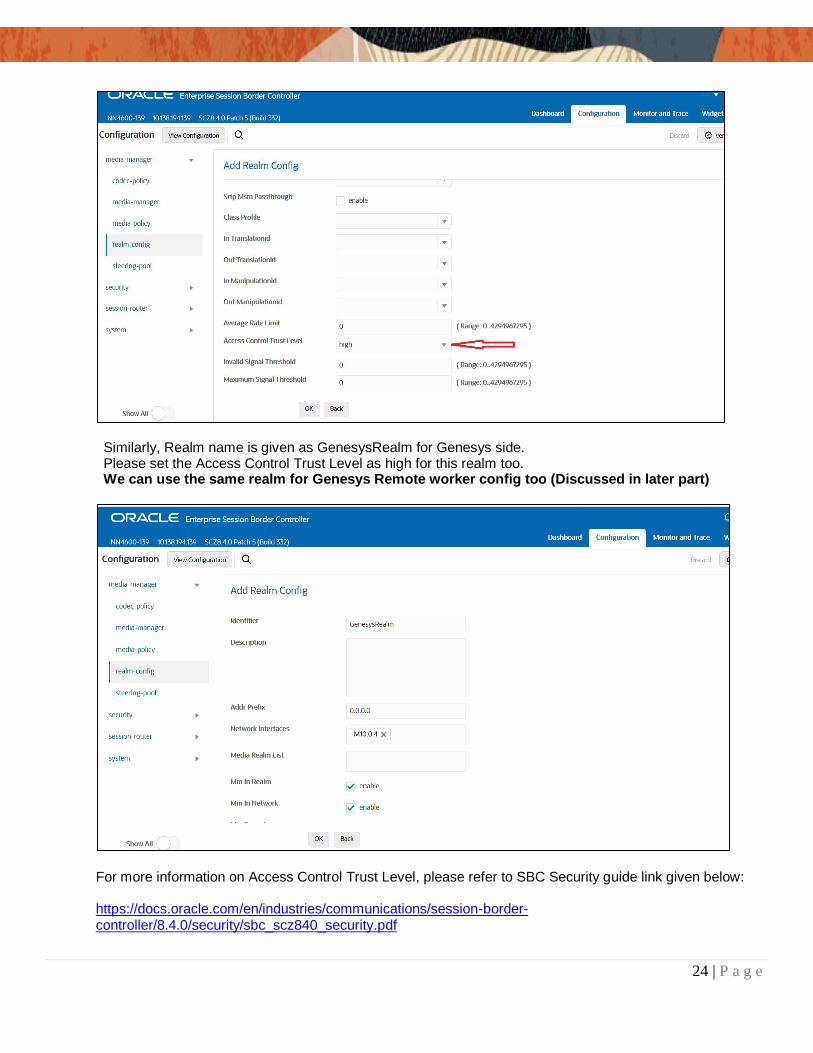
In the below case, Realm name is given as TwilioRealm for Twilio Elastic SIP Trunking Side Please set the Access Control Trust Level as high for this realm
24 | P a g e
Similarly, Realm name is given as GenesysRealm for Genesys side. Please set the Access Control Trust Level as high for this realm too. We can use the same realm for Genesys Remote worker config too (Discussed in later part)
For more information on Access Control Trust Level, please refer to SBC Security guide link given below: https://docs.oracle.com/en/industries/communications/session-border-controller/8.4.0/security/sbc_scz840_security.pdf
25 | P a g e
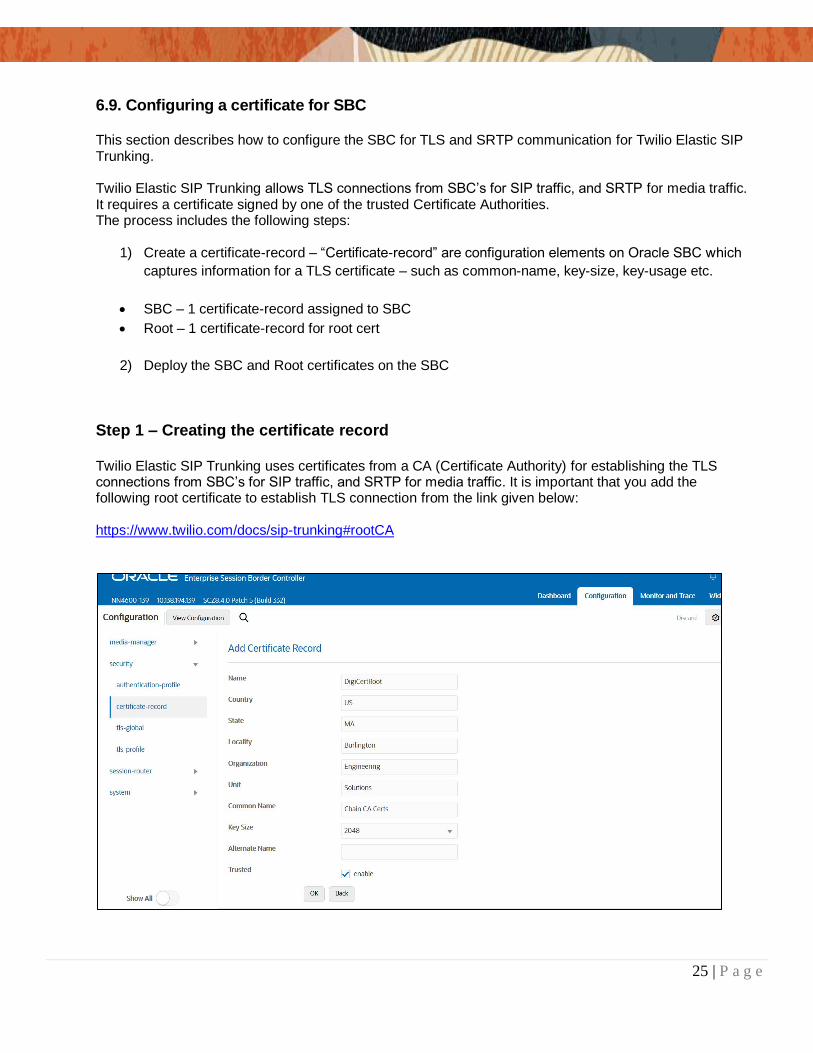
6.9. Configuring a certificate for SBC
This section describes how to configure the SBC for TLS and SRTP communication for Twilio Elastic SIP Trunking. Twilio Elastic SIP Trunking allows TLS connections from SBC’s for SIP traffic, and SRTP for media traffic. It requires a certificate signed by one of the trusted Certificate Authorities. The process includes the following steps:
1) Create a certificate-record – “Certificate-record” are configuration elements on Oracle SBC which
captures information for a TLS certificate – such as common-name, key-size, key-usage etc.
SBC – 1 certificate-record assigned to SBC
Root – 1 certificate-record for root cert
2) Deploy the SBC and Root certificates on the SBC
Step 1 – Creating the certificate record
Twilio Elastic SIP Trunking uses certificates from a CA (Certificate Authority) for establishing the TLS connections from SBC’s for SIP traffic, and SRTP for media traffic. It is important that you add the following root certificate to establish TLS connection from the link given below: https://www.twilio.com/docs/sip-trunking#rootCA
26 | P a g e
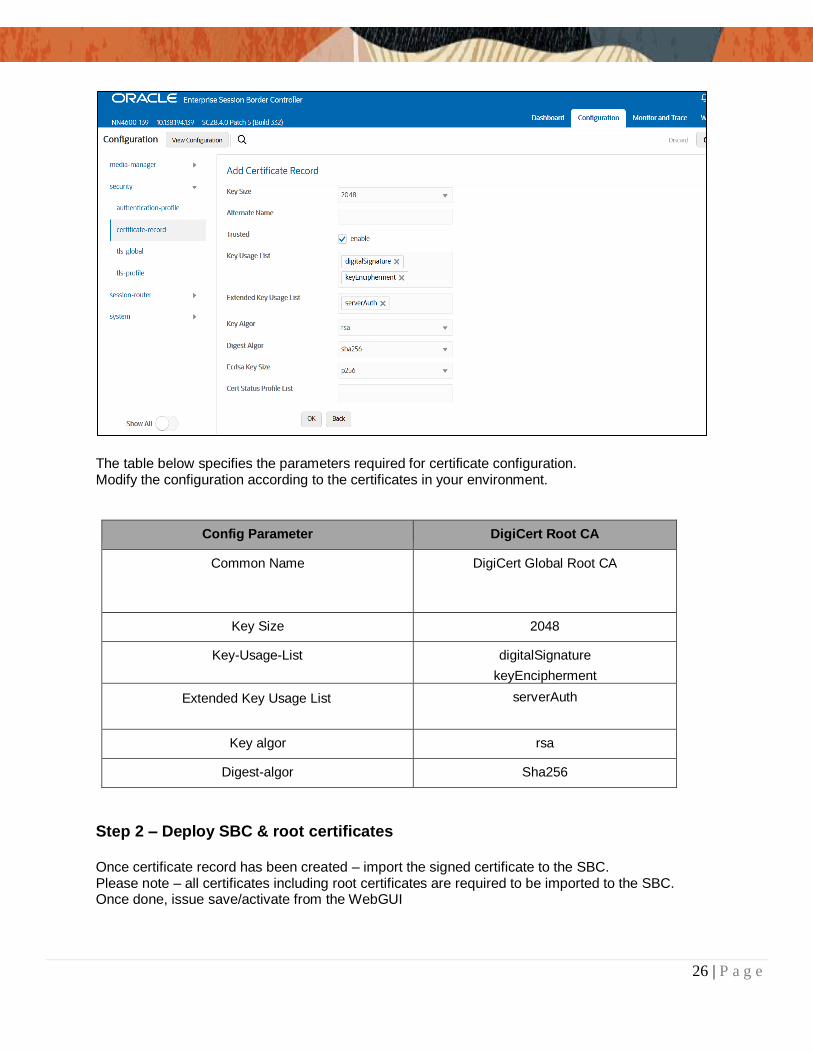
The table below specifies the parameters required for certificate configuration. Modify the configuration according to the certificates in your environment.
Config Parameter DigiCert Root CA
Common Name DigiCert Global Root CA
Key Size 2048
Key-Usage-List digitalSignature
keyEncipherment
Extended Key Usage List serverAuth
Key algor rsa
Digest-algor Sha256
Step 2 – Deploy SBC & root certificates Once certificate record has been created – import the signed certificate to the SBC. Please note – all certificates including root certificates are required to be imported to the SBC. Once done, issue save/activate from the WebGUI
27 | P a g e
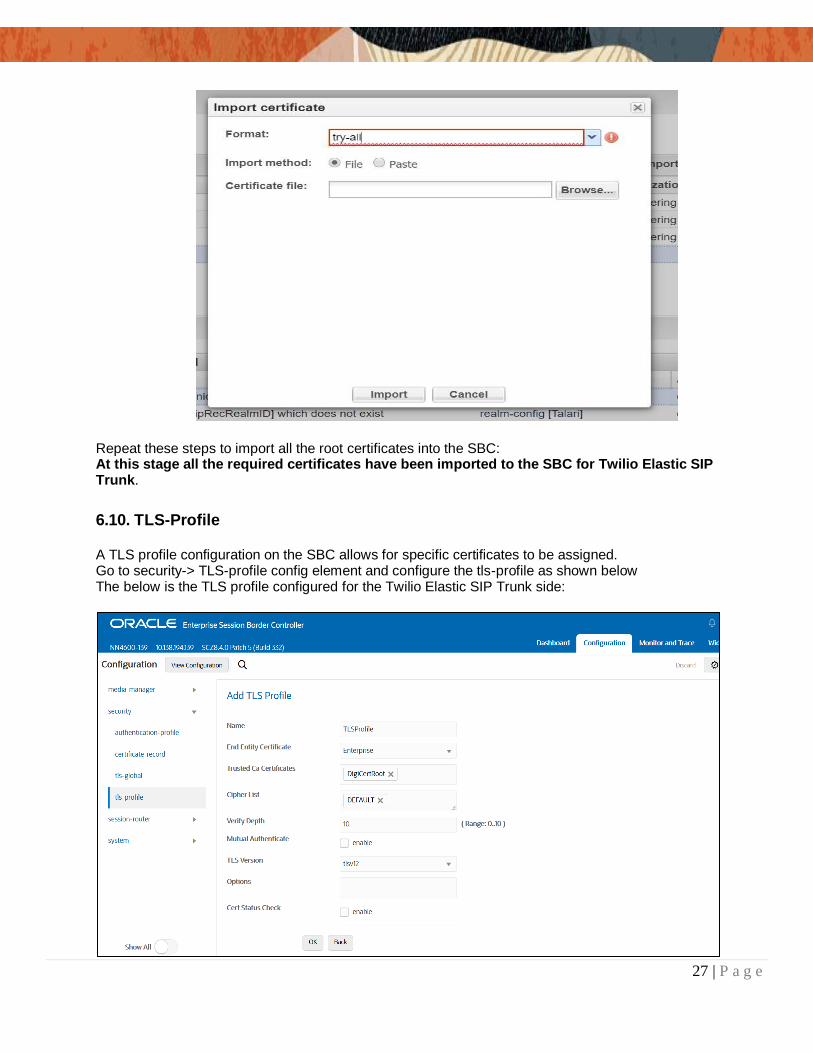
Repeat these steps to import all the root certificates into the SBC: At this stage all the required certificates have been imported to the SBC for Twilio Elastic SIP Trunk.
6.10. TLS-Profile
A TLS profile configuration on the SBC allows for specific certificates to be assigned. Go to security-> TLS-profile config element and configure the tls-profile as shown below The below is the TLS profile configured for the Twilio Elastic SIP Trunk side:
28 | P a g e
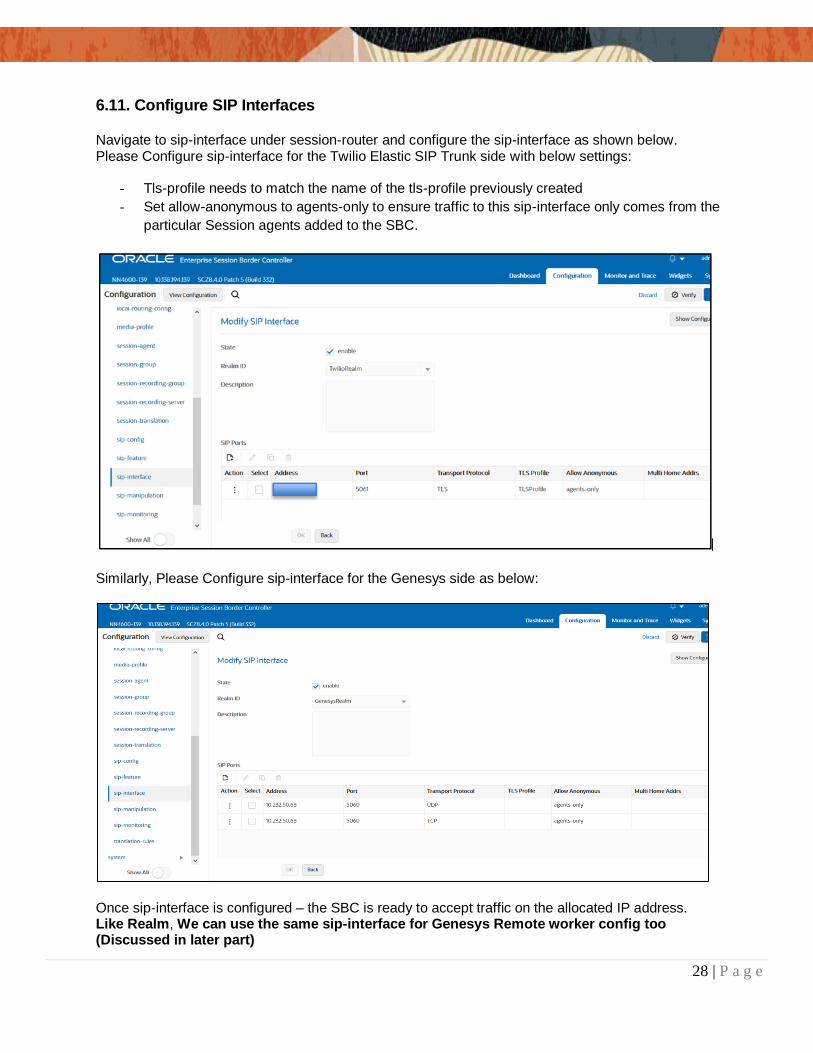
6.11. Configure SIP Interfaces
Navigate to sip-interface under session-router and configure the sip-interface as shown below. Please Configure sip-interface for the Twilio Elastic SIP Trunk side with below settings:
- Tls-profile needs to match the name of the tls-profile previously created
- Set allow-anonymous to agents-only to ensure traffic to this sip-interface only comes from the
particular Session agents added to the SBC.
Similarly, Please Configure sip-interface for the Genesys side as below:
Once sip-interface is configured – the SBC is ready to accept traffic on the allocated IP address. Like Realm, We can use the same sip-interface for Genesys Remote worker config too (Discussed in later part)
29 | P a g e
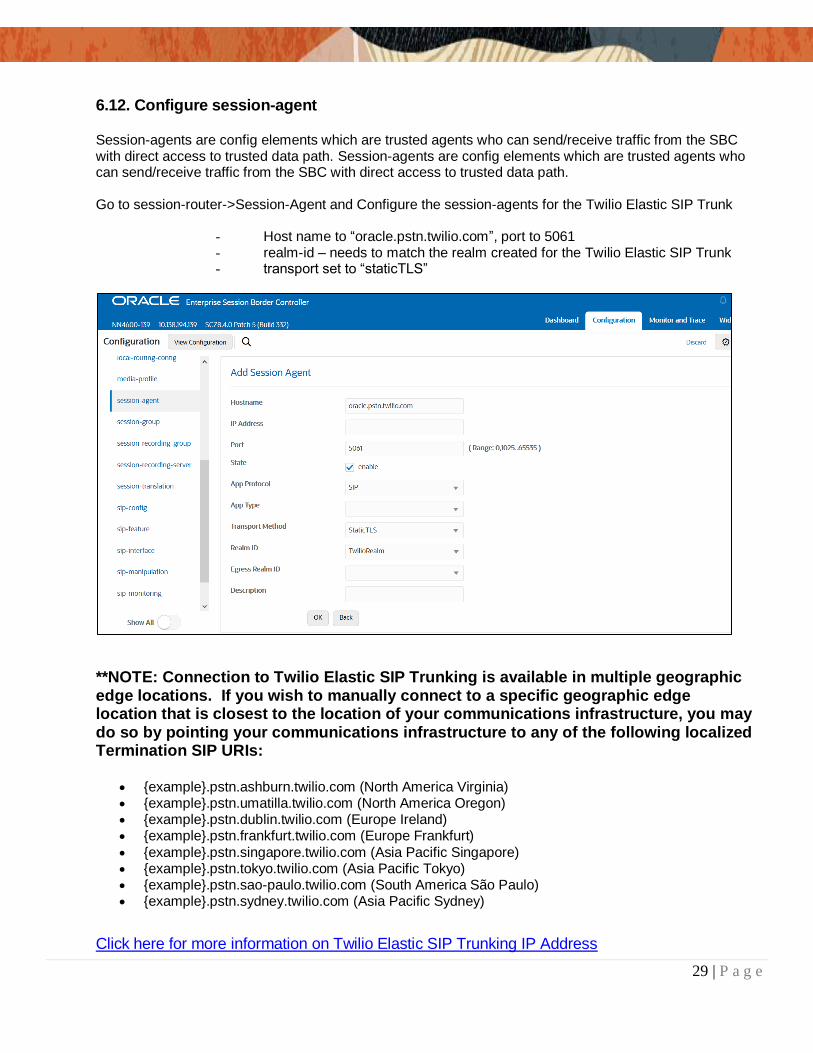
6.12. Configure session-agent
Session-agents are config elements which are trusted agents who can send/receive traffic from the SBC with direct access to trusted data path. Session-agents are config elements which are trusted agents who can send/receive traffic from the SBC with direct access to trusted data path. Go to session-router->Session-Agent and Configure the session-agents for the Twilio Elastic SIP Trunk
- Host name to “oracle.pstn.twilio.com”, port to 5061 - realm-id – needs to match the realm created for the Twilio Elastic SIP Trunk - transport set to “staticTLS”
**NOTE: Connection to Twilio Elastic SIP Trunking is available in multiple geographic edge locations. If you wish to manually connect to a specific geographic edge location that is closest to the location of your communications infrastructure, you may do so by pointing your communications infrastructure to any of the following localized Termination SIP URIs:
{example}.pstn.ashburn.twilio.com (North America Virginia) {example}.pstn.umatilla.twilio.com (North America Oregon) {example}.pstn.dublin.twilio.com (Europe Ireland) {example}.pstn.frankfurt.twilio.com (Europe Frankfurt)
{example}.pstn.singapore.twilio.com (Asia Pacific Singapore) {example}.pstn.tokyo.twilio.com (Asia Pacific Tokyo) {example}.pstn.sao-paulo.twilio.com (South America São Paulo) {example}.pstn.sydney.twilio.com (Asia Pacific Sydney)
Click here for more information on Twilio Elastic SIP Trunking IP Address
30 | P a g e
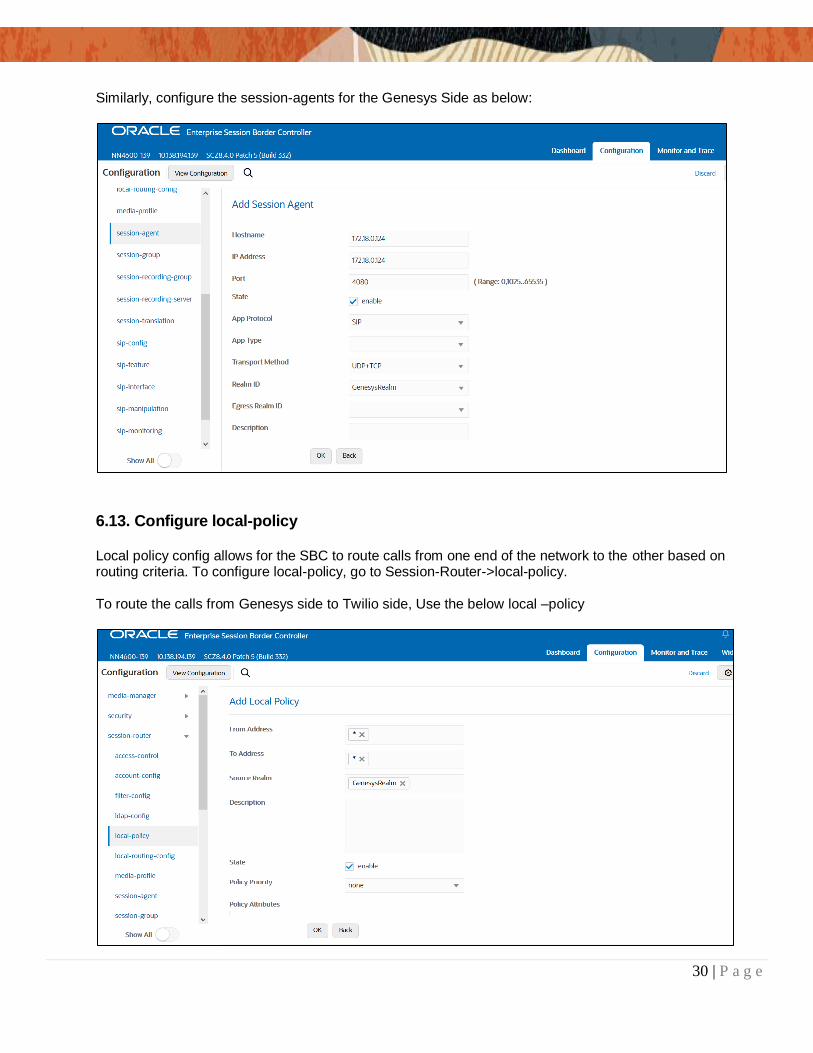
Similarly, configure the session-agents for the Genesys Side as below:
6.13. Configure local-policy
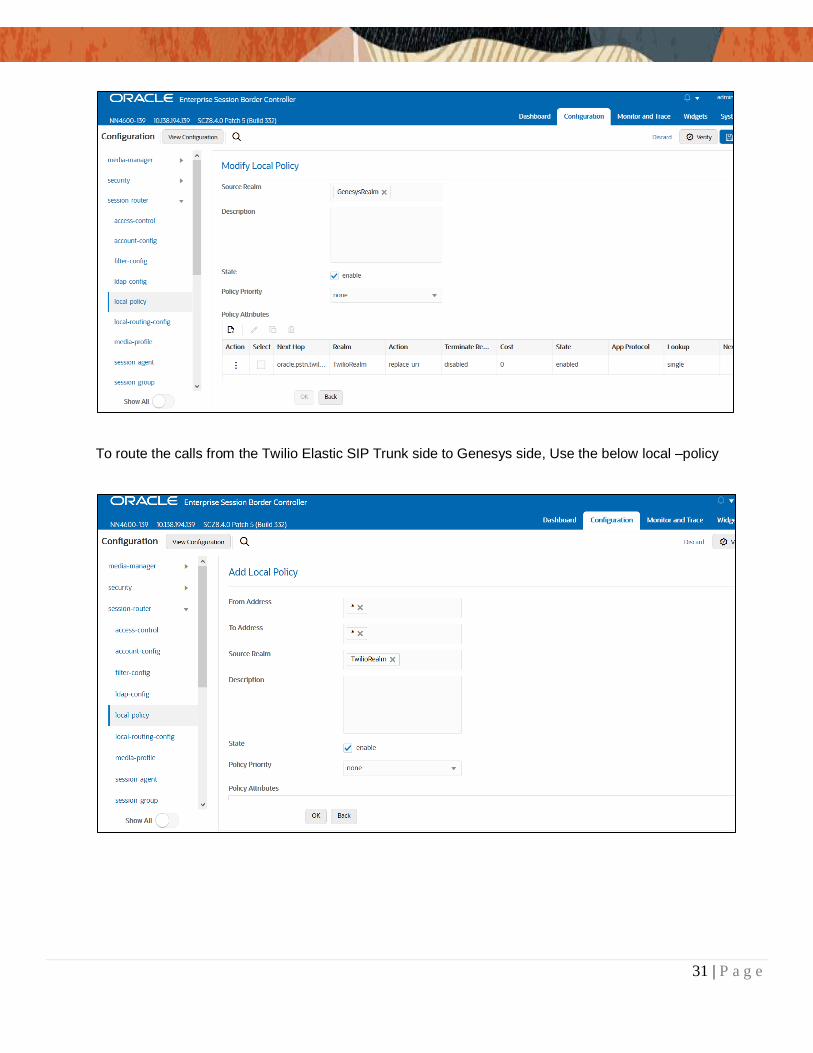
Local policy config allows for the SBC to route calls from one end of the network to the other based on routing criteria. To configure local-policy, go to Session-Router->local-policy. To route the calls from Genesys side to Twilio side, Use the below local –policy
31 | P a g e
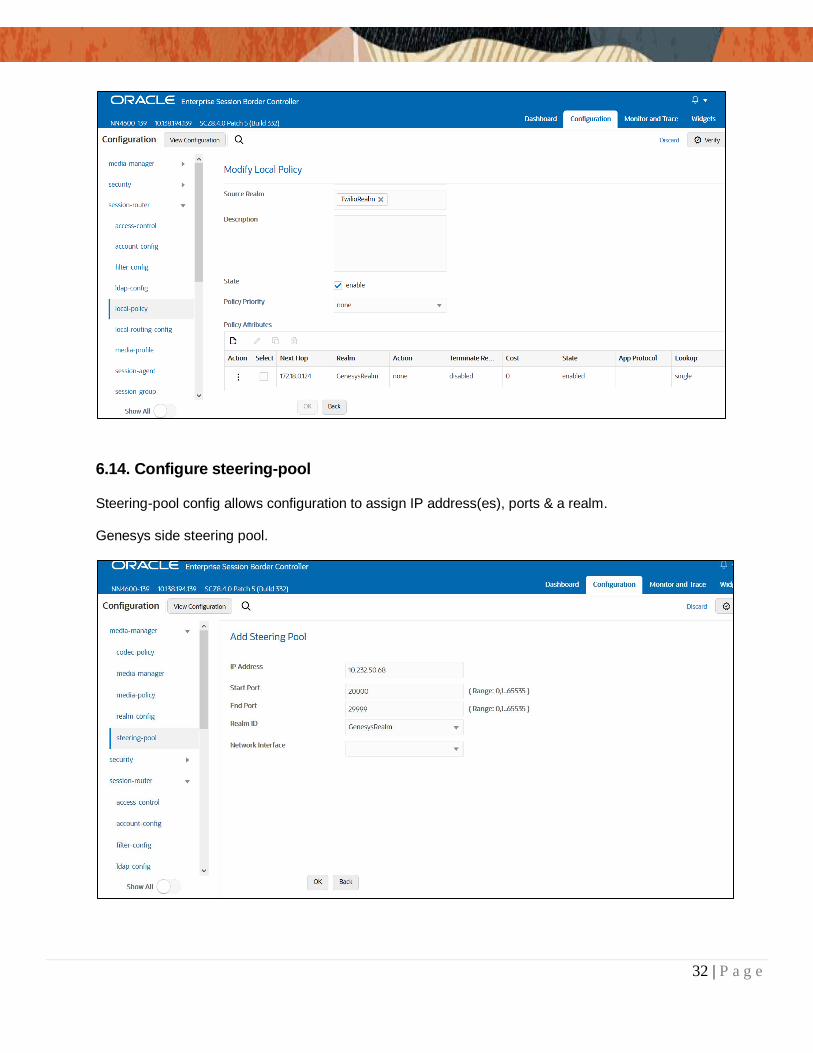
To route the calls from the Twilio Elastic SIP Trunk side to Genesys side, Use the below local –policy
32 | P a g e
6.14. Configure steering-pool
Steering-pool config allows configuration to assign IP address(es), ports & a realm. Genesys side steering pool.
33 | P a g e
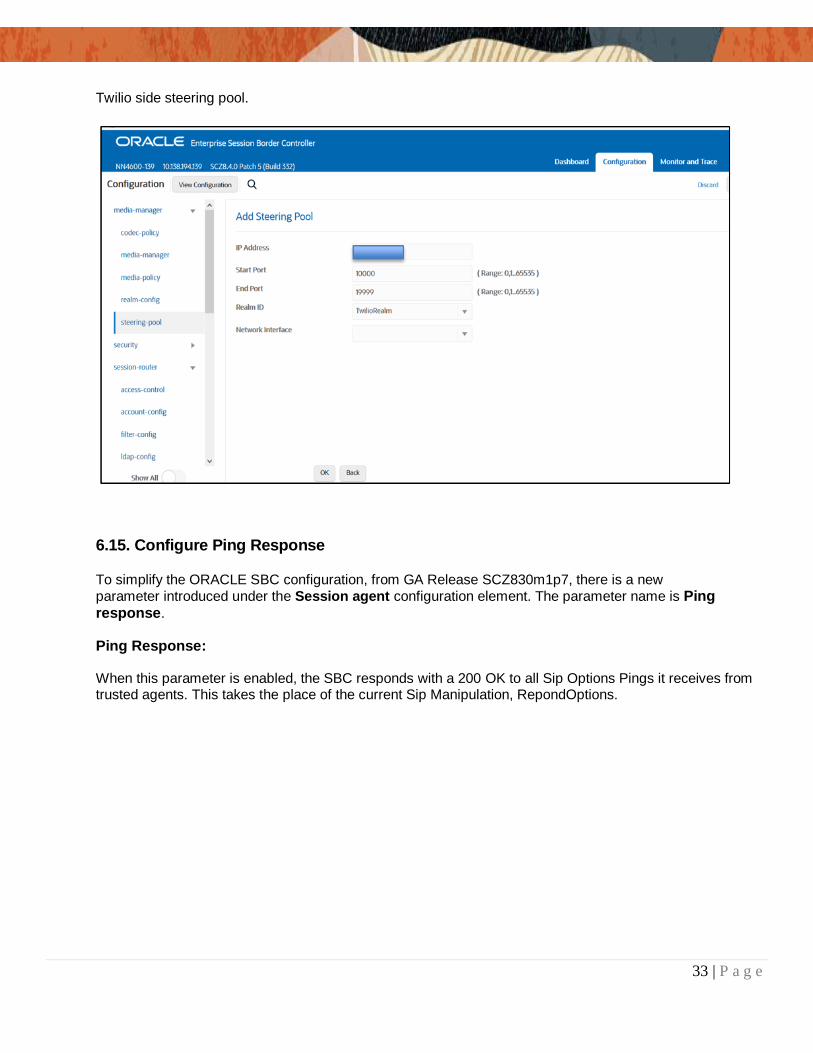
Twilio side steering pool.
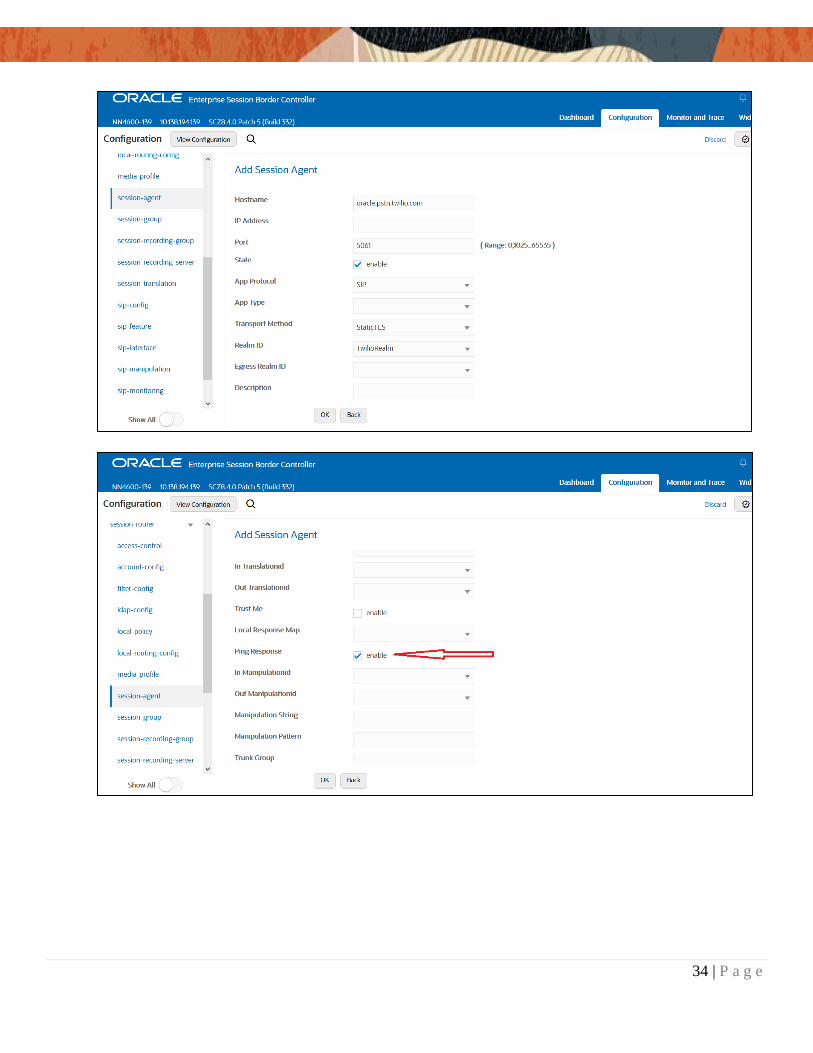
6.15. Configure Ping Response
To simplify the ORACLE SBC configuration, from GA Release SCZ830m1p7, there is a new
parameter introduced under the Session agent configuration element. The parameter name is Ping response.
Ping Response: When this parameter is enabled, the SBC responds with a 200 OK to all Sip Options Pings it receives from trusted agents. This takes the place of the current Sip Manipulation, RepondOptions.
34 | P a g e
35 | P a g e
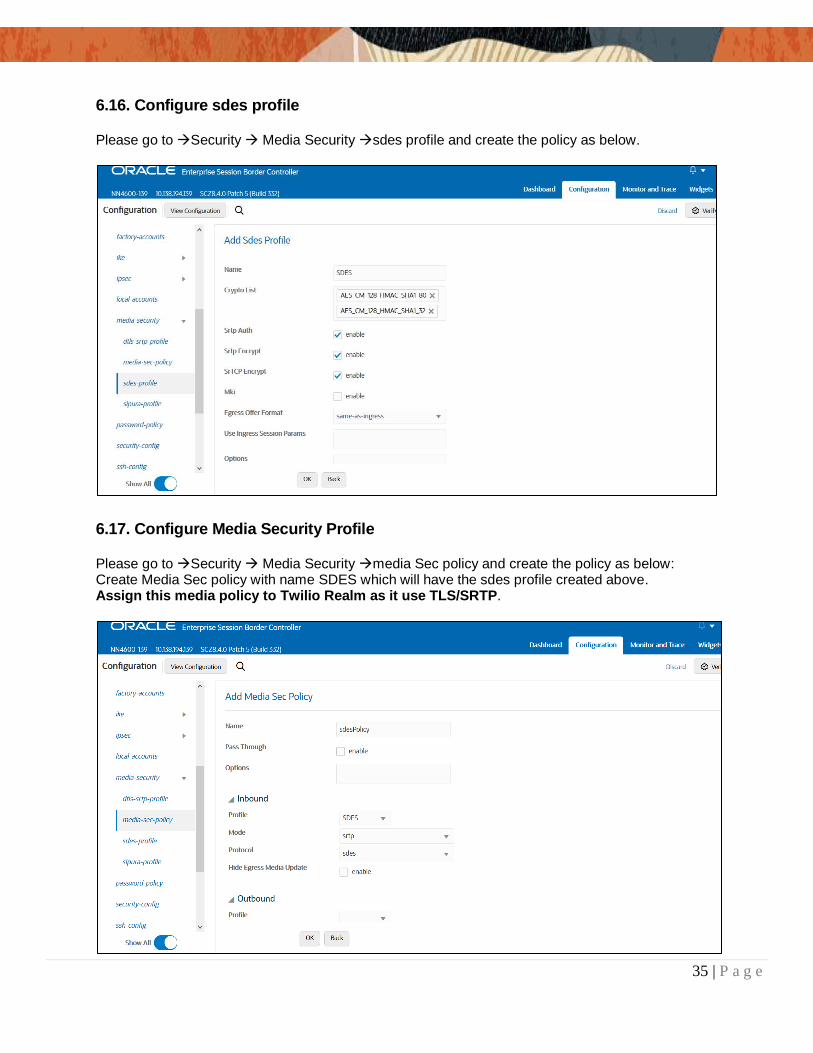
6.16. Configure sdes profile
Please go to Security Media Security sdes profile and create the policy as below.
6.17. Configure Media Security Profile
Please go to Security Media Security media Sec policy and create the policy as below: Create Media Sec policy with name SDES which will have the sdes profile created above. Assign this media policy to Twilio Realm as it use TLS/SRTP.
36 | P a g e
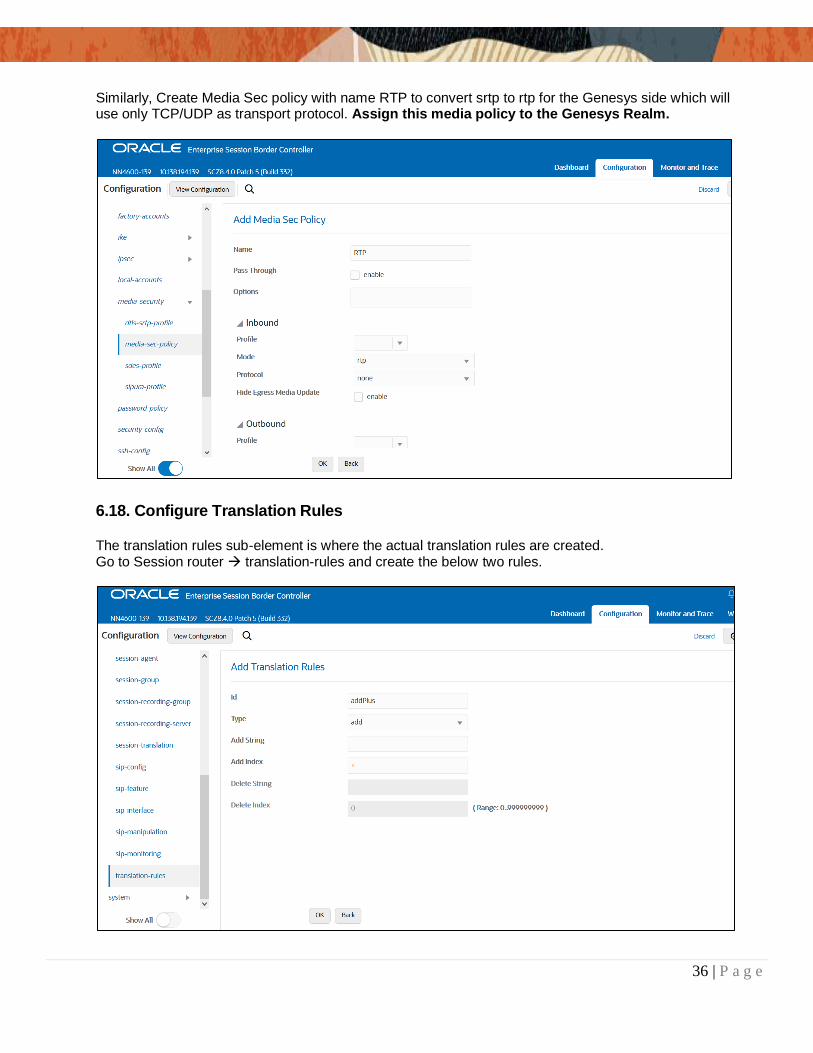
Similarly, Create Media Sec policy with name RTP to convert srtp to rtp for the Genesys side which will use only TCP/UDP as transport protocol. Assign this media policy to the Genesys Realm.
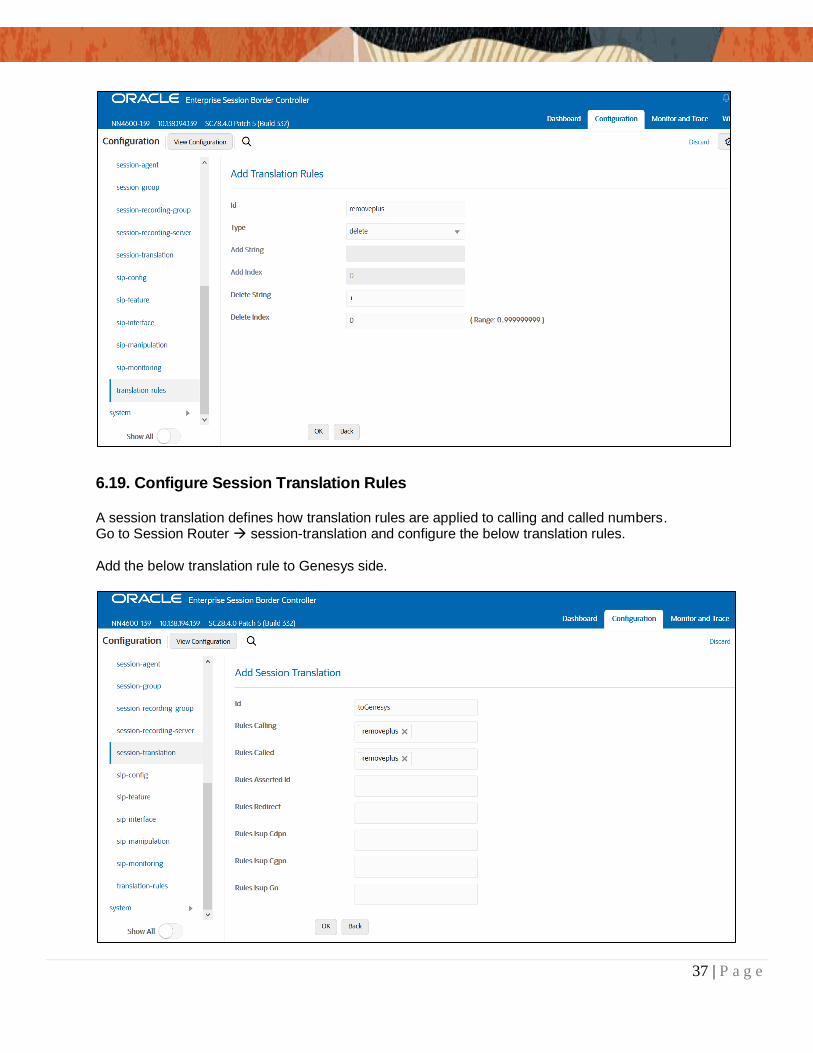
6.18. Configure Translation Rules
The translation rules sub-element is where the actual translation rules are created. Go to Session router translation-rules and create the below two rules.
37 | P a g e
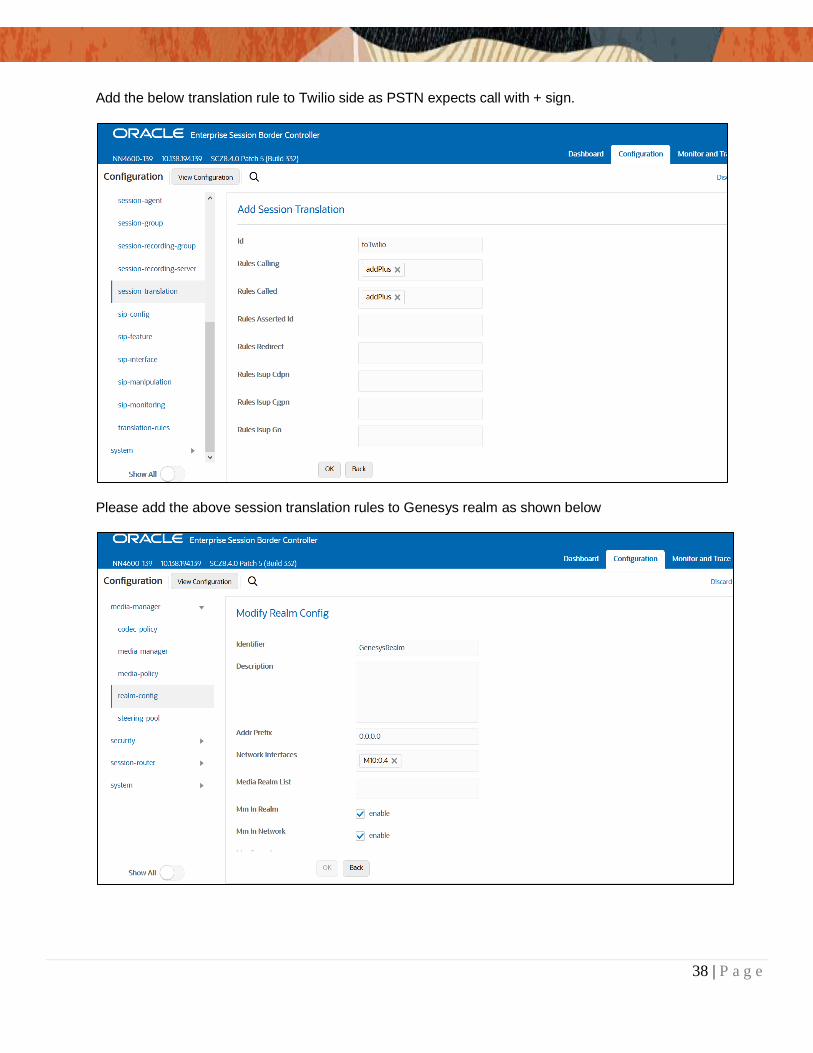
6.19. Configure Session Translation Rules
A session translation defines how translation rules are applied to calling and called numbers. Go to Session Router session-translation and configure the below translation rules. Add the below translation rule to Genesys side.
38 | P a g e
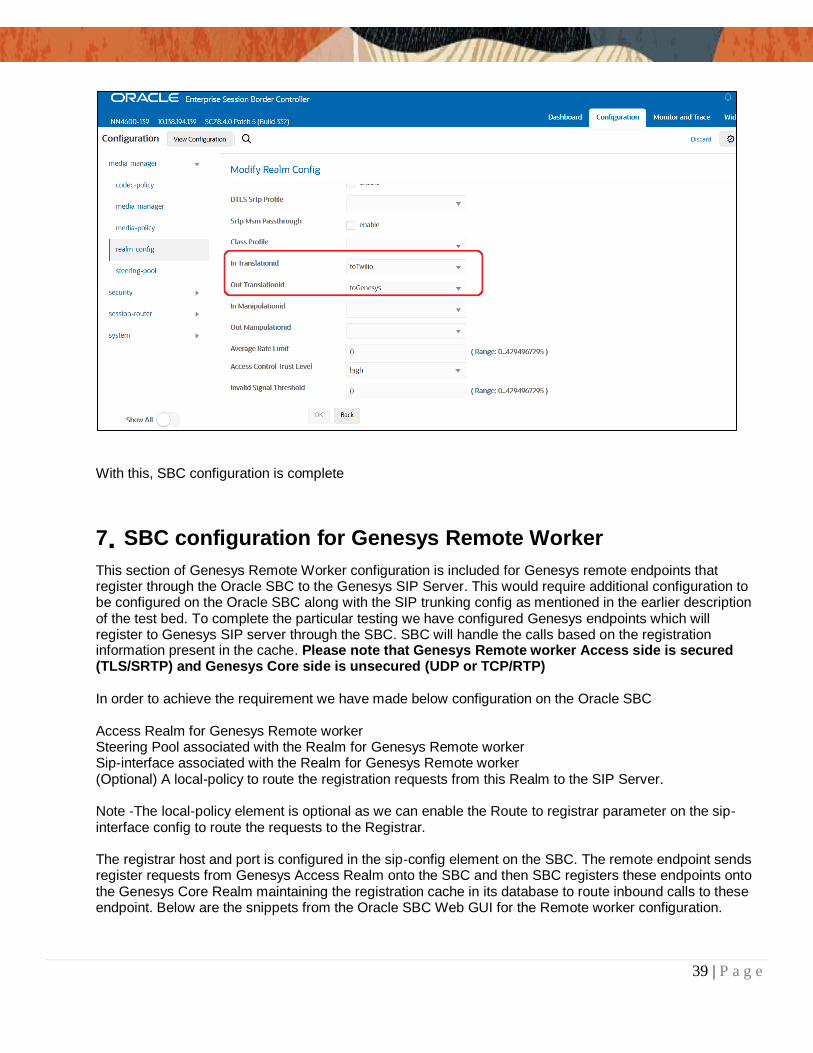
Add the below translation rule to Twilio side as PSTN expects call with + sign.
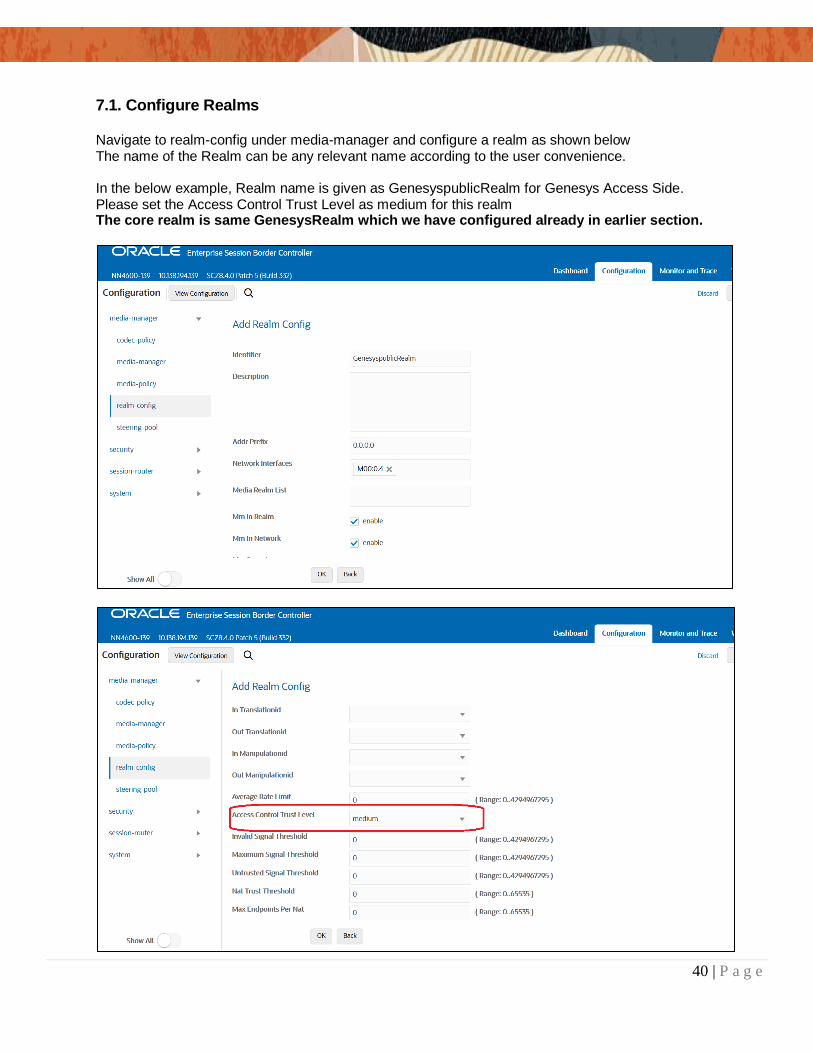
Please add the above session translation rules to Genesys realm as shown below
39 | P a g e
With this, SBC configuration is complete
7. SBC configuration for Genesys Remote Worker
This section of Genesys Remote Worker configuration is included for Genesys remote endpoints that register through the Oracle SBC to the Genesys SIP Server. This would require additional configuration to be configured on the Oracle SBC along with the SIP trunking config as mentioned in the earlier description of the test bed. To complete the particular testing we have configured Genesys endpoints which will register to Genesys SIP server through the SBC. SBC will handle the calls based on the registration information present in the cache. Please note that Genesys Remote worker Access side is secured (TLS/SRTP) and Genesys Core side is unsecured (UDP or TCP/RTP)
In order to achieve the requirement we have made below configuration on the Oracle SBC Access Realm for Genesys Remote worker Steering Pool associated with the Realm for Genesys Remote worker Sip-interface associated with the Realm for Genesys Remote worker (Optional) A local-policy to route the registration requests from this Realm to the SIP Server. Note -The local-policy element is optional as we can enable the Route to registrar parameter on the sip-interface config to route the requests to the Registrar. The registrar host and port is configured in the sip-config element on the SBC. The remote endpoint sends register requests from Genesys Access Realm onto the SBC and then SBC registers these endpoints onto the Genesys Core Realm maintaining the registration cache in its database to route inbound calls to these endpoint. Below are the snippets from the Oracle SBC Web GUI for the Remote worker configuration.
40 | P a g e
7.1. Configure Realms
Navigate to realm-config under media-manager and configure a realm as shown below The name of the Realm can be any relevant name according to the user convenience. In the below example, Realm name is given as GenesyspublicRealm for Genesys Access Side. Please set the Access Control Trust Level as medium for this realm The core realm is same GenesysRealm which we have configured already in earlier section.
41 | P a g e
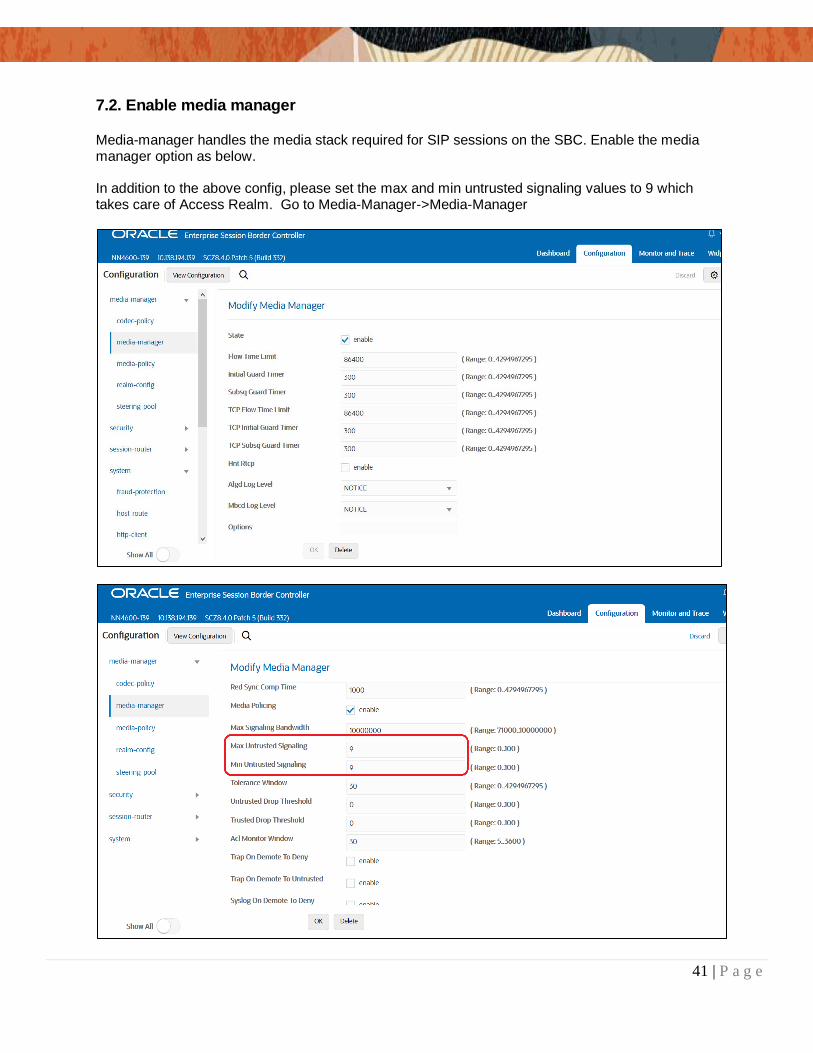
7.2. Enable media manager
Media-manager handles the media stack required for SIP sessions on the SBC. Enable the media manager option as below. In addition to the above config, please set the max and min untrusted signaling values to 9 which takes care of Access Realm. Go to Media-Manager->Media-Manager
42 | P a g e
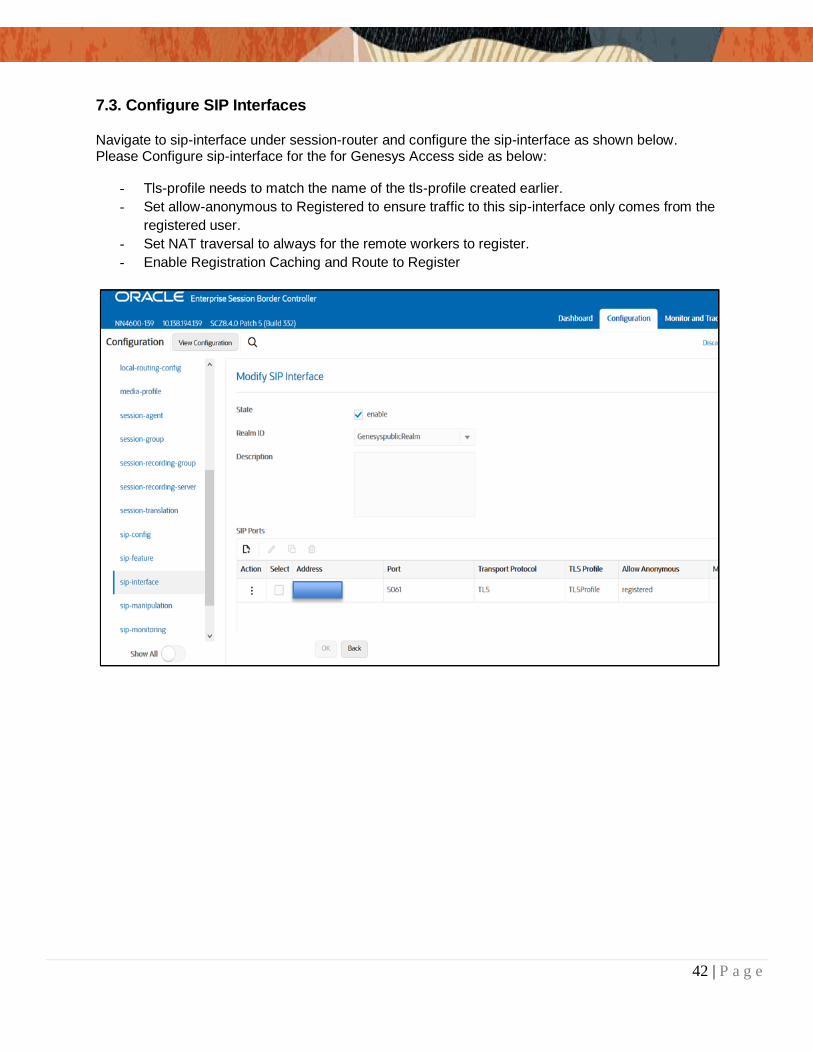
7.3. Configure SIP Interfaces
Navigate to sip-interface under session-router and configure the sip-interface as shown below. Please Configure sip-interface for the for Genesys Access side as below:
- Tls-profile needs to match the name of the tls-profile created earlier.
- Set allow-anonymous to Registered to ensure traffic to this sip-interface only comes from the
registered user.
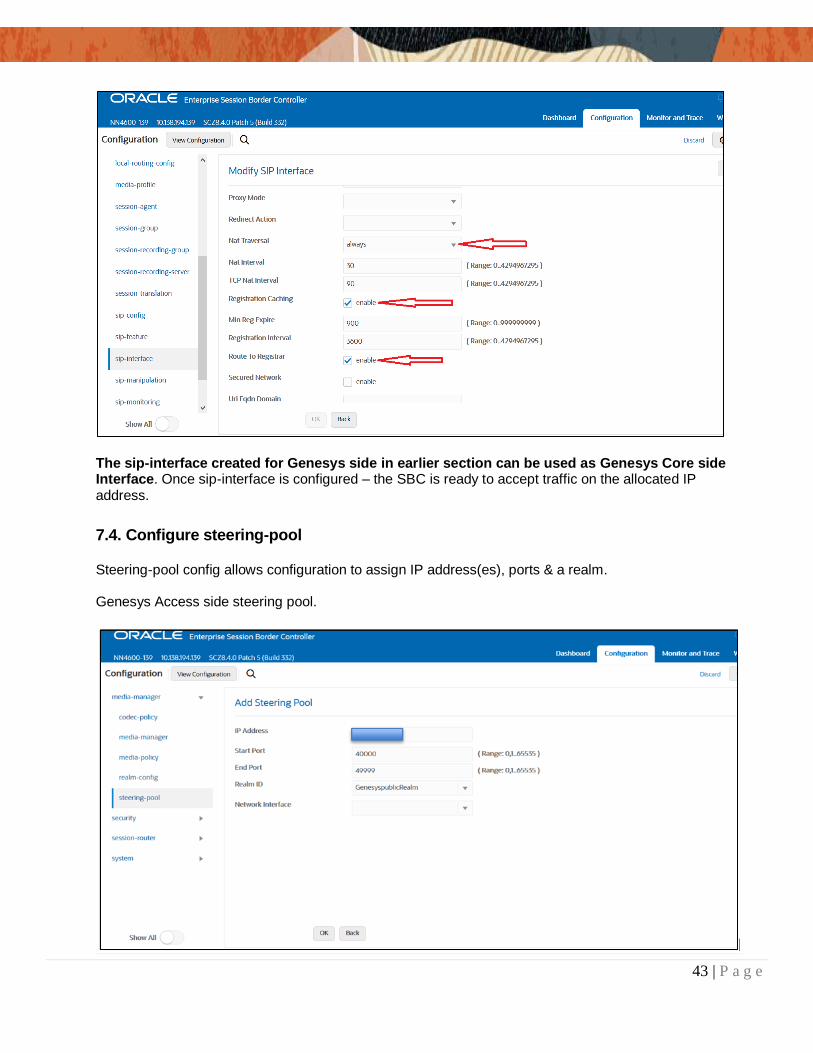
- Set NAT traversal to always for the remote workers to register.
- Enable Registration Caching and Route to Register
43 | P a g e
The sip-interface created for Genesys side in earlier section can be used as Genesys Core side Interface. Once sip-interface is configured – the SBC is ready to accept traffic on the allocated IP address.
7.4. Configure steering-pool
Steering-pool config allows configuration to assign IP address(es), ports & a realm. Genesys Access side steering pool.
44 | P a g e
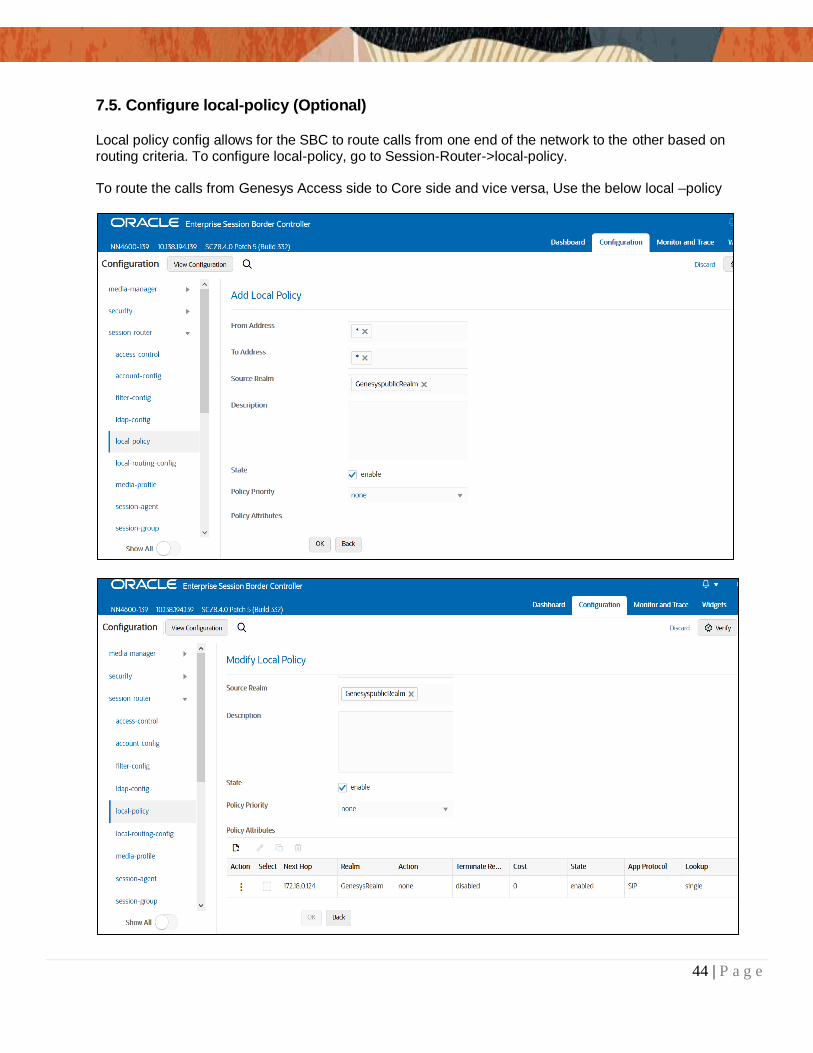
7.5. Configure local-policy (Optional)
Local policy config allows for the SBC to route calls from one end of the network to the other based on routing criteria. To configure local-policy, go to Session-Router->local-policy. To route the calls from Genesys Access side to Core side and vice versa, Use the below local –policy
45 | P a g e
8. Existing SBC configuration
If the SBC being used is an existing SBC with functional configuration, following configuration elements are required: - New realm-config - Configuring a certificate for SBC Interface - TLS-Profile - New sip-interface - New session-agent - New steering-pools - New local-policy - SDES Profile - Media-sec-Policy - New Translation Rules - Session Translation Rules Please follow the steps mentioned in the above chapters to configure these elements.
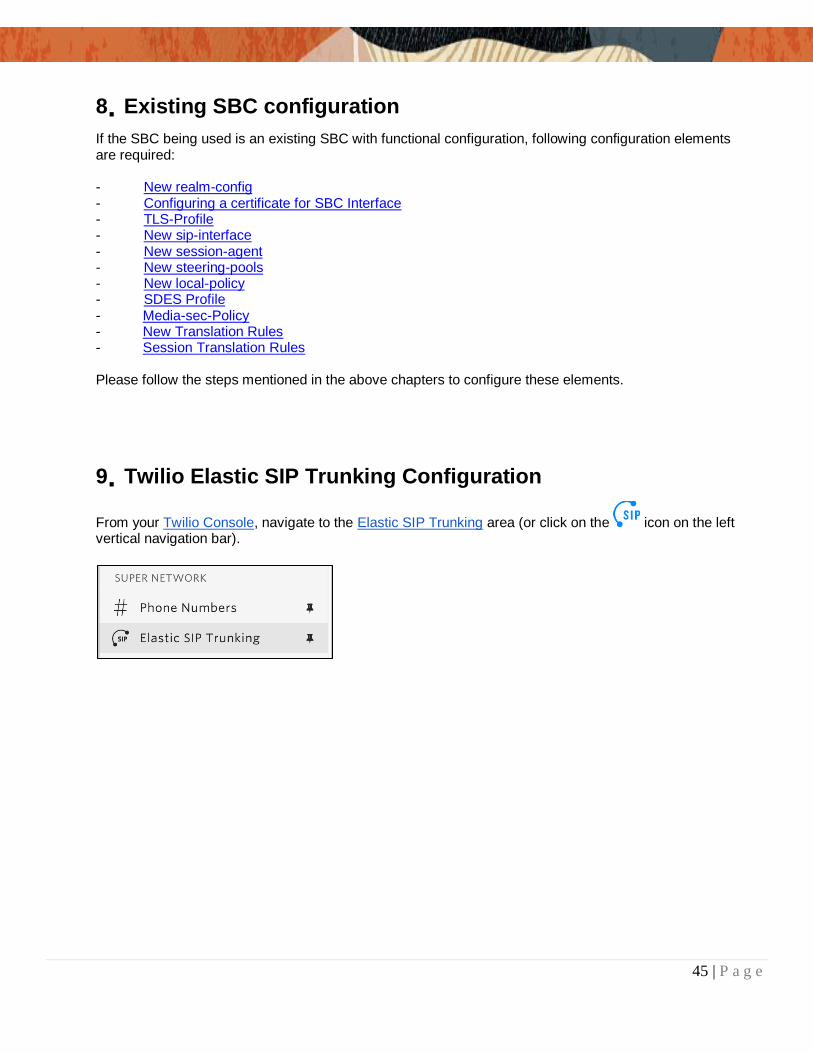
9. Twilio Elastic SIP Trunking Configuration
From your Twilio Console, navigate to the Elastic SIP Trunking area (or click on the icon on the left vertical navigation bar).
46 | P a g e
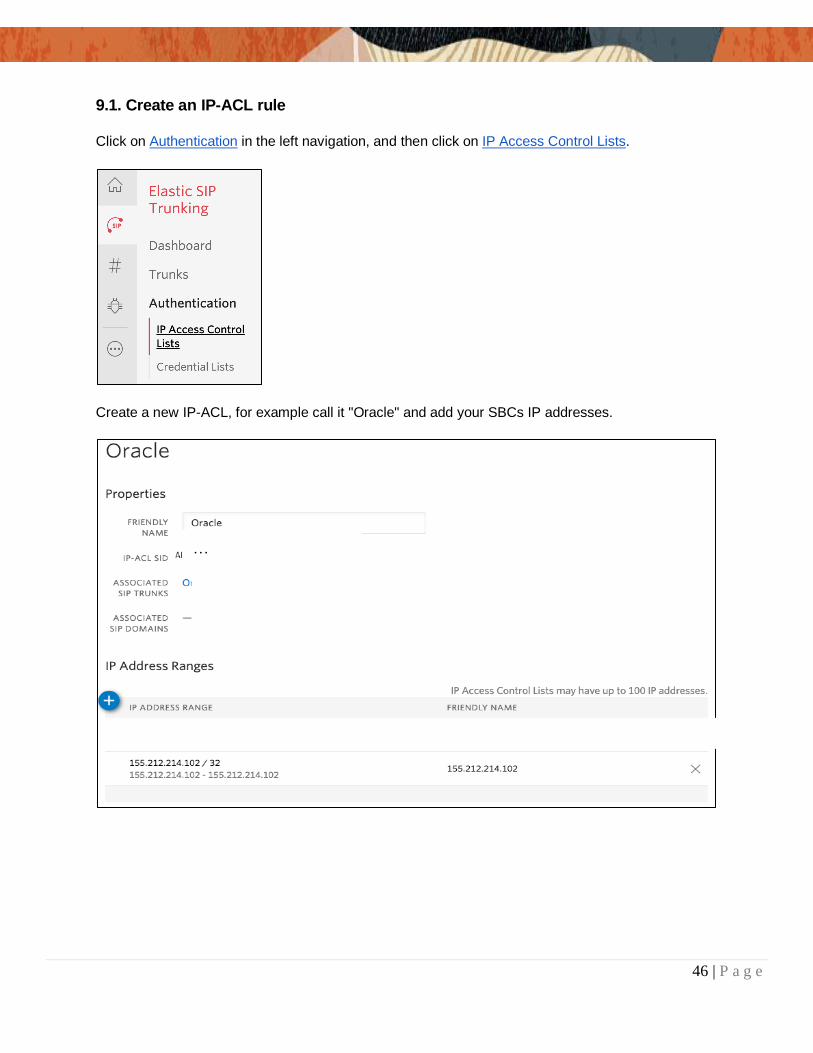
9.1. Create an IP-ACL rule
Click on Authentication in the left navigation, and then click on IP Access Control Lists.
Create a new IP-ACL, for example call it "Oracle" and add your SBCs IP addresses.
.....
…
47 | P a g e
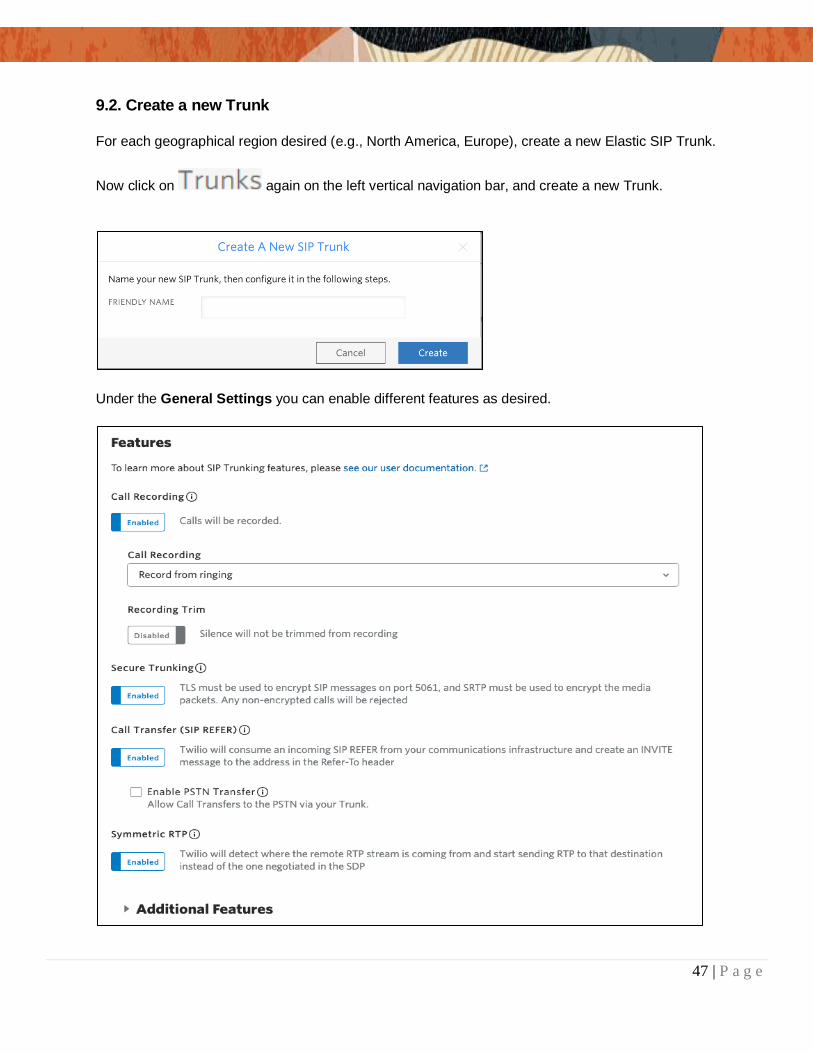
9.2. Create a new Trunk
For each geographical region desired (e.g., North America, Europe), create a new Elastic SIP Trunk.
Now click on again on the left vertical navigation bar, and create a new Trunk.
Under the General Settings you can enable different features as desired.
48 | P a g e
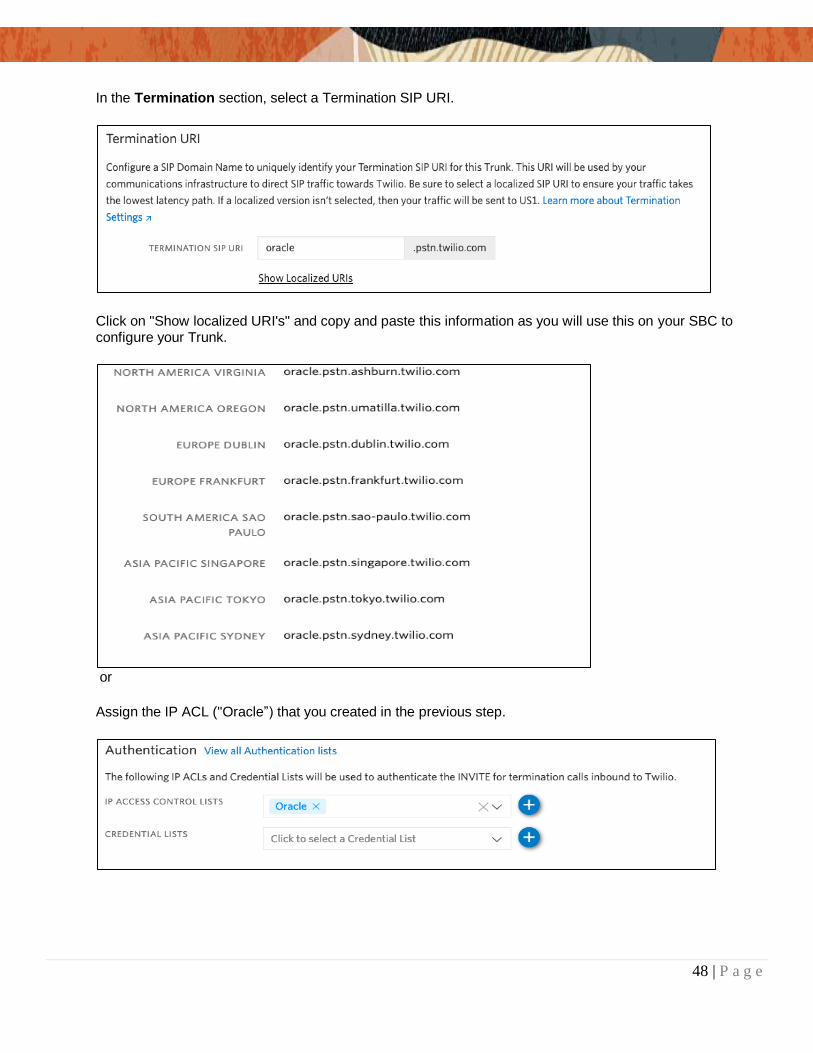
In the Termination section, select a Termination SIP URI.
Click on "Show localized URI's" and copy and paste this information as you will use this on your SBC to configure your Trunk.
or
Assign the IP ACL ("Oracle”) that you created in the previous step.
49 | P a g e
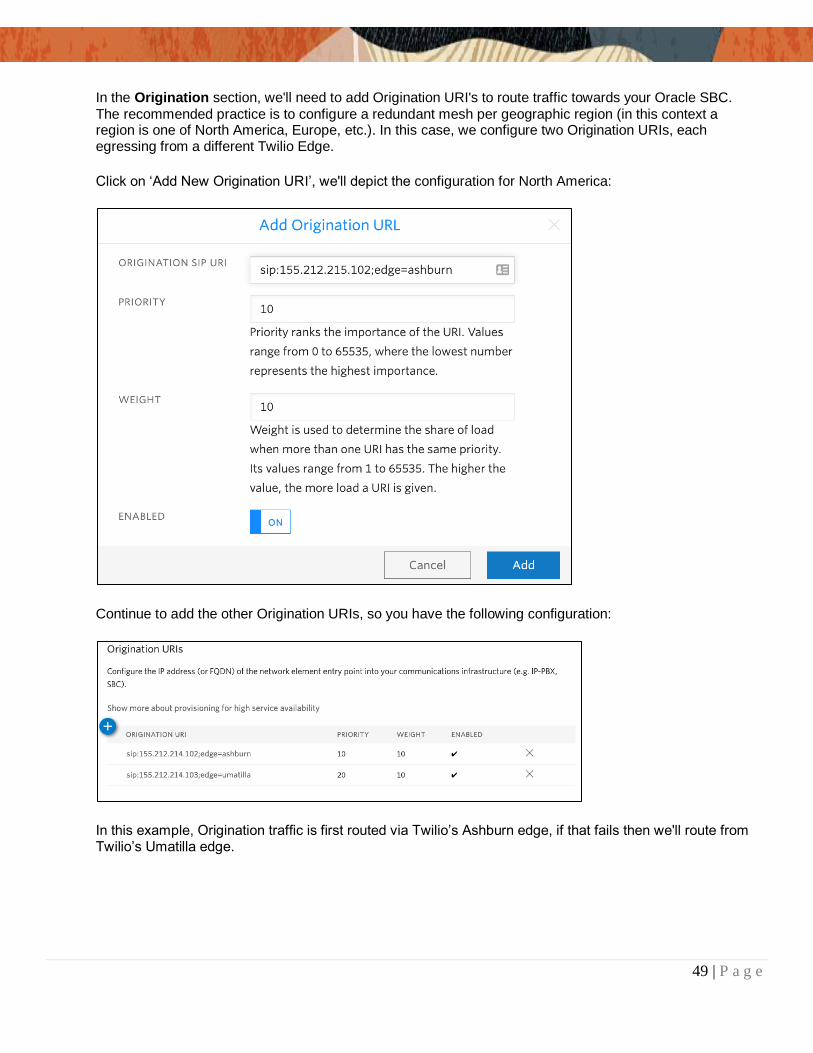
In the Origination section, we'll need to add Origination URI's to route traffic towards your Oracle SBC.
The recommended practice is to configure a redundant mesh per geographic region (in this context a region is one of North America, Europe, etc.). In this case, we configure two Origination URIs, each egressing from a different Twilio Edge.
Click on ‘Add New Origination URI’, we'll depict the configuration for North America:
Continue to add the other Origination URIs, so you have the following configuration:
In this example, Origination traffic is first routed via Twilio’s Ashburn edge, if that fails then we'll route from Twilio’s Umatilla edge.
50 | P a g e
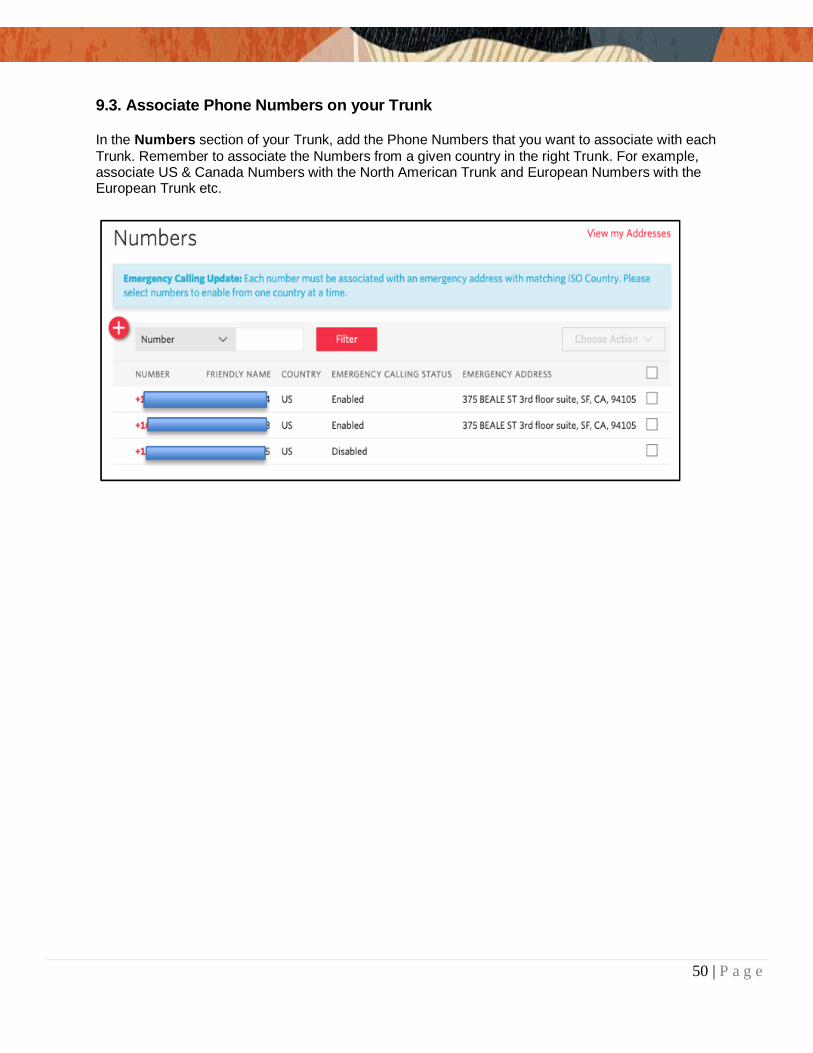
9.3. Associate Phone Numbers on your Trunk
In the Numbers section of your Trunk, add the Phone Numbers that you want to associate with each
Trunk. Remember to associate the Numbers from a given country in the right Trunk. For example, associate US & Canada Numbers with the North American Trunk and European Numbers with the European Trunk etc.
51 | P a g e
10. Verification of Sample Call flows
Once the configuration is complete, we can try making sample calls and can check the signaling
path between Twilio Elastic Sip Trunk (PSTN Users) and Genesys Users
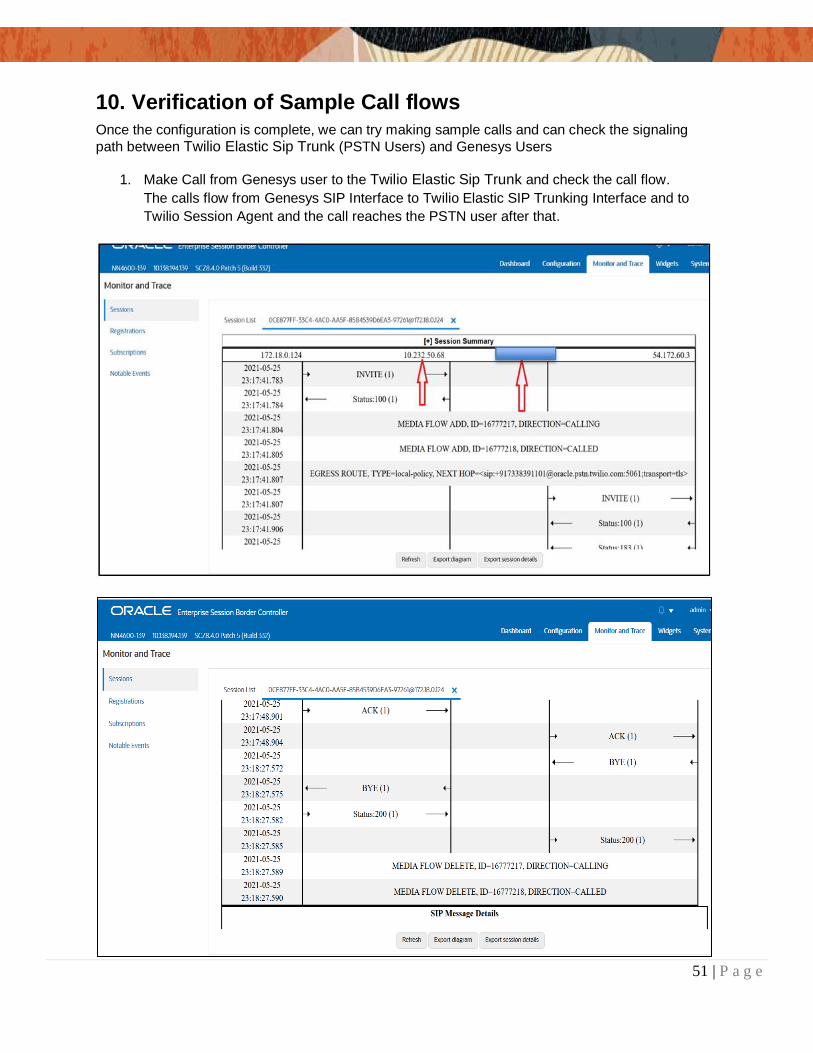
1. Make Call from Genesys user to the Twilio Elastic Sip Trunk and check the call flow.
The calls flow from Genesys SIP Interface to Twilio Elastic SIP Trunking Interface and to
Twilio Session Agent and the call reaches the PSTN user after that.
52 | P a g e
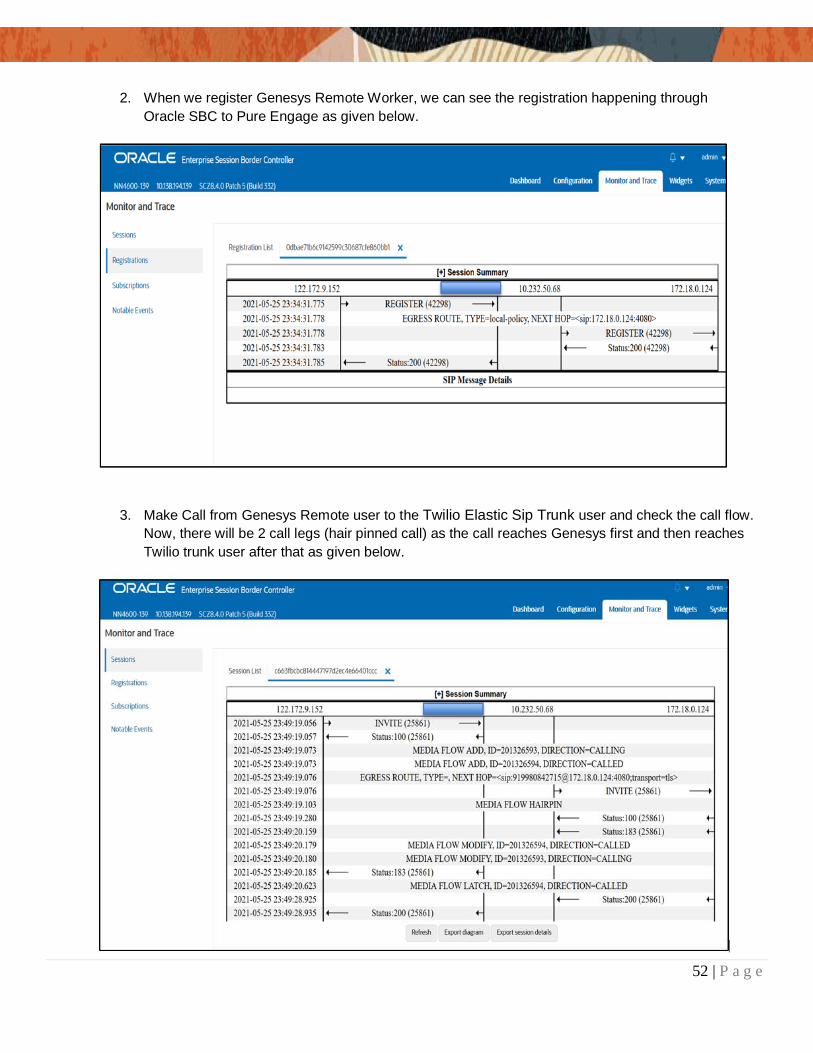
2. When we register Genesys Remote Worker, we can see the registration happening through
Oracle SBC to Pure Engage as given below.
3. Make Call from Genesys Remote user to the Twilio Elastic Sip Trunk user and check the call flow.
Now, there will be 2 call legs (hair pinned call) as the call reaches Genesys first and then reaches
Twilio trunk user after that as given below.
53 | P a g e
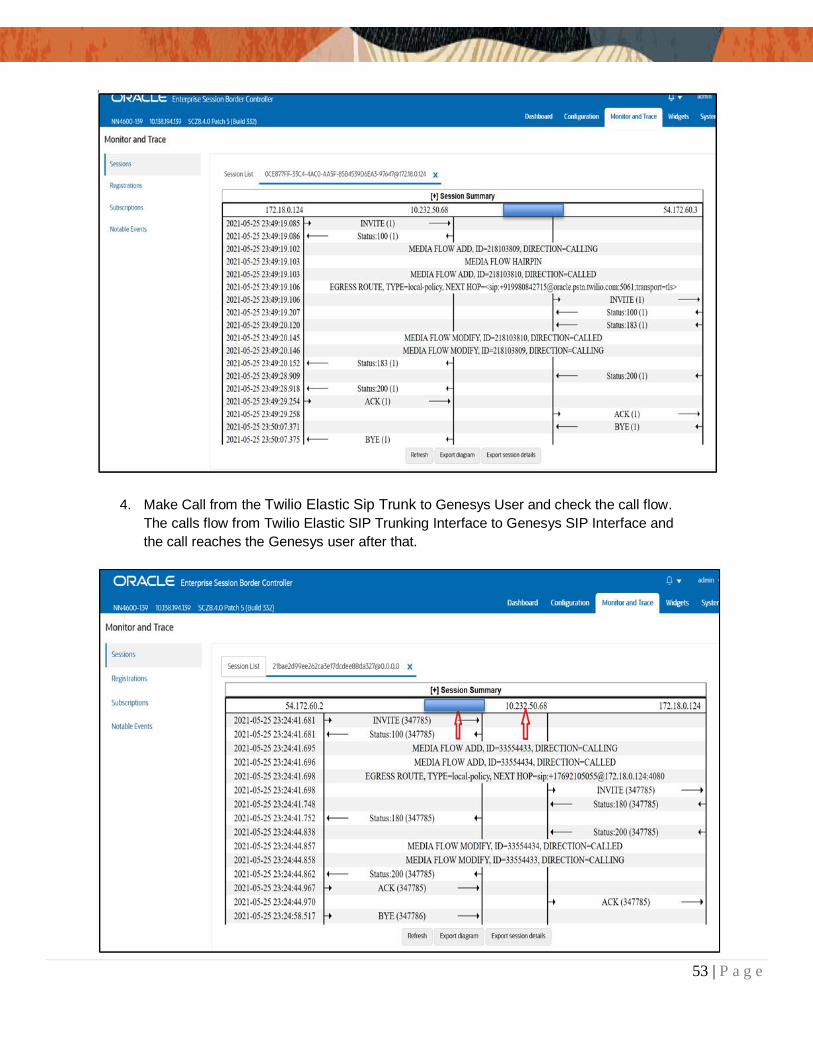
4. Make Call from the Twilio Elastic Sip Trunk to Genesys User and check the call flow.
The calls flow from Twilio Elastic SIP Trunking Interface to Genesys SIP Interface and
the call reaches the Genesys user after that.
54 | P a g e
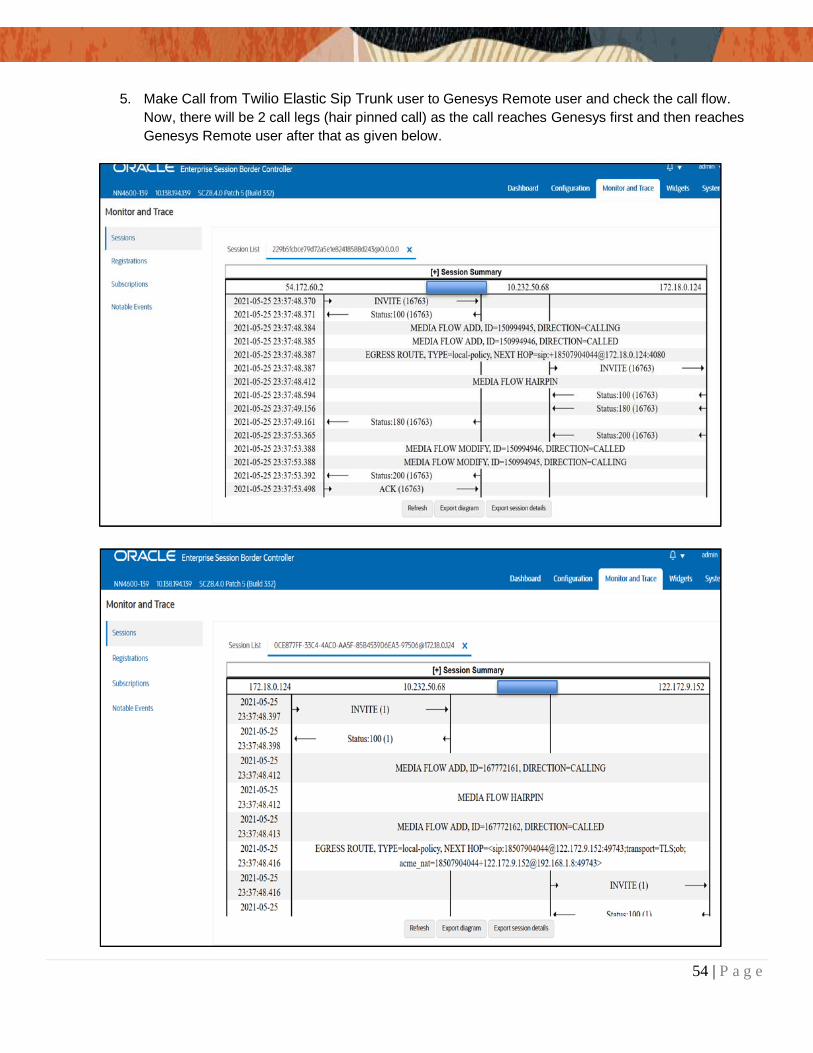
5. Make Call from Twilio Elastic Sip Trunk user to Genesys Remote user and check the call flow.
Now, there will be 2 call legs (hair pinned call) as the call reaches Genesys first and then reaches
Genesys Remote user after that as given below.

55 | P a g e
Appendix A
Following are the test cases that are executed between Genesys User with the Twilio Elastic SIP Trunk (PSTN user). Please note that Genesys User here refers both Genesys User inside Enterprise network as well as Genesys Remote worker.
Serial
Number Test Cases Executed Result
1 Genesys user disconnects an inbound connected call
Pass
2 Genesys user disconnects an outbound connected call
Pass
3 Twilio Elastic SIP Trunk user disconnects an inbound connected call
Pass
4 Twilio Elastic SIP Trunk User disconnects an outbound connected call
Pass
5 Genesys user places inbound call from Twilio Elastic SIP Trunk user on hold and then resumes
Pass
6 Genesys user makes outbound call to Twilio Elastic SIP Trunk user and put that call on hold and then resumes
Pass
7 Twilio Elastic SIP Trunk user places inbound call from Genesys user on hold and then resumes
Pass
8 Twilio Elastic SIP Trunk user makes outbound call to Genesys user and put that call on hold and then resumes
Pass
9 Genesys user places inbound call from Twilio Elastic SIP Trunk user on hold for over 15/30 minutes and then resumes
Pass
10
Genesys user makes outbound call to Twilio Elastic SIP Trunk user and places the call on hold for over 15/30 minutes and then resumes
Pass
11 Inbound Twilio Elastic SIP Trunk call to Genesys blind transferred to second Genesys/ PSTN User
Pass
12 Outbound Twilio Elastic SIP Trunk call from Genesys user blind transferred to second Genesys/ PSTN User
Pass
13 Inbound Twilio Elastic SIP Trunk Call to Genesys consultatively transferred to Genesys/ PSTN User
Pass
14 Outbound Twilio Elastic SIP Trunk call from Genesys user consultatively transferred to Genesys/ PSTN User
Pass
15 Genesys user makes outbound call to Twilio Elastic SIP Trunk user and makes a conference call by adding another Genesys/ PSTN user.
Pass
56 | P a g e
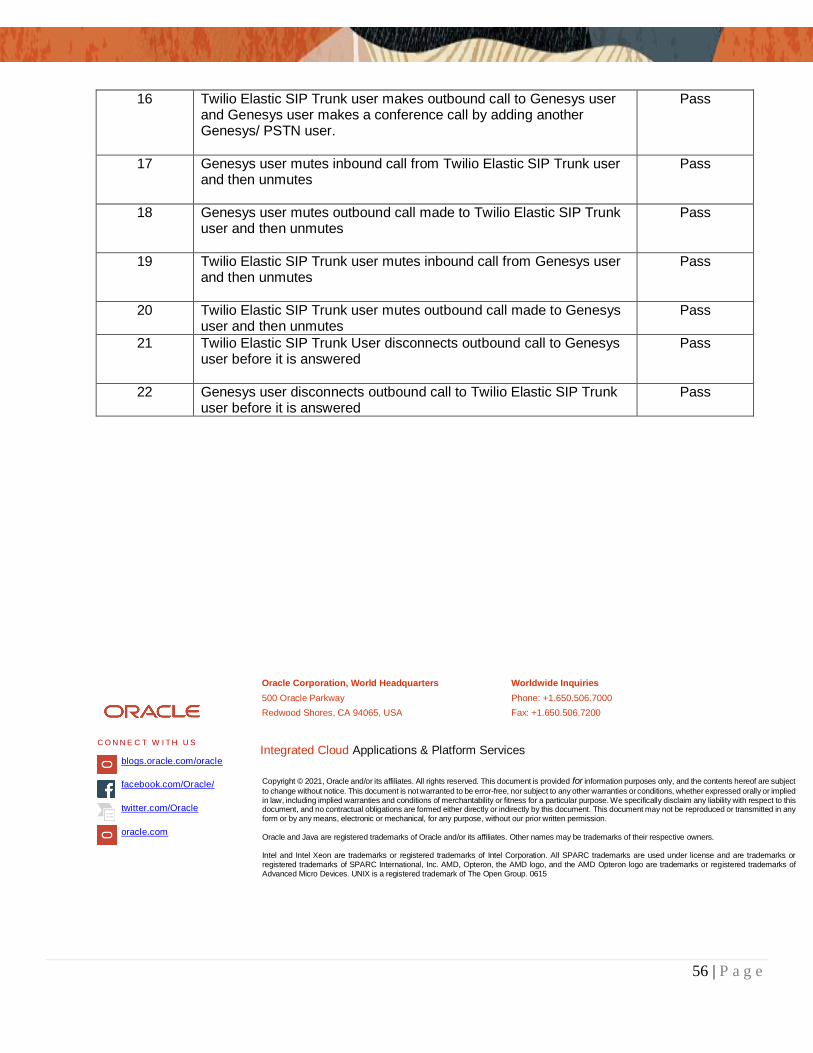
16 Twilio Elastic SIP Trunk user makes outbound call to Genesys user and Genesys user makes a conference call by adding another Genesys/ PSTN user.
Pass
17 Genesys user mutes inbound call from Twilio Elastic SIP Trunk user and then unmutes
Pass
18 Genesys user mutes outbound call made to Twilio Elastic SIP Trunk user and then unmutes
Pass
19 Twilio Elastic SIP Trunk user mutes inbound call from Genesys user and then unmutes
Pass
20 Twilio Elastic SIP Trunk user mutes outbound call made to Genesys user and then unmutes
Pass
21 Twilio Elastic SIP Trunk User disconnects outbound call to Genesys user before it is answered
Pass
22 Genesys user disconnects outbound call to Twilio Elastic SIP Trunk user before it is answered
Pass
Oracle Corporation, World Headquarters Worldwide Inquiries
500 Oracle Parkway Phone: +1.650.506.7000
Redwood Shores, CA 94065, USA Fax: +1.650.506.7200
Integrated Cloud Applications & Platform Services
Copyright © 2021, Oracle and/or its affiliates. All rights reserved. This document is provided for information purposes only, and the contents hereof are subject
to change without notice. This document is not warranted to be error-free, nor subject to any other warranties or conditions, whether expressed orally or implied in law, including implied warranties and conditions of merchantability or fitness for a particular purpose. We specifically disclaim any liability with respect to this document, and no contractual obligations are formed either directly or indirectly by this document. This document may not be reproduced or transmitted in any form or by any means, electronic or mechanical, for any purpose, without our prior written permission. Oracle and Java are registered trademarks of Oracle and/or its affiliates. Other names may be trademarks of their respective owners. Intel and Intel Xeon are trademarks or registered trademarks of Intel Corporation. All SPARC trademarks are used under license and are trademarks or registered trademarks of SPARC International, Inc. AMD, Opteron, the AMD logo, and the AMD Opteron logo are trademarks or registered trademarks of Advanced Micro Devices. UNIX is a registered trademark of The Open Group. 0615
C O N N E C T W I T H U S
blogs.oracle.com/oracle
facebook.com/Oracle/
twitter.com/Oracle
oracle.com


