Embed Size (px)
Citation preview
7-Mode Transition Documentation
ONTAP 7-Mode TransitionNetAppDecember 14, 2021
This PDF was generated from https://docs.netapp.com/us-en/ontap-7mode-transition/index.html onDecember 14, 2021. Always check docs.netapp.com for the latest.
Table of Contents
7-Mode Transition Documentation . . . . . . . . . . . . . . . . . . . . . . . . . . . . . . . . . . . . . . . . . . . . . . . . . . . . . . . . . . . . 1
7-Mode Transition Tool Release Notes . . . . . . . . . . . . . . . . . . . . . . . . . . . . . . . . . . . . . . . . . . . . . . . . . . . . . . . . 2
Command Map for 7-Mode Administrators. . . . . . . . . . . . . . . . . . . . . . . . . . . . . . . . . . . . . . . . . . . . . . . . . . . . . . 3
How 7-Mode commands map to ONTAP commands . . . . . . . . . . . . . . . . . . . . . . . . . . . . . . . . . . . . . . . . . . . 3
How 7-Mode options map to ONTAP commands . . . . . . . . . . . . . . . . . . . . . . . . . . . . . . . . . . . . . . . . . . . . . 39
How 7-Mode configuration files map to clustered Data ONTAP commands . . . . . . . . . . . . . . . . . . . . . . . . . 71
How to interpret the clustered Data ONTAP commands, options, and configuration files maps for 7-Mode
administrators. . . . . . . . . . . . . . . . . . . . . . . . . . . . . . . . . . . . . . . . . . . . . . . . . . . . . . . . . . . . . . . . . . . . . . . . . 72
Installation and Setup Guide . . . . . . . . . . . . . . . . . . . . . . . . . . . . . . . . . . . . . . . . . . . . . . . . . . . . . . . . . . . . . . . 75
Transition to clustered ONTAP by using the 7-Mode Transition Tool . . . . . . . . . . . . . . . . . . . . . . . . . . . . . . . 75
Installing or uninstalling the 7-Mode Transition Tool on a Windows system . . . . . . . . . . . . . . . . . . . . . . . . . 78
Installing or uninstalling the 7-Mode Transition Tool on Linux (Copy-based transition only) . . . . . . . . . . . . . 84
Modifying the configuration options of the 7-Mode Transition Tool . . . . . . . . . . . . . . . . . . . . . . . . . . . . . . . . 86
Troubleshooting issues . . . . . . . . . . . . . . . . . . . . . . . . . . . . . . . . . . . . . . . . . . . . . . . . . . . . . . . . . . . . . . . . . 87
Copy-Based Transition Guide . . . . . . . . . . . . . . . . . . . . . . . . . . . . . . . . . . . . . . . . . . . . . . . . . . . . . . . . . . . . . . 89
Transition overview . . . . . . . . . . . . . . . . . . . . . . . . . . . . . . . . . . . . . . . . . . . . . . . . . . . . . . . . . . . . . . . . . . . . 89
Collecting and assessing the inventory information . . . . . . . . . . . . . . . . . . . . . . . . . . . . . . . . . . . . . . . . . . . . 92
Copy-based transition workflow . . . . . . . . . . . . . . . . . . . . . . . . . . . . . . . . . . . . . . . . . . . . . . . . . . . . . . . . . . 102
Data and configuration migration process . . . . . . . . . . . . . . . . . . . . . . . . . . . . . . . . . . . . . . . . . . . . . . . . . . 103
Preparing for copy-based transition . . . . . . . . . . . . . . . . . . . . . . . . . . . . . . . . . . . . . . . . . . . . . . . . . . . . . . . 116
Migrating data and configuration from 7-Mode volumes . . . . . . . . . . . . . . . . . . . . . . . . . . . . . . . . . . . . . . . 158
Transitioning volumes by using the 7-Mode Transition Tool CLI . . . . . . . . . . . . . . . . . . . . . . . . . . . . . . . . . 177
Performing manual post-transition tasks . . . . . . . . . . . . . . . . . . . . . . . . . . . . . . . . . . . . . . . . . . . . . . . . . . . 199
Managing a transition project . . . . . . . . . . . . . . . . . . . . . . . . . . . . . . . . . . . . . . . . . . . . . . . . . . . . . . . . . . . . 205
Troubleshooting issues . . . . . . . . . . . . . . . . . . . . . . . . . . . . . . . . . . . . . . . . . . . . . . . . . . . . . . . . . . . . . . . . 217
Copy-Free Transition Guide . . . . . . . . . . . . . . . . . . . . . . . . . . . . . . . . . . . . . . . . . . . . . . . . . . . . . . . . . . . . . . . 223
Transition overview . . . . . . . . . . . . . . . . . . . . . . . . . . . . . . . . . . . . . . . . . . . . . . . . . . . . . . . . . . . . . . . . . . . 223
Collecting and assessing the inventory information . . . . . . . . . . . . . . . . . . . . . . . . . . . . . . . . . . . . . . . . . . . 226
Copy-free transition workflow. . . . . . . . . . . . . . . . . . . . . . . . . . . . . . . . . . . . . . . . . . . . . . . . . . . . . . . . . . . . 236
Preparing for copy-free transition. . . . . . . . . . . . . . . . . . . . . . . . . . . . . . . . . . . . . . . . . . . . . . . . . . . . . . . . . 240
Transitioning 7-Mode aggregates using copy-free transition . . . . . . . . . . . . . . . . . . . . . . . . . . . . . . . . . . . . 280
Completing the transition . . . . . . . . . . . . . . . . . . . . . . . . . . . . . . . . . . . . . . . . . . . . . . . . . . . . . . . . . . . . . . . 302
Transitioning a SnapMirror relationship . . . . . . . . . . . . . . . . . . . . . . . . . . . . . . . . . . . . . . . . . . . . . . . . . . . . 309
Troubleshooting transition issues. . . . . . . . . . . . . . . . . . . . . . . . . . . . . . . . . . . . . . . . . . . . . . . . . . . . . . . . . 313
Performing a transition rollback to 7-Mode . . . . . . . . . . . . . . . . . . . . . . . . . . . . . . . . . . . . . . . . . . . . . . . . . 320
Host and Storage Information Collection Guide. . . . . . . . . . . . . . . . . . . . . . . . . . . . . . . . . . . . . . . . . . . . . . . . 325
Collecting storage and host inventory information . . . . . . . . . . . . . . . . . . . . . . . . . . . . . . . . . . . . . . . . . . . . 325
7-Mode Data Transition Using SnapMirror® Technology . . . . . . . . . . . . . . . . . . . . . . . . . . . . . . . . . . . . . . . . . 341
Transitioning 7-Mode volumes using SnapMirror. . . . . . . . . . . . . . . . . . . . . . . . . . . . . . . . . . . . . . . . . . . . . 341
Transitioning a disaster recovery relationship between vFiler units. . . . . . . . . . . . . . . . . . . . . . . . . . . . . . . 374
Recovering from a disaster at the 7-Mode site during transition . . . . . . . . . . . . . . . . . . . . . . . . . . . . . . . . . 375
Troubleshooting transition issues when using SnapMirror. . . . . . . . . . . . . . . . . . . . . . . . . . . . . . . . . . . . . . 385
SAN Host Transition and Remediation Guide . . . . . . . . . . . . . . . . . . . . . . . . . . . . . . . . . . . . . . . . . . . . . . . . . 387

ONTAP target releases supported by the 7-Mode Transition Tool . . . . . . . . . . . . . . . . . . . . . . . . . . . . . . . . 387
7-Mode Transition Tool transition phases. . . . . . . . . . . . . . . . . . . . . . . . . . . . . . . . . . . . . . . . . . . . . . . . . . . 388
VMware ESXi host remediation . . . . . . . . . . . . . . . . . . . . . . . . . . . . . . . . . . . . . . . . . . . . . . . . . . . . . . . . . . 388
RHEL host remediation . . . . . . . . . . . . . . . . . . . . . . . . . . . . . . . . . . . . . . . . . . . . . . . . . . . . . . . . . . . . . . . . 408
Windows host remediation . . . . . . . . . . . . . . . . . . . . . . . . . . . . . . . . . . . . . . . . . . . . . . . . . . . . . . . . . . . . . . 439
HP-UX host remediation . . . . . . . . . . . . . . . . . . . . . . . . . . . . . . . . . . . . . . . . . . . . . . . . . . . . . . . . . . . . . . . 443
AIX host remediation . . . . . . . . . . . . . . . . . . . . . . . . . . . . . . . . . . . . . . . . . . . . . . . . . . . . . . . . . . . . . . . . . . 454
Solaris host remediation. . . . . . . . . . . . . . . . . . . . . . . . . . . . . . . . . . . . . . . . . . . . . . . . . . . . . . . . . . . . . . . . 461
Rolling back LUNs to 7-Mode after transition. . . . . . . . . . . . . . . . . . . . . . . . . . . . . . . . . . . . . . . . . . . . . . . . 482
Legal notices . . . . . . . . . . . . . . . . . . . . . . . . . . . . . . . . . . . . . . . . . . . . . . . . . . . . . . . . . . . . . . . . . . . . . . . . . . 485
Copyright . . . . . . . . . . . . . . . . . . . . . . . . . . . . . . . . . . . . . . . . . . . . . . . . . . . . . . . . . . . . . . . . . . . . . . . . . . . 485
Trademarks . . . . . . . . . . . . . . . . . . . . . . . . . . . . . . . . . . . . . . . . . . . . . . . . . . . . . . . . . . . . . . . . . . . . . . . . . 485
Patents . . . . . . . . . . . . . . . . . . . . . . . . . . . . . . . . . . . . . . . . . . . . . . . . . . . . . . . . . . . . . . . . . . . . . . . . . . . . . 485
Privacy policy . . . . . . . . . . . . . . . . . . . . . . . . . . . . . . . . . . . . . . . . . . . . . . . . . . . . . . . . . . . . . . . . . . . . . . . . 485
Machine translation . . . . . . . . . . . . . . . . . . . . . . . . . . . . . . . . . . . . . . . . . . . . . . . . . . . . . . . . . . . . . . . . . . . 485

7-Mode Transition Documentation
1

7-Mode Transition Tool Release NotesThe 7-Mode Transition Release Notes describe new features, upgrade notes, fixed issues, known limitations,
and known issues.
You are required to sign on to the NetApp Support Site to access the Release Notes.
2
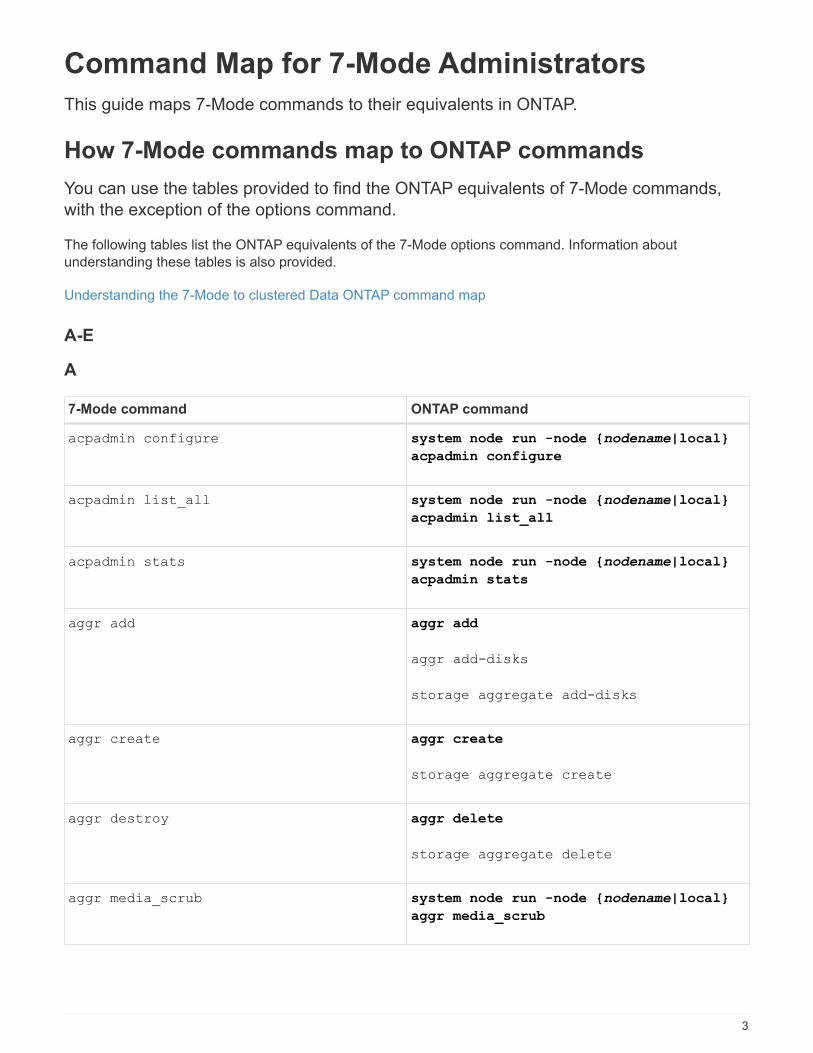
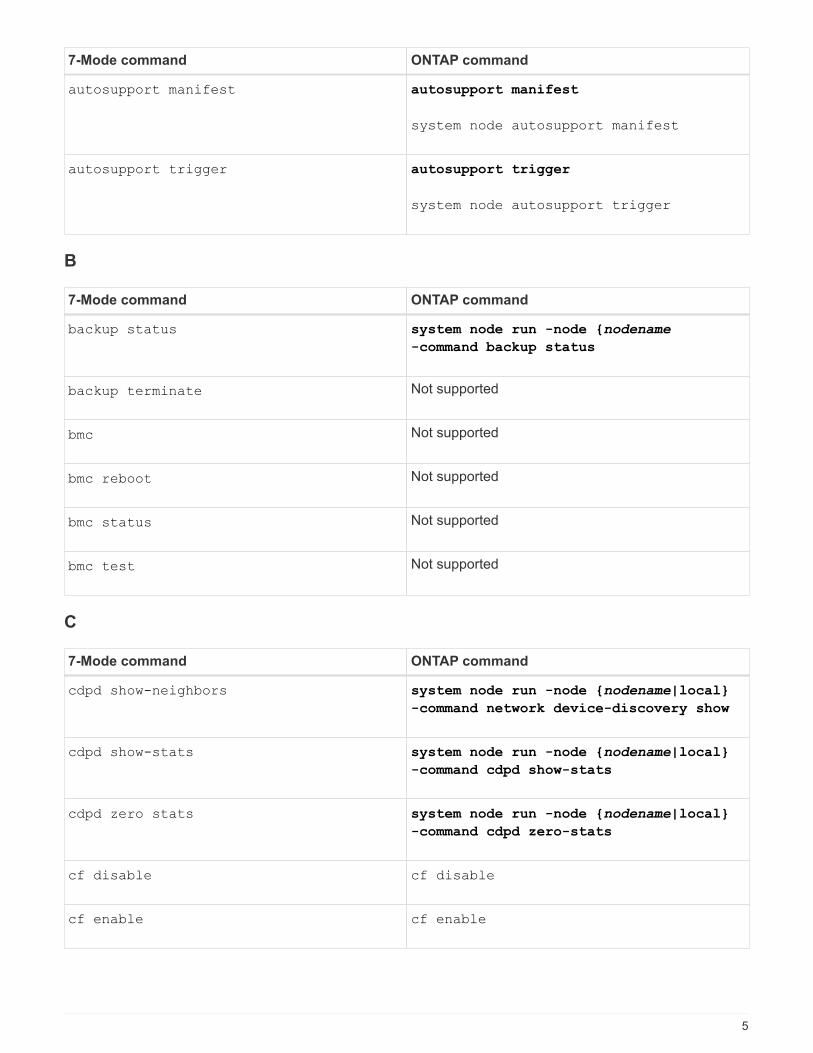
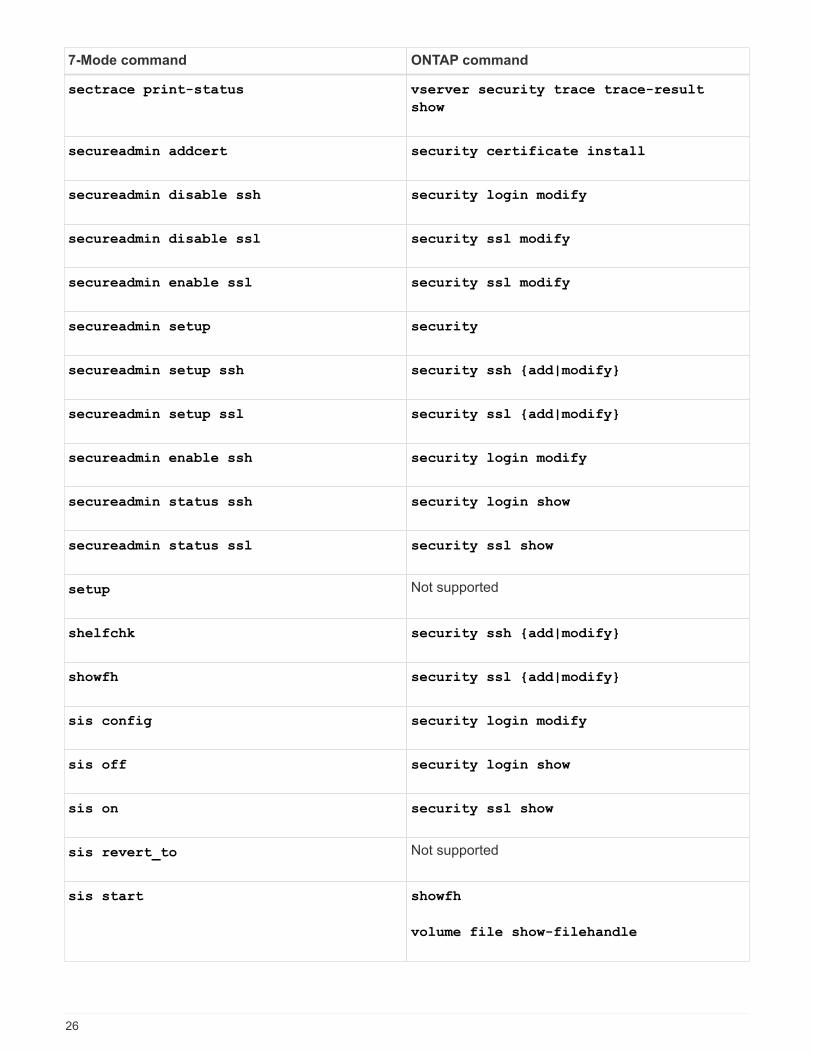
Command Map for 7-Mode Administrators
This guide maps 7-Mode commands to their equivalents in ONTAP.
How 7-Mode commands map to ONTAP commands
You can use the tables provided to find the ONTAP equivalents of 7-Mode commands,
with the exception of the options command.
The following tables list the ONTAP equivalents of the 7-Mode options command. Information about
understanding these tables is also provided.
Understanding the 7-Mode to clustered Data ONTAP command map
A-E
A
7-Mode command ONTAP command
acpadmin configure system node run -node {nodename|local}
acpadmin configure
acpadmin list_all system node run -node {nodename|local}
acpadmin list_all
acpadmin stats system node run -node {nodename|local}
acpadmin stats
aggr add aggr add
aggr add-disks
storage aggregate add-disks
aggr create aggr create
storage aggregate create
aggr destroy aggr delete
storage aggregate delete
aggr media_scrub system node run -node {nodename|local}
aggr media_scrub
3
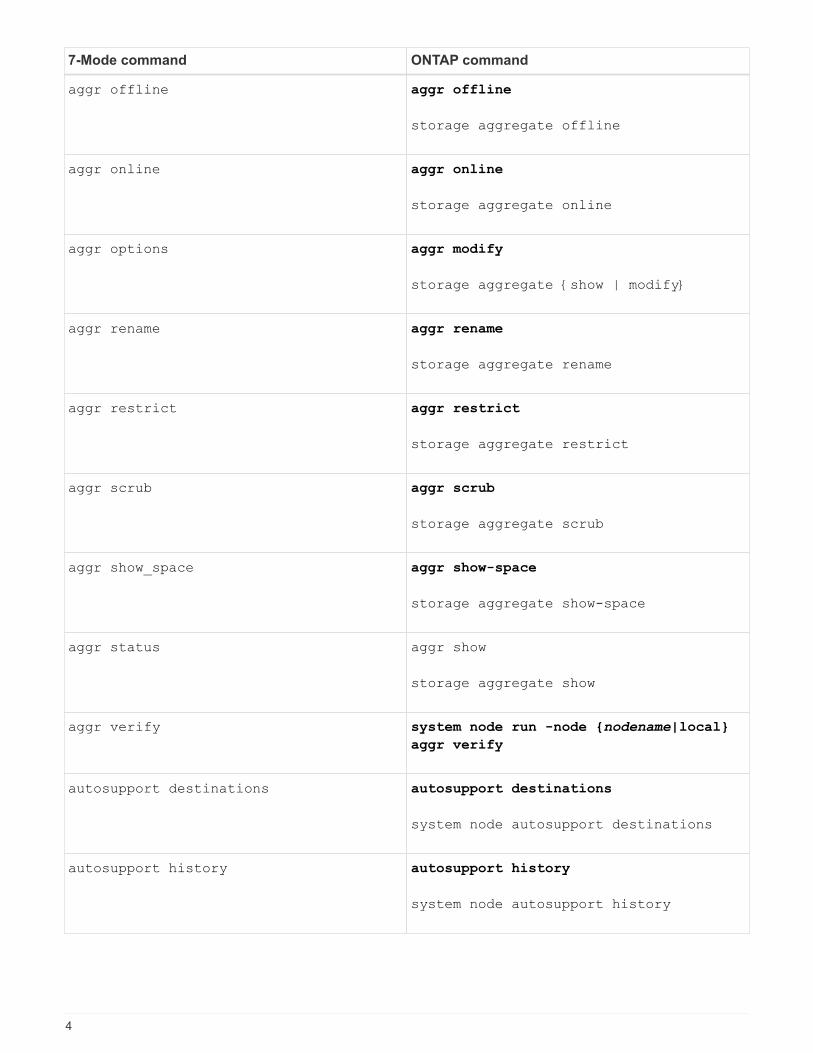
7-Mode command ONTAP command
aggr offline aggr offline
storage aggregate offline
aggr online aggr online
storage aggregate online
aggr options aggr modify
storage aggregate {show | modify}
aggr rename aggr rename
storage aggregate rename
aggr restrict aggr restrict
storage aggregate restrict
aggr scrub aggr scrub
storage aggregate scrub
aggr show_space aggr show-space
storage aggregate show-space
aggr status aggr show
storage aggregate show
aggr verify system node run -node {nodename|local}
aggr verify
autosupport destinations autosupport destinations
system node autosupport destinations
autosupport history autosupport history
system node autosupport history
4
7-Mode command ONTAP command
autosupport manifest autosupport manifest
system node autosupport manifest
autosupport trigger autosupport trigger
system node autosupport trigger
B
7-Mode command ONTAP command
backup status system node run -node {nodename
-command backup status
backup terminate Not supported
bmc Not supported
bmc reboot Not supported
bmc status Not supported
bmc test Not supported
C
7-Mode command ONTAP command
cdpd show-neighbors system node run -node {nodename|local}
-command network device-discovery show
cdpd show-stats system node run -node {nodename|local}
-command cdpd show-stats
cdpd zero stats system node run -node {nodename|local}
-command cdpd zero-stats
cf disable cf disable
cf enable cf enable
5
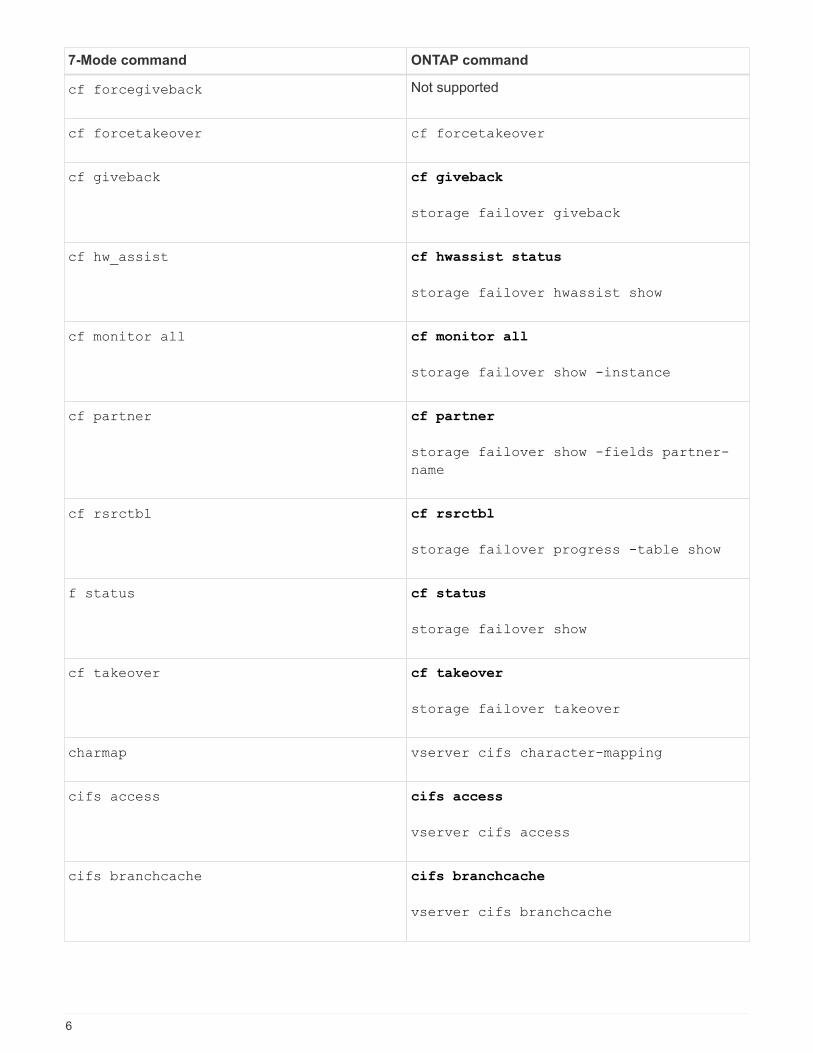
7-Mode command ONTAP command
cf forcegiveback Not supported
cf forcetakeover cf forcetakeover
cf giveback cf giveback
storage failover giveback
cf hw_assist cf hwassist status
storage failover hwassist show
cf monitor all cf monitor all
storage failover show -instance
cf partner cf partner
storage failover show -fields partner-
name
cf rsrctbl cf rsrctbl
storage failover progress -table show
f status cf status
storage failover show
cf takeover cf takeover
storage failover takeover
charmap vserver cifs character-mapping
cifs access cifs access
vserver cifs access
cifs branchcache cifs branchcache
vserver cifs branchcache
6
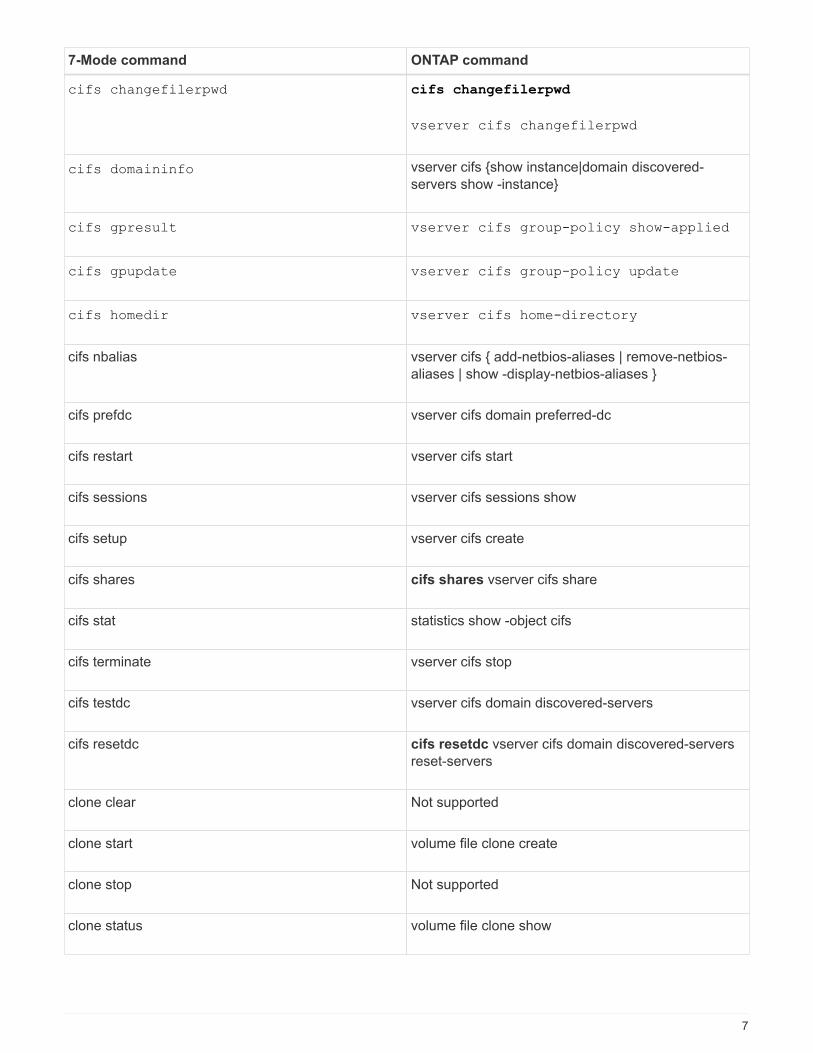
7-Mode command ONTAP command
cifs changefilerpwd cifs changefilerpwd
vserver cifs changefilerpwd
cifs domaininfo vserver cifs {show instance|domain discovered-
servers show -instance}
cifs gpresult vserver cifs group-policy show-applied
cifs gpupdate vserver cifs group-policy update
cifs homedir vserver cifs home-directory
cifs nbalias vserver cifs { add-netbios-aliases | remove-netbios-
aliases | show -display-netbios-aliases }
cifs prefdc vserver cifs domain preferred-dc
cifs restart vserver cifs start
cifs sessions vserver cifs sessions show
cifs setup vserver cifs create
cifs shares cifs shares vserver cifs share
cifs stat statistics show -object cifs
cifs terminate vserver cifs stop
cifs testdc vserver cifs domain discovered-servers
cifs resetdc cifs resetdc vserver cifs domain discovered-servers
reset-servers
clone clear Not supported
clone start volume file clone create
clone stop Not supported
clone status volume file clone show
7
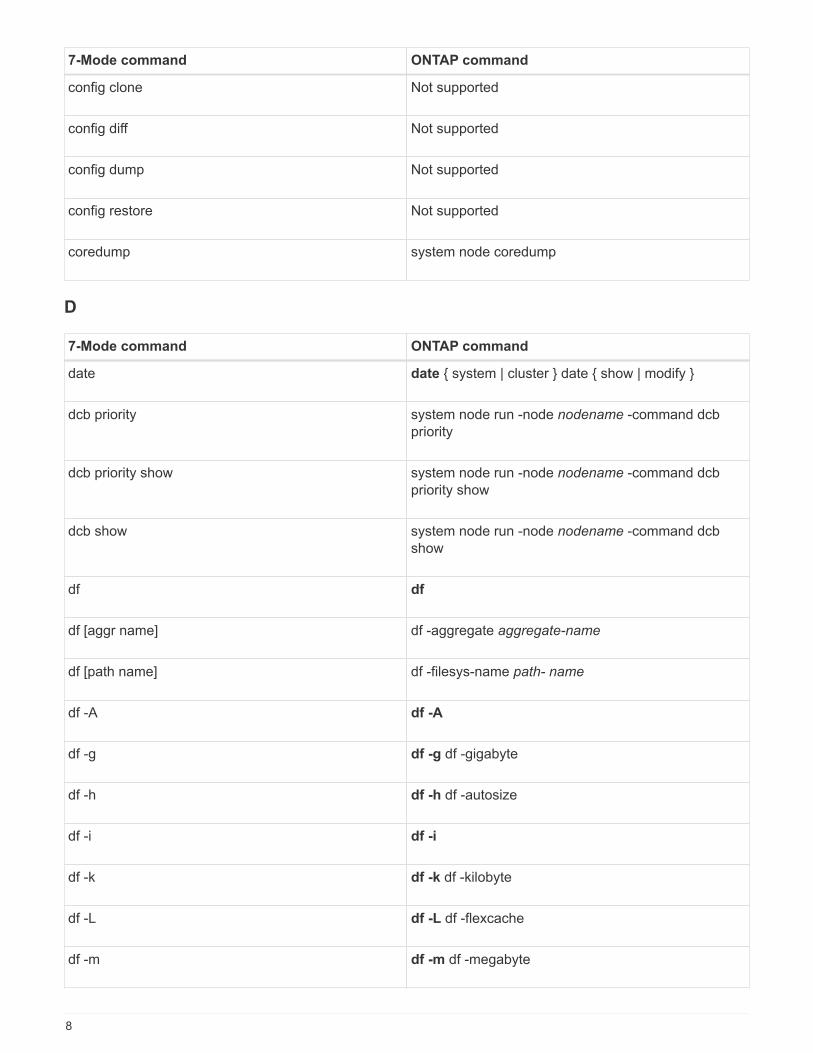
7-Mode command ONTAP command
config clone Not supported
config diff Not supported
config dump Not supported
config restore Not supported
coredump system node coredump
D
7-Mode command ONTAP command
date date { system | cluster } date { show | modify }
dcb priority system node run -node nodename -command dcb
priority
dcb priority show system node run -node nodename -command dcb
priority show
dcb show system node run -node nodename -command dcb
show
df df
df [aggr name] df -aggregate aggregate-name
df [path name] df -filesys-name path- name
df -A df -A
df -g df -g df -gigabyte
df -h df -h df -autosize
df -i df -i
df -k df -k df -kilobyte
df -L df -L df -flexcache
df -m df -m df -megabyte
8
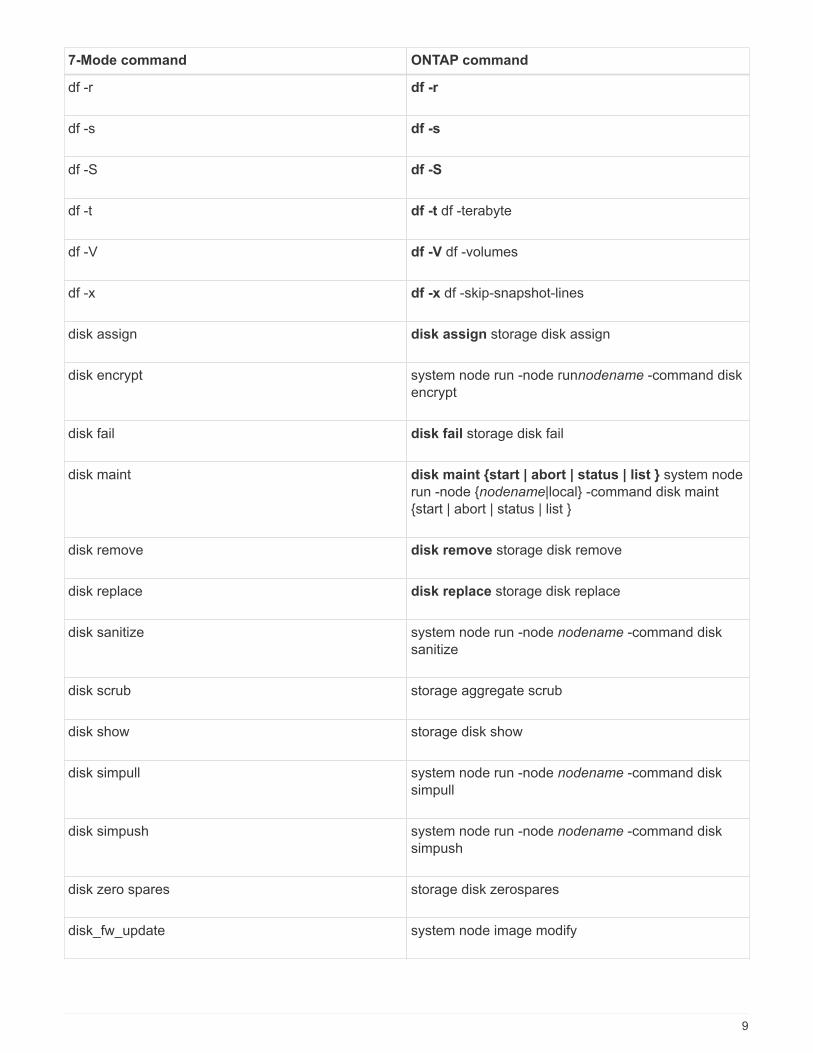
7-Mode command ONTAP command
df -r df -r
df -s df -s
df -S df -S
df -t df -t df -terabyte
df -V df -V df -volumes
df -x df -x df -skip-snapshot-lines
disk assign disk assign storage disk assign
disk encrypt system node run -node runnodename -command disk
encrypt
disk fail disk fail storage disk fail
disk maint disk maint {start | abort | status | list } system node
run -node {nodename|local} -command disk maint
{start | abort | status | list }
disk remove disk remove storage disk remove
disk replace disk replace storage disk replace
disk sanitize system node run -node nodename -command disk
sanitize
disk scrub storage aggregate scrub
disk show storage disk show
disk simpull system node run -node nodename -command disk
simpull
disk simpush system node run -node nodename -command disk
simpush
disk zero spares storage disk zerospares
disk_fw_update system node image modify
9
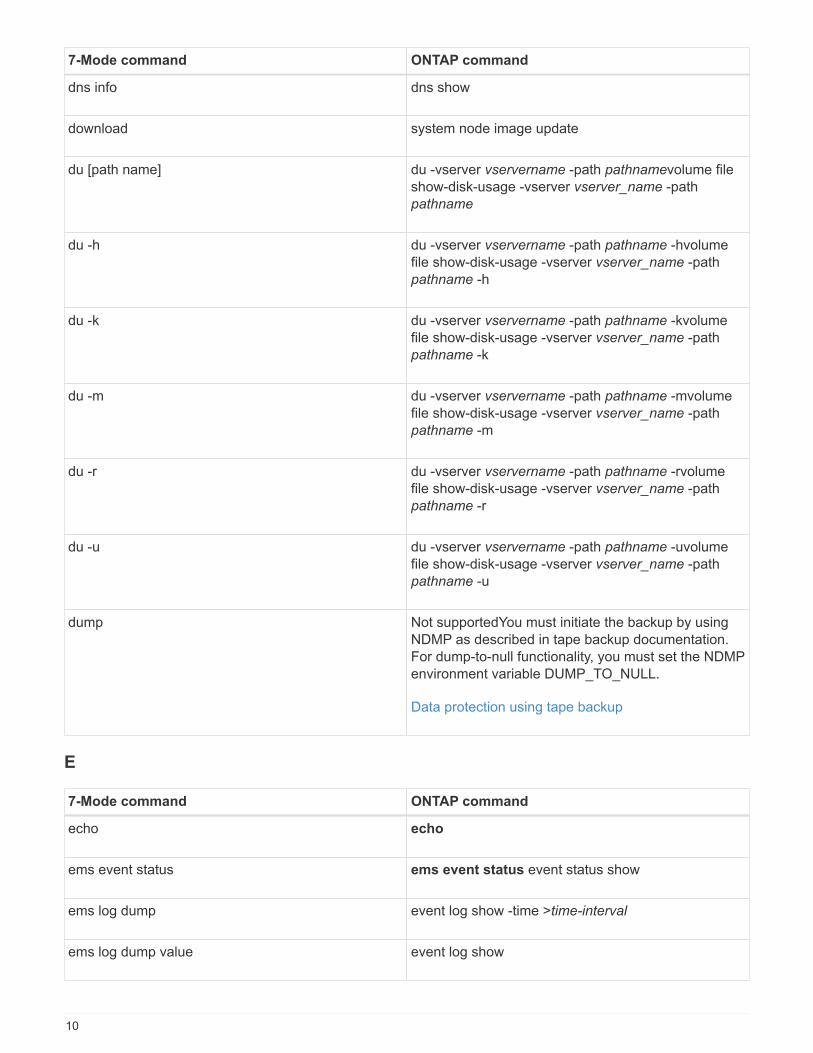
7-Mode command ONTAP command
dns info dns show
download system node image update
du [path name] du -vserver vservername -path pathnamevolume file
show-disk-usage -vserver vserver_name -path
pathname
du -h du -vserver vservername -path pathname -hvolume
file show-disk-usage -vserver vserver_name -path
pathname -h
du -k du -vserver vservername -path pathname -kvolume
file show-disk-usage -vserver vserver_name -path
pathname -k
du -m du -vserver vservername -path pathname -mvolume
file show-disk-usage -vserver vserver_name -path
pathname -m
du -r du -vserver vservername -path pathname -rvolume
file show-disk-usage -vserver vserver_name -path
pathname -r
du -u du -vserver vservername -path pathname -uvolume
file show-disk-usage -vserver vserver_name -path
pathname -u
dump Not supportedYou must initiate the backup by using
NDMP as described in tape backup documentation.
For dump-to-null functionality, you must set the NDMP
environment variable DUMP_TO_NULL.
Data protection using tape backup
E
7-Mode command ONTAP command
echo echo
ems event status ems event status event status show
ems log dump event log show -time >time-interval
ems log dump value event log show
10
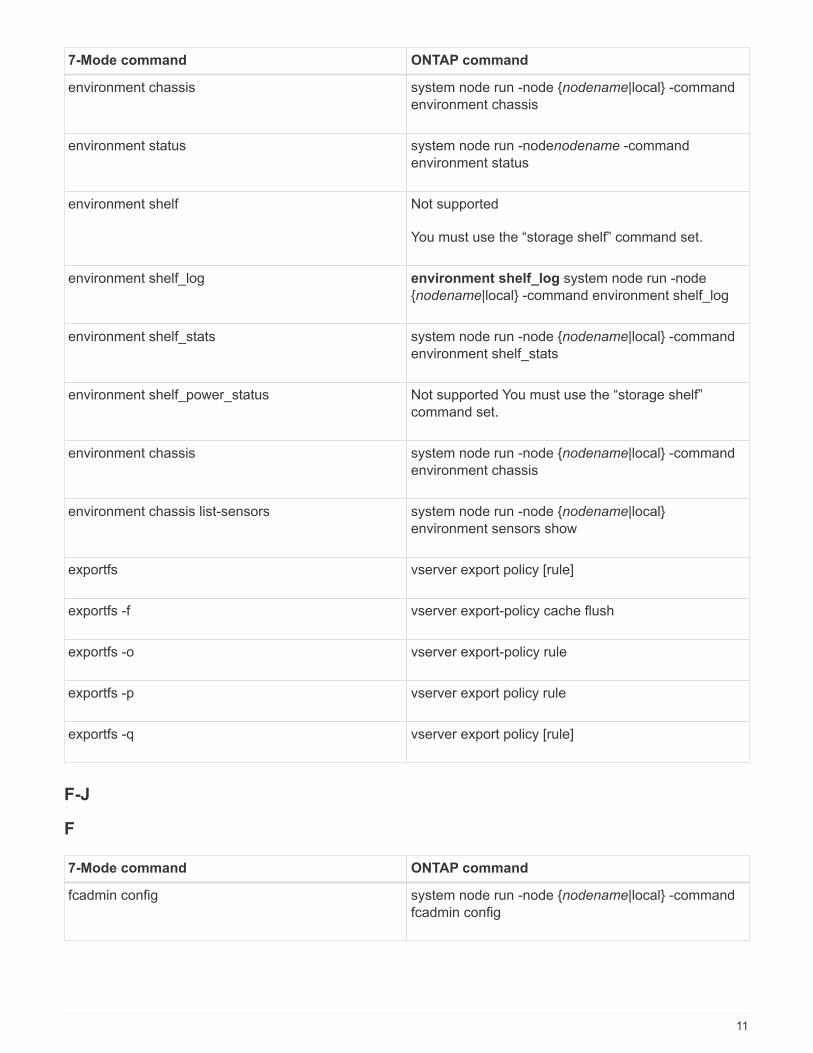
7-Mode command ONTAP command
environment chassis system node run -node {nodename|local} -command
environment chassis
environment status system node run -nodenodename -command
environment status
environment shelf Not supported
You must use the “storage shelf” command set.
environment shelf_log environment shelf_log system node run -node
{nodename|local} -command environment shelf_log
environment shelf_stats system node run -node {nodename|local} -command
environment shelf_stats
environment shelf_power_status Not supported You must use the “storage shelf”
command set.
environment chassis system node run -node {nodename|local} -command
environment chassis
environment chassis list-sensors system node run -node {nodename|local}
environment sensors show
exportfs vserver export policy [rule]
exportfs -f vserver export-policy cache flush
exportfs -o vserver export-policy rule
exportfs -p vserver export policy rule
exportfs -q vserver export policy [rule]
F-J
F
7-Mode command ONTAP command
fcadmin config system node run -node {nodename|local} -command
fcadmin config
11
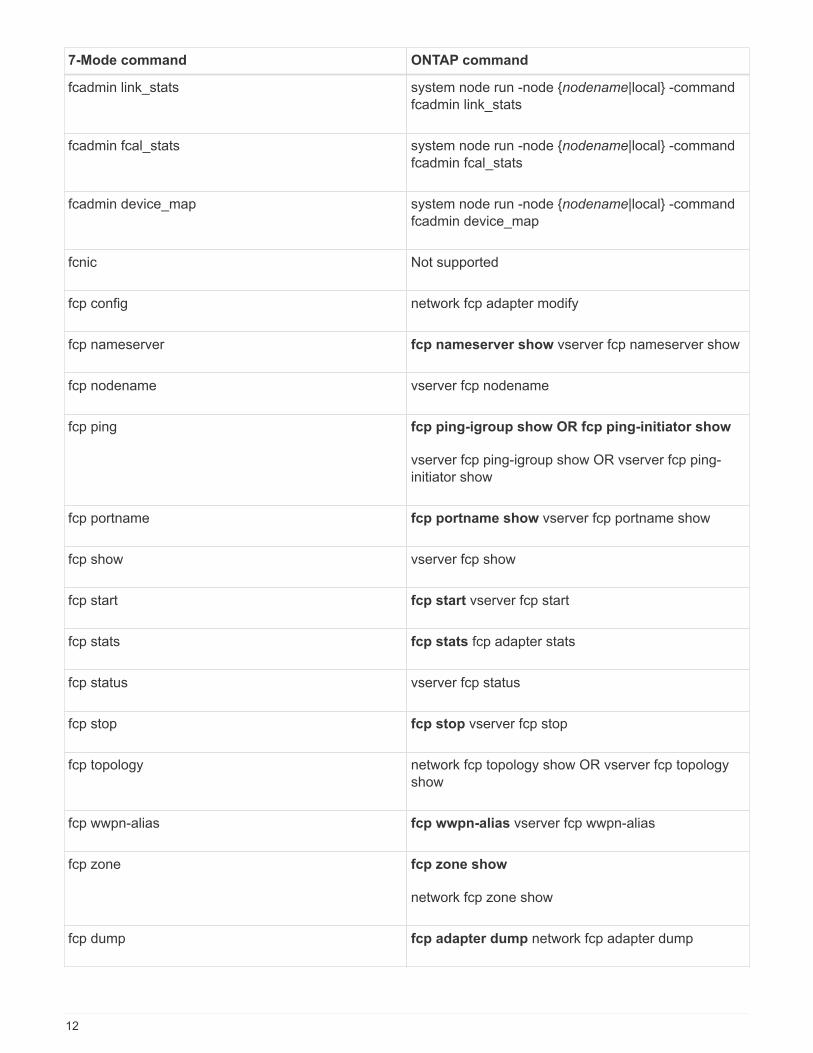
7-Mode command ONTAP command
fcadmin link_stats system node run -node {nodename|local} -command
fcadmin link_stats
fcadmin fcal_stats system node run -node {nodename|local} -command
fcadmin fcal_stats
fcadmin device_map system node run -node {nodename|local} -command
fcadmin device_map
fcnic Not supported
fcp config network fcp adapter modify
fcp nameserver fcp nameserver show vserver fcp nameserver show
fcp nodename vserver fcp nodename
fcp ping fcp ping-igroup show OR fcp ping-initiator show
vserver fcp ping-igroup show OR vserver fcp ping-
initiator show
fcp portname fcp portname show vserver fcp portname show
fcp show vserver fcp show
fcp start fcp start vserver fcp start
fcp stats fcp stats fcp adapter stats
fcp status vserver fcp status
fcp stop fcp stop vserver fcp stop
fcp topology network fcp topology show OR vserver fcp topology
show
fcp wwpn-alias fcp wwpn-alias vserver fcp wwpn-alias
fcp zone fcp zone show
network fcp zone show
fcp dump fcp adapter dump network fcp adapter dump
12
7-Mode command ONTAP command
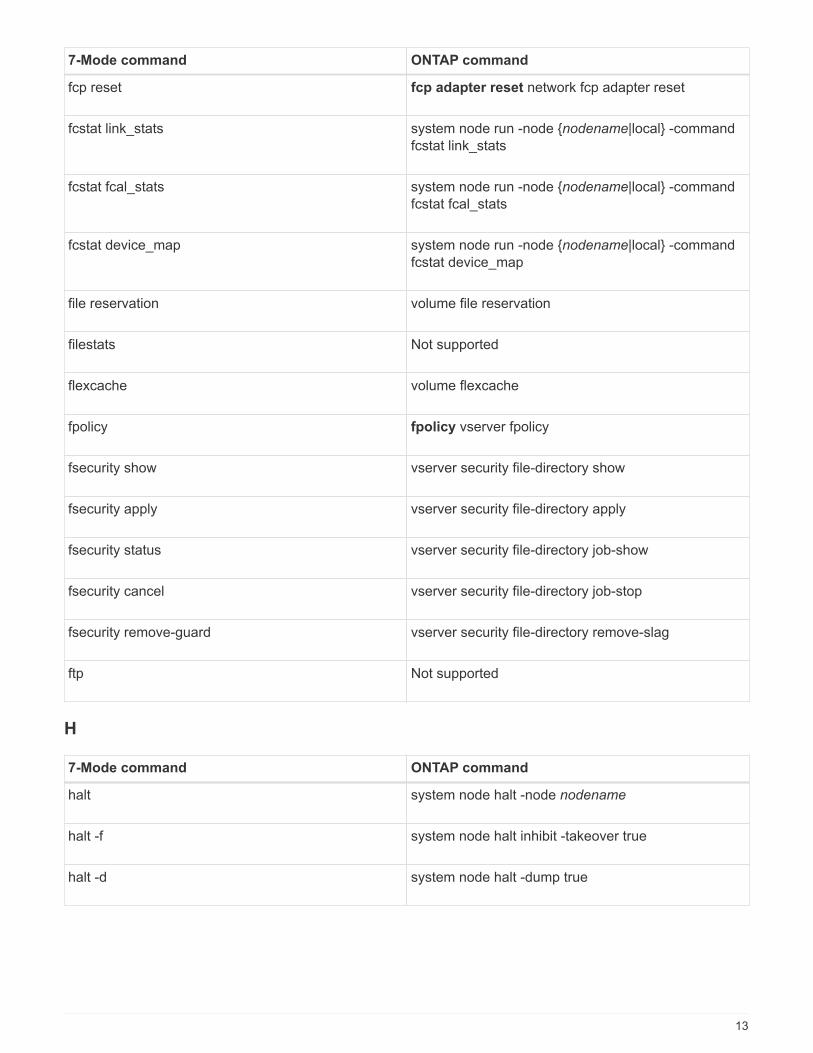
fcp reset fcp adapter reset network fcp adapter reset
fcstat link_stats system node run -node {nodename|local} -command
fcstat link_stats
fcstat fcal_stats system node run -node {nodename|local} -command
fcstat fcal_stats
fcstat device_map system node run -node {nodename|local} -command
fcstat device_map
file reservation volume file reservation
filestats Not supported
flexcache volume flexcache
fpolicy fpolicy vserver fpolicy
fsecurity show vserver security file-directory show
fsecurity apply vserver security file-directory apply
fsecurity status vserver security file-directory job-show
fsecurity cancel vserver security file-directory job-stop
fsecurity remove-guard vserver security file-directory remove-slag
ftp Not supported
H
7-Mode command ONTAP command
halt system node halt -node nodename
halt -f system node halt inhibit -takeover true
halt -d system node halt -dump true
13
7-Mode command ONTAP command
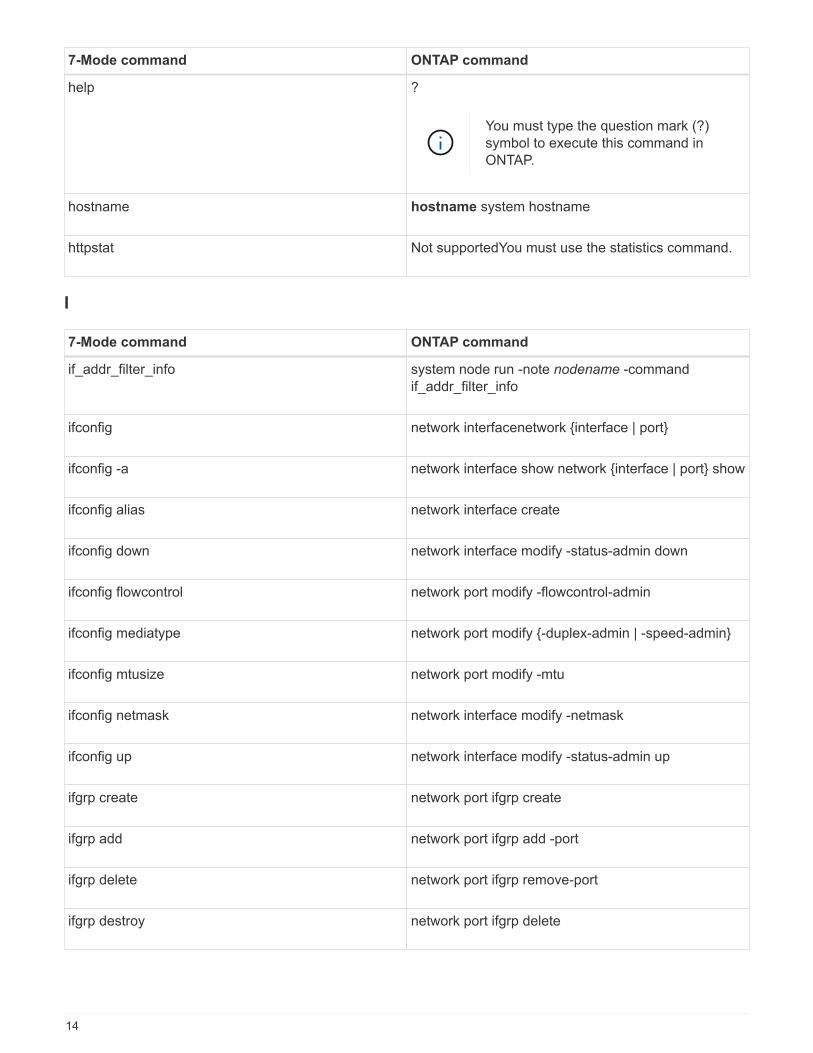
help ?
You must type the question mark (?)
symbol to execute this command in
ONTAP.
hostname hostname system hostname
httpstat Not supportedYou must use the statistics command.
I
7-Mode command ONTAP command
if_addr_filter_info system node run -note nodename -command
if_addr_filter_info
ifconfig network interfacenetwork {interface | port}
ifconfig -a network interface show network {interface | port} show
ifconfig alias network interface create
ifconfig down network interface modify -status-admin down
ifconfig flowcontrol network port modify -flowcontrol-admin
ifconfig mediatype network port modify {-duplex-admin | -speed-admin}
ifconfig mtusize network port modify -mtu
ifconfig netmask network interface modify -netmask
ifconfig up network interface modify -status-admin up
ifgrp create network port ifgrp create
ifgrp add network port ifgrp add -port
ifgrp delete network port ifgrp remove-port
ifgrp destroy network port ifgrp delete
14
7-Mode command ONTAP command
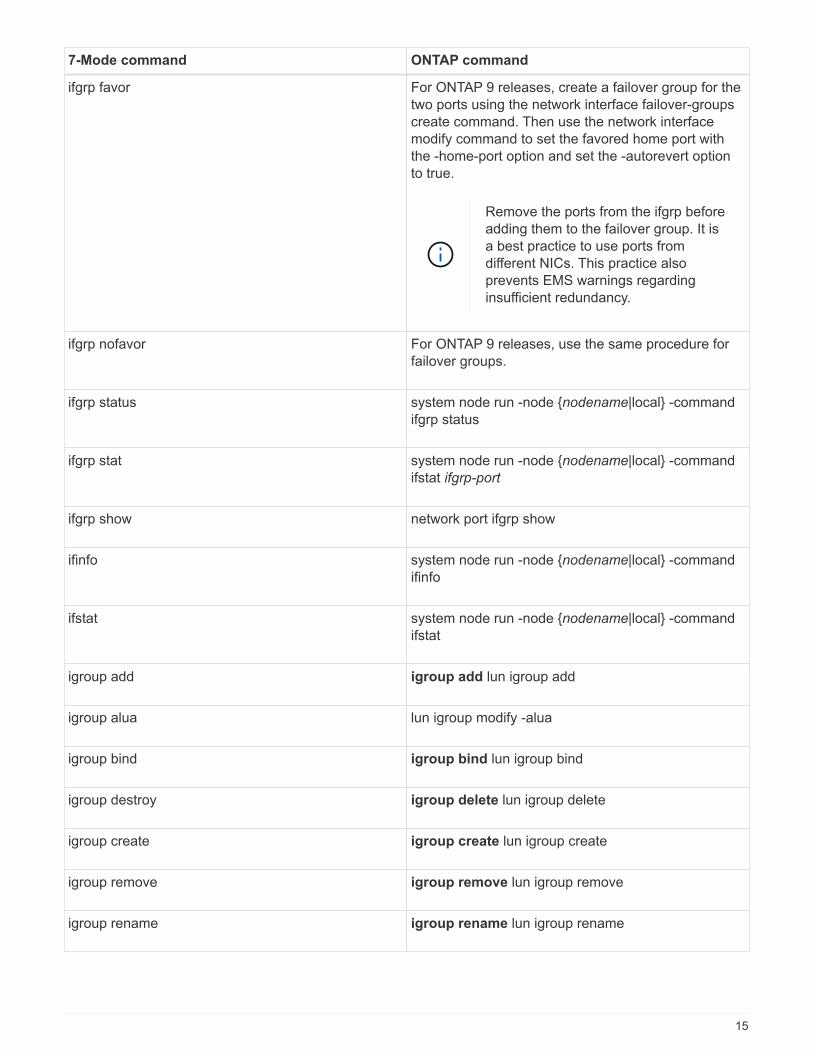
ifgrp favor For ONTAP 9 releases, create a failover group for the
two ports using the network interface failover-groups
create command. Then use the network interface
modify command to set the favored home port with
the -home-port option and set the -autorevert option
to true.
Remove the ports from the ifgrp before
adding them to the failover group. It is
a best practice to use ports from
different NICs. This practice also
prevents EMS warnings regarding
insufficient redundancy.
ifgrp nofavor For ONTAP 9 releases, use the same procedure for
failover groups.
ifgrp status system node run -node {nodename|local} -command
ifgrp status
ifgrp stat system node run -node {nodename|local} -command
ifstat ifgrp-port
ifgrp show network port ifgrp show
ifinfo system node run -node {nodename|local} -command
ifinfo
ifstat system node run -node {nodename|local} -command
ifstat
igroup add igroup add lun igroup add
igroup alua lun igroup modify -alua
igroup bind igroup bind lun igroup bind
igroup destroy igroup delete lun igroup delete
igroup create igroup create lun igroup create
igroup remove igroup remove lun igroup remove
igroup rename igroup rename lun igroup rename
15
7-Mode command ONTAP command
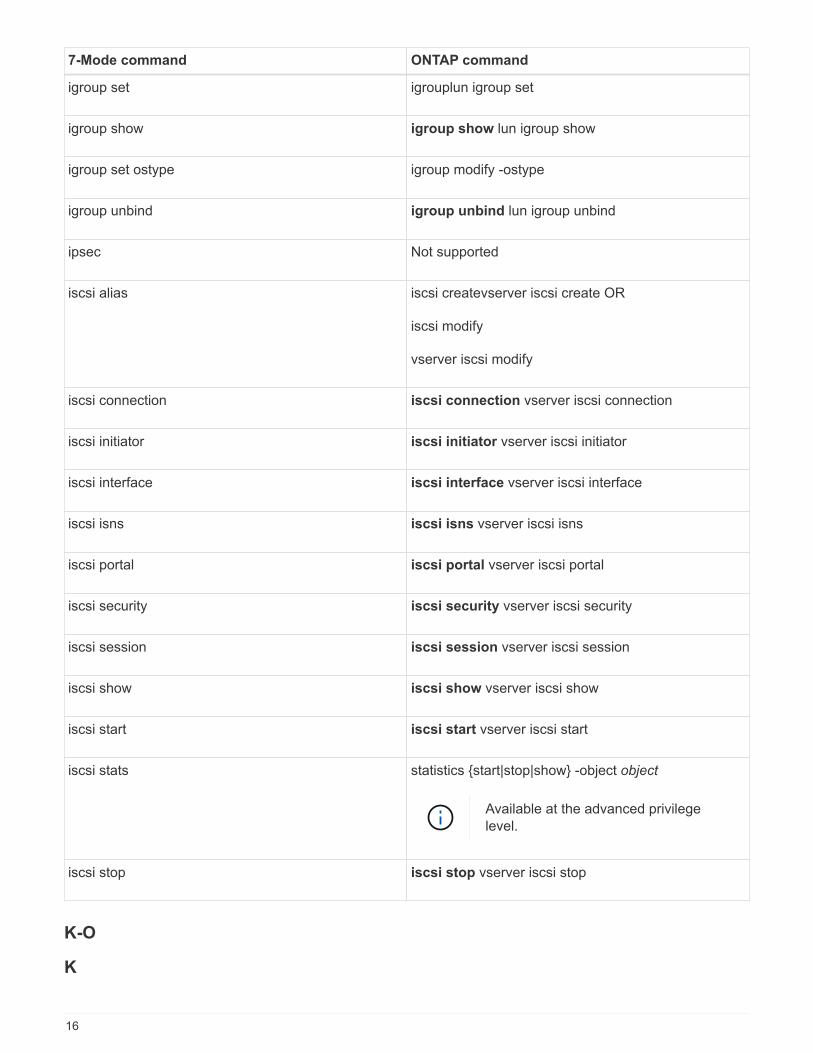
igroup set igrouplun igroup set
igroup show igroup show lun igroup show
igroup set ostype igroup modify -ostype
igroup unbind igroup unbind lun igroup unbind
ipsec Not supported
iscsi alias iscsi createvserver iscsi create OR
iscsi modify
vserver iscsi modify
iscsi connection iscsi connection vserver iscsi connection
iscsi initiator iscsi initiator vserver iscsi initiator
iscsi interface iscsi interface vserver iscsi interface
iscsi isns iscsi isns vserver iscsi isns
iscsi portal iscsi portal vserver iscsi portal
iscsi security iscsi security vserver iscsi security
iscsi session iscsi session vserver iscsi session
iscsi show iscsi show vserver iscsi show
iscsi start iscsi start vserver iscsi start
iscsi stats statistics {start|stop|show} -object object
Available at the advanced privilege
level.
iscsi stop iscsi stop vserver iscsi stop
K-O
K
16
7-Mode command ONTAP command
key_manager system node run -node {nodename|local} -command
key_manager
keymgr system node run -node {nodename|local} -command
keymgr For management interface keys, you must
use the “security certificates” commands.
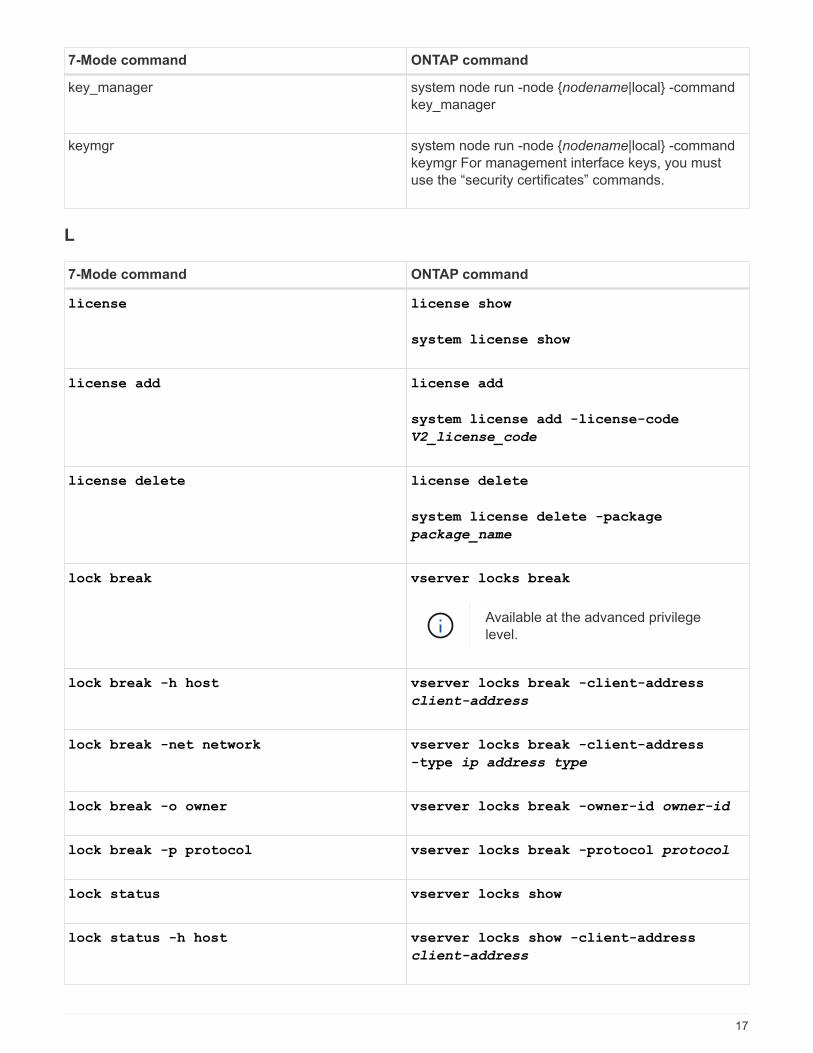
L
7-Mode command ONTAP command
license license show
system license show
license add license add
system license add -license-code
V2_license_code
license delete license delete
system license delete -package
package_name
lock break vserver locks break
Available at the advanced privilege
level.
lock break -h host vserver locks break -client-address
client-address
lock break -net network vserver locks break -client-address
-type ip address type
lock break -o owner vserver locks break -owner-id owner-id
lock break -p protocol vserver locks break -protocol protocol
lock status vserver locks show
lock status -h host vserver locks show -client-address
client-address
17
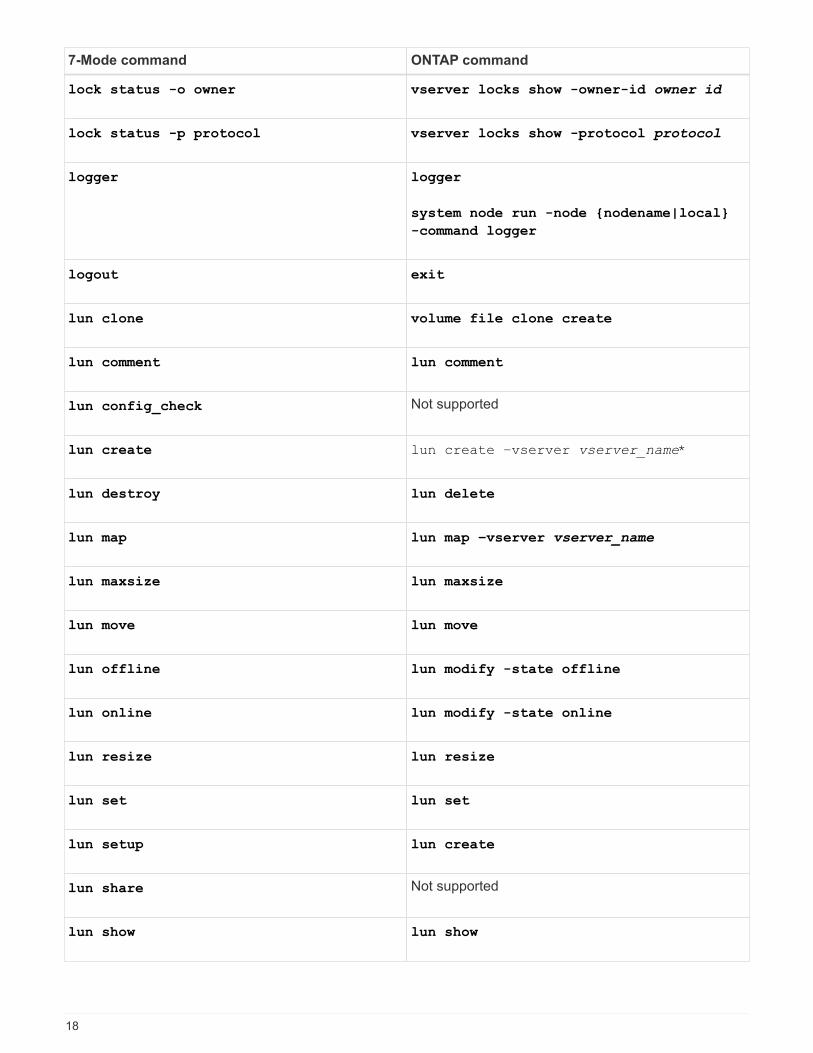
7-Mode command ONTAP command
lock status -o owner vserver locks show -owner-id owner id
lock status -p protocol vserver locks show -protocol protocol
logger logger
system node run -node {nodename|local}
-command logger
logout exit
lun clone volume file clone create
lun comment lun comment
lun config_check Not supported
lun create lun create –vserver vserver_name*
lun destroy lun delete
lun map lun map –vserver vserver_name
lun maxsize lun maxsize
lun move lun move
lun offline lun modify -state offline
lun online lun modify -state online
lun resize lun resize
lun set lun set
lun setup lun create
lun share Not supported
lun show lun show
18

7-Mode command ONTAP command
lun snap Not supported
lun stats statistics show -object lun
Available at the advanced privilege
level.
lun unmap lun unmap
M
7-Mode command ONTAP command
man man
maxfiles vol modify -max-number-of-files OR vol -fields files
mt Not supported
You must use the storage tape command set.
N
7-Mode command ONTAP command
nbtstat vserver cifs nbtstat
ndmpd {system | server} services ndmp
ndmpcopy system node run -node {nodename|local} ndmpcopy
ndmpd on ndmpd on system services ndmpd on
ndmpd off ndmpd off system services ndmpd off
ndmpd status {system | vserver} services ndmp status
ndmpd probe {system | vserver} services ndmp probe
ndmpd kill {system | vserver} services ndmp kill
ndmpd killall {system | vserver} services ndmp kill-all
19
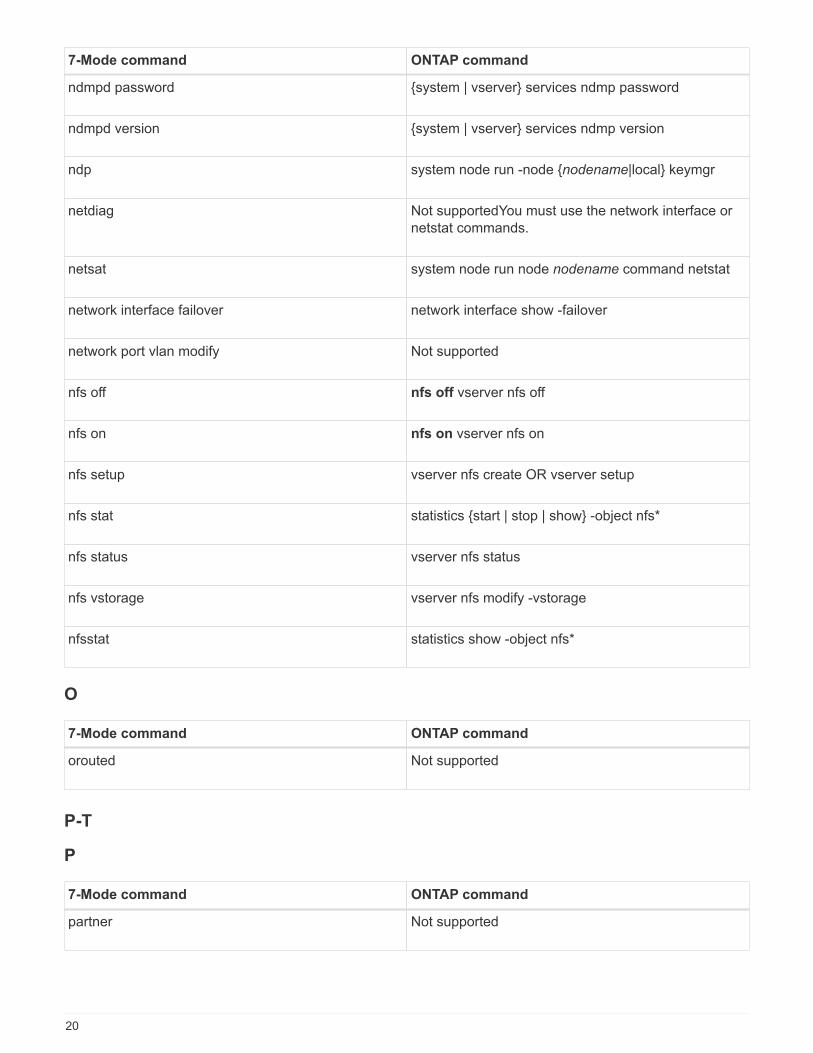
7-Mode command ONTAP command
ndmpd password {system | vserver} services ndmp password
ndmpd version {system | vserver} services ndmp version
ndp system node run -node {nodename|local} keymgr
netdiag Not supportedYou must use the network interface or
netstat commands.
netsat system node run node nodename command netstat
network interface failover network interface show -failover
network port vlan modify Not supported
nfs off nfs off vserver nfs off
nfs on nfs on vserver nfs on
nfs setup vserver nfs create OR vserver setup
nfs stat statistics {start | stop | show} -object nfs*
nfs status vserver nfs status
nfs vstorage vserver nfs modify -vstorage
nfsstat statistics show -object nfs*
O
7-Mode command ONTAP command
orouted Not supported
P-T
P
7-Mode command ONTAP command
partner Not supported
20
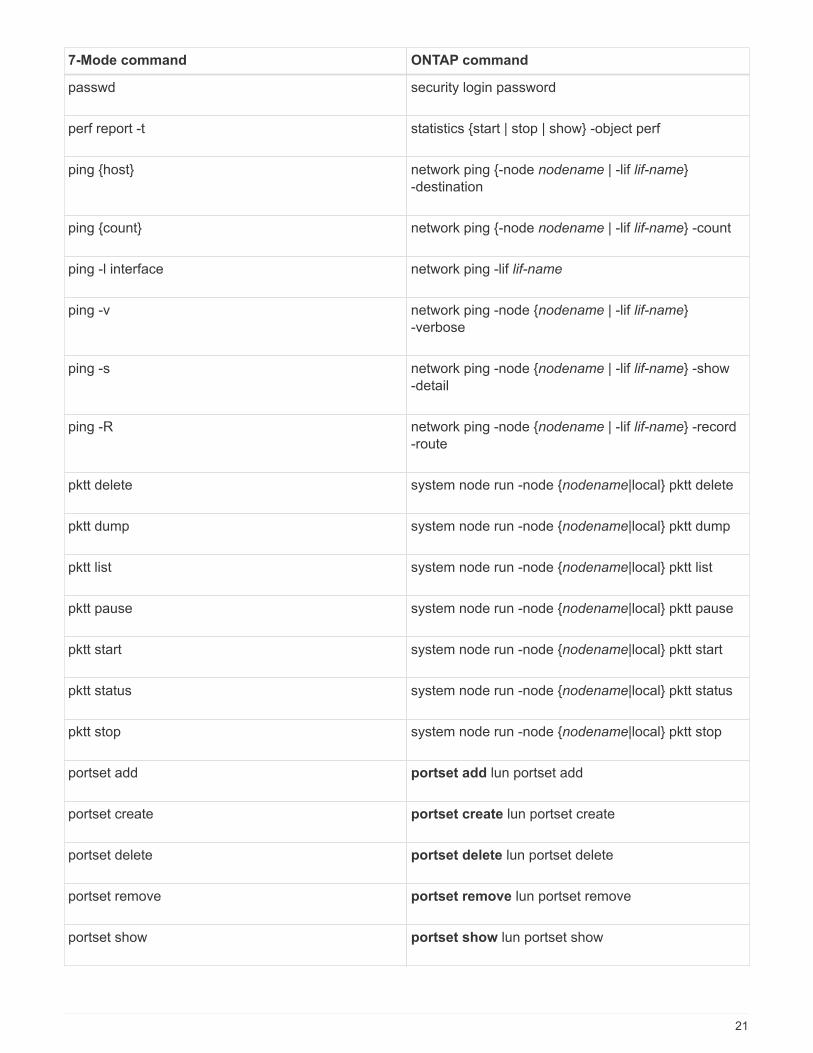
7-Mode command ONTAP command
passwd security login password
perf report -t statistics {start | stop | show} -object perf
ping {host} network ping {-node nodename | -lif lif-name}
-destination
ping {count} network ping {-node nodename | -lif lif-name} -count
ping -l interface network ping -lif lif-name
ping -v network ping -node {nodename | -lif lif-name}
-verbose
ping -s network ping -node {nodename | -lif lif-name} -show
-detail
ping -R network ping -node {nodename | -lif lif-name} -record
-route
pktt delete system node run -node {nodename|local} pktt delete
pktt dump system node run -node {nodename|local} pktt dump
pktt list system node run -node {nodename|local} pktt list
pktt pause system node run -node {nodename|local} pktt pause
pktt start system node run -node {nodename|local} pktt start
pktt status system node run -node {nodename|local} pktt status
pktt stop system node run -node {nodename|local} pktt stop
portset add portset add lun portset add
portset create portset create lun portset create
portset delete portset delete lun portset delete
portset remove portset remove lun portset remove
portset show portset show lun portset show
21
7-Mode command ONTAP command
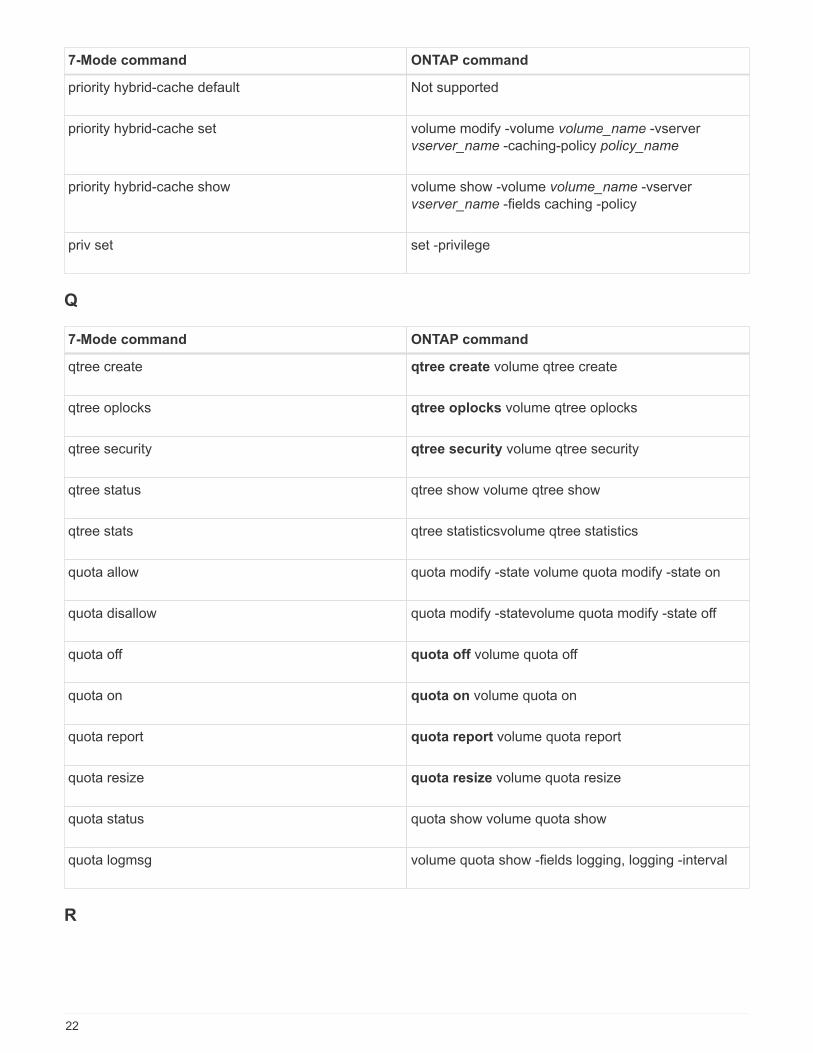
priority hybrid-cache default Not supported
priority hybrid-cache set volume modify -volume volume_name -vserver
vserver_name -caching-policy policy_name
priority hybrid-cache show volume show -volume volume_name -vserver
vserver_name -fields caching -policy
priv set set -privilege
Q
7-Mode command ONTAP command
qtree create qtree create volume qtree create
qtree oplocks qtree oplocks volume qtree oplocks
qtree security qtree security volume qtree security
qtree status qtree show volume qtree show
qtree stats qtree statisticsvolume qtree statistics
quota allow quota modify -state volume quota modify -state on
quota disallow quota modify -statevolume quota modify -state off
quota off quota off volume quota off
quota on quota on volume quota on
quota report quota report volume quota report
quota resize quota resize volume quota resize
quota status quota show volume quota show
quota logmsg volume quota show -fields logging, logging -interval
R
22
7-Mode command ONTAP command
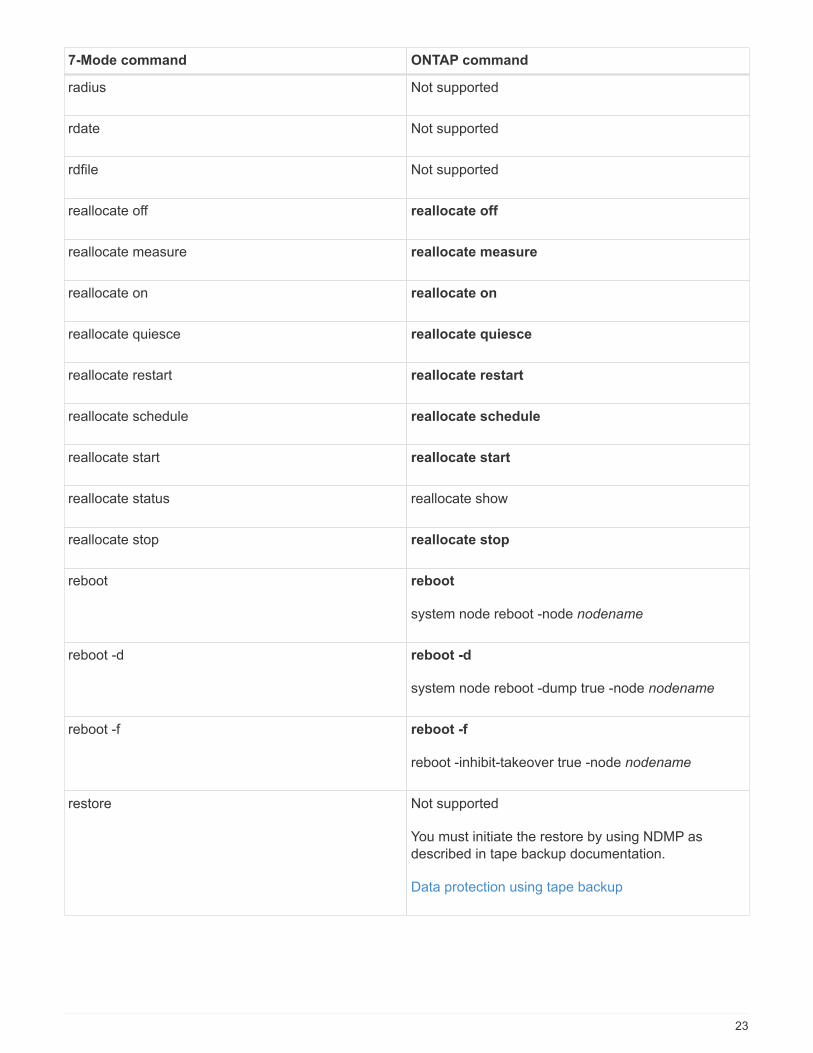
radius Not supported
rdate Not supported
rdfile Not supported
reallocate off reallocate off
reallocate measure reallocate measure
reallocate on reallocate on
reallocate quiesce reallocate quiesce
reallocate restart reallocate restart
reallocate schedule reallocate schedule
reallocate start reallocate start
reallocate status reallocate show
reallocate stop reallocate stop
reboot reboot
system node reboot -node nodename
reboot -d reboot -d
system node reboot -dump true -node nodename
reboot -f reboot -f
reboot -inhibit-takeover true -node nodename
restore Not supported
You must initiate the restore by using NDMP as
described in tape backup documentation.
Data protection using tape backup
23
7-Mode command ONTAP command
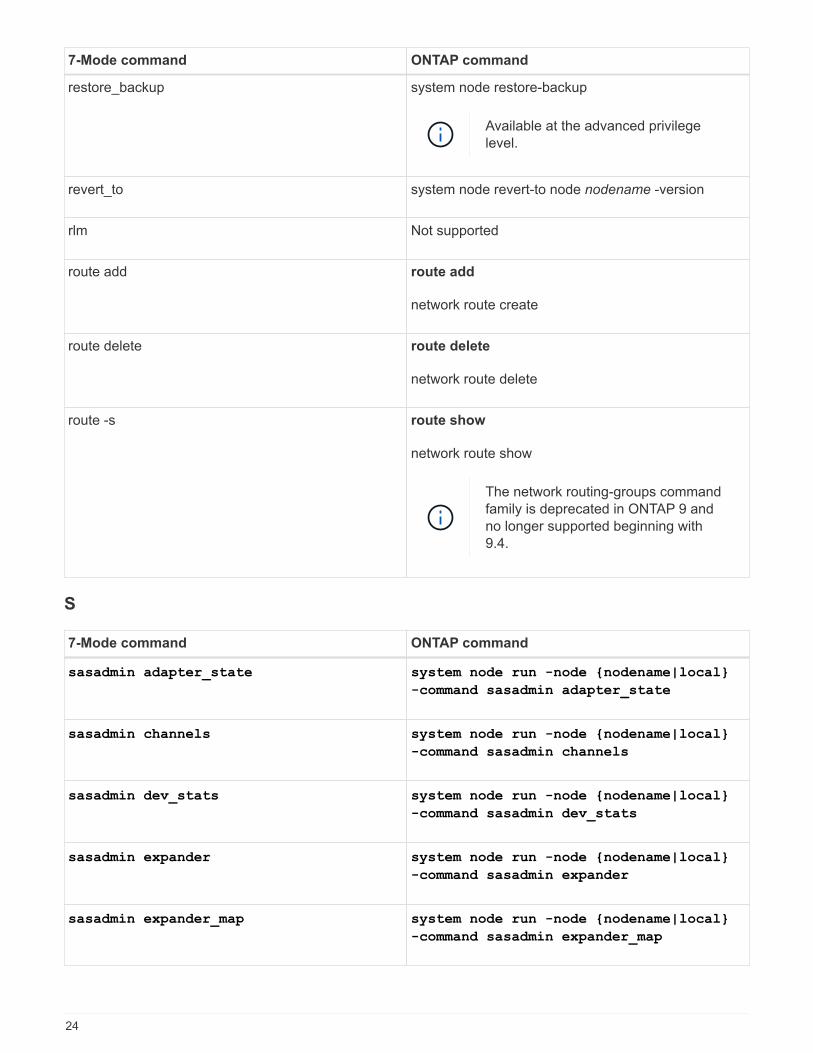
restore_backup system node restore-backup
Available at the advanced privilege
level.
revert_to system node revert-to node nodename -version
rlm Not supported
route add route add
network route create
route delete route delete
network route delete
route -s route show
network route show
The network routing-groups command
family is deprecated in ONTAP 9 and
no longer supported beginning with
9.4.
S
7-Mode command ONTAP command
sasadmin adapter_state system node run -node {nodename|local}
-command sasadmin adapter_state
sasadmin channels system node run -node {nodename|local}
-command sasadmin channels
sasadmin dev_stats system node run -node {nodename|local}
-command sasadmin dev_stats
sasadmin expander system node run -node {nodename|local}
-command sasadmin expander
sasadmin expander_map system node run -node {nodename|local}
-command sasadmin expander_map
24
7-Mode command ONTAP command
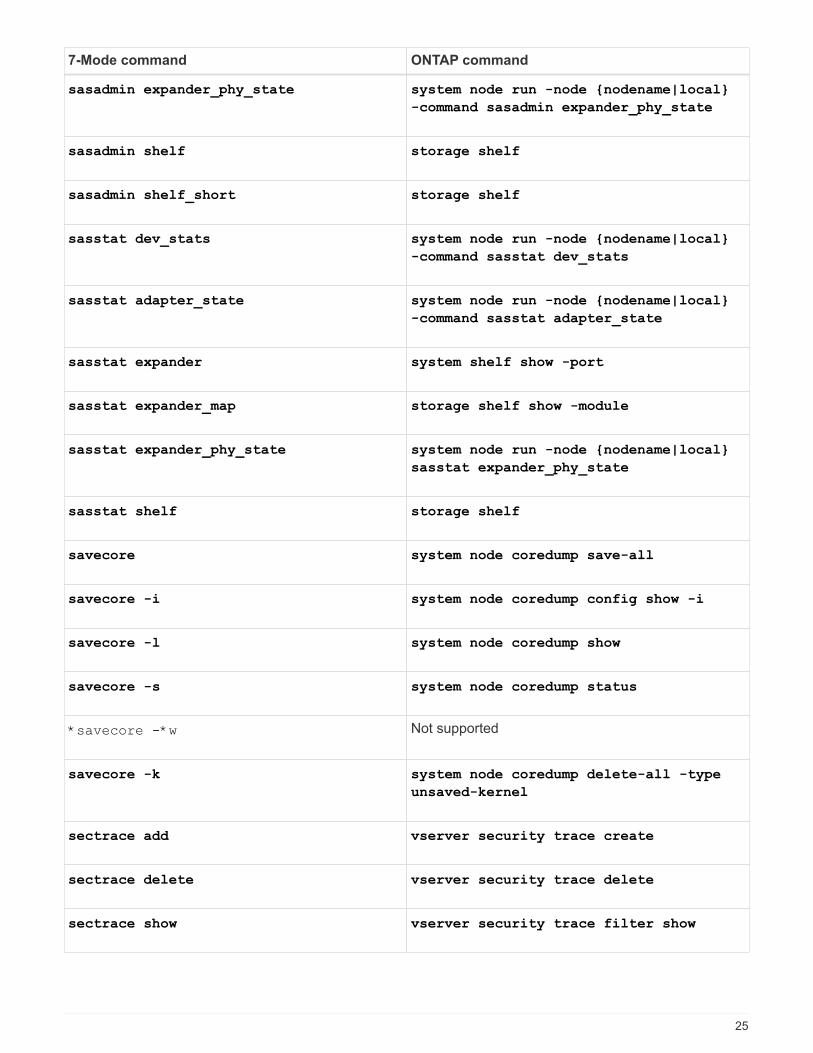
sasadmin expander_phy_state system node run -node {nodename|local}
-command sasadmin expander_phy_state
sasadmin shelf storage shelf
sasadmin shelf_short storage shelf
sasstat dev_stats system node run -node {nodename|local}
-command sasstat dev_stats
sasstat adapter_state system node run -node {nodename|local}
-command sasstat adapter_state
sasstat expander system shelf show -port
sasstat expander_map storage shelf show -module
sasstat expander_phy_state system node run -node {nodename|local}
sasstat expander_phy_state
sasstat shelf storage shelf
savecore system node coredump save-all
savecore -i system node coredump config show -i
savecore -l system node coredump show
savecore -s system node coredump status
*savecore -*w Not supported
savecore -k system node coredump delete-all -type
unsaved-kernel
sectrace add vserver security trace create
sectrace delete vserver security trace delete
sectrace show vserver security trace filter show
25
7-Mode command ONTAP command
sectrace print-status vserver security trace trace-result
show
secureadmin addcert security certificate install
secureadmin disable ssh security login modify
secureadmin disable ssl security ssl modify
secureadmin enable ssl security ssl modify
secureadmin setup security
secureadmin setup ssh security ssh {add|modify}
secureadmin setup ssl security ssl {add|modify}
secureadmin enable ssh security login modify
secureadmin status ssh security login show
secureadmin status ssl security ssl show
setup Not supported
shelfchk security ssh {add|modify}
showfh security ssl {add|modify}
sis config security login modify
sis off security login show
sis on security ssl show
sis revert_to Not supported
sis start showfh
volume file show-filehandle
26
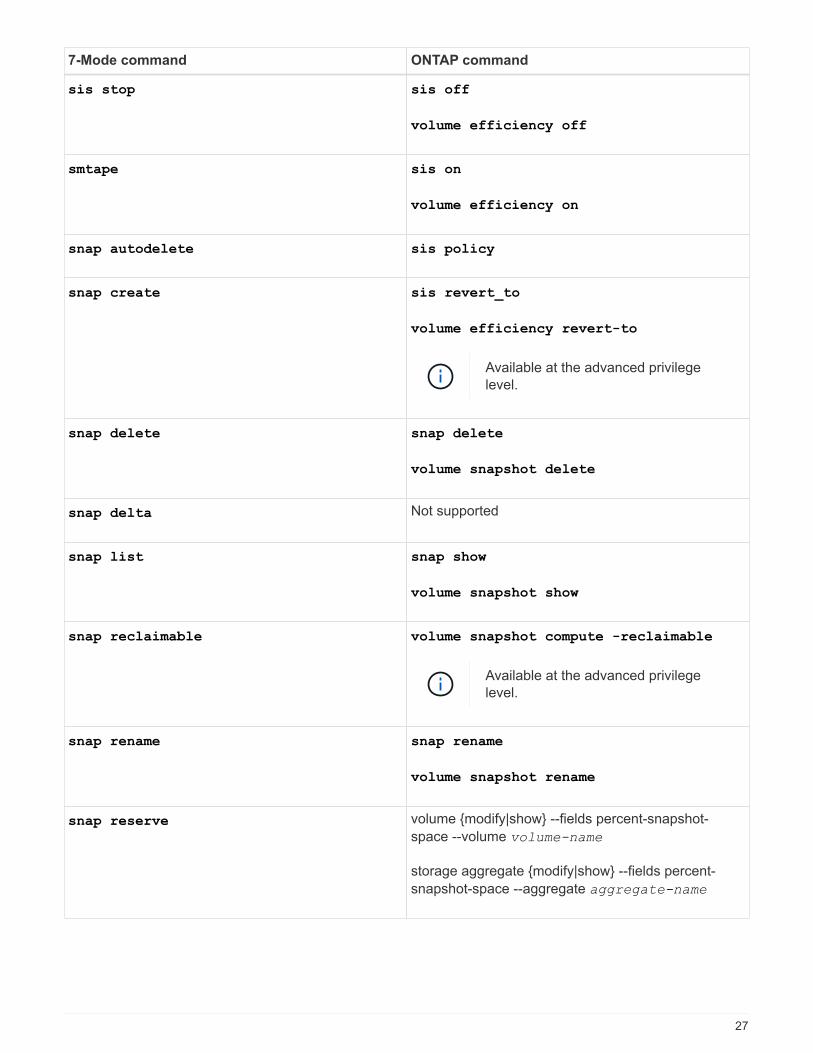
7-Mode command ONTAP command
sis stop sis off
volume efficiency off
smtape sis on
volume efficiency on
snap autodelete sis policy
snap create sis revert_to
volume efficiency revert-to
Available at the advanced privilege
level.
snap delete snap delete
volume snapshot delete
snap delta Not supported
snap list snap show
volume snapshot show
snap reclaimable volume snapshot compute -reclaimable
Available at the advanced privilege
level.
snap rename snap rename
volume snapshot rename
snap reserve volume {modify|show} --fields percent-snapshot-
space --volume volume-name
storage aggregate {modify|show} --fields percent-
snapshot-space --aggregate aggregate-name
27
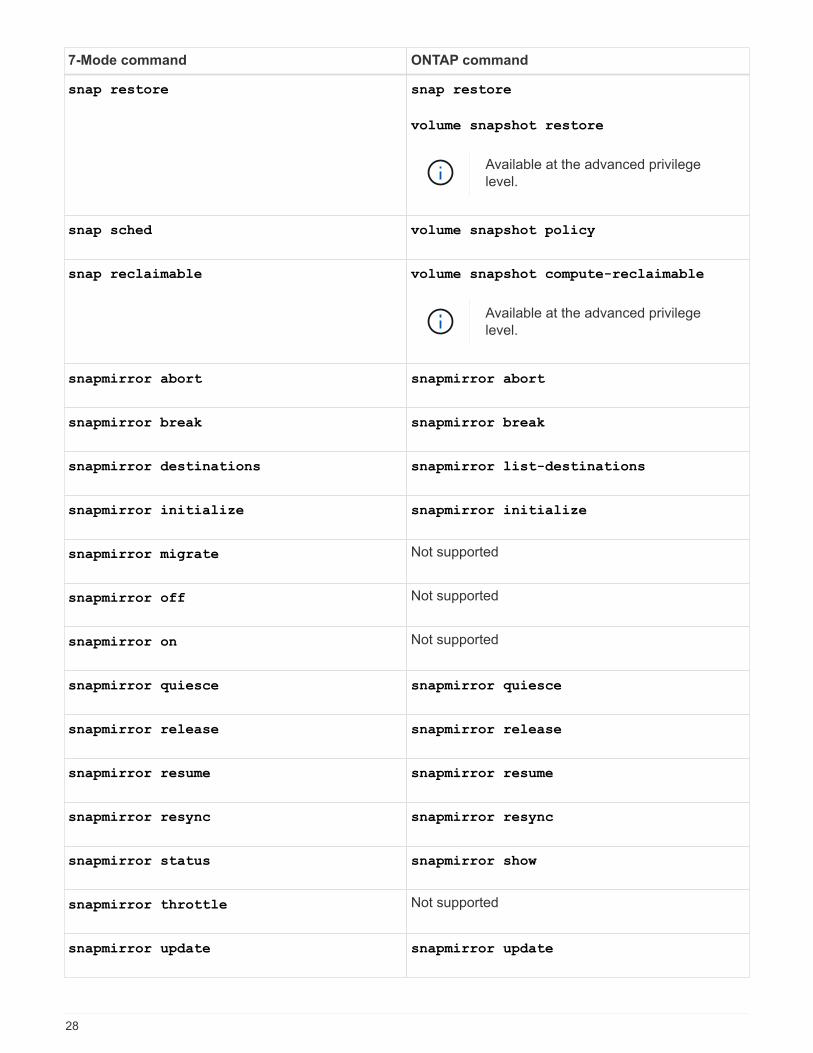
7-Mode command ONTAP command
snap restore snap restore
volume snapshot restore
Available at the advanced privilege
level.
snap sched volume snapshot policy
snap reclaimable volume snapshot compute-reclaimable
Available at the advanced privilege
level.
snapmirror abort snapmirror abort
snapmirror break snapmirror break
snapmirror destinations snapmirror list-destinations
snapmirror initialize snapmirror initialize
snapmirror migrate Not supported
snapmirror off Not supported
snapmirror on Not supported
snapmirror quiesce snapmirror quiesce
snapmirror release snapmirror release
snapmirror resume snapmirror resume
snapmirror resync snapmirror resync
snapmirror status snapmirror show
snapmirror throttle Not supported
snapmirror update snapmirror update
28
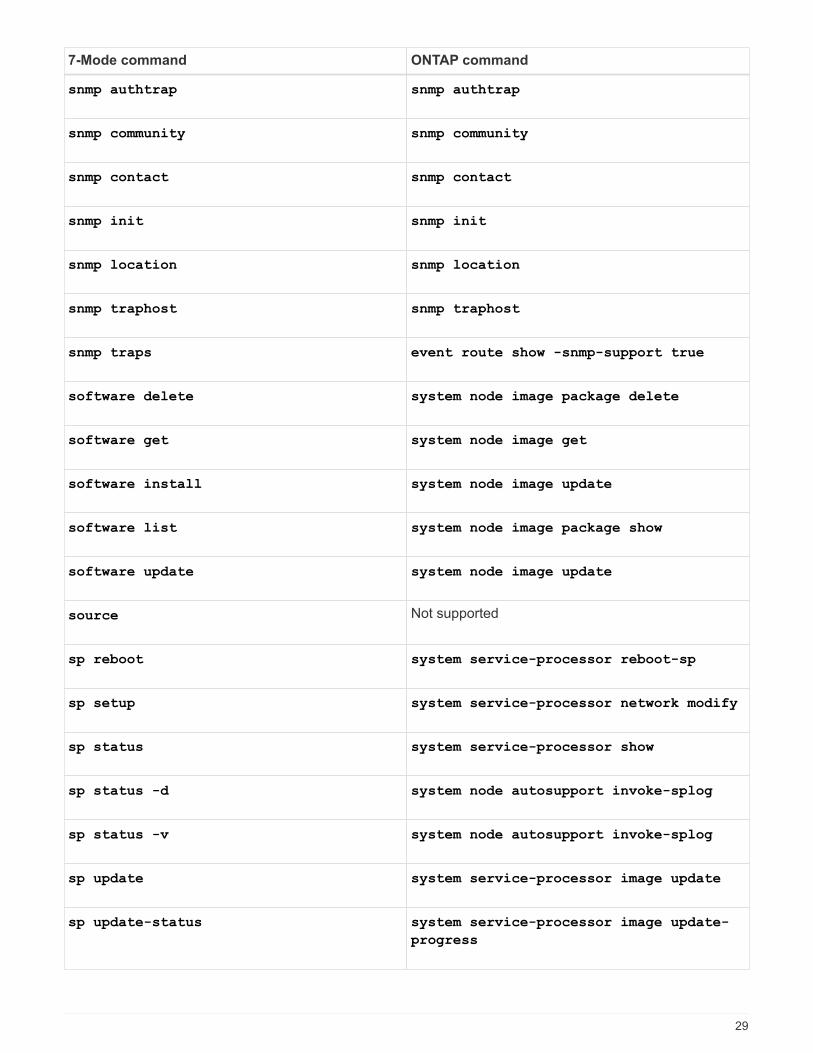
7-Mode command ONTAP command
snmp authtrap snmp authtrap
snmp community snmp community
snmp contact snmp contact
snmp init snmp init
snmp location snmp location
snmp traphost snmp traphost
snmp traps event route show -snmp-support true
software delete system node image package delete
software get system node image get
software install system node image update
software list system node image package show
software update system node image update
source Not supported
sp reboot system service-processor reboot-sp
sp setup system service-processor network modify
sp status system service-processor show
sp status -d system node autosupport invoke-splog
sp status -v system node autosupport invoke-splog
sp update system service-processor image update
sp update-status system service-processor image update-
progress
29
7-Mode command ONTAP command
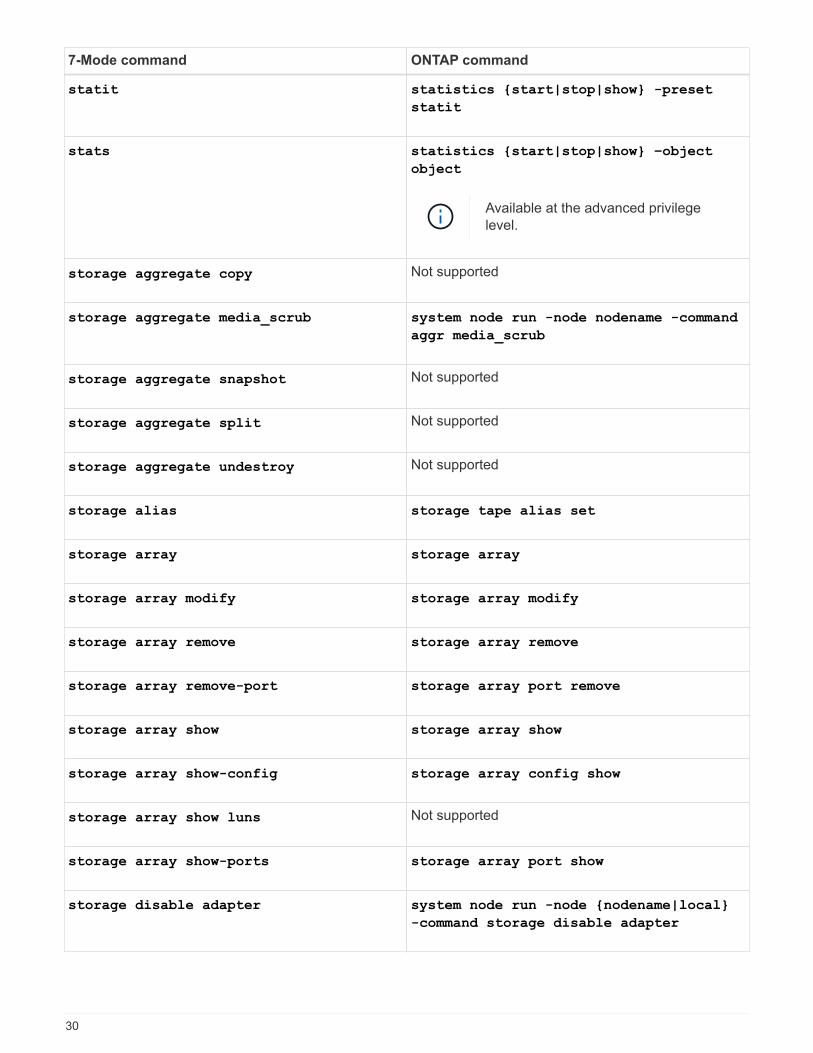
statit statistics {start|stop|show} -preset
statit
stats statistics {start|stop|show} –object
object
Available at the advanced privilege
level.
storage aggregate copy Not supported
storage aggregate media_scrub system node run -node nodename -command
aggr media_scrub
storage aggregate snapshot Not supported
storage aggregate split Not supported
storage aggregate undestroy Not supported
storage alias storage tape alias set
storage array storage array
storage array modify storage array modify
storage array remove storage array remove
storage array remove-port storage array port remove
storage array show storage array show
storage array show-config storage array config show
storage array show luns Not supported
storage array show-ports storage array port show
storage disable adapter system node run -node {nodename|local}
-command storage disable adapter
30
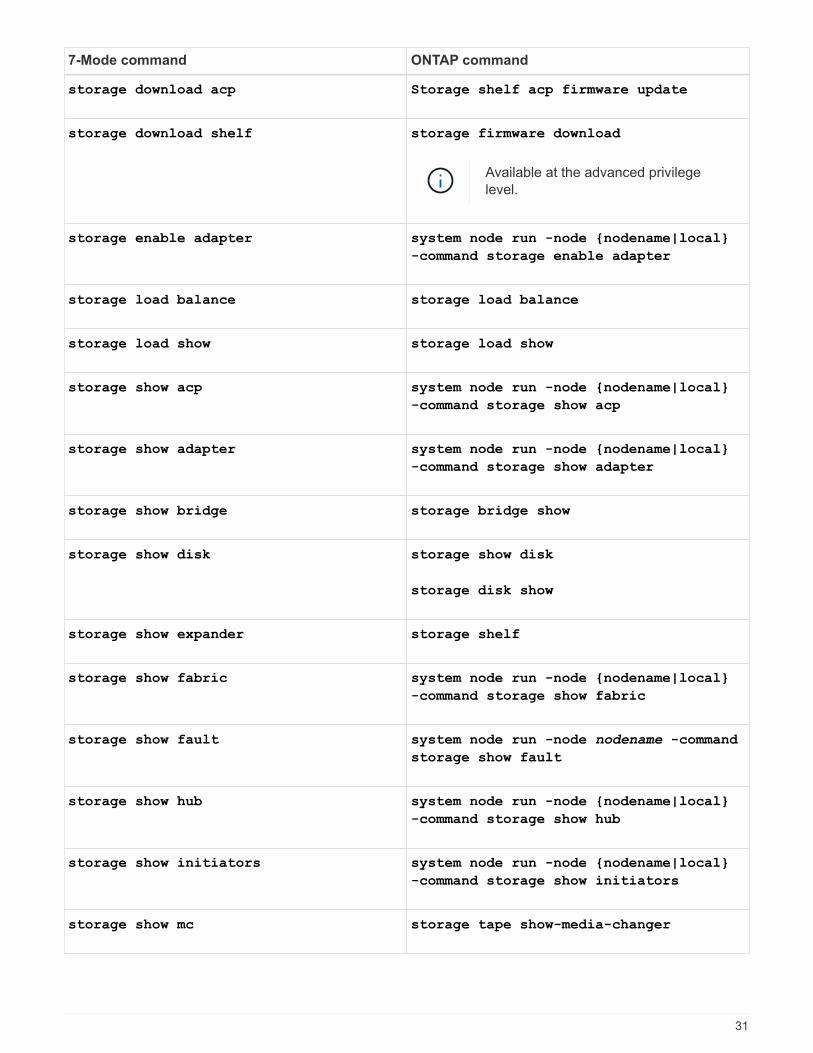
7-Mode command ONTAP command
storage download acp Storage shelf acp firmware update
storage download shelf storage firmware download
Available at the advanced privilege
level.
storage enable adapter system node run -node {nodename|local}
-command storage enable adapter
storage load balance storage load balance
storage load show storage load show
storage show acp system node run -node {nodename|local}
-command storage show acp
storage show adapter system node run -node {nodename|local}
-command storage show adapter
storage show bridge storage bridge show
storage show disk storage show disk
storage disk show
storage show expander storage shelf
storage show fabric system node run -node {nodename|local}
-command storage show fabric
storage show fault system node run -node nodename -command
storage show fault
storage show hub system node run -node {nodename|local}
-command storage show hub
storage show initiators system node run -node {nodename|local}
-command storage show initiators
storage show mc storage tape show-media-changer
31
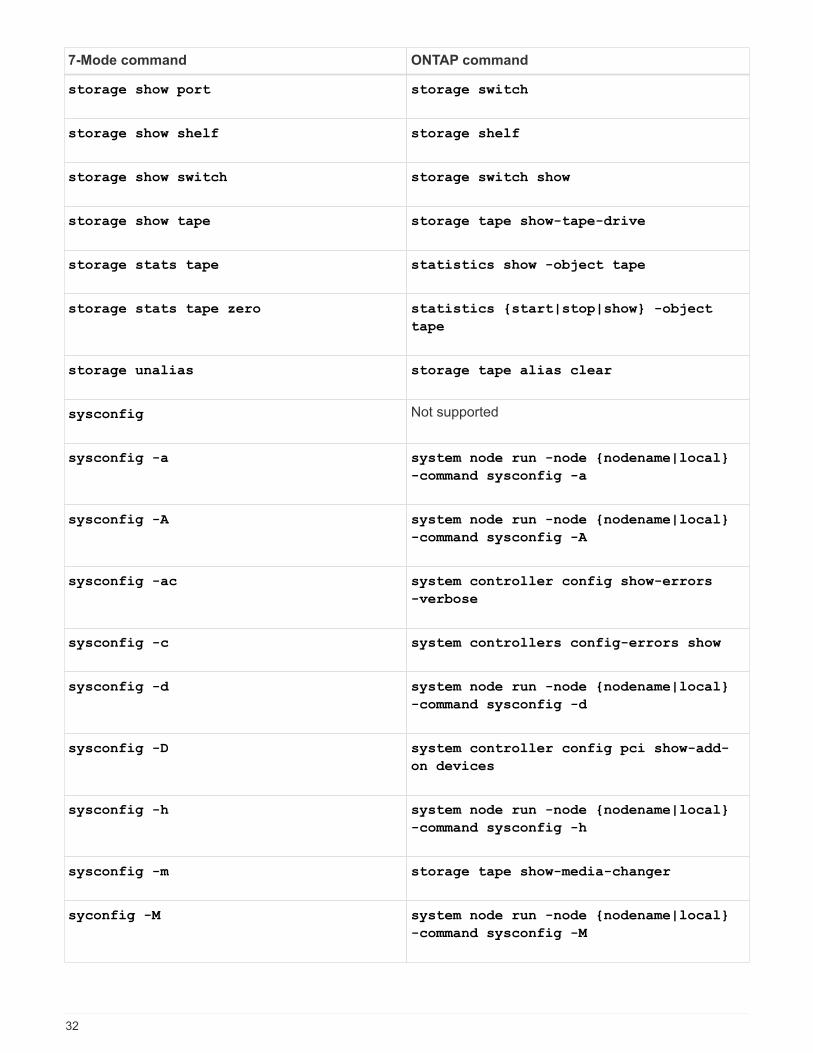
7-Mode command ONTAP command
storage show port storage switch
storage show shelf storage shelf
storage show switch storage switch show
storage show tape storage tape show-tape-drive
storage stats tape statistics show -object tape
storage stats tape zero statistics {start|stop|show} -object
tape
storage unalias storage tape alias clear
sysconfig Not supported
sysconfig -a system node run -node {nodename|local}
-command sysconfig -a
sysconfig -A system node run -node {nodename|local}
-command sysconfig -A
sysconfig -ac system controller config show-errors
-verbose
sysconfig -c system controllers config-errors show
sysconfig -d system node run -node {nodename|local}
-command sysconfig -d
sysconfig -D system controller config pci show-add-
on devices
sysconfig -h system node run -node {nodename|local}
-command sysconfig -h
sysconfig -m storage tape show-media-changer
syconfig -M system node run -node {nodename|local}
-command sysconfig -M
32
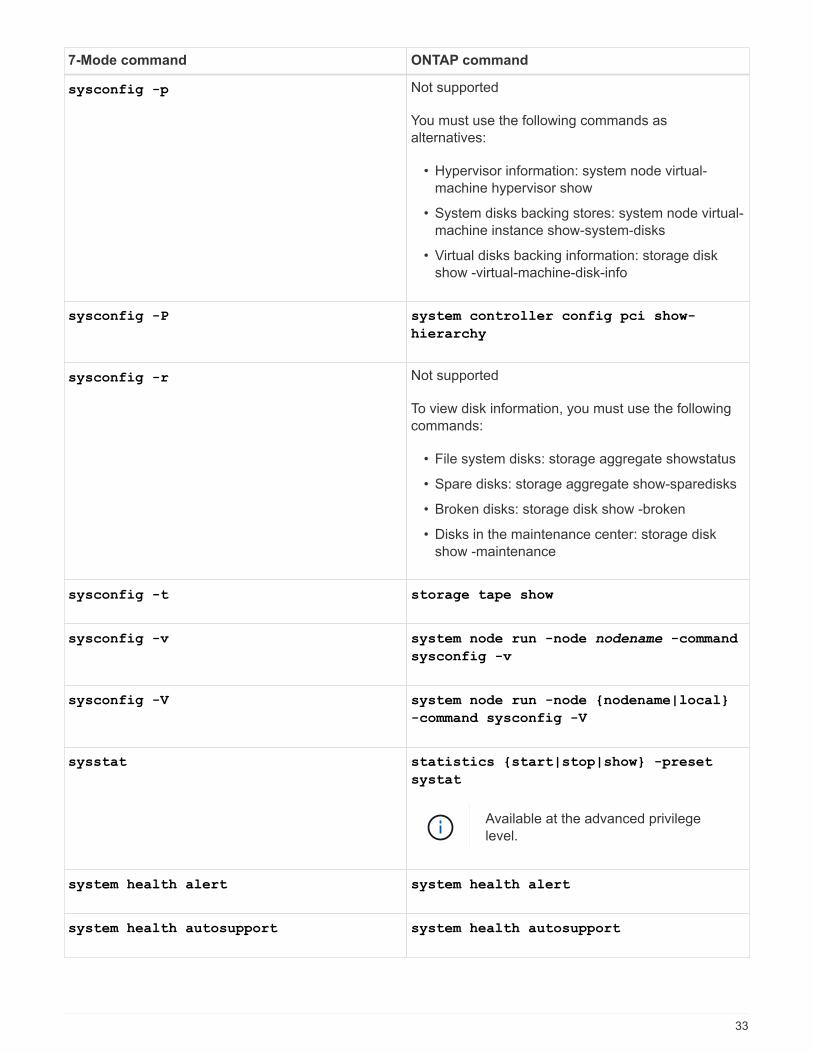
7-Mode command ONTAP command
sysconfig -p Not supported
You must use the following commands as
alternatives:
• Hypervisor information: system node virtual-
machine hypervisor show
• System disks backing stores: system node virtual-
machine instance show-system-disks
• Virtual disks backing information: storage disk
show -virtual-machine-disk-info
sysconfig -P system controller config pci show-
hierarchy
sysconfig -r Not supported
To view disk information, you must use the following
commands:
• File system disks: storage aggregate showstatus
• Spare disks: storage aggregate show-sparedisks
• Broken disks: storage disk show -broken
• Disks in the maintenance center: storage disk
show -maintenance
sysconfig -t storage tape show
sysconfig -v system node run -node nodename -command
sysconfig -v
sysconfig -V system node run -node {nodename|local}
-command sysconfig -V
sysstat statistics {start|stop|show} -preset
systat
Available at the advanced privilege
level.
system health alert system health alert
system health autosupport system health autosupport
33
7-Mode command ONTAP command
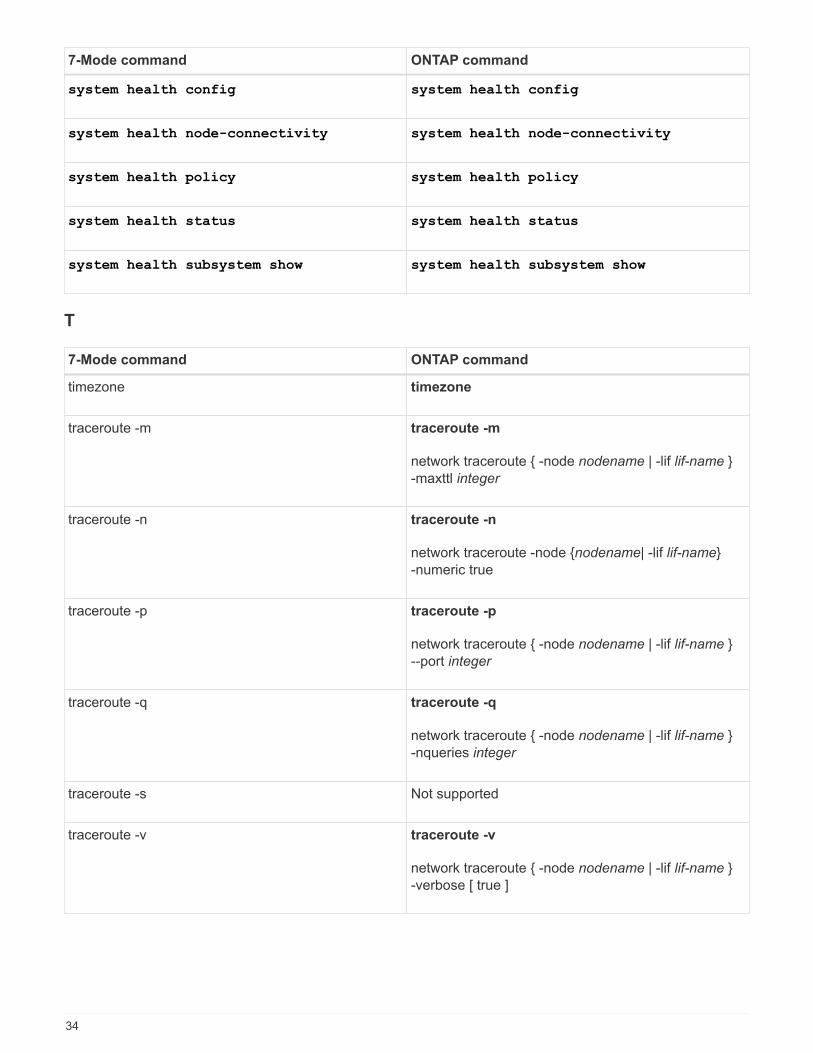
system health config system health config
system health node-connectivity system health node-connectivity
system health policy system health policy
system health status system health status
system health subsystem show system health subsystem show
T
7-Mode command ONTAP command
timezone timezone
traceroute -m traceroute -m
network traceroute { -node nodename | -lif lif-name }
-maxttl integer
traceroute -n traceroute -n
network traceroute -node {nodename| -lif lif-name}
-numeric true
traceroute -p traceroute -p
network traceroute { -node nodename | -lif lif-name }
--port integer
traceroute -q traceroute -q
network traceroute { -node nodename | -lif lif-name }
-nqueries integer
traceroute -s Not supported
traceroute -v traceroute -v
network traceroute { -node nodename | -lif lif-name }
-verbose [ true ]
34
7-Mode command ONTAP command
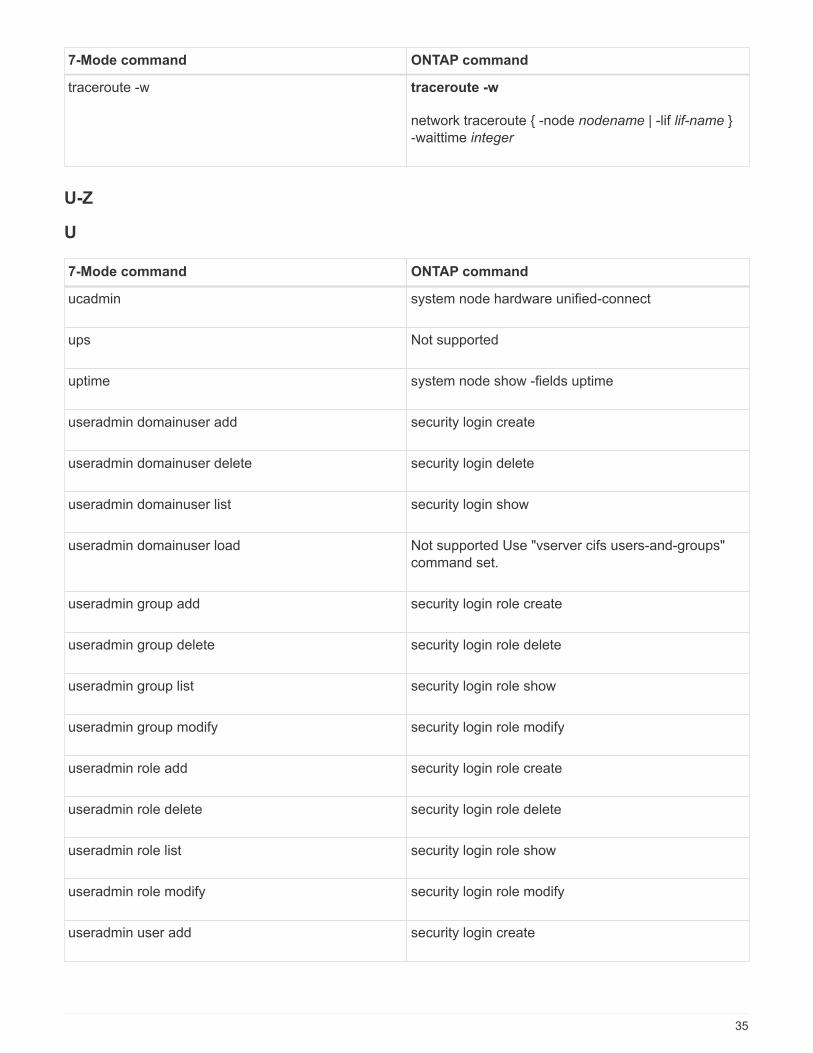
traceroute -w traceroute -w
network traceroute { -node nodename | -lif lif-name }
-waittime integer
U-Z
U
7-Mode command ONTAP command
ucadmin system node hardware unified-connect
ups Not supported
uptime system node show -fields uptime
useradmin domainuser add security login create
useradmin domainuser delete security login delete
useradmin domainuser list security login show
useradmin domainuser load Not supported Use "vserver cifs users-and-groups"
command set.
useradmin group add security login role create
useradmin group delete security login role delete
useradmin group list security login role show
useradmin group modify security login role modify
useradmin role add security login role create
useradmin role delete security login role delete
useradmin role list security login role show
useradmin role modify security login role modify
useradmin user add security login create
35
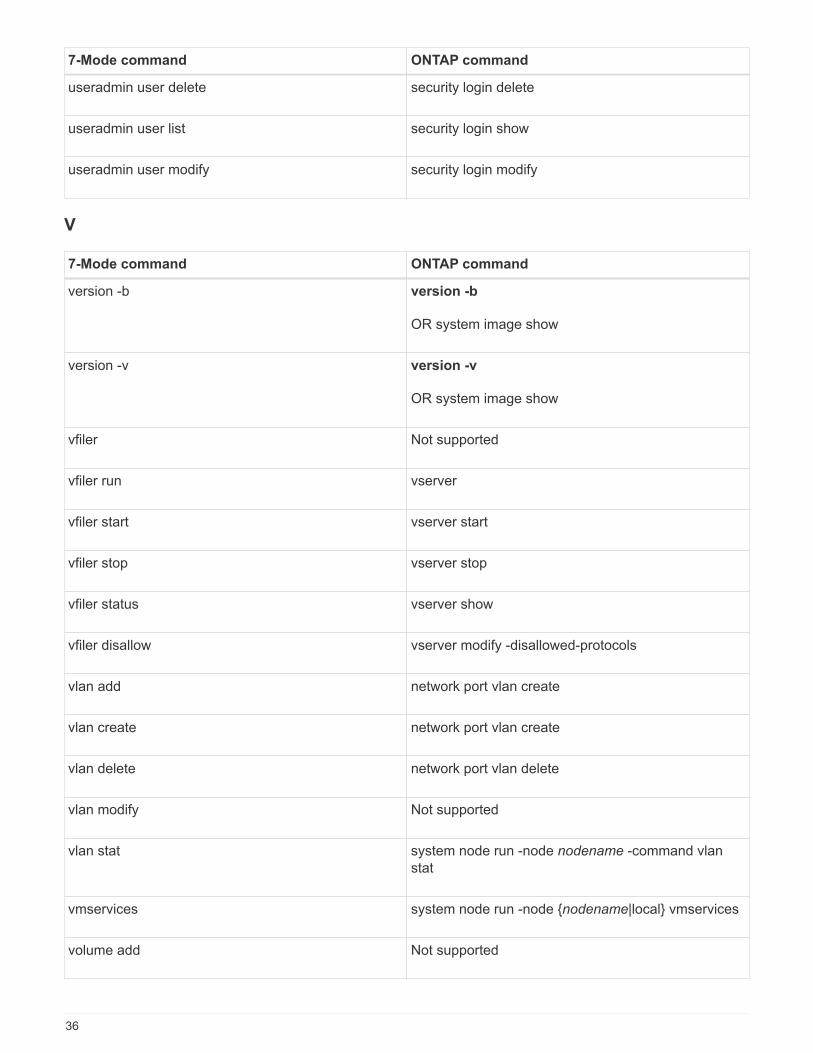
7-Mode command ONTAP command
useradmin user delete security login delete
useradmin user list security login show
useradmin user modify security login modify
V
7-Mode command ONTAP command
version -b version -b
OR system image show
version -v version -v
OR system image show
vfiler Not supported
vfiler run vserver
vfiler start vserver start
vfiler stop vserver stop
vfiler status vserver show
vfiler disallow vserver modify -disallowed-protocols
vlan add network port vlan create
vlan create network port vlan create
vlan delete network port vlan delete
vlan modify Not supported
vlan stat system node run -node nodename -command vlan
stat
vmservices system node run -node {nodename|local} vmservices
volume add Not supported
36
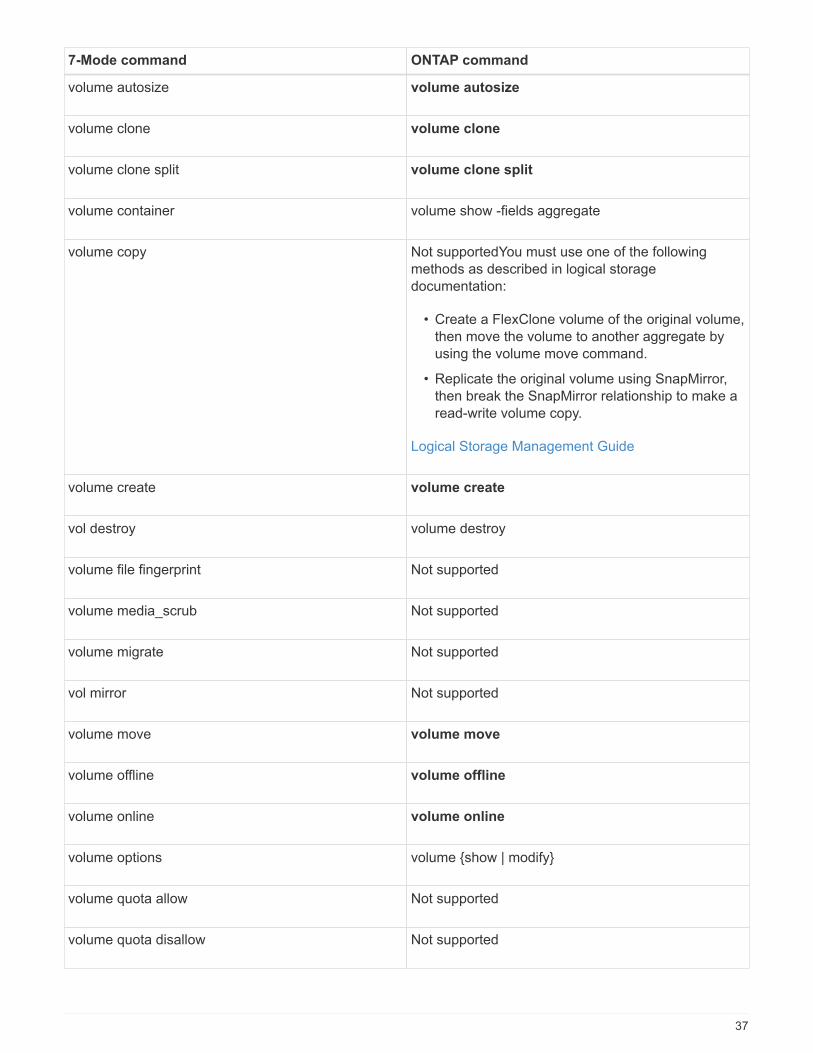
7-Mode command ONTAP command
volume autosize volume autosize
volume clone volume clone
volume clone split volume clone split
volume container volume show -fields aggregate
volume copy Not supportedYou must use one of the following
methods as described in logical storage
documentation:
• Create a FlexClone volume of the original volume,
then move the volume to another aggregate by
using the volume move command.
• Replicate the original volume using SnapMirror,
then break the SnapMirror relationship to make a
read-write volume copy.
Logical Storage Management Guide
volume create volume create
vol destroy volume destroy
volume file fingerprint Not supported
volume media_scrub Not supported
volume migrate Not supported
vol mirror Not supported
volume move volume move
volume offline volume offline
volume online volume online
volume options volume {show | modify}
volume quota allow Not supported
volume quota disallow Not supported
37
7-Mode command ONTAP command
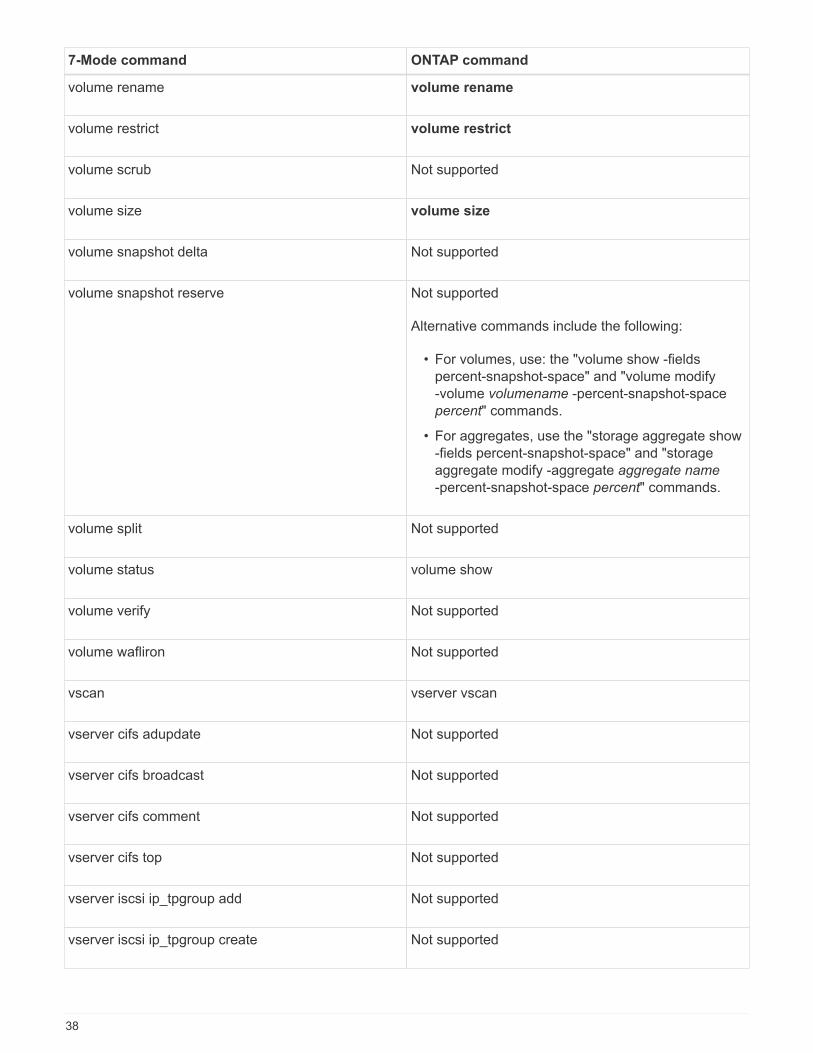
volume rename volume rename
volume restrict volume restrict
volume scrub Not supported
volume size volume size
volume snapshot delta Not supported
volume snapshot reserve Not supported
Alternative commands include the following:
• For volumes, use: the "volume show -fields
percent-snapshot-space" and "volume modify
-volume volumename -percent-snapshot-space
percent" commands.
• For aggregates, use the "storage aggregate show
-fields percent-snapshot-space" and "storage
aggregate modify -aggregate aggregate name
-percent-snapshot-space percent" commands.
volume split Not supported
volume status volume show
volume verify Not supported
volume wafliron Not supported
vscan vserver vscan
vserver cifs adupdate Not supported
vserver cifs broadcast Not supported
vserver cifs comment Not supported
vserver cifs top Not supported
vserver iscsi ip_tpgroup add Not supported
vserver iscsi ip_tpgroup create Not supported
38
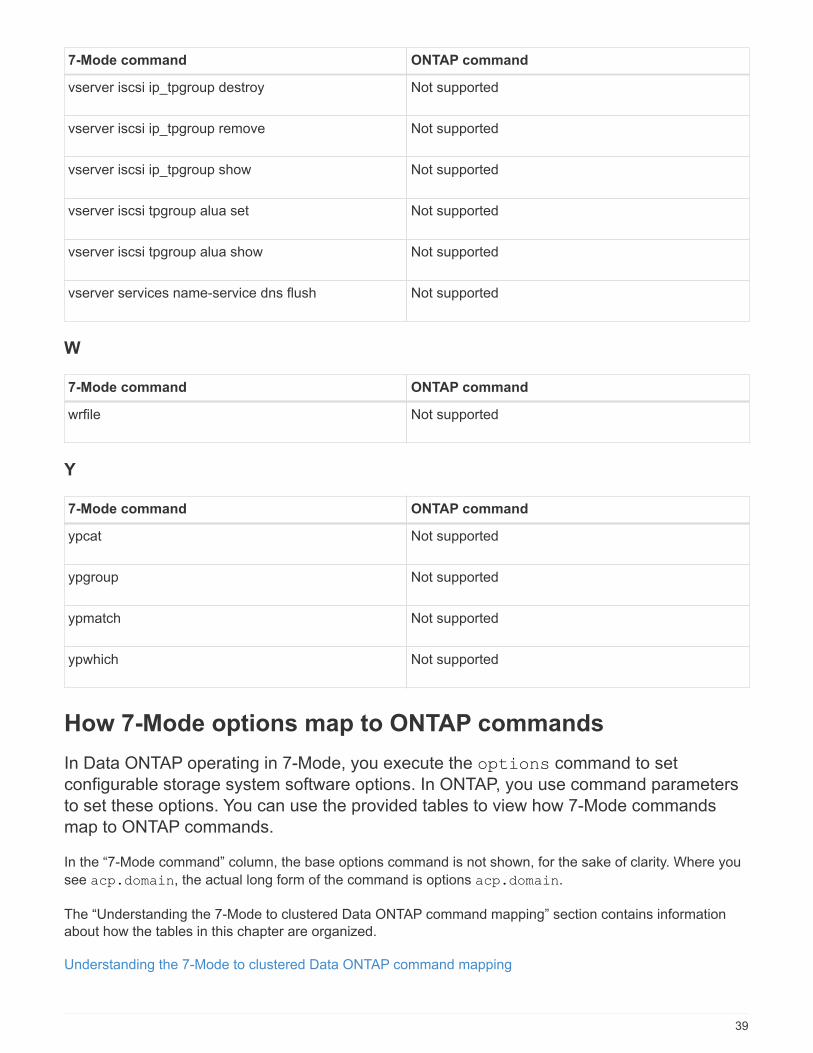
7-Mode command ONTAP command
vserver iscsi ip_tpgroup destroy Not supported
vserver iscsi ip_tpgroup remove Not supported
vserver iscsi ip_tpgroup show Not supported
vserver iscsi tpgroup alua set Not supported
vserver iscsi tpgroup alua show Not supported
vserver services name-service dns flush Not supported
W
7-Mode command ONTAP command
wrfile Not supported
Y
7-Mode command ONTAP command
ypcat Not supported
ypgroup Not supported
ypmatch Not supported
ypwhich Not supported
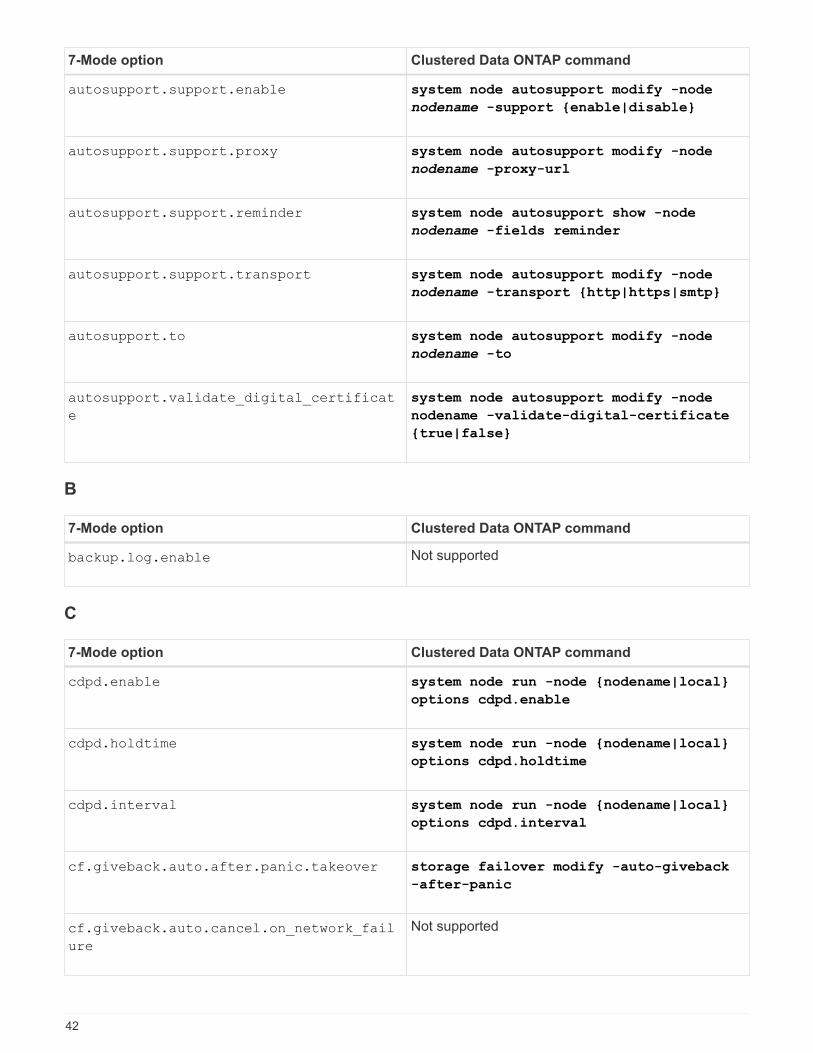
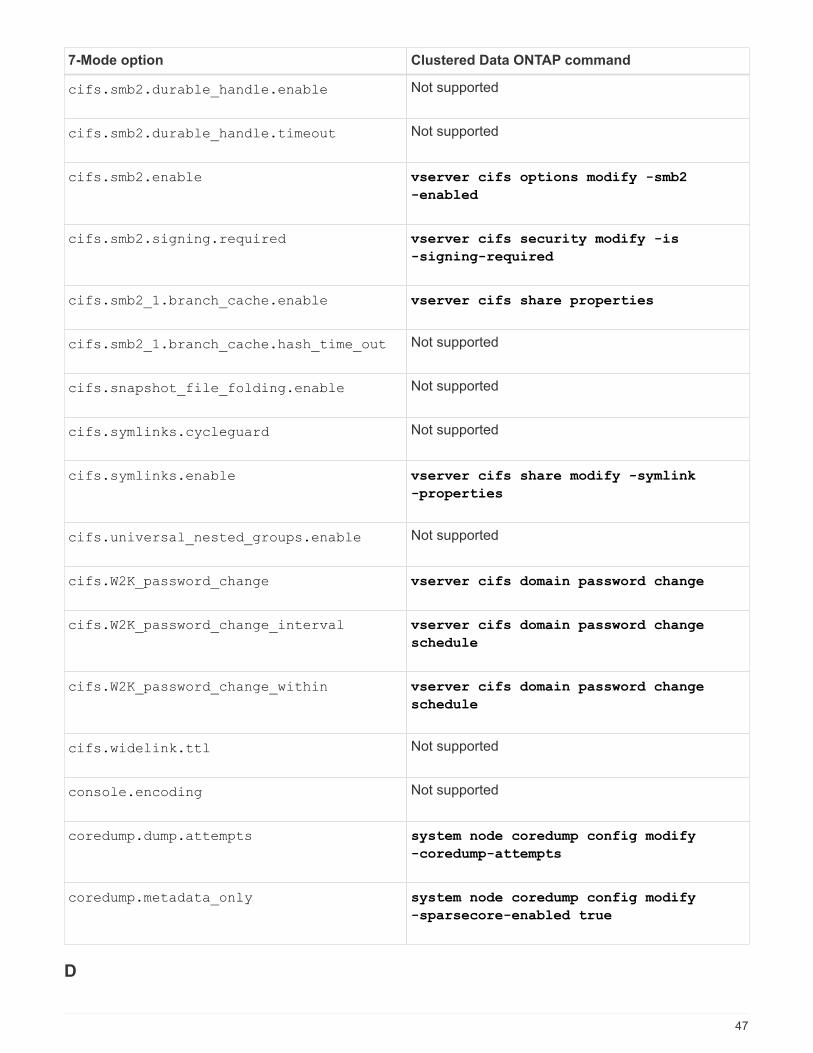
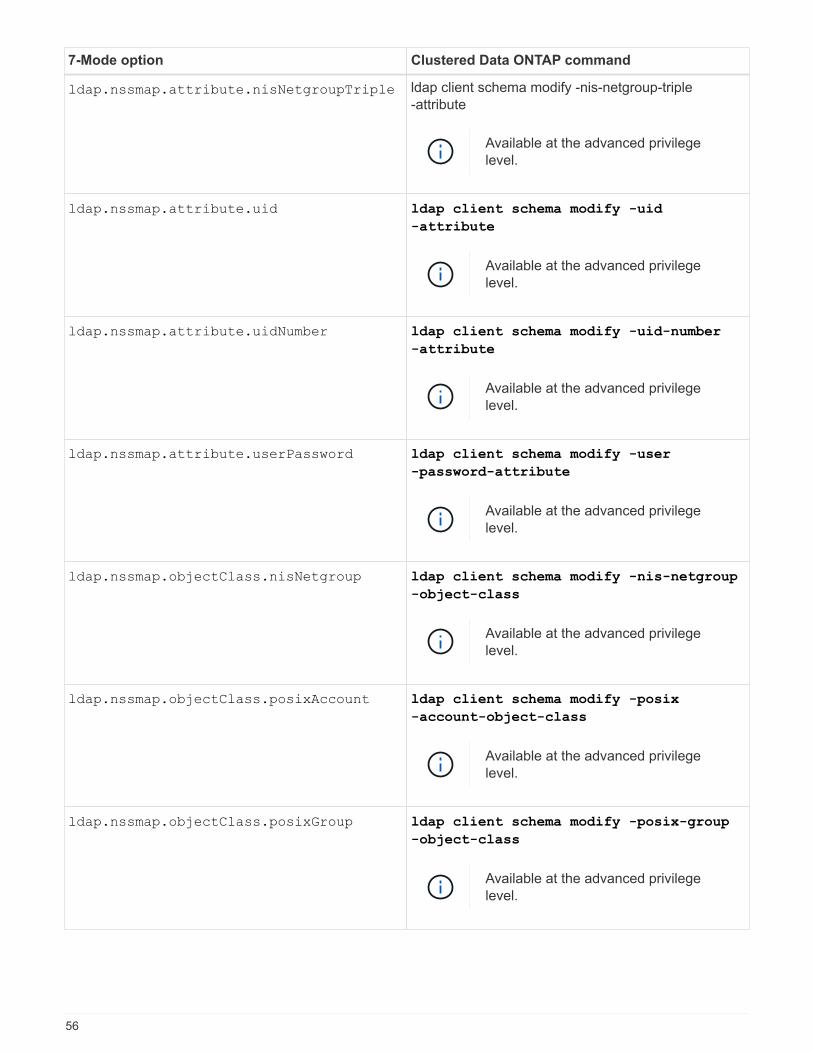
How 7-Mode options map to ONTAP commands
In Data ONTAP operating in 7-Mode, you execute the options command to set
configurable storage system software options. In ONTAP, you use command parameters
to set these options. You can use the provided tables to view how 7-Mode commands
map to ONTAP commands.
In the “7-Mode command” column, the base options command is not shown, for the sake of clarity. Where you
see acp.domain, the actual long form of the command is options acp.domain.
The “Understanding the 7-Mode to clustered Data ONTAP command mapping” section contains information
about how the tables in this chapter are organized.
Understanding the 7-Mode to clustered Data ONTAP command mapping
39
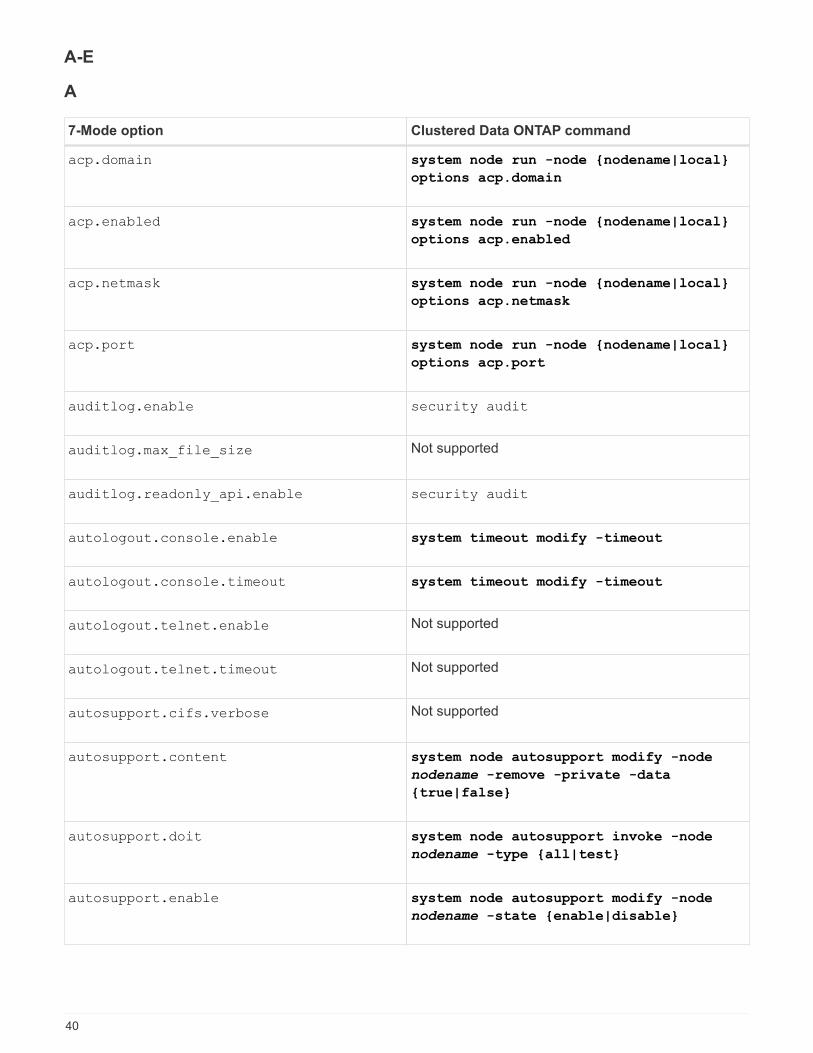
A-E
A
7-Mode option Clustered Data ONTAP command
acp.domain system node run -node {nodename|local}
options acp.domain
acp.enabled system node run -node {nodename|local}
options acp.enabled
acp.netmask system node run -node {nodename|local}
options acp.netmask
acp.port system node run -node {nodename|local}
options acp.port
auditlog.enable security audit
auditlog.max_file_size Not supported
auditlog.readonly_api.enable security audit
autologout.console.enable system timeout modify -timeout
autologout.console.timeout system timeout modify -timeout
autologout.telnet.enable Not supported
autologout.telnet.timeout Not supported
autosupport.cifs.verbose Not supported
autosupport.content system node autosupport modify -node
nodename -remove -private -data
{true|false}
autosupport.doit system node autosupport invoke -node
nodename -type {all|test}
autosupport.enable system node autosupport modify -node
nodename -state {enable|disable}
40
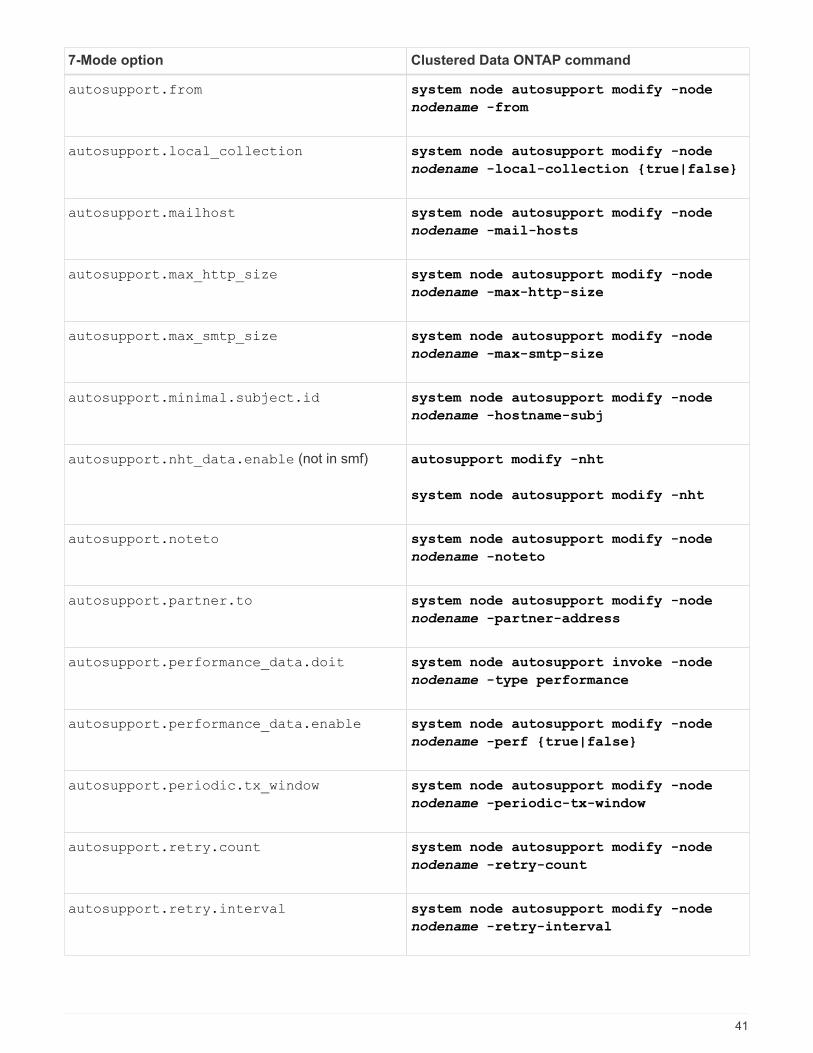
7-Mode option Clustered Data ONTAP command
autosupport.from system node autosupport modify -node
nodename -from
autosupport.local_collection system node autosupport modify -node
nodename -local-collection {true|false}
autosupport.mailhost system node autosupport modify -node
nodename -mail-hosts
autosupport.max_http_size system node autosupport modify -node
nodename -max-http-size
autosupport.max_smtp_size system node autosupport modify -node
nodename -max-smtp-size
autosupport.minimal.subject.id system node autosupport modify -node
nodename -hostname-subj
autosupport.nht_data.enable (not in smf) autosupport modify -nht
system node autosupport modify -nht
autosupport.noteto system node autosupport modify -node
nodename -noteto
autosupport.partner.to system node autosupport modify -node
nodename -partner-address
autosupport.performance_data.doit system node autosupport invoke -node
nodename -type performance
autosupport.performance_data.enable system node autosupport modify -node
nodename -perf {true|false}
autosupport.periodic.tx_window system node autosupport modify -node
nodename -periodic-tx-window
autosupport.retry.count system node autosupport modify -node
nodename -retry-count
autosupport.retry.interval system node autosupport modify -node
nodename -retry-interval
41
7-Mode option Clustered Data ONTAP command
autosupport.support.enable system node autosupport modify -node
nodename -support {enable|disable}
autosupport.support.proxy system node autosupport modify -node
nodename -proxy-url
autosupport.support.reminder system node autosupport show -node
nodename -fields reminder
autosupport.support.transport system node autosupport modify -node
nodename -transport {http|https|smtp}
autosupport.to system node autosupport modify -node
nodename -to
autosupport.validate_digital_certificat
e
system node autosupport modify -node
nodename -validate-digital-certificate
{true|false}
B
7-Mode option Clustered Data ONTAP command
backup.log.enable Not supported
C
7-Mode option Clustered Data ONTAP command
cdpd.enable system node run -node {nodename|local}
options cdpd.enable
cdpd.holdtime system node run -node {nodename|local}
options cdpd.holdtime
cdpd.interval system node run -node {nodename|local}
options cdpd.interval
cf.giveback.auto.after.panic.takeover storage failover modify -auto-giveback
-after-panic
cf.giveback.auto.cancel.on_network_fail
ure
Not supported
42
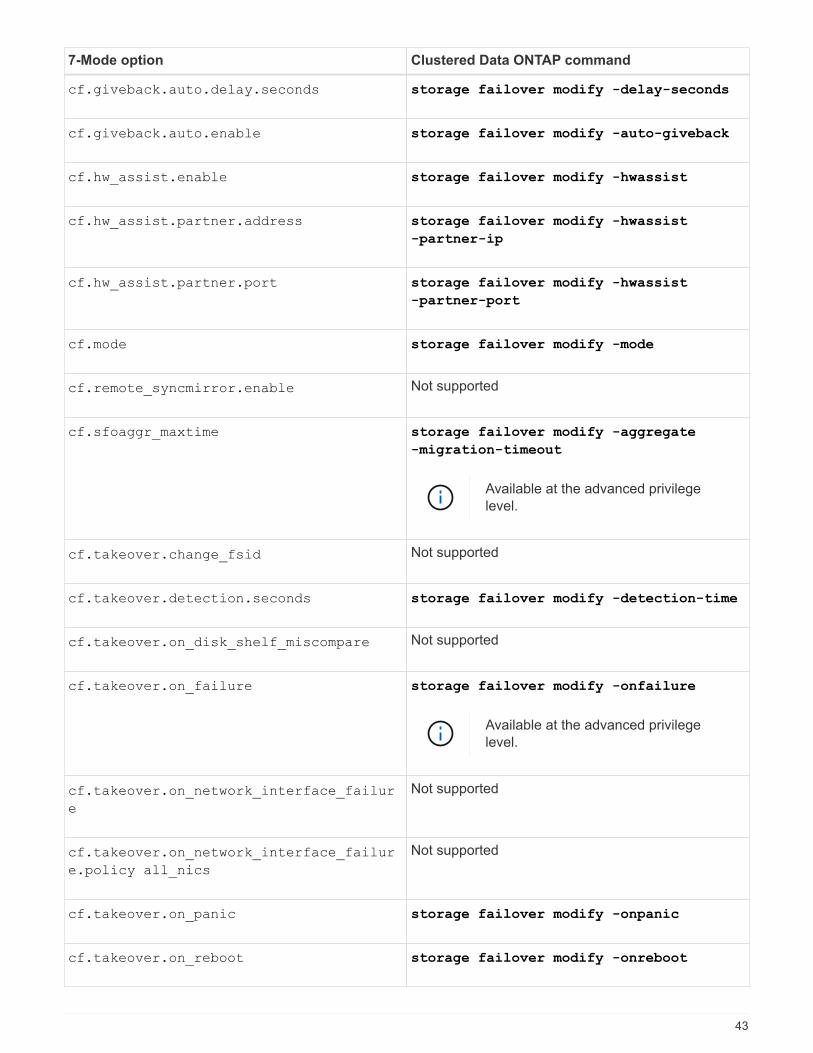
7-Mode option Clustered Data ONTAP command
cf.giveback.auto.delay.seconds storage failover modify -delay-seconds
cf.giveback.auto.enable storage failover modify -auto-giveback
cf.hw_assist.enable storage failover modify -hwassist
cf.hw_assist.partner.address storage failover modify -hwassist
-partner-ip
cf.hw_assist.partner.port storage failover modify -hwassist
-partner-port
cf.mode storage failover modify -mode
cf.remote_syncmirror.enable Not supported
cf.sfoaggr_maxtime storage failover modify -aggregate
-migration-timeout
Available at the advanced privilege
level.
cf.takeover.change_fsid Not supported
cf.takeover.detection.seconds storage failover modify -detection-time
cf.takeover.on_disk_shelf_miscompare Not supported
cf.takeover.on_failure storage failover modify -onfailure
Available at the advanced privilege
level.
cf.takeover.on_network_interface_failur
e
Not supported
cf.takeover.on_network_interface_failur
e.policy all_nics
Not supported
cf.takeover.on_panic storage failover modify -onpanic
cf.takeover.on_reboot storage failover modify -onreboot
43

7-Mode option Clustered Data ONTAP command
cf.takeover.on_short_uptime storage failover modify -onshort-uptime
Available at the advanced privilege
level.
cifs.LMCompatibilityLevel vserver cifs security modify -lm
-compatibility-level
cifs.audit.autosave.file.extension Not supported
cifs.audit.autosave.file.limit vserver audit modify -rotate-limit
cifs.audit.autosave.onsize.enable Not supported
cifs.audit.autosave.onsize.threshold Not supported
cifs.audit.autosave.ontime.enable Not supported
cifs.audit.autosave.ontime.interval Not supported
cifs.audit.enable vserver audit
cifs.audit.file_access_events.enable vserver audit modify -events
cifs.audit.nfs.filter.filename Not supported
cifs.audit.logon_events.enable vserver audit modify -events cifs-
logon-logoff
cifs.audit.logsize Not supported
cifs.audit.nfs.enable vserver audit modify -events file-ops
cifs.audit.nfs.filter.filename Not supported
cifs.audit.saveas vserver audit modify -destination
cifs.bypass_traverse_checking vserver cifs users-and-groups privilege
cifs.comment vserver cifs create -comment
44
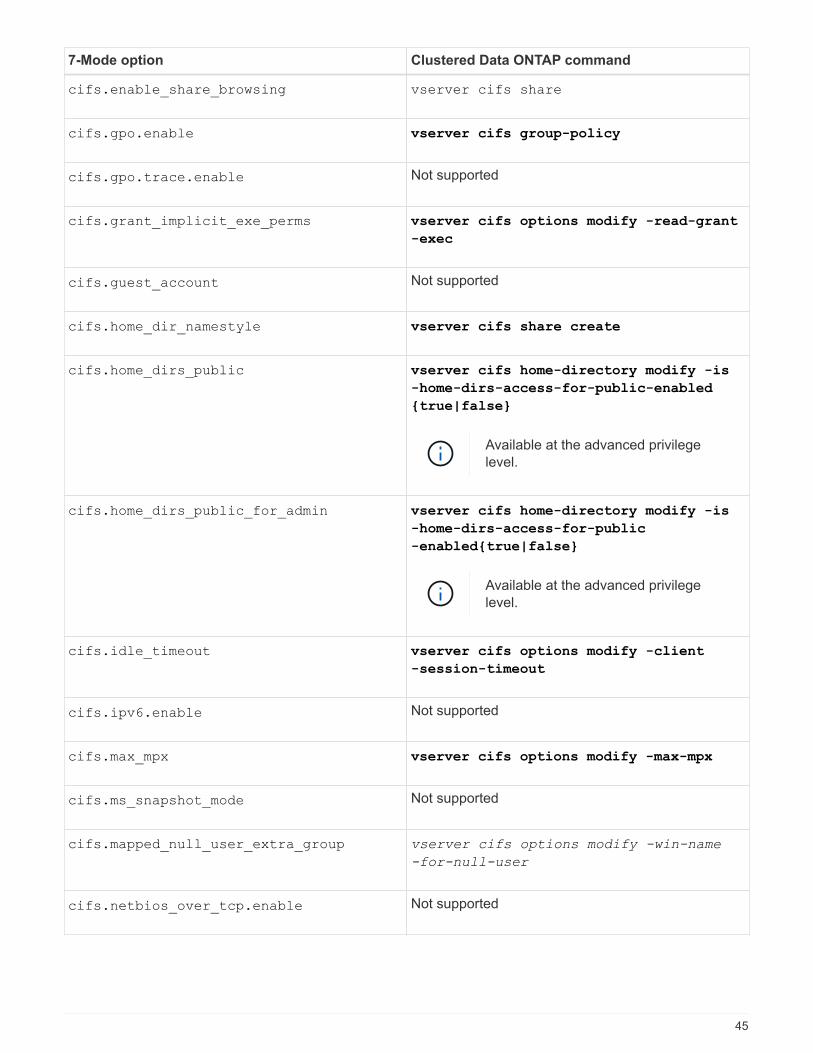
7-Mode option Clustered Data ONTAP command
cifs.enable_share_browsing vserver cifs share
cifs.gpo.enable vserver cifs group-policy
cifs.gpo.trace.enable Not supported
cifs.grant_implicit_exe_perms vserver cifs options modify -read-grant
-exec
cifs.guest_account Not supported
cifs.home_dir_namestyle vserver cifs share create
cifs.home_dirs_public vserver cifs home-directory modify -is
-home-dirs-access-for-public-enabled
{true|false}
Available at the advanced privilege
level.
cifs.home_dirs_public_for_admin vserver cifs home-directory modify -is
-home-dirs-access-for-public
-enabled{true|false}
Available at the advanced privilege
level.
cifs.idle_timeout vserver cifs options modify -client
-session-timeout
cifs.ipv6.enable Not supported
cifs.max_mpx vserver cifs options modify -max-mpx
cifs.ms_snapshot_mode Not supported
cifs.mapped_null_user_extra_group vserver cifs options modify -win-name
-for-null-user
cifs.netbios_over_tcp.enable Not supported
45
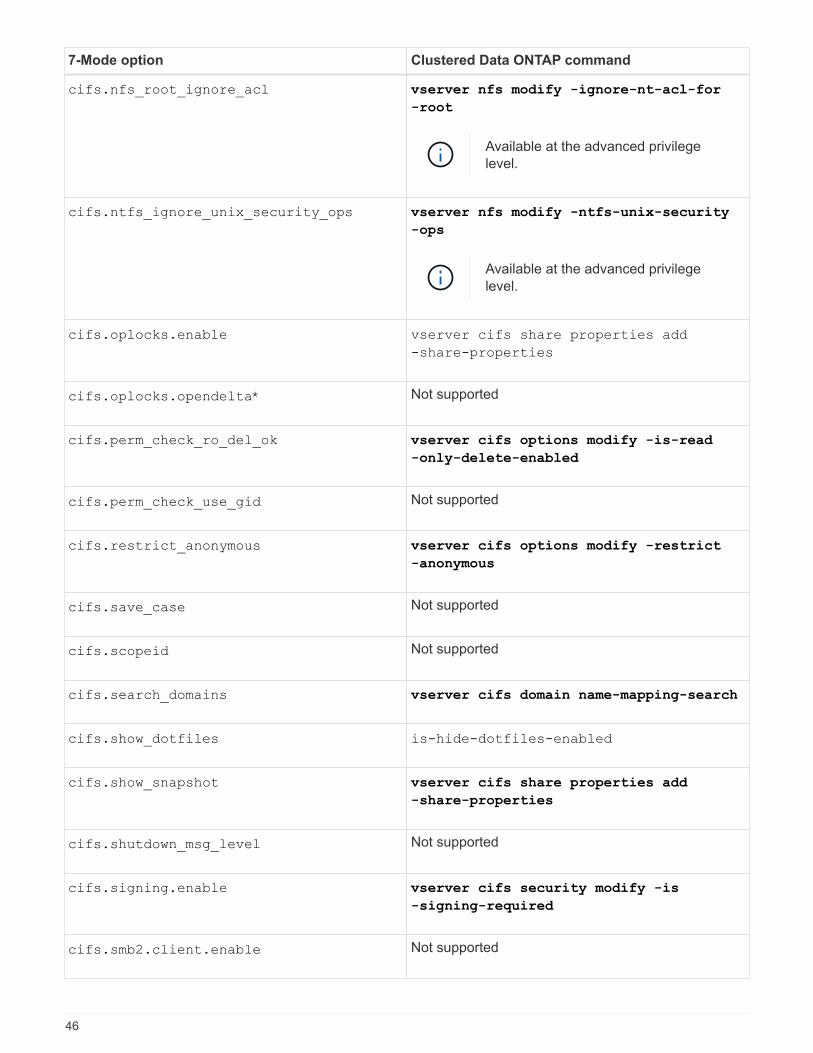
7-Mode option Clustered Data ONTAP command
cifs.nfs_root_ignore_acl vserver nfs modify -ignore-nt-acl-for
-root
Available at the advanced privilege
level.
cifs.ntfs_ignore_unix_security_ops vserver nfs modify -ntfs-unix-security
-ops
Available at the advanced privilege
level.
cifs.oplocks.enable vserver cifs share properties add
-share-properties
cifs.oplocks.opendelta* Not supported
cifs.perm_check_ro_del_ok vserver cifs options modify -is-read
-only-delete-enabled
cifs.perm_check_use_gid Not supported
cifs.restrict_anonymous vserver cifs options modify -restrict
-anonymous
cifs.save_case Not supported
cifs.scopeid Not supported
cifs.search_domains vserver cifs domain name-mapping-search
cifs.show_dotfiles is-hide-dotfiles-enabled
cifs.show_snapshot vserver cifs share properties add
-share-properties
cifs.shutdown_msg_level Not supported
cifs.signing.enable vserver cifs security modify -is
-signing-required
cifs.smb2.client.enable Not supported
46
7-Mode option Clustered Data ONTAP command
cifs.smb2.durable_handle.enable Not supported
cifs.smb2.durable_handle.timeout Not supported
cifs.smb2.enable vserver cifs options modify -smb2
-enabled
cifs.smb2.signing.required vserver cifs security modify -is
-signing-required
cifs.smb2_1.branch_cache.enable vserver cifs share properties
cifs.smb2_1.branch_cache.hash_time_out Not supported
cifs.snapshot_file_folding.enable Not supported
cifs.symlinks.cycleguard Not supported
cifs.symlinks.enable vserver cifs share modify -symlink
-properties
cifs.universal_nested_groups.enable Not supported
cifs.W2K_password_change vserver cifs domain password change
cifs.W2K_password_change_interval vserver cifs domain password change
schedule
cifs.W2K_password_change_within vserver cifs domain password change
schedule
cifs.widelink.ttl Not supported
console.encoding Not supported
coredump.dump.attempts system node coredump config modify
-coredump-attempts
coredump.metadata_only system node coredump config modify
-sparsecore-enabled true
D
47
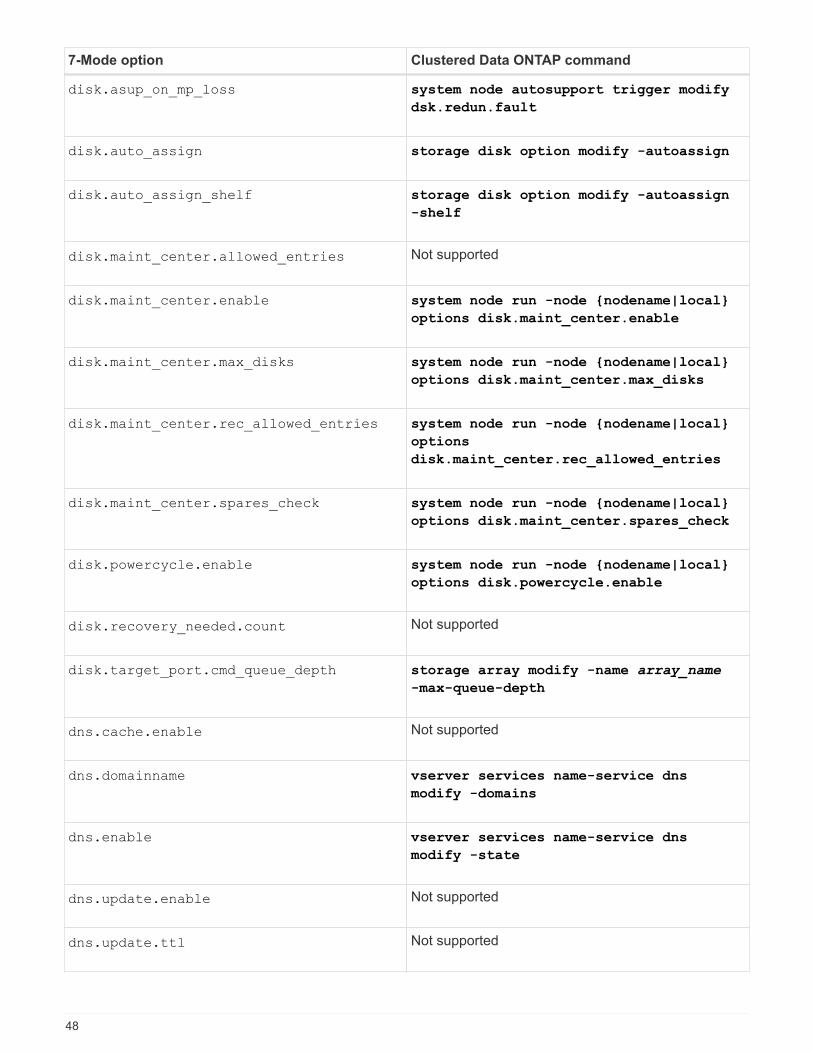
7-Mode option Clustered Data ONTAP command
disk.asup_on_mp_loss system node autosupport trigger modify
dsk.redun.fault
disk.auto_assign storage disk option modify -autoassign
disk.auto_assign_shelf storage disk option modify -autoassign
-shelf
disk.maint_center.allowed_entries Not supported
disk.maint_center.enable system node run -node {nodename|local}
options disk.maint_center.enable
disk.maint_center.max_disks system node run -node {nodename|local}
options disk.maint_center.max_disks
disk.maint_center.rec_allowed_entries system node run -node {nodename|local}
options
disk.maint_center.rec_allowed_entries
disk.maint_center.spares_check system node run -node {nodename|local}
options disk.maint_center.spares_check
disk.powercycle.enable system node run -node {nodename|local}
options disk.powercycle.enable
disk.recovery_needed.count Not supported
disk.target_port.cmd_queue_depth storage array modify -name array_name
-max-queue-depth
dns.cache.enable Not supported
dns.domainname vserver services name-service dns
modify -domains
dns.enable vserver services name-service dns
modify -state
dns.update.enable Not supported
dns.update.ttl Not supported
48
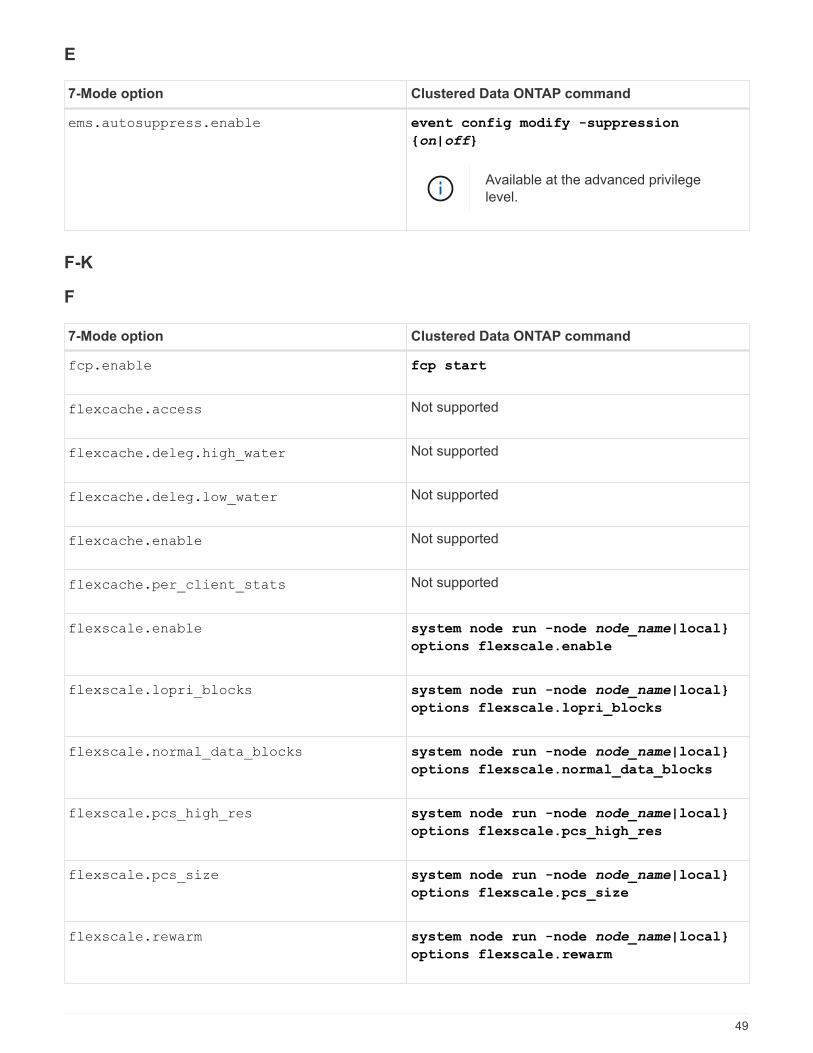
E
7-Mode option Clustered Data ONTAP command
ems.autosuppress.enable event config modify -suppression
{on|off}
Available at the advanced privilege
level.
F-K
F
7-Mode option Clustered Data ONTAP command
fcp.enable fcp start
flexcache.access Not supported
flexcache.deleg.high_water Not supported
flexcache.deleg.low_water Not supported
flexcache.enable Not supported
flexcache.per_client_stats Not supported
flexscale.enable system node run -node node_name|local}
options flexscale.enable
flexscale.lopri_blocks system node run -node node_name|local}
options flexscale.lopri_blocks
flexscale.normal_data_blocks system node run -node node_name|local}
options flexscale.normal_data_blocks
flexscale.pcs_high_res system node run -node node_name|local}
options flexscale.pcs_high_res
flexscale.pcs_size system node run -node node_name|local}
options flexscale.pcs_size
flexscale.rewarm system node run -node node_name|local}
options flexscale.rewarm
49

7-Mode option Clustered Data ONTAP command
fpolicy.enable vserver fpolicy enable
fpolicy.i2p_ems_interval Not supported
fpolicy.multiple_pipes Not supported
ftpd.3way.enable Not supported
ftpd.anonymous.enable Not supported
ftpd.anonymous.home_dir Not supported
ftpd.anonymous.name Not supported
ftpd.auth_style Not supported
ftpd.bypass_traverse_checking Not supported
ftpd.dir.override Not supported
ftpd.dir.restriction Not supported
ftpd.enable Not supported
ftpd.explicit.allow_secure_data_conn Not supported
ftpd.explicit.enable Not supported
ftpd.idle_timeout Not supported
ftpd.implicit.enable Not supported
ftpd.ipv6.enable Not supported
ftpd.locking Not supported
ftpd.log.enable Not supported
ftpd.log.filesize Not supported
50
7-Mode option Clustered Data ONTAP command
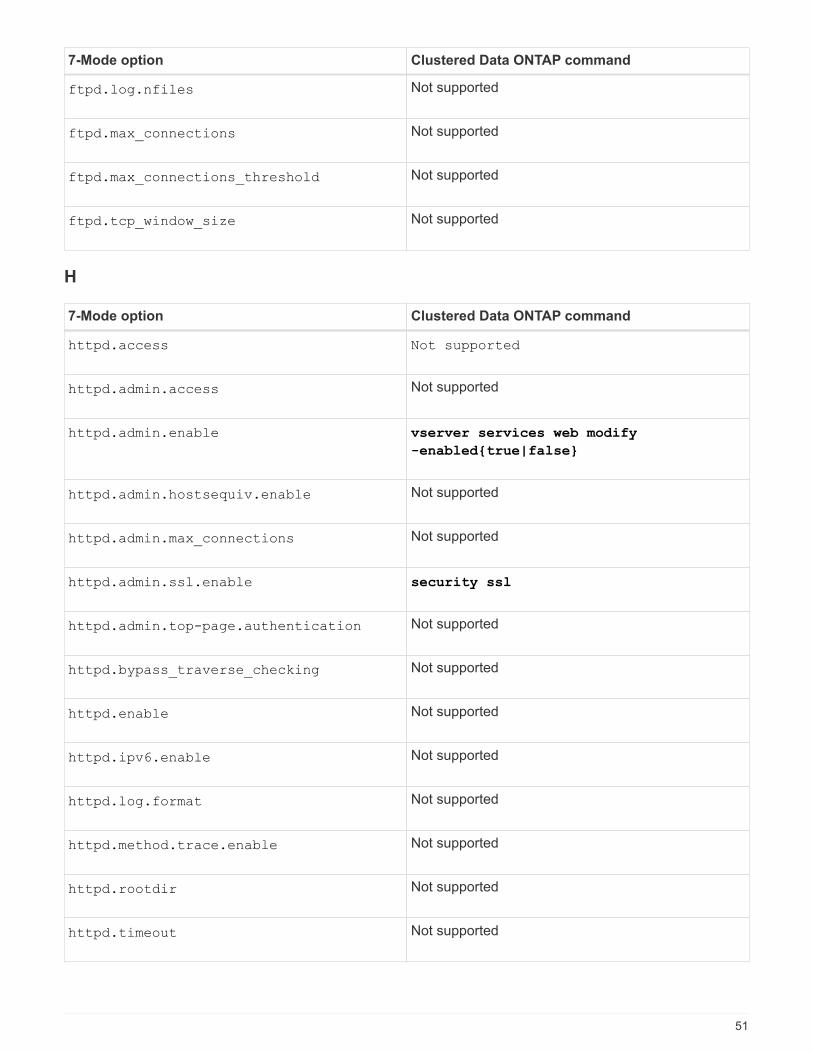
ftpd.log.nfiles Not supported
ftpd.max_connections Not supported
ftpd.max_connections_threshold Not supported
ftpd.tcp_window_size Not supported
H
7-Mode option Clustered Data ONTAP command
httpd.access Not supported
httpd.admin.access Not supported
httpd.admin.enable vserver services web modify
-enabled{true|false}
httpd.admin.hostsequiv.enable Not supported
httpd.admin.max_connections Not supported
httpd.admin.ssl.enable security ssl
httpd.admin.top-page.authentication Not supported
httpd.bypass_traverse_checking Not supported
httpd.enable Not supported
httpd.ipv6.enable Not supported
httpd.log.format Not supported
httpd.method.trace.enable Not supported
httpd.rootdir Not supported
httpd.timeout Not supported
51
7-Mode option Clustered Data ONTAP command
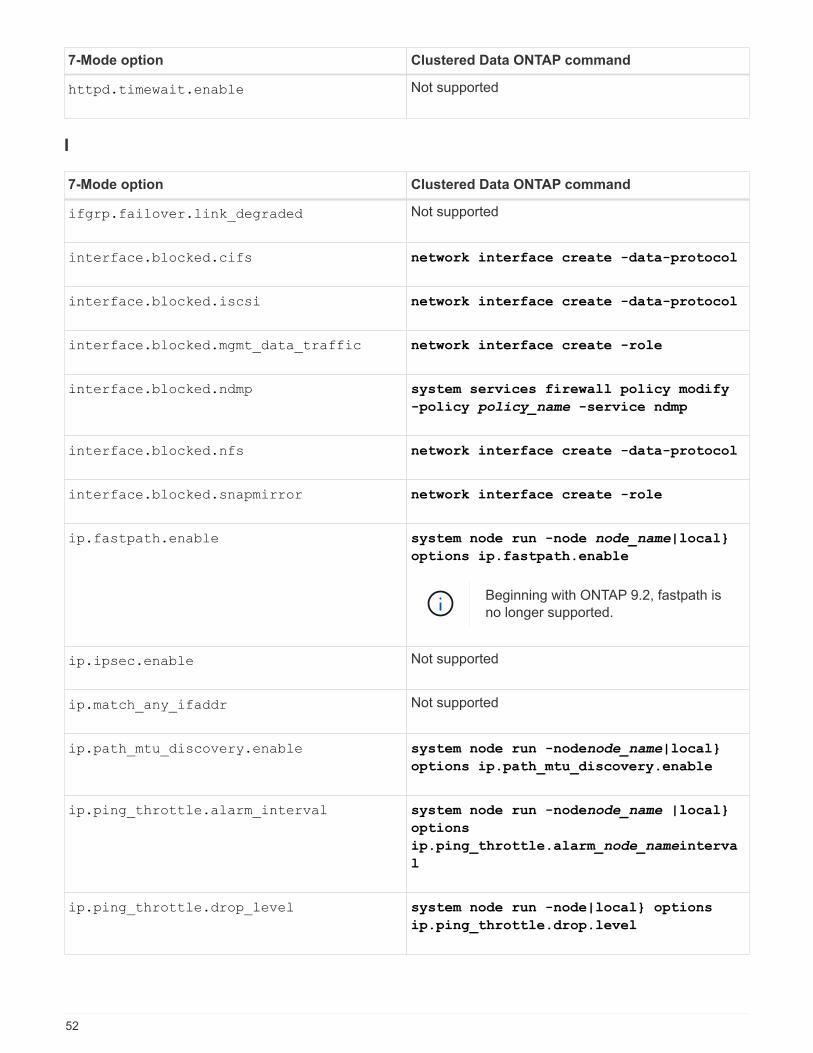
httpd.timewait.enable Not supported
I
7-Mode option Clustered Data ONTAP command
ifgrp.failover.link_degraded Not supported
interface.blocked.cifs network interface create -data-protocol
interface.blocked.iscsi network interface create -data-protocol
interface.blocked.mgmt_data_traffic network interface create -role
interface.blocked.ndmp system services firewall policy modify
-policy policy_name -service ndmp
interface.blocked.nfs network interface create -data-protocol
interface.blocked.snapmirror network interface create -role
ip.fastpath.enable system node run -node node_name|local}
options ip.fastpath.enable
Beginning with ONTAP 9.2, fastpath is
no longer supported.
ip.ipsec.enable Not supported
ip.match_any_ifaddr Not supported
ip.path_mtu_discovery.enable system node run -nodenode_name|local}
options ip.path_mtu_discovery.enable
ip.ping_throttle.alarm_interval system node run -nodenode_name |local}
options
ip.ping_throttle.alarm_node_nameinterva
l
ip.ping_throttle.drop_level system node run -node|local} options
ip.ping_throttle.drop.level
52
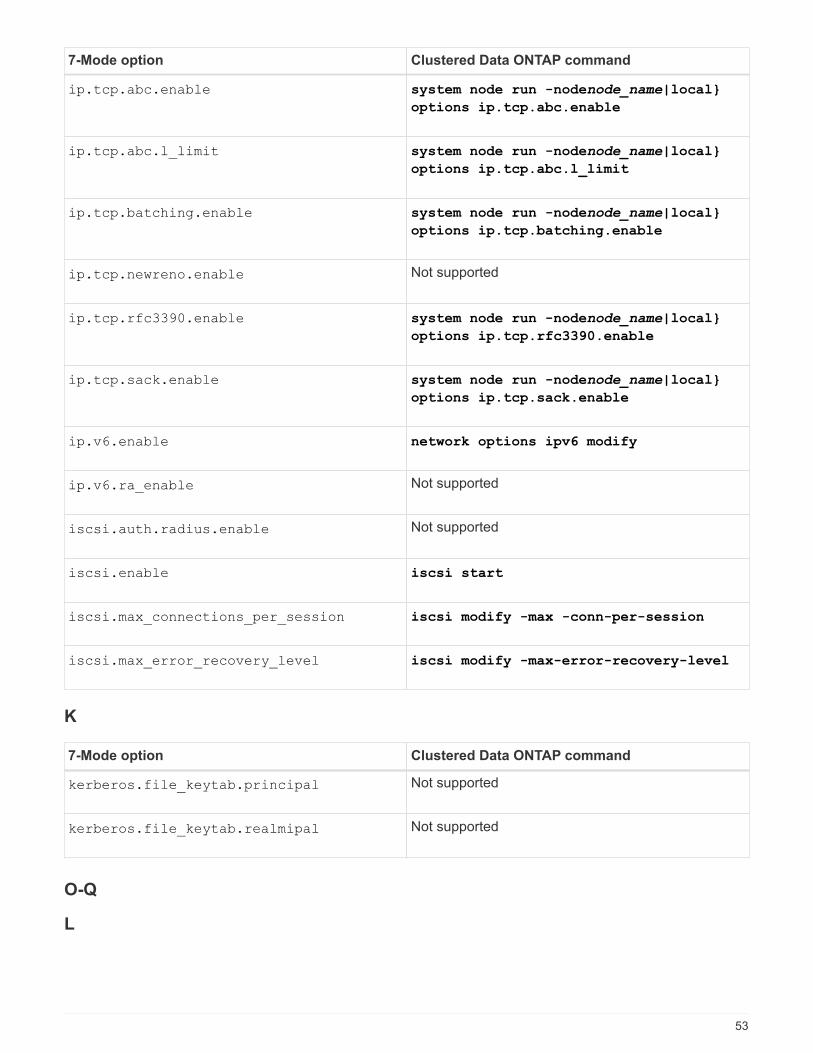
7-Mode option Clustered Data ONTAP command
ip.tcp.abc.enable system node run -nodenode_name|local}
options ip.tcp.abc.enable
ip.tcp.abc.l_limit system node run -nodenode_name|local}
options ip.tcp.abc.l_limit
ip.tcp.batching.enable system node run -nodenode_name|local}
options ip.tcp.batching.enable
ip.tcp.newreno.enable Not supported
ip.tcp.rfc3390.enable system node run -nodenode_name|local}
options ip.tcp.rfc3390.enable
ip.tcp.sack.enable system node run -nodenode_name|local}
options ip.tcp.sack.enable
ip.v6.enable network options ipv6 modify
ip.v6.ra_enable Not supported
iscsi.auth.radius.enable Not supported
iscsi.enable iscsi start
iscsi.max_connections_per_session iscsi modify -max -conn-per-session
iscsi.max_error_recovery_level iscsi modify -max-error-recovery-level
K
7-Mode option Clustered Data ONTAP command
kerberos.file_keytab.principal Not supported
kerberos.file_keytab.realmipal Not supported
O-Q
L
53
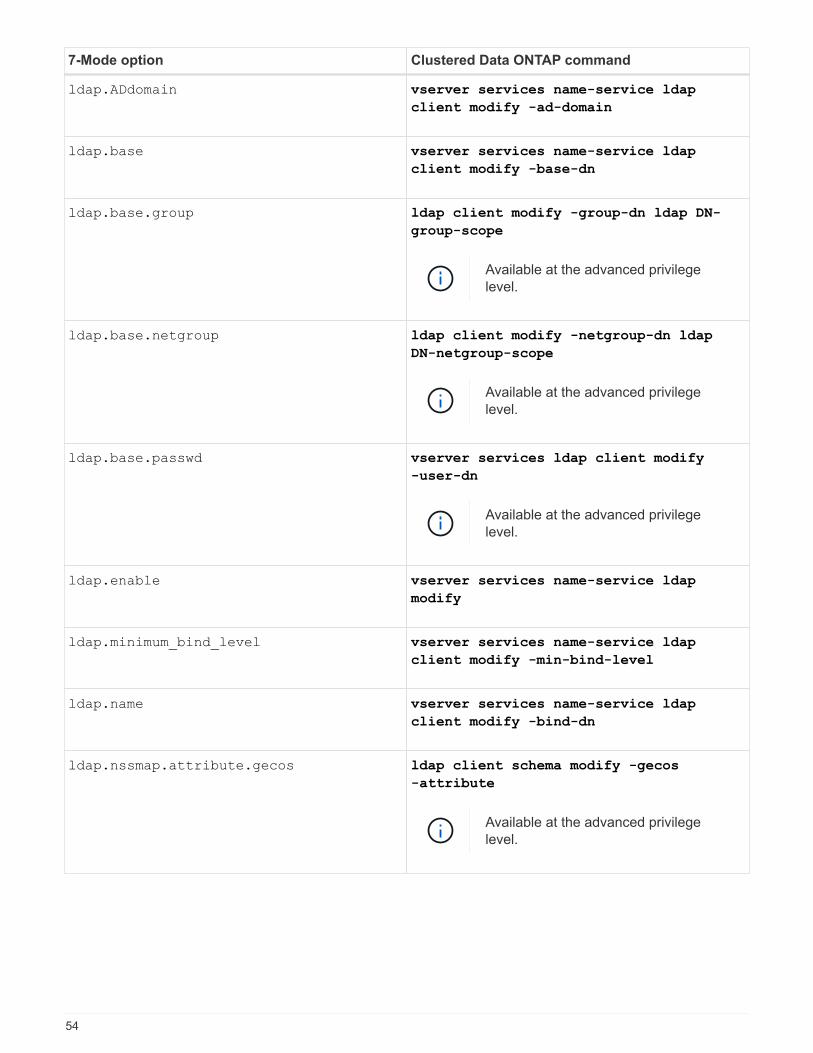
7-Mode option Clustered Data ONTAP command
ldap.ADdomain vserver services name-service ldap
client modify -ad-domain
ldap.base vserver services name-service ldap
client modify -base-dn
ldap.base.group ldap client modify -group-dn ldap DN-
group-scope
Available at the advanced privilege
level.
ldap.base.netgroup ldap client modify -netgroup-dn ldap
DN-netgroup-scope
Available at the advanced privilege
level.
ldap.base.passwd vserver services ldap client modify
-user-dn
Available at the advanced privilege
level.
ldap.enable vserver services name-service ldap
modify
ldap.minimum_bind_level vserver services name-service ldap
client modify -min-bind-level
ldap.name vserver services name-service ldap
client modify -bind-dn
ldap.nssmap.attribute.gecos ldap client schema modify -gecos
-attribute
Available at the advanced privilege
level.
54
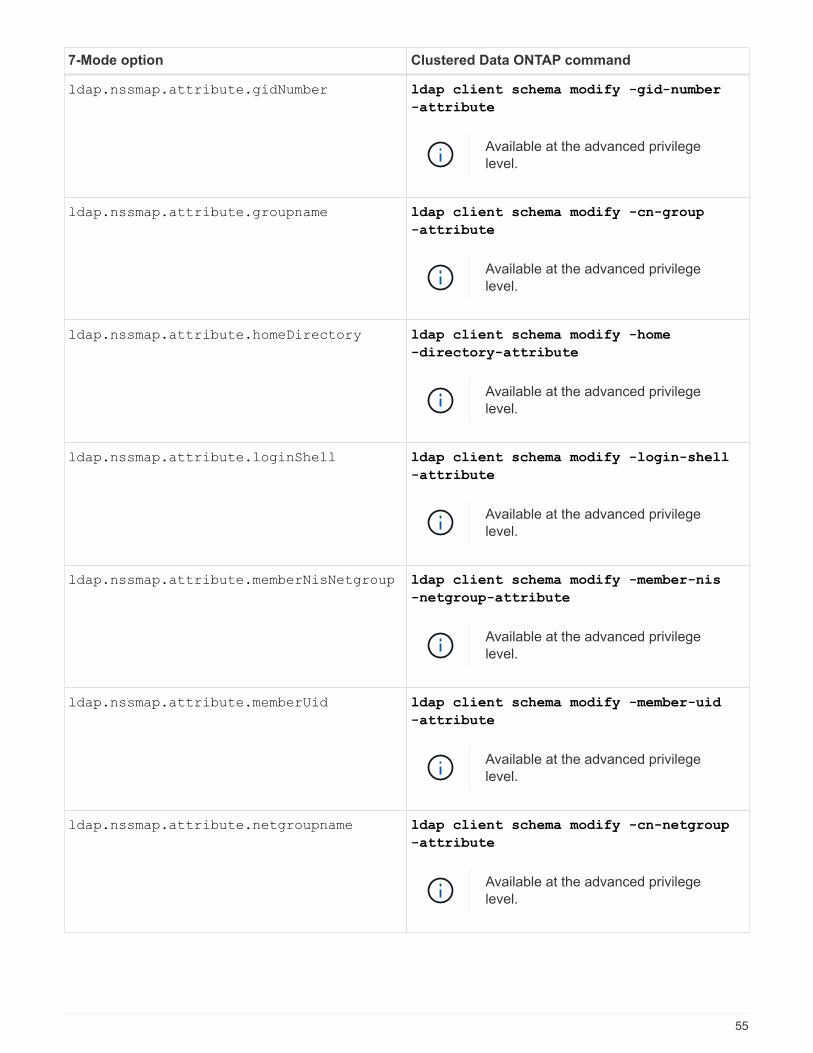
7-Mode option Clustered Data ONTAP command
ldap.nssmap.attribute.gidNumber ldap client schema modify -gid-number
-attribute
Available at the advanced privilege
level.
ldap.nssmap.attribute.groupname ldap client schema modify -cn-group
-attribute
Available at the advanced privilege
level.
ldap.nssmap.attribute.homeDirectory ldap client schema modify -home
-directory-attribute
Available at the advanced privilege
level.
ldap.nssmap.attribute.loginShell ldap client schema modify -login-shell
-attribute
Available at the advanced privilege
level.
ldap.nssmap.attribute.memberNisNetgroup ldap client schema modify -member-nis
-netgroup-attribute
Available at the advanced privilege
level.
ldap.nssmap.attribute.memberUid ldap client schema modify -member-uid
-attribute
Available at the advanced privilege
level.
ldap.nssmap.attribute.netgroupname ldap client schema modify -cn-netgroup
-attribute
Available at the advanced privilege
level.
55
7-Mode option Clustered Data ONTAP command
ldap.nssmap.attribute.nisNetgroupTriple ldap client schema modify -nis-netgroup-triple
-attribute
Available at the advanced privilege
level.
ldap.nssmap.attribute.uid ldap client schema modify -uid
-attribute
Available at the advanced privilege
level.
ldap.nssmap.attribute.uidNumber ldap client schema modify -uid-number
-attribute
Available at the advanced privilege
level.
ldap.nssmap.attribute.userPassword ldap client schema modify -user
-password-attribute
Available at the advanced privilege
level.
ldap.nssmap.objectClass.nisNetgroup ldap client schema modify -nis-netgroup
-object-class
Available at the advanced privilege
level.
ldap.nssmap.objectClass.posixAccount ldap client schema modify -posix
-account-object-class
Available at the advanced privilege
level.
ldap.nssmap.objectClass.posixGroup ldap client schema modify -posix-group
-object-class
Available at the advanced privilege
level.
56
7-Mode option Clustered Data ONTAP command
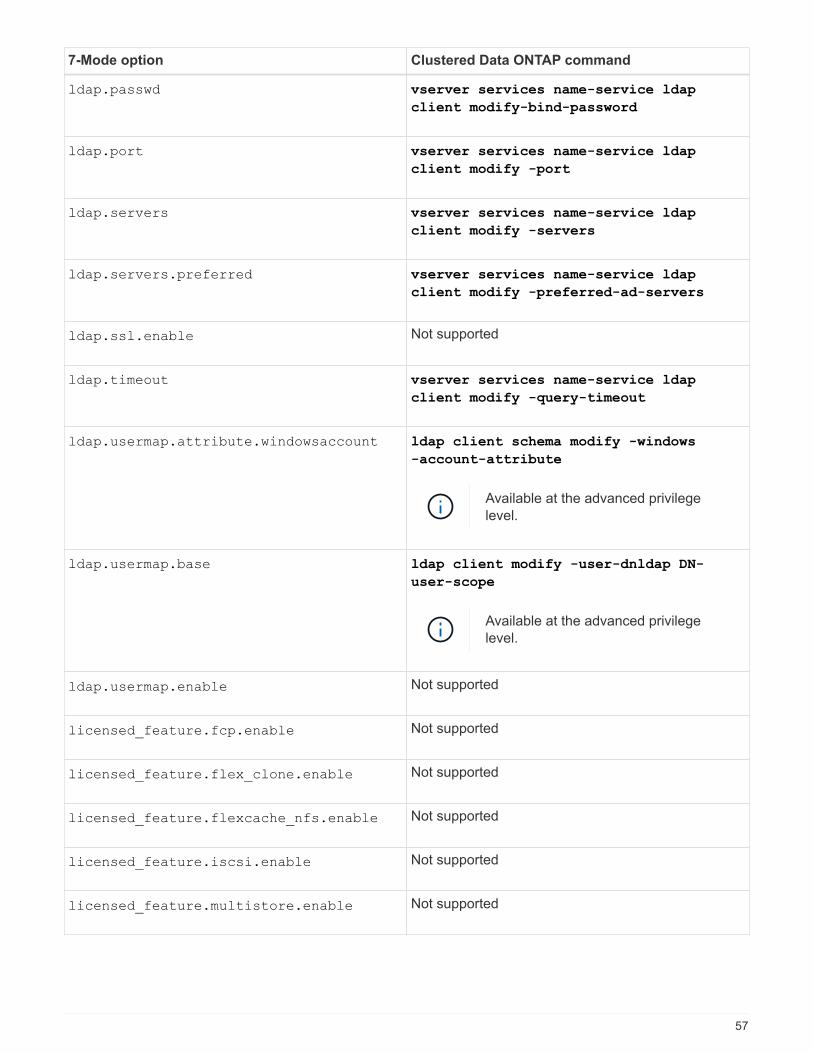
ldap.passwd vserver services name-service ldap
client modify-bind-password
ldap.port vserver services name-service ldap
client modify -port
ldap.servers vserver services name-service ldap
client modify -servers
ldap.servers.preferred vserver services name-service ldap
client modify -preferred-ad-servers
ldap.ssl.enable Not supported
ldap.timeout vserver services name-service ldap
client modify -query-timeout
ldap.usermap.attribute.windowsaccount ldap client schema modify -windows
-account-attribute
Available at the advanced privilege
level.
ldap.usermap.base ldap client modify -user-dnldap DN-
user-scope
Available at the advanced privilege
level.
ldap.usermap.enable Not supported
licensed_feature.fcp.enable Not supported
licensed_feature.flex_clone.enable Not supported
licensed_feature.flexcache_nfs.enable Not supported
licensed_feature.iscsi.enable Not supported
licensed_feature.multistore.enable Not supported
57
7-Mode option Clustered Data ONTAP command
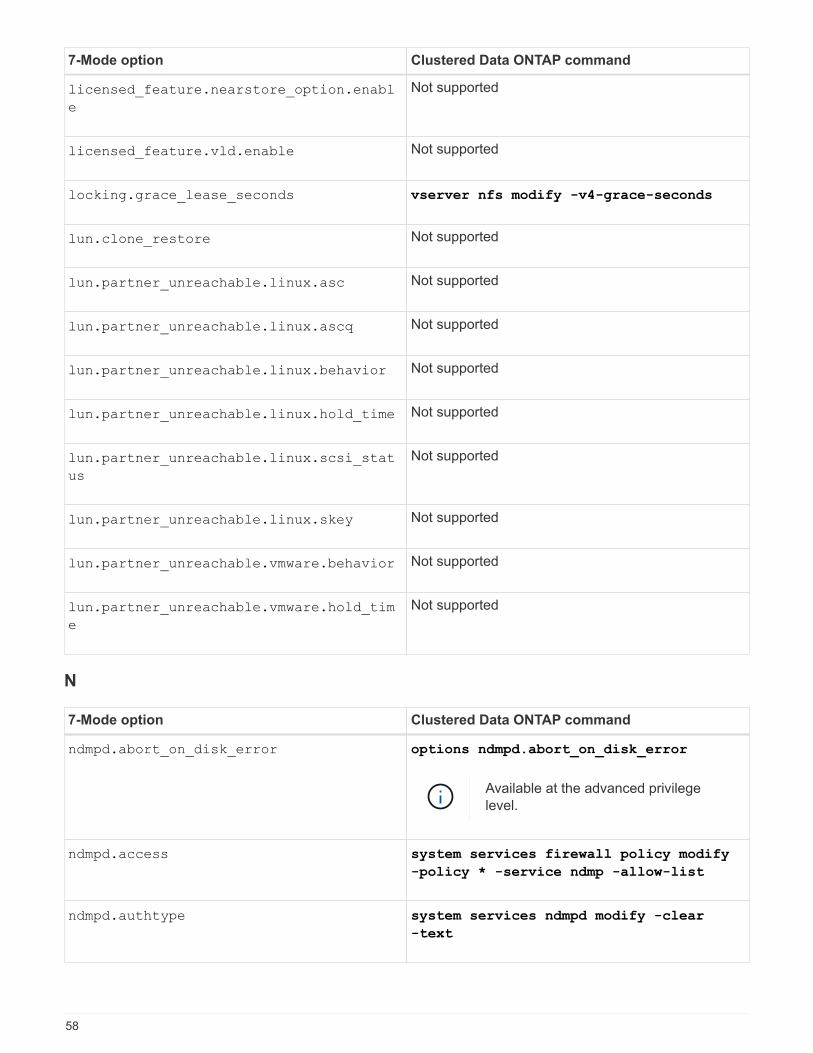
licensed_feature.nearstore_option.enabl
e
Not supported
licensed_feature.vld.enable Not supported
locking.grace_lease_seconds vserver nfs modify -v4-grace-seconds
lun.clone_restore Not supported
lun.partner_unreachable.linux.asc Not supported
lun.partner_unreachable.linux.ascq Not supported
lun.partner_unreachable.linux.behavior Not supported
lun.partner_unreachable.linux.hold_time Not supported
lun.partner_unreachable.linux.scsi_stat
us
Not supported
lun.partner_unreachable.linux.skey Not supported
lun.partner_unreachable.vmware.behavior Not supported
lun.partner_unreachable.vmware.hold_tim
e
Not supported
N
7-Mode option Clustered Data ONTAP command
ndmpd.abort_on_disk_error options ndmpd.abort_on_disk_error
Available at the advanced privilege
level.
ndmpd.access system services firewall policy modify
-policy * -service ndmp -allow-list
ndmpd.authtype system services ndmpd modify -clear
-text
58
7-Mode option Clustered Data ONTAP command
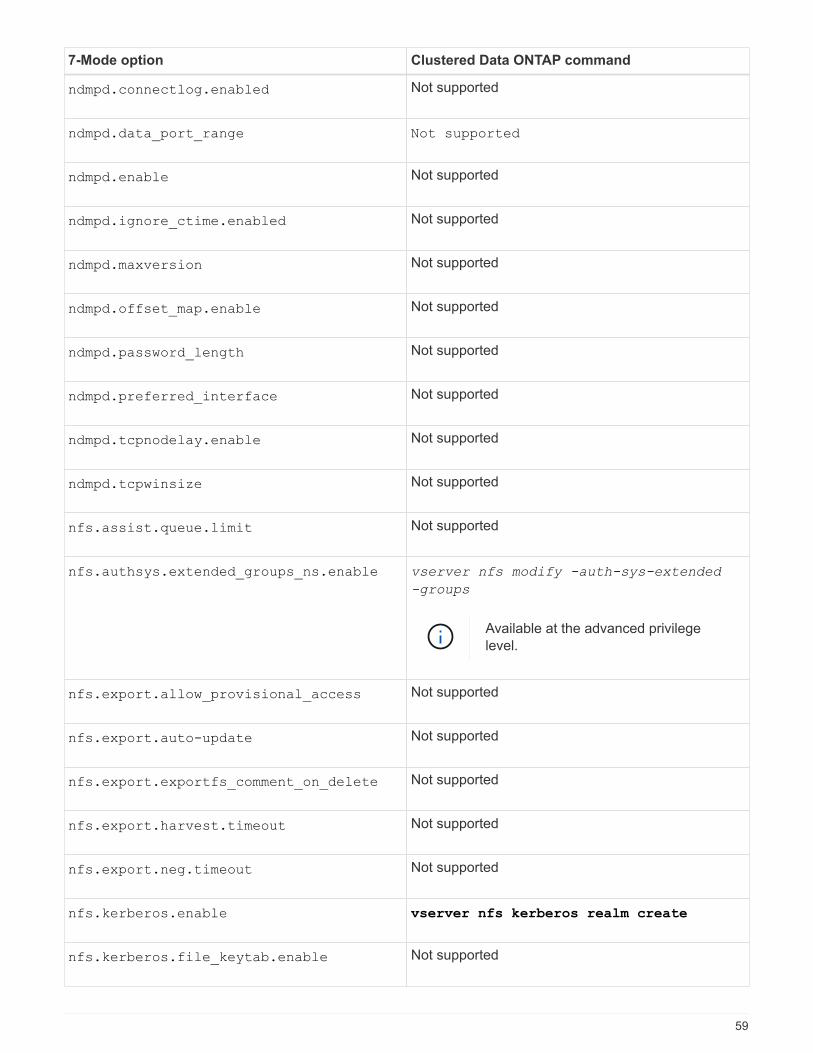
ndmpd.connectlog.enabled Not supported
ndmpd.data_port_range Not supported
ndmpd.enable Not supported
ndmpd.ignore_ctime.enabled Not supported
ndmpd.maxversion Not supported
ndmpd.offset_map.enable Not supported
ndmpd.password_length Not supported
ndmpd.preferred_interface Not supported
ndmpd.tcpnodelay.enable Not supported
ndmpd.tcpwinsize Not supported
nfs.assist.queue.limit Not supported
nfs.authsys.extended_groups_ns.enable vserver nfs modify -auth-sys-extended
-groups
Available at the advanced privilege
level.
nfs.export.allow_provisional_access Not supported
nfs.export.auto-update Not supported
nfs.export.exportfs_comment_on_delete Not supported
nfs.export.harvest.timeout Not supported
nfs.export.neg.timeout Not supported
nfs.kerberos.enable vserver nfs kerberos realm create
nfs.kerberos.file_keytab.enable Not supported
59
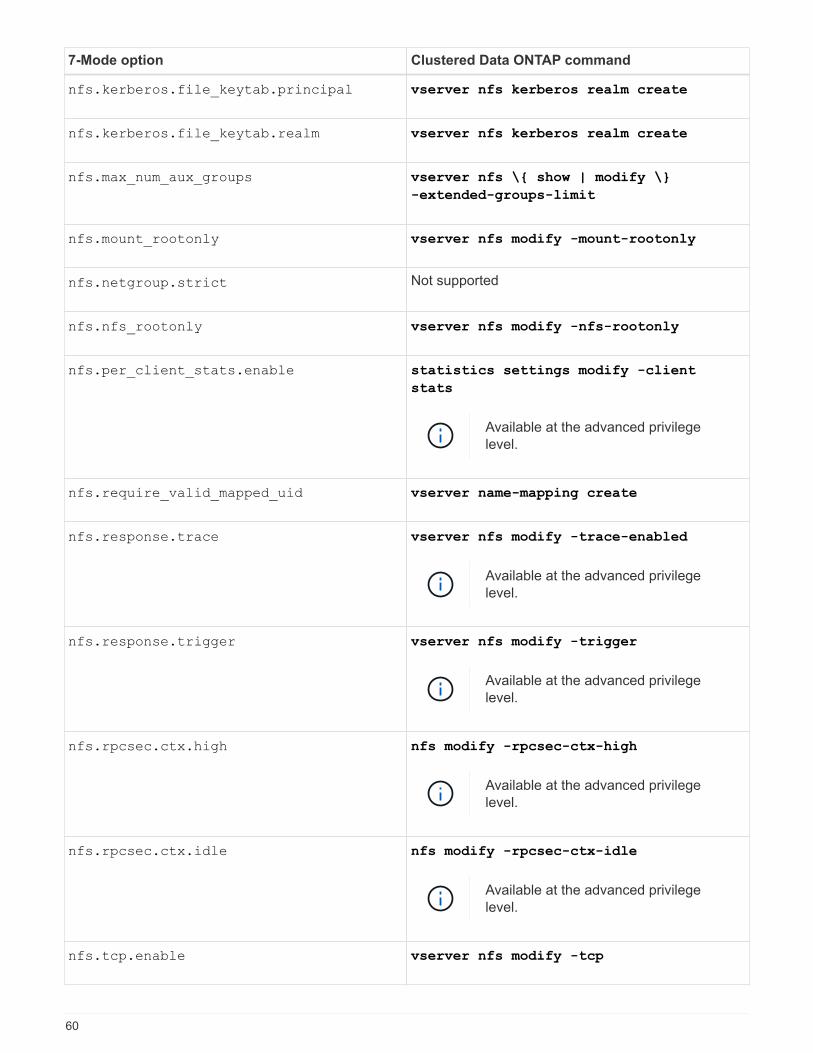
7-Mode option Clustered Data ONTAP command
nfs.kerberos.file_keytab.principal vserver nfs kerberos realm create
nfs.kerberos.file_keytab.realm vserver nfs kerberos realm create
nfs.max_num_aux_groups vserver nfs \{ show | modify \}
-extended-groups-limit
nfs.mount_rootonly vserver nfs modify -mount-rootonly
nfs.netgroup.strict Not supported
nfs.nfs_rootonly vserver nfs modify -nfs-rootonly
nfs.per_client_stats.enable statistics settings modify -client
stats
Available at the advanced privilege
level.
nfs.require_valid_mapped_uid vserver name-mapping create
nfs.response.trace vserver nfs modify -trace-enabled
Available at the advanced privilege
level.
nfs.response.trigger vserver nfs modify -trigger
Available at the advanced privilege
level.
nfs.rpcsec.ctx.high nfs modify -rpcsec-ctx-high
Available at the advanced privilege
level.
nfs.rpcsec.ctx.idle nfs modify -rpcsec-ctx-idle
Available at the advanced privilege
level.
nfs.tcp.enable vserver nfs modify -tcp
60
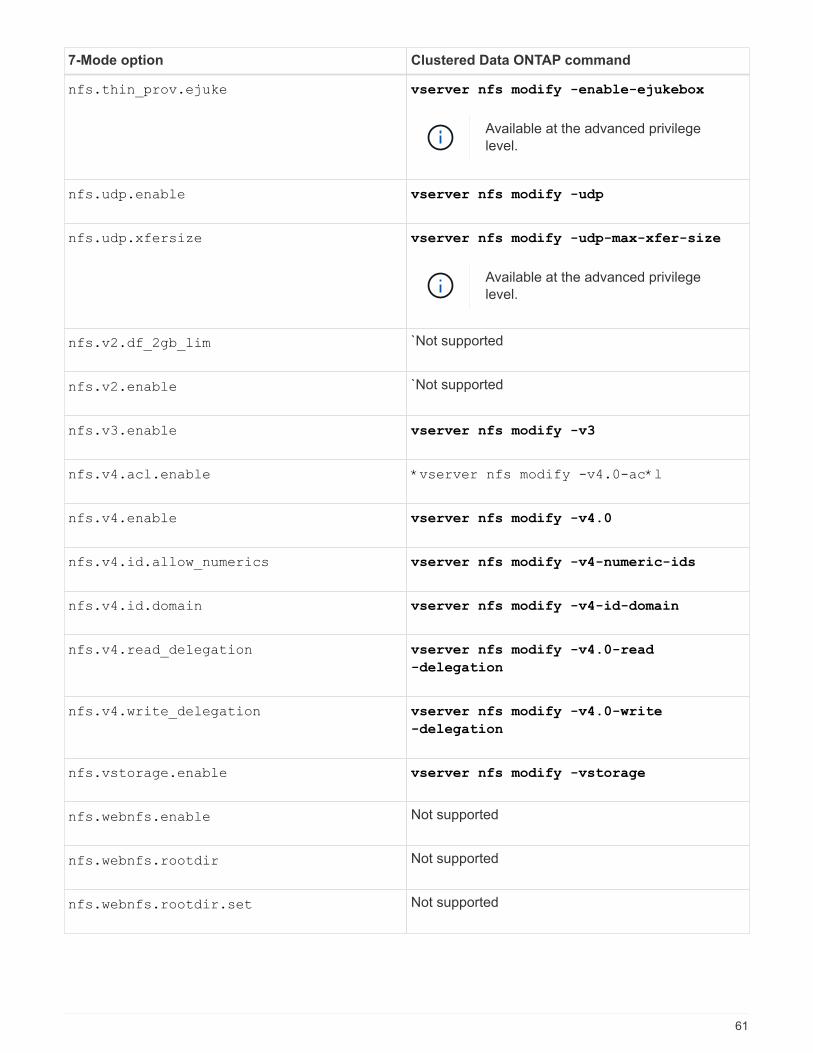
7-Mode option Clustered Data ONTAP command
nfs.thin_prov.ejuke vserver nfs modify -enable-ejukebox
Available at the advanced privilege
level.
nfs.udp.enable vserver nfs modify -udp
nfs.udp.xfersize vserver nfs modify -udp-max-xfer-size
Available at the advanced privilege
level.
nfs.v2.df_2gb_lim `Not supported
nfs.v2.enable `Not supported
nfs.v3.enable vserver nfs modify -v3
nfs.v4.acl.enable *vserver nfs modify -v4.0-ac*l
nfs.v4.enable vserver nfs modify -v4.0
nfs.v4.id.allow_numerics vserver nfs modify -v4-numeric-ids
nfs.v4.id.domain vserver nfs modify -v4-id-domain
nfs.v4.read_delegation vserver nfs modify -v4.0-read
-delegation
nfs.v4.write_delegation vserver nfs modify -v4.0-write
-delegation
nfs.vstorage.enable vserver nfs modify -vstorage
nfs.webnfs.enable Not supported
nfs.webnfs.rootdir Not supported
nfs.webnfs.rootdir.set Not supported
61
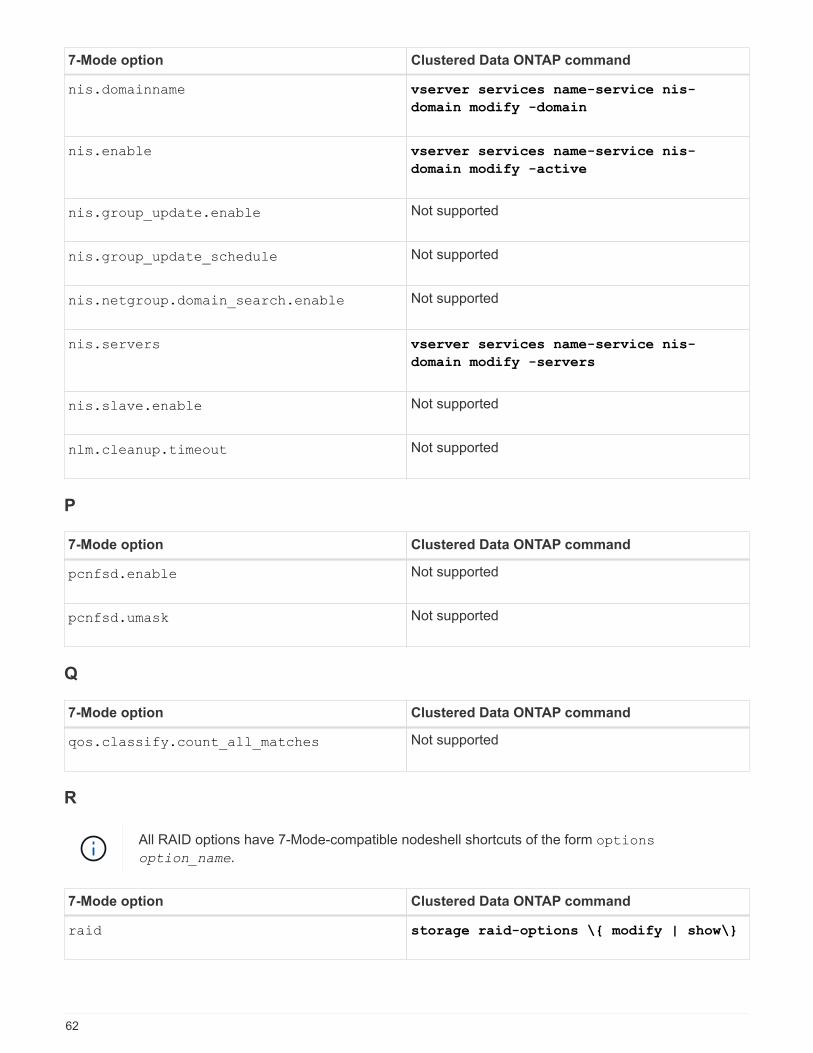
7-Mode option Clustered Data ONTAP command
nis.domainname vserver services name-service nis-
domain modify -domain
nis.enable vserver services name-service nis-
domain modify -active
nis.group_update.enable Not supported
nis.group_update_schedule Not supported
nis.netgroup.domain_search.enable Not supported
nis.servers vserver services name-service nis-
domain modify -servers
nis.slave.enable Not supported
nlm.cleanup.timeout Not supported
P
7-Mode option Clustered Data ONTAP command
pcnfsd.enable Not supported
pcnfsd.umask Not supported
Q
7-Mode option Clustered Data ONTAP command
qos.classify.count_all_matches Not supported
R
All RAID options have 7-Mode-compatible nodeshell shortcuts of the form options
option_name.
7-Mode option Clustered Data ONTAP command
raid storage raid-options \{ modify | show\}
62
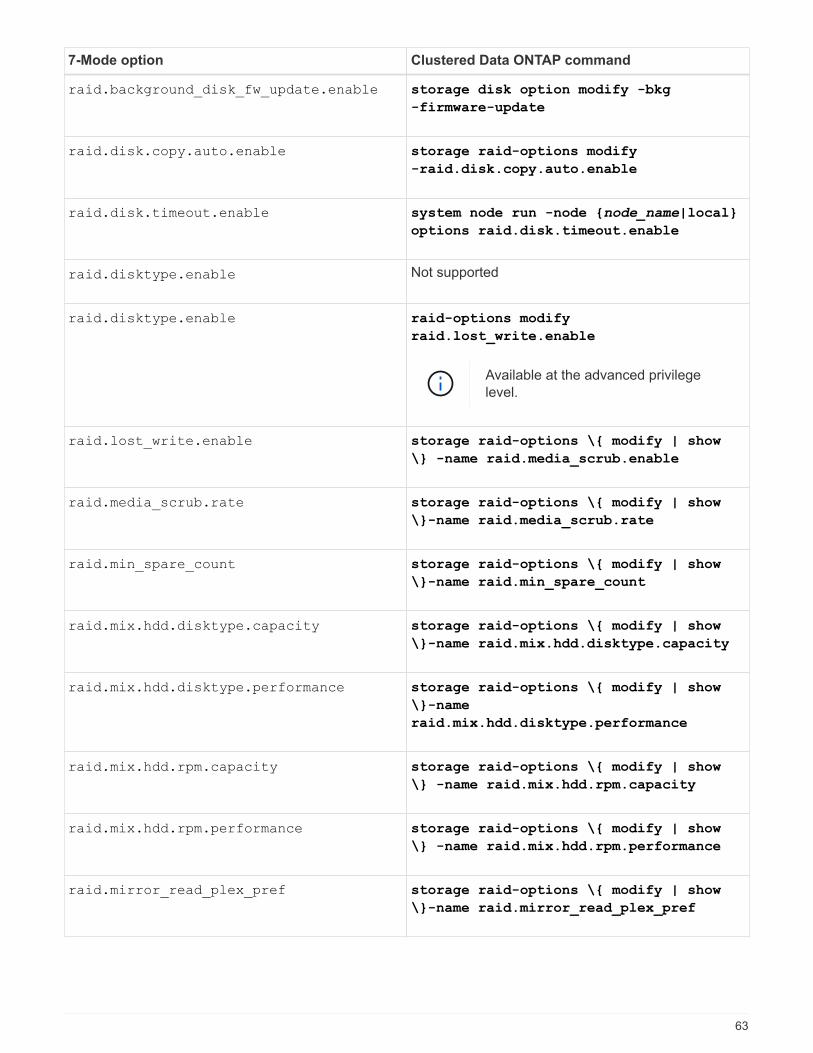
7-Mode option Clustered Data ONTAP command
raid.background_disk_fw_update.enable storage disk option modify -bkg
-firmware-update
raid.disk.copy.auto.enable storage raid-options modify
-raid.disk.copy.auto.enable
raid.disk.timeout.enable system node run -node {node_name|local}
options raid.disk.timeout.enable
raid.disktype.enable Not supported
raid.disktype.enable raid-options modify
raid.lost_write.enable
Available at the advanced privilege
level.
raid.lost_write.enable storage raid-options \{ modify | show
\} -name raid.media_scrub.enable
raid.media_scrub.rate storage raid-options \{ modify | show
\}-name raid.media_scrub.rate
raid.min_spare_count storage raid-options \{ modify | show
\}-name raid.min_spare_count
raid.mix.hdd.disktype.capacity storage raid-options \{ modify | show
\}-name raid.mix.hdd.disktype.capacity
raid.mix.hdd.disktype.performance storage raid-options \{ modify | show
\}-name
raid.mix.hdd.disktype.performance
raid.mix.hdd.rpm.capacity storage raid-options \{ modify | show
\} -name raid.mix.hdd.rpm.capacity
raid.mix.hdd.rpm.performance storage raid-options \{ modify | show
\} -name raid.mix.hdd.rpm.performance
raid.mirror_read_plex_pref storage raid-options \{ modify | show
\}-name raid.mirror_read_plex_pref
63
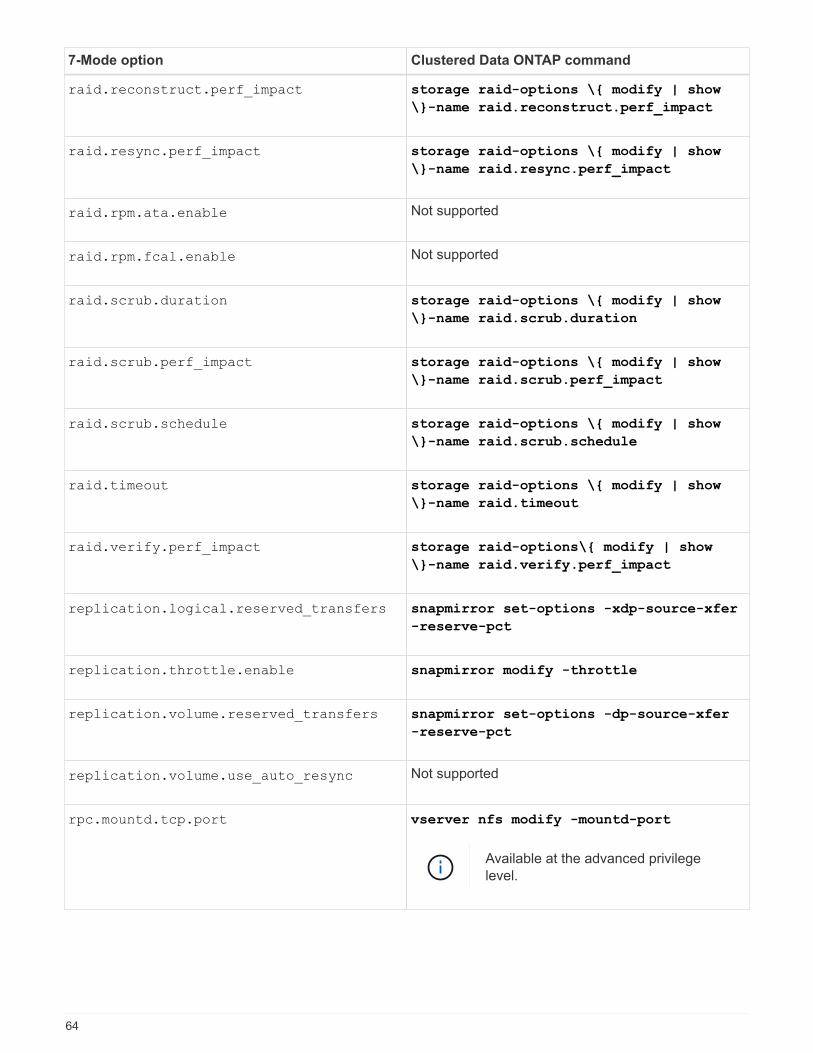
7-Mode option Clustered Data ONTAP command
raid.reconstruct.perf_impact storage raid-options \{ modify | show
\}-name raid.reconstruct.perf_impact
raid.resync.perf_impact storage raid-options \{ modify | show
\}-name raid.resync.perf_impact
raid.rpm.ata.enable Not supported
raid.rpm.fcal.enable Not supported
raid.scrub.duration storage raid-options \{ modify | show
\}-name raid.scrub.duration
raid.scrub.perf_impact storage raid-options \{ modify | show
\}-name raid.scrub.perf_impact
raid.scrub.schedule storage raid-options \{ modify | show
\}-name raid.scrub.schedule
raid.timeout storage raid-options \{ modify | show
\}-name raid.timeout
raid.verify.perf_impact storage raid-options\{ modify | show
\}-name raid.verify.perf_impact
replication.logical.reserved_transfers snapmirror set-options -xdp-source-xfer
-reserve-pct
replication.throttle.enable snapmirror modify -throttle
replication.volume.reserved_transfers snapmirror set-options -dp-source-xfer
-reserve-pct
replication.volume.use_auto_resync Not supported
rpc.mountd.tcp.port vserver nfs modify -mountd-port
Available at the advanced privilege
level.
64
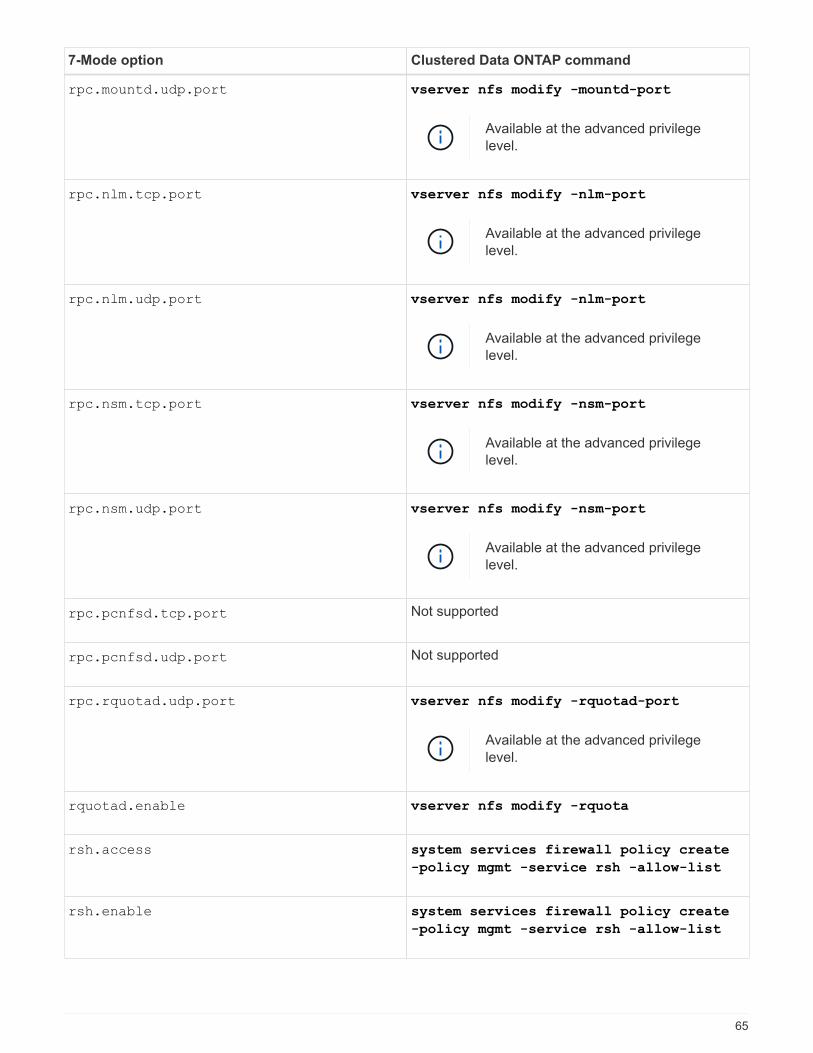
7-Mode option Clustered Data ONTAP command
rpc.mountd.udp.port vserver nfs modify -mountd-port
Available at the advanced privilege
level.
rpc.nlm.tcp.port vserver nfs modify -nlm-port
Available at the advanced privilege
level.
rpc.nlm.udp.port vserver nfs modify -nlm-port
Available at the advanced privilege
level.
rpc.nsm.tcp.port vserver nfs modify -nsm-port
Available at the advanced privilege
level.
rpc.nsm.udp.port vserver nfs modify -nsm-port
Available at the advanced privilege
level.
rpc.pcnfsd.tcp.port Not supported
rpc.pcnfsd.udp.port Not supported
rpc.rquotad.udp.port vserver nfs modify -rquotad-port
Available at the advanced privilege
level.
rquotad.enable vserver nfs modify -rquota
rsh.access system services firewall policy create
-policy mgmt -service rsh -allow-list
rsh.enable system services firewall policy create
-policy mgmt -service rsh -allow-list
65
S-Z
S
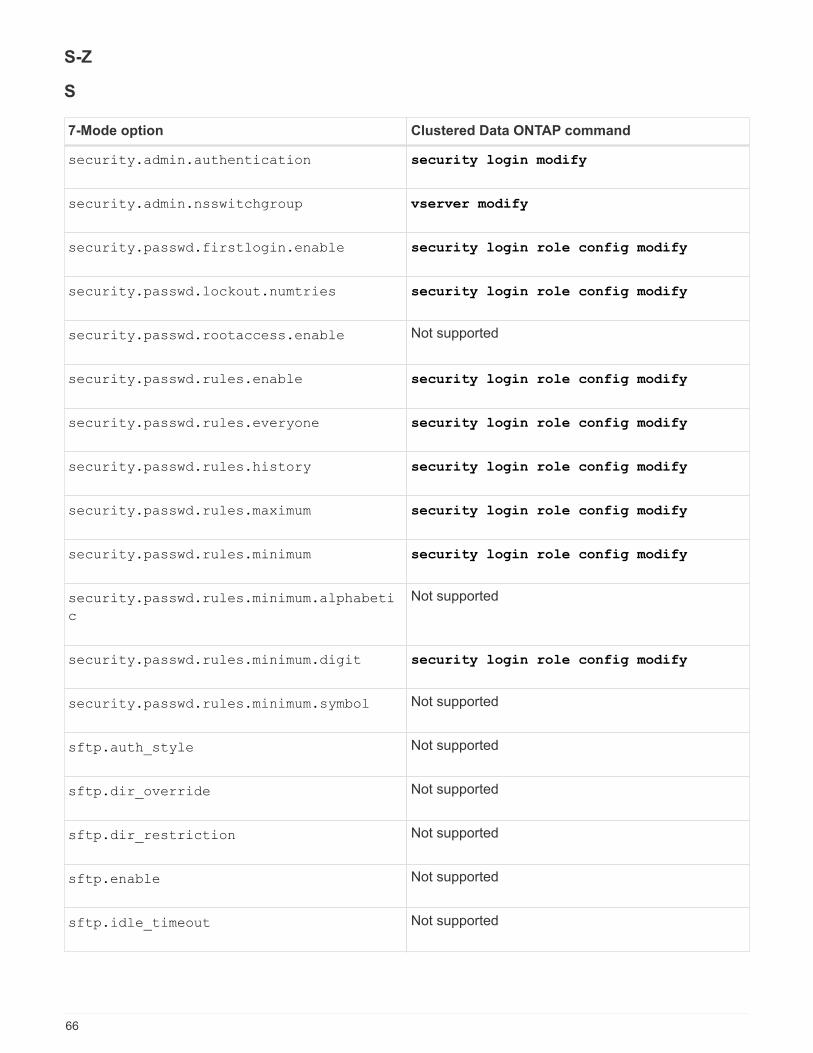
7-Mode option Clustered Data ONTAP command
security.admin.authentication security login modify
security.admin.nsswitchgroup vserver modify
security.passwd.firstlogin.enable security login role config modify
security.passwd.lockout.numtries security login role config modify
security.passwd.rootaccess.enable Not supported
security.passwd.rules.enable security login role config modify
security.passwd.rules.everyone security login role config modify
security.passwd.rules.history security login role config modify
security.passwd.rules.maximum security login role config modify
security.passwd.rules.minimum security login role config modify
security.passwd.rules.minimum.alphabeti
c
Not supported
security.passwd.rules.minimum.digit security login role config modify
security.passwd.rules.minimum.symbol Not supported
sftp.auth_style Not supported
sftp.dir_override Not supported
sftp.dir_restriction Not supported
sftp.enable Not supported
sftp.idle_timeout Not supported
66
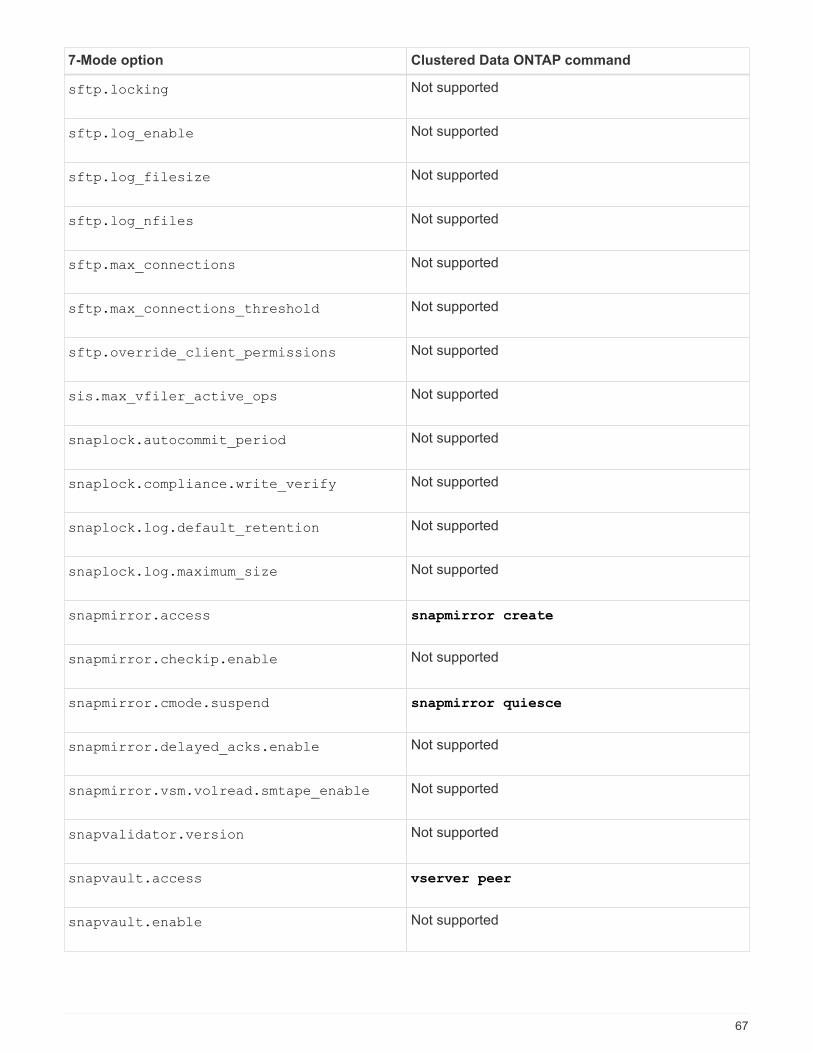
7-Mode option Clustered Data ONTAP command
sftp.locking Not supported
sftp.log_enable Not supported
sftp.log_filesize Not supported
sftp.log_nfiles Not supported
sftp.max_connections Not supported
sftp.max_connections_threshold Not supported
sftp.override_client_permissions Not supported
sis.max_vfiler_active_ops Not supported
snaplock.autocommit_period Not supported
snaplock.compliance.write_verify Not supported
snaplock.log.default_retention Not supported
snaplock.log.maximum_size Not supported
snapmirror.access snapmirror create
snapmirror.checkip.enable Not supported
snapmirror.cmode.suspend snapmirror quiesce
snapmirror.delayed_acks.enable Not supported
snapmirror.vsm.volread.smtape_enable Not supported
snapvalidator.version Not supported
snapvault.access vserver peer
snapvault.enable Not supported
67
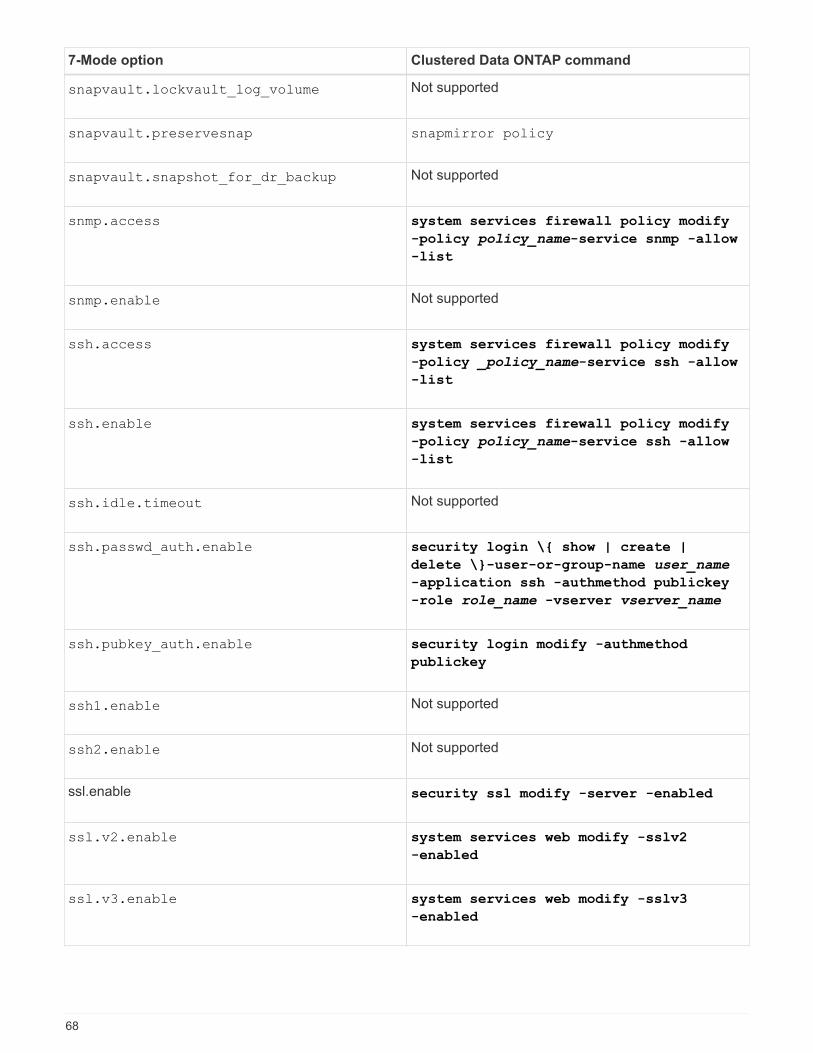
7-Mode option Clustered Data ONTAP command
snapvault.lockvault_log_volume Not supported
snapvault.preservesnap snapmirror policy
snapvault.snapshot_for_dr_backup Not supported
snmp.access system services firewall policy modify
-policy policy_name-service snmp -allow
-list
snmp.enable Not supported
ssh.access system services firewall policy modify
-policy _policy_name-service ssh -allow
-list
ssh.enable system services firewall policy modify
-policy policy_name-service ssh -allow
-list
ssh.idle.timeout Not supported
ssh.passwd_auth.enable security login \{ show | create |
delete \}-user-or-group-name user_name
-application ssh -authmethod publickey
-role role_name -vserver vserver_name
ssh.pubkey_auth.enable security login modify -authmethod
publickey
ssh1.enable Not supported
ssh2.enable Not supported
ssl.enable security ssl modify -server -enabled
ssl.v2.enable system services web modify -sslv2
-enabled
ssl.v3.enable system services web modify -sslv3
-enabled
68
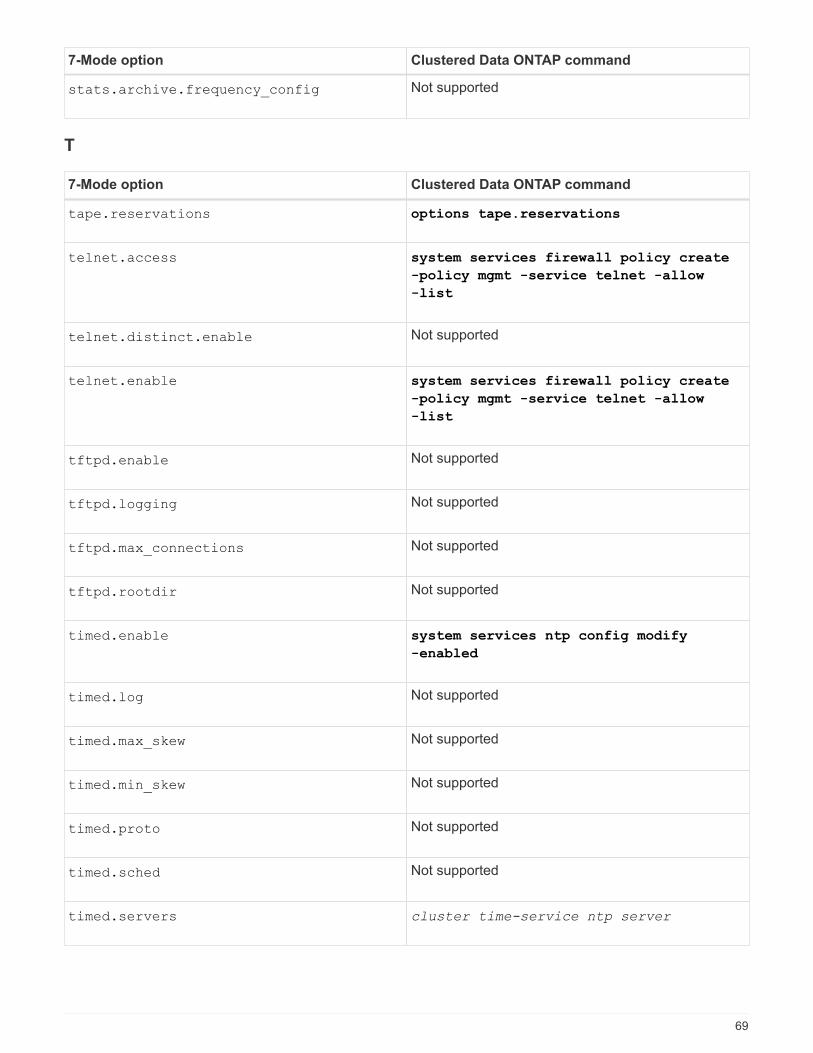
7-Mode option Clustered Data ONTAP command
stats.archive.frequency_config Not supported
T
7-Mode option Clustered Data ONTAP command
tape.reservations options tape.reservations
telnet.access system services firewall policy create
-policy mgmt -service telnet -allow
-list
telnet.distinct.enable Not supported
telnet.enable system services firewall policy create
-policy mgmt -service telnet -allow
-list
tftpd.enable Not supported
tftpd.logging Not supported
tftpd.max_connections Not supported
tftpd.rootdir Not supported
timed.enable system services ntp config modify
-enabled
timed.log Not supported
timed.max_skew Not supported
timed.min_skew Not supported
timed.proto Not supported
timed.sched Not supported
timed.servers cluster time-service ntp server
69
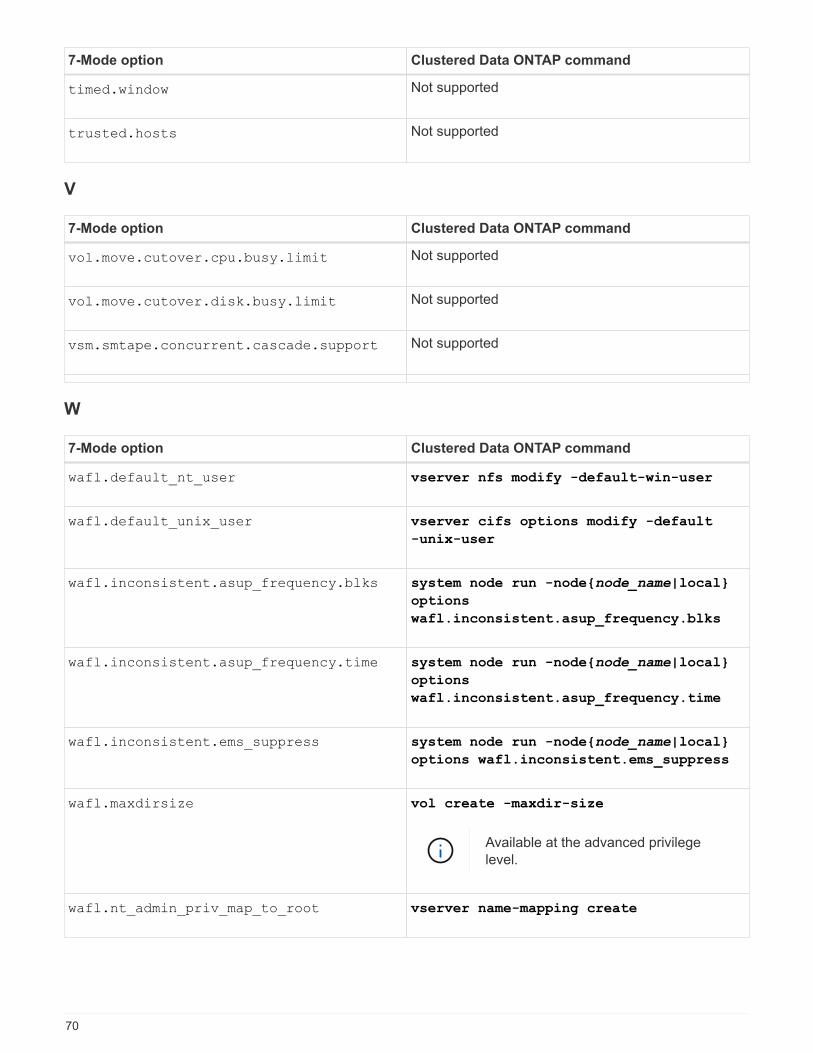
7-Mode option Clustered Data ONTAP command
timed.window Not supported
trusted.hosts Not supported
V
7-Mode option Clustered Data ONTAP command
vol.move.cutover.cpu.busy.limit Not supported
vol.move.cutover.disk.busy.limit Not supported
vsm.smtape.concurrent.cascade.support Not supported
W
7-Mode option Clustered Data ONTAP command
wafl.default_nt_user vserver nfs modify -default-win-user
wafl.default_unix_user vserver cifs options modify -default
-unix-user
wafl.inconsistent.asup_frequency.blks system node run -node{node_name|local}
options
wafl.inconsistent.asup_frequency.blks
wafl.inconsistent.asup_frequency.time system node run -node{node_name|local}
options
wafl.inconsistent.asup_frequency.time
wafl.inconsistent.ems_suppress system node run -node{node_name|local}
options wafl.inconsistent.ems_suppress
wafl.maxdirsize vol create -maxdir-size
Available at the advanced privilege
level.
wafl.nt_admin_priv_map_to_root vserver name-mapping create
70
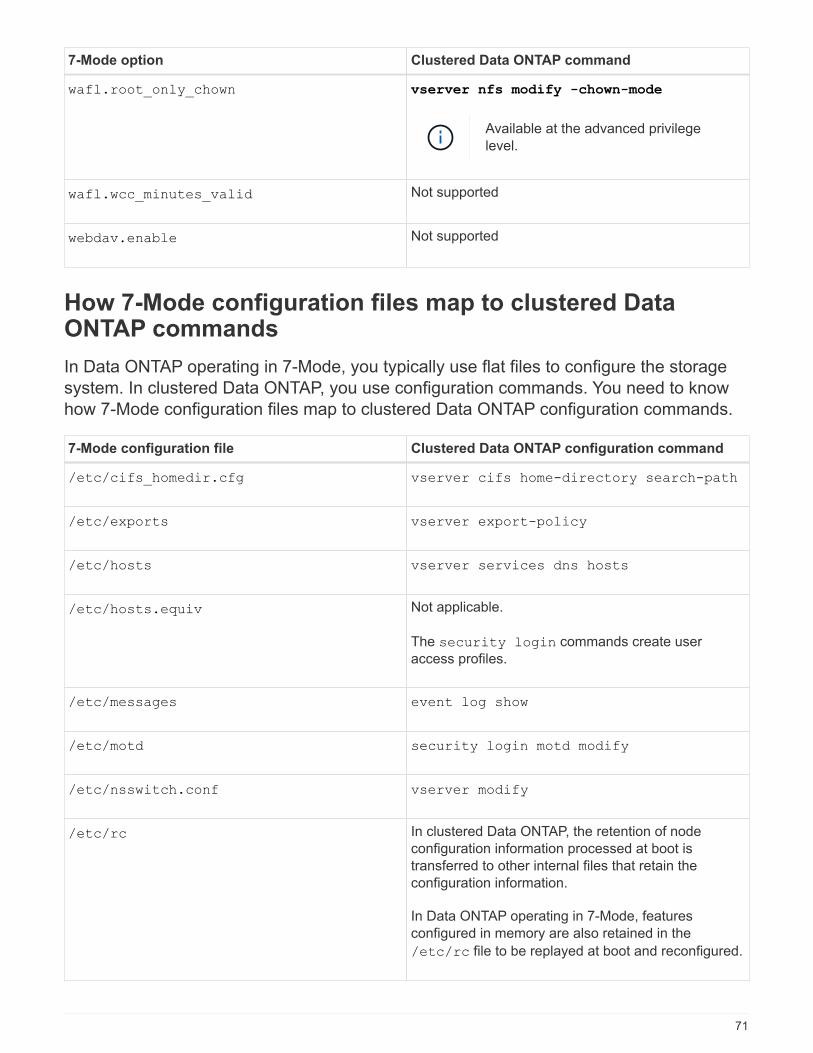
7-Mode option Clustered Data ONTAP command
wafl.root_only_chown vserver nfs modify -chown-mode
Available at the advanced privilege
level.
wafl.wcc_minutes_valid Not supported
webdav.enable Not supported
How 7-Mode configuration files map to clustered DataONTAP commands
In Data ONTAP operating in 7-Mode, you typically use flat files to configure the storage
system. In clustered Data ONTAP, you use configuration commands. You need to know
how 7-Mode configuration files map to clustered Data ONTAP configuration commands.
7-Mode configuration file Clustered Data ONTAP configuration command
/etc/cifs_homedir.cfg vserver cifs home-directory search-path
/etc/exports vserver export-policy
/etc/hosts vserver services dns hosts
/etc/hosts.equiv Not applicable.
The security login commands create user
access profiles.
/etc/messages event log show
/etc/motd security login motd modify
/etc/nsswitch.conf vserver modify
/etc/rc In clustered Data ONTAP, the retention of node
configuration information processed at boot is
transferred to other internal files that retain the
configuration information.
In Data ONTAP operating in 7-Mode, features
configured in memory are also retained in the
/etc/rc file to be replayed at boot and reconfigured.
71
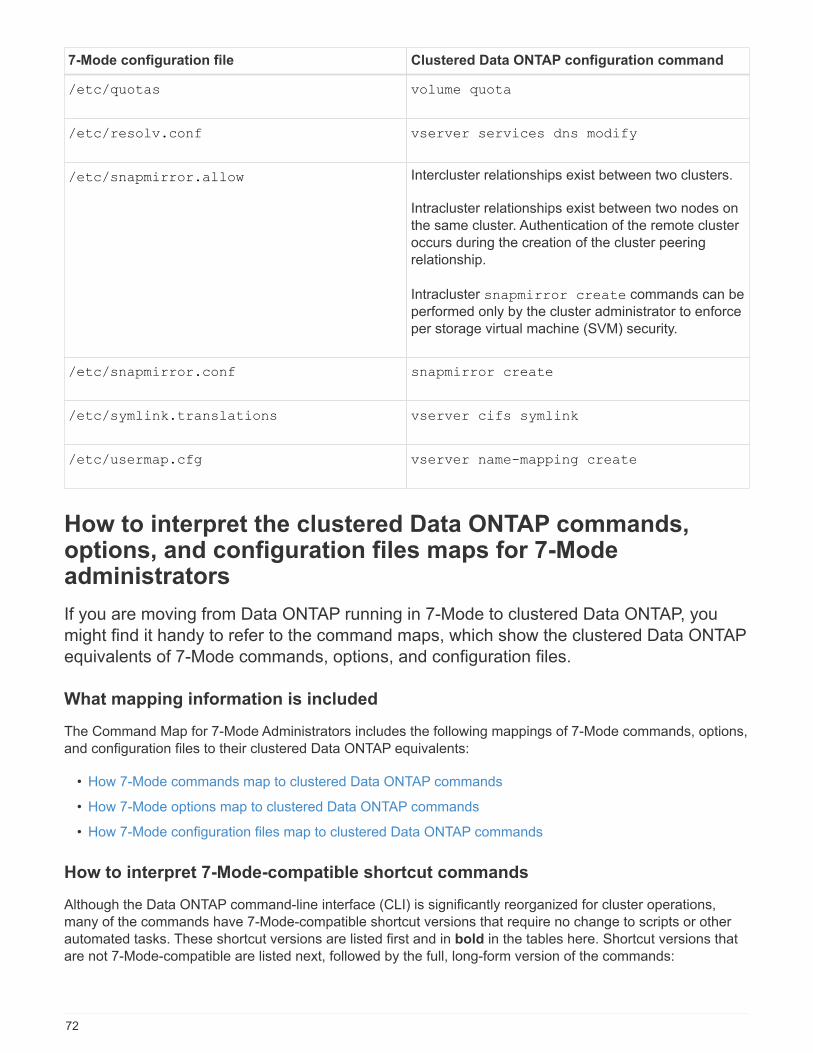
7-Mode configuration file Clustered Data ONTAP configuration command
/etc/quotas volume quota
/etc/resolv.conf vserver services dns modify
/etc/snapmirror.allow Intercluster relationships exist between two clusters.
Intracluster relationships exist between two nodes on
the same cluster. Authentication of the remote cluster
occurs during the creation of the cluster peering
relationship.
Intracluster snapmirror create commands can be
performed only by the cluster administrator to enforce
per storage virtual machine (SVM) security.
/etc/snapmirror.conf snapmirror create
/etc/symlink.translations vserver cifs symlink
/etc/usermap.cfg vserver name-mapping create
How to interpret the clustered Data ONTAP commands,options, and configuration files maps for 7-Modeadministrators
If you are moving from Data ONTAP running in 7-Mode to clustered Data ONTAP, you
might find it handy to refer to the command maps, which show the clustered Data ONTAP
equivalents of 7-Mode commands, options, and configuration files.
What mapping information is included
The Command Map for 7-Mode Administrators includes the following mappings of 7-Mode commands, options,
and configuration files to their clustered Data ONTAP equivalents:
• How 7-Mode commands map to clustered Data ONTAP commands
• How 7-Mode options map to clustered Data ONTAP commands
• How 7-Mode configuration files map to clustered Data ONTAP commands
How to interpret 7-Mode-compatible shortcut commands
Although the Data ONTAP command-line interface (CLI) is significantly reorganized for cluster operations,
many of the commands have 7-Mode-compatible shortcut versions that require no change to scripts or other
automated tasks. These shortcut versions are listed first and in bold in the tables here. Shortcut versions that
are not 7-Mode-compatible are listed next, followed by the full, long-form version of the commands:
72
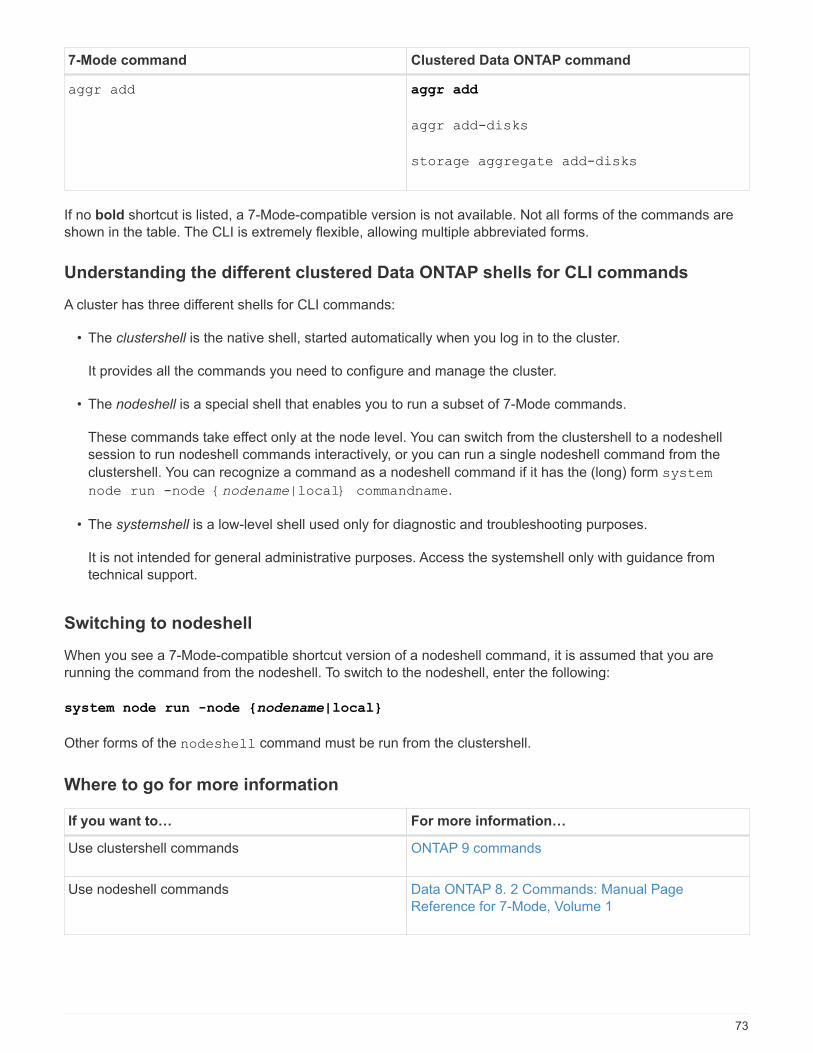
7-Mode command Clustered Data ONTAP command
aggr add aggr add
aggr add-disks
storage aggregate add-disks
If no bold shortcut is listed, a 7-Mode-compatible version is not available. Not all forms of the commands are
shown in the table. The CLI is extremely flexible, allowing multiple abbreviated forms.
Understanding the different clustered Data ONTAP shells for CLI commands
A cluster has three different shells for CLI commands:
• The clustershell is the native shell, started automatically when you log in to the cluster.
It provides all the commands you need to configure and manage the cluster.
• The nodeshell is a special shell that enables you to run a subset of 7-Mode commands.
These commands take effect only at the node level. You can switch from the clustershell to a nodeshell
session to run nodeshell commands interactively, or you can run a single nodeshell command from the
clustershell. You can recognize a command as a nodeshell command if it has the (long) form system
node run -node {nodename|local} commandname.
• The systemshell is a low-level shell used only for diagnostic and troubleshooting purposes.
It is not intended for general administrative purposes. Access the systemshell only with guidance from
technical support.
Switching to nodeshell
When you see a 7-Mode-compatible shortcut version of a nodeshell command, it is assumed that you are
running the command from the nodeshell. To switch to the nodeshell, enter the following:
system node run -node {nodename|local}
Other forms of the nodeshell command must be run from the clustershell.
Where to go for more information
If you want to… For more information…
Use clustershell commands ONTAP 9 commands
Use nodeshell commands Data ONTAP 8. 2 Commands: Manual Page
Reference for 7-Mode, Volume 1
73

If you want to… For more information…
Execute CLI commands, navigate CLI command
directories, set values in the CLI, and use queries,
patterns, and wildcards
System administration
74
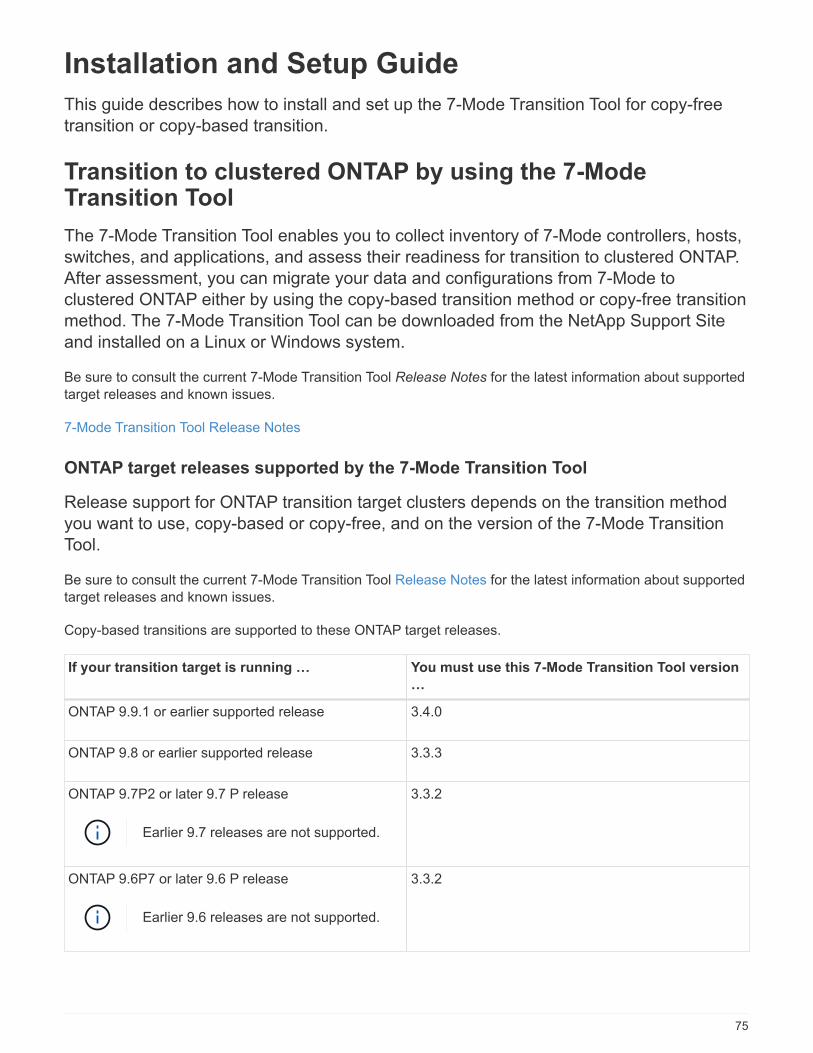
Installation and Setup Guide
This guide describes how to install and set up the 7-Mode Transition Tool for copy-free
transition or copy-based transition.
Transition to clustered ONTAP by using the 7-ModeTransition Tool
The 7-Mode Transition Tool enables you to collect inventory of 7-Mode controllers, hosts,
switches, and applications, and assess their readiness for transition to clustered ONTAP.
After assessment, you can migrate your data and configurations from 7-Mode to
clustered ONTAP either by using the copy-based transition method or copy-free transition
method. The 7-Mode Transition Tool can be downloaded from the NetApp Support Site
and installed on a Linux or Windows system.
Be sure to consult the current 7-Mode Transition Tool Release Notes for the latest information about supported
target releases and known issues.
7-Mode Transition Tool Release Notes
ONTAP target releases supported by the 7-Mode Transition Tool
Release support for ONTAP transition target clusters depends on the transition method
you want to use, copy-based or copy-free, and on the version of the 7-Mode Transition
Tool.
Be sure to consult the current 7-Mode Transition Tool Release Notes for the latest information about supported
target releases and known issues.
Copy-based transitions are supported to these ONTAP target releases.
If your transition target is running … You must use this 7-Mode Transition Tool version
…
ONTAP 9.9.1 or earlier supported release 3.4.0
ONTAP 9.8 or earlier supported release 3.3.3
ONTAP 9.7P2 or later 9.7 P release
Earlier 9.7 releases are not supported.
3.3.2
ONTAP 9.6P7 or later 9.6 P release
Earlier 9.6 releases are not supported.
3.3.2
75
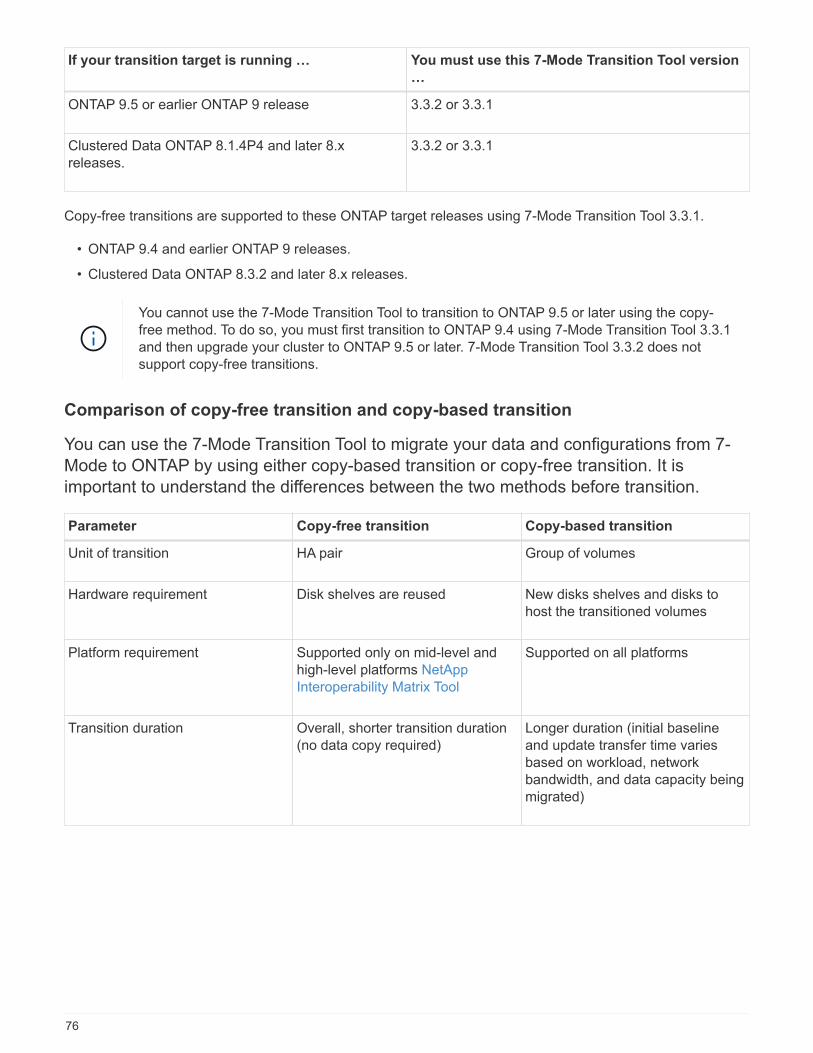
If your transition target is running … You must use this 7-Mode Transition Tool version
…
ONTAP 9.5 or earlier ONTAP 9 release 3.3.2 or 3.3.1
Clustered Data ONTAP 8.1.4P4 and later 8.x
releases.
3.3.2 or 3.3.1
Copy-free transitions are supported to these ONTAP target releases using 7-Mode Transition Tool 3.3.1.
• ONTAP 9.4 and earlier ONTAP 9 releases.
• Clustered Data ONTAP 8.3.2 and later 8.x releases.
You cannot use the 7-Mode Transition Tool to transition to ONTAP 9.5 or later using the copy-
free method. To do so, you must first transition to ONTAP 9.4 using 7-Mode Transition Tool 3.3.1
and then upgrade your cluster to ONTAP 9.5 or later. 7-Mode Transition Tool 3.3.2 does not
support copy-free transitions.
Comparison of copy-free transition and copy-based transition
You can use the 7-Mode Transition Tool to migrate your data and configurations from 7-
Mode to ONTAP by using either copy-based transition or copy-free transition. It is
important to understand the differences between the two methods before transition.
Parameter Copy-free transition Copy-based transition
Unit of transition HA pair Group of volumes
Hardware requirement Disk shelves are reused New disks shelves and disks to
host the transitioned volumes
Platform requirement Supported only on mid-level and
high-level platforms NetApp
Interoperability Matrix Tool
Supported on all platforms
Transition duration Overall, shorter transition duration
(no data copy required)
Longer duration (initial baseline
and update transfer time varies
based on workload, network
bandwidth, and data capacity being
migrated)
76
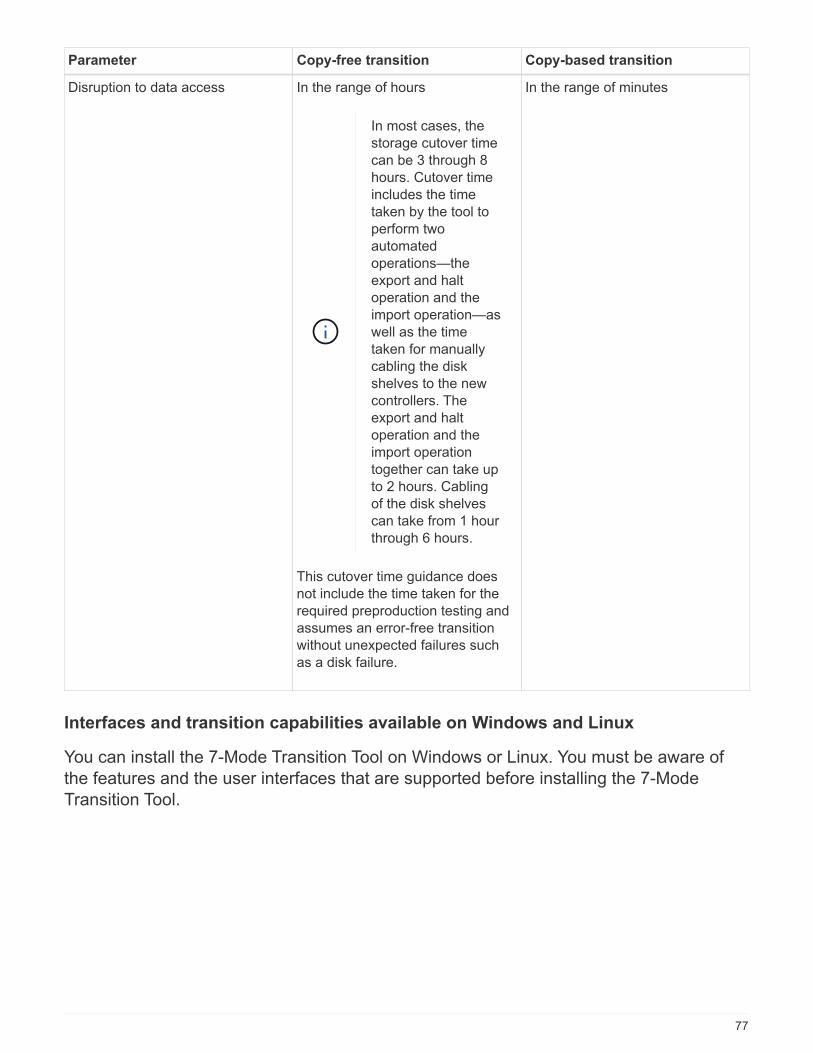
Parameter Copy-free transition Copy-based transition
Disruption to data access In the range of hours
In most cases, the
storage cutover time
can be 3 through 8
hours. Cutover time
includes the time
taken by the tool to
perform two
automated
operations—the
export and halt
operation and the
import operation—as
well as the time
taken for manually
cabling the disk
shelves to the new
controllers. The
export and halt
operation and the
import operation
together can take up
to 2 hours. Cabling
of the disk shelves
can take from 1 hour
through 6 hours.
This cutover time guidance does
not include the time taken for the
required preproduction testing and
assumes an error-free transition
without unexpected failures such
as a disk failure.
In the range of minutes
Interfaces and transition capabilities available on Windows and Linux
You can install the 7-Mode Transition Tool on Windows or Linux. You must be aware of
the features and the user interfaces that are supported before installing the 7-Mode
Transition Tool.
77
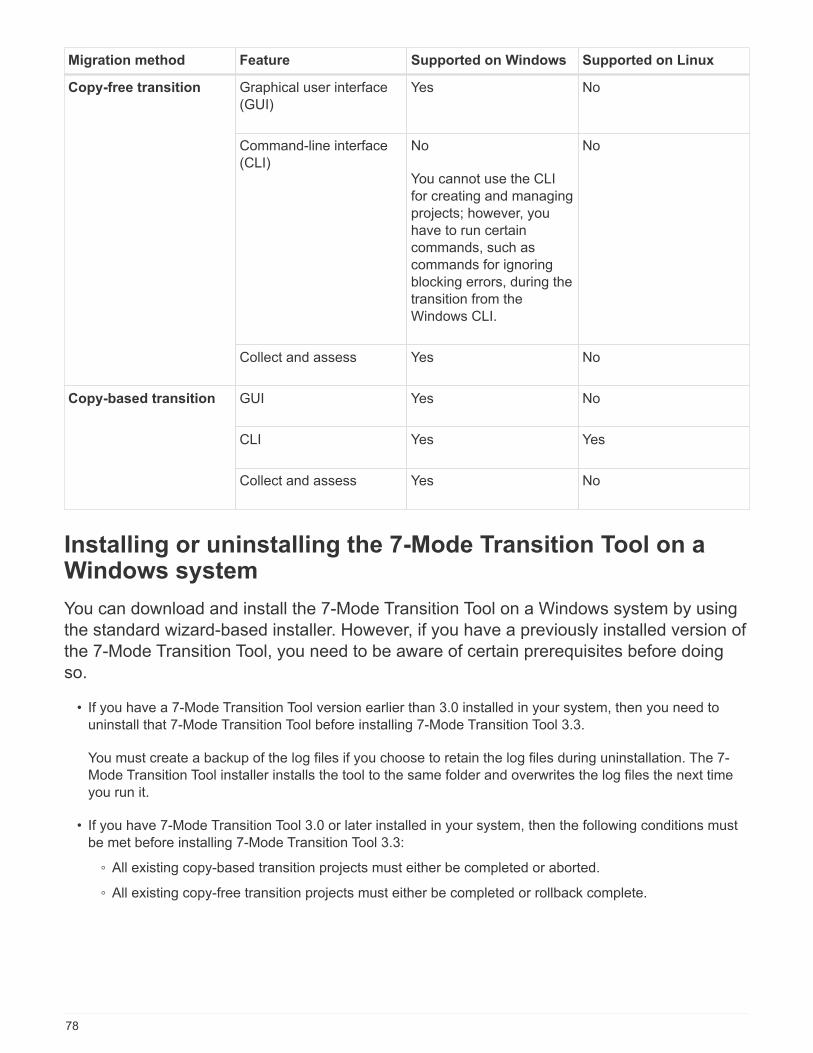
Migration method Feature Supported on Windows Supported on Linux
Copy-free transition Graphical user interface
(GUI)
Yes No
Command-line interface
(CLI)
No
You cannot use the CLI
for creating and managing
projects; however, you
have to run certain
commands, such as
commands for ignoring
blocking errors, during the
transition from the
Windows CLI.
No
Collect and assess Yes No
Copy-based transition GUI Yes No
CLI Yes Yes
Collect and assess Yes No
Installing or uninstalling the 7-Mode Transition Tool on aWindows system
You can download and install the 7-Mode Transition Tool on a Windows system by using
the standard wizard-based installer. However, if you have a previously installed version of
the 7-Mode Transition Tool, you need to be aware of certain prerequisites before doing
so.
• If you have a 7-Mode Transition Tool version earlier than 3.0 installed in your system, then you need to
uninstall that 7-Mode Transition Tool before installing 7-Mode Transition Tool 3.3.
You must create a backup of the log files if you choose to retain the log files during uninstallation. The 7-
Mode Transition Tool installer installs the tool to the same folder and overwrites the log files the next time
you run it.
• If you have 7-Mode Transition Tool 3.0 or later installed in your system, then the following conditions must
be met before installing 7-Mode Transition Tool 3.3:
◦ All existing copy-based transition projects must either be completed or aborted.
◦ All existing copy-free transition projects must either be completed or rollback complete.
78

System requirements for installing the 7-Mode Transition Tool on Windowssystems
You must ensure that the Windows host meets the required configuration to install and
run the 7-Mode Transition Tool.
Be sure to consult the current 7-Mode Transition Tool Release Notes for the latest information about supported
hosts and known issues.
Hardware requirements
• Dual-core x64 processor, 1.0 GHz or more
• 8 GB RAM
• 40 GB free disk space
Software requirements
• Your 64-bit Windows system must be running one of the following operating system versions:
◦ Windows 7 Enterprise
◦ Windows 7 Enterprise SP1
◦ Windows Server 2008 Standard
◦ Windows Server 2008 R2 Standard
◦ Windows Server 2008 R2 Enterprise with SP1
◦ Windows Server 2012 Standard
◦ Windows Server 2012 R2 Standard
◦ Windows 8.1 Enterprise
◦ Windows Server 2012 R2 Datacenter edition
◦ For 7-Mode Transition Tool version 3.3.2P1, you can also use one of the following operating system
versions:
▪ Windows 10 Enterprise
▪ Windows Server 2016 Standard
▪ Windows Server 2016 Datacenter
▪ Windows Server 2019 Standard
▪ Windows Server 2019 Datacenter
◦ For 7-Mode Transition Tool version 3.3.3, you can also use one of the following operating system
versions:
▪ Windows 10 Professional
You can use a Windows virtual machine that meets the required software
requirements and hardware requirements to install the 7-Mode Transition Tool.
• 64-bit Oracle Java Runtime Environment (JRE) 1.8 update 144
79
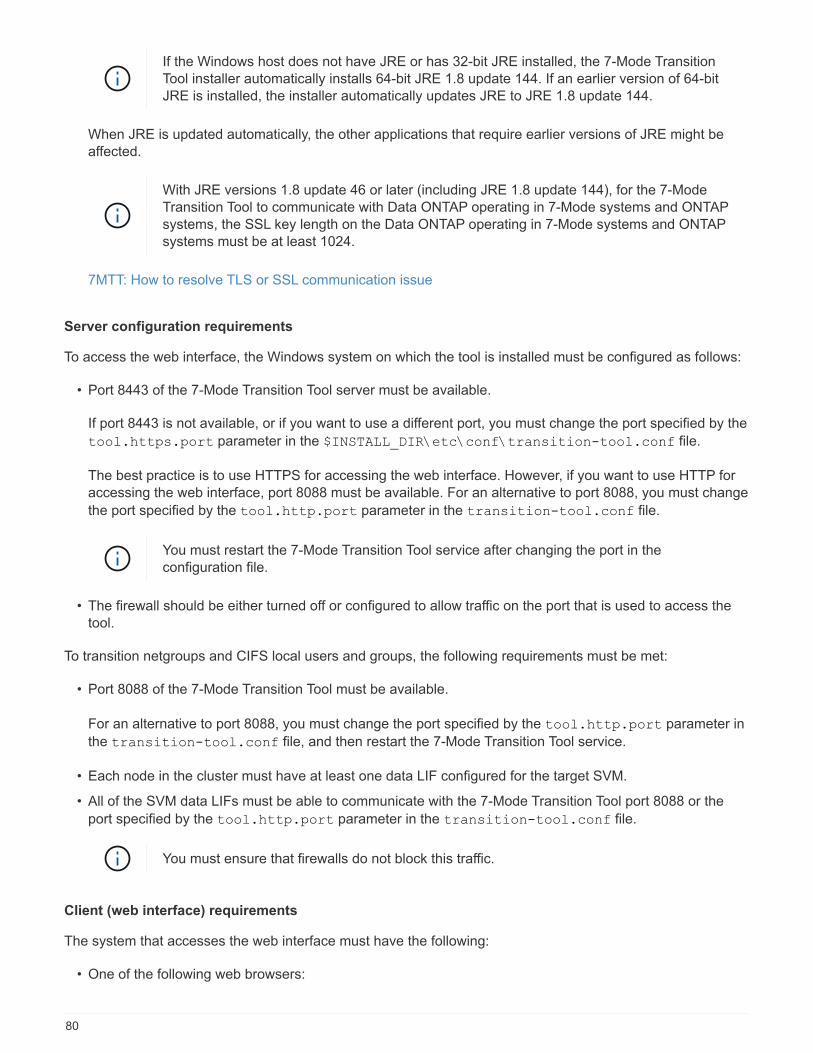
If the Windows host does not have JRE or has 32-bit JRE installed, the 7-Mode Transition
Tool installer automatically installs 64-bit JRE 1.8 update 144. If an earlier version of 64-bit
JRE is installed, the installer automatically updates JRE to JRE 1.8 update 144.
When JRE is updated automatically, the other applications that require earlier versions of JRE might be
affected.
With JRE versions 1.8 update 46 or later (including JRE 1.8 update 144), for the 7-Mode
Transition Tool to communicate with Data ONTAP operating in 7-Mode systems and ONTAP
systems, the SSL key length on the Data ONTAP operating in 7-Mode systems and ONTAP
systems must be at least 1024.
7MTT: How to resolve TLS or SSL communication issue
Server configuration requirements
To access the web interface, the Windows system on which the tool is installed must be configured as follows:
• Port 8443 of the 7-Mode Transition Tool server must be available.
If port 8443 is not available, or if you want to use a different port, you must change the port specified by the
tool.https.port parameter in the $INSTALL_DIR\etc\conf\transition-tool.conf file.
The best practice is to use HTTPS for accessing the web interface. However, if you want to use HTTP for
accessing the web interface, port 8088 must be available. For an alternative to port 8088, you must change
the port specified by the tool.http.port parameter in the transition-tool.conf file.
You must restart the 7-Mode Transition Tool service after changing the port in the
configuration file.
• The firewall should be either turned off or configured to allow traffic on the port that is used to access the
tool.
To transition netgroups and CIFS local users and groups, the following requirements must be met:
• Port 8088 of the 7-Mode Transition Tool must be available.
For an alternative to port 8088, you must change the port specified by the tool.http.port parameter in
the transition-tool.conf file, and then restart the 7-Mode Transition Tool service.
• Each node in the cluster must have at least one data LIF configured for the target SVM.
• All of the SVM data LIFs must be able to communicate with the 7-Mode Transition Tool port 8088 or the
port specified by the tool.http.port parameter in the transition-tool.conf file.
You must ensure that firewalls do not block this traffic.
Client (web interface) requirements
The system that accesses the web interface must have the following:
• One of the following web browsers:
80
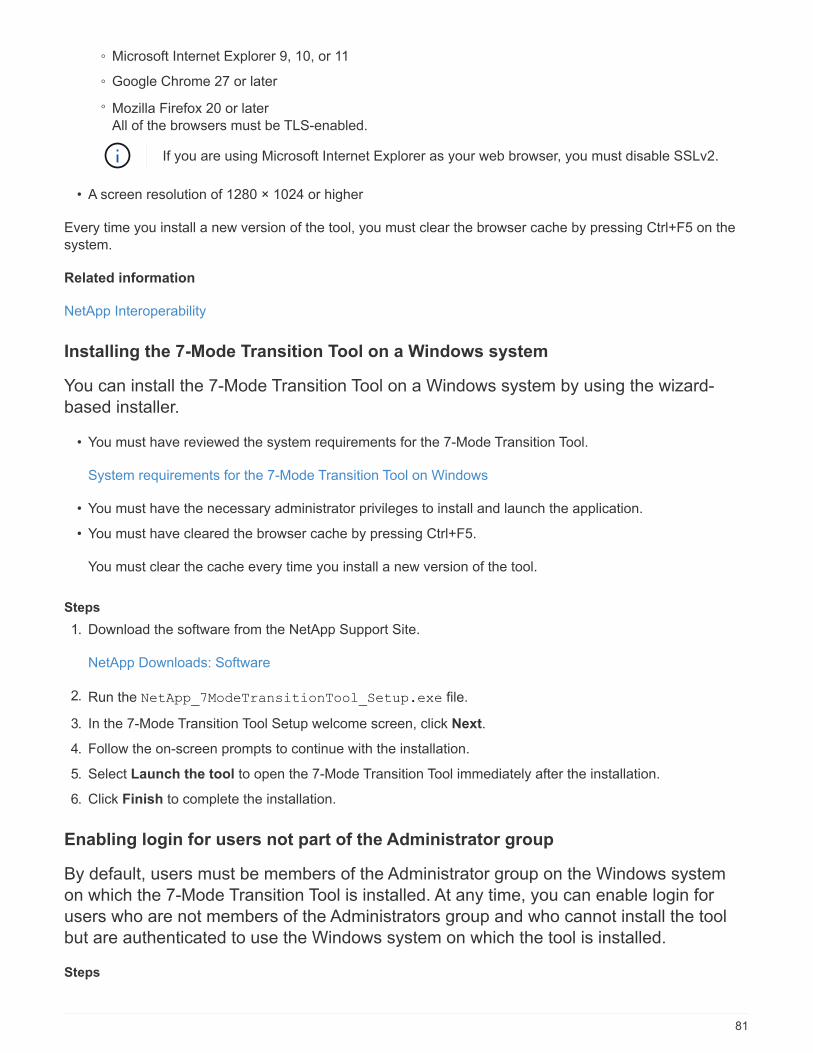
◦ Microsoft Internet Explorer 9, 10, or 11
◦ Google Chrome 27 or later
◦ Mozilla Firefox 20 or later
All of the browsers must be TLS-enabled.
If you are using Microsoft Internet Explorer as your web browser, you must disable SSLv2.
• A screen resolution of 1280 × 1024 or higher
Every time you install a new version of the tool, you must clear the browser cache by pressing Ctrl+F5 on the
system.
Related information
NetApp Interoperability
Installing the 7-Mode Transition Tool on a Windows system
You can install the 7-Mode Transition Tool on a Windows system by using the wizard-
based installer.
• You must have reviewed the system requirements for the 7-Mode Transition Tool.
System requirements for the 7-Mode Transition Tool on Windows
• You must have the necessary administrator privileges to install and launch the application.
• You must have cleared the browser cache by pressing Ctrl+F5.
You must clear the cache every time you install a new version of the tool.
Steps
1. Download the software from the NetApp Support Site.
NetApp Downloads: Software
2. Run the NetApp_7ModeTransitionTool_Setup.exe file.
3. In the 7-Mode Transition Tool Setup welcome screen, click Next.
4. Follow the on-screen prompts to continue with the installation.
5. Select Launch the tool to open the 7-Mode Transition Tool immediately after the installation.
6. Click Finish to complete the installation.
Enabling login for users not part of the Administrator group
By default, users must be members of the Administrator group on the Windows system
on which the 7-Mode Transition Tool is installed. At any time, you can enable login for
users who are not members of the Administrators group and who cannot install the tool
but are authenticated to use the Windows system on which the tool is installed.
Steps
81
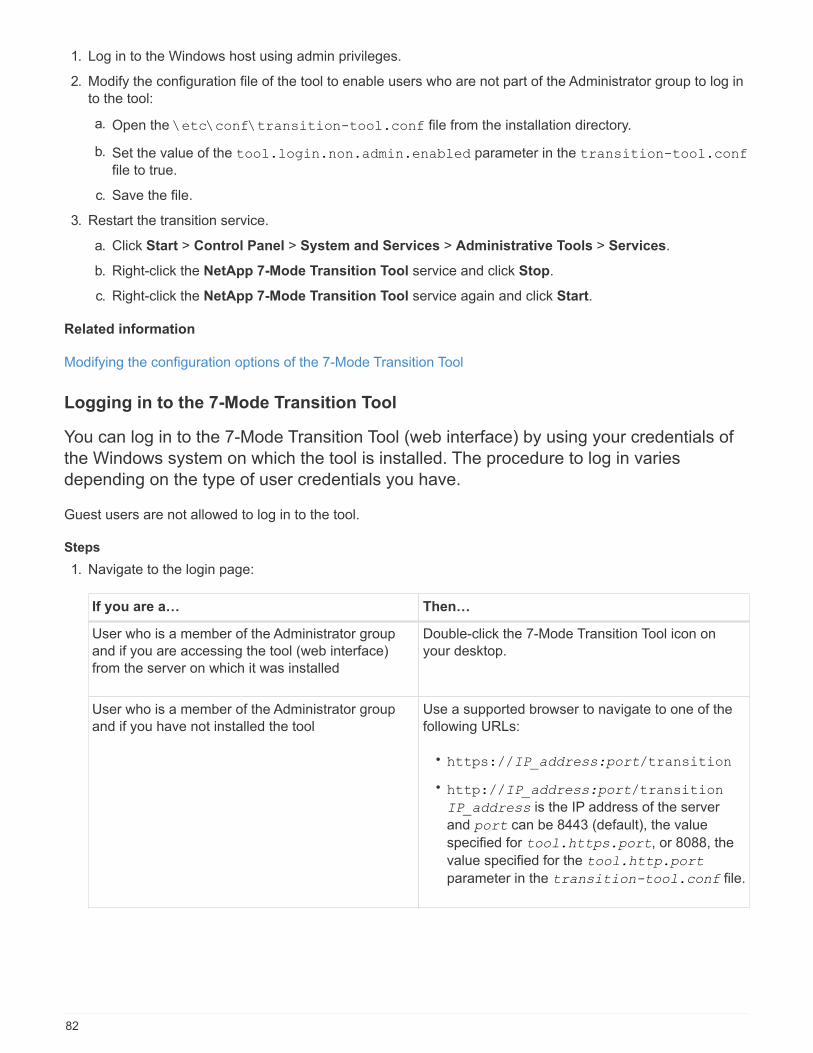
1. Log in to the Windows host using admin privileges.
2. Modify the configuration file of the tool to enable users who are not part of the Administrator group to log in
to the tool:
a. Open the \etc\conf\transition-tool.conf file from the installation directory.
b. Set the value of the tool.login.non.admin.enabled parameter in the transition-tool.conf
file to true.
c. Save the file.
3. Restart the transition service.
a. Click Start > Control Panel > System and Services > Administrative Tools > Services.
b. Right-click the NetApp 7-Mode Transition Tool service and click Stop.
c. Right-click the NetApp 7-Mode Transition Tool service again and click Start.
Related information
Modifying the configuration options of the 7-Mode Transition Tool
Logging in to the 7-Mode Transition Tool
You can log in to the 7-Mode Transition Tool (web interface) by using your credentials of
the Windows system on which the tool is installed. The procedure to log in varies
depending on the type of user credentials you have.
Guest users are not allowed to log in to the tool.
Steps
1. Navigate to the login page:
If you are a… Then…
User who is a member of the Administrator group
and if you are accessing the tool (web interface)
from the server on which it was installed
Double-click the 7-Mode Transition Tool icon on
your desktop.
User who is a member of the Administrator group
and if you have not installed the tool
Use a supported browser to navigate to one of the
following URLs:
• https://IP_address:port/transition
• http://IP_address:port/transition
IP_address is the IP address of the server
and port can be 8443 (default), the value
specified for tool.https.port, or 8088, the
value specified for the tool.http.port
parameter in the transition-tool.conf file.
82
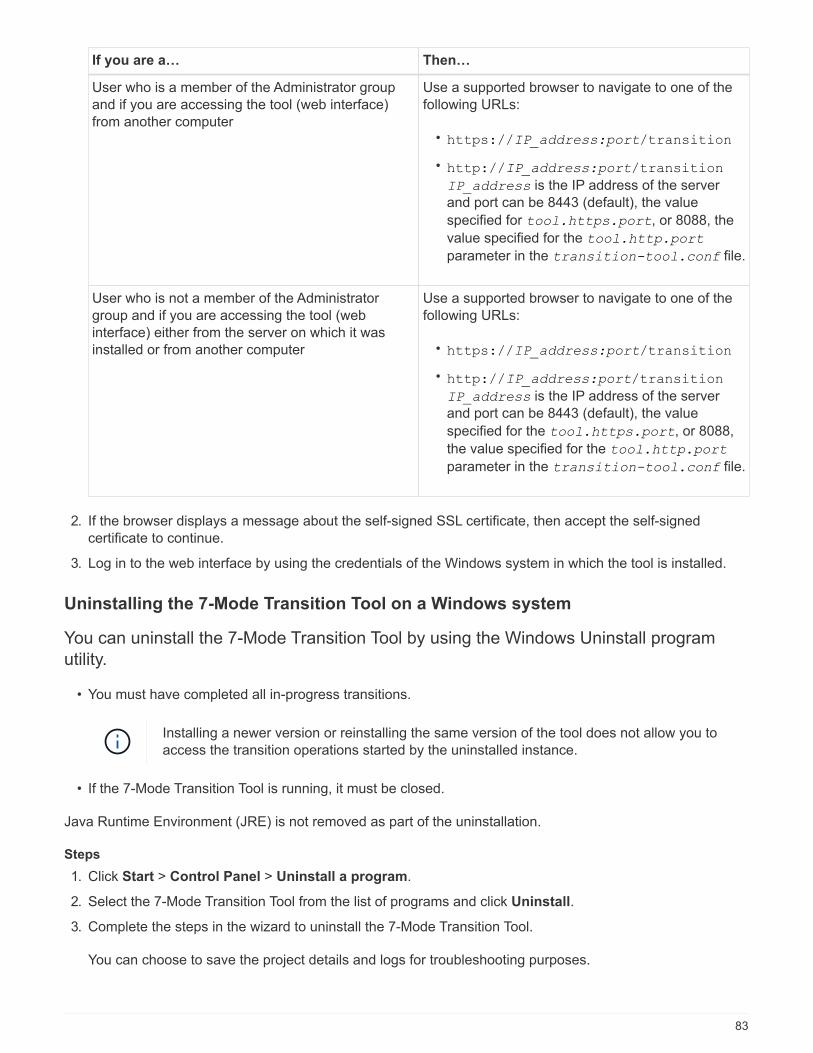
If you are a… Then…
User who is a member of the Administrator group
and if you are accessing the tool (web interface)
from another computer
Use a supported browser to navigate to one of the
following URLs:
• https://IP_address:port/transition
• http://IP_address:port/transition
IP_address is the IP address of the server
and port can be 8443 (default), the value
specified for tool.https.port, or 8088, the
value specified for the tool.http.port
parameter in the transition-tool.conf file.
User who is not a member of the Administrator
group and if you are accessing the tool (web
interface) either from the server on which it was
installed or from another computer
Use a supported browser to navigate to one of the
following URLs:
• https://IP_address:port/transition
• http://IP_address:port/transition
IP_address is the IP address of the server
and port can be 8443 (default), the value
specified for the tool.https.port, or 8088,
the value specified for the tool.http.port
parameter in the transition-tool.conf file.
2. If the browser displays a message about the self-signed SSL certificate, then accept the self-signed
certificate to continue.
3. Log in to the web interface by using the credentials of the Windows system in which the tool is installed.
Uninstalling the 7-Mode Transition Tool on a Windows system
You can uninstall the 7-Mode Transition Tool by using the Windows Uninstall program
utility.
• You must have completed all in-progress transitions.
Installing a newer version or reinstalling the same version of the tool does not allow you to
access the transition operations started by the uninstalled instance.
• If the 7-Mode Transition Tool is running, it must be closed.
Java Runtime Environment (JRE) is not removed as part of the uninstallation.
Steps
1. Click Start > Control Panel > Uninstall a program.
2. Select the 7-Mode Transition Tool from the list of programs and click Uninstall.
3. Complete the steps in the wizard to uninstall the 7-Mode Transition Tool.
You can choose to save the project details and logs for troubleshooting purposes.
83
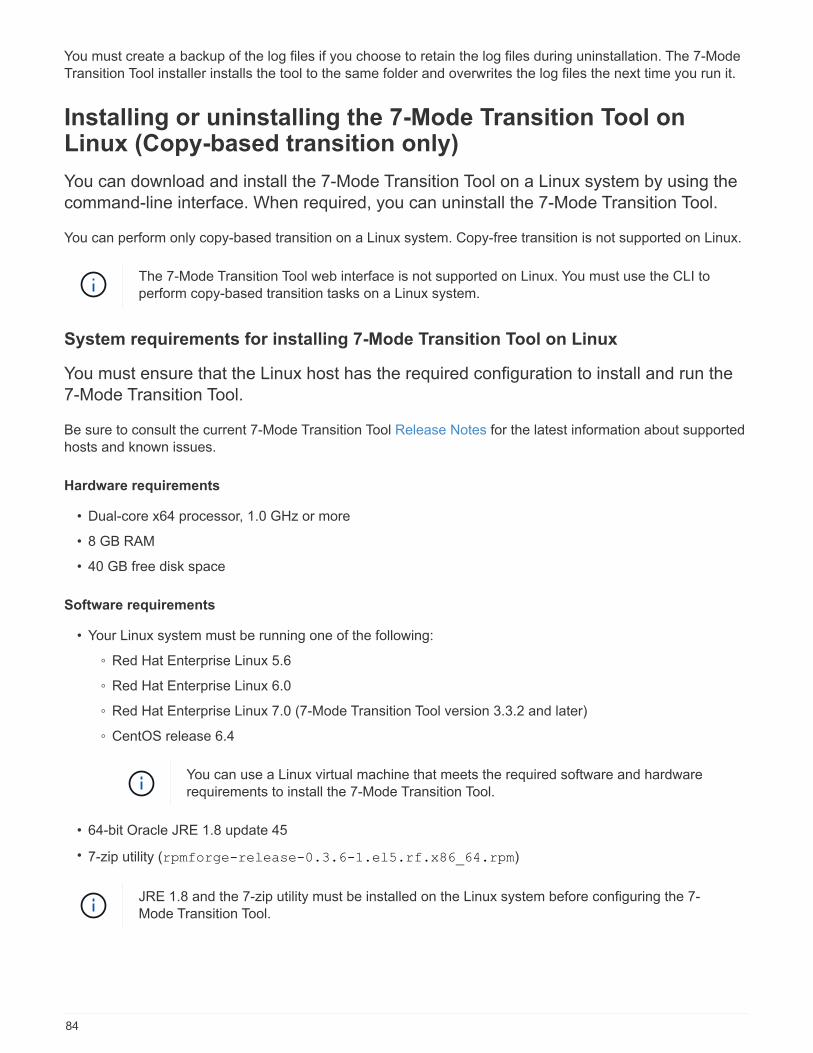
You must create a backup of the log files if you choose to retain the log files during uninstallation. The 7-Mode
Transition Tool installer installs the tool to the same folder and overwrites the log files the next time you run it.
Installing or uninstalling the 7-Mode Transition Tool onLinux (Copy-based transition only)
You can download and install the 7-Mode Transition Tool on a Linux system by using the
command-line interface. When required, you can uninstall the 7-Mode Transition Tool.
You can perform only copy-based transition on a Linux system. Copy-free transition is not supported on Linux.
The 7-Mode Transition Tool web interface is not supported on Linux. You must use the CLI to
perform copy-based transition tasks on a Linux system.
System requirements for installing 7-Mode Transition Tool on Linux
You must ensure that the Linux host has the required configuration to install and run the
7-Mode Transition Tool.
Be sure to consult the current 7-Mode Transition Tool Release Notes for the latest information about supported
hosts and known issues.
Hardware requirements
• Dual-core x64 processor, 1.0 GHz or more
• 8 GB RAM
• 40 GB free disk space
Software requirements
• Your Linux system must be running one of the following:
◦ Red Hat Enterprise Linux 5.6
◦ Red Hat Enterprise Linux 6.0
◦ Red Hat Enterprise Linux 7.0 (7-Mode Transition Tool version 3.3.2 and later)
◦ CentOS release 6.4
You can use a Linux virtual machine that meets the required software and hardware
requirements to install the 7-Mode Transition Tool.
• 64-bit Oracle JRE 1.8 update 45
• 7-zip utility (rpmforge-release-0.3.6-1.el5.rf.x86_64.rpm)
JRE 1.8 and the 7-zip utility must be installed on the Linux system before configuring the 7-
Mode Transition Tool.
84
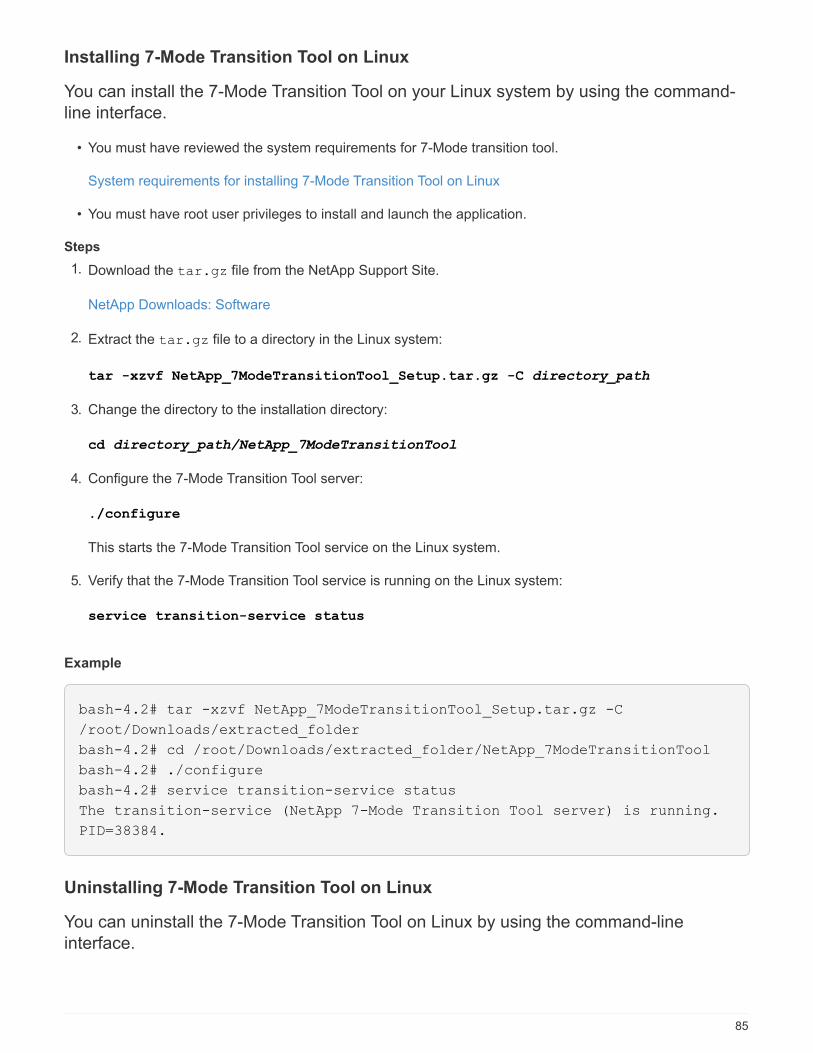
Installing 7-Mode Transition Tool on Linux
You can install the 7-Mode Transition Tool on your Linux system by using the command-
line interface.
• You must have reviewed the system requirements for 7-Mode transition tool.
System requirements for installing 7-Mode Transition Tool on Linux
• You must have root user privileges to install and launch the application.
Steps
1. Download the tar.gz file from the NetApp Support Site.
NetApp Downloads: Software
2. Extract the tar.gz file to a directory in the Linux system:
tar -xzvf NetApp_7ModeTransitionTool_Setup.tar.gz -C directory_path
3. Change the directory to the installation directory:
cd directory_path/NetApp_7ModeTransitionTool
4. Configure the 7-Mode Transition Tool server:
./configure
This starts the 7-Mode Transition Tool service on the Linux system.
5. Verify that the 7-Mode Transition Tool service is running on the Linux system:
service transition-service status
Example
bash-4.2# tar -xzvf NetApp_7ModeTransitionTool_Setup.tar.gz -C
/root/Downloads/extracted_folder
bash-4.2# cd /root/Downloads/extracted_folder/NetApp_7ModeTransitionTool
bash-4.2# ./configure
bash-4.2# service transition-service status
The transition-service (NetApp 7-Mode Transition Tool server) is running.
PID=38384.
Uninstalling 7-Mode Transition Tool on Linux
You can uninstall the 7-Mode Transition Tool on Linux by using the command-line
interface.
85
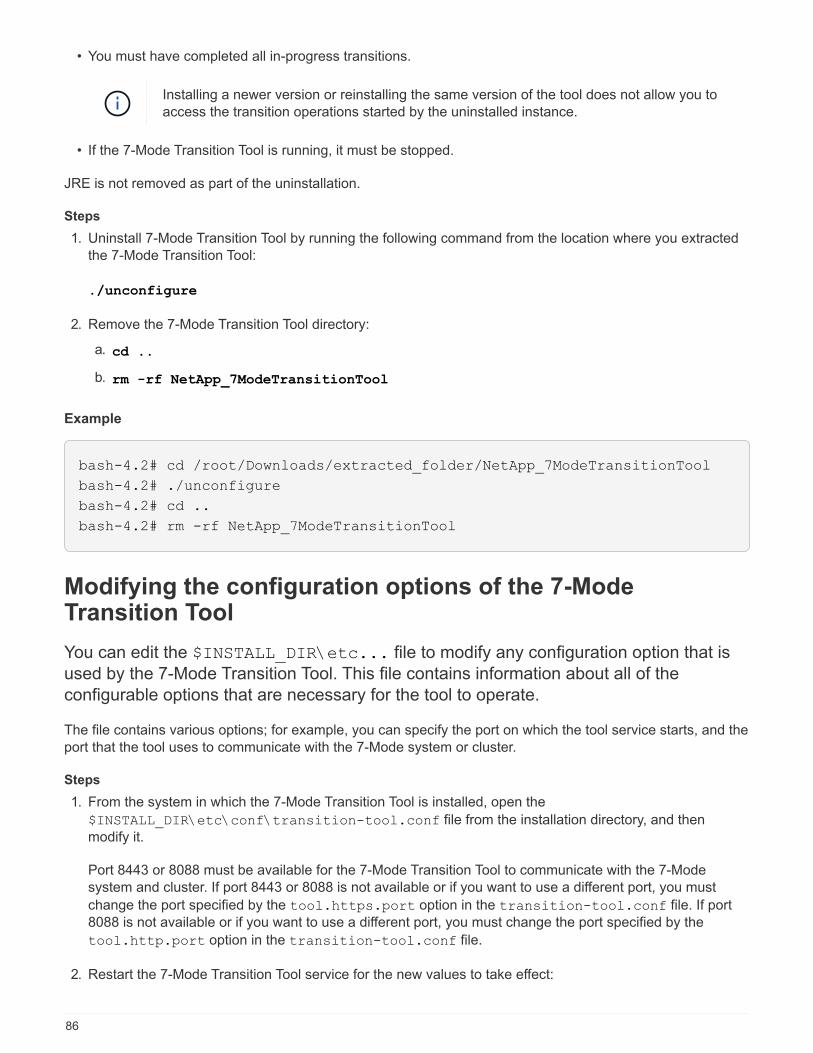
• You must have completed all in-progress transitions.
Installing a newer version or reinstalling the same version of the tool does not allow you to
access the transition operations started by the uninstalled instance.
• If the 7-Mode Transition Tool is running, it must be stopped.
JRE is not removed as part of the uninstallation.
Steps
1. Uninstall 7-Mode Transition Tool by running the following command from the location where you extracted
the 7-Mode Transition Tool:
./unconfigure
2. Remove the 7-Mode Transition Tool directory:
a. cd ..
b. rm -rf NetApp_7ModeTransitionTool
Example
bash-4.2# cd /root/Downloads/extracted_folder/NetApp_7ModeTransitionTool
bash-4.2# ./unconfigure
bash-4.2# cd ..
bash-4.2# rm -rf NetApp_7ModeTransitionTool
Modifying the configuration options of the 7-ModeTransition Tool
You can edit the $INSTALL_DIR\etc... file to modify any configuration option that is
used by the 7-Mode Transition Tool. This file contains information about all of the
configurable options that are necessary for the tool to operate.
The file contains various options; for example, you can specify the port on which the tool service starts, and the
port that the tool uses to communicate with the 7-Mode system or cluster.
Steps
1. From the system in which the 7-Mode Transition Tool is installed, open the
$INSTALL_DIR\etc\conf\transition-tool.conf file from the installation directory, and then
modify it.
Port 8443 or 8088 must be available for the 7-Mode Transition Tool to communicate with the 7-Mode
system and cluster. If port 8443 or 8088 is not available or if you want to use a different port, you must
change the port specified by the tool.https.port option in the transition-tool.conf file. If port
8088 is not available or if you want to use a different port, you must change the port specified by the
tool.http.port option in the transition-tool.conf file.
2. Restart the 7-Mode Transition Tool service for the new values to take effect:
86
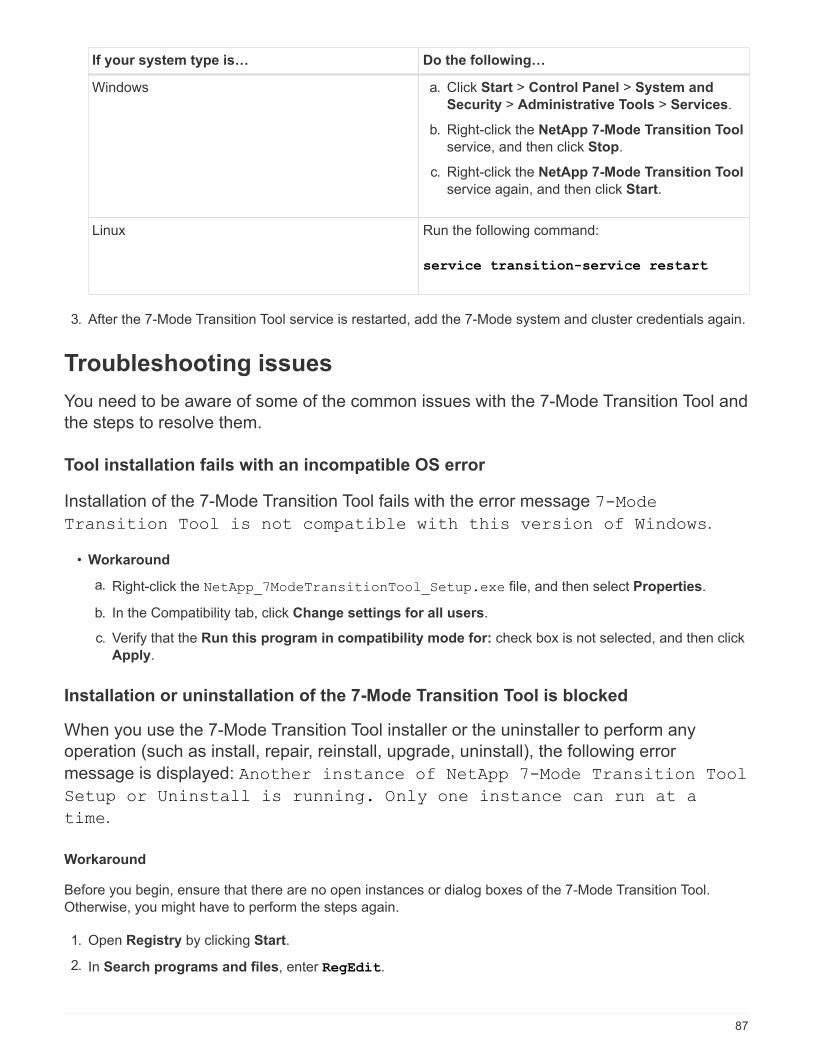
If your system type is… Do the following…
Windows a. Click Start > Control Panel > System and
Security > Administrative Tools > Services.
b. Right-click the NetApp 7-Mode Transition Tool
service, and then click Stop.
c. Right-click the NetApp 7-Mode Transition Tool
service again, and then click Start.
Linux Run the following command:
service transition-service restart
3. After the 7-Mode Transition Tool service is restarted, add the 7-Mode system and cluster credentials again.
Troubleshooting issues
You need to be aware of some of the common issues with the 7-Mode Transition Tool and
the steps to resolve them.
Tool installation fails with an incompatible OS error
Installation of the 7-Mode Transition Tool fails with the error message 7-Mode
Transition Tool is not compatible with this version of Windows.
• Workaround
a. Right-click the NetApp_7ModeTransitionTool_Setup.exe file, and then select Properties.
b. In the Compatibility tab, click Change settings for all users.
c. Verify that the Run this program in compatibility mode for: check box is not selected, and then click
Apply.
Installation or uninstallation of the 7-Mode Transition Tool is blocked
When you use the 7-Mode Transition Tool installer or the uninstaller to perform any
operation (such as install, repair, reinstall, upgrade, uninstall), the following error
message is displayed: Another instance of NetApp 7-Mode Transition Tool
Setup or Uninstall is running. Only one instance can run at a
time.
Workaround
Before you begin, ensure that there are no open instances or dialog boxes of the 7-Mode Transition Tool.
Otherwise, you might have to perform the steps again.
1. Open Registry by clicking Start.
2. In Search programs and files, enter RegEdit.
87
3. When Registry Editor is open, locate the HKEY_LOCAL_MACHINE registry hive.
4. Expand the HKEY_LOCAL_MACHINE hive by clicking the expand icon to the left of the folder icon.
5. Continue to expand the registry keys and subkeys until you locate HKEY_LOCAL_MACHINE\ SOFTWARE
\NetApp \7-Mode Transition Tool.
6. Click 7-Mode Transition Tool.
7. Right-click INSTALLATION_STATUS, and select Modify.
8. Change the value from INSTALLER_RUNNING to INSTALLED, and click OK.
You should now be able to perform any operation using the 7-Mode Transition Tool installer or the uninstaller.
Reinstalling or upgrading the 7-Mode Transition Tool fails on Windows system
This section provides information about the error when you reinstall or upgrade the 7-
Mode Transition Tool on Windows system. It also provides the reason for the error and
the steps to resolve the error.
• Message
Another instance of NetApp 7-Mode Transition Tool setup or uninstall is
running. Only one instance can run at a time.
• Cause
Some of the files in the 7-Mode Transition Tool installation folder are open.
• Corrective action
a. Close all of the 7-Mode Transition Tool installation files.
b. Open the registry entry for 7-Mode Transition Tool:
i. Check the INSTALLATION_STATUS field.
ii. If the value is INSTALLER_IS_RUNNING, change it to INSTALLED.
c. Retry reinstalling or upgrading the tool.
Windows Program Compatibility Assistant notification displayed while installingthe tool
Sometimes while installing the tool, you receive the Windows Program Compatibility
Assistant notification that the program might not have installed correctly. This notification
does not necessarily indicate that the program did not install correctly.
You can ignore this notification by clicking This program installed correctly.
88
Copy-Based Transition Guide
This guide describes how to assess 7-Mode controllers, hosts, and applications for
transition and perform a copy-based migration of data and configuration from 7-Mode
systems to ONTAP by using the 7-Mode Transition Tool.
Transition overview
Transitioning to clustered ONTAP involves identifying your current environment, defining
the transition scope, designing the optimal configuration of the destination systems,
planning how to migrate data and configurations, and making necessary environmental
updates.
Be sure to consult the current 7-Mode Transition Tool Release Notes for the latest information about supported
target releases and known issues.
7-Mode Transition Tool Release Notes
You must first collect information about the current environment, including both the current storage
environment as well as the hosts and applications. After collecting the storage inventory, you can assess the
current features and functionality that are used and identify any differences in the ONTAP version selected.
You can use 7-Mode Transition Tool to perform these tasks.
You can then define your migration project. This involves identifying what volumes and workloads you want to
migrate together, then you can design your cluster, and plan your transition. You can begin planning your
migration by first selecting the optimal migration method. When designing your cluster, you can use the
information gathered about your storage environment to map existing configuration items to their equivalent
items in ONTAP. For example, a 7-Mode volume should be mapped to an SVM and a volume in ONTAP and
an IP address that will be transitioned should be mapped to LIFs. You should also determine if any
environmental changes have to be made on the ONTAP system.
Implementation includes deploying and configuring the cluster, migrating data, applying configuration changes,
disconnecting clients and reconnecting to the destination ONTAP system, verifying access, as well as
performing any necessary environmental changes.
Related information
NetApp Documentation: ONTAP 9
Copy-based transition by using the 7-Mode Transition Tool
The 7-Mode Transition Tool enables you to perform copy-based transition by collecting
information and assessing 7-Mode controllers, hosts, switches, and applications for
transition. You can then migrate your data and configurations from 7-Mode to ONTAP.
The 7-Mode Transition Tool runs on a Windows or Linux system. The 7-Mode Transition Tool provides both a
web interface and a command-line interface for managing your transition operations.
Collecting and assessing ONTAP systems, hosts, switches, and applications
You can perform the following collect and assess tasks by using the 7-Mode Transition Tool:
89
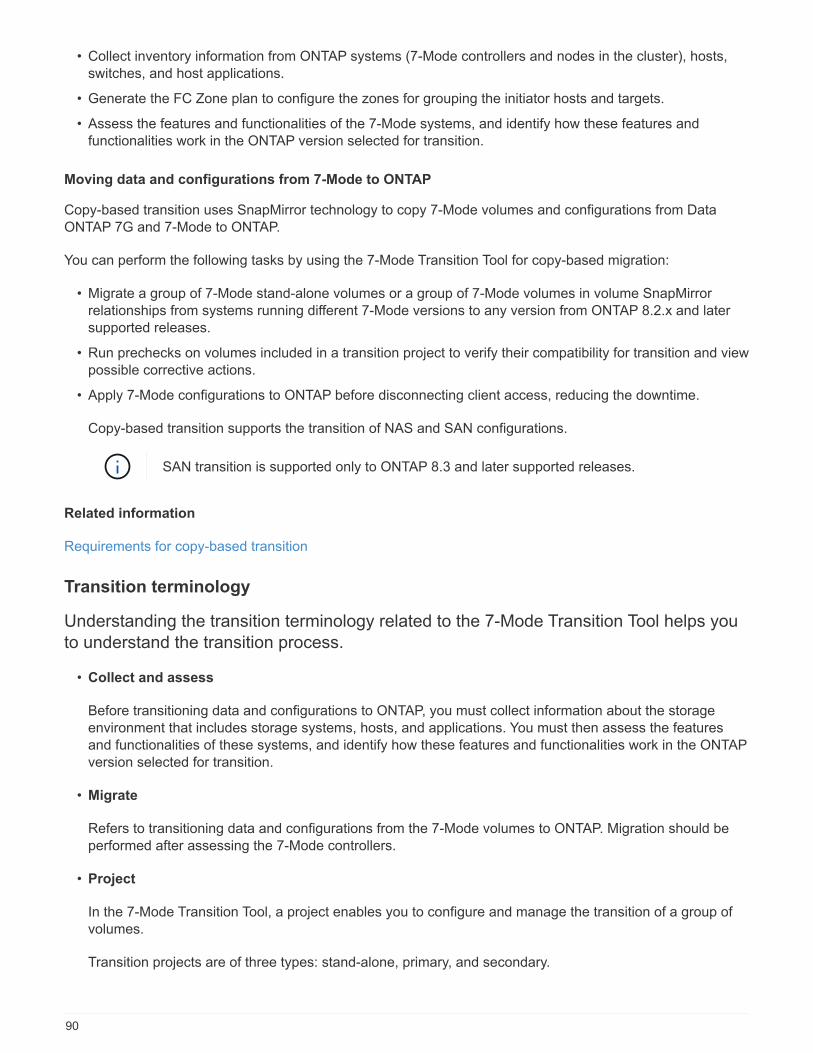
• Collect inventory information from ONTAP systems (7-Mode controllers and nodes in the cluster), hosts,
switches, and host applications.
• Generate the FC Zone plan to configure the zones for grouping the initiator hosts and targets.
• Assess the features and functionalities of the 7-Mode systems, and identify how these features and
functionalities work in the ONTAP version selected for transition.
Moving data and configurations from 7-Mode to ONTAP
Copy-based transition uses SnapMirror technology to copy 7-Mode volumes and configurations from Data
ONTAP 7G and 7-Mode to ONTAP.
You can perform the following tasks by using the 7-Mode Transition Tool for copy-based migration:
• Migrate a group of 7-Mode stand-alone volumes or a group of 7-Mode volumes in volume SnapMirror
relationships from systems running different 7-Mode versions to any version from ONTAP 8.2.x and later
supported releases.
• Run prechecks on volumes included in a transition project to verify their compatibility for transition and view
possible corrective actions.
• Apply 7-Mode configurations to ONTAP before disconnecting client access, reducing the downtime.
Copy-based transition supports the transition of NAS and SAN configurations.
SAN transition is supported only to ONTAP 8.3 and later supported releases.
Related information
Requirements for copy-based transition
Transition terminology
Understanding the transition terminology related to the 7-Mode Transition Tool helps you
to understand the transition process.
• Collect and assess
Before transitioning data and configurations to ONTAP, you must collect information about the storage
environment that includes storage systems, hosts, and applications. You must then assess the features
and functionalities of these systems, and identify how these features and functionalities work in the ONTAP
version selected for transition.
• Migrate
Refers to transitioning data and configurations from the 7-Mode volumes to ONTAP. Migration should be
performed after assessing the 7-Mode controllers.
• Project
In the 7-Mode Transition Tool, a project enables you to configure and manage the transition of a group of
volumes.
Transition projects are of three types: stand-alone, primary, and secondary.
90
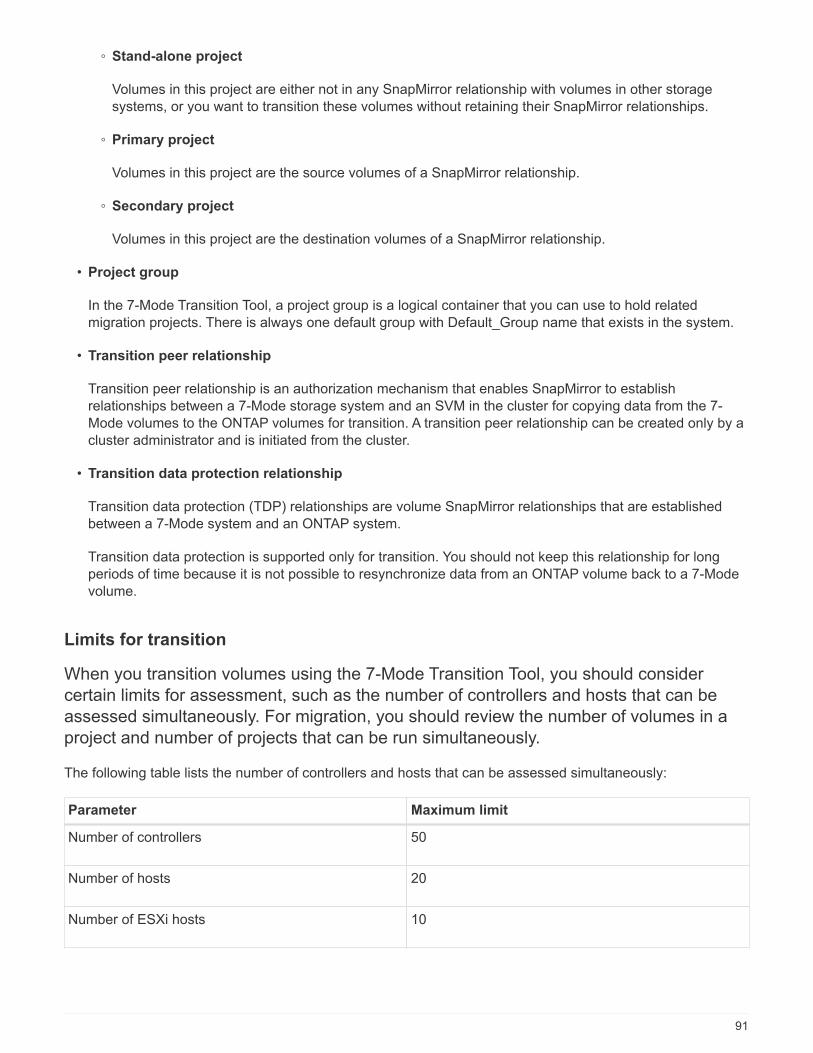
◦ Stand-alone project
Volumes in this project are either not in any SnapMirror relationship with volumes in other storage
systems, or you want to transition these volumes without retaining their SnapMirror relationships.
◦ Primary project
Volumes in this project are the source volumes of a SnapMirror relationship.
◦ Secondary project
Volumes in this project are the destination volumes of a SnapMirror relationship.
• Project group
In the 7-Mode Transition Tool, a project group is a logical container that you can use to hold related
migration projects. There is always one default group with Default_Group name that exists in the system.
• Transition peer relationship
Transition peer relationship is an authorization mechanism that enables SnapMirror to establish
relationships between a 7-Mode storage system and an SVM in the cluster for copying data from the 7-
Mode volumes to the ONTAP volumes for transition. A transition peer relationship can be created only by a
cluster administrator and is initiated from the cluster.
• Transition data protection relationship
Transition data protection (TDP) relationships are volume SnapMirror relationships that are established
between a 7-Mode system and an ONTAP system.
Transition data protection is supported only for transition. You should not keep this relationship for long
periods of time because it is not possible to resynchronize data from an ONTAP volume back to a 7-Mode
volume.
Limits for transition
When you transition volumes using the 7-Mode Transition Tool, you should consider
certain limits for assessment, such as the number of controllers and hosts that can be
assessed simultaneously. For migration, you should review the number of volumes in a
project and number of projects that can be run simultaneously.
The following table lists the number of controllers and hosts that can be assessed simultaneously:
Parameter Maximum limit
Number of controllers 50
Number of hosts 20
Number of ESXi hosts 10
91
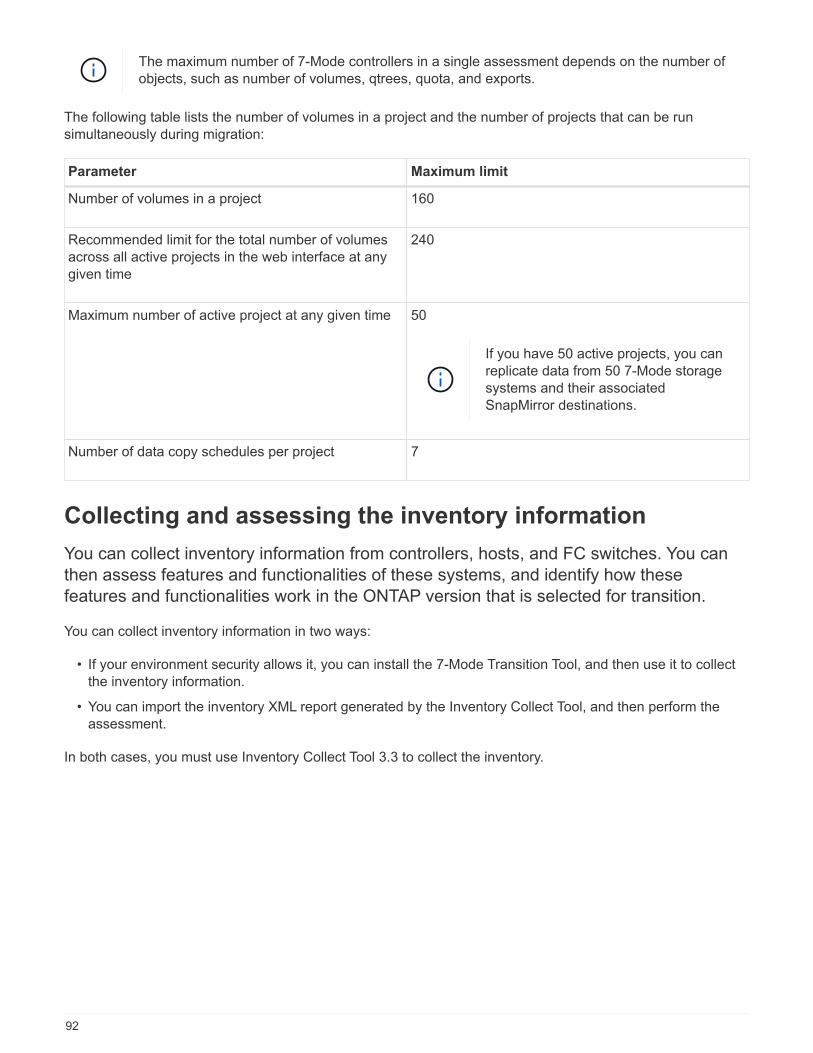
The maximum number of 7-Mode controllers in a single assessment depends on the number of
objects, such as number of volumes, qtrees, quota, and exports.
The following table lists the number of volumes in a project and the number of projects that can be run
simultaneously during migration:
Parameter Maximum limit
Number of volumes in a project 160
Recommended limit for the total number of volumes
across all active projects in the web interface at any
given time
240
Maximum number of active project at any given time 50
If you have 50 active projects, you can
replicate data from 50 7-Mode storage
systems and their associated
SnapMirror destinations.
Number of data copy schedules per project 7
Collecting and assessing the inventory information
You can collect inventory information from controllers, hosts, and FC switches. You can
then assess features and functionalities of these systems, and identify how these
features and functionalities work in the ONTAP version that is selected for transition.
You can collect inventory information in two ways:
• If your environment security allows it, you can install the 7-Mode Transition Tool, and then use it to collect
the inventory information.
• You can import the inventory XML report generated by the Inventory Collect Tool, and then perform the
assessment.
In both cases, you must use Inventory Collect Tool 3.3 to collect the inventory.
92
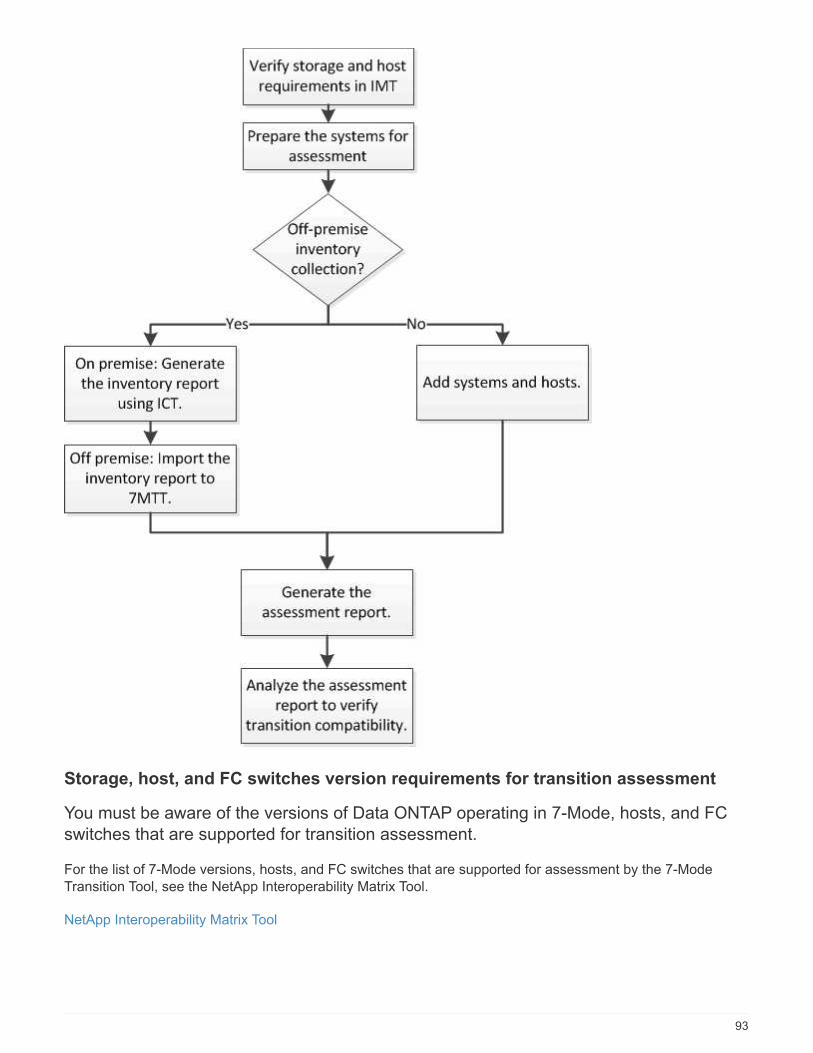
Storage, host, and FC switches version requirements for transition assessment
You must be aware of the versions of Data ONTAP operating in 7-Mode, hosts, and FC
switches that are supported for transition assessment.
For the list of 7-Mode versions, hosts, and FC switches that are supported for assessment by the 7-Mode
Transition Tool, see the NetApp Interoperability Matrix Tool.
NetApp Interoperability Matrix Tool
93
Preparing the 7-Mode systems and hosts for transition assessment
You must ensure that the 7-Mode systems and hosts meet certain network and protocol
requirements for successfully generating an assessment report.
Steps
1. Enable HTTPS on the 7-Mode system:
options httpd.admin.ssl.enable on
2. Enable TLS on the 7-Mode system:
options tls.enable on
The best practice is to enable TLS because of the security vulnerabilities in SSLv3.
3. Enable SSL and disable SSLv2 and SSLv3 on the 7-Mode system:
a. Set up and start SSL:
secureadmin setup ssl
b. Enable SSL:
options ssl.enable on
c. Disable SSLv2 and SSLv3:
options ssl.v2.enable off
options ssl.v3.enable off
The best practice is to disable SSLv2 and SSLv3 to avoid security vulnerabilities.
4. Enable SSH on the 7-Mode system:
a. Set up SSH on the 7-Mode system:
secureadmin setup -f ssh
The -f option forces the setup to run even if the SSH server is already configured.
b. Enable SSH:
secureadmin enable ssh2
c. Enable password authentication on the SSH server:
options ssh.passwd_auth.enable
d. Enable SSH access to the host:
+
options ssh.access
94
5. Prepare your Windows host systems:
◦ Enable WMI access.
For more information about enabling WMI access, see the host documentation.
◦ If you have Windows Server 2003, verify that you have installed the Microsoft Fibre Channel
Information Tool (fcinfo) package and run the tool once on your Windows host system.
This tool enables you to collect the HBA configuration information of the host.
◦ If the system on which the 7-Mode Transition Tool is run does not belong to a domain, verify the
following:
▪ The host system belongs to a domain.
▪ If the host has a local user, and the user name for that user is in the following format:
SystemName\Username
6. Enable SSH on the Linux or ESXi host.
For more information about enabling SSH, see the host documentation.
7. Verify that you have installed the latest NetApp Host Utilities software for each host.
For information about downloading and installing the NetApp Host Utilities software, see the NetApp
Support Site.
8. Verify that all the hosts and storage systems can be reached by the Windows system from which the 7-
Mode Transition Tool is run.
Assessing controllers and hosts
You can collect and assess information about the controllers and hosts by using either the
7-Mode Transition Tool or the Inventory Collect Tool, depending on the security
regulations in your environment.
• The 7-Mode Transition Tool collects inventory information about controller and hosts by adding the systems
or by using the inventory report generated by the Inventory Collect Tool.
The 7-Mode Transition Tool then assesses inventory information and creates the transition assessment
report.
• You must be aware of the following considerations when performing transition assessment:
◦ You should not perform both assessment and migration operations simultaneously on a controller.
◦ You should avoid performing assessment operations on active storage controllers during peak hours.
Generating an assessment report by adding systems to the 7-Mode Transition Tool
You can collect inventory information for controllers, hosts, and FC switches by adding
the systems to the 7-Mode Transition Tool. You can then create an assessment report to
assess the features and functionalities of those systems, and to identify how they work in
the ONTAP version selected for transition.
95
• The user name for the storage system and hosts must have sufficient privileges to execute the commands
listed in the readme file.
The readme file is located at 7-Mode_Transition_Tool_installed_location\bin\ict.
• You must have prepared the 7-Mode systems, hosts, and FC switches for transition assessment.
• For assessing Windows systems, you must have a domain user account.
• If you are adding multiple systems for assessment, you must create a text file that is encoded in the ASCII
or UTF-8 format and must contain the system details in the form of one system per line.
Each system details must be in the following format:
(ontap|windows|vmware|linux|cisco|brocade)://[(user|domain_user)[:passwo
rd]@](host_name|ip)
• The controller or host must be accessible by the system on which the 7-Mode Transition Tool is installed
and run.
• All features must be configured or their license enabled so that the workbook can contain inventory
information about these features.
• The user name for the storage system must have sufficient administrative privileges to collect inventory
information.
• All host names and storage system configurations, such as CIFS share names, user names, and group
names, must be in the UTF-8 format.
If the 7-Mode Transition Tool service or the system on which this tool is installed is restarted, then the system
details added to the tool are lost and the system must be added to the tool again.
Steps
1. If you want to use the latest Interoperability Matrix (IMT) data for transition assessment:
a. Download the IMT data from the Interoperability Matrix, and then save it:
i. From the Reports menu, click Complete Daily Exports.
ii. In the Complete Daily Exports dialog box, enter FAS in the search field.
iii. Download the ONTAP SAN Host excel file, and then save it.
NetApp Interoperability Matrix Tool
b. From the CLI, import the IMT data by using the transition imt import command.
c. Verify that the import is successful by using the transition imt show command.
Troubleshooting: If the IMT data import operation fails, you can revert to the previous data by using
the transition imt restore command.
2. Log in to the 7-Mode Transition Tool, and then click Get Started in the Collect and Assess section.
3. Click Add Systems.
4. In the Add System window, perform one of the following actions:
◦ Add a single system:
i. Enter the fully qualified domain name (FQDN) or IP address of the system.
96
ii. Enter the user name and password for the specified system.
iii. Select the system type:
▪ Data ONTAP storage systems
▪ Hosts: Microsoft Windows, Red Hat Linux Enterprise, and VMware ESXi
▪ FC switches: Cisco and Brocade
◦ Add multiple systems by clicking Browse, and then selecting the text file that contains the credentials
for multiple systems.
5. Click Add.
If the assessment status of a system is Ready, then you can perform transition assessment for that system.
6. Generate the transition assessment report:
a. Select the systems for transition assessment.
b. Click Create Transition Assessment Report.
c. In the Create Transition Assessment Report dialog box, select the Data ONTAP version of the target
cluster.
d. Specify a prefix for the file name of the reports.
e. Click Generate Report.
The assessment workbook (report name appended with “AssessmentWorkbook”) and assessment
executive summary (report name appended with “AssessmentExecutiveSummary”) reports are generated
in XML format.
+
You can access the assessment workbook, assessment summary, and inventory XML files that are used to
generate the assessment report from the …etc/webapp/transition-gui/tmc folder.
7. View the assessment workbook in Microsoft Excel and assessment executive summary in Microsoft Word
by using Microsoft Office 2007 or later versions.
In the assessment workbook, see the Transition Feasibility (CBT), Config Precheck Summary, Config
Precheck Details, and CBT Precheck Summary tabs for copy-based transition assessment details.
In the assessment executive summary, see the Copy-Based Transition Feasibility section for controller-
level assessment details.
You might have to enable macros in Excel to view the assessment workbook.
In the data collection summary of the assessment workbook, if the access status of a system is FAILED,
then the inventory information for that system is invalid. In the assessment executive summary, the value of
some of the fields of this system is displayed as Not Assessed.
Related information
Downloading transition log files
Generating an assessment report by importing the inventory report XML
You can import the inventory XML report generated by the Inventory Collect Tool to
97
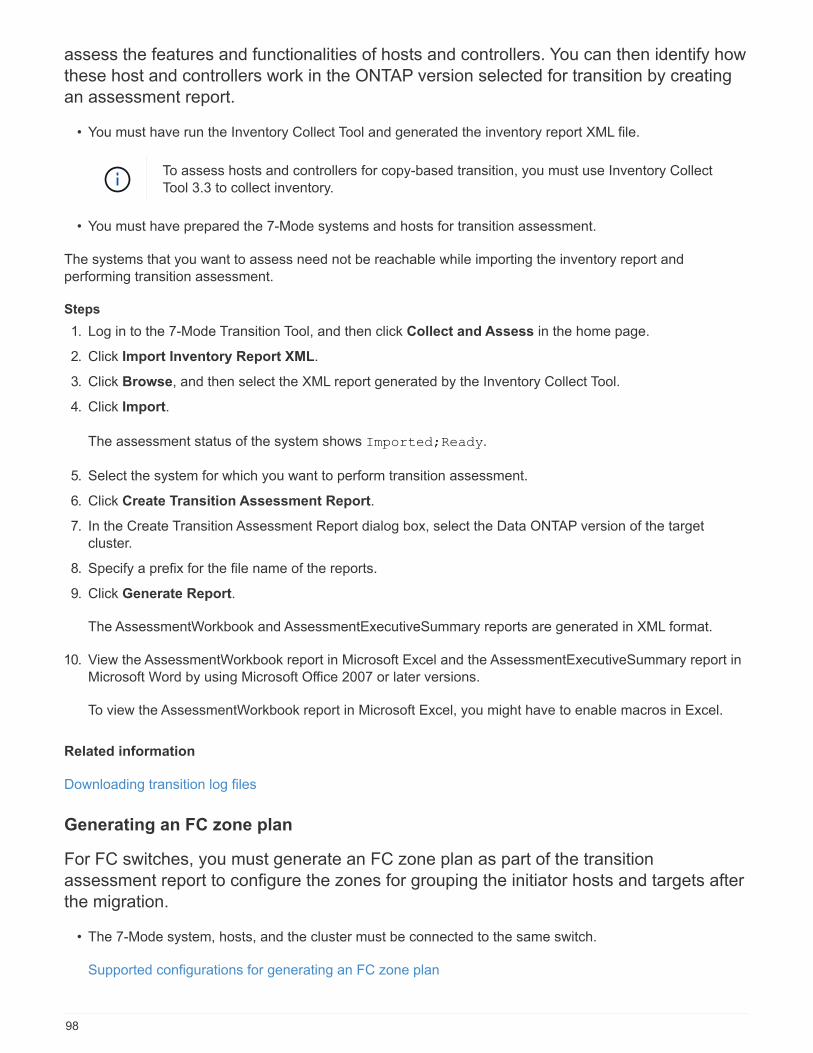
assess the features and functionalities of hosts and controllers. You can then identify how
these host and controllers work in the ONTAP version selected for transition by creating
an assessment report.
• You must have run the Inventory Collect Tool and generated the inventory report XML file.
To assess hosts and controllers for copy-based transition, you must use Inventory Collect
Tool 3.3 to collect inventory.
• You must have prepared the 7-Mode systems and hosts for transition assessment.
The systems that you want to assess need not be reachable while importing the inventory report and
performing transition assessment.
Steps
1. Log in to the 7-Mode Transition Tool, and then click Collect and Assess in the home page.
2. Click Import Inventory Report XML.
3. Click Browse, and then select the XML report generated by the Inventory Collect Tool.
4. Click Import.
The assessment status of the system shows Imported;Ready.
5. Select the system for which you want to perform transition assessment.
6. Click Create Transition Assessment Report.
7. In the Create Transition Assessment Report dialog box, select the Data ONTAP version of the target
cluster.
8. Specify a prefix for the file name of the reports.
9. Click Generate Report.
The AssessmentWorkbook and AssessmentExecutiveSummary reports are generated in XML format.
10. View the AssessmentWorkbook report in Microsoft Excel and the AssessmentExecutiveSummary report in
Microsoft Word by using Microsoft Office 2007 or later versions.
To view the AssessmentWorkbook report in Microsoft Excel, you might have to enable macros in Excel.
Related information
Downloading transition log files
Generating an FC zone plan
For FC switches, you must generate an FC zone plan as part of the transition
assessment report to configure the zones for grouping the initiator hosts and targets after
the migration.
• The 7-Mode system, hosts, and the cluster must be connected to the same switch.
Supported configurations for generating an FC zone plan
98
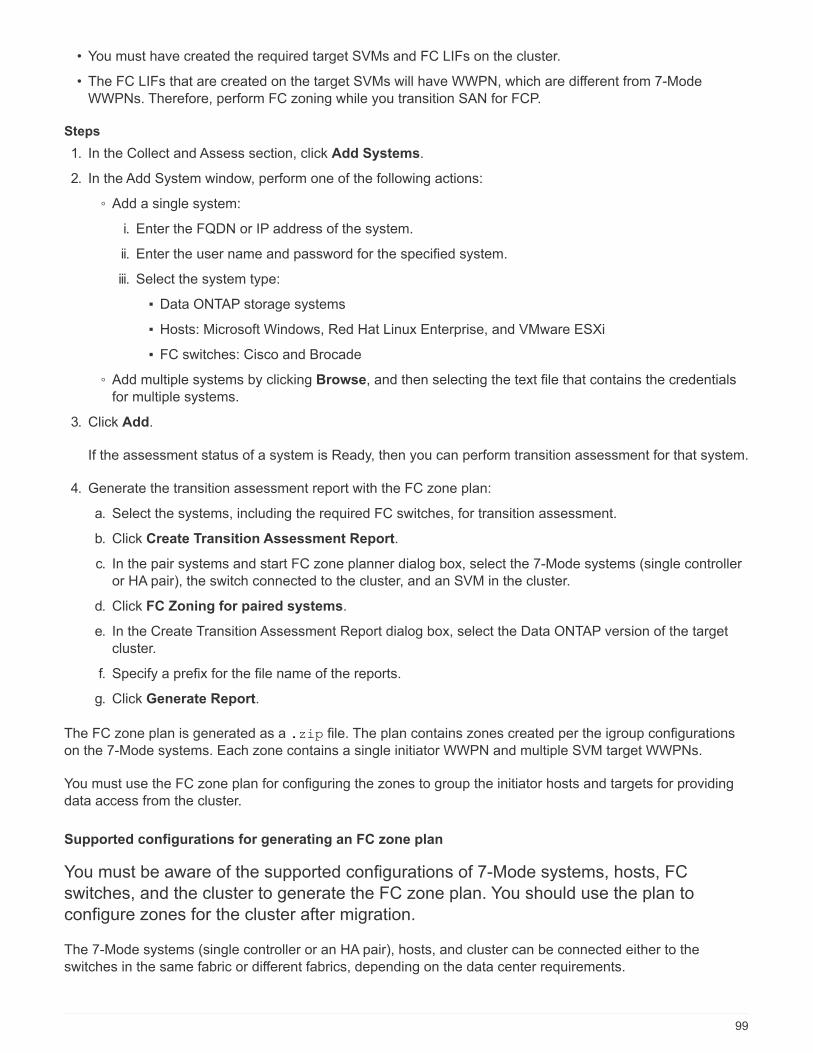
• You must have created the required target SVMs and FC LIFs on the cluster.
• The FC LIFs that are created on the target SVMs will have WWPN, which are different from 7-Mode
WWPNs. Therefore, perform FC zoning while you transition SAN for FCP.
Steps
1. In the Collect and Assess section, click Add Systems.
2. In the Add System window, perform one of the following actions:
◦ Add a single system:
i. Enter the FQDN or IP address of the system.
ii. Enter the user name and password for the specified system.
iii. Select the system type:
▪ Data ONTAP storage systems
▪ Hosts: Microsoft Windows, Red Hat Linux Enterprise, and VMware ESXi
▪ FC switches: Cisco and Brocade
◦ Add multiple systems by clicking Browse, and then selecting the text file that contains the credentials
for multiple systems.
3. Click Add.
If the assessment status of a system is Ready, then you can perform transition assessment for that system.
4. Generate the transition assessment report with the FC zone plan:
a. Select the systems, including the required FC switches, for transition assessment.
b. Click Create Transition Assessment Report.
c. In the pair systems and start FC zone planner dialog box, select the 7-Mode systems (single controller
or HA pair), the switch connected to the cluster, and an SVM in the cluster.
d. Click FC Zoning for paired systems.
e. In the Create Transition Assessment Report dialog box, select the Data ONTAP version of the target
cluster.
f. Specify a prefix for the file name of the reports.
g. Click Generate Report.
The FC zone plan is generated as a .zip file. The plan contains zones created per the igroup configurations
on the 7-Mode systems. Each zone contains a single initiator WWPN and multiple SVM target WWPNs.
You must use the FC zone plan for configuring the zones to group the initiator hosts and targets for providing
data access from the cluster.
Supported configurations for generating an FC zone plan
You must be aware of the supported configurations of 7-Mode systems, hosts, FC
switches, and the cluster to generate the FC zone plan. You should use the plan to
configure zones for the cluster after migration.
The 7-Mode systems (single controller or an HA pair), hosts, and cluster can be connected either to the
switches in the same fabric or different fabrics, depending on the data center requirements.
99

The following figure illustrates a configuration in which the 7-Mode systems, hosts, and cluster are connected
to the switches in the same fabric:
The following figure illustrates a configuration in which the 7-Mode systems and cluster are connected to
switches in different fabrics:
How you can use the assessment executive summary for transition assessment
The transition executive summary provides a summary of the 7-Mode controllers, hosts,
and FC switches in your environment. It provides an assessment report of the current
features and functionality that are used and recommends the transition methodology for
each volume within your storage environment. You can use the summary to plan your
transition.
The executive summary has the following main sections:
Target cluster
This section lists the ONTAP version of the target cluster that you selected during assessment.
Data collection summary
You can view the list of 7-Mode controllers, hosts, and switches for which you have collected information. You
can view the ONTAP version and model details of the 7-Mode controller. You can also view the OS type,
version, and model of the hosts.
Transition feasibility and recommended transition methodology
This section provides a summary of the prechecks that are run on each controller and the feasibility of
100
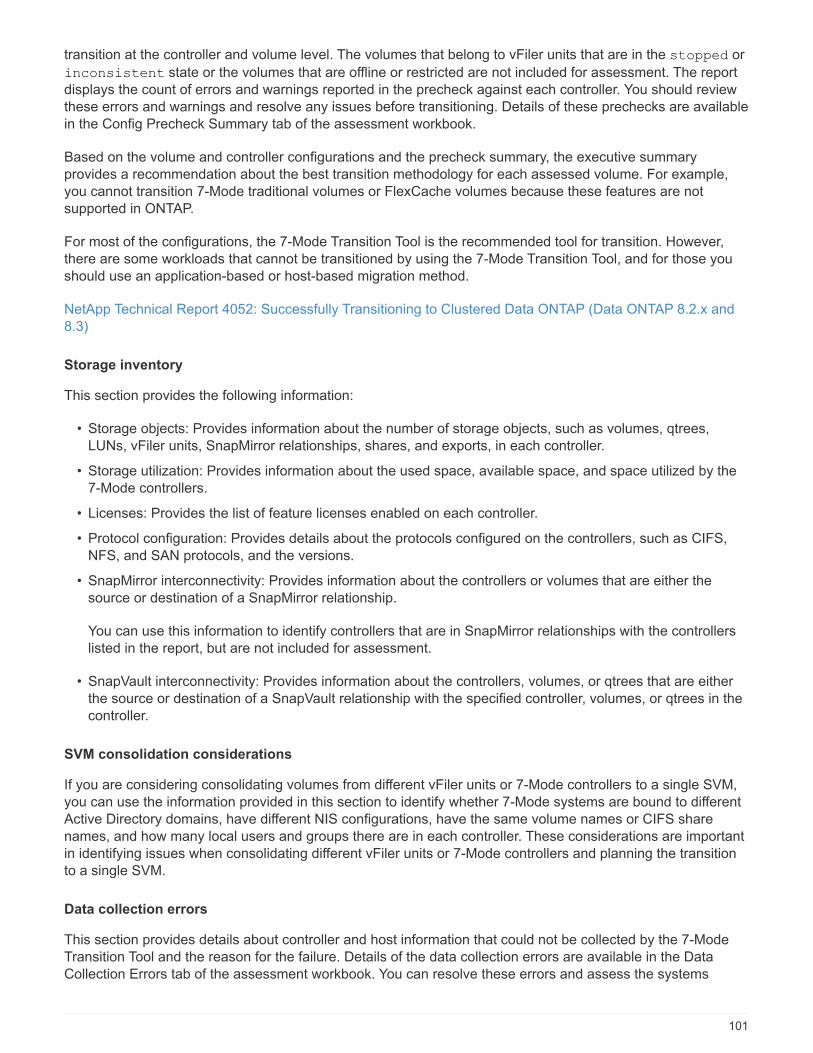
transition at the controller and volume level. The volumes that belong to vFiler units that are in the stopped or
inconsistent state or the volumes that are offline or restricted are not included for assessment. The report
displays the count of errors and warnings reported in the precheck against each controller. You should review
these errors and warnings and resolve any issues before transitioning. Details of these prechecks are available
in the Config Precheck Summary tab of the assessment workbook.
Based on the volume and controller configurations and the precheck summary, the executive summary
provides a recommendation about the best transition methodology for each assessed volume. For example,
you cannot transition 7-Mode traditional volumes or FlexCache volumes because these features are not
supported in ONTAP.
For most of the configurations, the 7-Mode Transition Tool is the recommended tool for transition. However,
there are some workloads that cannot be transitioned by using the 7-Mode Transition Tool, and for those you
should use an application-based or host-based migration method.
NetApp Technical Report 4052: Successfully Transitioning to Clustered Data ONTAP (Data ONTAP 8.2.x and
8.3)
Storage inventory
This section provides the following information:
• Storage objects: Provides information about the number of storage objects, such as volumes, qtrees,
LUNs, vFiler units, SnapMirror relationships, shares, and exports, in each controller.
• Storage utilization: Provides information about the used space, available space, and space utilized by the
7-Mode controllers.
• Licenses: Provides the list of feature licenses enabled on each controller.
• Protocol configuration: Provides details about the protocols configured on the controllers, such as CIFS,
NFS, and SAN protocols, and the versions.
• SnapMirror interconnectivity: Provides information about the controllers or volumes that are either the
source or destination of a SnapMirror relationship.
You can use this information to identify controllers that are in SnapMirror relationships with the controllers
listed in the report, but are not included for assessment.
• SnapVault interconnectivity: Provides information about the controllers, volumes, or qtrees that are either
the source or destination of a SnapVault relationship with the specified controller, volumes, or qtrees in the
controller.
SVM consolidation considerations
If you are considering consolidating volumes from different vFiler units or 7-Mode controllers to a single SVM,
you can use the information provided in this section to identify whether 7-Mode systems are bound to different
Active Directory domains, have different NIS configurations, have the same volume names or CIFS share
names, and how many local users and groups there are in each controller. These considerations are important
in identifying issues when consolidating different vFiler units or 7-Mode controllers and planning the transition
to a single SVM.
Data collection errors
This section provides details about controller and host information that could not be collected by the 7-Mode
Transition Tool and the reason for the failure. Details of the data collection errors are available in the Data
Collection Errors tab of the assessment workbook. You can resolve these errors and assess the systems
101
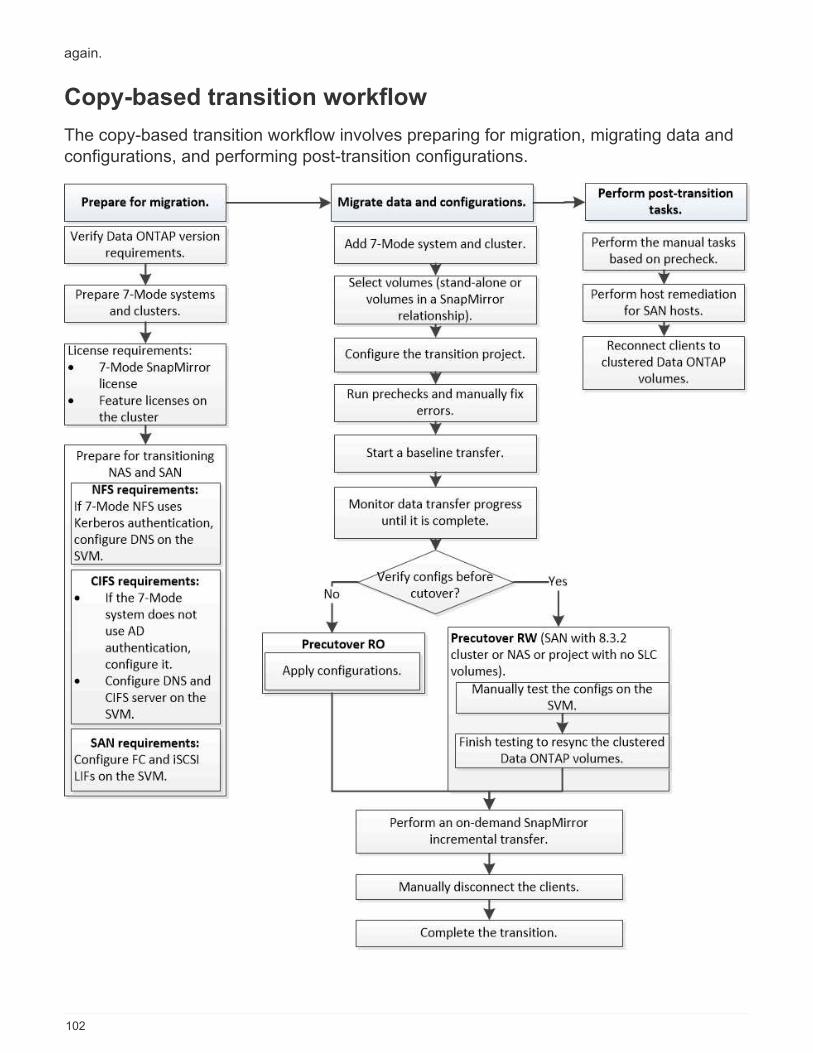
again.
Copy-based transition workflow
The copy-based transition workflow involves preparing for migration, migrating data and
configurations, and performing post-transition configurations.
102
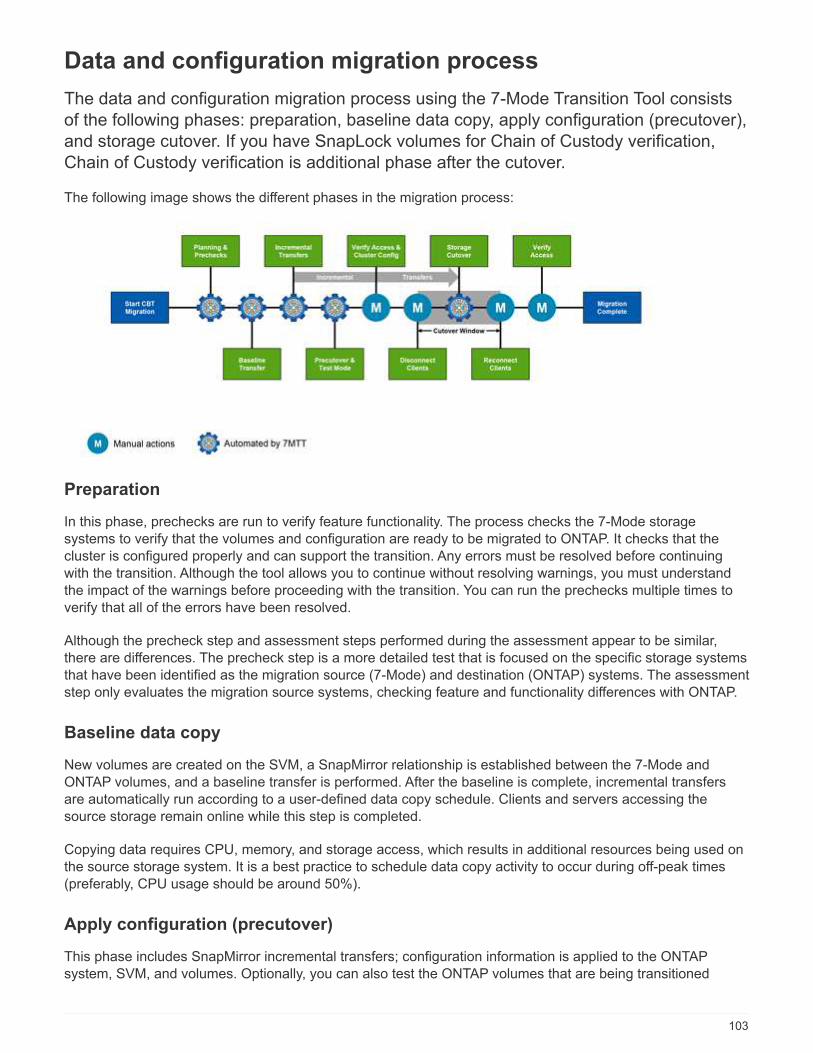
Data and configuration migration process
The data and configuration migration process using the 7-Mode Transition Tool consists
of the following phases: preparation, baseline data copy, apply configuration (precutover),
and storage cutover. If you have SnapLock volumes for Chain of Custody verification,
Chain of Custody verification is additional phase after the cutover.
The following image shows the different phases in the migration process:
Preparation
In this phase, prechecks are run to verify feature functionality. The process checks the 7-Mode storage
systems to verify that the volumes and configuration are ready to be migrated to ONTAP. It checks that the
cluster is configured properly and can support the transition. Any errors must be resolved before continuing
with the transition. Although the tool allows you to continue without resolving warnings, you must understand
the impact of the warnings before proceeding with the transition. You can run the prechecks multiple times to
verify that all of the errors have been resolved.
Although the precheck step and assessment steps performed during the assessment appear to be similar,
there are differences. The precheck step is a more detailed test that is focused on the specific storage systems
that have been identified as the migration source (7-Mode) and destination (ONTAP) systems. The assessment
step only evaluates the migration source systems, checking feature and functionality differences with ONTAP.
Baseline data copy
New volumes are created on the SVM, a SnapMirror relationship is established between the 7-Mode and
ONTAP volumes, and a baseline transfer is performed. After the baseline is complete, incremental transfers
are automatically run according to a user-defined data copy schedule. Clients and servers accessing the
source storage remain online while this step is completed.
Copying data requires CPU, memory, and storage access, which results in additional resources being used on
the source storage system. It is a best practice to schedule data copy activity to occur during off-peak times
(preferably, CPU usage should be around 50%).
Apply configuration (precutover)
This phase includes SnapMirror incremental transfers; configuration information is applied to the ONTAP
system, SVM, and volumes. Optionally, you can also test the ONTAP volumes that are being transitioned
103
before storage cutover.
Although a majority of the configuration is applied, some actions are deferred to storage cutover: for example,
applying quotas.
The 7-Mode IP addresses selected for the transition are created in the administrative down state. The new IP
addresses selected for the transition are created in the administrative up state. These new IP addresses can
be used to verify data access during precutover testing.
It is a best practice to run the apply configuration (precutover) phase a few days or weeks before the planned
cutover window. This activity helps to verify that all of the configurations are applied properly and whether any
changes are required.
Although incremental updates are not required, it is a best practice to perform an incremental
transfer as close to the storage cutover as possible to minimize the time that clients are
disconnected.
Storage cutover
At a high level during storage cutover, clients are disconnected, a final data transfer is performed, the
SnapMirror relationship is broken, and clients are manually reconnected.
Disconnecting clients or servers from the source storage volume prevents additional writes from being
performed while the final copy is being executed. Before disconnecting clients, it is a best practice to perform
an incremental update to minimize the downtime.
Storage access must be disconnected only for the volumes that are being migrated. Access to storage can be
discontinued from the storage side or the client side. The best practice is to discontinue connectivity from the
storage side. For example, if a CIFS client is accessing a volume named “user01” on a 7-Mode storage
system, you can use the cifs terminate -v user01 command to disable access to all of the CIFS shares
on the volume (discontinuing client access from the storage side). The IP addresses, mount points, or even
share names might change as a result of the migration, and therefore client access might be discontinued from
the client side as well. As long as clients cannot write any new data to the storage container that is being
migrated, you can use either or both of these methods for discontinuing access.
After clients are disconnected, the 7-Mode Transition Tool executes a final copy so that both the source and
destination datasets are at parity. The 7-Mode Transition Tool configures the data LIFs on the SVM. Some
configuration changes that were not transitioned during precutover, such as applying SAN configurations and
quotas, are also applied to the SVM at this time.
After storage cutover is complete, you can manually reconnect the clients and validate data access. Validating
data access involves verifying that clients are accessing the ONTAP system properly and that all permissions
are working as expected.
Chain of Custody verification for SnapLock volumes
You can trigger the Chain of Custody operation for the SnapLock volumes in the project after the transition is
complete. This operation is not mandatory and is required only if Chain of Custody verification is essential for
the transition of SnapLock volumes. You can perform this operation for all SnapLock volumes in the project or
for a subset of SnapLock volumes in the project. The Chain of Custody verification is supported for both
compliance and enterprise SnapLock volumes. The Chain of Custody verification is supported only for read-
write SnapLock volumes, and is not supported for read-only SnapLock volumes.
104

The Chain of Custody verification is not supported for SnapLock volume that have file names
with non-ASCII characters.
The verification workflow is supported only in the 7-Mode Transition Tool GUI and is not supported in the CLI
workflow.
The Chain of Custody verification operation performs the following:
• Enumerates all of the WORM files from 7-Mode volumes
• Calculates the fingerprint for each WORM file enumerated previously on both 7-Mode volumes and
transitioned ONTAP volumes
• Generates a report with details about the number of files with matched and unmatched fingerprints, and the
reason for the mismatch
Fingerprint data for all WORM files is stored in an ONTAP volume provided during the planning phase.
Based on the number of files on the 7-Mode volumes, the Chain of Custody verification process
can take a significant amount of time (days or weeks).
How you transition a stand-alone volume
Transitioning a stand-alone volume includes different phases: preparation, data copy,
apply configuration (precutover), and storage cutover. After completing transition, you
must perform some post-transition steps before resuming client access. Understanding
what occurs during each phase helps you manage your transition efficiently.
Phase Steps
Preparation 1. Gathering information
2. Performing the precheck
3. Creating data copy schedules
Data copy 1. Creating the ONTAP volumes as read-only
2. Creating a transition peer relationship
3. Establishing a SnapMirror relationship
4. Performing a baseline transfer
5. Performing scheduled incremental updates
105
Phase Steps
Precutover 1. Breaking the SnapMirror relationship
2. Applying configurations to the SVM
3. Configuring data LIFs on the SVM
4. Testing data and configurations (manual and only
for precutover RW)
5. Resynchronizing ONTAP volumes with
corresponding 7-Mode volumes
Storage cutover 1. Disconnecting client access (manual)
2. Performing a final SnapMirror update
3. Breaking the SnapMirror relationship
4. Removing 7-Mode IP addresses and setting the
data LIFs to the up state on the SVM
5. Taking the source volume offline
After cutover, performing post-transition steps and
enabling client access (manual)
Chain of Custody verification for SnapLock volumes 1. Enumerating all of the WORM files from 7-Mode
volumes
2. Calculating the fingerprint for each WORM file on
the 7-Mode volumes (enumerated in the previous
step) and calculating the fingerprint for the
corresponding WORM file on the transitioned
ONTAP volumes
3. Generating a report with details about the number
of files with matched and unmatched fingerprints,
and the reason for the mismatch
Preparation phase
In this phase, information about the 7-Mode system and the cluster, volumes, and IP addresses is collected.
The 7-Mode Transition Tool performs the following tasks in this phase:
1. Collects and adds 7-Mode storage system and volume information.
2. Runs the transition precheck.
3. Collects and adds cluster, SVM, and aggregate information.
4. Collects IP addresses that must be configured on the SVM:
◦ Selects the IP addresses that exist on the 7-Mode system.
◦ Specifies new IP addresses that must be configured on the SVM.
NOTE: Transitioning of iSCSI and FC LIFs (SAN) is not supported by the tool. You must manually
configure SAN LIFs on the SVM before transition.
5. Creates data copy schedules for baseline copy and incremental updates.
106

6. If the project contains SnapLock volumes, collects information about the read-write SnapLock volumes for
which Chain of Custody verification is required and the details of the ONTAP volume that stores the
fingerprint data that is generated during the Chain of Custody verification operation.
The Chain of Custody verification operation is supported only for volumes with file names
that have only ASCII characters.
7. Plans configuration transition by selecting the 7-Mode configurations that must be transitioned to the target
SVM and target volumes.
You should not modify the objects (volumes, IP addresses, system information, and so on) on the controller
after fixing the errors and warnings that are reported during the precheck.
Data copy phase
In this phase, data from the 7-Mode volumes is copied to the ONTAP volumes. The 7-Mode Transition Tool
performs the following tasks in this phase:
1. Creates the ONTAP volumes with read-only access.
2. Set up a transition peer relationship between the 7-Mode system and the SVM.
3. Establishes a transition SnapMirror relationship (relationship of type TDP) between the 7-Mode volumes
and ONTAP volumes.
4. Completes the baseline data copy transfer based on schedule inputs.
5. Performs scheduled incremental updates to the ONTAP volumes.
Apply configuration (precutover) phase
It is a best practice to run precutover operation a few days or weeks before the planned cutover window. This
activity is to verify whether all the configurations are applied properly and whether any changes are required.
In this phase, configurations from the 7-Mode volumes are copied to ONTAP volumes.
There are two modes for the apply configuration (precutover) phase: precutover read-only and precutover
read/write.
The precutover read/write mode is not supported when the project contains:
• SAN volumes and the target cluster is running Data ONTAP 8.3.1 or earlier
In this situation, the following configurations are not applied in the apply configuration (precutover) phase.
Instead, they are applied during the cutover phase.
◦ SAN configurations
◦ Snapshot Schedule configurations
• SnapLock Compliance volumes
If the project contains SnapLock Compliance volumes, then the Snapshot Schedule configurations are not
applied in the apply configuration (precutover) phase. Instead, these configurations are applied during the
cutover phase.
Considerations for transitioning of SnapLock Compliance volumes
107
If the target cluster is running Data ONTAP 8.3.1 or earlier, and you want to run the apply configuration
(precutover) operation in read/write mode for NAS volumes, then you must create separate projects for the
NAS volumes and SAN volumes. This action is required because the precutover read/write mode is not
supported if you have SAN volumes in your project.
If the project contains SnapLock Compliance volumes, and you want to run the apply configuration
(precutover) operation in read/write mode for non-SnapLock Compliance volumes, then you must create
separate projects for SnapLock Compliance volumes and non-SnapLock Compliance volumes. This action is
required because the precutover read/write mode is not supported if you have SnapLock Compliance volumes
in your project.
The tool performs the following steps in the precutover read-only mode:
1. Performs an incremental update from 7-Mode volumes to ONTAP volumes.
2. Breaks the SnapMirror relationship between 7-Mode volumes and ONTAP volumes.
For SnapLock Compliance volumes, the SnapMirror relationship between the 7-Mode
volume and ONTAP volumes is not broken. The SnapMirror relationship is not broken
because the SnapMirror resynchronization operation between 7-Mode and ONTAP volumes
is not supported for SnapLock Compliance volumes.
3. Collects configurations from 7-Mode volumes, and applies the configurations to the ONTAP volumes and
the SVM.
4. Configures the data LIFs on the SVM:
◦ Existing 7-Mode IP addresses are created on the SVM in the administrative down state.
◦ New IP addresses are created on the SVM in the administrative up state.
5. Resynchronizes the SnapMirror relationship between 7-Mode volumes and ONTAP volumes
The tool performs the following steps in the precutover read/write mode:
1. Performs an incremental update from 7-Mode volumes to ONTAP volumes.
2. Breaks the SnapMirror relationship between 7-Mode volumes and ONTAP volumes.
3. Collects configurations from 7-Mode volumes, and applying the configurations to the ONTAP volumes and
the SVM.
4. Configures the data LIFs on the SVM:
◦ Existing 7-Mode IP addresses are created on the SVM in the administrative down state.
◦ New IP addresses are created on the SVM in the administrative up state.
5. Makes the ONTAP volumes available for read/write access.
After you apply the configuration, the ONTAP volumes are available for read/write access so that read/write
data access can be tested on these volumes during apply configuration (precutover) testing. You can
manually verify the configurations and data access in ONTAP.
6. Resynchronizes the ONTAP volumes when "finish testing" operation is triggered manually.
Storage cutover phase
The 7-Mode Transition Tool performs the following tasks in this phase:
108
1. Optional: Performs an on-demand SnapMirror update to reduce the downtime after cutover.
2. Manual: Disconnect client access from the 7-Mode system.
3. Performs a final SnapMirror update from 7-Mode volumes to ONTAP volumes.
4. Breaks and deletes the SnapMirror relationship between the 7-Mode volumes to ONTAP volumes, making
the ONTAP volumes read/write.
If the selected volume is a SnapLock Compliance volume and the volume is the destination of a SnapMirror
relationship, then the SnapMirror relationship between the 7-Mode volume and the ONTAP volume is
deleted without a SnapMirror break operation. This action is performed to ensure that secondary ONTAP
SnapLock Compliance volumes remain in read-only mode. The secondary ONTAP SnapLock Compliance
volumes must be in read-only mode for the resynchronization operation to be successful between the
primary and secondary SnapLock Compliance volumes.
5. Applies Snapshot schedules configuration if:
◦ The target cluster is running clustered Data ONTAP 8.3.0 or 8.3.1 and project contains SAN volumes.
◦ The project contains SnapLock compliance volumes.
6. Applies SAN configurations, if the target cluster is running Data ONTAP 8.3.1 or earlier.
7. Applies quota configurations, if any.
8. Removes the existing 7-Mode IP addresses selected for transition from the 7-Mode system and brings the
data LIFs on the SVM to the administrative up state.
SAN LIFs are not transitioned by the 7-Mode Transition Tool.
9. Optional: Takes the 7-Mode volumes offline.
Chain of Custody verification process for SnapLock volumes
You must perform the Chain of Custody verification operation. The tool performs the following operations when
a Chain of Custody verification is initiated:
1. Enumerates all of the WORM files from 7-Mode volumes.
2. Calculates the fingerprint for each WORM file on the 7-Mode volumes (enumerated in the previous step)
and calculates the fingerprint for the corresponding WORM file on the transitioned ONTAP volumes.
3. Generates a report with details about the number of files with matched and unmatched fingerprints, and the
reason for the mismatch.
• The Chain of Custody verification operation is supported only for read-write SnapLock
volumes that have file names with only ASCII characters.
• This operation can take a significant amount of time based on the number of files on the 7-
Mode SnapLock volumes.
Post-transition steps
After the storage cutover phase finishes successfully and the transition is completed, you must perform some
post-transition manual tasks:
1. Perform the required steps to configure features that were not transitioned or were partially transitioned, as
listed in the precheck report.
109
For example, IPv6 and FPolicy must be configured manually after transition.
2. For SAN transition, reconfigure the hosts.
SAN host transition and remediation
3. Ensure that the SVM is ready to serve data to the clients by verifying the following:
◦ The volumes on the SVM are online and read/write.
◦ The IP addresses are up and reachable on the SVM.
4. Redirect client access to the ONTAP volumes.
Related information
Migrating data and configuration from 7-Mode volumes
How you transition volumes in a SnapMirror relationship
If you want to transition 7-Mode volumes that are in a SnapMirror relationship, the
secondary volumes must be transitioned first. Then, a volume SnapMirror relationship is
established between the 7-Mode primary volumes and ONTAP secondary volumes.
After transitioning the primary volumes, the 7-Mode Transition Tool establishes a volume SnapMirror
relationship between ONTAP primary and secondary volumes.
The 7-Mode Transition Tool does not automatically transition SnapLock Compliance volumes
that are in a SnapMirror relationship. All SnapLock Compliance volumes that are in a SnapMirror
relationship must be transitioned as stand-alone volumes. After the primary and secondary
SnapLock Compliance volumes are transitioned to ONTAP, you must manually perform the
SnapMirror resynchronization operation between these volumes.
You can perform precheck, baseline copy, incremental transfers, and apply configuration (precutover) on the
secondary and primary projects simultaneously; however, the storage cutover for the secondary project must
be performed first.
Preparation phase
In this phase, the 7-Mode system, cluster, volumes, and IP addresses are selected. The 7-Mode Transition
Tool performs the following tasks in this phase:
1. Adds 7-Mode storage system and volume information
2. Gathers information about 7-Mode source volumes and SnapMirror relationships:
◦ For transitioning a secondary volume, collecting information about the 7-Mode primary system
◦ For transitioning a primary volume, collecting information about the 7-Mode secondary system
3. Runs the transition precheck
4. Adds cluster, SVM, and aggregate information
5. Collects IP addresses that must be configured on the SVM:
◦ Selecting IP addresses that exist on the 7-Mode system
◦ Specifying new IP addresses that must be configured on the SVM
110
Transitioning iSCSI and FC LIFs (SAN) is not supported by the tool. You must manually
configure the SAN LIFs on the SVM before transition.
6. Creates the data copy schedules for baseline and incremental transfers.
7. If the project contains SnapLock volumes, collects information about the read-write SnapLock volumes for
which Chain of Custody verification is required and details about the ONTAP volume that stores the
fingerprint data generated during the Chain of Custody verification operation.
The SnapLock Chain of Custody verification is supported only for read/write 7-Mode
SnapLock volumes. It is not supported for read-only volumes. The SnapLock Chain of
Custody verification is not supported for SnapLock volumes containing files that have names
with non-ASCII characters.
8. Plans the configuration transition by selecting the 7-Mode configurations that must be transitioned to target
SVM and target volumes.
You must not modify the objects (volumes, IP addresses, system information, and so on) on the controller after
fixing errors and warnings that are reported by the precheck.
Data copy phase
In this phase, data from the 7-Mode volumes is copied to the ONTAP volumes. The 7-Mode Transition Tool
performs the following tasks in this phase:
1. Creates the ONTAP volumes with read-only access
2. Set up a transition peer relationship between the 7-Mode system and the SVM
3. Establishes a SnapMirror relationship between the 7-Mode volumes and ONTAP volumes
4. Completes the baseline data transfer based on schedule inputs
5. Performs scheduled SnapMirror data copy updates to the ONTAP volumes
Apply configuration (precutover) phase
It is a best practice to run Apply configuration a few days or weeks before the planned cutover window. This
precheck enables you to have enough time to verify that all of the configurations are applied properly and
whether any changes are required.
In this phase, configurations from the 7-Mode volumes are copied to the ONTAP volumes.
There are two modes for the apply configuration (precutover) phase: precutover read-only and precutover
read/write.
The precutover read/write mode is not supported when the project contains the following:
• SAN volumes and the target cluster is running Data ONTAP 8.3.1 or earlier
In this situation, the following configurations are not applied in the apply configuration (precutover) phase,
instead they are applied during the cutover phase:
◦ SAN configurations
◦ Snapshot schedule configurations
111
• SnapLock Compliance volumes
If the project contains SnapLock Compliance volumes, then the Snapshot schedule configurations are not
applied in the apply configuration (precutover) phase. Instead, these configurations are applied during the
cutover phase.
Considerations for transitioning of SnapLock Compliance volumes.
If the target cluster is running Data ONTAP 8.3.1 or earlier and you want to run the apply configuration
(precutover) operation in read/write mode for NAS volumes, then you must create separate projects for the
NAS and SAN volumes. This action is required because the apply configuration (precutover) read/write mode
is not supported if you have SAN volumes in your project.
If the project contains SnapLock Compliance volumes and you want to run the apply configuration (precutover)
operation in read/write mode for non-SnapLock Compliance volumes, then you must create separate projects
for SnapLock Compliance volumes and non-SnapLock Compliance volumes. This action is required because
the apply configuration (precutover) read/write mode is not supported if you have SnapLock Compliance
volumes in your project.
The following steps are performed by the tool in the precutover read-only mode:
1. Performs an incremental update from 7-Mode volumes to ONTAP volumes
2. Breaks the SnapMirror relationship between 7-Mode volumes and ONTAP volumes
For SnapLock Compliance volumes, the SnapMirror relationship between the 7-Mode
volume and ONTAP volumes is not broken. This is because the SnapMirror
resynchronization operation between 7-Mode and ONTAP volumes is not supported for
SnapLock Compliance volumes.
3. Collects configurations from 7-Mode volumes and applying the configurations to the ONTAP volumes and
SVM
4. Configures the data LIFs on the SVM:
◦ Existing 7-Mode IP addresses are created on the SVM in the administrative down state.
◦ New IP addresses are created on the SVM in the administrative up state.
5. Resynchronizes the SnapMirror relationship between 7-Mode volumes and ONTAP volumes
The following steps are performed in the precutover read/write mode:
1. Performs an incremental update from 7-Mode volumes to ONTAP volumes
2. Breaks the SnapMirror relationship between 7-Mode volumes and ONTAP volumes
3. Collects configurations from 7-Mode volumes and applying the configurations to the ONTAP volumes and
SVM
4. Configures the data LIFs on the SVM:
◦ Existing 7-Mode IP addresses are created on the SVM in the administrative down state.
◦ New IP addresses are created on the SVM in the administrative up state.
5. Tests the read/write data access on the ONTAP volumes during apply configuration (precutover) testing
These ONTAP volumes will be available for read/write access after you apply the configuration. After you
apply the configuration, the ONTAP volumes are available for read/write access so that read/write data
112
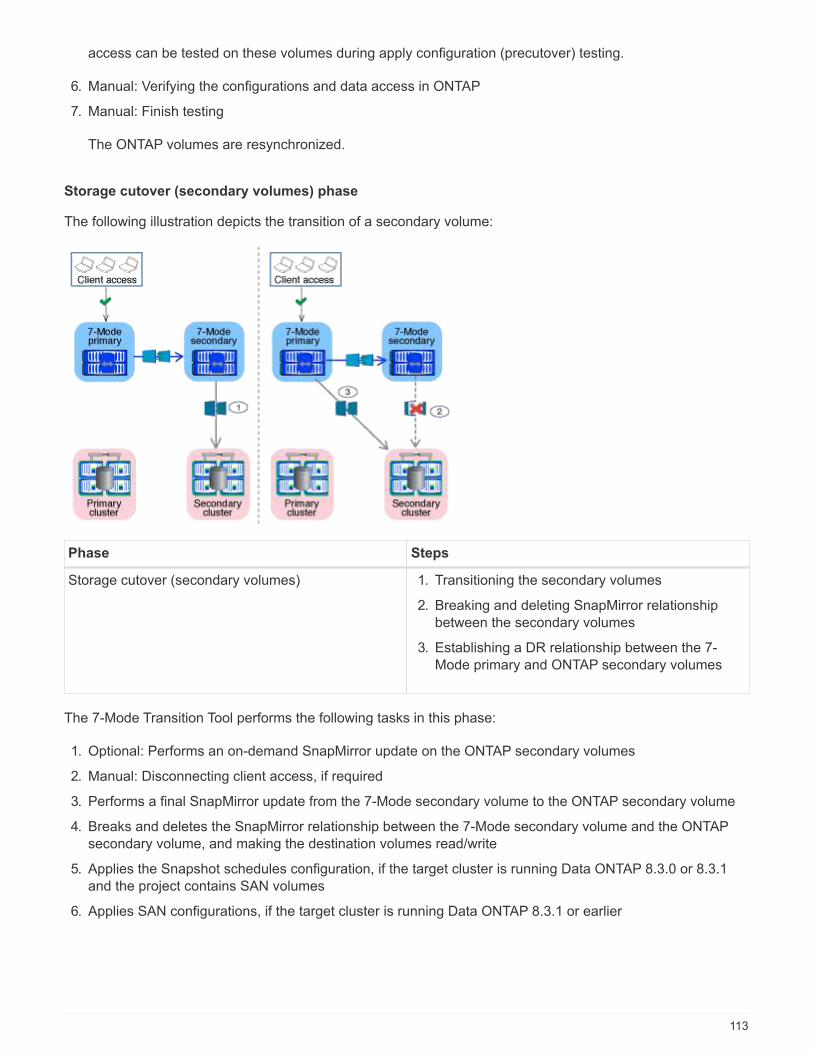
access can be tested on these volumes during apply configuration (precutover) testing.
6. Manual: Verifying the configurations and data access in ONTAP
7. Manual: Finish testing
The ONTAP volumes are resynchronized.
Storage cutover (secondary volumes) phase
The following illustration depicts the transition of a secondary volume:
Phase Steps
Storage cutover (secondary volumes) 1. Transitioning the secondary volumes
2. Breaking and deleting SnapMirror relationship
between the secondary volumes
3. Establishing a DR relationship between the 7-
Mode primary and ONTAP secondary volumes
The 7-Mode Transition Tool performs the following tasks in this phase:
1. Optional: Performs an on-demand SnapMirror update on the ONTAP secondary volumes
2. Manual: Disconnecting client access, if required
3. Performs a final SnapMirror update from the 7-Mode secondary volume to the ONTAP secondary volume
4. Breaks and deletes the SnapMirror relationship between the 7-Mode secondary volume and the ONTAP
secondary volume, and making the destination volumes read/write
5. Applies the Snapshot schedules configuration, if the target cluster is running Data ONTAP 8.3.0 or 8.3.1
and the project contains SAN volumes
6. Applies SAN configurations, if the target cluster is running Data ONTAP 8.3.1 or earlier
113
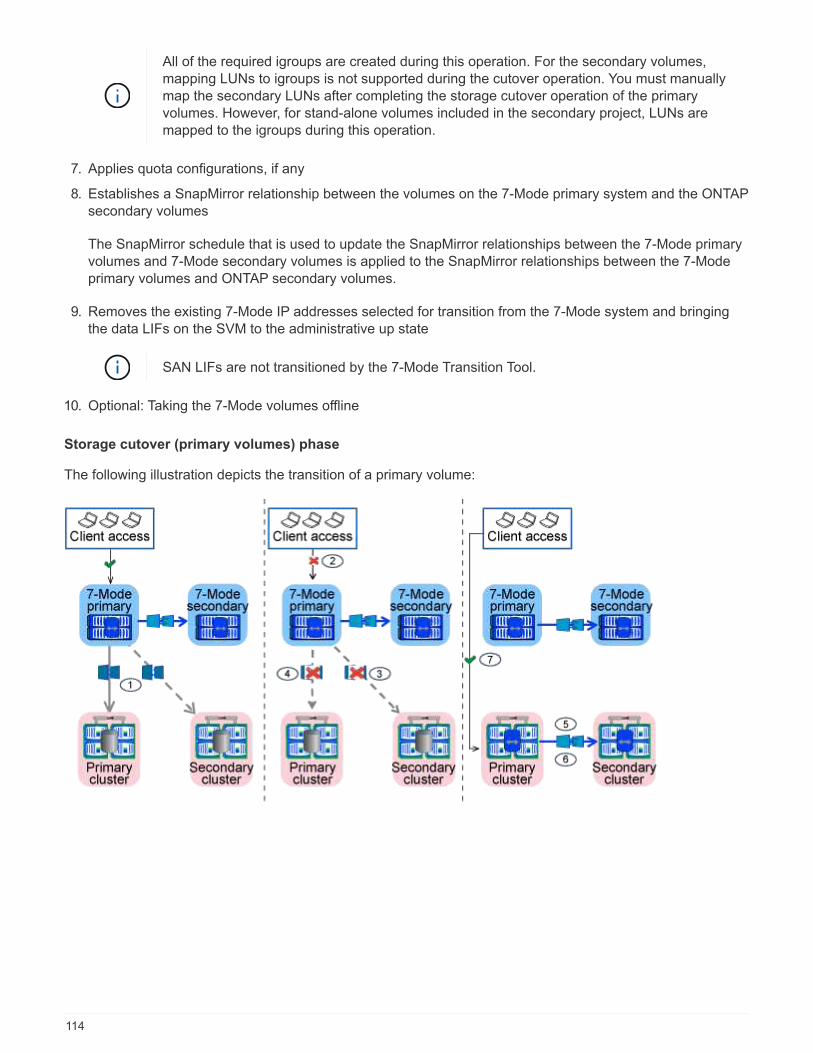
All of the required igroups are created during this operation. For the secondary volumes,
mapping LUNs to igroups is not supported during the cutover operation. You must manually
map the secondary LUNs after completing the storage cutover operation of the primary
volumes. However, for stand-alone volumes included in the secondary project, LUNs are
mapped to the igroups during this operation.
7. Applies quota configurations, if any
8. Establishes a SnapMirror relationship between the volumes on the 7-Mode primary system and the ONTAP
secondary volumes
The SnapMirror schedule that is used to update the SnapMirror relationships between the 7-Mode primary
volumes and 7-Mode secondary volumes is applied to the SnapMirror relationships between the 7-Mode
primary volumes and ONTAP secondary volumes.
9. Removes the existing 7-Mode IP addresses selected for transition from the 7-Mode system and bringing
the data LIFs on the SVM to the administrative up state
SAN LIFs are not transitioned by the 7-Mode Transition Tool.
10. Optional: Taking the 7-Mode volumes offline
Storage cutover (primary volumes) phase
The following illustration depicts the transition of a primary volume:
114
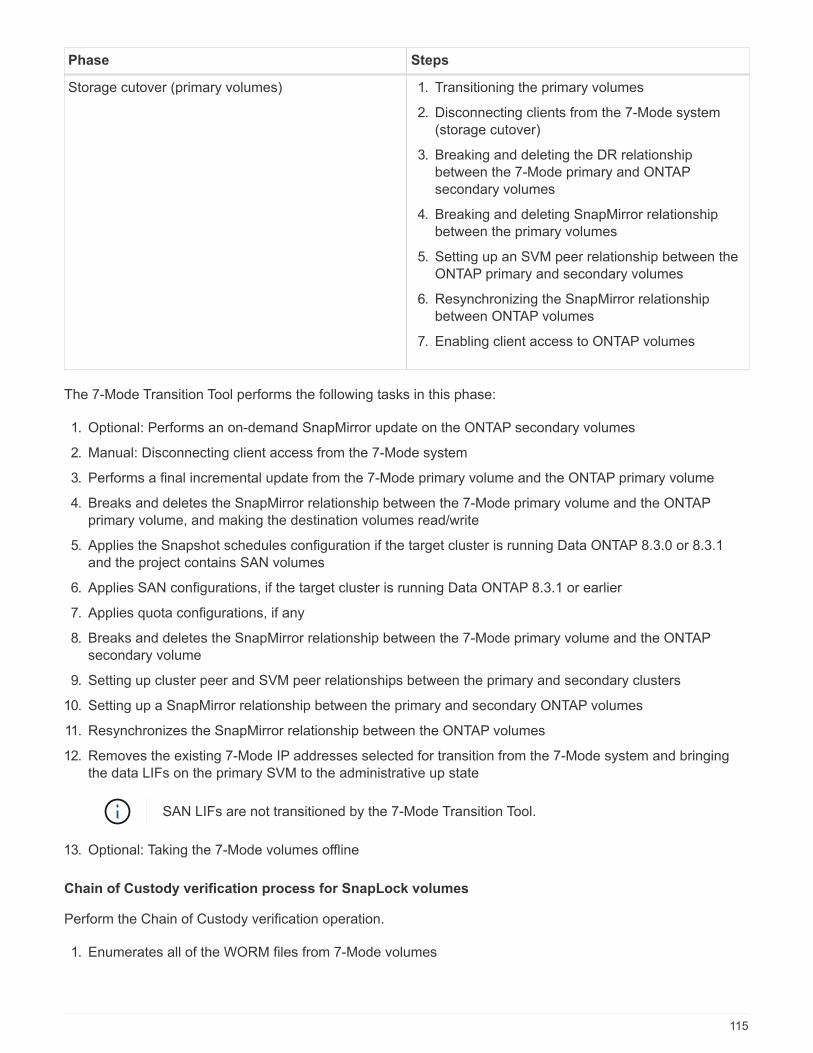
Phase Steps
Storage cutover (primary volumes) 1. Transitioning the primary volumes
2. Disconnecting clients from the 7-Mode system
(storage cutover)
3. Breaking and deleting the DR relationship
between the 7-Mode primary and ONTAP
secondary volumes
4. Breaking and deleting SnapMirror relationship
between the primary volumes
5. Setting up an SVM peer relationship between the
ONTAP primary and secondary volumes
6. Resynchronizing the SnapMirror relationship
between ONTAP volumes
7. Enabling client access to ONTAP volumes
The 7-Mode Transition Tool performs the following tasks in this phase:
1. Optional: Performs an on-demand SnapMirror update on the ONTAP secondary volumes
2. Manual: Disconnecting client access from the 7-Mode system
3. Performs a final incremental update from the 7-Mode primary volume and the ONTAP primary volume
4. Breaks and deletes the SnapMirror relationship between the 7-Mode primary volume and the ONTAP
primary volume, and making the destination volumes read/write
5. Applies the Snapshot schedules configuration if the target cluster is running Data ONTAP 8.3.0 or 8.3.1
and the project contains SAN volumes
6. Applies SAN configurations, if the target cluster is running Data ONTAP 8.3.1 or earlier
7. Applies quota configurations, if any
8. Breaks and deletes the SnapMirror relationship between the 7-Mode primary volume and the ONTAP
secondary volume
9. Setting up cluster peer and SVM peer relationships between the primary and secondary clusters
10. Setting up a SnapMirror relationship between the primary and secondary ONTAP volumes
11. Resynchronizes the SnapMirror relationship between the ONTAP volumes
12. Removes the existing 7-Mode IP addresses selected for transition from the 7-Mode system and bringing
the data LIFs on the primary SVM to the administrative up state
SAN LIFs are not transitioned by the 7-Mode Transition Tool.
13. Optional: Taking the 7-Mode volumes offline
Chain of Custody verification process for SnapLock volumes
Perform the Chain of Custody verification operation.
1. Enumerates all of the WORM files from 7-Mode volumes
115
2. Calculates the fingerprint for each WORM file on the 7-Mode volumes (enumerated in the previous step)
and calculates the fingerprint for the corresponding WORM file on the transitioned ONTAP volumes.
3. Generates a report with details about the number of files with matched and unmatched fingerprints, and the
reason for the mismatch
• The Chain of Custody verification operation is supported only for read-write SnapLock
volumes that have file names with only ASCII characters.
• This operation can take significant amount of time based on the number of files on the 7-
Mode SnapLock volumes.
Post-transition steps
After the cutover phase is successfully and the transition is completed, you must perform the following post-
transition tasks:
1. Perform any manual steps to transition features that were available on the 7-Mode system, but were not
transitioned automatically to the SVM by the tool.
2. If the target cluster is running Data ONTAP 8.3.1 or earlier, you must map the secondary LUNs manually.
3. For SAN transitions, manually reconfigure the hosts.
SAN host transition and remediation
4. Ensure that the SVM is ready to serve data to the clients by verifying the following:
◦ The volumes on the SVM are online and read/write.
◦ The transitioned IP addresses are up and reachable on the SVM.
5. Redirect client access to the ONTAP volumes.
Related information
Migrating data and configuration from 7-Mode volumes
Preparing for copy-based transition
Before initiating a data copy operation from 7-Mode to ONTAP, you must understand the
requirements and restrictions for migration, and complete certain tasks on the 7-Mode
system and the cluster.
You must ensure that the following requirements are met before transition:
• The 7-Mode and ONTAP systems must be reachable from the host on which the tool is installed.
• The 7-Mode systems must be running the supported Data ONTAP versions.
• SnapMirror must be licensed on the 7-Mode system.
• Required feature licenses, if they exist on the 7-Mode system, must be installed on the cluster.
• The NTP server must be configured and the time must be synchronized across the 7-Mode system and
cluster.
• All preparatory tasks on the 7-Mode system must be completed.
• All preparatory tasks on the cluster must be completed.
116
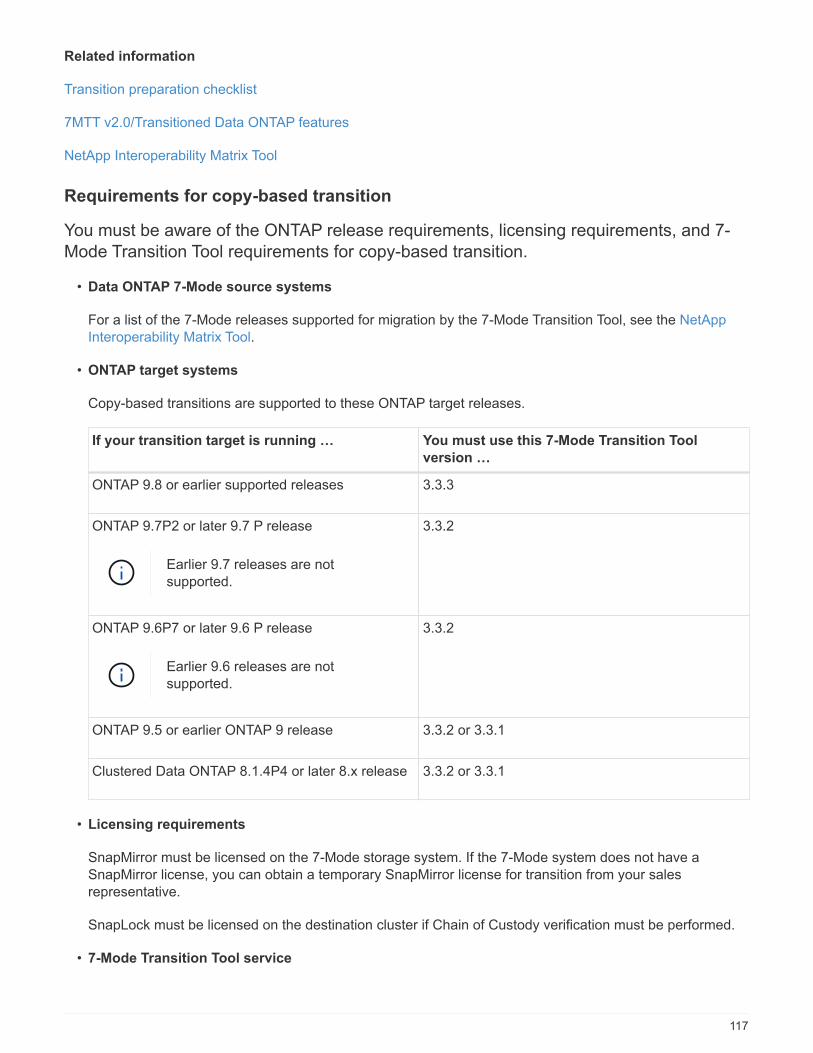
Related information
Transition preparation checklist
7MTT v2.0/Transitioned Data ONTAP features
NetApp Interoperability Matrix Tool
Requirements for copy-based transition
You must be aware of the ONTAP release requirements, licensing requirements, and 7-
Mode Transition Tool requirements for copy-based transition.
• Data ONTAP 7-Mode source systems
For a list of the 7-Mode releases supported for migration by the 7-Mode Transition Tool, see the NetApp
Interoperability Matrix Tool.
• ONTAP target systems
Copy-based transitions are supported to these ONTAP target releases.
If your transition target is running … You must use this 7-Mode Transition Tool
version …
ONTAP 9.8 or earlier supported releases 3.3.3
ONTAP 9.7P2 or later 9.7 P release
Earlier 9.7 releases are not
supported.
3.3.2
ONTAP 9.6P7 or later 9.6 P release
Earlier 9.6 releases are not
supported.
3.3.2
ONTAP 9.5 or earlier ONTAP 9 release 3.3.2 or 3.3.1
Clustered Data ONTAP 8.1.4P4 or later 8.x release 3.3.2 or 3.3.1
• Licensing requirements
SnapMirror must be licensed on the 7-Mode storage system. If the 7-Mode system does not have a
SnapMirror license, you can obtain a temporary SnapMirror license for transition from your sales
representative.
SnapLock must be licensed on the destination cluster if Chain of Custody verification must be performed.
• 7-Mode Transition Tool service
117
For the data copy schedules to take effect, the 7-Mode Transition Tool service must be always up and
running on the Windows or Linux system on which the tool is installed. However, it does not require the
web interface to be active or open for the schedules to take effect. You can close the web interface and re-
log in whenever required.
• Storage, host, and FC switch version requirements for transition assessment
For the list of 7-Mode versions, hosts, and FC switches that are supported for assessment by the 7-Mode
Transition Tool, see the NetApp Interoperability Matrix Tool.
Port requirements for communicating with the 7-Mode Transition Tool
The 7-Mode Transition Tool communicates with the 7-Mode system and the cluster over
certain ports. You must ensure that these ports on the 7-Mode system and the cluster are
open to allow communication with the 7-Mode Transition Tool.
Ports that must be open on the 7-Mode systems
The 7-Mode Transition Tool communicates with the 7-Mode systems by using HTTPS on port 443.
The following ports are required by the cluster to communicate with the 7-Mode systems for SnapMirror
replication:
• 10565/TCP
• 10566/TCP
• 10567/TCP
• 10568/TCP
• 10569/TCP
• 10670/TCP
Ports that must be open on the cluster
The 7-Mode Transition Tool communicates with the cluster by using HTTPS on port 443.
The following ports are required by the 7-Mode systems to communicate with the cluster for SnapMirror
replication:
• 10565/TCP
• 10566/TCP
• 10567/TCP
• 10568/TCP
• 10569/TCP
• 10670/TCP
• 11105/TCP
Additionally, the 7-Mode Transition Tool performs a ping operation from the intercluster LIFs to the data copy IP
address of the 7-Mode system to verify reachability.
118
Ports that must be open on the 7-Mode Transition Tool
Port 8444 of the 7-Mode Transition Tool must be open for the web interface.
To transition netgroups and CIFS local users and groups, the following requirements must be met:
• Port 8088 of the 7-Mode Transition Tool must be available.
For an alternative to port 8088, you must change the port specified by the tool.http.port parameter in
the transition-tool.conf file of the 7-Mode Transition Tool installation directory.
You must restart the 7-Mode Transition Tool service after changing the port in the
configuration file.
• Each node in the cluster must have at least one data LIF configured for the target SVM.
• All SVM data LIFs must be able to communicate with the 7-Mode Transition Tool port 8088 or the port
specified by the tool.http.port parameter in the transition-tool.conf file.
You must verify that firewalls do not block this traffic.
Restrictions for transition
You must be aware of certain restrictions for transitioning some 7-Mode volumes and
configurations.
• No volume within the same project can cut over until all volumes in the same project have completed their
baseline transfers.
• If you want to transition 7-Mode primary and secondary volumes when both the 7-Mode source and
destination are running Data ONTAP 7.3.x or 8.0.x, you must start transitioning the 7-Mode secondary
volume only when there are no data updates from the 7-Mode primary to the 7-Mode secondary volume.
You must verify that the data update schedules for the 7-Mode primary volume to the 7-Mode secondary
volume do not conflict with the schedules for the 7-Mode secondary volume to the ONTAP secondary
volume.
• You must not initiate a transition while the aggregates on either the 7-Mode system or cluster are
upgrading from 32-bit to 64-bit format; otherwise the transition fails.
• The 7-Mode Transition tool does not transition a volume with a qtree that is the destination of a qtree
SnapMirror relationship.
The qtree SnapMirror relationship must be broken before the volume can be transitioned.
• You cannot transition a fanout SnapMirror relationship (a primary volume that is in SnapMirror relationships
with more than one secondary volume in different controllers) by using the 7-Mode Transition Tool web
interface.
To transition the SnapMirror relationships in a fanout configuration, you must use the 7-Mode Transition
Tool CLI. You should create separate projects for each secondary volume, complete the transition of the
secondary projects, and then create and complete the transition of the primary volume.
• You cannot transition volumes from different vFiler units or from different 7-Mode controllers to the same
119
SVM at the same time.
You must complete the transition of volumes from a given vFiler unit or 7-Mode controller before you can
start the transition of volumes from another vFiler unit or 7-Mode controller.
• The 7-Mode Transition tool does not transition a vFiler unit as a single entity.
However, you can transition all of the volumes in a vFiler unit by selecting them as a part of one or more
projects.
• The 7-Mode Transition tool does not transition the root volume of a vFiler unit if the root volume is based
on a qtree that belongs to the default vFiler unit.
• The 7-Mode Transition tool does not transition a volume with a qtree if the volume and qtree are owned by
different vFiler units.
Transitioning such a volume causes the qtree to become inaccessible.
• Transitioned volumes cannot be converted to FlexGroup volumes.
The precheck operation displays information about some of these restrictions.
Preparing the 7-Mode system for transition
Before starting a transition, you must complete certain tasks on the 7-Mode system, such
as adding the SnapMirror license, enabling the 7-Mode system to communicate with the
target cluster, and enabling TLS.
All the 7-Mode volumes that you want to transition must be online.
Steps
1. Add and enable the SnapMirror license on the 7-Mode system:
a. Add the SnapMirror license on the 7-Mode system:
license add license_code
license_code is the license code you purchased.
b. Enable the SnapMirror functionality:
+
options snapmirror.enable on
2. Configure the 7-Mode system and the target cluster to communicate with each other by choosing one of
the following options:
◦ Set the snapmirror.access option to all.
◦ Set the value of the snapmirror.access option to the IP addresses of all the intercluster LIFs on the
cluster.
◦ If the snapmirror.access option is legacy and the snapmirror.checkip.enable option is
off, add the SVM name to the /etc/snapmirror.allow file.
◦ If the snapmirror.access option is legacy and the snapmirror.checkip.enable option is on,
add the IP addresses of the intercluster LIFs to the /etc/snapmirror.allow file.
120
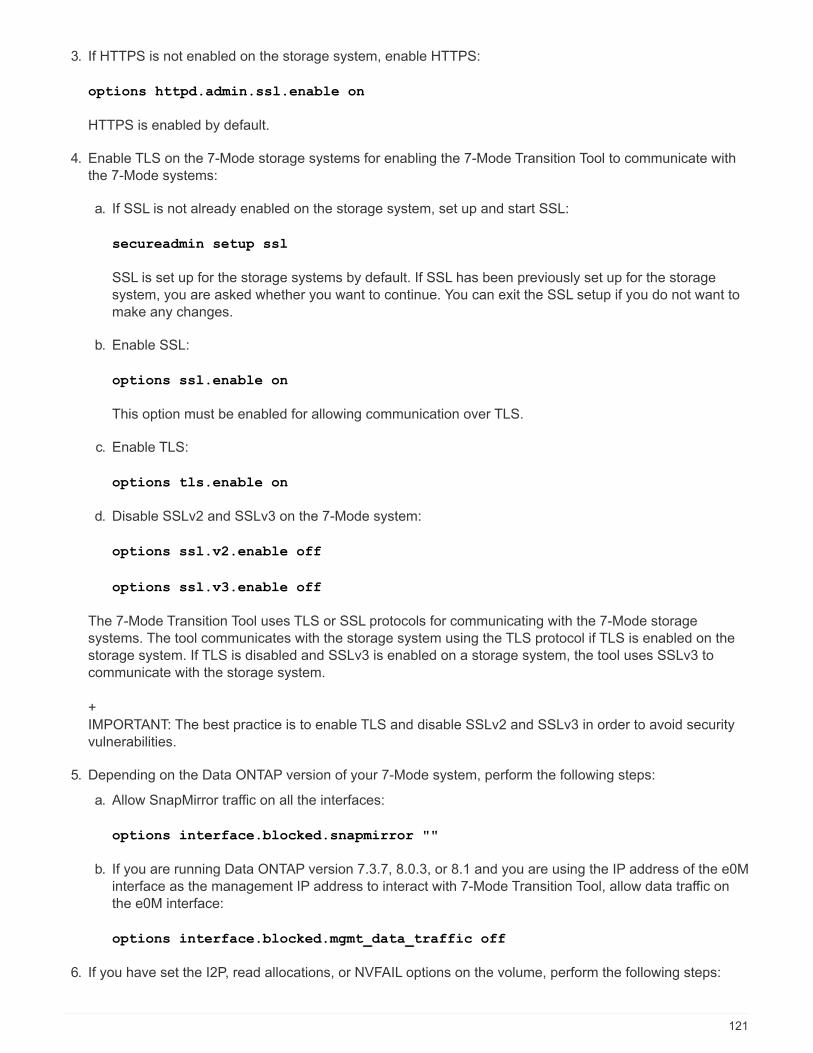
3. If HTTPS is not enabled on the storage system, enable HTTPS:
options httpd.admin.ssl.enable on
HTTPS is enabled by default.
4. Enable TLS on the 7-Mode storage systems for enabling the 7-Mode Transition Tool to communicate with
the 7-Mode systems:
a. If SSL is not already enabled on the storage system, set up and start SSL:
secureadmin setup ssl
SSL is set up for the storage systems by default. If SSL has been previously set up for the storage
system, you are asked whether you want to continue. You can exit the SSL setup if you do not want to
make any changes.
b. Enable SSL:
options ssl.enable on
This option must be enabled for allowing communication over TLS.
c. Enable TLS:
options tls.enable on
d. Disable SSLv2 and SSLv3 on the 7-Mode system:
options ssl.v2.enable off
options ssl.v3.enable off
The 7-Mode Transition Tool uses TLS or SSL protocols for communicating with the 7-Mode storage
systems. The tool communicates with the storage system using the TLS protocol if TLS is enabled on the
storage system. If TLS is disabled and SSLv3 is enabled on a storage system, the tool uses SSLv3 to
communicate with the storage system.
+
IMPORTANT: The best practice is to enable TLS and disable SSLv2 and SSLv3 in order to avoid security
vulnerabilities.
5. Depending on the Data ONTAP version of your 7-Mode system, perform the following steps:
a. Allow SnapMirror traffic on all the interfaces:
options interface.blocked.snapmirror ""
b. If you are running Data ONTAP version 7.3.7, 8.0.3, or 8.1 and you are using the IP address of the e0M
interface as the management IP address to interact with 7-Mode Transition Tool, allow data traffic on
the e0M interface:
options interface.blocked.mgmt_data_traffic off
6. If you have set the I2P, read allocations, or NVFAIL options on the volume, perform the following steps:
121
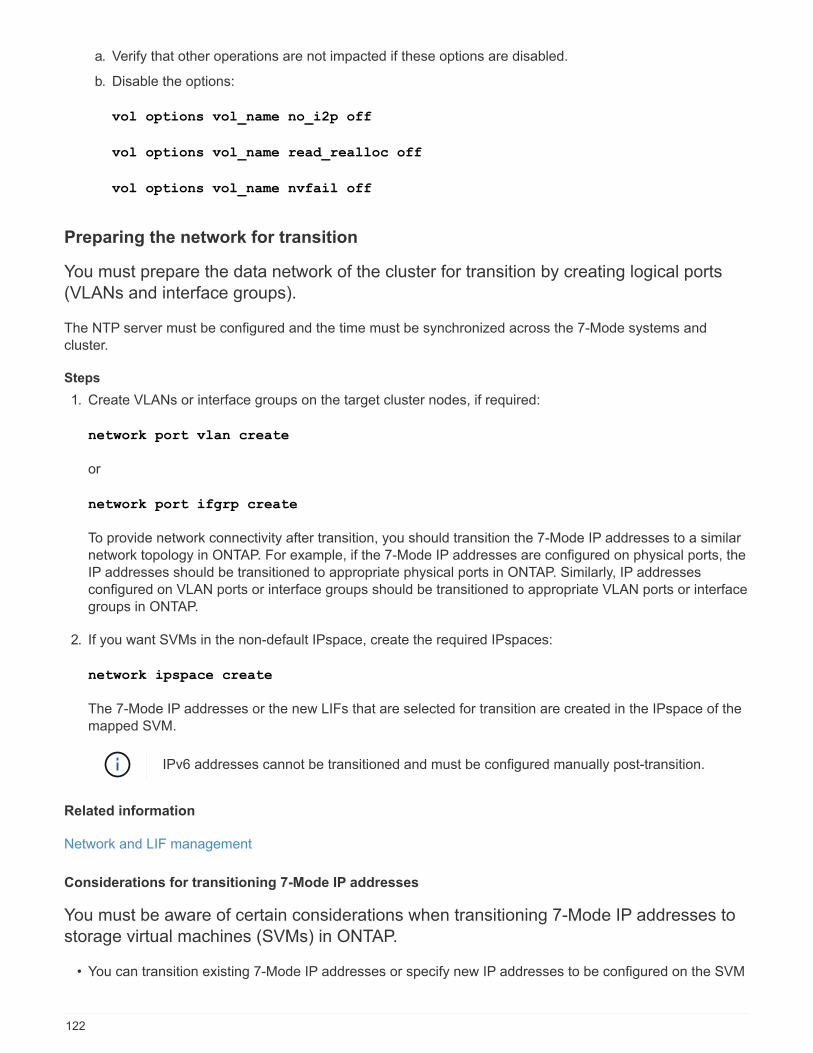
a. Verify that other operations are not impacted if these options are disabled.
b. Disable the options:
vol options vol_name no_i2p off
vol options vol_name read_realloc off
vol options vol_name nvfail off
Preparing the network for transition
You must prepare the data network of the cluster for transition by creating logical ports
(VLANs and interface groups).
The NTP server must be configured and the time must be synchronized across the 7-Mode systems and
cluster.
Steps
1. Create VLANs or interface groups on the target cluster nodes, if required:
network port vlan create
or
network port ifgrp create
To provide network connectivity after transition, you should transition the 7-Mode IP addresses to a similar
network topology in ONTAP. For example, if the 7-Mode IP addresses are configured on physical ports, the
IP addresses should be transitioned to appropriate physical ports in ONTAP. Similarly, IP addresses
configured on VLAN ports or interface groups should be transitioned to appropriate VLAN ports or interface
groups in ONTAP.
2. If you want SVMs in the non-default IPspace, create the required IPspaces:
network ipspace create
The 7-Mode IP addresses or the new LIFs that are selected for transition are created in the IPspace of the
mapped SVM.
IPv6 addresses cannot be transitioned and must be configured manually post-transition.
Related information
Network and LIF management
Considerations for transitioning 7-Mode IP addresses
You must be aware of certain considerations when transitioning 7-Mode IP addresses to
storage virtual machines (SVMs) in ONTAP.
• You can transition existing 7-Mode IP addresses or specify new IP addresses to be configured on the SVM
122
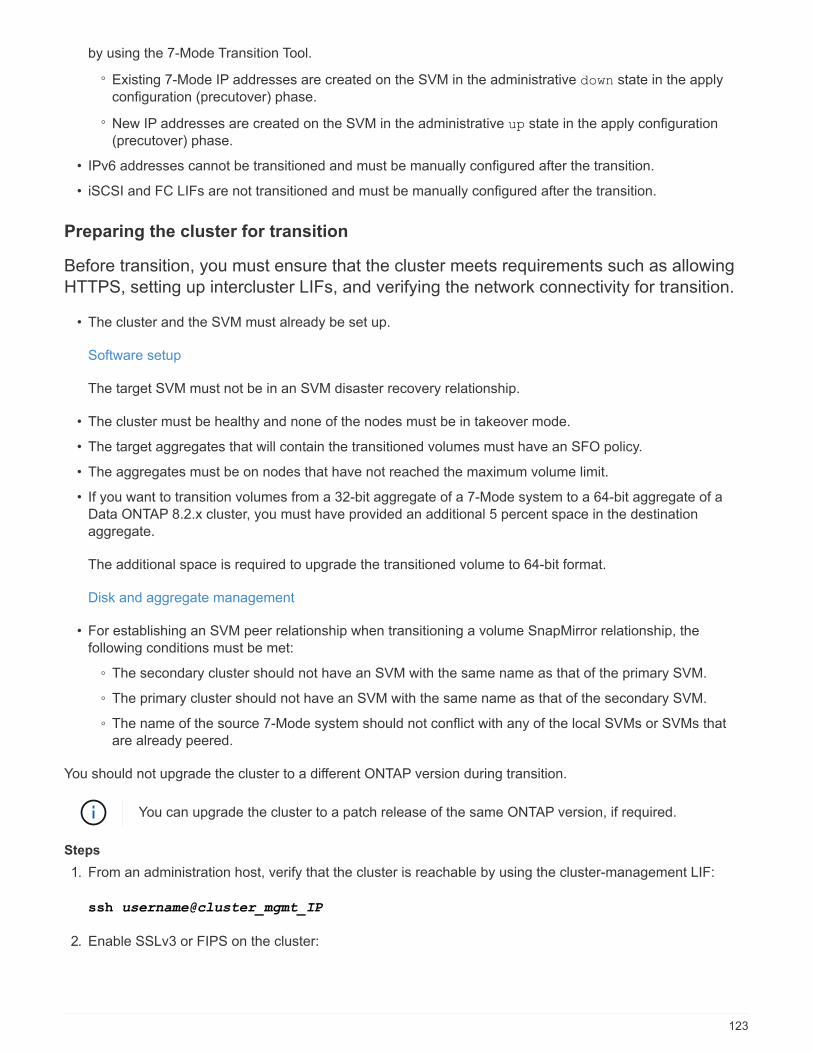
by using the 7-Mode Transition Tool.
◦ Existing 7-Mode IP addresses are created on the SVM in the administrative down state in the apply
configuration (precutover) phase.
◦ New IP addresses are created on the SVM in the administrative up state in the apply configuration
(precutover) phase.
• IPv6 addresses cannot be transitioned and must be manually configured after the transition.
• iSCSI and FC LIFs are not transitioned and must be manually configured after the transition.
Preparing the cluster for transition
Before transition, you must ensure that the cluster meets requirements such as allowing
HTTPS, setting up intercluster LIFs, and verifying the network connectivity for transition.
• The cluster and the SVM must already be set up.
Software setup
The target SVM must not be in an SVM disaster recovery relationship.
• The cluster must be healthy and none of the nodes must be in takeover mode.
• The target aggregates that will contain the transitioned volumes must have an SFO policy.
• The aggregates must be on nodes that have not reached the maximum volume limit.
• If you want to transition volumes from a 32-bit aggregate of a 7-Mode system to a 64-bit aggregate of a
Data ONTAP 8.2.x cluster, you must have provided an additional 5 percent space in the destination
aggregate.
The additional space is required to upgrade the transitioned volume to 64-bit format.
Disk and aggregate management
• For establishing an SVM peer relationship when transitioning a volume SnapMirror relationship, the
following conditions must be met:
◦ The secondary cluster should not have an SVM with the same name as that of the primary SVM.
◦ The primary cluster should not have an SVM with the same name as that of the secondary SVM.
◦ The name of the source 7-Mode system should not conflict with any of the local SVMs or SVMs that
are already peered.
You should not upgrade the cluster to a different ONTAP version during transition.
You can upgrade the cluster to a patch release of the same ONTAP version, if required.
Steps
1. From an administration host, verify that the cluster is reachable by using the cluster-management LIF:
ssh username@cluster_mgmt_IP
2. Enable SSLv3 or FIPS on the cluster:
123
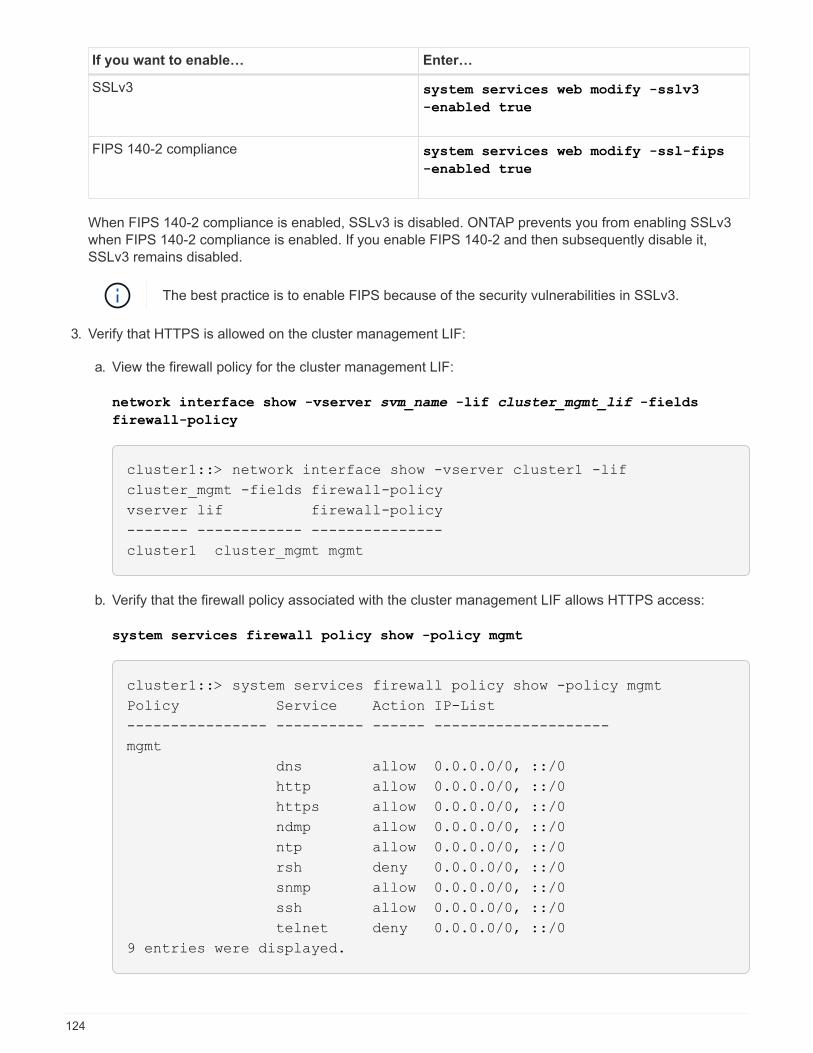
If you want to enable… Enter…
SSLv3 system services web modify -sslv3
-enabled true
FIPS 140-2 compliance system services web modify -ssl-fips
-enabled true
When FIPS 140-2 compliance is enabled, SSLv3 is disabled. ONTAP prevents you from enabling SSLv3
when FIPS 140-2 compliance is enabled. If you enable FIPS 140-2 and then subsequently disable it,
SSLv3 remains disabled.
The best practice is to enable FIPS because of the security vulnerabilities in SSLv3.
3. Verify that HTTPS is allowed on the cluster management LIF:
a. View the firewall policy for the cluster management LIF:
network interface show -vserver svm_name -lif cluster_mgmt_lif -fields
firewall-policy
cluster1::> network interface show -vserver cluster1 -lif
cluster_mgmt -fields firewall-policy
vserver lif firewall-policy
------- ------------ ---------------
cluster1 cluster_mgmt mgmt
b. Verify that the firewall policy associated with the cluster management LIF allows HTTPS access:
system services firewall policy show -policy mgmt
cluster1::> system services firewall policy show -policy mgmt
Policy Service Action IP-List
---------------- ---------- ------ --------------------
mgmt
dns allow 0.0.0.0/0, ::/0
http allow 0.0.0.0/0, ::/0
https allow 0.0.0.0/0, ::/0
ndmp allow 0.0.0.0/0, ::/0
ntp allow 0.0.0.0/0, ::/0
rsh deny 0.0.0.0/0, ::/0
snmp allow 0.0.0.0/0, ::/0
ssh allow 0.0.0.0/0, ::/0
telnet deny 0.0.0.0/0, ::/0
9 entries were displayed.
124
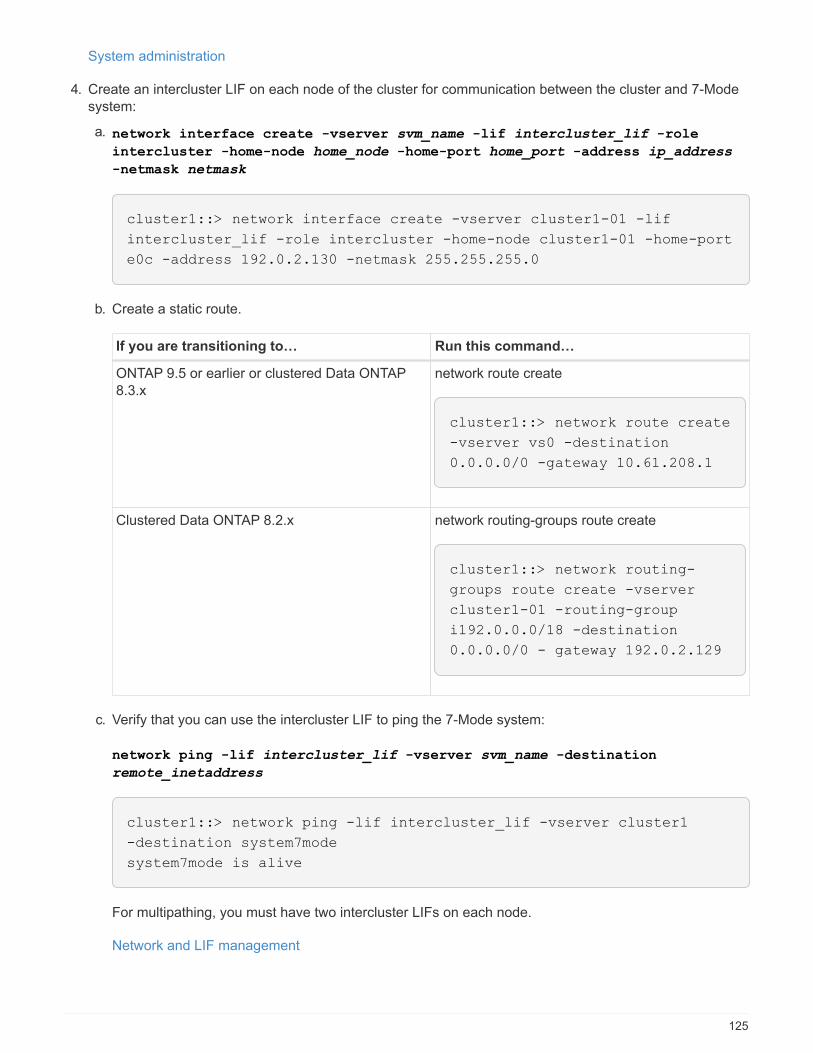
System administration
4. Create an intercluster LIF on each node of the cluster for communication between the cluster and 7-Mode
system:
a. network interface create -vserver svm_name -lif intercluster_lif -role
intercluster -home-node home_node -home-port home_port -address ip_address
-netmask netmask
cluster1::> network interface create -vserver cluster1-01 -lif
intercluster_lif -role intercluster -home-node cluster1-01 -home-port
e0c -address 192.0.2.130 -netmask 255.255.255.0
b. Create a static route.
If you are transitioning to… Run this command…
ONTAP 9.5 or earlier or clustered Data ONTAP
8.3.x
network route create
cluster1::> network route create
-vserver vs0 -destination
0.0.0.0/0 -gateway 10.61.208.1
Clustered Data ONTAP 8.2.x network routing-groups route create
cluster1::> network routing-
groups route create -vserver
cluster1-01 -routing-group
i192.0.0.0/18 -destination
0.0.0.0/0 - gateway 192.0.2.129
c. Verify that you can use the intercluster LIF to ping the 7-Mode system:
network ping -lif intercluster_lif -vserver svm_name -destination
remote_inetaddress
cluster1::> network ping -lif intercluster_lif -vserver cluster1
-destination system7mode
system7mode is alive
For multipathing, you must have two intercluster LIFs on each node.
Network and LIF management
125
Preparing 7-Mode aggregates and volumes for transition
Before transition, you must ensure that the 7-Mode aggregates and volumes are eligible
for transition and perform some manual steps before transition. For example, some
volume types cannot be transitioned and any 32-bit data must be removed from the 7-
Mode systems before transition.
Restrictions for transitioning 7-Mode volumes
You must be aware of certain restrictions for transitioning 7-Mode volumes. Some of the
restrictions are due to features that are not supported in ONTAP. For some restrictions,
you can perform a corrective action that enables you to continue with the transition.
Volume types
The following types of volumes are not supported for transition:
• Traditional volumes
You can use host-based transition methods to transition traditional volumes.
NetApp Technical Report 4052: Successfully Transitioning to Clustered Data ONTAP (Data ONTAP 8.2.x
and 8.3)
• FlexCache volumes
Volume states
Transition is blocked if any of the 7-Mode volumes selected for the transition are in one of the following states:
• Offline
• Restricted
• Inconsistent (wafl inconsistent)
Volume with qtrees that belong to a different vFiler unit
You cannot transition volumes with qtrees, where the qtrees are owned by a different vFiler unit than that of the
volume. Before transition, you must ensure that each volume and all of its qtrees belong to the same vFiler unit
by performing one of the following actions:
• Move the qtrees to the vFiler unit that owns the volume.
• Delete the qtrees.
Inode to parent pathname translation setting
The inode to parent pathname translations must be enabled on each volume. You can enable the parent to
pathname translations by turning off the no_i2p option:
vol options vol_name no_i2p off
You do not have to wait for the i2p scan to finish, and you can continue with the transition preparation.
126
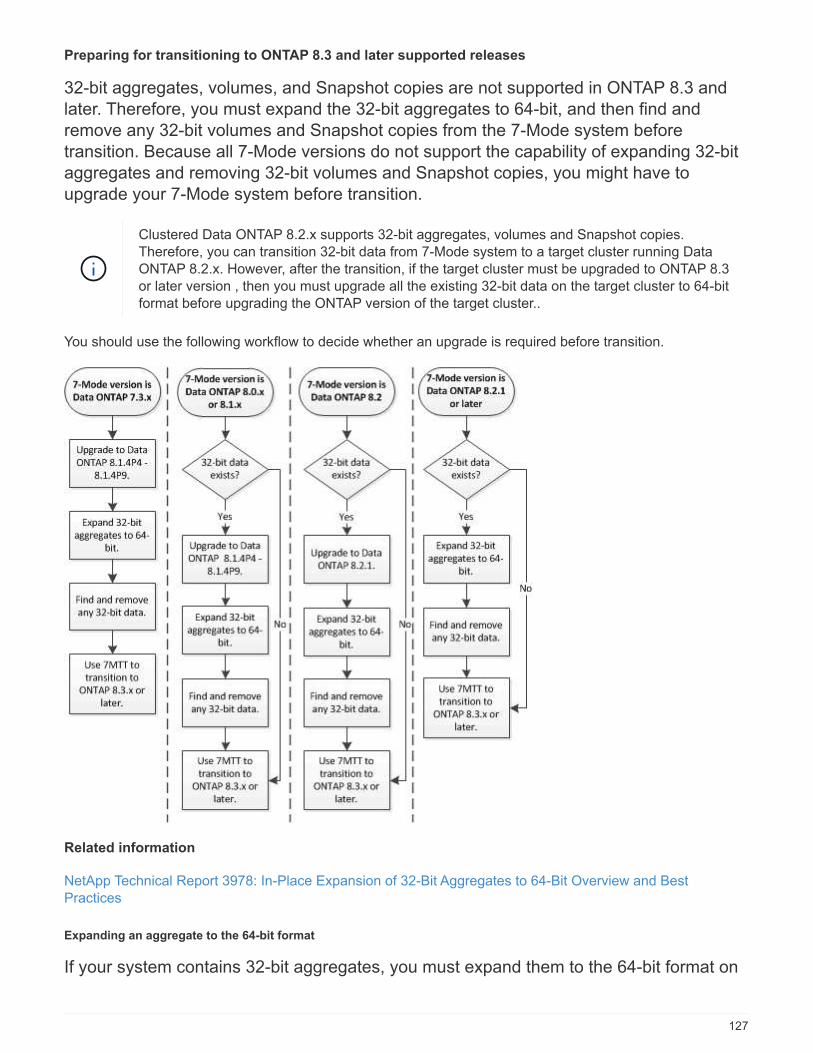
Preparing for transitioning to ONTAP 8.3 and later supported releases
32-bit aggregates, volumes, and Snapshot copies are not supported in ONTAP 8.3 and
later. Therefore, you must expand the 32-bit aggregates to 64-bit, and then find and
remove any 32-bit volumes and Snapshot copies from the 7-Mode system before
transition. Because all 7-Mode versions do not support the capability of expanding 32-bit
aggregates and removing 32-bit volumes and Snapshot copies, you might have to
upgrade your 7-Mode system before transition.
Clustered Data ONTAP 8.2.x supports 32-bit aggregates, volumes and Snapshot copies.
Therefore, you can transition 32-bit data from 7-Mode system to a target cluster running Data
ONTAP 8.2.x. However, after the transition, if the target cluster must be upgraded to ONTAP 8.3
or later version , then you must upgrade all the existing 32-bit data on the target cluster to 64-bit
format before upgrading the ONTAP version of the target cluster..
You should use the following workflow to decide whether an upgrade is required before transition.
Related information
NetApp Technical Report 3978: In-Place Expansion of 32-Bit Aggregates to 64-Bit Overview and Best
Practices
Expanding an aggregate to the 64-bit format
If your system contains 32-bit aggregates, you must expand them to the 64-bit format on
127
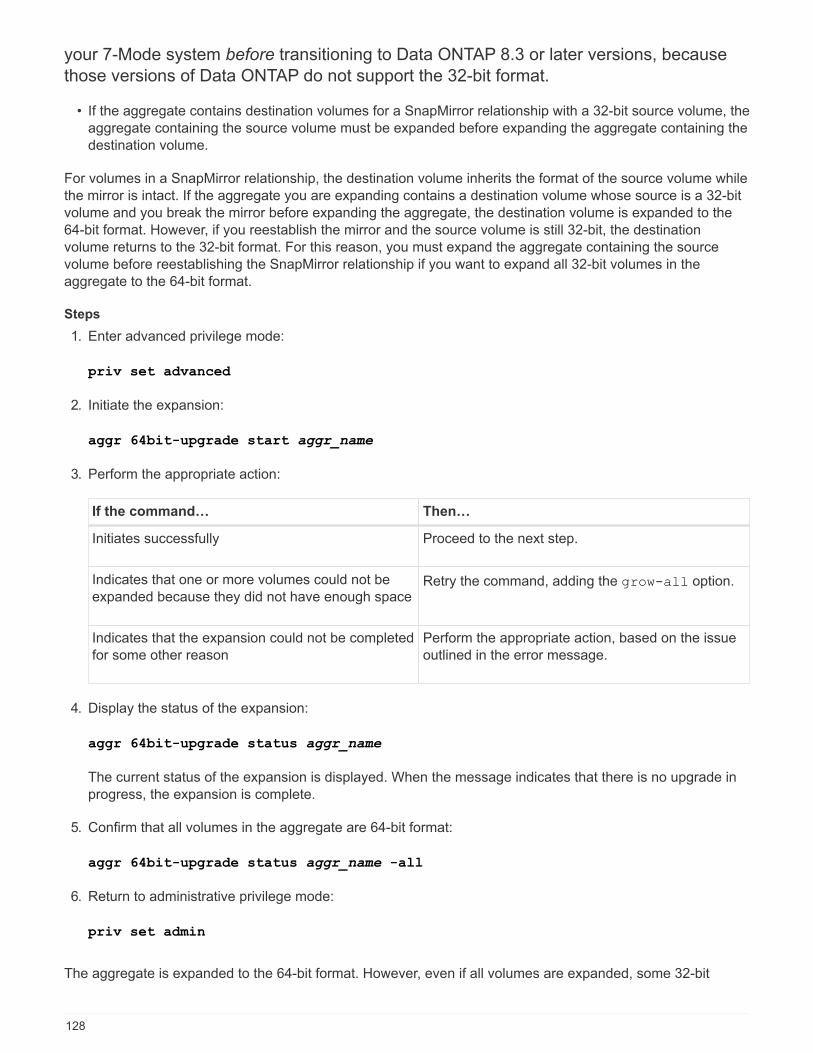
your 7-Mode system before transitioning to Data ONTAP 8.3 or later versions, because
those versions of Data ONTAP do not support the 32-bit format.
• If the aggregate contains destination volumes for a SnapMirror relationship with a 32-bit source volume, the
aggregate containing the source volume must be expanded before expanding the aggregate containing the
destination volume.
For volumes in a SnapMirror relationship, the destination volume inherits the format of the source volume while
the mirror is intact. If the aggregate you are expanding contains a destination volume whose source is a 32-bit
volume and you break the mirror before expanding the aggregate, the destination volume is expanded to the
64-bit format. However, if you reestablish the mirror and the source volume is still 32-bit, the destination
volume returns to the 32-bit format. For this reason, you must expand the aggregate containing the source
volume before reestablishing the SnapMirror relationship if you want to expand all 32-bit volumes in the
aggregate to the 64-bit format.
Steps
1. Enter advanced privilege mode:
priv set advanced
2. Initiate the expansion:
aggr 64bit-upgrade start aggr_name
3. Perform the appropriate action:
If the command… Then…
Initiates successfully Proceed to the next step.
Indicates that one or more volumes could not be
expanded because they did not have enough spaceRetry the command, adding the grow-all option.
Indicates that the expansion could not be completed
for some other reason
Perform the appropriate action, based on the issue
outlined in the error message.
4. Display the status of the expansion:
aggr 64bit-upgrade status aggr_name
The current status of the expansion is displayed. When the message indicates that there is no upgrade in
progress, the expansion is complete.
5. Confirm that all volumes in the aggregate are 64-bit format:
aggr 64bit-upgrade status aggr_name -all
6. Return to administrative privilege mode:
priv set admin
The aggregate is expanded to the 64-bit format. However, even if all volumes are expanded, some 32-bit
128
Snapshot copies might remain. The presence of 32-bit Snapshot copies in the source volumes prevents an
upgrade or transition to Data ONTAP 8.3 or later.
Finding and removing 32-bit volumes and Snapshot copies
Even if you have expanded all of your aggregates to the 64-bit format, some 32-bit or
mixed-format FlexVol volumes or Snapshot copies can remain. These volumes and
Snapshot copies must be removed before your data can be accessed by a cluster
running Data ONTAP 8.3 or later.
• You must have expanded all 32-bit aggregates on the system to the 64-bit format.
You must repeat the steps in this task for each aggregate that contains 32-bit volumes and Snapshot copies.
Steps
1. Enter advanced mode:
priv set advanced
2. Display the format of all volumes in the aggregate:
aggr 64bit-upgrade status aggr_name -all
Each volume in the aggregate is displayed with its format.
3. For each 32-bit or mixed-format volume, determine the reason that the volume has not been expanded to
the 64-bit format, and then take the appropriate action.
If you cannot determine the reason that the volume was not expanded, retry the aggregate expansion.
If the volume… Then…
Is the destination of a SnapMirror relationship Expand the aggregate containing the source volume
to the 64-bit format.
Is a read-only volume (but not a SnapMirror
destination)
Make the volume writable and retry the expansion,
or destroy the volume.
Did not expand because of insufficient free space in
the volume or aggregate
Increase the free space in the volume or aggregate
and retry the expansion.
All 32-bit and mixed-format volumes in the aggregate are now 64-bit. You can confirm this by repeating the
previous step.
4. Display the format of all Snapshot copies on the system:
snap list -fs-block-format
5. Remove the 32-bit Snapshot copies by using the snap delete command.
129
This action deletes the data in the Snapshot copies. You must be certain that you do not
need to retain the Snapshot copies before you delete them. Alternatively, you can wait for
the 32-bit Snapshot copies to be aged out. The amount of time this takes depends on your
Snapshot copy schedule.
If a Snapshot copy is the base Snapshot copy for a FlexClone volume, you must split the FlexClone
volume from its parent before you can remove the Snapshot copy.
All 32-bit Snapshot copies are removed. You can confirm this by repeating the previous step.
6. Return to the administrative privilege level:
priv set admin
Considerations for deduplication and compression
When using compression, the source and the destination volumes must belong to a 64-bit
aggregate. All compression and deduplication savings on the source volume are retained
over the network during transition. After transition, the destination volume inherits all of
the compression and deduplication attributes and storage savings from the source
volume.
Transitioning deduplicated and compressed data helps in reducing the network bandwidth during transition
because of the following reasons:
• Shared blocks are transferred only once.
• Compression is maintained throughout the transfer.
• Compressed and deduplicated data involves smaller transfer sizes as a result of compression and
deduplication space savings; therefore, the transfers are completed more quickly.
You should not start compression or deduplication of existing data on the source volume during transition. If
deduplication or compression is in progress, you should start the transition only after the deduplication or
compression operation is complete. Therefore, undeduplicated or uncompressed data and additional
temporary metadata files are not sent over the network to the destination volume.
For deduplication and compression to take effect on any new data written on the ONTAP volume, you must
enable deduplication and compression schedules after the transition.
Beginning with Data ONTAP 8.1, deduplication maintains a partially ordered fingerprint database in the volume
along with the aggregate copy. As a result, the destination system will have the space savings from the source
volume as well as a copy of the ordered fingerprint database. After migration, when volume efficiency is run on
the new volume for the first time, the aggregate fingerprint database is automatically constructed from the copy
in the destination volume. This can result in a one-time increase in the time it takes for volume efficiency
operations to complete.
If your source volume is running a Data ONTAP operating in 7-Mode prior to 8.1, you must run the volume
efficiency start command with the -scan-old-data option parameter to optimize space savings.
After the migration is complete, you should verify whether the deduplication schedule meets your requirements
on your cluster and consider switching to a volume efficiency policy.
130
Considerations for FlexClone volumes
When transitioning FlexClone volumes to the SVM, the clones are split from the parent
volumes and are transitioned as FlexVol volumes to the destination cluster. As a result,
the clone hierarchy and storage efficiency are lost in the transition process.
If the target cluster is running Data ONTAP 8.3 or earlier, FlexClone volumes cannot be created from Snapshot
copies that are transitioned from 7-Mode. You can create FlexClone volumes only from new Snapshot copies
that are created after the volume is transitioned to ONTAP. Beginning with clustered Data ONTAP 8.3.1, you
can create FlexClone volumes from Snapshot copies that are transitioned from 7-Mode.
Considerations for quotas
You must be aware of how quotas are transitioned when “apply configuration”
(precutover) is run in read-only and read-write mode.
Quotas are applied in the following ways during the precutover phase:
• Read-only mode
Quotas are not applied in the precutover read-only mode on the ONTAP system; they are applied only
during the storage cutover phase.
• Read-write mode
Quotas are applied in the precutover read-write mode on the ONTAP system, so that you can test them in
ONTAP. However, the quotas are removed during resynchronization (after testing is completed) of the
ONTAP volumes. The quotas are applied again during the storage cutover phase.
Support for transitioning SnapLock volumes
The 7-Mode Transition Tool supports the transition of SnapLock volumes to target
clusters running any ONTAP 9.0 release except 9.6.
The SnapLock Enterprise and SnapLock Compliance volumes are supported for transition to target clusters
that are running any ONTAP release except 9.6. However, SnapLock Compliance volume transition is not
supported to the target clusters that are in MetroCluster configurations.
Considerations for transitioning of SnapLock Enterprise volumes
The 7-Mode Transition Tool supports the transition of stand-alone SnapLock Enterprise
volumes and SnapLock Enterprise volumes that are in a SnapMirror relationship.
The workflow for transitioning SnapLock Enterprise volumes is the same as for FlexVol volumes.
SnapMirror relationships are preserved during the transition.
The 7-Mode Transition Tool only supports like-to-like transition for SnapMirror relationships of
SnapLock Enterprise volumes. That is, both the source and destination volumes must be
SnapLock Enterprise volumes.
131
Considerations for transitioning of SnapLock Compliance volumes
The 7-Mode Transition Tool supports the transition of standalone SnapLock Compliance
volumes and SnapLock Compliance volumes that are in a SnapMirror relationship.
The workflow for transitioning standalone SnapLock Compliance volumes is the same as for transitioning
FlexVol volumes.
The transition of SnapMirror relationships for SnapLock Compliance volumes is not automated by the 7-Mode
Transition Tool. You must transition the primary and secondary SnapLock Compliance volumes as stand-alone
volumes, and then manually resynchronize the relationships.
You can include the SnapLock Compliance volumes (both stand-alone and the volumes that are in SnapMirror
relationships) as a standalone volume in stand-alone, primary, and secondary projects.
The precutover read/write mode is not supported for projects with SnapLock Compliance volumes. It is a best
practice to create separate projects for SnapLock Compliance volumes and non-SnapLock Compliance
volumes because the precutover read/write mode is not supported if SnapLock Compliance volumes are
included in the project.
During the cutover operation, if the selected volume is a SnapLock Compliance volume and it is the destination
of a SnapMirror relationship, then the SnapMirror relationship between the 7-Mode volume and the ONTAP
volume is deleted without SnapMirror break operation. This action enables the secondary ONTAP SnapLock
Compliance volumes to remain in read-only mode. The secondary ONTAP SnapLock Compliance volumes
must be in read-only mode for the resynchronization operation to be successful between the primary and
secondary SnapLock Compliance volumes.
See How to transition the 7-Mode SnapLock Compliance volumes with SnapMirror relationship to clustered
Data ONTAP
Considerations for transitioning of SnapLock Audit volumes
The 7-Mode Transition Tool supports the transition of SnapLock Audit volumes. The
workflow to transition SnapLock Audit volumes is the same as the transition of SnapLock
Compliance volumes.
After you transition audit volumes to the ONTAP, you must manually designate the transitioned audit volume as
SnapLock Audit volume for the target SVM.
In ONTAP, the audit volumes are configured at an SVM level. In Data ONTAP operating in 7-Mode, an audit
volume serves as a consolidated repository for all of the volumes in the controller across the vFiler units.
SnapLock Audit volumes are a type of SnapLock Compliance volume. The transition of SnapLock Audit
volumes is not supported if the target cluster is in a MetroCluster configuration.
See How to configure audit volume in clustered Data ONTAP for the transitioned SnapLock volumes
Considerations for transitioning of 7-Mode SnapLock options
The 7-Mode Transition Tool supports the transition of a few 7-Mode options that are
related to SnapLock volumes.
Data ONTAP operating in 7-Mode has the following options that are related to SnapLock volumes:
132
• snaplock.autocommit_period
This option is at a volume level in ONTAP, and is transitioned to ONTAP during the transition.
• snaplock.compliance.write_verify
This option is not applicable in ONTAP.
• snaplock.log.default_retention
• snaplock.log.maximum_size
Although the snaplock.log.default_retention and snaplock.log.maximum_size options are
supported in ONTAP, the settings configured in these options are not transitioned by the 7-Mode Transition
Tool. You must manually set these options for audit volumes after the transition is completed.
Considerations for using Chain of Custody verification for 7-Mode SnapLock volumes
You should be aware of the considerations for using Chain of Custody verification for 7-
Mode SnapLock volumes.
• The SnapLock Chain of Custody verification must be performed only if it is a requirement for the transition
of SnapLock volumes.
You can perform the Chain of Custody verification for all or a subset of SnapLock volumes in the project.
• The SnapLock Chain of Custody verification can take a significant amount of time based on the number of
files on the 7-Mode SnapLock volumes.
• The Chain of Custody verification is supported only for read/write 7-Mode SnapLock volumes
The Chain of Custody verification is not supported for read-only volumes.
• The Chain of Custody verification is not supported for SnapLock volumes containing files that have names
with non-ASCII characters.
Preparing to transition name services
Name service configurations that include DNS, LDAP, NIS, hosts, name services switch,
UNIX users and groups, and netgroups configurations are transitioned by the 7-Mode
Transition Tool. You must be aware of some considerations before transitioning name
services configurations.
Name services transition: supported and unsupported configurations, and required manual steps
You must be aware of the name services configurations that are transitioned by the 7-
Mode Transition Tool. Some name services configurations are not transitioned to ONTAP
because either these are not supported in ONTAP or these must be manually
transitioned.
You should verify all the precheck error and warning messages to evaluate the impact of such configurations
on transition.
133

Configurations that are transitioned
At a high level, the following name services configurations are transitioned by the 7-Mode Transition Tool:
• DNS configuration (/etc/resolv.conf)
• LDAP configuration
• NIS configuration
• Name service switch configuration (/etc/nsswitch.conf and /etc/resolv.conf)
• Hosts configuration (/etc/hosts)
• UNIX users and groups (/etc/passwd and /etc/group)
• Netgroups configuration (/etc/netgroup)
See the precheck results for details about these name services configurations.
Unsupported configurations in ONTAP
• NIS slave
• NIS broadcast
• NIS groups caching
• Dynamic DNS
• DNS cache
• Shadow database
• Host database sources other than file or DNS
ONTAP supports only file and DNS for host lookup; other database sources are not supported. Host lookup
order in the /etc/nsswitch.conf is ignored during transition.
Configurations that must be manually configured
You must manually configure the following LDAP options on the SVMs:
• ldap.usermap.attribute.unixaccount
• ldap.password
• ldap.usermap.base
• ldap.ssl.enable
Related information
NFS management
Network and LIF management/ONTAP 9.7 and earlier
Network and LIF management/ONTAP 9.8 and later
134
Considerations for transitioning DNS, NIS, and LDAP configurations
You should be aware of how the DNS, NIS, and LDAP configurations in Data ONTAP
operating in 7-Mode are transitioned and applied in ONTAP.
Considerations for DNS transition
For DNS configurations, a maximum of six domain names and three name servers per SVM are supported in
ONTAP. If the unique number of domain names or name servers across 7-Mode systems and the target SVM
exceed the supported limit, the 7-Mode Transition Tool reports a blocking error. To continue with the transition,
you should ignore the transition of the DNS configuration from the tool.
If you ignore the transition of the DNS configuration, you must manually configure DNS on the
target SVM.
Considerations for NIS transition
• The length of the NIS domain name on the 7-Mode system must not exceed 64 characters.
• For transitioning to target cluster versions running ONTAP 9.1 or earlier, the nis.servers option on the
7-Mode system must be configured only with IP addresses, and not a fully qualified domain name (FQDN).
You must configure the nis.servers option on the 7-Mode system with IP addresses before transition if
you are transitioning to a cluster running ONTAP 9.1 or earlier. Transition is supported if you have the
nis.servers option on the 7-Mode system configured with an FQDN and you are transitioning to a
cluster running any version of ONTAP between 9.2 and 9.5.
Considerations for LDAP transition
• If multiple base values and scope values are set for the ldap.base, ldap.base.passwd,
ldap.base.group, or ldap.base.netgroup option, and if you are transitioning to clustered Data
ONTAP 8.2 or 8.2.1, only one value for each option is transitioned.
After transition, there might be lookup issues for these options. You must manually add the base values
and scope values after transition.
• If multiple scope values are set for the ldap.base, ldap.base.passwd, ldap.base.group, or
ldap.base.netgroup option, and if you are transitioning to clustered Data ONTAP 8.2.2, only one value
for each option is transitioned.
• If separate base values and scope values are specified for user mapping (ldap.usermap.base) and
user password (ldap.base.passwd) lookups in the 7-Mode system, the base values and scope values
for only the user password are transitioned.
The base values and scope values are used for user mapping and user password lookups in ONTAP,
which can cause security issues. You must manually add the base values and scope values for user
mapping to the user distinguished name (DN) option in ONTAP after transition, if required.
Considerations for transitioning netgroups and UNIX users and groups
Netgroup configuration is transitioned only if the 7-Mode /etc/netgroup file is less
than 5 MB in size. UNIX users and groups are transitioned only if the total number of
UNIX users and groups on the SVM do not exceed the limits for users and groups in
135
ONTAP.
Considerations for netgroups
If the /etc/netgroup file on 7-Mode is greater than 5 MB, the netgroup configuration is not transitioned. You
must perform one of the following actions to continue with the transition:
• Exclude the transition of netgroups.
• Move the netgroup configuration to NIS or LDAP servers before transition.
Considerations for UNIX users and groups
If the total number of transitioning UNIX users and groups exceed the limit of UNIX users and groups in
ONTAP, the 7-Mode Transition Tool blocks the transition. You must perform one of the following actions to
continue with the transition:
• Exclude the transition of UNIX users and groups.
• Move the UNIX users and groups to NIS or LDAP servers before transition.
Related information
NFS management
Preparing for NFS transition
If NFS is licensed and NFS service is running on the systems operating in 7-Mode, you
must manually prepare the cluster and target SVM for transitioning NFS configurations.
You must also be aware of what configurations are transitioned.
Some NFS configurations operating in 7-Mode are not supported in ONTAP. Some configurations are not
transitioned by the 7-Mode Transition Tool and must be manually applied to the SVM.
Prerequisites for transitioning NFS configurations
NFS configurations are transitioned by the 7-Mode Transition Tool only when certain
prerequisites are met on the 7-Mode system and the cluster. If any of the conditions are
not met, the tool does not transition the configuration.
7-Mode prerequisites
• NFS must be licensed.
• If MultiStore is licensed, NFS must be enabled on the vFiler unit that owns the transitioning volumes.
• For transitioning a Microsoft Active Directory (AD) based Kerberos server to a new SVM, a DNS entry must
exist for the AD domain.
To transition the Kerberos configuration, at least one LIF must be transitioned as part of the
project and the LIF must be resolvable to a host name.
• If you want to transition in-memory export rules, you must add them to the /etc/exports file before
transition.
136
The 7-Mode Transition Tool transitions only the persistent export rules that are defined in the
/etc/exports file.
Cluster prerequisites
• NFS must be licensed.
• For transitioning a Microsoft AD-based Kerberos server to an existing SVM with DNS configured, a DNS
entry must exist for the AD domain.
• The clock skew between the Kerberos key distribution center (KDC) and the ONTAP system must be less
than or equal to 5 minutes.
Related information
How NFS exports are transitioned
NetApp Documentation: ONTAP 9
NFS transition: supported and unsupported configurations, and required manual steps
Some NFS configurations are not transitioned to ONTAP because they are not supported
in ONTAP, there are functionality differences from 7-Mode, or they must be manually
transitioned. You should verify all of the precheck errors and warning messages to
evaluate the impact of such configurations on transition.
Supported configurations for transition
At a high level, the following NFS configurations are transitioned by the 7-Mode Transition Tool:
• NFS options:
◦ nfs.udp.xfersize
◦ nfs.v4.id.domain
◦ nfs.v4.acl.max.aces
◦ nfs.tcp.xfersize
◦ nfs.rpcsec.ctx.high
◦ nfs.rpcsec.ctx.idle
◦ nfs.response.trigger
◦ wafl.default_nt_user
◦ nfs.mount_rootonly
◦ nfs.tcp.enable
◦ nfs.udp.enable
◦ nfs.response.trace
◦ nfs.v4.read_delegation
◦ nfs.v4.write_delegation
137

◦ nfs.v4.acl.enable
◦ nfs.vstorage.enable
◦ nfs.v3.enable
◦ nfs.v4.enable
• NFS export rule:
If the export rule is configured with the -actual option, the exported path (alias path) is ignored and the
export rule is configured with the actual path.
• Export rules with Kerberos security krb5p
• Kerberos configuration
See the precheck results for details about these NFS configurations.
Unsupported configurations in ONTAP
The following NFS configurations are not supported in ONTAP:
• Subvolume NFS exports other than qtree-level NFS exports
• WebNFS
• PC-NFS
• NFSv2
• Fencing of NFS clients from one or more file system paths
• Some NFS options
See the precheck warning messages for a complete list of unsupported options.
Configurations that must be manually transitioned
There are some NFS configurations that are supported in ONTAP, but are not transitioned by the 7-Mode
Transition Tool.
The following NFS configurations generate a warning message in the precheck operation, and you must
manually apply the configurations on the SVM:
• NFS audit configuration
• NFS options:
◦ rpc.nsm.tcp.port
◦ rpc.nsm.udp.port
◦ rpc.mountd.tcp.port
◦ rpc.mountd.udp.port
◦ nfs.export.neg.timeout
◦ nfs.export.pos.timeout
◦ nfs.export.harvest.timeout
138

Use the vserver nfs modify command to modify the configuration of an NFS-enabled storage
virtual machine (SVM).
• Export rules with Kerberos security krb5p
Configurations that are functionally different in ONTAP
The following NFS configurations are functionally different in ONTAP:
• NFS export rules
• NFS export access cache
• NFS diagnostic commands
• Support for the showmount command
• NFS Kerberos encryption
• NLM version support
Related information
NFS management
How NFS exports are transitioned
You must be aware of how NFS exports are configured on the SVM after transition. You
might have to perform some manual steps if the 7-Mode export configurations are not
supported in ONTAP.
You must be aware of the following considerations about NFS exports transition:
• If the SVM root volume is not exported to allow read-only access to all NFS clients, the 7-Mode Transition
Tool creates a new export policy that allows read-only access for all the NFS clients and exports the root
volume of the SVM with the new export policy.
To ensure that all the transitioned volumes or qtrees are mountable, the root volume of the SVM must be
allowed read-only access for all the NFS clients.
• When 7-Mode volumes with export configurations that are not supported in ONTAP are transitioned, these
volumes are exported to allow read-only permissions to all NFS clients on the SVM.
Export policies for these volumes must be configured manually after transition to provide the required
access permissions.
• When 7-Mode qtrees with export configurations that are not supported in ONTAP are transitioned, they
inherit the export policy of the parent volume.
Export policies for these qtrees must be configured manually after transition to provide the required access
permissions.
• In ONTAP, for an NFS client to mount a qtree, the NFS client must have read-only permissions at all the
parent junction paths up to the SVM’s root volume junction path (that is, /).
For NFS clients to mount qtrees, the qtrees must belong to a volume that has read-only permission.
Without the read-only permissions at the volume level, the NFS clients cannot mount the qtree.
139
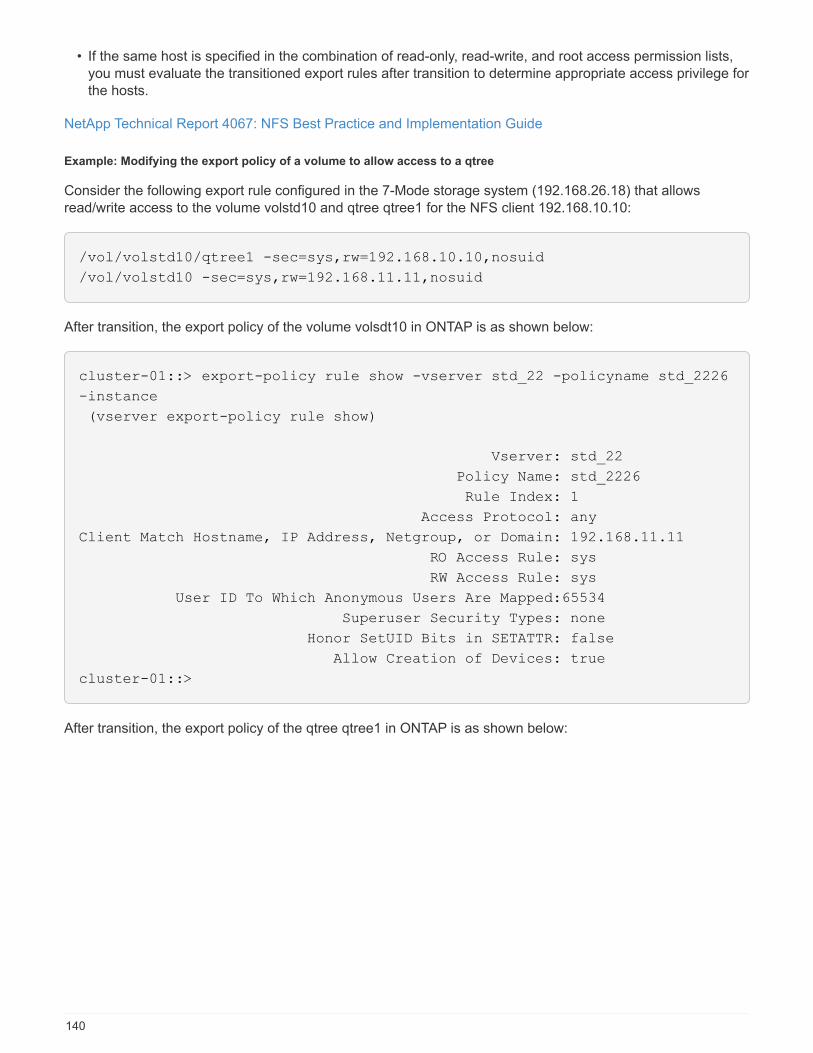
• If the same host is specified in the combination of read-only, read-write, and root access permission lists,
you must evaluate the transitioned export rules after transition to determine appropriate access privilege for
the hosts.
NetApp Technical Report 4067: NFS Best Practice and Implementation Guide
Example: Modifying the export policy of a volume to allow access to a qtree
Consider the following export rule configured in the 7-Mode storage system (192.168.26.18) that allows
read/write access to the volume volstd10 and qtree qtree1 for the NFS client 192.168.10.10:
/vol/volstd10/qtree1 -sec=sys,rw=192.168.10.10,nosuid
/vol/volstd10 -sec=sys,rw=192.168.11.11,nosuid
After transition, the export policy of the volume volsdt10 in ONTAP is as shown below:
cluster-01::> export-policy rule show -vserver std_22 -policyname std_2226
-instance
(vserver export-policy rule show)
Vserver: std_22
Policy Name: std_2226
Rule Index: 1
Access Protocol: any
Client Match Hostname, IP Address, Netgroup, or Domain: 192.168.11.11
RO Access Rule: sys
RW Access Rule: sys
User ID To Which Anonymous Users Are Mapped:65534
Superuser Security Types: none
Honor SetUID Bits in SETATTR: false
Allow Creation of Devices: true
cluster-01::>
After transition, the export policy of the qtree qtree1 in ONTAP is as shown below:
140
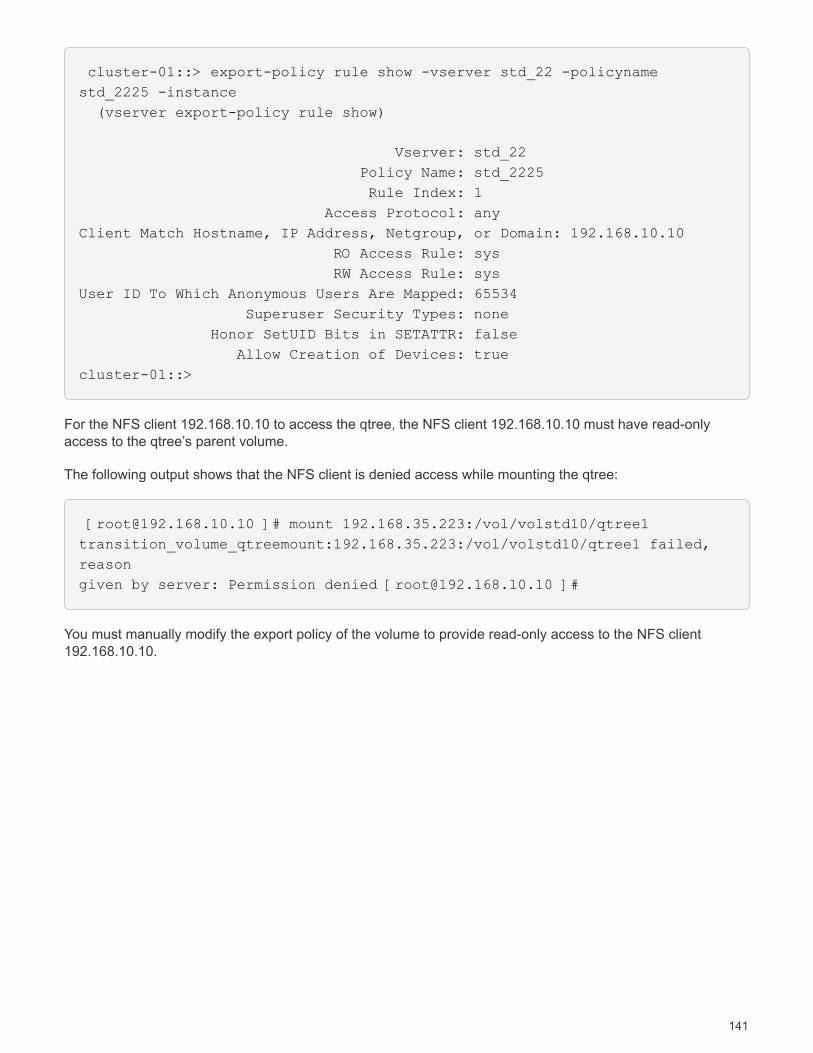
cluster-01::> export-policy rule show -vserver std_22 -policyname
std_2225 -instance
(vserver export-policy rule show)
Vserver: std_22
Policy Name: std_2225
Rule Index: 1
Access Protocol: any
Client Match Hostname, IP Address, Netgroup, or Domain: 192.168.10.10
RO Access Rule: sys
RW Access Rule: sys
User ID To Which Anonymous Users Are Mapped: 65534
Superuser Security Types: none
Honor SetUID Bits in SETATTR: false
Allow Creation of Devices: true
cluster-01::>
For the NFS client 192.168.10.10 to access the qtree, the NFS client 192.168.10.10 must have read-only
access to the qtree’s parent volume.
The following output shows that the NFS client is denied access while mounting the qtree:
[[email protected] ]# mount 192.168.35.223:/vol/volstd10/qtree1
transition_volume_qtreemount:192.168.35.223:/vol/volstd10/qtree1 failed,
reason
given by server: Permission denied [[email protected] ]#
You must manually modify the export policy of the volume to provide read-only access to the NFS client
192.168.10.10.
141
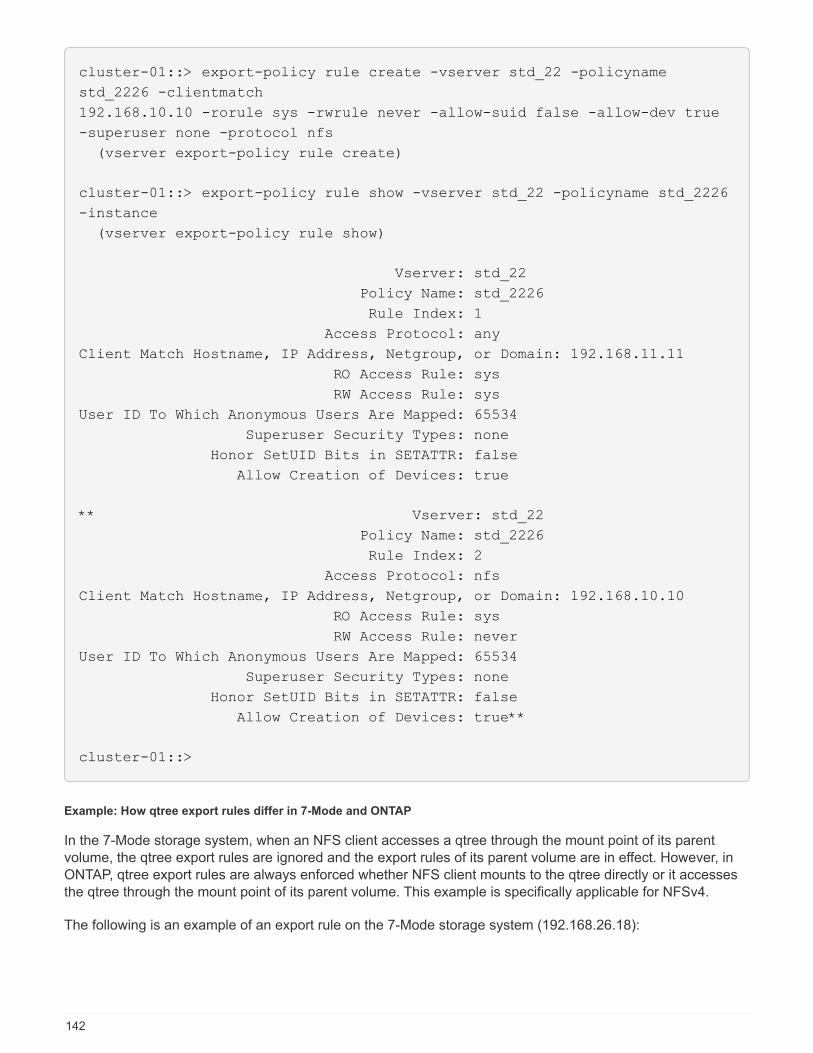
cluster-01::> export-policy rule create -vserver std_22 -policyname
std_2226 -clientmatch
192.168.10.10 -rorule sys -rwrule never -allow-suid false -allow-dev true
-superuser none -protocol nfs
(vserver export-policy rule create)
cluster-01::> export-policy rule show -vserver std_22 -policyname std_2226
-instance
(vserver export-policy rule show)
Vserver: std_22
Policy Name: std_2226
Rule Index: 1
Access Protocol: any
Client Match Hostname, IP Address, Netgroup, or Domain: 192.168.11.11
RO Access Rule: sys
RW Access Rule: sys
User ID To Which Anonymous Users Are Mapped: 65534
Superuser Security Types: none
Honor SetUID Bits in SETATTR: false
Allow Creation of Devices: true
** Vserver: std_22
Policy Name: std_2226
Rule Index: 2
Access Protocol: nfs
Client Match Hostname, IP Address, Netgroup, or Domain: 192.168.10.10
RO Access Rule: sys
RW Access Rule: never
User ID To Which Anonymous Users Are Mapped: 65534
Superuser Security Types: none
Honor SetUID Bits in SETATTR: false
Allow Creation of Devices: true**
cluster-01::>
Example: How qtree export rules differ in 7-Mode and ONTAP
In the 7-Mode storage system, when an NFS client accesses a qtree through the mount point of its parent
volume, the qtree export rules are ignored and the export rules of its parent volume are in effect. However, in
ONTAP, qtree export rules are always enforced whether NFS client mounts to the qtree directly or it accesses
the qtree through the mount point of its parent volume. This example is specifically applicable for NFSv4.
The following is an example of an export rule on the 7-Mode storage system (192.168.26.18):
142
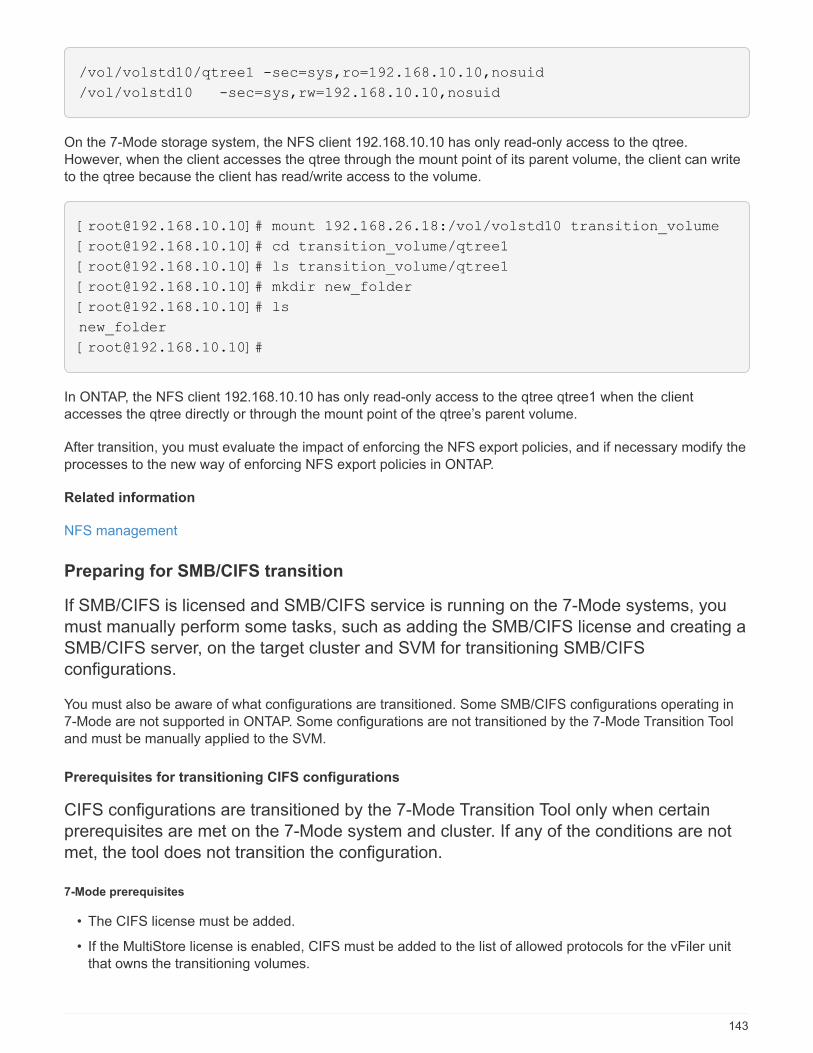
/vol/volstd10/qtree1 -sec=sys,ro=192.168.10.10,nosuid
/vol/volstd10 -sec=sys,rw=192.168.10.10,nosuid
On the 7-Mode storage system, the NFS client 192.168.10.10 has only read-only access to the qtree.
However, when the client accesses the qtree through the mount point of its parent volume, the client can write
to the qtree because the client has read/write access to the volume.
[[email protected]]# mount 192.168.26.18:/vol/volstd10 transition_volume
[[email protected]]# cd transition_volume/qtree1
[[email protected]]# ls transition_volume/qtree1
[[email protected]]# mkdir new_folder
[[email protected]]# ls
new_folder
In ONTAP, the NFS client 192.168.10.10 has only read-only access to the qtree qtree1 when the client
accesses the qtree directly or through the mount point of the qtree’s parent volume.
After transition, you must evaluate the impact of enforcing the NFS export policies, and if necessary modify the
processes to the new way of enforcing NFS export policies in ONTAP.
Related information
NFS management
Preparing for SMB/CIFS transition
If SMB/CIFS is licensed and SMB/CIFS service is running on the 7-Mode systems, you
must manually perform some tasks, such as adding the SMB/CIFS license and creating a
SMB/CIFS server, on the target cluster and SVM for transitioning SMB/CIFS
configurations.
You must also be aware of what configurations are transitioned. Some SMB/CIFS configurations operating in
7-Mode are not supported in ONTAP. Some configurations are not transitioned by the 7-Mode Transition Tool
and must be manually applied to the SVM.
Prerequisites for transitioning CIFS configurations
CIFS configurations are transitioned by the 7-Mode Transition Tool only when certain
prerequisites are met on the 7-Mode system and cluster. If any of the conditions are not
met, the tool does not transition the configuration.
7-Mode prerequisites
• The CIFS license must be added.
• If the MultiStore license is enabled, CIFS must be added to the list of allowed protocols for the vFiler unit
that owns the transitioning volumes.
143
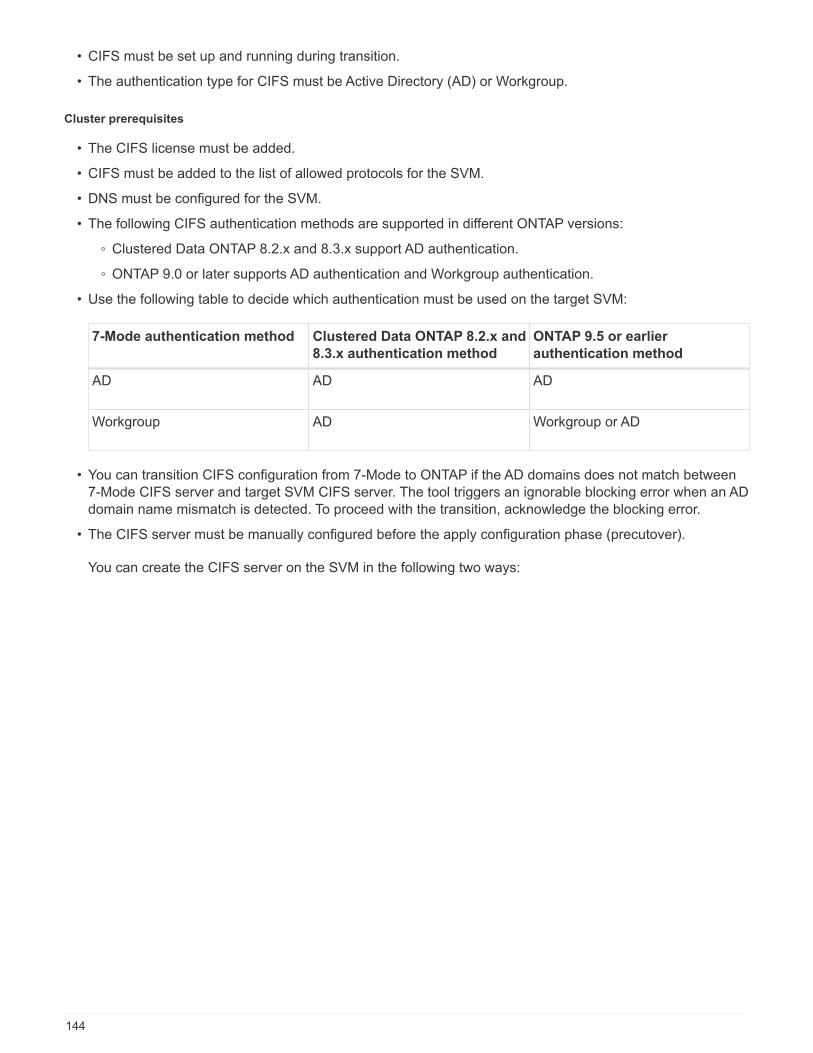
• CIFS must be set up and running during transition.
• The authentication type for CIFS must be Active Directory (AD) or Workgroup.
Cluster prerequisites
• The CIFS license must be added.
• CIFS must be added to the list of allowed protocols for the SVM.
• DNS must be configured for the SVM.
• The following CIFS authentication methods are supported in different ONTAP versions:
◦ Clustered Data ONTAP 8.2.x and 8.3.x support AD authentication.
◦ ONTAP 9.0 or later supports AD authentication and Workgroup authentication.
• Use the following table to decide which authentication must be used on the target SVM:
7-Mode authentication method Clustered Data ONTAP 8.2.x and
8.3.x authentication method
ONTAP 9.5 or earlier
authentication method
AD AD AD
Workgroup AD Workgroup or AD
• You can transition CIFS configuration from 7-Mode to ONTAP if the AD domains does not match between
7-Mode CIFS server and target SVM CIFS server. The tool triggers an ignorable blocking error when an AD
domain name mismatch is detected. To proceed with the transition, acknowledge the blocking error.
• The CIFS server must be manually configured before the apply configuration phase (precutover).
You can create the CIFS server on the SVM in the following two ways:
144

145
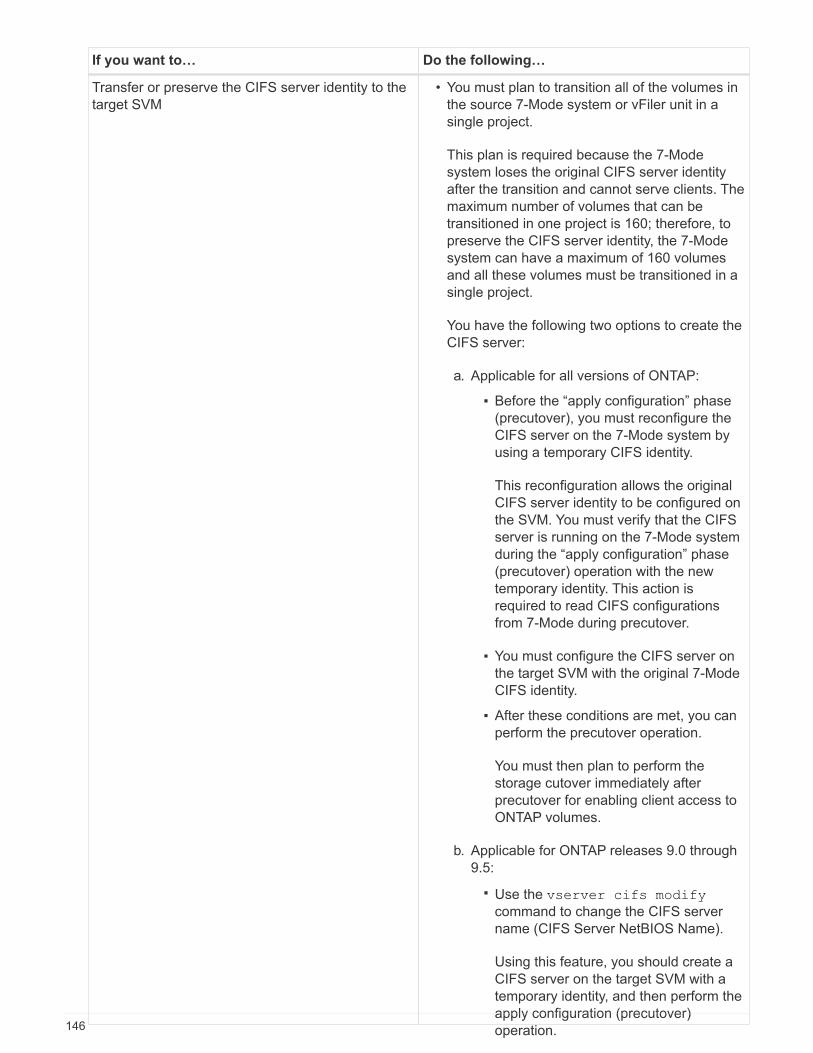
If you want to… Do the following…
Transfer or preserve the CIFS server identity to the
target SVM
• You must plan to transition all of the volumes in
the source 7-Mode system or vFiler unit in a
single project.
This plan is required because the 7-Mode
system loses the original CIFS server identity
after the transition and cannot serve clients. The
maximum number of volumes that can be
transitioned in one project is 160; therefore, to
preserve the CIFS server identity, the 7-Mode
system can have a maximum of 160 volumes
and all these volumes must be transitioned in a
single project.
You have the following two options to create the
CIFS server:
a. Applicable for all versions of ONTAP:
▪ Before the “apply configuration” phase
(precutover), you must reconfigure the
CIFS server on the 7-Mode system by
using a temporary CIFS identity.
This reconfiguration allows the original
CIFS server identity to be configured on
the SVM. You must verify that the CIFS
server is running on the 7-Mode system
during the “apply configuration” phase
(precutover) operation with the new
temporary identity. This action is
required to read CIFS configurations
from 7-Mode during precutover.
▪ You must configure the CIFS server on
the target SVM with the original 7-Mode
CIFS identity.
▪ After these conditions are met, you can
perform the precutover operation.
You must then plan to perform the
storage cutover immediately after
precutover for enabling client access to
ONTAP volumes.
b. Applicable for ONTAP releases 9.0 through
9.5:
▪ Use the vserver cifs modify
command to change the CIFS server
name (CIFS Server NetBIOS Name).
Using this feature, you should create a
CIFS server on the target SVM with a
temporary identity, and then perform the
apply configuration (precutover)
operation.146
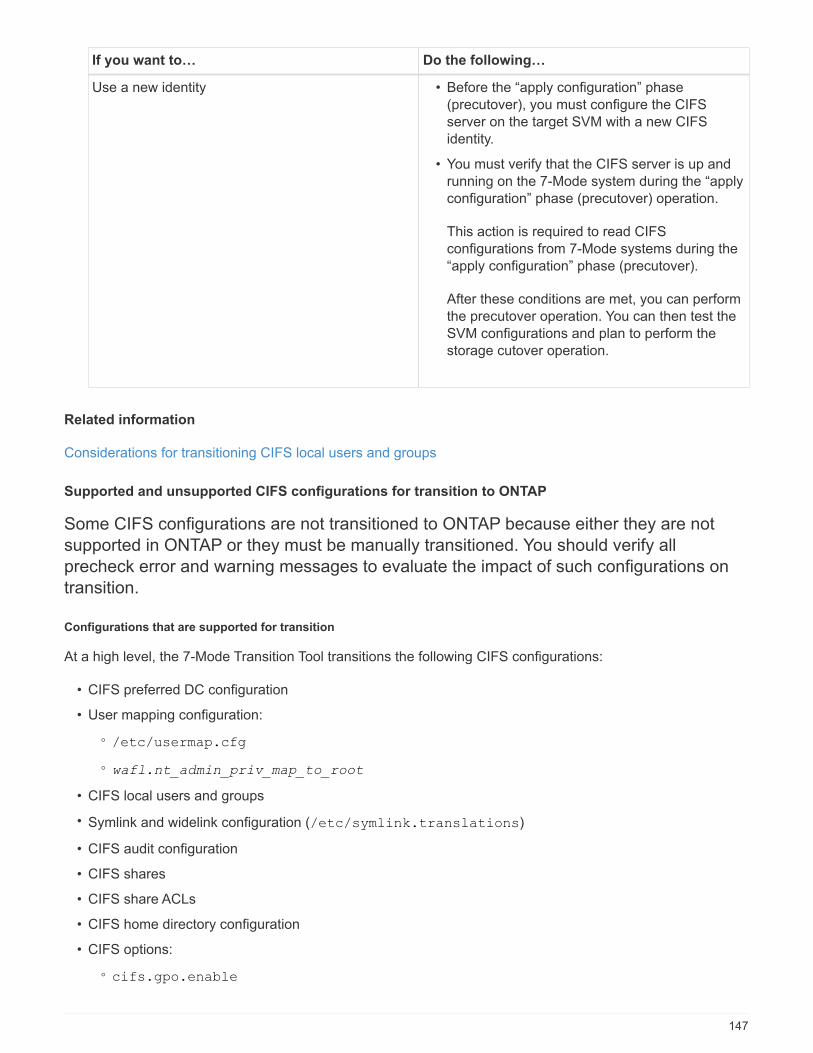
▪ After the “apply configuration”' phase,
you can run the vserver cifs
modify command on the target cluster
to replace the target SVM CIFS identity
with the 7-Mode CIFS identity.
If you want to… Do the following…
Use a new identity • Before the “apply configuration” phase
(precutover), you must configure the CIFS
server on the target SVM with a new CIFS
identity.
• You must verify that the CIFS server is up and
running on the 7-Mode system during the “apply
configuration” phase (precutover) operation.
This action is required to read CIFS
configurations from 7-Mode systems during the
“apply configuration” phase (precutover).
After these conditions are met, you can perform
the precutover operation. You can then test the
SVM configurations and plan to perform the
storage cutover operation.
Related information
Considerations for transitioning CIFS local users and groups
Supported and unsupported CIFS configurations for transition to ONTAP
Some CIFS configurations are not transitioned to ONTAP because either they are not
supported in ONTAP or they must be manually transitioned. You should verify all
precheck error and warning messages to evaluate the impact of such configurations on
transition.
Configurations that are supported for transition
At a high level, the 7-Mode Transition Tool transitions the following CIFS configurations:
• CIFS preferred DC configuration
• User mapping configuration:
◦ /etc/usermap.cfg
◦ wafl.nt_admin_priv_map_to_root
• CIFS local users and groups
• Symlink and widelink configuration (/etc/symlink.translations)
• CIFS audit configuration
• CIFS shares
• CIFS share ACLs
• CIFS home directory configuration
• CIFS options:
◦ cifs.gpo.enable
147
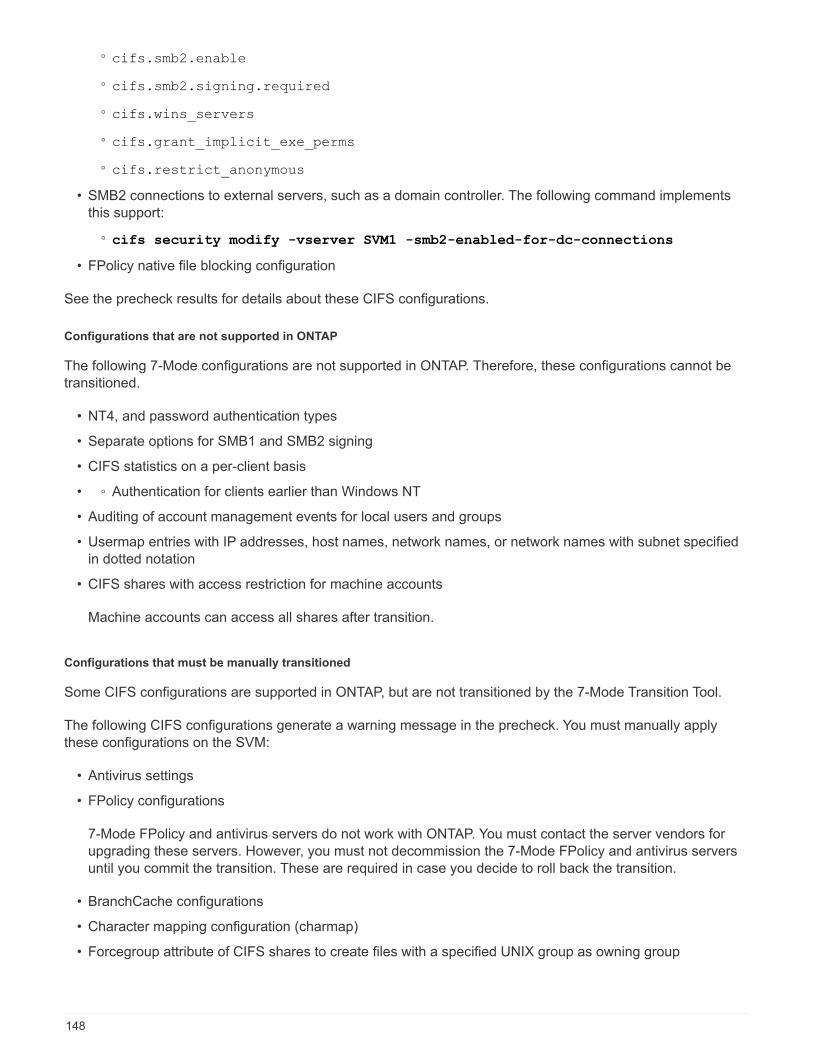
◦ cifs.smb2.enable
◦ cifs.smb2.signing.required
◦ cifs.wins_servers
◦ cifs.grant_implicit_exe_perms
◦ cifs.restrict_anonymous
• SMB2 connections to external servers, such as a domain controller. The following command implements
this support:
◦ cifs security modify -vserver SVM1 -smb2-enabled-for-dc-connections
• FPolicy native file blocking configuration
See the precheck results for details about these CIFS configurations.
Configurations that are not supported in ONTAP
The following 7-Mode configurations are not supported in ONTAP. Therefore, these configurations cannot be
transitioned.
• NT4, and password authentication types
• Separate options for SMB1 and SMB2 signing
• CIFS statistics on a per-client basis
• ◦ Authentication for clients earlier than Windows NT
• Auditing of account management events for local users and groups
• Usermap entries with IP addresses, host names, network names, or network names with subnet specified
in dotted notation
• CIFS shares with access restriction for machine accounts
Machine accounts can access all shares after transition.
Configurations that must be manually transitioned
Some CIFS configurations are supported in ONTAP, but are not transitioned by the 7-Mode Transition Tool.
The following CIFS configurations generate a warning message in the precheck. You must manually apply
these configurations on the SVM:
• Antivirus settings
• FPolicy configurations
7-Mode FPolicy and antivirus servers do not work with ONTAP. You must contact the server vendors for
upgrading these servers. However, you must not decommission the 7-Mode FPolicy and antivirus servers
until you commit the transition. These are required in case you decide to roll back the transition.
• BranchCache configurations
• Character mapping configuration (charmap)
• Forcegroup attribute of CIFS shares to create files with a specified UNIX group as owning group
148
• Maxusers attribute of CIFS shares to specify the maximum number of simultaneous connections allowed to
a 7-Mode CIFS share
• Storage-Level Access Guard (SLAG) configurations
• Share-level ACLs with UNIX-style permission
• Share ACLs for UNIX users and groups
• LAN Manager authentication level
• NetBIOS aliases
• CIFS search domains
• Some CIFS options
See the precheck results for details about these options.
Considerations for transitioning CIFS local users and groups
You must be aware of the considerations for running the transition operations when
migrating CIFS local users and groups.
• If the destination cluster is running clustered Data ONTAP 8.2, transition should not be attempted for 7-
Mode volumes that are serving CIFS data and are being accessed by local users and groups.
The 7-Mode Transition Tool does not support the transition of local users and groups to clustered Data
ONTAP 8.2.
• Transition of CIFS data-serving volumes from a 7-Mode controller or a vFiler unit that has local users and
groups to an SVM that has non-BUILTIN CIFS local users and groups is not supported.
The SVM must have only BUILTIN CIFS local users and groups for transition.
While transitioning local users and groups from a specific 7-Mode controller or a vFiler unit to a specific
SVM, local users and groups from the first transition project are transitioned. In the subsequent transition of
projects with the same 7-Mode controller or vFiler unit to the same SVM, the transition of local users and
groups is ignored, although transition succeeds. The local user’s name on the 7-Mode system must not be
the same as the CIFS server name on the SVM.
• You must be aware of the limits on the number of local users and groups supported in clustered Data
ONTAP 8.2.1 and later.
• A local user account with an empty password or local user accounts with passwords containing more than
14 characters on the 7-Mode system are transitioned to ONTAP software with the password cifsUser@1.
After the transition is complete, you can access these users from the Windows system by using the
password cifsUser@1. You must then manually change the password for such CIFS local users on the
SVM by using the following command:
cifs users-and-groups local-user set-password -vserver svm_name -user-name
user_name.
• If the 7-Mode Transition Tool IP address is not reachable from the target ONTAP software, the 7-Mode
Transition Tool blocks the transition of CIFS local users and groups to the ONTAP software during the
precheck phase. If you see this error during the precheck phase, use the
149
network ping -node local -destination ip_address
command to make sure the 7-Mode Transition Tool IP address is reachable from the target ONTAP
software. You can edit the \etc\conf\transition-tool.conf file that is installed with the 7-Mode
Transition Tool to modify any configuration option that is used by the tool, such as the 7-Mode Transition
Tool IP address.
• The SVM to which the local users and groups are transitioned must have a data LIF.
• If a local group has multiple member system identifiers (SIDs) mapped to a single domain user or group on
the 7-Mode system, the 7-Mode Transition Tool blocks the transition of local users and groups to ONTAP
during the precheck phase.
If you see this error during the precheck phase, you must manually remove the additional SIDs that are
mapped to a single domain user or group on the 7-Mode system. You must then rerun the precheck
operation with only a single SID mapped to the domain user or group.
Troubleshooting Workflow: CIFS: Device attached to the system is not functioning
Related information
SMB/CIFS management
Preparing for MetroCluster configuration transition
Before transitioning to a MetroCluster configuration, you must understand the
requirements and considerations for transitioning 7-Mode volumes to a MetroCluster
configuration in ONTAP.
Prerequisites
• The MetroCluster configuration in ONTAP must already be set up.
• The SVM type must be sync-source.
• The 7-Mode controllers must not be in a taken over state or waiting for a giveback.
• The nodes in the MetroCluster configuration in ONTAP must not be switched over or waiting for a
switchback.
Considerations
• Transitioning SnapLock Compliance volumes is not supported if the target cluster is in a MetroCluster
configuration.
• You can transition volumes from a 7-Mode controller, HA configuration, or MetroCluster configuration to a
MetroCluster configuration in ONTAP as stand-alone volumes.
• If a 7-Mode MetroCluster configuration has volumes that are in volume SnapMirror relationships with
volumes in another 7-Mode controller, you can transition the SnapMirror relationships as primary and
secondary relationships.
You should install the 7-Mode Transition Tool on each MetroCluster site and transition the volumes from
each site.
• Different subnets configured for a 7-Mode fabric MetroCluster configuration cannot be configured on the
MetroCluster configuration in ONTAP.
150
• The preferred port configured in a 7-Mode fabric MetroCluster configuration cannot be configured for the
MetroCluster configurations in ONTAP.
• If your 7-Mode fabric MetroCluster configuration is using Brocade 6510 switches, you can share the
existing switch fabrics with the new MetroCluster configuration in ONTAP.
It is best to share the switch fabrics only for the duration of the transition.
Fabric-attached MetroCluster installation and configuration, ONTAP 9.8 or earlier
Fabric-attached MetroCluster installation and configuration, ONTAP 9.9.1
• The cron job schedules created during transition are not replicated to the remote site, and therefore the
negotiated switchover fails after transition.
You must manually create the cron job schedules on the remote site after the transition.
Related information
Configuring cron job schedules on the remote site after transitioning a MetroCluster configuration
Impact of takeover and giveback on transition
Transitioning a MetroCluster configuration that failed due to switchover or switchback
Preparing for SAN transition
Before transitioning a SAN environment, you must understand what configurations are
supported for SAN transition, create SAN LIFs on the SVM, and prepare the SAN hosts
for transition.
Preparing SAN hosts for transition
Before transitioning a SAN environment, you must perform some manual steps to
prepare the SAN hosts for transition.
You must have generated the inventory workbook for the SAN hosts by using the Inventory Collect Tool.
Host and storage transition information collection
Steps
1. Verify that the host is supported for transition.
NetApp Interoperability Matrix Tool
2. Perform the pretransition steps on the host.
SAN host transition and remediation
Configuring zones by using the FC zone plan
Before transitioning a SAN FC environment, you must configure zones by using the FC
zone planner to group the initiator hosts and targets.
151
• The cluster and initiator hosts must be connected to the switch.
• The FC zone script file must be accessible.
Steps
1. If there are any changes to the igroup configurations on the 7-Mode systems, modify and regenerate the
FC zone plan.
Generating an assessment report by adding systems to the 7-Mode Transition Tool
2. Log in to the CLI of the switch.
3. Copy and execute the required zone commands one at a time.
The following example runs the zone commands on the switch:
switch1:admin>config terminal
# Enable NPIV feature
feature npiv
zone name auto_transition_igroup_d31_194bf3 vsan 10
member pwwn 21:00:00:c0:dd:19:4b:f3
member pwwn 20:07:00:a0:98:32:99:07
member pwwn 20:09:00:a0:98:32:99:07
.......
.......
.......
copy running-config startup-config
4. Verify the data access from the cluster by using the test initiator hosts.
5. After the verification is complete, perform the following steps:
a. Disconnect the test initiator hosts.
b. Remove the zone configuration.
Creating SAN LIFs before transition
Because FC and iSCSI LIFs are not transitioned by the 7-Mode Transition Tool, you must
create these LIFs on the SVMs before transition. You must configure SAN LIFs on both
the nodes that own the LUN and the node’s HA partner.
The required SAN (FC or iSCSI) license must be added to the cluster.
For redundancy, you must create SAN LIFs on both the node hosting the LUNs and its HA partner.
Steps
1. Create an FC or iSCSI LIF on the target node to which the LUNs are transitioned, depending on the
protocol used:
network interface create
If you want to reuse the 7-Mode IP address for iSCSI LIFs, you must create the LIFs in administrative down
152
state. You can bring these LIFs to the administrative up state after the cutover operation.
2. Create a LIF on the HA partner of the node.
3. Verify that you have set up your LIFs correctly:
network interface show
Related information
SAN administration
SAN transition: supported and unsupported configurations, and required manual steps
You must be aware of the SAN configurations that are transitioned by the 7-Mode
Transition Tool. You should also be aware of the 7-Mode SAN features that are not
supported in ONTAP, so that you can take any necessary actions before the transition.
You should verify all of the precheck error and warning messages to evaluate the impact of such configurations
on transition.
Configurations that are transitioned
The following SAN configurations are transitioned by the 7-Mode Transition Tool:
• FC and iSCSI services
• igroups and LUN maps
◦ 7-Mode igroups that are not mapped to any LUNs are not transitioned to the target
SVMs.
◦ For clustered Data ONTAP 8.3.0 and 8.3.1, the transition of igroups and LUN mapping
configurations is not supported during the precutover operation.
Instead, the required igroups are created during the cutover operation. For primary and
stand-alone volumes, LUNs are mapped to igroups during the cutover operation.
However, for secondary volumes, the mapping of LUNs to igroups is not supported
during the cutover operation. You must manually map the secondary LUNs after
completing the transition of primary volumes.
◦ For ONTAP 8.3.2 and later supported releases, igroups and LUN mapping
configurations are applied during the precutover operation.
Unsupported configurations in ONTAP
The unsupported configurations in ONTAP are as follows:
• 7-Mode Snapshot copy-backed LUN clones
Snapshot copy-backed LUN clones present in the Snapshot copies are not supported for any restore
operation. These LUNs are not accessible in ONTAP. You must split or delete the 7-Mode Snapshot copy-
backed LUN clones before transition.
153
• LUNs with an ostype parameter value of vld, image, or any user-defined string
You must either change the value of the ostype parameter for such LUNs or delete the LUNs before
transition.
• LUN clone split
You must either wait for the active LUN clone split operations to finish or abort the LUN clone split and
delete the LUN before transition.
The following 7-Mode features enable you to continue with the transition process, but are not supported in
ONTAP:
• The lun share command
Sharing a LUN over NAS protocols
• SnapValidator
Configurations that must be manually transitioned
The following configurations must be transitioned manually:
• SAN LIFs
You must manually create the LIFs before transition.
• Portsets
You must manually configure igroups that are bound to a portset after transition.
• iSCSI access list information
• iSNS configuration
• iSCSI CHAP and RADIUS configurations
Related information
NFS management
Network and LIF management/ONTAP 9.7 and earlier
Network and LIF management/ONTAP 9.8 and later
Space considerations when transitioning SAN volumes
You must ensure that sufficient space is available in the volumes during transition. In
addition to the space required for storing data and Snapshot copies, the transition
process also requires 1 MB of space per LUN for updating certain filesystem metadata.
Before cutover, you can use the df -h command on the 7-Mode volume to verify whether free space of 1 MB
per LUN is available in the volume. The volume should also have free space equivalent to the amount of data
that is expected to be written to the volume before final cutover. If the volume does not have sufficient free
space available, the required amount of space must be added to the 7-Mode volume.
154
If the transition of LUNs fails due to lack of space on the destination volume, the following EMS message is
generated: LUN.vol.proc.fail.no.space: Processing for LUNs in volume vol1 failed due
to lack of space.
In this case, you must set the filesys-size-fixed attribute to false on the destination volume, and then
add 1 MB per LUN of free space to the volume.
If there are volumes containing space-reserved LUNs, growing the volume by 1MB per LUN might not provide
sufficient space. In such cases, the amount of additional space that has to be added is the size of the Snapshot
reserve for the volume. After space is added to the destination volume, you can use the lun transition
start command to transition the LUNs.
Related information
NetApp Documentation: ONTAP 9
Preparing data protection features for transition
You must perform some manual steps for transitioning 7-Mode SnapMirror relationships.
You must also be aware of the data protection relationships that are supported and
unsupported for transition.
Data protection transition: supported and unsupported configurations
You can transition a volume that is part of a SnapMirror relationship. However, some data
protection and disaster recovery configurations are not supported for transition and
therefore you have to perform some manual steps for transitioning these configurations.
Supported configurations
You can transition volume SnapMirror relationships by using the 7-Mode Transition Tool. You can also
transition 7-Mode volumes from a MetroCluster Configuration to a MetroCluster Configuration in ONTAP 8.3
and later supported releases.
Unsupported configurations
• SnapVault relationships
Volumes that are the source of a SnapVault relationship can be migrated; however, the SnapVault
relationship is not transitioned. A volume that is the destination of a SnapVault relationship can be migrated
only after the SnapVault backups are stopped.
NetApp Technical Report 4052: Successfully Transitioning to Clustered Data ONTAP (Data ONTAP 8.2.x
and 8.3)
• Qtree SnapMirror relationships
Volumes with qtrees that are the source of a qtree SnapMirror relationship can be transitioned, but the
qtree SnapMirror relationship is not transitioned. A volume with a qtree that is the destination of a qtree
SnapMirror relationship can be migrated only after the qtree SnapMirror relationship is broken.
• Disaster recovery vFiler unit
155
Volumes that are the source of a disaster recovery vFiler unit can be migrated; however, the disaster
recovery vFiler unit is not transitioned. A volume that is the destination of a disaster recovery vFiler unit can
be migrated only after the disaster recovery relationship is deleted.
• NDMP configuration
After the transition is complete, you must manually set up backup policies for the transitioned volumes in
ONTAP.
Data protection using tape backup
• Synchronous SnapMirror relationships
This feature is not supported in ONTAP; however, the volumes that are part of the relationship can be
transitioned.
Considerations for using SnapMirror for transition
You can create data copy schedules and customize the SnapMirror data transfers for
transition operations without affecting the existing 7-Mode to 7-Mode SnapMirror or
SnapVault operations.
Maximum number of concurrent SnapMirror transfers
During transition, the maximum number of concurrent SnapMirror transfers supported on the 7-Mode and
ONTAP systems depend on the number of volume SnapMirror replication operations allowed for a specific
storage system model.
For information about the maximum number of concurrent volume SnapMirror transfers for your system model,
see the Data ONTAP Data Protection Online Backup and Recovery Guide for 7-Mode.
Data copy schedules
• The number of concurrent SnapMirror transfers that the tool uses for running the SnapMirror operations
(baseline, update, or resynchronization) is based on the schedules you configure while creating the project.
• If different projects are transitioning volumes from the same 7-Mode controller, you must ensure that the
data copy schedules do not overlap across different projects.
• You can ensure that your existing backup and disaster recovery (DR) operations are not impacted by the 7-
Mode Transition Tool transition operations in the following ways:
◦ You should create SnapMirror data copy schedules for a project such that it does not overlap with the
existing 7-Mode SnapMirror or SnapVault schedules.
◦ You should configure the number of concurrent SnapMirror transfers to run in such a way that the
existing 7-Mode SnapMirror or SnapVault schedules do not fail.
You can also release some transfers by editing the active schedule and modifying the maximum
number of concurrent volume SnapMirror transfers to zero.
• You must ensure that the number of concurrent SnapMirror transfers and the throttle configured for the
operations (precutover, cutover, and on-demand update) are available on the 7-Mode storage system for
the entire duration of the operation.
The cutover operation fails if the final incremental update operation fails even for one of the volumes in the
156
project.
• For secondary projects, after cutover, the incremental SnapMirror updates for the SnapMirror relationship
between the 7-Mode primary volumes and the ONTAP secondary volume is based on the 7-Mode to 7-
Mode SnapMirror relationship schedule.
You must ensure that there are sufficient concurrent SnapMirror transfers available on the 7-Mode primary
controller for these updates to occur.
Using multiple paths for transition
You can specify two paths for transition by using a data copy IP address and a multipath IP address. However,
both paths can be used only for load-balancing, not for failover.
Related information
Considerations for creating a data copy schedule
Creating a data copy schedule for SnapMirror transfers
Guidelines for deciding when to perform cutover
Because transition cutover is disruptive to clients, you must plan the activity to minimize
the downtime. You must schedule the cutover during a low-activity window. You should
update the ONTAP volumes and wait for the transfers to complete before disconnecting
clients and initiating storage cutover for reducing the downtime.
You must keep monitoring the SnapMirror status for each volume. If the last transfer duration of the previous
few updates for the volume is within an acceptable limit, most of the data changes in the volume should have
been copied and the time for final data update during cutover should be within the acceptable limit.
You can derive the approximate downtime depending on the number of volumes that are transitioned.
To minimize the cutover time, the network latency between the 7-Mode Transition Tool and storage systems
should be minimum. For transitioning a volume SnapMirror relationship, the network latency between the tool
and the primary systems should be minimum.
Related information
Performing on-demand SnapMirror updates
Impact of takeover and giveback on transition
Transition operations, such as transition prepare, start, pause, resume, or complete, fail
during a controller takeover or giveback.
If a transition operation fails due to a takeover, you must wait for the giveback to finish, and then run the
transition operation again.
If a controller takeover occurs during a baseline transfer, the transfer fails. To resume the baseline transfer
from the point where it was aborted, you must wait for the giveback to finish.
Data copy resumes based on the configured schedule.
157
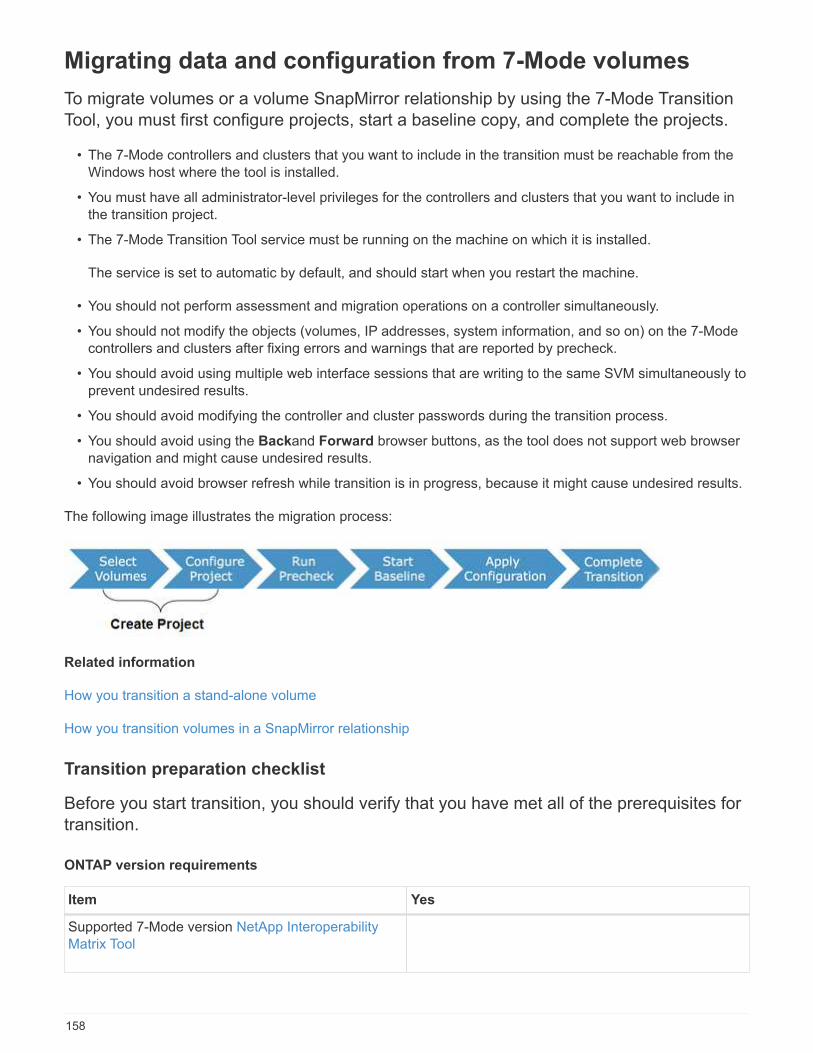
Migrating data and configuration from 7-Mode volumes
To migrate volumes or a volume SnapMirror relationship by using the 7-Mode Transition
Tool, you must first configure projects, start a baseline copy, and complete the projects.
• The 7-Mode controllers and clusters that you want to include in the transition must be reachable from the
Windows host where the tool is installed.
• You must have all administrator-level privileges for the controllers and clusters that you want to include in
the transition project.
• The 7-Mode Transition Tool service must be running on the machine on which it is installed.
The service is set to automatic by default, and should start when you restart the machine.
• You should not perform assessment and migration operations on a controller simultaneously.
• You should not modify the objects (volumes, IP addresses, system information, and so on) on the 7-Mode
controllers and clusters after fixing errors and warnings that are reported by precheck.
• You should avoid using multiple web interface sessions that are writing to the same SVM simultaneously to
prevent undesired results.
• You should avoid modifying the controller and cluster passwords during the transition process.
• You should avoid using the Backand Forward browser buttons, as the tool does not support web browser
navigation and might cause undesired results.
• You should avoid browser refresh while transition is in progress, because it might cause undesired results.
The following image illustrates the migration process:
Related information
How you transition a stand-alone volume
How you transition volumes in a SnapMirror relationship
Transition preparation checklist
Before you start transition, you should verify that you have met all of the prerequisites for
transition.
ONTAP version requirements
Item Yes
Supported 7-Mode version NetApp Interoperability
Matrix Tool
158
Item Yes
Your cluster must be running one of the following Data
ONTAP versions:
• Data ONTAP 8.2.x
• Data ONTAP 8.3.x
You must transition to one of the following ONTAP
releases:
• Using 7-Mode Transition Tool 3.3.3:
◦ ONTAP 9.8 or earlier supported releases
• Using 7-Mode Transition Tool 3.3.2:
◦ ONTAP 9.7P2 or later 9.7 P release (earlier
9.7 releases are not supported)
◦ ONTAP 9.6P7 or later 9.6 P release (earlier
9.6 releases are not supported)
◦ ONTAP 9.5 or earlier ONTAP 9 release
◦ Clustered Data ONTAP 8.1.4P4 or later 8.x
release
• Using 7-Mode Transition Tool 3.3.1:
◦ ONTAP 9.5 or earlier ONTAP 9 release
◦ Clustered Data ONTAP 8.1.4P4 or later 8.x
release
Licensing requirements
Item Yes
SnapMirror license is enabled on the 7-Mode system
SnapMirror licenses are enabled on the primary and
secondary clusters for transitioning a volume
SnapMirror relationship
CIFS license is enabled on the cluster, if it is enabled
on the 7-Mode system
NFS license is enabled on the cluster, if it is enabled
on the 7-Mode system
iSCSI license is enabled on the cluster, if it is enabled
on the 7-Mode system
159

Item Yes
FC license is enabled on the cluster, if it is enabled on
the 7-Mode system
Other feature licenses, if available on the 7-Mode
system, are added to the cluster
SnapMirror requirements on the 7-Mode system
Item Yes
SnapMirror license
options snapmirror.enable on
options interface.snapmirror.blocked ""
Verify if one of the following is true:
• The snapmirror.access option is set to all
• The snapmirror.access option is set to the IP
addresses of all the intercluster LIFs on the
cluster
• If the snapmirror.access option is set to
legacy and the
snapmirror.checkip.enable option is off,
the SVM name is added to the
/etc/snapmirror.allow file
• If the snapmirror.access option is set to
legacy and the snapmirror.checkip.enable
option is on, the IP addresses of the intercluster
LIFs are added to the
/etc/snapmirror.allow file
Volume settings on the 7-Mode system
Item Yes
Volume is online
Volume is not restricted
160
Item Yes
The following volume options are disabled:
• no_i2p
• read_realloc
• nvfail
Managing access to the cluster
Item Yes
SSL is enabled
system services web show
HTTPS is allowed on the cluster-management LIF
system services firewall policy show
Managing access to the 7-Mode system
Item Yes
HTTPS is enabled
options httpd.admin.ssl.enable on
SSL is enabled
secureadmin setup ssl
options ssl.enable on
SSLv2 and SSLv3 are disabled
options ssl.v2.enable off
options ssl.v3.enable off
Networking requirements
Item Yes
Cluster is reachable using the cluster-management
LIF
161
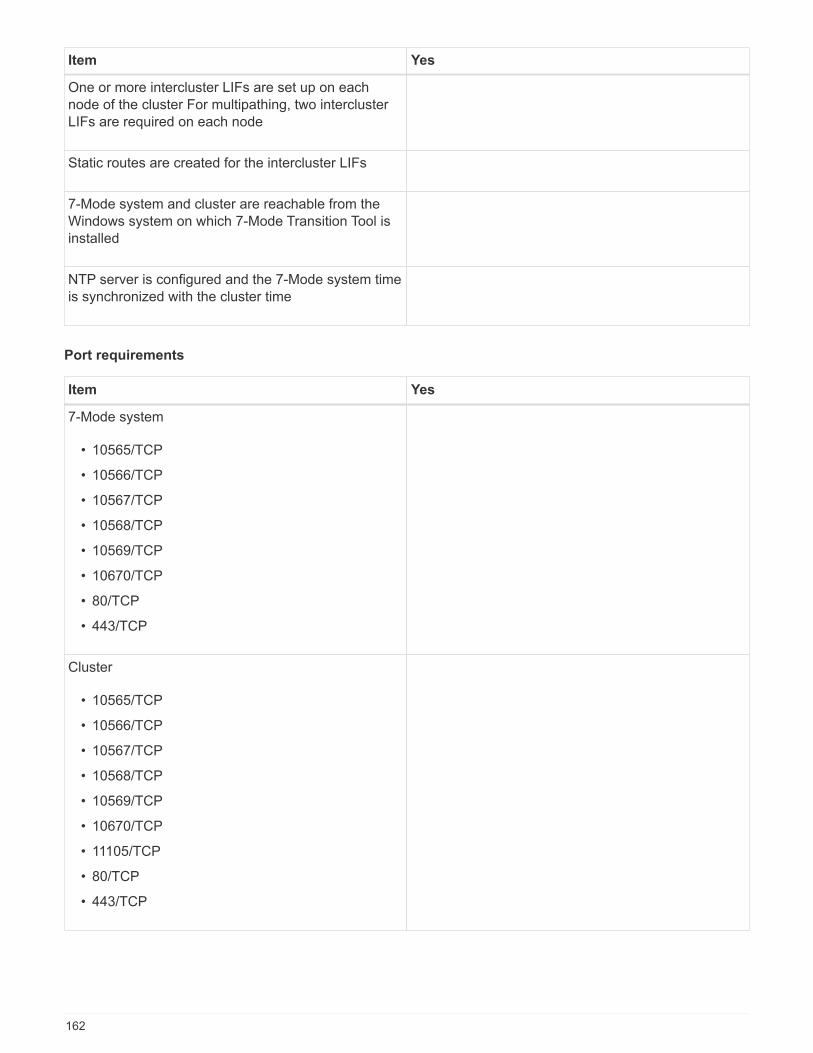
Item Yes
One or more intercluster LIFs are set up on each
node of the cluster For multipathing, two intercluster
LIFs are required on each node
Static routes are created for the intercluster LIFs
7-Mode system and cluster are reachable from the
Windows system on which 7-Mode Transition Tool is
installed
NTP server is configured and the 7-Mode system time
is synchronized with the cluster time
Port requirements
Item Yes
7-Mode system
• 10565/TCP
• 10566/TCP
• 10567/TCP
• 10568/TCP
• 10569/TCP
• 10670/TCP
• 80/TCP
• 443/TCP
Cluster
• 10565/TCP
• 10566/TCP
• 10567/TCP
• 10568/TCP
• 10569/TCP
• 10670/TCP
• 11105/TCP
• 80/TCP
• 443/TCP
162
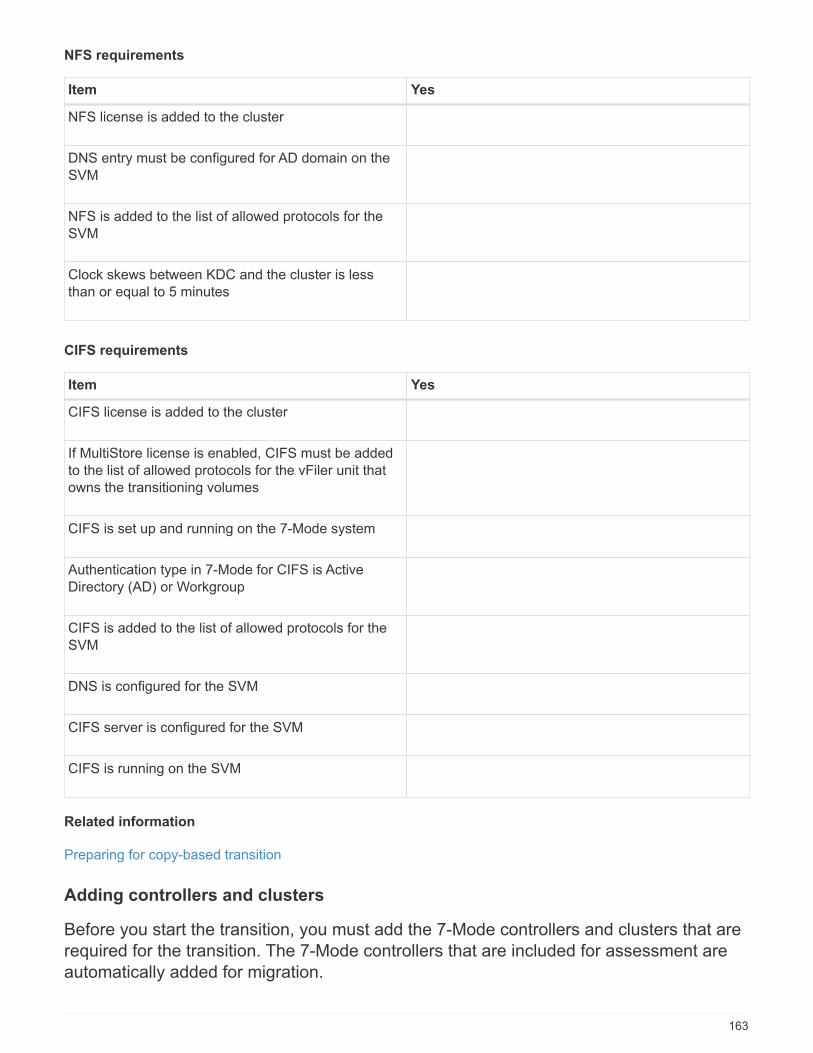
NFS requirements
Item Yes
NFS license is added to the cluster
DNS entry must be configured for AD domain on the
SVM
NFS is added to the list of allowed protocols for the
SVM
Clock skews between KDC and the cluster is less
than or equal to 5 minutes
CIFS requirements
Item Yes
CIFS license is added to the cluster
If MultiStore license is enabled, CIFS must be added
to the list of allowed protocols for the vFiler unit that
owns the transitioning volumes
CIFS is set up and running on the 7-Mode system
Authentication type in 7-Mode for CIFS is Active
Directory (AD) or Workgroup
CIFS is added to the list of allowed protocols for the
SVM
DNS is configured for the SVM
CIFS server is configured for the SVM
CIFS is running on the SVM
Related information
Preparing for copy-based transition
Adding controllers and clusters
Before you start the transition, you must add the 7-Mode controllers and clusters that are
required for the transition. The 7-Mode controllers that are included for assessment are
automatically added for migration.
163
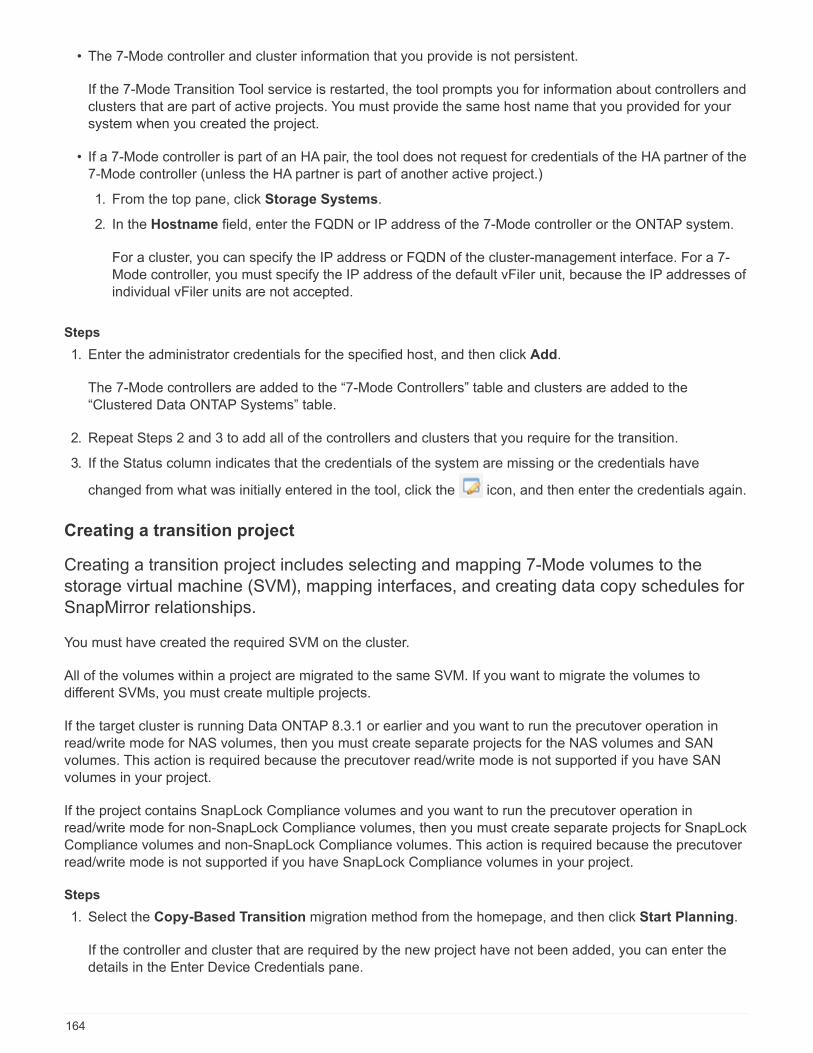
• The 7-Mode controller and cluster information that you provide is not persistent.
If the 7-Mode Transition Tool service is restarted, the tool prompts you for information about controllers and
clusters that are part of active projects. You must provide the same host name that you provided for your
system when you created the project.
• If a 7-Mode controller is part of an HA pair, the tool does not request for credentials of the HA partner of the
7-Mode controller (unless the HA partner is part of another active project.)
1. From the top pane, click Storage Systems.
2. In the Hostname field, enter the FQDN or IP address of the 7-Mode controller or the ONTAP system.
For a cluster, you can specify the IP address or FQDN of the cluster-management interface. For a 7-
Mode controller, you must specify the IP address of the default vFiler unit, because the IP addresses of
individual vFiler units are not accepted.
Steps
1. Enter the administrator credentials for the specified host, and then click Add.
The 7-Mode controllers are added to the “7-Mode Controllers” table and clusters are added to the
“Clustered Data ONTAP Systems” table.
2. Repeat Steps 2 and 3 to add all of the controllers and clusters that you require for the transition.
3. If the Status column indicates that the credentials of the system are missing or the credentials have
changed from what was initially entered in the tool, click the icon, and then enter the credentials again.
Creating a transition project
Creating a transition project includes selecting and mapping 7-Mode volumes to the
storage virtual machine (SVM), mapping interfaces, and creating data copy schedules for
SnapMirror relationships.
You must have created the required SVM on the cluster.
All of the volumes within a project are migrated to the same SVM. If you want to migrate the volumes to
different SVMs, you must create multiple projects.
If the target cluster is running Data ONTAP 8.3.1 or earlier and you want to run the precutover operation in
read/write mode for NAS volumes, then you must create separate projects for the NAS volumes and SAN
volumes. This action is required because the precutover read/write mode is not supported if you have SAN
volumes in your project.
If the project contains SnapLock Compliance volumes and you want to run the precutover operation in
read/write mode for non-SnapLock Compliance volumes, then you must create separate projects for SnapLock
Compliance volumes and non-SnapLock Compliance volumes. This action is required because the precutover
read/write mode is not supported if you have SnapLock Compliance volumes in your project.
Steps
1. Select the Copy-Based Transition migration method from the homepage, and then click Start Planning.
If the controller and cluster that are required by the new project have not been added, you can enter the
details in the Enter Device Credentials pane.
164
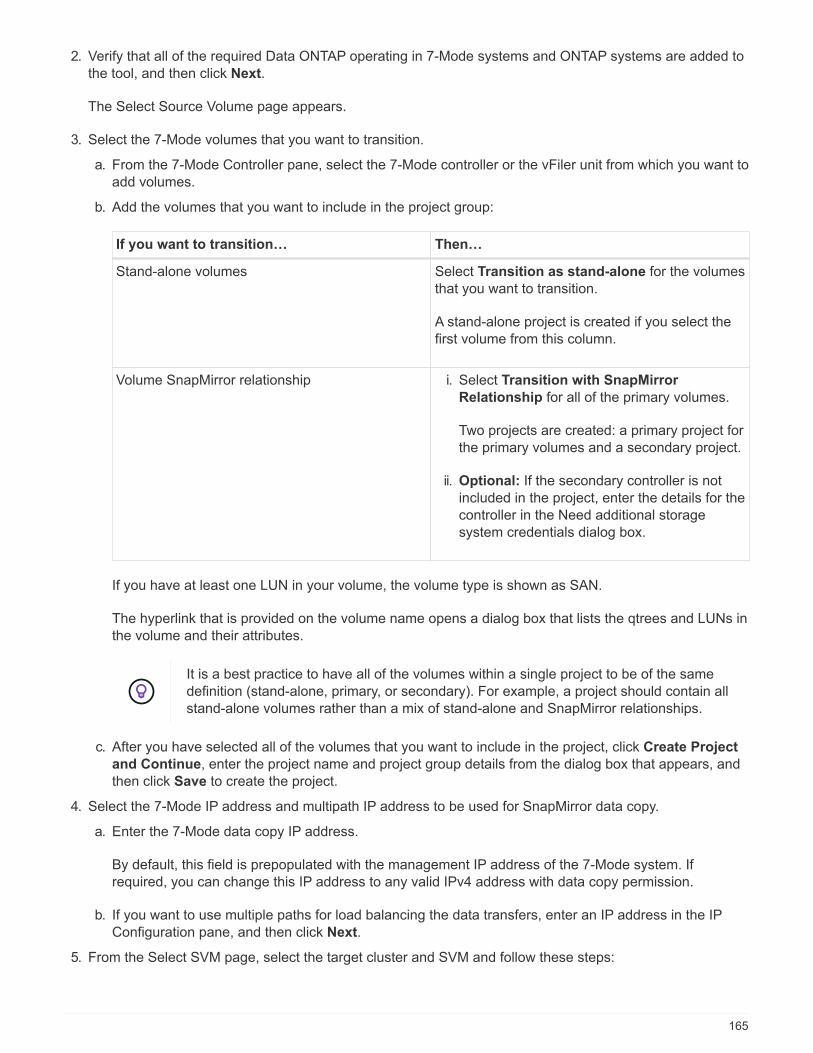
2. Verify that all of the required Data ONTAP operating in 7-Mode systems and ONTAP systems are added to
the tool, and then click Next.
The Select Source Volume page appears.
3. Select the 7-Mode volumes that you want to transition.
a. From the 7-Mode Controller pane, select the 7-Mode controller or the vFiler unit from which you want to
add volumes.
b. Add the volumes that you want to include in the project group:
If you want to transition… Then…
Stand-alone volumes Select Transition as stand-alone for the volumes
that you want to transition.
A stand-alone project is created if you select the
first volume from this column.
Volume SnapMirror relationship i. Select Transition with SnapMirror
Relationship for all of the primary volumes.
Two projects are created: a primary project for
the primary volumes and a secondary project.
ii. Optional: If the secondary controller is not
included in the project, enter the details for the
controller in the Need additional storage
system credentials dialog box.
If you have at least one LUN in your volume, the volume type is shown as SAN.
The hyperlink that is provided on the volume name opens a dialog box that lists the qtrees and LUNs in
the volume and their attributes.
It is a best practice to have all of the volumes within a single project to be of the same
definition (stand-alone, primary, or secondary). For example, a project should contain all
stand-alone volumes rather than a mix of stand-alone and SnapMirror relationships.
c. After you have selected all of the volumes that you want to include in the project, click Create Project
and Continue, enter the project name and project group details from the dialog box that appears, and
then click Save to create the project.
4. Select the 7-Mode IP address and multipath IP address to be used for SnapMirror data copy.
a. Enter the 7-Mode data copy IP address.
By default, this field is prepopulated with the management IP address of the 7-Mode system. If
required, you can change this IP address to any valid IPv4 address with data copy permission.
b. If you want to use multiple paths for load balancing the data transfers, enter an IP address in the IP
Configuration pane, and then click Next.
5. From the Select SVM page, select the target cluster and SVM and follow these steps:
165
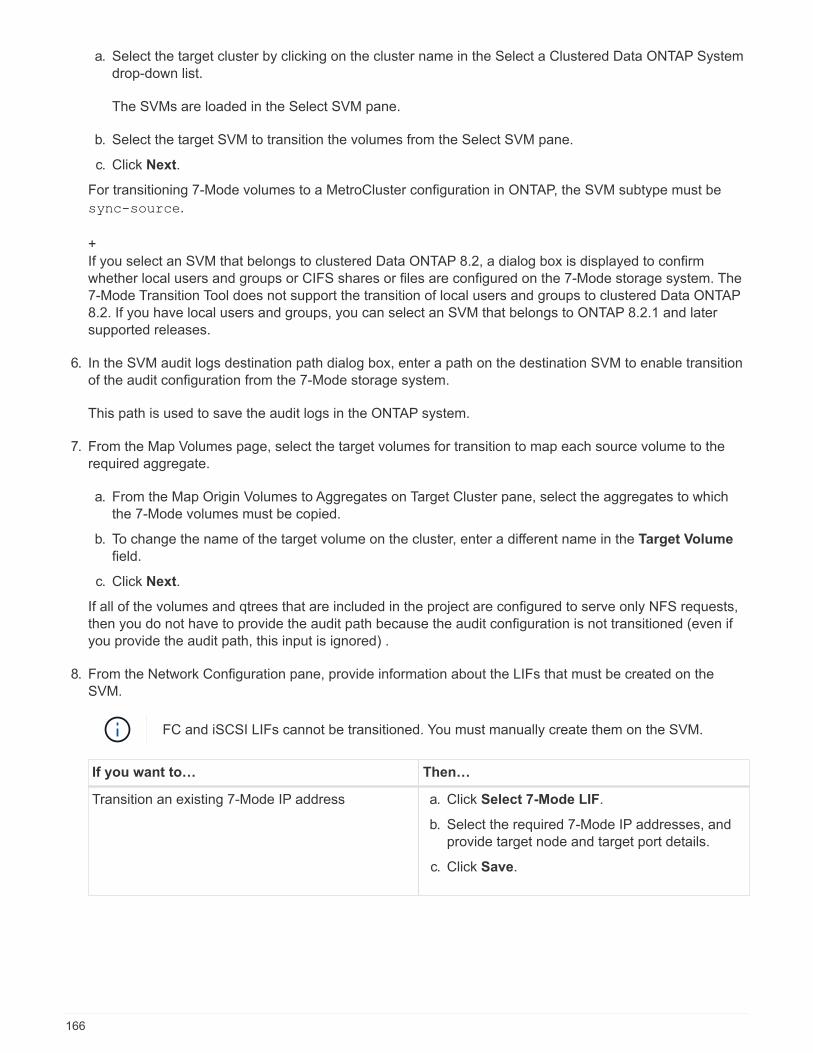
a. Select the target cluster by clicking on the cluster name in the Select a Clustered Data ONTAP System
drop-down list.
The SVMs are loaded in the Select SVM pane.
b. Select the target SVM to transition the volumes from the Select SVM pane.
c. Click Next.
For transitioning 7-Mode volumes to a MetroCluster configuration in ONTAP, the SVM subtype must be
sync-source.
+
If you select an SVM that belongs to clustered Data ONTAP 8.2, a dialog box is displayed to confirm
whether local users and groups or CIFS shares or files are configured on the 7-Mode storage system. The
7-Mode Transition Tool does not support the transition of local users and groups to clustered Data ONTAP
8.2. If you have local users and groups, you can select an SVM that belongs to ONTAP 8.2.1 and later
supported releases.
6. In the SVM audit logs destination path dialog box, enter a path on the destination SVM to enable transition
of the audit configuration from the 7-Mode storage system.
This path is used to save the audit logs in the ONTAP system.
7. From the Map Volumes page, select the target volumes for transition to map each source volume to the
required aggregate.
a. From the Map Origin Volumes to Aggregates on Target Cluster pane, select the aggregates to which
the 7-Mode volumes must be copied.
b. To change the name of the target volume on the cluster, enter a different name in the Target Volume
field.
c. Click Next.
If all of the volumes and qtrees that are included in the project are configured to serve only NFS requests,
then you do not have to provide the audit path because the audit configuration is not transitioned (even if
you provide the audit path, this input is ignored) .
8. From the Network Configuration pane, provide information about the LIFs that must be created on the
SVM.
FC and iSCSI LIFs cannot be transitioned. You must manually create them on the SVM.
If you want to… Then…
Transition an existing 7-Mode IP address a. Click Select 7-Mode LIF.
b. Select the required 7-Mode IP addresses, and
provide target node and target port details.
c. Click Save.
166
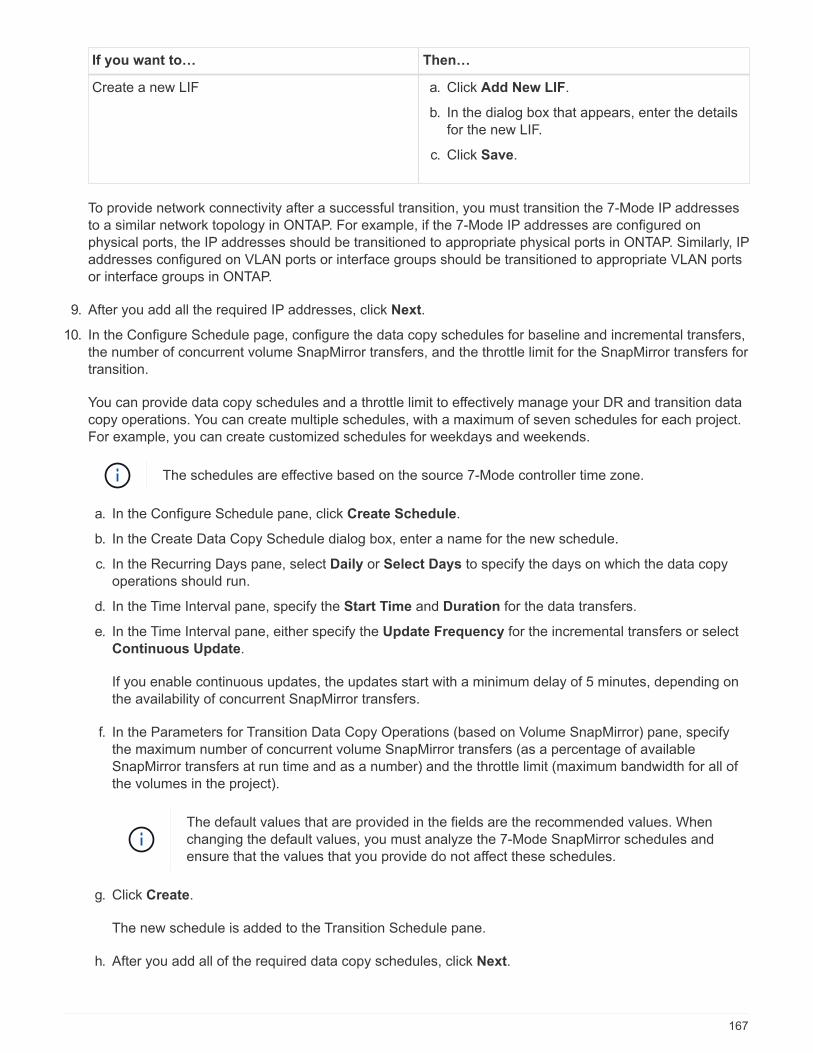
If you want to… Then…
Create a new LIF a. Click Add New LIF.
b. In the dialog box that appears, enter the details
for the new LIF.
c. Click Save.
To provide network connectivity after a successful transition, you must transition the 7-Mode IP addresses
to a similar network topology in ONTAP. For example, if the 7-Mode IP addresses are configured on
physical ports, the IP addresses should be transitioned to appropriate physical ports in ONTAP. Similarly, IP
addresses configured on VLAN ports or interface groups should be transitioned to appropriate VLAN ports
or interface groups in ONTAP.
9. After you add all the required IP addresses, click Next.
10. In the Configure Schedule page, configure the data copy schedules for baseline and incremental transfers,
the number of concurrent volume SnapMirror transfers, and the throttle limit for the SnapMirror transfers for
transition.
You can provide data copy schedules and a throttle limit to effectively manage your DR and transition data
copy operations. You can create multiple schedules, with a maximum of seven schedules for each project.
For example, you can create customized schedules for weekdays and weekends.
The schedules are effective based on the source 7-Mode controller time zone.
a. In the Configure Schedule pane, click Create Schedule.
b. In the Create Data Copy Schedule dialog box, enter a name for the new schedule.
c. In the Recurring Days pane, select Daily or Select Days to specify the days on which the data copy
operations should run.
d. In the Time Interval pane, specify the Start Time and Duration for the data transfers.
e. In the Time Interval pane, either specify the Update Frequency for the incremental transfers or select
Continuous Update.
If you enable continuous updates, the updates start with a minimum delay of 5 minutes, depending on
the availability of concurrent SnapMirror transfers.
f. In the Parameters for Transition Data Copy Operations (based on Volume SnapMirror) pane, specify
the maximum number of concurrent volume SnapMirror transfers (as a percentage of available
SnapMirror transfers at run time and as a number) and the throttle limit (maximum bandwidth for all of
the volumes in the project).
The default values that are provided in the fields are the recommended values. When
changing the default values, you must analyze the 7-Mode SnapMirror schedules and
ensure that the values that you provide do not affect these schedules.
g. Click Create.
The new schedule is added to the Transition Schedule pane.
h. After you add all of the required data copy schedules, click Next.
167
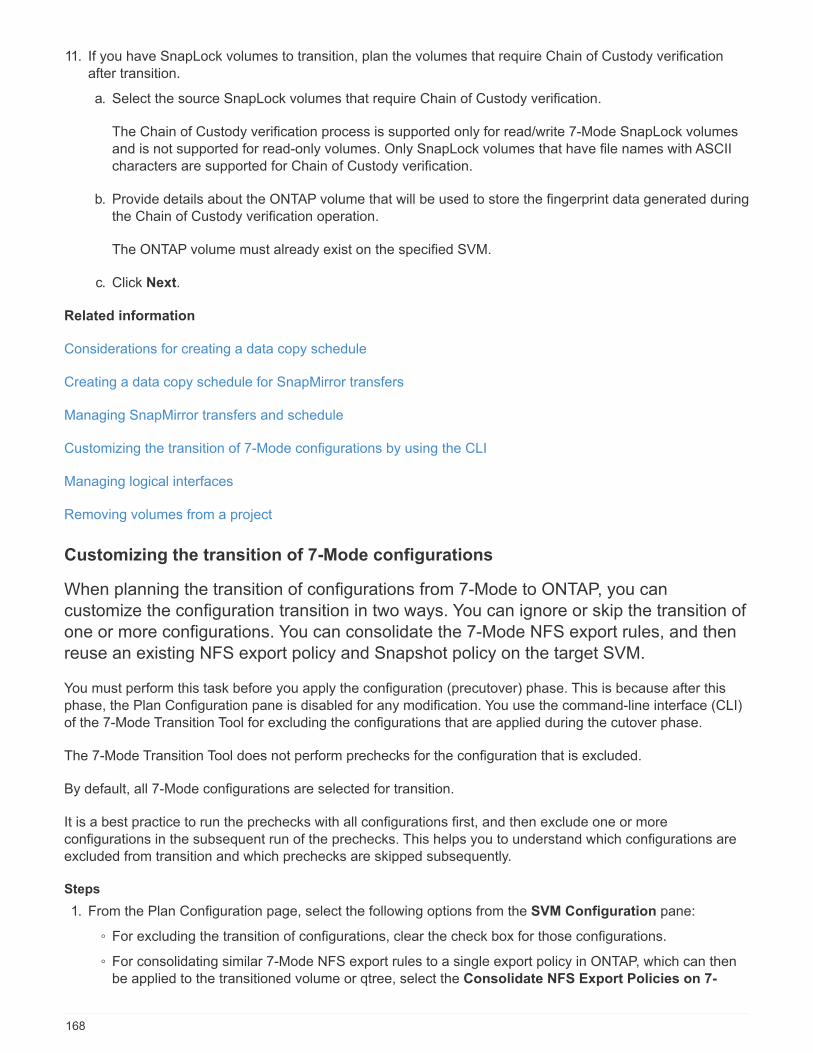
11. If you have SnapLock volumes to transition, plan the volumes that require Chain of Custody verification
after transition.
a. Select the source SnapLock volumes that require Chain of Custody verification.
The Chain of Custody verification process is supported only for read/write 7-Mode SnapLock volumes
and is not supported for read-only volumes. Only SnapLock volumes that have file names with ASCII
characters are supported for Chain of Custody verification.
b. Provide details about the ONTAP volume that will be used to store the fingerprint data generated during
the Chain of Custody verification operation.
The ONTAP volume must already exist on the specified SVM.
c. Click Next.
Related information
Considerations for creating a data copy schedule
Creating a data copy schedule for SnapMirror transfers
Managing SnapMirror transfers and schedule
Customizing the transition of 7-Mode configurations by using the CLI
Managing logical interfaces
Removing volumes from a project
Customizing the transition of 7-Mode configurations
When planning the transition of configurations from 7-Mode to ONTAP, you can
customize the configuration transition in two ways. You can ignore or skip the transition of
one or more configurations. You can consolidate the 7-Mode NFS export rules, and then
reuse an existing NFS export policy and Snapshot policy on the target SVM.
You must perform this task before you apply the configuration (precutover) phase. This is because after this
phase, the Plan Configuration pane is disabled for any modification. You use the command-line interface (CLI)
of the 7-Mode Transition Tool for excluding the configurations that are applied during the cutover phase.
The 7-Mode Transition Tool does not perform prechecks for the configuration that is excluded.
By default, all 7-Mode configurations are selected for transition.
It is a best practice to run the prechecks with all configurations first, and then exclude one or more
configurations in the subsequent run of the prechecks. This helps you to understand which configurations are
excluded from transition and which prechecks are skipped subsequently.
Steps
1. From the Plan Configuration page, select the following options from the SVM Configuration pane:
◦ For excluding the transition of configurations, clear the check box for those configurations.
◦ For consolidating similar 7-Mode NFS export rules to a single export policy in ONTAP, which can then
be applied to the transitioned volume or qtree, select the Consolidate NFS Export Policies on 7-
168
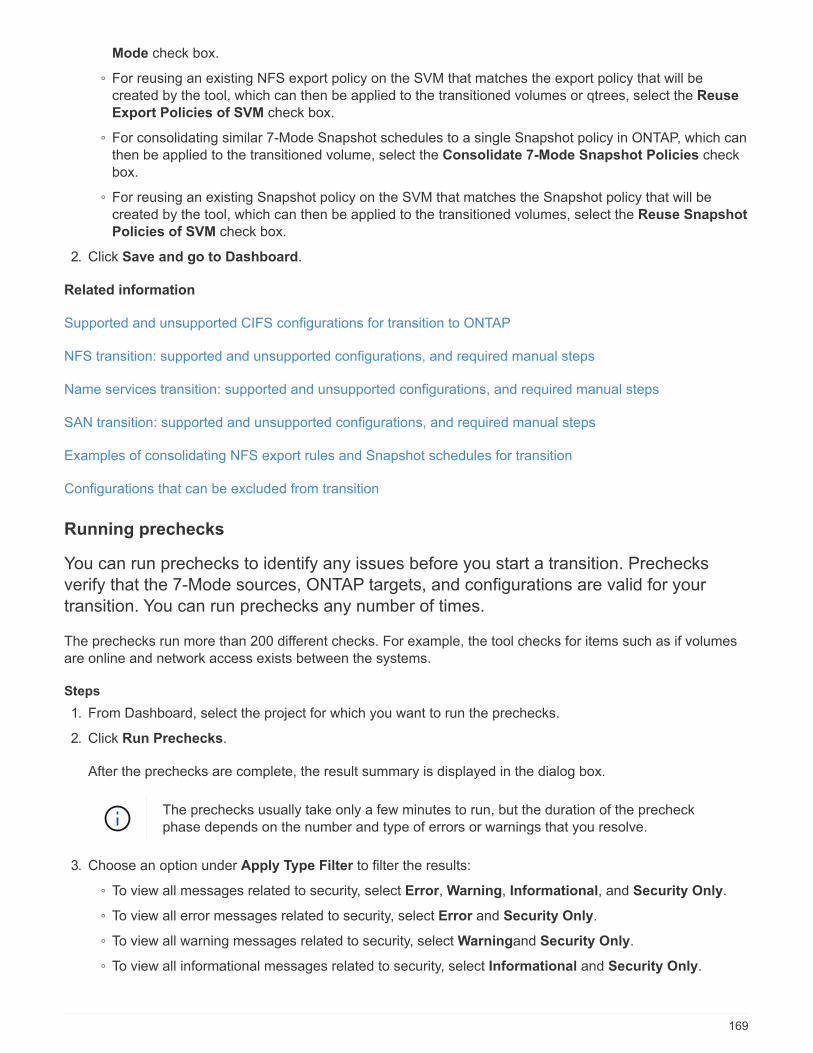
Mode check box.
◦ For reusing an existing NFS export policy on the SVM that matches the export policy that will be
created by the tool, which can then be applied to the transitioned volumes or qtrees, select the Reuse
Export Policies of SVM check box.
◦ For consolidating similar 7-Mode Snapshot schedules to a single Snapshot policy in ONTAP, which can
then be applied to the transitioned volume, select the Consolidate 7-Mode Snapshot Policies check
box.
◦ For reusing an existing Snapshot policy on the SVM that matches the Snapshot policy that will be
created by the tool, which can then be applied to the transitioned volumes, select the Reuse Snapshot
Policies of SVM check box.
2. Click Save and go to Dashboard.
Related information
Supported and unsupported CIFS configurations for transition to ONTAP
NFS transition: supported and unsupported configurations, and required manual steps
Name services transition: supported and unsupported configurations, and required manual steps
SAN transition: supported and unsupported configurations, and required manual steps
Examples of consolidating NFS export rules and Snapshot schedules for transition
Configurations that can be excluded from transition
Running prechecks
You can run prechecks to identify any issues before you start a transition. Prechecks
verify that the 7-Mode sources, ONTAP targets, and configurations are valid for your
transition. You can run prechecks any number of times.
The prechecks run more than 200 different checks. For example, the tool checks for items such as if volumes
are online and network access exists between the systems.
Steps
1. From Dashboard, select the project for which you want to run the prechecks.
2. Click Run Prechecks.
After the prechecks are complete, the result summary is displayed in the dialog box.
The prechecks usually take only a few minutes to run, but the duration of the precheck
phase depends on the number and type of errors or warnings that you resolve.
3. Choose an option under Apply Type Filter to filter the results:
◦ To view all messages related to security, select Error, Warning, Informational, and Security Only.
◦ To view all error messages related to security, select Error and Security Only.
◦ To view all warning messages related to security, select Warningand Security Only.
◦ To view all informational messages related to security, select Informational and Security Only.
169
4. To save the raw results in comma-separated values (CSV) format and export the results, click Save As
CSV.
You can view the transition operations that have been performed during the transition along with the
operation type, status, start time, end time, and results in the Operation History tab on the Dashboard
pane.
You must resolve all the errors detected by the prechecks before you start data copy. It is also a best practice
to resolve all warnings prior to proceeding with the migration process. Resolution can be resolving the source
issue of the warning message, implementing a workaround, or accepting the result of the issue.
Severity levels for precheck messages
You can verify whether the 7-Mode volumes can be transitioned by running the transition
precheck operation. Transition precheck reports all the transition issues. Transition issues
are assigned different severity levels, depending on the impact of the issue on the
transition process.
The issues detected by the prechecks are classified into the following categories:
• Error
Configurations that cannot be transitioned.
You cannot continue the transition if there is even one error. The following are a few example
configurations on the 7-Mode system that cause an error:
◦ Traditional volumes
◦ SnapLock volumes
◦ Offline volumes
• Warning
Configurations that can cause minor problems after transition.
Features that are supported in ONTAP, but are not transitioned by the 7-Mode Transition Tool, also
generate a warning message. You can continue the transition with these warnings. However, after the
transition you might lose some of these configurations or might have to complete some manual tasks for
enabling these configurations in ONTAP.
The following are a few example configurations on the 7-Mode system that generate a warning:
◦ IPv6
◦ NFSv2
◦ NDMP configurations
◦ Interface groups and VLANs
◦ Routing Information Protocol (RIP)
• Information
Configurations that have been successfully transitioned.
170
Starting baseline data copy
After you create a project and complete the precheck operation, you must initiate data
copy from the 7-Mode volumes to ONTAP. You can start baseline data copy operation for
individual projects. You should stop unnecessary system processes and network activity
during the data copy.
You must have created at least one data copy schedule.
You can estimate the time to complete baseline transfers and evaluate the performance achieved by volume
SnapMirror transfers in your environment by performing a test migration. The following are some of the factors
that can affect performance:
• Transition data copy schedule options selected
This schedule controls both the maximum number of SnapMirror concurrent transfers and the maximum
bandwidth to be used for the transfers.
• Maximum number of concurrent volume SnapMirror transfers supported by the 7-Mode source controllers
• Network bandwidth between the 7-Mode source and ONTAP destination controllers
Network traffic that is unrelated to the migration activity must be minimized so that the throughput is
maximized and response time is minimized between the source and destination systems.
• Performance capabilities of both the source and destination controllers
The source and destination systems should have optimum CPU utilization and memory available.
• Number of 7-Mode volume SnapMirror transfers occurring during the data copy
Steps
1. From Dashboard, select the project for which you want to start the baseline data copy.
2. Click Start Baseline.
The precheck is run once again in the background, and if no errors are detected, the baseline transfer is
started based on the data copy schedule. The Operation Progress dialog box displays the information
about the status of the precheck operations run during the baseline data copy.
3. Click the Volumes tab to view the status and progress of the baseline transfer.
To view the detailed SnapMirror details of each volume, you can click View Transition Details. The
number of concurrent SnapMirror transfers is based on the input provided in the schedule that is currently
active. You can track the active schedule from the Data Copy Schedule tab on Dashboard.
After the baseline data copy operation is completed, the incremental SnapMirror updates start based on
the schedule provided while creating the project.
Related information
Creating a data copy schedule for SnapMirror transfers
171
Applying 7-Mode configurations
After the baseline data copy is completed, you can copy and apply all configurations from
the 7-Mode system (including protocols and services configuration) to the ONTAP
volumes. If the target cluster is running any version from ONTAP 8.3.2 and later
supported releases, SAN configuration is transitioned in this phase.
If you are transitioning SAN volumes, you must have created at least one data LIF of the appropriate protocol
(iSCSI or FC) for every node in the cluster.
• The configurations are applied in the apply configuration (precutover) phase, which has two modes:
precutover read-only mode and precutover read/write mode.
The precutover read/write mode is not supported when the project contains:
• SAN volumes and the target cluster is running Data ONTAP 8.3.1 or earlier. In this situation, the following
configurations are not applied in the precutover phase, instead they are applied during the cutover phase:
◦ SAN configurations
◦ Snapshot Schedule configurations
• SnapLock Compliance volumes.
If the project contains SnapLock Compliance volumes, then the Snapshot Schedule configurations are not
applied in the precutover phase, instead these configurations are applied during the cutover phase.
See Considerations for transitioning of SnapLock Compliance volumes.
Steps
1. From the Dashboard, select the project.
2. Apply the configurations:
If you want to apply all configurations in… Then…
Read-only mode Click Apply Configuration.
Read/write mode a. Select the Test Mode check box.
b. Click Apply Configuration.
The ONTAP volumes are made read/write and
you can test the configurations and data access
operations.
c. Select Apply configuration in test mode in the
Apply Configuration (Precutover) dialog box.
3. Select the Customize the number of concurrent SnapMirror transfers and Throttle limit for this
operation check box to specify the number of SnapMirror data copy operations and throttle limit:
a. Enter the maximum number of concurrent SnapMirror transfers to run during transition.
b. Enter the percentage of available streams that can be used for SnapMirror transfers.
172
By default, the tool uses 50% of the available volume SnapMirror transfers.
c. Either enter a throttle limit or select Maximum to use the maximum bandwidth.
By default, the tool uses maximum throttle for configuration transition.
4. Select the Transition Kerberos Configuration check box to provide UNIX-based or Microsoft AD based
Kerberos server configuration details for transition.
This option is enabled only when Kerberos is configured on the source 7-Mode storage
system.
a. Enter the Kerberos server details such as the host name, IP address, user name, and password.
To transition the Kerberos configuration, at least one LIF has to be transitioned as part of
the project and the LIF must be resolvable to a host name.
5. Click Continue.
The Operation Progress dialog box is displayed, and the copy configuration operation is started.
6. If the configuration transition is performed in read/write mode, click Finish Testing after the testing and
verification of the configurations is complete.
This mode should be used only for testing purposes. All data written to the cluster on the volumes being
migrated during test mode is lost.
The tool reestablishes the SnapMirror relationship and resynchronizes (based on the active schedule for
that project at that time) the ONTAP volumes. Any data written to the 7-Mode is resynchronized with the
ONTAP volumes.
For a successful resynchronization, a common Snapshot copy must exist between the 7-
Mode and clustered Data ONTAP volumes. You should not manually delete the common
Snapshot copy; otherwise, resynchronization fails.
The 7-Mode IP addresses remain operational. The LIFs are configured on the storage virtual machine (SVM) in
the following ways:
• Existing 7-Mode IP addresses are created in the administrative down state.
During the storage cutover, these IP addresses are removed from the 7-Mode system and the
corresponding storage virtual machine (SVM) LIFs are brought to the administrative up state. If you select
the precutover read/write mode, you must use a different LIF to gain access to the volumes being migrated
to the cluster.
• New IP addresses are created in the administrative up state.
If you select the precutover read/write mode, these LIFs can be used for testing access to the volumes
being migrated in the cluster.
Related information
Managing logical interfaces
173
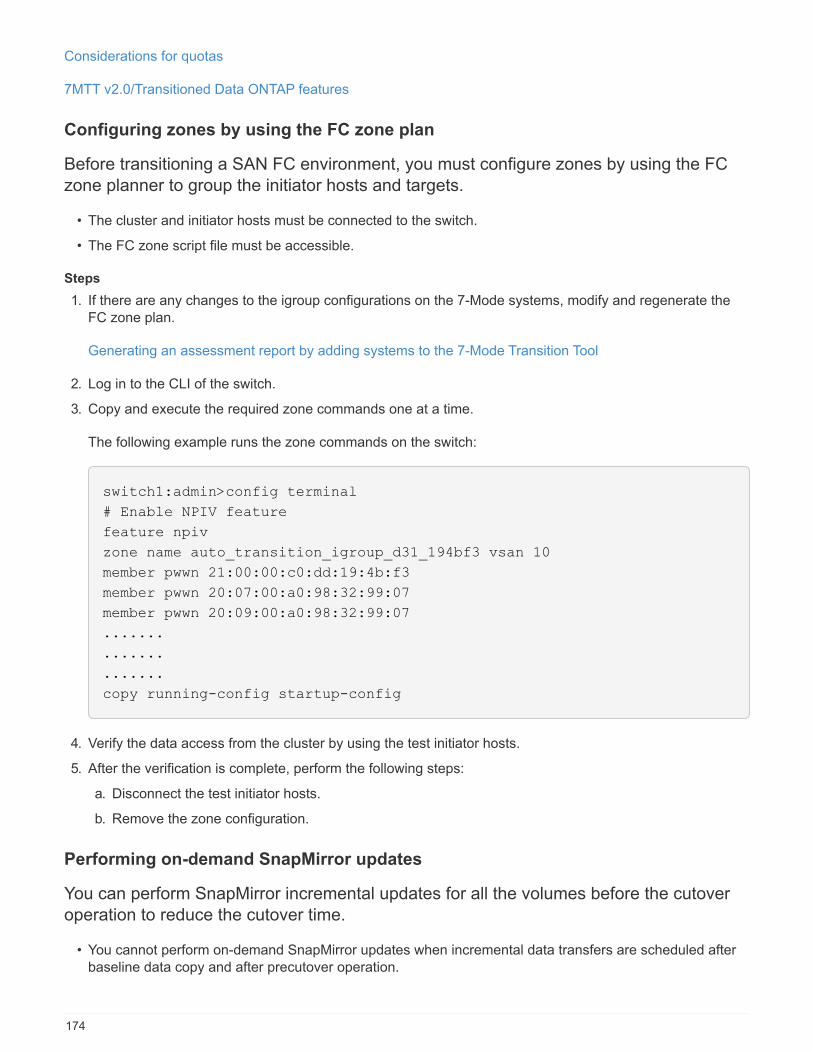
Considerations for quotas
7MTT v2.0/Transitioned Data ONTAP features
Configuring zones by using the FC zone plan
Before transitioning a SAN FC environment, you must configure zones by using the FC
zone planner to group the initiator hosts and targets.
• The cluster and initiator hosts must be connected to the switch.
• The FC zone script file must be accessible.
Steps
1. If there are any changes to the igroup configurations on the 7-Mode systems, modify and regenerate the
FC zone plan.
Generating an assessment report by adding systems to the 7-Mode Transition Tool
2. Log in to the CLI of the switch.
3. Copy and execute the required zone commands one at a time.
The following example runs the zone commands on the switch:
switch1:admin>config terminal
# Enable NPIV feature
feature npiv
zone name auto_transition_igroup_d31_194bf3 vsan 10
member pwwn 21:00:00:c0:dd:19:4b:f3
member pwwn 20:07:00:a0:98:32:99:07
member pwwn 20:09:00:a0:98:32:99:07
.......
.......
.......
copy running-config startup-config
4. Verify the data access from the cluster by using the test initiator hosts.
5. After the verification is complete, perform the following steps:
a. Disconnect the test initiator hosts.
b. Remove the zone configuration.
Performing on-demand SnapMirror updates
You can perform SnapMirror incremental updates for all the volumes before the cutover
operation to reduce the cutover time.
• You cannot perform on-demand SnapMirror updates when incremental data transfers are scheduled after
baseline data copy and after precutover operation.
174
• This is an optional task.
1. Click Update Now to perform a manual SnapMirror update.
The Transition Update dialog box is displayed, where you can choose to customize the number of
SnapMirror transfers and throttle limit for this operation.
2. Select the Customize the number of concurrent SnapMirror transfers and Throttle limit for this
operation check box to specify the number of SnapMirror data copy operations and throttle limit.
a. Enter the maximum number of concurrent SnapMirror transfers to run during transition.
b. Enter the percentage of available streams that the tool can use for SnapMirror transfers.
By default, the tool uses 50% of the available volume SnapMirror transfers.
c. Enter the throttle limit to use the maximum bandwidth.
By default, the tool uses maximum throttle for configuration transition.
3. Click Continue.
Related information
Starting baseline data copy
Creating a data copy schedule for SnapMirror transfers
Completing a transition project
You can complete a transition by completing the individual projects. Because this
operation is disruptive, you should evaluate when to run it. When transitioning volumes in
a SnapMirror relationship, the secondary project must be completed before completing
the transition of the primary project.
The storage cutover is completed in a few minutes. The time required for the clients to remount the data varies.
The timing of the storage cutover or outage window depends on the following factors:
• Final update
The final update of the data depends on the amount of change in the source data since the last update.
Incremental transfers minimize the amount of data that has to be transferred during cutover.
• Reconnecting clients
If updates are required for each client to connect to the cluster, the number of clients that have to be
updated determines the cutover time.
Outages apply only to the volumes that are being migrated. You do not need to shut down the entire source 7-
Mode storage system. Volumes on the source system that are not being migrated can remain online and
accessible.
1. From the Migration Dashboard, select the project that you want to complete.
2. Disconnect client access manually.
175
3. Click Complete Transition.
a. If you want to keep the 7-Mode source volumes online after the transition, clear the Take source
volumes offline after transition checkbox.
By default, this option is selected, and the source volumes are taken offline.
b. If you have selected SnapLock volumes for Chain of Custody verification, select the I understand that
I must not take 7-Mode SnapLock volumes offline during Chain of Custody verification checkbox
to keep the SnapLock volumes online after transition.
c. If you have selected the transition of a SnapMirror relationship between clusters that are running
ONTAP 9.3 or later supported releases, select the I understand that I must manually convert
SnapMirror relationship type from data_protection to extended_data_protection checkbox.
d. Select the Customize the number of concurrent SnapMirror transfers and Throttle limit for this
operation checkbox to specify the number of SnapMirror data copy operations and the throttle limit.
e. Click Continue.
The results of the cutover operation are displayed.
The 7-Mode IP addresses selected for the transition are unconfigured from the 7-Mode storage system, and
the associated LIFs created before the cutover are brought to the administrative up state. The 7-Mode volumes
are offline.
From the cluster, run the vserver check lif-multitenancy run command to verify that the name servers are
reachable by using the transitioned LIFs.
If you have created a new LIF, the users and applications of the transitioned volumes must be
remapped to the drives by using the new IP addresses and ports after all of the projects have
been completed.
If you have completed the transition of a SnapMirror relationship between clusters that are running ONTAP 9.3
or later supported releases, you must convert the SnapMirror relationship from type DP to type XDP.
Data protection
Related information
Guidelines for deciding when to perform cutover
Completing the Chain of Custody verification
If one or more SnapLock volumes are selected for Chain of Custody verification, then you
must perform the Chain of Custody operation to generate a Chain of Custody report.
You must have completed the transition of the project.
SnapLock Chain of Custody operation is supported for volumes with files that have file names with only ASCII
characters.
1. From the Migration Dashboard, click Start Chain of Custody.
If you want to keep the 7-Mode SnapLock volumes online after the Chain of Custody verification, you
should clear the Take 7-Mode SnapLock volumes selected for Chain of Custody verification offline
176
after Chain of Custody verification operation is completed check box.
2. Click Continue.
The Chain of Custody verification operation is initiated. This operation can take a significant amount of time
based on the number of files on the SnapLock volumes. You can click Run in Background to perform the
operation in the background.
You can track the progress of the Chain of Custody verification operation by clicking the SnapLock Chain of
Custody tab in the Migration Dashboard window. This tab displays per volume progress of the Chain of
Custody operation.
3. After the Chain of Custody operation is complete, click Download Report in the SnapLock Chain of
Custody tab to download the Chain of Custody verification report.
The Chain of Custody verification report contains details about whether the SnapLock Chain of Custody
verification succeeded. The report shows the total file count and the number of non-WORM files in each of
the 7-Mode SnapLock volumes that are selected for the Chain of Custody operation. You can also verify
the number of files for which the fingerprints matched and unmatched. The report also shows the number
of WORM files for which the Chain of Custody verification failed and reason for the failure.
Transitioning volumes by using the 7-Mode Transition ToolCLI
The 7-Mode Transition Tool provides commands that enable you to transition 7-Mode
volumes. If you have the 7-Mode Transition Tool installed on a Linux system, you must
use the CLI to perform the transition.
The tool collects the 7-Mode storage system’s volume and IP address information, verifies the 7-Mode
configuration, and interacts with the cluster to apply the configuration on the SVM.
Scenarios for selecting volumes in a project
Planning a project composition and deciding which 7-Mode volumes to transition in a
single transition operation can help in reducing the downtime for applications.
Understanding some sample scenarios can help you while creating projects in your
environment.
Bidirectional SnapMirror relationship
To transition a bidirectional SnapMirror relationship, you must create different transition projects for each
volume.
For example, as shown in the illustration below, consider a volume SnapMirror relationship that exists between
vf1:vol1 (primary) on system1 and vf2:vol1 (secondary) on system2. Similarly, another volume SnapMirror
relationship exists between vf2:vol2 (primary) on system2 and vf1:vol2 (secondary) on system1.
177
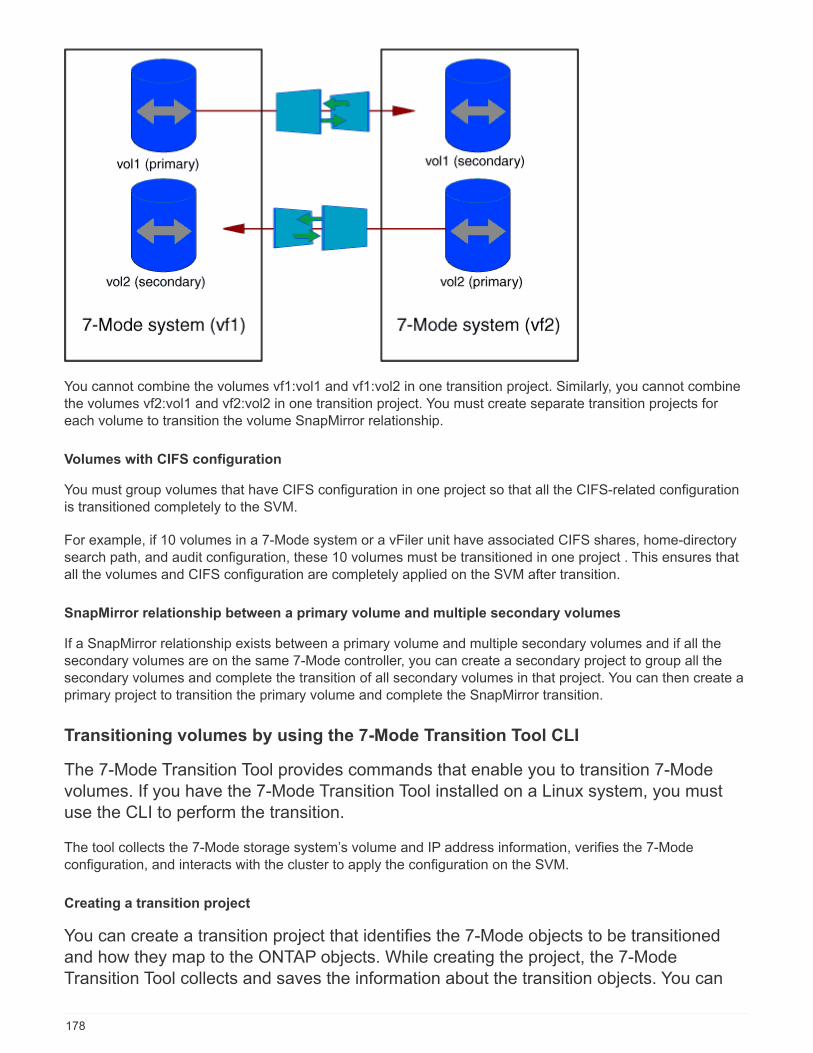
You cannot combine the volumes vf1:vol1 and vf1:vol2 in one transition project. Similarly, you cannot combine
the volumes vf2:vol1 and vf2:vol2 in one transition project. You must create separate transition projects for
each volume to transition the volume SnapMirror relationship.
Volumes with CIFS configuration
You must group volumes that have CIFS configuration in one project so that all the CIFS-related configuration
is transitioned completely to the SVM.
For example, if 10 volumes in a 7-Mode system or a vFiler unit have associated CIFS shares, home-directory
search path, and audit configuration, these 10 volumes must be transitioned in one project . This ensures that
all the volumes and CIFS configuration are completely applied on the SVM after transition.
SnapMirror relationship between a primary volume and multiple secondary volumes
If a SnapMirror relationship exists between a primary volume and multiple secondary volumes and if all the
secondary volumes are on the same 7-Mode controller, you can create a secondary project to group all the
secondary volumes and complete the transition of all secondary volumes in that project. You can then create a
primary project to transition the primary volume and complete the SnapMirror transition.
Transitioning volumes by using the 7-Mode Transition Tool CLI
The 7-Mode Transition Tool provides commands that enable you to transition 7-Mode
volumes. If you have the 7-Mode Transition Tool installed on a Linux system, you must
use the CLI to perform the transition.
The tool collects the 7-Mode storage system’s volume and IP address information, verifies the 7-Mode
configuration, and interacts with the cluster to apply the configuration on the SVM.
Creating a transition project
You can create a transition project that identifies the 7-Mode objects to be transitioned
and how they map to the ONTAP objects. While creating the project, the 7-Mode
Transition Tool collects and saves the information about the transition objects. You can
178
use this project information to perform the transition in stages.
You must have gathered the following information:
• Project type: Possible values are stand-alone, primary, or secondary
• FQDN or IP address of the 7-Mode storage system or the default vFiler unit, if MultiStore is licensed
• Administrative user name and password of the 7-Mode storage system
• List of 7-Mode volumes
• FQDN of the cluster or IP address of the cluster-management LIF
• SVM name
Steps
1. From the Start menu, click All Programs > NetApp 7-Mode Transition Tool > NetApp 7-Mode
Transition Tool (CLI) 3.0 to open the 7-Mode Transition Tool command prompt.
2. Add the user name and password of the systems that are a part of the transition project:
transition credentials add -h host_name -u user_name
host_name is FQDN or IP address of the 7-Mode system or cluster.
user_name is the administrative user name for the system.
You must repeat this step for each storage system that you want to add to the transition
projects.
7-Mode Transition Tool>transition credentials add -h system1.example.com
-u root
Enter password for '[email protected]':
3. Create a transition project:
transition cbt create -p project_name -t project_type -n 7-Mode_system -c
data-copy-ipaddress [-f vfiler_name] [-h cluster -v vserver_name
project_name is the name of the transition project.
project_type is the project type. Valid values are standalone, secondary, or primary.
7-Mode_system is the FQDN or IP address of the 7-Mode system.
cluster is the FQDN of the cluster or IP address of the cluster-management LIF.
The host names of your 7-Mode system and cluster must be the same as those you had
provided while creating the project.
data-copy-ipaddress is the IP address over which data is copied.
179

vfiler_name is the name of the nondefault vFiler unit.
vserver_name is the name of the SVM.
For a new SVM, you must provide the aggregate name of the root volume of the SVM with
the -g option.
7-Mode Transition Tool>transition cbt create -p sample_project -t
standalone -n system1.example.com -n 10.238.55.33 -h
cluster1.example.com -v vs2
The transition project moves to the preparation state.
4. Add the 7-Mode volume and ONTAP volume to the project:
transition cbt volumepair add -p project_name -v 7-Mode_volume -c
vserver_volume -g aggr_name -t
7-Mode_volume is the 7-Mode volume name.
vserver_volume is the ONTAP volume on the SVM.
You can also add an ONTAP volume for which the baseline transfer has been completed.
When you add such a volume in the preparation phase, only incremental transfers are
performed during the data copy phase.
aggr_name is the aggregate on which the ONTAP volume vserver_volume is created during the start
operation.
-t is used when a volume which is in SnapMirror relationships must be transitioned as standalone volume.
When a volume is transitioned as standalone volume, SnapMirror relationships are not
preserved during the transition.
For SnapLock Compliance volumes that are in SnapMirror relationship, the transition of SnapMirror
relationships for SnapLock Compliance volumes is not automated by the 7-Mode Transition Tool. All
SnapLock Compliance volumes that are in SnapMirror relationship must be transitioned as standalone
volumes (by specifying the flag -t) by including the volumes in standalone, primary, or secondary projects.
You must then manually perform the SnapMirror resychronization operation between these volumes after
the transition.
See Considerations for transitioning of SnapLock Compliance volumes
7-Mode Transition Tool>transition cbt volumepair add -p sample_project
-v vol1 -c vol1 -g aggr1
5. Add the IP addresses to be transitioned to the project:
180
transition cbt lif add -p project_name -i ip-address [-m netmask] [-g default-
gateway] [-p home_port] [ -n home_node]
To a transition project, you can also add existing IP addresses that are unconfigured or removed from the
7-Mode system during storage cutover, and new IP addresses that are not yet configured on either the 7-
Mode or ONTAP.
FC and iSCSI LIFs are not transitioned by the 7-Mode Transition Tool.
7-Mode Transition Tool>transition cbt lif add -p sample_project -i
192.0.2.250 -m 255.255.255.128 -g 192.40.0.1 -p e0a -n cluster1-01
The new IP addresses are configured on the ONTAP system in the up state during the apply configuration
(precutover) operation.
6. Follow these steps to add information to the primary and secondary project:
If you want to add information about the… Enter…
Primary 7-Mode system to the secondary project transition cbt add-primary-seven-mode-
system -p project_name -h source-host
-f management-ipaddress -d data-copy-
ipaddress [-m multipathing-ipaddress]
For more information, see CBT : How to provide all
the required primary 7-Mode details for a given
secondary project.
Secondary cluster or SVM to the primary project transition cbt add-secondary-cluster-
mode-system -p project_name -h c-mode-
host-name -v vserver-name
For more information, see the CBT: How to add the
required secondary cluster details to the primary
project
project_name is the name of the transition project.
source-host is the primary 7-Mode storage system host name or IP address as seen in the
snapmirror status command output of the secondary 7-Mode system.
For considerations about providing the 7-Mode primary system details, see the man pages.
management-ipaddress is the management IP address of the source host.
data-copy-ipaddress is the IP address over which data is copied.
multipathing-ipaddress is the additional IP address that is used for data copy.
c-mode-host-name is the FQDN or IP address of the cluster to which the secondary volumes in the
181
project have been transitioned.
vserver-name is the name of the SVM hosting the secondary volumes.
7. Create a data copy schedule:
transition cbt schedule add -p project_name -n schedule_name -d days-range -b
start-time -e duration -u update-frequency -t available-transfers-percentage
-c max-cap-concurrent-transfers -x project-snapmirror-throttle
The following command shows how to add a schedule that uses 100% of available concurrent SnapMirror
transfers. However, it does not exceed the 25 concurrent SnapMirror transfers at any point of time.
transition schedule add -p sample_project -n dr_active -d 1-5 -b 23:30 -e
03:00 -c 25 -x 200 -u 00:30
8. View the detailed information about the transition project created:
transition cbt show -p project-name
Customizing the transition of 7-Mode configurations by using the CLI
By default, all 7-Mode configurations are transitioned to ONTAP. You can choose to
exclude some or all the volume, NFS, CIFS, SAN, and name services configurations from
transition by using the 7-Mode Transition Tool CLI. You can also choose to consolidate
the 7-Mode NFS export rules and Snapshot schedules, and reuse an existing NFS export
policy and Snapshot policy on the target SVM.
You must perform this task before the configuration is applied, after which any modification will be ignored.
The 7-Mode Transition Tool does not perform prechecks for the configuration that is excluded.
By default, all 7-Mode configurations are selected for transition.
It is a best practice to run the prechecks with all configurations first, and then exclude one or more
configurations in the subsequent run of the prechecks. This helps you to understand which configurations are
excluded from transition and which prechecks are skipped subsequently.
Steps
• Exclude and verify the configurations:
a. Exclude the configurations:
transition cbt property-set -p project_name -n config_property_name -v true
config_property_name is the configuration that you want to exclude.
Configurations that can be excluded from transition
b. Verify the value of the property that is set for excluding the configuration:
transition cbt property-get -p project_name -n config_property_name
182
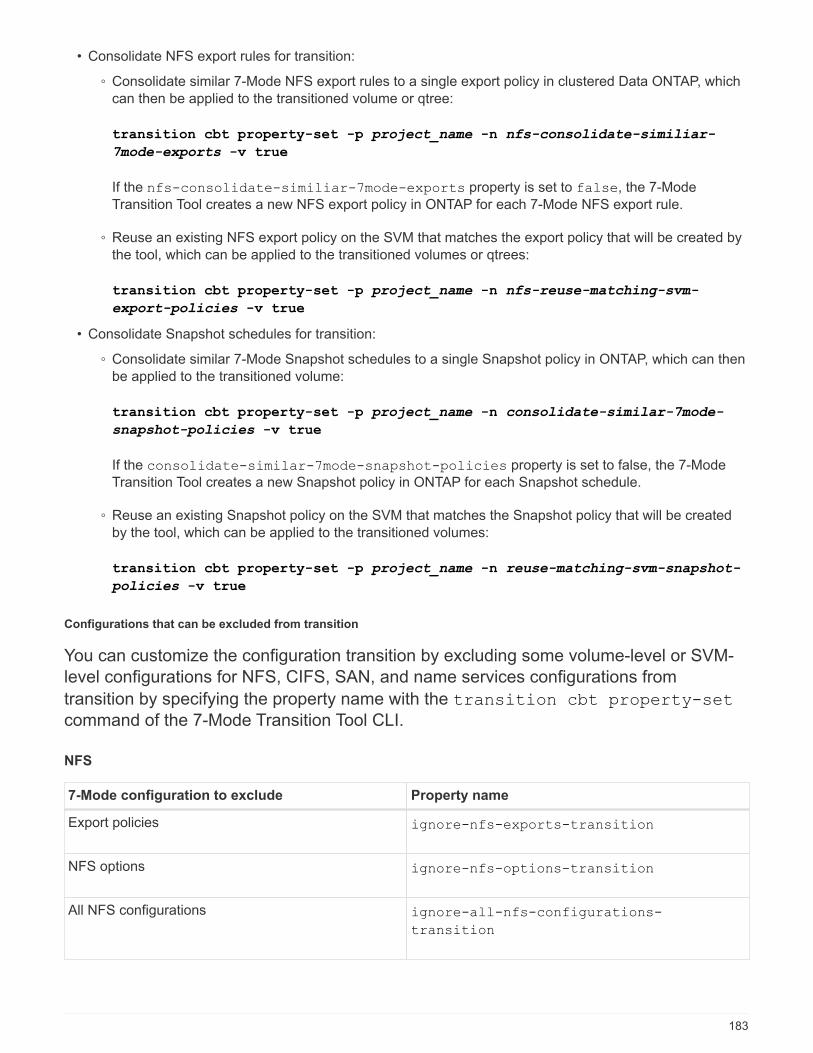
• Consolidate NFS export rules for transition:
◦ Consolidate similar 7-Mode NFS export rules to a single export policy in clustered Data ONTAP, which
can then be applied to the transitioned volume or qtree:
transition cbt property-set -p project_name -n nfs-consolidate-similiar-
7mode-exports -v true
If the nfs-consolidate-similiar-7mode-exports property is set to false, the 7-Mode
Transition Tool creates a new NFS export policy in ONTAP for each 7-Mode NFS export rule.
◦ Reuse an existing NFS export policy on the SVM that matches the export policy that will be created by
the tool, which can be applied to the transitioned volumes or qtrees:
transition cbt property-set -p project_name -n nfs-reuse-matching-svm-
export-policies -v true
• Consolidate Snapshot schedules for transition:
◦ Consolidate similar 7-Mode Snapshot schedules to a single Snapshot policy in ONTAP, which can then
be applied to the transitioned volume:
transition cbt property-set -p project_name -n consolidate-similar-7mode-
snapshot-policies -v true
If the consolidate-similar-7mode-snapshot-policies property is set to false, the 7-Mode
Transition Tool creates a new Snapshot policy in ONTAP for each Snapshot schedule.
◦ Reuse an existing Snapshot policy on the SVM that matches the Snapshot policy that will be created
by the tool, which can be applied to the transitioned volumes:
transition cbt property-set -p project_name -n reuse-matching-svm-snapshot-
policies -v true
Configurations that can be excluded from transition
You can customize the configuration transition by excluding some volume-level or SVM-
level configurations for NFS, CIFS, SAN, and name services configurations from
transition by specifying the property name with the transition cbt property-set
command of the 7-Mode Transition Tool CLI.
NFS
7-Mode configuration to exclude Property name
Export policies ignore-nfs-exports-transition
NFS options ignore-nfs-options-transition
All NFS configurations ignore-all-nfs-configurations-
transition
183
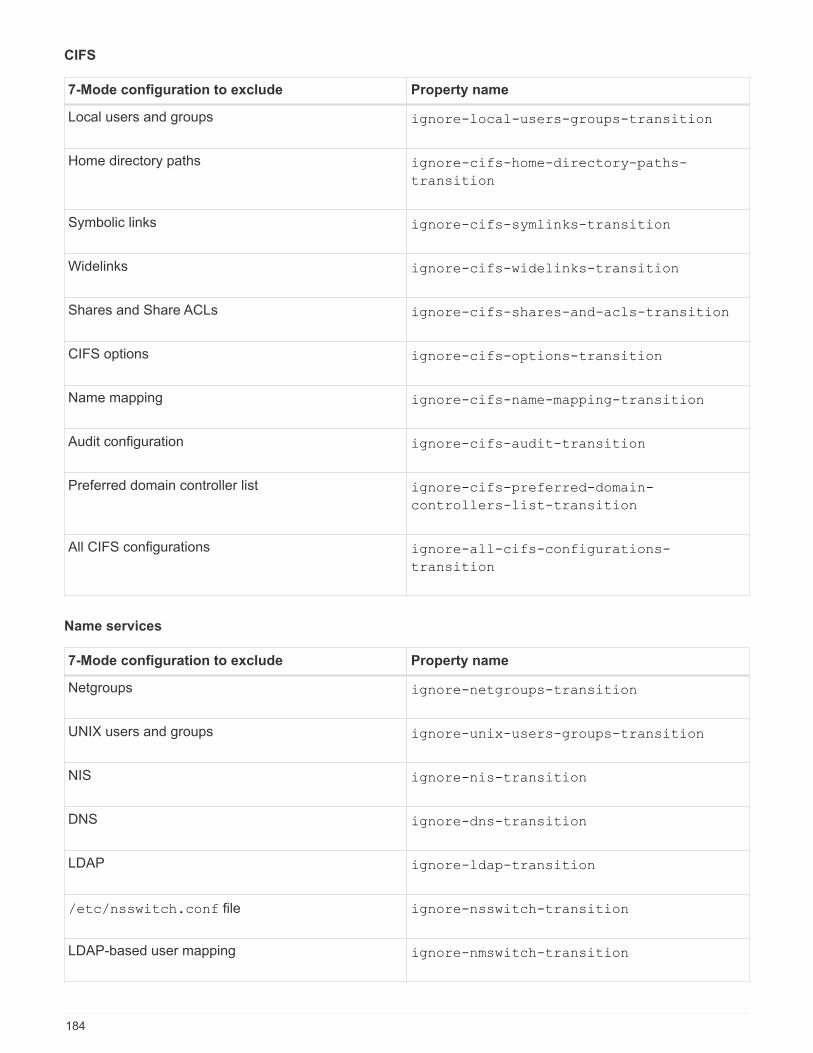
CIFS
7-Mode configuration to exclude Property name
Local users and groups ignore-local-users-groups-transition
Home directory paths ignore-cifs-home-directory-paths-
transition
Symbolic links ignore-cifs-symlinks-transition
Widelinks ignore-cifs-widelinks-transition
Shares and Share ACLs ignore-cifs-shares-and-acls-transition
CIFS options ignore-cifs-options-transition
Name mapping ignore-cifs-name-mapping-transition
Audit configuration ignore-cifs-audit-transition
Preferred domain controller list ignore-cifs-preferred-domain-
controllers-list-transition
All CIFS configurations ignore-all-cifs-configurations-
transition
Name services
7-Mode configuration to exclude Property name
Netgroups ignore-netgroups-transition
UNIX users and groups ignore-unix-users-groups-transition
NIS ignore-nis-transition
DNS ignore-dns-transition
LDAP ignore-ldap-transition
/etc/nsswitch.conf file ignore-nsswitch-transition
LDAP-based user mapping ignore-nmswitch-transition
184
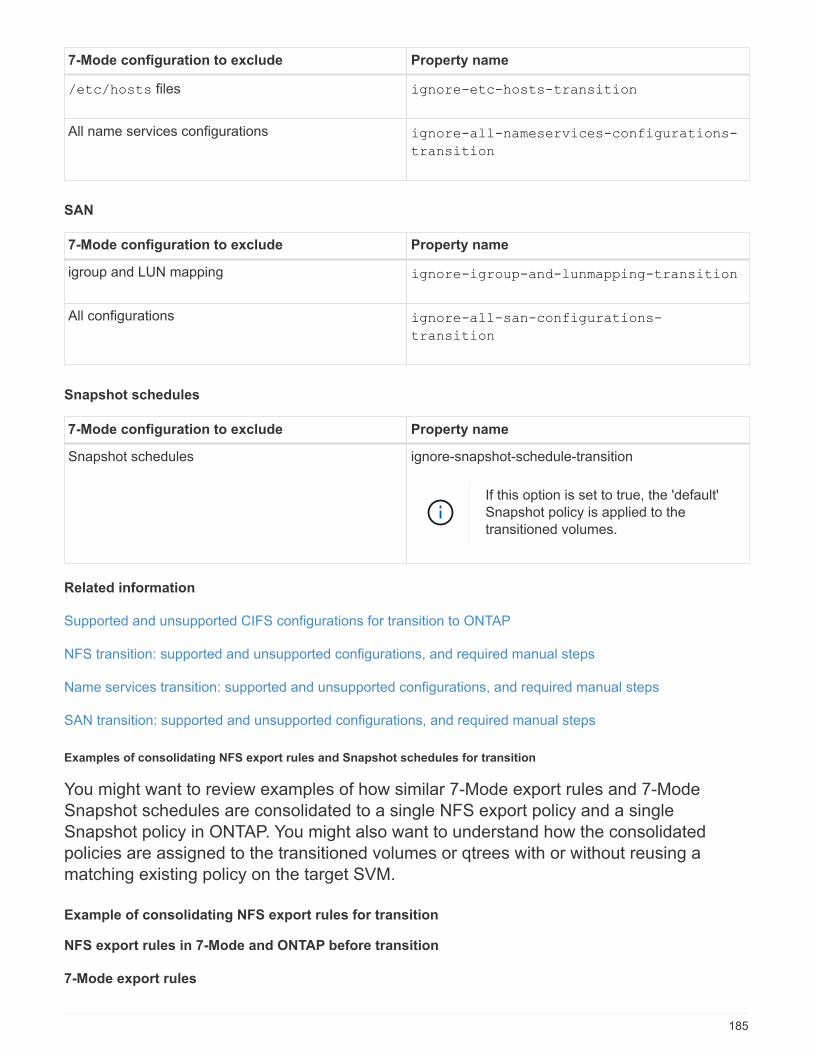
7-Mode configuration to exclude Property name
/etc/hosts files ignore-etc-hosts-transition
All name services configurations ignore-all-nameservices-configurations-
transition
SAN
7-Mode configuration to exclude Property name
igroup and LUN mapping ignore-igroup-and-lunmapping-transition
All configurations ignore-all-san-configurations-
transition
Snapshot schedules
7-Mode configuration to exclude Property name
Snapshot schedules ignore-snapshot-schedule-transition
If this option is set to true, the 'default'
Snapshot policy is applied to the
transitioned volumes.
Related information
Supported and unsupported CIFS configurations for transition to ONTAP
NFS transition: supported and unsupported configurations, and required manual steps
Name services transition: supported and unsupported configurations, and required manual steps
SAN transition: supported and unsupported configurations, and required manual steps
Examples of consolidating NFS export rules and Snapshot schedules for transition
You might want to review examples of how similar 7-Mode export rules and 7-Mode
Snapshot schedules are consolidated to a single NFS export policy and a single
Snapshot policy in ONTAP. You might also want to understand how the consolidated
policies are assigned to the transitioned volumes or qtrees with or without reusing a
matching existing policy on the target SVM.
Example of consolidating NFS export rules for transition
NFS export rules in 7-Mode and ONTAP before transition
7-Mode export rules
185
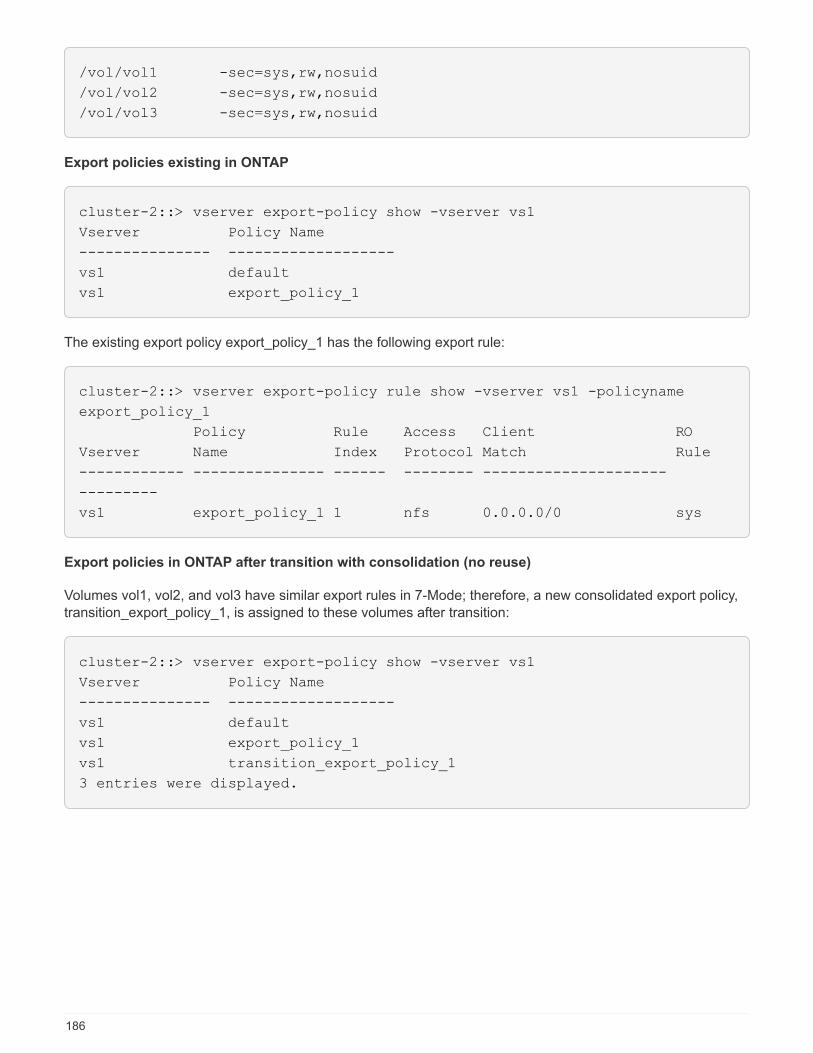
/vol/vol1 -sec=sys,rw,nosuid
/vol/vol2 -sec=sys,rw,nosuid
/vol/vol3 -sec=sys,rw,nosuid
Export policies existing in ONTAP
cluster-2::> vserver export-policy show -vserver vs1
Vserver Policy Name
--------------- -------------------
vs1 default
vs1 export_policy_1
The existing export policy export_policy_1 has the following export rule:
cluster-2::> vserver export-policy rule show -vserver vs1 -policyname
export_policy_1
Policy Rule Access Client RO
Vserver Name Index Protocol Match Rule
------------ --------------- ------ -------- ---------------------
---------
vs1 export_policy_1 1 nfs 0.0.0.0/0 sys
Export policies in ONTAP after transition with consolidation (no reuse)
Volumes vol1, vol2, and vol3 have similar export rules in 7-Mode; therefore, a new consolidated export policy,
transition_export_policy_1, is assigned to these volumes after transition:
cluster-2::> vserver export-policy show -vserver vs1
Vserver Policy Name
--------------- -------------------
vs1 default
vs1 export_policy_1
vs1 transition_export_policy_1
3 entries were displayed.
186
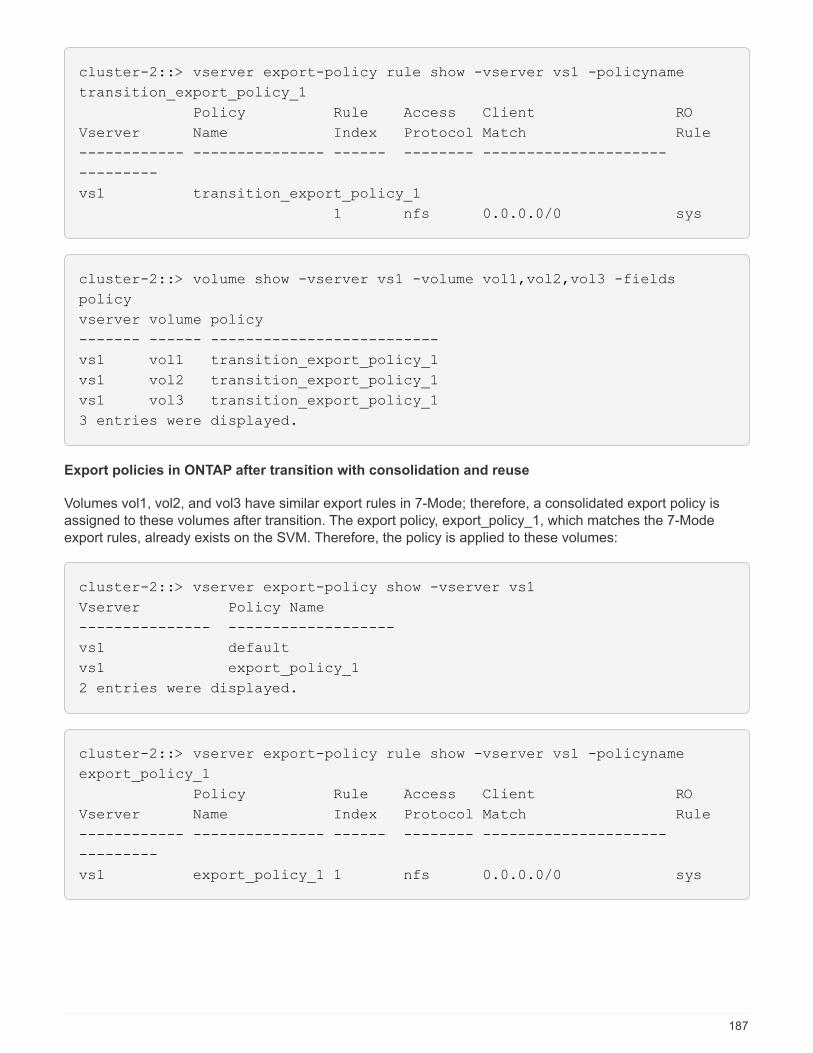
cluster-2::> vserver export-policy rule show -vserver vs1 -policyname
transition_export_policy_1
Policy Rule Access Client RO
Vserver Name Index Protocol Match Rule
------------ --------------- ------ -------- ---------------------
---------
vs1 transition_export_policy_1
1 nfs 0.0.0.0/0 sys
cluster-2::> volume show -vserver vs1 -volume vol1,vol2,vol3 -fields
policy
vserver volume policy
------- ------ --------------------------
vs1 vol1 transition_export_policy_1
vs1 vol2 transition_export_policy_1
vs1 vol3 transition_export_policy_1
3 entries were displayed.
Export policies in ONTAP after transition with consolidation and reuse
Volumes vol1, vol2, and vol3 have similar export rules in 7-Mode; therefore, a consolidated export policy is
assigned to these volumes after transition. The export policy, export_policy_1, which matches the 7-Mode
export rules, already exists on the SVM. Therefore, the policy is applied to these volumes:
cluster-2::> vserver export-policy show -vserver vs1
Vserver Policy Name
--------------- -------------------
vs1 default
vs1 export_policy_1
2 entries were displayed.
cluster-2::> vserver export-policy rule show -vserver vs1 -policyname
export_policy_1
Policy Rule Access Client RO
Vserver Name Index Protocol Match Rule
------------ --------------- ------ -------- ---------------------
---------
vs1 export_policy_1 1 nfs 0.0.0.0/0 sys
187
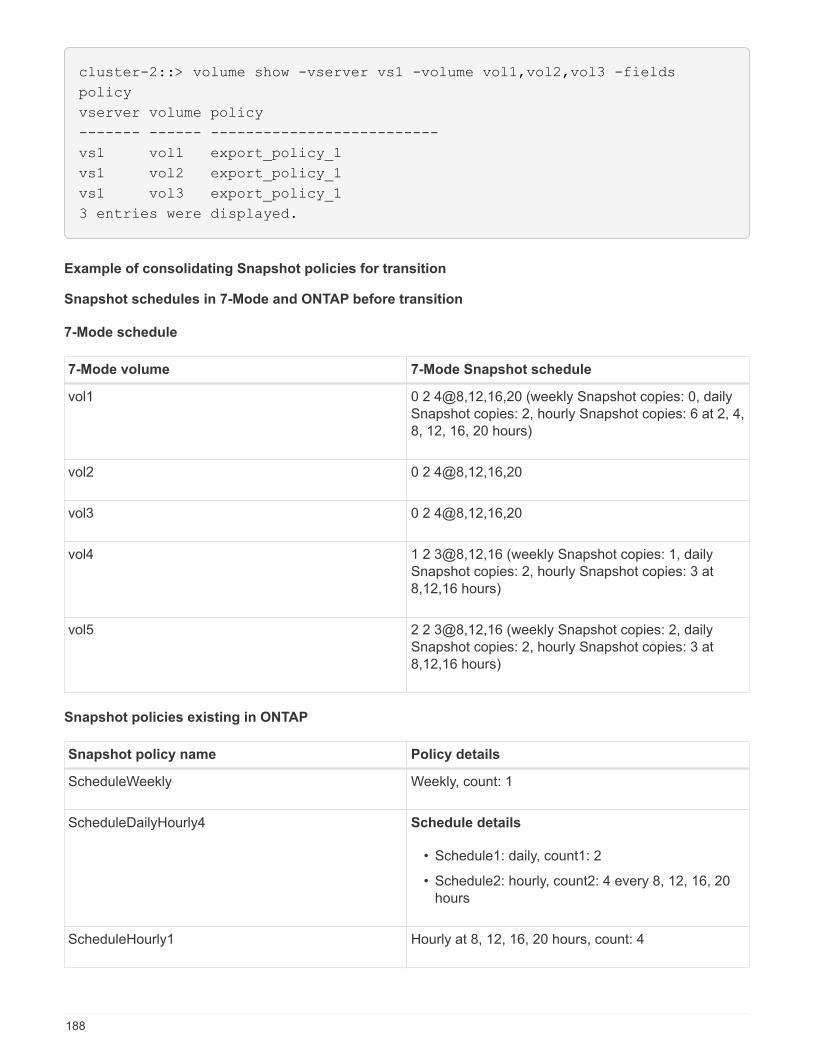
cluster-2::> volume show -vserver vs1 -volume vol1,vol2,vol3 -fields
policy
vserver volume policy
------- ------ --------------------------
vs1 vol1 export_policy_1
vs1 vol2 export_policy_1
vs1 vol3 export_policy_1
3 entries were displayed.
Example of consolidating Snapshot policies for transition
Snapshot schedules in 7-Mode and ONTAP before transition
7-Mode schedule
7-Mode volume 7-Mode Snapshot schedule
vol1 0 2 4@8,12,16,20 (weekly Snapshot copies: 0, daily
Snapshot copies: 2, hourly Snapshot copies: 6 at 2, 4,
8, 12, 16, 20 hours)
vol2 0 2 4@8,12,16,20
vol3 0 2 4@8,12,16,20
vol4 1 2 3@8,12,16 (weekly Snapshot copies: 1, daily
Snapshot copies: 2, hourly Snapshot copies: 3 at
8,12,16 hours)
vol5 2 2 3@8,12,16 (weekly Snapshot copies: 2, daily
Snapshot copies: 2, hourly Snapshot copies: 3 at
8,12,16 hours)
Snapshot policies existing in ONTAP
Snapshot policy name Policy details
ScheduleWeekly Weekly, count: 1
ScheduleDailyHourly4 Schedule details
• Schedule1: daily, count1: 2
• Schedule2: hourly, count2: 4 every 8, 12, 16, 20
hours
ScheduleHourly1 Hourly at 8, 12, 16, 20 hours, count: 4
188
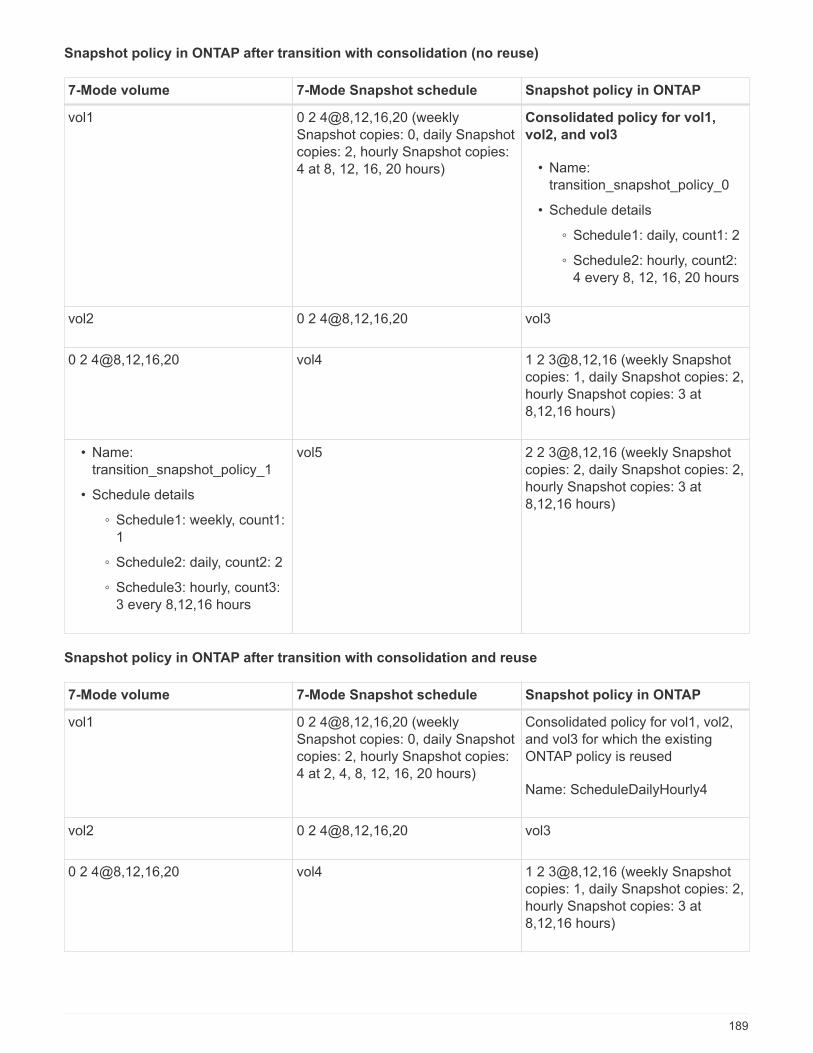
Snapshot policy in ONTAP after transition with consolidation (no reuse)
7-Mode volume 7-Mode Snapshot schedule Snapshot policy in ONTAP
vol1 0 2 4@8,12,16,20 (weekly
Snapshot copies: 0, daily Snapshot
copies: 2, hourly Snapshot copies:
4 at 8, 12, 16, 20 hours)
Consolidated policy for vol1,
vol2, and vol3
• Name:
transition_snapshot_policy_0
• Schedule details
◦ Schedule1: daily, count1: 2
◦ Schedule2: hourly, count2:
4 every 8, 12, 16, 20 hours
vol2 0 2 4@8,12,16,20 vol3
0 2 4@8,12,16,20 vol4 1 2 3@8,12,16 (weekly Snapshot
copies: 1, daily Snapshot copies: 2,
hourly Snapshot copies: 3 at
8,12,16 hours)
• Name:
transition_snapshot_policy_1
• Schedule details
◦ Schedule1: weekly, count1:
1
◦ Schedule2: daily, count2: 2
◦ Schedule3: hourly, count3:
3 every 8,12,16 hours
vol5 2 2 3@8,12,16 (weekly Snapshot
copies: 2, daily Snapshot copies: 2,
hourly Snapshot copies: 3 at
8,12,16 hours)
Snapshot policy in ONTAP after transition with consolidation and reuse
7-Mode volume 7-Mode Snapshot schedule Snapshot policy in ONTAP
vol1 0 2 4@8,12,16,20 (weekly
Snapshot copies: 0, daily Snapshot
copies: 2, hourly Snapshot copies:
4 at 2, 4, 8, 12, 16, 20 hours)
Consolidated policy for vol1, vol2,
and vol3 for which the existing
ONTAP policy is reused
Name: ScheduleDailyHourly4
vol2 0 2 4@8,12,16,20 vol3
0 2 4@8,12,16,20 vol4 1 2 3@8,12,16 (weekly Snapshot
copies: 1, daily Snapshot copies: 2,
hourly Snapshot copies: 3 at
8,12,16 hours)
189
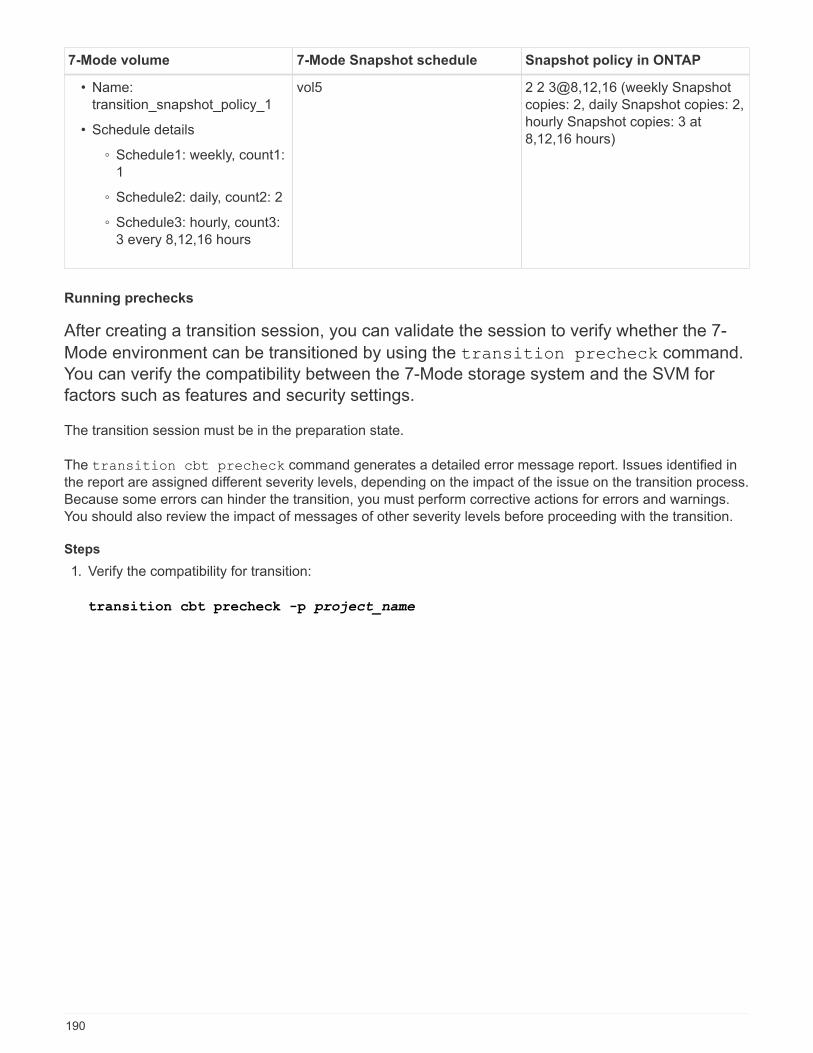
7-Mode volume 7-Mode Snapshot schedule Snapshot policy in ONTAP
• Name:
transition_snapshot_policy_1
• Schedule details
◦ Schedule1: weekly, count1:
1
◦ Schedule2: daily, count2: 2
◦ Schedule3: hourly, count3:
3 every 8,12,16 hours
vol5 2 2 3@8,12,16 (weekly Snapshot
copies: 2, daily Snapshot copies: 2,
hourly Snapshot copies: 3 at
8,12,16 hours)
Running prechecks
After creating a transition session, you can validate the session to verify whether the 7-
Mode environment can be transitioned by using the transition precheck command.
You can verify the compatibility between the 7-Mode storage system and the SVM for
factors such as features and security settings.
The transition session must be in the preparation state.
The transition cbt precheck command generates a detailed error message report. Issues identified in
the report are assigned different severity levels, depending on the impact of the issue on the transition process.
Because some errors can hinder the transition, you must perform corrective actions for errors and warnings.
You should also review the impact of messages of other severity levels before proceeding with the transition.
Steps
1. Verify the compatibility for transition:
transition cbt precheck -p project_name
190

7-Mode Transition Tool>transition cbt precheck -p project_finance
[1/14 ] Project status checks
[ Errors ]
Operation summary:
------------------
The 'precheck' operation on the project 'project_finance' has failed.
1 Errors - Failed!
Do you want to see a detailed report {yes, no} [yes]:
1 Errors:
---------
90202: Checking whether any of the 7-Mode volumes are in 'offline'
state. [ Error ]
> Following volumes are in 'offline' state.
> CORRECTIVE-ACTION: Bring offline volumes online by using the
following command: 'vol online
> <volume_name>'.
> AFFECTED-OBJECTS: { vol2 }
Next suggested steps:
---------------------
1. Review the 'precheck' operation results, fix all blocking errors and
run the 'precheck' operation again.
2. Use the 'transition job-results -j 6e33e0a7-bb36-49df-91f3-
2e52cbfa3074' command to see the results of this
operation.
Ran precheck for project 'project_finance'.
You must resolve all of the errors that might cause problems with the transition before starting the data copy
from the 7-Mode volumes.
Starting data copy for a transition project
You can initiate a data copy from 7-Mode volumes to ONTAP volumes for a baseline
transfer. The baseline transfer starts when the data copy schedules configured in a
project becomes active. After the baseline transfer is complete, the ONTAP volumes are
updated periodically based on the data copy schedule.
• You must have run a precheck on the project and resolved all errors.
• You must have configured a dedicated, high-bandwidth, low-latency network between the source and
191
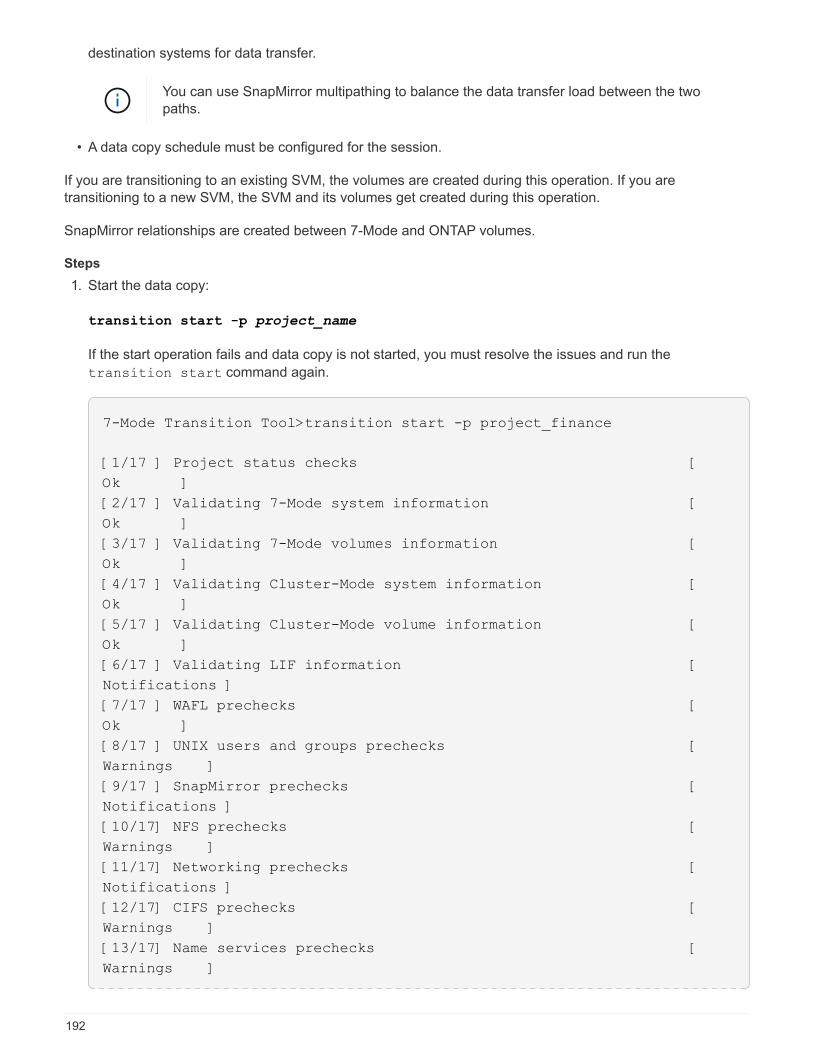
destination systems for data transfer.
You can use SnapMirror multipathing to balance the data transfer load between the two
paths.
• A data copy schedule must be configured for the session.
If you are transitioning to an existing SVM, the volumes are created during this operation. If you are
transitioning to a new SVM, the SVM and its volumes get created during this operation.
SnapMirror relationships are created between 7-Mode and ONTAP volumes.
Steps
1. Start the data copy:
transition start -p project_name
If the start operation fails and data copy is not started, you must resolve the issues and run the
transition start command again.
7-Mode Transition Tool>transition start -p project_finance
[1/17 ] Project status checks [
Ok ]
[2/17 ] Validating 7-Mode system information [
Ok ]
[3/17 ] Validating 7-Mode volumes information [
Ok ]
[4/17 ] Validating Cluster-Mode system information [
Ok ]
[5/17 ] Validating Cluster-Mode volume information [
Ok ]
[6/17 ] Validating LIF information [
Notifications ]
[7/17 ] WAFL prechecks [
Ok ]
[8/17 ] UNIX users and groups prechecks [
Warnings ]
[9/17 ] SnapMirror prechecks [
Notifications ]
[10/17] NFS prechecks [
Warnings ]
[11/17] Networking prechecks [
Notifications ]
[12/17] CIFS prechecks [
Warnings ]
[13/17] Name services prechecks [
Warnings ]
192
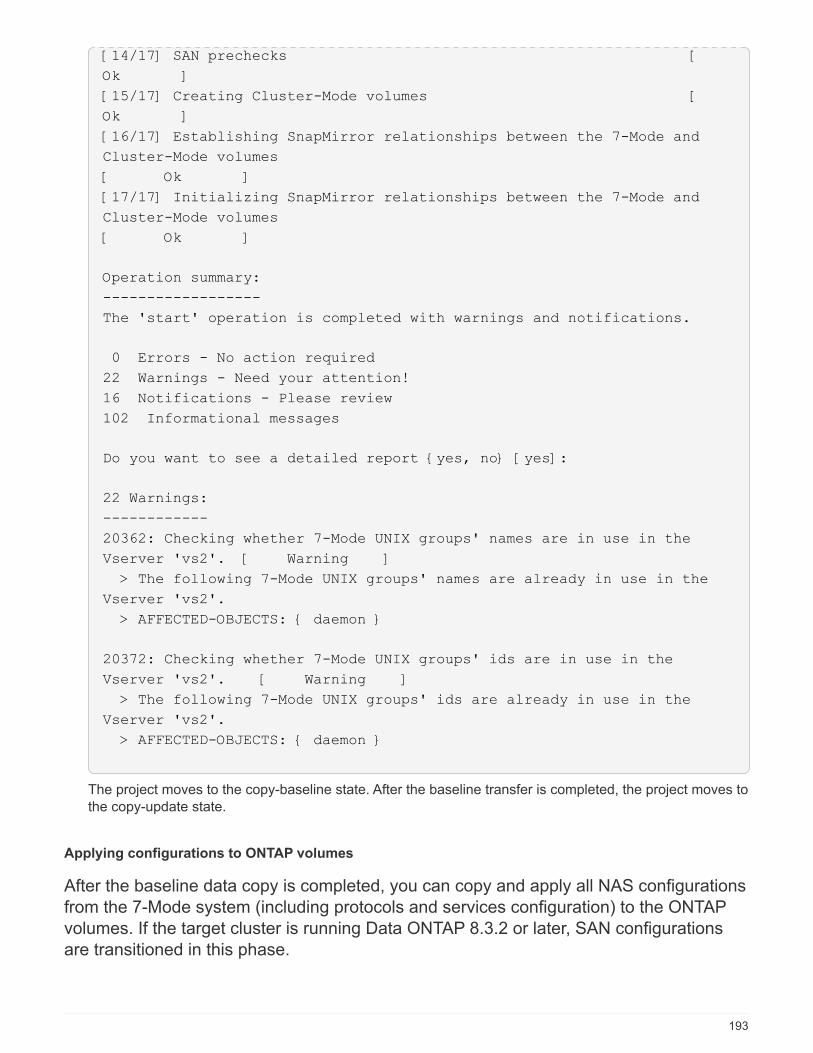
[14/17] SAN prechecks [
Ok ]
[15/17] Creating Cluster-Mode volumes [
Ok ]
[16/17] Establishing SnapMirror relationships between the 7-Mode and
Cluster-Mode volumes
[ Ok ]
[17/17] Initializing SnapMirror relationships between the 7-Mode and
Cluster-Mode volumes
[ Ok ]
Operation summary:
------------------
The 'start' operation is completed with warnings and notifications.
0 Errors - No action required
22 Warnings - Need your attention!
16 Notifications - Please review
102 Informational messages
Do you want to see a detailed report {yes, no} [yes]:
22 Warnings:
------------
20362: Checking whether 7-Mode UNIX groups' names are in use in the
Vserver 'vs2'. [ Warning ]
> The following 7-Mode UNIX groups' names are already in use in the
Vserver 'vs2'.
> AFFECTED-OBJECTS: { daemon }
20372: Checking whether 7-Mode UNIX groups' ids are in use in the
Vserver 'vs2'. [ Warning ]
> The following 7-Mode UNIX groups' ids are already in use in the
Vserver 'vs2'.
> AFFECTED-OBJECTS: { daemon }
The project moves to the copy-baseline state. After the baseline transfer is completed, the project moves to
the copy-update state.
Applying configurations to ONTAP volumes
After the baseline data copy is completed, you can copy and apply all NAS configurations
from the 7-Mode system (including protocols and services configuration) to the ONTAP
volumes. If the target cluster is running Data ONTAP 8.3.2 or later, SAN configurations
are transitioned in this phase.
193
• The configurations are applied in the precutover phase, which has two modes: precutover read-only mode
and precutover read/write mode.
• The precutover read/write mode is not supported when the project contains the following:
◦ SAN volumes and the target cluster is running Data ONTAP 8.3.1 or earlier. In this situation, the
following configurations are not applied in the precutover phase, instead they are applied during the
cutover phase:
▪ SAN configurations
▪ Snapshot Schedule configurations
◦ SnapLock Compliance volumes.
If the project contains SnapLock Compliance volumes, then the Snapshot Schedule configurations are
not applied in the precutover phase, instead these configurations are applied during the cutover phase.
See Considerations for transitioning of SnapLock Compliance volumes.
• If the target cluster is running Data ONTAP 8.3.1 or earlier, the read/write mode is not supported during
precutover if any volume in the project contains LUNs.
• If the target cluster is running Data ONTAP 8.3.1 or earlier and a project contains both SAN and NAS
volumes, only NAS configurations are transitioned in the precutover phase, and these NAS configurations
can be tested only in the read-only mode.
SAN configurations are transitioned only in the storage cutover phase.
SAN LIFs are not configured.
• If the target cluster is running Data ONTAP 8.3.1 or earlier and the project contains SAN volumes, then
Snapshot schedule configuration is not applied during apply configuration (precutover) phase.
These configurations are applied during the cutover phase.
• If the target cluster is running Data ONTAP 8.3.1 or earlier and the project contains SAN volumes, then
Snapshot schedule configuration is not applied during apply configuration (precutover) phase.
These configurations are applied during the cutover phase.
Steps
• Run the transition operation in read-only mode:
transition cbt precutover -p project_name -m ro_test -c
max_cap_concurrent_transfers -b snapmirror_throttle
• Run the transition operation in read/write mode:
a. Apply the configurations to ONTAP:
+
transition cbt precutover -p project_name -m rw_test -c
max_cap_concurrent_transfers -b snapmirror_throttle
b. Manually test and verify the configurations in ONTAP.
c. Start the resynchronization operation:
+
194
transition cbt resync -p project_name
Completing the transition
Because the complete operation is disruptive, you should evaluate when to run it. When
transitioning volumes in a SnapMirror relationship, the secondary project must be
completed before completing the transition of the primary project.
Steps
1. Perform a data copy from the 7-Mode volumes to the ONTAP volumes:
transition cbt update -p project_name -t available-transfers-percentage -c
snapmirror-throttlemax-cap-concurrent-transfers -x -r interactive
This helps in reducing the downtime during storage cutover.
2. Manual: Disconnect client access.
3. Complete the transition process:
transition cbt cutover -p project_name -t available-transfers-percentage -c
max-cap-concurrent-transfers -x snapmirror-throttle -r interactive -o
[true|false]
By default, the 7-Mode volumes are made offline. To keep the 7-Mode volumes online, set the -o option to
false.
If the cutover is not successful for some reason—for example, the 7-Mode system or cluster
is not reachable—you must resolve the issues and run the transition cutover
command again.
For more information about the commands, see the man pages.
The transition session moves to the cutover state. If the cutover is successful, the session moves to the
completed state.
You must perform any post-transition tasks and reconnect the clients to the ONTAP volumes.
Commands for managing transition
You can use the transition cbt command to manage functions, such as creating,
modifying, deleting, and displaying transition projects.
The following option can be used with all commands:
-r no: Disables the interactive nature of the command. By default, this option is enabled.
You can also use the -v option, which enables the verbose mode, with the transition version and
transition cbt menu commands.
195
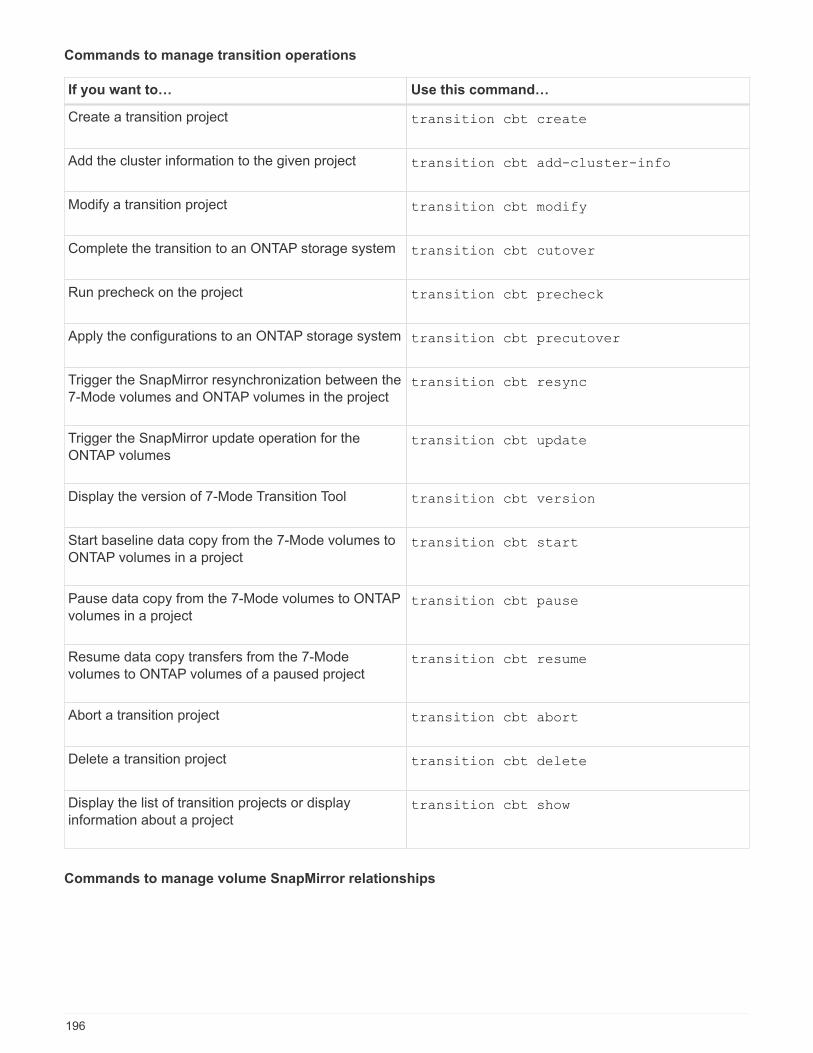
Commands to manage transition operations
If you want to… Use this command…
Create a transition project transition cbt create
Add the cluster information to the given project transition cbt add-cluster-info
Modify a transition project transition cbt modify
Complete the transition to an ONTAP storage system transition cbt cutover
Run precheck on the project transition cbt precheck
Apply the configurations to an ONTAP storage system transition cbt precutover
Trigger the SnapMirror resynchronization between the
7-Mode volumes and ONTAP volumes in the projecttransition cbt resync
Trigger the SnapMirror update operation for the
ONTAP volumestransition cbt update
Display the version of 7-Mode Transition Tool transition cbt version
Start baseline data copy from the 7-Mode volumes to
ONTAP volumes in a projecttransition cbt start
Pause data copy from the 7-Mode volumes to ONTAP
volumes in a projecttransition cbt pause
Resume data copy transfers from the 7-Mode
volumes to ONTAP volumes of a paused projecttransition cbt resume
Abort a transition project transition cbt abort
Delete a transition project transition cbt delete
Display the list of transition projects or display
information about a projecttransition cbt show
Commands to manage volume SnapMirror relationships
196

If you want to… Use this command…
Add information about a 7-Mode primary system to a
secondary projecttransition cbt add-primary-seven-mode-
system `
CBT : How to provide all the required primary 7-Mode
details for a given secondary project
Add information about an ONTAP secondary system
to a primary projecttransition cbt add-secondary-cluster-
mode-system
CBT: How to add the required secondary cluster
details to the primary project
Remove information about a 7-Mode primary system
from a secondary projecttransition cbt remove-primary-seven-
mode-system
Remove information about an ONTAP secondary
system from a primary projecttransition cbt remove-secondary-
cluster-mode-system
List the 7-Mode primary systems added to a
secondary projecttransition cbt show-primary-seven-mode-
systems
List the ONTAP secondary systems added to a
primary projecttransition cbt show-secondary-cluster-
mode-systems
Commands to manage credentials of Data ONTAP systems
If you want to… Use this command…
Save credentials (user name and password) of a host
in the transition servertransition credentials add
Retrieve user name of a host transition credentials get
Modify the user name or password of a host transition credentials modify
Delete credentials of a host from the transition server transition credentials remove
Commands to manage the volume pairs in a project
If you want to… Use this command…
Add the 7-Mode volume and the ONTAP volume
(volume pair) to a projecttransition cbt volumepair add
197
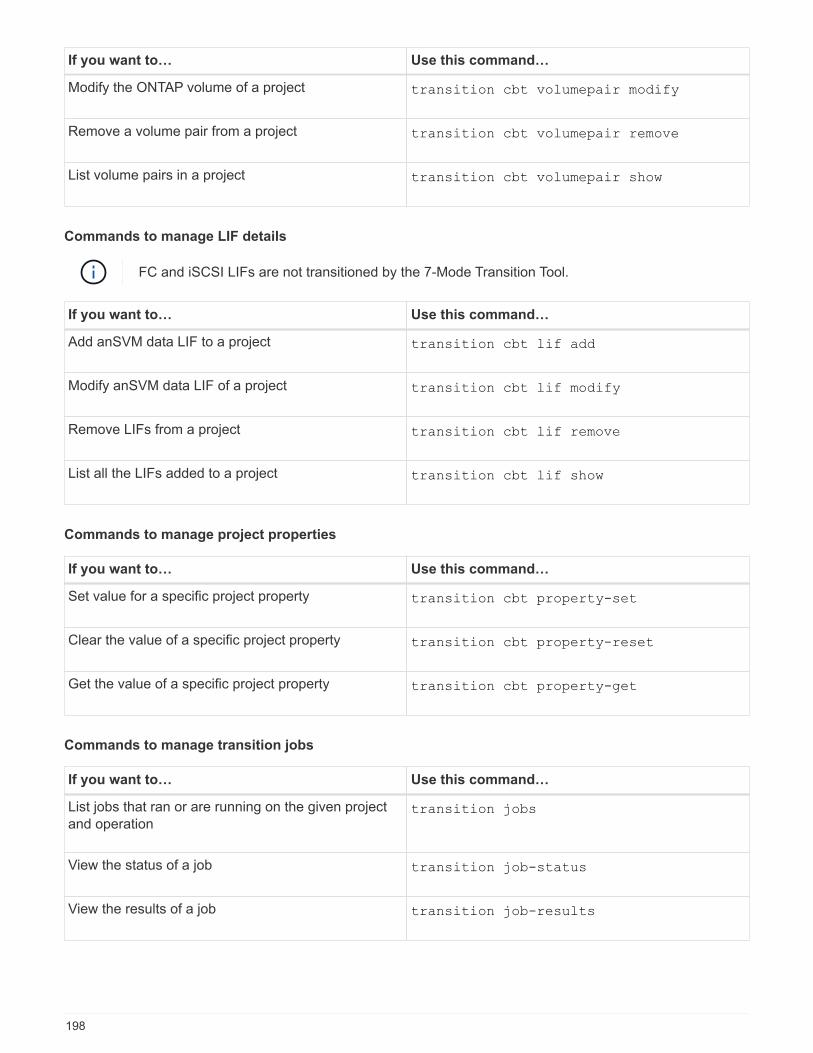
If you want to… Use this command…
Modify the ONTAP volume of a project transition cbt volumepair modify
Remove a volume pair from a project transition cbt volumepair remove
List volume pairs in a project transition cbt volumepair show
Commands to manage LIF details
FC and iSCSI LIFs are not transitioned by the 7-Mode Transition Tool.
If you want to… Use this command…
Add anSVM data LIF to a project transition cbt lif add
Modify anSVM data LIF of a project transition cbt lif modify
Remove LIFs from a project transition cbt lif remove
List all the LIFs added to a project transition cbt lif show
Commands to manage project properties
If you want to… Use this command…
Set value for a specific project property transition cbt property-set
Clear the value of a specific project property transition cbt property-reset
Get the value of a specific project property transition cbt property-get
Commands to manage transition jobs
If you want to… Use this command…
List jobs that ran or are running on the given project
and operationtransition jobs
View the status of a job transition job-status
View the results of a job transition job-results
198
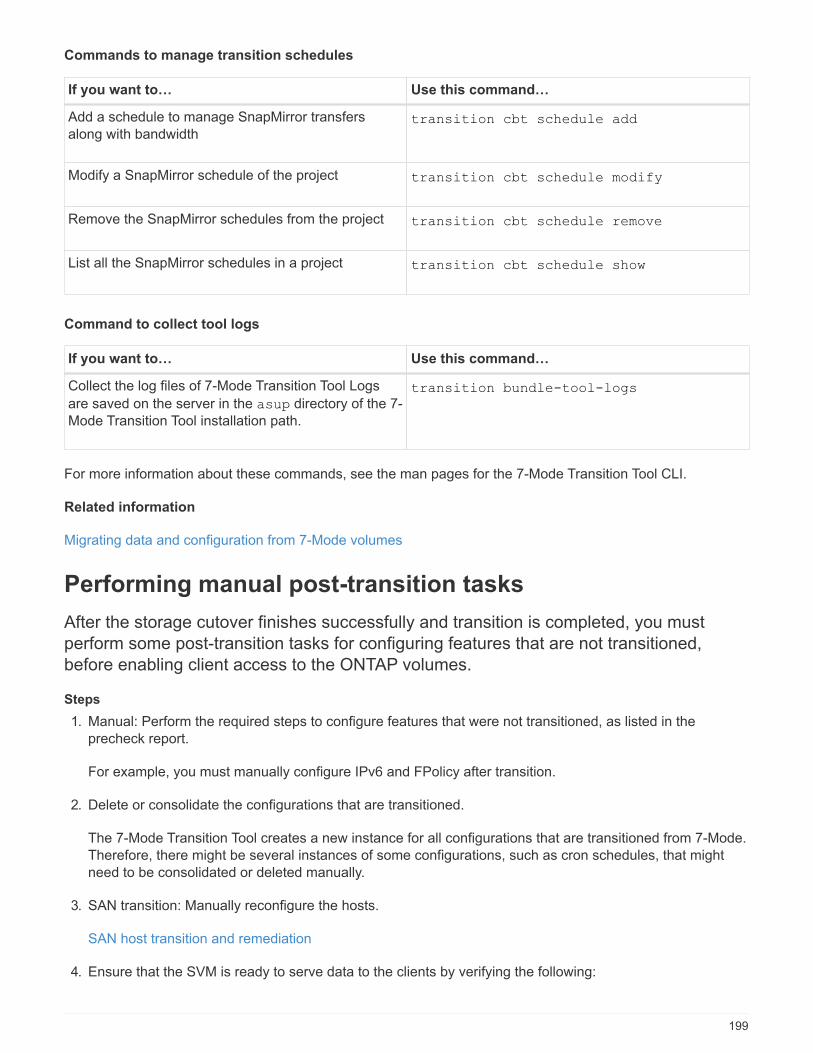
Commands to manage transition schedules
If you want to… Use this command…
Add a schedule to manage SnapMirror transfers
along with bandwidthtransition cbt schedule add
Modify a SnapMirror schedule of the project transition cbt schedule modify
Remove the SnapMirror schedules from the project transition cbt schedule remove
List all the SnapMirror schedules in a project transition cbt schedule show
Command to collect tool logs
If you want to… Use this command…
Collect the log files of 7-Mode Transition Tool Logs
are saved on the server in the asup directory of the 7-
Mode Transition Tool installation path.
transition bundle-tool-logs
For more information about these commands, see the man pages for the 7-Mode Transition Tool CLI.
Related information
Migrating data and configuration from 7-Mode volumes
Performing manual post-transition tasks
After the storage cutover finishes successfully and transition is completed, you must
perform some post-transition tasks for configuring features that are not transitioned,
before enabling client access to the ONTAP volumes.
Steps
1. Manual: Perform the required steps to configure features that were not transitioned, as listed in the
precheck report.
For example, you must manually configure IPv6 and FPolicy after transition.
2. Delete or consolidate the configurations that are transitioned.
The 7-Mode Transition Tool creates a new instance for all configurations that are transitioned from 7-Mode.
Therefore, there might be several instances of some configurations, such as cron schedules, that might
need to be consolidated or deleted manually.
3. SAN transition: Manually reconfigure the hosts.
SAN host transition and remediation
4. Ensure that the SVM is ready to serve data to the clients by verifying the following:
199
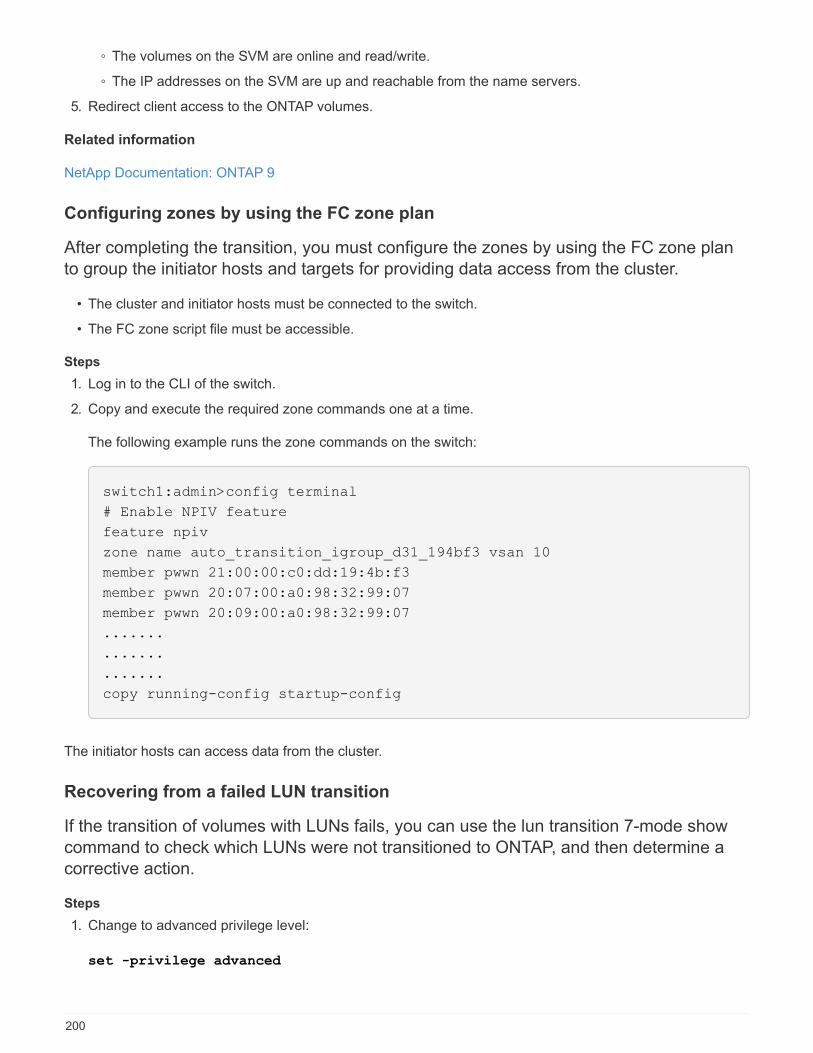
◦ The volumes on the SVM are online and read/write.
◦ The IP addresses on the SVM are up and reachable from the name servers.
5. Redirect client access to the ONTAP volumes.
Related information
NetApp Documentation: ONTAP 9
Configuring zones by using the FC zone plan
After completing the transition, you must configure the zones by using the FC zone plan
to group the initiator hosts and targets for providing data access from the cluster.
• The cluster and initiator hosts must be connected to the switch.
• The FC zone script file must be accessible.
Steps
1. Log in to the CLI of the switch.
2. Copy and execute the required zone commands one at a time.
The following example runs the zone commands on the switch:
switch1:admin>config terminal
# Enable NPIV feature
feature npiv
zone name auto_transition_igroup_d31_194bf3 vsan 10
member pwwn 21:00:00:c0:dd:19:4b:f3
member pwwn 20:07:00:a0:98:32:99:07
member pwwn 20:09:00:a0:98:32:99:07
.......
.......
.......
copy running-config startup-config
The initiator hosts can access data from the cluster.
Recovering from a failed LUN transition
If the transition of volumes with LUNs fails, you can use the lun transition 7-mode show
command to check which LUNs were not transitioned to ONTAP, and then determine a
corrective action.
Steps
1. Change to advanced privilege level:
set -privilege advanced
200
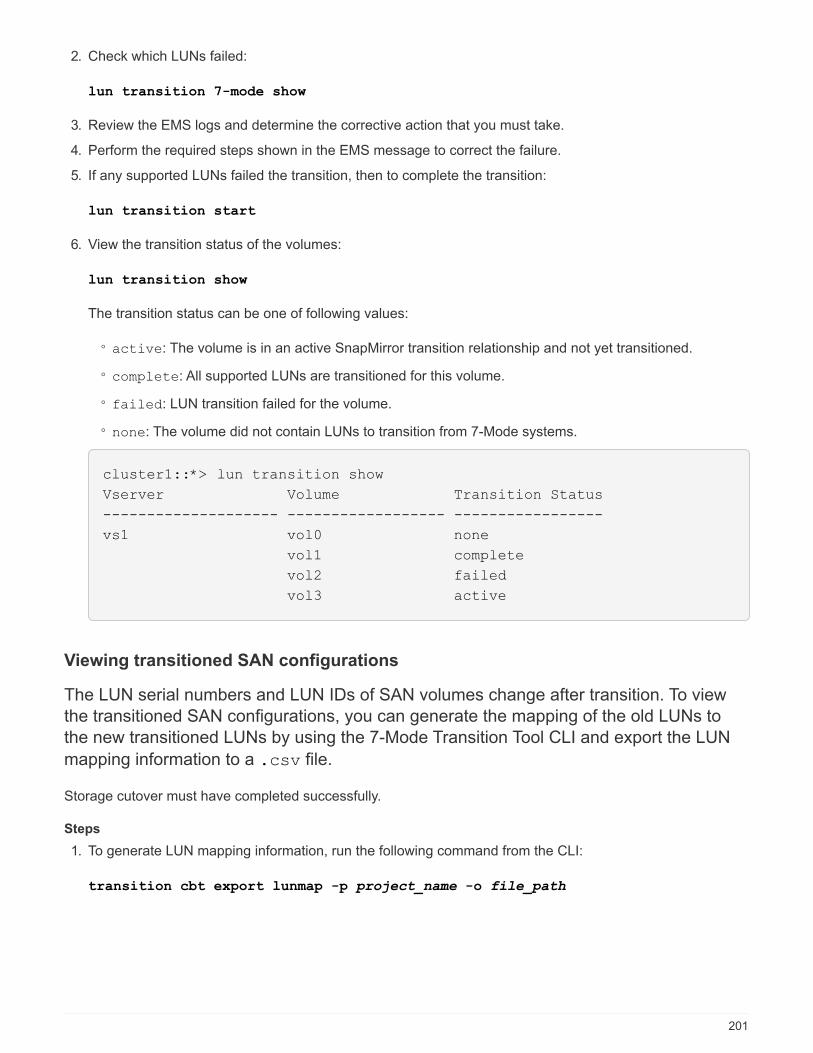
2. Check which LUNs failed:
lun transition 7-mode show
3. Review the EMS logs and determine the corrective action that you must take.
4. Perform the required steps shown in the EMS message to correct the failure.
5. If any supported LUNs failed the transition, then to complete the transition:
lun transition start
6. View the transition status of the volumes:
lun transition show
The transition status can be one of following values:
◦ active: The volume is in an active SnapMirror transition relationship and not yet transitioned.
◦ complete: All supported LUNs are transitioned for this volume.
◦ failed: LUN transition failed for the volume.
◦ none: The volume did not contain LUNs to transition from 7-Mode systems.
cluster1::*> lun transition show
Vserver Volume Transition Status
-------------------- ------------------ -----------------
vs1 vol0 none
vol1 complete
vol2 failed
vol3 active
Viewing transitioned SAN configurations
The LUN serial numbers and LUN IDs of SAN volumes change after transition. To view
the transitioned SAN configurations, you can generate the mapping of the old LUNs to
the new transitioned LUNs by using the 7-Mode Transition Tool CLI and export the LUN
mapping information to a .csv file.
Storage cutover must have completed successfully.
Steps
1. To generate LUN mapping information, run the following command from the CLI:
transition cbt export lunmap -p project_name -o file_path
201
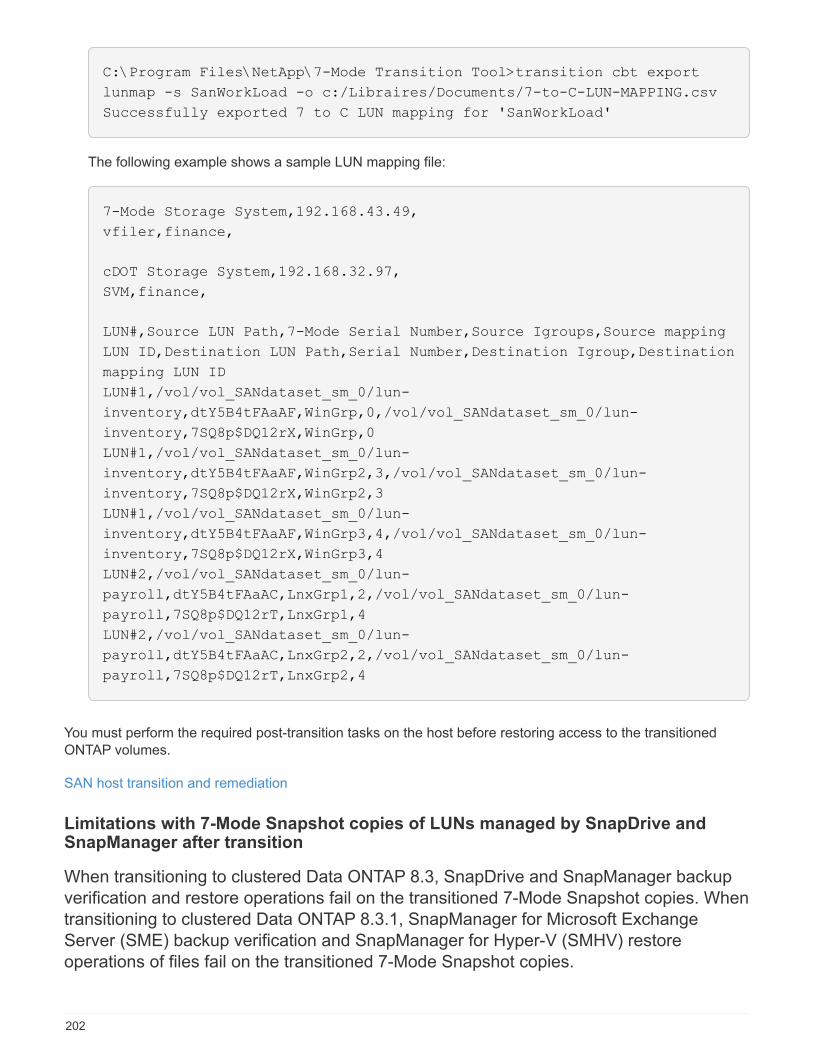
C:\Program Files\NetApp\7-Mode Transition Tool>transition cbt export
lunmap -s SanWorkLoad -o c:/Libraires/Documents/7-to-C-LUN-MAPPING.csv
Successfully exported 7 to C LUN mapping for 'SanWorkLoad'
The following example shows a sample LUN mapping file:
7-Mode Storage System,192.168.43.49,
vfiler,finance,
cDOT Storage System,192.168.32.97,
SVM,finance,
LUN#,Source LUN Path,7-Mode Serial Number,Source Igroups,Source mapping
LUN ID,Destination LUN Path,Serial Number,Destination Igroup,Destination
mapping LUN ID
LUN#1,/vol/vol_SANdataset_sm_0/lun-
inventory,dtY5B4tFAaAF,WinGrp,0,/vol/vol_SANdataset_sm_0/lun-
inventory,7SQ8p$DQ12rX,WinGrp,0
LUN#1,/vol/vol_SANdataset_sm_0/lun-
inventory,dtY5B4tFAaAF,WinGrp2,3,/vol/vol_SANdataset_sm_0/lun-
inventory,7SQ8p$DQ12rX,WinGrp2,3
LUN#1,/vol/vol_SANdataset_sm_0/lun-
inventory,dtY5B4tFAaAF,WinGrp3,4,/vol/vol_SANdataset_sm_0/lun-
inventory,7SQ8p$DQ12rX,WinGrp3,4
LUN#2,/vol/vol_SANdataset_sm_0/lun-
payroll,dtY5B4tFAaAC,LnxGrp1,2,/vol/vol_SANdataset_sm_0/lun-
payroll,7SQ8p$DQ12rT,LnxGrp1,4
LUN#2,/vol/vol_SANdataset_sm_0/lun-
payroll,dtY5B4tFAaAC,LnxGrp2,2,/vol/vol_SANdataset_sm_0/lun-
payroll,7SQ8p$DQ12rT,LnxGrp2,4
You must perform the required post-transition tasks on the host before restoring access to the transitioned
ONTAP volumes.
SAN host transition and remediation
Limitations with 7-Mode Snapshot copies of LUNs managed by SnapDrive andSnapManager after transition
When transitioning to clustered Data ONTAP 8.3, SnapDrive and SnapManager backup
verification and restore operations fail on the transitioned 7-Mode Snapshot copies. When
transitioning to clustered Data ONTAP 8.3.1, SnapManager for Microsoft Exchange
Server (SME) backup verification and SnapManager for Hyper-V (SMHV) restore
operations of files fail on the transitioned 7-Mode Snapshot copies.
202
Depending on the SnapDrive or SnapManager that is used on the host connected to the 7-Mode system and
the Data ONTAP version running on your cluster, 7-Mode Transition Tool displays a warning message for this
limitation during precheck.
All SnapDrive and SnapManager backup verification and restore operations are supported on
any newly created Snapshot copies in clustered Data ONTAP.
Workaround for backup and restore operations using SnapDrive and SnapManager in clustered DataONTAP 8.3
Perform the one of the following actions:
• Retain the 7-Mode systems till the 7-Mode Snapshot copies expire.
You can use the 7-Mode system to restore a file from a LUN in the 7-Mode Snapshot copy and then
migrate it to clustered Data ONTAP, if required.
• Use single file SnapRestore in ONTAP to restore the LUN from a 7-Mode Snapshot copy to the active file
system, and then mount the restored LUN for single file restore.
Workaround for backup and restore operations using SME and SMHV in ONTAP 8.3.1 and latersupported releases
Perform the one of the following actions:
• Verify that the SnapManager backups created in 7-Mode are valid before you perform a storage cutover to
ONTAP.
• Create a clone of the volume in ONTAP from the transitioned 7-Mode Snapshot copies, and then mount the
LUN on the cloned volume for backup verification and restore operations.
The best practice is to retain the 7-Mode systems till the 7-Mode Snapshot copies expire.
NetApp Documentation: SnapManager for Microsoft Exchange Server
NetApp Documentation: SnapManager for Hyper-V
NetApp Documentation: SnapManager for SAP
NetApp Documentation: SnapManager for Oracle
NetApp Documentation: SnapDrive for UNIX
NetApp Documentation: SnapDrive for Windows (current releases)
NetApp Documentation: SnapManager for Microsoft SQL Server
NetApp Documentation: SnapManager for Microsoft SharePoint
Configuring cron job schedules on the remote site after transitioning aMetroCluster configuration
The cron job schedules created during transition are not replicated to the remote site, and
therefore negotiated switchover fails after transition. You must manually create the cron
job schedules on the remote site after transition.
203
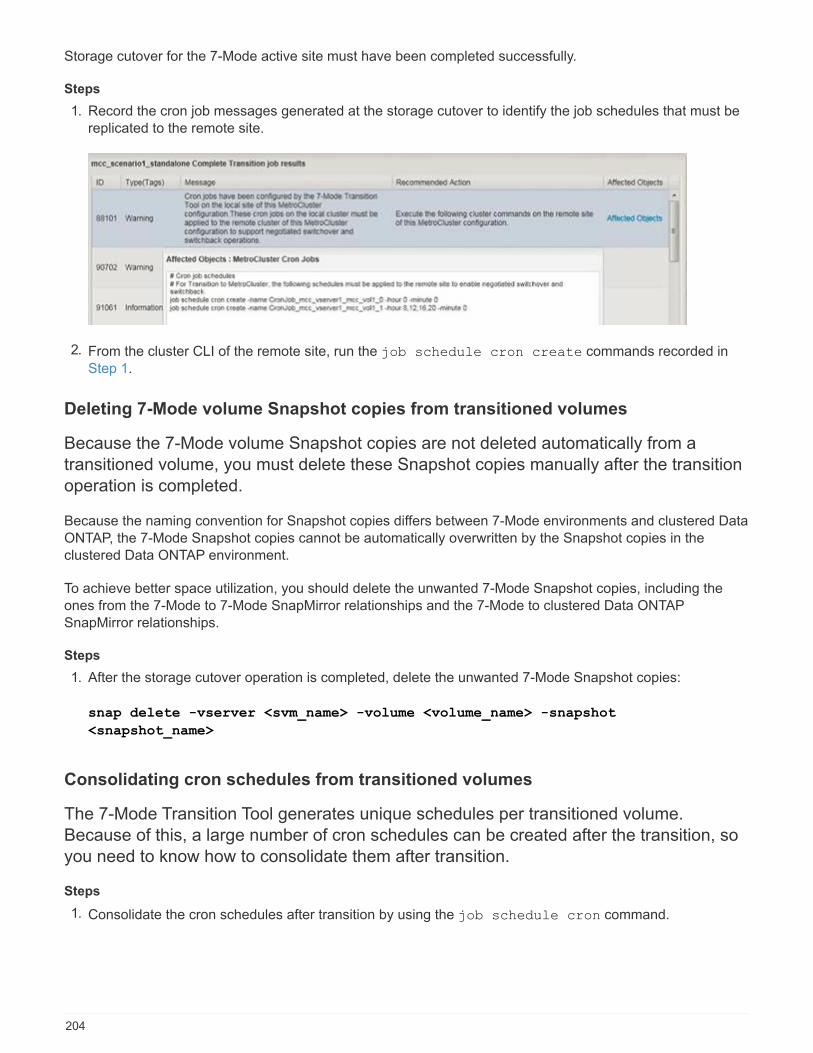
Storage cutover for the 7-Mode active site must have been completed successfully.
Steps
1. Record the cron job messages generated at the storage cutover to identify the job schedules that must be
replicated to the remote site.
2. From the cluster CLI of the remote site, run the job schedule cron create commands recorded in
Step 1.
Deleting 7-Mode volume Snapshot copies from transitioned volumes
Because the 7-Mode volume Snapshot copies are not deleted automatically from a
transitioned volume, you must delete these Snapshot copies manually after the transition
operation is completed.
Because the naming convention for Snapshot copies differs between 7-Mode environments and clustered Data
ONTAP, the 7-Mode Snapshot copies cannot be automatically overwritten by the Snapshot copies in the
clustered Data ONTAP environment.
To achieve better space utilization, you should delete the unwanted 7-Mode Snapshot copies, including the
ones from the 7-Mode to 7-Mode SnapMirror relationships and the 7-Mode to clustered Data ONTAP
SnapMirror relationships.
Steps
1. After the storage cutover operation is completed, delete the unwanted 7-Mode Snapshot copies:
snap delete -vserver <svm_name> -volume <volume_name> -snapshot
<snapshot_name>
Consolidating cron schedules from transitioned volumes
The 7-Mode Transition Tool generates unique schedules per transitioned volume.
Because of this, a large number of cron schedules can be created after the transition, so
you need to know how to consolidate them after transition.
Steps
1. Consolidate the cron schedules after transition by using the job schedule cron command.
204
Managing a transition project
You can manage transition projects by using the 7-Mode Transition Tool (web interface).
You can edit, pause, resume, abort, delete, and run prechecks on a project.
Editing a project
You can edit a project to add or remove volumes, and to modify the transition
configurations.
• You must have created a project.
• You must not have started the project that you want to edit.
You can edit a project to change the volumes that are selected for transition. You can also edit a project to
change the SVM mapping, volume mapping, and interface mapping, as well as the data copy schedule. You
cannot change the project type or the vFiler unit when editing a project.
Steps
1. From the Dashboard window, select the project that you want to edit.
2. Click Edit Project, and then select the required step from the drop-down list.
3. Complete the wizard to edit your project.
Managing SnapMirror transfers and schedule
In the data copy phase, the clustered Data ONTAP volumes are updated periodically with
the data from the 7-Mode volumes based on a data copy schedule. You can create, edit,
and delete the data copy schedule to be used for SnapMirror baseline copy, update, and
resynchronization operations.
You can manage the copy operations for all the volumes selected for transition by specifying multiple data copy
schedules comprising details such as, start time, duration, update frequency, the number of concurrent
SnapMirror transfers to run during that schedule, and throttle limit.
You can provide multiple concurrent transfers count and throttle limit for different time periods, such as
weekday, weekend, business hours, non-business hours, DR schedules, and non-DR schedules.
Related information
Creating a transition project
Creating a data copy schedule for SnapMirror transfers
You can create data copy schedules to effectively manage the transition data copy
operations for the volumes in a project. You can also specify the number of concurrent
SnapMirror transfers to run during that schedule to ensure that any replication operation
does not fail due to the concurrent SnapMirror transfers reaching the maximum limit.
• The project must be in the preparation, data copy, or apply configuration (precutover) phase.
• The 7-Mode Transition Tool service must always be running for the schedules to be effective.
205
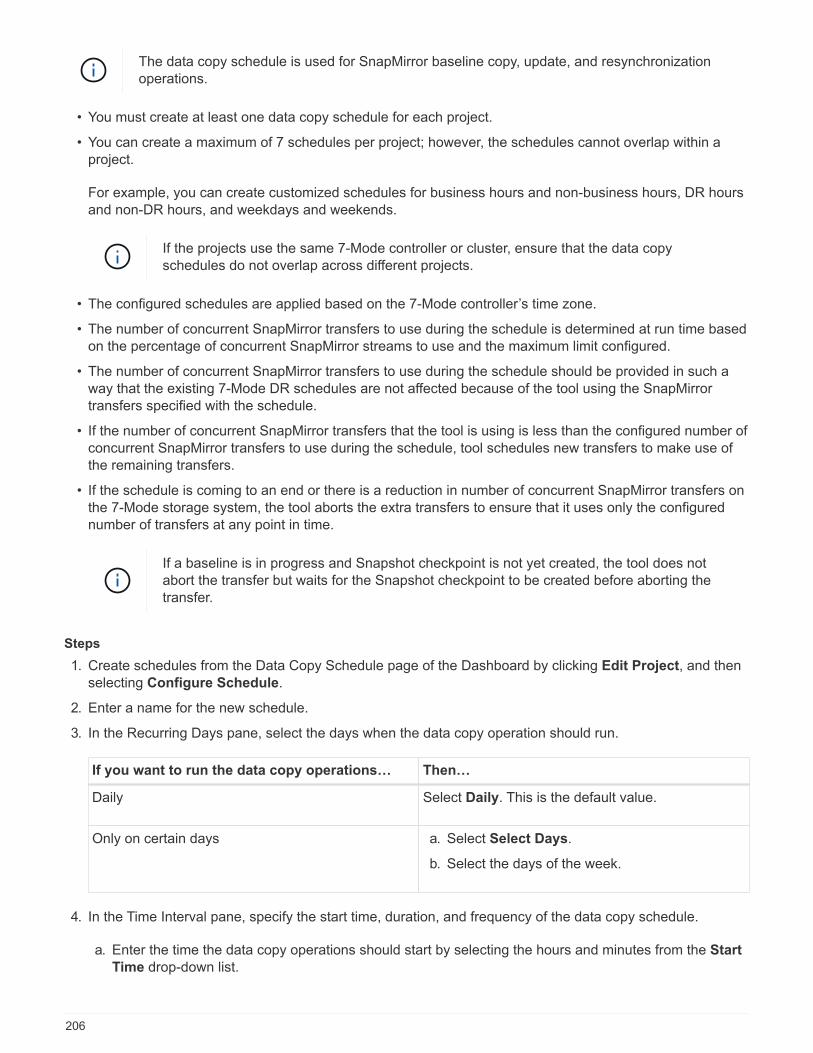
The data copy schedule is used for SnapMirror baseline copy, update, and resynchronization
operations.
• You must create at least one data copy schedule for each project.
• You can create a maximum of 7 schedules per project; however, the schedules cannot overlap within a
project.
For example, you can create customized schedules for business hours and non-business hours, DR hours
and non-DR hours, and weekdays and weekends.
If the projects use the same 7-Mode controller or cluster, ensure that the data copy
schedules do not overlap across different projects.
• The configured schedules are applied based on the 7-Mode controller’s time zone.
• The number of concurrent SnapMirror transfers to use during the schedule is determined at run time based
on the percentage of concurrent SnapMirror streams to use and the maximum limit configured.
• The number of concurrent SnapMirror transfers to use during the schedule should be provided in such a
way that the existing 7-Mode DR schedules are not affected because of the tool using the SnapMirror
transfers specified with the schedule.
• If the number of concurrent SnapMirror transfers that the tool is using is less than the configured number of
concurrent SnapMirror transfers to use during the schedule, tool schedules new transfers to make use of
the remaining transfers.
• If the schedule is coming to an end or there is a reduction in number of concurrent SnapMirror transfers on
the 7-Mode storage system, the tool aborts the extra transfers to ensure that it uses only the configured
number of transfers at any point in time.
If a baseline is in progress and Snapshot checkpoint is not yet created, the tool does not
abort the transfer but waits for the Snapshot checkpoint to be created before aborting the
transfer.
Steps
1. Create schedules from the Data Copy Schedule page of the Dashboard by clicking Edit Project, and then
selecting Configure Schedule.
2. Enter a name for the new schedule.
3. In the Recurring Days pane, select the days when the data copy operation should run.
If you want to run the data copy operations… Then…
Daily Select Daily. This is the default value.
Only on certain days a. Select Select Days.
b. Select the days of the week.
4. In the Time Interval pane, specify the start time, duration, and frequency of the data copy schedule.
a. Enter the time the data copy operations should start by selecting the hours and minutes from the Start
Time drop-down list.
206
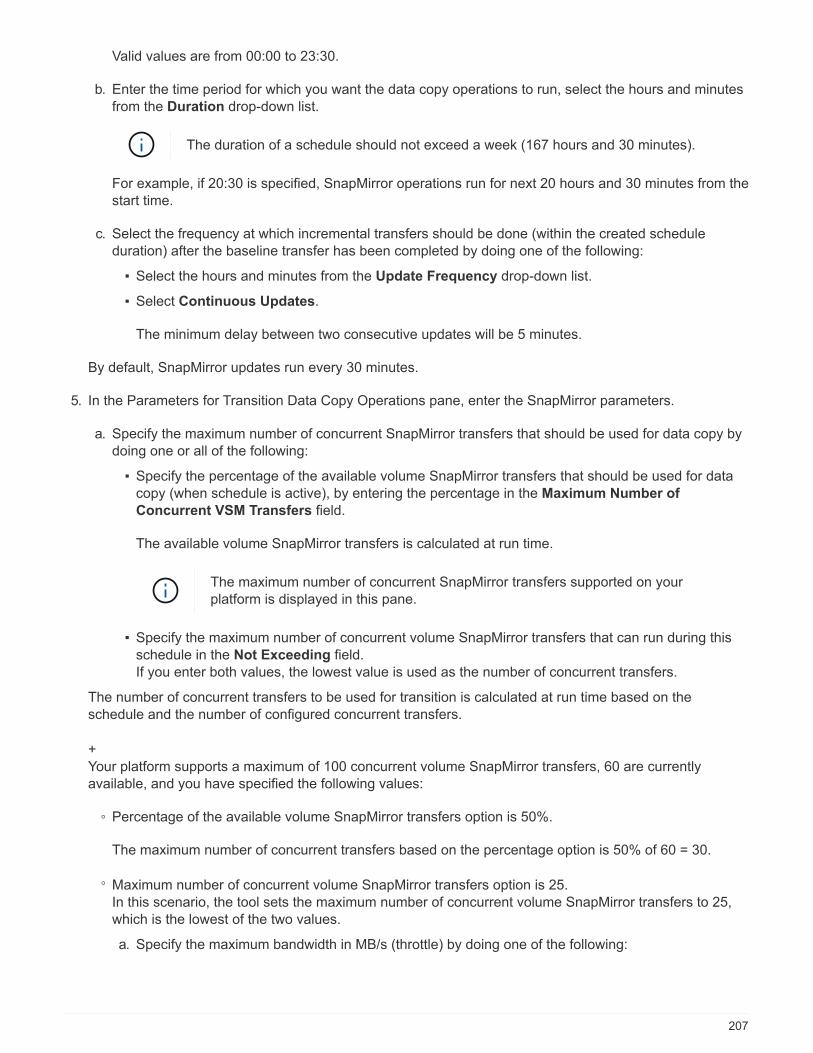
Valid values are from 00:00 to 23:30.
b. Enter the time period for which you want the data copy operations to run, select the hours and minutes
from the Duration drop-down list.
The duration of a schedule should not exceed a week (167 hours and 30 minutes).
For example, if 20:30 is specified, SnapMirror operations run for next 20 hours and 30 minutes from the
start time.
c. Select the frequency at which incremental transfers should be done (within the created schedule
duration) after the baseline transfer has been completed by doing one of the following:
▪ Select the hours and minutes from the Update Frequency drop-down list.
▪ Select Continuous Updates.
The minimum delay between two consecutive updates will be 5 minutes.
By default, SnapMirror updates run every 30 minutes.
5. In the Parameters for Transition Data Copy Operations pane, enter the SnapMirror parameters.
a. Specify the maximum number of concurrent SnapMirror transfers that should be used for data copy by
doing one or all of the following:
▪ Specify the percentage of the available volume SnapMirror transfers that should be used for data
copy (when schedule is active), by entering the percentage in the Maximum Number of
Concurrent VSM Transfers field.
The available volume SnapMirror transfers is calculated at run time.
The maximum number of concurrent SnapMirror transfers supported on your
platform is displayed in this pane.
▪ Specify the maximum number of concurrent volume SnapMirror transfers that can run during this
schedule in the Not Exceeding field.
If you enter both values, the lowest value is used as the number of concurrent transfers.
The number of concurrent transfers to be used for transition is calculated at run time based on the
schedule and the number of configured concurrent transfers.
+
Your platform supports a maximum of 100 concurrent volume SnapMirror transfers, 60 are currently
available, and you have specified the following values:
◦ Percentage of the available volume SnapMirror transfers option is 50%.
The maximum number of concurrent transfers based on the percentage option is 50% of 60 = 30.
◦ Maximum number of concurrent volume SnapMirror transfers option is 25.
In this scenario, the tool sets the maximum number of concurrent volume SnapMirror transfers to 25,
which is the lowest of the two values.
a. Specify the maximum bandwidth in MB/s (throttle) by doing one of the following:
207
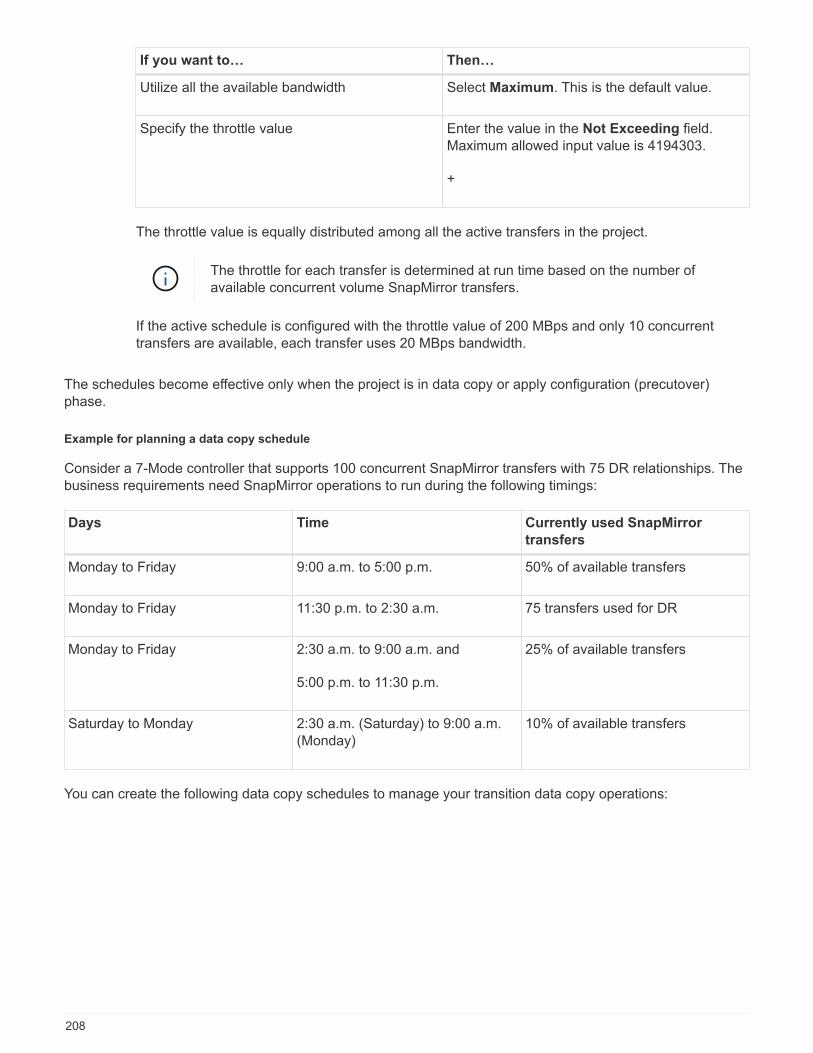
If you want to… Then…
Utilize all the available bandwidth Select Maximum. This is the default value.
Specify the throttle value Enter the value in the Not Exceeding field.
Maximum allowed input value is 4194303.
+
The throttle value is equally distributed among all the active transfers in the project.
The throttle for each transfer is determined at run time based on the number of
available concurrent volume SnapMirror transfers.
If the active schedule is configured with the throttle value of 200 MBps and only 10 concurrent
transfers are available, each transfer uses 20 MBps bandwidth.
The schedules become effective only when the project is in data copy or apply configuration (precutover)
phase.
Example for planning a data copy schedule
Consider a 7-Mode controller that supports 100 concurrent SnapMirror transfers with 75 DR relationships. The
business requirements need SnapMirror operations to run during the following timings:
Days Time Currently used SnapMirror
transfers
Monday to Friday 9:00 a.m. to 5:00 p.m. 50% of available transfers
Monday to Friday 11:30 p.m. to 2:30 a.m. 75 transfers used for DR
Monday to Friday 2:30 a.m. to 9:00 a.m. and
5:00 p.m. to 11:30 p.m.
25% of available transfers
Saturday to Monday 2:30 a.m. (Saturday) to 9:00 a.m.
(Monday)
10% of available transfers
You can create the following data copy schedules to manage your transition data copy operations:
208
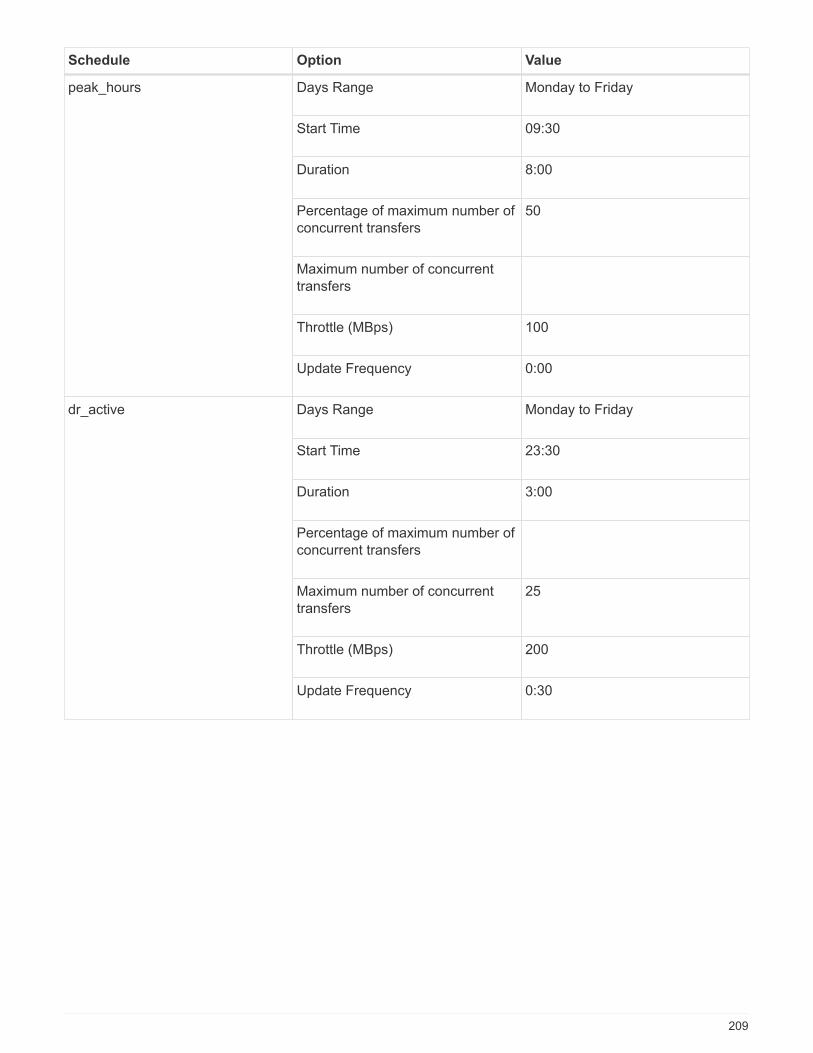
Schedule Option Value
peak_hours Days Range Monday to Friday
Start Time 09:30
Duration 8:00
Percentage of maximum number of
concurrent transfers
50
Maximum number of concurrent
transfers
Throttle (MBps) 100
Update Frequency 0:00
dr_active Days Range Monday to Friday
Start Time 23:30
Duration 3:00
Percentage of maximum number of
concurrent transfers
Maximum number of concurrent
transfers
25
Throttle (MBps) 200
Update Frequency 0:30
209
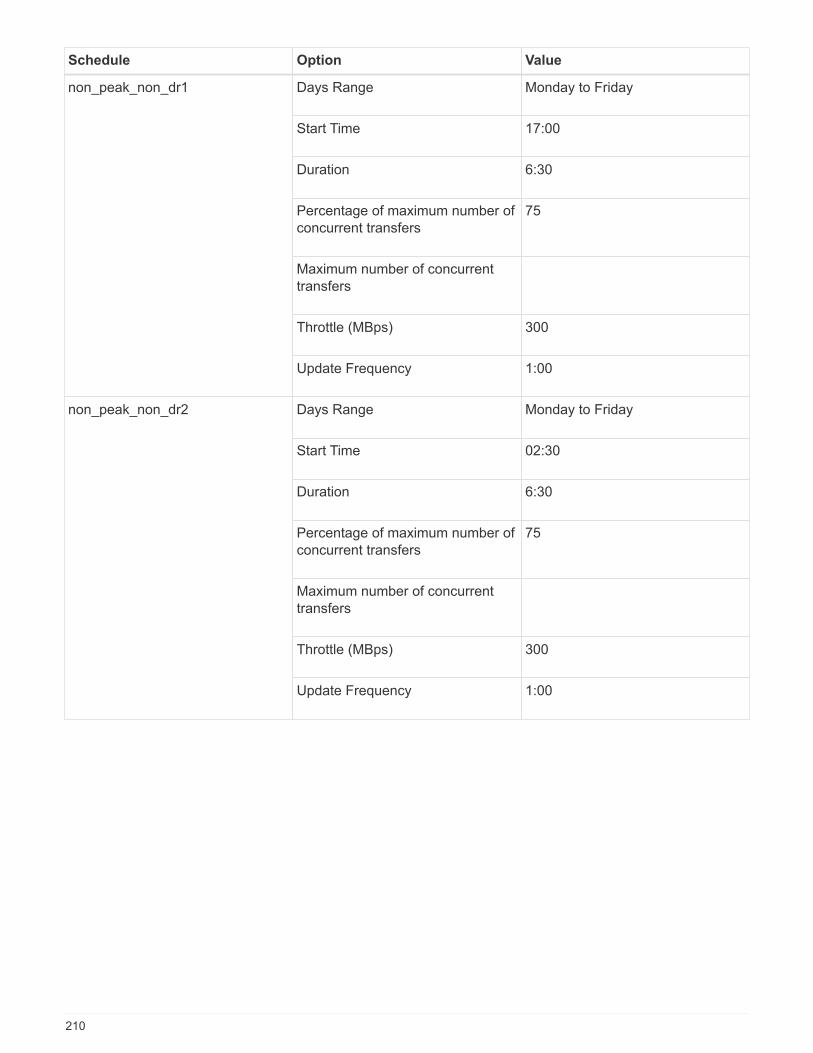
Schedule Option Value
non_peak_non_dr1 Days Range Monday to Friday
Start Time 17:00
Duration 6:30
Percentage of maximum number of
concurrent transfers
75
Maximum number of concurrent
transfers
Throttle (MBps) 300
Update Frequency 1:00
non_peak_non_dr2 Days Range Monday to Friday
Start Time 02:30
Duration 6:30
Percentage of maximum number of
concurrent transfers
75
Maximum number of concurrent
transfers
Throttle (MBps) 300
Update Frequency 1:00
210
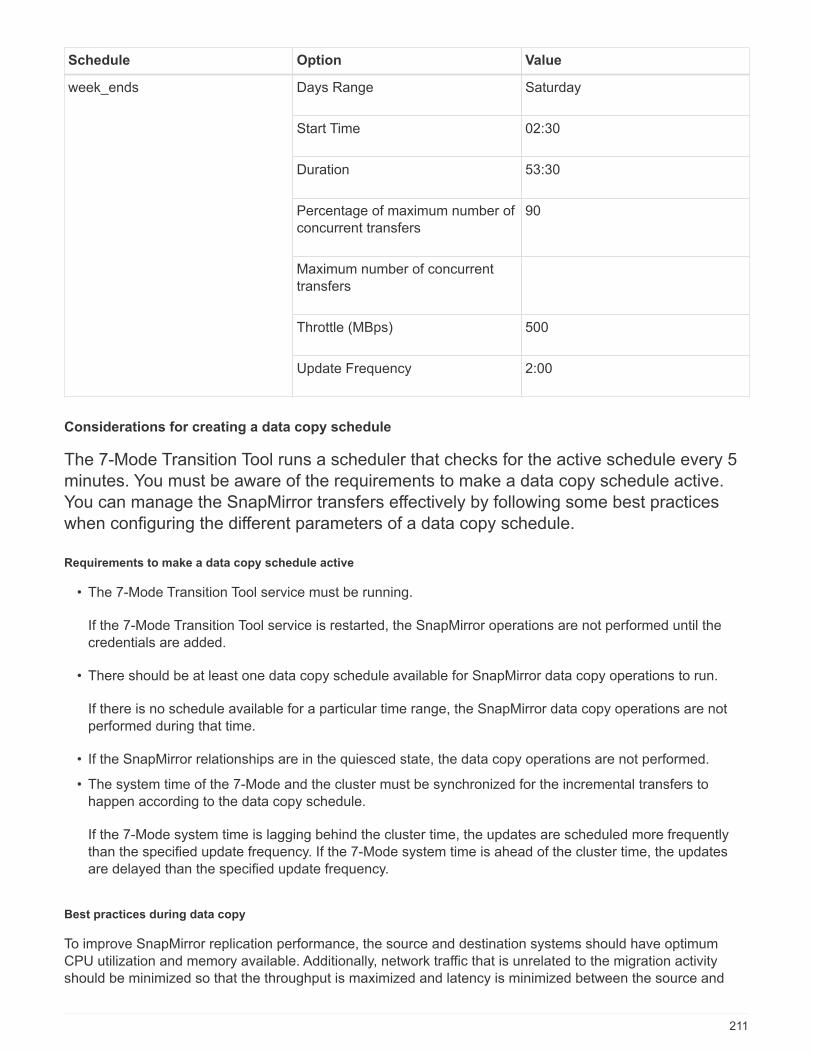
Schedule Option Value
week_ends Days Range Saturday
Start Time 02:30
Duration 53:30
Percentage of maximum number of
concurrent transfers
90
Maximum number of concurrent
transfers
Throttle (MBps) 500
Update Frequency 2:00
Considerations for creating a data copy schedule
The 7-Mode Transition Tool runs a scheduler that checks for the active schedule every 5
minutes. You must be aware of the requirements to make a data copy schedule active.
You can manage the SnapMirror transfers effectively by following some best practices
when configuring the different parameters of a data copy schedule.
Requirements to make a data copy schedule active
• The 7-Mode Transition Tool service must be running.
If the 7-Mode Transition Tool service is restarted, the SnapMirror operations are not performed until the
credentials are added.
• There should be at least one data copy schedule available for SnapMirror data copy operations to run.
If there is no schedule available for a particular time range, the SnapMirror data copy operations are not
performed during that time.
• If the SnapMirror relationships are in the quiesced state, the data copy operations are not performed.
• The system time of the 7-Mode and the cluster must be synchronized for the incremental transfers to
happen according to the data copy schedule.
If the 7-Mode system time is lagging behind the cluster time, the updates are scheduled more frequently
than the specified update frequency. If the 7-Mode system time is ahead of the cluster time, the updates
are delayed than the specified update frequency.
Best practices during data copy
To improve SnapMirror replication performance, the source and destination systems should have optimum
CPU utilization and memory available. Additionally, network traffic that is unrelated to the migration activity
should be minimized so that the throughput is maximized and latency is minimized between the source and
211
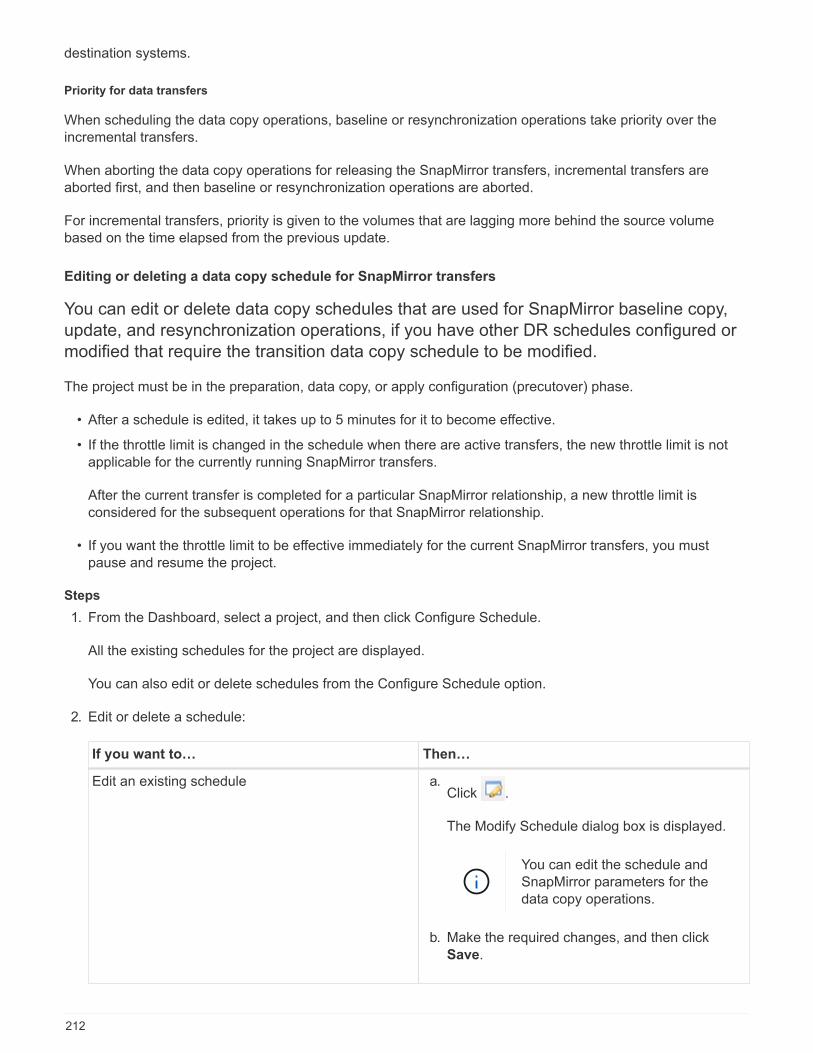
destination systems.
Priority for data transfers
When scheduling the data copy operations, baseline or resynchronization operations take priority over the
incremental transfers.
When aborting the data copy operations for releasing the SnapMirror transfers, incremental transfers are
aborted first, and then baseline or resynchronization operations are aborted.
For incremental transfers, priority is given to the volumes that are lagging more behind the source volume
based on the time elapsed from the previous update.
Editing or deleting a data copy schedule for SnapMirror transfers
You can edit or delete data copy schedules that are used for SnapMirror baseline copy,
update, and resynchronization operations, if you have other DR schedules configured or
modified that require the transition data copy schedule to be modified.
The project must be in the preparation, data copy, or apply configuration (precutover) phase.
• After a schedule is edited, it takes up to 5 minutes for it to become effective.
• If the throttle limit is changed in the schedule when there are active transfers, the new throttle limit is not
applicable for the currently running SnapMirror transfers.
After the current transfer is completed for a particular SnapMirror relationship, a new throttle limit is
considered for the subsequent operations for that SnapMirror relationship.
• If you want the throttle limit to be effective immediately for the current SnapMirror transfers, you must
pause and resume the project.
Steps
1. From the Dashboard, select a project, and then click Configure Schedule.
All the existing schedules for the project are displayed.
You can also edit or delete schedules from the Configure Schedule option.
2. Edit or delete a schedule:
If you want to… Then…
Edit an existing schedule a.Click .
The Modify Schedule dialog box is displayed.
You can edit the schedule and
SnapMirror parameters for the
data copy operations.
b. Make the required changes, and then click
Save.
212
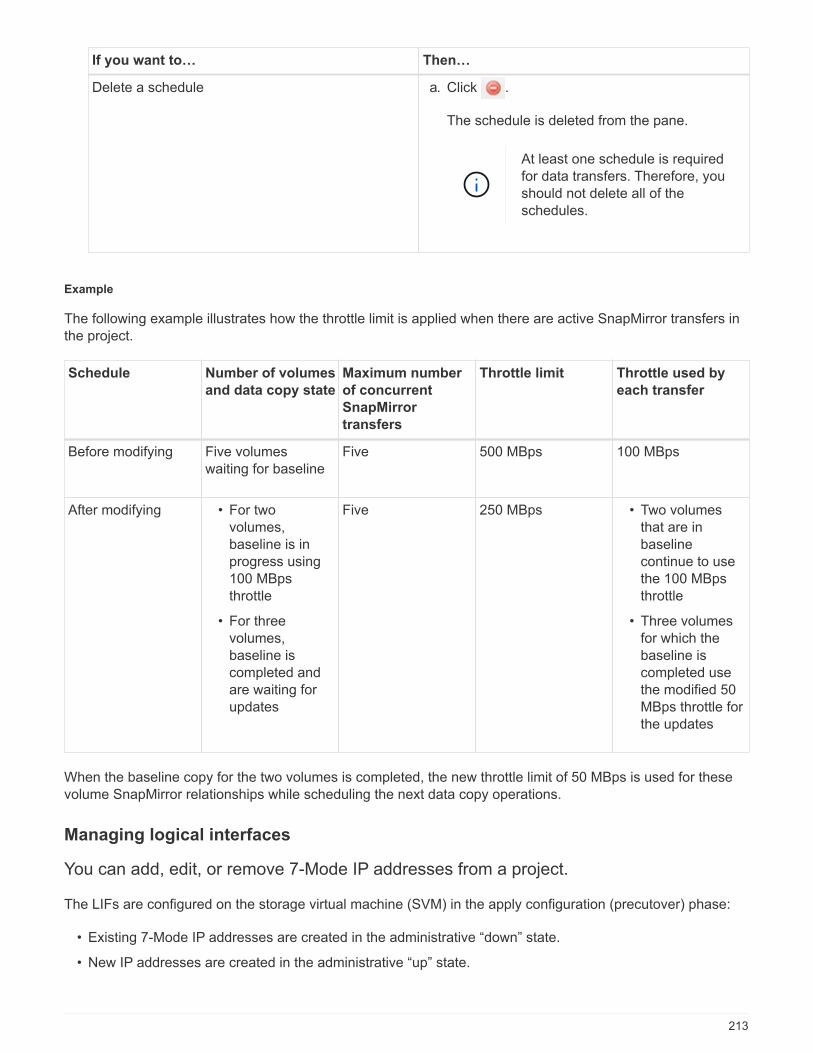
If you want to… Then…
Delete a schedule a. Click .
The schedule is deleted from the pane.
At least one schedule is required
for data transfers. Therefore, you
should not delete all of the
schedules.
Example
The following example illustrates how the throttle limit is applied when there are active SnapMirror transfers in
the project.
Schedule Number of volumes
and data copy state
Maximum number
of concurrent
SnapMirror
transfers
Throttle limit Throttle used by
each transfer
Before modifying Five volumes
waiting for baseline
Five 500 MBps 100 MBps
After modifying • For two
volumes,
baseline is in
progress using
100 MBps
throttle
• For three
volumes,
baseline is
completed and
are waiting for
updates
Five 250 MBps • Two volumes
that are in
baseline
continue to use
the 100 MBps
throttle
• Three volumes
for which the
baseline is
completed use
the modified 50
MBps throttle for
the updates
When the baseline copy for the two volumes is completed, the new throttle limit of 50 MBps is used for these
volume SnapMirror relationships while scheduling the next data copy operations.
Managing logical interfaces
You can add, edit, or remove 7-Mode IP addresses from a project.
The LIFs are configured on the storage virtual machine (SVM) in the apply configuration (precutover) phase:
• Existing 7-Mode IP addresses are created in the administrative “down” state.
• New IP addresses are created in the administrative “up” state.
213
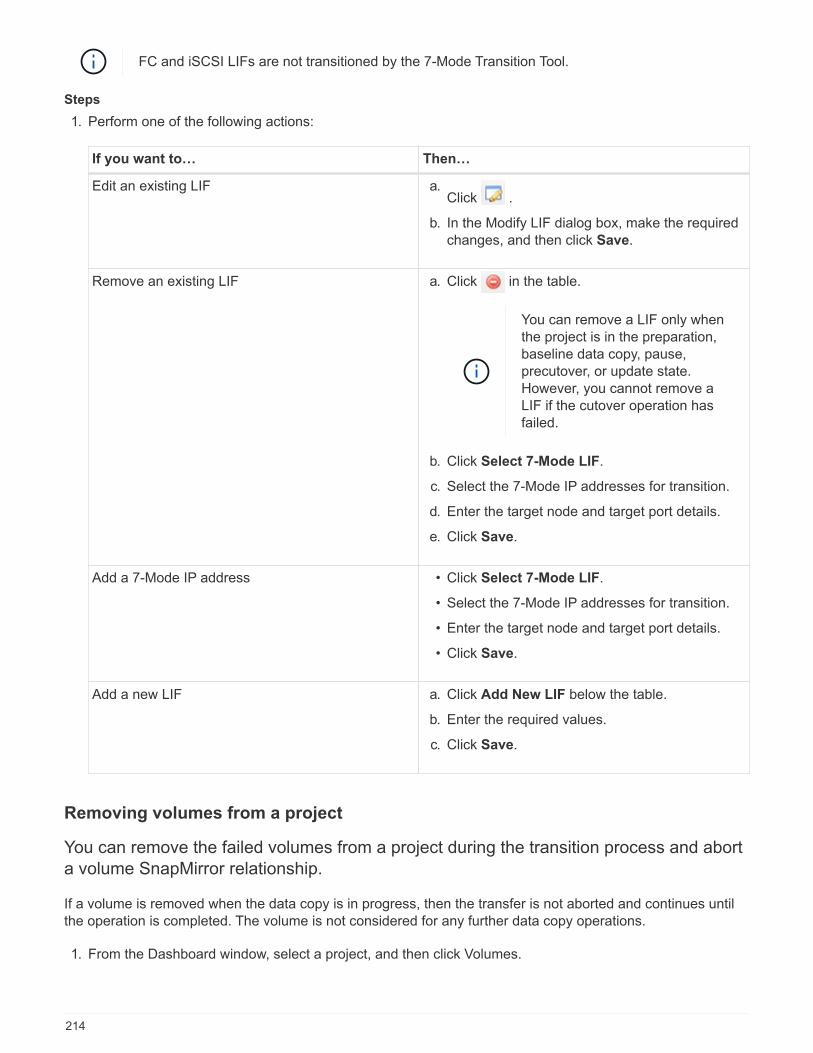
FC and iSCSI LIFs are not transitioned by the 7-Mode Transition Tool.
Steps
1. Perform one of the following actions:
If you want to… Then…
Edit an existing LIF a.Click .
b. In the Modify LIF dialog box, make the required
changes, and then click Save.
Remove an existing LIF a. Click in the table.
You can remove a LIF only when
the project is in the preparation,
baseline data copy, pause,
precutover, or update state.
However, you cannot remove a
LIF if the cutover operation has
failed.
b. Click Select 7-Mode LIF.
c. Select the 7-Mode IP addresses for transition.
d. Enter the target node and target port details.
e. Click Save.
Add a 7-Mode IP address • Click Select 7-Mode LIF.
• Select the 7-Mode IP addresses for transition.
• Enter the target node and target port details.
• Click Save.
Add a new LIF a. Click Add New LIF below the table.
b. Enter the required values.
c. Click Save.
Removing volumes from a project
You can remove the failed volumes from a project during the transition process and abort
a volume SnapMirror relationship.
If a volume is removed when the data copy is in progress, then the transfer is not aborted and continues until
the operation is completed. The volume is not considered for any further data copy operations.
1. From the Dashboard window, select a project, and then click Volumes.
214
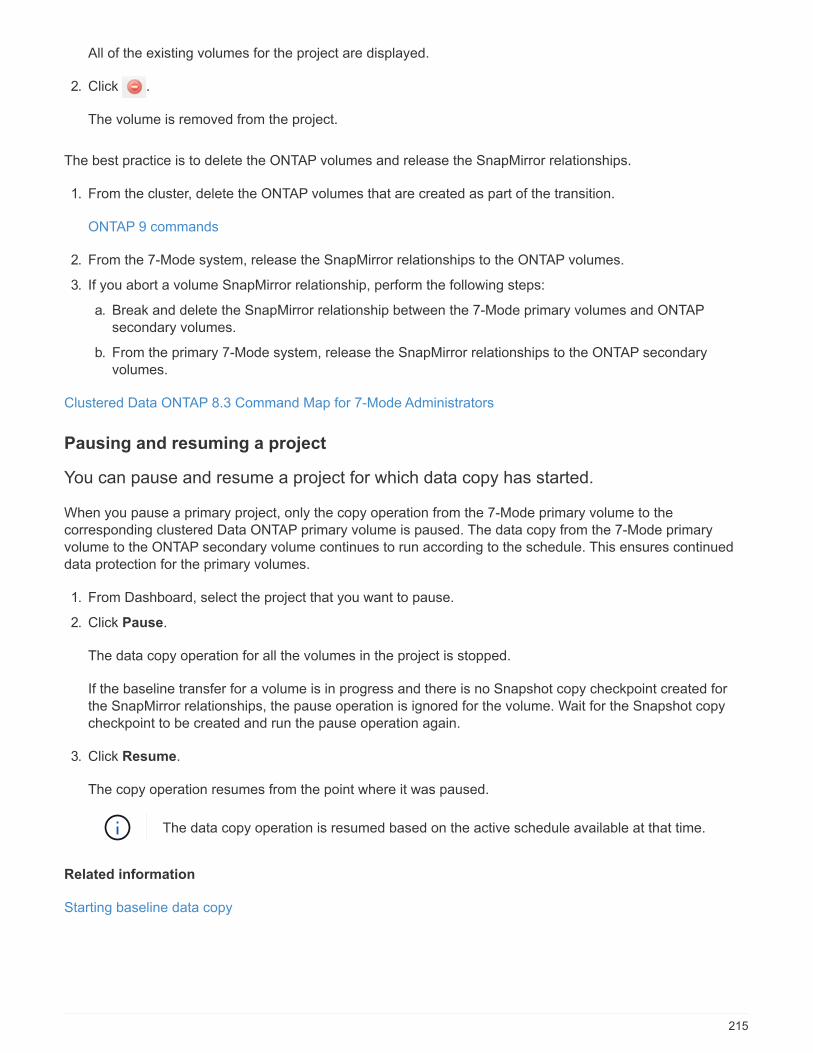
All of the existing volumes for the project are displayed.
2. Click .
The volume is removed from the project.
The best practice is to delete the ONTAP volumes and release the SnapMirror relationships.
1. From the cluster, delete the ONTAP volumes that are created as part of the transition.
ONTAP 9 commands
2. From the 7-Mode system, release the SnapMirror relationships to the ONTAP volumes.
3. If you abort a volume SnapMirror relationship, perform the following steps:
a. Break and delete the SnapMirror relationship between the 7-Mode primary volumes and ONTAP
secondary volumes.
b. From the primary 7-Mode system, release the SnapMirror relationships to the ONTAP secondary
volumes.
Clustered Data ONTAP 8.3 Command Map for 7-Mode Administrators
Pausing and resuming a project
You can pause and resume a project for which data copy has started.
When you pause a primary project, only the copy operation from the 7-Mode primary volume to the
corresponding clustered Data ONTAP primary volume is paused. The data copy from the 7-Mode primary
volume to the ONTAP secondary volume continues to run according to the schedule. This ensures continued
data protection for the primary volumes.
1. From Dashboard, select the project that you want to pause.
2. Click Pause.
The data copy operation for all the volumes in the project is stopped.
If the baseline transfer for a volume is in progress and there is no Snapshot copy checkpoint created for
the SnapMirror relationships, the pause operation is ignored for the volume. Wait for the Snapshot copy
checkpoint to be created and run the pause operation again.
3. Click Resume.
The copy operation resumes from the point where it was paused.
The data copy operation is resumed based on the active schedule available at that time.
Related information
Starting baseline data copy
215
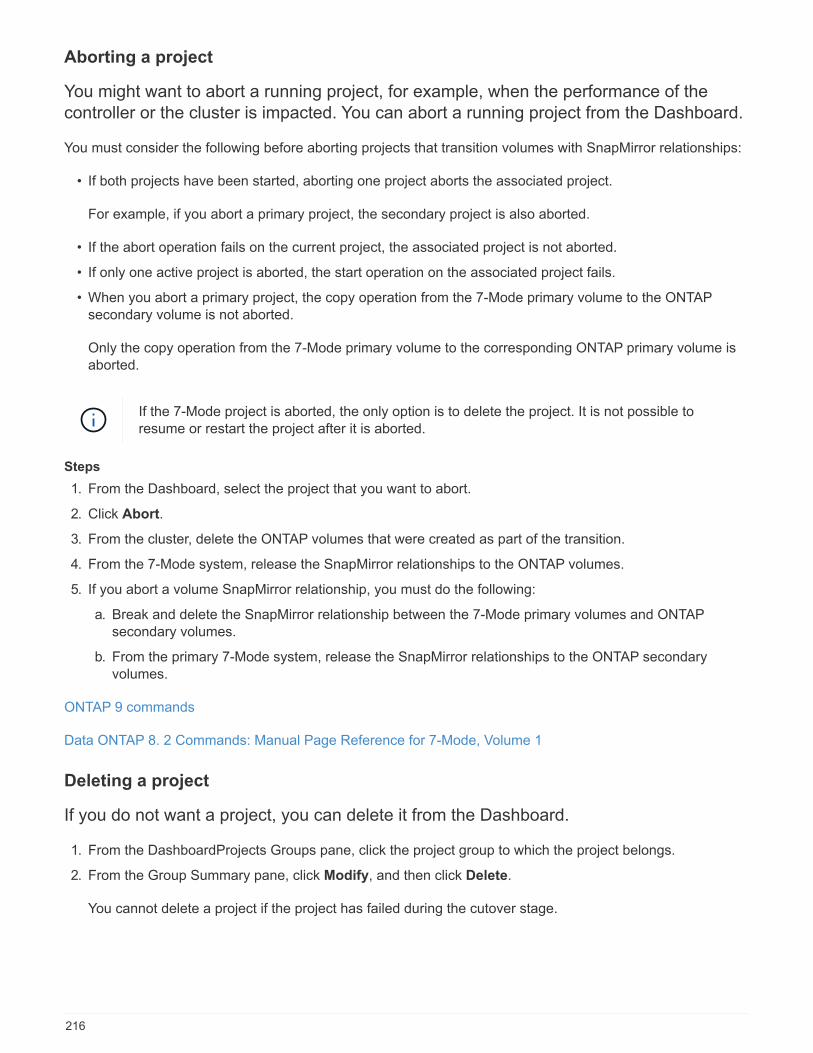
Aborting a project
You might want to abort a running project, for example, when the performance of the
controller or the cluster is impacted. You can abort a running project from the Dashboard.
You must consider the following before aborting projects that transition volumes with SnapMirror relationships:
• If both projects have been started, aborting one project aborts the associated project.
For example, if you abort a primary project, the secondary project is also aborted.
• If the abort operation fails on the current project, the associated project is not aborted.
• If only one active project is aborted, the start operation on the associated project fails.
• When you abort a primary project, the copy operation from the 7-Mode primary volume to the ONTAP
secondary volume is not aborted.
Only the copy operation from the 7-Mode primary volume to the corresponding ONTAP primary volume is
aborted.
If the 7-Mode project is aborted, the only option is to delete the project. It is not possible to
resume or restart the project after it is aborted.
Steps
1. From the Dashboard, select the project that you want to abort.
2. Click Abort.
3. From the cluster, delete the ONTAP volumes that were created as part of the transition.
4. From the 7-Mode system, release the SnapMirror relationships to the ONTAP volumes.
5. If you abort a volume SnapMirror relationship, you must do the following:
a. Break and delete the SnapMirror relationship between the 7-Mode primary volumes and ONTAP
secondary volumes.
b. From the primary 7-Mode system, release the SnapMirror relationships to the ONTAP secondary
volumes.
ONTAP 9 commands
Data ONTAP 8. 2 Commands: Manual Page Reference for 7-Mode, Volume 1
Deleting a project
If you do not want a project, you can delete it from the Dashboard.
1. From the DashboardProjects Groups pane, click the project group to which the project belongs.
2. From the Group Summary pane, click Modify, and then click Delete.
You cannot delete a project if the project has failed during the cutover stage.
216
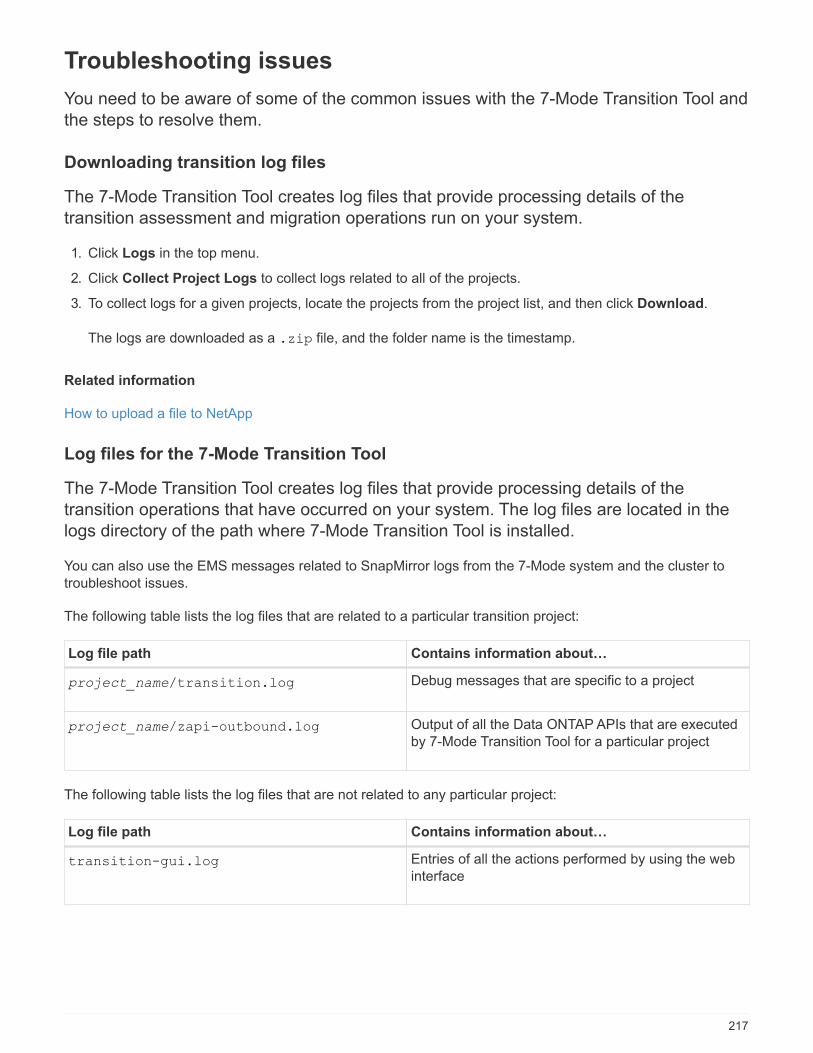
Troubleshooting issues
You need to be aware of some of the common issues with the 7-Mode Transition Tool and
the steps to resolve them.
Downloading transition log files
The 7-Mode Transition Tool creates log files that provide processing details of the
transition assessment and migration operations run on your system.
1. Click Logs in the top menu.
2. Click Collect Project Logs to collect logs related to all of the projects.
3. To collect logs for a given projects, locate the projects from the project list, and then click Download.
The logs are downloaded as a .zip file, and the folder name is the timestamp.
Related information
How to upload a file to NetApp
Log files for the 7-Mode Transition Tool
The 7-Mode Transition Tool creates log files that provide processing details of the
transition operations that have occurred on your system. The log files are located in the
logs directory of the path where 7-Mode Transition Tool is installed.
You can also use the EMS messages related to SnapMirror logs from the 7-Mode system and the cluster to
troubleshoot issues.
The following table lists the log files that are related to a particular transition project:
Log file path Contains information about…
project_name/transition.log Debug messages that are specific to a project
project_name/zapi-outbound.log Output of all the Data ONTAP APIs that are executed
by 7-Mode Transition Tool for a particular project
The following table lists the log files that are not related to any particular project:
Log file path Contains information about…
transition-gui.log Entries of all the actions performed by using the web
interface
217
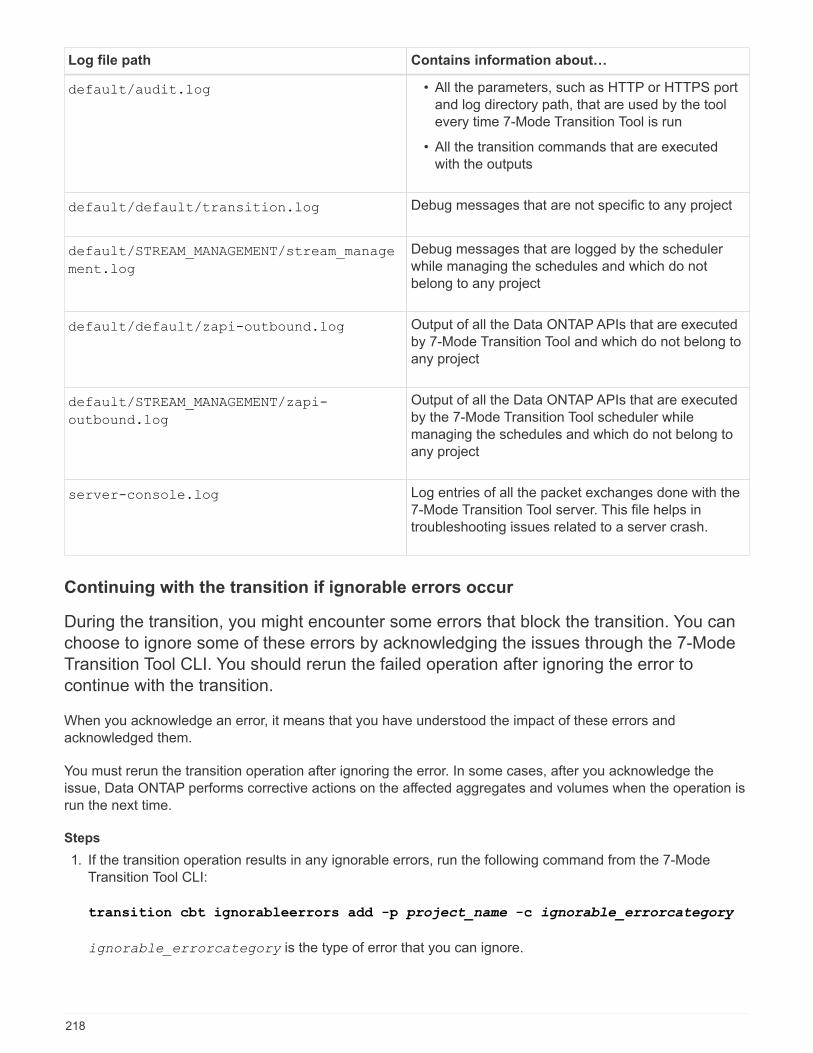
Log file path Contains information about…
default/audit.log • All the parameters, such as HTTP or HTTPS port
and log directory path, that are used by the tool
every time 7-Mode Transition Tool is run
• All the transition commands that are executed
with the outputs
default/default/transition.log Debug messages that are not specific to any project
default/STREAM_MANAGEMENT/stream_manage
ment.log
Debug messages that are logged by the scheduler
while managing the schedules and which do not
belong to any project
default/default/zapi-outbound.log Output of all the Data ONTAP APIs that are executed
by 7-Mode Transition Tool and which do not belong to
any project
default/STREAM_MANAGEMENT/zapi-
outbound.log
Output of all the Data ONTAP APIs that are executed
by the 7-Mode Transition Tool scheduler while
managing the schedules and which do not belong to
any project
server-console.log Log entries of all the packet exchanges done with the
7-Mode Transition Tool server. This file helps in
troubleshooting issues related to a server crash.
Continuing with the transition if ignorable errors occur
During the transition, you might encounter some errors that block the transition. You can
choose to ignore some of these errors by acknowledging the issues through the 7-Mode
Transition Tool CLI. You should rerun the failed operation after ignoring the error to
continue with the transition.
When you acknowledge an error, it means that you have understood the impact of these errors and
acknowledged them.
You must rerun the transition operation after ignoring the error. In some cases, after you acknowledge the
issue, Data ONTAP performs corrective actions on the affected aggregates and volumes when the operation is
run the next time.
Steps
1. If the transition operation results in any ignorable errors, run the following command from the 7-Mode
Transition Tool CLI:
transition cbt ignorableerrors add -p project_name -c ignorable_errorcategory
ignorable_errorcategory is the type of error that you can ignore.
218
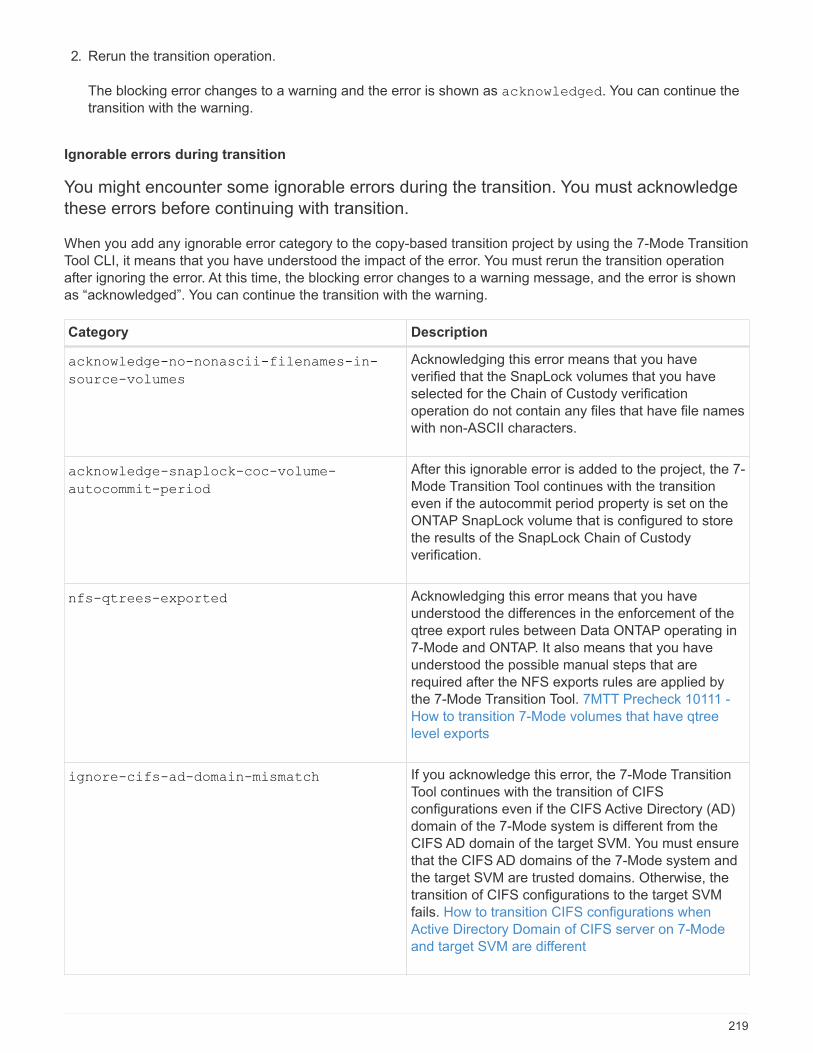
2. Rerun the transition operation.
The blocking error changes to a warning and the error is shown as acknowledged. You can continue the
transition with the warning.
Ignorable errors during transition
You might encounter some ignorable errors during the transition. You must acknowledge
these errors before continuing with transition.
When you add any ignorable error category to the copy-based transition project by using the 7-Mode Transition
Tool CLI, it means that you have understood the impact of the error. You must rerun the transition operation
after ignoring the error. At this time, the blocking error changes to a warning message, and the error is shown
as “acknowledged”. You can continue the transition with the warning.
Category Description
acknowledge-no-nonascii-filenames-in-
source-volumes
Acknowledging this error means that you have
verified that the SnapLock volumes that you have
selected for the Chain of Custody verification
operation do not contain any files that have file names
with non-ASCII characters.
acknowledge-snaplock-coc-volume-
autocommit-period
After this ignorable error is added to the project, the 7-
Mode Transition Tool continues with the transition
even if the autocommit period property is set on the
ONTAP SnapLock volume that is configured to store
the results of the SnapLock Chain of Custody
verification.
nfs-qtrees-exported Acknowledging this error means that you have
understood the differences in the enforcement of the
qtree export rules between Data ONTAP operating in
7-Mode and ONTAP. It also means that you have
understood the possible manual steps that are
required after the NFS exports rules are applied by
the 7-Mode Transition Tool. 7MTT Precheck 10111 -
How to transition 7-Mode volumes that have qtree
level exports
ignore-cifs-ad-domain-mismatch If you acknowledge this error, the 7-Mode Transition
Tool continues with the transition of CIFS
configurations even if the CIFS Active Directory (AD)
domain of the 7-Mode system is different from the
CIFS AD domain of the target SVM. You must ensure
that the CIFS AD domains of the 7-Mode system and
the target SVM are trusted domains. Otherwise, the
transition of CIFS configurations to the target SVM
fails. How to transition CIFS configurations when
Active Directory Domain of CIFS server on 7-Mode
and target SVM are different
219
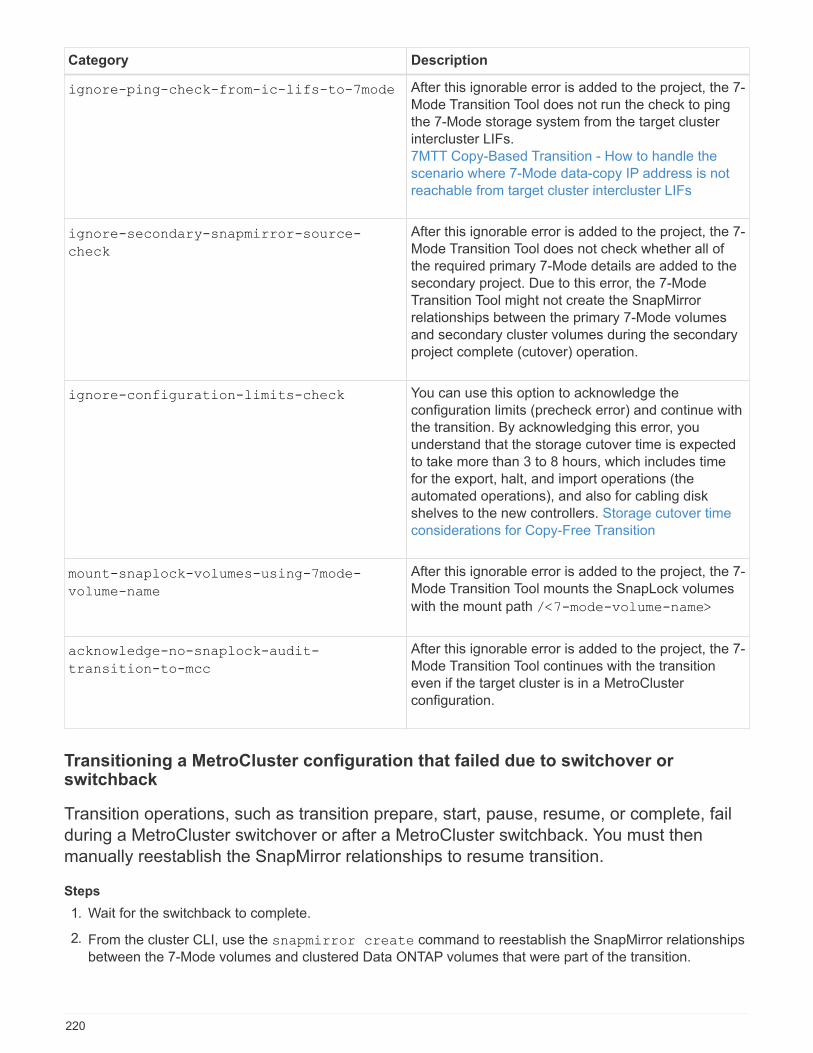
Category Description
ignore-ping-check-from-ic-lifs-to-7mode After this ignorable error is added to the project, the 7-
Mode Transition Tool does not run the check to ping
the 7-Mode storage system from the target cluster
intercluster LIFs.
7MTT Copy-Based Transition - How to handle the
scenario where 7-Mode data-copy IP address is not
reachable from target cluster intercluster LIFs
ignore-secondary-snapmirror-source-
check
After this ignorable error is added to the project, the 7-
Mode Transition Tool does not check whether all of
the required primary 7-Mode details are added to the
secondary project. Due to this error, the 7-Mode
Transition Tool might not create the SnapMirror
relationships between the primary 7-Mode volumes
and secondary cluster volumes during the secondary
project complete (cutover) operation.
ignore-configuration-limits-check You can use this option to acknowledge the
configuration limits (precheck error) and continue with
the transition. By acknowledging this error, you
understand that the storage cutover time is expected
to take more than 3 to 8 hours, which includes time
for the export, halt, and import operations (the
automated operations), and also for cabling disk
shelves to the new controllers. Storage cutover time
considerations for Copy-Free Transition
mount-snaplock-volumes-using-7mode-
volume-name
After this ignorable error is added to the project, the 7-
Mode Transition Tool mounts the SnapLock volumes
with the mount path /<7-mode-volume-name>
acknowledge-no-snaplock-audit-
transition-to-mcc
After this ignorable error is added to the project, the 7-
Mode Transition Tool continues with the transition
even if the target cluster is in a MetroCluster
configuration.
Transitioning a MetroCluster configuration that failed due to switchover orswitchback
Transition operations, such as transition prepare, start, pause, resume, or complete, fail
during a MetroCluster switchover or after a MetroCluster switchback. You must then
manually reestablish the SnapMirror relationships to resume transition.
Steps
1. Wait for the switchback to complete.
2. From the cluster CLI, use the snapmirror create command to reestablish the SnapMirror relationships
between the 7-Mode volumes and clustered Data ONTAP volumes that were part of the transition.
220
3. From the 7-Mode Transition Tool, rerun the transition operation.
Data copy operations start when the next schedule becomes active.
Cannot select a secondary volume from the Volume selection pane
You cannot select a secondary volume from the Volume selection pane and transition it
as a volume SnapMirror relationship if the volume is not online or if the SnapMirror
relationship is broken.
Workaround
Use the ONTAP command-line to perform either of the following workarounds:
• Bring the secondary volume online if it is offline.
• Fix the SnapMirror relationship if it is broken.
Cannot select a volume for transition if the tool fails to retrieve the volumeinformation
The Volume selection pane displays the Failed to retrieve volume
information error message when you try to select a volume. This error usually occurs
if the controller is busy.
Workaround
Wait until the controller is not busy, and then select the volume again.
Cannot proceed from the Volume mapping pane if the selected SVM has noaggregate
The tool displays an error message, SVM does not have aggregate assigned.
Please assign some aggregates to the SVM and click on the refresh
button, on the Volume mapping pane if the selected SVM has no aggregate other than
the root node aggregate.
Workaround
Add an aggregate to the SVM in clustered Data ONTAP.
Compression is not enabled after transition from Data ONTAP 7.3.x
If you transition a 32-bit volume on a system running Data ONTAP 7.3.x to an ONTAP
volume that is in a 64-bit aggregate, compression is not enabled on the ONTAP volume
after the transition. Compression cannot be enabled until the volume is upgraded from
32-bit to 64-bit.
221

Workaround
1. Wait for the upgrade to finish.
You can use the volume show -fields block-type -volume vol_name command to verify that
the block type of the volume changes to 64-bit.
2. Enable compression by using the volume efficiency modify command.
222
Copy-Free Transition Guide
This guide describes how to transition from a 7-Mode HA pair to an ONTAP cluster using
the 7-Mode Transition Tool, without having to copy data from disks; the existing disk
shelves are connected to the new cluster.
Transition overview
Transitioning to clustered ONTAP involves identifying your current environment, defining
the transition scope, designing the optimal configuration of the destination systems,
planning how to migrate data and configurations, and making necessary environmental
updates.
Be sure to consult the current 7-Mode Transition Tool Release Notes for the latest information about supported
target releases and known issues.
7-Mode Transition Tool Release Notes
You must first collect information about the current environment, including both the current storage
environment as well as the hosts and applications. After collecting the storage inventory, you can assess the
current features and functionality that are used and identify any differences in the ONTAP version selected.
You can use 7-Mode Transition Tool to perform these tasks.
You can then define your migration project. This involves identifying what volumes and workloads you want to
migrate together, then you can design your cluster, and plan your transition. You can begin planning your
migration by first selecting the optimal migration method. When designing your cluster, you can use the
information gathered about your storage environment to map existing configuration items to their equivalent
items in ONTAP. For example, a 7-Mode volume should be mapped to an SVM and a volume in ONTAP and
an IP address that will be transitioned should be mapped to LIFs. You should also determine if any
environmental changes have to be made on the ONTAP system.
Implementation includes deploying and configuring the cluster, migrating data, applying configuration changes,
disconnecting clients and reconnecting to the destination ONTAP system, verifying access, as well as
performing any necessary environmental changes.
Related information
NetApp Documentation: ONTAP 9
Copy-free transition by using 7-Mode Transition Tool
The 7-Mode Transition Tool enables you to collect inventory and to assess 7-Mode
controllers, hosts, switches, and applications for transition. After assessment, you can
use a copy-free transition to migrate your data and configurations to ONTAP. In copy-free
transition, you disconnect all the disk shelves from a 7-Mode HA pair and connect them
to an HA pair in the target cluster.
Copy-free transition significantly reduces the migration cost by enabling the reuse of 7-Mode disk shelves. The
overall duration for performing the transition is faster because data copy is not required.
The unit of a copy-free transition is an HA pair. You must move all the disk shelves from the 7-Mode HA pair to
223
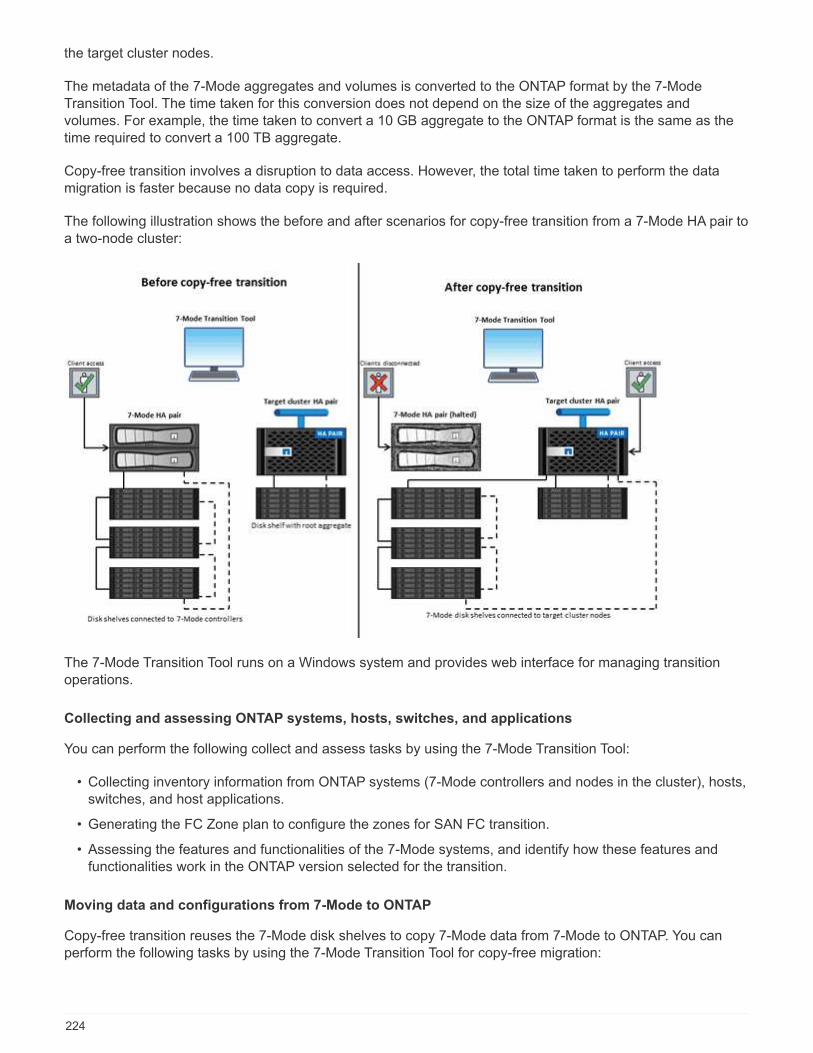
the target cluster nodes.
The metadata of the 7-Mode aggregates and volumes is converted to the ONTAP format by the 7-Mode
Transition Tool. The time taken for this conversion does not depend on the size of the aggregates and
volumes. For example, the time taken to convert a 10 GB aggregate to the ONTAP format is the same as the
time required to convert a 100 TB aggregate.
Copy-free transition involves a disruption to data access. However, the total time taken to perform the data
migration is faster because no data copy is required.
The following illustration shows the before and after scenarios for copy-free transition from a 7-Mode HA pair to
a two-node cluster:
The 7-Mode Transition Tool runs on a Windows system and provides web interface for managing transition
operations.
Collecting and assessing ONTAP systems, hosts, switches, and applications
You can perform the following collect and assess tasks by using the 7-Mode Transition Tool:
• Collecting inventory information from ONTAP systems (7-Mode controllers and nodes in the cluster), hosts,
switches, and host applications.
• Generating the FC Zone plan to configure the zones for SAN FC transition.
• Assessing the features and functionalities of the 7-Mode systems, and identify how these features and
functionalities work in the ONTAP version selected for the transition.
Moving data and configurations from 7-Mode to ONTAP
Copy-free transition reuses the 7-Mode disk shelves to copy 7-Mode data from 7-Mode to ONTAP. You can
perform the following tasks by using the 7-Mode Transition Tool for copy-free migration:
224
• Planning your transition to map the 7-Mode controllers or vFiler units to the target SVMs, and design the
namespace.
• Running prechecks to verify the compatibility of the 7-Mode systems and target cluster nodes for transition.
• Importing 7-Mode disk shelves in the following ways:
◦ From a 7-Mode HA pair to a new HA pair in a new cluster
◦ From a 7-Mode HA pair to a new HA pair in an existing cluster that has additional data-serving nodes
◦ From a 7-Mode HA pair to an HA pair that has data aggregates in an existing cluster that is serving
data
◦ From an HA pair that contains volumes in a volume SnapMirror relationship to an HA pair in a new or
existing cluster
You must manually create the cluster peer relationship after transition; however, a rebaseline transfer is
not required, and you can retain the SnapMirror relationship after transition.
• Transitioning 7-Mode configurations to SVMs.
Copy-free transition supports the transition of NAS and SAN configurations.
• Rolling back storage and configurations to 7-Mode if transition to ONTAP fails.
The tool generates the list of steps that are required to roll back to 7-Mode. You must manually perform
these rollback steps on the 7-Mode systems and the cluster.
Transition terminology
Understanding the transition terminology related to the 7-Mode Transition Tool helps you
to understand the transition process.
• Collect and assess
Before transitioning data and configurations to ONTAP, you must collect information about the storage
environment that includes storage systems, hosts, and applications. You must then assess the features
and functionalities of these systems, and identify how these features and functionalities work in the ONTAP
version selected for transition.
• Migrate
Refers to transitioning data and configurations from the 7-Mode volumes to ONTAP. Migration should be
performed after assessing the 7-Mode controllers.
• Project
In the 7-Mode Transition Tool, a project enables you to configure and manage the transition of a group of
volumes.
• Project group
In the 7-Mode Transition Tool, a project group is a logical container that you can use to hold related
migration projects. There is always one default group with Default_Group name that exists in the system.
225

Collecting and assessing the inventory information
You can collect inventory information from controllers, hosts, and FC switches. You can
then assess features and functionalities of these systems, and identify how these
features and functionalities work in the ONTAP version that is selected for transition.
You can collect inventory information in two ways:
• If your environment security allows it, you can install the 7-Mode Transition Tool, and then use it to collect
the inventory information.
• You can import the inventory XML report generated by the Inventory Collect Tool, and then perform the
assessment.
In both cases, you must use Inventory Collect Tool 3.3 to collect the inventory.
To assess the inventory information for a copy-free transition, you must select both of the nodes of the source
7-Mode HA pair. Although the assessment is done on a per-node basis, if a single node is not qualified for
transition, the entire HA pair cannot be transitioned.
226

Storage, host, and FC switches version requirements for transition assessment
You must be aware of the versions of Data ONTAP operating in 7-Mode, hosts, and FC
switches that are supported for transition assessment.
For the list of 7-Mode versions, hosts, and FC switches that are supported for assessment by the 7-Mode
Transition Tool, see the NetApp Interoperability Matrix Tool.
NetApp Interoperability Matrix Tool
227
Preparing the 7-Mode systems and hosts for transition assessment
You must ensure that the 7-Mode systems and hosts meet certain network and protocol
requirements for successfully generating an assessment report.
Steps
1. Enable HTTPS on the 7-Mode system:
options httpd.admin.ssl.enable on
2. Enable TLS on the 7-Mode system:
options tls.enable on
The best practice is to enable TLS because of the security vulnerabilities in SSLv3.
3. Enable SSL and disable SSLv2 and SSLv3 on the 7-Mode system:
a. Set up and start SSL:
secureadmin setup ssl
b. Enable SSL:
options ssl.enable on
c. Disable SSLv2 and SSLv3:
options ssl.v2.enable off
options ssl.v3.enable off
The best practice is to disable SSLv2 and SSLv3 to avoid security vulnerabilities.
4. Enable SSH on the 7-Mode system:
a. Set up SSH on the 7-Mode system:
secureadmin setup -f ssh
The -f option forces the setup to run even if the SSH server is already configured.
b. Enable SSH:
secureadmin enable ssh2
c. Enable password authentication on the SSH server:
options ssh.passwd_auth.enable
d. Enable SSH access to the host:
options ssh.access
228
5. Prepare your Windows host systems:
◦ Enable WMI access.
For more information about enabling WMI access, see the host documentation.
◦ If you have Windows Server 2003, verify that you have installed the Microsoft Fibre Channel
Information Tool (fcinfo) package and run the tool once on your Windows host system.
This tool enables you to collect the HBA configuration information of the host.
◦ If the system on which the 7-Mode Transition Tool is run does not belong to a domain, verify the
following:
▪ The host system belongs to a domain.
▪ If the host has a local user, and the user name for that user is in the following format:
SystemName\Username
6. Enable SSH on the Linux or ESXi host.
For more information about enabling SSH, see the host documentation.
7. Verify that you have installed the latest NetApp Host Utilities software for each host.
For information about downloading and installing the NetApp Host Utilities software, see the NetApp
Support Site.
8. Verify that all the hosts and storage systems can be reached by the Windows system from which the 7-
Mode Transition Tool is run.
Related information
Documentation on the NetApp Support Site: mysupport.netapp.com
Assessing controllers and hosts
You can collect and assess information about the controllers and hosts by using either the
7-Mode Transition Tool or the Inventory Collect Tool, depending on the security
regulations in your environment.
• The 7-Mode Transition Tool collects inventory information about controller and hosts by adding the systems
or by using the inventory report generated by the Inventory Collect Tool.
The 7-Mode Transition Tool then assesses inventory information and creates the transition assessment
report.
• You must be aware of the following considerations when performing transition assessment:
◦ You should not perform both assessment and migration operations simultaneously on a controller.
◦ You should avoid performing assessment operations on active storage controllers during peak hours.
229
Generating an assessment report by adding systems to the 7-Mode Transition Tool
You can collect inventory information for controllers, hosts, and FC switches by adding
the systems to the 7-Mode Transition Tool. You can then create an assessment report to
assess the features and functionalities of those systems, and to identify how they work in
the ONTAP version selected for transition.
• The user name for the storage system and hosts must have sufficient privileges to execute the commands
listed in the readme file.
The readme file is located at _7-Mode_Transition_Tool_installed_location\bin\ict.
• You must have prepared the 7-Mode systems, hosts, and FC switches for transition assessment.
• For assessing Windows systems, you must have a domain user account.
• If you are adding multiple systems for assessment, you must create a text file that is encoded in the ASCII
or UTF-8 format and must contain the system details in the form of one system per line.
Each system details must be in the following format:
(ontap|windows|vmware|linux|cisco|brocade)://[(user|domain_user)[:password]@](
host_name|ip)
• The controller or host must be accessible by the system on which the 7-Mode Transition Tool is installed
and run.
• All features must be configured or their license enabled so that the workbook can contain inventory
information about these features.
• The user name for the storage system must have sufficient administrative privileges to collect inventory
information.
• All host names and storage system configurations, such as CIFS share names, user names, and group
names, must be in the UTF-8 format.
If the 7-Mode Transition Tool service or the system on which this tool is installed is restarted, then the system
details added to the tool are lost and the system must be added to the tool again.
Steps
1. If you want to use the latest Interoperability Matrix (IMT) data for transition assessment:
a. Download the IMT data from the Interoperability Matrix, and then save it:
i. From the Reports menu, click Complete Daily Exports.
ii. In the Complete Daily Exports dialog box, enter FAS in the search field.
iii. Download the ONTAP SAN Host excel file, and then save it.
NetApp Interoperability Matrix Tool
b. From the CLI, import the IMT data by using the transition imt import command.
c. Verify that the import is successful by using the transition imt show command.
Troubleshooting: If the IMT data import operation fails, you can revert to the previous data by using
the transition imt restore command.
2. Log in to the 7-Mode Transition Tool, and then click Collect & Assess in the home page.
230
3. Click Add Systems.
4. In the Add System window, perform one of the following actions:
◦ Add a single system:
i. Enter the fully qualified domain name (FQDN) or IP address of the system.
ii. Enter the user name and password for the specified system.
iii. Select the system type:
▪ Data ONTAP storage systems
▪ Hosts: Microsoft Windows, Red Hat Linux Enterprise, and VMware ESXi
▪ FC switches: Cisco and Brocade
◦ Add multiple systems by clicking Browse, and then selecting the text file that contains the credentials
for multiple systems.
5. Click Add.
If the assessment status of a system is Ready, then you can perform transition assessment for that system.
6. Generate the transition assessment report:
a. Select the systems for transition assessment.
b. Click Create Transition Assessment Report.
c. In the Create Transition Assessment Report dialog box, select the Data ONTAP version of the target
cluster.
d. Specify a prefix for the file name of the reports.
e. Click Generate Report.
The assessment workbook (report name appended with “AssessmentWorkbook”) and assessment
executive summary (report name appended with “AssessmentExecutiveSummary”) reports are generated
in XML format.
+
You can access the assessment workbook, assessment summary, and inventory XML files that are used to
generate the assessment report from the …etc/webapp/transition-gui/tmc folder.
7. View the assessment workbook in Microsoft Excel and assessment executive summary in Microsoft Word
by using Microsoft Office 2007 or later versions.
In the assessment workbook, see the Transition Feasibility (CFT), Config Precheck Summary, Config
Precheck Details, and CFT Precheck Summary tabs for copy-free transition assessment details.
In the assessment executive summary, see the Copy-Free Transition Feasibility section for controller-level
assessment details.
You might have to enable macros in Excel to view the assessment workbook.
In the data collection summary of the assessment workbook, if the access status of a system is FAILED,
then the inventory information for that system is invalid. In the assessment executive summary, the value of
some of the fields of this system is displayed as Not Assessed.
231
Generating an assessment report by importing the inventory report XML
You can import the inventory XML report generated by the Inventory Collect Tool to
assess the features and functionalities of hosts and controllers. You can then identify how
these host and controllers work in the ONTAP version selected for transition by creating
an assessment report.
• You must have run the Inventory Collect Tool and generated the inventory report XML file.
To assess hosts and controllers for copy-free transition, you must use Inventory Collect Tool
3.3 to collect inventory.
• You must have prepared the 7-Mode systems and hosts for transition assessment.
The systems that you want to assess need not be reachable while importing the inventory report and
performing transition assessment.
Steps
1. Log in to the 7-Mode Transition Tool, and then click Collect and Assess in the home page.
2. Click Import Inventory Report XML.
3. Click Browse, and then select the XML report generated by the Inventory Collect Tool.
4. Click Import.
The assessment status of the system shows Imported;Ready.
5. Select the system for which you want to perform transition assessment.
6. Click Create Transition Assessment Report.
7. In the Create Transition Assessment Report dialog box, select the Data ONTAP version of the target
cluster.
8. Specify a prefix for the file name of the reports.
9. Click Generate Report.
The AssessmentWorkbook and AssessmentExecutiveSummary reports are generated in XML format.
10. View the AssessmentWorkbook report in Microsoft Excel and the AssessmentExecutiveSummary report in
Microsoft Word by using Microsoft Office 2007 or later versions.
To view the AssessmentWorkbook report in Microsoft Excel, you might have to enable macros in Excel.
Generating an FC zone plan
For FC switches, you must generate an FC zone plan as part of the transition
assessment report to configure the zones for grouping the initiator hosts and targets after
the migration.
• The 7-Mode system, hosts, and the cluster must be connected to the same switch.
Supported configurations for generating an FC zone plan
232
• You must have created the required target SVMs and FC LIFs on the cluster.
• The FC LIFs that are created on the target SVMs will have WWPN, which are different from 7-Mode
WWPNs. Therefore, perform FC zoning while you transition SAN for FCP.
Steps
1. In the Collect and Assess section, click Add Systems.
2. In the Add System window, perform one of the following actions:
◦ Add a single system:
i. Enter the FQDN or IP address of the system.
ii. Enter the user name and password for the specified system.
iii. Select the system type:
▪ Data ONTAP storage systems
▪ Hosts: Microsoft Windows, Red Hat Linux Enterprise, and VMware ESXi
▪ FC switches: Cisco and Brocade
◦ Add multiple systems by clicking Browse, and then selecting the text file that contains the credentials
for multiple systems.
3. Click Add.
If the assessment status of a system is Ready, then you can perform transition assessment for that system.
4. Generate the transition assessment report with the FC zone plan:
a. Select the systems, including the required FC switches, for transition assessment.
b. Click Create Transition Assessment Report.
c. In the pair systems and start FC zone planner dialog box, select the 7-Mode systems (single controller
or HA pair), the switch connected to the cluster, and an SVM in the cluster.
If you plan to consolidate the FC LUNs to a single SVM by rehosting transitioned volumes, select the 7-
Mode HA pair and the target SVM.
It is a best practice to consolidate the FC LUNs to a single SVM for preserving the 7-
Mode single-system image (SSI) configuration.
If you do not plan to consolidate the FC LUNs, you must generate the FC zone plan for each 7-Mode
controller and the corresponding target SVM.
d. Click FC Zoning for paired systems.
e. In the Create Transition Assessment Report dialog box, select the Data ONTAP version of the target
cluster.
f. Specify a prefix for the file name of the reports.
g. Click Generate Report.
The FC zone plan is generated as a .zip file. The plan contains zones created per the igroup configurations
on the 7-Mode systems. Each zone contains a single initiator WWPN and multiple SVM target WWPNs.
You must use the FC zone plan for configuring the zones to group the initiator hosts and targets for providing
data access from the cluster.
233
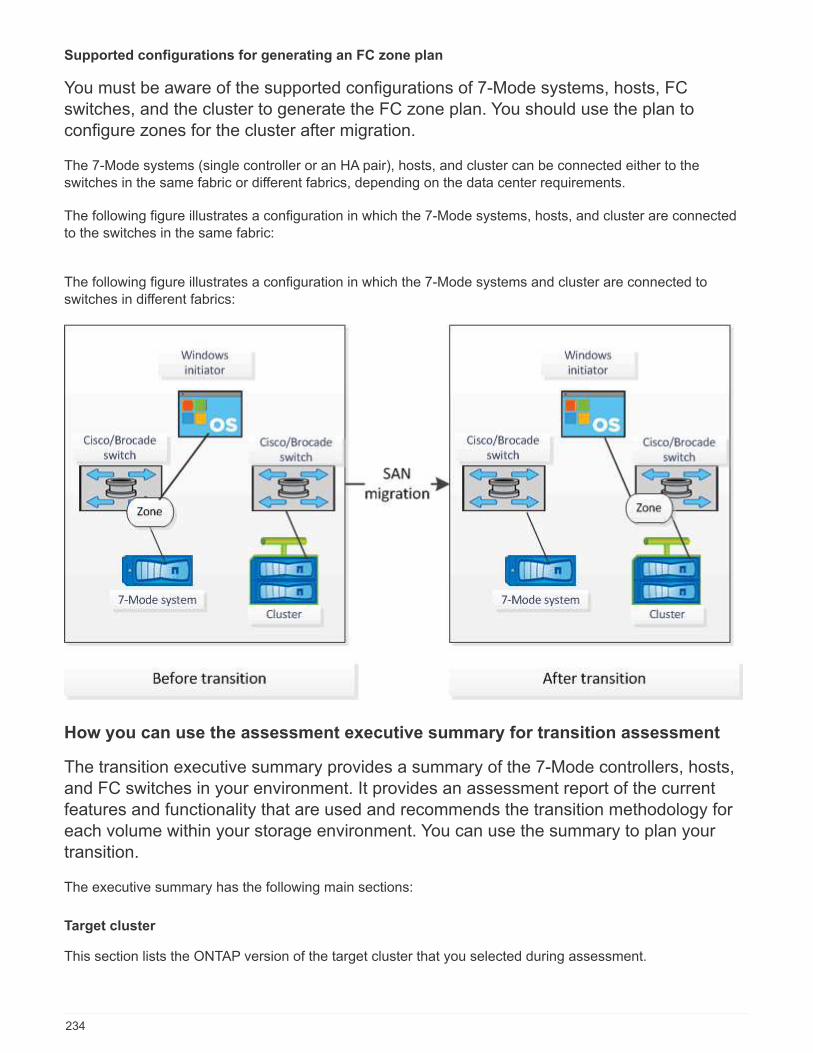
Supported configurations for generating an FC zone plan
You must be aware of the supported configurations of 7-Mode systems, hosts, FC
switches, and the cluster to generate the FC zone plan. You should use the plan to
configure zones for the cluster after migration.
The 7-Mode systems (single controller or an HA pair), hosts, and cluster can be connected either to the
switches in the same fabric or different fabrics, depending on the data center requirements.
The following figure illustrates a configuration in which the 7-Mode systems, hosts, and cluster are connected
to the switches in the same fabric:
The following figure illustrates a configuration in which the 7-Mode systems and cluster are connected to
switches in different fabrics:
How you can use the assessment executive summary for transition assessment
The transition executive summary provides a summary of the 7-Mode controllers, hosts,
and FC switches in your environment. It provides an assessment report of the current
features and functionality that are used and recommends the transition methodology for
each volume within your storage environment. You can use the summary to plan your
transition.
The executive summary has the following main sections:
Target cluster
This section lists the ONTAP version of the target cluster that you selected during assessment.
234
Data collection summary
You can view the list of 7-Mode controllers, hosts, and switches for which you have collected information. You
can view the ONTAP version and model details of the 7-Mode controller. You can also view the OS type,
version, and model of the hosts.
Transition feasibility and recommended transition methodology
This section provides a summary of the prechecks that are run on each controller and the feasibility of
transition at the controller and volume level. The volumes that belong to vFiler units that are in the stopped or
inconsistent state or the volumes that are offline or restricted are not included for assessment. The report
displays the count of errors and warnings reported in the precheck against each controller. You should review
these errors and warnings and resolve any issues before transitioning. Details of these prechecks are available
in the Config Precheck Summary tab of the assessment workbook.
Copy-free transition feasibility: This section lists the number of controller-level prechecks that resulted in
errors and warnings for copy-free transition. If a precheck fails for any one controller in the HA pair, you cannot
transition the HA pair by using copy-free transition. You must resolve all errors and warnings before
transitioning the HA pair. Details of these prechecks are available in the CFT Precheck Summary tab of the
assessment workbook.
Based on the volume and controller configurations and the precheck summary, the executive summary
provides a recommendation about the best transition methodology for each assessed volume. For example,
you cannot transition 7-Mode traditional volumes or FlexCache volumes because these features are not
supported in ONTAP.
For most of the configurations, the 7-Mode Transition Tool is the recommended tool for transition. However,
there are some workloads that cannot be transitioned by using the 7-Mode Transition Tool, and for those you
should use an application-based or host-based migration method.
NetApp Technical Report 4052: Successfully Transitioning to Clustered Data ONTAP (Data ONTAP 8.2.x and
8.3)
Storage inventory
This section provides the following information:
• Storage objects: Provides information about the number of storage objects, such as volumes, qtrees,
LUNs, vFiler units, SnapMirror relationships, shares, and exports, in each controller.
• Storage utilization: Provides information about the used space, available space, and space utilized by the
7-Mode controllers.
• Licenses: Provides the list of feature licenses enabled on each controller.
• Protocol configuration: Provides details about the protocols configured on the controllers, such as CIFS,
NFS, and SAN protocols, and the versions.
• SnapMirror interconnectivity: Provides information about the controllers or volumes that are either the
source or destination of a SnapMirror relationship.
You can use this information to identify controllers that are in SnapMirror relationships with the controllers
listed in the report, but are not included for assessment.
• SnapVault interconnectivity: Provides information about the controllers, volumes, or qtrees that are either
the source or destination of a SnapVault relationship with the specified controller, volumes, or qtrees in the
controller.
235
Data collection errors
This section provides details about controller and host information that could not be collected by the 7-Mode
Transition Tool and the reason for the failure. Details of the data collection errors are available in the Data
Collection Errors tab of the assessment workbook. You can resolve these errors and assess the systems
again.
Copy-free transition workflow
The copy-free transition workflow includes preparing for the transition, performing the
transition, and completing the transition. Some of these tasks must be done manually on
the 7-Mode systems and the cluster.
236
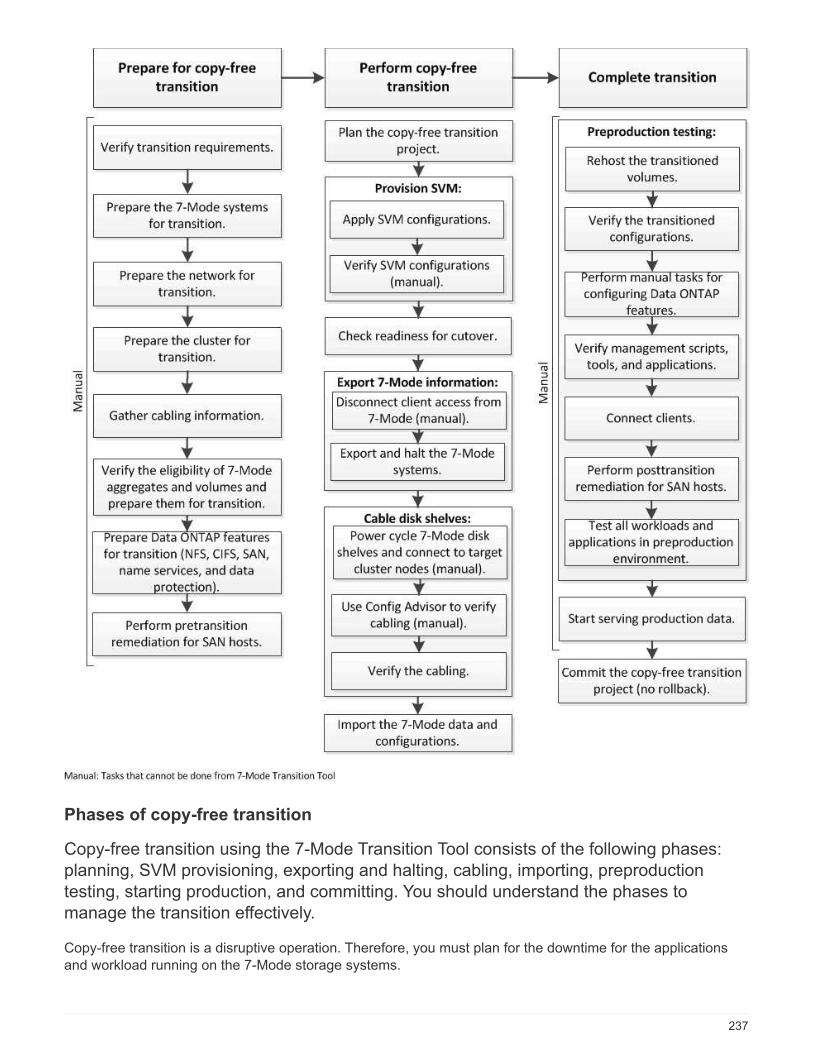
Phases of copy-free transition
Copy-free transition using the 7-Mode Transition Tool consists of the following phases:
planning, SVM provisioning, exporting and halting, cabling, importing, preproduction
testing, starting production, and committing. You should understand the phases to
manage the transition effectively.
Copy-free transition is a disruptive operation. Therefore, you must plan for the downtime for the applications
and workload running on the 7-Mode storage systems.
237
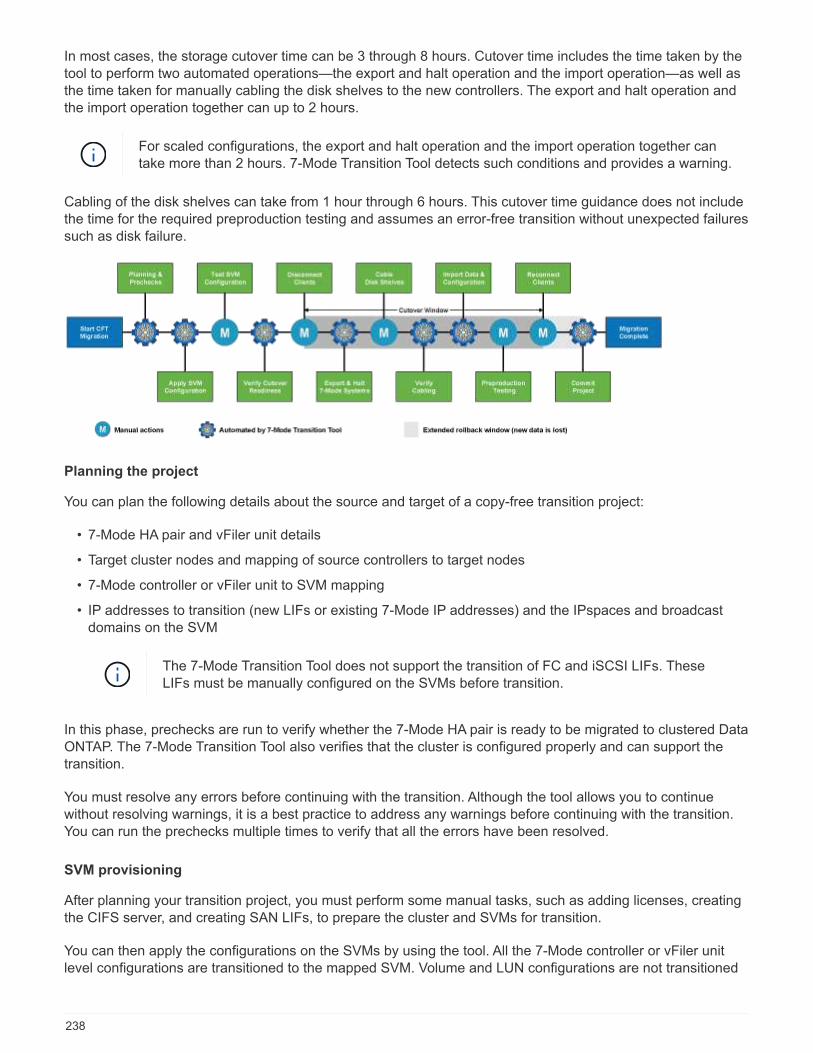
In most cases, the storage cutover time can be 3 through 8 hours. Cutover time includes the time taken by the
tool to perform two automated operations—the export and halt operation and the import operation—as well as
the time taken for manually cabling the disk shelves to the new controllers. The export and halt operation and
the import operation together can up to 2 hours.
For scaled configurations, the export and halt operation and the import operation together can
take more than 2 hours. 7-Mode Transition Tool detects such conditions and provides a warning.
Cabling of the disk shelves can take from 1 hour through 6 hours. This cutover time guidance does not include
the time for the required preproduction testing and assumes an error-free transition without unexpected failures
such as disk failure.
Planning the project
You can plan the following details about the source and target of a copy-free transition project:
• 7-Mode HA pair and vFiler unit details
• Target cluster nodes and mapping of source controllers to target nodes
• 7-Mode controller or vFiler unit to SVM mapping
• IP addresses to transition (new LIFs or existing 7-Mode IP addresses) and the IPspaces and broadcast
domains on the SVM
The 7-Mode Transition Tool does not support the transition of FC and iSCSI LIFs. These
LIFs must be manually configured on the SVMs before transition.
In this phase, prechecks are run to verify whether the 7-Mode HA pair is ready to be migrated to clustered Data
ONTAP. The 7-Mode Transition Tool also verifies that the cluster is configured properly and can support the
transition.
You must resolve any errors before continuing with the transition. Although the tool allows you to continue
without resolving warnings, it is a best practice to address any warnings before continuing with the transition.
You can run the prechecks multiple times to verify that all the errors have been resolved.
SVM provisioning
After planning your transition project, you must perform some manual tasks, such as adding licenses, creating
the CIFS server, and creating SAN LIFs, to prepare the cluster and SVMs for transition.
You can then apply the configurations on the SVMs by using the tool. All the 7-Mode controller or vFiler unit
level configurations are transitioned to the mapped SVM. Volume and LUN configurations are not transitioned
238
during this phase; they are transitioned in the import phase.
At the end of this phase, you should manually verify the configurations applied to SVMs and make the
necessary changes.
Exporting storage configurations and halting 7-Mode systems
This phase starts the cutover window for copy-free transition. Client access must be manually disconnected.
However, all the NAS and SAN services must be up and running on the 7-Mode HA pair. This is because the 7-
Mode Transition Tool requires all services to be up and running for collecting the volume-level configurations
from the 7-Mode systems.
The tool performs the following operations in the export phase:
• Collects all volume and storage configurations
• Creates a Snapshot copy of each transitioning aggregate
This Snapshot copy is used for rolling back to 7-Mode, if required.
• Boots the 7-Mode controllers in maintenance mode
• Removes disk ownership from the disks attached to the 7-Mode controllers
• Disables disk autoassignment on the target cluster nodes
Cabling the 7-Mode disk shelves
You must perform the tasks in this phase manually. You must ensure that the disk shelf IDs are unique across
the 7-Mode controllers and target cluster nodes.
If there are duplicate shelf IDs, you must change the disk shelf IDs and power cycle the disk
shelves.
You must disconnect all the 7-Mode disk shelves and hot-add them to the target cluster nodes. After the disk
shelves are connected to the target cluster nodes, you must power cycle the disk shelves.
It is a best practice to manually verify the cabling by using Config Advisor. Config Advisor is a configuration
validation and health check tool for NetApp systems. It can be deployed at both secure sites and non-secure
sites for data collection and system analysis.
You can then verify the cabling by using the 7-Mode Transition Tool to proceed with the transition. The 7-Mode
Transition Tool performs only a subset of the cabling checks that are performed by Config Advisor.
Importing 7-Mode data and configurations
All the storage objects (aggregates, volumes, and LUNs) and the associated configurations are transitioned
during this phase.
The tool performs the following operations in the import phase:
• 7-Mode disks are assigned to the mapped target cluster nodes.
• All 7-Mode aggregates, volumes, and LUNs are converted to the clustered Data ONTAP format.
• LIFs are configured on the SVMs in the administrative up state.
• All volume-level and LUN-level configurations are applied.
239
Preproduction testing
You must manually test all the transitioned aggregates, volumes, and configurations that are applied to the
target SVMs during this phase. You must also perform all manual tasks for completing your configuration—for
example, configuring hosts and performing host remediation for SAN hosts.
You cannot perform certain operations on the transitioned aggregates or volumes during this phase. There are
also certain operations that are not recommended during the testing phase. This is to ensure a successful
rollback operation in case you decide to roll back to 7-Mode.
You must also manually test all applications and workloads thoroughly before starting data access in a
production environment.
The aggregates might run out of space because of the aggregate Snapshot copies and the write
operations that are performed during the testing. If the free physical space is less than 5% of the
total space, the aggregates are taken offline. You must regularly monitor the free physical space
available in the transitioned aggregates to avoid space issues.
Starting production
After testing all workloads and applications, you can start client access to the transitioned data in the
production environment. This stage of transition—where production is started but the project is not yet
committed—is the final stage of transition when you can decide to roll back to 7-Mode. You must not prolong
this phase because of the following reasons:
• The probability of running out of space in the transitioned aggregates increases as new data is written to
the volumes.
• Any new data written to the volumes during this stage will not be available after rollback.
Committing the project
In this final stage of transition, the aggregate-level Snapshot copies that were created during the export phase
are deleted.
You cannot roll back to 7-Mode after you commit the 7-Mode aggregates and complete the transition.
Related information
NetApp Downloads: Config Advisor
Preparing for copy-free transition
Before starting the copy-free transition, you must identify the 7-Mode HA pair to transition,
understand the requirements and restrictions for migration, and prepare the 7-Mode
systems and cluster for transition. You must also be aware of the Data ONTAP features
that are supported and unsupported for transition.
240
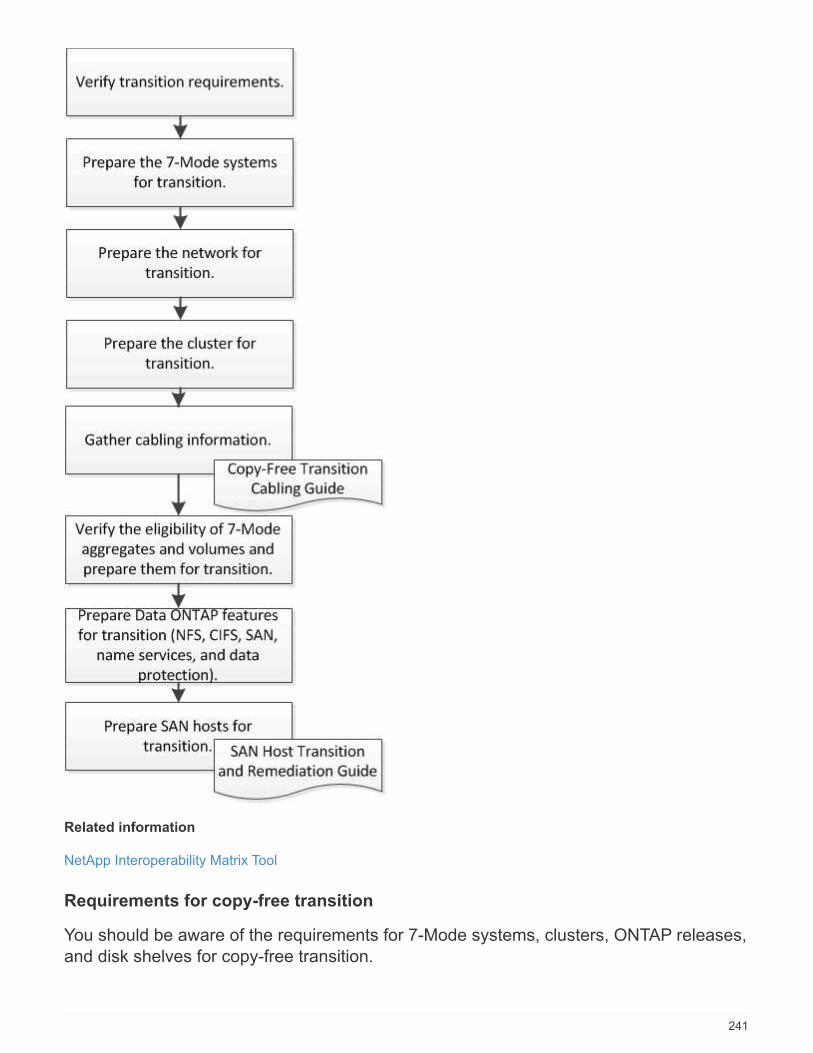
Related information
NetApp Interoperability Matrix Tool
Requirements for copy-free transition
You should be aware of the requirements for 7-Mode systems, clusters, ONTAP releases,
and disk shelves for copy-free transition.
241
Be sure to consult the current 7-Mode Transition Tool Release Notes for the latest information about supported
target releases and known issues.
7-Mode Transition Tool Release Notes
• Platform models
Copy-free transition is supported only on mid-end and high-end FAS systems and IBM N series systems.
The NetApp Interoperability Matrix Tool has the latest information about the supported platforms for 7-Mode
systems and the target cluster nodes.
• Data ONTAP in 7-Mode source systems
For a list of the 7-Mode releases supported for migration by the 7-Mode Transition Tool, see the NetApp
Interoperability Matrix Tool
• ONTAP target systems
7-Mode Transition Tool version 3.3.1 supports transition to the following ONTAP releases by using the
copy-free method:
◦ ONTAP 9.4 and earlier ONTAP 9 releases
◦ Clustered Data ONTAP 8.3.2 and later 8.x releases
Note: You cannot use the 7-Mode Transition Tool to transition to ONTAP 9.5 or later using the copy-
free method. To do so, you must first transition to ONTAP 9.4 using 7-Mode Transition Tool 3.3.1 and
then upgrade your cluster to ONTAP 9.5 or later. 7-Mode Transition Tool 3.3.2 does not support copy-
free transitions.
• HA configuration
The 7-Mode controllers and target cluster nodes must be in an HA configuration. The HA pairs must be
healthy, and none of the nodes can be in takeover mode. Stand-alone controllers are not supported for
copy-free transition.
• Disk shelf models
The following disk shelf models are supported:
◦ DS4486
◦ DS4246
◦ DS4243
The disk shelf model DS4243 is not supported with ONTAP 9.2 and ONTAP 9.4. This
model is supported with all ONTAP 9.2 patch releases starting with ONTAP 9.2P1 and
with ONTAP 9.3. 7-Mode Transition Tool 3.3.1 supports transition with the disk shelf
model DS4243 for copy-free transition to ONTAP 9.2P1 through ONTAP 9.3.
◦ DS2246
◦ DS14mk4 FC (not supported in ONTAP 9.0 and later)
◦ DS14mk2 AT (not supported in ONTAP 9.0 and later)
The disk shelf model DS14mk2 FC is not supported.
242
• Disk firmware
You must download and install the latest disk qualification package, disk firmware, and disk shelf and ACP
firmware on the 7-Mode systems and target cluster nodes.
NetApp Downloads: Disk Qualification Package
NetApp Downloads: Disk Drive Firmware
NetApp Downloads: Disk Shelf Firmware
• Tool to verify cabling
After connecting the 7-Mode disk shelves to the target cluster nodes during the transition, you must use
Config Advisor to verify the cabling.
NetApp Downloads: Config Advisor
Tools and documentation required for copy-free transition
The Config Advisor is the required tool for copy-free transition. You should use Config
Advisor to verify the cabling of the disk shelves. Additional documentation is also
available for SAN host remediation.
Config Advisor
You should use the “Transition” execution profile in Config Advisor to verify the cabling after the 7-Mode disk
shelves are connected to the target cluster nodes.
NetApp Downloads: Config Advisor
Documentation
Describes the pre-transition and post-transition steps that have to be performed on SAN hosts when
transitioning using copy-free transition.
SAN host transition and remediation
Port requirements for communicating with the 7-Mode Transition Tool
The 7-Mode Transition Tool communicates with the 7-Mode system and the cluster over
certain ports. You must ensure that these ports on the 7-Mode system and the cluster are
open to allow communication with the 7-Mode Transition Tool.
Ports that must be open on the 7-Mode systems
The 7-Mode Transition Tool communicates with the 7-Mode systems by using HTTPS on port 443.
Ports that must be open on the cluster
The 7-Mode Transition Tool communicates with the cluster by using HTTPS on port 443.
243
Ports that must be open on the 7-Mode Transition Tool
Port 8444 of the 7-Mode Transition Tool must be open for the web interface.
To transition netgroups and CIFS local users and groups, the following requirements must be met:
• Port 8088 of the 7-Mode Transition Tool must be available.
For an alternative to port 8088, you must change the port specified by the tool.http.port parameter in
the transition-tool.conf file of the 7-Mode Transition Tool installation directory.
You must restart the 7-Mode Transition Tool service after changing the port in the
configuration file.
• Each node in the cluster must have at least one data LIF configured for the target SVM.
• All SVM data LIFs must be able to communicate with the 7-Mode Transition Tool port 8088 or the port
specified by the tool.http.port parameter in the transition-tool.conf file.
You must verify that firewalls do not block this traffic.
Related information
7-Mode Transition Tool installation and administration
Preparing the 7-Mode HA pair for transition
Before starting a transition, you must complete certain tasks on the 7-Mode system, such
as enabling the 7-Mode system to communicate with the target cluster, and enabling
HTTPS and TLS.
The HA pair must be healthy and none of the nodes must be in the takeover mode, which can be verified by
using the cf status command. You can also use the NetApp AutoSupport tool to detect any errors or at risk
conditions.
1. If HTTPS is not enabled on the storage system, enable HTTPS:
options httpd.admin.ssl.enable on
HTTPS is enabled by default.
2. Enable TLS on the 7-Mode storage systems for enabling the 7-Mode Transition Tool to communicate with
the 7-Mode systems:
a. If SSL is not already enabled on the storage system, set up and start SSL:
secureadmin setup ssl
SSL is set up for the storage systems by default. If SSL has been previously set up for the storage
system, you are asked whether you want to continue. You can exit the SSL setup if you do not want to
make any changes.
b. Enable SSL:
244
options ssl.enable on
This option must be enabled for allowing communication over TLS.
c. Enable TLS:
options tls.enable on
d. Disable SSLv2 and SSLv3 on the 7-Mode system:
options ssl.v2.enable off
options ssl.v3.enable off
The 7-Mode Transition Tool uses TLS or SSL protocols for communicating with the 7-Mode storage
systems. The tool communicates with the storage system using the TLS protocol if TLS is enabled on the
storage system. If TLS is disabled and SSLv3 is enabled on a storage system, the tool uses SSLv3 to
communicate with the storage system.
+
IMPORTANT: The best practice is to enable TLS and disable SSLv2 and SSLv3 in order to avoid security
vulnerabilities.
Setting up the SP or RLM on the 7-Mode systems for copy-free transition
If the Service Processor (SP) or the Remote LAN Module (RLM) is not already configured
on the 7-Mode storage systems or if you have configured the SP or RLM with an IPv6
address, you must configure the SP or RLM with an IPv4 address.
• SSHv2 must be supported on the host on which the 7-Mode Transition Tool is installed.
• You must have access to the SP or RLM “naroot” account or a Data ONTAP user account with the
credentials of the “admin” role or a role with “login-sp” capability.
7-Mode Transition Tool accesses the 7-Mode systems when the systems are halted during transition by using a
remote management device that can be the SP or RLM, whichever is available on your system based on the
platform model. You must configure the SP or RLM with an IPv4 address. IPv6 configuration is not supported
for transition.
Steps
• Configure the SP and provide SP access to the host on which 7-Mode Transition Tool is installed.
a. Configure and enable the SP network with an IPv4 address:
sp setup
245
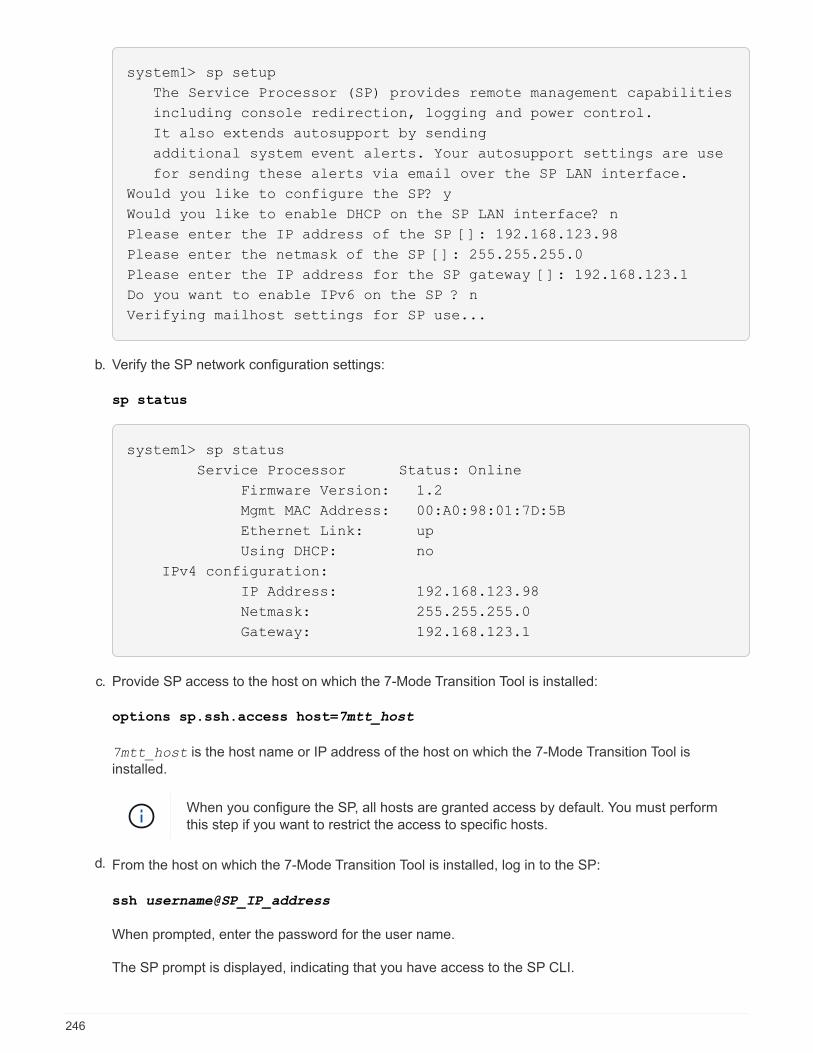
system1> sp setup
The Service Processor (SP) provides remote management capabilities
including console redirection, logging and power control.
It also extends autosupport by sending
additional system event alerts. Your autosupport settings are use
for sending these alerts via email over the SP LAN interface.
Would you like to configure the SP? y
Would you like to enable DHCP on the SP LAN interface? n
Please enter the IP address of the SP []: 192.168.123.98
Please enter the netmask of the SP []: 255.255.255.0
Please enter the IP address for the SP gateway []: 192.168.123.1
Do you want to enable IPv6 on the SP ? n
Verifying mailhost settings for SP use...
b. Verify the SP network configuration settings:
sp status
system1> sp status
Service Processor Status: Online
Firmware Version: 1.2
Mgmt MAC Address: 00:A0:98:01:7D:5B
Ethernet Link: up
Using DHCP: no
IPv4 configuration:
IP Address: 192.168.123.98
Netmask: 255.255.255.0
Gateway: 192.168.123.1
c. Provide SP access to the host on which the 7-Mode Transition Tool is installed:
options sp.ssh.access host=7mtt_host
7mtt_host is the host name or IP address of the host on which the 7-Mode Transition Tool is
installed.
When you configure the SP, all hosts are granted access by default. You must perform
this step if you want to restrict the access to specific hosts.
d. From the host on which the 7-Mode Transition Tool is installed, log in to the SP:
ssh username@SP_IP_address
When prompted, enter the password for the user name.
The SP prompt is displayed, indicating that you have access to the SP CLI.
246
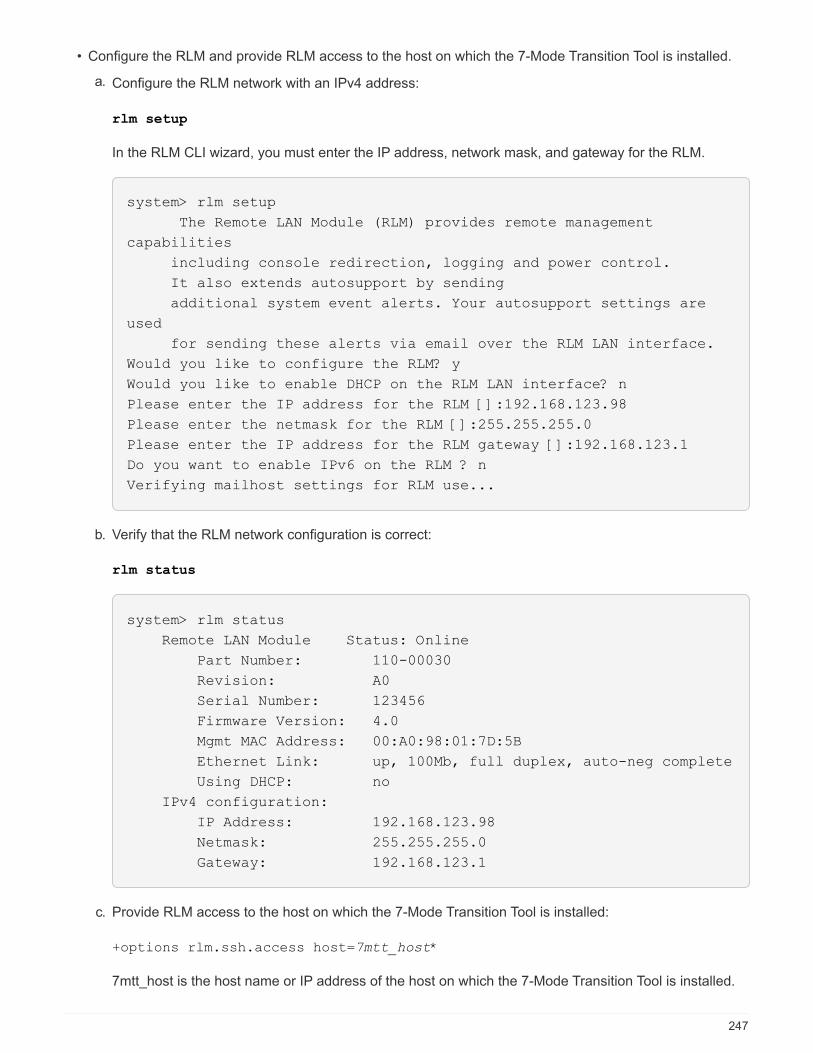
• Configure the RLM and provide RLM access to the host on which the 7-Mode Transition Tool is installed.
a. Configure the RLM network with an IPv4 address:
rlm setup
In the RLM CLI wizard, you must enter the IP address, network mask, and gateway for the RLM.
system> rlm setup
The Remote LAN Module (RLM) provides remote management
capabilities
including console redirection, logging and power control.
It also extends autosupport by sending
additional system event alerts. Your autosupport settings are
used
for sending these alerts via email over the RLM LAN interface.
Would you like to configure the RLM? y
Would you like to enable DHCP on the RLM LAN interface? n
Please enter the IP address for the RLM []:192.168.123.98
Please enter the netmask for the RLM []:255.255.255.0
Please enter the IP address for the RLM gateway []:192.168.123.1
Do you want to enable IPv6 on the RLM ? n
Verifying mailhost settings for RLM use...
b. Verify that the RLM network configuration is correct:
rlm status
system> rlm status
Remote LAN Module Status: Online
Part Number: 110-00030
Revision: A0
Serial Number: 123456
Firmware Version: 4.0
Mgmt MAC Address: 00:A0:98:01:7D:5B
Ethernet Link: up, 100Mb, full duplex, auto-neg complete
Using DHCP: no
IPv4 configuration:
IP Address: 192.168.123.98
Netmask: 255.255.255.0
Gateway: 192.168.123.1
c. Provide RLM access to the host on which the 7-Mode Transition Tool is installed:
+options rlm.ssh.access host=7mtt_host*
7mtt_host is the host name or IP address of the host on which the 7-Mode Transition Tool is installed.
247

When you configure the RLM, all hosts are granted access by default. You must perform
this step if you want to restrict the access to specific hosts.
d. From the host on which the 7-Mode Transition Tool is installed, log in to the RLM:
ssh username@RLM_IP_address
When you are prompted, you must enter the password for the user name.
The RLM prompt is displayed, indicating that you have access to the RLM CLI.
Preparing the network for transition
You must prepare the data network of the cluster for transition by creating logical ports
(VLANs and interface groups).
The NTP server must be configured and the time must be synchronized across the 7-Mode systems and
cluster.
Steps
1. Create VLANs or interface groups on the target cluster nodes, if required:
network port vlan create
or
network port ifgrp create
To provide network connectivity after transition, you should transition the 7-Mode IP addresses to a similar
network topology in ONTAP. For example, if the 7-Mode IP addresses are configured on physical ports, the
IP addresses should be transitioned to appropriate physical ports in ONTAP. Similarly, IP addresses
configured on VLAN ports or interface groups should be transitioned to appropriate VLAN ports or interface
groups in ONTAP.
2. If you want SVMs in the non-default IPspace, create the required IPspaces:
network ipspace create
The 7-Mode IP addresses or the new LIFs that are selected for transition are created in the IPspace of the
mapped SVM.
IPv6 addresses cannot be transitioned and must be configured manually post-transition.
Related information
Network and LIF management
Considerations for transitioning 7-Mode IP addresses
You must be aware of certain considerations when transitioning 7-Mode IP addresses to
storage virtual machines (SVMs) in ONTAP.
248
• You can transition existing 7-Mode IP addresses or specify new IP addresses to be configured on the SVM
by using the 7-Mode Transition Tool.
◦ Existing 7-Mode IP addresses are created on the SVM in the administrative down state in the apply
configuration (precutover) phase.
◦ New IP addresses are created on the SVM in the administrative up state in the apply configuration
(precutover) phase.
• IPv6 addresses cannot be transitioned and must be manually configured after the transition.
• iSCSI and FC LIFs are not transitioned and must be manually configured after the transition.
Preparing the cluster for transition
Before transition, you must prepare the cluster to communicate with the 7-Mode
Transition Tool and prepare the SVMs for transition. You can transition to a target HA pair
that has data aggregates.
• The cluster must already be set up and the target cluster nodes must be joined to the cluster.
Software setup
• The SVMs must be created and assigned to an IPspace.
• You can transition the 7-Mode disk shelves to a target HA pair that has preexisting data aggregates and
volumes.
For a two-node cluster, you must have a data aggregate to host the root volumes of the target SVMs. For a
cluster with four or more nodes, the root volumes of the SVMs can be hosted either on the target nodes of
the transition or on other nodes in the cluster.
You should not upgrade the cluster to a different ONTAP version during transition.
You can upgrade the cluster to a patch release of the same ONTAP version, if required.
1. From an administration host, verify that the cluster is reachable by using the cluster-management LIF:
ssh username@cluster_mgmt_IP
2. Enable SSLv3 or FIPS on the cluster:
If you want to enable… Enter…
SSLv3 system services web modify -sslv3
-enabled true
FIPS 140-2 compliance system services web modify -ssl-fips
-enabled true
When FIPS 140-2 compliance is enabled, SSLv3 is disabled. ONTAP prevents you from enabling SSLv3
when FIPS 140-2 compliance is enabled. If you enable FIPS 140-2 and then subsequently disable it,
SSLv3 remains disabled.
249
The best practice is to enable FIPS because of the security vulnerabilities in SSLv3.
3. Verify that HTTPS is allowed on the cluster management LIF:
a. View the firewall policy for the cluster management LIF:
network interface show -vserver svm_name -lif cluster_mgmt_lif -fields
firewall-policy
cluster1::> network interface show -vserver cluster1 -lif
cluster_mgmt -fields firewall-policy
vserver lif firewall-policy
------- ------------ ---------------
cluster1 cluster_mgmt mgmt
b. Verify that the firewall policy associated with the cluster management LIF allows HTTPS access:
system services firewall policy show -policy mgmt
cluster1::> system services firewall policy show -policy mgmt
Policy Service Action IP-List
---------------- ---------- ------ --------------------
mgmt
dns allow 0.0.0.0/0, ::/0
http allow 0.0.0.0/0, ::/0
https allow 0.0.0.0/0, ::/0
ndmp allow 0.0.0.0/0, ::/0
ntp allow 0.0.0.0/0, ::/0
rsh deny 0.0.0.0/0, ::/0
snmp allow 0.0.0.0/0, ::/0
ssh allow 0.0.0.0/0, ::/0
telnet deny 0.0.0.0/0, ::/0
9 entries were displayed.
System administration
Gathering cabling information for transition
Before starting copy-free transition, you must gather information about the adapters,
ports, disk shelves, and storage connectivity of your 7-Mode controllers, and then plan
how to connect the 7-Mode disk shelves to the target cluster nodes.
You must have printed the copy-free transition cabling worksheet.
Copy-free transition cabling worksheet
250
1. Use Config Advisor to perform a health check on the 7-Mode storage and cabling and collect cabling data.
You should use the 7-Mode Install Checks option from the “Data ONTAP 7 and 8 (7-Mode)”
execution profile.
2. Gather the required information about each 7-Mode controller by using the following command:
sysconfig slot_number
You can use the output of this command to identify which ports are used for disk shelf connectivity.
host1> sysconfig 3
slot 3: SAS Host Adapter 3a
24 Disks: 13440.0GB
1 shelf with IOM3
slot 3: SAS Host Adapter 3b
24 Disks: 13440.0GB
1 shelf with IOM3
slot 3: SAS Host Adapter 3c
24 Disks: 13440.0GB
1 shelf with IOM3
slot 3: SAS Host Adapter 3d
24 Disks: 13440.0GB
1 shelf with IOM3
3. From the cluster, run the following nodeshell command on each node:
system node run -node node_name -command sysconfig -a
You can use the output of this command to obtain information about the available ports and expansion card
slots.
4. On the target cluster nodes, plan the ports to be used for connecting the 7-Mode disk shelves:
a. Review the available (open) ports.
b. Review the expansion card slots.
c. Plan the expansion card configuration.
You can plan to move the expansion cards from the 7-Mode systems if they are also supported on the
destination platform and ONTAP version. You can also plan for PAM cards, if required.
NetApp Hardware Universe
d. Plan the destination ports to use for the disk shelf cabling.
The selection of the destination ports depends on some of the following factors:
▪ Separate or existing disk shelf stack
▪ Port availability
251
▪ SAS or FC connections
▪ Availability of on-board ports or expansion cards
5. Go to the data center to physically record the port connections on the 7-Mode controllers and target cluster
nodes in the cabling worksheet:
a. Record the used ports on the 7-Mode controllers in the cabling worksheet.
b. Record the used ports on the target cluster nodes in the cabling worksheet.
c. Record the destination ports to be used for connecting the 7-Mode disk shelves, as planned in Step
#STEP_D0CFE719A0384F7FA5D9E73C8EA6C2E7.
d. Ensure that you have the right cables for connecting the disk shelves.
You should identify any issues with cabling based on the new disk shelf stack location.
e. Plan for longer cable lengths due to ladder racking or data center requirements.
f. Label each disk shelf stack and cable on the 7-Mode controllers.
The best practice is to label the 7-Mode disk shelf stacks in case you want to roll back the transition
and have to reconnect the disk shelves to the 7-Mode controllers.
Related information
SAS Disk Shelves Installation and Service Guide for DS4243, DS2246, DS4486, and DS4246
DiskShelf14mk2 AT Hardware Service Guide
DS14mk2 FC, and DS14mk4 FC Hardware Service Guide
Copy-free transition cabling worksheet
You can use the copy-free transition cabling worksheet to plan your cabling. You must
record information about the ports and disk shelves connected to the 7-Mode controllers
and target cluster nodes. You should also record the ports to use for connecting the 7-
Mode disk shelves to the target cluster nodes.
252
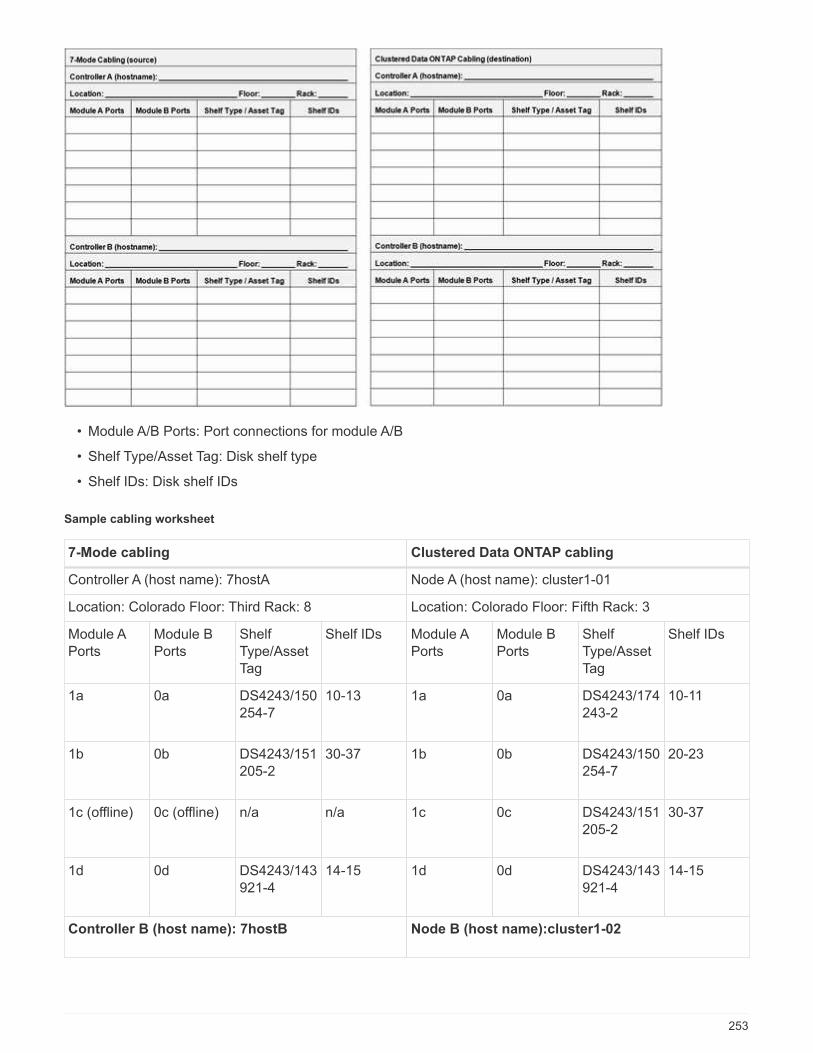
• Module A/B Ports: Port connections for module A/B
• Shelf Type/Asset Tag: Disk shelf type
• Shelf IDs: Disk shelf IDs
Sample cabling worksheet
7-Mode cabling Clustered Data ONTAP cabling
Controller A (host name): 7hostA Node A (host name): cluster1-01
Location: Colorado Floor: Third Rack: 8 Location: Colorado Floor: Fifth Rack: 3
Module A
Ports
Module B
Ports
Shelf
Type/Asset
Tag
Shelf IDs Module A
Ports
Module B
Ports
Shelf
Type/Asset
Tag
Shelf IDs
1a 0a DS4243/150
254-7
10-13 1a 0a DS4243/174
243-2
10-11
1b 0b DS4243/151
205-2
30-37 1b 0b DS4243/150
254-7
20-23
1c (offline) 0c (offline) n/a n/a 1c 0c DS4243/151
205-2
30-37
1d 0d DS4243/143
921-4
14-15 1d 0d DS4243/143
921-4
14-15
Controller B (host name): 7hostB Node B (host name):cluster1-02
253
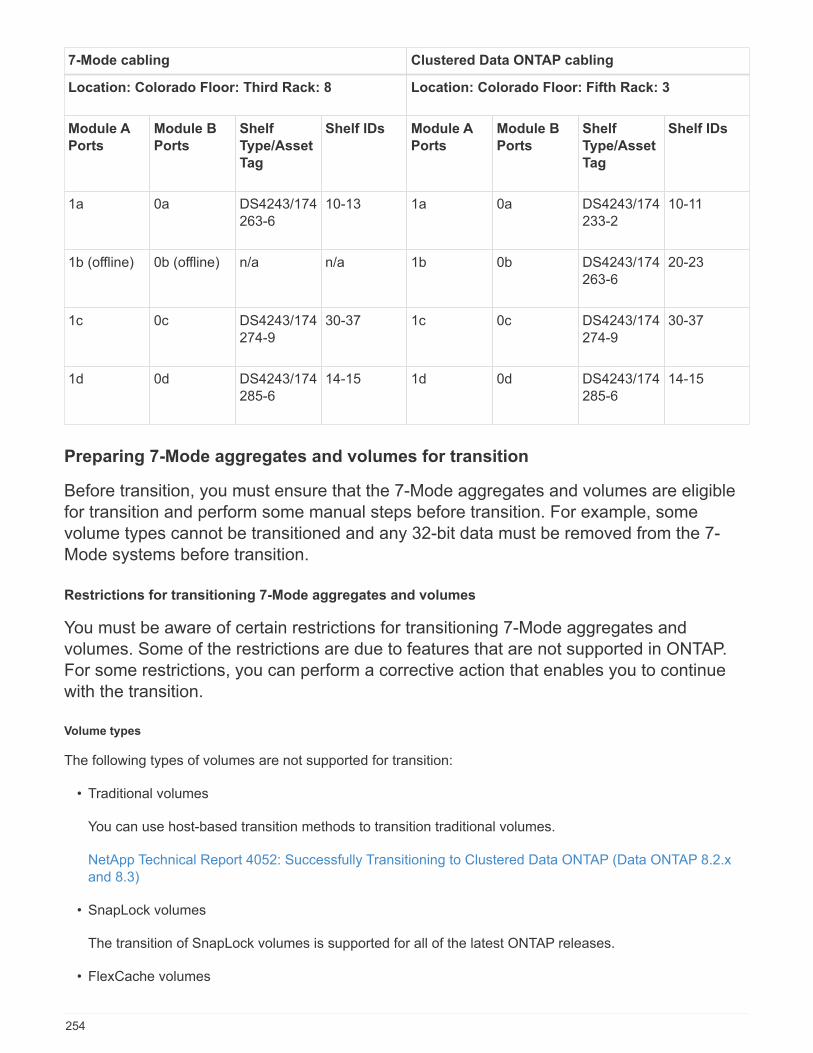
7-Mode cabling Clustered Data ONTAP cabling
Location: Colorado Floor: Third Rack: 8 Location: Colorado Floor: Fifth Rack: 3
Module A
Ports
Module B
Ports
Shelf
Type/Asset
Tag
Shelf IDs Module A
Ports
Module B
Ports
Shelf
Type/Asset
Tag
Shelf IDs
1a 0a DS4243/174
263-6
10-13 1a 0a DS4243/174
233-2
10-11
1b (offline) 0b (offline) n/a n/a 1b 0b DS4243/174
263-6
20-23
1c 0c DS4243/174
274-9
30-37 1c 0c DS4243/174
274-9
30-37
1d 0d DS4243/174
285-6
14-15 1d 0d DS4243/174
285-6
14-15
Preparing 7-Mode aggregates and volumes for transition
Before transition, you must ensure that the 7-Mode aggregates and volumes are eligible
for transition and perform some manual steps before transition. For example, some
volume types cannot be transitioned and any 32-bit data must be removed from the 7-
Mode systems before transition.
Restrictions for transitioning 7-Mode aggregates and volumes
You must be aware of certain restrictions for transitioning 7-Mode aggregates and
volumes. Some of the restrictions are due to features that are not supported in ONTAP.
For some restrictions, you can perform a corrective action that enables you to continue
with the transition.
Volume types
The following types of volumes are not supported for transition:
• Traditional volumes
You can use host-based transition methods to transition traditional volumes.
NetApp Technical Report 4052: Successfully Transitioning to Clustered Data ONTAP (Data ONTAP 8.2.x
and 8.3)
• SnapLock volumes
The transition of SnapLock volumes is supported for all of the latest ONTAP releases.
• FlexCache volumes
254
Aggregate and volume states
Transition is blocked if any of the 7-Mode aggregates and volumes selected for the transition are in one of the
following states:
• Offline
• Restricted
• Inconsistent (wafl inconsistent)
FlexClone volumes
The clone hierarchy and storage efficiency are preserved during the copy-free transition. However, you must
ensure that the parent FlexVol volume and all of its FlexClone volumes belong to the same vFiler unit. If the
FlexClone volumes are in different vFiler units from the parent volume, you must choose one of the following
actions:
• Move the FlexClone volumes to the vFiler unit that owns the parent FlexVol volume.
• Split the clones from the parent FlexClone volume, and then transition these volumes as FlexVol volumes.
Volume with qtrees that belong to a different vFiler unit
You cannot transition volumes with qtrees, where the qtrees are owned by a different vFiler unit than that of the
volume. Before transition, you must ensure that each volume and all of its qtrees belong to the same vFiler unit
by performing one of the following actions:
• Move the qtrees to the vFiler unit that owns the volume.
• Delete the qtrees.
Inode to parent pathname translation setting
The inode to parent pathname translations must be enabled on each volume. You can enable the parent to
pathname translations by turning off the no_i2p option:
vol options vol_name no_i2p off
You do not have to wait for the i2p scan to finish, and you can continue with the transition preparation.
Preparing for transitioning 7-Mode systems with 32-bit aggregates
32-bit aggregates, volumes, and Snapshot copies are not supported in ONTAP 8.3 and
later. Therefore, you must expand the 32-bit aggregates to 64-bit, and then find and
remove any 32-bit volumes and Snapshot copies from the 7-Mode system before
transition.
• 32-bit aggregates
a. Expanding an aggregate to the 64-bit format
b. Finding and removing 32-bit volumes and Snapshot copies
• 32-bit volumes or Snapshot copies
Even if you have only 64-bit aggregates and volumes, some 32-bit or mixed-format FlexVol volumes or
Snapshot copies might remain. You must remove these volumes and Snapshot copies before transition.
255
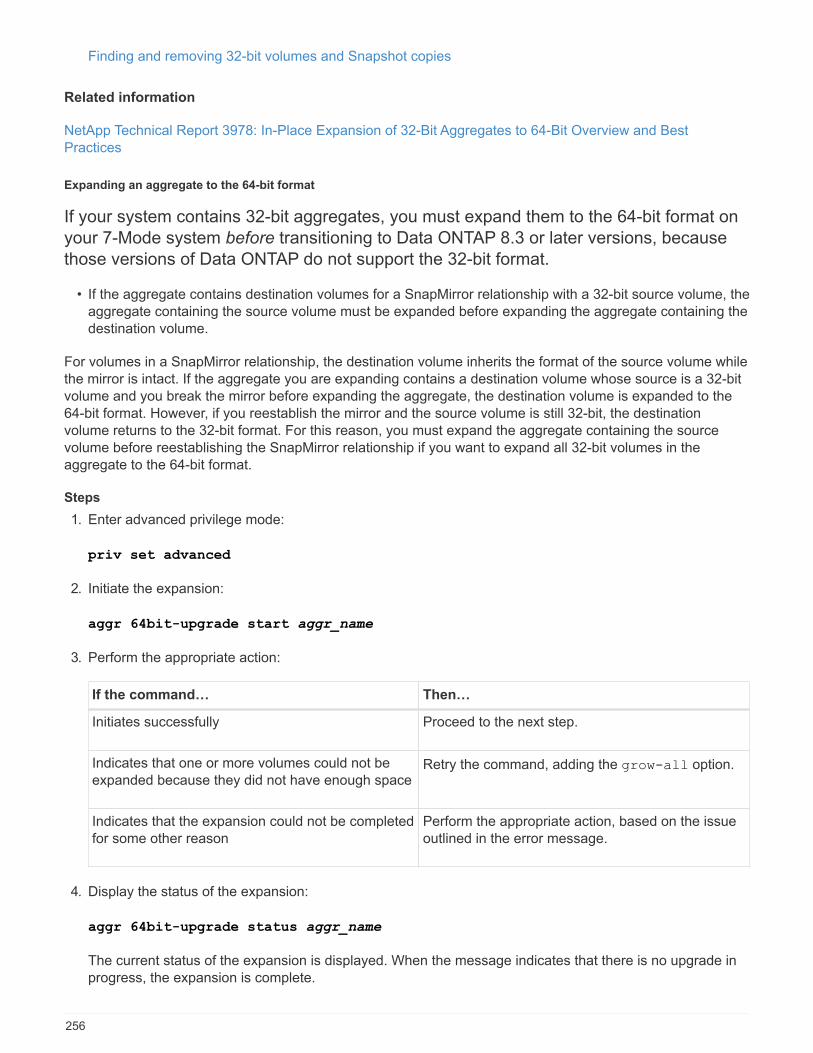
Finding and removing 32-bit volumes and Snapshot copies
Related information
NetApp Technical Report 3978: In-Place Expansion of 32-Bit Aggregates to 64-Bit Overview and Best
Practices
Expanding an aggregate to the 64-bit format
If your system contains 32-bit aggregates, you must expand them to the 64-bit format on
your 7-Mode system before transitioning to Data ONTAP 8.3 or later versions, because
those versions of Data ONTAP do not support the 32-bit format.
• If the aggregate contains destination volumes for a SnapMirror relationship with a 32-bit source volume, the
aggregate containing the source volume must be expanded before expanding the aggregate containing the
destination volume.
For volumes in a SnapMirror relationship, the destination volume inherits the format of the source volume while
the mirror is intact. If the aggregate you are expanding contains a destination volume whose source is a 32-bit
volume and you break the mirror before expanding the aggregate, the destination volume is expanded to the
64-bit format. However, if you reestablish the mirror and the source volume is still 32-bit, the destination
volume returns to the 32-bit format. For this reason, you must expand the aggregate containing the source
volume before reestablishing the SnapMirror relationship if you want to expand all 32-bit volumes in the
aggregate to the 64-bit format.
Steps
1. Enter advanced privilege mode:
priv set advanced
2. Initiate the expansion:
aggr 64bit-upgrade start aggr_name
3. Perform the appropriate action:
If the command… Then…
Initiates successfully Proceed to the next step.
Indicates that one or more volumes could not be
expanded because they did not have enough spaceRetry the command, adding the grow-all option.
Indicates that the expansion could not be completed
for some other reason
Perform the appropriate action, based on the issue
outlined in the error message.
4. Display the status of the expansion:
aggr 64bit-upgrade status aggr_name
The current status of the expansion is displayed. When the message indicates that there is no upgrade in
progress, the expansion is complete.
256
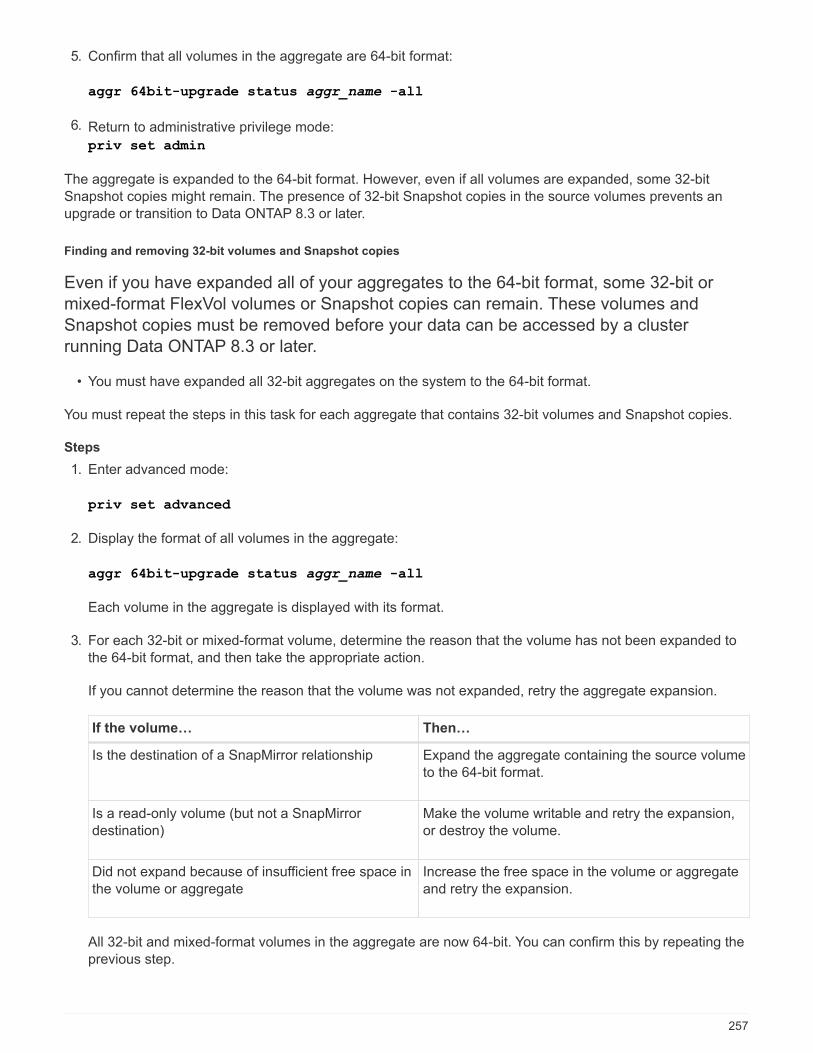
5. Confirm that all volumes in the aggregate are 64-bit format:
aggr 64bit-upgrade status aggr_name -all
6. Return to administrative privilege mode:
priv set admin
The aggregate is expanded to the 64-bit format. However, even if all volumes are expanded, some 32-bit
Snapshot copies might remain. The presence of 32-bit Snapshot copies in the source volumes prevents an
upgrade or transition to Data ONTAP 8.3 or later.
Finding and removing 32-bit volumes and Snapshot copies
Even if you have expanded all of your aggregates to the 64-bit format, some 32-bit or
mixed-format FlexVol volumes or Snapshot copies can remain. These volumes and
Snapshot copies must be removed before your data can be accessed by a cluster
running Data ONTAP 8.3 or later.
• You must have expanded all 32-bit aggregates on the system to the 64-bit format.
You must repeat the steps in this task for each aggregate that contains 32-bit volumes and Snapshot copies.
Steps
1. Enter advanced mode:
priv set advanced
2. Display the format of all volumes in the aggregate:
aggr 64bit-upgrade status aggr_name -all
Each volume in the aggregate is displayed with its format.
3. For each 32-bit or mixed-format volume, determine the reason that the volume has not been expanded to
the 64-bit format, and then take the appropriate action.
If you cannot determine the reason that the volume was not expanded, retry the aggregate expansion.
If the volume… Then…
Is the destination of a SnapMirror relationship Expand the aggregate containing the source volume
to the 64-bit format.
Is a read-only volume (but not a SnapMirror
destination)
Make the volume writable and retry the expansion,
or destroy the volume.
Did not expand because of insufficient free space in
the volume or aggregate
Increase the free space in the volume or aggregate
and retry the expansion.
All 32-bit and mixed-format volumes in the aggregate are now 64-bit. You can confirm this by repeating the
previous step.
257
4. Display the format of all Snapshot copies on the system:
snap list -fs-block-format
5. Remove the 32-bit Snapshot copies by using the snap delete command.
This action deletes the data in the Snapshot copies. You must be certain that you do not
need to retain the Snapshot copies before you delete them. Alternatively, you can wait for
the 32-bit Snapshot copies to be aged out. The amount of time this takes depends on your
Snapshot copy schedule.
If a Snapshot copy is the base Snapshot copy for a FlexClone volume, you must split the FlexClone
volume from its parent before you can remove the Snapshot copy.
All 32-bit Snapshot copies are removed. You can confirm this by repeating the previous step.
6. Return to the administrative privilege level:
priv set admin
Aggregate space requirements for transition
Before transition, you must ensure that the 7-Mode aggregates have adequate free
space. The 7-Mode Transition Tool performs various space checks on the aggregates
based on the physical space, logical space, space occupied by Snapshot copies, and
space guarantee settings. You must also be aware of the space considerations with Flash
Pool aggregates.
Physical space in the aggregates
Transition is blocked if the free space is less than 5% of the physical space in the 7-Mode aggregates. The
best practice is to have at least 20% free space in the 7-Mode aggregates before transition.
The additional space is required in the aggregates for the following reasons:
• Creating the aggregate-level Snapshot copy for each 7-Mode aggregate during the export phase
• Testing the workload on the transitioned aggregates with new data in the preproduction testing phase
If you do not have additional space, you can add disks to the 7-Mode systems before transition. If adding disks
is not feasible or if you can ensure that only limited amount of data is written on the transitioned volumes
during the preproduction phase, the 7-Mode Transition Tool allows you to acknowledge this error and continue
with the transition. However, you must continue to monitor the aggregate space during the transition and
ensure that the aggregates do not grow in the preproduction testing phase.
Logical space in the aggregates
If the logical space in the 7-Mode aggregates is more than 97% full, 7-Mode Transition Tool throws a blocking
error during precheck. You can ignore this error during the planning phase and continue with the transition;
however, you must ensure that the logical space used is less than 97% before the export and halt operation by
either reducing the size of the volumes in such aggregates or adding more disks to the aggregates. You cannot
ignore this error in the export and halt phase.
258
Snapshot spill
If the Snapshot copies in the 7-Mode aggregates occupy more space than the allocated space for Snapshot
copy reserve, the creation of aggregate-level Snapshot copies in the export and halt operation might fail. 7-
Mode Transition Tool throws a blocking error during precheck for this condition. In such conditions, you must
delete all the existing aggregate-level Snapshot copies during the planning phase.
If you do not want to delete the existing Snapshot copies, you can ignore this error during the planning phase
and continue with the transition; however, you must ensure that the Snapshot copy used capacity percentage
is less than 100% before the export and halt operation.
Space guarantee settings
7-Mode Transition Tool throws a blocking error during precheck if the 7-Mode controllers have volumes with the
following space guarantee settings:
• Volume-guaranteed volumes with guarantee disabled
• File-guaranteed volumes
• Volume-guaranteed volumes with guarantee disabled
In some cases, the space guarantee is disabled for the volume guaranteed volumes because of lack of
space in the aggregates.
You must create sufficient free space on the 7-Mode aggregates and then enable space guarantee for such
7-Mode volumes by using the following 7-Mode command:
vol options volume_name guarantee volume
If you do not want to perform any corrective actions on 7-Mode, you can ignore this error. After the
transition, examine the volumes for which guarantee is disabled and enable the guarantee manually by
using the following command:
volume modify -vserver -volume -space-guarantee volume
• File-guaranteed volumes
File guarantee is not supported in ONTAP.
If you have file-guaranteed volumes, you must perform one of the following actions:
◦ If the 7-Mode volumes contain space-reserved LUNs or files, change the space guarantee type of the
volumes to volume by using the 7-Mode command:
vol options volume_name guarantee volume
You must ensure that there is enough free space on the 7-Mode aggregates before running this
command.
◦ If the 7-Mode volumes do not contain any space-reserved LUNs or files, change the space guarantee
of the volumes to none by using the following 7-Mode command:
vol options volume_name guarantee noneIf you do not want to perform any corrective actions on 7-Mode, you can ignore this error and continue
with the transition.
259
During the transition, if these volumes contain space-reserved LUNs or files, their space guarantee will be
automatically converted to volume, but the space guarantee will be disabled initially. You must create
sufficient free space on the aggregates and then manually enable the guarantee by using the following
command:
+
volume modify -vserver -volume -space-guarantee volume
+
If the volumes do not contain any space-reserved LUNs or files, their space guarantee will be automatically
converted to none during the transition.
Additional consideration for Flash Pool aggregates
Transition is not supported if the free space in the SSDs of Flash Pool aggregates is less than 5% of the total
disk space of the SSDs. You must either disable the SSD cache or add more SSDs to continue with the
transition.
Related information
Ignorable errors during transition
Disk and aggregate management
Preparing to transition name services
Name service configurations that include DNS, LDAP, NIS, hosts, name services switch,
UNIX users and groups, and netgroups configurations are transitioned by the 7-Mode
Transition Tool. You must be aware of some considerations before transitioning name
services configurations.
Name services transition: supported and unsupported configurations, and required manual steps
You must be aware of the name services configurations that are transitioned by the 7-
Mode Transition Tool. Some name services configurations are not transitioned to ONTAP
because either these are not supported in ONTAP or these must be manually
transitioned.
You should verify all the precheck error and warning messages to evaluate the impact of such configurations
on transition.
Configurations that are transitioned
At a high level, the following name services configurations are transitioned by the 7-Mode Transition Tool:
• DNS configuration (/etc/resolv.conf)
• LDAP configuration
• NIS configuration
• Name service switch configuration (/etc/nsswitch.conf and /etc/resolv.conf)
• Hosts configuration (/etc/hosts)
260
• UNIX users and groups (/etc/passwd and /etc/group)
• Netgroups configuration (/etc/netgroup)
See the precheck results for details about these name services configurations.
Unsupported configurations in ONTAP
• NIS slave
• NIS broadcast
• NIS groups caching
• Dynamic DNS
• DNS cache
• Shadow database
• Host database sources other than file or DNS
ONTAP supports only file and DNS for host lookup; other database sources are not supported. Host lookup
order in the /etc/nsswitch.conf is ignored during transition.
Configurations that must be manually configured
You must manually configure the following LDAP options on the SVMs:
• ldap.usermap.attribute.unixaccount
• ldap.password
• ldap.usermap.base
• ldap.ssl.enable
Related information
Customizing the transition of 7-Mode configurations
NFS management
Network and LIF management
Considerations for transitioning DNS, NIS, and LDAP configurations
You should be aware of how the DNS, NIS, and LDAP configurations in Data ONTAP
operating in 7-Mode are transitioned and applied in ONTAP.
Considerations for DNS transition
For DNS configurations, a maximum of six domain names and three name servers per SVM are supported in
ONTAP. If the unique number of domain names or name servers across 7-Mode systems and the target SVM
exceed the supported limit, the 7-Mode Transition Tool reports a blocking error. To continue with the transition,
you should ignore the transition of the DNS configuration from the tool.
261
If you ignore the transition of the DNS configuration, you must manually configure DNS on the
target SVM.
Considerations for NIS transition
• The length of the NIS domain name on the 7-Mode system must not exceed 64 characters.
• For transitioning to target cluster versions running ONTAP 9.1 or earlier, the nis.servers option on the
7-Mode system must be configured only with IP addresses, and not a fully qualified domain name (FQDN).
You must configure the nis.servers option on the 7-Mode system with IP addresses before transition if
you are transitioning to a cluster running ONTAP 9.1 or earlier. Transition is supported if you have the
nis.servers option on the 7-Mode system configured with an FQDN and you are transitioning to a
cluster running any version of ONTAP between 9.2 and 9.5.
Considerations for LDAP transition
• If separate base values and scope values are specified for user mapping (ldap.usermap.base) and
user password (ldap.base.passwd) lookups in the 7-Mode system, the base values and scope values
for only the user password are transitioned.
The base values and scope values are used for user mapping and user password lookups in ONTAP,
which can cause security issues. You must manually add the base values and scope values for user
mapping to the user distinguished name (DN) option in ONTAP after transition, if required.
Considerations for transitioning netgroups and UNIX users and groups
Netgroup configuration is transitioned only if the 7-Mode /etc/netgroup file is less
than 5 MB in size. UNIX users and groups are transitioned only if the total number of
UNIX users and groups on the SVM do not exceed the limits for users and groups in
ONTAP.
Considerations for netgroups
If the /etc/netgroup file on 7-Mode is greater than 5 MB, the netgroup configuration is not transitioned. You
must perform one of the following actions to continue with the transition:
• Exclude the transition of netgroups.
Customizing the transition of 7-Mode configurations
• Move the netgroup configuration to NIS or LDAP servers before transition.
Considerations for UNIX users and groups
If the total number of transitioning UNIX users and groups exceed the limit of UNIX users and groups in
ONTAP, the 7-Mode Transition Tool blocks the transition. You must perform one of the following actions to
continue with the transition:
• Exclude the transition of UNIX users and groups.
Customizing the transition of 7-Mode configurations
262

• Move the UNIX users and groups to NIS or LDAP servers before transition.
Related information
NFS management
Preparing for NFS transition
If NFS is licensed and NFS service is running on the systems operating in 7-Mode, you
must manually prepare the cluster and target SVM for transitioning NFS configurations.
You must also be aware of what configurations are transitioned.
Some NFS configurations operating in 7-Mode are not supported in ONTAP. Some configurations are not
transitioned by the 7-Mode Transition Tool and must be manually applied to the SVM.
Prerequisites for transitioning NFS configurations
NFS configurations are transitioned by the 7-Mode Transition Tool only when certain
prerequisites are met on the 7-Mode system and the cluster. If any of the conditions are
not met, the tool does not transition the configuration.
7-Mode prerequisites
• NFS must be licensed.
• If MultiStore is licensed, NFS must be enabled on all of the vFiler units.
• NFS service must be running on the 7-Mode systems during transition.
Even after client access is disconnected and you prepare to start the export phase, the service must be
running on the 7-Mode systems.
• If you want to transition in-memory export rules, you must add them to the /etc/exports file before
transition.
The 7-Mode Transition Tool transitions only the persistent export rules that are defined in the
/etc/exports file.
Cluster prerequisites
• NFS must be licensed.
Related information
NetApp Documentation: ONTAP 9
NFS transition: supported and unsupported configurations, and required manual steps
Some NFS configurations are not transitioned to ONTAP because they are not supported
in ONTAP, there are functionality differences from 7-Mode, or they must be manually
transitioned. You should verify all of the precheck errors and warning messages to
evaluate the impact of such configurations on transition.
263
Supported configurations for transition
At a high level, the following NFS configurations are transitioned by the 7-Mode Transition Tool:
• NFS options:
◦ nfs.udp.xfersize
◦ nfs.v4.id.domain
◦ nfs.v4.acl.max.aces
◦ nfs.tcp.xfersize
◦ nfs.rpcsec.ctx.high
◦ nfs.rpcsec.ctx.idle
◦ nfs.response.trigger
◦ wafl.default_nt_user
◦ nfs.mount_rootonly
◦ nfs.tcp.enable
◦ nfs.udp.enable
◦ nfs.response.trace
◦ nfs.v4.read_delegation
◦ nfs.v4.write_delegation
◦ nfs.v4.acl.enable
◦ nfs.vstorage.enable
◦ nfs.v3.enable
◦ nfs.v4.enable
• NFS export rule:
If the export rule is configured with the -actual option, the exported path (alias path) is ignored and the
export rule is configured with the actual path.
• Export rules with Kerberos security krb5p
See the precheck results for details about these NFS configurations.
Unsupported configurations in ONTAP
The following NFS configurations are not supported in ONTAP:
• Subvolume NFS exports other than qtree-level NFS exports
• WebNFS
• PC-NFS
• NFSv2
• Fencing of NFS clients from one or more file system paths
264
• Some NFS options
See the precheck warning messages for a complete list of unsupported options.
Configurations that must be manually transitioned
There are some NFS configurations that are supported in ONTAP, but are not transitioned by the 7-Mode
Transition Tool.
The following NFS configurations generate a warning message in the precheck operation, and you must
manually apply the configurations on the SVM:
• NFS audit configuration
• NFS options:
◦ rpc.nsm.tcp.port
◦ rpc.nsm.udp.port
◦ rpc.mountd.tcp.port
◦ rpc.mountd.udp.port
◦ nfs.export.neg.timeout
◦ nfs.export.pos.timeout
◦ nfs.export.harvest.timeout
Use the vserver nfs modify command to modify the configuration of an NFS-enabled storage
virtual machine (SVM).
• Kerberos configuration
Configurations that are functionally different in ONTAP
The following NFS configurations are functionally different in ONTAP:
• NFS export rules
• NFS export access cache
• NFS diagnostic commands
• Support for the showmount command
• NFS Kerberos encryption
• NLM version support
Related information
Customizing the transition of 7-Mode configurations
NFS management
How NFS exports are transitioned
You must be aware of how NFS exports are configured on the SVM after transition. You
might have to perform some manual steps if the 7-Mode export configurations are not
265
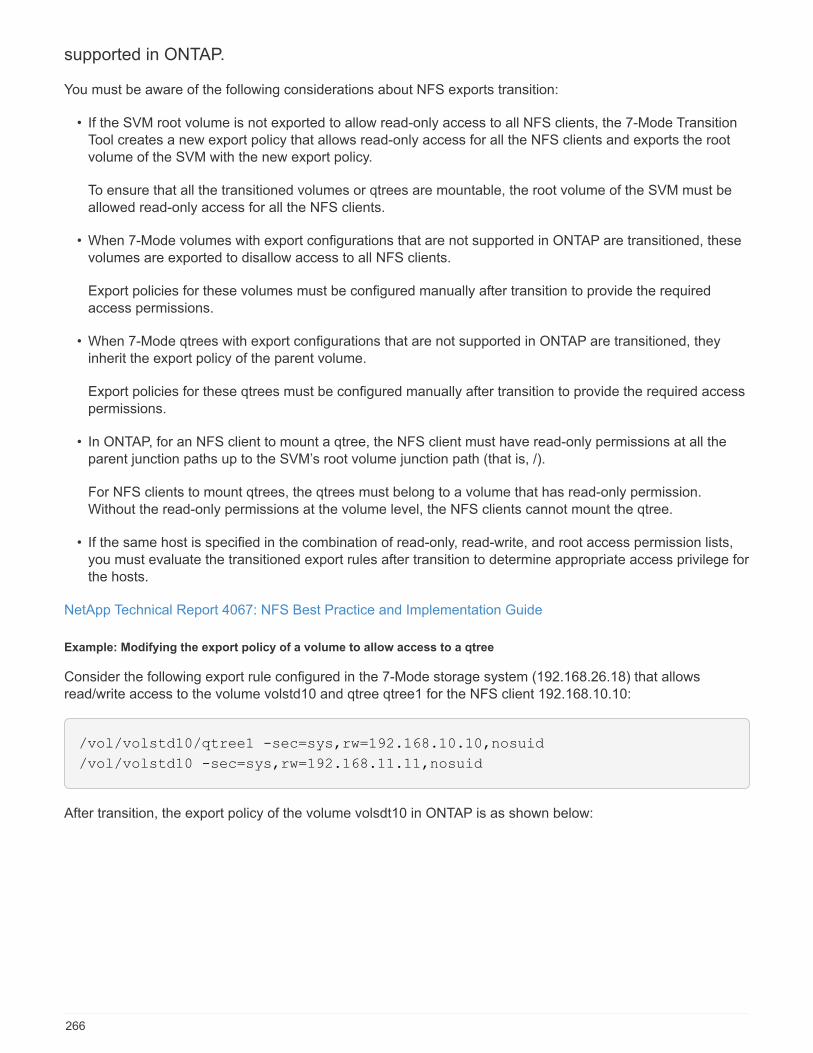
supported in ONTAP.
You must be aware of the following considerations about NFS exports transition:
• If the SVM root volume is not exported to allow read-only access to all NFS clients, the 7-Mode Transition
Tool creates a new export policy that allows read-only access for all the NFS clients and exports the root
volume of the SVM with the new export policy.
To ensure that all the transitioned volumes or qtrees are mountable, the root volume of the SVM must be
allowed read-only access for all the NFS clients.
• When 7-Mode volumes with export configurations that are not supported in ONTAP are transitioned, these
volumes are exported to disallow access to all NFS clients.
Export policies for these volumes must be configured manually after transition to provide the required
access permissions.
• When 7-Mode qtrees with export configurations that are not supported in ONTAP are transitioned, they
inherit the export policy of the parent volume.
Export policies for these qtrees must be configured manually after transition to provide the required access
permissions.
• In ONTAP, for an NFS client to mount a qtree, the NFS client must have read-only permissions at all the
parent junction paths up to the SVM’s root volume junction path (that is, /).
For NFS clients to mount qtrees, the qtrees must belong to a volume that has read-only permission.
Without the read-only permissions at the volume level, the NFS clients cannot mount the qtree.
• If the same host is specified in the combination of read-only, read-write, and root access permission lists,
you must evaluate the transitioned export rules after transition to determine appropriate access privilege for
the hosts.
NetApp Technical Report 4067: NFS Best Practice and Implementation Guide
Example: Modifying the export policy of a volume to allow access to a qtree
Consider the following export rule configured in the 7-Mode storage system (192.168.26.18) that allows
read/write access to the volume volstd10 and qtree qtree1 for the NFS client 192.168.10.10:
/vol/volstd10/qtree1 -sec=sys,rw=192.168.10.10,nosuid
/vol/volstd10 -sec=sys,rw=192.168.11.11,nosuid
After transition, the export policy of the volume volsdt10 in ONTAP is as shown below:
266
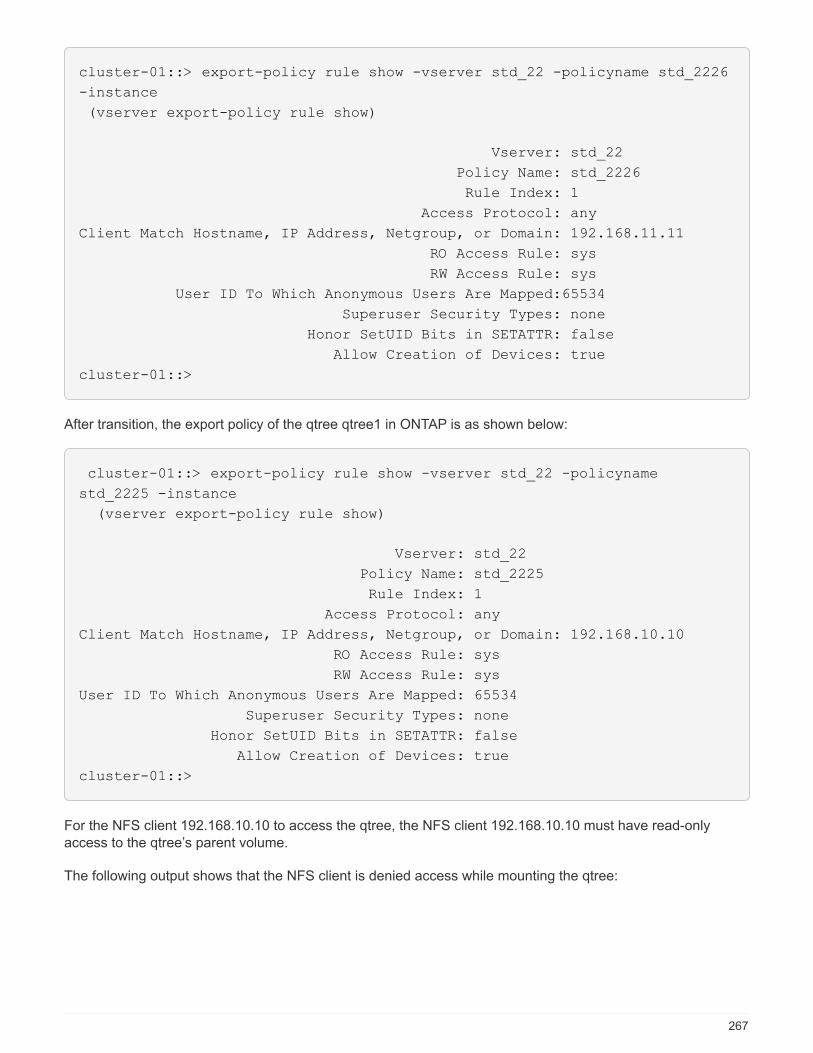
cluster-01::> export-policy rule show -vserver std_22 -policyname std_2226
-instance
(vserver export-policy rule show)
Vserver: std_22
Policy Name: std_2226
Rule Index: 1
Access Protocol: any
Client Match Hostname, IP Address, Netgroup, or Domain: 192.168.11.11
RO Access Rule: sys
RW Access Rule: sys
User ID To Which Anonymous Users Are Mapped:65534
Superuser Security Types: none
Honor SetUID Bits in SETATTR: false
Allow Creation of Devices: true
cluster-01::>
After transition, the export policy of the qtree qtree1 in ONTAP is as shown below:
cluster-01::> export-policy rule show -vserver std_22 -policyname
std_2225 -instance
(vserver export-policy rule show)
Vserver: std_22
Policy Name: std_2225
Rule Index: 1
Access Protocol: any
Client Match Hostname, IP Address, Netgroup, or Domain: 192.168.10.10
RO Access Rule: sys
RW Access Rule: sys
User ID To Which Anonymous Users Are Mapped: 65534
Superuser Security Types: none
Honor SetUID Bits in SETATTR: false
Allow Creation of Devices: true
cluster-01::>
For the NFS client 192.168.10.10 to access the qtree, the NFS client 192.168.10.10 must have read-only
access to the qtree’s parent volume.
The following output shows that the NFS client is denied access while mounting the qtree:
267
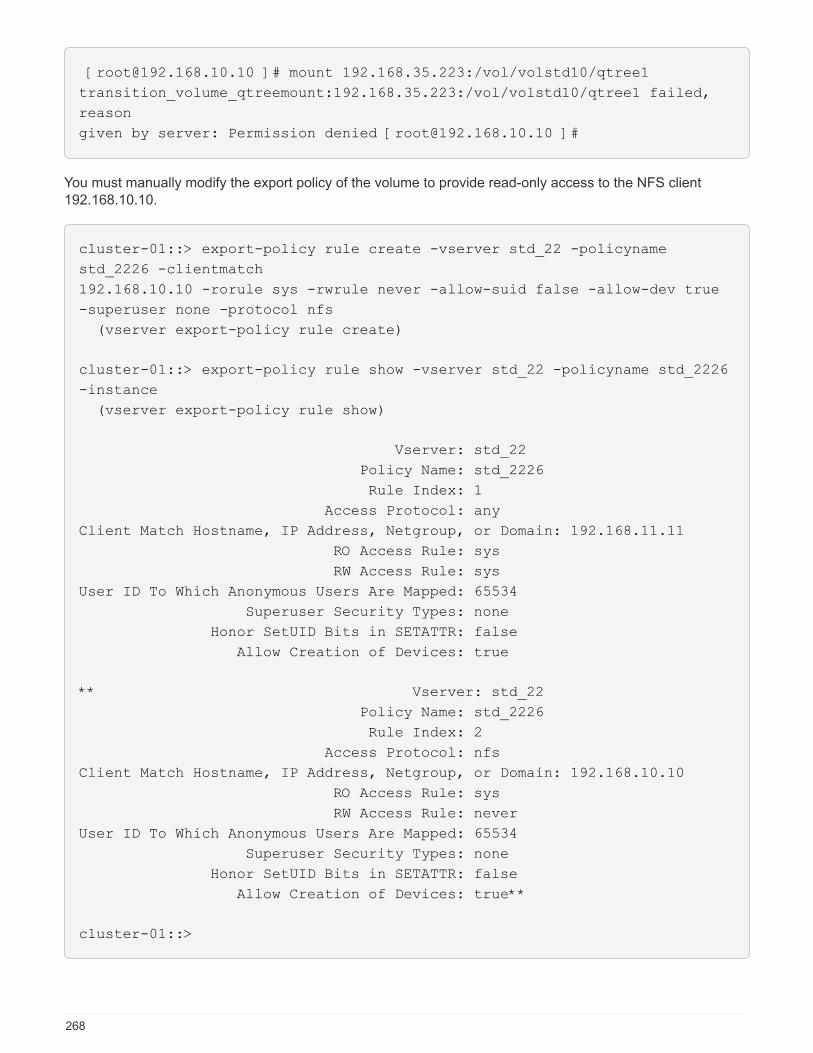
[[email protected] ]# mount 192.168.35.223:/vol/volstd10/qtree1
transition_volume_qtreemount:192.168.35.223:/vol/volstd10/qtree1 failed,
reason
given by server: Permission denied [[email protected] ]#
You must manually modify the export policy of the volume to provide read-only access to the NFS client
192.168.10.10.
cluster-01::> export-policy rule create -vserver std_22 -policyname
std_2226 -clientmatch
192.168.10.10 -rorule sys -rwrule never -allow-suid false -allow-dev true
-superuser none -protocol nfs
(vserver export-policy rule create)
cluster-01::> export-policy rule show -vserver std_22 -policyname std_2226
-instance
(vserver export-policy rule show)
Vserver: std_22
Policy Name: std_2226
Rule Index: 1
Access Protocol: any
Client Match Hostname, IP Address, Netgroup, or Domain: 192.168.11.11
RO Access Rule: sys
RW Access Rule: sys
User ID To Which Anonymous Users Are Mapped: 65534
Superuser Security Types: none
Honor SetUID Bits in SETATTR: false
Allow Creation of Devices: true
** Vserver: std_22
Policy Name: std_2226
Rule Index: 2
Access Protocol: nfs
Client Match Hostname, IP Address, Netgroup, or Domain: 192.168.10.10
RO Access Rule: sys
RW Access Rule: never
User ID To Which Anonymous Users Are Mapped: 65534
Superuser Security Types: none
Honor SetUID Bits in SETATTR: false
Allow Creation of Devices: true**
cluster-01::>
268
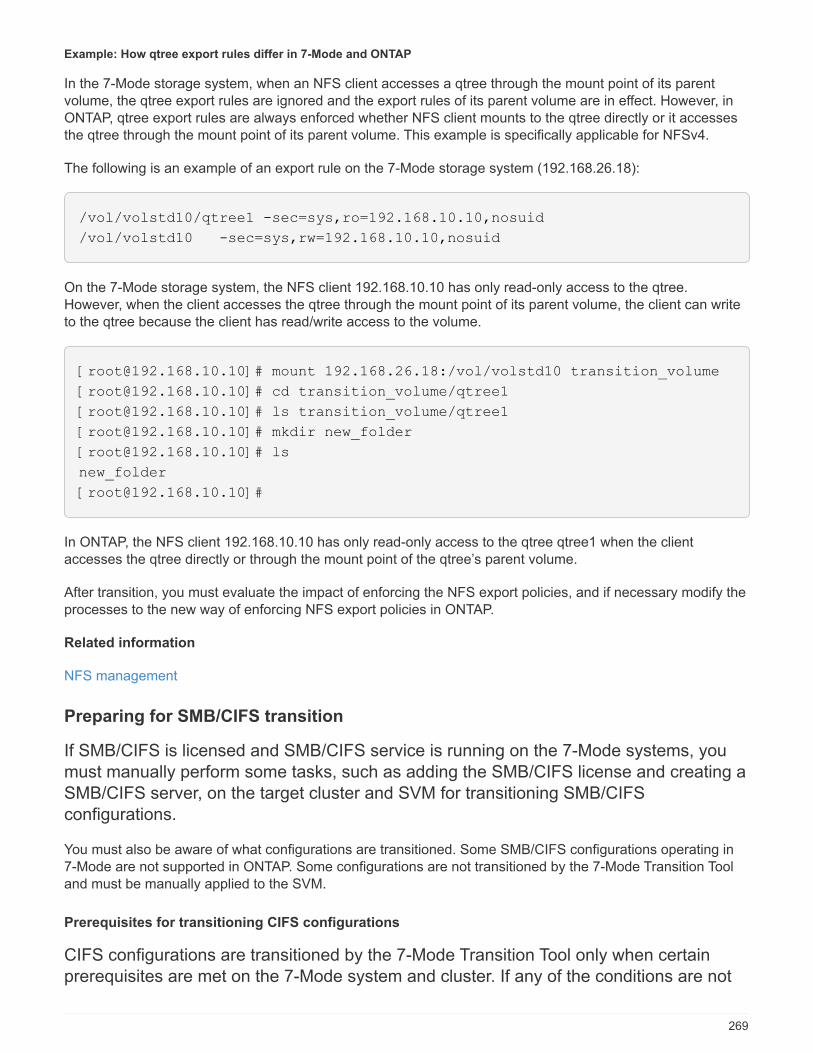
Example: How qtree export rules differ in 7-Mode and ONTAP
In the 7-Mode storage system, when an NFS client accesses a qtree through the mount point of its parent
volume, the qtree export rules are ignored and the export rules of its parent volume are in effect. However, in
ONTAP, qtree export rules are always enforced whether NFS client mounts to the qtree directly or it accesses
the qtree through the mount point of its parent volume. This example is specifically applicable for NFSv4.
The following is an example of an export rule on the 7-Mode storage system (192.168.26.18):
/vol/volstd10/qtree1 -sec=sys,ro=192.168.10.10,nosuid
/vol/volstd10 -sec=sys,rw=192.168.10.10,nosuid
On the 7-Mode storage system, the NFS client 192.168.10.10 has only read-only access to the qtree.
However, when the client accesses the qtree through the mount point of its parent volume, the client can write
to the qtree because the client has read/write access to the volume.
[[email protected]]# mount 192.168.26.18:/vol/volstd10 transition_volume
[[email protected]]# cd transition_volume/qtree1
[[email protected]]# ls transition_volume/qtree1
[[email protected]]# mkdir new_folder
[[email protected]]# ls
new_folder
In ONTAP, the NFS client 192.168.10.10 has only read-only access to the qtree qtree1 when the client
accesses the qtree directly or through the mount point of the qtree’s parent volume.
After transition, you must evaluate the impact of enforcing the NFS export policies, and if necessary modify the
processes to the new way of enforcing NFS export policies in ONTAP.
Related information
NFS management
Preparing for SMB/CIFS transition
If SMB/CIFS is licensed and SMB/CIFS service is running on the 7-Mode systems, you
must manually perform some tasks, such as adding the SMB/CIFS license and creating a
SMB/CIFS server, on the target cluster and SVM for transitioning SMB/CIFS
configurations.
You must also be aware of what configurations are transitioned. Some SMB/CIFS configurations operating in
7-Mode are not supported in ONTAP. Some configurations are not transitioned by the 7-Mode Transition Tool
and must be manually applied to the SVM.
Prerequisites for transitioning CIFS configurations
CIFS configurations are transitioned by the 7-Mode Transition Tool only when certain
prerequisites are met on the 7-Mode system and cluster. If any of the conditions are not
269
met, the tool does not transition the configuration.
7-Mode prerequisites
• The CIFS license must be added.
• If the MultiStore license is enabled, CIFS must be added to the list of allowed protocols for the vFiler unit
that owns the transitioning volumes.
• CIFS must be set up and running during transition.
Even after client access is disconnected and you prepare to start the export phase, the CIFS service must
be running on the 7-Mode systems.
• The authentication type for CIFS must be Active Directory (AD) or Workgroup.
Cluster prerequisites
• The CIFS license must be added.
• The following CIFS authentication methods are supported in different ONTAP versions:
◦ Clustered Data ONTAP 8.2.x and 8.3.x support AD authentication.
◦ ONTAP 9.0 or later supports AD authentication and Workgroup authentication.
• The following table identifies which authentication method must be used on the target SVM:
7-Mode authentication method Clustered Data ONTAP 8.2.x and
8.3.x authentication method
ONTAP 9.5 or earlier
authentication method
AD AD AD
Workgroup AD Workgroup or AD
• You can transition the CIFS configuration from 7-Mode to ONTAP if the AD domains do not match between
the 7-Mode CIFS server and the target SVM CIFS server.
The tool triggers an ignorable blocking error when an AD domain name mismatch is detected. To proceed
with the transition, you can acknowledge the blocking error.
• The CIFS server must be manually configured before the apply configuration (precutover) phase.
You can create the CIFS server on the SVM in the following two ways:
270
If you want to… Do the following…
Transfer or preserve the CIFS server identity to the
target SVM You have the following two
options to create the CIFS
server:
a. Applicable for all versions of ONTAP:
◦ Before the SVM provision phase, you must
reconfigure the CIFS server on the 7-Mode
system system by using a temporary CIFS
identity.
This reconfiguration allows the original CIFS
server identity to be configured on the SVM.
You must verify that the CIFS server is
running on the 7-Mode system during the
“SVM Provision” and “Export & Halt” phases
with the new temporary identity. This action
is required to read CIFS configurations from
7-Mode during the SVM Provision and
“Export & Halt” phases.
◦ You must configure the CIFS server on the
target SVM with the original 7-Mode CIFS
identity.
◦ After these conditions are met, you can
perform the “SVM Provision” operation, and
then perform the “Export & Halt” operation
to enable client access to ONTAP volumes.
b. Applicable for ONTAP releases 9.0 through 9.5:
◦ Use the vserver cifs modify
command to change the CIFS server name
(CIFS Server NetBIOS Name).
Using this feature, you should create a CIFS
server on the target SVM with a temporary
identity, and then perform the “SVM
Provision” operation.
◦ After the “import”' phase, you can run the
vserver cifs modify command on the
target cluster to replace the target SVM
CIFS identity with the 7-Mode CIFS identity.
271
If you want to… Do the following…
Use a new identity • Before the “SVM Provision” phase, you must
configure the CIFS server on the target SVM
with a new CIFS identity.
• You must verify that the CIFS server is up and
running on the 7-Mode system during the “SVM
Provision” and “Export & Halt” phases.
This action is required to read CIFS
configurations from 7-Mode during the “SVM
Provision`"and "`Export & Halt”.
• After verifying these conditions, you can perform
the “SVM Provision” operation.
You can then test the SVM configurations, and
then plan to perform the storage cutover.
Supported and unsupported CIFS configurations for transition to ONTAP
Some CIFS configurations are not transitioned to ONTAP because either they are not
supported in ONTAP or they must be manually transitioned. You should verify all
precheck error and warning messages to evaluate the impact of such configurations on
transition.
Configurations that are supported for transition
At a high level, the 7-Mode Transition Tool transitions the following CIFS configurations:
• CIFS preferred DC configuration
• User mapping configuration:
◦ /etc/usermap.cfg
◦ wafl.nt_admin_priv_map_to_root
• CIFS local users and groups
• Symlink and widelink configuration (/etc/symlink.translations)
• CIFS audit configuration
• CIFS shares
• CIFS share ACLs
• CIFS home directory configuration
• CIFS options:
◦ cifs.gpo.enable
◦ cifs.smb2.enable
◦ cifs.smb2.signing.required
272
◦ cifs.wins_servers
◦ cifs.grant_implicit_exe_perms
◦ cifs.restrict_anonymous
• SMB2 connections to external servers, such as a domain controller. The following command implements
this support:
◦ cifs security modify -vserver SVM1 -smb2-enabled-for-dc-connections
• FPolicy native file blocking configuration
See the precheck results for details about these CIFS configurations.
Configurations that are not supported in ONTAP
The following 7-Mode configurations are not supported in ONTAP. Therefore, these configurations cannot be
transitioned.
• NT4, and password authentication types
• Separate options for SMB1 and SMB2 signing
• CIFS statistics on a per-client basis
• ◦ Authentication for clients earlier than Windows NT
• Auditing of account management events for local users and groups
• Usermap entries with IP addresses, host names, network names, or network names with subnet specified
in dotted notation
• CIFS shares with access restriction for machine accounts
Machine accounts can access all shares after transition.
Configurations that must be manually transitioned
Some CIFS configurations are supported in ONTAP, but are not transitioned by the 7-Mode Transition Tool.
The following CIFS configurations generate a warning message in the precheck. You must manually apply
these configurations on the SVM:
• Antivirus settings
• FPolicy configurations
7-Mode FPolicy and antivirus servers do not work with ONTAP. You must contact the server vendors for
upgrading these servers. However, you must not decommission the 7-Mode FPolicy and antivirus servers
until you commit the transition. These are required in case you decide to roll back the transition.
• BranchCache configurations
• Character mapping configuration (charmap)
• Forcegroup attribute of CIFS shares to create files with a specified UNIX group as owning group
• Maxusers attribute of CIFS shares to specify the maximum number of simultaneous connections allowed to
a 7-Mode CIFS share
• Storage-Level Access Guard (SLAG) configurations
273
• Share-level ACLs with UNIX-style permission
• Share ACLs for UNIX users and groups
• LAN Manager authentication level
• NetBIOS aliases
• CIFS search domains
• Some CIFS options
See the precheck results for details about these options.
Related information
Customizing the transition of 7-Mode configurations
Considerations for transitioning CIFS local users and groups
You must be aware of the considerations for running the transition operations when
migrating CIFS local users and groups.
• Transition of CIFS data-serving volumes from a 7-Mode controller or a vFiler unit that has local users and
groups to an SVM that has non-BUILTIN CIFS local users and groups is not supported.
The SVM must have only BUILTIN CIFS local users and groups for transition.
• You must ensure that the number of local users and groups in 7-Mode does not exceed the local users and
groups limit for ONTAP.
You must contact technical support if the number of local users and groups in 7-Mode exceeds the limit
defined in ONTAP.
• A local user account with an empty password or local user accounts with passwords containing more than
14 characters on the 7-Mode system are transitioned to ONTAP software with the password cifsUser@1.
After the transition is complete, you can access these users from the Windows system by using the
password cifsUser@1. You must then manually change the password for such CIFS local users on the
SVM by using the following command:
cifs users-and-groups local-user set-password -vserver svm_name -user-name
user_name.
• If the 7-Mode Transition Tool IP address is not reachable from the target ONTAP software, the 7-Mode
Transition Tool blocks the transition of CIFS local users and groups to the ONTAP software during the
precheck phase. If you see this error during the precheck phase, use the
network ping -node local -destination ip_address
command to make sure the 7-Mode Transition Tool IP address is reachable from the target ONTAP
software. You can edit the \etc\conf\transition-tool.conf file that is installed with the 7-Mode
Transition Tool to modify any configuration option that is used by the tool, such as the 7-Mode Transition
Tool IP address.
• The SVM to which the local users and groups are transitioned must have a data LIF.
274

• If a local group has multiple member system identifiers (SIDs) mapped to a single domain user or group on
the 7-Mode system, the 7-Mode Transition Tool blocks the transition of local users and groups to ONTAP
during the precheck phase.
If you see this error during the precheck phase, you must manually remove the additional SIDs that are
mapped to a single domain user or group on the 7-Mode system. You must then rerun the precheck
operation with only a single SID mapped to the domain user or group.
Troubleshooting Workflow: CIFS: Device attached to the system is not functioning
Related information
SMB/CIFS management
Preparing for SAN transition
Before transitioning a SAN environment, you must understand what configurations are
supported for SAN transition, create SAN LIFs on the SVM, and prepare the SAN hosts
for transition.
Creating SAN LIFs before transition
Because FC and iSCSI LIFs are not transitioned by the 7-Mode Transition Tool, you must
create these LIFs on the SVMs before transition. You must configure SAN LIFs on both
the nodes that own the LUN and the node’s HA partner.
The required SAN (FC or iSCSI) license must be added to the cluster.
For redundancy, you must create SAN LIFs on both the node hosting the LUNs and its HA partner.
Steps
1. Create an FC or iSCSI LIF on the target node to which the LUNs are transitioned, depending on the
protocol used:
network interface create
If you want to reuse the 7-Mode IP address for iSCSI LIFs, you must create the LIFs in administrative down
state. You can bring these LIFs to the administrative up state after the cutover operation.
2. Create a LIF on the HA partner of the node.
3. Verify that you have set up your LIFs correctly:
network interface show
Related information
SAN administration
Configuring zones by using the FC zone plan
Before transitioning a SAN FC environment, you must configure zones by using the FC
275
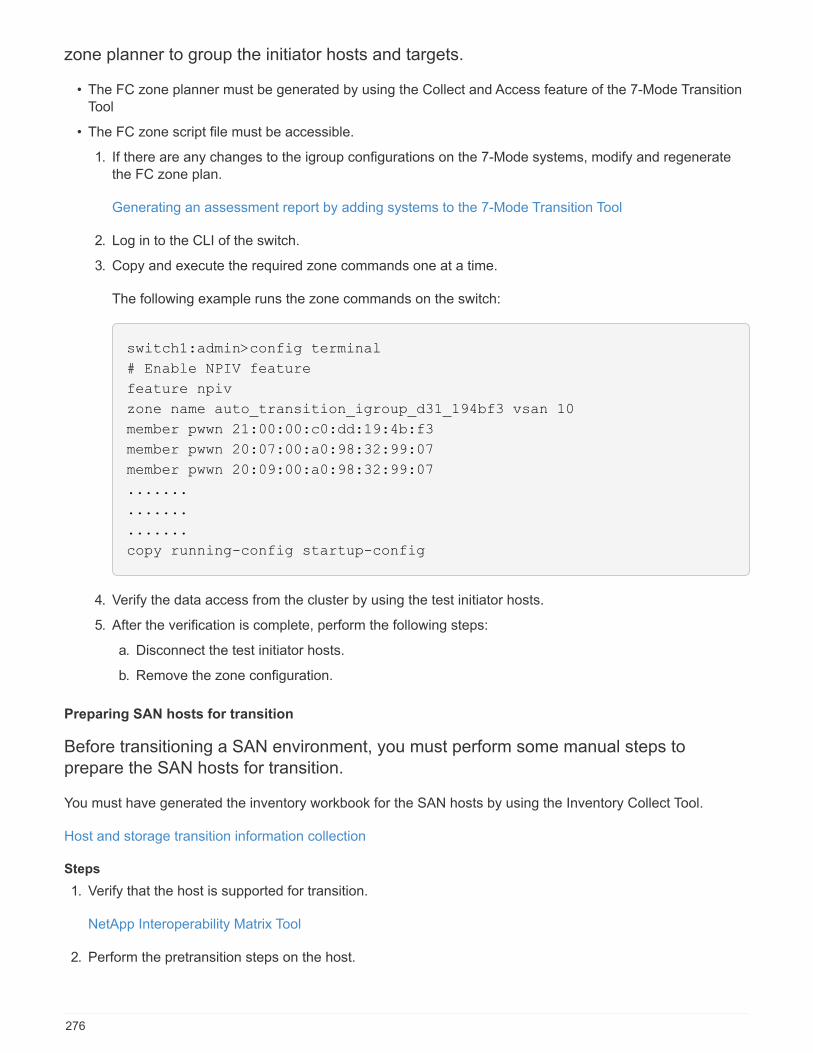
zone planner to group the initiator hosts and targets.
• The FC zone planner must be generated by using the Collect and Access feature of the 7-Mode Transition
Tool
• The FC zone script file must be accessible.
1. If there are any changes to the igroup configurations on the 7-Mode systems, modify and regenerate
the FC zone plan.
Generating an assessment report by adding systems to the 7-Mode Transition Tool
2. Log in to the CLI of the switch.
3. Copy and execute the required zone commands one at a time.
The following example runs the zone commands on the switch:
switch1:admin>config terminal
# Enable NPIV feature
feature npiv
zone name auto_transition_igroup_d31_194bf3 vsan 10
member pwwn 21:00:00:c0:dd:19:4b:f3
member pwwn 20:07:00:a0:98:32:99:07
member pwwn 20:09:00:a0:98:32:99:07
.......
.......
.......
copy running-config startup-config
4. Verify the data access from the cluster by using the test initiator hosts.
5. After the verification is complete, perform the following steps:
a. Disconnect the test initiator hosts.
b. Remove the zone configuration.
Preparing SAN hosts for transition
Before transitioning a SAN environment, you must perform some manual steps to
prepare the SAN hosts for transition.
You must have generated the inventory workbook for the SAN hosts by using the Inventory Collect Tool.
Host and storage transition information collection
Steps
1. Verify that the host is supported for transition.
NetApp Interoperability Matrix Tool
2. Perform the pretransition steps on the host.
276
SAN host transition and remediation
SAN transition: supported and unsupported configurations, and required manual steps
You must be aware of the SAN configurations that are transitioned by the 7-Mode
Transition Tool. You should also be aware of the 7-Mode SAN features that are not
supported in ONTAP, so that you can take any necessary actions before the transition.
You should verify all of the precheck error and warning messages to evaluate the impact of such configurations
on transition.
Configurations that are transitioned
The following SAN configurations are transitioned by the 7-Mode Transition Tool:
• FC and iSCSI services
• igroups and LUN maps
◦ 7-Mode igroups that are not mapped to any LUNs are not transitioned to the target
SVMs.
◦ For clustered Data ONTAP 8.3.0 and 8.3.1, the transition of igroups and LUN mapping
configurations is not supported during the precutover operation.
Instead, the required igroups are created during the cutover operation. For primary and
stand-alone volumes, LUNs are mapped to igroups during the cutover operation.
However, for secondary volumes, the mapping of LUNs to igroups is not supported
during the cutover operation. You must manually map the secondary LUNs after
completing the transition of primary volumes.
◦ For ONTAP 8.3.2 and later supported releases, igroups and LUN mapping
configurations are applied during the precutover operation.
Unsupported configurations in ONTAP
The unsupported configurations in ONTAP are as follows:
• 7-Mode Snapshot copy-backed LUN clones
Snapshot copy-backed LUN clones present in the Snapshot copies are not supported for any restore
operation. These LUNs are not accessible in ONTAP. You must split or delete the 7-Mode Snapshot copy-
backed LUN clones before transition.
• LUNs with an ostype parameter value of vld, image, or any user-defined string
You must either change the value of the ostype parameter for such LUNs or delete the LUNs before
transition.
• LUN clone split
You must either wait for the active LUN clone split operations to finish or abort the LUN clone split and
delete the LUN before transition.
277
The following 7-Mode features enable you to continue with the transition process, but are not supported in
ONTAP:
• The lun share command
Sharing a LUN over NAS protocols
• SnapValidator
Configurations that must be manually transitioned
The following configurations must be transitioned manually:
• SAN LIFs
You must manually create the LIFs before transition.
• Portsets
You must manually configure igroups that are bound to a portset after transition.
• iSCSI access list information
• iSNS configuration
• iSCSI CHAP and RADIUS configurations
Related information
NFS management
Network and LIF management
Space considerations when transitioning SAN volumes
You must ensure that sufficient space is available in the volumes during transition. In
addition to the space required for storing data and Snapshot copies, the transition
process also requires 1 MB of space per LUN for updating certain filesystem metadata.
You can use the df -h command on the 7-Mode volume to verify whether free space of 1 MB per LUN is
available in the volume. The volume should also have free space equivalent to the amount of data that is
expected to be written to the volume before the hosts are quiesced. If the volume does not have sufficient free
space available, the required amount of space must be added to the 7-Mode volume.
If transition fails during the import phase due to lack of space on the volume, the following EMS message is
generated: LUN.vol.proc.fail.no.space: Processing for LUNs in volume vol_name failed
due to lack of space.
If there are volumes containing space-reserved LUNs, growing the volume by 1MB per LUN might not provide
sufficient space. In such cases, the amount of space that has to be added is the size of the Snapshot reserve
for the volume. After space is added to the volume, you can use the lun transition start command to
transition the LUNs.
Related information
Recovering from a failed LUN transition
278
NetApp Documentation: ONTAP 9
Preparing data protection features for transition
You must perform some manual steps for transitioning 7-Mode SnapMirror relationships.
You must also be aware of the data protection relationships that are supported and
unsupported for transition.
Preparing the cluster for transitioning volume SnapMirror relationships
For transitioning 7-Mode volume SnapMirror relationships, you must add the SnapMirror
license to the source and destination clusters. You must also create a cluster peer
relationship between the clusters to which the primary and secondary volumes of the
SnapMirror relationships are transitioned and create the SnapMirror schedules.
You must have recorded the SnapMirror schedules defined in the /etc/snapmirror.conf file of the 7-Mode
secondary system.
Steps
1. Add the SnapMirror license on both the source and destination clusters:
system license add license_code
2. From each cluster, create the cluster peer relationship.
Cluster and SVM peering express configuration
3. Create schedules on the secondary SVMs that match the schedules in the 7-Mode secondary system:
job schedule cron create
Related information
ONTAP 9 commands
Data protection transition: supported and unsupported configurations
You can transition a volume that is part of a SnapMirror relationship. However, some data
protection and disaster recovery configurations are not supported for transition and
therefore you have to perform some manual steps for transitioning these configurations.
Supported configurations
You can transition volume SnapMirror relationships by using the 7-Mode Transition Tool. You can perform a
copy-free transition of primary and secondary HA pairs. You must then manually set up the volume SnapMirror
relationships after transition.
Transitioning a SnapMirror relationship
279
Unsupported configurations
• SnapVault relationships
Volumes that are the source of a SnapVault relationship can be migrated; however, the SnapVault
relationship is not transitioned. A volume that is the destination of a SnapVault relationship can be migrated
only after the SnapVault backups are stopped.
NetApp Technical Report 4052: Successfully Transitioning to Clustered Data ONTAP (Data ONTAP 8.2.x
and 8.3)
• Qtree SnapMirror relationships
Volumes with qtrees that are the source of a qtree SnapMirror relationship can be transitioned, but the
qtree SnapMirror relationship is not transitioned. A volume with a qtree that is the destination of a qtree
SnapMirror relationship can be migrated only after the qtree SnapMirror relationship is broken.
• Disaster recovery vFiler unit
Volumes that are the source of a disaster recovery vFiler unit can be migrated; however, the disaster
recovery vFiler unit is not transitioned. A volume that is the destination of a disaster recovery vFiler unit can
be migrated only after the disaster recovery relationship is deleted.
• NDMP configuration
After the transition is complete, you must manually set up backup policies for the transitioned volumes in
ONTAP.
Data protection using tape backup
• Synchronous SnapMirror relationships
This feature is not supported in ONTAP; however, the volumes that are part of the relationship can be
transitioned.
Related information
Customizing the transition of 7-Mode configurations
Transitioning 7-Mode aggregates using copy-free transition
The copy-free transition workflow involves planning a project, applying 7-Mode
configurations to the SVMs, exporting the 7-Mode system information and halting the 7-
Mode system, manually cabling the disk shelves to cluster nodes, and importing the 7-
Mode data and configurations.
280
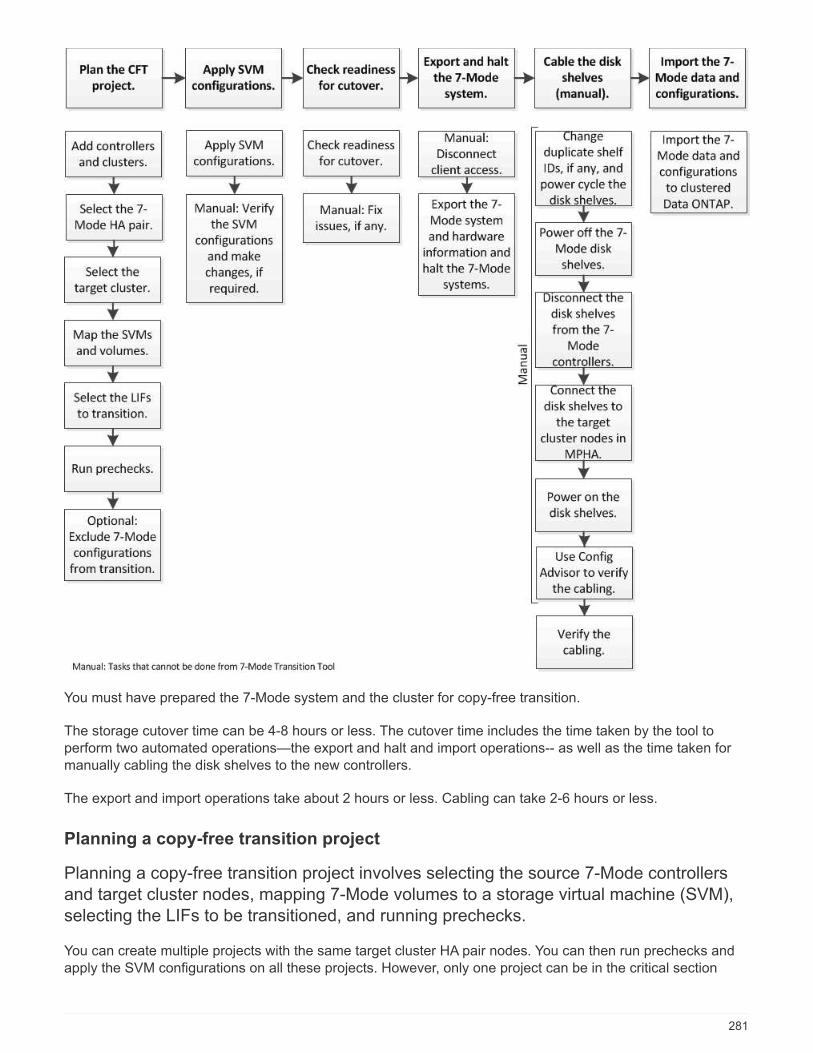
You must have prepared the 7-Mode system and the cluster for copy-free transition.
The storage cutover time can be 4-8 hours or less. The cutover time includes the time taken by the tool to
perform two automated operations—the export and halt and import operations-- as well as the time taken for
manually cabling the disk shelves to the new controllers.
The export and import operations take about 2 hours or less. Cabling can take 2-6 hours or less.
Planning a copy-free transition project
Planning a copy-free transition project involves selecting the source 7-Mode controllers
and target cluster nodes, mapping 7-Mode volumes to a storage virtual machine (SVM),
selecting the LIFs to be transitioned, and running prechecks.
You can create multiple projects with the same target cluster HA pair nodes. You can then run prechecks and
apply the SVM configurations on all these projects. However, only one project can be in the critical section
281
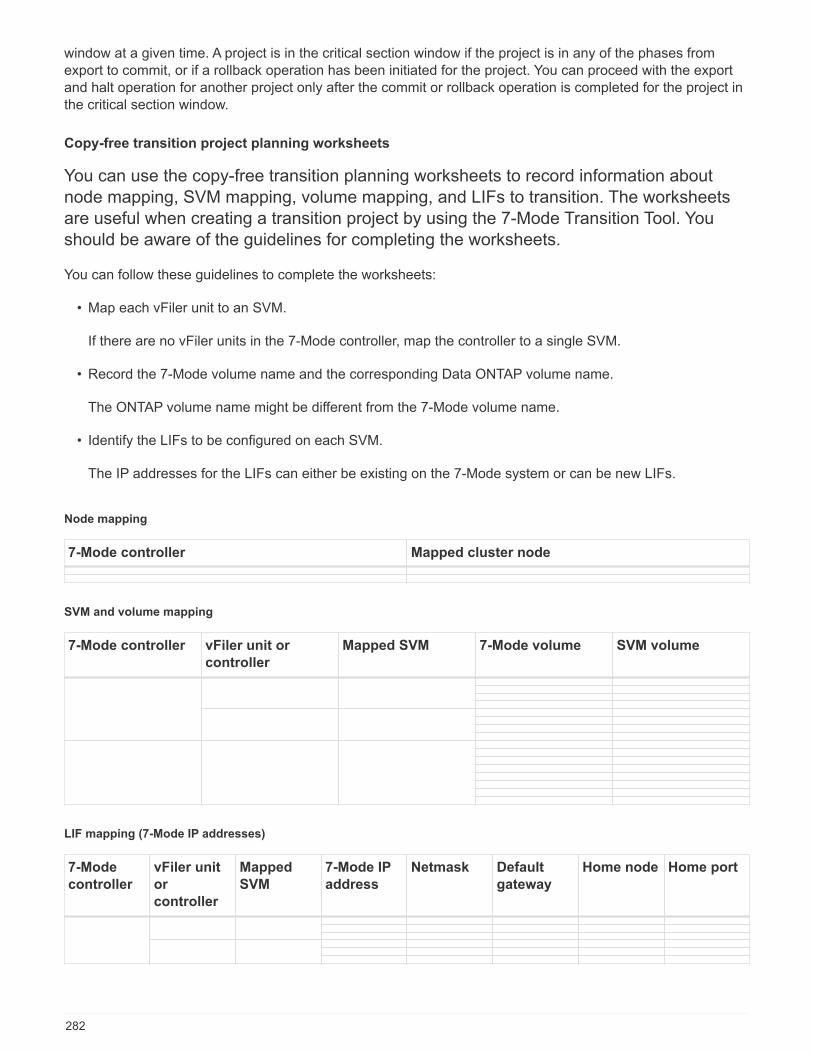
window at a given time. A project is in the critical section window if the project is in any of the phases from
export to commit, or if a rollback operation has been initiated for the project. You can proceed with the export
and halt operation for another project only after the commit or rollback operation is completed for the project in
the critical section window.
Copy-free transition project planning worksheets
You can use the copy-free transition planning worksheets to record information about
node mapping, SVM mapping, volume mapping, and LIFs to transition. The worksheets
are useful when creating a transition project by using the 7-Mode Transition Tool. You
should be aware of the guidelines for completing the worksheets.
You can follow these guidelines to complete the worksheets:
• Map each vFiler unit to an SVM.
If there are no vFiler units in the 7-Mode controller, map the controller to a single SVM.
• Record the 7-Mode volume name and the corresponding Data ONTAP volume name.
The ONTAP volume name might be different from the 7-Mode volume name.
• Identify the LIFs to be configured on each SVM.
The IP addresses for the LIFs can either be existing on the 7-Mode system or can be new LIFs.
Node mapping
7-Mode controller Mapped cluster node
SVM and volume mapping
7-Mode controller vFiler unit or
controller
Mapped SVM 7-Mode volume SVM volume
LIF mapping (7-Mode IP addresses)
7-Mode
controller
vFiler unit
or
controller
Mapped
SVM
7-Mode IP
address
Netmask Default
gateway
Home node Home port
282
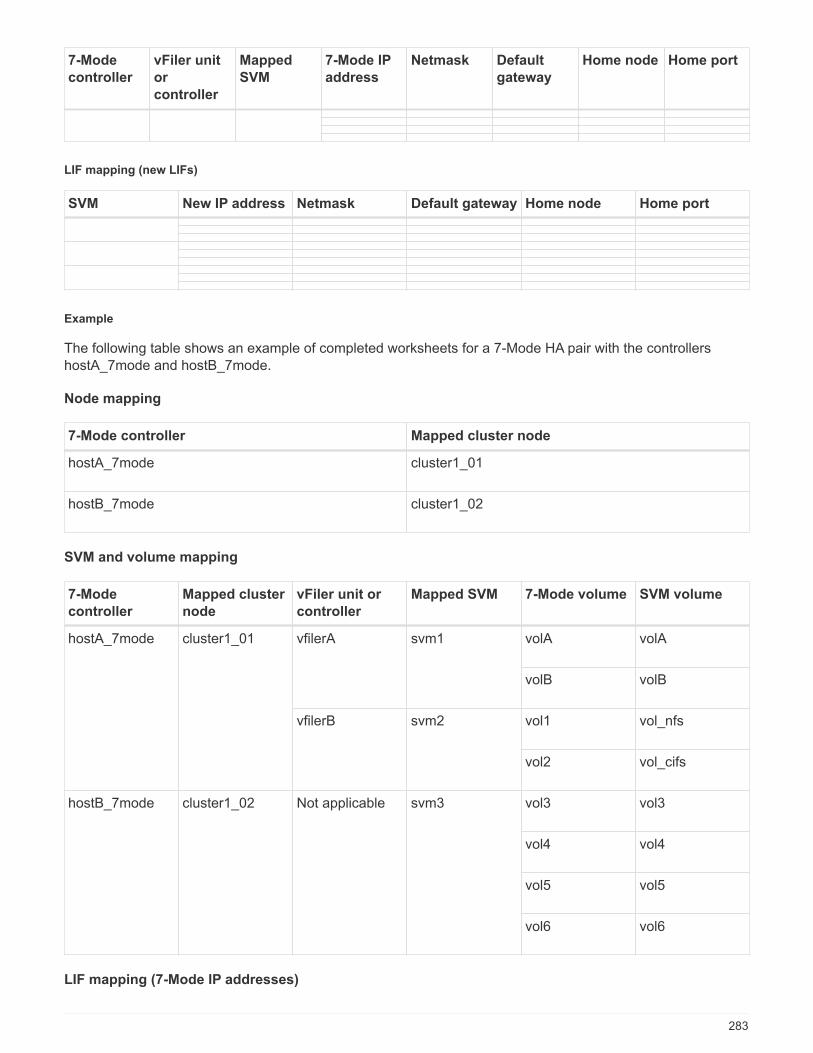
7-Mode
controller
vFiler unit
or
controller
Mapped
SVM
7-Mode IP
address
Netmask Default
gateway
Home node Home port
LIF mapping (new LIFs)
SVM New IP address Netmask Default gateway Home node Home port
Example
The following table shows an example of completed worksheets for a 7-Mode HA pair with the controllers
hostA_7mode and hostB_7mode.
Node mapping
7-Mode controller Mapped cluster node
hostA_7mode cluster1_01
hostB_7mode cluster1_02
SVM and volume mapping
7-Mode
controller
Mapped cluster
node
vFiler unit or
controller
Mapped SVM 7-Mode volume SVM volume
hostA_7mode cluster1_01 vfilerA svm1 volA volA
volB volB
vfilerB svm2 vol1 vol_nfs
vol2 vol_cifs
hostB_7mode cluster1_02 Not applicable svm3 vol3 vol3
vol4 vol4
vol5 vol5
vol6 vol6
LIF mapping (7-Mode IP addresses)
283
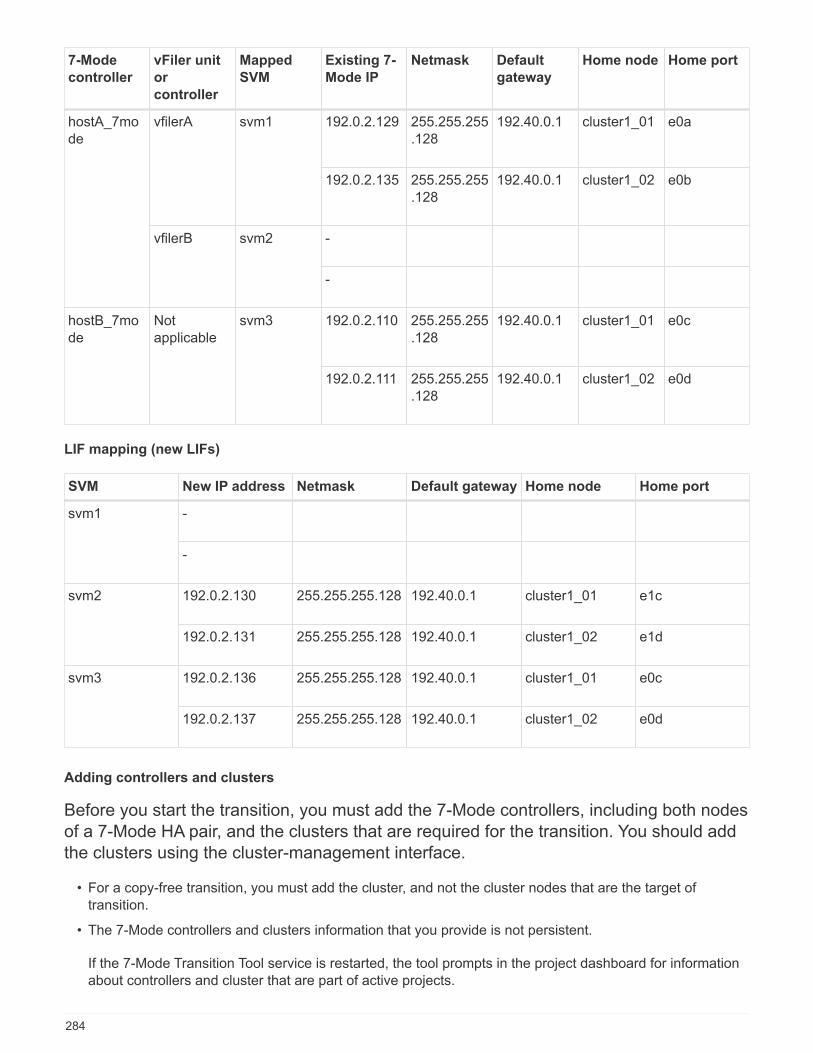
7-Mode
controller
vFiler unit
or
controller
Mapped
SVM
Existing 7-
Mode IP
Netmask Default
gateway
Home node Home port
hostA_7mo
de
vfilerA svm1 192.0.2.129 255.255.255
.128
192.40.0.1 cluster1_01 e0a
192.0.2.135 255.255.255
.128
192.40.0.1 cluster1_02 e0b
vfilerB svm2 -
-
hostB_7mo
de
Not
applicable
svm3 192.0.2.110 255.255.255
.128
192.40.0.1 cluster1_01 e0c
192.0.2.111 255.255.255
.128
192.40.0.1 cluster1_02 e0d
LIF mapping (new LIFs)
SVM New IP address Netmask Default gateway Home node Home port
svm1 -
-
svm2 192.0.2.130 255.255.255.128 192.40.0.1 cluster1_01 e1c
192.0.2.131 255.255.255.128 192.40.0.1 cluster1_02 e1d
svm3 192.0.2.136 255.255.255.128 192.40.0.1 cluster1_01 e0c
192.0.2.137 255.255.255.128 192.40.0.1 cluster1_02 e0d
Adding controllers and clusters
Before you start the transition, you must add the 7-Mode controllers, including both nodes
of a 7-Mode HA pair, and the clusters that are required for the transition. You should add
the clusters using the cluster-management interface.
• For a copy-free transition, you must add the cluster, and not the cluster nodes that are the target of
transition.
• The 7-Mode controllers and clusters information that you provide is not persistent.
If the 7-Mode Transition Tool service is restarted, the tool prompts in the project dashboard for information
about controllers and cluster that are part of active projects.
284

Steps
1. From the top pane, click Storage Systems.
2. In the Hostname field, enter the FQDN or IP address of the 7-Mode controller or the ONTAP system.
For a cluster, you can specify the IP address or FQDN of the cluster-management interface. For a 7-Mode
controller, you must specify the IP address of the default vFiler unit, because the IP addresses of individual
vFiler units are not accepted.
3. Enter the administrator credentials for the specified host, and then click Add.
The 7-Mode controllers are added to the “7-Mode Controllers” table and clusters are added to the
“Clustered Data ONTAP Systems” table.
4. Repeat Steps 2 and 3 to add all of the controllers and clusters that you require for the transition.
5. If the Status column indicates that the credentials of the system are missing or the credentials have
changed from what was initially entered in the tool, click the icon, and then enter the credentials again.
6. Click Next.
The Select Source Systems screen is displayed.
Creating a copy-free transition project
The first step in planning a transition project is to select the source 7-Mode HA pair from
which you want to transition the disk shelves, aggregates, volumes, and configurations,
and then create a transition project.
• The 7-Mode controllers in the HA pair must be running a supported ONTAP version on a platform that is
supported for a copy-free transition.
NetApp Interoperability Matrix Tool
• Both controllers in the HA configuration must be healthy.
1. Select the Copy-Free Transition migration method from the homepage and click Start Planning.
If the controller and cluster required for a new project are not added, you can enter the details in the
Enter Device Credentials pane.
2. Select the source 7-Mode HA pair that you want to transition.
3. Click Create Project.
a. In the Project Details window, provide a name for the project.
b. Select a project group to which the project should be added.
You can either create a new project group or add the project to the default group.
Creating a project group enables you to group and monitor related projects.
c. Click Save.
The Select Target Cluster screen is displayed.
285
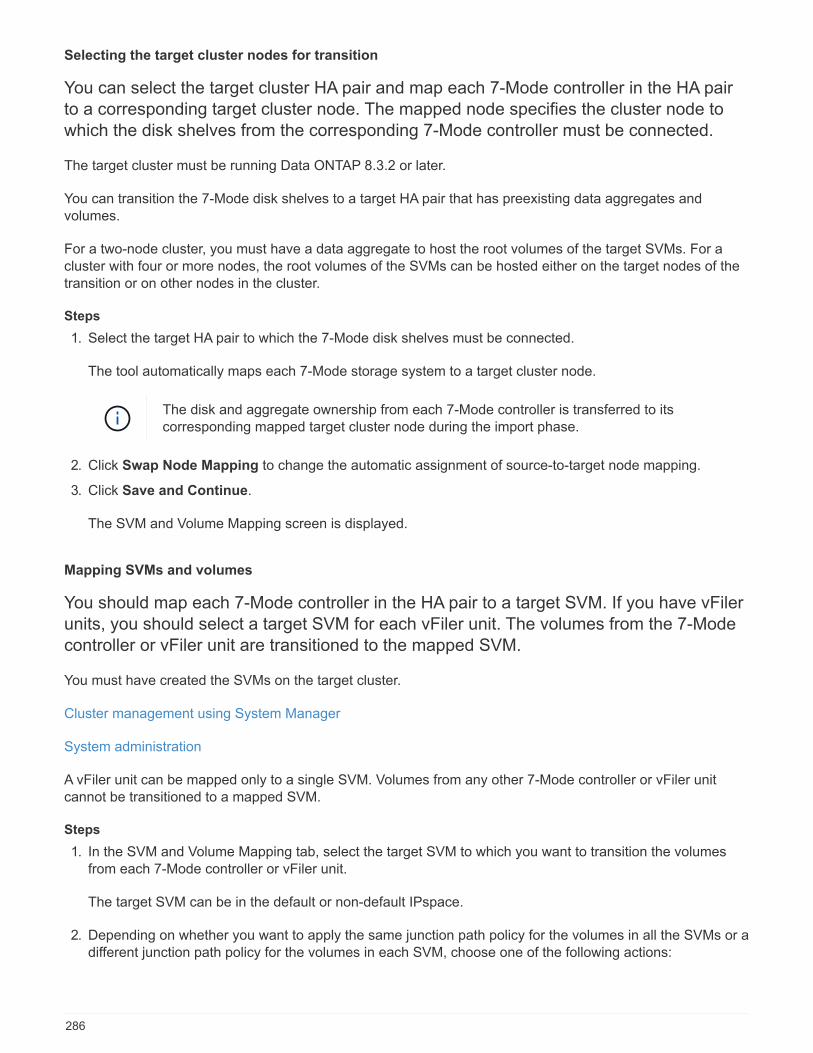
Selecting the target cluster nodes for transition
You can select the target cluster HA pair and map each 7-Mode controller in the HA pair
to a corresponding target cluster node. The mapped node specifies the cluster node to
which the disk shelves from the corresponding 7-Mode controller must be connected.
The target cluster must be running Data ONTAP 8.3.2 or later.
You can transition the 7-Mode disk shelves to a target HA pair that has preexisting data aggregates and
volumes.
For a two-node cluster, you must have a data aggregate to host the root volumes of the target SVMs. For a
cluster with four or more nodes, the root volumes of the SVMs can be hosted either on the target nodes of the
transition or on other nodes in the cluster.
Steps
1. Select the target HA pair to which the 7-Mode disk shelves must be connected.
The tool automatically maps each 7-Mode storage system to a target cluster node.
The disk and aggregate ownership from each 7-Mode controller is transferred to its
corresponding mapped target cluster node during the import phase.
2. Click Swap Node Mapping to change the automatic assignment of source-to-target node mapping.
3. Click Save and Continue.
The SVM and Volume Mapping screen is displayed.
Mapping SVMs and volumes
You should map each 7-Mode controller in the HA pair to a target SVM. If you have vFiler
units, you should select a target SVM for each vFiler unit. The volumes from the 7-Mode
controller or vFiler unit are transitioned to the mapped SVM.
You must have created the SVMs on the target cluster.
Cluster management using System Manager
System administration
A vFiler unit can be mapped only to a single SVM. Volumes from any other 7-Mode controller or vFiler unit
cannot be transitioned to a mapped SVM.
Steps
1. In the SVM and Volume Mapping tab, select the target SVM to which you want to transition the volumes
from each 7-Mode controller or vFiler unit.
The target SVM can be in the default or non-default IPspace.
2. Depending on whether you want to apply the same junction path policy for the volumes in all the SVMs or a
different junction path policy for the volumes in each SVM, choose one of the following actions:
286
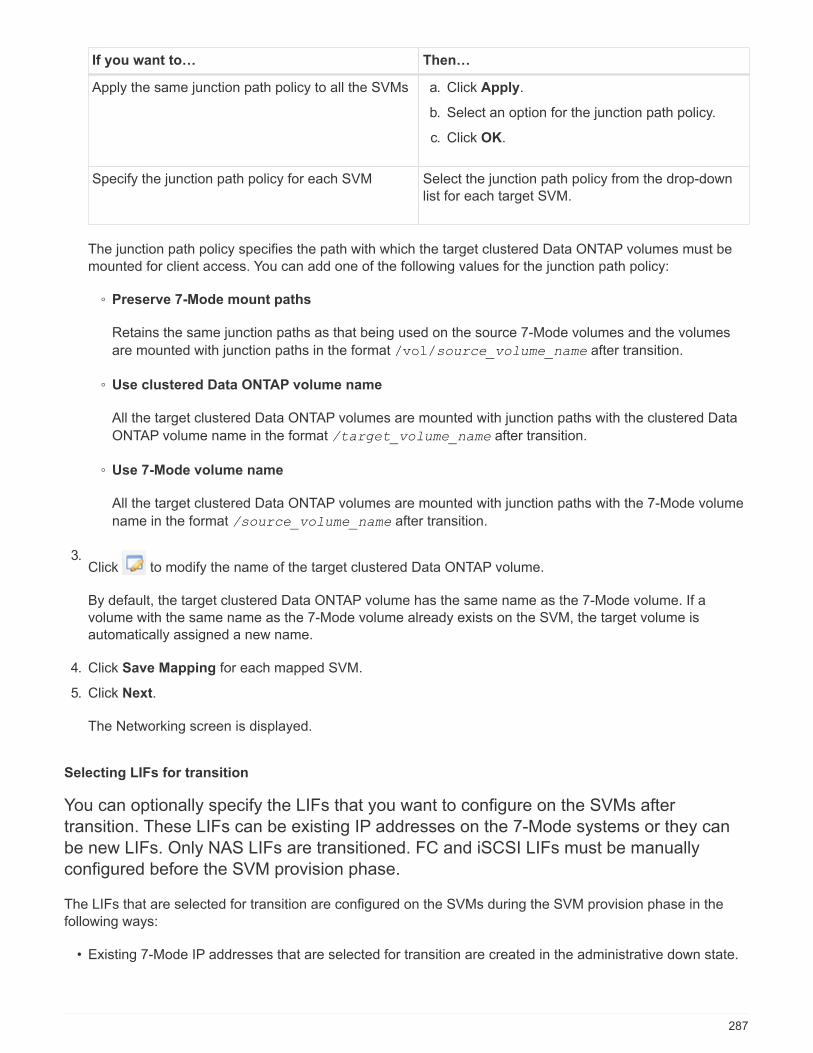
If you want to… Then…
Apply the same junction path policy to all the SVMs a. Click Apply.
b. Select an option for the junction path policy.
c. Click OK.
Specify the junction path policy for each SVM Select the junction path policy from the drop-down
list for each target SVM.
The junction path policy specifies the path with which the target clustered Data ONTAP volumes must be
mounted for client access. You can add one of the following values for the junction path policy:
◦ Preserve 7-Mode mount paths
Retains the same junction paths as that being used on the source 7-Mode volumes and the volumes
are mounted with junction paths in the format /vol/source_volume_name after transition.
◦ Use clustered Data ONTAP volume name
All the target clustered Data ONTAP volumes are mounted with junction paths with the clustered Data
ONTAP volume name in the format /target_volume_name after transition.
◦ Use 7-Mode volume name
All the target clustered Data ONTAP volumes are mounted with junction paths with the 7-Mode volume
name in the format /source_volume_name after transition.
3.Click to modify the name of the target clustered Data ONTAP volume.
By default, the target clustered Data ONTAP volume has the same name as the 7-Mode volume. If a
volume with the same name as the 7-Mode volume already exists on the SVM, the target volume is
automatically assigned a new name.
4. Click Save Mapping for each mapped SVM.
5. Click Next.
The Networking screen is displayed.
Selecting LIFs for transition
You can optionally specify the LIFs that you want to configure on the SVMs after
transition. These LIFs can be existing IP addresses on the 7-Mode systems or they can
be new LIFs. Only NAS LIFs are transitioned. FC and iSCSI LIFs must be manually
configured before the SVM provision phase.
The LIFs that are selected for transition are configured on the SVMs during the SVM provision phase in the
following ways:
• Existing 7-Mode IP addresses that are selected for transition are created in the administrative down state.
287
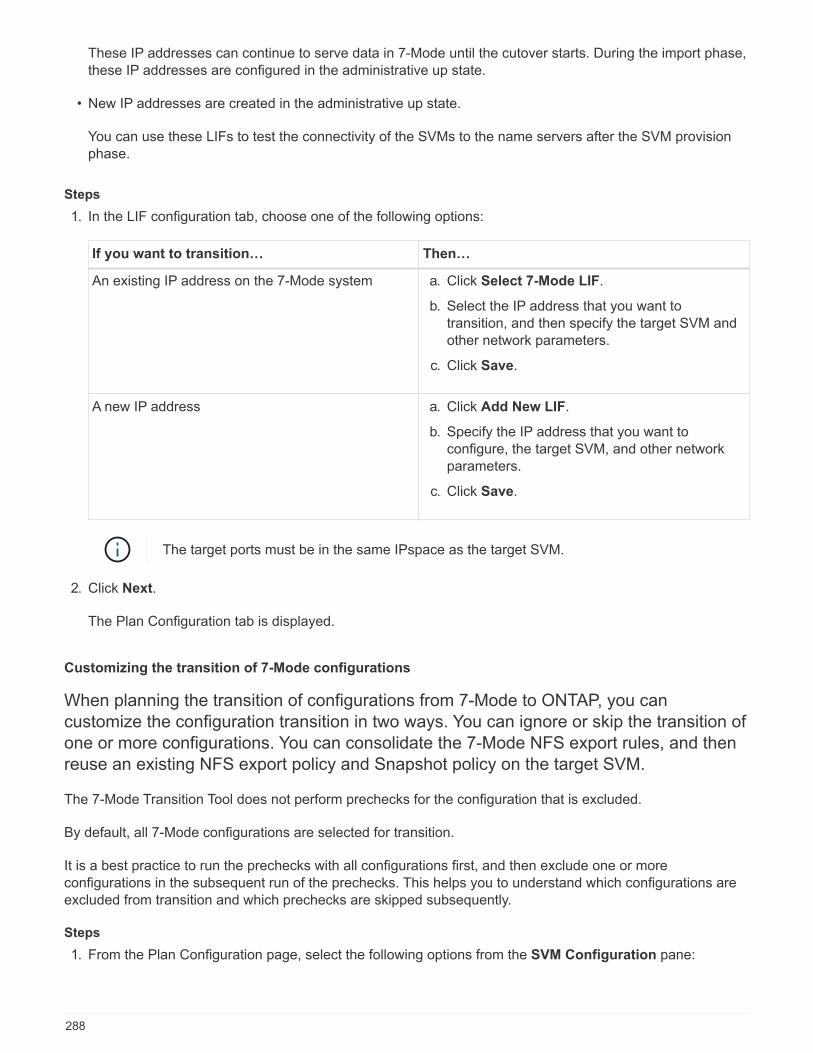
These IP addresses can continue to serve data in 7-Mode until the cutover starts. During the import phase,
these IP addresses are configured in the administrative up state.
• New IP addresses are created in the administrative up state.
You can use these LIFs to test the connectivity of the SVMs to the name servers after the SVM provision
phase.
Steps
1. In the LIF configuration tab, choose one of the following options:
If you want to transition… Then…
An existing IP address on the 7-Mode system a. Click Select 7-Mode LIF.
b. Select the IP address that you want to
transition, and then specify the target SVM and
other network parameters.
c. Click Save.
A new IP address a. Click Add New LIF.
b. Specify the IP address that you want to
configure, the target SVM, and other network
parameters.
c. Click Save.
The target ports must be in the same IPspace as the target SVM.
2. Click Next.
The Plan Configuration tab is displayed.
Customizing the transition of 7-Mode configurations
When planning the transition of configurations from 7-Mode to ONTAP, you can
customize the configuration transition in two ways. You can ignore or skip the transition of
one or more configurations. You can consolidate the 7-Mode NFS export rules, and then
reuse an existing NFS export policy and Snapshot policy on the target SVM.
The 7-Mode Transition Tool does not perform prechecks for the configuration that is excluded.
By default, all 7-Mode configurations are selected for transition.
It is a best practice to run the prechecks with all configurations first, and then exclude one or more
configurations in the subsequent run of the prechecks. This helps you to understand which configurations are
excluded from transition and which prechecks are skipped subsequently.
Steps
1. From the Plan Configuration page, select the following options from the SVM Configuration pane:
288
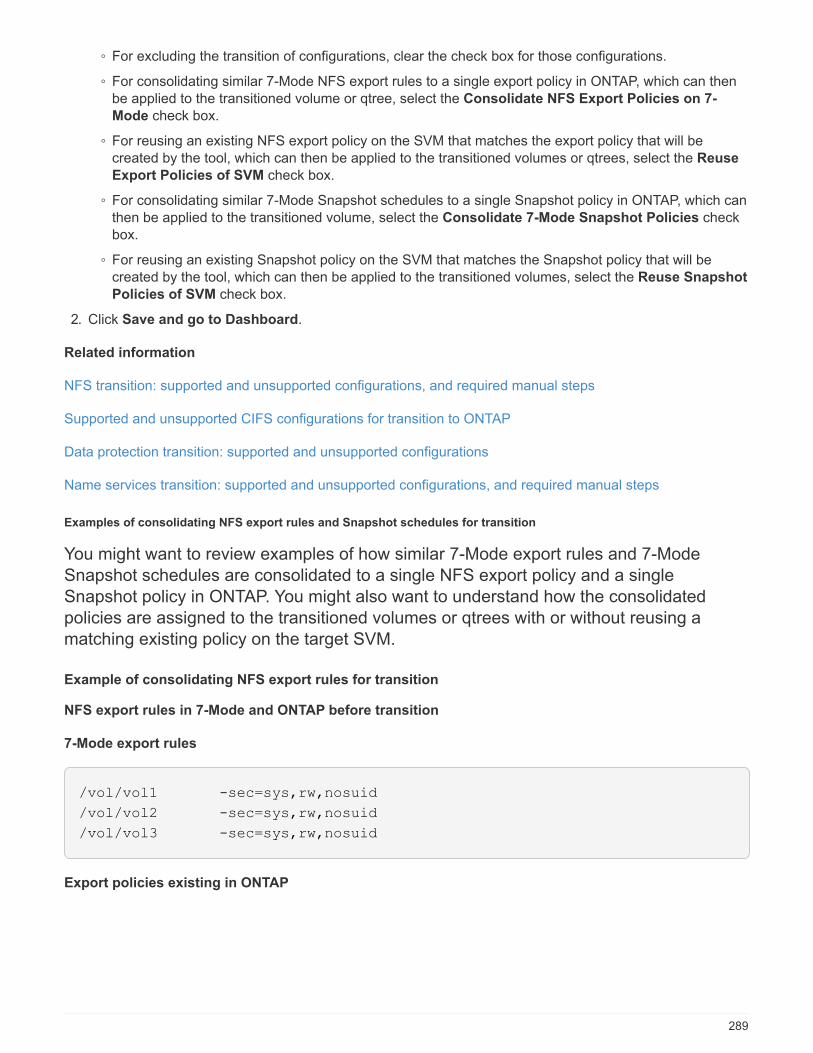
◦ For excluding the transition of configurations, clear the check box for those configurations.
◦ For consolidating similar 7-Mode NFS export rules to a single export policy in ONTAP, which can then
be applied to the transitioned volume or qtree, select the Consolidate NFS Export Policies on 7-
Mode check box.
◦ For reusing an existing NFS export policy on the SVM that matches the export policy that will be
created by the tool, which can then be applied to the transitioned volumes or qtrees, select the Reuse
Export Policies of SVM check box.
◦ For consolidating similar 7-Mode Snapshot schedules to a single Snapshot policy in ONTAP, which can
then be applied to the transitioned volume, select the Consolidate 7-Mode Snapshot Policies check
box.
◦ For reusing an existing Snapshot policy on the SVM that matches the Snapshot policy that will be
created by the tool, which can then be applied to the transitioned volumes, select the Reuse Snapshot
Policies of SVM check box.
2. Click Save and go to Dashboard.
Related information
NFS transition: supported and unsupported configurations, and required manual steps
Supported and unsupported CIFS configurations for transition to ONTAP
Data protection transition: supported and unsupported configurations
Name services transition: supported and unsupported configurations, and required manual steps
Examples of consolidating NFS export rules and Snapshot schedules for transition
You might want to review examples of how similar 7-Mode export rules and 7-Mode
Snapshot schedules are consolidated to a single NFS export policy and a single
Snapshot policy in ONTAP. You might also want to understand how the consolidated
policies are assigned to the transitioned volumes or qtrees with or without reusing a
matching existing policy on the target SVM.
Example of consolidating NFS export rules for transition
NFS export rules in 7-Mode and ONTAP before transition
7-Mode export rules
/vol/vol1 -sec=sys,rw,nosuid
/vol/vol2 -sec=sys,rw,nosuid
/vol/vol3 -sec=sys,rw,nosuid
Export policies existing in ONTAP
289
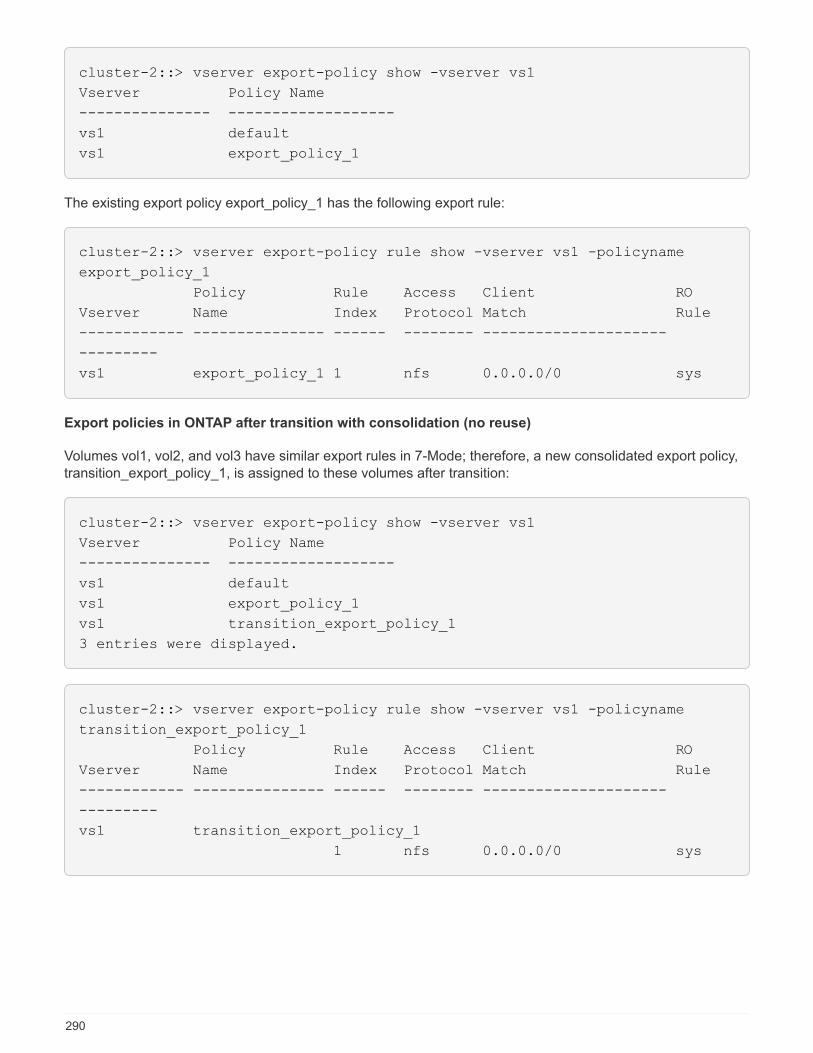
cluster-2::> vserver export-policy show -vserver vs1
Vserver Policy Name
--------------- -------------------
vs1 default
vs1 export_policy_1
The existing export policy export_policy_1 has the following export rule:
cluster-2::> vserver export-policy rule show -vserver vs1 -policyname
export_policy_1
Policy Rule Access Client RO
Vserver Name Index Protocol Match Rule
------------ --------------- ------ -------- ---------------------
---------
vs1 export_policy_1 1 nfs 0.0.0.0/0 sys
Export policies in ONTAP after transition with consolidation (no reuse)
Volumes vol1, vol2, and vol3 have similar export rules in 7-Mode; therefore, a new consolidated export policy,
transition_export_policy_1, is assigned to these volumes after transition:
cluster-2::> vserver export-policy show -vserver vs1
Vserver Policy Name
--------------- -------------------
vs1 default
vs1 export_policy_1
vs1 transition_export_policy_1
3 entries were displayed.
cluster-2::> vserver export-policy rule show -vserver vs1 -policyname
transition_export_policy_1
Policy Rule Access Client RO
Vserver Name Index Protocol Match Rule
------------ --------------- ------ -------- ---------------------
---------
vs1 transition_export_policy_1
1 nfs 0.0.0.0/0 sys
290

cluster-2::> volume show -vserver vs1 -volume vol1,vol2,vol3 -fields
policy
vserver volume policy
------- ------ --------------------------
vs1 vol1 transition_export_policy_1
vs1 vol2 transition_export_policy_1
vs1 vol3 transition_export_policy_1
3 entries were displayed.
Export policies in ONTAP after transition with consolidation and reuse
Volumes vol1, vol2, and vol3 have similar export rules in 7-Mode; therefore, a consolidated export policy is
assigned to these volumes after transition. The export policy, export_policy_1, which matches the 7-Mode
export rules, already exists on the SVM. Therefore, the policy is applied to these volumes:
cluster-2::> vserver export-policy show -vserver vs1
Vserver Policy Name
--------------- -------------------
vs1 default
vs1 export_policy_1
2 entries were displayed.
cluster-2::> vserver export-policy rule show -vserver vs1 -policyname
export_policy_1
Policy Rule Access Client RO
Vserver Name Index Protocol Match Rule
------------ --------------- ------ -------- ---------------------
---------
vs1 export_policy_1 1 nfs 0.0.0.0/0 sys
cluster-2::> volume show -vserver vs1 -volume vol1,vol2,vol3 -fields
policy
vserver volume policy
------- ------ --------------------------
vs1 vol1 export_policy_1
vs1 vol2 export_policy_1
vs1 vol3 export_policy_1
3 entries were displayed.
Example of consolidating Snapshot policies for transition
Snapshot schedules in 7-Mode and ONTAP before transition
291
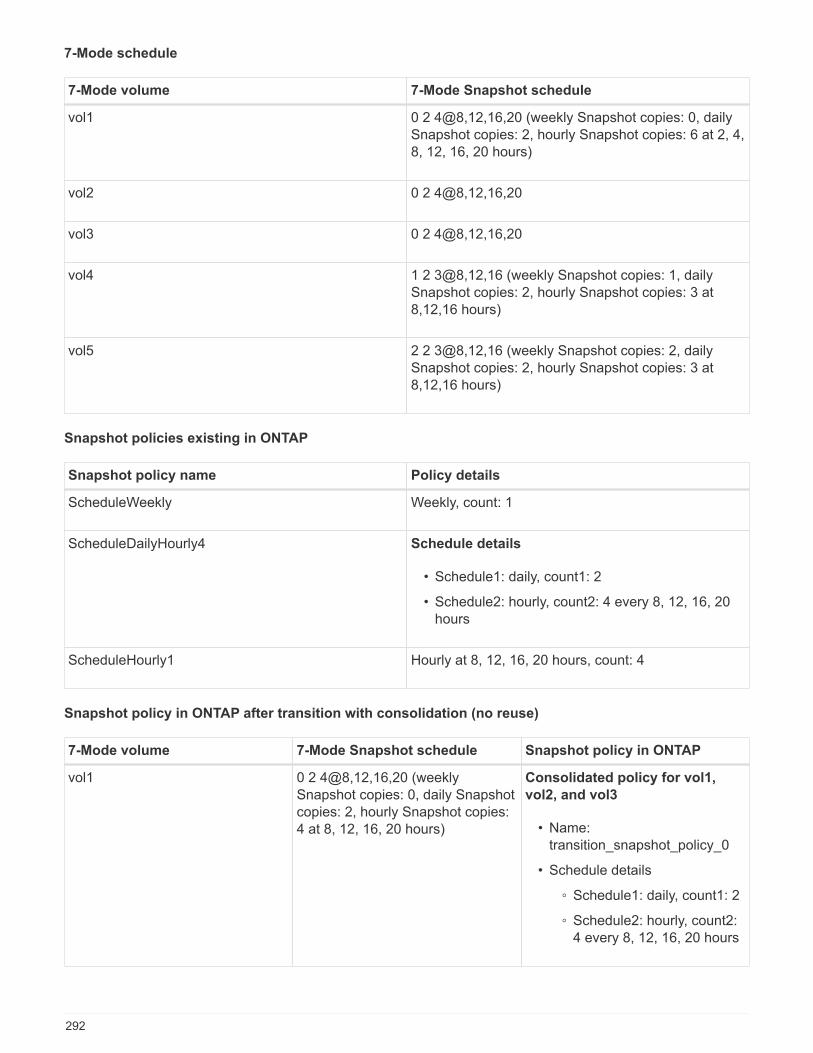
7-Mode schedule
7-Mode volume 7-Mode Snapshot schedule
vol1 0 2 4@8,12,16,20 (weekly Snapshot copies: 0, daily
Snapshot copies: 2, hourly Snapshot copies: 6 at 2, 4,
8, 12, 16, 20 hours)
vol2 0 2 4@8,12,16,20
vol3 0 2 4@8,12,16,20
vol4 1 2 3@8,12,16 (weekly Snapshot copies: 1, daily
Snapshot copies: 2, hourly Snapshot copies: 3 at
8,12,16 hours)
vol5 2 2 3@8,12,16 (weekly Snapshot copies: 2, daily
Snapshot copies: 2, hourly Snapshot copies: 3 at
8,12,16 hours)
Snapshot policies existing in ONTAP
Snapshot policy name Policy details
ScheduleWeekly Weekly, count: 1
ScheduleDailyHourly4 Schedule details
• Schedule1: daily, count1: 2
• Schedule2: hourly, count2: 4 every 8, 12, 16, 20
hours
ScheduleHourly1 Hourly at 8, 12, 16, 20 hours, count: 4
Snapshot policy in ONTAP after transition with consolidation (no reuse)
7-Mode volume 7-Mode Snapshot schedule Snapshot policy in ONTAP
vol1 0 2 4@8,12,16,20 (weekly
Snapshot copies: 0, daily Snapshot
copies: 2, hourly Snapshot copies:
4 at 8, 12, 16, 20 hours)
Consolidated policy for vol1,
vol2, and vol3
• Name:
transition_snapshot_policy_0
• Schedule details
◦ Schedule1: daily, count1: 2
◦ Schedule2: hourly, count2:
4 every 8, 12, 16, 20 hours
292
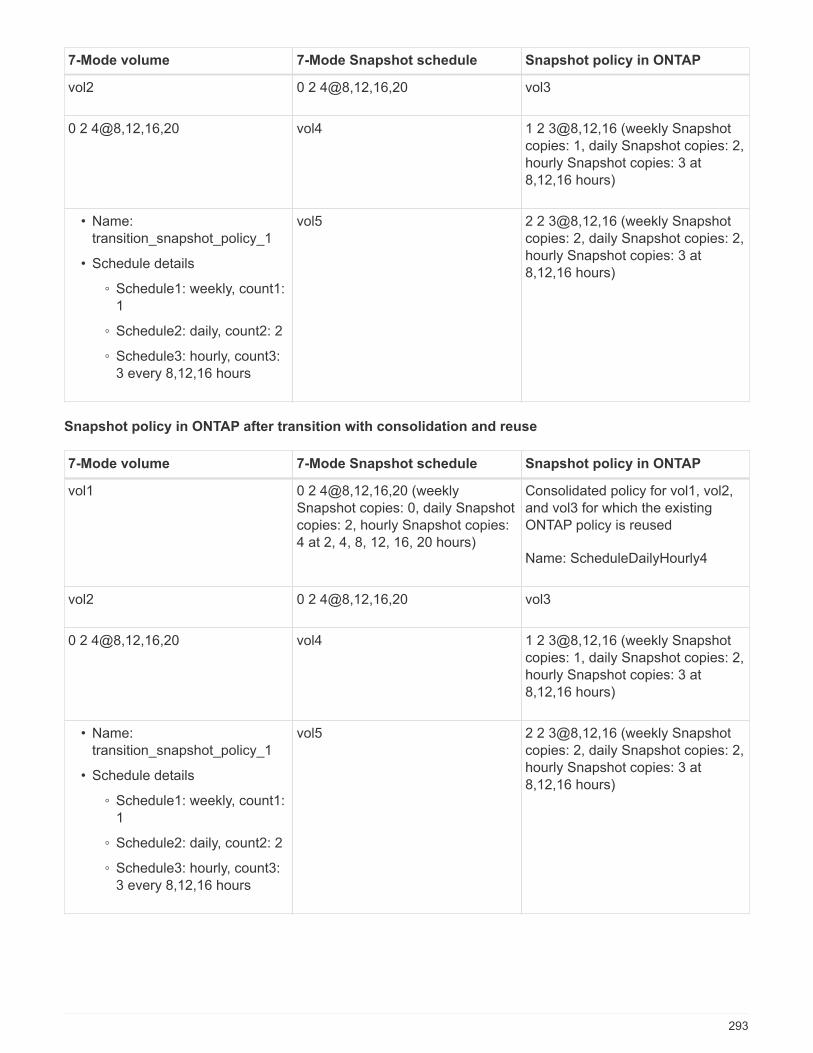
7-Mode volume 7-Mode Snapshot schedule Snapshot policy in ONTAP
vol2 0 2 4@8,12,16,20 vol3
0 2 4@8,12,16,20 vol4 1 2 3@8,12,16 (weekly Snapshot
copies: 1, daily Snapshot copies: 2,
hourly Snapshot copies: 3 at
8,12,16 hours)
• Name:
transition_snapshot_policy_1
• Schedule details
◦ Schedule1: weekly, count1:
1
◦ Schedule2: daily, count2: 2
◦ Schedule3: hourly, count3:
3 every 8,12,16 hours
vol5 2 2 3@8,12,16 (weekly Snapshot
copies: 2, daily Snapshot copies: 2,
hourly Snapshot copies: 3 at
8,12,16 hours)
Snapshot policy in ONTAP after transition with consolidation and reuse
7-Mode volume 7-Mode Snapshot schedule Snapshot policy in ONTAP
vol1 0 2 4@8,12,16,20 (weekly
Snapshot copies: 0, daily Snapshot
copies: 2, hourly Snapshot copies:
4 at 2, 4, 8, 12, 16, 20 hours)
Consolidated policy for vol1, vol2,
and vol3 for which the existing
ONTAP policy is reused
Name: ScheduleDailyHourly4
vol2 0 2 4@8,12,16,20 vol3
0 2 4@8,12,16,20 vol4 1 2 3@8,12,16 (weekly Snapshot
copies: 1, daily Snapshot copies: 2,
hourly Snapshot copies: 3 at
8,12,16 hours)
• Name:
transition_snapshot_policy_1
• Schedule details
◦ Schedule1: weekly, count1:
1
◦ Schedule2: daily, count2: 2
◦ Schedule3: hourly, count3:
3 every 8,12,16 hours
vol5 2 2 3@8,12,16 (weekly Snapshot
copies: 2, daily Snapshot copies: 2,
hourly Snapshot copies: 3 at
8,12,16 hours)
293
Running prechecks
You can run prechecks to identify any issues before you start a transition. Prechecks
verify that the 7-Mode sources, ONTAP targets, and configurations are valid for your
transition. You can run prechecks any number of times.
The prechecks run more than 200 different checks. For example, the tool checks for items such as if volumes
are online and network access exists between the systems.
1. From Dashboard, select the project for which you want to run the prechecks.
2. Click Run Prechecks.
After the prechecks are complete, the result summary is displayed in the dialog box.
The prechecks usually take only a few minutes to run, but the duration of the precheck
phase depends on the number and type of errors or warnings that you resolve.
Steps
1. Choose an option under Apply Type Filter to filter the results:
◦ To view all messages related to security, select Error, Warning, Informational, and Security Only.
◦ To view all error messages related to security, select Error and Security Only.
◦ To view all warning messages related to security, select Warningand Security Only.
◦ To view all informational messages related to security, select Informational and Security Only.
2. To save the raw results in comma-separated values (CSV) format and export the results, click Save As
CSV.
You can view the transition operations that have been performed during the transition along with the
operation type, status, start time, end time, and results in the Operation History tab on the Dashboard
pane.
You must resolve all the errors detected by the prechecks before you start data copy. It is also a best practice
to resolve all warnings prior to proceeding with the migration process. Resolution can be resolving the source
issue of the warning message, implementing a workaround, or accepting the result of the issue.
Severity levels for precheck messages
You can verify whether the 7-Mode volumes can be transitioned by running the transition
precheck operation. Transition precheck reports all the transition issues. Transition issues
are assigned different severity levels, depending on the impact of the issue on the
transition process.
The issues detected by the prechecks are classified into the following categories:
• Error
Configurations that cannot be transitioned.
You cannot continue the transition if there is even one error. The following are a few example
configurations on the 7-Mode system that cause an error:
294
◦ Traditional volumes
◦ SnapLock volumes
◦ Offline volumes
• Warning
Configurations that can cause minor problems after transition.
Features that are supported in ONTAP, but are not transitioned by the 7-Mode Transition Tool, also
generate a warning message. You can continue the transition with these warnings. However, after the
transition you might lose some of these configurations or might have to complete some manual tasks for
enabling these configurations in ONTAP.
The following are a few example configurations on the 7-Mode system that generate a warning:
◦ IPv6
◦ NFSv2
◦ NDMP configurations
◦ Interface groups and VLANs
◦ Routing Information Protocol (RIP)
• Information
Configurations that have been successfully transitioned.
Applying SVM configurations
You must manually apply some configurations before the SVM provision phase. You can
then apply all configurations that are defined in the 7-Mode controller (files in the /etc
directory) or at the vFiler unit level to the mapped SVMs by using the tool.
If you do not want to transition all configurations to the target SVMs, you must have set the properties for the
configurations to be excluded on the SVMs.
Customizing the transition of 7-Mode configurations
• Configurations such as NFS exports, CIFS shares, and LUN mapping are not applied to the SVM in the
SVM provision phase.
• The following configurations are applied by the tool on the SVMs in the SVM provision phase:
◦ Name services
▪ DNS configuration
▪ LDAP configuration
▪ NIS configuration
▪ Name service switch configuration
▪ Hosts configuration
▪ UNIX users and groups
▪ Netgroups configuration
295
◦ Networking
▪ Existing 7-Mode IP addresses that are selected for transition are created in the administrative down
state.
During the import phase, these IP addresses are configured in the administrative up state.
▪ New IP addresses are created in the administrative up state.
◦ NFS
NFS options
◦ CIFS
▪ CIFS preferred DC configuration
▪ User mapping configuration
▪ Widelinks configuration
▪ CIFS options
▪ Audit configuration
◦ SAN
FC and iSCSI services
You cannot rerun this operation after it is completed successfully.
Therefore, if you make any changes to the 7-Mode controller-level configurations after
this operation, you must manually transition the configurations to the target SVMs before
the export phase. For example, if you add a new vFiler unit to the 7-Mode controller and
map it to an SVM after this operation, you must manually transition the configurations of
that vFiler unit to the mapped SVM. Another example is if you add some UNIX users on
the 7-Mode controller after the SVM provision phase, you must create these UNIX users
manually on the mapped SVMs.
Steps
1. Click Apply SVM Config to apply the 7-Mode configurations to the target SVMs.
A confirmation message that lists important considerations for this operation is displayed.
2. Click Yes to continue.
3. After the operation is complete, perform the following steps:
a. Click Save as CSV to save the operation results in a file.
b. Click Collect Project Logs to create a backup of all of the transition log files.
It is a best practice to save the log files after each transition operation.
c. Click Close to close the operation results window.
If the operation takes a long time to complete, you can click Run in Background to exit the operation
results window. You should not edit the project or perform any other task when the operation is running in
the background. You can then view the operations results from the Operation History tab.
296
4. Verify and test the configurations that are applied to the target SVMs manually and make the required
changes.
5. Manually verify the connectivity to external name servers.
Verifying that 7-Mode systems are ready for cutover
Before disconnecting client access, you can verify the readiness of the 7-Mode system
for storage cutover, such as verifying whether the SP or RLM is configured on the 7-Mode
system and whether the disk shelves, aggregates, and volumes are ready for transition.
You can manually fix any issues before the export operation, thereby reducing the
downtime.
You can run this operation multiple times before the export and halt operation is initiated.
Steps
1. Click Check Readiness to verify that the 7-Mode systems are ready for cutover.
Although this operation is optional, it is a best practice to verify the readiness of the systems and fix issues
before the export operation in order to minimize the storage cutover window.
2. Wait for the operation to complete and do the following:
a. Click Save as CSV to save the operation results in a file.
b. Click Collect Tool Logs to take a backup of all the transition log files.
It is a best practice to save the log files after each transition operation.
c. Click Close to close the operation results window.
If the operation takes a long time to complete, you can click Run in Background to exit the operation
results window. You should not edit the project or perform any other task when the operation is running in
the background. You can then view the operations results from the Operation History tab.
Exporting storage configurations and halting 7-Mode systems
The cutover window for the transition starts from the export phase. In this phase, the tool
collects system information, disk shelf details, and storage configurations from the 7-
Mode systems, and then halts the 7-Mode storage systems.
• The Service Processor (SP) or Remote LAN Module (RLM) must be configured with an IPv4 address on
the 7-Mode system.
• All clients must be disconnected from the 7-Mode systems (by unmounting NFS exports, disconnecting
CIFS shares, and shutting down SAN hosts), but the applicable NAS and SAN services must be running on
the 7-Mode systems.
You must not stop any protocol services because they are required for collecting the protocol
configurations from the 7-Mode storage systems.
• Any data written to the 7-Mode volumes during this operation is lost.
• You must not perform any management operations on the 7-Mode systems during this operation.
297
• The tool performs the following operations in the export phase:
◦ Collects all volume and storage configurations
◦ Creates a Snapshot copy of each transitioning aggregate
If you decide to revert to 7-Mode at any stage of transition, these Snapshot copies are used by the tool
for the revert operation.
◦ Boots the 7-Mode controllers in maintenance mode
◦ Removes disk ownerships from the 7-Mode controllers
◦ Disables disk autoassignment on the target cluster nodes
Steps
1. Click Export & Halt.
A message that lists important considerations for this operation is displayed.
2. Click the Confirm that the client access is disconnected check box.
3. Click Yes to continue with the export and halt operation.
The operation results are displayed.
4. Wait for the operation to complete and perform the following steps to save the operation results and collect
the tool logs:
a. Click Save as CSV to save the operation results in a file.
b. Click Collect Tool Logs to create a backup of all the transition log files.
It is a best practice to save the log files after each transition operation.
c. Click Close to close the operation results window.
If the operation takes a long time to complete, you can click Run in Background to exit the operation
results window. You should not edit the project or perform any other task when the operation is running in
the background. You can then view the operations results from the Operation History tab.
Disconnecting disk shelves from the 7-Mode system and connecting to clusternodes
Cabling the 7-Mode disk shelves to the target cluster nodes is a manual process. After
cabling the disk shelves, it is a best practice to verify the cabling by using Config Advisor.
You can then verify the cabling by using the 7-Mode Transition Tool. The tool performs
only a subset of the checks that are performed by Config Advisor.
You must have recorded the information about disk shelf connectivity to the 7-Mode controller ports.
You must be aware of some of the considerations for connecting SAS disk shelves:
• You must follow the rules for cabling SAS square and circle ports.
• IOM6 and IOM3 shelves can be mixed in the same stack, but there should be no more than a single
transition between shelves that are using different IOM types.
298
For example, IOM6e (controller)--IOM6 (shelf)--IOM3 (shelf)--IOM3 (shelf) is a supported configuration. But
IOM6e (controller)--IOM3 (shelf)--IOM6 (shelf)--IOM3 (shelf) is not a supported configuration.
Steps
1. Check the disk shelf IDs in the 7-Mode HA pair and the target cluster nodes:
a. If there are duplicate shelf IDs (if the 7-Mode disk shelf IDs are used for the disk shelves in the target
cluster nodes), change the disk shelf IDs.
▪ For SAS disk shelves, a valid shelf ID is 00 through 99.
▪ SAS shelf IDs must be unique within the HA pair.
SAS Disk Shelves Installation and Service Guide for DS4243, DS2246, DS4486, and DS4246
▪ For FC disk shelves, a valid shelf ID is 1 through 7.
▪ FC shelf IDs must be unique within each FC loop.
DS14mk2 FC, and DS14mk4 FC Hardware Service Guide
b. Power cycle the disk shelves for the new IDs to take effect.
2. Power off the 7-Mode disk shelves.
3. Depending on whether additional ports are available on the target cluster nodes, choose one of the
following options:
If… Then…
Additional ports are available to connect the disk
shelves
Connect the disk shelves in a new stack to the
target cluster nodes in a multipath configuration.
It is the best practice to connect the
disk shelves to a separate stack. The
7-Mode Transition Tool detects the
availability of the required number of
ports on the target cluster nodes
when prechecks are run.
Ports are not available to connect the disk shelves Perform one of the following actions:
• Add a new expansion card and connect the disk
shelves in a new stack to the target cluster
nodes in a multipath configuration.
You must have verified that the expansion card
is supported on the destination platform.
• Connect the disk shelves to an existing stack in
a multipath configuration.
SAS Disk Shelves Installation and Service Guide for DS4243, DS2246, DS4486, and DS4246
DiskShelf14mk2 AT Hardware Service Guide
DS14mk2 FC, and DS14mk4 FC Hardware Service Guide
299
4. Power on the disk shelves.
You must wait for at least 70 seconds before you proceed.
5. Use Config Advisor to verify the connections.
You must fix any cabling issues identified by Config Advisor.
NetApp Downloads: Config Advisor
6. From the 7-Mode Transition Tool, click Verify Cabling.
A message listing the important considerations for this operation is displayed.
Troubleshooting: If there are missing disks in an aggregate, the aggregate becomes degraded and the
cabling verification fails. If the number of missing disks is within a permissible limit, you can continue the
transition with the degraded aggregates by running the following command from the 7-Mode Transition Tool
CLI:
transition cft aggregate degraded-transition -p project_name -n 7-
mode_host_name -a 7-mode_aggregate_name -i acknowledge
You can then rerun the cabling verification operation and continue with the transition. You must ensure that
there are enough spare disks in the target cluster node to reconstruct these RAID groups after the
aggregates are transitioned.
7. Click Yes to continue.
8. Wait for the operation to complete and perform the following steps to save the operation results and collect
the tool logs:
a. Click Save as CSV to save the operation results in a file.
b. Click Collect Tool Logs to create a backup of all the transition log files.
It is a best practice to save the log files after each transition operation.
c. Click Close.
If the operation takes a long time to complete, you can click Run in Background to exit the operation
results window. You should not edit the project or perform any other task when the operation is running in
the background. You can then view the operations results from the Operation History tab.
Related information
Gathering cabling information for transition
Importing 7-Mode data to ONTAP
After verifying the cabling and resolving any issues, you can run the import operation. In
this phase, the disk ownership is assigned to the mapped cluster nodes, and the 7-Mode
aggregates, volumes, and LUNs are converted to the ONTAP format. All the volume-level
and LUN-level configurations are also applied.
The following operations are performed by the tool in this phase:
300
• 7-Mode disks are assigned to the mapped target cluster nodes.
• All the 7-Mode aggregates, volumes, and LUNs are converted to the ONTAP format.
• The 7-Mode IP addresses that were selected for transition are configured on the SVMs in the
administrative up state.
• The following configurations are applied:
◦ NFS export rules
◦ CIFS shares
◦ CIFS ACLs configuration
◦ CIFS home directory configuration
◦ CIFS symbolic links
◦ Quota configuration
◦ Snapshot copy schedules
◦ LUN maps and igroups
Steps
1. Click Import.
Troubleshooting: If there are missing disks in an aggregate, the aggregate becomes degraded and the
import operation fails. If the number of missing disks is within a permissible limit, you can continue the
transition with the degraded aggregates by running the following command from the 7-Mode Transition Tool
CLI:
transition cft aggregate degraded-transition -p project-name -n 7-mode-host-
name -a 7-mode-aggregate-name -i acknowledge
You can then rerun the cabling verification operation and continue with the transition. You must make sure
that there are enough spare disks in the target cluster node to reconstruct these RAID groups after the
aggregates are transitioned.
A warning message is displayed, listing the important considerations for this operation.
2. Click Yes to continue.
The operation results are displayed.
3. Wait for the operation to complete and do the following:
a. Click Save as CSV to save the operation results in a file.
b. Click Collect Tool Logs to take a backup of all the transition log files.
It is a best practice to save the log files after each transition operation.
c. Click Close to close the operation results window.
If the operation takes a long time to complete, you can click Run in Background to exit the operation
results window. You should not edit the project or perform any other task when the operation is running in
the background. You can then view the operations results from the Operation History tab.
301
Completing the transition
Completing the transition involves manually verifying the transitioned volumes and
configurations, testing your workload, starting production, and then committing the copy-
free transition project. Because rollback is not allowed after the commit operation, you
should verify all workloads and start production for a brief duration to evaluate if rollback
is required.
Restrictions during preproduction testing
Some operations are blocked and some operations are not recommended during
preproduction testing. These restrictions are imposed for allowing a rollback to 7-Mode if
you do not want to commit the transition.
Operations that are blocked
Operation Description
Automatically deleting (autodelete) aggregate
Snapshot copies
Because the 7-Mode aggregate-level Snapshot
copies created during the export operation are
required in case of a rollback, the Snapshot copies
are not deleted automatically when the used space in
the aggregate grows.
You must monitor the free physical
space in the aggregate and ensure that
the aggregates do not run out of space
during the testing.
Moving volumes to another aggregate • You cannot move volumes to the transitioned
aggregates.
• You can move volumes from the transitioned
aggregates to aggregates in the cluster.
Copying or moving LUNs across volumes • You cannot copy or move LUNs to the transitioned
volumes.
• You can copy or move LUNs from the transitioned
volumes to other volumes in the cluster.
Creating an aggregate This operation is restricted on the target cluster HA
pair. You can create aggregates on other nodes in the
cluster.
Destroying an aggregate Because the 7-Mode aggregate-level Snapshot
copies created during the export operation are
required in case of a rollback, the transitioned
aggregates cannot be destroyed.
302
Operation Description
Setting up a transitioned aggregate as the root
aggregate
The transitioned aggregates cannot be selected as
root aggregates. Additionally, you cannot modify the
HA policy of the transitioned aggregates to CFO.
Performing file copy operations • You cannot move or copy files (single file copy-on-
demand) to the transitioned volumes.
• You can move or copy files from the transitioned
volumes to other volumes in the cluster.
Mirroring an existing aggregate The operation is blocked on all the aggregates in the
cluster.
Upgrading or reverting the Data ONTAP version on
the target cluster nodes
You must commit the project before upgrading or
reverting the target cluster nodes.
Adding disks You cannot run the storage aggregate add-
disks command in the admin privilege level.
However, you can run this command in the advanced
privilege level.
You must ensure that only the spare
disks from the 7-Mode disk shelves are
added for increasing the space in the
transitioned aggregates. You must add
spare disks by using the -disklist
parameter (the -diskcount
parameter must not be used).
Designating a transitioned volume as the SVM root
volumeYou cannot run the volume make-vsroot
command on the transitioned volumes.
Operations that are not recommended
Operation Corrective action before rollback
Relocating aggregates
The ownership of the transitioned aggregate is
changed to its HA partner.
Swap the aggregate ownership before rollback
because the 7-Mode Transition Tool maps the
aggregates to the 7-Mode controllers based on the
target node mapping information saved in the project.
Creating volumes on the transitioned aggregates You must delete these volumes or move them to
different aggregates.
Renaming aggregates or volumes Rename the aggregates or volumes to their original
names.
303
Operation Corrective action before rollback
Changing the RAID type The RAID type must match the 7-Mode RAID type if
you decide to roll back to 7-Mode.
Related information
ONTAP 9 commands
Rehosting transitioned volumes to a different SVM
Volume rehost enables you to migrate a transitioned volume from one SVM to another
SVM without data copy. The rehost operation enables you to consolidate all volumes that
have FC LUNs to a single SVM, thereby preserving the 7-Mode single-system image
(SSI) semantics. You can also rehost transitioned NAS volumes.
• The volume that you want to rehost must be online.
• Volume management operations, such as volume move or LUN move, must not be running.
• Data access to the volume that is being rehosted must be stopped.
Rehosting is a disruptive operation.
The following volume policies, policy rules, and configurations are lost from the source volume and must be
manually reconfigured on the rehosted volume after the rehost operation:
• Volume and qtree export policies
• Antivirus policies
• Volume efficiency policy
• Quality of Service (QoS) policies
• Snapshot policies
• Quota rules
• CIFS shares
• igroups associated with a portset
Steps
• Rehosting FC and iSCSI volumes
a. Switch to the advanced privilege level:
set -privilege advanced
b. Rehost the volume on the destination SVM:
304
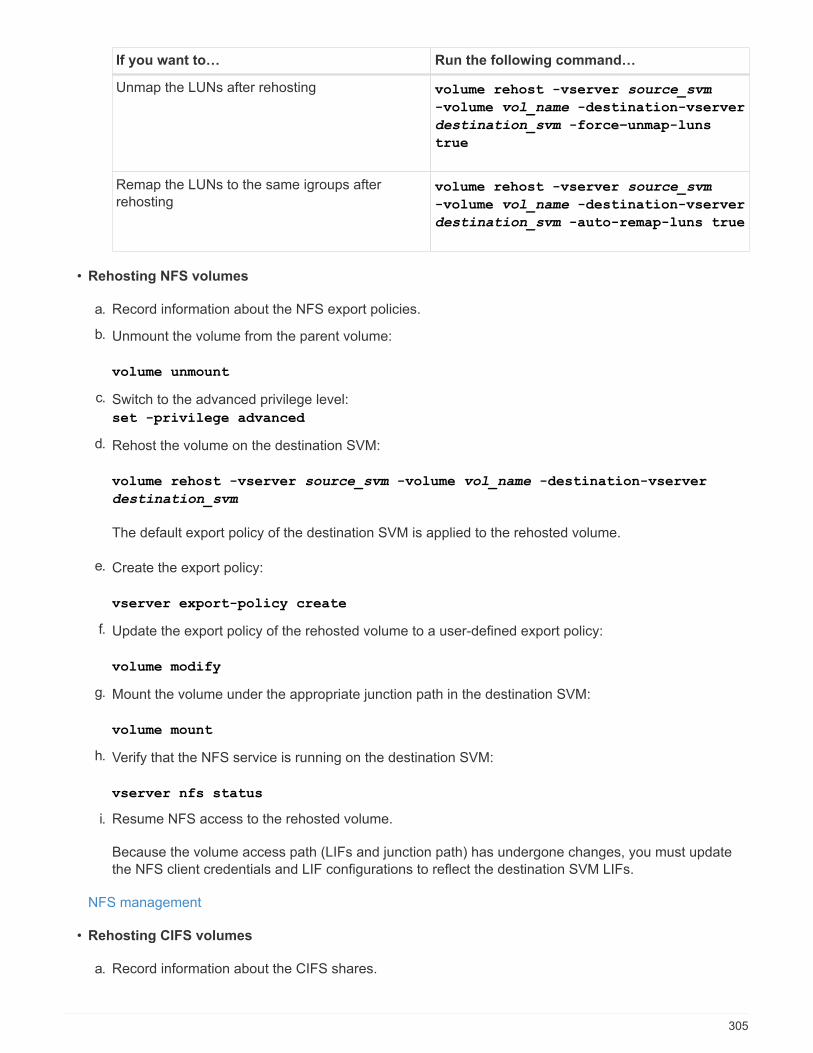
If you want to… Run the following command…
Unmap the LUNs after rehosting volume rehost -vserver source_svm
-volume vol_name -destination-vserver
destination_svm -force–unmap-luns
true
Remap the LUNs to the same igroups after
rehostingvolume rehost -vserver source_svm
-volume vol_name -destination-vserver
destination_svm -auto-remap-luns true
• Rehosting NFS volumes
a. Record information about the NFS export policies.
b. Unmount the volume from the parent volume:
volume unmount
c. Switch to the advanced privilege level:
set -privilege advanced
d. Rehost the volume on the destination SVM:
volume rehost -vserver source_svm -volume vol_name -destination-vserver
destination_svm
The default export policy of the destination SVM is applied to the rehosted volume.
e. Create the export policy:
vserver export-policy create
f. Update the export policy of the rehosted volume to a user-defined export policy:
volume modify
g. Mount the volume under the appropriate junction path in the destination SVM:
volume mount
h. Verify that the NFS service is running on the destination SVM:
vserver nfs status
i. Resume NFS access to the rehosted volume.
Because the volume access path (LIFs and junction path) has undergone changes, you must update
the NFS client credentials and LIF configurations to reflect the destination SVM LIFs.
NFS management
• Rehosting CIFS volumes
a. Record information about the CIFS shares.
305
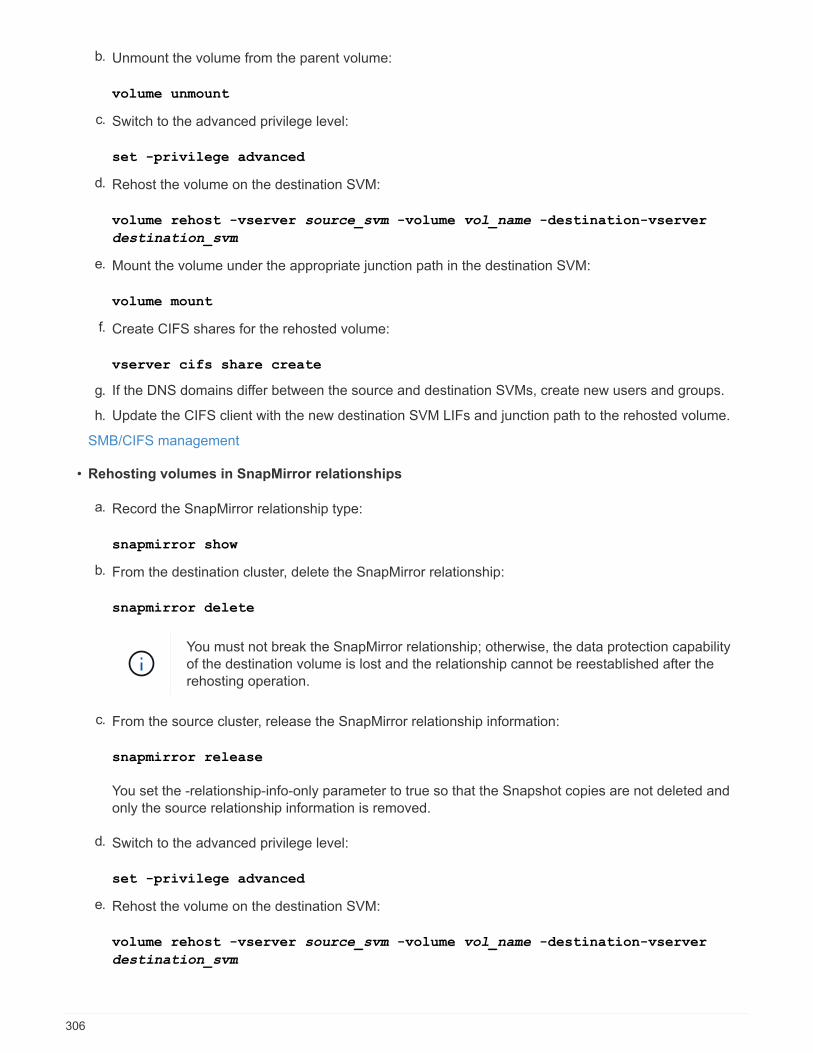
b. Unmount the volume from the parent volume:
volume unmount
c. Switch to the advanced privilege level:
set -privilege advanced
d. Rehost the volume on the destination SVM:
volume rehost -vserver source_svm -volume vol_name -destination-vserver
destination_svm
e. Mount the volume under the appropriate junction path in the destination SVM:
volume mount
f. Create CIFS shares for the rehosted volume:
vserver cifs share create
g. If the DNS domains differ between the source and destination SVMs, create new users and groups.
h. Update the CIFS client with the new destination SVM LIFs and junction path to the rehosted volume.
SMB/CIFS management
• Rehosting volumes in SnapMirror relationships
a. Record the SnapMirror relationship type:
snapmirror show
b. From the destination cluster, delete the SnapMirror relationship:
snapmirror delete
You must not break the SnapMirror relationship; otherwise, the data protection capability
of the destination volume is lost and the relationship cannot be reestablished after the
rehosting operation.
c. From the source cluster, release the SnapMirror relationship information:
snapmirror release
You set the -relationship-info-only parameter to true so that the Snapshot copies are not deleted and
only the source relationship information is removed.
d. Switch to the advanced privilege level:
set -privilege advanced
e. Rehost the volume on the destination SVM:
volume rehost -vserver source_svm -volume vol_name -destination-vserver
destination_svm
306
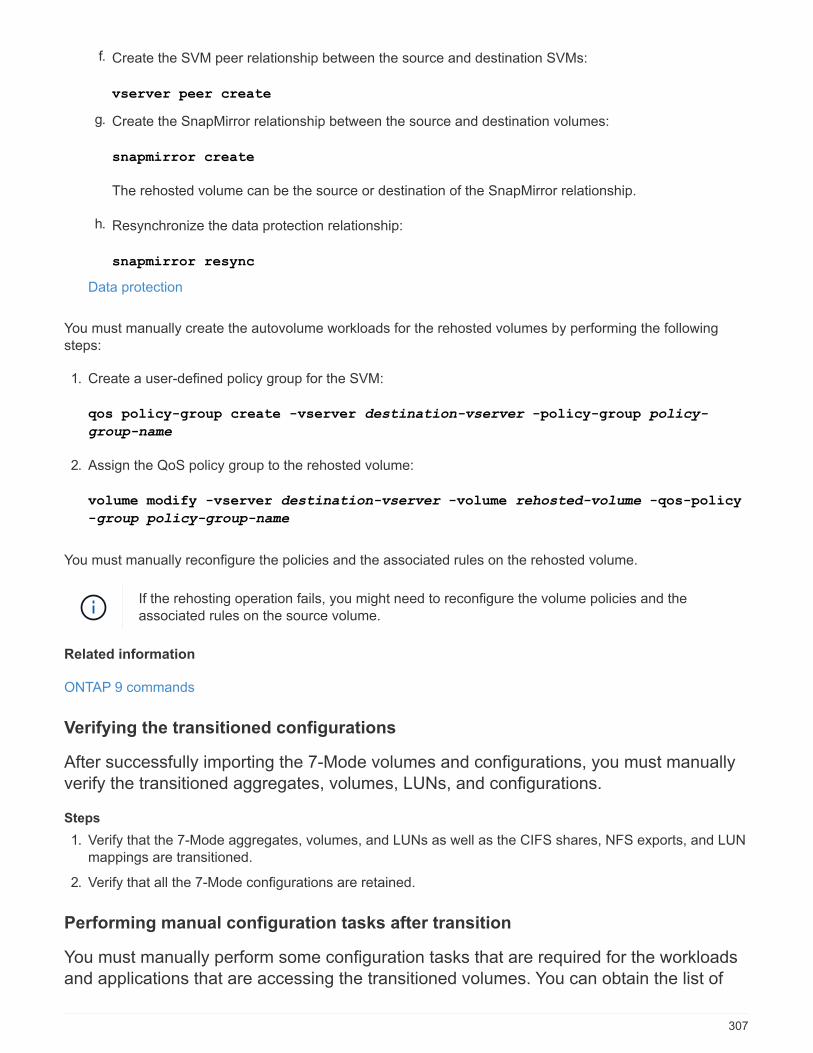
f. Create the SVM peer relationship between the source and destination SVMs:
vserver peer create
g. Create the SnapMirror relationship between the source and destination volumes:
snapmirror create
The rehosted volume can be the source or destination of the SnapMirror relationship.
h. Resynchronize the data protection relationship:
snapmirror resync
Data protection
You must manually create the autovolume workloads for the rehosted volumes by performing the following
steps:
1. Create a user-defined policy group for the SVM:
qos policy-group create -vserver destination-vserver -policy-group policy-
group-name
2. Assign the QoS policy group to the rehosted volume:
volume modify -vserver destination-vserver -volume rehosted-volume -qos-policy
-group policy-group-name
You must manually reconfigure the policies and the associated rules on the rehosted volume.
If the rehosting operation fails, you might need to reconfigure the volume policies and the
associated rules on the source volume.
Related information
ONTAP 9 commands
Verifying the transitioned configurations
After successfully importing the 7-Mode volumes and configurations, you must manually
verify the transitioned aggregates, volumes, LUNs, and configurations.
Steps
1. Verify that the 7-Mode aggregates, volumes, and LUNs as well as the CIFS shares, NFS exports, and LUN
mappings are transitioned.
2. Verify that all the 7-Mode configurations are retained.
Performing manual configuration tasks after transition
You must manually perform some configuration tasks that are required for the workloads
and applications that are accessing the transitioned volumes. You can obtain the list of
307
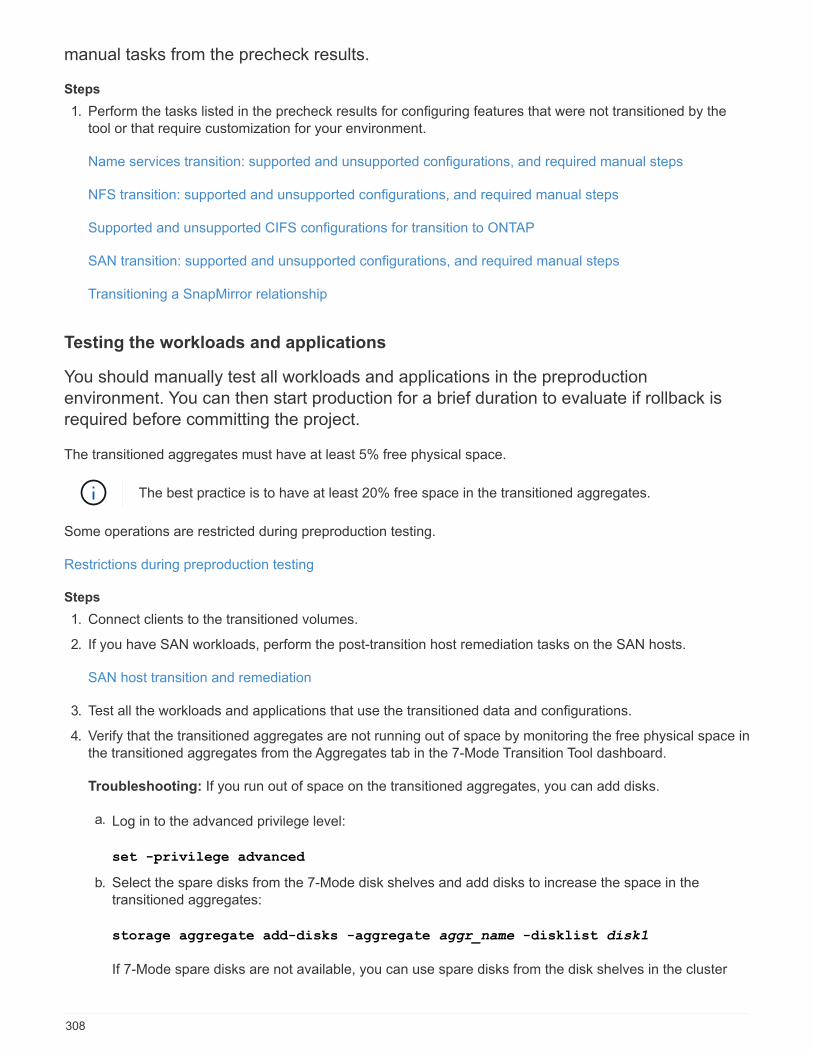
manual tasks from the precheck results.
Steps
1. Perform the tasks listed in the precheck results for configuring features that were not transitioned by the
tool or that require customization for your environment.
Name services transition: supported and unsupported configurations, and required manual steps
NFS transition: supported and unsupported configurations, and required manual steps
Supported and unsupported CIFS configurations for transition to ONTAP
SAN transition: supported and unsupported configurations, and required manual steps
Transitioning a SnapMirror relationship
Testing the workloads and applications
You should manually test all workloads and applications in the preproduction
environment. You can then start production for a brief duration to evaluate if rollback is
required before committing the project.
The transitioned aggregates must have at least 5% free physical space.
The best practice is to have at least 20% free space in the transitioned aggregates.
Some operations are restricted during preproduction testing.
Restrictions during preproduction testing
Steps
1. Connect clients to the transitioned volumes.
2. If you have SAN workloads, perform the post-transition host remediation tasks on the SAN hosts.
SAN host transition and remediation
3. Test all the workloads and applications that use the transitioned data and configurations.
4. Verify that the transitioned aggregates are not running out of space by monitoring the free physical space in
the transitioned aggregates from the Aggregates tab in the 7-Mode Transition Tool dashboard.
Troubleshooting: If you run out of space on the transitioned aggregates, you can add disks.
a. Log in to the advanced privilege level:
set -privilege advanced
b. Select the spare disks from the 7-Mode disk shelves and add disks to increase the space in the
transitioned aggregates:
storage aggregate add-disks -aggregate aggr_name -disklist disk1
If 7-Mode spare disks are not available, you can use spare disks from the disk shelves in the cluster
308
nodes; however, doing so complicates the rollback process.
You can start serving production data.
You can serve data in the production environment for a brief duration to ensure that the
workloads are operating correctly in a production environment and a rollback to 7-Mode is not
required. You must not prolong this phase and must not delay committing the copy-free
transition project for the following reasons:
• The probability of running out of space in the transitioned aggregates increases as new data
is written to the volumes.
• Any new data written to the volumes during this stage will not be available during rollback.
Related information
Performing a transition rollback to 7-Mode
ONTAP 9 commands
Committing the copy-free transition project
The final step in transition is to commit the copy-free transition project. After committing
the aggregates, you cannot perform a rollback to 7-Mode.
You must have manually verified the transitioned data and configurations and tested workloads and
applications.
All the aggregate-level Snapshot copies that were created in the export phase are deleted.
Steps
1. Click Commit.
2. In the warning message that is displayed, click Yes.
All the preproduction testing phase restrictions are removed and the transitioned volumes can serve production
data, if not done in the preproduction testing phase.
Transitioning a SnapMirror relationship
You can transition the secondary HA pair first, set up a staggered SnapMirror relationship
between the 7-Mode primary volumes and clustered Data ONTAP secondary volumes,
and then transition the primary HA pair later. In some scenarios, you must transition the
secondary and primary HA pairs of a 7-Mode SnapMirror relationship in parallel.
If all the primary volumes belong to one HA pair and all the secondary volumes belong to the other HA pair,
you can transition by using the staggered method.
If either HA pair has a mix of primary and secondary volumes, you must transition by using the parallel method.
After transitioning the primary and secondary HA pairs, you must manually set up the volume SnapMirror
relationship in clustered Data ONTAP after transition. For a successful resynchronization, at least one common
Snapshot copy, which is created in Data ONTAP 8.1 or later, must exist between the primary and secondary
309

volumes of the SnapMirror relationship.
Related information
Cluster management using System Manager
Transitioning HA pairs in a SnapMirror relationship in a staggered configuration
You can transition the secondary HA pair first, set up a staggered SnapMirror relationship
between the 7-Mode primary volumes and ONTAP secondary volumes, and then
transition the primary HA pair later.
You must have prepared the source and destination clusters for transitioning the SnapMirror relationships.
Preparing the cluster for transitioning volume SnapMirror relationships
Steps
1. From the 7-Mode Transition Tool, perform a copy-free transition of the HA pair that contain the secondary
volumes of the 7-Mode volume SnapMirror relationships.
Before transitioning the 7-Mode HA pair that contains the secondary volumes, no manual intervention is
required for the 7-Mode SnapMirror relationships. This ensures that the 7-Mode secondary volumes are
transitioned as read-only volumes to ONTAP.
Transitioning 7-Mode aggregates using copy-free transition
2. During the precommit testing phase of the secondary HA pair, create a disaster recovery relationship
between the 7-Mode primary volume and ONTAP secondary volume:
a. From the secondary destination cluster, use the vserver peer transition create command to
create an SVM peer relationship between the 7-Mode primary volume and the ONTAP secondary
volume.
b. Use the job schedule cron create command to create a job schedule that matches the schedule
configured for the 7-Mode SnapMirror relationship.
c. Use the snapmirror create command to create a SnapMirror relationship of type TDP between the
7-Mode primary volume and the ONTAP secondary volume.
d. Use the snapmirror resync command to resynchronize the ONTAP secondary volume.
For successful resynchronization, a common 7-Mode Snapshot copy must exist between the 7-Mode
primary volume and the ONTAP secondary volume.
3. Perform the required testing of the transitioned aggregates and volumes.
4. From the 7-Mode Transition Tool, commit the transition of the project for the secondary HA pair.
Committing the copy-free transition project
5. Perform a copy-free transition of the HA pair that contains the primary volumes of the 7-Mode volume
SnapMirror relationships.
Transitioning 7-Mode aggregates using copy-free transition
6. During the precommit testing phase of the primary HA pair, create a SnapMirror relationship between the
transitioned secondary and primary volumes.
310
a. From the destination cluster, create an intercluster SVM peer relationship between the SVMs that
contain the transitioned primary and secondary volumes.
System administration
b. Use the snapmirror delete command to delete the TDP SnapMirror relationship between the 7-
Mode primary volume and the ONTAP secondary volume that was created in Step
#SUBSTEP_D528769DF8EC49058D1958565914CF47.
c. Delete the cron job schedule that was created in Step
#SUBSTEP_EB470706425C45759EAAE8F0A87BA547:
job schedule cron delete
d. Create a volume SnapMirror relationship between the transitioned primary and secondary volumes.
Volume disaster recovery express preparation
e. On the destination volume, resynchronize the source volume and destination volume of the SnapMirror
relationship:
snapmirror resync
At least one common Snapshot copy must exist between the source and destination
volumes.
Troubleshooting: SnapMirror resynchronization fails if the common Snapshot copy was created in a
Data ONTAP release earlier than 8.1. You can use the -fs-version parameter with the volume
snapshot show command in the advanced privilege level to view the release in which the Snapshot
copy is created. If this issue occurs, break the SnapMirror relationship and then perform the
resynchronization.
f. Monitor the status of the SnapMirror data transfers:
snapmirror show
You must not perform any operation, such as volume move or SnapMirror break, on the
source and destination volumes until the resynchronization is completed successfully.
Ensure that the resynchronization does not get aborted and completes successfully;
otherwise, the volumes can go to an inconsistent state.
7. Commit the transition of the primary project.
Committing the copy-free transition project
Related information
7-Mode data transition using SnapMirror
ONTAP 9 commands
311
Transitioning primary and secondary systems in a SnapMirror relationship inparallel
You can transition the primary and secondary HA pairs that contain the volumes of a 7-
Mode SnapMirror relationship in parallel. You must then manually set up the volume
SnapMirror relationship in clustered Data ONTAP after transition. The SnapMirror
relationship is retained after transition without requiring a rebaseline.
You must have prepared the source and destination clusters for transitioning the SnapMirror relationships.
Preparing the cluster for transitioning volume SnapMirror relationships
You must transition both the secondary and primary HA pairs in the same cutover window.
Steps
1. From the 7-Mode Transition Tool, perform a copy-free transition of the two HA pairs that contain the
primary and secondary volumes of the 7-Mode volume SnapMirror relationship.
Before transitioning the 7-Mode HA pair that contains the secondary volumes, no manual intervention is
required for the 7-Mode SnapMirror relationships. This ensures that the 7-Mode secondary volumes are
transitioned as read-only volumes to ONTAP.
Transitioning 7-Mode aggregates using copy-free transition
2. Create an intercluster SVM peer relationship between the SVMs that contain the transitioned primary and
secondary volumes.
System administration
3. Create a volume SnapMirror relationship between the transitioned primary and secondary volumes.
Volume disaster recovery express preparation
4. On the destination volume, resynchronize the source volume and destination volume of the SnapMirror
relationship:
snapmirror resync
At least one common Snapshot copy must exist between the source and destination
volumes.
Troubleshooting: SnapMirror resynchronization fails if the common Snapshot copy was created in a Data
ONTAP release earlier than 8.1. You can use the -fs-version parameter with the volume snapshot
show command in the advanced privilege level to view the release in which the Snapshot copy was
created. If you encounter this issue, break the SnapMirror relationship and then perform the
resynchronization.
5. Monitor the status of the SnapMirror data transfers:
snapmirror show
312
You must not perform any operation, such as volume move or SnapMirror break, on the
source and destination volumes until the resynchronization is completed successfully.
Ensure that the resynchronization does not get aborted and completes successfully;
otherwise, the volumes can go to an inconsistent state.
6. Commit the transition of the secondary project, followed by the primary project.
Committing the copy-free transition project
Related information
ONTAP 9 commands
System Manager
Troubleshooting transition issues
You should be aware of how to troubleshoot issues with the 7-Mode Transition Tool and
where to look for log files. When you use the 7-Mode Transition Tool, you might see error
messages that identify the issue and provide the solution.
Continuing with the transition if ignorable errors occur
During the transition, you might encounter some errors that block the transition. You can
choose to ignore some of these errors by acknowledging the issues through the 7-Mode
Transition Tool CLI. You should rerun the failed operation after ignoring the error to
continue with the transition.
When you acknowledge an error, it means that you have understood the impact of these errors and
acknowledged them.
You must rerun the transition operation after ignoring the error. In some cases, after you acknowledge the
issue, Data ONTAP performs corrective actions on the affected aggregates and volumes when the operation is
run the next time.
Steps
1. If the transition operation results in any ignorable errors, run the following command from the 7-Mode
Transition Tool CLI:
transition cft ignorableerrors add -p project_name -c ignorable_errorcategory
ignorable_errorcategory is the type of error that you can ignore.
Ignorable errors during transition
2. Rerun the transition operation.
The blocking error changes to a warning and the error is shown as acknowledged. You can continue the
transition with the warning.
313
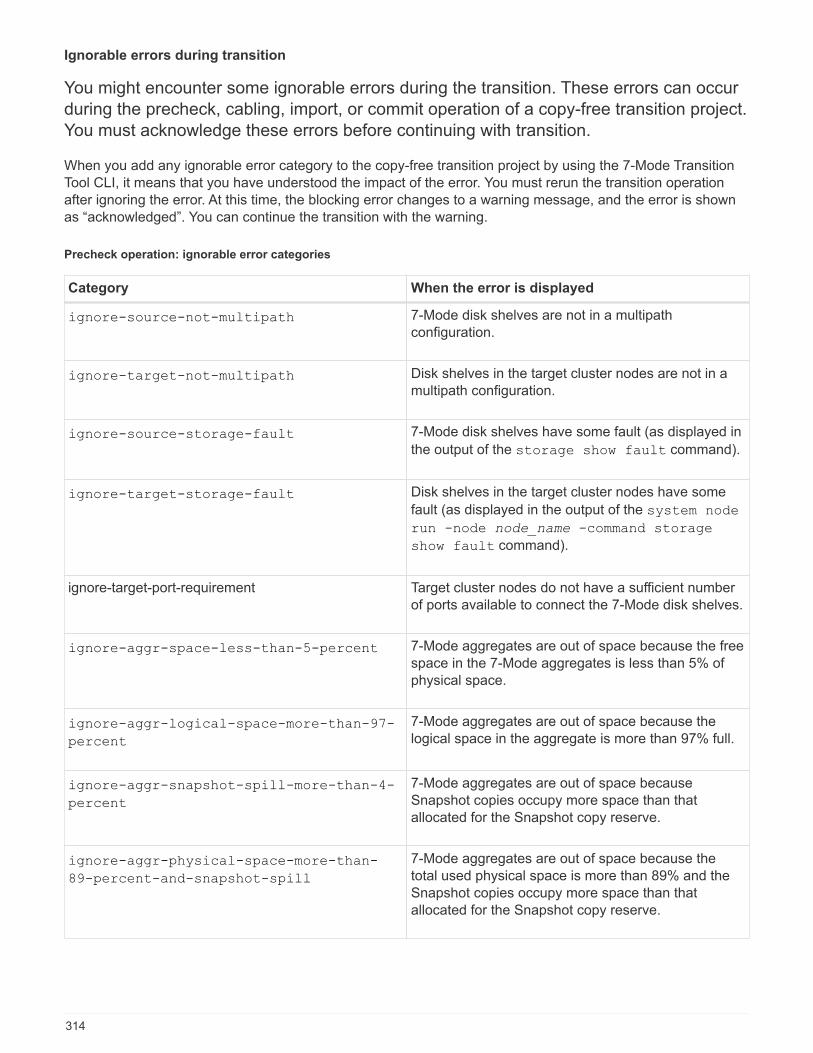
Ignorable errors during transition
You might encounter some ignorable errors during the transition. These errors can occur
during the precheck, cabling, import, or commit operation of a copy-free transition project.
You must acknowledge these errors before continuing with transition.
When you add any ignorable error category to the copy-free transition project by using the 7-Mode Transition
Tool CLI, it means that you have understood the impact of the error. You must rerun the transition operation
after ignoring the error. At this time, the blocking error changes to a warning message, and the error is shown
as “acknowledged”. You can continue the transition with the warning.
Precheck operation: ignorable error categories
Category When the error is displayed
ignore-source-not-multipath 7-Mode disk shelves are not in a multipath
configuration.
ignore-target-not-multipath Disk shelves in the target cluster nodes are not in a
multipath configuration.
ignore-source-storage-fault 7-Mode disk shelves have some fault (as displayed in
the output of the storage show fault command).
ignore-target-storage-fault Disk shelves in the target cluster nodes have some
fault (as displayed in the output of the system node
run -node node_name -command storage
show fault command).
ignore-target-port-requirement Target cluster nodes do not have a sufficient number
of ports available to connect the 7-Mode disk shelves.
ignore-aggr-space-less-than-5-percent 7-Mode aggregates are out of space because the free
space in the 7-Mode aggregates is less than 5% of
physical space.
ignore-aggr-logical-space-more-than-97-
percent
7-Mode aggregates are out of space because the
logical space in the aggregate is more than 97% full.
ignore-aggr-snapshot-spill-more-than-4-
percent
7-Mode aggregates are out of space because
Snapshot copies occupy more space than that
allocated for the Snapshot copy reserve.
ignore-aggr-physical-space-more-than-
89-percent-and-snapshot-spill
7-Mode aggregates are out of space because the
total used physical space is more than 89% and the
Snapshot copies occupy more space than that
allocated for the Snapshot copy reserve.
314
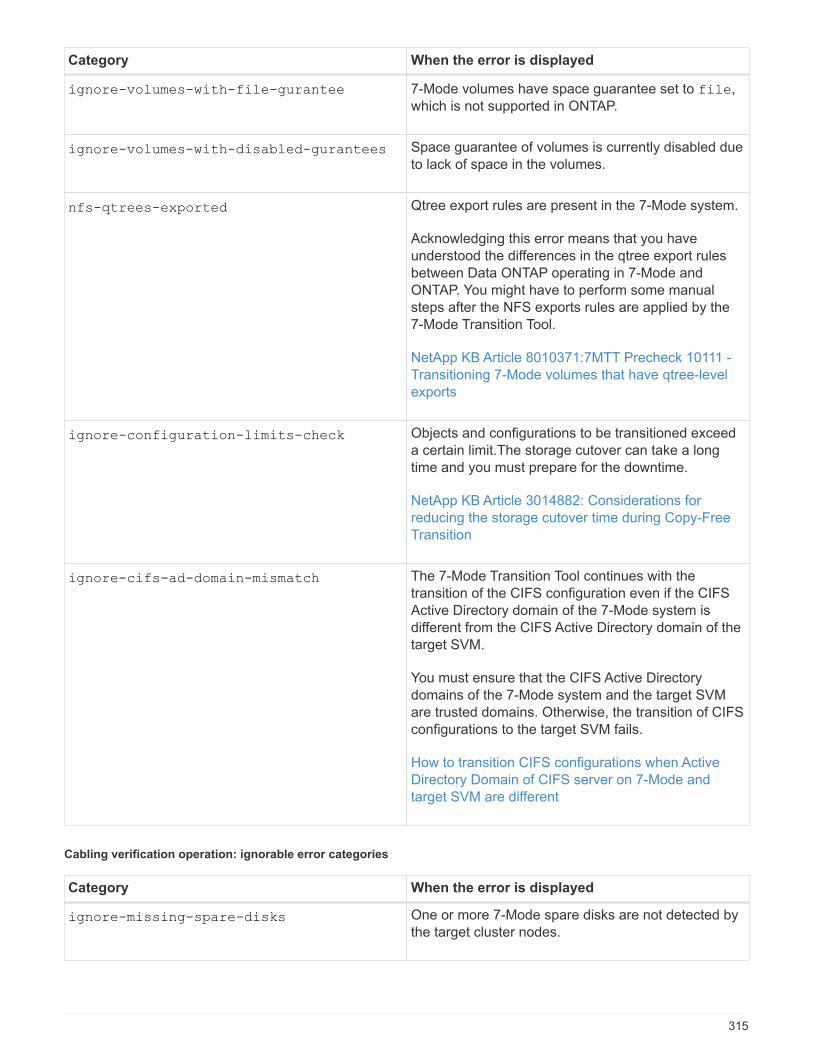
Category When the error is displayed
ignore-volumes-with-file-gurantee 7-Mode volumes have space guarantee set to file,
which is not supported in ONTAP.
ignore-volumes-with-disabled-gurantees Space guarantee of volumes is currently disabled due
to lack of space in the volumes.
nfs-qtrees-exported Qtree export rules are present in the 7-Mode system.
Acknowledging this error means that you have
understood the differences in the qtree export rules
between Data ONTAP operating in 7-Mode and
ONTAP. You might have to perform some manual
steps after the NFS exports rules are applied by the
7-Mode Transition Tool.
NetApp KB Article 8010371:7MTT Precheck 10111 -
Transitioning 7-Mode volumes that have qtree-level
exports
ignore-configuration-limits-check Objects and configurations to be transitioned exceed
a certain limit.The storage cutover can take a long
time and you must prepare for the downtime.
NetApp KB Article 3014882: Considerations for
reducing the storage cutover time during Copy-Free
Transition
ignore-cifs-ad-domain-mismatch The 7-Mode Transition Tool continues with the
transition of the CIFS configuration even if the CIFS
Active Directory domain of the 7-Mode system is
different from the CIFS Active Directory domain of the
target SVM.
You must ensure that the CIFS Active Directory
domains of the 7-Mode system and the target SVM
are trusted domains. Otherwise, the transition of CIFS
configurations to the target SVM fails.
How to transition CIFS configurations when Active
Directory Domain of CIFS server on 7-Mode and
target SVM are different
Cabling verification operation: ignorable error categories
Category When the error is displayed
ignore-missing-spare-disks One or more 7-Mode spare disks are not detected by
the target cluster nodes.
315
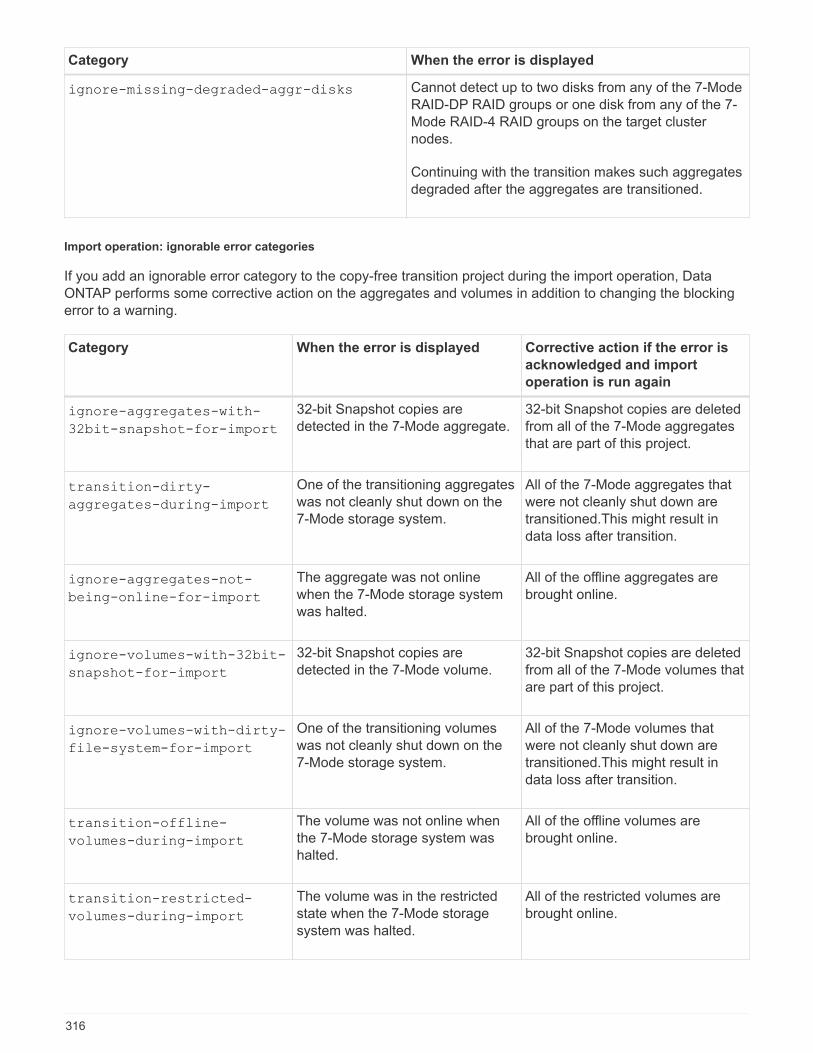
Category When the error is displayed
ignore-missing-degraded-aggr-disks Cannot detect up to two disks from any of the 7-Mode
RAID-DP RAID groups or one disk from any of the 7-
Mode RAID-4 RAID groups on the target cluster
nodes.
Continuing with the transition makes such aggregates
degraded after the aggregates are transitioned.
Import operation: ignorable error categories
If you add an ignorable error category to the copy-free transition project during the import operation, Data
ONTAP performs some corrective action on the aggregates and volumes in addition to changing the blocking
error to a warning.
Category When the error is displayed Corrective action if the error is
acknowledged and import
operation is run again
ignore-aggregates-with-
32bit-snapshot-for-import
32-bit Snapshot copies are
detected in the 7-Mode aggregate.
32-bit Snapshot copies are deleted
from all of the 7-Mode aggregates
that are part of this project.
transition-dirty-
aggregates-during-import
One of the transitioning aggregates
was not cleanly shut down on the
7-Mode storage system.
All of the 7-Mode aggregates that
were not cleanly shut down are
transitioned.This might result in
data loss after transition.
ignore-aggregates-not-
being-online-for-import
The aggregate was not online
when the 7-Mode storage system
was halted.
All of the offline aggregates are
brought online.
ignore-volumes-with-32bit-
snapshot-for-import
32-bit Snapshot copies are
detected in the 7-Mode volume.
32-bit Snapshot copies are deleted
from all of the 7-Mode volumes that
are part of this project.
ignore-volumes-with-dirty-
file-system-for-import
One of the transitioning volumes
was not cleanly shut down on the
7-Mode storage system.
All of the 7-Mode volumes that
were not cleanly shut down are
transitioned.This might result in
data loss after transition.
transition-offline-
volumes-during-import
The volume was not online when
the 7-Mode storage system was
halted.
All of the offline volumes are
brought online.
transition-restricted-
volumes-during-import
The volume was in the restricted
state when the 7-Mode storage
system was halted.
All of the restricted volumes are
brought online.
316
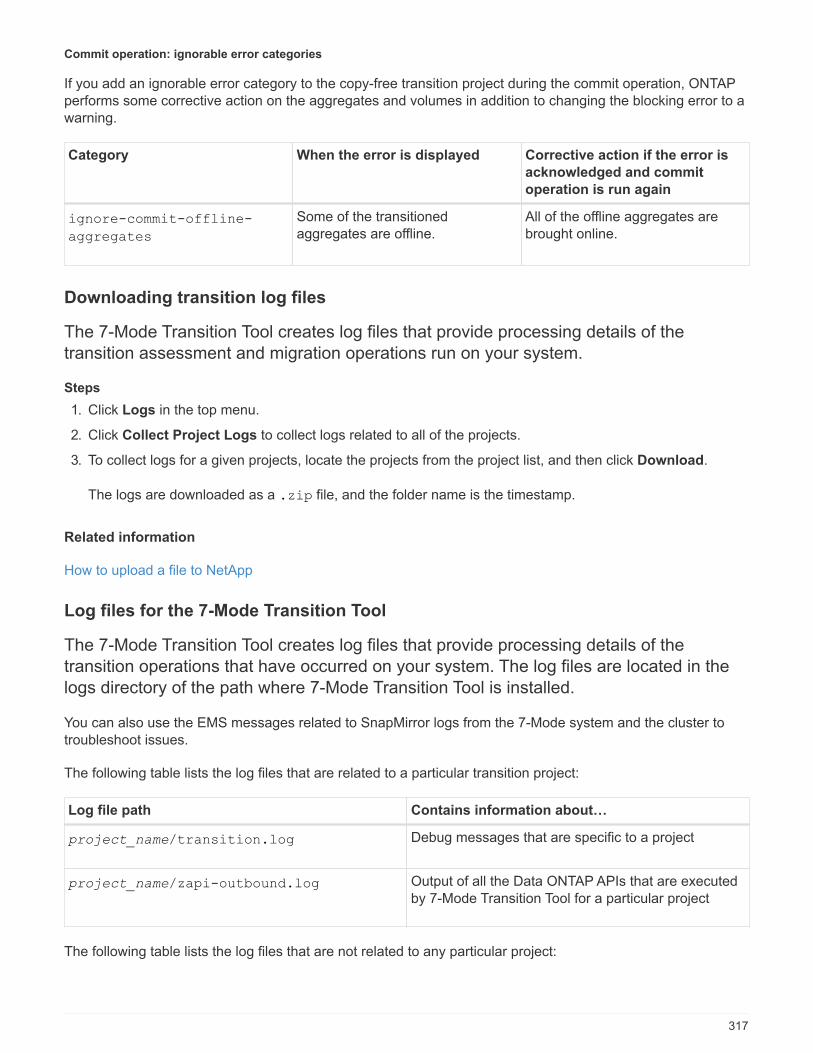
Commit operation: ignorable error categories
If you add an ignorable error category to the copy-free transition project during the commit operation, ONTAP
performs some corrective action on the aggregates and volumes in addition to changing the blocking error to a
warning.
Category When the error is displayed Corrective action if the error is
acknowledged and commit
operation is run again
ignore-commit-offline-
aggregates
Some of the transitioned
aggregates are offline.
All of the offline aggregates are
brought online.
Downloading transition log files
The 7-Mode Transition Tool creates log files that provide processing details of the
transition assessment and migration operations run on your system.
Steps
1. Click Logs in the top menu.
2. Click Collect Project Logs to collect logs related to all of the projects.
3. To collect logs for a given projects, locate the projects from the project list, and then click Download.
The logs are downloaded as a .zip file, and the folder name is the timestamp.
Related information
How to upload a file to NetApp
Log files for the 7-Mode Transition Tool
The 7-Mode Transition Tool creates log files that provide processing details of the
transition operations that have occurred on your system. The log files are located in the
logs directory of the path where 7-Mode Transition Tool is installed.
You can also use the EMS messages related to SnapMirror logs from the 7-Mode system and the cluster to
troubleshoot issues.
The following table lists the log files that are related to a particular transition project:
Log file path Contains information about…
project_name/transition.log Debug messages that are specific to a project
project_name/zapi-outbound.log Output of all the Data ONTAP APIs that are executed
by 7-Mode Transition Tool for a particular project
The following table lists the log files that are not related to any particular project:
317
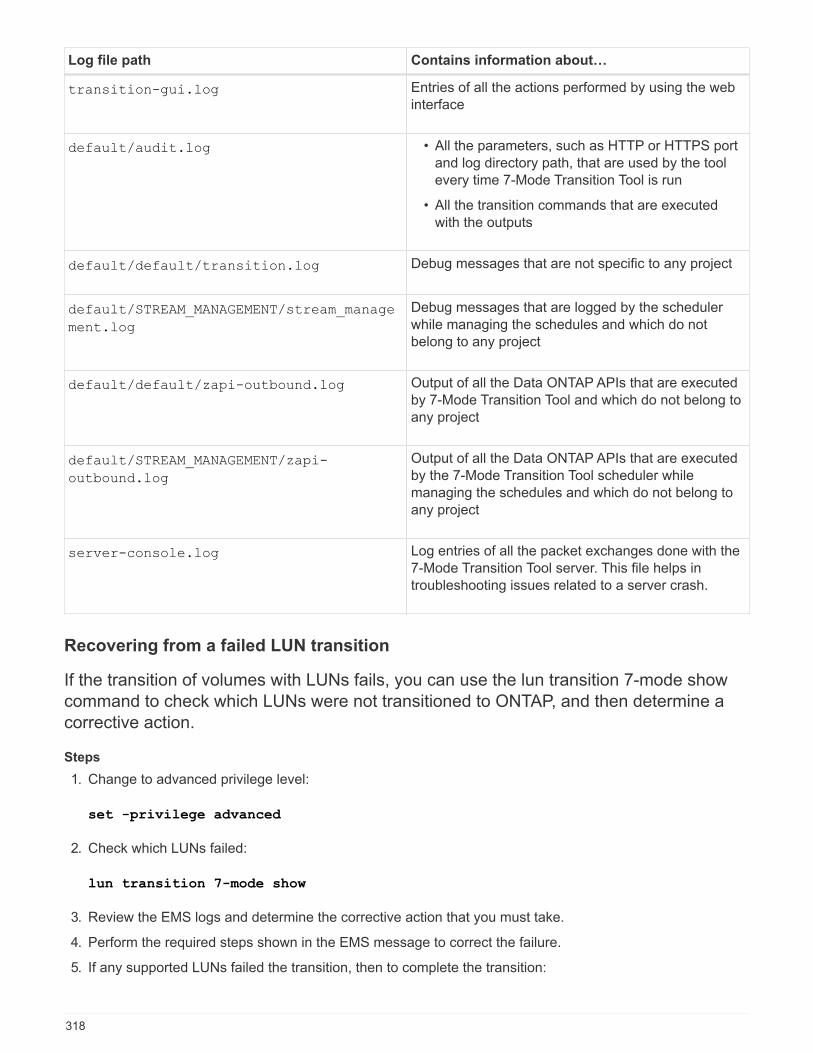
Log file path Contains information about…
transition-gui.log Entries of all the actions performed by using the web
interface
default/audit.log • All the parameters, such as HTTP or HTTPS port
and log directory path, that are used by the tool
every time 7-Mode Transition Tool is run
• All the transition commands that are executed
with the outputs
default/default/transition.log Debug messages that are not specific to any project
default/STREAM_MANAGEMENT/stream_manage
ment.log
Debug messages that are logged by the scheduler
while managing the schedules and which do not
belong to any project
default/default/zapi-outbound.log Output of all the Data ONTAP APIs that are executed
by 7-Mode Transition Tool and which do not belong to
any project
default/STREAM_MANAGEMENT/zapi-
outbound.log
Output of all the Data ONTAP APIs that are executed
by the 7-Mode Transition Tool scheduler while
managing the schedules and which do not belong to
any project
server-console.log Log entries of all the packet exchanges done with the
7-Mode Transition Tool server. This file helps in
troubleshooting issues related to a server crash.
Recovering from a failed LUN transition
If the transition of volumes with LUNs fails, you can use the lun transition 7-mode show
command to check which LUNs were not transitioned to ONTAP, and then determine a
corrective action.
Steps
1. Change to advanced privilege level:
set -privilege advanced
2. Check which LUNs failed:
lun transition 7-mode show
3. Review the EMS logs and determine the corrective action that you must take.
4. Perform the required steps shown in the EMS message to correct the failure.
5. If any supported LUNs failed the transition, then to complete the transition:
318
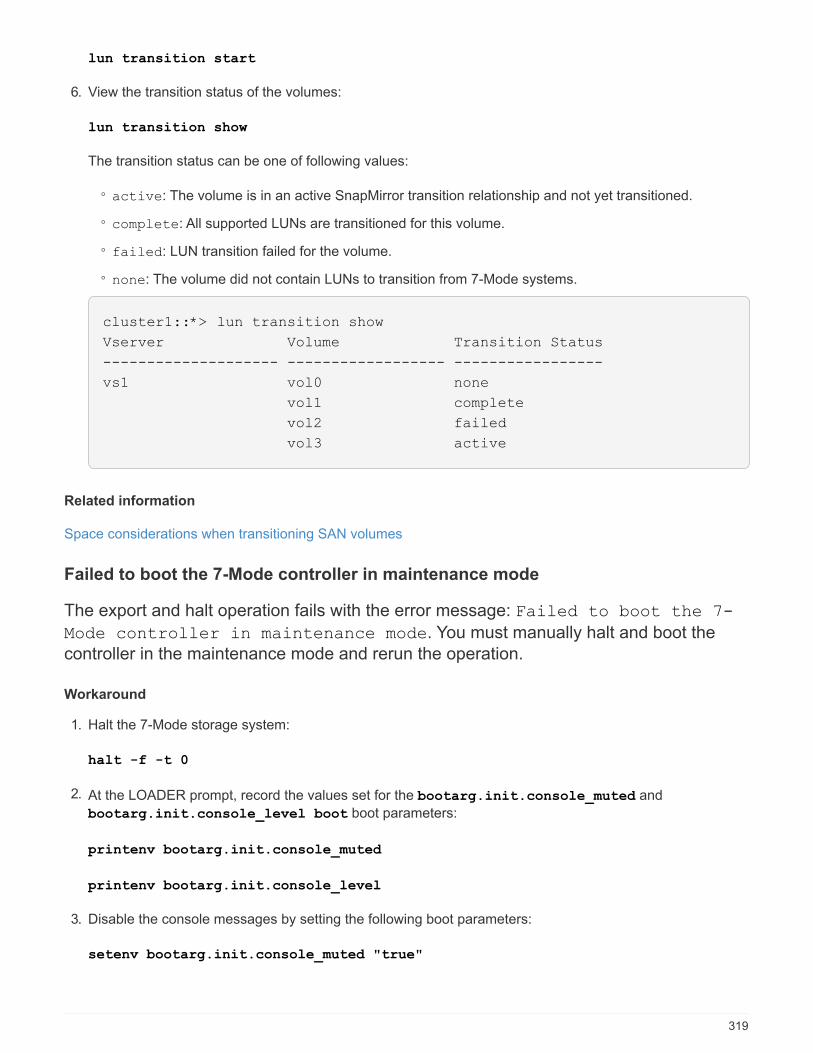
lun transition start
6. View the transition status of the volumes:
lun transition show
The transition status can be one of following values:
◦ active: The volume is in an active SnapMirror transition relationship and not yet transitioned.
◦ complete: All supported LUNs are transitioned for this volume.
◦ failed: LUN transition failed for the volume.
◦ none: The volume did not contain LUNs to transition from 7-Mode systems.
cluster1::*> lun transition show
Vserver Volume Transition Status
-------------------- ------------------ -----------------
vs1 vol0 none
vol1 complete
vol2 failed
vol3 active
Related information
Space considerations when transitioning SAN volumes
Failed to boot the 7-Mode controller in maintenance mode
The export and halt operation fails with the error message: Failed to boot the 7-
Mode controller in maintenance mode. You must manually halt and boot the
controller in the maintenance mode and rerun the operation.
Workaround
1. Halt the 7-Mode storage system:
halt -f -t 0
2. At the LOADER prompt, record the values set for the bootarg.init.console_muted and
bootarg.init.console_level boot boot parameters:
printenv bootarg.init.console_muted
printenv bootarg.init.console_level
3. Disable the console messages by setting the following boot parameters:
setenv bootarg.init.console_muted "true"
319
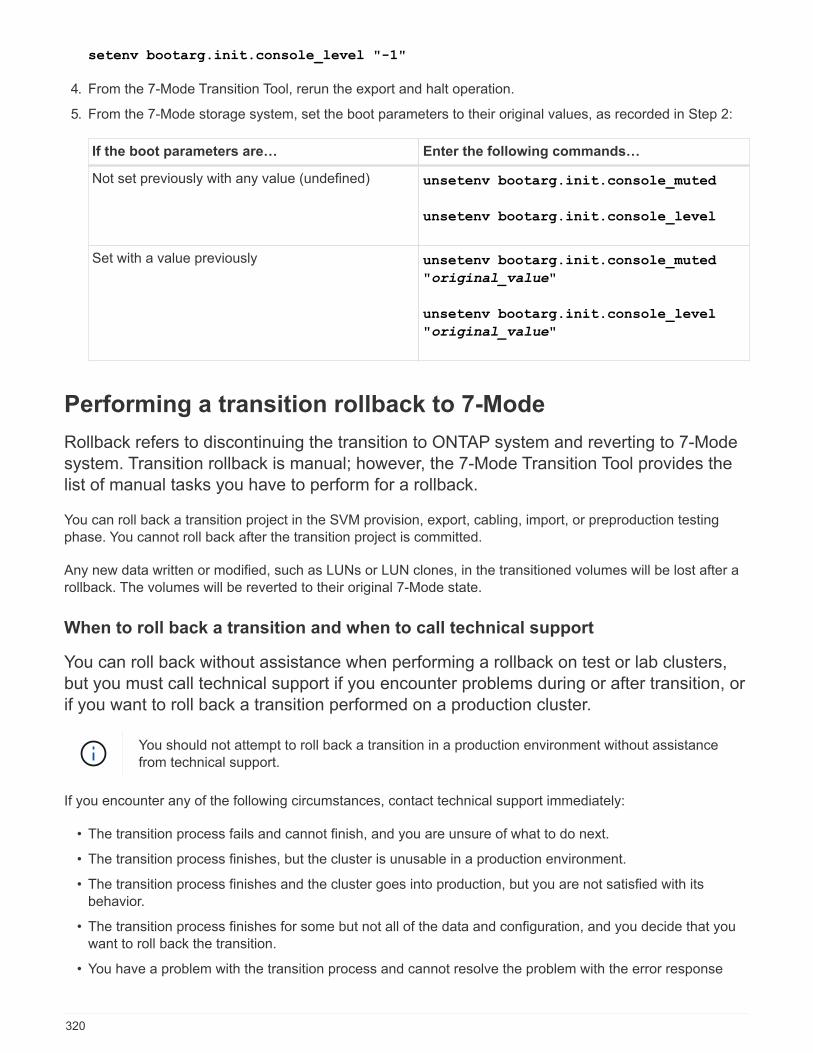
setenv bootarg.init.console_level "-1"
4. From the 7-Mode Transition Tool, rerun the export and halt operation.
5. From the 7-Mode storage system, set the boot parameters to their original values, as recorded in Step 2:
If the boot parameters are… Enter the following commands…
Not set previously with any value (undefined) unsetenv bootarg.init.console_muted
unsetenv bootarg.init.console_level
Set with a value previously unsetenv bootarg.init.console_muted
"original_value"
unsetenv bootarg.init.console_level
"original_value"
Performing a transition rollback to 7-Mode
Rollback refers to discontinuing the transition to ONTAP system and reverting to 7-Mode
system. Transition rollback is manual; however, the 7-Mode Transition Tool provides the
list of manual tasks you have to perform for a rollback.
You can roll back a transition project in the SVM provision, export, cabling, import, or preproduction testing
phase. You cannot roll back after the transition project is committed.
Any new data written or modified, such as LUNs or LUN clones, in the transitioned volumes will be lost after a
rollback. The volumes will be reverted to their original 7-Mode state.
When to roll back a transition and when to call technical support
You can roll back without assistance when performing a rollback on test or lab clusters,
but you must call technical support if you encounter problems during or after transition, or
if you want to roll back a transition performed on a production cluster.
You should not attempt to roll back a transition in a production environment without assistance
from technical support.
If you encounter any of the following circumstances, contact technical support immediately:
• The transition process fails and cannot finish, and you are unsure of what to do next.
• The transition process finishes, but the cluster is unusable in a production environment.
• The transition process finishes and the cluster goes into production, but you are not satisfied with its
behavior.
• The transition process finishes for some but not all of the data and configuration, and you decide that you
want to roll back the transition.
• You have a problem with the transition process and cannot resolve the problem with the error response
320
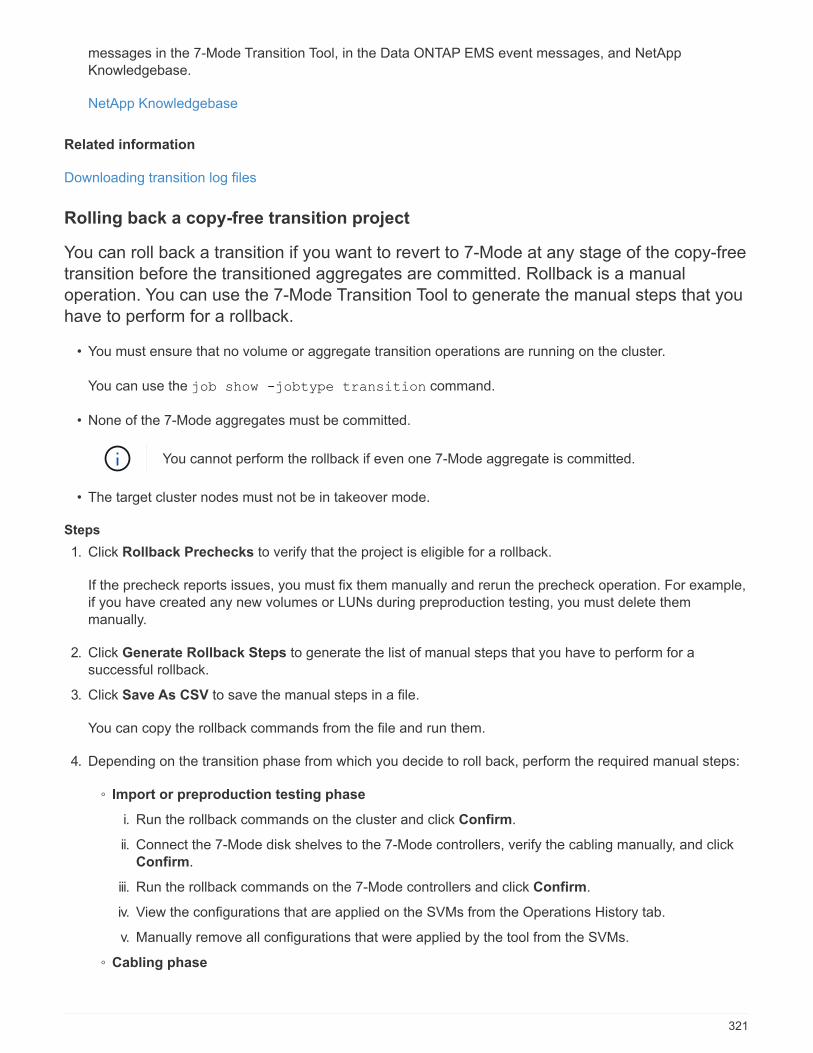
messages in the 7-Mode Transition Tool, in the Data ONTAP EMS event messages, and NetApp
Knowledgebase.
NetApp Knowledgebase
Related information
Downloading transition log files
Rolling back a copy-free transition project
You can roll back a transition if you want to revert to 7-Mode at any stage of the copy-free
transition before the transitioned aggregates are committed. Rollback is a manual
operation. You can use the 7-Mode Transition Tool to generate the manual steps that you
have to perform for a rollback.
• You must ensure that no volume or aggregate transition operations are running on the cluster.
You can use the job show -jobtype transition command.
• None of the 7-Mode aggregates must be committed.
You cannot perform the rollback if even one 7-Mode aggregate is committed.
• The target cluster nodes must not be in takeover mode.
Steps
1. Click Rollback Prechecks to verify that the project is eligible for a rollback.
If the precheck reports issues, you must fix them manually and rerun the precheck operation. For example,
if you have created any new volumes or LUNs during preproduction testing, you must delete them
manually.
2. Click Generate Rollback Steps to generate the list of manual steps that you have to perform for a
successful rollback.
3. Click Save As CSV to save the manual steps in a file.
You can copy the rollback commands from the file and run them.
4. Depending on the transition phase from which you decide to roll back, perform the required manual steps:
◦ Import or preproduction testing phase
i. Run the rollback commands on the cluster and click Confirm.
ii. Connect the 7-Mode disk shelves to the 7-Mode controllers, verify the cabling manually, and click
Confirm.
iii. Run the rollback commands on the 7-Mode controllers and click Confirm.
iv. View the configurations that are applied on the SVMs from the Operations History tab.
v. Manually remove all configurations that were applied by the tool from the SVMs.
◦ Cabling phase
321
i. Connect the 7-Mode disk shelves to the 7-Mode controllers, verify the cabling manually, and click
Confirm.
You must ensure that the 7-Mode cabling matches the way it was at the start of the project.
You should use Config Advisor to verify the cabling.
ii. Run the rollback commands on the 7-Mode controllers and click Confirm.
iii. Manually remove all configurations that were applied by the tool from the SVMs.
You can view the configurations that are applied on the SVMs from the Operations History tab.
◦ Export phase
i. Run the rollback commands on the 7-Mode controllers and click Confirm.
ii. Manually remove all configurations that were applied by the tool from the SVMs.
You can view the configurations that are applied on the SVMs from the Operations History tab.
◦ SVM provision phase
Manually remove all configurations that were applied by the tool from the SVMs.
You can view the configurations that are applied on the SVMs from the Operations History tab.
Manual steps for rolling back the transition
5. After completing all the manual steps, click Verify 7-Mode from the 7-Mode Transition Tool to verify that
the 7-Mode controllers are ready to serve data.
Manually rolling back the transition
You must perform some manual steps on the cluster and 7-Mode systems if you decide to
roll back the transition. The list of manual rollback steps is generated by the 7-Mode
Transition Tool.
The rollback steps vary depending on the stage at which you decide to roll back. You must perform all steps in
this task if you decide to roll back after a successful import operation. If you decide to roll back at an earlier
stage, you have to perform a subset of these steps.
Steps
1. Log in to the cluster.
2. If any transitioned volume is in a SnapMirror relationship, choose one of the following actions:
◦ If a transitioned volume is the destination of a SnapMirror relationship, delete the SnapMirror
relationship:
snapmirror delete -destination-path destination-path -source-path source-
path
◦ If a transitioned volume is the source of a SnapMirror relationship, release the SnapMirror relationship:
snapmirror release -destination-path destination-path -source-path source-
path
322

3. From the cluster, verify that the following operations are not running on the transitioned volumes:
a. Volume move operation:
volume move show
b. LUN move operation:
lun move show
c. LUN copy operation:
lun copy show
4. Perform the rollback for all of the 7-Mode aggregates:
a. Log in to the diagnostic privilege level:
set -privilege diagnostic
b. Revert the aggregates to the 7-Mode state by using the storage transition revert start
command.
This command requires additional parameters, such as the transition project ID and aggregate
attributes. You should use the complete command with the parameters and its values, as generated by
the 7-Mode Transition Tool.
c. Verify that the rollback is successful for all of the transitioned aggregates:
storage transition revert show-status
The status-code field for an aggregate is displayed as revert_complete when the rollback is
successful.
5. Reassign the disk ownerships from the target cluster nodes to the 7-Mode controllers:
a. Assign disk ownership to the 7-Mode controllers:
disk assign –disk disk_id –s system_id -force true
b. Verify that the disk ownership is assigned to the 7-Mode controllers:
storage disk show -fields owner-id
6. Remove the 7-Mode LIFs from the SVMs:
network interface delete -vserver svm_name -lif lif_name
7. Remove the copy-free transition restrictions on the target cluster nodes from the diagnostic privilege level:
storage transition pre-commit end -session-id transition_project_id
You can also perform this step after the rollback operation is completed and the 7-Mode controllers are
operational.
8. Delete the transition project information about the target cluster nodes by using the following diagnostic
privilege level command:
323
storage transition purge-info -session-id transition_project_id
You can also perform this step after the rollback operation is completed and the 7-Mode controllers are
operational.
9. If disk ownership autoassigment was disabled on the cluster nodes during the export and halt operation,
enable it:
storage disk assign -auto true
10. Manually remove all of the configurations that the tool has transitioned to the target SVMs.
You can view the results of the SVM provision and import operations for information about the
configurations transitioned by the tool.
11. Remove the disk shelves from the target cluster nodes, and then reconnect them to the 7-Mode controllers.
You should use the Config Advisor tool to verify the cabling.
12. If any 7-Mode disk shelf IDs were changed to resolve the conflicts with the disk shelf IDs of the target
cluster nodes, manually change them to the old IDs and power-cycle the disk shelves for the new IDs to
take effect.
13. Boot the source 7-Mode controllers in to the normal mode.
14. From one of the source 7-Mode controllers, enable the takeover capability:
cf enable
15. If automatic deletion of aggregate Snapshot copies was disabled during the export and halt operation,
enable it:
options snap autodelete aggr_name on
324
Host and Storage Information Collection Guide
This guide describes how to collect information about ONTAP and 7-Mode systems,
switches, hosts, and host applications, and generate an inventory report that you can use
with the 7-Mode Transition Tool for assessing whether the systems are ready for
transition.
Collecting storage and host inventory information
Inventory Collect Tool enables you to collect information about clustered Data ONTAP
and 7-Mode systems, switches, hosts, and the applications running on these hosts and to
create an inventory report. You can then import the inventory report to the 7-Mode
Transition Tool for transition assessment.
The tool generates an inventory report workbook and an inventory report XML file that contain configuration
details of the storage and host systems.
The Inventory Collect Tool uses TLS or SSL protocols for communicating with the 7-Mode storage systems and
SSH or WMI for communicating with hosts. The tool communicates with the storage system using the TLS
protocol if TLS is enabled on the storage system. If TLS is disabled and SSLv3 is enabled on a storage
system, the tool uses SSLv3 to communicate with the storage system.
The best practice is to enable TLS and disable SSLv3 on the storage system in order to avoid
SSLv3 security vulnerabilities (CVE-2014-3566).
If you cannot install the 7-Mode Transition Tool in your environment due to security reasons, then you can
import the inventory report XML file generated by the Inventory Collect Tool to 7-Mode Transition Tool (installed
outside your data center) for generating an assessment report. You can use the assessment report for
assessing the features and functionalities of your systems and identify how these features and functionalities
work in the clustered Data ONTAP version selected for transition.
Inventory Collect Tool is a stand-alone utility that does not require any installation.
Be sure to consult the current 7-Mode Transition Tool Release Notes for the latest information about supported
target releases and known issues.
ONTAP target releases supported by the 7-Mode Transition Tool
Release support for ONTAP transition target clusters depends on the transition method
you want to use, copy-based or copy-free, and on the version of the 7-Mode Transition
Tool.
Be sure to consult the current 7-Mode Transition Tool Release Notes for the latest information about supported
target releases and known issues.
Copy-based transitions are supported to these ONTAP target releases.
325
If your transition target is running … You must use this 7-Mode Transition Tool version
…
ONTAP 9.9.1 or earlier supported release 3.4.0
ONTAP 9.8 or earlier supported release 3.3.3
ONTAP 9.7P2 or later 9.7 P release
Earlier 9.7 releases are not supported.
3.3.2
ONTAP 9.6P7 or later 9.6 P release
Earlier 9.6 releases are not supported.
3.3.2
ONTAP 9.5 or earlier ONTAP 9 release 3.3.2 or 3.3.1
Clustered Data ONTAP 8.1.4P4 and later 8.x
releases.
3.3.2 or 3.3.1
Copy-free transitions are supported to these ONTAP target releases using 7-Mode Transition Tool 3.3.1.
• ONTAP 9.4 and earlier ONTAP 9 releases.
• Clustered Data ONTAP 8.3.2 and later 8.x releases.
You cannot use the 7-Mode Transition Tool to transition to ONTAP 9.5 or later using the copy-
free method. To do so, you must first transition to ONTAP 9.4 using 7-Mode Transition Tool 3.3.1
and then upgrade your cluster to ONTAP 9.5 or later. 7-Mode Transition Tool 3.3.2 does not
support copy-free transitions.
System requirements for running the Inventory Collect Tool
You can download and run the Inventory Collect Tool on a Windows system. The
Windows system must have the required configuration to run the Inventory Collect Tool.
• The Windows system must be one of the following:
◦ 64-bit Windows 7 Enterprise
◦ Windows Server 2008 R2 Enterprise with SP1 or later
◦ Windows Server 2012 R2 Standard
You can use a Windows virtual machine that meets the required software and hardware
requirements to install the Inventory Collect Tool.
• Dual-core x64 processor (1.0 GHz or more)
• 4-GB RAM
• 40-GB HDD
326
Storage, host, and FC switches version requirements for inventory collection
You must be aware of the versions of Data ONTAP operating in 7-Mode, hosts, and FC
switches from which you can collect inventory information.
For the list of 7-Mode versions, hosts, and FC switches that are supported for assessment by the Inventory
Collect Tool, see the Interoperability Matrix.
NetApp Interoperability Matrix Tool
Preparing the 7-Mode systems and hosts for inventory collection
You must ensure that the 7-Mode systems and hosts meet certain network and protocol
requirements for successfully generating an inventory report.
Steps
1. Enable HTTPS on the 7-Mode system:
options httpd.admin.ssl.enable on
2. Enable TLS on the 7-Mode system:
options tls.enable on
The best practice is to enable TLS because of the security vulnerabilities in SSLv3.
3. Enable SSL and disable SSLv2 and SSLv3 on the 7-Mode system:
a. Set up and start SSL:
secureadmin setup ssl
b. Enable SSL:
options ssl.enable on
c. Disable SSLv2 and SSLv3:
options ssl.v2.enable off
options ssl.v3.enable off
The best practice is to disable SSLv2 and SSLv3 to avoid security vulnerabilities.
4. Enable SSH on the 7-Mode system:
a. Set up SSH on the 7-Mode system:
secureadmin setup -f ssh
The -f option forces the setup to run even if the SSH server is already configured.
b. Enable SSH:
327
secureadmin enable ssh2
c. Enable password authentication on the SSH server:
options ssh.passwd_auth.enable
d. Enable SSH access to the host:
options ssh.access
5. Prepare your Windows host systems:
◦ Enable WMI access.
For more information about enabling WMI access, see the host documentation.
◦ If you have Windows Server 2003, verify that you have installed the Microsoft Fibre Channel
Information Tool (fcinfo) package and run the tool once on your Windows host system.
This tool enables you to collect the HBA configuration information of the host.
6. Enable SSH on the Linux or ESXi host.
For more information about enabling SSH, see the host documentation.
7. Verify that you have installed the latest NetApp Host Utilities software for each host.
For information about downloading and installing the NetApp Host Utilities software, see the NetApp
Support Site.
8. Verify that all the hosts and storage systems can be reached by the Windows system from which the
Inventory Collect Tool is run.
Supported configurations for generating an FC zone plan
You must be aware of the supported configurations of 7-Mode systems, hosts, FC
switches, and the cluster to generate the FC zone plan. You should use the plan to
configure zones for the cluster after migration.
The 7-Mode systems (single controller or an HA pair), hosts, and cluster can be connected either to the
switches in the same fabric or different fabrics, depending on the data center requirements.
The following figure illustrates a configuration in which the 7-Mode systems, hosts, and cluster are connected
to the switches in the same fabric:
The following figure illustrates a configuration in which the 7-Mode systems and cluster are connected to
switches in different fabrics:
328
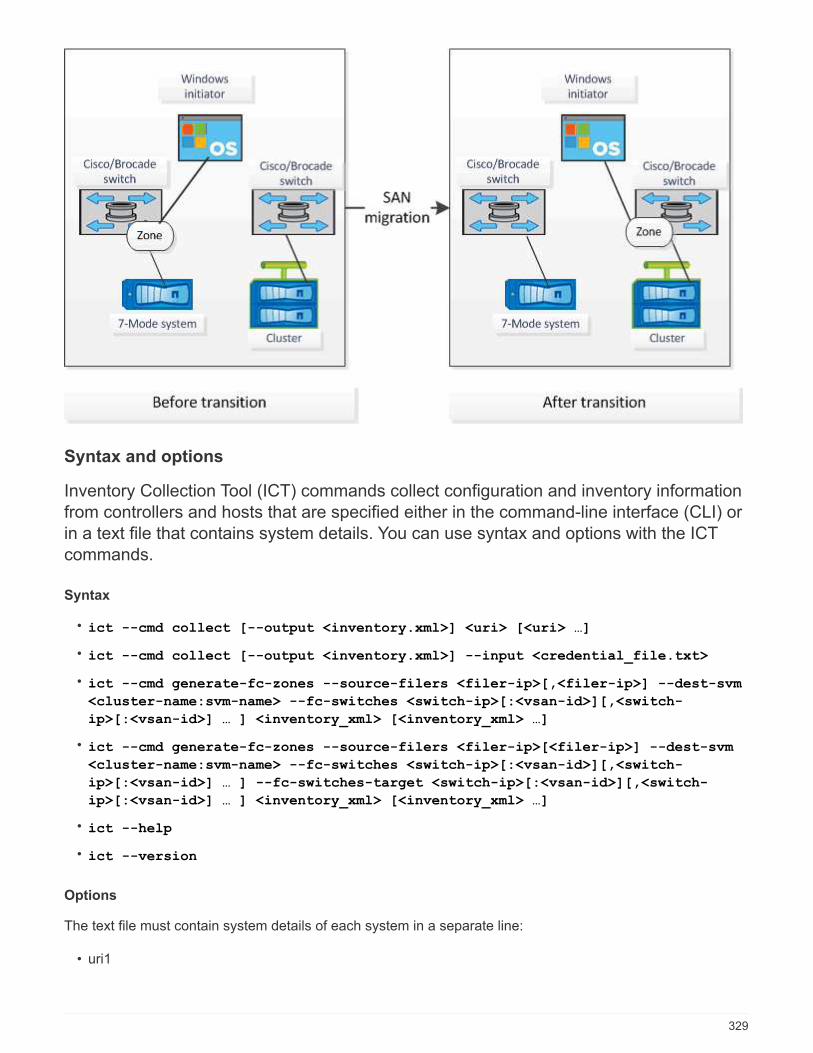
Syntax and options
Inventory Collection Tool (ICT) commands collect configuration and inventory information
from controllers and hosts that are specified either in the command-line interface (CLI) or
in a text file that contains system details. You can use syntax and options with the ICT
commands.
Syntax
• ict --cmd collect [--output <inventory.xml>] <uri> [<uri> …]
• ict --cmd collect [--output <inventory.xml>] --input <credential_file.txt>
• ict --cmd generate-fc-zones --source-filers <filer-ip>[,<filer-ip>] --dest-svm
<cluster-name:svm-name> --fc-switches <switch-ip>[:<vsan-id>][,<switch-
ip>[:<vsan-id>] … ] <inventory_xml> [<inventory_xml> …]
• ict --cmd generate-fc-zones --source-filers <filer-ip>[<filer-ip>] --dest-svm
<cluster-name:svm-name> --fc-switches <switch-ip>[:<vsan-id>][,<switch-
ip>[:<vsan-id>] … ] --fc-switches-target <switch-ip>[:<vsan-id>][,<switch-
ip>[:<vsan-id>] … ] <inventory_xml> [<inventory_xml> …]
• ict --help
• ict --version
Options
The text file must contain system details of each system in a separate line:
• uri1
329
• uri2
• uri3
If a password is * or omitted either in the CLI or text file, then the user is prompted to enter a password in the
CLI. The following options are available to run the ICT:
• --help
Shows the help message and exits.
• --version
Prints the tool version and exits.
• --cmd [collect|generate-fc-zones]
collect: Collects configuration and inventory information from controllers and hosts.
generate-fc-zones: Generates FC Zone planner document on a given inventory.
• --output <filename[.xml[.gz]]>
Specifies the location where the files are generated. If the file name is suffixed with “.gz” , then the file is
compressed. This option generates two files (reports): Inventory Report and Inventory Report Workbook.
• --input <credentials_file.txt>
Specifies the location where the file with system credentials is saved. This option is not used in --cmd
generate-fc- zones.
Only ASCII encoded text file is supported.
• uri
format(ontap|windows|vmware|linux|cisco|brocade)://[(<user>|<domain_user>)[:(<pa
ssword>|*)]@](<hostname>|<ip>)
Specifies the system type, IP address, and credentials of the controller or host. If the password provided is
*, or if no passwords are provided, then the user is prompted to enter a password in the command line.
• --source-filers
Specifies comma-separated IP address of the source controllers to be used in generating the FC Zone
Plan.
• --dest-svm
Specifies the destination clustered Data ONTAP SVM formatted as cluster-name:svm-name to be used
in generating the FC Zone Plan.
• --fc-switches
Lists the FC switches for which the FC Zone Plan has to be generated. It is a comma-separated list of
switch identifiers. For Cisco, FC switches should be formatted as switch-ip:vsan-id and for Brocade,
330
FC switches should be formatted as switch-ip. For example, 10.61.187.6:200,10.61.187.7:200 (Cisco)
or 10.61.187.4,10.61.187.5 (Brocade)
• --fc-switches-target
Specifies the list of FC switches (connected to the cluster) for which the FC Zone Plan has to be
generated. It is a comma-separated list of target switch identifiers that are listed in the same sequence as
origin FC switches (--fc-switches). The FC zoning script is generated for each origin switch added to the fc-
switches parameter list. This is an optional parameter.
For FC Zone Planner, input inventory XMLs are given as unnamed arguments.
Collecting inventory and generating inventory report
You can collect information about the Data ONTAP systems (7-Mode systems and nodes
of the cluster), switches, hosts, and host applications. By using this information, you can
generate inventory report that contains detailed information about the 7-Mode systems,
hosts, and host applications for transition assessment.
• You must have downloaded the ict.exe file from the NetApp Support Site.
• You must have the user name, password, and IP addresses of the storage systems and hosts for which the
inventory report is required.
• The user name for the storage system and hosts must have sufficient privileges to execute the commands.
• If you are adding multiple systems for inventory collection, you must have created a text file that is encoded
in ASCII or UTF-8 format and contains the system details, one system per line.
Each system detail must be in the following format:
(ontap|windows|vmware|linux|cisco|brocade)://[(domain_user\\user):[password]@]
(host_name|ip)
If you provide * as the password, you are prompted to enter the password at the command line.
• All features must be configured and their licenses must be enabled so that the workbook can contain the
inventory information about the features.
• All storage system configurations, such as CIFS share names, user names, and group names, must be in
the UTF-8 format.
• For the FC zone plan, the 7-Mode systems and hosts must be connected to the switch.
The cluster can be connected either to the same switch as the 7-Mode system or to a new switch in the
same fabric.
The Inventory Collect Tool can collect configuration information from a maximum of four controllers and 20
hosts simultaneously. However, for scaled configurations with quotas, qtrees, exports, or UNIX users and
groups, it might take a significantly longer time for the inventory report to be generated.
You should avoid performing inventory collection operations on active storage controllers during
peak hours.
331
1. In the Windows command prompt, navigate to the path where the Inventory Collect Tool is downloaded.
2. Generate the inventory report by running the ict command with the system IP address and credentials:
If you want to provide information… Enter the following command…
For each system by using the command-line
interface
`ict --cmd collect --output filename
(ontap|windows|vmware|linux|cisco|brocade)://[(
user|domain_user)[:(password|*)]@]hostname)
…
• filename is the name you want to provide for
the inventory report.
• ontap|windows|vmware|linux is the
system type.
For example, for a 7-Mode storage system, the
system type is ontap and for a Linux host, the
system type is linux.
• cisco|brocade are the supported FC
switches.
• user|domain_user and password are the
system credentials.
If the controller has no password, you can enter
the characters \"\" as the password.
• hostname is the IP address or host name of the
controller, host, or switch.
For multiple systems in a text file ict --cmd collect --output filename
--input credentials_file.txt
credentials_file.txt is the text file that
contains the system details and credentials for
multiple systems:
• Only text files encoded in ASCII format are
supported.
• If you provide * as the password, you are
prompted to enter the password at the
command line.
• If the controller has no password, then you can
enter "" as the password.
If your storage system is running Windows 7 or later and you have restricted privileges to
the folder where the output XML file for the inventory report will be stored, the output files
are automatically stored in the VirtualStore directory and the application runs as usual.
332
The inventory report is created for a storage system and a Linux host. The reports generated are
collected_data.xml and collected_data_InventoryWorkbook.xml:
ict --cmd collect --output collected_data ontap://root:test123@hostname1
linux://root@hostname2
The estimated time required for collecting inventory information per controller is displayed.
The inventory workbook and inventory report are generated in XML format.
3. View the inventory workbook in Microsoft Excel by using Microsoft Office 2007 or later versions.
You are ready to import the inventory report XML to the 7-Mode Transition Tool to assess the features and
functionalities of the 7-Mode controller and hosts, and to identify how the features and functionalities work in
the clustered Data ONTAP version selected for transition.
Generating the FC zone plan
After collecting information about the Data ONTAP systems, hosts, and FC switches, you
can generate the FC zone plan, which is used to configure the switches in the cluster
after migration.
• The 7-Mode systems, hosts, and the cluster must be connected to the switch.
• Information about the cluster, SVMs, FCP LIFs, and switches must be collected.
The cluster can be connected either to the same switch as the 7-Mode system or to a new switch in the
same fabric.
Supported configurations for generating an FC zone plan
Steps
1. In the CLI, navigate to the ICT directory.
2. From the CLI, generate the FC zone plan:
ict --cmd generate-fc-zones --source-filers 7-mode-ip1,7mode-ip2 --dest-svm
cluster-name:vserver-name --fc-switches switch-name:vsan-id1,vsan-id2
7mode_cdot_switch_inventory.xml
You must enter the VSAN ID for the Cisco switches.
...bin\ict>ict --cmd generate-fc-zones --source-filers system1,system2
--dest-svm vs1:fc_zone1
--fc-switches brocade-1,brocade-2 7mode_cdot_switch_inventory.xml
The FC zone plan contains zones created per the igroup configurations on the 7-Mode systems. Each
zone contains a single initiator WWPN and multiple SVM target WWPNs.
In a copy-based transition, you can use the FC zone plan to configure the zones either during the precutover
333
read/write mode to verify the cluster configuration by using the test hosts, or after the cutover phase to provide
data access to the initiator hosts from the cluster.
In a copy-free transition, you must use the FC zone plan to configure the zones to group the initiator hosts and
targets for providing data access from the cluster during apply configuration phase.
Collection and assessment commands
The Inventory Collect Tool (ICT) collects inventory information from controllers, hosts, and
FC switches by using a list of commands to generate an inventory XML report; assesses
the features and functionalities of these systems; and identifies how these features and
functionalities work in the clustered Data ONTAP version that is selected for transition.
ONTAP 7-Mode APIs
• aggr-list-info
• cf-status
• cifs-homedir-paths-get
• cifs-list-config
• cifs-nbalias-names-get
• cifs-share-acl-list-iter-start
• cifs-share-list-iter-start
• cifs-status
• disk-list-info
• fcp-adapter-list-info
• fpolicy-list-info
• igroup-list-info
• iscsi-interface-list-info
• iscsi-node-get-name
• license-list-info
• license-v2-list-info
• lun-get-comment
• lun-list-info
• lun-map-list-info
• net-config-get-active
• nfs-exportfs-list-rules
• nfs-exportfs-list-rules-2
• nfs-exportfs-list-rules-2
• nfs-status
334
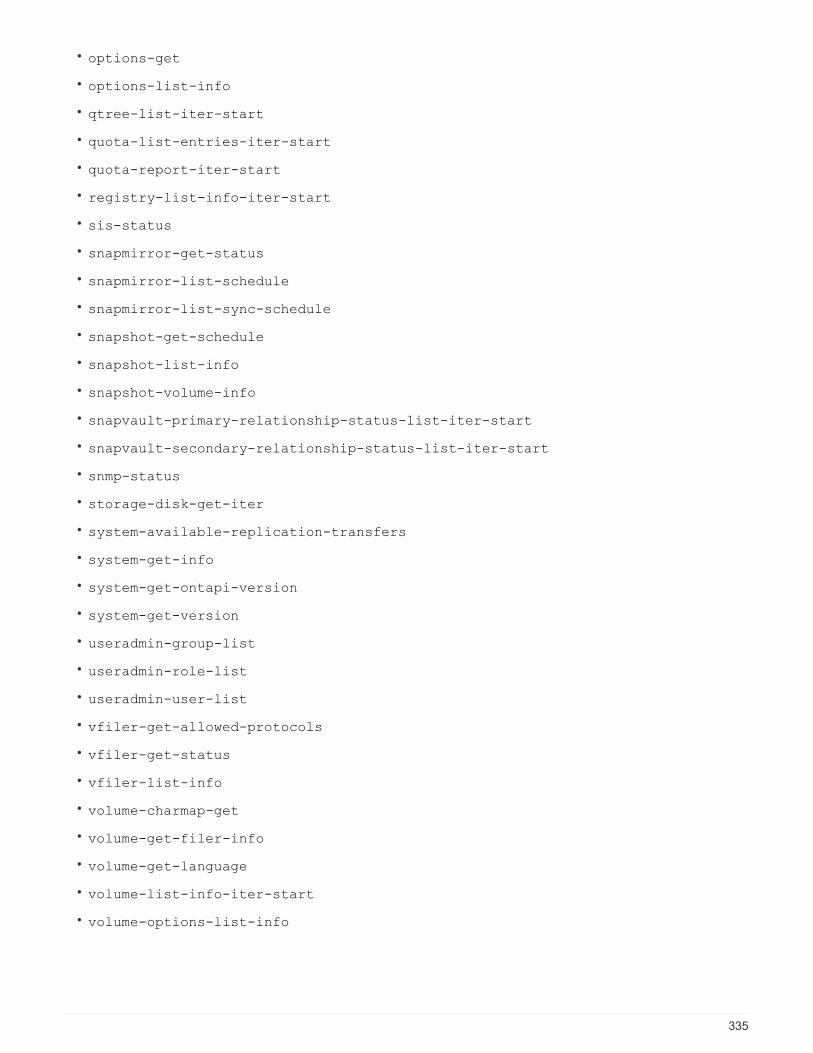
• options-get
• options-list-info
• qtree-list-iter-start
• quota-list-entries-iter-start
• quota-report-iter-start
• registry-list-info-iter-start
• sis-status
• snapmirror-get-status
• snapmirror-list-schedule
• snapmirror-list-sync-schedule
• snapshot-get-schedule
• snapshot-list-info
• snapshot-volume-info
• snapvault-primary-relationship-status-list-iter-start
• snapvault-secondary-relationship-status-list-iter-start
• snmp-status
• storage-disk-get-iter
• system-available-replication-transfers
• system-get-info
• system-get-ontapi-version
• system-get-version
• useradmin-group-list
• useradmin-role-list
• useradmin-user-list
• vfiler-get-allowed-protocols
• vfiler-get-status
• vfiler-list-info
• volume-charmap-get
• volume-get-filer-info
• volume-get-language
• volume-list-info-iter-start
• volume-options-list-info
335
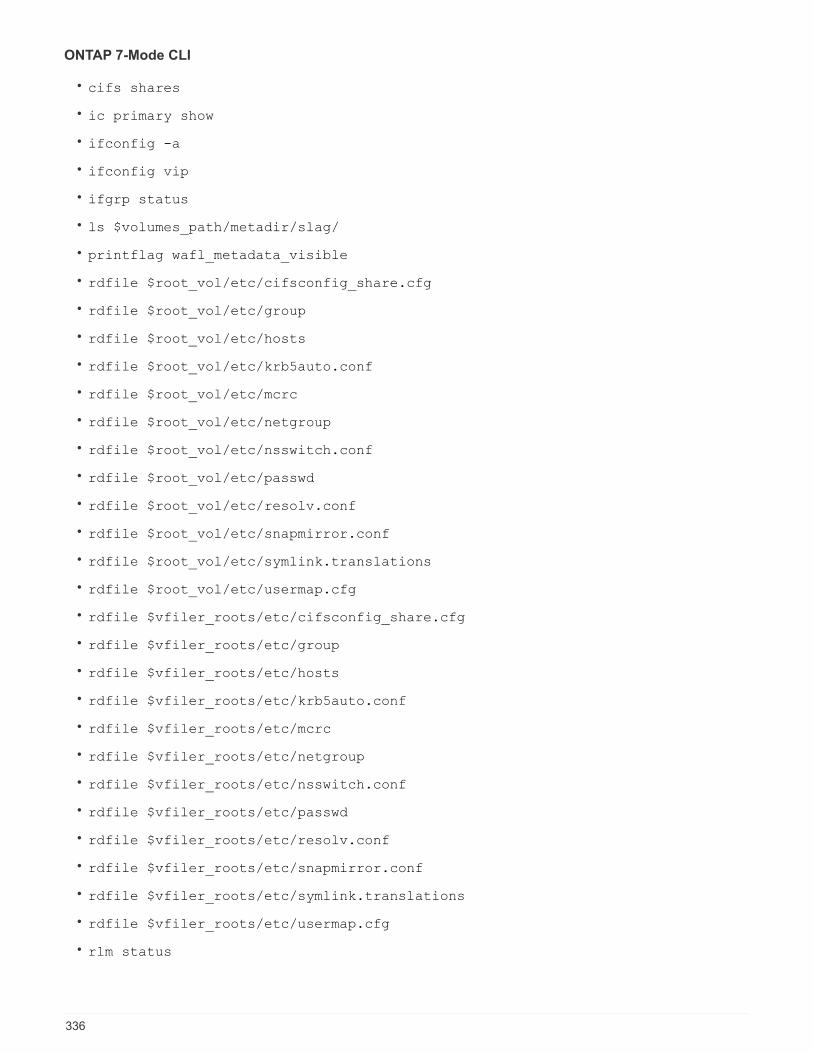
ONTAP 7-Mode CLI
• cifs shares
• ic primary show
• ifconfig -a
• ifconfig vip
• ifgrp status
• ls $volumes_path/metadir/slag/
• printflag wafl_metadata_visible
• rdfile $root_vol/etc/cifsconfig_share.cfg
• rdfile $root_vol/etc/group
• rdfile $root_vol/etc/hosts
• rdfile $root_vol/etc/krb5auto.conf
• rdfile $root_vol/etc/mcrc
• rdfile $root_vol/etc/netgroup
• rdfile $root_vol/etc/nsswitch.conf
• rdfile $root_vol/etc/passwd
• rdfile $root_vol/etc/resolv.conf
• rdfile $root_vol/etc/snapmirror.conf
• rdfile $root_vol/etc/symlink.translations
• rdfile $root_vol/etc/usermap.cfg
• rdfile $vfiler_roots/etc/cifsconfig_share.cfg
• rdfile $vfiler_roots/etc/group
• rdfile $vfiler_roots/etc/hosts
• rdfile $vfiler_roots/etc/krb5auto.conf
• rdfile $vfiler_roots/etc/mcrc
• rdfile $vfiler_roots/etc/netgroup
• rdfile $vfiler_roots/etc/nsswitch.conf
• rdfile $vfiler_roots/etc/passwd
• rdfile $vfiler_roots/etc/resolv.conf
• rdfile $vfiler_roots/etc/snapmirror.conf
• rdfile $vfiler_roots/etc/symlink.translations
• rdfile $vfiler_roots/etc/usermap.cfg
• rlm status
336
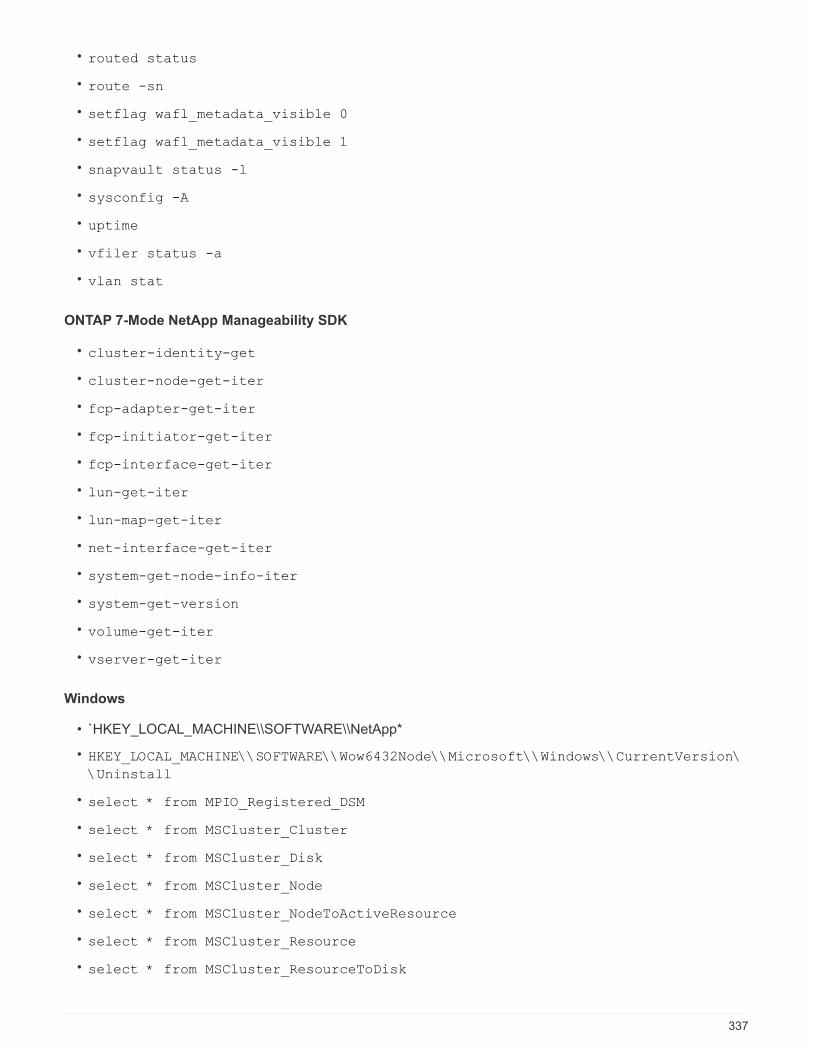
• routed status
• route -sn
• setflag wafl_metadata_visible 0
• setflag wafl_metadata_visible 1
• snapvault status -l
• sysconfig -A
• uptime
• vfiler status -a
• vlan stat
ONTAP 7-Mode NetApp Manageability SDK
• cluster-identity-get
• cluster-node-get-iter
• fcp-adapter-get-iter
• fcp-initiator-get-iter
• fcp-interface-get-iter
• lun-get-iter
• lun-map-get-iter
• net-interface-get-iter
• system-get-node-info-iter
• system-get-version
• volume-get-iter
• vserver-get-iter
Windows
• `HKEY_LOCAL_MACHINE\\SOFTWARE\\NetApp*
• HKEY_LOCAL_MACHINE\\SOFTWARE\\Wow6432Node\\Microsoft\\Windows\\CurrentVersion\
\Uninstall
• select * from MPIO_Registered_DSM
• select * from MSCluster_Cluster
• select * from MSCluster_Disk
• select * from MSCluster_Node
• select * from MSCluster_NodeToActiveResource
• select * from MSCluster_Resource
• select * from MSCluster_ResourceToDisk
337
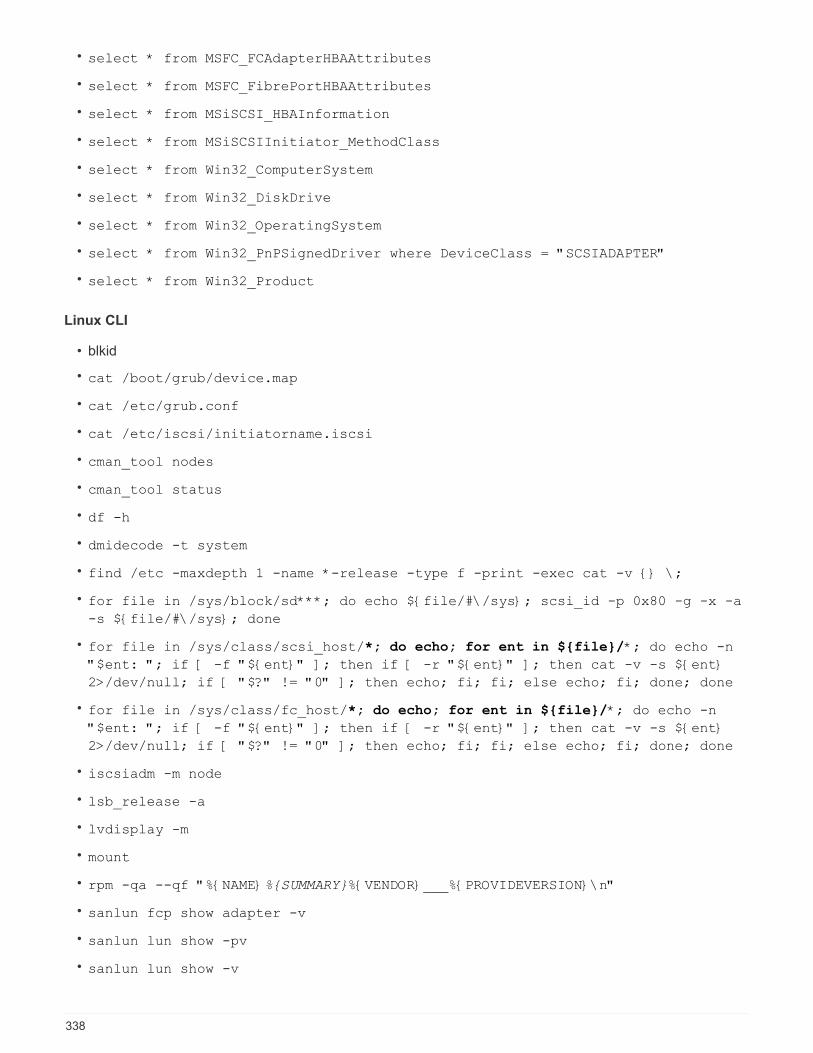
• select * from MSFC_FCAdapterHBAAttributes
• select * from MSFC_FibrePortHBAAttributes
• select * from MSiSCSI_HBAInformation
• select * from MSiSCSIInitiator_MethodClass
• select * from Win32_ComputerSystem
• select * from Win32_DiskDrive
• select * from Win32_OperatingSystem
• select * from Win32_PnPSignedDriver where DeviceClass = "SCSIADAPTER"
• select * from Win32_Product
Linux CLI
• blkid
• cat /boot/grub/device.map
• cat /etc/grub.conf
• cat /etc/iscsi/initiatorname.iscsi
• cman_tool nodes
• cman_tool status
• df -h
• dmidecode -t system
• find /etc -maxdepth 1 -name *-release -type f -print -exec cat -v {} \;
• for file in /sys/block/sd***; do echo ${file/#\/sys}; scsi_id -p 0x80 -g -x -a
-s ${file/#\/sys}; done
• for file in /sys/class/scsi_host/*; do echo; for ent in ${file}/*; do echo -n
"$ent: "; if [ -f "${ent}" ]; then if [ -r "${ent}" ]; then cat -v -s ${ent}
2>/dev/null; if [ "$?" != "0" ]; then echo; fi; fi; else echo; fi; done; done
• for file in /sys/class/fc_host/*; do echo; for ent in ${file}/*; do echo -n
"$ent: "; if [ -f "${ent}" ]; then if [ -r "${ent}" ]; then cat -v -s ${ent}
2>/dev/null; if [ "$?" != "0" ]; then echo; fi; fi; else echo; fi; done; done
• iscsiadm -m node
• lsb_release -a
• lvdisplay -m
• mount
• rpm -qa --qf "%{NAME}%{SUMMARY}%{VENDOR}___%{PROVIDEVERSION}\n"
• sanlun fcp show adapter -v
• sanlun lun show -pv
• sanlun lun show -v
338
• sanlun version
• san_version
• sfdisk -uS -l
• uname -a
• vxclustadm nidmap
• vxclustadm -v nodestate
VMware CLI
• esxcfg-info -a -F xml
• esxcfg-mpath -l
• esxcfg-scsidevs -a
• esxcfg-scsidevs -l
• esxcli software vib get
• find /proc/scsi -type f | while read line; do echo $line; cat $line; done
• san_version
• uname -m
• uname -n
• /usr/lib/vmware/vmkmgmt_keyval/vmkmgmt_keyval -a
• /usr/lib/vmware/vm-support/bin/dump-vmdk-rdm-info.sh $vmx_paths
• vim-cmd /vmsvc/getallvms
• vim-cmd vmsvc/snapshot.get $vm_ids
• vmkload_mod -s nmp
• vmware -l
• vmware -v
Cisco CLI
• show fcdomain domain-list
• show flogi database
• show switchname
• show version
• show vsan
• show zoneset
• show zoneset active
• uname -m
339
• nsshow
• switchshow
• version
• zoneshow
• vim-cmd vmsvc/snapshot.get $vm_ids
• vmkload_mod -s nmp
• vmware -l
• vmware -v
Brocade CLI
• nsshow
• switchshow
• version
• zoneshow
Where to find information about transition assessment
You can find information about assessing storage systems, hosts, and host applications
to verify that they are ready for transition in the 7-Mode Transition Tool Copy-Based
Transition Guide. The guide provides details about how to import the inventory report you
created for controllers and hosts and how to assess these controllers and hosts to verify
that they are ready for transition.
340
7-Mode Data Transition Using SnapMirror®Technology
Describes the transition of data from 7-Mode systems to ONTAP by using SnapMirror
commands.
Transitioning 7-Mode volumes using SnapMirror
You can transition 7-Mode volumes in a NAS and SAN environment to clustered Data
ONTAP volumes by using clustered Data ONTAP SnapMirror commands. You must then
set up the protocols, services, and other configuration on the cluster after the transition is
complete.
Recommendation: You should use the 7-Mode Transition Tool for copy-based transition to transition 7-Mode
volumes because the tool provides prechecks to verify both 7-Mode and the cluster in every step of the
migration process, which helps you to avoid many potential issues. The tool significantly simplifies the
migration of all protocols, network, and services configurations along with the data migration.
7-Mode Transition Tool Release Notes
This procedure provides the high-level tasks you have to perform for transition using SnapMirror.
1. Verify that the volumes you plan to transition are supported for transition.
2. Prepare the 7-Mode system for transition.
3. Prepare the cluster for transition.
4. Create a transition peer relationship between the 7-Mode system as the source and the SVM as the
destination.
5. Copy the data from the 7-Mode volume to the clustered Data ONTAP volume by creating a SnapMirror
relationship between the two volumes.
After data migration finishes, you must perform the following tasks:
• Optional: Create a data LIF on the SVM to enable client access.
Network and LIF management.
• Configure protocols, networking, and services on the SVM.
◦ Network and LIF management.
◦ SMB/CIFS management
◦ NFS management
• Create igroups and map LUNs
SAN administration
• If you transition volumes with LUNs, you must perform the required post-transition tasks on the hosts
before restoring access to the transitioned clustered Data ONTAP volumes.
SAN host transition and remediation
341
NetApp Support
Planning for transition
Before copying data from 7-Mode volumes to clustered ONTAP volumes, you must
understand when to use SnapMirror to perform the transition and review the information
for supported 7-Mode versions and supported volumes for transition. You must also be
aware of certain transition considerations.
You should review the Release Notes for the transition target release in case there are any transition issues.
ONTAP 9 Release Notes
SnapMirror relationships between 7-Mode and clustered ONTAP volumes are supported in the following
releases:
• ONTAP 9.8 and later releases
• ONTAP 9.7P2 and later 9.7 releases
• ONTAP 9.6P7 and later 9.6 releases
• ONTAP 9.0 to ONTAP 9.5
You can use SnapMirror to transition data in the following scenarios:
• The 7-Mode Transition Tool does not support your requirements for transition; for example, the 7-Mode
Transition Tool requires a Windows or Linux host that might be unavailable in your environment.
Recommendation: You should use the 7-Mode Transition Tool to transition 7-Mode volumes because the
tool provides prechecks to verify the feasibility of transition and migrates all protocol, network, and services
configurations along with the data.
You can install and use the 7-Mode Transition Tool to perform the prechecks for transitioning and then use
SnapMirror commands to perform the data migration from the 7-Mode volume to the clustered ONTAP
volume.
• The cluster and storage virtual machine (SVM) are already configured and only the data has to be
transitioned from the 7-Mode volumes to the clustered ONTAP volumes.
Features and volumes not supported for transition
You cannot transition certain 7-Mode volumes, such as traditional volumes, and certain 7-
Mode features, such as synchronous SnapMirror relationships, because some features
might not be available in clustered Data ONTAP.
You can transition a 7-Mode volume only to an SVM.
You cannot transition the following 7-Mode volumes or configurations:
• Restricted or offline volumes
• Traditional volumes
• Volumes with NFS-to-CIFS character mapping (charmap)
342
• Volumes with Storage-Level Access Guard configurations
• Volumes that contain qtrees with Storage-Level Access Guard configurations
If the target cluster is running Data ONTAP 8.3.1 or later, you can transition volumes that contain qtrees
with this configuration.
• Volumes with the no_i2p option enabled.
• FlexCache volumes
• 32-bit volumes and 64-bit volumes that have 32-bit Snapshot copies if the destination cluster is running
Data ONTAP 8.3 or later
• FlexClone volumes
FlexClone volumes can be transitioned as FlexVol volumes, but the clone hierarchy and storage efficiency
will be lost.
• Root volume of a vFiler unit, where the root volume is based on a qtree that belongs to the default vFiler
unit
• Synchronous SnapMirror configuration
• Qtree SnapMirror relationships
• IPv6 configurations
• SnapVault relationships
• Network compression for SnapMirror
• Restoring the destination volume to a specific Snapshot copy (SnapMirror break -s command)
• Volume move operation
Features not supported for SAN transition
You should be aware of the 7-Mode SAN features that are not supported in clustered
Data ONTAP so that you can take any necessary actions before the transition.
The following 7-Mode SAN features are not supported in clustered Data ONTAP:
• Snapshot copy-backed LUN clones
Snapshot copy-backed LUN clones present in the Snapshot copies are not supported for any restore
operation. These LUNs are not accessible in clustered Data ONTAP. You must split or delete the 7-Mode
Snapshot copy backed LUN clones before transition.
• LUNs with ostype of vld, image, or any user-defined string LUNs
You must either change the ostype of such LUNs or delete the LUNs before transition.
• LUN clone split
You must either wait for the active LUN clone split operations to complete or abort the LUN clone split and
delete the LUN before transition.
• The lun share command
343
Sharing a LUN over NAS protocols is not supported in clustered Data ONTAP.
• SnapValidator
7-Mode version requirements for transition
You should be aware of the versions of Data ONTAP operating in 7-Mode that are
supported for transitioning to clustered Data ONTAP 8.3 or later.
If the 7-Mode system has only 64-bit aggregates and volumes, you can transition volumes from systems
running the following 7-Mode versions to clustered Data ONTAP 8.3 or later:
• Data ONTAP 8.0
• Data ONTAP 8.0.1
• Data ONTAP 8.0.2
• Data ONTAP 8.0.3
• Data ONTAP 8.0.4
• Data ONTAP 8.0.5
• Data ONTAP 8.1
• Data ONTAP 8.1.2
• Data ONTAP 8.1.3
• Data ONTAP 8.1.4
• Data ONTAP 8.2
• Data ONTAP 8.2.1
• Data ONTAP 8.2.2
• Data ONTAP 8.2.3
• Data ONTAP 8.2.4
• Data ONTAP 8.2.5
If the 7-Mode system is running Data ONTAP 8.0.x, 8.1.x, or 8.2 and has 32-bit aggregates or volumes with 32-
bit Snapshot copies, you must upgrade to 8.1.4 P4 or 8.2.1. After upgrading, you must expand the 32-bit
aggregates to 64-bit, and then find and remove any 32-bit data.
You must upgrade the following 7-Mode versions to Data ONTAP 8.1.4 P4 before transitioning to clustered
Data ONTAP 8.3 or later:
• Data ONTAP 7.3.3
• Data ONTAP 7.3.4
• Data ONTAP 7.3.5
• Data ONTAP 7.3.6
• Data ONTAP 7.3.7
Considerations for using SnapMirror for transition
You must be aware of certain considerations when running transition operations
344
simultaneously with SnapMirror or SnapVault operations occurring in the 7-Mode system,
such as the maximum number of concurrent SnapMirror transfers, data copy schedules,
and using multiple paths for transition.
Maximum number of concurrent SnapMirror transfers
During transition, the maximum number of concurrent SnapMirror transfers supported on the 7-Mode and
ONTAP systems depend on the number of volume SnapMirror replication operations allowed for a specific
storage system model.
For information about the maximum number of concurrent volume SnapMirror transfers for your system model,
see the Data ONTAP Data Protection Online Backup and Recovery Guide for 7-Mode.
Data copy schedules
Data copy schedules for transition operations should not overlap with the existing schedules for SnapMirror or
SnapVault operations running on the 7-Mode system.
Using multiple paths for transition
You can specify two paths for transition by using a data copy IP address and a multipath IP address. However,
both paths can be used only for load-balancing, not for failover.
Space considerations when transitioning SAN volumes
You must ensure that sufficient space is available in the volumes during transition. In
addition to the space required for storing data and Snapshot copies, the transition
process also requires 1 MB of space per LUN for updating certain filesystem metadata.
Before cutover, you can use the df -h command on the 7-Mode volume to verify whether free space of 1 MB
per LUN is available in the volume. If the volume does not have sufficient free space available, the required
amount of space must be added to the 7-Mode volume.
If the transition of LUNs fails due to lack of space on the destination volume, the following EMS message is
generated: LUN.vol.proc.fail.no.space: Processing for LUNs in volume vol1 failed due
to lack of space.
In this case, you must set the filesys-size-fixed attribute to false on the destination volume, and then
add 1 MB per LUN of free space to the volume.
If there are volumes containing space-reserved LUNs, growing the volume by 1MB per LUN might not provide
sufficient space. In such cases, the amount of additional space that has to be added is the size of the Snapshot
reserve for the volume. After space is added to the destination volume, you can use the lun transition
start command to transition the LUNs.
Related information
NetApp Documentation: ONTAP 9
Guidelines for transitioning SnapLock volumes
You can transition 7-Mode SnapLock volumes to SnapLock volumes created in ONTAP
9.5 or earlier. You must be aware of the requirements and guidelines for transitioning
345
SnapLock volumes.
• Transition of 7-Mode SnapLock volumes is not supported if the SnapLock volumes contain LUNs.
• You can transition 7-Mode SnapLock Enterprise volumes only to SnapLock Enterprise volumes in ONTAP
9.5 or earlier.
• You can transition 7-Mode SnapLock Compliance volumes only to SnapLock Compliance volumes in
ONTAP 9.5 or earlier.
• When transitioning a 7-Mode volume SnapMirror relationship, you can use staggered transition (transition
secondary first and then primary) only for SnapLock Enterprise volumes.
SnapMirror disaster recovery (DR) relationship between 7-Mode primary volumes and ONTAP secondary
volumes is supported only for SnapLock Enterprise volumes, but not for SnapLock Compliance volumes.
Transitioning a volume SnapMirror relationship in a staggered configuration
• You must transition a 7-Mode volume SnapMirror relationship between SnapLock Compliance volumes by
transitioning the primary and secondary volumes in parallel.
Transitioning a volume SnapMirror relationship in parallel
Related information
Archive and compliance using SnapLock technology
Preparing for transition
Before you start the transition, you must prepare the 7-Mode storage system and cluster
before transitioning 7-Mode volumes to clustered Data ONTAP. You must also create a
transition peer relationship between the 7-Mode system and the storage virtual machine
(SVM).
License requirements for transition
Before you transition a volume from 7-Mode to clustered Data ONTAP, you must ensure
that SnapMirror is licensed on the 7-Mode storage system. If you are transitioning a 7-
Mode volume SnapMirror relationship, SnapMirror licenses are also required on the
source and destination clusters.
If SnapMirror is already licensed on your 7-Mode system, you can use the same license for transition. If you do
not have the 7-Mode SnapMirror license, you can obtain a temporary SnapMirror license for transition from
your sales representative.
Feature licenses that are enabled on the 7-Mode system must be added to the cluster. For information about
obtaining feature licenses on the cluster, see the System Administration Reference.
Preparing the 7-Mode system for transition
Before starting a transition, you must complete certain tasks on the 7-Mode system, such
as adding the SnapMirror license and the 7-Mode system to communicate with the target
cluster.
346
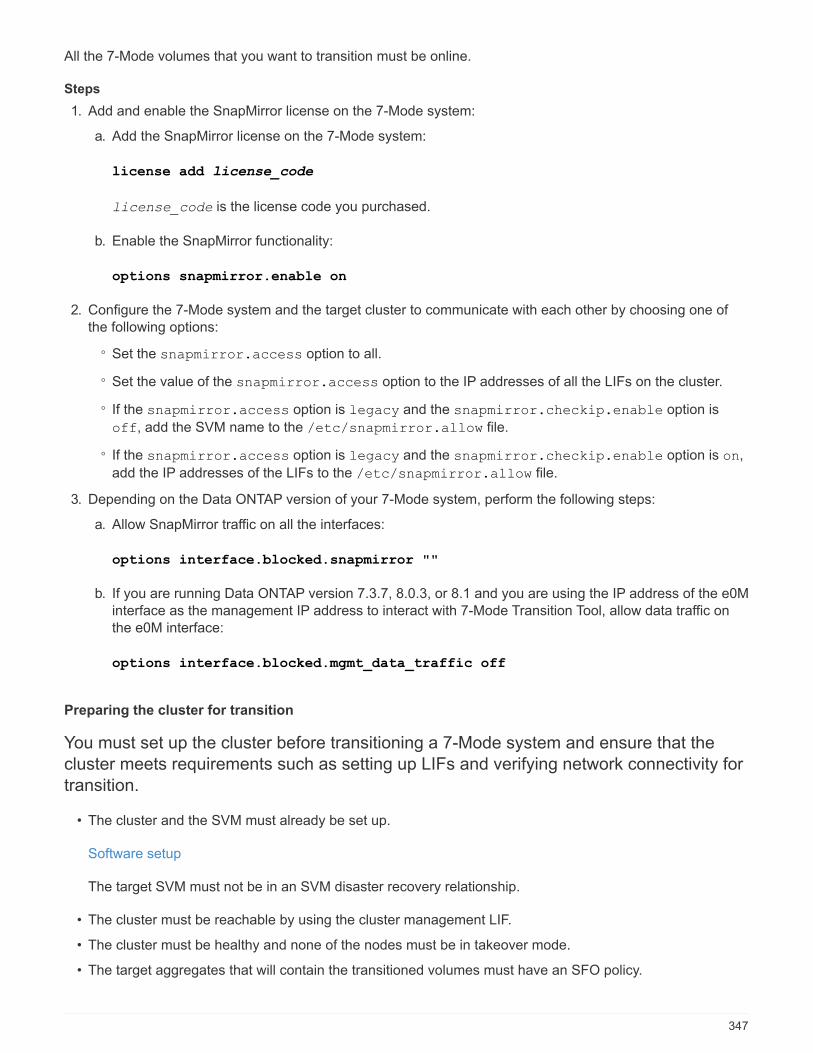
All the 7-Mode volumes that you want to transition must be online.
Steps
1. Add and enable the SnapMirror license on the 7-Mode system:
a. Add the SnapMirror license on the 7-Mode system:
license add license_code
license_code is the license code you purchased.
b. Enable the SnapMirror functionality:
options snapmirror.enable on
2. Configure the 7-Mode system and the target cluster to communicate with each other by choosing one of
the following options:
◦ Set the snapmirror.access option to all.
◦ Set the value of the snapmirror.access option to the IP addresses of all the LIFs on the cluster.
◦ If the snapmirror.access option is legacy and the snapmirror.checkip.enable option is
off, add the SVM name to the /etc/snapmirror.allow file.
◦ If the snapmirror.access option is legacy and the snapmirror.checkip.enable option is on,
add the IP addresses of the LIFs to the /etc/snapmirror.allow file.
3. Depending on the Data ONTAP version of your 7-Mode system, perform the following steps:
a. Allow SnapMirror traffic on all the interfaces:
options interface.blocked.snapmirror ""
b. If you are running Data ONTAP version 7.3.7, 8.0.3, or 8.1 and you are using the IP address of the e0M
interface as the management IP address to interact with 7-Mode Transition Tool, allow data traffic on
the e0M interface:
options interface.blocked.mgmt_data_traffic off
Preparing the cluster for transition
You must set up the cluster before transitioning a 7-Mode system and ensure that the
cluster meets requirements such as setting up LIFs and verifying network connectivity for
transition.
• The cluster and the SVM must already be set up.
Software setup
The target SVM must not be in an SVM disaster recovery relationship.
• The cluster must be reachable by using the cluster management LIF.
• The cluster must be healthy and none of the nodes must be in takeover mode.
• The target aggregates that will contain the transitioned volumes must have an SFO policy.
347
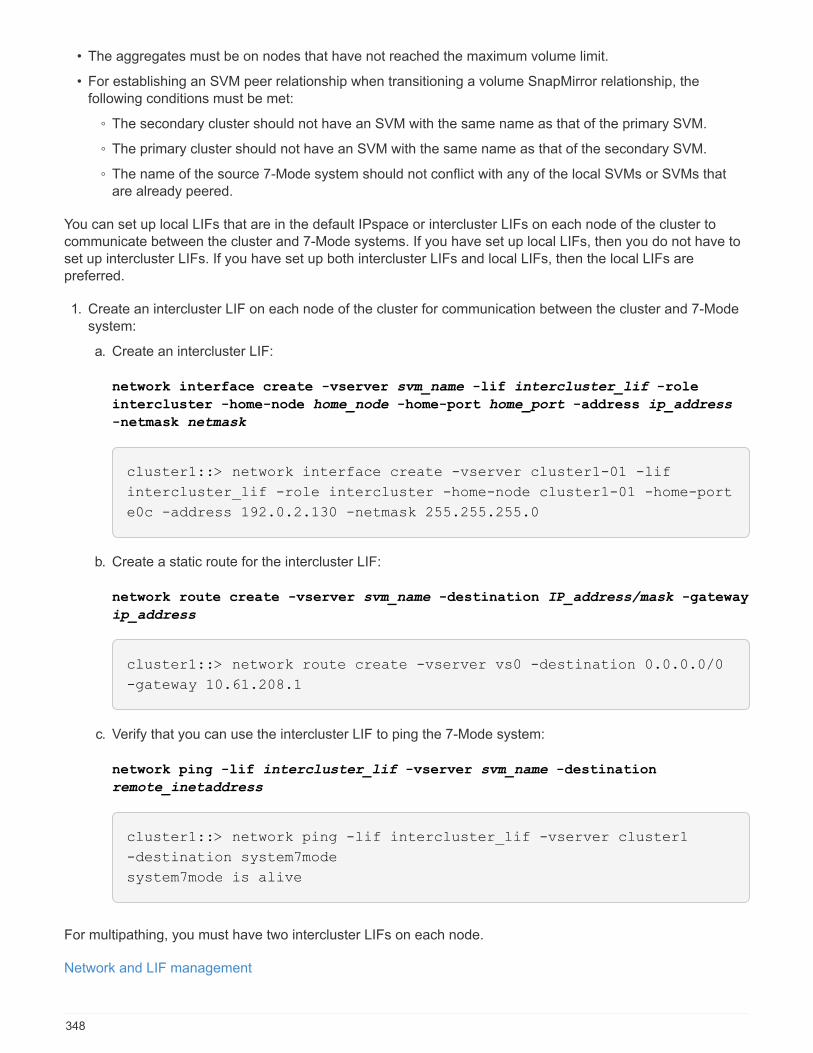
• The aggregates must be on nodes that have not reached the maximum volume limit.
• For establishing an SVM peer relationship when transitioning a volume SnapMirror relationship, the
following conditions must be met:
◦ The secondary cluster should not have an SVM with the same name as that of the primary SVM.
◦ The primary cluster should not have an SVM with the same name as that of the secondary SVM.
◦ The name of the source 7-Mode system should not conflict with any of the local SVMs or SVMs that
are already peered.
You can set up local LIFs that are in the default IPspace or intercluster LIFs on each node of the cluster to
communicate between the cluster and 7-Mode systems. If you have set up local LIFs, then you do not have to
set up intercluster LIFs. If you have set up both intercluster LIFs and local LIFs, then the local LIFs are
preferred.
1. Create an intercluster LIF on each node of the cluster for communication between the cluster and 7-Mode
system:
a. Create an intercluster LIF:
network interface create -vserver svm_name -lif intercluster_lif -role
intercluster -home-node home_node -home-port home_port -address ip_address
-netmask netmask
cluster1::> network interface create -vserver cluster1-01 -lif
intercluster_lif -role intercluster -home-node cluster1-01 -home-port
e0c -address 192.0.2.130 -netmask 255.255.255.0
b. Create a static route for the intercluster LIF:
network route create -vserver svm_name -destination IP_address/mask -gateway
ip_address
cluster1::> network route create -vserver vs0 -destination 0.0.0.0/0
-gateway 10.61.208.1
c. Verify that you can use the intercluster LIF to ping the 7-Mode system:
network ping -lif intercluster_lif -vserver svm_name -destination
remote_inetaddress
cluster1::> network ping -lif intercluster_lif -vserver cluster1
-destination system7mode
system7mode is alive
For multipathing, you must have two intercluster LIFs on each node.
Network and LIF management
348
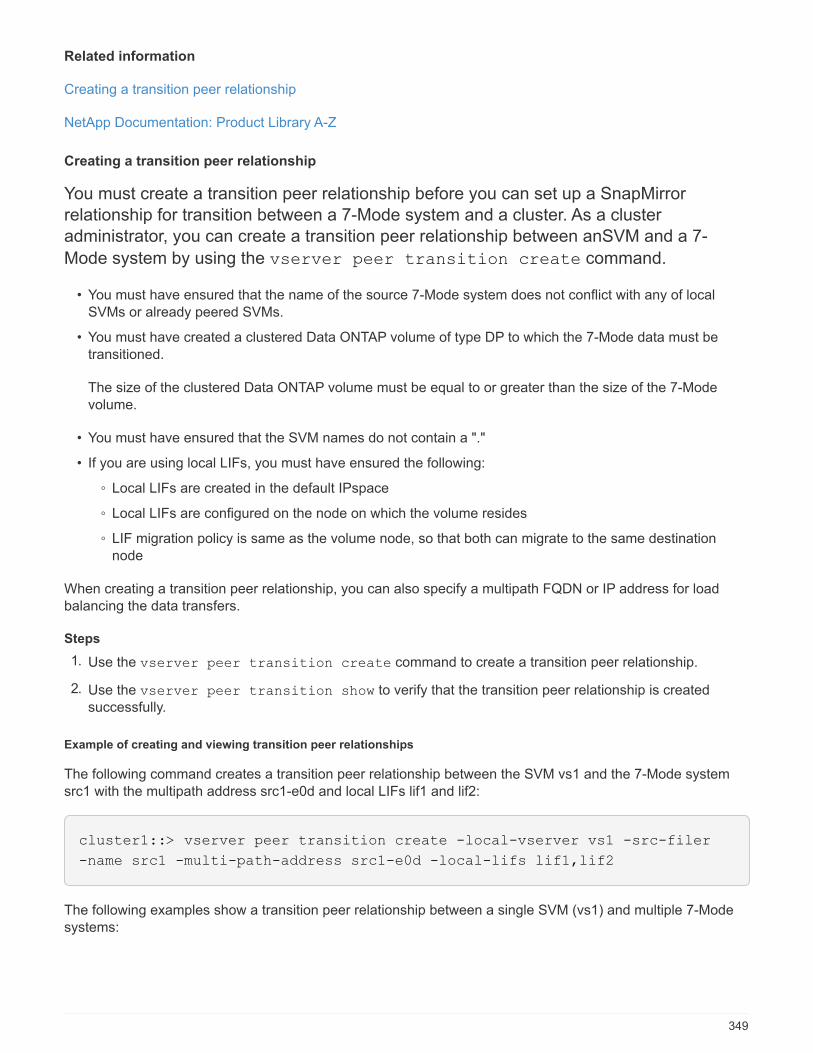
Related information
Creating a transition peer relationship
NetApp Documentation: Product Library A-Z
Creating a transition peer relationship
You must create a transition peer relationship before you can set up a SnapMirror
relationship for transition between a 7-Mode system and a cluster. As a cluster
administrator, you can create a transition peer relationship between anSVM and a 7-
Mode system by using the vserver peer transition create command.
• You must have ensured that the name of the source 7-Mode system does not conflict with any of local
SVMs or already peered SVMs.
• You must have created a clustered Data ONTAP volume of type DP to which the 7-Mode data must be
transitioned.
The size of the clustered Data ONTAP volume must be equal to or greater than the size of the 7-Mode
volume.
• You must have ensured that the SVM names do not contain a "."
• If you are using local LIFs, you must have ensured the following:
◦ Local LIFs are created in the default IPspace
◦ Local LIFs are configured on the node on which the volume resides
◦ LIF migration policy is same as the volume node, so that both can migrate to the same destination
node
When creating a transition peer relationship, you can also specify a multipath FQDN or IP address for load
balancing the data transfers.
Steps
1. Use the vserver peer transition create command to create a transition peer relationship.
2. Use the vserver peer transition show to verify that the transition peer relationship is created
successfully.
Example of creating and viewing transition peer relationships
The following command creates a transition peer relationship between the SVM vs1 and the 7-Mode system
src1 with the multipath address src1-e0d and local LIFs lif1 and lif2:
cluster1::> vserver peer transition create -local-vserver vs1 -src-filer
-name src1 -multi-path-address src1-e0d -local-lifs lif1,lif2
The following examples show a transition peer relationship between a single SVM (vs1) and multiple 7-Mode
systems:
349
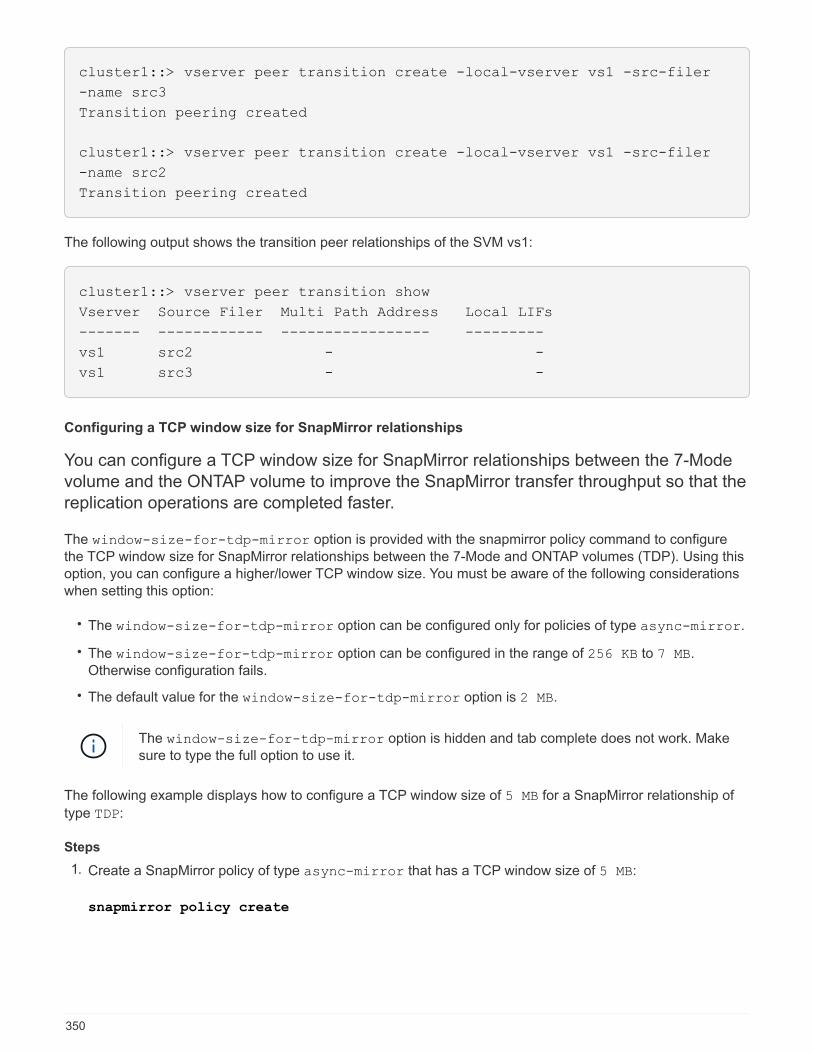
cluster1::> vserver peer transition create -local-vserver vs1 -src-filer
-name src3
Transition peering created
cluster1::> vserver peer transition create -local-vserver vs1 -src-filer
-name src2
Transition peering created
The following output shows the transition peer relationships of the SVM vs1:
cluster1::> vserver peer transition show
Vserver Source Filer Multi Path Address Local LIFs
------- ------------ ----------------- ---------
vs1 src2 - -
vs1 src3 - -
Configuring a TCP window size for SnapMirror relationships
You can configure a TCP window size for SnapMirror relationships between the 7-Mode
volume and the ONTAP volume to improve the SnapMirror transfer throughput so that the
replication operations are completed faster.
The window-size-for-tdp-mirror option is provided with the snapmirror policy command to configure
the TCP window size for SnapMirror relationships between the 7-Mode and ONTAP volumes (TDP). Using this
option, you can configure a higher/lower TCP window size. You must be aware of the following considerations
when setting this option:
• The window-size-for-tdp-mirror option can be configured only for policies of type async-mirror.
• The window-size-for-tdp-mirror option can be configured in the range of 256 KB to 7 MB.
Otherwise configuration fails.
• The default value for the window-size-for-tdp-mirror option is 2 MB.
The window-size-for-tdp-mirror option is hidden and tab complete does not work. Make
sure to type the full option to use it.
The following example displays how to configure a TCP window size of 5 MB for a SnapMirror relationship of
type TDP:
Steps
1. Create a SnapMirror policy of type async-mirror that has a TCP window size of 5 MB:
snapmirror policy create
350
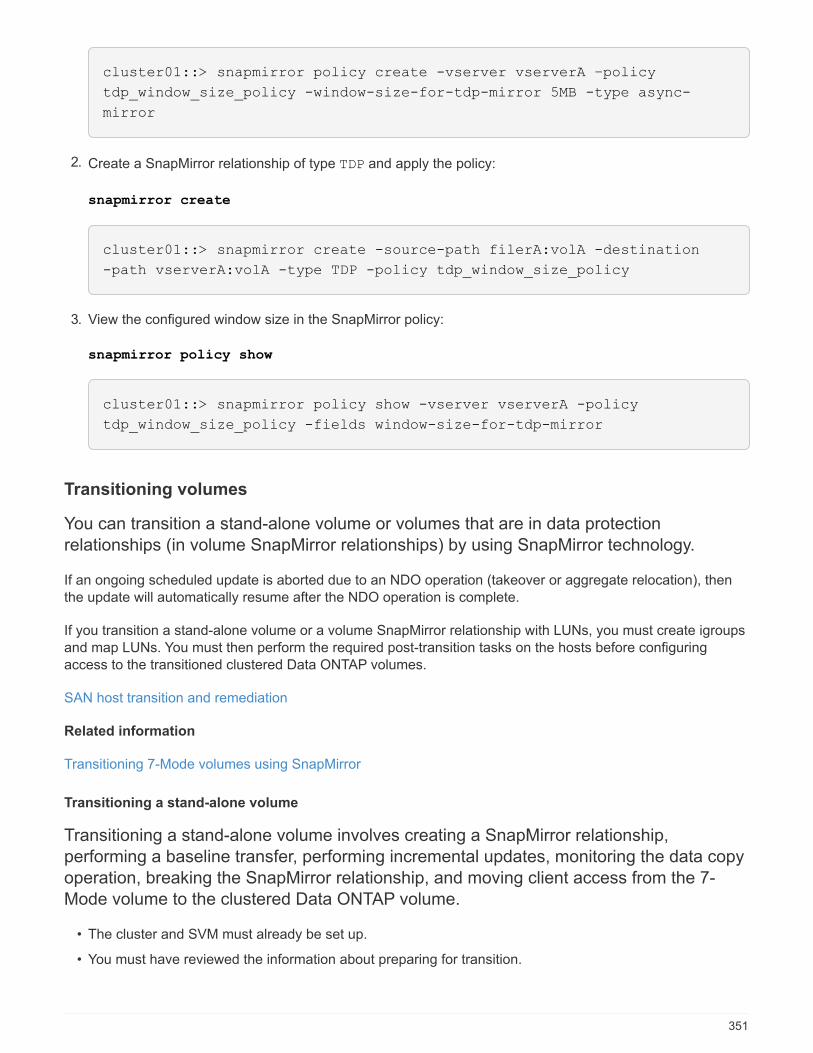
cluster01::> snapmirror policy create -vserver vserverA –policy
tdp_window_size_policy -window-size-for-tdp-mirror 5MB -type async-
mirror
2. Create a SnapMirror relationship of type TDP and apply the policy:
snapmirror create
cluster01::> snapmirror create -source-path filerA:volA -destination
-path vserverA:volA -type TDP -policy tdp_window_size_policy
3. View the configured window size in the SnapMirror policy:
snapmirror policy show
cluster01::> snapmirror policy show -vserver vserverA -policy
tdp_window_size_policy -fields window-size-for-tdp-mirror
Transitioning volumes
You can transition a stand-alone volume or volumes that are in data protection
relationships (in volume SnapMirror relationships) by using SnapMirror technology.
If an ongoing scheduled update is aborted due to an NDO operation (takeover or aggregate relocation), then
the update will automatically resume after the NDO operation is complete.
If you transition a stand-alone volume or a volume SnapMirror relationship with LUNs, you must create igroups
and map LUNs. You must then perform the required post-transition tasks on the hosts before configuring
access to the transitioned clustered Data ONTAP volumes.
SAN host transition and remediation
Related information
Transitioning 7-Mode volumes using SnapMirror
Transitioning a stand-alone volume
Transitioning a stand-alone volume involves creating a SnapMirror relationship,
performing a baseline transfer, performing incremental updates, monitoring the data copy
operation, breaking the SnapMirror relationship, and moving client access from the 7-
Mode volume to the clustered Data ONTAP volume.
• The cluster and SVM must already be set up.
• You must have reviewed the information about preparing for transition.
351

Preparing for transition
Steps
1. Copy data from the 7-Mode volume to the clustered Data ONTAP volume:
a. If you want to configure the TCP window size for the SnapMirror relationship between the 7-Mode
system and the SVM, create a SnapMirror policy of type async-mirror with the window-size-
for-tdp-mirror option.
You must then apply this policy to the TDP SnapMirror relationship between the 7-Mode system and
the SVM.
You can configure the TCP window size in the range of 256 KB to 7 MB for improving the SnapMirror
transfer throughput so that the transition copy operations get completed faster. The default value of
TCP window size is 2 MB.
cluster1::> snapmirror policy create -vserver vs1 –policy tdp_policy
-window-size-for-tdp-mirror 5MB -type async-mirror
b. Use the snapmirror create command with the relationship type as TDP to create a SnapMirror
relationship between the 7-Mode system and the SVM.
If you have created a SnapMirror policy to configure the TCP window size, you must apply the policy to
this SnapMirror relationship.
cluster1::> snapmirror create -source-path system7mode:dataVol20
-destination-path vs1:dst_vol -type TDP -policy tdp_policy
Operation succeeded: snapmirror create the relationship with
destination vs1:dst_vol.
c. Use the snapmirror initialize command to start the baseline transfer.
cluster1::> snapmirror initialize -destination-path vs1:dst_vol
Operation is queued: snapmirror initialize of destination
vs1:dst_vol.
d. Use the snapmirror show command to monitor the status.
cluster1::>snapmirror show -destination-path vs1:dst_vol
Source Path: system7mode:dataVol20
Destination Path: vs1:dst_vol
Relationship Type: TDP
Relationship Group Type: none
SnapMirror Schedule: -
SnapMirror Policy Type: async-mirror
352
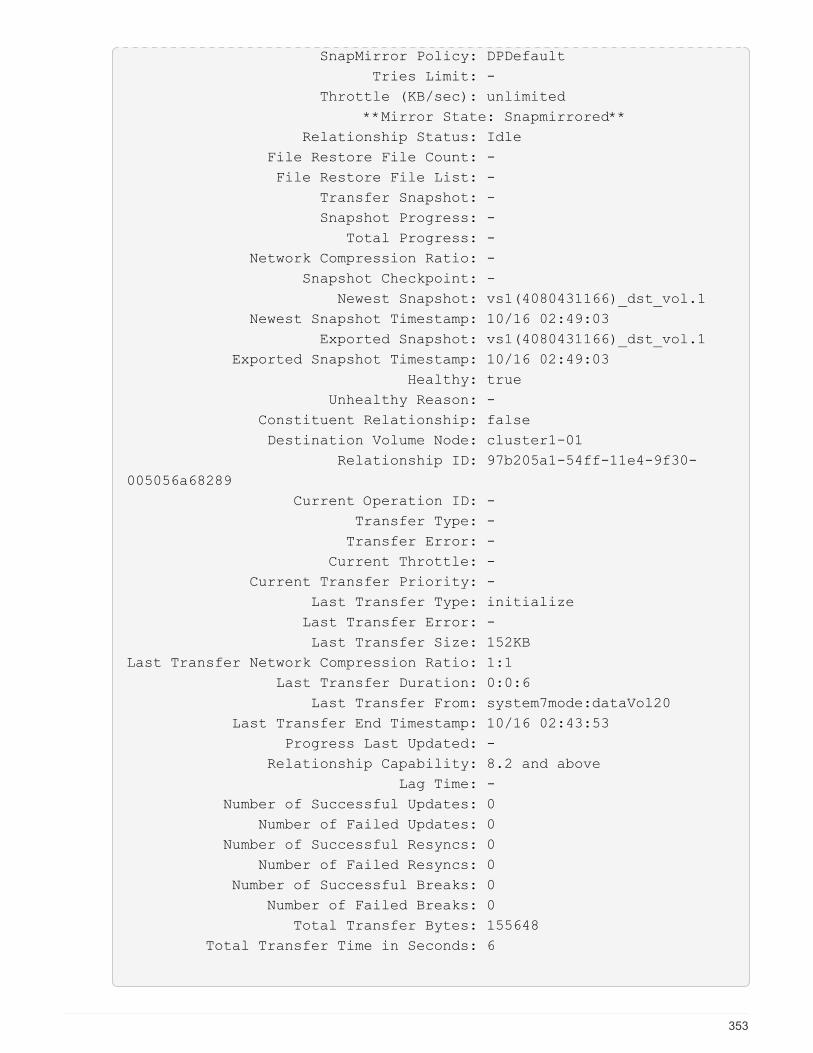
SnapMirror Policy: DPDefault
Tries Limit: -
Throttle (KB/sec): unlimited
**Mirror State: Snapmirrored**
Relationship Status: Idle
File Restore File Count: -
File Restore File List: -
Transfer Snapshot: -
Snapshot Progress: -
Total Progress: -
Network Compression Ratio: -
Snapshot Checkpoint: -
Newest Snapshot: vs1(4080431166)_dst_vol.1
Newest Snapshot Timestamp: 10/16 02:49:03
Exported Snapshot: vs1(4080431166)_dst_vol.1
Exported Snapshot Timestamp: 10/16 02:49:03
Healthy: true
Unhealthy Reason: -
Constituent Relationship: false
Destination Volume Node: cluster1-01
Relationship ID: 97b205a1-54ff-11e4-9f30-
005056a68289
Current Operation ID: -
Transfer Type: -
Transfer Error: -
Current Throttle: -
Current Transfer Priority: -
Last Transfer Type: initialize
Last Transfer Error: -
Last Transfer Size: 152KB
Last Transfer Network Compression Ratio: 1:1
Last Transfer Duration: 0:0:6
Last Transfer From: system7mode:dataVol20
Last Transfer End Timestamp: 10/16 02:43:53
Progress Last Updated: -
Relationship Capability: 8.2 and above
Lag Time: -
Number of Successful Updates: 0
Number of Failed Updates: 0
Number of Successful Resyncs: 0
Number of Failed Resyncs: 0
Number of Successful Breaks: 0
Number of Failed Breaks: 0
Total Transfer Bytes: 155648
Total Transfer Time in Seconds: 6
353

e. Depending on whether you want to update the clustered Data ONTAP volume manually or by setting
up a SnapMirror schedule, perform the appropriate action:
354

355
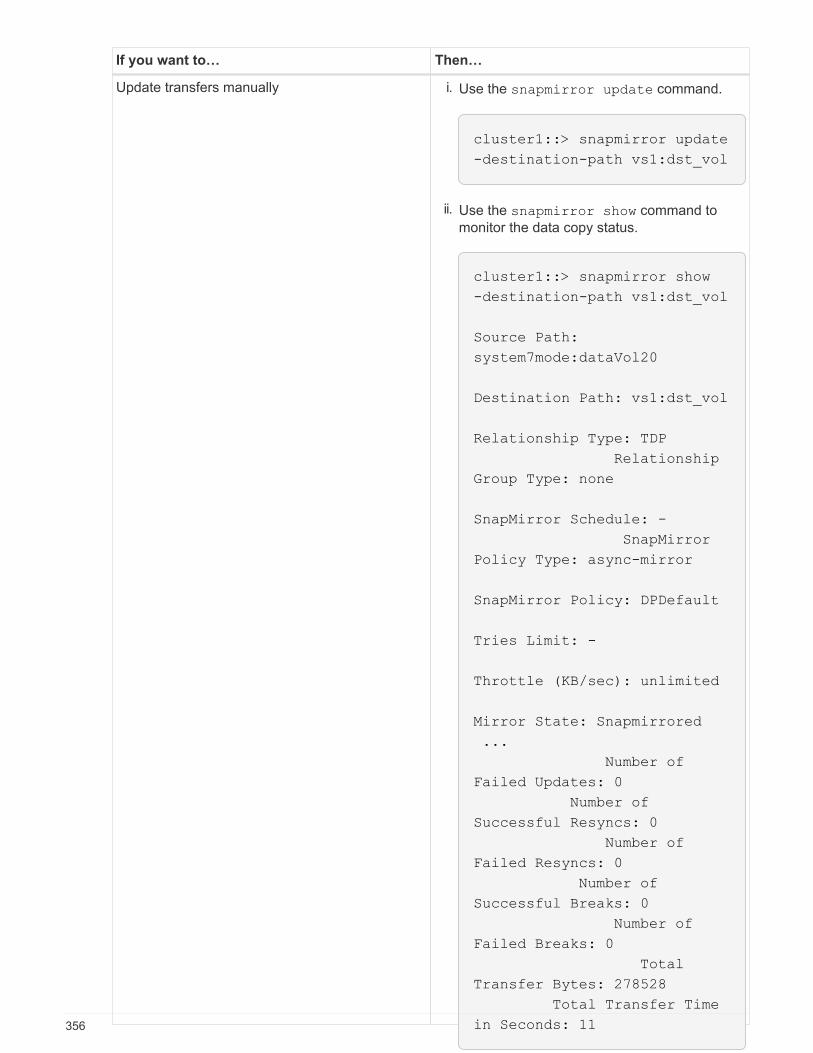
If you want to… Then…
Update transfers manually i. Use the snapmirror update command.
cluster1::> snapmirror update
-destination-path vs1:dst_vol
ii. Use the snapmirror show command to
monitor the data copy status.
cluster1::> snapmirror show
-destination-path vs1:dst_vol
Source Path:
system7mode:dataVol20
Destination Path: vs1:dst_vol
Relationship Type: TDP
Relationship
Group Type: none
SnapMirror Schedule: -
SnapMirror
Policy Type: async-mirror
SnapMirror Policy: DPDefault
Tries Limit: -
Throttle (KB/sec): unlimited
Mirror State: Snapmirrored
...
Number of
Failed Updates: 0
Number of
Successful Resyncs: 0
Number of
Failed Resyncs: 0
Number of
Successful Breaks: 0
Number of
Failed Breaks: 0
Total
Transfer Bytes: 278528
Total Transfer Time
in Seconds: 11356
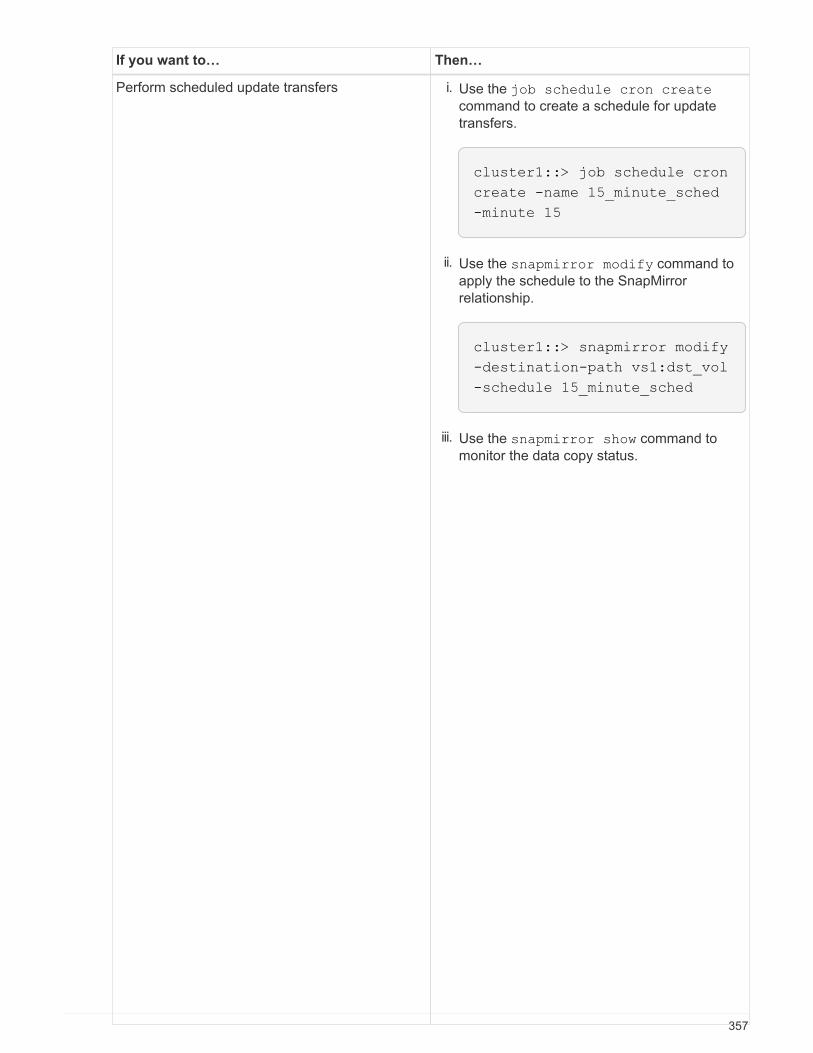
iii. Go to step 3.
If you want to… Then…
Perform scheduled update transfers i. Use the job schedule cron create
command to create a schedule for update
transfers.
cluster1::> job schedule cron
create -name 15_minute_sched
-minute 15
ii. Use the snapmirror modify command to
apply the schedule to the SnapMirror
relationship.
cluster1::> snapmirror modify
-destination-path vs1:dst_vol
-schedule 15_minute_sched
iii. Use the snapmirror show command to
monitor the data copy status.
357

cluster1::> snapmirror show
-destination-path vs1:dst_vol
Source Path:
system7mode:dataVol20
Destination Path: vs1:dst_vol
Relationship Type: TDP
Relationship
Group Type: none
SnapMirror Schedule:
15_minute_sched
SnapMirror
Policy Type: async-mirror
SnapMirror Policy: DPDefault
Tries Limit: -
Throttle (KB/sec): unlimited
Mirror State: Snapmirrored
...
Number of
Failed Updates: 0
Number of
Successful Resyncs: 0
Number of
Failed Resyncs: 0
Number of
Successful Breaks: 0
Number of
Failed Breaks: 0
Total
Transfer Bytes: 278528
Total Transfer Time
in Seconds: 11
2. If you have a schedule for incremental transfers, perform the following steps when you are ready to
perform cutover:
a. Use the snapmirror quiesce command to disable all future update transfers.
cluster1::> snapmirror quiesce -destination-path vs1:dst_vol
b. Use the snapmirror modify command to delete the SnapMirror schedule.
cluster1::> snapmirror modify -destination-path vs1:dst_vol -schedule
""
c. If you quiesced the SnapMirror transfers earlier, use the snapmirror resume command to enable
SnapMirror transfers.
cluster1::> snapmirror resume -destination-path vs1:dst_vol
3. Wait for any ongoing transfers between the 7-Mode volumes and the clustered Data ONTAP volumes to
finish, and then disconnect client access from the 7-Mode volumes to start cutover.
4. Use the snapmirror update command to perform a final data update to the clustered Data ONTAP
volume.
cluster1::> snapmirror update -destination-path vs1:dst_vol
Operation is queued: snapmirror update of destination vs1:dst_vol.
5. Use the snapmirror show command to verify that the last transfer was successful.
6. Use the snapmirror break command to break the SnapMirror relationship between the 7-Mode volume
and the clustered Data ONTAP volume.
cluster1::> snapmirror break -destination-path vs1:dst_vol
[Job 60] Job succeeded: SnapMirror Break Succeeded
7. If your volumes have LUNs configured, at the advanced privilege level, use the lun transition 7-
mode show command to verify that the LUNs were transitioned.
You can also use the lun show command on the clustered Data ONTAP volume to view all of the LUNs
that were successfully transitioned.
8. Use the snapmirror delete command to delete the SnapMirror relationship between the 7-Mode
volume and the clustered Data ONTAP volume.
cluster1::> snapmirror delete -destination-path vs1:dst_vol
358
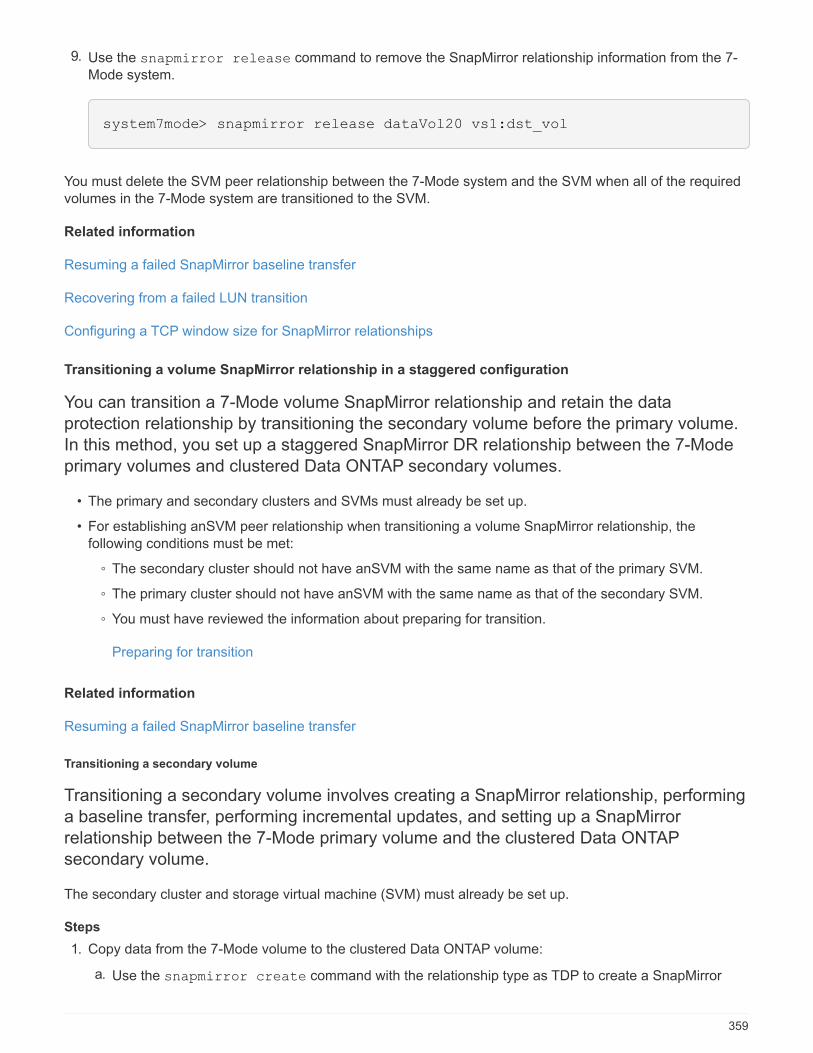
9. Use the snapmirror release command to remove the SnapMirror relationship information from the 7-
Mode system.
system7mode> snapmirror release dataVol20 vs1:dst_vol
You must delete the SVM peer relationship between the 7-Mode system and the SVM when all of the required
volumes in the 7-Mode system are transitioned to the SVM.
Related information
Resuming a failed SnapMirror baseline transfer
Recovering from a failed LUN transition
Configuring a TCP window size for SnapMirror relationships
Transitioning a volume SnapMirror relationship in a staggered configuration
You can transition a 7-Mode volume SnapMirror relationship and retain the data
protection relationship by transitioning the secondary volume before the primary volume.
In this method, you set up a staggered SnapMirror DR relationship between the 7-Mode
primary volumes and clustered Data ONTAP secondary volumes.
• The primary and secondary clusters and SVMs must already be set up.
• For establishing anSVM peer relationship when transitioning a volume SnapMirror relationship, the
following conditions must be met:
◦ The secondary cluster should not have anSVM with the same name as that of the primary SVM.
◦ The primary cluster should not have anSVM with the same name as that of the secondary SVM.
◦ You must have reviewed the information about preparing for transition.
Preparing for transition
Related information
Resuming a failed SnapMirror baseline transfer
Transitioning a secondary volume
Transitioning a secondary volume involves creating a SnapMirror relationship, performing
a baseline transfer, performing incremental updates, and setting up a SnapMirror
relationship between the 7-Mode primary volume and the clustered Data ONTAP
secondary volume.
The secondary cluster and storage virtual machine (SVM) must already be set up.
Steps
1. Copy data from the 7-Mode volume to the clustered Data ONTAP volume:
a. Use the snapmirror create command with the relationship type as TDP to create a SnapMirror
359
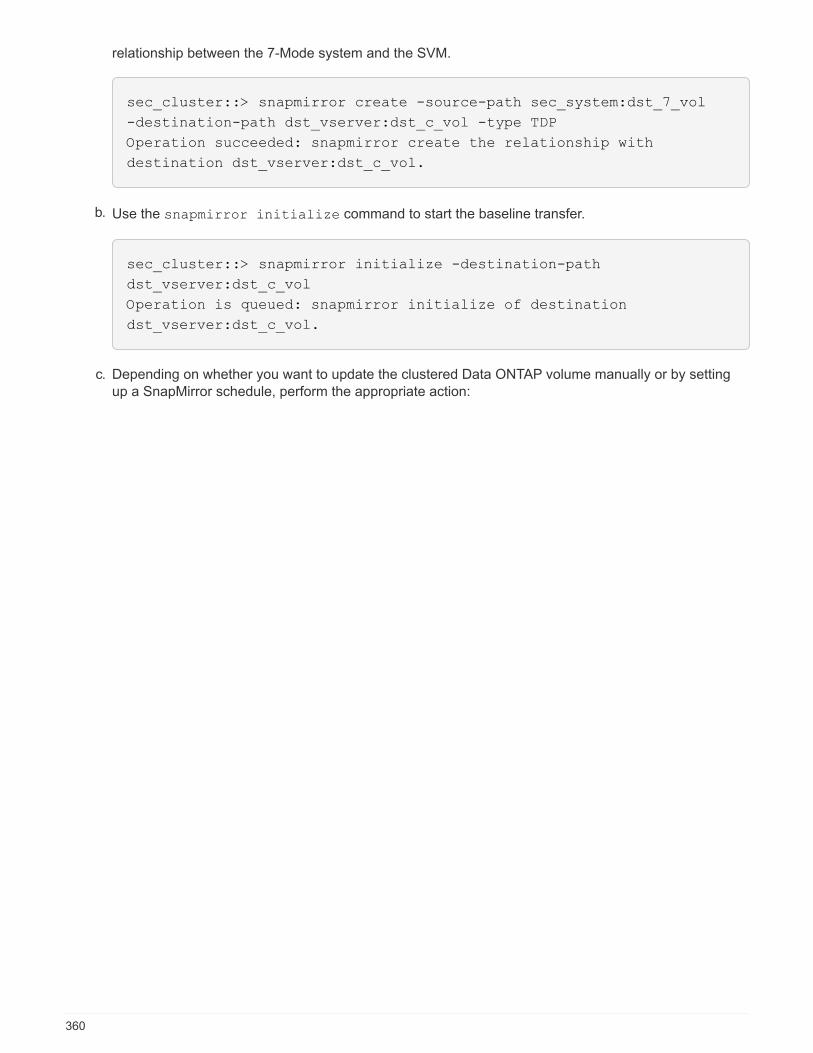
relationship between the 7-Mode system and the SVM.
sec_cluster::> snapmirror create -source-path sec_system:dst_7_vol
-destination-path dst_vserver:dst_c_vol -type TDP
Operation succeeded: snapmirror create the relationship with
destination dst_vserver:dst_c_vol.
b. Use the snapmirror initialize command to start the baseline transfer.
sec_cluster::> snapmirror initialize -destination-path
dst_vserver:dst_c_vol
Operation is queued: snapmirror initialize of destination
dst_vserver:dst_c_vol.
c. Depending on whether you want to update the clustered Data ONTAP volume manually or by setting
up a SnapMirror schedule, perform the appropriate action:
360

361

If you want to… Then…
Update transfers manually i. Use the snapmirror update command.
sec_cluster::> snapmirror
update -destination-path
dst_vserver:dst_c_vol
ii. Use the snapmirror show command to
monitor the data copy status.
362
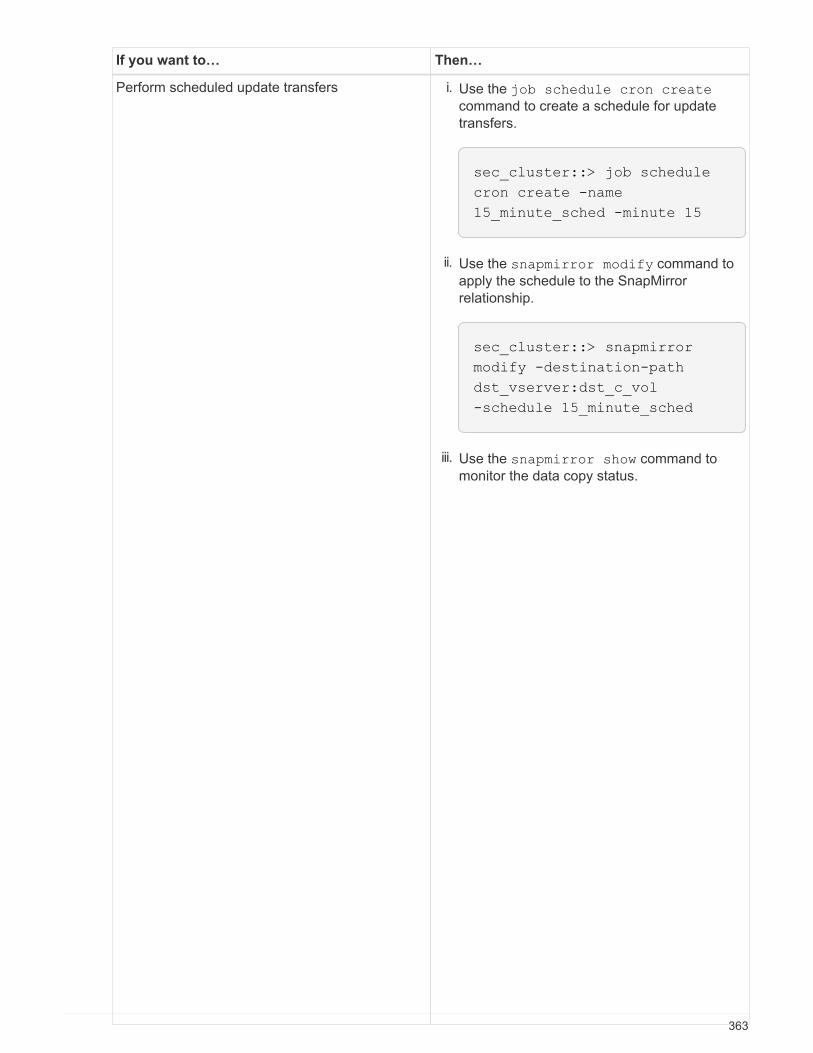
sec_cluster::> snapmirror
show -destination-path
dst_vserver:dst_c_vol
Source Path:
sec_system:dst_7_vol
Destination Path:
dst_vserver:dst_c_vol
Relationship Type: TDP
Relationship
Group Type: none
SnapMirror Schedule: -
SnapMirror
Policy Type: async-mirror
SnapMirror Policy: DPDefault
Tries Limit: -
Throttle (KB/sec): unlimited
Mirror State: Snapmirrored
...
Number of
Successful Updates: 1
Number of
Failed Updates: 0
Number of
Successful Resyncs: 0
Number of
Failed Resyncs: 0
Number of
Successful Breaks: 0
Number of
Failed Breaks: 0
Total
Transfer Bytes: 278528
Total Transfer Time
in Seconds: 11
Go to step 3.
If you want to… Then…
Perform scheduled update transfers i. Use the job schedule cron create
command to create a schedule for update
transfers.
sec_cluster::> job schedule
cron create -name
15_minute_sched -minute 15
ii. Use the snapmirror modify command to
apply the schedule to the SnapMirror
relationship.
sec_cluster::> snapmirror
modify -destination-path
dst_vserver:dst_c_vol
-schedule 15_minute_sched
iii. Use the snapmirror show command to
monitor the data copy status.
363
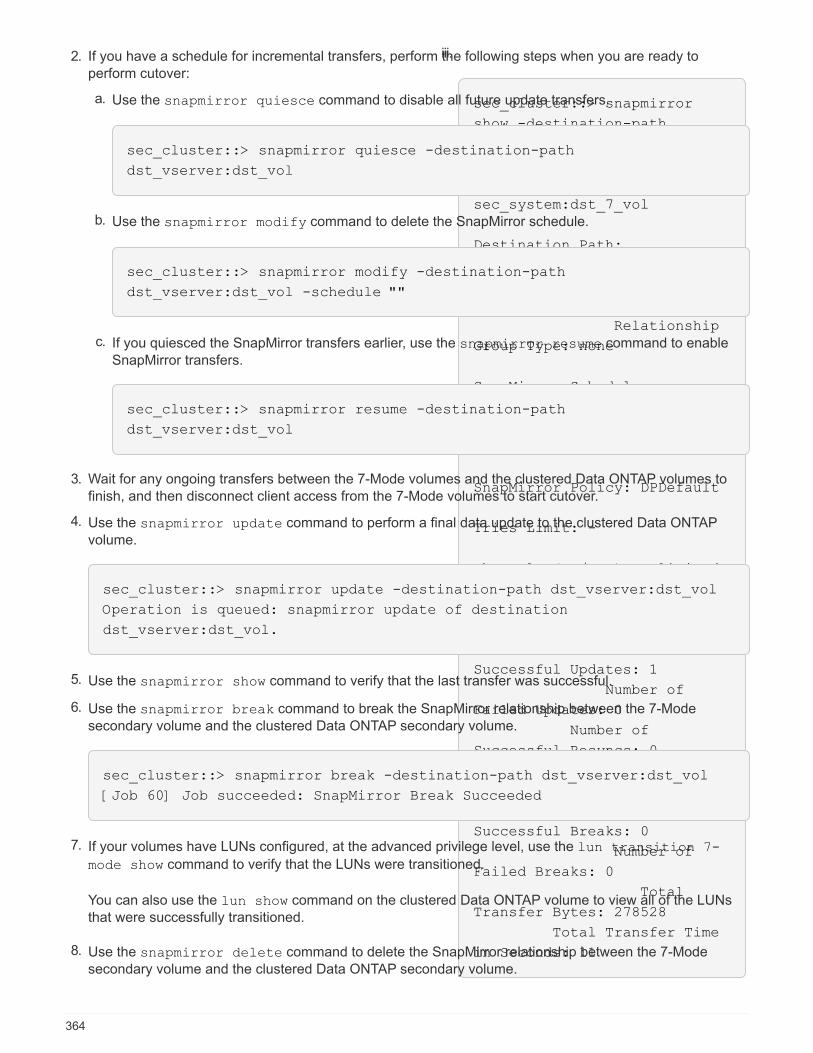
iii.
sec_cluster::> snapmirror
show -destination-path
dst_vserver:dst_c_vol
Source Path:
sec_system:dst_7_vol
Destination Path:
dst_vserver:dst_c_vol
Relationship Type: TDP
Relationship
Group Type: none
SnapMirror Schedule:
15_minute_sched
SnapMirror
Policy Type: async-mirror
SnapMirror Policy: DPDefault
Tries Limit: -
Throttle (KB/sec): unlimited
Mirror State: Snapmirrored
...
Number of
Successful Updates: 1
Number of
Failed Updates: 0
Number of
Successful Resyncs: 0
Number of
Failed Resyncs: 0
Number of
Successful Breaks: 0
Number of
Failed Breaks: 0
Total
Transfer Bytes: 278528
Total Transfer Time
in Seconds: 11
2. If you have a schedule for incremental transfers, perform the following steps when you are ready to
perform cutover:
a. Use the snapmirror quiesce command to disable all future update transfers.
sec_cluster::> snapmirror quiesce -destination-path
dst_vserver:dst_vol
b. Use the snapmirror modify command to delete the SnapMirror schedule.
sec_cluster::> snapmirror modify -destination-path
dst_vserver:dst_vol -schedule ""
c. If you quiesced the SnapMirror transfers earlier, use the snapmirror resume command to enable
SnapMirror transfers.
sec_cluster::> snapmirror resume -destination-path
dst_vserver:dst_vol
3. Wait for any ongoing transfers between the 7-Mode volumes and the clustered Data ONTAP volumes to
finish, and then disconnect client access from the 7-Mode volumes to start cutover.
4. Use the snapmirror update command to perform a final data update to the clustered Data ONTAP
volume.
sec_cluster::> snapmirror update -destination-path dst_vserver:dst_vol
Operation is queued: snapmirror update of destination
dst_vserver:dst_vol.
5. Use the snapmirror show command to verify that the last transfer was successful.
6. Use the snapmirror break command to break the SnapMirror relationship between the 7-Mode
secondary volume and the clustered Data ONTAP secondary volume.
sec_cluster::> snapmirror break -destination-path dst_vserver:dst_vol
[Job 60] Job succeeded: SnapMirror Break Succeeded
7. If your volumes have LUNs configured, at the advanced privilege level, use the lun transition 7-
mode show command to verify that the LUNs were transitioned.
You can also use the lun show command on the clustered Data ONTAP volume to view all of the LUNs
that were successfully transitioned.
8. Use the snapmirror delete command to delete the SnapMirror relationship between the 7-Mode
secondary volume and the clustered Data ONTAP secondary volume.
364
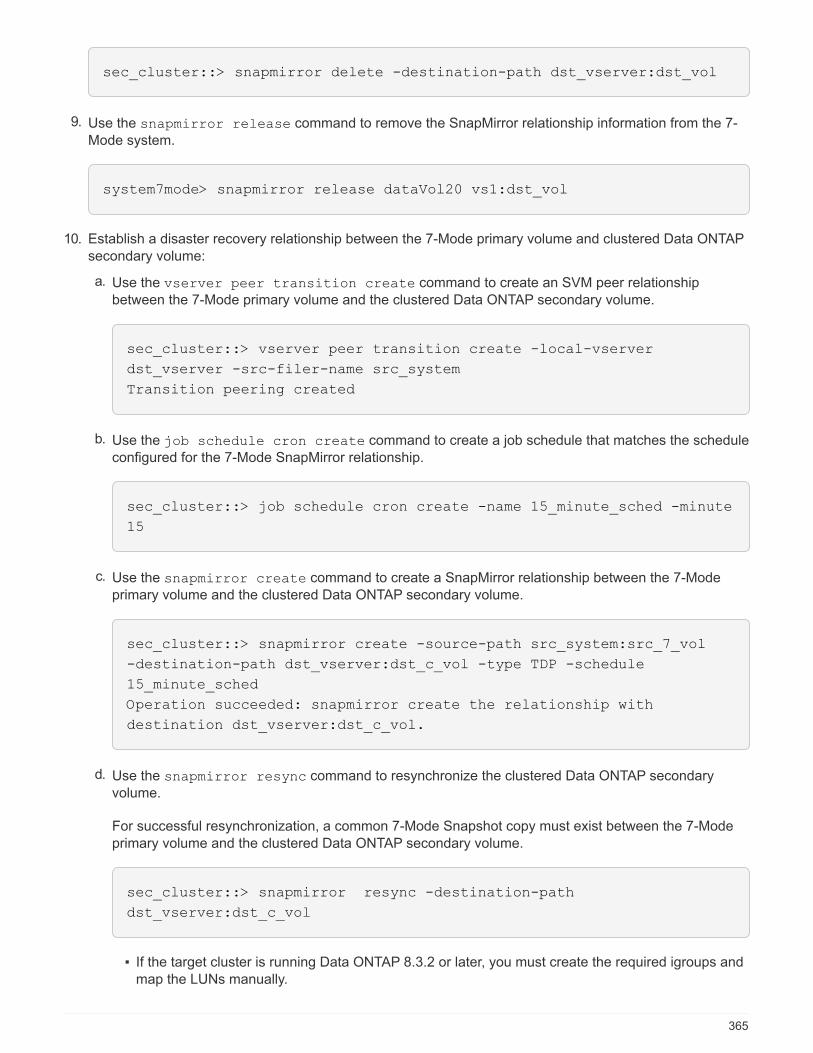
sec_cluster::> snapmirror delete -destination-path dst_vserver:dst_vol
9. Use the snapmirror release command to remove the SnapMirror relationship information from the 7-
Mode system.
system7mode> snapmirror release dataVol20 vs1:dst_vol
10. Establish a disaster recovery relationship between the 7-Mode primary volume and clustered Data ONTAP
secondary volume:
a. Use the vserver peer transition create command to create an SVM peer relationship
between the 7-Mode primary volume and the clustered Data ONTAP secondary volume.
sec_cluster::> vserver peer transition create -local-vserver
dst_vserver -src-filer-name src_system
Transition peering created
b. Use the job schedule cron create command to create a job schedule that matches the schedule
configured for the 7-Mode SnapMirror relationship.
sec_cluster::> job schedule cron create -name 15_minute_sched -minute
15
c. Use the snapmirror create command to create a SnapMirror relationship between the 7-Mode
primary volume and the clustered Data ONTAP secondary volume.
sec_cluster::> snapmirror create -source-path src_system:src_7_vol
-destination-path dst_vserver:dst_c_vol -type TDP -schedule
15_minute_sched
Operation succeeded: snapmirror create the relationship with
destination dst_vserver:dst_c_vol.
d. Use the snapmirror resync command to resynchronize the clustered Data ONTAP secondary
volume.
For successful resynchronization, a common 7-Mode Snapshot copy must exist between the 7-Mode
primary volume and the clustered Data ONTAP secondary volume.
sec_cluster::> snapmirror resync -destination-path
dst_vserver:dst_c_vol
▪ If the target cluster is running Data ONTAP 8.3.2 or later, you must create the required igroups and
map the LUNs manually.
365
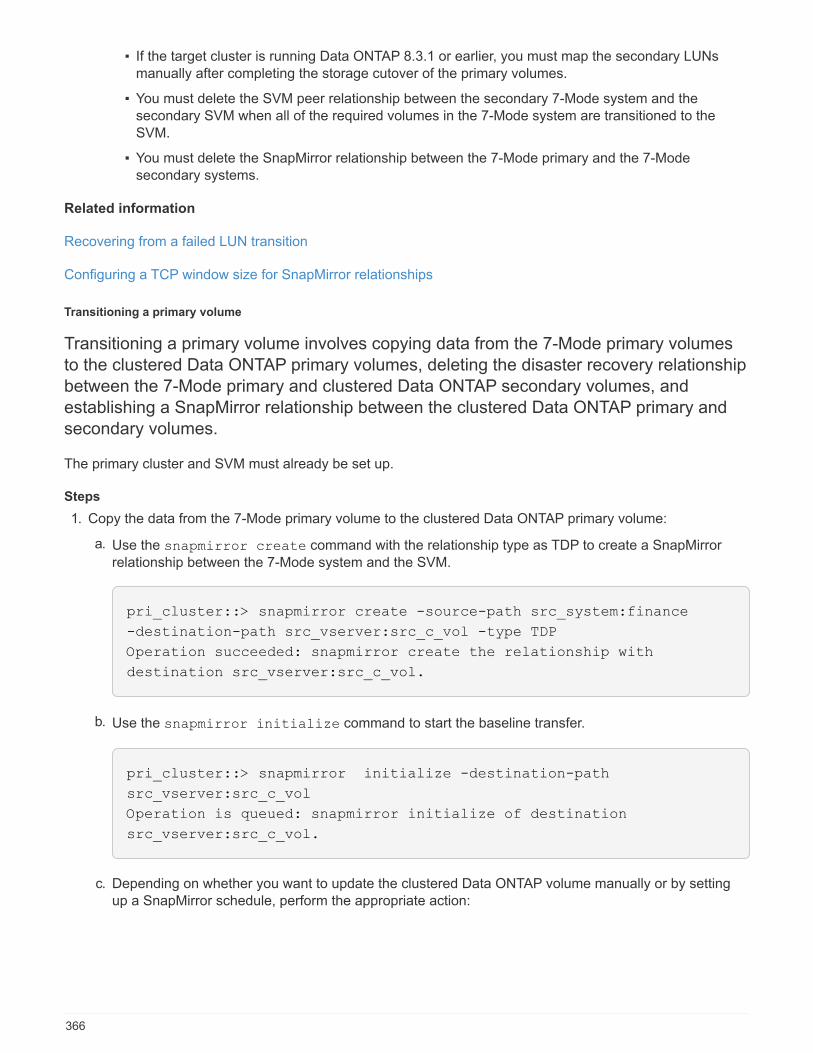
▪ If the target cluster is running Data ONTAP 8.3.1 or earlier, you must map the secondary LUNs
manually after completing the storage cutover of the primary volumes.
▪ You must delete the SVM peer relationship between the secondary 7-Mode system and the
secondary SVM when all of the required volumes in the 7-Mode system are transitioned to the
SVM.
▪ You must delete the SnapMirror relationship between the 7-Mode primary and the 7-Mode
secondary systems.
Related information
Recovering from a failed LUN transition
Configuring a TCP window size for SnapMirror relationships
Transitioning a primary volume
Transitioning a primary volume involves copying data from the 7-Mode primary volumes
to the clustered Data ONTAP primary volumes, deleting the disaster recovery relationship
between the 7-Mode primary and clustered Data ONTAP secondary volumes, and
establishing a SnapMirror relationship between the clustered Data ONTAP primary and
secondary volumes.
The primary cluster and SVM must already be set up.
Steps
1. Copy the data from the 7-Mode primary volume to the clustered Data ONTAP primary volume:
a. Use the snapmirror create command with the relationship type as TDP to create a SnapMirror
relationship between the 7-Mode system and the SVM.
pri_cluster::> snapmirror create -source-path src_system:finance
-destination-path src_vserver:src_c_vol -type TDP
Operation succeeded: snapmirror create the relationship with
destination src_vserver:src_c_vol.
b. Use the snapmirror initialize command to start the baseline transfer.
pri_cluster::> snapmirror initialize -destination-path
src_vserver:src_c_vol
Operation is queued: snapmirror initialize of destination
src_vserver:src_c_vol.
c. Depending on whether you want to update the clustered Data ONTAP volume manually or by setting
up a SnapMirror schedule, perform the appropriate action:
366

367
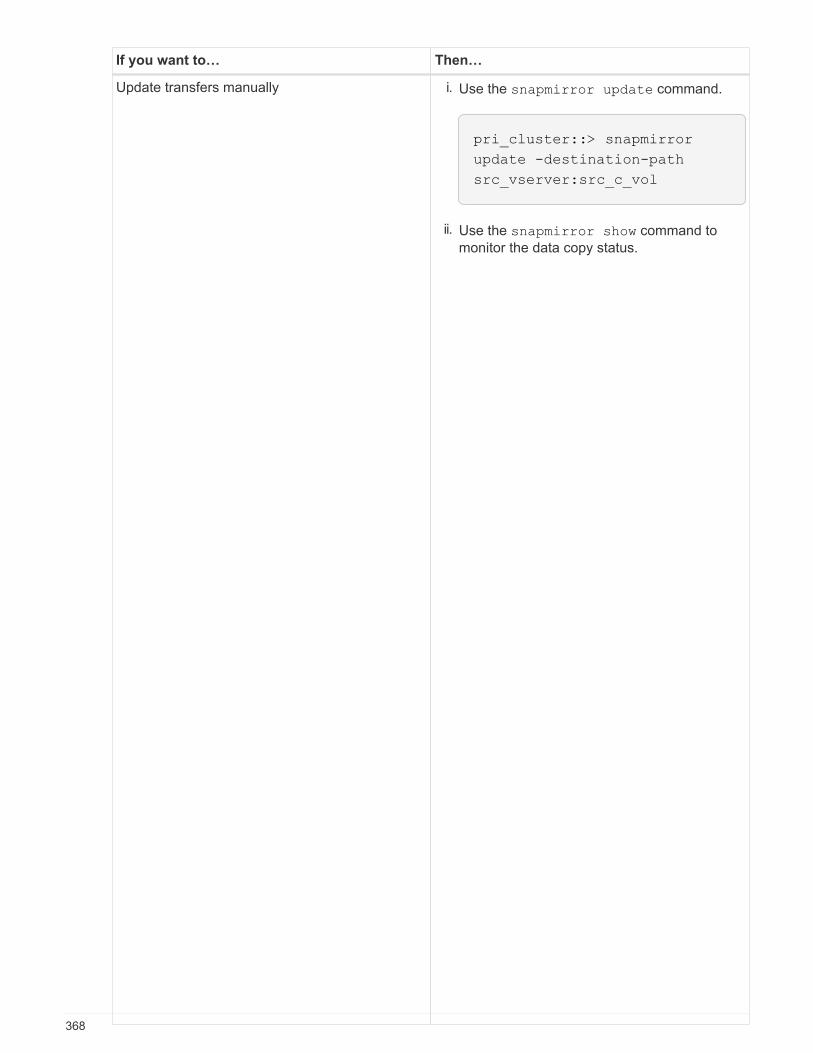
If you want to… Then…
Update transfers manually i. Use the snapmirror update command.
pri_cluster::> snapmirror
update -destination-path
src_vserver:src_c_vol
ii. Use the snapmirror show command to
monitor the data copy status.
368
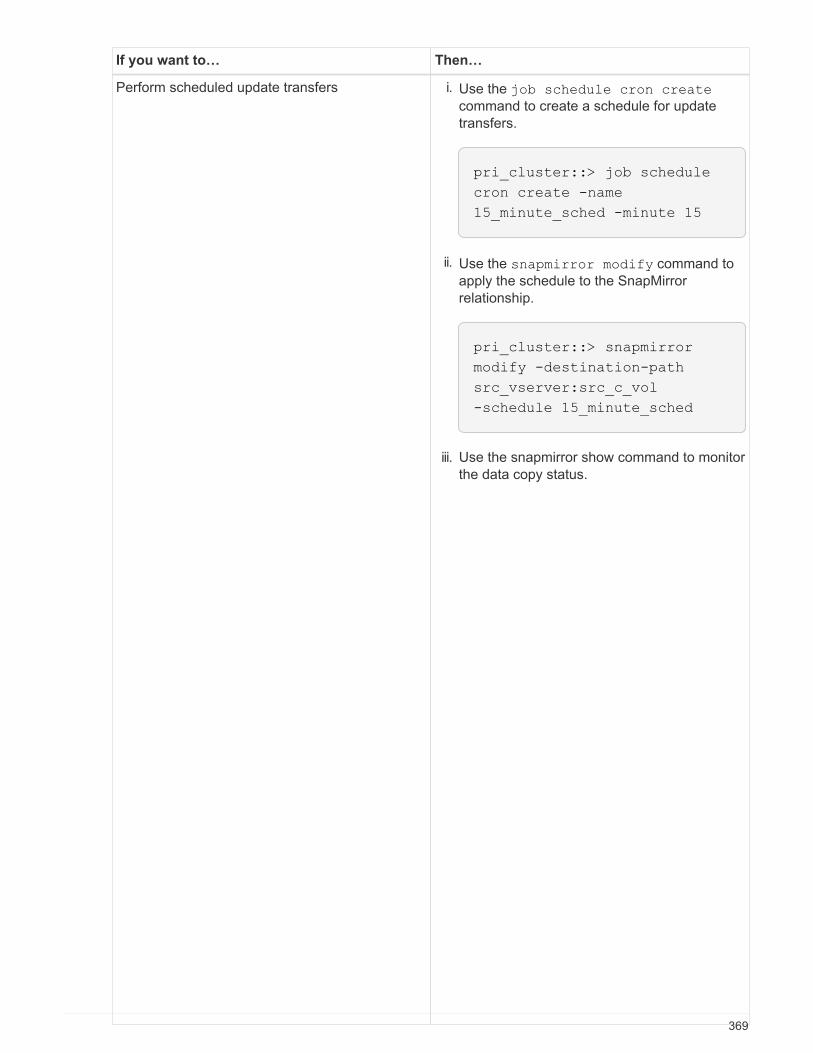
pri_cluster::> snapmirror
show -destination-path
src_vserver:src_c_vol
Source Path:
pri_system:src_7_vol
Destination Path:
src_vserver:src_c_vol
Relationship Type: TDP
Relationship
Group Type: none
SnapMirror Schedule: -
SnapMirror
Policy Type: async-mirror
SnapMirror Policy: DPDefault
Tries Limit: -
Throttle (KB/sec): unlimited
Mirror State: Snapmirrored
...
Number of
Successful Updates: 1
Number of
Failed Updates: 0
Number of
Successful Resyncs: 0
Number of
Failed Resyncs: 0
Number of
Successful Breaks: 0
Number of
Failed Breaks: 0
Total
Transfer Bytes: 473163808768
Total Transfer Time
in Seconds: 43405
Go to step 3.
If you want to… Then…
Perform scheduled update transfers i. Use the job schedule cron create
command to create a schedule for update
transfers.
pri_cluster::> job schedule
cron create -name
15_minute_sched -minute 15
ii. Use the snapmirror modify command to
apply the schedule to the SnapMirror
relationship.
pri_cluster::> snapmirror
modify -destination-path
src_vserver:src_c_vol
-schedule 15_minute_sched
iii. Use the snapmirror show command to monitor
the data copy status.
369

iii.
pri_cluster::> snapmirror
show -destination-path
src_vserver:src_c_vol
Source Path:
pri_system:src_7_vol
Destination Path:
src_vserver:src_c_vol
Relationship Type: TDP
Relationship
Group Type: none
SnapMirror Schedule:
15_minute_sched
SnapMirror
Policy Type: async-mirror
SnapMirror Policy: DPDefault
Tries Limit: -
Throttle (KB/sec): unlimited
Mirror State: Snapmirrored
...
Number of
Successful Updates: 1
Number of
Failed Updates: 0
Number of
Successful Resyncs: 0
Number of
Failed Resyncs: 0
Number of
Successful Breaks: 0
Number of
Failed Breaks: 0
Total
Transfer Bytes: 473163808768
Total Transfer Time
in Seconds: 43405
2. If you have a schedule for incremental transfers, perform the following steps when you are ready to
perform cutover:
a. Use the snapmirror quiesce command to disable all future update transfers.
pri_cluster::> snapmirror quiesce -destination-path
src_vserver:src_c_vol
b. Use the snapmirror modify command to delete the SnapMirror schedule.
pri_cluster::> snapmirror modify -destination-path
src_vserver:src_c_vol -schedule ""
c. If you quiesced the SnapMirror transfers earlier, use the snapmirror resume command to enable
SnapMirror transfers.
pri_cluster::> snapmirror resume -destination-path
src_vserver:src_c_vol
3. Create an SVM peer relationship between the clustered Data ONTAP secondary and primary SVMs.
a. Use the cluster peer create command to create a cluster peer relationship.
pri_cluster::> cluster peer create -peer-addrs cluster2-d2,
10.98.234.246 -timeout 60
Notice: Choose a passphrase of 8 or more characters. To ensure the
authenticity of the peering relationship, use a phrase or sequence of
characters that would be hard to guess.
Enter the passphrase: ********
Confirm the passphrase: ********
b. From the source cluster, use the vserver peer create command to create the SVM peer
relationship between the clustered Data ONTAP primary and secondary volumes.
pri_cluster::> vserver peer create -vserver src_vserver -peervserver
src_c_vserver -applications snapmirror -peer-cluster sec_cluster
c. From the destination cluster, use the vserver peer accept command to accept the SVM peer
request and establish the SVM peer relationship.
370
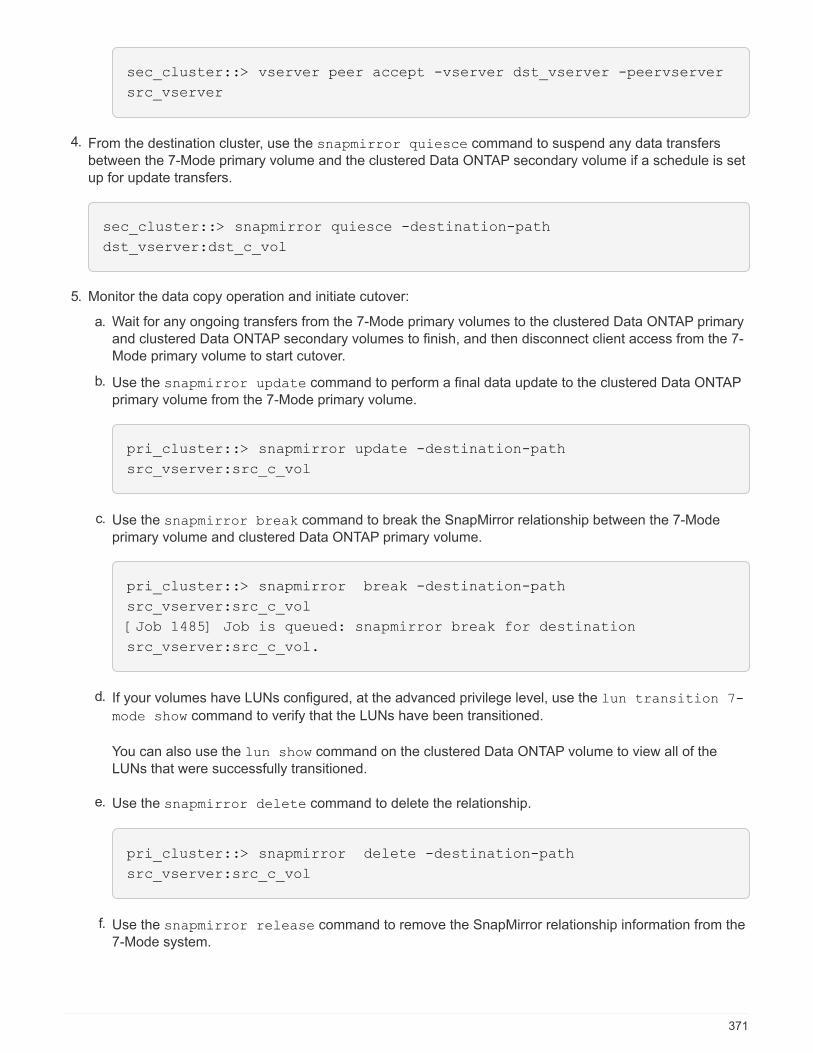
sec_cluster::> vserver peer accept -vserver dst_vserver -peervserver
src_vserver
4. From the destination cluster, use the snapmirror quiesce command to suspend any data transfers
between the 7-Mode primary volume and the clustered Data ONTAP secondary volume if a schedule is set
up for update transfers.
sec_cluster::> snapmirror quiesce -destination-path
dst_vserver:dst_c_vol
5. Monitor the data copy operation and initiate cutover:
a. Wait for any ongoing transfers from the 7-Mode primary volumes to the clustered Data ONTAP primary
and clustered Data ONTAP secondary volumes to finish, and then disconnect client access from the 7-
Mode primary volume to start cutover.
b. Use the snapmirror update command to perform a final data update to the clustered Data ONTAP
primary volume from the 7-Mode primary volume.
pri_cluster::> snapmirror update -destination-path
src_vserver:src_c_vol
c. Use the snapmirror break command to break the SnapMirror relationship between the 7-Mode
primary volume and clustered Data ONTAP primary volume.
pri_cluster::> snapmirror break -destination-path
src_vserver:src_c_vol
[Job 1485] Job is queued: snapmirror break for destination
src_vserver:src_c_vol.
d. If your volumes have LUNs configured, at the advanced privilege level, use the lun transition 7-
mode show command to verify that the LUNs have been transitioned.
You can also use the lun show command on the clustered Data ONTAP volume to view all of the
LUNs that were successfully transitioned.
e. Use the snapmirror delete command to delete the relationship.
pri_cluster::> snapmirror delete -destination-path
src_vserver:src_c_vol
f. Use the snapmirror release command to remove the SnapMirror relationship information from the
7-Mode system.
371
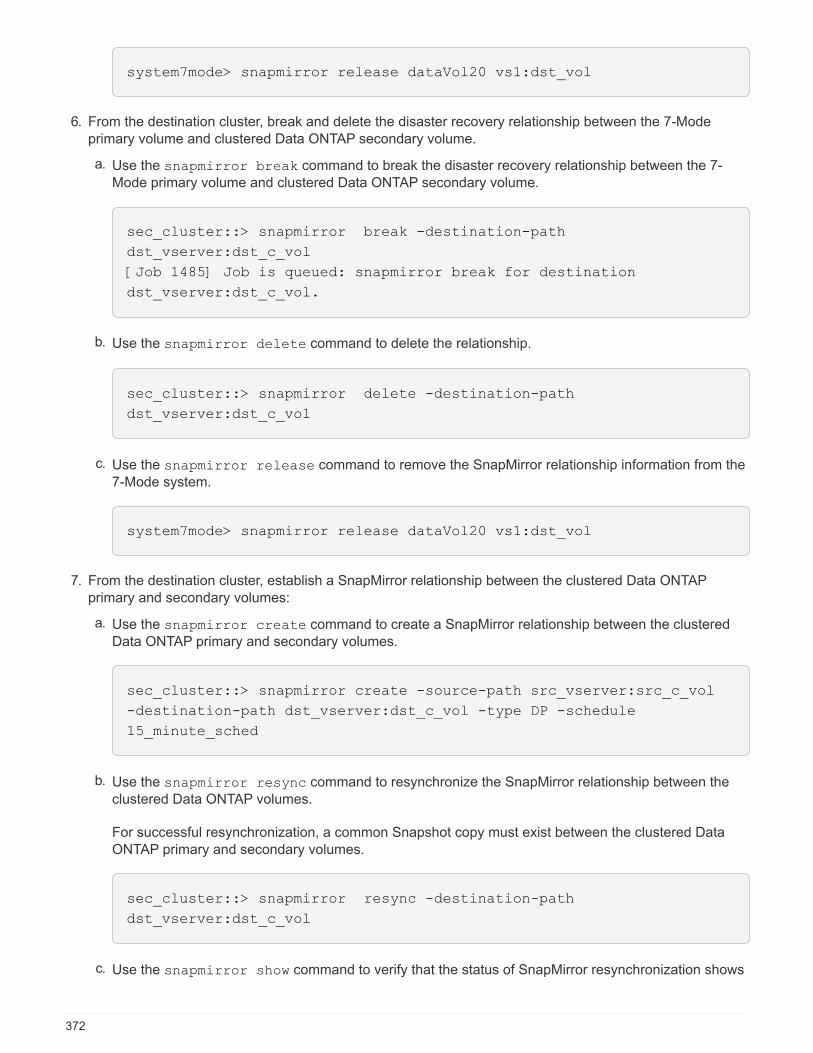
system7mode> snapmirror release dataVol20 vs1:dst_vol
6. From the destination cluster, break and delete the disaster recovery relationship between the 7-Mode
primary volume and clustered Data ONTAP secondary volume.
a. Use the snapmirror break command to break the disaster recovery relationship between the 7-
Mode primary volume and clustered Data ONTAP secondary volume.
sec_cluster::> snapmirror break -destination-path
dst_vserver:dst_c_vol
[Job 1485] Job is queued: snapmirror break for destination
dst_vserver:dst_c_vol.
b. Use the snapmirror delete command to delete the relationship.
sec_cluster::> snapmirror delete -destination-path
dst_vserver:dst_c_vol
c. Use the snapmirror release command to remove the SnapMirror relationship information from the
7-Mode system.
system7mode> snapmirror release dataVol20 vs1:dst_vol
7. From the destination cluster, establish a SnapMirror relationship between the clustered Data ONTAP
primary and secondary volumes:
a. Use the snapmirror create command to create a SnapMirror relationship between the clustered
Data ONTAP primary and secondary volumes.
sec_cluster::> snapmirror create -source-path src_vserver:src_c_vol
-destination-path dst_vserver:dst_c_vol -type DP -schedule
15_minute_sched
b. Use the snapmirror resync command to resynchronize the SnapMirror relationship between the
clustered Data ONTAP volumes.
For successful resynchronization, a common Snapshot copy must exist between the clustered Data
ONTAP primary and secondary volumes.
sec_cluster::> snapmirror resync -destination-path
dst_vserver:dst_c_vol
c. Use the snapmirror show command to verify that the status of SnapMirror resynchronization shows
372
SnapMirrored.
You must ensure that the SnapMirror resynchronization is successful to make the
clustered Data ONTAP secondary volume available for read-only access.
You must delete the SVM peer relationship between the 7-Mode system and the SVM when all the required
volumes in the 7-Mode system are transitioned to the SVM.
Related information
Recovering from a failed LUN transition
Configuring a TCP window size for SnapMirror relationships
Transitioning a volume SnapMirror relationship in parallel
You can transition the primary and secondary volumes of a 7-Mode SnapMirror
relationship in parallel and in the same cutover window. You must then manually set up
the volume SnapMirror relationship in the ONTAP clusters after transition. You must use
this method for transitioning SnapLock Compliance volumes.
• You must have set up the primary and secondary clusters and SVMs.
• For establishing anSVM peer relationship when transitioning a volume SnapMirror relationship, the
following conditions must be met:
◦ The secondary cluster should not have an SVM with the same name as that of the primary SVM.
◦ The primary cluster should not have an SVM with the same name as that of the secondary SVM.
◦ You must have reviewed the information about preparing for transition.
Preparing for transition
A 7-Mode SnapMirror relationship between SnapLock Compliance volumes must be transitioned in parallel
because SnapMirror resynchronization of a transition data protection (TDP) relationship with SnapLock
Compliance volumes is not supported. Therefore, you cannot establish a SnapMirror disaster recovery (DR)
relationship between 7-Mode primary volumes and ONTAP secondary volumes with SnapLock Compliance
volumes.
1. Transition the secondary and primary volumes of the SnapMirror relationship by following the steps for
transitioning a standalone volume.
Before transitioning the 7-Mode secondary volumes, no manual intervention is required for the 7-Mode
SnapMirror relationships. This ensures that the 7-Mode secondary volumes are transitioned as read-only
volumes to ONTAP.
Transitioning a stand-alone volume
2. Create an intercluster SVM peer relationship between the SVMs that contain the transitioned primary and
secondary volumes.
System administration
3. Create a volume SnapMirror relationship between the transitioned primary and secondary volumes.
373
Volume disaster recovery express preparation
4. On the destination volume, resynchronize the source volume and destination volume of the SnapMirror
relationship.
At least one common Snapshot copy must exist between the source and destination
volumes.
5. Monitor the status of the SnapMirror data transfers.
You must not perform any operation, such as volume move or SnapMirror break, on the
source and destination volumes until the resynchronization is completed successfully. You
must ensure that the resynchronization is not aborted and completes successfully;
otherwise, the volumes can change to an inconsistent state.
Related information
Guidelines for transitioning SnapLock volumes
Transitioning a disaster recovery relationship betweenvFiler units
You can transition the disaster recovery (DR) relationship between the primary vFiler unit
and the secondary vFiler unit on 7-Mode systems to a disaster recovery relationship
between the source SVM and destination SVM in clusters.
During the transition process, the primary vFiler unit is transitioned to the source SVM, and the secondary
vFiler unit is transitioned to the destination SVM.
Steps
1. Transition the primary vFiler unit to the source SVM, and the secondary vFiler unit to the destination SVM.
2. Stop the destination SVM by using the vserver stop command.
You must not rename any volume or add any new volumes on the destination SVM.
3. For each transitioned primary volume, create a volume-level SnapMirror relationship with the
corresponding secondary volume by using the snapmirror create command.
destination_cluster::> snapmirror create -source-path src_vserver:c_vol
-destination-path dst_vserver:c_vol -type DP
4. Resynchronize the volume-level SnapMirror relationships between the transitioned primary and secondary
volumes by using the snapmirror resync command.
For successful resynchronization, a common Snapshot copy must exist between the primary and
secondary volumes.
374
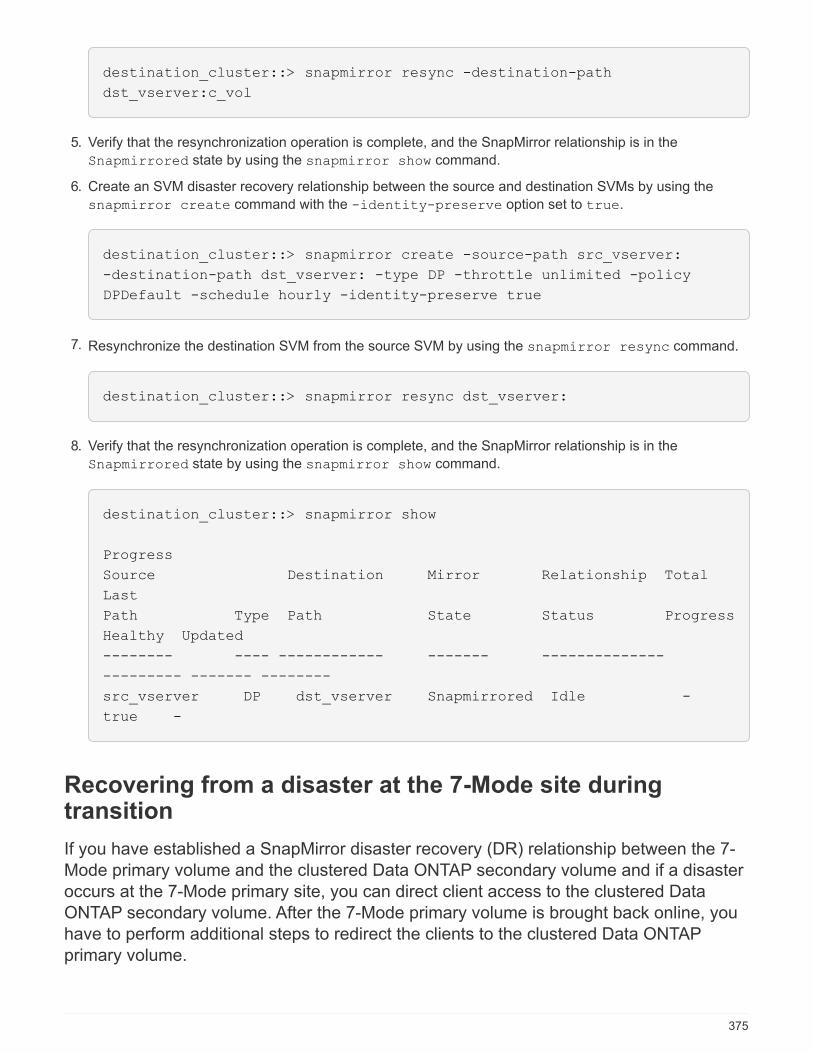
destination_cluster::> snapmirror resync -destination-path
dst_vserver:c_vol
5. Verify that the resynchronization operation is complete, and the SnapMirror relationship is in the
Snapmirrored state by using the snapmirror show command.
6. Create an SVM disaster recovery relationship between the source and destination SVMs by using the
snapmirror create command with the -identity-preserve option set to true.
destination_cluster::> snapmirror create -source-path src_vserver:
-destination-path dst_vserver: -type DP -throttle unlimited -policy
DPDefault -schedule hourly -identity-preserve true
7. Resynchronize the destination SVM from the source SVM by using the snapmirror resync command.
destination_cluster::> snapmirror resync dst_vserver:
8. Verify that the resynchronization operation is complete, and the SnapMirror relationship is in the
Snapmirrored state by using the snapmirror show command.
destination_cluster::> snapmirror show
Progress
Source Destination Mirror Relationship Total
Last
Path Type Path State Status Progress
Healthy Updated
-------- ---- ------------ ------- --------------
--------- ------- --------
src_vserver DP dst_vserver Snapmirrored Idle -
true -
Recovering from a disaster at the 7-Mode site duringtransition
If you have established a SnapMirror disaster recovery (DR) relationship between the 7-
Mode primary volume and the clustered Data ONTAP secondary volume and if a disaster
occurs at the 7-Mode primary site, you can direct client access to the clustered Data
ONTAP secondary volume. After the 7-Mode primary volume is brought back online, you
have to perform additional steps to redirect the clients to the clustered Data ONTAP
primary volume.
375

To retain any data written on the clustered Data ONTAP secondary volume after the disaster, you must
transition the 7-Mode primary volume after the 7-Mode primary volume is back online and establish a
SnapMirror relationship between the clustered Data ONTAP primary and secondary volumes. You can then
redirect the clients to the clustered Data ONTAP primary volumes.
SnapMirror resynchronization from clustered Data ONTAP volumes to the 7-Mode volumes is not supported.
Therefore, if you reestablish the DR relationship between the 7-Mode primary volume and the clustered Data
ONTAP secondary volume after the disaster, any data written on the secondary clustered Data ONTAP will be
lost.
Redirecting clients to the clustered Data ONTAP secondary volume after a disaster
If you have established a SnapMirror disaster recovery (DR) relationship between the 7-
Mode primary volume and the clustered Data ONTAP secondary volume and if a disaster
occurs at the 7-Mode primary site, you must redirect client access to the clustered Data
ONTAP secondary volume.
Steps
1. From the secondary cluster, use the snapmirror break command to break the SnapMirror relationship
between the 7-Mode primary volume and the clustered Data ONTAP secondary volume.
sec_cluster::> snapmirror break -destination-path dst_vserver:dst_c_vol
2. From the secondary cluster, use the snapmirror delete command to delete the SnapMirror
relationship between the 7-Mode primary volume and the clustered Data ONTAP secondary volume.
sec_cluster::> snapmirror delete -destination-path dst_vserver:dst_c_vol
3. Redirect client access to the clustered Data ONTAP secondary volume.
For more information about setting up client access in clustered Data ONTAP, see the Clustered Data
ONTAP File Access and Protocols Management Guide.
Transitioning the 7-Mode primary as a stand-alone volume
After the 7-Mode primary volume is back online after a disaster, you must transition the 7-
Mode primary volume. Because all SnapMirror relationships to the 7-Mode primary
volume are broken and deleted at this stage, you can transition a stand-alone volume for
this type of transition.
Steps
1. Copy data from the 7-Mode volume to the clustered Data ONTAP volume:
a. If you want to configure the TCP window size for the SnapMirror relationship between the 7-Mode
system and the SVM, create a SnapMirror policy of type async-mirror with the window-size-
for-tdp-mirror option.
You must then apply this policy to the TDP SnapMirror relationship between the 7-Mode system and
376
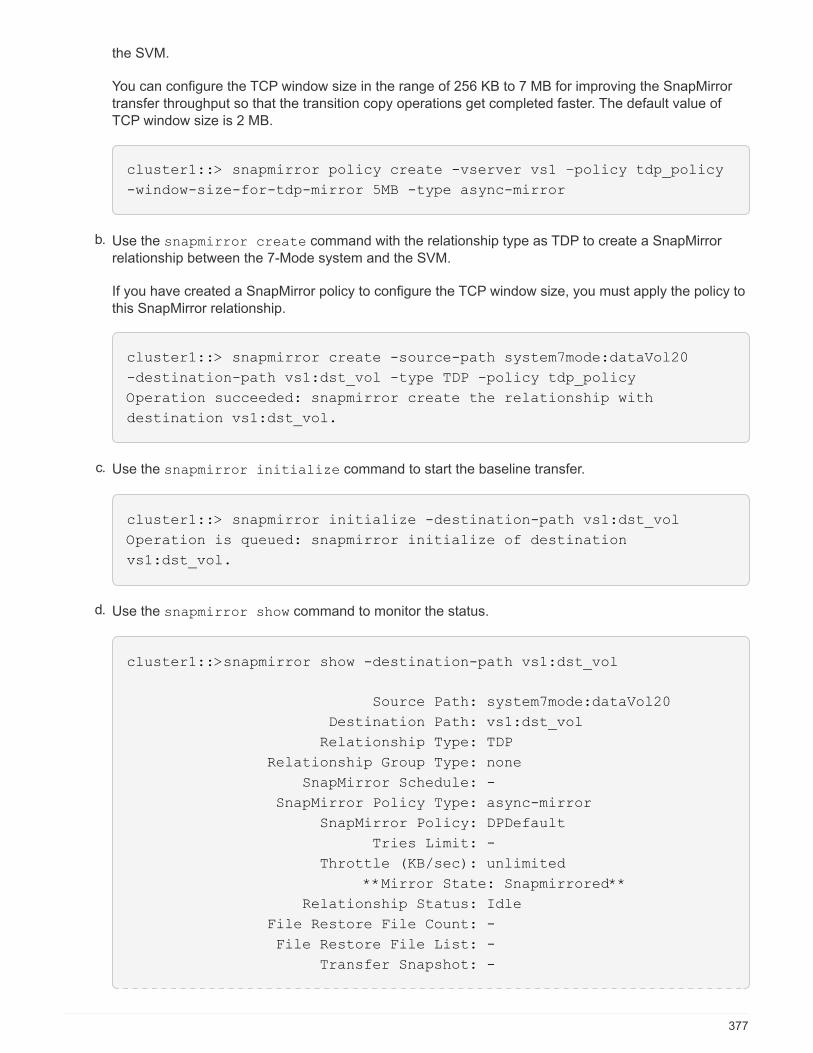
the SVM.
You can configure the TCP window size in the range of 256 KB to 7 MB for improving the SnapMirror
transfer throughput so that the transition copy operations get completed faster. The default value of
TCP window size is 2 MB.
cluster1::> snapmirror policy create -vserver vs1 –policy tdp_policy
-window-size-for-tdp-mirror 5MB -type async-mirror
b. Use the snapmirror create command with the relationship type as TDP to create a SnapMirror
relationship between the 7-Mode system and the SVM.
If you have created a SnapMirror policy to configure the TCP window size, you must apply the policy to
this SnapMirror relationship.
cluster1::> snapmirror create -source-path system7mode:dataVol20
-destination-path vs1:dst_vol -type TDP -policy tdp_policy
Operation succeeded: snapmirror create the relationship with
destination vs1:dst_vol.
c. Use the snapmirror initialize command to start the baseline transfer.
cluster1::> snapmirror initialize -destination-path vs1:dst_vol
Operation is queued: snapmirror initialize of destination
vs1:dst_vol.
d. Use the snapmirror show command to monitor the status.
cluster1::>snapmirror show -destination-path vs1:dst_vol
Source Path: system7mode:dataVol20
Destination Path: vs1:dst_vol
Relationship Type: TDP
Relationship Group Type: none
SnapMirror Schedule: -
SnapMirror Policy Type: async-mirror
SnapMirror Policy: DPDefault
Tries Limit: -
Throttle (KB/sec): unlimited
**Mirror State: Snapmirrored**
Relationship Status: Idle
File Restore File Count: -
File Restore File List: -
Transfer Snapshot: -
377
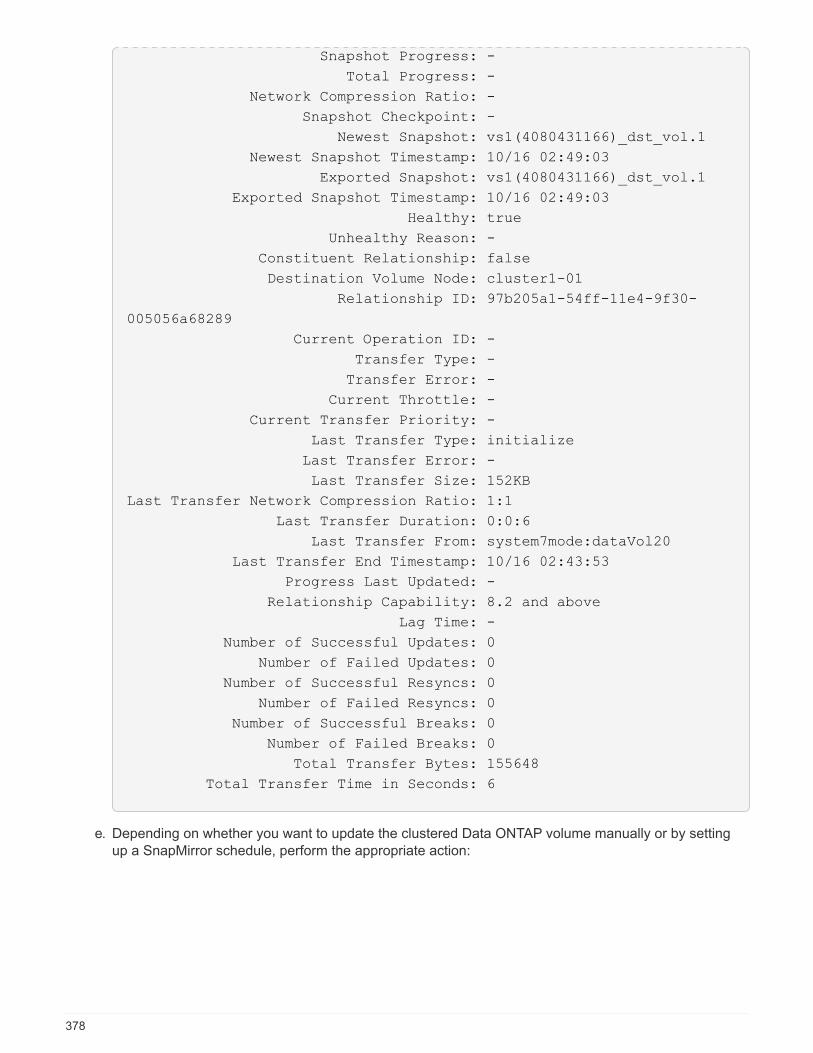
Snapshot Progress: -
Total Progress: -
Network Compression Ratio: -
Snapshot Checkpoint: -
Newest Snapshot: vs1(4080431166)_dst_vol.1
Newest Snapshot Timestamp: 10/16 02:49:03
Exported Snapshot: vs1(4080431166)_dst_vol.1
Exported Snapshot Timestamp: 10/16 02:49:03
Healthy: true
Unhealthy Reason: -
Constituent Relationship: false
Destination Volume Node: cluster1-01
Relationship ID: 97b205a1-54ff-11e4-9f30-
005056a68289
Current Operation ID: -
Transfer Type: -
Transfer Error: -
Current Throttle: -
Current Transfer Priority: -
Last Transfer Type: initialize
Last Transfer Error: -
Last Transfer Size: 152KB
Last Transfer Network Compression Ratio: 1:1
Last Transfer Duration: 0:0:6
Last Transfer From: system7mode:dataVol20
Last Transfer End Timestamp: 10/16 02:43:53
Progress Last Updated: -
Relationship Capability: 8.2 and above
Lag Time: -
Number of Successful Updates: 0
Number of Failed Updates: 0
Number of Successful Resyncs: 0
Number of Failed Resyncs: 0
Number of Successful Breaks: 0
Number of Failed Breaks: 0
Total Transfer Bytes: 155648
Total Transfer Time in Seconds: 6
e. Depending on whether you want to update the clustered Data ONTAP volume manually or by setting
up a SnapMirror schedule, perform the appropriate action:
378

379

If you want to… Then…
Update transfers manually i. Use the snapmirror update command.
cluster1::> snapmirror update
-destination-path vs1:dst_vol
ii. Use the snapmirror show command to
monitor the data copy status.
cluster1::> snapmirror show
-destination-path vs1:dst_vol
Source Path:
system7mode:dataVol20
Destination Path: vs1:dst_vol
Relationship Type: TDP
Relationship
Group Type: none
SnapMirror Schedule: -
SnapMirror
Policy Type: async-mirror
SnapMirror Policy: DPDefault
Tries Limit: -
Throttle (KB/sec): unlimited
Mirror State: Snapmirrored
...
Number of
Failed Updates: 0
Number of
Successful Resyncs: 0
Number of
Failed Resyncs: 0
Number of
Successful Breaks: 0
Number of
Failed Breaks: 0
Total
Transfer Bytes: 278528
Total Transfer Time
in Seconds: 11380

iii. Go to 3.
If you want to… Then…
Perform scheduled update transfers i. Use the job schedule cron create
command to create a schedule for update
transfers.
cluster1::> job schedule cron
create -name 15_minute_sched
-minute 15
ii. Use the snapmirror modify command to
apply the schedule to the SnapMirror
relationship.
cluster1::> snapmirror modify
-destination-path vs1:dst_vol
-schedule 15_minute_sched
iii. Use the snapmirror show command to
monitor the data copy status.
381
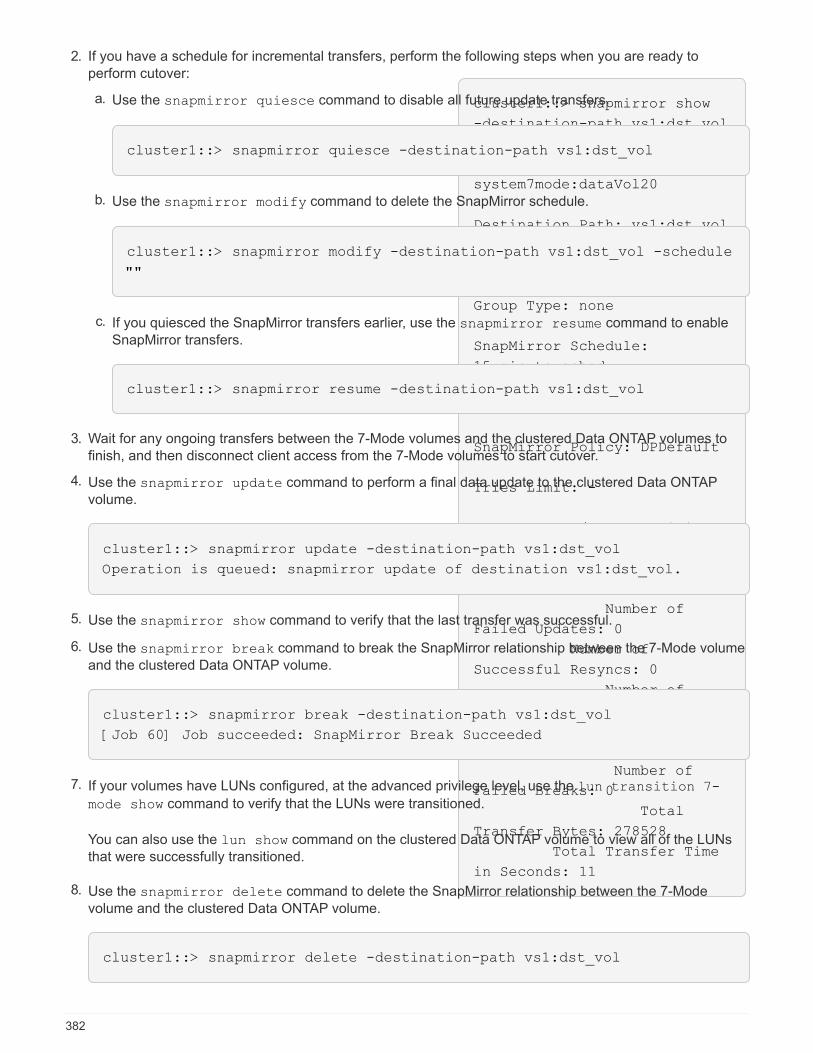
cluster1::> snapmirror show
-destination-path vs1:dst_vol
Source Path:
system7mode:dataVol20
Destination Path: vs1:dst_vol
Relationship Type: TDP
Relationship
Group Type: none
SnapMirror Schedule:
15_minute_sched
SnapMirror
Policy Type: async-mirror
SnapMirror Policy: DPDefault
Tries Limit: -
Throttle (KB/sec): unlimited
Mirror State: Snapmirrored
...
Number of
Failed Updates: 0
Number of
Successful Resyncs: 0
Number of
Failed Resyncs: 0
Number of
Successful Breaks: 0
Number of
Failed Breaks: 0
Total
Transfer Bytes: 278528
Total Transfer Time
in Seconds: 11
2. If you have a schedule for incremental transfers, perform the following steps when you are ready to
perform cutover:
a. Use the snapmirror quiesce command to disable all future update transfers.
cluster1::> snapmirror quiesce -destination-path vs1:dst_vol
b. Use the snapmirror modify command to delete the SnapMirror schedule.
cluster1::> snapmirror modify -destination-path vs1:dst_vol -schedule
""
c. If you quiesced the SnapMirror transfers earlier, use the snapmirror resume command to enable
SnapMirror transfers.
cluster1::> snapmirror resume -destination-path vs1:dst_vol
3. Wait for any ongoing transfers between the 7-Mode volumes and the clustered Data ONTAP volumes to
finish, and then disconnect client access from the 7-Mode volumes to start cutover.
4. Use the snapmirror update command to perform a final data update to the clustered Data ONTAP
volume.
cluster1::> snapmirror update -destination-path vs1:dst_vol
Operation is queued: snapmirror update of destination vs1:dst_vol.
5. Use the snapmirror show command to verify that the last transfer was successful.
6. Use the snapmirror break command to break the SnapMirror relationship between the 7-Mode volume
and the clustered Data ONTAP volume.
cluster1::> snapmirror break -destination-path vs1:dst_vol
[Job 60] Job succeeded: SnapMirror Break Succeeded
7. If your volumes have LUNs configured, at the advanced privilege level, use the lun transition 7-
mode show command to verify that the LUNs were transitioned.
You can also use the lun show command on the clustered Data ONTAP volume to view all of the LUNs
that were successfully transitioned.
8. Use the snapmirror delete command to delete the SnapMirror relationship between the 7-Mode
volume and the clustered Data ONTAP volume.
cluster1::> snapmirror delete -destination-path vs1:dst_vol
382
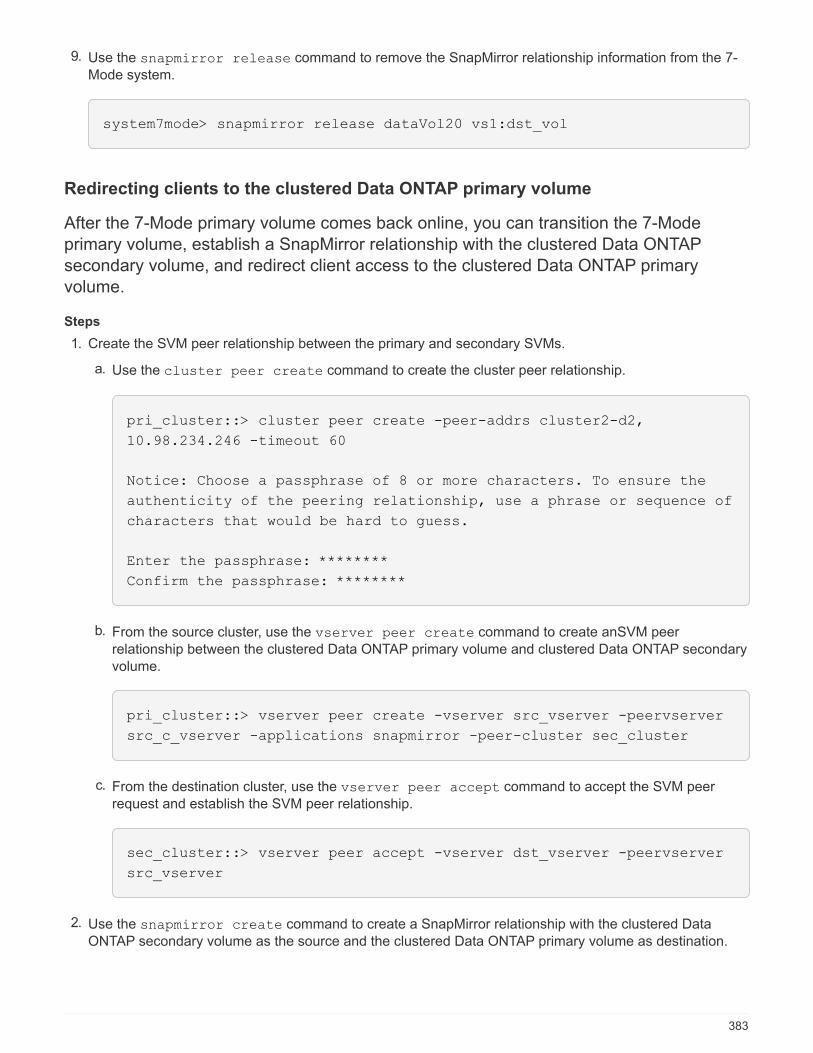
9. Use the snapmirror release command to remove the SnapMirror relationship information from the 7-
Mode system.
system7mode> snapmirror release dataVol20 vs1:dst_vol
Redirecting clients to the clustered Data ONTAP primary volume
After the 7-Mode primary volume comes back online, you can transition the 7-Mode
primary volume, establish a SnapMirror relationship with the clustered Data ONTAP
secondary volume, and redirect client access to the clustered Data ONTAP primary
volume.
Steps
1. Create the SVM peer relationship between the primary and secondary SVMs.
a. Use the cluster peer create command to create the cluster peer relationship.
pri_cluster::> cluster peer create -peer-addrs cluster2-d2,
10.98.234.246 -timeout 60
Notice: Choose a passphrase of 8 or more characters. To ensure the
authenticity of the peering relationship, use a phrase or sequence of
characters that would be hard to guess.
Enter the passphrase: ********
Confirm the passphrase: ********
b. From the source cluster, use the vserver peer create command to create anSVM peer
relationship between the clustered Data ONTAP primary volume and clustered Data ONTAP secondary
volume.
pri_cluster::> vserver peer create -vserver src_vserver -peervserver
src_c_vserver -applications snapmirror -peer-cluster sec_cluster
c. From the destination cluster, use the vserver peer accept command to accept the SVM peer
request and establish the SVM peer relationship.
sec_cluster::> vserver peer accept -vserver dst_vserver -peervserver
src_vserver
2. Use the snapmirror create command to create a SnapMirror relationship with the clustered Data
ONTAP secondary volume as the source and the clustered Data ONTAP primary volume as destination.
383
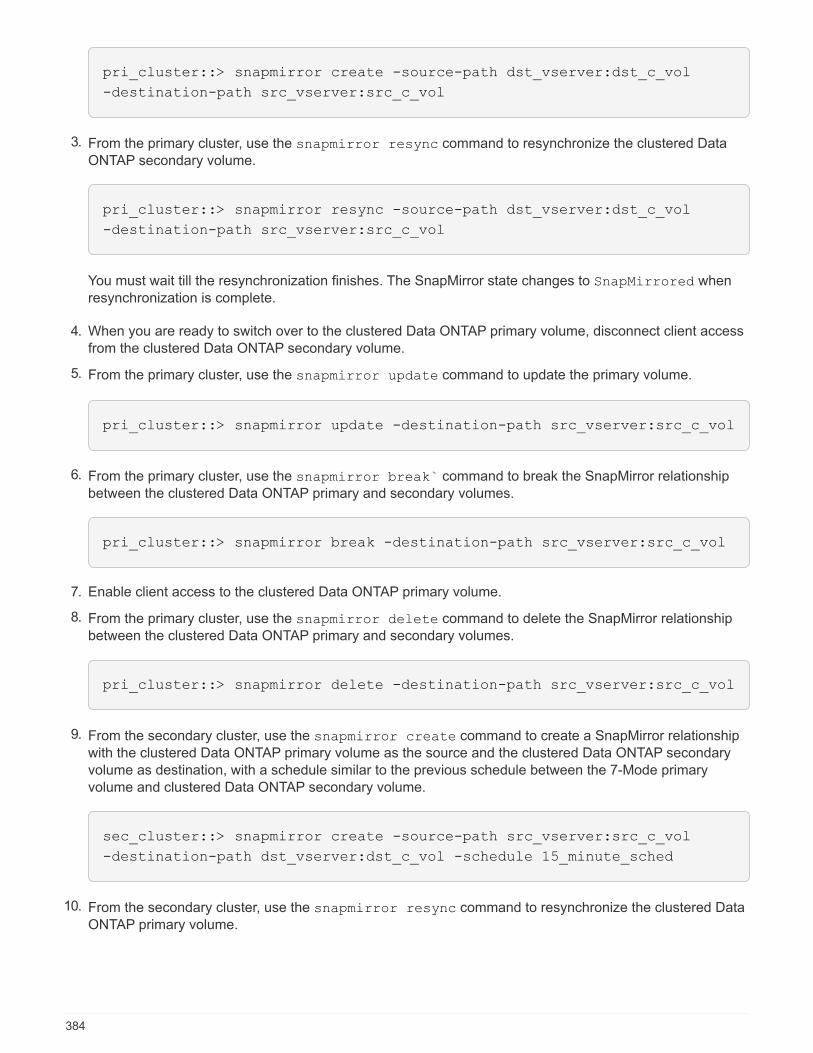
pri_cluster::> snapmirror create -source-path dst_vserver:dst_c_vol
-destination-path src_vserver:src_c_vol
3. From the primary cluster, use the snapmirror resync command to resynchronize the clustered Data
ONTAP secondary volume.
pri_cluster::> snapmirror resync -source-path dst_vserver:dst_c_vol
-destination-path src_vserver:src_c_vol
You must wait till the resynchronization finishes. The SnapMirror state changes to SnapMirrored when
resynchronization is complete.
4. When you are ready to switch over to the clustered Data ONTAP primary volume, disconnect client access
from the clustered Data ONTAP secondary volume.
5. From the primary cluster, use the snapmirror update command to update the primary volume.
pri_cluster::> snapmirror update -destination-path src_vserver:src_c_vol
6. From the primary cluster, use the snapmirror break` command to break the SnapMirror relationship
between the clustered Data ONTAP primary and secondary volumes.
pri_cluster::> snapmirror break -destination-path src_vserver:src_c_vol
7. Enable client access to the clustered Data ONTAP primary volume.
8. From the primary cluster, use the snapmirror delete command to delete the SnapMirror relationship
between the clustered Data ONTAP primary and secondary volumes.
pri_cluster::> snapmirror delete -destination-path src_vserver:src_c_vol
9. From the secondary cluster, use the snapmirror create command to create a SnapMirror relationship
with the clustered Data ONTAP primary volume as the source and the clustered Data ONTAP secondary
volume as destination, with a schedule similar to the previous schedule between the 7-Mode primary
volume and clustered Data ONTAP secondary volume.
sec_cluster::> snapmirror create -source-path src_vserver:src_c_vol
-destination-path dst_vserver:dst_c_vol -schedule 15_minute_sched
10. From the secondary cluster, use the snapmirror resync command to resynchronize the clustered Data
ONTAP primary volume.
384
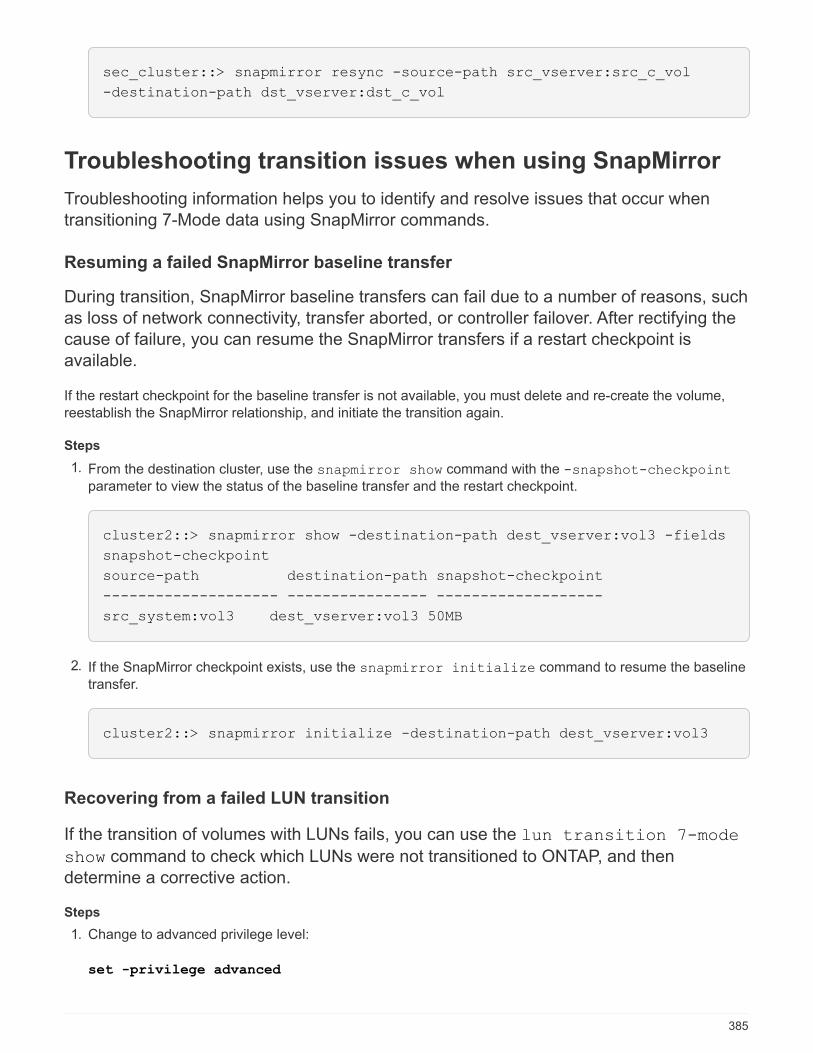
sec_cluster::> snapmirror resync -source-path src_vserver:src_c_vol
-destination-path dst_vserver:dst_c_vol
Troubleshooting transition issues when using SnapMirror
Troubleshooting information helps you to identify and resolve issues that occur when
transitioning 7-Mode data using SnapMirror commands.
Resuming a failed SnapMirror baseline transfer
During transition, SnapMirror baseline transfers can fail due to a number of reasons, such
as loss of network connectivity, transfer aborted, or controller failover. After rectifying the
cause of failure, you can resume the SnapMirror transfers if a restart checkpoint is
available.
If the restart checkpoint for the baseline transfer is not available, you must delete and re-create the volume,
reestablish the SnapMirror relationship, and initiate the transition again.
Steps
1. From the destination cluster, use the snapmirror show command with the -snapshot-checkpoint
parameter to view the status of the baseline transfer and the restart checkpoint.
cluster2::> snapmirror show -destination-path dest_vserver:vol3 -fields
snapshot-checkpoint
source-path destination-path snapshot-checkpoint
-------------------- ---------------- -------------------
src_system:vol3 dest_vserver:vol3 50MB
2. If the SnapMirror checkpoint exists, use the snapmirror initialize command to resume the baseline
transfer.
cluster2::> snapmirror initialize -destination-path dest_vserver:vol3
Recovering from a failed LUN transition
If the transition of volumes with LUNs fails, you can use the lun transition 7-mode
show command to check which LUNs were not transitioned to ONTAP, and then
determine a corrective action.
Steps
1. Change to advanced privilege level:
set -privilege advanced
385
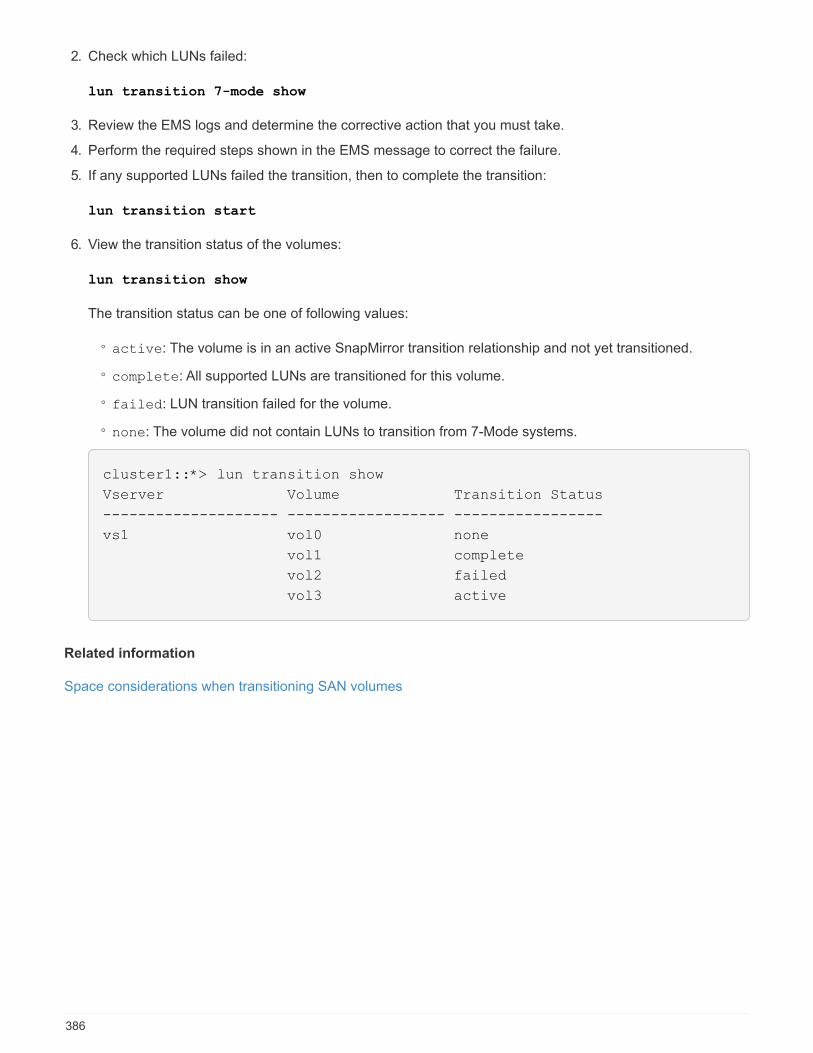
2. Check which LUNs failed:
lun transition 7-mode show
3. Review the EMS logs and determine the corrective action that you must take.
4. Perform the required steps shown in the EMS message to correct the failure.
5. If any supported LUNs failed the transition, then to complete the transition:
lun transition start
6. View the transition status of the volumes:
lun transition show
The transition status can be one of following values:
◦ active: The volume is in an active SnapMirror transition relationship and not yet transitioned.
◦ complete: All supported LUNs are transitioned for this volume.
◦ failed: LUN transition failed for the volume.
◦ none: The volume did not contain LUNs to transition from 7-Mode systems.
cluster1::*> lun transition show
Vserver Volume Transition Status
-------------------- ------------------ -----------------
vs1 vol0 none
vol1 complete
vol2 failed
vol3 active
Related information
Space considerations when transitioning SAN volumes
386
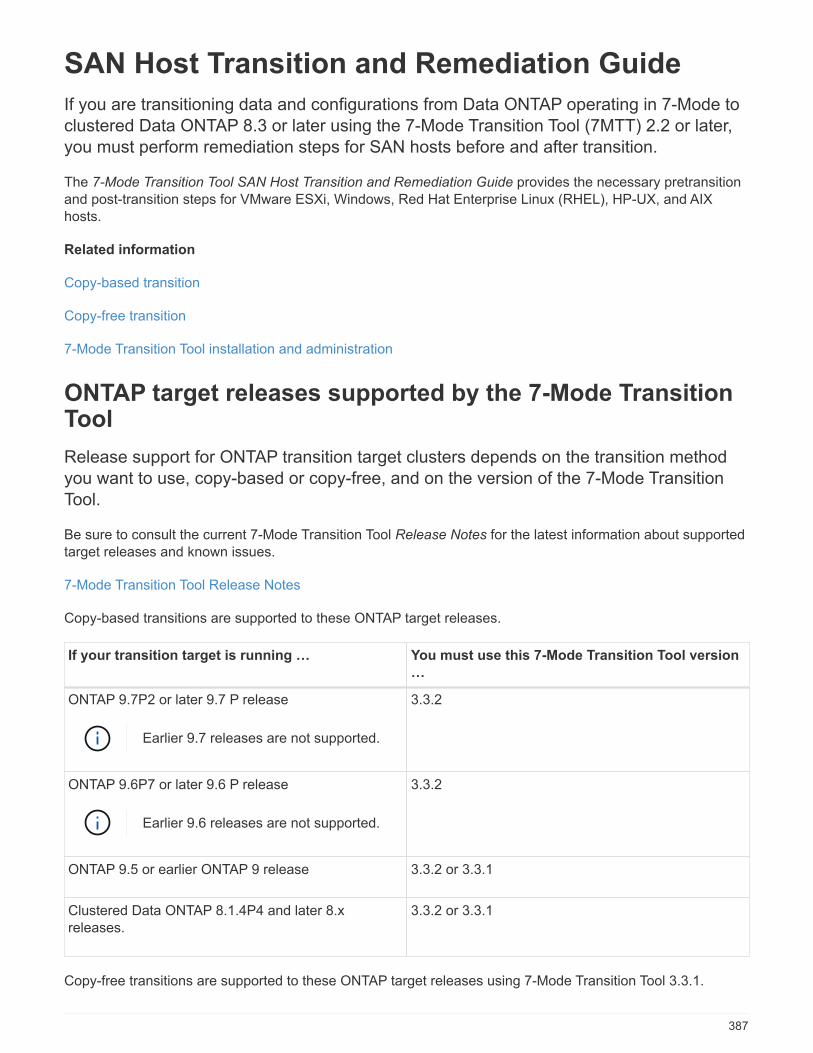
SAN Host Transition and Remediation Guide
If you are transitioning data and configurations from Data ONTAP operating in 7-Mode to
clustered Data ONTAP 8.3 or later using the 7-Mode Transition Tool (7MTT) 2.2 or later,
you must perform remediation steps for SAN hosts before and after transition.
The 7-Mode Transition Tool SAN Host Transition and Remediation Guide provides the necessary pretransition
and post-transition steps for VMware ESXi, Windows, Red Hat Enterprise Linux (RHEL), HP-UX, and AIX
hosts.
Related information
Copy-based transition
Copy-free transition
7-Mode Transition Tool installation and administration
ONTAP target releases supported by the 7-Mode TransitionTool
Release support for ONTAP transition target clusters depends on the transition method
you want to use, copy-based or copy-free, and on the version of the 7-Mode Transition
Tool.
Be sure to consult the current 7-Mode Transition Tool Release Notes for the latest information about supported
target releases and known issues.
7-Mode Transition Tool Release Notes
Copy-based transitions are supported to these ONTAP target releases.
If your transition target is running … You must use this 7-Mode Transition Tool version
…
ONTAP 9.7P2 or later 9.7 P release
Earlier 9.7 releases are not supported.
3.3.2
ONTAP 9.6P7 or later 9.6 P release
Earlier 9.6 releases are not supported.
3.3.2
ONTAP 9.5 or earlier ONTAP 9 release 3.3.2 or 3.3.1
Clustered Data ONTAP 8.1.4P4 and later 8.x
releases.
3.3.2 or 3.3.1
Copy-free transitions are supported to these ONTAP target releases using 7-Mode Transition Tool 3.3.1.
387
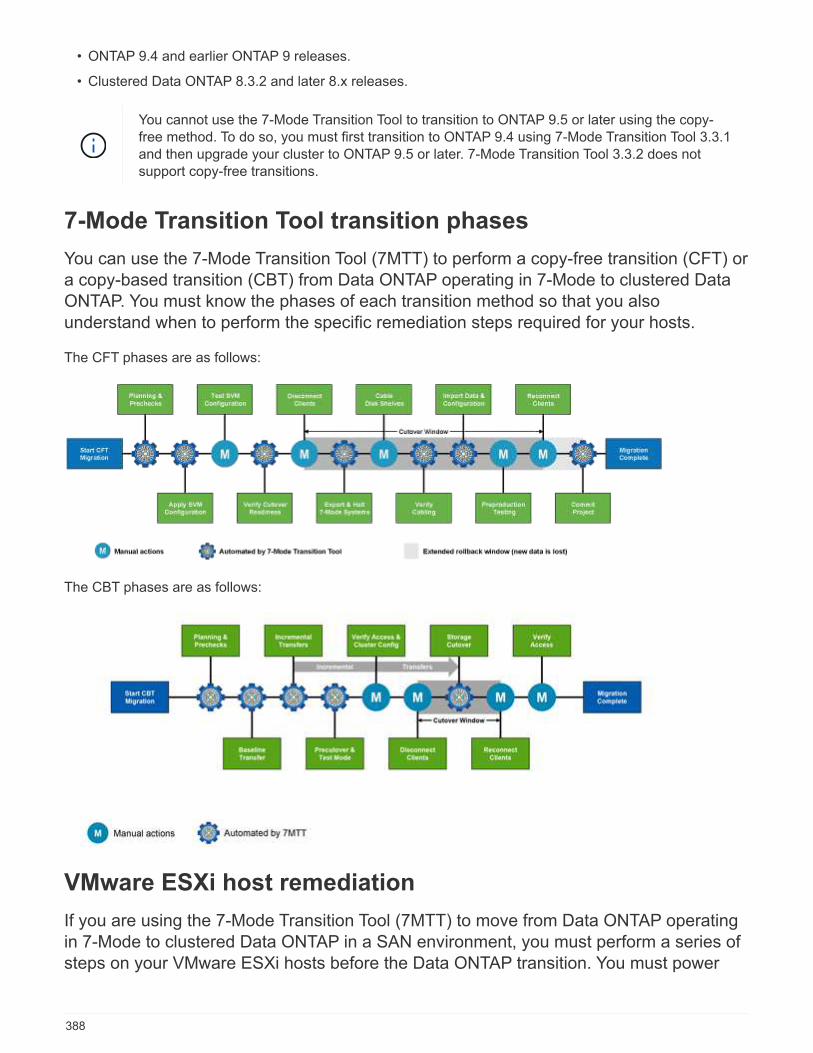
• ONTAP 9.4 and earlier ONTAP 9 releases.
• Clustered Data ONTAP 8.3.2 and later 8.x releases.
You cannot use the 7-Mode Transition Tool to transition to ONTAP 9.5 or later using the copy-
free method. To do so, you must first transition to ONTAP 9.4 using 7-Mode Transition Tool 3.3.1
and then upgrade your cluster to ONTAP 9.5 or later. 7-Mode Transition Tool 3.3.2 does not
support copy-free transitions.
7-Mode Transition Tool transition phases
You can use the 7-Mode Transition Tool (7MTT) to perform a copy-free transition (CFT) or
a copy-based transition (CBT) from Data ONTAP operating in 7-Mode to clustered Data
ONTAP. You must know the phases of each transition method so that you also
understand when to perform the specific remediation steps required for your hosts.
The CFT phases are as follows:
The CBT phases are as follows:
VMware ESXi host remediation
If you are using the 7-Mode Transition Tool (7MTT) to move from Data ONTAP operating
in 7-Mode to clustered Data ONTAP in a SAN environment, you must perform a series of
steps on your VMware ESXi hosts before the Data ONTAP transition. You must power
388
down your hosts before cutover and you must perform another series of steps after
transition before you can begin servicing data.
Related information
Testing transitioned LUNs and ESXi host applications before the cutover phase of copy-based transitions
Post-transition remediation requirements for ESXi hosts
ESXi versions and features supported for SAN transitions using 7MTT
Only certain versions and features of ESXi are supported for SAN transitions using the 7-
Mode Transition Tool (7MTT).
The following versions and features are supported as listed in the NetApp Interoperability Matrix Tool
• ESXi 5.0, 5.1, 5.5, and later
You must upgrade hosts running ESX/ESXi 4.x or earlier to ESX/ESXi 5.0 or later to transition them.
• VMFS3 and VMFS5 datastores
• SAN boot configurations
• RDM (RAW device map) devices
• All Guest OS supported in the Interoperability Matrix
• All SAN protocols (FC/FCoE/iSCSI)
Preparing for transition of ESXi hosts
You must complete several prerequisite tasks before you use the 7-Mode Transition Tool
(7MTT) to transition your ESXi hosts from Data ONTAP operating in 7-Mode to ONTAP.
Steps
1. Configure clustered Data ONTAP as described in the 7-Mode Transition Tool Copy-Based Transition Guide
or the 7-Mode Transition Tool Copy-Free Transition Guide based on the type of transition that you are
performing.
2. Gather the following information for the ESXi hosts that you are transitioning:
◦ IP address
◦ Host name
◦ Authentication details
3. Complete the zoning between FC or FCoE hosts and new clustered Data ONTAP nodes.
You can use the Collect and Assess feature to generate the zoning plan.
4. Use the NetApp Interoperability Matrix Tool to verify that the following are supported for transition to
clustered Data ONTAP:
◦ Your version of Data ONTAP operating in 7-Mode
In some cases, you might have to upgrade your version of Data ONTAP operating in 7-Mode to a
7MTT SAN compatible version. For example, Data ONTAP 7.3.7 operating in 7-Mode is not compatible
389
for transitions using the 7MTT. If you are running this version, you must upgrade it before initiating
transition.
◦ Your ESXi host configuration
◦ Your HBA driver and firmware
For iSCSI, only software initiators are supported. For FC and FCoE, only QLogic and Emulex initiators
are supported. If your ESXi FC or FCoE initiator is not supported, you must upgrade to a version that is
supported by clustered Data ONTAP as described in the Interoperability Matrix.
5. If configured, disable VMware high availability (HA) and Distributed Resource Scheduler (DRS).
VMware HA and DRS are not supported during transition.
Related information
Retaining resource pools when disabling VMware DRS clusters in the vSphere Web Client
Disabling VMware High Availability (HA)
What the Inventory Collect Tool is
The Inventory Collect Tool (ICT) is a stand-alone utility for collecting configuration and
inventory information about 7-Mode storage controllers, hosts attached to controllers, and
applications running on these hosts for assessing the transition readiness of these
systems. You can use the ICT to generate information about your LUNs and the
configuration that you need for transition.
The ICT generates an Inventory Assessment Workbook and an Inventory Report XML file that contains
configuration details of the storage and host systems.
The ICT is available for ESXi, 5.x, ESXi 6.x, and Windows hosts.
Preparing Linux guest operating systems for transition
If have 7-Mode LUNs mapped as physical compatible RDM (PTRDM) to Linux virtual
machines (VMs) for the boot device, there are steps you must perform to prepare your
Linux VMs for transition.
• For copy-based transitions, perform these steps before initiating the Storage Cutover operation in the 7-
Mode Transition Tool (7MTT).
• For copy-free transitions, perform these steps before initiating the Export & Halt 7-Mode Systems operation
in the 7MTT.
Steps
1. Obtain the SCSI device serial numbers:
cat /boot/grub/menu.lst
In the following example, 360a9800032466879362b45777447462d-part2 and
360a9800032466879362b45777447462d-part1 are SCSI device numbers:
390
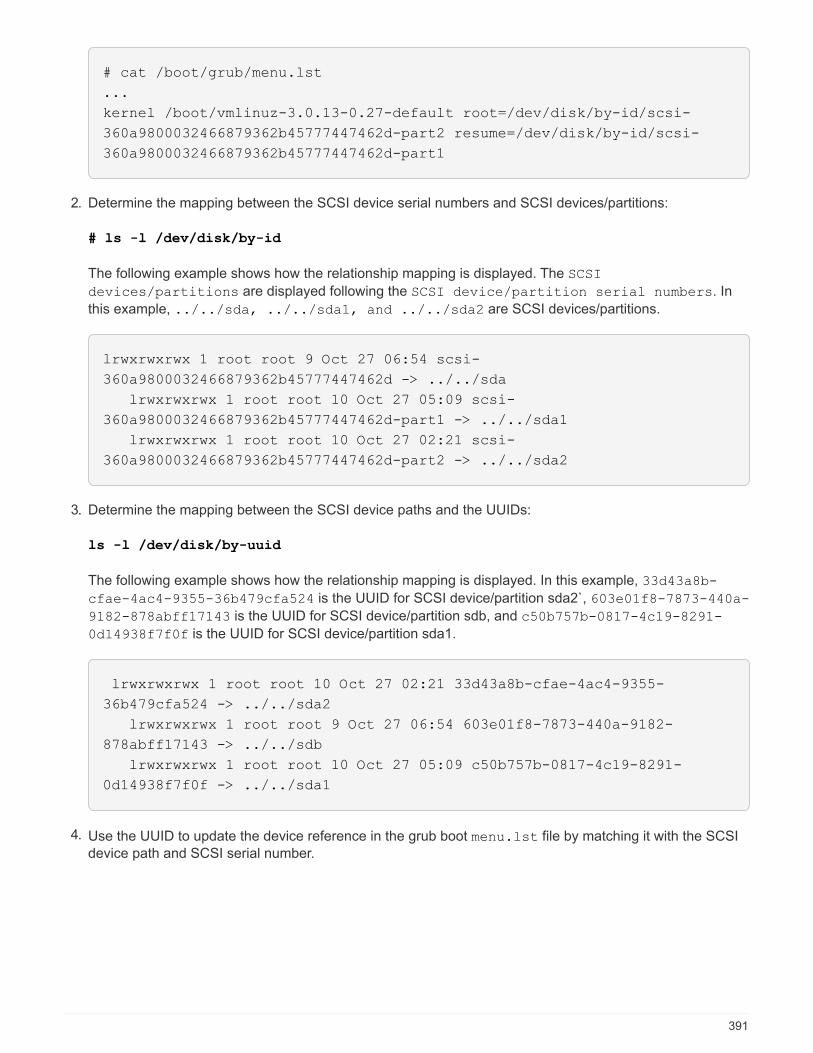
# cat /boot/grub/menu.lst
...
kernel /boot/vmlinuz-3.0.13-0.27-default root=/dev/disk/by-id/scsi-
360a9800032466879362b45777447462d-part2 resume=/dev/disk/by-id/scsi-
360a9800032466879362b45777447462d-part1
2. Determine the mapping between the SCSI device serial numbers and SCSI devices/partitions:
# ls -l /dev/disk/by-id
The following example shows how the relationship mapping is displayed. The SCSI
devices/partitions are displayed following the SCSI device/partition serial numbers. In
this example, ../../sda, ../../sda1, and ../../sda2 are SCSI devices/partitions.
lrwxrwxrwx 1 root root 9 Oct 27 06:54 scsi-
360a9800032466879362b45777447462d -> ../../sda
lrwxrwxrwx 1 root root 10 Oct 27 05:09 scsi-
360a9800032466879362b45777447462d-part1 -> ../../sda1
lrwxrwxrwx 1 root root 10 Oct 27 02:21 scsi-
360a9800032466879362b45777447462d-part2 -> ../../sda2
3. Determine the mapping between the SCSI device paths and the UUIDs:
ls -l /dev/disk/by-uuid
The following example shows how the relationship mapping is displayed. In this example, 33d43a8b-
cfae-4ac4-9355-36b479cfa524 is the UUID for SCSI device/partition sda2`, 603e01f8-7873-440a-
9182-878abff17143 is the UUID for SCSI device/partition sdb, and c50b757b-0817-4c19-8291-
0d14938f7f0f is the UUID for SCSI device/partition sda1.
lrwxrwxrwx 1 root root 10 Oct 27 02:21 33d43a8b-cfae-4ac4-9355-
36b479cfa524 -> ../../sda2
lrwxrwxrwx 1 root root 9 Oct 27 06:54 603e01f8-7873-440a-9182-
878abff17143 -> ../../sdb
lrwxrwxrwx 1 root root 10 Oct 27 05:09 c50b757b-0817-4c19-8291-
0d14938f7f0f -> ../../sda1
4. Use the UUID to update the device reference in the grub boot menu.lst file by matching it with the SCSI
device path and SCSI serial number.
391
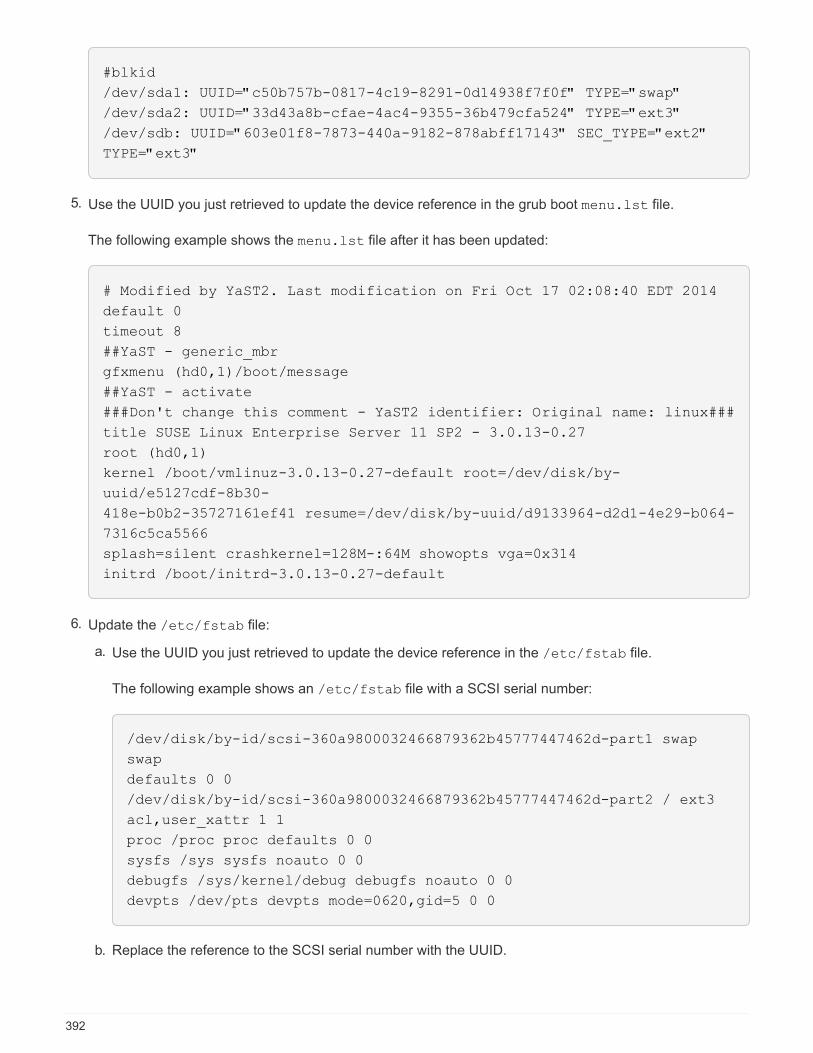
#blkid
/dev/sda1: UUID="c50b757b-0817-4c19-8291-0d14938f7f0f" TYPE="swap"
/dev/sda2: UUID="33d43a8b-cfae-4ac4-9355-36b479cfa524" TYPE="ext3"
/dev/sdb: UUID="603e01f8-7873-440a-9182-878abff17143" SEC_TYPE="ext2"
TYPE="ext3"
5. Use the UUID you just retrieved to update the device reference in the grub boot menu.lst file.
The following example shows the menu.lst file after it has been updated:
# Modified by YaST2. Last modification on Fri Oct 17 02:08:40 EDT 2014
default 0
timeout 8
##YaST - generic_mbr
gfxmenu (hd0,1)/boot/message
##YaST - activate
###Don't change this comment - YaST2 identifier: Original name: linux###
title SUSE Linux Enterprise Server 11 SP2 - 3.0.13-0.27
root (hd0,1)
kernel /boot/vmlinuz-3.0.13-0.27-default root=/dev/disk/by-
uuid/e5127cdf-8b30-
418e-b0b2-35727161ef41 resume=/dev/disk/by-uuid/d9133964-d2d1-4e29-b064-
7316c5ca5566
splash=silent crashkernel=128M-:64M showopts vga=0x314
initrd /boot/initrd-3.0.13-0.27-default
6. Update the /etc/fstab file:
a. Use the UUID you just retrieved to update the device reference in the /etc/fstab file.
The following example shows an /etc/fstab file with a SCSI serial number:
/dev/disk/by-id/scsi-360a9800032466879362b45777447462d-part1 swap
swap
defaults 0 0
/dev/disk/by-id/scsi-360a9800032466879362b45777447462d-part2 / ext3
acl,user_xattr 1 1
proc /proc proc defaults 0 0
sysfs /sys sysfs noauto 0 0
debugfs /sys/kernel/debug debugfs noauto 0 0
devpts /dev/pts devpts mode=0620,gid=5 0 0
b. Replace the reference to the SCSI serial number with the UUID.
392
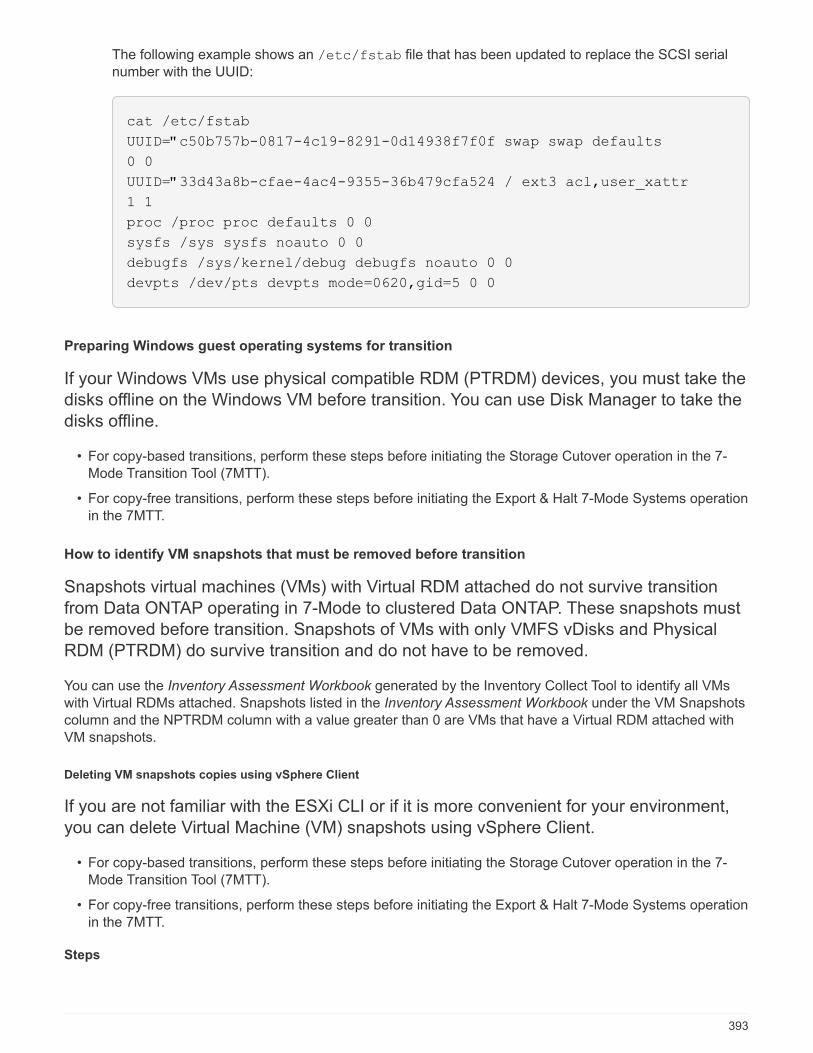
The following example shows an /etc/fstab file that has been updated to replace the SCSI serial
number with the UUID:
cat /etc/fstab
UUID="c50b757b-0817-4c19-8291-0d14938f7f0f swap swap defaults
0 0
UUID="33d43a8b-cfae-4ac4-9355-36b479cfa524 / ext3 acl,user_xattr
1 1
proc /proc proc defaults 0 0
sysfs /sys sysfs noauto 0 0
debugfs /sys/kernel/debug debugfs noauto 0 0
devpts /dev/pts devpts mode=0620,gid=5 0 0
Preparing Windows guest operating systems for transition
If your Windows VMs use physical compatible RDM (PTRDM) devices, you must take the
disks offline on the Windows VM before transition. You can use Disk Manager to take the
disks offline.
• For copy-based transitions, perform these steps before initiating the Storage Cutover operation in the 7-
Mode Transition Tool (7MTT).
• For copy-free transitions, perform these steps before initiating the Export & Halt 7-Mode Systems operation
in the 7MTT.
How to identify VM snapshots that must be removed before transition
Snapshots virtual machines (VMs) with Virtual RDM attached do not survive transition
from Data ONTAP operating in 7-Mode to clustered Data ONTAP. These snapshots must
be removed before transition. Snapshots of VMs with only VMFS vDisks and Physical
RDM (PTRDM) do survive transition and do not have to be removed.
You can use the Inventory Assessment Workbook generated by the Inventory Collect Tool to identify all VMs
with Virtual RDMs attached. Snapshots listed in the Inventory Assessment Workbook under the VM Snapshots
column and the NPTRDM column with a value greater than 0 are VMs that have a Virtual RDM attached with
VM snapshots.
Deleting VM snapshots copies using vSphere Client
If you are not familiar with the ESXi CLI or if it is more convenient for your environment,
you can delete Virtual Machine (VM) snapshots using vSphere Client.
• For copy-based transitions, perform these steps before initiating the Storage Cutover operation in the 7-
Mode Transition Tool (7MTT).
• For copy-free transitions, perform these steps before initiating the Export & Halt 7-Mode Systems operation
in the 7MTT.
Steps
393
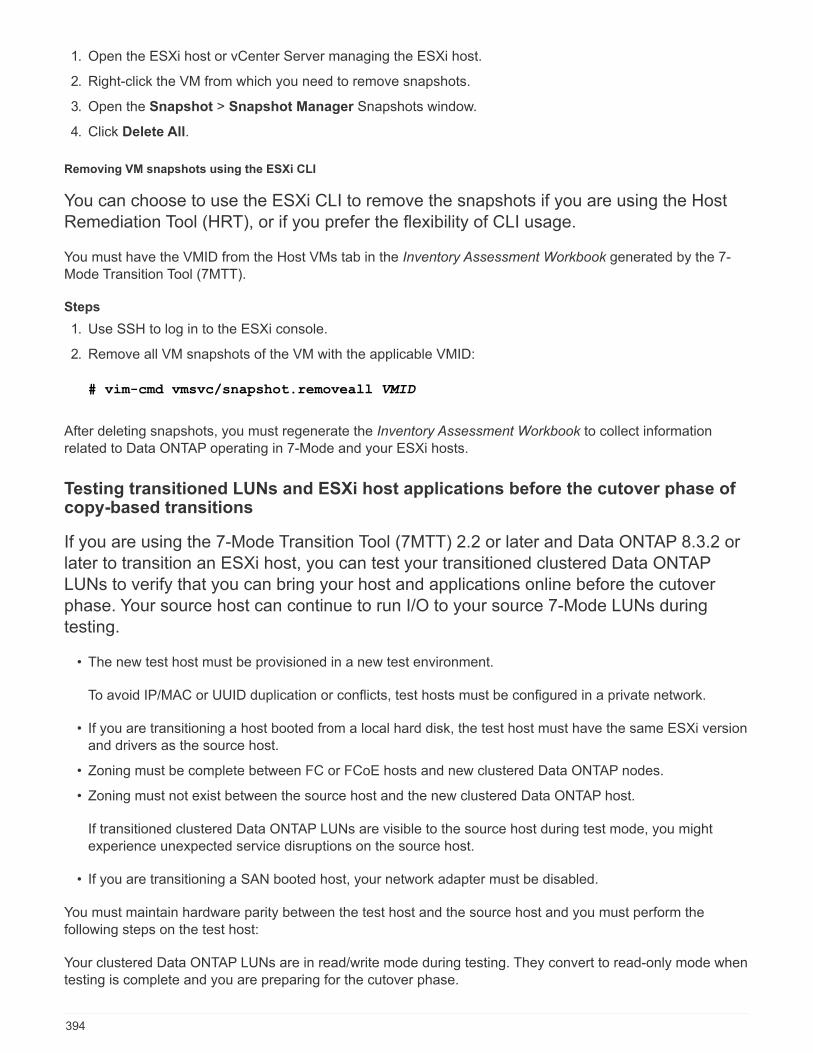
1. Open the ESXi host or vCenter Server managing the ESXi host.
2. Right-click the VM from which you need to remove snapshots.
3. Open the Snapshot > Snapshot Manager Snapshots window.
4. Click Delete All.
Removing VM snapshots using the ESXi CLI
You can choose to use the ESXi CLI to remove the snapshots if you are using the Host
Remediation Tool (HRT), or if you prefer the flexibility of CLI usage.
You must have the VMID from the Host VMs tab in the Inventory Assessment Workbook generated by the 7-
Mode Transition Tool (7MTT).
Steps
1. Use SSH to log in to the ESXi console.
2. Remove all VM snapshots of the VM with the applicable VMID:
# vim-cmd vmsvc/snapshot.removeall VMID
After deleting snapshots, you must regenerate the Inventory Assessment Workbook to collect information
related to Data ONTAP operating in 7-Mode and your ESXi hosts.
Testing transitioned LUNs and ESXi host applications before the cutover phase ofcopy-based transitions
If you are using the 7-Mode Transition Tool (7MTT) 2.2 or later and Data ONTAP 8.3.2 or
later to transition an ESXi host, you can test your transitioned clustered Data ONTAP
LUNs to verify that you can bring your host and applications online before the cutover
phase. Your source host can continue to run I/O to your source 7-Mode LUNs during
testing.
• The new test host must be provisioned in a new test environment.
To avoid IP/MAC or UUID duplication or conflicts, test hosts must be configured in a private network.
• If you are transitioning a host booted from a local hard disk, the test host must have the same ESXi version
and drivers as the source host.
• Zoning must be complete between FC or FCoE hosts and new clustered Data ONTAP nodes.
• Zoning must not exist between the source host and the new clustered Data ONTAP host.
If transitioned clustered Data ONTAP LUNs are visible to the source host during test mode, you might
experience unexpected service disruptions on the source host.
• If you are transitioning a SAN booted host, your network adapter must be disabled.
You must maintain hardware parity between the test host and the source host and you must perform the
following steps on the test host:
Your clustered Data ONTAP LUNs are in read/write mode during testing. They convert to read-only mode when
testing is complete and you are preparing for the cutover phase.
394
Steps
1. After the baseline data copy is complete, select Test Mode in the 7MTT user interface (UI).
2. In the 7MTT UI, click Apply Configuration.
3. Zone the clustered Data ONTAP nodes on the test host.
4. Log in to the clustered Data ONTAP node, and then add new test host initiators to the igroup created by the
7MTT during the test phase.
5. Navigate to C:\Program Files\NetApp\operating in 7-Mode Transition Tool\.
6. Generate the 7-Mode to clustered Data ONTAP LUN mapping file from the Linux host where the 7MTT is
installed:
transition cbt export lunmap -p project-name -o file_path
For example:
transition cbt export lunmap -p SanWorkLoad -o c:/Libraires/Documents/7-to-C-
LUN-MAPPING.csv
7. Bring the test host online.
◦ Reconfigure your VMware software iSCSI initiator after transition
◦ Set up your ESXi hosts configured for SAN boot after transition
8. Verify that all transitioned clustered Data ONTAP LUNs are discovered.
9. If you are transitioning a non-SAN booted host, reregister your VMs.
Re-registering VMs after transition of ESXi host.
10. Complete the necessary post-transition steps for ESXi hosts.
Post transition requirements for ESXi hosts
11. Bring the host and applications online.
12. Perform your testing as needed.
13. Shut down the test host.
14. In the 7MTT UI, click Finish Testing.
The new clustered Data ONTAP LUNs are now read-only, and the data from the source 7-Mode LUNs is
resynchronized.
15. If you plan to use the same source after you complete your transition, then edit the igroup on the clustered
Data ONTAP node to add the appropriate initiator.
If you are planning to promote your test host to production, then you do not need to edit the igroup.
After you complete your test, plan time to shut down the source host connected to your controllers running
Data ONTAP operating in 7-Mode. When you click Complete Transition, your source 7-Mode volumes and
LUNs go offline and the transitioned clustered Data ONTAP LUNs become read/write.
Related information
Copy-based transition
395
Downtime at apply configuration (precutover) phase of ESXi host transition
You must plan for downtime at the apply configuration (precutover) phase while
transitioning ESXi hosts.
After you complete the prerequisites for ESXi host transitions, you can use the 7-Mode Transition Tool (7MTT)
to transition your LUNs from Data ONTAP operating in 7-Mode to ONTAP. ESXi hosts, VMs, and applications
can be online until the apply configuration (precutover) phase of the 7MTT transition. However, at the apply
configuration (precutover) phase, all applications and guest operating systems must be powered down. If ESXi
hosts are SAN booted, or if SAN booted LUNs are part of the transition, the ESXi hosts must also be powered
down at the apply configuration (precutover) phase.
If the host is not SAN booted and you need to keep your service running to non-transitioning LUNs or array
LUNs that are not made by NetApp, you can choose not to shut it down. However, if you do not shut it down,
you might experience the all-paths-down (APD) condition. To avoid the APD condition, you can mask Data
ONTAP operating in 7-Mode LUNs. See the VMware Knowledgebase ID 1009449 for more information.
Post-transition remediation requirements for ESXi hosts
After you transition LUNs for ESXi hosts from Data ONTAP operating in 7-Mode to
clustered Data ONTAP using the 7-Mode Transition Tool (7MTT), you must perform a
series of remediation tasks to bring your LUNs online and begin servicing data.
Related information
Preparing for post-transition ESXi host remediation
Reregistering VMs after transition on non-SAN boot ESXi hosts using vSphere Client
Setting up ESXi hosts configured for SAN boot after transition
Determining whether VMFS volumes need to be remounted after transition
Reattaching RDM LUNs to VMs
Enabling CAW on a datastore using the ESXi CLI
Post-transition remediation for Linux and Windows guest operating systems
Recommended settings for ESXi hosts after transition remediation
Preparing for post-transition ESXi host remediation
After the 7-Mode Transition Tool (7MTT) transition is complete, you must perform various
ESXi host remediation tasks. There are several steps you must complete before you can
perform those tasks.
• For copy-based transitions (CBTs), perform these steps before initiating the Storage Cutover operation in
the 7MTT.
• For copy-free transitions (CFTs), perform these steps before initiating the Export & Halt 7-Mode Systems
operation in the 7MTT.
Steps
396
1. Generate the 7-Mode to ONTAP LUN mapping file:
◦ For CBTs, run the following command from the Linux host where 7MTT is installed:
transition cbt export lunmap -p project-name -o file_path
For example:
transition cbt export lunmap -p SanWorkLoad -o c:/Libraires/Documents/7-to-
C-LUN-MAPPING.csv
◦ For CFTs, run the following command from the system where the 7MTT is installed:
transition cft export lunmap -p project-name -s svm-name -o output-file
For example:
transition cft export lunmap -p SanWorkLoad -s svm1 -o
c:/Libraires/Documents/7-to-C-LUN-MAPPING-svm1.csv
You must run this command for each of your storage virtual machines (SVMs).
2. Verify that igroup and initiator mappings are present.
7MTT re-creates the same igroup with initiators used in Data ONTAP operating in 7-Mode, and remaps the
clustered Data ONTAP LUN to the host.
3. Verify that zoning is appropriate for the new clustered Data ONTAP target.
4. If you are doing a copy-free transition (CFT), run vol rehost.
See the 7-Mode Transition Tool Copy-Free Transition Guide for vol rehost procedures.
Reregistering VMs after transition on non-SAN boot ESXi hosts using vSphere Client
After you transition a non-SAN booted host, you must reregister your Virtual Machines
(VMs).
The host must be online and the LUNs must be discovered.
• For copy-based transitions, perform these steps before initiating the Storage Cutover operation in the 7-
Mode Transition Tool.
• For copy-free transitions, perform these steps before initiating the Export & Halt 7-Mode Systems operation
in the 7MTT.
Steps
1. Open the Inventory Assessment Workbook generated by the Inventory Collect Tool (ICT).
2. Navigate to the Host VMs tab, and then record the VM Config File path and Location/Datastore Name of
the VM.
3. Use vSphere Client to log in to the ESXi host or the vCenter Server managing the ESXi host.
4. Under Host and Clusters, select the ESXi host.
397
5. Navigate to Configuration > Hardware > Storage.
6. Select the datastore with the datastore name you previously noted.
7. Right click and select Browse Datastore.
The Datastore Browser window opens.
8. Navigate to the VM Config File path you previously noted.
9. Right click the `.vmx `file, and then select Add To Inventory.
10. Repeat these steps for each VM listed in the Host VMs tab in the Inventory Assessment Workbook
generated by the ICT.
Reconfiguration of VMware software iSCSI initiator after transition
If your ESXi host accessed your Data ONTAP operating in 7-Mode system with the
VMware software iSCSI initiator, then after transition from 7-Mode to clustered Data
ONTAP, you must reconfigure the VMware software iSCSI initiator on your ESXi host and
enable it to discover the new clustered Data ONTAP target.
For copy-based transitions, you must reconfigure your VMware software iSCSI initiator before initiating the
Storage Cutover operation in the 7-Mode Transition Tool (7MTT). For copy-free transitions, you must
reconfigure your VMware software iSCSI initiator before initiating the Export & Halt 7-Mode Systems operation
in the 7MTT.
During the reconfiguration, you must retrieve the iSCSI IP and IQN used by the new clustered Data ONTAP
target. If the target IP subnet has changed, the respective IP subnet changes are required on the host iSCSI
initiator ports as well.
To make the required changes to the software iSCSI initiator on the VMware ESXi host, see the VMWare
vSphere ESXi5.x Storage Guide.
Related information
System administration
Setting up ESXi hosts configured for SAN boot after transition
If your ESXi host was configured for SAN boot before transition from Data ONTAP
operating in 7-Mode, you must perform several steps before using the host after
transition.
• For copy-based transitions, perform these steps before initiating the Storage Cutover operation in the
7MTT.
• For copy-free transitions, perform these steps before initiating the Export & Halt 7-Mode Systems operation
in the 7MTT.
Steps
1. Reconfigure your FC and FCoE HBA BIOS to boot from the SAN boot LUN of the clustered Data ONTAP
system.
2. Boot the ESXi host.
398
3. Reset the host configurations to the pretransition settings.
4. For iSCSI hosts, see how to reconfigure your VMware iSCSI initiator.
Reconfigure your VMware iSCSI initiator
5. Remount the VMFS datastores created from the boot LUN in the default installation.
Related information
Remounting VMFS volumes after transition using vSphere Client
Remounting VMFS volumes after transition using the ESXi CLI
SAN administration
Determining whether VMFS volumes need to be remounted after transition
After transitioning from Data ONTAP operating in 7-Mode to clustered Data ONTAP, you
might have VMFS volumes that need to be remounted to bring VMFS datastores and
VMs to their pretransition states.
• For copy-based transitions, perform these steps before initiating the Storage Cutover operation in the 7-
Mode Transition Tool (7MTT).
• For copy-free transitions, perform these steps before initiating the Export & Halt 7-Mode Systems operation
in the 7MTT.
Steps
1. Open the Inventory Assessment Workbook generated by the Inventory Collect Tool (ICT).
2. Click the SAN Host Filesystems tab.
3. Check the Drive / Mount / Datastore Name column for the filesystems and datastores mounted on the
host before transition.
4. Make a note of the corresponding LUN naa IDs in the SCSI Device ID/Device Name column for the
datastore.
5. Check whether the naa IDs noted for the datastore are listed in the 7MTT mapping file that was generated
after the transition.
◦ If none of the naa IDs are present in the 7MTT mapping file, the datastore and its underlying LUNs
were not part of the 7MTT transition and no remediation is required.
◦ If only part of the naa IDs are present in the 7MTT mapping file, your transition is incomplete and you
cannot proceed.
◦ If all naa IDs are present, you must remount your VMFS volumes.
Related information
Remounting VMFS volumes after transition using vSphere Client
Remounting VMFS volumes after transition using the ESXi CLI
What the Inventory Collect Tool is
399
Remounting VMFS volumes after transition using vSphere Client
After transition, you must remount your VMFS volumes to bring your datastores and
virtual machines (VMs) to their pretransition states. If you are not familiar with the ESXi
CLI or it is more convenient in your environment, you can use vSphere Client to remount
your volumes.
These steps apply to volumes and spanned volumes.
Steps
1. Log in to the ESXi host or the vCenter Server managing the ESXi host.
2. Under Hosts and Clusters, select the ESXi host.
3. Navigate to Configuration > Hardware > Storage.
4. In the upper-right corner, click Add storage.
5. Select Disk/LUN.
6. Click Next.
7. In the list of LUNs, locate the VMFS_label column displaying the name of the datastore.
8. Select the LUN to complete the remount operation.
If you are remounting a spanned VMFS volume, the first LUN in the span is marked “head”. You must
select the “head” LUN to complete the remount operation.
9. Click Next.
10. In the Select VMFS Mount Options window, select Keep the existing signature.
11. Complete the wizard.
12. Repeat these steps for all of the LUNs displaying the datastore name in the VMFS_label column.
Datastores are remounted and VMs are active.
Remounting VMFS volumes after transition using the ESXi CLI
After transition, you can use the ESXi CLI to remount your volumes and bring your
datastores and VMs to their pretransition states.
The original 7-Mode LUN must be unmapped or offline.
These steps apply to volumes and spanned volumes.
Steps
1. Log in to the ESXi console using SSH.
2. List the newly added LUNs with existing VMFS signatures and VMFS labels:
# esxcfg-volume -l
The following is an example of the LUNs listed with VMFS signatures and VMFS labels.
400
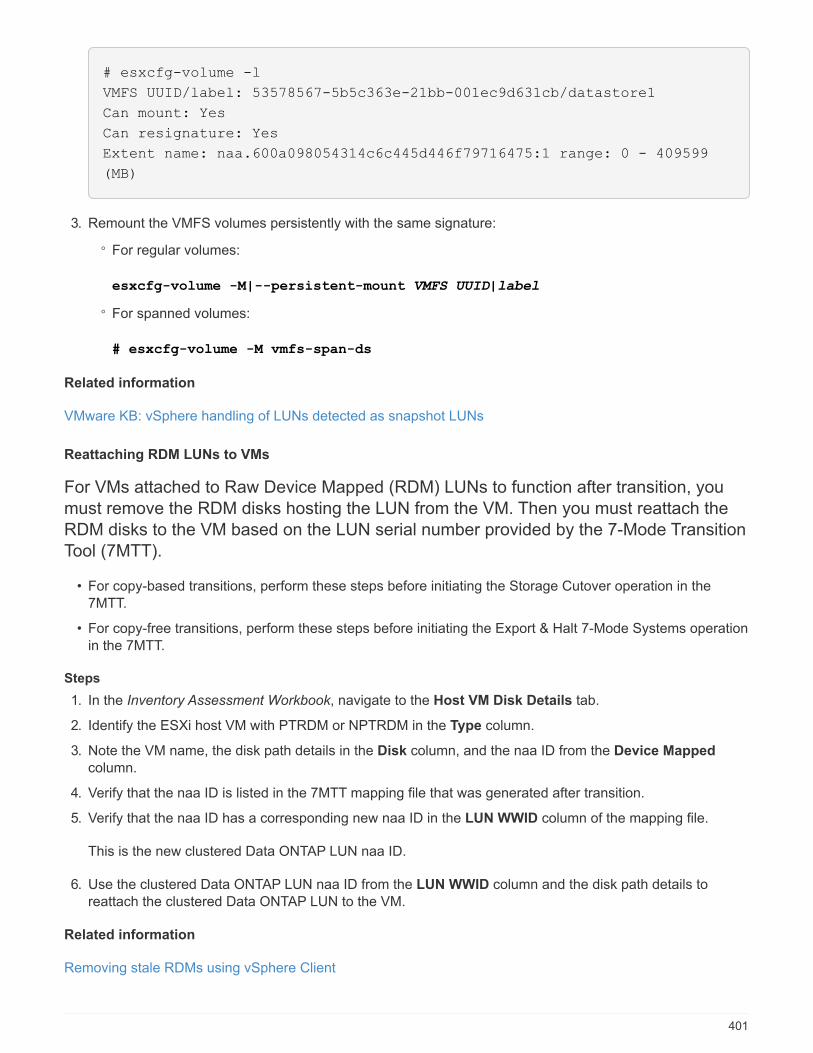
# esxcfg-volume -l
VMFS UUID/label: 53578567-5b5c363e-21bb-001ec9d631cb/datastore1
Can mount: Yes
Can resignature: Yes
Extent name: naa.600a098054314c6c445d446f79716475:1 range: 0 - 409599
(MB)
3. Remount the VMFS volumes persistently with the same signature:
◦ For regular volumes:
esxcfg-volume -M|--persistent-mount VMFS UUID|label
◦ For spanned volumes:
# esxcfg-volume -M vmfs-span-ds
Related information
VMware KB: vSphere handling of LUNs detected as snapshot LUNs
Reattaching RDM LUNs to VMs
For VMs attached to Raw Device Mapped (RDM) LUNs to function after transition, you
must remove the RDM disks hosting the LUN from the VM. Then you must reattach the
RDM disks to the VM based on the LUN serial number provided by the 7-Mode Transition
Tool (7MTT).
• For copy-based transitions, perform these steps before initiating the Storage Cutover operation in the
7MTT.
• For copy-free transitions, perform these steps before initiating the Export & Halt 7-Mode Systems operation
in the 7MTT.
Steps
1. In the Inventory Assessment Workbook, navigate to the Host VM Disk Details tab.
2. Identify the ESXi host VM with PTRDM or NPTRDM in the Type column.
3. Note the VM name, the disk path details in the Disk column, and the naa ID from the Device Mapped
column.
4. Verify that the naa ID is listed in the 7MTT mapping file that was generated after transition.
5. Verify that the naa ID has a corresponding new naa ID in the LUN WWID column of the mapping file.
This is the new clustered Data ONTAP LUN naa ID.
6. Use the clustered Data ONTAP LUN naa ID from the LUN WWID column and the disk path details to
reattach the clustered Data ONTAP LUN to the VM.
Related information
Removing stale RDMs using vSphere Client
401
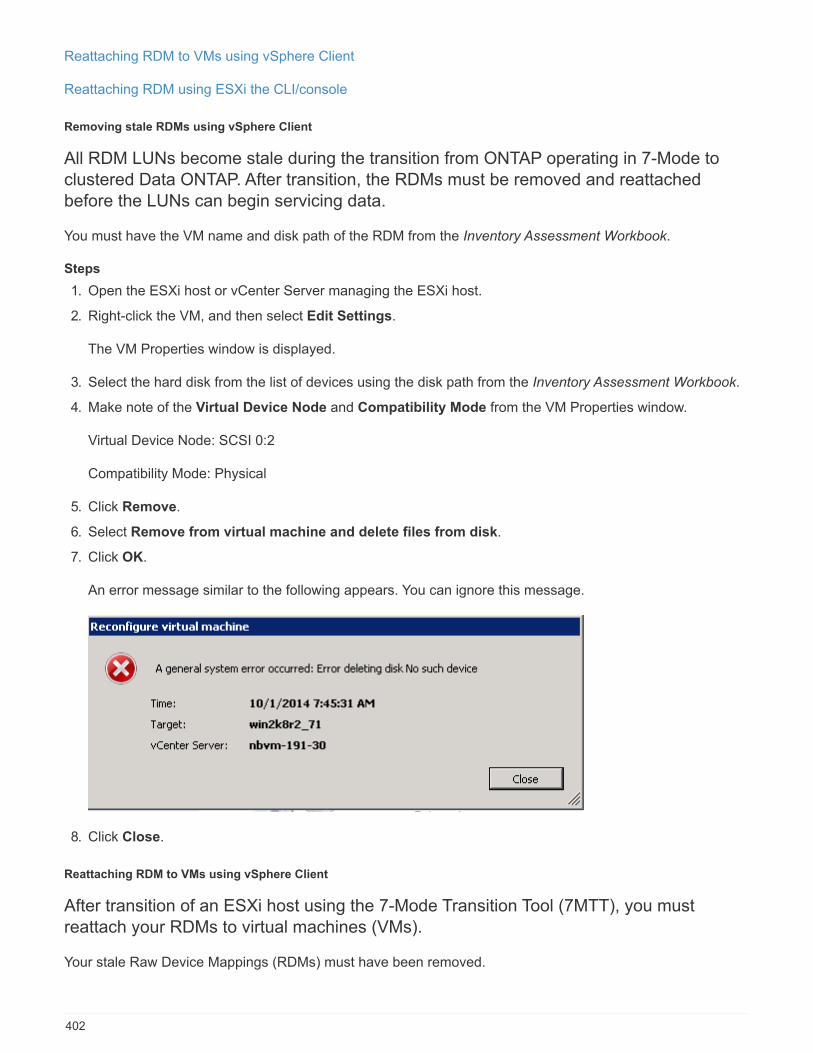
Reattaching RDM to VMs using vSphere Client
Reattaching RDM using ESXi the CLI/console
Removing stale RDMs using vSphere Client
All RDM LUNs become stale during the transition from ONTAP operating in 7-Mode to
clustered Data ONTAP. After transition, the RDMs must be removed and reattached
before the LUNs can begin servicing data.
You must have the VM name and disk path of the RDM from the Inventory Assessment Workbook.
Steps
1. Open the ESXi host or vCenter Server managing the ESXi host.
2. Right-click the VM, and then select Edit Settings.
The VM Properties window is displayed.
3. Select the hard disk from the list of devices using the disk path from the Inventory Assessment Workbook.
4. Make note of the Virtual Device Node and Compatibility Mode from the VM Properties window.
Virtual Device Node: SCSI 0:2
Compatibility Mode: Physical
5. Click Remove.
6. Select Remove from virtual machine and delete files from disk.
7. Click OK.
An error message similar to the following appears. You can ignore this message.
8. Click Close.
Reattaching RDM to VMs using vSphere Client
After transition of an ESXi host using the 7-Mode Transition Tool (7MTT), you must
reattach your RDMs to virtual machines (VMs).
Your stale Raw Device Mappings (RDMs) must have been removed.
402
Steps
1. Open the ESXi host or vCenter server managing the ESXi host.
2. Right-click the VM, and then select Edit Settings.
The VM Properties window opens.
3. Click Add.
The Add Hardware window opens.
4. Click Hard Disk.
5. Click Next to select the disk.
6. Select Raw Device Mappings.
7. Click Next to select the target LUN.
8. Select the LUN with the new clustered Data ONTAP NAA ID that you noted from the 7MTT mapping file.
9. Click Next.
10. Choose Select Datastore.
11. Select the datastore that matches the disk path that you noted in the 7MTT mapping file.
12. Click Next.
13. Choose either Physical or Virtual for the Compatibility Mode.
Choose the compatibility mode noted when your stale RDM was removed.
14. Click Next.
15. Choose Advance Options.
16. Select the Virtual Device Node.
Select the virtual device mode that you noted when you removed the stale RDM.
17. Click Next.
18. Click Finish to submit your changes.
19. Repeat the steps for all VMs with RDM attached.
Related information
Removing stale RDMs using vSphere Client
Reattaching RDM using ESXi the CLI/console
After transition from Data ONTAP operating in 7-Mode to clustered Data ONTAP you
must reattach your raw device mapping (RDM).
• You must retrieve the RDM disk file listed in the Disk column of the Inventory Assessment Workbook.
• You must retrieve the new clustered Data ONTAP LUN naa ID from the 7MTT mapping file.
Steps
1. Log in to the ESXi console using SSH.
403
2. Use the mv command to make a backup of the RDM disk file and the associated device file.
The RDM disk file is listed in the Disk column of the Inventory Assessment Workbook.
If the RDM disk file is /vmfs/volumes/53a3ac3d-df5aca03-3a94-001ec9d631cb/VM2-win-bus-
A/VM2-winbus-A.vmdk, you would issue the following command:
mv /vmfs/volumes/53a3ac3d-df5aca03-3a94-001ec9d631cb/VM2-win-bus-A/VM2-winbus-
A.vmdk /vmfs/volumes/53a3ac3d-df5aca03-3a94-001ec9d631cb/VM2-win-bus-A/VM2-
win-bus-A.vmdk _bak
◦ For physical compatibility RDM (PTRDM):
mv RDM_disk_file_name-rdmp.vdmk RDM_disk_file_name-rdmp.vdmk_bak
For example:
mv/vmfs/volumes/53a3ac3d-df5aca03-3a94-001ec9d631cb/VM2-win-bus-A/VM2-
winbus-A-rdmp.vmdk/vmfs/volumes/53a3ac3d-df5aca03-3a94-001ec9d631cb/VM2-
winbus-A/VM2-win-bus-A-rdmp.vmdk _bak
◦ For virtual compatibility RDM (NPTRDM):
mv RDM_disk_file_name-rdmp.vdmk RDM_disk_file_name-rdmp.vdmk_bak
For example:
mv/vmfs/volumes/53a3ac3d-df5aca03-3a94-001ec9d631cb/VM2-win-bus-A/VM2-
winbus-A-rdmp.vmdk/vmfs/volumes/53a3ac3d-df5aca03-3a94-001ec9d631cb/VM2-
winbus-A/VM2-win-bus-A-rdmp.vmdk _bak
3. Use the new clustered Data ONTAP LUN naa ID and the RDM disk file to re-create the RDM configuration
and device files.
◦ For PTRDM:
# vmkfstools –z /vmfs/devices/disks/new_clustered_Data_ONTAP_naa_ID.vmdk
For example:
vmkfstools –z /vmfs/devices/disks/naa.600a098054314c6c442b446f79712313
/vmfs/volumes/53a3ac3d-df5aca03-3a94-001ec9d631cb/VM2-win-bus-A/VM2-win-bus-
A.vmdk
◦ For NPTRDM:
# vmkfstools –r /vmfs/devices/disks/new_clustered_Data_ONTAP_naa_ID.vmdk
For example:
vmkfstools –r /vmfs/devices/disks/naa.600a098054314c6c442b446f79712313
/vmfs/volumes/53a3ac3d-df5aca03-3a94-001ec9d631cb/VM2-win-bus-A/VM2-win-bus-
A.vmdk
404
4. Confirm that the configuration and pointer files are created:
# ls /vmfs/volumes/datastore/VM_directory
#ls /vmfs/volumes/53a3ac3d-df5aca03-3a94-001ec9d631cb/VM2-win-bus-A
The new configuration and pointer files are displayed under the VM directory path.
5. Repeat the steps for all VMs with RDM attached.
6. Restart the hostd and vpxa agents in the ESXi host:
/etc/init.d/hostd/restart
/etc/init.d/vpxa/restart
Post-transition remediation for Linux and Windows guest operating systems
Linux and Windows guest operating systems might require additional remediation after
transition of LUNs from Data ONTAP operating in 7-Mode to clustered Data ONTAP.
For copy-based transitions, do the following after completing the Storage Cutover operation in the 7MTT. For
copy-free transitions, do the following after the Import Data & Configuration operation in the 7MTT is complete.
• Linux
If the mount points are defined in the /etc/fstab `file, you must mount the LUN (`mount
--a).
• Windows
If Failover Cluster is configured on the VM, you must bring the disks online from Failover Cluster Manager.
Recommended settings for ESXi hosts after transition remediation
After you complete the post-transition remediation steps for your ESXi host, you should
apply the recommended ESXi host settings for clustered Data ONTAP on the host.
You can use Virtual Storage Console (VSC) to configure ESXi host settings. VSC is the standard NetApp plug-
in that enables vSphere vCenter to configure ESXi host settings for Data ONTAP. ESXi hosts and virtual
machines (VMs) deployed on the source 7-Mode system should be configured using VSC. Alternatively, you
can configure VMs manually by using the information in the following Knowledgebase articles:
• Guest OS tunings
• Task Set Full (QFull) Tunables for LUNs in vSphere 5.1
• Storage Array Type Plugin option for a NetApp array on VMware vSphere
• HardwareAcceleratedLocking setting required for VMware deployment
Enabling CAW on a datastore using the ESXi CLI
If you did not have support for Compare and Write (CAW) in Data ONTAP operating in 7-
405
Mode, you must manually enable CAW support when you transition to clustered Data
ONTAP. Clustered Data ONTAP supports CAW by default.
• There must be no I/O or VMs actively running on the VMFS datastore.
• The datastore must be remounted, if it was migrated.
• You must have the new ONTAP LUN naa ID from the 7-Mode Transition Tool (7MTT) mapping file.
CAW must be enabled only when no I/O or VMs are actively running on the VMFS datastore.
• CAW must be enabled only when no I/O or VMs are actively running on the VMFS datastore.
• For copy-based transitions, perform these steps after completing the Storage cutover operation in the
7MTT.
• For copy-free transitions, perform these steps after the Import Data & Configuration operation in the 7MTT
is complete.
Steps
1. Open the Inventory Assessment Workbook generated by the Inventory Collect Tool (ICT).
2. Navigate to the SAN Host Filesystems tab.
3. Verify the CAW status for the datastore.
The ATS/CAW value for the datastore should display Disabled, and the Filesystem column should display
VMFS.x.
4. Note the name of the datastore in the Disk column
5. Log in to the ESXi console using SSH.
6. List the device and partition details:
~ # vmkfstools -Ph -v1 datastore_path
datastore_path is the datastore name from the Disk column of the Inventory Assessment Workbook.
# vmkfstools -Ph -v1 /vmfs/volumes/datastorename
406
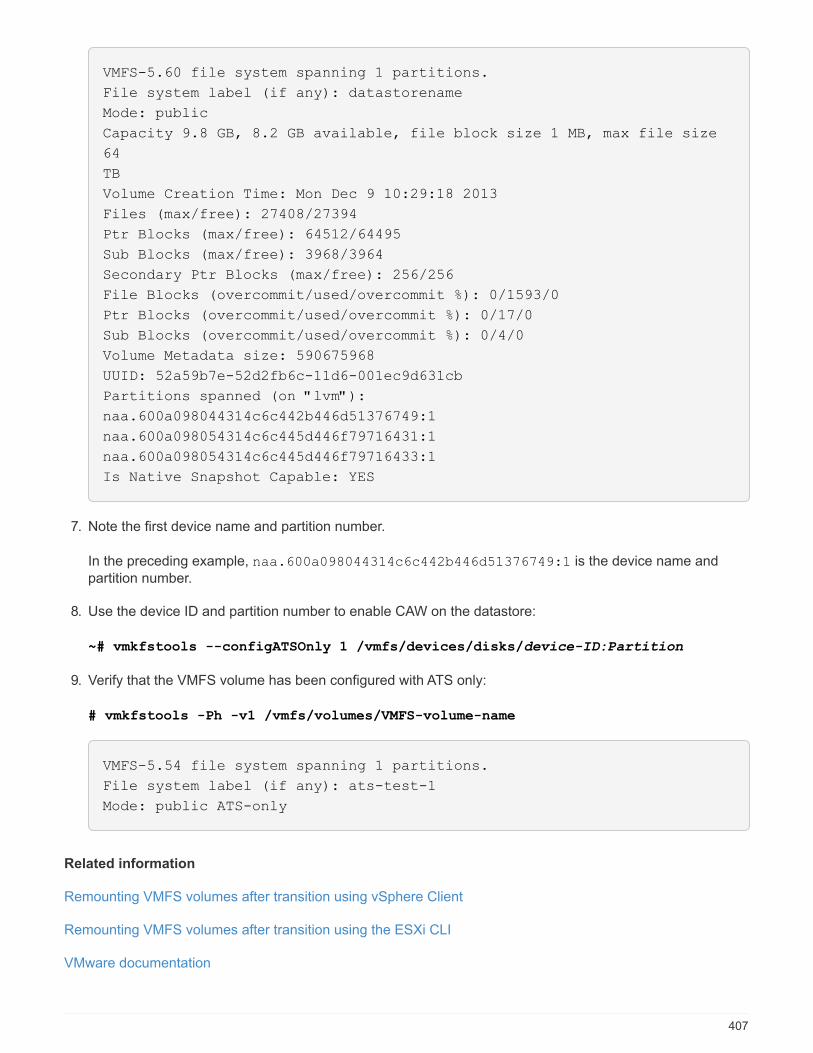
VMFS-5.60 file system spanning 1 partitions.
File system label (if any): datastorename
Mode: public
Capacity 9.8 GB, 8.2 GB available, file block size 1 MB, max file size
64
TB
Volume Creation Time: Mon Dec 9 10:29:18 2013
Files (max/free): 27408/27394
Ptr Blocks (max/free): 64512/64495
Sub Blocks (max/free): 3968/3964
Secondary Ptr Blocks (max/free): 256/256
File Blocks (overcommit/used/overcommit %): 0/1593/0
Ptr Blocks (overcommit/used/overcommit %): 0/17/0
Sub Blocks (overcommit/used/overcommit %): 0/4/0
Volume Metadata size: 590675968
UUID: 52a59b7e-52d2fb6c-11d6-001ec9d631cb
Partitions spanned (on "lvm"):
naa.600a098044314c6c442b446d51376749:1
naa.600a098054314c6c445d446f79716431:1
naa.600a098054314c6c445d446f79716433:1
Is Native Snapshot Capable: YES
7. Note the first device name and partition number.
In the preceding example, naa.600a098044314c6c442b446d51376749:1 is the device name and
partition number.
8. Use the device ID and partition number to enable CAW on the datastore:
~# vmkfstools --configATSOnly 1 /vmfs/devices/disks/device-ID:Partition
9. Verify that the VMFS volume has been configured with ATS only:
# vmkfstools -Ph -v1 /vmfs/volumes/VMFS-volume-name
VMFS-5.54 file system spanning 1 partitions.
File system label (if any): ats-test-1
Mode: public ATS-only
Related information
Remounting VMFS volumes after transition using vSphere Client
Remounting VMFS volumes after transition using the ESXi CLI
VMware documentation
407
RHEL host remediation
If you are using the 7-Mode Transition Tool (7MTT) to move from Data ONTAP operating
in 7-Mode to clustered Data ONTAP in a SAN environment, you must perform a series of
steps on your Red Hat Enterprise Linux (RHEL) hosts based on your LUN type before
and after the transition to avoid transition complications.
7MTT transitions only support RHEL 5 and RHEL 6.
Related information
Transitioning RHEL DMMP devices without file systems
Transitioning LUNs with mount points using DMMP device names
Transitioning LUNs with mount points using DMMP alias names
Transitioning Linux host file systems on LVM devices
Transitioning of SAN boot LUNs
Gathering pretransition information from the Inventory Assessment Workbook
There is information in the Inventory Assessment Workbook that you need in various
phases of the transition. You should gather and record this information before you begin
the transition so that you can reference it as needed throughout the process.
Steps
1. Use the Inventory Collect Tool (ICT) to generate the Inventory Assessment Workbook.
2. Open the Inventory Assessment Workbook.
3. Go to the LUN tab.
4. In the LUN name column, identify and record the name of the LUN to be transitioned.
5. Go to the SAN Host LUNs tab.
6. In the SCSI Device ID column, identify and record the SCSI device name.
7. In the OS Device ID column, identify and record the DMMP device name for the LUN to be transitioned.
8. In the Filesystems column, identify and record the file system configured on the DMMP device.
9. In the UUID column, identify and record the UUID number for the LUN.
10. In the Mount column, identify and record the directory on which the DMMP device is mounted.
11. Go to the LVMs tab.
12. In the Physical Volume Name column, identify and record the DMMP devices that are used by the logical
volume.
13. Go to the SAN Host LVMs tab.
14. In the Volume Group Name column, identify and record the volume group.
15. In the Logical Volume Path column, identify and record the logical volume.
16. Go to the SAN Host Filesystems tab.
408
17. In the Filesystem column, identify and record the file system configured on the logical volume.
18. In the Mount column, identify and record the directory to which the logical volumes are mounted.
19. Go to the GRUB Configuration tab.
20. In the initrd column, identify and record the initrd image to be modified.
21. Go to the SAN Host HBAs tab.
You can also see the iSCSI SAN Interfaces tab to identify the iSCSI IQN number and IP addresses that
are configured on 7-Mode controllers.
22. In the Target IPs (iSCSI) column identify and record the iSCSI sessions for the 7-Mode controllers.
Related information
What the Inventory Collect Tool is
What the Inventory Collect Tool is
The Inventory Collect Tool (ICT) is a stand-alone utility for collecting configuration and
inventory information about 7-Mode storage controllers, hosts attached to controllers, and
applications running on these hosts for assessing the transition readiness of these
systems. You can use the ICT to generate information about your LUNs and the
configuration that you need for transition.
The ICT generates an Inventory Assessment Workbook and an Inventory Report XML file that contains
configuration details of the storage and host systems.
The ICT is available for ESXi, 5.x, ESXi 6.x, and Windows hosts.
Transitioning RHEL DMMP devices without file systems
Before transition of a Red Hat Enterprise Linux (RHEL) DMMP device without a file
system, you must verify that the DMMP device does not have a file system. You must
also perform specific steps to prepare for the cutover phase, and after transition you must
replace the WWID.
Related information
Verifying that RHEL LUNs are ready for transition using the Inventory Assessment Workbook
Verifying that RHEL 5 LUNs are ready for transition using the CLI
Verifying that RHEL 6 DDMP devices are ready for transition using CLI
Preparing for cutover when transitioning a Linux host DMMP device without a file system
Replacing 7-Mode LUN WWIDs on Linux hosts after transition of LUNs
Verifying that RHEL LUNs are ready for transition using the Inventory Assessment Workbook
If your Red Hat Enterprise Linux (RHEL) 5 or RHEL 6 LUN is configured with a device
409
mapper multipath (DMMP), you should verify that a file system is not configured before
you transition the LUN from Data ONTAP operating in 7-Mode to clustered Data ONTAP.
This procedure applies to copy-based transitions and copy-free transitions.
Steps
1. Gather pretransition information from the Inventory Assessment Workbook.
2. Check whether the DMMP device entry is present under the SAN Host File system tab.
If the DMMP device entry is not present, a file system is not configured and you can transition the LUN.
Verifying that RHEL 5 LUNs are ready for transition using the CLI
If your Red Hat Enterprise Linux (RHEL) 5 LUN is configured with a device mapper
multipath (DMMP), you should verify that a file system is not configured before you
transition the LUN from Data ONTAP operating in 7-Mode to clustered Data ONTAP.
Steps
1. Locate the SCSI device name for the LUN to be transitioned:
sanlun lunshow
2. Identify the DMMP device name for the LUN:
multipath -11
The DMMP device name can be a device handle ID (WWID) such as
360a980003753456258244538554b4b53, or it can be an alias, such as, dmmp_raw_lun.
3. Verify that the LUN does not have a file system:
dumpe2fs/dev/mapper/DMMP device name
If the LUN does not have a file system, Couldn’t find valid filesystem superblock is displayed in the output.
Verifying that RHEL 6 DDMP devices are ready for transition using CLI
Before you transition your Red Hat Enterprise Linux (RHEL) 6 DMMP device, you must
verify that it is not part of a Logical Volume Manager (LVM) and that it does not have a file
system.
Steps
1. Gather pretransition information from the Inventory Assessment Workbook.
2. Verify that the DMMP device exists in the /dev/mapper directory:
ls /dev/mapper/ DMMP_device_name
If the DMMP device is not displayed, the device might be using an alias or a user-friendly name.
3. Determine whether the DMMP device is part of an LVM and whether the DMMP device has a file system:
410
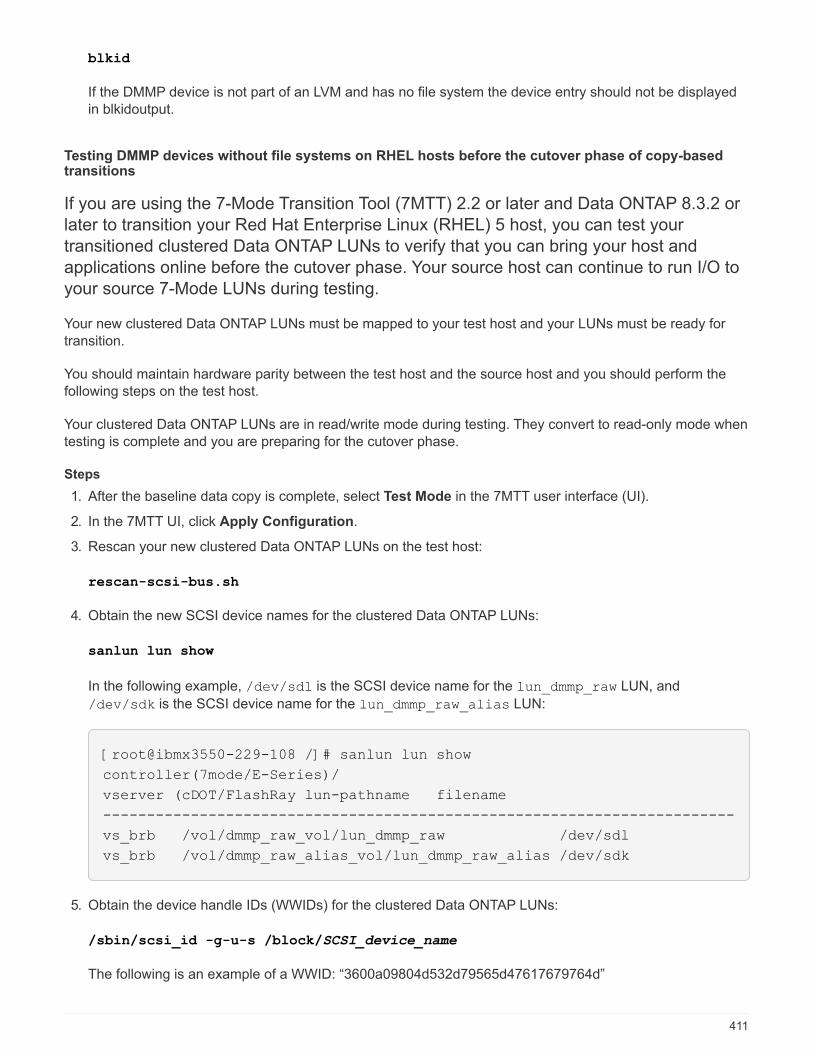
blkid
If the DMMP device is not part of an LVM and has no file system the device entry should not be displayed
in blkidoutput.
Testing DMMP devices without file systems on RHEL hosts before the cutover phase of copy-basedtransitions
If you are using the 7-Mode Transition Tool (7MTT) 2.2 or later and Data ONTAP 8.3.2 or
later to transition your Red Hat Enterprise Linux (RHEL) 5 host, you can test your
transitioned clustered Data ONTAP LUNs to verify that you can bring your host and
applications online before the cutover phase. Your source host can continue to run I/O to
your source 7-Mode LUNs during testing.
Your new clustered Data ONTAP LUNs must be mapped to your test host and your LUNs must be ready for
transition.
You should maintain hardware parity between the test host and the source host and you should perform the
following steps on the test host.
Your clustered Data ONTAP LUNs are in read/write mode during testing. They convert to read-only mode when
testing is complete and you are preparing for the cutover phase.
Steps
1. After the baseline data copy is complete, select Test Mode in the 7MTT user interface (UI).
2. In the 7MTT UI, click Apply Configuration.
3. Rescan your new clustered Data ONTAP LUNs on the test host:
rescan-scsi-bus.sh
4. Obtain the new SCSI device names for the clustered Data ONTAP LUNs:
sanlun lun show
In the following example, /dev/sdl is the SCSI device name for the lun_dmmp_raw LUN, and
/dev/sdk is the SCSI device name for the lun_dmmp_raw_alias LUN:
[root@ibmx3550-229-108 /]# sanlun lun show
controller(7mode/E-Series)/
vserver (cDOT/FlashRay lun-pathname filename
------------------------------------------------------------------------
vs_brb /vol/dmmp_raw_vol/lun_dmmp_raw /dev/sdl
vs_brb /vol/dmmp_raw_alias_vol/lun_dmmp_raw_alias /dev/sdk
5. Obtain the device handle IDs (WWIDs) for the clustered Data ONTAP LUNs:
/sbin/scsi_id -g-u-s /block/SCSI_device_name
The following is an example of a WWID: “3600a09804d532d79565d47617679764d”
411
6. Check whether an alias is defined in the /etc/multipath.conf file on the source host.
7. If there is an alias defined on the source host, add the alias to the /etc/multipath.conf file on the test
host, but replace the 7-Mode device handle ID with the clustered Data ONTAP LUN ID.
8. Update the DMMP alias settings:
multipath
9. Verify that the DMMP alias name correctly references the clustered Data ONTAP LUN:
multipath -ll
10. Perform your testing as needed.
11. After you have completed your testing, shut down the test host:
shutdown -h -t0 now
12. In the 7MTT UI, click Finish Testing.
If your clustered Data ONTAP LUNs are to be remapped to your source host, you must prepare your source
host for the cutover phase. If your clustered Data ONTAP LUNs are to remain mapped to your test host, no
further steps are required on the test host.
Related information
Gathering pretransition information from the Inventory Assessment Workbook
Verifying that RHEL LUNs are ready for transition using the Inventory Assessment Workbook
Preparing for cutover when transitioning a Linux host DMMP device without a file system
Preparing for cutover when transitioning a Linux host DMMP device without a file system
If you are transitioning a DMMP device without a file system from a Linux host, there are
several steps you must perform before entering the cutover phase.
For FC configurations, you must have fabric connectivity and zoning to clustered Data ONTAP controllers.
For iSCSI configurations, your iSCSI sessions must be discovered and logged in to your clustered Data
ONTAP controllers.
• For copy-based transitions, perform these steps before initiating the Storage Cutover operation in the 7-
Mode Transition Tool (7MTT).
• For copy-free transitions, perform these steps before initiating the Export & Halt 7-Mode operation in 7MTT.
Steps
1. Stop I/O to the mount points.
2. Shut down the applications that are accessing the LUNs according to the application vendor’s
recommendations.
3. Flush the 7-Mode LUN DMMP device or alias:
multipath -f device_name
412
If needed, you can get the DMMP device name from the OS Device ID column under the SAN Host LUNs
tab in the Inventory Assessment Workbook.
Replacing 7-Mode LUN WWIDs on Linux hosts after transition of LUNs
After LUN transition, the 7-Mode LUN WWID changes. You must replace it with the
corresponding ONTAP LUN WWID before you can begin servicing data.
If you are doing a copy-free transition (CFT), then procedures for vol rehost must be complete.
See the 7-Mode Transition Tool Copy-Free Transition Guidefor details.
• For copy-based transitions (CBTs), perform these steps after completing the Storage cutover operation in
the 7MTT.
• For CFTs, perform these steps after the Import Data & Configuration operation in the 7MTT is complete.
Steps
1. Generate the 7-Mode to ONTAP LUN mapping file:
◦ For CBTs, run the following command from the Linux host where the 7MTT is installed:
transition cbt export lunmap -p project-name -o file_path
For example:
transition cbt export lunmap -p SanWorkLoad -o c:/Libraires/Documents/7-to-
C-LUN-MAPPING.csv
◦ For CFTs, run the following command from the system where the 7MTT is installed:
transition cft export lunmap -p project-name -s svm-name -o output-file
For example:
transition cft export lunmap -p SanWorkLoad -s svml -0
c:/Libraries/Documents/7-to-C-LUN-MAPPING-svml.csv
You must run this command for each of your storage virtual machines (SVMs).
2. Make a note of the new ONTAP LUN device handle ID from the LUN mapping file.
3. Remove the SCSI devices created for 7-Mode LUNs:
◦ To remove all of the SCSI devices:
rescan-scsi-bus.sh -r
◦ To remove each SCSI device individually:
echo 1> /sys/block/SCSI_ID/delete
This command must be executed on all 7-Mode LUN SCSI devices. See the SCSI Device ID column
on the SAN Host LUNs tab of the Inventory Assessment Workbook to identify the SCSI device IDs for
the LUNs.
413
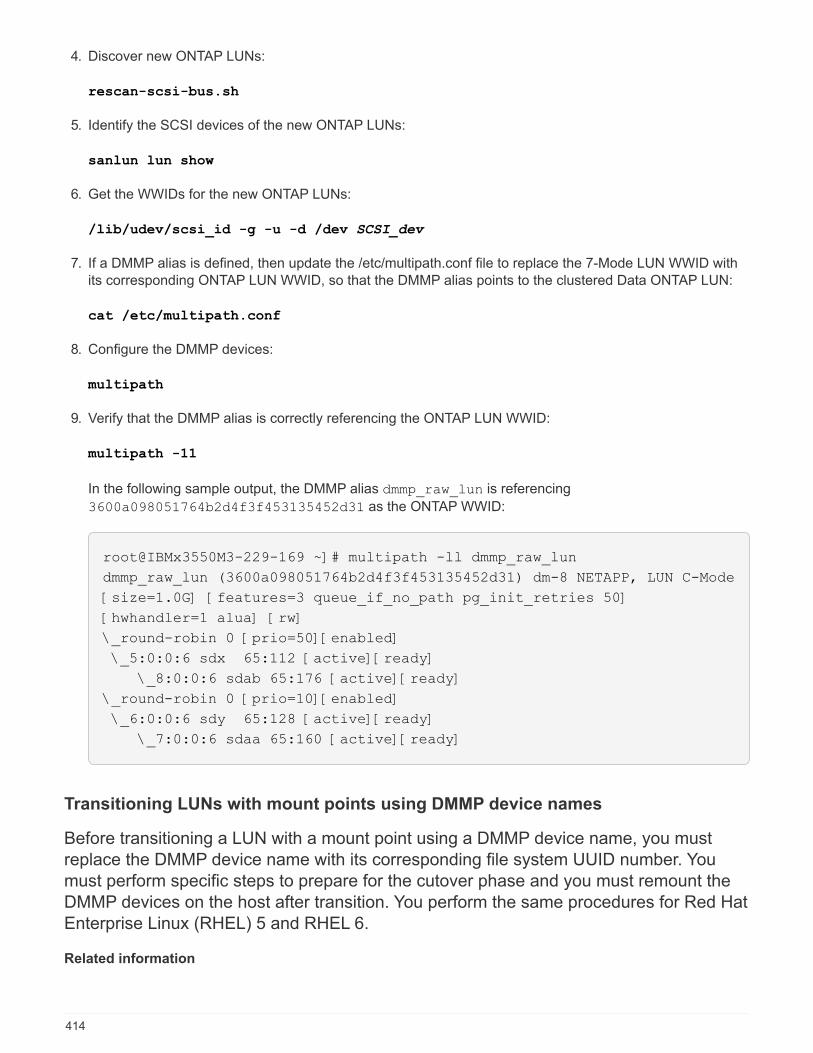
4. Discover new ONTAP LUNs:
rescan-scsi-bus.sh
5. Identify the SCSI devices of the new ONTAP LUNs:
sanlun lun show
6. Get the WWIDs for the new ONTAP LUNs:
/lib/udev/scsi_id -g -u -d /dev SCSI_dev
7. If a DMMP alias is defined, then update the /etc/multipath.conf file to replace the 7-Mode LUN WWID with
its corresponding ONTAP LUN WWID, so that the DMMP alias points to the clustered Data ONTAP LUN:
cat /etc/multipath.conf
8. Configure the DMMP devices:
multipath
9. Verify that the DMMP alias is correctly referencing the ONTAP LUN WWID:
multipath -11
In the following sample output, the DMMP alias dmmp_raw_lun is referencing
3600a098051764b2d4f3f453135452d31 as the ONTAP WWID:
root@IBMx3550M3-229-169 ~]# multipath -ll dmmp_raw_lun
dmmp_raw_lun (3600a098051764b2d4f3f453135452d31) dm-8 NETAPP, LUN C-Mode
[size=1.0G] [features=3 queue_if_no_path pg_init_retries 50]
[hwhandler=1 alua] [rw]
\_round-robin 0 [prio=50][enabled]
\_5:0:0:6 sdx 65:112 [active][ready]
\_8:0:0:6 sdab 65:176 [active][ready]
\_round-robin 0 [prio=10][enabled]
\_6:0:0:6 sdy 65:128 [active][ready]
\_7:0:0:6 sdaa 65:160 [active][ready]
Transitioning LUNs with mount points using DMMP device names
Before transitioning a LUN with a mount point using a DMMP device name, you must
replace the DMMP device name with its corresponding file system UUID number. You
must perform specific steps to prepare for the cutover phase and you must remount the
DMMP devices on the host after transition. You perform the same procedures for Red Hat
Enterprise Linux (RHEL) 5 and RHEL 6.
Related information
414
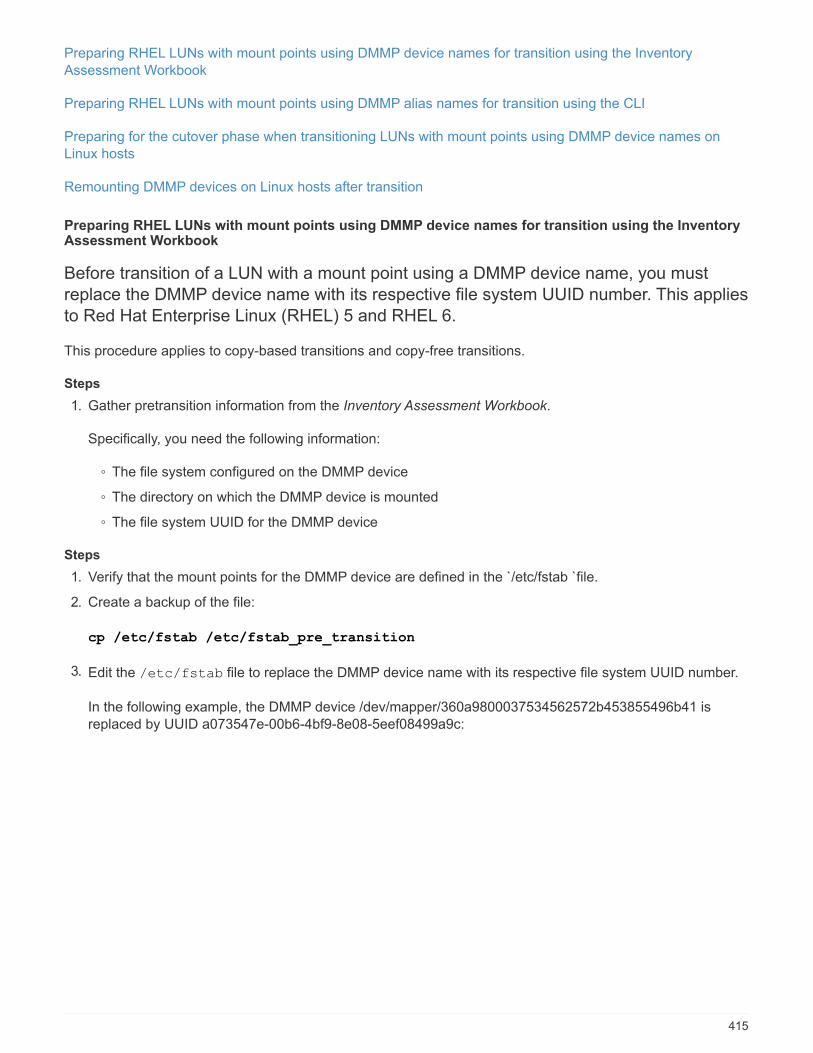
Preparing RHEL LUNs with mount points using DMMP device names for transition using the Inventory
Assessment Workbook
Preparing RHEL LUNs with mount points using DMMP alias names for transition using the CLI
Preparing for the cutover phase when transitioning LUNs with mount points using DMMP device names on
Linux hosts
Remounting DMMP devices on Linux hosts after transition
Preparing RHEL LUNs with mount points using DMMP device names for transition using the InventoryAssessment Workbook
Before transition of a LUN with a mount point using a DMMP device name, you must
replace the DMMP device name with its respective file system UUID number. This applies
to Red Hat Enterprise Linux (RHEL) 5 and RHEL 6.
This procedure applies to copy-based transitions and copy-free transitions.
Steps
1. Gather pretransition information from the Inventory Assessment Workbook.
Specifically, you need the following information:
◦ The file system configured on the DMMP device
◦ The directory on which the DMMP device is mounted
◦ The file system UUID for the DMMP device
Steps
1. Verify that the mount points for the DMMP device are defined in the `/etc/fstab `file.
2. Create a backup of the file:
cp /etc/fstab /etc/fstab_pre_transition
3. Edit the /etc/fstab file to replace the DMMP device name with its respective file system UUID number.
In the following example, the DMMP device /dev/mapper/360a9800037534562572b453855496b41 is
replaced by UUID a073547e-00b6-4bf9-8e08-5eef08499a9c:
415
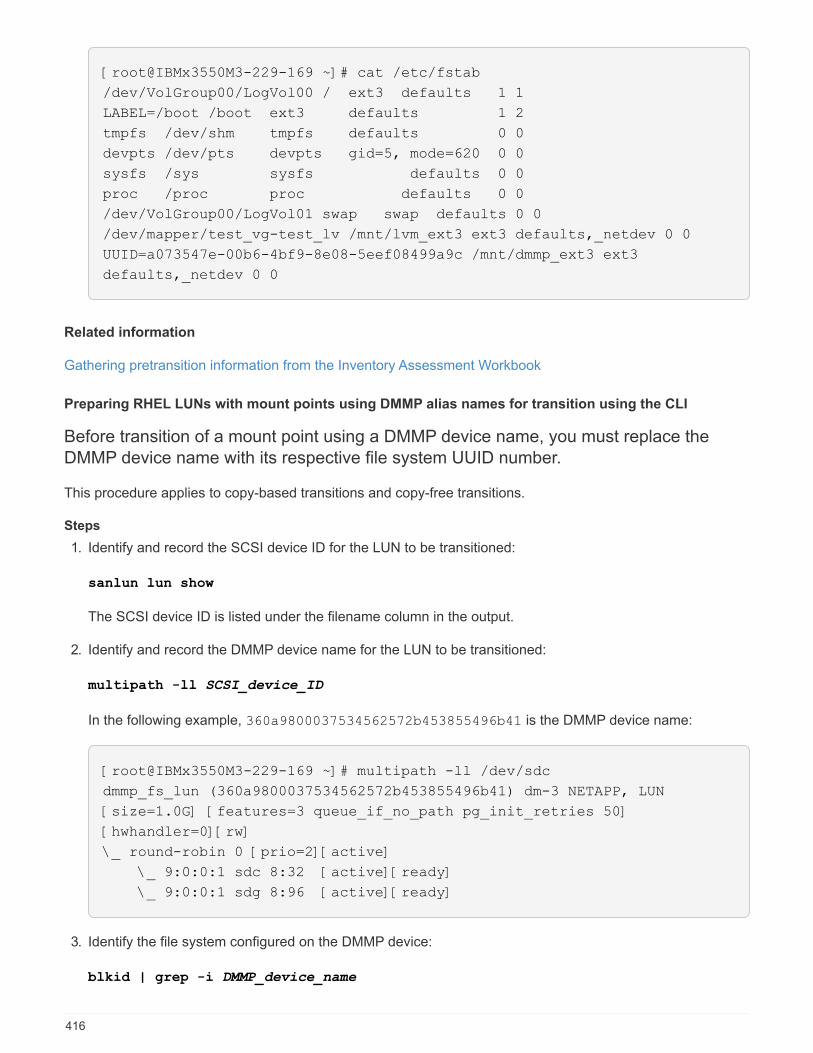
[root@IBMx3550M3-229-169 ~]# cat /etc/fstab
/dev/VolGroup00/LogVol00 / ext3 defaults 1 1
LABEL=/boot /boot ext3 defaults 1 2
tmpfs /dev/shm tmpfs defaults 0 0
devpts /dev/pts devpts gid=5, mode=620 0 0
sysfs /sys sysfs defaults 0 0
proc /proc proc defaults 0 0
/dev/VolGroup00/LogVol01 swap swap defaults 0 0
/dev/mapper/test_vg-test_lv /mnt/lvm_ext3 ext3 defaults,_netdev 0 0
UUID=a073547e-00b6-4bf9-8e08-5eef08499a9c /mnt/dmmp_ext3 ext3
defaults,_netdev 0 0
Related information
Gathering pretransition information from the Inventory Assessment Workbook
Preparing RHEL LUNs with mount points using DMMP alias names for transition using the CLI
Before transition of a mount point using a DMMP device name, you must replace the
DMMP device name with its respective file system UUID number.
This procedure applies to copy-based transitions and copy-free transitions.
Steps
1. Identify and record the SCSI device ID for the LUN to be transitioned:
sanlun lun show
The SCSI device ID is listed under the filename column in the output.
2. Identify and record the DMMP device name for the LUN to be transitioned:
multipath -ll SCSI_device_ID
In the following example, 360a9800037534562572b453855496b41 is the DMMP device name:
[root@IBMx3550M3-229-169 ~]# multipath -ll /dev/sdc
dmmp_fs_lun (360a9800037534562572b453855496b41) dm-3 NETAPP, LUN
[size=1.0G] [features=3 queue_if_no_path pg_init_retries 50]
[hwhandler=0][rw]
\_ round-robin 0 [prio=2][active]
\_ 9:0:0:1 sdc 8:32 [active][ready]
\_ 9:0:0:1 sdg 8:96 [active][ready]
3. Identify the file system configured on the DMMP device:
blkid | grep -i DMMP_device_name
416
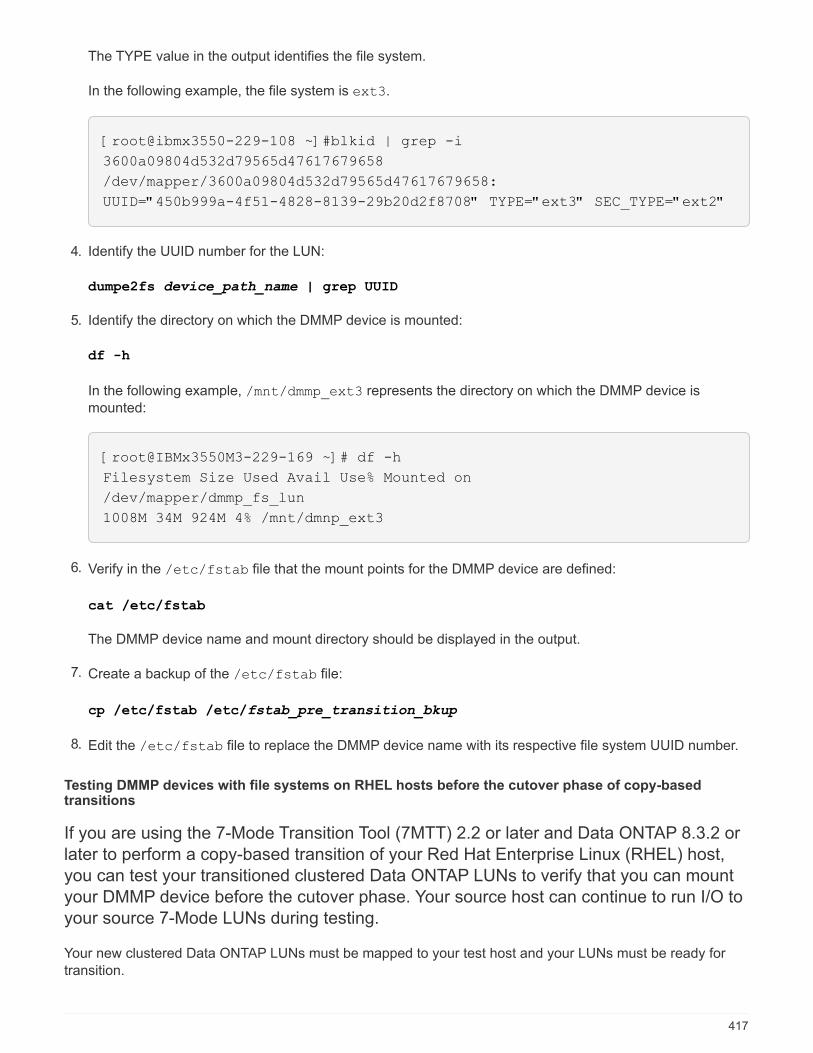
The TYPE value in the output identifies the file system.
In the following example, the file system is ext3.
[root@ibmx3550-229-108 ~]#blkid | grep -i
3600a09804d532d79565d47617679658
/dev/mapper/3600a09804d532d79565d47617679658:
UUID="450b999a-4f51-4828-8139-29b20d2f8708" TYPE="ext3" SEC_TYPE="ext2"
4. Identify the UUID number for the LUN:
dumpe2fs device_path_name | grep UUID
5. Identify the directory on which the DMMP device is mounted:
df -h
In the following example, /mnt/dmmp_ext3 represents the directory on which the DMMP device is
mounted:
[root@IBMx3550M3-229-169 ~]# df -h
Filesystem Size Used Avail Use% Mounted on
/dev/mapper/dmmp_fs_lun
1008M 34M 924M 4% /mnt/dmnp_ext3
6. Verify in the /etc/fstab file that the mount points for the DMMP device are defined:
cat /etc/fstab
The DMMP device name and mount directory should be displayed in the output.
7. Create a backup of the /etc/fstab file:
cp /etc/fstab /etc/fstab_pre_transition_bkup
8. Edit the /etc/fstab file to replace the DMMP device name with its respective file system UUID number.
Testing DMMP devices with file systems on RHEL hosts before the cutover phase of copy-basedtransitions
If you are using the 7-Mode Transition Tool (7MTT) 2.2 or later and Data ONTAP 8.3.2 or
later to perform a copy-based transition of your Red Hat Enterprise Linux (RHEL) host,
you can test your transitioned clustered Data ONTAP LUNs to verify that you can mount
your DMMP device before the cutover phase. Your source host can continue to run I/O to
your source 7-Mode LUNs during testing.
Your new clustered Data ONTAP LUNs must be mapped to your test host and your LUNs must be ready for
transition.
417
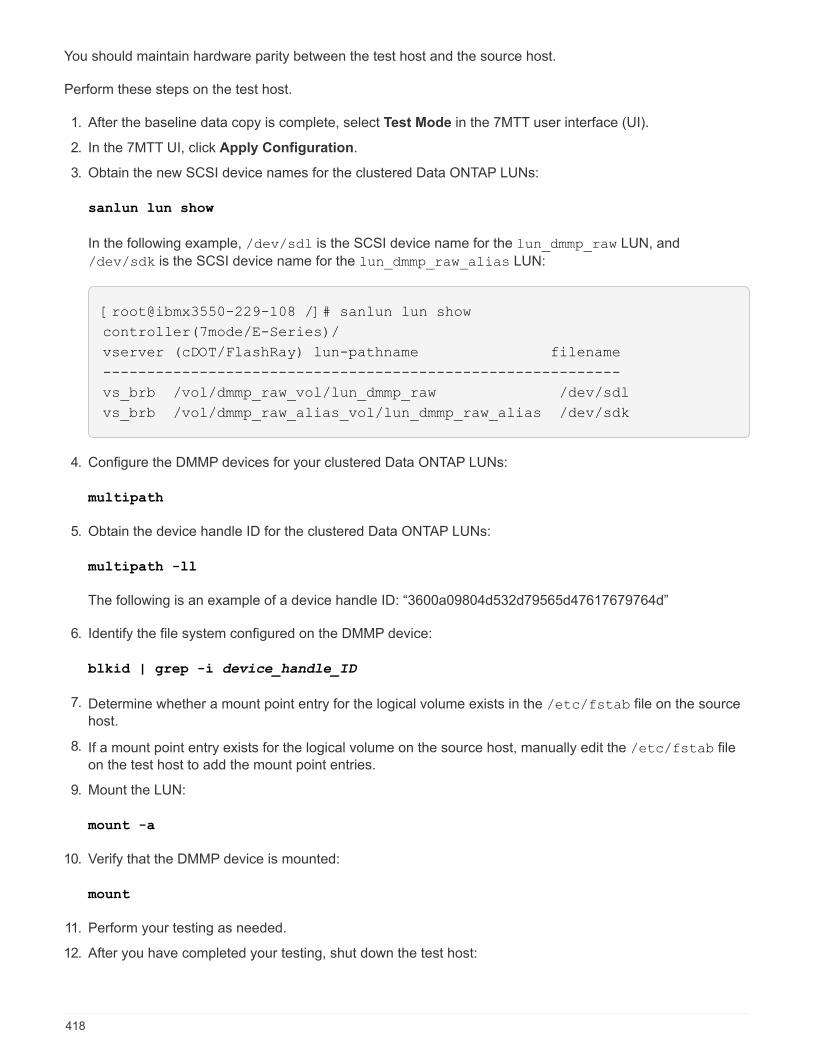
You should maintain hardware parity between the test host and the source host.
Perform these steps on the test host.
1. After the baseline data copy is complete, select Test Mode in the 7MTT user interface (UI).
2. In the 7MTT UI, click Apply Configuration.
3. Obtain the new SCSI device names for the clustered Data ONTAP LUNs:
sanlun lun show
In the following example, /dev/sdl is the SCSI device name for the lun_dmmp_raw LUN, and
/dev/sdk is the SCSI device name for the lun_dmmp_raw_alias LUN:
[root@ibmx3550-229-108 /]# sanlun lun show
controller(7mode/E-Series)/
vserver (cDOT/FlashRay) lun-pathname filename
-----------------------------------------------------------
vs_brb /vol/dmmp_raw_vol/lun_dmmp_raw /dev/sdl
vs_brb /vol/dmmp_raw_alias_vol/lun_dmmp_raw_alias /dev/sdk
4. Configure the DMMP devices for your clustered Data ONTAP LUNs:
multipath
5. Obtain the device handle ID for the clustered Data ONTAP LUNs:
multipath -ll
The following is an example of a device handle ID: “3600a09804d532d79565d47617679764d”
6. Identify the file system configured on the DMMP device:
blkid | grep -i device_handle_ID
7. Determine whether a mount point entry for the logical volume exists in the /etc/fstab file on the source
host.
8. If a mount point entry exists for the logical volume on the source host, manually edit the /etc/fstab file
on the test host to add the mount point entries.
9. Mount the LUN:
mount -a
10. Verify that the DMMP device is mounted:
mount
11. Perform your testing as needed.
12. After you have completed your testing, shut down the test host:
418
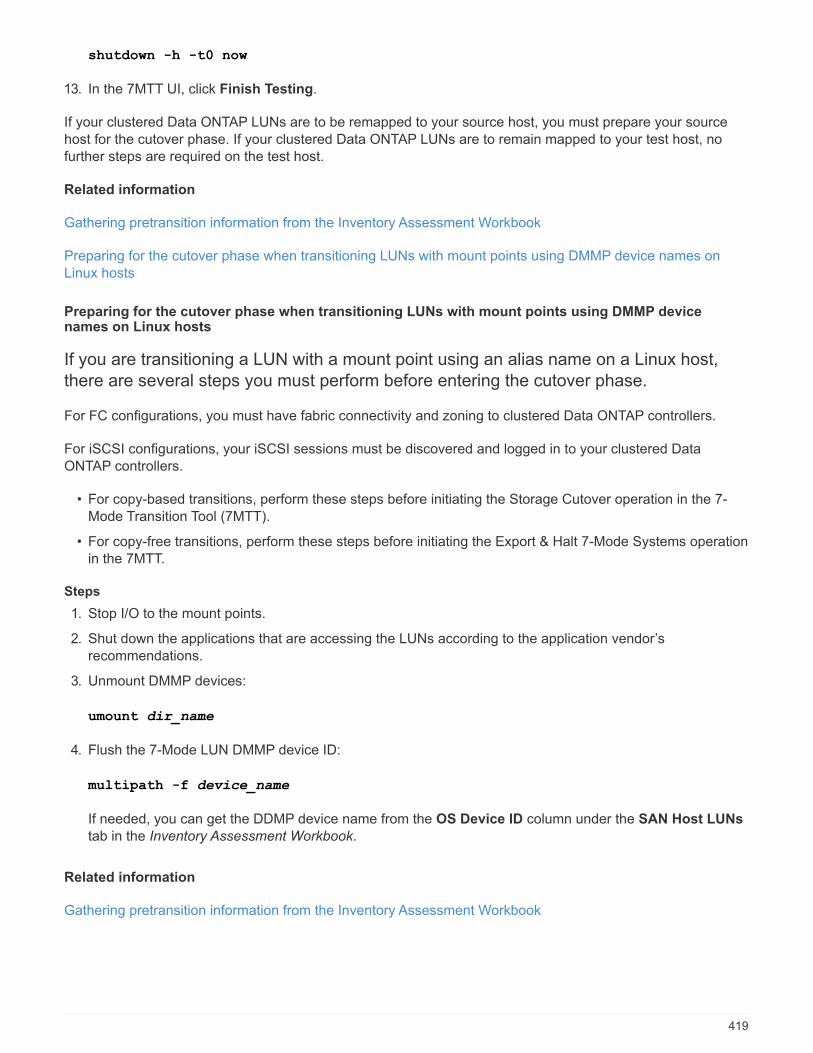
shutdown -h -t0 now
13. In the 7MTT UI, click Finish Testing.
If your clustered Data ONTAP LUNs are to be remapped to your source host, you must prepare your source
host for the cutover phase. If your clustered Data ONTAP LUNs are to remain mapped to your test host, no
further steps are required on the test host.
Related information
Gathering pretransition information from the Inventory Assessment Workbook
Preparing for the cutover phase when transitioning LUNs with mount points using DMMP device names on
Linux hosts
Preparing for the cutover phase when transitioning LUNs with mount points using DMMP devicenames on Linux hosts
If you are transitioning a LUN with a mount point using an alias name on a Linux host,
there are several steps you must perform before entering the cutover phase.
For FC configurations, you must have fabric connectivity and zoning to clustered Data ONTAP controllers.
For iSCSI configurations, your iSCSI sessions must be discovered and logged in to your clustered Data
ONTAP controllers.
• For copy-based transitions, perform these steps before initiating the Storage Cutover operation in the 7-
Mode Transition Tool (7MTT).
• For copy-free transitions, perform these steps before initiating the Export & Halt 7-Mode Systems operation
in the 7MTT.
Steps
1. Stop I/O to the mount points.
2. Shut down the applications that are accessing the LUNs according to the application vendor’s
recommendations.
3. Unmount DMMP devices:
umount dir_name
4. Flush the 7-Mode LUN DMMP device ID:
multipath -f device_name
If needed, you can get the DDMP device name from the OS Device ID column under the SAN Host LUNs
tab in the Inventory Assessment Workbook.
Related information
Gathering pretransition information from the Inventory Assessment Workbook
419
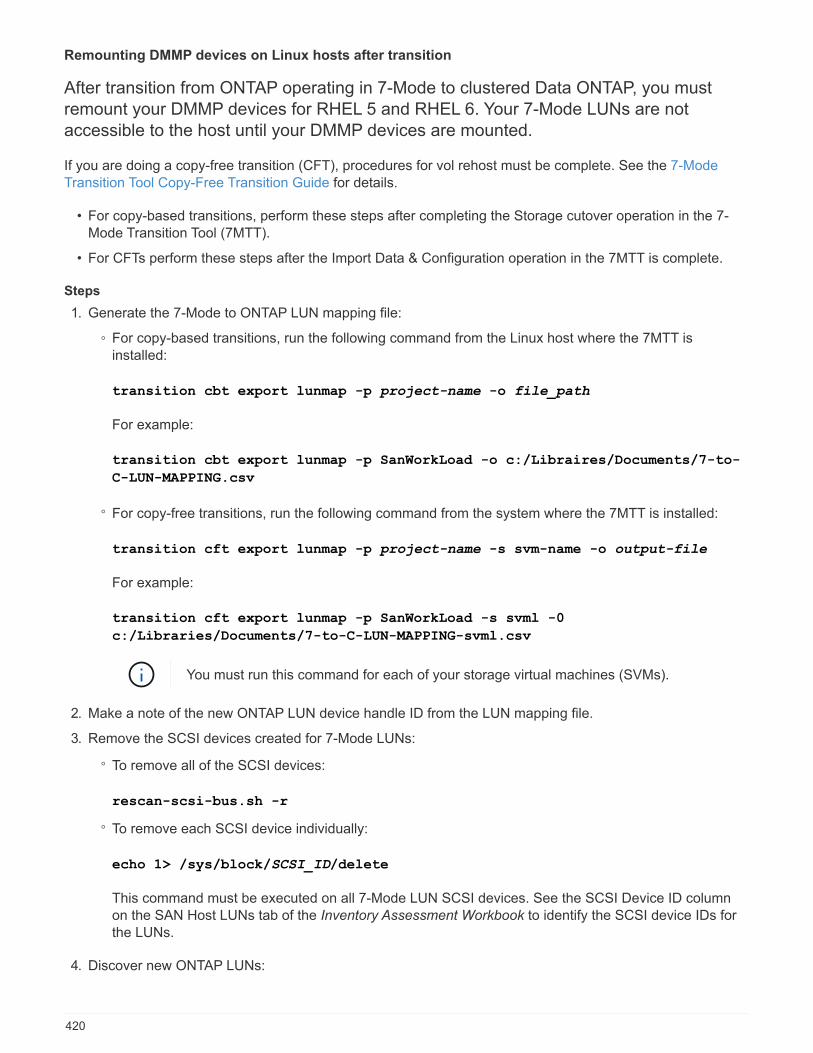
Remounting DMMP devices on Linux hosts after transition
After transition from ONTAP operating in 7-Mode to clustered Data ONTAP, you must
remount your DMMP devices for RHEL 5 and RHEL 6. Your 7-Mode LUNs are not
accessible to the host until your DMMP devices are mounted.
If you are doing a copy-free transition (CFT), procedures for vol rehost must be complete. See the 7-Mode
Transition Tool Copy-Free Transition Guide for details.
• For copy-based transitions, perform these steps after completing the Storage cutover operation in the 7-
Mode Transition Tool (7MTT).
• For CFTs perform these steps after the Import Data & Configuration operation in the 7MTT is complete.
Steps
1. Generate the 7-Mode to ONTAP LUN mapping file:
◦ For copy-based transitions, run the following command from the Linux host where the 7MTT is
installed:
transition cbt export lunmap -p project-name -o file_path
For example:
transition cbt export lunmap -p SanWorkLoad -o c:/Libraires/Documents/7-to-
C-LUN-MAPPING.csv
◦ For copy-free transitions, run the following command from the system where the 7MTT is installed:
transition cft export lunmap -p project-name -s svm-name -o output-file
For example:
transition cft export lunmap -p SanWorkLoad -s svml -0
c:/Libraries/Documents/7-to-C-LUN-MAPPING-svml.csv
You must run this command for each of your storage virtual machines (SVMs).
2. Make a note of the new ONTAP LUN device handle ID from the LUN mapping file.
3. Remove the SCSI devices created for 7-Mode LUNs:
◦ To remove all of the SCSI devices:
rescan-scsi-bus.sh -r
◦ To remove each SCSI device individually:
echo 1> /sys/block/SCSI_ID/delete
This command must be executed on all 7-Mode LUN SCSI devices. See the SCSI Device ID column
on the SAN Host LUNs tab of the Inventory Assessment Workbook to identify the SCSI device IDs for
the LUNs.
4. Discover new ONTAP LUNs:
420
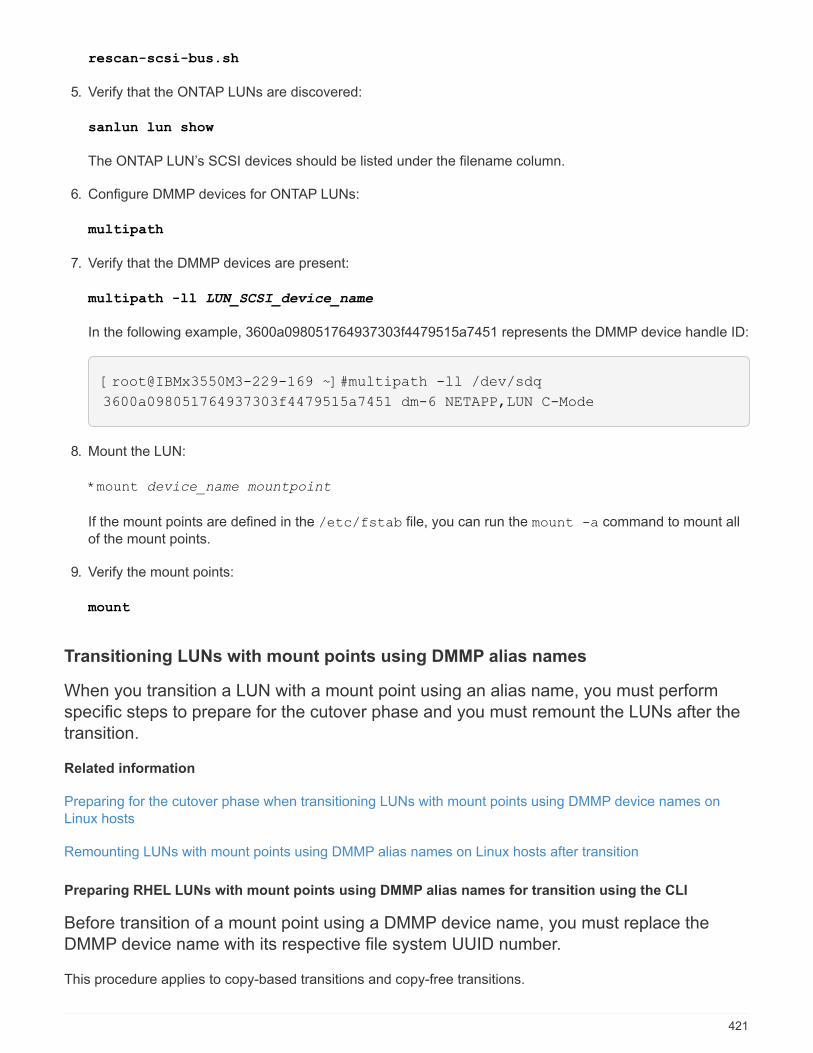
rescan-scsi-bus.sh
5. Verify that the ONTAP LUNs are discovered:
sanlun lun show
The ONTAP LUN’s SCSI devices should be listed under the filename column.
6. Configure DMMP devices for ONTAP LUNs:
multipath
7. Verify that the DMMP devices are present:
multipath -ll LUN_SCSI_device_name
In the following example, 3600a098051764937303f4479515a7451 represents the DMMP device handle ID:
[root@IBMx3550M3-229-169 ~]#multipath -ll /dev/sdq
3600a098051764937303f4479515a7451 dm-6 NETAPP,LUN C-Mode
8. Mount the LUN:
*mount device_name mountpoint
If the mount points are defined in the /etc/fstab file, you can run the mount -a command to mount all
of the mount points.
9. Verify the mount points:
mount
Transitioning LUNs with mount points using DMMP alias names
When you transition a LUN with a mount point using an alias name, you must perform
specific steps to prepare for the cutover phase and you must remount the LUNs after the
transition.
Related information
Preparing for the cutover phase when transitioning LUNs with mount points using DMMP device names on
Linux hosts
Remounting LUNs with mount points using DMMP alias names on Linux hosts after transition
Preparing RHEL LUNs with mount points using DMMP alias names for transition using the CLI
Before transition of a mount point using a DMMP device name, you must replace the
DMMP device name with its respective file system UUID number.
This procedure applies to copy-based transitions and copy-free transitions.
421
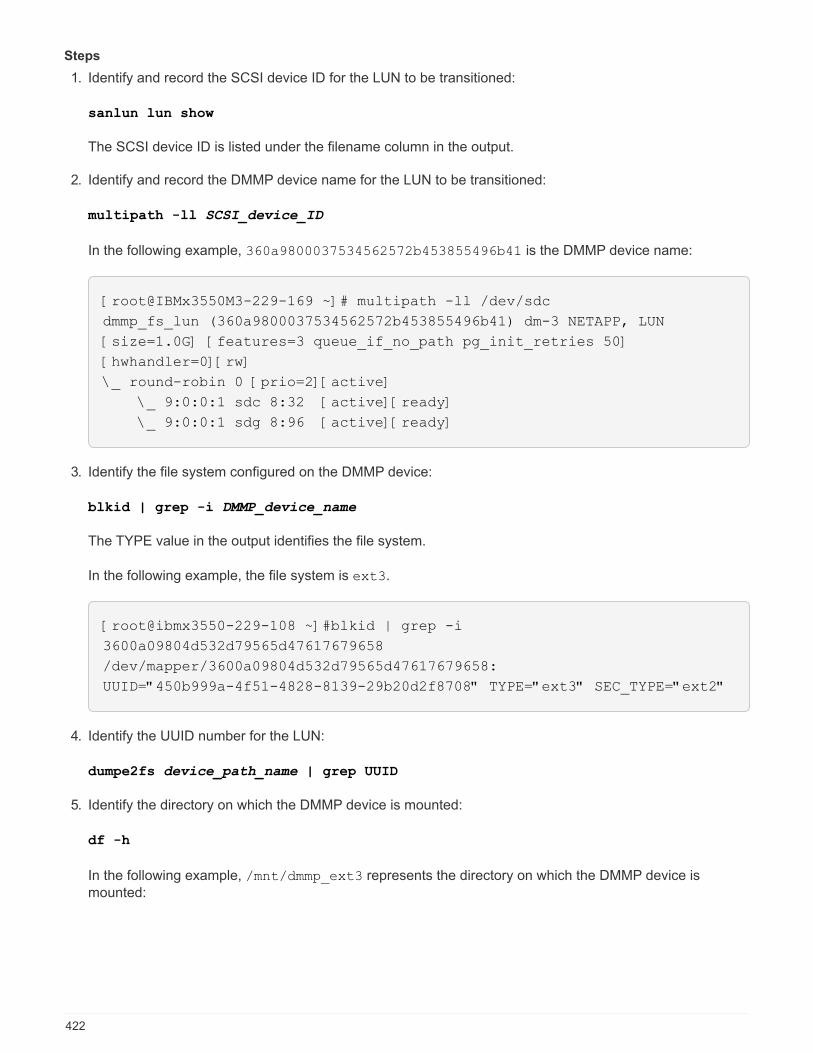
Steps
1. Identify and record the SCSI device ID for the LUN to be transitioned:
sanlun lun show
The SCSI device ID is listed under the filename column in the output.
2. Identify and record the DMMP device name for the LUN to be transitioned:
multipath -ll SCSI_device_ID
In the following example, 360a9800037534562572b453855496b41 is the DMMP device name:
[root@IBMx3550M3-229-169 ~]# multipath -ll /dev/sdc
dmmp_fs_lun (360a9800037534562572b453855496b41) dm-3 NETAPP, LUN
[size=1.0G] [features=3 queue_if_no_path pg_init_retries 50]
[hwhandler=0][rw]
\_ round-robin 0 [prio=2][active]
\_ 9:0:0:1 sdc 8:32 [active][ready]
\_ 9:0:0:1 sdg 8:96 [active][ready]
3. Identify the file system configured on the DMMP device:
blkid | grep -i DMMP_device_name
The TYPE value in the output identifies the file system.
In the following example, the file system is ext3.
[root@ibmx3550-229-108 ~]#blkid | grep -i
3600a09804d532d79565d47617679658
/dev/mapper/3600a09804d532d79565d47617679658:
UUID="450b999a-4f51-4828-8139-29b20d2f8708" TYPE="ext3" SEC_TYPE="ext2"
4. Identify the UUID number for the LUN:
dumpe2fs device_path_name | grep UUID
5. Identify the directory on which the DMMP device is mounted:
df -h
In the following example, /mnt/dmmp_ext3 represents the directory on which the DMMP device is
mounted:
422
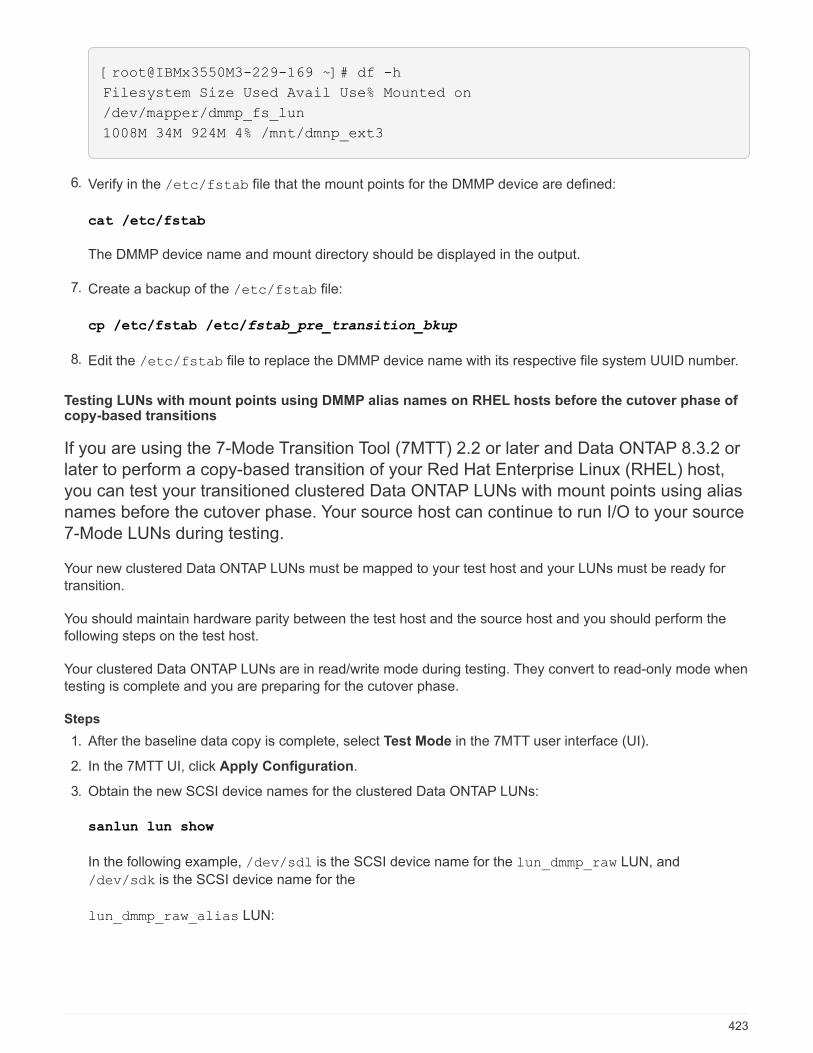
[root@IBMx3550M3-229-169 ~]# df -h
Filesystem Size Used Avail Use% Mounted on
/dev/mapper/dmmp_fs_lun
1008M 34M 924M 4% /mnt/dmnp_ext3
6. Verify in the /etc/fstab file that the mount points for the DMMP device are defined:
cat /etc/fstab
The DMMP device name and mount directory should be displayed in the output.
7. Create a backup of the /etc/fstab file:
cp /etc/fstab /etc/fstab_pre_transition_bkup
8. Edit the /etc/fstab file to replace the DMMP device name with its respective file system UUID number.
Testing LUNs with mount points using DMMP alias names on RHEL hosts before the cutover phase ofcopy-based transitions
If you are using the 7-Mode Transition Tool (7MTT) 2.2 or later and Data ONTAP 8.3.2 or
later to perform a copy-based transition of your Red Hat Enterprise Linux (RHEL) host,
you can test your transitioned clustered Data ONTAP LUNs with mount points using alias
names before the cutover phase. Your source host can continue to run I/O to your source
7-Mode LUNs during testing.
Your new clustered Data ONTAP LUNs must be mapped to your test host and your LUNs must be ready for
transition.
You should maintain hardware parity between the test host and the source host and you should perform the
following steps on the test host.
Your clustered Data ONTAP LUNs are in read/write mode during testing. They convert to read-only mode when
testing is complete and you are preparing for the cutover phase.
Steps
1. After the baseline data copy is complete, select Test Mode in the 7MTT user interface (UI).
2. In the 7MTT UI, click Apply Configuration.
3. Obtain the new SCSI device names for the clustered Data ONTAP LUNs:
sanlun lun show
In the following example, /dev/sdl is the SCSI device name for the lun_dmmp_raw LUN, and
/dev/sdk is the SCSI device name for the
lun_dmmp_raw_alias LUN:
423
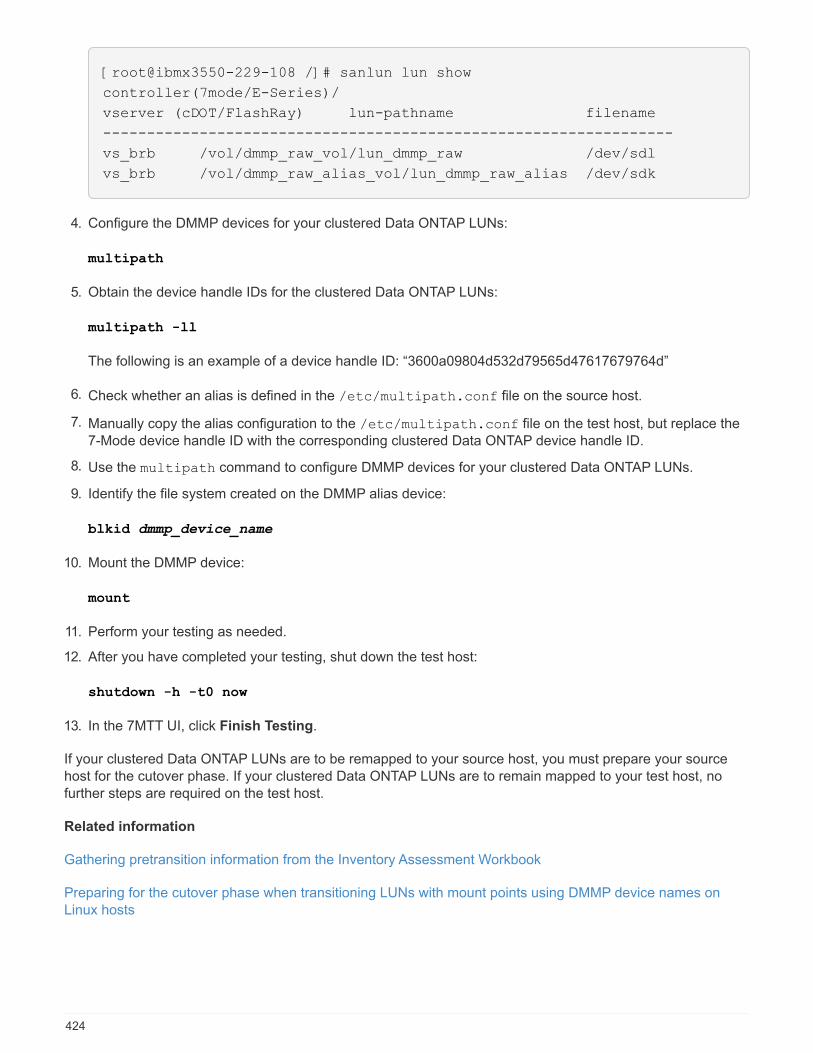
[root@ibmx3550-229-108 /]# sanlun lun show
controller(7mode/E-Series)/
vserver (cDOT/FlashRay) lun-pathname filename
-----------------------------------------------------------------
vs_brb /vol/dmmp_raw_vol/lun_dmmp_raw /dev/sdl
vs_brb /vol/dmmp_raw_alias_vol/lun_dmmp_raw_alias /dev/sdk
4. Configure the DMMP devices for your clustered Data ONTAP LUNs:
multipath
5. Obtain the device handle IDs for the clustered Data ONTAP LUNs:
multipath -ll
The following is an example of a device handle ID: “3600a09804d532d79565d47617679764d”
6. Check whether an alias is defined in the /etc/multipath.conf file on the source host.
7. Manually copy the alias configuration to the /etc/multipath.conf file on the test host, but replace the
7-Mode device handle ID with the corresponding clustered Data ONTAP device handle ID.
8. Use the multipath command to configure DMMP devices for your clustered Data ONTAP LUNs.
9. Identify the file system created on the DMMP alias device:
blkid dmmp_device_name
10. Mount the DMMP device:
mount
11. Perform your testing as needed.
12. After you have completed your testing, shut down the test host:
shutdown -h -t0 now
13. In the 7MTT UI, click Finish Testing.
If your clustered Data ONTAP LUNs are to be remapped to your source host, you must prepare your source
host for the cutover phase. If your clustered Data ONTAP LUNs are to remain mapped to your test host, no
further steps are required on the test host.
Related information
Gathering pretransition information from the Inventory Assessment Workbook
Preparing for the cutover phase when transitioning LUNs with mount points using DMMP device names on
Linux hosts
424
Preparing for the cutover phase when transitioning LUNs with mount points using DMMP devicenames on Linux hosts
If you are transitioning a LUN with a mount point using an alias name on a Linux host,
there are several steps you must perform before entering the cutover phase.
For FC configurations, you must have fabric connectivity and zoning to clustered Data ONTAP controllers.
For iSCSI configurations, your iSCSI sessions must be discovered and logged in to your clustered Data
ONTAP controllers.
• For copy-based transitions, perform these steps before initiating the Storage Cutover operation in the 7-
Mode Transition Tool (7MTT).
• For copy-free transitions, perform these steps before initiating the Export & Halt 7-Mode Systems operation
in the 7MTT.
Steps
1. Stop I/O to the mount points.
2. Shut down the applications that are accessing the LUNs according to the application vendor’s
recommendations.
3. Unmount DMMP devices:
umount dir_name
4. Flush the 7-Mode LUN DMMP device ID:
multipath -f device_name
If needed, you can get the DDMP device name from the OS Device ID column under the SAN Host LUNs
tab in the Inventory Assessment Workbook.
Related information
Gathering pretransition information from the Inventory Assessment Workbook
Remounting LUNs with mount points using DMMP alias names on Linux hosts after transition
After transition from ONTAP operating in 7-Mode to clustered Data ONTAP, you must
remount your LUNs with mount points. The7-Mode volumes are offline and the 7-Mode
LUNs are not accessible to your hosts.
If you are doing a copy-free transition (CFT), procedures for vol rehost must be complete.
See the 7-Mode Transition Tool Copy-Free Transition Guide for details.
• For copy-based transitions (CBTs), perform these steps after completing the Storage Cutover operation in
the 7MTT.
• For CFTs, perform these steps after the Import Data & Configuration operation in the 7MTT.
1. Generate the 7-Mode to ONTAP LUN mapping file:
▪ For copy-based transitions, run the following command from the Linux host where the 7MTT is
425
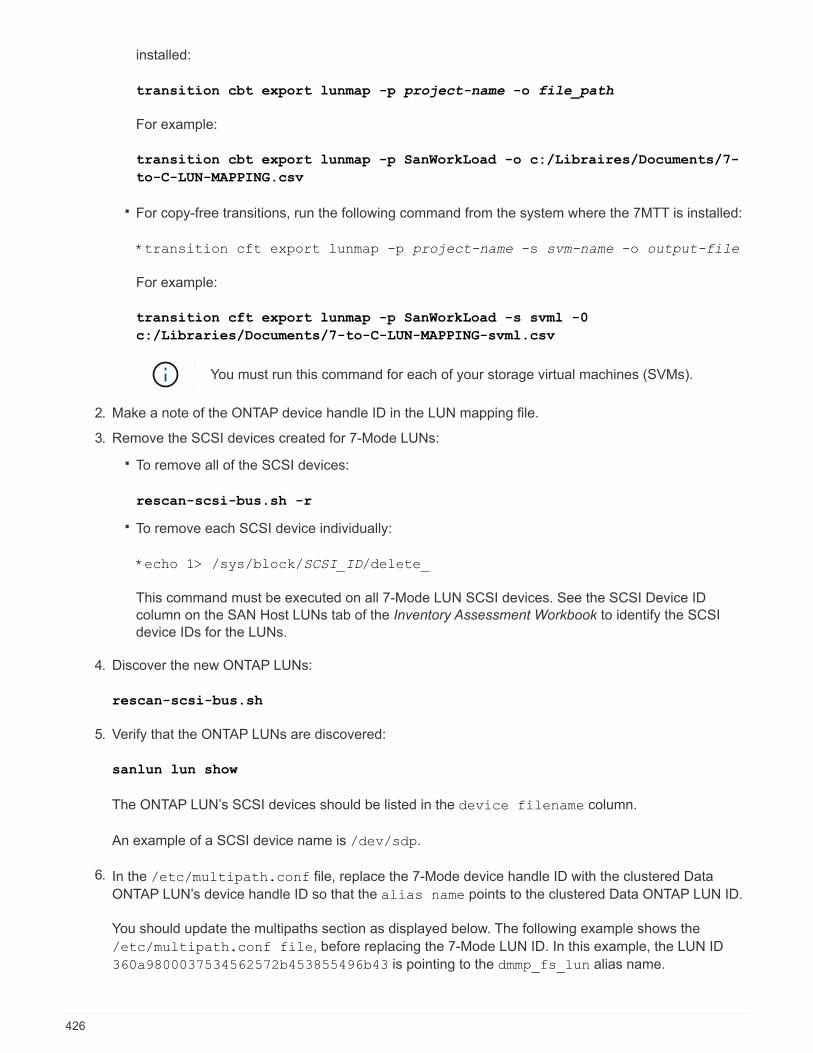
installed:
transition cbt export lunmap -p project-name -o file_path
For example:
transition cbt export lunmap -p SanWorkLoad -o c:/Libraires/Documents/7-
to-C-LUN-MAPPING.csv
▪ For copy-free transitions, run the following command from the system where the 7MTT is installed:
*transition cft export lunmap -p project-name -s svm-name -o output-file
For example:
transition cft export lunmap -p SanWorkLoad -s svml -0
c:/Libraries/Documents/7-to-C-LUN-MAPPING-svml.csv
You must run this command for each of your storage virtual machines (SVMs).
2. Make a note of the ONTAP device handle ID in the LUN mapping file.
3. Remove the SCSI devices created for 7-Mode LUNs:
▪ To remove all of the SCSI devices:
rescan-scsi-bus.sh -r
▪ To remove each SCSI device individually:
*echo 1> /sys/block/SCSI_ID/delete_
This command must be executed on all 7-Mode LUN SCSI devices. See the SCSI Device ID
column on the SAN Host LUNs tab of the Inventory Assessment Workbook to identify the SCSI
device IDs for the LUNs.
4. Discover the new ONTAP LUNs:
rescan-scsi-bus.sh
5. Verify that the ONTAP LUNs are discovered:
sanlun lun show
The ONTAP LUN’s SCSI devices should be listed in the device filename column.
An example of a SCSI device name is /dev/sdp.
6. In the /etc/multipath.conf file, replace the 7-Mode device handle ID with the clustered Data
ONTAP LUN’s device handle ID so that the alias name points to the clustered Data ONTAP LUN ID.
You should update the multipaths section as displayed below. The following example shows the
/etc/multipath.conf file, before replacing the 7-Mode LUN ID. In this example, the LUN ID
360a9800037534562572b453855496b43 is pointing to the dmmp_fs_lun alias name.
426
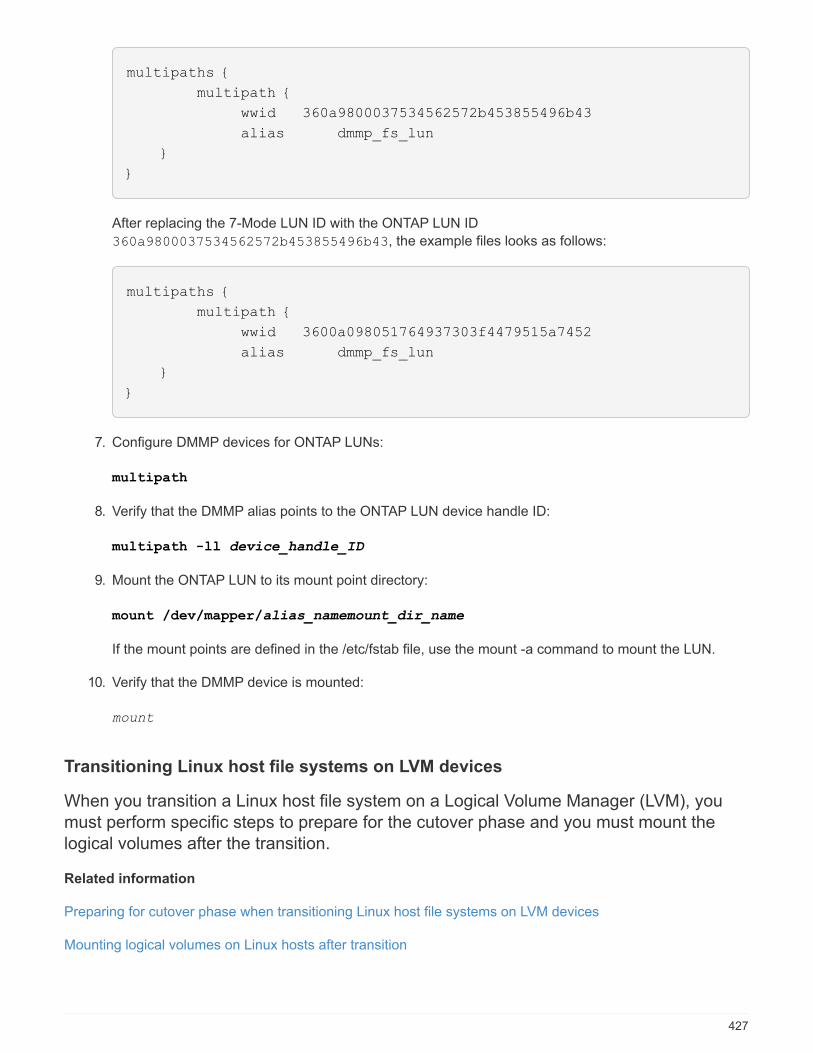
multipaths {
multipath {
wwid 360a9800037534562572b453855496b43
alias dmmp_fs_lun
}
}
After replacing the 7-Mode LUN ID with the ONTAP LUN ID
360a9800037534562572b453855496b43, the example files looks as follows:
multipaths {
multipath {
wwid 3600a098051764937303f4479515a7452
alias dmmp_fs_lun
}
}
7. Configure DMMP devices for ONTAP LUNs:
multipath
8. Verify that the DMMP alias points to the ONTAP LUN device handle ID:
multipath -ll device_handle_ID
9. Mount the ONTAP LUN to its mount point directory:
mount /dev/mapper/alias_namemount_dir_name
If the mount points are defined in the /etc/fstab file, use the mount -a command to mount the LUN.
10. Verify that the DMMP device is mounted:
mount
Transitioning Linux host file systems on LVM devices
When you transition a Linux host file system on a Logical Volume Manager (LVM), you
must perform specific steps to prepare for the cutover phase and you must mount the
logical volumes after the transition.
Related information
Preparing for cutover phase when transitioning Linux host file systems on LVM devices
Mounting logical volumes on Linux hosts after transition
427
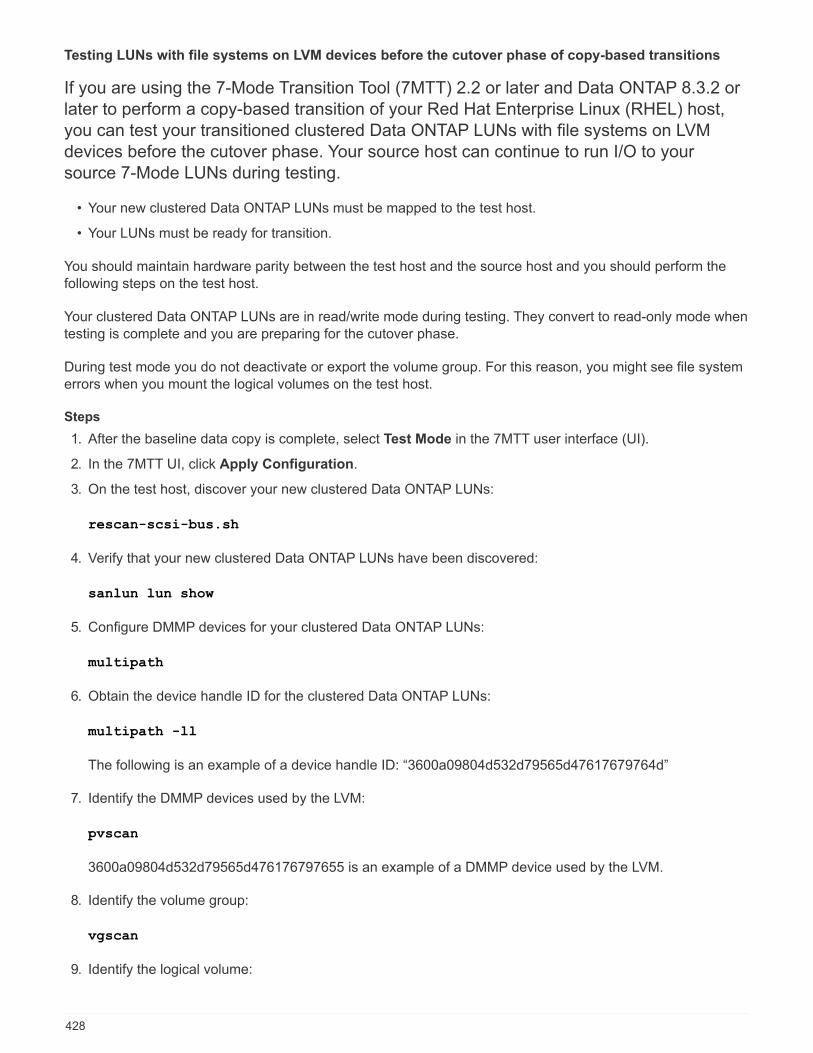
Testing LUNs with file systems on LVM devices before the cutover phase of copy-based transitions
If you are using the 7-Mode Transition Tool (7MTT) 2.2 or later and Data ONTAP 8.3.2 or
later to perform a copy-based transition of your Red Hat Enterprise Linux (RHEL) host,
you can test your transitioned clustered Data ONTAP LUNs with file systems on LVM
devices before the cutover phase. Your source host can continue to run I/O to your
source 7-Mode LUNs during testing.
• Your new clustered Data ONTAP LUNs must be mapped to the test host.
• Your LUNs must be ready for transition.
You should maintain hardware parity between the test host and the source host and you should perform the
following steps on the test host.
Your clustered Data ONTAP LUNs are in read/write mode during testing. They convert to read-only mode when
testing is complete and you are preparing for the cutover phase.
During test mode you do not deactivate or export the volume group. For this reason, you might see file system
errors when you mount the logical volumes on the test host.
Steps
1. After the baseline data copy is complete, select Test Mode in the 7MTT user interface (UI).
2. In the 7MTT UI, click Apply Configuration.
3. On the test host, discover your new clustered Data ONTAP LUNs:
rescan-scsi-bus.sh
4. Verify that your new clustered Data ONTAP LUNs have been discovered:
sanlun lun show
5. Configure DMMP devices for your clustered Data ONTAP LUNs:
multipath
6. Obtain the device handle ID for the clustered Data ONTAP LUNs:
multipath -ll
The following is an example of a device handle ID: “3600a09804d532d79565d47617679764d”
7. Identify the DMMP devices used by the LVM:
pvscan
3600a09804d532d79565d476176797655 is an example of a DMMP device used by the LVM.
8. Identify the volume group:
vgscan
9. Identify the logical volume:
428
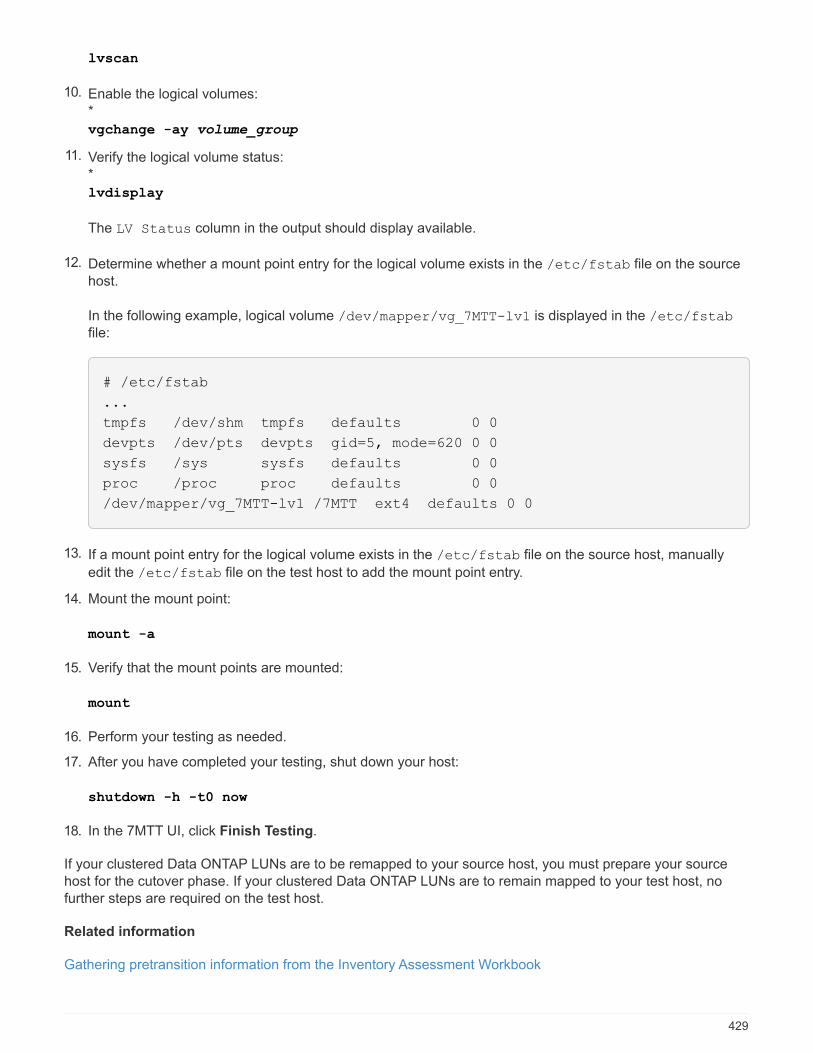
lvscan
10. Enable the logical volumes:
*
vgchange -ay volume_group
11. Verify the logical volume status:
*
lvdisplay
The LV Status column in the output should display available.
12. Determine whether a mount point entry for the logical volume exists in the /etc/fstab file on the source
host.
In the following example, logical volume /dev/mapper/vg_7MTT-lv1 is displayed in the /etc/fstab
file:
# /etc/fstab
...
tmpfs /dev/shm tmpfs defaults 0 0
devpts /dev/pts devpts gid=5, mode=620 0 0
sysfs /sys sysfs defaults 0 0
proc /proc proc defaults 0 0
/dev/mapper/vg_7MTT-lv1 /7MTT ext4 defaults 0 0
13. If a mount point entry for the logical volume exists in the /etc/fstab file on the source host, manually
edit the /etc/fstab file on the test host to add the mount point entry.
14. Mount the mount point:
mount -a
15. Verify that the mount points are mounted:
mount
16. Perform your testing as needed.
17. After you have completed your testing, shut down your host:
shutdown -h -t0 now
18. In the 7MTT UI, click Finish Testing.
If your clustered Data ONTAP LUNs are to be remapped to your source host, you must prepare your source
host for the cutover phase. If your clustered Data ONTAP LUNs are to remain mapped to your test host, no
further steps are required on the test host.
Related information
Gathering pretransition information from the Inventory Assessment Workbook
429
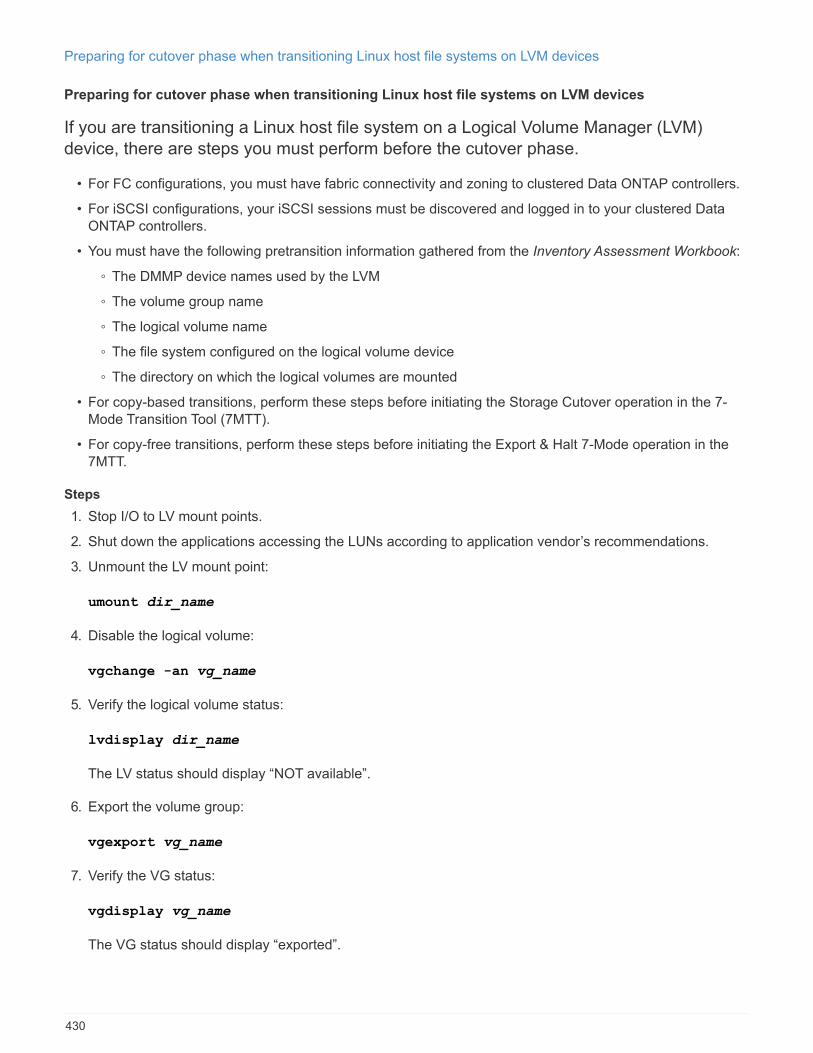
Preparing for cutover phase when transitioning Linux host file systems on LVM devices
Preparing for cutover phase when transitioning Linux host file systems on LVM devices
If you are transitioning a Linux host file system on a Logical Volume Manager (LVM)
device, there are steps you must perform before the cutover phase.
• For FC configurations, you must have fabric connectivity and zoning to clustered Data ONTAP controllers.
• For iSCSI configurations, your iSCSI sessions must be discovered and logged in to your clustered Data
ONTAP controllers.
• You must have the following pretransition information gathered from the Inventory Assessment Workbook:
◦ The DMMP device names used by the LVM
◦ The volume group name
◦ The logical volume name
◦ The file system configured on the logical volume device
◦ The directory on which the logical volumes are mounted
• For copy-based transitions, perform these steps before initiating the Storage Cutover operation in the 7-
Mode Transition Tool (7MTT).
• For copy-free transitions, perform these steps before initiating the Export & Halt 7-Mode operation in the
7MTT.
Steps
1. Stop I/O to LV mount points.
2. Shut down the applications accessing the LUNs according to application vendor’s recommendations.
3. Unmount the LV mount point:
umount dir_name
4. Disable the logical volume:
vgchange -an vg_name
5. Verify the logical volume status:
lvdisplay dir_name
The LV status should display “NOT available”.
6. Export the volume group:
vgexport vg_name
7. Verify the VG status:
vgdisplay vg_name
The VG status should display “exported”.
430
8. Flush the 7-Mode DDMP device IDs:
multipath -f device_name
Related information
Gathering pretransition information from the Inventory Assessment Workbook
Mounting logical volumes on Linux hosts after transition
After the transition from ONTAP operating in 7-Mode to clustered Data ONTAP, your
logical volumes are offline. You must mount those logical volumes for your LUNs to be
accessible to your hosts.
If you are doing a copy-free transition (CFT), procedures for vol rehost must be complete. See the 7-Mode
Transition Tool Copy-Free Transition Guide for details.
• For copy-based transitions (CBTs), perform these steps after completing the Storage Cutover operation in
the 7-Mode Transition Tool (7MTT).
• For CFTs, perform these steps after the Import Data & Configuration operation in the 7MTT.
1. Generate the 7-Mode to clustered Data ONTAP LUN mapping file:
▪ For copy-based transitions, run the following command from the Linux host where the 7MTT is
installed:
transition cbt export lunmap -p project-name -o file_path
For example:
transition cbt export lunmap -p SanWorkLoad -o c:/Libraires/Documents/7-
to-C-LUN-MAPPING.csv
▪ For copy-free transitions, run the following command from the system where the 7MTT is installed:
transition cft export lunmap -p p_roject-name_ -s svm-name -o output-file
For example:
transition cft export lunmap -p SanWorkLoad -s svml -0
c:/Libraries/Documents/7-to-C-LUN-MAPPING-svml.csv
You must run this command for each of your storage virtual machines (SVMs).
2. Remove the SCSI devices created for 7-Mode LUNs:
▪ To remove all of the SCSI devices:
rescan-scsi-bus.sh -r
▪ To remove each SCSI device individually:
echo 1> /sys/block/SCSI_ID/delete
431
This command must be executed on all 7-Mode LUN SCSI devices. See the SCSI Device ID
column on the SAN Host LUNs tab of the Inventory Assessment Workbook to identify the SCSI
device IDs for the LUNs.
3. Discover new ONTAP LUNs:
rescan-scsi-bus.sh
4. Configure DMMP devices for ONTAP LUNs:
multipath
5. Verify that ONTAP LUNs are discovered:
sanlun lun show
6. Determine the new ONTAP LUN device handle ID:
multipath -ll Device_handle_name
7. Import the volume group:
vgimport vg_name
8. Verify the volume group status:
vgdisplay
9. Enable logical volumes:
vgchange -ay vg_name
10. Verify the logical volume status:
lvdisplay
The LV status should be displayed as “available”.
11. Mount the logical volumes from the ONTAP LUN to its respective mount point directory:
mount lv_namemount_point
If the mount points are defined in the etc/fstab file, you can use the mount -a command to mount
the logical volumes.
12. Verify the mount points:
mount
Transitioning of SAN boot LUNs
You must reboot SAN boot LUNs before you transition from Data ONTAP operating in 7-
Mode to clustered Data ONTAP using the 7-Mode Transition Tool (7MTT). You must
432

perform specific steps to prepare for the cutover phase, and after transition you must
discover your LUNs.
Related information
Preparing for transition of FC or FCoE SAN boot LUNs on RHEL hosts
Preparing for transition of iSCSI SAN boot LUNs
Discovering SAN boot LUNs after transition
Types of SAN boot LUNs supported for transition
Only certain types of SAN boot LUNs are supported for transition from Data ONTAP
operating in 7-Mode to clustered Data ONTAP.
The following SAN boot LUNs are supported for transition:
• FC or FCoE SAN boot LUNs
• iSCSI SAN boot LUNs for Red Hat Enterprise Linux (RHEL) 6
Transition of iSCSI SAN boot LUNs for RHEL 5.x is not supported.
Preparing for transition of FC or FCoE SAN boot LUNs on RHEL hosts
Before you transition an FC or FCoE SAN boot LUN, you must perform specific steps on
your Red Hat Enterprise Linux (RHEL) host.
You must have the following information from the Inventory Assessment Workbook:
• 7-Mode LUN name on which RHEL 5 or RHEL 6 is installed
• SCSI device name for the transition LUN
• DMMP device name for the transition LUN
• Mount directory
• File system configured on the DMMP device
• UUID number of the /boot partition
• Name of the initrid image
This procedure applies to copy-based transitions and copy-free transitions.
1. Verify that the DMMP device exists in the /dev/mapper directory:
ls /dev/mapper/ DMMP_device_name
If you cannot locate the DMMP device, then it might be using an alias or user-friendly name.
2. Identify the DMMP devices and Logical Volume Manager (LVM) names on which the RHEL 5 or RHEL 6
operating system /boot and root (/) directories are installed:
df - h
433
By default, RHEL 5 and RHEL 6 are installed on the root (/) partition on the logical volume. If the root
partition is installed on the logical volume, then no pretransition changes to the configuration are required.
3. If the /boot partition is installed on the DMMP device, confirm how the /boot partition is referenced to mount
in /etc/fstab at boot time.
4. If the /boot partition is referenced in /etc/fstab by its DMMP device name, replace the DMMP device
name with the file system UUID name.
5. Make a backup of the /etc/fstab file:
cp /etc/fstab /etc/fstab_pre_transition_file_name
6. Edit the /etc/fstab file to replace the DMMP device name with its respective file system UUID number.
7. Make a backup of the initrd image file:
cp /boot/initrd_image_file_nameinitrd_image_file_name.bak
8. For RHEL 5 only:
a. In the /etc/mutipath.conf file, identify the SWAP partition device.
In the following example, /dev/VolGroup00/LogVol01 is the SWAP partition device:
/dev/VolGroup00/LogVol01 swap swap defaults 0 0
b. Create a label for mounting the swap partition:
swapoff swap-partition_device
mkswap -L label-for-swapswap-partition-device
swapon swap-partition_device
c. Replace the SWAP partition device name in the /etc/fstab file with THE SWAP label.
The updated line in the /etc/fstab file should be as follows:
LABEL=SwapPartition swap swap defaults 0 0
9. Re-create the initrd image.
◦ For RHEL5:
mkinitrd -f/boot/ initrd-"'uname-r'".img 'uname-r' --with multipath
◦ For RHEL 6:
dracut --force --add multipath --verbose
10. Restart the host to boot from the new initrd image.
Related information
434
Gathering pretransition information from the Inventory Assessment Workbook
Preparing for transition of iSCSI SAN boot LUNs
Before you transition an iSCSI SAN boot LUN, you must perform specific steps on the
host. Transition of Red Hat Enterprise Linux (RHEL) 5.x is not supported. Transition of
RHEL 6 is supported.
You must have the following information from the Inventory Assessment Workbook:
• Name of the LUN that RHEL 6 is installed on
• DMMP device name for the transition LUN
• Logical volume (LV) name
• Volume group (VG) name
• Physical volume (PV) devices
• Logical Volume Manager (LVM) names and mount directories on which RHEL 6 /boot and root (/) partitions
are installed
• File system configured on DMMP
• iSCSI sessions for 7-Mode controllers
• Grub information
• IQN number of the storage virtual machine (SVM) where the iSCSI SAN boot LUN will be created
• LIF IP address of the clustered Data ONTAP SVM where the iSCSI SAN boot LUN will be created
This procedure applies to copy-based transitions and copy-free transitions.
Steps
1. Verify that the DMMP device exists in the /dev/mapper directory:
ls /dev/mapper/DMMP_device_name
If the DMMP device is not displayed, the device might be using an alias or a user-friendly name.
2. Determine whether the DMMP device is part of an LVM:
blkid
If the DMMP device TYPE value is LVM2_member, the DMMP is part of an LVM.
3. Obtain the mount point details of the / and /boot partitions from the /etc/fstab file:
◦ If the /boot partition is installed on a DMMP device, check how it is referenced to mount in the
/etc/fstab file at boot time.
◦ If the /boot partition is mounted using the file system UUID that you obtained using the blkid
command output, then no pretransition change are required.
4. If the /boot partition is referenced in /etc/fstab file by its DMMP device name, replace the DMMP device
name with the file system UUID name.
5. For iSCSI SAN booted hosts, edit the /boot/grub/grub.conf file to create a new kernel command-line
435
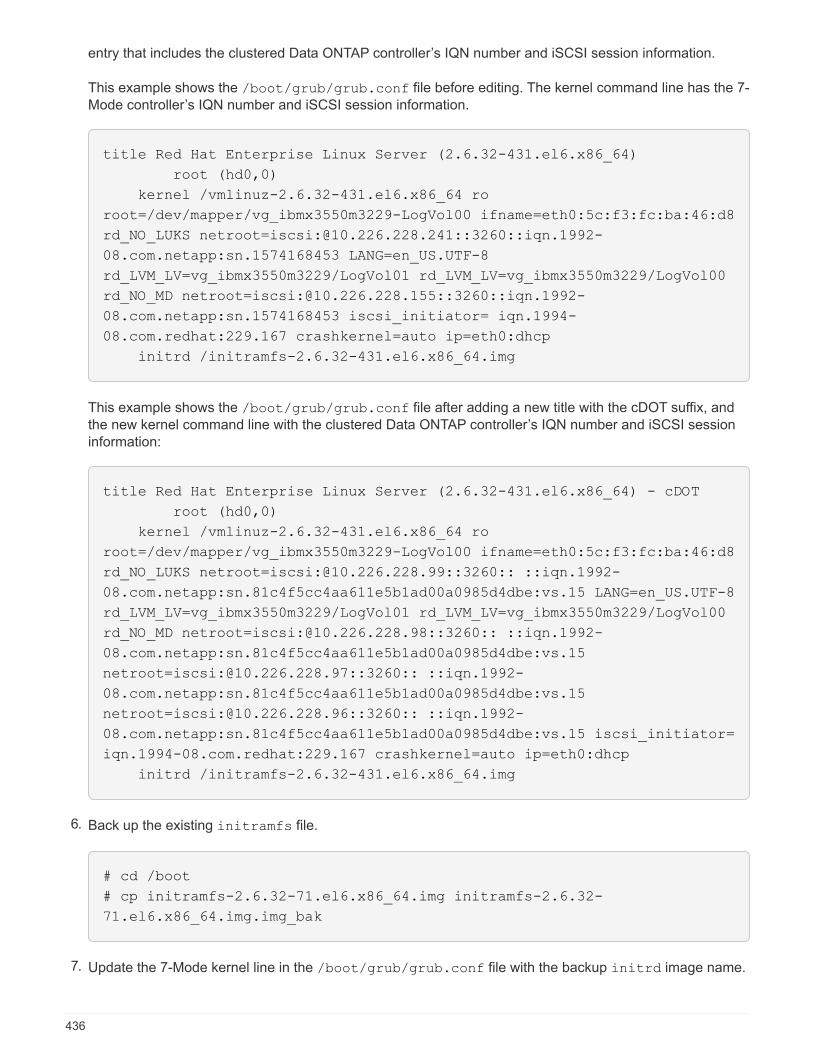
entry that includes the clustered Data ONTAP controller’s IQN number and iSCSI session information.
This example shows the /boot/grub/grub.conf file before editing. The kernel command line has the 7-
Mode controller’s IQN number and iSCSI session information.
title Red Hat Enterprise Linux Server (2.6.32-431.el6.x86_64)
root (hd0,0)
kernel /vmlinuz-2.6.32-431.el6.x86_64 ro
root=/dev/mapper/vg_ibmx3550m3229-LogVol00 ifname=eth0:5c:f3:fc:ba:46:d8
rd_NO_LUKS netroot=iscsi:@10.226.228.241::3260::iqn.1992-
08.com.netapp:sn.1574168453 LANG=en_US.UTF-8
rd_LVM_LV=vg_ibmx3550m3229/LogVol01 rd_LVM_LV=vg_ibmx3550m3229/LogVol00
rd_NO_MD netroot=iscsi:@10.226.228.155::3260::iqn.1992-
08.com.netapp:sn.1574168453 iscsi_initiator= iqn.1994-
08.com.redhat:229.167 crashkernel=auto ip=eth0:dhcp
initrd /initramfs-2.6.32-431.el6.x86_64.img
This example shows the /boot/grub/grub.conf file after adding a new title with the cDOT suffix, and
the new kernel command line with the clustered Data ONTAP controller’s IQN number and iSCSI session
information:
title Red Hat Enterprise Linux Server (2.6.32-431.el6.x86_64) - cDOT
root (hd0,0)
kernel /vmlinuz-2.6.32-431.el6.x86_64 ro
root=/dev/mapper/vg_ibmx3550m3229-LogVol00 ifname=eth0:5c:f3:fc:ba:46:d8
rd_NO_LUKS netroot=iscsi:@10.226.228.99::3260:: ::iqn.1992-
08.com.netapp:sn.81c4f5cc4aa611e5b1ad00a0985d4dbe:vs.15 LANG=en_US.UTF-8
rd_LVM_LV=vg_ibmx3550m3229/LogVol01 rd_LVM_LV=vg_ibmx3550m3229/LogVol00
rd_NO_MD netroot=iscsi:@10.226.228.98::3260:: ::iqn.1992-
08.com.netapp:sn.81c4f5cc4aa611e5b1ad00a0985d4dbe:vs.15
netroot=iscsi:@10.226.228.97::3260:: ::iqn.1992-
08.com.netapp:sn.81c4f5cc4aa611e5b1ad00a0985d4dbe:vs.15
netroot=iscsi:@10.226.228.96::3260:: ::iqn.1992-
08.com.netapp:sn.81c4f5cc4aa611e5b1ad00a0985d4dbe:vs.15 iscsi_initiator=
iqn.1994-08.com.redhat:229.167 crashkernel=auto ip=eth0:dhcp
initrd /initramfs-2.6.32-431.el6.x86_64.img
6. Back up the existing initramfs file.
# cd /boot
# cp initramfs-2.6.32-71.el6.x86_64.img initramfs-2.6.32-
71.el6.x86_64.img.img_bak
7. Update the 7-Mode kernel line in the /boot/grub/grub.conf file with the backup initrd image name.
436
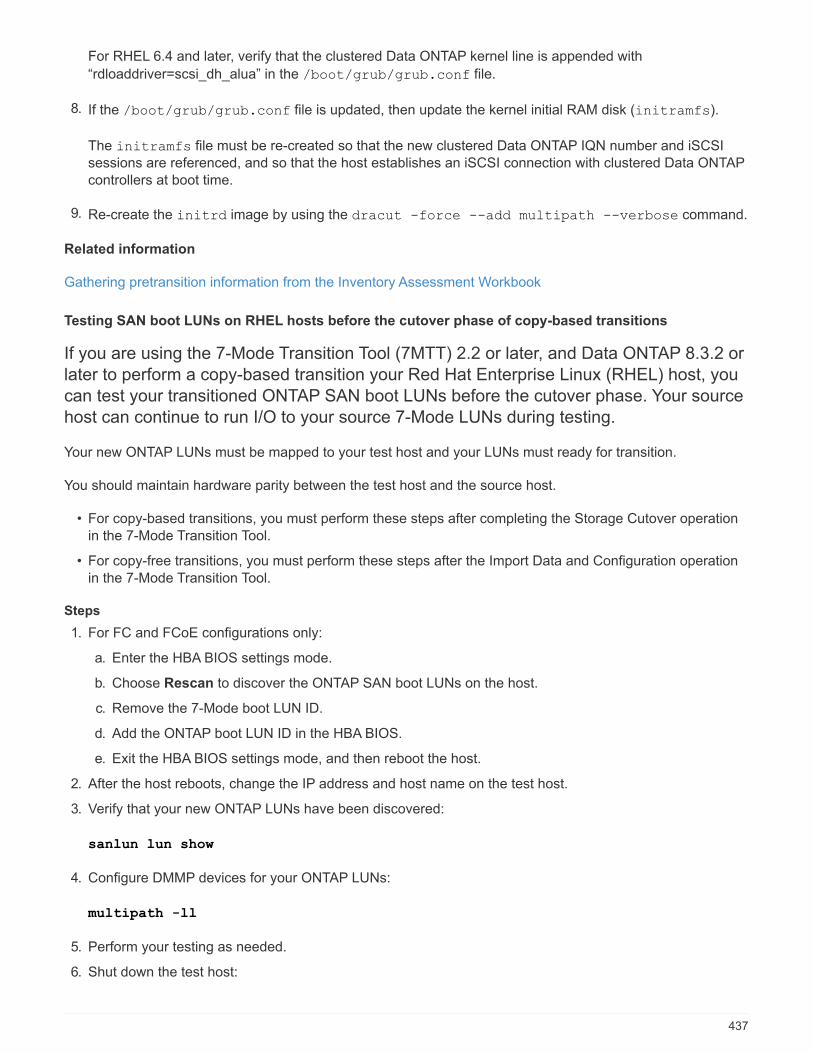
For RHEL 6.4 and later, verify that the clustered Data ONTAP kernel line is appended with
“rdloaddriver=scsi_dh_alua” in the /boot/grub/grub.conf file.
8. If the /boot/grub/grub.conf file is updated, then update the kernel initial RAM disk (initramfs).
The initramfs file must be re-created so that the new clustered Data ONTAP IQN number and iSCSI
sessions are referenced, and so that the host establishes an iSCSI connection with clustered Data ONTAP
controllers at boot time.
9. Re-create the initrd image by using the dracut -force --add multipath --verbose command.
Related information
Gathering pretransition information from the Inventory Assessment Workbook
Testing SAN boot LUNs on RHEL hosts before the cutover phase of copy-based transitions
If you are using the 7-Mode Transition Tool (7MTT) 2.2 or later, and Data ONTAP 8.3.2 or
later to perform a copy-based transition your Red Hat Enterprise Linux (RHEL) host, you
can test your transitioned ONTAP SAN boot LUNs before the cutover phase. Your source
host can continue to run I/O to your source 7-Mode LUNs during testing.
Your new ONTAP LUNs must be mapped to your test host and your LUNs must ready for transition.
You should maintain hardware parity between the test host and the source host.
• For copy-based transitions, you must perform these steps after completing the Storage Cutover operation
in the 7-Mode Transition Tool.
• For copy-free transitions, you must perform these steps after the Import Data and Configuration operation
in the 7-Mode Transition Tool.
Steps
1. For FC and FCoE configurations only:
a. Enter the HBA BIOS settings mode.
b. Choose Rescan to discover the ONTAP SAN boot LUNs on the host.
c. Remove the 7-Mode boot LUN ID.
d. Add the ONTAP boot LUN ID in the HBA BIOS.
e. Exit the HBA BIOS settings mode, and then reboot the host.
2. After the host reboots, change the IP address and host name on the test host.
3. Verify that your new ONTAP LUNs have been discovered:
sanlun lun show
4. Configure DMMP devices for your ONTAP LUNs:
multipath -ll
5. Perform your testing as needed.
6. Shut down the test host:
437
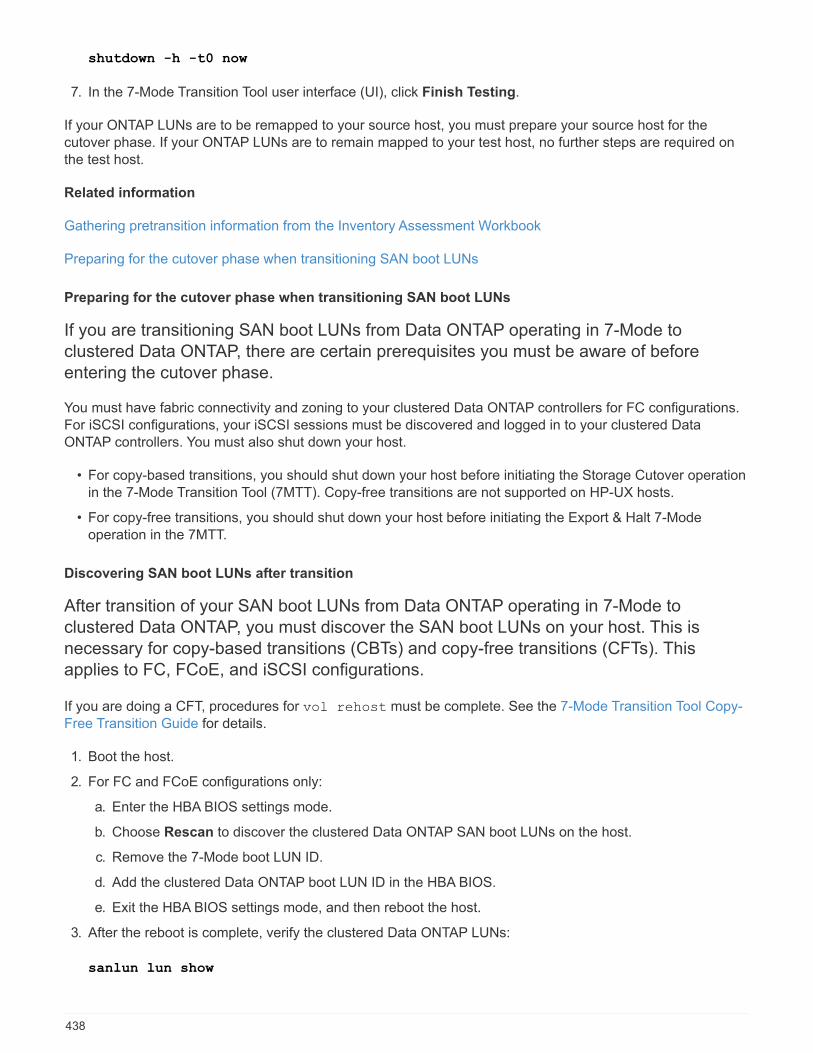
shutdown -h -t0 now
7. In the 7-Mode Transition Tool user interface (UI), click Finish Testing.
If your ONTAP LUNs are to be remapped to your source host, you must prepare your source host for the
cutover phase. If your ONTAP LUNs are to remain mapped to your test host, no further steps are required on
the test host.
Related information
Gathering pretransition information from the Inventory Assessment Workbook
Preparing for the cutover phase when transitioning SAN boot LUNs
Preparing for the cutover phase when transitioning SAN boot LUNs
If you are transitioning SAN boot LUNs from Data ONTAP operating in 7-Mode to
clustered Data ONTAP, there are certain prerequisites you must be aware of before
entering the cutover phase.
You must have fabric connectivity and zoning to your clustered Data ONTAP controllers for FC configurations.
For iSCSI configurations, your iSCSI sessions must be discovered and logged in to your clustered Data
ONTAP controllers. You must also shut down your host.
• For copy-based transitions, you should shut down your host before initiating the Storage Cutover operation
in the 7-Mode Transition Tool (7MTT). Copy-free transitions are not supported on HP-UX hosts.
• For copy-free transitions, you should shut down your host before initiating the Export & Halt 7-Mode
operation in the 7MTT.
Discovering SAN boot LUNs after transition
After transition of your SAN boot LUNs from Data ONTAP operating in 7-Mode to
clustered Data ONTAP, you must discover the SAN boot LUNs on your host. This is
necessary for copy-based transitions (CBTs) and copy-free transitions (CFTs). This
applies to FC, FCoE, and iSCSI configurations.
If you are doing a CFT, procedures for vol rehost must be complete. See the 7-Mode Transition Tool Copy-
Free Transition Guide for details.
1. Boot the host.
2. For FC and FCoE configurations only:
a. Enter the HBA BIOS settings mode.
b. Choose Rescan to discover the clustered Data ONTAP SAN boot LUNs on the host.
c. Remove the 7-Mode boot LUN ID.
d. Add the clustered Data ONTAP boot LUN ID in the HBA BIOS.
e. Exit the HBA BIOS settings mode, and then reboot the host.
3. After the reboot is complete, verify the clustered Data ONTAP LUNs:
sanlun lun show
438
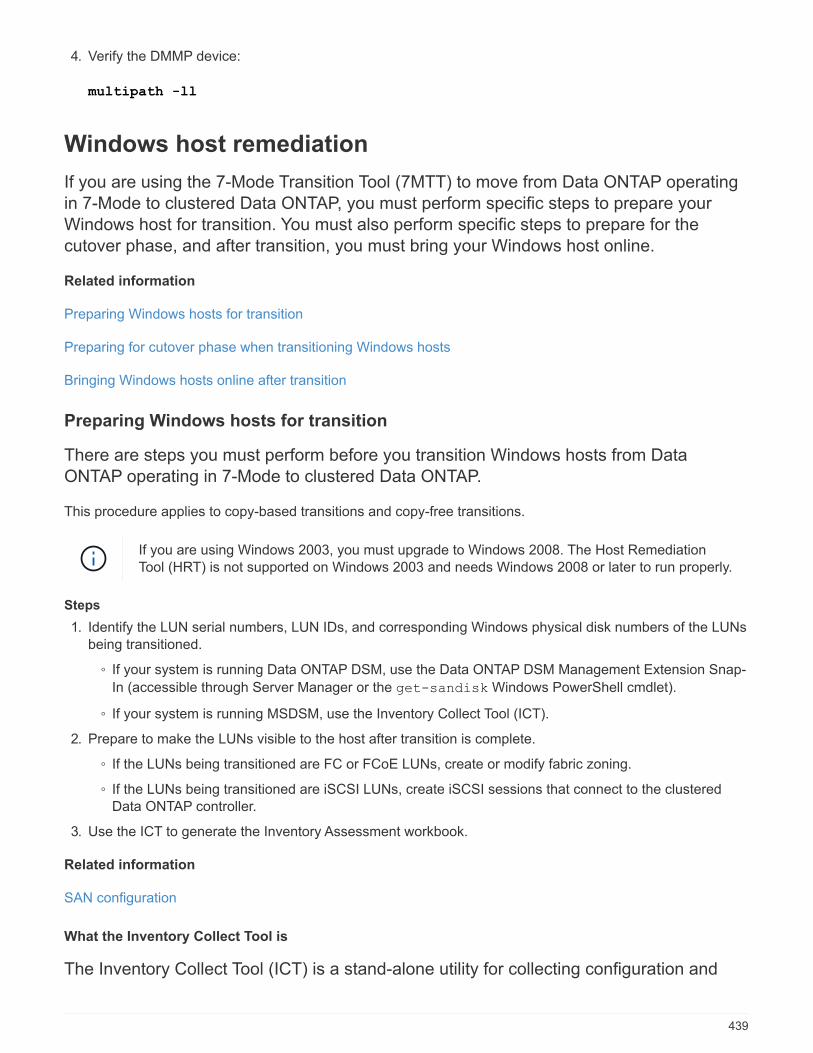
4. Verify the DMMP device:
multipath -ll
Windows host remediation
If you are using the 7-Mode Transition Tool (7MTT) to move from Data ONTAP operating
in 7-Mode to clustered Data ONTAP, you must perform specific steps to prepare your
Windows host for transition. You must also perform specific steps to prepare for the
cutover phase, and after transition, you must bring your Windows host online.
Related information
Preparing Windows hosts for transition
Preparing for cutover phase when transitioning Windows hosts
Bringing Windows hosts online after transition
Preparing Windows hosts for transition
There are steps you must perform before you transition Windows hosts from Data
ONTAP operating in 7-Mode to clustered Data ONTAP.
This procedure applies to copy-based transitions and copy-free transitions.
If you are using Windows 2003, you must upgrade to Windows 2008. The Host Remediation
Tool (HRT) is not supported on Windows 2003 and needs Windows 2008 or later to run properly.
Steps
1. Identify the LUN serial numbers, LUN IDs, and corresponding Windows physical disk numbers of the LUNs
being transitioned.
◦ If your system is running Data ONTAP DSM, use the Data ONTAP DSM Management Extension Snap-
In (accessible through Server Manager or the get-sandisk Windows PowerShell cmdlet).
◦ If your system is running MSDSM, use the Inventory Collect Tool (ICT).
2. Prepare to make the LUNs visible to the host after transition is complete.
◦ If the LUNs being transitioned are FC or FCoE LUNs, create or modify fabric zoning.
◦ If the LUNs being transitioned are iSCSI LUNs, create iSCSI sessions that connect to the clustered
Data ONTAP controller.
3. Use the ICT to generate the Inventory Assessment workbook.
Related information
SAN configuration
What the Inventory Collect Tool is
The Inventory Collect Tool (ICT) is a stand-alone utility for collecting configuration and
439
inventory information about 7-Mode storage controllers, hosts attached to controllers, and
applications running on these hosts for assessing the transition readiness of these
systems. You can use the ICT to generate information about your LUNs and the
configuration that you need for transition.
The ICT generates an Inventory Assessment Workbook and an Inventory Report XML file that contains
configuration details of the storage and host systems.
The ICT is available for ESXi, 5.x, ESXi 6.x, and Windows hosts.
Testing transitioned LUNs on Windows hosts before the cutover phase
If you are using the 7-Mode Transition Tool (7MTT) 2.2 or later and Data ONTAP 8.3.2 or
later to transition your Windows host LUNs, you can test your transitioned clustered Data
ONTAP LUNs to verify that you can bring your disk online and that your application
operations work as expected before the cutover phase. Your source host can continue to
run I/O to your source 7-Mode LUNs during testing.
Your 7-Mode LUNs must be ready for transition.
You should maintain hardware parity between the test host and the source host, and you should perform the
following steps on the test host.
Your clustered Data ONTAP LUNs are in read/write mode during testing. They convert to read-only mode when
testing is complete and you are preparing for the cutover phase.
Steps
1. After the baseline data copy is complete, select Test Mode in the 7MTT user interface (UI).
2. In the 7MTT UI, click Apply configuration.
3. Generate the 7-Mode to clustered Data ONTAP LUN mapping file:
◦ For copy-based transitions, run the following command from the host where the 7MTT is installed:
transition cbt export lunmap -p project-name -o file_path
For example:
transition cbt export lunmap -p SanWorkLoad -o c:/Libraires/Documents/7-to-
C-LUN-MAPPING.csv
◦ For copy-free transitions, run the following command from the system where the 7MTT is installed:
*transition cft export lunmap -p project-name -s svm-name -o output-file
You must run this command for each of your storage virtual machines (SVMs).
For example:
transition cft export lunmap -p SANWorkLoad -s svml -o
c:/Libraries/Documents/7-to-C-LUN-MAPPING-svml.csv
440
4. Bring the transitioned disks and applications online:
◦ If the transitioned disks are not part of Cluster Failover, use the Windows Disk Manager to bring the
disks online.
◦ If the transitioned disks are part of Cluster Failover, use the Cluster Failover Manager to bring the disks
online.
5. Perform your testing as needed.
6. After your testing is complete, take your applications and disks offline:
◦ If the transitioned disks are not part of Cluster Failover, use the Windows Disk Manager to take the
disks offline.
◦ If the transitioned disks are part of Cluster Failover, use the Cluster Failover Manager to take the disks
offline.
If your clustered Data ONTAP LUNs are to be remapped to your source host, you must prepare your source
host for the cutover phase. If your clustered Data ONTAP LUNs are to remain mapped to your test host, no
further steps are required on the test host.
Preparing for cutover phase when transitioning Windows hosts
If you are transitioning a Windows host from Data ONTAP operating in 7-Mode to
clustered Data ONTAP, there are steps you must perform after the transition begins, but
before the cutover phase begins.
If you are running Data ONTAP DSM, the version of Data ONTAP DSM installed on the server must be
supported for the version of Data ONTAP that is running on the target clustered Data ONTAP node.
If you are running MSDSM, the version of Windows Host Utilities installed on the server must be supported for
the version of Data ONTAP that is running on the target clustered Data ONTAP node.
• For copy-based transitions, perform these steps before initiating the Storage Cutover operation in the 7-
Mode Transition Tool (7MTT).
• For copy-free transitions, perform these steps before initiating the Export & Halt 7-Mode operation in the
7MTT.
Steps
1. Use Disk Manager to take offline the disks to be transitioned.
2. If the host is booted from SAN and the boot LUN is being transitioned, shut down the boot host.
3. If the host is clustered, use Failover Cluster Manager to take offline the clustered disks, including the
quorum disk.
4. If the host is running Windows Server 2003 and you need to migrate the quorum device, stop the cluster
services on all cluster nodes.
5. If you are transitioning LUNs on a server that has Hyper-V enabled, perform the appropriate host side
transition steps for your guest operating system.
6. If you are transitioning LUNs on a server that has Hyper-V enabled and the boot device of the guest OS
resides on a Data ONTAP LUN that is being transitioned, do the following:
a. Shut down the guest OS.
b. Take offline the corresponding disk on the parent system.
441
Bringing Windows hosts online after transition
After you transition your LUNs using the 7-Mode Transition Tool (7MTT) for Windows
hosts, you must complete several steps to bring your host online and begin servicing data
again.
If you are doing a copy-free transition (CFT), procedures for vol rehost must be complete. See the 7-Mode
Transition Tool Copy-Free Transition Guide for details.
• For copy-based transitions (CBTs), perform these steps after completing the Storage Cutover operation in
the 7-Mode Transition Tool (7MTT).
• For CFTs, perform these steps after completing the Import & Data Configuration operation in the 7MTT.
1. Generate the 7-Mode to ONTAP LUN mapping file:
▪ For copy-based transitions, run the following command from the host where the 7MTT is installed:
transition cbt export lunmap -p project-name -o file_path
For example:
transition cbt export lunmap -p SanWorkLoad -o c:/Libraires/Documents/7-
to-C-LUN-MAPPING.csv
▪ For copy-free transitions, run the following command from the system where the 7MTT is installed:
transition cft export lunmap -p project-name -s svm-name -o output-file
You must run this command for each of your storage virtual machines (SVMs).
For example:
transition cft export lunmap -p SANWorkLoad -s svml -o
c:/Libraries/Documents/7-to-C-LUN-MAPPING-svml.csv
2. If the Windows host is SAN-booted and the boot LUN was transitioned, power on the host.
3. Update the FC BIOS to enable the system to boot from the LUN on the clustered Data ONTAP
controller.
See the HBA documentation for more information.
4. On the Windows host, rescan the disks from the Disk Manager.
5. Obtain the LUN serial numbers, LUN IDs, and corresponding Windows physical disk numbers of the
LUNs mapped to the host.
▪ For systems running Data ONTAP ONTAPDSM: Use the Data ONTAPDSM Management
Extension Snap-In or the get-sandisk Windows PowerShell cmdlet.
▪ For systems running MSDSM: Use the Inventory Collect Tool (ICT).
The LUN ID, LUN serial number, and corresponding serial number is captured under the SAN Host
LUNs tab.
6. Use the LUN serial numbers, LUN IDs, and corresponding Windows physical disk numbers of the
442
LUNs along with the LUN map output and the data collected in the pretransition state, to determine
whether the LUNs have transitioned successfully.
7. Note whether the physical disk numbers of the transitioned LUNs have changed.
8. Bring your disks online.
▪ Use Windows Disk Manager to bring online disks that are not part of Cluster Failover.
▪ Use Failover Cluster Manager to bring online disks that are part of Cluster Failover.
9. If the host you are transitioning is running Windows Server 2003 and you have migrated the quorum
device, start the cluster services on all of the cluster nodes.
10. If Hyper-V is enabled on the host and pass-through devices are configured to the VMs, modify the
settings from Hyper-V Manager.
The physical disk number of the LUN corresponding to the pass-through device might have changed as
a result of the transition.
Related information
What the Inventory Collect Tool is
Exceptions and known issues when transitioning SAN hosts to ONTAP
You should be aware of certain exceptions and known issues when transitioning SAN
hosts from Data ONTAP operating in 7-Mode to later versions of ONTAP.
• For transitioning Hyper-Virtual Machine (VMs) with only VHD or VHDX file types, you can use storage live
migration instead of the 7-Mode Transition Tool (7MTT).
For details about Hyper-V storage live migration, see the Microsoft documentation.
• If you used the same igroup name on both nodes of the 7-Mode controller, the transition tool might fail to
resolve the igroup conflict.
Bug ID 769715.
HP-UX host remediation
If you are using the 7-Mode Transition Tool (7MTT) to move from Data ONTAP operating
in 7-Mode to clustered Data ONTAP in a SAN environment, you must perform a series of
steps on your HP-UX host before and after the transition to avoid transition complications.
Related information
Making a SAN boot LUN the primary boot LUN for HP-UX Emulex HBAs after transition
Making a SAN boot LUN the primary boot LUN for HP-UX QLogic HBAs after transition
Transitioning HP-UX host LUNs with file systems
If you transition an HP-UX host LUN with a file system from Data ONTAP operating in 7-
Mode to clustered Data ONTAP using the 7-Mode Transition Tool (7MTT), you must
443
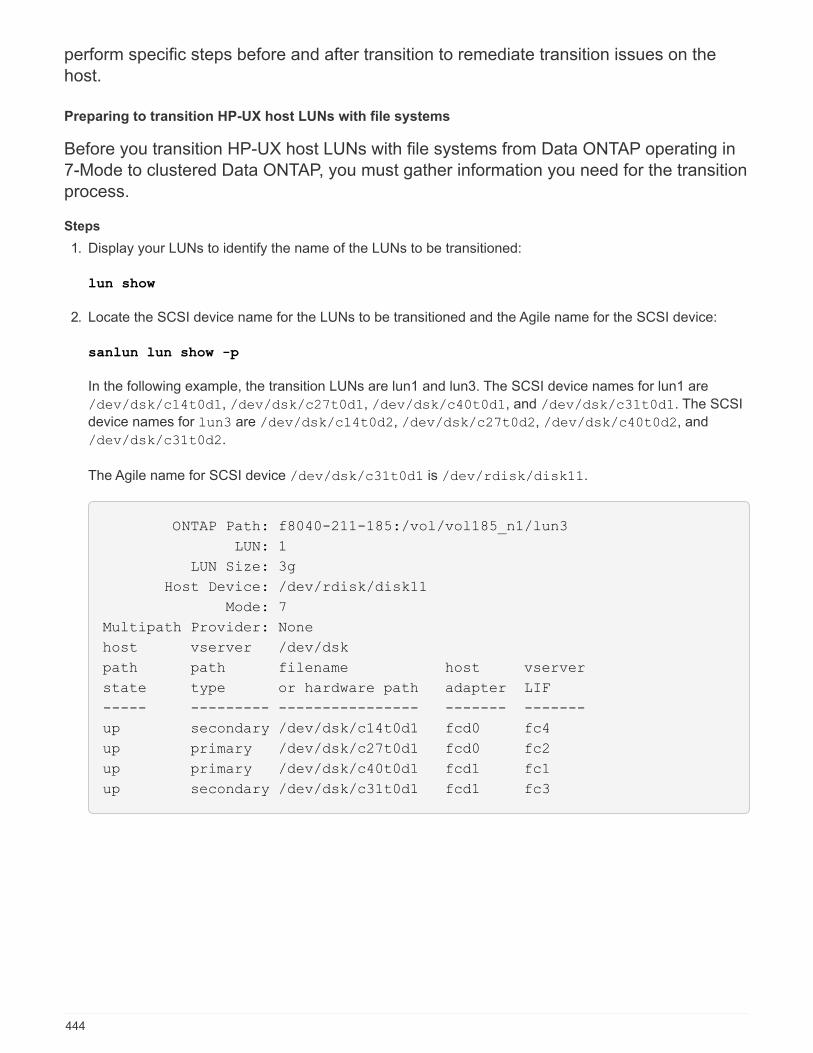
perform specific steps before and after transition to remediate transition issues on the
host.
Preparing to transition HP-UX host LUNs with file systems
Before you transition HP-UX host LUNs with file systems from Data ONTAP operating in
7-Mode to clustered Data ONTAP, you must gather information you need for the transition
process.
Steps
1. Display your LUNs to identify the name of the LUNs to be transitioned:
lun show
2. Locate the SCSI device name for the LUNs to be transitioned and the Agile name for the SCSI device:
sanlun lun show -p
In the following example, the transition LUNs are lun1 and lun3. The SCSI device names for lun1 are
/dev/dsk/c14t0d1, /dev/dsk/c27t0d1, /dev/dsk/c40t0d1, and /dev/dsk/c31t0d1. The SCSI
device names for lun3 are /dev/dsk/c14t0d2, /dev/dsk/c27t0d2, /dev/dsk/c40t0d2, and
/dev/dsk/c31t0d2.
The Agile name for SCSI device /dev/dsk/c31t0d1 is /dev/rdisk/disk11.
ONTAP Path: f8040-211-185:/vol/vol185_n1/lun3
LUN: 1
LUN Size: 3g
Host Device: /dev/rdisk/disk11
Mode: 7
Multipath Provider: None
host vserver /dev/dsk
path path filename host vserver
state type or hardware path adapter LIF
----- --------- ---------------- ------- -------
up secondary /dev/dsk/c14t0d1 fcd0 fc4
up primary /dev/dsk/c27t0d1 fcd0 fc2
up primary /dev/dsk/c40t0d1 fcd1 fc1
up secondary /dev/dsk/c31t0d1 fcd1 fc3
444
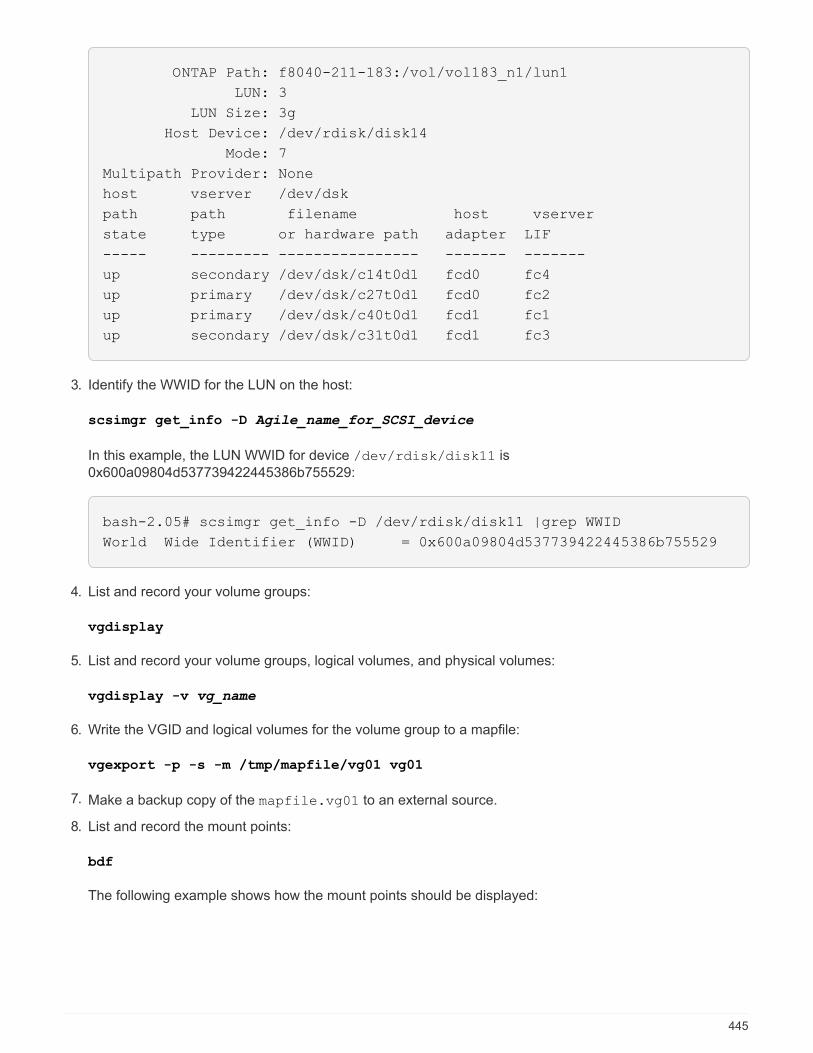
ONTAP Path: f8040-211-183:/vol/vol183_n1/lun1
LUN: 3
LUN Size: 3g
Host Device: /dev/rdisk/disk14
Mode: 7
Multipath Provider: None
host vserver /dev/dsk
path path filename host vserver
state type or hardware path adapter LIF
----- --------- ---------------- ------- -------
up secondary /dev/dsk/c14t0d1 fcd0 fc4
up primary /dev/dsk/c27t0d1 fcd0 fc2
up primary /dev/dsk/c40t0d1 fcd1 fc1
up secondary /dev/dsk/c31t0d1 fcd1 fc3
3. Identify the WWID for the LUN on the host:
scsimgr get_info -D Agile_name_for_SCSI_device
In this example, the LUN WWID for device /dev/rdisk/disk11 is
0x600a09804d537739422445386b755529:
bash-2.05# scsimgr get_info -D /dev/rdisk/disk11 |grep WWID
World Wide Identifier (WWID) = 0x600a09804d537739422445386b755529
4. List and record your volume groups:
vgdisplay
5. List and record your volume groups, logical volumes, and physical volumes:
vgdisplay -v vg_name
6. Write the VGID and logical volumes for the volume group to a mapfile:
vgexport -p -s -m /tmp/mapfile/vg01 vg01
7. Make a backup copy of the mapfile.vg01 to an external source.
8. List and record the mount points:
bdf
The following example shows how the mount points should be displayed:
445
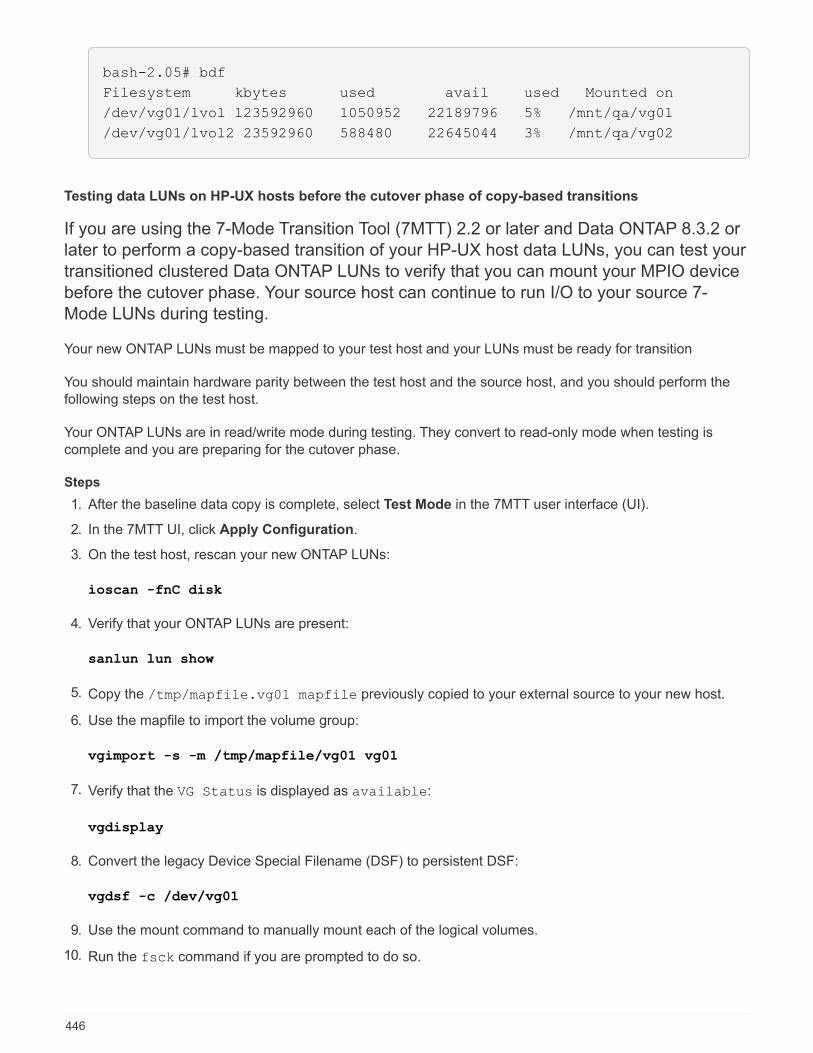
bash-2.05# bdf
Filesystem kbytes used avail used Mounted on
/dev/vg01/lvol 123592960 1050952 22189796 5% /mnt/qa/vg01
/dev/vg01/lvol2 23592960 588480 22645044 3% /mnt/qa/vg02
Testing data LUNs on HP-UX hosts before the cutover phase of copy-based transitions
If you are using the 7-Mode Transition Tool (7MTT) 2.2 or later and Data ONTAP 8.3.2 or
later to perform a copy-based transition of your HP-UX host data LUNs, you can test your
transitioned clustered Data ONTAP LUNs to verify that you can mount your MPIO device
before the cutover phase. Your source host can continue to run I/O to your source 7-
Mode LUNs during testing.
Your new ONTAP LUNs must be mapped to your test host and your LUNs must be ready for transition
You should maintain hardware parity between the test host and the source host, and you should perform the
following steps on the test host.
Your ONTAP LUNs are in read/write mode during testing. They convert to read-only mode when testing is
complete and you are preparing for the cutover phase.
Steps
1. After the baseline data copy is complete, select Test Mode in the 7MTT user interface (UI).
2. In the 7MTT UI, click Apply Configuration.
3. On the test host, rescan your new ONTAP LUNs:
ioscan -fnC disk
4. Verify that your ONTAP LUNs are present:
sanlun lun show
5. Copy the /tmp/mapfile.vg01 mapfile previously copied to your external source to your new host.
6. Use the mapfile to import the volume group:
vgimport -s -m /tmp/mapfile/vg01 vg01
7. Verify that the VG Status is displayed as available:
vgdisplay
8. Convert the legacy Device Special Filename (DSF) to persistent DSF:
vgdsf -c /dev/vg01
9. Use the mount command to manually mount each of the logical volumes.
10. Run the fsck command if you are prompted to do so.
446

11. Verify the mount points:
bdf
12. Perform your testing as needed.
13. Shut down the test host.
14. In the 7MTT UI, click Finish Test.
If your ONTAP LUNs must be remapped to your source host, then you must prepare your source host for the
cutover phase. If your ONTAP LUNs must remain mapped to your test host, then no further steps are required
on the test host.
Preparing for cutover phase when transitioning HP-UX host data LUNs with file systems
If you are transitioning an HP host data LUN with a file system from Data ONTAP
operating in 7-Mode to clustered Data ONTAP, you must perform certain steps before
entering the cutover phase.
If you are using an FC configuration, fabric connectivity and zoning to the clustered Data ONTAP nodes must
be established.
If you are using an iSCSI configuration, the iSCSI sessions to the clustered Data ONTAP nodes must be
discovered and logged in.
For copy-based transitions, perform these steps after completing the Storage Cutover operation in the 7-Mode
Transition Tool (7MTT). Copy-free transitions are not supported for HP-UX hosts.
Steps
1. Stop I/O on all mount points.
2. Shut down each application accessing the LUNs according to the recommendations of the application
vendor.
3. Unmount all of the mount points:
umount mount_point
4. Export your volume group and write the VGID and logical volumes for the volume group to a mapfile:
vgexport -p -s -m /tmp/mapfile.vg01 vg01
5. Make a backup copy of the mapfile.vg01 file to an external source.
6. Disable the volume group:
vgchange -a n vg_name
7. Export the volume group:
vgexport vg_name
8. Verify that the volume group has been exported:
vgdisplay
447
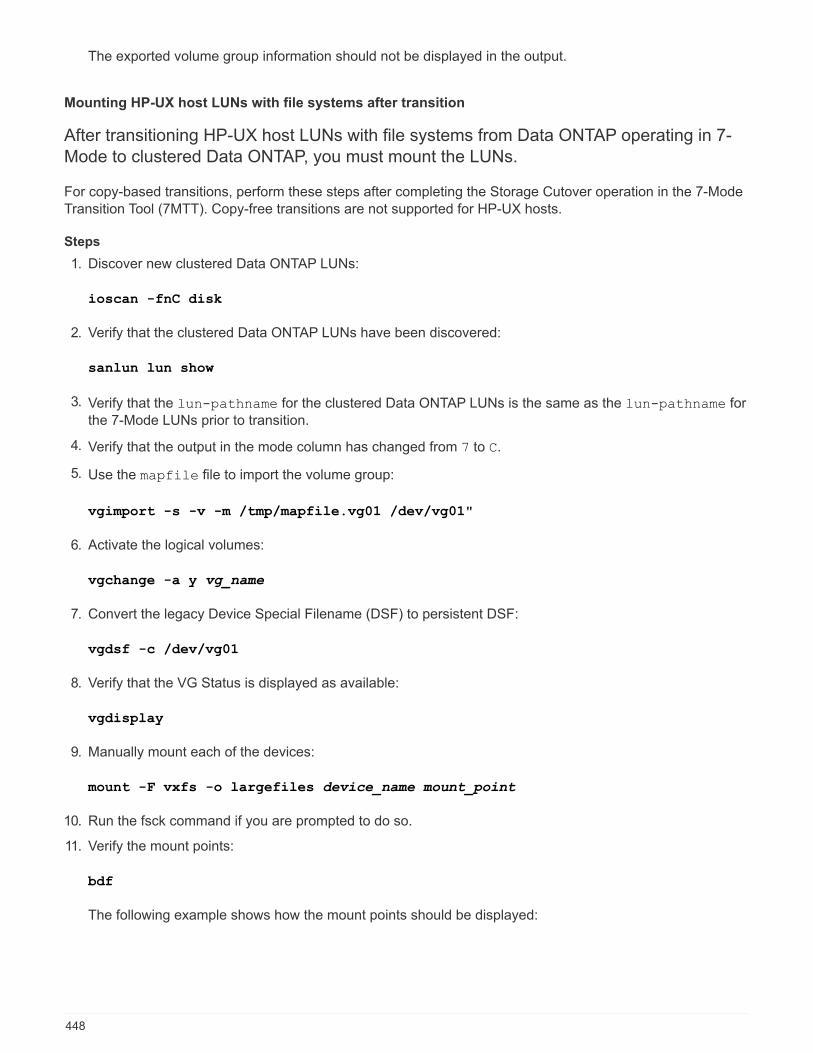
The exported volume group information should not be displayed in the output.
Mounting HP-UX host LUNs with file systems after transition
After transitioning HP-UX host LUNs with file systems from Data ONTAP operating in 7-
Mode to clustered Data ONTAP, you must mount the LUNs.
For copy-based transitions, perform these steps after completing the Storage Cutover operation in the 7-Mode
Transition Tool (7MTT). Copy-free transitions are not supported for HP-UX hosts.
Steps
1. Discover new clustered Data ONTAP LUNs:
ioscan -fnC disk
2. Verify that the clustered Data ONTAP LUNs have been discovered:
sanlun lun show
3. Verify that the lun-pathname for the clustered Data ONTAP LUNs is the same as the lun-pathname for
the 7-Mode LUNs prior to transition.
4. Verify that the output in the mode column has changed from 7 to C.
5. Use the mapfile file to import the volume group:
vgimport -s -v -m /tmp/mapfile.vg01 /dev/vg01"
6. Activate the logical volumes:
vgchange -a y vg_name
7. Convert the legacy Device Special Filename (DSF) to persistent DSF:
vgdsf -c /dev/vg01
8. Verify that the VG Status is displayed as available:
vgdisplay
9. Manually mount each of the devices:
mount -F vxfs -o largefiles device_name mount_point
10. Run the fsck command if you are prompted to do so.
11. Verify the mount points:
bdf
The following example shows how the mount points should be displayed:
448
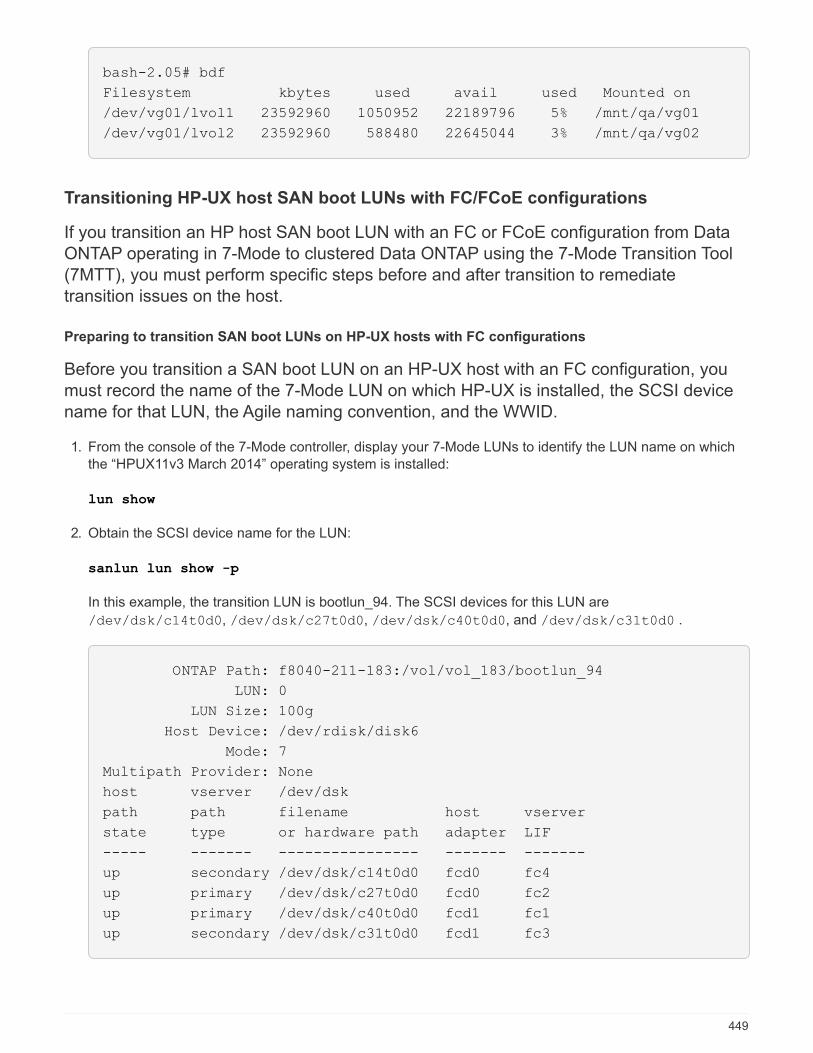
bash-2.05# bdf
Filesystem kbytes used avail used Mounted on
/dev/vg01/lvol1 23592960 1050952 22189796 5% /mnt/qa/vg01
/dev/vg01/lvol2 23592960 588480 22645044 3% /mnt/qa/vg02
Transitioning HP-UX host SAN boot LUNs with FC/FCoE configurations
If you transition an HP host SAN boot LUN with an FC or FCoE configuration from Data
ONTAP operating in 7-Mode to clustered Data ONTAP using the 7-Mode Transition Tool
(7MTT), you must perform specific steps before and after transition to remediate
transition issues on the host.
Preparing to transition SAN boot LUNs on HP-UX hosts with FC configurations
Before you transition a SAN boot LUN on an HP-UX host with an FC configuration, you
must record the name of the 7-Mode LUN on which HP-UX is installed, the SCSI device
name for that LUN, the Agile naming convention, and the WWID.
1. From the console of the 7-Mode controller, display your 7-Mode LUNs to identify the LUN name on which
the “HPUX11v3 March 2014” operating system is installed:
lun show
2. Obtain the SCSI device name for the LUN:
sanlun lun show -p
In this example, the transition LUN is bootlun_94. The SCSI devices for this LUN are
/dev/dsk/c14t0d0, /dev/dsk/c27t0d0, /dev/dsk/c40t0d0, and /dev/dsk/c31t0d0 .
ONTAP Path: f8040-211-183:/vol/vol_183/bootlun_94
LUN: 0
LUN Size: 100g
Host Device: /dev/rdisk/disk6
Mode: 7
Multipath Provider: None
host vserver /dev/dsk
path path filename host vserver
state type or hardware path adapter LIF
----- ------- ---------------- ------- -------
up secondary /dev/dsk/c14t0d0 fcd0 fc4
up primary /dev/dsk/c27t0d0 fcd0 fc2
up primary /dev/dsk/c40t0d0 fcd1 fc1
up secondary /dev/dsk/c31t0d0 fcd1 fc3
449

3. Identify the WWID for the LUN on the host:
scsimgr get_info -D SCSI_device_name |grep WWID
In the following example, the LUN WWID for device /dev/rdisk/disk6 is
0x600a09804d537739422445386b75556:
bash-2.05# scsimgr get_info -D /dev/rdisk/disk6 | grep WWID
World Wide Identifier (WWID) = 0x600a09804d537739422445386b755564
bash-2.05#
Testing transitioned SAN boot LUNs on HP-UX hosts before the cutover phase of copy-basedtransitions
If you are using the 7-Mode Transition Tool (7MTT) 2.2 or later and Data ONTAP 8.3.2 or
later to transition your HP-UX host SAN boot LUNs, you can test your transitioned
clustered Data ONTAP LUNs before the cutover phase. Your source host can continue to
run I/O to your source 7-Mode LUNs during testing.
Your new clustered Data ONTAP LUNs must be mapped to your test host and your LUNs must be ready for
transition
You should maintain hardware parity between the test host and the source host, and you should perform the
following steps on the test host.
Your clustered Data ONTAP LUNs are in read/write mode during testing. They convert to read-only mode when
testing is complete and you are preparing for the cutover phase.
Steps
1. After the baseline data copy is complete, select Test Mode in the 7MTT user interface (UI).
2. In the 7MTT UI, click Apply Configuration.
3. On the test host, enter the HBA BIOS.
4. Change the IP address and host name on the test host.
5. Verify that your clustered Data ONTAP LUNs are present on the test host:
sanlun lun show
6. Perform your testing as needed.
7. Shut down the test host:
shutdown -h -y 0
8. In the 7MTT UI, click Finish Testing.
If your clustered Data ONTAP LUNs are to be remapped to your source host, you must prepare your source
host for the cutover phase. If your clustered Data ONTAP LUNs are to remain mapped to your test host, no
further steps are required on the test host.
450
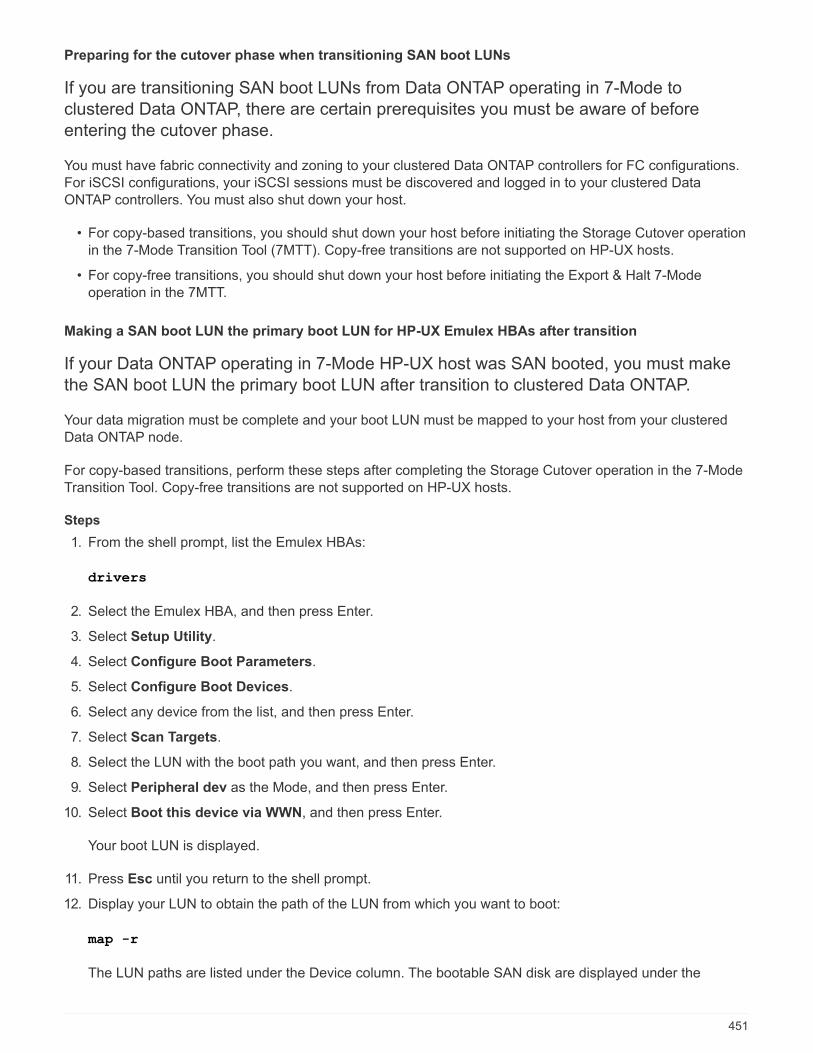
Preparing for the cutover phase when transitioning SAN boot LUNs
If you are transitioning SAN boot LUNs from Data ONTAP operating in 7-Mode to
clustered Data ONTAP, there are certain prerequisites you must be aware of before
entering the cutover phase.
You must have fabric connectivity and zoning to your clustered Data ONTAP controllers for FC configurations.
For iSCSI configurations, your iSCSI sessions must be discovered and logged in to your clustered Data
ONTAP controllers. You must also shut down your host.
• For copy-based transitions, you should shut down your host before initiating the Storage Cutover operation
in the 7-Mode Transition Tool (7MTT). Copy-free transitions are not supported on HP-UX hosts.
• For copy-free transitions, you should shut down your host before initiating the Export & Halt 7-Mode
operation in the 7MTT.
Making a SAN boot LUN the primary boot LUN for HP-UX Emulex HBAs after transition
If your Data ONTAP operating in 7-Mode HP-UX host was SAN booted, you must make
the SAN boot LUN the primary boot LUN after transition to clustered Data ONTAP.
Your data migration must be complete and your boot LUN must be mapped to your host from your clustered
Data ONTAP node.
For copy-based transitions, perform these steps after completing the Storage Cutover operation in the 7-Mode
Transition Tool. Copy-free transitions are not supported on HP-UX hosts.
Steps
1. From the shell prompt, list the Emulex HBAs:
drivers
2. Select the Emulex HBA, and then press Enter.
3. Select Setup Utility.
4. Select Configure Boot Parameters.
5. Select Configure Boot Devices.
6. Select any device from the list, and then press Enter.
7. Select Scan Targets.
8. Select the LUN with the boot path you want, and then press Enter.
9. Select Peripheral dev as the Mode, and then press Enter.
10. Select Boot this device via WWN, and then press Enter.
Your boot LUN is displayed.
11. Press Esc until you return to the shell prompt.
12. Display your LUN to obtain the path of the LUN from which you want to boot:
map -r
The LUN paths are listed under the Device column. The bootable SAN disk are displayed under the
451
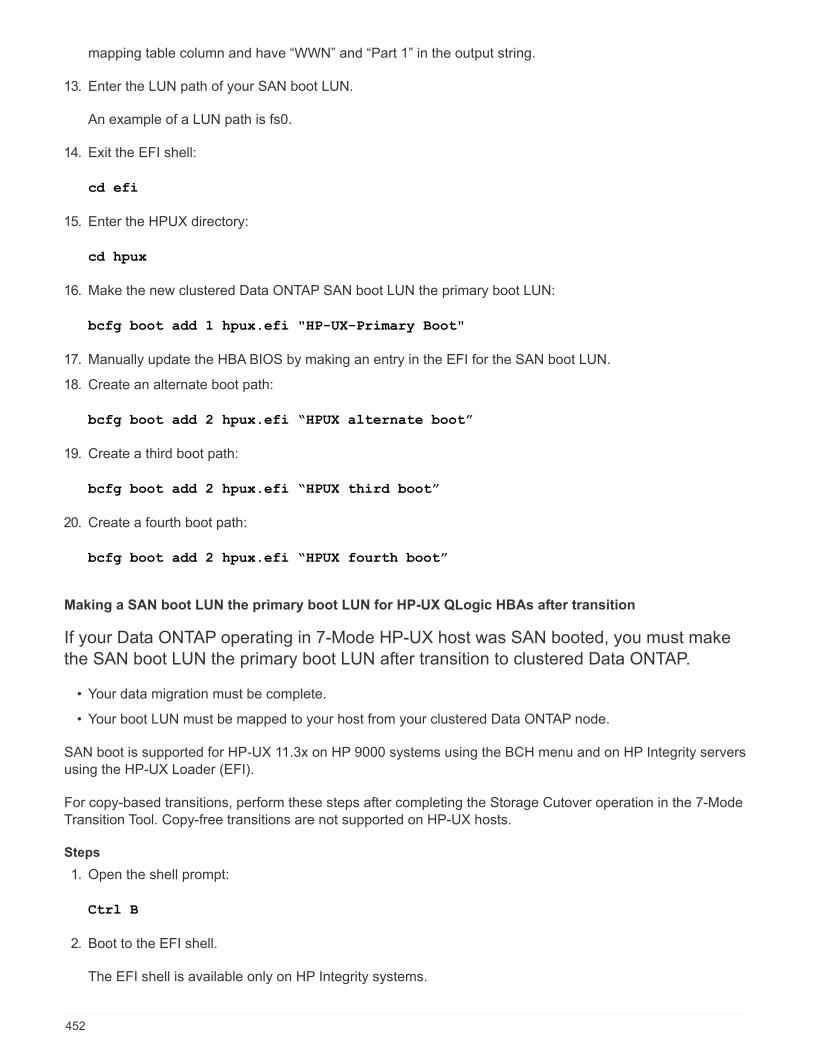
mapping table column and have “WWN” and “Part 1” in the output string.
13. Enter the LUN path of your SAN boot LUN.
An example of a LUN path is fs0.
14. Exit the EFI shell:
cd efi
15. Enter the HPUX directory:
cd hpux
16. Make the new clustered Data ONTAP SAN boot LUN the primary boot LUN:
bcfg boot add 1 hpux.efi "HP-UX-Primary Boot"
17. Manually update the HBA BIOS by making an entry in the EFI for the SAN boot LUN.
18. Create an alternate boot path:
bcfg boot add 2 hpux.efi “HPUX alternate boot”
19. Create a third boot path:
bcfg boot add 2 hpux.efi “HPUX third boot”
20. Create a fourth boot path:
bcfg boot add 2 hpux.efi “HPUX fourth boot”
Making a SAN boot LUN the primary boot LUN for HP-UX QLogic HBAs after transition
If your Data ONTAP operating in 7-Mode HP-UX host was SAN booted, you must make
the SAN boot LUN the primary boot LUN after transition to clustered Data ONTAP.
• Your data migration must be complete.
• Your boot LUN must be mapped to your host from your clustered Data ONTAP node.
SAN boot is supported for HP-UX 11.3x on HP 9000 systems using the BCH menu and on HP Integrity servers
using the HP-UX Loader (EFI).
For copy-based transitions, perform these steps after completing the Storage Cutover operation in the 7-Mode
Transition Tool. Copy-free transitions are not supported on HP-UX hosts.
Steps
1. Open the shell prompt:
Ctrl B
2. Boot to the EFI shell.
The EFI shell is available only on HP Integrity systems.
452
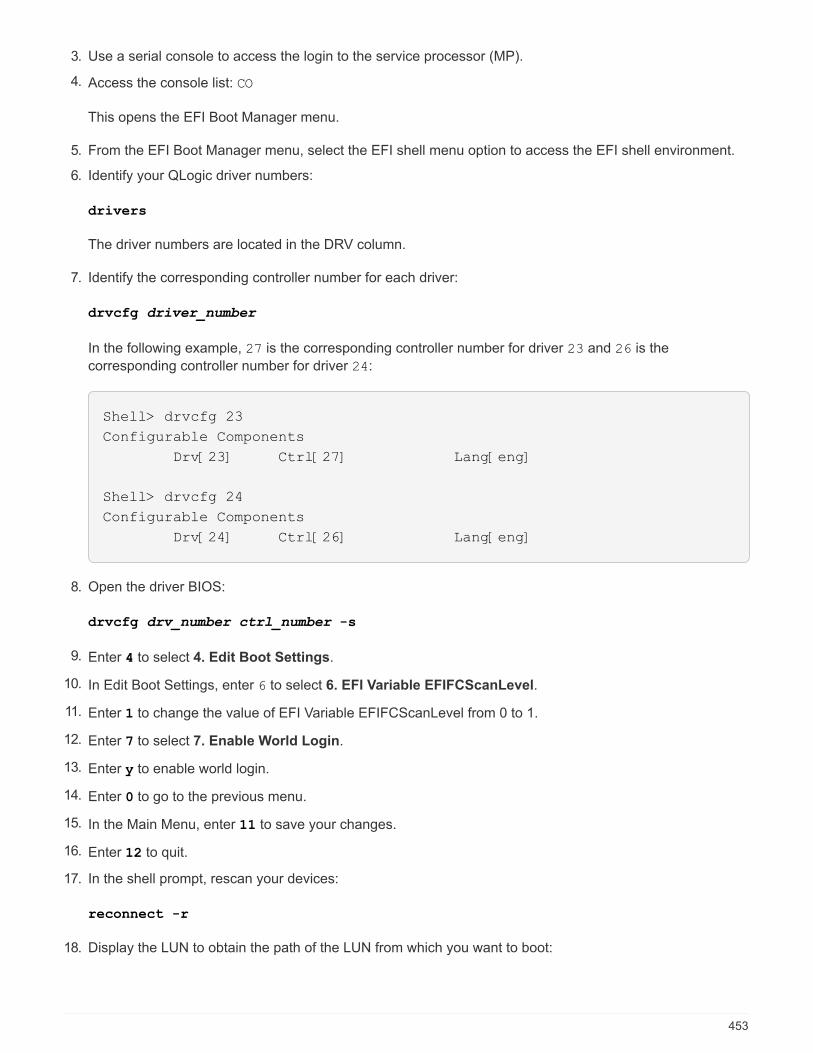
3. Use a serial console to access the login to the service processor (MP).
4. Access the console list: CO
This opens the EFI Boot Manager menu.
5. From the EFI Boot Manager menu, select the EFI shell menu option to access the EFI shell environment.
6. Identify your QLogic driver numbers:
drivers
The driver numbers are located in the DRV column.
7. Identify the corresponding controller number for each driver:
drvcfg driver_number
In the following example, 27 is the corresponding controller number for driver 23 and 26 is the
corresponding controller number for driver 24:
Shell> drvcfg 23
Configurable Components
Drv[23] Ctrl[27] Lang[eng]
Shell> drvcfg 24
Configurable Components
Drv[24] Ctrl[26] Lang[eng]
8. Open the driver BIOS:
drvcfg drv_number ctrl_number -s
9. Enter 4 to select 4. Edit Boot Settings.
10. In Edit Boot Settings, enter 6 to select 6. EFI Variable EFIFCScanLevel.
11. Enter 1 to change the value of EFI Variable EFIFCScanLevel from 0 to 1.
12. Enter 7 to select 7. Enable World Login.
13. Enter y to enable world login.
14. Enter 0 to go to the previous menu.
15. In the Main Menu, enter 11 to save your changes.
16. Enter 12 to quit.
17. In the shell prompt, rescan your devices:
reconnect -r
18. Display the LUN to obtain the path of the LUN from which you want to boot:
453

map -r
The LUN paths are listed under the Device column. The bootable SAN disk are displayed under the
mapping table column and have “WWN” and “Part 1” in the output string.
19. Enter the LUN path of your SAN boot LUN.
An example of a LUN path is fs0.
20. Exit the EFI shell:
cd efi
21. Enter the HPUX directory:
cd hpux
22. Make the new clustered Data ONTAP SAN boot LUN the primary boot LUN:
bcfg boot add 1 hpux.efi "HP-UX-Primary Boot"
23. Manually update the HBA BIOS by making an entry in the EFI for the SAN boot LUN.
24. Create an alternate boot path:
bcfg boot add 2 hpux.efi “HPUX alternate boot”
25. Create a third boot path:
bcfg boot add 2 hpux.efi “HPUX third boot”
26. Create a fourth boot path:
bcfg boot add 2 hpux.efi “HPUX fourth boot”
AIX host remediation
If you are using the 7-Mode Transition Tool (7MTT) to move from Data ONTAP operating
in 7-Mode to clustered Data ONTAP in a SAN environment, you must perform a series of
steps on your AIX host before and after transition to avoid transition complications.
Transition of SAN boot LUNs on AIX hosts with FC/FCoE configurations
If you transition a SAN boot LUN on an AIX host with an FC or FCoE configuration from
Data ONTAP operating in 7-Mode to clustered Data ONTAP using the 7-Mode Transition
Tool (7MTT), you must perform specific steps before and after transition to remediate
transition issues on the host.
Preparing to transition SAN boot LUNs on AIX hosts with FC/FCoE configurations
Before you transition a SAN boot LUN on an AIX host with an FC/FCoE configuration,
you must record the name of the 7-Mode LUN on which AIX is installed and the SCSI
454
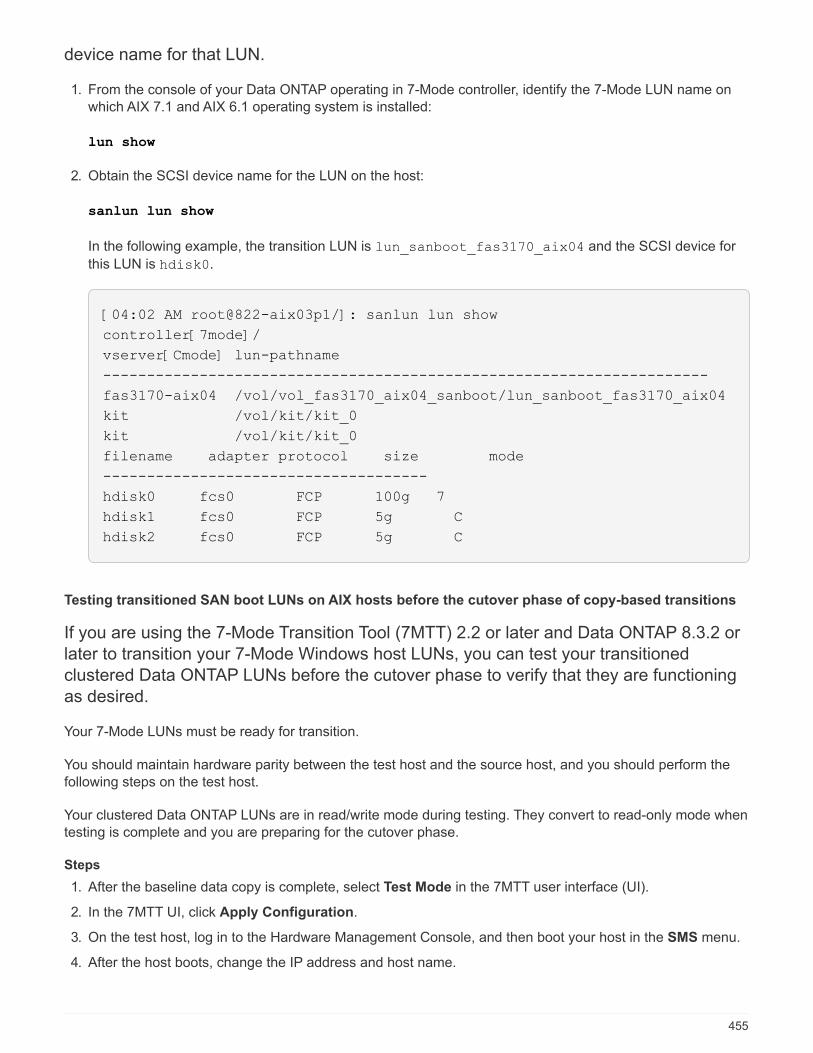
device name for that LUN.
1. From the console of your Data ONTAP operating in 7-Mode controller, identify the 7-Mode LUN name on
which AIX 7.1 and AIX 6.1 operating system is installed:
lun show
2. Obtain the SCSI device name for the LUN on the host:
sanlun lun show
In the following example, the transition LUN is lun_sanboot_fas3170_aix04 and the SCSI device for
this LUN is hdisk0.
[04:02 AM root@822-aix03p1/]: sanlun lun show
controller[7mode]/
vserver[Cmode] lun-pathname
---------------------------------------------------------------------
fas3170-aix04 /vol/vol_fas3170_aix04_sanboot/lun_sanboot_fas3170_aix04
kit /vol/kit/kit_0
kit /vol/kit/kit_0
filename adapter protocol size mode
-------------------------------------
hdisk0 fcs0 FCP 100g 7
hdisk1 fcs0 FCP 5g C
hdisk2 fcs0 FCP 5g C
Testing transitioned SAN boot LUNs on AIX hosts before the cutover phase of copy-based transitions
If you are using the 7-Mode Transition Tool (7MTT) 2.2 or later and Data ONTAP 8.3.2 or
later to transition your 7-Mode Windows host LUNs, you can test your transitioned
clustered Data ONTAP LUNs before the cutover phase to verify that they are functioning
as desired.
Your 7-Mode LUNs must be ready for transition.
You should maintain hardware parity between the test host and the source host, and you should perform the
following steps on the test host.
Your clustered Data ONTAP LUNs are in read/write mode during testing. They convert to read-only mode when
testing is complete and you are preparing for the cutover phase.
Steps
1. After the baseline data copy is complete, select Test Mode in the 7MTT user interface (UI).
2. In the 7MTT UI, click Apply Configuration.
3. On the test host, log in to the Hardware Management Console, and then boot your host in the SMS menu.
4. After the host boots, change the IP address and host name.
455
5. Verify that your clustered Data ONTAP LUNs are present:
sanlun lun show
6. Perform your testing as needed.
7. Shut down the test host:
shutdown -h
8. In the 7MTT UI, click Finish Testing.
If your clustered Data ONTAP LUNs are to be remapped to your source host, you must prepare your source
host for the cutover phase. If your clustered Data ONTAP LUNs are to remain mapped to your test host, no
further steps are required on the test host.
Preparing for the cutover phase when transitioning AIX hosts with FC/FCoE configurations.
Before entering the cutover phase for AIX hosts with FC or FCoE configurations, you
must perform specific steps.
Fabric connectivity and zoning to the clustered Data ONTAP nodes must be established.
For copy-based transitions, perform these steps after completing the Storage Cutover operation in the 7-Mode
Transition Tool. Copy-free transitions are not supported on AIX hosts.
Steps
1. Shut down your host:
shutdown -h
Booting from SAN boot LUN on AIX hosts with FC/FCoE configurations after transition
After transitioning a SAN boot LUN on an AIX host with an FC or FCoE configuration, you
must perform certain steps to boot your host from the SAN boot LUN.
For copy-based transitions, you must perform these steps after completing the Storage Cutover operation in
the 7-Mode Transition Tool. Copy-free transitions are not supported on AIX hosts.
1. Log in to the Hardware Management Console (HMC), and then boot your host in the SMS menu.
2. Select the host.
3. Select Operations > Activate > Profile.
4. Click the Advanced tab.
5. Select SMS, and then click OK.
6. In the SMS Main Menu, enter 5 to select 5. Select Boot Options.
7. Enter 1 to select 1. Select Install/Boot Device.
8. Enter 5 to select 5. List all Devices.
9. Enter the device number of the ONTAP SAN boot LUN that you want to boot with.
456
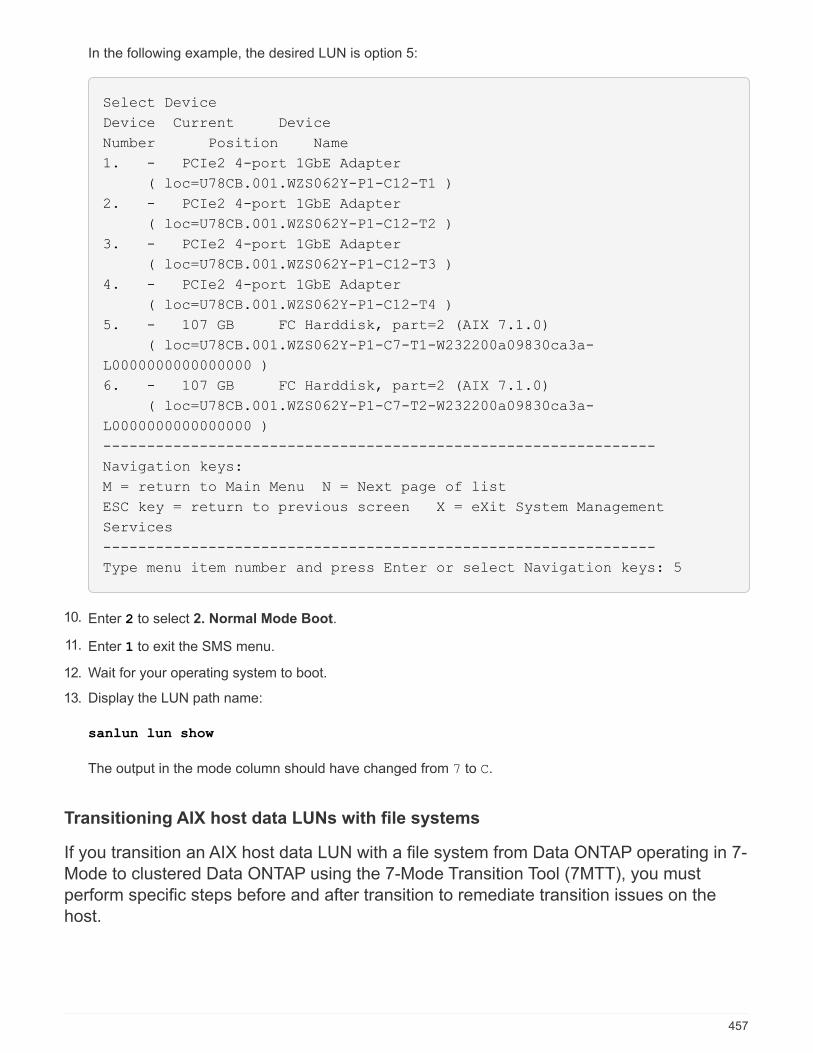
In the following example, the desired LUN is option 5:
Select Device
Device Current Device
Number Position Name
1. - PCIe2 4-port 1GbE Adapter
( loc=U78CB.001.WZS062Y-P1-C12-T1 )
2. - PCIe2 4-port 1GbE Adapter
( loc=U78CB.001.WZS062Y-P1-C12-T2 )
3. - PCIe2 4-port 1GbE Adapter
( loc=U78CB.001.WZS062Y-P1-C12-T3 )
4. - PCIe2 4-port 1GbE Adapter
( loc=U78CB.001.WZS062Y-P1-C12-T4 )
5. - 107 GB FC Harddisk, part=2 (AIX 7.1.0)
( loc=U78CB.001.WZS062Y-P1-C7-T1-W232200a09830ca3a-
L0000000000000000 )
6. - 107 GB FC Harddisk, part=2 (AIX 7.1.0)
( loc=U78CB.001.WZS062Y-P1-C7-T2-W232200a09830ca3a-
L0000000000000000 )
---------------------------------------------------------------
Navigation keys:
M = return to Main Menu N = Next page of list
ESC key = return to previous screen X = eXit System Management
Services
---------------------------------------------------------------
Type menu item number and press Enter or select Navigation keys: 5
10. Enter 2 to select 2. Normal Mode Boot.
11. Enter 1 to exit the SMS menu.
12. Wait for your operating system to boot.
13. Display the LUN path name:
sanlun lun show
The output in the mode column should have changed from 7 to C.
Transitioning AIX host data LUNs with file systems
If you transition an AIX host data LUN with a file system from Data ONTAP operating in 7-
Mode to clustered Data ONTAP using the 7-Mode Transition Tool (7MTT), you must
perform specific steps before and after transition to remediate transition issues on the
host.
457
Preparing to transition AIX host data LUNs with file systems
Before you transition AIX host data LUNs with file systems from Data ONTAP operating in
7-Mode to clustered Data ONTAP, you must gather information you need for the transition
process.
1. On the 7-Mode controller, identify the name of the LUN to be transitioned:
lun show
2. On the host, locate the SCSI device name for the LUN:
sanlun lun show
The SCSI device name is located in the device filename column.
3. List and record the physical volumes used by the volume group configured in the data LUNs to be
transitioned:
lsvg -p vg_name
4. List and record the logical volumes used by the volume group:
lsvg -l vg_name
Testing transitioned LUNs on AIX hosts before the cutover phase of copy-based transitions
If you are using the 7-Mode Transition Tool (7MTT) 2.2 or later and Data ONTAP 8.3.2 or
later to transition your AIX host LUNs, you can test your transitioned clustered Data
ONTAP LUNs to verify that you can mount your MPIO device before the cutover phase.
Your source host can continue to run I/O to your source 7-Mode LUNs during testing.
Your LUNs must be prepared for transition.
You should maintain hardware parity between the test host and the source host and you should perform the
following steps on the test host.
Your clustered Data ONTAP LUNs are in read/write mode during testing. They convert to read-only mode when
testing is complete and you are preparing for the cutover phase.
Steps
1. After the Baseline Data Copy is complete select Test Mode in the 7MTT user interface (UI).
2. In the 7MTT UI, click Apply Configuration.
3. On the test host, rescan your new clustered Data ONTAP LUNs:
cfgmgr
4. Verify that your new clustered Data ONTAP LUNs are present:
sanlun lun show
458
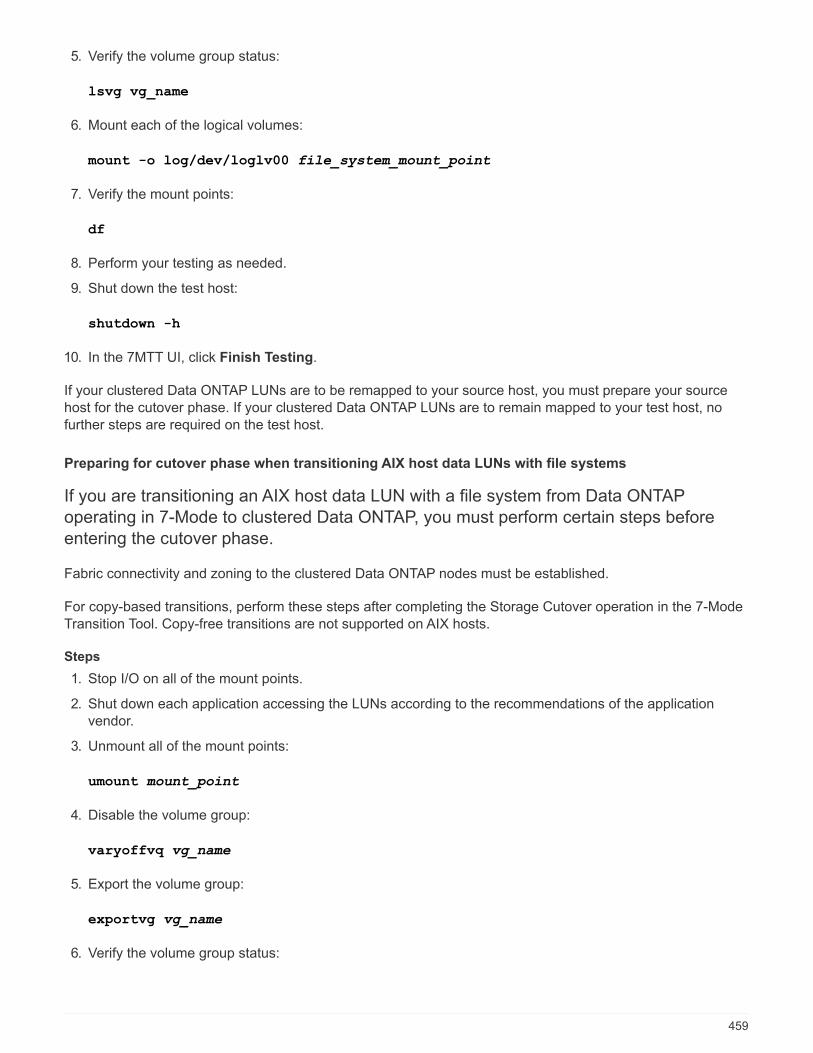
5. Verify the volume group status:
lsvg vg_name
6. Mount each of the logical volumes:
mount -o log/dev/loglv00 file_system_mount_point
7. Verify the mount points:
df
8. Perform your testing as needed.
9. Shut down the test host:
shutdown -h
10. In the 7MTT UI, click Finish Testing.
If your clustered Data ONTAP LUNs are to be remapped to your source host, you must prepare your source
host for the cutover phase. If your clustered Data ONTAP LUNs are to remain mapped to your test host, no
further steps are required on the test host.
Preparing for cutover phase when transitioning AIX host data LUNs with file systems
If you are transitioning an AIX host data LUN with a file system from Data ONTAP
operating in 7-Mode to clustered Data ONTAP, you must perform certain steps before
entering the cutover phase.
Fabric connectivity and zoning to the clustered Data ONTAP nodes must be established.
For copy-based transitions, perform these steps after completing the Storage Cutover operation in the 7-Mode
Transition Tool. Copy-free transitions are not supported on AIX hosts.
Steps
1. Stop I/O on all of the mount points.
2. Shut down each application accessing the LUNs according to the recommendations of the application
vendor.
3. Unmount all of the mount points:
umount mount_point
4. Disable the volume group:
varyoffvq vg_name
5. Export the volume group:
exportvg vg_name
6. Verify the volume group status:
459
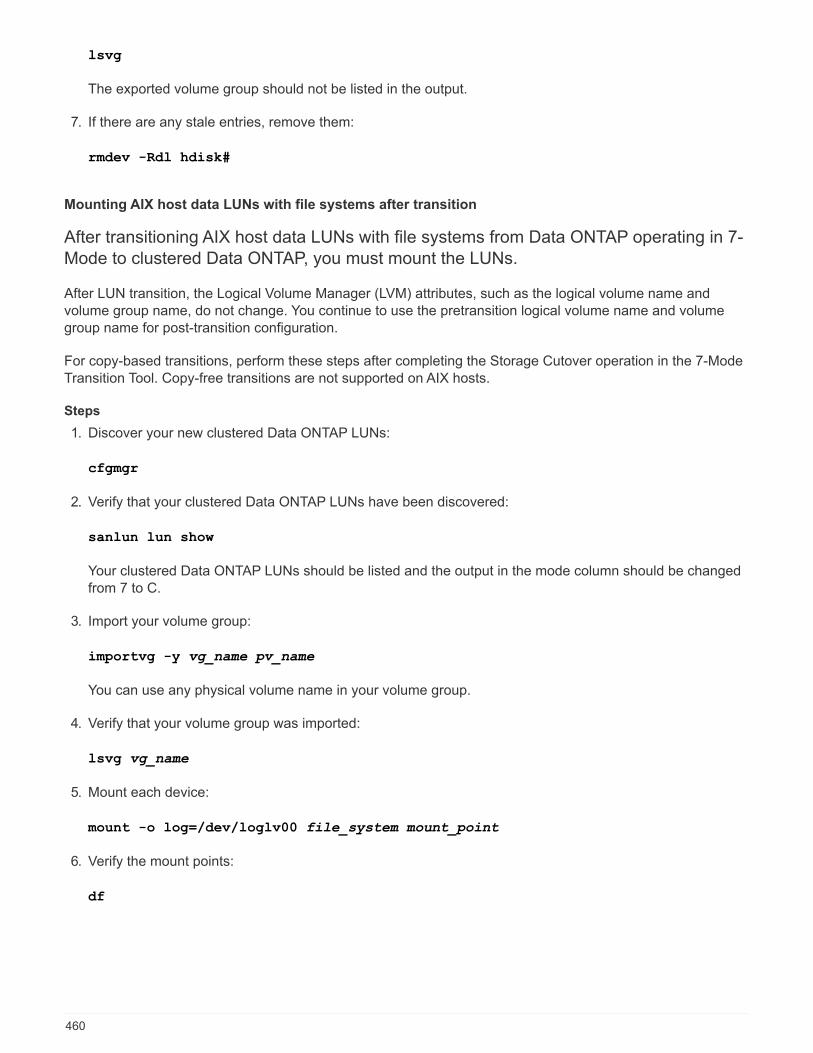
lsvg
The exported volume group should not be listed in the output.
7. If there are any stale entries, remove them:
rmdev -Rdl hdisk#
Mounting AIX host data LUNs with file systems after transition
After transitioning AIX host data LUNs with file systems from Data ONTAP operating in 7-
Mode to clustered Data ONTAP, you must mount the LUNs.
After LUN transition, the Logical Volume Manager (LVM) attributes, such as the logical volume name and
volume group name, do not change. You continue to use the pretransition logical volume name and volume
group name for post-transition configuration.
For copy-based transitions, perform these steps after completing the Storage Cutover operation in the 7-Mode
Transition Tool. Copy-free transitions are not supported on AIX hosts.
Steps
1. Discover your new clustered Data ONTAP LUNs:
cfgmgr
2. Verify that your clustered Data ONTAP LUNs have been discovered:
sanlun lun show
Your clustered Data ONTAP LUNs should be listed and the output in the mode column should be changed
from 7 to C.
3. Import your volume group:
importvg -y vg_name pv_name
You can use any physical volume name in your volume group.
4. Verify that your volume group was imported:
lsvg vg_name
5. Mount each device:
mount -o log=/dev/loglv00 file_system mount_point
6. Verify the mount points:
df
460
Solaris host remediation
If you are using the 7-Mode Transition Tool (7MTT) to move from ONTAP operating in 7-
Mode to clustered ONTAP in a SAN environment, you must perform a series of steps on
your Solaris host before and after transition to avoid transition complications.
The following scenarios are not supported for any transition workflow (support for copy-based or copy-free
transitions):
• Transition of SAN boot LUNs
You can set up a SAN boot LUN to work in a Veritas dynamic multipathing (DMP) environment or a Solaris
MPxIO environment by running the Solaris Host Utilities and using the FC protocol. The method you use to
set up a SAN boot LUN can vary, depending on your volume manager and file system.
Solaris Host Utilities 6.2 Installation and Setup Guide
• Solaris host clustering transition
• Veritas configuration
Transitioning Solaris host data LUNs with ZFS file systems
If you transition a Solaris host data LUN with ZFS file system from Data ONTAP operating
in 7-Mode to clustered Data ONTAP using the 7-Mode Transition Tool (7MTT), you must
perform specific steps before and after transition to remediate transition issues on the
host.
Preparing to transition Solaris host data LUNs with ZFS file system
Before you transition Solaris host LUNs with ZFS file systems from Data ONTAP
operating in 7-Mode to clustered Data ONTAP, you must gather information you need for
the transition process.
This applies to copy-based transitions and copy-free transitions.
Steps
1. On the 7-Mode controller, identify the name of the LUN to be transitioned:
lun show
461
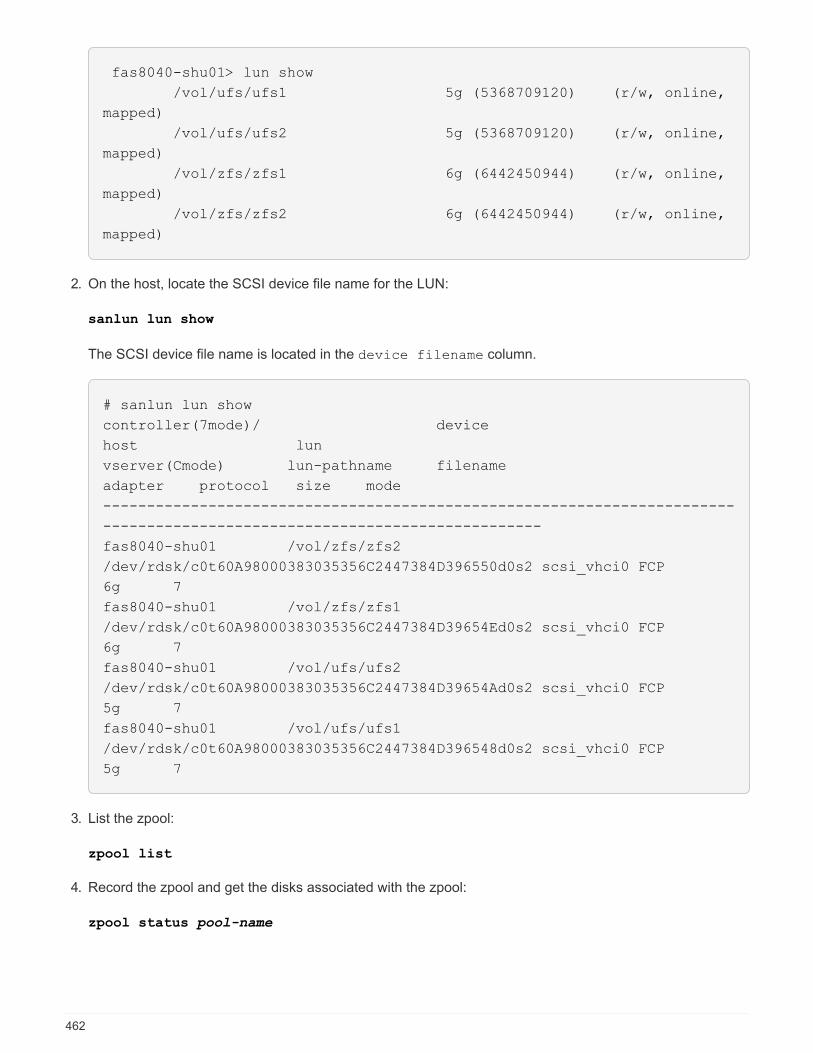
fas8040-shu01> lun show
/vol/ufs/ufs1 5g (5368709120) (r/w, online,
mapped)
/vol/ufs/ufs2 5g (5368709120) (r/w, online,
mapped)
/vol/zfs/zfs1 6g (6442450944) (r/w, online,
mapped)
/vol/zfs/zfs2 6g (6442450944) (r/w, online,
mapped)
2. On the host, locate the SCSI device file name for the LUN:
sanlun lun show
The SCSI device file name is located in the device filename column.
# sanlun lun show
controller(7mode)/ device
host lun
vserver(Cmode) lun-pathname filename
adapter protocol size mode
------------------------------------------------------------------------
--------------------------------------------------
fas8040-shu01 /vol/zfs/zfs2
/dev/rdsk/c0t60A98000383035356C2447384D396550d0s2 scsi_vhci0 FCP
6g 7
fas8040-shu01 /vol/zfs/zfs1
/dev/rdsk/c0t60A98000383035356C2447384D39654Ed0s2 scsi_vhci0 FCP
6g 7
fas8040-shu01 /vol/ufs/ufs2
/dev/rdsk/c0t60A98000383035356C2447384D39654Ad0s2 scsi_vhci0 FCP
5g 7
fas8040-shu01 /vol/ufs/ufs1
/dev/rdsk/c0t60A98000383035356C2447384D396548d0s2 scsi_vhci0 FCP
5g 7
3. List the zpool:
zpool list
4. Record the zpool and get the disks associated with the zpool:
zpool status pool-name
462
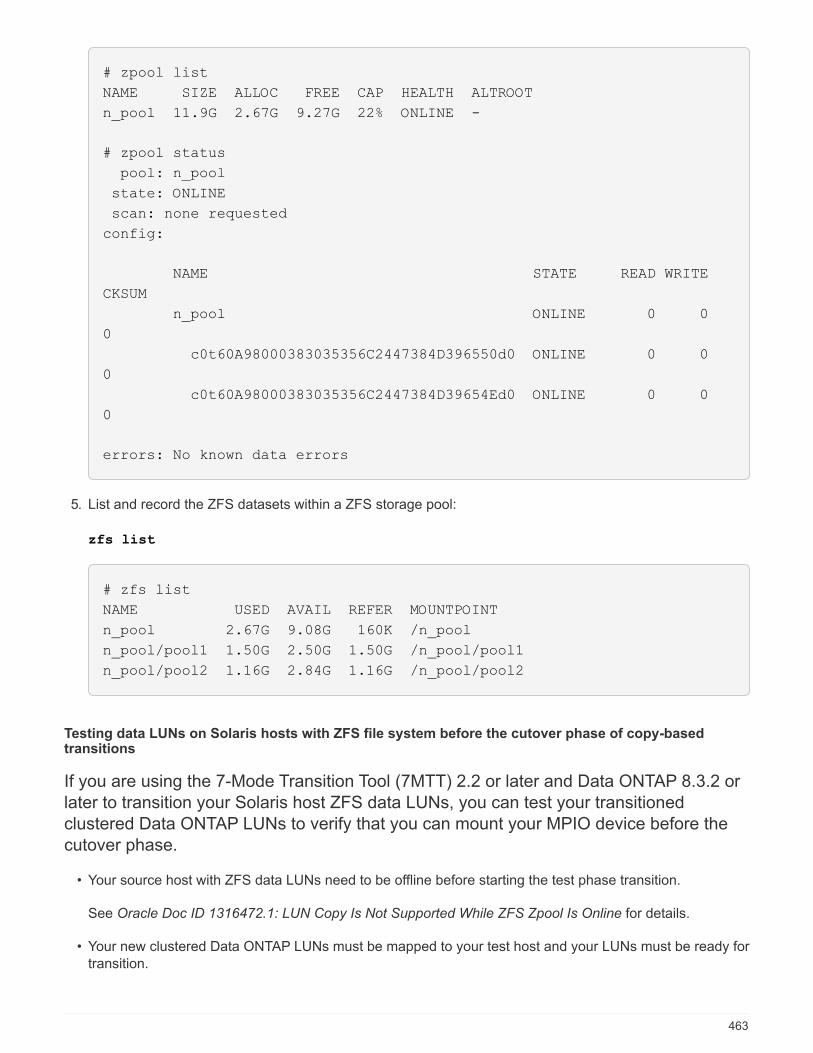
# zpool list
NAME SIZE ALLOC FREE CAP HEALTH ALTROOT
n_pool 11.9G 2.67G 9.27G 22% ONLINE -
# zpool status
pool: n_pool
state: ONLINE
scan: none requested
config:
NAME STATE READ WRITE
CKSUM
n_pool ONLINE 0 0
0
c0t60A98000383035356C2447384D396550d0 ONLINE 0 0
0
c0t60A98000383035356C2447384D39654Ed0 ONLINE 0 0
0
errors: No known data errors
5. List and record the ZFS datasets within a ZFS storage pool:
zfs list
# zfs list
NAME USED AVAIL REFER MOUNTPOINT
n_pool 2.67G 9.08G 160K /n_pool
n_pool/pool1 1.50G 2.50G 1.50G /n_pool/pool1
n_pool/pool2 1.16G 2.84G 1.16G /n_pool/pool2
Testing data LUNs on Solaris hosts with ZFS file system before the cutover phase of copy-basedtransitions
If you are using the 7-Mode Transition Tool (7MTT) 2.2 or later and Data ONTAP 8.3.2 or
later to transition your Solaris host ZFS data LUNs, you can test your transitioned
clustered Data ONTAP LUNs to verify that you can mount your MPIO device before the
cutover phase.
• Your source host with ZFS data LUNs need to be offline before starting the test phase transition.
See Oracle Doc ID 1316472.1: LUN Copy Is Not Supported While ZFS Zpool Is Online for details.
• Your new clustered Data ONTAP LUNs must be mapped to your test host and your LUNs must be ready for
transition.
463
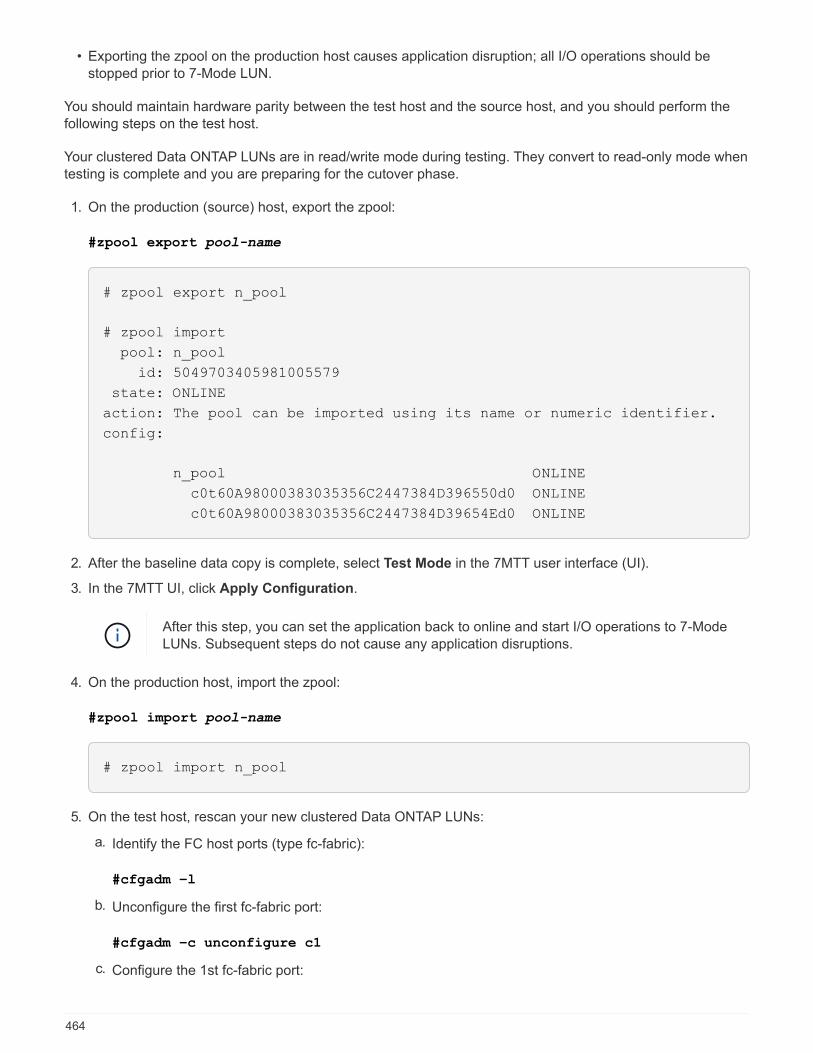
• Exporting the zpool on the production host causes application disruption; all I/O operations should be
stopped prior to 7-Mode LUN.
You should maintain hardware parity between the test host and the source host, and you should perform the
following steps on the test host.
Your clustered Data ONTAP LUNs are in read/write mode during testing. They convert to read-only mode when
testing is complete and you are preparing for the cutover phase.
1. On the production (source) host, export the zpool:
#zpool export pool-name
# zpool export n_pool
# zpool import
pool: n_pool
id: 5049703405981005579
state: ONLINE
action: The pool can be imported using its name or numeric identifier.
config:
n_pool ONLINE
c0t60A98000383035356C2447384D396550d0 ONLINE
c0t60A98000383035356C2447384D39654Ed0 ONLINE
2. After the baseline data copy is complete, select Test Mode in the 7MTT user interface (UI).
3. In the 7MTT UI, click Apply Configuration.
After this step, you can set the application back to online and start I/O operations to 7-Mode
LUNs. Subsequent steps do not cause any application disruptions.
4. On the production host, import the zpool:
#zpool import pool-name
# zpool import n_pool
5. On the test host, rescan your new clustered Data ONTAP LUNs:
a. Identify the FC host ports (type fc-fabric):
#cfgadm –l
b. Unconfigure the first fc-fabric port:
#cfgadm –c unconfigure c1
c. Configure the 1st fc-fabric port:
464
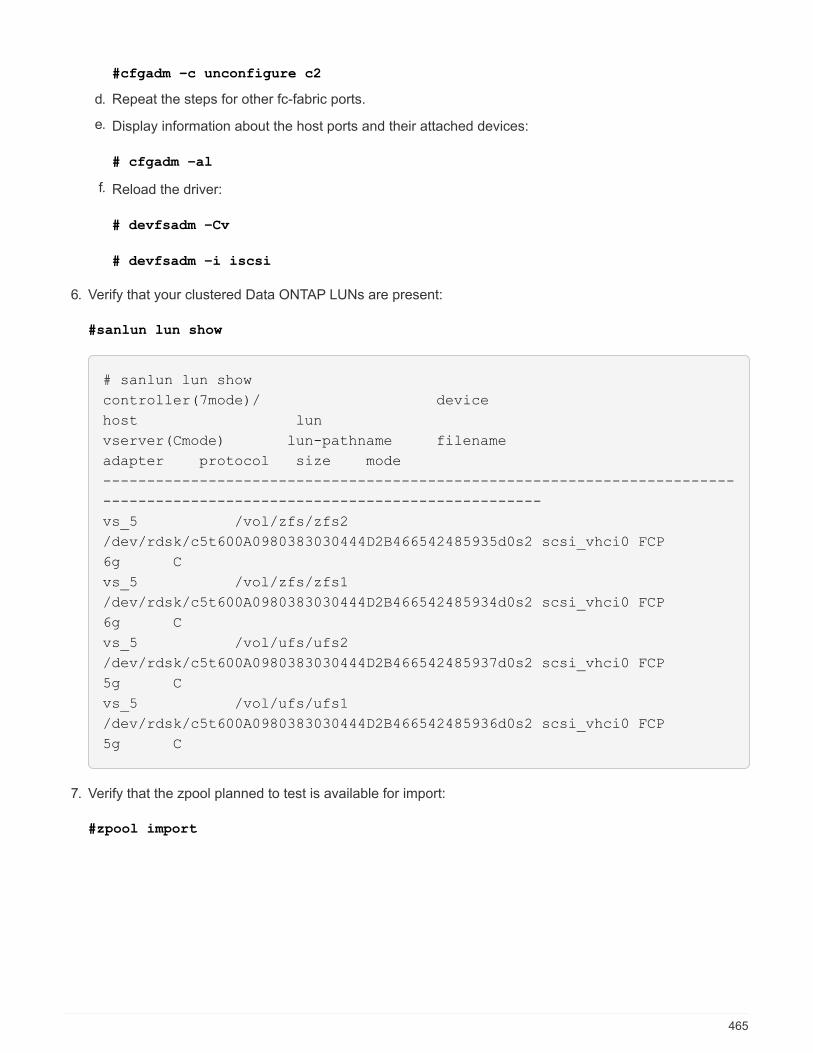
#cfgadm –c unconfigure c2
d. Repeat the steps for other fc-fabric ports.
e. Display information about the host ports and their attached devices:
# cfgadm –al
f. Reload the driver:
# devfsadm –Cv
# devfsadm –i iscsi
6. Verify that your clustered Data ONTAP LUNs are present:
#sanlun lun show
# sanlun lun show
controller(7mode)/ device
host lun
vserver(Cmode) lun-pathname filename
adapter protocol size mode
------------------------------------------------------------------------
--------------------------------------------------
vs_5 /vol/zfs/zfs2
/dev/rdsk/c5t600A0980383030444D2B466542485935d0s2 scsi_vhci0 FCP
6g C
vs_5 /vol/zfs/zfs1
/dev/rdsk/c5t600A0980383030444D2B466542485934d0s2 scsi_vhci0 FCP
6g C
vs_5 /vol/ufs/ufs2
/dev/rdsk/c5t600A0980383030444D2B466542485937d0s2 scsi_vhci0 FCP
5g C
vs_5 /vol/ufs/ufs1
/dev/rdsk/c5t600A0980383030444D2B466542485936d0s2 scsi_vhci0 FCP
5g C
7. Verify that the zpool planned to test is available for import:
#zpool import
465
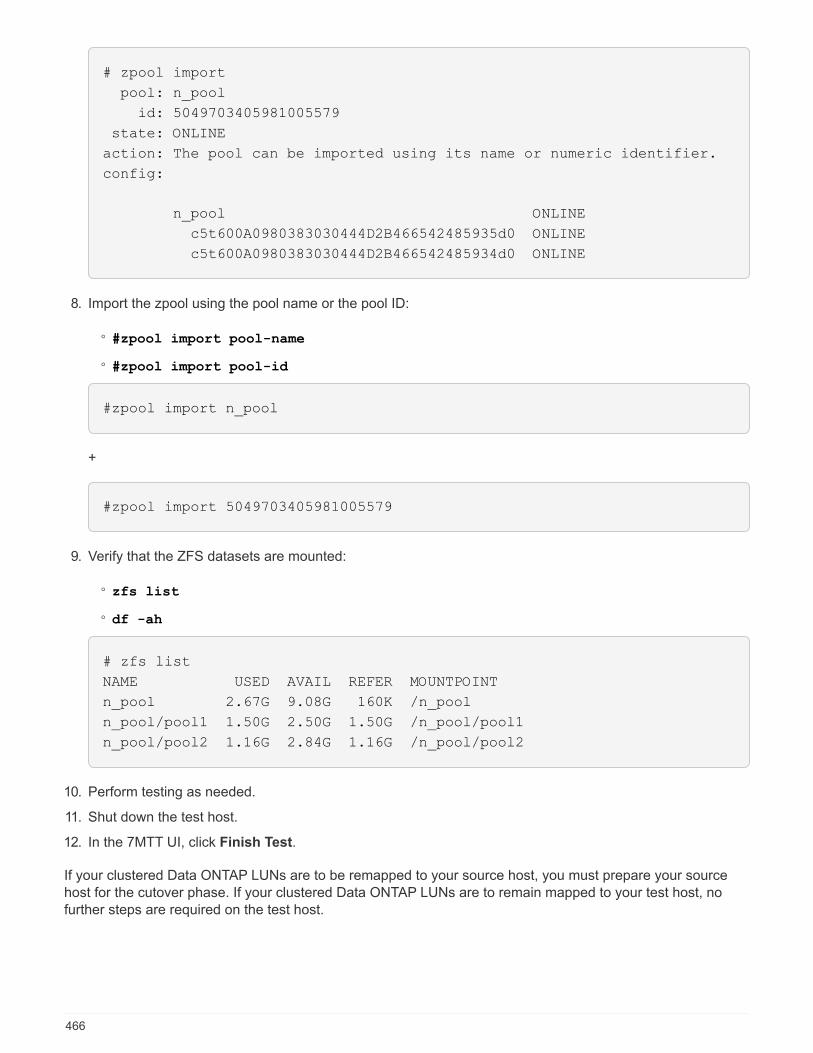
# zpool import
pool: n_pool
id: 5049703405981005579
state: ONLINE
action: The pool can be imported using its name or numeric identifier.
config:
n_pool ONLINE
c5t600A0980383030444D2B466542485935d0 ONLINE
c5t600A0980383030444D2B466542485934d0 ONLINE
8. Import the zpool using the pool name or the pool ID:
◦ #zpool import pool-name
◦ #zpool import pool-id
#zpool import n_pool
+
#zpool import 5049703405981005579
9. Verify that the ZFS datasets are mounted:
◦ zfs list
◦ df -ah
# zfs list
NAME USED AVAIL REFER MOUNTPOINT
n_pool 2.67G 9.08G 160K /n_pool
n_pool/pool1 1.50G 2.50G 1.50G /n_pool/pool1
n_pool/pool2 1.16G 2.84G 1.16G /n_pool/pool2
10. Perform testing as needed.
11. Shut down the test host.
12. In the 7MTT UI, click Finish Test.
If your clustered Data ONTAP LUNs are to be remapped to your source host, you must prepare your source
host for the cutover phase. If your clustered Data ONTAP LUNs are to remain mapped to your test host, no
further steps are required on the test host.
466
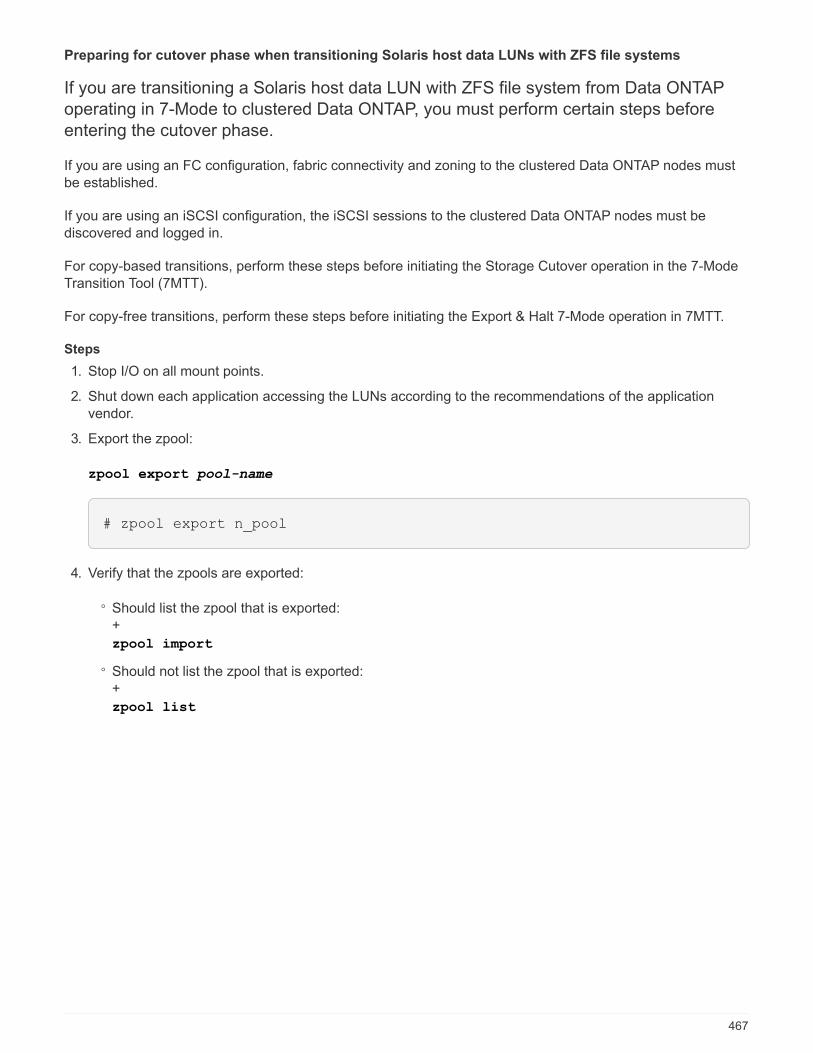
Preparing for cutover phase when transitioning Solaris host data LUNs with ZFS file systems
If you are transitioning a Solaris host data LUN with ZFS file system from Data ONTAP
operating in 7-Mode to clustered Data ONTAP, you must perform certain steps before
entering the cutover phase.
If you are using an FC configuration, fabric connectivity and zoning to the clustered Data ONTAP nodes must
be established.
If you are using an iSCSI configuration, the iSCSI sessions to the clustered Data ONTAP nodes must be
discovered and logged in.
For copy-based transitions, perform these steps before initiating the Storage Cutover operation in the 7-Mode
Transition Tool (7MTT).
For copy-free transitions, perform these steps before initiating the Export & Halt 7-Mode operation in 7MTT.
Steps
1. Stop I/O on all mount points.
2. Shut down each application accessing the LUNs according to the recommendations of the application
vendor.
3. Export the zpool:
zpool export pool-name
# zpool export n_pool
4. Verify that the zpools are exported:
◦ Should list the zpool that is exported:
+
zpool import
◦ Should not list the zpool that is exported:
+
zpool list
467
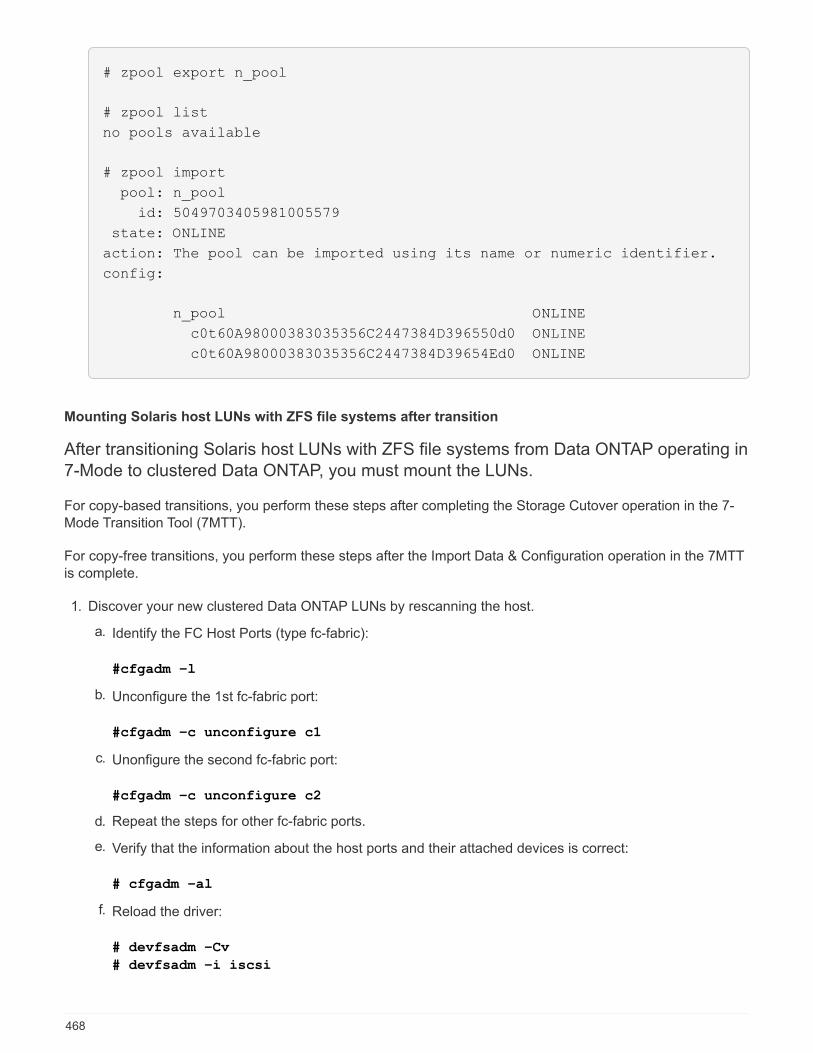
# zpool export n_pool
# zpool list
no pools available
# zpool import
pool: n_pool
id: 5049703405981005579
state: ONLINE
action: The pool can be imported using its name or numeric identifier.
config:
n_pool ONLINE
c0t60A98000383035356C2447384D396550d0 ONLINE
c0t60A98000383035356C2447384D39654Ed0 ONLINE
Mounting Solaris host LUNs with ZFS file systems after transition
After transitioning Solaris host LUNs with ZFS file systems from Data ONTAP operating in
7-Mode to clustered Data ONTAP, you must mount the LUNs.
For copy-based transitions, you perform these steps after completing the Storage Cutover operation in the 7-
Mode Transition Tool (7MTT).
For copy-free transitions, you perform these steps after the Import Data & Configuration operation in the 7MTT
is complete.
1. Discover your new clustered Data ONTAP LUNs by rescanning the host.
a. Identify the FC Host Ports (type fc-fabric):
#cfgadm –l
b. Unconfigure the 1st fc-fabric port:
#cfgadm –c unconfigure c1
c. Unonfigure the second fc-fabric port:
#cfgadm –c unconfigure c2
d. Repeat the steps for other fc-fabric ports.
e. Verify that the information about the host ports and their attached devices is correct:
# cfgadm –al
f. Reload the driver:
# devfsadm –Cv
# devfsadm –i iscsi
468
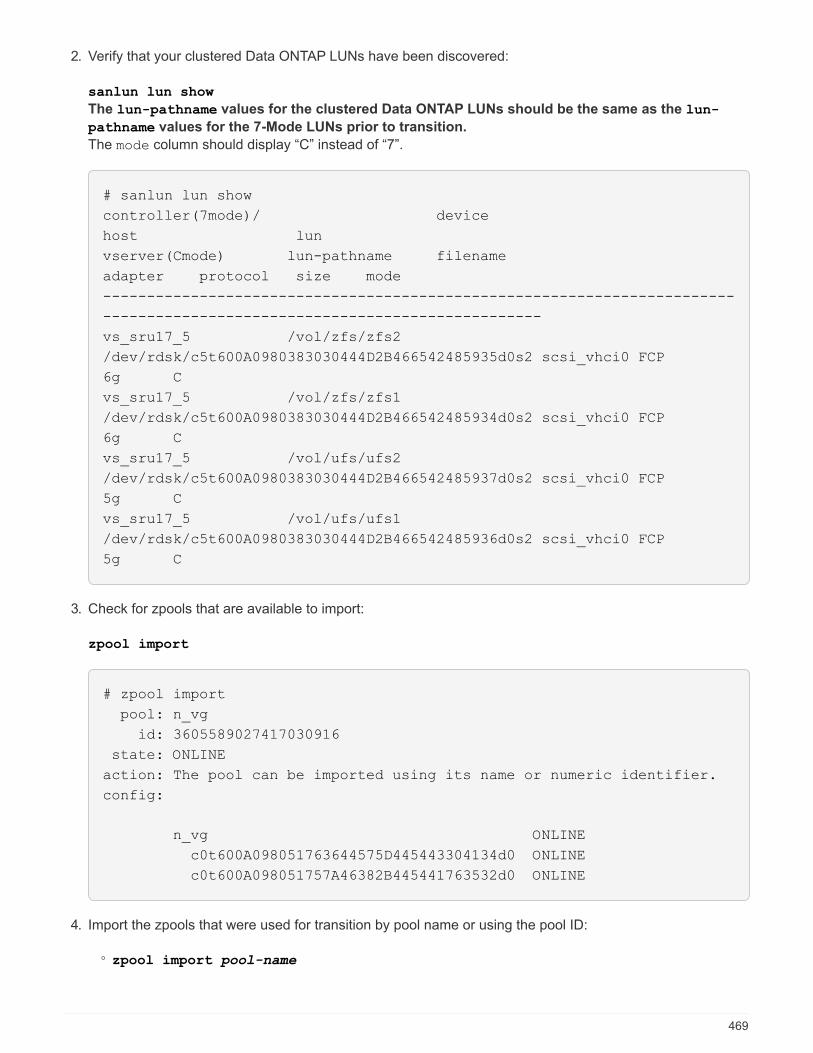
2. Verify that your clustered Data ONTAP LUNs have been discovered:
sanlun lun show
The lun-pathname values for the clustered Data ONTAP LUNs should be the same as the lun-
pathname values for the 7-Mode LUNs prior to transition.
The mode column should display “C” instead of “7”.
# sanlun lun show
controller(7mode)/ device
host lun
vserver(Cmode) lun-pathname filename
adapter protocol size mode
------------------------------------------------------------------------
--------------------------------------------------
vs_sru17_5 /vol/zfs/zfs2
/dev/rdsk/c5t600A0980383030444D2B466542485935d0s2 scsi_vhci0 FCP
6g C
vs_sru17_5 /vol/zfs/zfs1
/dev/rdsk/c5t600A0980383030444D2B466542485934d0s2 scsi_vhci0 FCP
6g C
vs_sru17_5 /vol/ufs/ufs2
/dev/rdsk/c5t600A0980383030444D2B466542485937d0s2 scsi_vhci0 FCP
5g C
vs_sru17_5 /vol/ufs/ufs1
/dev/rdsk/c5t600A0980383030444D2B466542485936d0s2 scsi_vhci0 FCP
5g C
3. Check for zpools that are available to import:
zpool import
# zpool import
pool: n_vg
id: 3605589027417030916
state: ONLINE
action: The pool can be imported using its name or numeric identifier.
config:
n_vg ONLINE
c0t600A098051763644575D445443304134d0 ONLINE
c0t600A098051757A46382B445441763532d0 ONLINE
4. Import the zpools that were used for transition by pool name or using the pool ID:
◦ zpool import pool-name
469
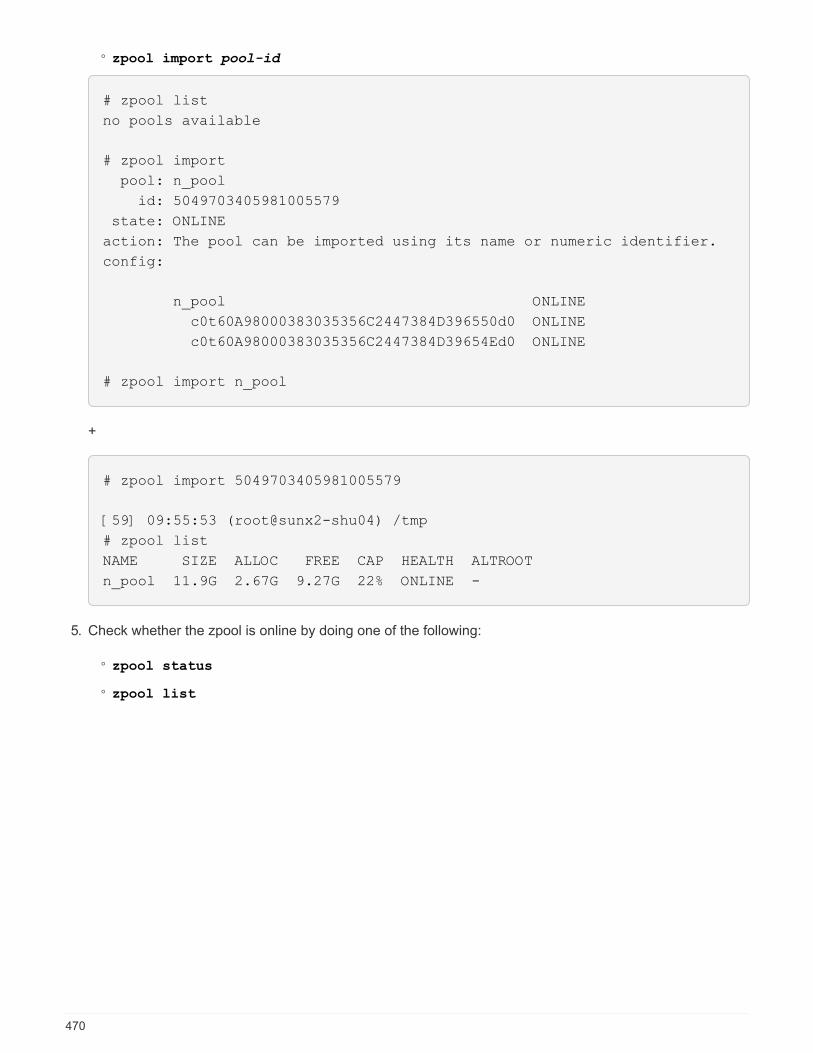
◦ zpool import pool-id
# zpool list
no pools available
# zpool import
pool: n_pool
id: 5049703405981005579
state: ONLINE
action: The pool can be imported using its name or numeric identifier.
config:
n_pool ONLINE
c0t60A98000383035356C2447384D396550d0 ONLINE
c0t60A98000383035356C2447384D39654Ed0 ONLINE
# zpool import n_pool
+
# zpool import 5049703405981005579
[59] 09:55:53 (root@sunx2-shu04) /tmp
# zpool list
NAME SIZE ALLOC FREE CAP HEALTH ALTROOT
n_pool 11.9G 2.67G 9.27G 22% ONLINE -
5. Check whether the zpool is online by doing one of the following:
◦ zpool status
◦ zpool list
470
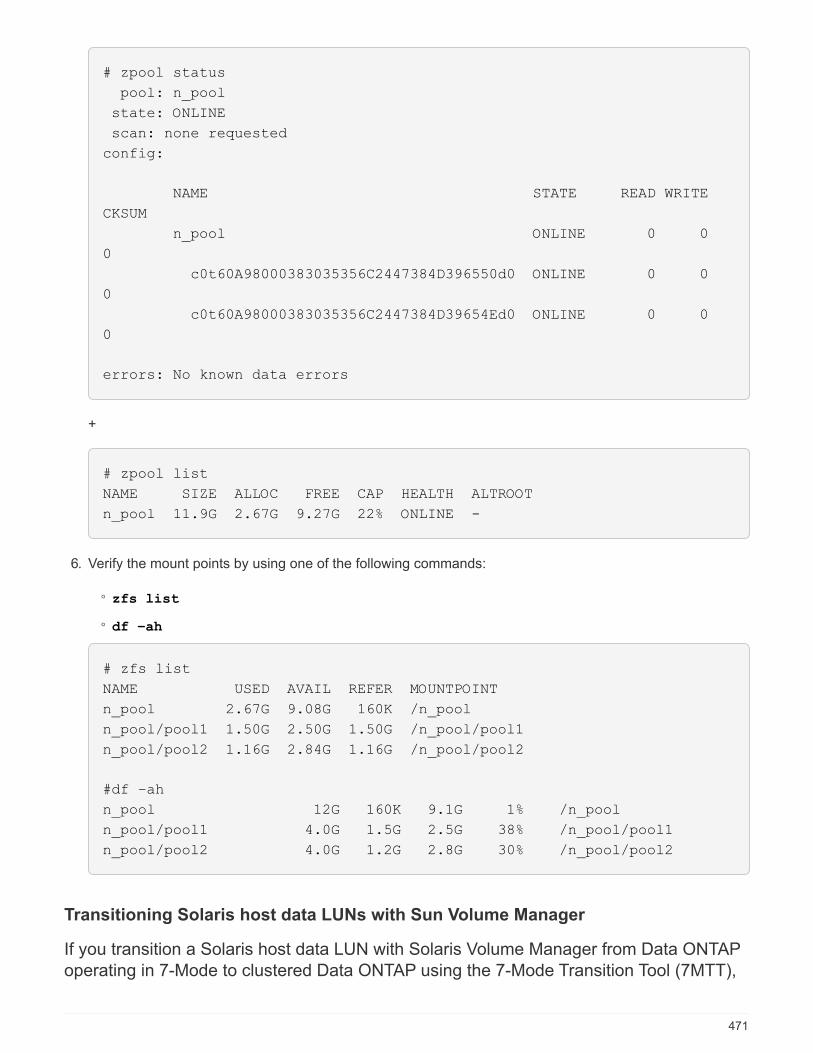
# zpool status
pool: n_pool
state: ONLINE
scan: none requested
config:
NAME STATE READ WRITE
CKSUM
n_pool ONLINE 0 0
0
c0t60A98000383035356C2447384D396550d0 ONLINE 0 0
0
c0t60A98000383035356C2447384D39654Ed0 ONLINE 0 0
0
errors: No known data errors
+
# zpool list
NAME SIZE ALLOC FREE CAP HEALTH ALTROOT
n_pool 11.9G 2.67G 9.27G 22% ONLINE -
6. Verify the mount points by using one of the following commands:
◦ zfs list
◦ df –ah
# zfs list
NAME USED AVAIL REFER MOUNTPOINT
n_pool 2.67G 9.08G 160K /n_pool
n_pool/pool1 1.50G 2.50G 1.50G /n_pool/pool1
n_pool/pool2 1.16G 2.84G 1.16G /n_pool/pool2
#df –ah
n_pool 12G 160K 9.1G 1% /n_pool
n_pool/pool1 4.0G 1.5G 2.5G 38% /n_pool/pool1
n_pool/pool2 4.0G 1.2G 2.8G 30% /n_pool/pool2
Transitioning Solaris host data LUNs with Sun Volume Manager
If you transition a Solaris host data LUN with Solaris Volume Manager from Data ONTAP
operating in 7-Mode to clustered Data ONTAP using the 7-Mode Transition Tool (7MTT),
471
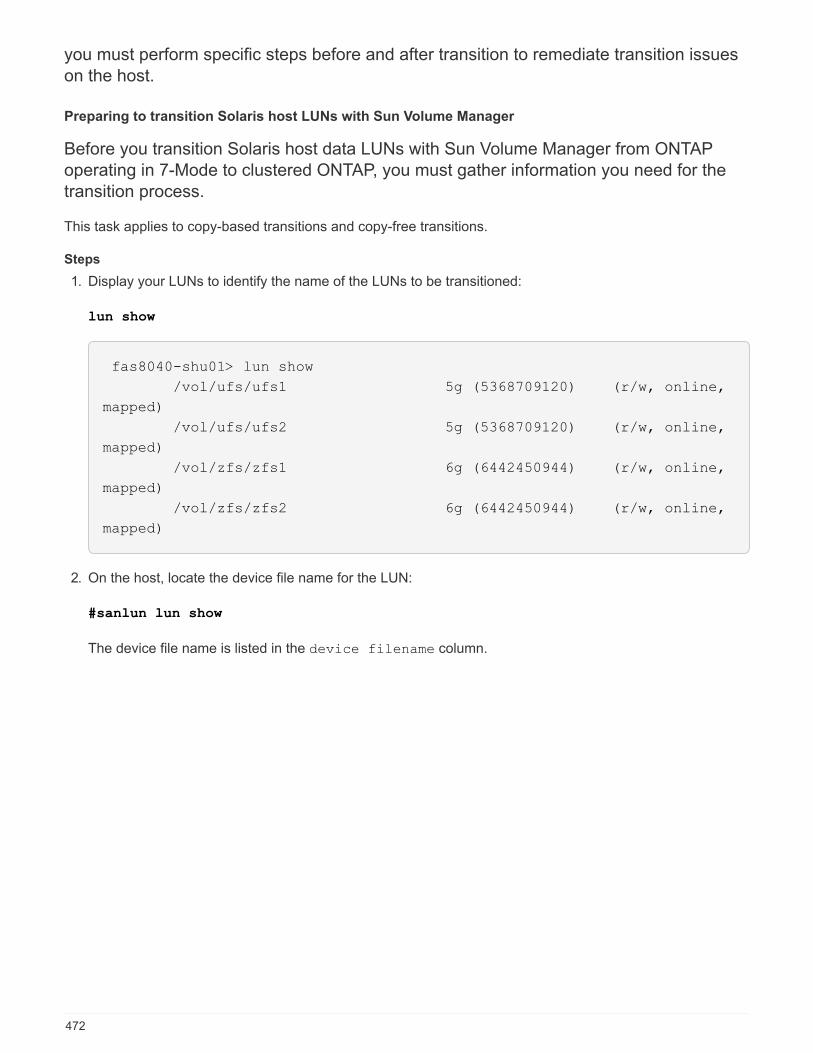
you must perform specific steps before and after transition to remediate transition issues
on the host.
Preparing to transition Solaris host LUNs with Sun Volume Manager
Before you transition Solaris host data LUNs with Sun Volume Manager from ONTAP
operating in 7-Mode to clustered ONTAP, you must gather information you need for the
transition process.
This task applies to copy-based transitions and copy-free transitions.
Steps
1. Display your LUNs to identify the name of the LUNs to be transitioned:
lun show
fas8040-shu01> lun show
/vol/ufs/ufs1 5g (5368709120) (r/w, online,
mapped)
/vol/ufs/ufs2 5g (5368709120) (r/w, online,
mapped)
/vol/zfs/zfs1 6g (6442450944) (r/w, online,
mapped)
/vol/zfs/zfs2 6g (6442450944) (r/w, online,
mapped)
2. On the host, locate the device file name for the LUN:
#sanlun lun show
The device file name is listed in the device filename column.
472
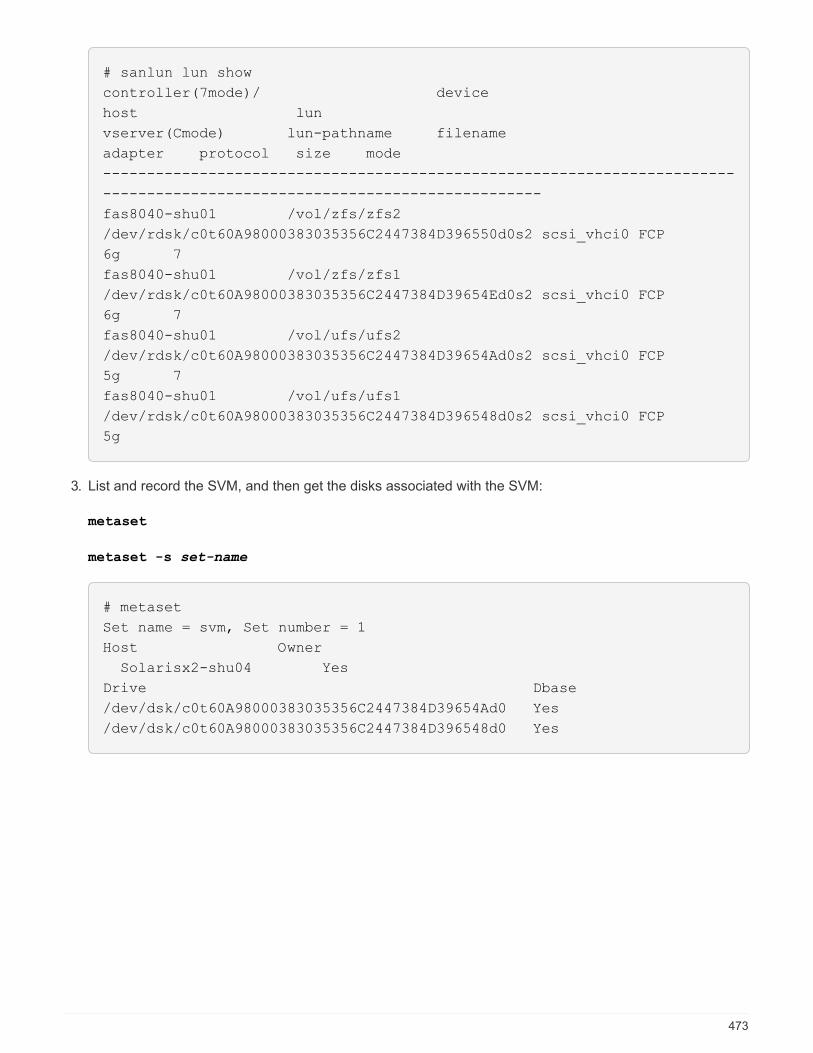
# sanlun lun show
controller(7mode)/ device
host lun
vserver(Cmode) lun-pathname filename
adapter protocol size mode
------------------------------------------------------------------------
--------------------------------------------------
fas8040-shu01 /vol/zfs/zfs2
/dev/rdsk/c0t60A98000383035356C2447384D396550d0s2 scsi_vhci0 FCP
6g 7
fas8040-shu01 /vol/zfs/zfs1
/dev/rdsk/c0t60A98000383035356C2447384D39654Ed0s2 scsi_vhci0 FCP
6g 7
fas8040-shu01 /vol/ufs/ufs2
/dev/rdsk/c0t60A98000383035356C2447384D39654Ad0s2 scsi_vhci0 FCP
5g 7
fas8040-shu01 /vol/ufs/ufs1
/dev/rdsk/c0t60A98000383035356C2447384D396548d0s2 scsi_vhci0 FCP
5g
3. List and record the SVM, and then get the disks associated with the SVM:
metaset
metaset -s set-name
# metaset
Set name = svm, Set number = 1
Host Owner
Solarisx2-shu04 Yes
Drive Dbase
/dev/dsk/c0t60A98000383035356C2447384D39654Ad0 Yes
/dev/dsk/c0t60A98000383035356C2447384D396548d0 Yes
473
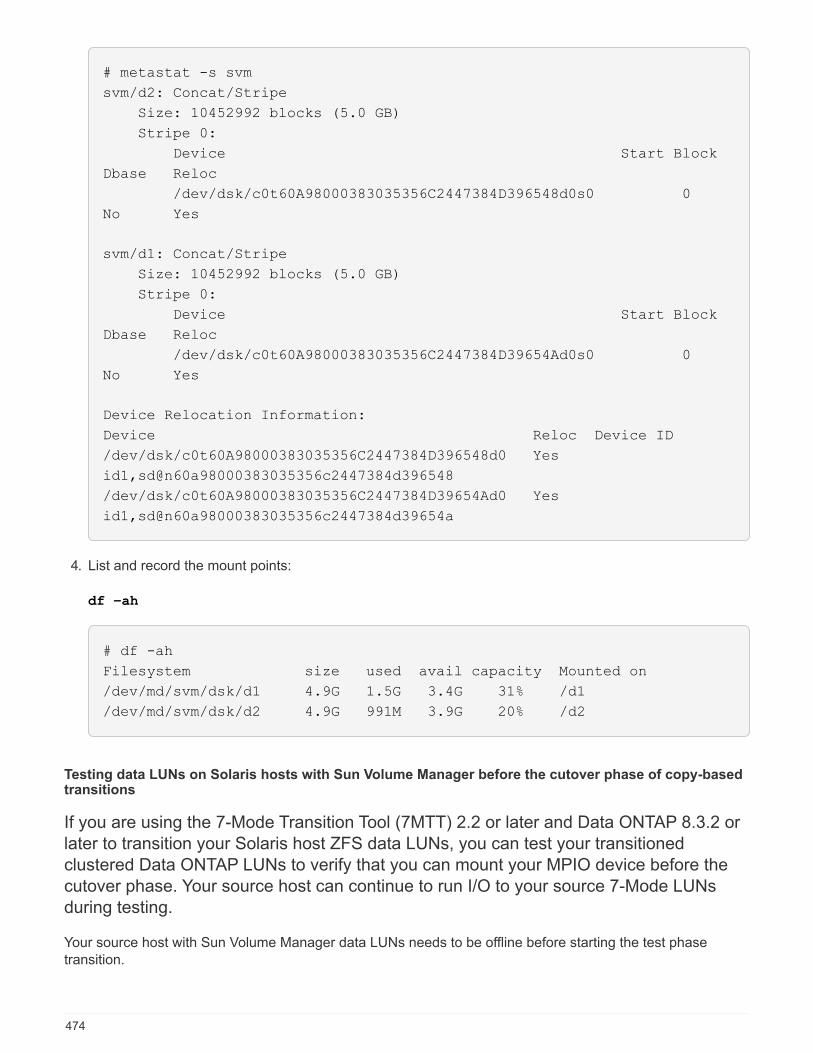
# metastat -s svm
svm/d2: Concat/Stripe
Size: 10452992 blocks (5.0 GB)
Stripe 0:
Device Start Block
Dbase Reloc
/dev/dsk/c0t60A98000383035356C2447384D396548d0s0 0
No Yes
svm/d1: Concat/Stripe
Size: 10452992 blocks (5.0 GB)
Stripe 0:
Device Start Block
Dbase Reloc
/dev/dsk/c0t60A98000383035356C2447384D39654Ad0s0 0
No Yes
Device Relocation Information:
Device Reloc Device ID
/dev/dsk/c0t60A98000383035356C2447384D396548d0 Yes
id1,sd@n60a98000383035356c2447384d396548
/dev/dsk/c0t60A98000383035356C2447384D39654Ad0 Yes
id1,sd@n60a98000383035356c2447384d39654a
4. List and record the mount points:
df –ah
# df -ah
Filesystem size used avail capacity Mounted on
/dev/md/svm/dsk/d1 4.9G 1.5G 3.4G 31% /d1
/dev/md/svm/dsk/d2 4.9G 991M 3.9G 20% /d2
Testing data LUNs on Solaris hosts with Sun Volume Manager before the cutover phase of copy-basedtransitions
If you are using the 7-Mode Transition Tool (7MTT) 2.2 or later and Data ONTAP 8.3.2 or
later to transition your Solaris host ZFS data LUNs, you can test your transitioned
clustered Data ONTAP LUNs to verify that you can mount your MPIO device before the
cutover phase. Your source host can continue to run I/O to your source 7-Mode LUNs
during testing.
Your source host with Sun Volume Manager data LUNs needs to be offline before starting the test phase
transition.
474
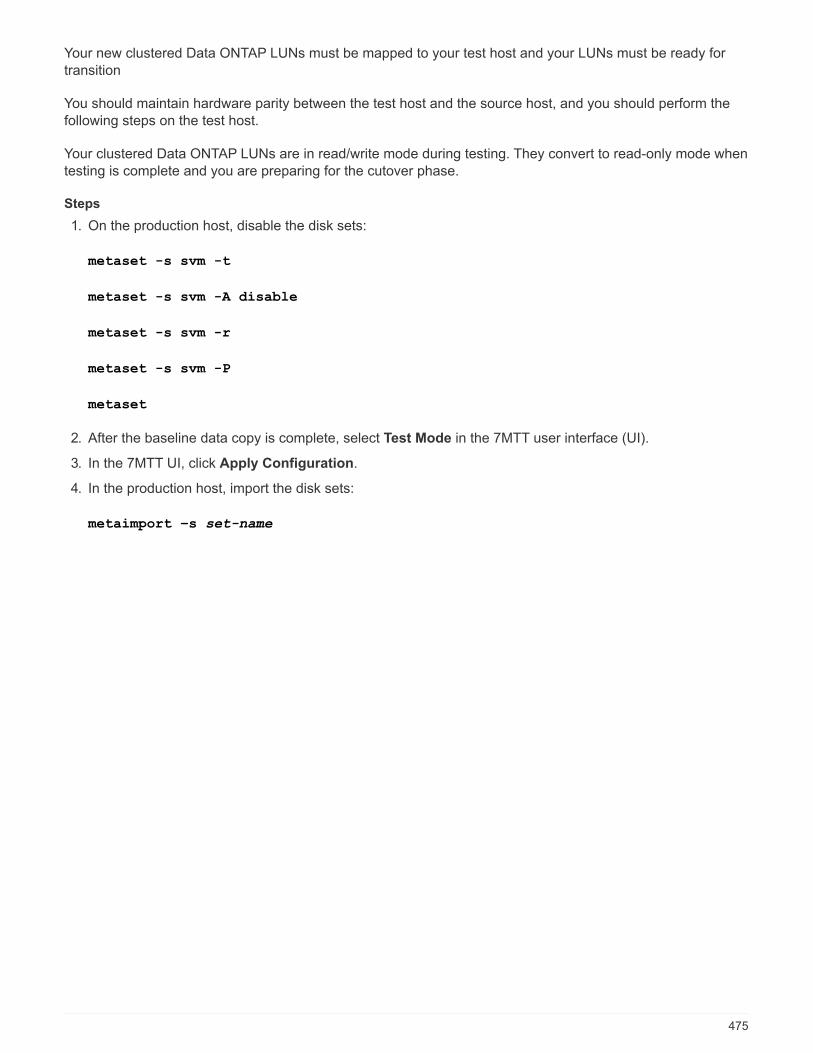
Your new clustered Data ONTAP LUNs must be mapped to your test host and your LUNs must be ready for
transition
You should maintain hardware parity between the test host and the source host, and you should perform the
following steps on the test host.
Your clustered Data ONTAP LUNs are in read/write mode during testing. They convert to read-only mode when
testing is complete and you are preparing for the cutover phase.
Steps
1. On the production host, disable the disk sets:
metaset -s svm -t
metaset -s svm -A disable
metaset -s svm -r
metaset -s svm -P
metaset
2. After the baseline data copy is complete, select Test Mode in the 7MTT user interface (UI).
3. In the 7MTT UI, click Apply Configuration.
4. In the production host, import the disk sets:
metaimport –s set-name
475
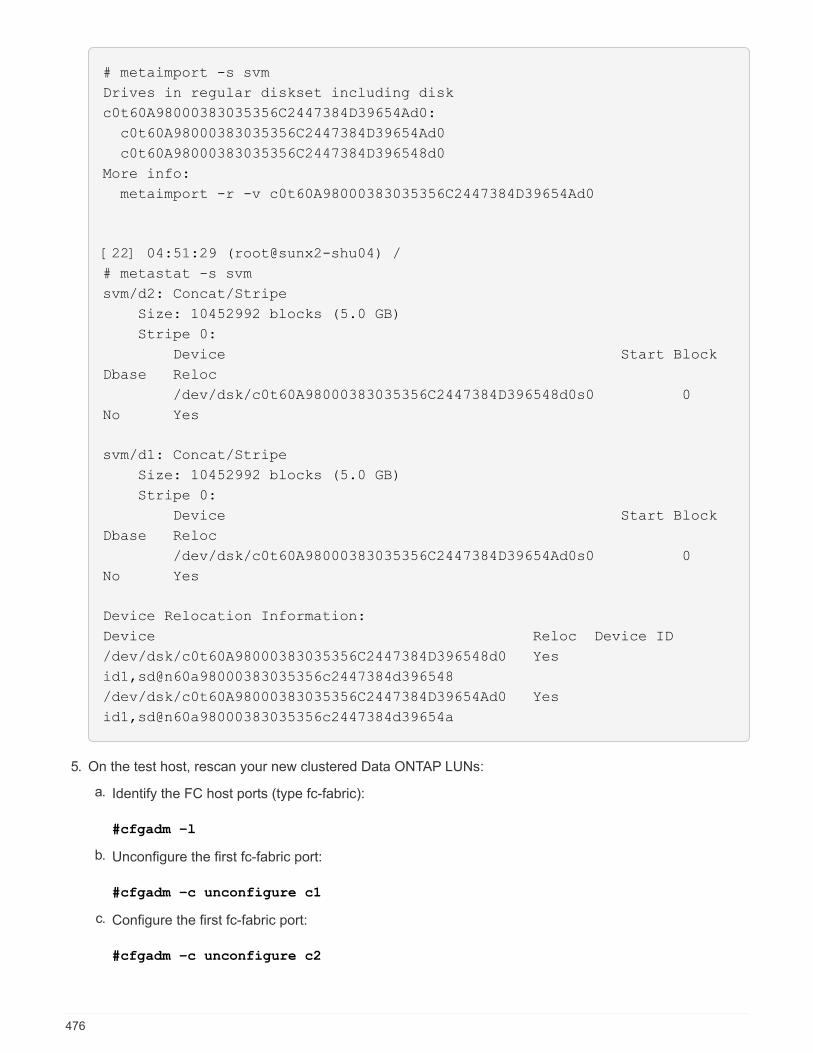
# metaimport -s svm
Drives in regular diskset including disk
c0t60A98000383035356C2447384D39654Ad0:
c0t60A98000383035356C2447384D39654Ad0
c0t60A98000383035356C2447384D396548d0
More info:
metaimport -r -v c0t60A98000383035356C2447384D39654Ad0
[22] 04:51:29 (root@sunx2-shu04) /
# metastat -s svm
svm/d2: Concat/Stripe
Size: 10452992 blocks (5.0 GB)
Stripe 0:
Device Start Block
Dbase Reloc
/dev/dsk/c0t60A98000383035356C2447384D396548d0s0 0
No Yes
svm/d1: Concat/Stripe
Size: 10452992 blocks (5.0 GB)
Stripe 0:
Device Start Block
Dbase Reloc
/dev/dsk/c0t60A98000383035356C2447384D39654Ad0s0 0
No Yes
Device Relocation Information:
Device Reloc Device ID
/dev/dsk/c0t60A98000383035356C2447384D396548d0 Yes
id1,sd@n60a98000383035356c2447384d396548
/dev/dsk/c0t60A98000383035356C2447384D39654Ad0 Yes
id1,sd@n60a98000383035356c2447384d39654a
5. On the test host, rescan your new clustered Data ONTAP LUNs:
a. Identify the FC host ports (type fc-fabric):
#cfgadm –l
b. Unconfigure the first fc-fabric port:
#cfgadm –c unconfigure c1
c. Configure the first fc-fabric port:
#cfgadm –c unconfigure c2
476
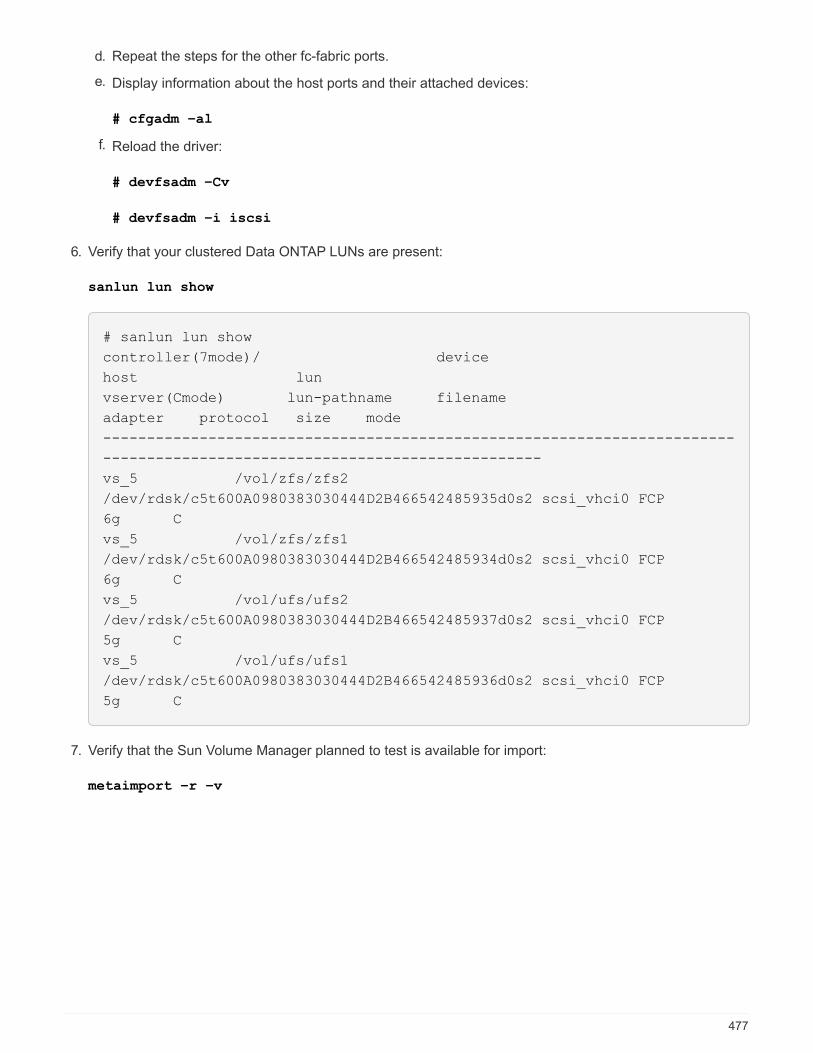
d. Repeat the steps for the other fc-fabric ports.
e. Display information about the host ports and their attached devices:
# cfgadm –al
f. Reload the driver:
# devfsadm –Cv
# devfsadm –i iscsi
6. Verify that your clustered Data ONTAP LUNs are present:
sanlun lun show
# sanlun lun show
controller(7mode)/ device
host lun
vserver(Cmode) lun-pathname filename
adapter protocol size mode
------------------------------------------------------------------------
--------------------------------------------------
vs_5 /vol/zfs/zfs2
/dev/rdsk/c5t600A0980383030444D2B466542485935d0s2 scsi_vhci0 FCP
6g C
vs_5 /vol/zfs/zfs1
/dev/rdsk/c5t600A0980383030444D2B466542485934d0s2 scsi_vhci0 FCP
6g C
vs_5 /vol/ufs/ufs2
/dev/rdsk/c5t600A0980383030444D2B466542485937d0s2 scsi_vhci0 FCP
5g C
vs_5 /vol/ufs/ufs1
/dev/rdsk/c5t600A0980383030444D2B466542485936d0s2 scsi_vhci0 FCP
5g C
7. Verify that the Sun Volume Manager planned to test is available for import:
metaimport –r –v
477

# metaimport -r -v
Import: metaimport -s <newsetname> c5t600A0980383030444D2B466542485937d0
Device offset length replica
flags
c5t600A0980383030444D2B466542485937d0 16 8192 a m
luo
c5t600A0980383030444D2B466542485936d0 16 8192 a
luo
8. Import the metaset with a new name:
metaimport –s set-name disk-id
Disk-id is obtained from the metaimport --r --v command.
# metaimport -s svm c5t600A0980383030444D2B466542485937d0
Drives in regular diskset including disk
c5t600A0980383030444D2B466542485937d0:
c5t600A0980383030444D2B466542485937d0
c5t600A0980383030444D2B466542485936d0
More info:
metaimport -r -v c5t600A0980383030444D2B466542485937d0
9. Check whether the metaset is available:
metaset
10. Run the file system check:
fsck -F ufs /dev/md/svm/rdsk/d1
11. Use the mount command to manually mount.
12. Perform testing as needed.
13. Shut down the test host.
14. In the 7MTT UI, click Finish Test.
If your clustered Data ONTAP LUNs are to be remapped to your source host, you must prepare your source
host for the cutover phase. If your clustered Data ONTAP LUNs are to remain mapped to your test host, no
further steps are required on the test host.
Preparing for cutover phase when transitioning Solaris host Sun Volume Manager data LUNs
If you are transitioning a Solaris host data LUN with Sun Volume Manager from Data
ONTAP operating in 7-Mode to clustered Data ONTAP, you must perform certain steps
before entering the cutover phase.
478
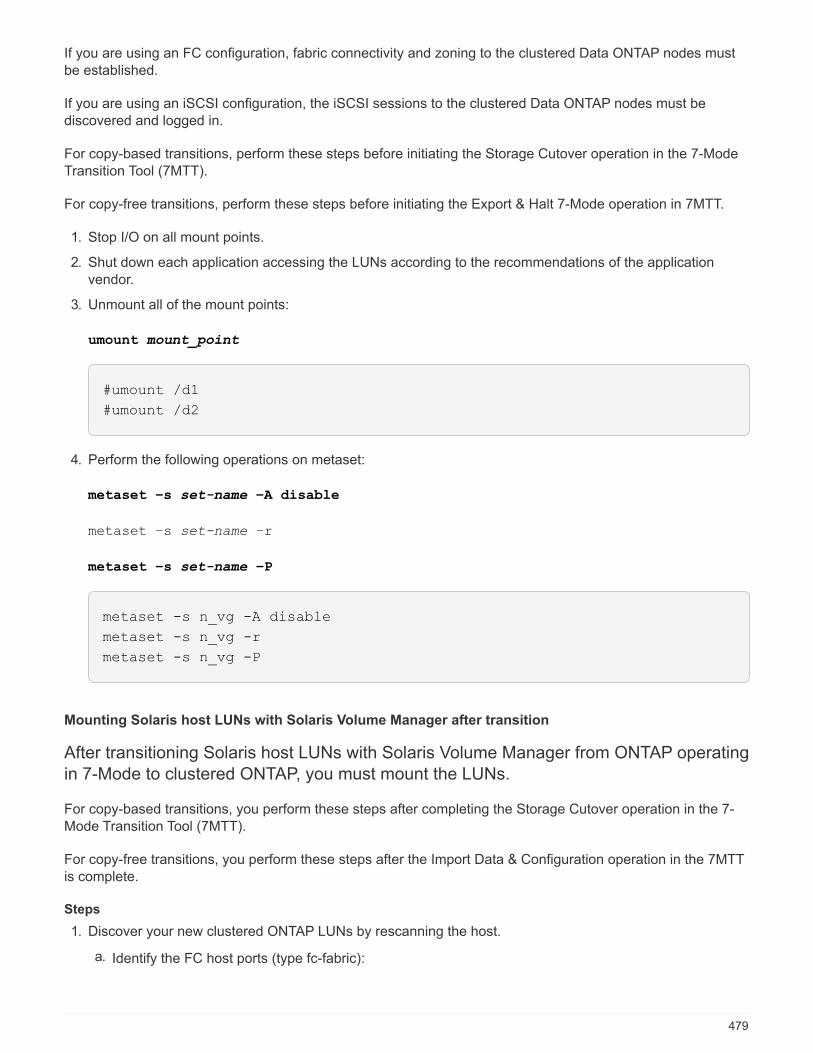
If you are using an FC configuration, fabric connectivity and zoning to the clustered Data ONTAP nodes must
be established.
If you are using an iSCSI configuration, the iSCSI sessions to the clustered Data ONTAP nodes must be
discovered and logged in.
For copy-based transitions, perform these steps before initiating the Storage Cutover operation in the 7-Mode
Transition Tool (7MTT).
For copy-free transitions, perform these steps before initiating the Export & Halt 7-Mode operation in 7MTT.
1. Stop I/O on all mount points.
2. Shut down each application accessing the LUNs according to the recommendations of the application
vendor.
3. Unmount all of the mount points:
umount mount_point
#umount /d1
#umount /d2
4. Perform the following operations on metaset:
metaset –s set-name –A disable
metaset –s set-name –r
metaset –s set-name –P
metaset -s n_vg -A disable
metaset -s n_vg -r
metaset -s n_vg -P
Mounting Solaris host LUNs with Solaris Volume Manager after transition
After transitioning Solaris host LUNs with Solaris Volume Manager from ONTAP operating
in 7-Mode to clustered ONTAP, you must mount the LUNs.
For copy-based transitions, you perform these steps after completing the Storage Cutover operation in the 7-
Mode Transition Tool (7MTT).
For copy-free transitions, you perform these steps after the Import Data & Configuration operation in the 7MTT
is complete.
Steps
1. Discover your new clustered ONTAP LUNs by rescanning the host.
a. Identify the FC host ports (type fc-fabric):
479
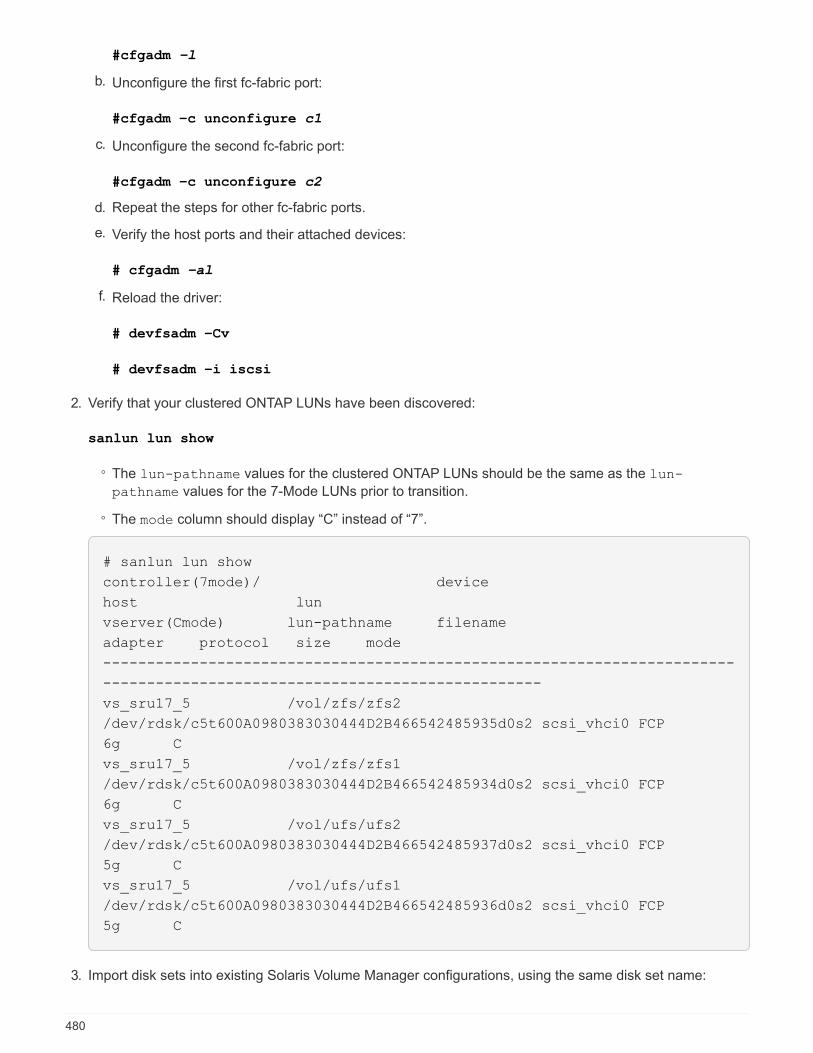
#cfgadm –l
b. Unconfigure the first fc-fabric port:
#cfgadm –c unconfigure c1
c. Unconfigure the second fc-fabric port:
#cfgadm –c unconfigure c2
d. Repeat the steps for other fc-fabric ports.
e. Verify the host ports and their attached devices:
# cfgadm –al
f. Reload the driver:
# devfsadm –Cv
# devfsadm –i iscsi
2. Verify that your clustered ONTAP LUNs have been discovered:
sanlun lun show
◦ The lun-pathname values for the clustered ONTAP LUNs should be the same as the lun-
pathname values for the 7-Mode LUNs prior to transition.
◦ The mode column should display “C” instead of “7”.
# sanlun lun show
controller(7mode)/ device
host lun
vserver(Cmode) lun-pathname filename
adapter protocol size mode
------------------------------------------------------------------------
--------------------------------------------------
vs_sru17_5 /vol/zfs/zfs2
/dev/rdsk/c5t600A0980383030444D2B466542485935d0s2 scsi_vhci0 FCP
6g C
vs_sru17_5 /vol/zfs/zfs1
/dev/rdsk/c5t600A0980383030444D2B466542485934d0s2 scsi_vhci0 FCP
6g C
vs_sru17_5 /vol/ufs/ufs2
/dev/rdsk/c5t600A0980383030444D2B466542485937d0s2 scsi_vhci0 FCP
5g C
vs_sru17_5 /vol/ufs/ufs1
/dev/rdsk/c5t600A0980383030444D2B466542485936d0s2 scsi_vhci0 FCP
5g C
3. Import disk sets into existing Solaris Volume Manager configurations, using the same disk set name:
480
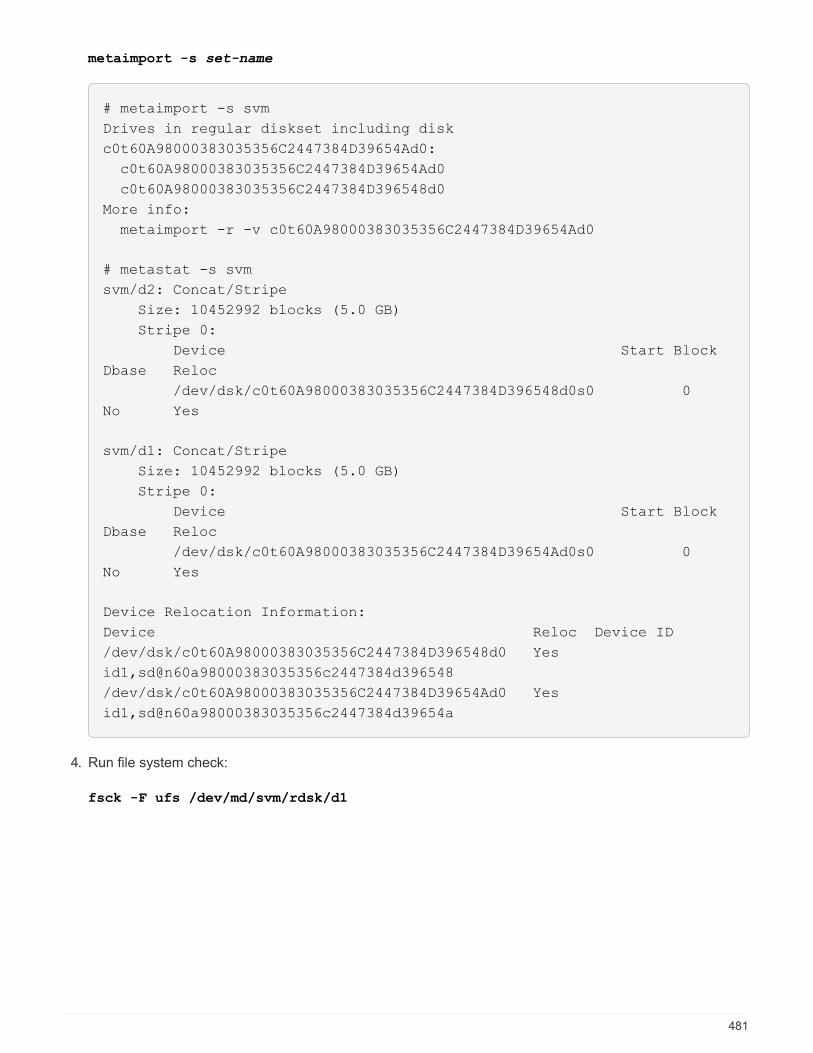
metaimport -s set-name
# metaimport -s svm
Drives in regular diskset including disk
c0t60A98000383035356C2447384D39654Ad0:
c0t60A98000383035356C2447384D39654Ad0
c0t60A98000383035356C2447384D396548d0
More info:
metaimport -r -v c0t60A98000383035356C2447384D39654Ad0
# metastat -s svm
svm/d2: Concat/Stripe
Size: 10452992 blocks (5.0 GB)
Stripe 0:
Device Start Block
Dbase Reloc
/dev/dsk/c0t60A98000383035356C2447384D396548d0s0 0
No Yes
svm/d1: Concat/Stripe
Size: 10452992 blocks (5.0 GB)
Stripe 0:
Device Start Block
Dbase Reloc
/dev/dsk/c0t60A98000383035356C2447384D39654Ad0s0 0
No Yes
Device Relocation Information:
Device Reloc Device ID
/dev/dsk/c0t60A98000383035356C2447384D396548d0 Yes
id1,sd@n60a98000383035356c2447384d396548
/dev/dsk/c0t60A98000383035356C2447384D39654Ad0 Yes
id1,sd@n60a98000383035356c2447384d39654a
4. Run file system check:
fsck -F ufs /dev/md/svm/rdsk/d1
481
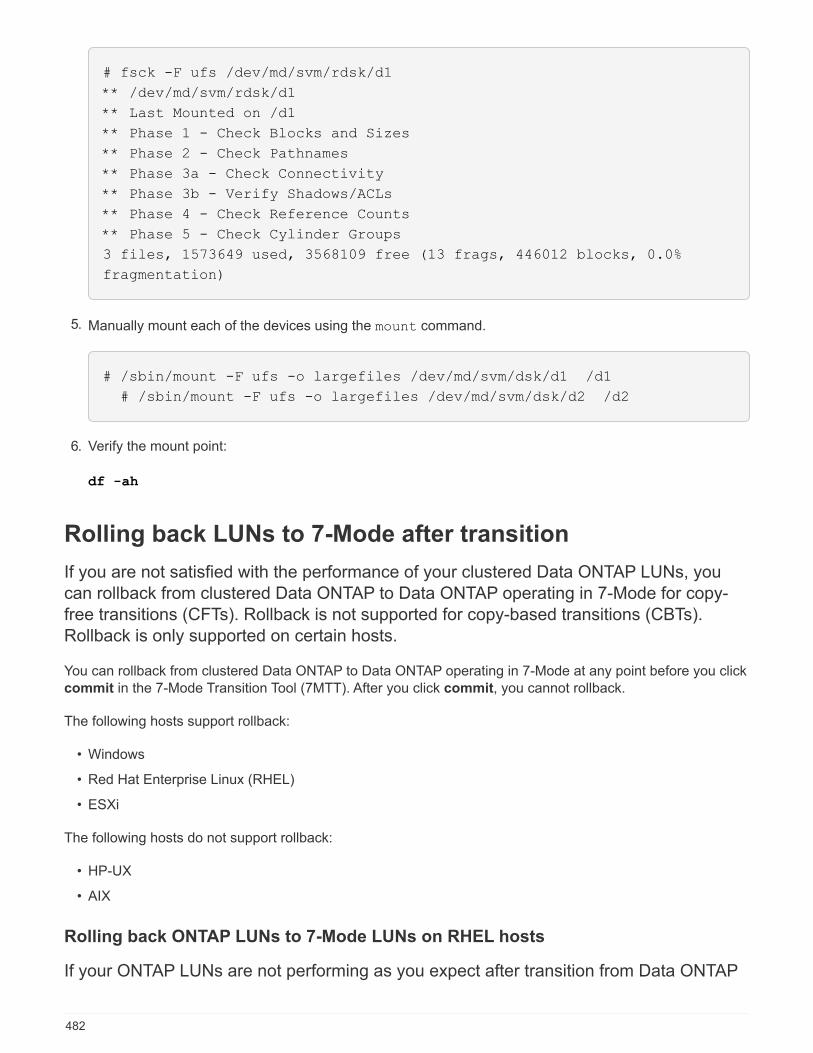
# fsck -F ufs /dev/md/svm/rdsk/d1
** /dev/md/svm/rdsk/d1
** Last Mounted on /d1
** Phase 1 - Check Blocks and Sizes
** Phase 2 - Check Pathnames
** Phase 3a - Check Connectivity
** Phase 3b - Verify Shadows/ACLs
** Phase 4 - Check Reference Counts
** Phase 5 - Check Cylinder Groups
3 files, 1573649 used, 3568109 free (13 frags, 446012 blocks, 0.0%
fragmentation)
5. Manually mount each of the devices using the mount command.
# /sbin/mount -F ufs -o largefiles /dev/md/svm/dsk/d1 /d1
# /sbin/mount -F ufs -o largefiles /dev/md/svm/dsk/d2 /d2
6. Verify the mount point:
df -ah
Rolling back LUNs to 7-Mode after transition
If you are not satisfied with the performance of your clustered Data ONTAP LUNs, you
can rollback from clustered Data ONTAP to Data ONTAP operating in 7-Mode for copy-
free transitions (CFTs). Rollback is not supported for copy-based transitions (CBTs).
Rollback is only supported on certain hosts.
You can rollback from clustered Data ONTAP to Data ONTAP operating in 7-Mode at any point before you click
commit in the 7-Mode Transition Tool (7MTT). After you click commit, you cannot rollback.
The following hosts support rollback:
• Windows
• Red Hat Enterprise Linux (RHEL)
• ESXi
The following hosts do not support rollback:
• HP-UX
• AIX
Rolling back ONTAP LUNs to 7-Mode LUNs on RHEL hosts
If your ONTAP LUNs are not performing as you expect after transition from Data ONTAP
482

operating in 7-Mode, you can rollback from ONTAP to 7-Mode LUNs on a Red Hat
Enterprise Linux (RHEL) 5 or RHEL 6 host.
Your 7-Mode LUNs must be mapped back to your RHEL 5 or RHEL 6 host.
Steps
1. Discover the 7-Mode LUNs:
rescan-scsi-bus.sh
2. Configure your DMMP devices for 7-Mode LUNs:
multipath
3. Verify your 7-Mode LUNs:
sanlun lun show
4. Determine the 7-Mode LUN device handle ID:
multipath -ll device_handle_name
5. If the host was configured with Logical Volume Manager (LVM), do the following:
a. Import the volume group:
vgimport vg_name
b. Verify the volume group status:
vgdisplay
c. Enable logical volumes:
vgchange -ay vg_name
d. Verify logical volume status:
lvdisplay
The LV Status should be displayed as available.
e. Mount the logical volumes from the ONTAP LUN to its respective mount point directory:
mount lv_name mount_point
If the mount points are defined in the etc/fstab file, you can also use the mount -a command to
mount the logical volumes.
f. Verify the mount points:
mount
483
Rolling back ONTAP LUNs to 7-Mode LUNs on Windows hosts
If your ONTAP LUNs are not performing as you expect after transition from Data ONTAP
operating in 7-Mode, you can rollback from ONTAP to 7-Mode LUNs on a Windows host.
Your 7-Mode LUNs must be remapped to your host.
Steps
1. Use Hyper-V Manager to shut down all virtual machines (VMs) running on the LUNs.
2. Use Windows Disk Manager to take the LUNs offline.
3. Use Cluster Disk Manager to take the cluster disks offline.
4. Shut down the host.
5. Revert back to Data ONTAP operating in 7-Mode.
6. Boot the host.
7. Use Windows Disk Manager to bring your 7-Mode LUNs online.
8. Use Cluster Disk Manager to bring cluster disks online.
9. Use Hyper-V Manager to bring your VMs online.
484

Legal noticesLegal notices provide access to copyright statements, trademarks, patents, and more.
Copyright
http://www.netapp.com/us/legal/copyright.aspx
Trademarks
NETAPP, the NETAPP logo, and the marks listed on the NetApp Trademarks page are trademarks of NetApp,
Inc. Other company and product names may be trademarks of their respective owners.
http://www.netapp.com/us/legal/netapptmlist.aspx
Patents
A current list of NetApp owned patents can be found at:
https://www.netapp.com/us/media/patents-page.pdf
Privacy policy
https://www.netapp.com/us/legal/privacypolicy/index.aspx
Machine translation
See important information about localized content at netapp.com
485

Copyright Information
Copyright © 2021 NetApp, Inc. All rights reserved. Printed in the U.S. No part of this document
covered by copyright may be reproduced in any form or by any means-graphic, electronic, or
mechanical, including photocopying, recording, taping, or storage in an electronic retrieval system-
without prior written permission of the copyright owner.
Software derived from copyrighted NetApp material is subject to the following license and disclaimer:
THIS SOFTWARE IS PROVIDED BY NETAPP “AS IS” AND WITHOUT ANY EXPRESS OR IMPLIED
WARRANTIES, INCLUDING, BUT NOT LIMITED TO, THE IMPLIED WARRANTIES OF
MERCHANTABILITY AND FITNESS FOR A PARTICULAR PURPOSE, WHICH ARE HEREBY
DISCLAIMED. IN NO EVENT SHALL NETAPP BE LIABLE FOR ANY DIRECT, INDIRECT,
INCIDENTAL, SPECIAL, EXEMPLARY, OR CONSEQUENTIAL DAMAGES (INCLUDING, BUT NOT
LIMITED TO, PROCUREMENT OF SUBSTITUTE GOODS OR SERVICES; LOSS OF USE, DATA, OR
PROFITS; OR BUSINESS INTERRUPTION) HOWEVER CAUSED AND ON ANY THEORY OF
LIABILITY, WHETHER IN CONTRACT, STRICT LIABILITY, OR TORT (INCLUDING NEGLIGENCE OR
OTHERWISE) ARISING IN ANY WAY OUT OF THE USE OF THIS SOFTWARE, EVEN IF ADVISED OF
THE POSSIBILITY OF SUCH DAMAGE.
NetApp reserves the right to change any products described herein at any time, and without notice.
NetApp assumes no responsibility or liability arising from the use of products described herein,
except as expressly agreed to in writing by NetApp. The use or purchase of this product does not
convey a license under any patent rights, trademark rights, or any other intellectual property
rights of NetApp.
The product described in this manual may be protected by one or more U.S. patents,
foreign patents, or pending applications.
RESTRICTED RIGHTS LEGEND: Use, duplication, or disclosure by the government is subject to
restrictions as set forth in subparagraph (c)(1)(ii) of the Rights in Technical Data and
Computer Software clause at DFARS 252.277-7103 (October 1988) and FAR 52-227-19 (June 1987).
Trademark Information
NETAPP, the NETAPP logo, and the marks listed at http://www.netapp.com/TM are trademarks of
NetApp, Inc. Other company and product names may be trademarks of their respective owners.
486


