Embed Size (px)
Citation preview
Objects Specialty Group PostprintsVolume Nineteen, 2012
Proceedings of the Objects Specialty Group SessionMay 9-11, 2012
AMERICAN INSTITUTE FOR CONSERVATION OF HISTORIC AND ARTISTIC WORKS
40th Annual MeetingAlbuquerque, New Mexico
Objects Specialty Group PostprintsVolume Nineteen, 2012
Compiled by Mina Thompson, Program Chair, with Emily Hamilton and Kari Dodson
Proceedings of the Objects Specialty Group SessionMay 9-11, 2012
40th Annual MeetingAlbuquerque, NM
This publication entitled Objects Specialty Group Postprints, Volume Nineteen, 2012 is produced by the Objects Specialty Group of the American Institute for Conservation of Historic & Artistic Works.
Copyright © 2012 by The American Institute for Conservation of Historic & Artistic Works
Cover photograph by Laura Kubick.
The papers presented in this publication have been edited for clarity and content but have not undergone a formal process of peer review. This publication is primarily intended for the members of the Objects Specialty Group of the American Institute for Conservation of Historic & Artistic Works. Additional copies of this publication are available for purchase by contacting AIC.
American Institute for Conservation of Historic & Artistic Works1156 15th Street, NW • Suite 320Washington, DC 20005
http://www.conservation-us.org/
ISSN (print version) 2169-379XISSN (online version) 2169-1290
Contents
PROGRAM CHAIR’S FOREWORDMina Thompson
1
SO FAR AWAY FROM ME? CONSERVATION AND ARCHAEOLOGYSuzanne Davis and Claudia Chemello
3
IN THEIR TRUE COLORS: DEVELOPING NEW METHODS FOR RECOLORING FADED TAXIDERMY
Elizabeth Nunan, Judith Levinson, Lisa Elkin, Corina Rogge, Julia Sybalsky, and Becca Pollak25
A COMPARATIVE STUDY OF PROTECTIVE COATINGS FOR MARBLE SCULPTURE IN THE MUSEUM SETTING
Laura Kubick and Jennifer Giaccai, with contributions by Helen Ingalls and Hugh Shockey45
THE USE OF AGAR AS A SOLVENT GEL IN OBJECTS CONSERVATIONCindy Lee Scott
71
SOME UNUSUAL, HIDDEN, SURPRISING, OR FORGOTTEN SOURCES OF (POSSIBLE) SULFUR CONTAMINATION IN MUSEUMS AND HISTORIC STRUCTURES
Paul Benson85
THE TREATMENT OF A MI’KMAQ BOX MADE OF BIRCHBARK, PORCUPINE QUILLS, AND IRON-DYED SPRUCEROOT
Carole Dignard, Amanda Salmon109
RAISING MERETITES: EXAMINING AND CONSERVING AN EGYPTIAN MUMMIFORM COFFIN FROM 380-250 BCE
Kathleen M. Garland, John Twilley, Dr. Johanna Bernstein, and Joe Rogers129
ALWAYS BECOMINGNora Naranjo-Morse, Gail Joice, and Kelly McHugh
147

2012 OSG Program Chair Foreword
This volume contains a selection of papers presented at the Objects Specialty Group and the joint Research and Technical Studies/OSG Sessions at the 2012 AIC Annual Meeting in Albuquerque. Commemorating AIC’s 40th anniversary, general sessions in the theme “Connecting to Conservation: Outreach and Advocacy” brought new innovations in presentations, such as panel discussions, debates and intensive interaction between presenters and their audience. OSG’s sessions reflected some of these newer styles, with a sing along (really), videos (and video as a significant part of one postprint), and through Research and Technical Studies’ posting of some papers in powerpoint form. This postprints volume will be the first OSG volume sent to an outside publisher for final formatting, as well, which should streamline the editing process in future meetings.
Included in this volume are a selection of papers from all sessions three OSG sessions: the OSG Outreach Luncheon Session followed by the joint RATS/OSG session, both on Wednesday, May 9, and the OSG session on Friday, May 11. The joint session with RATS focused on collaborations between conservators and scientists, while OSG papers were solicited on the conference theme. As always, however, papers on other topics were submitted and were too tantalizing to pass up.
OSG session kicked off the meeting with its Outreach-themed luncheon session featuring Vanessa Muros and Allison Lewis for a discussion of their experiences with outreach and education about the conservation of a Columbian Mammoth. Muros described both the conservation of the mammoth in California, and then the journey leaving remaining work with non-conservators. Suzanne Davis and Claudia Chemello shared the results of their in-depth survey of archaeologists to determine their level of familiarity with conservation. This presentation represented the second part of a two-part project, the first of which was presented in the AIC annual meeting in Philadelphia in 2011. Aside from the high level of professionalism and fascinating insights into our profession – passing it onto others and as seen by others – each presentation had a definite cool factor: conservation of an Ice Age mammoth (who doesn’t want to hear about that?), followed by Davis’ intermission sing-along of Dire Straits “So Far Away”.
Luncheon concluded, signaling the beginning of the joint OSG/RATS session, which was co-chaired with RATS Vice-Chair Jason Church, Materials Conservator at National Center for Preservation Technology and Training. Presentations reflected upon outreach, collaborations between scientists and conservators and general materials and treatment research. Patricia Hill, Professor of Chemistry at Millersville University, presented for Cheminart: Chemistry in Art Scholars, wherein scientists at participating universities help students and art historians understand the science in art (www.cheminart.org). Emily Kaplan shared the most current research conducted by several conservators on the long-term Qero Project. Elizabeth Nunan discussed the AMNH conservation staff’s journey to develop new methods for recoloring faded taxidermy in their decades-old displays, and Laura Kubick presented her analysis of protective coatings for marble sculpture at the Smithsonian American Art Museum. This project was necessary due to the unfortunate fact that at least one museum visitor took it upon [herself] to kiss a statue. Cindy Lee Scott discussed her research and experiments using Agar as a solvent
Foreword
gel for treating a variety of condition problems, while Paul Benson shared his impressive wealth of knowledge on where sulfur lurks in museum collections – both in the artwork and in the museum itself.
Unfortunately not all of these joint session presentations are in the OSG postprints. Most, however, may be found in powerpoint form on the RATS Publications and Resources webpage on the AIC website: http://www.conservation-us.org/publications-resources/specialty-group/ research-and-technical-studies#.UvQAnxaRJLQ
Friday morning, May 11, was the final OSG session and contained a healthy variety of conservation topics, including analysis and treatment of modern, ethnographic and ancient art. Teresa Moreno opened the session with an update of her dissertation work on the analysis of American Indian Silver Jewelry. Season Tse presented on behalf of CCI’s Carole Dignard and Amanda Salmon, who described the treatment of a Mi-kmaq Box made from birchbark, porcupine quills and iron-dyed spruceroot. This treatment involved the use of many techniques more traditionally associated with paper conservation, such as the use of easy iron spot-test papers commonly used to assess iron gall ink to gauge the level of degradation in the quills. Kate Garland presented her collaboration in the treatment of an Egyptian Mummiform Coffin with conservation scientists and mechanical engineers, and the use of a Leica scanner to record the dimensions of the inner coffin when laid flat and then vertical, providing a baseline for comparison of wood compression (or lack thereof) for the future. Rachel Rivenc, the project leader “Art in L.A.” at the Getty Conservation Institute, summarized the extraordinary contemporary works, and GCI’s analysis of, the “Finish Fetish” artists. While her paper is not included here, more information on the project can be accessed through GCI’s website: http://www.getty.edu/conservation/our_projects/science/art_LA/index.html
The session closed with a lovely presentation by Santa Clara Pueblo artist Nora Naranjo-Morse, NMAI Collections Manager Gail Joice and NMAI objects conservator Kelly McHugh. I allowed this session to go on beyond its deadline because I couldn’t pass the opportunity to continue the excellent Q & A between the artist and the audience. Naranjo-Morse’s actively, intentionally deteriorating sculpture in the Washington Mall challenged many conservators’ notions of conservation. This paper was shown in part in video form, which are available as links in the postprint volume here.
I was honored to chair these fantastic papers and to represent the Objects Specialty Group in general. I would like to thank all the speakers and authors who made the sessions successful, and those who submitted their papers to this volume, especially. I thank Jason Church and RATS for co-chairing the afternoon session and Corina Rogge for posting the presentations online. A special thanks to Sanchita Balachandran and Carolyn Riccardelli, 2011 and 2010 Program chairs, respectively, for their invaluable guidance and insights throughout the year. Christine del Re generously offered her advice for copy-editing, and Emily Hamilton and Kari Dodson have spent innumerable hours formatting the papers included in this volume, without whom this would not have been possible.
Mina Thompson, OSG Program Chair 2012

AIC Objects Specialty Group Postprints, Vol. 19, 2012 3
1. INTRODUCTION
As conservators employed in an academic setting and engaged in frequent archaeological fieldwork, the authors interact with a wide variety of archaeologists. Informally, most of these professionals express a desire for more information about conservation, more access to conservators and conservation services, and express frustration with the lack of funding for conservation and preservation on archaeological projects. The authors’ primary motivations for conducting this project were to gauge, in a more systematic way, archaeologists’ engagement with conservation and to identify areas in which the conservation community might improve outreach and education.
To address these issues, the authors designed an anonymous, online survey. The survey targeted directors of archaeological excavations, the professionals who make overall decisions about research and project goals, client services, staffing, and funding for archaeological projects. The primarily multiple choice survey collected information about the respondents and the projects they direct, with an emphasis on their knowledge of conservation and their engagement with professional conservators. Funding for conservation on excavations was examined, as was the archaeologists’ need for and access to information about conservation. One section of the survey asked specifically about the respondents’ familiarity with the American Institute for Conservation (AIC) and their ability to access, navigate, and use resources available through AIC and the AIC website.
ABSTRACT
Conservation is integral to the practice of archaeology, and many conservators and archaeologists would like more sustained collaboration. However, little has been done to examine archaeologists’ need for, access to, and utilization of conservation resources. For example, how do archaeologists identify and hire appropriate conservators? Do they have access to the conservation information and services they need? Is conservation prohibitively expensive or affordable for excavations?
This paper presents part two of a survey-based research project conducted by the authors to examine the work-ing relationship between conservation and archaeology. In this phase of the project, the authors conducted an online, anonymous survey of archaeologists who direct field projects. Completed in 2012, the primarily multiple choice survey collected information about the respondents and the projects they direct, with an emphasis on their knowledge of conser-vation and their engagement with professional conservators. Funding for conservation on excavations was examined, as was the archaeologists’ need for and access to information about conservation. One section of the survey asked specifi-cally about the respondents’ familiarity with the American Institute for Conservation and their ability to access, navigate, and use resources available through the organization and its website.
In addition to presenting results from the survey of archaeological field directors, this paper will include brief demo-graphic information on the respondents and will describe the survey’s design and methodology. Finally, the authors will discuss how our professional body might use the data generated by this survey to improve outreach and better connect with the archaeological community. Developing and sustaining avenues for communication between archaeology and conservation will not only benefit the preservation of archaeological sites and artifacts, it will also have a positive impact on implementing and disseminating best practices in both of these allied professions.
So Far away From me? ConServation and arChaeology
SUZANNE DAVIS AND CLAUDIA CHEMELLO
Davis and Chemello AIC Objects Specialty Group Postprints, Vol. 19, 2012
4
The data collected in this project complement information from a previous survey on archaeological conservation. That survey, conducted by the authors in 2010, focused on conservators and gathered information on the services they provided and the compensation they received for archaeological field projects (Davis and Chemello 2011). This survey asked archaeologists where they had located appropriate conservators, how much of their project budget was expended on conservation, and whether they perceived conservation services to be affordable.
The primary purpose of this paper is to provide a summary of the data collected by the survey. This paper will also provide information on previous research which informed the structure and content of the survey and will describe the methodology and design of the survey. It will examine the results and suggest directions for outreach and engagement with the archaeological community.
2. BACKGROUND
Archaeologists’ attitudes towards conservators and conservation have been a topic of some interest in the conservation community, and there have been previous efforts by individuals, institutions, and professional organizations to examine the integration of conservation with archaeology and the development of archaeological conservation practice over time. For example, Caldararo (1987), Johnson (1993), Berducou (1996), and Matero (2000) have written about the development of archaeological conservation and its integration with fieldwork. An article by Susan Rotroff (2001) in the Journal of the American Institute for Conservation examined how codes of archaeological ethics and professional standards treat conservation. Jacqueline Zak (2008), in her PhD dissertation, looked at the exchange of knowledge between conservators and archaeologists with a focus on identifying opportunities for increased collaboration.
Numerous conferences have focused on archaeological conservation, for example: the International Institute for Conservation, 1996, Copenhagen Congress, “Archaeological Conservation and its Consequences;” the 5th World Archaeological Congress, 2003, in Washington, D.C.; “The Conservation of Archaeological Materials: Current Trends and Future Directions,” 2005, in Williamsburg, Virginia (an effort of the Archaeological Discussion Group of the American Institute for Conservation); and “The Interface Between Field Archaeology and Conservation,” 2011, in Abu Dhabi, hosted by New York University’s Conservation Center and the New York University Abu Dhabi Institute.
Much effort has also been focused on ways to better integrate conservation and archaeology, especially on the part of the Getty Conservation Institute through their publications as well as programmatic activities. In part to address the need for better trained archaeological conservators, University of California Los Angeles and the Getty Conservation Institute began a graduate level training program that focuses on archaeological and ethnographic conservation. Additionally, since 1991 Harriet F. Beaubien at the Smithsonian Institution has managed a training program in archaeological conservation and hosted interns and fellows (Smithsonian Museum Conservation Institute). For currently enrolled conservation graduate students in any program, the Conservation Center at New York University’s Institute of Fine Arts offers a one-week training course in archaeological conservation (New York University).

Davis and Chemello AIC Objects Specialty Group Postprints, Vol. 19, 2012
5
A number of publications by conservators have been aimed at improving archaeological conservation education and skills (see Further Reading), and many archaeological organizations identify preservation as part of their core mission, for example: the Archaeological Institute of America, the Society for American Archaeology, and the Society for Historical Archaeology (Archaeological Institute of America, Society of American Archaeology, Society of Historical Archaeology).
These larger efforts, of which only a few are listed, have been extremely important. They have improved the collaborative relationship between conservation and archaeology and addressed gaps in education for both archaeologists and conservators. In addition, a number of small-scale surveys have examined aspects of archaeological conservation. A survey conducted by Claire Peachey in 2005 looked at training for archaeologists and conservators as well as respondents’ thoughts on the working relationship between archaeologists and conservators (Peachey 2010). As part of her graduate work, LeeAnn Barnes Gordon investigated the collaborative nature of archaeological conservation, including the attitudes of both conservators and archaeologists towards archaeological conservation (Gordon 2009). In 2010, a group of conservators in California and the Southwest surveyed archaeologists and other professionals working with archaeological materials about their use of conservation resources and their experiences working with conservators (Gleeson 2012).
The surveys cited above focused on the attitudes of conservators and archaeologists towards conservation and were distributed to a relatively small number of professionals, with 20 or fewer respondents. This survey aimed to be more comprehensive, to reach a larger number of respondents, and to produce quantifiable results suitable for analysis. It was targeted specifically to archaeologists who direct active excavations. Although other professionals on excavations may be intimately involved in conservation decision-making, project directors typically have overall financial and staffing authority, as well as final determination of research and project goals.
3. RESEARCH METHODOLOGY
The authors’ goal was to create a survey which was clear, simple, and took less than 10 minutes to complete. Various online survey tools were considered, and the authors chose to use Qualtrics1, a versatile online survey tool which is used by multiple academic units within the University of Michigan (the authors’ employer). Qualtrics is relatively simple to use, has sophisticated analytical capabilities, and allows survey responses to be exported to multiple file formats including Microsoft Excel and SPSS (Statistical Package for the Social Sciences). Qualtrics was used with success in the authors’ previous survey of archaeological conservators.
The survey had a total of 28 questions, but employed skip-and-display logic so that the number of questions answered by individual respondents varied. For example, an archaeologist that had never employed a conservator was not asked what percent of his/her budget was typically expended on conservation. The questions were primarily multiple choice, with a few write-in boxes and areas for longer text responses. Answering most questions was mandatory in order for respondents to continue taking the survey (forced validation), but a few questions which the authors thought might be sensitive or difficult to determine quickly, such as the actual rate of compensation, were optional. Respondents had the option of providing their names and contact information, and the responses of individuals who did so were kept confidential.

Davis and Chemello AIC Objects Specialty Group Postprints, Vol. 19, 2012
6
Otherwise, respondent anonymity was maintained; each response was coded with a unique number generated randomly by Qualtrics.
A group of archaeologists selected by the authors was asked to test the survey. The test group included archaeologists employed in academic settings, in federal and state government, cultural resource management, and private business settings. These archaeologists had excavation experience in the United States, Europe, and Asia, and had worked on a variety of sites including terrestrial and underwater, as well as historic and prehistoric civilizations. The survey was edited based on feedback from this group.
The survey was intended primarily for archaeologists employed by institutions based in the United States, and was distributed accordingly. However, there were responses from archaeologists employed outside the U.S. The survey was distributed in January of 2012 and was active for three weeks. It was distributed by emailing a survey link to 17 lists. Most lists targeted archaeologists2, but the link was also sent to 2 lists for museum professionals3 and 4 lists specific to conservation4.
There were 432 responses, 86 of which were removed because they were incomplete. Removal of the incomplete responses resulted in 346 responses which could be used for analysis. No duplications were found. Multiple obvious errors were found and the responses were re-coded to correct them. For example, if a faculty member at a university chose “other” for primary employer, this answer was recoded to “academic department – faculty.”
Please note that for the purposes of this survey, “conservation” was defined as “encompassing a broad range of preservation activities, from overall site preservation to individual artifact treatment.”
4. RESULTS
4.1 RESPONDENT PROFILEThis section provides a summary of professional profile information for respondents.
Questions in this section of the survey included: years of experience directing archaeological projects, primary employer, location of archaeological projects (United States or elsewhere), and type of site (terrestrial or underwater). As noted in the introduction, the survey was intended primarily for archaeologists based in the United States and was distributed only to U.S.-based archaeology discussion lists and websites. Although respondents were not asked to identify their geographic location, some provided this information voluntarily. In addition to the United States, respondents’ geographic locations included: Australia, Canada, the Czech Republic, Germany, Greece, Honduras, Israel, Portugal, South Africa, South Korea, Turkey, and the United Kingdom.
4.1.1 Years of Experience Directing Archaeological ProjectsRespondents were asked to indicate for how many years they had directed projects. The
largest group, 152 respondents (44%), had been directing projects for more than 15 years. The next largest group, 114 respondents (33%), had been directing projects for between 5 and 15 years. The smallest number of respondents, 80 (23%), had been directing projects for less than 5 years.
4.1.2 Primary EmployerAs seen in table 1, the largest group of respondents, 130 (37%), worked as faculty in
academic departments. The next largest groups indicated that they worked for cultural resource management firms, 75 respondents (22%), and federal and state government agencies, 65
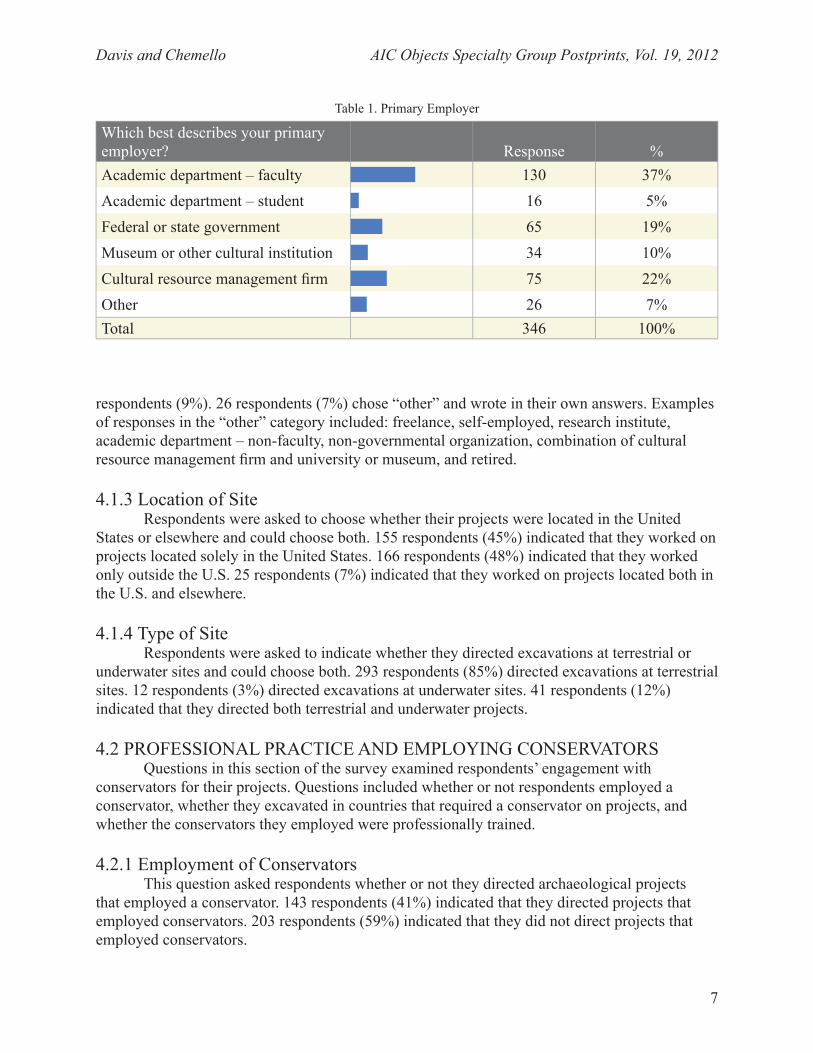
Davis and Chemello AIC Objects Specialty Group Postprints, Vol. 19, 2012
7
respondents (9%). 26 respondents (7%) chose “other” and wrote in their own answers. Examples of responses in the “other” category included: freelance, self-employed, research institute, academic department – non-faculty, non-governmental organization, combination of cultural resource management firm and university or museum, and retired.
4.1.3 Location of SiteRespondents were asked to choose whether their projects were located in the United
States or elsewhere and could choose both. 155 respondents (45%) indicated that they worked on projects located solely in the United States. 166 respondents (48%) indicated that they worked only outside the U.S. 25 respondents (7%) indicated that they worked on projects located both in the U.S. and elsewhere.
4.1.4 Type of SiteRespondents were asked to indicate whether they directed excavations at terrestrial or
underwater sites and could choose both. 293 respondents (85%) directed excavations at terrestrial sites. 12 respondents (3%) directed excavations at underwater sites. 41 respondents (12%) indicated that they directed both terrestrial and underwater projects.
4.2 PROFESSIONAL PRACTICE AND EMPLOYING CONSERVATORS Questions in this section of the survey examined respondents’ engagement with
conservators for their projects. Questions included whether or not respondents employed a conservator, whether they excavated in countries that required a conservator on projects, and whether the conservators they employed were professionally trained.
4.2.1 Employment of ConservatorsThis question asked respondents whether or not they directed archaeological projects
that employed a conservator. 143 respondents (41%) indicated that they directed projects that employed conservators. 203 respondents (59%) indicated that they did not direct projects that employed conservators.
Table 1. Primary Employer
Which best describes your primary employer? Response %Academic department – faculty 130 37%Academic department – student 16 5%Federal or state government 65 19%Museum or other cultural institution 34 10%Cultural resource management firm 75 22%Other 26 7%Total 346 100%
Davis and Chemello AIC Objects Specialty Group Postprints, Vol. 19, 2012
8
4.2.2 Requirement for Employment of ConservatorsFor respondents who indicated that they had employed conservators, there were
several additional questions. The first was, “Do you excavate in a country that requires archaeological projects to employ a conservator?” 73 people, or 51% of the group who had employed conservators, indicated that they excavated in a country requiring a conservator for archaeological projects. This represents 21% of all respondents. 70 people, or 49% of the group that had employed conservators, indicated that they did not excavate in a country requiring conservators for archaeological projects. This represents 20% of all respondents.
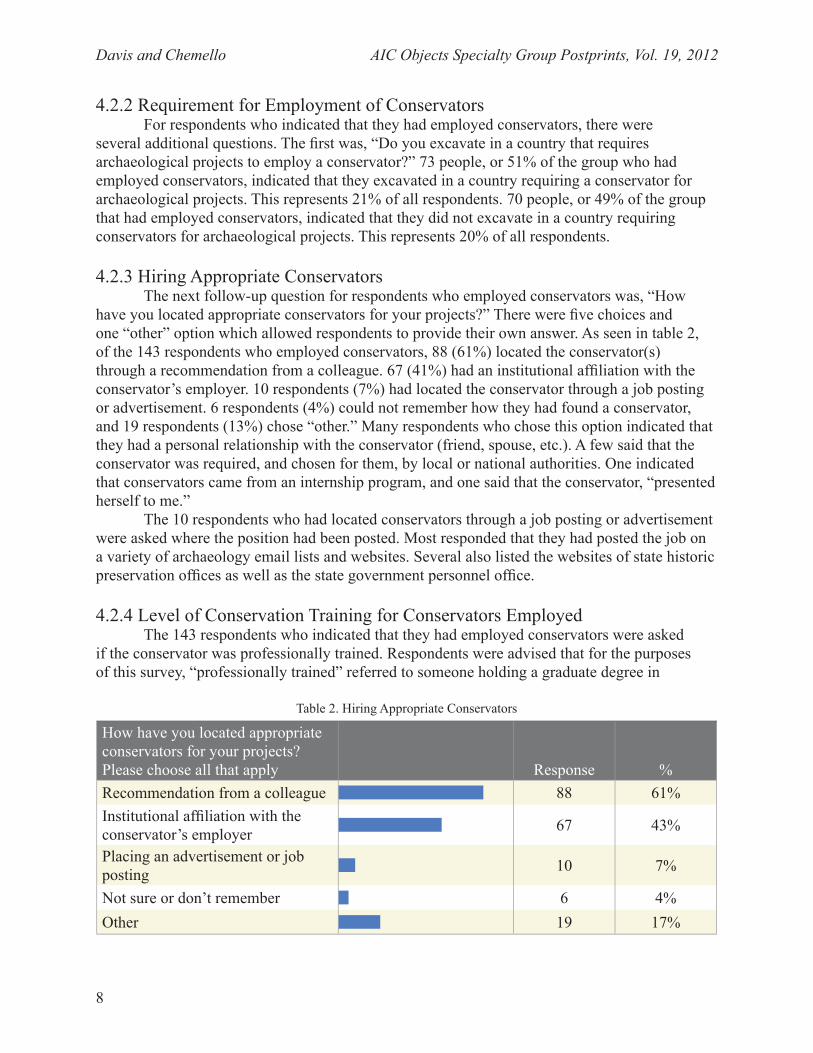
4.2.3 Hiring Appropriate ConservatorsThe next follow-up question for respondents who employed conservators was, “How
have you located appropriate conservators for your projects?” There were five choices and one “other” option which allowed respondents to provide their own answer. As seen in table 2, of the 143 respondents who employed conservators, 88 (61%) located the conservator(s) through a recommendation from a colleague. 67 (41%) had an institutional affiliation with the conservator’s employer. 10 respondents (7%) had located the conservator through a job posting or advertisement. 6 respondents (4%) could not remember how they had found a conservator, and 19 respondents (13%) chose “other.” Many respondents who chose this option indicated that they had a personal relationship with the conservator (friend, spouse, etc.). A few said that the conservator was required, and chosen for them, by local or national authorities. One indicated that conservators came from an internship program, and one said that the conservator, “presented herself to me.”
The 10 respondents who had located conservators through a job posting or advertisement were asked where the position had been posted. Most responded that they had posted the job on a variety of archaeology email lists and websites. Several also listed the websites of state historic preservation offices as well as the state government personnel office.
4.2.4 Level of Conservation Training for Conservators EmployedThe 143 respondents who indicated that they had employed conservators were asked
if the conservator was professionally trained. Respondents were advised that for the purposes of this survey, “professionally trained” referred to someone holding a graduate degree in
Table 2. Hiring Appropriate Conservators
How have you located appropriate conservators for your projects? Please choose all that apply Response %Recommendation from a colleague 88 61%Institutional affiliation with the conservator’s employer 67 43%
Placing an advertisement or job posting 10 7%
Not sure or don’t remember 6 4%Other 19 17%
Davis and Chemello AIC Objects Specialty Group Postprints, Vol. 19, 2012
9
conservation. 121 respondents (85%) indicated that they had employed a professionally trained conservator. 12 respondents (8%) chose “no”, that the conservator they employed was not professionally trained. 10 respondents (7%) were not sure.
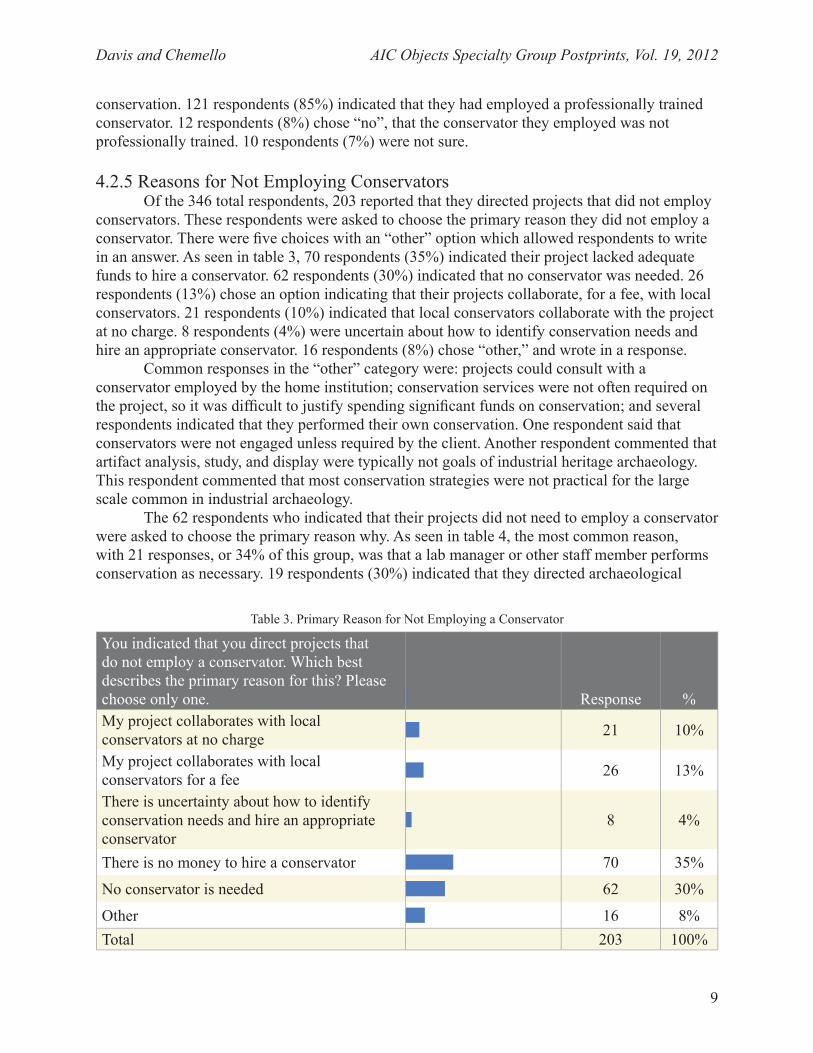
4.2.5 Reasons for Not Employing ConservatorsOf the 346 total respondents, 203 reported that they directed projects that did not employ
conservators. These respondents were asked to choose the primary reason they did not employ a conservator. There were five choices with an “other” option which allowed respondents to write in an answer. As seen in table 3, 70 respondents (35%) indicated their project lacked adequate funds to hire a conservator. 62 respondents (30%) indicated that no conservator was needed. 26 respondents (13%) chose an option indicating that their projects collaborate, for a fee, with local conservators. 21 respondents (10%) indicated that local conservators collaborate with the project at no charge. 8 respondents (4%) were uncertain about how to identify conservation needs and hire an appropriate conservator. 16 respondents (8%) chose “other,” and wrote in a response.
Common responses in the “other” category were: projects could consult with a conservator employed by the home institution; conservation services were not often required on the project, so it was difficult to justify spending significant funds on conservation; and several respondents indicated that they performed their own conservation. One respondent said that conservators were not engaged unless required by the client. Another respondent commented that artifact analysis, study, and display were typically not goals of industrial heritage archaeology. This respondent commented that most conservation strategies were not practical for the large scale common in industrial archaeology.
The 62 respondents who indicated that their projects did not need to employ a conservator were asked to choose the primary reason why. As seen in table 4, the most common reason, with 21 responses, or 34% of this group, was that a lab manager or other staff member performs conservation as necessary. 19 respondents (30%) indicated that they directed archaeological
Table 3. Primary Reason for Not Employing a Conservator
You indicated that you direct projects that do not employ a conservator. Which best describes the primary reason for this? Please choose only one. Response %My project collaborates with local conservators at no charge 21 10%
My project collaborates with local conservators for a fee 26 13%
There is uncertainty about how to identify conservation needs and hire an appropriate conservator
8 4%
There is no money to hire a conservator 70 35%
No conservator is needed 62 30%
Other 16 8%Total 203 100%

Davis and Chemello AIC Objects Specialty Group Postprints, Vol. 19, 2012
10
surveys. 13 respondents (21%) indicated that they directed sites where the artifacts and structures excavated were in good condition. 6 respondents (10%) reported that few artifacts or structures were excavated at the sites they directed. 3 respondents (5%) chose “other” and wrote in an answer. One respondent reported that s/he directed only surveys or projects on private land, where all excavated artifacts are the property of the landowner. Another wrote that s/he excavated structures prior to destruction by developers (no artifact conservation was referenced). The final respondent in this category indicated that s/he is a conservator.
4.3 PROFESSIONAL PRACTICE, FUNDING, AND CONSERVATION EXPENDITURE
Questions in this section of the survey examined general funding sources and conservation expenditures for archaeological projects. Conservation expenditures were investigated primarily for respondents that had employed conservators. All respondents were asked their opinion on the affordability of conservation.
4.3.1 Funding for Archaeological ProjectsAll 346 respondents were asked about the funding sources for their projects. There were
five possible choices, including an “other” category that allowed write-in answers. Respondents were instructed to choose all applicable answers. 172 respondents, or 50% of the overall group, had funded their projects with grant monies. 150 respondents’ projects (43%) were funded by clients, for example developers or government agencies. 140 respondents (40%) used monies from their primary employer for projects. 88 respondents (25%) also used private donations to fund their excavations. 20 respondents (6%) chose “other” and provided a response. Common responses in the “other” category were: tuition from field school students, fees paid by volunteers, self-funded, and all-volunteer labor.
4.3.2 Compensation of ConservatorsThe 143 respondents who indicated that they directed projects that employed
conservators were asked how their projects compensated conservators. There were four choices and respondents were asked to choose all that applied. The largest number of respondents,
Table 4. Primary Reason No Conservator Was Needed
You indicated that no conservator is needed for your projects. Please indicate the primary reason why. Response %The project(s) is a survey 19 30%Few artifacts or structures are excavated 6 10%The artifacts and structures excavated are in good condition 13 21%
Other 3 5%A lab manager or other staff member performs conservation as necessary 21 34%
Total 62 100%
Davis and Chemello AIC Objects Specialty Group Postprints, Vol. 19, 2012
11
116 or 81% of this group, indicated that they paid a fee for conservation services or time. 70 respondents (49%) covered room and board for conservators. 69 respondents (48%) paid for travel expenses. Finally, 6 respondents (4%) did not provide any financial compensation.
4.3.3 Expenditure on ConservationThe 143 respondents that had employed conservators were asked what percentage of their
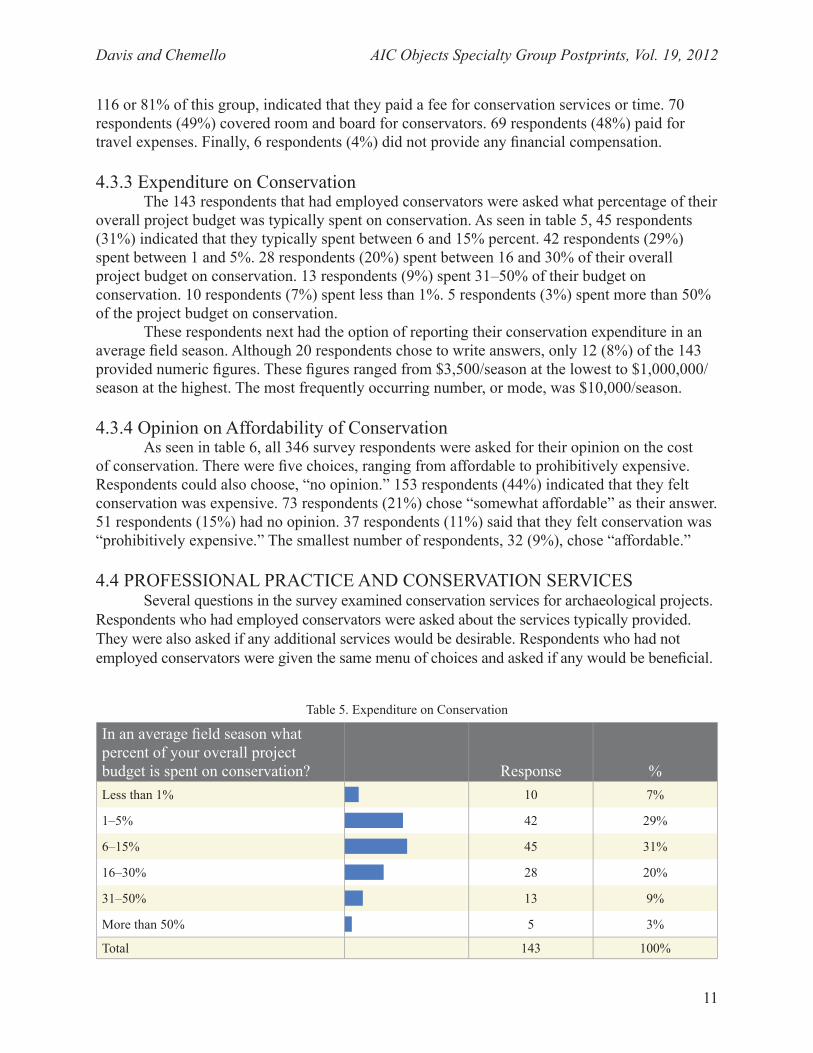
overall project budget was typically spent on conservation. As seen in table 5, 45 respondents (31%) indicated that they typically spent between 6 and 15% percent. 42 respondents (29%) spent between 1 and 5%. 28 respondents (20%) spent between 16 and 30% of their overall project budget on conservation. 13 respondents (9%) spent 31–50% of their budget on conservation. 10 respondents (7%) spent less than 1%. 5 respondents (3%) spent more than 50% of the project budget on conservation.
These respondents next had the option of reporting their conservation expenditure in an average field season. Although 20 respondents chose to write answers, only 12 (8%) of the 143 provided numeric figures. These figures ranged from $3,500/season at the lowest to $1,000,000/season at the highest. The most frequently occurring number, or mode, was $10,000/season.
4.3.4 Opinion on Affordability of Conservation As seen in table 6, all 346 survey respondents were asked for their opinion on the cost
of conservation. There were five choices, ranging from affordable to prohibitively expensive. Respondents could also choose, “no opinion.” 153 respondents (44%) indicated that they felt conservation was expensive. 73 respondents (21%) chose “somewhat affordable” as their answer. 51 respondents (15%) had no opinion. 37 respondents (11%) said that they felt conservation was “prohibitively expensive.” The smallest number of respondents, 32 (9%), chose “affordable.”
4.4 PROFESSIONAL PRACTICE AND CONSERVATION SERVICESSeveral questions in the survey examined conservation services for archaeological projects.
Respondents who had employed conservators were asked about the services typically provided. They were also asked if any additional services would be desirable. Respondents who had not employed conservators were given the same menu of choices and asked if any would be beneficial.
Table 5. Expenditure on Conservation
In an average field season what percent of your overall project budget is spent on conservation? Response %Less than 1% 10 7%
1–5% 42 29%
6–15% 45 31%
16–30% 28 20%
31–50% 13 9%
More than 50% 5 3%
Total 143 100%

Davis and Chemello AIC Objects Specialty Group Postprints, Vol. 19, 2012
12
4.4.1 Conservation Services ProvidedThe 143 respondents who indicated that they employed conservators were asked to
choose from a menu which conservation services were provided for their projects. As seen in table 7, there were seven choices including “other” which allowed respondents to write in an answer. 130 respondents (91%) received artifact processing. 88 respondents (62%) received a written report detailing conservation activities. 84 respondents (59%) received conservation planning and consultation. 80 respondents (56%) received conservation of architectural elements or structures. There were 8 responses in the “other” category. Several respondents identified “curation” as an additional service, but did not define what they meant by the word. Other responses in this category included: museum creation and exposition, conservation of cemetery markers, conservation of rock art, and investigative analysis.
Table 6. Opinion on Affordability of Conservation
Which choice best represents your opinion about the cost of conservation? Response %Affordable 32 9%Somewhat affordable 73 21%Expensive 153 44%Prohibitively expensive 37 11%No opinion 51 15%Total 346 100%
Table 7. Conservation Services Provided
Which of the following conservation services are provided for the projects you direct? Response %Artifact processing, such as lifting, cleaning, reconstruction, and stabilization
130 91%
Conservation of architectural elements and/or structures 80 56%
Conservation planning and consultation 84 59%
Overall site preservation and heritage management 63 44%
Conservation teaching and training on-site 57 40%
Written report detailing conservation priorities and activities 88 62%
Other 8 6%
Davis and Chemello AIC Objects Specialty Group Postprints, Vol. 19, 2012
13
4.4.2 Additional Conservation Services NeededThe same group of 143 respondents was asked if, in addition to the services already
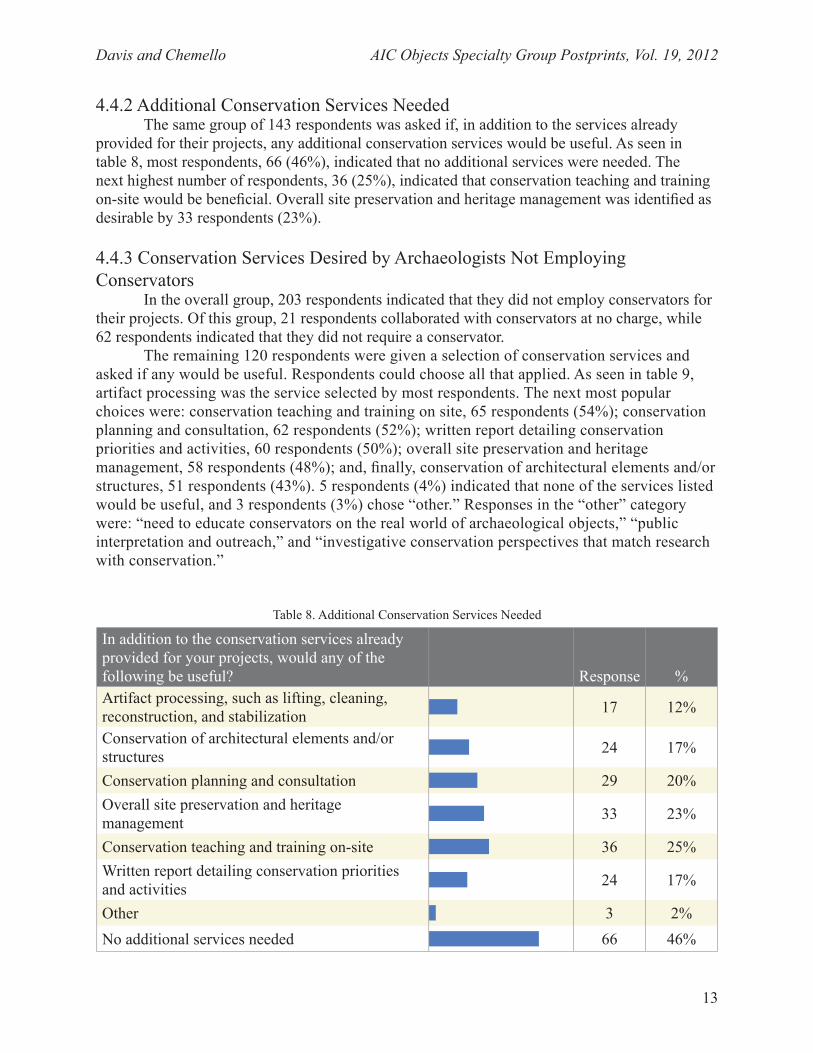
provided for their projects, any additional conservation services would be useful. As seen in table 8, most respondents, 66 (46%), indicated that no additional services were needed. The next highest number of respondents, 36 (25%), indicated that conservation teaching and training on-site would be beneficial. Overall site preservation and heritage management was identified as desirable by 33 respondents (23%).
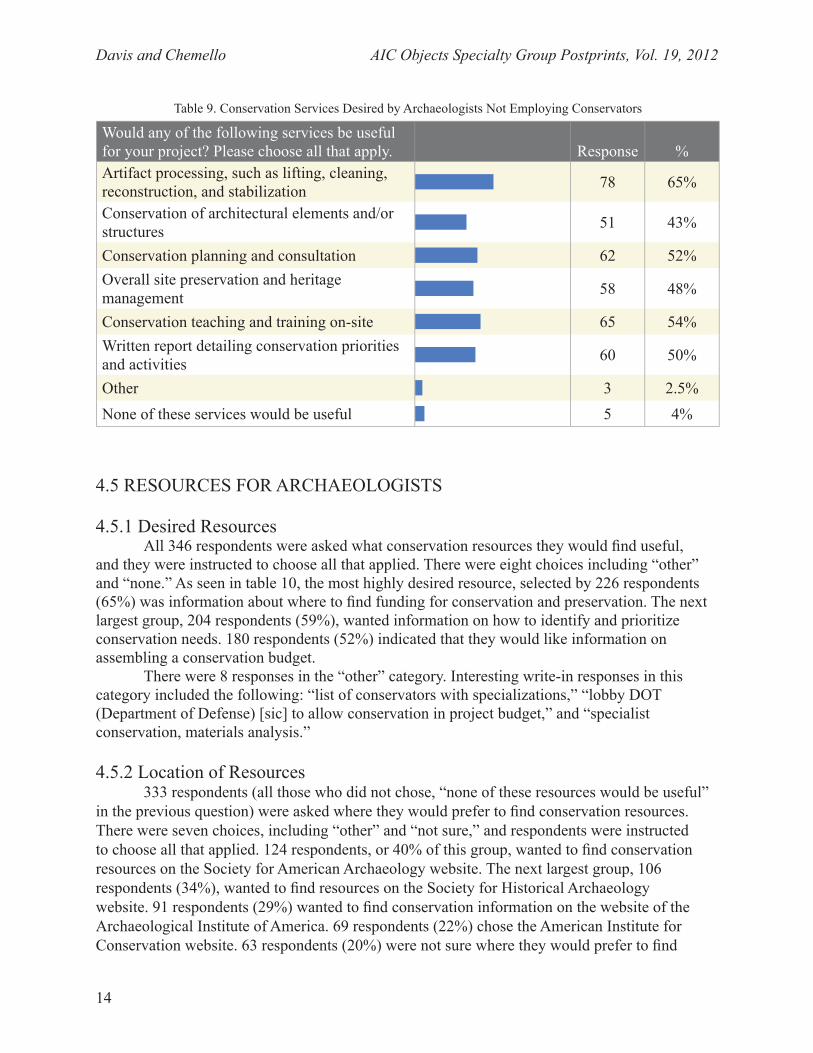
4.4.3 Conservation Services Desired by Archaeologists Not Employing Conservators
In the overall group, 203 respondents indicated that they did not employ conservators for their projects. Of this group, 21 respondents collaborated with conservators at no charge, while 62 respondents indicated that they did not require a conservator.
The remaining 120 respondents were given a selection of conservation services and asked if any would be useful. Respondents could choose all that applied. As seen in table 9, artifact processing was the service selected by most respondents. The next most popular choices were: conservation teaching and training on site, 65 respondents (54%); conservation planning and consultation, 62 respondents (52%); written report detailing conservation priorities and activities, 60 respondents (50%); overall site preservation and heritage management, 58 respondents (48%); and, finally, conservation of architectural elements and/or structures, 51 respondents (43%). 5 respondents (4%) indicated that none of the services listed would be useful, and 3 respondents (3%) chose “other.” Responses in the “other” category were: “need to educate conservators on the real world of archaeological objects,” “public interpretation and outreach,” and “investigative conservation perspectives that match research with conservation.”
Table 8. Additional Conservation Services Needed
In addition to the conservation services already provided for your projects, would any of the following be useful? Response %Artifact processing, such as lifting, cleaning, reconstruction, and stabilization 17 12%
Conservation of architectural elements and/or structures 24 17%
Conservation planning and consultation 29 20%Overall site preservation and heritage management 33 23%
Conservation teaching and training on-site 36 25%Written report detailing conservation priorities and activities 24 17%
Other 3 2%No additional services needed 66 46%
Davis and Chemello AIC Objects Specialty Group Postprints, Vol. 19, 2012
14
4.5 RESOURCES FOR ARCHAEOLOGISTS
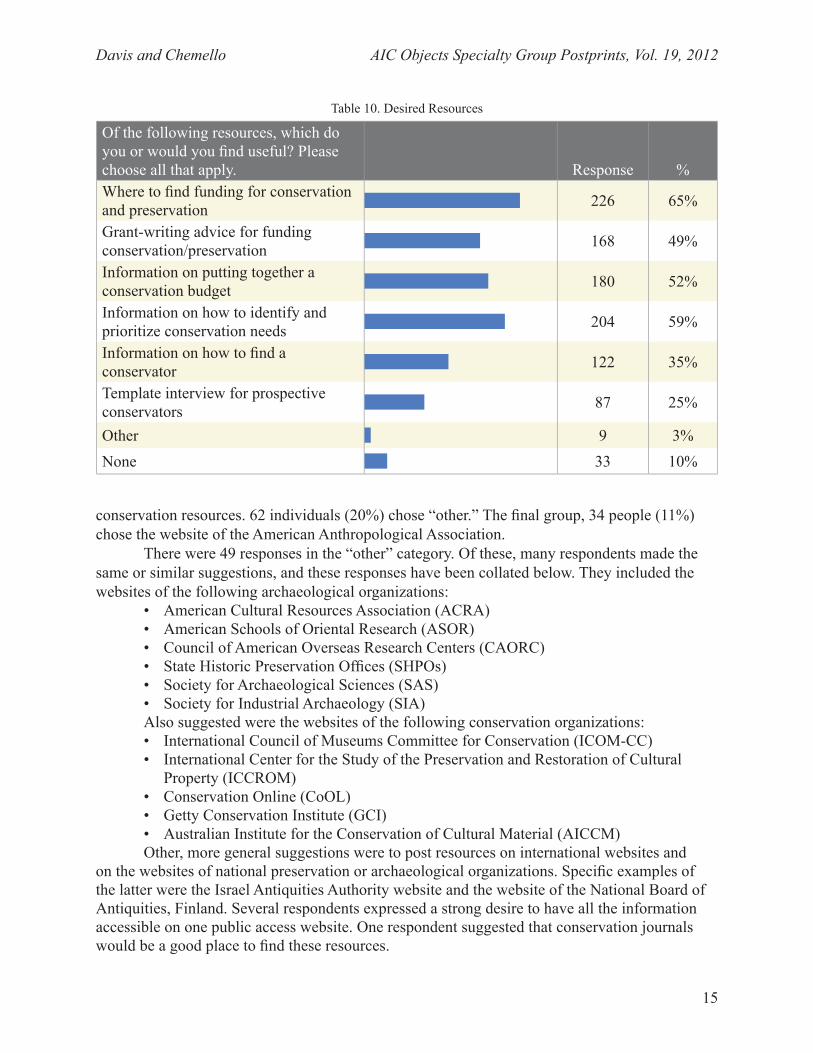
4.5.1 Desired ResourcesAll 346 respondents were asked what conservation resources they would find useful,
and they were instructed to choose all that applied. There were eight choices including “other” and “none.” As seen in table 10, the most highly desired resource, selected by 226 respondents (65%) was information about where to find funding for conservation and preservation. The next largest group, 204 respondents (59%), wanted information on how to identify and prioritize conservation needs. 180 respondents (52%) indicated that they would like information on assembling a conservation budget.
There were 8 responses in the “other” category. Interesting write-in responses in this category included the following: “list of conservators with specializations,” “lobby DOT (Department of Defense) [sic] to allow conservation in project budget,” and “specialist conservation, materials analysis.”
4.5.2 Location of Resources333 respondents (all those who did not chose, “none of these resources would be useful”
in the previous question) were asked where they would prefer to find conservation resources. There were seven choices, including “other” and “not sure,” and respondents were instructed to choose all that applied. 124 respondents, or 40% of this group, wanted to find conservation resources on the Society for American Archaeology website. The next largest group, 106 respondents (34%), wanted to find resources on the Society for Historical Archaeology website. 91 respondents (29%) wanted to find conservation information on the website of the Archaeological Institute of America. 69 respondents (22%) chose the American Institute for Conservation website. 63 respondents (20%) were not sure where they would prefer to find
Table 9. Conservation Services Desired by Archaeologists Not Employing Conservators
Would any of the following services be useful for your project? Please choose all that apply. Response %Artifact processing, such as lifting, cleaning, reconstruction, and stabilization 78 65%
Conservation of architectural elements and/or structures 51 43%
Conservation planning and consultation 62 52%Overall site preservation and heritage management 58 48%
Conservation teaching and training on-site 65 54%Written report detailing conservation priorities and activities 60 50%
Other 3 2.5%None of these services would be useful 5 4%
Davis and Chemello AIC Objects Specialty Group Postprints, Vol. 19, 2012
15
conservation resources. 62 individuals (20%) chose “other.” The final group, 34 people (11%) chose the website of the American Anthropological Association.
There were 49 responses in the “other” category. Of these, many respondents made the same or similar suggestions, and these responses have been collated below. They included the websites of the following archaeological organizations:
• American Cultural Resources Association (ACRA)• American Schools of Oriental Research (ASOR)• Council of American Overseas Research Centers (CAORC)• State Historic Preservation Offices (SHPOs)• Society for Archaeological Sciences (SAS)• Society for Industrial Archaeology (SIA)Also suggested were the websites of the following conservation organizations:• International Council of Museums Committee for Conservation (ICOM-CC)• International Center for the Study of the Preservation and Restoration of Cultural
Property (ICCROM)• Conservation Online (CoOL)• Getty Conservation Institute (GCI)• Australian Institute for the Conservation of Cultural Material (AICCM)Other, more general suggestions were to post resources on international websites and
on the websites of national preservation or archaeological organizations. Specific examples of the latter were the Israel Antiquities Authority website and the website of the National Board of Antiquities, Finland. Several respondents expressed a strong desire to have all the information accessible on one public access website. One respondent suggested that conservation journals would be a good place to find these resources.
Table 10. Desired Resources
Of the following resources, which do you or would you find useful? Please choose all that apply. Response %Where to find funding for conservation and preservation 226 65%
Grant-writing advice for funding conservation/preservation 168 49%
Information on putting together a conservation budget 180 52%
Information on how to identify and prioritize conservation needs 204 59%
Information on how to find a conservator 122 35%
Template interview for prospective conservators 87 25%
Other 9 3%None 33 10%
Davis and Chemello AIC Objects Specialty Group Postprints, Vol. 19, 2012
16
4.5.3 Familiarity with the American Institute for ConservationAll 346 respondents were asked if they were familiar with the American Institute for
Conservation. 256 respondents (74%) were not. 90 respondents (26%) responded that yes, they were familiar with AIC.
4.5.4 Use of AIC ResourcesThe 90 respondents who indicated that they were familiar with AIC were asked a follow-
up question: whether they had used the AIC website or other AIC resources to find a conservator or other information about conservation. 46 respondents (51%) had, while 44 respondents (49%) had not.
The 46 who had used an AIC resource were asked whether they had used the website or another resource. They were asked to choose all that applied (website or other) and to describe any non-web resource. 45 respondents, or 98% of this group, had used the website. 5 people (11%) had used another resource. 3 of these respondents gave a description of what they had used. One simply listed, “printed material.” One had used CoOL, and one had used the Journal of the American Institute for Conservation.
All 46 respondents who were familiar with AIC and had used an AIC resource were asked if they had been able to find the information they were seeking. 37 (80%) responded “yes,” while 9 (20%) responded “no.”
The 45 respondents who had used the website were asked if the website was easy to navigate. 38 (84%) indicated that it was, while 7 (16%) indicated that it was not.
4.6 COMMENTS FROM RESPONDENTSThe survey included a write-in section where respondents could comment. In addition,
respondents frequently provided commentary in the write-in areas for “other” options on individual questions. Overall, more than 70 comments were received. It is not possible to record or address every individual comment here, however, multiple themes emerged. Each is introduced below with a representative quote in bold text.
“i’m not sure if employing someone who specializes as the curator is the same specialty as a conservator.” Multiple respondents expressed confusion between the responsibilities of curators and conservators. One commented specifically that the word “conservator” had been used “inappropriately as a synonym for curation and other curatorial practices.” Related to this were comments expressing confusion about what, exactly, the survey meant by “conservator.”
“Many of us recognize that conservation is important, but we have too few finds of the type that might require conservation in the field (such as metal objects).” Among the respondents who commented, there seemed to be a general feeling that most excavated materials did not require “specialist conservation.” For example, one respondent commented, “I have been doing archaeology for 42 years all over the western U.S. and Guatemala and possibly out of the hundreds of thousands of artifacts that have passed before my eyes, those requiring special conservation needs could be counted on my fingers and toes.”
“I have had conservation training so I do our conservation.” Multiple respondents commented that they or a trained staff member who was not a conservator provided conservation for their projects. Many characterized this work as “basic” or “minor.” Others indicated that they were trained as conservators and had a good grasp of conservation needs and procedures.

Davis and Chemello AIC Objects Specialty Group Postprints, Vol. 19, 2012
17
“one of the big problems we have is the lack of experience most conservators have with archaeological (dry and wet) material…most of our conservators have very limited field experience and lack a practical approach to conservation.” A lack of conservators trained specifically in archaeological field conservation was frequently cited. Many respondents said that they felt most conservators were trained for museum and fine art conservation and lacked the ability to apply appropriate methods and materials in the field, “…after many years of experience I have watched expensively and meticulously conserved mosaics, frescoes, walls, lost because the practices undertaken were specific to the material, not to the future of it in-situ at the site.”
On a related note, many respondents commented that communication needed to be improved between archaeologists and conservators because they felt that conservators frequently did not understand archaeological research goals. “There needs to be better communication between archaeologists and conservators, and having supervised both, and I do see that sometimes conservators just don’t get it about how archaeologists – the real curators here – make priorities. The perfectly conserved object is not really the end game of archaeological research.”
“i believe that conservation is essential, otherwise archaeology approximates vandalism. Having said that, I also find it to be quite expensive to pay for conservation services.” Several respondents commented on the expense of conservation, but characterized it as a necessary and reasonable cost that was in line with other expenditures on archaeological projects. One respondent expressed frustration with the questions about expenditure, saying, “Conservation is required so it does not matter if I think it is affordable. It is necessary. Period.”
“There is a need to change attitudes to make the costs of artifact conservation acknowledged and accepted.” Many respondents, especially those working in cultural resource management archaeology and at state agencies, noted difficulty with convincing clients and co-workers that conservation was necessary. “I struggle to educate personnel regarding the importance of historic preservation. On the whole, people at my agency construe anything related to cultural resource management as costly and time consuming. Having better information regarding conservation/preservation initiatives and how-to’s on collaborative partnerships in preservation would be most helpful.” Another representative example was, “It is difficult to convince clients that curation and the associated curation fees are important, let alone that conservation in the thousands of dollars is necessary. A stronger message of preserving our heritage is necessary to convince developers and the state/federal agencies that conservation should be done.”
“I am delighted to see surveys such as this and hope the results are made available to the broader archaeological community. I do value conservation and wish to see it become more of a staple in the american archaeological arena.” Multiple respondents commented on the usefulness of the survey and/or remarked that the topic was interesting. However, several respondents also expressed this concern, “It is not clear what information you are seeking or how it will help us ‘in the field.’” One respondent also commented, “This survey seems intended for one purpose, to find out how to get more archaeological conservators hired.” Another wrote, “How relevant is it to non-Americans?”
“…but the world heritage people OUGHT to know the desperate state the building is in, and its importance to the history of ancient wall-painting…” Multiple comments did not fit any of the previous categories, but were instead pleas for help with conservation on specific projects, lists of places the respondent had worked, suggestions of organizations to which we should send the survey, and information about the respondents’ publications.
Davis and Chemello AIC Objects Specialty Group Postprints, Vol. 19, 2012
18
5. DISCUSSION
5.1 RESPONDENT PROFILEWhen considering the results of the survey, an understanding of the respondent profile is
beneficial. Almost half the respondents, 44%, are relatively experienced, having directed projects for more than fifteen years. A large percentage, 33%, had between five and fifteen years of experience.
Very few archaeologists who directed underwater projects took the survey, only 53 out of 346, therefore the views of this group may not be adequately represented. The balance between academic archaeologists and archaeologists working in other settings is almost even, weighted slightly towards those in non-academic settings.
The authors would also like to comment on a phenomenon they came to call “the donkey vote.” This term, commonly used in Australia (the native country of one of the authors), refers to a vote that was inappropriately cast. For example, the survey was emailed to multiple conservation lists with a request for conservators to forward it as appropriate. Several conservators wrote to say they had completed the survey, “just to see what it was like,” despite clear instructions that it was intended for archaeological dig directors. Because the survey was anonymous and these respondents did not clearly identify themselves, their responses could not be removed from the final report. In future, to discourage donkey votes motivated by curiosity, the authors recommend offering interested colleagues a file with the survey questions. In a few other possible cases of donkey voting, respondents made ambiguous comments about their role on projects. For example, several said that they “worked on” projects or managed specific aspects of projects, whereas others identified themselves as directors or co-directors.
5.2 EMPLOYMENT OF CONSERVATORS AND EXPENDITURE ON CONSERVATION
41% of respondents directed projects that employed a conservator. Although this represents less than half of the overall group, the percentage is higher than expected based on the authors’ anecdotal information from archaeologists. Furthermore, 85% of this group employed conservators that were professionally trained. 81% paid a fee for conservation work, and 96% compensated conservators in some way. Only 4% of respondents did not compensate conservators.
Certain funding sources correlate with employment or non-employment of conservators. Respondents whose projects were funded by clients like developers or government agencies were less likely to employ conservators. This finding corresponds to comments from respondents on the difficulty of convincing clients of the need for conservation. On the other hand, conservators were more likely to be employed by respondents whose projects were funded with money from private donations. Of the group that did not employ conservators for their projects, 35% (70 individuals) said the primary reason for this was that they could not afford it. Funding sources were examined for this group, and were split evenly between primary employer, grant monies, and clients like developers or government agencies. When this group’s need for resources was examined, 60% or more indicated interest in the following: where to find funding, grant writing advice, information on assembling a conservation budget, and information on identifying and prioritizing conservation needs.
It is interesting to note that 23% of respondents who did not a employ a conservator still received conservation services through some level of collaboration with conservators, either fee-based or for free. Another 21 respondents, a third of the group that said no conservator was
Davis and Chemello AIC Objects Specialty Group Postprints, Vol. 19, 2012
19
needed, were either performing conservation activities themselves or employing non-conservator staff members to do the work. Furthermore, in the group that had not employed conservators, 85% indicated that they would like some level of conservation; when asked to choose potentially useful services from a list, only 15% chose “none of these services would be useful.” Out of the entire group of 346 respondents, only 27 or 8% said that they did not want any kind of conservation service. This suggests that although 59% of respondents indicated they did not employ conservators for their projects, the need for conservation remains high.
Respondents’ opinions about the affordability of conservation were examined against the percentage of their budgets that was spent on conservation. There were respondents in each opinion category from “affordable” to “prohibitively expensive” that spent up to 50% of their project budget on conservation. In the category of “prohibitively expensive”, only two respondents spent more than 30% of their project budget on conservation, with most spending between 1 and 15%. Respondents who directed projects that did not employ conservators also felt that conservation was expensive. Out of 203 respondents who did not employ conservators, 97 thought conservation was expensive and 20 felt it was prohibitively expensive. This suggests that feelings about the cost of conservation are not tied to the percentage of funding allocated to conservation and are instead more subjective.
Related to any discussion about employment of archaeological conservators is the fact that many respondents identified a lack of adequately trained conservators as a significant problem. More than one respondent commented that conservation treatment and methodology for artifacts in museum collections were not necessarily appropriate for excavated artifacts or structures, and expressed frustration with conservators’ inability to adapt conservation approaches in the field. This begs the question, are current training programs producing conservators who are unprepared for the realities of on-site work?
5.3 CONSERVATION SERVICESIt may not come as a surprise to practicing archaeological conservators that 90%
of respondents employing a conservator received some type of artifact processing, such as cleaning, reconstruction, or stabilization. However, the fact that 38% of projects did not receive a written report detailing conservation activities is troubling. As noted in the authors’ survey of archaeological conservators in 2011, a professional report summarizing conservation activities is an important form of documentation for excavations. In that survey, 22% of the 116 respondents indicated that they did not provide end of season conservation reports (Davis and Chemello 2011). The authors would like to encourage both groups, archaeological conservators as well as field directors, to consider a written report of conservation activities to be essential. The full range of conservation activities on a project may not be visible or documented for excavation directors without such a report.
As noted in the results section on comments, many respondents expressed the belief that conservation is highly specialized and only necessary for certain materials, such as metal objects. One respondent commented specifically that most finds, like ceramics, were “shelf-stable.” This suggests that many of the respondents may not be fully aware of conservation and condition issues for archaeological materials. It also suggests that conservation is perceived by many as relating solely to the treatment of individual finds. The comments about curation, and how this is not the responsibility of conservators, also suggest that conservation is perceived as active treatment and that conservators are not necessarily seen as professionals who can provide preservation information or preventive conservation for excavated material.
Davis and Chemello AIC Objects Specialty Group Postprints, Vol. 19, 2012
20
5.4 RESOURCESFor the overall group, the most highly requested resources were information about
funding sources and about how to identify and prioritize conservation needs. As noted in the comments section, respondents expressed a strong desire to have a central electronic source for conservation information.
An important finding of this survey is the fact that 74% of the respondents were not familiar with the American Institute for Conservation (AIC). To make this statistic more personal, in the test group, multiple archaeologists who knew the authors well and had worked with them had not heard of AIC. This lack of awareness of AIC as a resource is something that could be improved, both at institutional and individual levels. For AIC, a consistent presence at professional archaeology conferences would be a way to reach out to affiliated organizations and increase awareness among large numbers of archaeologists. The year 2012 was a good first step, when AIC and the Archaeological Institute of America arranged to have a booth swap at their respective annual meetings. For individual conservators, the authors would like to encourage outreach about AIC at an institutional level as well as through personal interactions with colleagues. If attending the annual AIC meeting, for example, conservators could submit a post to their institution’s blog or a news item to the newsletter. In conversations with non-conservator colleagues, AIC and its professional journal could be referred to by name. For conservators in private practice, their participation in AIC meetings and service work might be something that could be featured on the company website. For conservators presenting at archaeological conferences, mentioning AIC even briefly would be a way to raise awareness.
More encouraging is the fact that of the 26% of respondents who were familiar with the American Institute for Conservation, slightly over half, (51%), had used the AIC website or other resources and 80% of those individuals were able to find the information they were seeking. Most respondents who had used the website found it easy to navigate. One respondent did suggest creating a more integrated structure that would allow end users without much knowledge of conservation to search and find multiple types of relevant information. For example, a search for “industrial heritage conservation” would bring up related articles, links, and funding sources, as well as contact information for individual conservators with the appropriate specialization. Another important comment was that archaeologists are often charged with the care and preservation of complex sites, structures, and artifact assemblages, whereas the AIC resources tend to be geared toward helping people deal with individual objects or material types. For conservation resources to be successful and useful for archaeologists, conservators need to take a more comprehensive approach to what is needed for the preservation and stewardship of sites.
6. SUMMARY
In summary, a number of aspects of this survey are worth noting. First, there are many reasons for conservators and archaeologists to feel encouraged by the results. Participation was higher than the authors expected and significantly higher than with previous projects of this type. The willingness of more than 20% of survey respondents to provide detailed comments was encouraging, as was the interest in conservation expressed by most respondents. Additionally, more projects had conservation support than expected by the authors, and many respondents were expending significant resources to ensure conservation and preservation for their sites.
Second, the survey identified several specific areas for improvement. The most important of these is increased education for conservators and archaeologists. For archaeologists, a better
Davis and Chemello AIC Objects Specialty Group Postprints, Vol. 19, 2012
21
understanding of how artifacts and sites deteriorate, and of how conservators can assist not only with preservation but also with archaeological research, would be highly beneficial. In part, this can be accomplished by increased and sustained outreach on the part of conservators to archaeologists and archaeological organizations. For archaeological conservators, more comprehensive training is needed; training that moves away from a focus on individual artifacts and material types and towards an approach that embraces the realities of fieldwork, integrates site and artifact preservation, and seeks to understand and support archaeological research goals.
Additional areas for improvement include providing the comprehensive conservation resources desired by archaeologists and increasing advocacy among United States government agencies for conservation support on excavations. In conclusion, archaeology and conservation are not so far away from each other. This survey identified a strong interest in conservation on the part of archaeologists, and the results can be used as a guide for where and how the conservation community can improve education, outreach, and resources for archaeological conservation.
ACKNOWLEDGEMENTS
Special thanks are due to the University of Michigan Center for Statistical Consultation and Research, as well as to the following individuals for their contributions to this project: Andrea Berlin, LeeAnn Barnes Gordon, Ellen Carlee, Steven Ellis, Jody Michael Gordon, Sarah Herr, Anne Jensen, Thomas Landvatter, John O’Shea, Janet Richards, Caroline Roberts, Carla Sinopoli, Andrew Wilburn, Justin Winger, and Lisa Young. Additionally, the authors would like to thank the many colleagues who posted and forwarded the survey link, and all survey respondents, particularly those who took the time to give comments and feedback.
NOTES
1. The data and data analysis for this paper were generated using Qualtrics Labs, Inc. software, Version 2009 of the Qualtrics Research Suite. Copyright 2010, Qualtrics Labs, Inc. Qualtrics and all other Qualtrics Labs, Inc. product or service names are registered trademarks or trademarks of Qualtrics Labs, Inc., Provo, UT, USA. www.Qualtrics.com
2. The survey link was sent to the following archaeology lists: Agade, a news list covering the Ancient Near East run by Jack Sasson at Vanderbilt University; HISTARCH, a discussion list covering historical archaeology, run from Arizona State University (1,191 subscribers); SUB-ARCH, a discussion list focusing on underwater archaeology, also from Arizona State University (539 subscribers); ACRA-L, the email list of the American Cultural Resources Association; Anthro-L, a discussion list on anthropology topics, run from the State University of New York at Buffalo; Classics.Conferences, a list run by the University of Michigan, including Classical Studies departments in the U.S. and Canada as well as University of Michigan graduate students (192 subscribers); AegeaNet, a discussion and news list on Aegean archaeology (survey link posted by John Younger, 900 subscribers); ANE-2, a moderated academic discussion list that focuses on topics and issues of interest in Ancient Near Eastern Studies (survey link posted by Charles Jones); AWOL, The Ancient World Online, a blog focusing on ancient studies run by Charles Jones (3500 readers); ROMARCH, a discussion list for early Italian and Roman
Davis and Chemello AIC Objects Specialty Group Postprints, Vol. 19, 2012
22
art and archaeology, run by Pedar Foss at DePauw University (800 subscribers); Society of Archaeological Sciences wiki and listserv (posted by Rob Sternberg). Attempts were also made to post to websites or email lists maintained by the Register for Professional Archaeologists, the Archaeological Institute of America, the Society for American Archaeology, the Society for Historical Archaeology, and the American Anthropological Association. These lists were either closed for posting, or the schedule for list or site moderators to evaluate the response request was too long to be useful for this survey (in one case, the lead time for evaluation was nine months).
3. The survey link was sent to the following museum lists: RC-AAM, the Registrars Committee of the American Association of Museums, and MUSEUM-L, a general purpose discussion list for museum professionals run by University of New Mexico (3854 subscribers).
4. The survey link was sent to the following email groups within the American Institute for Conservation, with instructions for conservators to forward the link to archaeologists as appropriate: OSG-L, the list of the Objects Specialty Group; ASG-L, the list of the Architecture Specialty Group (posted by Joshua Freedland); WAG-L, Wooden Artifacts Group (posted by Alexander Carlisle); and CIPP, Conservators in Private Practice (posted by George Schwartz).
REFERENCES
Archaeological Institute of America. About page. www.archaeological.org/about (accessed 07/17/12).
Berducou, M. 1996. Introduction to archaeological conservation. In Historical and philosophical issues in the conservation of cultural heritage, eds. N. S. Price et al. Los Angeles: The Getty Conservation Institute. 248–259.
Caldararo, N. L. 1987. An outline history of conservation in archaeology and anthropology as presented through its publications. Journal of the American Institute for Conservation 26(2):85–104.
Davis, S., and C. Chemello. 2011. Get your field work for nothin’ and your sherds for free: compensation for archaeological field conservators. AIC Objects Specialty Group Postprints. American Institute for Conservation 39th Annual Meeting, Philadelphia. Washington, D.C.: AIC. 18:33–49.
Gleeson, M. 2012. Personal communication. University of Pennsylvania Museum of Archaeology and Anthropology, Philadelphia, PA.
Gordon, L. B. 2009. Qualifying preventive conservation at archaeological excavations. Winterthur/University of Delaware Program in Art Conservation. Unpublished research paper.
Johnson, J. 1993. Conservation and archaeology in Great Britain and the United States: a comparison. Journal of the American Institute for Conservation 32(3):249–269.
Matero, F. 2000. Ethics and policy in conservation. Conservation: The GCI Newsletter 15(1):5–9. http://getty.edu/conservation/publications_resources/newsletters/15_1/feature1_2.html (accessed July 18, 2012).
Davis and Chemello AIC Objects Specialty Group Postprints, Vol. 19, 2012
23
New York University. Institute of Fine Arts Conservation Center practical training page. www.nyu.edu/gsas/dept/fineart/conservation/training.htm (accessed 07/27/12).
Peachey, C. 2010. A clear case of profiling: defining archaeological conservators in the U.S. In Conservation of archaeological materials: current trends and future directions, British Archaeological Reports S2116. ed. E. Williams and C. Peachey. Oxford: Archaeopress. 17–24.
Smithsonian Museum Conservation Institute. Archaeological conservation. www.si.edu/mci/english/professional_development/archaeological_conservation/index.html (accessed 07/17/12).
Society for American Archaeology. Welcome to the Society of American Archaeology. www.saa.org/AbouttheSociety/tabid/54/Default.aspx (accessed 07/17/12).
Society for Historical Archaeology. Who we are. www.sha.org/about/who_we_are.cfm (accessed 07/17/12).
Rotroff, S. I. 2001. Archaeologists on conservation: how codes of archaeological ethics and professional standards treat conservation. Journal of the American Institute for Conservation 40(2):137–146.
Zak, J. I. 2008. Boundaries and trading zones between conservation and archaeological practice. Ph.D. diss., University College London, Institute of Archaeology.
FURTHER READING
Cronyn, J. M. 1990. The elements of archaeological conservation. London: Routledge.
Pye, E. 2001. Caring for the past: issues in conservation for archaeology and museums. London: James and James.
Sease, C. 1987. A conservation manual for the field archaeologist. Los Angeles: Institute of Archaeology, University of California.
Watkinson, D., and V. Neal. 1998. First aid for finds. United Kingdom: RESCUE – The British Archaeological Trust and the United Kingdom Institute for Conservation Archaeology Section.
SUZANNE DAVIS is an associate curator and the head of conservation at the Kelsey Museum of Archaeology at the University of Michigan, where she is also affiliated faculty for the University’s Museum Studies Program. Prior to joining the Kelsey in 2001, she was a conservator for the Underwater Archaeology Branch of the Naval Historical Center in Washington, D.C. She is a professional associate member of AIC and holds graduate degrees in art history and conservation from the Conservation Center of the Institute of Fine Arts, New York University. Her primary interests are the conservation of archaeological materials and the history and practice of archaeological field conservation. She has provided conservation for numerous

Davis and Chemello AIC Objects Specialty Group Postprints, Vol. 19, 2012
24
excavations in the Middle East, the Mediterranean, and the United States. Address: Kelsey Museum of Archaeology, University of Michigan, 434 South State Street, Ann Arbor, MI 48109; phone: 734.647.0439; fax: 734.763.8976. E-mail: [email protected]
CLAUDIA CHEMELLO is senior conservator at the Kelsey Museum of Archaeology at the University of Michigan. Prior to joining the Museum in 2006, she was a conservator for the Agora Excavations, Greece. She has a graduate degree in conservation from the University of Western Sydney, Australia and is a professional associate member of AIC. Her primary interests are the conservation of archaeological materials, particularly metals, and field conservation methods. She has provided conservation for numerous excavations in the Middle East, the Mediterranean, Central America, and Asia. Address: as for Davis; phone: 734.615.6555; fax: 734.763.8976. E-mail: [email protected]
This article was presented at the Objects Specialty Group or in the joint Research and Technical Studies/OSG Sessions at the 2012 AIC Annual Meeting in Albuquerque. The papers presented in this publication have been edited for clarity and content but have not undergone a formal process of peer review.
AIC Objects Specialty Group Postprints, Vol. 19, 2012 25
1. INTRODUCTION
In 2010–11 the American Museum of Natural History (AMNH) undertook an ambitious program of renovation to the 45 habitat dioramas in the Hall of North American Mammals and Small Mammal Hall. Some of the earliest collections at the AMNH were mounted taxidermy bird and mammal specimens, and the evolution of the habitat diorama was a natural development in the tradition of using art to teach science. Within the museum, dioramas were created to promote the awareness of wildlife and so-called ‘primitive cultures’ as finite, and to engender concern for the populations and habitats that were threatened by unregulated development and hunting. Fusing art and science, the habitat dioramas at the AMNH depict specific geographic locations and house anatomically correct mounted specimens in their natural habitat (Quinn 2006). On
ABSTRACT
From 2010–11, the American Museum of Natural History completed an ambitious program of renovation to the habitat dioramas in the Hall of North American Mammals. Created in the 1940s, these historic dioramas were conceived as a means to inspire wonder and appreciation for the natural world, and to educate visitors about the fragile ecosystems threatened by unregulated hunting and development. Having been on permanent display for over 70 years, many of the zoological specimens were faded to such an extent that they no longer reflected the natural appearance of living animals, compromising the overall impact and effect of the dioramas.
The renovation arose from a re-lamping project in which the original diorama lighting systems were to be replaced with modern fixtures. Previous testing in the Akeley Hall of African Mammals had demonstrated that it was possible to reduce heat and light levels inside the dioramas – while maintaining the desired visual appearance – through the use of energy-efficient lamps. As the re-lamping project would extend the exhibit life of the materials within the dioramas, the renovation team became motivated to explore complimentary methods of restoring naturalistic color to specimens that had become faded and desiccated in the original harsh lighting environment.
Several important factors limited the materials that could be considered for recoloring. As the lighting design in each diorama reflects a specific location, season, and time of day, the light levels often greatly exceed that of a typical art exhibition space. Additionally, the larger taxidermy mounts are permanently embedded into the wire-and-plaster matrix of the diorama floors and cannot be removed for treatment. Finally, the dioramas themselves are not air-tight and accumulate dust over time. For the treatment to be successful, any materials used had to be lightfast, allow for application in situ with no rinsing of excess colorant, and had to impart minimal alteration to the physical characteristics of the hairs, helping to insure that specimens can be cleaned and groomed in the future.
Preliminary investigation into contemporary taxidermy restoration practices revealed few references to materials used in recoloring faded mounts. Some institutions have reported success with commercial hair dyes, while acrylic paints are commonly used among taxidermists. The American Museum of Natural History conservation team ultimately chose to focus its investigation on Wildlife Colors acrylic paint (commercially available acrylic paints used by taxidermists), Orasol dyes (solvent-soluble metal-complex dyes with uses in conservation treatments), and XSL micronized pigments (water-dispersible pigments).
Conservators worked closely with the project taxidermist and partnered with outside conservation scientists to assess these materials against the necessary criteria. Physical attributes of colored hair samples were examined using scanning electron microscopy, and the lightfastness of dyes and pigments was tested using microfadeometry and accelerated aging. The investigation has contributed to a better understanding of aging properties in these materials, and has led to innovative recoloring methods that prioritize long-term stability and retreatability.
In THeIr TrUe COlOrs: DevelOpInG new MeTHODs For reColoring Faded taxidermy
ELIZABETH NUNAN, JUDITH LEVINSON, LISA ELKIN, CORINA ROGGE, JULIA SYBALSKY, AND BECCA POLLAK
Nunan et al. AIC Objects Specialty Group Postprints, Vol. 19, 2012
26
permanent display for over 70 years, with at least one known prior renovation campaign, many of the zoological specimens were faded to such an extent that they no longer reflected their accurate scientific appearance. Real and fabricated floral elements were equally, if not more, deteriorated. This degradation had compromised the overall impact and effect of the dioramas.
The original fabrication of the dioramas was a collaborative effort, combining the talents of artists and scientists to represent the complex inter-relationships between animals and their environment. Alongside the museum’s curators, they conducted extensive research, visiting each site to assemble reference sketches, photographs, and specimens for exhibit. Once back at the museum, every detail of the scene was painstakingly recreated, from the narrative moment implied in the postures of the taxidermy and the illusion created by the background painting to the site-specific foreground materials.
2. MATERIALS AND METHODS OF DIORAMA CONSTRUCTION
The major external elements that house the habitat dioramas are the concrete case and the light box, which is situated above the diorama and separated from the exhibition space by panes of glass.
The three main internal elements of the dioramas are: a background painting, foreground materials, and mounted taxidermy specimens. Each diorama is illuminated using a specific combination and placement of lights to create the illusion of a particular season and time of day in the depicted location.
2.1 CASEThe partial dome-shaped enclosure is constructed from vertical angle iron beams and
heavy wire mesh that supports a layer of rough-coat plaster (fig. 1). Inside the dome, the rough plaster is smoothed with layers of fine-coat plaster, to which the canvas is adhered with lead white and oil adhesive. A large glass panel, which is angled slightly to prevent reflection, serves as the front face of the diorama. A separated light box with fixtures for interior illumination is located above the enclosure. Access to the dioramas is difficult and can only be achieved by removing the front panes of glass or, in some cases, is attained by narrow ladders on the interior extending from the light box to the diorama floor.
2.2 BACKGROUND PAINTINGThe background paintings were examples of the highest form of wildlife artistry in their
day, and many consider those in the North American Mammal Hall to be the most accomplished of their kind. The curved oil painting is essential to the overall illusion of space, distance and environment. It draws on Renaissance techniques such as under-painting, plotting perspective, and transferring images with grids (fig. 2).
Painters of note included James Perry Wilson, Frances Lee Jaques, and Charles S. Chapman. Wilson described his diorama work as “art to conceal art”, in other words, art intended to imitate nature so closely that the artist’s role is not visible (Quinn 2006).
2.3 FOREGROUND MATERIALSThe floor of the diorama was built from a wooden framework over which wire screen
was manipulated to simulate the desired topography (fig. 3). Physical features of the landscape
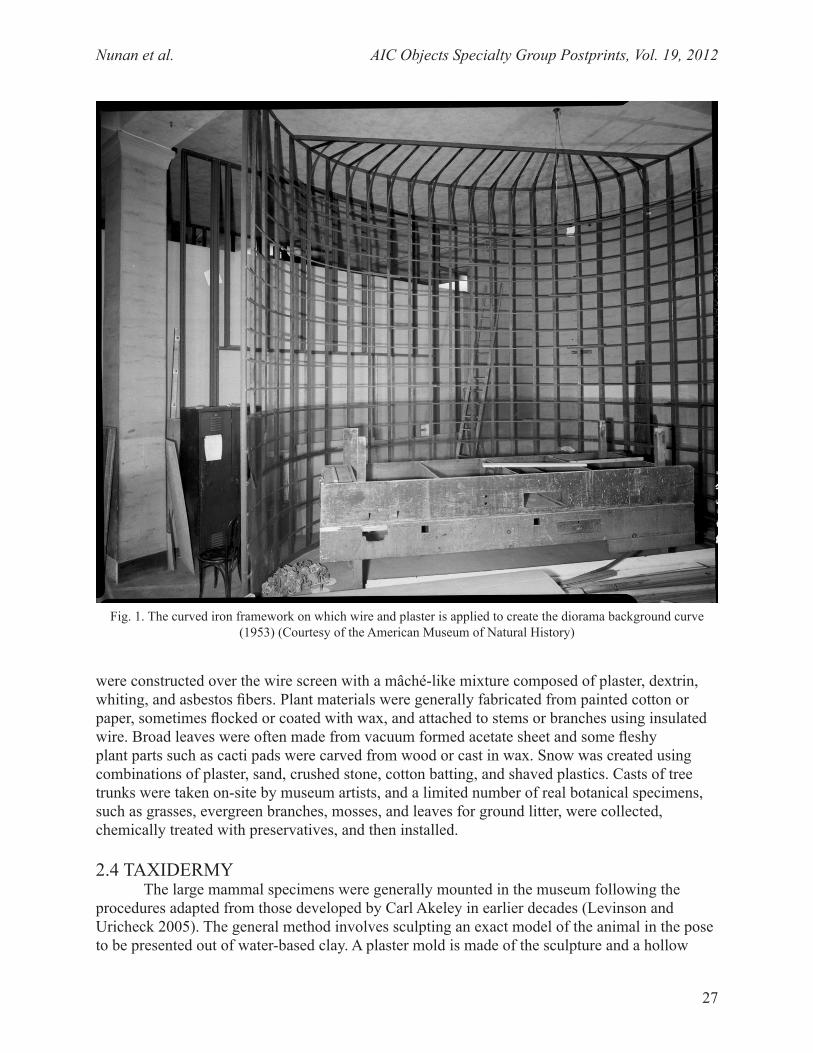
Nunan et al. AIC Objects Specialty Group Postprints, Vol. 19, 2012
27
were constructed over the wire screen with a mâché-like mixture composed of plaster, dextrin, whiting, and asbestos fibers. Plant materials were generally fabricated from painted cotton or paper, sometimes flocked or coated with wax, and attached to stems or branches using insulated wire. Broad leaves were often made from vacuum formed acetate sheet and some fleshy plant parts such as cacti pads were carved from wood or cast in wax. Snow was created using combinations of plaster, sand, crushed stone, cotton batting, and shaved plastics. Casts of tree trunks were taken on-site by museum artists, and a limited number of real botanical specimens, such as grasses, evergreen branches, mosses, and leaves for ground litter, were collected, chemically treated with preservatives, and then installed.
2.4 TAXIDERMY The large mammal specimens were generally mounted in the museum following the
procedures adapted from those developed by Carl Akeley in earlier decades (Levinson and Uricheck 2005). The general method involves sculpting an exact model of the animal in the pose to be presented out of water-based clay. A plaster mold is made of the sculpture and a hollow
Fig. 1. The curved iron framework on which wire and plaster is applied to create the diorama background curve (1953) (Courtesy of the American Museum of Natural History)
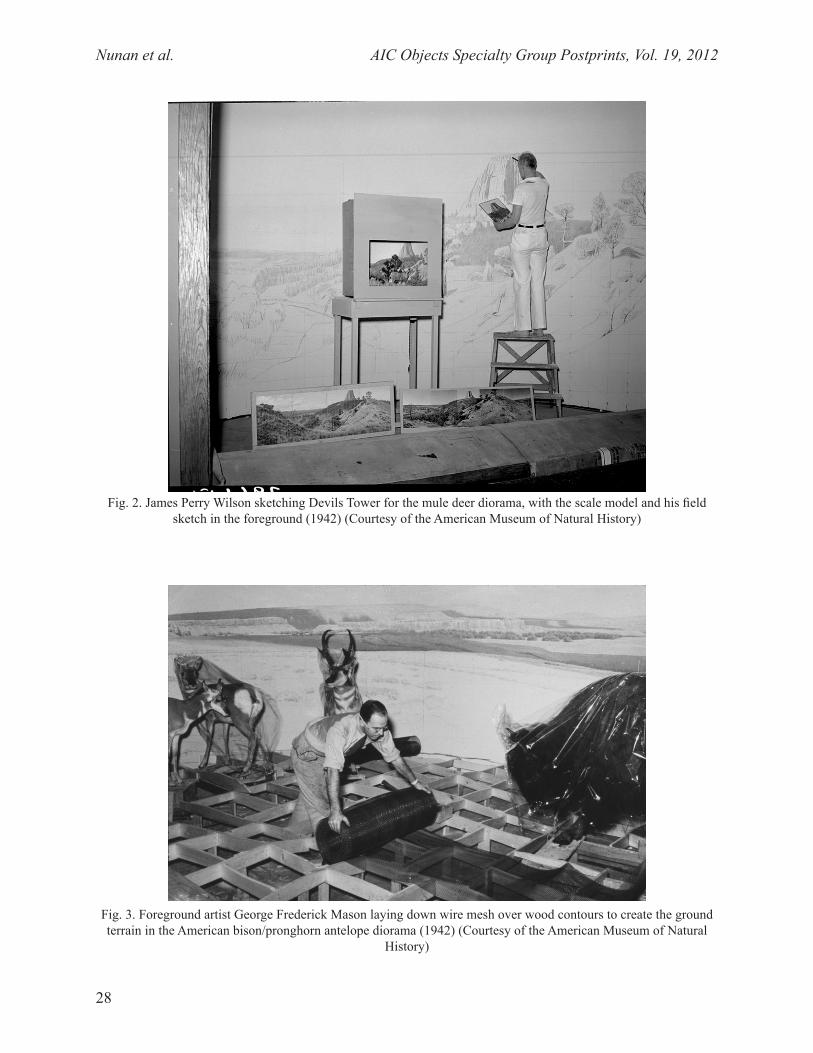
Nunan et al. AIC Objects Specialty Group Postprints, Vol. 19, 2012
28
Fig. 2. James Perry Wilson sketching Devils Tower for the mule deer diorama, with the scale model and his field sketch in the foreground (1942) (Courtesy of the American Museum of Natural History)
Fig. 3. Foreground artist George Frederick Mason laying down wire mesh over wood contours to create the ground terrain in the American bison/pronghorn antelope diorama (1942) (Courtesy of the American Museum of Natural
History)
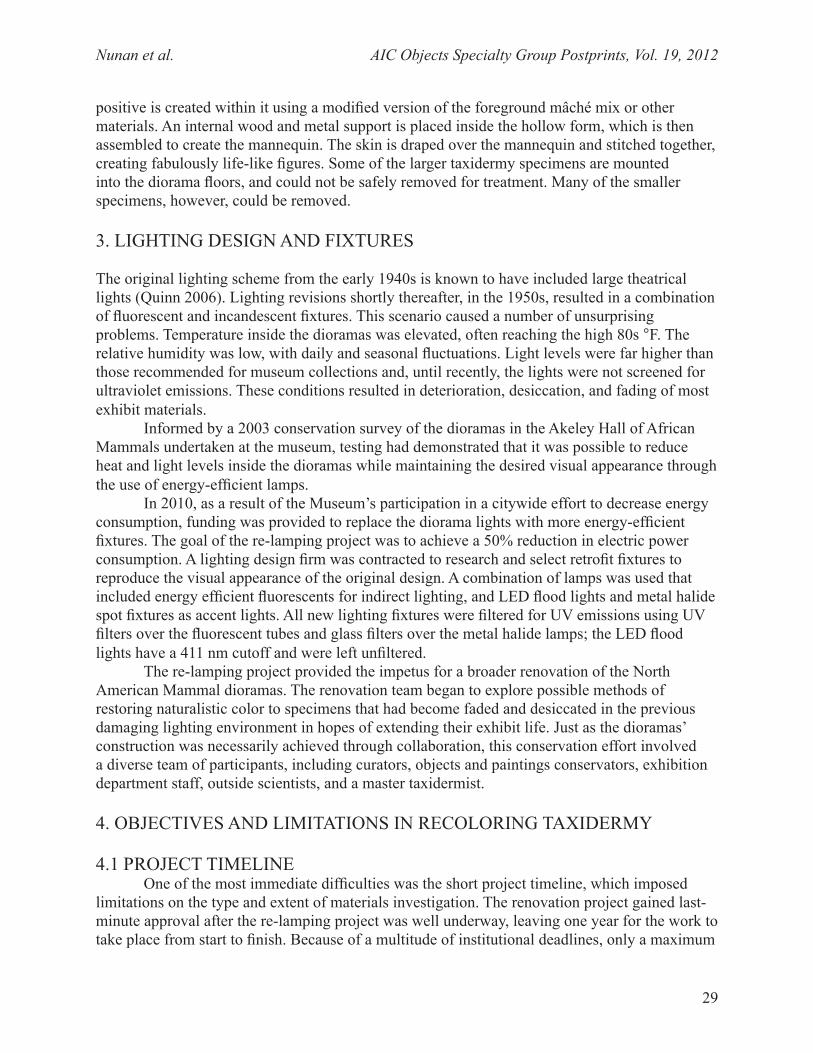
Nunan et al. AIC Objects Specialty Group Postprints, Vol. 19, 2012
29
positive is created within it using a modified version of the foreground mâché mix or other materials. An internal wood and metal support is placed inside the hollow form, which is then assembled to create the mannequin. The skin is draped over the mannequin and stitched together, creating fabulously life-like figures. Some of the larger taxidermy specimens are mounted into the diorama floors, and could not be safely removed for treatment. Many of the smaller specimens, however, could be removed.
3. LIGHTING DESIGN AND FIXTURES
The original lighting scheme from the early 1940s is known to have included large theatrical lights (Quinn 2006). Lighting revisions shortly thereafter, in the 1950s, resulted in a combination of fluorescent and incandescent fixtures. This scenario caused a number of unsurprising problems. Temperature inside the dioramas was elevated, often reaching the high 80s °F. The relative humidity was low, with daily and seasonal fluctuations. Light levels were far higher than those recommended for museum collections and, until recently, the lights were not screened for ultraviolet emissions. These conditions resulted in deterioration, desiccation, and fading of most exhibit materials.
Informed by a 2003 conservation survey of the dioramas in the Akeley Hall of African Mammals undertaken at the museum, testing had demonstrated that it was possible to reduce heat and light levels inside the dioramas while maintaining the desired visual appearance through the use of energy-efficient lamps.
In 2010, as a result of the Museum’s participation in a citywide effort to decrease energy consumption, funding was provided to replace the diorama lights with more energy-efficient fixtures. The goal of the re-lamping project was to achieve a 50% reduction in electric power consumption. A lighting design firm was contracted to research and select retrofit fixtures to reproduce the visual appearance of the original design. A combination of lamps was used that included energy efficient fluorescents for indirect lighting, and LED flood lights and metal halide spot fixtures as accent lights. All new lighting fixtures were filtered for UV emissions using UV filters over the fluorescent tubes and glass filters over the metal halide lamps; the LED flood lights have a 411 nm cutoff and were left unfiltered.
The re-lamping project provided the impetus for a broader renovation of the North American Mammal dioramas. The renovation team began to explore possible methods of restoring naturalistic color to specimens that had become faded and desiccated in the previous damaging lighting environment in hopes of extending their exhibit life. Just as the dioramas’ construction was necessarily achieved through collaboration, this conservation effort involved a diverse team of participants, including curators, objects and paintings conservators, exhibition department staff, outside scientists, and a master taxidermist.
4. OBJECTIVES AND LIMITATIONS IN RECOLORING TAXIDERMY
4.1 PROJECT TIMELINEOne of the most immediate difficulties was the short project timeline, which imposed
limitations on the type and extent of materials investigation. The renovation project gained last-minute approval after the re-lamping project was well underway, leaving one year for the work to take place from start to finish. Because of a multitude of institutional deadlines, only a maximum
Nunan et al. AIC Objects Specialty Group Postprints, Vol. 19, 2012
30
of two months within that year could be allotted for research and testing of possible colorants for the faded mammals. In order to prioritize which specimens were in the greatest need of recoloring, a survey was carried out in consultation with exhibit personnel and mammalogy curators knowledgeable about species and seasonal variations that may be present in fur coloration. Specimens in the dioramas were compared to study skins from the AMNH collection and others borrowed from the Smithsonian Institution.
Several important factors restricted the materials that could be considered for recoloring. Even with the new energy efficient lights, the naturalistic lighting design in each diorama precluded reduction of light levels to those generally considered acceptable for museum collections. The highest recorded light levels are 65 fc on the top of the highest mountain goat and 50 fc at the head of the cow in the bison diorama, whereas the recommended level for fur at the museum is 5 foot candles. Therefore, even with somewhat reduced light exposure, it was clear from the outset that any colorant considered for use would require high lightfastness ratings.
4.2 SPECIMEN ACCESSIBILITYMany of the larger taxidermy mounts are deeply embedded into the wire and mâché of
the diorama floors, and had to be treated in situ. Safe access for in situ treatment could only be achieved by providing custom-built platforms with strategically placed feet in order to avoid crushing fragile diorama ground cover. Sandbags on the bottom of the platform feet distributed the weight of the platform and its occupants across the weak floor structure. Because specimens were fixed in place, washing and rinsing excess colorant from the specimen were precluded, and ease of colorant preparation, application, and clean up were all important considerations for colorant selection.
4.3 PUBLIC SPACEThe use of certain solvents was restricted because of the limited possibility of effective
fume extraction within the dioramas. Furthermore, because half of the exhibition hall was required to remain open to the public over the duration of the project, control of solvent fumes was critical.
4.4 RETREATABILITY/REVERSIBILITYFinally, because the dioramas would probably not be renovated again for at least 25 years
due to associated costs, favorable aging characteristics, reversibility, and ease of retreatment were significant factors in material choice. The material selected should not cause the hairs to clump or mat in a way that would inhibit their grooming or surface cleaning. If not fully reversible, it should not prevent future recoloring campaigns on these irreplaceable taxidermy mounts.
5. COLORANT RESEARCH
Historically, some recoloring of specimens at AMNH was done using spray application of oil paints thinned with trichloroethane. These treatments did not meet our criteria for long-term stability, retreatability, or personal safety. Investigation of the conservation literature on
Nunan et al. AIC Objects Specialty Group Postprints, Vol. 19, 2012
31
contemporary methods revealed few references for recoloring faded taxidermy mounts. Through personal correspondence, the Canadian Museum of Nature reported success recoloring some of their taxidermy mounts using Clairol commercial hair dye, but their situation allowed for the removal of the specimens from the diorama for treatment. A recent study investigated the use of fiber-reactive dyes for feather recoloring (Palumbo 2012), but concerns about aqueous treatments having an adverse effect on the tanned hides, as well as the long-term effects of the acidic or basic dye residues, ruled out this approach.
5.1 CONTEMPORARY TAXIDERMY COLORANTSAqueous and solvent-based acrylic paints are commonly used among contemporary
taxidermists, but in this application reversing acrylic paints for retreatment would be very problematic. Also, due to their low glass transition temperature, there is potential for the paints to soften in the heat of the diorama, entrapping dust and hindering future surface cleaning.
Nevertheless, the project taxidermist’s familiarity with commercially available acrylic paints and their primary mode of application by airbrush played a critical role in determining what alternative colorants would be considered. His method for restoring faded specimens consisted of layered airbrush applications of colorant with constant grooming and positioning of the hair throughout the process in order to control the hue and intensity of the color. Any alternative colorant would need to be able to be applied in a similar manner, in order to fully utilize the taxidermist’s tremendous skill in this method and to meet the tight deadline.
5.2 ALTERNATIVE COLORANTSTwo colorants offered initial promise as suitable alternatives to acrylic paint: Orasol dyes
and XSL micronized pigments.
5.2.1 Orasol DyesOrasol dyes (Ciba-Geigy; currently marketed by BASF for coatings, printing inks, and
specialty industries) are commercially available 1:2 pre-metallized dyes that are insoluble in water and soluble in organic solvents. They can be applied without acidic salts or peroxides, and require no rinsing. They are available in a palette of 17 colors, sufficient to mix the range of tones characteristic of the North American mammals. Members of this dye class consist of a transition metal ion such as chromium, copper, or cobalt complexed to two symmetrical dye molecules. The latter are typically monoazo structures with a chromophore(s) (imparts color) and an auxochrome(s) (modulates the color and intensity and may enable hydrogen bonding, ionic bonding, or dipole-dipole interactions with the substrate).
In general, the lightfastness of 1:2 metal complex dyes is superior to that of other dye classes, due to the stability of the chelated complex and their large particle size; this has been the basis for their past use in conservation contexts, principally in wood stains and tinted resin fills. However, chromophore and auxochrome structures vary, making some dye colors more susceptible to photochemical degradation. The manufacturer reports a marked range in both lightfastness and solubility from color to color (fig. 4). All previous studies, however, were done in binding media (nitrocellulose and vinyl acetate), and the stability of the dyes alone was unreported. In order to assess the lightfastness of the Orasol dyes in a manner more applicable to taxidermy restoration, it was necessary to design a customized course of analyses.
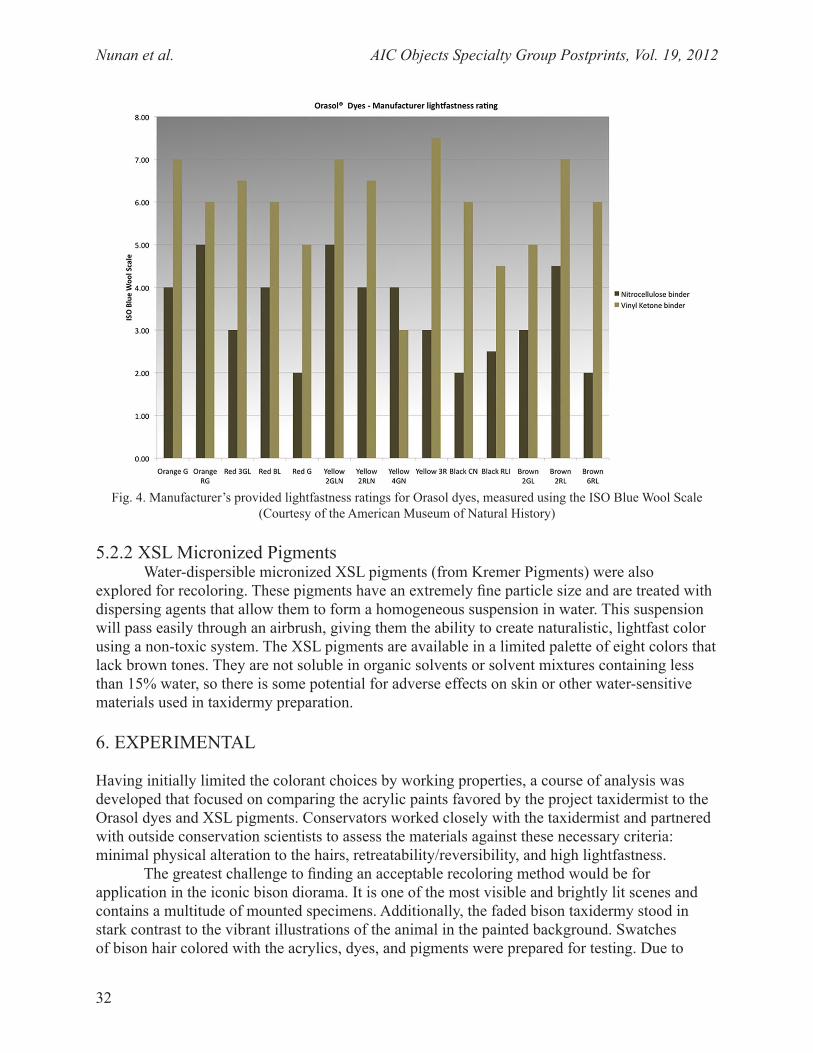
Nunan et al. AIC Objects Specialty Group Postprints, Vol. 19, 2012
32
5.2.2 XSL Micronized PigmentsWater-dispersible micronized XSL pigments (from Kremer Pigments) were also
explored for recoloring. These pigments have an extremely fine particle size and are treated with dispersing agents that allow them to form a homogeneous suspension in water. This suspension will pass easily through an airbrush, giving them the ability to create naturalistic, lightfast color using a non-toxic system. The XSL pigments are available in a limited palette of eight colors that lack brown tones. They are not soluble in organic solvents or solvent mixtures containing less than 15% water, so there is some potential for adverse effects on skin or other water-sensitive materials used in taxidermy preparation.
6. EXPERIMENTAL
Having initially limited the colorant choices by working properties, a course of analysis was developed that focused on comparing the acrylic paints favored by the project taxidermist to the Orasol dyes and XSL pigments. Conservators worked closely with the taxidermist and partnered with outside conservation scientists to assess the materials against these necessary criteria: minimal physical alteration to the hairs, retreatability/reversibility, and high lightfastness.
The greatest challenge to finding an acceptable recoloring method would be for application in the iconic bison diorama. It is one of the most visible and brightly lit scenes and contains a multitude of mounted specimens. Additionally, the faded bison taxidermy stood in stark contrast to the vibrant illustrations of the animal in the painted background. Swatches of bison hair colored with the acrylics, dyes, and pigments were prepared for testing. Due to
Fig. 4. Manufacturer’s provided lightfastness ratings for Orasol dyes, measured using the ISO Blue Wool Scale (Courtesy of the American Museum of Natural History)
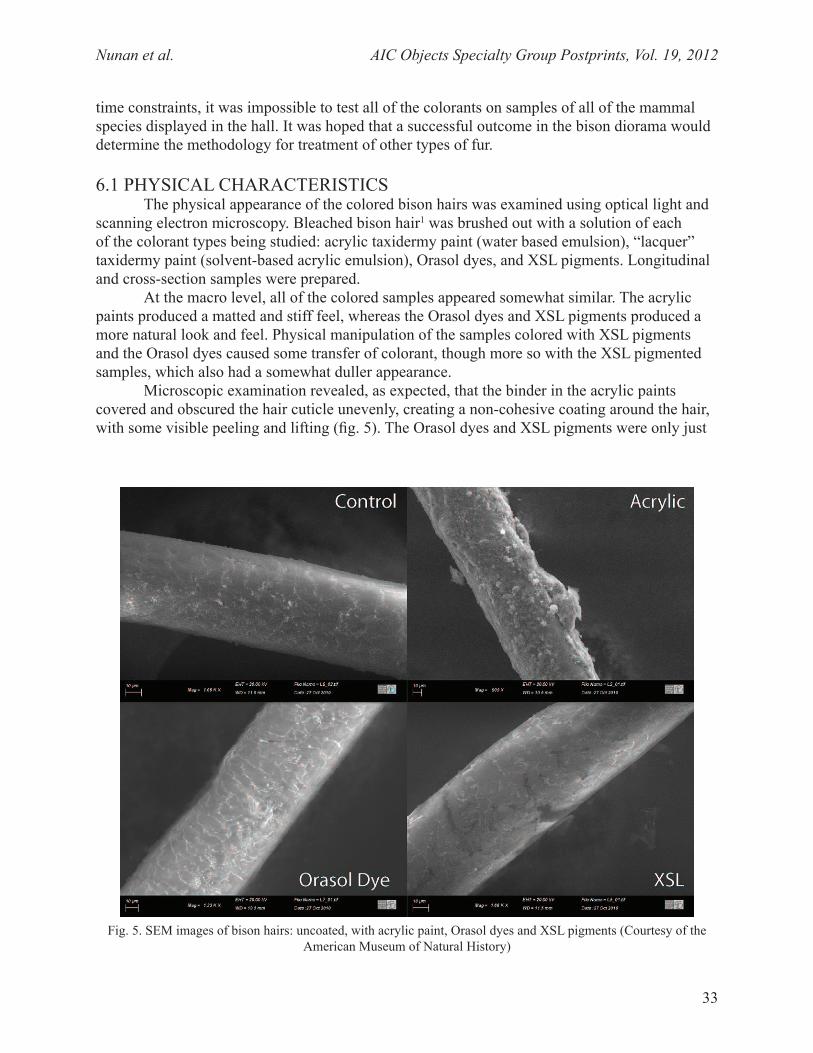
Nunan et al. AIC Objects Specialty Group Postprints, Vol. 19, 2012
33
time constraints, it was impossible to test all of the colorants on samples of all of the mammal species displayed in the hall. It was hoped that a successful outcome in the bison diorama would determine the methodology for treatment of other types of fur.
6.1 PHYSICAL CHARACTERISTICS The physical appearance of the colored bison hairs was examined using optical light and
scanning electron microscopy. Bleached bison hair1 was brushed out with a solution of each of the colorant types being studied: acrylic taxidermy paint (water based emulsion), “lacquer” taxidermy paint (solvent-based acrylic emulsion), Orasol dyes, and XSL pigments. Longitudinal and cross-section samples were prepared.
At the macro level, all of the colored samples appeared somewhat similar. The acrylic paints produced a matted and stiff feel, whereas the Orasol dyes and XSL pigments produced a more natural look and feel. Physical manipulation of the samples colored with XSL pigments and the Orasol dyes caused some transfer of colorant, though more so with the XSL pigmented samples, which also had a somewhat duller appearance.
Microscopic examination revealed, as expected, that the binder in the acrylic paints covered and obscured the hair cuticle unevenly, creating a non-cohesive coating around the hair, with some visible peeling and lifting (fig. 5). The Orasol dyes and XSL pigments were only just
Fig. 5. SEM images of bison hairs: uncoated, with acrylic paint, Orasol dyes and XSL pigments (Courtesy of the American Museum of Natural History)
Nunan et al. AIC Objects Specialty Group Postprints, Vol. 19, 2012
34
visible on the hair fibers and did not appear to cover or coat the hair shaft. The team was not able to determine the level of dye penetration into the hair.
The taxidermist also found that the Orasol dyes could be reduced or removed entirely when wiped or rinsed with ethanol. Although initially taken aback by this revelation, the team quickly recognized the potential of its reversibility, and gained a greater understanding of its working properties, such as localized reduction or removal of color to achieve special effects.
6.2 LIGHTFASTNESSWith the Orasol dyes having gained the approval of the taxidermist in terms of
application, and the deadline for determining a conservation-approved colorant swiftly approaching, the lightfastness of the dyes was tested using microfadeometry and accelerated light-aging. Microfade testing was chosen because it could return results quickly. To complement this work and broaden the range of dye samples tested, accelerated light aging was conducted following the ASTM Standard for Lightfastness of Artists’ Materials Colorants (ASTM 2010).
6.2.1 Sample PreparationTest swatches for the Orasol dye family were produced by airbrushing 1% solutions of
dye dissolved in ethanol onto unbleached 100% worsted wool and Whatman filter papers. A select number of colors were also applied to swatches of bleached bison1.
One wool swatch was produced for each dye color in each of three application weights: light, medium, and heavy. One gram of dye was weighed to within 1/100 of a gram and added to 100 mL of ethanol. The dye was mixed by hand using a wooden stick until no clumps remained. Some of the dye colors were prone to various degrees of clumping, and it was occasionally necessary to decant the mixture several times to ensure that all clumps were adequately broken up. The dye was loaded into an airbrush canister, and each swatch was sprayed with a relatively wide pass using smooth broad strokes executed in a variety of directions (horizontal, vertical, and diagonal). Variation in application weight was achieved by increasing the number of passes with the airbrush, rather than by changing the concentration of the dye. Swatches receiving a light application were sprayed with 15 passes, depositing approximately ½ oz. of dye onto the fabric. Swatches receiving a medium application were sprayed in 30 passes, depositing approximately 1 oz. of dye onto the fabric. Swatches receiving a heavy application were sprayed with 60 passes, depositing approximately 2 oz. of dye onto the fabric. The test swatches were allowed to dry in the fume hood, and were then removed and examined for consistency. One by three inch samples for testing were cut from areas judged to be representative.
A customized palette of eight dye mixtures was developed to replicate the natural color range of the American bison, referred to as ‘bison brown’ mixes. These mixtures contained various proportions of the Orasol dye solutions prepared as outlined above. Test swatches were produced for each dye mixture in light, medium, and heavy applications; each dye mixture was airbrushed onto fabric swatches as well as a 2 x 3 inch piece of bleached bison fur. In this case, each fur swatch was placed with the flesh-side down on a flat surface, and sprayed using short, smooth strokes in a variety of directions. The swatch was frequently groomed and rotated through 360 degrees to ensure thorough coverage of the hairs. Fur swatches were sprayed with approximately 30 passes, depositing approximately ½ oz. of dye onto the fur.
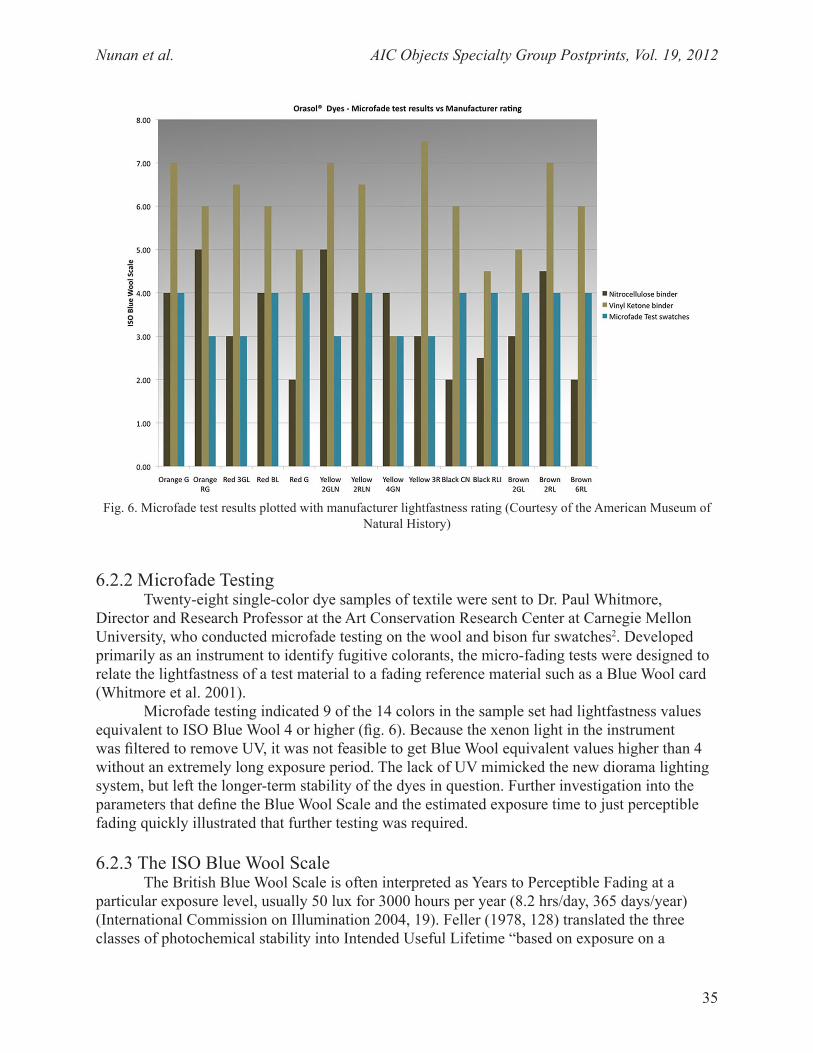
Nunan et al. AIC Objects Specialty Group Postprints, Vol. 19, 2012
35
6.2.2 Microfade TestingTwenty-eight single-color dye samples of textile were sent to Dr. Paul Whitmore,
Director and Research Professor at the Art Conservation Research Center at Carnegie Mellon University, who conducted microfade testing on the wool and bison fur swatches2. Developed primarily as an instrument to identify fugitive colorants, the micro-fading tests were designed to relate the lightfastness of a test material to a fading reference material such as a Blue Wool card (Whitmore et al. 2001).
Microfade testing indicated 9 of the 14 colors in the sample set had lightfastness values equivalent to ISO Blue Wool 4 or higher (fig. 6). Because the xenon light in the instrument was filtered to remove UV, it was not feasible to get Blue Wool equivalent values higher than 4 without an extremely long exposure period. The lack of UV mimicked the new diorama lighting system, but left the longer-term stability of the dyes in question. Further investigation into the parameters that define the Blue Wool Scale and the estimated exposure time to just perceptible fading quickly illustrated that further testing was required.
6.2.3 The ISO Blue Wool Scale The British Blue Wool Scale is often interpreted as Years to Perceptible Fading at a
particular exposure level, usually 50 lux for 3000 hours per year (8.2 hrs/day, 365 days/year) (International Commission on Illumination 2004, 19). Feller (1978, 128) translated the three classes of photochemical stability into Intended Useful Lifetime “based on exposure on a
Fig. 6. Microfade test results plotted with manufacturer lightfastness rating (Courtesy of the American Museum of Natural History)
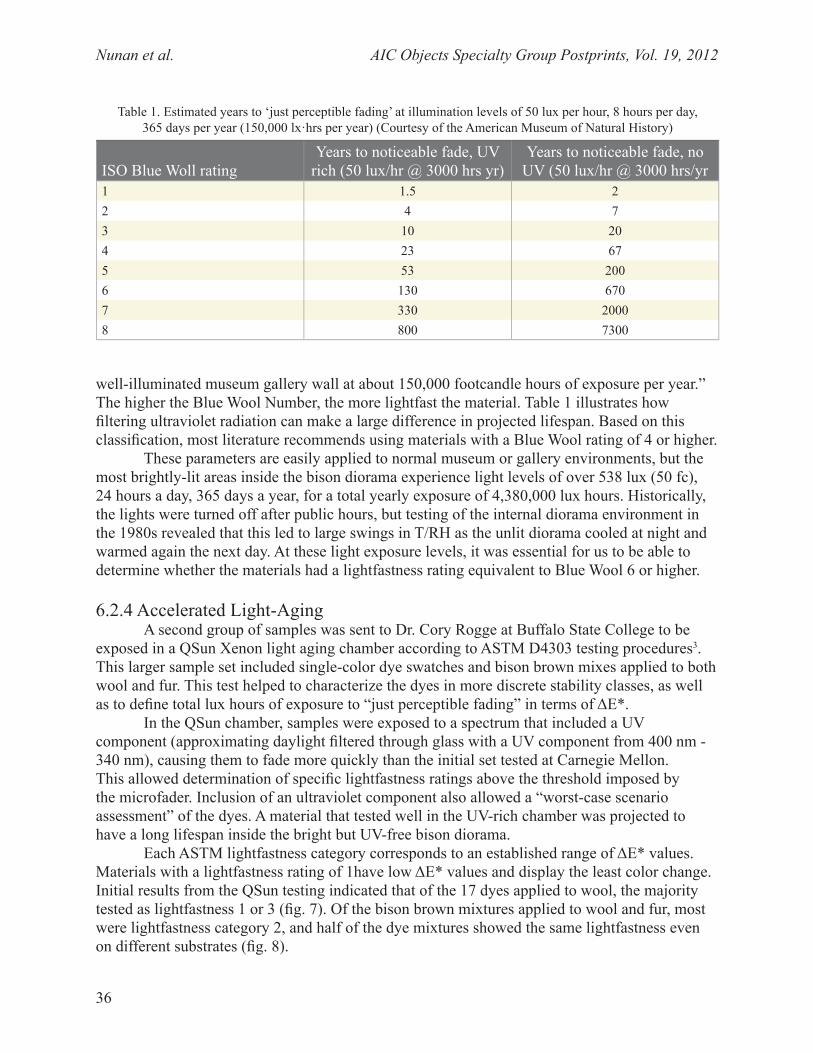
Nunan et al. AIC Objects Specialty Group Postprints, Vol. 19, 2012
36
well-illuminated museum gallery wall at about 150,000 footcandle hours of exposure per year.” The higher the Blue Wool Number, the more lightfast the material. Table 1 illustrates how filtering ultraviolet radiation can make a large difference in projected lifespan. Based on this classification, most literature recommends using materials with a Blue Wool rating of 4 or higher.
These parameters are easily applied to normal museum or gallery environments, but the most brightly-lit areas inside the bison diorama experience light levels of over 538 lux (50 fc), 24 hours a day, 365 days a year, for a total yearly exposure of 4,380,000 lux hours. Historically, the lights were turned off after public hours, but testing of the internal diorama environment in the 1980s revealed that this led to large swings in T/RH as the unlit diorama cooled at night and warmed again the next day. At these light exposure levels, it was essential for us to be able to determine whether the materials had a lightfastness rating equivalent to Blue Wool 6 or higher.
6.2.4 Accelerated Light-AgingA second group of samples was sent to Dr. Cory Rogge at Buffalo State College to be
exposed in a QSun Xenon light aging chamber according to ASTM D4303 testing procedures3. This larger sample set included single-color dye swatches and bison brown mixes applied to both wool and fur. This test helped to characterize the dyes in more discrete stability classes, as well as to define total lux hours of exposure to “just perceptible fading” in terms of ΔE*.
In the QSun chamber, samples were exposed to a spectrum that included a UV component (approximating daylight filtered through glass with a UV component from 400 nm - 340 nm), causing them to fade more quickly than the initial set tested at Carnegie Mellon. This allowed determination of specific lightfastness ratings above the threshold imposed by the microfader. Inclusion of an ultraviolet component also allowed a “worst-case scenario assessment” of the dyes. A material that tested well in the UV-rich chamber was projected to have a long lifespan inside the bright but UV-free bison diorama.
Each ASTM lightfastness category corresponds to an established range of ΔE* values. Materials with a lightfastness rating of 1have low ΔE* values and display the least color change. Initial results from the QSun testing indicated that of the 17 dyes applied to wool, the majority tested as lightfastness 1 or 3 (fig. 7). Of the bison brown mixtures applied to wool and fur, most were lightfastness category 2, and half of the dye mixtures showed the same lightfastness even on different substrates (fig. 8).
Table 1. Estimated years to ‘just perceptible fading’ at illumination levels of 50 lux per hour, 8 hours per day, 365 days per year (150,000 lx·hrs per year) (Courtesy of the American Museum of Natural History)
ISO Blue Woll ratingYears to noticeable fade, UV
rich (50 lux/hr @ 3000 hrs yr)Years to noticeable fade, no
UV (50 lux/hr @ 3000 hrs/yr1 1.5 22 4 73 10 204 23 675 53 2006 130 6707 330 20008 800 7300
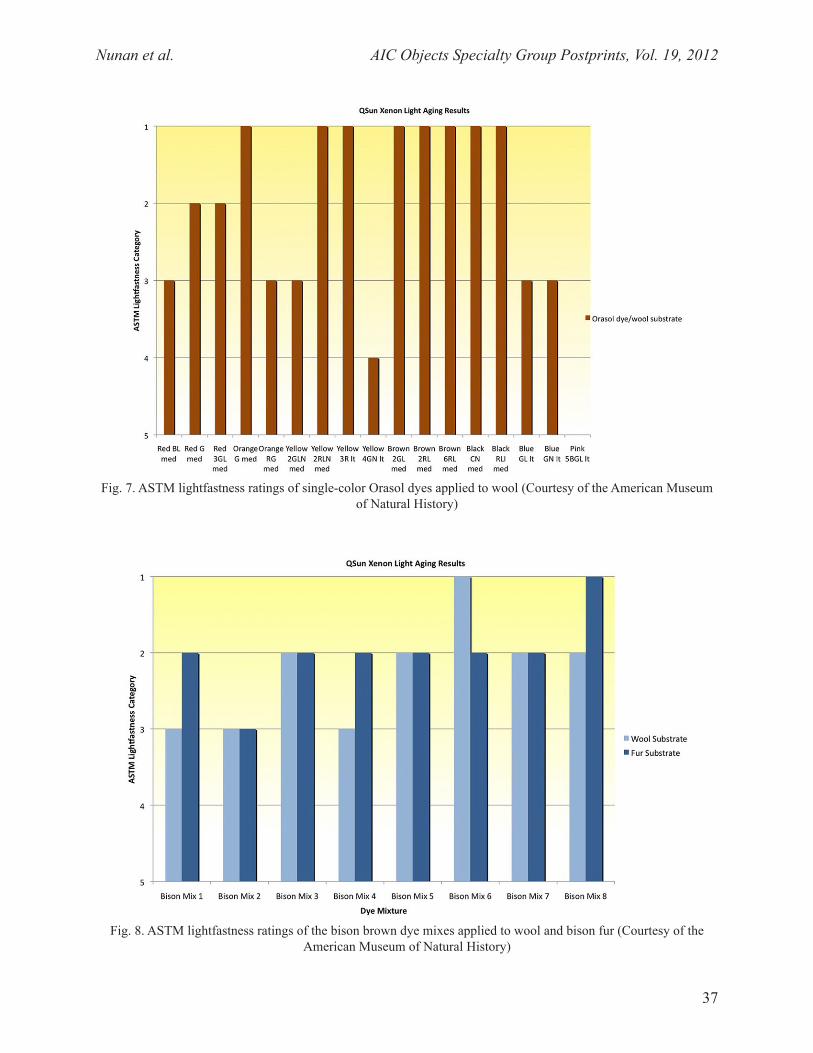
Nunan et al. AIC Objects Specialty Group Postprints, Vol. 19, 2012
37
Fig. 7. ASTM lightfastness ratings of single-color Orasol dyes applied to wool (Courtesy of the American Museum of Natural History)
Fig. 8. ASTM lightfastness ratings of the bison brown dye mixes applied to wool and bison fur (Courtesy of the American Museum of Natural History)
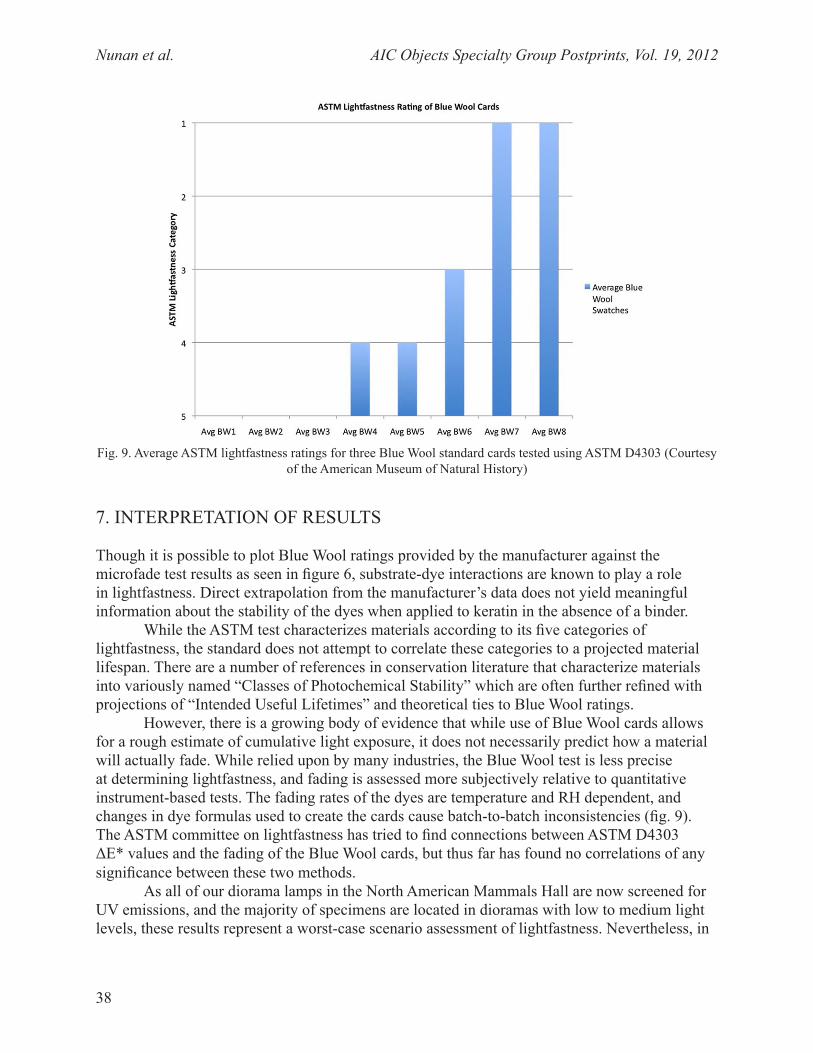
Nunan et al. AIC Objects Specialty Group Postprints, Vol. 19, 2012
38
7. INTERPRETATION OF RESULTS
Though it is possible to plot Blue Wool ratings provided by the manufacturer against the microfade test results as seen in figure 6, substrate-dye interactions are known to play a role in lightfastness. Direct extrapolation from the manufacturer’s data does not yield meaningful information about the stability of the dyes when applied to keratin in the absence of a binder.
While the ASTM test characterizes materials according to its five categories of lightfastness, the standard does not attempt to correlate these categories to a projected material lifespan. There are a number of references in conservation literature that characterize materials into variously named “Classes of Photochemical Stability” which are often further refined with projections of “Intended Useful Lifetimes” and theoretical ties to Blue Wool ratings.
However, there is a growing body of evidence that while use of Blue Wool cards allows for a rough estimate of cumulative light exposure, it does not necessarily predict how a material will actually fade. While relied upon by many industries, the Blue Wool test is less precise at determining lightfastness, and fading is assessed more subjectively relative to quantitative instrument-based tests. The fading rates of the dyes are temperature and RH dependent, and changes in dye formulas used to create the cards cause batch-to-batch inconsistencies (fig. 9). The ASTM committee on lightfastness has tried to find connections between ASTM D4303 ΔE* values and the fading of the Blue Wool cards, but thus far has found no correlations of any significance between these two methods.
As all of our diorama lamps in the North American Mammals Hall are now screened for UV emissions, and the majority of specimens are located in dioramas with low to medium light levels, these results represent a worst-case scenario assessment of lightfastness. Nevertheless, in
Fig. 9. Average ASTM lightfastness ratings for three Blue Wool standard cards tested using ASTM D4303 (Courtesy of the American Museum of Natural History)
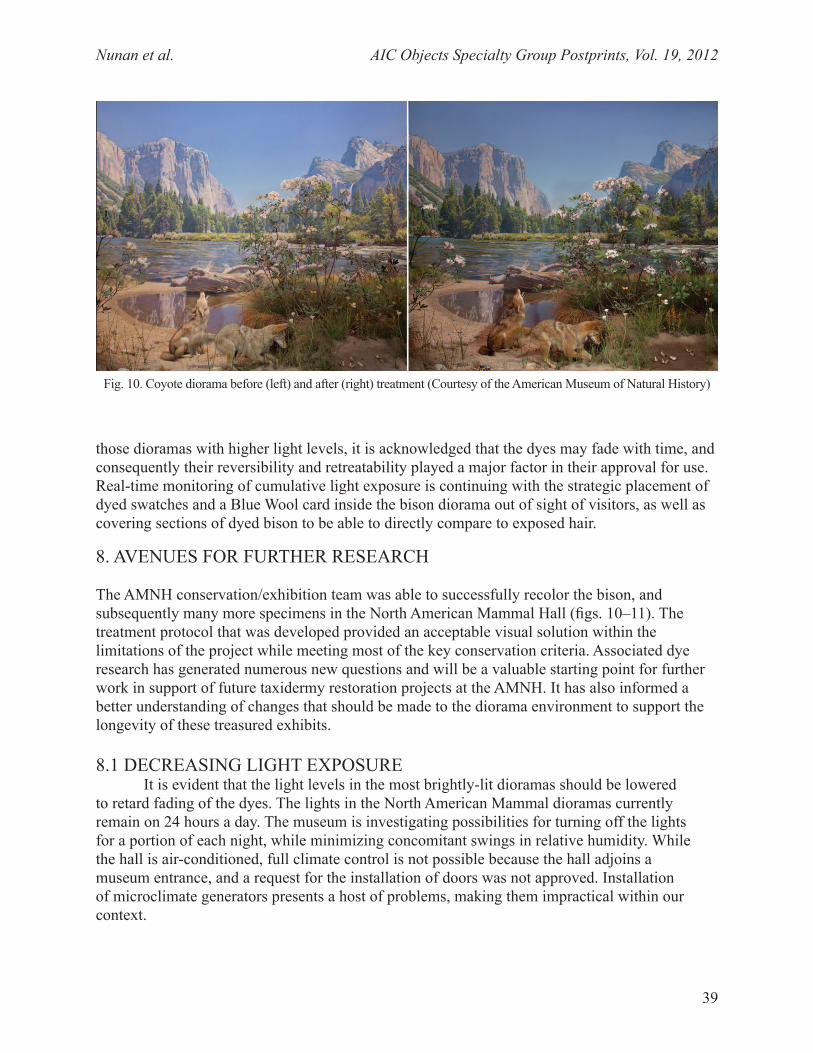
Nunan et al. AIC Objects Specialty Group Postprints, Vol. 19, 2012
39
Fig. 10. Coyote diorama before (left) and after (right) treatment (Courtesy of the American Museum of Natural History)
those dioramas with higher light levels, it is acknowledged that the dyes may fade with time, and consequently their reversibility and retreatability played a major factor in their approval for use. Real-time monitoring of cumulative light exposure is continuing with the strategic placement of dyed swatches and a Blue Wool card inside the bison diorama out of sight of visitors, as well as covering sections of dyed bison to be able to directly compare to exposed hair.
8. AVENUES FOR FURTHER RESEARCH
The AMNH conservation/exhibition team was able to successfully recolor the bison, and subsequently many more specimens in the North American Mammal Hall (figs. 10–11). The treatment protocol that was developed provided an acceptable visual solution within the limitations of the project while meeting most of the key conservation criteria. Associated dye research has generated numerous new questions and will be a valuable starting point for further work in support of future taxidermy restoration projects at the AMNH. It has also informed a better understanding of changes that should be made to the diorama environment to support the longevity of these treasured exhibits.
8.1 DECREASING LIGHT EXPOSUREIt is evident that the light levels in the most brightly-lit dioramas should be lowered
to retard fading of the dyes. The lights in the North American Mammal dioramas currently remain on 24 hours a day. The museum is investigating possibilities for turning off the lights for a portion of each night, while minimizing concomitant swings in relative humidity. While the hall is air-conditioned, full climate control is not possible because the hall adjoins a museum entrance, and a request for the installation of doors was not approved. Installation of microclimate generators presents a host of problems, making them impractical within our context.
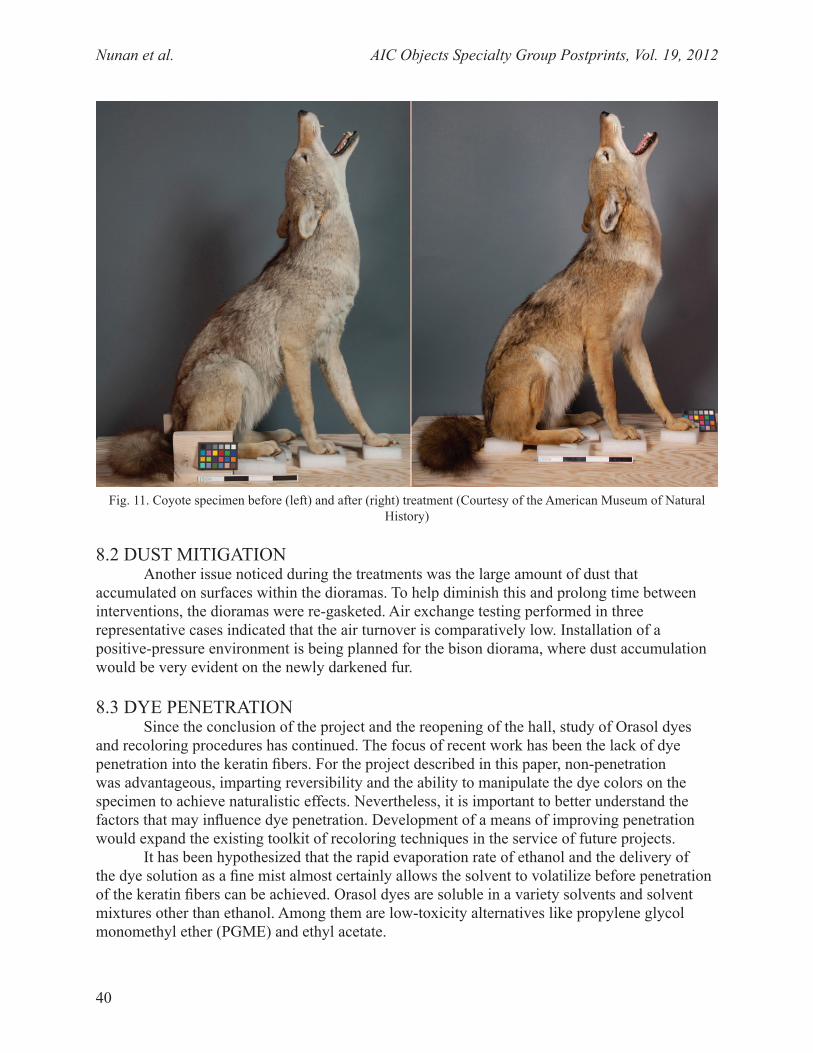
Nunan et al. AIC Objects Specialty Group Postprints, Vol. 19, 2012
40
8.2 DUST MITIGATIONAnother issue noticed during the treatments was the large amount of dust that
accumulated on surfaces within the dioramas. To help diminish this and prolong time between interventions, the dioramas were re-gasketed. Air exchange testing performed in three representative cases indicated that the air turnover is comparatively low. Installation of a positive-pressure environment is being planned for the bison diorama, where dust accumulation would be very evident on the newly darkened fur.
8.3 DYE PENETRATIONSince the conclusion of the project and the reopening of the hall, study of Orasol dyes
and recoloring procedures has continued. The focus of recent work has been the lack of dye penetration into the keratin fibers. For the project described in this paper, non-penetration was advantageous, imparting reversibility and the ability to manipulate the dye colors on the specimen to achieve naturalistic effects. Nevertheless, it is important to better understand the factors that may influence dye penetration. Development of a means of improving penetration would expand the existing toolkit of recoloring techniques in the service of future projects.
It has been hypothesized that the rapid evaporation rate of ethanol and the delivery of the dye solution as a fine mist almost certainly allows the solvent to volatilize before penetration of the keratin fibers can be achieved. Orasol dyes are soluble in a variety solvents and solvent mixtures other than ethanol. Among them are low-toxicity alternatives like propylene glycol monomethyl ether (PGME) and ethyl acetate.
Fig. 11. Coyote specimen before (left) and after (right) treatment (Courtesy of the American Museum of Natural History)
Nunan et al. AIC Objects Specialty Group Postprints, Vol. 19, 2012
41
In order to characterize the effect of the solvent on the depth of dye penetration, and to determine whether penetration depth correlates with variation in lightfastness, cross-sections of dyed hairs were analyzed using SEM-EDS. Samples of bleached bison hair were dipped into chromium- and cobalt-based dye colors (Brown 6RL and Orange G), each dissolved in three solvents (ethanol, PGME, and ethyl acetate). In all samples, metals were detected on the surface of the hair, but no measurable penetration into the keratin substrate was observed, regardless of the improved contact afforded by dipping the samples rather than airbrushing them (Pollak et. al 2012). It appears likely that even on degraded fibers, some form of chemical manipulation would be necessary to open up the hair cuticle and allow penetration of the dye.
9. CONCLUSION
This investigation of the Orasol dyes and XSL pigments has contributed to a better understanding of their aging properties and allowed for development of an acceptable solution for a specific challenge in a very short time frame. It has led to innovative recoloring methods that prioritize long-term stability and retreatability. It should be stressed, however, that the treatment applied to this group of mounted specimens at the Museum would not be appropriate for all situations in which recoloring of taxidermy is desired. Its use must be confined to specimens housed in closed exhibit cases. The dye is somewhat transferable, and vacuuming or other cleaning could lead to its unintentional removal. Moreover, opening the possibility for contact with the chemicals by unsuspecting people, such as in a historic house or a private residence, is not advised.
In conclusion, this research has made stunningly clear the difficulties encountered when published product data does not correlate with the information needed to solve the problem at hand. Test results produced by industry cannot necessarily be accepted wholesale without thorough investigation of testing methods and conditions. This project has provided one means to solve the problem of faded taxidermy, and has suggested a number of avenues for further investigation.
ACKNOWLEDGEMENTS
Collaboration among a variety of disciplines served to enrich this process, as well as the outcome of the project. In particular, the support of conservation scientists Paul Whitmore and Corina Rogge was critical to developing appropriate testing methods and to interpretation of resulting data.
NOTES
1. Bison fur samples were obtained through the project taxidermist. The hair of the tanned pelt was bleached using Clairol peroxide bleach to obtain a faded tone comparable to those of the taxidermy in the dioramas, rinsed repeatedly to remove residual peroxides, and cut into swatches.
2. Although there are substantial differences between wool prepared as a textile and a bison pelt that has been tanned, mounted, and aged by exhibit for over 70 years, there are also substantial differences between the hairs of a bison and those of other faded specimens in the halls that

Nunan et al. AIC Objects Specialty Group Postprints, Vol. 19, 2012
42
would potentially be recolored. As a flat substrate comprised of keratin fibers, the wool textile was chosen as the most reasonable substrate to utilize for measurement of color changes using a colorimeter. Due to time constraints, none of the filter paper samples were tested at this time, but were retained for future analysis.
3. Model Xe-1-SC. The samples were exposed to an irradiance of 0.35 W/m2 of light at 340 nm for 410.5 hours for a total of 510 kJ/(m2 nm), the equivalent of 1260 MJ/m2 of total solar radiation. The un-insulated black panel in the light aging chamber was held to 63oC. Colorimetry was performed using a GretagMacbeth ColorEye XTH colorimeter, interfaced to a PC running Color iControl. The spectrophotometer was calibrated using a diffuse white standard with a D65-10 standard illuminant. To account for instrumental drift, a stable green standard was measured before each set of colorimetry data was obtained and any changes in the L*, a* or b* readings of the standard between measurements were corrected for. The L*, a* and b* values of each sample were measured before and after fading at least three times in different locations on the sample, and each reading was the average of two measurements. The L*, a* and b* values obtained before and after fading were used to calculate the ΔL*, Δa*, Δb* and ΔE* ’94 values of the samples. The ΔE* ’94 values were used to determine the ASTM lightfastness ratings as follows: Lightfastness 1 has ΔE* < 4; Lightfastness II has 4.0 < ΔE* < 8.0; Lightfastness III has 8.0 < ΔE* < 16.0; Lightfastness IV has 16.0 < ΔE* < 24.0 and Lightfastness V has 24.0 < ΔE*.
REFERENCES
ASTM. 2010. Standard test methods for lightfastness of colorants used in artists’ materials, D4303-10. Philadelphia: American Society for Testing and Materials.
Feller, R. L. 1978. Further studies on the International Blue-Wool Standards for exposure to light. ICOM Committee for Conservation preprints. 5th Triennial Meeting, Zagreb: ICOM. 78/18/2.
International Commission on Illumination. 2004. Control of damage to museum objects by optical radiation. CIE 157:2004. ISBN 3-901-906-27-4.
Levinson, J., and S. Uricheck. 2005. Documenting the documenters: The conservation survey of the Akeley Hall of African Mammals, AIC-OSG Postprints, American Institute for Conservation 33rd Annual Meeting, Minneapolis. Washington, D.C.: AIC. 12:39–61.
Palumbo, B. 2012. The restoration of color to avian mounts. Collection Forum 26(1–2):50–59.
Pollak, R., J. Sybalsky., E. Nunan, J. Levinson, L. Elkin, and C. Rogge. 2012. Developing new methods for recoloring faded taxidermy specimens at the American Museum of Natural History. Poster presented at the AIC 40th Annual Conference, Albuquerque, NM.
Quinn, S. C. 2006. Windows on nature: The great habitat dioramas of the American Museum of Natural History. New York: AMNH/Harry N. Abrams.
Nunan et al. AIC Objects Specialty Group Postprints, Vol. 19, 2012
43
Whitmore, P. M., C. Bailie, and S. A. Connors. 2001. Micro-fading tests to predict the result of exhibition: progress and prospects. In Tradition and innovation: Advances in conservation, eds. A. Roy and P. Smith. Melbourne: International Institute for Conservation. 200–205.
FURTHER READING
Feller, R. L. 1963. Standards of exposure to light. In Bulletin of the American group. International Institute for Conservation of Historic and Artistic Works 4(1):10-12. Also available at: www.jstor.org/stable/3179203 (accessed 03/06/14).
Knutson, L. 1982. Synthetic dyes for natural fibers. Seattle: Madrona Publishers.
SOURCES OF MATERIALS
Clairol peroxide bleach – sourced locally
Orasol® Dyes and XSL Pigments Kremer Pigments Inc.247 West 29th StreetNew York, NY 10001(212) 219-2394 or (800) 995-5501www.kremerpigments.com
Wildlife Artist Supply Company (WASCO) and Smith Wildlife colorsMcKenzie Taxidermy Supply PO Box 480Granite Quarry, NC 28072
ELIZABETH NUNAN is the associate conservator of Natural Science Collections at the American Museum of Natural History, where she is also manager of the museum’s Collections Risk Assessment program. She is a graduate of the Buffalo State College Art Conservation department. Address: 200 Central Park West, Natural Science Collections Conservation, New York, NY 10024. E-mail: [email protected]
JUDITH LEVINSON has been the director of conservation, Division of Anthropology, at the American Museum of Natural History since 1985. She received her BA from the University of Pennsylvania and an MA in Art History and Certificate in Conservation from the Conservation Center, Institute of Fine Arts, New York University, where she also teaches inorganic treatment classes. E-mail: [email protected]
LISA ELKIN joined the American Museum of Natural History in 1994 where she is currently chief registrar and director of conservation. Prior to this position, Ms. Elkin was a staff conservator in the Museum Anthropology department and then director of conservation for the natural science collections.
Nunan et al. AIC Objects Specialty Group Postprints, Vol. 19, 2012
44
She holds a BA from the University of Rochester and an MA with a Certificate of Advanced Study in Conservation from the State University College at Buffalo. E-mail: [email protected]
CORINA ROGGE obtained a BA from Bryn Mawr College, a PhD in chemistry from Yale University, and has held postdoctoral appointments at the University of Wisconsin–Madison and the University of Texas Health Sciences Center at Houston. She is now the Andrew W. Mellon assistant professor in conservation science at Buffalo State College. Her research interests include 19th century photographic techniques, enzymology as applied to art, and Egyptology.
JULIA SYBALSKY is an assistant conservator at the American Museum of Natural History. She received her AB in Physical Anthropology and her BFA in Sculpture from Washington University in St. Louis in 2002. In 2012 she received her MA in Art History with an Advanced Certificate in Art Conservation from the Conservation Center, Institute of Fine Arts, New York University.
BECCA POLLAK received her BFA from the Art Institute of Chicago and was technical advisor for Kremer Pigments, Inc. until entering a conservation graduate program in 2011. She is currently completing her MA and Certificate of Advanced Study in Art Conservation at Buffalo State College.
This article was presented at the Objects Specialty Group or in the joint Research and Technical Studies/OSG Sessions at the 2012 AIC Annual Meeting in Albuquerque. The papers presented in this publication have been edited for clarity and content but have not undergone a formal process of peer review.

AIC Objects Specialty Group Postprints, Vol. 19, 2012 45
1. INTRODUCTION
Marble sculptures that are on display for extended periods of time and are accessible to the public tend to develop grimy areas from frequent touching by museum visitors. Additionally, there have been several documented occurrences of inappropriate visitor actions at the Smithsonian American Art Museum. Marble sculptures, including Sleeping Children by William Henry Rinehart and Tennyson’s Princess by William Couper, were kissed by members of the public. The kisses left bright lipstick marks on the surfaces of the sculptures (figs. 1, 2). Another incident occurred in 2009 at the National Portrait Gallery: an unidentified, sticky, red liquid was dripped onto an unknown copyist’s sculpture, Marquis De Lafayette after Antoine Houdon.
Marble is porous and prone to staining. It can be a difficult substrate to clean effectively and safely, particularly of oily materials or silicone-containing substances like lipsticks. Therefore, the application of a barrier coating could be useful to help protect the surfaces.
Sacrificial coatings for sculptures and architectural surfaces have been frequently used and documented in outdoor contexts, however they have been much less studied and possibly less frequently used in indoor environments. A literature search turned up only three sources on preventive coatings for use on marble in indoor environments, none with a recent publication date (Hempel and Moncrieff 1972; Larson 1978, 1980). While indoor artworks are not perceived to be as vulnerable as sculptures in outdoor contexts, marble, especially white marble, seems to be a particularly attractive substrate to touch and mark by members of the public. Not every marble sculpture is in need of a protective coating, but a suitable coating may prevent damage in cases where sculpture is deemed particularly vulnerable.
For this experiment, four materials were chosen for evaluation as protective coatings: a mixture of Cosmolloid 80H wax and Ketone N resin (also known as Laropal K-80), Renaissance microcrystalline wax, Dow Methocel A4C methyl cellulose, and Avalure AC 315 Polymer.
Wax-resin mixtures have historically been used as protective coatings for indoor marble sculptures, although there are very few published accounts. As such, it is unclear how often preventive treatments like this have been carried out. Conservation literature documents only the
ABSTRACT
This paper presents the study of four protective coatings intended for use on marble sculpture displayed in an indoor museum context. The coatings tested include Renaissance microcrystalline wax and a cosmolloid wax-ketone resin mixture, both of which have been used historically for this purpose. In addition, the experiment also included materials that have not been traditionally used as marble coatings: Dow Methocel methyl cellulose and Avalure AC 315 polymer. The coatings were applied to polished and unpolished samples of Carrara marble tile. A colorimeter, gloss meter, and Fourier transform infrared spectroscopy were employed to assess the coatings’ aesthetic properties, reversibility, and ability to protect marble from red wine, lipstick, and permanent marker. A portion of the samples was also light-aged to determine the effect of aging on the coatings’ aesthetic and reversibility properties.
A COMpArATIve sTUDY OF prOTeCTIve COATInGs FOr MArBle sCUlpTUre
LAURA KUBICK AND JENNIFER GIACCAI
CONTRIBUTORS: HELEN INGALLS AND HUGH SHOCKEY
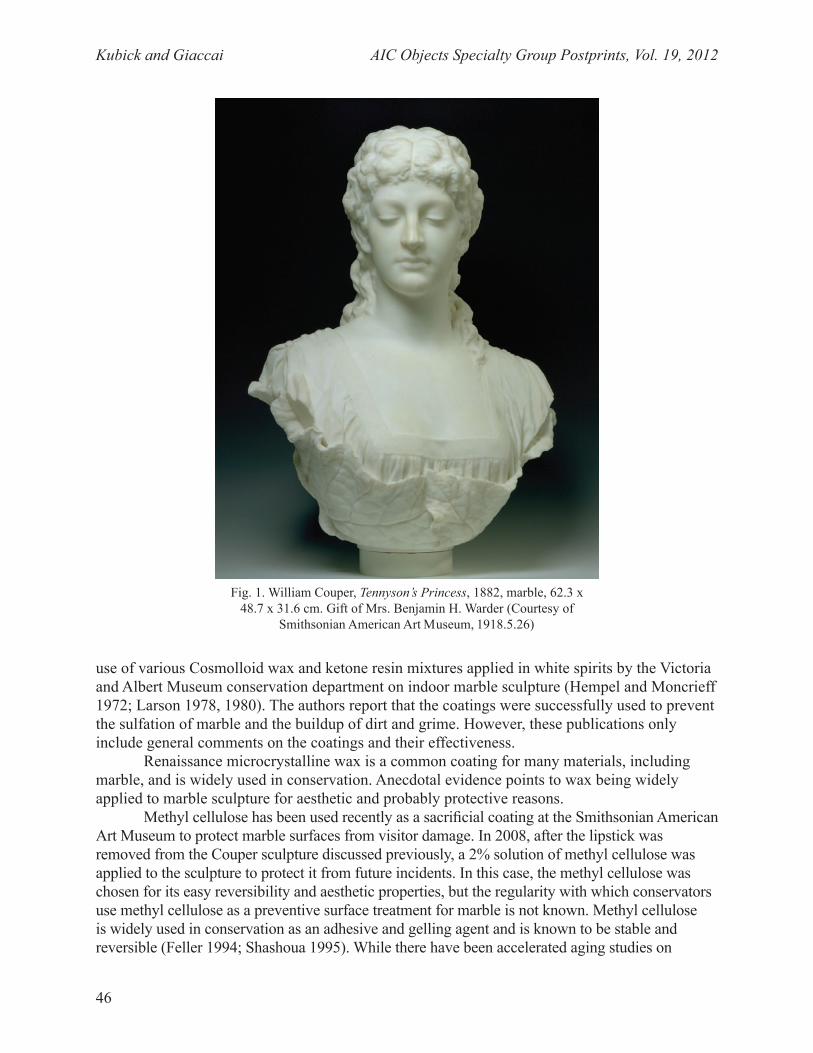
Kubick and Giaccai AIC Objects Specialty Group Postprints, Vol. 19, 2012
46
use of various Cosmolloid wax and ketone resin mixtures applied in white spirits by the Victoria and Albert Museum conservation department on indoor marble sculpture (Hempel and Moncrieff 1972; Larson 1978, 1980). The authors report that the coatings were successfully used to prevent the sulfation of marble and the buildup of dirt and grime. However, these publications only include general comments on the coatings and their effectiveness.
Renaissance microcrystalline wax is a common coating for many materials, including marble, and is widely used in conservation. Anecdotal evidence points to wax being widely applied to marble sculpture for aesthetic and probably protective reasons.
Methyl cellulose has been used recently as a sacrificial coating at the Smithsonian American Art Museum to protect marble surfaces from visitor damage. In 2008, after the lipstick was removed from the Couper sculpture discussed previously, a 2% solution of methyl cellulose was applied to the sculpture to protect it from future incidents. In this case, the methyl cellulose was chosen for its easy reversibility and aesthetic properties, but the regularity with which conservators use methyl cellulose as a preventive surface treatment for marble is not known. Methyl cellulose is widely used in conservation as an adhesive and gelling agent and is known to be stable and reversible (Feller 1994; Shashoua 1995). While there have been accelerated aging studies on
Fig. 1. William Couper, Tennyson’s Princess, 1882, marble, 62.3 x 48.7 x 31.6 cm. Gift of Mrs. Benjamin H. Warder (Courtesy of
Smithsonian American Art Museum, 1918.5.26)
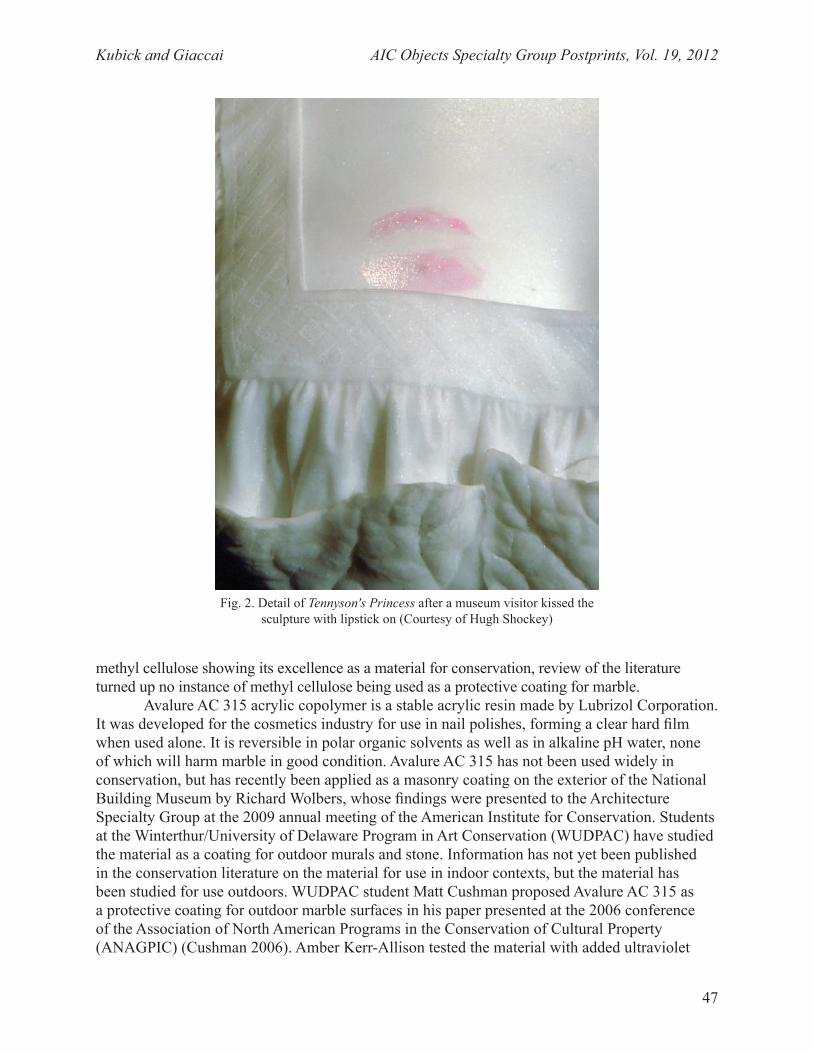
Kubick and Giaccai AIC Objects Specialty Group Postprints, Vol. 19, 2012
47
methyl cellulose showing its excellence as a material for conservation, review of the literature turned up no instance of methyl cellulose being used as a protective coating for marble.
Avalure AC 315 acrylic copolymer is a stable acrylic resin made by Lubrizol Corporation. It was developed for the cosmetics industry for use in nail polishes, forming a clear hard film when used alone. It is reversible in polar organic solvents as well as in alkaline pH water, none of which will harm marble in good condition. Avalure AC 315 has not been used widely in conservation, but has recently been applied as a masonry coating on the exterior of the National Building Museum by Richard Wolbers, whose findings were presented to the Architecture Specialty Group at the 2009 annual meeting of the American Institute for Conservation. Students at the Winterthur/University of Delaware Program in Art Conservation (WUDPAC) have studied the material as a coating for outdoor murals and stone. Information has not yet been published in the conservation literature on the material for use in indoor contexts, but the material has been studied for use outdoors. WUDPAC student Matt Cushman proposed Avalure AC 315 as a protective coating for outdoor marble surfaces in his paper presented at the 2006 conference of the Association of North American Programs in the Conservation of Cultural Property (ANAGPIC) (Cushman 2006). Amber Kerr-Allison tested the material with added ultraviolet
Fig. 2. Detail of Tennyson's Princess after a museum visitor kissed the sculpture with lipstick on (Courtesy of Hugh Shockey)
Kubick and Giaccai AIC Objects Specialty Group Postprints, Vol. 19, 2012
48
radiation inhibitors as a coating for outdoor murals intended to prevent the fading of paints, presenting her findings at the 2007 ANAGPIC conference (Kerr-Allison 2007).
2. EXPERIMENTAL
2.1 EVALUATION CRITERIASeveral properties of the coatings were evaluated using a spectrophotometer, gloss meter,
and Fourier transform infrared spectroscopy (FTIR): aesthetic properties, aging properties, ability to protect the marble from staining, and safe reversibility. Changes in gloss, yellowing, and darkening are problems cited in literature on coatings for outdoor marble, and these properties are important aesthetic considerations when choosing a coating (Tarnowski et al. 2007). Yellowing and darkening can be visually disturbing and suggest deterioration of the coating with age, which may signal the onset of irreversible change. Blanching or bleaching may signal other forms of coating failure, including cleaving from the surface and chemical deterioration. Simply applying a coating to a surface can cause a perceived change in gloss, as the coating may give a more or less saturated surface, however a change in gloss over time may also signal deterioration. Changes in color or gloss to the marble substrate can indicate damage as well. Color change is of course characteristic of staining, while gloss changes in the substrate can indicate mechanical or chemical damage.
2.2 SAMPLE PREPARATION AND EXPERIMENTAL PROCEDURE
2.2.1 Sample Tiles and CoatingsTo prepare samples, commercially available 12” x 12” Carrara marble tiles were cut into
6” x 2” pieces. Each piece had four sites that could be analyzed separately using the colorimeter and gloss meter, and so were treated as four separate but conjoined samples. The tiles had a polished and an unpolished side and each tile was coated on only one side. Every coating was applied to an equal number of polished and unpolished surfaces. For each coating there was a set of samples with one application of the coating and another set with two coats of the material. The one exception to this procedure was Avalure, which did not produce good results when applying a second coating, so a 5% solution and a 7% solution described below were used to represent a thinner and thicker coating, respectively. All of the coatings were applied with brushes.
The wax-resin recipe used for this experiment was obtained from objects conservator Ginny Naudé, who previously worked with John Larson. 20.75 g of Ketone N resin was mixed into 200 mL of Stoddard solvent. The solvent was heated and then 62.5 g of Cosmolloid 80H wax was added.
The Avalure solutions were mixed up from dry resin in 5% and 7% solutions (w/v) in ethanol. The methyl cellulose was prepared as a 2% (w/v) solution of Dow Methocel in water saturated with marble chips, mixed according to the manufacturer’s instructions. The marble chips were added in order to saturate the solution with ions and prevent solubilizing the marble samples.
The microcrystalline wax was applied from the container with no modifications.For each combination of coating material, marble surface, and coating thickness, there
were 48 samples. All 48 were examined to determine how applying the coating affected the color and gloss of the samples alongside two sets (unpolished and polished marble) of 16 control samples. Smaller subgroups were created from the 48 to evaluate how the coatings affected the
Kubick and Giaccai AIC Objects Specialty Group Postprints, Vol. 19, 2012
49
substrate, how they aged, and how well they protected the marble from different staining agents. Twenty unstained samples and two sets of 16 controls were used to determine color change just from removing the coating. Four unstained samples of each combination of coating type and marble surface, and coating thickness, and two sets of four controls were sent away for light aging. Four samples of each type were analyzed by FTIR while the samples remained coated and four of each type were analyzed after the coatings were removed.
The gloss and color of all 48 samples of each type were tested with a gloss meter and spectrophotometer before and after the application of the coatings and the results were compared to help quantify aesthetic changes that occurred just by applying a coating. Observations were also made about the appearance of the coated samples.
2.2.2 Accelerated AgingFour of each type of sample were sent to the Image Permanence Institute (IPI) for aging
in their light fade unit (see section 2.3 Equipment below). Then observations were recorded and color and gloss data were recorded upon their return.
2.2.3 Application of Staining AgentsStaining agents were applied to a portion of the unaged samples. The staining agents
chosen for testing were lipstick, red wine, and permanent marker. Each staining material was applied to eight samples of each type of coating in a manner that mimicked reality: the lipstick was kissed onto the tiles, the wine was splashed on with a pipette, and the marker was drawn on. Revlon Color Stay Ultimate Liquid Lipstick in Top Tomato was chosen for its bright shade of red and because it was advertised to stay on for 24 hours without need of reapplication, a very long time for a lipstick. D’Arenberg The Stump Jump Shiraz 2009 wine, a red wine, was used even though many museums have policies prohibiting red wine, because it was easier to detect whether the wine had penetrated a coating. A black Sharpie Fine Point Permanent Marker was used because this brand of marker is in frequent use and is widely available.
Each staining agent was left on the surfaces of the samples for a minimum of 24 hours to set the stain. After the stain-setting period, samples, including the uncoated controls, were wiped with an appropriate solvent to remove the bulk of the staining material before removing the coatings: mineral spirits to remove the lipstick, marble saturated water to remove the wine, and acetone on cotton pads to remove the marker.
2.2.4 Coating RemovalAll of the coatings on all the sample types, stained and unstained, aged and unaged, were
reversed, and color and gloss measurements and observations were recorded again. To reverse the wax-resin coating, two rounds of poultices of xylene on cotton pads were used, and then the tiles were wiped once with xylene on a cotton pad. To reverse the microcrystalline wax one round of xylene poulticing on cotton pads was followed by another cotton pad poultice with mineral spirits and then the tiles were wiped once with xylene on a cotton pad. The methyl cellulose was removed by wiping three times with a cotton pad soaked with marble-saturated water. The Avalure was removed with two ethanol poultices on cotton pads and then wiped with another ethanol soaked pad.
Ease of reversibility of the coatings was evaluated by observation and using FTIR during this process. Observations were made about whether the coatings appeared to be removed, while FTIR data gave evidence as to whether the coatings remained on the surfaces by comparing
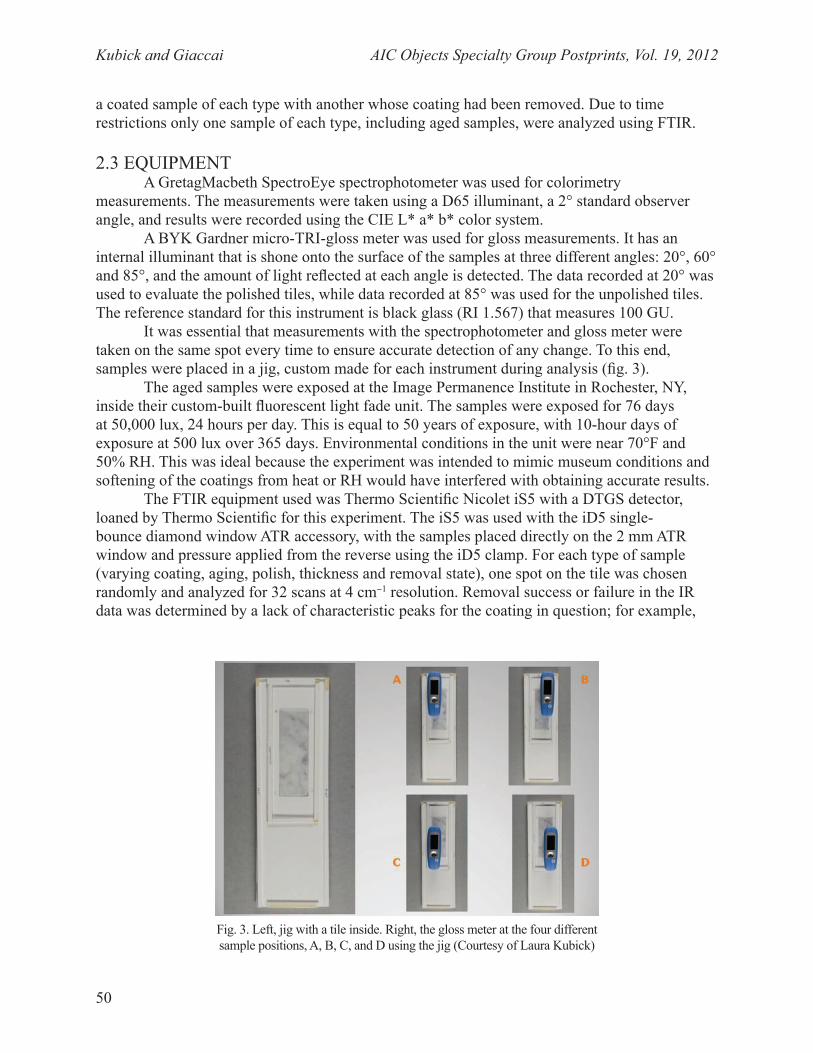
Kubick and Giaccai AIC Objects Specialty Group Postprints, Vol. 19, 2012
50
a coated sample of each type with another whose coating had been removed. Due to time restrictions only one sample of each type, including aged samples, were analyzed using FTIR.
2.3 EQUIPMENTA GretagMacbeth SpectroEye spectrophotometer was used for colorimetry
measurements. The measurements were taken using a D65 illuminant, a 2° standard observer angle, and results were recorded using the CIE L* a* b* color system.
A BYK Gardner micro-TRI-gloss meter was used for gloss measurements. It has an internal illuminant that is shone onto the surface of the samples at three different angles: 20°, 60° and 85°, and the amount of light reflected at each angle is detected. The data recorded at 20° was used to evaluate the polished tiles, while data recorded at 85° was used for the unpolished tiles. The reference standard for this instrument is black glass (RI 1.567) that measures 100 GU.
It was essential that measurements with the spectrophotometer and gloss meter were taken on the same spot every time to ensure accurate detection of any change. To this end, samples were placed in a jig, custom made for each instrument during analysis (fig. 3).
The aged samples were exposed at the Image Permanence Institute in Rochester, NY, inside their custom-built fluorescent light fade unit. The samples were exposed for 76 days at 50,000 lux, 24 hours per day. This is equal to 50 years of exposure, with 10-hour days of exposure at 500 lux over 365 days. Environmental conditions in the unit were near 70°F and 50% RH. This was ideal because the experiment was intended to mimic museum conditions and softening of the coatings from heat or RH would have interfered with obtaining accurate results.
The FTIR equipment used was Thermo Scientific Nicolet iS5 with a DTGS detector, loaned by Thermo Scientific for this experiment. The iS5 was used with the iD5 single-bounce diamond window ATR accessory, with the samples placed directly on the 2 mm ATR window and pressure applied from the reverse using the iD5 clamp. For each type of sample (varying coating, aging, polish, thickness and removal state), one spot on the tile was chosen randomly and analyzed for 32 scans at 4 cm−1 resolution. Removal success or failure in the IR data was determined by a lack of characteristic peaks for the coating in question; for example,
Fig. 3. Left, jig with a tile inside. Right, the gloss meter at the four different sample positions, A, B, C, and D using the jig (Courtesy of Laura Kubick)
Kubick and Giaccai AIC Objects Specialty Group Postprints, Vol. 19, 2012
51
unsuccessfully removed Avalure showed a carbonyl peak at approximately 1728 cm−1, and unsuccessfully removed wax and wax-resin showed C-H stretch peaks between 2900–3000 cm−1.
2.4 CALCULATIONSColor change was calculated using the following CIE 1975 equation: √(∆L*2 + ∆a*2 +
∆b*2 ) = ∆E. A just-noticeable difference is 1 ∆E. The values for ∆L*, ∆a*, ∆b* are determined using the following equations: ∆L*= L*2 − L*1, ∆a*= a*2 − a*1, and ∆b*= b*2 − b*1. The ∆E was calculated for each sample and the mean ∆E was calculated for each sample type from those values. The average ∆L* data reported were calculated as the mean of all of the ∆L* values from a given sample type.
Gloss change is calculated using the following equation: G2 – G1 = ∆G. The gloss change was calculated for each sample and the mean ∆G was calculated for each sample type from those values. A just-noticeable difference in gloss is reported in the instrument’s manual to be a change of about 5 GU, except with very matte surfaces where changes of 3 GU may be visible.
Standard deviations for color and gloss changes were calculated in Excel using s = √(Ʃ(x − x)2/n − 1).
3. RESULTS AND DISCUSSION
3.1 EVALUATION OF COATED SAMPLES When observing the unaged, unstained samples with the naked eye from normal viewing
distance (fig. 4), it appeared that the wax-resin and microcrystalline wax saturated the unpolished surfaces more than the methyl cellulose or Avalure. While this represents a visual change, in some cases it may be desirable to saturate matte surfaces.
The methyl cellulose looked essentially invisible on all of the samples. It seemed to abrade more easily than the other coatings tested.
The Avalure had mixed aesthetic results. It gave a plastic-like surface on the polished tiles and exhibited iridescence in areas. On the other hand, the Avalure coatings looked invisible on the unpolished surfaces. It should be noted that the polished marble samples were much shinier than typical marble sculpture; most of the samples had surfaces that gave gloss readings above 90 GU. For comparison, gloss measurements were taken from sculptures on view at the Smithsonian American Art Museum with results between 12 and 40 GU, suggesting that this aesthetic problem might not occur on typical museum objects. Caroline Roberts also evaluated Avalure as a coating for outdoor marble sculpture in an unpublished paper she completed as a WUDPAC student in 2010. Roberts’ samples were made from salvaged architectural marble and she did not have this same problem when applying solutions of similar concentration (Roberts 2010).
The color change results, ∆E, comparing the color data from the spectrophotometer before and after coating is listed in table 1. All sample sets included individual samples that had changes of more than 1 ∆E. On average, the greatest change occurred in the unpolished wax-resin samples. It is worth noting that most of the color change for these samples occurred in the L* channel of the data. The average ∆L* for the unpolished wax-resin samples with thick coatings was −4.34 (s = 0.779), and −3.43 (s = 1.01) for the thin coatings. A negative ∆L* indicates darkening, which is consistent with the observation that the wax-resin saturated the
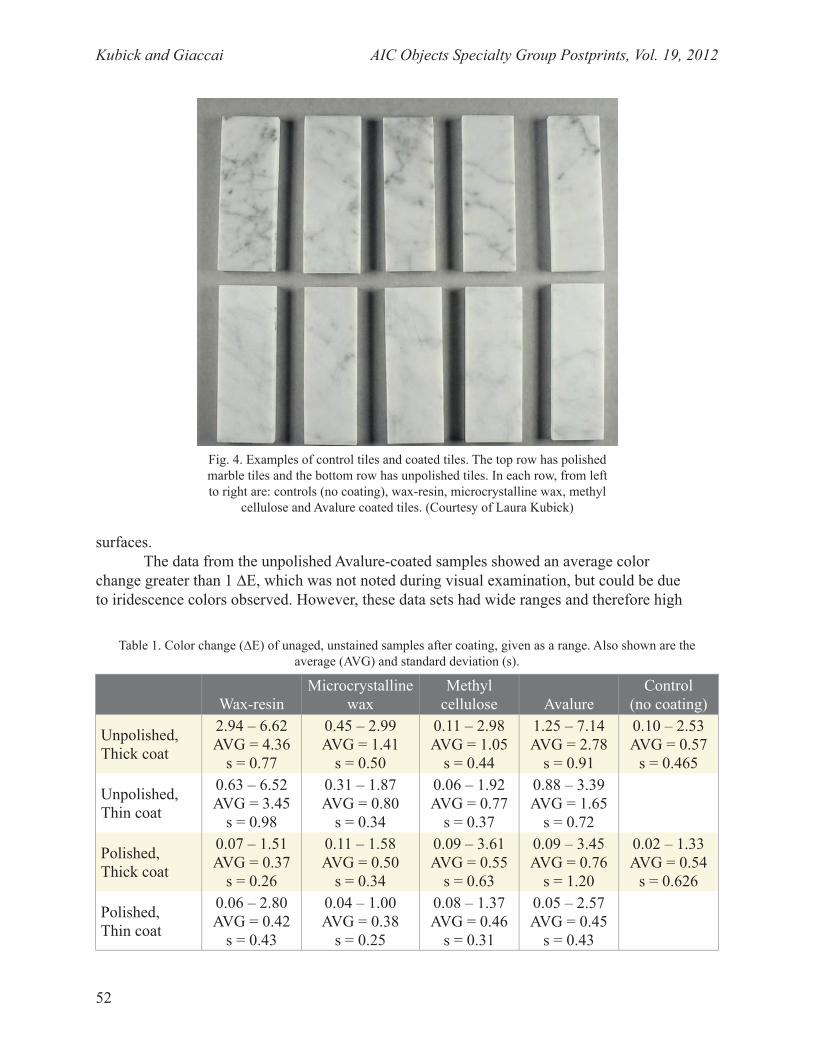
Kubick and Giaccai AIC Objects Specialty Group Postprints, Vol. 19, 2012
52
Table 1. Color change (∆E) of unaged, unstained samples after coating, given as a range. Also shown are the average (AVG) and standard deviation (s).
Wax-resinMicrocrystalline
waxMethyl
cellulose Avalure Control
(no coating)
Unpolished, Thick coat
2.94 – 6.62 AVG = 4.36
s = 0.77
0.45 – 2.99 AVG = 1.41
s = 0.50
0.11 – 2.98 AVG = 1.05
s = 0.44
1.25 – 7.14 AVG = 2.78
s = 0.91
0.10 – 2.53 AVG = 0.57
s = 0.465
Unpolished, Thin coat
0.63 – 6.52 AVG = 3.45
s = 0.98
0.31 – 1.87 AVG = 0.80
s = 0.34
0.06 – 1.92 AVG = 0.77
s = 0.37
0.88 – 3.39 AVG = 1.65
s = 0.72
Polished, Thick coat
0.07 – 1.51 AVG = 0.37
s = 0.26
0.11 – 1.58 AVG = 0.50
s = 0.34
0.09 – 3.61 AVG = 0.55
s = 0.63
0.09 – 3.45 AVG = 0.76
s = 1.20
0.02 – 1.33 AVG = 0.54
s = 0.626
Polished, Thin coat
0.06 – 2.80 AVG = 0.42
s = 0.43
0.04 – 1.00 AVG = 0.38
s = 0.25
0.08 – 1.37 AVG = 0.46
s = 0.31
0.05 – 2.57 AVG = 0.45
s = 0.43
Fig. 4. Examples of control tiles and coated tiles. The top row has polished marble tiles and the bottom row has unpolished tiles. In each row, from left to right are: controls (no coating), wax-resin, microcrystalline wax, methyl
cellulose and Avalure coated tiles. (Courtesy of Laura Kubick)
surfaces. The data from the unpolished Avalure-coated samples showed an average color
change greater than 1 ∆E, which was not noted during visual examination, but could be due to iridescence colors observed. However, these data sets had wide ranges and therefore high
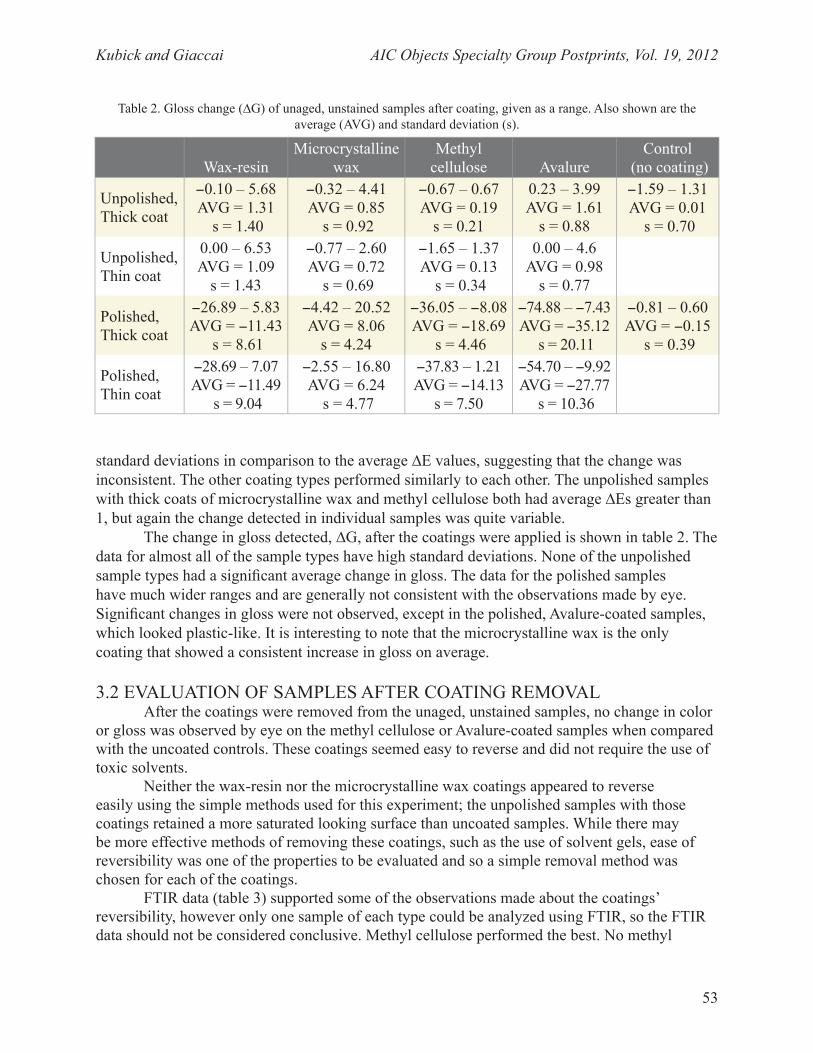
Kubick and Giaccai AIC Objects Specialty Group Postprints, Vol. 19, 2012
53
standard deviations in comparison to the average ∆E values, suggesting that the change was inconsistent. The other coating types performed similarly to each other. The unpolished samples with thick coats of microcrystalline wax and methyl cellulose both had average ∆Es greater than 1, but again the change detected in individual samples was quite variable.
The change in gloss detected, ∆G, after the coatings were applied is shown in table 2. The data for almost all of the sample types have high standard deviations. None of the unpolished sample types had a significant average change in gloss. The data for the polished samples have much wider ranges and are generally not consistent with the observations made by eye. Significant changes in gloss were not observed, except in the polished, Avalure-coated samples, which looked plastic-like. It is interesting to note that the microcrystalline wax is the only coating that showed a consistent increase in gloss on average.
3.2 EVALUATION OF SAMPLES AFTER COATING REMOVAL After the coatings were removed from the unaged, unstained samples, no change in color
or gloss was observed by eye on the methyl cellulose or Avalure-coated samples when compared with the uncoated controls. These coatings seemed easy to reverse and did not require the use of toxic solvents.
Neither the wax-resin nor the microcrystalline wax coatings appeared to reverse easily using the simple methods used for this experiment; the unpolished samples with those coatings retained a more saturated looking surface than uncoated samples. While there may be more effective methods of removing these coatings, such as the use of solvent gels, ease of reversibility was one of the properties to be evaluated and so a simple removal method was chosen for each of the coatings.
FTIR data (table 3) supported some of the observations made about the coatings’ reversibility, however only one sample of each type could be analyzed using FTIR, so the FTIR data should not be considered conclusive. Methyl cellulose performed the best. No methyl
Table 2. Gloss change (∆G) of unaged, unstained samples after coating, given as a range. Also shown are the average (AVG) and standard deviation (s).
Wax-resinMicrocrystalline
waxMethyl
cellulose AvalureControl
(no coating)
Unpolished, Thick coat
−0.10 – 5.68 AVG = 1.31
s = 1.40
−0.32 – 4.41 AVG = 0.85
s = 0.92
−0.67 – 0.67 AVG = 0.19
s = 0.21
0.23 – 3.99 AVG = 1.61
s = 0.88
−1.59 – 1.31 AVG = 0.01
s = 0.70
Unpolished, Thin coat
0.00 – 6.53 AVG = 1.09
s = 1.43
−0.77 – 2.60 AVG = 0.72
s = 0.69
−1.65 – 1.37 AVG = 0.13
s = 0.34
0.00 – 4.6 AVG = 0.98
s = 0.77
Polished, Thick coat
−26.89 – 5.83 AVG = −11.43
s = 8.61
−4.42 – 20.52 AVG = 8.06
s = 4.24
−36.05 – −8.08 AVG = −18.69
s = 4.46
−74.88 – −7.43 AVG = −35.12
s = 20.11
−0.81 – 0.60 AVG = −0.15
s = 0.39
Polished, Thin coat
−28.69 – 7.07 AVG = −11.49
s = 9.04
−2.55 – 16.80 AVG = 6.24
s = 4.77
−37.83 – 1.21 AVG = −14.13
s = 7.50
−54.70 – −9.92 AVG = −27.77
s = 10.36
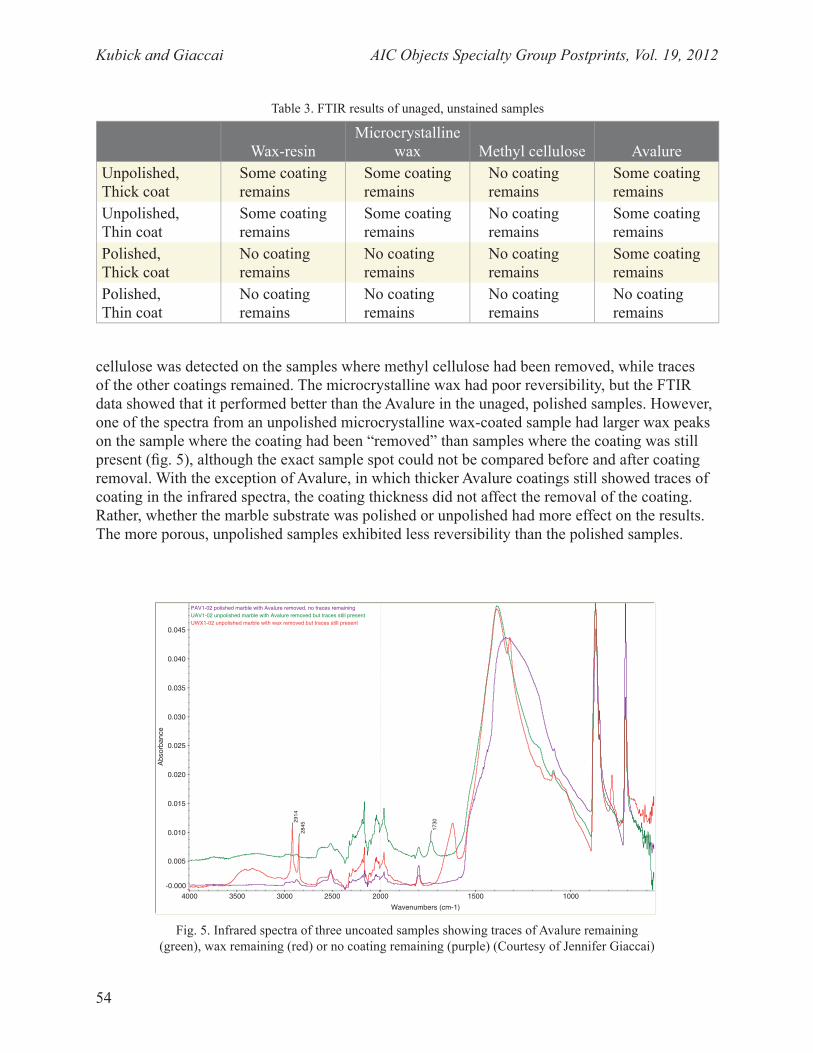
Kubick and Giaccai AIC Objects Specialty Group Postprints, Vol. 19, 2012
54
Table 3. FTIR results of unaged, unstained samples
Wax-resinMicrocrystalline
wax Methyl cellulose Avalure Unpolished, Thick coat
Some coating remains
Some coating remains
No coating remains
Some coating remains
Unpolished, Thin coat
Some coating remains
Some coating remains
No coating remains
Some coating remains
Polished, Thick coat
No coating remains
No coating remains
No coating remains
Some coating remains
Polished, Thin coat
No coating remains
No coating remains
No coating remains
No coating remains
cellulose was detected on the samples where methyl cellulose had been removed, while traces of the other coatings remained. The microcrystalline wax had poor reversibility, but the FTIR data showed that it performed better than the Avalure in the unaged, polished samples. However, one of the spectra from an unpolished microcrystalline wax-coated sample had larger wax peaks on the sample where the coating had been “removed” than samples where the coating was still present (fig. 5), although the exact sample spot could not be compared before and after coating removal. With the exception of Avalure, in which thicker Avalure coatings still showed traces of coating in the infrared spectra, the coating thickness did not affect the removal of the coating. Rather, whether the marble substrate was polished or unpolished had more effect on the results. The more porous, unpolished samples exhibited less reversibility than the polished samples.
Fig. 5. Infrared spectra of three uncoated samples showing traces of Avalure remaining (green), wax remaining (red) or no coating remaining (purple) (Courtesy of Jennifer Giaccai)
1730
2845
2914
PAV1-02 polished marble with Avalure removed, no traces remainingUAV1-02 unpolished marble with Avalure removed but traces still presentUWX1-02 unpolished marble with wax removed but traces still present
-0.000
0.005
0.010
0.015
0.020
0.025
0.030
0.035
0.040
0.045
Abs
orba
nce
1000 1500 2000 2500 3000 3500 4000
Wavenumbers (cm-1)
Kubick and Giaccai AIC Objects Specialty Group Postprints, Vol. 19, 2012
55
Table 5. Color value change (∆L*) of unaged, unstained Avalure and microcrystalline wax samples after coating removal, given as a range. Also shown are the average (AVG) and standard deviation (s).
Unpolished thick coat
Unpolished thin coat
Polished thick coat
Polished thin coat
Avalure−2.61 – −0.19 AVG = −1.12
s = 0.557
−1.08 – 0.34 AVG = −0.73
s = 0.55
−0.22 – 0.96 AVG = 0.29
s = 0.32
−0.20 – 0.38 AVG = −0.01
s = 0.3
Microcrystalline Wax
−4.37 – 1.06 AVG = −0.51
s = 1.3
−4.99 – 2.19 AVG = −0.72
s = 1.9
−5.85 – 5.73 AVG = 0.29
s = 3.35
−4.46 – 0.18 AVG = −1.41
s = 1.73
As seen in table 4, when the coatings were removed, the microcrystalline wax-coated samples had the greatest average color change; but even this was not much change, and the change was not consistent across the samples. The unpolished Avalure samples with thick coatings showed what should have been a just-noticeable difference in the average color change as well. These changes were primarily the result of a decrease in the value of the L* channel of the data, indicating darkening. The ∆L* values for Avalure and microcrystalline wax coated samples are in table 5. None of the other sample types exhibited significant average color change.
The gloss data for the samples after the coatings were removed is shown in table 6. The average gloss change data showed no significant change in the unpolished samples, and a decrease in gloss in the polished samples after coating removal. However, individual samples within the groups show more change than the averages, as standard
Table 4. Color change (∆E) of unaged, unstained samples after coating removal, given as a range. Also shown are the average (AVG) and standard deviation (s).
Wax-resinMicrocrystalline
waxMethyl
cellulose Avalure Control (no
coating)
Unpolished, Thick coat
0.20 – 2.44 AVG = 0.57 s = 0.451
0.12 – 4.45 AVG = 1.00
s = 0.969
0.23 – 1.95 AVG = 0.94 s = 0.516
0.26 – 2.63 AVG = 1.13 s = 0.552
0.06 – 0.84 AVG = 0.31
s = 0.23
Unpolished, Thin coat
0.12 – 1 .67 AVG = 0.63
s = 0.528
0.16 – 7.80 AVG = 1.73
s = 2.02
0.10 – 2.24 AVG = 0.72 s = 0.606
0.08 – 3.14 AVG = 0.89 s = 0.726
Polished, Thick coat
0.09 – 1.41 AVG = 0.35 s = 0.369
0.38 – 6.02 AVG = 3.09
s = 1.56
0.06 – 3.68 AVG = 0.72 s = 0.976
0.03 – 0.97 AVG = 0.36
s = 0.27
0.04 – 1.29 AVG = 0.43
s = 0.31
Polished, Thin coat
0.05 – 1.54 AVG = 0.33
s = 0.387
0.06 – 4.53 AVG = 1.49
s = 1.72
0.06 – 1.54 AVG = 0.31 s = 0.354
0.04 – 0.65 AVG = 0.23
s = 0.18
Kubick and Giaccai AIC Objects Specialty Group Postprints, Vol. 19, 2012
56
Table 6. Gloss change (∆G) of unaged, unstained samples after coating removal, given as a range. Also shown are the average (AVG) and standard deviation (s).
Wax-resinMicrocrystalline
waxMethyl
cellulose Avalure Control (no
coating)
Unpolished, Thick coat
−0.34 – 1.30 AVG = 0.17
s = 0.445
−0.45 – 0.74 AVG = 0.15
s = 0.25
−0.31 – 0.58 AVG = 0.01
s = 0.17
−0.23 – 0.23 AVG = 0.06
s = 0.11
−1.41 – 1.29 AVG = 0.024
s = 0.643
Unpolished, Thin coat
0.01 – 0.84 AVG = 0.24
s = 0.24
0.01 – 0.81 AVG = 0.18
s = 0.19
−0.34 – 0.40 AVG = 0.02
s = 0.16
0.01 – 0.66 AVG = 0.17
s = 0.16
Polished, Thick coat
−9.01 – −0.47 AVG = −3.22
s = 2.15
−5.70 – 2.64 AVG = 0.18
s = 1.80
−9.06 – 4.41 AVG = −0.88
s = 3.51
−17.69 – 19.52 AVG = −5.38
s = 13.7
−1.39 – 4.09 AVG = −0.403
s = 2.01
Polished, Thin coat
−8.37 – 4.03 AVG = −1.59
s = 2.44
−8.58 – 2.14 AVG = −0.39
s = 2.22
−0.40 – 2.52 AVG = 1.05
s = 0.853
−10.03 – 2.73 AVG= −1.67
s = 2.96
deviations were high. The Avalure and wax-resin coatings performed similarly, showing a more significant loss of gloss on their marble substrates than the other coatings. The decrease in gloss that is indicated for all the polished samples, even if not detectible by eye, could be due to scratching the highly polished surfaces of the tile during coating application and removal, or could signal incomplete removal of the coatings. Again the data varied considerably, and this could be another reason that decrease in gloss indicated by the data was not seen with the eye. Furthermore, the unstained polished samples, as a group, showed more change in gloss than the lipstick- or marker-stained samples. This is counterintuitive, as more handling, staining, and attempts at removing substances from the surface should promote more gloss change. Therefore, it is unlikely that the coating and removal procedures are the cause of the gloss changes. A larger set of samples would likely give a more consistent data set.
3.3 EVALUATION OF AGED SAMPLESEvaluation of the unstained samples compared the color and gloss after the samples
were coated, before and after light aging. Due to time and equipment-related constraints, only four samples of each type could be light-aged, so the aging data should not be considered conclusive. No color or gloss change was observed in any of the coated samples after aging. Infrared spectra from the aged coated samples did not appear different from the unaged coated samples.
The reversibility of the coatings did not originally appear to be affected by aging. However, this observation was not fully supported by the FTIR data (table 7). In the case of the microcrystalline wax, this coating was less reversible in the aged samples. The aged wax coating was not removed from the polished marble, while the unaged coating could be successfully removed from the polished marble. On the other hand, Avalure showed more reversibility in
Kubick and Giaccai AIC Objects Specialty Group Postprints, Vol. 19, 2012
57
Table 7. FTIR results of aged, unstained samples. Four samples of each type were analyzed to obtain this data.
Wax-resinMicrocrystalline
wax Methyl cellulose Avalure Unpolished, Thick coat
Some coating Remains
Some coating Remains
No Coating Remains
Some coating Remains
Unpolished, Thin coat
Some coating Remains
Some coating Remains
No Coating Remains
No Coating Remains
Polished, Thick coat
No Coating Remains
Some coating Remains
No Coating Remains
Some coating Remains
Polished, Thin coat
No Coating Remains
Some coating Remains
No Coating Remains
No Coating Remains
Table 8. Color change (∆E) of aged, unstained samples after coating, given as a range. Also shown are the average (AVG) and standard deviation (s).
Wax-resinMicrocrystalline
waxMethyl
cellulose Avalure Control
(no coating)
Unpolished, Thick coat
0.86 – 1.14 AVG = 1.04
s = 0.128
0.57 – 0.73 AVG = 0.67
s = 0.07
0.45 – 1.09 AVG = 0.73
s = 0.27
0.90 – 1.53 AVG = 1.09
s = 0.298
0.33 – 1.02 AVG = 0.66
s = 0.34
Unpolished, Thin coat
0.37 – 0.88 AVG = 0.70
s = 0.23
0.24 – 0.92 AVG = 0.67
s = 0.31
0.45 – 1.00 AVG = 0.63
s = 0.25
0.31 – 0.53 AVG = 0.44
s = 0.10
Polished, Thick coat
0.73 – 0.94 AVG = 0.82
s = 0.09
0.79 – 1.26 AVG = 1.06
s = 0.207
0.26 – 1.19 AVG = 0.93
s = 0.451
0.99 – 1.28 AVG = 1.13
s = 0.14
0.66 – 1.09 AVG = 0.95
s = 0.20
Polished, Thin coat
0.31 – 0.71 AVG = 0.49
s = 0.20
0.48 – 0.99 AVG= 0.84
s = 0.24
0.83 – 1.12 AVG = 0.92
s = 0.14
0.79 – 1.10 AVG = 0.87
s = 0.16
the aged unpolished samples with thin coatings. Again, only one aged sample of each type was analyzed, so this data cannot be considered conclusive.
The color change results from the spectrophotometer data for the coated aged samples are shown in table 8. There was almost no average change in color after aging overall. Methyl cellulose had the least average change, but the sample group included individuals that had a ∆E of 1 or more.
In the unpolished samples with thicker coatings, the wax-resin and Avalure samples had slightly more color change after aging. For the polished samples all of the coatings performed very similarly to the control, even those that had a ∆E of 1 or more.
The change in color detected in the control samples suggests that the color change may have been due to abrasion from travel to and from IPI. Most of these small changes were in the L* channel, but the average ∆L* for all sample types, including the controls, was positive,
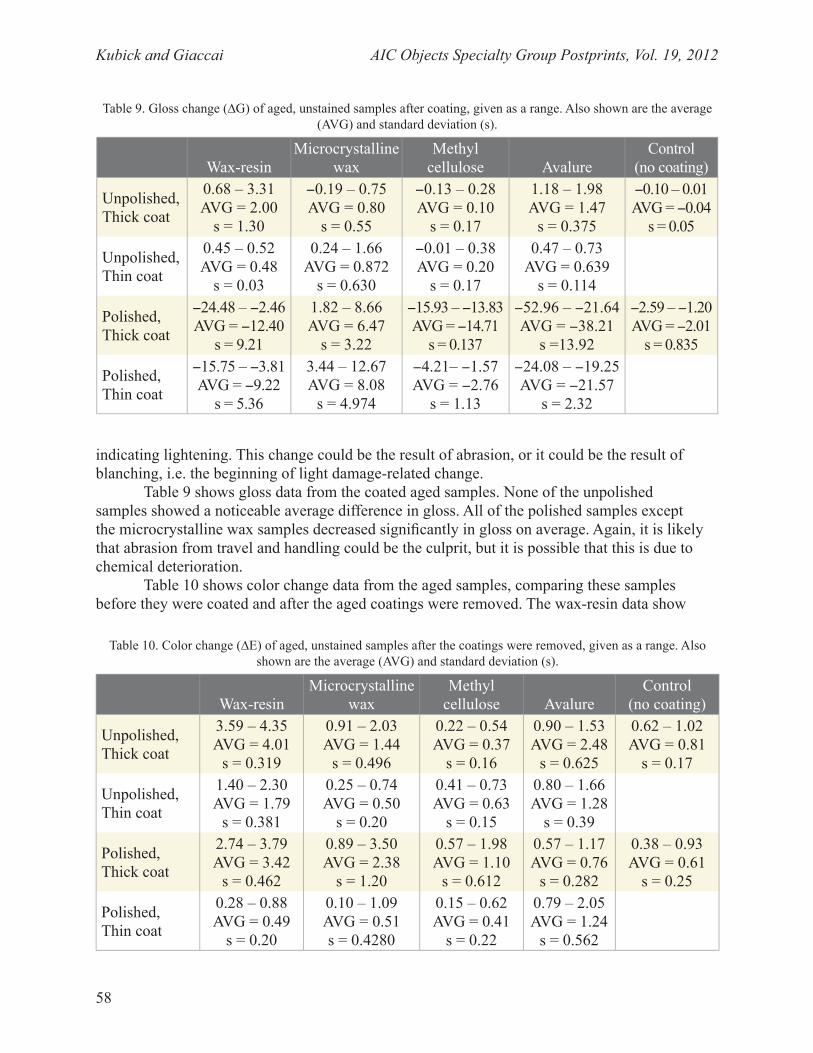
Kubick and Giaccai AIC Objects Specialty Group Postprints, Vol. 19, 2012
58
Table 10. Color change (∆E) of aged, unstained samples after the coatings were removed, given as a range. Also shown are the average (AVG) and standard deviation (s).
Wax-resinMicrocrystalline
waxMethyl
cellulose Avalure Control
(no coating)
Unpolished, Thick coat
3.59 – 4.35 AVG = 4.01
s = 0.319
0.91 – 2.03 AVG = 1.44
s = 0.496
0.22 – 0.54 AVG = 0.37
s = 0.16
0.90 – 1.53 AVG = 2.48
s = 0.625
0.62 – 1.02 AVG = 0.81
s = 0.17
Unpolished, Thin coat
1.40 – 2.30 AVG = 1.79
s = 0.381
0.25 – 0.74 AVG = 0.50
s = 0.20
0.41 – 0.73 AVG = 0.63
s = 0.15
0.80 – 1.66 AVG = 1.28
s = 0.39
Polished, Thick coat
2.74 – 3.79 AVG = 3.42
s = 0.462
0.89 – 3.50 AVG = 2.38
s = 1.20
0.57 – 1.98 AVG = 1.10
s = 0.612
0.57 – 1.17 AVG = 0.76
s = 0.282
0.38 – 0.93 AVG = 0.61
s = 0.25
Polished, Thin coat
0.28 – 0.88 AVG = 0.49
s = 0.20
0.10 – 1.09 AVG = 0.51 s = 0.4280
0.15 – 0.62 AVG = 0.41
s = 0.22
0.79 – 2.05 AVG = 1.24
s = 0.562
Table 9. Gloss change (∆G) of aged, unstained samples after coating, given as a range. Also shown are the average (AVG) and standard deviation (s).
Wax-resinMicrocrystalline
waxMethyl
cellulose Avalure Control
(no coating)
Unpolished, Thick coat
0.68 – 3.31 AVG = 2.00
s = 1.30
−0.19 – 0.75 AVG = 0.80
s = 0.55
−0.13 – 0.28 AVG = 0.10
s = 0.17
1.18 – 1.98 AVG = 1.47
s = 0.375
−0.10 – 0.01 AVG = −0.04
s = 0.05
Unpolished, Thin coat
0.45 – 0.52 AVG = 0.48
s = 0.03
0.24 – 1.66 AVG = 0.872
s = 0.630
−0.01 – 0.38 AVG = 0.20
s = 0.17
0.47 – 0.73 AVG = 0.639
s = 0.114
Polished, Thick coat
−24.48 – −2.46 AVG = −12.40
s = 9.21
1.82 – 8.66 AVG = 6.47
s = 3.22
−15.93 – −13.83 AVG = −14.71
s = 0.137
−52.96 – −21.64 AVG = −38.21
s =13.92
−2.59 – −1.20 AVG = −2.01
s = 0.835
Polished, Thin coat
−15.75 – −3.81 AVG = −9.22
s = 5.36
3.44 – 12.67 AVG = 8.08
s = 4.974
−4.21– −1.57 AVG = −2.76
s = 1.13
−24.08 – −19.25 AVG = −21.57
s = 2.32
indicating lightening. This change could be the result of abrasion, or it could be the result of blanching, i.e. the beginning of light damage-related change.
Table 9 shows gloss data from the coated aged samples. None of the unpolished samples showed a noticeable average difference in gloss. All of the polished samples except the microcrystalline wax samples decreased significantly in gloss on average. Again, it is likely that abrasion from travel and handling could be the culprit, but it is possible that this is due to chemical deterioration.
Table 10 shows color change data from the aged samples, comparing these samples before they were coated and after the aged coatings were removed. The wax-resin data show
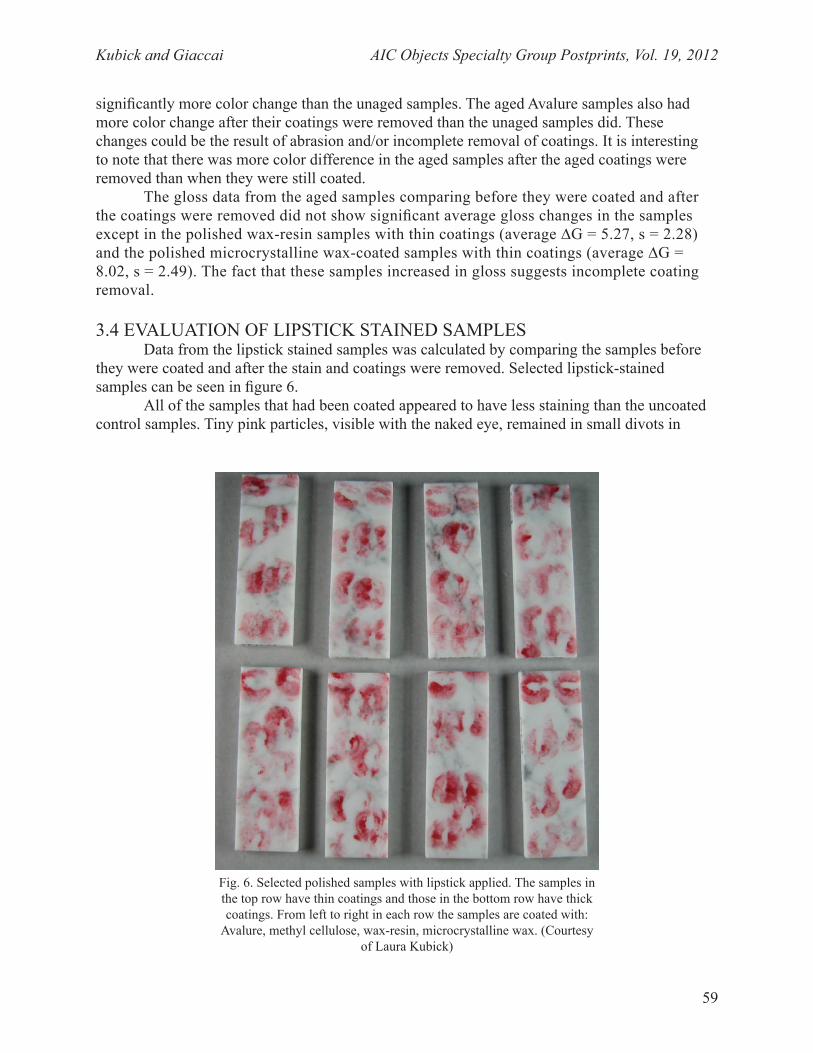
Kubick and Giaccai AIC Objects Specialty Group Postprints, Vol. 19, 2012
59
significantly more color change than the unaged samples. The aged Avalure samples also had more color change after their coatings were removed than the unaged samples did. These changes could be the result of abrasion and/or incomplete removal of coatings. It is interesting to note that there was more color difference in the aged samples after the aged coatings were removed than when they were still coated.
The gloss data from the aged samples comparing before they were coated and after the coatings were removed did not show significant average gloss changes in the samples except in the polished wax-resin samples with thin coatings (average ∆G = 5.27, s = 2.28) and the polished microcrystalline wax-coated samples with thin coatings (average ∆G = 8.02, s = 2.49). The fact that these samples increased in gloss suggests incomplete coating removal.
3.4 EVALUATION OF LIPSTICK STAINED SAMPLES Data from the lipstick stained samples was calculated by comparing the samples before
they were coated and after the stain and coatings were removed. Selected lipstick-stained samples can be seen in figure 6.
All of the samples that had been coated appeared to have less staining than the uncoated control samples. Tiny pink particles, visible with the naked eye, remained in small divots in
Fig. 6. Selected polished samples with lipstick applied. The samples in the top row have thin coatings and those in the bottom row have thick coatings. From left to right in each row the samples are coated with:
Avalure, methyl cellulose, wax-resin, microcrystalline wax. (Courtesy of Laura Kubick)
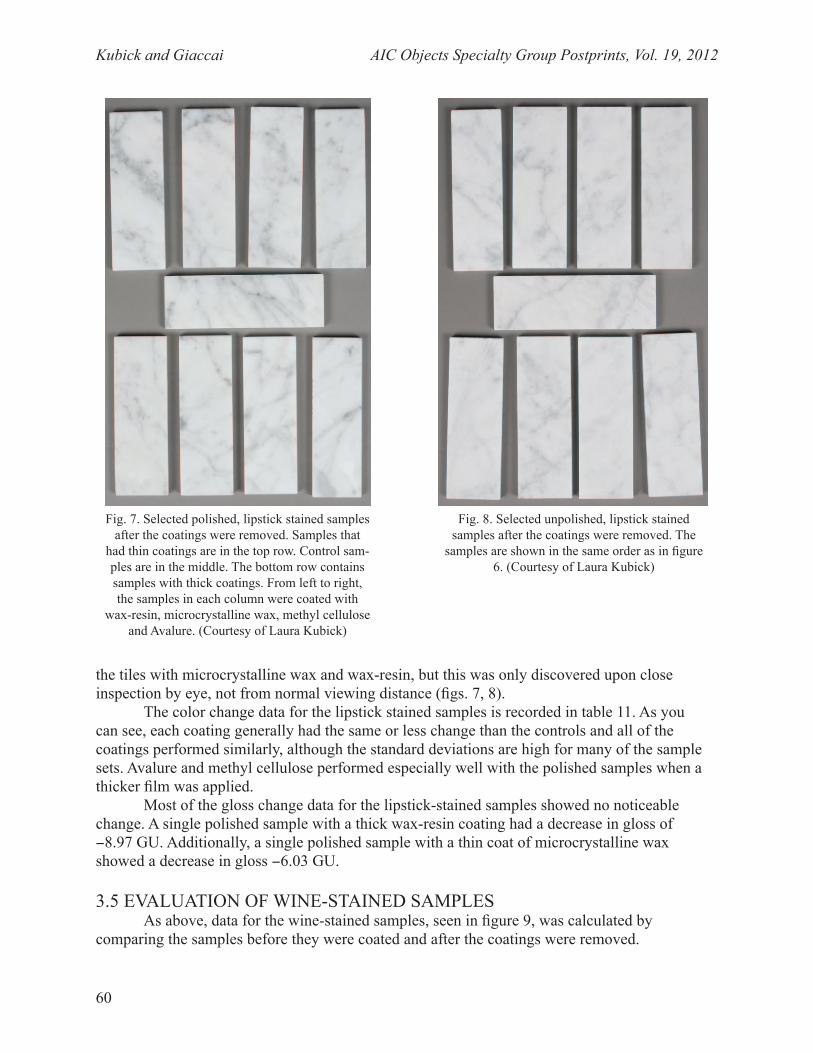
Kubick and Giaccai AIC Objects Specialty Group Postprints, Vol. 19, 2012
60
Fig. 8. Selected unpolished, lipstick stained samples after the coatings were removed. The
samples are shown in the same order as in figure 6. (Courtesy of Laura Kubick)
Fig. 7. Selected polished, lipstick stained samples after the coatings were removed. Samples that
had thin coatings are in the top row. Control sam-ples are in the middle. The bottom row contains samples with thick coatings. From left to right, the samples in each column were coated with
wax-resin, microcrystalline wax, methyl cellulose and Avalure. (Courtesy of Laura Kubick)
the tiles with microcrystalline wax and wax-resin, but this was only discovered upon close inspection by eye, not from normal viewing distance (figs. 7, 8).
The color change data for the lipstick stained samples is recorded in table 11. As you can see, each coating generally had the same or less change than the controls and all of the coatings performed similarly, although the standard deviations are high for many of the sample sets. Avalure and methyl cellulose performed especially well with the polished samples when a thicker film was applied.
Most of the gloss change data for the lipstick-stained samples showed no noticeable change. A single polished sample with a thick wax-resin coating had a decrease in gloss of −8.97 GU. Additionally, a single polished sample with a thin coat of microcrystalline wax showed a decrease in gloss −6.03 GU.
3.5 EVALUATION OF WINE-STAINED SAMPLESAs above, data for the wine-stained samples, seen in figure 9, was calculated by
comparing the samples before they were coated and after the coatings were removed.
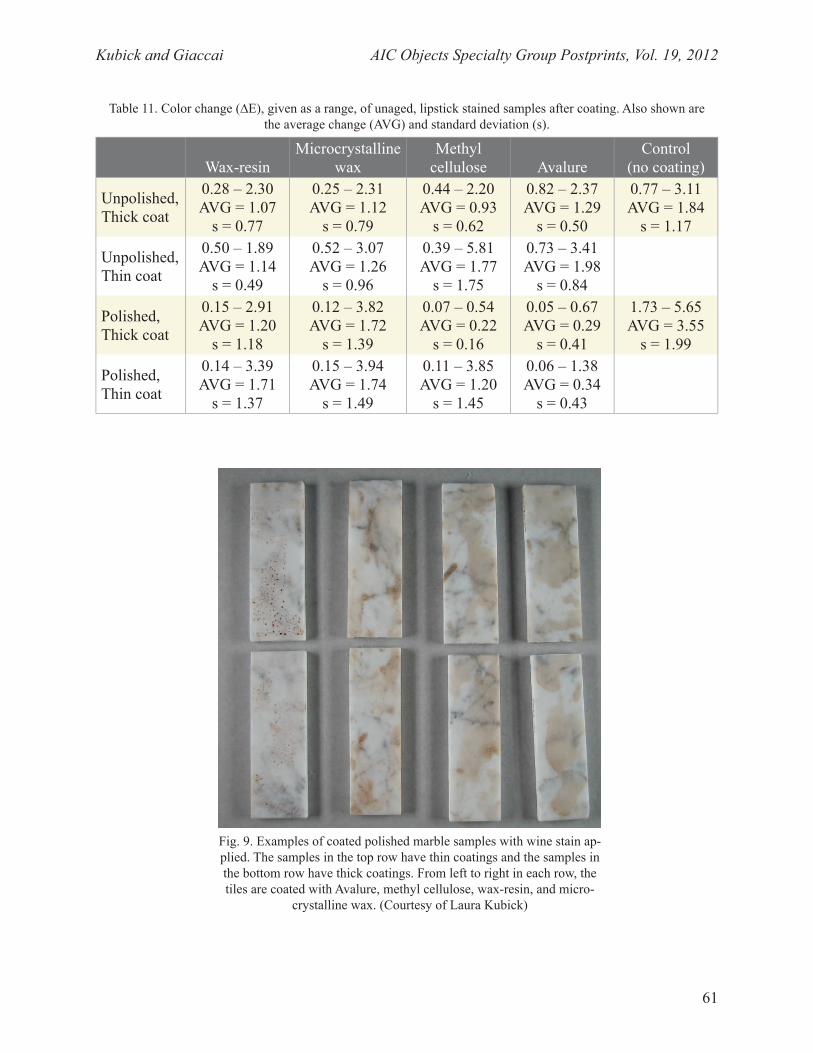
Kubick and Giaccai AIC Objects Specialty Group Postprints, Vol. 19, 2012
61
Table 11. Color change (∆E), given as a range, of unaged, lipstick stained samples after coating. Also shown are the average change (AVG) and standard deviation (s).
Wax-resinMicrocrystalline
waxMethyl
cellulose Avalure Control
(no coating)
Unpolished, Thick coat
0.28 – 2.30 AVG = 1.07
s = 0.77
0.25 – 2.31 AVG = 1.12
s = 0.79
0.44 – 2.20 AVG = 0.93
s = 0.62
0.82 – 2.37 AVG = 1.29
s = 0.50
0.77 – 3.11 AVG = 1.84
s = 1.17
Unpolished, Thin coat
0.50 – 1.89 AVG = 1.14
s = 0.49
0.52 – 3.07 AVG = 1.26
s = 0.96
0.39 – 5.81 AVG = 1.77
s = 1.75
0.73 – 3.41 AVG = 1.98
s = 0.84
Polished, Thick coat
0.15 – 2.91 AVG = 1.20
s = 1.18
0.12 – 3.82 AVG = 1.72
s = 1.39
0.07 – 0.54 AVG = 0.22
s = 0.16
0.05 – 0.67 AVG = 0.29
s = 0.41
1.73 – 5.65 AVG = 3.55
s = 1.99
Polished, Thin coat
0.14 – 3.39 AVG = 1.71
s = 1.37
0.15 – 3.94 AVG = 1.74
s = 1.49
0.11 – 3.85 AVG = 1.20
s = 1.45
0.06 – 1.38 AVG = 0.34
s = 0.43
Fig. 9. Examples of coated polished marble samples with wine stain ap-plied. The samples in the top row have thin coatings and the samples in the bottom row have thick coatings. From left to right in each row, the tiles are coated with Avalure, methyl cellulose, wax-resin, and micro-
crystalline wax. (Courtesy of Laura Kubick)
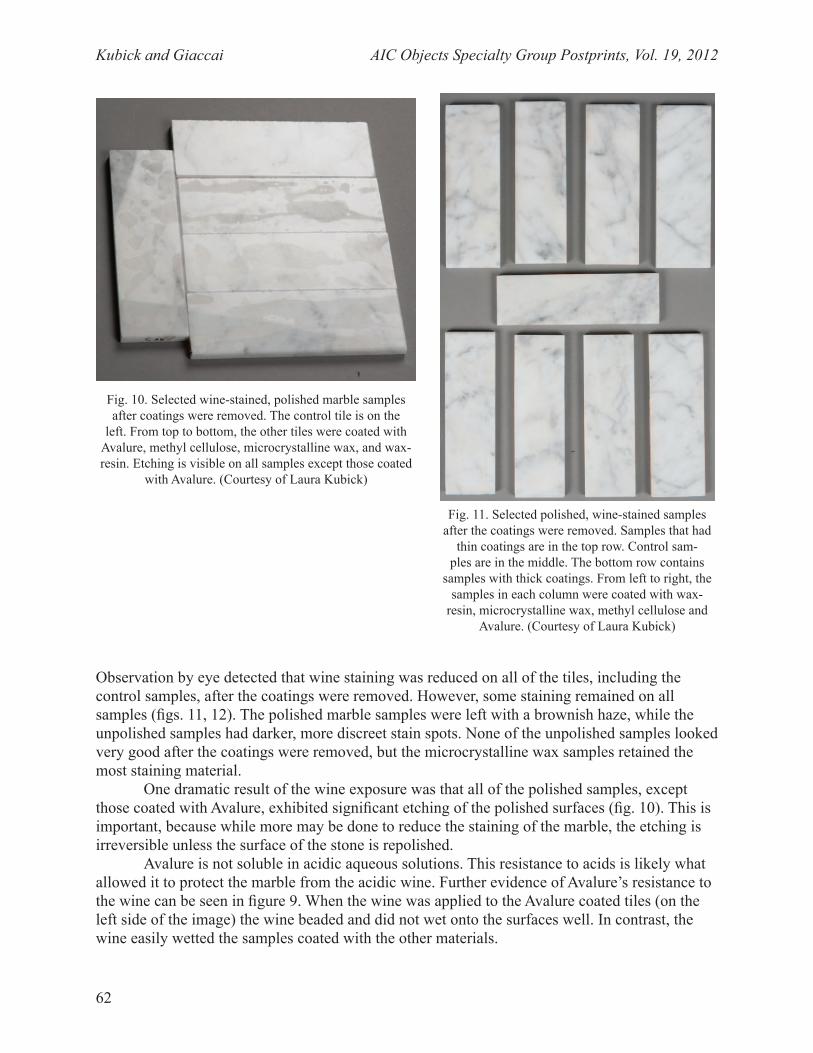
Kubick and Giaccai AIC Objects Specialty Group Postprints, Vol. 19, 2012
62
Fig. 10. Selected wine-stained, polished marble samples after coatings were removed. The control tile is on the
left. From top to bottom, the other tiles were coated with Avalure, methyl cellulose, microcrystalline wax, and wax-resin. Etching is visible on all samples except those coated
with Avalure. (Courtesy of Laura Kubick)
Observation by eye detected that wine staining was reduced on all of the tiles, including the control samples, after the coatings were removed. However, some staining remained on all samples (figs. 11, 12). The polished marble samples were left with a brownish haze, while the unpolished samples had darker, more discreet stain spots. None of the unpolished samples looked very good after the coatings were removed, but the microcrystalline wax samples retained the most staining material.
One dramatic result of the wine exposure was that all of the polished samples, except those coated with Avalure, exhibited significant etching of the polished surfaces (fig. 10). This is important, because while more may be done to reduce the staining of the marble, the etching is irreversible unless the surface of the stone is repolished.
Avalure is not soluble in acidic aqueous solutions. This resistance to acids is likely what allowed it to protect the marble from the acidic wine. Further evidence of Avalure’s resistance to the wine can be seen in figure 9. When the wine was applied to the Avalure coated tiles (on the left side of the image) the wine beaded and did not wet onto the surfaces well. In contrast, the wine easily wetted the samples coated with the other materials.
Fig. 11. Selected polished, wine-stained samples after the coatings were removed. Samples that had
thin coatings are in the top row. Control sam-ples are in the middle. The bottom row contains
samples with thick coatings. From left to right, the samples in each column were coated with wax-
resin, microcrystalline wax, methyl cellulose and Avalure. (Courtesy of Laura Kubick)
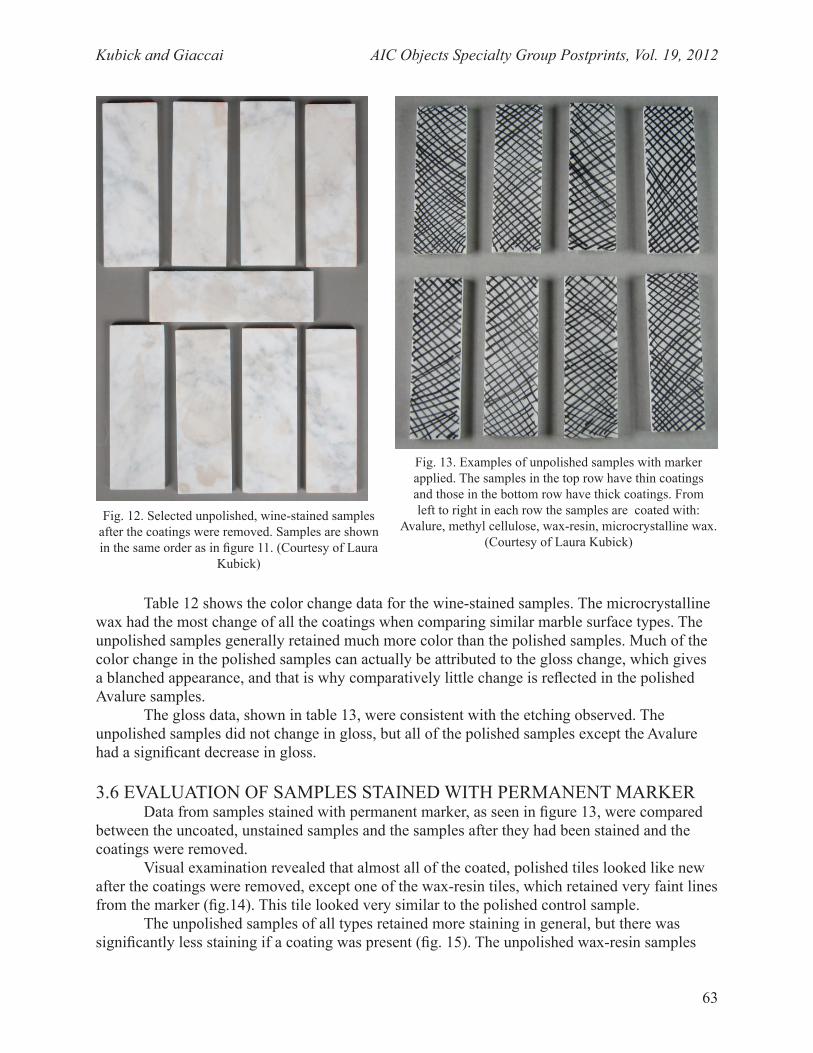
Kubick and Giaccai AIC Objects Specialty Group Postprints, Vol. 19, 2012
63
Table 12 shows the color change data for the wine-stained samples. The microcrystalline wax had the most change of all the coatings when comparing similar marble surface types. The unpolished samples generally retained much more color than the polished samples. Much of the color change in the polished samples can actually be attributed to the gloss change, which gives a blanched appearance, and that is why comparatively little change is reflected in the polished Avalure samples.
The gloss data, shown in table 13, were consistent with the etching observed. The unpolished samples did not change in gloss, but all of the polished samples except the Avalure had a significant decrease in gloss.
3.6 EVALUATION OF SAMPLES STAINED WITH PERMANENT MARKERData from samples stained with permanent marker, as seen in figure 13, were compared
between the uncoated, unstained samples and the samples after they had been stained and the coatings were removed.
Visual examination revealed that almost all of the coated, polished tiles looked like new after the coatings were removed, except one of the wax-resin tiles, which retained very faint lines from the marker (fig.14). This tile looked very similar to the polished control sample.
The unpolished samples of all types retained more staining in general, but there was significantly less staining if a coating was present (fig. 15). The unpolished wax-resin samples
Fig. 12. Selected unpolished, wine-stained samples after the coatings were removed. Samples are shown in the same order as in figure 11. (Courtesy of Laura
Kubick)
Fig. 13. Examples of unpolished samples with marker applied. The samples in the top row have thin coatings and those in the bottom row have thick coatings. From left to right in each row the samples are coated with:
Avalure, methyl cellulose, wax-resin, microcrystalline wax. (Courtesy of Laura Kubick)
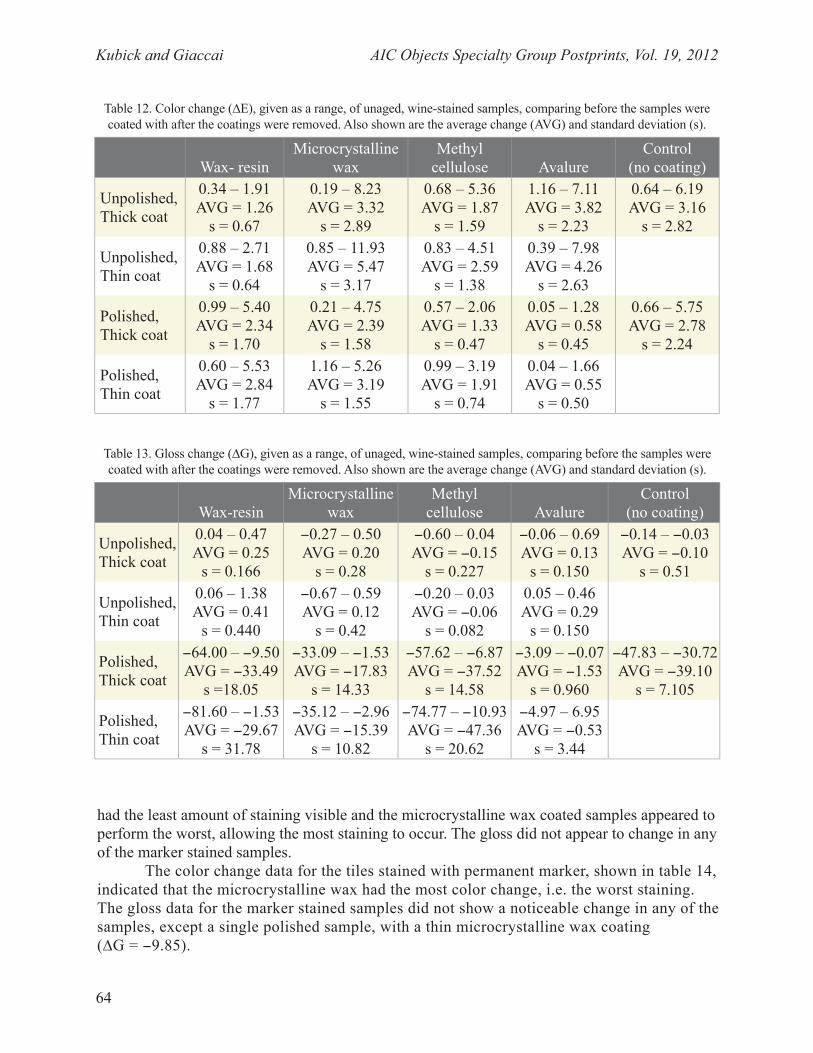
Kubick and Giaccai AIC Objects Specialty Group Postprints, Vol. 19, 2012
64
had the least amount of staining visible and the microcrystalline wax coated samples appeared to perform the worst, allowing the most staining to occur. The gloss did not appear to change in any of the marker stained samples.
The color change data for the tiles stained with permanent marker, shown in table 14, indicated that the microcrystalline wax had the most color change, i.e. the worst staining. The gloss data for the marker stained samples did not show a noticeable change in any of the samples, except a single polished sample, with a thin microcrystalline wax coating (∆G = −9.85).
Table 12. Color change (∆E), given as a range, of unaged, wine-stained samples, comparing before the samples were coated with after the coatings were removed. Also shown are the average change (AVG) and standard deviation (s).
Wax- resinMicrocrystalline
waxMethyl
cellulose Avalure Control
(no coating)
Unpolished, Thick coat
0.34 – 1.91 AVG = 1.26
s = 0.67
0.19 – 8.23 AVG = 3.32
s = 2.89
0.68 – 5.36 AVG = 1.87
s = 1.59
1.16 – 7.11 AVG = 3.82
s = 2.23
0.64 – 6.19 AVG = 3.16
s = 2.82
Unpolished, Thin coat
0.88 – 2.71 AVG = 1.68
s = 0.64
0.85 – 11.93 AVG = 5.47
s = 3.17
0.83 – 4.51 AVG = 2.59
s = 1.38
0.39 – 7.98 AVG = 4.26
s = 2.63
Polished, Thick coat
0.99 – 5.40 AVG = 2.34
s = 1.70
0.21 – 4.75 AVG = 2.39
s = 1.58
0.57 – 2.06 AVG = 1.33
s = 0.47
0.05 – 1.28 AVG = 0.58
s = 0.45
0.66 – 5.75 AVG = 2.78
s = 2.24
Polished, Thin coat
0.60 – 5.53 AVG = 2.84
s = 1.77
1.16 – 5.26 AVG = 3.19
s = 1.55
0.99 – 3.19 AVG = 1.91
s = 0.74
0.04 – 1.66 AVG = 0.55
s = 0.50
Table 13. Gloss change (∆G), given as a range, of unaged, wine-stained samples, comparing before the samples were coated with after the coatings were removed. Also shown are the average change (AVG) and standard deviation (s).
Wax-resinMicrocrystalline
waxMethyl
cellulose Avalure Control
(no coating)
Unpolished, Thick coat
0.04 – 0.47 AVG = 0.25
s = 0.166
−0.27 – 0.50 AVG = 0.20
s = 0.28
−0.60 – 0.04 AVG = −0.15
s = 0.227
−0.06 – 0.69 AVG = 0.13
s = 0.150
−0.14 – −0.03 AVG = −0.10
s = 0.51
Unpolished, Thin coat
0.06 – 1.38 AVG = 0.41
s = 0.440
−0.67 – 0.59 AVG = 0.12
s = 0.42
−0.20 – 0.03 AVG = −0.06
s = 0.082
0.05 – 0.46 AVG = 0.29
s = 0.150
Polished, Thick coat
−64.00 – −9.50 AVG = −33.49
s =18.05
−33.09 – −1.53 AVG = −17.83
s = 14.33
−57.62 – −6.87 AVG = −37.52
s = 14.58
−3.09 – −0.07 AVG = −1.53
s = 0.960
−47.83 – −30.72 AVG = −39.10
s = 7.105
Polished, Thin coat
−81.60 – −1.53 AVG = −29.67
s = 31.78
−35.12 – −2.96 AVG = −15.39
s = 10.82
−74.77 – −10.93 AVG = −47.36
s = 20.62
−4.97 – 6.95 AVG = −0.53
s = 3.44
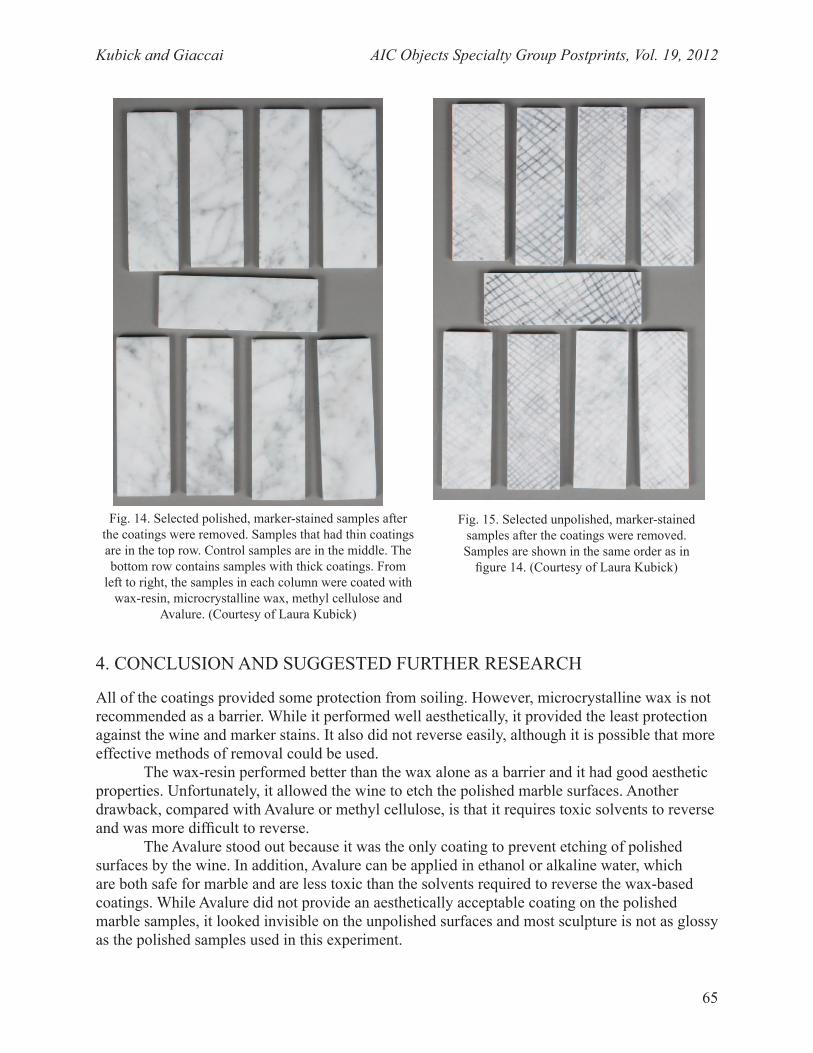
Kubick and Giaccai AIC Objects Specialty Group Postprints, Vol. 19, 2012
65
4. CONCLUSION AND SUGGESTED FURTHER RESEARCH
All of the coatings provided some protection from soiling. However, microcrystalline wax is not recommended as a barrier. While it performed well aesthetically, it provided the least protection against the wine and marker stains. It also did not reverse easily, although it is possible that more effective methods of removal could be used.
The wax-resin performed better than the wax alone as a barrier and it had good aesthetic properties. Unfortunately, it allowed the wine to etch the polished marble surfaces. Another drawback, compared with Avalure or methyl cellulose, is that it requires toxic solvents to reverse and was more difficult to reverse.
The Avalure stood out because it was the only coating to prevent etching of polished surfaces by the wine. In addition, Avalure can be applied in ethanol or alkaline water, which are both safe for marble and are less toxic than the solvents required to reverse the wax-based coatings. While Avalure did not provide an aesthetically acceptable coating on the polished marble samples, it looked invisible on the unpolished surfaces and most sculpture is not as glossy as the polished samples used in this experiment.
Fig. 15. Selected unpolished, marker-stained samples after the coatings were removed. Samples are shown in the same order as in
figure 14. (Courtesy of Laura Kubick)
Fig. 14. Selected polished, marker-stained samples after the coatings were removed. Samples that had thin coatings are in the top row. Control samples are in the middle. The bottom row contains samples with thick coatings. From
left to right, the samples in each column were coated with wax-resin, microcrystalline wax, methyl cellulose and
Avalure. (Courtesy of Laura Kubick)
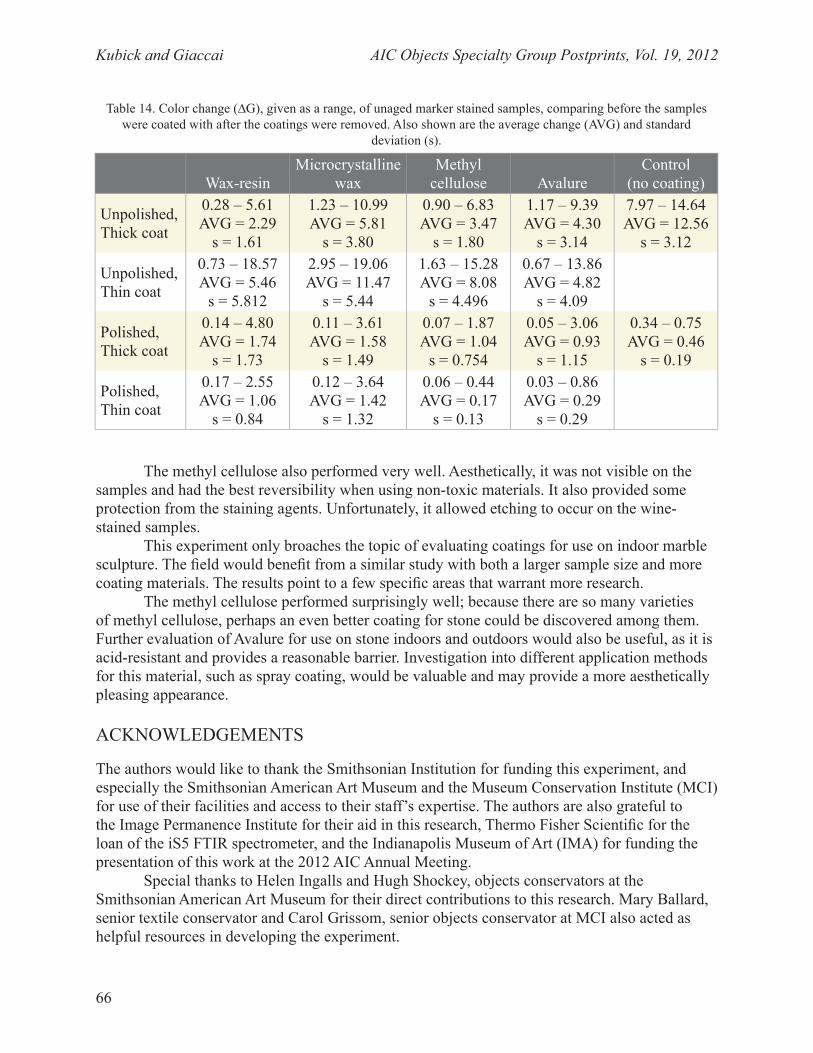
Kubick and Giaccai AIC Objects Specialty Group Postprints, Vol. 19, 2012
66
The methyl cellulose also performed very well. Aesthetically, it was not visible on the samples and had the best reversibility when using non-toxic materials. It also provided some protection from the staining agents. Unfortunately, it allowed etching to occur on the wine-stained samples.
This experiment only broaches the topic of evaluating coatings for use on indoor marble sculpture. The field would benefit from a similar study with both a larger sample size and more coating materials. The results point to a few specific areas that warrant more research.
The methyl cellulose performed surprisingly well; because there are so many varieties of methyl cellulose, perhaps an even better coating for stone could be discovered among them. Further evaluation of Avalure for use on stone indoors and outdoors would also be useful, as it is acid-resistant and provides a reasonable barrier. Investigation into different application methods for this material, such as spray coating, would be valuable and may provide a more aesthetically pleasing appearance.
ACKNOWLEDGEMENTS
The authors would like to thank the Smithsonian Institution for funding this experiment, and especially the Smithsonian American Art Museum and the Museum Conservation Institute (MCI) for use of their facilities and access to their staff’s expertise. The authors are also grateful to the Image Permanence Institute for their aid in this research, Thermo Fisher Scientific for the loan of the iS5 FTIR spectrometer, and the Indianapolis Museum of Art (IMA) for funding the presentation of this work at the 2012 AIC Annual Meeting.
Special thanks to Helen Ingalls and Hugh Shockey, objects conservators at the Smithsonian American Art Museum for their direct contributions to this research. Mary Ballard, senior textile conservator and Carol Grissom, senior objects conservator at MCI also acted as helpful resources in developing the experiment.
Table 14. Color change (∆G), given as a range, of unaged marker stained samples, comparing before the samples were coated with after the coatings were removed. Also shown are the average change (AVG) and standard
deviation (s).
Wax-resinMicrocrystalline
waxMethyl
cellulose Avalure Control
(no coating)
Unpolished, Thick coat
0.28 – 5.61 AVG = 2.29
s = 1.61
1.23 – 10.99 AVG = 5.81
s = 3.80
0.90 – 6.83 AVG = 3.47
s = 1.80
1.17 – 9.39 AVG = 4.30
s = 3.14
7.97 – 14.64 AVG = 12.56
s = 3.12
Unpolished, Thin coat
0.73 – 18.57 AVG = 5.46
s = 5.812
2.95 – 19.06 AVG = 11.47
s = 5.44
1.63 – 15.28 AVG = 8.08
s = 4.496
0.67 – 13.86 AVG = 4.82
s = 4.09
Polished, Thick coat
0.14 – 4.80 AVG = 1.74
s = 1.73
0.11 – 3.61 AVG = 1.58
s = 1.49
0.07 – 1.87 AVG = 1.04
s = 0.754
0.05 – 3.06 AVG = 0.93
s = 1.15
0.34 – 0.75 AVG = 0.46
s = 0.19
Polished, Thin coat
0.17 – 2.55 AVG = 1.06
s = 0.84
0.12 – 3.64 AVG = 1.42
s = 1.32
0.06 – 0.44 AVG = 0.17
s = 0.13
0.03 – 0.86 AVG = 0.29
s = 0.29
Kubick and Giaccai AIC Objects Specialty Group Postprints, Vol. 19, 2012
67
The authors would also like to acknowledge the following individuals for their help and support: Daniel Burge, senior research scientist, Image Permanence Institute; James Reilly, director, Image Permanence Institute; Debra Hess Norris, chair, WUDPAC; Ginny Naudé, president, Norton Art Conservation; Caroline Roberts, Samuel H. Kress fellow, Kelsey Museum of Archaeology; Gregory D. Smith, Otto N. Frenzel III senior conservation scientist, IMA; and Richard Wolbers, associate professor, WUDPAC.
REFERENCES
Cushman, M. 2006. A new method for the treatment of iron-stained architectural marble: in situ reduction of iron(III) using photovoltaic polymers and the introduction of a new chelating agent for conservation. ANAGPIC 2006 Student Papers: presented at the 2006 annual student conference hosted by the University of Delaware/Winterthur Art Conservation Department. Newark: Winterthur/University of Delaware Program in Art Conservation.
Feller, R. L. 1994. Accelerated aging: photochemical and thermal aspects. Los Angeles: Getty Conservation Institute.
Hempel, K., and A. Moncrieff. 1972. Summary of work on marble conservation at the Victoria and Albert Museum conservation department up to August 1971. The treatment of stone: proceedings of the meeting of the joint committee for the conservation of stone, Bologna, October 1–3, 1971. Rapporti della soprintendenza alle gallerie di Bologna 14. Fondazione Cesare Gnudi: 165–182.
Kerr-Allison, A. 2007. Outdoor public murals: materials, advocacy and conservation. ANAGPIC 2007 Student Papers: presented at the 2007 annual student conference hosted by the Harvard University Art Museums Straus Center for Conservation and Technical Studies. Cambridge: Harvard University Art Museums Straus Center for Conservation and Technical Studies.
Larson, J. 1978. The conservation of marble monuments in churches. The Conservator 2: 20–25.
Larson, J. 1980. The conservation of stone sculptures in historic buildings. Conservation within historic buildings: preprints of the contributions to the Vienna Congress, 7–13 September 1980. International Institute for Conservation of Historic and Artistic Works: 132–138.
Roberts, C. 2010. The effectiveness of Avalure AC 315 as a sacrificial graffiti barrier for marble surfaces. Unpublished student paper, Winterthur/University of Delaware Program in Art Conservation.
Shashoua, Y. 1995. Cellulose ethers for textile conservation. Starch and Other Carbohydrate Adhesives for Use in Textile Conservation. London: United Kingdom Institute for Conservation, Textile Section. 1–5.
Kubick and Giaccai AIC Objects Specialty Group Postprints, Vol. 19, 2012
68
Tarnowski, A., X. Zhang, C. McNamara, S. T. Martin, and R. Mitchell. 2007. Biodeterioration and performance of anti-graffiti coatings on sandstone and marble. Journal of the Canadian Association for Conservation 32:3–16.
FURTHER READING
Feller, R. L., and M. Witt. 1990. Evaluation of cellulose ethers for conservation. Los Angeles: Getty Conservation Institute.
Lauffenburger, J. A., C. A. Grissom, and A. E. Charola. 1992. Changes in gloss of marble surfaces as a result of methylcellulose poulticing. Studies in Conservation 37(3):155–164.
Lubrizol Corporation. 2002. Avalure™ AC 315™ AC Acrylic Polymers Dispersing, Handling and Storage Information, Technical Data Sheet, TDS-249. Cleveland, OH: Lubrizol/Noveon Consumer Specialties.
Lubrizol Corporation. 2007. Avalure™ Film Forming Polymers for Personal Care Applications, Technical Data Sheet, TDS-248. Cleveland, OH: Lubrizol/Noveon Consumer Specialties.
Niemcewicz, P. 2008. Protection of marble by means of micro-waxes. 11th International Congress on Deterioration and Conservation of Stone: 15–20 September 2008, Torun, Poland: proceedings. Torun: Wydawnictwo Naukowe Uniwersytetu Mikołaja Kopernika. 1011–1017.
Spry, A. H. 1985. The defence against graffiti. Heritage Australia 4(3)Spring:42–45.
Urquhart, D. 1999. The treatment of graffiti on historic surfaces: advice on graffiti removal procedures, anti-graffiti coatings and alternative strategies. Edinburgh: Historic Scotland.
SOURCES OF MATERIALS
Avalure AC 315 Polymer resinThe Lubrizol Corporation29400 Lakeland BoulevardWickliffe, OH 44092www.lubrizol.com
Carrara marble tilesMorris Tile Distributors2525 Kenilworth AvenueTuxedo, MD 20781www.morristile.com
Cosmolloid 80H wax, Dow Methocel A4C methyl cellulose, Ketone N resin, Renaissance Microcrystalline Wax
Kubick and Giaccai AIC Objects Specialty Group Postprints, Vol. 19, 2012
69
Distributed by Talas330 Morgan AvenueBrooklyn, NY 11211www.talasonline.com
D’Arenberg, The Stump Jump Shiraz: d’ArenbergPO Box 195McLaren Vale, SA 5171Australiawww.darenberg.com.au
Revlon Color Stay Ultimate Liquid LipstickRevlon Inc.237 Park AvenueNew York, NY10017www.revlon.comAvailable at most major drugstores
Sharpie Fine Point Permanent MarkerNewell Rubbermaid Office Products2707 Butterfield RoadOakbrook, IL 60523www.sharpie.comAvailable at most major art supply, office supply, and drug stores
LAURA KUBICK is the assistant conservator of objects and variable art at the Indianapolis Museum of Art. She completed her Smithsonian Post-graduate Fellowship in Conservation at the Smithsonian American Art Museum to carry out the research for this paper, after graduating from the Winterthur/University of Delaware Program in Art Conservation in 2010. Address: Indianapolis Museum of Art, 4000 Michigan Road, Indianapolis, IN 46220. E-mail: [email protected]
JENNIFER GIACCAI is a conservation scientist at the Museum Conservation Institute at the Smithsonian Institution. She has an M.S.E. from Johns Hopkins University and her recent research has included investigations into the analytical limitations when examining mixed media paintings, and technical studies of paintings by Richard Diebenkorn and Henry Ossawa Tanner. Address: Museum Conservation Institute, Smithsonian Institution, 4210 Silver Hill Road, Suitland, MD 20746. E-mail: [email protected]
This article was presented at the Objects Specialty Group or in the joint Research and Technical Studies/OSG Sessions at the 2012 AIC Annual Meeting in Albuquerque. The papers presented in this publication have been edited for clarity and content but have not undergone a formal process of peer review.

AIC Objects Specialty Group Postprints, Vol. 19, 2012 71
1. INTRODUCTION
At a conference on cleaning held in Valencia in June 2010, Italian chemist Paolo Cremonesi presented a paper on the use of rigid agar gels for the conservation and cleaning of outdoor plaster busts. The research he presented in Valencia, and that he published in later months with his colleagues in Milan, showed that agar gels have great promise as cleaning materials for three-dimensional objects (Cremonesi 2013). In their studies, they used the gel primarily with deionized water. Given their degree of success, the author wondered if other cleaning agents, such as solvents, could be added to the gel to increase its versatility, and how the addition of such agents would affect the stability and working properties of the gel.
The studies published by Anzani et al. (2010) and Cremonesi (2013) explore the use of agar as a sol, or colloidal solution, which allows for its application on three-dimensional materials (the rigid nature of the gel had previously restricted its use to two-dimensional materials). Since these studies were originally published, the usage of agar gels in conservation has gained ground in North America, as exemplified by an upcoming workshop sponsored by the Smithsonian Institute in June 2012.
2. AGAR
Agar is a rigid gel derived from the cell walls of a species of red algae of the Gelidium or Gracilaria families (Davidson and Jaine 2006). Agar gels can be classified as reversible sol-gels or reversible hydrocolloid gels. A sol-gel starts from a colloidal solution (the sol) that acts as the precursor for an integrated network of polymers (the gel) (Sol-gel 2012). Herein, the warm, semi-solid form of agar will be referred to as the sol, while the cooled, more rigid form will be referred to as the gel.
According to the Lonza Bench Guide on the physical properties of agar, the gelation mechanism involves a “shift from a random coil in solution to a double helix in the initial stages
ABSTRACT
Agar, or agarose, is a rigid polysaccharide gel that has found use in conservation cleaning treatments of three-dimensional porous objects in recent years, most notably by Italian conservation scientists Marilena Anzani and Paulo Cremonesi. Used strictly as an aqueous gel, it has shown great promise as a poulticing material on porous plaster substrates for the removal of surface particulate matter and water-soluble soiling.
Agar is readily soluble in hot water, stable in both alkaline and acidic conditions, and (prior to adding other materials) is a safe, non-toxic, and eco-friendly material. The dispersion rate of agar can be tailored to the treatment by adjusting the concentration of the solution. In addition, agar acts as a molecular sponge; the gel, when used with solvents, is both a poulticing material as well as a solvent gel, solubilizing the impurities, drawing them away from the surface, and holding those materials within its gel matrix. Post-treatment analysis of cleaned surfaces and used gels using Fourier transform infrared spectroscopy and ultraviolet-induced visible fluorescence photography indicate that the gels show great promise with respect to clearance.
This paper builds upon the work of Anzani et al. (2010) by using agar as a support material for multiple solvents as well as other aqueous cleaning solutions. Specifically, its uses for the cleaning of and adhesive reversal on three-dimensional objects are explored.
THe Use OF AGAr As A sOlvenT Gel In OBJeCTs ConServation
CINDY LEE SCOTT
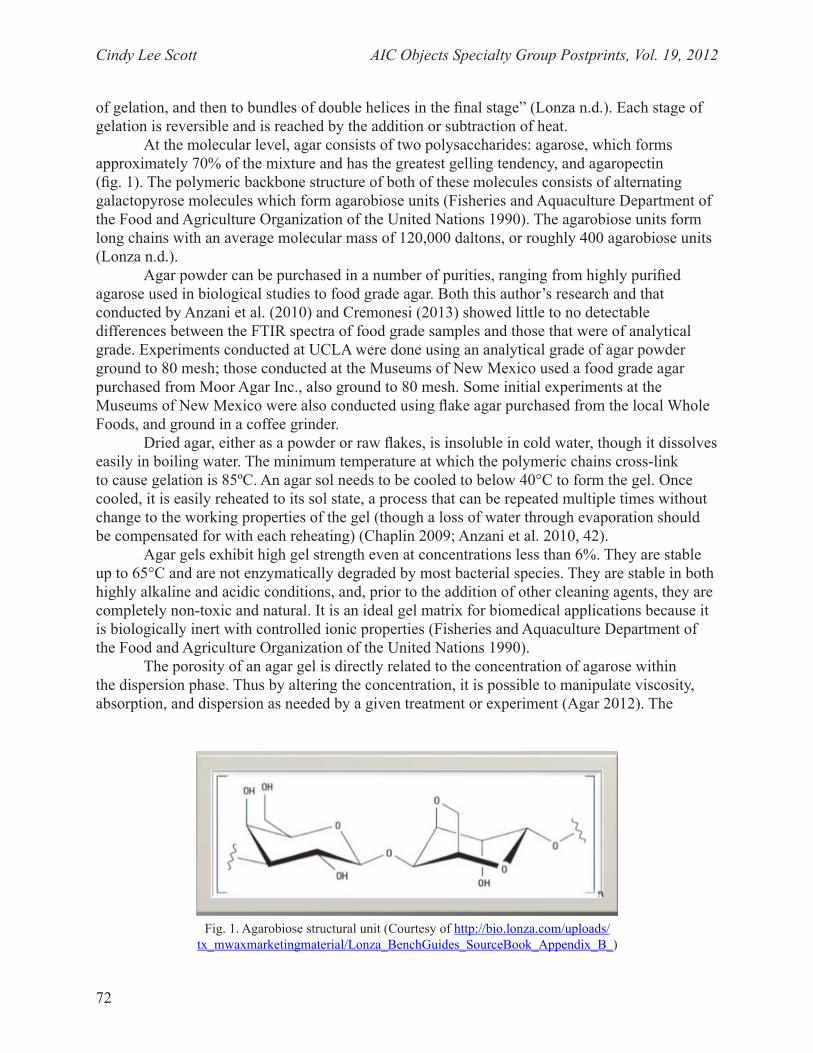
Cindy Lee Scott AIC Objects Specialty Group Postprints, Vol. 19, 2012
72
of gelation, and then to bundles of double helices in the final stage” (Lonza n.d.). Each stage of gelation is reversible and is reached by the addition or subtraction of heat.
At the molecular level, agar consists of two polysaccharides: agarose, which forms approximately 70% of the mixture and has the greatest gelling tendency, and agaropectin (fig. 1). The polymeric backbone structure of both of these molecules consists of alternating galactopyrose molecules which form agarobiose units (Fisheries and Aquaculture Department of the Food and Agriculture Organization of the United Nations 1990). The agarobiose units form long chains with an average molecular mass of 120,000 daltons, or roughly 400 agarobiose units (Lonza n.d.).
Agar powder can be purchased in a number of purities, ranging from highly purified agarose used in biological studies to food grade agar. Both this author’s research and that conducted by Anzani et al. (2010) and Cremonesi (2013) showed little to no detectable differences between the FTIR spectra of food grade samples and those that were of analytical grade. Experiments conducted at UCLA were done using an analytical grade of agar powder ground to 80 mesh; those conducted at the Museums of New Mexico used a food grade agar purchased from Moor Agar Inc., also ground to 80 mesh. Some initial experiments at the Museums of New Mexico were also conducted using flake agar purchased from the local Whole Foods, and ground in a coffee grinder.
Dried agar, either as a powder or raw flakes, is insoluble in cold water, though it dissolves easily in boiling water. The minimum temperature at which the polymeric chains cross-link to cause gelation is 85ºC. An agar sol needs to be cooled to below 40°C to form the gel. Once cooled, it is easily reheated to its sol state, a process that can be repeated multiple times without change to the working properties of the gel (though a loss of water through evaporation should be compensated for with each reheating) (Chaplin 2009; Anzani et al. 2010, 42).
Agar gels exhibit high gel strength even at concentrations less than 6%. They are stable up to 65°C and are not enzymatically degraded by most bacterial species. They are stable in both highly alkaline and acidic conditions, and, prior to the addition of other cleaning agents, they are completely non-toxic and natural. It is an ideal gel matrix for biomedical applications because it is biologically inert with controlled ionic properties (Fisheries and Aquaculture Department of the Food and Agriculture Organization of the United Nations 1990).
The porosity of an agar gel is directly related to the concentration of agarose within the dispersion phase. Thus by altering the concentration, it is possible to manipulate viscosity, absorption, and dispersion as needed by a given treatment or experiment (Agar 2012). The
Fig. 1. Agarobiose structural unit (Courtesy of http://bio.lonza.com/uploads/tx_mwaxmarketingmaterial/Lonza_BenchGuides_SourceBook_Appendix_B_)
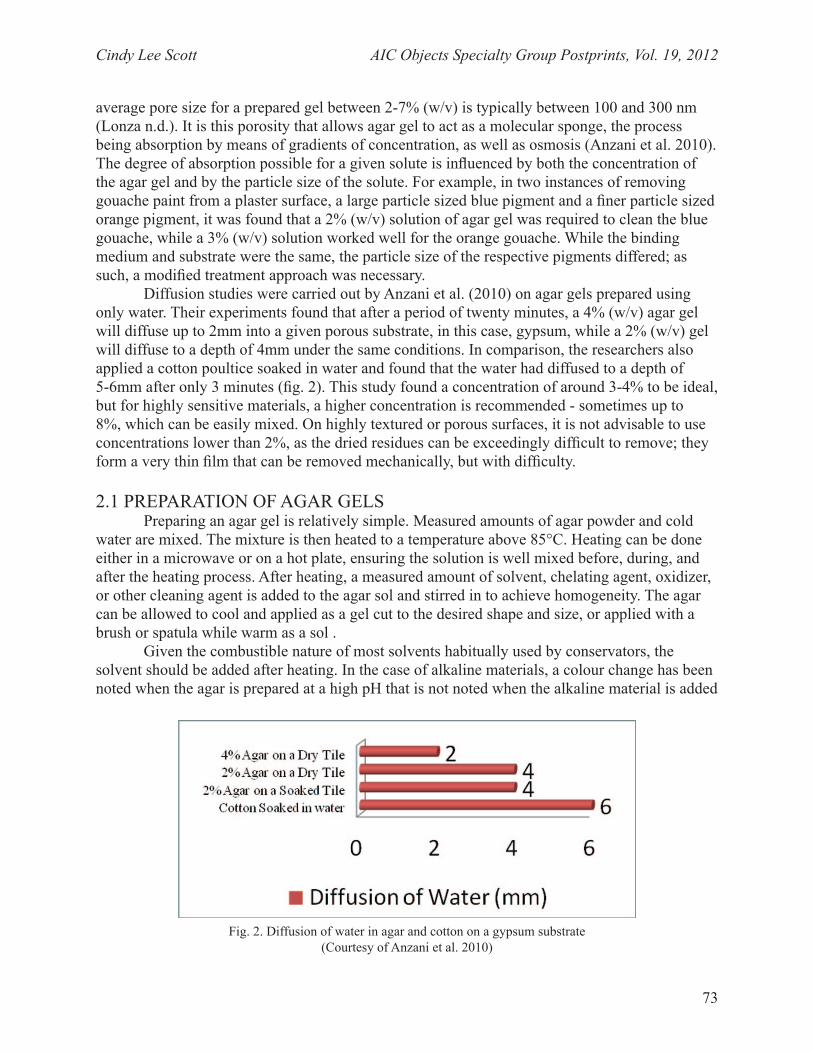
Cindy Lee Scott AIC Objects Specialty Group Postprints, Vol. 19, 2012
73
average pore size for a prepared gel between 2-7% (w/v) is typically between 100 and 300 nm (Lonza n.d.). It is this porosity that allows agar gel to act as a molecular sponge, the process being absorption by means of gradients of concentration, as well as osmosis (Anzani et al. 2010). The degree of absorption possible for a given solute is influenced by both the concentration of the agar gel and by the particle size of the solute. For example, in two instances of removing gouache paint from a plaster surface, a large particle sized blue pigment and a finer particle sized orange pigment, it was found that a 2% (w/v) solution of agar gel was required to clean the blue gouache, while a 3% (w/v) solution worked well for the orange gouache. While the binding medium and substrate were the same, the particle size of the respective pigments differed; as such, a modified treatment approach was necessary.
Diffusion studies were carried out by Anzani et al. (2010) on agar gels prepared using only water. Their experiments found that after a period of twenty minutes, a 4% (w/v) agar gel will diffuse up to 2mm into a given porous substrate, in this case, gypsum, while a 2% (w/v) gel will diffuse to a depth of 4mm under the same conditions. In comparison, the researchers also applied a cotton poultice soaked in water and found that the water had diffused to a depth of 5-6mm after only 3 minutes (fig. 2). This study found a concentration of around 3-4% to be ideal, but for highly sensitive materials, a higher concentration is recommended - sometimes up to 8%, which can be easily mixed. On highly textured or porous surfaces, it is not advisable to use concentrations lower than 2%, as the dried residues can be exceedingly difficult to remove; they form a very thin film that can be removed mechanically, but with difficulty.
2.1 PREPARATION OF AGAR GELSPreparing an agar gel is relatively simple. Measured amounts of agar powder and cold
water are mixed. The mixture is then heated to a temperature above 85°C. Heating can be done either in a microwave or on a hot plate, ensuring the solution is well mixed before, during, and after the heating process. After heating, a measured amount of solvent, chelating agent, oxidizer, or other cleaning agent is added to the agar sol and stirred in to achieve homogeneity. The agar can be allowed to cool and applied as a gel cut to the desired shape and size, or applied with a brush or spatula while warm as a sol .
Given the combustible nature of most solvents habitually used by conservators, the solvent should be added after heating. In the case of alkaline materials, a colour change has been noted when the agar is prepared at a high pH that is not noted when the alkaline material is added
Fig. 2. Diffusion of water in agar and cotton on a gypsum substrate (Courtesy of Anzani et al. 2010)
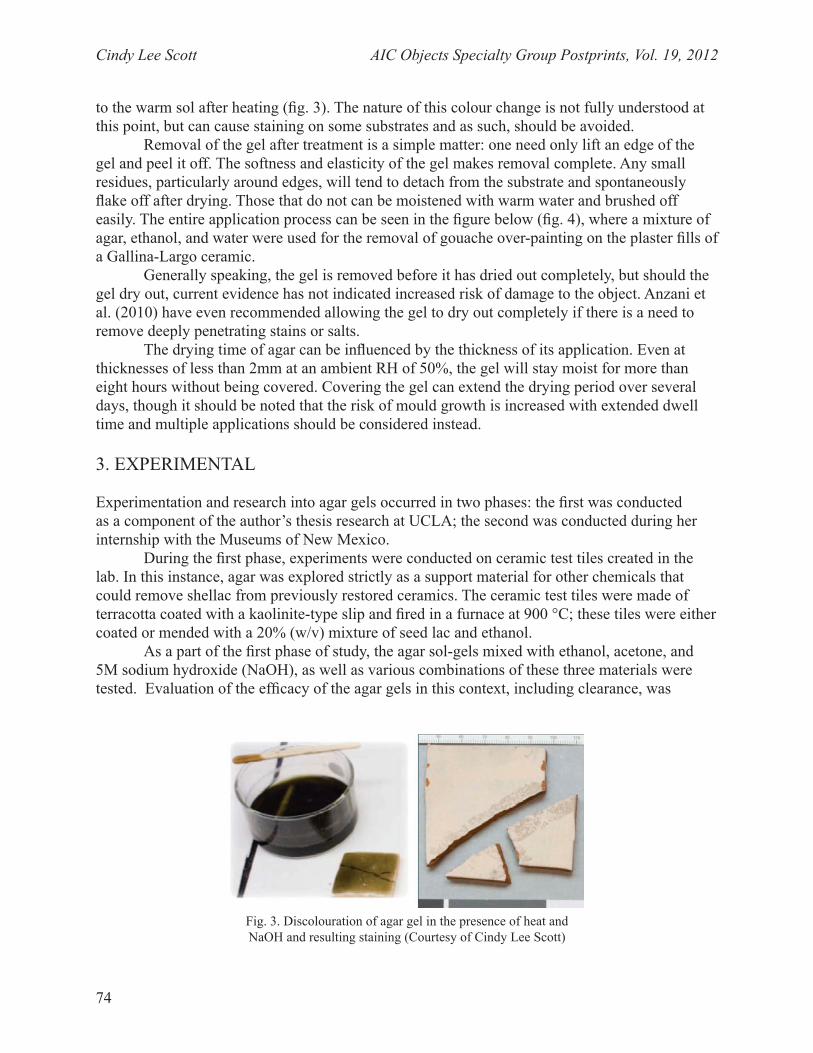
Cindy Lee Scott AIC Objects Specialty Group Postprints, Vol. 19, 2012
74
to the warm sol after heating (fig. 3). The nature of this colour change is not fully understood at this point, but can cause staining on some substrates and as such, should be avoided.
Removal of the gel after treatment is a simple matter: one need only lift an edge of the gel and peel it off. The softness and elasticity of the gel makes removal complete. Any small residues, particularly around edges, will tend to detach from the substrate and spontaneously flake off after drying. Those that do not can be moistened with warm water and brushed off easily. The entire application process can be seen in the figure below (fig. 4), where a mixture of agar, ethanol, and water were used for the removal of gouache over-painting on the plaster fills of a Gallina-Largo ceramic.
Generally speaking, the gel is removed before it has dried out completely, but should the gel dry out, current evidence has not indicated increased risk of damage to the object. Anzani et al. (2010) have even recommended allowing the gel to dry out completely if there is a need to remove deeply penetrating stains or salts.
The drying time of agar can be influenced by the thickness of its application. Even at thicknesses of less than 2mm at an ambient RH of 50%, the gel will stay moist for more than eight hours without being covered. Covering the gel can extend the drying period over several days, though it should be noted that the risk of mould growth is increased with extended dwell time and multiple applications should be considered instead.
3. EXPERIMENTAL
Experimentation and research into agar gels occurred in two phases: the first was conducted as a component of the author’s thesis research at UCLA; the second was conducted during her internship with the Museums of New Mexico.
During the first phase, experiments were conducted on ceramic test tiles created in the lab. In this instance, agar was explored strictly as a support material for other chemicals that could remove shellac from previously restored ceramics. The ceramic test tiles were made of terracotta coated with a kaolinite-type slip and fired in a furnace at 900 °C; these tiles were either coated or mended with a 20% (w/v) mixture of seed lac and ethanol.
As a part of the first phase of study, the agar sol-gels mixed with ethanol, acetone, and 5M sodium hydroxide (NaOH), as well as various combinations of these three materials were tested. Evaluation of the efficacy of the agar gels in this context, including clearance, was
Fig. 3. Discolouration of agar gel in the presence of heat and NaOH and resulting staining (Courtesy of Cindy Lee Scott)
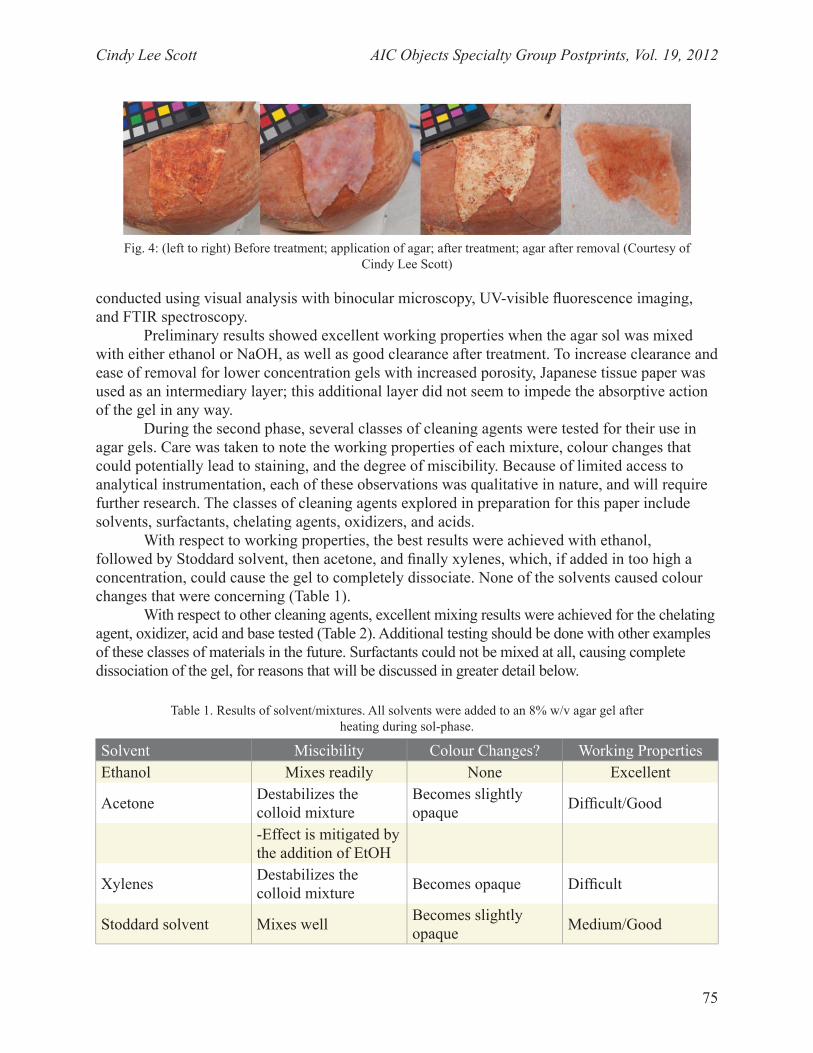
Cindy Lee Scott AIC Objects Specialty Group Postprints, Vol. 19, 2012
75
conducted using visual analysis with binocular microscopy, UV-visible fluorescence imaging, and FTIR spectroscopy.
Preliminary results showed excellent working properties when the agar sol was mixed with either ethanol or NaOH, as well as good clearance after treatment. To increase clearance and ease of removal for lower concentration gels with increased porosity, Japanese tissue paper was used as an intermediary layer; this additional layer did not seem to impede the absorptive action of the gel in any way.
During the second phase, several classes of cleaning agents were tested for their use in agar gels. Care was taken to note the working properties of each mixture, colour changes that could potentially lead to staining, and the degree of miscibility. Because of limited access to analytical instrumentation, each of these observations was qualitative in nature, and will require further research. The classes of cleaning agents explored in preparation for this paper include solvents, surfactants, chelating agents, oxidizers, and acids.
With respect to working properties, the best results were achieved with ethanol, followed by Stoddard solvent, then acetone, and finally xylenes, which, if added in too high a concentration, could cause the gel to completely dissociate. None of the solvents caused colour changes that were concerning (Table 1).
With respect to other cleaning agents, excellent mixing results were achieved for the chelating agent, oxidizer, acid and base tested (Table 2). Additional testing should be done with other examples of these classes of materials in the future. Surfactants could not be mixed at all, causing complete dissociation of the gel, for reasons that will be discussed in greater detail below.
Table 1. Results of solvent/mixtures. All solvents were added to an 8% w/v agar gel after heating during sol-phase.
Solvent Miscibility Colour Changes? Working PropertiesEthanol Mixes readily None Excellent
Acetone Destabilizes the colloid mixture
Becomes slightly opaque Difficult/Good
-Effect is mitigated by the addition of EtOH
Xylenes Destabilizes the colloid mixture Becomes opaque Difficult
Stoddard solvent Mixes well Becomes slightly opaque Medium/Good
Fig. 4: (left to right) Before treatment; application of agar; after treatment; agar after removal (Courtesy of Cindy Lee Scott)
Cindy Lee Scott AIC Objects Specialty Group Postprints, Vol. 19, 2012
76
In addition to the above tests, plaster tiles were cast in the labs at the Museum of New Mexico in order to further test the gel using these different cleaning agents in a number of cleaning challenges. The plaster tiles were coated with the following materials:
i. Alizarin dye ii. Garnet shellac (20% (w/v) in ethanol)iii. Phthalo green watercolour (in gum Arabic)iv. Turquoise blue gouachev. Iridescent bronze acrylic emulsion paint
vi. PVA wood gluevii. Soil
After each of the tiles was ‘mis-treated’ with their respective cleaning challenges, they were artificially aged with cycles of heat and humidity. This was accomplished by placing the tiles in an oven at 70°C with a beaker of water to increase humidity to roughly 60-70% for 24 hours, and then removed to the ambient atmosphere of the lab for another 24 hours; this cycle was repeated for a 14 day period.
Using the most efficacious cleaning agent for each(as determined through solubility testing), the agar gel was applied in its sol form and left in place for 15 minutes, after which time it was removed. Generally, only one application was evaluated, though in the case of the blue gouache, a second application at a lower concentration was tested. Each test was evaluated for the following:
i. Efficacy and efficiency of cleaningii. Visible damage or morphological changes to the substrateiii. Working properties of the geliv. Ease of removal/clearance
3.1 RESULTSSolvent mixtures with agar gels were inadequate in the cleaning of either the plaster tile
coated with alizarin, or the plaster tile coated with shellac, though some reduction is visible on the alizarin tile. On the shellac tile, clearance was achieved only through the addition of 5M NaOH, which did cause some slight pitting to the plaster. All treatment efforts for removing the watercolour from the tile were unsuccessful, likely due to the use of a phthalo green dye-based
Table 2. Results of mixing tests using other cleaning agents
Cleaning Agent Miscibility Colour Changes? Working PropertiesTriton XL-80N (1% w/v in H2O) (Surfactant)
Gel dissociation None Gel dissociation
Orvus Paste (1% w/v in H2O) (Surfactant)
Gel dissociation None Gel dissociation
Ammonium citrate (3% w/v in H2O) (Chelating Agent)
Excellent None Excellent
Hydrogen peroxide (3% w/v in H2O) (Oxidizer)
Excellent None Excellent
Phosphoric acid (10% v/v) Excellent None ExcellentSodium hydroxide (5M) Excellent Yellows slightly (temporary) Excellent
Cindy Lee Scott AIC Objects Specialty Group Postprints, Vol. 19, 2012
77
watercolour. As previously discussed, there was good success removing the gouache using a 2% (w/v) agar in water alone. Acetone on a cotton swab proved to be quite efficacious for the removal of the acrylic emulsion, whereas an acetone/agar mixture proved to be completely ineffective. Treatment of the PVA with agar was highly successful. The extended contact time with the adhesive has proven a very effective means for its removal. A high degree of success was achieved using agar on the soiled tile. A single treatment showed significant cleaning without damage to the surface. The results are summarized in table 3.
It should go without saying that in any conservation treatment using an agar gel, the efficacy of treatment depends upon the suitability of the chosen cleaning agent. Efficacy can be enhanced by increasing or decreasing the respective concentrations of agar and solvent, or by changing the temperature, length, and number of applications.Some other noteworthy results are as follows:
a. The addition of ethanol to the gel increases the efficacy of treatment through improved wettability.
b. When trying to mix the gel with acetone, the addition of ethanol can increase the mis-cibility of the solution.
c. Chemically complexed materials, such as the alizarin, cannot be removed by solvation alone; additional steps must be taken to reverse the chemical complex. This can be ac-complished by lowering the pH of the gel to create an acidic environment.
d. Agents that disrupt hydrogen bond formation, such as chaotropic agents and some classes of surfactants, can significantly decrease melting and gelling temperatures, and can even inhibit the formation of the gel entirely. When adding such agents to the gel after gelation has occurred, a disassociation of the gel has been observed.
e. For the cleaning of heavily soiled or saturated substrates, the gel should be reapplied intermittently to avoid saturation of the gel and diffusion of the solubilised material back into the substrate. The more heavily soiled or contaminated the surface, the more often the gel should be changed.
Table 3. Results of cleaning tests
Tile Solvent Efficacy DamageWorking
Properties ClearanceAlizarin Dye Ethanol Moderate None Excellent TotalGarnet Shellac 1:1 EtOH and
Acetone Minimal Lac Dye stains Good Total
NaOH and EtOH Moderate Lac Dye stains Good GoodWater Colour Water/EtOH Minimal None Excellent Total
Gouache Water Needs lower concentration Tidelines Excellent Total
Acrylic Emulsion Acetone No change None Excellent Total
PVA Adhesive Water Excellent None Excellent Total
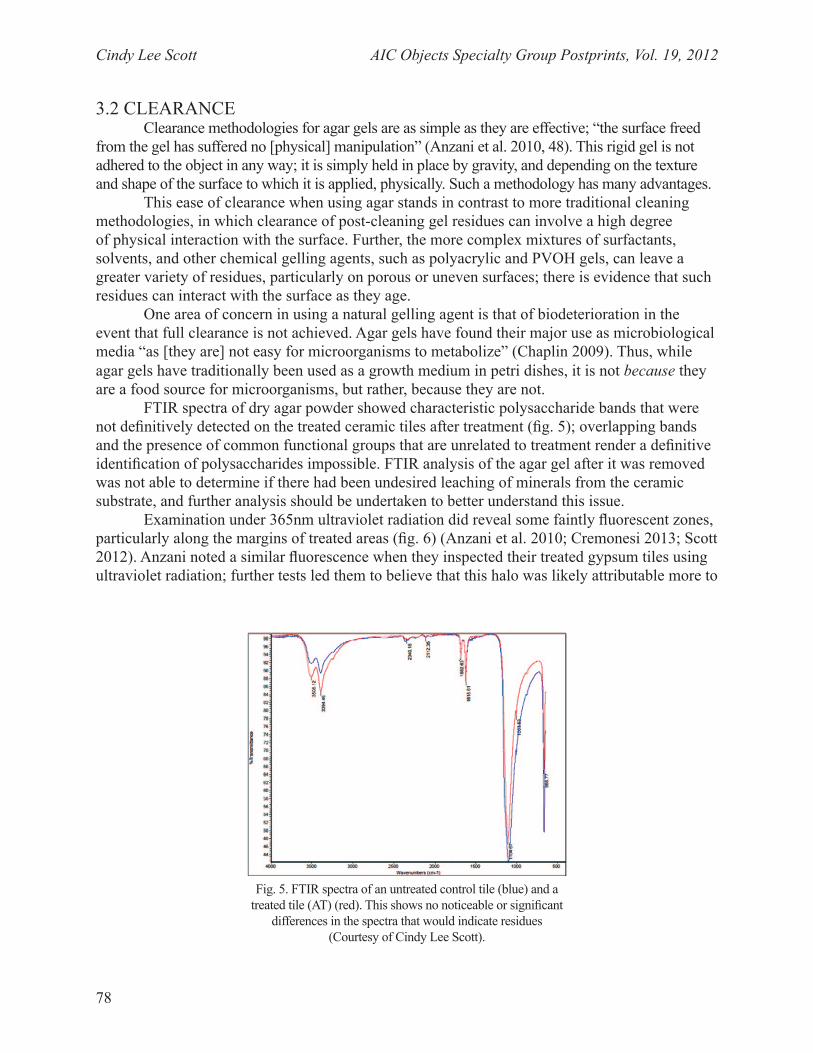
Cindy Lee Scott AIC Objects Specialty Group Postprints, Vol. 19, 2012
78
3.2 CLEARANCEClearance methodologies for agar gels are as simple as they are effective; “the surface freed
from the gel has suffered no [physical] manipulation” (Anzani et al. 2010, 48). This rigid gel is not adhered to the object in any way; it is simply held in place by gravity, and depending on the texture and shape of the surface to which it is applied, physically. Such a methodology has many advantages.
This ease of clearance when using agar stands in contrast to more traditional cleaning methodologies, in which clearance of post-cleaning gel residues can involve a high degree of physical interaction with the surface. Further, the more complex mixtures of surfactants, solvents, and other chemical gelling agents, such as polyacrylic and PVOH gels, can leave a greater variety of residues, particularly on porous or uneven surfaces; there is evidence that such residues can interact with the surface as they age.
One area of concern in using a natural gelling agent is that of biodeterioration in the event that full clearance is not achieved. Agar gels have found their major use as microbiological media “as [they are] not easy for microorganisms to metabolize” (Chaplin 2009). Thus, while agar gels have traditionally been used as a growth medium in petri dishes, it is not because they are a food source for microorganisms, but rather, because they are not.
FTIR spectra of dry agar powder showed characteristic polysaccharide bands that were not definitively detected on the treated ceramic tiles after treatment (fig. 5); overlapping bands and the presence of common functional groups that are unrelated to treatment render a definitive identification of polysaccharides impossible. FTIR analysis of the agar gel after it was removed was not able to determine if there had been undesired leaching of minerals from the ceramic substrate, and further analysis should be undertaken to better understand this issue.
Examination under 365nm ultraviolet radiation did reveal some faintly fluorescent zones, particularly along the margins of treated areas (fig. 6) (Anzani et al. 2010; Cremonesi 2013; Scott 2012). Anzani noted a similar fluorescence when they inspected their treated gypsum tiles using ultraviolet radiation; further tests led them to believe that this halo was likely attributable more to
Fig. 5. FTIR spectra of an untreated control tile (blue) and a treated tile (AT) (red). This shows no noticeable or significant
differences in the spectra that would indicate residues (Courtesy of Cindy Lee Scott).
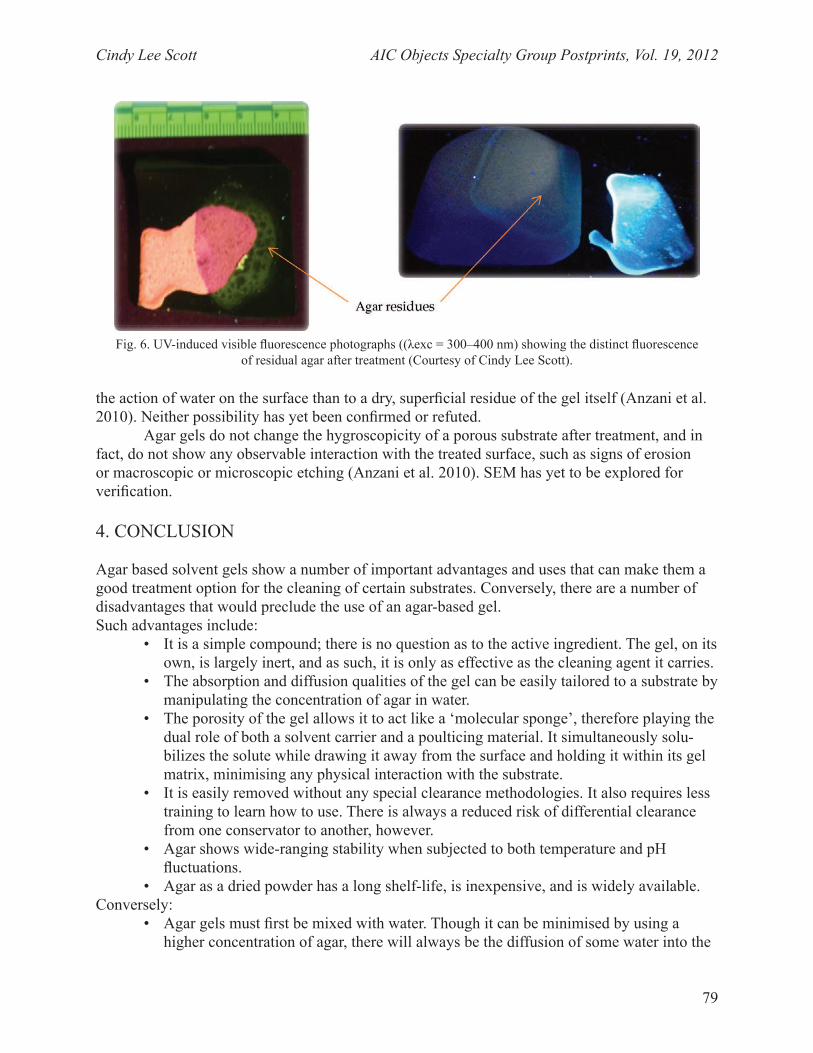
Cindy Lee Scott AIC Objects Specialty Group Postprints, Vol. 19, 2012
79
the action of water on the surface than to a dry, superficial residue of the gel itself (Anzani et al. 2010). Neither possibility has yet been confirmed or refuted.
Agar gels do not change the hygroscopicity of a porous substrate after treatment, and in fact, do not show any observable interaction with the treated surface, such as signs of erosion or macroscopic or microscopic etching (Anzani et al. 2010). SEM has yet to be explored for verification.
4. CONCLUSION
Agar based solvent gels show a number of important advantages and uses that can make them a good treatment option for the cleaning of certain substrates. Conversely, there are a number of disadvantages that would preclude the use of an agar-based gel. Such advantages include:
• It is a simple compound; there is no question as to the active ingredient. The gel, on its own, is largely inert, and as such, it is only as effective as the cleaning agent it carries.
• The absorption and diffusion qualities of the gel can be easily tailored to a substrate by manipulating the concentration of agar in water.
• The porosity of the gel allows it to act like a ‘molecular sponge’, therefore playing the dual role of both a solvent carrier and a poulticing material. It simultaneously solu-bilizes the solute while drawing it away from the surface and holding it within its gel matrix, minimising any physical interaction with the substrate.
• It is easily removed without any special clearance methodologies. It also requires less training to learn how to use. There is always a reduced risk of differential clearance from one conservator to another, however.
• Agar shows wide-ranging stability when subjected to both temperature and pH fluctuations.
• Agar as a dried powder has a long shelf-life, is inexpensive, and is widely available.Conversely:
• Agar gels must first be mixed with water. Though it can be minimised by using a higher concentration of agar, there will always be the diffusion of some water into the
Fig. 6. UV-induced visible fluorescence photographs ((λexc = 300–400 nm) showing the distinct fluorescence of residual agar after treatment (Courtesy of Cindy Lee Scott).

Cindy Lee Scott AIC Objects Specialty Group Postprints, Vol. 19, 2012
80
substrate. If the substrate is sensitive to water, another cleaning treatment should be considered.
• Because of differences in polarity, some solvents, such as acetone, can be tricky to mix into the gel. The addition of a small amount of ethanol prior to mixing more polar solvents can mitigate this effect, but the presence of ethanol in a mixture is not always desirable. Further, the volatility of solvents such as acetone can have a rapid cooling effect on the gel, causing it to solidify before the solvent has been fully mixed. The use of a double boiler to heat the gel can help to mitigate this effect.
• Currently it is not possible to mix surfactants into the gel. The disruption of hydrogen bond formation causes the gel to dissociate and liquefy in the presence of the sur-factants tested.
• There is some risk, though minimal and improbable, of biological deterioration if full clearance is not achieved.
• If using the gel as a carrier for flammable solvents, it is not possible to keep the agar solvent gel premixed as one does with Carbopol, unless it will only be used as a rigid gel and not reheated. If reheating is necessary, the solvents should be added only after heating, just prior to application.
• If one wishes to apply agar as a sol, special equipment such as a hot plate or microwave will be necessary; these are not always available or practical in a field setting.
As with any material that one uses for conservation treatment, additional research into aging, potential residues, and interaction with different substrates is required before it can and should be used on other types of materials; but the properties seen within the scope of this study have shown it to be a promising material.
ACKNOWLEDGEMENTS
I would like to acknowledge and thank the following people, without whom this project and my research could have never moved forward:
UCLA/Getty Conservation Program• Ioanna Kakoulli • Ellen Pearlstein• David Scott• Vanessa Muros
J. Paul Getty Museum (Antiquities Conservation)• Marie Svoboda • Jerry Podany • Marc Walton (GCI)
Museums of New Mexico• Mark MacKenzie• Mina Thompson• Larry Humetewa
Cindy Lee Scott AIC Objects Specialty Group Postprints, Vol. 19, 2012
81
REFERENCES
Agar. 2012. Wikipedia. http://en.wikipedia.org/wiki/Agar (accessed 01/06/12).
Anzani, M., M. Berzioli, E. Campani, A. Casoli, P. Cremonesi, M. Fratelli, A. Rabbolini, and D. Riggiardi. 2010. Gel rigidi di agar per il trattamento di pulitura di manufatti in gesso. CESMAR 7.
Chaplin, M. 2009. Water structure and science: agar. www.lsbu.ac.uk/water/hyagar.html (accessed 02/15/12).
Cremonesi, P. 2013. Rigid gels and enzyme cleaning. In New insights into the cleaning of paintings, eds. M. F. Mecklenburg, A. E. Charola, and R. J. Koestler. Washington DC: Smithsonian Institution Scholarly Press. 179–184.
Davidson, A. and T. Jaine. 2006. The Oxford companion to food. Oxford University Press, 805.
Fisheries and Aquaculture Department of the Food and Agriculture Organization of the United Nations. 1990. Training manual on Gracilaria culture and seaweed processing in China, chapter III: Properties, manufacture and application of seaweed polysaccharides–agar, carrageenan and algin. www.fao.org/docrep/field/003/AB730E03.htm (accessed 01/23/12).
Lonza. n.d. Sourcebook for electrophoresis (207–209) http://bio.lonza.com/uploads/tx_mwaxmarketingmaterial/Lonza_BenchGuides_SourceBook_Appendix_B_-_Agarose_Physical_Chemistry.pdf (accessed 09/19/11).
Sol-gel. 2012. Wikipedia. http://en.wikipedia.org/wiki/Sol-gel (accessed 01/06/12).
FURTHER READING
Craigie, J. S., and Z. C. Wen. 1984. Effects of temperature and tissue age on gel strength and composition of agar from Gracilaria tikvahiae (Rhodophyceae). Canadian Journal of Botany 62: 1665–1670.
Gorel, F. 2010. Assessment of agar gel loaded with micro-emulsion for the cleaning of porous surfaces. CeROArt http://ceroart.revues.org/1827 (accessed 06/15/11).
Lang, S. 1999. Not so new methods of cleaning. Victoria and Albert Museum Conservation Journal 32 (July). http://amethyst.vam.ac.uk/res_cons/conservation/journal/journal32/notsonew32/index.html (accessed 01/06/12).
Stulik, D., H. Khanjian, D. Miller, N. Kandekar, R. Wolbers, J. Carlson, C. Petersen, and V. Dorge (ed.). 2004. Solvent gels for the cleaning of works of art: the residue question. Los Angeles: Getty Publications.
Cindy Lee Scott AIC Objects Specialty Group Postprints, Vol. 19, 2012
82
Valentini, F., A. Diamanti, and G. Pallesch. 2010. New bio-cleaning strategies on porous building materials affected by biodeterioration event. Applied Surface Science 256:6550–6563.
Warda, J., I. Bruckle, A. Bezur, and D. Kushel. 2007. Analysis of agarose, carbopol, and laponite gel poultices in paper conservation. Journal of the American Institute for Conservation 46(3):263–279.
Wolbers, R. 1989. Notes for workshop on new methods in the cleaning of paintings. Marina del Rey, CA: Getty Conservation Institute. Wolbers, R. 2000. Cleaning painted surfaces. London: Archetype Publishing.
SOURCES OF MATERIALS
Agar (Powder)Fluka AnalyticalSigma-Aldrich Corp. St. Louis, MO USA
Agar (Powder)Moor Agar Inc.PO Box 1799Rocklin, CA 95677
Agar (Flakes)Whole Foods Markets753 Cerrillos Rd. Santa Fe, NM 87505
Batanas ClayHellenic Clay CenterS.A.55 G. LyraKifissia 14564, Greece
Carpenter’s Interior Wood GlueElmer’s Products, Inc.460 Polaris Parkway, Suite 500Westerville, OH 43082
Grumbacher Watercolour in Pthalo Green; Winsor & Newton Designers Gouache in TurquoiseArtisans Art Supply2601 Cerrillos Rd. Santa Fe, NM 87505
Plaster of ParisDAP, Inc.2400 Boston St., Suite 200Baltimore, MD 21224
Cindy Lee Scott AIC Objects Specialty Group Postprints, Vol. 19, 2012
83
Seed Lac, Stick Lac, Madder Lake (Alizarin)Kremer Pigments247 W. 29th St. New York, NY 10001
TerracottaLaguna Clay Company14400 Lomitas Ave.City of Industry, CA 91746
CINDY LEE SCOTT is a recent graduate of the UCLA/Getty Masters in Conservation of Archaeological and Ethnographic Materials. She has recently completed a nine-month internship at the Museums of New Mexico, and is currently working as a field conservator for the Gournia Archaeological Project, in Crete, Greece. In September 2012, she will begin the Andrew Mellon Fellowship in Objects Conservation at the Detroit Institute of Arts. E-mail: [email protected]
This article was presented at the Objects Specialty Group or in the joint Research and Technical Studies/OSG Sessions at the 2012 AIC Annual Meeting in Albuquerque. The papers presented in this publication have been edited for clarity and content but have not undergone a formal process of peer review.

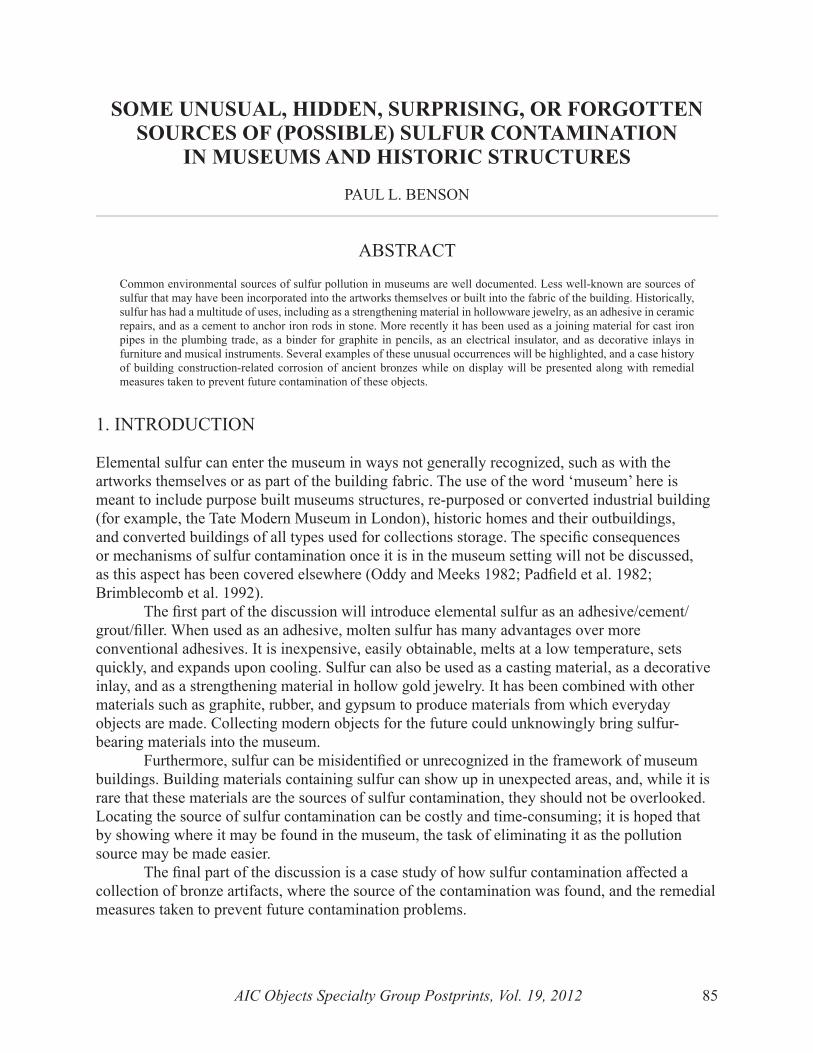
AIC Objects Specialty Group Postprints, Vol. 19, 2012 85
1. INTRODUCTION
Elemental sulfur can enter the museum in ways not generally recognized, such as with the artworks themselves or as part of the building fabric. The use of the word ‘museum’ here is meant to include purpose built museums structures, re-purposed or converted industrial building (for example, the Tate Modern Museum in London), historic homes and their outbuildings, and converted buildings of all types used for collections storage. The specific consequences or mechanisms of sulfur contamination once it is in the museum setting will not be discussed, as this aspect has been covered elsewhere (Oddy and Meeks 1982; Padfield et al. 1982; Brimblecomb et al. 1992).
The first part of the discussion will introduce elemental sulfur as an adhesive/cement/grout/filler. When used as an adhesive, molten sulfur has many advantages over more conventional adhesives. It is inexpensive, easily obtainable, melts at a low temperature, sets quickly, and expands upon cooling. Sulfur can also be used as a casting material, as a decorative inlay, and as a strengthening material in hollow gold jewelry. It has been combined with other materials such as graphite, rubber, and gypsum to produce materials from which everyday objects are made. Collecting modern objects for the future could unknowingly bring sulfur-bearing materials into the museum.
Furthermore, sulfur can be misidentified or unrecognized in the framework of museum buildings. Building materials containing sulfur can show up in unexpected areas, and, while it is rare that these materials are the sources of sulfur contamination, they should not be overlooked. Locating the source of sulfur contamination can be costly and time-consuming; it is hoped that by showing where it may be found in the museum, the task of eliminating it as the pollution source may be made easier.
The final part of the discussion is a case study of how sulfur contamination affected a collection of bronze artifacts, where the source of the contamination was found, and the remedial measures taken to prevent future contamination problems.
ABSTRACT
Common environmental sources of sulfur pollution in museums are well documented. Less well-known are sources of sulfur that may have been incorporated into the artworks themselves or built into the fabric of the building. Historically, sulfur has had a multitude of uses, including as a strengthening material in hollowware jewelry, as an adhesive in ceramic repairs, and as a cement to anchor iron rods in stone. More recently it has been used as a joining material for cast iron pipes in the plumbing trade, as a binder for graphite in pencils, as an electrical insulator, and as decorative inlays in furniture and musical instruments. Several examples of these unusual occurrences will be highlighted, and a case history of building construction-related corrosion of ancient bronzes while on display will be presented along with remedial measures taken to prevent future contamination of these objects.
sOMe UnUsUAl, HIDDen, sUrprIsInG, Or FOrGOTTen sOUrCes OF (pOssIBle) sUlFUr COnTAMInATIOn
In MUseUMs AnD HIsTOrIC sTrUCTUres
PAUL L. BENSON
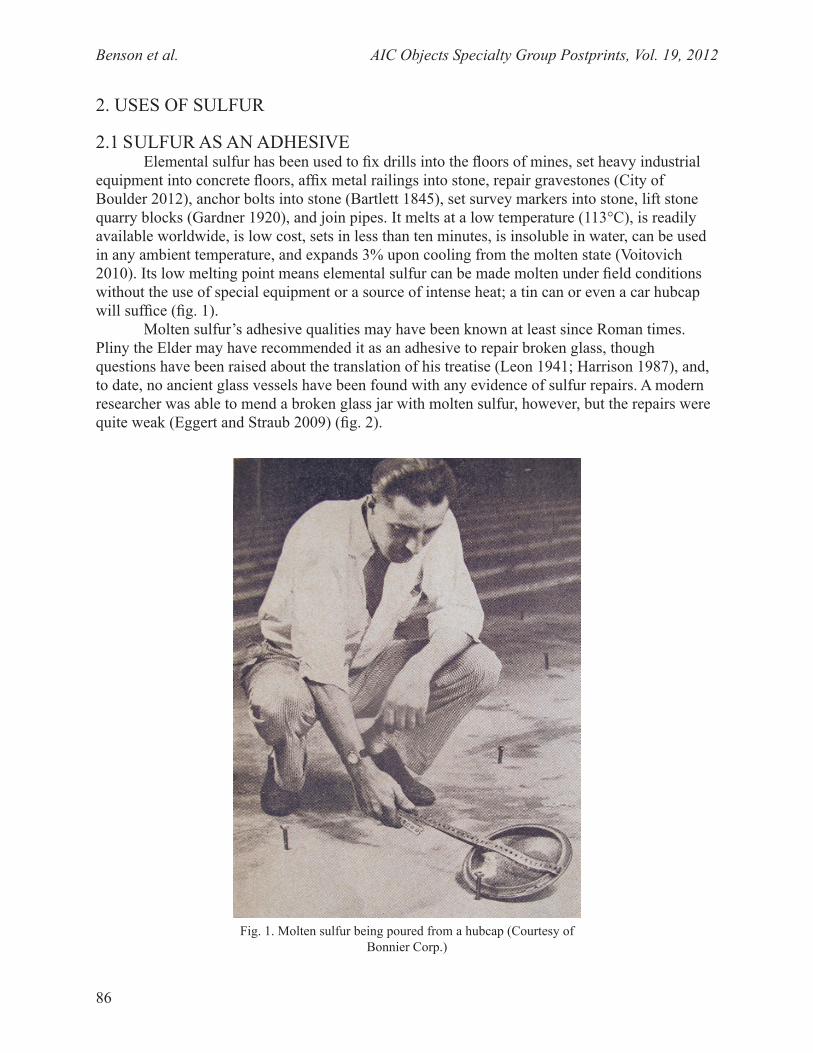
Benson et al. AIC Objects Specialty Group Postprints, Vol. 19, 2012
86
2. USES OF SULFUR
2.1 SULFUR AS AN ADHESIVEElemental sulfur has been used to fix drills into the floors of mines, set heavy industrial
equipment into concrete floors, affix metal railings into stone, repair gravestones (City of Boulder 2012), anchor bolts into stone (Bartlett 1845), set survey markers into stone, lift stone quarry blocks (Gardner 1920), and join pipes. It melts at a low temperature (113°C), is readily available worldwide, is low cost, sets in less than ten minutes, is insoluble in water, can be used in any ambient temperature, and expands 3% upon cooling from the molten state (Voitovich 2010). Its low melting point means elemental sulfur can be made molten under field conditions without the use of special equipment or a source of intense heat; a tin can or even a car hubcap will suffice (fig. 1).
Molten sulfur’s adhesive qualities may have been known at least since Roman times. Pliny the Elder may have recommended it as an adhesive to repair broken glass, though questions have been raised about the translation of his treatise (Leon 1941; Harrison 1987), and, to date, no ancient glass vessels have been found with any evidence of sulfur repairs. A modern researcher was able to mend a broken glass jar with molten sulfur, however, but the repairs were quite weak (Eggert and Straub 2009) (fig. 2).
Fig. 1. Molten sulfur being poured from a hubcap (Courtesy of Bonnier Corp.)
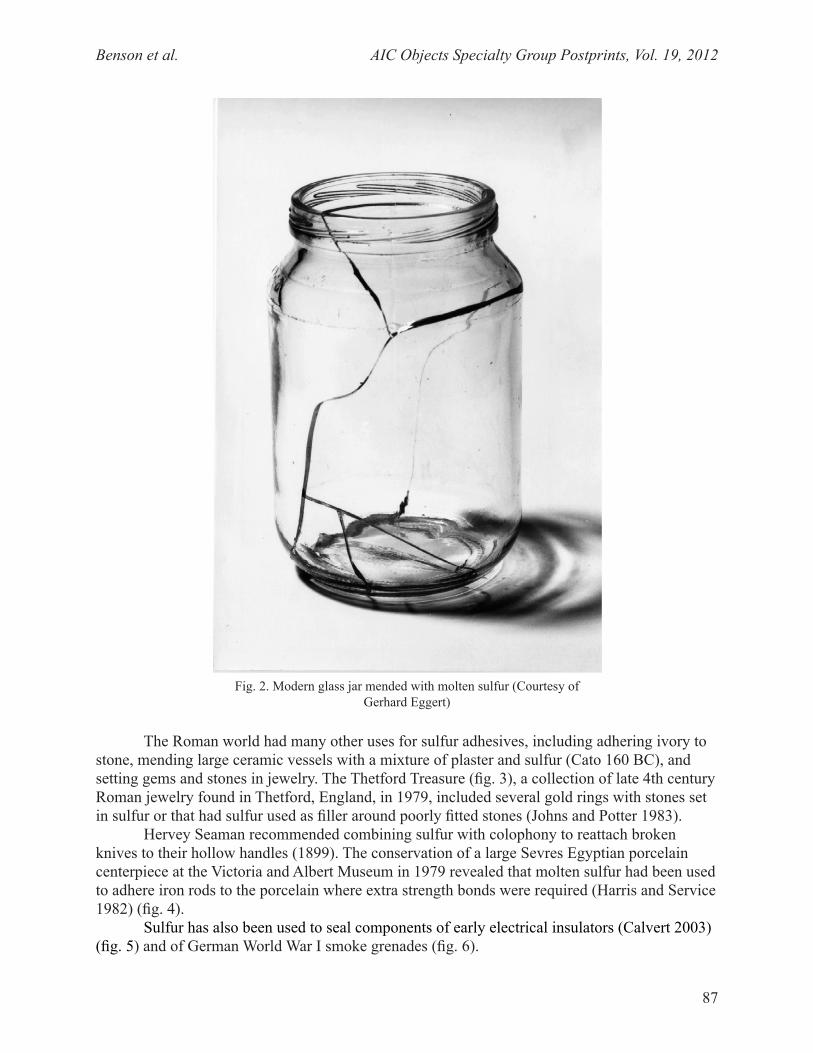
Benson et al. AIC Objects Specialty Group Postprints, Vol. 19, 2012
87
The Roman world had many other uses for sulfur adhesives, including adhering ivory to stone, mending large ceramic vessels with a mixture of plaster and sulfur (Cato 160 BC), and setting gems and stones in jewelry. The Thetford Treasure (fig. 3), a collection of late 4th century Roman jewelry found in Thetford, England, in 1979, included several gold rings with stones set in sulfur or that had sulfur used as filler around poorly fitted stones (Johns and Potter 1983).
Hervey Seaman recommended combining sulfur with colophony to reattach broken knives to their hollow handles (1899). The conservation of a large Sevres Egyptian porcelain centerpiece at the Victoria and Albert Museum in 1979 revealed that molten sulfur had been used to adhere iron rods to the porcelain where extra strength bonds were required (Harris and Service 1982) (fig. 4).
Sulfur has also been used to seal components of early electrical insulators (Calvert 2003) (fig. 5) and of German World War I smoke grenades (fig. 6).
Fig. 2. Modern glass jar mended with molten sulfur (Courtesy of Gerhard Eggert)
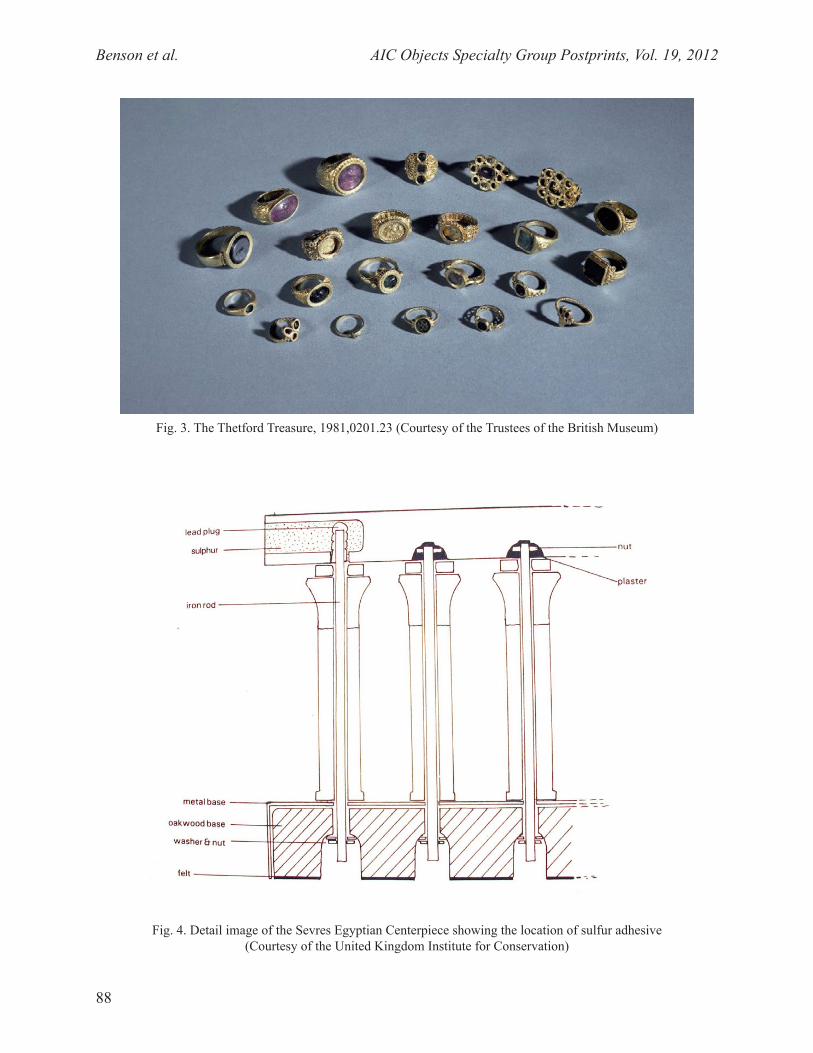
Benson et al. AIC Objects Specialty Group Postprints, Vol. 19, 2012
88
Fig. 3. The Thetford Treasure, 1981,0201.23 (Courtesy of the Trustees of the British Museum)
Fig. 4. Detail image of the Sevres Egyptian Centerpiece showing the location of sulfur adhesive (Courtesy of the United Kingdom Institute for Conservation)
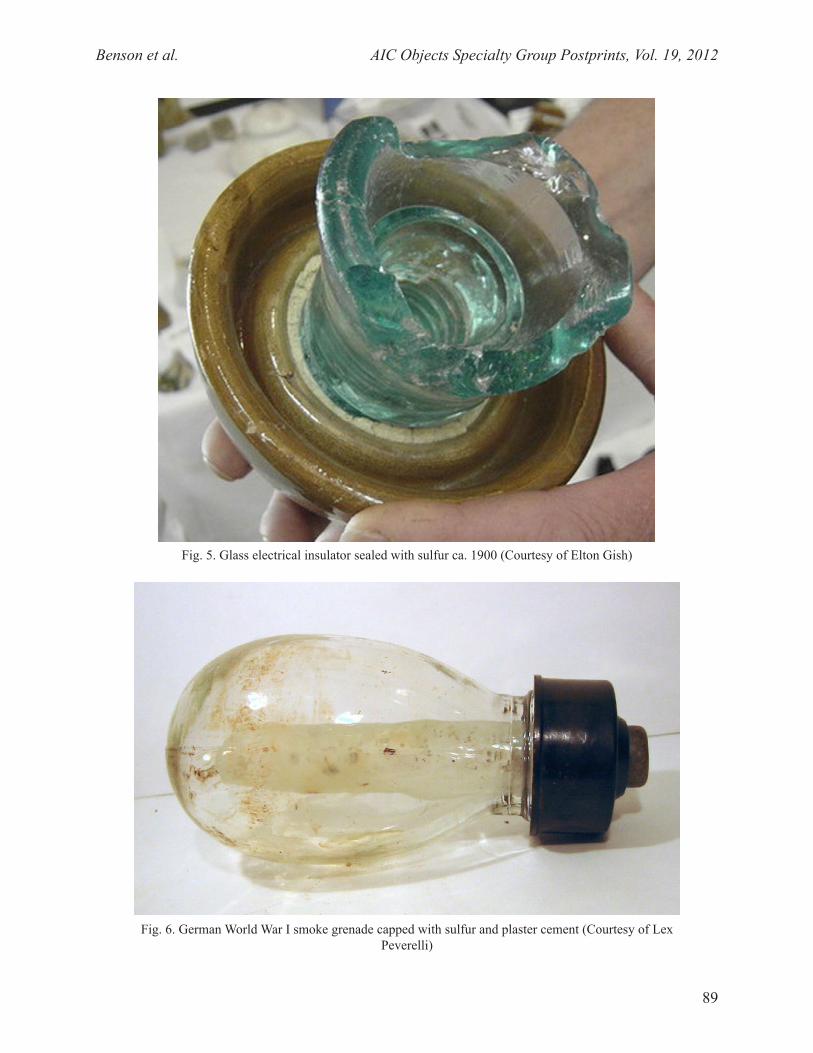
Benson et al. AIC Objects Specialty Group Postprints, Vol. 19, 2012
89
Fig. 5. Glass electrical insulator sealed with sulfur ca. 1900 (Courtesy of Elton Gish)
Fig. 6. German World War I smoke grenade capped with sulfur and plaster cement (Courtesy of Lex Peverelli)
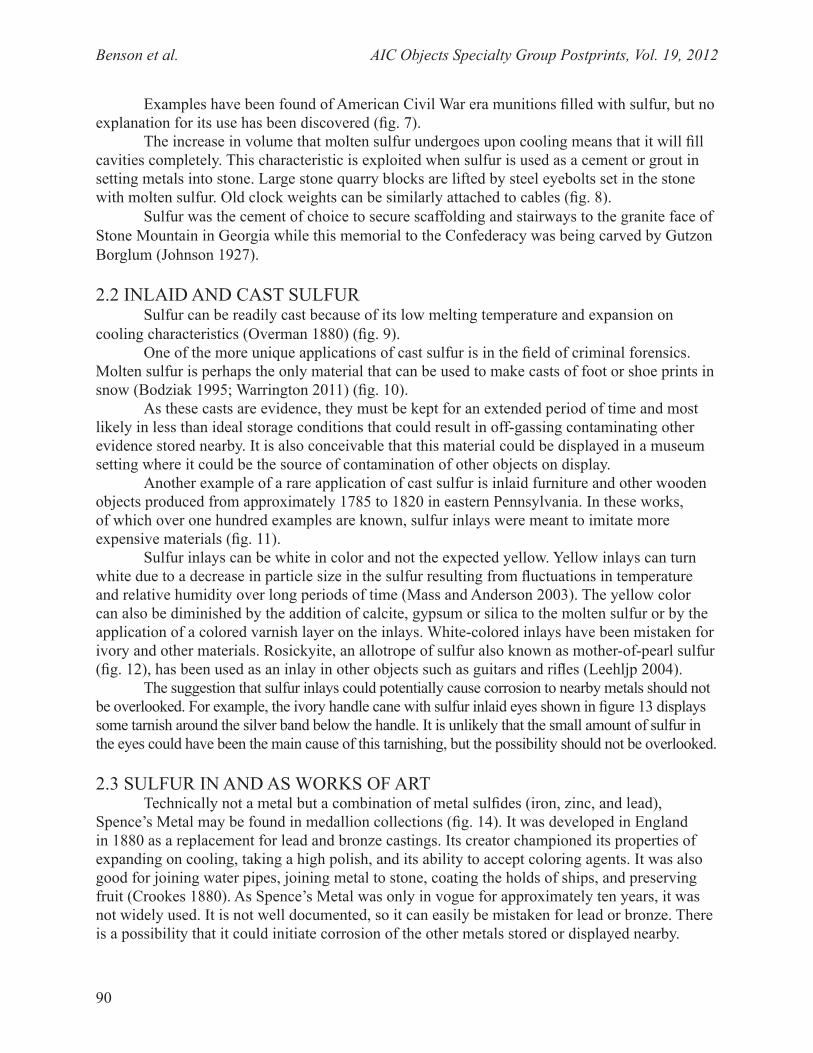
Benson et al. AIC Objects Specialty Group Postprints, Vol. 19, 2012
90
Examples have been found of American Civil War era munitions filled with sulfur, but no explanation for its use has been discovered (fig. 7).
The increase in volume that molten sulfur undergoes upon cooling means that it will fill cavities completely. This characteristic is exploited when sulfur is used as a cement or grout in setting metals into stone. Large stone quarry blocks are lifted by steel eyebolts set in the stone with molten sulfur. Old clock weights can be similarly attached to cables (fig. 8).
Sulfur was the cement of choice to secure scaffolding and stairways to the granite face of Stone Mountain in Georgia while this memorial to the Confederacy was being carved by Gutzon Borglum (Johnson 1927).
2.2 INLAID AND CAST SULFURSulfur can be readily cast because of its low melting temperature and expansion on
cooling characteristics (Overman 1880) (fig. 9). One of the more unique applications of cast sulfur is in the field of criminal forensics.
Molten sulfur is perhaps the only material that can be used to make casts of foot or shoe prints in snow (Bodziak 1995; Warrington 2011) (fig. 10).
As these casts are evidence, they must be kept for an extended period of time and most likely in less than ideal storage conditions that could result in off-gassing contaminating other evidence stored nearby. It is also conceivable that this material could be displayed in a museum setting where it could be the source of contamination of other objects on display.
Another example of a rare application of cast sulfur is inlaid furniture and other wooden objects produced from approximately 1785 to 1820 in eastern Pennsylvania. In these works, of which over one hundred examples are known, sulfur inlays were meant to imitate more expensive materials (fig. 11).
Sulfur inlays can be white in color and not the expected yellow. Yellow inlays can turn white due to a decrease in particle size in the sulfur resulting from fluctuations in temperature and relative humidity over long periods of time (Mass and Anderson 2003). The yellow color can also be diminished by the addition of calcite, gypsum or silica to the molten sulfur or by the application of a colored varnish layer on the inlays. White-colored inlays have been mistaken for ivory and other materials. Rosickyite, an allotrope of sulfur also known as mother-of-pearl sulfur (fig. 12), has been used as an inlay in other objects such as guitars and rifles (Leehljp 2004).
The suggestion that sulfur inlays could potentially cause corrosion to nearby metals should not be overlooked. For example, the ivory handle cane with sulfur inlaid eyes shown in figure 13 displays some tarnish around the silver band below the handle. It is unlikely that the small amount of sulfur in the eyes could have been the main cause of this tarnishing, but the possibility should not be overlooked.
2.3 SULFUR IN AND AS WORKS OF ARTTechnically not a metal but a combination of metal sulfides (iron, zinc, and lead),
Spence’s Metal may be found in medallion collections (fig. 14). It was developed in England in 1880 as a replacement for lead and bronze castings. Its creator championed its properties of expanding on cooling, taking a high polish, and its ability to accept coloring agents. It was also good for joining water pipes, joining metal to stone, coating the holds of ships, and preserving fruit (Crookes 1880). As Spence’s Metal was only in vogue for approximately ten years, it was not widely used. It is not well documented, so it can easily be mistaken for lead or bronze. There is a possibility that it could initiate corrosion of the other metals stored or displayed nearby.
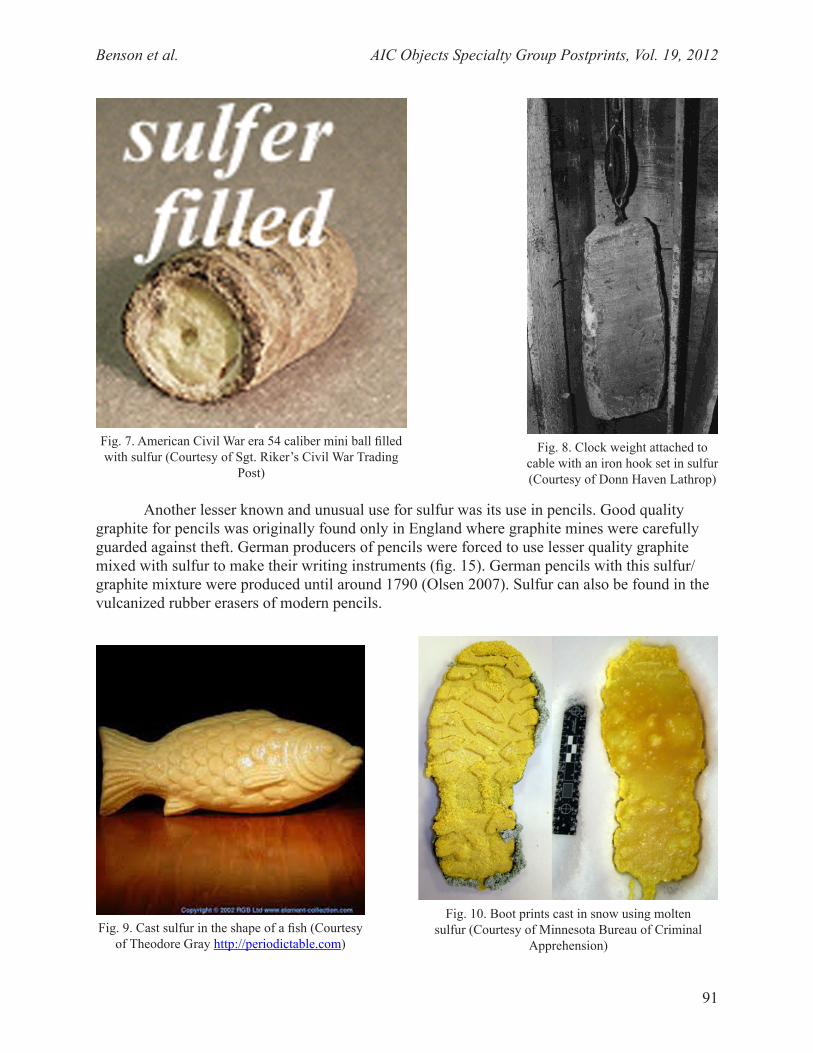
Benson et al. AIC Objects Specialty Group Postprints, Vol. 19, 2012
91
Fig. 8. Clock weight attached to cable with an iron hook set in sulfur (Courtesy of Donn Haven Lathrop)
Fig. 9. Cast sulfur in the shape of a fish (Courtesy of Theodore Gray http://periodictable.com)
Fig. 10. Boot prints cast in snow using molten sulfur (Courtesy of Minnesota Bureau of Criminal
Apprehension)
Fig. 7. American Civil War era 54 caliber mini ball filled with sulfur (Courtesy of Sgt. Riker’s Civil War Trading
Post)
Another lesser known and unusual use for sulfur was its use in pencils. Good quality graphite for pencils was originally found only in England where graphite mines were carefully guarded against theft. German producers of pencils were forced to use lesser quality graphite mixed with sulfur to make their writing instruments (fig. 15). German pencils with this sulfur/graphite mixture were produced until around 1790 (Olsen 2007). Sulfur can also be found in the vulcanized rubber erasers of modern pencils.

Benson et al. AIC Objects Specialty Group Postprints, Vol. 19, 2012
92
Fig. 11. Wardrobe with sulfur inlays attributed to Peter Holl and Christian Huber, Lancaster County, Pennsylvania, 1779, now at
the Philadelphia Museum of Art (Courtesy of Bonnier Corp.)
Fig. 12. The mineral rosickyite, an allotrope of sulfur, also known as mother-of-pearl sulfur (Courtesy of Stefano Broetto)

Benson et al. AIC Objects Specialty Group Postprints, Vol. 19, 2012
93
Fig. 13. Ivory handle cane with sulfur-inlaid eyes; note the tarnished silver band. (Courtesy of Paul Benson)
Fig. 14. Prince Louis Napoleon medal made from Spence’s Metal, ca. 1880 (Courtesy of Philip Mernick)
Ebonite is a form of rubber that was first made in 1839 and contains approximately 30-40% sulfur. It can be shaped into just about any form from bowling balls to buttons (fig. 16).
Ebonite buttons can be found on military uniforms where it may be misidentified as a type of plastic. Black-colored casters on furniture may also be ebonite. Exposure to high levels of heat, light, and humidity will cause the sulfur to migrate out of the rubber.
As noted above, sulfur has been used as a strengthening material inside hollow gold jewelry (Hockey 1989). It may have also functioned as a support for repoussé work (fig. 17) or used as a ‘chasers pitch’ (Eggert 1999b). Molten sulfur would have been poured into the hollow area of the jewelry and then rapidly cooled, forming into a rubbery state that would offer sufficient resistance for working the metal and, upon further cooling, would harden and support the hollowware. This technique appears to have been used by goldsmiths from Hellenistic through Roman and Byzantine times (Ogden 1982; Dandridge 2000).

Benson et al. AIC Objects Specialty Group Postprints, Vol. 19, 2012
94
Fig. 15. The oldest known pencil with graphite mixed with sulfur (Cour-tesy of Faber-Castell)
Fig. 16. Clarinet made of Ebonite (Courtesy of Cecilio Musical Instruments)
Fig. 17. Early Byzantine (sixth or seventh century) gold Torc, registration number 1984,0502.1, from the area of the southeastern Mediterranean
(Courtesy of the Trustees of the British Museum)
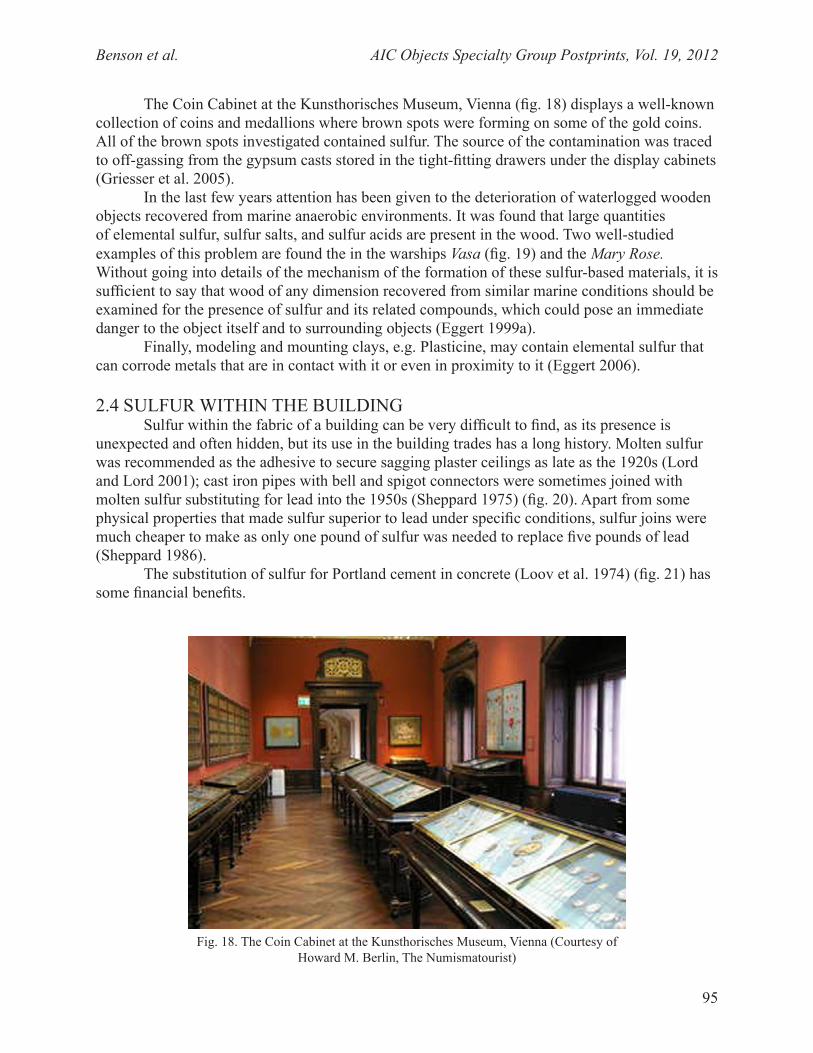
Benson et al. AIC Objects Specialty Group Postprints, Vol. 19, 2012
95
The Coin Cabinet at the Kunsthorisches Museum, Vienna (fig. 18) displays a well-known collection of coins and medallions where brown spots were forming on some of the gold coins. All of the brown spots investigated contained sulfur. The source of the contamination was traced to off-gassing from the gypsum casts stored in the tight-fitting drawers under the display cabinets (Griesser et al. 2005).
In the last few years attention has been given to the deterioration of waterlogged wooden objects recovered from marine anaerobic environments. It was found that large quantities of elemental sulfur, sulfur salts, and sulfur acids are present in the wood. Two well-studied examples of this problem are found the in the warships Vasa (fig. 19) and the Mary Rose. Without going into details of the mechanism of the formation of these sulfur-based materials, it is sufficient to say that wood of any dimension recovered from similar marine conditions should be examined for the presence of sulfur and its related compounds, which could pose an immediate danger to the object itself and to surrounding objects (Eggert 1999a).
Finally, modeling and mounting clays, e.g. Plasticine, may contain elemental sulfur that can corrode metals that are in contact with it or even in proximity to it (Eggert 2006).
2.4 SULFUR WITHIN THE BUILDINGSulfur within the fabric of a building can be very difficult to find, as its presence is
unexpected and often hidden, but its use in the building trades has a long history. Molten sulfur was recommended as the adhesive to secure sagging plaster ceilings as late as the 1920s (Lord and Lord 2001); cast iron pipes with bell and spigot connectors were sometimes joined with molten sulfur substituting for lead into the 1950s (Sheppard 1975) (fig. 20). Apart from some physical properties that made sulfur superior to lead under specific conditions, sulfur joins were much cheaper to make as only one pound of sulfur was needed to replace five pounds of lead (Sheppard 1986).
The substitution of sulfur for Portland cement in concrete (Loov et al. 1974) (fig. 21) has some financial benefits.
Fig. 18. The Coin Cabinet at the Kunsthorisches Museum, Vienna (Courtesy of Howard M. Berlin, The Numismatourist)

Benson et al. AIC Objects Specialty Group Postprints, Vol. 19, 2012
96
Fig. 19. The warship Vasa in Stockholm (Courtesy of Herve Sasso)
Fig. 20. Cast iron pipe being joined with molten sulfur (Courtesy of Royal Dutch Shell)
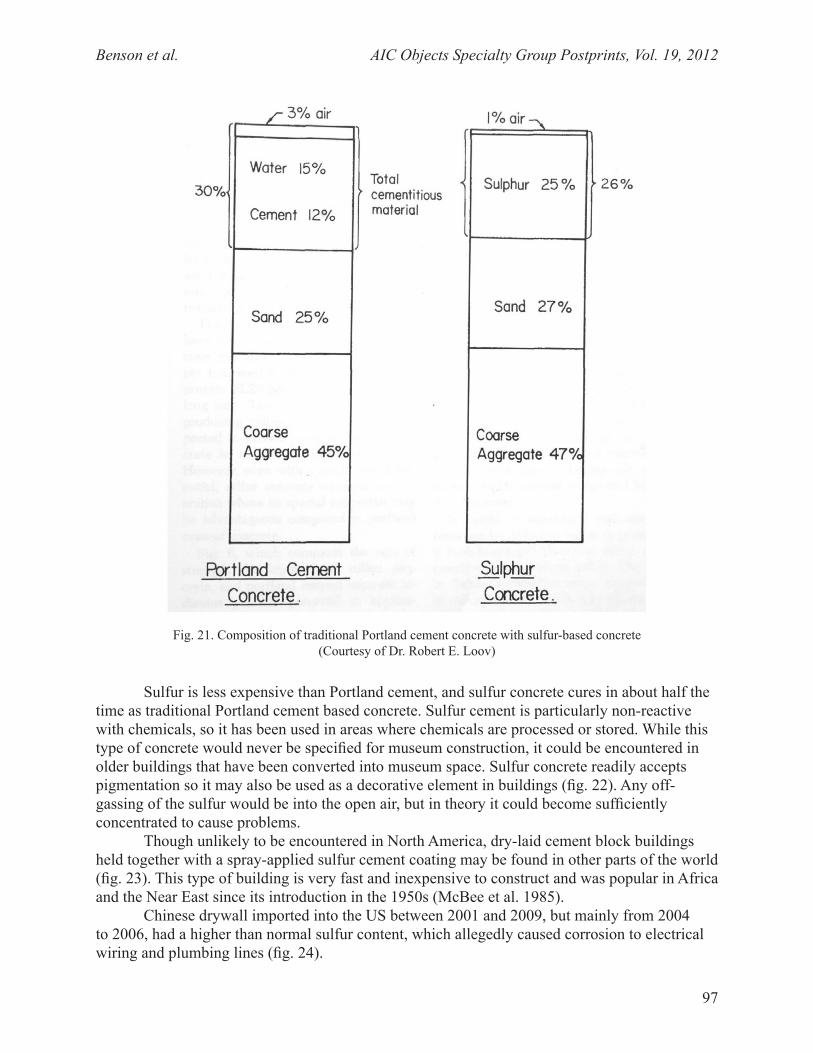
Benson et al. AIC Objects Specialty Group Postprints, Vol. 19, 2012
97
Sulfur is less expensive than Portland cement, and sulfur concrete cures in about half the time as traditional Portland cement based concrete. Sulfur cement is particularly non-reactive with chemicals, so it has been used in areas where chemicals are processed or stored. While this type of concrete would never be specified for museum construction, it could be encountered in older buildings that have been converted into museum space. Sulfur concrete readily accepts pigmentation so it may also be used as a decorative element in buildings (fig. 22). Any off-gassing of the sulfur would be into the open air, but in theory it could become sufficiently concentrated to cause problems.
Though unlikely to be encountered in North America, dry-laid cement block buildings held together with a spray-applied sulfur cement coating may be found in other parts of the world (fig. 23). This type of building is very fast and inexpensive to construct and was popular in Africa and the Near East since its introduction in the 1950s (McBee et al. 1985).
Chinese drywall imported into the US between 2001 and 2009, but mainly from 2004 to 2006, had a higher than normal sulfur content, which allegedly caused corrosion to electrical wiring and plumbing lines (fig. 24).
Fig. 21. Composition of traditional Portland cement concrete with sulfur-based concrete (Courtesy of Dr. Robert E. Loov)
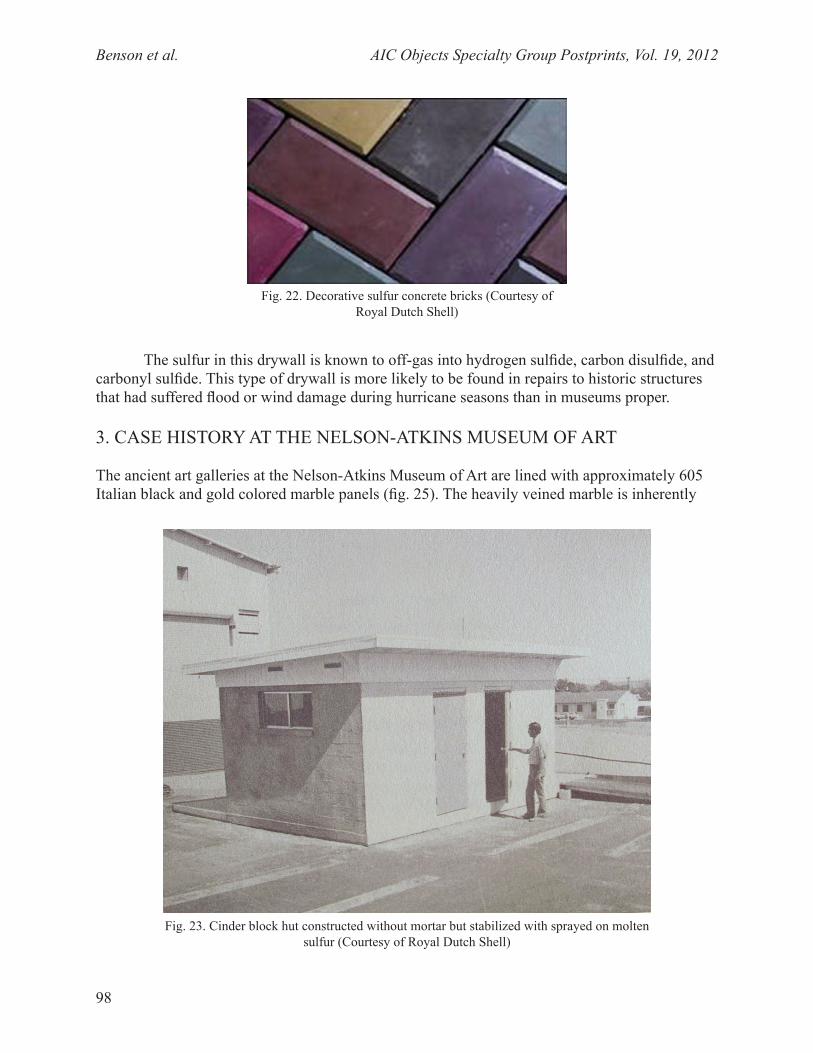
Benson et al. AIC Objects Specialty Group Postprints, Vol. 19, 2012
98
Fig. 22. Decorative sulfur concrete bricks (Courtesy of Royal Dutch Shell)
Fig. 23. Cinder block hut constructed without mortar but stabilized with sprayed on molten sulfur (Courtesy of Royal Dutch Shell)
The sulfur in this drywall is known to off-gas into hydrogen sulfide, carbon disulfide, and carbonyl sulfide. This type of drywall is more likely to be found in repairs to historic structures that had suffered flood or wind damage during hurricane seasons than in museums proper.
3. CASE HISTORY AT THE NELSON-ATKINS MUSEUM OF ART
The ancient art galleries at the Nelson-Atkins Museum of Art are lined with approximately 605 Italian black and gold colored marble panels (fig. 25). The heavily veined marble is inherently

Benson et al. AIC Objects Specialty Group Postprints, Vol. 19, 2012
99
weak. Construction contracts from 1932 specify that these panels were to be reinforced on the back with pieces of either slate or sound marble. For some unexplained reason, the reinforcement was done differently.
The ancient galleries have several built-in wall cases that are lined with either travertine, as shown or with black colored marble (fig. 26).
The travertine is exceptionally porous, allowing air inside the cases to fully exchange with air from behind the false gallery walls. The example shown here is a typical case displaying two ancient bronze sculptures (fig. 26). The small Kneeling Satyr on the left will serve as an example for the deterioration occurring inside these cases.
In figure 27, the figure displays the overall condition of the bronze after only a few months in the closed display case. Figures 28a and 28b are detail images of the corrosion on the Kneeling Satyr.
Analysis revealed that the corrosion products were sulfides. Not all of the bronzes in the cases were affected to this extent. It appeared that there was a source of sulfur contamination in these galleries, but after extensive investigations over several years the source could not be positively identified. Ten years after this problem was recognized, the galleries were reorganized. One of the marble wall panels was removed in a test to see if it was possible to remove the panels without damaging them. It was then that the source of the sulfur contamination was discovered. It was found that the stonemasons who constructed the galleries did not reinforce the panels as the contract called for; rather, they used a technique known as ‘rodding’.
Fig. 24. Corrosion on copper pipe caused by off-gassing of sulfur in Chinese produced drywall (Courtesy of Real Estate Inspectors Inc.)
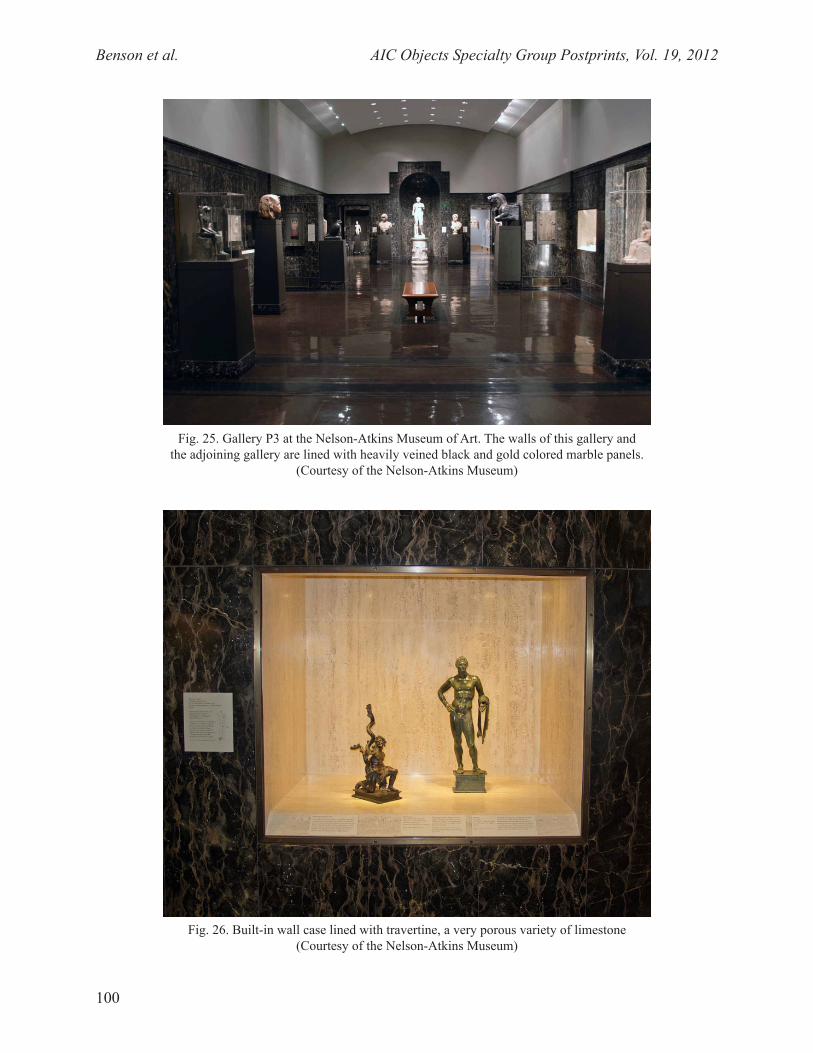
Benson et al. AIC Objects Specialty Group Postprints, Vol. 19, 2012
100
Fig. 25. Gallery P3 at the Nelson-Atkins Museum of Art. The walls of this gallery and the adjoining gallery are lined with heavily veined black and gold colored marble panels.
(Courtesy of the Nelson-Atkins Museum)
Fig. 26. Built-in wall case lined with travertine, a very porous variety of limestone (Courtesy of the Nelson-Atkins Museum)
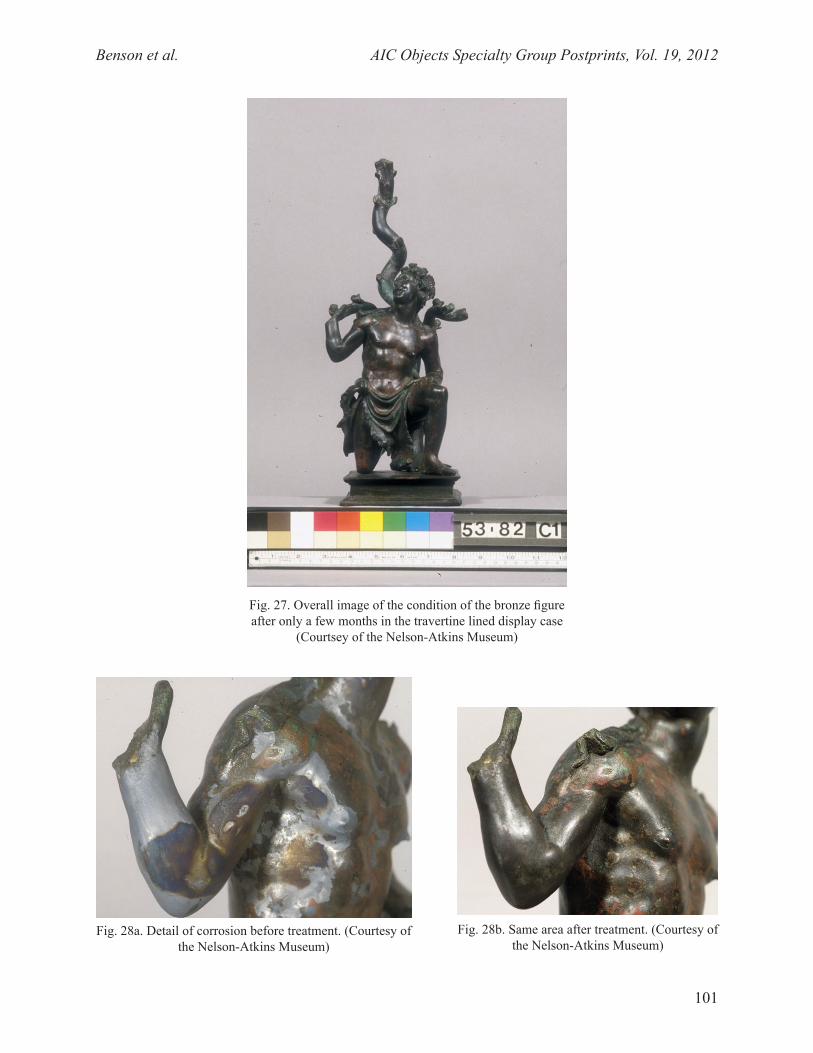
Benson et al. AIC Objects Specialty Group Postprints, Vol. 19, 2012
101
Fig. 27. Overall image of the condition of the bronze figure after only a few months in the travertine lined display case
(Courtsey of the Nelson-Atkins Museum)
Fig. 28a. Detail of corrosion before treatment. (Courtesy of the Nelson-Atkins Museum)
Fig. 28b. Same area after treatment. (Courtesy of the Nelson-Atkins Museum)
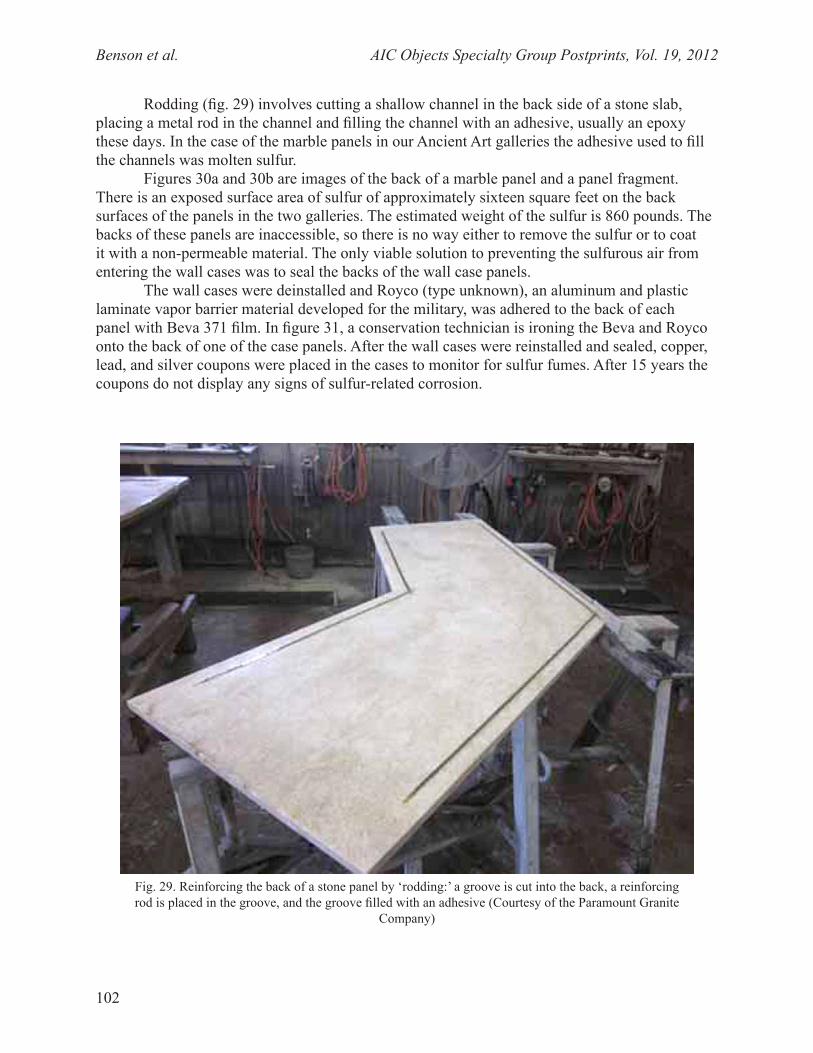
Benson et al. AIC Objects Specialty Group Postprints, Vol. 19, 2012
102
Rodding (fig. 29) involves cutting a shallow channel in the back side of a stone slab, placing a metal rod in the channel and filling the channel with an adhesive, usually an epoxy these days. In the case of the marble panels in our Ancient Art galleries the adhesive used to fill the channels was molten sulfur.
Figures 30a and 30b are images of the back of a marble panel and a panel fragment. There is an exposed surface area of sulfur of approximately sixteen square feet on the back surfaces of the panels in the two galleries. The estimated weight of the sulfur is 860 pounds. The backs of these panels are inaccessible, so there is no way either to remove the sulfur or to coat it with a non-permeable material. The only viable solution to preventing the sulfurous air from entering the wall cases was to seal the backs of the wall case panels.
The wall cases were deinstalled and Royco (type unknown), an aluminum and plastic laminate vapor barrier material developed for the military, was adhered to the back of each panel with Beva 371 film. In figure 31, a conservation technician is ironing the Beva and Royco onto the back of one of the case panels. After the wall cases were reinstalled and sealed, copper, lead, and silver coupons were placed in the cases to monitor for sulfur fumes. After 15 years the coupons do not display any signs of sulfur-related corrosion.
Fig. 29. Reinforcing the back of a stone panel by ‘rodding:’ a groove is cut into the back, a reinforcing rod is placed in the groove, and the groove filled with an adhesive (Courtesy of the Paramount Granite
Company)
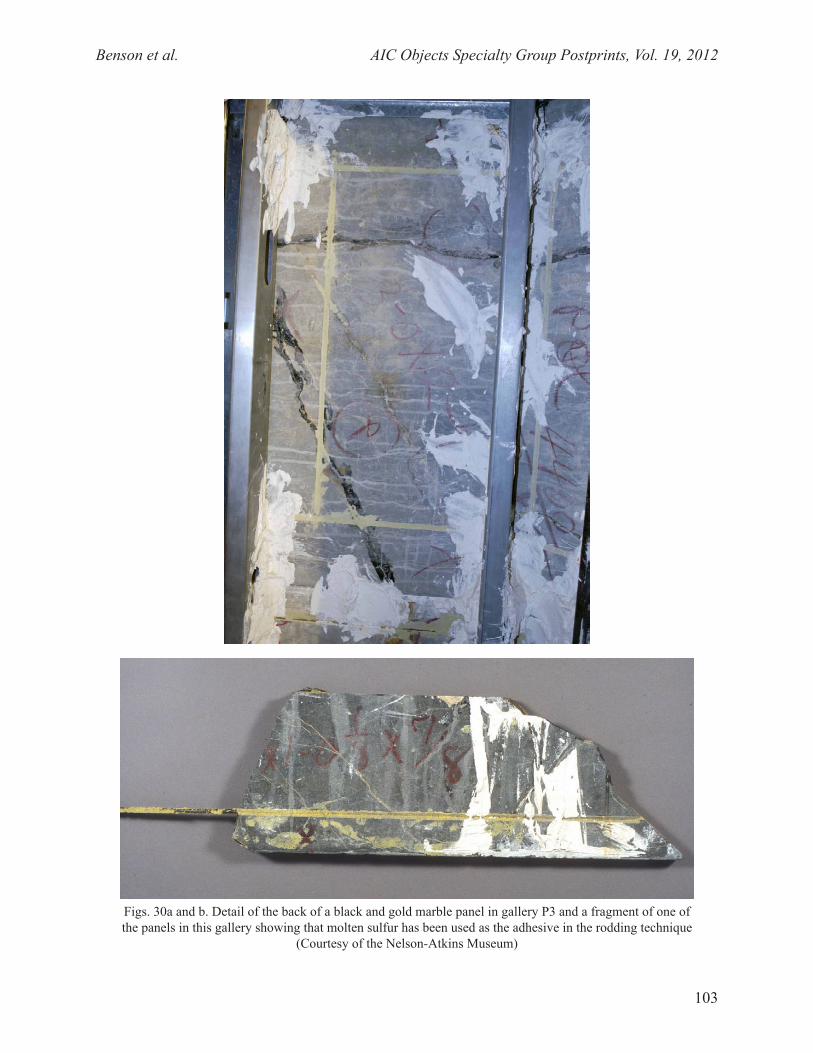
Benson et al. AIC Objects Specialty Group Postprints, Vol. 19, 2012
103
Figs. 30a and b. Detail of the back of a black and gold marble panel in gallery P3 and a fragment of one of the panels in this gallery showing that molten sulfur has been used as the adhesive in the rodding technique
(Courtesy of the Nelson-Atkins Museum)
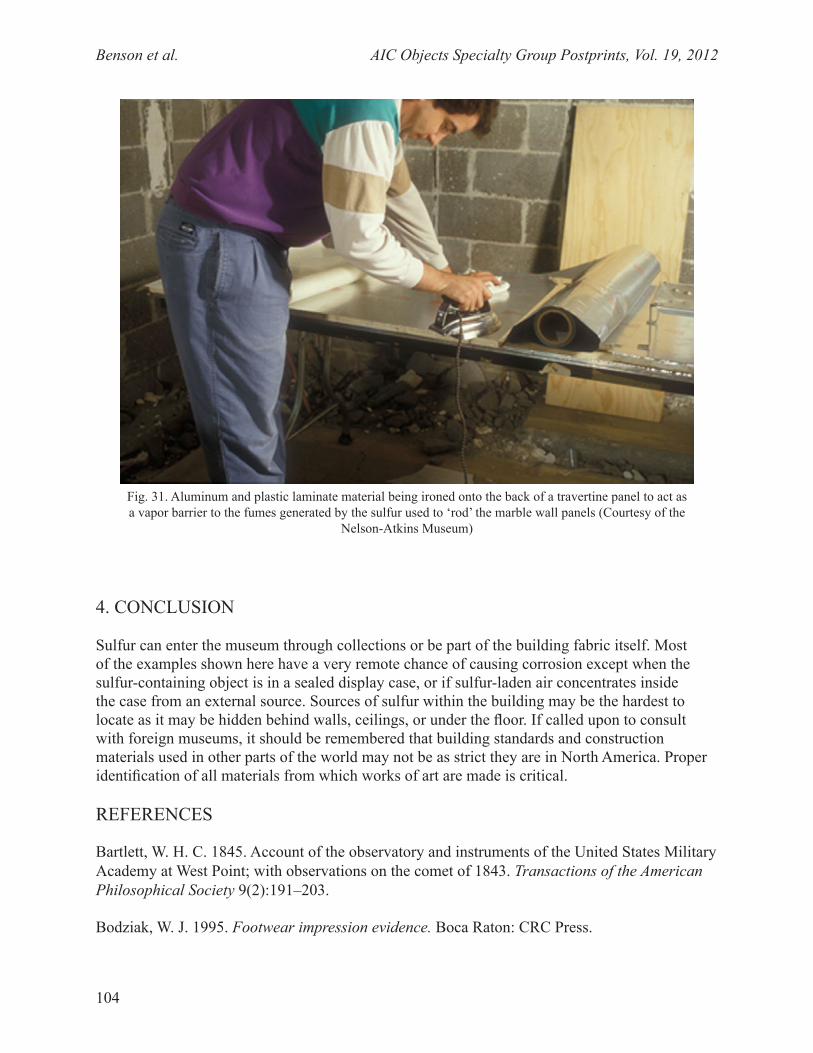
Benson et al. AIC Objects Specialty Group Postprints, Vol. 19, 2012
104
4. CONCLUSION
Sulfur can enter the museum through collections or be part of the building fabric itself. Most of the examples shown here have a very remote chance of causing corrosion except when the sulfur-containing object is in a sealed display case, or if sulfur-laden air concentrates inside the case from an external source. Sources of sulfur within the building may be the hardest to locate as it may be hidden behind walls, ceilings, or under the floor. If called upon to consult with foreign museums, it should be remembered that building standards and construction materials used in other parts of the world may not be as strict they are in North America. Proper identification of all materials from which works of art are made is critical.
REFERENCES
Bartlett, W. H. C. 1845. Account of the observatory and instruments of the United States Military Academy at West Point; with observations on the comet of 1843. Transactions of the American Philosophical Society 9(2):191–203.
Bodziak, W. J. 1995. Footwear impression evidence. Boca Raton: CRC Press.
Fig. 31. Aluminum and plastic laminate material being ironed onto the back of a travertine panel to act as a vapor barrier to the fumes generated by the sulfur used to ‘rod’ the marble wall panels (Courtesy of the
Nelson-Atkins Museum)
Benson et al. AIC Objects Specialty Group Postprints, Vol. 19, 2012
105
Brimblecombe, P., D. Shooter, and A. Kaur. 1992. Wool and reduced sulphur gases in museum air. Studies in Conservation 37(1):53–60.
Calvert, J. B. 2003. Sulfur. https://mysite.du.edu/~jcalvert/phys/sulphur.htm (accessed 1/9/14)
Cato the Elder, 160 BC, De agricultura, 39. 1-2. in Dalby, A. 1998. Cato: On Farming. Totnes: Prospect Books.
City of Boulder. 2012. Columbia cemetery: formerly a disgrace to Boulder. https://bouldercolorado.gov/pages/columbia-cemetery-conservation (accessed 1/9/14).
Crookes, Sir W. (ed.). 1880. Chemical news and journal of industrial science, vol. 61 (1049): 87–91.
Dandridge, P. 2000. Idiomatic and mainstream: the technical vocabulary of a late Roma fibula. Metropolitan Museum Journal 35:71–86.
Eggert, G. 1999a. Black spots on bronzes and elemental sulfur. ICOM Committee on Conservation preprints. 12th Triennial Meeting, Lyon. London: James and James. 2:823–827.
Eggert, G. 1999b. The use of sulfur in hollow ancient gold objects. Journal of Archaeological Science 26(8):1089–1092.
Eggert, G. 2006. Plastiline: another unsuspected danger in display causing black spots on bronzes. Beiträge zur Erhaltung von Kunstund Kulturgut 2:112–116.
Eggert, G., and D. S. Straub. 2009. Ancient glass gluing recipes. In Holding it together: ancient and modern approaches to joining, repair and consolidation, eds. Janet Ambers et al. London: Archetype Publications Ltd. 3–7.
Gardner, H. F. 1920. The calcite cave in the New York State Museum. American Mineralogist 5(1):3–5.
Griesser, M., R. Traum, K. E. Mayerhofer, K. Piplits, R. Denk, and H. Winter. 2005. Brown spot corrosion on historic gold coins and medals. Surface Engineering 21(5–6):385–392.
Harris, R., and S. Service. 1982. The conservation of the centerpiece of the Sevres Egyptian table service. The Conservator 6:37–44.
Harrison, G. W. M. 1987. Martial 1.41: Sulfur and glass. Classical Quarterly 37(1):203–207.
Hockey, M. 1989. The composition and structure of a byzantine torc. Jewellery Studies 3:33–39.
Johns, C., and T. Potter, 1983. The Thetford treasure. London: British Museum Publications Limited.
Benson et al. AIC Objects Specialty Group Postprints, Vol. 19, 2012
106
Johnson, G. W. 1927. The undefeated. New York: Balch and Company.
Leehljp. 2004. www.bt3central.com/showthread.php?t=2386 (accessed 10/9/07).
Leon, H. J. 1941. Sulphur for broken glass. Transactions and proceedings of the American philological association 72:233–236.
Loov, R. E., A. H. Vroom, and M. A. Ward. 1974. Sulfur concrete- a new construction material. PCI Journal 5(1):86–95.
Lord, P., and N. Lord. 2001. How to fix plaster ceilings. www.oldhouseonline.com/how-to- fix-plaster-ceilings/ (accessed 03/06/12).
Mass, J. L., and M. J. Anderson. 2003. Pennsylvania German sulfur-inlaid furniture: characterization, reproduction, and ageing phenomena of the inlays. Measurement Science and Technology 14:1598–1607.
McBee, W. C., T. A. Sullivan and H. L. File, 1985. Sulfur construction material. Bulletin 678, US Department of the Interior.
Oddy, W. A., and N. D. Meeks, 1982. Unusual phenomena in the corrosion of ancient bronze. In Science and Technology in the Service of Conservation. eds. N. S. Brommelle and Gerry Thomson. London: International Institute for Conservation of Historic and Artistic Works. 119–124.
Ogden, J. 1982. Jewelry of the ancient world. New York: Rizzoli International Publications Inc.
Olsen, T. A. 2007. Pencils. http://knowledgehouse.info/njfkpencils.html (accessed 10/9/07).
Overman, F. O. 1880. The moulder’s and founder’s pocket guide. Philadelphia: Henry Carey Baird & Co.
Padfield, T., D. Erhardt, and W. Hopwood. 1982. Trouble in store. In Science and technology in the service of conservation, eds. N.S. Brommelle and Garry Thomson. London: International Institute for Conservation of Historic and Artistic Works. 24–27.
Seaman, H. J. 1899. The expert cleaner. New York and London: Funk and Wagnalls.
Sheppard, Jr., W. L. 1975. Sulfur mortars: a historical survey. Sulfur Institute Journal 11(3/4):15–17.
Sheppard, Jr., W. L., 1986. Corrosion and chemical resistant masonry materials handbook. Park Ridge, New Jersey: Noyes Publications.
Voitovich, V. A. 2010, Adhesives and sealants based on sulfur. Polymer Science, Series D. Glues and Sealing Materials 3(2):133–136.
Benson et al. AIC Objects Specialty Group Postprints, Vol. 19, 2012
107
Warrington, R. 2011. Casting in snow with sulfur. www.csigixmos.com/products/toolimpressionmaterial/sulfur.html (accessed 08/31/11).
SOURCES OF MATERIALS
Royco Barrier FilmRoyco Packaging, Inc.3979 Mann RoadHuntingdon Valley, PA 19006(215) 322-8082www.roycopackaging.com
Beva 371 filmConservation Resources International, LLC5532 Port Royal Road Springfield, VA 22151(800) 634-6932www.conservationresources.com
PAUL L. BENSON is a conservator of objects at the Nelson-Atkins Museum of Art. Prior to joining the Nelson-Atkins in 1992, he spent a year as a Mellon Fellow at the Saint Louis Art Museum. He received a BSc in Archaeological Conservation and Material Science from the Institute of Archaeology, University of London in 1991. Before joining the art conservation profession he was a field supervisor for data acquisition with Western Geophysical Company of America working in South America and the South Pacific. He graduated from Kent State University with a BS in geology in 1972. Address: Nelson-Atkins Museum of Art, 4525 Oak St., Kansas City, MO 64111. E-mail: [email protected]
This article was presented at the Objects Specialty Group or in the joint Research and Technical Studies/OSG Sessions at the 2012 AIC Annual Meeting in Albuquerque. The papers presented in this publication have been edited for clarity and content but have not undergone a formal process of peer review.

AIC Objects Specialty Group Postprints, Vol. 19, 2012 109
1. INTRODUCTION
A 19th century Mi’kmaq birchbark box decorated with porcupine quillwork on its lid and spruce root whip-stitched on its walls was treated at the Canadian Conservation Institute (fig. 1a). This paper discusses the box’s treatment, in particular the various analyses carried out, the stabilization treatment of the spruce root, and the cleaning and reshaping of the birchbark quill-worked cover.
2. DESCRIPTION
Owned by the McCord Museum in Montreal, the cylindrical box is made as an assembly of three birchbark outer rings, lashed to an inner birchbark cylinder, and pegged to a circular wooden board base. A fourth, mobile birchbark ring at the top of the stack is in fact the rim of the lid. Two of the birchbark rings are decorated with closely wrapped (whip-stitched) spruce root and with porcupine quill chevron decorations, while the bottom ring, and the third-ring-up-from-bottom, are decorated with black-dyed spruce root wrappings and quilled chevrons. The lid cover consists of a two layers of birchbark fixed together at cross-grain, decorated with porcupine quillwork. The brown-black spruce root wrappings were extensively deteriorated: they were almost totally missing, with only a few elements left on the two rings. These remaining strands of black spruce root were brittle, often split or precariously attached.
The lid cover, densely decorated with porcupine quillwork, was completely detached from its rim (the fourth, top ring). The cover was deformed, curving upwards approximately 2 cm high, and the deformation was such that it prevented it from fitting into the rim opening. It also had a small area of loss, and was quite dirty.
ABSTRACT
A 19th century Mi’kmaq birchbark box decorated with porcupine quills and spruce root from the McCord Museum in Montreal was treated at the Canadian Conservation Institute. The box’s black spruce root was brittle and showed extensive losses, and the quilled birchbark lid cover was detached and curved. Dyes and mordants were analyzed: for the black spruce root, iron was confirmed using bathophenanthroline test strips as well as by atomic absorption spectroscopy. Iron and other metal ions are known to catalyze the oxidative degradation of cellulose. The birchbark lid cover required flattening while avoiding any compression of the quillwork decoration. This was accomplished by exposure to methanol vapors, followed by vacuum restraint pressure. The iron-dyed spruce root was chemically stabilized by applying calcium phytate / calcium carbonate solutions by brush. Problems included the swelling of the root during treatment due to absorption of water, and the migration of iron ions causing staining. The spruce root was physically repaired using toned Japanese paper facings or backings and Lascaux 498 HV acrylic dispersion. The quills’ fading rates were measured using the micro-fading technique in order to provide specific display lighting recommendations.
the treatment oF a mi’KmaQ Box made oF BIrCHBArK, pOrCUpIne QUIlls, AnD IrOn-DYeD
sprUCe rOOT
CAROLE DIGNARD, AMANDA SALMON AND SEASON TSE
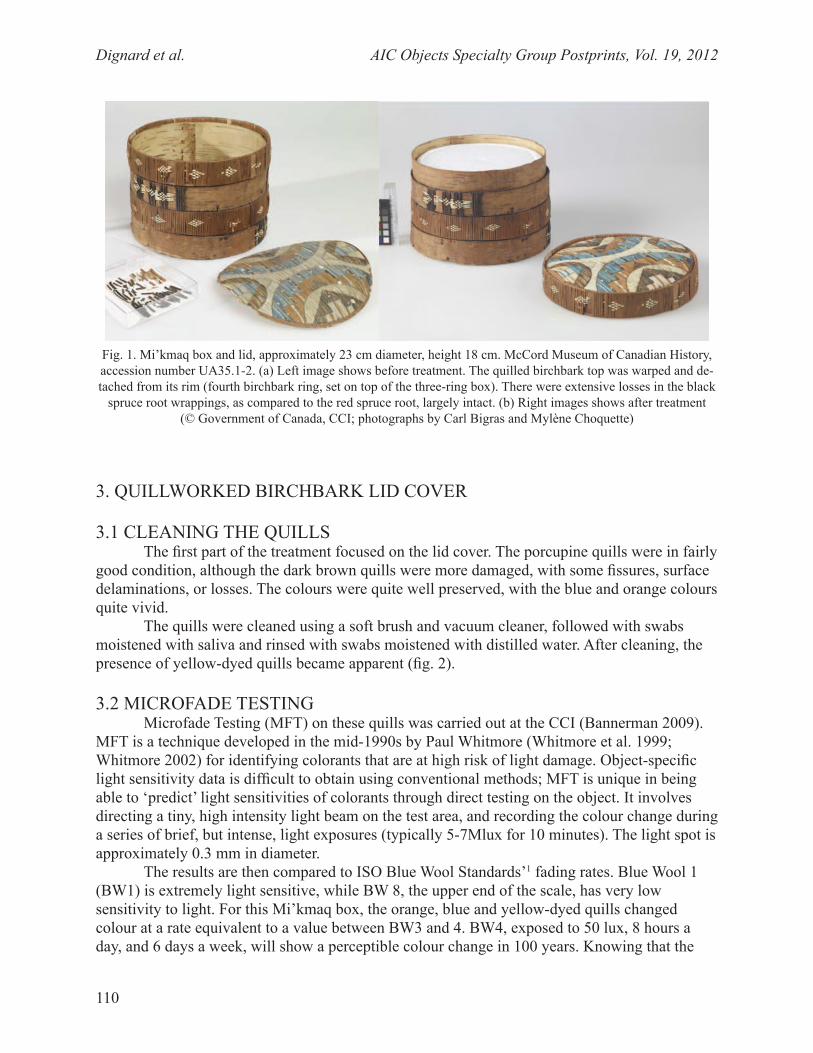
Dignard et al. AIC Objects Specialty Group Postprints, Vol. 19, 2012
110
3. QUILLWORKED BIRCHBARK LID COVER
3.1 CLEANING THE QUILLSThe first part of the treatment focused on the lid cover. The porcupine quills were in fairly
good condition, although the dark brown quills were more damaged, with some fissures, surface delaminations, or losses. The colours were quite well preserved, with the blue and orange colours quite vivid.
The quills were cleaned using a soft brush and vacuum cleaner, followed with swabs moistened with saliva and rinsed with swabs moistened with distilled water. After cleaning, the presence of yellow-dyed quills became apparent (fig. 2).
3.2 MICROFADE TESTINGMicrofade Testing (MFT) on these quills was carried out at the CCI (Bannerman 2009).
MFT is a technique developed in the mid-1990s by Paul Whitmore (Whitmore et al. 1999; Whitmore 2002) for identifying colorants that are at high risk of light damage. Object-specific light sensitivity data is difficult to obtain using conventional methods; MFT is unique in being able to ‘predict’ light sensitivities of colorants through direct testing on the object. It involves directing a tiny, high intensity light beam on the test area, and recording the colour change during a series of brief, but intense, light exposures (typically 5-7Mlux for 10 minutes). The light spot is approximately 0.3 mm in diameter.
The results are then compared to ISO Blue Wool Standards’1 fading rates. Blue Wool 1 (BW1) is extremely light sensitive, while BW 8, the upper end of the scale, has very low sensitivity to light. For this Mi’kmaq box, the orange, blue and yellow-dyed quills changed colour at a rate equivalent to a value between BW3 and 4. BW4, exposed to 50 lux, 8 hours a day, and 6 days a week, will show a perceptible colour change in 100 years. Knowing that the
Fig. 1. Mi’kmaq box and lid, approximately 23 cm diameter, height 18 cm. McCord Museum of Canadian History, accession number UA35.1-2. (a) Left image shows before treatment. The quilled birchbark top was warped and de-tached from its rim (fourth birchbark ring, set on top of the three-ring box). There were extensive losses in the black
spruce root wrappings, as compared to the red spruce root, largely intact. (b) Right images shows after treatment (© Government of Canada, CCI; photographs by Carl Bigras and Mylène Choquette)
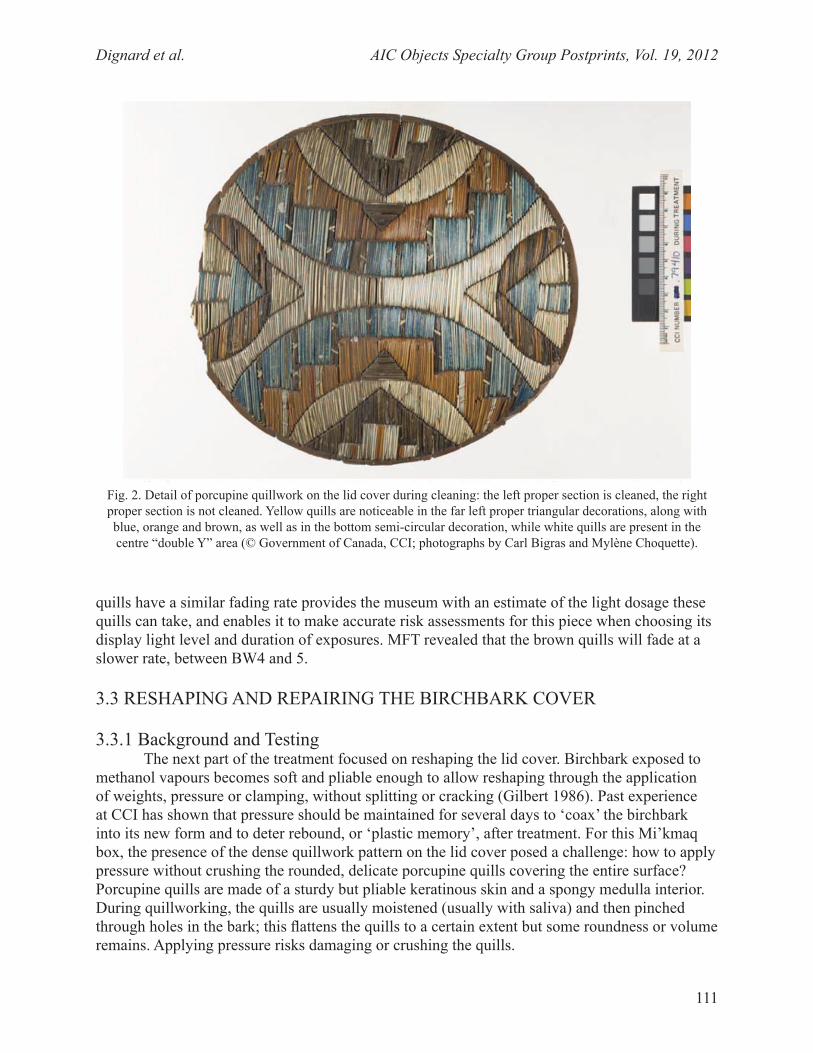
Dignard et al. AIC Objects Specialty Group Postprints, Vol. 19, 2012
111
quills have a similar fading rate provides the museum with an estimate of the light dosage these quills can take, and enables it to make accurate risk assessments for this piece when choosing its display light level and duration of exposures. MFT revealed that the brown quills will fade at a slower rate, between BW4 and 5.
3.3 RESHAPING AND REPAIRING THE BIRCHBARK COVER
3.3.1 Background and TestingThe next part of the treatment focused on reshaping the lid cover. Birchbark exposed to
methanol vapours becomes soft and pliable enough to allow reshaping through the application of weights, pressure or clamping, without splitting or cracking (Gilbert 1986). Past experience at CCI has shown that pressure should be maintained for several days to ‘coax’ the birchbark into its new form and to deter rebound, or ‘plastic memory’, after treatment. For this Mi’kmaq box, the presence of the dense quillwork pattern on the lid cover posed a challenge: how to apply pressure without crushing the rounded, delicate porcupine quills covering the entire surface? Porcupine quills are made of a sturdy but pliable keratinous skin and a spongy medulla interior. During quillworking, the quills are usually moistened (usually with saliva) and then pinched through holes in the bark; this flattens the quills to a certain extent but some roundness or volume remains. Applying pressure risks damaging or crushing the quills.
Fig. 2. Detail of porcupine quillwork on the lid cover during cleaning: the left proper section is cleaned, the right proper section is not cleaned. Yellow quills are noticeable in the far left proper triangular decorations, along with blue, orange and brown, as well as in the bottom semi-circular decoration, while white quills are present in the centre “double Y” area (© Government of Canada, CCI; photographs by Carl Bigras and Mylène Choquette).
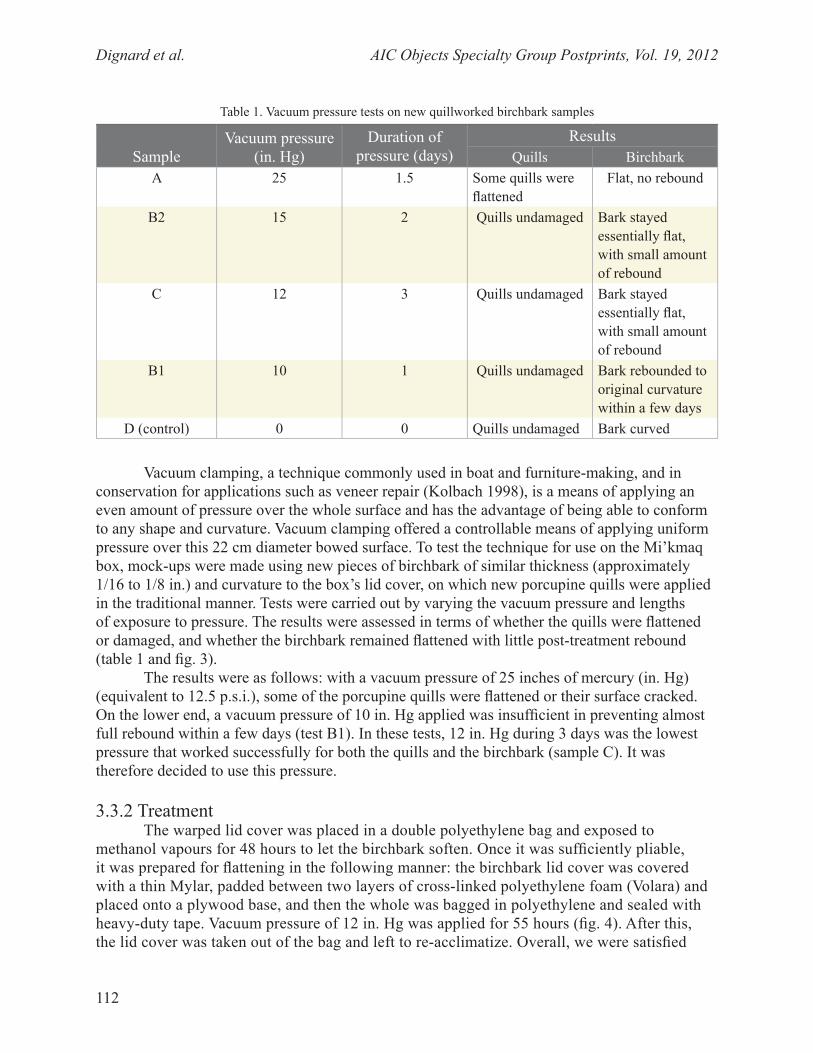
Dignard et al. AIC Objects Specialty Group Postprints, Vol. 19, 2012
112
Vacuum clamping, a technique commonly used in boat and furniture-making, and in conservation for applications such as veneer repair (Kolbach 1998), is a means of applying an even amount of pressure over the whole surface and has the advantage of being able to conform to any shape and curvature. Vacuum clamping offered a controllable means of applying uniform pressure over this 22 cm diameter bowed surface. To test the technique for use on the Mi’kmaq box, mock-ups were made using new pieces of birchbark of similar thickness (approximately 1/16 to 1/8 in.) and curvature to the box’s lid cover, on which new porcupine quills were applied in the traditional manner. Tests were carried out by varying the vacuum pressure and lengths of exposure to pressure. The results were assessed in terms of whether the quills were flattened or damaged, and whether the birchbark remained flattened with little post-treatment rebound (table 1 and fig. 3).
The results were as follows: with a vacuum pressure of 25 inches of mercury (in. Hg) (equivalent to 12.5 p.s.i.), some of the porcupine quills were flattened or their surface cracked. On the lower end, a vacuum pressure of 10 in. Hg applied was insufficient in preventing almost full rebound within a few days (test B1). In these tests, 12 in. Hg during 3 days was the lowest pressure that worked successfully for both the quills and the birchbark (sample C). It was therefore decided to use this pressure.
3.3.2 TreatmentThe warped lid cover was placed in a double polyethylene bag and exposed to
methanol vapours for 48 hours to let the birchbark soften. Once it was sufficiently pliable, it was prepared for flattening in the following manner: the birchbark lid cover was covered with a thin Mylar, padded between two layers of cross-linked polyethylene foam (Volara) and placed onto a plywood base, and then the whole was bagged in polyethylene and sealed with heavy-duty tape. Vacuum pressure of 12 in. Hg was applied for 55 hours (fig. 4). After this, the lid cover was taken out of the bag and left to re-acclimatize. Overall, we were satisfied
Table 1. Vacuum pressure tests on new quillworked birchbark samples
SampleVacuum pressure
(in. Hg)Duration of
pressure (days)Results
Quills BirchbarkA 25 1.5 Some quills were
flattenedFlat, no rebound
B2 15 2 Quills undamaged Bark stayed essentially flat, with small amount of rebound
C 12 3 Quills undamaged Bark stayed essentially flat, with small amount of rebound
B1 10 1 Quills undamaged Bark rebounded to original curvature within a few days
D (control) 0 0 Quills undamaged Bark curved
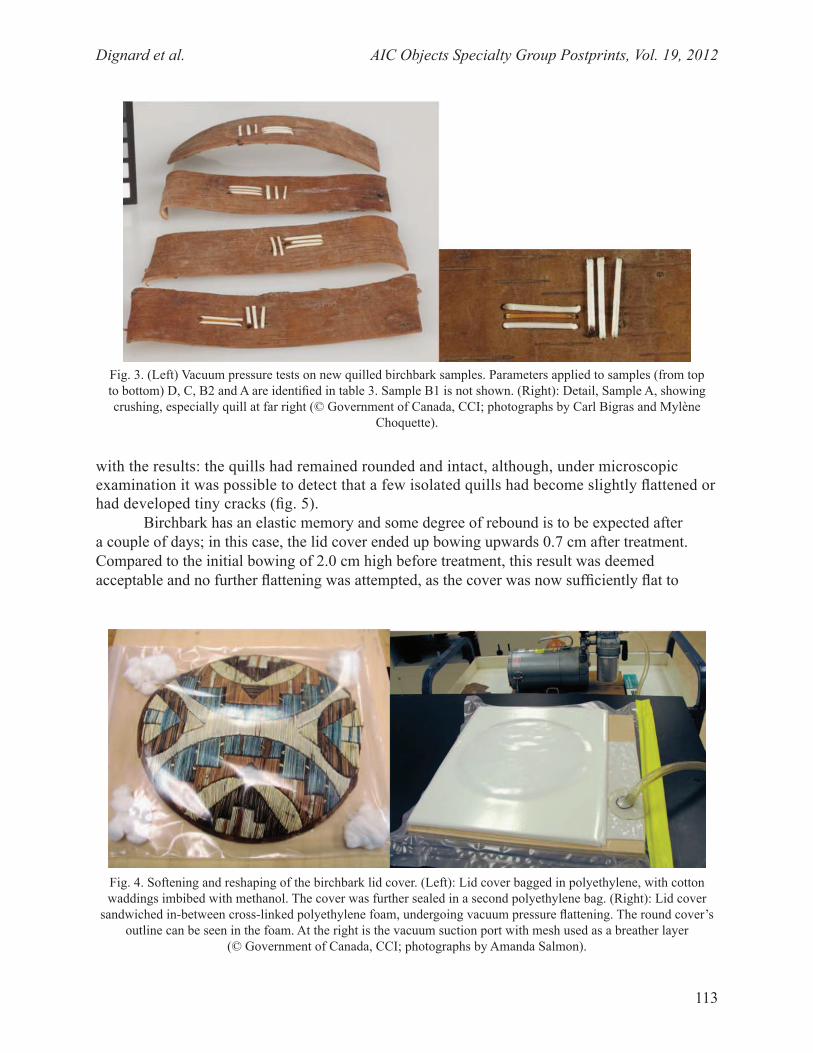
Dignard et al. AIC Objects Specialty Group Postprints, Vol. 19, 2012
113
with the results: the quills had remained rounded and intact, although, under microscopic examination it was possible to detect that a few isolated quills had become slightly flattened or had developed tiny cracks (fig. 5).
Birchbark has an elastic memory and some degree of rebound is to be expected after a couple of days; in this case, the lid cover ended up bowing upwards 0.7 cm after treatment. Compared to the initial bowing of 2.0 cm high before treatment, this result was deemed acceptable and no further flattening was attempted, as the cover was now sufficiently flat to
Fig. 3. (Left) Vacuum pressure tests on new quilled birchbark samples. Parameters applied to samples (from top to bottom) D, C, B2 and A are identified in table 3. Sample B1 is not shown. (Right): Detail, Sample A, showing crushing, especially quill at far right (© Government of Canada, CCI; photographs by Carl Bigras and Mylène
Choquette).
Fig. 4. Softening and reshaping of the birchbark lid cover. (Left): Lid cover bagged in polyethylene, with cotton waddings imbibed with methanol. The cover was further sealed in a second polyethylene bag. (Right): Lid cover
sandwiched in-between cross-linked polyethylene foam, undergoing vacuum pressure flattening. The round cover’s outline can be seen in the foam. At the right is the vacuum suction port with mesh used as a breather layer
(© Government of Canada, CCI; photographs by Amanda Salmon).
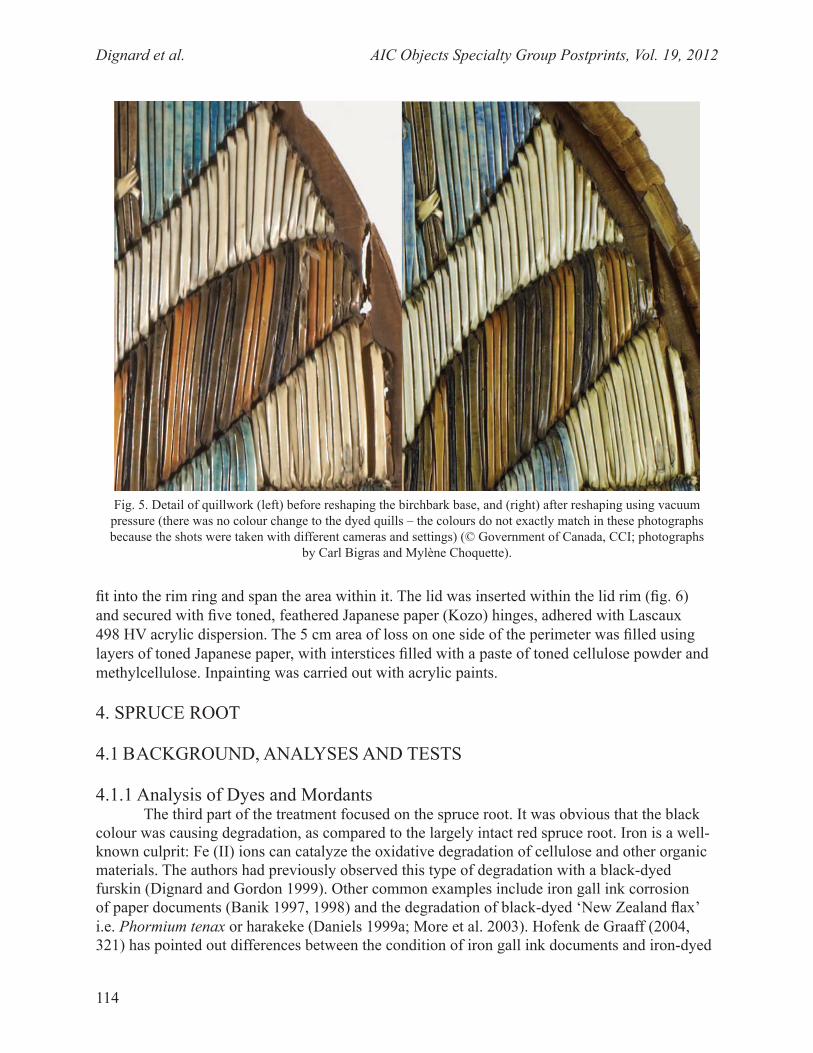
Dignard et al. AIC Objects Specialty Group Postprints, Vol. 19, 2012
114
fit into the rim ring and span the area within it. The lid was inserted within the lid rim (fig. 6) and secured with five toned, feathered Japanese paper (Kozo) hinges, adhered with Lascaux 498 HV acrylic dispersion. The 5 cm area of loss on one side of the perimeter was filled using layers of toned Japanese paper, with interstices filled with a paste of toned cellulose powder and methylcellulose. Inpainting was carried out with acrylic paints.
4. SPRUCE ROOT
4.1 BACKGROUND, ANALYSES AND TESTS
4.1.1 Analysis of Dyes and MordantsThe third part of the treatment focused on the spruce root. It was obvious that the black
colour was causing degradation, as compared to the largely intact red spruce root. Iron is a well-known culprit: Fe (II) ions can catalyze the oxidative degradation of cellulose and other organic materials. The authors had previously observed this type of degradation with a black-dyed furskin (Dignard and Gordon 1999). Other common examples include iron gall ink corrosion of paper documents (Banik 1997, 1998) and the degradation of black-dyed ‘New Zealand flax’ i.e. Phormium tenax or harakeke (Daniels 1999a; More et al. 2003). Hofenk de Graaff (2004, 321) has pointed out differences between the condition of iron gall ink documents and iron-dyed
Fig. 5. Detail of quillwork (left) before reshaping the birchbark base, and (right) after reshaping using vacuum pressure (there was no colour change to the dyed quills – the colours do not exactly match in these photographs because the shots were taken with different cameras and settings) (© Government of Canada, CCI; photographs
by Carl Bigras and Mylène Choquette).
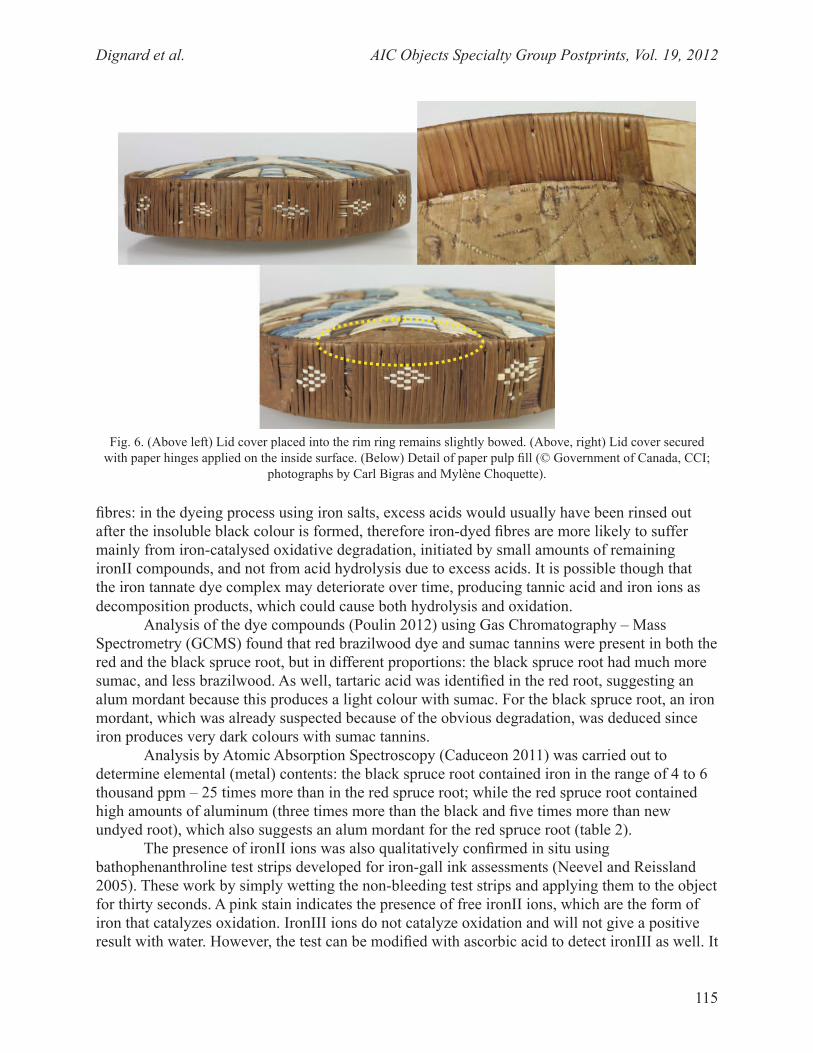
Dignard et al. AIC Objects Specialty Group Postprints, Vol. 19, 2012
115
fibres: in the dyeing process using iron salts, excess acids would usually have been rinsed out after the insoluble black colour is formed, therefore iron-dyed fibres are more likely to suffer mainly from iron-catalysed oxidative degradation, initiated by small amounts of remaining ironII compounds, and not from acid hydrolysis due to excess acids. It is possible though that the iron tannate dye complex may deteriorate over time, producing tannic acid and iron ions as decomposition products, which could cause both hydrolysis and oxidation.
Analysis of the dye compounds (Poulin 2012) using Gas Chromatography – Mass Spectrometry (GCMS) found that red brazilwood dye and sumac tannins were present in both the red and the black spruce root, but in different proportions: the black spruce root had much more sumac, and less brazilwood. As well, tartaric acid was identified in the red root, suggesting an alum mordant because this produces a light colour with sumac. For the black spruce root, an iron mordant, which was already suspected because of the obvious degradation, was deduced since iron produces very dark colours with sumac tannins.
Analysis by Atomic Absorption Spectroscopy (Caduceon 2011) was carried out to determine elemental (metal) contents: the black spruce root contained iron in the range of 4 to 6 thousand ppm – 25 times more than in the red spruce root; while the red spruce root contained high amounts of aluminum (three times more than the black and five times more than new undyed root), which also suggests an alum mordant for the red spruce root (table 2).
The presence of ironII ions was also qualitatively confirmed in situ using bathophenanthroline test strips developed for iron-gall ink assessments (Neevel and Reissland 2005). These work by simply wetting the non-bleeding test strips and applying them to the object for thirty seconds. A pink stain indicates the presence of free ironII ions, which are the form of iron that catalyzes oxidation. IronIII ions do not catalyze oxidation and will not give a positive result with water. However, the test can be modified with ascorbic acid to detect ironIII as well. It
Fig. 6. (Above left) Lid cover placed into the rim ring remains slightly bowed. (Above, right) Lid cover secured with paper hinges applied on the inside surface. (Below) Detail of paper pulp fill (© Government of Canada, CCI;
photographs by Carl Bigras and Mylène Choquette).
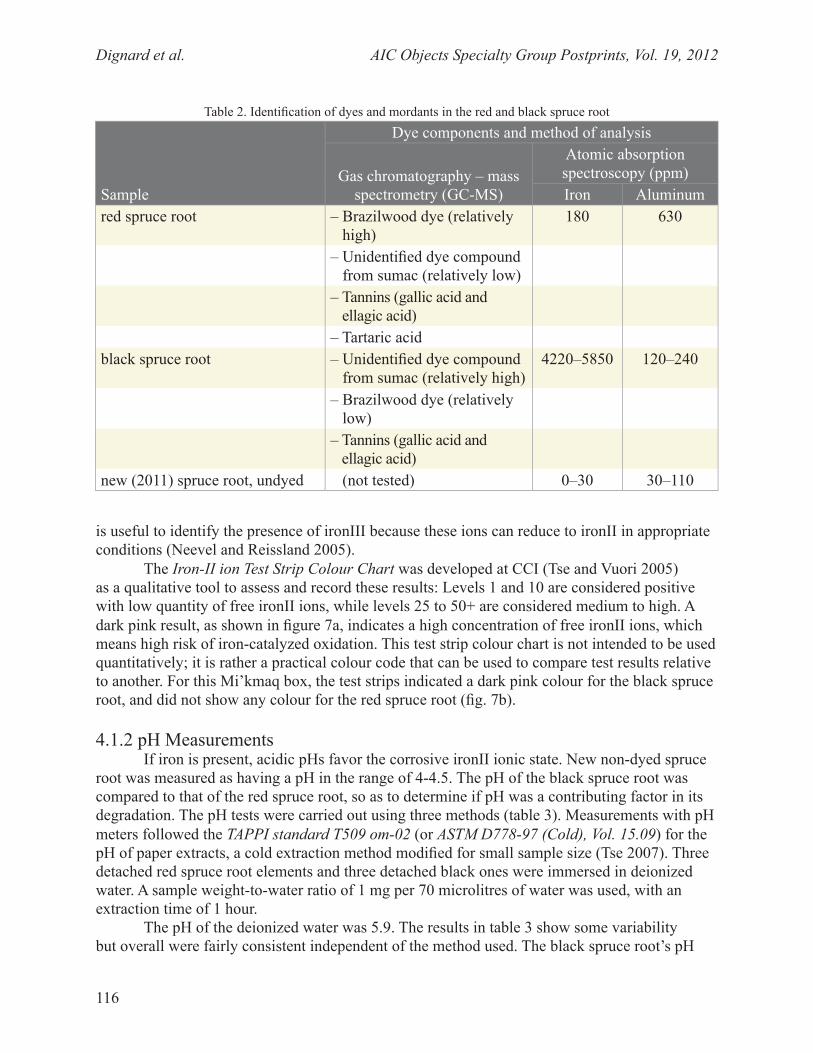
Dignard et al. AIC Objects Specialty Group Postprints, Vol. 19, 2012
116
Table 2. Identification of dyes and mordants in the red and black spruce root
Sample
Dye components and method of analysis
Gas chromatography – mass spectrometry (GC-MS)
Atomic absorption spectroscopy (ppm)Iron Aluminum
red spruce root – Brazilwood dye (relatively high)
180 630
– Unidentified dye compound from sumac (relatively low)
– Tannins (gallic acid and ellagic acid)
– Tartaric acidblack spruce root – Unidentified dye compound
from sumac (relatively high)4220–5850 120–240
– Brazilwood dye (relatively low)
– Tannins (gallic acid and ellagic acid)
new (2011) spruce root, undyed (not tested) 0–30 30–110
is useful to identify the presence of ironIII because these ions can reduce to ironII in appropriate conditions (Neevel and Reissland 2005).
The Iron-II ion Test Strip Colour Chart was developed at CCI (Tse and Vuori 2005) as a qualitative tool to assess and record these results: Levels 1 and 10 are considered positive with low quantity of free ironII ions, while levels 25 to 50+ are considered medium to high. A dark pink result, as shown in figure 7a, indicates a high concentration of free ironII ions, which means high risk of iron-catalyzed oxidation. This test strip colour chart is not intended to be used quantitatively; it is rather a practical colour code that can be used to compare test results relative to another. For this Mi’kmaq box, the test strips indicated a dark pink colour for the black spruce root, and did not show any colour for the red spruce root (fig. 7b).
4.1.2 pH MeasurementsIf iron is present, acidic pHs favor the corrosive ironII ionic state. New non-dyed spruce
root was measured as having a pH in the range of 4-4.5. The pH of the black spruce root was compared to that of the red spruce root, so as to determine if pH was a contributing factor in its degradation. The pH tests were carried out using three methods (table 3). Measurements with pH meters followed the TAPPI standard T509 om-02 (or ASTM D778-97 (Cold), Vol. 15.09) for the pH of paper extracts, a cold extraction method modified for small sample size (Tse 2007). Three detached red spruce root elements and three detached black ones were immersed in deionized water. A sample weight-to-water ratio of 1 mg per 70 microlitres of water was used, with an extraction time of 1 hour.
The pH of the deionized water was 5.9. The results in table 3 show some variability but overall were fairly consistent independent of the method used. The black spruce root’s pH
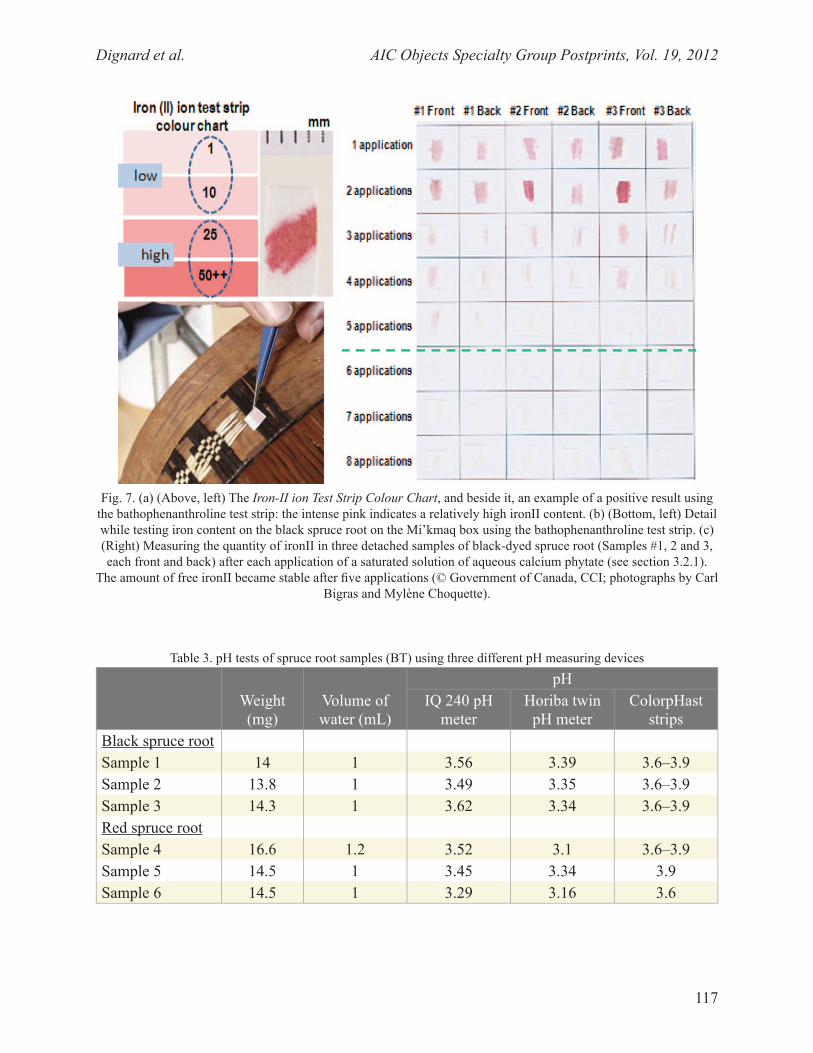
Dignard et al. AIC Objects Specialty Group Postprints, Vol. 19, 2012
117
Fig. 7. (a) (Above, left) The Iron-II ion Test Strip Colour Chart, and beside it, an example of a positive result using the bathophenanthroline test strip: the intense pink indicates a relatively high ironII content. (b) (Bottom, left) Detail while testing iron content on the black spruce root on the Mi’kmaq box using the bathophenanthroline test strip. (c) (Right) Measuring the quantity of ironII in three detached samples of black-dyed spruce root (Samples #1, 2 and 3, each front and back) after each application of a saturated solution of aqueous calcium phytate (see section 3.2.1).
The amount of free ironII became stable after five applications (© Government of Canada, CCI; photographs by Carl Bigras and Mylène Choquette).
Table 3. pH tests of spruce root samples (BT) using three different pH measuring devices
Weight (mg)
Volume of water (mL)
pHIQ 240 pH
meterHoriba twin
pH meterColorpHast
stripsBlack spruce rootSample 1 14 1 3.56 3.39 3.6–3.9Sample 2 13.8 1 3.49 3.35 3.6–3.9Sample 3 14.3 1 3.62 3.34 3.6–3.9Red spruce rootSample 4 16.6 1.2 3.52 3.1 3.6–3.9Sample 5 14.5 1 3.45 3.34 3.9Sample 6 14.5 1 3.29 3.16 3.6
Dignard et al. AIC Objects Specialty Group Postprints, Vol. 19, 2012
118
was comparable to that of the red spruce root, both in the range of 3.5. As a comparison, old twined spruce root basketry fibres of Tlingit origin, which were not dyed but were fragile and fragmentary, had a pH of 3.6 (Clavir 1976). Old black-dyed samples of Phormium tenax were found to range in pH from 3.5 to 4.3, while modern samples ranged from 4.4 to 6.9 (Daniels 1999a). For this Mi’kmaq box, because both the red and the black spruce root essentially have the same pH level, it was concluded that the root acidity on its own is not the cause of the embrittlement of the black spruce root. However, a lower pH range contributes to degradation because it favors the formation of free iron ions which can then catalyse oxidative degradation (Daniels 1999a).
4.1.3 Stabilization: Research and Preliminary TestsIn the iron gall ink literature, Dr. Neevel published a landmark study (1995) on a calcium
phytate treatment that sequesters ironII ions and stabilizes corroding iron gall ink. Since then, variants of this method or methods using other chelating agents and antioxidants have been studied, including work done at CCI (Neevel 2002; Kolar et al. 2005; Kolar and Strlic 2006; Kolar et al. 2008; Tse, Guild et al. 2012; Tse, Trojan-Bedynski et al. 2012). Still, as stated on The Iron Gall Ink Website: ‘All studies agree that the calcium-phytate / calcium-bicarbonate method is an effective aqueous method to prolong the life-time of ink corroded objects with minimal side effects’ (Reissland et al. 2007). The method typically involves immersing the iron gall ink document in water to remove, as much as possible, free, water-soluble ironII ions. This is followed by immersion in a calcium phytate solution, where the calcium ions are exchanged for any free remaining ironII ions, forming a complex between ironII ions and phytates (myo-inositol hexaphosphate) which prevent the catalytic degradation of cellulose. The ink’s black colour is, by and large, not affected. Deacidification in a calcium bicarbonate solution follows the calcium phytate treatment to neutralize the acids in the ink. A possible result is the formation of ironIII phytates as loose, white deposits on the surface after treatment, which are usually easily brushed off.
In the case of this Mi’kmaq box, it was not possible to immerse the black spruce root in a phytate solution to wash out the free iron ions, given the intimate assembly of the three birchbark rings with spruce root wrapped tightly around each ring. It was decided to test whether successive applications by brush of the calcium phytate and calcium bicarbonate solutions would have any benefit on the black spruce root having had no prior washing. The solutions were prepared following the The Iron Gall Ink Website instructions (Reissland et al. 2007). As a test, the solutions were applied on the front and back sides of three detached pieces of black spruce root, and after each application, the spruce roots were left to air-dry, then tested for the presence of ironII using the bathophenanthroline indicator strips. Results are shown in figure 7c. Up to eight applications of the phytate/bicarbonate solutions were applied. The bathophenanthroline strips indicated that the amount of free ironII decreased progressively with up to five applications, and that there was no significant difference after further applications. It was decided that the successive applications of calcium phytate / calcium bicarbonate solutions were at least partially successful in sequestering some of the ironII, and that this treatment would benefit the degraded, brittle black spruce root.
There have been a few investigations on similar chemical stabilization methods for iron-dyed basketry or vegetable fibres. Daniels (1999b) studied various stabilisation treatments for black-dyed Phormium tenax (‘New Zealand flax’) and found magnesium bicarbonate,
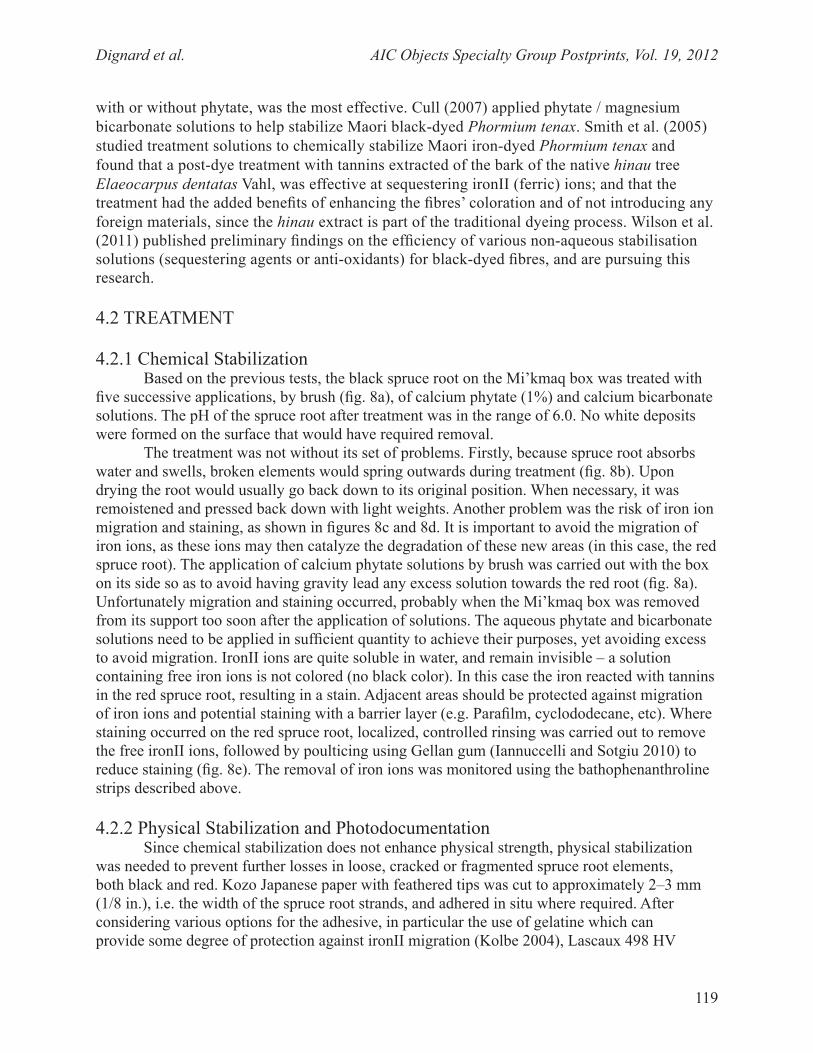
Dignard et al. AIC Objects Specialty Group Postprints, Vol. 19, 2012
119
with or without phytate, was the most effective. Cull (2007) applied phytate / magnesium bicarbonate solutions to help stabilize Maori black-dyed Phormium tenax. Smith et al. (2005) studied treatment solutions to chemically stabilize Maori iron-dyed Phormium tenax and found that a post-dye treatment with tannins extracted of the bark of the native hinau tree Elaeocarpus dentatas Vahl, was effective at sequestering ironII (ferric) ions; and that the treatment had the added benefits of enhancing the fibres’ coloration and of not introducing any foreign materials, since the hinau extract is part of the traditional dyeing process. Wilson et al. (2011) published preliminary findings on the efficiency of various non-aqueous stabilisation solutions (sequestering agents or anti-oxidants) for black-dyed fibres, and are pursuing this research.
4.2 TREATMENT
4.2.1 Chemical StabilizationBased on the previous tests, the black spruce root on the Mi’kmaq box was treated with
five successive applications, by brush (fig. 8a), of calcium phytate (1%) and calcium bicarbonate solutions. The pH of the spruce root after treatment was in the range of 6.0. No white deposits were formed on the surface that would have required removal.
The treatment was not without its set of problems. Firstly, because spruce root absorbs water and swells, broken elements would spring outwards during treatment (fig. 8b). Upon drying the root would usually go back down to its original position. When necessary, it was remoistened and pressed back down with light weights. Another problem was the risk of iron ion migration and staining, as shown in figures 8c and 8d. It is important to avoid the migration of iron ions, as these ions may then catalyze the degradation of these new areas (in this case, the red spruce root). The application of calcium phytate solutions by brush was carried out with the box on its side so as to avoid having gravity lead any excess solution towards the red root (fig. 8a). Unfortunately migration and staining occurred, probably when the Mi’kmaq box was removed from its support too soon after the application of solutions. The aqueous phytate and bicarbonate solutions need to be applied in sufficient quantity to achieve their purposes, yet avoiding excess to avoid migration. IronII ions are quite soluble in water, and remain invisible – a solution containing free iron ions is not colored (no black color). In this case the iron reacted with tannins in the red spruce root, resulting in a stain. Adjacent areas should be protected against migration of iron ions and potential staining with a barrier layer (e.g. Parafilm, cyclododecane, etc). Where staining occurred on the red spruce root, localized, controlled rinsing was carried out to remove the free ironII ions, followed by poulticing using Gellan gum (Iannuccelli and Sotgiu 2010) to reduce staining (fig. 8e). The removal of iron ions was monitored using the bathophenanthroline strips described above.
4.2.2 Physical Stabilization and PhotodocumentationSince chemical stabilization does not enhance physical strength, physical stabilization
was needed to prevent further losses in loose, cracked or fragmented spruce root elements, both black and red. Kozo Japanese paper with feathered tips was cut to approximately 2–3 mm (1/8 in.), i.e. the width of the spruce root strands, and adhered in situ where required. After considering various options for the adhesive, in particular the use of gelatine which can provide some degree of protection against ironII migration (Kolbe 2004), Lascaux 498 HV
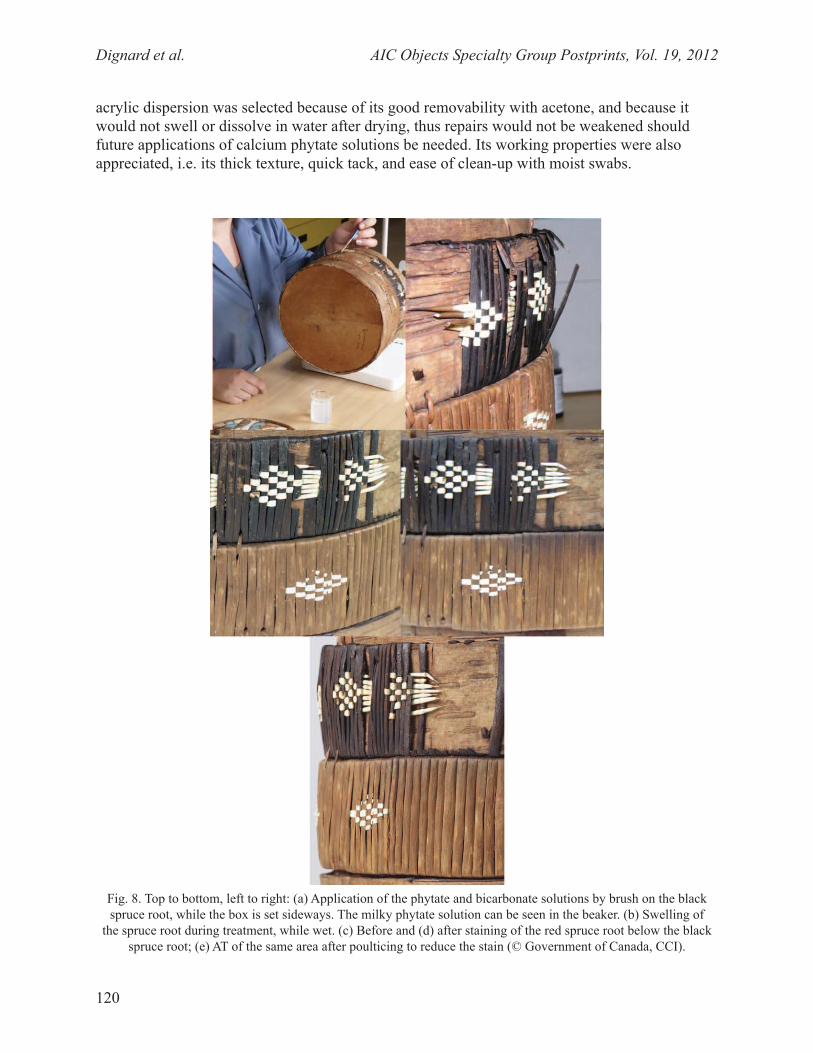
Dignard et al. AIC Objects Specialty Group Postprints, Vol. 19, 2012
120
acrylic dispersion was selected because of its good removability with acetone, and because it would not swell or dissolve in water after drying, thus repairs would not be weakened should future applications of calcium phytate solutions be needed. Its working properties were also appreciated, i.e. its thick texture, quick tack, and ease of clean-up with moist swabs.
Fig. 8. Top to bottom, left to right: (a) Application of the phytate and bicarbonate solutions by brush on the black spruce root, while the box is set sideways. The milky phytate solution can be seen in the beaker. (b) Swelling of
the spruce root during treatment, while wet. (c) Before and (d) after staining of the red spruce root below the black spruce root; (e) AT of the same area after poulticing to reduce the stain (© Government of Canada, CCI).
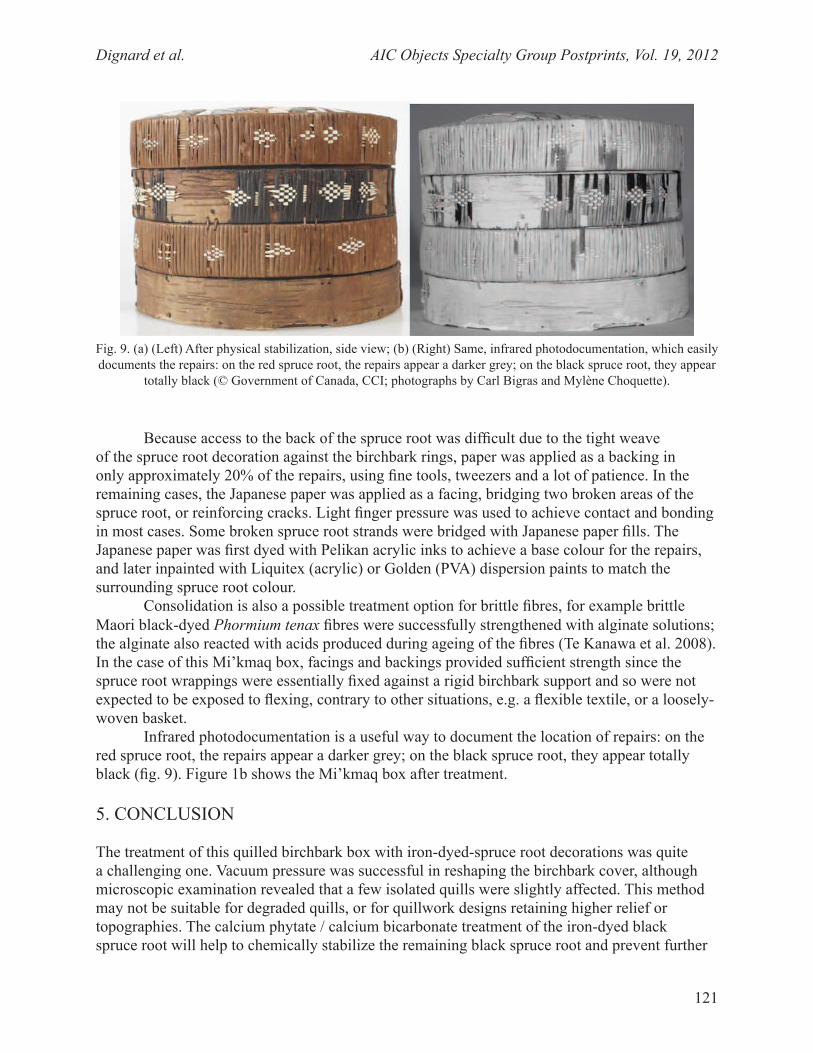
Dignard et al. AIC Objects Specialty Group Postprints, Vol. 19, 2012
121
Because access to the back of the spruce root was difficult due to the tight weave of the spruce root decoration against the birchbark rings, paper was applied as a backing in only approximately 20% of the repairs, using fine tools, tweezers and a lot of patience. In the remaining cases, the Japanese paper was applied as a facing, bridging two broken areas of the spruce root, or reinforcing cracks. Light finger pressure was used to achieve contact and bonding in most cases. Some broken spruce root strands were bridged with Japanese paper fills. The Japanese paper was first dyed with Pelikan acrylic inks to achieve a base colour for the repairs, and later inpainted with Liquitex (acrylic) or Golden (PVA) dispersion paints to match the surrounding spruce root colour.
Consolidation is also a possible treatment option for brittle fibres, for example brittle Maori black-dyed Phormium tenax fibres were successfully strengthened with alginate solutions; the alginate also reacted with acids produced during ageing of the fibres (Te Kanawa et al. 2008). In the case of this Mi’kmaq box, facings and backings provided sufficient strength since the spruce root wrappings were essentially fixed against a rigid birchbark support and so were not expected to be exposed to flexing, contrary to other situations, e.g. a flexible textile, or a loosely-woven basket.
Infrared photodocumentation is a useful way to document the location of repairs: on the red spruce root, the repairs appear a darker grey; on the black spruce root, they appear totally black (fig. 9). Figure 1b shows the Mi’kmaq box after treatment.
5. CONCLUSION
The treatment of this quilled birchbark box with iron-dyed-spruce root decorations was quite a challenging one. Vacuum pressure was successful in reshaping the birchbark cover, although microscopic examination revealed that a few isolated quills were slightly affected. This method may not be suitable for degraded quills, or for quillwork designs retaining higher relief or topographies. The calcium phytate / calcium bicarbonate treatment of the iron-dyed black spruce root will help to chemically stabilize the remaining black spruce root and prevent further
Fig. 9. (a) (Left) After physical stabilization, side view; (b) (Right) Same, infrared photodocumentation, which easily documents the repairs: on the red spruce root, the repairs appear a darker grey; on the black spruce root, they appear
totally black (© Government of Canada, CCI; photographs by Carl Bigras and Mylène Choquette).
Dignard et al. AIC Objects Specialty Group Postprints, Vol. 19, 2012
122
embrittlement and losses. However, if this treatment were to be repeated, further measures would be taken to prevent staining, for example, by physically protecting adjacent areas using temporary barrier layers such as moldable Parafilm wax film, silicone gasketing film or cyclododecane.
ACKNOWLEDGEMENTS
The following colleagues are warmly thanked for their help, advice or contribution to this project: Judith Bannerman, Carl Bigras, Mylène Choquette, Marion Cinqualbre, Patricia Dunnett, Alison Fleming, Sherry Guild, Emily Higginson, Elisabeth Joy, Anne MacKay, Caroline Marchand, Janet Mason, Joanna McMann, Jennifer Poulin and Jan Vuori.
NOTE
1. Blue Wool Standards are a set of eight different dyed fabrics that fade after exposure to a known light dose. The dyes are chosen such that each reference takes about two to three times longer to begin fading as the next lower reference in the scale (Michalski 2011).
REFERENCES
Banik, G. 1997. Decay caused by iron-gall inks. In Proceedings of the European workshop: irongall ink corrosion, June 16–17, 1997. Amsterdam: Museum Boijmans van Beuningen Rotterdam and Netherlands Institute for Cultural Heritage Amsterdam. 21–26.
Banik, G. 1998. Ink corrosion – Chemistry. In The Iron Gall Ink Website, Cultural Heritage Agency of the Netherlands (RCE). http://irongallink.org/igi_index22a4.html (accessed 12/01/2014).
Bannerman, J. 2009. Micro-fade analysis of the porcupine quill decoration on a Micmac box. CCI Report No. 79410, February 2009. Unpublished Report.
Caduceon Environmental Laboratories. 2011. Report No. B11-04933, May 2, 2011. Unpublished Report.
Clavir, M. 1976. A preliminary study on the deacidification of basketry. Queen’s University research project. Kingston, Ontario: Queen’s University. Unpublished report.
Cull, D. 2007. Conserving harakeke at the Royal Albert Memorial Museum and Art Gallery. ICON News, July 2007:45–47.
Daniels, V. 1999a. Factors affecting the deterioration of the cellulosic fibres in black-dyed New Zealand flax (Phormium texax). Studies in Conservation 44:73–85.
Daniels, V. 1999b. Stabilisation treatments for black-dyed New Zealand flax. ICOM Committee for Conservation preprints. 12th Triennial Meeting, Lyon. Paris: ICOM. 2:579–84.
Dignard et al. AIC Objects Specialty Group Postprints, Vol. 19, 2012
123
Dignard, C., and G. Gordon. 1999. Metal ion catalysed oxidation of skin: treatment of the fur trim and collar on a velvet cape. Journal of the Canadian Association for Conservation 24:11–22. Also available at: www.cac-accr.ca/files/pdf/Vol24_doc2.pdf (accessed 10/01/2014).
Gilbert, M. 1986. Plasticization and forming of misshapen birch-bark artifacts using solvent vapour. Studies in Conservation 31:177–84.
Hofenk de Graaff, J. H. 2004. The colourful past: origins, chemistry and identification of natural dyestuffs. London: Archetype Publications Ltd.
Iannuccelli, S., and S. Sotgiu. 2010. A new methodology for wet conservation treatments of graphic art on paper with a rigid polysaccaride gel of gellan gum. In Choices in Conservation: Practice versus Research, ICOM-CC Graphic Documents Working Group Interim Meeting, 6–8 October 2010, The Royal Library Denmark (ICOM-CC). Also available at: www.icom-cc.org/54/document/icom-cc-working-group-graphic-documents-interim-meeting--choices-in-conservation-practice-versus-research-copenhagen-6-8-october-2010/?id=943 (accessed 10/01/2014).
Kolar, J., A. Možir, M. Strlič, G. Ceres, V. Conte, V. Mirruzzo, T. Steemers, and G. de Bruin. 2008. New antioxidants for treatment of transition metals containing ink. In Durability of paper and writing, vol. 2. Second International Symposium and Workshops, Ljublijana, Slovenia, July 7–9, 2008. Book of Abstracts (Ljublijana: Faculty of Chemistry and Chemical Technology – Narodna in univerzitetna knjižnica). 20–21. Also available at: www.science4heritage.org/DPW2/DPW2%20book.pdf (accessed 10/01/2014).
Kolar, J., J. Malasic, and M. Strlič. 2005. Antioxidants for stabilisation of iron gall ink corrosion. ICOM Committee for Conservation preprints. 14th Triennial Meeting, The Hague. London: James & James/Earthscan. 1:186-92.
Kolar, J., and M. Strlič. 2006. Ageing and stabilisation of paper containing iron gall ink. In Iron gall inks: on manufacture, characterisation, degradation and stabilisation, ed. J. Kolar and M. Strlič. Ljubljana: National and University Library. 181–194.
Kolbach, D. 1998. A note on the use of vacuum clamping to treat the damaged parquetry on a bombe writing desk. Journal of the Canaidan Association for Conservation 23:15–9. Also available at: www.cac-accr.ca/files/pdf/Vol23_doc2.pdf (accessed 10/01/2014).
Kolbe, G. 2004. Gelatine in historical paper production and as inhibiting agent for iron-gall ink corrosion on paper. Restaurator 25:26–39.
Michalski, S. 2011. Agent of deterioration: light, ultraviolet and infrared. www.cci-icc.gc.ca/caringfor-prendresoindes/articles/10agents/chap08-eng.aspx (accessed 10/01/2014).
More, N., G. Smith, R. Te Kanawa, and I. Miller. 2003. Iron-sensitised degradation of black-dyed Maori textiles. In Dyes in history and archaeology, vol. 19, ed. J. Kirby. London: Archetype Publications. 144–148.
Dignard et al. AIC Objects Specialty Group Postprints, Vol. 19, 2012
124
Neevel, J. G. 1995. Phytate: a potential conservation agent for the treatment of ink corrosion caused by iron-gall inks. Restaurator 16:143–60.
Neevel, J. G. 2002. (Im)possibilities of the phytate treatment of ink corrosion. In Contributions to conservation: Research from the IC. ed. J. A. Mosk and N. H. Tennent. London: James and James Science Publishers. 74–86.
Neevel, J. G., and B. Reissland. 2005. Bathophenanthroline Indicator Paper. PapierRestaurierung 6:28–36. Also available at: www.ink-corrosion.org/images/file/pdf%203_fe%20test%20artikel.pdf (accessed 12/01/2014).
Poulin, J. 2012. Analysis of red and black spruce root on a Mi’kmaq box. CCI Report No. CSD 4913, CCI 86101. February 24, 2012. Unpublished Report.
Reissland, B., K. Scheper, and S. Fleischer. 2007. Phytate – Preparation of treatment solutions. In The Iron Gall Ink Website, Cultural Heritage Agency of the Netherlands (RCE). http://irongallink.org/igi_index7c5f.html (accessed 12/01/2014).
Smith, G., R. Te Kanawa, I. Miller, and G. Fenton. 2005. Stabilization of cellulosic textiles decorated with iron-containing dyes. In Dyes in history and archaeology, vol. 20, ed. J. Kirby. London: Archetype Publications. 89–94.
Te Kanawa, R., G. J. Smith, G. A. Fenton, I. J. Miller, and C. L. Dunford. 2008. Evaluation of consolidants for black iron-tannate-dyed Maori textiles. In Dyes in history and archaeology, vol. 21, ed. J. Kirby. London: Archetype Publications. 224–9.
Tse, S., and J. Vuori. 2005. A preliminary study of the use of bathophenanthroline iron test strips on textiles. ICOM Committee for Conservation preprints. 14th Triennial Meeting, The Hague. London: James & James/Earthscan. 2:989–95.
Tse, S. 2007. Guidelines for pH measurement in conservation. Technical bulletin 28. Ottawa: Canadian Conservation Institute.
Tse, S., S. Guild, and A. Gould. 2012. A comparison of aqueous versus ethanol modified calcium phytate solutions for the treatment of iron-gall ink inscribed paper. Journal of the Canadian Association for Conservation 37:3–16.
Tse, S., M. Trojan-Bedynski, and D. St-Jacques. 2012. Treatment considerations for the Haggadah prayer book: evaluation of two antioxidants for treatment of copper-containing inks and colorants. AIC Book and Paper Annual 31:87–97.
Whitmore, P. M. 2002. Pursuing the fugitive: direct measurement of light sensitivity with micro-fading tests. In The broad spectrum: studies in the materials, techniques and conservation of color on paper, ed. Stratis et al. London: Archetype Publications Ltd. 241–4.
Whitmore, P. M., P. Xun, and C. Bailie. 1999. Predicting the fading of objects: identification of fugitive colorants through direct non-destructive lightfastness measurements. Journal of the American Institute for Conservation 38:395–409.

Dignard et al. AIC Objects Specialty Group Postprints, Vol. 19, 2012
125
Wilson, H., P. Cruickshank, M. Hacke, R. Stacey, C. Carr, V. Daniels, M. Rigout. 2011. Investigation of non-aqueous remedial treatments for iron-tannate dyed textiles. ICOM Committee for Conservation preprints. 16th Triennial Conference, Lisbon. Lisbon: Criterio.
SOURCES OF MATERIALS
Colour charts for Fe(II) test stripsCanadian Conservation Institute (Attention: Season Tse)1030 Innes RoadOttawa, Canada K1A OM5Telephone: 613-998-3721 Fax: 613-998-4721
Bathophenanthroline indicator strips and instruction manual (Product Code 539-3000)Preservation Equipment Ltd Vinces Road, Diss,Norfolk IP22 4HQ, U.K.Telephone: +44 (0)1379 647400Fax: +44 (0) 1379 650582www.preservationequipment.com/
Calcium phytate (phytic acid, calcium carbonate), Calcium bicarbonate (use calcium carbonate and carbonate with a soda siphon or seltzer bottle)
Sigma-Aldrich Ltd.Customer Support PO Box 14508 St. Louis, MO 63178, USA Telephone: 800-325-3010 Fax: 800-325-5052www.sigmaaldrich.com/customer-service.html
Soda siphons and seltzer bottles (Kitchen devices for making sparkling water)The Prairie Moon Company311 W Monroe St Highland, IL 62249-1326 Telephone: 866-331-0767 or 618-651-9939 Fax: 618-654-7768Email: [email protected]
Horiba TwinpH Compact pH Meter model #B-213:Osprey Scientific Inc105 Avenue NorthwestEdmonton, AB T5S 2T4, CanadaTelephone: 780-487-4334www.ospreyscientific.com/
Dignard et al. AIC Objects Specialty Group Postprints, Vol. 19, 2012
126
IQ240 pH Meter Microprobe with ISFET (non-glass) sensor:RL Instruments9 Main Street, Suite 2E PO Box 423 Manchaug, MA 01526, USATelephone: 508-476-1935Fax: 508-476-1927 www.rlinstruments.com
Methanol, EMD ColorpHast pH strips: (pH 4.0–7.0 and 2.5–4.5)Fisher Scientific Company112 Colonnade RoadOttawa, ON, Canada K2E 7L6Telephone: 800-234-7437 Fax: 800-463-2996www.fishersci.ca/default.aspx
Japanese ‘Kozo’ paperThe Japanese Paper Place 77 Brock Avenue Toronto, ON Canada M6K 2L3 Telephone: 416-538-9669 Fax: 416-538-0563 Email: [email protected]/general/contact_us.htm
Cellulose powder; Gellan gum; Mylar (Melinex) polyester film, Golden PVA Conservation Paints; Lascaux acrylic adhesive 498HV; Volara cross-linked polyethylene foam
Talas 330 Morgan Ave Brooklyn NY 11211 Telephone: 212-219-0770 Fax: 212-219-0735 www.talasonline.com/
Polyethylene sheet, tapeLocal hardware store
Liquitex acrylic paints, Pelikan inksLocal art supplier
CAROLE DIGNARD graduated from the University of Ottawa (1981 B.Sc. Physics and Italian; 1983 B.A. Classical Studies) and Queen’s University (1986 Master’s in Art Conservation), and after a Getty Fellowship at Harvard University’s Peabody Museum, she joined CCI’s Objects Laboratory in 1989 and is currently senior objects conservator. She has published on various treatment case studies, ultrasonic misting, Nd-YAG laser-cleaning, and adhesives for leather. She
Dignard et al. AIC Objects Specialty Group Postprints, Vol. 19, 2012
127
was program chair of CCI’s Symposium 2007 – Preserving Aboriginal Heritage: Technical and Traditional Approaches, chaired the CAC Code of Ethics revisions (2000), and was coordinator of the ICOM-CC Working Group on Ethnographic Collections during 2005-2011. She is a fellow of IIC (2002) and of AIC (2005), and honorary member of the CAC (2011). Address: Canadian Conservation Institute, 1030 Innes Road Ottawa, Ontario, Canada K1A 0M5. E-mail: [email protected]
AMANDA SALMON has a B.A. Honours in Art History and English from Queen’s University (Kingston, Ontario) as well as diplomas in Collections Conservation and Management from Fleming College (Peterborough, Ontario) and Cabinetmaking from Algonquin College of Applied Arts and Technology (Ottawa, Ontario). She has also completed internships at Parks Canada and the Canadian Conservation Institute (CCI), and has worked extensively in the private sector for several museums and institutions across Ontario including the Ontario Heritage Trust, the Ontario Museum Association, and the Royal Canadian Mounted Police (RCMP). She became an assistant conservator of furniture and heritage interiors at CCI in 2011. Amanda has been a member of the Canadian Association for Conservation of Cultural Property (CAC) since 2004, and is currently their Ottawa regional representative. Address: Canadian Conservation Institute, 1030 Innes Road Ottawa, Ontario, Canada. E-mail: [email protected]
SEASON TSE is a senior conservation scientist at the Canadian Conservation Institute (CCI). She completed her undergraduate degree in Honors Applied Chemistry at the University of Waterloo, received her M.Sc. in Chemistry from Carleton University, in Ottawa, and joined CCI in 1984. Her research focuses on enzyme, washing, deacidification, and bleaching treatments for historic paper and textiles, preservation of iron gall ink documents, and the use of microfade testing to assess risk of light damage among historic documents and works of art in museums and archives. Address: Canadian Conservation Institute, 1030 Innes Road Ottawa, Ontario, Canada.E-mail: [email protected]
This article was presented at the Objects Specialty Group or in the joint Research and Technical Studies/OSG Sessions at the 2012 AIC Annual Meeting in Albuquerque. The papers presented in this publication have been edited for clarity and content but have not undergone a formal process of peer review.

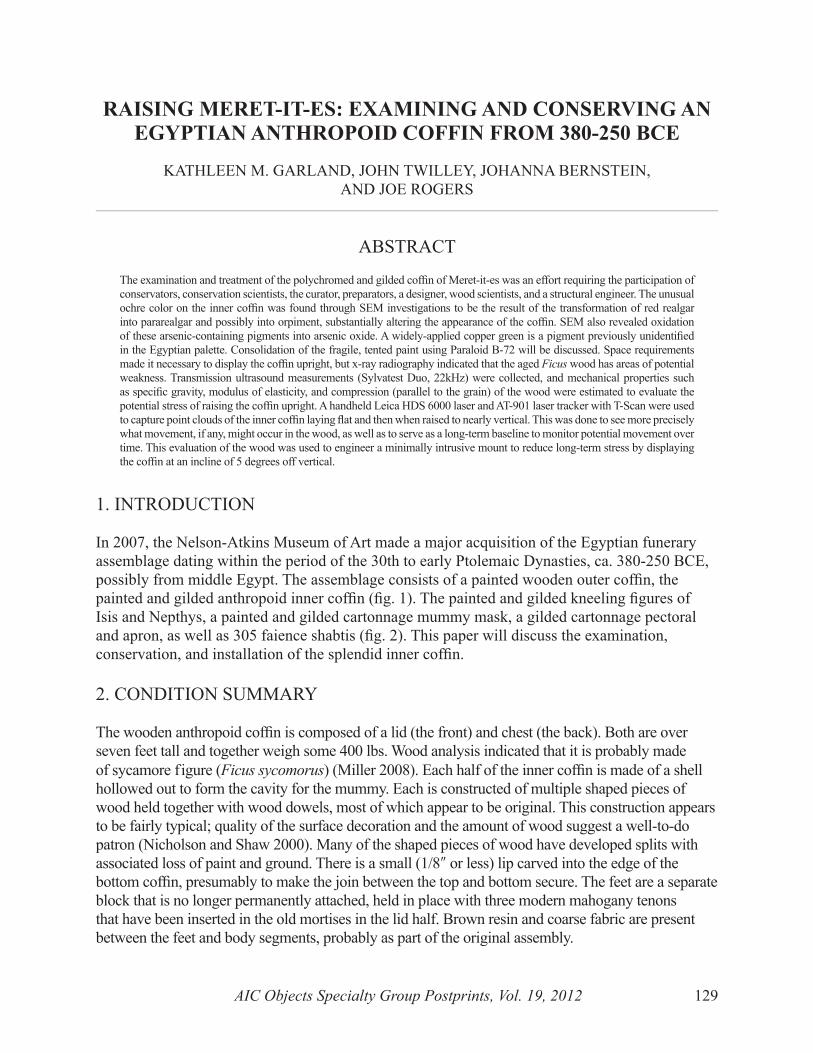
AIC Objects Specialty Group Postprints, Vol. 19, 2012 129
1. INTRODUCTION
In 2007, the Nelson-Atkins Museum of Art made a major acquisition of the Egyptian funerary assemblage dating within the period of the 30th to early Ptolemaic Dynasties, ca. 380-250 BCE, possibly from middle Egypt. The assemblage consists of a painted wooden outer coffin, the painted and gilded anthropoid inner coffin (fig. 1). The painted and gilded kneeling figures of Isis and Nepthys, a painted and gilded cartonnage mummy mask, a gilded cartonnage pectoral and apron, as well as 305 faience shabtis (fig. 2). This paper will discuss the examination, conservation, and installation of the splendid inner coffin.
2. CONDITION SUMMARY
The wooden anthropoid coffin is composed of a lid (the front) and chest (the back). Both are over seven feet tall and together weigh some 400 lbs. Wood analysis indicated that it is probably made of sycamore f igure (Ficus sycomorus) (Miller 2008). Each half of the inner coffin is made of a shell hollowed out to form the cavity for the mummy. Each is constructed of multiple shaped pieces of wood held together with wood dowels, most of which appear to be original. This construction appears to be fairly typical; quality of the surface decoration and the amount of wood suggest a well-to-do patron (Nicholson and Shaw 2000). Many of the shaped pieces of wood have developed splits with associated loss of paint and ground. There is a small (1/8″ or less) lip carved into the edge of the bottom coffin, presumably to make the join between the top and bottom secure. The feet are a separate block that is no longer permanently attached, held in place with three modern mahogany tenons that have been inserted in the old mortises in the lid half. Brown resin and coarse fabric are present between the feet and body segments, probably as part of the original assembly.
ABSTRACT
The examination and treatment of the polychromed and gilded coffin of Meret-it-es was an effort requiring the participation of conservators, conservation scientists, the curator, preparators, a designer, wood scientists, and a structural engineer. The unusual ochre color on the inner coffin was found through SEM investigations to be the result of the transformation of red realgar into pararealgar and possibly into orpiment, substantially altering the appearance of the coffin. SEM also revealed oxidation of these arsenic-containing pigments into arsenic oxide. A widely-applied copper green is a pigment previously unidentified in the Egyptian palette. Consolidation of the fragile, tented paint using Paraloid B-72 will be discussed. Space requirements made it necessary to display the coffin upright, but x-ray radiography indicated that the aged Ficus wood has areas of potential weakness. Transmission ultrasound measurements (Sylvatest Duo, 22kHz) were collected, and mechanical properties such as specific gravity, modulus of elasticity, and compression (parallel to the grain) of the wood were estimated to evaluate the potential stress of raising the coffin upright. A handheld Leica HDS 6000 laser and AT-901 laser tracker with T-Scan were used to capture point clouds of the inner coffin laying flat and then when raised to nearly vertical. This was done to see more precisely what movement, if any, might occur in the wood, as well as to serve as a long-term baseline to monitor potential movement over time. This evaluation of the wood was used to engineer a minimally intrusive mount to reduce long-term stress by displaying the coffin at an incline of 5 degrees off vertical.
rAIsInG MereT-IT-es: eXAMInInG AnD COnservInG An eGYpTIAn AnTHrOpOID COFFIn FrOM 380-250 BCe
KATHLEEN M. GARLAND, JOHN TWILLEY, JOHANNA BERNSTEIN, AND JOE ROGERS
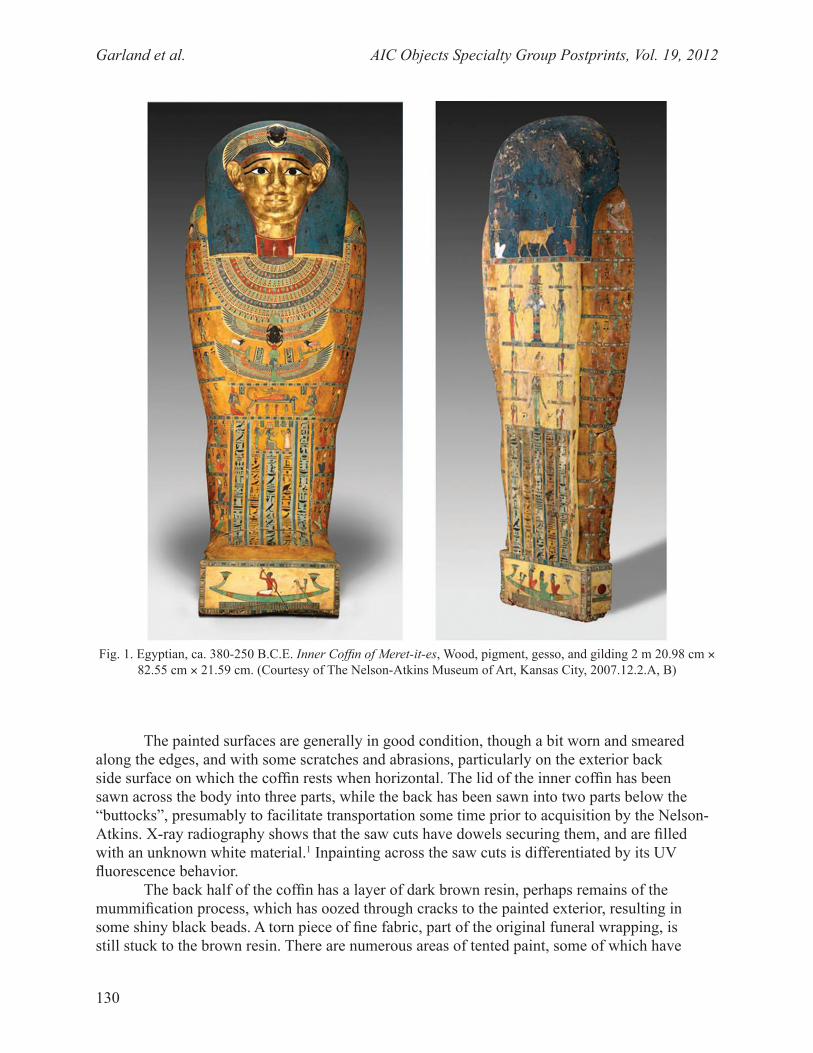
Garland et al. AIC Objects Specialty Group Postprints, Vol. 19, 2012
130
The painted surfaces are generally in good condition, though a bit worn and smeared along the edges, and with some scratches and abrasions, particularly on the exterior back side surface on which the coffin rests when horizontal. The lid of the inner coffin has been sawn across the body into three parts, while the back has been sawn into two parts below the “buttocks”, presumably to facilitate transportation some time prior to acquisition by the Nelson-Atkins. X-ray radiography shows that the saw cuts have dowels securing them, and are filled with an unknown white material.1 Inpainting across the saw cuts is differentiated by its UV fluorescence behavior.
The back half of the coffin has a layer of dark brown resin, perhaps remains of the mummification process, which has oozed through cracks to the painted exterior, resulting in some shiny black beads. A torn piece of fine fabric, part of the original funeral wrapping, is still stuck to the brown resin. There are numerous areas of tented paint, some of which have
Fig. 1. Egyptian, ca. 380-250 B.C.E. Inner Coffin of Meret-it-es, Wood, pigment, gesso, and gilding 2 m 20.98 cm × 82.55 cm × 21.59 cm. (Courtesy of The Nelson-Atkins Museum of Art, Kansas City, 2007.12.2.A, B)
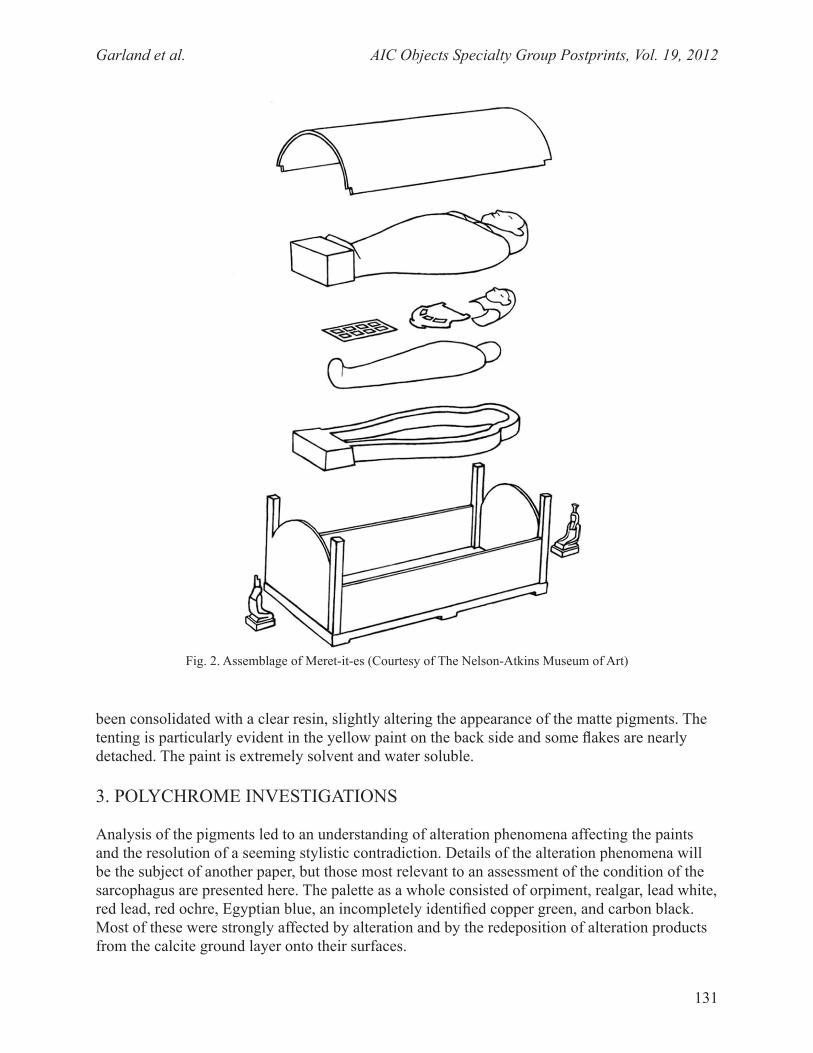
Garland et al. AIC Objects Specialty Group Postprints, Vol. 19, 2012
131
been consolidated with a clear resin, slightly altering the appearance of the matte pigments. The tenting is particularly evident in the yellow paint on the back side and some flakes are nearly detached. The paint is extremely solvent and water soluble.
3. POLYCHROME INVESTIGATIONS
Analysis of the pigments led to an understanding of alteration phenomena affecting the paints and the resolution of a seeming stylistic contradiction. Details of the alteration phenomena will be the subject of another paper, but those most relevant to an assessment of the condition of the sarcophagus are presented here. The palette as a whole consisted of orpiment, realgar, lead white, red lead, red ochre, Egyptian blue, an incompletely identified copper green, and carbon black. Most of these were strongly affected by alteration and by the redeposition of alteration products from the calcite ground layer onto their surfaces.
Fig. 2. Assemblage of Meret-it-es (Courtesy of The Nelson-Atkins Museum of Art)
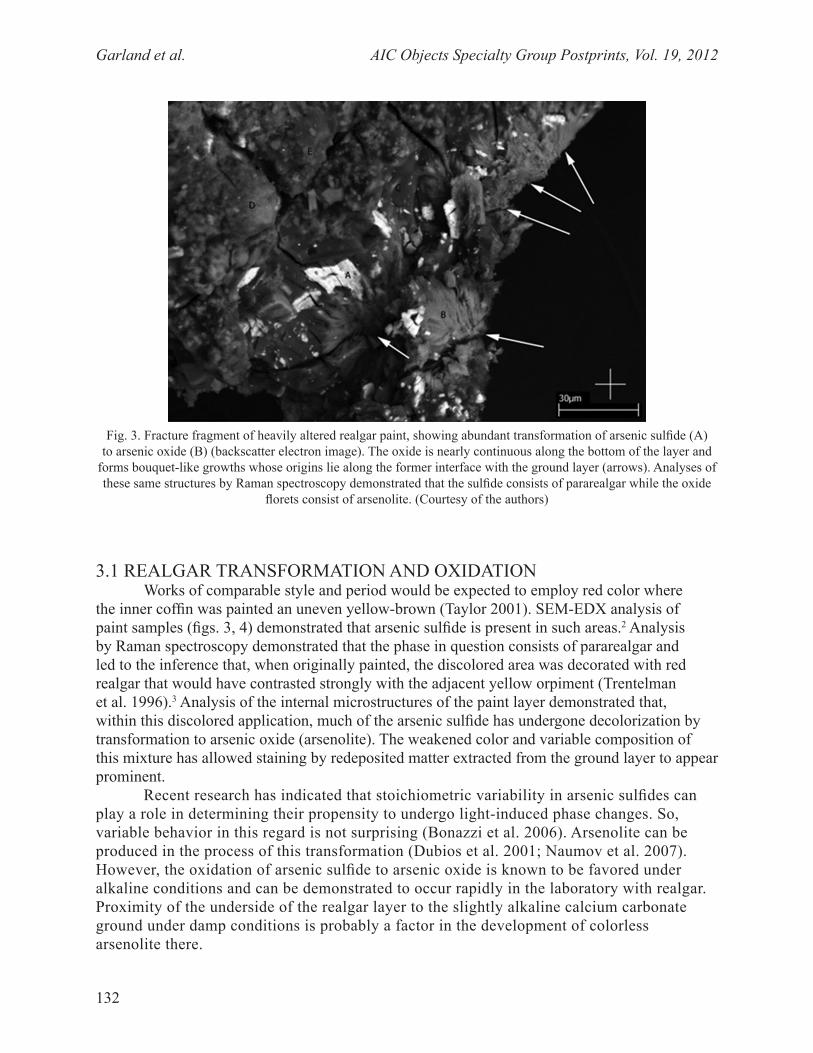
Garland et al. AIC Objects Specialty Group Postprints, Vol. 19, 2012
132
3.1 REALGAR TRANSFORMATION AND OXIDATIONWorks of comparable style and period would be expected to employ red color where
the inner coffin was painted an uneven yellow-brown (Taylor 2001). SEM-EDX analysis of paint samples (figs. 3, 4) demonstrated that arsenic sulfide is present in such areas.2 Analysis by Raman spectroscopy demonstrated that the phase in question consists of pararealgar and led to the inference that, when originally painted, the discolored area was decorated with red realgar that would have contrasted strongly with the adjacent yellow orpiment (Trentelman et al. 1996).3 Analysis of the internal microstructures of the paint layer demonstrated that, within this discolored application, much of the arsenic sulfide has undergone decolorization by transformation to arsenic oxide (arsenolite). The weakened color and variable composition of this mixture has allowed staining by redeposited matter extracted from the ground layer to appear prominent.
Recent research has indicated that stoichiometric variability in arsenic sulfides can play a role in determining their propensity to undergo light-induced phase changes. So, variable behavior in this regard is not surprising (Bonazzi et al. 2006). Arsenolite can be produced in the process of this transformation (Dubios et al. 2001; Naumov et al. 2007). However, the oxidation of arsenic sulfide to arsenic oxide is known to be favored under alkaline conditions and can be demonstrated to occur rapidly in the laboratory with realgar. Proximity of the underside of the realgar layer to the slightly alkaline calcium carbonate ground under damp conditions is probably a factor in the development of colorless arsenolite there.
Fig. 3. Fracture fragment of heavily altered realgar paint, showing abundant transformation of arsenic sulfide (A) to arsenic oxide (B) (backscatter electron image). The oxide is nearly continuous along the bottom of the layer and
forms bouquet-like growths whose origins lie along the former interface with the ground layer (arrows). Analyses of these same structures by Raman spectroscopy demonstrated that the sulfide consists of pararealgar while the oxide
florets consist of arsenolite. (Courtesy of the authors)
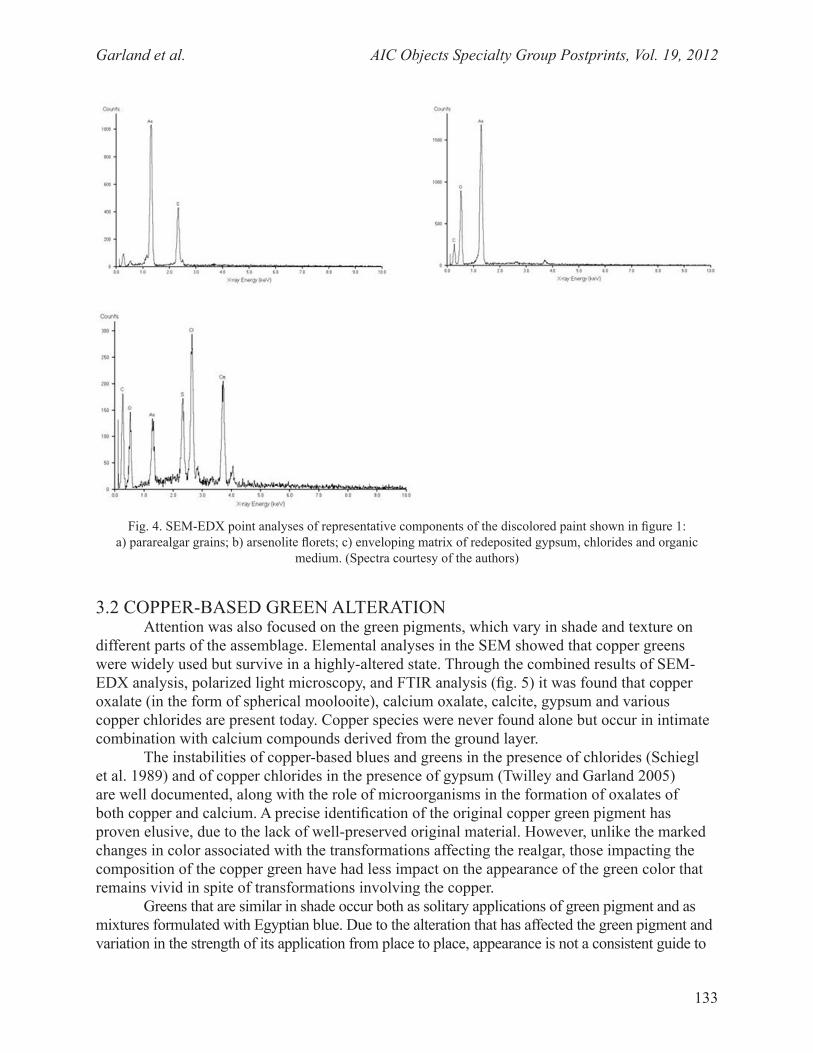
Garland et al. AIC Objects Specialty Group Postprints, Vol. 19, 2012
133
3.2 COPPER-BASED GREEN ALTERATIONAttention was also focused on the green pigments, which vary in shade and texture on
different parts of the assemblage. Elemental analyses in the SEM showed that copper greens were widely used but survive in a highly-altered state. Through the combined results of SEM-EDX analysis, polarized light microscopy, and FTIR analysis (fig. 5) it was found that copper oxalate (in the form of spherical moolooite), calcium oxalate, calcite, gypsum and various copper chlorides are present today. Copper species were never found alone but occur in intimate combination with calcium compounds derived from the ground layer.
The instabilities of copper-based blues and greens in the presence of chlorides (Schiegl et al. 1989) and of copper chlorides in the presence of gypsum (Twilley and Garland 2005) are well documented, along with the role of microorganisms in the formation of oxalates of both copper and calcium. A precise identification of the original copper green pigment has proven elusive, due to the lack of well-preserved original material. However, unlike the marked changes in color associated with the transformations affecting the realgar, those impacting the composition of the copper green have had less impact on the appearance of the green color that remains vivid in spite of transformations involving the copper.
Greens that are similar in shade occur both as solitary applications of green pigment and as mixtures formulated with Egyptian blue. Due to the alteration that has affected the green pigment and variation in the strength of its application from place to place, appearance is not a consistent guide to
Fig. 4. SEM-EDX point analyses of representative components of the discolored paint shown in figure 1: a) pararealgar grains; b) arsenolite florets; c) enveloping matrix of redeposited gypsum, chlorides and organic
medium. (Spectra courtesy of the authors)
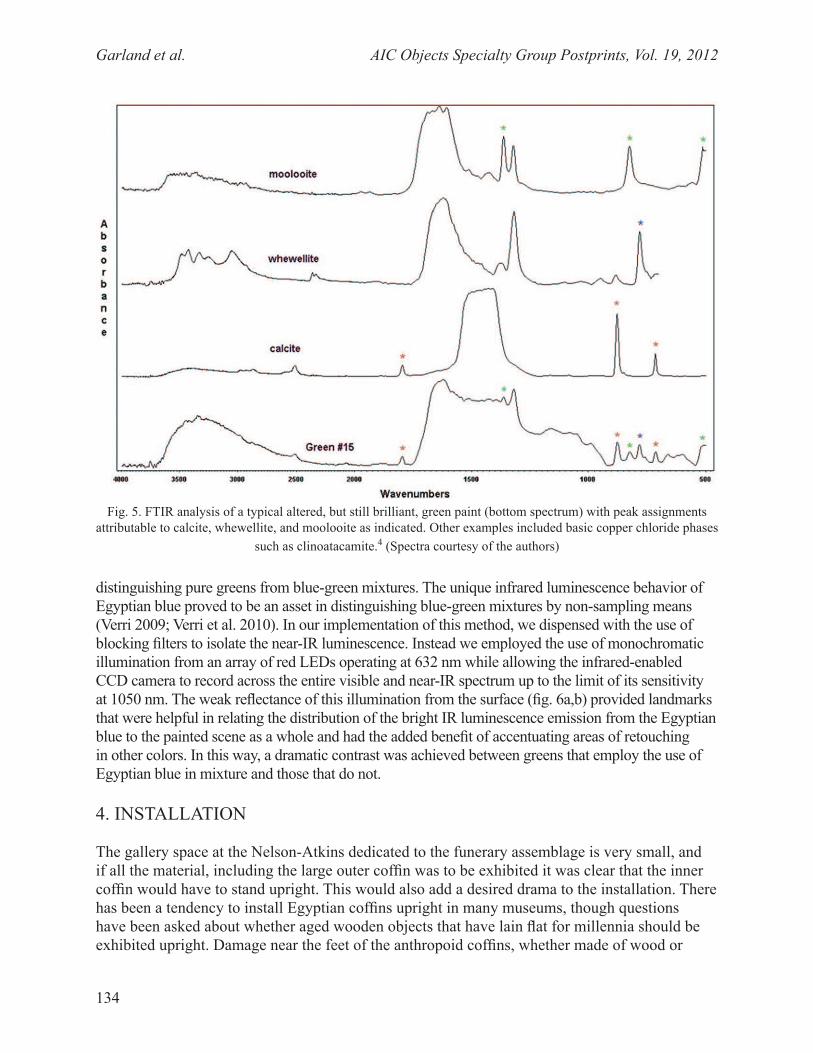
Garland et al. AIC Objects Specialty Group Postprints, Vol. 19, 2012
134
distinguishing pure greens from blue-green mixtures. The unique infrared luminescence behavior of Egyptian blue proved to be an asset in distinguishing blue-green mixtures by non-sampling means (Verri 2009; Verri et al. 2010). In our implementation of this method, we dispensed with the use of blocking filters to isolate the near-IR luminescence. Instead we employed the use of monochromatic illumination from an array of red LEDs operating at 632 nm while allowing the infrared-enabled CCD camera to record across the entire visible and near-IR spectrum up to the limit of its sensitivity at 1050 nm. The weak reflectance of this illumination from the surface (fig. 6a,b) provided landmarks that were helpful in relating the distribution of the bright IR luminescence emission from the Egyptian blue to the painted scene as a whole and had the added benefit of accentuating areas of retouching in other colors. In this way, a dramatic contrast was achieved between greens that employ the use of Egyptian blue in mixture and those that do not.
4. INSTALLATION
The gallery space at the Nelson-Atkins dedicated to the funerary assemblage is very small, and if all the material, including the large outer coffin was to be exhibited it was clear that the inner coffin would have to stand upright. This would also add a desired drama to the installation. There has been a tendency to install Egyptian coffins upright in many museums, though questions have been asked about whether aged wooden objects that have lain flat for millennia should be exhibited upright. Damage near the feet of the anthropoid coffins, whether made of wood or
Fig. 5. FTIR analysis of a typical altered, but still brilliant, green paint (bottom spectrum) with peak assignments attributable to calcite, whewellite, and moolooite as indicated. Other examples included basic copper chloride phases
such as clinoatacamite.4 (Spectra courtesy of the authors)
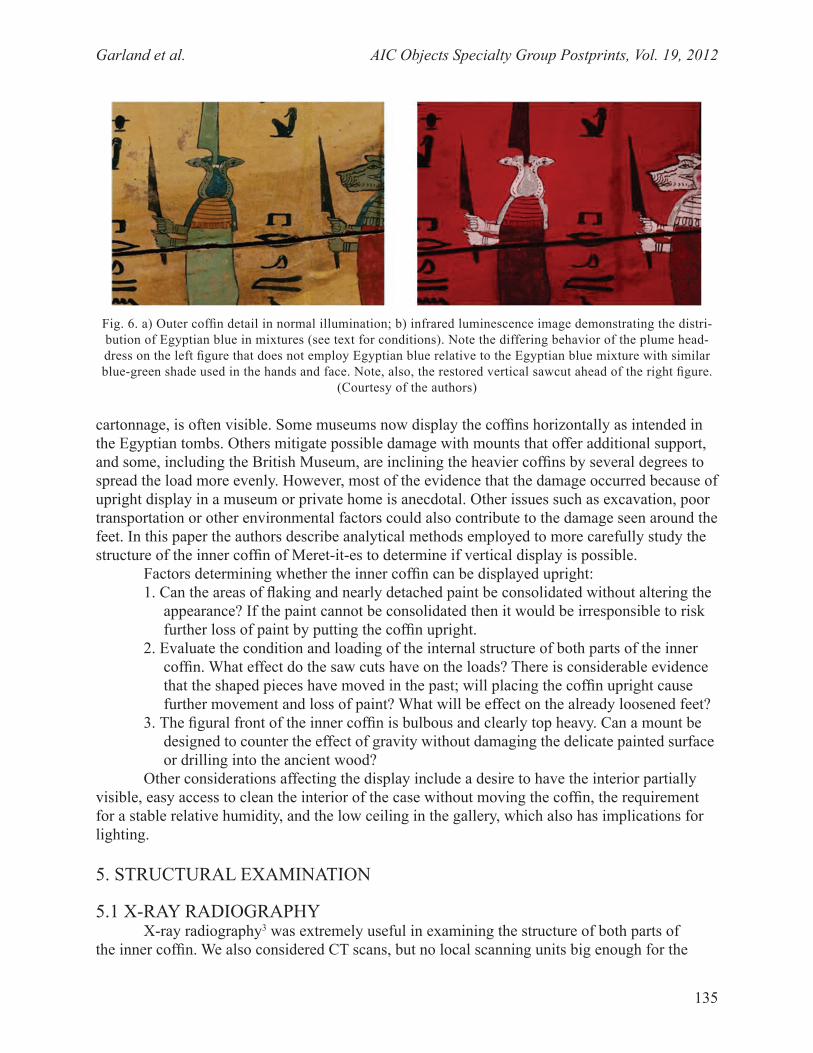
Garland et al. AIC Objects Specialty Group Postprints, Vol. 19, 2012
135
cartonnage, is often visible. Some museums now display the coffins horizontally as intended in the Egyptian tombs. Others mitigate possible damage with mounts that offer additional support, and some, including the British Museum, are inclining the heavier coffins by several degrees to spread the load more evenly. However, most of the evidence that the damage occurred because of upright display in a museum or private home is anecdotal. Other issues such as excavation, poor transportation or other environmental factors could also contribute to the damage seen around the feet. In this paper the authors describe analytical methods employed to more carefully study the structure of the inner coffin of Meret-it-es to determine if vertical display is possible.
Factors determining whether the inner coffin can be displayed upright:1. Can the areas of flaking and nearly detached paint be consolidated without altering the
appearance? If the paint cannot be consolidated then it would be irresponsible to risk further loss of paint by putting the coffin upright.
2. Evaluate the condition and loading of the internal structure of both parts of the inner coffin. What effect do the saw cuts have on the loads? There is considerable evidence that the shaped pieces have moved in the past; will placing the coffin upright cause further movement and loss of paint? What will be effect on the already loosened feet?
3. The figural front of the inner coffin is bulbous and clearly top heavy. Can a mount be designed to counter the effect of gravity without damaging the delicate painted surface or drilling into the ancient wood?
Other considerations affecting the display include a desire to have the interior partially visible, easy access to clean the interior of the case without moving the coffin, the requirement for a stable relative humidity, and the low ceiling in the gallery, which also has implications for lighting.
5. STRUCTURAL EXAMINATION
5.1 X-RAY RADIOGRAPHYX-ray radiography3 was extremely useful in examining the structure of both parts of
the inner coffin. We also considered CT scans, but no local scanning units big enough for the
Fig. 6. a) Outer coffin detail in normal illumination; b) infrared luminescence image demonstrating the distri-bution of Egyptian blue in mixtures (see text for conditions). Note the differing behavior of the plume head-dress on the left figure that does not employ Egyptian blue relative to the Egyptian blue mixture with similar blue-green shade used in the hands and face. Note, also, the restored vertical sawcut ahead of the right figure.
(Courtesy of the authors)
Garland et al. AIC Objects Specialty Group Postprints, Vol. 19, 2012
136
anthropoid shape were available. Surprisingly, it is the back section that is of most concern, not the much larger and top-heavy front. The wood in the back has a number of defects. Of particular concern are two vertical splits running down the center of the main load-bearing wooden structure. The lower split is accompanied by a large wood patch and gesso fills of undetermined material.
5.2 ULTRASOUNDRough estimates of the physical properties of the wood were calculated). The detached
foot section was weighed to estimate the volume of the foot section and then used to estimate the density of the wood as 400.9 kg/m3.
The inner coffin was also examined with a through transmission ultrasound system (Sylvatest Duo, 22 kHz) in order to determine if any past or present biological decay existed. The probes were used only on bare wood surfaces, i.e. on the interior of the coffin or on areas where the paint was lost.
In general, all of the speeds of sound measurements were consistent with structurally sound wood (Dundar and Ross 2009, Ross 2010). No evidence of biological decay of any type is found on the coffin lid, which would have been indicated by a shift in the ultrasonic wave speed. The bottom of the coffin is also largely free of any evidence of decay. However, ultrasound testing near the center of the bottom “leg” area gave results that are indicative of a structural anomaly, i.e. a crack, void or biological decay. The speed of sound transmission values in this area are significantly lower than expected for solid wood indicating what appears to be a semi-planar crack, also seen with x-ray radiography. Because of the orientation of the crack, neither x-ray radiography nor ultrasound is able to image the defect in this area completely, nor is it able to indicate the depth of the void/crack. However, the combination of x-ray radiography and ultrasound suggest the defect is of significant size and in a load-bearing area for vertical orientation.
5.3 LASER SCANNINGLaser scanning was proposed to examine how much movement might occur as the top-
heavy, doweled, multi-section inner coffin lid was lifted to a vertical position. The coffin lid was scanned using a high precision Leica T-Scan laser tracker and a non-contact Leica T-Scan hand scanner.6 A Leica HDS 6000 system provided a supplemental measuring tool to the hand scanner, providing dense data spread out over a large area. The ultra-high speed hand scanner rapidly gathers millions of points with an accuracy of ±20 μm (0.00079″). The optical device works in varying light conditions, whether measurements are captured in direct sunlight or in an industrial setting with sharply changing environmental light. The scanner allows the operator to scan a much wider range of black and shiny surfaces than other technologies. The measurements were taken when the coffin was horizontal, then repeated when the coffin was near vertical. The two sets of data were processed using Geomagic software and reduced to mesh models from which a color-coded difference map was generated (fig. 7). No movement was observed when the piece was lifted except in the separate section forming the feet, which was already semi-detached. The scans have been archived and can be used as a baseline in the future to determine if there has been movement over the years.5
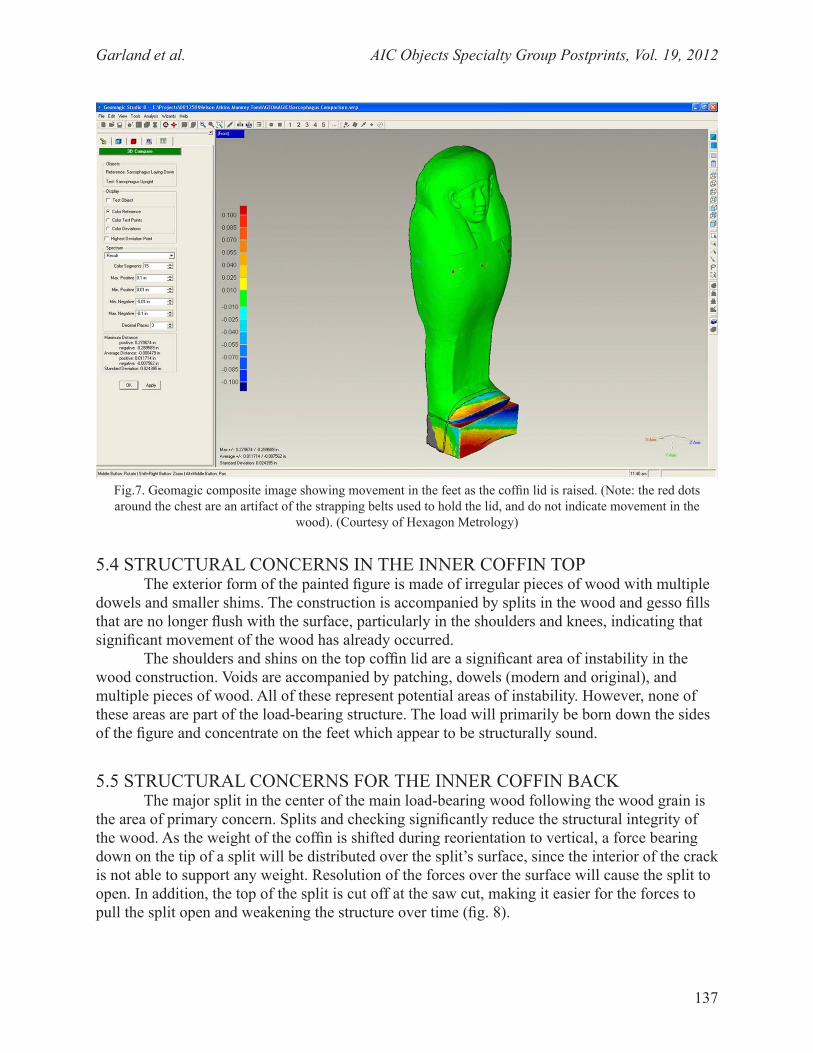
Garland et al. AIC Objects Specialty Group Postprints, Vol. 19, 2012
137
5.4 STRUCTURAL CONCERNS IN THE INNER COFFIN TOPThe exterior form of the painted figure is made of irregular pieces of wood with multiple
dowels and smaller shims. The construction is accompanied by splits in the wood and gesso fills that are no longer flush with the surface, particularly in the shoulders and knees, indicating that significant movement of the wood has already occurred.
The shoulders and shins on the top coffin lid are a significant area of instability in the wood construction. Voids are accompanied by patching, dowels (modern and original), and multiple pieces of wood. All of these represent potential areas of instability. However, none of these areas are part of the load-bearing structure. The load will primarily be born down the sides of the figure and concentrate on the feet which appear to be structurally sound.
5.5 STRUCTURAL CONCERNS FOR THE INNER COFFIN BACKThe major split in the center of the main load-bearing wood following the wood grain is
the area of primary concern. Splits and checking significantly reduce the structural integrity of the wood. As the weight of the coffin is shifted during reorientation to vertical, a force bearing down on the tip of a split will be distributed over the split’s surface, since the interior of the crack is not able to support any weight. Resolution of the forces over the surface will cause the split to open. In addition, the top of the split is cut off at the saw cut, making it easier for the forces to pull the split open and weakening the structure over time (fig. 8).
Fig.7. Geomagic composite image showing movement in the feet as the coffin lid is raised. (Note: the red dots around the chest are an artifact of the strapping belts used to hold the lid, and do not indicate movement in the
wood). (Courtesy of Hexagon Metrology)
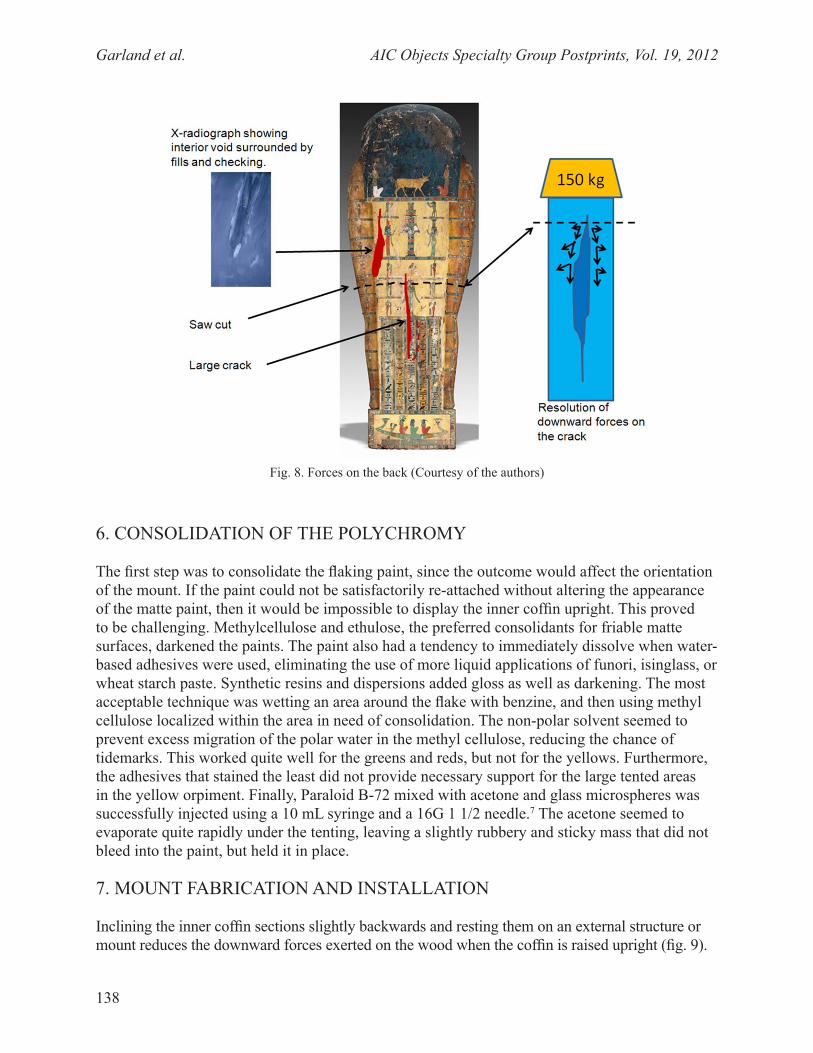
Garland et al. AIC Objects Specialty Group Postprints, Vol. 19, 2012
138
6. CONSOLIDATION OF THE POLYCHROMY
The first step was to consolidate the flaking paint, since the outcome would affect the orientation of the mount. If the paint could not be satisfactorily re-attached without altering the appearance of the matte paint, then it would be impossible to display the inner coffin upright. This proved to be challenging. Methylcellulose and ethulose, the preferred consolidants for friable matte surfaces, darkened the paints. The paint also had a tendency to immediately dissolve when water-based adhesives were used, eliminating the use of more liquid applications of funori, isinglass, or wheat starch paste. Synthetic resins and dispersions added gloss as well as darkening. The most acceptable technique was wetting an area around the flake with benzine, and then using methyl cellulose localized within the area in need of consolidation. The non-polar solvent seemed to prevent excess migration of the polar water in the methyl cellulose, reducing the chance of tidemarks. This worked quite well for the greens and reds, but not for the yellows. Furthermore, the adhesives that stained the least did not provide necessary support for the large tented areas in the yellow orpiment. Finally, Paraloid B-72 mixed with acetone and glass microspheres was successfully injected using a 10 mL syringe and a 16G 1 1/2 needle.7 The acetone seemed to evaporate quite rapidly under the tenting, leaving a slightly rubbery and sticky mass that did not bleed into the paint, but held it in place.
7. MOUNT FABRICATION AND INSTALLATION
Inclining the inner coffin sections slightly backwards and resting them on an external structure or mount reduces the downward forces exerted on the wood when the coffin is raised upright (fig. 9).
Fig. 8. Forces on the back (Courtesy of the authors)
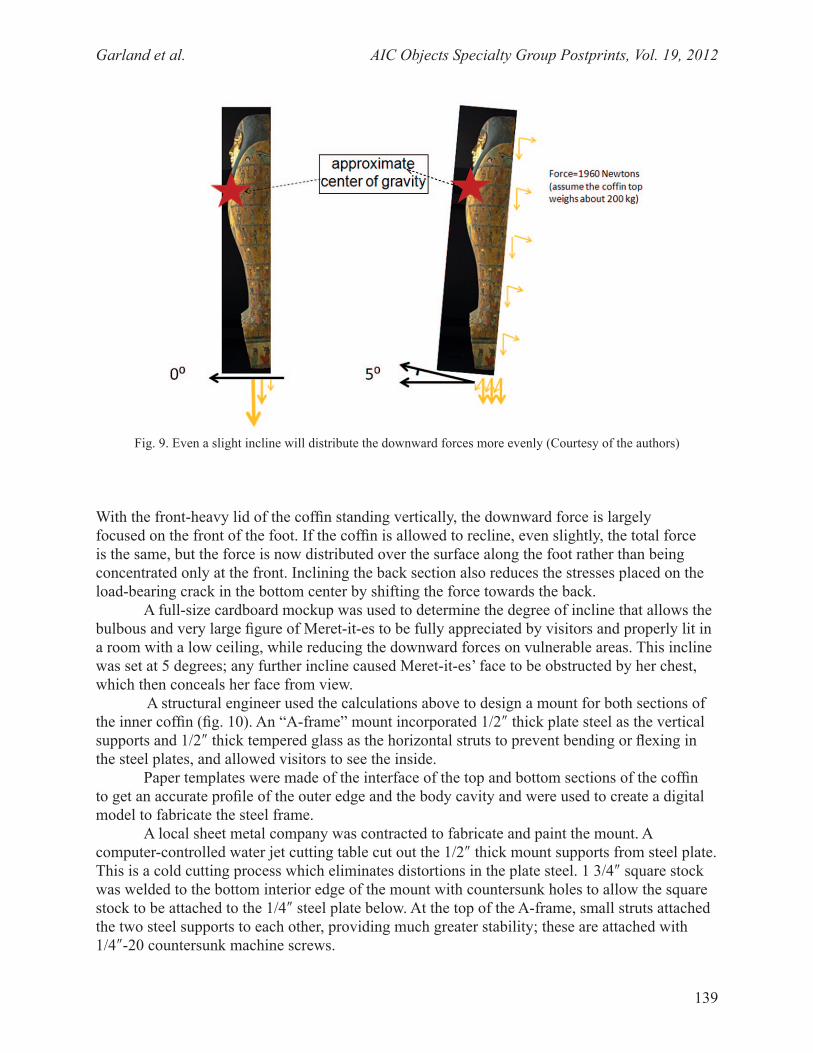
Garland et al. AIC Objects Specialty Group Postprints, Vol. 19, 2012
139
With the front-heavy lid of the coffin standing vertically, the downward force is largely focused on the front of the foot. If the coffin is allowed to recline, even slightly, the total force is the same, but the force is now distributed over the surface along the foot rather than being concentrated only at the front. Inclining the back section also reduces the stresses placed on the load-bearing crack in the bottom center by shifting the force towards the back.
A full-size cardboard mockup was used to determine the degree of incline that allows the bulbous and very large figure of Meret-it-es to be fully appreciated by visitors and properly lit in a room with a low ceiling, while reducing the downward forces on vulnerable areas. This incline was set at 5 degrees; any further incline caused Meret-it-es’ face to be obstructed by her chest, which then conceals her face from view.
A structural engineer used the calculations above to design a mount for both sections of the inner coffin (fig. 10). An “A-frame” mount incorporated 1/2″ thick plate steel as the vertical supports and 1/2″ thick tempered glass as the horizontal struts to prevent bending or flexing in the steel plates, and allowed visitors to see the inside.
Paper templates were made of the interface of the top and bottom sections of the coffin to get an accurate profile of the outer edge and the body cavity and were used to create a digital model to fabricate the steel frame.
A local sheet metal company was contracted to fabricate and paint the mount. A computer-controlled water jet cutting table cut out the 1/2″ thick mount supports from steel plate. This is a cold cutting process which eliminates distortions in the plate steel. 1 3/4″ square stock was welded to the bottom interior edge of the mount with countersunk holes to allow the square stock to be attached to the 1/4″ steel plate below. At the top of the A-frame, small struts attached the two steel supports to each other, providing much greater stability; these are attached with 1/4″-20 countersunk machine screws.
Fig. 9. Even a slight incline will distribute the downward forces more evenly (Courtesy of the authors)
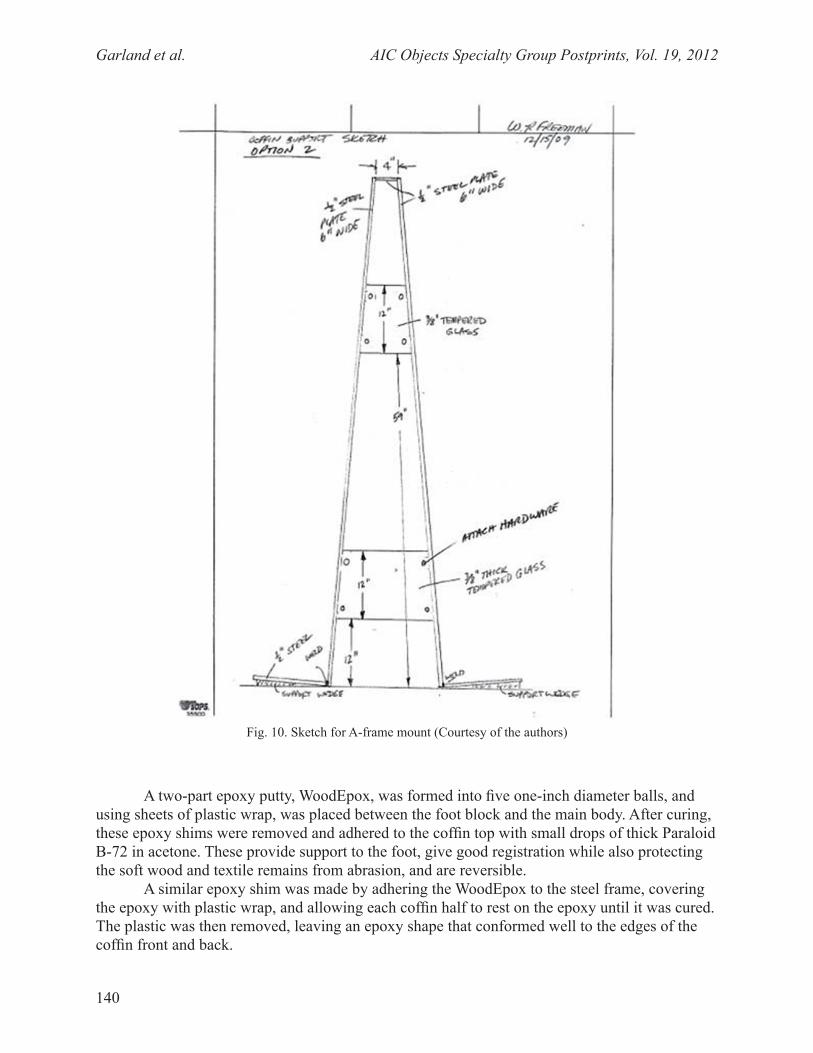
Garland et al. AIC Objects Specialty Group Postprints, Vol. 19, 2012
140
A two-part epoxy putty, WoodEpox, was formed into five one-inch diameter balls, and using sheets of plastic wrap, was placed between the foot block and the main body. After curing, these epoxy shims were removed and adhered to the coffin top with small drops of thick Paraloid B-72 in acetone. These provide support to the foot, give good registration while also protecting the soft wood and textile remains from abrasion, and are reversible.
A similar epoxy shim was made by adhering the WoodEpox to the steel frame, covering the epoxy with plastic wrap, and allowing each coffin half to rest on the epoxy until it was cured. The plastic was then removed, leaving an epoxy shape that conformed well to the edges of the coffin front and back.
Fig. 10. Sketch for A-frame mount (Courtesy of the authors)
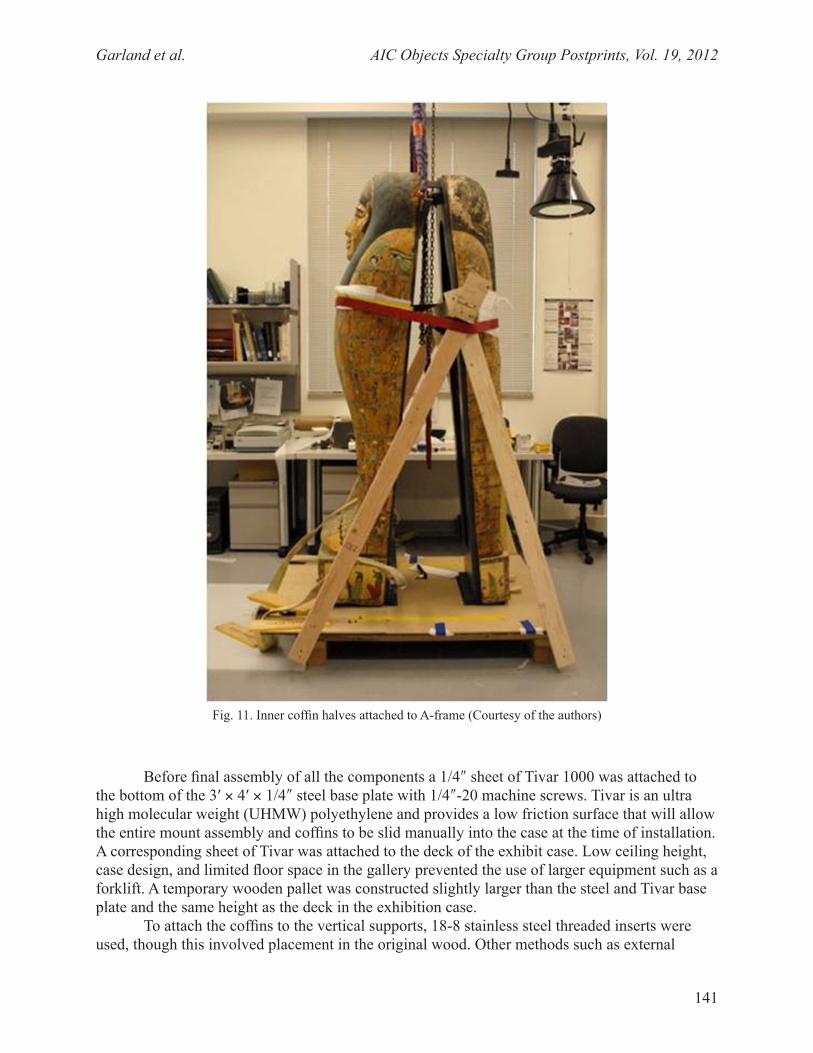
Garland et al. AIC Objects Specialty Group Postprints, Vol. 19, 2012
141
Before final assembly of all the components a 1/4″ sheet of Tivar 1000 was attached to the bottom of the 3′ × 4′ × 1/4″ steel base plate with 1/4″-20 machine screws. Tivar is an ultra high molecular weight (UHMW) polyethylene and provides a low friction surface that will allow the entire mount assembly and coffins to be slid manually into the case at the time of installation. A corresponding sheet of Tivar was attached to the deck of the exhibit case. Low ceiling height, case design, and limited floor space in the gallery prevented the use of larger equipment such as a forklift. A temporary wooden pallet was constructed slightly larger than the steel and Tivar base plate and the same height as the deck in the exhibition case.
To attach the coffins to the vertical supports, 18-8 stainless steel threaded inserts were used, though this involved placement in the original wood. Other methods such as external
Fig. 11. Inner coffin halves attached to A-frame (Courtesy of the authors)
Garland et al. AIC Objects Specialty Group Postprints, Vol. 19, 2012
142
clips over the polychrome surface and inserts in several of the empty mortises were considered. External clips are likely to damage the painted surfaces, while concerns about harming the soft wood with new tenon inserts, and a desire to minimize the profile of the mount, made the threaded inserts the best option.
During the assembly it became clear that the center of gravity of the front section had not been sufficiently minimized by the 5 degree angle, creating a tendency for the coffin to fall forward. One of the threaded inserts pulled out, so 2 1/2″ stainless steel #10 wood screws were added. After both sections of the coffin were secured to the mount (fig. 11), 1/2″ tempered glass struts were added to stiffen the mounts and to prevent movement in the 1/2″ steel, while allowing visitors to view the inside of the coffin. Aluminum channels to hold the glass struts were attached to the mounts at locations determined by the structural engineer. The struts were adhered to the aluminum channels using a structural silicone resin. The silicone was allowed to off-gas several weeks before the coffin was installed into the exhibition case.
8. CONCLUSIONS AND RECOMMENDATIONS
The long-term effects of reorienting the structure remain unknown. In other words, even though no structural shifting occurred during reorientation, it is not possible to predict what will happen over time, even when the vertical load has been reduced by inclining the inner coffin halves by 5 degrees. Neither the fatigue strength of 2,500 year-old wood nor the pull-out strength of the doweled structure can be predicted with accuracy, though a finite element model could be useful in comparing the loading of the inner coffin horizontally and vertically. However, exhibition schedules do not usually allow for the time and research needed to create effective models. Further studies, in addition to finite element modeling, might include:
1. Internal imaging of the inner coffin using x-ray CT or electron beam CT.2. Completion of laser scanning of interior surface of lid and both surfaces of the bottom
as per the needs of the model. Recent developments in Reflectance Transformation Imaging (RTI) with photogrammetry may provide an alternative to laser scanning, and it would be worth comparing the data.
3. Wood identification of the dowel and tenon materials, old and new.4. Material identification of restoration materials in saw-cut joints.5. Construction of model joints with accompanying mechanical stress testing.6. Work with other institutions to document changes in similar coffins displayed upright.There is still much work to be done evaluating the pros and cons of the upright display
of Egyptian coffins; the authors offer a few suggestions that may aid in future discussions. The argument that the coffins were intended to lay flat, and have been laying flat for centuries is a powerful one, and should remain so, but that discussion is beyond the scope of this paper. First of all, it is important to scientifically evaluate the structure of each piece individually and understand that one single solution is not going to work for all cases. Many common and cost-effective non-destructive examination techniques used by conservators can be adapted for this purpose. Ideally a materials scientist, structural engineer, or similar specialist should be consulted. Documenting and disseminating the results will establish a significant body of knowledge on the structure of mummy coffins so that these ancient, fragile structures will continue to inform and delight us.
Garland et al. AIC Objects Specialty Group Postprints, Vol. 19, 2012
143
ACKNOWLEDGEMENTS
The Andrew W. Mellon Foundation; Bill Freeman, Honeywell Federal Manufacturing & Technologies, LLC; Bob Ross, Forest Products Lab; Turker Dundar, Istanbul University; Ryan Woodward, EpicScan; Rina Molari, Hexagon Metrology; Arlen Heginbotham, J.P. Getty Museum.
The Nelson-Atkins Museum of Art: Marc Wilson, Robert Cohon, Elisabeth Batchelor, Paul Benson, Robert Krueger, Dinah Henderson; Lou Meluso, Amanda Ramirez, Mark Milani, Chris Holle, Jack VanDerWerth, Chuck Flook, John Laney.
NOTES
1. X-radiography was done using 4-9 min. exposure, 2 mA, 185 kV, Type AA and T X-ray Film.
2. Electron Microscopy was performed on a LEO-1550 Field Emission microscope with Robinson backscatter electron detector operated at 20 kV. Elemental analysis was performed by an EDAX Si(Li) X-ray spectrometer.
3. Raman spectroscopy was performed on fracture fragments using a Chromex Senturion Spectrometer with 785 nm excitation recording the Stokes emission over the range of 180–1690 cm–1. Spectra were background subtracted using GRAMS-A1 software (ThermoScientific: www.thermoscientific.com/ecomm/servlet/productscatalog?storeId=11152&categoryId=81850. (accessed 06/22/12)). Identifications were based upon in-house standards and reference spectra contained in the RRUFF database: http://rruff.info/ (accessed 06/22/12).
4. FTIR spectroscopy was performed on a Mattson Galaxy 5020 Spectrometer with Quantum microscope equipped with a liquid nitrogen-cooled MCT detector operating over the range of 500-4000 cm–1. Samples were flattened and recorded in transmission on a single-crystal diamond plate.
5. Reflectance Transformation Imaging (RTI) or RTI combined with photogrammetry is a tool that could serve a similar purpose, and is likely to be more cost-effective and timely. For more information see http://culturalheritageimaging.com.
6. Laser scanning and data were provided by Rina Molari, Application Engineer, Hexagon Metrology Services, www.hexagonmetrology.com.us and Ryan Woodward, Director of Business Development, Epic Scan Ltd., www.epicscan.com. Geomagic software, from www.geomagic.com.
7. Suggested by Arlen Heginbotham, conservator at the J.P. Getty Museum. The mixture was as thick as could be safely forced through the syringe.
REFERENCES
Garland et al. AIC Objects Specialty Group Postprints, Vol. 19, 2012
144
Bonazzi, P., L. Bindi, G. Pratesi, and S. Menchetti. 2006. Light-induced changes in molecular arsenic sulphides: state of the art and new evidence by single-crystal X-ray diffraction. American Mineralogist 91:1323–30.
Dubios, H., S. Meloni, E. Metz, B. Schoonhoven, and A.Wallert. 2001. Breakdown processes of orpiment- and realgar-based sixteenth-century paints. In A Joint Meeting of ICOM-CC Working Groups Paintings 1 & 2 and The Paintings Section, UKIC, London, 10–11 September 2001, ed. A. Phenix. 75-79.
Dundar, Turker, and R.J. Ross. Condition Assessment of a 2500 Year Old Mummy Coffin, Undated manuscript received by email, June 1, 2009.
Forest Products Laboratory. 2010. Wood handbook – wood as an engineering material. General Technical Report FPL-GTR-190. Madison: U.S. Department of Agriculture, Forest Service, Forest Products Laboratory.
Miller, Regis B. Report dated October 5, 2008.
Ross, R.J., Forest Products Laboratory, personal communication: For the two strength values, the formula in the Wood Handbook was used (Forest Products Laboratory 2010).
Naumov, P., P. Makreski, and G. Jovanovski. 2007. Direct atomic scale observation of linkage isomerization of As4S4 clusters during the photoinduced transition of realgar to pararealgar. Inorganic Chemistry 46:10624–31.
Nicholson, P.T., and I. Shaw, eds. 2000. Ancient Egyptian materials and technology. Cambridge: Cambridge University Press.
Schiegl, S., K.L. Weiner, and A. El Goresy. 1989. Discovery of copper chloride cancer in ancient Egyptian polychromic wall paintings and faience: a developing archaeological disaster. Naturwissenschaften 76:393–400.
Taylor, J. 2001. Patterns of coloring on ancient Egyptian coffins. In Colour and painting in ancient Egypt, W.V. Davies, ed. London: British Museum. 164–181.
Trentelman, K., L. Stodulski, and M. Pavlosky. 1996. Characterization of pararealgar and other light-induced transformation products from realgar by Raman microspectroscopy. Analytical Chemistry 68(10):1755–61.
Twilley, J., and K. M. Garland. 2005. Painting materials and deterioration phenomena in a Yuan Dynasty wall painting from the Guangsheng Lower Monastery, Shanxi. In Scientific Research on the Pictorial Arts of Asia, Proceedings of the Second Forbes Symposium at the Freer Gallery of Art, P. Jett, J. Winter, and B. McCarthy, eds. Washington, D.C.: Freer Gallery of Art. 109–119.
Verri, G. 2009. The spatial characterisation of Egyptian blue, Han blue and Han purple by photo-induced luminescence digital imaging. Analytical and Bioanalytical Chemistry 394(4):1011–1021.
Garland et al. AIC Objects Specialty Group Postprints, Vol. 19, 2012
145
Verri, G., D. Saunders, J. Ambers, and J. Sweek. 2010. Digital mapping of Egyptian blue: conservation implications. In Conservation and the Eastern Mediterranean: Contributions to the 2010 IIC Congress, Istanbul. London: IIC:220–224.
FURTHER READING
Douglass, D. L., C. Shing and W. Ge. 1992. The light-induced alteration of realgar to pararealgar. American Mineralogist 77:1266–74.
SOURCES OF MATERIALS
Gieske Sheet Metal1724 Washington St.Kansas City, MO 64108www.gieske.com
Glass microspheres3MSt. Paul, MN 55144www.3m.com
Exhibition caseGoppion Museum Workshop, Inc.300 Linwood Ave.Newton, MA 02460www.goppion.com
Paraloid B-72Conservation Support Systems, PO Box 91746, Santa Barbara, CA 93190
Sitol Silicon Neutro structural siliconeTorggler Chimica spa39020 Marlengo, ItaliaVia Prati Nuovi, 9www.torggler.com/it
Tivar 1000Quadrant2120 Fairmont Ave.Reading, PA 19612
WoodEpox Abatron, Inc.5501 95th Ave.Kenosha, WI 53144
Garland et al. AIC Objects Specialty Group Postprints, Vol. 19, 2012
146
B-D 10 mL syringe; B-D 16G 1 1/2 Precision Glide NeedleFisher Scientific300 Industry Dr.Pittsburgh, PA 15275
Western Blue Print Company1814 Main St.Kansas City, MO 64108
KATHLEEN M. GARLAND received her BA in Art History from Brown University and her MA in Art Conservation from the State University of New York, Cooperstown. She completed her internship in the Sculpture Conservation Department at the Victoria and Albert Museum in London. From 1986–89 she held the position of senior sculpture conservator for the National Trust for Great Britain. In 1989 she established the Objects Conservation lab at the Nelson-Atkins Museum of Art where she is senior conservator. Address: The Nelson-Atkins Museum of Art, 4525 Oak Street, Kansas City, MO 64111. E-mail: [email protected]
JOHN TWILLEY is an independent conservation scientist with over 30 years experience in the field serving a wide variety of institutions. He has played a role as external Mellon scientific advisor to the Nelson-Atkins Museum of Art since 2007. The primary focus of his work entails the application of instrumental microanalysis techniques to the study of artists’ materials and their deterioration. These research interests augment conservation practice in the development of treatment methods and curatorial research into questions of condition, authenticity, and attribution. PO Box 215, Hawthorne, New York 10532-0215, tel: (914) 747-1877, E-mail: [email protected]
JOHANNA BERNSTEIN is a materials scientist in the Institute for Advanced Materials, Devices and Nanotechnology at Rutgers – The State University of New Jersey. Dr. Bernstein received her PhD in Materials Science and Engineering from Johns Hopkins University and MS from the Winterthur/University of Delaware Program in Art Conservation. Her research interests include materials characterization and non-destructive evaluation techniques for artistic and historic materials. Address: IAMDN, Rutgers – The State University of New Jersey, Piscataway, NJ 08854. E-mail: [email protected]
JOE ROGERS, conservation associate, objects, has worked in the conservation department at the Nelson-Atkins Museum of art for the past 28 years. Rogers’ work has focused on wooden and stone artifacts and outdoor sculpture in the collection. He has treated important pieces of monumental Greek and Egyptian stone sculptures as well as furniture by Gustav Herter and John Townsend. Rogers recently supervised the conservation treatment and re-installation of an 18th century American period room interior.
This article was presented at the Objects Specialty Group or in the joint Research and Technical Studies/OSG Sessions at the 2012 AIC Annual Meeting in Albuquerque. The papers presented in this publication have been edited for clarity and content but have not undergone a formal process of peer review.
AIC Objects Specialty Group Postprints, Vol. 19, 2012 147
1. INTRODUCTION
Known collectively as Always Becoming, the hand-built sculptures emerged from the grounds of the National Museum of the American Indian (NMAI) in 2007. Artist Nora Naranjo-Morse (Santa Clara Pueblo) made history when she erected these five distinct shapes, creating the first outdoor sculpture by a Native American woman in Washington, D.C. It is the artist’s intent for Always Becoming to purposefully erode over time, reflecting the message of growth, transformation, and Native peoples’ relationship with the land, in which it is common practice to leave clay utilitarian or ceremonial pots outside to melt back into the ground. This way of responding to cultural objects was one of the inspirations for Always Becoming.
Always Becoming is an ephemeral, cultural object that has opened discussions concerning the way institutions view conservation. Always Becoming embraces a more cultural knowledge- and practice-based philosophy, embodying NMAI’s core mandate of inclusion. Naranjo-Morse worked side-by-side with family, friends, and volunteers from the NMAI and the public to build the pieces. This all-encompassing approach in the fabrication of the sculptures was not limited to their creation. Adherence to the original concept of purposeful erosion continues; however, the artist acts as steward of the sculptures, visiting them once a year to care for them.
Naranjo-Morse has a strong relationship with the staff of NMAI, who understand and support the nature of the work. The collections manager monitors the pieces on a day-to-day basis, reporting social interactions from the public with the sculptures and evolutions in their appearance to the artist throughout the year. The artist works with an NMAI horticulturist to allow the sculptures to be protected by their environment, as well as interact with it. NMAI conservation staff was involved in the creation process and works with the artist to care for the sculpture under her direction. All of this evolution and work happens under the watchful eye of the public.
This written version of the presentation given at the 2012 AIC meeting in Albuquerque includes the three perspectives of the presenters: the artist, the collections manager, and the conservator. Unlike most OSG Postprint submissions, this paper is written as it was presented and includes the video clips that were shown during the talk. The authors felt it was important to retain the integrity of each participant’s version of their experience in this shared initiative.
ABSTRACT
The evolution and stewardship of Always Becoming, created by artist Nora Naranjo-Morse (Santa Clara Pueblo) for the National Museum of the American Indian, is seemingly contrary to the role and purpose of a conservator to preserve and protect works of art. This unique project, however, defines and illustrates the benefits of relationships that go beyond the convention. It puts the role of the conservator in a larger team, whose purpose is well articulated and redefines the concept of care. Care takes on a larger purpose, underscoring the important principle for Native people of returning to the earth. This talk will discuss the dynamics of the ongoing care of these sculptures as they continue to bring people together, engaging the artist, collections managers, horticulturalists, conservators, and the public.
alwayS BeComing
NORA NARANJO-MORSE, GAIL JOICE, AND KELLY McHUGH
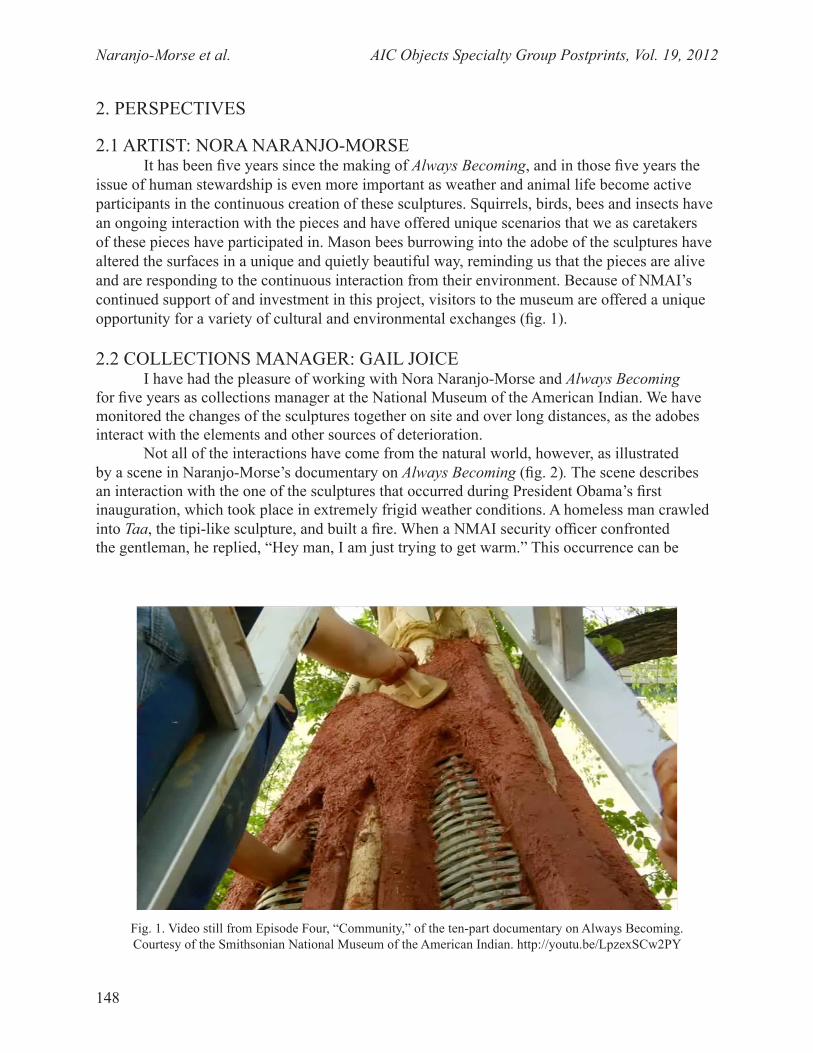
Naranjo-Morse et al. AIC Objects Specialty Group Postprints, Vol. 19, 2012
148
Fig. 1. Video still from Episode Four, “Community,” of the ten-part documentary on Always Becoming. Courtesy of the Smithsonian National Museum of the American Indian. http://youtu.be/LpzexSCw2PY
2. PErSPECtIVES
2.1 ArtISt: NorA NArANjo-MorSEIt has been five years since the making of Always Becoming, and in those five years the
issue of human stewardship is even more important as weather and animal life become active participants in the continuous creation of these sculptures. Squirrels, birds, bees and insects have an ongoing interaction with the pieces and have offered unique scenarios that we as caretakers of these pieces have participated in. Mason bees burrowing into the adobe of the sculptures have altered the surfaces in a unique and quietly beautiful way, reminding us that the pieces are alive and are responding to the continuous interaction from their environment. Because of NMAI’s continued support of and investment in this project, visitors to the museum are offered a unique opportunity for a variety of cultural and environmental exchanges (fig. 1).
2.2 CoLLECtIoNS MANAgEr: gAIL joICEI have had the pleasure of working with Nora Naranjo-Morse and Always Becoming
for five years as collections manager at the National Museum of the American Indian. We have monitored the changes of the sculptures together on site and over long distances, as the adobes interact with the elements and other sources of deterioration.
Not all of the interactions have come from the natural world, however, as illustrated by a scene in Naranjo-Morse’s documentary on Always Becoming (fig. 2). the scene describes an interaction with the one of the sculptures that occurred during President Obama’s first inauguration, which took place in extremely frigid weather conditions. A homeless man crawled into Taa, the tipi-like sculpture, and built a fire. When a NMAI security officer confronted the gentleman, he replied, “Hey man, I am just trying to get warm.” This occurrence can be
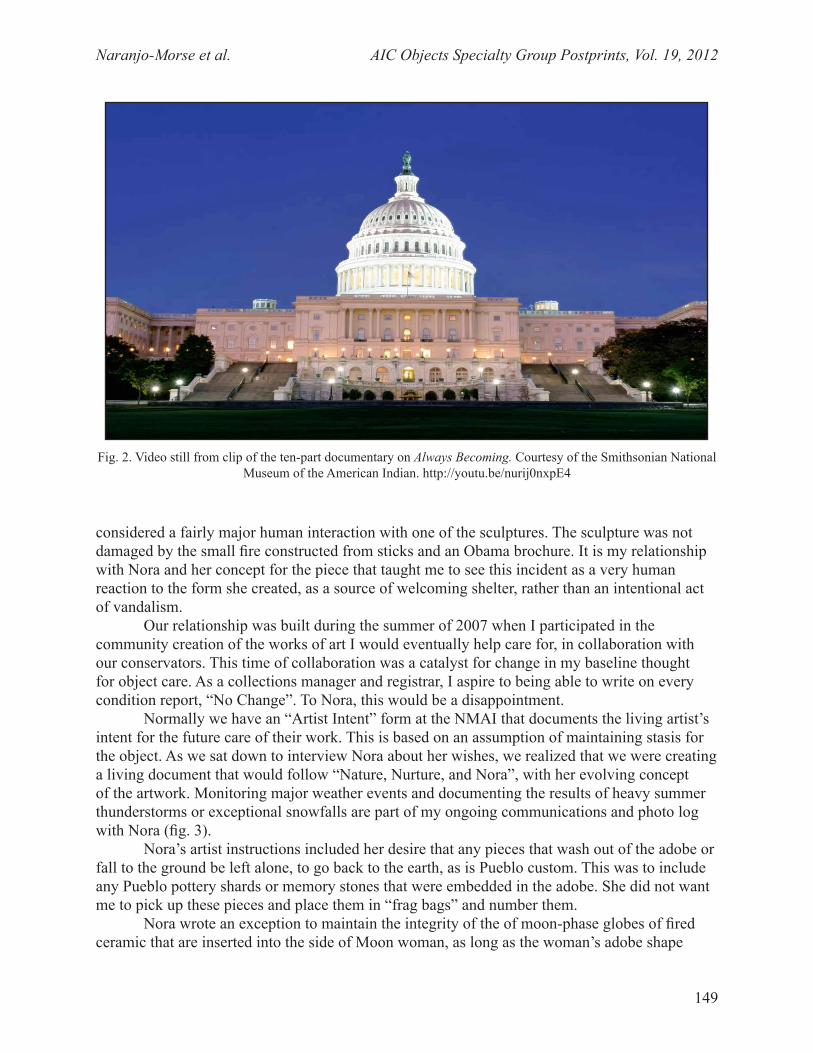
Naranjo-Morse et al. AIC Objects Specialty Group Postprints, Vol. 19, 2012
149
considered a fairly major human interaction with one of the sculptures. The sculpture was not damaged by the small fire constructed from sticks and an Obama brochure. It is my relationship with Nora and her concept for the piece that taught me to see this incident as a very human reaction to the form she created, as a source of welcoming shelter, rather than an intentional act of vandalism.
our relationship was built during the summer of 2007 when I participated in the community creation of the works of art I would eventually help care for, in collaboration with our conservators. This time of collaboration was a catalyst for change in my baseline thought for object care. As a collections manager and registrar, I aspire to being able to write on every condition report, “No Change”. to Nora, this would be a disappointment.
Normally we have an “Artist Intent” form at the NMAI that documents the living artist’s intent for the future care of their work. This is based on an assumption of maintaining stasis for the object. As we sat down to interview Nora about her wishes, we realized that we were creating a living document that would follow “Nature, Nurture, and Nora”, with her evolving concept of the artwork. Monitoring major weather events and documenting the results of heavy summer thunderstorms or exceptional snowfalls are part of my ongoing communications and photo log with Nora (fig. 3).
Nora’s artist instructions included her desire that any pieces that wash out of the adobe or fall to the ground be left alone, to go back to the earth, as is Pueblo custom. This was to include any Pueblo pottery shards or memory stones that were embedded in the adobe. She did not want me to pick up these pieces and place them in “frag bags” and number them.
Nora wrote an exception to maintain the integrity of the of moon-phase globes of fired ceramic that are inserted into the side of Moon woman, as long as the woman’s adobe shape
Fig. 2. Video still from clip of the ten-part documentary on Always Becoming. Courtesy of the Smithsonian National Museum of the American Indian. http://youtu.be/nurij0nxpE4
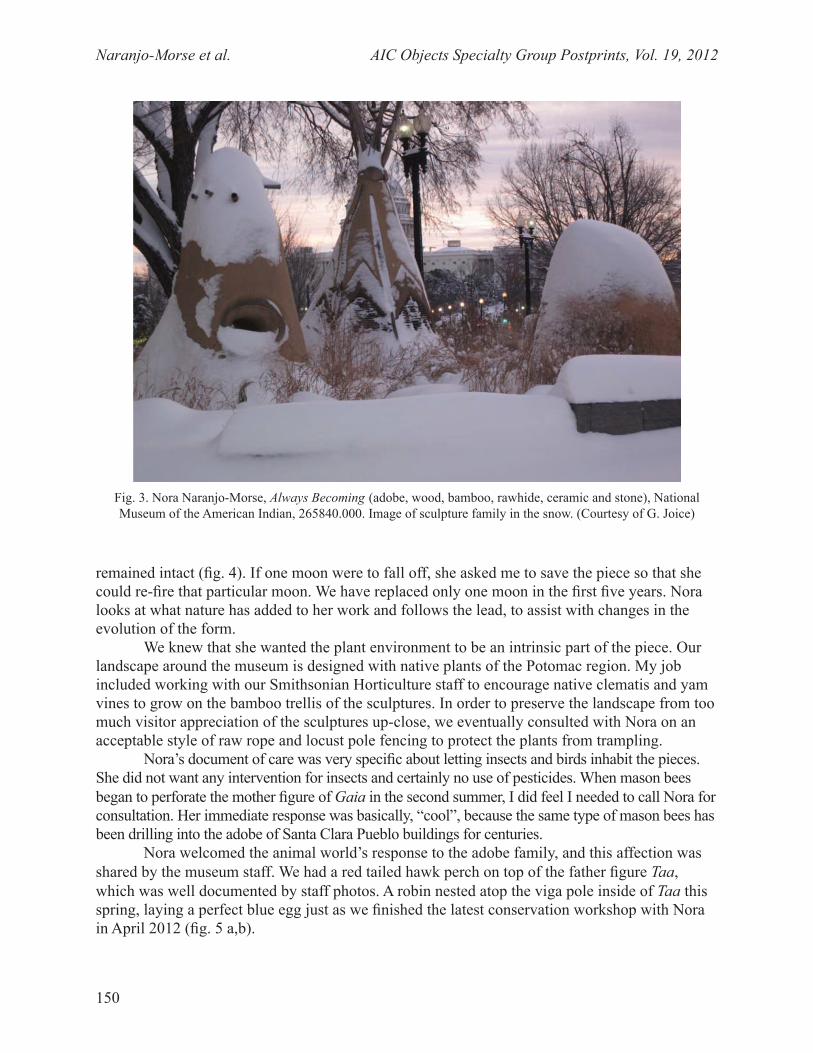
Naranjo-Morse et al. AIC Objects Specialty Group Postprints, Vol. 19, 2012
150
remained intact (fig. 4). If one moon were to fall off, she asked me to save the piece so that she could re-fire that particular moon. We have replaced only one moon in the first five years. Nora looks at what nature has added to her work and follows the lead, to assist with changes in the evolution of the form.
We knew that she wanted the plant environment to be an intrinsic part of the piece. Our landscape around the museum is designed with native plants of the Potomac region. My job included working with our Smithsonian Horticulture staff to encourage native clematis and yam vines to grow on the bamboo trellis of the sculptures. In order to preserve the landscape from too much visitor appreciation of the sculptures up-close, we eventually consulted with Nora on an acceptable style of raw rope and locust pole fencing to protect the plants from trampling.
Nora’s document of care was very specific about letting insects and birds inhabit the pieces. She did not want any intervention for insects and certainly no use of pesticides. When mason bees began to perforate the mother figure of Gaia in the second summer, I did feel I needed to call Nora for consultation. Her immediate response was basically, “cool”, because the same type of mason bees has been drilling into the adobe of Santa Clara Pueblo buildings for centuries.
Nora welcomed the animal world’s response to the adobe family, and this affection was shared by the museum staff. We had a red tailed hawk perch on top of the father figure Taa, which was well documented by staff photos. A robin nested atop the viga pole inside of Taa this spring, laying a perfect blue egg just as we finished the latest conservation workshop with Nora in April 2012 (fig. 5 a,b).
Fig. 3. Nora Naranjo-Morse, Always Becoming (adobe, wood, bamboo, rawhide, ceramic and stone), National Museum of the American Indian, 265840.000. Image of sculpture family in the snow. (Courtesy of G. Joice)
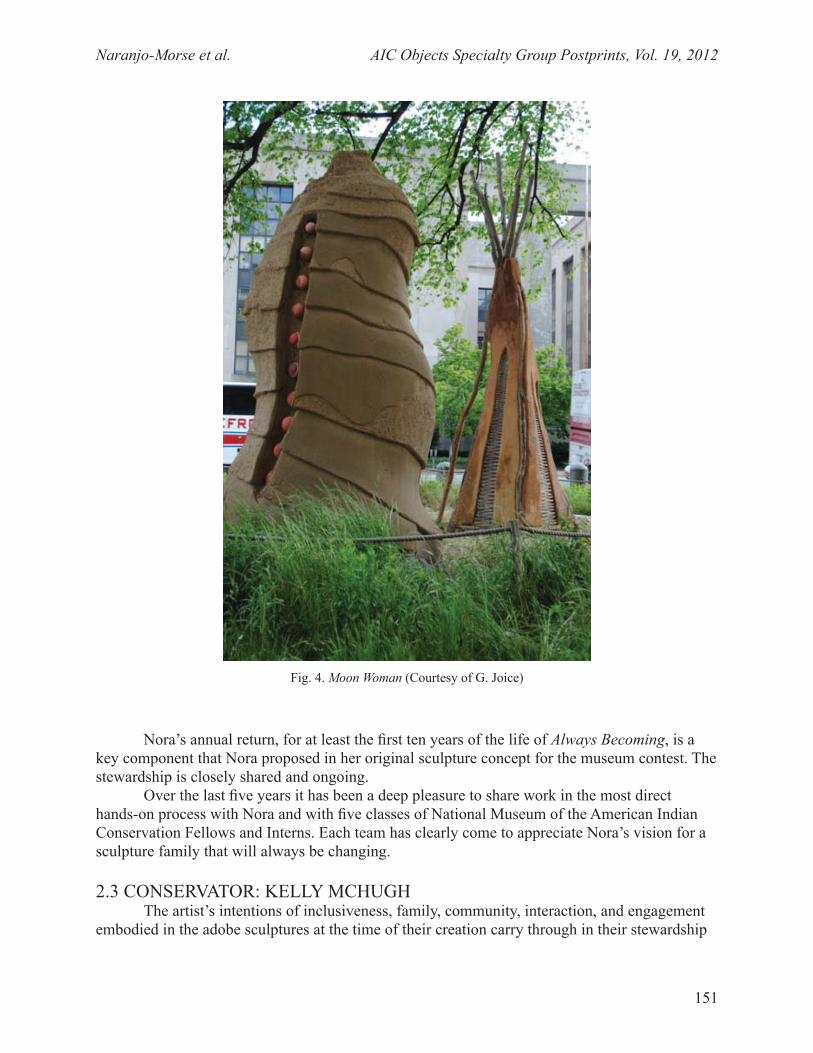
Naranjo-Morse et al. AIC Objects Specialty Group Postprints, Vol. 19, 2012
151
Nora’s annual return, for at least the first ten years of the life of Always Becoming, is a key component that Nora proposed in her original sculpture concept for the museum contest. The stewardship is closely shared and ongoing.
Over the last five years it has been a deep pleasure to share work in the most direct hands-on process with Nora and with five classes of National Museum of the American Indian Conservation Fellows and Interns. Each team has clearly come to appreciate Nora’s vision for a sculpture family that will always be changing.
2.3 CONSERVATOR: KELLY MCHUGHThe artist’s intentions of inclusiveness, family, community, interaction, and engagement
embodied in the adobe sculptures at the time of their creation carry through in their stewardship
Fig. 4. Moon Woman (Courtesy of G. Joice)
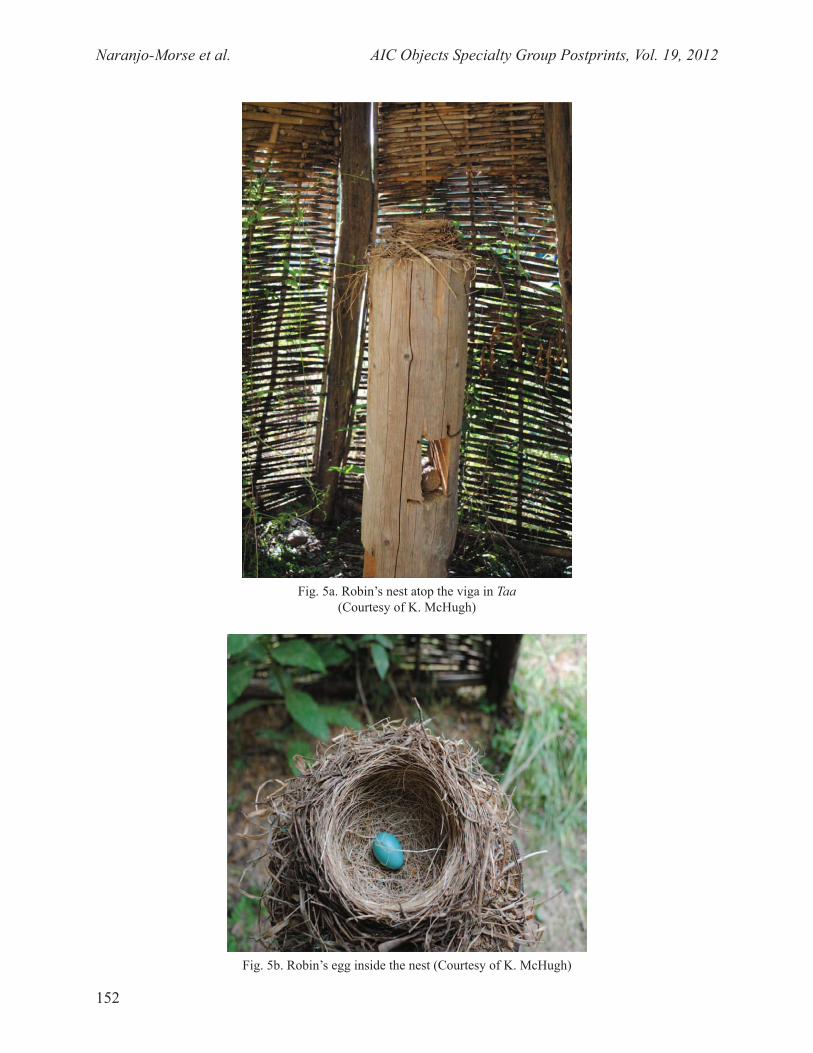
Naranjo-Morse et al. AIC Objects Specialty Group Postprints, Vol. 19, 2012
152
Fig. 5a. Robin’s nest atop the viga in Taa (Courtesy of K. McHugh)
Fig. 5b. Robin’s egg inside the nest (Courtesy of K. McHugh)
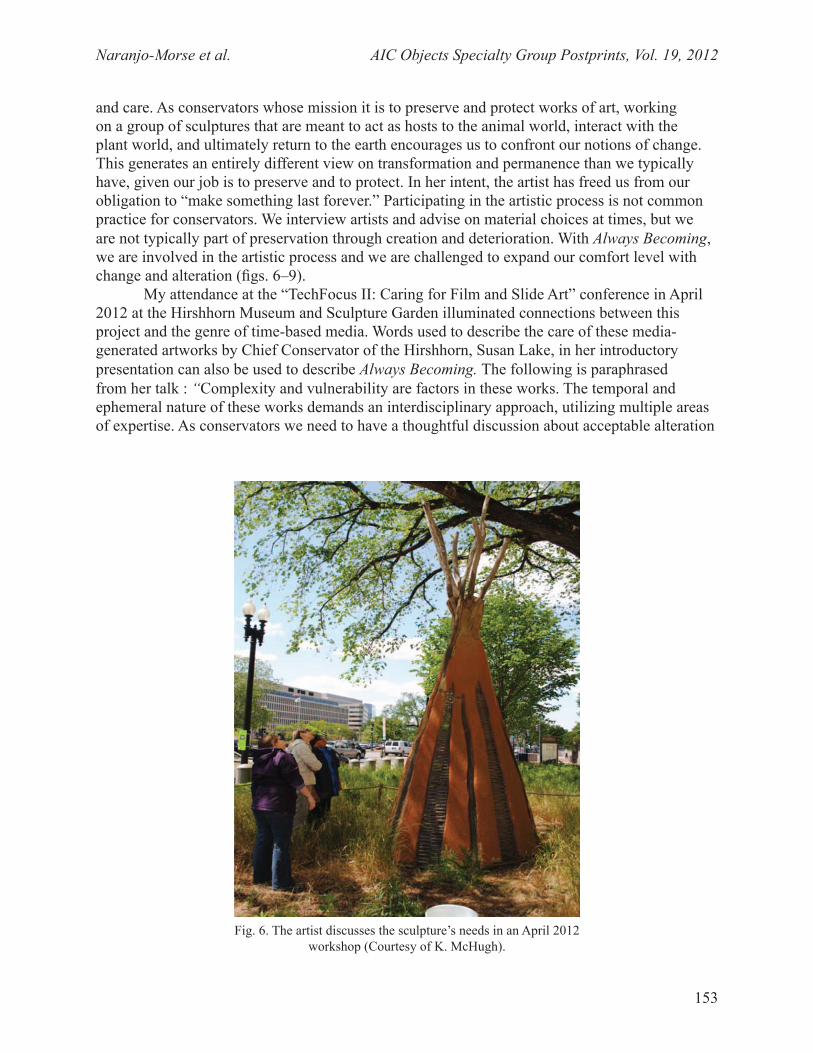
Naranjo-Morse et al. AIC Objects Specialty Group Postprints, Vol. 19, 2012
153
and care. As conservators whose mission it is to preserve and protect works of art, working on a group of sculptures that are meant to act as hosts to the animal world, interact with the plant world, and ultimately return to the earth encourages us to confront our notions of change. This generates an entirely different view on transformation and permanence than we typically have, given our job is to preserve and to protect. In her intent, the artist has freed us from our obligation to “make something last forever.” Participating in the artistic process is not common practice for conservators. We interview artists and advise on material choices at times, but we are not typically part of preservation through creation and deterioration. With Always Becoming, we are involved in the artistic process and we are challenged to expand our comfort level with change and alteration (figs. 6–9).
My attendance at the “TechFocus II: Caring for Film and Slide Art” conference in April 2012 at the Hirshhorn Museum and Sculpture Garden illuminated connections between this project and the genre of time-based media. Words used to describe the care of these media-generated artworks by Chief Conservator of the Hirshhorn, Susan Lake, in her introductory presentation can also be used to describe Always Becoming. The following is paraphrased from her talk : “Complexity and vulnerability are factors in these works. The temporal and ephemeral nature of these works demands an interdisciplinary approach, utilizing multiple areas of expertise. As conservators we need to have a thoughtful discussion about acceptable alteration
Fig. 6. The artist discusses the sculpture’s needs in an April 2012 workshop (Courtesy of K. McHugh).
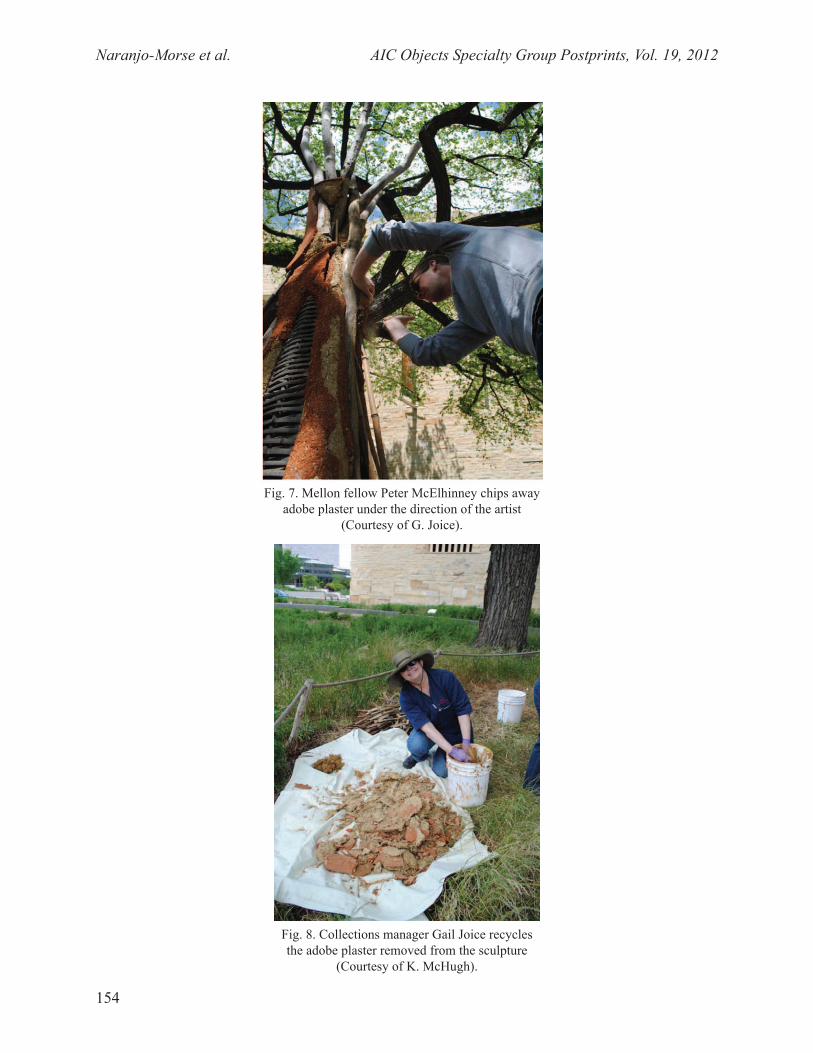
Naranjo-Morse et al. AIC Objects Specialty Group Postprints, Vol. 19, 2012
154
Fig. 7. Mellon fellow Peter McElhinney chips away adobe plaster under the direction of the artist
(Courtesy of G. Joice).
Fig. 8. Collections manager Gail Joice recycles the adobe plaster removed from the sculpture
(Courtesy of K. McHugh).
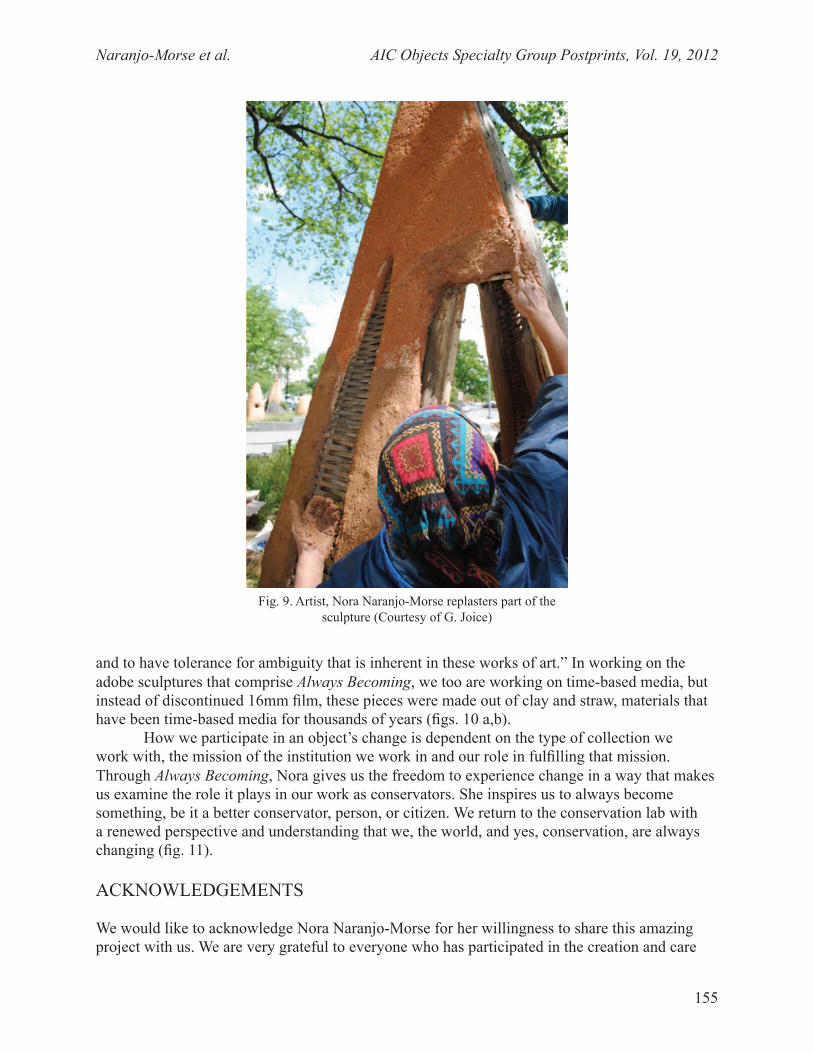
Naranjo-Morse et al. AIC Objects Specialty Group Postprints, Vol. 19, 2012
155
and to have tolerance for ambiguity that is inherent in these works of art.” In working on the adobe sculptures that comprise Always Becoming, we too are working on time-based media, but instead of discontinued 16mm film, these pieces were made out of clay and straw, materials that have been time-based media for thousands of years (figs. 10 a,b).
How we participate in an object’s change is dependent on the type of collection we work with, the mission of the institution we work in and our role in fulfilling that mission. Through Always Becoming, Nora gives us the freedom to experience change in a way that makes us examine the role it plays in our work as conservators. She inspires us to always become something, be it a better conservator, person, or citizen. We return to the conservation lab with a renewed perspective and understanding that we, the world, and yes, conservation, are always changing (fig. 11).
ACKNOWLEDGEMENTS
We would like to acknowledge Nora Naranjo-Morse for her willingness to share this amazing project with us. We are very grateful to everyone who has participated in the creation and care
Fig. 9. Artist, Nora Naranjo-Morse replasters part of the sculpture (Courtesy of G. Joice)
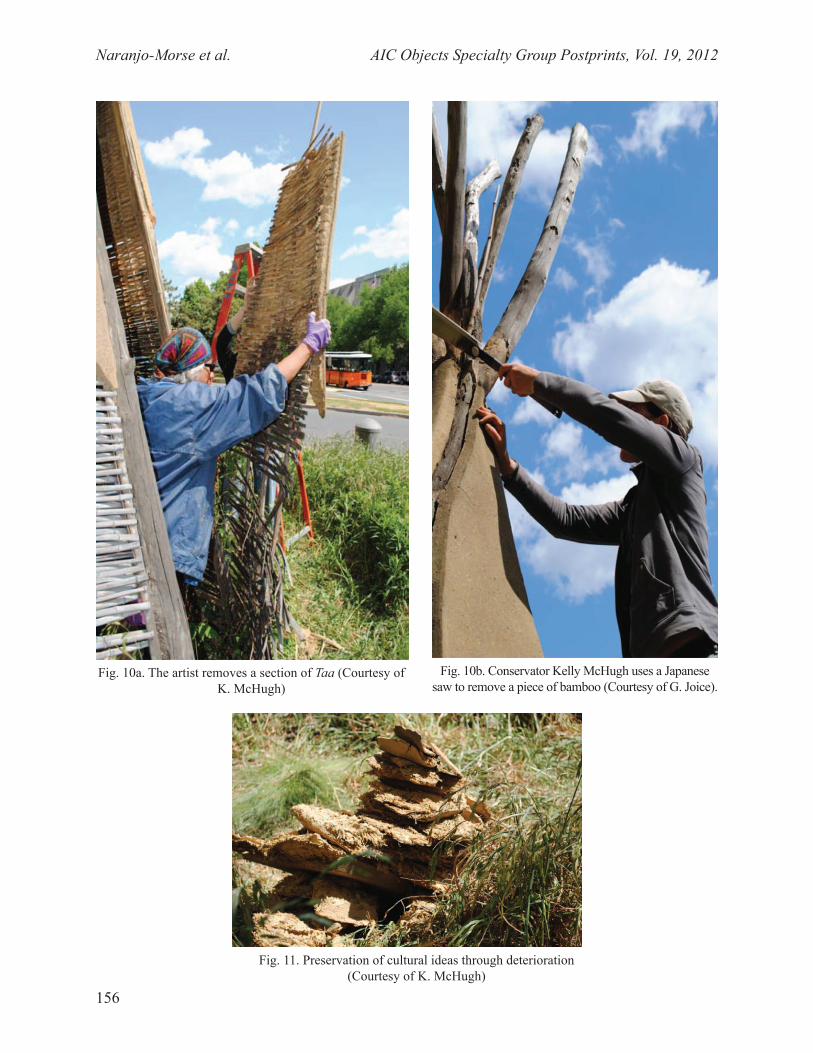
Naranjo-Morse et al. AIC Objects Specialty Group Postprints, Vol. 19, 2012
156
Fig. 10b. Conservator Kelly McHugh uses a Japanese saw to remove a piece of bamboo (Courtesy of G. Joice).
Fig. 10a. The artist removes a section of Taa (Courtesy of K. McHugh)
Fig. 11. Preservation of cultural ideas through deterioration (Courtesy of K. McHugh)
Naranjo-Morse et al. AIC Objects Specialty Group Postprints, Vol. 19, 2012
157
of the Always Becoming sculptures over the last five years. Special thanks go to Dan Davis of the NMAI Media Department, Glenn Burlack from the NMAI Community Services Department and Robert Patterson of the NMAI Exhibits Fabrication Department. We also would like to acknowledge the generous support of the Andrew W. Mellon Foundation.
FURTHER READING/VIEWING
Ten podcasts on the Always Becoming Sculpture Project are available on YouTube. https://www.youtube.com/playlist?list=PLEAF79944F6B13C8D
A video of the 2013 conservation workshop with the artists can be seen on YouTube at the following link: www.youtube.com/watch?v=IiQ1TgQ6DLQ
Naranjo-Morse, N. 1992. Mud Woman. Tuscon, Arizona: University of Arizona Press.
NORA NARANJO-MORSE is a member of the Tewa tribe from Santa Clara Pueblo in New Mexico. Nora Naranjo-Morse earned a BA from the College of Santa Fe. She is the daughter of the potter Rose Naranjo and grew up surrounded by women relatives and siblings, all of whom worked with clay. Her own sculptures and films are in collections at the Smithsonian Institution, the Heard Museum, the Albuquerque Museum, and the National Museum of the American Indian. Naranjo-Morse is the author of the poetry collection Mud Woman: Poems from the Clay (1992), which combines poems with photographs of her clay figures.
GAIL JOICE is the collections manager at the National Museum of the American Indian’s Museum on the National Mall in Washington D.C., where she has worked since 2003. Prior to working at NMAI, she was the head of museum services and registrar at the Seattle Art Museum where she was the administrator for contract conservation. She currently serves on the Smithsonian Collections Advisory Committee. In 2010 Gail traveled to Port-au-Prince, Haiti to help set up the object registration and storage system for the Smithsonian Haiti Cultural Recovery Center for conservation of earthquake damaged art.
KELLY McHUGH is an objects conservator at the National Museum of the American Indian. She received an MA in Art History/Certificate in Conservation (2000) from New York University, Institute of Fine Arts; BA in Art History/Peace and Global Policy Studies (1990), New York University. Areas of interest: collaborative work with north, central, South American Native communities, contemporary art, materials and technology of ethnographic objects.National Museum of the American Indian, Cultural Resources Center – Conservation, 4220 Silver Hill Road, Suitland, MD 20746. E-mail: [email protected]
This article was presented at the Objects Specialty Group or in the joint Research and Technical Studies/OSG Sessions at the 2012 AIC Annual Meeting in Albuquerque. The papers presented in this publication have been edited for clarity and content but have not undergone a formal process of peer review.