Embed Size (px)
Citation preview

Proiector digital
Manual de utilizareEX800ST / EW800ST V 1.01
2 Informaţii cu privire la garanţie şi drepturile de autor
Informaţii cu privire la garanţie şi drepturile de autorGaranţie limitatăBenQ garantează acest produs faţă de orice defecte ale materialelor folosite şi ale manoperei, în condiţii de utilizare şi depozitare normale.Data dovezii de achiziţie va fi necesară la orice solicitare de garanţie. În eventualitatea în care acest produs este găsit defect în timpul perioadei de garanţie, singura obligaţie a BenQ's şi soluţia exclusivă pentru dumneavoastră este înlocuirea oricăror piese defecte (manopera este inclusă). Pentru a beneficia de serviciul de garanţie, anunţaţi imediat distribuitorul de la care aţi achiziţionat acest produs cu privire la orice defecte.Important: Garanţia de mai sus va deveni nulă dacă clientul nu utilizează acest produs în acord cu instrucţiunile în scris ale BenQ, în special, condiţiile de umiditate a mediului, care trebuie să fie între 10% şi 90%, temperatura, între 0°C şi 35°C, altitudine mai mică de 4920 feet şi evitarea utilizării acestui proiector într-un mediu cu mult praf. Această garanţie vă oferă drepturile legale specifice şi puteţi avea şi alte drepturi care pot diferi de la o ţară la alta.Pentru mai multe informaţii, vă rugăm să vizitaţi www.BenQ.com.Drepturi de autorDrepturi de autor © 2020 de BenQ Corporation. Toate drepturile sunt rezervate. Nicio parte a acestei publicaţii nu poate fi reprodusă, transmisă, transcrisă, stocată într-un sistem de descărcare sau tradusă într-o altă limbă sau limbaj informatic, în orice formă electronică, mecanică, magnetică, optică, chimică, manuală sau de alt gen, fără acordul în scris al BenQ Corporation.Declinarea responsabilităţiiBenQ Corporation nu-şi asumă răspunderi sau garanţii, explicite sau implicite, cu privire la conţinutul prezentei şi respinge orice garanţie, vandabilitate sau competenţe pentru orice scop particular. Mai mult, BenQ Corporation îşi rezervă dreptul de a revizui această publicaţie şi de a efectua schimbări periodice ale conţinutului prezentei, fără obligaţia de a notifica orice persoană cu privire la revizuiri sau modificări.*DLP, Digital Micromirror Device şi DMD sunt mărcile înregistrate ale Texas Instrument. Altele sunt sub influenţa drepturilor de autor ale companiilor sau organizaţiilor respective.BreveteVizitaţi pagina web http://patmarking.benq.com/ pentru detalii referitoare la acoperirea brevetului pentru proiectorul BenQ.
3 Cuprins
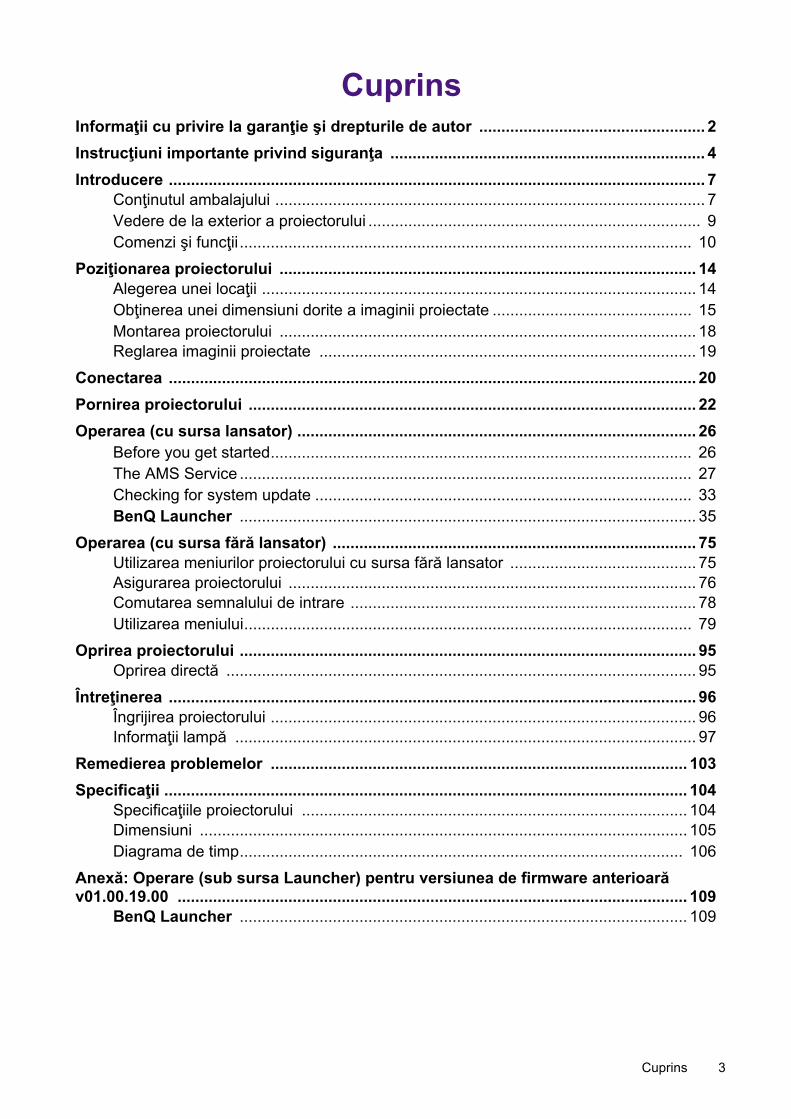
CuprinsInformaţii cu privire la garanţie şi drepturile de autor ................................................... 2Instrucţiuni importante privind siguranţa ....................................................................... 4Introducere ......................................................................................................................... 7
Conţinutul ambalajului ................................................................................................. 7Vedere de la exterior a proiectorului ........................................................................... 9Comenzi şi funcţii ...................................................................................................... 10
Poziţionarea proiectorului .............................................................................................. 14Alegerea unei locaţii .................................................................................................. 14Obţinerea unei dimensiuni dorite a imaginii proiectate ............................................. 15Montarea proiectorului .............................................................................................. 18Reglarea imaginii proiectate ..................................................................................... 19
Conectarea ....................................................................................................................... 20Pornirea proiectorului ..................................................................................................... 22Operarea (cu sursa lansator) .......................................................................................... 26
Before you get started............................................................................................... 26The AMS Service ...................................................................................................... 27Checking for system update ..................................................................................... 33BenQ Launcher ....................................................................................................... 35
Operarea (cu sursa fără lansator) .................................................................................. 75Utilizarea meniurilor proiectorului cu sursa fără lansator .......................................... 75Asigurarea proiectorului ............................................................................................ 76Comutarea semnalului de intrare .............................................................................. 78Utilizarea meniului..................................................................................................... 79
Oprirea proiectorului ....................................................................................................... 95Oprirea directă .......................................................................................................... 95
Întreţinerea ....................................................................................................................... 96Îngrijirea proiectorului ................................................................................................ 96Informaţii lampă ........................................................................................................ 97
Remedierea problemelor .............................................................................................. 103Specificaţii ...................................................................................................................... 104
Specificaţiile proiectorului ....................................................................................... 104Dimensiuni .............................................................................................................. 105Diagrama de timp.................................................................................................... 106
Anexă: Operare (sub sursa Launcher) pentru versiunea de firmware anterioară v01.00.19.00 ................................................................................................................... 109
BenQ Launcher ..................................................................................................... 109

4 Instrucţiuni importante privind siguranţa
Instrucţiuni importante privind siguranţaProiectorul dumneavoastră este realizat şi testat pentru a îndeplini ultimele standarde de siguranţă ale echipamentelor de tehnologia informaţiei. Totuşi, pentru a asigura siguranţa în utilizare a acestui produs, este important să respectaţi instrucţiunile menţionate în acest manual şi marcate pe produs.
1. Vă rugăm să citiţi acest manual înainte de a utiliza proiectorul dumneavoastră. Păstraţi-l pentru consultările ulterioare.
2. Nu priviţi direct în obiectivul proiectorului în timpul utilizării. Raza intensă de lumină vă poate afecta ochii.
3. Lăsaţi servisarea pe seama personalului calificat de service.
4. Deschideţi întotdeauna obturatorul obiectivului (dacă este cazul) sau scoateţi capacul obiectivului (dacă este cazul), când lampa proiectorului este pornită.
5. Lampa devine extrem de fierbinte în timpul utilizării. Permiteţi-i proiectorului să se răcească pentru aproximativ 45 de minute înainte de a demonta ansamblul lămpii pentru înlocuire.
6. În anumite ţări, tensiunea liniei NU este stabilă. Acest proiector este realizat pentru a funcţiona în condiţii de siguranţă cu o tensiune a reţelei între 100 şi 240 volţi CA, dar poate avea erori la căderile de tensiune sau la supratensiunile tranzitorii de ±10 volţi. În zonele unde tensiunea reţelei poate fluctua sau poate cădea, este recomandat să conectaţi proiectorul printr-un stabilizator de alimentare, protector de supratensiune tranzitorie sau o sursă de alimentare neîntreruptibilă (UPS).
7. Nu blocaţi obiectivul de proiecţie cu niciun obiect când proiectorul este utilizat, întrucât aceasta poate provoca încălzirea şi deformarea obiectelor sau chiar producerea incendiilor. Pentru a opri temporar lampa, utilizaţi funcţia GOL.
8. Nu utilizaţi lămpi peste durata nominală de viaţă. Utilizarea excesivă a lămpilor peste durata nominală de viaţă poate provoca spargerea acestora, în situaţii rare.

5 Instrucţiuni importante privind siguranţa
9. Nu înlocuiţi niciodată ansamblul lămpii sau orice alte componente electronice, decât dacă proiectorul este deconectat de la reţea.
10. Nu amplasaţi acest produs pe un cărucior, stand sau masă instabilă. Produsul poate cădea, ceea ce duce la defectarea gravă.
11. Nu încercaţi să demontaţi acest proiector. În interiorul său sunt tensiuni înalte care pot provoca moartea, dacă intraţi în contact cu componentele sub tensiune. Singura componentă care poate fi servisată de utilizator este lampa, care are propriul capac demontabil.În nicio situaţie nu trebuie să demontaţi sau să îndepărtaţi orice alte capace. Lăsaţi reparaţiile doar în seama personalului profesionist calificat pentru service.
12. Nu blocaţi deschiderile de ventilaţie.- Nu amplasaţi acest proiector pe o pătură,
aşternuturi pentru pat sau pe orice altă suprafaţă moale.
- Nu acoperiţi acest proiector cu materiale textile sau cu orice alt obiect.
- Nu lăsaţi substanţe inflamabile lângă proiector.
Dacă deschiderile de ventilaţie sunt obstrucţionate, supraîncălzirea din interiorul proiectorului poate provoca incendii.
13. Amplasaţi întotdeauna proiectorul pe o suprafaţă dreaptă, orizontală în timpul utilizării.- Nu-l folosiţi dacă este înclinat într-un unghi de
peste 10 grade de la stânga la dreapta, sau într-un unghi de mai mult de 15 grade din faţă în spate. Folosirea proiectorului când nu este complet orizontal poate provoca o funcţionare nesatisfăcătoare sau defectarea lămpii.
14. Nu amplasaţi proiectorul vertical, sprijinit pe partea din spate. Aceasta poate duce la căderea proiectorului, provocând răniri sau rezultând în defectarea sa.
15. Nu călcaţi pe proiector sau amplasaţi obiecte grele pe el. Dincolo de posibilele defecţiuni fizice ale proiectorului, aceasta poate duce la accidentări şi posibile răniri.
16. Când proiectorul este utilizat, puteţi simţi puţin aer cald degajat şi un miros uşor provenind de la grilajul ventilaţiei. Acesta este un fenomen normal, nu un defect al produsului.

6 Instrucţiuni importante privind siguranţa
17. Nu lăsaţi substanţe lichide lângă sau pe proiector. Lichidele scurse pe proiector pot provoca defectarea acestuia. Dacă proiectorul s-a udat, scoateţi-l din priză şi apelaţi la BenQ pentru servisarea acestuia.
18. Acest produs poate să afişeze imagini întoarse pentru instalaţiile de montare pe tavan/perete.
19. Acest aparat trebuie să fie împământat.
20. Nu amplasaţi acest proiector în oricare dintre următoarele medii.- Locaţiile unde spaţiul este slab ventilat sau este
închis. Lăsaţi o distanţă de cel puţin 50 cm faţă de pereţi şi un curent liber de aer în jurul proiectorului.
- Locaţiile unde temperaturile pot deveni excesiv de mari, precum în interiorul unei maşini cu toate ferestrele ridicate.
- Locaţiile unde există o umiditate excesivă, praf sau fum de ţigară, care pot contamina componentele optice, scurtând durata de viaţă a proiectorului şi întunecând imaginea.
- Locaţiile de lângă alarmele pentru incendiu- Locaţiile cu o temperatură ambientală de peste
40 °C/104 °F- Locaţiile unde altitudinile sunt mai mari de
3000 m (10000 feet).
Hg - Această lampă conţine mercur. Respectaţi normele privind reciclarea. Consultaţi www.lamprecycle.org.
Pentru a evita deteriorarea cip-urilor DLP, nu orientaţi niciodată un fascicul laser de mare putere în lentilele de proiecţie.
3.000 m(10000 feet)
0 m(0 feet)
7 Introducere
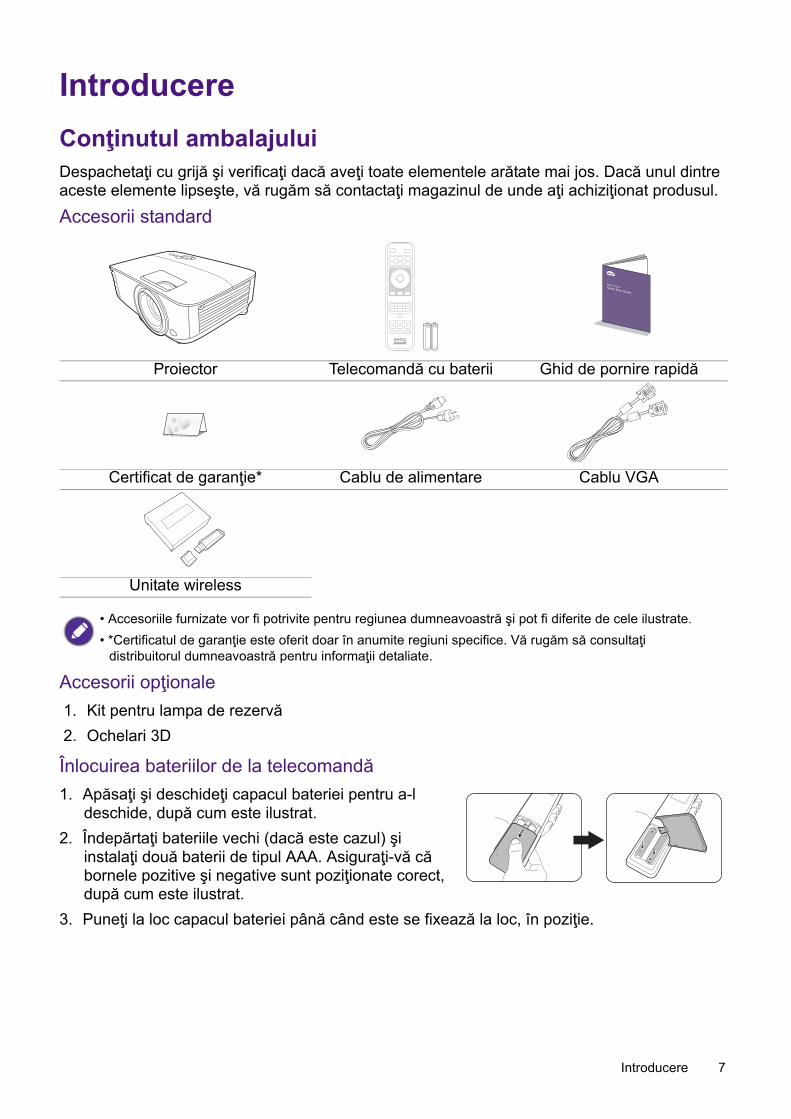
IntroducereConţinutul ambalajuluiDespachetaţi cu grijă şi verificaţi dacă aveţi toate elementele arătate mai jos. Dacă unul dintre aceste elemente lipseşte, vă rugăm să contactaţi magazinul de unde aţi achiziţionat produsul.Accesorii standard
Accesorii opţionale
Înlocuirea bateriilor de la telecomandă1. Apăsaţi şi deschideţi capacul bateriei pentru a-l
deschide, după cum este ilustrat.2. Îndepărtaţi bateriile vechi (dacă este cazul) şi
instalaţi două baterii de tipul AAA. Asiguraţi-vă că bornele pozitive şi negative sunt poziţionate corect, după cum este ilustrat.
3. Puneţi la loc capacul bateriei până când este se fixează la loc, în poziţie.
Proiector Telecomandă cu baterii Ghid de pornire rapidă
Certificat de garanţie* Cablu de alimentare Cablu VGA
Unitate wireless
• Accesoriile furnizate vor fi potrivite pentru regiunea dumneavoastră şi pot fi diferite de cele ilustrate.• *Certificatul de garanţie este oferit doar în anumite regiuni specifice. Vă rugăm să consultaţi
distribuitorul dumneavoastră pentru informaţii detaliate.
1. Kit pentru lampa de rezervă2. Ochelari 3D

8 Introducere
Instalarea dongle-ului wireless
1. Slăbiţi şurubul care securizează capacul I/O Port şi deschideţi capacul potului I/O.2. Scoateţi capacul de pe dongle-ul wireless furnizat şi introduceţi-l în port DISPOZITIV
WIRELESS.3. Reinstalaţi capacul portului I/O.
• Evitaţi lăsarea telecomenzii şi a bateriilor într-un mediu cu căldură sau umiditate excesivă, precum bucătărie, baie, saună, cameră de bronzare sau într-o maşină închisă.
• Înlocuiţi doar cu acelaşi tip de baterie sau cu un tip echivalent recomandat de fabricantul acesteia.• Aruncaţi bateriile utilizate în acord cu instrucţiunile fabricantului şi cu normele locale de mediu din
regiunea dumneavoastră.• Nu aruncaţi niciodată bateriile în foc. Ele pot prezenta un pericol de explozie.• Dacă bateriile sunt goale sau dacă nu veţi folosi telecomanda pentru o perioadă mare de timp, scoateţi
bateriile pentru a evita defectarea telecomenzii prin posibilele scurgeri ale bateriilor.
Proiectorul acceptă conexiuni Wi-Fi şi/sau Bluetooth doar atunci când este instalat un dongle wireless (WDR02U).

9 Introducere
Vedere de la exterior a proiectorului
1. Inel de focalizare şi inel de zoom2. Ventilator (evacuare aer)3. Picior reglabil4. Obiectiv de proiecţie5. Senzor IR pentru telecomandă6. Panou de control extern
(Consultaţi Comenzi şi funcţii la pagina 10.)
7. Capac pentru lampă8. Ventilaţie (admisie aer proaspăt)9. Mufe de intrare Audio
Mufă de ieşire audio10. Mufă de ieşire a semnalului RGB (PC)
11. Port de control RS-23212. Mufe de intrare a semnalului RGB (PC)13. Port intrare HDMI14. Port USB Mini-B15. Port USB tip A16. Port USB tip A17. Mufă de alimentare CA18. Orificii de montare pe perete19. Bara de securitate20. Port USB tip-A (pentru dongle wireless)21. Capac dongle wireless
76
17
18
18 19
18
83
3
3
3
54
1
2
1312 14 1610
15119
2021

10 Introducere
Comenzi şi funcţiiProiector şi telecomandă
Nr. Când sursa de intrare este Lansator BenQ
Când sursa de intrare NU este Lansator BenQ
1. ALIMENTARE
Comută proiectorul între modul de aşteptare şi pornit. ON (PORNIT)/ Off (Oprit)
2.
Lumina indicatoare pentru POWER (Pornit / Oprit)/Lumină avertizare TEMPeratură (TEMP)/Lumina indicatoare pentru LAMP (Lampă)
(Consultaţi Indicatori la pagina 102.)
3. Senzor IR pentru telecomandă
4. (BACK (ÎNAPOI))Revine la meniul anterior, meniul principal de setări sau iese din aplicaţie.
Revine la meniul OSD anterior sau iese din setările meniului.
2
9
76
8
51
34 10
• Toate comenzile prezentate în acest document sunt disponibile pe telecomandă sau pe proiector.• Telecomanda este fără indicator cu laser în Japonia. 11
1213
1516
1
5
9
4
7
14
8
6
18
22
17
19
2120
10
2324

11 Introducere
5.
Taste săgeată ( , , , )
Se deplasează prin elementele din meniu sau trece prin opţiunile disponibile.
Când meniul afişat pe ecran (OSD) este activat, aceste taste sunt folosite ca săgeţi direcţionale pentru a selecta elementele dorite de meniu şi pentru a efectua reglajele.
Taste corecţie trapez ( , ) (Nu este disponibil.) Afişează pagina de corecţie a trapezului.
Taste pentru volum / (Nu este disponibil.) Scade sau creşte volumul proiectorului.
6. (SOURCE (SURSĂ)) Afişează bara de selecţie a sursei.
7. ECO BLANK (GOL ECO), BLANK (GOL)
Este folosit pentru a ascunde imaginea ecranului.Nu blocaţi obiectivul de proiecţie de pe proiector, întrucât aceasta poate duce la încălzirea şi deformarea obiectului care blochează sau chiar poate provoca un incendiu.
8. OK Confirmă elementul selectat de meniu.
Confirmă elementul selectat din meniul afişat pe ecran (OSD).
9. (MENU) Intră în meniul Setări.Porneşte sau opreşte meniul afişat pe ecran (OSD) al proiectorului.
10. (HOME)Revenire la pagina de pornire. (Nu este disponibil.)
11. Butoane de selectare a sursei: HDMI, PC, LAUNCHER (LANSATOR)
Selectează o sursă de intrare pentru afişare.
12. Comută sunetul proiectorului în modul pornit şi oprit.Scade volumul proiectorului.Creşte volumul proiectorului.
13. Butoane de control: F1, F2, F3
Butoanele personalizate, implicit sunt setările de proiecţie mobil iOS (F1) / Setări de proiecţie mobil Android (F2) / Setări de proiecţie pentru laptop (F3).
(Nu este disponibil.)
14. LASER Emite o lumină laser vizibilă pentru a fi folosită la prezentări.
15. (WiFi)Intră în meniul Internet la Setări. (Nu este disponibil.)
16. PICTURE (IMAGINE) Selectează un mod disponibil imagine.17. (Cursor) Activează funcţia cursorului. (Nu este disponibil.)
18. (Meniu Android)
Merge la meniul Setări. Dacă setările asociate aplicaţiei pot fi apelate din interiorul aplicaţiei.
(Nu este disponibil.)
Nr. Când sursa de intrare este Lansator BenQ
Când sursa de intrare NU este Lansator BenQ

12 Introducere
Operarea indicatorului LASERIndicatorul Laser este, pentru profesionişti, un ajutor în efectuarea prezentărilor. Emite o culoare roşie când este apăsat. Raza laser este vizibilă. Este necesar să apăsaţi şi să ţineţi apăsat LASER pentru lumină continuă.Indicatorul laser nu este o jucărie. Părinţii trebuie să fie conştienţi de pericolul energiei laser şi trebuie să păstreze această telecomandă într-un loc inaccesibil pentru copii.
19. (Hotspot)Intră în meniul Hotspot la Setări. (Nu este disponibil.)
20. (Golire memorie)Trece într-un mod de avansare a tastei (o tastă goală).
(Nu este disponibil.)
21. BRIGHTNESS (LUMINOZITATE)
Reglează luminozitatea.
22. CONTRAST Reglează contrastul.
23. LIGHT MODE (MOD ILUMINARE)
Afişează meniul Mod iluminare pentru selectarea unui mod adecvat de operare a lămpii.
24. AUTO (Nu este disponibil.)
Determină automat cea mai bună sincronizare pentru imaginea afişată când este selectat semnalul PC (RGB analog).
Nu priviţi direct în lumina laser şi nu proiectaţi raza laser pe dumneavoastră sau pe alte persoane. Consultaţi mesajele de avertizare de pe partea din spate a telecomenzii înainte de utilizare.
Nr. Când sursa de intrare este Lansator BenQ
Când sursa de intrare NU este Lansator BenQ

13 Introducere
Distanţa efectivă de funcţionare a telecomenziiTelecomanda trebuie să fie ţinută într-un unghi de 30 grade perpendicular pe senzorul IR al proiectorului, pentru a funcţiona corect. Distanţa faţă de telecomandă nu trebuie să depăşească 8 metri (~ 26 feet).Asiguraţi-vă că nu sunt obstacole între telecomandă şi senzorul IR de pe proiector, care ar putea obstrucţiona raza infraroşie.• Utilizarea proiectorului din faţă • Utilizarea proiectorului din partea superioară
Aprox. +30º
Aprox. +30º
14 Poziţionarea proiectorului
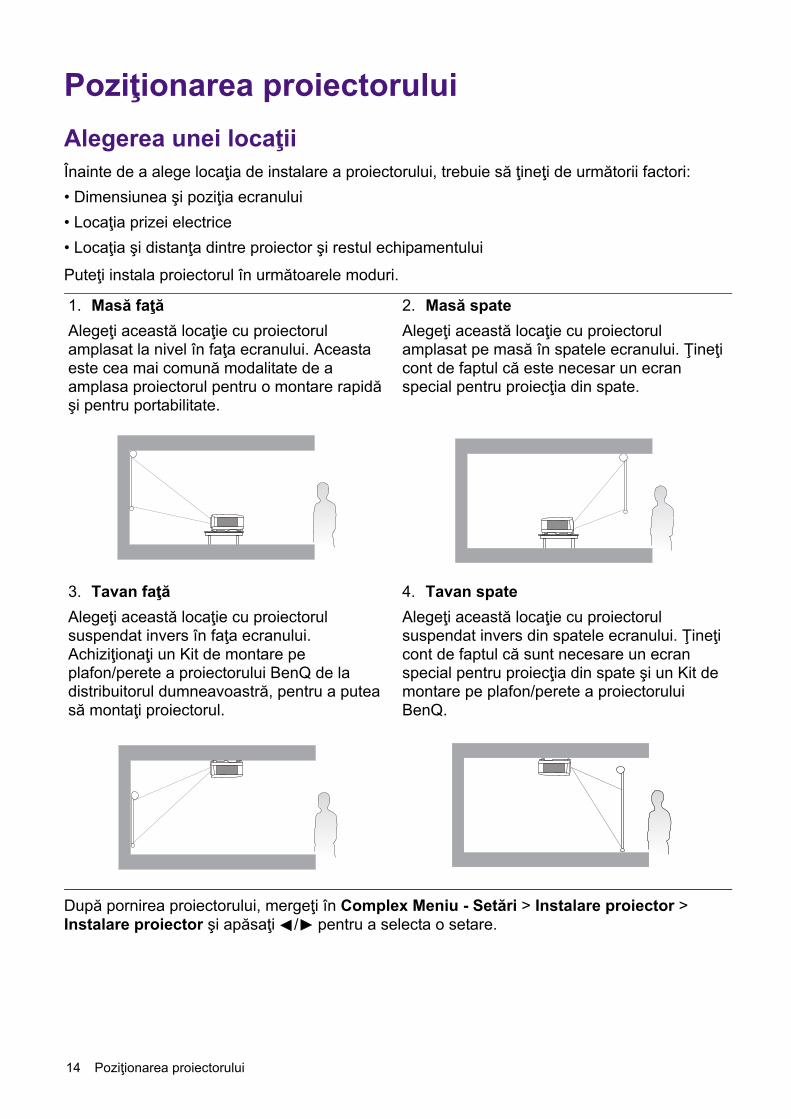
Poziţionarea proiectoruluiAlegerea unei locaţiiÎnainte de a alege locaţia de instalare a proiectorului, trebuie să ţineţi de următorii factori:• Dimensiunea şi poziţia ecranului• Locaţia prizei electrice• Locaţia şi distanţa dintre proiector şi restul echipamentului
Puteţi instala proiectorul în următoarele moduri.
După pornirea proiectorului, mergeţi în Complex Meniu - Setări > Instalare proiector > Instalare proiector şi apăsaţi / pentru a selecta o setare.
1. Masă faţăAlegeţi această locaţie cu proiectorul amplasat la nivel în faţa ecranului. Aceasta este cea mai comună modalitate de a amplasa proiectorul pentru o montare rapidă şi pentru portabilitate.
2. Masă spateAlegeţi această locaţie cu proiectorul amplasat pe masă în spatele ecranului. Ţineţi cont de faptul că este necesar un ecran special pentru proiecţia din spate.
3. Tavan faţăAlegeţi această locaţie cu proiectorul suspendat invers în faţa ecranului. Achiziţionaţi un Kit de montare pe plafon/perete a proiectorului BenQ de la distribuitorul dumneavoastră, pentru a putea să montaţi proiectorul.
4. Tavan spateAlegeţi această locaţie cu proiectorul suspendat invers din spatele ecranului. Ţineţi cont de faptul că sunt necesare un ecran special pentru proiecţia din spate şi un Kit de montare pe plafon/perete a proiectorului BenQ.
15 Poziţionarea proiectorului
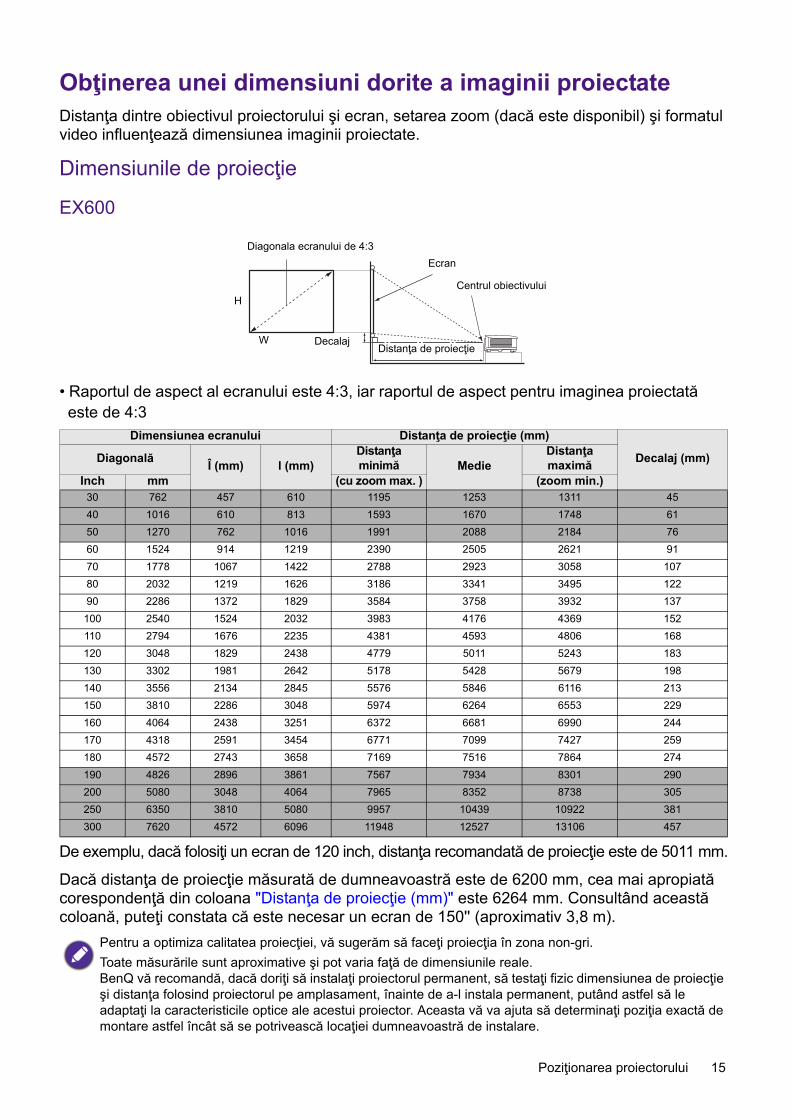
Obţinerea unei dimensiuni dorite a imaginii proiectateDistanţa dintre obiectivul proiectorului şi ecran, setarea zoom (dacă este disponibil) şi formatul video influenţează dimensiunea imaginii proiectate.
Dimensiunile de proiecţie
EX600
• Raportul de aspect al ecranului este 4:3, iar raportul de aspect pentru imaginea proiectată este de 4:3
De exemplu, dacă folosiţi un ecran de 120 inch, distanţa recomandată de proiecţie este de 5011 mm.
Dacă distanţa de proiecţie măsurată de dumneavoastră este de 6200 mm, cea mai apropiată corespondenţă din coloana "Distanţa de proiecţie (mm)" este 6264 mm. Consultând această coloană, puteţi constata că este necesar un ecran de 150'' (aproximativ 3,8 m).
Dimensiunea ecranului Distanţa de proiecţie (mm)
Decalaj (mm)Diagonală Î (mm) l (mm)Distanţa minimă Medie
Distanţa maximă
Inch mm (cu zoom max. ) (zoom min.)30 762 457 610 1195 1253 1311 4540 1016 610 813 1593 1670 1748 61 50 1270 762 1016 1991 2088 2184 76 60 1524 914 1219 2390 2505 2621 91 70 1778 1067 1422 2788 2923 3058 10780 2032 1219 1626 3186 3341 3495 122 90 2286 1372 1829 3584 3758 3932 137
100 2540 1524 2032 3983 4176 4369 152 110 2794 1676 2235 4381 4593 4806 168120 3048 1829 2438 4779 5011 5243 183 130 3302 1981 2642 5178 5428 5679 198140 3556 2134 2845 5576 5846 6116 213150 3810 2286 3048 5974 6264 6553 229 160 4064 2438 3251 6372 6681 6990 244170 4318 2591 3454 6771 7099 7427 259180 4572 2743 3658 7169 7516 7864 274190 4826 2896 3861 7567 7934 8301 290 200 5080 3048 4064 7965 8352 8738 305 250 6350 3810 5080 9957 10439 10922 381 300 7620 4572 6096 11948 12527 13106 457
Pentru a optimiza calitatea proiecţiei, vă sugerăm să faceţi proiecţia în zona non-gri.Toate măsurările sunt aproximative şi pot varia faţă de dimensiunile reale. BenQ vă recomandă, dacă doriţi să instalaţi proiectorul permanent, să testaţi fizic dimensiunea de proiecţie şi distanţa folosind proiectorul pe amplasament, înainte de a-l instala permanent, putând astfel să le adaptaţi la caracteristicile optice ale acestui proiector. Aceasta vă va ajuta să determinaţi poziţia exactă de montare astfel încât să se potrivească locaţiei dumneavoastră de instalare.
H
WDistanţa de proiecţie
Centrul obiectivului
EcranDiagonala ecranului de 4:3
Decalaj

16 Poziţionarea proiectorului
EW600
• Raportul de aspect este 16:10, iar raportul de aspect pentru imaginea proiectată este de 16:10
De exemplu, dacă folosiţi un ecran de 120 inch, distanţa recomandată de proiecţie este de 4200 mm.Dacă distanţa de proiecţie măsurată de dumneavoastră este de 5200 mm, cea mai apropiată corespondenţă din coloana "Distanţa de proiecţie (mm)" este 5250 mm. Consultând această coloană, puteţi constata că este necesar un ecran de 150'' (aproximativ 3,8 m).
Dimensiunea ecranului Distanţa de proiecţie (mm)
Decalaj (mm)Diagonală Î (mm) l (mm)Distanţa minimă Medie
Distanţa maximă
Inch mm (cu zoom max. ) (zoom min.)30 762 406 646 1002 1050 1098 040 1016 538 862 1335 1400 1465 0 50 1270 673 1077 1669 1750 1831 0 60 1524 808 1292 2003 2100 2197 0 70 1778 942 1508 2337 2450 2563 080 2032 1007 1723 2671 2800 2929 0 90 2286 1212 1939 3005 3150 3295 0
100 2540 1346 2154 3339 3500 3662 0 110 2794 1481 2369 3672 3850 4028 0120 3048 1615 2585 4006 4200 4394 0 130 3302 1750 2800 4340 4550 4760 0140 3556 1885 3015 4676 4900 5126 0150 3810 2019 3231 5008 5250 5492 0 160 4064 2154 3446 5342 5600 5859 0170 4318 2289 3662 5676 5950 6225 0180 4572 2423 3877 6009 6300 6591 0190 4826 2558 4092 6343 6650 6957 0200 5080 2692 4308 6677 7000 7323 0 250 6350 3365 5385 8346 8750 9154 0 300 7620 4039 6462 10016 10500 10985 0
Pentru a optimiza calitatea proiecţiei, vă sugerăm să faceţi proiecţia în zona non-gri.Toate măsurările sunt aproximative şi pot varia faţă de dimensiunile reale. BenQ vă recomandă, dacă doriţi să instalaţi proiectorul permanent, să testaţi fizic dimensiunea de proiecţie şi distanţa folosind proiectorul pe amplasament, înainte de a-l instala permanent, putând astfel să le adaptaţi la caracteristicile optice ale acestui proiector. Aceasta vă va ajuta să determinaţi poziţia exactă de montare astfel încât să se potrivească locaţiei dumneavoastră de instalare.
H
WDistanţa de proiecţie
Centrul obiectivului
EcranDiagonală ecran 16:10
Decalaj

17 Poziţionarea proiectorului
EH600
• Raportul de aspect al ecranului este 16:9, iar raportul de aspect pentru imaginea proiectată este de 16:9
De exemplu, dacă folosiţi un ecran de 120 inch, distanţa recomandată de proiecţie este de 4158 mm.Dacă distanţa de proiecţie măsurată de dumneavoastră este de 5200 mm, cea mai apropiată corespondenţă din coloana "Distanţa de proiecţie (mm)" este 5197 mm. Consultând această coloană, puteţi constata că este necesar un ecran de 150'' (aproximativ 3,8 m).
Dimensiunea ecranului Distanţa de proiecţie (mm)
Decalaj (mm)Diagonală Î (mm) l (mm)Distanţa minimă Medie
Distanţa maximă
Inch mm (cu zoom max. ) (zoom min.)30 762 374 664 990 1039 1089 30
40 1016 498 886 1319 1386 1452 40
50 1270 623 1107 1649 1732 1815 50
60 1524 747 1328 1979 2079 2178 60 70 1778 872 1550 2309 2425 2541 70
80 2032 996 1771 2639 2772 2905 80
90 2286 1121 1992 2969 3118 3268 90
100 2540 1245 2214 3299 3465 3631 100
110 2794 1370 2435 3628 3811 3994 110120 3048 1494 2657 3958 4158 4357 120
130 3302 1619 2878 4288 4504 4720 130
140 3556 1743 3099 4618 4850 5083 139
150 3810 1868 3321 4948 5197 5446 149
160 4064 1992 3542 5278 5543 5809 159170 4318 2117 3763 5608 5890 6172 169
180 4572 2241 3985 5937 6236 6535 179
190 4826 2366 4206 6267 6583 6898 189
200 5080 2491 4428 6597 6929 7261 199 250 6350 3113 5535 8246 8661 9077 249
300 7620 3736 6641 9896 10394 10892 299
Pentru a optimiza calitatea proiecţiei, vă sugerăm să faceţi proiecţia în zona non-gri.Toate măsurările sunt aproximative şi pot varia faţă de dimensiunile reale. BenQ vă recomandă, dacă doriţi să instalaţi proiectorul permanent, să testaţi fizic dimensiunea de proiecţie şi distanţa folosind proiectorul pe amplasament, înainte de a-l instala permanent, putând astfel să le adaptaţi la caracteristicile optice ale acestui proiector. Aceasta vă va ajuta să determinaţi poziţia exactă de montare astfel încât să se potrivească locaţiei dumneavoastră de instalare.
H
WDistanţa de proiecţie
Centrul obiectivului
EcranDiagonala ecranului de 16:9
Decalaj

18 Poziţionarea proiectorului
Montarea proiectoruluiDacă intenţionaţi să montaţi dvs. proiectorul, vă recomandăm cu tărie să utilizaţi un kit de montare pe plafon a proiectorului BenQ şi să vă asiguraţi că este instalat bine şi în condiţii de siguranţă.Dacă folosiţi un alt kit de montare a proiectorului care nu este marca BenQ, există riscul ca proiectorul să cadă datorită prinderii improprii prin utilizarea altor dimensiuni de montare sau a şuruburilor de altă lungime.
Înainte de montarea proiectorului• Achiziţiona un kit de montare a proiectorului BenQ din acelaşi loc de unde aţi achiziţionat şi proiectorul BenQ.
• BenQ vă recomandă să achiziţionaţi separat un cablu de siguranţă compatibil cu închiderea Kensington şi să-l montaţi pentru a asigura slotul Kensington de pe proiector şi baza consolei de montare. Aceasta va juca un rol suplimentar în menţinerea proiectorului, dacă montarea sa faţă de consolă este slăbită.
• Rugaţi distribuitorul dvs. să vă instaleze proiectorul. Instalarea proiectorului după cum credeţi dvs. poate face ca acesta să cadă şi să vă rănească.
• Luaţi măsurile necesare pentru a preveni căderea proiectorului, cum ar fi, de exemplu, în timpul unui cutremur.
• Garanţia nu acoperă nicio deteriorare a produsului cauzată de montarea proiectorului utilizând un kit de montare a proiectorului care nu este marca BenQ.
• Ţineţi cont de temperatura ambientală din încăperea în care proiectorul este montat pe tavan/perete. Dacă se utilizează un sistem de încălzire, temperatura din jurul tavanului/peretelui ar putea fi mai mare decât vă aşteptaţi.
• Citiţi manualul de utilizare pentru kit-ul de montare cu privire la valoarea cuplului de strângere. Utilizarea unui cuplu de strângere mai mare decât cel recomandat poate cauza deteriorarea proiectorului şi, ulterior, căderea acestuia.
• Asiguraţi-vă că priza de alimentare cu curent se află la o înălţime accesibilă pentru a putea opri cu uşurinţă proiectorului.
Diagrama pentru instalarea pe plafon/perete=
Şurub pentru montarea pe plafon/perete: M4(Max L = 25 mm; Min L = 20 mm)
Unitate: mm75146
100
75
19 Poziţionarea proiectorului
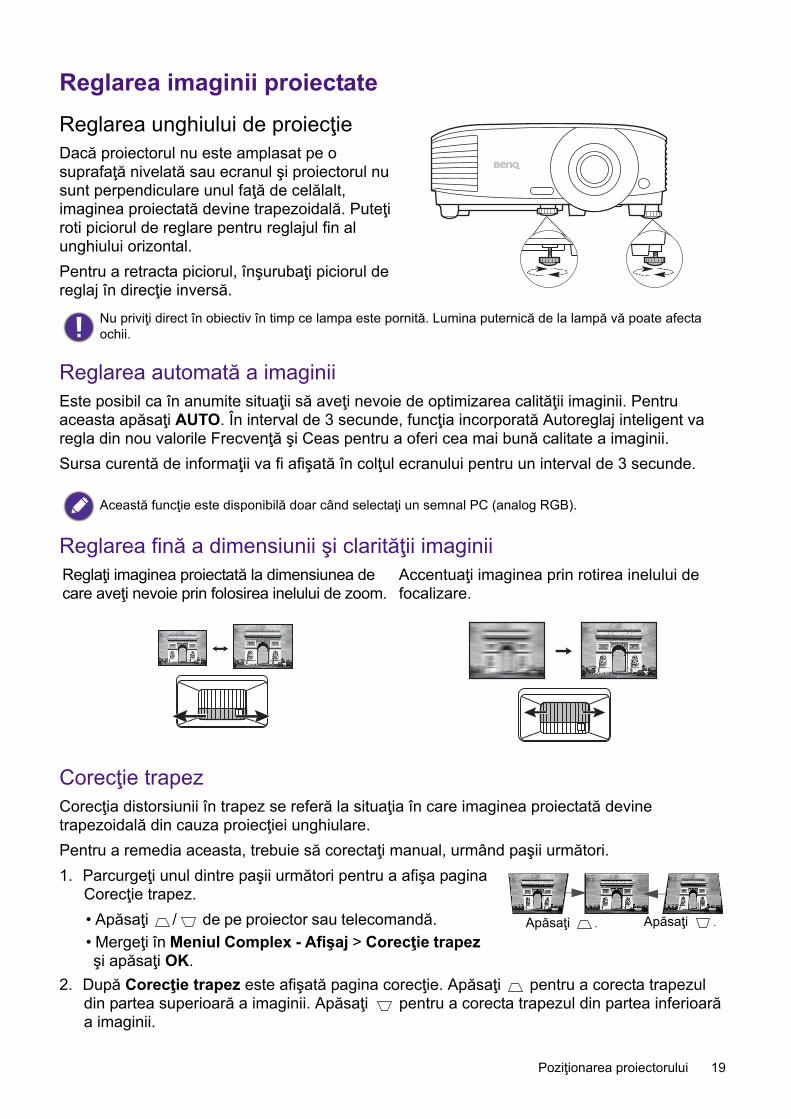
Reglarea imaginii proiectateReglarea unghiului de proiecţieDacă proiectorul nu este amplasat pe o suprafaţă nivelată sau ecranul şi proiectorul nu sunt perpendiculare unul faţă de celălalt, imaginea proiectată devine trapezoidală. Puteţi roti piciorul de reglare pentru reglajul fin al unghiului orizontal.Pentru a retracta piciorul, înşurubaţi piciorul de reglaj în direcţie inversă.
Reglarea automată a imaginiiEste posibil ca în anumite situaţii să aveţi nevoie de optimizarea calităţii imaginii. Pentru aceasta apăsaţi AUTO. În interval de 3 secunde, funcţia incorporată Autoreglaj inteligent va regla din nou valorile Frecvenţă şi Ceas pentru a oferi cea mai bună calitate a imaginii. Sursa curentă de informaţii va fi afişată în colţul ecranului pentru un interval de 3 secunde.
Reglarea fină a dimensiunii şi clarităţii imaginii
Corecţie trapezCorecţia distorsiunii în trapez se referă la situaţia în care imaginea proiectată devine trapezoidală din cauza proiecţiei unghiulare.Pentru a remedia aceasta, trebuie să corectaţi manual, urmând paşii următori.1. Parcurgeţi unul dintre paşii următori pentru a afişa pagina
Corecţie trapez.• Apăsaţi / de pe proiector sau telecomandă. • Mergeţi în Meniul Complex - Afişaj > Corecţie trapez şi apăsaţi OK.
2. După Corecţie trapez este afişată pagina corecţie. Apăsaţi pentru a corecta trapezul din partea superioară a imaginii. Apăsaţi pentru a corecta trapezul din partea inferioară a imaginii.
Nu priviţi direct în obiectiv în timp ce lampa este pornită. Lumina puternică de la lampă vă poate afecta ochii.
Această funcţie este disponibilă doar când selectaţi un semnal PC (analog RGB).
Reglaţi imaginea proiectată la dimensiunea de care aveţi nevoie prin folosirea inelului de zoom.
Accentuaţi imaginea prin rotirea inelului de focalizare.
Apăsaţi . Apăsaţi .
20 Conectarea
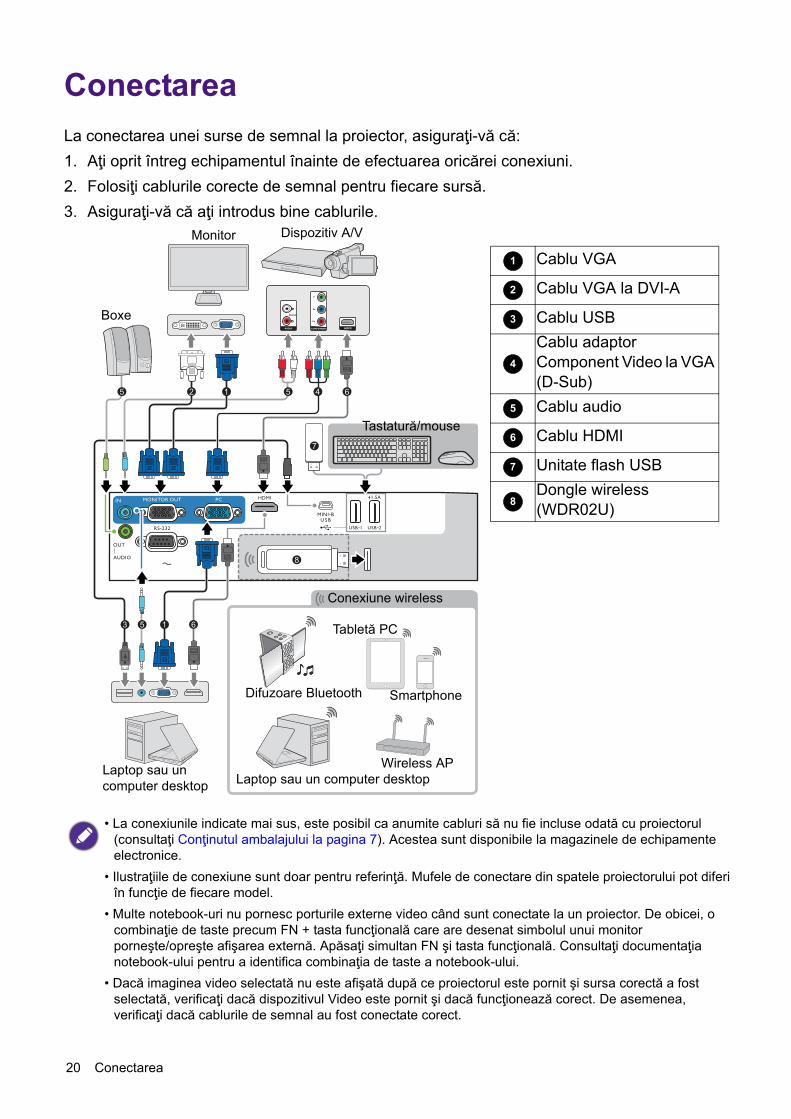
ConectareaLa conectarea unei surse de semnal la proiector, asiguraţi-vă că:1. Aţi oprit întreg echipamentul înainte de efectuarea oricărei conexiuni.2. Folosiţi cablurile corecte de semnal pentru fiecare sursă.3. Asiguraţi-vă că aţi introdus bine cablurile.
• La conexiunile indicate mai sus, este posibil ca anumite cabluri să nu fie incluse odată cu proiectorul (consultaţi Conţinutul ambalajului la pagina 7). Acestea sunt disponibile la magazinele de echipamente electronice.
• Ilustraţiile de conexiune sunt doar pentru referinţă. Mufele de conectare din spatele proiectorului pot diferi în funcţie de fiecare model.
• Multe notebook-uri nu pornesc porturile externe video când sunt conectate la un proiector. De obicei, o combinaţie de taste precum FN + tasta funcţională care are desenat simbolul unui monitor porneşte/opreşte afişarea externă. Apăsaţi simultan FN şi tasta funcţională. Consultaţi documentaţia notebook-ului pentru a identifica combinaţia de taste a notebook-ului.
• Dacă imaginea video selectată nu este afişată după ce proiectorul este pornit şi sursa corectă a fost selectată, verificaţi dacă dispozitivul Video este pornit şi dacă funcţionează corect. De asemenea, verificaţi dacă cablurile de semnal au fost conectate corect.
5
55 6
1
42 1
3 6
7
8
Laptop sau un computer desktop
Cablu VGA
Cablu VGA la DVI-A
Cablu USBCablu adaptor Component Video la VGA (D-Sub)Cablu audio
Cablu HDMI
Unitate flash USBDongle wireless (WDR02U)
1
2
3
4
5
6
7
8
Boxe
Monitor
Conexiune wireless
Dispozitiv A/V
Laptop sau un computer desktop
Tabletă PC
SmartphoneDifuzoare Bluetooth
Wireless AP
Tastatură/mouse

21 Conectarea
Trebuie doar să conectaţi proiectorul la un dispozitiv sursă video folosind doar una dintre metodele de conectare menţionate, totuşi fiecare oferă un nivel diferit al calităţii video.
Conectarea semnalului AudioProiectorul are difuzoare încorporate mono, care sunt realizate pentru a oferi o funcţionalitate de bază pentru însoţirea prezentărilor de date în scopuri de afaceri. Acestea nu sunt realizate pentru reproducerea semnalului audio stereo, aşa cum poate vă aşteptaţi, în aplicaţiile home theater sau home cinema. Orice intrare audio stereo (dacă este oferită), este transformată în sunet comun mono prin boxa(le) proiectorului.
Boxa încorporată va fi Fără sonor, când mufa IEŞIRE AUDIO este conectată.
Terminal Calitatea imaginii
HDMI Cea mai bună
Component Video (prin intrarea RGB) Mai bună
• Proiectorul poate să redea doar semnale audio mono, chiar dacă este conectată o intrare audio stereo.• Dacă imaginea video selectată nu este afişată după ce proiectorul este pornit şi sursa corectă a fost
selectată, verificaţi dacă dispozitivul Video este pornit şi dacă funcţionează corect. De asemenea, verificaţi dacă cablurile de semnal au fost conectate corect.
22 Pornirea proiectorului
Pornirea proiectorului1. Conectaţi cablul de alimentare. Cuplaţi comutatorul
prizei de perete (acolo unde acesta există). Indicatorul de PORNIT/OPRIT de pe proiector luminează în culoarea portocalie după conectarea la sursa de alimentare.
2. Apăsaţi de pe proiector sau de pe telecomandă pentru a porni proiectorul. Indicatorul luminos pentru alimentare luminează verde intermitent şi rămâne aprins când timp proiectorul este pornit.Procedura de pornire durează aproximativ 30 de secunde. În următorul stadiu de pornire, este proiectat un logo.(Dacă este necesar) Rotiţi inelul de focalizare pentru a regla claritatea imaginii.
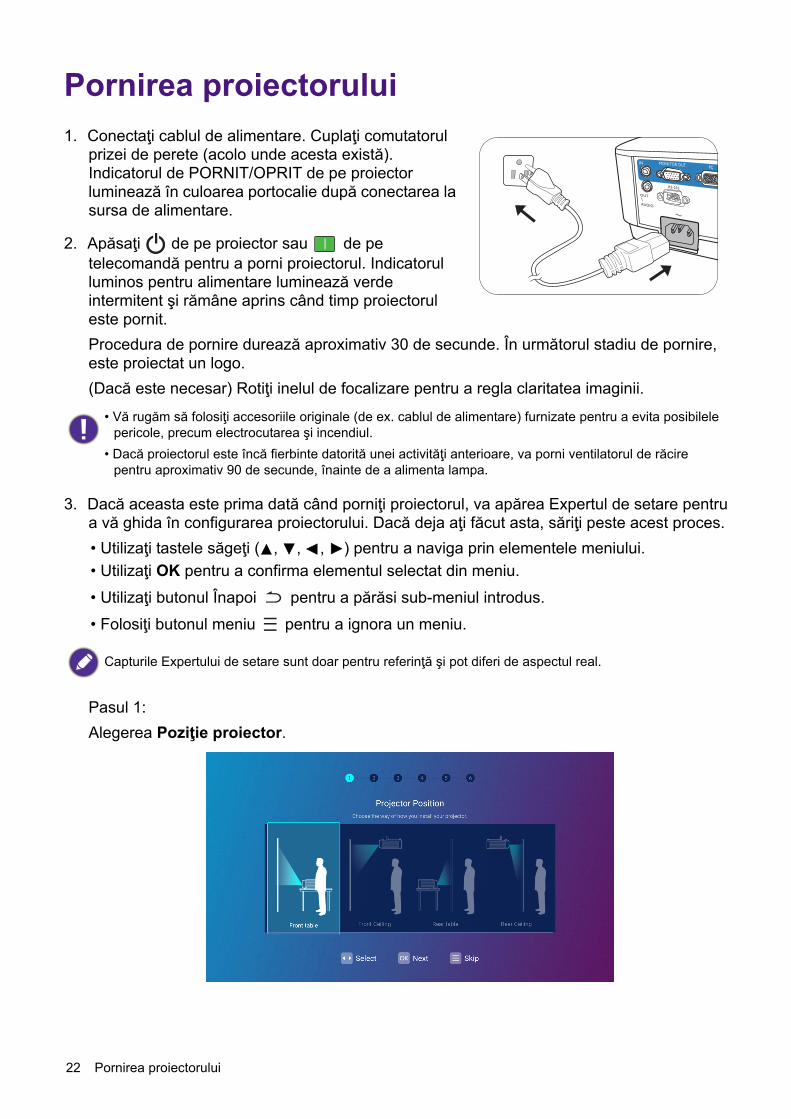
3. Dacă aceasta este prima dată când porniţi proiectorul, va apărea Expertul de setare pentru a vă ghida în configurarea proiectorului. Dacă deja aţi făcut asta, săriţi peste acest proces.• Utilizaţi tastele săgeţi ( , , , ) pentru a naviga prin elementele meniului.• Utilizaţi OK pentru a confirma elementul selectat din meniu.• Utilizaţi butonul Înapoi pentru a părăsi sub-meniul introdus.• Folosiţi butonul meniu pentru a ignora un meniu.
Pasul 1:Alegerea Poziţie proiector.
• Vă rugăm să folosiţi accesoriile originale (de ex. cablul de alimentare) furnizate pentru a evita posibilele pericole, precum electrocutarea şi incendiul.
• Dacă proiectorul este încă fierbinte datorită unei activităţi anterioare, va porni ventilatorul de răcire pentru aproximativ 90 de secunde, înainte de a alimenta lampa.
Capturile Expertului de setare sunt doar pentru referinţă şi pot diferi de aspectul real.
23 Pornirea proiectorului
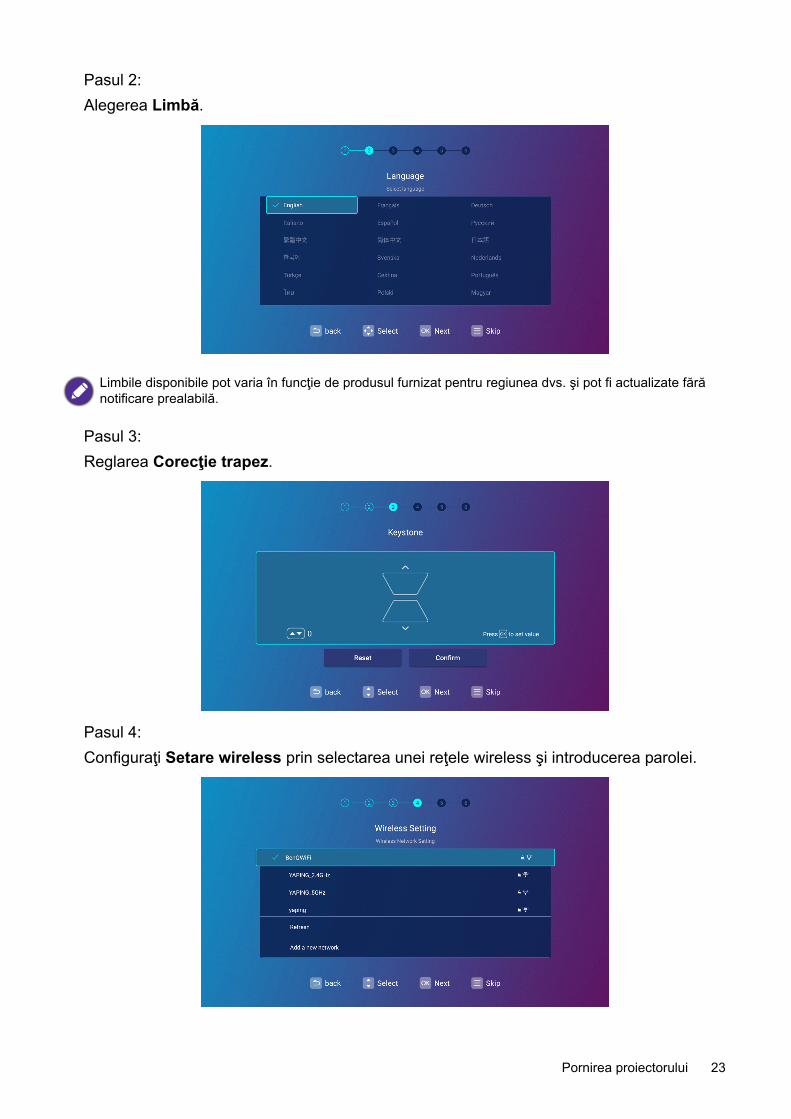
Pasul 2:Alegerea Limbă.
Pasul 3:Reglarea Corecţie trapez.
Pasul 4:Configuraţi Setare wireless prin selectarea unei reţele wireless şi introducerea parolei.
Limbile disponibile pot varia în funcţie de produsul furnizat pentru regiunea dvs. şi pot fi actualizate fără notificare prealabilă.

24 Pornirea proiectorului
Pasul 5: Specificaţi Timp zonă.
Pasul 6:Citiţi Anunţ de confidenţialitate şi apăsaţi OK pentru a vă da acordul.
După ce aţi finalizat paşii de mai sus; proiectorul vă va întreba dacă doriţi să activaţi funcţia AMS.Dacă nu vi se solicită să activaţi funcţia AMS, vi se recomandă să actualizaţi firmware-ul pentru a optimiza experienţa utilizatorului. Consultaţi System Update la pagina 146 pentru detalii. Dacă preferaţi să nu actualizaţi firmware-ul, consultaţi Anexă: Operare (sub sursa Launcher) pentru versiunea de firmware anterioară v01.00.19.00 la pagina 109 pentru operaţii.
Dacă în viitor doriţi să eliminaţi consimţământul dvs. pentru acordul de confidenţialitate, puteţi face acest lucru în meniul Generalităţi > Despre > Anunţ de confidenţialitate din meniul Lansator BenQ Setări. Consultaţi About la pagina 69 pentru mai multe informaţii.
25 Pornirea proiectorului
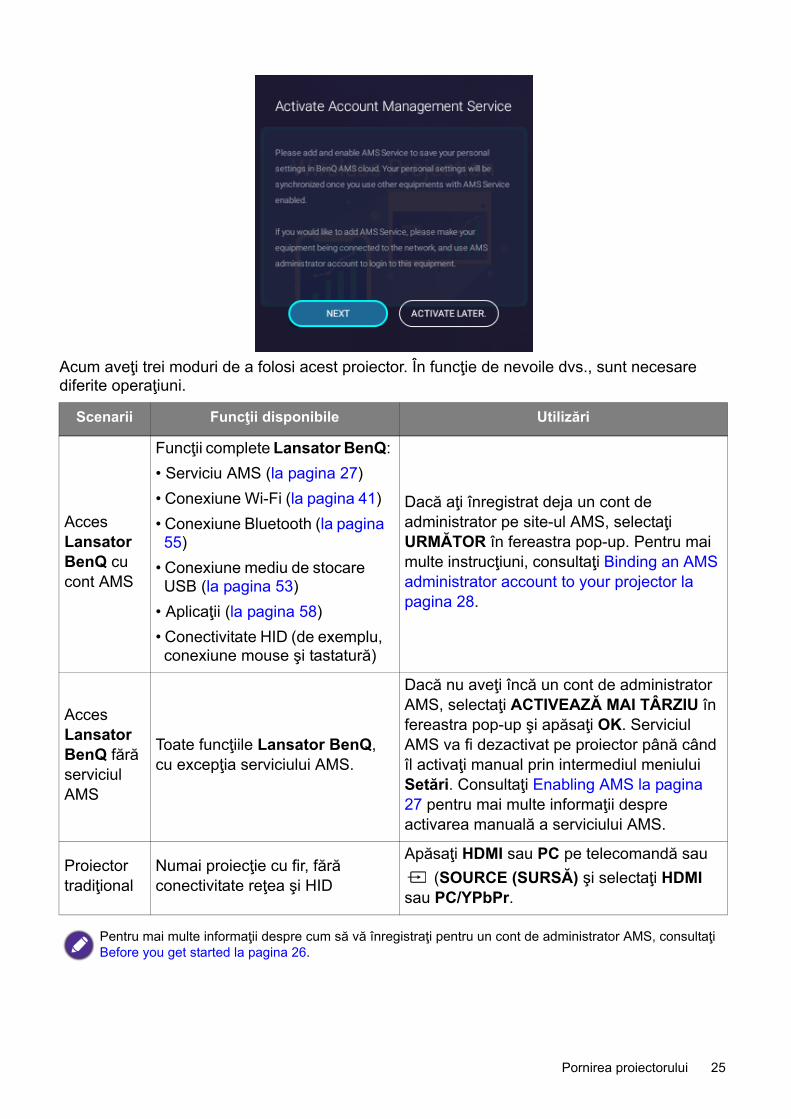
Acum aveţi trei moduri de a folosi acest proiector. În funcţie de nevoile dvs., sunt necesare diferite operaţiuni.
Scenarii Funcţii disponibile Utilizări
Acces Lansator BenQ cu cont AMS
Funcţii complete Lansator BenQ: • Serviciu AMS (la pagina 27)• Conexiune Wi-Fi (la pagina 41) • Conexiune Bluetooth (la pagina 55)
• Conexiune mediu de stocare USB (la pagina 53)
• Aplicaţii (la pagina 58)• Conectivitate HID (de exemplu, conexiune mouse şi tastatură)
Dacă aţi înregistrat deja un cont de administrator pe site-ul AMS, selectaţi URMĂTOR în fereastra pop-up. Pentru mai multe instrucţiuni, consultaţi Binding an AMS administrator account to your projector la pagina 28.
Acces Lansator BenQ fără serviciul AMS
Toate funcţiile Lansator BenQ, cu excepţia serviciului AMS.
Dacă nu aveţi încă un cont de administrator AMS, selectaţi ACTIVEAZĂ MAI TÂRZIU în fereastra pop-up şi apăsaţi OK. Serviciul AMS va fi dezactivat pe proiector până când îl activaţi manual prin intermediul meniului Setări. Consultaţi Enabling AMS la pagina 27 pentru mai multe informaţii despre activarea manuală a serviciului AMS.
Proiector tradiţional
Numai proiecţie cu fir, fără conectivitate reţea şi HID
Apăsaţi HDMI sau PC pe telecomandă sau (SOURCE (SURSĂ) şi selectaţi HDMI
sau PC/YPbPr.
Pentru mai multe informaţii despre cum să vă înregistraţi pentru un cont de administrator AMS, consultaţi Before you get started la pagina 26.

26 Operarea (cu sursa lansator)
Operarea (cu sursa lansator)Before you get startedOne of the key features for this projector is its use of the Account Management System (AMS) service which allows you to create and manage individual login accounts for the projector. By using the AMS service you will be able to:• Customize the projector’s workspace for each login• Access files stored in cloud storage accounts (such as Google Drive, Dropbox, and others) directly from the projector
• Manage authorization for each login, including limiting access to various projector’s functions.In order to use the AMS service it is highly recommended that you first register for an AMS administrator account before you begin the initial start-up process for the projector. To register for an AMS account open the BenQ Service website (https://service-portal.benq.com/login) using a Chrome or Firefox browser, click the Register (Admins only) link, and proceed with the registration process.
For a full description of the features of the AMS service, including instructions on how to setup and manage accounts, refer to the AMS User Manual which you can download at the following URL: https://www.benq.com/en-us/business/index.html > your Projector Model > Downloads > User Manual.
The images in this document are for reference only. The user interface may be subject to change without prior notice.

27 Operarea (cu sursa lansator)
The AMS ServiceAs mentioned previously the AMS service is a key feature of this projector that allows you to customize the projector’s workspace, access files stored in cloud storage accounts directly from the projector, and manage access to various projector’s functions based on a user’s login.For a full description of the features of the AMS service, including instructions on how to setup and manage accounts, refer to the AMS User Manual which you can download at the following URL: https://www.benq.com/en-us/business/index.html > your Projector Model > Downloads > User Manual.
Enabling AMSIf the AMS service was not enabled in the setup wizard procedure during your initial startup. You will have to manually enable AMS. To manually enable AMS:1. Ensure that you have already created an AMS administrator account. See Before you get
started on page 26 for more information on registering for an AMS administrator account.2. Choose one of the following methods:
• Select AMS Service on the BenQ Launcher home screen and press OK.• Select the Settings menu button on the BenQ Launcher home screen, and press OK. Then select AMS Service in the Preference section of the Settings menu and press OK.
28 Operarea (cu sursa lansator)
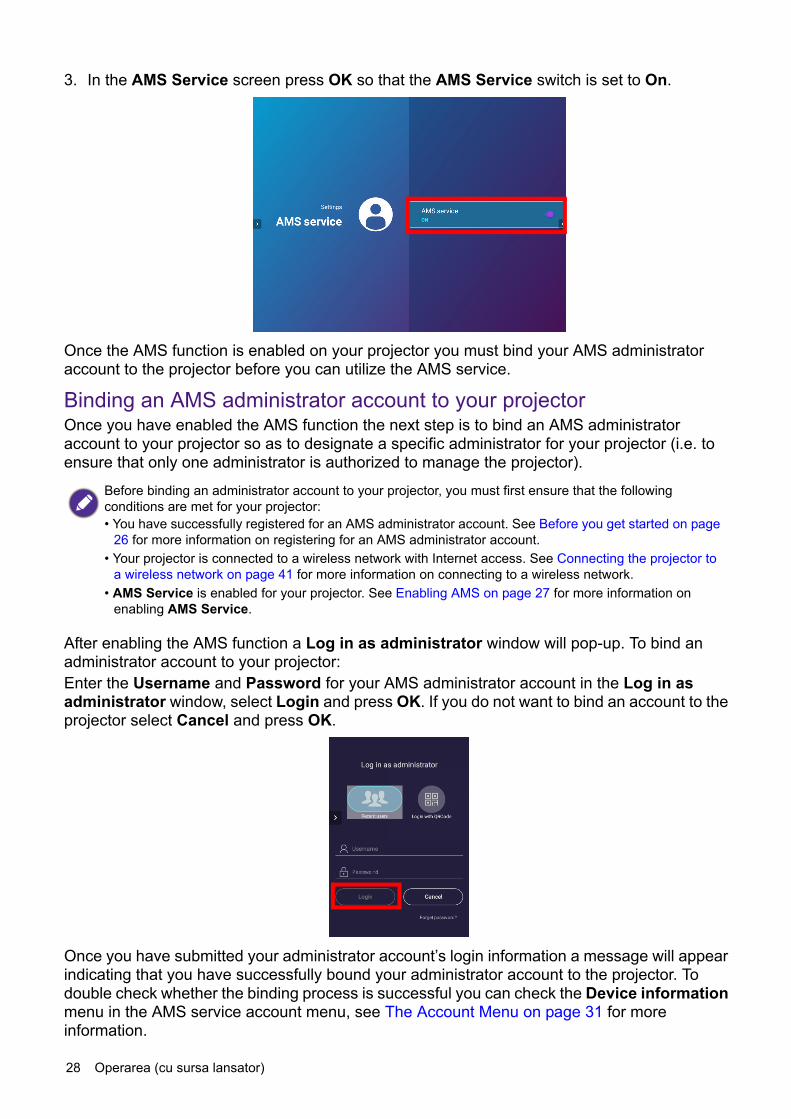
3. In the AMS Service screen press OK so that the AMS Service switch is set to On.
Once the AMS function is enabled on your projector you must bind your AMS administrator account to the projector before you can utilize the AMS service.
Binding an AMS administrator account to your projectorOnce you have enabled the AMS function the next step is to bind an AMS administrator account to your projector so as to designate a specific administrator for your projector (i.e. to ensure that only one administrator is authorized to manage the projector).
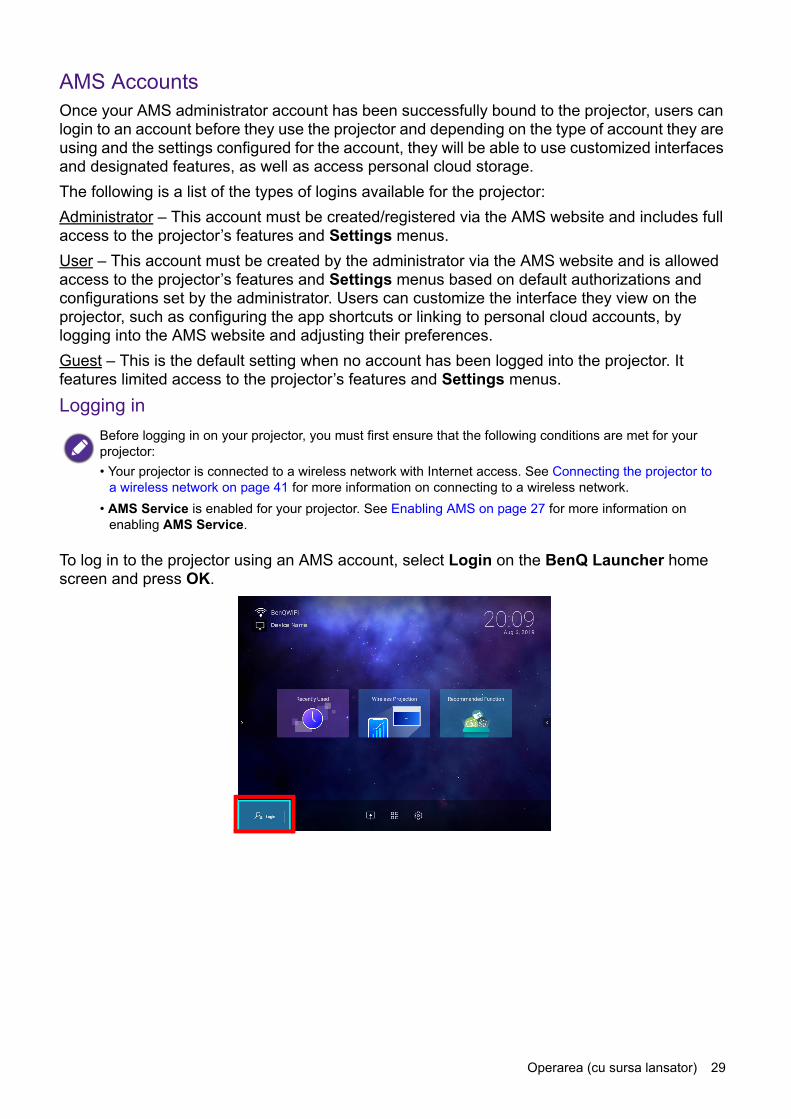
After enabling the AMS function a Log in as administrator window will pop-up. To bind an administrator account to your projector:Enter the Username and Password for your AMS administrator account in the Log in as administrator window, select Login and press OK. If you do not want to bind an account to the projector select Cancel and press OK.
Once you have submitted your administrator account’s login information a message will appear indicating that you have successfully bound your administrator account to the projector. To double check whether the binding process is successful you can check the Device information menu in the AMS service account menu, see The Account Menu on page 31 for more information.
Before binding an administrator account to your projector, you must first ensure that the following conditions are met for your projector:• You have successfully registered for an AMS administrator account. See Before you get started on page
26 for more information on registering for an AMS administrator account.• Your projector is connected to a wireless network with Internet access. See Connecting the projector to
a wireless network on page 41 for more information on connecting to a wireless network.• AMS Service is enabled for your projector. See Enabling AMS on page 27 for more information on
enabling AMS Service.
29 Operarea (cu sursa lansator)
AMS AccountsOnce your AMS administrator account has been successfully bound to the projector, users can login to an account before they use the projector and depending on the type of account they are using and the settings configured for the account, they will be able to use customized interfaces and designated features, as well as access personal cloud storage. The following is a list of the types of logins available for the projector:Administrator – This account must be created/registered via the AMS website and includes full access to the projector’s features and Settings menus.User – This account must be created by the administrator via the AMS website and is allowed access to the projector’s features and Settings menus based on default authorizations and configurations set by the administrator. Users can customize the interface they view on the projector, such as configuring the app shortcuts or linking to personal cloud accounts, by logging into the AMS website and adjusting their preferences. Guest – This is the default setting when no account has been logged into the projector. It features limited access to the projector’s features and Settings menus.Logging in
To log in to the projector using an AMS account, select Login on the BenQ Launcher home screen and press OK.
Before logging in on your projector, you must first ensure that the following conditions are met for your projector:• Your projector is connected to a wireless network with Internet access. See Connecting the projector to
a wireless network on page 41 for more information on connecting to a wireless network.• AMS Service is enabled for your projector. See Enabling AMS on page 27 for more information on
enabling AMS Service.
30 Operarea (cu sursa lansator)
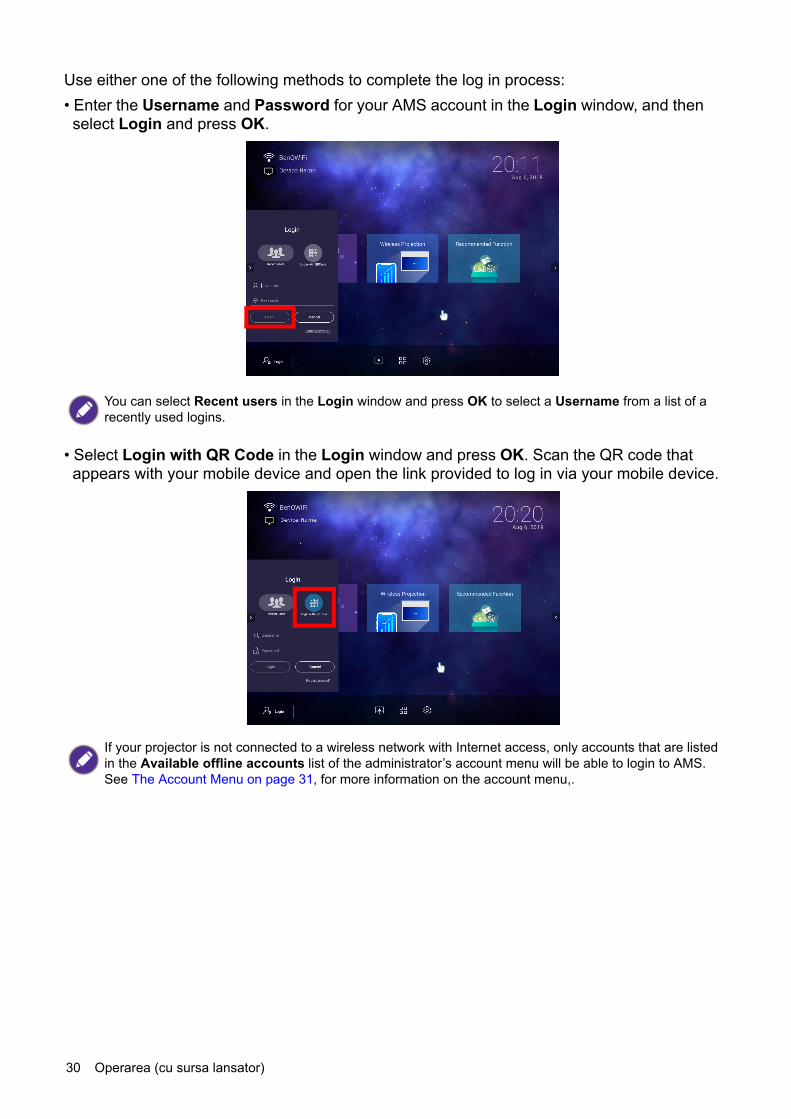
Use either one of the following methods to complete the log in process:• Enter the Username and Password for your AMS account in the Login window, and then select Login and press OK.
• Select Login with QR Code in the Login window and press OK. Scan the QR code that appears with your mobile device and open the link provided to log in via your mobile device.
You can select Recent users in the Login window and press OK to select a Username from a list of a recently used logins.
If your projector is not connected to a wireless network with Internet access, only accounts that are listed in the Available offline accounts list of the administrator’s account menu will be able to login to AMS. See The Account Menu on page 31, for more information on the account menu,.
31 Operarea (cu sursa lansator)
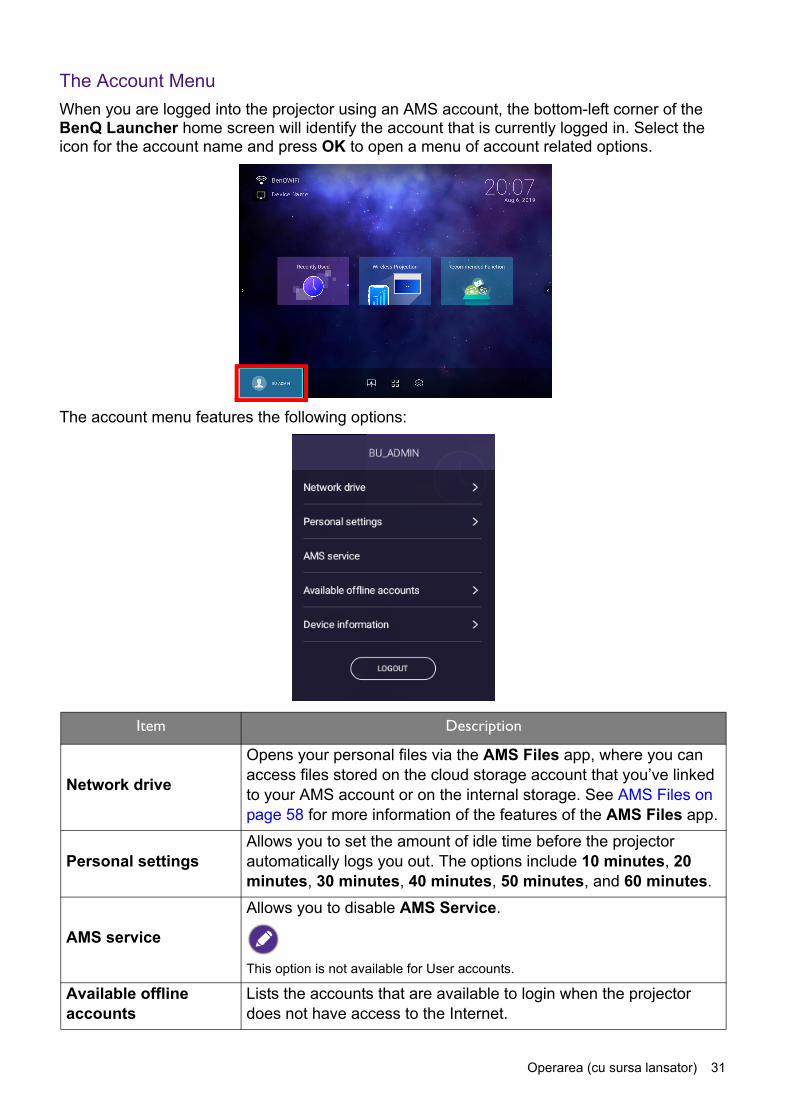
The Account MenuWhen you are logged into the projector using an AMS account, the bottom-left corner of the BenQ Launcher home screen will identify the account that is currently logged in. Select the icon for the account name and press OK to open a menu of account related options.
The account menu features the following options:
Item Description
Network drive
Opens your personal files via the AMS Files app, where you can access files stored on the cloud storage account that you’ve linked to your AMS account or on the internal storage. See AMS Files on page 58 for more information of the features of the AMS Files app.
Personal settingsAllows you to set the amount of idle time before the projector automatically logs you out. The options include 10 minutes, 20 minutes, 30 minutes, 40 minutes, 50 minutes, and 60 minutes.
AMS service
Allows you to disable AMS Service.
This option is not available for User accounts.
Available offline accounts
Lists the accounts that are available to login when the projector does not have access to the Internet.
32 Operarea (cu sursa lansator)
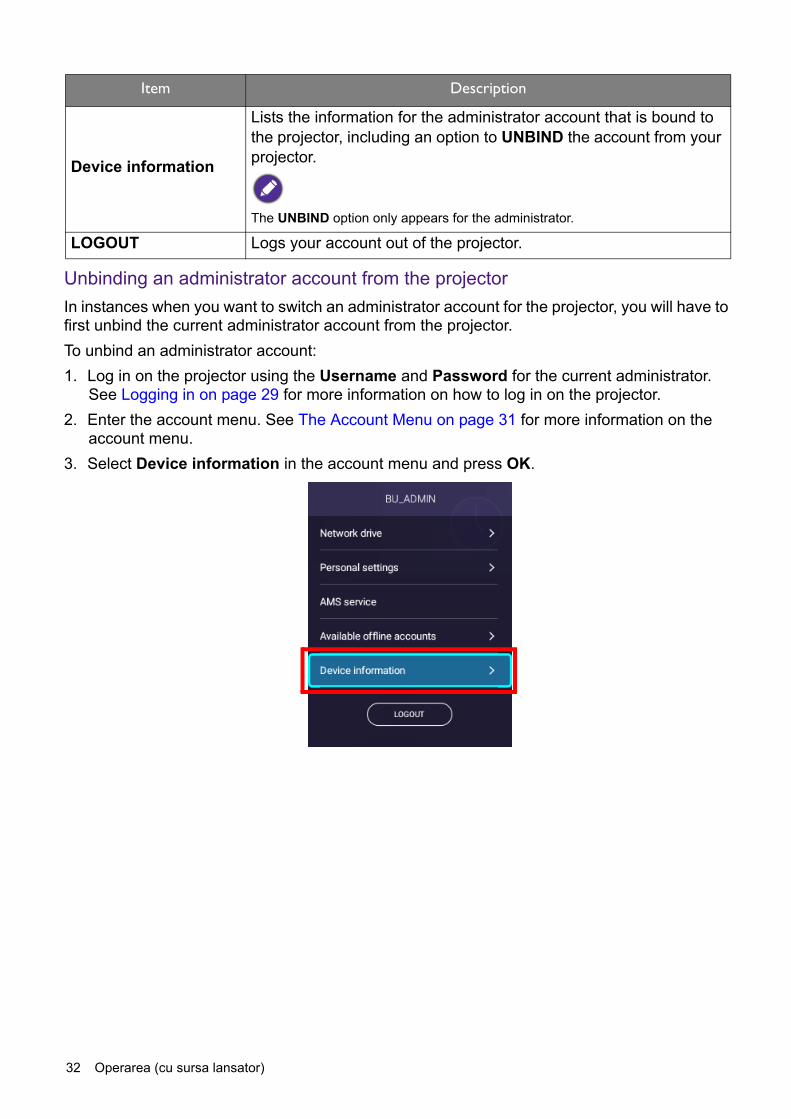
Unbinding an administrator account from the projectorIn instances when you want to switch an administrator account for the projector, you will have to first unbind the current administrator account from the projector. To unbind an administrator account:1. Log in on the projector using the Username and Password for the current administrator.
See Logging in on page 29 for more information on how to log in on the projector.2. Enter the account menu. See The Account Menu on page 31 for more information on the
account menu.3. Select Device information in the account menu and press OK.
Device information
Lists the information for the administrator account that is bound to the projector, including an option to UNBIND the account from your projector.
The UNBIND option only appears for the administrator.
LOGOUT Logs your account out of the projector.
Item Description

33 Operarea (cu sursa lansator)
4. Select UNBIND and press OK.
Checking for system updateIt is suggested that users regularly update their projector with the latest version of the firmware to optimize the user experience. The projector uses Over-the-Air (OTA) updates to install the update file wirelessly.When a new version is available on the BenQ OTA server, a message will pop up once the projector is connected to a wireless network. You can find the availability of a new firmware version from the notification icon on the lower-part of the BenQ Launcher home screen.
Follow the steps below to begin updating the firmware:1. Select DOWNLOAD to download the update file.

34 Operarea (cu sursa lansator)
2. Once the download is completed, the projector will restart automatically. Do not turn off or unplug the projector before the projector is finished updating and BenQ Launcher reappears on the screen.

35 Operarea (cu sursa lansator)
BenQ Launcher BenQ Launcher is the projector’s operating system that allows you to wirelessly cast your device’s screen, play files, run apps, as well as adjust projector settings.
The BenQ Launcher home screenUpon initial start up or when BenQ Launcher is selected in the input source menu, the projector will display BenQ Launcher. If the projector is projecting from an input source (e.g. HDMI or PC/YPbPr), you can return to BenQ Launcher mode by pressing the source button or the LAUNCHER button on the remote control and then selecting BenQ Launcher in the input source menu.
The BenQ Launcher home screen features six main components:
Use the buttons on the projector, the remote control, or connect a USB mouse to the projector’s USB-1 or USB-2 ports to navigate BenQ Launcher and operate its functions.
When the Auto Source function is enabled in the Advanced > Settings menu of the projector’s OSD menu, the projector will display the BenQ Launcher home screen by default every time it is powered on. If the Auto Source function is disabled, the projector will detect if a signal is available from the input source that was last used and switch to that input source if it is available, if a signal is not available or the projector was set to BenQ Launcher during the previous session, the projector will enter the BenQ Launcher home screen. See Setări on page 91.
Actual screen may vary based on your BenQ Launcher firmware version.
No. Component Description
1 Status Bar Icons that display the time, Bluetooth, wireless status, and device name.
2 Main Menu
Shortcuts to recently used apps/documents, instructions on how to project wirelessly, and recommended features/functions. See Using the Main Menu on page 37 for more information regarding the Main Menu.
1
2
3
4
5
3
6
36 Operarea (cu sursa lansator)
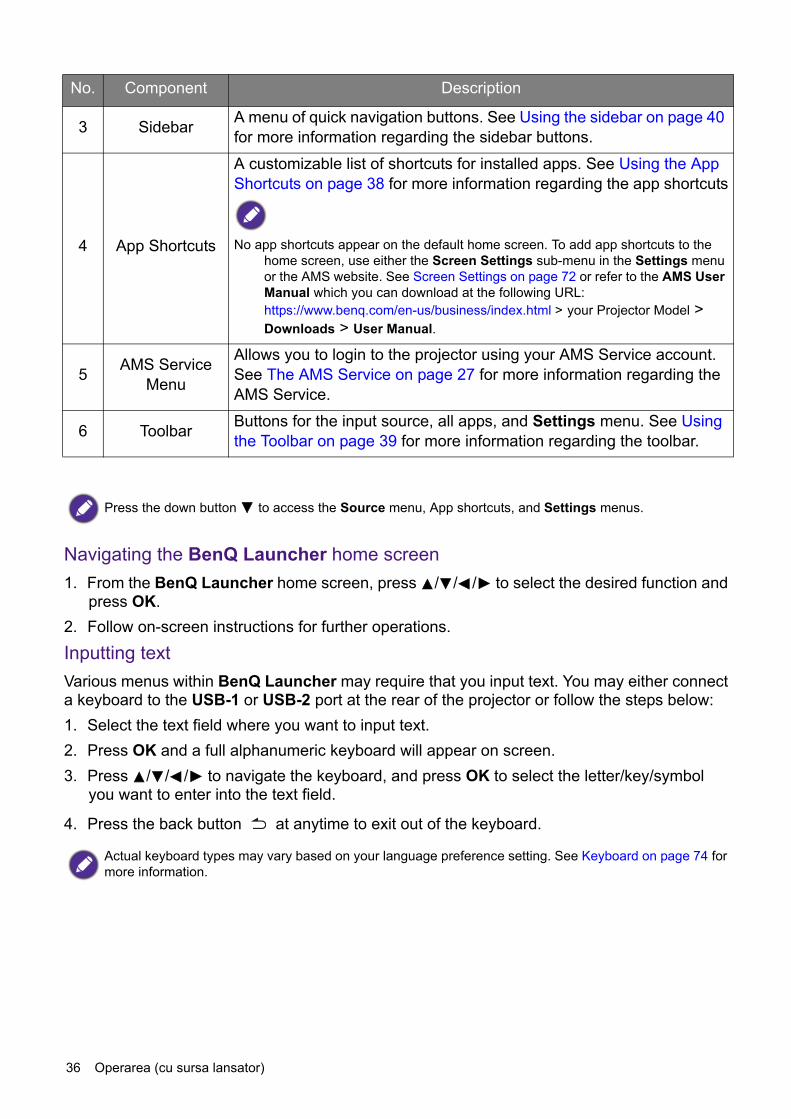
Navigating the BenQ Launcher home screen1. From the BenQ Launcher home screen, press / / / to select the desired function and
press OK.2. Follow on-screen instructions for further operations.Inputting textVarious menus within BenQ Launcher may require that you input text. You may either connect a keyboard to the USB-1 or USB-2 port at the rear of the projector or follow the steps below:1. Select the text field where you want to input text.2. Press OK and a full alphanumeric keyboard will appear on screen.3. Press / / / to navigate the keyboard, and press OK to select the letter/key/symbol
you want to enter into the text field.
4. Press the back button at anytime to exit out of the keyboard.
3 Sidebar A menu of quick navigation buttons. See Using the sidebar on page 40 for more information regarding the sidebar buttons.
4 App Shortcuts
A customizable list of shortcuts for installed apps. See Using the App Shortcuts on page 38 for more information regarding the app shortcuts
No app shortcuts appear on the default home screen. To add app shortcuts to the home screen, use either the Screen Settings sub-menu in the Settings menu or the AMS website. See Screen Settings on page 72 or refer to the AMS User Manual which you can download at the following URL: https://www.benq.com/en-us/business/index.html > your Projector Model > Downloads > User Manual.
5 AMS Service Menu
Allows you to login to the projector using your AMS Service account. See The AMS Service on page 27 for more information regarding the AMS Service.
6 Toolbar Buttons for the input source, all apps, and Settings menu. See Using the Toolbar on page 39 for more information regarding the toolbar.
Press the down button to access the Source menu, App shortcuts, and Settings menus.
Actual keyboard types may vary based on your language preference setting. See Keyboard on page 74 for more information.
No. Component Description
37 Operarea (cu sursa lansator)
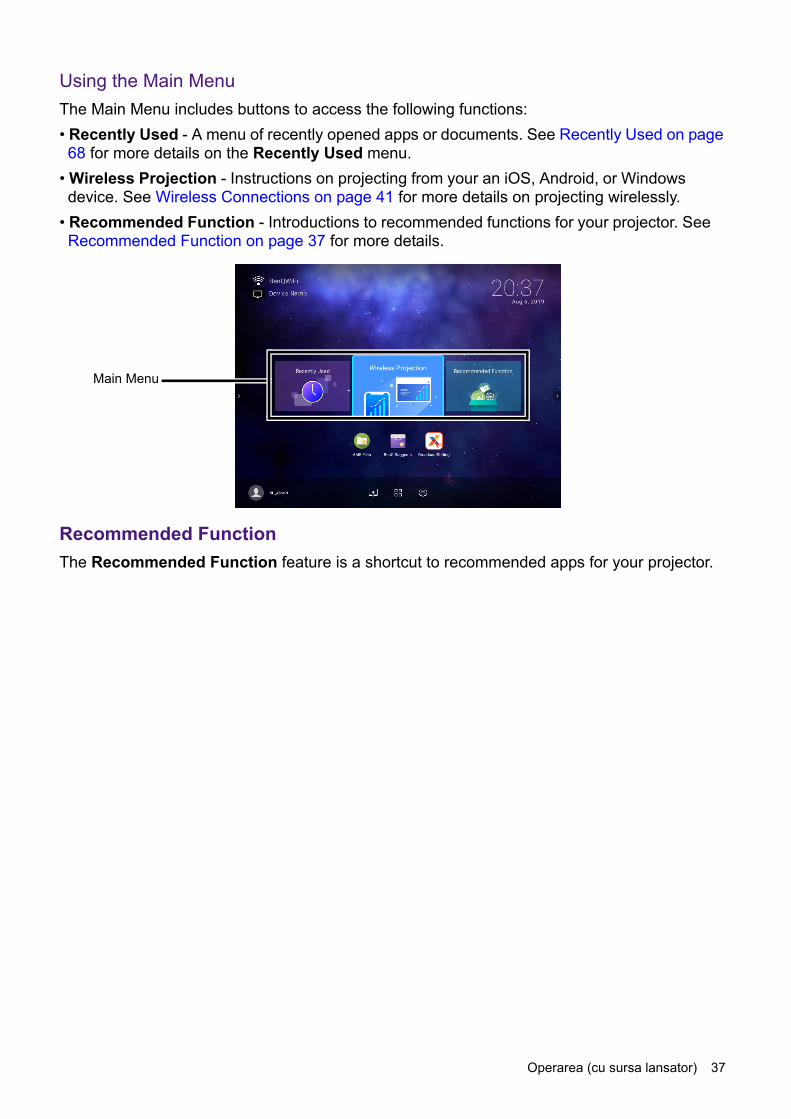
Using the Main MenuThe Main Menu includes buttons to access the following functions:• Recently Used - A menu of recently opened apps or documents. See Recently Used on page 68 for more details on the Recently Used menu.
• Wireless Projection - Instructions on projecting from your an iOS, Android, or Windows device. See Wireless Connections on page 41 for more details on projecting wirelessly.
• Recommended Function - Introductions to recommended functions for your projector. See Recommended Function on page 37 for more details.
Recommended FunctionThe Recommended Function feature is a shortcut to recommended apps for your projector.
Main Menu
38 Operarea (cu sursa lansator)
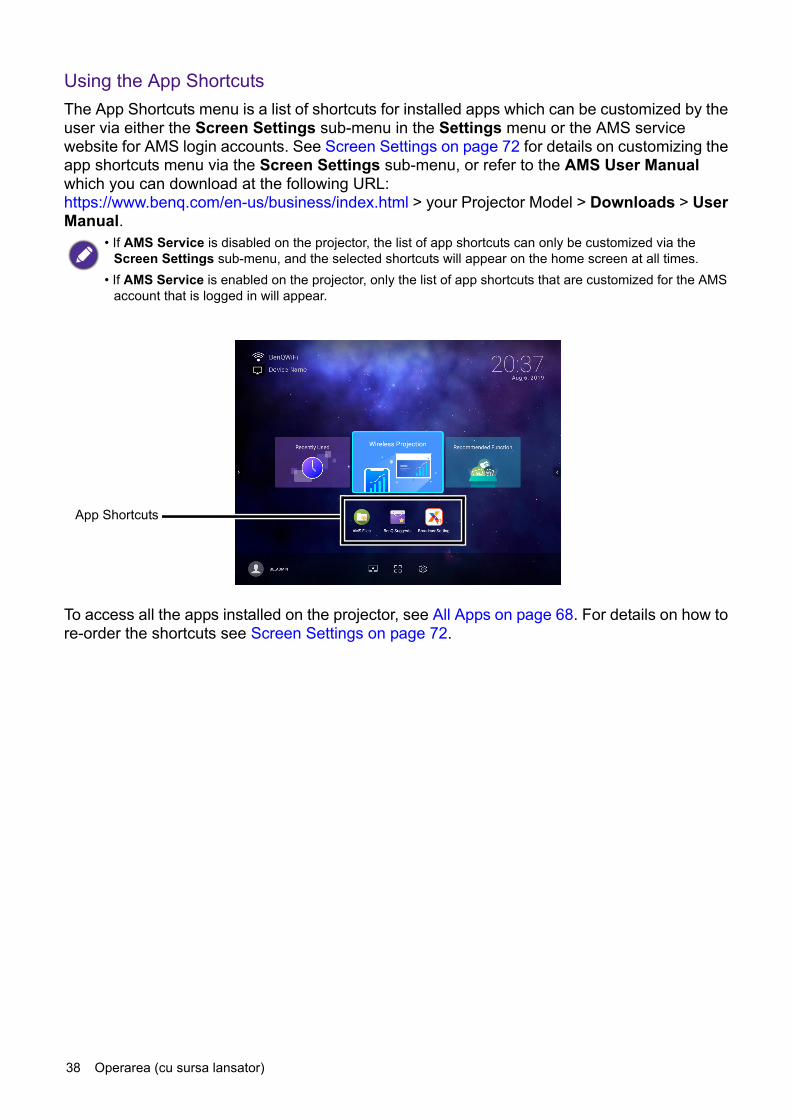
Using the App ShortcutsThe App Shortcuts menu is a list of shortcuts for installed apps which can be customized by the user via either the Screen Settings sub-menu in the Settings menu or the AMS service website for AMS login accounts. See Screen Settings on page 72 for details on customizing the app shortcuts menu via the Screen Settings sub-menu, or refer to the AMS User Manual which you can download at the following URL: https://www.benq.com/en-us/business/index.html > your Projector Model > Downloads > User Manual.
To access all the apps installed on the projector, see All Apps on page 68. For details on how to re-order the shortcuts see Screen Settings on page 72.
• If AMS Service is disabled on the projector, the list of app shortcuts can only be customized via the Screen Settings sub-menu, and the selected shortcuts will appear on the home screen at all times.
• If AMS Service is enabled on the projector, only the list of app shortcuts that are customized for the AMS account that is logged in will appear.
App Shortcuts
39 Operarea (cu sursa lansator)
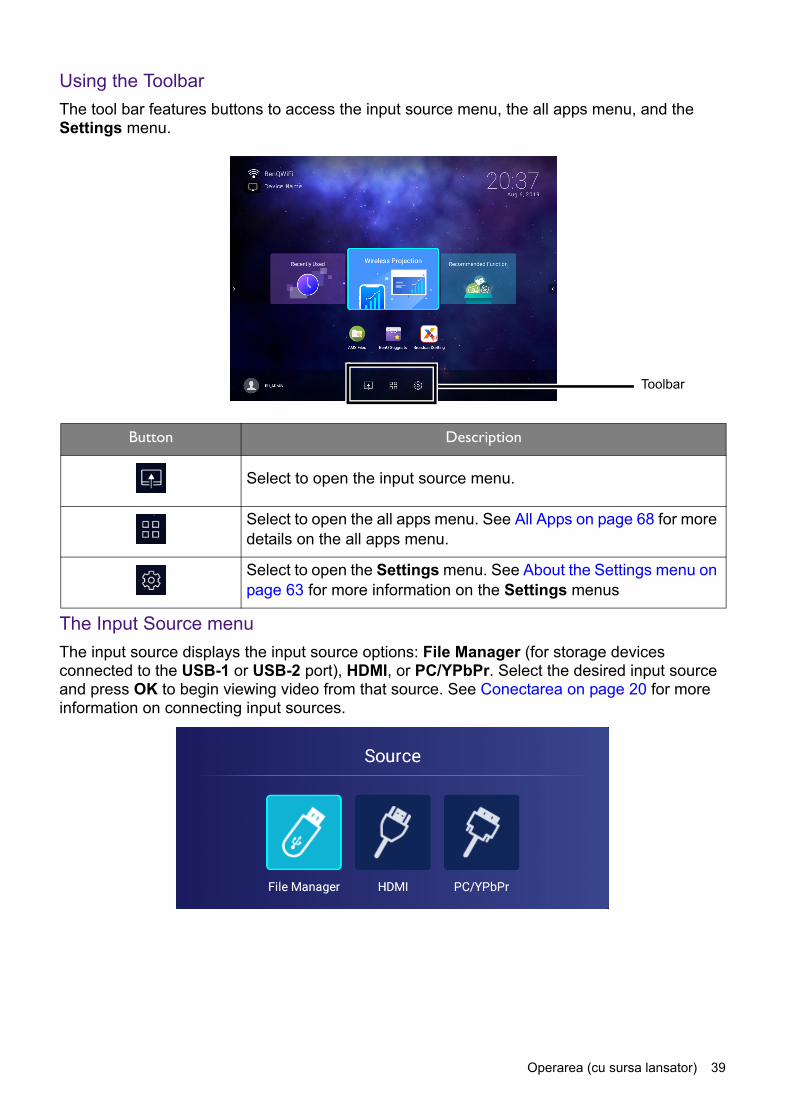
Using the ToolbarThe tool bar features buttons to access the input source menu, the all apps menu, and the Settings menu.
The Input Source menuThe input source displays the input source options: File Manager (for storage devices connected to the USB-1 or USB-2 port), HDMI, or PC/YPbPr. Select the desired input source and press OK to begin viewing video from that source. See Conectarea on page 20 for more information on connecting input sources.
Button Description
Select to open the input source menu.
Select to open the all apps menu. See All Apps on page 68 for more details on the all apps menu.
Select to open the Settings menu. See About the Settings menu on page 63 for more information on the Settings menus
Toolbar
40 Operarea (cu sursa lansator)
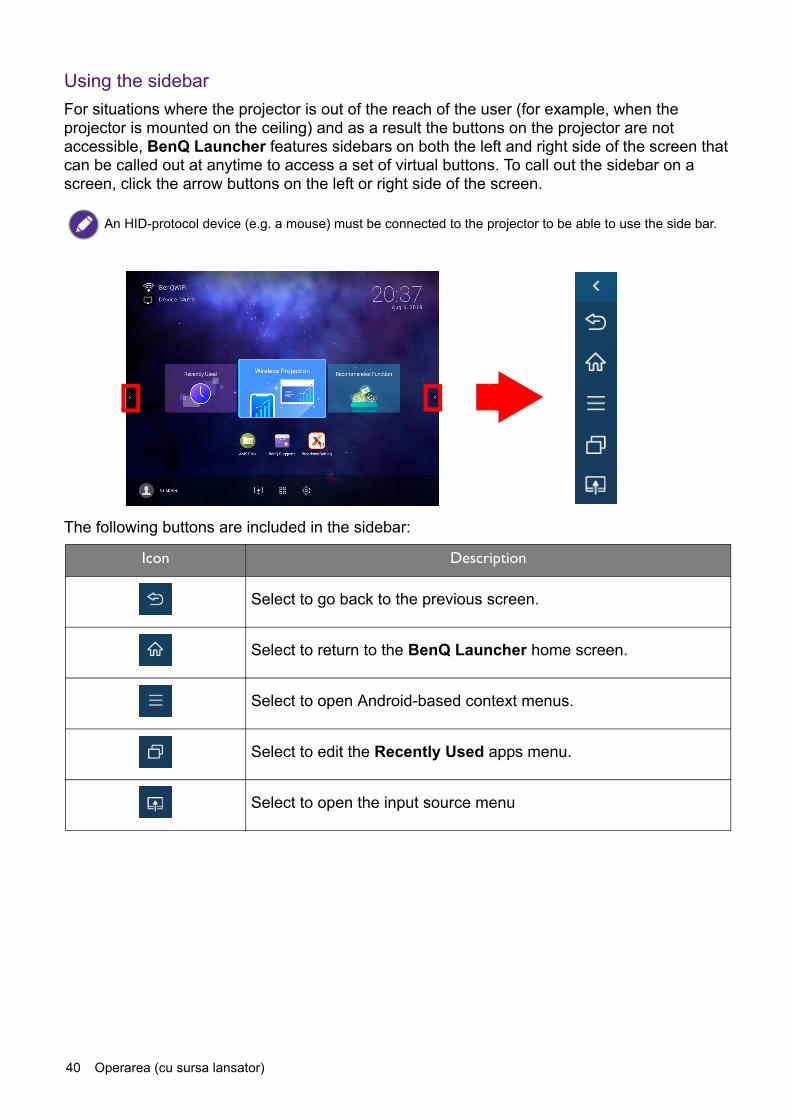
Using the sidebarFor situations where the projector is out of the reach of the user (for example, when the projector is mounted on the ceiling) and as a result the buttons on the projector are not accessible, BenQ Launcher features sidebars on both the left and right side of the screen that can be called out at anytime to access a set of virtual buttons. To call out the sidebar on a screen, click the arrow buttons on the left or right side of the screen.
The following buttons are included in the sidebar:
An HID-protocol device (e.g. a mouse) must be connected to the projector to be able to use the side bar.
Icon Description
Select to go back to the previous screen.
Select to return to the BenQ Launcher home screen.
Select to open Android-based context menus.
Select to edit the Recently Used apps menu.
Select to open the input source menu

41 Operarea (cu sursa lansator)
Switching to BenQ Launcher from an input sourceWhen HDMI or PC/YPbPr is selected in the source menu, the projector will exit the BenQ Launcher interface to project video from the input source (e.g. a Blu-Ray/DVD player, set-top box, or PC). The projector will remain outside of the BenQ Launcher interface as long as the HDMI or PC/YPbPr input source is selected or (depending on Auto Source settings) until the projector is powered off and back on again. As a result, anytime the user wants to wirelessly cast their device’s screen, view media files stored on a flash drive, or run apps, they must return to the BenQ Launcher interface. To return to BenQ Launcher: 1. Press the source button or the LAUNCHER button on the remote control.2. Select BenQ Launcher in the source menu.
Wireless ConnectionsConnecting the projector to a wireless networkBefore you can project wirelessly via the projector, you must first connect the projector to a wireless network. To connect your projector to a wireless network, or to switch wireless networks:
1. Install the provided wireless dongle into the wireless dongle port (see Instalarea dongle-ului wireless on page 8).
2. Power on the projector (see Pornirea proiectorului on page 22).
When the Auto Source function is enabled in the Advanced > Settings menu of the projector’s OSD menu, the projector will display the BenQ Launcher home screen by default once it is powered on. If the Auto Source function is disabled, the projector will detect if a signal is available from the input source that was last used and switch to that input source if it is available, if a signal is not available or the projector was set to BenQ Launcher during the previous session, the projector will enter the BenQ Launcher home screen. See Setări on page 91.
If you have already connected the projector to a wireless network during the setup wizard you may skip the steps in this section.
42 Operarea (cu sursa lansator)
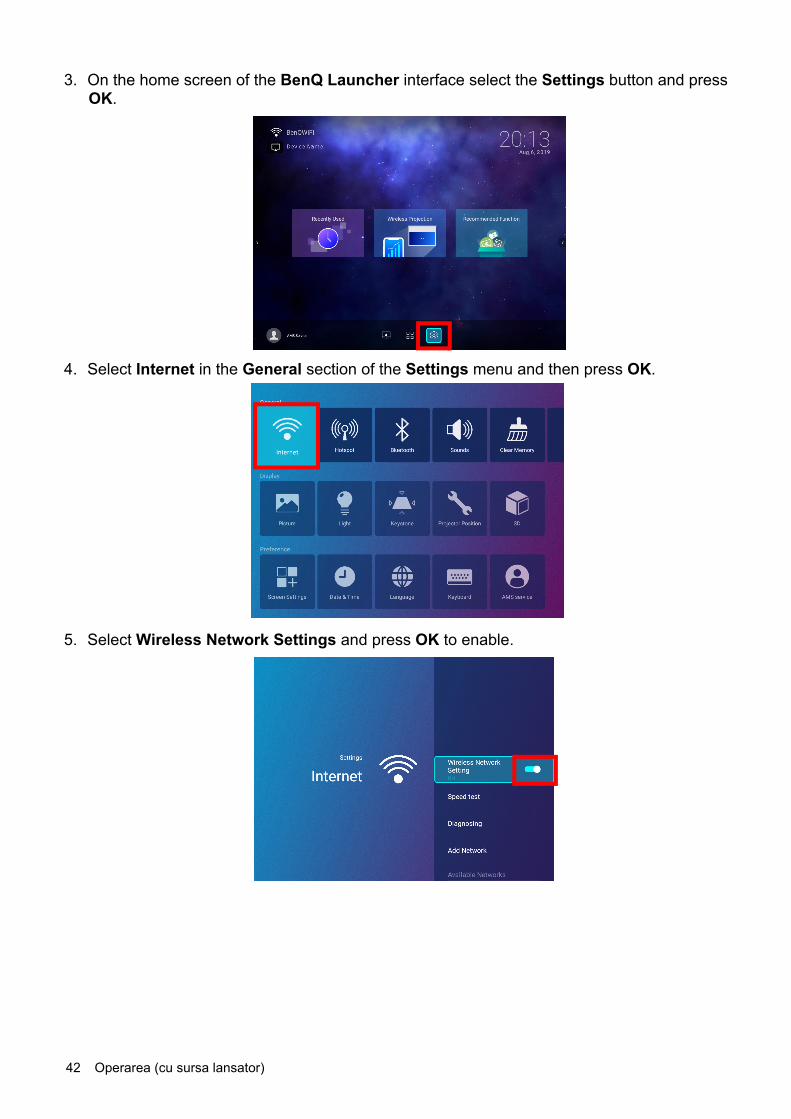
3. On the home screen of the BenQ Launcher interface select the Settings button and press OK.
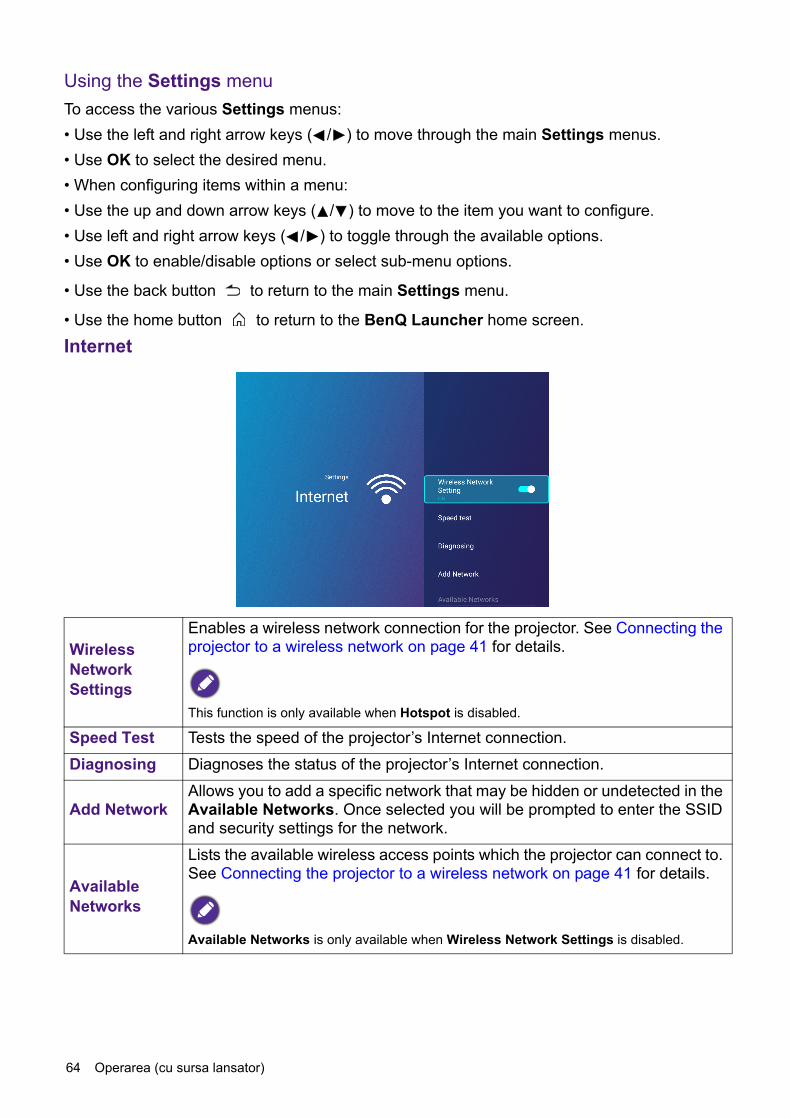
4. Select Internet in the General section of the Settings menu and then press OK.
5. Select Wireless Network Settings and press OK to enable.

43 Operarea (cu sursa lansator)
6. Select the SSID for the wireless AP you want to connect to and press OK.
7. If you chose a secured SSID for the first time, a window appears prompting you to enter the appropriate password. Use the virtual keypad to enter the password. After you have entered the password, select Next and the projector will automatically connect.
8. Once you have successfully connected to the wireless AP, a wireless connection icon will appear at the top left corner of the BenQ Launcher interface. You can now connect your devices wirelessly to the projector to cast your device’s screen.
Wireless Projection for iOS & macOS®
To connect an iOS device to the projector and cast your device’s screen via AirPlay:
• To connect to a hidden wireless network select Add A Network and enter the SSID, security setting, and password for the network.
• The list of available wireless networks will be refreshed every 10 seconds. If the desired SSID is not listed please wait for refreshing to complete.
• The password will be stored in the projector’s memory. In the future, if you select the same SSID again, you will not be prompted to enter a password unless you delete the SSID from the projector’s memory.
• If the password is typed incorrectly, you can select either re-enter the password or press the back button to return to the list of SSIDs.

44 Operarea (cu sursa lansator)
1. On the home screen of the BenQ Launcher interface, select Wireless Projection and press OK.
2. In the Wireless Projection menu, select iPhone and press OK.
3. On your iOS mobile device’s wireless network menu connect to the wireless network shown on the Wireless Projection for iPhone screen and then select Next.
45 Operarea (cu sursa lansator)
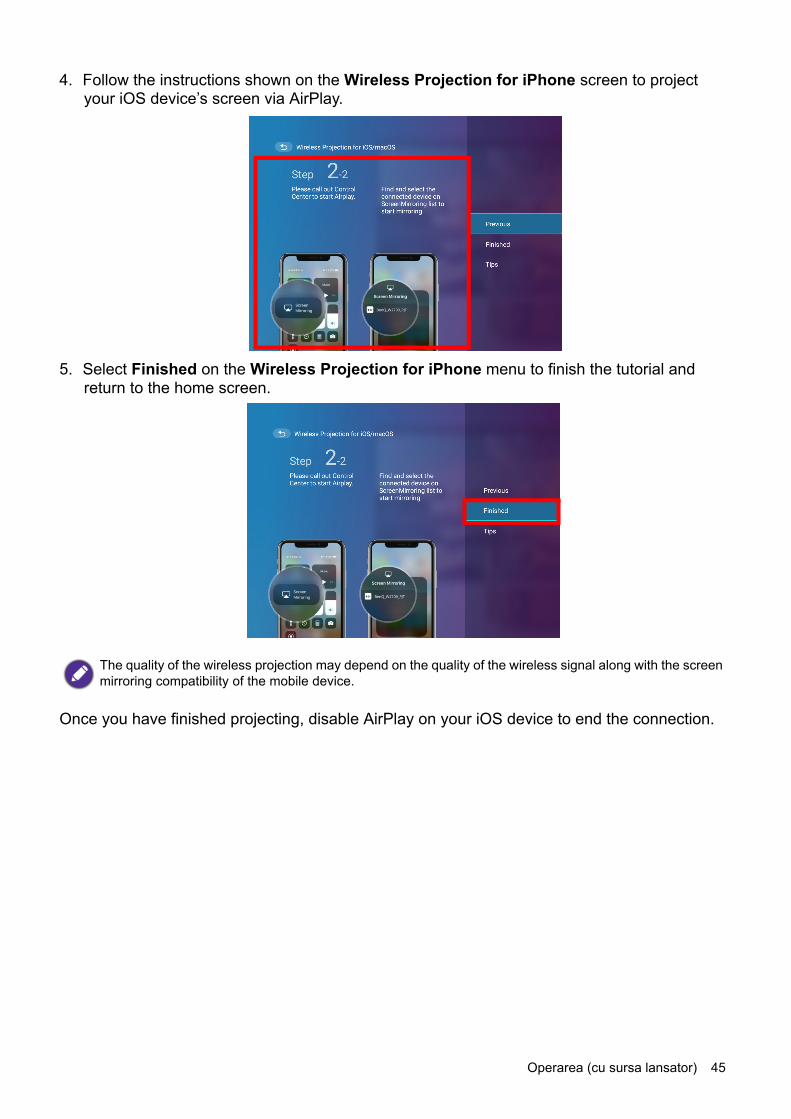
4. Follow the instructions shown on the Wireless Projection for iPhone screen to project your iOS device’s screen via AirPlay.
5. Select Finished on the Wireless Projection for iPhone menu to finish the tutorial and return to the home screen.
Once you have finished projecting, disable AirPlay on your iOS device to end the connection.
The quality of the wireless projection may depend on the quality of the wireless signal along with the screen mirroring compatibility of the mobile device.
46 Operarea (cu sursa lansator)
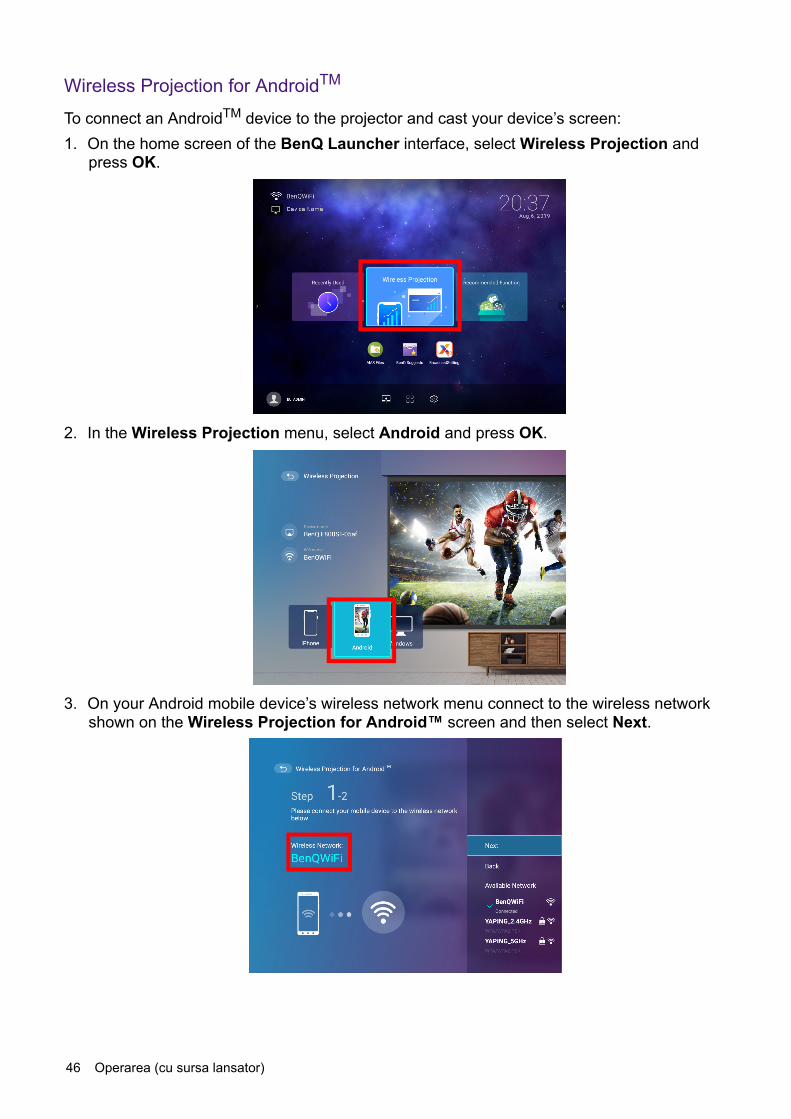
Wireless Projection for AndroidTM
To connect an AndroidTM device to the projector and cast your device’s screen:1. On the home screen of the BenQ Launcher interface, select Wireless Projection and
press OK.
2. In the Wireless Projection menu, select Android and press OK.
3. On your Android mobile device’s wireless network menu connect to the wireless network shown on the Wireless Projection for Android™ screen and then select Next.
47 Operarea (cu sursa lansator)
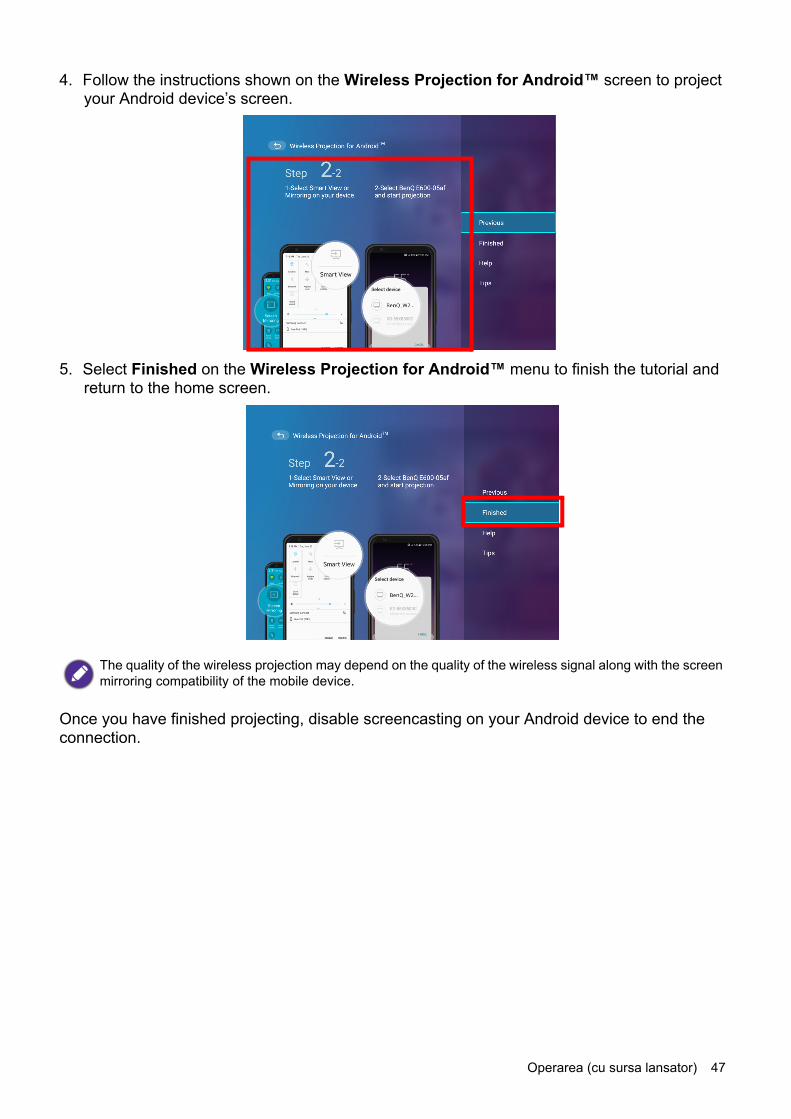
4. Follow the instructions shown on the Wireless Projection for Android™ screen to project your Android device’s screen.
5. Select Finished on the Wireless Projection for Android™ menu to finish the tutorial and return to the home screen.
Once you have finished projecting, disable screencasting on your Android device to end the connection.
The quality of the wireless projection may depend on the quality of the wireless signal along with the screen mirroring compatibility of the mobile device.
48 Operarea (cu sursa lansator)
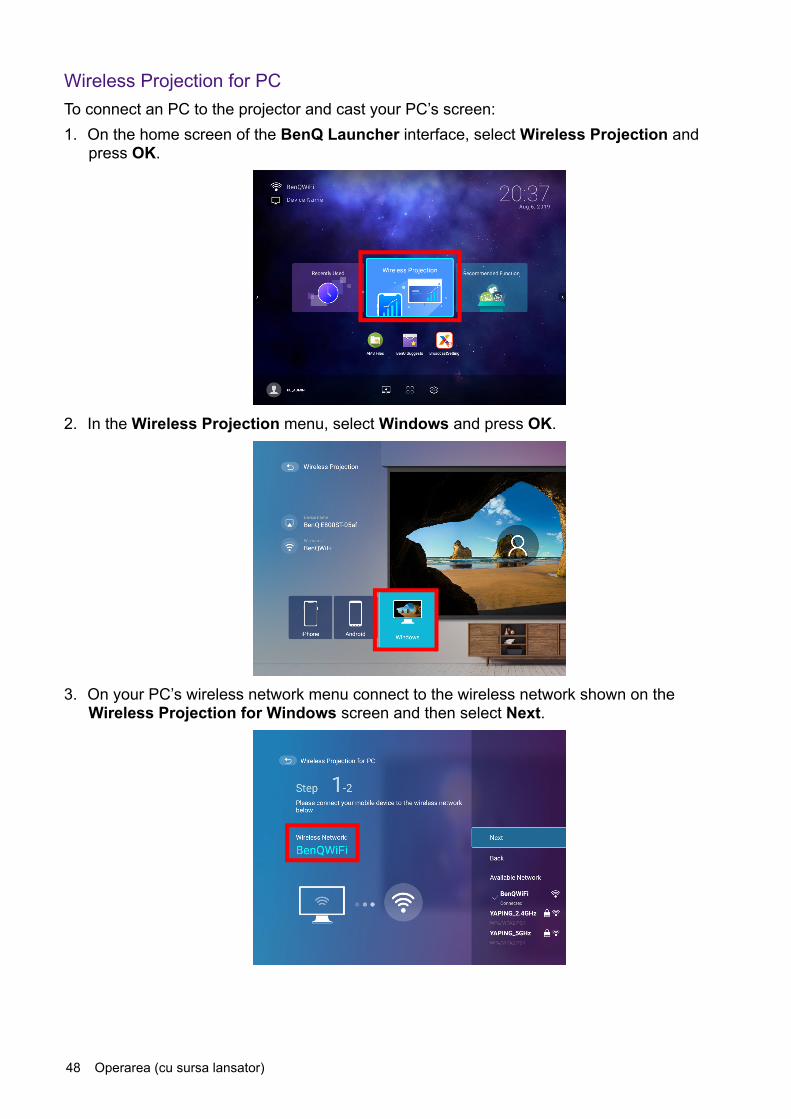
Wireless Projection for PCTo connect an PC to the projector and cast your PC’s screen:1. On the home screen of the BenQ Launcher interface, select Wireless Projection and
press OK.
2. In the Wireless Projection menu, select Windows and press OK.
3. On your PC’s wireless network menu connect to the wireless network shown on the Wireless Projection for Windows screen and then select Next.

49 Operarea (cu sursa lansator)
4. Follow the instructions shown on the Wireless Projection for Windows screen to project your PC’s screen.
5. Select Finished on the Wireless Projection for Windows menu to finish the tutorial and return to the home screen.
Once you have finished projecting, disable screencasting on your PC to end the connection.YouTube BroadcastTo connect a mobile device to the projector and broadcast your device’s YouTube screen:1. Make sure your projector and the mobile device are connected to the same wireless AP. To
connect your projector to a wireless network, see Connecting the projector to a wireless network on page 41.
2. Launch the YouTube app on your mobile device.
3. On the upper-right corner of your YouTube screen, click the icon.4. A list of available devices is displayed. Choose to connect to your projector. The YouTube
screen is casting to your projector. Note that options and procedures may vary by app version or OS version. Follow the on-screen instructions to select your projector to cast.
5. To end the connection / broadcasting, click the icon on the upper-right corner of your device’s YouTube screen.
The quality of the wireless projection may depend on the quality of the wireless signal along with the screen mirroring compatibility of the PC.
50 Operarea (cu sursa lansator)
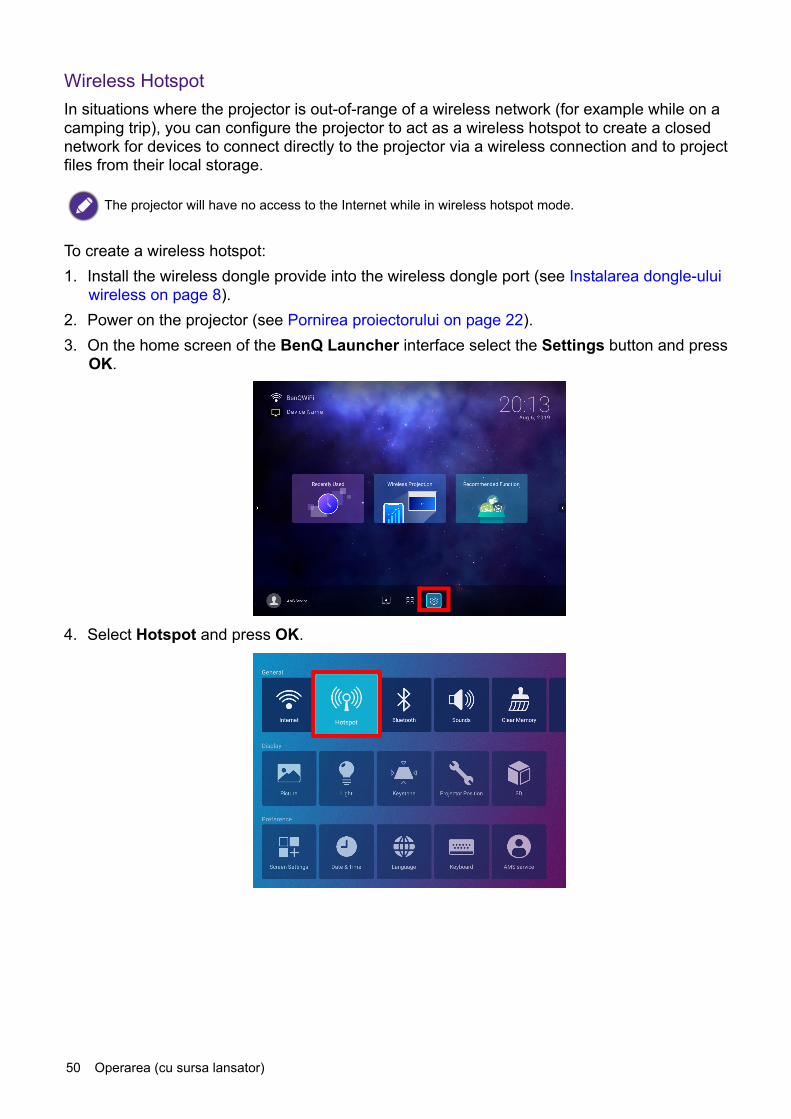
Wireless HotspotIn situations where the projector is out-of-range of a wireless network (for example while on a camping trip), you can configure the projector to act as a wireless hotspot to create a closed network for devices to connect directly to the projector via a wireless connection and to project files from their local storage.
To create a wireless hotspot:1. Install the wireless dongle provide into the wireless dongle port (see Instalarea dongle-ului
wireless on page 8).2. Power on the projector (see Pornirea proiectorului on page 22).3. On the home screen of the BenQ Launcher interface select the Settings button and press
OK.
4. Select Hotspot and press OK.
The projector will have no access to the Internet while in wireless hotspot mode.
51 Operarea (cu sursa lansator)
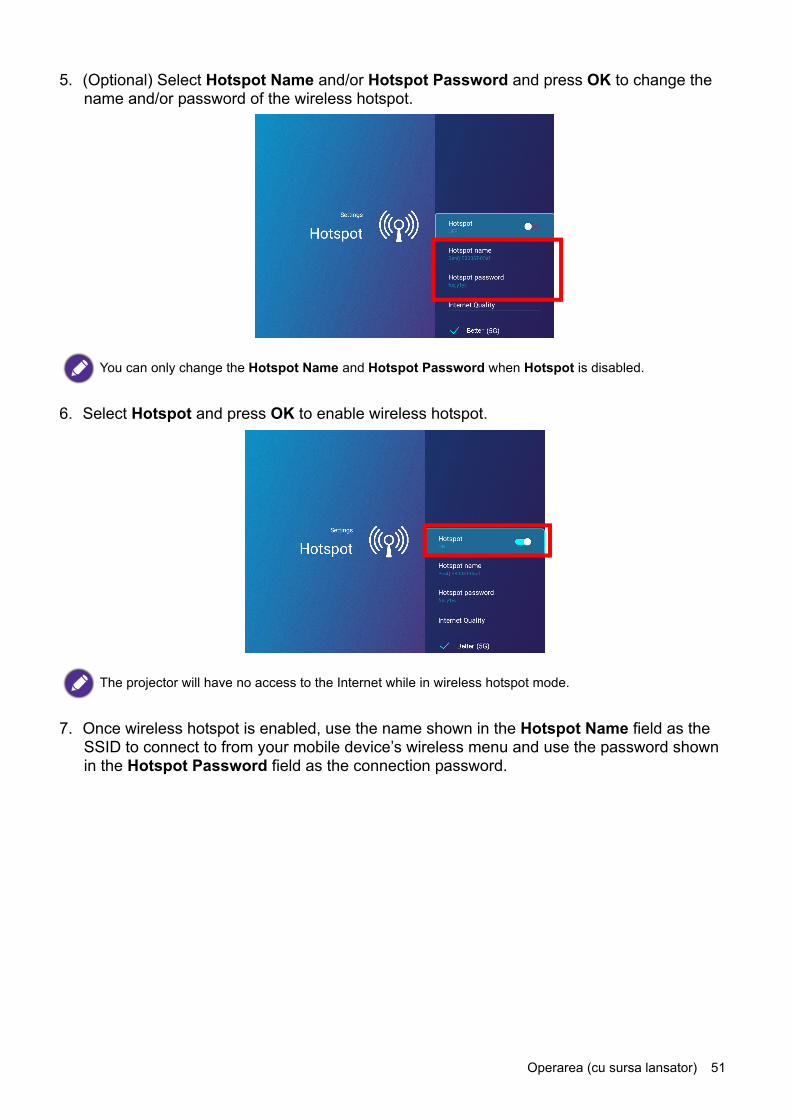
5. (Optional) Select Hotspot Name and/or Hotspot Password and press OK to change the name and/or password of the wireless hotspot.
6. Select Hotspot and press OK to enable wireless hotspot.
7. Once wireless hotspot is enabled, use the name shown in the Hotspot Name field as the SSID to connect to from your mobile device’s wireless menu and use the password shown in the Hotspot Password field as the connection password.
You can only change the Hotspot Name and Hotspot Password when Hotspot is disabled.
The projector will have no access to the Internet while in wireless hotspot mode.
52 Operarea (cu sursa lansator)
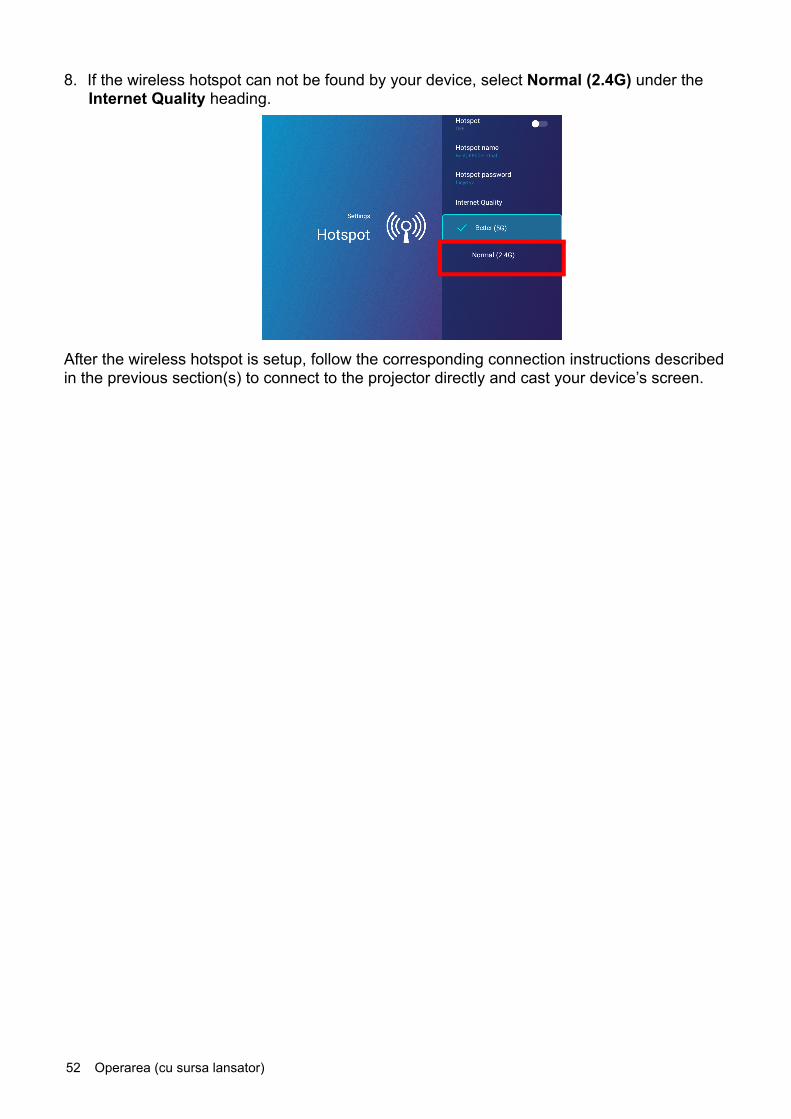
8. If the wireless hotspot can not be found by your device, select Normal (2.4G) under the Internet Quality heading.
After the wireless hotspot is setup, follow the corresponding connection instructions described in the previous section(s) to connect to the projector directly and cast your device’s screen.
53 Operarea (cu sursa lansator)
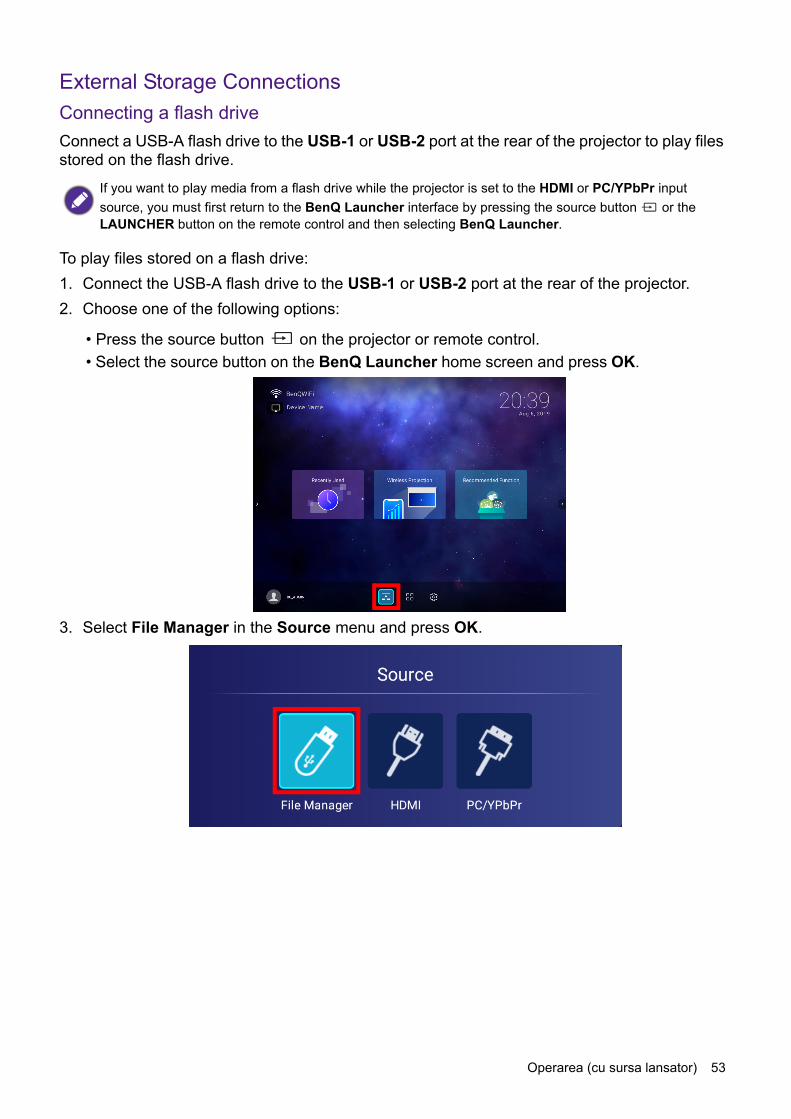
External Storage ConnectionsConnecting a flash driveConnect a USB-A flash drive to the USB-1 or USB-2 port at the rear of the projector to play files stored on the flash drive.
To play files stored on a flash drive:1. Connect the USB-A flash drive to the USB-1 or USB-2 port at the rear of the projector.2. Choose one of the following options:
• Press the source button on the projector or remote control.• Select the source button on the BenQ Launcher home screen and press OK.
3. Select File Manager in the Source menu and press OK.
If you want to play media from a flash drive while the projector is set to the HDMI or PC/YPbPr input source, you must first return to the BenQ Launcher interface by pressing the source button or the LAUNCHER button on the remote control and then selecting BenQ Launcher.
54 Operarea (cu sursa lansator)
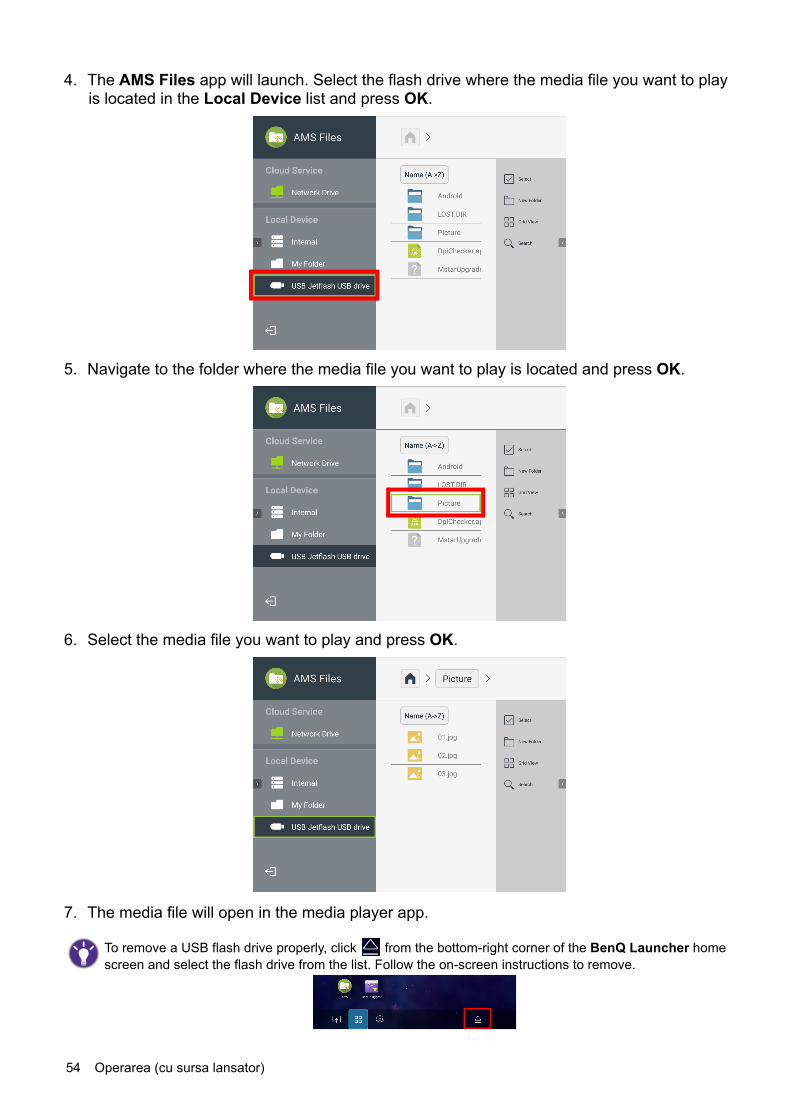
4. The AMS Files app will launch. Select the flash drive where the media file you want to play is located in the Local Device list and press OK.
5. Navigate to the folder where the media file you want to play is located and press OK.
6. Select the media file you want to play and press OK.
7. The media file will open in the media player app.
To remove a USB flash drive properly, click from the bottom-right corner of the BenQ Launcher home screen and select the flash drive from the list. Follow the on-screen instructions to remove.
55 Operarea (cu sursa lansator)
Bluetooth ConnectionsThe projector is able to connect to a Bluetooth-enabled speaker or headphones to output audio directly for greater sound, particularly in outdoor settings.
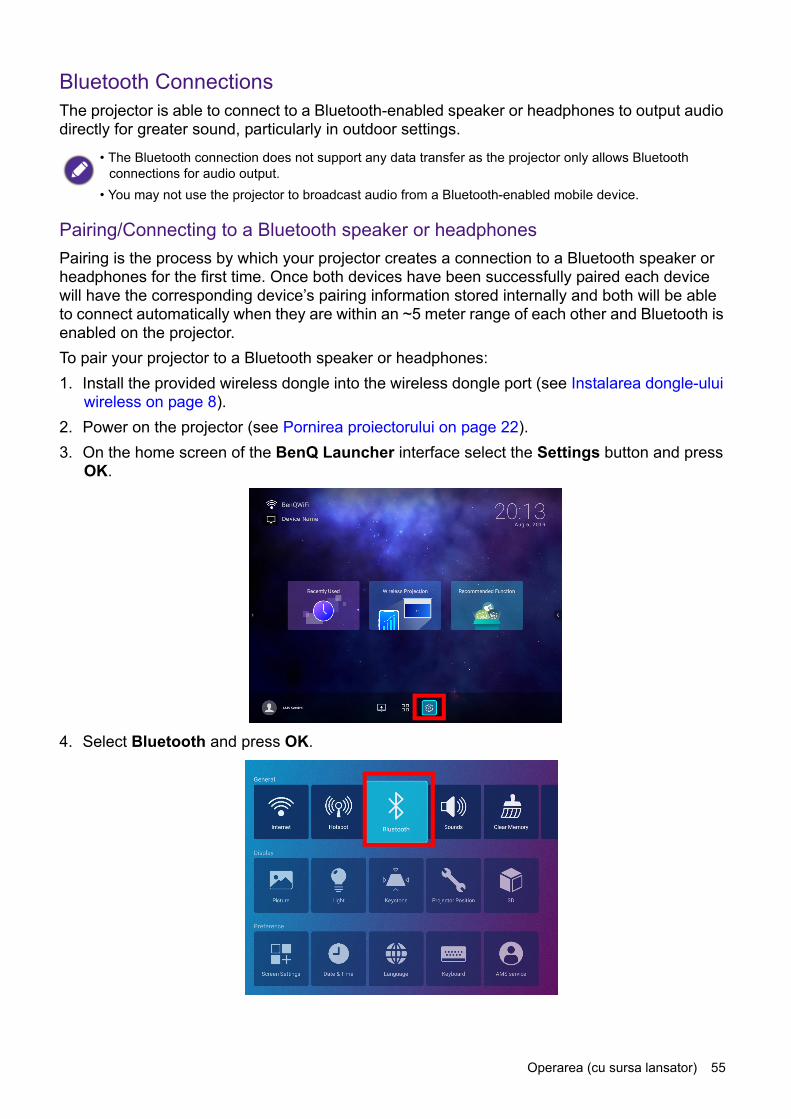
Pairing/Connecting to a Bluetooth speaker or headphonesPairing is the process by which your projector creates a connection to a Bluetooth speaker or headphones for the first time. Once both devices have been successfully paired each device will have the corresponding device’s pairing information stored internally and both will be able to connect automatically when they are within an ~5 meter range of each other and Bluetooth is enabled on the projector.To pair your projector to a Bluetooth speaker or headphones:1. Install the provided wireless dongle into the wireless dongle port (see Instalarea dongle-ului
wireless on page 8).2. Power on the projector (see Pornirea proiectorului on page 22).3. On the home screen of the BenQ Launcher interface select the Settings button and press
OK.
4. Select Bluetooth and press OK.
• The Bluetooth connection does not support any data transfer as the projector only allows Bluetooth connections for audio output.
• You may not use the projector to broadcast audio from a Bluetooth-enabled mobile device.
56 Operarea (cu sursa lansator)
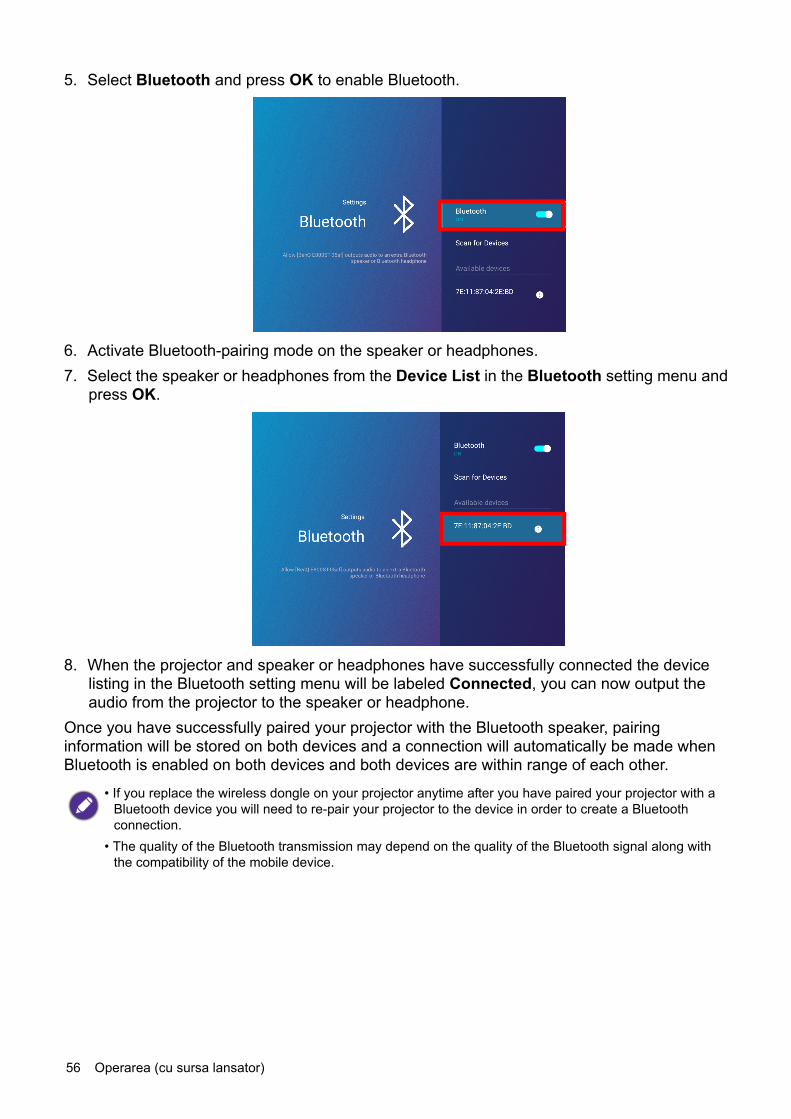
5. Select Bluetooth and press OK to enable Bluetooth.
6. Activate Bluetooth-pairing mode on the speaker or headphones.7. Select the speaker or headphones from the Device List in the Bluetooth setting menu and
press OK.
8. When the projector and speaker or headphones have successfully connected the device listing in the Bluetooth setting menu will be labeled Connected, you can now output the audio from the projector to the speaker or headphone.
Once you have successfully paired your projector with the Bluetooth speaker, pairing information will be stored on both devices and a connection will automatically be made when Bluetooth is enabled on both devices and both devices are within range of each other.
• If you replace the wireless dongle on your projector anytime after you have paired your projector with a Bluetooth device you will need to re-pair your projector to the device in order to create a Bluetooth connection.
• The quality of the Bluetooth transmission may depend on the quality of the Bluetooth signal along with the compatibility of the mobile device.
57 Operarea (cu sursa lansator)
Ending the Bluetooth connectionIn cases where you want to disconnect a speaker or headphones from the projector and connect to another speaker or headphones follow the steps below:1. On the home screen of the BenQ Launcher interface select the Settings button and press
OK.2. Select Bluetooth and press OK.3. Select the already connected speaker or headphones from the Device List in the
Bluetooth setting menu and press OK.4. Confirm that you want to disconnect the speaker or headphones from the projector.5. Activate Bluetooth-pairing mode on the new speaker or headphones.6. Select the new speaker or headphones from the Device List in the Bluetooth setting
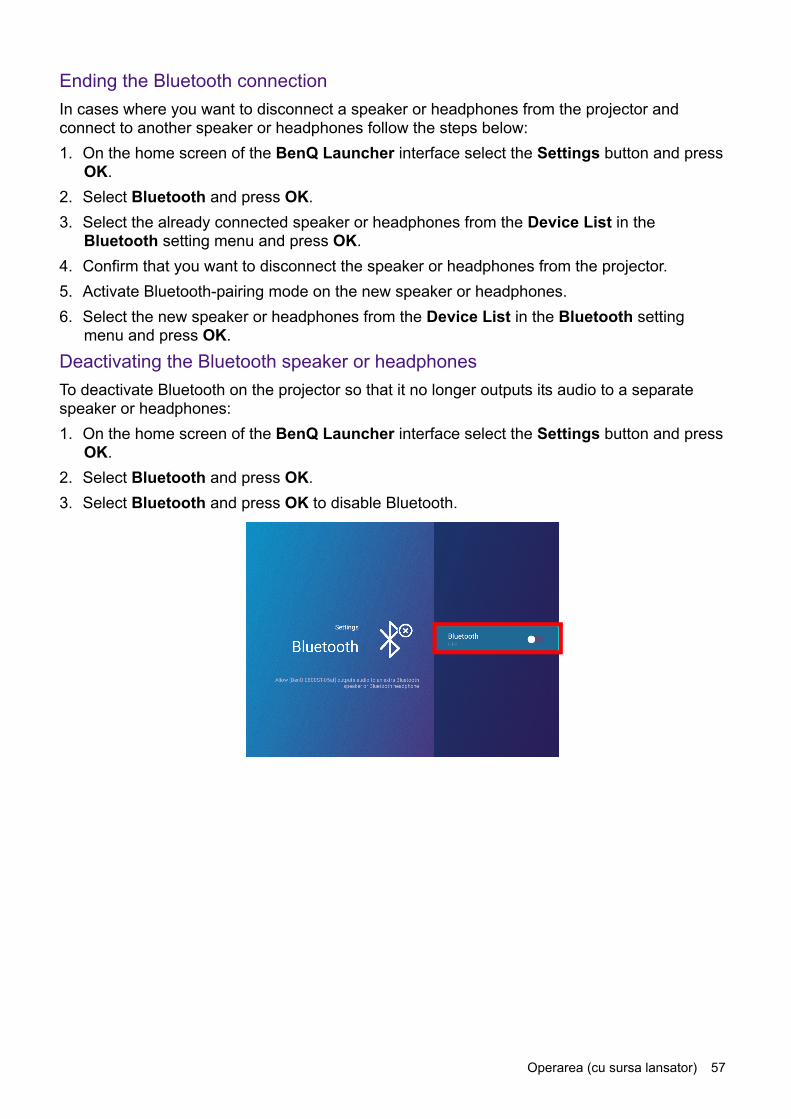
menu and press OK.Deactivating the Bluetooth speaker or headphonesTo deactivate Bluetooth on the projector so that it no longer outputs its audio to a separate speaker or headphones:1. On the home screen of the BenQ Launcher interface select the Settings button and press
OK.2. Select Bluetooth and press OK. 3. Select Bluetooth and press OK to disable Bluetooth.

58 Operarea (cu sursa lansator)
AppsTo access all the apps installed on the projector, select the all apps button in the tool bar section of BenQ Launcher. Your projector comes pre-installed with the following apps: File Manager, BenQ Suggests, X-Sign Broadcast, and WPS Office.
AMS FilesThe AMS Files app allows you to browse, open, and manage files stored on cloud-based storage drives linked to the corresponding AMS login account, the projector’s internal storage, or in connected storage devices (e.g. a USB flash drive).
The main menu classifies storage types into three categories:Cloud Service - Allows you to access files stored on cloud-based storage services (e.g. Google Drive, Dropbox, One Drive, etc.) linked to your AMS login account.
Network Drive - Allows you to access files stored on a network-based storage space (e.g. a server). In order to link to the network drive you must first obtain information for the server including domain name, IP address, and login information and enter it into the Network Drive menu.
Certain apps require the use of a mouse and/or keyboard to operate. It is suggested that you connect a mouse and/or keyboard to the projector before opening any apps from the Shortcut section.
• To access cloud-based files your projector must be connected to a wireless network with Internet access and logged in using an AMS account which has a cloud service linked to it. See Linking a cloud storage drive to your AMS login on page 59 for more details.
• A link icon next to Google Drive, Dropbox, or One Drive in the AMS Files menu indicates that the corresponding cloud storage account has been bound to the current AMS login account.
59 Operarea (cu sursa lansator)
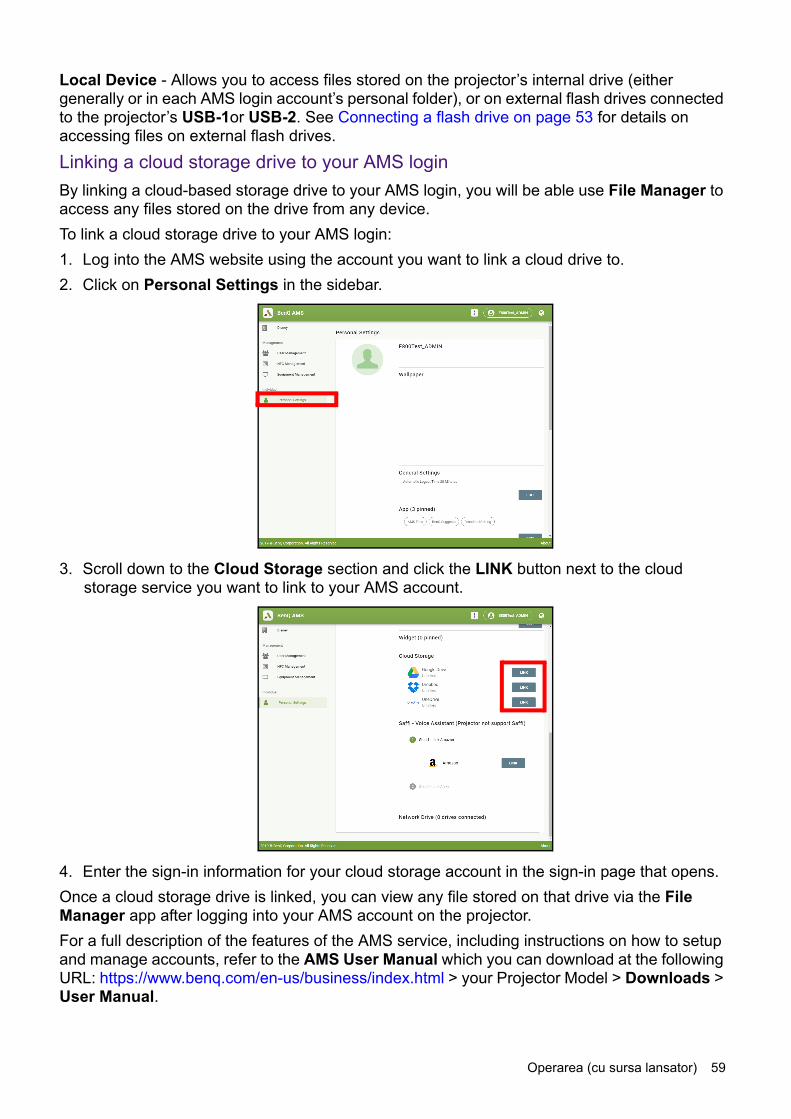
Local Device - Allows you to access files stored on the projector’s internal drive (either generally or in each AMS login account’s personal folder), or on external flash drives connected to the projector’s USB-1or USB-2. See Connecting a flash drive on page 53 for details on accessing files on external flash drives.Linking a cloud storage drive to your AMS loginBy linking a cloud-based storage drive to your AMS login, you will be able use File Manager to access any files stored on the drive from any device.To link a cloud storage drive to your AMS login:1. Log into the AMS website using the account you want to link a cloud drive to.2. Click on Personal Settings in the sidebar.
3. Scroll down to the Cloud Storage section and click the LINK button next to the cloud storage service you want to link to your AMS account.
4. Enter the sign-in information for your cloud storage account in the sign-in page that opens.Once a cloud storage drive is linked, you can view any file stored on that drive via the File Manager app after logging into your AMS account on the projector.For a full description of the features of the AMS service, including instructions on how to setup and manage accounts, refer to the AMS User Manual which you can download at the following URL: https://www.benq.com/en-us/business/index.html > your Projector Model > Downloads > User Manual.
60 Operarea (cu sursa lansator)
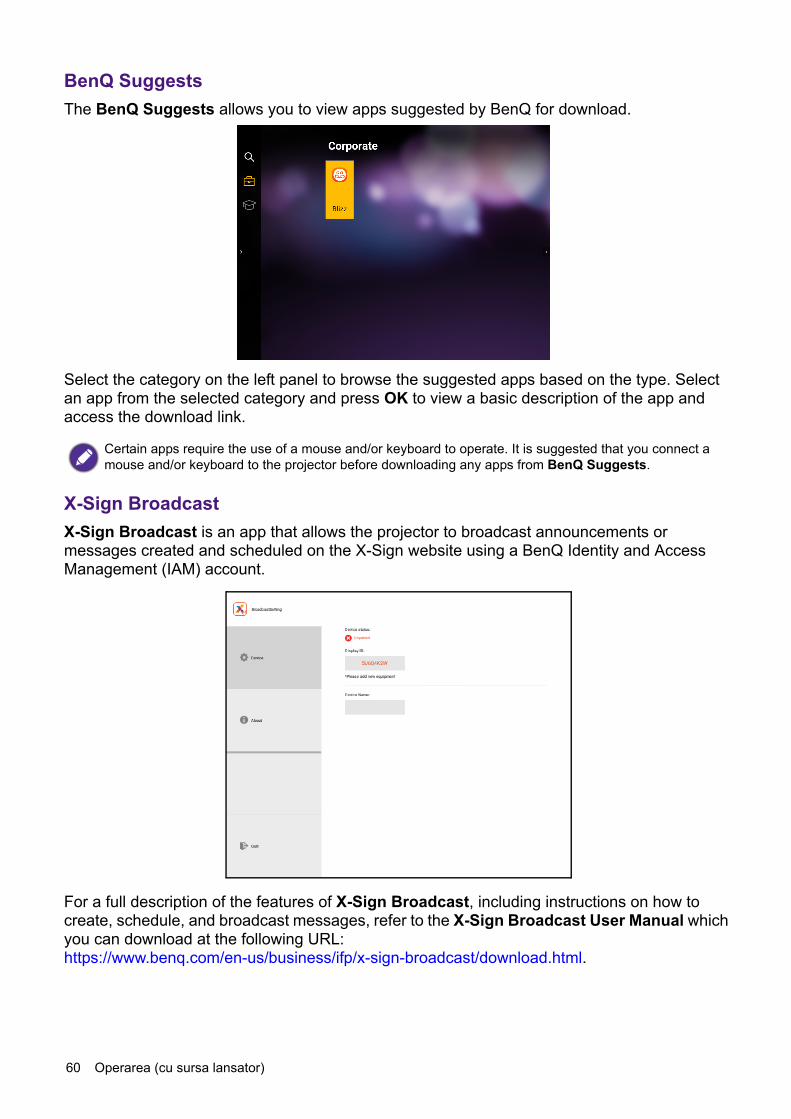
BenQ SuggestsThe BenQ Suggests allows you to view apps suggested by BenQ for download.
Select the category on the left panel to browse the suggested apps based on the type. Select an app from the selected category and press OK to view a basic description of the app and access the download link.
X-Sign BroadcastX-Sign Broadcast is an app that allows the projector to broadcast announcements or messages created and scheduled on the X-Sign website using a BenQ Identity and Access Management (IAM) account.
For a full description of the features of X-Sign Broadcast, including instructions on how to create, schedule, and broadcast messages, refer to the X-Sign Broadcast User Manual which you can download at the following URL: https://www.benq.com/en-us/business/ifp/x-sign-broadcast/download.html.
Certain apps require the use of a mouse and/or keyboard to operate. It is suggested that you connect a mouse and/or keyboard to the projector before downloading any apps from BenQ Suggests.
61 Operarea (cu sursa lansator)
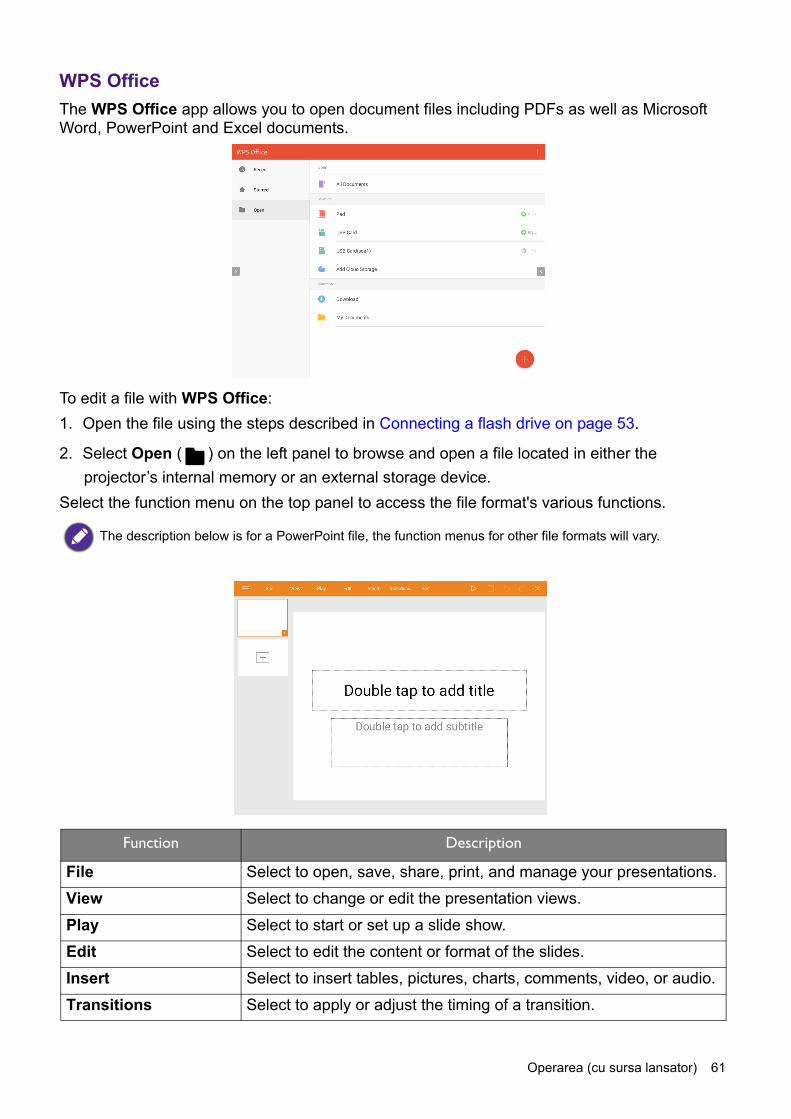
WPS OfficeThe WPS Office app allows you to open document files including PDFs as well as Microsoft Word, PowerPoint and Excel documents.
To edit a file with WPS Office:1. Open the file using the steps described in Connecting a flash drive on page 53.
2. Select Open ( ) on the left panel to browse and open a file located in either the projector’s internal memory or an external storage device.
Select the function menu on the top panel to access the file format's various functions.
The description below is for a PowerPoint file, the function menus for other file formats will vary.
Function Description
File Select to open, save, share, print, and manage your presentations.View Select to change or edit the presentation views.Play Select to start or set up a slide show.Edit Select to edit the content or format of the slides.Insert Select to insert tables, pictures, charts, comments, video, or audio.Transitions Select to apply or adjust the timing of a transition.
62 Operarea (cu sursa lansator)
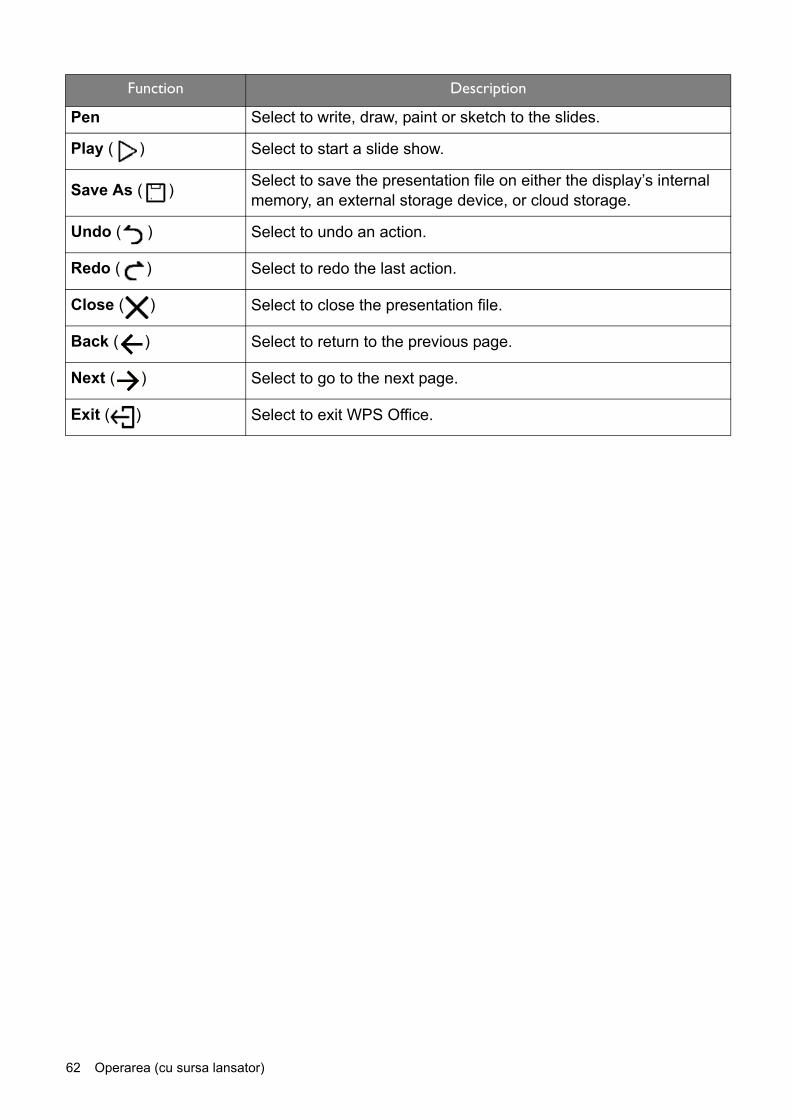
Pen Select to write, draw, paint or sketch to the slides.
Play ( ) Select to start a slide show.
Save As ( ) Select to save the presentation file on either the display’s internal memory, an external storage device, or cloud storage.
Undo ( ) Select to undo an action.
Redo ( ) Select to redo the last action.
Close ( ) Select to close the presentation file.
Back ( ) Select to return to the previous page.
Next ( ) Select to go to the next page.
Exit ( ) Select to exit WPS Office.
Function Description
63 Operarea (cu sursa lansator)
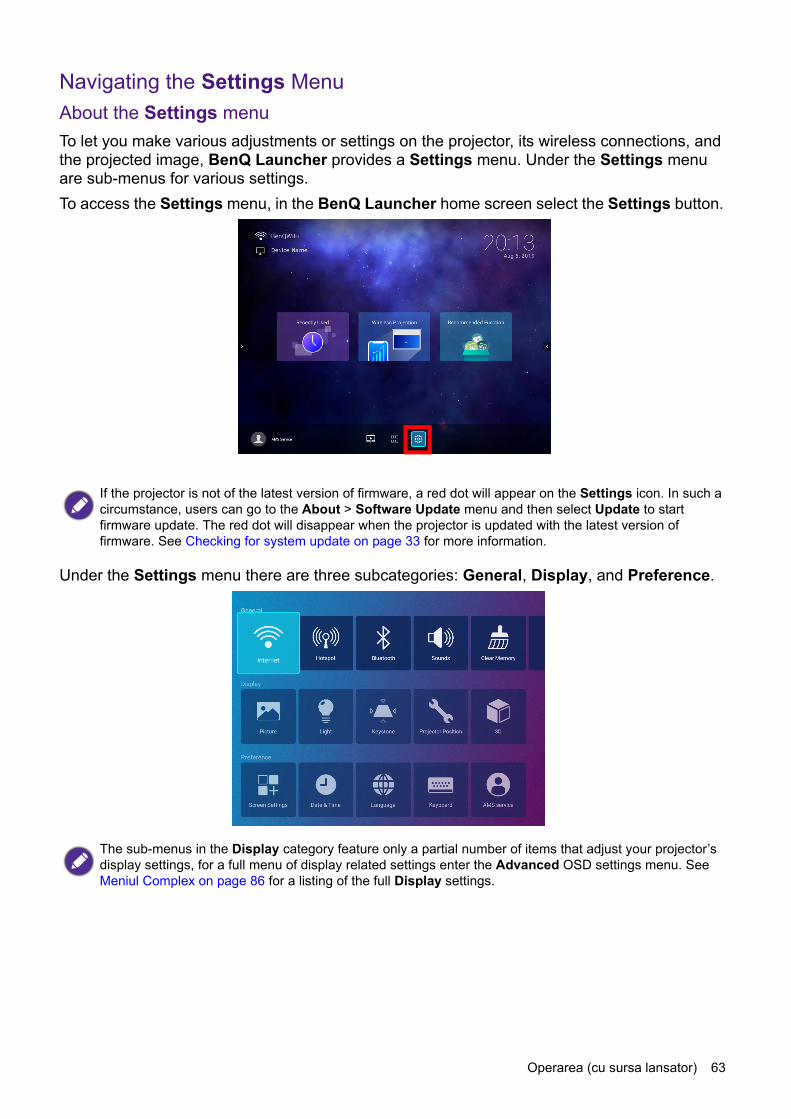
Navigating the Settings MenuAbout the Settings menuTo let you make various adjustments or settings on the projector, its wireless connections, and the projected image, BenQ Launcher provides a Settings menu. Under the Settings menu are sub-menus for various settings.To access the Settings menu, in the BenQ Launcher home screen select the Settings button.
Under the Settings menu there are three subcategories: General, Display, and Preference.
If the projector is not of the latest version of firmware, a red dot will appear on the Settings icon. In such a circumstance, users can go to the About > Software Update menu and then select Update to start firmware update. The red dot will disappear when the projector is updated with the latest version of firmware. See Checking for system update on page 33 for more information.
The sub-menus in the Display category feature only a partial number of items that adjust your projector’s display settings, for a full menu of display related settings enter the Advanced OSD settings menu. See Meniul Complex on page 86 for a listing of the full Display settings.
64 Operarea (cu sursa lansator)
Using the Settings menuTo access the various Settings menus:• Use the left and right arrow keys ( / ) to move through the main Settings menus.• Use OK to select the desired menu.• When configuring items within a menu:• Use the up and down arrow keys ( / ) to move to the item you want to configure.• Use left and right arrow keys ( / ) to toggle through the available options.• Use OK to enable/disable options or select sub-menu options.
• Use the back button to return to the main Settings menu.
• Use the home button to return to the BenQ Launcher home screen.Internet
Wireless Network Settings
Enables a wireless network connection for the projector. See Connecting the projector to a wireless network on page 41 for details.
This function is only available when Hotspot is disabled.
Speed Test Tests the speed of the projector’s Internet connection.Diagnosing Diagnoses the status of the projector’s Internet connection.
Add NetworkAllows you to add a specific network that may be hidden or undetected in the Available Networks. Once selected you will be prompted to enter the SSID and security settings for the network.
Available Networks
Lists the available wireless access points which the projector can connect to. See Connecting the projector to a wireless network on page 41 for details.
Available Networks is only available when Wireless Network Settings is disabled.
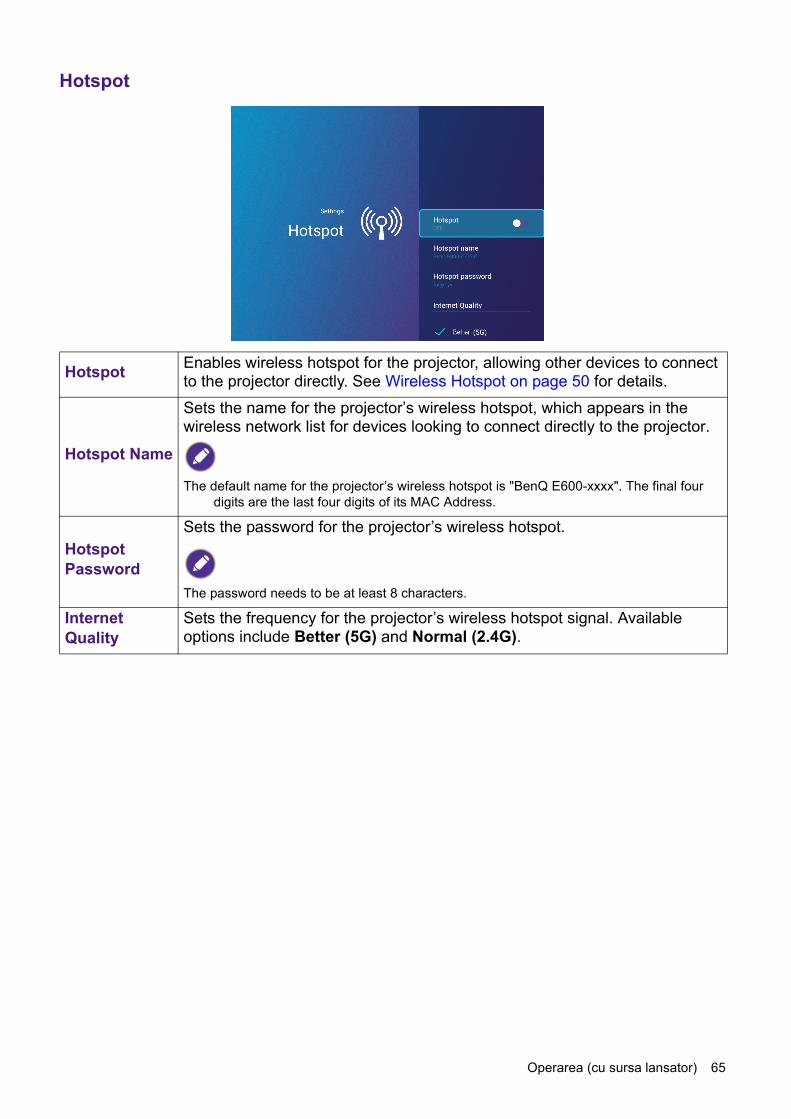
65 Operarea (cu sursa lansator)
Hotspot
Hotspot Enables wireless hotspot for the projector, allowing other devices to connect to the projector directly. See Wireless Hotspot on page 50 for details.
Hotspot Name
Sets the name for the projector’s wireless hotspot, which appears in the wireless network list for devices looking to connect directly to the projector.
The default name for the projector’s wireless hotspot is "BenQ E600-xxxx". The final four digits are the last four digits of its MAC Address.
Hotspot Password
Sets the password for the projector’s wireless hotspot.
The password needs to be at least 8 characters.
Internet Quality
Sets the frequency for the projector’s wireless hotspot signal. Available options include Better (5G) and Normal (2.4G).
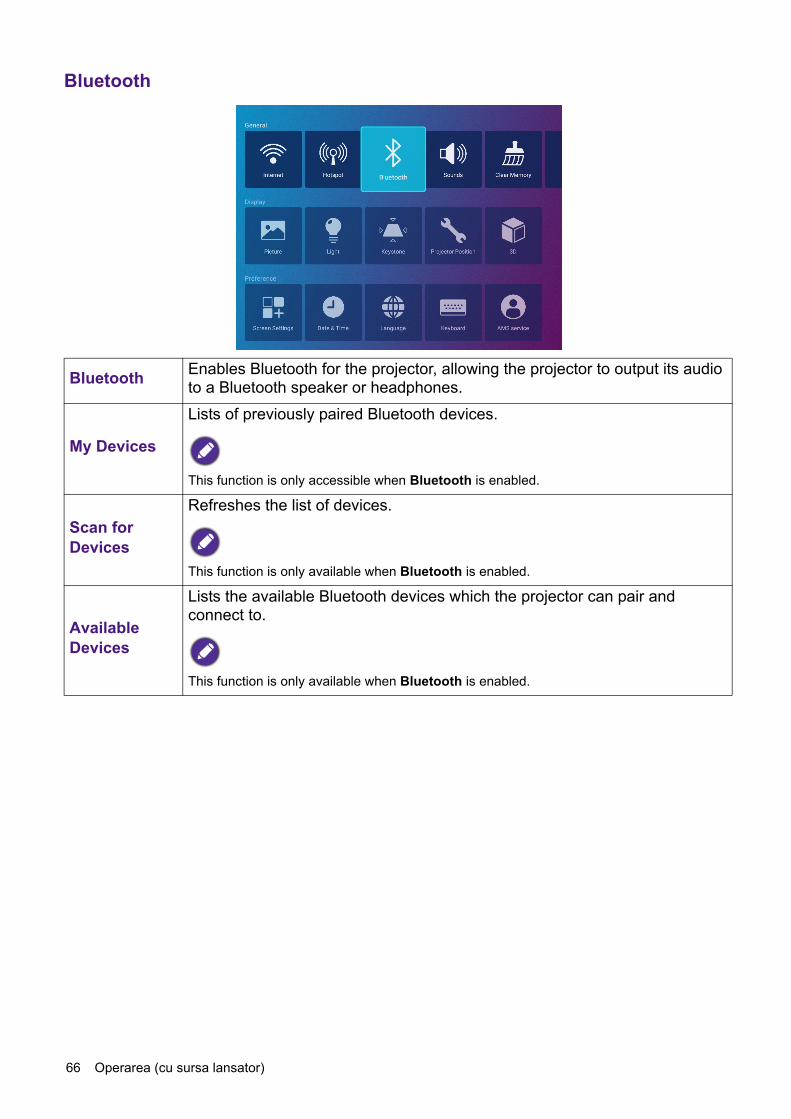
66 Operarea (cu sursa lansator)
Bluetooth
Bluetooth Enables Bluetooth for the projector, allowing the projector to output its audio to a Bluetooth speaker or headphones.
My Devices
Lists of previously paired Bluetooth devices.
This function is only accessible when Bluetooth is enabled.
Scan for Devices
Refreshes the list of devices.
This function is only available when Bluetooth is enabled.
Available Devices
Lists the available Bluetooth devices which the projector can pair and connect to.
This function is only available when Bluetooth is enabled.

67 Operarea (cu sursa lansator)
Sounds
Clear Memory
Clears out the memory of unnecessary files and boosts available RAM.
Feedback Sound
Enables/Disables feedback on the audio provided by the projector.
Volume Adjusts the sound level for the projector.Mute Disables/Enables audio for the projector.

68 Operarea (cu sursa lansator)
All Apps
Select the All Apps menu to access all the apps that have been installed on the projector.• Select an app and press OK to launch the app.
• Select an app and press the menu button ( ) to uninstall the app.
Recently Used
Select the Recently Used menu to access a list of apps that have been recently used.• Select any icon and press the down button ( ) to remove the icon from the list of recently used apps.
• Select any icon and press the menu button ( ) to clear all icons from the list of recently used apps.
When AMS Service is enabled, Guest AMS accounts will not be allowed to uninstall apps in this menu.
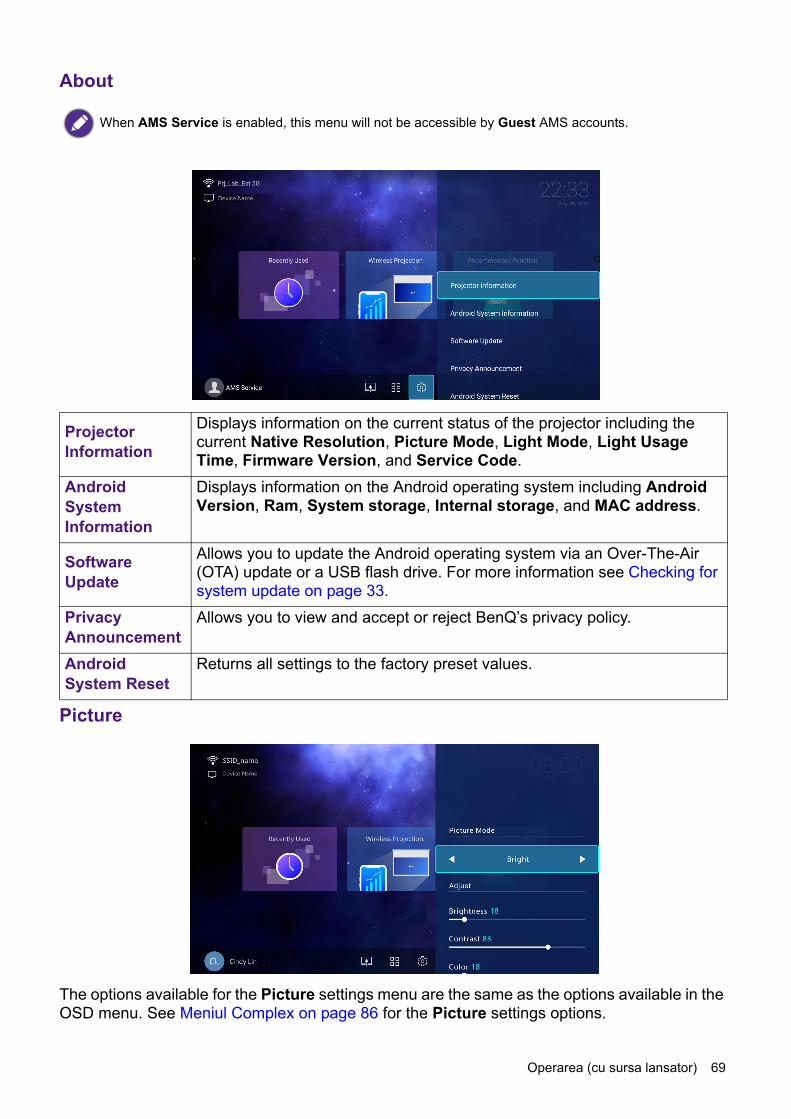
69 Operarea (cu sursa lansator)
About
Picture
The options available for the Picture settings menu are the same as the options available in the OSD menu. See Meniul Complex on page 86 for the Picture settings options.
When AMS Service is enabled, this menu will not be accessible by Guest AMS accounts.
Projector Information
Displays information on the current status of the projector including the current Native Resolution, Picture Mode, Light Mode, Light Usage Time, Firmware Version, and Service Code.
Android System Information
Displays information on the Android operating system including Android Version, Ram, System storage, Internal storage, and MAC address.
Software Update
Allows you to update the Android operating system via an Over-The-Air (OTA) update or a USB flash drive. For more information see Checking for system update on page 33.
Privacy Announcement
Allows you to view and accept or reject BenQ’s privacy policy.
Android System Reset
Returns all settings to the factory preset values.

70 Operarea (cu sursa lansator)
Light Settings
The options available for the Light Settings settings menu are the same as the options available in the OSD menu. See Meniul Complex on page 86 for the Light Settings settings options.Keystone
The options available for the Keystone settings menu are the same as the options available in the OSD menu. See Meniul Complex on page 86 for the Keystone settings options.

71 Operarea (cu sursa lansator)
Projector Position
The options available for the Projector Position settings menu are the same as the options available in the OSD menu. See Meniul Complex on page 86 for the Projector Position settings options.3D
The options available for the 3D settings menu are the same as the options available in the OSD menu. See Meniul Complex on page 86 for the 3D settings options.

72 Operarea (cu sursa lansator)
Screen Settings
Shortcut
Sets which app shortcuts are displayed on the BenQ Launcher home screen and their sequence. The home screen requires at least one shortcut and allows up to ten shortcuts.• Auto: Enables the projector to automatically arrange the sequence of app shortcuts on the home screen so that the most recently used app will appear first in the row.
• Manual: Enables the user to manually arrange which app shortcuts to be displayed on the home screen and their sequence. Press OK on an app in the Adjust menu and then press / to adjust the sequence of the apps in the apps shortcuts section. Press OK on an app in the Show/Hide Apps menu to check (show) or uncheck (hide) the shortcuts.
This function is only available when Auto is disabled.
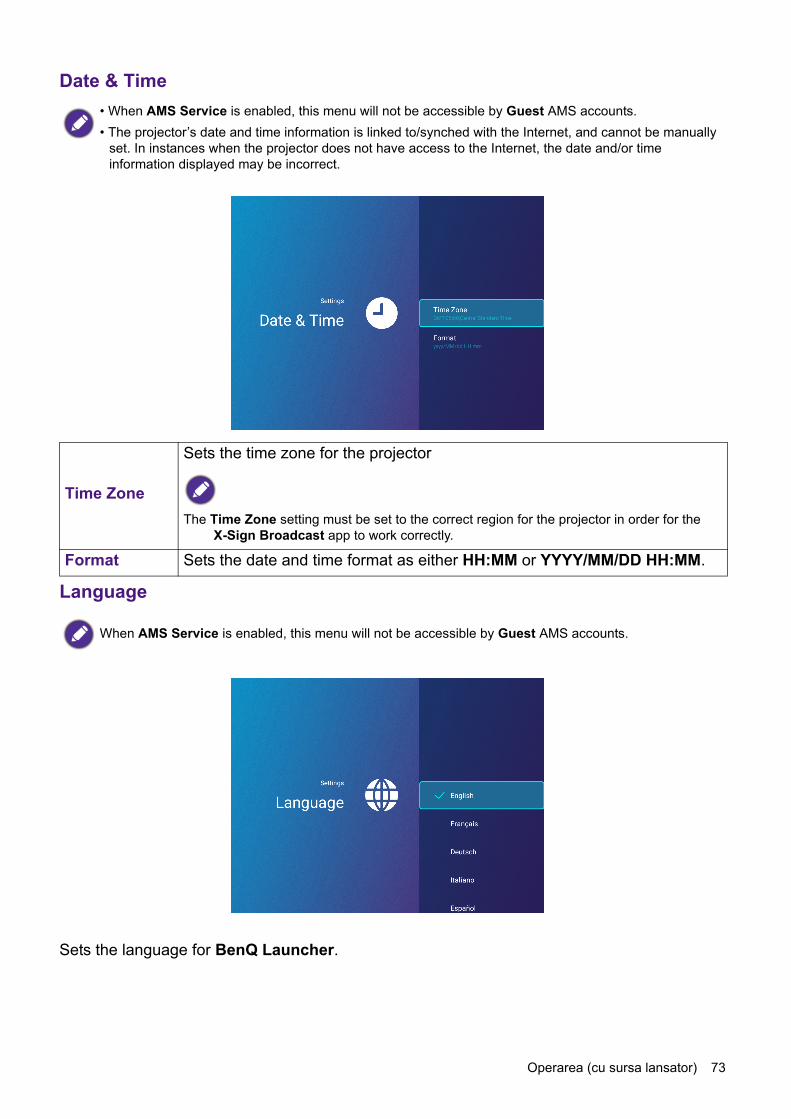
73 Operarea (cu sursa lansator)
Date & Time
Language
Sets the language for BenQ Launcher.
• When AMS Service is enabled, this menu will not be accessible by Guest AMS accounts.• The projector’s date and time information is linked to/synched with the Internet, and cannot be manually
set. In instances when the projector does not have access to the Internet, the date and/or time information displayed may be incorrect.
Time Zone
Sets the time zone for the projector
The Time Zone setting must be set to the correct region for the projector in order for the X-Sign Broadcast app to work correctly.
Format Sets the date and time format as either HH:MM or YYYY/MM/DD HH:MM.
When AMS Service is enabled, this menu will not be accessible by Guest AMS accounts.

74 Operarea (cu sursa lansator)
Keyboard
AMS Service
Select whether to enable or disable the BenQ Account Management System.
When AMS Service is enabled, this menu will not be accessible by Guest AMS accounts.
Current Keyboard
Displays the current keyboard setting.
Keyboard Settings
Sets the projector’s virtual keyboard for inputting text. The available options are BenQ Keyboard and Android keyboard (AOSP).
To input Chinese characters, set the language preference to traditional Chinese or simplified Chinese, and set the keyboard to BenQ Keyboard.
When AMS Service is enabled, this menu will not be accessible by Guest or User AMS accounts.

75 Operarea (cu sursa fără lansator)
Operarea (cu sursa fără lansator)Utilizarea meniurilor proiectorului cu sursa fără lansatorCând semnalul de intrare este HDMI sau PC/YPbPr, puteţi folosi cele 2 tipuri de meniu afişat pe ecran (OSD) pentru efectuarea diferitelor reglaje şi setări.• De bazăMeniul OSD: oferă funcţiile meniului principal. (Consultaţi Meniul De bază la pagina 79)
• Complex Meniul OSD: oferă funcţiile meniului complet. (Consultaţi Meniul Complex la pagina 80)
Pentru a accesa meniul OSD, apăsaţi de pe proiector sau de pe telecomandă.• Utilizaţi tastele săgeţi ( / / / ) de pe proiector sau de pe telecomandă, pentru a vă deplasa prin elementele meniului.
• Utilizaţi OK de pe proiector sau telecomandă pentru a confirma elementul meniului selectat.Prima dată când utilizaţi proiectorul (după finalizarea configurării iniţiale), va fi afişat meniul OSD de bază.
Dedesubt este o prezentare generală a meniului OSD De bază.
Dacă intenţionaţi să comutaţi din meniul OSD De bază în meniul OSD Complex, urmaţi instrucţiunile de mai jos:1. Mergeţi în Meniul De bază > Tip meniu.2. Apăsaţi OK şi apăsaţi / pentru a selecta Complex. Data viitoare când porniţi
proiectorul, puteţi accesa meniul OSD Complex apăsând .
Capturile OSD de mai jos sunt doar pentru referinţă şi pot diferi de aspectul real.
Tip meniu Apăsaţi OK pentru a intra în meniu.
Meniul principal Stare
Semnalul curent de intrare
Apăsaţi pentru a reveni la pagina anterioară sau pentru ieşire.
Meniul De bază
Luminozitate
Raport aspect
2
1
2
6
Mod iluminare
Mod imagine
Volum
Informaţii
Tip meniu
Auto
Prezentare
SmartEco
Introdu- Ieşire
5
34
LAN fără fir
1 4
2 5
3 6
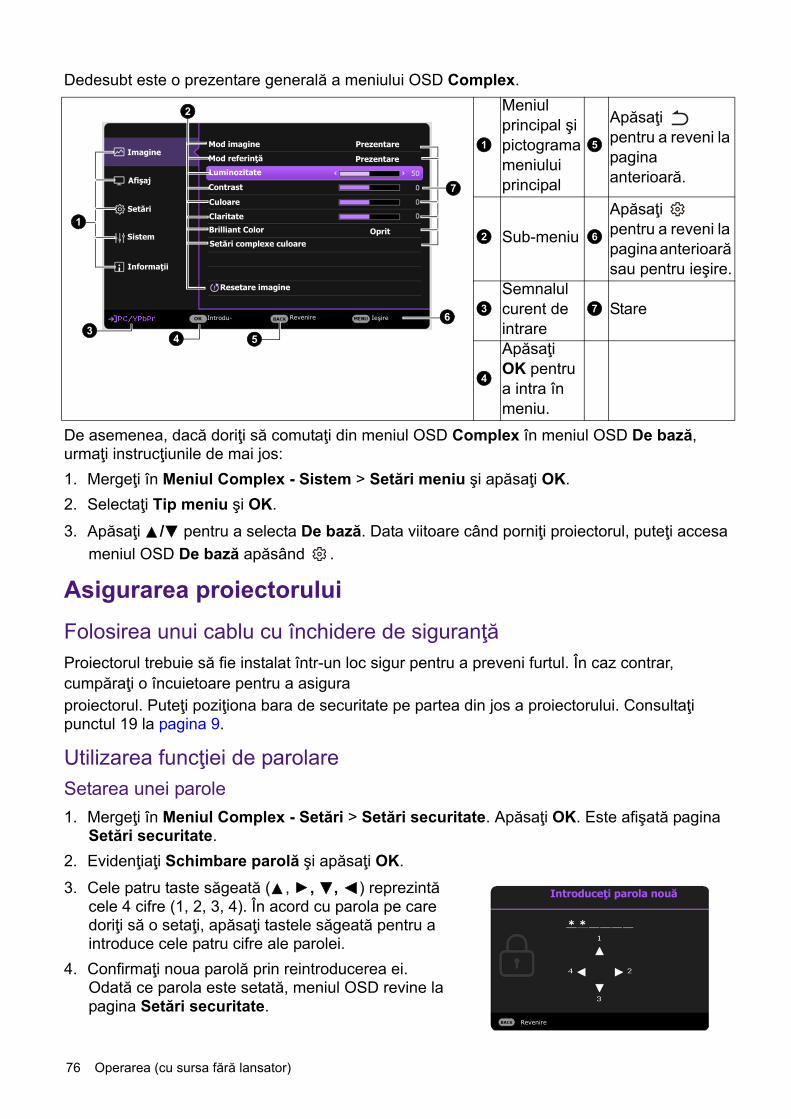
76 Operarea (cu sursa fără lansator)
Dedesubt este o prezentare generală a meniului OSD Complex.
De asemenea, dacă doriţi să comutaţi din meniul OSD Complex în meniul OSD De bază, urmaţi instrucţiunile de mai jos:1. Mergeţi în Meniul Complex - Sistem > Setări meniu şi apăsaţi OK.2. Selectaţi Tip meniu şi OK.3. Apăsaţi / pentru a selecta De bază. Data viitoare când porniţi proiectorul, puteţi accesa
meniul OSD De bază apăsând .
Asigurarea proiectoruluiFolosirea unui cablu cu închidere de siguranţăProiectorul trebuie să fie instalat într-un loc sigur pentru a preveni furtul. În caz contrar, cumpăraţi o încuietoare pentru a asiguraproiectorul. Puteţi poziţiona bara de securitate pe partea din jos a proiectorului. Consultaţi punctul 19 la pagina 9.
Utilizarea funcţiei de parolareSetarea unei parole1. Mergeţi în Meniul Complex - Setări > Setări securitate. Apăsaţi OK. Este afişată pagina
Setări securitate.2. Evidenţiaţi Schimbare parolă şi apăsaţi OK.3. Cele patru taste săgeată ( , , , ) reprezintă
cele 4 cifre (1, 2, 3, 4). În acord cu parola pe care doriţi să o setaţi, apăsaţi tastele săgeată pentru a introduce cele patru cifre ale parolei.
4. Confirmaţi noua parolă prin reintroducerea ei.Odată ce parola este setată, meniul OSD revine la pagina Setări securitate.
Meniul principal şi pictograma meniului principal
Apăsaţi pentru a reveni la pagina anterioară.
Sub-meniu
Apăsaţi pentru a reveni la pagina anterioară sau pentru ieşire.
Semnalul curent de intrare
Stare
Apăsaţi OK pentru a intra în meniu.
ImagineMod imagine
Luminozitate
Contrast
CuloareClaritateBrilliant Color Oprit
Mod referinţă
1
7
6
Setări complexe culoare
Afişaj
Setări
Informaţii
Introdu- IeşireRevenire
Prezentare
Prezentare
Resetare imagine
Sistem
2
34 5
1 5
2 6
3 7
4
Introduceţi parola nouă
Revenire
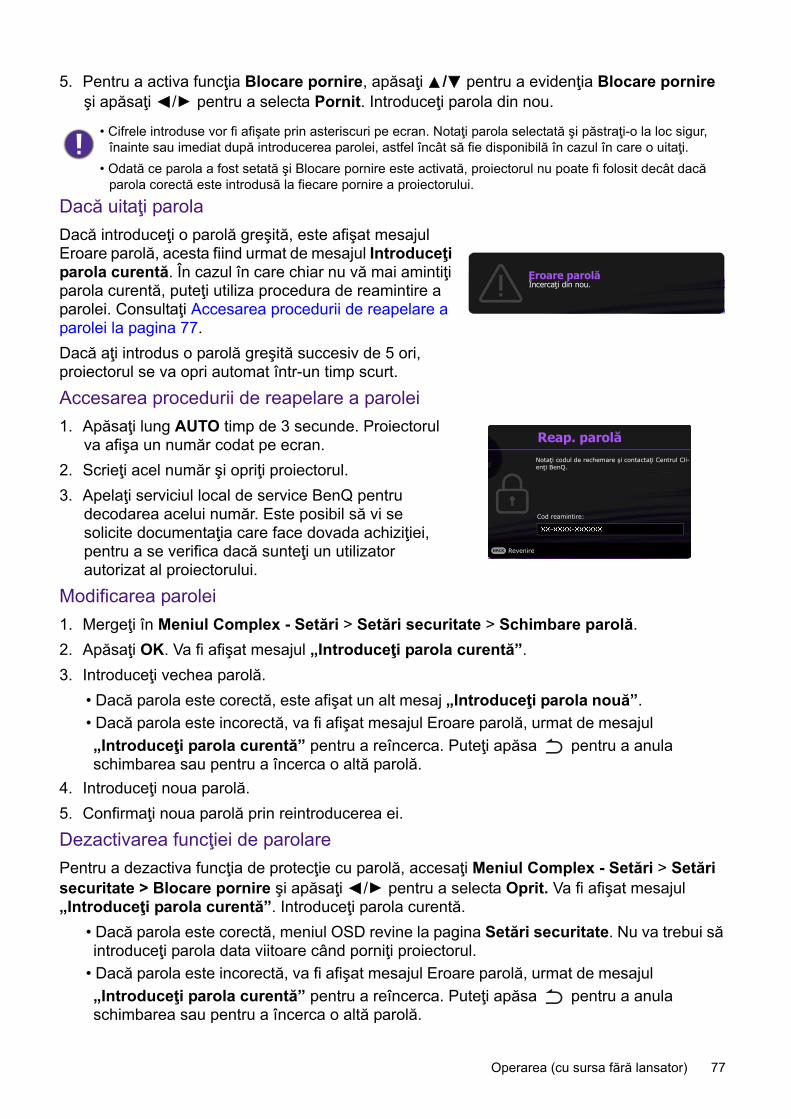
77 Operarea (cu sursa fără lansator)
5. Pentru a activa funcţia Blocare pornire, apăsaţi / pentru a evidenţia Blocare pornire şi apăsaţi / pentru a selecta Pornit. Introduceţi parola din nou.
Dacă uitaţi parolaDacă introduceţi o parolă greşită, este afişat mesajul Eroare parolă, acesta fiind urmat de mesajul Introduceţi parola curentă. În cazul în care chiar nu vă mai amintiţi parola curentă, puteţi utiliza procedura de reamintire a parolei. Consultaţi Accesarea procedurii de reapelare a parolei la pagina 77.Dacă aţi introdus o parolă greşită succesiv de 5 ori, proiectorul se va opri automat într-un timp scurt.Accesarea procedurii de reapelare a parolei1. Apăsaţi lung AUTO timp de 3 secunde. Proiectorul
va afişa un număr codat pe ecran.2. Scrieţi acel număr şi opriţi proiectorul.3. Apelaţi serviciul local de service BenQ pentru
decodarea acelui număr. Este posibil să vi se solicite documentaţia care face dovada achiziţiei, pentru a se verifica dacă sunteţi un utilizator autorizat al proiectorului.
Modificarea parolei1. Mergeţi în Meniul Complex - Setări > Setări securitate > Schimbare parolă.2. Apăsaţi OK. Va fi afişat mesajul „Introduceţi parola curentă”.3. Introduceţi vechea parolă.
• Dacă parola este corectă, este afişat un alt mesaj „Introduceţi parola nouă”. • Dacă parola este incorectă, va fi afişat mesajul Eroare parolă, urmat de mesajul „Introduceţi parola curentă” pentru a reîncerca. Puteţi apăsa pentru a anula schimbarea sau pentru a încerca o altă parolă.
4. Introduceţi noua parolă.5. Confirmaţi noua parolă prin reintroducerea ei.Dezactivarea funcţiei de parolarePentru a dezactiva funcţia de protecţie cu parolă, accesaţi Meniul Complex - Setări > Setări securitate > Blocare pornire şi apăsaţi / pentru a selecta Oprit. Va fi afişat mesajul „Introduceţi parola curentă”. Introduceţi parola curentă.
• Dacă parola este corectă, meniul OSD revine la pagina Setări securitate. Nu va trebui să introduceţi parola data viitoare când porniţi proiectorul.
• Dacă parola este incorectă, va fi afişat mesajul Eroare parolă, urmat de mesajul „Introduceţi parola curentă” pentru a reîncerca. Puteţi apăsa pentru a anula schimbarea sau pentru a încerca o altă parolă.
• Cifrele introduse vor fi afişate prin asteriscuri pe ecran. Notaţi parola selectată şi păstraţi-o la loc sigur, înainte sau imediat după introducerea parolei, astfel încât să fie disponibilă în cazul în care o uitaţi.
• Odată ce parola a fost setată şi Blocare pornire este activată, proiectorul nu poate fi folosit decât dacă parola corectă este introdusă la fiecare pornire a proiectorului.
Eroare parolăÎncercaţi din nou.
Notaţi codul de rechemare şi contactaţi Centrul Cli-enţi BenQ.
Cod reamintire:
Reap. parolă
Revenire
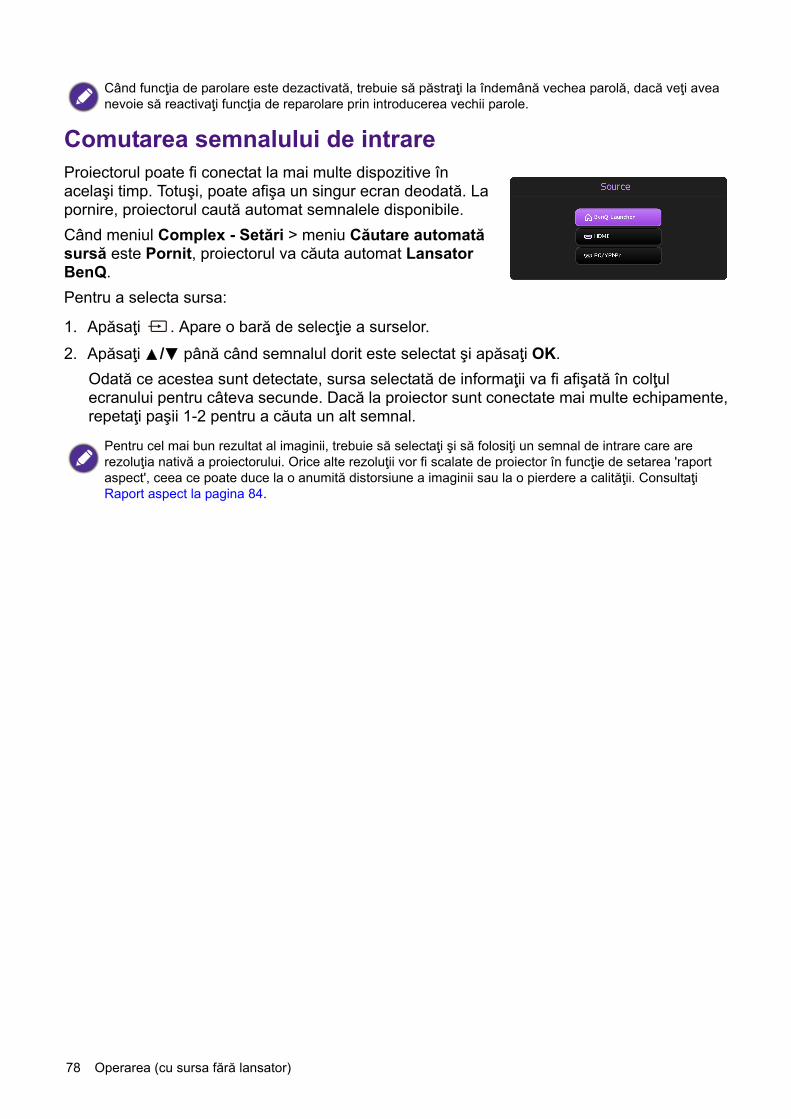
78 Operarea (cu sursa fără lansator)
Comutarea semnalului de intrareProiectorul poate fi conectat la mai multe dispozitive în acelaşi timp. Totuşi, poate afişa un singur ecran deodată. La pornire, proiectorul caută automat semnalele disponibile.Când meniul Complex - Setări > meniu Căutare automată sursă este Pornit, proiectorul va căuta automat Lansator BenQ.Pentru a selecta sursa:
1. Apăsaţi . Apare o bară de selecţie a surselor. 2. Apăsaţi / până când semnalul dorit este selectat şi apăsaţi OK.
Odată ce acestea sunt detectate, sursa selectată de informaţii va fi afişată în colţul ecranului pentru câteva secunde. Dacă la proiector sunt conectate mai multe echipamente, repetaţi paşii 1-2 pentru a căuta un alt semnal.
Când funcţia de parolare este dezactivată, trebuie să păstraţi la îndemână vechea parolă, dacă veţi avea nevoie să reactivaţi funcţia de reparolare prin introducerea vechii parole.
Pentru cel mai bun rezultat al imaginii, trebuie să selectaţi şi să folosiţi un semnal de intrare care are rezoluţia nativă a proiectorului. Orice alte rezoluţii vor fi scalate de proiector în funcţie de setarea 'raport aspect', ceea ce poate duce la o anumită distorsiune a imaginii sau la o pierdere a calităţii. Consultaţi Raport aspect la pagina 84.

79 Operarea (cu sursa fără lansator)
Utilizarea meniuluiVă rugăm să ţineţi cont de faptul că meniurile afişate pe ecran (OSD) pot varia în funcţie de tipul de semnal selectat şi tipul de model pe care îl folosiţi.Elementele de meniu sunt disponibile când proiectorul detectează cel puţin un semnal valid. Dacă nu este niciun echipament conectat la proiector sau nu este detectat niciun semnal, sunt accesibile elemente limitate de meniu.
Meniul de sistemMeniul De bazăMeniul principal OpţiuniLuminozitate 0~50~100Raport aspect Auto/Real/4:3/16:9/16:10
Mod imagine Luminos/Prezentare/Infographic/Video/sRGB/(3D)/Utilizator 1/Utilizator 2
Volum 0~5~10Mod iluminare Normal/Economic/SmartEco/LampSave
Informaţii
Rezoluţie nativăRezoluţie detectatăSursăMod imagineMod iluminareFormat 3DSistem de culoareDurată de utiliz. ilumin.Versiune firmwareCod de service
Tip meniu De bază/Complex

80 Operarea (cu sursa fără lansator)
Meniul ComplexMeniul principal Submeniu Opţiuni
Imagine
Mod imagineLuminos/Prezentare/Infographic/Video/sRGB/(3D)/Utilizator 1/Utilizator 2
Mod referinţă Luminos/Prezentare/Infographic/Video/sRGB/(3D)
Luminozitate 0~50~100Contrast -50~0~50Culoare -50~0~50Claritate 0~15~31Brilliant Color Pornit/Oprit
Setări complexe culoare
Temperatură culoare Rece/Normal/Cald
Reglare temperatură culoare
Amplificare R (0~50~100)Amplificare G (0~50~100)Amplificare B (0~50~100)Decalaj R (-50~0~50)Decalaj G (-50~0~50)Decalaj B (-50~0~50)
Gestiune culoare
R (Culoare primară/Tonalitate culoare/Saturaţie/Amplificare)G (Culoare primară/Tonalitate culoare/Saturaţie/Amplificare)B (Culoare primară/Tonalitate culoare/Saturaţie/Amplificare)C (Culoare primară/Tonalitate culoare/Saturaţie/Amplificare)M (Culoare primară/Tonalitate culoare/Saturaţie/Amplificare)Y (Culoare primară/Tonalitate culoare/Saturaţie/Amplificare)
Culoare perete Oprit/Galben deschis/Roz/Verde deschis/Albastru/Fundal negru
Resetare imagine Resetare/Anulare
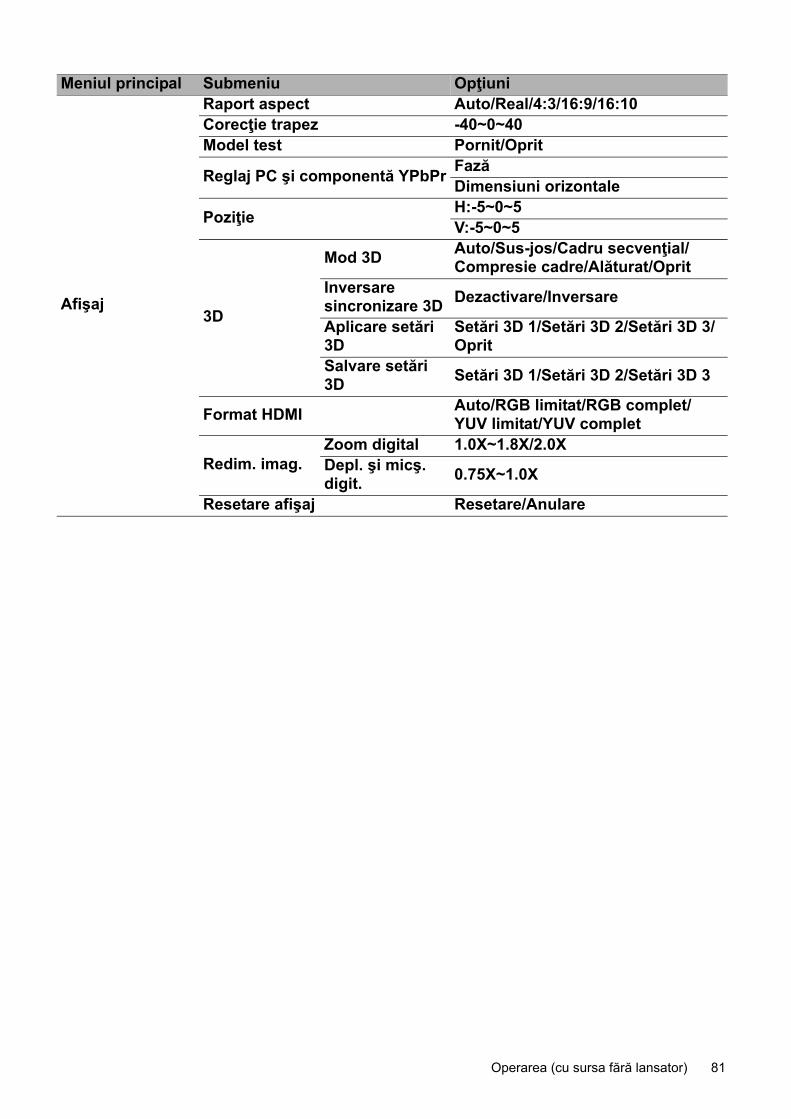
81 Operarea (cu sursa fără lansator)
Afişaj
Raport aspect Auto/Real/4:3/16:9/16:10Corecţie trapez -40~0~40Model test Pornit/Oprit
Reglaj PC şi componentă YPbPr FazăDimensiuni orizontale
Poziţie H:-5~0~5V:-5~0~5
3D
Mod 3D Auto/Sus-jos/Cadru secvenţial/Compresie cadre/Alăturat/Oprit
Inversare sincronizare 3D Dezactivare/Inversare
Aplicare setări 3D
Setări 3D 1/Setări 3D 2/Setări 3D 3/Oprit
Salvare setări 3D Setări 3D 1/Setări 3D 2/Setări 3D 3
Format HDMI Auto/RGB limitat/RGB complet/YUV limitat/YUV complet
Redim. imag.Zoom digital 1.0X~1.8X/2.0XDepl. şi micş. digit. 0.75X~1.0X
Resetare afişaj Resetare/Anulare
Meniul principal Submeniu Opţiuni
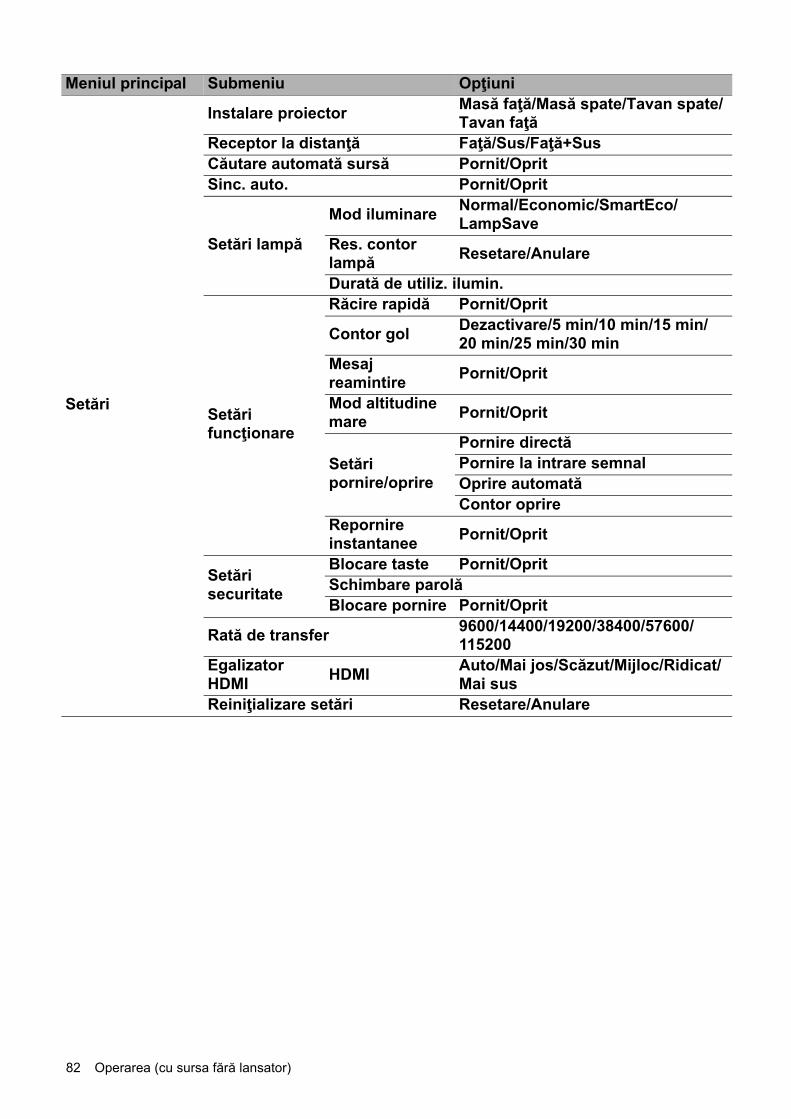
82 Operarea (cu sursa fără lansator)
Setări
Instalare proiector Masă faţă/Masă spate/Tavan spate/Tavan faţă
Receptor la distanţă Faţă/Sus/Faţă+SusCăutare automată sursă Pornit/OpritSinc. auto. Pornit/Oprit
Setări lampă
Mod iluminare Normal/Economic/SmartEco/LampSave
Res. contor lampă Resetare/Anulare
Durată de utiliz. ilumin.
Setări funcţionare
Răcire rapidă Pornit/Oprit
Contor gol Dezactivare/5 min/10 min/15 min/20 min/25 min/30 min
Mesaj reamintire Pornit/Oprit
Mod altitudine mare Pornit/Oprit
Setări pornire/oprire
Pornire directăPornire la intrare semnalOprire automatăContor oprire
Repornire instantanee Pornit/Oprit
Setări securitate
Blocare taste Pornit/OpritSchimbare parolăBlocare pornire Pornit/Oprit
Rată de transfer 9600/14400/19200/38400/57600/115200
Egalizator HDMI HDMI Auto/Mai jos/Scăzut/Mijloc/Ridicat/
Mai susReiniţializare setări Resetare/Anulare
Meniul principal Submeniu Opţiuni

83 Operarea (cu sursa fără lansator)
Sistem
Limba
Setări mod aşteptare
Mod aşteptare Eco/NormalTransfer audio Oprit/Intrare audio/HDMI
Setări fundalFundal BenQ/Negru/Albastru/PurpuriuEcran de pornire BenQ/Negru/Albastru
Setări meniuTip meniu De bază/ComplexTimp afişare meniu
5 sec/10 sec/20 sec/30 sec/Întotdeauna
Setări audio
Fără sunet Pornit/OpritVolum 0~5~10Alarmă pornire/oprire Pornit/Oprit
Setările din fabrică Resetare/AnulareResetare sistem Resetare/Anulare
Informaţii
Rezoluţie nativăRezoluţie detectatăSursăMod imagineMod iluminareFormat 3DSistem de culoareDurată de utiliz. ilumin.Versiune firmwareCod de service
Meniul principal Submeniu Opţiuni
Bhs Ind
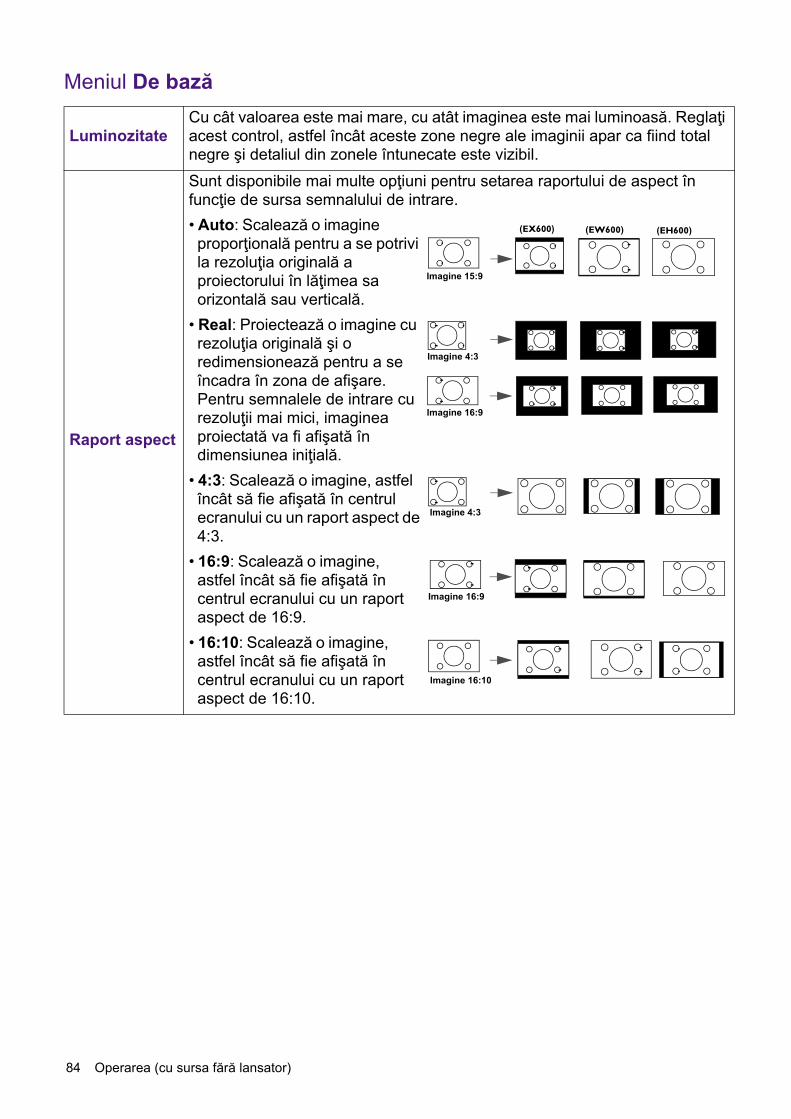
84 Operarea (cu sursa fără lansator)
Meniul De bază
LuminozitateCu cât valoarea este mai mare, cu atât imaginea este mai luminoasă. Reglaţi acest control, astfel încât aceste zone negre ale imaginii apar ca fiind total negre şi detaliul din zonele întunecate este vizibil.
Raport aspect
Sunt disponibile mai multe opţiuni pentru setarea raportului de aspect în funcţie de sursa semnalului de intrare.• Auto: Scalează o imagine proporţională pentru a se potrivi la rezoluţia originală a proiectorului în lăţimea sa orizontală sau verticală.
• Real: Proiectează o imagine cu rezoluţia originală şi o redimensionează pentru a se încadra în zona de afişare. Pentru semnalele de intrare cu rezoluţii mai mici, imaginea proiectată va fi afişată în dimensiunea iniţială.
• 4:3: Scalează o imagine, astfel încât să fie afişată în centrul ecranului cu un raport aspect de 4:3.
• 16:9: Scalează o imagine, astfel încât să fie afişată în centrul ecranului cu un raport aspect de 16:9.
• 16:10: Scalează o imagine, astfel încât să fie afişată în centrul ecranului cu un raport aspect de 16:10.
Imagine 15:9
(EX600) (EW600) (EH600)
Imagine 4:3
Imagine 16:9
Imagine 4:3
Imagine 16:9
Imagine 16:10
85 Operarea (cu sursa fără lansator)
Mod imagine
Proiectorul este presetat cu mai multe moduri de culoare predefinite dintre care puteţi alege una care se potriveşte mediului de utilizare şi tipul imaginii semnalului de intrare.• Luminos: Maximizează luminozitatea imaginii proiectate. Acest mod este adecvat pentru mediile unde este necesară o luminozitate suplimentară, precum utilizarea proiectorului în camerele bine luminate.
• Prezentare: Este realizat pentru prezentări. Luminozitatea este accentuată în acest mod pentru a se potrivi cu culorile PC-ului şi ale notebook-ului.
• Infographic: Este perfect pentru prezentări care conţin text şi grafice, datorită luminozităţii mari a culorilor şi a gradării mai bune a culorii care permit vizualizarea mai clară a detaliilor.
• Video: Este potrivit pentru redarea videoclipurilor într-un mediu în care există lumină ambientală. Detaliile dinamice ale culorilor sunt păstrate de tehnologia de îmbunătăţire BenQ.
• sRGB: Maximizează puritatea culorilor RGB pentru a oferi imagini reale, fără a ţine cont de setarea luminozităţii. Este cel mai potrivit pentru vizionarea fotografiilor efectuate cu o cameră compatibilă sRGB şi bine calibrată şi pentru vizionarea imaginilor grafice de pe PC şi a aplicaţiilor de desenare, precum AutoCAD.
• 3D: Este adecvat pentru redarea imaginilor 3D şi a filmelor 3D.• Utilizator 1/Utilizator 2: Reapelează setările realizate pe baza modurilor de imagine disponibile. Consultaţi Mod referinţă la pagina 86.
Volum Reglează nivelul de sunet.Mod iluminare Consultaţi Setarea Mod iluminare la pagina 97.
Informaţii
• Rezoluţie nativă: Afişează rezoluţia nativă a proiectorului.• Rezoluţie detectată: Afişează rezoluţia originală a semnalului de intrare.• Sursă: Afişează sursa curentă de semnal.• Mod imagine: Arată modul selectat în meniul Imagine.• Mod iluminare: Arată modul selectat în meniul Setări lampă.• Format 3D: Arată modul curent 3D.• Sistem de culoare: Arată formatul sistemului de intrare.• Durată de utiliz. ilumin.: Afişează numărul de ore de utilizare a lămpii.• Versiune firmware: Arată versiunea firmware a proiectorului.• Cod de service: Afişează numărul de serie al proiectorului.
Tip meniu Comută la meniul OSD Complex. Consultaţi Utilizarea meniurilor proiectorului cu sursa fără lansator la pagina 75.

86 Operarea (cu sursa fără lansator)
Meniul ComplexImagine
Mod imagine
Proiectorul este presetat cu mai multe moduri de culoare predefinite dintre care puteţi alege una care se potriveşte mediului de utilizare şi tipul imaginii semnalului de intrare.• Luminos: Maximizează luminozitatea imaginii proiectate. Acest mod este adecvat pentru mediile unde este necesară o luminozitate suplimentară, precum utilizarea proiectorului în camerele bine luminate.
• Prezentare: Este realizat pentru prezentări. Luminozitatea este accentuată în acest mod pentru a se potrivi cu culorile PC-ului şi ale notebook-ului.
• Infographic: Este perfect pentru prezentări care conţin text şi grafice, datorită luminozităţii mari a culorilor şi a gradării mai bune a culorii care permit vizualizarea mai clară a detaliilor.
• Video: Este potrivit pentru redarea videoclipurilor într-un mediu în care există lumină ambientală. Detaliile dinamice ale culorilor sunt păstrate de tehnologia de îmbunătăţire BenQ.
• sRGB: Maximizează puritatea culorilor RGB pentru a oferi imagini reale, fără a ţine cont de setarea luminozităţii. Este cel mai potrivit pentru vizionarea fotografiilor efectuate cu o cameră compatibilă sRGB şi bine calibrată şi pentru vizionarea imaginilor grafice de pe PC şi a aplicaţiilor de desenare, precum AutoCAD.
• 3D: Este adecvat pentru redarea imaginilor 3D şi a filmelor 3D.• Utilizator 1/Utilizator 2: Reapelează setările realizate pe baza modurilor de imagine disponibile. Consultaţi Mod referinţă la pagina 86.
Mod referinţă
Sunt 2 moduri ce pot fi definite de utilizator dacă modurile de imagine disponibile nu se potrivesc nevoilor dumneavoastră. Puteţi utiliza unul dintre aceste moduri de imagine (exceptând Utilizator 1/Utilizator 2) ca punct de pornire şi realizarea setărilor.1. Mergeţi la Imagine > Mod imagine.2. Apăsaţi / pentru a selecta Utilizator 1 sau Utilizator 2.3. Apăsaţi pentru a evidenţia Mod referinţă şi apăsaţi / pentru a
selecta un mod imagine care este cât mai apropiat de ceea ce aveţi nevoie.
4. Apăsaţi pentru a selecta elementul de meniu pentru schimbare şi reglaţi valoarea. Reglajele definesc modul utilizator selectat.
LuminozitateCu cât valoarea este mai mare, cu atât imaginea este mai luminoasă. Reglaţi acest control, astfel încât aceste zone negre ale imaginii apar ca fiind total negre şi detaliul din zonele întunecate este vizibil.
ContrastCu cât valoarea este mai mare, cu atât contrastul este mai mare. Folosiţi această setare pentru a ajusta nivelul de alb, după ce aţi reglat anterior setarea Luminozitate pentru a se potrivi intrării selectate şi mediului de vizionare.
87 Operarea (cu sursa fără lansator)
CuloareSetările mai scăzute produc culori mai puţin saturate. Dacă setarea este prea ridicată, culorile de pe imagine vor fi prea puternice, ceea ce face ca imaginile să nu mai fie reale.
Claritate Cu cât valoarea este mai mare, cu atât imaginea devine mai detaliată.
Brilliant Color
Această caracteristică utilizează un nou algoritm de procesare a culorilor şi o îmbunătăţire a nivelului de sistem, pentru a face posibilă o luminozitate mai mare care conferă imaginii culori mai adevărate şi mai vibrante. Face posibilă o creştere a luminozităţii cu peste 50% în imaginile cu o tonalitate medie, care sunt comune pentru scenele video şi naturale, astfel încât proiectorul reproduce imagini în culori realistice şi adevărate. Dacă preferaţi o imagine de această calitate, selectaţi Pornit.Când Oprit este selectat, funcţia Temperatură culoare nu este disponibilă.
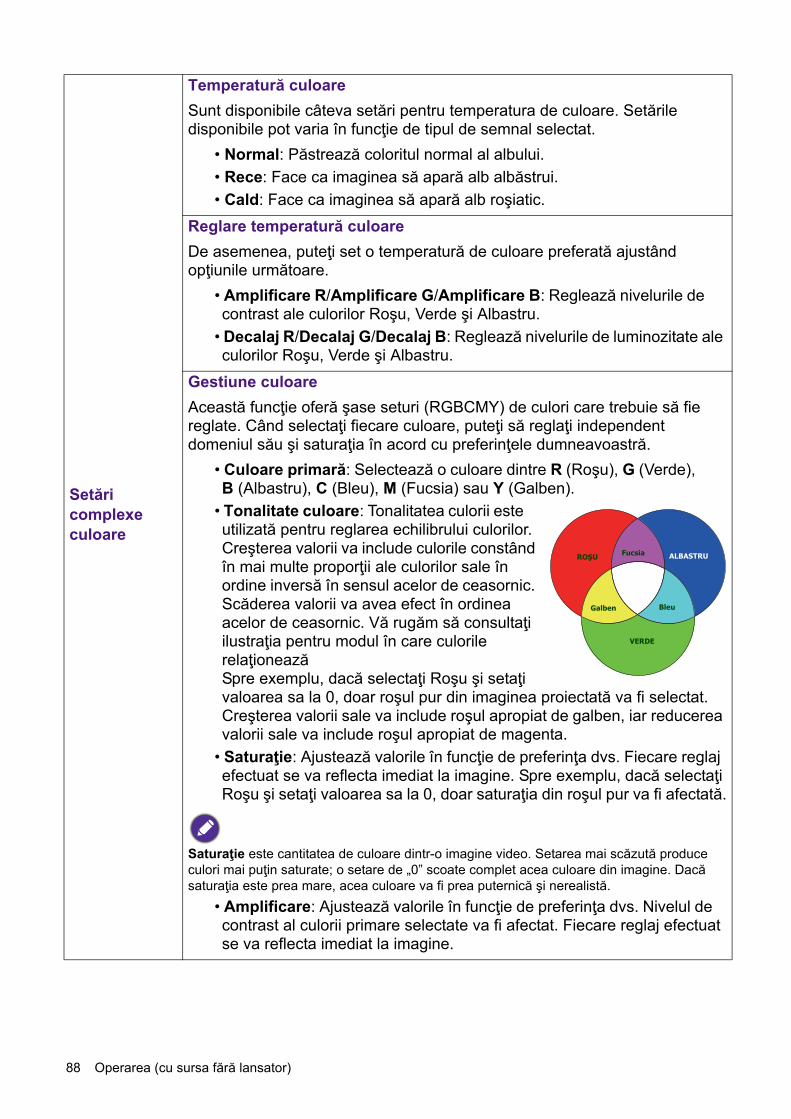
88 Operarea (cu sursa fără lansator)
Setări complexe culoare
Temperatură culoareSunt disponibile câteva setări pentru temperatura de culoare. Setările disponibile pot varia în funcţie de tipul de semnal selectat.
• Normal: Păstrează coloritul normal al albului.• Rece: Face ca imaginea să apară alb albăstrui.• Cald: Face ca imaginea să apară alb roşiatic.
Reglare temperatură culoareDe asemenea, puteţi set o temperatură de culoare preferată ajustând opţiunile următoare.
• Amplificare R/Amplificare G/Amplificare B: Reglează nivelurile de contrast ale culorilor Roşu, Verde şi Albastru.
• Decalaj R/Decalaj G/Decalaj B: Reglează nivelurile de luminozitate ale culorilor Roşu, Verde şi Albastru.
Gestiune culoareAceastă funcţie oferă şase seturi (RGBCMY) de culori care trebuie să fie reglate. Când selectaţi fiecare culoare, puteţi să reglaţi independent domeniul său şi saturaţia în acord cu preferinţele dumneavoastră.
• Culoare primară: Selectează o culoare dintre R (Roşu), G (Verde), B (Albastru), C (Bleu), M (Fucsia) sau Y (Galben).
• Tonalitate culoare: Tonalitatea culorii este utilizată pentru reglarea echilibrului culorilor. Creşterea valorii va include culorile constând în mai multe proporţii ale culorilor sale în ordine inversă în sensul acelor de ceasornic. Scăderea valorii va avea efect în ordinea acelor de ceasornic. Vă rugăm să consultaţi ilustraţia pentru modul în care culorile relaţioneazăSpre exemplu, dacă selectaţi Roşu şi setaţi valoarea sa la 0, doar roşul pur din imaginea proiectată va fi selectat. Creşterea valorii sale va include roşul apropiat de galben, iar reducerea valorii sale va include roşul apropiat de magenta.
• Saturaţie: Ajustează valorile în funcţie de preferinţa dvs. Fiecare reglaj efectuat se va reflecta imediat la imagine. Spre exemplu, dacă selectaţi Roşu şi setaţi valoarea sa la 0, doar saturaţia din roşul pur va fi afectată.
Saturaţie este cantitatea de culoare dintr-o imagine video. Setarea mai scăzută produce culori mai puţin saturate; o setare de „0” scoate complet acea culoare din imagine. Dacă saturaţia este prea mare, acea culoare va fi prea puternică şi nerealistă.
• Amplificare: Ajustează valorile în funcţie de preferinţa dvs. Nivelul de contrast al culorii primare selectate va fi afectat. Fiecare reglaj efectuat se va reflecta imediat la imagine.
ROŞU
VERDE
ALBASTRUFucsia
BleuGalben

89 Operarea (cu sursa fără lansator)
Afişaj
Setări complexe culoare
Culoare pereteCorectează culoarea imaginii proiectate atunci când suprafaţa de proiecţie, precum un perete zugrăvit care este posibil să nu fie alb, caracteristica Culoarea peretelui poate ajuta la corectarea culorilor imaginii proiectate pentru a preveni posibilelor diferenţe de culoare dintre imaginea sursă şi cea proiectată. Sunt mai multe culori precalibrate dintre care puteţi alege: Galben deschis, Roz, Verde deschis, Albastru şi Fundal negru.
Resetare imagine
Readuce toate reglările pe care le-aţi făcut pentru meniul Imagine la valorile setate din fabrică.
Raport aspect
Sunt disponibile mai multe opţiuni pentru setarea raportului de aspect în funcţie de sursa semnalului de intrare.• Auto: Scalează o imagine proporţională pentru a se potrivi la rezoluţia originală a proiectorului în lăţimea sa orizontală sau verticală.
• Real: Proiectează o imagine cu rezoluţia originală şi o redimensionează pentru a se încadra în zona de afişare. Pentru semnalele de intrare cu rezoluţii mai mici, imaginea proiectată va fi afişată în dimensiunea iniţială.
• 4:3: Scalează o imagine, astfel încât să fie afişată în centrul ecranului cu un raport aspect de 4:3.
• 16:9: Scalează o imagine, astfel încât să fie afişată în centrul ecranului cu un raport aspect de 16:9.
• 16:10: Scalează o imagine, astfel încât să fie afişată în centrul ecranului cu un raport aspect de 16:10.
Corecţie trapez
Corectează trapezul imaginii. Consultaţi Corecţie trapez la pagina 19.
Model test
Ajustează dimensiunea imaginii şi focalizarea şi verifică dacă imaginea proiectată este fără distorsiuni.
Imagine 15:9
(EX600) (EW600) (EH600)
Imagine 4:3
Imagine 16:9
Imagine 4:3
Imagine 16:9
Imagine 16:10

90 Operarea (cu sursa fără lansator)
Reglaj PC şi componentă YPbPr
• Fază: Reglează faza de ceas pentru a reduce distorsiunile imagini. Această funcţie este disponibilă doar când selectaţi un semnal PC (analog RGB) sau YPbPr.
• Dimensiuni orizontale: Reglează lăţimea orizontală a imaginii. Această funcţie este disponibilă doar când selectaţi un semnal PC (analog RGB).
PoziţieAfişează poziţia paginii de reglare. Pentru a deplasa imaginea proiectată, folosiţi tastele direcţionale săgeată. Această funcţie este disponibilă doar când selectaţi un semnal PC (analog RGB).
3D
Acest proiector are o funcţie 3D care vă dă posibilitatea de a vă bucura de filmele 3D şi evenimentele sportive într-un mod mai realist, prin prezentarea profunzimii imaginilor. Trebuie să purtaţi o pereche de ochelari 3D pentru a vedea imaginile 3D.• Mod 3D: Setarea implicită este Oprit. Dacă doriţi ca proiectorul să aleagă automat un format 3D corespunzător atunci când detectează conţinuturi 3D, selectaţi Auto. Dacă proiectorul nu poate recunoaşte formatul 3D, apăsaţi / pentru a alege un format 3D dintre Sus-jos, Cadru secvenţial, Compresie cadre şi Alăturat.
Când funcţia 3D este activată:• Nivelul de luminozitate al imaginii proiectate va scădea.• Următoarele setări nu pot fi reglate: Mod imagine, Mod referinţă.• Corecţie trapez poate fi reglat doar în grade limitate.
• Inversare sincronizare 3D: Când descoperiţi inversarea profunzimii imaginii, activaţi această funcţie pentru a corecta problema.
• Aplicare setări 3D: După ce setările 3D sunt salvate, vă puteţi decide dacă doriţi să le aplicaţi prin alegerea unui set de configurări 3D pe care le-aţi salvat. După aplicarea setărilor, proiectorul va reda automat conţinutul 3D, în cazul în care se potriveşte cu setările 3D salvate.
Sunt disponibile setările 3D cu date salvate.
• Salvare setări 3D: După ce aţi proiectat cu succes conţinutul 3D după efectuarea reglajelor adecvate, puteţi activa această funcţie şi puteţi alege un set de configurări 3D pentru salvarea setărilor 3D curente.
Format HDMI
Selectează un format de culoare potrivit pentru a optimiza calitatea afişajului.• Auto: Selectează automat un spaţiu de culoare adecvat şi nivelul de gri pentru semnalul HDMI primit.
• RGB limitat: Utilizează intervalul limitat RGB 16-235.• RGB complet: Utilizează intervalul complet RGB 0-255.• YUV limitat: Utilizează intervalul limitat YUV 16-235.• YUV complet: Utilizează intervalul complet YUV 0-255.

91 Operarea (cu sursa fără lansator)
Setări
Redim. imag.
Zoom digitalMăreşte sau reduce dimensiunea imaginii proiectate. 1. După afişarea barei de ajustare, apăsaţi / în mod repetat pentru a
reduce sau mări imaginea la dimensiunea dorită. 2. Apăsaţi OK pentru a intra în modul panoramare.3. Apăsaţi săgeţile direcţionale ( , , , ) de pe proiector sau
telecomandă pentru a naviga prin imagine.
Prin imagine se poate naviga doar când este mărită. Puteţi să măriţi mai mult imaginea în timp ce căutaţi detaliile.
Depl. şi micş. digit.Restrânge şi/sau deplasează imaginea proiectată.1. După afişarea barei de ajustare, apăsaţi / în mod repetat pentru a
restrânge sau mări imaginea la dimensiunea dorită.2. Apăsaţi OK pentru a activa funcţia de deplasare digitală.3. După activarea funcţiei de deplasare digitală, apăsaţi săgeţile
direcţionale ( , , , ) pentru a depl. imaginea.4. Apăsaţi AUTO pentru a restabili dimensiunea originală a imaginii.
Imagine se poate deplasa doar când este mărită.
Resetare afişaj
Readuce toate reglările pe care le-aţi făcut pentru meniul Afişaj la valorile setate din fabrică.
Instalare proiector
Consultaţi Alegerea unei locaţii la pagina 14.
Receptor la distanţă
Vă permite să activaţi toate receptoarele la distanţa sau un anumit receptor specific pentru proiector.
Căutare automată sursă
Permite proiectorului să caute automat un semnal.
Sinc. auto.
• Pornit: Permite proiectorului să determine automat cea mai bună sincronizare pentru imaginea afişată când este selectat semnalul PC (RGB analog) şi este apăsat AUTO.
• Oprit: Proiectorul nu va răspunde când apăsaţi AUTO.
Setări lampă
• Mod iluminare: Consultaţi Setarea Mod iluminare la pagina 97.• Res. contor lampă: Consultaţi Resetarea cronometrului lămpii la pagina 101.
• Durată de utiliz. ilumin.: Afişează numărul de ore de utilizare a lămpii.
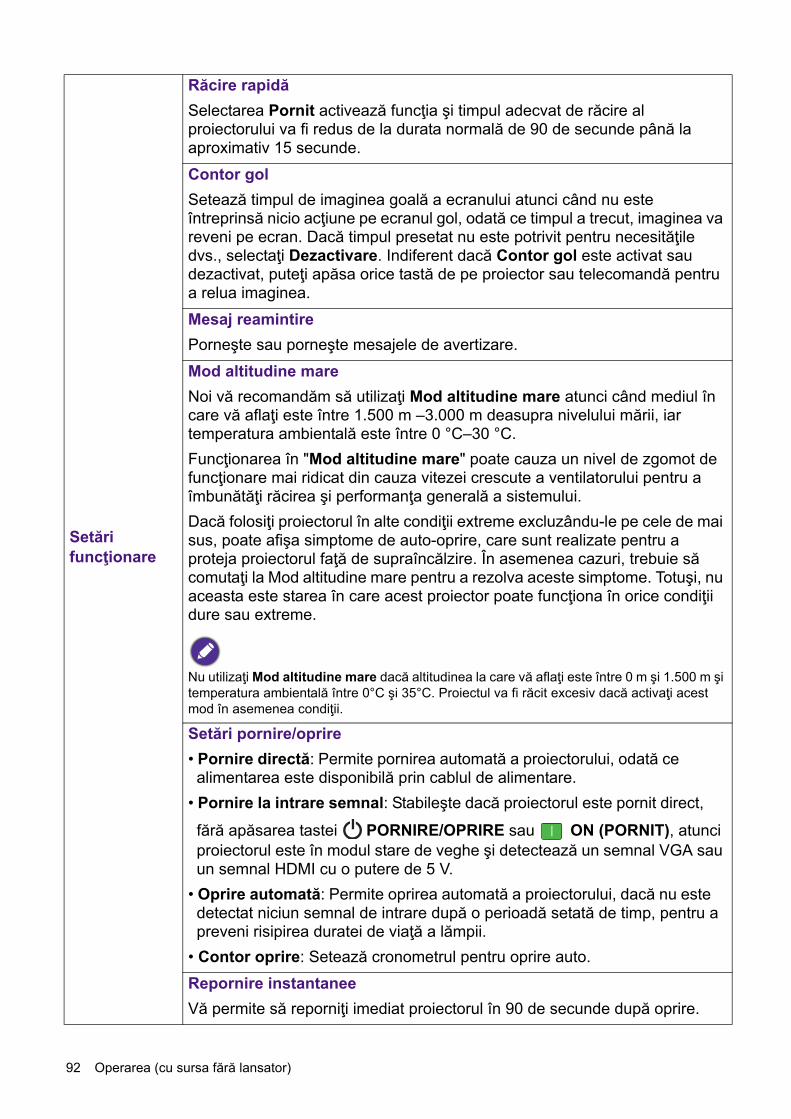
92 Operarea (cu sursa fără lansator)
Setări funcţionare
Răcire rapidăSelectarea Pornit activează funcţia şi timpul adecvat de răcire al proiectorului va fi redus de la durata normală de 90 de secunde până la aproximativ 15 secunde.Contor golSetează timpul de imaginea goală a ecranului atunci când nu este întreprinsă nicio acţiune pe ecranul gol, odată ce timpul a trecut, imaginea va reveni pe ecran. Dacă timpul presetat nu este potrivit pentru necesităţile dvs., selectaţi Dezactivare. Indiferent dacă Contor gol este activat sau dezactivat, puteţi apăsa orice tastă de pe proiector sau telecomandă pentru a relua imaginea.Mesaj reamintirePorneşte sau porneşte mesajele de avertizare.Mod altitudine mareNoi vă recomandăm să utilizaţi Mod altitudine mare atunci când mediul în care vă aflaţi este între 1.500 m –3.000 m deasupra nivelului mării, iar temperatura ambientală este între 0 °C–30 °C.Funcţionarea în "Mod altitudine mare" poate cauza un nivel de zgomot de funcţionare mai ridicat din cauza vitezei crescute a ventilatorului pentru a îmbunătăţi răcirea şi performanţa generală a sistemului.Dacă folosiţi proiectorul în alte condiţii extreme excluzându-le pe cele de mai sus, poate afişa simptome de auto-oprire, care sunt realizate pentru a proteja proiectorul faţă de supraîncălzire. În asemenea cazuri, trebuie să comutaţi la Mod altitudine mare pentru a rezolva aceste simptome. Totuşi, nu aceasta este starea în care acest proiector poate funcţiona în orice condiţii dure sau extreme.
Nu utilizaţi Mod altitudine mare dacă altitudinea la care vă aflaţi este între 0 m şi 1.500 m şi temperatura ambientală între 0°C şi 35°C. Proiectul va fi răcit excesiv dacă activaţi acest mod în asemenea condiţii.
Setări pornire/oprire• Pornire directă: Permite pornirea automată a proiectorului, odată ce alimentarea este disponibilă prin cablul de alimentare.
• Pornire la intrare semnal: Stabileşte dacă proiectorul este pornit direct,
fără apăsarea tastei PORNIRE/OPRIRE sau ON (PORNIT), atunci proiectorul este în modul stare de veghe şi detectează un semnal VGA sau un semnal HDMI cu o putere de 5 V.
• Oprire automată: Permite oprirea automată a proiectorului, dacă nu este detectat niciun semnal de intrare după o perioadă setată de timp, pentru a preveni risipirea duratei de viaţă a lămpii.
• Contor oprire: Setează cronometrul pentru oprire auto.Repornire instantaneeVă permite să reporniţi imediat proiectorul în 90 de secunde după oprire.
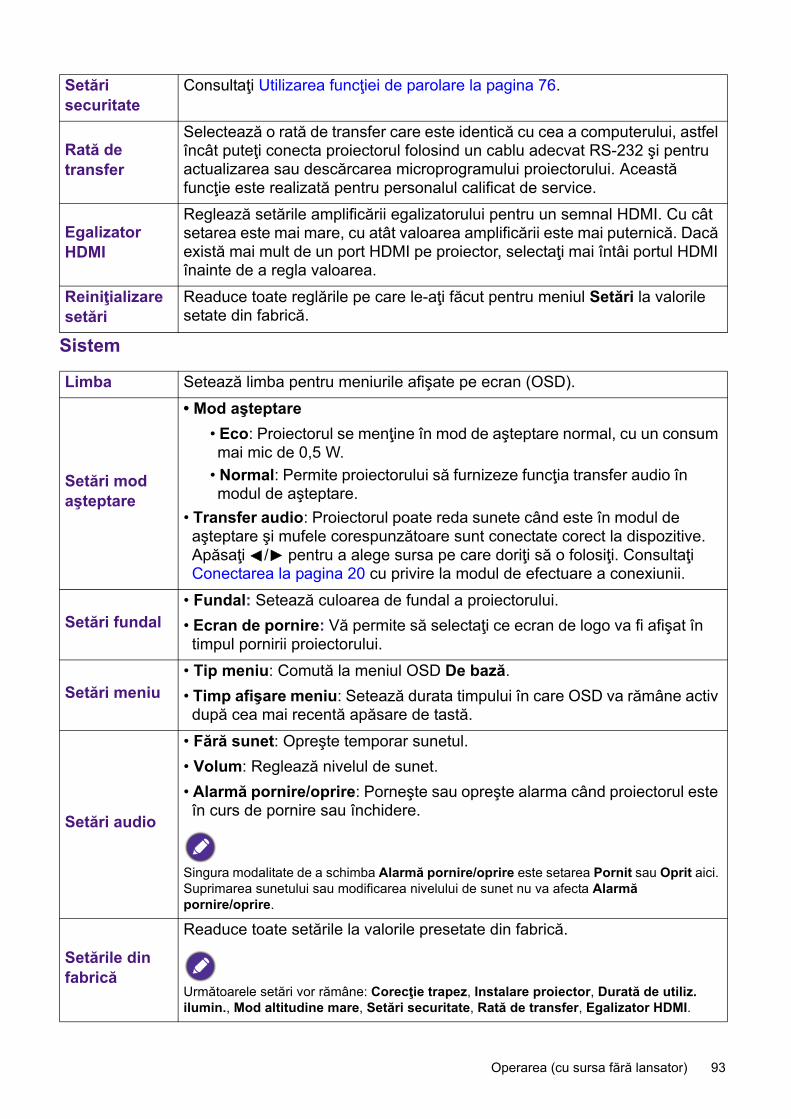
93 Operarea (cu sursa fără lansator)
Sistem
Setări securitate
Consultaţi Utilizarea funcţiei de parolare la pagina 76.
Rată de transfer
Selectează o rată de transfer care este identică cu cea a computerului, astfel încât puteţi conecta proiectorul folosind un cablu adecvat RS-232 şi pentru actualizarea sau descărcarea microprogramului proiectorului. Această funcţie este realizată pentru personalul calificat de service.
Egalizator HDMI
Reglează setările amplificării egalizatorului pentru un semnal HDMI. Cu cât setarea este mai mare, cu atât valoarea amplificării este mai puternică. Dacă există mai mult de un port HDMI pe proiector, selectaţi mai întâi portul HDMI înainte de a regla valoarea.
Reiniţializare setări
Readuce toate reglările pe care le-aţi făcut pentru meniul Setări la valorile setate din fabrică.
Limba Setează limba pentru meniurile afişate pe ecran (OSD).
Setări mod aşteptare
• Mod aşteptare• Eco: Proiectorul se menţine în mod de aşteptare normal, cu un consum mai mic de 0,5 W.
• Normal: Permite proiectorului să furnizeze funcţia transfer audio în modul de aşteptare.
• Transfer audio: Proiectorul poate reda sunete când este în modul de aşteptare şi mufele corespunzătoare sunt conectate corect la dispozitive. Apăsaţi / pentru a alege sursa pe care doriţi să o folosiţi. Consultaţi Conectarea la pagina 20 cu privire la modul de efectuare a conexiunii.
Setări fundal• Fundal: Setează culoarea de fundal a proiectorului.• Ecran de pornire: Vă permite să selectaţi ce ecran de logo va fi afişat în timpul pornirii proiectorului.
Setări meniu• Tip meniu: Comută la meniul OSD De bază.• Timp afişare meniu: Setează durata timpului în care OSD va rămâne activ după cea mai recentă apăsare de tastă.
Setări audio
• Fără sunet: Opreşte temporar sunetul.• Volum: Reglează nivelul de sunet.• Alarmă pornire/oprire: Porneşte sau opreşte alarma când proiectorul este în curs de pornire sau închidere.
Singura modalitate de a schimba Alarmă pornire/oprire este setarea Pornit sau Oprit aici. Suprimarea sunetului sau modificarea nivelului de sunet nu va afecta Alarmă pornire/oprire.
Setările din fabrică
Readuce toate setările la valorile presetate din fabrică.
Următoarele setări vor rămâne: Corecţie trapez, Instalare proiector, Durată de utiliz. ilumin., Mod altitudine mare, Setări securitate, Rată de transfer, Egalizator HDMI.

94 Operarea (cu sursa fără lansator)
Informaţii
Resetare sistem
Readuce toate reglările pe care le-aţi făcut pentru meniul Sistem la valorile setate din fabrică.
Informaţii
• Rezoluţie nativă: Afişează rezoluţia nativă a proiectorului.• Rezoluţie detectată: Afişează rezoluţia originală a semnalului de intrare.• Sursă: Afişează sursa curentă de semnal.• Mod imagine: Arată modul selectat în meniul Imagine.• Mod iluminare: Arată modul selectat în meniul Setări lampă.• Format 3D: Arată modul curent 3D.• Sistem de culoare: Arată formatul sistemului de intrare.• Durată de utiliz. ilumin.: Afişează numărul de ore de utilizare a lămpii.• Versiune firmware: Arată versiunea firmware a proiectorului.• Cod de service: Afişează numărul de serie al proiectorului.
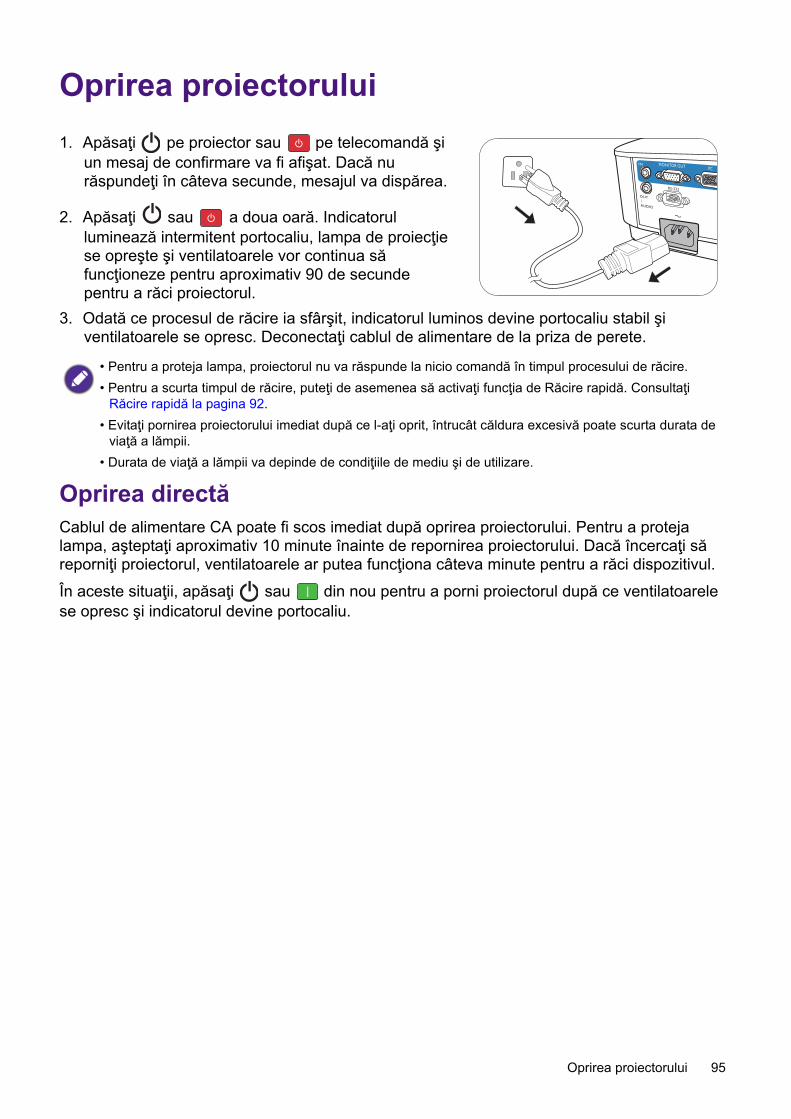
95 Oprirea proiectorului
Oprirea proiectorului1. Apăsaţi pe proiector sau pe telecomandă şi
un mesaj de confirmare va fi afişat. Dacă nu răspundeţi în câteva secunde, mesajul va dispărea.
2. Apăsaţi sau a doua oară. Indicatorul luminează intermitent portocaliu, lampa de proiecţie se opreşte şi ventilatoarele vor continua să funcţioneze pentru aproximativ 90 de secunde pentru a răci proiectorul.
3. Odată ce procesul de răcire ia sfârşit, indicatorul luminos devine portocaliu stabil şi ventilatoarele se opresc. Deconectaţi cablul de alimentare de la priza de perete.
Oprirea directăCablul de alimentare CA poate fi scos imediat după oprirea proiectorului. Pentru a proteja lampa, aşteptaţi aproximativ 10 minute înainte de repornirea proiectorului. Dacă încercaţi să reporniţi proiectorul, ventilatoarele ar putea funcţiona câteva minute pentru a răci dispozitivul. În aceste situaţii, apăsaţi sau din nou pentru a porni proiectorul după ce ventilatoarele se opresc şi indicatorul devine portocaliu.
• Pentru a proteja lampa, proiectorul nu va răspunde la nicio comandă în timpul procesului de răcire.• Pentru a scurta timpul de răcire, puteţi de asemenea să activaţi funcţia de Răcire rapidă. Consultaţi
Răcire rapidă la pagina 92.• Evitaţi pornirea proiectorului imediat după ce l-aţi oprit, întrucât căldura excesivă poate scurta durata de
viaţă a lămpii.• Durata de viaţă a lămpii va depinde de condiţiile de mediu şi de utilizare.
96 Întreţinerea
ÎntreţinereaÎngrijirea proiectoruluiCurăţarea obiectivuluiCurăţaţi obiectivul de fiecare dată când constataţi că există murdărie sau praf pe suprafaţa sa. Vă rugăm să vă asiguraţi că proiectorul este oprit şi că este răcit complet, înainte de curăţarea obiectivului.• Folosiţi un recipient cu aer comprimat pentru îndepărtarea prafului.• Dacă există murdărie sau pete, folosiţi hârtie pentru curăţarea obiectivului sau o cârpă uşor înmuiată în lichid pentru curăţare şi ştergeţi uşor suprafaţa obiectivului.
• Nu folosiţi niciodată un material abraziv, curăţitor alcalin/acid, praf de curăţat sau solvent volatil, precum benzen, diluant sau insecticid. Folosirea unor asemenea materiale sau menţinerea unei perioade prelungite de contact cu materiale din cauciuc sau vinil, poate deteriora suprafaţa proiectorului şi materialul carcasei.
Curăţarea carcasei proiectoruluiÎnainte de a curăţa carcasa, opriţi proiectorul folosind procedura standard de oprire, aşa cum este descris în Utilizarea meniului la pagina 79, şi scoateţi cablul de alimentare.• Pentru a îndepărta murdăria sau praful, ştergeţi carcasa cu o cârpă moale, fără scame.• Pentru a îndepărta murdăria persistentă sau petele, înmuiaţi o cârpă moale în apă cu un detergent cu pH neutru. Apoi, ştergeţi carcasa.
Depozitarea proiectoruluiDacă aveţi nevoie să depozitaţi proiectorul pentru o perioadă mare de timp, vă rugăm să respectaţi instrucţiunile de mai jos:• Asiguraţi-vă că temperatura şi umiditatea locului de depozitare sunt în domeniul recomandat pentru proiector. Vă rugăm să consultaţi Specificaţii la pagina 104 sau să întrebaţi distribuitorul dumneavoastră despre acest domeniu.
• Retractaţi piciorul reglabil.• Scoateţi bateriile din telecomandă.• Împachetaţi proiectorul în ambalajul său original sau într-un ambalaj echivalent.
Transportarea proiectoruluiEste recomandat să expediaţi proiectorul în ambalajul său original sau într-un ambalaj echivalent.
Nu folosiţi niciodată ceară, alcool, benzen, diluant sau alţi detergenţi chimici. Acestea ar putea deteriora carcasa.
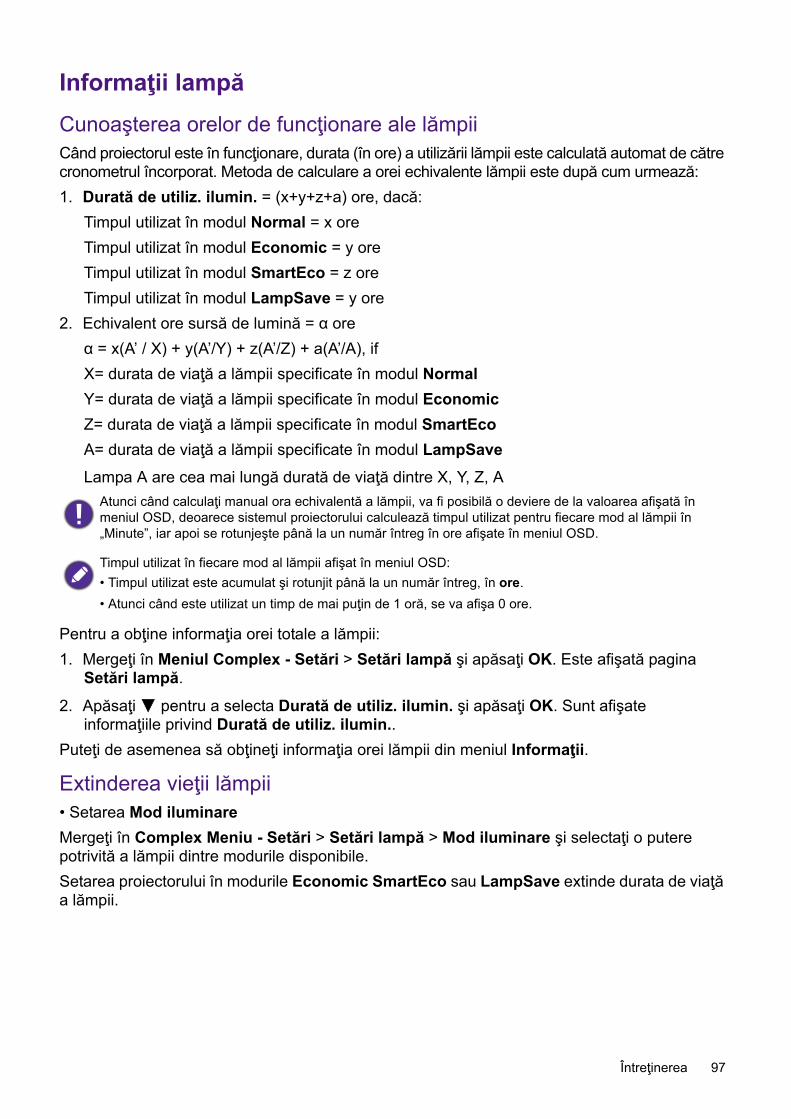
97 Întreţinerea
Informaţii lampăCunoaşterea orelor de funcţionare ale lămpiiCând proiectorul este în funcţionare, durata (în ore) a utilizării lămpii este calculată automat de către cronometrul încorporat. Metoda de calculare a orei echivalente lămpii este după cum urmează:1. Durată de utiliz. ilumin. = (x+y+z+a) ore, dacă:
Timpul utilizat în modul Normal = x oreTimpul utilizat în modul Economic = y oreTimpul utilizat în modul SmartEco = z oreTimpul utilizat în modul LampSave = y ore
2. Echivalent ore sursă de lumină = α oreα = x(A’ / X) + y(A’/Y) + z(A’/Z) + a(A’/A), ifX= durata de viaţă a lămpii specificate în modul NormalY= durata de viaţă a lămpii specificate în modul EconomicZ= durata de viaţă a lămpii specificate în modul SmartEcoA= durata de viaţă a lămpii specificate în modul LampSaveLampa A are cea mai lungă durată de viaţă dintre X, Y, Z, A
Pentru a obţine informaţia orei totale a lămpii:1. Mergeţi în Meniul Complex - Setări > Setări lampă şi apăsaţi OK. Este afişată pagina
Setări lampă.
2. Apăsaţi pentru a selecta Durată de utiliz. ilumin. şi apăsaţi OK. Sunt afişate informaţiile privind Durată de utiliz. ilumin..
Puteţi de asemenea să obţineţi informaţia orei lămpii din meniul Informaţii.
Extinderea vieţii lămpii• Setarea Mod iluminareMergeţi în Complex Meniu - Setări > Setări lampă > Mod iluminare şi selectaţi o putere potrivită a lămpii dintre modurile disponibile.Setarea proiectorului în modurile Economic SmartEco sau LampSave extinde durata de viaţă a lămpii.
Atunci când calculaţi manual ora echivalentă a lămpii, va fi posibilă o deviere de la valoarea afişată în meniul OSD, deoarece sistemul proiectorului calculează timpul utilizat pentru fiecare mod al lămpii în „Minute”, iar apoi se rotunjeşte până la un număr întreg în ore afişate în meniul OSD.
Timpul utilizat în fiecare mod al lămpii afişat în meniul OSD:• Timpul utilizat este acumulat şi rotunjit până la un număr întreg, în ore.• Atunci când este utilizat un timp de mai puţin de 1 oră, se va afişa 0 ore.

98 Întreţinerea
• Setarea Oprire automatăAceastă funcţie permite oprirea automată a proiectorului, dacă nu este detectat niciun semnal de intrare după o perioadă setată de timp, pentru a preveni risipirea duratei de viaţă a lămpii.Pentru a seta Oprire automată, mergeţi în Complex Meniul - Setări > Setări funcţionare > Setări pornire/oprire > Oprire automată şi apăsaţi / .
Mod lampă DescriereNormal Oferă luminozitatea completă a lămpiiEconomic Scade luminozitatea lămpii şi scade zgomotul ventilatorului
SmartEco Reglează puterea lămpii în funcţie de nivelul de luminozitate al conţinutului, optimizând calitatea afişajului
LampSave Reglează puterea lămpii în funcţie de nivelul de luminozitate al conţinutului, prelungind durata de viaţă a lămpii

99 Întreţinerea
Timpul de înlocuire a lămpiiCând Indicatorul lampă se aprinde sau apare un mesaj care sugerează că este timpul să înlocuiţi lampa, vă rugăm să consultaţi un distribuitor sau să mergeţi la http://www.BenQ.com înainte de a instala o nouă lampă. O lampă veche poate provoca disfuncţionalităţi ale proiectorului şi, în anumite situaţii, lampa poate exploda.
Următoarele avertizări pentru lampă vă vor reaminti că trebuie să schimbaţi lampa.
• Luminozitatea aparentă a imaginii proiectate va depinde de condiţiile ambientale de iluminat, setările de contrast/luminozitate selectate ale semnalului de intrare şi este direct proporţională cu distanţa de proiecţie.
• Luminozitatea lămpii va scădea de-a lungul timpului şi poate varia foarte mult în funcţie de specificaţiile fabricanţilor. Acesta este un comportament normal şi aşteptat.
• Lumina indicatoare pentru LAMP (Lampă) şi Lumină avertizare TEMPeratură (TEMP) se vor aprinde dacă lampa devine prea fierbinte. Opriţi alimentarea şi lăsaţi proiectorul să se răcească pentru 45 de minute. Dacă indicatorii Lamp sau Temp sunt încă aprinşi după reluarea alimentării, vă rugăm să consultaţi distribuitorul dumneavoastră. Consultaţi Indicatori la pagina 102.
Instalaţi o lampă nouă pentru o performanţă optimă. Apăsaţi OK pentru a anula mesajul.
Este recomandat să înlocuiţi lampa cu această vechime. Lampa este un element consumabil. Luminozitatea lămpii scade în utilizare. Acesta este un comportament normal al lămpii. Puteţi înlocui lampa de fiecare dată când constataţi că nivelul de luminozitate este diminuat semnificativ.Apăsaţi OK pentru a anula mesajul.
Lampa TREBUIE înlocuită înainte ca proiectorul să funcţioneze normal.Apăsaţi OK pentru a anula mesajul.
„XXXX” afişat în mesajul de mai sus reprezintă numere care pot diferi în funcţie de diferitele modele.
Comandaţi o lampă de schimbEchivalent ore lampă > XXXX ore
Comandaţi o lampă nouă la www.BenQ.com
Notif.
Înlocuiţi lampa curândEchivalent ore lampă > XXXX ore
Comandaţi o lampă nouă la www.BenQ.com
Notif.
Durată utilizare lampă expiratăÎnlocuiţi lampa (consultaţi manualul),reiniţializaţi contorul becului
Comandaţi o lampă nouă la www.BenQ.com
Notif.
Înlocuiţi lampa acumEchivalent ore lampă > XXXX ore
Comandaţi o lampă nouă la www.BenQ.com
Notif.
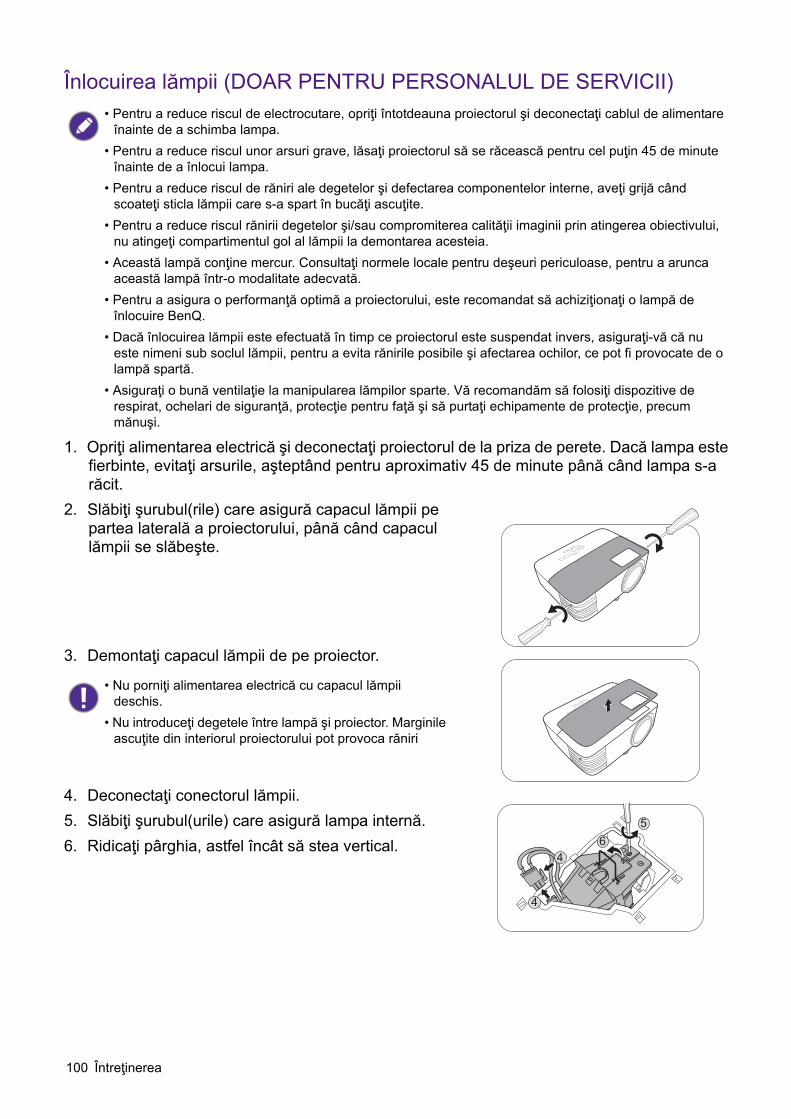
100 Întreţinerea
Înlocuirea lămpii (DOAR PENTRU PERSONALUL DE SERVICII)
1. Opriţi alimentarea electrică şi deconectaţi proiectorul de la priza de perete. Dacă lampa este fierbinte, evitaţi arsurile, aşteptând pentru aproximativ 45 de minute până când lampa s-a răcit.
2. Slăbiţi şurubul(rile) care asigură capacul lămpii pe partea laterală a proiectorului, până când capacul lămpii se slăbeşte.
3. Demontaţi capacul lămpii de pe proiector.
4. Deconectaţi conectorul lămpii.5. Slăbiţi şurubul(urile) care asigură lampa internă.6. Ridicaţi pârghia, astfel încât să stea vertical.
• Pentru a reduce riscul de electrocutare, opriţi întotdeauna proiectorul şi deconectaţi cablul de alimentare înainte de a schimba lampa.
• Pentru a reduce riscul unor arsuri grave, lăsaţi proiectorul să se răcească pentru cel puţin 45 de minute înainte de a înlocui lampa.
• Pentru a reduce riscul de răniri ale degetelor şi defectarea componentelor interne, aveţi grijă când scoateţi sticla lămpii care s-a spart în bucăţi ascuţite.
• Pentru a reduce riscul rănirii degetelor şi/sau compromiterea calităţii imaginii prin atingerea obiectivului, nu atingeţi compartimentul gol al lămpii la demontarea acesteia.
• Această lampă conţine mercur. Consultaţi normele locale pentru deşeuri periculoase, pentru a arunca această lampă într-o modalitate adecvată.
• Pentru a asigura o performanţă optimă a proiectorului, este recomandat să achiziţionaţi o lampă de înlocuire BenQ.
• Dacă înlocuirea lămpii este efectuată în timp ce proiectorul este suspendat invers, asiguraţi-vă că nu este nimeni sub soclul lămpii, pentru a evita rănirile posibile şi afectarea ochilor, ce pot fi provocate de o lampă spartă.
• Asiguraţi o bună ventilaţie la manipularea lămpilor sparte. Vă recomandăm să folosiţi dispozitive de respirat, ochelari de siguranţă, protecţie pentru faţă şi să purtaţi echipamente de protecţie, precum mănuşi.
• Nu porniţi alimentarea electrică cu capacul lămpii deschis.
• Nu introduceţi degetele între lampă şi proiector. Marginile ascuţite din interiorul proiectorului pot provoca răniri
4
56
4

101 Întreţinerea
7. Folosiţi pârghia pentru a trage uşor lampa din proiector.
8. Aşa cum este indicat în figură, introduceţi noua lampă. Aliniaţi conectorul lămpii şi cele 2 puncte ascuţite cu proiectorul şi împingeţi puţin lampa pe poziţie.
9. Introduceţi conectorul lămpii.
10. Strângeţi şurubul(urile) care asigură lampa.11. Asiguraţi-vă că pârghia este coborâtă în întregime şi
că este blocată în locul său.
12. Montaţi capacul lămpii de pe proiector.
13. Strângeţi şurubul care asigură capacul lămpii.
14. Conectaţi alimentarea şi reporniţi proiectorul.Resetarea cronometrului lămpii15. După logoul de pornire, deschideţi meniul afişat pe
ecran (OSD). Mergeţi în meniul Complex - Setări > Setări lampă şi apăsaţi OK. Apare pagina Setări lampă. Evidenţiaţi Resetare contor lampă şi apăsaţi OK. Apare un mesaj de avertizare, care vă întreabă dacă doriţi să resetaţi cronometrul lămpii. Evidenţiaţi Resetare şi apăsaţi OK. Timpul lămpii va fi resetat la „0”.
• Tragerea prea rapidă poate duce la spargerea lămpii şi la împrăştierea sticlei sparte în interiorul proiectorului.
• Nu amplasaţi lampa în locurile unde poate intra în contact cu apa, este accesibilă copiilor sau lângă materiale inflamabile.
• Nu introduceţi mâinile în proiector după ce lampa este demontată. Marginile ascuţite din interiorul proiectorului pot provoca răniri. Dacă atingeţi componentele optice din interior, se pot provoca variaţii şi distorsiuni ale imaginilor proiectate.
• Un şurub slăbit poate duce la o conexiune proastă, ceea ce poate duce la disfuncţionalităţi.
• Nu strângeţi excesiv şurubul.
• Un şurub slăbit poate duce la o conexiune proastă, ceea ce poate duce la disfuncţionalităţi.
• Nu strângeţi excesiv şurubul.
Nu reiniţializaţi dacă lampa nu este nouă sau înlocuită, întrucât aceasta ar putea provoca defecţiuni.
8
89
10
11

102 Întreţinerea
IndicatoriLumină
Stare şi descriere
Evenimente legate de alimentareMod stare de veghe
Se alimentează
Funcţionare normală
Răcire normală la oprire
Descărcare
Eşec pornire CW
Evenimente legate de lampăEroare lampă la funcţionarea normală
Lampa nu este aprinsă
Durata de funcţionare a lămpii s-a încheiat
Uşa compartimentului lămpii nu este închisă
Evenimente termiceEroare ventilator 1 (viteza actuală a ventilatorului este peste viteza dorită)Eroare ventilator 2 (viteza actuală a ventilatorului este peste viteza dorită)Temperatură eroare 1 (temperatură peste limite)
: Oprit: Portocaliu aprins : Verde aprins : Roşu aprins
: Portocaliu intermitent : Verde intermitent : Roşu intermitent
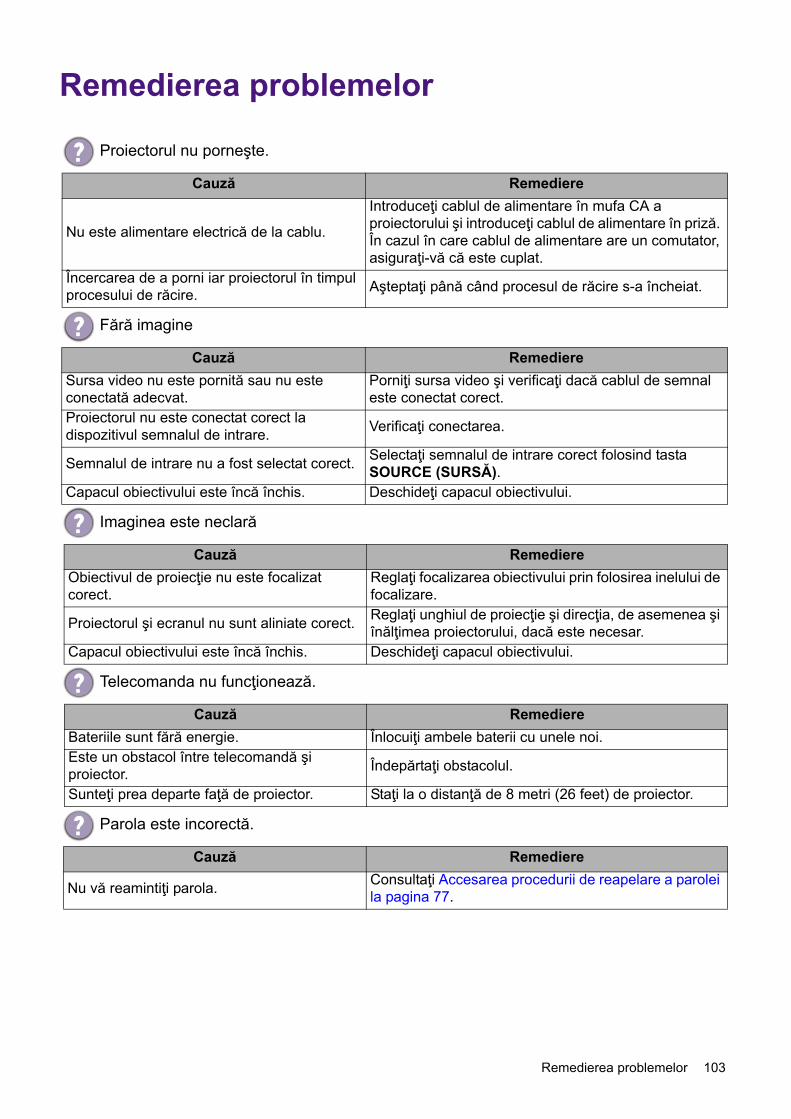
103 Remedierea problemelor
Remedierea problemelor
Proiectorul nu porneşte.
Cauză Remediere
Nu este alimentare electrică de la cablu.
Introduceţi cablul de alimentare în mufa CA a proiectorului şi introduceţi cablul de alimentare în priză. În cazul în care cablul de alimentare are un comutator, asiguraţi-vă că este cuplat.
Încercarea de a porni iar proiectorul în timpul procesului de răcire. Aşteptaţi până când procesul de răcire s-a încheiat.
Fără imagine
Cauză RemediereSursa video nu este pornită sau nu este conectată adecvat.
Porniţi sursa video şi verificaţi dacă cablul de semnal este conectat corect.
Proiectorul nu este conectat corect la dispozitivul semnalul de intrare. Verificaţi conectarea.
Semnalul de intrare nu a fost selectat corect. Selectaţi semnalul de intrare corect folosind tasta SOURCE (SURSĂ).
Capacul obiectivului este încă închis. Deschideţi capacul obiectivului.
Imaginea este neclară
Cauză RemediereObiectivul de proiecţie nu este focalizat corect.
Reglaţi focalizarea obiectivului prin folosirea inelului de focalizare.
Proiectorul şi ecranul nu sunt aliniate corect. Reglaţi unghiul de proiecţie şi direcţia, de asemenea şi înălţimea proiectorului, dacă este necesar.
Capacul obiectivului este încă închis. Deschideţi capacul obiectivului.
Telecomanda nu funcţionează.
Cauză RemediereBateriile sunt fără energie. Înlocuiţi ambele baterii cu unele noi.Este un obstacol între telecomandă şi proiector. Îndepărtaţi obstacolul.
Sunteţi prea departe faţă de proiector. Staţi la o distanţă de 8 metri (26 feet) de proiector.
Parola este incorectă.
Cauză Remediere
Nu vă reamintiţi parola. Consultaţi Accesarea procedurii de reapelare a parolei la pagina 77.
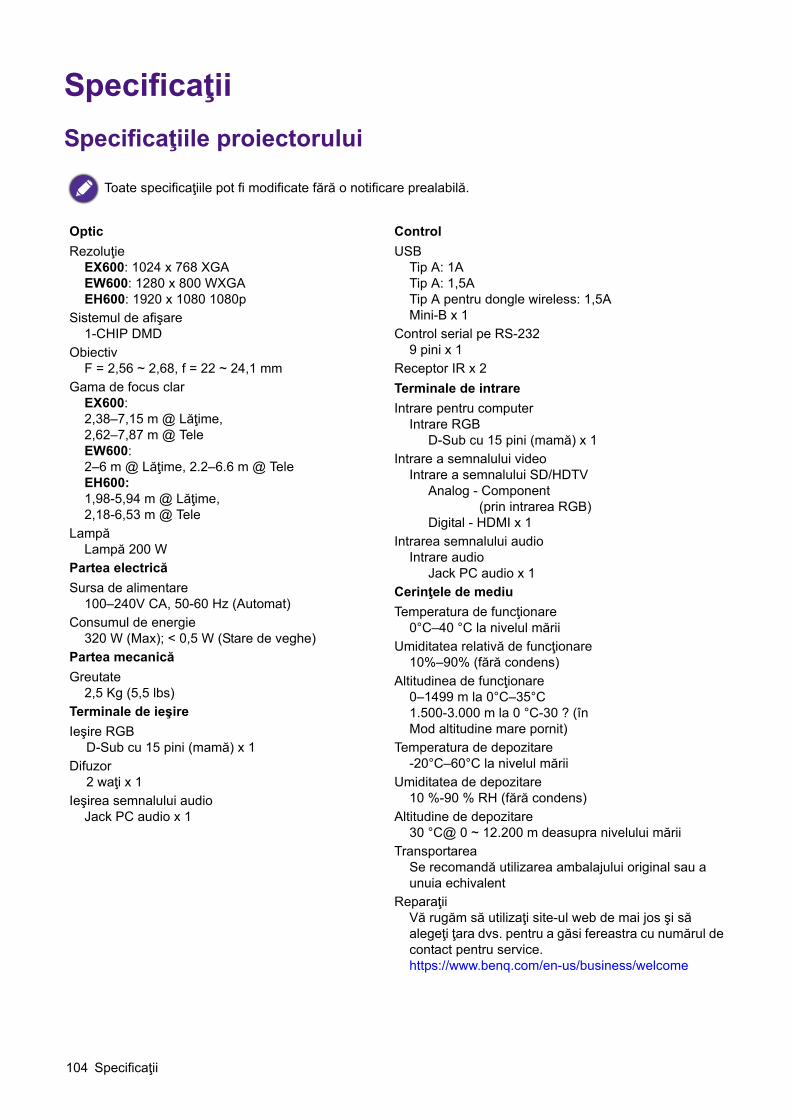
104 Specificaţii
SpecificaţiiSpecificaţiile proiectorului
Toate specificaţiile pot fi modificate fără o notificare prealabilă.
OpticRezoluţie
EX600: 1024 x 768 XGAEW600: 1280 x 800 WXGAEH600: 1920 x 1080 1080p
Sistemul de afişare1-CHIP DMD
ObiectivF = 2,56 ~ 2,68, f = 22 ~ 24,1 mm
Gama de focus clarEX600: 2,38–7,15 m @ Lăţime, 2,62–7,87 m @ TeleEW600: 2–6 m @ Lăţime, 2.2–6.6 m @ TeleEH600: 1,98-5,94 m @ Lăţime, 2,18-6,53 m @ Tele
LampăLampă 200 W
Partea electricăSursa de alimentare
100–240V CA, 50-60 Hz (Automat)Consumul de energie
320 W (Max); < 0,5 W (Stare de veghe)Partea mecanicăGreutate
2,5 Kg (5,5 lbs)Terminale de ieşireIeşire RGB
D-Sub cu 15 pini (mamă) x 1Difuzor
2 waţi x 1Ieşirea semnalului audio
Jack PC audio x 1
ControlUSB
Tip A: 1ATip A: 1,5ATip A pentru dongle wireless: 1,5A Mini-B x 1
Control serial pe RS-2329 pini x 1
Receptor IR x 2Terminale de intrareIntrare pentru computer
Intrare RGBD-Sub cu 15 pini (mamă) x 1
Intrare a semnalului videoIntrare a semnalului SD/HDTV
Analog - Component (prin intrarea RGB)
Digital - HDMI x 1 Intrarea semnalului audio
Intrare audioJack PC audio x 1
Cerinţele de mediuTemperatura de funcţionare
0°C–40 °C la nivelul măriiUmiditatea relativă de funcţionare
10%–90% (fără condens)Altitudinea de funcţionare
0–1499 m la 0°C–35°C1.500-3.000 m la 0 °C-30 ? (în Mod altitudine mare pornit)
Temperatura de depozitare-20°C–60°C la nivelul mării
Umiditatea de depozitare10 %-90 % RH (fără condens)
Altitudine de depozitare30 °C@ 0 ~ 12.200 m deasupra nivelului mării
TransportareaSe recomandă utilizarea ambalajului original sau a unuia echivalent
ReparaţiiVă rugăm să utilizaţi site-ul web de mai jos şi să alegeţi ţara dvs. pentru a găsi fereastra cu numărul de contact pentru service. https://www.benq.com/en-us/business/welcome
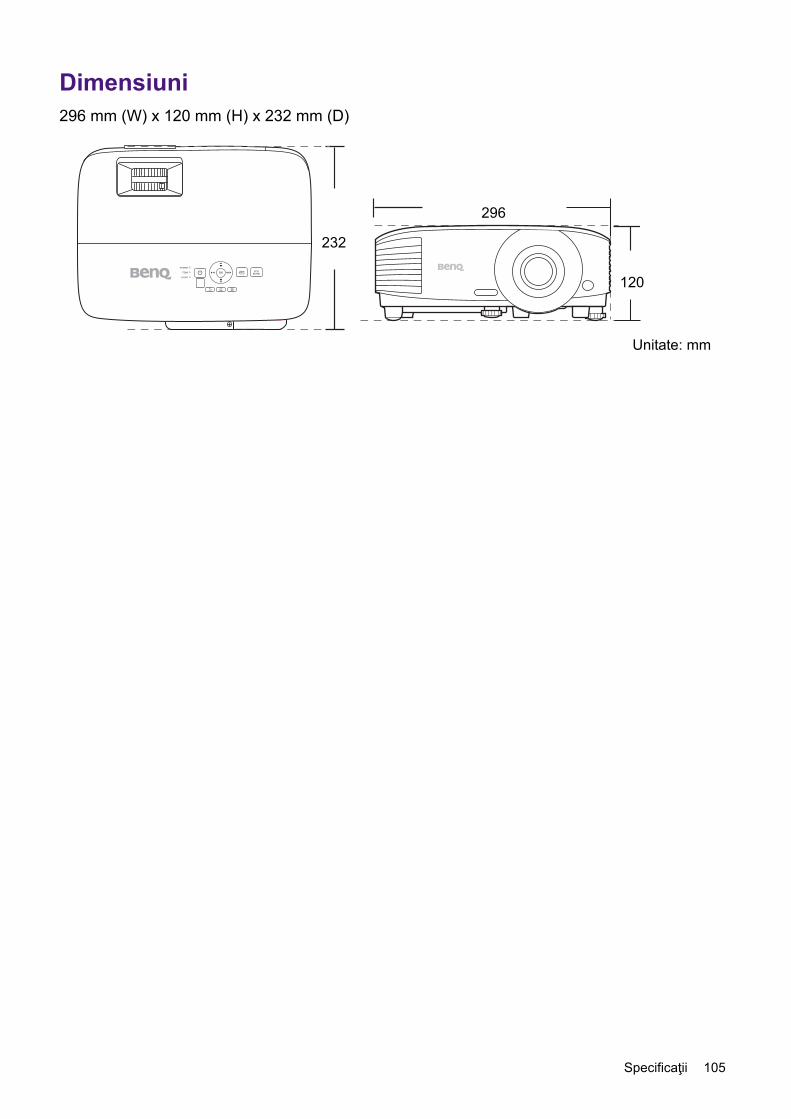
105 Specificaţii
Dimensiuni296 mm (W) x 120 mm (H) x 232 mm (D)
296
232
120
Unitate: mm
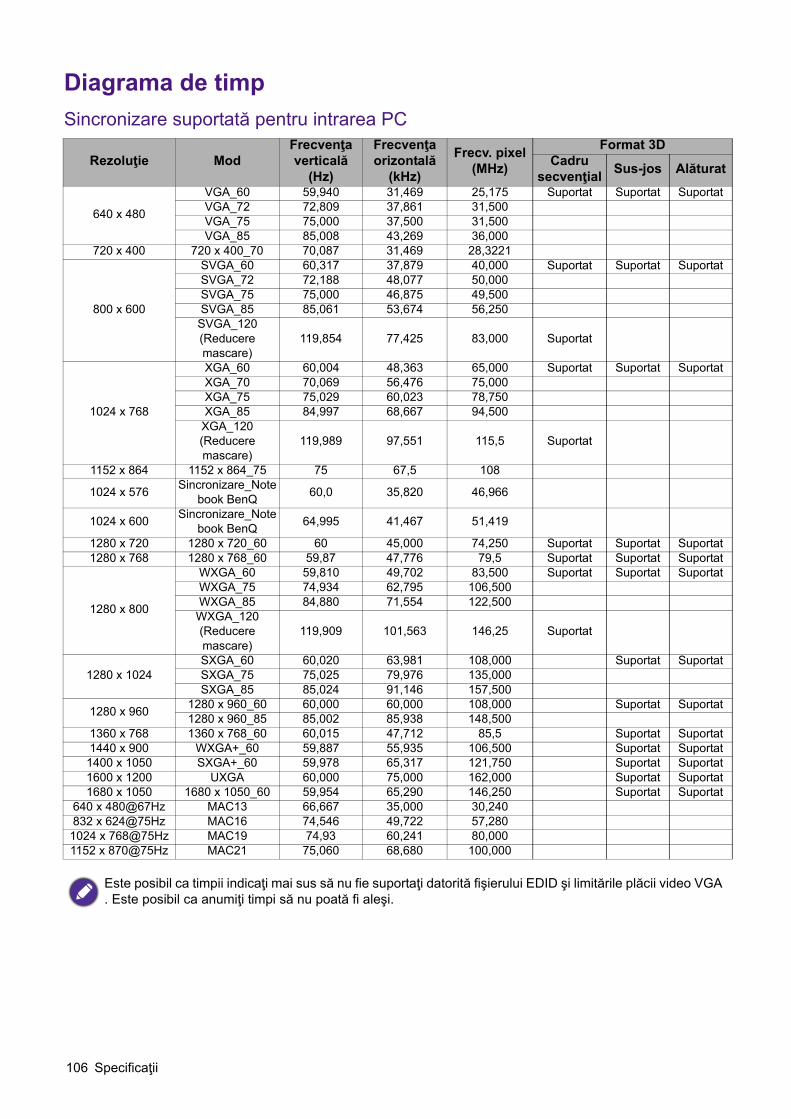
106 Specificaţii
Diagrama de timpSincronizare suportată pentru intrarea PC
Rezoluţie ModFrecvenţa verticală
(Hz)
Frecvenţa orizontală
(kHz)
Frecv. pixel(MHz)
Format 3DCadru
secvenţial Sus-jos Alăturat
640 x 480
VGA_60 59,940 31,469 25,175 Suportat Suportat SuportatVGA_72 72,809 37,861 31,500VGA_75 75,000 37,500 31,500VGA_85 85,008 43,269 36,000
720 x 400 720 x 400_70 70,087 31,469 28,3221
800 x 600
SVGA_60 60,317 37,879 40,000 Suportat Suportat SuportatSVGA_72 72,188 48,077 50,000SVGA_75 75,000 46,875 49,500SVGA_85 85,061 53,674 56,250SVGA_120 (Reducere mascare)
119,854 77,425 83,000 Suportat
1024 x 768
XGA_60 60,004 48,363 65,000 Suportat Suportat SuportatXGA_70 70,069 56,476 75,000XGA_75 75,029 60,023 78,750XGA_85 84,997 68,667 94,500
XGA_120 (Reducere mascare)
119,989 97,551 115,5 Suportat
1152 x 864 1152 x 864_75 75 67,5 108
1024 x 576 Sincronizare_Notebook BenQ 60,0 35,820 46,966
1024 x 600 Sincronizare_Notebook BenQ 64,995 41,467 51,419
1280 x 720 1280 x 720_60 60 45,000 74,250 Suportat Suportat Suportat1280 x 768 1280 x 768_60 59,87 47,776 79,5 Suportat Suportat Suportat
1280 x 800
WXGA_60 59,810 49,702 83,500 Suportat Suportat SuportatWXGA_75 74,934 62,795 106,500WXGA_85 84,880 71,554 122,500WXGA_120 (Reducere mascare)
119,909 101,563 146,25 Suportat
1280 x 1024SXGA_60 60,020 63,981 108,000 Suportat SuportatSXGA_75 75,025 79,976 135,000SXGA_85 85,024 91,146 157,500
1280 x 960 1280 x 960_60 60,000 60,000 108,000 Suportat Suportat1280 x 960_85 85,002 85,938 148,500
1360 x 768 1360 x 768_60 60,015 47,712 85,5 Suportat Suportat1440 x 900 WXGA+_60 59,887 55,935 106,500 Suportat Suportat1400 x 1050 SXGA+_60 59,978 65,317 121,750 Suportat Suportat1600 x 1200 UXGA 60,000 75,000 162,000 Suportat Suportat1680 x 1050 1680 x 1050_60 59,954 65,290 146,250 Suportat Suportat
640 x 480@67Hz MAC13 66,667 35,000 30,240832 x 624@75Hz MAC16 74,546 49,722 57,2801024 x 768@75Hz MAC19 74,93 60,241 80,0001152 x 870@75Hz MAC21 75,060 68,680 100,000
Este posibil ca timpii indicaţi mai sus să nu fie suportaţi datorită fişierului EDID şi limitările plăcii video VGA . Este posibil ca anumiţi timpi să nu poată fi aleşi.

107 Specificaţii
Sincronizare suportată pentru intrarea HDMI (HDCP)• Sincronizări PC
Rezoluţie ModFrecvenţa verticală
(Hz)
Frecvenţa orizontală
(kHz)
Frecv. pixel(MHz)
Format 3DCadru
secvenţial Sus-jos Alăturat
640 x 480
VGA_60 59,940 31,469 25,175 Suportat Suportat SuportatVGA_72 72,809 37,861 31,500 VGA_75 75,000 37,500 31,500 VGA_85 85,008 43,269 36,000
720 x 400 720 x 400_70 70,087 31,469 28,3221
800 x 600
SVGA_60 60,317 37,879 40,000 Suportat Suportat SuportatSVGA_72 72,188 48,077 50,000 SVGA_75 75,000 46,875 49,500 SVGA_85 85,061 53,674 56,250
SVGA_120 (Reducere mascare) 119,854 77,425 83,000 Suportat
1024 x 768
XGA_60 60,004 48,363 65,000 Suportat Suportat SuportatXGA_70 70,069 56,476 75,000 XGA_75 75,029 60,023 78,750 XGA_85 84,997 68,667 94,500
XGA_120 (Reducere mascare) 119,989 97,551 115,5 Suportat
1152 x 864 1152 x 864_75 75 67,5 108
1024 x 576@60Hz Sincronizare Notebook BenQ 60,00 35,820 46,996
1024 x 600@65Hz Sincronizare Notebook BenQ 64,995 41,467 51,419
1280 x 720 1280 x 720_60 60 45,000 74,250 Suportat Suportat Suportat1280 x 768 1280 x 768_60 59,870 47,776 79,5 Suportat Suportat Suportat
1280 x 800
WXGA_60 59,810 49,702 83,500 Suportat Suportat SuportatWXGA_75 74,934 62,795 106,500WXGA_85 84,880 71,554 122,500
WXGA_120 (Reducere mascare) 119,909 101,563 146,25 Suportat
1280 x 1024SXGA_60 60,020 63,981 108,000 Suportat SuportatSXGA_75 75,025 79,976 135,000SXGA_85 85,024 91,146 157,500
1280 x 960 1280 x 960_60 60,000 60,000 108 Suportat Suportat1280 x 960_85 85,002 85,938 148,500
1360 x 768 1360 x 768_60 60,015 47,712 85,500 Suportat Suportat1440 x 900 WXGA+_60 59,887 55,935 106,500 Suportat Suportat1400 x 1050 SXGA+_60 59,978 65,317 121,750 Suportat Suportat1600 x 1200 UXGA 60,000 75,000 162,000 Suportat Suportat1680 x 1050 1680 x 1050_60 59,954 65,290 146,250 Suportat Suportat
640 x 480@67Hz MAC13 66,667 35,000 30,240832 x 624@75Hz MAC16 74,546 49,722 57,280
1024 x 768@75Hz MAC19 75,020 60,241 80,0001152 x 870@75Hz MAC21 75,06 68,68 100,00
1920 x 1080@60Hz 1920 x 1080_60 60 67,5 148,5 Suportat Suportat
1920 x 1200 1920 x 1200_60 (Mascare redusă) 59,950 74,038 154,0000 Suportat Suportat
Este posibil ca timpii indicaţi mai sus să nu fie suportaţi datorită fişierului EDID şi limitările plăcii video VGA . Este posibil ca anumiţi timpi să nu poată fi aleşi.
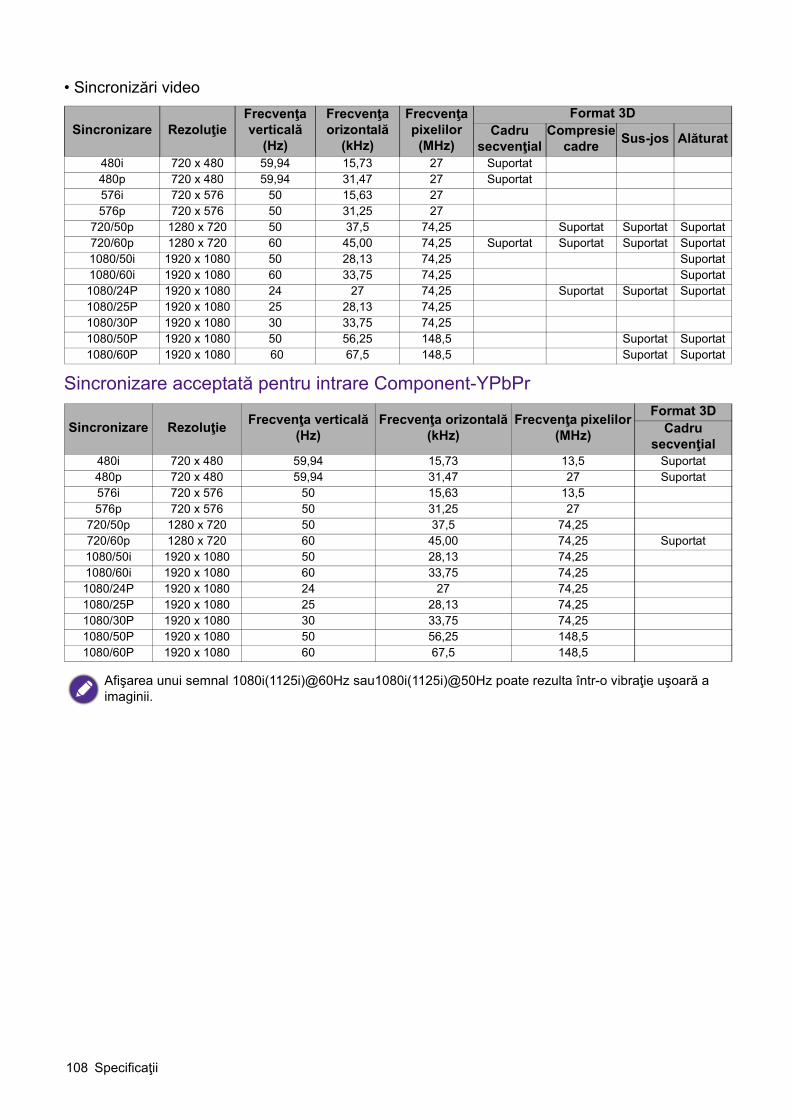
108 Specificaţii
• Sincronizări video
Sincronizare acceptată pentru intrare Component-YPbPr
Sincronizare RezoluţieFrecvenţa verticală
(Hz)
Frecvenţa orizontală
(kHz)
Frecvenţa pixelilor (MHz)
Format 3DCadru
secvenţialCompresie
cadre Sus-jos Alăturat
480i 720 x 480 59,94 15,73 27 Suportat480p 720 x 480 59,94 31,47 27 Suportat576i 720 x 576 50 15,63 27576p 720 x 576 50 31,25 27
720/50p 1280 x 720 50 37,5 74,25 Suportat Suportat Suportat720/60p 1280 x 720 60 45,00 74,25 Suportat Suportat Suportat Suportat1080/50i 1920 x 1080 50 28,13 74,25 Suportat1080/60i 1920 x 1080 60 33,75 74,25 Suportat1080/24P 1920 x 1080 24 27 74,25 Suportat Suportat Suportat1080/25P 1920 x 1080 25 28,13 74,251080/30P 1920 x 1080 30 33,75 74,251080/50P 1920 x 1080 50 56,25 148,5 Suportat Suportat1080/60P 1920 x 1080 60 67,5 148,5 Suportat Suportat
Sincronizare Rezoluţie Frecvenţa verticală (Hz)
Frecvenţa orizontală (kHz)
Frecvenţa pixelilor (MHz)
Format 3DCadru
secvenţial480i 720 x 480 59,94 15,73 13,5 Suportat480p 720 x 480 59,94 31,47 27 Suportat576i 720 x 576 50 15,63 13,5576p 720 x 576 50 31,25 27
720/50p 1280 x 720 50 37,5 74,25720/60p 1280 x 720 60 45,00 74,25 Suportat1080/50i 1920 x 1080 50 28,13 74,251080/60i 1920 x 1080 60 33,75 74,251080/24P 1920 x 1080 24 27 74,251080/25P 1920 x 1080 25 28,13 74,251080/30P 1920 x 1080 30 33,75 74,251080/50P 1920 x 1080 50 56,25 148,51080/60P 1920 x 1080 60 67,5 148,5
Afişarea unui semnal 1080i(1125i)@60Hz sau1080i(1125i)@50Hz poate rezulta într-o vibraţie uşoară a imaginii.
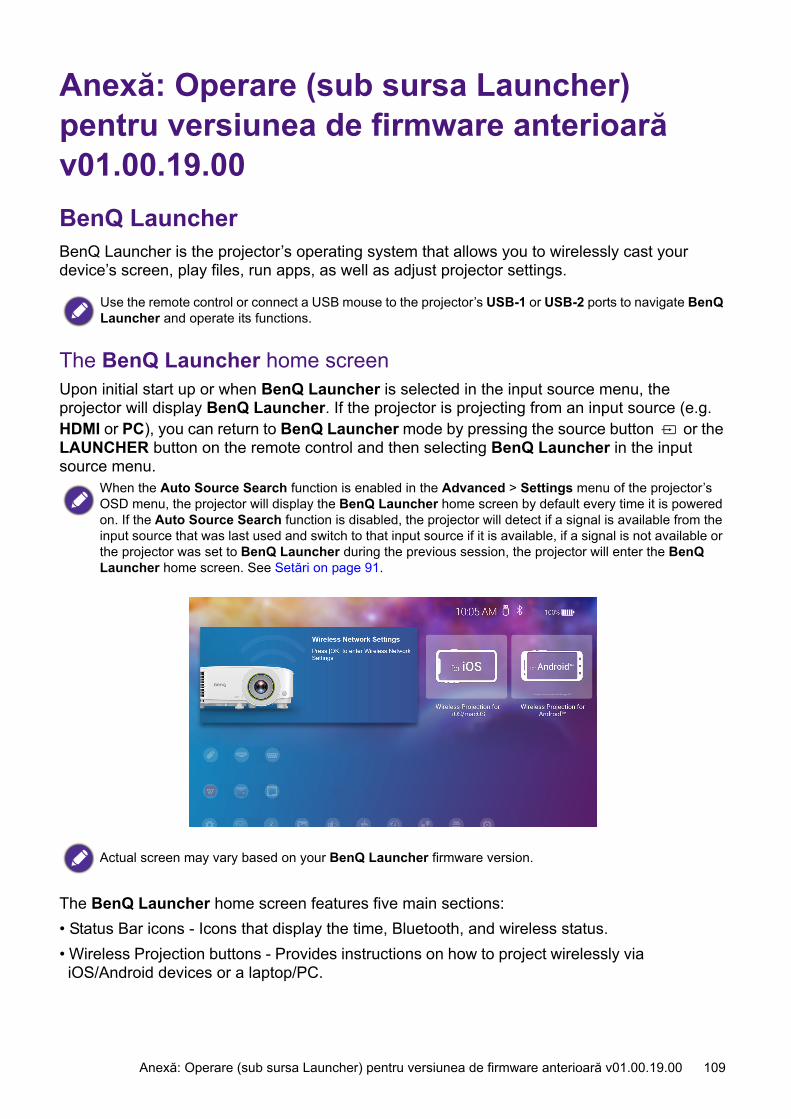
109 Anexă: Operare (sub sursa Launcher) pentru versiunea de firmware anterioară v01.00.19.00
Anexă: Operare (sub sursa Launcher) pentru versiunea de firmware anterioară v01.00.19.00BenQ LauncherBenQ Launcher is the projector’s operating system that allows you to wirelessly cast your device’s screen, play files, run apps, as well as adjust projector settings.
The BenQ Launcher home screenUpon initial start up or when BenQ Launcher is selected in the input source menu, the projector will display BenQ Launcher. If the projector is projecting from an input source (e.g. HDMI or PC), you can return to BenQ Launcher mode by pressing the source button or the LAUNCHER button on the remote control and then selecting BenQ Launcher in the input source menu.
The BenQ Launcher home screen features five main sections:• Status Bar icons - Icons that display the time, Bluetooth, and wireless status.• Wireless Projection buttons - Provides instructions on how to project wirelessly via iOS/Android devices or a laptop/PC.
Use the remote control or connect a USB mouse to the projector’s USB-1 or USB-2 ports to navigate BenQ Launcher and operate its functions.
When the Auto Source Search function is enabled in the Advanced > Settings menu of the projector’s OSD menu, the projector will display the BenQ Launcher home screen by default every time it is powered on. If the Auto Source Search function is disabled, the projector will detect if a signal is available from the input source that was last used and switch to that input source if it is available, if a signal is not available or the projector was set to BenQ Launcher during the previous session, the projector will enter the BenQ Launcher home screen. See Setări on page 91.
Actual screen may vary based on your BenQ Launcher firmware version.
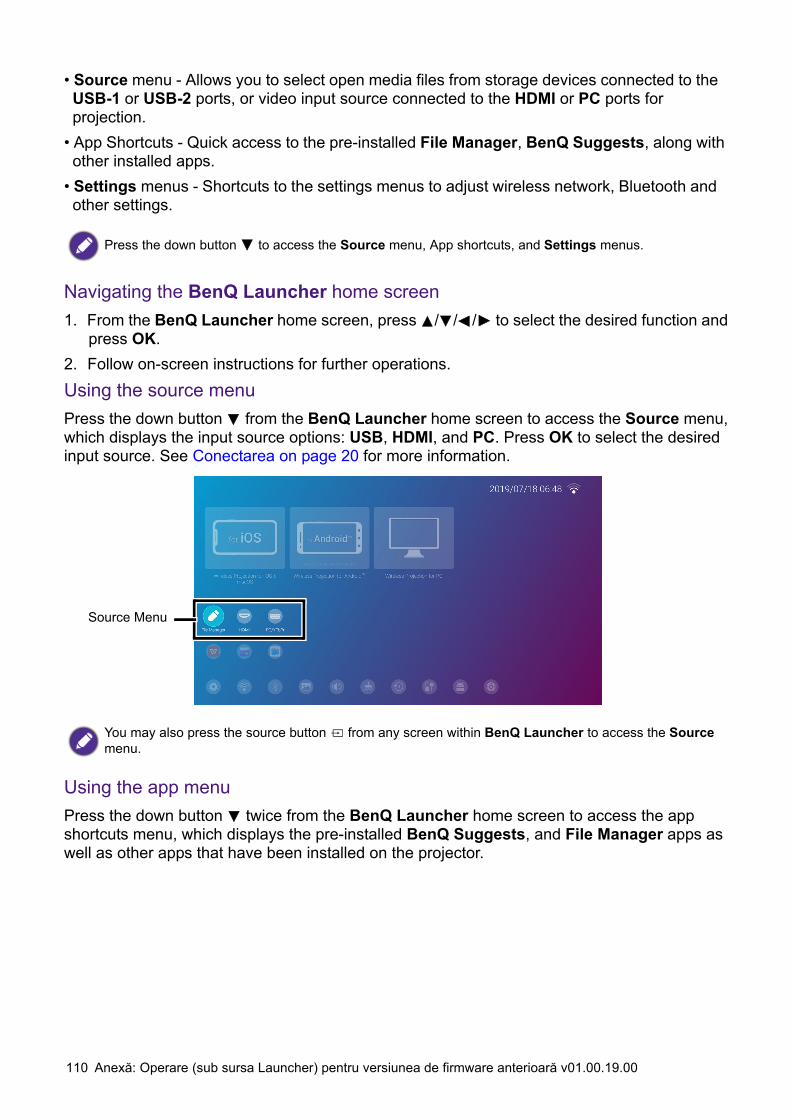
110 Anexă: Operare (sub sursa Launcher) pentru versiunea de firmware anterioară v01.00.19.00
• Source menu - Allows you to select open media files from storage devices connected to the USB-1 or USB-2 ports, or video input source connected to the HDMI or PC ports for projection.
• App Shortcuts - Quick access to the pre-installed File Manager, BenQ Suggests, along with other installed apps.
• Settings menus - Shortcuts to the settings menus to adjust wireless network, Bluetooth and other settings.
Navigating the BenQ Launcher home screen1. From the BenQ Launcher home screen, press / / / to select the desired function and
press OK.2. Follow on-screen instructions for further operations.Using the source menuPress the down button from the BenQ Launcher home screen to access the Source menu, which displays the input source options: USB, HDMI, and PC. Press OK to select the desired input source. See Conectarea on page 20 for more information.
Using the app menuPress the down button twice from the BenQ Launcher home screen to access the app shortcuts menu, which displays the pre-installed BenQ Suggests, and File Manager apps as well as other apps that have been installed on the projector.
Press the down button to access the Source menu, App shortcuts, and Settings menus.
You may also press the source button from any screen within BenQ Launcher to access the Source menu.
Source Menu
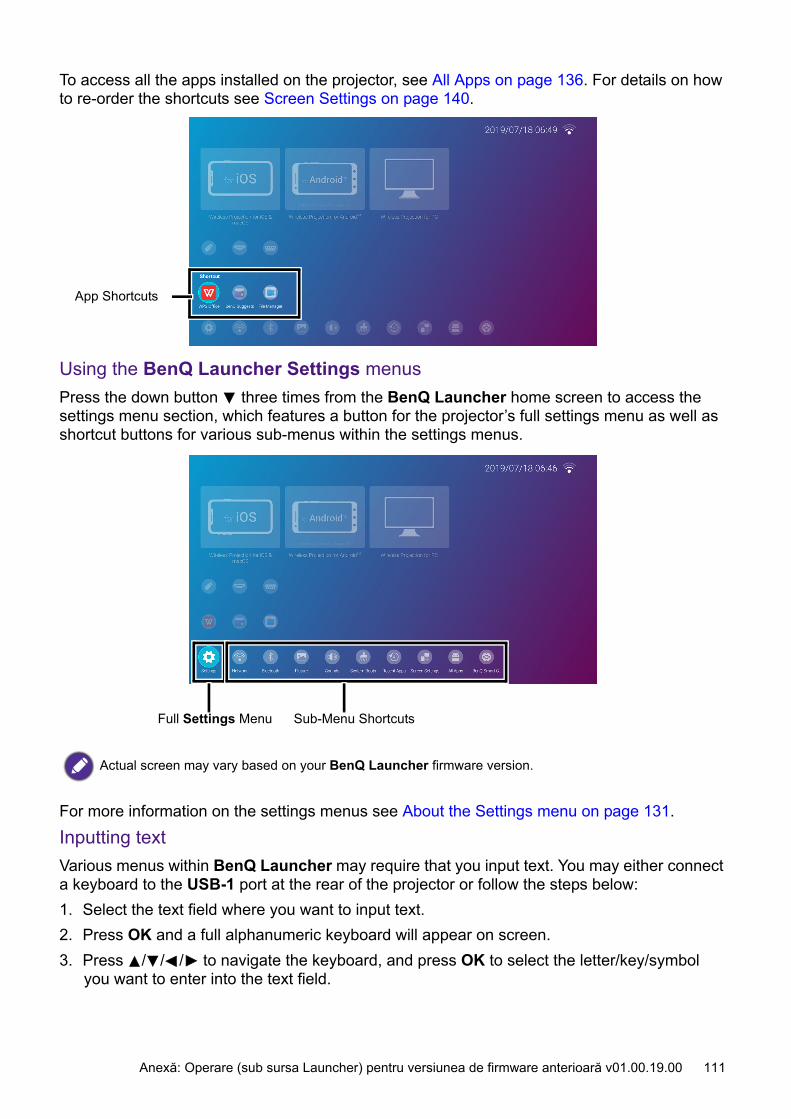
111 Anexă: Operare (sub sursa Launcher) pentru versiunea de firmware anterioară v01.00.19.00
To access all the apps installed on the projector, see All Apps on page 136. For details on how to re-order the shortcuts see Screen Settings on page 140.
Using the BenQ Launcher Settings menusPress the down button three times from the BenQ Launcher home screen to access the settings menu section, which features a button for the projector’s full settings menu as well as shortcut buttons for various sub-menus within the settings menus.
For more information on the settings menus see About the Settings menu on page 131.Inputting textVarious menus within BenQ Launcher may require that you input text. You may either connect a keyboard to the USB-1 port at the rear of the projector or follow the steps below:1. Select the text field where you want to input text.2. Press OK and a full alphanumeric keyboard will appear on screen.3. Press / / / to navigate the keyboard, and press OK to select the letter/key/symbol
you want to enter into the text field.
Actual screen may vary based on your BenQ Launcher firmware version.
App Shortcuts
Full Settings Menu Sub-Menu Shortcuts

112 Anexă: Operare (sub sursa Launcher) pentru versiunea de firmware anterioară v01.00.19.00
4. Press the back button at anytime to exit out of the keyboard.
Switching to BenQ Launcher from an input sourceWhen HDMI or PC is selected in the source menu, the projector will exit the BenQ Launcher interface to project video from the input source (e.g. a Blu-Ray/DVD player, set-top box, or PC). The projector will remain outside of the BenQ Launcher interface as long as the HDMI or PC input source is selected or (depending on Auto Source Search settings) until the projector is powered off and back on again. As a result, anytime the user wants to wirelessly cast their device’s screen, view media files stored on a flash drive, or run apps, they must return to the BenQ Launcher interface. To return to BenQ Launcher: 1. Press the source button or the LAUNCHER button on the remote control.2. Select BenQ Launcher in the source menu.
Wireless ConnectionsConnecting the projector to a wireless networkBefore you can project wirelessly via the projector, you must first connect the projector to a wireless network. To connect your projector to a wireless network, or to switch wireless networks:
1. Install the provided wireless dongle into the wireless dongle port (see Instalarea dongle-ului wireless on page 8).
2. Power on the projector (see Anexă: Operare (sub sursa Launcher) pentru versiunea de firmware anterioară v01.00.19.00 on page 109).
Actual keyboard types may vary based on your language preference setting. See Keyboard on page 142 for more information.
When the Auto Source Search function is enabled in the Advanced > Settings menu of the projector’s OSD menu, the projector will display the BenQ Launcher home screen by default once it is powered on. If the Auto Source Search function is disabled, the projector will detect if a signal is available from the input source that was last used and switch to that input source if it is available, if a signal is not available or the projector was set to BenQ Launcher during the previous session, the projector will enter the BenQ Launcher home screen. See Setări on page 91.
If you have already connected the projector to a wireless network during the setup wizard you may skip the steps in this section.
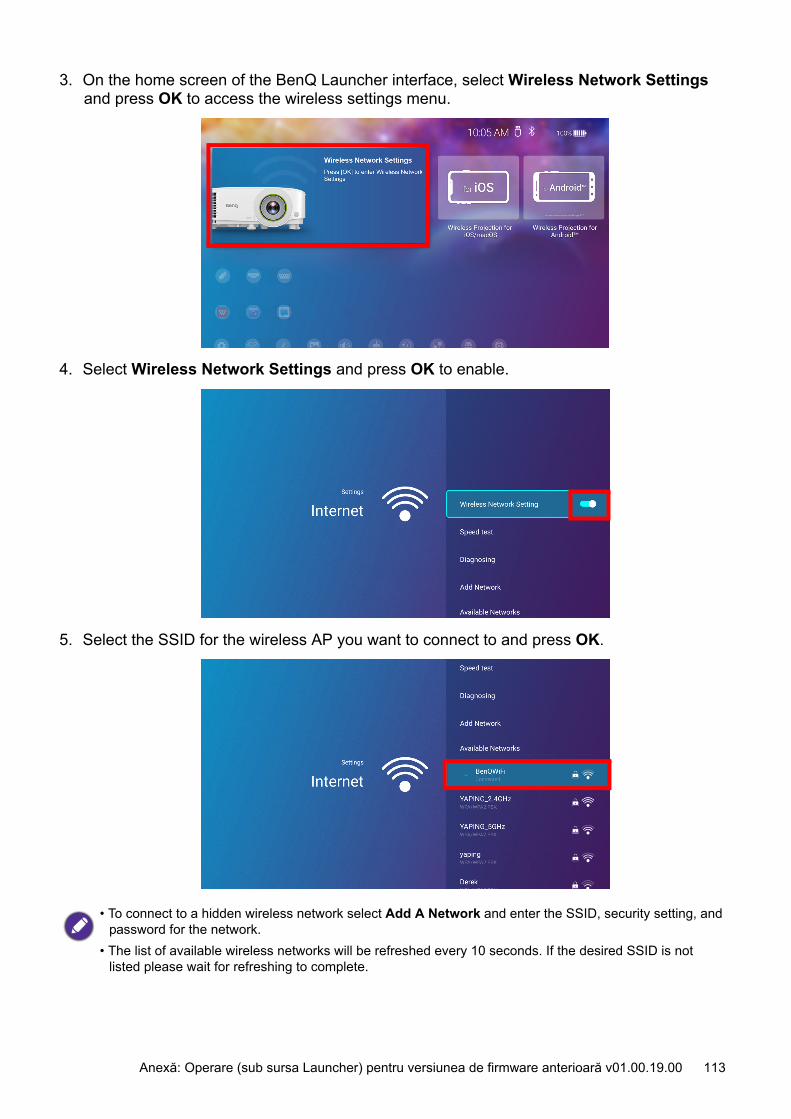
113 Anexă: Operare (sub sursa Launcher) pentru versiunea de firmware anterioară v01.00.19.00
3. On the home screen of the BenQ Launcher interface, select Wireless Network Settings and press OK to access the wireless settings menu.
4. Select Wireless Network Settings and press OK to enable.
5. Select the SSID for the wireless AP you want to connect to and press OK.
• To connect to a hidden wireless network select Add A Network and enter the SSID, security setting, and password for the network.
• The list of available wireless networks will be refreshed every 10 seconds. If the desired SSID is not listed please wait for refreshing to complete.

114 Anexă: Operare (sub sursa Launcher) pentru versiunea de firmware anterioară v01.00.19.00
6. If you chose a secured SSID for the first time, a window appears prompting you to enter the appropriate password. Use the virtual keypad to enter the password. After you have entered the password, select Next and the projector will automatically connect.
7. Once you have successfully connected to the wireless AP a wireless connection icon will appear at the top right corner of the BenQ Launcher interface. You can now connect your devices wirelessly to the projector to cast your device’s screen.
Wireless Projection for iOS & macOS®
To connect an iOS device to the projector and cast your device’s screen via AirPlay:1. On the home screen of the BenQ Launcher interface, select Wireless Projection for iOS
& macOS and press OK.
• The password will be stored in the projector’s memory. In the future, if you select the same SSID again, you will not be prompted to enter a password unless you delete the SSID from the projector’s memory.
• If the password is typed incorrectly, you can select either re-enter the password or press the back button to return to the list of SSIDs.

115 Anexă: Operare (sub sursa Launcher) pentru versiunea de firmware anterioară v01.00.19.00
2. On your iOS mobile device’s wireless network menu connect to the wireless network shown on the Wireless Projection for iOS & macOS screen and then select Next.
3. Follow the instructions shown on the Wireless Projection for iOS & macOS screen to project your iOS device’s screen via AirPlay.
4. Select Finished on the Wireless Projection for iOS & macOS menu to finish the tutorial and return to the home screen.
Once you have finished projecting, disable AirPlay on your iOS device to end the connection.
The quality of the wireless projection may depend on the quality of the wireless signal along with the screen mirroring compatibility of the mobile device.

116 Anexă: Operare (sub sursa Launcher) pentru versiunea de firmware anterioară v01.00.19.00
Wireless Projection for AndroidTM
To connect an AndroidTM device to the projector and cast your device’s screen:1. On the home screen of the BenQ Launcher interface, select Wireless Projection for
Android™ and press OK.
2. On your Android mobile device’s wireless network menu connect to the wireless network shown on the Wireless Projection for Android™ screen and then select Next.
3. Follow the instructions shown on the Wireless Projection for Android™ screen to project your Android device’s screen.

117 Anexă: Operare (sub sursa Launcher) pentru versiunea de firmware anterioară v01.00.19.00
4. Select Finished on the Wireless Projection for Android™ menu to finish the tutorial and return to the home screen.
Once you have finished projecting, disable screencasting on your Android device to end the connection.Wireless Projection for PCTo connect an PC to the projector and cast your PC’s screen:1. On the home screen of the BenQ Launcher interface, select Wireless Projection for PC
and press OK.
The quality of the wireless projection may depend on the quality of the wireless signal along with the screen mirroring compatibility of the mobile device.

118 Anexă: Operare (sub sursa Launcher) pentru versiunea de firmware anterioară v01.00.19.00
2. On your PC’s wireless network menu connect to the wireless network shown on the Wireless Projection for PC screen and then select Next.
3. Follow the instructions shown on the Wireless Projection for PC screen to project your PC’s screen.
4. Select Finished on the Wireless Projection for PC menu to finish the tutorial and return to the home screen.
Once you have finished projecting, disable screencasting on your PC to end the connection.
The quality of the wireless projection may depend on the quality of the wireless signal along with the screen mirroring compatibility of the PC.

119 Anexă: Operare (sub sursa Launcher) pentru versiunea de firmware anterioară v01.00.19.00
Wireless HotspotIn situations where the projector is out-of-range of a wireless network (for example while on a camping trip), you can configure the projector to act as a wireless hotspot to create a closed network for devices to connect directly to the projector via a wireless connection and to project files from their local storage.
To create a wireless hotspot:1. Install the wireless dongle provide into the wireless dongle port (see Instalarea dongle-ului
wireless on page 8).2. Power on the projector (see Anexă: Operare (sub sursa Launcher) pentru versiunea de
firmware anterioară v01.00.19.00 on page 109).3. On the home screen of the BenQ Launcher interface, press the down arrow key the
three times to navigate to the Settings menus.4. Select Settings and press OK.
5. Select Hotspot and press OK.
The projector will have no access to the Internet while in wireless hotspot mode.
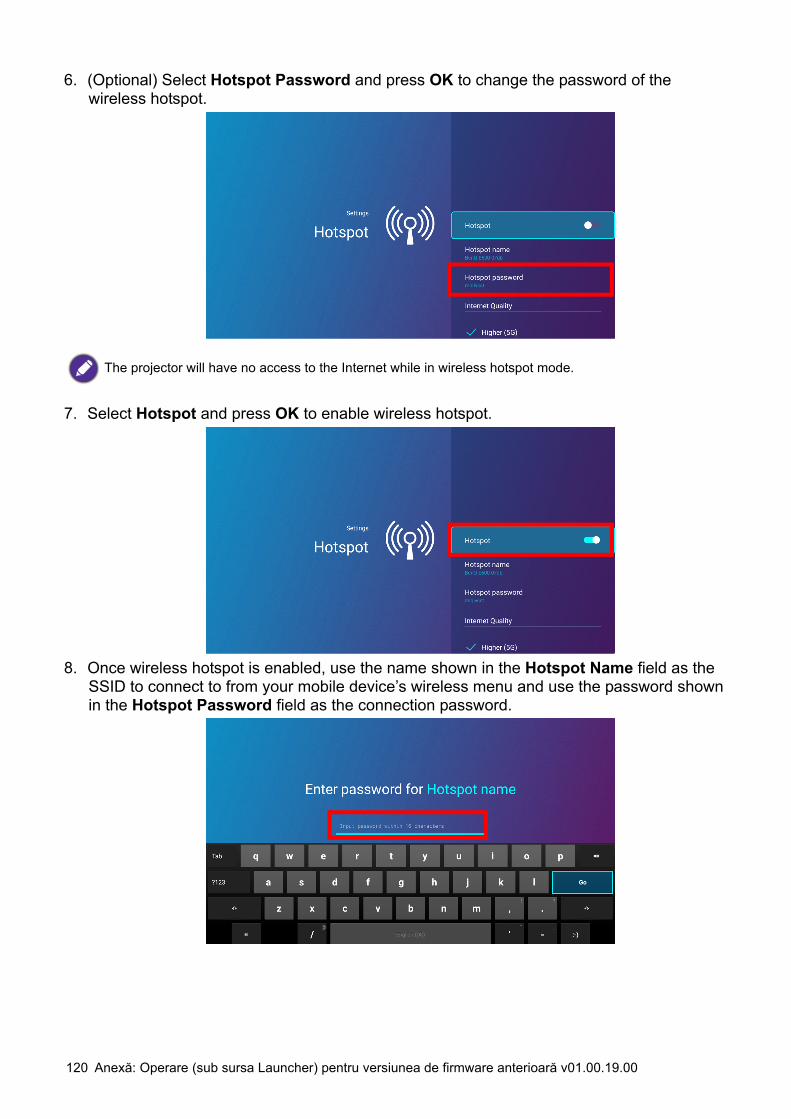
120 Anexă: Operare (sub sursa Launcher) pentru versiunea de firmware anterioară v01.00.19.00
6. (Optional) Select Hotspot Password and press OK to change the password of the wireless hotspot.
7. Select Hotspot and press OK to enable wireless hotspot.
8. Once wireless hotspot is enabled, use the name shown in the Hotspot Name field as the SSID to connect to from your mobile device’s wireless menu and use the password shown in the Hotspot Password field as the connection password.
The projector will have no access to the Internet while in wireless hotspot mode.
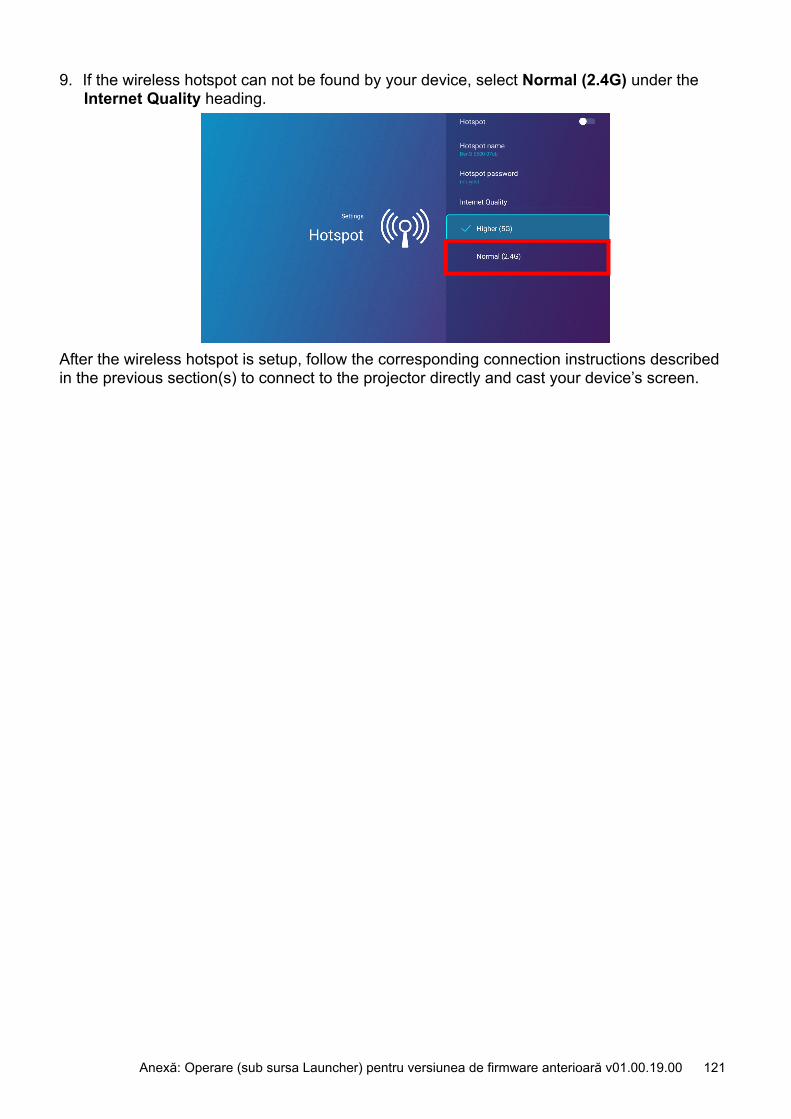
121 Anexă: Operare (sub sursa Launcher) pentru versiunea de firmware anterioară v01.00.19.00
9. If the wireless hotspot can not be found by your device, select Normal (2.4G) under the Internet Quality heading.
After the wireless hotspot is setup, follow the corresponding connection instructions described in the previous section(s) to connect to the projector directly and cast your device’s screen.

122 Anexă: Operare (sub sursa Launcher) pentru versiunea de firmware anterioară v01.00.19.00
External Storage ConnectionsConnecting a flash driveConnect a USB-A flash drive to the USB-1 or USB-2 port at the rear of the projector to play files stored on the flash drive.
To play files stored on a flash drive:1. Connect the USB-A flash drive to the USB-1 or USB-2 port at the rear of the projector.2. A pop-up notification from the File Manager app will appear indicating that a storage
device is detected. Select All Files and press OK to open the device.
• If you want to play media from a flash drive while the projector is set to the HDMI or PC input source, you must first return to the BenQ Launcher interface by pressing the source button or the LAUNCHER button on the remote control and then selecting BenQ Launcher.
• A red dot will appear above the USB icon in the Source menu anytime a USB-A flash drive is connected to the projector.
• If you do not want to open the media file immediately after connecting the storage device, press the back button to remain on the current screen.
• If you are trying to open a media file from a storage device that was already previously connected, select USB in the Source menu, press OK, and select All Files.
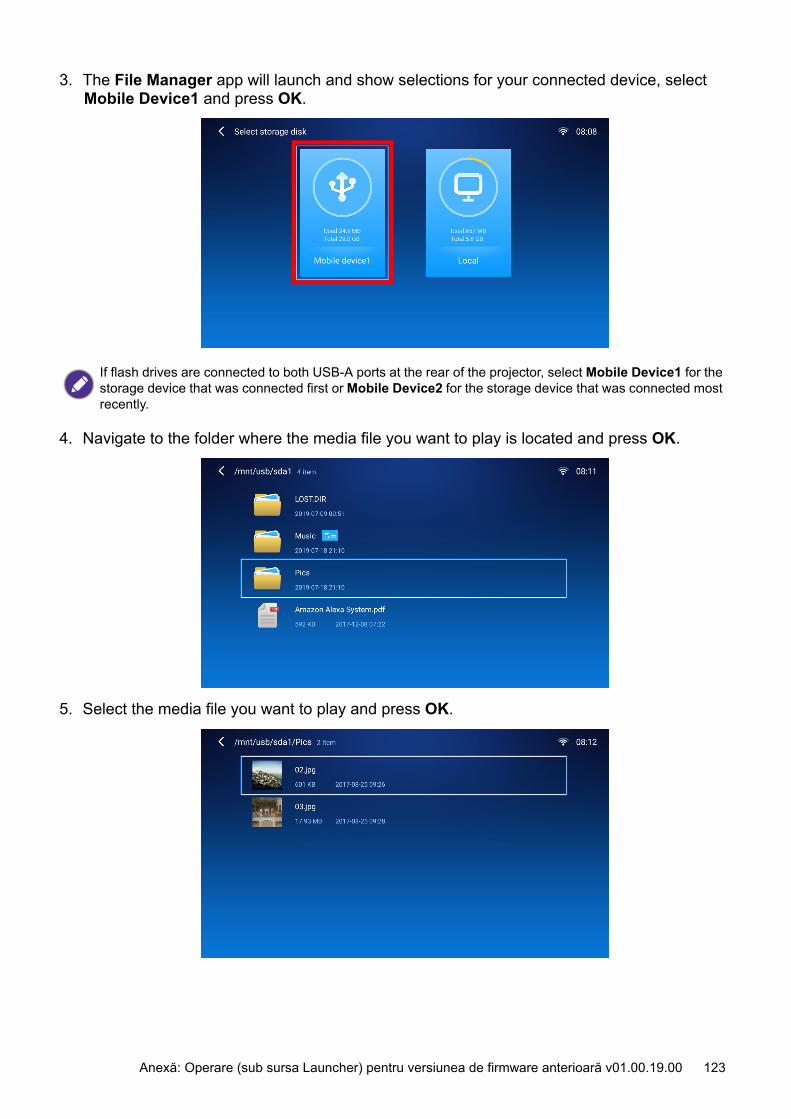
123 Anexă: Operare (sub sursa Launcher) pentru versiunea de firmware anterioară v01.00.19.00
3. The File Manager app will launch and show selections for your connected device, select Mobile Device1 and press OK.
4. Navigate to the folder where the media file you want to play is located and press OK.
5. Select the media file you want to play and press OK.
If flash drives are connected to both USB-A ports at the rear of the projector, select Mobile Device1 for the storage device that was connected first or Mobile Device2 for the storage device that was connected most recently.
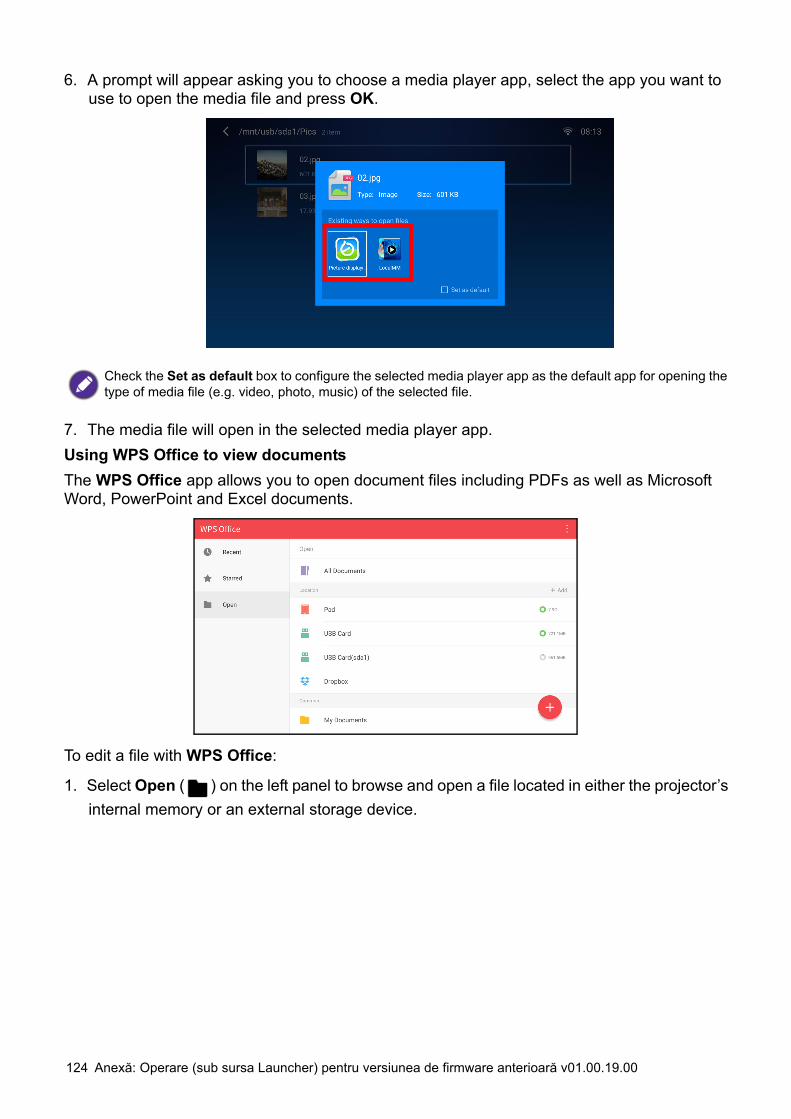
124 Anexă: Operare (sub sursa Launcher) pentru versiunea de firmware anterioară v01.00.19.00
6. A prompt will appear asking you to choose a media player app, select the app you want to use to open the media file and press OK.
7. The media file will open in the selected media player app.Using WPS Office to view documentsThe WPS Office app allows you to open document files including PDFs as well as Microsoft Word, PowerPoint and Excel documents.
To edit a file with WPS Office:
1. Select Open ( ) on the left panel to browse and open a file located in either the projector’s internal memory or an external storage device.
Check the Set as default box to configure the selected media player app as the default app for opening the type of media file (e.g. video, photo, music) of the selected file.

125 Anexă: Operare (sub sursa Launcher) pentru versiunea de firmware anterioară v01.00.19.00
Select the function menu on the top panel to access the file format's various functions.
The description below is for a PowerPoint file, the function menus for other file formats will vary.
Function Description
File Select to open, save, share, print, and manage your presentations.View Select to change or edit the presentation views.Play Select to start or set up a slide show.Edit Select to edit the content or format of the slides.Insert Select to insert tables, pictures, charts, comments, video, or audio.Transitions Select to apply or adjust the timing of a transition.Pen Select to write, draw, paint or sketch to the slides.
Play ( ) Select to start a slide show.
Save As ( ) Select to save the presentation file on either the display’s internal memory, an external storage device, or cloud storage.
Undo ( ) Select to undo an action.
Redo ( ) Select to redo the last action.
Close ( ) Select to close the presentation file.
Back ( ) Select to return to the previous page.
Next ( ) Select to go to the next page.
Exit ( ) Select to exit WPS Office.
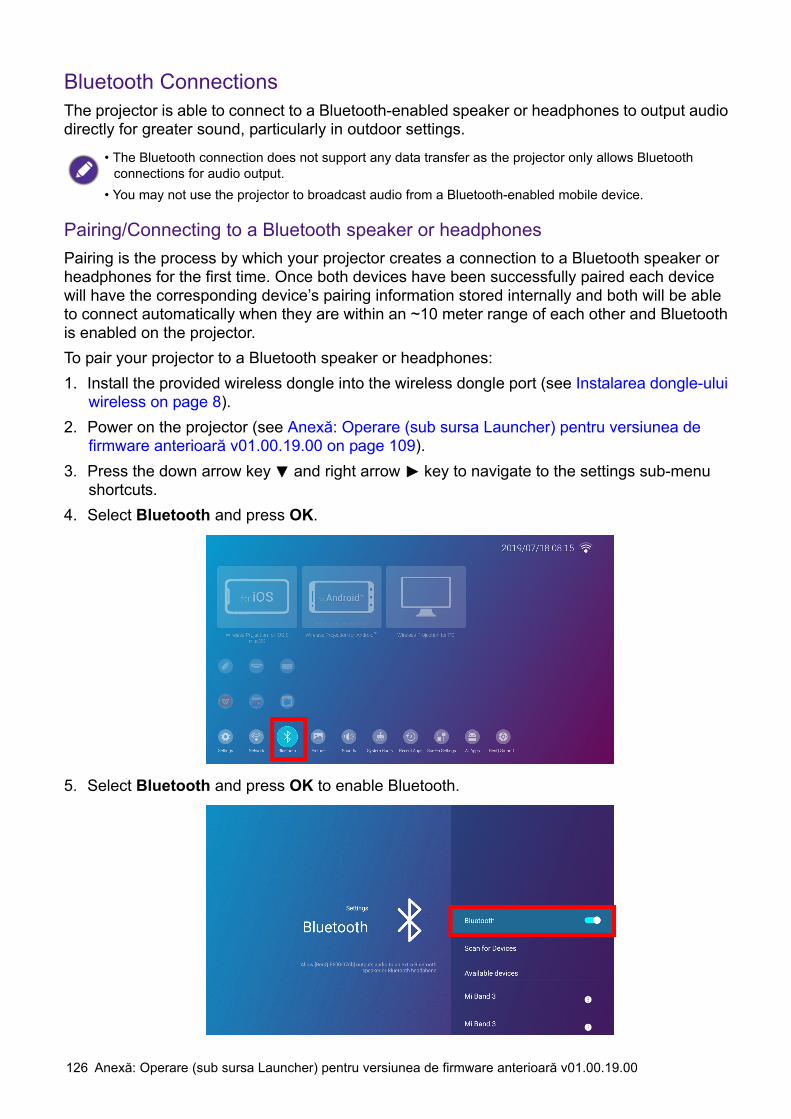
126 Anexă: Operare (sub sursa Launcher) pentru versiunea de firmware anterioară v01.00.19.00
Bluetooth ConnectionsThe projector is able to connect to a Bluetooth-enabled speaker or headphones to output audio directly for greater sound, particularly in outdoor settings.
Pairing/Connecting to a Bluetooth speaker or headphonesPairing is the process by which your projector creates a connection to a Bluetooth speaker or headphones for the first time. Once both devices have been successfully paired each device will have the corresponding device’s pairing information stored internally and both will be able to connect automatically when they are within an ~10 meter range of each other and Bluetooth is enabled on the projector.To pair your projector to a Bluetooth speaker or headphones:1. Install the provided wireless dongle into the wireless dongle port (see Instalarea dongle-ului
wireless on page 8).2. Power on the projector (see Anexă: Operare (sub sursa Launcher) pentru versiunea de
firmware anterioară v01.00.19.00 on page 109).3. Press the down arrow key and right arrow key to navigate to the settings sub-menu
shortcuts.4. Select Bluetooth and press OK.
5. Select Bluetooth and press OK to enable Bluetooth.
• The Bluetooth connection does not support any data transfer as the projector only allows Bluetooth connections for audio output.
• You may not use the projector to broadcast audio from a Bluetooth-enabled mobile device.

127 Anexă: Operare (sub sursa Launcher) pentru versiunea de firmware anterioară v01.00.19.00
6. Activate Bluetooth-pairing mode on the speaker or headphones.7. Select the speaker or headphones from the Device List in the Bluetooth setting menu and
press OK.
8. When the projector and speaker or headphones have successfully connected the device listing in the Bluetooth setting menu will be labeled Connected, you can now output the audio from the projector to the speaker or headphone.
Once you have successfully paired your projector with the Bluetooth speaker, pairing information will be stored on both devices and a connection will automatically be made when Bluetooth is enabled on both devices and both devices are within range of each other.
Ending the Bluetooth connectionIn cases where you want to disconnect a speaker or headphones from the projector and connect to another speaker or headphones follow the steps below:1. Press the down arrow key and right arrow key to navigate to the settings sub-menu
shortcuts.2. Select Bluetooth and press OK.3. Select the already connected speaker or headphones from the Device List in the
Bluetooth setting menu and press OK.4. Confirm that you want to disconnect the speaker or headphones from the projector.5. Activate Bluetooth-pairing mode on the new speaker or headphones.6. Select the new speaker or headphones from the Device List in the Bluetooth setting
menu and press OK.Deactivating the Bluetooth speaker or headphonesTo deactivate Bluetooth on the projector so that it no longer outputs its audio to a separate speaker or headphones:1. Press the down arrow key and right arrow key to navigate to the settings sub-menu
shortcuts.2. Select Bluetooth and press OK.
• If you replace the wireless dongle on your projector anytime after you have paired your projector with a Bluetooth device you will need to re-pair your projector to the device in order to create a Bluetooth connection.
• The quality of the Bluetooth transmission may depend on the quality of the Bluetooth signal along with the compatibility of the mobile device.
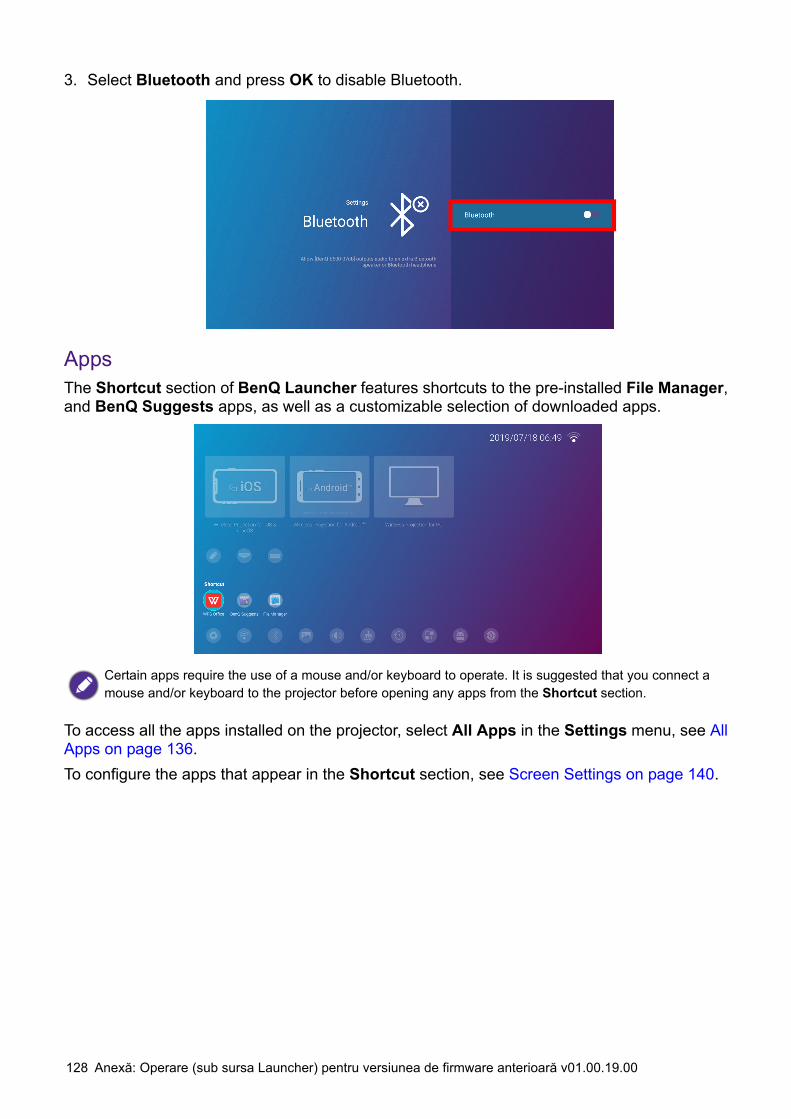
128 Anexă: Operare (sub sursa Launcher) pentru versiunea de firmware anterioară v01.00.19.00
3. Select Bluetooth and press OK to disable Bluetooth.
AppsThe Shortcut section of BenQ Launcher features shortcuts to the pre-installed File Manager, and BenQ Suggests apps, as well as a customizable selection of downloaded apps.
To access all the apps installed on the projector, select All Apps in the Settings menu, see All Apps on page 136.To configure the apps that appear in the Shortcut section, see Screen Settings on page 140.
Certain apps require the use of a mouse and/or keyboard to operate. It is suggested that you connect a mouse and/or keyboard to the projector before opening any apps from the Shortcut section.

129 Anexă: Operare (sub sursa Launcher) pentru versiunea de firmware anterioară v01.00.19.00
BenQ SuggestsThe BenQ Suggests allows you to view apps suggested by BenQ for download.
Select the category on the left panel to browse the suggested apps based on the type. Select an app from the selected category and press OK to view a basic description of the app and access the download link.
File ManagerThe File Manager app allows you to browse, open, and manage files stored on your projector’s internal storage or in connected storage devices (e.g. a USB flash drive).
Certain apps require the use of a mouse and/or keyboard to operate. It is suggested that you connect a mouse and/or keyboard to the projector before downloading any apps from BenQ Suggests.
Function Description
APK
Select to open the list of available installation files for Android apps stored internally or on an external storage device.
For APK files located on external storage devices, the files must be saved in the outer most directory of the storage device to be able to be detected by File Manager.
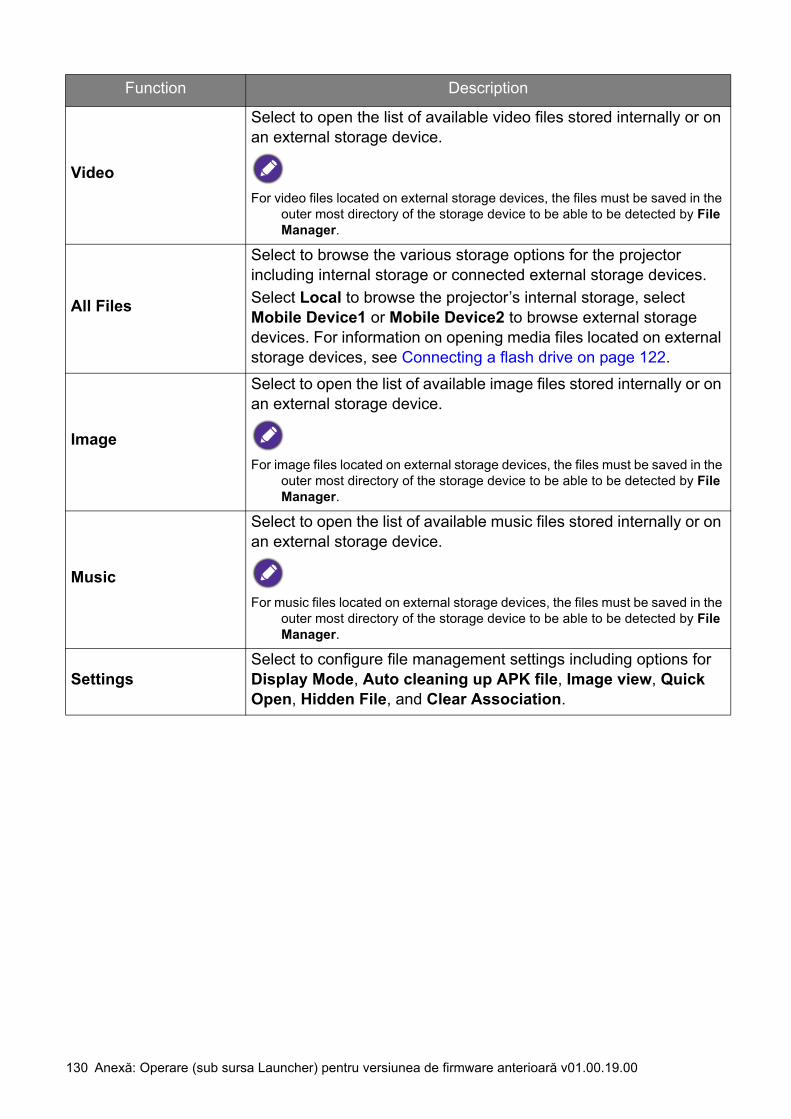
130 Anexă: Operare (sub sursa Launcher) pentru versiunea de firmware anterioară v01.00.19.00
Video
Select to open the list of available video files stored internally or on an external storage device.
For video files located on external storage devices, the files must be saved in the outer most directory of the storage device to be able to be detected by File Manager.
All Files
Select to browse the various storage options for the projector including internal storage or connected external storage devices.Select Local to browse the projector’s internal storage, select Mobile Device1 or Mobile Device2 to browse external storage devices. For information on opening media files located on external storage devices, see Connecting a flash drive on page 122.
Image
Select to open the list of available image files stored internally or on an external storage device.
For image files located on external storage devices, the files must be saved in the outer most directory of the storage device to be able to be detected by File Manager.
Music
Select to open the list of available music files stored internally or on an external storage device.
For music files located on external storage devices, the files must be saved in the outer most directory of the storage device to be able to be detected by File Manager.
SettingsSelect to configure file management settings including options for Display Mode, Auto cleaning up APK file, Image view, Quick Open, Hidden File, and Clear Association.
Function Description
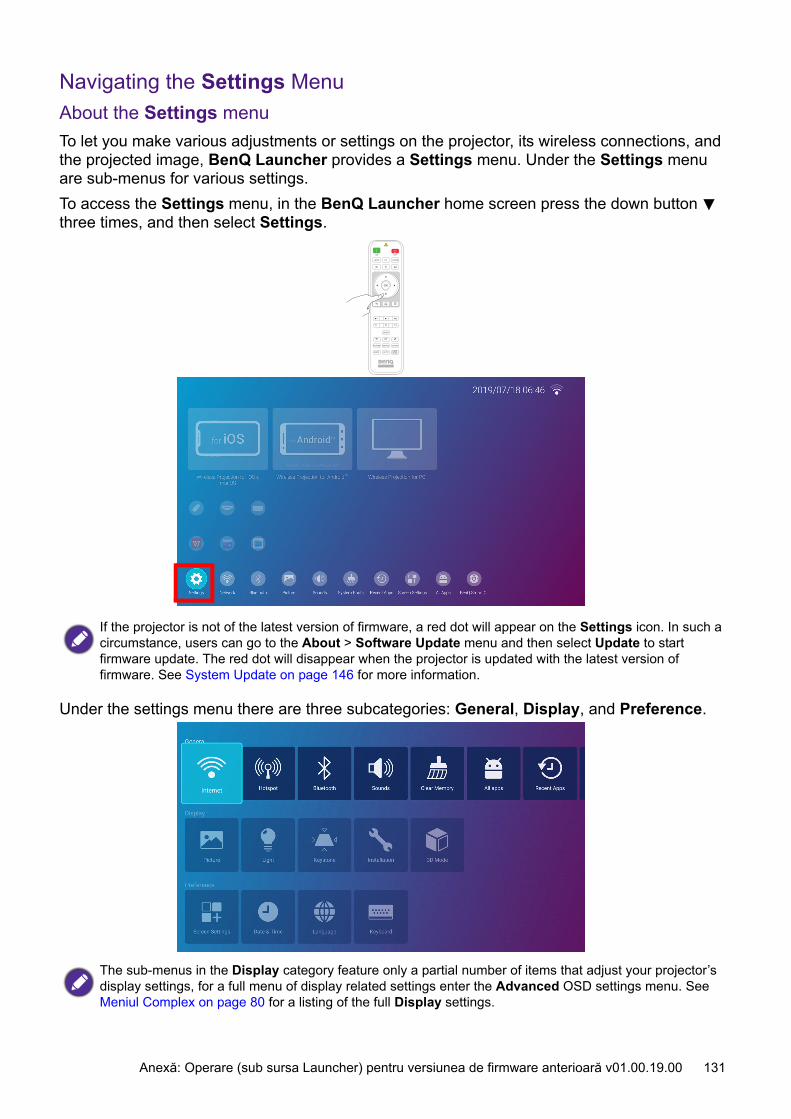
131 Anexă: Operare (sub sursa Launcher) pentru versiunea de firmware anterioară v01.00.19.00
Navigating the Settings MenuAbout the Settings menuTo let you make various adjustments or settings on the projector, its wireless connections, and the projected image, BenQ Launcher provides a Settings menu. Under the Settings menu are sub-menus for various settings.To access the Settings menu, in the BenQ Launcher home screen press the down button three times, and then select Settings.
Under the settings menu there are three subcategories: General, Display, and Preference.
If the projector is not of the latest version of firmware, a red dot will appear on the Settings icon. In such a circumstance, users can go to the About > Software Update menu and then select Update to start firmware update. The red dot will disappear when the projector is updated with the latest version of firmware. See System Update on page 146 for more information.
The sub-menus in the Display category feature only a partial number of items that adjust your projector’s display settings, for a full menu of display related settings enter the Advanced OSD settings menu. See Meniul Complex on page 80 for a listing of the full Display settings.

132 Anexă: Operare (sub sursa Launcher) pentru versiunea de firmware anterioară v01.00.19.00
Using the Settings menuTo access the various settings menus:• Use the left and right arrow keys ( / ) to move through the main settings menus.• Use OK to select the desired menu.• When configuring items within a menu:• Use the up and down arrow keys ( / ) to move to the item you want to configure.• Use left and right arrow keys ( / ) to toggle through the available options.• Use OK to enable/disable options or select sub-menu options.
• Use the back button to return to the main settings menu.
• Use the home button to return to the BenQ Launcher home screen.Internet
Wireless Network Settings
Enables a wireless network connection for the projector. See Connecting the projector to a wireless network on page 112 for details.
This function is only available when Hotspot is disabled.
Speed Test Tests the speed of the projector’s Internet connection.Diagnosing Diagnoses the status of the projector’s Internet connection.
Add NetworkAllows you to add a specific network that may be hidden or undetected in the Available Networks. Once selected you will be prompted to enter the SSID and security settings for the network.
Available Networks
Lists the available wireless access points which the projector can connect to. See Connecting the projector to a wireless network on page 112 for details.
Available Networks is only available when Wireless Network Settings is disabled.
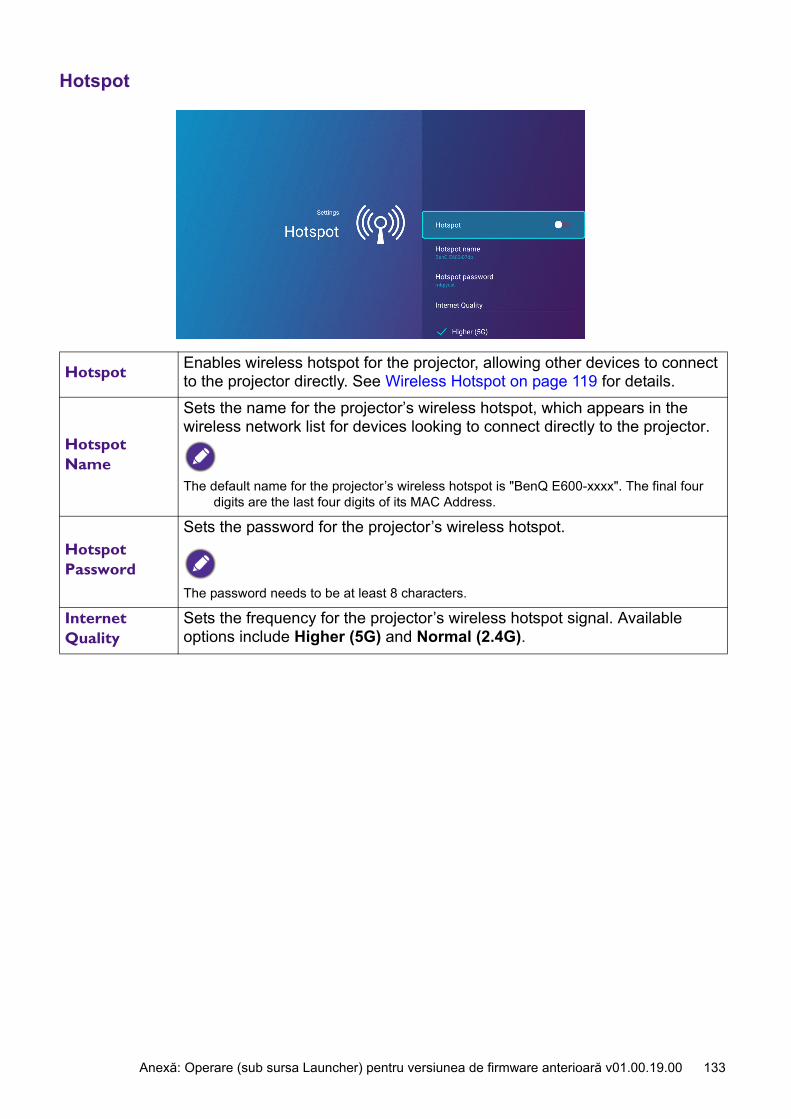
133 Anexă: Operare (sub sursa Launcher) pentru versiunea de firmware anterioară v01.00.19.00
Hotspot
HotspotEnables wireless hotspot for the projector, allowing other devices to connect to the projector directly. See Wireless Hotspot on page 119 for details.
Hotspot Name
Sets the name for the projector’s wireless hotspot, which appears in the wireless network list for devices looking to connect directly to the projector.
The default name for the projector’s wireless hotspot is "BenQ E600-xxxx". The final four digits are the last four digits of its MAC Address.
Hotspot Password
Sets the password for the projector’s wireless hotspot.
The password needs to be at least 8 characters.
Internet Quality
Sets the frequency for the projector’s wireless hotspot signal. Available options include Higher (5G) and Normal (2.4G).
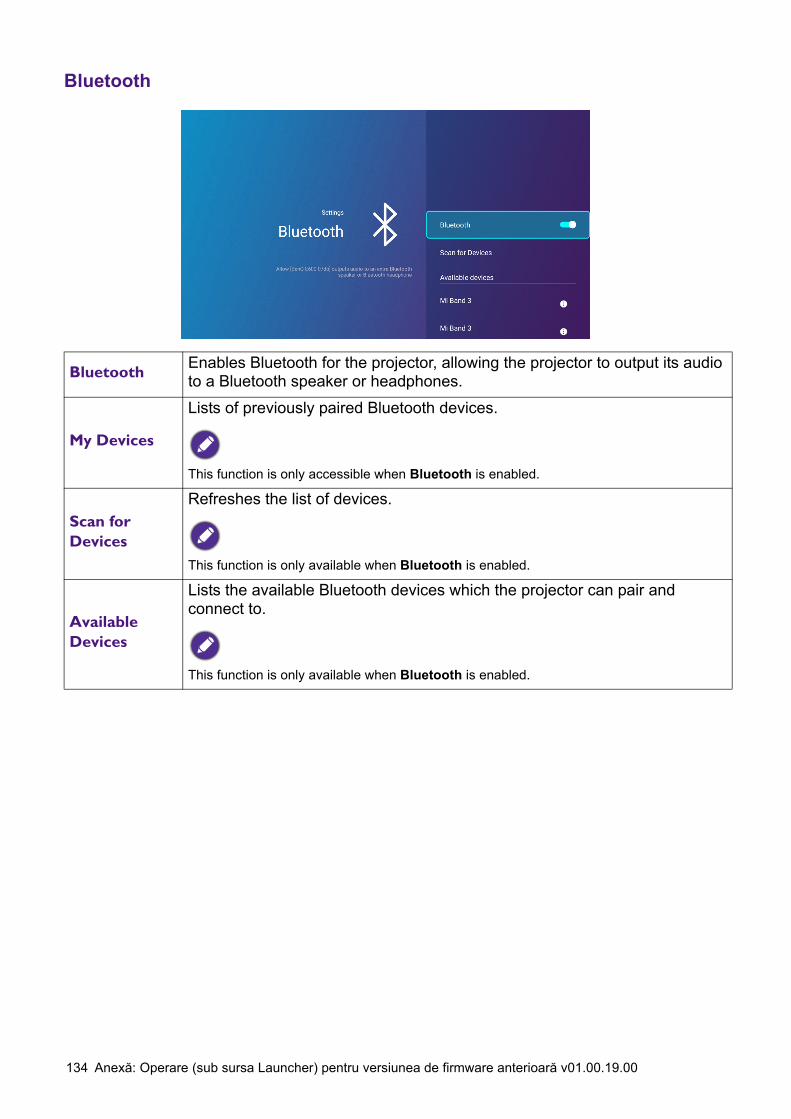
134 Anexă: Operare (sub sursa Launcher) pentru versiunea de firmware anterioară v01.00.19.00
Bluetooth
BluetoothEnables Bluetooth for the projector, allowing the projector to output its audio to a Bluetooth speaker or headphones.
My Devices
Lists of previously paired Bluetooth devices.
This function is only accessible when Bluetooth is enabled.
Scan for Devices
Refreshes the list of devices.
This function is only available when Bluetooth is enabled.
Available Devices
Lists the available Bluetooth devices which the projector can pair and connect to.
This function is only available when Bluetooth is enabled.
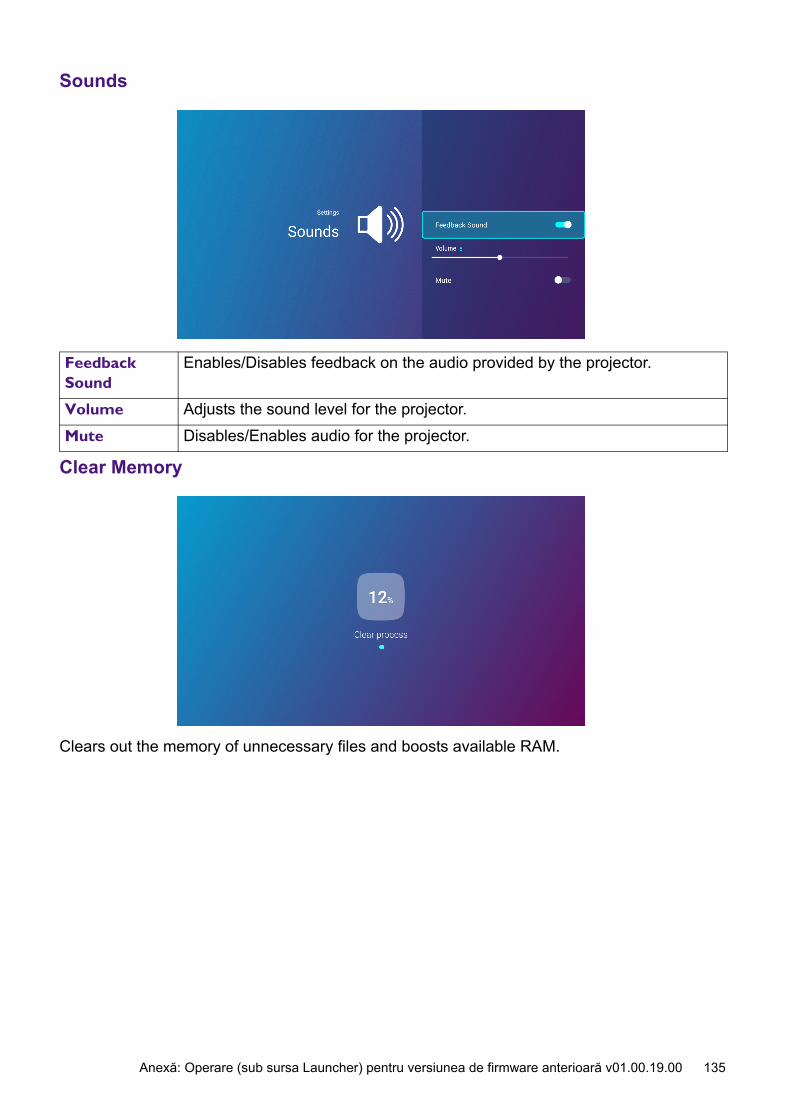
135 Anexă: Operare (sub sursa Launcher) pentru versiunea de firmware anterioară v01.00.19.00
Sounds
Clear Memory
Clears out the memory of unnecessary files and boosts available RAM.
Feedback Sound
Enables/Disables feedback on the audio provided by the projector.
Volume Adjusts the sound level for the projector.Mute Disables/Enables audio for the projector.

136 Anexă: Operare (sub sursa Launcher) pentru versiunea de firmware anterioară v01.00.19.00
All Apps
Select the All Apps menu to access all the apps that have been installed on the projector.• Select an app and press OK to launch the app.
• Select an app and press the menu button ( ) to uninstall the app.Recent Apps
Select the Recent Apps menu to access a list of apps that have been recently used.• Select any icon and press the down button ( ) to remove the icon from the list of recently used apps.
• Select any icon and press the menu button ( ) to clear all icons from the list of recently used apps.
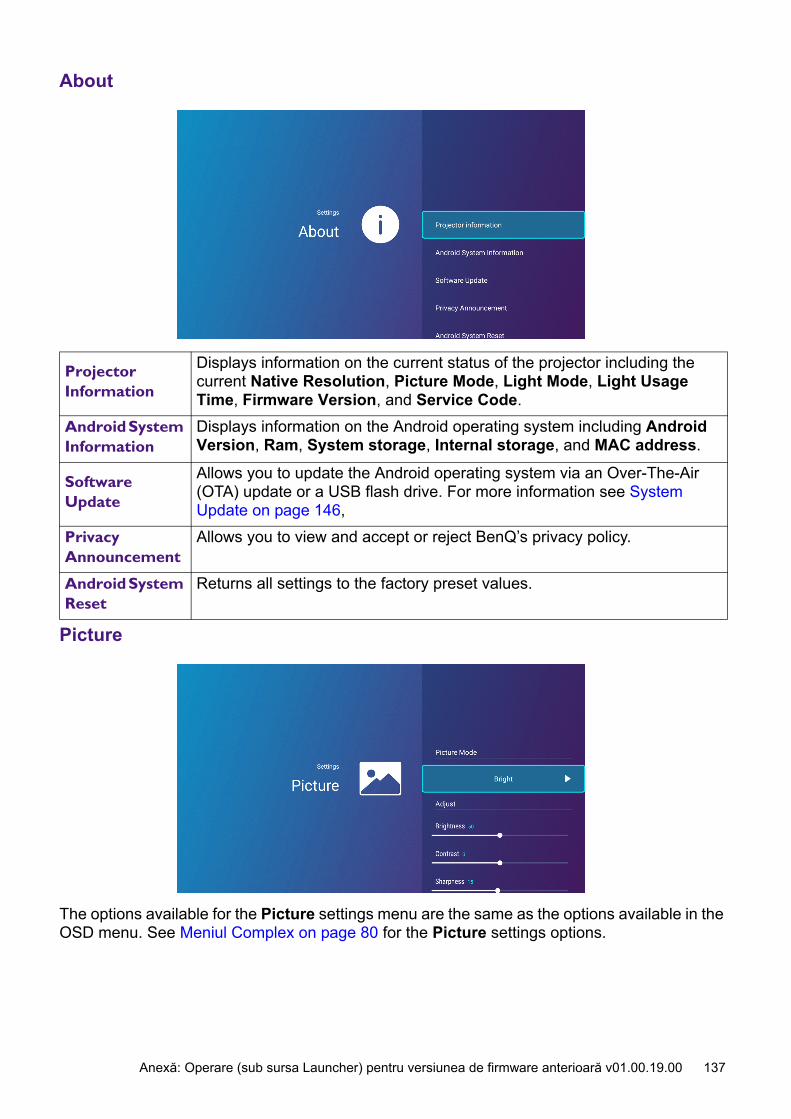
137 Anexă: Operare (sub sursa Launcher) pentru versiunea de firmware anterioară v01.00.19.00
About
Picture
The options available for the Picture settings menu are the same as the options available in the OSD menu. See Meniul Complex on page 80 for the Picture settings options.
Projector Information
Displays information on the current status of the projector including the current Native Resolution, Picture Mode, Light Mode, Light Usage Time, Firmware Version, and Service Code.
Android System Information
Displays information on the Android operating system including Android Version, Ram, System storage, Internal storage, and MAC address.
Software Update
Allows you to update the Android operating system via an Over-The-Air (OTA) update or a USB flash drive. For more information see System Update on page 146,
Privacy Announcement
Allows you to view and accept or reject BenQ’s privacy policy.
Android System Reset
Returns all settings to the factory preset values.
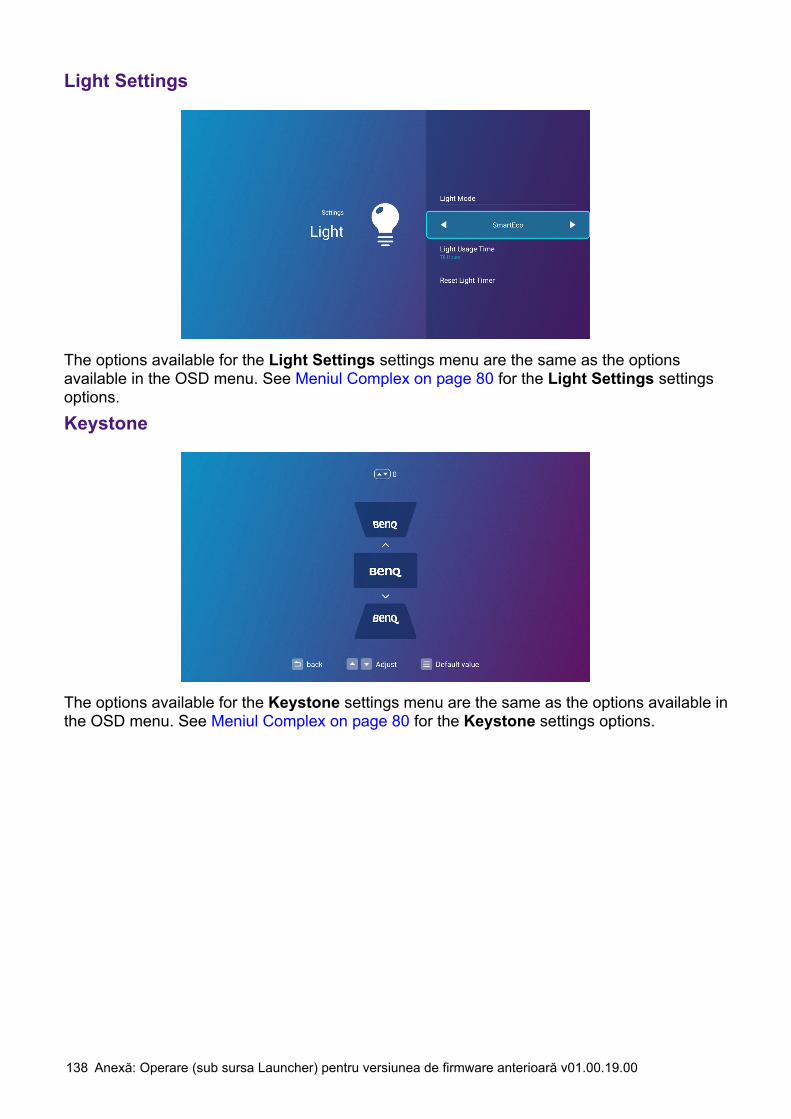
138 Anexă: Operare (sub sursa Launcher) pentru versiunea de firmware anterioară v01.00.19.00
Light Settings
The options available for the Light Settings settings menu are the same as the options available in the OSD menu. See Meniul Complex on page 80 for the Light Settings settings options.Keystone
The options available for the Keystone settings menu are the same as the options available in the OSD menu. See Meniul Complex on page 80 for the Keystone settings options.

139 Anexă: Operare (sub sursa Launcher) pentru versiunea de firmware anterioară v01.00.19.00
Projector Position
The options available for the Projector Position settings menu are the same as the options available in the OSD menu. See Meniul Complex on page 80 for the Projector Position settings options.3D
The options available for the 3D settings menu are the same as the options available in the OSD menu. See Meniul Complex on page 80 for the 3D settings options.

140 Anexă: Operare (sub sursa Launcher) pentru versiunea de firmware anterioară v01.00.19.00
Screen Settings
Shortcut
Sets which app shortcuts are displayed on the BenQ Launcher home screen and their sequence. The home screen requires at least one shortcut and allows up to ten shortcuts.• Auto: Enables the projector to automatically arrange the sequence of app shortcuts on the home screen so that the most recently used app will appear first in the row.
• Manual: Enables the user to manually arrange which app shortcuts to be displayed on the home screen and their sequence. Press OK on an app in the Adjust menu and then press / to adjust the sequence of the apps in the apps shortcuts section. Press OK on an app in the Show/Hide Apps menu to check (show) or uncheck (hide) the shortcuts.
This function is only available when Auto is disabled.
Settings
Sets which settings menu shortcuts are displayed on the BenQ Launcher home screen and their sequence. The home screen requires at least one shortcut and allows up to eight shortcuts.• Manual: Enables the user to manually arrange which settings menu shortcuts to be displayed on the home screen and their sequence. Press OK on a settings menu in the Adjust menu and then press / to adjust the sequence of the settings menu shortcuts in the settings menu section. Press OK on an settings menu in the Show/Hide settings menu to check (show) or uncheck (hide) the shortcuts.
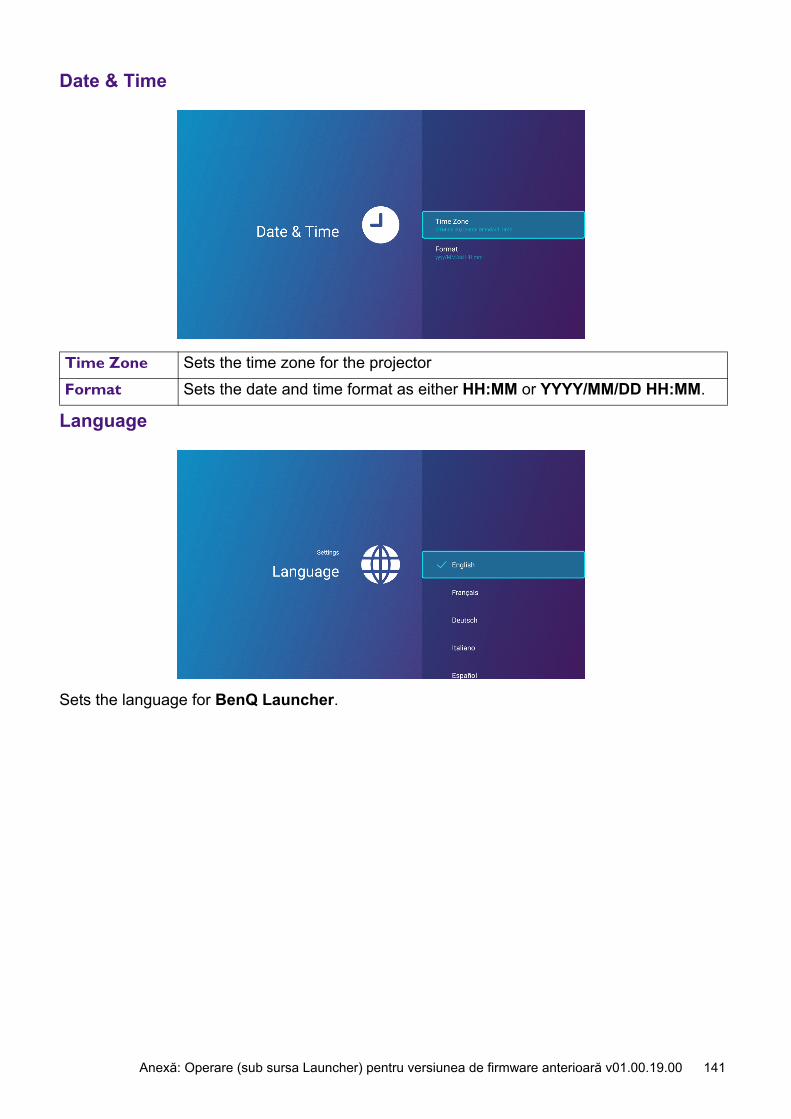
141 Anexă: Operare (sub sursa Launcher) pentru versiunea de firmware anterioară v01.00.19.00
Date & Time
Language
Sets the language for BenQ Launcher.
Time Zone Sets the time zone for the projectorFormat Sets the date and time format as either HH:MM or YYYY/MM/DD HH:MM.

142 Anexă: Operare (sub sursa Launcher) pentru versiunea de firmware anterioară v01.00.19.00
Keyboard
Current Keyboard
Displays the current keyboard setting.
Keyboard Settings
Sets the projector’s virtual keyboard for inputting text. The available options are BenQ Keyboard and Android keyboard (AOSP).
To input Chinese characters, set the language preference to traditional Chinese or simplified Chinese, and set the keyboard to BenQ Keyboard.
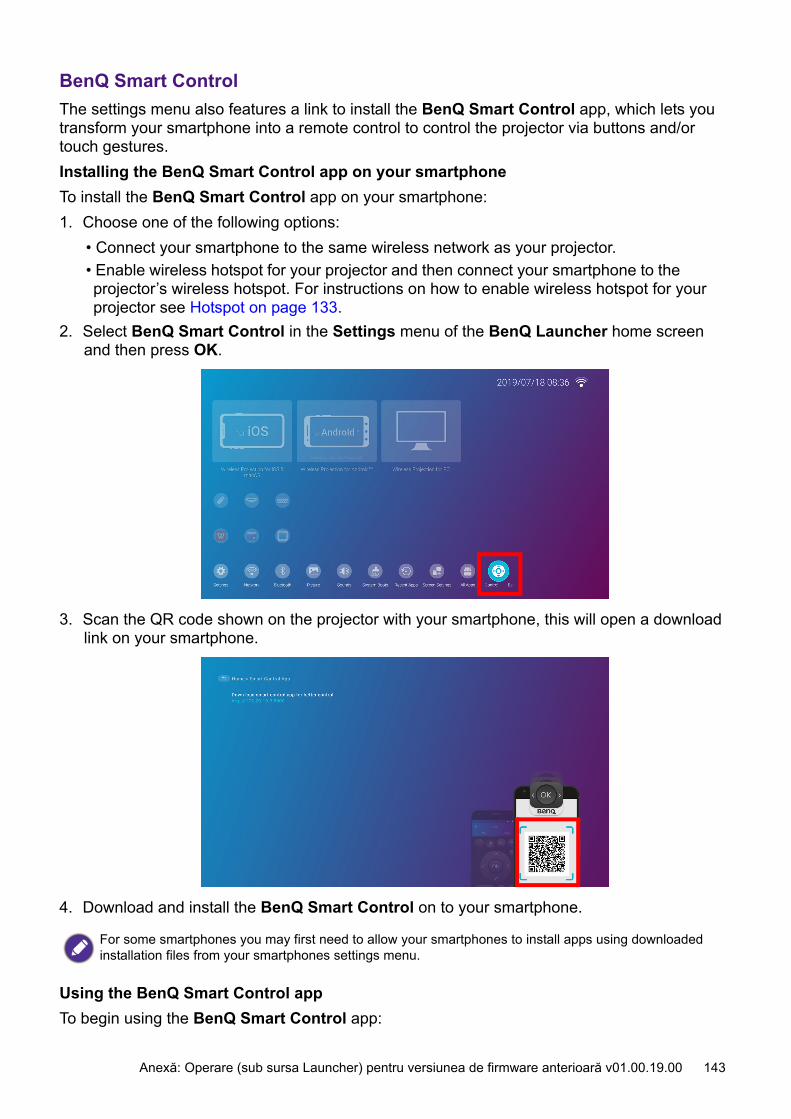
143 Anexă: Operare (sub sursa Launcher) pentru versiunea de firmware anterioară v01.00.19.00
BenQ Smart ControlThe settings menu also features a link to install the BenQ Smart Control app, which lets you transform your smartphone into a remote control to control the projector via buttons and/or touch gestures. Installing the BenQ Smart Control app on your smartphoneTo install the BenQ Smart Control app on your smartphone:1. Choose one of the following options:
• Connect your smartphone to the same wireless network as your projector.• Enable wireless hotspot for your projector and then connect your smartphone to the projector’s wireless hotspot. For instructions on how to enable wireless hotspot for your projector see Hotspot on page 133.
2. Select BenQ Smart Control in the Settings menu of the BenQ Launcher home screen and then press OK.
3. Scan the QR code shown on the projector with your smartphone, this will open a download link on your smartphone.
4. Download and install the BenQ Smart Control on to your smartphone.
Using the BenQ Smart Control appTo begin using the BenQ Smart Control app:
For some smartphones you may first need to allow your smartphones to install apps using downloaded installation files from your smartphones settings menu.
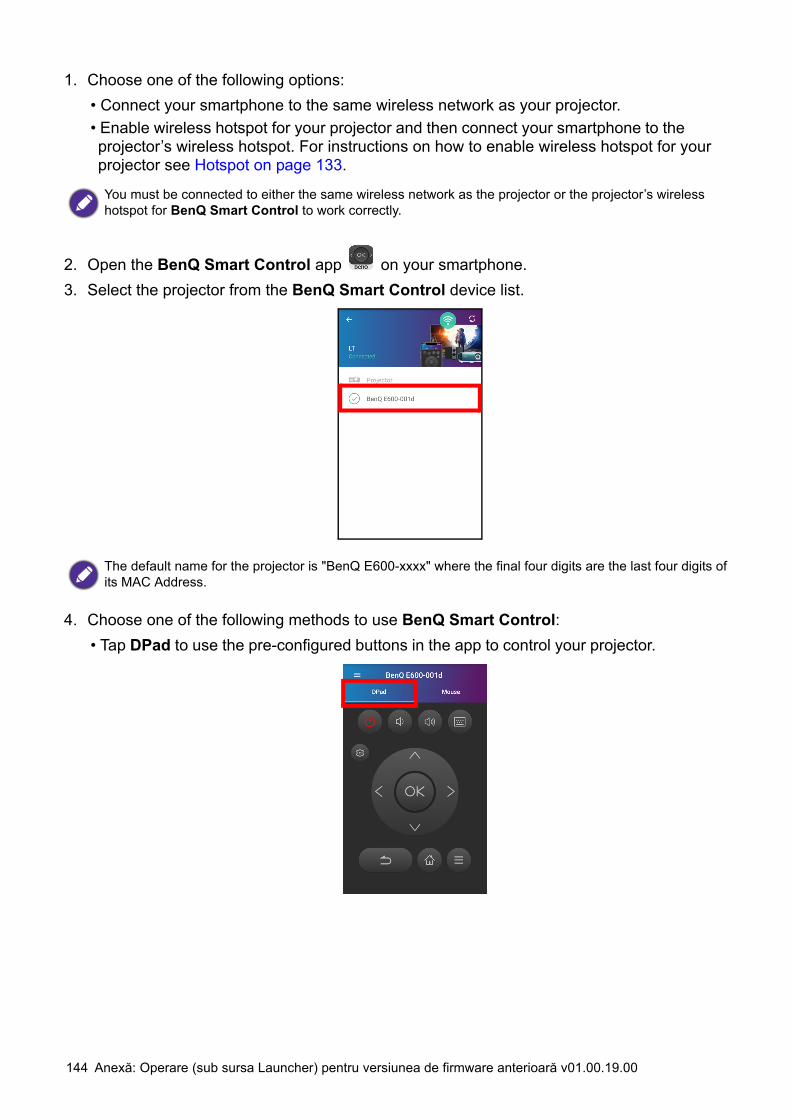
144 Anexă: Operare (sub sursa Launcher) pentru versiunea de firmware anterioară v01.00.19.00
1. Choose one of the following options:• Connect your smartphone to the same wireless network as your projector.• Enable wireless hotspot for your projector and then connect your smartphone to the projector’s wireless hotspot. For instructions on how to enable wireless hotspot for your projector see Hotspot on page 133.
2. Open the BenQ Smart Control app on your smartphone.3. Select the projector from the BenQ Smart Control device list.
4. Choose one of the following methods to use BenQ Smart Control:• Tap DPad to use the pre-configured buttons in the app to control your projector.
You must be connected to either the same wireless network as the projector or the projector’s wireless hotspot for BenQ Smart Control to work correctly.
The default name for the projector is "BenQ E600-xxxx" where the final four digits are the last four digits of its MAC Address.
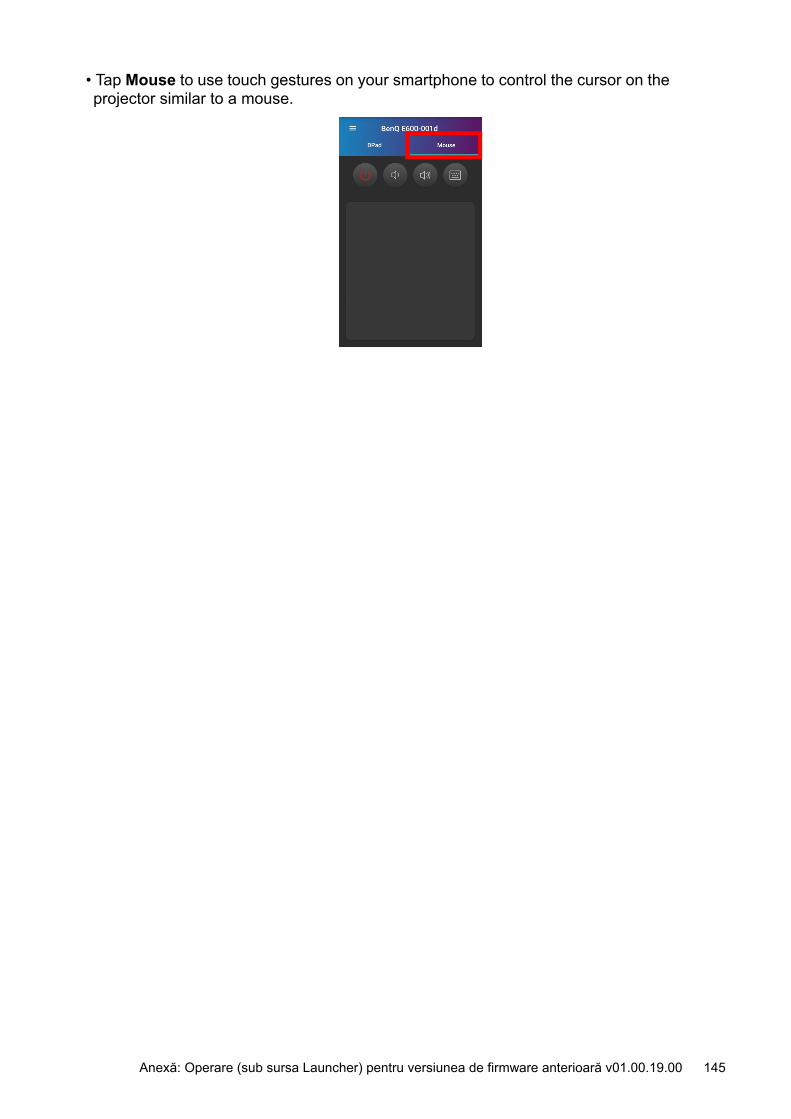
145 Anexă: Operare (sub sursa Launcher) pentru versiunea de firmware anterioară v01.00.19.00
• Tap Mouse to use touch gestures on your smartphone to control the cursor on the projector similar to a mouse.
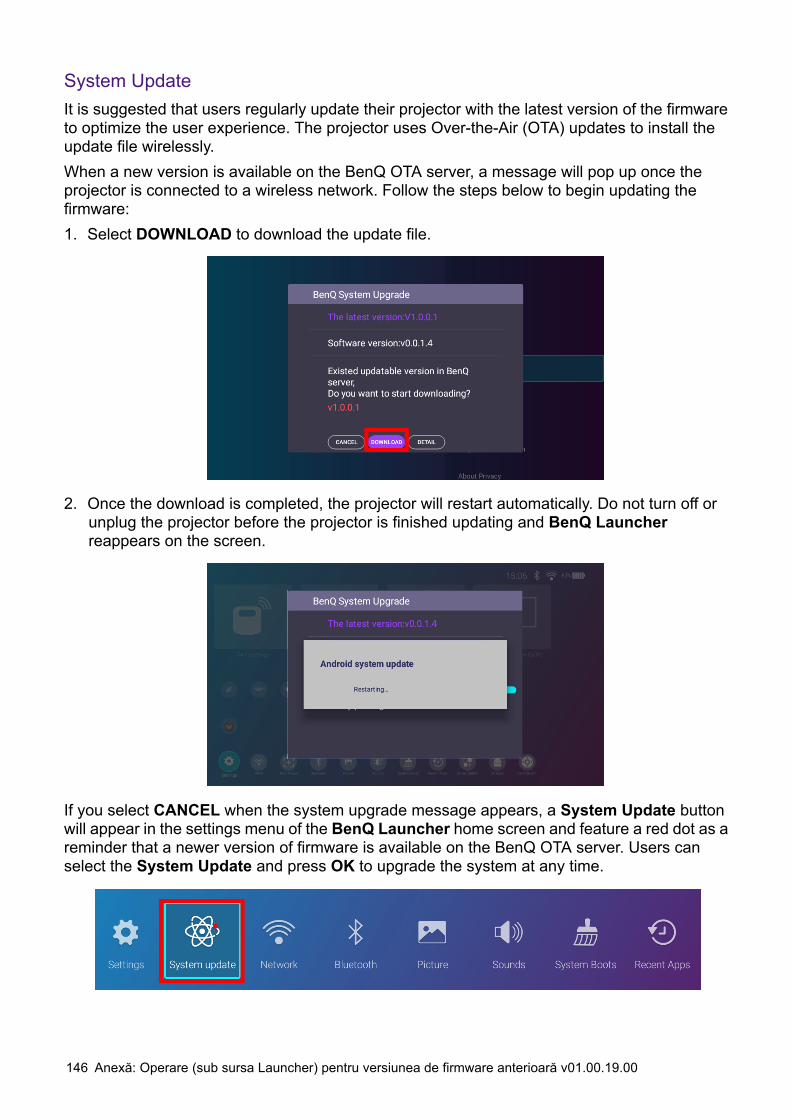
146 Anexă: Operare (sub sursa Launcher) pentru versiunea de firmware anterioară v01.00.19.00
System UpdateIt is suggested that users regularly update their projector with the latest version of the firmware to optimize the user experience. The projector uses Over-the-Air (OTA) updates to install the update file wirelessly.When a new version is available on the BenQ OTA server, a message will pop up once the projector is connected to a wireless network. Follow the steps below to begin updating the firmware:1. Select DOWNLOAD to download the update file.
2. Once the download is completed, the projector will restart automatically. Do not turn off or unplug the projector before the projector is finished updating and BenQ Launcher reappears on the screen.
If you select CANCEL when the system upgrade message appears, a System Update button will appear in the settings menu of the BenQ Launcher home screen and feature a red dot as a reminder that a newer version of firmware is available on the BenQ OTA server. Users can select the System Update and press OK to upgrade the system at any time.


