Embed Size (px)
Citation preview

I*rTP*.TIP*ll DIERENARTSEN VETERINAIRES zomm G n m m I SANS m o m s
~ u l ~ n r u ! i

Livestock Farmer Field Schools
Guidelines for Facilitation and Technical Manual
Kim Groeneweg, Gertrude Buyu, Dannie Romney and Bruno Minjauw

© International Livestock Research Centre 2006
Correct citation: Groeneweg, K., Buyu, G., Romney, D. and Minjauw, B. (2006) Livestock Farmer Field Schools – Guidelines for Facilitation and Technical Manual. International Livestock Research Centre: Nairobi, Kenya.
CONTRIBUTORS
Authors:
Kim Groeneweg Gertrude Buyu Dannie Romney Bruno Minjauw
Technical Editor: Kim Groeneweg
With contributions from:
Agnes Kavatha Josephine Kirui Anne Kimari Julius Nyangaga Deborah Duveskog Kidau P. Madeda Dorothy Maye Margaret Wambugu Godrick Khisa Masai M. Masai Humphrey Khakula Samuel Kinyua John Gichuki Samuel M. Muriuki John Makori Samuel M. Mwaura John Njoroge Silvester M. Mwazi Cover design: Paulo van Breugel
Illustrator: Simon Ndonye
For further information contact:
Kim Groeneweg: Wolvenstraat 72, 3512 CH Utrecht, The NetherlandsTel: +31 6 20871048 E-mail: [email protected]
or
Bruno Minjauw: ILRI, PO Box 30709, Nairobi, KenyaTel: +254 20 4223063E-mail: [email protected]

Preface
iii
PREFACE
Farmer Field Schools (FFS) are based on an innovative, participatory and interactive learning approach. The FFS approach was developed by the Food and Agriculture Organization of the United Nations (FAO). It emerged as a way for small-scale rice farmers to investigate and learn for themselves the required skills for adopting integrated pest management (IPM) practices in their paddy fields. The approach proved to be so successful that today IPM FFS programmes are conducted in more than 30 countries throughout Asia, South America and Africa (Van de Berg, 2004).
In 2001, the International Livestock Research Institute (ILRI), with the support of the FAO and the Animal Health Programme (AHP) of the UK’s Department for International Development (DFID), adapted the FFS methodology to livestock production systems. This required the integration of animal health concerns and crop/forage production activities within the FFS curriculum. ILRI worked with both smallholder dairy and extensive mixed farming systems in Kenya to develop and research the new schools. More than 20 dairy FFS were created in Nakuru and Nyandarua Districts in Kenya between 2001 and 2003. Each new FFS helped shape the methodology further, facilitating the development of additional tools. New stakeholders also became involved in the project, including the private sector and non-governmental organisations (NGOs).
For the new FFS to be successful and have a wide-ranging, positive impact, it was important to create awareness of the FFS methodology among livestock farmers, organisations and policy makers both in and outside of East Africa. To disseminate the FFS information and promote the methodology, the ILRI FFS team and its partners participated in national and international meetings and developed a trainers’ manual for livestock FFS. The team also provided written materials for websites1, local newspapers, magazine articles, international radio programmes, books and scientific publications. One of the highlights of the campaign was the organisation of a stakeholder workshop in Kenya in 2003, which was attended by more than 100 staff from the Ministry of Agriculture including policy makers and district officers (Sones et al., 2003).
As awareness of this project increased, so did the number of requests received from elsewhere in Africa, Central America and Asia for ILRI’s support in implementing similar FFS schemes. In response, DFID–AHP has extended the project to allow this guide to be produced and to develop a programme to train 10 FFS Master Trainers who can then train extension workers in the FFS methodology.
This guide provides examples of FFS activities as well as basic livestock technical information to help new facilitators implement a livestock FFS. The guide comprises three distinct sections:
Part I: Farmer Field School Methodology – Principles and Concepts: describes the FFS methodology, introduces the guiding principles and concepts, and suggests how to organise the overall programme and farmer groups.
1 www.farmerfieldschool.net and www.ilri.org

Preface
iv
Part II: Field Guidelines for Facilitating Livestock FFS Activities: provides new FFS facilitators with a course of action and specific examples to assist them in creating activities that enhance participation, promote experimental approaches and facilitate learning of livestock topics.
Part III: Animal Health and Production – Dairy Technical Manual: a series of simple, easy to read fact sheets containing technical information on cattle health and production. The fact sheets in this section can be used as templates for writing additional fact sheets in the future, specifically adapted to the needs of each FFS.
FFS facilitators, extension specialists and ILRI researchers collaborated to create the material for this guide based on personal and institutional experience and existing research documents. The guide was tested during Training of Facilitators (TOF) sessions in Pakistan, Kenya and Costa Rica to verify its integrity and usefulness. It was then used and refined in a Training of Master Trainers programme that focused on improved FFS methods, tools and technical information.
The guide should not be taken as a recipe book that provides all the answers. Instead, it should be viewed as reference material that will help facilitators and farming communities create the FFS activities most appropriate to their needs. It is designed to be a living tool that allows facilitators to add or remove information and it has space for FFS practitioners to enhance it and incorporate their own experiences. ILRI’s FFS experience in Kenya has been highly focused on dairy cattle production systems; hence the field guide limits its scope to this topic. However, the concepts and principles included here can be applied and adapted to any individual field and can easily be expanded to include other livestock.
The authors gratefully acknowledge all the FFS participants, facilitators, researchers and other associated people who have contributed to the development of this manual. They would also like to acknowledge the support received from DFID–AHP as well as ILRI management and colleagues.

v
LIST OF ABBREVIATIONS
AESA Agro-ecosystem analysisAHP Animal Health Programme of DFIDAI Artificial inseminationCAN Calcium ammonium nitrateDAP Diammonium phosphateDFID Department for International Development (UK)DM Dry matterECF East Coast FeverFAO Food and Agriculture Organization of the United NationsFFS Farmer Field SchoolFMD Foot and mouth diseaseGAP Group action planILRI International Livestock Research InstituteIPM Integrated pest managementILM Integrated livestock managementKARI Kenya Agricultural Research InstituteLU Livestock unitLW Live weight (of cattle)M&E Monitoring and evaluationMP Member of ParliamentNGO Non-governmental organisationN P K Nitrogen phosphorus potassium PE Participatory epidemiologyPM&E Participatory monitoring and evaluationPRA Participatory rural appraisalPTD Participatory technology developmentSR Small ruminantTOF Training of Facilitators UNDP United Nations Development Programme
List of abbreviations


Part I
Farmer Field School Methodology – Principles
and Concepts


Contents
1. INTRODUCTION ................................................................................................. 1
Farmer Field Schools: a brief history ....................................................................... 1
Why the Farmer Field School approach? ................................................................. 1
What is a Farmer Field School? .............................................................................. 2
Objectives ............................................................................................................. 2
2. PRINCIPLES AND PRACTICE .............................................................................. 3
Farmer Field School principles ................................................................................ 3
Farmer Field School core activities .......................................................................... 5
3. ORGANISATION OF THE FARMER FIELD SCHOOL ........................................... 9
Phase 1: Preparation ........................................................................................... 10
Phase 2: FFS implementation ............................................................................... 14
Phase 3: Post-graduation ..................................................................................... 16
4. LESSONS LEARNED IN THE FFS APPROACH ................................................... 17
REFERENCES and FURTHER READING ................................................................ 18


Part I–1
1. INTRODUCTION
Farmer Field Schools: a brief history
The Farmer Field School (FFS) approach was first developed in 1989 by the Food and Agriculture Organization of the United Nations (FAO). It was used to train rice farmers in Indonesia on integrated pest management (IPM) as part of their National IPM Programme. The approach proved to be very successful in helping to control rice pests and was quickly expanded to other countries in Asia, Africa, the Middle East and Latin America. In 1995, the FFS program began to broaden its scope beyond IPM to cover other types of agricultural production and incorporate socio-ecological conditions.
The FFS approach was introduced to Kenya in 1995 under the Special Programme for Food Security. Funded by the FAO, four FFS were established on maize-based farming systems. The number has risen since to more than 2,500 spread throughout the country.
In 2001, the International Livestock Research Institute (ILRI) developed and adapted the FFS methodology for livestock production systems in Kenya with support from the Animal Health Programme (AHP) of the UK’s Department for International Development (DFID) and FAO. Smallholder dairy and extensive mixed farming systems were used as case studies owing to their complexity and the availability of data from previous work by ILRI and partners.
Why the Farmer Field School approach?
Extension work has traditionally been seen by research and extension institutions as a mechanism to transfer technologies to farmers. This approach, however, has proved inadequate in complex situations where farmers must frequently adjust their activities to changing conditions (crop protection, soil nutrient management, animal health and production). Technology packages, delivered in a ‘top-down’ approach, were often too complex, expensive or poorly adapted to farmers’ needs. Extension workers realised that farmers were not sufficiently involved in identifying problems, selecting and testing options, and evaluating possible solutions. With declining government support for traditional extension work, it became clear that alternative methods were needed to identify the problems faced by farmers and to disseminate appropriate technologies.
The FFS approach, in contrast, strengthens the capacity of farmers and the local communities to analyse their production systems, identify their main constraints and test possible solutions. By adding their own knowledge to existing information, farmers eventually identify and adopt the most suitable practices and technologies to their farming system and needs to become more productive, profitable and responsive to changing conditions.
Chapter 1: Introduction

Part I–2
What is a Farmer Field School?
An FFS is a capacity building method based on adult education principles using groups of farmers. It is best described as a ‘school without walls’, where farmers learn through observation and experimentation in their own fields. This allows them to improve their management skills and become knowledge experts on their own farms.
The approach empowers farmers using experiential and participatory learning techniques rather than advising farmers what to do. Farmers are encouraged to handle their own on-farm decisions in which they apply previous experiences and test new technologies. An FFS usually comprises a group of 20–30 farmers who meet regularly over a defined period of time, a crop production season for example, to validate (new) production options with the help of a facilitator. Management decisions are made at the end of every meeting on what action to take. After the training period, farmers continue to meet and share information with less facilitator contact.
An FFS is a process, not a goal. It aims to increase the capacity of farmers to test new technologies in their own fields and assess results and their relevance to particular circumstances. Farmers interact with researchers and extension workers on a demand-driven basis, only asking for help where they are unable to solve a problem themselves. As an extension methodology, an FFS is a dynamic process that is practised, controlled and owned by the farmers to help them transform their observations to create a better understanding of their crop–livestock system.
To enable an FFS group to test alternative solutions and take the risk of experimenting with new technologies, a grant or loan is often made available by the funding agency. Since the grant is entirely the property of the FFS and under the sole management of the members, it empowers the group to access the information and instruments they need when they need it.
Objectives
“FFS is not about technology but about people development. It brings farmers together for them to assess their problems and seek ways of addressing them.”
Specific FFS objectives include:
• empowering farmers with knowledge and skills to make them experts in their own fields• sharpening the farmers’ ability to make critical and informed decisions so that they can
make their farming profitable and sustainable• sensitising farmers to new ways of thinking and problem solving• helping farmers learn how to organise themselves and their communities• enhancing the relationships between farmers, extensionists and researchers, so they
work together to test, assess and adapt a variety of options within the specific local conditions.
Chapter 1: What is a Farmer Field School?

Part I–3
2. PRINCIPLES AND PRACTICE
Farmer Field School principles
Every FFS is guided by the following 10 principles:
1. Learning by doingAdults do not change their behaviour and practices just because someone tells them what to do or how to change. They learn better through experience than from passive listening at lectures or demonstrations. Discovery-based learning is an essential part of the FFS as it helps participants to develop a feeling of ownership and to gain the confidence that they are able to reproduce the activities and results on their own farm.
2. Farmer-led learning activitiesFarmers, not the facilitator, decide what is relevant to them and what they want the FFS to address. This ensures that the information is relevant and tailored to their actual needs. The facilitator simply guides the farmers through their learning process by creating participatory exercises to provide farmers with new experiences.
3. Learning from mistakesBehavioural change requires time and patience. Learning is an evolutionary process characterised by free and open communication, confrontation, acceptance, respect and the right to make mistakes. This last point is key as more is often learned from mistakes than from successes. Each person’s experience of reality is unique.
4. Learn how to learnFarmers are learning the necessary skills to improve their ability to observe and analyse their own problems and make conscious decisions. They also learn how they can educate and develop themselves further.
Chapter 2: Principles and practice

Part I–4
5. Problem-posing/problem-solvingProblems are presented as challenges, not constraints. Farmer groups learn different analytical methods to help them gain the ability to identify and solve any problem they may encounter in the field.
6. The farmer’s field is the learning groundThe field (crop production system) is the main learning tool. All activities are organised around it. In the case of a livestock FFS, both the animal(s) and the field are the main learning tools. Farmers learn directly from what they observe, collect and experience in their fields instead of text books, pictures or other extension materials. Farmers also produce their own learning materials (drawings, etc.) based on what they observe. The advantages of these home-made materials are that they are consistent with local conditions, inexpensive to develop, and owned by the farmers.
7. Extension workers are facilitators, not teachersExtension workers are called facilitators because their role is to guide the learning process and not to teach. The facilitator contributes to the discussions and aims to reach consensus on what actions need to be taken. Facilitators are trained in a formal Training of Facilitators (TOF) course developed by experienced FFS Master Trainers.
Researchers and subject matter specialists are invited to provide technical and methodological backstopping support to an FFS and also learn to work in a participatory and consultative way with farmers.
8. Unity is strengthEmpowerment through collective action is essential. Farmers united in a group have more power than individuals. Also, when recognised as an active member within a group, the social role of individuals within a community is enhanced. The combination of two or more minds is often more successful than one mind on its own. The FFS expresses this as 1 + 1 = 3; i.e. one mind + one mind creates a new, third mind.
Chapter 2: Farmer Field School principles

Part I–5
9. Every FFS is uniqueLearning topics within the FFS should be chosen by the community. Training activities must be based on existing gaps in the community’s knowledge and skills and should also take into consideration its level of understanding. Every group is different and has its own needs and realities. As participants develop their own content, each FFS is unique.
10. Systematic training processAll FFS follow the same systematic training process. The key steps are observation, group discussion, analysis, decision making and action planning.
Past FFS experience has shown that the best results are achieved with weekly meetings. Longer gaps can slow down the learning process. The length of the FFS cycle depends on the focal activity. With livestock, a full year cycle is usually needed to allow for all seasonal variations to be studied. Crop- or poultry-based FFS usually base their length on the cycle of production; from land preparation to harvesting or egg to egg respectively. FFS increasingly include marketing and processing activities which may lengthen the FFS learning cycle.
Farmer Field School core activities
There are five core activities that are repeated in each session to provide the framework for each FFS: agro-ecosystem analysis (AESA); field comparative experiments; topic of the day (special topic); participatory monitoring and evaluation (PM&E); and group dynamic exercises.
1. Agro-ecosystem analysis (AESA) AESA is the cornerstone of the FFS approach and is based on the ecosystem concept (see Part II, page 60), in which each element in the field has its own, unique role. It involves field observations, data collection and analysis, and recommendations. Through regular observation of a crop–livestock system, AESA exercises help establish the interaction between crops and livestock as well as other living and non-living factors. Data are collected based on key factors observed to help put a process in place for decision making. The analysis is performed in sub-groups of four to five members to enhance participatory learning. Each sub-group presents their observations and recommendations in plenary sessions for collective decision making on management actions.
AESA exercises improve decision-making skills by:
• enhancing observational skills• developing record keeping skills by drawing simple forms• generating discussions and sharing of farmer-to-farmer experience • developing presentation skills to promote communal decisions.
Chapter 2: Farmer Field School core activities

Part I–6
2. Field comparative experimentsField comparative experimentation, also known in Kenya as participatory technology development (PTD), is a collective investigation process to solve local problems. Simple experiments are carried out to enhance farmers’ observational and analytical skills to investigate the cause and effect of major production problems. They help farmers become experts and to design simple and practical experiments to test and select the best solution to their problems.
Experiments also encourage the validation and adoption of new technologies or practices. In this case, the experiments compare farmer practices with a set of available solutions presented either by the facilitator, researchers or other farmers. By analysing the results and developing recording skills, farmers are able to decide which solution (technology or practice) is best suited to their situation. See Part II for details on the principles of experimentation (page 68) and their design and implementation (page 72).
Each experiment should include a cost–benefit analysis using the data recorded during AESA exercises. Assessing the economics of each option improves decision-making skills for livestock health and production activities as farmers often do not know whether they operate at a profit or loss. Farmers can better understand the difference between production and productivity – where cost per unit produced is calculated – to determine the efficiency of their own systems.
Besides recording and analysing the financial costs and benefits of the options tested in the experiment, other indicators to validate the results of the experiment should be identified by FFS participants (e.g. labour needs, length and speed of growth, accessibility). Precise record keeping of indicators is required to monitor and evaluate the performance of a treatment or technology. See Part II, page 55 for more guidelines.
An FFS participant presents the results of her subgroup to the whole group so that collective decisions can be made
Chapter 2: Farmer Field School core activities

Part I–7
3. Facilitation of special topics – livestock topics in FFSThough adults learn best through a ‘learning by doing’ approach, where new knowledge is acquired from experience, basic technical information is usually needed before any hands-on activity can be implemented. Certain activities are also too risky to apply without proper expertise or information, as is often the case with animal health issues. The special topic or ‘topic of the day’ is used to introduce technical information. The objectives of special topics are to:
• provide an opportunity for the facilitator, researcher or specialist to give theoretical inputs needed for a general understanding of the subject before any activities can be carried out
• enhance the farmers’ technical knowledge and present the farmers with information they need at the time they need it (this also applies for non-livestock related issues)
• ensure a demand-driven learning process • level knowledge among the participants.
Thirty minutes to 1.5 hours of each FFS session should be reserved to discuss a specific topic relevant to farmers’ needs. The topic of the day is normally a livestock-related topic but could be any subject of concern. Participants may have other problems and feel a need to discuss issues such as HIV/AIDS, micro-finance, gender inequity, etc. If the facilitator lacks the specific expertise, external scientists, specialists or other farmers can be invited to lead the discussion. The role of the facilitator is to target a specific topic at the most relevant time for FFS participants.
This guide includes two participatory approaches to facilitate the ‘special topics’: a) Focus group discussions where sub-groups of FFS participants are asked to answer questions followed by a plenary discussion (see Part II, page 87); and b) Participatory learning exercises of short- and medium-term duration (which can include simple demonstrations) to introduce technical topics and lead the group in discussing their experiences (see Part II, page 88).
4. Participatory monitoring and evaluation (PM&E)The PM&E plan is an extension of the participatory plan developed in the initial FFS stages. To implement the FFS approach, both the participants and facilitator need to be able to continuously assess whether they are making any positive changes and actually achieving the goals they set. Monitoring and evaluation (M&E) methods have been developed to help FFS practitioners (mainly project staff, facilitators and participants) actively observe and analyse situations and performances and help them understand what they are observing. Given the participatory nature of FFS, M&E should also embrace the established participatory principles (see Participatory Methods and Tools, Part II, page 2). This Field Guide provides PM&E guidelines to:
• monitor and evaluate the FFS performance and assess whether it is achieving its specific objectives (Part II, page 43)
• monitor and evaluate specific FFS sessions for self-evaluation purposes (Part II, page 51)• monitor and evaluate a field comparative experiment (Part II, page 55).
Chapter 2: Farmer Field School core activities

Part I–8
5. Group dynamic exercisesGroup dynamic exercises are used to create a pleasant learning environment, facilitate learning and create space to reflect and share. They also enhance capacity building in communication skills, problem solving and leadership skills. Part II includes specific examples that:
• energise participants: page 108• enhance participation: page 111• strengthen learning topics: page 114• strengthen group work and cohesion: page 115• assist in solving conflicts: page 119.
Chapter 2: Farmer Field School core activities

Part I–9
3. ORGANISATION OF THE FARMER FIELD SCHOOL
The following steps, discussed more broadly in the next section, should be followed to successfully implement an FFS:
Phase 1: Preparation
Step 1. Carry out a pre-conditions survey
Step 2. Training of Facilitators (TOF)
Step 3. General ground working • implement an initial survey• hold an awareness-raising meeting to introduce the FFS concept• identify the focal activity (also called the FFS enterprise)• identify the participants• identify the learning site
Step 4. Establishing the FFS • participatory introduction of the participants• levelling of expectations• identifying the host team • participatory planning of FFS activities: developing the FFS group action plan
(GAP): 1. establishing the FFS group 2. problem analysis and ranking 3. identifying potential solutions 4. developing the learning programme 5. developing a detailed budget 6. PM&E plan
Phase 2: FFS implementation
Step 5. FFS sessions with core activities Step 6. Field daysStep 7. Exchange visitsStep 8. Graduation
Phase 3: Post-graduation
Step 9. Follow up of FFS activitiesStep 10. Establish/create FFS networksStep 11. Set up farmer-led FFS
Chapter 3: Organisation of the Farmer Field School

Part I–10
Phase 1: Preparation
This phase includes the steps leading up to the actual implementation of FFS core activities. To enable an FFS group to test alternative solutions and risk experimenting with new technologies, a grant or loan is often made available by the implementing agency. However in this phase, the application for a grant or loan by the FFS group will not yet have taken place. The implementing agency will therefore have to help coordinate Steps 1 to 3 to enable the facilitator to establish the FFS. A two-week period is usually required with five half-day sessions to conduct all the activities in Step 4 to come up with a relevant GAP. During that period, the facilitators will also help to formalise the FFS group and to open a bank account.
These conditions are essential before the FFS can submit its GAP and apply for a grant or loan. The implementing agency should have a system in place to effectively process grant proposals and rapidly deposit the funds in the FFS group’s bank account. These funds are then managed exclusively by FFS members, empowering them to achieve the goals set out in their GAP. A delay between the grant application and fund allocation might discourage participants. However, if there is a delay, the facilitator should promote low cost or income generating activities in the meantime to maintain cohesion within the group.
Step 1. Carrying out a pre-conditions surveyBefore establishing an FFS in a new region, a simple survey should be performed by an FFS expert or Master Trainer to assess the conditions for FFS implementation. This will ensure that the environment is suitable for the FFS approach. Questions to be raised include:
• Is the extension department of the ministry (agriculture/livestock) supporting FFS implementation? (This is essential as an FFS should be seen as an opportunity to test a new approach, not as a threat to existing systems.)
• Are there any other FFS or similar programmes in the region, country or neighbouring countries? (It is important to link up FFS wherever possible.)
• Are there any Master Trainers available in the region?• Is an FFS the most suitable approach to tackling existing problems?• Are there any cultural barriers to the FFS approach?• Who are suitable FFS facilitators? (e.g. government or non-government extension
workers, farmers, experts, etc.) Do they have a guaranteed income? Are they willing to try facilitating an FFS?
• How many FFS can be guaranteed implementation after the first TOF course? Are there sufficient resources? Under which programme is the FFS going to be supported?
Results of the pre-condition survey will help assess if an FFS should be implemented in a particular region. If authorities are supportive and an FFS has been recognised as a potentially appropriate method, the remaining results will help assess the costs and needs for external inputs to determine the level of difficulty in establishing the FFS.
Chapter 3: Phase 1: Preparation

Part I–11
Step 2. Training of Facilitators (TOF)Extension workers or farmers need to participate in a TOF prior to facilitating an FFS. The TOF, organised by experienced FFS Master Trainers, is a two- to three-week training programme to prepare participants in the principles and core elements of the FFS methodology and facilitation skills. Additional training on specific topics (technical and methodological) can be organised if necessary to further develop their capacity.
Step 3. General ground workingFollowing TOF graduation, facilitators must first determine the actual needs of their (project) area. Basic area information is collected using participatory tools (see page 22) to better understand the local production system and enable future M&E. Activities should begin at least a month ahead of the planned start of the FFS. The following steps are recommended for this phase:
The initial survey: Initial contact with the community is needed to understand the area and characterise the production systems. In most places, community leaders should be contacted first to seek their advice and authorisation. Following their approval, facilitators can plan an awareness-raising meeting to introduce the FFS approach to the community (Part II, page 22).
The awareness-raising meeting: A meeting with the community to introduce the FFS concept is necessary in areas where awareness is low (Part II, page 24). The facilitator needs to ensure that community members have a clear understanding of what they can expect from the FFS. Participants and the facilitator can then discuss how to move forward to plan the FFS implementation (Part II, page 25).
Identifying the focal activity (FFS enterprise): Sufficient time should be spent on identifying the focus of the FFS activity to avoid involving farmers in activities that are not of interest to them. Though this field guide focuses on cattle, this should not imply that every FFS should be on cattle production. The selection of the FFS enterprise depends entirely on local farmers’ needs and interest. For a cattle-focused FFS, the community’s main enterprise should be cattle production. The problems they are facing should be relevant to motivate participants to look for solutions. It is therefore important during the initial survey for the facilitator to analyse the community, identify its main enterprise and whether they have problems concerning this enterprise (Part II, page 25).
Identification of participants: Through consultation with the community and the help of local leaders, 30–40 FFS participants should be identified (groups tend to shrink to 25–30 after the first few sessions). An already existing group can be approached or a new group can be formed. In the identification process the facilitator needs to be aware of gender relations and cultural practices within the community. Criteria for selecting participants are:
• common interest group (i.e. all members have the same enterprise interest – dairy, poultry, pig fattening, etc.)
• the participant has relevant problems• the participant is a decision maker on the farm• the enterprise is the main source of income
Chapter 3: Phase 1: Preparation

Part I–12
• all participants are from the same educational and socio-economic level, since the learning process can be hampered by influential personalities (local chiefs or Members of Parliament [MPs]) who may impose their views and impede participation
• all participants should live within a relatively short distance of the FFS learning site, preferably the same village (see ‘Identification of learning site’ below)
• there are no known conflicts between participants• the participant must be willing to attend all sessions during the FFS season • the participant must be willing to work in a team and share ideas with others, including
non-members• the participant must be willing to contribute financially, in material inputs or in personal
time to the FFS work• the participant must be interested in learning and not expect material benefits• at least one participant must be willing to provide a learning site (field/animal).
Part II, page 26, provides complete guidelines for FFS participant selection.
Identification of learning site: The FFS group will select a site to conduct meetings. A field and/or animal is also needed as a study object. Criteria for learning site selection are:
• the site or animal must be suitable for the enterprise in a given season• it must be representative of the problems in the area• it must be central and accessible to farmers and facilitators• it should be democratically selected by farmers • site and animal security should be ensured• the farmer providing the learning site should be present most of the time (particularly
between FFS sessions to provide access for other farmers to visit) • the meeting place should be spacious enough to hold a group of 20–30 farmers and an
indoor alternative is recommended in case of harsh weather.
Part II, page 29, provides complete guidelines for identification of the learning site.
By following all these steps and criteria, the facilitator should now have formed a cohesive group of farmers willing to commit themselves to FFS activities.
Step 4. Establishing the FFS
Participatory introduction of the participants: The FFS participants might already know each other, however to break the ice and get to know each other better a participatory introduction of all actors present is highly recommended (Part II, page 30).
Levelling of expectations: In order to facilitate the learning process and avoid disappointment it is important to level the expectations of the participants and of the facilitator (Part II, page 32).
Host team: The host team is the helping hand of the facilitator. In turns, sub-groups of FFS members are responsible for the day’s activities and additional responsibilities in the (field) tasks (Part II, page 34).
Chapter 3: Phase 1: Preparation

Part I–13
Participatory planning of FFS activities: Developing an FFS GAP
i. Establishing an FFS group: The group of farmers responding to the criteria will officially establish their own FFS by:
• choosing a name for their FFS and (optional but recommended) choosing a slogan• setting ground rules or a constitution also called ‘Setting of learning norms’. The FFS
members will set the learning norms to ensure a suitable learning environment and avoid interruptions and frustrations (for guidelines see Part II, page 35)
• electing officials, e.g. a chairperson, secretary, treasurer and board members• registering officially at the respective ministry• opening a bank account: each member will need to contribute money as a deposit for
group activities; money withdrawals need to be supported by a letter explaining the purpose of the withdrawal, signed by the three officials and five FFS board members
• sourcing funds to finance their activities (even when a grant is provided it is recommended that the FFS looks for additional funds)
ii. Problem analysis and ranking: The first FFS sessions will be used to analyse the problems perceived by the farmers in the focal activity/enterprise of their choice. These problems will be defined and prioritised and will direct the learning programme of the FFS (Part II, page 37).
iii. Identifying potential solutions: The main problems need to be analysed intensively. FFS group brainstorming sessions aim to develop options that can be tested and evaluated (Part II, page 38).
iv. Developing the learning programme: Once the FFS group is established, the facilitator develops a programme (i.e. the curriculum for the FFS, based on the main problems identified). In collaboration with the group, the facilitator decides what activities need to be undertaken to further explore the problems, test the solutions and identify what kind of outside assistance is needed. Key activities to facilitate learning in the FFS are the AESA, field comparative experiments and special topics, where group discussion and short- and medium-term learning exercises are conducted. Field trips or exchange visits with other FFS are also useful methods to enhance learning and participants’ motivation. A programme defining the FFS season and outlining dates of meetings and the topics of discussion needs to be drafted on a flip chart and made accessible to all (Part II, page 40).
v. Developing a detailed budget: Having identified which activities the FFS will perform, the group will establish a detailed budget. An overview of the budget required for the FFS needs to be drafted (especially when the FFS group wants to apply for a grant or loan). This normally includes (for guidelines see Part II, page 42):
• field inputs (rent, seeds, fertilisers, etc.)• stationery (flip charts, pens, markers, etc.)• management tools (weigh bands, thermometers, etc.)• AESA/experiments/learning activities: specific inputs required• field days• exchange visits
Chapter 3: Phase 1: Preparation

Part I–14
• graduation• facilitation: allowance/expenses of the facilitator• PM&E activities.
vi. Participatory monitoring and evaluation plan: M&E needs to be planned to ensure that the objectives of the FFS group are met and progress can be tracked. M&E tools are provided in Part II, page 43. The data generated in the problem analysis need to be properly recorded as they provide baseline information for evaluation. Additional exercises to generate information before the FFS and the pre-test ballot box exercise to assess farmers’ knowledge need to be conducted (see Part II, page 46). Hence a PM&E action plan can be developed describing why evaluations are done, what is being evaluated, who is evaluating, when and where the evaluations should be done and what resources are needed (Part II, page 43).
Phase 2: FFS implementation
Step 5. FFS sessions with core activities Enrolled FFS members agree with the facilitator when the school programme will start, the frequency of meetings and the length of the cycle before graduation. In general, in livestock FFS, the group meets for a four-hour session once a week and the members agree to join the FFS for a full year to enable the implementation of medium-term field comparative experiments and learning exercises related to livestock issues (e.g. feeding and breeding of cattle). The table below indicates a typical FFS session.
Typical FFS session
Time Activity Objectives Responsible persons
8.00–8.10 OpeningRoll call and brief recap
Record attendance and review past activities Host team
8.10–9.00 Field/livestock monitoring (AESA)
Monitor progress of the enterprise by collecting data
All
9.00–10.00 AESA processing and presentation and decision making
Analyse and present data to the larger groups for collective decisions on management action
Facilitator and host team
10.00–10.30 Group dynamics - energise (revitalise) the group- enhance participation- enhance learning (introduce special topic)- enhance group work, etc.
Facilitator and host team
10.30–11.30 Special topic Promote discussion and learning on a special topic to widen knowledge/skills
Facilitator
11.30–11.40 Review of the day’s activities
Evaluate the group’s achievements Facilitator and host team
11.40–11.50 Agreements, planning of homework, planning for next session
Prepare any field activities outside of the FFS session and activities to be done before the next session
Host team
11.50–12.00 Roll callAnnouncements
note late-comers and absentees Host team
Chapter 3: Phase 2: FFS implementation

Part I–15
Step 7. Exchange visitsExchange visits are educational tours to another FFS, agricultural institution or innovative farmer. They encourage FFS members to compare the activities of different groups with their own and to exchange tested technologies and unique innovations.
Step 8. GraduationFarmers with a good record of attendance (e.g. 75% of sessions) can graduate for the specific activities completed during the FFS meetings. The graduation is organised by the farmers and the facilitator and involves an official ceremony to which community members, (government) officials and neighbouring communities are invited. Participants are awarded a certificate by the supporting agency/programme to recognise their efforts and celebrate their achievements. At the same time, other community members will be attracted and the event marks the end of an official learning period (for an example of a certificate see Part II, Annex 2).
Step 6. Field daysField days provide an opportunity for non-participants to be exposed to the FFS group’s lessons and the skills and knowledge gained in the process. In addition, they provide the FFS members with an opportunity to display and share their experiences, e.g. the experimentation results and learning activities, including group dynamics. Field days reinforce the FFS cohesion and raise awareness among the community, the government and other organisations in the area, creating support and new demand for FFS (Part II, page 122).
Chapter 3: Phase 2: FFS implementation

Part I–16
Phase 3: Post-graduation
The FFS does not end with the graduation, as in many cases the FFS group expresses a need for more training, either in the same focal activity or in a different enterprise. However the programme and the activities are different and the approach is aimed towards the sustainability of the group and the implementation and dissemination of the lessons learned.
Step 9. Follow-up of FFS activitiesAt the end of a learning cycle and after the graduation ceremony, the FFS normally continues. With help from the facilitator, the group evaluates the FFS and develops an action plan based on the evaluation of what has been learned and what is lacking. In addition, new sessions (different topics or more in-depth learning of the specific topics), implementation of commercial plots or enterprises, and linkages with researchers, extension workers and other FFS are planned. In many cases, one of the farmers takes on the role of the facilitator.
Grants from donor agencies are not always available for FFS follow-up activities and should be restricted to the poorest farmers in the community. Current FFS are encouraged to undertake commercial plots to finance their FFS activities. Self-financing groups are flourishing and other alternative funding sources like loans and private sector support should be investigated.
Step 10. Establish/create FFS networksWhen there are several FFS in a region, FFS networks should be encouraged. Networking is a sustainable mechanism to support economic activities and support the development of existing and new FFS. It initiates commercial ventures in all affiliated FFS, facilitates fundraising and helps to coordinate marketing activities.
Step 11. Set up farmer-led FFSThe FFS facilitator and participating farmers identify a few farmers willing to play the role of facilitator and who have the potential to be trained further. The farmers selected will start by assisting the current facilitator, and will learn the basics. When the farmer is ready, he/she can conduct an FFS on his/her own. The so-called farmer-led FFS is backed up by the current facilitator. The facilitator can oversee many trained farmers, helping to scale up the methodology.
Chapter 3: Phase 3: Post-graduation

Part I–17
4. LESSONS LEARNED IN THE FFS APPROACH
• The support and goodwill of the authorities at various levels is essential, especially that of community leaders and the employers of the facilitators.
• FFS cannot operate in a vacuum. Clear understanding of the FFS concepts and procedures should be established and effective linkages formed between stakeholders.
• The FFS curriculum is very demanding of the facilitators and, in general, an FFS requires one day per week of his/her time.
• The FFS concept and implementation should be flexible enough to be modified to fit with local conditions.
• Facilitators should have local knowledge of the topics under study and terminologies used (e.g. pests, diseases, etc.).
• Internalising facilitation skills and attitude changes among extension staff takes time and, in general, facilitators need additional support from the FFS Master Trainers during the FFS implementation.
• Adequate resources and logistical support are key first steps. Financial resources should be in place even prior to the initial survey.
• Options for grants or self-financing should be included. The facilitator should explain the advantages and disadvantages of each approach.
• Self-financing mechanisms should be started from the onset of the FFS. Income generating activities such as the sale of cash crops or a proportion of milk produced are good examples. Also contributions by individual FFS participants are useful for self-financing of FFS activities.
• FFS should be cost- and time-effective.
• Balance of sexes should be encouraged as it enhances the whole learning process for all participants and encourages communication between men and women.
• Built-in M&E methods are needed to assess the FFS’s impact on farmers’ lives and environment.
• The process and results should be well documented by the facilitator.
• The FFS can effectively integrate with other participatory methods and this should be encouraged to enhance the overall outcome.
• The majority of the FFS training material requires literacy by the participants. Therefore at least some of the FFS members should be able to read and write so they can assist illiterate FFS members.
• Appropriate technologies should be locally available for farmers to practise them in their own farms.
Chapter 4: Lessons learned in the FFS approach

Part I–18
REFERENCES and FURTHER READING
CIP–UPWARD (2003) Farmer Field Schools: From IPM to platforms for learning and empowerment. International Potato Centre–User’s Perspective With Agricultural Research and Development, Los Baños, Laguna, Philippines.
Minjauw, B. (2001) Training of Trainers manual for Livestock Farmer Field Schools. Based on a participatory workshop held on 17–19 September 2001, Mabanga Farmer Training Center, Bungoma, Kenya. See www.ilri.org
Sones, K.R., Duveskog, D. and Minjauw, B. (eds) (2003) Farmer Field Schools: The Kenyan experience. Report of the Farmer Field School stakeholders’ forum held on the 27th March 2003 at the International Livestock Research Institute (ILRI), Nairobi, Kenya. FAO/KARI/IRLI, Nairobi, Kenya. See www.ilri.org.
Van de Berg, H. (2004) IPM Farmer Field Schools: A synthesis of 25 impact evaluations. Prepared by Wageningen University, the Netherlands, for Global IPM Facility, Food and Agriculture Organization of the United Nations, Rome, Italy.
Van de Fliert, E. and Braun, A.R. (2000) Farmer Field School for integrated crop management of sweet potato: Field guide and technical manual. International Potato Centre–User’s Perspective With Agricultural Research and Development, Los Baños, Laguna, Philippines.
www.communityipm.org
www.farmerfieldschool.net
References and further reading

Part II
Field Guidelines For Facilitating Livestock FFS Activities


Contents
1. INTRODUCTION .................................................................................................. 1
2. PARTICIPATORY METHODS AND TOOLS – AN OVERVIEW ............................... 2
Principles of participation ....................................................................................... 2
Participatory epidemiology ..................................................................................... 2
Types of participatory methods ............................................................................... 3
Informal interviewing – ORAL methods ................................................................ 6
1. Semi-structured interviews ....................................................................... 6
2. Focus-group discussion ........................................................................... 8
3. Drama and role play ............................................................................... 8
4. Letter exchange ....................................................................................... 8
5. Daily activity analysis and diaries ............................................................. 8
6. Change or success stories ........................................................................ 9
7. Historical trends and time lines ................................................................ 9
8. Transect walks ........................................................................................ 9
Illustrative approach – VISUAL methods ............................................................. 10
1. Participatory mapping ........................................................................... 10
2. Seasonal calendars ................................................................................ 12
3. Using drawings and pictures .................................................................. 14
4. Venn diagrams/network diagrams .......................................................... 15

Ranking and scoring – VALUATION methods ...................................................... 16
1. Pair-wise ranking ................................................................................... 16
2. Matrix scoring ....................................................................................... 17
3. Proportional piling ................................................................................ 20
3. FFS PREPARATION ............................................................................................ 22
General ground working ....................................................................................... 22
The initial survey ....................................................................................... 22
The awareness-raising meeting – Introducing the FFS .................................. 24
Identification of the focal activity – FFS enterprise ..................................... 25
Identification of participants ..................................................................... 26
Identification of the learning site ............................................................... 29
Establishing the FFS .............................................................................................. 30
Participatory introduction of the participants ............................................ 30
Levelling of expectations ............................................................................ 32
The host team .......................................................................................... 34
Participatory planning of FFS activities – Developing an FFS group action plan ............................................................................................... 35
1. Establishing an FFS group .............................................................. 35
2. Problem analysis and ranking ......................................................... 37
3. Identifying potential solutions ........................................................ 38
4. Developing the learning programme ............................................... 40
5. Developing a detailed budget ......................................................... 42
6. Participatory monitoring and evaluation plan ................................. 43

4. FFS IMPLEMENTATION ..................................................................................... 57
Basic principles of integrated livestock management ................................... 57
Concept of discovery-based learning – What is this? What is that? .............. 59
The concept of an ecosystem ..................................................................... 60
Ecosystem interactions .............................................................................. 62
The concept of the agro-ecosystem analysis (AESA) .................................... 63
Decision making through agro-ecosystem analysis (AESA) .......................... 64
Principles of experimentation .................................................................... 68
Field comparative experiments in FFS ......................................................... 72
Alternative experimentation ....................................................................... 78
Cost–benefit analysis ................................................................................ 85
Facilitation of special topics – Livestock topics in FFS ................................. 87
Learning activity 1: Farm structures – Why a farm structure? ...................... 89
Learning activity 2: Farm structures – Farmers’ expertise on farm structures ......................................................................................... 90
Learning activity 3: Farm structures – Key points for construction .............. 91
Learning activity 4: Animal feeding and nutrition – What to eat? ............... 92
Learning activity 5: Animal feeding and nutrition – Home-made rations .... 94
Learning activity 6: Animal feeding and nutrition – Feed conservation ........ 94
Learning activity 7: Reproductive management and breeding ..................... 96
Learning activity 8: Animal health – Tick biology and control ..................... 97
Learning activity 9: Animal Health – Detecting mastitis .............................. 99
Learning activity 10: General husbandry practices – Deworming .............. 100
Learning activity 11: General husbandry practices – Routine practices ..... 101
The icon indicates sections in the text where detailed step-by-step guidelines are provided on FFS activities.
The start and end of each guideline are marked by .
Learning activity 12: General husbandry practices – Body scoring as a technique for management decisions ............................................... 102
Learning activity 13: Milk marketing and processing – Milk market dynamics ................................................................................................ 103
Learning activity 14: Milk marketing and processing – Making yoghurt .... 105
Group dynamic exercises ......................................................................... 107
Group dynamics to energise participants .......................................... 108
Group dynamics to enhance participation ........................................ 111
Group dynamics to strengthen a learning topic ................................. 114
Group dynamics to strengthen group work and cohesion .................. 115
Group dynamics to solve conflict ..................................................... 119
Organisation of a field day ...................................................................... 122
REFERENCES and FURTHER READING ............................................................... 125
ANNEX 1: Example of FFS Grant Proposal Form .................................................. 126
ANNEX 2: Example of an FFS Certificate ............................................................... 128

Part II–1
1. INTRODUCTION
This section (Part II) of the Livestock Farmer Field School (FFS) Guidelines for Facilitation and Technical Manual provides practical advice on implementing and facilitating FFS activities to encourage high levels of participation and strengthen learning throughout the FFS cycle. The exercises are designed to guide facilitators. However, facilitators are strongly recommended to use them as examples and to create new ones that are adapted to the needs of their particular FFS. In other words, this section of the guide should not be viewed as a recipe book providing all the answers, but as a handbook that encourages facilitators to build on the guidelines and improve the methods and tools included.
This section is strongly interlinked with the other two parts of this guide. Part I: Farmer Field School Methodology – Principles and Concepts, defines aspects of the FFS approach and provides an overview of its activities. Part III: Animal Health and Production – Dairy Technical Manual provides the facilitator with reference material and backstops the guidelines for the facilitation of dairy cattle topics in FFS with technical information1.
Part II aims to translate the concepts and principles suggested into practical exercises, preserving the FFS philosophy throughout all planned activities. These exercises, combined with the creativity and imagination of the facilitator, will help the FFS to respond to participants’ requests in a participatory way. This section focuses on the core activities of an FFS, i.e. ground working, establishing an FFS, and implementing FFS core activities and guidelines for facilitation of livestock topics (special topics). The guidelines for these core activities are presented in accordance with the logical steps of FFS implementation. Pre- and post-FFS activities (i.e. the pre-conditions survey, Training of Facilitators (TOF) and FFS follow-up activities) are not included as this guide is primarily concerned with the implementation phase.
To give some understanding of the thinking behind the guidelines, Chapter 2 provides an overview of the principles of participation and the types and use of participatory methods and tools.
1 This Field Guide’s focus is on dairy cattle production owing to the fact that the experiences of the ILRI/DFID/
FAO Livestock FFS Project in Kenya were mainly focused on dairy cattle.
Chapter 1: Introduction

Part II–2
2. PARTICIPATORY METHODS AND TOOLS – AN OVERVIEW
The FFS approach is a participatory process focusing on farmers’ needs, knowledge and capacity for learning. Because the approach is based on the principles of participatory learning and action, this guide provides an overview of the principles of participation and the types of participatory methods and tools. It also provides guidelines on how the methods and tools can be used.
Principles of participation
Participatory methods and approaches are becoming increasingly important in the context of sustainable development, while participation, action research and adult education are all helping to empower the poor. Participation also helps to develop people as it enhances the communication and understanding between different groups. In addition, interaction between people from different institutional contexts tends to promote innovation.
There are many variations in the way participatory methods are used, not only because each site is unique, but also because the methods can be employed to serve many different objectives. This guide focuses mainly on the use of participatory methods for participatory planning, learning, and for monitoring and evaluation (M&E). When using participatory methods, FFS facilitators should take account of the following principles (adapted from Pretty et al., 1995):
• Multiple perspectives: Everyone is different and makes different evaluations of situations; therefore everyone’s opinion is important. Seek diversity not simplicity.
• Group learning processes: Ensure that groups interact and that diverse views are incorporated in the learning process. Unity is strength.
• Context specific: The approach should be adapted to suit each different condition, objective and community.
• Experts as facilitators: External experts should help people carry out their own studies, thereby learning and achieving their own objectives.
• Leading to change: The process of joint analysis and dialogue helps people to take action to implement the defined changes.
Participatory epidemiology
Epidemiology is the science that looks at the dynamics of diseases in a population (how diseases are transmitted, controlled and eradicated). Participatory epidemiology (PE) is based on the use of participatory techniques for the harvesting of qualitative epidemiological data contained within community observations, existing veterinary knowledge and traditional oral history. It relies on the widely accepted techniques of participatory rural appraisal (PRA; Mariner, 2001). The facilitators can use this information to disseminate
Chapter 2: Participatory methods and tools – an overview

Part II–3
information on disease prevalence, design relevant participatory field experiments and introduce more successful surveillance and control strategies.
PE is extremely useful in helping new facilitators evaluate local knowledge, understand farmer perception and acquire information on local ethno-veterinary practices. When PE exercises are repeated, they will evaluate changes in knowledge and practices and thus become part of the PM&E plan of the FFS. Many of the participatory methods described below can be used for PE purposes.
Types of participatory methods
The three main ways to apply participatory methods are:
• Informal interviewing – ORAL methods: Semi-structured interviews, focus-group discussions, drama and role plays, letter exchanges, songs, poems, informal dialogues, etc.
• Illustrative approach – VISUAL methods: Sketches, maps, calendars, Venn diagrams, photographs, etc.
• Ranking and scoring – VALUATION methods: Matrix scoring, proportional piling, pair-wise ranking, etc.
All these methods are supported by knowledge of secondary literature and direct observation. Ideally, the methods are used together. The results from one method should be compared with those of other methods to ensure the data are trustworthy. This process of comparison and cross-checking is called triangulation (Figure 1).
Other important features of participatory methods are:
The use of a key person (key informant): Within communities, certain local people are recognised as possessing particular knowledge and skills. These local experts or key persons can be identified by asking community members to state who knows most about a certain topic, and then seeing which names are mentioned repeatedly. Key persons can be used to provide detailed information on specialised areas, such as specific aspects of crop production, animal husbandry or human health.
Building relationships: The type of interaction between a facilitator and farmers determines the relationship and trust that develops, and affects the types of issues and information that farmers are willing to discuss in an open manner. Therefore, facilitators must be constantly aware of their own attitudes and behaviour.
Respect: Facilitators must believe that a farmer has something useful to say. This means respecting local views and opinions and being open to ideas that may not necessarily agree with modern science. This does not mean that as livestock experts we must automatically accept all indigenous knowledge as valid and useful. The idea is to identify local knowledge and skills that seem to agree with our professional know-how, and to develop existing local capacity further. At the same time, possible gaps in local knowledge can be identified and discussed.
Chapter 2: Types of participatory methods

Part II–4
Non-verbal communication and listening skills: As outsiders, everything we do in a community influences information flow. This is not only what we say, but also how we behave. Such non-verbal communication can take many forms, for example, how we dress and appear, what we carry with us – our possessions, how we travel – on foot, bicycle, local transport or project vehicle (bearing the project logo), our body posture and our behaviour. For examples see Box 1.
Do-it-yourself: One way to show people that you are interested in their way of life is to take part in the everyday working tasks that they perform. This can show people that you are not too proud to work alongside them and at the beginning of a project it helps to create good rapport. In many cases, facilitators have to be taught how to perform a certain job. This role reversal, where the ‘expert’ learns from local people, shows that local knowledge and skills are valuable.
Work in teams: Many of the methods work best when a team of two or more facilitators work together. Roles within the team should be clearly defined. One person should be the facilitator. The facilitator introduces the session, asks questions, explains the method and checks the information as it arises from the farmers. The facilitator interacts directly with the farmers and does not need to write anything down. This avoids interrupting the communication flow. Another team member acts as the recorder. This person usually
Chapter 2: Types of participatory methods
Figure 1. An overview of types of participatory methods and the use of triangulation Source: Mariner, 2001.
Direct observation
Direct observation
Direct observation
Secondary data and literature
Secondary data and literature
Secondary data and literature
Visualisation
MappingVenn
and Flow diagrams
Transects
Ranking and scoring
Pair-wise ranking
Simple ranking
Matrix scoring
Proportional piling
Informal interviews
Semi-structured
Structured
Time lines
Direct observation
Triangulate

Part II–5
sits slightly back from the group and records the discussion or results as they arise. The recorder also watches the group dynamics and notes who is contributing and who is not. If necessary, the recorder can remind the facilitator to include people who are not contributing to the discussion.
Team members need to prepare their use of participatory methods and decide who is going to do and say what. It can be very confusing for farmers if, for example, the team members interrupt or contradict each other when explaining a particular method.
Box 1. Non-verbal communication dos and don’ts
• Don’t dress formally or in expensive clothes: this creates the impression that the facilitator is more wealthy and powerful than the farmers.
• Do sit at the same level: sitting at a higher level makes the facilitator automatically look down on the farmers.
• Do make proper personal introductions and begin meetings according to local customs and manners: this gives the impression that local customs are important.
• Do arrange meetings and interviews at times to suit local people: farmers are busy people and may only be available at certain times.
• Don’t show signs of boredom or fatigue, e.g. yawning.• Don’t show signs of impatience, e.g. foot tapping or repeatedly looking at a
watch.• Don’t dominate the discussion or interview and don’t lecture people.• Do accept offers of local food or drink.
Chapter 2: Types of participatory methods

Part II–6
Informal interviewing – ORAL methods
1. Semi-structured interviews
Background Informal dialogue and interviewing is generally one of the first steps in participatory planning activities. Taking time to talk to people will set the right atmosphere. Interviewing is a specialised skill that improves with practice. Guidelines on how to use interview methods and techniques are presented below.
Objectives• set the right atmosphere for FFS development• collect general and specific information.
TimeInterviews should be planned to last about an hour. After an hour, participants will begin to lose interest and the quality of information will decline. Learn to spot signs of fatigue or boredom.
Steps1. A participatory approach does not use interview questionnaires. Instead, the facilitator
prepares a checklist of important points and exercises to be covered. This allows the interview to be flexible and the farmers to express themselves in their own words. Box 2 contains an example checklist that identifies and prioritises animal health problems. It provides a starting point and facilitators should adapt it to local needs and personal preferences. A checklist provides overall direction and ensures no major points are
Box 2. Checklist used in semi-structured interviews
1. Introduce the facilitator. 2. Identify the farmers. 3. Describe farmer enterprise/activities. 4. List livestock species kept and their roles. 5. Discuss husbandry systems. 6. Map grazing locations. 7. Identify and describe problems in one livestock species enterprise (e.g. poultry or
dairy). 8. Rank problems. 9. Rank diseases (e.g. using pair-wise ranking).10. Direct observations (e.g. transect walks and clinical examinations).
Chapter 2: Informal interviewing – ORAL methods

Part II–7
missed. It also allows time for the farmers to deviate into areas of special interest to them and for the facilitator to investigate specific themes raised by the farmers. These diversions are often a gold mine of information that would have been missed in a rigorously structured interview.
2. The site and time of interviews has a large effect on the amount of information gathered. Unfortunately, the facilitator does not always have control over this aspect, but every effort should be made to arrange a convenient time and a quiet and comfortable location.
3. The first step in any interview is to perform proper introductions, which should be accurate and should not bias the response of the participants. The facilitator must also explain the purpose of the interview, taking care not to put too much emphasis on one particular subject, or the farmers’ replies will also emphasise that topic. The facilitator must be careful not to raise community expectations concerning future projects or services. Normally, the facilitator records the names and community memberships of the farmers.
4. It is essential to the reliability of the information collected that questions are open-ended and do not restrict or direct the farmer to a particular response or type of response. Open questions begin with “who”, “how”, “what”, “where”, “when” or “why”. Avoid closed questions that can be answered with a simple “yes” or “no”. A good question does not make assumptions. In an animal health appraisal it is often best to begin with a question such as: “What animal health problems are you experiencing?” Questions should be ordered so that the interview progresses from general themes to specifics. As far as possible, the farmers should determine the direction of the interview. As a result, the majority of questions cannot be pre-planned.
During interviews, it is very important to observe as well as listen. Are the farmers relaxed and confident? Is there eye contact? What types of body language are being expressed? Are some topics sensitive? Is everyone participating? Who is not participating? Are some people comfortable and others not? What are the differences in appearance between those participating and those who are not? Is gender, wealth or age the issue (don’t ask, observe)? Follow-up interviews can be arranged, with ‘non-participating’ participants in different groupings where they may feel more comfortable.
5. ‘Probing’ is asking detailed questions on a specific subject that has been raised by the farmers and can help gather more detailed information on a particular subject. Probing can also verify the internal consistency of information: an important means of data quality control. Probing helps to establish the plausibility of statements made by the participants through expanding on the detail and background of the issue.
Chapter 2: Informal interviewing – ORAL methods

Part II–8
2. Focus-group discussionA focus-group discussion aims to collect general information, clarify details or gather opinions from a small group of selected people who represent different viewpoints. A group of 4–8 people is ideal. The group is presented with a broad question, for example: “What impact do you think the agro-ecosystem analysis (AESA) has on farmer practices?” Let the group discuss this question for the time period agreed upon. The facilitator observes and helps the group to maintain the focus of the discussion. After the discussion has ended, the facilitator notes down the results.
Chapter 2: Informal interviewing – ORAL methods
3. Drama and role playDrama and role play can explore a topic in a relaxed, creative and expressive way. For planning purposes, a drama can be used to ask FFS participants to play how they want their lives to be after FFS. For M&E purposes, participants are asked to respond to a question by expressing their opinions in the drama. Role plays can be used to clarify a specific learning topic (see page 87: Approaches for facilitating special topics in FFS).
4. Letter exchangeLiterate farmers can be asked to write a letter expressing their needs or to respond to a letter (from the facilitator or another FFS) that poses certain questions. For example, FFS X asks FFS Y’s opinion about sustainability issues. The letter can be a genuine request by a party or an imaginary one written by the facilitator to encourage discussion on a specific subject.
5. Daily activity analysis and diaries A diary keeps a record of events over time and can be used to collect information regarding changes in the lives of individuals or groups. Diaries are simple records of facts, such as the attendance of participants in the FFS, and can be kept by individual farmers, groups or facilitators.

Part II–9
6. Change or success storiesThe change or success story of an individual or group identifies significant/critical changes – both positive and negative – relating to a key objective. Recording these stories highlights a project’s impact and people’s perception of it. Stories document a sequence of events over time related to a person, location, household or organisation and give insight into the history of a community or the impact of the FFS, e.g. how people deal with change and why change occurs in specific ways. Stories also help the project team to learn about people’s experiences and expectations and can help highlight obstacles to future plans.
7. Historical trends and time lines These help to obtain a historical understanding of sequential changes relating to particular points of interest. From an M&E perspective, this could focus on specific indicators, be used as a trigger in discussions to assess if certain changes can be attributed to project activities, and list changes in context that help explain effects of the project. Participants are asked to draw a line and to define the start and end (i.e. dates, major events, seasons, etc.). They then draw meaningful events in the relevant place along the line, inviting group discussion.
8. Transect walksThe transect walk helps in mapping data collection and monitoring. The facilitator takes a structured walk (for example, in a zig-zag or X-mode) through a selected area, observing farmer activities and environmental characteristics. The facilitator needs to identify indicators for observation before the walk and should record the findings in a diagram (usually a cross-sectional view of the route clearly indicating the key observations).
Chapter 2: Informal interviewing – ORAL methods

Part II–10
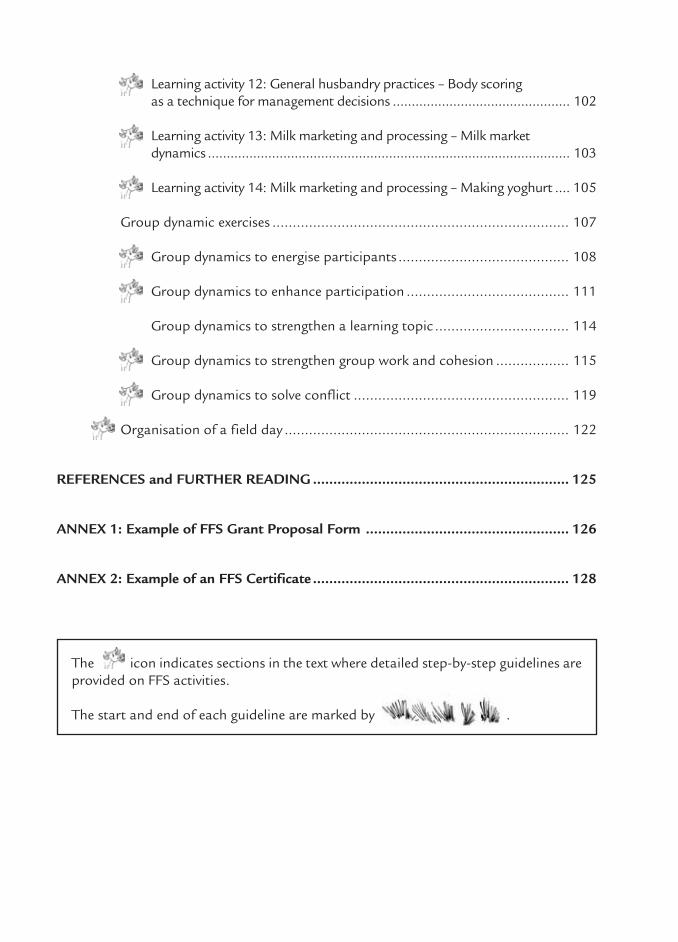
Illustrative approach – VISUAL methods
1. Participatory mapping
BackgroundMapping is a popular participatory method among farmers and a useful tool to locate biophysical, economic and social indicators (e.g. problems, resources, innovations) that have a geographic distribution. Examples of maps include livestock mobility and grazing maps, natural resource maps, social maps, etc. Mapping is a useful method as both literate and non-literate people can contribute, and when large maps are constructed on the ground many people can be involved and contribute ideas. People will correct each other, providing accurate information. Maps can represent complex information that would be difficult to describe using text alone and can act as a focus for discussion.
Objectives• provide a visual representation of information of how people perceive any focus issue• facilitate recording, analysing and feedback.
MaterialsLocally available materials (sticks, stones, leaves, etc.) and flip charts, marker pens and notebooks.
TimeOne hour.
Steps1. Mapping works best with a group of 5–15 farmers. Find a clean piece of open ground.
Explain that the map should be constructed on the ground using any materials that are to hand (e.g. sticks can be used to show boundaries) and that you would like the group to produce a picture showing features such as:
• geographical boundaries; in pastoral areas, these should include the furthest extent of grazing
• main human settlements• roads and main footpaths• rivers, wells and other water sources• grazing areas, farmed areas, forests and other natural resources• services e.g. veterinary clinics, drug shop or agrovet shops• ethnic groups• seasonal movements of livestock by livestock type• seasonal and spatial contacts with herds from other communities or wildlife• areas of ‘high risk’ (e.g. tsetse flies or ticks).
Chapter 2: Illustrative approach – VISUAL methods
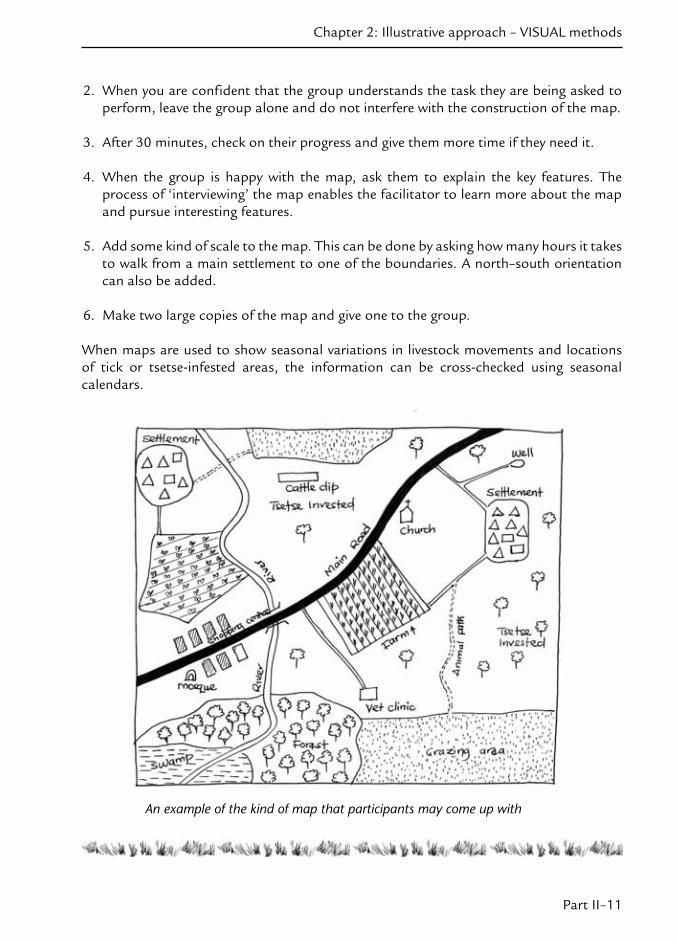
Part II–11
2. When you are confident that the group understands the task they are being asked to perform, leave the group alone and do not interfere with the construction of the map.
3. After 30 minutes, check on their progress and give them more time if they need it.
4. When the group is happy with the map, ask them to explain the key features. The process of ‘interviewing’ the map enables the facilitator to learn more about the map and pursue interesting features.
5. Add some kind of scale to the map. This can be done by asking how many hours it takes to walk from a main settlement to one of the boundaries. A north–south orientation can also be added.
6. Make two large copies of the map and give one to the group.
When maps are used to show seasonal variations in livestock movements and locations of tick or tsetse-infested areas, the information can be cross-checked using seasonal calendars.
Chapter 2: Illustrative approach – VISUAL methods
An example of the kind of map that participants may come up with

Part II–12
2. Seasonal calendars
BackgroundSeasonal calendars are a useful method for understanding seasonal variations in disease occurrence, weather, labour needs, cash, fodder availability, etc. They help participants to visualise, understand and discuss when and why problems occur. The following exercise looks at seasonality of diseases and would normally be used during a PE investigation.
Objectives • enhance understanding of seasonal variations and help plan to prevent and control
problems• guide decision-making (e.g. to come up with a disease control strategy).
MaterialsLocally available materials (sticks, stones, leaves, etc.), about 30 stones, markers, flip charts, pens and notebooks.
TimeOne hour.
Steps1. Construct a one-year time line. Explain to the farmers that you are interested in learning
about how a specific topic (e.g. a disease) changes throughout the year. Draw a horizontal line on the ground to represent a year. The line should be at least one metre in length. Divide the line according to local definitions of month or season. Label each month or season using either a piece of card with the local name or an everyday object to represent each month or season. Carefully explain the meaning of the cards or objects to the farmers and ask them questions to check that they understand.
2. It is useful to choose rainfall as the first event to be illustrated on the calendar. This is because in the tropics, where temperature variations are relatively small, rainfall is often the main determinant of livestock movements, animal interactions and populations of disease vectors such as biting flies, snails, etc. Give the farmers a pile of about 30 stones and ask them to divide the stones into seasons (or months) to show the typical pattern of rainfall throughout the year. The greater the rainfall in a particular season, the greater the number of stones assigned to that season. Similarly, a season with no rain should have no stones. A similar exercise can be done for temperature, wind, frost, etc. Record the final scores and leave the stones in place.
3. Show seasonal patterns in the topic under discussion (e.g. diseases and vectors) by asking the farmers to illustrate on the diagram the occurrence of the events under investigation (e.g. livestock diseases identified previously during a livestock disease scoring or ranking exercise). Each disease or vector should be represented by written labels, pictures or actual specimens. It is often useful to pre-prepare the pictures on pieces of card (see page 14: Using drawings and pictures). Remember that only literate farmers can understand
Chapter 2: Illustrative approach – VISUAL methods

Part II–13
written labels. Illiterate farmers, although very knowledgeable on animal health matters, can become isolated from the method if written labels are used. Take each disease or vector in turn, and ask the farmers to show the seasonal variation using piles of stones. Use the same number of stones for each item.
4. Interviewing the diagram involves asking the farmers to explain interesting aspects of the diagram, i.e. the positioning and relative scores of the various diseases and parasites. Use probing questions (e.g. “Why?”, “How?”, etc.) to follow up interesting leads. Examples of questions include: “Why do you see this disease mainly in the wet season?”, “You’ve shown me that this disease (give local name) is seen mainly in the wet season – when is the best time to prevent this disease?” and “Why do you see this disease in the dry season?”
This stage is crucial. It helps to cross-check the information presented in the diagram and enables the facilitator to explore the reasoning behind the scores. It also ensures local analysis of the information. The facilitator should take detailed notes of the questions and discussion – these notes are part of the ‘results’ of the seasonal calendar and should be presented in any reports arising from the use of the method. Give a copy of the result to the farmers for their records.
Chapter 2: Illustrative approach – VISUAL methods
Example of a seasonal calendar

Part II–14
3. Using drawings and pictures
BackgroundMany participatory methods, such as interviews, matrix scoring, mapping, seasonal calendars and proportional piling, can be conducted using no written words. An important aspect of participatory methods is their capacity to reach illiterate people and involve them in the description and analysis of local problems. With methods requiring people to write or understand text, illiterate people can easily become isolated and may not contribute because they are embarrassed, or because literate people dominate the discussion. Drawings and pictures, especially when made or taken by the FFS participants themselves, are easily understood and thus facilitate learning.
Chapter 2: Illustrative approach – VISUAL methods
Lacrimation
Diarrhoea
Mortality
Examples of clear drawings

Part II–15
Objectives• enhance involvement of illiterate FFS participants and facilitate discussion and learning• depict impact and track changes through a sequence of images• record, analyse data and share findings
MaterialsIf taking photographs: a disposable or digital camera. When using drawings, make sure they are clear, and provide pens/markers in different colours and paper.
Steps1. By picturing the same spot at regular intervals, changes can be identified. This will
provoke discussion about the causes of the changes, whether they are a sufficient explanation and what other actions might be needed, etc. It is also useful for auto-evaluation when actors take pictures of their own performances.
2. When using pictures, it is always necessary to check that the farmers understand the meaning of the pictures. The facilitators need to show each picture to the group and explain the meaning, e.g. this is a picture of a bull that has died suddenly or this picture shows a cow with wounds on its feet.
3. When discussing causes or sources of diseases associated with parasites, actual specimens of the insects are better than pictures and ensure that the facilitator and the farmers are talking about the same thing. Pictures can be misleading when there is no scale to show the actual size.
4. Venn diagrams/network diagrams
Venn diagrams show the relationships between groups, institutions and individuals. The technique uses circles of different sizes to indicate the significance of the actor, while the position of the circle marks the closeness of relationship. Network diagrams show changes in the type and degree of contact between people and services.
Chapter 2: Illustrative approach – VISUAL methods

Part II–16
Ranking and scoring – VALUATION methods
1. Pair-wise ranking
BackgroundOften it is important to prioritise items to be more efficient. During interviews, the facilitator collects a lot of information that will need to be classified in order of importance to the farmer. Pair-wise ranking helps to order long lists of items like problems, diseases, animal species, etc.
Objective• gain a consensus from a group on the ranking by importance of a large number of items
(e.g. diseases).
MaterialsSmall objects (local materials) or cards, flip charts and markers.
TimeDepends on the size of the list: for 10–15 items, around two hours are needed.
Steps1. Identify the items to be scored using informal interviews (see page 5: Guidelines for
informal interviewing) to get a list of all the problems/diseases/options, etc. Ask for the local names of diseases. Record the different things mentioned by the farmers on separate pieces of card using the local language. Check that at least one farmer is literate. If all farmers are illiterate use different everyday objects to represent each named item.
2. Conduct pair-wise comparison of the named items:
1. First, choose two of the named items (e.g. animal disease versus lack of water). Show them to the farmers and check that they understand the meaning of the name cards or objects.
2. Ask which of these two is most important. The farmers will discuss among themselves and choose one of the problems.
3. Ask why that issue is more important than the other. The farmers will provide a list of reasons why they consider it to be important.
4. Ask how you recognise these two problems. The farmers will provide a list of criteria (e.g. corresponding to clinical symptoms).
5. Ask what you can do when faced with this situation. The farmers will provide solutions (e.g. control and treatment methods).
6. Ask when they saw this situation most recently. The farmers will provide frequency information.
Chapter 2: Ranking and scoring – VALUATION methods

Part II–17
2. Matrix scoring
BackgroundThis method is used for understanding local characterisation of (livestock) problems, ideas, diseases, etc. It facilitates communication, e.g. to establish whether a facilitator and a livestock keeper are talking about the same disease.
Objective• establish the relationship between certain criteria and the items evaluated. For example,
what do farmers understand about the relationship between clinical signs and different diseases?
In participatory methods, the reasons, criteria and specific information provided by farmers are usually called indicators. When you have asked questions 2–6, you should have a list of indicators like clinical signs (diarrhoea, coughing, etc.) and the extent of a disease regarding morbidity and mortality, production or economic losses, types of species or age groups affected, etc. Record all the responses and repeat the process until each problem has been compared with every other. At the end of the pair-wise comparisons, you should have a long list of indicators. The problem that ‘wins’ most head-to-head comparisons is ranked the highest. The illustration below shows the results of a comparison.
Chapter 2: Ranking and scoring – VALUATION methods
Example of a pair-wise matrix ranking four identified problems

Part II–18
MaterialsAbout 30 stones, locally available materials such as sticks, leaves, stones, etc., cards, markers and flip charts. Pictures and drawings can facilitate the exercise.
TimeOne hour.
Steps1. Score the topic of discussion verses indicators. If the topic of discussion is animal
diseases, write the disease names on cards or use different objects to represent them. Place the cards/objects in a row on the ground. Once again, check that the farmers understand the meaning of the cards or objects. Collect a pile of stones. You will need five stones per disease (so if six diseases are being scored, 30 stones are required). Remind the farmers of the first indicator mentioned during the pair-wise comparison. Write this indicator on a piece of card or use a picture to represent the indicator.
2. Ask the farmers to distribute the stones according to the strength of the relationship between this indicator and each of the diseases in the row. Explain that all stones must be used.
3. After the stones have been allocated to each item, check the scoring with the farmers and allow them to alter the distribution of stones if they wish. Record the final number of stones allocated to each disease.
4. Repeat steps 1–3 with the same diseases, placing a new indicator below the first. (It is useful to prepare all the pictures for the indicators in advance. Draw the pictures on strong pieces of card that will not become damaged in the field. Also see the handout: Using pictures to assist participatory methods.) Keep going until all the indicators are scored. You should have the beginnings of a matrix on the ground. The illustration below shows how the matrix might appear. At the top of the illustration the various objects can be seen representing the diseases. Along the left side are various picture cards depicting the indicators. The stones will show the associations between the diseases and the indicators.
5. The facilitator should interview the matrix on the ground, asking questions and developing discussion among the participants. By physically pointing to particular scores, the facilitator can summarise all the indicators associated with a particular disease. Open and probing questions can be used to explore the knowledge of the farmers. This is the most difficult stage of the method. Facilitators often forget to ask additional questions about the matrix. Copy the matrix onto flip chart paper.
Chapter 2: Ranking and scoring – VALUATION methods

Part II–19
Chapter 2: Ranking and scoring – VALUATION methods
Example of matrix scoring

Part II–20
3. Proportional piling
BackgroundProportional piling helps to compare the importance of one element versus another. It can be used to understand the importance given to different problems, to visualise resource allocation or, as in PE, to evaluate herd age-structures, disease incidence and mortality.
In a FFS, proportional piling is a useful tool for PE. It is useful for production systems with large numbers of animals where it is difficult to assess herd size. It also avoids having to ask sensitive questions like “How many cattle do you own?” The method involves comparing different diseases and therefore avoids exaggeration of a particular disease when assessing incidence and mortality.
Objectives• understand the importance given by FFS participants to different problems• visualise resource allocation.
TimeTwenty minutes per person interviewed.
MaterialsNotebook, pen, 100 stones, paper, markers.
Steps1. Proportional piling is done with one farmer at a time. It is important to interview
a large number of farmers within the same area to achieve meaningful results.
2. Ask the farmer to define the different animal categories in a herd, e.g. suckling calves, weaners, lactating cows, bulls, oxen, etc.
3. For each animal category:• give 100 stones to the farmer and tell him/her that they represent all of his/her
calves during last year. The farmer does not know the number of stones• ask the farmer to divide his/her herd of calves (100 stones) into calves that got
sick and those that remained healthy• take the pile of stones representing the sick calves and ask the farmer to
distribute them against the five majors diseases (plus add a category for any other diseases)
• for each disease, ask the farmer to divide the pile into animals that recovered and those that died. The illustration opposite shows a diagrammatic representation of the method.
Chapter 2: Ranking and scoring – VALUATION methods

Part II–21
4. Since we started with 100 stones, the number of stones under each disease represents the percentage of animals that were sick during the last year. This is the incidence of that disease. The number of stones representing the percentage of animals that died from each disease is the specific mortality rate.
5. Repeat the process for all animals or animal categories: weaners, lactating cows, bulls, oxen, etc.
Chapter 2: Ranking and scoring – VALUATION methods

Part II–22
3. FFS PREPARATION
In Part I, the preparation for establishing a FFS started with a pre-condition survey and the TOF. These two activities are normally performed by Master Trainers or FFS experts and thus are not part of facilitators’ responsibilities and activities. Master Trainer responsibilities and activities are explained in FFS Training of Facilitators Manual, 2005, published by ILRI. Guidelines are provided for the various steps in the preparation i.e. ground working and the establishment of an FFS.
General ground working
Basic area information is collected using participatory tools to better understand the local production systems and enable future M&E. The following activities should begin at least a month ahead of the planned start of the FFS. The steps to follow in ground working are:
a) The initial survey b) The awareness-raising meeting – Introducing the FFS c) Identification of the focal activity – FFS enterprise d) Identification of participants e) Identification of the learning site
The initial survey
BackgroundInitial contact with the community needs to be made to determine whether the area has suitable potential for an FFS. In most parts of the developing world, the first step is to talk to the community opinion leaders. They are the route to the community. In some cases the community and the facilitator already know each other, or the community has requested the FFS. The first contact with the community opinion leaders is important since you want them to give you the green light and you want to get a feel of the attitudes to expect. Once you have the approval of the leaders you can plan together for an awareness-raising meeting where the community and the facilitator can express their needs and identify common ground.
Objectives• get the advice and approval of the community opinion leaders on the possibility of
starting an FFS• identify opportunities for collaboration between the facilitator and the community• plan a date for an awareness-raising meeting with the whole community.
MaterialsPen and notebook.
Chapter 3: FFS preparation

Part II–23
Familiarising yourself with an area and talking to community leaders are essential to determining whether a community is suitable for FFS.
Here a facilitator and community leaders go on a transect walk together.
Chapter 3: The intitial survey
7. Prepare for the awareness-raising meeting (see below).
TimeApproximately three days in a new area.
Steps1. If you are new in the area, make an appointment with the local opinion leaders/chiefs.
2. Visit the leaders at their house or office or attend the local development committee meetings.
3. Initiate a conversation on the activities going on in the community, the successes and problems and, if you think the conditions are suited for an FFS, explain your intentions.
4. Level expectations by stressing that FFS are a training methodology and do not provide materials, gifts or presents, and that the FFS aims to work with willing and committed (livestock) farmers.
5. Once you have the green light – and only when you are confident that there is a potential for an FFS – you can plan the date and site for the sensitisation meeting.
6. If you do not know the area, have a walk around the community to become aware of its environmental and cultural characteristics (do a transect walk, see page 9).

Part II–24
The awareness-raising meeting – Introducing the FFS
BackgroundWhere FFS are new and/or not all community members are aware of the principles, a meeting is needed to introduce the concept. To explain the FFS well, so that participants know what to expect, it is important that this first contact makes a sound and clear impression. Show the community what they can expect when participating – give them a little FFS experience!
Objectives• introduce the FFS methodology, with its specific characteristics, to community members • provide those community members who are interested in participating in the FFS with a
clear and real view of the FFS approach so they know what to expect.
MaterialsPieces of paper/flip charts, pens/markers, one or more tick specimens (or any other insect that is common) and a display board.
TimeAround 45 minutes.
Steps1. The facilitator initiates the activity by asking the farmers to draw a tick. Everybody knows
what a tick looks like, so it should not be difficult. This exercise can be carried out by each person or by a few volunteers (the number of people present and the level of literacy will dictate how you go about it, although it is good to have as many people drawing as possible).
2. The facilitator collects the drawings and displays them on a board or somewhere where all the farmers present can clearly see them.
3. The facilitator asks how many legs the ticks in the drawings have. The participants look, count and share what they see.
Chapter 3: The awareness-raising meeting – Introducing the FFS

Part II–25
4. If the number of legs differs from drawing to drawing, the facilitator mentions that people have different ideas and asks why that is.
5. The facilitator brings out a tick (or more than one) and shows it to the farmers, asking them to have look and count how many legs the tick has.
6. The facilitator explains that by observing and discussing the tick, we are able to determine how many legs it has (something we previously did not know or were not paying attention to). We did not need to bring in an expert. Together we found out, simply by paying attention, observing and discussing together – that this is what the FFS is all about.
7. The facilitator then starts explaining the concepts, principles and activities of an FFS.
Chapter 3: Identification of the focal activity – FFS enterprise
Identification of the focal activity – FFS enterprise
Background Past experience shows that is important to dedicate sufficient time to identify the focus of the FFS activity. Some farmers have previously been involved in activities that were of little interest to or imposed on them, from which they benefited little. This guide focuses on cattle, but that does not imply that every FFS should be about cattle production. The selection of the FFS focal activity depends on farmers’ needs and interests. For a cattle-focused FFS, the community’s (or participating farmers’) main activity should be cattle production. The problems they are facing should be relevant so they feel a need to look for solutions. For this reason, during the initial survey (page 21) it is important for the facilitator to determine the community’s main activities and livelihood sources (i.e. of the food and income) and whether they face significant problems. The facilitator also has to decide if the focal activity (enterprise) is suitable in the area and has potential for development.
Objectives• ensure the FFS is targeting the right activity (enterprise) and problems• ensure there is potential to solve these problems• ensure both the FFS group and the facilitator have an opportunity to discuss and agree
upon the focal activity (enterprise) and problems identified.
MaterialsFlip chart, markers (different sizes and colours), cards, manila papers, pens, notebooks.
TimeThree hours.

Part II–26
Steps1. Search for Background information to gain an understanding of the area, its conditions
and problems. Local ministries and community organisations normally have a database containing reports, maps and other useful documents.
2. Verify the information with visits to the community. During these visits the following participatory methods can be applied:
• a transect walk is a structured walk through a selected area to observe the main activities and environmental characteristics
• mapping can be very useful during this stage of the FFS to identify the focal activities (enterprises) of the community. Maps can represent complex information that would be difficult to describe using text alone and act as a focus for discussion and planning (see page 10: Participatory mapping)
• a seasonal calendar is a useful method for identifying farmers’ associations between diseases, environmental factors and interactions with animals, vectors and human beings (see page 12: Seasonal calendars)
• semi-structured interviews are used to gain face-to-face information from individual farmers or a small group. To identify a focal activity, ask the following types of questions: “Is it a valued economic activity?”, “Is it culturally accepted?”, “Is it controversial?”, “Is it suitable in the area?”, “Does the focal activity (enterprise) have problems?”, “Are there solutions for these problems?”, “Is there a potential for development in that community?” and “Are the potential solutions self-sustaining?” (see page 5: Semi-structured interviews)
Identification of participants
BackgroundAn FFS takes place in the community, so it is important to target people who are involved in making decisions on the focal activity, if the community is to benefit from the knowledge and skills gained during an FFS. When selecting participants, it is easy to choose the loud, rich and educated, because they are visible in group meetings. The challenge is to reach the people who will benefit most from their participation.
It is also important to understand gender relations and cultural practices in respect to the focal activity (enterprise). For example, in most traditional communities women rarely participate in educational activities. However, they are often responsible for looking after the animals and undertaking the daily routines that maintain the health of livestock and crops. To select the most appropriate FFS participant within a family (husband, wife, son, etc.) an FFS participant analysis needs to be performed, keeping in mind the selection criteria presented in Part I, page 11.
Chapter 3: Identification of participants

Part II–27
Objectives• identify and select 25–30 participants who will find the FFS relevant for their
development• mobilise FFS participants who are committed to investing in learning and community
development• create a group with common interests (these are the people that have a major interest
in the focal activity).
MaterialsFlip chart, paper, markers in two different colours, tape, 100 stones.
TimeThree hours.
Steps1. In a plenary session with interested farmers, the facilitator asks the group what the
activities (tasks) are in the identified focal activity (e.g. livestock production).
2. Write a detailed list of activities on a flip chart. In livestock production this can be feeding, milking, fodder production, washing utensils, selling milk, etc.
3. The facilitator asks people to suggest how the society is differentiated (by roles/status/age). For example, young women, young men, old women, old men, community officials, farm workers, etc.
4. Make sure that all the participants understand the classifications and then form groups by the classes identified. Thus the participants have to stand with the group they think they belong to.
5. The facilitator and the group use the list of activities and the different classified groups to form a matrix, marked out with the tape (see illustration overleaf).
6. Each group receives the same number of stones and has to discuss which activity they are responsible for by putting stones in the matrix. If they think they are very responsible for a specific activity they put down three stones; two stones when they share the responsibility of the activity; one stone when they help out and no stones when they are not involved in that activity.
7. When the groups have completed the exercise, the matrix is analysed by all in a plenary session to see who is responsible for what.
8. The facilitator can use the following questions to enhance the discussion: “For this activity (e.g. milking), which group is the most responsible?”, “Which groups work together (share specific responsibilities)?” and “Which group(s) is/are the most important in livestock production?”
Chapter 3: Identification of participants

Part II–28
9. Following the discussion and looking at the results of the matrix, the facilitator asks the group to choose which group(s) is/are important for livestock production, then asks: “Is this group the most suitable to participate in an FFS on livestock?” In addition, they discuss what the profile of an FFS participant looks like (i.e. responsible for livestock, a small-scale farmer, committed to participate throughout the FFS, share information, etc.)
10. Discuss who (specific people out of the whole group) should be the direct participants of the FFS (e.g. let each person write a name on a piece of paper of someone they think is qualified as an FFS participant). Explain that the entire family is an indirect member of FFS and that the direct FFS participants have the duty to pass on what they learn to other family members and neighbours.
11. Make a first list of the people that decide to participate in the FFS.
This is not the final meeting for the identification of participants. It is more for sensitising community members to who should be participating.
Chapter 3: Identification of participants

Part II–29
Chapter 3: Identification of the learning site
Identification of the learning site
BackgroundThe FFS is a ‘school without walls’ and the field and/or animal are the main learning tools. Farmers learn directly from what they see, collect and experience and not from a text book, pictures or other extension materials. The advantages of learning in the field are that the materials are completely relevant to local conditions and the problems are recognised and owned by the farmers. However, the learning site needs to meet certain criteria to provide suitable conditions.
Objective• select a learning site that has the required conditions to facilitate learning.
MaterialsFlip charts, markers, coloured paper and map of the community/area.
TimeOne hour.
Steps1. Use the map of the area made during the participatory planning. If this has not yet
been made, divide the group in two and ask each group to make a drawing of the community/area indicating each participant’s farm, settlement, other farms, cow sheds, rivers, roads, etc.
2. Place the map(s) where everyone can see it/them.
3. Identify with the group the study objects required for learning, e.g. field, cow, farm structure, meeting place, etc.
4. Follow the criteria for selection of learning site presented in Part I, page 12.
5. Use the maps to discuss the selection criteria and select the appropriate sites. Mark the location of the sites/animals selected on one of the maps as this can be used as reference and demonstration material. Ranking methods can be used if FFS participants have conflicting opinions. The different sites chosen need to be directly linked to the learning programme plan by answering the question: “Which FFS activity will take place where and when?”

Part II–30
Establishing the FFS
A significant part of the FFS preparation phase, after having completed ground working activities, is the establishment of the FFS. Guidelines are provided to implement the following activities required to establish a farmer field school:
• Participatory introduction of participants • Leveling of expectations • Host team • Participatory planning of FFS activities – Developing an FFS GAP:
1. Establishing a FFS group 2. Problem analysis and ranking 3. Identifying potential solutions 4. Developing the learning programme 5. Developing a detailed budget 6. Participatory monitoring and evaluation plan
Participatory introduction of the participants
BackgroundWhen the ambiance is good, people feel comfortable and give their best. The first step in establishing a good learning environment is to ensure the FFS participants know and feel comfortable with each other. Even when the participants already know each other it is useful to do this exercise to encourage participation from the beginning. It breaks the ice. Two methods for participant introduction are presented below:
Objectives• encourage the participants to get to know each other and learn a little about each
others’ personalities• break down any barriers between the farmers and the facilitator (to help participants
relax)• discover what the participants want to achieve from the FFS course.
Option 1: Pair-wise interviewingThe key to this exercise is that participants do not introduce themselves. In this way they do not become nervous while waiting for their turn. The exercise is neutral to seniority as participants sitting next to each other do the interview together. It can happen that you as a facilitator may find out only later that a junior officer is reporting on a director or vice versa.
MaterialsA piece of paper and a pen/pencil for each participant who can write.
Chapter 3: Establishing the FFS

Part II–31
TimeApproximately 45 minutes (five minutes for explaining the exercise; five minutes for the interview and two minutes each per presentation. The total amount of time depends on the number of participants).
Steps1. Split the participants into pairs (e.g. by combining people that sit next to each other).
Ask each participant to interview their partner by focusing on questions such as: “What is your name?”, “Can you share your experiences as a farmer?”, “What do you do?”, “What is your interaction with extension workers?” and “Can you name two likes and dislikes?”
2. After five minutes of interviewing each other, participants then report in a plenary session about their partner, summarising the main information in two minutes.
Chapter 3: Participatory introduction of the participants
Option 2: Spider web introduction
MaterialsA ball of sisal twine.
TimeTwenty minutes.
Steps1. All the participants form a circle.
2. One participant holds the ball of twine and says his/her name. The participant then holds the end of the twine in his/her hand and throws the ball to any another participant.
It is important that participants get to know each other so that they feel comfortable and so can contribute their best to the FFS

Part II–32
3. The participant receiving the ball says his/her name and throws the ball to another participant, keeping hold of the twine. This is repeated until all participants have said their names and a spider web has been formed.
4. The facilitator says that the spider web connects all the participants forming an FFS group.
5. In order to practise and remember the names of each participant, the spider web is unravelled. The last person to receive the ball returns it to the person it came from, saying the name of the person he/she is returning the ball to. The person that receives the ball says the name of the participant he/she got the ball from, rolls up the twine and throws the ball to the participant he/she is attached to.
6. When participants are no longer connected, they can leave the circle.
Levelling of expectations
BackgroundTo avoid disappointment and drop-out among FFS participants, it is important that the facilitator and the group are aware of what everybody expects of the FFS. In this way, at a very early stage, unrealistic expectations can be recognised and aligned before the participants commit themselves. Only a well-informed person can fully commit themselves. In addition, being aware of expectations helps the group to plan the FFS and, later on, to monitor whether they are still focused on the initial objectives.
Objectives• discover what participants want to get out of the FFS course• become aware of unrealistic expectations • help the facilitator and group plan the programme of the FFS• help the facilitator and the participants monitor and evaluate the FFS.
MaterialsFlip charts, marker pens, pins/clips.
TimeOne hour.
Steps1. Do the levelling of expectations after the participant introduction with the whole group
or in sub-groups.
Chapter 3: Levelling of expectations

Part II–33
2. The facilitator presents the following questions: “Why have you joined the FFS?”, “What do you hope to gain?”, “What do you expect from me (the facilitator)?” and “What do you think I (the facilitator) expect from you?”
3. The facilitator divides the group into sub-groups each with a maximum of five participants who then discuss the questions among themselves.
4. The sub-groups write their answers on a flip chart or keep them in their memory.
5. The facilitator invites a representative of each sub-group to present their responses to the whole group.
6. The facilitator and the group summarise the expectations.
7. The facilitator discusses and responds to each expectation and asks the group whether they think the expectation is realistic and achievable within the FFS cycle.
8. The facilitator has to make sure that unrealistic expectations are levelled out and realistic expectations become part of the FFS programme.
It is also possible to incorporate the questions for the levelling of expectations with the pair-wise introduction exercise explained in the previous section.
Chapter 3: Levelling of expectations
To ensure commitment to the FFS it is important to determine participants’ expectations and resolve any unrealistic ones at the beginning

Part II–34
The host team
BackgroundThe host team is an important functional element in the running of the FFS and has responsibility for: • assisting the facilitator• preparing the daily programme and schedule of activities• arranging and setting ready the training venue• providing energisers/group dynamics• introducing visitors (e.g. a resource person) to the FFS• checking the weekly attendance of the FFS participants• serving as time-keepers• distributing reading and other material• acting as a recorder and reporter of discussions• upon request, assisting the facilitator in other functions.
Objectives• enhance responsibilities, participation and FFS ownership of the participants• support the FFS facilitator in the set up and facilitation of the FFS activities• enhance farmers’ organisational and communication (presentation) skills.
MaterialsNotebooks, pens/pencils, flip charts, marker pens.
TimeThirty minutes (to form the host team).
Steps1. The facilitator introduces the concept of the host team and explains its functions.
2. The facilitator splits the FFS group into sub-groups. The following exercise can be used: The facilitator assigns the numbers one to five to the participants and those who have the same number form a group (see also page 115: The goats and the lion exercise). Each of the five sub-groups selects a leader and a secretary, decides on the sub-group’s name and develops a sub-group slogan.
3. Each sub-group presents their members, name and slogan in the plenary to the other FFS members.
4. Each sub-group will be host team at least once. A schedule is made for each sub-group to be aware of which dates they are responsible for as the host team.
Chapter 3: The host team

Part II–35
Participatory planning of FFS activities – Developing an FFS group action plan
BackgroundOnce the FFS participants have been selected, their expectations levelled and they have a clear understanding of the objectives of the FFS approach, the group needs to develop its group action plan (GAP).
Objectives• be focused! The GAP should set out a clear path identifying what the FFS will achieve
and how you are going to achieve it• create feelings of ownership among the FFS group and thus enhance commitment and
sustainability• pool resources, synchronise efforts and avoid duplication• increase accountability and transparency and thus permit monitoring and evaluation of
the performances of the FFS• train farmers in how to organise and manage themselves better.
TimeNot more that two weeks (including two full FFS sessions). Official registration can take longer.
StepsTo develop a GAP there are six activities to follow i.e. establishing the FFS group; problem analysis and ranking; identifying potential solutions; developing the learning programme; developing a detailed budget; and developing a PM&E plan. Guidelines for each of these activities are presented below.
1. Establishing an FFS group
BackgroundTo establish the FFS group it is recommended that the group create an identity, organised structure and the resources to work effectively. Farmers effectively united in a group interact, share experiences and stimulate learning. However, a disorganised group is a burden to all and can even make the FFS dissolve.
TimeA full session.
Chapter 3: Participatory planning of FFS activities – Developing an FFS group action plan

Part II–36
StepsTo establish the FFS group several activities need to be undertaken:
1. The group needs to choose a name and slogan.
2. The group needs to elect officials e.g. a chairperson, secretary, treasurer and members to form a board. The roles and responsibilities of each person in the board should be defined and be clear to all.
3. The FFS needs to register officially with the respective ministry.
4. The group needs to open a bank account in the name of the FFS to be able to receive a grant. To open a bank account the group needs to make a deposit, which needs to come out of individual members’ contributions. Money withdrawals need to be supported by a letter explaining the purpose of the withdrawal, signed by the three officials and five FFS board members.
5. The group needs to plan how to source additional funds, for example by agreeing on personal contributions, commercial production, looking for donors, etc.
6. Having done this, the group together with the facilitator sets ground rules (learning norms) or develops a constitution. The FFS members will set the learning norms to ensure a suitable learning environment and avoid interruptions and frustrations. Interruptions such as people coming in late or under the influence of alcohol, using mobile phones, not turning up, having a domineering attitude, not participating, etc. hamper the learning process and should be controlled. Ask the group what they think the learning norms should be. The facilitator then guides the group to produce more norms and suggestions on what should be done in case of:
• latecomers, e.g. member has to pay a fine, member has to dance, etc.• absenteeism, e.g. group can decide on how many sessions a participant needs to
attend to be able to graduate (e.g. 75%) • dominant people or lack of order in the group, e.g. use a token – only the person
holding the token (such as a stick) is allowed to speak; when someone wishes to speak they must raise their hand and be given the stick. Alternatively, use a slogan to get the group’s attention
• people not contributing to group work, e.g. should pay for a day’s labour • members who do not respect other people’s opinions, e.g. should receive a
reprimand.
The learning norms should be pinned up on the wall for every body to see throughout the FFS sessions.
Chapter 3: Participatory planning of FFS activities – Developing an FFS group action plan
Part II–37
2. Problem analysis and ranking
BackgroundFarmers in dairy cattle production have many problems; some of more immediate concern than others. To get a clear understanding, it is important that the FFS participants share their ideas and perceptions. Since the FFS has a limited time frame it is not able to address all the problems faced by the group. It is therefore important to identify the most pressing problems or those shared by the majority.
Objectives• gain a joint understanding of the farmers’ problems (in livestock production)• share insights into the potentials and constraints facing livestock owners in the group
(analysing the cause–effect relationship of specific problems)• prioritise the problems and identify which problems the FFS is going to address.
MaterialsCards, markers, flip charts, crayons, etc.
TimeOne FFS session (four hours).
Chapter 3: Participatory planning of FFS activities – Developing an FFS group action plan
An FFS group should establish some ground rules (learning norms) so that it can operate effectively

Part II–38
Steps1. Identify the problems: In a plenary session, the facilitator asks the group to list all the
problems they face in livestock production. These are written on a flip chart.
2. Each problem is analysed by discussing why it is a problem.
3. Record all the responses. At the end of the analysis there should be a list of indicators (reasons why is it a problem) for each problem.
4. The FFS should focus on the most important problem. Therefore the problems need to be ranked. Ranking methods such as pair-wise ranking for example (see page 16) can be used.
5. The pair-wise matrix is implemented step-by-step. The scoring is calculated and then the problem having the highest score is marked as the most pressing problem. The second highest score can be seen as the second most pressing problem, etc.
6. Participants then decide which or how many of these problems the FFS can realistically address.
3. Identifying potential solutions
BackgroundOnce the main problems are identified, it is possible to start the process of finding solutions. Different people will come up with different solutions and it is important to have a brainstorming session, where all the participants, including the facilitator, can share their ideas. The different solutions voiced by the group can then be analysed jointly and the best option can be tested in the FFS.
Objectives• identify solutions to common/major problems • plan the activities that will implement these solutions• ensure that the FFS group owns the solutions.
MaterialsFlip chart, problem/solution analysis table, markers (different colours).
TimeOne hour.
Chapter 3: Participatory planning of FFS activities – Developing an FFS group action plan

Part II–39
Steps1. Identify solutions. The facilitator introduces the problem/solution analysis table (see
illustration), which is displayed on a flip chart. In a plenary session, the facilitator explains the different columns. The three or four main problems identified in the pair-wise ranking are put in the table and analysed one by one. The FFS group discuss the signs (indicators/evidence) of each problem and identify the root cause. Then the strategies that farmers use to cope with the problem are discussed and the group brainstorms the possible solutions.
Chapter 3: Participatory planning of FFS activities – Developing an FFS group action plan
An example of a problem/solution analysis table
2. Rank the solutions: An exercise that can be used is matrix scoring to prioritise the solutions or the options to be tested in the FFS (see page 17). Each of the solutions is evaluated by looking at sustainability, productivity, time constraints, equitability, cost and social acceptability. With 25–100 stones, the participants decide upon significance or weight of each solution using the indicators (see options assessment format; to facilitate this exercise one can say that the stones reflect money and that the farmers have to choose how much money they are willing to spend by deciding how many stones to give to that specific indicator for each solution). For each solution, the score is calculated, then one can see which solution is considered of most interest to the FFS participants and the rest of the solutions can be ranked in order of interest. The exercise is repeated for each of the main problems identified. Then the solutions with the highest scores are listed and will be pursued in the FFS. These form the basis of the learning programme.

Part II–40
4. Developing the learning programme
BackgroundWhatever the farmers perceive as the priority must be the subject of a follow-up activity, such as a field comparative experiment, participatory learning exercise or special topic. The learning programme should link activities to objectives and put them in a logical order that works towards addressing priority problems in the field. To ensure that all key topics are dealt with in the FFS cycle, the topics for learning derive logically from the participatory planning activities. To assist the development of a learning programme, logical steps and guidelines are provided below.
Objectives• ensure that the FFS learning programme tackles priority learning topics at the right time
in the FFS cycle• facilitate the selection of activities/strategies to enhance learning (e.g. AESA, field
comparative experiments, special topics, exchange visits, etc.).
Chapter 3: Participatory planning of FFS activities – Developing an FFS group action plan
An example of an options assessment format

Part II–41
MaterialsFlip charts, markers.
TimeTwo hours.
Steps1. Display the list of priority problems in a seasonal calendar (see page 12) to guide the
planning.
2. Each priority problem is discussed following the order of the calendar. The FFS group in collaboration with the facilitator decides what activities need to be undertaken to further explore the problem and test the solutions.
3. Each FFS core activity is discussed and the FFS group decides which is most appropriate for each problem. Sometimes a series of different activities can be planned, e.g. the implementation of a field comparative experiment or, consulting the calendar, plan in which sessions livestock topics (topic of the day) and non-livestock topics (special topics) need to be addressed. Field days, field exchange trips, invitation of farmers/experts, etc. can also be planned.
4. After this, to further develop the learning programme, dates of FFS sessions and the topics to be addressed need to be drafted on a flip chart and made accessible to all (see an example below). The programme is not fixed but should be regarded as a flexible guideline that tracks the progress of the FFS and enhances learning and participation.
5. Plans should also cover topics such as: when the FFS will start and when the graduation will take place; when sessions will begin and end (morning sessions of around four hours are recommended); which dates (weekly sessions are recommended); and when is each host team on duty?
Chapter 3: Participatory planning of FFS activities – Developing an FFS group action plan
An example of an FFS learning programme

Part II–42
5. Developing a detailed budget
BackgroundHaving defined which activities the FFS will perform, the group should establish a detailed budget. Participants will have to investigate what is available locally and at what price. Alternatives using local materials and affordable solutions should be promoted by the facilitator. All equipment and materials will have to be purchased by the group without external help. This is to ensure that participants realise they can reproduce whatever the group achieves. Purchases should benefit the FFS group as a whole, not just a few individuals. Facilitation costs should not exceed 50% of the total budget and should be disbursed at each session. These also include the cost of an external facilitator invited for a special topic session. (Annex 1 illustrates an example of a grant proposal form.)
Example of a detailed budget
Requirements Cost (in local currency)
Field inputsField rent for X months (cost per acre per month)Fertiliser (cost per bag)Seeds (cost per kg) etc.
Stationery (give all details)Flip charts, felt pens, masking tapes, manila papers, registers, etc.
General tools used across all activitiesWeigh bands, cow calendar, scale, thermometer, etc.
Field comparative experimentsFor each experiment separately detail all equipment and materials needed:Exp 1:Exp 2:Exp 3:etc.
Field days Minimum one field day. Give date and costs
Graduation Invitation, certificates, transport, food/drinks, T-shirts, stationery, etc.
Exchange visitsTransport, although if possible this should be financed from members’ contributions or other funds.
Chapter 3: Participatory planning of FFS activities – Developing an FFS group action plan
– continued opposite

Part II–43
FacilitationNumber of FFS sessions and facilitation cost per session. Amounts need to be agreed upon by farmers and facilitator to cover transport and/or lunch allowance. This cost will vary from one country to another and from one FFS to another depending on the distance between the FFS site and the facilitator’s house. Total costs for facilitation should not exceed 50% of the total grant.
FFS participant contribution and commitmentThis can be in cash (amount per session) or in kind (material, field, animal, litre of milk per week, etc.)
Total
Total requested for grant or loan
6. Participatory monitoring and evaluation plan
BackgroundWhen implementing the FFS approach, we need to watch carefully to know whether we are making positive changes and are actually achieving the goals. An M&E plan helps us to consciously observe and analyse situations and performances and to understand what we are seeing. Given the participatory nature of the FFS approach it is highly appropriate that M&E should also embrace participatory principles. Participatory monitoring and evaluation (PM&E) is an effective management tool to enhance learning and stimulate corrective action. Thus, PM&E should be directly linked to the results of the participatory planning (the GAP) as this information provides the basis for continuous M&E.
ObjectivesPM&E tools can be used for many different purposes. In this section guidelines are provided for PM&E for the following objectives:
1. Monitor and evaluate the FFS (performance).2. Monitor and evaluate an FFS session (process).3. Monitor and evaluate a field comparative experiment.
1. Monitor and evaluate the FFS performance. FFS facilitators need to report on FFS performance to their supervisors, colleagues, donors, community opinion leaders and any other interested parties. This requires some form of M&E. Precisely what a facilitator ought to monitor is largely dependent on the objective(s) of the specific FFS project, as well as the needs of the different stakeholders (FFS participants, implementing organisation, donor, etc.). The guidelines given here aim to provide the facilitator with tools to develop a PM&E action plan to: assess whether the FFS is achieving the set goals; provide tools to demonstrate results (for donors, researchers, government, etc.); and enhance transparency of the FFS.
Chapter 3: Participatory planning of FFS activities – Developing an FFS group action plan

Part II–44
The basis of a PM&E plan are the ‘6 Ws + 1 H’:
• Why are we doing the PM&E?• What do I need to evaluate?• Who should be involved in the evaluation?• Where should the evaluation activity take place?• When do you need to start and end, and when in the FFS cycle should the PM&E activities
take place?• With what kind of resources should you do the evaluation?• How should participatory methods and tools be used?
Why and What: PM&E is a management tool that can be used to control, educate, provide feedback, facilitate change, etc. For this reason it is important to clearly identify the intended use of PM&E. In the FFS, PM&E is used mainly as a tool to enhance learning and identify paths of further development. Once you have identified the purpose of PM&E you need to clearly identify the objectives of the FFS project. Even though the objectives of every FFS are specific – because the problems and realities of every community are different – there are some basic goals each FFS aims to achieve. In a workshop held in Kenya (Groeneweg et al., 2004), FFS practitioners developed some general parameters for the evaluation of any FFS project:
• changes in farmers’ skills/knowledge• evidence of adoption of appropriate technologies• change in productivity• change in farmers’ income level• changes in socio-cultural practices and social status• changes in quality and quantity of human nutrition• evidence of spread of FFS message• changes in extension/research systems• establishment of farmer institutions.
These are not all-embracing nor will they necessarily be the ones that stakeholders of a specific FFS project will choose. It is therefore important to select the parameters applicable and develop others if required.
Who: In a participatory process, the FFS participants are the key actors in the planning and implementation of the M&E plan. The facilitator’s role is to guide the process, making sure that all stakeholders are involved and the roles and responsibilities of each stakeholder are clear to all. It is important to involve people from outside (government officials, researchers, development workers, neighbouring farmers, donors, etc.) in the PM&E plan. It is also recommended that you invite them on regular visits to the FFS and to ask them to evaluate the FFS. This can provide constructive feedback and refresh views on how to develop the FFS successfully. In addition, it encourages stakeholders to be directly involved and to support the FFS.
Where and When: PM&E is not an activity that is to be done only at the end of the FFS; it is a continuous process. It starts with the initial survey in the ground working phase
Chapter 3: Participatory planning of FFS activities – Developing an FFS group action plan

Part II–45
Chapter 3: Participatory planning of FFS activities – Developing an FFS group action plan
The participatory monitoring and evaluation cycle in an FFS
(baseline study), which records the conditions found before the FFS implementation; like taking a picture of the situation so as not to forget how it was before the FFS. This provides an FFS project with points of reference so that changes as a result of the FFS activities can be measured. Continuous monitoring, to check that the FFS is heading in the right direction, is also important throughout the entire FFS cycle. Thus PM&E starts during the participatory planning, carries on during the FFS implementation, and a final evaluation is done at the end of the FFS season (see illustration). In addition, one needs to identify where the monitoring activities will take place: either in the FFS or at project level. Furthermore, will the PM&E cover all FFS activities or are you taking a sample (30% of the population is recommended)? The location and intensity of the monitoring activities depends on the need for information, the type of information required, the budget and the time available.
With what: It is vital that the required resources to undertake PM&E are available. The PM&E activities on FFS level are incorporated in the FFS learning programme and are thus paid through the grant. This includes the initial survey, processing of the final PM&E results and evaluation by project staff and/or external evaluators. In general, it is recommended that 2% of the overall project budget be allocated to (P)M&E activities.

Part II–46
How: The same participatory methods and tools used for the participatory planning can be adapted and applied to M&E. The list below gives some examples of participatory methods for PM&E that suit the FFS:
• sketches and maps (pages 11 and 46)• semi-structured interviews (page 6)• focus-group discussion (page 8)• daily activity analysis/diaries (page 8)• change or success stories (page 9)• transect walk (page 9)• records (already existing data on a specific location/subject)• historical trends and time lines (page 9)• direct observation• ballot box test (page 48)• evaluation wheel (page 52).
The ‘PM&E Tools’ on the next few pages describe specific examples of the use of PM&E tools to evaluate the FFS overall.
PM&E Tool 1. Sketching and mapping
Pictures can be understood by all, including the illiterate, and can be used to visualise the types of changes in the area. Sketches (and maps) can be made by the FFS participants at the beginning of the FFS season (for assessment and planning purposes), during the FFS (for monitoring purposes) and at the end of the FFS (for evaluation purposes) in order to locate the changes and to analyse their causes and effects. Many different items of interest can be addressed including villages/communities, social status, resources, etc.
Objective• provide an example of how a map or sketch can be used to measure change. The
example given is to measure farmers’ adoption of appropriate technologies.
MaterialsFlip charts, paper, markers of different colours, scissors, glue, local materials.
TimeAllow one hour per sketch.
Steps1. The facilitator divides the participants into two groups.
Chapter 3: Participatory planning of FFS activities – Developing an FFS group action plan
– continued opposite

Part II–47
Chapter 3: Participatory planning of FFS activities – Developing an FFS group action plan
Examples of sketches drawn to monitor and evaluate the FFS
– continued
2. One group is asked to make a sketch (map) of the technologies used in livestock production. The other group makes a sketch (map) of the technologies they think they need to tackle the priority problems of the community.
3. Paper and markers and, even better, local materials can be used to indicate particular technologies.
4. After the groups have finished, the two sketches/maps need to be analysed and compared to provide information on how FFS participants perceive the technologies present and what technologies they think are needed to tackle their problems. This information forms a good basis for the development of the FFS learning programme.
5. To monitor a change in the use of technologies, this exercise can be repeated halfway through the FFS season. The group can then be asked to sketch the new technologies learned and see if any are already being used.
6. At the end of the FFS season, or some months after graduation, another sketch/map can be made to evaluate the use of technologies in the area.
7. By comparing the differences in the sketches/maps made at different times in the FFS season, we can see what has changed and thus ‘witness’ the adoption of new technologies (see illustration).

Part II–48
PM&E Tool 2. Ballot box test
The FFS is all about learning and aims to increase FFS participants’ knowledge. The ballot box is a tool that helps to measure changes in knowledge levels. During the first and the last FFS sessions, the participants take a test to evaluate their knowledge on the focal topic of the FFS (such as livestock production). The pre-test provides the FFS facilitator with some diagnostic information that he/she can use to adjust the FFS learning programme to the knowledge level of the group. The post-test results are an indicator of progress made as a result of the FFS.
Objectives• measure change in the knowledge level of FFS participants• provide a method to take a test in a non-confronting way, making sure that all
participants, including illiterate participants, can participate.
MaterialsTen questions; 10 boxes with three compartments indicating the alternatives; 10 sticks (to put the boxes up); 10 small pieces of paper for each FFS participant that fit through the holes and clearly indicate the name or the number of the participant (see below); a ballot box question-and-answer sheet; a score sheet and masking tape (see illustration).
TimePreparation: 4 hours. The questions and boxes have to be prepared beforehand. However, the boxes can be used for other FFS activities (provided that the questions are changed). Implementation of the test: 4 hours (full session).
Steps1. The ballot box exercise requires thorough preparation and planning. The
facilitator prepares each test by formulating questions that relate directly to local (field) problems. To answer the questions, participants choose from three alternatives. When possible, the subject of the question should be a live sample, for instance leaves with pest damage or nutrient deficiency symptoms, or insect and soil specimens. For example, Question 1: Identify what this cow is suffering from: mastitis, a tick-borne disease or trypanosomiasis, (see illustration (a)).
2. Each question and the three answers are written on cardboard and placed next to the live sample e.g. on a stick or on the floor (be aware of wind and rain!).
3. Each participant receives a slip of paper, one per question, with a number linked to their name. For example, there are 10 questions. Participant No1 is Philip Kamau. Philip will get 10 slips of paper bearing the number 1.
Chapter 3: Participatory planning of FFS activities – Developing an FFS group action plan
– continued opposite

Part II–49
4. The participants are requested to go to the different ballot boxes and read the questions and make their choice by putting one of their numbered slips into the compartment they think has the correct answer. They have to do all the questions in turn and the facilitator has to make sure that the participants are doing the test individually. Illiterate participants can be assisted by literate participants, who read the questions and the answers to that person, without influencing their decision.
5. The question and answer sheet [see illustration (b)] can assist the facilitator in structuring the ballot box exercise by listing all the questions and answers. The scoring sheet [see illustration (c)] assists in calculating the score of the participants.
6. At the end of the test, the facilitator has to organise a plenary session when all questions are discussed. For each question the facilitator asks the participants which answer they chose and why they think this is the correct answer. This provides the facilitator with valuable information that can be used in the development of the learning programme (pre-test) or to check on FFS participants’ strengths and weaknesses after the FFS (post-test).
7. Ideally, the score of the ballot box test should be calculated in the same session, although this may not always be possible. Participants’ results should be presented to them in the next session. It is important to discuss with participants that it is not a shame to have a low score. The FFS is a learning opportunity and the aim is not to have a high or low score but to become experts in our own field.
Chapter 3: Participatory planning of FFS activities – Developing an FFS group action plan
– continued overleaf
– continued
(a) FFS participants doing the ballot box test

Part II–50
Chapter 3: Participatory planning of FFS activities – Developing an FFS group action plan
(b) Example of a ballot box question and answer sheet
(c) Example of a ballot box score sheet
– continued

Part II–51
PM&E Tool 3. Introduce PM&E concept
It is important to track whether the FFS is achieving its aims and to make corrections if necessary. This means including monitoring activities in the daily FFS activities.
Scarecrow
MaterialsAny material such as cartons, paper, plastic, robes, tape, clothes, etc.
Time Twenty minutes.
Steps1. The participants split into groups of five.
2. Each group is asked to dress up one of its members as a scarecrow using the materials available. The groups are given 10 minutes to make the most beautiful scarecrow.
3. Once the scarecrows are ready, each is evaluated.
4. What one can learn from the exercise is that with similar materials available, different people make different looking scarecrows. One may be more functional, another may
Chapter 3: Participatory planning of FFS activities – Developing an FFS group action plan
2. Monitor and evaluate the FFS session. It is important to track whether the FFS is achieving its aims and to make corrections if necessary. This means monitoring activities in the daily FFS sessions. Specific tools are described in detail to help the facilitator introduce the concept of PM&E and to monitor the FFS on a regular basis. This allows them to: gain an overview of progress and to enhance the participants’ confidence and motivation; draw lessons learned and stimulate corrective action, thus improving the quality of the next FFS; and get an early warning of problematic activities and processes that will need corrective action. Regular monitoring will also empower the FFS group by creating opportunities for them to reflect critically on their own progress, the direction of the FFS and to decide on improvements.
Over the next few pages we present two types of tools to help with PM&E: 3 covers introductory exercises, which are FFS-participant friendly and provide a clear understanding of the role and importance of PM&E in an FFS; while Tools 4–5 are for monitoring participants’ levels of satisfaction, to provide immediate feedback on what is going well and what needs improving. The exercises only take a short time and could avoid escalation of minor conflict or negative feelings.
– continued overleaf

Part II–52
be more attractive, etc. We need to analyse what we have learned because with the same knowledge (FFS experiences) different people will accomplish different things.
Tug of war
MaterialsLong and strong rope.
TimeTwenty minutes.
Steps1. The participants split into two equal-numbered teams and are placed at different
ends of a long thick rope.
2. The teams are asked to hold the rope and pull until one team is pulled over a line that is drawn in the middle.
3. Both teams evaluate why they have either won or lost the battle.
4. Then the tug of war is done again.
5. The exercise is evaluated in a plenary session to discuss why one wins or loses and if there was any difference in the teams as a result of evaluating their performance in the tug of war. One can learn from this exercise that evaluation makes you realise what goes well and what does not, and for what reasons. This helps to take corrective action and plans can be made for improvements.
Chapter 3: Participatory planning of FFS activities – Developing an FFS group action plan
– continued
PM&E Tool 4. The evaluation wheel
MaterialsA flip chart with an empty evaluation wheel drawn on (see illustration), and markers of different colours.
TimeThirty minutes to introduce the wheel, and after that 15 minutes to use.
Steps1. The facilitator (or the host team) prepares and displays the wheel on a flip chart.
2. Each spoke in the wheel represents an indicator to evaluate the FFS sessions. The indicators should be identified by the FFS group. For example, attendance, appreciation of the specific content of the session, performance of the facilitator, etc.
– continued opposite

Part II–53
Chapter 3: Participatory planning of FFS activities – Developing an FFS group action plan
– continued
Example of an evaluation wheel used to evaluate an FFS session
– continued overleaf

Part II–54
3. The FFS group then decides on the score to give to the indicator and chooses a location for the dot (the value marked with a pen or marker) to be placed on the spoke (close to the centre indicates positive, while close to the border is negative or a ranking of 1–5 can be applied).
4. The FFS group then decides the score for each indicator and discusses the reasons behind the scoring.
5. If a low (or negative) score is recorded, solutions to improve the situation need to be sought collectively.
6. The evaluation wheel should be repeated at the end of every session.
7. Evaluation wheels can be compared week to week to monitor how the FFS is going and to assess progress.
Chapter 3: Participatory planning of FFS activities – Developing an FFS group action plan
PM&E Tool 5. How full is the glass of milk?
MaterialsA box or bag, paper, flip chart and markers of different colours.
TimeTen minutes.
Steps1. The designated host team should be responsible for this exercise. Before the
session, they make from paper (or draw) three glasses of milk: one almost empty, one half-full and the other full. The almost empty glass represents a low level of satisfaction, the half empty glass means that one is partially satisfied and the full glass represents a completely fulfilled person.
2. Each participant has a small slip of blank paper.
3. At the end of the FFS session, the participants decide which glass represents their feelings.
4. The participants put their piece of paper in a box (or bag) next to their chosen glass (give people privacy when they are selecting, otherwise they might be intimidated to make a socially accepted choice instead of their own)
5. The host team opens each box and counts how many ‘votes’ there are for each glass.
– continued
– continued opposite
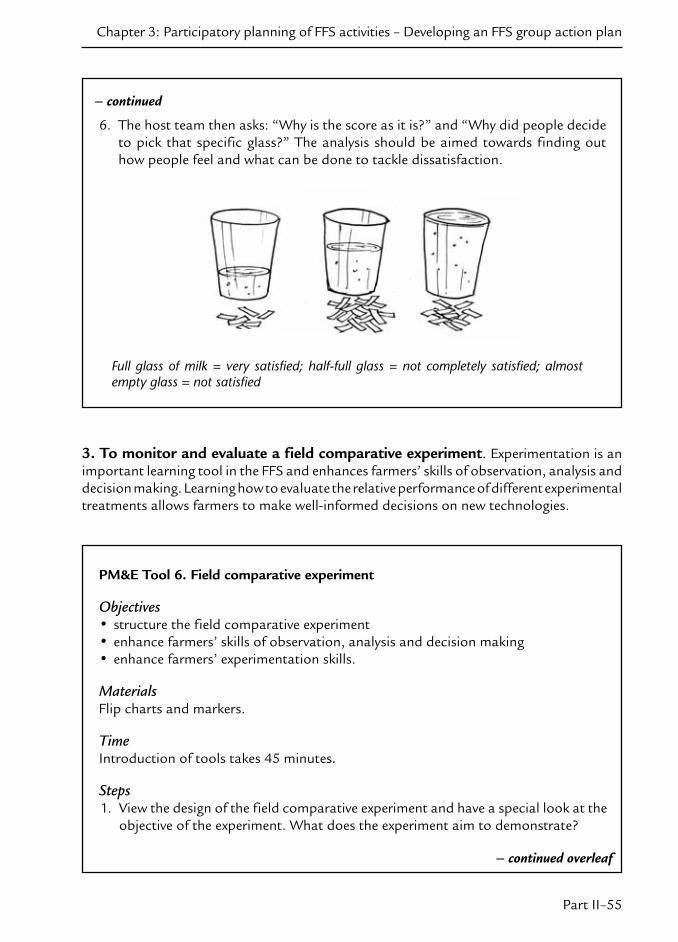
Part II–55
6. The host team then asks: “Why is the score as it is?” and “Why did people decide to pick that specific glass?” The analysis should be aimed towards finding out how people feel and what can be done to tackle dissatisfaction.
Full glass of milk = very satisfied; half-full glass = not completely satisfied; almost empty glass = not satisfied
Chapter 3: Participatory planning of FFS activities – Developing an FFS group action plan
– continued overleaf
– continued
3. To monitor and evaluate a field comparative experiment. Experimentation is an important learning tool in the FFS and enhances farmers’ skills of observation, analysis and decision making. Learning how to evaluate the relative performance of different experimental treatments allows farmers to make well-informed decisions on new technologies.
PM&E Tool 6. Field comparative experiment
Objectives• structure the field comparative experiment• enhance farmers’ skills of observation, analysis and decision making • enhance farmers’ experimentation skills.
MaterialsFlip charts and markers.
TimeIntroduction of tools takes 45 minutes.
Steps1. View the design of the field comparative experiment and have a special look at the
objective of the experiment. What does the experiment aim to demonstrate?

Part II–56
Chapter 3: Participatory planning of FFS activities – Developing an FFS group action plan
– continued
2. Discuss with the FFS participants what needs to measured in order to evaluate the performance of the different treatments. In other words, identify the indicators for evaluation. For example, the objective of the experiment is to compare the performance of three types of fertilizer treatment to a specific fodder. The facilitator asks the group: “What do we need to measure to find out which treatment is the best?” For this experiment the indicators can be yield, growth rate, resistance to disease/pests, labour requirement, cost of the fertilizer or the gross margin (see cost–benefit analysis, page 85), availability of the fertilizer, etc.
3. The indicators identified need to be evaluated throughout the experiment and recorded.
4. The evaluation of the experiment should be done during the AESA.
5. To facilitate the evaluation of the indicators, the FFS participants need to keep adequate records (in the AESA sheet and the members’ notebooks).
6. Because every experiment is different, the group and facilitator should design a basic record-keeping format such as the format in the illustration below.

Part II–57
4. FFS IMPLEMENTATION
All FFS follow the same systematic training process, which is based on the FFS concepts and core activities. The key steps followed in the learning process are observation, group discussion (sharing of experiences), analysis, decision making and action. Once the FFS is established, the systematic training process is implemented in regular sessions of approximately four hours each. Past FFS experience has shown that the best results are achieved with weekly meetings. Longer gaps can slow the learning process. The length of the FFS cycle depends on the focal activity. However, the core of each FFS is similar and for this reason this section of Part II provides the guidelines for the main FFS concepts and core activities
Basic principles of integrated livestock management
BackgroundIntegrated livestock management (ILM) is an approach that takes account of the interrelations between animal health and other production factors. Good animal husbandry practices include controlling disease, improving nutrition and having a good understanding of the effects of external factors on livestock productivity. Good livestock management needs an integrated approach, since single management practices (e.g. vaccination) are seldom effective on their own. The principles of and guidelines for ILM are presented in the ILM song (Box 3) and the following exercise.
Objectives• help farmers understand the critical importance of proper livestock management and
the principles of an integrated management • enable them to identify a range of elements that influence animal well-being and
productivity.
MaterialsNotebooks, pens/pencils, markers, flip chart.
Steps 1. Ask the FFS participants to come up with a relevant problem regarding livestock
production.
2. Write the problem in the middle of the flip chart (see illustration on next page).
3. Ask the participants to think of ways to solve the problem.
4. Write each solution around the problem on the flip chart and discuss the fact that there are many ways to solve a single problem. Are the solutions effective on their own or is it more effective to use multiple solutions (thus to integrate management practices)? Initiate a discussion on the benefits of an ILM approach.
Chapter 4: FFS implementation

Part II–58
Chapter 4: Basic principles of integrated livestock management
Box 3. Integrated livestock management song
Kanuni za ILM ziko nne twazijua (x2) The rules of ILM are four as we know
Kuzalisha kustawisha ngombe nzuri wa maziwa To produce and prosper with nice dairy cattle
Kutunza kuzuia kutokana na magonjwa To take care to prevent diseases
Kuchunguza ngombe wetu mara kwa mara To inspect our cattle often
Hatimaye nkulima huwa ndiye mtalaam (x2) Finally, the farmer is usually the expert

Part II–59
Concept of discovery-based learning – What is this? What is that?
Background The goal of discovery-based learning is to provide an opportunity for participants to learn through curiosity and by discovering, rather than by memorising facts. The methodology by which learning takes place strongly influences the impact of the education. One way of stimulating critical thinking is to ask questions that allow the participants to develop their own analysis and understanding of an issue. When a participant asks a question, instead of answering the question directly, the facilitator directs the participant towards the answer by asking probing questions. In this way, participants are given the opportunity to learn by themselves and come up with their own solutions.
Objectives• help participants learn through discovery and curiosity• guide them to critically analyse an issue and make their own decisions on a given
problem.
MaterialsField, plastic bags, notebook and pen/pencil.
TimeOne hour.
Steps1. This is a role play. In a field, assign the following roles to different participants: farmer,
recorder and expert.
2. The ‘farmer’ should focus on something in the crop–livestock system (pests, natural enemies, weeds, etc.) and ask: “What is this?”
3. The ‘recorder’ writes down the questions and responses.
4. The ‘expert’ should respond with one of the following type of responses: “Where did you find it?”, “What was it doing?”, “Have you seen it before?”, “What do you think it is?” (Keep asking questions.)
5. The facilitator should try not to provide the answer! The ‘expert’ should also avoid providing answers, instead guiding the other participants towards the correct answers that explain the function of the organism, e.g. “This is an insect that feeds on the plant. It is not actually a problem insect until it is present in large numbers. Many organisms eat this insect, including spiders and parasites.” or “This is a spider that eats insects and is a friend. It happens to be called a hunter because it moves around the field searching for insects.”
Chapter 4: Concept of discovery-based learning – What is this? What is that?

Part II–60
6. NEVER PROVIDE THE NAME OF THE ORGANISM – THAT KILLS CURIOSITY. THE QUESTION IS A VALUABLE CHANCE TO LEARN!
7. After the members have taken their turns in each role, process experiences and lessons learned through a plenary discussion.
The concept of an ecosystem
BackgroundIt is important for FFS participants to understand the concept of an ecosystem since this is the basis for the AESA. An ecosystem consists of living and non-living things that all interact. Examples of living things include cows, ticks, mosquitoes, grass and trees. Examples of non-living things include stones, wooden posts, farm structures, etc. An ecosystem functions within the physical environment that includes air, water, soil, wind, etc.
Living ecosystem components have a ‘tropic level’ that refers to their position within the ecosystem, i.e. 1 – producers (e.g. crops, grass and weeds); 2 – primary consumers (herbivores, e.g. insects, rodents, sheep, goats, cattle, poultry); 3 – secondary consumers (carnivores and omnivores that eat herbivores, e.g. cats, dogs, snakes); 4 – tertiary consumers (predators and parasites that eat herbivores and carnivores, e.g. lions, cheetahs, leopards, eagles and man); and 5 – decomposers, (e.g. bacteria, fungi and insects that feed on dead plants and animals).
At all levels and especially between the levels, there are multiple interactions and the absence of some of these actors will greatly affect the balance of the ecosystem
Objectives• introduce the concept of an ecosystem• enhance understanding of the tropic levels in an ecosystem.
MaterialsA ball of wool or string, cards, masking tape, marker pens.
TimeForty-five minutes.
Steps1. The facilitator should prepare the exercise by taking the same number of cards as there
are participants and writing the name of a component of the ecosystem on each card (e.g. cow, grass, water, etc.).
Chapter 4: The concept of an ecosystem

Part II–61
2. The FFS participants form a circle and pick one card each. Each participant fixes the card on his/her body so all can see it.
3. The participant who picked the card showing ‘cow’ stands in the middle of the circle holding the ball of wool or string.
4. The participant who represents the cow says: “I am a cow and I relate to X because of Y” (e.g. “I relate to grass because I eat it and it gives me energy”). The ‘cow’, keeping hold of the end of the string, then throws the ball to the person with the ‘grass’ card.
5. The person receiving the ball does the same and this is repeated until all participants are connected. Each card or person can be visited more than once.
6. The participants are asked why they are connected, what they can learn from the exercise and if they can group together the cards/components in the ecosystem (e.g. living and non-living, producers and consumers, etc.).
7. The facilitator then introduces the concept of tropic levels within the ecosystem.
Chapter 4: The concept of an ecosystem

Part II–62
Ecosystem interactions
BackgroundThere is a need to understand the components of a particular ecosystem and how their interactions influence each other. Some interactions result in benefits, such as increased productivity, while others lead to losses. There is a need maximise the positive results and to minimise the negative ones through better management. Hence, farmers should understand the functions and interactions of various components.
Objectives• build awareness of the relationships that exists between the living and non-living things
in our environment• learn to appreciate that if one element of the network of interaction is changed, it can
influence all of the other components • become more aware of the organisms and interactions that make up the farming
ecosystem or agro-ecosystem• use understanding and observations of the agro-ecosystem as a basis for decision-
making about crop and livestock management• facilitate learning by discovery • guide farmers towards critical analysis and better decisions related to problems in their
fields.
MaterialsNotebook, pen/pencil, container.
TimeOne hour.
Steps1. Divide participants into small groups.
2. Each group will go to the field and look around as far, and as close, as the eye can see, list all the living and non-living things that can be seen, and discuss between them how they are connected or how they affect each other.
3. After 20 minutes of observation, discussion and note-taking the group returns to the session hall.
4. Each group then makes a sketch showing all the things they observed and draws lines to show how things are connected and illustrate how they affect each other.
5. In a plenary session, each group presents and explains their drawing to the other groups.
Chapter 4: Ecosystem interactions

Part II–63
The concept of the agro-ecosystem analysis (AESA)
BackgroundThe agro-ecosystem analysis (AESA) is one of the core activities of the FFS and aims to enhance farmers’ observational, analytical and decision-making skills. Unfortunately, by nature, most human beings are not good observers. However, it is important to improve our skills of observation if we are to become fully aware of livestock production dynamics and avoid overlooking elements that can negatively affect livestock production. The following is an exercise to introduce AESA.
Objectives• learn the value of being a good observer• become aware of how observation relates to farm management • introduce the concept behind the AESA exercise.
MaterialsFlip charts, markers (many colours).
TimeThirty minutes.
Chapter 4: The concept of the agro-ecosystem analysis (AESA)
Participants need to understand the concept of an ecosystem and how the different components interact and affect one another

Part II–64
Steps1. The facilitator asks for a volunteer to leave the FFS learning site and hide for 10
minutes.
2. After the volunteer has left, the facilitator asks whether the group is able to describe them in detail, i.e. the clothes and accessories they are wearing, whether are they are tall or small, their style of hair, etc.
3. Instructed by the rest of the group, two volunteers make a drawing of the absent person.
4. After completing the drawing, the volunteer returns and has a look at the drawing. Can he/she recognise him/herself?
5. The group then discuss the drawing guided by the questions: “What are the similarities and differences between the drawing and the person?”, “Did the group manage to capture all their features?” and “What did the group miss?”
6. In a plenary session, discuss the conclusions of this exercise: Are human beings good observers? Do we need to train ourselves to be more observant so we don’t miss things? Why is it important to be good observers in our fields or with our livestock?
This exercise can also be done through describing a watch or other personal item instead of using a person. The facilitator asks one volunteer to hand over his/her watch. Then, without looking at the watch, the volunteer has to describe it. The exercise shows that we don’t always notice the detailed features of the things we have with us constantly.
Decision making through agro-ecosystem analysis (AESA)
BackgroundThe AESA is a tool for gathering information about the components of a particular ecosystem, understanding their interactions and placing them in a decision-making process. This involves regular observation of the crop–livestock ecosystem. It promotes learning by discovery, leads participants towards their own analyses and helps farmers to make better management decisions.
Objectives• improve decision-making skills through analysis of a field situation by observation,
analysis, drawing pictures and discussion• improve decision-making skills by presenting small group decisions for critique in the
large group.
Chapter 4: Decision making through agro-ecosystem analysis (AESA)

Part II–65
MaterialsPen/pencils, markers, flip charts, crayons, tape measure and weigh band.
TimeOne and a half hours.
Steps1. In a plenary session, the facilitator reminds the group about the previous session on
the ecosystem. Briefly discuss the definition of an ecosystem and its components and interactions.
2. The group is asked what needs to be observed and what information needs to be collected for the particular ecosystem.
3. Based on this information, the AESA format is developed by the group asking participants what they need to know to enable appropriate management decisions to be taken. In the field, it is important to include a drawing of the subject to visualise what is observed (see examples of format on later pages).
4. The parameters identified should be categorised into those that need to be captured only once (e.g. date of birth of the animal), those that need periodic updating (e.g. pregnancy status) and those that need frequent measurements (e.g. body weight, health status).
5. The group is divided into smaller groups. Each sub-group goes to the field for 30 minutes to collect data according to the agreed format.
6. Each sub-group then analyses the data collected and generates the AESA format on a flip chart (allow 20–30 minutes).
7. Each sub-group presents its results in a plenary session and receives feedback from the other sub-groups. They then compare their results.
8. The whole group comes up with a consensus that forms the basis for future management decisions.
9. The AESA format will be used in each session and will be modified according the activities (field comparative experiments, special topics, etc.) and the features in the field.
Chapter 4: Decision making through agro-ecosystem analysis (AESA)

Part II–66
Example 1 of an AESA format for a dairy cow
Chapter 4: Decision making through agro-ecosystem analysis (AESA)
AESA number
Week/date
Sub-group name
GENERAL INFORMATION
Breed
Name/tag
Sire name and breed
Dam name and breed
Date of birth and age
Time of observation
Weather condition
Last treatment: date and drug used
OBSERVATIONS
Hair/coat
Body condition
Rumination
Movement/temperament
Respiration
Temperature
Ecto-parasites
Discharges
Dung
Urine
Wounds
Eyes condition
Mucus membrane colour
Lymph nodes
Housing and shading conditions
Presence of other animal/insects
Noises
Feed quality
Feed quantity
Supplement
Water quality
Water quantity
PARAMETERS
Body weight
Last weight
Weight gain
Daily milk yield
Milk yield status
(improving or decreasing)
Number of calves
Date of serving
Date last calving
Pregnancy status
Calving interval
RECOMMENDATIONS
How to improve the AESA records
Parameter to be included
Quality of observation
What needs to be done to improve productivity?
Which treatment should be done?

Part II–67
An AESA can be used for improving observation on anything, not only animal conditions. The facilitator will have to use his/her imagination to develop the AESA format needed for all the activities planned with the farmers including all the information needed for the analysis of field comparative experiments. The following examples are of how AESA can be used to evaluate a farm structure (in this case a milk parlour) or fodder establishment.
Chapter 4: Decision making through agro-ecosystem analysis (AESA)
Example 2 of an AESA format for fodder growth and yield
Title/objective of AESA:Fodder growth and yield
AESA N0/Week No: 17Date: 4 / 6 / 2005
Name of the host farmer: Rosemary Ngethe
GENERAL INFORMATIONTime: 11.45 a.m. Weather: dry, sunny & windy Soils: sandy loam Season: dry season Fodder type: Bana grassAge: 3 years Method of use: cutting and carrying Planting method: furrows Special treatment: water harvesting practised Fertilisers used: FYM manure
PARAMETERSCutting interval (number of days between cuttings): 60 days Date of last cut: 16 May 2005Plant height: 1 mWidth of strip: 1.5 m Leaf length: 65 cm No of tillers/stool : 8No leaves per tiller: 10 Leaf width: 3 cmLength of sheath: 65 cmWeight of material/area cut: 22 kg
DRAWING of the fodder as observed in the field
OBSERVATIONSColour of leaves: yellowing in some plotsPests: antsPlant vigour: stunted growth, wilting/withering in certain plotsCutting interval: very long as irrigation is practiced Weed management: weeds present
RECOMMENDATIONSWeed the plots, water more and extend trenches If yellowing of leaves continues after improved watering further investigation into cause is neededAnts aren’t harmful so no action is needed

Part II–68
Example 3 of an AESA format for observation of a milk parlour
Title/objective of AESA:Milk parlour characteristics
AESA N0/Week No: 23Date: 4 / 6 / 2005
Name of the host farmer: John Mutua
GENERAL INFORMATIONTime: 11.45 a.m. Weather: dry, sunny and windy Season: dry season How many cows can be milked together: 1Type: mobile When it was built: 2002Who uses it and how often: every day by MaryFor how many cows: 2
PARAMETERSMeasurements: 2 m x 1.5 m x 75 cmMaterial used: wooden plank and wireHow long does it take to build such a parlour: 1 dayExpected costs of the materials: US$25
DRAWING of the milk parlour as observed
OBSERVATIONSGeneral condition: quite badIs it robust: not any more, eaten by insectsIs it practical: very heavyIs it suitable: yes because it can be movedIs it durable: noIs it dangerous: a bit due to the wire and lack of stabilityAre the materials used locally available: the planks come from town
RECOMMENDATIONSHow to improve the milk parlour: Use bamboo and not planks. Make sure that the wire is not dangerous. Treat against insects.What is missing: No place to feed the cow with concentrate while you milk. No roof.Compare with a fixed parlour to evaluate if it is good.
Chapter 4: Principles of experimentation
Principles of experimentation
BackgroundFarmers are continuously experimenting and trying out new things. They may test and experiment with new technologies introduced to them by researchers and extension workers, but they also test their own or their neighbours’ ideas. However, they may not consider they are doing experiments and they may not plan in the same way as a scientist. Similarly, many scientists do not consider farmer experiments to be proper trials or the results to be scientifically valid.
Farmers think experiments are something complicated that scientists do. However, experiments do not need to be complicated or risky to be helpful and farmers do not need a scientific education to carry them out. It is important to remember that FFS

Part II–69
Chapter 4: Principles of experimentation
experiments are tools for learning and an opportunity for farmers to test different options for themselves. Nevertheless, some basic principles of experimentation are important to avoid making wrong conclusions or decisions for future management.
Objectives• learn the importance of some basic principles of experimentation • acquire basic techniques to use to improve skills of planning, designing, implementing,
monitoring and evaluating trials.
MaterialsFive buckets (three of the same size, two of different sizes), 30 stones, flip charts and markers.
TimeOne and a half hours.
Steps1. Start by asking the participants to do something silly, such as try to stand on their head
or hang a spoon on their nose (this is a nice ice-breaker!). Then ask if they experiment and ask them to give examples. If they say no, tell them they were all just experimenting with the spoons! Ask again in a different way, e.g. “Is there anything you do now that is different to your neighbours’ practices or to what you did before?” Discuss the examples people give (but keep one of your own in case they cannot think of any).
2. Ask for three volunteers and explain that these people represent three things you want to compare (see Table 1 for the corresponding key steps in experimentation and FFS examples). Explain to the group that the objective is to find out who is the best at throwing stones into a bucket. Each person is given 10 stones and the one who gets the most stones in the bucket will be the winner.
3. Ask the rest of the group to vote on who do they think is going to win.
4. Place the three different sized buckets, one in front of each volunteer so that they are all the same distance from the buckets, and give them each 10 stones. Ask them to throw as many stones as they can into their bucket. Count the number of stones in each bucket. Give farmers the ‘results’ and ask them who they think is the winner. Then ask: “Was this a fair competition?” Of course it wasn’t fair, because it is much easier to get the stones into the biggest bucket. Ask how the game can be made fairer. It can be made fairer to provide a uniform situation i.e. everybody has the same size bucket.
5. Play the game again, give the results and ask again who is the winner. This time the results seem fair – but now ask the farmers whether they think the same person will win if they play more times? Play the game once or twice more – enough times to show that people don’t always have the same scores. This demonstrates the importance of repeating treatments to make sure your results are reliable. Work out the average score for each person and then declare the winner.

Part II–70
6. Ask the three volunteers to pick the bucket and stones of their choice and explain how they made that choice. People are not always objective and may be biased without knowing. This can influence the results; therefore it is important to give the treatments and the location of the experiment an equal chance of being chosen (randomisation).
7. Ask some of the farmers who did not play the game: “Did they vote for the right person (was their hypothesis right)?” Ask if it was difficult to guess who would win, since they had never seen these people throwing stones before. Then ask the same farmers: “Do they consider themselves better or worse at throwing stones?” Everybody must have an idea on how to scale themselves or maybe a good friend. If you have someone participating in the game of whom you know his/her capacity of throwing stones you have a point of reference (also called control) to value the scores of the others.
8. You can stop the game here and go straight to step 10, or continue through 9 to increase understanding.
9. Take away the two similar buckets and return the two of different sizes. Ask the farmers to now imagine that they do not have buckets in all the same sizes. How else can they make the game fair? One option is that the volunteers play the game three times, changing buckets each time so that they throw into each of the three sizes.
10. Explain that to set up a good experiment you need to think about: the objective, uniformity, replication, randomisation and farmer practice/control to make sure you have a good quality experiment. Every field comparative experiment should consider these elements. Furthermore, keep the following principles in mind:
• experiments should be based on the community priority problems• experiments should be developed with the participation of the whole group. The
process has to be owned by the participants, so they should design and implement the experiment, keep the records, perform the analysis and draw their own conclusions
• use locally available materials• the experiment should not be complicated• it should be cost effective.
Chapter 4: Principles of experimentation

Part II–71
Chapter 4: Principles of experimentation
Table 1. Principles of experimentation. How the throwing game relates to FFS examples.
Key steps in experimentation
‘Throwing stones’ exercise FFS examples
Subject Three volunteers Types of forage or amounts of concentrate fed to lactating dairy cow
Objective To find out which of the three volunteers is the best at throwing stones
To find out which fodder gives the highest yield
To find out whether a cow fed on concentrates gives the highest milk yield
Uniform situation Buckets are of the same sizeDistances from the volunteers to the buckets are similar
(If there are not three buckets of the same size, the volunteers can play the game three times, changing buckets each time so that they throw into each of the three sizes)
Plant forage in same kind of soil at the same time to ensure same rainfall and sunshineMake sure cows are at the same stage of lactation and as similar as possible i.e. same breed and age
(If it is not possible to have similar plots, split plots that seem different and grow a small patch of each forage in each plot.If the cows are all very different, give each cow all three treatments (one after the other). See ‘stop and go’ method on page 82)
Replication Repeat game to give the volunteers another chance to win because the volunteers did not always have the same score
Plant more than one plot of each forage Give each concentrate treatment to more than one cow
Results are average yields of forage or milk
Randomisation Account for bias (the volunteers did not decide on the bucket but were given a bucket randomly)
To select the plots or which cow is given which treatment, write the treatments and the plots/cows on separate cards. Put the cards with the treatments in a bag and the cards with the plots/cows in another bag. Pick a treatment card from the bag and then pick a card with a plot/cow. This is a match. Continue until all treatments are allocated. This determines your design
Point of reference: i.e. control or normal farmer practice
Ensure participation of yourself or someone whose skills in throwing stones you know
Compare regular fodder crop to new crops grown under the same conditions Compare normal feeding practice to feeding with different amounts of concentrates

Part II–72
Chapter 4: Field comparative experiments in FFS
Field comparative experiments in FFS
BackgroundField comparative experiments, also known as participatory technology development, are a process of collective investigation with the purpose of initiating activities or testing solutions to solve local problems. The main basis for experimentation in FFS is to create a learning process through which farmers test, monitor and evaluate new ideas, technologies or innovations for improving productivity of farming systems. Field comparative experiments within FFS are implemented to empower participants (both farmers and facilitators) with observational and analytical skills to investigate the cause and effect of major production problems. Farmer practices are tested and compared with other available solutions to solve an identified problem. Analysing the results allows farmers to decide which solution (technology and/or practice) is best suited to his/her own situation. Field experiments are also used to demonstrate new production opportunities and to help farmers diversify.
Objectives• help the farmer become an expert and design good quality experiments; the principle of
‘learning how to learn’ rather than learning about one technology• enhance FFS participants’ observational and analytical skills and empower them to produce
meaningful results • help farmers acquire the skills needed to learn about new technology options and practices
and to decide which solutions are most appropriate.
StepsField comparative experiments in FFS should combine local knowledge and skills with conventional methods and/or technologies to develop solutions suited to a specific situation. Good planning is the basis for systematic experimentation, which involves a range of steps (outlined below).
1. Prioritising field problems: Use the FFS GAP wherein the major (ranked) production constraints perceived by the participants are outlined (see page 35). Whatever the farmers perceive as a priority must be the subject of a follow-up activity like an AESA, a comparative experiment, a participatory learning exercise or a special topic. A comparative experiment is a good option to select when one wants to test new technologies or farming practices and compare these with current technologies/practices. It also provides the opportunity to innovate. Setting up an experiment with farmers gives them the opportunity to evaluate different possibilities and take decisions on the options that are best suited to their needs.
2. Discuss the principles of experimentation: To ensure that all FFS participants have a good understanding of the basic principles of experimentation and to provide them with the tools they need to design their own experiments. The throwing game (page 68) can be used to guide this process.

Part II–73
Chapter 4: Field comparative experiments in FFS
3. Plan and design experiments: Each experimental plan should incorporate the basic principles of experimentation (page 71). While it is relatively easy to design a comparative experiment for crops, the high economic value of cattle does not allow any experiment involving risk or even medium-term loss of productivity. This is why we apply the principles of a ‘no risk zone’ in livestock FFS:• Animals involved in the experiments should at no time be under any health risk. This
precludes the use of control groups if control conditions will put animals at risk.• Always consult with a local veterinarian, researcher or colleague in the design of
experiments. Any animal health treatment should be carried out by a professional.• Any benefits accrued from the experiments should be shared between all FFS participants.
The experimental plan includes the following steps:• Define the objective of the experiment, which should be linked to the previously identified
local priority problem.• List the different treatments/options, which should include a mixture of farmer generated
ideas and ‘new’ options (e.g. practices introduced by research/extension staff). • Do not have more than five treatments/options as it makes the experiment too complex
(three is recommended). The treatments should be kept as simple as possible by having only one factor under study.
• If the experiment has too many variables it will be very difficult to evaluate which one is responsible for the results. Similarly, if the treatments are very similar it will not be possible to see any difference. There are two ways of ensuring that various treatments can be compared with each other: i) aim for uniform situation/factors (e.g. soil type,
The principles of a “no risk zone” need to be applied when doing experiments for livestock FFS

Part II–74
Chapter 4: Field comparative experiments in FFS
breed and age of cow); and ii) replicate the treatments. The more replications, the surer one can be that the final results are valid and that correct conclusions can be drawn. However, too many replications make the experimental design complicated and difficult to implement in the field (two or three are recommended).
• When deciding where to locate the field trial, do not be influenced by personal bias. Instead, try to locate the treatments randomly. An exercise to facilitate randomisation is to put cards with all the treatments in a bag or a hat and pick the treatments one by one; this will dictate the order of the set up.
4. Plan record keeping and evaluation: Evaluating the performances of the different treatments/options under study involves keeping track of changes and assessing progress towards achieving the goal of the experiment. It also helps learning and enables participants to make a well-informed decision about new technologies. The FFS participants should therefore be responsible for collecting data on the experiment, systematically recording the data and interpreting all results. To be able to evaluate comparative treatments/options, indicators need to be developed with the participants.
Drawing reliable conclusions from the results of experiments depends on keeping good quality records. AESA is one way of keeping records but evaluation methods can also be used to assess the changes (see page 43: PM&E).
5. Implementation and organisation of the experiment: When the design of the experiment is clear to all participants, the experiment can be implemented in the field. First, discuss the time frame of the experiment, then identify a suitable site, materials and local providers and develop a precise budget. It is also important to identify participants’ roles and responsibilities: Who should do what? It is important that everybody has a chance to participate in every activity taking place. As the participants carry out, measure and assess experiments, they simultaneously build up experimental skills and strengthen their capacity to conduct and monitor their own experiments. If an FFS does more than one experiment at a time, it is recommended that each experiment be allocated to sub-groups who will be responsible for the implementation, record keeping and analysis. Each sub-group will inform the other participants about the progress of their experiment during the weekly AESA presentation.
6. Analysis of results: The main objective is to allow FFS participants to test new technologies and determine their applicability. The different treatments need to be compared using indicators that the participants have identified themselves. In this phase of the experiment, all the data collected in the record-keeping format should be analysed. An important tool is the cost–benefit analysis (see page 85) but for less tangible indicators, e.g. the taste of the milk, the participants have to come up with criteria to quantify the outcomes (e.g. very good taste – average taste – weak taste). The resulting analysis can be presented according to different formats (see example illustrations opposite).
Using PM&E methods (see page 43), the facilitator can evaluate FFS participants’ perceptions and level of adoption of technologies on their own farms. In addition, the knowledge they gain from the experiments can be assessed. Benefits, constraints and barriers to adoption

Part II–75
Chapter 4: Field comparative experiments in FFS
Using illustrations and/or drawings
Using a bar graph
can be identified and discussed in plenary sessions. New experiments or other activities can be designed to solve such anticipated problems. Results of experiments should be shared with the community and neighbours during field days and with other resource persons – with a view to improving overall production and extending lessons and benefits beyond the FFS.

Part II–76
Chapter 4: Field comparative experiments in FFS
Box 4. Example of a classic field comparative experiment: Fodder establishment
BackgroundNapier grass is an important fodder planted by dairy farmers owing to its prolificacy and high yields combined with reasonable quality. However, the many varieties perform differently in different areas.
Objective• evaluate the performance of different varieties of Napier grass.
Treatments/optionsΤhree varieties of Napier: Kakamega 1 (new variety), Bana and French Cameroon.
Uniform situationPlots of equal size (10 m x 10 m) and same soil; same type and quantity of manure/fertilizer; all rain fed; six months duration; similar weeding and all other management practices.
ReplicationΤwo replications per fodder type.
RandomisationSix plots (two for each fodder type) are prepared and clearly marked. Slips of paper marked with the different treatments are put in a bagIn the field a farmer selects a plot and picks a note from the bag. In this way the treatments and their location in the field can be selected randomly.
MaterialsCane cuttings of Bana (200); Kakamega 1 (200); French Cameroon (200), fertilizer (10 kg NPK [nitrogen, phosphorous, potassium], 10 kg CAN (calcium ammonium nitrate), 300 kg manure), tools (hoe, rake and machete), labour provided by farmer with the assistance of facilitator, weighing scale, ropes, measuring tape.
BudgetIncludes costs of cuttings; manure; instruments and tools if required.
– continued opposite
Box 4 is an example of a classic field comparative experiment design.

Part II–77
Chapter 4: Field comparative experiments in FFS
Observation and record keepingDuring the AESA, each subgroup is responsible for collecting data on the following indicators: growth rate, production (yield in kg), costs of production and basic characteristics of the plant (size of leaves, colour of leaves, etc.). Use the record-keeping format given below:
Indicators Treatments (varieties)
Length after 12 weeks
Weight after 12 weeks
Cost of production Basic characteristics
FRENCH CAMEROON
64 cm 90 kg Highly variable from area to area
• High yielder in terms of dry matter
• Relatively thin stems, smooth leaves which are not hairy
BANA 73 cm 112.5 kg Highly variable from area to area
• High yielder in terms of dry matter
• Thick stems with a hairy leaf sheath
• Hairy to the touch making it unpleasant to handle
• Highly palatable if fed early
KAKAMEGA 1 91 cm 150 kg Highly variable from area to area
• High yielding• High palatability• Resistant to snow, moulding
disease, frostbites• More drought resistant• Requires well fertilized soils
Analysis of results (Based on the above example):After planting the cane two nodes under the soil and one node above the ground it took only three weeks for the first leaves to grow. Establishment for all the three plots was more than 90%. However, growth pattern varied for the three plots, with Kakamega 1 growing faster and producing more tillers and foliage than Bana and French Cameroon. Kakamega 1 was also frost resistant: an incidence of frost destroyed up to 70% of the plantation of Bana and French Cameroon but left Kakamega 1 intact. We concluded that Kakamega 1 performs better than Bana and French Cameroon in the locality.
– continued

Part II–78
Chapter 4: Alternative experimentation
Alternative experimentationIt is not always possible to design a classic comparative experiment with a control group. The principle of ‘no risk zone’ also precludes ethically unacceptable experiments. In such situations, alternative ways of conducting experiments are needed.
1. Comparing ongoing farmer practicesFarmers are already carrying out a range of different practices in relation to their livestock management and these can be identified, observed and evaluated without having any responsibility for trial design. This is particularly useful for experiments that have high risk or cost implications or for an aspect for which wrong perceptions have been held for a long time. For example:
• tick control: comparing efficacy of different acaricides and/or different application regimens (see Part III page 57)
• vaccination efficacy: comparing incidence of disease in immunised and non-immunised animals using participatory methodology (Part III, page 63)
• overstocking/underfeeding: establishing incidences of inadequate feed supply among farmers with the same land size but different land use practices for supplying livestock feeds (Box 5)

Part II–79
Observation and analysis of such experiments can be done by FFS participants visiting selected farms within and outside the FFS group to observe and evaluate existing and new livestock management practices.
Chapter 4: Alternative experimentation
Box 5. Example of an on-going farmer practice experiment: Evaluating farmers’ knowledge on estimating carrying capacity of his/her farm
BackgroundResearchers have developed guidelines on what size of land (in acres) will need to be planted with forages in order to provide adequate feed for a certain number of animals (given in livestock units: LUs). However many farmers are generally not familiar or confident in whether they are undersupplying or oversupplying forages. If they are set on keeping a certain number of animals and yet they undersupply feed, they should consider growing higher yielding types of forages. On the other hand, if they are oversupplying they could consider selling some or increasing the number of animals they own.
Objective• determine the accuracy of farmer guesswork in deciding adequate feed production
and supply.
Treatments/optionsThree farmers in the same area with similar management regime for forages (no topdressing with fertilizer, no irrigation).
Uniform situationUse standard estimates of LU and DM (dry matter) yield of each forage type (these can be provided by the local researchers).
ReplicationTwo seasons (same farm during the wet and the dry season).
RandomisationNot needed.
MaterialsPaper, pen.
BudgetNone.
Observations and record keepingFarmers undertake field walks. Observations are summarised by the sub-groups using the record-keeping format given overleaf.
– continued overleaf

Part II–80
Chapter 4: Alternative experimentation
ANIMALS KEPT ON THE FARM FORAGES AVAILABLE ON THE FARM
Livestock typeNumber on farm
LU (equivalent)
Total LU
Roughagestype
Estimated DM kg
yield/acreAcreage on farm
Total DM kg
Pure grade 1 Napier 5,500
Cross 0.8 Natural pasture 2,000
Local breed 0.8 Maize (green) 4,000
Heifer <12 months
0.6 Sorghum 6,500
Calf 5–12 months
0.7 Sweet potato vines
3,000
Young stock 0.4 Lucerne 3,000
Donkey 0.4 Desmodium 1,800
Working oxen 0.8 Columbus 6,500
Sheep/goats 0.2 Kow kandy 6,500
Maize stover 1,500
Sorghum local var.
6,500
TOTAL A TOTAL Y
Analysis of results
Calculations
Observations Treatments (farmers)
Ú
Total number of LUs = A
Amount DM (kg) required/day for each LU = B
Total kg DM needed on this farm in 365 days: A x B x 365 = X
What is available?Total DM yield (kg) = Y
Is the feed adequate for all the animals:Is Y ≥ X?
Farmer 1
Farmer 2
Farmer 3
How much is the deficit or surplus (Y – X)?
RecommendationsFor example:
• sell some sheep• plant more forage sorghums.
– continued

Part II–81
2. Comparing non-FFS or past experience
FFS practices can be compared with past experience or with non-FFS member practices. In these experiments, all FFS members’ animals receive a positive treatment (e.g. vaccination or treatment for a disease) with the objective of improving the overall health status of the FFS herd. Farmers then compare the results with their own past record (written or in memory) or with non-FFS farmers in the same area who are not using the treatment. Participatory exercises can be used to evaluate the farmers’ perception of the impact of the treatment (Box 6).
Chapter 4: Alternative experimentation
Box 6. Example of comparing non-FFS or past experience: Vaccination
BackgroundFarmers’ limited response to vaccination campaigns suggests that they are not fully convinced of the benefits of vaccination. The veterinary services of each country undertake disease surveillance to predict outbreaks or check the spread of diseases so as to minimise losses from disease. Diseases such as rinderpest, foot and mouth disease (FMD) and lumpy skin disease are some of the ones classified as notifiable diseases. As an intervention the government then asks farmers to get their animals covered by vaccination.
The experiment is undertaken as a rapid appraisal of disease incidence before and after the FFS using PRA exercises such as seasonal calendars and proportional piling (see pages 12 and 20). All FFS members’ animals are subjected to a positive treatment (e.g. vaccination against FMD or lumpy skin disease) as communicated by the veterinary department. Because of the trans-boundary character of some of these diseases this learning exercise can be jointly undertaken by all the FFS in an area, or other farmer groups can be encouraged to participate. A seasonal disease calendar or proportional piling developed at the start of the FFS can give a picture of the disease situation before the interventions. In addition, the local veterinary officer can be invited to give feedback on disease incidences in the past two or three years.
Objective • learn by reflecting on the effect of the response to vaccination campaigns.
Treatment Adherence to the veterinary services vaccination programme for that particular area.All the FFS members’ animals.
– continued overleaf

Part II–82
3. Stop and go
In the ‘stop and go’ method, a positive treatment is applied, then stopped, then re-introduced. This is repeated several times. The effect of the treatment will be demonstrated by what happens when the treatment is stopped. Thus each animal is alternatively the treatment and the control. This method cannot be used to compare multiple treatments, but it is useful to demonstrate the effect of a single treatment (e.g. the impact of supplementary feeding, see Box 7).
Chapter 4: Alternative experimentation
Uniform situationAll the FFS members involved.Entire herd covered against the most common notifiable diseases.Each FFS member keeps records of incidence of diseases and costs of treatment.
Replication Neighbouring FFS act as replications for this experiment.
Randomisation Randomly select farmer for weekly visit during FFS day. All farmers are however encouraged to keep individual AESA records of health monitoring and costs of diseases that were experienced.
Materials Animals, vaccines, vaccination cards, pens.
Budget Costs are met individually. The FFS coordinates availability of veterinary staff on FFS budget.
Observations and record keeping On FFS herds: AESA format sheet adapted for health monitoring.
On non-FFS herds: reports of outbreaks are carefully traced by FFS members and by reports from the local veterinary staff.
The results of each FFS/farmer group can be synthesised using the seasonal calendar proportional piling matrix (see page 20)
– continued

Part II–83
Chapter 4: Alternative experimentation
Box 7. Example of stop and go: Feeding concentrates
BackgroundWhen there is a lack of quality roughage, animals need concentrated feed to ensure they obtain sufficient nutrients for maintenance and production.
Objective• demonstrate the cost effectiveness of supplementary feeding on milk production.
Treatments/optionsFeeding the same quantities of concentrates.
Uniform situationOnly one animal required.
Replication2–3 times.
RandomisationNot needed.
MaterialsCow in early lactation, quality concentrate feed, recording materials. weighing balance or scales.
BudgetDepends on the type of ingredients in the concentrate. Use of locally available ingredients is recommended.
Observation and record keepingTime frame: 1 month. Weigh and record the milk production for a week before starting the concentrates. Feed the concentrates for one week and record milk production. Stop feeding concentrates for one week and continue recording milk production. Resume feeding with concentrates for another week repeating the above procedure. Present results of milk production in a graph (see illustration). Calculate the cost of each extra litre of milk produced. Discuss results with other farmers. What are the likely effects of supplementary feeding other than an increase milk production?
– continued overleaf

Part II–84
Analysis of results
RecommendationsThe stop and go method demonstrates the principles rather than the real effect of the treatment. Nevertheless, you can calculate the value of concentrate used compared with the milk production lost when supplementary feeding is stopped. In addition to the milk lost, the general condition of the cow and its immunity status should also be taken into consideration.
Chapter 4: Alternative experimentation
Graph of change in milk production using the stop and go experimentation method
– continued

Part II–85
Cost–benefit analysis
BackgroundMany farmers do not record their expenses and therefore do not know how their expenditure relates to their income. In some cases, they may not realise that they are earning little money or even making a loss. In livestock production, expenditures are diverse and include feed, healthcare, artificial insemination (AI) and labour and can be difficult to track. Systematic record keeping of all costs and benefits (e.g. sales of milk and meat) is crucial to performing cost–benefit analysis which, in turn, will help farmers to understand the factors determining their income and find ways to improve their profits. It is important that record keeping is not imposed on the participants but that they realise the need.
Objectives• make farmers aware of the importance of record keeping• train farmers in how to use records to make economic analyses of their (livestock)
enterprise.
MaterialsFlip charts, markers, ruler, calculator (optional).
TimeOne hour.
Steps Activity 1:1. The facilitator asks the FFS group to list all the expenses related to raising a bull calf
up to three months of age. The list may look like this:
Cost of milk from 1–90 days (360 litres) KSh 6,480 Tick control twice per month KSh 90 Deworming twice in the three months KSh 140 Minerals (stock lick) KSh 100Forage or hay KSh 450
Total KSh 7,260
2. The facilitator asks the group: “How much is a bull calf worth in the market?”, “What is the profit?” and “Is raising a bull calf cost-effective?”
3. The facilitator starts a discussion on the importance of doing a cost–benefit analysis as a tool to make decisions.
Chapter 4: Cost–benefit analysis

Part II–86
Activity 2:1. The facilitator initiates the activity by asking the farmers how much profit they have made
from one dairy cow in the last month. The profits mentioned by each farmer (from the top of his/her head) are written down on a flip chart.
2. A discussion is initiated on how they were able to come up with the figures given. What are the reasons for the different profits obtained by different farmers?
3. The participants are divided into sub-groups and asked to note down all expenses for one FFS participant for the last month (household labour should be converted into wages). They also list the income generated in that particular month. The net income is calculated by subtracting the total expenditures from the gross income.
4. Compare the profit the specific farmer mentioned from the top of his/his head and the profit calculated by the group. Why are the figures different? Is it important to have exact figures?
5. From here, the facilitator can start a discussion on the most important factors that determine the net income. What should we include in our calculations and which factors determine our expenses/benefits? How long should we keep records? Which expenditures can be reduced and how? What should the price of one litre of milk be if we are to make a profit? What is the farmer’s daily wage?
6. The facilitator distributes the record keeping chart to the participants and explains how the chart can be used. To test the chart, all FFS participants are asked to record all costs and revenues from one animal for a minimum of three months. Every 2–3 weeks, one farmer presents to the group his/her chart and discusses the difficulties he/she has in completing it. Another way of testing the chart is to ask five volunteers to keep a record of their expenses throughout the period of the FFS.
7. It is recommended that during each session, the record keeping is discussed briefly to check whether there are any problems and to monitor the financial situation of the FFS.
8. A record-keeping chart should also be used for each FFS experiment and the net incomes should be calculated at the end of each experiment (see illustration).
Chapter 4: Cost–benefit analysis

Part II–87
Facilitation of special topics – Livestock topics in FFS
BackgroundIt is increasingly recognised that adult learning is best achieved through a ‘learning by doing’ approach, where new knowledge is acquired through hands-on experience. However, basic information is usually needed before any hands-on learning activity can be implemented to help people understand what they have to do and to avoid risk. For example, if the AI service offers semen from a wide range of breeds, farmers will need basic information to help them choose the right breed for their environment.
The special topics or topic of the day is normally about livestock (if livestock is the main enterprise of the FFS) but it can be about any relevant subject. This gives participants the chance to learn about anything they feel is important to their livelihood (e.g. family planning, HIV/AIDS, etc.)
Objectives• provide an opportunity for the facilitator (or his/her invitee) to give input needed for a
general understanding of the subject before any activities are carried out• ensure farmers have access to the information they need at the required time• ensure a demand-driven learning process since the special topic is provided on request • create common knowledge on key issues among the entire group.
Two different participatory approaches are commonly used to facilitate special topics in the FFS:
1. Focus-group discussions, where sub-groups of FFS participants are asked to answer questions followed by a plenary discussion.
2. Participatory learning exercises of short- and medium-term duration (which can include simple demonstrations) to introduce technical topics and lead the group in discussing their experiences.
Focus-group discussion and plenary sessionAn example of the use of focus-group discussion to facilitate livestock topics is presented below (for more guidelines on focus-group discussion see page 8).
Topic of the day: MastitisObjectives • share knowledge and skills for identifying and controlling mastitis • identify knowledge gaps (e.g. the link between poor milking practices or udder
conformation and mastitis).
MaterialsFlip chart, markers, cards and demonstration materials.
Chapter 4: Facilitation of special topics – Livestock topics in FFS

Part II–88
TimeForty minutes: 10 minutes to discuss and answer the questions in sub-groups; 10 minutes per question for each presentation; 20 minutes for feedback and final comments.
Steps1. Prepare one set of questions. For example, if mastitis is the topic of the day: “What is
mastitis?”, “What are the causes of mastitis?”, “How do you recognise mastitis?” and “How do you control/treat mastitis?”
2. Form sub-groups of 4–5 people and allocate one question per group. Groups answer their question within the allocated time.
3. Each sub-group presents their discussion/answer to the other groups, perhaps using the flip chart. Comments and feedback with all participants/members follows. The facilitator makes the final comments (wrap-up).
Participatory learning exercisesExamples on how to use short- and medium-term exercises to facilitate capacity building in technical livestock topics are given below.
Chapter 4: Facilitation of special topics – Livestock topics in FFS

Part II–89
Learning activity 1: Farm structures – Why a farm structure? See Part III, page 2 for technical information on farm structures.
Objectives • enhance understanding of the importance of farm structures• involve farmers in designing farm structures that use appropriate and locally available
skills and materials.
MaterialsFlip charts, marker pens, string, fencing post or stake, bucket, grass, four sets of a plan for a zero-grazing unit (see Part III, page 3).
TimeOne hour.
Steps 1. Ask for three volunteers: the first represents a cow, the second a milker and the third
holds the grass/forage. Tie the ‘cow’ to the post. The milker starts milking and farmer three walks past carrying the grass. When the cow sees the forage, it starts to kick and jump around.
2. Discuss with the participants: “Why did this happen?”, “What can we learn?” and “What type of structure do we need to avoid this?”
3. Ask a group of farmers to complete a puzzle made up of pieces of a plan of a zero-grazing unit in three minutes. Discuss the plan.
4. Why does the farmer from the role play not have a milking shed or a zero-grazing unit? Take three sheets of flip chart. On the first sheet, list the advantages of a zero-grazing unit, on the second, list the disadvantages and on the third, list the ways to reduce risks and costs.
Chapter 4: Facilitation of special topics – Livestock topics in FFS

Part II–90
Learning activity 2: Farm structures – Farmers’ expertise on farm structures
Objectives• generate and share facts on farm structures• discover FFS participants’ existing knowledge and practices.
MaterialsFlip charts and marker pen.
TimeOne hour.
Steps 1. Farmers form four sub-groups. Each sub-group selects a chairperson and two
secretaries and the rest of the group represent information seekers.
2. Each subgroup receives a set of questions such as: “Group 1: Why do we put a roof on a zero grazing unit? What materials can we use for roofing?”; “Group 2: What is the average-size of a dairy animal? What are the measurements (length, height and width) for a sleeping area for a dairy animal?”; “Group 3: How do we make a strong floor? What are the ratios of cement–sand–ballast?”; “Group 4: What materials can we use to make a calf pen? What are the measurements of a calf pen?”
3. Each group will need to get information from the other sub-groups to answer their questions. The chairperson and the secretaries of each group are responsible for collecting the information. The other members of the group will receive the chairperson and secretaries from other sub-groups and answer their questions as best as they can. To save time and have everyone involved, the following rotation system can be used: round 1 – Groups 1 and 2 together and Groups 3 and 4 together; round 2 – Groups 1 and 3 together and Groups 2 and 4 together; round 3 – Groups 1 and 4 together and Groups 2 and 3 together.
4. Each sub-group analyses and summarises their answers on a flip chart. All the flip charts are presented in a plenary session.
5. The facilitator elaborates upon the discussion by listing the dos and don’ts for proper farm structures.
Chapter 4: Facilitation of special topics – Livestock topics in FFS

Part II–91
Learning activity 3: Farm structures – Key points for construction
Objective • introduce the key points of a good farm structure.
MaterialsBox of drinking straws, masking tape, flip charts, marker pens.
TimeThirty minutes.
Steps1. Split into sub-groups of 4–5 participants. Each sub-group receives a handful of
drinking straws (and masking tape if they ask for it).
2. The facilitator explains that the groups are in a competition. They need to make the most beautiful and highest tower in 15 minutes using the drinking straws.
3. After 15 minutes, all the participants view the towers of the different groups and discuss their quality, beauty and height.
4. Discuss the following:
• Why are the towers different, despite using the same materials?• What makes the best tower (i.e. is strong and serves the purpose)?• What makes a strong/stable/high tower (i.e. solid base)?• What needs to be done before starting the construction of a tower (i.e. make a
plan; all participants agree and work towards the same goal)?• Would the tower look different if other materials were used? Why? What
factors does one have to consider when selecting the materials (budget, quality, availability, labour costs, etc.)?
• Would this apply to construction of a farm structure? Make a list of all the factors that should be considered when planning and constructing a farm structure.
• Hence a plan for the construction of a farm can be developed.
Chapter 4: Facilitation of special topics – Livestock topics in FFS

Part II–92
Learning activity 4: Animal feeding and nutrition – What to eat? Seasonal variations in the quality and availability of feed affects the production of livestock. Farmers cannot always give feed supplements because of the high cost. Instead, locally available feed materials such as maize, fodder trees, etc. can be used to make a ration. See Part III, page 12 for technical information on animal feeding and nutrition.
Objectives• introduce principles of basic feeding• stress the importance of a balanced diet.
MaterialsDifferent types of food and feed.
TimeOne hour.
Steps1. The week before the activity, ask farmers to bring: a small amount of something they
would eat at home; a small amount of what they feed to their cattle at home.
2. Split the farmers into sub-groups of five. Ask them to: i) describe the ‘perfect’ meal – perhaps for their growing child; ii) describe why they chose that food; and iii) group the foods they brought and discuss the differences. Ask them to sort the animal feed they brought in a similar way.
3. Ask each group to present their findings.
4. Analyse by discussing the different types of food and feed: Did they identify the five food types (carbohydrate, protein, fat, minerals and vitamins)? Did they mention water? Discuss the purpose of each food/feed type (see Table2).
5. Discuss the proportions needed. Was there more than one food/feed type in a category (demonstrates choice)? How are foods and feeds presented (cooked or raw, stewed or roasted, chopped or whole)? How is the acceptability of food and feed enhanced? What can cattle eat that humans cannot? How can you make sure food and feed meets the goals of feeding (e.g. high protein for growing animals, high energy for working animals, lower quality for the least productive ones).
Chapter 4: Facilitation of special topics – Livestock topics in FFS

Part II–93
Table 2. Different types of food and feed and their purpose
Type of nutrients and purpose Human dietary examples Cattle dietary examples
Carbohydrates
for energy, and roughage for bulk
Cereals e.g. maize, wheat, riceCereal flour-based foods, e.g. breadPotatoesSugar
Bulk forages and roughages e.g. grass, hay, straw, stoversCereal by-products e.g. branRoot crops e.g. cassava chips
Protein
for building body tissues – usually quite expensive and eaten in small amounts
Milk, meat, fish, eggsPulses e.g. lentils, cowpeas, beans
Legume crops and forages e.g. desmodium, lucaena or calliandra leavesUrea*Poultry litter*
Fat
for concentrated energy – only small amounts are needed
Oil, butter, ghee, oil seed products Oil seed products
Vitamins
very important to avoid illness –needed in small amounts
Fruit and green vegetables, milk, margarine
Vitamin supplementsMade in rumen by micro-organisms
Minerals
very important to avoid illness –needed in small amounts
Milk, green vegetables, liver, salt Forages and roughages, mineral licks, salt
Example of a balanced diet
Rice or maize meal, green vegetables, lentils, milk, fruit plus a little vegetable oil and salt
Napier grass, maize stovers plus some concentrates (bought-in dairy meal or maize bran) plus access to vitamin and mineral blocks and/or salt
Chapter 4: Facilitation of special topics – Livestock topics in FFS
A food ‘plate’ showing the different proportions of types of food needed in the daily diet

Part II–94
Learning activity 5: Animal feeding and nutrition – Home-made rations
Objectives• learn how to produce a home-made ration of reliable quality that will increase livestock
profitability
Materials50 kg maize on cob (milled), 49 kg fodder trees leaves (dried and milled), 1 kg minerals, weighing scales/balance, polythene sheet/canvas, spade, gunny bags.
TimeOne hour.
Steps1. List all the materials and decide who is going to do what. Spread the canvas on the
ground and hang the scales or balance ready for use. Weigh out the ingredients and mix them together. Pack the mixture into gunny bags ready for storage and feeding.
2. Complete a cost–benefit chart for the production of 100 kg of home-made supplement. Compare the cost with 100 kg of commercial feed (including the transport costs!).
3. Discuss the advantages and inconveniences of a home-made supplement. What increase in production would be needed for supplementary feeding to be economic?
Learning activity 6: Animal feeding and nutrition – Feed conservation
Objectives• make farmers aware of the need to conserve feed• enhance farmers’ understanding of the methods of feed conservation.
MaterialsFlip charts, markers.
TimeOne hour.
Steps1. Divide participants into groups. The number of groups will be determined by the
numbers of seasons in the specific area. For example, an area with a wet and a dry
Chapter 4: Facilitation of special topics – Livestock topics in FFS

Part II–95
season will need two groups. If the groups are too big, split them so that more than one group has the same task.
2. Each group is given one season and asked to discuss and then draw an animal (e.g. a cow) showing the effects of that season on body condition and production level.
3. Ask each sub-group to present their pictures to the bigger group and to explain what they represent. The way they have drawn the animal may reflect a number of things, but the discussion should focus on what the relationship is between the condition of the cow and the feed quantity/quality available in the particular season.
4. Try to identify which feeds are available in each season and ask people to think how they could save some of this feed for use in the dry season. Consider different methods of conservation for different types of feeds (e.g. making hay, types of storage, silage, etc.) and discuss the advantages and disadvantages of each.
Chapter 4: Facilitation of special topics – Livestock topics in FFS

Part II–96
Learning activity 7: Reproductive management and breeding
See Part III, page 45 for technical information on reproductive management and breeding.
Objectives • introduce the concept of selective breeding • enhance knowledge of natural breeding and AI.
MaterialsTwo cows of different breeds (a high-producing exotic or crossbred cow and a zebu or local breed), two buckets.
TimeOne hour.
Steps1. Ask for two volunteers to milk the cows.
2. Start milking and the rest of the FFS participants are asked to observe and listen to the sound of the milk pouring into the bucket.
3. After a few minutes the milking stops and the facilitator asks the group: “What characteristics distinguish the two cows?” and “What are the reason(s) for these differences?” Brainstorm how the two types of breed find their way into the community.
4. To enhance the discussion, split into sub-groups (4–5 people per group) and discuss: “Why is there a difference between breeds?”, “What is breeding?”, “What are the objectives of breeding?”, “What breeding methods are there?” and “What are the strengths and weaknesses of the methods?” Each sub-group presents their findings in plenary.
5. The learning exercises can also involve role play where two farmers, each having a bucket of milk (water) have a discussion on how many and what breed(s) of cows were needed to fill the bucket. An external expert can also be brought in to cover the option of AI.
Chapter 4: Facilitation of special topics – Livestock topics in FFS

Part II–97
Learning activity 8: Animal health – Tick biology and control
See Part III, page 53 for technical information on tick biology.
BackgroundAlthough ticks are part of the daily life of livestock farmers, their basic biology is often little understood. Farmers are more likely to understand the relationship between ticks and tick-borne diseases once they are aware of the life cycle of the tick.
Objectives• demonstrate the life cycle of the most important tick species• demonstrate the importance of tick control and introduce basic principles • introduce the relationship between ticks and diseases.
MaterialsEngorged ticks, glass tubes of 1–2 cm diameter and approx 10 cm long, sand, wooden box, thick paper, tray, cotton wool, tick identification key.
TimeOne hour for each learning activity.
Steps1. Types of ticks. Identify some animals (cattle, goats or sheep) carrying ticks and handpick
as many ticks as possible. Try not to damage them, especially the mouthparts. Note from which animals and from where on the animal they come from. Lay all ticks on a tray and ask the farmers to group them by category (size, species, colour, etc.) and where the specific tick species attach themselves on the animal.
2. Gender and lifecycle. Ask if the farmers can recognise male and female ticks. The female body is only partially covered by the scutum (hard part that protects the body). The scutum is sometime decorated. The body of the male is fully covered by the scutum because they do not engorge and thus do not need to have a flexible body. They also live longer and need to be protected.
Chapter 4: Facilitation of special topics – Livestock topics in FFS

Part II–98
Ask farmers how many legs do the ticks have? Ticks have eight legs like a spider (they are arachnids). They are not insects although the tick larvae have only six legs. This introduces the four stages in the life cycle: egg, larva, nymph and adult. Depending on the species, the transformation from one stage to the next is done on the host or on the ground. If all stages happen on the same host without going back to the ground, it is a single host tick species. With a two-host tick, the nymph will moult into the adult stage on the ground. With a three-host tick, the moulting occurs on the ground and the same tick will infest three different animals.
Draw the conclusions that only the females engorge; the adult males stay on the same animal for longer and need very little blood to survive. Depending on the species, a single tick may need to feed on several different animals. Some ticks spend time on the ground while others do not. Some ticks like livestock while other species like rodents or birds where they cannot be controlled by acaricide.
3. Tick species and genera. Ask farmers if they can identify different species of ticks by local names. Select adult ticks from each identified species. Use the simple key to identify tick genera (see Part III, page 58) to show the different body parts that identify different species. Introduce the identification key and use it to demonstrate how to identify different ticks. Ask the farmers to do it in sub-groups. Can they remember where on the animal they found each species of tick? Each species has a predilection site and may be identified by where on the animal they are found. Discuss which diseases are transmitted by which species of ticks.
4. Tick reproduction. Few farmers realise how many larvae a single female tick can produce. The following exercise will demonstrate the importance of tick control, showing that each female tick can be responsible for thousands of offspring ready to parasitise the farmer’s animals. First, collect all the fully engorged females from the tray. Cut a band of paper 1 cm wide and 2 cm longer than the tube, and wet it. In each tube place a wet strip of paper that sticks out a little at the top. In each tube place an engorged tick and close the tube with cotton wool. In a wooden box, lay 5 cm of wet sand and place all tubes in the sand. Close the box and place it in the shade.
Every day, check all tubes, ensuring that the sand in the box and the paper in the tube are slightly wet. The atmosphere in the box should be humid. Within a week or so, the females will lay between 1,000 and 12,000 eggs, depending on the species and the size. The female ticks die after egg-laying and their bodies should be removed to avoid fungal growth. Within 20–50 days, the eggs will hatch and tiny larvae will be seen crawling in the tubes (keep the tubes closed!).
Finally, empty one tube at a time onto a large tray and try to count how many larvae each tick produced. The larvae will run in all directions and it is difficult to control them. Capture them in cotton wool as they run away and put this in a jar of acaricide or burn it immediately.
Chapter 4: Facilitation of special topics – Livestock topics in FFS

Part II–99
Learning activity 9: Animal Health – Detecting mastitis
See Part III, page 65 for more technical information about animal health.
BackgroundBacteria in milk affects its consistency, colour and taste and renders the milk unsuitable for sale. Simple detection of mastitis would enable farmers to take remedial measures and avoid further loss of income.
Objective• demonstrate how to detect mastitis using a simple method.
MaterialsTwo cows, one infected with mastitis and one not (both should be milking), gumboot or black container, milk strip cup (if available).
TimeOne hour.
Steps 1. The facilitator asks the FFS participants to look at the animal and try to detect any
abnormal behaviour, e.g. is it feeding normally, chewing the cud, restless? Look at the udder and see if you can spot anything unusual.
2. Instruct the class to touch the udder and feel for heat and/or swelling with the backs of their hands. Gently squeeze all parts of the udder to see if the animal experiences any pain. Are the udder and teats soft or hard? Heat, swelling, pain and hardness are all signs of infection.
Chapter 4: Facilitation of special topics – Livestock topics in FFS
Observational experiment over time with egg-laying ticks

Part II–100
3. Get them to strip some milk onto the backs of their hands or onto a smooth black surface (e.g. gumboot) to see if there are any clots, which would indicate mastitis. Is the colour normal or yellowish, blood tainted, or pus-like and watery? (If watery and with any colour then mastitis is possible).
4. Decide if the animal has mastitis. If so, what do you do? (Seek veterinary advice).
5. Discuss methods of preventing mastitis (see Part III, page 66)
Learning activity 10: General husbandry practices – Deworming
See Part III, page 76 for technical information on general husbandry practices.
BackgroundWorm infestation in livestock greatly affects production and the profit for the farmer.
Objective• demonstrate the effectiveness of deworming on daily live weight gain of calves.
MaterialsDrenching gun (dosing gun), drench (dewormer), animals to be dewormed, recording materials (notebook, pens/pencils), weighing band or calf scale.
TimeWeekly observation for three months.
Steps1. Using information collected from participatory epidemiology exercises, decide what
type of animal should be treated, at what time of the year and against which type of worms. Then identify the appropriate drug. This exercise uses the example of treating calves at weaning.
2. Design an AESA format and complete a cost–benefit chart to monitor the effect of drenching.
3. Ideally, all calves from the FFS should be treated and a comparison made with similar aged calves from non-FFS participants. Alternatively, if farmers are not convinced and do not want to meet the cost of treating their animals, they can act as the control group.
Chapter 4: Facilitation of special topics – Livestock topics in FFS

Part II–101
4. Record the weekly weight gain of 10 untreated calves of similar age and weight for one month before treatment. You can also take a picture of the calves at the beginning of the experiment and compare it with another taken at the end.
5. Following veterinary advice and drug specifications, determine the frequency and the amount of drench required per animal, and treat five animals accordingly. Use additional methods for minimising re-infestation, e.g. cleaning the night calf pen, rotating pasture management, etc.
6. Record the weight of each animal weekly for the next three months. Using information from the AESA and from a cost–benefit analysis chart to work out if deworming is cost-effective. Discuss with the farmer what would be the impact of treatment if all calves were treated?
Learning activity 11: General husbandry practices – Routine practices
Objective• create awareness of routine husbandry practices and to discuss methods to improve
them.
MaterialsFlip chart, marker.
TimeTwenty minutes.
Steps1. Ask for two volunteers, one man and one woman.
2. Let each describe all the farm-related activities they perform in a day, from the time they wake up until bedtime. List these on a flip chart.
3. Ask the group which activities, if not done daily, would make living impossible?
4. Ask the group which activities, if not done daily, could lead to death of the animal. Discuss which livestock management activities are essential (e.g. feeding, watering, security, housing, disease control, dehorning, hoof trimming, tick/worm/flea control). Why are these activities so important?
5. The facilitator enhances the discussion by asking about the FFS participants’ current husbandry practices, their advantages and disadvantages, and possible improvements that would raise productivity (e.g. keeping only healthy stock, selecting the right individuals to breed from, better marketing).
Chapter 4: Facilitation of special topics – Livestock topics in FFS

Part II–102
Learning activity 12: General husbandry practices – Body scoring as a technique for management decisions
BackgroundLivestock keepers continuously make decisions such as buying and selling stock, giving supplementary feed, breeding with a local bull or AI, seeking veterinary advice, etc. These decisions are normally governed by the value the farmer attaches to the animal. A guide for scoring the animal would therefore be very useful.
Objective• introduce body scoring techniques to help farmers monitor animal condition and
improve management decisions.
MaterialsBaskets, markers, tray of eggs (or fruits in season).
TimeOne hour.
Steps1. The facilitator asks FFS participants to brainstorm around the subject of criteria used
for grading eggs (or fruit), e.g. by appearance, size, age or quality. Present a scale of one to five, where one is bad, two is slightly bad, three is average, four is good, and five is very good. Group the eggs (or fruit) into the different categories.
2. Divide farmers to work in sub-groups (4–5 people each) to answer specific questions such as: “Which category is best for eating?”, “Which is best for selling?”, “Which is best for hatching?” and so on.
3. The facilitator asks: “Eggs can serve different purposes and can receive a score for each specific purpose – can this be done with animals too?”
4. The facilitator explains that in animal scoring, a scale of 1–5 is used such that a cow with a condition score of one is considered too thin, two is thin, three is average, four is fat, and five is too fat. (see Part III, page 77)
5. Select a cow and apply the body scoring technique. Then discuss when the best time is to score for body condition: One month after calving? In the middle of the milking period? At the end of the milking period? Just before calving? At six months of age for calves and near breeding age (18 months) for heifers?
6. Based on the experiences with body scoring techniques, what should you do when a cow scores one, two, three, four or five?
Chapter 4: Facilitation of special topics – Livestock topics in FFS

Part II–103
Learning activity 13: Milk marketing and processing – Milk market dynamics
See Part III, page 82 for technical information on milk marketing and processing.
Objectives• introduce the topic of marketing• enhance participants’ understanding of marketing issues• develop marketing strategies for livestock keepers.
MaterialsContainer of water holding exactly 8 litres of water and two empty containers of exactly 5 and 3 litre capacity.
TimeFifteen minutes.
Steps1. The facilitator asks for three volunteers and explains that two of them are livestock
keepers selling milk. One volunteer is a customer who wants to buy 4 litres of milk. They have 8 litres to sell (represented by the container of water) and two empty containers (5 and 3 litre capacity).
2. The customer approaches the livestock keepers and asks for exactly 4 litres of milk. The livestock keepers are challenged to provide the customers with what he wants using the containers available.
3. After repeated trials with or without success the facilitator intervenes and if necessary explains the right answer (see table and illustration) and asks: “What can we learn from this exercise?” The participants had to go through many steps of trial and error to find the solution. However the problems could be solved. It shows that the problem can be solved if you have determination and creativity. Marketing is complex and farmers often struggle with it but, as the exercise shows, they can solve the problem.
4. The facilitator poses another question: “What could the milk seller do to avoid having to do this another time?” The answer is to buy a 1 litre container so any amount can be measured. Alternatively, the milk seller could study the needs of the customer so they know what type of container is needed to sell the milk easily. A discussion can be initiated on what a livestock farmer needs to know before their produce can be marketed successfully.
Chapter 4: Facilitation of special topics – Livestock topics in FFS

Part II–104
8 litre can (full)
5 litre can (empty)
3 litre can (empty) Instructions
0 l 5 l 3 l The 8 l can is emptied into the 5 and 3 l cans
5 l 3 l 0 l The milk from the 5 l can is poured into the 8 l can and the milk from the 3 l can goes into the 5 l can
2 l 3 l 3 l Fill the 3 l can from the 8 l can
2 l 5 l 1 l Fill the 5 l can from the 3 l can
7 l 0 l 1 l Pour the milk from the 5 l can into the 8 l can
7 l 1 l 0 l Pour the 1 l left in the 3 l can into the 5 l can
4 l 1 l 3 l Fill the 3 l can out of the 8 l can and then the 8 l can is left with 4 l
Obviously there are many ways of solving this. Below another alternative is presented:
Chapter 4: Facilitation of special topics – Livestock topics in FFS

Part II–105
Learning activity 14: Milk marketing and processing – Making yoghurt
BackgroundFresh milk cannot be kept for long; it soon turns sour owing to the rapid multiplication of bacteria. Other milk products have a longer shelf life, e.g. yoghurt can be kept for up to five days.
Objective• preserve milk and add to its value, thus improving profitability.
MaterialsFive litres of milk, milk can, burner/stove, large pot, water, lactometer, thermometer, inoculant/culture, sweetener/sugar, food flavour, food colour, filtering cloth, stirrer, spoon.
TimeOne hour.
Steps1. Filter the milk to remove any physical dirt.
2. Test the milk using the clot on boil test, lactometer test and organoleptic tests. For the clot on boil test: boil a small amount of milk in a spoon or other suitable container. If there is coagulation or precipitation, the milk has failed and should be rejected. For the organoleptic test: conduct a visual check for any abnormalities (colour or foreign particles) and an odour check. If the quality is good, it can be used.
Chapter 4: Facilitation of special topics – Livestock topics in FFS
Milk can immersed in a hot water pot

Part II–106
3. Heat water in the large pot to 80–85°C. Put the milk in the milk can and add sugar or sweetener (up to 6% depending on client). Put the milk can in the water for 30 minutes (see illustration).
4. Cool the milk to 42–45°C (put in a cold water basin or trough).
5. Inoculate the milk with a starter culture (4–5 grains of culture for 5 litres of milk). Take care to avoid contamination with other micro-organisms. If a starter culture is not available, half a tablespoon of good quality live or bio yoghurt can be used as an inoculant. Stir well for 2–3 minutes to ensure uniform distribution.
6. Incubate at 42–45°C for a period of 2–3 hours (or at 30°C overnight).
7. Check the surface of the fermented milk. It should be compact without cracks and whey on top.
8. Add flavour and colour, then stir well to homogenise the curd to a smooth consistency.
Chapter 4: Facilitation of special topics – Livestock topics in FFS

Part II–107
Group dynamic exercises
BackgroundGroup dynamic exercises create a pleasant learning environment, facilitate learning and create space to reflect. They also enhance communication, problem solving and leadership skills. The games and exercises are lively and convey messages. They also break the ice and improve participation. Furthermore, people tend to remember the exercises and thus the message. Each exercise can serve multiple purposes. To apply group dynamics properly, the facilitator should keep the following in mind:• be clear about what you want to achieve with the exercise• be aware of the appropriate moment, e.g. do an exercise to energise people when they
are feeling tired, or to tackle conflict if you see one arising• plan and prepare the exercises (reserve time for them in the FFS programme) and always
add a ‘head’ and a ‘tail’ (introduction and analysis)• good exercises involve everyone in the group• exercises should be adapted to local and cultural conditions and should not offend
people or make them feel embarrassed• vary the type and use of the exercises – don’t only do exercises that energise• treat group dynamic exercises as a toolbox – do not become trapped in a fixed formula.
Remember that each FFS is unique and exercises should be modified for each specific FFS.
ObjectivesThis section gives examples of group dynamic exercises which aim to facilitate various objectives:• energise participants Claps page 108 Coconut page 109 Fruits and animals page 109 Inside the field – outside the field page 110• enhance participation Talking object page 111 Knotty problem page 112 Folding paper game page 113 Puzzle page 114• strengthen a learning topic Folk media page 115 Agro-ecosystem analysis (AESA) page 63 Ecosystem page 60 Facilitation of learning activities page 87 Participatory monitoring and evaluation (PM&E) page 43• strengthen group work and cohesion Goats and the lion page 115 Gun, rabbit, wall page 116 Digging exercise page 118• solve conflict Different sites page 119 Come on over page 120 Confronting the lion page 121
Chapter 4: Group dynamic exercises

Part II–108
Claps In the FFS in Kenya, many different types of claps are used to energise the participants and also to welcome or thank a contributor.
Time1–3 minutes.
Steps1. The FFS clap: two rounds of three fast claps followed by one loud clap.
2. The OK clap: three fast stamps with one foot on the floor, three fast claps followed by the OK sign formed by the fingers.
3. The praise clap: three fast stamps on the floor, two fast claps followed by stretching the arms towards the person being welcomed or thanked.
4. The rain clap: the arms are raised above the head and the fingers are moving fast (like rain coming down), slowly the arms are lowered in a wide circle until they are down, followed by a loud clap with the hands.
5. The energy clap: the right arm is spinning around next to the body (like the wings of a helicopter) first slowly then faster. When the speed is at its fastest, a loud clap with the hands follows.
Chapter 4: Group dynamic exercises
Group dynamics to energise participants These games and exercises enhance the participatory learning process by energising participants: making them laugh, relaxing and calming them and refreshing their minds. They also enhance concentration and attentiveness. Energisers are used during and after a long or difficult session, when the group has become tired or tense or when the pace of the session needs to be changed. Four examples are provided below, and there are many others in published books.

Part II–109
Coconut
TimeFive minutes.
StepsThe participants stand up and write the word C-O-C-O-N-U-T with their bodies (of course, any other word can be used)
Chapter 4: Group dynamic exercises
Fruits and animals
Time5–10 minutes.
Steps1. The facilitator asks the group to form a circle standing up.
2. The group claps three times then the facilitator says the name of a fruit.
3. After three more claps, the person next to the facilitator says the name of an animal.
4. After three more claps the next person says the name of a fruit and so on around the circle.
5. If someone says the name of a fruit when an animal is required, or cannot think of a fruit or animal, or repeats the name of a fruit or an animal that has been said already, they must sit down.
6. Continue until only one participant is left standing.

Part II–110
Inside the field – outside the field
Time5–10 minutes.
Steps1. Draw two parallel lines on the ground with a distance of approx.2 m between
them.
2. Divide the group into two. Each group stands behind a line, so that the two groups are facing each other.
3. The facilitator explains that the area between the lines is the field.
4. When the facilitator says “Inside the field”, all participants have to step over the line into the field area. When the facilitator says “Outside the field”, the participants have to stand on the other side of the line.
5. The facilitator will gradually increase the speed of the commands to enhance the participants’ alertness.
6. Each participant that reacts too late, or does not follow the command correctly is out.
Chapter 4: Group dynamic exercises

Part II–111
Chapter 4: Group dynamic exercises
Group dynamics to enhance participation Since the FFS participants are the key focus of the programme and their skills and experiences are the main resources, it is important to create an atmosphere where people feel free to share and exchange experiences and discuss views. Exercises to enhance participation should be included from the beginning of the FFS to break the ice and create a pleasant learning environment where participants respect each other’s opinions and contributions.
Talking object Objective• encourage participation and discourage dominance.
TimeFifteen minutes.
Steps1. Participants sit in a circle.
2. An object is passed around the circle and the group decides on the subject of discussion.
3. The person who receives the object has to talk continuously until his/her neighbour decides to take the object and takes over.
4. This continues until all participants have spoken.
5. To reflect upon the exercise, the facilitator asks the participants to express how they felt when they were talking, when they had to wait for the object, and when they were interrupted.
6. Discuss that in a group it is important to share (talk), listen and respect other participants.

Part II–112
Knotty problem
Objectives• demonstrate that groups empowered to solve their own problems are much more
successful than those instructed by outsiders• strengthen participants’ confidence in their ability to solve problems themselves.
Time10–15 minutes.
Steps1. Select one, two or three participants to act as FFS facilitators. They are asked to leave
the room while the facilitator instructs the rest of the group.
2. Ask the remaining participants to hold hands in a circle and tie themselves into an entangled knot. They must not let go of each other’s hands.
3. Once the knot is complete, the ‘facilitators’ who left the room return and are asked to unravel this knotty problem within three minutes, using verbal instructions only. They should hold their hands behind their backs so they are not tempted to touch the others.
4. The participants entangled in the knot are asked to follow the facilitators’ instructions literally and not make it easier for them by doing anything they have not been told to do.
5. The attempt is generally not very successful and sometimes even produces a more complex knot. Now repeat the exercise with the facilitators participating in the knot. When the knot is ready, simply ask the participants to get out of the knot themselves. This untying process is usually much quicker.
6. Ask the participants to comment on the differences between the first and the second time the knot was unravelled and why these differences occur. “What does the game tell us about the role of outsiders/facilitators and insiders (in the knot and in other problems in general)?” “What does the exercise tell us about the effectiveness of outsiders and managers in organising people?” “Who were the most successful in solving problems and why?”
Chapter 4: Group dynamic exercises

Part II–113
Folding paper game Objectives• demonstrate that even simple instructions can be misinterpreted• raise awareness of misinterpretation of instructions and facts through non-
participation, absenteeism and not asking for clarification• develop ways to avoid/resolve situations of misinterpretation.
MaterialsSeveral sheets of paper (square sheets are most interesting, as ingenious participants could choose to fold them from corner to corner, thus getting a triangle).
TimeFive minutes.
Steps1. Select four participants (or ask for volunteers) and ask them to stand in front,
facing the rest of the group.
2. Give each a sheet of paper. They must keep their eyes closed and must not ask questions.
3. Instruct them to fold their paper in half and then tear off the bottom right-hand corner of the paper. Tell them to fold the paper in half again and then tear off the top right-hand corner. Tell them to fold the paper again and tear off the bottom left-hand corner.
4. Ask them to open their eyes and display the unfolded paper to each other and the audience.
5. It is quite likely that the pieces of paper will look different. “What words in the instructions could be interpreted in different ways?” “How could the directions have been clearer to reduce the ambiguity?” “How can we encourage people to ask for clarification when they do not understand something?”
Chapter 4: Group dynamic exercises

Part II–114
Puzzle Objective• increase understanding of teamwork.
MaterialsPuzzles made out of a piece of paper cut into pieces (better when the paper has a picture or drawing). Use a different puzzle for each sub-group.
TimeFifteen minutes.
Steps1. Make or use existing sub-groups.
2. Give each sub-group a puzzle and ask them to solve it in three minutes.
3. Discuss which group managed to solve the puzzle? “How did they do it?” “What were the roles of the different members of the group (e.g. who took the lead, who put the pieces together and who stood back)?” “What makes a good team?” “What kind of people should a team have?”
Chapter 4: Group dynamic exercises
Group dynamics to strengthen a learning topic FFS facilitators should convert technical information into practical exercises and field activities and avoid lecturing or conventional forms of training. The aim is to ensure participation by all and to make the learning situation entertaining and effective. For example, instead of describing local fodder grasses in front of the group, the facilitator should ask the farmers to walk around in the field, observing and discussing the local fodder species where they grow. This Field Guide gives many examples of how technical topics can be delivered through exercises such as scarecrow and tug of war (tools to introduce PM&E, page 51), the concept of an ecosystem (page 60), the concept of AESA (page 63), etc.
In addition, the special topics (learning activities) demonstrate how group dynamic exercises can be used to introduce and enhance understanding. However, since the FFS programme is guided by the FFS participants, it is not possible to provide a list of all the technical exercises to be carried out. The facilitator needs to be very innovative and

Part II–115
Chapter 4: Group dynamic exercises
to develop different ways to deliver the technical content requested by farmers. Some guiding principles:
• Avoid situations where the facilitator stands in front of the group and explains technical aspects away from the location of the topic of study.
• The participants should always talk more than the facilitator in any given learning session.
• Physical activity should be encouraged in all learning sessions, e.g. farmers digging in the soil to look at root development or searching the chicken for fleas.
• Entertaining aspects should be encouraged when delivering technical topics, e.g. a simple song or drama rather than a presentation on a flip chart. Folk media (role plays, drama, poems, songs, story telling, dances and legends) are particularly useful.
Group dynamics to strengthen group work and cohesion Good group work enhances exchange of information, reflection and learning. In participatory processes, the different capabilities of different people complement one another. A group can only become a team when all the members are interdependent. With constructive interaction, dialogue and consensus, aspects such as cooperation and team work increase. Group dynamic exercises to strengthen group work and cohesion are designed to encourage such dialogue and to reflect on the nature and process of teamwork. Guidelines for dynamics on the formation of sub-groups, support of groups and strengthening of groups are presented in the following section.
The goats and the lion Objective• form sub-groups and make sure that the groups are mixed
TimeFive minutes.
Steps1. Participants are requested to roam around the room as if they were goats
grazing.
2. The facilitator explains that a lion is approaching and that only the goats that are in groups of a certain number (e.g. groups of eight, but can be any number) will be safe.
– continued overleaf

Part II–116
3. The participants have to react quickly and hold each other’s hands or shoulders.
4. This is repeated until the desired number of sub-groups are formed. With a group of 25–30, sub-groups of around 5–6 are most effective for learning.
Gun, rabbit, wall Objectives• enhance understanding of strengths and weaknesses, and learn importance of
identifying strengths of each individual to help one another overcome weaknesses• recognise importance of group work and consensus, since all members of a team
need to be going in the same direction• understand that a group needs to be organised to function well.
Time10–15 minutes.
Steps1. Split the group into two.
2. The facilitator explains that there are three characters: a gun, a rabbit and a wall, each having its specific strengths and weaknesses. The gun can beat the rabbit since the rabbit can be shot. The wall beats the gun as it can stop the bullet, and the rabbit beats the wall as it can jump over it.
– continued
– continued opposite
Chapter 4: Group dynamic exercises

Part II–117
3. Each group has to decide whether it is a rabbit (by placing the hands on the head), a gun (by placing the hands like a gun) or a wall (by stretching the arms out wide).
4. The two groups form a line facing each other. The facilitator counts to three, then the groups show which they are by making the movements. The team with the most ‘winning’ moves is declared the winner.
5. What can be learned from this exercise? Each creature has its strengths and weaknesses. Also, a group needs to be organised and must communicate well, and a good leader can bring the group together.
6. In addition, the group has to pull together and will lose out if one person does something different from the others.
7. Ask the participants to comment on what can be learned from the exercise (each creature has its strengths and weaknesses and that the group needs to be organised and communicate and reach a consensus to be able to win the game).
– continued
Chapter 4: Group dynamic exercises

Part II–118
Digging exercise Objective• enhance group cohesion and facilitate work through proper planning.
MaterialsA hoe.
Time10–15 minutes.
Steps1. The facilitator asks for three volunteers.
2. The participants are asked to dig together using the hoe.
3. In most cases, the participants struggle and the digging does not go very well.
4. The facilitator asks them to stop and asks the group what they just witnessed. What can we say about the digging? What can they do to improve the digging?
5. The three volunteers discuss amongst themselves and make another digging attempt.
6. When they have stopped digging, the facilitator asks what the group could observe comparing the two digging attempts. The first attempt was uncoordinated digging, whereas before the second attempt, the three participants coordinated the activity and agreed how to dig together.
7. One can learn from this exercise that group work needs coordination and communication (agreements amongst all members) to be able to successfully conduct activities. This is what the sub-groups in the FFS need to keep in mind whenever they undertake an activity.
This exercise can also be done using a pen (for literate farmers) to draw an object of their choice on a flip chart, using the same procedure.
Chapter 4: Group dynamic exercises

Part II–119
Group dynamics to solve conflict Where there are people, conflict can occur. Conflicts arise out of different perceptions, varying views, intolerance and prejudice. Conflicts hamper learning and should be tackled before they break up a group. A well-facilitated FFS creates dialogue and encourages understanding and should not fear the management of conflicts. The group dynamics provided assist discussion on the causes and effects of conflicts and provide a start for problem solving.
Different sites Objectives• provide insight into cause and effect of conflict• provide ways and means of addressing conflict.
MaterialsSeveral objects representing resources, such as books, pens and stones.
TimeTen minutes.
Steps1. The facilitator asks for four volunteers to leave the FFS learning site.
2. Objects (resources) are put in the middle of the remaining group of participants.
3. The facilitator gives instructions to the four volunteers separately. Each volunteer receives instructions to take all the objects to a location. However, the location given is different for each volunteer.
4. The volunteers are asked to come back, have a look at the objects and follow up their specific instructions.
5. Each volunteer will move the objects according the instructions given. Most probably a conflict occurs as none of the volunteers will manage to take all the objects to the place they were instructed, because the other volunteer will take the objects away again.
6. If the volunteers do not come up with a solution themselves, the facilitator needs to stimulate the volunteers to discuss how they can solve the problem.
– continued overleaf
Chapter 4: Group dynamic exercises

Part II–120
After discussing among themselves, the volunteers agree on a way to carry out the various instructions in a systematic way to the satisfaction of each of them.
7. The facilitator initiates the analysis of the exercise using questions like: “Has this exercise revealed general difficulties experienced in real life? If so, what kind?”, “What was the solution of the volunteers?”, “Is the solution applicable to conflict in real life?” and “What tool/mechanism was used?” (After discussion they understood each others’ instructions and could then decide to follow up the instructions, one by one.) “What can we learn from this exercise?” (That communication and understanding of each person’s needs and aims is crucial in conflict solving.)
– continued
Come on overObjective• demonstrate that non-resistance may actually work in your favour.
Time5–10 minutes.
Steps1. The facilitator asks participants to form pairs and face each other while
kneeling.
2. Designate one person ‘A’ and the other ‘B’. Partners place their hands against each other with palms open and forward.
3. Ask each person to push their hands against their partners’ with firm pressure. Tell A to give in (stop pushing) at any time without warning B.
4. Reverse the roles and repeat the exercise.
5. The facilitator asks the following questions: “How did it feel when you stopped resisting?” and “How did it feel when you exerted continued pressure?” Unnecessary strength or pressure can sometimes be counterproductive. “Can you think of some examples in daily life when this has happened?”, “Can you think of examples in the FFS when this happened?”
– continued opposite
Chapter 4: Group dynamic exercises

Part II–121
Confronting the lion Objectives• show that people have different reactions to the same problem/obstacle• encourage
self-analysis• show that obstacles can be overcome.
MaterialsFlip charts and markers.
TimeTwenty minutes.
Steps1. Vividly describe a scene of walking alone and meeting a lion.
2. Ask participants to describe in one word what they would do in that situation.
3. The facilitator records these responses on a flip chart.
4. Why are the responses different? Discuss ways in which the responses may be similar to daily situations in which we meet ‘lions’ or problems and barriers.
– continued
Chapter 4: Group dynamic exercises

Part II–122
Organisation of a field day BackgroundField days provide an opportunity for non-participants to be exposed to the FFS group’s lessons and the skills and knowledge gained in the process. In addition, they provide the FFS members with an opportunity to display and share their experiences, e.g. the experimentation results and learning activities, including group dynamics. Field days reinforce the FFS cohesion and raise awareness among the community, the government and other organisations in the area, creating support and new demand for FFS.
Objectives• provide FFS participants the opportunity to share their experiences with their and other
community members• exchange experiences with other farmers, extension workers, government officials and
other visitors• create awareness for the FFS approach in the region.
MaterialsFlip charts, paper, markers, masking tape, pins, camera, plastics/umbrella in case of rain.
TimePreparation time: one full session. Field day: one full morning.
Steps1. In an FFS session, the facilitator explains the objectives of the field day. First of all, the
group needs to agree on the date and identify the venue for the field day. The venue needs to be accessible, show the FFS field comparative experiments and should be able to host many people.
2. Then the group decides what activities in the FFS they would like to display and share. Important topics include an introduction the FFS core activities and field comparative experiments. The group needs to select at least two accessible locations (or the results of experiments if the trial has already ended).
3. One or two FFS participants need to take the responsibility of presenting the topic to the visitors. In addition the group needs to select a master of ceremonies, a secretary (responsible for invitations and registration, guides, catering, logistics and stationery).
4. The FFS group needs to draft a letter to invite visitors and a poster to publicise the event. The group needs to compile a list of people they want to invite e.g. community members, neighbouring communities, government staff, other FFS, companies, development organisations in the area, etc. Guest(s) of honour are identified and invited accordingly.
Chapter 4: Organisation of a field day

Part II–123
5. The field day expenditures are part of the FFS budget. The group needs to make a detailed overview of the field day’s expenditures and make a plan for purchasing.
6. The group develops a programme and lays out the stations. An example of a field day programme and layout are presented below. Ensure a smooth flow for the visitor passing the stations. If possible, mark the path to be followed.
7. The group should prepare an evaluation of the field day by inviting the visitors to express their opinions. A box can be placed at the exit and departing visitors are invited to the write their comments on cards and place them in the box. Visitor comments can also be included in a plenary session.
Example of a field day programme DATE: Tuesday 11th November 2004
VENUE: Mrs Mary Wangari Kamau farm, Manyatta Rurii, Olkalou
MASTER OF CEREMONY: Lucas Mburu Muiruri
Time Activity Person responsible
8.30 am School members arrive
9.00 am Participants arrive and are registered
Introduction to the FFS subjects covered and stations in the field day
Secretary and guides (registration and information desk)Master of ceremony
10.00 am PRESENTATION OF FFS:sub groups of visitor are guided around the station by FFS members. In each station, the visitors receive a short presentation (maximum of 10 minutes) on the specific subject of the station, where after the visitors can ask questions (5 minutes)
Station:FFS core activities = MaryCalf rearing = Robert and JohnDeworming = Samuel and RosemaryBreeding/AI = Beatrice and KimaniTick control = Peter and WilliamColostrums artificially made = Kamau Fodder conservation = Agnes and Solomon Feeding of a dairy cow = Jane and Paul
12.00 pm – 13.30 pm
PLENARY MEETING:Opening word/prayer Integrated livestock management songSpeech by secretary/master of ceremony introducing the FFS members, objectives, activities, etc. Folk media by the FFSIntroduction of guest(s) of honourSpeeches by guest(s) of honourEvaluation of the field dayClosure and refreshments
Master of ceremonyFFS members
Chapter 4: Organisation of a field day

Part II–124
Example of field day set-up
Registration/information desk
• Visitors book• Summary of the field day activities is given to the visitors
Stations with demonstration of the field comparative experiments
Station 1: Feeding and nutrition Station 2: General animal husbandry Station 3: Marketing (product value adding – cheese, yoghurt, butter) Station 4: Calf rearing Station 5: Fodder production
Each station contains:• Demonstrations of the experiment (design, results [including cost–benefit analysis],
lessons learned)• All treatments clearly displayed
Station 1: Explanation of FFS core activities
• FFS concepts and principles• Overview of the learning process, FFS programme, AESA, special topics, group
dynamics, PM&E, exchange visits, etc.
Chapter 4: Organisation of a field day

Part II–125
REFERENCES and FURTHER READING
Fliert van de, E. and Braun, A.R. (2000) Farmer Field School for Integrated Crop Management of Sweet Potato. Field Guides and Technical Manual, International Potato Center in Indonesia and User’s Perspective with Agricultural Research and Development in the Philippines.
Groeneweg, K. (2004) Pilot Participatory Impact Study of ‘Promoting Farmer Innovation Through Farmer Field Schools’ (PFI-FFS) Project (KEN/99/200), Food and Agriculture Organization, Mwingi District, Kenya.
Groeneweg, K., Minjauw, B., Buyu, G. and Sones, K.R. (2004) Guidelines for Participatory Monitoring and Evaluation of Farmer Field Schools. Working paper of workshop proceedings 22–24 March 2004, Mombasa, Kenya. Organised by Danida, FAO Kenya and ILRI
Mariner, J.C. (2001). Manual on Participatory Epidemiology. Methods for the Collection of Action-Oriented Epidemiological Intelligence. FAO Animal Health Manual No10. Food and Agriculture Organization of the United Nations, Rome, Italy.
Minjauw, B. (2001) Training of Trainers Manual for Livestock Farmer Field Schools. Based on a participatory workshop held on the 17–19 September 2001. Mabanga Farmer Training Center, Bungoma, Kenya.
Pretty, J. Guijt, I., Scoones, I. and Thompson, J. (1995). Participatory Learning and Action: A Trainers’ Guide. International Institute for Environmental Development (IIED) Participatory Methodology Series, London, UK. pp 267.
References and further reading

Part II–126
Annex 1: FFS Grant Proposal Form
ANNEX 1
FFS Grant Proposal Form
Please discuss the following items among association members (and FFS facilitator) and fill in as completely as possible. Submit to your supervisor. Attach extra pages if necessary. Thank you.
Proposal title: ............................................................................................................
Association name: .....................................................................................................
Address: ....................................................................................................................
Account information1: ................................................................................................
Association introduction2: ......................................................................................................................................................................................................................................................................................................................................................................................................................................................................................................................................................................................................................................
FFS proposed activities3: ........................................................................................................................................................................................................................................................................................................................................................................................................................................................................................................................................................................................................................................
Workplan4: ............................................................................................................................................................................................................................................................................................................................................................................................................................................................................................................................................................................................................................................................
Detailed budget5:
Field inputs: ................................................................................................... ...................................................................................................................... ...................................................................................................................... ......................................................................................................................
Stationery and supplies: ................................................................................. ...................................................................................................................... ...................................................................................................................... ......................................................................................................................

Part II–127
Annex 1: FFS Grant Proposal Form
Travel for facilitator: (amount per week with x number of meetings) ................... ........................................................................................................................ ........................................................................................................................ ........................................................................................................................ ........................................................................................................................
Field day: ......................................................................................................... ........................................................................................................................ ........................................................................................................................ ........................................................................................................................ ........................................................................................................................ ........................................................................................................................
Group contribution6: .......................................................................................
Study field: ......................................................................................................
Snacks: ............................................................................................................
Total grant requested: ................................................................................................
Signatures (name, signature and date):
Association chairperson: ..................................................................................
Facilitator: .......................................................................................................
DAO/DLPO: ....................................................................................................
1 Include bank, branch, account name and account number.2 Explain the activities of your association and community activities in general including association objectives
and membership. 3 Describe the crops/livestock to be studied, including analysis of economic benefits expected as a result of
this FFS activity.4 Provide commencement date, meeting days, and field day date. Also attach a list of members to be enrolled
in the FFS including name, gender and age.5 Provide list of materials, supplies and other items to be purchased here or on a separate sheet.6 Describe contributions from the association.

Part II–128
Annex 2: Example of an FFS certificate

Running head
Part I
Part III
Animal Health and Production – Dairy Technical
Manual


Contents
1. INTRODUCTION .................................................................................................. 1
2. FARM STRUCTURES ............................................................................................ 2
Zero grazing unit .................................................................................................... 2
Crush pen .............................................................................................................. 5
Milking parlour ...................................................................................................... 7
Calf pen ................................................................................................................. 8
Feed, water and mineral troughs ........................................................................... 10
3. ANIMAL FEEDING AND NUTRITION ................................................................ 12
Nutritional requirements ...................................................................................... 12
Types of feed ........................................................................................................ 13
Home-made rations ............................................................................................. 14
Dairy meal ...................................................................................................... 14
Mineral block ................................................................................................. 16
Feeding ................................................................................................................ 17
How much to feed? ......................................................................................... 17
Feeding calves ................................................................................................. 18
Feeding heifers ................................................................................................ 20
Feeding cows before and during pregnancy ...................................................... 21
Feeding milking cows ...................................................................................... 22
4. CATTLE FEED RESOURCES ............................................................................... 24
How to choose planted fodders ............................................................................ 24

How to cultivate ................................................................................................... 27
Establishing common fodders ............................................................................... 31
1. Lucerne (alfalfa) .......................................................................................... 31
2. Sweet potato vines (crop by-product and fodder varieties) ............................ 32
3. Napier grass (elephant grass, Pennisetum purpureum) ...................................... 32
4. Forage oats (Avena sativa) ............................................................................. 33
5. Fodder sorghum (sweet sorghum, Sorghum bicolour) ....................................... 34
6. Turnips and mangolds ................................................................................. 35
7. Rhodes grass (Chloris gayana: synonym Eustachys paspaloides) ............................ 36
8. Desmodium ................................................................................................ 36
9. Mulberry (Morus alba) .................................................................................. 37
10. Calliandra (Calliandra calothyrsus) ................................................................ 38
11. Fodder maize ............................................................................................ 39
12. Kow Kandy ............................................................................................... 40
How to conserve forage ........................................................................................ 41
Hay making .................................................................................................... 41
Storing fodder shrubs ...................................................................................... 43
Storing root crops ........................................................................................... 43
Silage making .................................................................................................. 43
5. REPRODUCTIVE MANAGEMENT ...................................................................... 45
Breeds and breeding ............................................................................................. 45
Natural breeding ............................................................................................. 47
Artificial insemination ..................................................................................... 48

Principles of breeding ...................................................................................... 49
Castration ........................................................................................................... 50
6. ANIMAL HEALTH ............................................................................................... 52
Common signs of illness ....................................................................................... 52
Causes of disease ................................................................................................. 52
Vector-borne diseases ........................................................................................... 53
Tick-borne diseases ......................................................................................... 53
Trypanosomosis .............................................................................................. 60
Management of animal health on the farm ............................................................ 63
Disease prevention and control ........................................................................ 63
Disease treatment ........................................................................................... 64
Common animal health problems on the farm ....................................................... 65
Mastitis .......................................................................................................... 65
Worms ........................................................................................................... 66
Diarrhoea ....................................................................................................... 71
Bloat .............................................................................................................. 72
Wounds and fractures ..................................................................................... 73
Eye infection ................................................................................................... 75
7. GENERAL HUSBANDRY PRACTICES ................................................................. 76
Dehorning ........................................................................................................... 76
Dehorning by disbudding ................................................................................ 76
Dehorning using a dehorning wire .................................................................... 76
Weight estimation (body scoring) ......................................................................... 77

Handling and restraining cattle ............................................................................. 79
Disposing of waste and carcasses .......................................................................... 81
Steps in carrying out a post-mortem ................................................................ 81
How to burn a carcass .................................................................................... 81
Disposal by burying ......................................................................................... 81
8. MILK MARKETING AND PROCESSING ............................................................. 82
Milk ..................................................................................................................... 82
Methods of milking .............................................................................................. 84
Preserving milk ..................................................................................................... 84
Cooling .......................................................................................................... 84
Heating .......................................................................................................... 85
Using chemicals .............................................................................................. 86
Manufacture of milk products ............................................................................... 86
Butter ............................................................................................................. 86
Cheese ............................................................................................................ 87
Ghee .............................................................................................................. 88
Yoghurt .......................................................................................................... 88
REFERENCES and FURTHER READING ................................................................. 89
Useful websites and literature references ................................................................ 90

Part III–1
Chapter 1: Introduction
1. INTRODUCTION
Part III of the Livestock Farmer Field School (FFS) Guidelines for Facilitation and Technical Manual: Animal Health and Production – Dairy Technical Manual provides practical technical information for livestock husbandry with an emphasis on dairy cattle production. It aims to provide technical backstopping for FFS facilitators by providing comprehensive reference material (fact sheets) focusing on diary cattle health and production.
Part III is strongly interlinked with Part II of the Field Guide: Field Guidelines for Facilitating Livestock FFS Activities, which provides practical guidelines and exercises that facilitators can use when making new technologies and practices available to livestock farmers.
Part III of the Field Guide focuses on dairy cattle production because the experiences of the ILRI/DFID/FAO1 FFS livestock projects are focused mainly on dairy cattle. However, the Field Guide is designed to be a living document, so that any information of interest to FFS facilitators can be added. For this reason, facilitators and other FFS practitioners are encouraged to develop technical fact sheets on sheep, poultry, goats and other ruminants so they can provide a more comprehensive technical backstopping service.
This technical manual provides data on farm structures; animal feeding and nutrition; cattle feed resources; reproductive management and breeding; animal health; general husbandry practices; and marketing and milk processing.
1 ILRI: International Livestock Research Institute, DFID: Department for International Development, FAO: Food and Agriculture Organization of the United Nations.

Part III–2
2. FARM STRUCTURESVarious structures (buildings or constructions) are required in livestock rearing systems, including animal housing, feeding structures, storage facilities for farm implements, and storage space for inputs and products from the farm. Farm structures are useful for: • promoting easy handling of animals (using the crush)• confining animals to keep them away from crops• providing clean and hygienic conditions (e.g. for milk production)• close monitoring of animal status • controlling/monitoring exposure to disease and disease vectors• reducing feed wastage• enhancing security of the animals• enhancing manure collection• safekeeping of feed and equipment
This section describes the various types of farm structures (zero grazing units; milking parlours; calf pens; crush pens; and feed, water and mineral troughs), their benefits and the resources needed for their construction.
Zero grazing unit
In a zero grazing unit, animals are confined for most of their lives and feed and water are brought to them. A typical dairy zero grazing unit has a sleeping/resting area, walking area, troughs for feed, water and a mineral lick (see page 10), a milking area/parlour (see page 7) and a manure collection pit. Some also have a feed/fodder storage place, a fodder chopping area and calf pens (see page 8).
Aerial view of a five-cubicle zero grazing unit
Chapter 2: Farm structures

Part III–3
Floor plan of a five-cubicle zero grazing unit
Chapter 2: Zero grazing unit
The benefits of a zero grazing unit are:• cows are confined and spend less energy walking around• the rest of the farmland is available for other uses• manure is in one place so easy to collect• proximity to the homestead means the animal can be observed frequently • animals are secured against thieves and predators• it is easy to coordinate various routine activities (watering, feeding, milking, etc.)• diseases (particularly vector-borne) can be controlled
The constraints are the high initial cost of construction and the high labour requirement to maintain standards of hygiene and to cut and bring the feed and water.
Materials
Area Materials needed
Roof: the sleeping/resting area, milking parlour and calf pens all need a roof
Corrugated iron sheetsThatch (grass or makuti)
Floor: sleeping area Soft earthConcrete with bedding material
Floor: walking area, milking place, store, calf penFloor should drain away from milking place and from the entire unit to an outside pit for ease of cleaning and manure collection
ConcreteStone on a bed of hardcore or ballast is not ideal since the stones will separate over time creating space for puddles of water, dung and mud
– continued overleaf

Part III–4
Walls TimberSteel (e.g. rails or bars)Concrete or adobe blocks (not common)Iron sheets (not common)
Feed trough TimberConcrete
Water trough ConcreteCut away containers
All wood should be treated to prevent termite attack by applying anti-termite chemicals or old engine oil.
The size of the unit can be adjusted depending on the number of animals being kept. Design the walking area so that the floor slopes away from the feed and water troughs and from the sleeping area. Water and slurry should drain into an outside collection pit. The floor surface should be roughened to prevent animals slipping. The length of the sleeping pen can be adjusted by installing a movable neck-pole (see diagram below).
Side view of sleeping and walking area
Chapter 2: Zero grazing unit
Cross-section view of sleeping and walking area
– continued

Part III–5
CostThe cost of construction of a five-cubicle zero grazing unit can be worked out from the quantities of materials listed below. Generally, the farmer should consult a local artisan for quantities and costs.
Materials Size Quantity
Posts 244 cm (8 ft) long 26 pieces
Timber/rails/poles Timber 7.6 cm × 5 cm (3 inch × 2 inch) 253 running metres
Off cuts Average 305 cm (10 ft) 45 pieces
Iron sheets 91.5 cm (3 ft) wide 17 of 3 metres (30 gauge)
Nails 10.2 cm (4 inch)7.6 cm (3 inch)5 cm (2 inch)
3.5 kg 3.5 kg 2 kg 2 kg of roofing type
Hardcore 0.5 lorry
Ballast 2.5 cm (1 inch) 0.5 lorry
Cement 10 bags
Sand 0.5 lorry
Concrete mixing ratio: 1 bag cement + 2 wheelbarrows sand + 3 wheelbarrows ballast. The concrete mix should be strictly followed to enable the floor to hold the weight of the cows hooves and prevent cracking after construction. The cemented area of the unit should be given at least two weeks to dry before the animals can be brought in. A wet bag (drape bag on floor and sprinkle with water) should be used for the first two days to slow down the drying process to allow proper curing. This prevents cracking.
Adapted from NDDP (2000) Zero Grazing Series Vol.1
Crush pen
This is a separate place for restraining an animal so that regular management practices (e.g. administering injections, deworming and hand spraying with insecticide) can be undertaken safely. Crush pens can be erected within or outside the zero grazing unit. Crush pens allow the stockowner to have close contact with the animal without risk of injury. It is also easier to make observations (external and internal organs) and administer drugs. However, the maintenance/repair costs will be high if constructed in fragile materials.
MaterialsFloor: well firmed murram soil mixture. Walls: wooden poles.
Chapter 2: Crush pen

Part III–6
CostThe cost of a single crush pen can be worked out from the quantities given below.
Materials Size Quantity
Timber 5 cm × 5 cm(2 x 2 inch)
6 metres
Timber 5 cm × 2.5 cm(2 x 1 inch)
30 running metres
Off cuts Average 305 cm(10 ft)
1 piece
Nails 7.6 cm (3 inch) 0.5 kg A handful of roofing type
Hardcore 4 wheelbarrows
Ballast 2.5 cm (1 inch) 4 wheelbarrows
Cement 1 bag
Sand 2 wheelbarrows
Concrete mixing ratio: 1 bag cement + 2 wheelbarrows sand + 3 wheelbarrows ballast. Just like the floor of the zero grazing unit, the floor of the crush pen should be given at least two weeks to dry before animals can be brought in.
Use of a crush pen
Chapter 2: Crush pen

Part III–7
Milking parlour
This is where the cow is restrained for milking. Milking parlours can be fixed (within or separate from the zero grazing unit) or mobile (a structure with all the components of a milking parlour that can be towed from place to place. These are common in ranches where milking is done in the field). Mobile parlours are used mainly by large-scale farmers who move milking herds around different fields (free grazing systems).
A milking parlour creates clean, hygienic conditions for milking and milking is possible even when it is raining. A restrained cow moves less, making the milking process more efficient and faster. However, the initial cost of construction is high because most of the materials have to be bought and construction requires guidance from a skilled person.
MaterialsFloor: concrete for the fixed parlour. Roof: corrugated iron sheets or thatch. Walls: timber or steel poles.
CostCosts for a fixed milking parlour within a zero grazing unit can be worked out according to the materials using the estimated quantities given below. The farmer should consult a local artisan to estimate requirements for a given milking parlour plan.
Chapter 2: Milking parlour
A milking parlour

Part III–8
Materials Size Quantity
Posts 20.3 cm (8 inch) 6 pieces
Timber/rails/poles Timber 7.6 cm × 5cm (3 × 2 inch) 20 running metres
Off cuts Average 305 cm (10 ft) 5 pieces
Iron sheets 91.5 cm (3 ft) wide 2 or 3 metres (30 gauge)
Nails 7.6 cm + 10.2 cm (3 + 4 inch) 0.5 kg 0.25 kg of roofing type
Hardcore 5 wheelbarrows
Ballast 2.5 cm (1 inch) 3 wheelbarrows
Cement 1 bag
Sand 2 wheelbarrows
Concrete mixing ratio: 1 bag cement + 2 wheelbarrows sand + 3 wheelbarrows ballast. Allow two weeks for the concrete floor to dry.
Calf pen
This is a specially designed unit to house a growing calf. It can be fixed (within or separate from the zero grazing unit) or movable (common in ranches and free grazing systems). A calf pen allows close and frequent monitoring of the calf, eases planning and monitoring of the feeding regimen and supports high standards of hygiene and disease control. However, it is a labour-intensive choice, since the calf is fully dependant on the stockowner for feed and water.
Slatted and raised calf pen
Chapter 2: Calf pen

Part III–9
MaterialsFloor: for fixed pens – concrete with bedding or raised wooden slats. Movable pens can have a raised slatted floor (or an earth floor if the site has good drainage). Roof: corrugated iron sheets or thatch. Walls: wooden poles from farm timber or steel poles.
CostThe costs can be worked out according to the materials given below (one unit for one calf).
Materials Size Quantity
Timber 5 cm × 5 cm (2 × 2 inch) 6 metres
Timber 5 cm × 2.5 cm (2 × 1 inch) 30 running metres
Off cuts Average 305 cm (10 ft) 1 piece
Iron sheets 91.5 cm (3 ft) wide 1 or 2 metres (30 gauge)
Nails 7.6cm (3 inch) 0.5 kg A handful of roofing type
Hardcore 5 wheelbarrows
Ballast 2.5 cm (1 inch) 3 wheelbarrows
Cement 1 bag
Sand 2 wheelbarrows
Concrete mixing ratio: 1 bag cement + 2 wheelbarrows sand + 3 wheelbarrows ballast.
The concrete mix ratio should be strictly followed to enable the floor to hold the weight of the calf hooves and prevent cracking. The cemented area of the unit should be given at least two weeks to dry before the animals can be brought in. A wet bag (drape bag on floor and sprinkle with water) should be used for the first two days to slow down the drying process and prevent cracking.
Floor plan of a calf pen
Chapter 2: Calf pen

Part III–10
Feed, water and mineral troughs
These are containers used to hold feed, water and minerals. They can be fixed (part of the animal shed) or movable (common in ranches and free grazing systems; large ones are sometimes pulled by draft power). Troughs reduce wastage, ensure high standards of hygiene and the farmer can monitor the amount of feed/water given to the animals per day, but he/she will have to buy some of the materials for trough construction.
Feed and water trough
Mineral box
Chapter 2: Feed, water and mineral troughs

Part III–11
MaterialsFeed trough: concrete, wood. Water trough: concrete, drum-shaped metal or plastic containers that can be cut lengthwise. Mineral box: small roofed wooden compartment or cutaway containers into which mineral lick or block can be placed.
CostThe costs can be worked out according to the materials below, but generally concrete troughs will be more expensive than wooden ones or cutaway containers. Materials required for the construction of a trough for five adult cows are given below.
Materials Size Quantity
Wooden trough (used for feed only)
Timber 7.6 cm × 5 cm (3 × 2 inch) 10 metres
Timber 5 cm × 2.5 cm (2 × 1 inch) 30 running metres
Off cuts average 305 cm (10ft) 16 pieces
Nails 7.6 cm (3 inch) 0.5 kgA handful of roofing type
Posts (for fixed trough) 244 cm (8ft) length 6 pieces
Concrete trough (used for feed or water)
Hardcore 3 wheelbarrows
Ballast 2.5 cm (1 inch) 2 wheelbarrows
Sand 2 wheelbarrows
Cement (ordinary) 1 bag
Waterproof cement (for water trough) The waterproof cement is bought ready-made.
1 kg
Chapter 2: Feed, water and mineral troughs

Part III–12
3. ANIMAL FEEDING AND NUTRITION
Nutritional requirements
Proper feeding is essential to ensure animals receive adequate nutrients for maintenance and production, and remain healthy and in good body condition. Dairy cattle must eat a balanced diet. Too little (or poor-quality feed) results in thin animals that cannot resist disease. Conversely, giving too much feed is wasteful and does not make economic sense. Lack of essential nutrients will result in ill-health, failure to reach full potential and sometimes death.
For cattle, the basic types of ingredients needed are (see Table 1):
• Macro ingredients. Energy supplies the body’s fuel allowing the animal to move, keep warm, stay alive and be productive. Energy feeds form the main part of the diet. Protein helps young animals to grow and develop strong muscles and enables cows to produce healthy calves and adequate milk.
• Micro ingredients. Minerals and vitamins are required in small amounts and fulfil a variety of functions, including forming strong bones and maintaining the reproductive system.
Table 1. Feeds supplying different types of nutrients
Type of nutrients Cattle diets
Energy Bulk forages and pastures – grass, hay, straw, stoversCereal by-products – branRoot crops – cassava chipsOil seed products
Protein Legume crops and forages – desmodium, sweet potato vines or calliandra leaves Poultry litter1
Vitamins Vitamin supplementsMade in rumen by micro-organisms
Minerals ForagesMineral licksSalt
1 Should be dry and sieved to minimise amount of sawdust. Non-protein sources converted into protein by micro-organisms in the digestive system
Chapter 3: Animal feeding and nutrition

Part III–13
Types of feed
Balanced diets for cattle are made up of the following:
Bulk feedsAlso known as basal feeds (see Table 2, page 14), these are fibrous plants known as forages and include grass, hay, straw and stovers (stems and leaves of tall cereals such as maize and sorghum). They provide most of the energy and bulk an animal needs and will make up most of the diet. Most contain only low or medium levels of protein. Forage forms up to 70% of the diet. Using a feed trough helps to make forage accessible without wastage.
Supplementary feedsThese are feeds with a higher concentration of energy or protein or both, i.e. more nutrients in the same volume or weight of feed. Certain forages (e.g. legumes, commercial dairy meals and cereal by-products) are high in protein. They are fed in relatively small amounts together with the bulk feeds and are most often fed to productive animals such as lactating or pregnant cows. Protein feed should not exceed 30% of total feed since proteins cannot be stored in the body and will be wasted (See Table 3 on page 15: Dairy meal).
Minerals and vitaminsAlthough some minerals and vitamins occur naturally in bulk feeds and supplements, usually the animal will need small amounts of commercially manufactured mineral and vitamin supplements and/or salt. This forms around 2% of the total feed and is most important for in-calf and lactating cows (see page 16: Fact sheet on minerals). Animals should be able to obtain minerals according to their needs (see illustration on page 16) so it is advisable to place the mineral in an accessible place that is shielded from the weather.
WaterAll animals need water to digest the feed, to cool the body and to remove waste materials from the body. A milking cow requires about 5 litres of water to produce 1 litre of milk. Dairy cows should have constant access to clean drinking water. In tropical production systems, cattle need 30–40 litres of water per day, while in temperate climates, they need 4–5 times the weight of the dry matter eaten.
Chapter 3: Types of feed

Part III–14
Table 2. Bulk forages commonly used in dairy production
Supplementary forages *
Bulk Forages
Good quality Medium quality Poor quality
Desmodium
Lucerne (Alfalfa)
Calliandra
Leucaena species
Sesbania
Mulberry
Sweet potato vines
Lab lab also known as Dolichos lablab
Mangolds
Turnips
Young Napier grass (up to 1 metre tall)
Young Rhodes/Kikuyu/Setaria grass (up to flowering stage)
Young fodder sorghum/Kow Kandy (before flowering stage)
Young fodder oats (before flowering stage)
Young weeds (before flowering stage)
Young roadside grass (before flowering stage)
Hay (made at early to mid-flowering stage of grasses)
Maize thinnings
Horticultural waste (cabbage leaves, airport rejects of fresh green beans and peas)
Old Napier grass (1 to 2 metres tall)
Old Rhodes/Kikuyu/Setaria grass
Old fodder sorghum/Kow Kandy
Old pasture/grass
Green maize stover
Old weeds
Hay (made after seed set)
Old fodder oats
Mature roadside grass
Overgrown Napier grass (more than 2 metres tall)
Dry maize (after harvesting of the cob)
Old dry sorghum/Kow Kandy
Rice straw
Wheat straw
Barley straw
Old, dry pasture/grass
Bean haulms/husks (after harvesting the beans)
Sugar cane tops
Banana pseudostems and leaves
Edible cana
Home-made rations
Dairy mealCommercial dairy meal is produced by mixing different feeds so that the final feed is relatively high in protein (about 16%) and has a good (but not overly high) amount of energy. Dairy meal is often expensive, and may not be cost-effective, especially if the quality is sub-standard and the farmer has to pay transport costs. It is possible to make a better quality and more cost-effective mixture mainly using ingredients grown on the farm. However, seasonal fluctuations in availability mean that the ingredients needed are not always available and thus it is not always possible to make your own ration.
Table 3 classifies different supplementary feeds according to the amount of protein and energy they contain.
To make a mixture similar to dairy meal, make sure you select feeds from each of the different boxes (see Table 3).
If feeds are fresh (e.g. some of the forages in box 4 and brewers waste in box 5), add three times as many scoops. This is because the dry matter content of the feeds is much lower.
Chapter 3: Home-made rations

Part III–15
Table 3. Protein and energy content of common supplements
EnergyProtein
High Medium Low
High Groundnut mealMaize germ meal
Box 1
Maize grain
Box 2
TurnipsMangolds
Box 3
Medium Cotton seed mealSunflower mealBrewers wasteSweet potato vinesLucerneDesmodiumCalliandra leavesSesbania leaves
Box 4
Wheat branDairy mealRice branMaize germBrewers waste (wet)
Box 5
Wheat branMaize branRice branMaize on cob
Box 6Low Poultry litter
Blood mealFish meal
Box 7
Box 8
Box 9
Table 4. A concentrate mix for lactating cows
Using feeds classified as 1–6 Incorporating feeds from box 7, Table 3
60 buckets or scoops from box 5
25 buckets or scoops from box 6 or 3
15 buckets or scoops from box 1 or 4
2 buckets or scoops of minerals
OR
50 buckets or scoops from box 3 or 6
49 buckets or scoops from box 1 or 4
1 bucket or scoop of minerals
60 buckets or scoops from box 5
35 buckets or scoops from box 6 or 3
5 buckets or scoops from box 7
2 buckets or scoops of minerals
Mineral blockMinerals can be offered as mineral powder (difficult to mix with feed) or as a commercially produced mineral block (can be expensive). An alternative is to use locally available ingredients, such as the example used successfully in Kenya, described in Table 5.
Chapter 3: Home-made rations

Part III–16
Table 5. Composition of mineral block
Content % of each ingredient
Magadi soda 20
Dairy meal 40
Bone meal 7
Fish meal 7
Urea 4
Mineral salts 2
Molasses 20
Mix Magadi soda and dairy meal together to give mix A. Mix bone meal and fish meal together to give mix B. Mix urea and mineral salts together to give mix C. Combine mix A and mix B to give mix D. Combine mix D with mix C to give mix E. Stir mix E continuously while adding the molasses. The mixture is then divided into smaller containers (or left in the container used for mixing) and left in the shade for about 24–48 hours until it becomes hard. Sub-dividing into small blocks with a hole pressed through the middle will allow a rope to be passed through the hole and the block tied to a fence post or the rails of the cattle stall. The mixture should dry to a hard block so that the animals can lick it as much as they like. It should not be used if it becomes crumbly since the animals can then bite off big chunks, leading to wastage.
Chapter 3: Home-made rations
Lack of minerals and vitamins can lead to cravings and cause cattle to eat clothing, bones and plastic bags

Part III–17
Feeding
How much to feed? Dairy cattle will need different amounts of nutrients (energy, protein, vitamins and minerals) at different stages in their lives. Nutrients are needed for: • Maintenance: Animals require nutrients to remain alive and keep the body working without
losing weight. This is like keeping a car engine running in neutral without moving. • Growth: Apart from maintaining the body, young growing animals require additional
nutrients in order to develop and grow normally. Similarly the car will use more fuel to move than just to run the engine.
• Reproduction: A pregnant cow requires additional nutrients to support the development of the calf growing inside her. A moving car will use more fuel to carry an additional passenger.
• Milk production: A lactating cow requires more nutrients in order to produce more milk – the more milk produced, the more nutrients she will need.
Feeding according to physiological needs (growing heifer, lactating cow, maintenance for the bull)
Chapter 3: Feeding

Part III–18
Table 6. Estimated weight of forage in different on-farm measures
Common sizes of loads Fresh forage estimate weight (kg)
Dry forage estimate weight (kg)
Standard empty sack (gunny bag) 32 20
Wheelbarrow 100 60
Load an adult person can carry from field to homestead
60 40
Donkey cart 210 120
Generally, the amount of feed needed to maintain cattle can be calculated as 3% of their body weight per day (half of which is provided as supplementary or concentrate feed), e.g. 3% of a cow that weighs 400 kg is 12 kg of dry matter, of which 6 kg is supplementary). Dairy cattle will only eat a certain quantity before they feel full and stop eating (see Table 7). It is therefore important that cattle receive forage of adequate quality (that does not contain too much roughage, which will make them full before they have ingested sufficient nutrients).
Table 7. Factors affecting the quantity of forage eaten
Cattle eat more when: Cattle eat less when:
Forage is young, green and soft Forage is old, yellowing and dry
Forage is chopped Forage is fed whole
More forage is offered than they can eat so that they can select the bits they like
Small amounts of forage are offered so that they are left with the bits they do not like (such as dry, tough stalks)
The animal has plenty of water available The animal does not have enough water
The animal is in a cool dry place, free from stress and disease
The animal is kept in a hot, damp place and is stressed
Feeding calvesThe objectives of a good calf feeding programme are to achieve: i) fast growth rate and rapid weight gain; ii) strong disease resistance; iii) survival of a healthy, normal calf; and iv) early maturity and breeding. Proper calf rearing should be achieved economically, allowing milk to be taken for home consumption or sale.
Milk can be fed to calves by suckling or by separating the calf from the mother and feeding from a bucket. Each method has its own advantages (see Table 8). Most of the water a young calf needs is provided by milk, but clean water should also be available.
Chapter 3: Feeding

Part III–19
Table 8. Comparison of calf-feeding methods – Differences between bucket feeding and natural suckling.
Advantages of suckling Advantages of bucket feeding
Milk is at the correct temperature
Calf is unlikely to get scours (diarrhoea)
Milk is clean
No investment needed for feeding equipment
No labour required to feed the calf
For zebu cows, the calf suckling stimulates milk let down; without the calf being present the cow cannot be milked
Calf experiences less noise and disturbance
Easier to teach the calf how to feed
Records can be kept of the amount of milk fed
Easier to control the amounts of milk/feed given to the calf
Possible to record and monitor the cow’s milk production
For a zebu cow that has been accustomed to the bucket feeding system, if the calf dies, then the cow will not have a problem with milk let down.
Take care when bucket-feeding calves. Here are some points to consider.• Feeding excess milk to the calf causes diarrhoea (scouring). If scouring occurs, reduce
the amount of milk by half and mix this with an equal amount of clean water. • Give the calf its milk immediately after milking when the milk is at body temperature.• Observe strict cleanliness and hygiene routines to prevent diarrhoea and other disease
problems. • From the second week, provide the calf with clean drinking water at all times.• From the second week, introduce other feeds (e.g. a handful of pellets, hay or sweet
potato vines).• Hang a mineral lick where the calf can reach it.
For bucket-fed calves, the recommended amount of milk is 15% of the birth weight per day.
Schedule for feeding calves after birthDays 1–3: Encourage the calf to suckle immediately after birth by allowing it to suck your fingers and then moving its muzzle into the milk. During the first 3–4 days after calving the cow produces colostrum in its milk and the calf should drink as much of this as possible. Colostrum contains antibodies, which give the calf immunity and protection against certain diseases. It is very rich in highly digestible nutrients (protein and energy) and contains high levels of vitamins and minerals. It also has a laxative effect that assists the calf to pass its first dropping (faeces).
Day 4 to week 6 (early weaning) or week 9 (late weaning): The calf ’s diet should consist mainly of milk, but gradually increase solid food including calf pellets and/or good quality forage such as young Napier or other grasses, lucerne, sweet potato vines, etc. Include hay from the second week for early rumen development. Then gradually decrease the amount of milk as the calf starts to eat more solid feed (see Table 9 for late-weaning schedule).
Chapter 3: Feeding

Part III–20
Table 9. Example of a feeding schedule for late weaning
Age Daily allowance: offered in 2–3 meals
Milk (l) Calf pellets (kg) Water (l)
Day 1 Suckle freely - -
Day 2–3 Suckle 3 × per day or Bucket 4–5 × per day
- -
Day 4–7
Week 2–3
Week 4–8
Week 9
4
5
5
5
handful
0.5
0.75
1.0
1
4
6
7
Week 10–11
Week 12–13
Week 14–15
4
3
2
1.0
1.0
1.0
9
11
13
Feeding heifersThe way a heifer is fed is very important as it can greatly affect fertility (age at which the heifer is ready for mating or insemination) and the chance of getting in calf. Feeding also affects milk production and the number of calves produced. A well fed, healthy heifer that was also well fed as a calf should be ready for its first service (mating/insemination) from the 18th month.
Heifers that are less than one year old have high nutrient requirements but cannot eat as much as an adult cow (see Table 10). Feeding forage alone will not provide the ideal amount of nutrients and will result in a slow growth rate. From 3–6 months of age, the amount of forage in the ration should be increased from 40% to 80%, and during this period the protein content of the diet should be gradually reduced from 16% to 12%. A mineral lick should be provided at all times. Try to ensure the animals have free access to water. If this is not possible, aim to let them drink 1 litre for every 10 kg of body weight (a 300 kg heifer should receive approximately 30 litres of water per day). Usually less water is needed if the animals are eating fresh forage.
Table 10. Feed requirements for a heifer
Age Daily allowance: offered in 2–3 meals
Good quality concentrate Good quality hay or forage
Weaning–6 months 1.5 reducing to 1 kg free access
6–18 months none free access
Chapter 3: Feeding

Part III–21
Feeding cows before and during pregnancyBetween 45 and 60 days before calving, milking should be stopped gradually. Good ‘dry period’ management ensures the cow is in good condition at the time of calving and gives birth to a healthy calf, produces maximum milk during the next lactation and avoids health problems at calving or in early lactation. The dry cow should not gain excessive body weight.
During the dry period, the cow requires nutrients to maintain her body, support the unborn calf and repair milk-producing cells in the udder in preparation for the next lactation. During this time the cow can eat a lot of forage. Stop feeding concentrates for the first two weeks of the dry period. After this, the amount fed will depend on the animal’s condition. Provide the cow with access to a good-quality mineral mixture during this time.
During the last two weeks of pregnancy, the cow’s appetite will be reduced. Therefore you need to gradually increase the concentrate ration by about 2 kg a day. This is called ‘steaming-up’ and is done to ensure a healthy calf and prepare for the next lactation (see Table 11). Try to ensure that the animals have access to water at all times. If this is not possible, aim to let the animals drink 1 litre for every 10 kg of body weight per day. Provide extra water at the end of pregnancy. A 350 kg cow should receive approximately 45 litres of water per day towards the end of pregnancy.
Table 11. Example of a feeding schedule for dry cow
Stage
Daily allowance
Concentrates if animal is in good condition (kg)
Concentrates if animal is in poor condition (kg)
Offer minerals?
Drying (or heifer)
9–6 weeks before calving Nil Nil Yes
Steaming up
6 weeks before calving
5 weeks before calving
4 weeks before calving
3 weeks before calving
2 weeks before calving
1 week before calving
0.5
1.0
1.5
2.0
2.5
3.0–4.0
1–2
1–2
1–2
2.0
2.5
3.0–4.0
Yes
Yes
Yes
Yes
No
Yes
Chapter 3: Feeding

Part III–22
Feeding milking cowsA good feeding programme for a milking cow should make best use of the feeds available to achieve a high peak yield early in lactation and a high total lactation yield. It should also prevent too much weight loss during lactation and enable the cow to show clear signs of being ready to be inseminated or served by a bull. A lactating cow requires nutrients for maintenance, continued growth (if less than 36 months old), growth of the unborn calf (if she is pregnant) and milk production.
The cow needs nutrients to recondition the body after calving and support milk production. If the cow receives insufficient feed during early lactation, her milk supply will be less than optimal, even if feed supply is improved later in the lactation. To make milk production more cost-effective, feed cows with as much forage as possible before offering concentrates because forage is cheaper than concentrates (see Table 12). Ensure the milking cow has free access to water. If this is not possible, aim to provide 1 litre for every 10 kg of body weight, plus 1.5 litres for every litre of milk you expect the cow to produce per day. Ensure a good quality mineral block is available at all times or mix small amounts of mineral powder with the feed.
Table 12. Indication of amounts of fodder a cow can consume
Wet feed (kg/day) Dry feed (kg/day)
Large breed e.g. Friesian 100 65–85
Small breed e.g. Jersey, and cross-breeds 70–80 55–65
In early lactation, give the cow as much good quality forage as she can eat. A good dairy cow (pure breed or cross-breed) should produce 7 to 10 kg milk per day.
After calving, start by giving 4 kg dairy meal per day and increase the amount by 0.5–1 kg per day so long as the cow responds by increasing her milk production (see Figure 1). Maintain this amount of concentrate until the milk yield starts dropping. If the farmer cannot afford to feed concentrates very often, it is better to feed a lot of concentrates for the first 12 weeks of lactation (e.g. 8 kg/day) and then just good-quality forages afterwards, rather than to feed 2 kg per day for the whole milking period. After calving, if the cow is not already accustomed to concentrates, start off by giving just 2 kg per day and increase gradually over the first week to 8 kg per day.
Where protein-rich forages (legumes) are available (e.g. lucerne, desmodium, calliandra and leucaena), these should be mixed with grass at a ratio of one part legume to three parts grass. In general, 3 kg of legumes can replace 1 kg dairy meal.
In mid– late lactation, as milk yield drops, supplement the diet depending on the quality and quantity of forage. A dairy cow should produce about 7–10 kg milk on good quality forage alone. For every 1 kg of concentrate, there should be an increase of 1–1.5 kg of milk, with the maximum depending on the animal and the breed.
Chapter 3: Feeding

Part III–23
Feeding a lot of concentrates in the first weeks of lactation (e.g. 8 kg per day for 12 weeks) only...
gives more milk
than feeding a little (e.g. 2 kg) daily throughout the lactation
results in less milk
0
2
4
6
8
10
12
14
16
18
20
1 3 5 7 9 11 13 15 17 19 21 23 25 27 29 31 33 35 37 39 41 43 45 47 49
Am
ou
nt o
f co
nce
ntr
ate/
milk
pro
du
ced
per
day
Weeks of lactation
Chapter 3: Feeding
Figure 1. Effects of concentrates on milk production

Part III–24
4. CATTLE FEED RESOURCES
How to choose planted fodders
Farmers may already have crops on their farm that produce forage to feed their animal(s) from grain crops like maize and sorghum, or vines from sweet potato etc. However, farmers may also wish to grow crops specifically as bulk or supplementary forages, or root crops, such as turnips or mangolds, to use as energy supplements. The choice of crops will depend on many factors, including the local climate and growing conditions as well as the farm conditions (see Tables 13 and 14 for more detailed information).
Table 13. Important factors for the choice of fodder
Where to grow Fodder rarely receives priority if land sizes are small. However, some fodder can be grown in areas where crops are not grown, e.g. field borders or under trees. Some fodder is produced as crop by-products e.g. maize stover
Yield High-yielding varieties will be sought, but it should be remembered that yields depend on such factors as soil fertility, rainfall, good weeding, etc., and table values are only a guideline. Use of fertilizer and manure will increase yields but farmers may prioritise other crops that are grown for food or sale
Climate Rainfall and temperature are very important. Some plants require a lot of water all year round, others tolerate periods of drought
Ease of management Farmers’ labour is limited and they rarely use machinery. Therefore forages should not require high labour inputs or need a lot of attention
Availability of seeds A fodder may sound ideal, but planting material may not be available locally. Clubbing together with other farmers to pay for one person to collect the materials may reduce costs
Chapter 4: Cattle feed resources

Part III–25
Chapter 4: How to choose planted fodders
Tab
le 1
4.
Pla
nti
ng
an
d g
row
ing
ch
ara
cteri
stic
of
imp
ort
an
t fo
dd
er
cro
ps1
C
lim
ate
Man
agem
ent
An
nu
al Y
ield
(t
on
nes
/acr
e)R
ain
fall
(m
m)
Tem
per
atu
re(º
C)
Alt
itu
de
(m
asl
)2So
il t
ype
Wh
ere
to
gro
w o
n
farm
*C
on
serv
atio
n
Ener
gy
sup
ple
men
ts
Man
gold
sU
p t
o 40
fres
h m
ater
ial
Col
d cl
imat
eA
bove
2,0
00
Dee
p fe
rtile
soi
lC
CIn
gro
und
Turn
ips
15–2
0 fr
esh
mat
eria
lC
old
clim
ate
Abo
ve 2
,000
A
mod
erat
ely
deep
, hi
ghly
fert
ile s
oil w
ith
pH
6.0
–6.5
CC
In g
roun
d
Fodd
er o
ats
3–4.
5 dr
y m
atte
r1 C
ool m
oist
clim
ate
Abo
ve 2
,000
A
cid
soils
CC
Hay
, sila
ge
Pro
tein
su
pp
lem
ents
Fodd
er s
wee
t p
otat
o vi
nes
750–
1,00
0A
bove
24
0–2,
100
Slig
htly
aci
dic,
wel
l dr
aine
d fr
ee a
nd fe
rtile
so
il
CC
N/A
Swee
t p
otat
o vi
nes
750–
1,25
0A
bove
24
–Sl
ight
ly a
cidi
c, w
ell
drai
ned
free
soi
l BY
N
/A
Luce
rne
Up
to
9 dr
y m
atte
r50
0–1,
000
15–2
5 –
Fert
ile lo
amy
soil
CC
Hay
, Sila
ge
Des
mod
ium
Up
to
9 dr
y m
atte
r A
t le
ast
875
War
m c
limat
e80
0–2,
500m
Doe
s no
t to
lera
te
drou
ght
or
alka
line
soils
CC
, MG
, UT
Hay
Cal
liand
ra1–
5 dr
y m
atte
r70
0–2,
400
War
m
Up
to
1,90
0 A
cid
soils
, mod
erat
e fe
rtili
tyBF
, CC
Leaf
mea
l
Sesb
ania
ses
ban
Up
to
8 dr
y m
atte
r50
0–2,
000
17–2
0 U
p t
o 23
,000
M
oist
allu
vial
BF
, CC
Le
af m
eal
Leuc
aena
leuc
ocep
hala
Up
to
4 dr
y m
atte
r75
0–2,
500
25–3
0 1,
500
Dee
p, w
ell d
rain
ed,
neut
ral t
o ca
lcar
eous
BF
, CC
Le
af m
eal
Mul
berr
y 6–
15 fr
esh
edib
le
mat
eria
l2,
000
Goo
d de
ep s
BF, C
CLe
af m
eal

Part III–26
Chapter 4: How to choose planted fodders
Cli
mat
eM
anag
emen
t
An
nu
al Y
ield
(t
on
nes
/acr
e)R
ain
fall
(m
m)
Tem
per
atu
re
(ºC
) A
ltit
ud
e (m
asl
) So
il t
ype
Wh
ere
to
gro
w o
n
farm
*C
on
serv
atio
n
Bu
lk f
ora
ges
Fodd
er M
aize
–70
0–2,
400
Mod
erat
ely
hot
to
cool
tem
per
atur
es10
0–2,
000
Mod
erat
e to
hig
hly
fert
ile
Will
tol
erat
e w
ater
-lo
ggin
g
CC
Sila
ge
Mai
ze fo
dder
–
thin
ning
Up
to
9 dr
y m
atte
r H
igh
rain
fall
Mod
erat
ely
hot
to
cool
tem
per
atur
es10
0–2,
000
Mod
erat
e to
hig
hly
fert
ile s
Will
tol
erat
e w
ater
-lo
ggin
g
BY N
/A
Mai
ze fo
dder
– g
reen
U
p t
o 8
dry
mat
ter
Hig
h ra
infa
ll–
––
BY S
ilage
Mai
ze fo
dder
– s
tove
rU
p t
o 2
tdry
m
atte
r 70
0–2,
400
––
–BY
As
is
Kow
Kan
dy
–Lo
w –
m
oder
atel
y hi
gh
Hot
–
–C
CSi
lage
Fodd
er s
orgh
um10
–30
fres
h m
ater
ial
Low
rW
arm
to
mod
erat
ely
hot
Up
to
1,00
0 D
eep
san
dsC
CH
ay, S
ilage
Nap
ier
10–3
0 fr
esh
mat
eria
lA
t le
ast
1,50
0 W
arm
to
mod
erat
ely
cool
Se
a le
vel–
2,00
0 D
eep
, fer
tile,
wel
l dr
aine
d C
CSi
lage
, Sta
ndin
g ha
y
Rhod
es g
rass
4–10
dry
mat
ter
Low
W
arm
to
mod
erat
ely
hot
600–
2,00
0Lo
amy,
fert
ile
GH
ay
Edib
le c
ana
15–2
0 t
fres
h m
ater
ial
At
leas
t 70
0 M
oder
atel
y w
arm
to
coo
l c
–W
ell-d
rain
ed
CC
N/A
1 D
epen
din
g o
n v
arie
ty.
2 m
etre
s ab
ove
sea
leve
l. *
Key
to lo
cati
on
s:
CC
= S
mal
l plo
t w
ith
an
imal
s ex
clu
ded
, fo
dd
er c
ut
and
car
ried
to a
nim
als
(cu
t &
car
ry);
BF
= b
ord
ers
and
fen
ces;
MG
= m
ixed
wit
h g
rass
es;
MF
= m
ixed
wit
h fo
od
or c
ash
cro
ps;
G =
gra
zed
plo
ts;
BY
= b
y-p
rod
uct
fro
m fo
od
or c
ash
cro
p;
UT
= u
nd
er t
rees
; N
/A =
no
t ap
plic
able
[ver
y d
iffic
ult
to c
on
serv
e].

Part III–27
How to cultivate
PlantingThe method that should be used for planting will depend on the type of planting material available (seeds, bulbs, cuttings, etc.), while the nature of the plant is a guide to the appropriate planting rates and spacings. These are listed in Table 15, although these details should be used as guidelines; other spacings and seed rates may be tested and found suitable for local conditions.
Table 15. Planting methods
Type of material
Seed bed
Method of planting Growth patterns
Small seed Nursery
Sow in raised bed and water regularly Plant out young seedlings into
cultivated land
Small seed Fine
Scatter seed across seedbed (broadcasting)
Plants grow in a random pattern
Small seed Fine
Seeds can be planted in a narrow row (drilling)
Plants grow in neat rows
Large seed Coarse
Dig holes spaced apart and place a number of seeds per hole
Plants grow in clumps and can be thinned to give desired number per hill
Chapter 4: How to cultivate

Part III–28
Type of material
Seed bed
Method of planting Growth patterns
Cuttings Coarse
Good cuttings for vegetative propagation: cuttings are prepared; 3 nodes for desmodium, 5–6 for sweet potato
Well-growing cuttings: 60% of nodes are buried underground
Splits Coarse
Split a mature plant ensuring there are some stalks and roots in each bundle, and transfer
Canes Coarse
Overgrown Napier grass produces large canes that can be cut into 4–5 nodes, burying 2–3 nodes and leaving 2–3 above ground
Splits/canes Coarse
Tumbukiza is a farmer innovation by which better growth can be achieved if canes or splits are planted 5–7 in one large hole (60 cm diameter × 60 cm depth) filled with manure on the bottom and topsoil on top. Sub-soil should be moved somewhere else
Harvesting must take place at the right time to maximise yields (Table 16). If harvested too soon the plant will not grow properly. If harvested too late, the nutrient content of the material may be low. Decisions on when to harvest will also depend on farmers’ needs.
Chapter 4: How to cultivate

Part III–29
Ta
ble
16.
Pla
nti
ng
an
d h
arv
est
ing
cri
teri
a f
or
imp
ort
an
t fo
dd
er
P
lan
tin
gP
lan
tin
g r
ate
(per
ac
re)
Spac
ing
(cm
)W
hen
to
pla
nt
Wh
en t
o h
arve
st
Ener
gy
sup
ple
men
ts
Man
gold
sN
urse
ry17
,800
pla
nts
35 c
m ×
65
cm
4–5
mon
ths
befo
re u
seLe
aves
sta
rt t
o ye
llow
Turn
ips
Nur
sery
17,8
00 p
lant
s35
cm
× 6
5 cm
4–
5 m
onth
s be
fore
use
Leav
es s
tart
to
yello
w
Fodd
er o
ats
Seed
40–5
0 kg
Broa
dcas
t St
art
of lo
ng r
ains
10%
flow
erin
g
Pro
tein
su
pp
lem
ents
Swee
t p
otat
o vi
nes
(fod
der
varie
ty)
Cut
tings
20,0
00 c
uttin
gs
50 c
m ×
100
cm
St
art
of lo
ng r
ains
4–5
mon
ths
afte
r p
lant
ing
or
runn
ers
0.5–
1 m
long
Swee
t p
otat
o vi
nes
(dua
l-pur
pos
e va
riety
)C
uttin
gs20
, 000
cut
tings
50 c
m ×
100
cm
St
art
of lo
ng r
ains
4–5
mon
ths
afte
r p
lant
ing
or
runn
ers
0.5–
1 m
long
Luce
rne
Seed
2–3
kg30
–45
cm
betw
een
row
s To
war
ds e
nd o
f lon
g ra
ins
10%
flow
erin
g
Des
mod
ium
Cut
tings
2,00
0 (in
terc
rop
) 30
cm
× 6
0 cm
Tow
ards
end
of l
ong
rain
s4
mon
ths
afte
r p
lant
ing
leav
ing
at le
ast
10 c
m
Cal
liand
raN
urse
ry12
g s
eed
for
1m x
1m
se
edbe
d(5
0 kg
/acr
e)
Plan
t al
ong
the
hedg
e at
50
cm
betw
een
pla
nts
Tran
spla
nt s
eedl
ings
in h
eavy
ra
ins
Onc
e bu
sh a
t 1
m c
ut r
egro
wth
50
–60
cm
Sesb
ania
ses
ban
Nur
sery
12 g
see
d fo
r 1m
x 1
m
seed
bed
(50
kg/a
cre)
50 ×
50
cm P
lant
al
ong
the
hedg
e at
50
cm
betw
een
pla
nts
Tran
spla
nt s
eedl
ings
in h
eavy
ra
ins
Onc
e bu
sh a
t 1
m c
ut r
egro
wth
50
–60
cm
Leuc
aena
leuc
ocep
hala
Nur
sery
12 g
see
d fo
r 1m
x 1
m
seed
bed
(50
kg/a
cre)
Plan
t al
ong
the
hedg
e at
50
cm
betw
een
pla
nts
Tran
spla
nt s
eedl
ings
in h
eavy
ra
ins
Chapter 4: How to cultivate

Part III–30
P
lan
tin
gP
lan
tin
g r
ate
(per
ac
re)
Spac
ing
(cm
)W
hen
to
pla
nt
Wh
en t
o h
arve
st
Mul
berr
yN
urse
ry12
g s
eed
for
1m x
1m
see
dbed
Stem
cut
tings
are
re
com
men
ded
at a
bout
16,
000
cutt
ings
per
acr
e.
Plan
t al
ong
the
boar
der
at 0
.5 m
be
twee
n p
lant
s an
d be
twee
n ro
ws
if p
lant
ing
doub
le r
ows
Tran
spla
nt s
eedl
ings
in
heav
y ra
ins
Bu
lk f
ora
ge
Fodd
er m
aize
Seed
15 k
g30
cm
× 4
5 cm
St
art
or e
nd o
f lon
g ra
ins1
Dou
gh s
tage
Mai
ze fo
dder
– t
hinn
ing
Seed
10 k
g45
cm
× 0
.75
cmSt
art
of lo
ng r
ains
Knee
hei
ght
Mai
ze fo
dder
– g
reen
mai
ze fo
dder
Seed
10 k
g0.
45 c
m ×
75
cmSt
art
of lo
ng r
ains
Har
vest
of r
oast
ing
cob
Mai
ze fo
dder
– s
tove
rSe
ed10
kg
45 c
m ×
75
cmSt
art
of lo
ng r
ains
Aft
er g
rain
har
vest
Kow
Kan
dySe
ed22
kg
–St
art
of lo
ng r
ains
1W
hen
first
not
ice
‘hon
ey’
Fodd
er s
orgh
umSe
ed3–
5 kg
30 c
m ×
45
cmSt
art
of lo
ng r
ains
1D
ough
sta
ge
Fodd
er m
aize
Seed
15 k
g30
cm
× 4
5 cm
Dou
gh s
tage
Nap
ier
gras
sSp
lits
or c
anes
4000
–800
0 p
lant
s/ac
re1
m ×
1 m
or
1
m ×
0.5
m
Star
t of
long
rai
ns1
m h
igh
Rhod
es g
rass
Seed
5 kg
Bro
adca
stTo
war
ds e
nd o
f lon
g ra
in10
–20%
flow
erin
g
Edib
le c
ana
Split
s80
00 s
plit
s/ac
re1m
× 0
.5 m
Star
t of
long
rai
ns
1 If
farm
ers
wan
t to
co
nse
rve
as s
ilag
e th
ey s
ho
uld
pla
nt
at e
nd
of l
on
g ra
ins
so t
hat
th
ey c
an h
arve
st s
uit
able
mat
eria
ls a
fter
th
e ra
ins
sto
p
Chapter 4: How to cultivate

Part III–31
Establishing common fodders
This section describes the following forages:1. lucerne (alfalfa)2. sweet potato vines3. Napier grass4. forage oats5. fodder sorghum6. turnips and mangolds7. Rhodes grass8. desmodium9. mulberry10. calliandra11. fodder maize12. Kow Kandy (fodder sorghum)
1. Lucerne (alfalfa)Lucerne is a deep-rooted perennial herbaceous legume that bears a lot of stems, leaves and purple flowers at maturity. It is high in nutrients and palatable and it forms an important component in dairy cattle rations as well as providing feed for horses, beef cattle, sheep and milking goats. Lucerne is used primarily as a hay crop, but may be used in systems where fresh forage is cut and carried to animals on a daily basis and even as year-round pasture. It is generally grown alone but can also be mixed with grasses or other legumes.
AdvantagesHigh-yielding, good-quality fodder.
DisadvantagesLucerne is seriously affected by water shortage and requires irrigation at some point. Since it does not tolerate acidity, occasional liming of the soil is required. Yields decline with age.
FeedingFeed as a supplement. Wilt before feeding to prevent bloat or mix the lucerne with bulk forage. About 5% of daily bulk forage is recommended and 4–7 kg per animal per day is the estimated amount to feed.
CultivationSow seed in rows 30 cm apart; 0.6–1.3 cm deep or broadcast. If planting on a new field, mix seed with innoculum or soil from a lucerne field. If this is not possible the plant will grow, but at a slower rate. Maintain a weed-free field but do not use herbicide. Use phosphate fertilizer at planting (40 kg/acre) and once a year if available.
Suitable climatePrefers a lot of sunshine and deep, well drained highly fertile loamy soils. Will not do well where water is inadequate or in waterlogged or acid soils.
Chapter 4: Establishing common fodders

Part III–32
Pests and diseasesSome of the major pests are lucerne weevil, caterpillars, cutworms/army worms, aphids and leafhoppers. Major diseases include bacterial leaf spot, common leaf spot, downy mildew and stem blight. Control them using natural predators, chemicals, maintaining a healthy stand, practising crop rotation or by planting resistant varieties (ask your seed supplier).
2. Sweet potato vines (crop by-product and fodder varieties)Sweet potato is a root crop with vines that can be used as animal feed. When planted as a food crop, the plants generally stay in the ground for up to a year, although roots can be harvested after 4–5 months. Vines regrow after cutting and usually give good regrowth after one or two months depending on rainfall. Fodder species which produce a lot of fodder but no tubers are available.
AdvantagesIt is a by-product where the crop is grown for food and therefore does not take additional space. It provides a high-quality fodder.
DisadvantagesForage yields from the crop are relatively small and the plant does not resist drought well.
FeedingSweet potato vines are fed as protein supplement to livestock.
CultivationLoosen soil to 35 cm and avoid stony soil. Vines, with leaves pointing upwards, are planted in ridges or mounds of soil. Although it is rare for farmers to use fertilizer, it is worthwhile to use 25 kg (½ a standard bag) of diammonium phosphate (DAP) per acre.
Suitable climateDifferent varieties are available for different climates.
Pests and diseasesThe most important pest is sweet potato weevil. However, this is generally uncommon and the crop does not suffer greatly from pests or diseases.
3. Napier grass (elephant grass, Pennisetum purpureum)A fast growing perennial grass with a fibrous and well spread root system; this is one of the most common sources of bulk forage. It is often grown in a pure stand close to the zero grazing unit or as a measure for controlling erosion on sloping land in contour strips or river banks. Common varieties in Africa include French Cameroon, Bana and Kakamega 1. The latter is resistant to the fungal disease Napier head smut that is becoming a problem in Kenya.
Chapter 4: Establishing common fodders

Part III–33
AdvantagesHigh-yielding, good palatability, good nutritional value when young (dark green, less than 1 m tall), easy to establish and drought-tolerant. It makes very good silage.
DisadvantageNot suitable for direct grazing. Requires a lot of manure/fertilizer to get high yields because it is a heavy feeder and not very frost-tolerant.
FeedingChop plants to increase intake. A high-yielding animal can produce up to 10 litres of milk on Napier alone.
CultivationDoes best in deep, fertile, well-drained soils. Prepare site by deep digging or ploughing at start of main rains. Canes (four nodes) or splits (leaves cut down to 10–15cm and uprooted portion split into parts with some roots and soil) are planted at an angle of 45 degrees. Plant 0.5 x 0.5–1 m spacing. Try to plant with nitrogen–phosphorus–potassium /compound fertilizer (NPK, 20:20:20) at the rate of 1 teaspoon per hole (4 teaspoons/plant) and in heavy rains. Top dress between rows after cutting with as much manure as possible, plus 1 teaspoon per plant of nitrogenous fertilizer (urea/calcium ammonium nitrate(CAN)). Keep plot weed-free, especially after planting, and avoid heaping soil around the plants. Cut from 3–4 months after planting (to 10 cm), when Napier grass is about 1 m high. In subsequent years, manure can be used instead of inorganic fertilizer.
ClimateDoes best in high rainfall areas (1,500 mm per year) and up to 2,000 m asl altitude so long as there is little frost. It survives drought well, though yields are reduced.
Pests and diseasesNapier is relatively free of pests and diseases but susceptible to Napier head smut in some regions. Control by removing and avoiding infected material and by planting resistant varieties, such as Kakamega 1. Infected plants should not be fed to cattle because this spreads the disease.
4. Forage oats (Avena sativa)An annual grass (new seed is planted each year) grown as a forage crop for systems where forage is cut and carried to the animals.
AdvantagesGreen material is of high nutritional value and makes good hay and silage. Crop will grow on most soils, even if they are relatively poor and acidic, so long as they do not get waterlogged. Grows where it is too cold for other crops.
Chapter 4: Establishing common fodders

Part III–34
DisadvantagesFeeding fresh green chop can cause bloat so feeding must be controlled.
FeedingAs a bulk feed.
CultivationPrepare a fine seedbed and broadcast seed. After spreading the seed, scrape the soil over with a twig to bury the seed (no deeper than 4 cm) and protect from birds. Recommended rates of fertilizer are 50 kg/acre DAP and a top dressing of calcium ammonium nitrate (CAN). The crop will still grow without fertilizer but will give lower yields. It can be planted with trailing plants like vetch or peas that will grow up the oat stems, although they must be planted so that the climbing plant matures at the same time as the oats. The crop can be harvested green to give forage of high nutritive value. Harvesting late may increase the quantity but nutritive value will be lower. If cut early, the plant will regrow although the second harvest will be smaller.
ClimateA wide range of varieties are grown, generally at high altitudes (above 1,600 m asl), does best above 2,000 m and is excellent at 2,800 m asl.
Pests and diseasesThere are a number of diseases that can affect the crop, but they are not commonly seen.
5. Fodder sorghum (sweet sorghum, Sorghum bicolor)An annual or short-term perennial fodder crop, growing 4 m or more high. There are numerous varieties of sorghum mainly grown for grain but only the sweet variety is grown for fodder. It is highly drought-tolerant and can grow where rainfall is too low for maize. Normally grown in cut-and-carry plots and can be used for silage or hay.
AdvantagesDrought-tolerant.
DisadvantagesMost sorghum contains prussic acid and direct grazing should be controlled.
CultivationGrows in many soils, from deep sands to heavy black cracking clays if there is good drainage. Sow in a fine, weed-free seedbed at the start of short rains or when rain is light. Sow 4–5 cm deep at the rate of 3–5 kg per acre using a hand hoe. For good growth apply 60–100 kg/acre of phosphorus and top dress with nitrogenous fertilizer during growth or after cutting. Usually ready to cut after 3–4 months or graze when it is 0.75–1.25 m tall.
Chapter 4: Establishing common fodders

Part III–35
ClimateGrows at altitudes from sea level to 1,000 m in areas with an annual rainfall of 400–750 mm. Can be dormant (does not grow but stays alive) in drought, starting to grow when rain returns.
Pests and diseasesSuffers from anthracnose and leaf blight, which can be controlled using resistant varieties. Smut (from fungus) can be stopped by using fungicide at planting. Striga or witchweed (a pink/purple flowering plant that attaches itself to roots of other plants) and grasshoppers can also cause problems in some areas. To control Striga, use an intercrop of desmodium/sorghum, while a crop that would serve as a ‘trap crop’ such as Sudan grass can minimise the chances of insect attack.
6. Turnips and mangolds These are brassicas, like cabbages, kales, kohl rabi and sukumawiki (type of spinach). They are rich in minerals and vitamins and provide high-energy feed which is low in protein. The crop is biannual, producing a tuber in the first year and seed in the second year. Both the leaves and the tuber are fed. Forage varieties that do not produce tubers exist. Turnips have a higher nutritive value than mangolds because they have less water in them, but production of both tubers and forage is lower than in mangolds. The tubers of both crops can be stored in the field if the tops are removed. Feed chopped in the dry season.
AdvantagesBoth turnips and mangolds withstand frosts and low temperatures and can be left in the ground and used as needed. Easy to establish.
DisadvantagesAvoid feeding in the rainy season when they could cause bloat.
CultivationNeed deep fertile soil. Plant seed in nursery and transplant seedlings to the field at a spacing of 0.35 x 0.7 m. Seed can also be planted in rows 0.7 m apart and thinned. Planting can be at any time of the year. In Kenya, in areas where there are two rainy seasons, farmers plant in the cold dry spell in June–July, so that the crop is ready to harvest five months later in the warm dry spell when feed is particularly difficult to find. To harvest, uproot the shoot, feed the tops soon after harvesting and feed/store the tubers.
ClimateGrows best in cool temperatures but cannot withstand freezing temperatures.
Pests and diseasesTurnips and mangolds resist pests and diseases well, although moles will eat the crop from underground.
Chapter 4: Establishing common fodders

Part III–36
7. Rhodes grass (Chloris gayana: synonym Eustachys paspaloides) A vigorous, perennial grass, growing up to 1.5 m tall that spreads quickly forming good ground cover. It has a strong root system giving good drought tolerance. Grazing is the most common method of feeding, although some farmers use it for cut-and-carry. Animals may overgraze because it is very palatable and this decreases the yield. It makes very good hay. It can be left to seed, yielding 56 kg seed per acre (140 kg per ha).
AdvantagesDoes well even under medium to low rainfall and is drought-tolerant. Withstands medium to heavy grazing pressure, palatable, good for hay.
DisadvantagesSeed germination can be poor and because animals like it, they can graze it so hard that it stops growing.
CultivationGrows well in a wide range of soil conditions but best in loamy, fertile soils. It does not do well in alkaline or very acidic soils. Plough and harrow to a fine seedbed and sow by broadcasting. Cover the seeds lightly, for example by pulling light tree branches over the ground. Can be planted under mature maize or together with wheat so it remains after the wheat harvest. Plant in the middle of the rains to avoid seeds being washed away. For high productivity, apply nitrogen fertilizer preferably during heavy rains at the rate of 100 kg per hectare. Cut close to the ground or graze soon after flowering, but harvest at least once after planting before grazing.
ClimateGrows well at altitudes from 600–2,000 m asl but will grow higher. It needs more than 250 mm annual rainfall. .
Pests and diseasesNo disease of importance but common pests like army worms may attack.
8. DesmodiumA trailing or climbing perennial legume with small leaves and deep roots covering the ground thickly in good conditions. The most common varieties are greenleaf (which has green leaves) and silverleaf (green and white leaves). Desmodium is popular in cut-and-carry systems. It is high in protein and is fed wilted and mixed with other forages, 3–6 kg is roughly the same as 1–2 kg of concentrate. Excess can be made into hay.
AdvantagesHigh-quality, protein-rich forage. Can be grown between or under other crops, even trees. It can be multiplied using vines (vegetatively). It can be established as an intercrop with Napier and in this way efficiently uses minimal land. It is a legume and makes some of its own nitrogen, hence improving soil fertility.
Chapter 4: Establishing common fodders

Part III–37
DisadvantagesSeed is expensive and inoculants rare in rural areas. Without using inoculants the crop establishes slowly requiring more frequent weeding. It suffers from pests and diseases in very high rainfall areas (more than 1,500 mm per year) and does not tolerate drought or alkaline soils.
CultivationAdapted to a wide range of soils and tolerates slight acidity but not salinity. It can be grown on its own in plots or under trees or mixed with Napier grass or food crops. Seeds can be sown in a nursery and seedlings taken to the field, but cuttings are easier to establish. Sow seeds in short rains and cuttings in long rains. Mix seed with an inoculant or with soil from another desmodium plot. Plant vines that are 50 cm long (keeping soil to roots) 30 x 30 cm apart and 10 cm deep, burying two-thirds of the nodes. If planting with Napier, plant cuttings 1 m between plants and 2 m between rows. Needs phosphate fertilizer (100 kg per hectare) or manure to grow well. Harvest after at least 4 months or at about 12-week intervals leaving at least 10 cm of plant.
ClimateIt does well in warm, wet regions at altitudes of 800–2,500 m receiving at least 875 mm annual rainfall.
Pests and diseasesAphids and the Amnemus weevil can be controlled using insecticides (be careful to observe use and safety instructions on the pack).
9. Mulberry (Morus alba)A tree that can grow as high as 20 m but, when grown for fodder, is normally cut back and kept as a low-growing bush around the homestead, on field edges or on spare land. It is used in Asia for silkworm production. It has large leaves that are highly nutrititious and can be fed fresh as a protein supplement in cut-and-carry systems. Young bark can also be peeled from cut branches and fed. What is left of the stems after they have been used by silk worms can be used as livestock feed.
AdvantagesThe leaves contain a lot of protein and are a good supplement or feed for young calves.
DisadvantagesThe tree is very greedy for nutrients and can reduce the fertility of the soil.
CultivationNeeds to be in full sun in good deep soils with good drainage. Can be planted as seed in a nursery then planted out. Maintain at 2.5–3 m high by cutting or pruning. It can also be cut back to just above the ground and will regrow.
Chapter 4: Establishing common fodders

Part III–38
ClimateCan grow up to 2,000 m asl and is frost-resistant.
Pests and diseasesGenerally not greatly affected by pests and diseases.
10. Calliandra (Calliandra calothyrsus)This is a multipurpose leguminous tree with many leaves and pink flowers at maturity. Its leaves and young stems are used as high-quality protein supplement in the cut-and-carry system. It can also be used for smothering weeds, soil erosion control, fertility improvement and even as an ornamental tree. It is usually planted in border areas. Other closely related fodder trees are lucaena and sesbania.
AdvantagesA high-quality protein supplement that helps improve animal production. It enriches the soil through its nitrogen fixing abilities. It is a multipurpose tree and supplies fodder, wood, poles and firewood.
DisadvantagesHas to be fed to animals with caution to prevent build up of tannins, which affect the function of the digestive system. Labour for cut-and-carry is high. Poor seed setter therefore seed production is limited. When grown with food crops, spacing has to be carefully planned to avoid suppressing yields from food crops.
CultivationIt does not tolerate waterlogging. It grows in a wide range of soils, including acid soils, but needs moderate fertility. Calliandra may be planted as a pure stand in cut-and-carry plots, as a hedgerow or live fence along boundaries and around the homestead, within Napier grass plots, along contours for soil conservation and even in cropping land as in alley cropping. Calliandra is established from seeds. The seeds may be sown directly into the field or in the nursery. Make furrows 3 to 10 metres apart and drill the seed at a rate of 1 to 2 kg per hectare. Place the seeds 2 to 3 cm deep
ClimateIt grows well in warm climates at altitudes of up to 1,500 m asl and an average annual rainfall of 700–2,400 mm.
FeedingFeed fresh calliandra to supplement basal diets consisting of Napier or other grasses, weeds, crop residues, hay or straw. Feeding 3 kg of fresh calliandra fodder can replace 1 kg of commercial dairy concentrate without affecting milk production. Wilting of calliandra greatly reduces the extent to which it can be utilised by the animal; therefore it should be fed to the animals within 1 hour of cutting.
Chapter 4: Establishing common fodders

Part III–39
Pests and diseasesScales, black ants, termites, crickets and hoppers and the fungus, Armillaria mellea. Pests can be controlled by sprinkling ash around the base of the tree. To control Armillaria, avoid planting calliandra in areas that have recently been cleared of trees.
11. Fodder maizeMaize forage is a basal feed for livestock and can be fed fresh or conserved as silage. It is possible to obtain fodder as well as grain from a maize crop by: i) thinning weak, thin and sick plants – these thinnings are of high nutritive value; ii) leaf stripping and topping i.e. removing basal leaves and cutting off the plant top soon after the dough stage; iii) harvesting the stover when green or dry; and iv) using a salvage crop, which becomes available when there has been a crop failure.
Increased amounts of maize fodder can be obtained through dense planting, i.e. at planting, either put 4–5 seeds per hole instead of the usual two and apply 20 g (two teaspoons) of fertilizer per hole instead of the usual 10 g (or four handfuls of manure instead of the usual two), or dig double the normal number of holes and spread the maize seeds inside evenly.
AdvantagesMore and better quality fodder from the same land. You can get fodder from maize when other feed is scarce and can conserve surplus. You can conserve surplus feed as silage or maize stover.
DisadvantagesIt is labour-intensive. The cobs from dense planting are small. Cannot intercrop. Higher croping densities require more manure and fertilizer.
CultivationThe recommended spacing for maize is 75 cm x 30 cm (one seed per hole) and 90 cm x 30 cm (two seeds per hole). Reduce this spacing to 60 cm x 30 cm to increase the plant population. Apply fertilizer and manure at the usual rates of 10 g of fertilizer and two handfuls of manure per hole at planting. Do proper weeding, twice or more depending on the amount of precipitation. Top dress with appropriate ammonium fertilizer.
ClimateFodder maize does well in medium to high altitude areas. In very high altitude areas it takes longer to mature and demands extra attention. Rainfall requirements range from 700–2,400 mm per annum. Requires moderate to high-fertility soils. Although it tolerates acidic soils, production is adversely affected. It does not tolerate waterlogging.
Pests and diseasesThe most common problems (especially in warm and high rainfall areas) include stalk borer, maize streak virus and head smut. Pesticides for the control of stalk borer are available from stockists. Maize streak and head smut can be controlled by uprooting and burning diseased plants.
Chapter 4: Establishing common fodders

Part III–40
12. Kow KandyThis is an annual crop growing to a height of 4 m or more. It is mainly grown as a pure stand and can grow in fairly low to moderately high rainfall areas.
AdvantagesEarly maturing, producing adequate quantities of forage. Easy to establish from seeds. Very low levels of prussic acid compared with other sorghums. Animals can directly graze on it without harm. It gives 2–3 good regrowths (ratoons) from the current crop before the plants need replacing.
DisadvantagesIt is not a composite but a hybrid and therefore gives few ratoons with subsequent production. Seeds are relatively expensive and not easily available. The amount of forage produced, particularly by the ratoons, is low compared to other forage sorghums like Sudan and Columbus grasses.
CultivationCan be propagated on well-prepared land with moderate to fine soil texture. Planting can be done using seed at a spacing of 45–70 cm although in high rainfall areas this can be adjusted. It performs poorly in cold areas. Use phosphate fertilizer at a rate of 50 kg per 0.4 ha at planting. The required cultural practices include weeding and thinning. It takes 3–4 months to reach maturity. Harvest for feed before it starts pouring thick exudates (honey-like fluids) from the floral parts.
FeedingSuitable for cut-and-carry systems. Can be grazed directly. Can be conserved in the form of silage and standing hay.
Pests and diseasesOccasionally attacked by rust, which can be controlled through crop rotation.
Chapter 4: Establishing common fodders

Part III–41
Spreading to wilt
Dry on ground – turn once a day for approximately 3 days or until a handful, taken from inner layers, breaks a little when twisted and material is slightly brown
Cutting
Cut grass when 10–20% is in flower
How to conserve forage
Farmers often have only just enough feed from the farm to feed their livestock even during the rains when growth is good. In the dry season they have to look for alternatives to feed their animals, perhaps by using feeds not normally used such as banana leaves and pseudo-stems, or by buying hay or other materials. However, some manage to grow more than enough. These farmers may wish to explore options to conserve the fodder for the dry season. There are a number of different ways to conserve forage (see Table 17).
Table 17. Fodder conservation methods and examples of fodders that are suitable
Hay Fodder oats, lucerne, desmodium, Rhodes grass, Napier grass See page 41
Standing hay Napier grass, Rhodes grass See page 43
Stored in stacks Maize stover See page 43
Stored underground Turnips, mangolds See page 43
Silage Fodder sorghum, oats, maize, Kow Kandy, Napier grass See page 43
Hay making This refers to cutting and drying forage quickly in the sun and wind to reduce the water content while preserving the nutrients. Hay from planted forage is of much higher quality than that from natural pasture, while proper timing of planting and other management activities, such as top dressing with fertilizer, improve the quality of pasture. The following illustrations show the key steps in making hay.
Chapter 4: How to conserve forage
Making bales of hayBaling is useful because it helps prevent the loss of the most nutritious parts of the forage, and makes the hay easier to handle. Bales can be made in a box (100 cm long, 50 cm wide and 40 cm deep) and secured with two long ropes or twine that have been laid across the box so that they hang over the middle and flow on either side. Straw and stover can also be

Part III–42
Compacting to eliminate air
Fill a box (approximately 100 cm x 50 cm x 40 cm) with hay then pack it down
Loading the tripod stand
Load dry grass onto a tripod
Completely stacked tripod stand
Ensure that finished tripod has forage facing down so that rain runs off
Chapter 4: How to conserve forage
Storing hay on a tripod or in a barnHay should be stored away from the sun and rain in a barn, or loose on a tripod so that rain rolls off the hay. If there is no suitable storage site, the hay may be stored on slats and covered with mats or plastic. Buns (a type of shed) should be raised off the ground and covered to protect from rain.
Tying for easy storage or transportation
Tie the bale very tightly and remove from the box
Raised bun
made into bales, although coarse-stemmed material can be difficult to compress. If wood is not available to make a box, an alternative is to use a hole in the ground, dug to the same size as the box and with strings placed in the same way. Hay is put in the hole and packed tightly before the strings are tied and the bale removed.

Part III–43
Standing hayIf land is not needed and there is no space at the homestead for storing, material can be left to overgrow in the field and becomes standing hay. This method is not ideal as the material is exposed to sun and rain and the nutritive value decreases rapidly.
Stored in stackStraw and stover that is already dry can be stored immediately stacked upright or in a hay barn.
Storing fodder shrubs Drying the leaves from fodder trees or other legumes produces hay-like material that can be stored in sacks. Ideally the material should be dried on a sheet on the ground to avoid losses.
Storing root cropsOnce the leaves are chopped off, turnips or mangolds can be stored underground. The roots are placed with the leafy end facing the bottom and covered with soil.
Silage makingSilage is feed preserved by natural fermentation in conditions where flow of air through the heaped material and contact with water is eliminated. Legumes can be mixed with cereal forages or grasses. The following illustrations show the key steps in making silage.
Chapter 4: How to conserve forage
Adding molasses as a source of sugar for fast fermentation
Sprinkle and mix with molasses (for 1 gunny sack: mix 0.6–1 litre molasses + 2–3 times as much water). Use more molasses if material is older. Mix well
Chopping
Cut forage to approx. 2.5 cm long

Part III–44
Piling material
Lay 2 polythene sheets (10 m long, 3 m wide, 500 gauge) 30–60 cm apart preferably on a gentle slope. Put a 15–30 cm layer of chopped material towards one end (lower end if the land is sloping)
Compacting
Compress with weights e.g. a drum containing water or sand, rolling around the edges, then just leave it.
Compacting to eliminate air
Compress material in black plastic tube (2.5 m long, 1.5 m wide, very thick plastic is recommended for durability (1,000 gauge) approx. 8–10 gunny sacks)
Tying and placing weights for sustained compaction
Sacks can be tied. Using weights on top can help to keep air out
Chapter 4: How to conserve forage
For surface silage, that is less labour-intensive and uses less plastic.
For tube silage

Part III–45
5. REPRODUCTIVE MANAGEMENT
This covers all aspects of cattle management to ensure cows are producing quality calves annually.
Breeds and breeding
Breeding involves natural mating or artificial insemination (AI). Selective breeding can improve the productivity of a herd. Different livestock breeds are kept for different purposes. In cattle breeding, the aim is to produce dairy, beef or dual-purpose animals. Table 18 lists many of the different breeds of cattle and their features.
Chapter 5: Reproductive management
East African Zebu (Bos indicus)
Charolais (Bos taurus)
Friesian (Holstein)

Part III–46
Chapter 5: Breeds and breeding
Tab
le 1
8.
Ca
ttle
bre
ed
s
Bree
dW
eigh
t (k
g)Pu
rpos
eC
hara
cter
istic
s
Frie
sian
400–
600
Dua
l (m
ulti-
pur
pos
e)
Blac
k an
d w
hite
pat
ches
with
whi
te t
ail s
witc
h; L
arge
bod
y; H
igh
milk
yie
ld; H
eavy
feed
er; G
ood
mea
t p
rodu
cer;
Milk
has
lo
w b
utte
rfat
con
tent
; Ver
y se
nsiti
ve t
o m
anag
emen
t
Ayr
shire
350–
500
Dai
ryRe
d an
d w
hite
pat
ches
; Hig
h m
ilk p
rodu
cer;
Hea
vy fe
eder
; Fai
r m
eat
pro
duce
r; F
air
butt
erfa
t co
nten
t in
milk
(m
ore
than
Fr
iesi
an)
Gue
rnse
y 35
0–50
0D
airy
Ligh
t br
own
to r
ed; M
oder
ate
milk
pro
duce
r; R
elat
ivel
y lig
ht fe
eder
; Rel
ativ
ely
high
but
terf
at c
onte
nt in
milk
Jers
ey
250–
350
Dai
ryBl
ack
to g
rey,
ligh
t br
own
and
brow
n; D
ish-
shap
ed fa
ce a
nd b
lack
circ
les
arou
nd t
he e
yes;
Mod
erat
e m
ilk p
rodu
cer;
Smal
l to
med
ium
ani
mal
; Lig
ht fe
eder
; Hig
h bu
tter
fat
cont
ent
in m
ilk
Sahi
wal
350–
500
Dua
lRe
d to
ligh
t br
own;
Hea
vily
bui
lt w
ith s
hort
legs
; Rel
ativ
ely
low
milk
pro
duce
r; H
ardy
ani
mal
and
goo
d fo
r m
argi
nal a
reas
H
igh
butt
erfa
t co
nten
t in
milk
; Use
d to
cro
ss-b
reed
with
indi
geno
us c
attle
in o
rder
to
imp
rove
on
milk
yie
ld o
r w
ith e
xotic
ca
ttle
to
imp
rove
on
tole
ranc
e of
adv
erse
clim
ate
Sim
men
tal
500–
700
Dua
lYe
llow
to
red
with
whi
te m
arki
ngs;
Hea
vy fe
eder
; Rel
ativ
ely
good
milk
yie
lder
; Sen
sitiv
e to
man
agem
ent;
Goo
d fo
r ho
t an
d dr
y p
lace
s
East
Afr
ican
Z
ebu
250–
350
Dua
lC
olou
r va
riabl
e; V
ery
hard
y an
imal
; Has
a d
ewla
p a
nd p
rom
inen
t ea
rs; L
ate
mat
urin
g; P
rom
inen
t hu
mp
; Ver
y lo
w m
ilk y
ield
Cha
rola
is50
0–80
0Be
efW
hite
in c
olou
r w
ith t
hick
hai
r; G
ood
and
lean
hig
h gr
ade
beef
pro
duce
r; H
eavy
feed
er; H
ardy
and
vig
orou
s an
imal
s
Her
efor
d45
0–55
0Be
efBr
own
or d
eep
red
bod
y w
ith w
hite
woo
lly h
ead;
Goo
d be
ef p
rodu
cer;
Hea
vy fe
eder
; Can
tol
erat
e he
at a
nd d
roug
ht in
the
se
mi-a
rid a
reas
and
are
goo
d fo
r cr
oss-
bree
ding
and
up
grad
ing
with
oth
er b
reed
s; S
ensi
tive
to m
anag
emen
t
Bora
n40
0–70
0Be
efW
hite
, gre
y or
bei
ge in
col
our;
Can
with
stan
d hi
gh t
emp
erat
ures
and
can
tw
itch
thei
r lo
ose
skin
to
redu
ce fl
y w
orry
; Goo
d be
ef p
rodu
cer;
Har
dy a
nim
al fo
r ha
rsh
cond
ition
s; H
as a
pro
min
ent
hum
p; C
an b
e cr
oss-
bred
to
imp
rove
milk
yie
ld

Part III–47
Natural breedingThis is when a bull is used for mating. The bull could belong to a neighbour or a bull scheme (either a government or private scheme for mating cows or heifers in a community). It is used predominantly where AI is not available and for large herds in extensive systems.
Natural mating
Selecting a bullThe type of bull depends on the type of cattle that will be mated and their body size. Very large bulls are not good for very small cows. The bull must be strong, of good appearance, active and of good size according to the standard for its breed. It should be examined and certified by a veterinarian.
Management of a bullThe bull should receive adequate and proper feed, clean water and good care. It needs to be observed regularly for condition and signs of disease. It is important that the cows to be mated should also be healthy with no signs of disease or parasites.
CostIf keeping a bull, the farmer will either buy it or rear it for 18–24 months before it is ready for service. The cost of rearing a bull calf to 18–24 months or buying a mature bull in Kenya is US$ 250–400. The bull should be disposed of when its daughters are ready to be served to control inbreeding.
Benefits of natural serviceIt is always available. For a large herd, or with a bull scheme the cost is low. The bull can be used for draft power. It is easier to tell if a cow is in heat when there is a bull around.
ConstraintsDiseases such as brucellosis, vibriosis, trichomoniasis and orchitis can spread very fast within the herd, resulting in problems such as long calving intervals and increased expenditure on
Chapter 5: Breeds and breeding

Part III–48
the treatment of infected animals. Cows travelling long distances to the bull are likely to have low milk yields and poor conception. There is limited choice for selective breeding to increase the incidence of desired traits in the herd. It is expensive to keep and maintain a bull especially on small farms.
Artificial inseminationAI is the process of artificially depositing semen in the uterus of cow instead of allowing natural mating. It is widely practised with cattle but has been also used for goats and pigs. Semen is collected from selected high-quality bulls in a hygienic environment. It is available from qualified AI technicians.
Artificial insemination
CostThe cost of setting up the service is high. A well-trained person is required. The cost of distribution and storage is relatively high.
BenefitsAllows the farmer to select semen for performance (e.g. for milk production). Through the use of AI one bull can be used to inseminate many cows. Semen can be removed and stored for use even after the bull dies. It is easy to transport semen even from countries like America to Kenya. AI controls the spread of sexually transmitted diseases. Selective breeding is possible.
ConstraintsExpensive and delicate equipment is needed. It requires trained AI technicians and knowledge of the signs that indicate when a cow should be served. If records are not properly kept, inbreeding can accidentally occur. For transportation, reliable infrastructure is important.
Any information regarding the source of semen (especially the bull) should be recorded as it helps in the breeding programme.
Chapter 5: Breeds and breeding

Part III–49
Principles of breedingHeifers are ready for service when they are 18 months old, or earlier if they have reached a suitable live weight (LW): • Exotic breeds 250–300 kg• Indigenous breeds 200–250 kg
After calving, the cow comes on heat (and is ready to be mated or inseminated) around day 38–45. The aim is to serve the cow 45–90 days after calving to get a calf every year. Hormonal changes cause the cow to come on heat and release an egg (see Table 19 for signs of heat). Poor heat detection is a major cause of failed conception.
Table 19. Signs of heat
Early heat Standing heat After heat
Increased restlessness
Mounting other cows
Swollen vulva
Sniffing other cows and being sniffed
Reduced feed intake
Standing to be mounted
Clear mucus discharge from vulva
Sharp decline in milk production
Tail bent away from vulva
May stop eating
Dried mucus on the tail
Roughened tail head
Animal refuses to be mounted
Early signs: watch cow closely Best signs: take cow for service Late signs: keep record
Mounting other cows is a sign that an animal is on heat
Animals observed on heat in the morning should be inseminated in the afternoon and those detected in the afternoon/evening should be served the following morning.
Chapter 5: Breeds and breeding

Part III–50
Criteria for breeding selectionThe ‘best’ breed is the one that suits the farmer’s circumstances. It is important to maintain a manageable herd size for optimum production. Continuous selection and culling helps create a healthy, productive herd. The following characteristics can be used to select a good dairy cow:• well balanced fore and hind part of the body, and udder that is above the hock. Needs
a bullet teat, whose length should be between 5–8 cm• prominent and well developed milk veins on the udder and belly• wedge-shaped body (from top and side view) • good body depth• wide chest• strong and level top-line (spine)• strong legs with long, straight steps
Castration
Castration is the destruction or removal of the testicles. It is carried out on male animals that are not wanted for breeding. The best time to castrate an animal is when it is very young because the operation is more successful and the wounds heal fast. Castration can be done using a burdizzo (specialised castration tool), rubber ring, sharp knife or scalpel. The initial cost of a burdizzo is high. The cost of a rubber ring is low although the elastrator (tool to apply it) is of medium cost. Castration enables controlled breeding and castrated animals are quiet (do not fight). However, open castration can only be done by qualified personnel and the equipment is not always available. Sometimes the animal’s growth rate is slowed and there is a risk of infection from open castration.
The timing chart for service
Chapter 5: Castration

Part III–51
Castration techniquesTo castrate with a burdizzo, feel the scrotum with your hand and you will feel the two rope-like testicular cords inside. Take the burdizzo in your right hand and with your left hand push one cord to the side between the jaws of the burdizzo and then squeeze hard. Now take the burdizzo in the left hand and crush the other cord.
Castration using a burdizzo
To castrate with rubber ring, put a rubber ring around the four teeth of the elastrator and squeeze the handle. The rubber ring will stretch open. Pass the scrotum of the animal through the ring making sure that it goes over the two testicles. Release the elastrator and the rubber ring will tighten over the cords. After two weeks the scrotum will fall off.
Castration using a rubber ring
Chapter 5: Castration

Part III–52
6. ANIMAL HEALTH
For animals to grow normally, reproduce and produce sufficient milk they need to be healthy. Good management promotes good health and involves balanced feeding, suitable housing and good general husbandry.
Common signs of illness
• a change from normal behaviour: the animal is weak and listless • loss of appetite: the animal stops eating (partially or completely)• coarse dry skin with ruffled hair• loss of body condition• abnormal breathing• abnormal discharges• dry muzzle
Causes of disease
Disease-causing agents occur naturally in the environment. They include bacteria, protozoa, fungi, viruses, worms, etc. The population of disease-causing agents (also known as germs) is greater in areas that are dirty or contaminated, such as dirty animal houses. Germs are constantly entering the body. If the animal is strong and has good resistance, it may not get sick even after being infected, but weaker animals in poor condition are likely to become ill. The occurrence of disease in animal populations is determined by the interaction between the environment, the animal and the disease agents. The role of a good livestock manager or farmer should be to reduce the occurrence of disease as much as possible by controlling the environment, maintaining good hygiene and ensuring the animals are well managed.
The population and virulence of disease-causing agents, their ability to survive in the environment, their speed of multiplication and ability to enter into the host body determine
how frequently the diseases they cause will occur in a given population. If the host animal is weakened by malnutrition, stress or age (too old or too young), disease agents will grow, making it sick. Environmental factors contribute to disease occurrence in different ways. The environment may allow the disease agents to grow and multiply (e.g. in dirty and wet conditions), create a good home for vectors that transmit diseases (such as flies, ticks, mosquitoes, etc.) or stress the host animal thereby making it weak and vulnerable. The disease causation triangle
Agent factors
Environmental factors
Animal/host factors
Chapter 6: Animal health
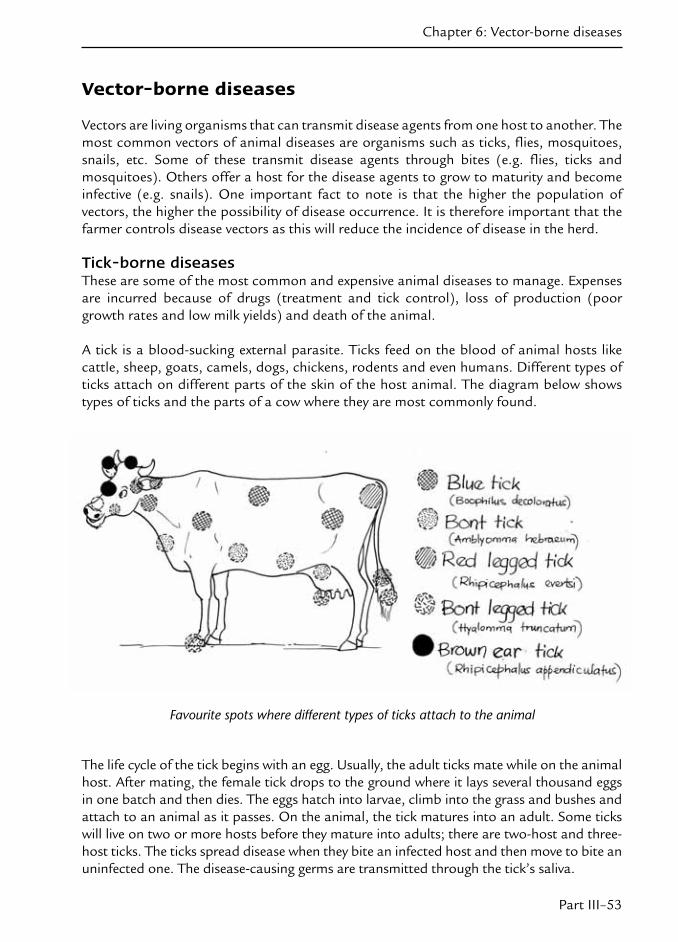
Part III–53
Vector-borne diseases
Vectors are living organisms that can transmit disease agents from one host to another. The most common vectors of animal diseases are organisms such as ticks, flies, mosquitoes, snails, etc. Some of these transmit disease agents through bites (e.g. flies, ticks and mosquitoes). Others offer a host for the disease agents to grow to maturity and become infective (e.g. snails). One important fact to note is that the higher the population of vectors, the higher the possibility of disease occurrence. It is therefore important that the farmer controls disease vectors as this will reduce the incidence of disease in the herd.
Tick-borne diseasesThese are some of the most common and expensive animal diseases to manage. Expenses are incurred because of drugs (treatment and tick control), loss of production (poor growth rates and low milk yields) and death of the animal.
A tick is a blood-sucking external parasite. Ticks feed on the blood of animal hosts like cattle, sheep, goats, camels, dogs, chickens, rodents and even humans. Different types of ticks attach on different parts of the skin of the host animal. The diagram below shows types of ticks and the parts of a cow where they are most commonly found.
Favourite spots where different types of ticks attach to the animal
Chapter 6: Vector-borne diseases
The life cycle of the tick begins with an egg. Usually, the adult ticks mate while on the animal host. After mating, the female tick drops to the ground where it lays several thousand eggs in one batch and then dies. The eggs hatch into larvae, climb into the grass and bushes and attach to an animal as it passes. On the animal, the tick matures into an adult. Some ticks will live on two or more hosts before they mature into adults; there are two-host and three-host ticks. The ticks spread disease when they bite an infected host and then move to bite an uninfected one. The disease-causing germs are transmitted through the tick’s saliva.

Part III–54
Life cycle of the tick
Chapter 6: Vector-borne diseases

Part III–55
There are a number of diseases that are transmitted by ticks. The most important are East Coast fever (ECF), anaplasmosis, redwater (babesiosis), heartwater and sweating sickness (see Table 20). Table 21 is a comprehensive list of all tick-borne diseases.
Table 20. Tick-borne diseases
Name of disease Symptoms
East Coast fever (ECF) Swollen glands (lymph nodes), very high fever, lack of appetite, bleeding in mucus membranes, coughing in later stages, sometimes diarrhoea and dysentery in later stages
Anaplasmosis (gall sickness)
Body weakness, hard faeces (constipation), very pale eye membranes and tongue indicating severe lack of blood
Redwater (babesiosis) Rapid loud heartbeat, fever, very pale eye membranes and tongue indicating severe lack of blood, red or black urine
Heartwater Walking in circles, staggering (drunken behaviour), sometimes diarrhoea
Sweating sickness Salivation, runny eyes and nose, reddening and appearance of wounds in the mouth, sweating, patches of skin with no hair, bad smell
Table 21. Principal agents of tick-borne diseases: vectors and distribution
Agent Disease Principal vectors Host Main distribution
Aegyptianella pullorum
Aegyptianellosis Argas spp Poultry Africa, Europe
Anaplasma centrale Mild anaplasmosisGall sickness
R. simus Cattle Most tropical and sub-tropical regions
Anaplasma marginale Malignant anaplasmosis Gall sickness
Most tick species and mechanical transmission by biting flies; congenital transmission
Cattle Tropical and sub-tropical regions
Babesia bigemina Redwater tick fever Texas fever
B. microplus B. decoloratus B. annulatusR. bursa
Cattle Most tropical and sub-tropical regions
Babesia bovis Tropical bovine babesiosis Redwater
B. microplusB. annulatusR. bursa
Cattle Most tropical and sub-tropical regions
Babesia caballi Equine piroplasmosis
Hyalomma Rhipicephalus Dermacentor
Equines Africa, America, Asia, Europe
Chapter 6: Vector-borne diseases

Part III–56
Agent Disease Principal vectors Host Main distribution
Babesia equi (syn. Nuttalia equi)
Equine babesiosis Hyalomma Rhipicephalus Dermacentor spp, B. microplus
Equines Africa, Asia, Europe, America
Babesia motasi European piroplasmosis of SR
Haemaphysalis spp Sheep and goats
Europe, Africa, Asia
Babesia ovis Tropical babesiosis of SR
R. bursa Sheep and goats
Europe, North Africa, Asia
Babesia perroncitoi Porcine babesiosis Unknown Pig Africa, Europe (Italy)
Babesia trautmanni Porcine piroplasmosis
Rhipicephalus spp Pig Africa, Europe
Borrelia anserina Avian spirochetosis Argas spp Poultry Africa, Asia, Europe, America
Borrelia burgdorferi Lyme disease Ixodes spp All domestic mammals
Cosmopolitan
Borrelia theileri Tick spirochaetosis B. decoloratusR. evertsi H. dromedarii
Cattle, sheep, goats, horses
Cosmopolitan
Bunyamwera virus Nairobi sheep disease
R.appendiculatus R. pulchellus
Small ruminants
Eastern and central Africa
Cowdria ruminantium Heartwater 10 African Amblyomma spp
Cattle, small ruminants
Sub-Saharan Africa and Caribbean islands
Ehrlichia bovis Tropical bovine ehrlichiosis, Nofel or Nopel
H. anatolicum R.appendiculatusA. cajennense
Cattle Africa, Iran, Indian sub-continent, Brazil
Epitheliotropictoxin Sweating sickness H. truncatum Cattle, pigs Sub-Saharan Africa
Iridovirus African swine fever O. moubata groupO. erraticus
Pig Sub-Saharan Africa, southern Europe
Neurotoxin Tick paralysis 53 tick species from both Ixodid and Argasid genera
All domestic stock
Cosmopolitan
Theileria annulata Tropical theileriosis, Mediterranean Coast fever, Egyptian fever
H. detritumH. anatolicum anatolicum
CattleWater buffalo
Northern Africa, Sudan, Eritrea, southern Europe, Balkans, southern Russia, Middle East, Indian subcontinent, southern Siberia and part of China
Chapter 6: Vector-borne diseases
Table 21 continued.

Part III–57
Agent Disease Principal vectors Host Main distribution
Theileria lestoquardi (syn.T. hirci)
Malignant theileriosis of SR
Hyalomma spp Sheep and goats
Northern Africa, southern Europe and Asia
Theileria ovis (syn.T. recondita)
Benign theileriosis of SR
R. evertsi,R. bursa
Sheep and goats
Africa, Asia, Europe
Theileria mutans Benign theileriosis Amblyomma spp Cattle Sub-Saharan Africa and Caribbean islands
Theileria parva (3 types T.p.parva, T.parva lawrencei, T.parva bovis)
ECF Corridor disease Rhodesian tick fever January disease.
R.appendiculatus R. zambeziensis
Cattle, Water buffalo, African buffalo
Eastern, central and southern Africa
SR=small ruminantsSource: FAO (1984); Coetzer et al. (1994)Tick genus: A=Amblyomma, B=Boophilus, H= Hyalomma, O=Ornithodorus, R=Rhipicephalus
The illustration on page 58 helps identify different genera of tick.
Control of tick-borne diseases: ChemicalsTick-borne diseases are best controlled by controlling ticks, but ticks can only be controlled effectively while on the host animal. Applying chemicals (called acaricides) to the host animal kills the ticks already on the animal and prevents others from attaching. The different ways of applying the acaricide include dipping, partial immersion, spraying (using spray races or hand sprays), applying pye grease and ‘pour on’, and dusting with acaricide powders.
Dipping involves immersing the animal in an acaricide wash in a dip tank. There are two types of dips: the plunge dip, where the cows are fully immersed, and the Machakos dip, where the animal is partially immersed. Where the acaricide does not reach the skin, pye grease should also be applied.
Where many animals use the same dip tank, dipping is the cheapest method of applying acaricide. When a plunge dip is used, the whole body of the animal is covered by the acaricide. The disadvantages of dipping include the high cost of construction of a dip tank. It is not easy to monitor and maintain the strength of the dip wash owing to the large volume of water combined with the mud and dung left behind by the animals. To minimise cost, all animals must be dipped at the same time. It is not suitable for very young calves or heavily pregnant animals.
Spraying involves pumping the acaricide onto the animal using a spray device. It is possible to use a spray race, where the acaricide is pumped by a power-operated machine and the animal is sprayed as it passes through an array of jets. This is the best method for a large farm. The alternative is to hand spray. Because of the close contact between handler and
Chapter 6: Vector-borne diseases
Table 21 continued.

Part III–58
Chapter 6: Vector-borne diseases

Part III–59
chemicals, all safety precautions should be taken (see drug labels). The hand sprayer is the most common method on small-scale farms. When hand spraying, make sure all parts of the animal are covered by the acaricide. The correct areas that must be covered when hand spraying are shown in the illustration below.
There is more than one type of acaricide (Table 22). The choice of acaricide often depends on government approval but also on individual observation of efficacy. Some types may not kill the kinds of ticks found in one area as the ticks develop resistance. Farmers should observe their animals after applying the acaricide to check whether ticks are dying or not. If they are not, they should seek advice from an animal health professional.
Table 22. Common acaricides in use
Type Common names Application method Length of activity/protection
Amitraz Alamtix/triatix Dip/spray Weekly
Pyrethroids Dominex©
Ectomin© Dip/sprayDip/spray
2 weeks 2 weeks
Pyrethroid Spot on Pour on the back of the cow 2 weeks–1 month
Spraying using a hand sprayer
Chapter 6: Vector-borne diseases

Part III–60
‘Pour-on’ and pye grease are acaricide preparations that are applied to particular parts of the body to control ticks and flies. Pour-on is poured along the back of the animal from the front to the tip of the tail from where it spreads to the rest of the body. Pye grease is an acaricide mixed with oil, applied to the areas of the body where ticks like to feed. The advantage of these preparations is that they contain a very strong concentration of acaricide, hence ticks coming into contact with them are definitely killed. In addition, they do not require investment in equipment and infrastructure. The disadvantages are that they need to be combined with other control methods such as dipping or spraying hence they present an additional cost. Furthermore, the risk of exposure of the farmer to the chemical is higher. Because it is a slow process they can only be used where there is a small number of animals.
Control of tick-borne diseases: Non-chemicalControl of animal movements. Avoid taking animals to areas already known to have large populations of ticks. Avoidance of disease- and vector-prone areas has been practised by pastoralists for a long time with a good measure of success. Some vectors (ticks and tsetse) have definite seasonal and spatial patterns and can therefore be easily monitored.
Burning and clearing of vegetation. This kills the larvae and adult vectors both on the ground and in the vegetation.
Trypanosomiasis This is a disease caused by blood parasites called trypanosomes. Different forms of the disease are caused by the different types of trypanosomes and given different names. Some common names for trypanosomiasis inlcude nagana, which refers to trypanosomiasis in cattle; surra, which refers to trypanosomosis in camels, horses and buffalos; and sleeping sickness and chaggas disease, which refer to trypanosomiasis in humans. The disease is more common in dry and bushy grasslands.
Trypanosomiasis is transmitted mainly by tsetse flies, which feed on mammal hosts by sucking blood. Other biting flies can also transmit the disease mechanically. Some animals, especially game, can have the trypanosomes in their blood without falling sick. Such animals are called carriers of the disease.
Ttsetse fly
Chapter 6: Vector-borne diseases

Part III–61
Signs of trypanosomiasis include intermittent (on and off) fever, progressive anaemia and progressive loss of condition and body weight over a long period of time (chronic) even when the animal seems to be eating well. The signs are not specific and it is important to submit a blood sample to the laboratory for proper diagnosis.
There are several drugs that can be used to treat the disease. The common ones are Berenil®, Novidium®, Samorin® and Antrycide®. These are mainly injectable preparations and farmers should call their veterinarian for diagnosis and treatment. Infected animals should be given proper rest and good nutrition to minimise losses from the disease.
Control of trypanosomiasisControl is aimed at interrupting the life cycle of the trypanosome either on the animal or on the fly. On the animal, it is done by the administration of the drugs mentioned previously at specific intervals. It is advisable to consult the veterinarian for correct drug application. The advantages of control on the animal are that the disease infection levels are kept low and the procedure is easy to implement. The disadvantages are that there is a cost involved in the purchase of drugs and prolonged use or poor administration could create drug resistance.
Control of the insect can be achieved by several methods. Chemical methods include dipping and spraying of animals as well as their sheds using pyrethroid acaricides or insectides and application of pour-on. Insecticide can also be sprayed in fly-breeding areas near bushes and along river valleys. The advantage of controlling the insect is that chemical control is more effective than other methods in reducing the fly population. The disadvantages are that there are risks of environmental pollution, human exposure to the chemicals and of killing useful insects. There is also cost involved in purchasing the chemicals.
Fly traps are specially designed structures that attract the flies into net and cloth devices where they are left to die or are killed using an insecticide. The advantages are that there is no risk to human or environmental health and the method has a low labour requirement. The disadvantage is that there is a cost involved in the purchase of traps.
Two types of tsetse traps
Chapter 6: Vector-borne diseases

Part III–62
Environmental control involves clearing the bushes, especially where the flies are abundant. This is because leaves and branches provide a suitable shaded place for the flies to brood and thrive. Clearing can be by manual cutting or burning. The advantages are that there is no risk of environmental pollution and very little or no extra cost is incurred. The disadvantages are that the area may not be available for grazing until some time afterwards and the method can only be used on small pieces of land.
Biological control involves the use of sterilised male flies and can only be done by special laboratories. Biological control may also involve the introduction of types of livestock that are resistant to trypanosomiasis in a tsetse-infested area. The method is very effective and there is no risk of pollution, however, a high level of skill and technical know-how is required, the method may be quite expensive and it is a slow process.
Barrier methods involve protecting the animals from tsetse flies by keeping them in special enclosures. This is only possible for small numbers of animals. Animals can be housed in fly-screened units so that insects cannot bite them. This allows livestock production in otherwise unsuitable areas but it can be expensive and confines the animal to the house.
Chapter 6: Vector-borne diseases

Part III–63
Management of animal health on the farm
Disease prevention and controlLosses from animal health problems can be greatly reduced by preventing diseases (prevention is better than cure). In addition, some diseases do not have any specific cure and will kill even treated animals. Keeping animals healthy is more cost-efficient as productivity is maintained and the expense of drugs is avoided. Some of the disease-control methods that farmers can use are listed below.
Good nutritionAnimals that are getting sufficient quantities of a well-balanced feed are unlikely to suffer mineral deficiencies (e.g. milk fever, downer cow syndrome), malnutrition or other feed-related complications such as infertility, blindness and stunting. In addition, good nutrition builds the body’s immune system, making the animals better able to resist many common infections (see also page 12: Animal feeding and nutrition).
Controlled movementThe farmer should try as much as possible to prevent healthy animals from mixing with those that have been exposed to diseases or may be carrying disease vectors such as ticks. Sick animals should be isolated and farmers should avoid grazing their animals in areas that are known to harbour disease vectors such as ticks and tsetse flies. Restriction of animal movement from areas with disease outbreaks to clean areas (quarantine) is a technique commonly used by government departments to control the spread of infectious diseases.
HygieneOrganisms that cause disease generally grow and multiply in dirty places. If cleanliness is not observed in the management and handling of animals, livestock tend to get infected more frequently. Poor hygiene is a common cause of diseases such as mastitis, foot-rot and diarrhoea in calves. It is therefore important to ensure that animal houses are cleaned regularly, are well lit and have good air circulation. Milking equipment should be cleaned and left in the sun for natural sanitisation. All calf-feeding equipment must also be kept very clean.
VaccinationsThese stimulate the immune system of the animal to produce antibodies against a specific disease (Table 23). Animals should be vaccinated regularly against the major infectious diseases in a given area. Because vaccines offer protection for a limited period of time, there is need to repeat vaccinations as advised by the animal health professionals.
Chapter 6: Management of animal health on the farm

Part III–64
Table 23. Some common diseases controlled by vaccination
Disease Scheme Cost Is the disease curable?
Foot and mouth disease (FMD)
1st at 3–4 months 2nd at 1 year thentwice every year
Low No drug for the virus. Only the secondary infections can be treated. Some animals can recover on their own
Anthrax 1st at 6 months thenonce every year
Medium Yes, if the animal is treated at an early stage; otherwise sudden death can result
Black quarter 1st at 6 months thenonce every year
Medium Same as above
Lumpy skin disease 1st at 6 months thenonce every year
Low No: only symptoms can be treated. Vaccination or one-off attacks lead to animal gaining natural immunity unless there are very severe outbreaks
East Coast fever (ECF) At 4 months – infection and treatment vaccine given once in a lifetime
High Yes: but very costly
Rabies Dogs: At 3 months, 9–12 months and thereafter annuallyVaccines also available for other animals and humans
Medium No, it is a deadly viral disease. Hyper-immune serum can be used at early stage of exposure but the cost is very high
Rinderpest At 6 months then once every year
Low No, they are viral but vaccination or one-off attack leads to animal gaining natural immunity unless there are very severe outbreaks
Brucellosis For heifers at 3–9 months; given once in a lifetime
High Yes: but early diagnosis is important and the treatment regimen is quite costly
All these vaccines are available from government, non-governmental organisations (NGOs) and private veterinarians. Farmers should take advantage of vaccination campaigns organised by the government because their costs are relatively low.
Disease treatmentWhen signs of sickness are observed in the animal, immediate action should be taken and professional advice sought. An animal health professional will examine the animal, advise on the treatment required and provide treatment if the owner is ready to pay for it. The longer an animal stays sick without treatment, the higher the risk of permanent damage and death. It is important to engage a professional to treat your animals because the drugs used for animal treatment must be administered in specific measures (or doses) to work properly. The professional will also determine if any drugs are required at all.
Chapter 6: Management of animal health on the farm

Part III–65
Common animal health problems on the farm
MastitisMastitis is a bacterial disease that causes the udder of the cow to swell, redden and become painful. One, two, three or all four quarters of the udder may become infected. Mastitis is difficult to detect and treat but easy to control, therefore preventive measures rather than treatment should be emphasised. A cow with mastitis will have greatly reduced milk production and, in serious cases, she may stop producing milk altogether. Infected milk is likely to be rejected by the dairy, even while the cow is being treated. A cow that frequently goes down with mastitis will have to be culled.
Mastitis is more likely to occur in a dirty, unhygienic environment, e.g. floor covered with manure or milkers with dirty hands. Cows with udders that hang very low or with very large teats are more prone to injuries and mastitis. Incomplete milking will make the cow more likely to contract mastitis and pulling (instead of squeezing) the teats may cause injury and infection. Wounds on the teats, poor body condition and poor nutrition are additional predisposing factors.
Signs of mastitis• The udder is hot, swollen, hard and painful• The milk is watery and thin, contains clots and is yellowish in colour• In severe cases, blood may be seen in the milk• The animal will generally refuse to be milked or will kick when the udder is touched• If disease-causing organisms spread to the body, the animal will show signs of fever• If the cow is not treated, the affected quarter(s) will become hard, produce less milk
and may become completely unproductive.
To test for mastitis, milk the first few streams into a strip cup (see illustration) or onto a smooth black surface (e.g. Wellington boot or bucket lid). Check carefully for any change in colour or any watery appearance and/or clots. Clean the surface or strip cup and then check milk from the next teat.
Chapter 6: Common animal health problems on the farm
A strip cup
Part III–66
Preventing mastitis• Keep the milking parlour (and anywhere the animal is likely to lie down) clean by removing
manure and rubbish and cutting grass and bushes away from the housing unit.• Clean hands thoroughly before and after milking and rinse with a disinfectant solution
between milking different cows. • Clean the udder thoroughly with a disinfectant solution before and after milking. Dry
the teats and udder with disposable paper towel or clean dry cloth. Use only one cloth per cow.
• If you use a milking machine, clean and disinfect it thoroughly after every milking and make sure it works correctly.
• During milking, remove as much milk as possible from the udder or let the calf suckle afterwards. Milk left in the udder forms a good medium for bacteria to grow and multiply.
• Maintain a regular routine (same milking times, same milker) to minimise stress to the cows.
• Treat all wounds on the teats and udder immediately. If not treated, they may be infected with bacteria, which could then be transferred into the udder through the hands of the milker.
• Remove any objects that can injure the cows and avoid slippery floors and overgrown hooves.
• Give animals feed after milking to keep them standing until their teats close.• Always test for mastitis before milking and milk cows with mastitis last, disposing of the
milk far away from the rest of the herd.• Infuse antibiotics into the teats when drying off the cow.• Cull animals that suffer mastitis repeatedly.• When new animals are brought into the farm, they should be screened for mastitis (and
treated) before joining the rest of the herd.
Treating mastitisTreatment should begin as soon as mastitis is diagnosed. Call the veterinarian to make sure proper treatment is administered. Infuse antibiotics into the teat canal and, if the animal shows poor condition, inject antibiotic into the blood stream. After antibiotic treatment, discard milk from all four quarters, even if only one quarter was infected. Do not send the animal for slaughter until the withdrawal time has elapsed (consult the veterinarian about the length of withdrawal time).
WormsWorms are internal parasites found mostly in the digestive system of animals. Eggs from the adult worm are passed with the animal’s faeces onto the ground. The eggs hatch into larvae and will be taken in when the animal feeds on contaminated pasture. While inside the animal, the larvae develop into adults, lay eggs and the cycle is repeated. Some worms will pass through another animal (an intermediate host) before getting to the final (definitive) host.
Chapter 6: Common animal health problems on the farm

Part III–67
Life cycle of worms
Different worms find different hosts
Chapter 6: Common animal health problems on the farm

Part III–68
Worms cause several types of damage to the host:• They suck the blood of animals and this may lead to death from anaemia (shortage of
blood in the body).• They steal nutrients causing deficiencies and leading to poor health, growth and
production. This is the major negative effect of worms on farm animals.• Some worms may block the intestines and small passages in the body interfering with
movement of food and flow of digestive enzymes.• They cause damage to the cells lining the gut and interfere with production of enzymes
and absorption of nutrients.• Irritation to cells of the gut may cause diarrhoea and loss of body fluids leading to
dehydration, abdominal pain (colic) and loss of appetite.
Worms can generally be classified into round and flat worms (see Table 24).
Table 24. Internal parasites
Type of worms Common worms Where found
Flat worms Liver flukes Bile ducts (liver)
Tapeworms Muscles
Lungworms Lungs
Round worms Barberpole worm Stomach
Brown stomach worm
Small stomach worm or stomach hair worm
Thread-necked intestinal worm Intestines
Small intestinal worms
Hook worms
Nodular worms
Symptoms of worm infestationSymptoms of worm infestation may not be obvious and can easily be ignored or mistaken for other illnesses. They are likely to be most severe during the dry season when animals are not well fed.
Non-specific signs include:• less than expected weight gain and/or weight loss• decreased milk production• well fed cattle may fail to grow or fatten as they should• lacks of appetite• poor body condition.
Chapter 6: Common animal health problems on the farm

Part III–69
Specific signs include:• the animal appears pale around the eyes• it has a dry, dull coat• the animal may appear to be swollen around the jaws owing to accumulation of body
fluid (referred to as ‘bottle jaw’)• in some cases, adult worms or tapeworm segments may be seen in the faeces• diarrhoea (may be bloody), loss of weight, and death may occur.
Treating wormsIf farmers suspect worm infestation they should treat all animals with broad-spectrum dewormers. If farmers are not certain which type of dewormer to use and the method of administration, they should consult their veterinarian. There are different types of dewormers in different preparations that can be used to control different types of worms (see Table 25). It is therefore important for the farmer to know the active product present in a brand. Ask the veterinarian for advice on when to deworm, and which type of dewormer to use.
Table 25. Common dewormers1
Active product(Trade name/brand)
Parasites Preparations available
Levamisole(Levasole®, Nilzan®, Nilverm®, Nilzol®, Levafas®, Wormicid®, Unizan®, Levacide Injection®)
Stomach worms, lung worms Drench, bolus, feed block
Fenbendazole(Panacur®)
Stomach worms, lung worms, tapeworms
Drench, paste, bolus
Albendazole(Valbazen®, Gardal®, Fasinex®, Hook®)
Stomach worms, lung worms, common liver fluke, tapeworms
Drench, paste
Doramectin(Dectomax®)
Stomach worms, lung worms, grubs, sucking lice, mange mites
Injection
Ivermectin(Ivomec®, Noromectin®)
Stomach worms, lung worms, grubs, sucking lice, mange mites
Injection, bolus
1 The information in the table above is given for educational purposes only. References to commercial products or trade names are made with the understanding that no discrimination and no endorsement is intended.
Controlling wormsIt is not possible under farm conditions to totally eradicate worms; the main aim is to limit the scale of worm attack to a level that does little or no harm to the animals. In addition, it is not possible to apply specific measures to each type of worm, hence broad measures are applied that deal with all the types that are likely to be present. The best way to control worms is by using a combination of management methods as well as dewormers.
Chapter 6: Common animal health problems on the farm

Part III–70
Management and husbandry methods involve planning farm activities in a way that minimises exposure to worms.• Practice pasture rotation so animals move on to another pasture before they get infected.
By the time they are back in the same paddock, the infectious stages of the worms have died.
• Cut-and-carry systems (practiced under zero grazing) reduce worm infestation.• Give young animals the cleanest pastures since older animals that have been exposed to
worms before, are more resistant.• Feed a well-balanced diet. If an animal is poorly nourished it will become weak and
unable to resist even the slightest worm burden. This is made worse by the fact that the worms will utilise the body reserves (feed stored in the body).
• Practice good hygiene in animal sheds. Remove manure at least once a week and keep the ground as dry as possible.
• Keep animals away from marshy areas or drain them.
Controlling worms by management and husbandry methods minimises the costs involved and there is no risk of either the animals losing their immunity or creating resistance to drugs in the worms. However, the stockowner cannot be sure that the animals are completely safe and some practices may not be possible, especially on small land holdings.
Control by dewormers in treatment regimens minimises the worm load in the animals (Table 26). The drugs are administered during specific periods or seasons so that the development of various worm stages and numbers in the animal are kept to a minimum or the worms are periodically eradicated. It is easy to administer most dewormers and, when used properly, animals remain relatively safe from the effects of worm infestation. However, where a large number of animals is involved, farmers can find treatment too costly. In addition, if one type of dewormer is continuously used over a long period of time, the worms may become resistant to it.
Table 26. Different worm control regimens
Regular/routine Seasonal
Administration of a broad-spectrum dewormer every 3 months
Administration of dewormers right at the beginning of the rainy season, followed by another dose two weeks later
Easy: because the intervals between administration are fixed and easy to remember. However, not very effective
More effective in worm control. However, it is difficult to specify the exact time a rainy season starts
Chapter 6: Common animal health problems on the farm

Part III–71
DiarrhoeaAn animal with diarrhoea (or scouring) passes loose, watery faeces more frequently (4–6 times in 12 hours) than normal. Diarrhoea is a common problem and is associated with many diseases (Table 27). Sometimes the faeces have an unusual colour and unpleasant smell. Sometimes there is blood in the faeces. When an animal is passing bloody faeces, it is said to have dysentery. An animal with diarrhoea loses body fluids and can rapidly become dehydrated and weak, developing a tight, dry skin and sunken eyes. In severe cases, the animal may die.
Table 27. Possible causes of diarrhoea
Possible cause Examples Treatment Preventive measures
Bacterial infection Common in calves aged 1–4 months Antibiotics and rehydration therapy (salt and sugar solution)
Maintain high standards of hygiene
Worm infestation Stomach and intestinal worms causing poor health and progressive weight loss
Dewormers Regular deworming
Protozoal infestation Coccidiosis, cryptosporidiosis Antipropotozoal drugs
Good hygiene
Inappropriate nutrition
Calf scours resulting from rapid or excess intake of milk
Rehydration therapy Avoid feeding too much milk
Grain overload caused by accidental eating of large amounts of grain
Antidiarrhoeal preparations e.g. kaolin
Keep animals away from the grain store
Drenching
Chapter 6: Common animal health problems on the farm

Part III–72
BloatThis is a condition of ruminant animals (e.g. cattle, sheep and goats) caused by an accumulation of gas in the fore stomach (rumen). The abdomen becomes distended and appears swollen on one side. Bloat is easy to control but animals can die very quickly if not attended to. A farmer may lose several animals from bloat in a very short period.
When feed is digested into the rumen, a large quantity of gas is produced. This is normally expelled from the body by frequent belching. If the oesophagus (food pipe) becomes blocked or the rumen contents become frothy, the rumen will start to swell with froth or gas. Bloat can be caused by any of the following:• eating a lot of wet, green pasture, especially if it has many legumes in it, as at the
beginning of a wet season• eating ripe fruits and fruit waste (e.g. pineapple waste)• eating feeds that ferment easily such as brewers’ waste and grains (maize, millet, etc.)• eating certain toxic plants• the food pipe being blocked by large pieces of feed (e.g. potatoes, maize cobs, etc.)• certain diseases (e.g. tetanus) that paralyse normal breathing.
When an animal has bloat, its stomach becomes clearly distended, swelling on the left side behind the rib cage. The animal will stop eating and have difficulty breathing. Sometimes green froth comes out of the mouth and nose and some animals have mild diarrhoea. Sometimes the animal kicks its side or lies down and sticks its legs out. After a while the animal will collapse and lie on its side with its head stretched out. It can die if left for long in this position.
Treating bloatDo not feed the animal for a few hours. Instead make it move or run about. Give anti-bloat medicine by mouth and rub the left side of the abdomen to help mix it up. A common drug is Stop Bloat®. Give the medicine once a day for 2–3 days until the animal recovers, administering small amounts at a time slowly. If the animal will not swallow, it is possible to tie a rope across the animal’s mouth and around the head to make it chew at the rope and stimulate belching. If the animal is very distressed and looks as if it will die, an emergency operation can be undertaken. Using a trochar and cannular (a hollow instrument designed to puncture the bloated rumen and allow excess gas to escape) or a knife, puncture the skin and the distended rumen on the left-hand side of the cow to let the gas out (see illustration). When a knife is used, a hollow tube is inserted into the puncture hole to allow air to escape. A bloat treatment chemical (e.g. Stop Bloat®) can be put into the rumen via the puncture hole to prevent further gas accumulation. The stockowner can also use a knife to make a hole the size of a hand’s width behind the last rib and a hand away from the edge of the backbone. Push hard at the distended abdomen to let the gas out. It is advisable to put a tube into the hole to keep it open. Pour some ant-bloat medicine or vegetable oil through the tube into the rumen to prevent bloat from recurring. When the tube is removed, the hole will close on its own. Try to avoid infection by applying some antibiotic powder, disinfectant spray and/or anti-fly grease. If possible, call a veterinarian to assist.
Chapter 6: Common animal health problems on the farm

Part III–73
Preventing bloatFeed animals with dry grass before letting them onto new, wet green pastures. Do not give them water just before you turn them onto wet pastures. Do not put animals onto wet green pasture early in the morning, wait until the sun has dried the grass. Introduce animals to young, green pastures gradually, initially for an hour or two per day and then slowly increase the time. After a week or two they will be used to it and are less likely to develop bloat. When changing their feed, do it gradually.
Wounds and fracturesA wound is a break in the skin, usually caused by a sharp object. Wounds are caused accidentally or by parasites and other animals (e.g. fights and bites). When left untreated, the exposed tissues may become infected.
Treating a wound involves the following steps:1. Stop any bleeding. 2. Clip hair or wool way from the edges of the wound.3. Remove all foreign objects. Wash the wound thoroughly with plenty of clean water (the
water should have been boiled, cooled and salt or a mild antiseptic added). 4. Dry the wound with a clean cloth.5. Put a wound dressing or antibiotic powder on the wound. 6. When there are a lot of flies about, use a wound dressing that repels flies or kills fly eggs
and larvae.7. Encourage wounds to drain and pus to come out by pressure and incision if
necessary.8. If the wound does not heal, becomes black and smells bad, the dead flesh must be cut
away. Wash the wound with antiseptic and treat with antibiotic powder.
Fractures (usually to the legs) result from falling into holes, falling over heavy farm implements or jumping over fences. For large, heavy animals or fractures where the bone
Treating bloat by using a trochar and canula
Chapter 6: Common animal health problems on the farm

Part III–74
breaks high up in the leg it is better to slaughter the animal for meat. For young and light animals:1. Keep the animal quiet and stop it from moving around.2. Stop any bleeding.3. If the bone has come through the skin, clean the wound and give local anaesthesia by
injection.4. Arrange the leg so that the broken ends of the bone touch in their normal positions as
far as possible.5. Tie a piece of wood (a splint) to the leg to keep the bones in position.6. Confine the animal to reduce movement during the healing period.
Splints can be also made by dipping strips of cloth in mud and egg white and wrapping around the leg. Cover with a strip of tree bark and a fresh goatskin. As it dries, the splint will harden and shrink, holding the broken bones together. Check every day that the fixing is not too tight. If the leg below the splint is cold or very swollen, loosen the fixing and then tighten again carefully, keeping the leg in the same position. Leave the splint on for at least 10 –14 days for a young animal or 21–28 days for an adult animal.
Tying a splint to a fractured limb
Chapter 6: Common animal health problems on the farm

Part III–75
Eye infectionKnown as ‘pink eye’ disease, eye infection is more common in sheep and goats than cattle. The disease is caused by micro-organisms that are transmitted by flies and other insects. It is therefore more frequent during dry weather and dusty conditions. One or both eyes can become infected. Cattle usually recover after 3–4 weeks without treatment. Signs of eye infection include the following:• Clear discharge from the affected eye, which becomes greyish white.• Surface under the eyelid becomes congested and appears more red than normal.• Animal avoids strong light and blinks a lot.• Most cattle have a small white/grey/yellow spot in the middle of the eye; when infected
this grows larger.• Animal cannot see with the bad eye.• Sometime the spot becomes red and swells; the eye bulges out and may become
injured.• If not treated, the eye may burst and the animal will be blind in that eye.
Treatment is mainly by antibiotics. The antibiotic ointment or powder is applied directly into the eye. Injectable antibiotics are available but should only be administered by a veterinarian.
Controlling flies and dust is the most effective way of preventing eye infections. Remove dung from the housing structures and night shelters daily. Dust is difficult to eliminate but procedures like avoiding dusty paths may help.
Chapter 6: Common animal health problems on the farm

Part III–76
7. GENERAL HUSBANDRY PRACTICES
Dehorning
Animals may be dehorned to avoid them damaging one another. If considered necessary, animals should be dehorned while young (two months old) when the horn buttons are soft and easy to cut. Animals with no horns require less space at the feeding troughs and will not damage the hides of others. However, if an adult animal is dehorned, the wound may take a long time to heal and may become infected. Dehorning also requires a degree of skill. Dehorning methods involve a disbudding iron or dehorning wire.
Dehorning by disbudding 1. Get someone to help by holding the animal still.2. Clip the hair off the horn area. 3. Heat the disbudding iron until it is red hot.4. Place the heated end over the bud firmly but not applying great pressure for 5–10
seconds.5. Stop heating when the colour of the horn bud turns deep copper.6. Apply a wound dressing that kills fly eggs (e.g. iodine).
Dehorning using a dehorning wire1. Tie the animal securely, preferably in a crush pen.2. Inject 10 ml of local anaesthetic under the skin around the horn.3. Tie a piece of thin rope around the base of the two horns to prevent bleeding. 4. Cut the horn near the skin at a slanting angle.5. Burn the cut surface with a hot iron to stop the bleeding.6. If a hole appears, apply cotton wool soaked in iodine for about three minutes to stop
bleeding and cleanse the wound.
Chapter 7: General husbandry practices
Dehorning

Part III–77
Weight estimation (body scoring)
Body scoring is a system used to judge an animal’s body condition and is a useful tool for management decisions. An animal that is poorly nourished will have a poor body condition. Conversely, feeding to excess results in an overly fat animal. Regular assessment of body condition helps the stockowner to adjust the feeding programme accordingly.
Usually a scale of 1–5 is used, and a cow with a condition score of 1 is considered too thin, 2 is thin, 3 is average, 4 is fat and 5 is too fat. An animal with a body score of 1 will be prone to health problems, silent heats and low conception rates, and may have trouble standing after calving. A cow with a body score of 5 may have difficulty calving, a retained placenta and poor fertility. In large herds, cattle can be grouped according to body condition score to maximise efficiency of feed resources.
Knowing the weight of a cow helps a farmer to give the right dose when treating a disease and deworming. It also allows the growth rate to be recorded and the farmer will know when the animal has attained a suitable weight for service (particularly useful for young heifers). The price at slaughter can also be negotiated. Farmers without cattle scales can find out the approximate weight of their animals by using a weigh band or by measuring the girth of the animal using a common tailor’s tape or a length of thin rope. To measure the girth, first restrain the animal so it is standing straight with the front legs on level ground. Measure the girth (right around the animal’s body, just behind the front legs). Read off the relevant weight from the weigh band or note the measurement in cm and use the conversion table (Table 28) to get the relevant weight.
Chapter 7: Weight estimation (body scoring)
Body condition scores

Part III–78
Table 28. Conversion table
Girth measurement (cm) Estimated live weight (kg))
50 2255 2660 3065 3570 4075 4580 5085 5990 6995 79100 89105 103110 118115 134120 150125 170130 190135 210140 230145 251150 272155 295160 325165 358170 392175 427180 467185 508190 552195 600200 650
Chapter 7: Weight estimation (body scoring)
Taking girth measurements

Part III–79
Handling and restraining cattle
Cattle need to be handled and/or restrained when they are moved, treated for illness, dewormed or when acaricide is applied. The following illustrations show four different ways of restraining an animal.
Restraining using a yoke
Restraining using a crush
Chapter 7: Handling and restraining cattle

Part III–80
If a pen or crush is not available, adult cattle can be restrained on the ground using a rope. First, choose some soft ground where the animal can be put down without getting injured. Tie the animal’s head to a tree or post low down near the ground with a short rope or halter. Then make a big loop in one end of another piece of thick rope about 10 m long. Use a knot that does not easily slip. Put the loop over the animal’s head. Then pull the tail of the rope over its back and tie it around the body just behind its front legs and again just in front of the back legs. Get two or three people to pull the rope and the animal will lie down. Get a strong person to hold its head firmly and tie its legs to stop it kicking. Keep the animal on the ground just long enough to treat it since animals kept lying on their sides may get bloat. Take extra care with a pregnant animal (let it lie on the left side).
Chapter 7: Handling and restraining cattle
Restraining using a nose ring
Restraining using a rope

Part III–81
Disposing of waste and carcasses
Before dealing with a carcass, consider the diseases that can be passed to humans (anthrax, brucellosis, rabies, ringworm and mange are the most common ones). If the animal died unexpectedly, a post-mortem will reveal the cause of death and guide the means of disposal. Post-mortems should be performed by qualified animal health officers or vets. If anthrax is suspected the body should be burned and no post-mortem should be carried out.
Steps in carrying out a post-mortem1. If the hide is required, it should be taken off and laid out.2. Lay the carcass on its right side. 3. Open it up and take care not to puncture the rumen or intestines.4. Remove the abdominal organs carefully by cutting the membranes holding them in
place. Wash them in clean water, checking for abnormalities.5. When the post-mortem is over, if there is any doubt about the diagnosis or if the animal
died from any dangerous diseases, the carcass should be burned.
How to burn a carcass1. Dig two trenches (2 m long, 40 cm wide and 40 cm deep) in the form of a cross. The
trenches will provide oxygen to the fire.2. Place two iron bars so they lie across one of the trenches.3. Place strong wooden posts across the bars.4. Place the carcass and a heap of fuel (wood and straw soaked in waste oil) on the
wooden posts. 5. Light the fire and burn the carcass.
Disposal by burying1. Dig a hole 2 m long by 1.5 m wide and 2 m deep.2. Put the carcass in the hole and cover with soil and logs or large stones to stop wild
animals or dogs digging it up again.
Chapter 7: Disposing of waste and carcasses

Part III–82
8. MILK MARKETING AND PROCESSING
Milk
Milk contains around 86% water, 4.7% sugar, 4.1% fat, 4.2% protein and 1% minerals. Milk supports the growth of micro-organisms and thus is prone to contamination. Milking should therefore always be carried out under conditions of good hygiene (Table 29).
Table 29. Principles of clean milk production
Cow hygiene Cow should be free of diseaseClean udder before milkingCheck for mastitis with a strip cup (see illustration) or any black surface e.g. gumbootIsolate sick animals and milk them lastAlways groom and cut the hair around the udderUse a teat dip (an antiseptic solution) after milking
Milker hygiene Should be free from infectious diseasesShould maintain short fingernailsKeep hair short or cover the head Avoid smoking or wearing strong-smelling scentsMilking should be continuous with no interruptions
Environment hygiene Free from smells and odoursClean/mimimal contamination risk
Utensil hygiene Use seamless utensils (preferably aluminium or stainless steel), which are easy to cleanCleaning procedure involves rinsing utensils with water, scrub using hot water and detergent, soap, rinse again and place upside down on a rack to dryStore utensils in a clean, well-ventilated place
When preparing for milking, handle the cow in a quiet manner since stress in the form of beating it, banging utensils or slamming doors will interfere with milk let down. Maintain a regular milking regimen. Milk quickly and evenly and make sure you empty the udder at each milking. Milking each cow should take 7–10 minutes at most.
Weigh the milk from each cow immediately after milking. Filter the milk with a white filter cloth, which should be washed and disinfected immediately after use. Store the milk without chemicals in a cool and clean place, which is lockable. Use a teat dip after milking to control mastitis. Do not mix warm (morning) milk with cool (evening) milk. Keep it separate for the collecting centre or cool the warm milk before mixing.
Chapter 8: Milk marketing and processing

Part III–83
Chapter 8: Milk
Cleaning the parlour
Getting a cow into a milking parlour
Washing the udder
Using a strip cup

Part III–84
Methods of milking
Chapter 8: Methods of milking
Squeeze the base of the teat with thumb and forefinger
Close the other three fingers squeezing downwards in turn
The milk in the teats is squeezed downwards and not pulled
Squeezing progressively downwards expels the milk. Pulling can cause mastitis
Preserving milk
Milk is highly perishable. Milk is preserved to ensure it is safe for human consumption at home and that it reaches the final consumer and/or processor in good condition when it is sold. The success of any preservation method depends upon the initial hygiene quality of the milk. If the milk and milking utensils are clean and the cow and the milker are healthy, then the milk produced will be clean. Milk can be preserved using the methods described below.
CoolingKeeping milk cool slows down the growth and activity of germs and stops the milk becoming sour. About 4°C is the ideal temperature. Milk can be cooled by:
• keeping it in the shade or in a dark, well-ventilated place• keeping it in a cold water bath• putting the milk cans in a flowing stream• putting the milk cans in a cooling tank

Part III–85
Heating milk using a pan
Indirect heating
• keeping it in a refrigerator• using a dripping water cooler• using a charcoal cooler• using cooling rings: if cool (10°C or less) running water is available, you can pass it
through a perforated ring so that it flows over the cans• using an electric cooling tank.
When cooling milk, loosen the lids of the cans to allow the air to escape, and make sure no water gets into the milk. Cover the cooling tank with a lid to protect the milk from insects and dust.
HeatingHeating kills many bacteria and heated milk will keep longer. It also gets rid of harmful micro-organisms that could transfer diseases from the cow to humans. The best way of heating milk (retaining the taste and avoiding off-flavours) is to immerse the milk can in boiling water for at least 30 minutes. Milk to be consumed at home should be boiled, using a large pan or other cooking container. Milk can be heated to a certain temperature and kept at that temperature for some time to kill germs, then cooled. This is called pasteurisation. A thermometer is required for monitoring the temperatures. Milk can also be subjected to low heat treatment. Heat the milk to 65°C then cool it as fast as possible to below 10°C.
Chapter 8: Preserving milk

Part III–86
Using chemicalsChemicals can be used to preserve milk but they should only be used on advice from the collecting centre because it is important to use the correct types and amounts. Use of chemicals is illegal in some countries and only milk delivered to a dairy plant should be preserved with chemicals. Nevertheless, chemicals allow un-cooled milk to keep longer even in high temperatures and, if used correctly, chemicals have little effect on the physical quality of the milk.
Manufacture of milk products
ButterButter can be made by separating the milk and churning the cream. Butter can be made from fresh or sour milk. To make butter from fresh milk or cream, first heat the milk/cream to 80–90°C, then cool it quickly in running water to 18°C. To ripen, add 50 ml (3 tablespoons) of sour buttermilk or starter. Stir this into the milk or cream. Cover and leave for 24 hours at 18°C (you can place it in a fireless cooker). If you use raw milk or cream that is naturally sour, you do not require the ripening process.
Half fill a churn with sour milk or cream. Churn with regular movements until the pieces of butter are as big as peas. Do not let the pieces of butter become one large lump. If there are no pieces of butter after 30 minutes, change the temperature by adding cold or warm water then churn again. If using cream, do not add more than 25% water. Churning may take 15–60 minutes; the time depends on the weather conditions, type of churn, fullness of the churn and fat content of the milk. Carefully remove the pieces of butter from the lid and side with clean cold water. The water and butter will float on top of the buttermilk. Do not use too much water. Pour off the buttermilk through a coarse sieve.
Churning
Chapter 8: Manufacture of milk products

Part III–87
Wash the butter to remove the buttermilk. The more buttermilk you remove, the better the butter. Half fill the churn with clean cold water. Churn for at least 10 minutes. Use a skimmer to remove the pieces of butter floating on the water or wash the butter in a sieve. Sieve the butter and buttermilk, put the buttermilk on one side, turn the butter over while washing with clean cold water. Do not let the butter become one large lump. If you wash your butter carefully, you reduce the water content and get a longer shelf life. Do not over-wash, since this reduces the non-fat content and gives an unpleasant smell. Salt according to taste – around 10 g salt per kg of butter. Leave it overnight.
Work (knead) the following day to improve the butter’s structure and quality. First, wash the work table, then work the butter with a damp wooden spoon or roller until it has a smooth surface and you can see no more drops of water. As you work, remove any water.
Butter should be stored in a pot or wrapped in greaseproof paper or aluminium foil and kept in a cool place. Sprinkle a little salt on the surface of butter in a pot to prevent fungal growth. You can freeze butter but it becomes rancid quickly after defrosting. Divide the butter into small pieces and defrost only what you need. Do not freeze salted butter; it becomes fatty or oily and smells fishy. If you keep butter for too long it tastes rancid and develops fungus. You can keep it longer by making ghee.
CheeseCheese is the solid part of milk also known as curd. It is obtained by separating the curd from the liquid part (known as whey) by chemical reaction. You can make the curd separate from the whey by adding acid, bacterial culture and/or starter (rennet). Cheese can be described as hard, semi-hard or soft cheese, or fresh or ripened.
To make cheese, you need good-quality milk. Avoid milk with a high bacterial content. Use milk from healthy cows; do not use milk from cows with mastitis or other diseases. Do not use milk that contains antibiotics or milk that still has colostrum in it. Use only clean equipment.
Use fresh whole milk (with full cream). Reduce the fat content by allowing the milk to stand for about one hour, then skim off the top layer. Heat the milk to about 85°C to destroy bacteria and increase yield through the precipitation of the whey protein. Dilute lemon juice with an equal quantity of clean water and add about 50 ml (3 tablespoons) of lemon juice per litre of milk, stirring the milk.
The curd precipitates almost immediately. Continue stirring for about three minutes then allow the curd to settle for 15 minutes. Separate the curds from the whey by draining through a sieve or a cloth (use a cotton cloth folded twice). While draining the whey, stir the curd to prevent excess matting (coagulation). Add salt to the curd at the rate of about 4 g (about a level teaspoon) per 100 g of curd and mix thoroughly. The amount of salt may be varied to cater for different consumer tastes and preferences.
Transfer the curd to a mould (container) lined with cheesecloth (see illustration). The mould may be cylindrical or square-shaped and may be made from metal, plastic or wood.
Chapter 8: Manufacture of milk products

Part III–88
Cover the curd by folding the cheesecloth over. Fit a wooden ‘follower’ neatly inside the mould to enable the curd to be pressed. Press the curd overnight by placing metal weights on top of the follower. Press with twice the weight of the cheese (for every 1 kg cheese use a 2 kg press). Press for 1–2 hours then take the cheese out of the mould. Store the cheese as it is or cut it into pieces for sale. Coat the cheese with a thin film of butter to enhance the appearance.
Ripen the cheese on clean wooden shelves for at least four weeks at a temperature of 12–16°C. During the ripening take the cheese off the shelf every 3 days, put vinegar on a cloth and wipe the cheese with it to prevent fungal growth. The longer you ripen the cheese, the stronger the flavour.
Cheese moulds
GheeGhee is almost entirely butterfat and contains practically no water or milk solids. It is more convenient than butter in the tropics because it keeps longer under warm conditions. The low moisture and solids-not-fat inhibit bacterial growth.
To make ghee, churn the milk or cream until enough butter has accumulated. Place the butter in a pan and put on a low fire to evaporate water at a constant rate of boiling. Do not overheat as this will impair the flavour. When a scum forms on the surface, remove it using a perforated spoon. When all the moisture has evaporated, the casein will begin to char (burn), indicating that the process is complete. Pour the ghee into an earthenware jar for storage.
YoghurtInstructions for making yoghurt are given in Part II, page 105.
Chapter 8: Manufacture of milk products

Part III–89
REFERENCES AND FURTHER READING
Coetzer, J. A. W., Thomson, G. R. and Tustin R. C. (eds) (1994) Infectious Diseases of Livestock with Special Reference to Southern Africa. Oxford University Press, Cape Town, South Africa.
Conroy, C. (2001) Participatory Situation Analysis with Livestock Keepers: A Guide. Bharatiya Agro-Industries Foundation (BAIF)/Natural Resources Institute (NRI), Pune, India.
Czech, C. (2002) Participatory Technology Development with Livestock Keepers: A Guide. BAIF Development Research Foundation, Bharatiya Agro-Industries Foundation (BAIF)/Natural Resources Institute (NRI), Pune, India.
FAO (1983) Manual for Animal Health Auxiliary Personnel. Food and Agriculture Organization of the United Nations, Rome, Italy.
FAO (1984) Ticks and Tick-borne Disease Control (A Practical Field Manual), Vol. l. Tick Control. Food and Agriculture Organization of the United Nations, Rome, Italy. pp. 299 (M/R1688/E/1.85/1/3500).
FAO (1994) A Manual for the Primary Animal Healthcare Worker. Food and Agricultural Organization of the United Nations, Rome, Italy.
FAO (1998) Participatory Curriculum Development in Agricultural Education: A Training Guide. Food and Agricultural Organization of the United Nations, Rome, Italy.
Forse, B. (1999) Where There is No Vet. Macmillan Press, London and Oxford, UK.
Hall, H.T.B. (1985) Diseases and Parasites of Livestock in the Tropics (2nd Edition). Intermediate Tropical Agriculture Series. Longman Scientific and Technical Publications, London, UK.
ILRI (1995) Rural Dairy Technology. International Livestock Research Institute, Addis Ababa, Ethiopia.
Kariuki, J. (1998) Healthy Cow, More Milk. Macmillan Press, London and Oxford, UK.
Lambert, J.C. (1998) Village Milk Processing. Animal Production and Health, Paper 69. Food and Agricultural Organization of the United Nations (FAO), Rome, Italy.
Minjauw, B. (ed.) (2001) Training of trainers manual for livestock farmer field schools.International Livestock Research Institute (ILRI), Nairobi, Kenya.
NDDP (1992) Ticks and their Control. National Dairy Development Project, Privatisation Unit, Ministry of Agriculture Livestock Development and Marketing, Nairobi, Kenya.
NDDP (2000) Housing, Zero-grazing Series, Volume 1. National Dairy Development Project, Ministry of Agriculture, Nairobi, Kenya.
NDDP (2000) Livestock Development and Marketing, Zero-grazing Series, Volume 2. National Dairy Development Project, Ministry of Agriculture, Nairobi, Kenya.
References and further reading

Part III–90
NDDP (2000) Livestock Development and Marketing, Calf Rearing, Zero-grazing Series, Volume 3. National Dairy Development Project, Ministry of Agriculture, Nairobi, Kenya.
Network for Smallholder Poultry Development I., Keeping Village Poultry. A technical manual on small-scale poultry production, Network for Smallholder Poultry Development, Copenhagen, Denmark.
O’Connor, C.B. (1995) ILRI Training Manual I: Rural Dairy Technology. International Livestock Research Institute, Addis Ababa, Ethiopia.
Wambugu, C. (2002) Calliandra calothyrsus –Tree Management and Utilization. World Agroforestry Centre (ICRAF), Nairobi, Kenya. 17pp.
Wanyama, J. (1999) Intermediate Technology (Kenya). Training Manual for Community-based Animal Health Workers in Isiolo District. ITDG Publications, East Africa.
Useful websites and literature references
Food and Agricultural Organization of the United Nations (FAO). Small-Scale Dairy Farming Manual, Volumes 1–6. [http://www.fao.org/ag/aga/AGAP/Dairyman/Dairy]
Specifically:
• Milk preservation: Technology Unit 4. [http://www.fao.org/WAICENT/FAOINFO/AGRICULT/AGA/AGAP/Dairyman/dairy/V1U4.htm]
• Butter making: Technology Unit 10.2. [http://www.fao.org/WAICENT/FAOINFO/AGRICULT/AGA/AGAP/Dairyman/dairy/V1U10_2.htm]
• Cheese Making: Technology Unit 10.3. [http://www.fao.org/WAICENT/FAOINFO/AGRICULT/AGA/AGAP/Dairyman/dairy/V1U10_3.htm]
Tropical Grassland Society of Australia. [http://www.tropicalgrasslands.asn.au]
Useful websites and literature references