Embed Size (px)
Citation preview

Juniper SecIntel Administration Guide
Published
2020-12-10

Juniper Networks, Inc.1133 Innovation WaySunnyvale, California 94089USA408-745-2000www.juniper.net
Juniper Networks, the Juniper Networks logo, Juniper, and Junos are registered trademarks of Juniper Networks, Inc. inthe United States and other countries. All other trademarks, service marks, registered marks, or registered service marksare the property of their respective owners.
Juniper Networks assumes no responsibility for any inaccuracies in this document. Juniper Networks reserves the rightto change, modify, transfer, or otherwise revise this publication without notice.
Juniper SecIntel Administration GuideCopyright © 2020 Juniper Networks, Inc. All rights reserved.
The information in this document is current as of the date on the title page.
YEAR 2000 NOTICE
Juniper Networks hardware and software products are Year 2000 compliant. Junos OS has no known time-relatedlimitations through the year 2038. However, the NTP application is known to have some difficulty in the year 2036.
END USER LICENSE AGREEMENT
The Juniper Networks product that is the subject of this technical documentation consists of (or is intended for use with)Juniper Networks software. Use of such software is subject to the terms and conditions of the EndUser License Agreement(“EULA”) posted at https://support.juniper.net/support/eula/. By downloading, installing or using such software, youagree to the terms and conditions of that EULA.
ii
Table of Contents
About the Documentation | vii
Documentation and Release Notes | vii
Documentation Conventions | vii
Documentation Feedback | x
Requesting Technical Support | x
Self-Help Online Tools and Resources | xi
Creating a Service Request with JTAC | xi
Introduction to SecIntel1What is SecIntel? | 13
Perimeter Security Today | 13
Juniper Networks Security Intelligence | 13
Benefits | 15
SecIntel on SRX Series Devices | 15
SecIntel on MX Series Routers | 17
SecIntel on EX and QFX Series Switches | 17
SecIntel Components | 19
Centralized Policy Management (Security Director and Policy Enforcer) | 19
Threat Information and Detection | 20
End points (SRX Series Devices, MX Series Routers, EX Series, and QFX Series Switches) | 21
Overview of Policy Enforcer, Juniper ATP Cloud, and Juniper ATP Appliance | 22
Advanced Threat Prevention Overview | 22
Sky ATP Overview | 23
Sky ATP Configuration Type Overview | 25
Features By Sky ATP Configuration Type | 28
Available UI Pages by Sky ATP Configuration Type | 29
Policy Enforcer Overview | 31
Supported Topologies | 32
Policy Enforcer Components and Dependencies | 33
Policy Enforcer Configuration Concepts | 38
iii

Advanced Threat Prevention Licensing | 39
Standard Software License-Cloud | 39
Initial Setup2Install and Configure Junos Space, Security Director, and Log Collector | 42
Install Junos Space, Security Director, and Log Collector | 42
Configure Basic Junos Space Networking | 43
Install the required DMI Schemas on Security Director | 43
Device Discovery in Junos Space | 43
Install and Configure Policy Enforcer, Juniper ATP Cloud, and Juniper ATPAppliance | 44
Download, Deploy, and Configure Policy Enforcer Virtual Machine | 44
Policy Enforcer Settings | 45
Obtain a ATP Cloud license and Create an ATP Cloud Web Portal Account | 48
Install Root CA on the ATP Cloud Supported SRX Series Devices | 48
Generate Root CA Certificate using Junos OS CLI or OpenSSL on a UNIX Device | 49
Configure a Certificate Authority Profile Group | 49
Install and Configure ATP Appliance | 50
Verify Device Enrollment | 50
Configure3Configure SecIntel on SRX Series and EX Series Devices | 54
Creating Sky ATP Realms and Enrolling Devices or Associating Sites | 54
Creating Threat Prevention Policies | 58
Sky ATP Email Management: SMTP Settings | 64
Configure IMAP Settings | 67
Creating File Inspection Profiles | 70
Creating Allowlist for Sky ATP Email and Malware Management | 72
Creating Blocklists for Sky ATP Email and Malware Management | 73
Add JATP Server | 75
Creating Custom Feeds | 77
iv

Configuring Settings for Custom Feeds | 81
Configure SecIntel on MX Series Routers | 83
Overview | 84
Benefits | 84
Understanding Policy Enforcer and Juniper Sky ATP | 84
Security Intelligence (SecIntel) - Overview | 86
Web Filtering (URL-Filterd) - Overview | 87
Configuring the Web Filter Profile for Sampling | 88
Associate a Sampling Instance with the FPC | 89
Configure a Sampling Instance and Associate the Template With the SamplingInstance. | 90
Configure the sample instance and associate the flow-server IP address and otherparameters. | 90
Example: Configuring Web-filter Profile to Define Different Threat-Levels | 92
Example: Add MX/vMX Series Routers as Enforcement Points and DDoS ProfileSupport | 93
Monitor4Monitor Feed Sources | 107
Policy Enforcer Dashboard Widgets | 107
Infected Host Details | 108
Command and Control Servers Overview | 110
HTTP File Download Details | 111
File Summary | 112
HTTP Downloads | 113
SMTP Quarantine Overview | 113
Email Attachments Scanning Details | 115
File Summary | 115
IMAP Block Overview | 117
All Hosts Status Details | 118
Device Feed Status Details | 120
DDoS Feeds Status Details | 122
v

Configuration Statements and Operational Commands5SecIntel Configuration Statements | 125
set services security-intelligence | 126
security-intelligence | 130
security-intelligence-policy | 132
SecIntel Operational Commands | 133
show services security-intelligence category summary | 134
show services security-intelligence update status | 137
show services web-filter secintel-policy status profile | 138
Migrate Spotlight Secure Customers6Migration Instructions for Spotlight Secure Customers | 141
Moving From Spotlight Secure to Policy Enforcer | 141
Spotlight Secure and Policy Enforcer Deployment Comparison | 142
License Requirements | 142
Sky ATP and Spotlight Secure Comparison Table | 142
Migrating Spotlight Secure to a Policy Enforcer Configuration Overview | 144
Installing Policy Enforcer | 144
Configuring Advanced Threat Prevention Features: Spotlight Secure/Policy EnforcerComparison | 150
vi

About the Documentation
IN THIS SECTION
Documentation and Release Notes | vii
Documentation Conventions | vii
Documentation Feedback | x
Requesting Technical Support | x
Use this guide to configure SecIntel on SRX Series devices, EX Series switches, QFX Series switches, andMX Series Routers. SecIntel enables automatic and responsive traffic filtering to deliver real-time threatintelligence.
Documentation and Release Notes
To obtain the most current version of all Juniper Networks® technical documentation, see the productdocumentation page on the Juniper Networks website at https://www.juniper.net/documentation/.
If the information in the latest release notes differs from the information in the documentation, follow theproduct Release Notes.
Juniper Networks Books publishes books by Juniper Networks engineers and subject matter experts.These books go beyond the technical documentation to explore the nuances of network architecture,deployment, and administration. The current list can be viewed at https://www.juniper.net/books.
Documentation Conventions
Table 1 on page viii defines notice icons used in this guide.
vii

Table 1: Notice Icons
DescriptionMeaningIcon
Indicates important features or instructions.Informational note
Indicates a situation that might result in loss of data or hardwaredamage.
Caution
Alerts you to the risk of personal injury or death.Warning
Alerts you to the risk of personal injury from a laser.Laser warning
Indicates helpful information.Tip
Alerts you to a recommended use or implementation.Best practice
Table 2 on page viii defines the text and syntax conventions used in this guide.
Table 2: Text and Syntax Conventions
ExamplesDescriptionConvention
To enter configuration mode, typethe configure command:
user@host> configure
Represents text that you type.Bold text like this
user@host> show chassis alarms
No alarms currently active
Represents output that appears onthe terminal screen.
Fixed-width text like this
• A policy term is a named structurethat defines match conditions andactions.
• Junos OS CLI User Guide
• RFC 1997, BGP CommunitiesAttribute
• Introduces or emphasizes importantnew terms.
• Identifies guide names.
• Identifies RFC and Internet drafttitles.
Italic text like this
viii

Table 2: Text and Syntax Conventions (continued)
ExamplesDescriptionConvention
Configure the machine’s domainname:
[edit]root@# set system domain-namedomain-name
Represents variables (options forwhich you substitute a value) incommands or configurationstatements.
Italic text like this
• To configure a stub area, includethe stub statement at the [editprotocols ospf area area-id]hierarchy level.
• The console port is labeledCONSOLE.
Represents names of configurationstatements, commands, files, anddirectories; configuration hierarchylevels; or labels on routing platformcomponents.
Text like this
stub <default-metric metric>;Encloses optional keywords orvariables.
< > (angle brackets)
broadcast | multicast
(string1 | string2 | string3)
Indicates a choice between themutually exclusive keywords orvariables on either side of the symbol.The set of choices is often enclosedin parentheses for clarity.
| (pipe symbol)
rsvp { # Required for dynamic MPLSonly
Indicates a comment specified on thesame line as the configurationstatement to which it applies.
# (pound sign)
community name members [community-ids ]
Encloses a variable for which you cansubstitute one or more values.
[ ] (square brackets)
[edit]routing-options {static {route default {nexthop address;retain;
}}
}
Identifies a level in the configurationhierarchy.
Indention and braces ( { } )
Identifies a leaf statement at aconfiguration hierarchy level.
; (semicolon)
GUI Conventions
ix

Table 2: Text and Syntax Conventions (continued)
ExamplesDescriptionConvention
• In the Logical Interfaces box, selectAll Interfaces.
• To cancel the configuration, clickCancel.
Represents graphical user interface(GUI) items you click or select.
Bold text like this
In the configuration editor hierarchy,select Protocols>Ospf.
Separates levels in a hierarchy ofmenu selections.
> (bold right angle bracket)
Documentation Feedback
We encourage you to provide feedback so that we can improve our documentation. You can use eitherof the following methods:
• Online feedback system—Click TechLibrary Feedback, on the lower right of any page on the JuniperNetworks TechLibrary site, and do one of the following:
• Click the thumbs-up icon if the information on the page was helpful to you.
• Click the thumbs-down icon if the information on the page was not helpful to you or if you havesuggestions for improvement, and use the pop-up form to provide feedback.
• E-mail—Send your comments to [email protected]. Include the document or topic name,URL or page number, and software version (if applicable).
Requesting Technical Support
Technical product support is available through the Juniper Networks Technical Assistance Center (JTAC).If you are a customer with an active Juniper Care or Partner Support Services support contract, or are
x
covered under warranty, and need post-sales technical support, you can access our tools and resourcesonline or open a case with JTAC.
• JTAC policies—For a complete understanding of our JTAC procedures and policies, review the JTACUserGuide located at https://www.juniper.net/us/en/local/pdf/resource-guides/7100059-en.pdf.
• Productwarranties—For productwarranty information, visit https://www.juniper.net/support/warranty/.
• JTAC hours of operation—The JTAC centers have resources available 24 hours a day, 7 days a week,365 days a year.
Self-Help Online Tools and Resources
For quick and easy problem resolution, Juniper Networks has designed an online self-service portal calledthe Customer Support Center (CSC) that provides you with the following features:
• Find CSC offerings: https://www.juniper.net/customers/support/
• Search for known bugs: https://prsearch.juniper.net/
• Find product documentation: https://www.juniper.net/documentation/
• Find solutions and answer questions using our Knowledge Base: https://kb.juniper.net/
• Download the latest versions of software and review release notes:https://www.juniper.net/customers/csc/software/
• Search technical bulletins for relevant hardware and software notifications:https://kb.juniper.net/InfoCenter/
• Join and participate in the Juniper Networks Community Forum:https://www.juniper.net/company/communities/
• Create a service request online: https://myjuniper.juniper.net
To verify service entitlement by product serial number, use our Serial Number Entitlement (SNE) Tool:https://entitlementsearch.juniper.net/entitlementsearch/
Creating a Service Request with JTAC
You can create a service request with JTAC on the Web or by telephone.
• Visit https://myjuniper.juniper.net.
• Call 1-888-314-JTAC (1-888-314-5822 toll-free in the USA, Canada, and Mexico).
For international or direct-dial options in countries without toll-free numbers, seehttps://support.juniper.net/support/requesting-support/.
xi

1CHAPTER
Introduction to SecIntel
What is SecIntel? | 13
SecIntel Components | 19
Overview of Policy Enforcer, Juniper ATP Cloud, and Juniper ATP Appliance | 22
Advanced Threat Prevention Licensing | 39

What is SecIntel?
Perimeter Security Today
Threats to your network continue to evolve. Also, defensive software and appliances that you can deployto defend your network, and the assets that are available through your network, are becoming morecomplex. The typical approach to deal with new security threats is to add layers of security. Defense indepth is a basic approach to network security, but it adds complexity by adding gateways that must oftenbe managed and configured separately. The complexity of the system can slow your ability to react andrespond to a threat.
Traditional network perimeter security uses stateful firewall protection and intrusion prevention tied toan enterprise business policy. This type of enforcement works well against known threats. The emergenceof next-generation firewalls (NGFW) combinedwith unified threatmanagement (UTM) has allowed amoregranular degree of filtering. These integrated security functions expand security measures beyond basicstateful firewall filtering. However, the security policies must be manually configured and maintained inmost cases.
The threat landscape has evolved. Attackers have migrated from using broad, unfocused tactics and arenow creating specializedmalware that attacks specific targets or groups of targets. Often, the goal of theseattacks is to embedmalware in the target’s infrastructure and continue the attack, without detection, overlong periods. If malware infiltrates a rich target, it can carry out a wide range of undetected maliciousactivities over months or years, including data theft, espionage, and disruption or destruction ofinfrastructure and processes. While methods vary, the commonality of these specialized attacks are thatthey are designed to avoid detection by mainstream security technologies, such as antivirus, firewalls, andcontent inspection gateways.
To respond more quickly to evolving network security threats, the NGFW must adapt dynamically inreal-time. The next-generation firewall needs access to external threat detection systems that are updateddynamically with information about new and evolving threats.With access to dynamic threat data, securitypolicies can adapt and evolve over time without manual intervention.
Juniper Networks Security Intelligence
Security Intelligence (SecIntel) provides carefully curated and verified threat intelligence from the followingcomponenets:
• Juniper Networks’ Advanced Threat Prevention (ATP) Cloud
• Juniper Threat Labs
13

• Industry-leading threat feeds to MX Series routers, SRX Series Services Gateways, and NFX SeriesNetwork Services Platform.
This enables blockingmalicious and unwanted traffic such as Command and Control (C&C) communications,GeoIP, Attacker IPs, and more with minimum latency. SecIntel delivers real-time threat intelligence byenabling automatic and responsive traffic filtering.
SecIntel also integrates with EX Series and QFX Series switches and enables these switches to subscribeto SecIntel’s infected host feed. This enables you to block compromised hosts at the switch port. You cannow extend SecIntel throughout your entire network and increase the number of security enforcementpoints, as shown in Figure 1 on page 14.
Figure 1: SecIntel Solution
Table 3 on page 14 shows different threats detected and enforced by SRX Series devices, MX Seriesrouters, EX Series, and QFX Series switches.
Table 3: Using the Network to Detect and Enforce
QFX SeriesSwitches
EX SeriesSwitches
MX SeriesRouters
SRX SeriesDevicesThreat Type
NoNoYesYesMalicious IP addresses
NoNoNoYesMalicious URLs
14

Table 3: Using the Network to Detect and Enforce (continued)
QFX SeriesSwitches
EX SeriesSwitches
MX SeriesRouters
SRX SeriesDevicesThreat Type
NoNoNoYesGeoIP
YesYesNoYesInfected Host Feed
NoNoYesYesCustom feeds
NoNoNoYes3rd party feeds
Benefits
• Detect and block known malicious IP addresses, DNS requests, and DDoS attacks
• Quarantine the compromised internal hosts
• Identify the connected devices that are at risk
• Shut down attacks before they start
• Protect users (including subscribers), applications, and infrastructure from compromise.
• Turn connectivity layers into security layers without additional infrastructure
SecIntel on SRX Series Devices
SRX Series devices use SecIntel threat feeds to offer traffic filtering at both the network and applicationlayers making it possible to identify and act upon known threats.
The threat intelligence provided through SecIntel from ATP Cloud includes the following information:
• Command and Control (C&C)
• Attacker IP
• IP Address including geographic location
• Infected hosts
• Adaptive Threat Profiles
• Dynamic address groups
15

• Global as well as custom allowlists
• Blocklists consisting of:
• File hashes
• Domain names
• IP addresses
• Malicious URLs
• Code signing certificates
• Signer organizations
Using the threat intelligence from Juniper Threat Labs and the dynamic intelligence feeds generated bySRX Series devices and ATP Cloud detections from your network, SRX Series devices can block variousmatch types such as IP addresses, URLs, domains, and malicious certificates. You can configure SRX Seriesfirewalls to passively monitor and alert or to monitor and block threats detected using SecIntel.
Figure 2: SecIntel on SRX Series Devices
16

SecIntel on MX Series Routers
Network operators and security engineers are battling attacks and trying to protect the network while atthe same time struggling with more workloads and costs around network administration. By incorporatingSecIntel onto the MX Series routers, you can extend the security to routing infrastructure to turnconnectivity layers into automated defense layers at scale. SecIntel on MX Series Routers is supportedfrom Junos OS Release 19.3R1 onwards.
Extending SecIntel to MX Series routers offers another layer of network security by blocking C&C trafficdiscovered by Juniper ATP Cloud, Juniper Threat Labs, and custom blocklists at line rate. This turnsconnectivity layers into automated defense layers, as shown in Figure 3 on page 17.
Figure 3: SecIntel on MX Series Router
Blocking knownmalicious IP addresses and URLs at the hardware or the PFE level usingMX Series routerscomplements the existing capabilities and integrations, such as DDoS protection. Blocking the knownC&Ccommunications at the MX Series routers prevents potential compromise directly at the network layerand frees up resources on SRX Series devices to focus on targeted unknown threats.
SecIntel on EX and QFX Series Switches
Routers and firewalls are typically found at the network's edge. However, information security best practicescall for enforcing policy as close to the point of compromise as possible. SecIntel for EX Series and QFXSeries switches allows organizations to identify and block—or quarantine—compromised hosts anywhereon the network, protecting you against lateral threat propagation. EX Series and QFX Series switches useSecIntel's InfectedHostFeed, which is dynamically updated via ATP Cloud, to quickly identify compromised
17

hosts and automatically quarantine or block the host from accessing the network. This extends policyenforcement to every point of connection throughout the network, providing the deep network visibilityrequired to build a threat-aware network.
Figure 4: SecIntel on EX/QFX Series Switches
RELATED DOCUMENTATION
SecIntel Components | 19
Overview of Policy Enforcer, Juniper ATP Cloud, and Juniper ATP Appliance | 22
Advanced Threat Prevention Licensing | 39
18

SecIntel Components
IN THIS SECTION
Centralized Policy Management (Security Director and Policy Enforcer) | 19
Threat Information and Detection | 20
End points (SRX Series Devices, MX Series Routers, EX Series, and QFX Series Switches) | 21
SecIntel consists of the following components:
Centralized Policy Management (Security Director and Policy Enforcer)
Junos Space Security Director is the centralized policy management system used to manage logs, events,threat information, objects, identity and access information, and security policies.
Junos Space Security Director:
• Provides policy management of SRX firewalls
• Consumes files from the distributed SRX deployment for threat analysis
• Incorporates threat information from:
• SRX Series devices log data
• ATP Cloud GeoIP, Infected Host, C&C, and Advanced Malware feeds
• 3rd party feeds, dynamic address groups, infected host feed, and adaptive threat profile feeds.
Policy Enforcer, a component of Junos Space Security Director, enforces threat remediation andmicrosegmentation policies on Juniper virtual and physical SRX Series firewalls, EX Series and QFX Seriesswitches, MX Series routers, third-party switch and wireless networks, private cloud/SDN solutions likeContrail and VMware NSX, and public cloud deployments. Juniper ATP Cloud’s cloud-based malwaredetection, Command and Control, and GeoIP identification feeds, along with trusted custom feeds fromJuniper ATP, act as threat detectionmechanisms for Policy Enforcer to orchestrate remediationworkflows.
19

Threat Information and Detection
The threat Information sources include threat feeds provided by Juniper Networks or 3rd party threatfeeds. Certain enforcement points (for example, routers, switches, and firewalls) and out-of-path ingestionpoints contribute to the overall threat view presented by Security Director.
Working in concert with Juniper ATP Cloud and Policy Enforcer, Juniper devices can be utilized to enforceor block threats within a network.
The threat information is received from the following components:
• Juniper ATP Appliance (Core and Collector)
• Juniper ATP Appliance provides similar features of Juniper ATP Cloud. Juniper ATP Appliance scansand detects internet downloads, emails, phishing, attachments, lateral threat movement, and othermalware threats.
• Juniper ATP Appliance can deploy an Infection Verification Package (IVP) for an endpoint compromisechecking. The IVP collects information from locations of suspected compromise on the endpoint andreturns an infection status to the Smart Core.
• Juniper ATP Appliance can ingest threat information from the logged data on the 3rd party securitysolutions.
• Juniper ATP Cloud
• You can configure Juniper ATP Cloud with SRX firewalls to analyze the traffic passing through thefirewalls for various threats. The following traffic can be analyzed:
• Email attachments including ransomware threats
• Web downloads
The attachments and downloaded content are sent to the Juniper ATP Cloud’s service for assessment.Once you receive a response from theATP cloud service, you can label the threat with a threat score.
• SRX Firewalls
The SRX firewall deployed on a network perimeter provides visibility of north and south traffic (trafficdestined to or coming from the Internet). It detects threats entering the network perimeter and blockstraffic destined for unsavory Command & Control infrastructures. The SRX Firewalls specified on anetwork perimeter would be scaled to meet Internet facing endpoint, session, and throughputrequirements. You can deploy additional SRX firewalls to segment the internal network traffic or providesecurity for east-west traffic within datacenters, user environments, or between various cloudinfrastructures.
• Enforcement points
Enforcement points include all elements that comprise the infrastructure that pass network traffic. Thisincludes layer 2 switching devices, routers, firewalls, wireless controllers, and so on. Certain enforcement
20

points provide threat visibility to Security Director. All points can enforce (allow or block) the traffic andcontain the infected hosts based on security and access policies received from Security Director.
Once the threat on the infected host is remediated, you can use Security Director to release the host fromisolation. The SRX host policy will be removed and the switch port configurations will be returned to fullyoperational.
End points (SRX Series Devices, MX Series Routers, EX Series, and QFXSeries Switches)
• SRX Series devices—Based on the threat score assigned to a threat by Juniper ATP Cloud, you canconfigure SRX Series device to either block or allow the suspicious traffic to pass.
• MX Series routers—When the network infrastructure is under a DDoS attack, use Policy Enforcer toorchestrate MX Series routers to:
• Block the DDoS attack and malicious IP addresses
• Rate limit the bandwidth on the flow route
• Forward traffic to a routing next hop for scrubbing
NOTE: MX Series routers blocks C&C traffic and known threats at line rate for SecIntel.
• EX Series andQFX Series Switches—Receives infected host information from JuniperNetworks AdvancedThreat Prevention service and then blocks the infected host at the EX or QFX switch port. Allows hostto resume communication when remediated.
RELATED DOCUMENTATION
What is SecIntel? | 13
Overview of Policy Enforcer, Juniper ATP Cloud, and Juniper ATP Appliance | 22
Advanced Threat Prevention Licensing | 39
21

Overview of Policy Enforcer, Juniper ATP Cloud, andJuniper ATP Appliance
IN THIS SECTION
Advanced Threat Prevention Overview | 22
Sky ATP Overview | 23
Sky ATP Configuration Type Overview | 25
Features By Sky ATP Configuration Type | 28
Available UI Pages by Sky ATP Configuration Type | 29
Policy Enforcer Overview | 31
Policy Enforcer Components and Dependencies | 33
Policy Enforcer Configuration Concepts | 38
Advanced Threat Prevention Overview
The Advanced Thread Protection (ATP) solution can identify and block known and unknown threats byleveraging threat feed data that includes C&C, IP reputation, and IPS signatures to identify known threats,and sandboxing techniques to identify unknown threats. Additional threat information can be ingestedfrom other security solutions that include firewalls, secure web gateways, and endpoint security software.Automated threat remediation is available when integrated with Juniper Networks or third-party switchesto automatically quarantine infected hosts. The Juniper ATP solution can provide comprehensive analyticsin a consolidated view. In other words, ATP gives you an actionable intelligence to safeguard users,applications, and infrastructure against advanced threats.
Juniper ATPCloud and Juniper ATPAppliance are combined and renamed, as shown in Figure 5 on page 23.
22

Figure 5: Juniper Advanced Threat Prevention
Sky ATP Overview
Sky ATP is a cloud-based solution that integrates with Policy Enforcer. Cloud environments are flexibleand scalable, shared environments. They can help ensure that everyone attached to the cloud can benefitfrom new threat intelligence in near real-time. Your sensitive data is secured even though it is in acloud(shared) environment. Security administrators can update their defenses when new attack techniquesare discovered and distribute the threat intelligence with very little delay.
Sky ATP offers the following features:
• Communicates with firewalls and switches to simplify threat prevention policy deployment and enhancethe anti-threat capabilities of the network.
• Delivers protection against “zero-day” threats using a combination of tools to provide robust coverageagainst sophisticated, evasive threats.
• Checks inbound and outbound traffic with policy enhancements that allow users to stop malware,quarantine infected systems, prevent data exfiltration, and disrupt lateral threat movement.
• Provides deep inspection, actionable reporting, and inline malware blocking.
• Provides feeds for GeoIP, C&C, allowlist and blocklist, infection hosts, custom configured feeds and filesubmission.
Figure 6 on page 24 lists the Sky ATP components.
23

Figure 6: Sky ATP Components
Table 4 on page 24 briefly describes each Sky ATP component’s operation.
Table 4: Sky ATP Components
OperationComponent
C&C feeds are essentially a list of servers that are known command and controlfor botnets. The list also includes servers that are known sources for malwaredownloads. See “Command and Control Servers Overview” on page 110.
Command and control (C&C) cloudfeeds
GeoIP feeds is an up-to-datemapping of IP addresses to geographical regions.This gives you the ability to filter traffic to and from specific geographies inthe world.
GeoIP cloud feeds
Infected hosts indicate local devices that are potentially compromised becausethey appear to be part of a C&C network or exhibit other symptoms. SeeInfected Hosts Overview.
Infected host cloud feeds
Lists you customize by adding IP addresses, domains, and URLs to your ownlists. See Custom Feed Sources Overview.
Custom Feeds
An allowlist is simply a list of known IP addresses that you trust and a blocklistis a list that you do not trust.
Allowlist and blocklists
24

Table 4: Sky ATP Components (continued)
OperationComponent
Performs malware analysis and threat detection.Malware inspection pipeline
Inspects files, metadata, and other information.Internal compromise detection
SEE ALSO
Sky ATP Realm Overview
Using Guided Setup for Sky ATP
Configuring Sky ATP (No Juniper Connected Security and No Guided Setup) Overview
Sky ATP Configuration Type Overview
Sky ATP or JATP with Policy Enforcer can be used in four different configuration types, which will beexplained here.
NOTE: The license you purchase determines if you can use the available configurations andfeature sets for your selected Sky ATP Configuration Type.
Configuration Type is set here in the UI: Administration > Policy Enforcer > Settings.
The following Sky ATP Configuration Types and corresponding workflows are available. Workflows arethe items you configure for each selection.
Sky ATP or JATP with Juniper Connected Security—This is the full version of the product. All PolicyEnforcer features and threat prevention types are available.
Here is the Sky ATP with Juniper Connected Security configuration:
• Secure Fabric
• Policy Enforcement Group
• Sky ATP Realm
• Threat Prevention Policies for the following threat types:
25

• C&C Server
• Infected Hosts
• Malware
• Geo IP
Here is the JATP with Juniper Connected Security configuration:
• Secure Fabric
• Policy Enforcement Group
• Threat Prevention Policies for the following threat types:
• C&C Server
• Infected Hosts
• Malware
• Geo IP
Sky ATP or JATP—This includes all threat prevention types, but does not include the benefits of SecureFabric, Policy Enforcement Groups, and Threat Prevention policies provided by Policy Enforcer. Allenforcement is done through SRX Series Device policies.
Here is the Sky ATP configuration:
• Sky ATP Realm
• Threat Prevention Policies for the following threat types:
• C&C Server
• Infected Hosts
• Malware
• Geo IP
Here are the JATP components:
• Threat Prevention Policies for the following threat types:
• C&C Server
• Infected Hosts
• Malware
• Geo IP
Cloud feeds only—The prevention types available are command and control server, infections hosts, andGeo IP feeds. All enforcement is done through SRX Series Device policies.
26

Here is the Cloud feeds only configuration:
• Secure Fabric
• Policy Enforcement Group
• Sky ATP Realm
• Threat Prevention Policies for the following threat types:
• C&C Server
• Infected Hosts
• Geo IP
NoSkyATP (no selection)—Youwouldmake no Sky ATP selection to configure Juniper Connected Securityusing custom feeds. Custom feeds are available for dynamic address, allowlist, blocklist, and infected hosts.With this setting, there are no feeds available from Sky ATP, but the benefits of Secure Fabric, PolicyEnforcement Groups, and Threat Prevention policies provided by Policy Enforcer are available as options.Infected hosts is the only prevention type available.
Here is the No selection configuration:
• Secure Fabric
• Policy Enforcement Group
• Custom Feeds
• Threat Prevention Policies for the following threat type:
• Infected Hosts
NOTE: Moving between solution types is not supported in all cases. You can only move fromone Sky ATP Configuration Type to a “higher” configuration type. You cannot move to a lowertype. Please note the following hierarchy:
• Sky ATP or JATP with Juniper Connected Security (highest)
• Sky ATPor JATP
• Cloud feeds only
• No Sky ATP or JATP- No selection (lowest)
For each solution type, certain features and UI pages are available. Please see the links below for details.
• Features By Sky ATP Configuration Type on page 28
• Available UI Pages by Sky ATP Configuration Type on page 29
27

SEE ALSO
Policy Enforcer Overview | 31
Policy Enforcer Components and Dependencies | 33
Benefits of Policy Enforcer
Policy Enforcer Configuration Concepts | 38
Features By Sky ATP Configuration Type
For each configuration type, certain features and UI pages are available.
Refer to the following table for the features available for each configuration type.
Table 5: List of features by Sky ATP Configuration Type
No Sky ATP/JATP(no selection)Cloud feeds onlySky ATP/JATP
SkyATP/JATPwithJuniper ConnectedSecurityFeature
Not AvailableNot AvailableYES
Support with existingSRX Series policies.(No Secure Fabric,Policy EnforcementGroup or Third-partyswitch support)
YES
Support with PolicyEnforcement Groupsacross the entireSecure Fabric(including Third-partyswitch support)
Full ThreatPrevention Support
Not AvailableNot AvailableYESYESSRX Series DeviceMalware Scanning
Not AvailableNot AvailableYESYESSRX Series DeviceInfected HostBlocking with SkyATP or JATP
Not AvailableYESYESYESCloud Feeds forCommand andControl Servers andGeoIP with Sky ATPor JATP
28

Table 5: List of features by Sky ATP Configuration Type (continued)
No Sky ATP/JATP(no selection)Cloud feeds onlySky ATP/JATP
SkyATP/JATPwithJuniper ConnectedSecurityFeature
YESYESYESYESInfected HostsCustom Feeds
YESYESYESYESDynamic AddressCustom Feeds
YESYESYESYESCustomAllowlist andBlocklists
SEE ALSO
Available UI Pages by Sky ATP Configuration Type | 29
Sky ATP Configuration Type Overview | 25
Available UI Pages by Sky ATP Configuration Type
For each configuration type, certain features and UI pages are available.
Refer to the following table for the UI pages available for each configuration type.
Table 6: List of available UI pages by Sky ATP Configuration Type
No Sky ATP/JATP(no selection)Cloud feeds onlySky ATP/JATP
Sky ATP/JATPwith JuniperConnectedSecurityUI Page
Monitor Pages: Threat Prevention
Not AvailableNot AvailableYESYESHosts
Not AvailableNot AvailableYESYESC&C Servers
Not AvailableNot AvailableYESYESHTTP File Download
29

Table 6: List of available UI pages by Sky ATP Configuration Type (continued)
No Sky ATP/JATP(no selection)Cloud feeds onlySky ATP/JATP
Sky ATP/JATPwith JuniperConnectedSecurityUI Page
Not AvailableNot AvailableYESYESSMTP Quarantine
Not AvailableNot AvailableYESYESEmail Attachments
Not AvailableNot AvailableYESYESManual Upload
YESYESYESYESAll Hosts Status
YESYESNot AvailableYESDDoS Feeds Status
Devices Page
YESYESNot AvailableYESSecure Fabric
Configure Pages: Threat Prevention
YESYESYESYESPolicies
YESYESYESYESCustom Feeds
(Dynamic Address, Allowlist,Blocklist)
YESYESNot AvailableYESCustom Feeds
(Infected Host, DDoS)
Not AvailableYESYES
(Only for Sky ATP)
YES
(Only for Sky ATP)
Sky ATP Realms
Not AvailableNot AvailableYESYESEmail Management
Not AvailableNot AvailableYESYESMalware Management
Shared Objects
YESYESNot AvailableYESPolicy Enforcement Groups
30

Table 6: List of available UI pages by Sky ATP Configuration Type (continued)
No Sky ATP/JATP(no selection)Cloud feeds onlySky ATP/JATP
Sky ATP/JATPwith JuniperConnectedSecurityUI Page
Not AvailableYESYESYESGeo IP
Administration: Policy Enforcer
YESYESYESYESSettings
YESYESNot AvailableYESConnectors
NOTE: SMTP Quarantine is available only for Sky ATP. It is not available for JATP.
SEE ALSO
For each configuration type, certain features and UI pages are available. Please see the links below.
Features By Sky ATP Configuration Type | 28
Sky ATP Configuration Type Overview | 25
Policy Enforcer Overview
Policy Enforcer, a component of the Junos Space Security Director user interface, integrates with Sky ATPto provide centralized threat management and monitoring to your Juniper connected security network,giving you the ability to combine threat intelligence from different solutions and act on that intelligencefrom one management point.
It also automates the enforcement of security policies across the network and quarantines infectedendpoints to prevent threats across firewalls and switches. Working with Sky ATP, it protects againstperimeter-oriented threats as well as threats within the network. For example, if a user downloads a filefrom the Internet and that file passes through an SRX Series firewall, the file can be sent to the Sky ATPcloud for malware inspection. If the file is determined to be malware, Policy Enforcer identifies the IPaddress and MAC address of the host that downloaded the file. Based on a user-defined policy, that hostcan be put into a quarantine VLAN or blocked from accessing the Internet.
31

Figure 7 on page 32 illustrates the flow diagram of Policy Enforcer over a traditional SRX Seriesconfiguration.
Figure 7: Comparing Traditional SRX Customers to Policy Enforcer Customers
Supported Topologies
Policy Enforcer supports the following topologies:
• Client to Layer 2 switch to Layer 3 SRX (IRB)
• Client to Layer 2 switch to Layer 3 switch (IRB)
• Client to Layer 2/Layer 3 switch (IRB)
32

SEE ALSO
Juniper Networks Connected Security Overview
Policy Enforcer Components and Dependencies | 33
Policy Enforcer Configuration Concepts | 38
Sky ATP Overview | 23
Policy Enforcer Installation Overview
Using Guided Setup for Sky ATP with Juniper Connected Security
Using Guided Setup for Sky ATP
Policy Enforcer Components and Dependencies
The Policy Enforcer management interface is a component of Junos Space Security Director and requiresthe following to be configured and deployed:
• Junos Space Platform—Junos Space is a comprehensive network management solution that simplifiesand automates the management of Juniper Networks switching, routing, and security devices. JunosSpace can be installed as a VIrtual Appliance (virtual machine) on a larger server or as a hardware deviceusing the Junos Space Network Appliance.
• Security Director—Junos Space Security Director provides centralized and orchestrated security policymanagement through aweb-based interface. Security administrators can use Security Director tomanageall phases of the security policy life cycle for every SRX Series physical and virtual device. SecurityDirector is a software module that installs on the Junos Space Platform.
• Policy Enforcer—Policy Enforcer itself is installed on a VM and uses RESTful APIs to communicate withboth Security Director and Sky Advanced Threat Prevention (ATP). Policy Enforcer contains twocomponents:
• Policy Controller—Defines the logical grouping of the network into secure fabric, automates theenrollment of SRX Series devices with Sky ATP, and configures the SRX firewall policies.
• Feed Connector—Aggregates the cloud and customer feeds and is the server for SRX Series devicesto download feeds.
• Sky ATP—Sky ATP employs a pipeline of technologies in the cloud to identify varying levels of risk, andprovides a higher degree of accuracy in threat protection. It integrates with SRX Series gateways todeliver deep inspection, inline malware blocking, and actionable reporting.
Sky ATP’s identification technology uses a variety of techniques to quickly identify a threat and preventan impending attack, including:
• Rapid cache lookups to identify known files.
33

• Dynamic analysis that involves unique deception techniques applied in a sandbox to trick malwareinto activating and self-identifying.
• Machine-learning algorithms to adapt to and identify new malware.
• SRX Series device—SRX Series security gateways provide security enforcement across all network layersand applications. Users can be permitted or prohibited from accessing specific business applications andWeb applications, regardless of the network ports and protocols that are used to transmit the applications.
Figure 8 on page 34 illustrates how the components in the Policy Enforcer Deployment Model interact.
Figure 8: Components of the Policy Enforcer Deployment Model
Figure 9 on page 35 shows an example infected endpoint scenario to illustrate how some of the componentswork together.
34

Figure 9: Blocking an Infected Endpoint
ActionStep
A user downloads a file from the Internet.1
Based on network security policy, the file is sent to the Sky ATP cloud for malware inspection.2
The inspection determines this file is malware and informs Policy Enforcer of the results.3
The enforcement policy is automatically deployed to the SRX Series device and switches.4
The infected endpoint is quarantined.5
Policy Enforcer can track the infected endpoint and automatically quarantine it or block it from accessingthe Internet if the user moves from one campus location to another. See Figure 10 on page 36.
35

Figure 10: Tracking Infected Endpoint Movement
In this example, Sky ATP identifies the endpoint as having an IP address of 192.168.10.1 and resides inSVL-A. The EX Series switch quarantines it because it has been labeled as an infected host by Sky ATP.Suppose the infected host physically moves from location SVL-A to location SVL-B. The EX Series switchtracks the MAC address to the new IP address and automatically quarantines it. Policy Enforcer theninforms Sky ATP of the new MAC address-to-IP address binding.
Policy Enforcer can also quarantine infected hosts even if those hosts are connected to third-party switches,as shown in Figure 11 on page 37.
For Policy Enforcer to provide threat remediation to endpoints connecting through third-party devices, itmust be able to authenticate those devices and determine their state. It does this using a tracking andaccounting threat remediation plug-in to gather information from a RADIUS server and enforce policiessuch as terminate session and quarantine. For more information, see Policy Enforcer Connector Overview
36

Figure 11: Third-Party Switch Support
ActionStep
An end-user authenticates to the network through IEEE 802.1X or throughMAC-based authentication.1
Sky ATP detects the end point is infected with malware and adds it to the infected host feed.2
Policy Enforcer downloads the infected host feed.3
Policy Enforcer enforces the infected host policy using the Connector. See Policy Enforcer ConnectorOverview.
4
The Connector queries the RADIUS server for the infected host endpoint details and initiates a Changeof Authorization (CoA) for the infected host.
The CoA can be either block or quarantine the infected host.
5
The enforcement occurs on the NAC device the infected host is authenticated with.6
Policy Enforcer communicates the infected host details back to Sky ATP.7
SEE ALSO
Policy Enforcer Overview | 31
37

Policy Enforcer Configuration Concepts | 38
Sky ATP Overview | 23
Policy Enforcer Installation Overview
Using Guided Setup for Sky ATP with Juniper Connected Security
Using Guided Setup for Sky ATP
Configuring Sky ATP with Juniper Connected Security (Without Guided Setup) Overview
Policy Enforcer Configuration Concepts
You have some options for how you can approach the initial setup of Sky ATP and Policy Enforcer. Thereis a “Guided Setup” approach which walks you through the necessary steps for getting the product up andrunning. This is the recommended approach. If you prefer, you can manually configure each part of theproduct.
Either way, before you begin the configuration, you need to understand the concepts behind theconfiguration items required to successfully deploy threat management policies across your network.These items include security realms for Sky ATP, secure fabric for sites, and policy groups for endpoints.These are explained in this section.
• Security Realm—When configuring Sky ATP or Policy Enforcer with Sky ATP, there are Realm selectionfields at the top of several pages such as Guided Setup and Feed Sources. A security realm is a groupidentifier for an organization used to restrict access to Web applications. You must create at least onesecurity realm to login into Sky ATP. Once you create a realm, you can enroll SRX Series devices intothe realm. You can also give more users (administrators) permission to access the realm.
If you have multiple security realms, note that each SRX Series device can only be bound to one realm,and users cannot travel between realms.
• Policy Enforcement Groups—A policy enforcement group is a grouping of endpoints to which threatprevention policies are applied. Create a policy enforcement group by adding endpoints (firewalls,switches, subnets, set of end users) under one common group name and later applying a threat preventionpolicy to that group.
Some information to know about enforcement groups is as follows: Determine what endpoints you willadd to the group based on how you will configure threat prevention, either according to location, usersand applications, or threat risk. Endpoints cannot belong to multiple policy enforcement groups.
• Threat Prevention Policies—Once you have a Threat Prevention Policy, you assign one or more PolicyEnforcement Groups to it. Threat prevention policies provide protection and monitoring for selectedthreat profiles, including command & control servers, GeoIP, infected hosts, and malware. Using feedsfrom Sky ATP and custom feeds you configure, ingress and egress traffic is monitored for suspicious
38

content and behavior. Based on a threat score, detected threats are evaluated and action may be takenonce a verdict is reached.
• Secure Fabric—For your configuration you must create one or more sites for your secure fabric. Securefabric is a collection of sites which contain network devices (switches, routers, firewalls, and othersecurity devices), used in policy enforcement groups. When threat prevention policies are applied topolicy enforcement groups, the system automatically discovers to which sites those groups belong. Thisis how threat prevention is aggregated across your secure fabric.
Some information to know about sites is as follows: When you create a site, you must identify theperimeter firewalls so you can enroll them with Sky ATP. If you want to enforce an infected host policywithin the network, you must assign a switch to the site. Devices cannot belong to multiple sites.
SEE ALSO
Sky ATP Configuration Type Overview | 25
Using Guided Setup for Sky ATP with Juniper Connected Security
Using Guided Setup for Sky ATP
Policy Enforcer Overview | 31
Sky ATP Overview | 23
Advanced Threat Prevention Licensing
Standard Software License-Cloud
The starting point for Juniper’s ATP solution as a cloud offering provides SecIntel to block known threats.Table 7 on page 39 shows the license details of the standalone SecIntel SKUs.
Table 7: Standalone SecIntel SKUs License Details
DescriptionLicense DurationNew SKUsPlatform
Subscription to ATP Cloud ThreatIntelligence Feeds only (no fileprocessing)
Subscription: 1, 3, or5 year
SRX-THRTFEED
NOTE: The premium licensessuch as Premium 1, 2, or 3offer other services alongwith SecIntel.
SRX SeriesFirewalls
39

Table 7: Standalone SecIntel SKUs License Details (continued)
DescriptionLicense DurationNew SKUsPlatform
Cloud-based threat feeds, SecIntel -MX240, MX480, MX960 (C&C, customallowlist, and blocklist only)
NOTE: Requires Policy Enforcer.
Subscription: 1, 3, or5 year
S-MX(Model)-CSECINTELMX SeriesRouters
Cloud-based threat feeds, SecIntel.Infected host feed only
NOTE: Requires Policy Enforcer.
Subscription: 1, 3, or5 year
S-(EX or QFX)-CSECINTELEX/QFX SeriesSwitches
RELATED DOCUMENTATION
What is SecIntel? | 13
SecIntel Components | 19
Overview of Policy Enforcer, Juniper ATP Cloud, and Juniper ATP Appliance | 22
40

2CHAPTER
Initial Setup
Install and Configure Junos Space, Security Director, and Log Collector | 42
Install and Configure Policy Enforcer, Juniper ATP Cloud, and Juniper ATPAppliance | 44

Install and Configure Junos Space, Security Director,and Log Collector
IN THIS SECTION
Install Junos Space, Security Director, and Log Collector | 42
Configure Basic Junos Space Networking | 43
Install the required DMI Schemas on Security Director | 43
Device Discovery in Junos Space | 43
Let us understand how to install and configure Junos Space, Security Directory, and Log Collector requiredfor SecIntel. These applications provide the centralized policy and management application for consistentnetwork security policies.
This section covers the following procedures:
Install Junos Space, Security Director, and Log Collector
1. Download the Junos Space Network Management Platform image fromhttps://www.juniper.net/support/downloads/?p=space#sw.
2. Install Junos Space using the instructions atJunos Space Virtual Appliance Installation and Configuration Guide
3. Install Junos Security Director using the instructions atSecurity Director Installation and Upgrade Guide.
4. Install Log Collector using the instructions atSetting Up Security Director Log Collector.
42

Configure Basic Junos Space Networking
To configure basic Junos Space Networking:
1. Configure relevant routes, netmask, gateway, DNS, andNTP so that all components except Log Collectorcan connect to the Internet.
2. Ensure all components are in same time zone.
3. Ensure that SSH is enabled.
4. Ensure that Security Director can connect to the SkyATP cloud server, Policy Enforcer, and all devices.
For additional information on configuring Junos Space, see Junos Space Network Management PlatformDocumentation.
Install the required DMI Schemas on Security Director
Download and install the correct matching Junos OS schemas to manage the Juniper Networks’ devices:
1. Add the DMI schemas for the Juniper Networks’ devices using the instructions atAddingMissingDMI Schemas orUpdatingOutdatedDMI Schemas in Junos SpaceNetworkManagementPlatform.
2. Ensure that device software version and schema version match for all managed devices (SRX Series,MX Series, QFX Series, and EX Series devices).
Device Discovery in Junos Space
To add devices to the Junos Space Network Management platform, perform the following tasks:
1. In Junos Space, discover and import the SRX Series, MX Series, EX Series, and/or QFX Series devicesin your environment. See Creating a Device Discovery Profile.
2. In Security Director, assign, publish, and update any existing firewall policies to ensure Security Directorand the SRX devices are in sync. See Publishing Policies and Updating Policies on Devices.
43

Install and Configure Policy Enforcer, Juniper ATPCloud, and Juniper ATP Appliance
IN THIS SECTION
Download, Deploy, and Configure Policy Enforcer Virtual Machine | 44
Policy Enforcer Settings | 45
Obtain a ATP Cloud license and Create an ATP Cloud Web Portal Account | 48
Install Root CA on the ATP Cloud Supported SRX Series Devices | 48
Install and Configure ATP Appliance | 50
Verify Device Enrollment | 50
Let us understand how to install and configure Policy Enforcer, Juniper ATP Cloud, and Juniper ATPAppliance for SecIntel. This section covers the following procedures:
Download, Deploy, and Configure Policy Enforcer Virtual Machine
To deploy and configure the Policy Enforcer virtual machine, perform the following tasks:
1. Download the Policy Enforcer virtual machine image fromhttps://www.juniper.net/support/downloads/?p=sdpe to the management station where the vSphereclient is installed.
2. On the vSphere client, select File > Deploy OVF Template from the menu bar.
3. Click Browse to locate the OVA file that was downloaded.
4. Click Next and follow the instructions in the installation wizard.
5. Once the installation is complete, login to the virtual machine using root and abc123 as the usernameand password, respectively.
6. Configure the network settings, NTP information, and customer information, and finish the wizardaccordingly.
44

For more detailed instructions, see Deploying and Configuring the Policy Enforcer with OVA files.
Policy Enforcer Settings
To configure your Policy Enforcer, perform the following actions.
Before You Begin
• Policy Enforcer Release version and Security Director Release version must be compatible. The Settingspage shows the current release version of Policy Enforcer. If there is an incompatibility, an errormessageis shown that there is a mismatch between Security Director and Policy Enforcer release versions. Toknow more about the supported software versions, see Policy Enforcer Release Notes.
You cannot proceed further if the Policy Enforcer and Security Director Release versions are incompatible.
• A valid Policy Enforcer VMpassword is required to have a fully functional Policy Enforcer. If the passwordis valid, a message is shown at the top of the Settings page that the Policy Enforcer Space user (pe_user)password is currently valid and the date by when the password expires. The pe_user has the samecapabilities as the super user.
If the password is invalid, an error message is shown at the top of the Settings page. To fix this issue,login to the Policy Enforcer VM, change the root password, and then enter the new root password inthe Settings page.
• Policy Enforcer with Security Director can be used in four different configuration types. For eachconfiguration type, certain features are available. Read the following topic: “Sky ATP Configuration TypeOverview” on page 25 before you make a Sky ATP or Juniper Advanced Threat Prevention (JATP)Configuration Type selection on the Policy Enforcer Settings page.
• If you are using Sky ATP or JATP without Juniper Connected Security or Cloud Feeds only, you muststill download Policy Enforcer and create a policy enforcer virtual machine.
• A Sky ATP license and account are needed for three of the configuration types (Sky ATP or JATP withJuniper Connected Security, Sky ATP or JATP, and Cloud Feeds only), but not for the default mode (NoSelection). If you do not have a Sky ATP license, contact your local sales office or Juniper Networkspartner to place an order for a Sky ATP premium license. If you do not have a Sky ATP account, whenyou configure Sky ATP, you are redirected to the Sky ATP server to create one. Please obtain a licensebefore you try to create a Sky ATP account. Refer to Policy Enforcer Installation Overview for instructionson obtaining a Sky ATP premium license.
45

To set up a Sky ATP or JATP Configuration Type, you must do the following:
1. Select Security Director>Administration>Policy enforcer>Settings.
2. Enter the IP address for the policy enforcer virtual machine. (This is the IP address you configuredduring the PE VM installation. You can locate this IP address in the vSphere Center portal.)
3. Enter the password for the policy enforcer virtual machine. (This is the same password you use to loginto the VM with your root credentials. Note that the username defaults to root )
NOTE: Refer to Deploying and Configuring the Policy Enforcer with OVA files for instructionson downloading Policy Enforcer and creating your policy enforcer virtual machine.
4. If youwant to use certificate based authentication, enable theCertificate BasedAuthentication option.
Browse the X509 certificate file and X509 certificate Key file.
5. Select a Sky ATP Configuration Type. If you do not select a type, Policy Enforcer works in default mode.(See“Sky ATP Configuration Type Overview” on page 25 for more information.)
Refer Table 8 on page 46 to understand the supported threat prevention types for different PolicyEnforcer modes:
Table 8: Supported Threat Prevention Types for Different PE Modes
Sky ATP or JATPwith JuniperConnected Security
Sky ATP orJATP
Cloud FeedsOnly
No Selection(Default)Threat Prevention Type
YesYesYesYesCustom feeds
YesYesYesYesCommand and Control (C&C) feeds
YesYesYes-Infected Host feed
YesYes--Malware inspection
Yes---Enforcement on EX Series and QFXSeries switches or using 3rd partyConnectors
You cannot change or modify a higher configuration to a basic mode. For example, you cannot change:
• Sky ATP or JATP ->Cloud feeds only
46

• Sky ATP or JATP with Juniper Connected Security ->Cloud feeds only
• Sky ATP or JATP ->No Selection (Default)
WARNING: If you change to a lower mode, you must reinstall Security Directorand Policy Enforcer.
However, you can change or modify your configuration to a higher mode. For example you can change:
• Cloud feeds only-> Sky ATP or JATP
• Cloud feeds only ->Sky ATP with Juniper Connected Security
• Sky ATP or JATP -> Sky ATP with Juniper Connected Security
6. Polling timers affect how often the system polls to discover endpoints. There are two polling timers,one that polls network wide and one that polls site wide. They each have default settings, but you canchange those defaults to poll more or less often.
• Network wide polling interval (value in hours): The default is 24 hours. You can set this range frombetween 1 to 48 hours. This timer polls all endpoints added to the secure fabric.
• Site wide polling interval (value in minutes): The default is 5 minutes. You can set this range from 1minute to 60 minutes. This timer polls infected endpoints moving within the sites that are a part ofSecure fabric.
7. Click the Download button to view or save Policy Enforcer data logs to your local system. These logsare in a compressed file format.
SEE ALSO
Comparing the Juniper Connected Security and non-Juniper Connected Security Configuration Steps
Using Guided Setup for Sky ATP with Juniper Connected Security
Using Guided Setup for Sky ATP
Configuring Cloud Feeds Only
Using Guided Setup for No Sky ATP (No Selection)
47

Obtain a ATP Cloud license and Create an ATP CloudWeb Portal Account
NOTE: Obtaining license and creating a web portal account is not required for ATP Appliance.
To obtain an ATP Cloud license and create an ATP Cloud Web Portal account:
1. ATP Cloud has three service levels: free, basic, and premium. The free license provides limitedfunctionality and is includedwith the base software. To obtain and install an ATPCloud basic or premiumlicense, click Managing the Sky Advanced Threat Prevention License.
2. For more details on ATP Cloud service levels and license types, click Sky Advanced Threat PreventionLicense Types.
3. Create an ATP Cloud Web portal account by clicking https://sky.junipersecurity.net and filling in therequired information.
Install Root CA on the ATP Cloud Supported SRX Series Devices
IN THIS SECTION
Generate Root CA Certificate using Junos OS CLI or OpenSSL on a UNIX Device | 49
Configure a Certificate Authority Profile Group | 49
After the Policy Enforcer virtual machine is configured and created and before creating any ATP policy,you must set up certificates on any ATP-supported SRX Series device.
NOTE: Do these steps only if you are enabling HTTPS inspection as part of a malware profileor threat prevention policy.
This section covers the following topics:
48

Generate Root CA Certificate using Junos OS CLI or OpenSSL on a UNIX Device
NOTE: Use only one of these options.
To generate a root CA certificate using the Junos OS CLI on the SRX device:
1. Generate a PKI public key or private key pair for a local digital certificate.
user@host> request security pki generate-key-pair certificate-id ssl-inspect-ca size 2048 type rsa
2. Using the key pair, define a self-signed certificate by providing FQDN and other details.
user@host> request security pki local-certificate generate-self-signed certificate-id ssl-inspect-cadomain-name domain-name subject subject email email-id add-ca-constraint
OR
To generate a root CA certificate using OpenSSL on a UNIX device:
1. Generate a PKI public key or private key pair for a local digital certificate.
% openssl req -x509 -nodes -sha256 -days 365 -newkey rsa:2048 -keyout ssl-inspect-ca.key -outssl-inspect-ca.crt
2. Copy the key pair onto the SRX device or devices.
3. On the SRX device(s), import the key pair.
user@host> request security pki local-certificate load key ssl-inspect-ca.key filename ssl-inspect-ca.crtcertificate-id ssl-inspect-ca
4. Apply the loaded certificate as root-ca in the SSL proxy profile.
user@host> set services ssl proxy profile ssl-inspect-profile root-ca ssl-inspect-ca
Configure a Certificate Authority Profile Group
To configure a Certificate Authority (CA) profile group:
1. Create the CA profile.
user@host# set security pki ca-profile ssl-inspect-ca ca-identity ssl-inspect-ca
user@host# commit
49

2. Junos OS provides a default list of trusted CA certificates that you can load on your system using thedefault command option.
user@host> request security pki ca-certificate ca-profile-group load ca-group-name ssl-inspect-cafilename default
Do you want to load this CA certificate ? [yes,no] (no) yes
Loading 155 certificates for group 'ssl-inspect-ca'.
ssl-inspect-ca_1: Loading done.
ssl-inspect-ca_2: Loading done.
ssl-inspect-ca_3: Loading done.
ssl-inspect-ca_4: Loading done.
ssl-inspect-ca_5: Loading done.
...
3. Verify that the ssl-inspect-ca certificates are loaded.
user@host> show security pki local-certificate
...
Certificate identifier: ssl-inspect-ca
...
Install and Configure ATP Appliance
Before you integrate ATP Appliance with Policy Enforcer, you must install the appliance. You can eitherinstall ATP Appliance as a hardware appliance or as a virtual appliance. ATP Appliance integration withPolicy Enforcer has similar capabilities as ATP Cloud integration with Policy Enforcer.
To install and configure the hardware appliance, follow instructions provided here.
To install and configure the the virtual appliance, follow instructions provided here.
Verify Device Enrollment
Before you verify the device enrollment, you must create sites within your secure fabric page, and assignthe enforcement points to the site.
50

To create a site and assign the enforcement points:
1. Select Security Director>Devices>Secure Fabric>Sites.
The Sites page appears.
2. Click the + sign.
The Create Site page appears.
3. In the Site field, enter a unique name for your site.
4. In the Tenants field, select a tenant from the drop-down list.
5. In the Description field, enter a description.
6. Click OK.
The new site is listed in the Sites page. You must now assign a device to the site.
7. Select a site and click Add Enforcement Points.
The Add Enforcement Points page appears.
8. Select the check box beside a device in the Available list and click the > icon to move it to the Selectedlist.
9. Click OK.
Devices that are added to the site are listed in the Sites page.
To verify the device enrollment:
1. In the ATP CloudWeb UI Enrolled Devices page, verify that the SRX Series device and Policy Enforcerare enrolled, as shown in Figure 12 on page 51.
Figure 12: ATP Cloud Enrolled Devices
51

2. In the Security Director UI Secure Fabric page, you must see the ATP Cloud Enroll Status for the SRXSeries device as green, as shown in Figure 13 on page 52.
Figure 13: Secure Fabric Page
3. Run the following CLI command to verify that the SRX Series device is connected to the ATP Cloudserver.
root@SRX1500-WF> show services advanced-anti-malware status
Server connection status:
Server hostname: srxapi.us-west-2.sky.junipersecurity.net
Server port: 443
Control Plane:
Connection time: 2018-01-25 10:42:43 EST
Connection status: Connected
Service Plane:
fpc0
Connection active number: 1
Connection retry statistics: 634
root@SRX1500-WF>
52

3CHAPTER
Configure
Configure SecIntel on SRX Series and EX Series Devices | 54
Configure SecIntel on MX Series Routers | 83
Example: Add MX/vMX Series Routers as Enforcement Points and DDoS ProfileSupport | 93

Configure SecIntel on SRX Series and EX SeriesDevices
IN THIS SECTION
Creating Sky ATP Realms and Enrolling Devices or Associating Sites | 54
Creating Threat Prevention Policies | 58
Sky ATP Email Management: SMTP Settings | 64
Configure IMAP Settings | 67
Creating File Inspection Profiles | 70
Creating Allowlist for Sky ATP Email and Malware Management | 72
Creating Blocklists for Sky ATP Email and Malware Management | 73
Add JATP Server | 75
Creating Custom Feeds | 77
Configuring Settings for Custom Feeds | 81
The following topics describe how to configure Juniper ATP Cloud and SecIntel for SRX Series and EXSeries devices.
Creating Sky ATP Realms and Enrolling Devices or Associating Sites
You can select a geographical location and enter your Juniper Sky ATP credentials to create a realm andassociate sites or devices with the realm.
If you do not have a Juniper Sky ATP account, select a geographical region and click here. You are redirectedto the Juniper Sky ATP account page.
Before You Begin
• Understandwhich type of Juniper Sky ATP license you have: free, basic, or premium. The license controlswhich Juniper Sky ATP features are available.
• To configure a Juniper Sky ATP realm, you must already have a Juniper Sky ATP account with anassociated license.
54

• Ensure that the internet connectivity is available for Policy Enforcer. Without the internet connectivity,you cannot create a realm.
• Decide which region will be covered by the realm you are creating. You must a select a region when youconfigure a realm.
• Note that adding a device to a realm results in one or more commit operations occurring on the deviceto apply the Juniper Sky ATP or Policy Enforcer configuration.
To configure a Sky ATP Realm:
1. Select Configure>Threat Prevention>Feed Sources.
The Feed Sources page appears.
2. In the Sky ATP tab, click the + icon to add a realm.
3. Complete the initial configuration by using the guidelines in Table 9 on page 55 below.
4. Click Finish.
Table 9: Fields on the Add Sky ATP Realm Page
DescriptionField
Sky ATP Realm Credentials
Select a region of the world from the available choices.
The following options are available in the Location list:
• North America
• European Region
• Canada
• Asia Pacific
By default, the North America value appears in the list. To know more about the geographicregion, see here.
Location
The username for Sky ATP is your e-mail address.Username
Enter a unique string at least 8 characters long. Include both uppercase and lowercase letters,at least one number, and at least one special character (~!@#$%^&*()_-+={}[]|:;<>,./?); no spacesare allowed, and you cannot use the same sequence of characters that are in your username.
Password
55

Table 9: Fields on the Add Sky ATP Realm Page (continued)
DescriptionField
Enter a name for the security realm. This should be a name that is meaningful to your organization.A realm name can only contain alphanumeric characters and the dash symbol. Once created,this name cannot be changed.
NOTE: When you create a custom feed with a realm, the feed is associated at the site level andnot at the realm level. If you modify this realm and associate new sites to it, a warning messageis shown that there are custom feeds are associatedwith this realm. Changing the site informationwill change the custom feed information. You must go and edit the custom feed that wasassociated with this realm and verify the realm association.
Realm
Site
Select one or more sites to enroll into the realm. If there are no sites associated with the realm,click Create new site. To know more about creating a new site, see Creating Secure Fabric andSites.
NOTE:• If you are using Juniper Sky ATP without Policy Enforcer, you are not prompted to select asite.
• Assigning a site to the realm will cause a change in the device configuration in the associateddevices.
• You must select the sites either with tenants or without tenants. You cannot select both ata time.
Site
Lists all devices from the realm that are not managed in Security Director. You must manuallydiscover them.
If you are using Juniper Sky ATP with Policy Enforcer and you have no devices enrolled in therealm, you are asked to select devices in the box on the left and move them to the right to enrollthem. All selected devices are automatically enrolled with Juniper Sky ATP when you finish theguided setup. To disenroll a device, you can edit a realm and move the device back to the leftside box.
NOTE: Adding a device to a realm results in one or more commit operations occurring on thedevice to apply the Juniper Sky ATP or Policy Enforcer configuration.
UnmanagedDevices
Global Configuration
Enable this option to receive IPv6 feeds (C&C and Geo IP) from Policy Enforcer.IPv6 Feeds
56

Table 9: Fields on the Add Sky ATP Realm Page (continued)
DescriptionField
Select a threshold level to block the infected hosts and to send an e-mail to the selectedadministrators notifying about the infected host events.
Click the+ sign if you want to add new administrators to the list.
Threat LevelThreshold
Enable this option to log the Malware or the Host Status event or both the event types.Logging
Click the add icon (+) to enter the trusted IPv4 address of the proxy server, in the Server IPcolumn.
When there is a proxy server between users on the network and a firewall, the firewall mightsee the proxy server IP address as the source of an HTTP or HTTPS request, instead of theactual address of the user making the request.
With this in mind, X-Forwarded-For (XFF) is a standard header added to packets by a proxyserver that includes the real IP address of the client making the request. Therefore, if you addtrusted proxy servers IP addresses to the list in Juniper Sky ATP, by matching this list with theIP addresses in the HTTP header (X-Forwarded-For field) for requests sent from the SRX Seriesdevices, Juniper Sky ATP can determines the originating IP address.
NOTE: XFF only applies to HTTP or HTTPS traffic, and only if the proxy server supports theXFF header.
Proxy Servers
NOTE: If you enrolled a device into a realm from within Security Director and you want todisenroll it, you must do that from within Security Director. If you enrolled a device into a realmfrom within Sky ATP and you want to disenroll it, you must do that from within Sky ATP. Youcannot disenroll a device from within Security Directory that was enrolled from within Sky ATP.
SEE ALSO
About the Feed Sources Page
Sky ATP Realm Overview
Using Guided Setup for Sky ATP
Creating Secure Fabric and Sites
57

Creating Threat Prevention Policies
You can create threat prevention policies for various profiles from the Policies page.
NOTE: If you are creating policies for the first time, you are given the option of setting up PolicyEnforcer with Sky ATP or configuring Sky ATP alone. Clicking either button takes you to quicksetup for your selection. SeeComparing the Juniper Connected Security and non-Juniper ConnectedSecurity Configuration Steps for a configuration comparison.
Before You Begin
• Determine the type of profile you will use for this policy; command & control server, infected hosts,malware. You can select one or more threat profiles in a policy. Note that you configure Geo IP policiesseparately. See Creating Geo IP Policies.
• Determine what action to take if a threat is found.
• Know what policy enforcement group you will add to this policy. To apply the policy, you must assignone or more policy enforcement groups. See the instructions for assigning groups to policies at thebottom of this page.
• Once policies are configured with one more groups assigned, you can save a policy in draft form orupdate it. Policies changes do not go live until they have been updated.
• If you are using Sky ATP without Policy Enforcer, you must assign your threat prevention policy to afirewall rule for it to take affect. See the instructions at the bottom of this page.
• If you delete a threat prevention policy that is assigned to a policy enforcement group, a status screenappears displaying the progress of the deletion and the affected configuration items.
To create a threat prevention policy:
1. Select Configure>Threat Prevention > Policies.
2. Click the + icon.
The Create Threat Prevention Policy page appears.
3. Complete the configuration by using the guidelines in theTable 10 on page 59, Table 11 on page 59,Table 12 on page 60, Table 13 on page 61, and Table 14 on page 63 below.
4. Click OK.
58

Table 10: Fields on the Threat Prevention Policy Page
DescriptionField
Enter a unique string that must begin with an alphanumeric character and can includeunderscores; no spaces allowed; 63-character maximum.
Name
Enter a description;maximum length is 1024 characters. You shouldmake this descriptionas useful as possible for all administrators.
Description
Include the following profiles to your threat prevention policy. Youmust include at leastone profile. An error message is shown if you try to create the threat prevention policywithout selecting a profile.
• C&C profile—See Table 11 on page 59.
• Infected host profile—See Table 12 on page 60.
• Malware profile—See Table 13 on page 61.
• DDoS profile—See Table 14 on page 63.
Profiles
Select the log setting for the policy. You can log all traffic, log only blocked traffic, orlog no traffic.
Log Setting (Policysetting for all profiles)
Table 11 on page 59 shows the management of command and control server threat in a policy.
Table 11: C&C Server Profile Management
DescriptionField
Select and choose settings for command and control servers. A C&C is a centralized computerthat issues commands to botnets (compromised networks of computers) and receives reportsback from them. Botnets can be used to gather sensitive information, such as account numbersor credit card information, or to participate in a distributed denial-of-service (DDoS) attack.
CommandandControlServer
Select the check box to include management for this threat type in the policy.Include C& C profile inpolicy
Use the slider to change the action to be taken based on the threat score. Threat scores areassigned using several criteria. Refer to the monitoring pages in the UI to investigate, locatedunderMonitor > Threat Management.
Threat Score
59
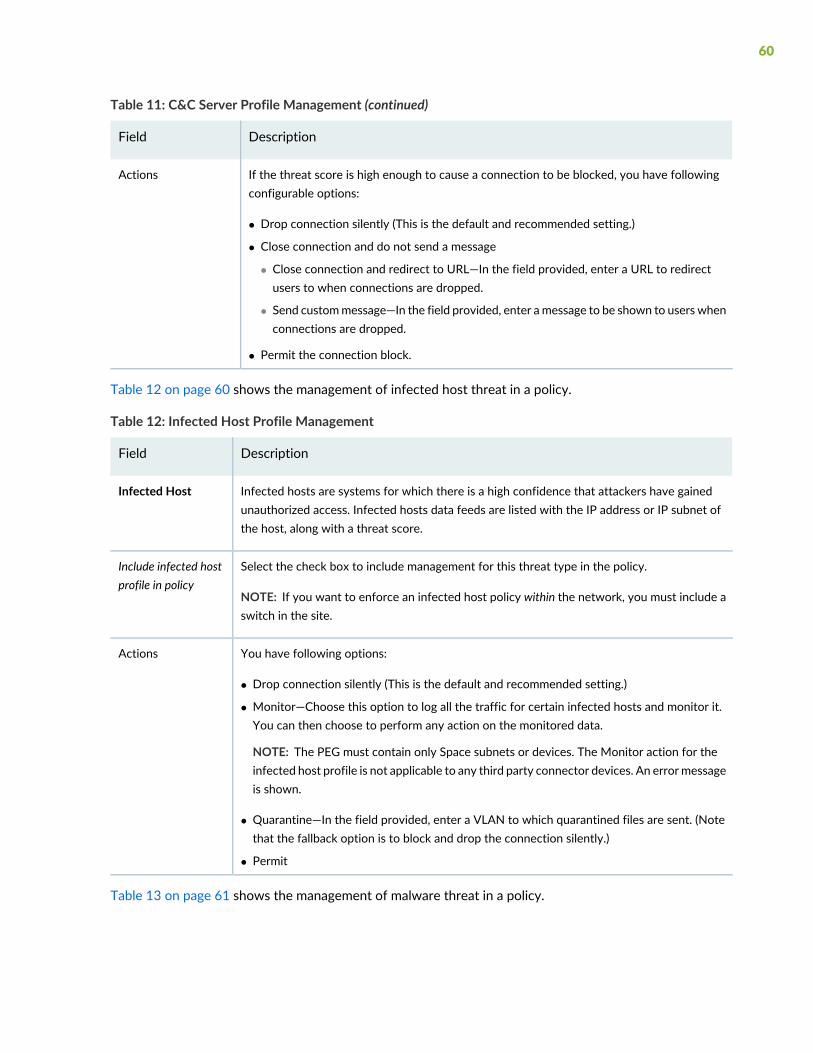
Table 11: C&C Server Profile Management (continued)
DescriptionField
If the threat score is high enough to cause a connection to be blocked, you have followingconfigurable options:
• Drop connection silently (This is the default and recommended setting.)
• Close connection and do not send a message
• Close connection and redirect to URL—In the field provided, enter a URL to redirectusers to when connections are dropped.
• Send custommessage—In the field provided, enter amessage to be shown to users whenconnections are dropped.
• Permit the connection block.
Actions
Table 12 on page 60 shows the management of infected host threat in a policy.
Table 12: Infected Host Profile Management
DescriptionField
Infected hosts are systems for which there is a high confidence that attackers have gainedunauthorized access. Infected hosts data feeds are listed with the IP address or IP subnet ofthe host, along with a threat score.
Infected Host
Select the check box to include management for this threat type in the policy.
NOTE: If you want to enforce an infected host policy within the network, you must include aswitch in the site.
Include infected hostprofile in policy
You have following options:
• Drop connection silently (This is the default and recommended setting.)
• Monitor—Choose this option to log all the traffic for certain infected hosts and monitor it.You can then choose to perform any action on the monitored data.
NOTE: The PEG must contain only Space subnets or devices. The Monitor action for theinfected host profile is not applicable to any third party connector devices. An error messageis shown.
• Quarantine—In the field provided, enter a VLAN to which quarantined files are sent. (Notethat the fallback option is to block and drop the connection silently.)
• Permit
Actions
Table 13 on page 61 shows the management of malware threat in a policy.
60

Table 13: Malware Threat Profile Management
DescriptionField
Malware is files that are downloaded by hosts or received as email attachments and foundto be suspicious based on known signatures, URLs. or other heuristics.
Malware (HTTP filedownload, SMTP Fileattachment, and IMAPattachments)
Select the check box to include management for this threat type in the policy.Include malware profile inpolicy
Turn this feature on to scan files downloaded over HTTP and then select a file scanningdevice profile. The device profile is configured using Sky ATP.
HTTP file download
Turn this feature to scan encrypted files downloaded over HTTPS.Scan HTTPS
Select a Sky ATP device profile. This is configured through Sky ATP. Sky ATP profiles letyou define which files to send to the cloud for inspection. You can group types of files tobe scanned together under a common name and create multiple profiles based on thecontent you want scanned.
Device Profile
If the threat score is high enough to cause a connection to be blocked, you have followingconfigurable options:
• Drop connection silently (This is the default and recommended setting.)
• Close connection and do not send a message
• Close connection and redirect to URL—In the field provided, enter a URL to redirectusers to when connections are dropped.
• Send custom message—In the field provided, enter a message to be shown to userswhen connections are dropped.
• Permit
Actions
Turn this feature on to inspect files received as email attachments (over SMTP only).SMTP File Attachments
Enable this option to configure reverse proxy for SMTP.
The reverse proxy does not prohibit server certificates. It forwards the actual servercertificate or chain as is to the client without modifying it.
Scan SMTPS
61

Table 13: Malware Threat Profile Management (continued)
DescriptionField
If you do not click the Change button to select a device profile for SMTP scanning, thedevice profile selected for HTTP will be used by default.
Select Change to use a different device profile for SMTP.
Device profiles are configured through Sky ATP and define which files to send to thecloud for inspection.
Device Profile
Use the slider to change the action to be taken based on the threat score. Threat scoresare assigned using several criteria. This threat score applies to all malware, HTTP andSMTP. (Note: There is no monitoring setting for malware.)
Threat Score
Actions for SMTP File Attachments include: Quarantine, Deliver malicious messages withwarning headers added, and Permit. This actions are set in Sky ATP. Refer to the Sky ATPdocumentation for information.
Actions
Turn this feature on to select a a file scanning device profile and threat score ranges toapply to IMAP e-mails.
IMAP Attachments
Enable this option to configure reverse proxy for IMAP e-mails.Scan IMAPS
If you do not click the Change button to select a device profile for IMAP scanning, thedevice profile selected for HTTP will be used by default.
Select Change to use a different device profile for IMAP.
Device profiles are configured through Sky ATP and define which files to send to thecloud for inspection.
Device Profile
Actions for IMAP Attachments include: Block, Deliver malicious messages with warningheaders added, and Permit. This actions are set in Sky ATP. Refer to the Sky ATPdocumentation for information.
Actions
Use the slider to change the action to be taken based on the threat score. Threat scoresare assigned using several criteria. This threat score applies to all malware, HTTP, SMTP,and IMAP. (Note: There is no monitoring setting for malware.)
Threat Score
Table 14 on page 63 shows the management of DDoS threat in a policy
62

Table 14: DDoS Threat Profile Management
DescriptionField
Enable this option to include themanagement of Distributed denial-of-service (DDoS) protectionthat enables the MX router to quickly identify an attack and prevent a flood of malicious controlpackets from exhausting system resources.
When you create a threat policy for the DDoS profile, it is not pushed to the device because thepolicy is not yet assigned to any device. Assign the policy to the policy enforcement group.Because the policy is created for the MX router, rule analysis is not initiated when a policy isassigned to the policy enforcement group (PEG).
Include DDoSProfile in Policy
Select the following actions from the list for the DDoS profile:
• Block—Use this option to block the DDoS attack.
• Rate Limit Value—Use this option to limit the bandwidth on the flow route. You can expressthe rate limit value in Kbps, Mbps, or Gbps units. The rate limit range is 10Kbps to 100Gbps.
• Forward to—Use this option to configure the routing next hop to forward the packets forscrubbing.
Actions
Specify a routing instance to which packets are forwarded in the as-number:community-valueformat, where each value is a decimal number. For example, 65001:100.
Scrubbing Site
Once you have a threat prevention policy, you assign one or more groups to it:
1. In the threat prevention policy main page (located under Configure>Threat Prevention > Policy), findthe appropriate policy.
2. In the Policy Enforcement Groups column, click theAssign toGroups link that appears herewhen thereare no policy enforcement groups assigned or click the group name that appears in this column to editthe existing list of assigned groups. You can also select the check box beside a policy and click theAssign to Groups button at the top of the page. See Policy Enforcement Groups Overview .
For the infected host profiles created with Monitor action, you cannot assign a policy enforcementgroup if it contains only the third-party connector devices or the combination of both Junos Space andthird-party connector devices. You must have only the Junos Space subnets (IP addresses assigned tothe Junos Space NetworkManagement Platform ethernet interfaces) in the policy enforcement groupsto assign them to the infected host profiles with Monitor action.
If you edit an existing infected host profile with either Drop Connection or Quarantine action toMonitoraction, you cannot assign any policy enforcement group having only third-party connector devices orthe combination of Junos Space and third-party connector devices.
3. In the Assign to Groups page, select the check box beside a group in the Available list and click the >icon to move it to the Selected list. The groups in the Selected list will be assigned to the policy.
63

4. Click OK.
Snapshot is taken and policy analysis is initiated. For more information about the threat policy analysis,see Threat Policy Analysis Overview. From there you can view your changes and choose to Update now,Update later, or Save them in draft form without updating.
5. If you are using Sky ATP without Policy Enforcer, you must assign your threat prevention policy to afirewall rule for it to take affect. Navigate to Configure>Firewall Policy>Standard Policies. Click on arule and you are taken to the respective rules page. In the Advanced Security column, click an item toaccess the Edit Advanced Security page and select the threat prevention policy from the ThreatPrevention pulldown list.
SEE ALSO
Comparing the Juniper Connected Security and non-Juniper Connected Security Configuration Steps
Creating Policy Enforcement Groups
Threat Policy Analysis Overview
Creating Geo IP Policies
Threat Prevention Policy Overview
Policy Enforcer Overview | 31
Benefits of Policy Enforcer
Policy Enforcer Components and Dependencies | 33
Sky ATP Overview | 23
Sky ATP Email Management: SMTP Settings
Use the SMTP Settings page to inspect and manage email attachments sent over SMTP.
Before You Begin
• Read the Sky ATP Email Management Overview topic.
• Decide how malicious emails are handled: quarantined, delivered with headers, or permitted.
To configure the email management settings for the Sky ATP realm:
1. Select Configure > Threat Prevention > Feed Sources.
The Feed Sources page appears
64

2. Under the Sky ATP tab, right-click a Sky ATP Realm or from the More list, select SMTP Settings.
3. Based on your selections, configuration options described in Table 15 on page 65, Table 16 on page 66,and Table 17 on page 66.
Table 15: Configure Quarantine Malicious Messages
GuidelineSetting
Quarantine malicious messages (the default)—When you select toquarantinemalicious email messages, in place of the original email, intendedrecipients receive a custom email you configure with information on thequarantining. Both the original email and the attachment are stored in thecloud in an encrypted format.
Action to take
• Recipients can release email—This option provides recipients with a linkto the Sky ATP quarantine portal where they can preview the email.From the portal, recipients can select to Release the email or Delete it.Either action causes a message to be sent to the administrator.
NOTE: If a quarantined email has multiple recipients, any individualrecipient can release the email from the portal and all recipients willreceive it. Similarly, if one recipient deletes the email from the portal, itis deleted for all recipients.
• Recipients can request administrator to release email—This option alsoprovides recipients with a link to the Sky ATP quarantine portal wherethey can preview the email. From the portal, recipients can select toRequest toRelease the email orDelete it. Either choice causes amessageto be sent to the administrator. When the administrator takes action onthe email, a message is sent to the recipient.
NOTE: When a quarantined email is released, it is allowed to pass throughthe SRX series with a header message that prevents it from beingquarantined again, but the attachment is placed inside apassword-protected zip file with a text file containing the password thatthe recipient must use to open the file.
Release option
Email Notifications for End Users
If you have a corporate web site with further information for users, enterthat URL here. If you leave this field blank, this option will not appear tothe end user.
Learn More Link URL
65

Table 15: Configure Quarantine Malicious Messages (continued)
GuidelineSetting
When an email is quarantined, the recipient receives a custom messageinforming them of their quarantined email. For this custommessage, entera subject indicating a suspicious email sent to them has been quarantined,such as "Malware Detected."
Subject
Enter information to help email recipients understand what they shoulddo next.
Custom Message
Enter custom text for the Sky ATP quarantine portal link where recipientscan preview quarantined emails and take action on them.
Click Preview to view the custom message that will be sent to a recipientwhen an email is quarantined.
Custom Link Text
Table 16: Configure Deliver with Warning Headers
GuidelineSetting
Delivermaliciousmessageswithwarning headers added—When you selectto deliver a suspicious email with warning headers, you can add headersto emails that most mail servers will recognize and filter into spam or junkfolders.
Action to take
• X-Distribution (Bulk, Spam)—Use this header for messages that are sentto a large distribution list and are most likely spam. You can also select“Do not add this header.”
• X-Spam-Flag—This is a common header added to incoming emails thatare possibly spam and should be redirected into spam or junk folders.You can also select “Do not add this header.”
• Subject Prefix—You can prepend headers with information for therecipient, such as "Possible Spam."
SMTP Headers
Table 17: Permit
GuidelineSetting
Permit—You can select to permit themessage and no further configurationis required.
Action to take
66

To send notifications to administrators when emails are quarantined or released from quarantine:
1. Click the + sign to add an administrator.
2. Enter the administrator's email address.
3. Select the Quarantine Notification check box to receive those notifications.
4. Select the Release Notifications check box to receive those notifications.
5. Click OK.
SEE ALSO
Sky ATP Email Management Overview
Configure IMAP Settings
Use the IMAP Settings page to configure email management for IMAP.With email management for IMAP,the enrolled SRX Series devices can transparently submit suspicious emails to Sky ATP for inspection andblocking.
Before You Begin
• Read the Sky ATP Email Management Overview topic.
• Decide how malicious emails are handled. For IMAP, the available options are to block or permit email.Unlike SMTP, there is no quarantine option for IMAP and there is no option to preview a blocked email.
To configure the IMAP settings:
1. Select Configure > Threat Prevention > Feed Sources.
The Feed Sources page appears
2. Under the Sky ATP tab, right-click a Sky ATP Realm or from the More list, select IMAP Settings.
3. Complete the configuration as per the guidelines given in Table 18 on page 68.
Based on your selections, configuration options will vary.
67

Table 18: Configure Block Malicious Messages
GuidelineSetting
• Permit download of attachments—Allow email attachments, either fromall IMAP servers or specific IMAP servers, through to their destination.
NOTE: In Permit mode, block and allowlists are not checked. Emailsfrom blocklisted addresses are not sent to the cloud for scanning. Theyare allowed through to the client.
• Block download of attachments—Block email attachments, either fromall IMAP servers or specific IMAP servers, from reaching their destination.
NOTE: In Block mode, block and allowlists are checked. Emails fromblocklisted addresses are blocked. Emails from allowlisted addresses areallowed through to the client.
Recipients can send a request to an administrator to release the email.Enter the email address towhich recipients should send a release request.
NOTE: If a blocked email hasmultiple recipients, any individual recipientcan request to release the email and all recipients will receive it.
When you select to block email attachments, in place of the original email,intended recipients receive a custom email you configure with informationon the block action. Both the original email and the attachment are storedin the cloud in an encrypted format.
Action to take
• All IMAP Servers—The permitting or blocking of email attachmentsapplies to all IMAP servers.
• Specific IMAP Server—The permitting or blocking of email attachmentsapplies only to IMAP servers with hostnames that you add to a list. Aconfiguration section to add the IMAP server name appears when youselect this option.
When you add IMAP servers to the list, it is sent to the SRX Series deviceto filter emails sent to Sky ATP for scanning. For emails that are sent forscanning, if the returned score is above the set policy threshold on theSRX, then the email is blocked.
IMAP Server
Select the Specific IMAP Server option above and click the + sign to addIMAP server hostnames to the list.
NOTE: You must use the IMAP server hostname and not the IP address.
IMAP Servers
Email Notifications for End Users
68

Table 18: Configure Block Malicious Messages (continued)
GuidelineSetting
If you have a corporate web site with further information for users, enterthat URL here. If you leave this field blank, this option will not appear tothe end user.
Learn More Link URL
When an email is blocked, the recipient receives a custom messageinforming them of their blocked email. For this custom message, enter asubject indicating a suspicious email sent to them has been blocked, suchas "Malware Detected."
Subject
Enter information to help email recipients understand what they shoulddo next.
Custom Message
Enter custom text for the Sky ATP quarantine portal link where recipientscan preview blocked emails and take action on them.
Click Preview to view the custom message that will be sent to a recipientwhen an email is blocked.
Custom Link Text
To send notifications to administrators when emails are blocked or released from quarantine:
1. Click the + sign to add an administrator.
2. Enter the email address of the administrator and click OK.
3. Once the administrator is created, you can uncheck or check which notification types the administratorwill receive.
• Block Notifications—If you enable this option, a notification is sent when an email is blocked.
• Unblock Notifications—If you enable this option, a notification is sent when a user releases a blockedemail.
SEE ALSO
About the Feed Sources Page
69

Creating File Inspection Profiles
Use the Sky ATP File Inspection Profiles page to create profiles to define which files to send to the cloudfor inspection.
Before you Begin
• Read the File Inspection Profiles Overview topic.
• Read the File Scanning Limits topic.
• Note that if you are using the free version of Sky ATP, only executable files are scanned.
To configure file inspection profiles:
1. Select Configure>Threat Prevention> Feed Sources.
The Feed Sources page appears.
2. Under the Sky ATP tab, select a Sky ATP realm, right-click or from the More list, select File InspectionProfiles.
The Sky ATP File Inspection Profiles page appears showing the existing file inspection profiles.
3. Click the + sign to create new profiles.
The Create Profile page appears.
4. Enter a name for the profile. (You can create multiple profiles for file inspection.)
5. In the File Categories section, select the file categories and the following actions from the list for eachfile category:
• Do not scan—The file category will not be scanned.
• Scan file up to max size—The maximum files size (up to 32MB) to scan. If a file falls outside of themaximum file size limit, the file is automatically downloaded to the client system.
• Hash lookup only—Hash lookups are not recommended because, they are compared with the filesthat are already evaluated before.
See Table 19 on page 71 for the list of file types for each category.
6. Click OK.
70

Table 19: File Category Contents
DescriptionCategory
Archive filesArchive
Configuration filesConfiguration
All document types except PDFsDocument
Executable binariesExecutable
Java applications, archives, and librariesJava
Dynamic and static libraries and kernel modulesLibrary
Mobile formatsMobile
OS-specific update applicationsOS package
PDF, e-mail, and MBOX filesPDF
Scripting filesScript
Installable Internet Applications such as Adobe Flash, JavaFX, MicrosoftSilverlight
Rich Application
NOTE: Once the profile is created, use the set services advanced-anti-malware policy CLIcommand to associate it with the Sky ATP profile. For more details, see set servicesadvanced-anti-malware policy.
SEE ALSO
File Inspection Profiles Overview
Sky ATP Malware Management Overview
File Scanning Limits
About the Feed Sources Page
71

Creating Allowlist for Sky ATP Email and Malware Management
Use theModifyWhitelist page to add email addresses, IP addresses, and URLs to the allowlist. An allowlistcontains known trusted IP addresses, URLs, and domains. Content downloaded from locations on theallowlist does not have to be inspected for malware.
Before You Begin
• Read the Sky ATP Email Management Overview topic.
• Read the Sky ATP Malware Management Overview topic.
• Decide on the type of location you intend to define: URL or IP address.
• Review the current list of entries to ensure that the item you are adding does not already exist.
To configure the allowlists:
1. Select Configure>Threat Prevention> Feed Sources.
The Feed Sources page appears.
2. Under the Sky ATP tab, right-click the Sky ATP realm or from the More list, selectWhitelist.
The Modify Whitelist page appears.
3. Click the + sign to add more entries to the allowlist.
4. Complete the configuration by using the guidelines in Table 20 on page 72.
5. Click OK.
Table 20: Fields on the Modify Whitelist Page
DescriptionField
Email List
The allowed email senders are listed here.
To add more email senders to the allowlist, click the + sign.
Enter the full address in the format [email protected] or wildcard the name to permit all emailsfrom a specific domain. For example, *@domain.com.
Email Sender
Malware List
72

Table 20: Fields on the Modify Whitelist Page (continued)
DescriptionField
Enter an IP address or a URL.
• IP—Enter an IPV4 address in standard four octet format. CIDR notation and IP address rangesare also accepted. Any of the following formats are valid: 1.2.3.4, 1.2.3.4/30, or 1.2.3.4-1.2.3.6.
• URL—Enter the URL using the following format: juniper.net. Wildcards and protocols are notvalid entries. The system automatically adds a wildcard to the beginning and end of URLs.Therefore juniper.net also matches a.juniper.net, a.b.juniper.net, and a.juniper.net/abc. If youexplicitly enter a.juniper.net, it matches b.a.juniper.net, but not c.juniper.net. You can enter aspecific path. If you enter juniper.net/abc, it matches x.juniper.net/abc, but not x.juniper.net/123.
IP and URL
To edit an existing allowlist entry, select the allowlist that you want to edit and click the pencil icon.
Sky ATP periodically polls for new and updated content and automatically downloads it to your SRX Seriesdevice. There is no need to manually push your allowlist files.
SEE ALSO
Sky ATP Email Management Overview
Sky ATP Malware Management Overview
About the Feed Sources Page
Creating Blocklists for Sky ATP Email and Malware Management
Use the Modify Blacklist page to add email addresses, IP addresses, and URLs to the blocklist. A blocklistcontains known untrusted IP addresses, URLs, and domains. Access to locations on the blocklist is blocked,and therefore no content can be downloaded from those sites.
Before You Begin
• Read the Sky ATP Email Management Overview topic.
• Read the Sky ATP Malware Management Overview topic.
• Compile a list of knownmalicious email addresses or domains to add to your blocklist. If an email matchesthe blocklist, it is considered to be malicious and is handled the same way as an email with a maliciousattachment, blocked and a replacement email is sent. If an email matches the allowlist, that email isallowed through without any scanning.
73

• It is worth noting that attackers can easily fake the “From” email address of an email, making blocklistsa less effective way to stop malicious emails.
• Decide on the type of location you intend to define: URL or IP address.
• Review the current list of entries to ensure that the item you are adding does not already exist.
To configure the blocklists:
1. Select Configure>Threat Prevention> Feed Sources.
The Feed Sources page appears.
2. Under the Sky ATP tab, right-click the Sky ATP realm or from the More list, select Blacklist.
The Modify Blacklist page appears.
3. Click the + sign to add more entries to the blocklist.
4. Complete the configuration by using the guidelines in Table 21 on page 74.
5. Click OK.
Table 21: Fields on the Modify Blacklist Page
DescriptionField
Email List
The allowed email senders are listed here.
To add more email senders to the blocklist, click the + sign.
Enter the full address in the format [email protected] or wildcard the name to permit all emailsfrom a specific domain. For example, *@domain.com.
Email Sender
Malware List
Enter an IP address or a URL.
• IP—Enter an IPV4 address in standard four octet format. CIDR notation and IP address rangesare also accepted. Any of the following formats are valid: 1.2.3.4, 1.2.3.4/30, or 1.2.3.4-1.2.3.6.
• URL—Enter the URL using the following format: juniper.net. Wildcards and protocols are notvalid entries. The system automatically adds a wildcard to the beginning and end of URLs.Therefore juniper.net also matches a.juniper.net, a.b.juniper.net, and a.juniper.net/abc. If youexplicitly enter a.juniper.net, it matches b.a.juniper.net, but not c.juniper.net. You can enter aspecific path. If you enter juniper.net/abc, it matches x.juniper.net/abc, but not x.juniper.net/123.
IP and URL
74

To edit an existing blocklist entry, select the blocklist that you want to edit and click the pencil icon.
Sky ATP periodically polls for new and updated content and automatically downloads it to your SRX Seriesdevice. There is no need to manually push your blocklist files.
SEE ALSO
Sky ATP Email Management Overview
Sky ATP Malware Management Overview
About the Feed Sources Page
Add JATP Server
Configure the Juniper ATP appliance in Policy Enforcer to receive threat feeds for threat mitigation.
Before You Begin
Before you add the Juniper ATP Appliance:
• Obtain the IP address of the Juniper ATP appliance.
• Generate the API Authorization key for the Juniper ATP admin user. This is required to provide authorizedprogrammatic access to the Juniper ATP Appliance REST API. The configured Authorization Key for thatuser is then applied each time an API request is made by that user.
• In the Juniper ATP Appliance web UI, navigate to Config>System Profiles>Users and click on anexisting user account. To know more about accessing the web UI, see Juniper ATP Appliance Web UIAccess.
• In the Update User page, select the Generate New API Key option.
For more information, see Updating a User Account and Setting an API Authorization Key.
• Configure multi-tenancy Web Collector Zones for Managed Security Service Provider (MSSP) support.
75

• In the Juniper ATP Appliance web UI, navigate to Config>System Profiles>Zones.
For more information, see Configuring MSSP Multi-Tenancy Zones.
To add a Juniper ATP server:
1. Select Configure>Threat Prevention>Feed Sources.
The Feed Source page appears.
2. In the JATP page, click the + sign.
The Add JATP Server page appears.
3. Complete the configuration according to the guidelines provided in Table 22 on page 76.
4. Click Finish.
The required Juniper ATP appliance is added to Policy Enforcer for threat monitoring.
Table 22: Fields on the Add JATP Server Page
DescriptionField
JATP Server Settings
Enter the IP address of the Juniper ATP appliance.JATP Server IP Address
Enter the API Authorization key of the Juniper ATP appliance user. The same API key isused for general Juniper ATP RESTful API access and also to integrate with SRX Seriesdevices.
The API key is used only once to obtain the application token from the JATP server. Theobtained application token is provided to Policy Enforcer and this token never expires.
To know more about generating the API key, see Updating a User Account and Settingan API Authorization Key.
API Key
Enter the configured zone name.
You can enroll Policy Enforcer with the Juniper ATP default zone or with a specific JuniperATP zone. This enrollment is authenticated with an API authorization key.
Zone Name
Site
Select the site to be enrolled to the zone from the list.
If there are no sites associated with the realm, click Add new Site.
Site
76

Table 22: Fields on the Add JATP Server Page (continued)
DescriptionField
Lists all devices from the zone that are not managed in Security Director. You mustmanually discover them.
Unmanaged Devices
Enable this option to receive IPv6 feeds (C&C and Geo IP) from Policy Enforcer.IPv6 Feeds
SEE ALSO
About the Feed Sources Page
Edit or Delete a JATP Server
JATP Operator’s Guide
Creating Custom Feeds
Use the Create Custom Feed page to configure the Dynamic Address, Allowlist, Blocklist, Infected Hosts,and DDoS custom feeds. These feeds provide relevant and timely intelligence that you can use to createenforcement policies.
NOTE: If you have configured Sky ATP Configuration Type as “No Selection” in theAdministration>Policy Enforcer>Settings page, only the Dynamic Address custom feed issupported.
Before You Begin
• Knowwhat type of feed you are configuring and have all the necessary information on hand. Local feedsare created on your local system and uploaded from there.
• Note that infected hosts are hosts known to be compromised. For an infected host custom feed, enterhost IP addresses manually or upload a text file with the IP addresses of infected hosts.
• If you create an allowlist, blocklist, or infected hosts feed, it will override the respective Sky ATP/JATPfeed.
• Note that when Sky ATP/JATP only mode is selected as the Threat Prevention Type, the infected hostand DDoS custom feeds are not available.
77

To create local file and remote file custom feeds:
1. Select Configure>Threat Prevention> Feed Sources.
The Feed Sources page appears. Youwill see only custom feeds available as the threat prevention type,if you make no selection for Sky ATP/JATP Configuration Type in the Policy Enforcer Settings page.
2. Click Create and select one of the following:
• Feeds with local files—Enter your data manually into the provided fields or upload from a text file onyour location machine.
• Feeds with remote file server—Configure communication with the remote server to fetch the datafeed from it.
3. Complete the configuration by using the guidelines in Table 23 on page 78 or Table 24 on page 80.
4. Click OK.
NOTE:• Feeds are processed in the following order: SecIntel feeds -> Policy Enforcer -> SRX Seriesdevices. If you configure a local feed through Policy Enforcer, the configured local feed willoverwrite the cloud feeds.
• To use a custom feed, apply it to the source or destination address in a firewall rule. In thefirewall rule, you can filter addresses to show only the custom feeds.
If there is a firewall policy rule created using the dynamic address, you cannot delete the samedynamic address from the Feed Sources page. You must first delete the firewall policy ruleand then , delete the dynamic address from the Feed Sources page.
• When you have no Sky ATP/JATP Configuration Type selected (No selection), Sky ATP/JATPrealms are disabled. Because site selection is usually done from the Sky ATP/JATP realm page,you must select sites from the Create Custom Feed page when in “No selection” mode. Thecustom feeds are then downloaded to the devices in the chosen sites. This is the only timesite selection available in the Create Custom Feed page.
Table 23: Fields on the Create Custom Feed Page, Feeds with Local Files
DescriptionField
Enter a unique string that must begin with an alphanumeric character and can include only dashesand underscores; no spaces allowed; 32-character maximum.
Name
Enter a description for your custom feed; maximum length is 64 characters. You should make thisdescription as useful as possible for all administrators.
Description
78

Table 23: Fields on the Create Custom Feed Page, Feeds with Local Files (continued)
DescriptionField
Select one of the following custom feeds as a threat prevention type:
• Dynamic Address
• Whitelist
• Blacklist
• Infected Hosts
• DDoS
• CC
Feed Type
Select the required sites from the list to associate them with the dynamic address or allowlists andblocklists feeds.
In the default mode (no Sky ATP), only sites are listed because of no Sky ATP. You can share a siteacross the same feed type for dynamic address, allowlist, and blocklist. For Infected hosts andDDoS, sites cannot be shared across the same feed type. However, you can share a site acrossdifferent feed types.
Sites
Select the required realms from the list, if you are in Cloud feeds only, Sky ATP/JATP, or SkyATP/JATP with Juniper Connected Security mode.
Associate these realms with dynamic address or allowlists and blocklists feeds. You can share arealm across the same feed type for dynamic address, allowlist, and blocklist. For Infected hostsand DDoS, realms cannot be shared across the same feed type. However, you can share a realmacross different feed types.
The Sky ATP/JATP realm without any assigned sites are not listed here. Only realms with sitesassociated are listed here.
NOTE: If a site is associated with a tenant, the Sky ATP/JATP realm displays the list in the<realm-name>(Tenant:<tenant-name>) format.
Zones/Realms
Select one of the following input types for Whitelist and Blacklist:
• IP, Subnet and Range—Enter an IPV4 address in standard four octet format. CIDR notation andIP address ranges are also accepted. Any of the following formats are valid: 1.2.3.4, 1.2.3.4/30,or 1.2.3.4-1.2.3.6.
• URL and Domain—Enter the URL using the following format: http://yourfeed.com/abc andDomain using the following format: http://yourfeed.com.
Wildcards and protocols are not valid entries.
User Input Type
(Available forAllowlist andBlocklist)
79

Table 23: Fields on the Create Custom Feed Page, Feeds with Local Files (continued)
DescriptionField
Do one of the following:
• Click Upload File to upload a text file with an IP address list. Click the Add button to include theaddress list in your custom list.
For infected host andDDoS, the uploading file must have the string add at the beginning, followedby the IP addresses. If you want to delete certain IP addresses, enter the string delete followedby the IP addresses to delete.
Note that the file must contain only one item per line (no commas or semi colons). All items arevalidated before being added to the custom list.
The file must not contain more than 500 entries. An error message is shown if you try to uploada file containing more than 500 IP addresses. Use the Feeds with remote file server option toupload a file containing more than 500 IP addresses.
• Manually enter your item and threshhold value in the space provided in the Custom List section.To add more items, click + to add more spaces.
For syntax, enter an IPv4 address in standard four octet format. CIDR notation and IP addressranges are also accepted. Any of the following formats are valid: 1.2.3.4, 1.2.3.4/30, or1.2.3.4-1.2.3.6.
Custom List
Table 24: Fields on the Create Custom Feed Page, Feeds with Remote File Server
DescriptionField
Enter a unique string that must begin with an alphanumeric character and can includeonly dashes and underscores; no spaces allowed; 32-character maximum.
Name
Enter a description for your custom feed; maximum length is 64 characters. You shouldmake this description as useful as possible for all administrators.
Description
Select one of the following custom feeds as a threat prevention type:
• Dynamic Address
• Blocklist
• Infected Hosts
• DDoS
• CC
Feed Type
Select one of the following:
• http
• https
Type of Server URL
Enter the URL for the remote file server.Server File URL
80

Table 24: Fields on the Create Custom Feed Page, Feeds with Remote File Server (continued)
DescriptionField
Click Browse and select the CA certificate to upload.
If you do not upload a certificate for https server URL, a warning message is shownthat a certificate is not uploaded and to whether proceed further or not. Click Yes toproceed further without uploading a certificate or No to go back and upload thecertificate.
Certificate Upload
(If the URL type is HTTPS)
Enter the credentials for the remote file server.
This is not a mandatory field. You can still proceed to create a custom feed withoutentering the username.
Username
Enter the credentials for the remote file server.
This is a mandatory field, if you have provided the username.
Password
Select how often updates are retrieved from the remote files server: Hourly, Daily,Weekly, Monthly, Never
Update Interval
Select the required sites from the list to associate them with the custom feeds.Sites
If you try to disenroll a site in an infected host, a warning message is shown to resolve all the currentinfected hosts from the respective endpoints within a site. To resolve the infected hosts, log-in to Sky ATPUI, resolve the hosts, and then unassign sites from Policy Enforcer. Ensure that you always resolve theinfected hosts before unassigning sites. Once you unassign sites, you cannot resolve the hosts.
SEE ALSO
Custom Feed Sources Overview
About the Feed Sources Page
Configuring Settings for Custom Feeds | 81
Configuring Settings for Custom Feeds
Use the Settings page to specify the number of days for the custom feed to be active and expire once theduration is crossed. Also, specify how often the feeds must be updated.
81

In the Sky ATP with Juniper Connected Security, Clouds feed only, and No Sky ATP modes, you canconfigure the Time To Live (TTL) settings for dynamic address, allowlist, blocklist, infected host, and DDoSfeed types. In the Sky ATP mode, you can configure TTL settings for only dynamic address, allowlist, andblocklist feed types.
NOTE: When you configure a TTL setting for a particular feed type, the configuration is applicablefor all the custom feeds belonging to that particular feed type. For example, if you set TTL forAllowlist feed type to 45 days, then all Allowlist feeds will have the same configuration.
To configure Settings:
1. Select Configure>Threat Prevention>Feed Source.
The Feed Sources page appears.
2. In the Custom Feeds tab, select Settings.
The Settings page appears.
3. Complete the configuration by using the guidelines in Table 25 on page 82.
4. Click Update.
The settings are updated and a success message is shown that the Settings are updated successfully.
At the beginning of the Settings page, the last updated settings information is shown. This message isrefreshed whenever you update the setting.
Table 25: Fields on the Settings Page
DescriptionOption
Select one of the following options:
• Specify manually—Select this option to specify the number of days for the required customfeed type to be active.
• Expires in (days)—Enter the number of days for the required custom feed to be active. Defaultvalue is 30 days. The available range is 1 to 365 days.The number of days that you configure in this field appears in the Days to Become Inactivefield on the Custom Feeds page. If you make any changes to this field, the same informationis refreshed in the Days to Become Inactive field and the timer is adjusted to the updatedvalue.
• Never Expire—Select this option if you do not want any custom feed type to be inactive orexpire.
Time to live
82

Table 25: Fields on the Settings Page (continued)
DescriptionOption
Specify how often each feed type must be updated.
By default, all feeds are updated every 5 minutes.
Valid range is 1 through 5 minutes.
Update Interval
SEE ALSO
Custom Feed Sources Overview
Creating Custom Feeds | 77
Configure SecIntel on MX Series Routers
IN THIS SECTION
Overview | 84
Configuring the Web Filter Profile for Sampling | 88
For MX Series routers to download Command & Control (C&C) and Geo IP feeds from Policy Enforcer,you must mark them as perimeter devices while you are adding enforcement points for a site in Devices> Secure Fabric > Add Enforcement Points page.
In the Sky ATP/JATP with Juniper Connected Security mode, if you choose an MX Series router as aperimeter firewall device, the MX Series router is not enrolled to ATP Cloud. The Policy Enforcer URL isconfigured to the device and this enables the device to receive feeds from Policy Enforcer. Unlike in SRXSeries device where a policy must be configured to download feeds, you do not have to configure anypolicies for MX Series routers to download the feeds.
83

Overview
IN THIS SECTION
Benefits | 84
Understanding Policy Enforcer and Juniper Sky ATP | 84
Security Intelligence (SecIntel) - Overview | 86
Web Filtering (URL-Filterd) - Overview | 87
Juniper Sky™Advanced Threat Prevention (Juniper Sky ATP) is integratedwithMX series routers to protectall hosts in your network against evolving security threats by employing cloud-based threat detectionsoftware with a next-generation firewall system.
This topic provides an overview of Juniper Sky ATP, Policy Enforcer, Security Intelligence, Web filtering,and their benefits when integrated on MX Series routers (MX240, MX480 and MX960).
Benefits
• Simplifies deployment and enhances the anti-threat capabilities when integrated with the MX routers.
• Delivers protection against “zero-day” threats using a combination of tools to provide robust coverageagainst sophisticated, evasive threats.
• Checks inbound and outbound traffic with policy enhancements that allow users to stop malware,quarantine infected systems, prevent data exfiltration, and disrupt lateral movement.
• Supports High Availability to provide uninterrupted service.
• Provides scalability to handle increasing loads that require more computing resources, increased networkbandwidth to receive more customer submissions, and a large storage for malware.
• Provides deep inspection, actionable reporting, and inline malware blocking.
Understanding Policy Enforcer and Juniper Sky ATP
Juniper Networks Security Director comprises a feature called the Policy Enforcer (PE) that enables it tolearn from threat conditions, automate the policy creation, and to dynamically deploy enforcement toJuniper devices in the network.
Figure 14 on page 85 illustrates the traffic flow between the Policy Enforcer, the Juniper Sky ATP, andthe MX router which functions as a firewall.
84

• Policy Enforcer (PE) learns from threat conditions, automates the policy creation, and deploys enforcementto Juniper devices in the network.
• Juniper Sky™ Advanced Threat Prevention (Juniper Sky ATP) protects all hosts in your network byemploying cloud-based threat detection software with a next-generation firewall system.
• MX router fetches the threat intelligence feeds from Policy Enforcer (PE) and implements those policiesto quarantine compromised hosts. It comprises of the following important components:
• Security Intelligence process
• Web Filtering process
• Firewall process
Figure 14: System Architecture
To understand the functionality of the system architecture consider the following example—if a userdownloads a file from the Internet and that file passes through an MX firewall, the file can be sent to theJuniper Sky ATP cloud for malware inspection (depending on your configuration settings.) If the file isdetermined to be malware, PE identifies the IP address and MAC address of the host that downloadedthe file. Based on a user-defined policy, that host can be put into a quarantine VLAN or blocked fromaccessing the Internet.
85

Starting in Junos OS Release 18.4R1, MX Series routers (MX240, MX480, andMX960) are integrated withthe Juniper Sky ATP to prevent compromised hosts (botnets) from communicating with command andcontrol servers.
Starting in JunosOS Release 19.3R2, onMX Series routersMX240,MX480 andMX960with theMX-SPC3services card are integrated with the Juniper Sky ATP.
Security Intelligence (SecIntel) - Overview
The Security Intelligence process (IPFD), is responsible for downloading the security intelligence feeds andparsing from the feed connector or Sky ATP cloud feed server. The IPFD process on the MX platformsfetches the command and control IPv4/IPv6 feeds from Policy Enforcer. C&C feeds are essentially a listof servers that are known command and control servers for botnets. The list also includes servers that areknown sources for malware downloads. The information thus fetched is saved in a file (urlf_si_cc_db.txt)created under the /var/db/url-filterd directory.
The file format of the blacklisted IPs sent by IPFD to the web filtering process is as follows:
IPv4 address | IPv6 address, threat-level.
The threat-level is an integer ranging from 1 to 10 to indicate the threat level of files scanned for malwareand for infected hosts. Here, 1 represents the lowest threat level and 10 represents the highest threatlevel.
For example: 178.10.19.20, 4
Here, 178.10.19.20 indicates the blacklisted IP and 4 indicates the threat-level.
The C&C feed database is synced onto the backup Routing Engine. IPFD then shares the information tothe web filtering process (url-filterd). The web filtering process reads the file contents and configures thefilters accordingly.
Configuring Security Intelligence to Download the CC Feed from Policy Enforcer
To download the command and control IPv4/IPv6 feeds from Juniper Sky ATP/Policy Enforcer, includethe security-intelligence statement at the [edit services] hierarchy as shown in the following example:
security-intelligence {authentication {auth-token 7QGSBL5ZRKR5UHUZ2X2R6QLHB656D5EN;
}url https://10.92.83.245:443/api/v1/manifest.xml;traceoptions {file security-inteligence.log size 1g;level all;flag all;
86

}}
Web Filtering (URL-Filterd) - Overview
The web filtering process reads the file contents fetched from the IPFD and configures the filters on thePacket Forwarding Engine accordingly. Theweb filtering process enforces the command and control feedsby programming the filters in the Packet Forwarding Engine to block the packets destined to the blockedIP addresses and to generate logs for reporting the incident.
Figure 15 on page 87 illustrates the way C&C feed is fetched by the IPFD and then processed by the webfiltering process.
Figure 15: Web Filtering
ERROR: Unresolved graphic fileref="" not found in"//cmsxml/default/main/supplemental/STAGING/images/".
g300
601
RE
PFE
Samping CollectorSource IP and
urlf_si_cc_db.txt matching
url-filteredIPFD (SecIntel)
FilterProgramming
DFWDC&CFeed
IPFIX Message
SyslogDrop Packets
Implicit Filter
Sampling
Destination IP Match
IP Packets from Host No Match for Destination IP
Threat Level Extraction
Juniper Networks MX Series
Command and Control FeedDownload
Junos Space Security Director
Policy Enforcer
ThreatInformation
Sky ATP
87

The web filter profile can have more than one templates. Each template consists of a set of configuredlogical interfaces for Web filtering and one or more terms. A term is a set of match criteria with actionsto be taken if the match criteria is met. To configure the web filter profile to use dynamically fetched C&Cfeed, you can configure the security-intelligence-policy command under the [edit services web-filterprofile profile-name hierarchy level. You need not configure a term for a security-intelligence-policy basedweb filter profiles.
You can configure the following threat level actions for the web filter profile at the edit web-filter profileprofile-name security-intelligence-policy threat-level threat-level threat-action hierarchy level:
• drop
• drop-and-log
• log
You can configure only one threat-action for each threat level. If the threat-action is not configured fora particular threat level, the default threat-action is accept.
SEE ALSO
security-intelligence-policy | 132
security-intelligence | 130
Configuring the Web Filter Profile for Sampling
Starting in Junos OS Release 19.3R1, web filtering process (url-filterd) supports inline sampling of packetsas a threat level action. The packets are dropped, logged, and sampled based on the threat-action youconfigure. For scaled scenarios, sampling of packets is preferred over the logging option. Along with theexisting threat level actions, you can configure the following threat level actions on the web filter profileat the editweb-filter profile profile-name security-intelligence-policy threat-level threat-level threat-actionhierarchy level:
• drop-and-sample
• drop-log-and-sample
• log-and-sample
• sample
The inline flow monitoring samples the packets and sends the flow records in IPFIX format to a flowcollector. You can derive the threat level for the sampled packets received at the external collector by
88

matching the received IP from the sampled packets with the corresponding IP entry in/var/db/url-filterd/urlf_si_cc_db.txt. You can configure sampling using any of the following methods:
• Associate a sampling instance with the FPC on which the media interface is present at the [edit chassis]hierarchy level. If you are configuring sampling of IPv4 flows, IPv6 flows, or VPLS flows, you can configurethe flow hash table size for each family.
• Configure the template properties for inline flow monitoring at the [edit services flow-monitoringhierarchy level.
• Configure a sampling instance and associate the flow-server IP address, port number, flow export rate,and specify the collectors at the [edit forwarding-options hierarchy level.
Associate a Sampling Instance with the FPC
To associate the defined instance with a particular FPC, MPC, or DPC, you include the sampling-instancestatement at the [edit chassis fpc number] hierarchy level, as shown in the following example:
chassis {redundancy {graceful-switchover;
}fpc 0 {pic0 {inline-services {bandwidth 10g;
}}
}pic 2 {inline-services {bandwidth 10g;
}}pic 3 {inline-services {bandwidth 10g;
}}sampling-instance 1to1;inline-services{flow-table-size {ipv4-flow-table-size 5;ipv6flow-table-size 5;
}
89

}}
Configure a Sampling Instance and Associate the Template With the Sampling Instance.
To configure the template properties for inline flow monitoring, include the following statements at theedit services flow-monitoring hierarchy level as shown in the following example:
services {flow-monitoring {version-ipfix {template ipv4 {flow-active-timeout 60;
flow-inactive-timeout 60;template-refresh-rate {packets 48000;seconds 60;
}option-refresh-rate {packets 48000;seconds 60;}
ipv4-template;template ipv6 {flow-active-timeout 60;flow-inactive-timeout 60;template-refresh-rate {packets 48000;seconds 60;}ipv6-template;
}}
}
Configure the sample instance and associate the flow-server IP address and other parameters.
To configure a sampling instance and associate the flow-server IP address and other parameters. includethe following statements at the [edit forwarding-options] hierarchy, as shown in the following example:
forwarding-options {
90

sampling {traceoptions {file ipfix.log size 10k;
}instance {1to1 {input {rate 1;
}family inet {output {flow-server 192.168.9.194;port 2055;;autonomous-system-type origin;version-ipfix {template {
ipv4;}}}inline-jflow {source-address 192.168.9.195;}}
}family inet6 {output {flow-server 192.168.9.194;port 2000;autonomous-system-type origin;version-ipfix {template {
ipv6;}}}inline-jflow {source-address 192.168.9.195;}}
}}
}
91

Example: Configuring Web-filter Profile to Define Different Threat-Levels
web-filter {profile Profile1 ;security-intelligence-policy{file-type txt;threat-level 7 {threat-action {log-and-sample;}
}threat-level 8 {threat-action {drop-log-and-sample;}
}threat-level 10 {threat-action {drop-log-and-sample;}
}threat-level 5{threat-action {drop-log-and-sample;}
}threat-level 6 {threat-action {drop-log-and-sample;}
}threat-level 9{threat-action {drop-log-and-sample;}
}}url-filter-template template1 {client-interfaces ge-0/0/4.0;client-routing-instance inet.0;
}}traceoptions {file webfilter_log size 1g;
92

level all;flag all;
}}
}
SEE ALSO
security-intelligence-policy | 132
Configuring Traffic Sampling on MX, M and T Series Routers
Example:AddMX/vMXSeriesRouters asEnforcementPoints and DDoS Profile Support
To add MX or vMX Series routers as enforcement points and enable the DDoS profile support:
1. Log into Security Director UI.
2. Select Configure > Guided Setup > Threat Prevention and click Start Setup, as shown inFigure 16 on page 93.
The Threat Prevention Policy Setup page appears.
Figure 16: Threat Prevention Policy Setup Page
93

3. Create a tenant and assign a Virtual Routing and Forwarding (VRF) instance to it.
• In the Tenants section, click the plus icon (+) to create a tenant.
The Create Tenant page appears, as shown in Figure 17 on page 94
Figure 17: Create Tenant Page
• In the Name field, enter a unique name for the tenant.
• In the LDOM field, enter the logical systems information. Only root logical system is supported.
• In the VRF field, enter the VRF instance information.
• Click OK.
A new tenant is created and listed in the Tenants page.
• Click Next.
The Sites page appears.
4. Create sites and add devices in the Secure Fabric page.
94

• In the Sites page, click the plus icon (+) to create a new site.
The Create Site page appears, as shown in Figure 18 on page 95.
Figure 18: Create Site Page
• In the Site field, enter a unique name for your site.
• In the Tenants field, select a tenant from the drop-down list.
• In the Description field, enter a description.
• Click OK.
The new site is listed in the Sites page. You must now assign a device to the site.
• Select a site and click Add Enforcement Points.
The Add Enforcement Points page appears, as shown in Figure 19 on page 96.
95

Figure 19: Add Enforcement Points Page
• Select the check box beside a device in the Available list and click the > icon tomove it to the Selectedlist.
• In the Perimeter Device field, select a perimeter from the drop-down list to receive the threat feeds.
• Click OK.
Devices that are added to the site are listed in the Sites page.
• Click Next.
5. Create a policy enforcement group.
96

• In the Policy Enforcement Groups page, click the plus icon (+).
The Policy Enforcement Group page appears, as shown in Figure 20 on page 97.
Figure 20: Policy Enforcement Group Page
• In the Name field, enter a unique name for the policy enforcement group.
• In the Description field, enter a description.
• In the Group Type field, select a group type from the available choices: IP Address/Subnet or Location.
• Select the check box beside the IP address of the endpoint devices in the Available list and click the> icon to move them to the Selected list. The endpoints in the Selected list will be included in thepolicy enforcement group.
Click Refresh Available subnets to refresh the available IP addresses or subnets. If you edit anyselected items in the Selected column, the list is refreshed to the initial selected list after the refresh.
• If the endpoint you want does not appear in the list, add it as an Additional IP and click Add.
This field is available only if the Group Type field is IP Address/Subnet. If the Group Type is Location,sites with the threat remediation enabled instances are listed in the Sites field.
• Click OK.
The new Policy Enforcement Group is listed.
• Click Next.
6. Create Juniper Sky ATP realms.
97

• In the Sky ATP Realm page, click the plus icon (+).
The Sky ATP realm page appears, as shown in Figure 21 on page 98.
Figure 21: Sky ATP Realm Page
• In the Location field, select a region from the drop-down list.
• In the Username field, enter a username. Your username for Sky ATP is your e-mail address.
• In the Password field, enter a password. It should be a unique string at least 8 characters long, andinclude uppercase and lowercase letters, at least one number, and at least one special character.
• In the Realm field, enter a name for the security realm. The name can contain alphanumeric charactersand the dash symbol, and should be a name that is meaningful to your organization.
• Click OK.
You must now assign a site for the new realm.
• Select the realm for which youwant to assign site and clickAssign Sites in the Sites Assigned column.
The Sky ATP Realm page to assign sites appears, as shown in Figure 22 on page 99.
98

Figure 22: Assign Sites Page
• Select the site from the Site drop-down list.
• Click OK.
A new is assigned to the realm.
• Click Next.
7. Create a threat prevention policy as per your requirements.
99

• In the Policies page, click the plus (+) icon to create a threat prevention policy.
The Create Threat Prevention Policy page appears, as shown in Figure 23 on page 100.
Figure 23: Create Threat Prevention Policy Page
• In the Name field, enter a name for the policy.
• In the Description field, enter a description.
• In the Profiles section, select the C&Cprofile or infected host profile option based on your requirement.
• The threat prevention policy needs a profile for HTTP downloads. Select the Includemalware profilein policy option and enable the HTTP File Download option. This indicates the file types that needto be scanned for threats.
If you want to select a device profile, expand the Sky ATP realm, and select a profile, as shown inFigure 24 on page 101.
100

Figure 24: Include Malware Profile Option
• Select the Include DDoS profile in policy option to include the management of Distributeddenial-of-service (DDoS) protection.
This enables the MX Series routers to quickly identify an attack and prevent a flood of maliciouscontrol packets from the exhausting system resources.
You can take the following actions for the DDoS profile:
• Block—Block the DDoS attack.
• Rate Limit Value—Limit the bandwidth on the flow route. You can express the rate limit value inKbps, Mbps, or Gbps unit. The rate limit range is 10Kbps to 100Gbps.
• Forward to—Configure the routing next hop to forward the packets for scrubbing.
Scrubbing Site—Specify a routing instance to which packets are forwarded in theas-number:community-value format, where each value is a decimal number. For example, 65001:100.
• Click OK.
8. Apply Threat Prevention Policy to Policy Enforcement Groups.
101

Apply your threat prevention policies to policy enforcement groups. When threat prevention policiesare applied to policy enforcement groups, the system automatically discovers to which sites thosegroups belong.
• In the Policies page under the Policy Enforcement Groups column, click Assign to Groups or clickthe group name that appears in this column to edit the existing list of assigned groups. You can alsoselect a policy and click the Assign to Groups option at the top of the page.
The Assign to Policy Enforcement Groups page appears, as shown in Figure 25 on page 102.
Figure 25: Assign to Policy Enforcement Groups Page
• In the Assign to Policy Enforcement Groups page, select the option beside a group in the Availablelist and click the > icon to move it to the Selected list. The groups in the Selected list will inherit thepolicy.
• Click OK.
The system performs a rule analysis, and prepares device configurations that include the threatprevention policies, as shown in figure.
102

Figure 26: Rule Analysis Page
• Once the analysis is complete, click Update to push the updated policy to the SRX Series devices.
• Configuration changes updates to the SRX or vSRX Series device, as shown in Figure 27 on page 103.
Figure 27: Threat Prevention Policies Page
NOTE: If the update fails, exit the Guided Setup, and go to Devices>Security Devices.Resynchronize your SRX or vSRX Series device with the network, go to Configure>ThreatPrevention>Policies, and clickUpdate Required. This will push the updates one more time.
• Click OK.
The Policies page appears.
• Click Next.
9. Configure the Geo IP feeds to map the IP addresses to geographical regions.
This step is optional in this example.
103

• In the Geo IP page, click the plus (+) icon.
The Create GeoIP page appears, as shown in figure
• In the Name field, enter a unique name.
• In the Description field, enter a description.
• In the Countries field, select the check box beside the countries in the Available list and click the >icon to move them to the Selected list.
The countries in the Selected list will be included in the policy and action will be taken according totheir threat levels.
• From the Block Traffic drop-down list, choose what traffic to block from the selected countries.Incoming traffic, Outgoing traffic, or Incoming and Outgoing traffic.
• Click OK.
A new Geo IP policy is created. Once you have a Geo IP policy, you assign it to one more group.
• To assign a Geo IP policy to a group or groups, in the Group column, click Assign to Groups.
• In the Assign to Groups page, select the check box beside a group in the Available list and click the> icon to move it to the Selected list. The groups in the Selected list will be assigned to the policy.
• Click OK.
Once one or more groups have been assigned, a Ready to Update link appears in the Status column.You must update to apply your new or edited policy configuration.
• Click Ready to Update.
You can view your changes and choose to Update now, Update later, or Save them in draft formwithout updating.
10.Click Finish.
The Summary Page appears, as shown in Figure 28 on page 105.
104

Figure 28: Threat Prevention Policy Summary Page
11.Review the summary of configuration changes and clickOK or click Back to modify the configuration.
A threat prevention policy with MX Series routers as enforcement point and DDoS profile enabled iscreated. You can view the policy in Configure>Threat Prevention>Policies.
RELATED DOCUMENTATION
Configure SecIntel on MX Series Routers | 83
SecIntel Configuration Statements | 125
SecIntel Operational Commands | 133
105

4CHAPTER
Monitor
Monitor Feed Sources | 107
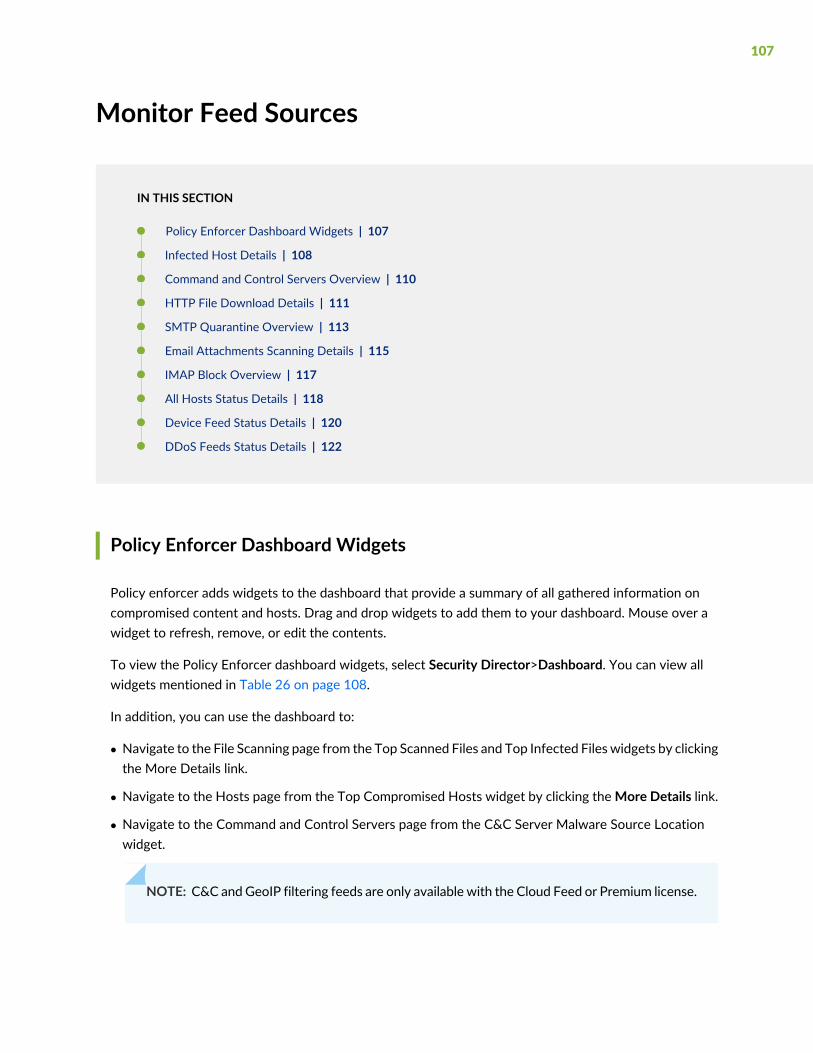
Monitor Feed Sources
IN THIS SECTION
Policy Enforcer Dashboard Widgets | 107
Infected Host Details | 108
Command and Control Servers Overview | 110
HTTP File Download Details | 111
SMTP Quarantine Overview | 113
Email Attachments Scanning Details | 115
IMAP Block Overview | 117
All Hosts Status Details | 118
Device Feed Status Details | 120
DDoS Feeds Status Details | 122
Policy Enforcer Dashboard Widgets
Policy enforcer adds widgets to the dashboard that provide a summary of all gathered information oncompromised content and hosts. Drag and drop widgets to add them to your dashboard. Mouse over awidget to refresh, remove, or edit the contents.
To view the Policy Enforcer dashboard widgets, select Security Director>Dashboard. You can view allwidgets mentioned in Table 26 on page 108.
In addition, you can use the dashboard to:
• Navigate to the File Scanning page from the Top Scanned Files and Top Infected Files widgets by clickingthe More Details link.
• Navigate to the Hosts page from the Top Compromised Hosts widget by clicking theMore Details link.
• Navigate to the Command and Control Servers page from the C&C Server Malware Source Locationwidget.
NOTE: C&C andGeoIP filtering feeds are only available with the Cloud Feed or Premium license.
107

Available dashboard widgets are as follows:
Table 26: Policy Enforcer Dashboard Widgets
DefinitionWidget
A list of the top malware found based on the number of times the malware isdetected over a period of time. Use the arrow to filter by different time frames.
Top Malware Identified
A list of the top compromised hosts based on their associated threat level andblocked status.
Top Compromised Hosts
A graph of the top infected file types by file extension. Examples: exe, pdf, ini,zip. Use the arrows to filter by threat level and time frame.
Top Infected File Types
A graph of the top infected file categories. Examples: executables, archived files,libraries. Use the arrows to filter by threat level and time frame.
Top Infected File Categories
A graph of the top file types scanned for malware. Examples: exe, pdf, ini, zip.Use the arrows to filter by different time frames.
Top Scanned File Types
A graph of the top file categories scanned for malware. Examples: executables,archived files, libraries. Use the arrows to filter by different time frames.
Top Scanned File Categories
A color-coded map displaying the location of Command and Control servers orothermalware sources. Click a location on themap to view the number of detectedsources.
C&C Server and Malware Source
SEE ALSO
Infected Hosts Overview
Command and Control Servers Overview | 110
HTTP File Download Overview
SMTP Quarantine Overview | 113
Infected Host Details
Use the host details page to view in-depth information about current threats to a specific host by timeframe. From here you can change the investigation status and the blocked status of the host.
Table 27 on page 109 shows the information provided on the host details page:
108

Table 27: Threat Level Definitions
DefinitionThreat Level
Clean; no action is required.0
Low threat level. Recommendation: Disable this host.1–3
Medium threat level. Recommendation: Disable this host.4–6
High threat level. Host has been automatically blocked.7–10
• Host Status—Displays the current state by threat level, which could be any of the levels described in thetable above.
• Investigation Status—The following states of investigation are available: Open, In progress, Resolved -false positive, Resolved - fixed, and Resolved - ignored.
• Policy override for this host—The following options are available: Use configured policy (not includedin infected hosts feed), Always include host in infected hosts feed, Never include host in infected hostsfeed.
NOTE: The blocked status changes in relation to the investigation state. For example, whena host changes from an open status (Open or In Progress) to one of the resolved statuses, theblocked status is changed to allowed and the threat level is brought down to 0. Also, whenthe investigation status is changed to resolved, an event is added to the log at the bottom ofthe page.
• Host threat level graph—This is a color-coded graphical representation of threats to this host displayedby time frame. You can change the time frame, and you can slide the graph backward or forward tozoom in or out on certain times. When you zoom in, you can view individual days within a month.
• Expand time-frame to separate events—Use this check box to stretch a period of time and see the eventsspread out individually.
• Past threats—The date and status of past threats to this host are listed here. The time frame set previouslyalso applies to this list. The description for each event provides details about the threat and the actiontaken at the time.
SEE ALSO
Infected Hosts Overview
109

HTTP File Download Overview
HTTP File Download Details | 111
File Scanning Limits
Command and Control Servers Overview
The Command and Control (C&C) servers page lists information on servers that have attempted to contactand compromise hosts on your network. A C&C server is a centralized computer that issues commandsto botnets (compromised networks of computers) and receives reports back from them. Botnets can beused to gather sensitive information, such as account numbers or credit card information, or to participatein a distributed denial-of-service (DDoS) attack.
NOTE:• C&C and Geo IP filtering feeds are only available with a Sky ATP premium license.
• When managing Sky ATP with Security Director, you must select a Sky ATP realm from theavailable pulldown.
When a host on your network tries to initiate contact with a possible C&C server on the Internet, the SRXSeries device can intercept the traffic and perform an enforcement action based on real-time intelligencefeed information that identifies the C&C server IP address and URL.
• Export Data—Click the Export button to download C&C data to a CSV file. You are prompted to narrowthe data download to a selected time-frame.
Table 28 on page 110 provides the following information available on the C&C page.
Table 28: Command & Control Server Data Fields
DefinitionField
The IP address of the suspected command and control server.External Server IP
The hostname of the suspected command and control server.External Server Hostname
Specifies the information on how the servers are blocked.Blocked Via
The threat level of the C&C server as determined by an analysis of actions andbehaviors.
Highest Threat Level
The number of times the C&C server has attempted to contact hosts on yournetwork.
Count
110

Table 28: Command & Control Server Data Fields (continued)
DefinitionField
The country where the C&C server is located.Country
The date and time of the most recent C&C server hit.Last Seen
The action taken on the communication (permitted or blocked).Action
Specifies the category of the C&C server.Category
SEE ALSO
Command and Control Server Details
HTTP File Download Overview
Email Attachments Scanning Overview
Email Attachments Scanning Details | 115
File Scanning Limits
HTTP File Download Details
Use the File Scanning Details page to view analysis information and malware behavior summaries for thedownloaded file. In the HTTP File Donwload page, click on the File Signature to go to the File ScanningDetails page. This page is divided into several sections:
Report False Positives—Click the Report False Positive button to launch a new screen which lets you senda report to Juniper Networks, informing Juniper of a false position or a false negative. Juniper will investigatethe report, however, this does not change the verdict. If you want to make a correction (mark system asclean) you must do it manually.
Printable View—Click this link to organize the information into a print-ready format.
The top of the page provides a quick view of the following information (scroll to the right in the UI to seemore boxes):
• Threat Level—This is the threat level assigned (0-10), This box also provides the threat category and theaction taken.
• Top Indicators—In this box, you will find the malware name, the signature it matches, and the IPaddress/URL from which the file originated.
111

• Prevalence—This box provides information on howoften thismalware has been seen, howmany individualhosts on the network downloaded the file, and the protocol used.
File Summary
Table 29: General Summary Fields
DefinitionField
This is the assigned threat level 0-10. 10 is the most malicious.Threat Level
How often this file has been seen across different customers.Global Prevalence
The time and date of the last scan to detect the suspicious file.Last Scanned
The name of the suspicious file. Examples: unzipper-setup.exe,20160223158005.exe,, wordmui.msi.
File Name
The type of file. Examples: PDF, executable, document.Category
The size of the downloaded file.File Size
The target operating system of the file. Example. Win32Platform
If possible, Sky ATP determines the name of the malware.Malware Name
If possible, Sky ATP determines the type of threat. Example: Trojan, Application,Adware.
Malware Type
If possible, Sky ATP determines the strain of malware detected. Example:Outbrowse.1198, Visicom.E, Flystudio.
Malware Strain
One way to determine whether a file is malware is to calculate a checksum for thefile and then query to see if the file has previously been identified as malware.
sha256 and md5
In the Network Activity section, you can view information in the following tabs:
• Contacted Domains—If available, lists any domains that were contacted while executing the file in theSky ATP sandbox.
• Contacted IPs—If available, lists all IPs that were contacted while executing the file, along with thedestination IP’s country, ASN, and reputation. The reputation field is based on Juniper IP intelligencedata destination.
112

• DNS Activity— This tab lists DNS activity while executing the file, including reverse lookup to find thedomain name of externally contacted servers. This tab also provides the known reputation of thedestination servers.
HTTP Downloads
This is a list of hosts that have downloaded the suspicious file. Click the IP address to be taken to the HostDetails page for this host. Click the Device Serial number to be taken to the Devices page. From thereyou can view device versions and version numbers for the Sky ATP configuration, including profile, allowlist,and blocklist versions. You can also view themalware detection connection type for the device: telemetry,submission, or C&C event.
SEE ALSO
HTTP File Download Details | 111
SMTP Quarantine Overview | 113
Email Attachments Scanning Overview
File Scanning Limits
SMTP Quarantine Overview
Access this page from theMonitor menu.
The SMTP quarantine monitor page lists quarantined emails with their threat score and other detailsincluding sender and recipient. You can also take action on quarantined emails here, including releasingthem and adding them to the blocklist.
The following information is available from the Summary View:
Table 30: Blocked Email Summary View
DescriptionField
Use the slider to narrow or increase the time-frame within the selected thetime parameter in the top right: 12 hrs, 24 hrs, 7 days or custom.
Time Range
This lists the total number of emails scanned during the chosen time-frameand then categorizes them into blocked, quarantined, released, and permittedemails.
Total Email Scanned
113
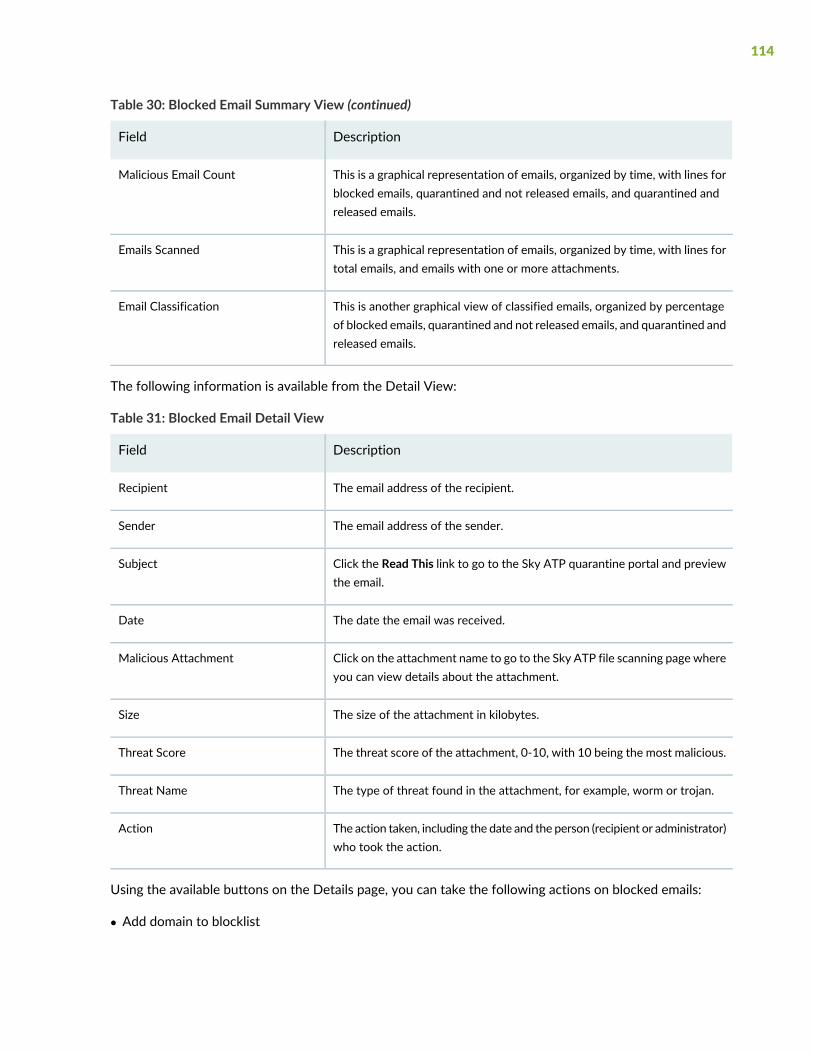
Table 30: Blocked Email Summary View (continued)
DescriptionField
This is a graphical representation of emails, organized by time, with lines forblocked emails, quarantined and not released emails, and quarantined andreleased emails.
Malicious Email Count
This is a graphical representation of emails, organized by time, with lines fortotal emails, and emails with one or more attachments.
Emails Scanned
This is another graphical view of classified emails, organized by percentageof blocked emails, quarantined and not released emails, and quarantined andreleased emails.
Email Classification
The following information is available from the Detail View:
Table 31: Blocked Email Detail View
DescriptionField
The email address of the recipient.Recipient
The email address of the sender.Sender
Click the Read This link to go to the Sky ATP quarantine portal and previewthe email.
Subject
The date the email was received.Date
Click on the attachment name to go to the Sky ATP file scanning page whereyou can view details about the attachment.
Malicious Attachment
The size of the attachment in kilobytes.Size
The threat score of the attachment, 0-10, with 10 being the most malicious.Threat Score
The type of threat found in the attachment, for example, worm or trojan.Threat Name
The action taken, including the date and the person (recipient or administrator)who took the action.
Action
Using the available buttons on the Details page, you can take the following actions on blocked emails:
• Add domain to blocklist
114

• Add sender to blocklist
• Release
SEE ALSO
HTTP File Download Overview
HTTP File Download Details | 111
Email Attachments Scanning Overview
Email Attachments Scanning Details
Use the File Scanning Details page to view analysis information and malware behavior summaries for thedownloaded file. In the Email Attachments page, click on the File Signature to go to the File ScanningDetails page. This page is divided into several sections:
Report False Positives—Click the Report False Positive button to launch a new screen which lets you senda report to Juniper Networks, informing Juniper of a false position or a false negative. Juniper will investigatethe report, however, this does not change the verdict. If you want to make a correction (mark system asclean) you must do it manually.
Printable View—Click this link to organize the information into a print-ready format.
The top of the page provides a quick view of the following information (scroll to the right in the UI to seemore boxes):
• Threat Level—This is the threat level assigned (0-10), This box also provides the threat category and theaction taken.
• Top Indicators—In this box, you will find the malware name, the signature it matches, and the IPaddress/URL from which the file originated.
• Prevalence—This box provides information on howoften thismalware has been seen, howmany individualhosts on the network downloaded the file, and the protocol used.
File Summary
Table 32: General Summary Fields
DefinitionField
This is the assigned threat level 0-10. 10 is the most malicious.Threat Level
115

Table 32: General Summary Fields (continued)
DefinitionField
The action taken based on the threat level and host settings: block or permit.Action Taken
How often this file has been seen across different customers.Global Prevalence
The time and date of the last scan to detect the suspicious file.Last Scanned
The name of the suspicious file. Examples: unzipper-setup.exe,20160223158005.exe,, wordmui.msi.
File Name
The type of file. Examples: PDF, executable, document.Category
The size of the downloaded file.File Size
The target operating system of the file. Example. Win32Platform
If possible, Sky ATP determines the name of the malware.Malware Name
If possible, Sky ATP determines the type of threat. Example: Trojan, Application,Adware.
Malware Type
If possible, Sky ATP determines the strain of malware detected. Example:Outbrowse.1198, Visicom.E, Flystudio.
Malware Strain
One way to determine whether a file is malware is to calculate a checksum for thefile and then query to see if the file has previously been identified as malware.
sha256 and md5
In the Network Activity section, you can view information in the following tabs:
NOTE: This section will appear blank if there has been no network activity.
• Contacted Domains—If available, lists any domains that were contacted while executing the file in theSky ATP sandbox.
• Contacted IPs—If available, lists all IPs that were contacted while executing the file, along with thedestination IP’s country, ASN, and reputation. The reputation field is based on Juniper IP intelligencedata destination.
• DNS Activity—This tab lists DNS activity while executing the file, including reverse lookup to find thedomain name of externally contacted servers. This tab also provides the known reputation of thedestination servers.
116

In the Behavior Details section, you can view the behavior of the file on the system. This includes anyprocesses that were started, files that were dropped, and network activity seen during the execution ofthe file. Dropped files are any additional files that were downloaded and installed by the original file.
SEE ALSO
Email Attachments Scanning Overview
Infected Hosts Overview
HTTP File Download Overview
SMTP Quarantine Overview | 113
File Scanning Limits
IMAP Block Overview
The IMAP Blockmonitor page lists blocked emails with their threat score and other details including senderand recipient. You can also take action on blocked emails here, including releasing them and adding themto the blocklist.
Table 33 on page 117 shows information available from the Summary View tab.
Table 33: Blocked Email Summary View
DescriptionField
Select the registered Sky ATP realm from the list.Sky ATP Realm
Use the slider to narrow or increase the time-frame within the selected thetime parameter in the top right: 12 hrs, 24 hrs, 7 days or custom.
Time Range
This lists the total number of malicious emails scanned during the chosentime-frame and then categorizes them into blocked, blocked and not allowed,quarantined and allowed.
Malicious Email Count
This is a graphical representation of all scanned emails, organized by date.Emails Scanned
Table 34 on page 118 shows information available from the Detail View tab.
117

Table 34: Blocked Email Detail View
DescriptionField
Specifies the email address of the recipient.Recipient
Specifies the email address of the sender.Sender
ClickRead This to go to the Sky ATP quarantine portal and preview the email.Subject
Specifies the date the email was received.Date
Click on the attachment name to go to the Sky ATP file scanning page whereyou can view details about the attachment.
Malicious Attachment
Specifies the size of the attachment in kilobytes.Size
Specifies the threat score of the attachment, in a scale of 0-10, with 10 beingthe most malicious.
Threat Score
Specifies the type of threat found in the attachment, for example, worm ortrojan.
Threat Name
Specifies the action taken, including the date and the person (recipient oradministrator) who took the action.
Action
Using the available buttons on the Details page, you can take the following actions on blocked emails:
• Unblock Attachment for Selected User(s)
• Unblock Attachment for All Users
SEE ALSO
All Hosts Status Details
Use the All Hosts Status page to view the enforcement status of infected hosts feeds. The supported hostfeeds are custom and Sky ATP.
By default, details for both custom and Sky ATP hosts are shown. You must select the required feed typefrom the Feed Source column.
118

NOTE: To view the All Hosts Status page, you must have the Threat Management privileges orpredefined roles enabled.
To see the details of all hosts status:
1. SelectMonitor > Threat Prevention > All Hosts Status.
The All Hosts Status page appears.
2. Table 35 on page 119 shows the information provided on the All Hosts Status page.
Table 35: Fields on All Hosts Status Page
DescriptionColumn Name
Specifies the IP address of the feed.IP Address
Specifies the MAC address of the feed.MAC Address
Specifies the name of the feed.Feed Name
Specifies type of the feed source.Feed Source
Specifies the action of the infected host. For example: Block or Quarantine.Action
Specifies the enforcement status of the infected host.Enforcement Status
Specifies the name of the Juniper Networks switch used to monitor the feed.Switch Name
Specifies the interface on the switch where the user is connected to a network.Interface Name
Specifies the name of the associated threat prevention policy.
This column is not shown by default. Click ShowHide Column and select this fieldto appear on the All Hosts Status page.
Policy Associated
Specifies the Policy Enforcement Group (PEG) associated with the policy.
This column is not shown by default. Click ShowHide Column and select this fieldto appear on the All Hosts Status page.
PEG Associated
119

Table 35: Fields on All Hosts Status Page (continued)
DescriptionColumn Name
Specifies the subnet that is added as an endpoint for the PEG.
This column is not shown by default. Click ShowHide Column and select this fieldto appear on the All Hosts Status page.
Matched Subnet
Specifies the type of connector used as an enforcement point.Connector Type
Specifies the name of the connector.
This column is not shown by default. Click ShowHide Column and select this fieldto appear on the All Hosts Status page.
Connector Name
Specifies the type of endpoints added to a PEG.
This column is not shown by default. Click ShowHide Column and select this fieldto appear on the All Hosts Status page.
Endpoint Address Space Type
Specifies the name of an endpoint.
This column is not shown by default. Click ShowHide Column and select this fieldto appear on the All Hosts Status page.
Endpoint Address Space Name
You can click the filter icon to filter the data based on the following fields:
• Feed source type
• Action
• Enforcement status
• Connector type
SEE ALSO
Custom Feed Sources Overview
Device Feed Status Details
Use the Device Feed Status page to view the download status of feeds from various feed sources. Youcan view the status of feeds for each device.
120

NOTE: To view the Device Feed Status page, you must have the Threat Management privilegesor predefined roles enabled.
To view the details of the device feed status:
1. SelectMonitor > Threat Prevention > Device Feed Status.
The Device Feed Status page appears.
2. Table 36 on page 121 shows the information provided on the Device Feed Status page.
Table 36: Fields on the Device Feed Status Page
DescriptionColumn Name
Specifies the name of the device.Device Name
Specifies the IP address of the device.IP
Specifies the model of the device mentioned in the Device Name column. Forexample, vSRX.
Model
Specifies the name of the feed downloaded to the device.
This also shows the number of feeds downloaded. Click on the number to viewthe names of the individual feeds.
Feed Name
Specifies the category of the feed. For example, CC.Feed Category
Specifies the last downloaded date and time of each feed.Last Downloaded
You can click the filter icon to filter the data based on the following fields:
• Device name
• IP address of the device
• Model of the device
• Name of the feed
• Following feed categories:
• C&C
• Allowlist
121

• Blocklist
• Infected hosts
• Dynamic address
• DDoS
• GeoIP
SEE ALSO
About the Feed Sources Page
DDoS Feeds Status Details
Use the DDoS Feeds Status page to view the enforcement status of Distributed Denial of Service (DDoS)feeds.
In Sky ATP Only mode, you do not see the DDoS Feeds Status page under Monitor. An error message isshown that the page is unavailable because the current threat prevention type is set to Sky ATP onlymode.
NOTE: To view the DDoS Feeds Status page, you must have the Threat Management privilegesor predefined roles enabled.
To view details of DDoS feeds status:
1. SelectMonitor > Threat Prevention > DDoS Feeds Status.
The DDoS Feeds Status page appears.
2. Table 37 on page 122 shows information provided on the DDoS Feeds Status page.
Table 37: Fields on the DDoS Feeds Status Page
DescriptionColumn Name
Specifies the DDoS feed name to monitor the feeds.Feed Name
Specifies the associated site name with the DDoS feedsSite
122

Table 37: Fields on the DDoS Feeds Status Page (continued)
DescriptionColumn Name
Specifies the name of the MX router where DDoS is enabled.MX Name
Specifies the IP address of the MX router.MX IP
Specifies the status of the MX router.MX Status
Specifies the action taken for the DDoS profile
To filter the data based on a specific action, click the filter icon and select the requiredDDoS profile action from the list.
Action
Specifies the enforcement status of the feed. Hover over the status to view the reasonfor that particular status.
To filter the data based on a specific enforcement status, click the filter icon and selectthe required enforcement status from list to monitor the feed.
Enforcement Status
Specifies the name of the associated threat prevention policy.Policy
Specifies the Policy Enforcement Group (PEG) associated with the policy.PEG
SEE ALSO
Custom Feed Sources Overview
123

5CHAPTER
Configuration Statements andOperational Commands
SecIntel Configuration Statements | 125
SecIntel Operational Commands | 133

SecIntel Configuration Statements
IN THIS SECTION
set services security-intelligence | 126
security-intelligence | 130
security-intelligence-policy | 132
125

set services security-intelligence
Syntax
set services security-intelligenceauthenticationcategory (all | category-name)policy policy-name category profile-nameprofile profile-name category rule rule-name (match | then)traceoptions (file | flag | evel | no-remote-trace)url url-addressurl-parameter url-parameteraction block close (file message|redirect-URL)
Release InformationCommand introduced in Junos OS 12.1X46. Starting with Junos OS 15.1X49-D110, this command addsthe feed-name option which can be used in security intelligence rules. Prior to Junos OS 15.1X49-D100you could perform HTTP URL redirect based on threat levels. With feed-name, you can now performHTTP URL redirection based on a feed name.User notification of infected hosts—As of Junos OS 18.1R1, there is support HTTP URL redirection basedon infected hosts with the block action. This allows for administrator notification of InfectedHosts. Duringthe processing of a session IP address, if the IP address is on the infected hosts list and HTTP traffic isusing ports 80 or 8080, infected hosts HTTP redirection can be done. If HTTP traffic is using dynamicports, HTTP traffic redirection cannot be done. See command at bottom of this page.
DescriptionUsing this command, you can configure security intelligence profiles and policies to work with securityintelligence feeds, such as infected hosts and C&C. You then configure a firewall policy to include theinclude the security intelligence policy to, for example, block outgoing requests to a C&C host.
A security intelligence rule can havemultiple feed names (feed-name) withmultiple threat levels. Specifyingthe threat level is required, but feed-name is optional. Juniper Sky ATP makes sure there is no duplicatefeed-name associatedwith threat levels configured in the same profile. Juniper Sky ATP uses the followingapproach:
• If feed-name is configured, it looks up the feed-name first.
• If no feed-name configured or the feed-name is not match, it uses the threat level rules.
• If no rules are present or match, the profile’s default rule is used.
Optionsauthentication—Configure authentication, such as an auth token or TLS profile, to commute with the feed
server. This operation is performed by the ops script used to enroll your devices and is typically notrequired afterwards. If you have problems establishing a connection with the Juniper Sky ATP cloud
126

server, it is recommended that you rerun the ops script instead of manually entering all the CLIcommands.
category (all | category-name)—Category to be disabled. You can disable a specific category or all. Thisoption is used for temporarily disabling a category during debugging phases.
policypolicy-namecategoryprofile-name—Configure the security intelligence policy. You specify the category(such as CC) and the security intelligence profile to associate with this policy.
profile profile-name category rule rule-name (match | then)—Configure security intelligence profile. Youspecify the profile name, the category (such as CC), and any rules and actions (such as threat levelscores, permit or drop the session, etc.)
traceoptions—Set security intelligence trace options.
url url-address—Configure the URL of the feed server. This operation is performed by the ops script usedto enroll your devices and is typically not required afterwards. If you have problems establishing aconnection with the Juniper Sky ATP cloud server, it is recommended that you rerun the ops scriptinstead of manually entering all the CLI commands.
url-parameter url-parameter—This is an internal option. Do not use this option unless instructed to byJuniper Networks Technical Support.
block close infected host file message|redirect-URL—Provides HTTP URL redirection based on infectedhosts with the block action.
This allows for administrator notification of Infected Hosts. During the processing of a session IPaddress, if the IP address is on the infected hosts list and HTTP traffic is using ports 80 or 8080,infected hosts HTTP redirection can be done. If HTTP traffic is using dynamic ports, HTTP trafficredirection cannot be done.
Required Privilege Level
SEE ALSO
Example: Configuring a Juniper Sky Advanced Threat Prevention Policy Using the CLI
List of Sample Outputset services security-intelligence profile secintel_profile rule on page 128set services security-intelligence profile on page 128set services security-intelligence profile on page 129set services advanced-anti-malware connection authentication on page 129set services security-intelligence url on page 129set services security-intelligence profile secintel_profile rule secintel_rule2 then action block close infectedhost|http redirect-url http://www.test.com/url2.html on page 129
127

Output FieldsThere are no output fields for this command.
Sample Output
set services security-intelligence profile secintel_profile rule
This example performs feed name-based URL redirection.
user@host# set services security-intelligenceprofile secintel_profile rule secintel_rule1match feed-namecustom_feed1uuser@host# set services security-intelligence profile secintel_profile rule secintel_rule1 matchthreat-level 7user@host# set services security-intelligence profile secintel_profile rule secintel_rule1 matchthreat-level 8user@host# set services security-intelligence profile secintel_profile rule secintel_rule1 matchthreat-level 9user@host# set services security-intelligence profile secintel_profile rule secintel_rule1 matchthreat-level 10user@host# set services security-intelligence profile secintel_profile rule secintel_rule1 then actionblock close http redirect-url http://www.test.com/url1.htmluser@host# set services security-intelligenceprofile secintel_profile rule secintel_rule2match feed-namecustom_feed2uuser@host# set services security-intelligence profile secintel_profile rule secintel_rule2 matchthreat-level 7user@host# set services security-intelligence profile secintel_profile rule secintel_rule2 matchthreat-level 8user@host# set services security-intelligence profile secintel_profile rule secintel_rule2 matchthreat-level 9user@host# set services security-intelligence profile secintel_profile rule secintel_rule2 matchthreat-level 10user@host# set services security-intelligence profile secintel_profile rule secintel_rule2 then actionblock close http redirect-url http://www.test.com/url2.html
set services security-intelligence profile
user@host# set services security-intelligence profile cc_profile category CC
128

set services security-intelligence profile
This example configures a profile name, a profile rule and the threat level scores. Anything that matchesthese scores is considered malware or an infected host.
user@host# set services security-intelligence profile cc_profile rule CC_rule match threat-level [8 910]
set services advanced-anti-malware connection authentication
This example defines the TLS profile, typically done by the ops script when enrolling devices.
user@host# set services advanced-anti-malware connection authentication tls-profile aamw-ssl
set services security-intelligence url
This example defines the feed server URL, typically done by the ops script when enrolling devices.
user@host# set services security-intelligence url https://cloudfeeds.argon.junipersecurity.net/api/manifest.xml
set services security-intelligence profile secintel_profile rule secintel_rule2 then action block close infectedhost|http redirect-url http://www.test.com/url2.html
User notification of infected hosts—(Starting in Junos 18.1R1) This command allows you to configureHTTP URL redirection based on infected hosts with the block action. During the processing of a sessionIP address, if the IP address is on the infected hosts list and HTTP traffic is using ports 80 or 8080, infectedhosts HTTP redirection to a specified URL can be used in conjunction with the block action. This allowsadministrators to receive a notification of the block action. Note that if HTTP traffic is using dynamic ports,HTTP traffic redirection cannot be done
The syntax for the command is as follows:
Syntax: set services security-intelligence profile <name> then action block close <filemessage|redirect-URL>
For example:
user@host# set services security-intelligence profile secintel_profile rule secintel_rule2 then actionblock close infected host|http redirect-url http://www.test.com/url2.html
To view the HTTP URL redirection counter, type show services security-intelligence statistics
129

security-intelligence
Syntax
authentication {auth-token auth-token;
tls-profile tls-profile;traceoptions {no-remote-trace;file [ filename <files number> <size bytes> <match expression> <world-readable | no-world-readable>];flag [all | feed | ipc];level [all| error | info | notice | verbose | warning];
no-remote-trace;url url;
Hierarchy Level
[edit services]
Release InformationStatement introduced in JunosOS Release 19.3R2 onMX Series routers with Juniper Sky Advanced ThreatPrevention (ATP).Support added in Junos OS Release 19.3R2 for Next Gen Services on MX Series routers MX240, MX480,and MX960 with the MX-SPC3 services card.
DescriptionYou can configure security intelligence profiles and policies to work with security intelligence feeds, suchas infected hosts and C&C. You then configure a firewall policy to include the security intelligence policy,for example, block outgoing requests to a C&C host.
Optionsauthentication—Configure authentication, such as an auth token or TLS profile, to commute with the feed
server. This operation is performed by the ops script used to enroll your devices and is typically notrequired afterwards. If you have problems establishing a connection with the Juniper Sky ATP cloudserver, we recommend that you rerun the ops script instead ofmanually entering all the CLI commands.
traceoptions—Set security intelligence trace options.
• file—Name of the file to receive the output of the tracing operation.
• files number—Maximum number of trace files
Range: 2 through 1000
• match— Regular expression for lines to be logged
130

• no-world-readable—Prevent any user from reading the log file
• size—Maximum size of each trace file
Range: 10240 through 1073741824
• world-readable—Allow any user to read the log file
• flag—Tracing operation to perform
• all—All interface tracing operation
• feed—Trace feed operation
• ipc—Trace interface interprocess communication (IPC) module messages
• level—Level of debugging output
• no-remote-trace—Disable the remote trace
url url-address—Configure the URL of the feed server. This operation is performed by the ops script usedto enroll your devices and is typically not required afterwards. If you have problems establishing aconnectionwith the Juniper Sky ATP cloud server, we recommend that you rerun the ops script insteadof manually entering all the CLI commands.
Required Privilege Levelsystem—To view this statement in the configuration.system-control—To add this statement to the configuration.
131

security-intelligence-policy
Syntax
security-intelligence-policy {threat-level threat-level;threat-action {dropdrop-and-logdrop-and-sampledrop-log-and-sampleloglog-and-samplesample
}}
Hierarchy Level
[edit services web-filter profile profile-name]
Release InformationStatement introduced in JunosOS Release 19.3R1 onMX Series routers with Juniper Sky Advanced ThreatPrevention (Juniper Sky ATP) .Support added in Junos OS Release 19.3R2 for Next Gen Services on MX Series routers MX240, MX480,and MX960 with the MX-SPC3 services card
DescriptionDefine the threat level and action for the Web filter profile. The packets are redirected at the PacketForwarding Engine based on the configured threat-level action associated with the threat-level of thedestination IP address.
Optionsthreat-level—Define the Web filtering threat level. The value ranges from 1 through 10
threat-action—Define the way the Packet Forwarding Engine processes packets in response to a threat.Only one action can be configured for each threat level that is defined. The default threat-action isaccept.
• drop—Drop the packets and do not generate a log message.
• drop-and-log—Drop the packets and generate a log message.
• drop-and-sample—Drop and sample the packets.
132

• drop-log-and-sample—Drop, sample, and allow the packets, and generate a log message.
• log—Allow the packets and generate a log message.
• log-and-sample—Allow, sample the packets, and generate a log message.
• sample—Sample the packets.
Required Privilege Levelsystem—To view this statement in the configuration.system-control—To add this statement to the configuration.
SEE ALSO
web-filter
SecIntel Operational Commands
IN THIS SECTION
show services security-intelligence category summary | 134
show services security-intelligence update status | 137
show services web-filter secintel-policy status profile | 138
133

show services security-intelligence category summary
Syntax
show services security-intelligence category summary category-name
Release InformationStatement introduced before Junos OS Release 18.4.Support added in Junos OS Release 19.3R2 for Next Gen Services on MX Series routers MX240, MX480,and MX960 with the MX-SPC3 services card.
DescriptionDisplay summary for the specified Security Intelligence category.
Optionscategory-name—Name of the category.
Required Privilege LevelView
SEE ALSO
security-intelligence | 130
List of Sample Outputshow services security-intelligence category summary on page 135
Output FieldsTable 38 on page 134 lists the output fields for the show services security-intelligence category summarycommand. Output fields are listed in the approximate order in which they appear.
Table 38: show services security-intelligence category summary Output Fields
Field DescriptionField Name
Name of the Security Intelligence category.Category name
Status of the Security Intelligence category.Status
Description of the Security Intelligence categoryDescription
Amount of time after which Policy Enforcer sends an update for the feed.Update interval
134

Table 38: show services security-intelligence category summary Output Fields (continued)
Field DescriptionField Name
Length of time (in minutes) the file remains open, receiving statistics before it is closed,transferred, and rotated. When either the time or the file size is exceeded, the file is closedand a new one is opened, whether or not a transfer site is specified.
TTL
Information about the feed, including:
• Version
• Object umber
• Create time
• Update time
• Update status
• Expired
• Options
Feed name
Sample Output
show services security-intelligence category summary
user@host> show services security-intelligence category summary
node1:
--------------------------------------------------------------------------
Category name :CC
Status :Enable
Description :Command and Control data schema
Update interval :1800s
TTL :3456000s
Feed name :cc_ip_data
Version :N/A
Objects number:0
Create time :2018-03-16 05:57:39 PDT
Update time :2018-03-19 12:30:32 PDT
Update status :N/A
Expired :No
Options :N/A
Feed name :cc_ipv6_data
Version :20180228.1
Objects number:1
135

Create time :2018-03-16 05:57:39 PDT
Update time :2018-03-16 06:19:47 PDT
Update status :Store succeeded
Expired :No
Options :N/A
136

show services security-intelligence update status
Syntax
show services security-intelligence update status
Release InformationStatement introduced before Junos OS Release 18.4.Support added in Junos OS Release 19.3R2 for Next Gen Services on MX Series routers MX240, MX480,and MX960 with the MX-SPC3 services card.
DescriptionDisplay the status of the connection with Policy Enforcer.
Required Privilege LevelView
SEE ALSO
security-intelligence | 130
List of Sample Outputshow services security-intelligence update status on page 137
Sample Output
show services security-intelligence update status
user@host> show services security-intelligence update status
node1:
--------------------------------------------------------------------------
Current action :Start downloading the latest manifest.
Last update status :Download manifest failed.
Last connection status:succeeded
Last update time :2018-03-21 16:59:59 PDT
137

show services web-filter secintel-policy status profile
Syntax
show services web-filter secintel-policy status profile profile-name
Release InformationStatement introduced before Junos OS Release 18.4.Support added in Junos OS Release 19.3R2 for Next Gen Services on MX Series routers MX240, MX480,and MX960 with the MX-SPC3 services card.
DescriptionDisplay the IPv4 and IPv6 count per threat level received from the C&C feed from Policy Enforcer. It alsodisplays the count of the number of terms used in the implicit filter per threat level.
Optionsprofile-name—Name of the profile
Required Privilege Levelview
SEE ALSO
security-intelligence | 130
List of Sample Outputshow services web-filter secintel-policy status profile on page 138
Sample Output
show services web-filter secintel-policy status profile
user@host> show services web-filter secintel-policy status profile
URL Filtering SecIntel Policy Status:
Profile : Profile1
C DB File : /var/db/url-filterd/urlf_si_cc_db.txt
Policy State: Ready
DB File Change Time : Tue Nov 27 11:01:10 2018
DB File Load Time : Tue Nov 27 11:01:38 2018
138

C Prefix Count : IPv4: 11093 IPv6: 5
Filters:
Threat level Action v4 Term Count IPv4 v6 Term Count IPv6
1 ACCEPT 23 1129 1 2
2 ACCEPT 11 1444 0 0
3 ACCEPT 6 996 0 0
4 ACCEPT 7 564 0 0
5 ACCEPT 7 451 0 0
6 ACCEPT 4 126 0 0
7 LOG 5 175 0 0
8 DROP AND LOG 4 396 1 1
9 ACCEPT 2 164 0 0
10 ACCEPT 33 5601 1 2
139

6CHAPTER
Migrate Spotlight Secure Customers
Migration Instructions for Spotlight Secure Customers | 141

Migration Instructions for Spotlight SecureCustomers
IN THIS SECTION
Moving From Spotlight Secure to Policy Enforcer | 141
Moving From Spotlight Secure to Policy Enforcer
IN THIS SECTION
Spotlight Secure and Policy Enforcer Deployment Comparison | 142
License Requirements | 142
Sky ATP and Spotlight Secure Comparison Table | 142
Migrating Spotlight Secure to a Policy Enforcer Configuration Overview | 144
Installing Policy Enforcer | 144
Configuring Advanced Threat Prevention Features: Spotlight Secure/Policy Enforcer Comparison | 150
The Spotlight Secure Threat Intelligence Platform aggregates threat feeds frommultiple sources to deliveropen, consolidated, actionable intelligence to SRX Series Devices across an organization. This product isnow superseded by the Juniper Connected Security Policy Enforcer. The Juniper Connected Securityframework delivers enhanced security from external as well as internal attacks by leveraging both securityas well as network devices as a coherent security system.
Policy Enforcer is an orchestration solution that orchestrates user intent policy enforcement for threatremediation as well as micro-segmentation across the entire network. This document talks about thelogistics of migrating from Spotlight Secure to Policy Enforcer.
Spotlight Secure and Policy Enforcer with Sky ATP are two different platforms and therefore a directmigration of threat policies from Spotlight Secure to Policy Enforcer is not supported. Instead it isrecommended that you remove Spotlight Connector from your Space Fabric and remove threat relatedconfigurations on Security Director before you install Policy Enforcer. Then you will need to reconfigureyour data and threat feeds. The following sections provide an overview of the transition process fromSpotlight Secure to Policy Enforcer with Sky ATP.
141
Spotlight Secure and Policy Enforcer Deployment Comparison
The function of Spotlight Secure connector, to bring together all the available threat intelligence andmakeit available to security policies, is now done via Policy Enforcer with Sky ATP. In addition, Policy enforceris a key part of the Juniper Connected Security Solution.
Spotlight Secure was installed to a separate virtual machine and then added as a specialized node to theJunos Space Fabric on Junos Space until version 15.1. Policy Enforcer is shipped as a virtual machine thatis deployed independently. Instead of adding the new VM as a Junos Space node, the configuration hasbeen simplified with a workflow using the Security Director user interface.
NOTE: Spotlight Secure supported a HA deployment. The current version of Policy Enforcer issupported only as a single stand-alone deployment.
License Requirements
For existing Spotlight Secure customers, no new additional license is needed. If you have a Spot-CC license,it can be used with Policy Enforcer and Sky ATP as well. A Policy Enforcer license would only be neededif youwant to use the complete set of Juniper Connected Security featureswith SkyATP. Juniper ConnectedSecurity/Policy Enforcer features includes all threat prevention types: C&C, infected hosts, malware, GeoIP,and policy management and deployment features such as secure fabric and threat prevention policies. See“Features By Sky ATP Configuration Type” on page 28 for more details.
Sky ATP and Spotlight Secure Comparison Table
The following table provides a product comparison:
142

Table 39: SKY ATP and Spotlight support Quick Summary
Workflow using Sky ATP, SecurityDirector and Policy Enforcer
Support with PolicyEnforcer and SkyATP
Support in SpotlightSecureFeature
• Create a Realm in Sky ATP if you donot already have one
• Configure Policy Enforcer in Cloudfeed only or Sky ATP or Sky ATP withJuniper Connected Security modes toconnect to the realm
• Configure a Threat Prevention Profileusing Command and Control options
• Use this Threat Prevention Profile inFirewall Policy
Fully SupportedFully SupportedCommand andControlFeed
• Create a Realm in Sky ATP if you donot already have one
• Configure Policy Enforcer Setting inSky ATP mode
• Create a Custom Feed using Blocklist,Allowlist or Dynamic address optionsselecting static IP or file options
Blocklist, Allowlist,Infected Host, andDynamic Addressfeatures are fullysupported
Blocklist, Allowlist andDynamic Addressfeatures are fullysupported.
Custom Feeds
Sky ATP supports an Infected Host feed,natively integrated with Policy Enforcerand Security Director.
Sky ATP supports anInfected Host feed,natively integrated withPolicy Enforcer andSecurity Director.
Not directlysupported bySpotlight. You mustcreate custom feeds
Infected Host
Sky ATP supports an Infected Host feedwhich is natively integrated with PolicyEnforcer. Policy Enforcer can takeblock/quarantine actions at the switchport level.
Sky ATP supports anInfected Host feedwhich is nativelyintegrated with PolicyEnforcer. PolicyEnforcer can takeblock/quarantineactions at the accessnetwork level.
NOTE: This requires aPolicy Enforcer licenseand does not comewitha SPOT_CC license.
Not supported usingSpotlight and SecurityDirector
Infected HostRemediation at theAccess Network level
143

Migrating Spotlight Secure to a Policy Enforcer Configuration Overview
In this section, there is a side by side comparison of feature configuration for Spotlight Secure on SecurityDirector 15.1 and Policy Enforcer on Security Director 16.1 and higher to aid in re-configuring your threatpolicies.
This is an overview of the tasks needed to migrate:
1. Document the current data and feed configuration from current version of Security Director.
2. Remove Spotlight Connector from your Junos Space Fabric and remove the threat preventionconfiguration.
3. Upgrade to the latest versions of Junos Space and Security Director.
NOTE: Since the underlying operation system is upgraded to Centos6.8 on Junos Spaceversion 16.1, first upgrade Junos Space and applications to 15.2R2 and then follow thedocumentation to restore the database before deploying 16.1 or higher. Please refer to theJunos Space 16.1 release notes for details.
4. Deploy the Policy Enforcer virtual machine. See instructions in the following section.
5. Deploy Security Director and install Policy Enforcer to Security Director.
6. Configure a Sky ATP realm and enroll SRX Series devices into the realm. For all deployment models, itis necessary to configure a Sky realm and enroll firewalls.
7. Configure feeds and threat policies.
Installing Policy Enforcer
Policy Enforcer provides centralized, integrated management of all your security devices (both physicaland virtual), allowing you to combine threat intelligence from different solutions and act on that intelligencefrom one management point. Using Policy Enforcer and the intelligence feeds it offers through Sky ATP,you can create threat prevention policies that provide monitoring and actionable intelligence for threattypes such as known malware, command and control servers, infected hosts, and Geo IP-based serverdata.
144

Policy enforcer is shipped as a OVA file that should be deployed over VMware ESX.
145

1. Download the Policy Enforcer virtualmachineOVA image from the JuniperNetworks software downloadpage. It is recommended to deploy Policy Enforcer on the same ESX server as Junos Space.
146

NOTE: Do not change the name of the Policy Enforcer virtual machine image file that youdownload from the Juniper Networks support site. If you change the name of the image file,the creation of the Policy Enforcer virtual machine can fail.
Figure 29: Deploy Policy Enforcer OVF File 1
Figure 30: Deploy Policy Enforcer OVF File 2
147

NOTE: SeeDeploying and Configuring the Policy Enforcer withOVA files for the complete PolicyEnforcer installation documentation.
2. Initial configuration is done through the console. In addition to network and host configuration, youmust set a customer ID and reset the root password. The default login to Policy Enforcer is Username:root,Password: abc123
148

Figure 31: Policy Enforcer Configuration Summary
3. Once Policy Enforcer is deployed, it must be added to Security Director via Security Director UserInterface. From the Security Director UI, navigate to Administration > Policy Enforcer > Settings.
NOTE: Unlike Spotlight Secure, Policy Enforcer does not need to be added to Junos SpaceFabric. The addition is done only through the Security Director UI.
4. On the Settings page, there three Sky ATP Configuration Types to choose from.
• Sky ATP with Juniper Connected Security—All Policy Enforcer features and threat prevention typesare available
• Sky ATP—All threat prevention types are available: Command and control server, Geo IP, and Infectedhosts.
• Cloud feeds only—Command and control server and Geo IP are the only threat prevention typesavailable.
• No selection (No Sky ATP)—You can choose to make no selection. When you make no selection,there are no feeds available from Sky ATP, but the benefits of Secure Fabric, Policy EnforcementGroups, and Threat Prevention policies provided by Policy Enforcer are available. Infected hosts isthe only prevention type available
149

NOTE: You can switch from Cloud feeds only to Sky ATP, or SKY ATP to SKY ATP withJuniper Connected Security, but the reverse is not supported.
NOTE: If you upgrade fromCloud feeds only to SkyATP, you cannot roll back again. Upgradingresets all devices previously participating in threat prevention, and you must re-enroll themwith Sky ATP. This is true for upgrading from Sky ATP to SKY ATP with Juniper ConnectedSecurity. “SKY ATP with Juniper Connected Security” is for the Juniper Connected Securitysolution and not covered in this section.
NOTE: See “Sky ATP Configuration Type Overview” on page 25 for the Policy Enforcerdocumentation on this topic.
NOTE: Policy Enforcer with Sky ATP does not support a workflow for removing Policy Enforcer.To switch to a different Policy Enforcer, replace the IP and login information in the Policy Enforcersettings page.
ConfiguringAdvancedThreat Prevention Features: Spotlight Secure/Policy EnforcerComparison
The following section is a side by side comparison of how advanced threat prevention features wereconfigured on Spotlight Secure compared to how they are configured with Policy Enforcer.
Configuring Command and Control and Infected Host
150

Spotlight Secure: C&C and Infected Host
This is how C&C and infected host feeds were configured on Security Director 15.1 with Spotlight Secure:
1. Under Security intelligence > Information Source, click + to add a new information source. SelectSpotlight Secure Cloud as source.
Figure 32: Spotlight Secure: Add Information Source
2. Create a Security Intelligence profile from Security intelligence > Profiles . Choose Command andControl as the feed category and set the Blocking threshold. Configure Block Options and Logging.
151

Figure 33: Spotlight Secure: Create Security Intelligence Profile
3. Complete the workflow to create a profile.
Figure 34: Spotlight Secure: Create Profile
4. Create a security intelligence policy.
152

Figure 35: Spotlight Secure: Create Security Intelligence Policy
5. Apply the security intelligence policy to a firewall policy.
Figure 36: Spotlight Secure: Apply Security Intelligence Policy to Firewall Policy
153

Policy Enforcer with Sky ATP: C&C and Infected Host
This is how C&C and infected host feeds are configured on Security Director 16.1 and higher with PolicyEnforcer:
NOTE: Policy Enforcer can be configuredwith Sky ATP or Cloud feeds only to enable Commandand Control feeds. The following instructions are for Cloud feeds only.
NOTE: In addition to the instructions provided here, Threat Prevention Guided Setup underConfiguration >Guided Setup >Threat Prevention can be leveraged for awizard drivenworkflow.
1. Configure a Sky ATP Realm by navigating to Configure > Threat Prevention > Sky ATP Realms. Click+ to create a realm.
(You must have a Sky ATP account to configure a realm. If you do not have an account please click onthe link provided in the Sky ATPRealmwindow to create one at the Sky ATP account page. See “CreatingSky ATP Realms and Enrolling Devices or Associating Sites” on page 54 for details).
NOTE: You do not need a Sky ATP premium license to create an account or realm.
2. Once the Sky ATP realm is created, add a policy by navigating to Configure > Threat Prevention >Policies. Click + to create a policy. Enable the check box to Include C&C profile in policy and set threatscore thresholds, actions, and logging.
154

Figure 37: Policy Enforcer: Create Threat Prevention Policy
Figure 38: Policy Enforcer: Create Threat Prevention Policy, Select Threat Score and Logging
3. Apply the threat prevention policy to a firewall policy.
155

Figure 39: Policy Enforcer: Apply Threat Prevention Policy to Firewall Policy
4. Publish, verify the configuration and update to the firewall.
Figure 40: Policy Enforcer: Update Firewall Policy
156

NOTE: If Sky ATP is chosen as the Sky ATP Configuration Type under Administration >Policy Enforcer > Settings, theworkflow remains the same, but additional parameters becomeavailable for configuring anti-malware.
Configuring Custom Feeds
Spotlight Secure: Custom Feeds
This is how custom feeds were configured on Security Director 15.1 with Spotlight Secure:
1. Create an information source by navigating to Security Intelligence > Information Source . Click + toadd a source. (Note that WebApp Secure is no longer supported.)
Figure 41: Spotlight Secure: Add Information Source
2. Upload from a custom file. Select Source as Custom File Upload and point to a local file.
157

Figure 42: Spotlight Secure: Configure Custom File Upload
3. Configure a periodic upload from a remote file server. Provide the full URL to the plain text file youwant to poll and enter server login information, Username and Password.
Figure 43: Spotlight Secure: Enter Server Login for Custom File Upload
158

4. Create a dynamic object by navigating to Security Intelligence > Dynamic Address Group. Configurethe feed as the custom feed that was created in the previous step.
Figure 44: Spotlight Secure: Select Custom Feed in Dynamic Address Group
5. Use the dynamic object in a security policy.
159

Figure 45: Spotlight Secure: Select Dynamic Address in Security Policy
6. Configure a custom feed as an allowlist or blocklist by navigating to Security Intelligence > Profiles.Edit Global White List or Global Black List to add a custom feed created in the previous steps.
Figure 46: Spotlight Secure: Edit Global Whitelist or Blacklist
160

Policy Enforcer with Sky ATP: Custom Feeds
This is how custom feeds are configured on Security Director 16.1 and higher with Policy Enforcer:
NOTE: In addition to the instructions provided here, Threat Prevention Guided Setup underConfiguration >Guided Setup >Threat Prevention can be leveraged for awizard drivenworkflow.
Policy Enforcer supports manually adding or uploading custom feed information from a file server. Thecustom feed can be a dynamic object, infected hosts list, allowlist or blocklist which can then be usedwithin the match criteria of a firewall rule.
1. Create Custom Feeds by navigating to Configure > Threat Prevention > Custom Feeds. Click + tocreate a new feed.
2. Provide a Name and Description for the custom feed and choose the tab for the type of feed:DynamicAddress, Blacklist,Whitelist or Infected Host.
Figure 47: Policy Enforcer: Configure Custom Feed
3. Manually configure the IP list or upload it from a local file. The IP list can be defined as individual IPaddresses, IP address ranges, or subnets. See “Creating Custom Feeds” on page 77 for complete details.
161

NOTE: Dynamic objects can be used within a firewall policy to match criteria as a source ordestination address object.
NOTE: Policy Enforcer supports only cloud based C&C feeds and not custom C&C feeds.Policy Enforcer APIs can be used to extend this functionality.
4. Upload a local file. Select the Upload file option in the right corner of the page.
Figure 48: Policy Enforcer: Upload Custom File
5. If you have configured an allowlist, downloads from those IP addresses are considered trusted. Forblocklists, all downloads from those IP addresses are blocked. Dynamic objects can be used within afirewall policy match criteria as a source or destination address object.
162

Figure 49: Policy Enforcer: Use Dynamic Addresses in Firewall Policy
Configuring Geo IP
Spotlight Secure: Geo IP
This is how Geo IP feeds were configured on Security Director 15.1 with Spotlight Secure:
1. Create a GeoIP object under dynamic object by navigating to Security Intelligence >Dynamic AddressGroup. Select the feed as GeoIP and pick the countries from the drop down list.
163

Figure 50: Spotlight Secure: Create Geo IP with Dynamic Address Group
2. Use the Geo IP object in a firewall policy.
Figure 51: Spotlight Secure: Use Geo IP in Firewall Policy
164

Policy Enforcer with Sky ATP: Geo IP
This is how Geo IP feeds are configured on Security Director 16.1 and higher with Policy Enforcer:
1. Define GeoIP objects that can then be used within the match criteria of a firewall policy by navigatingto Configure > Shared Objects > Geo IP. Create a Geo IP feed and choose countries to include fromthe list.(This feature requires a SecIntel or SKY ATP license.)
Figure 52: Policy Enforcer: Create Geo IP
2. Use the Geo IP feed you created as the source or destination address in a firewall policy.
165

Figure 53: Policy Enforcer: Use Geo IP in the Firewall Policy
166


