Embed Size (px)
Citation preview

1
SECTION HEADER HERE
CATERPILLAR® | CUMMINS® | DETROIT™ | MERCEDES® | PACCAR®
HEAVY DUTY GT INSTALLATION MANUAL
2
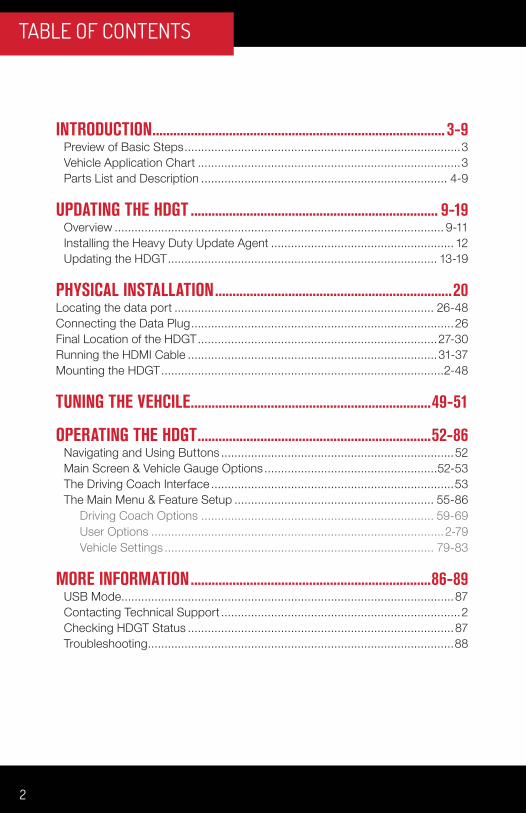
TABLE OF CONTENTS
INTRODUCTION .................................................................................... 3-9Preview of Basic Steps ...................................................................................3Vehicle Application Chart ...............................................................................3Parts List and Description .......................................................................... 4-9
UPDATING THE HDGT ....................................................................... 9-19Overview ................................................................................................... 9-11Installing the Heavy Duty Update Agent ....................................................... 12Updating the HDGT ................................................................................. 13-19
PHYSICAL INSTALLATION ....................................................................20Locating the data port .............................................................................. 26-48Connecting the Data Plug ...............................................................................26Final Location of the HDGT ........................................................................27-30Running the HDMI Cable ...........................................................................31-37Mounting the HDGT .....................................................................................2-48
TUNING THE VEHCILE .....................................................................49-51
OPERATING THE HDGT ...................................................................52-86Navigating and Using Buttons ......................................................................52Main Screen & Vehicle Gauge Options ....................................................52-53The Driving Coach Interface .........................................................................53The Main Menu & Feature Setup ............................................................ 55-86
Driving Coach Options ...................................................................... 59-69User Options ........................................................................................2-79Vehicle Settings ................................................................................. 79-83
MORE INFORMATION .....................................................................86-89USB Mode....................................................................................................87Contacting Technical Support ........................................................................2Checking HDGT Status ................................................................................87Troubleshooting ............................................................................................88
3
INTRODUCTION
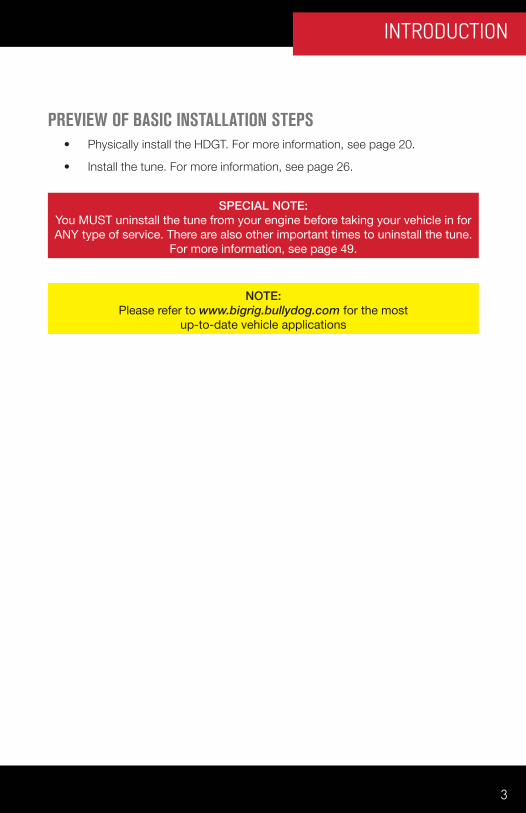
PREVIEW OF BASIC INSTALLATION STEPS• Physically install the HDGT. For more information, see page 20.
• Install the tune. For more information, see page 26.
SPECIAL NOTE:You MUST uninstall the tune from your engine before taking your vehicle in for ANY type of service. There are also other important times to uninstall the tune.
For more information, see page 49.
NOTE:Please refer to www.bigrig.bullydog.com for the most
up-to-date vehicle applications
4
PARTS LIST
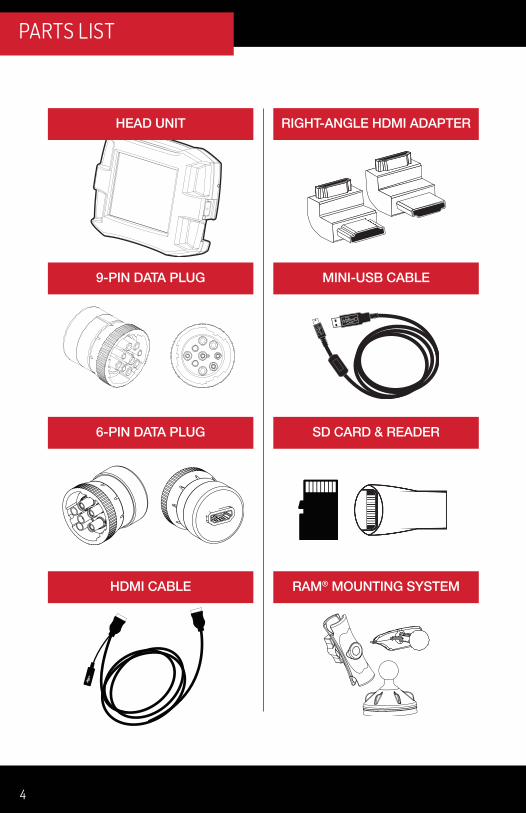
HEAD UNIT
9-PIN DATA PLUG
HDMI CABLE
6-PIN DATA PLUG
RIGHT-ANGLE HDMI ADAPTER
MINI-USB CABLE
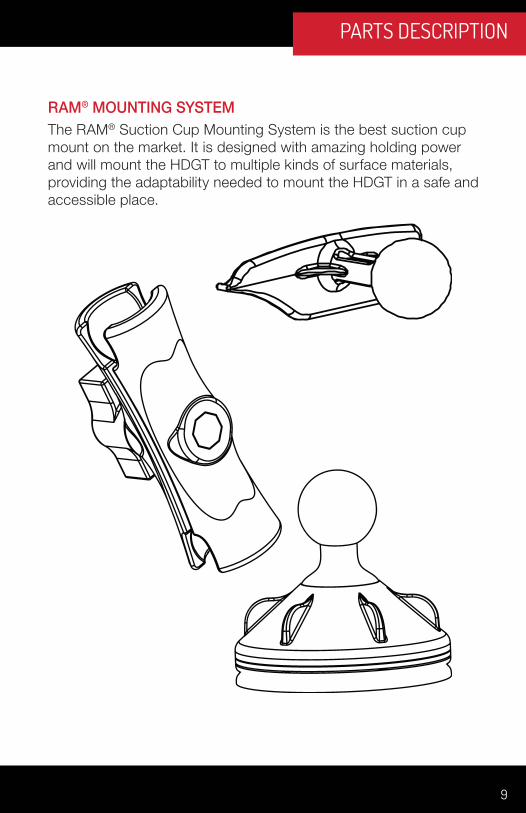
RAM® MOUNTING SYSTEM
SD CARD & READER9 pin
5
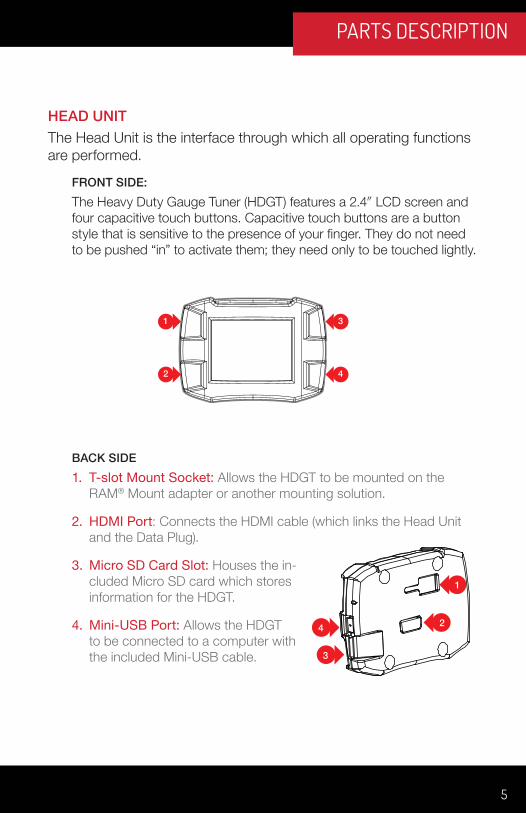
HEAD UNITThe Head Unit is the interface through which all operating functions are performed.
FRONT SIDE:The Heavy Duty Gauge Tuner (HDGT) features a 2.4″ LCD screen and four capacitive touch buttons. Capacitive touch buttons are a button style that is sensitive to the presence of your finger. They do not need to be pushed “in” to activate them; they need only to be touched lightly.
BACK SIDE1. T-slot Mount Socket: Allows the HDGT to be mounted on the
RAM® Mount adapter or another mounting solution.
2. HDMI Port: Connects the HDMI cable (which links the Head Unit and the Data Plug).
3. Micro SD Card Slot: Houses the in-cluded Micro SD card which stores information for the HDGT.
4. Mini-USB Port: Allows the HDGT to be connected to a computer with the included Mini-USB cable.
1
2
3
4
1
24
3
PARTS DESCRIPTION

6
PARTS DESCRIPTION
6 & 9-PIN DATA PLUGSThe 6- and 9-pin data plugs connect the HDGT to the vehicle. Count the number of pins in the vehicle data port and use the match-ing plug. (If both plug types are present, use the 9-pin connection.)
The diagram below shows the important parts of each Data Plug:
1. 9-Pin Data Plug Face
2. 6-Pin Data Plug Face
3. Plug lock ring: Each vehicle data port will have a lock ring receiver. This lock ring will secure the data plug to the port when it is proper-ly seated in the lock ring receiver.
4. HDMI Port: Connects the HDMI cable (which links the Data Plug and the Head Unit).
1
3
4
2

7
HDMI CABLEThe 10 foot HDMI cable connects the HDGT to the Data Plug.
HDMI RIGHT ANGLE ADAPTERSThese adapters are included for your convenience and can be used to redirect the HDMI cable coming out of the Data Plug.
90º HDMI Adapter2270º HDMI Adapter1
PARTS DESCRIPTION

8
PARTS DESCRIPTION
MINI-USB CABLEThe Mini-USB cable is a standard, off-the-shelf Mini-USB cable. It can be used to connect the HDGT to a computer.
MicroSD MEMORY CARDThe MicroSD memory card holds all of the electronic files for the HDGT; the HDGT will not function if the card is not installed. The card can also be removed from the HDGT and connected to a computer via the included card reader.
9
RAM® MOUNTING SYSTEMThe RAM® Suction Cup Mounting System is the best suction cup mount on the market. It is designed with amazing holding power and will mount the HDGT to multiple kinds of surface materials, providing the adaptability needed to mount the HDGT in a safe and accessible place.
PARTS DESCRIPTION
10
UPDATING THE HDGT
OVERVIEWWhy do I have to update my HDGT?1. Vehicle manufacturers regularly change the part numbers and
other information that the HDGT uses to communicate effectively with the engine computer. If the HDGT doesn’t have the updated information, it may not work correctly. In order to give our custom-ers the best support possible, Bully Dog releases updates when necessary to keep up with any changes that vehicle manufactur-ers may make.
2. The Bully Dog technical support team gathers information about any problems experienced by customers and then works with the engineering team to fix the problems as quickly as possible. If these fixes can help other people avoid similar problems, the engi-neers include them in the updates that are released for everybody. One of the most important troubleshooting steps is to make sure that the HDGT has been updated to the most recently released software version. Updating is quite often an immediate fix for most problems.
3. Bully Dog engineers are constantly working to expand the fea-tures and vehicles that the HDGT is able to support. Once a new vehicle or option is unlocked, they make sure it is available to ev-eryone by including it in the updated software version.
How often should I update?The HDGT is pre-loaded with the necessary software to perform the initial install, so there is no need to update on a regular basis. There are only a few conditions when an update would be needed, for exam-ple: if a new feature has been released or if the HDGT does not rec-ognize the vehicle. The Bully Dog technical support team can provide more information (see page 2).
These instructions are for use with a Microsoft Windows® computer with an Internet connection. There are currently no alternative methods to update
using an Apple® or other computer that cannot successfully run applications designed for Microsoft Windows operating systems.
11
What is included in the updates?Updates include new part numbers and other information from vehicle manufacturers, tested fixes for problems customers may encounter, and any additional features or vehicles that Bully Dog engineers have developed.
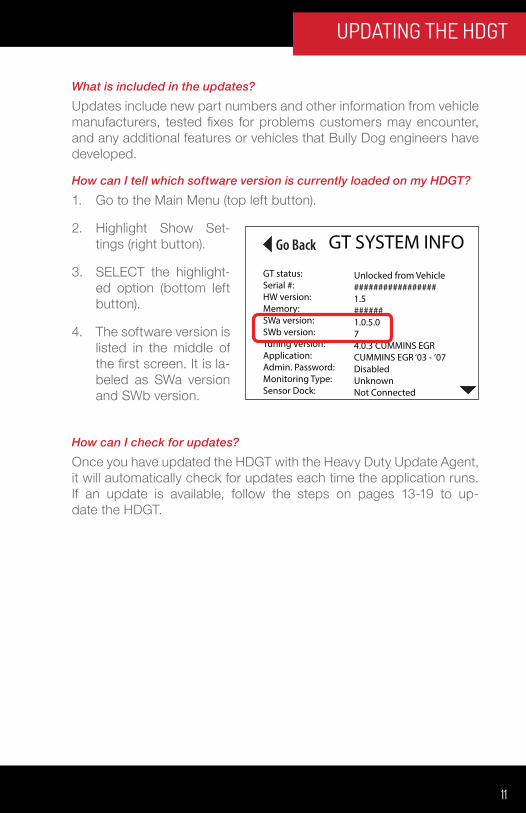
How can I tell which software version is currently loaded on my HDGT?1. Go to the Main Menu (top left button).
2. Highlight Show Set-tings (right button).
3. SELECT the highlight-ed option (bottom left button).
4. The software version is listed in the middle of the first screen. It is la-beled as SWa version and SWb version.
How can I check for updates?Once you have updated the HDGT with the Heavy Duty Update Agent, it will automatically check for updates each time the application runs. If an update is available, follow the steps on pages 13-19 to up-date the HDGT.
Go Back GT SYSTEM INFOGT status:Serial #:HW version:Memory:SWa version:SWb version:Tuning Version:Application:Admin. Password:Monitoring Type:Sensor Dock:
Unlocked from Vehicle#################1.5######1.0.5.074.0.3 CUMMINS EGRCUMMINS EGR ‘03 - ’07DisabledUnknownNot Connected
UPDATING THE HDGT
12
UPDATING THE HDGT
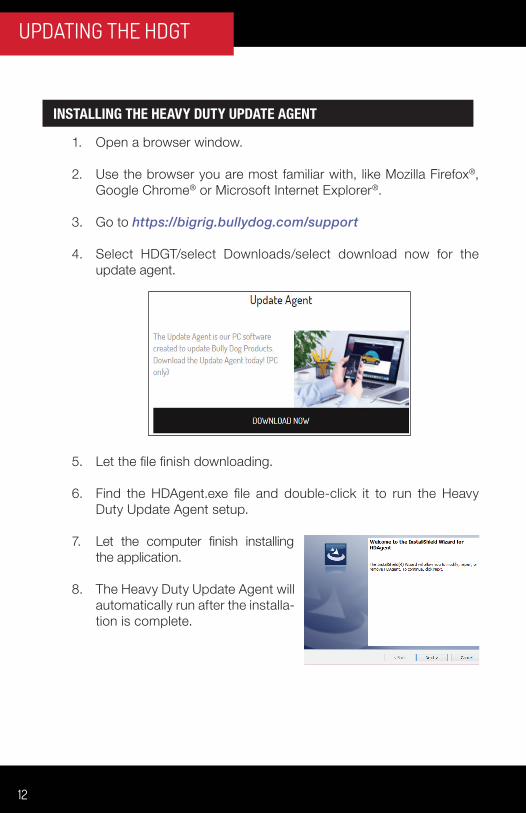
INSTALLING THE HEAVY DUTY UPDATE AGENT
1. Open a browser window.
2. Use the browser you are most familiar with, like Mozilla Firefox®, Google Chrome® or Microsoft Internet Explorer®.
3. Go to https://bigrig.bullydog.com/support
4. Select HDGT/select Downloads/select download now for the update agent.
5. Let the file finish downloading.
6. Find the HDAgent.exe file and double-click it to run the Heavy Duty Update Agent setup.
7. Let the computer finish installing the application.
8. The Heavy Duty Update Agent will automatically run after the installa-tion is complete.

13
UPDATING THE HDGT
1. Start the Heavy Duty Update Agent (if it is not already running).• You can check to see if it is already running by looking for the
Bully Dog icon in the System Tray in the bottom right corner of your screen.
• If the Heavy Duty Update Agent is already installed, you will find it in the following folder on your Windows Start Menu: All Programs > Bully Dog Technologies > Heavy Duty Update Agent
• If the Heavy Duty Update Agent is not present in your programs list, you will need to install it (for more information, see page 12).
2. Plug the MicroSD memory card into the card reader.
UPDATING THE HDGT

14
UPDATING THE HDGT
3. Plug the card reader (with the microSD memory card) into a com-puter USB port.
4. Your computer and the Heavy Duty Update Agent will automati-cally recognize the memory card.• Close the window or click Continue without scanning if a dialog box
pops up with an option to “scan and fix BDCARD.”
• Close the window if you receive an Autoplay pop-up with options like “Open folder to view files.”
• Likewise, you should close or ignore any other pop-up messages about the newly detected device that might be generated by your com-puter or any anti-virus software that may be running (it is common for these to appear in the System Tray on the bottom right side of your computer screen).
It is possible to update by keeping the memory card installed and connecting the HDGT to a computer via Mini-USB cable; however, this method is slower
and not recommended.
15
UPDATING THE HDGT
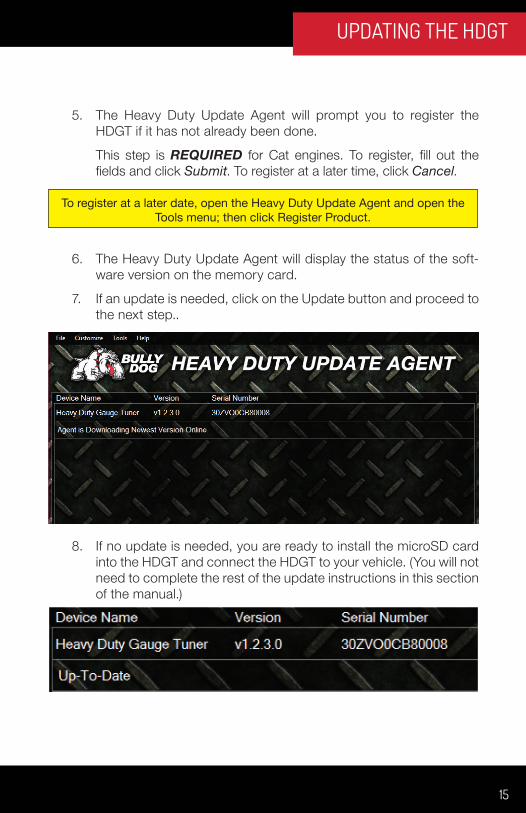
5. The Heavy Duty Update Agent will prompt you to register the HDGT if it has not already been done.
This step is REQUIRED for Cat engines. To register, fill out the fields and click Submit. To register at a later time, click Cancel.
6. The Heavy Duty Update Agent will display the status of the soft-ware version on the memory card.
7. If an update is needed, click on the Update button and proceed to the next step..
8. If no update is needed, you are ready to install the microSD card into the HDGT and connect the HDGT to your vehicle. (You will not need to complete the rest of the update instructions in this section of the manual.)
To register at a later date, open the Heavy Duty Update Agent and open the Tools menu; then click Register Product.

16
UPDATING THE HDGT
9. Once the update is complete, a pop-up will appear with instruc-tions to finish the update (steps 7-13 in this manual).• Click OK.
10. The dialogue box will disappear and the HDGT will display the following message:
• Disconnect the card reader from your computer.
• Take the microSD memory card out of the card reader and install it in the HDGT.
17
UPDATING THE HDGT
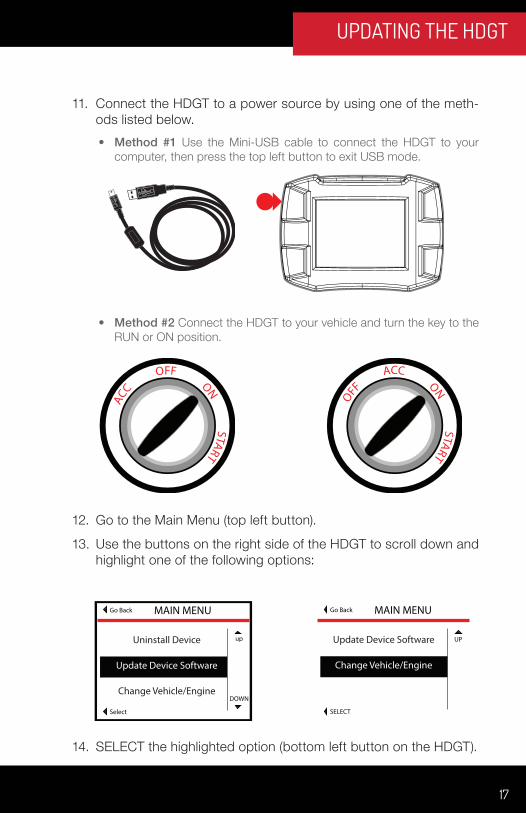
11. Connect the HDGT to a power source by using one of the meth-ods listed below.• Method #1 Use the Mini-USB cable to connect the HDGT to your
computer, then press the top left button to exit USB mode.
• Method #2 Connect the HDGT to your vehicle and turn the key to the RUN or ON position.
12. Go to the Main Menu (top left button).
13. Use the buttons on the right side of the HDGT to scroll down and highlight one of the following options:
14. SELECT the highlighted option (bottom left button on the HDGT).
MAIN MENUGo Back
Select
up
DOWN
Uninstall Device
Update Device Software
Change Vehicle/Engine
MAIN MENUGo Back
SELECT
UPUpdate Device Software
Change Vehicle/Engine
18
UPDATING THE HDGT
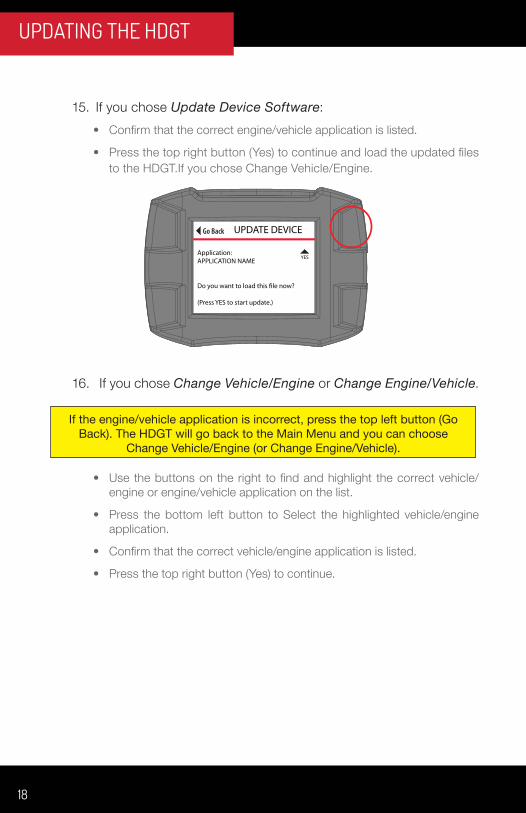
15. If you chose Update Device Software:• Confirm that the correct engine/vehicle application is listed.
• Press the top right button (Yes) to continue and load the updated files to the HDGT.If you chose Change Vehicle/Engine.
16. If you chose Change Vehicle/Engine or Change Engine/Vehicle.
• Use the buttons on the right to find and highlight the correct vehicle/engine or engine/vehicle application on the list.
• Press the bottom left button to Select the highlighted vehicle/engine application.
• Confirm that the correct vehicle/engine application is listed.
• Press the top right button (Yes) to continue.
Go Back UPDATE DEVICE
Application:APPLICATION NAME
Do you want to load this �le now?
(Press YES to start update.)
YES
If the engine/vehicle application is incorrect, press the top left button (Go Back). The HDGT will go back to the Main Menu and you can choose
Change Vehicle/Engine (or Change Engine/Vehicle).
19
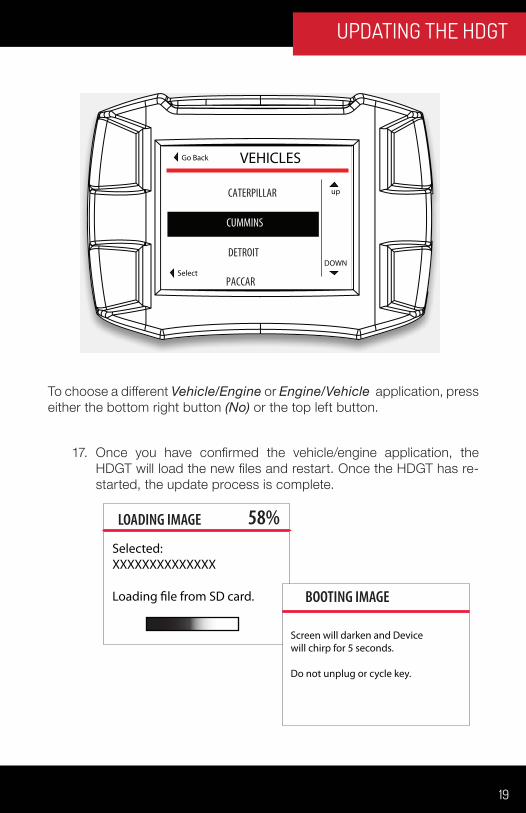
To choose a different Vehicle/Engine or Engine/Vehicle application, press either the bottom right button (No) or the top left button.
17. Once you have confirmed the vehicle/engine application, the HDGT will load the new files and restart. Once the HDGT has re-started, the update process is complete.
LOADING IMAGE 58%Selected:XXXXXXXXXXXXXX
Loading �le from SD card. BOOTING IMAGE
Screen will darken and Devicewill chirp for 5 seconds.
Do not unplug or cycle key.
VEHICLESGo Back
Select
up
DOWN
CATERPILLAR
CUMMINS
DETROIT
PACCAR
UPDATING THE HDGT

20
PHYSICAL INSTALLATION
LOCATE THE DATA PORT & CONNECT THE PLUG
The vehicle data port is typically located in one of 3 different locations:
• Underneath the dash on the driver’s side of the cab or on the lower front part of the dash.
• Near the back of the driver’s seat.
• Under the driver’s seat.
Once the vehicle data port has been located, follow the steps below.
1. Line up the pin-pattern on the face of the data plug to the hole-pat-tern on the data port.
2. Press the plug in.
3. Secure the connection by rotating the lock ring on the data plug.
NOTICE: Some trucks may have two data ports. Use the 9-pin connection.
The data port shown above is in a vulnerable position; it is important to protect the connection in this type of situation.

21
PHYSICAL INSTALLATION
SPECIAL NOTE:Volvo trucks with Cummins® engines, some Cat® engines and the Detroit®
DDEC IV require a direct connection to the engine computer. Bully Dog has created wiring harnesses to address this need.
Cummins®: 46510-1 Cat®: 46520-2
Detroit® DDEC IV: 46530-1
90º HDMI Adapter2270º HDMI Adapter1
90º HDMI Adapter2270º HDMI Adapter1
These adapters are included for your convenience and can be used to redirect the HDMI cable coming out of the data plug.

22
PHYSICAL INSTALLATION
CHOOSE THE FINAL LOCATION OF THE HDGT
Take some time to consider the final placement of the HDGT. Make sure that you have chosen a location which:
• Will not obstruct the driver’s line of vision.
• Will not distract the driver.
• Provides easy access to the HDGT.
• Will connect to the provided ten foot HDMI cable.
If a desired location will not work with the cable provided, it is possible to use any HDMI cable to connect the data plug and the HDGT head unit.
23
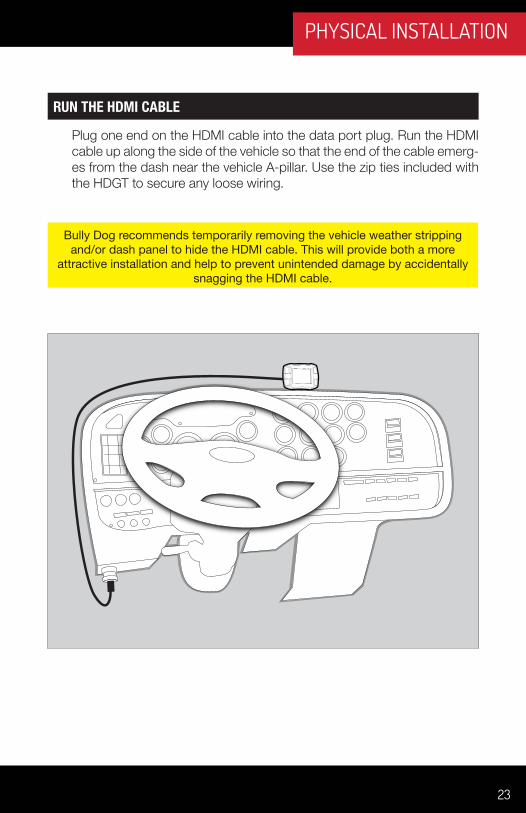
RUN THE HDMI CABLE
Plug one end on the HDMI cable into the data port plug. Run the HDMI cable up along the side of the vehicle so that the end of the cable emerg-es from the dash near the vehicle A-pillar. Use the zip ties included with the HDGT to secure any loose wiring.
Bully Dog recommends temporarily removing the vehicle weather stripping and/or dash panel to hide the HDMI cable. This will provide both a more
attractive installation and help to prevent unintended damage by accidentally snagging the HDMI cable.
PHYSICAL INSTALLATION
24
PHYSICAL INSTALLATION
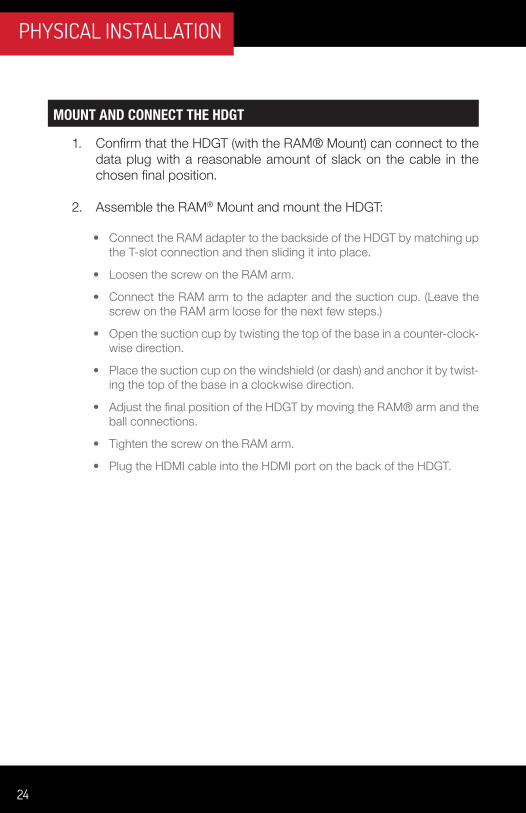
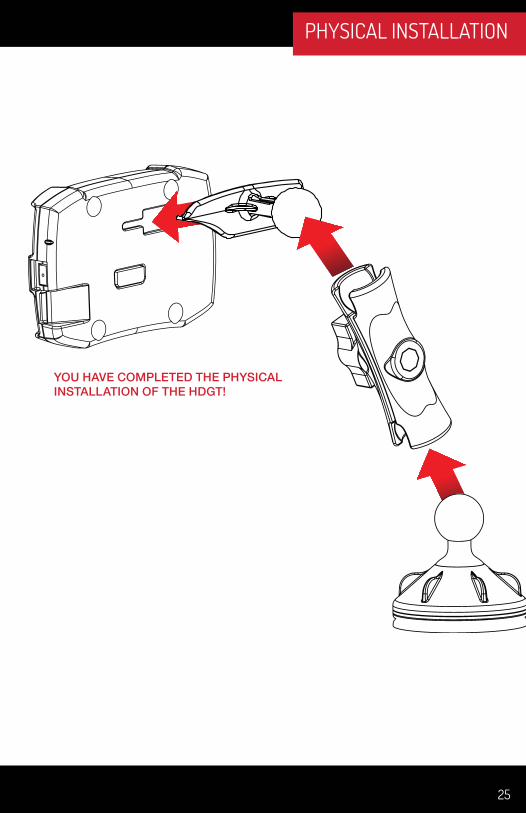
MOUNT AND CONNECT THE HDGT
1. Confirm that the HDGT (with the RAM® Mount) can connect to the data plug with a reasonable amount of slack on the cable in the chosen final position.
2. Assemble the RAM® Mount and mount the HDGT:
• Connect the RAM adapter to the backside of the HDGT by matching up the T-slot connection and then sliding it into place.
• Loosen the screw on the RAM arm.
• Connect the RAM arm to the adapter and the suction cup. (Leave the screw on the RAM arm loose for the next few steps.)
• Open the suction cup by twisting the top of the base in a counter-clock-wise direction.
• Place the suction cup on the windshield (or dash) and anchor it by twist-ing the top of the base in a clockwise direction.
• Adjust the final position of the HDGT by moving the RAM® arm and the ball connections.
• Tighten the screw on the RAM arm.
• Plug the HDMI cable into the HDMI port on the back of the HDGT.
25
YOU HAVE COMPLETED THE PHYSICAL INSTALLATION OF THE HDGT!
PHYSICAL INSTALLATION
MOUNT AND CONNECT THE HDGT
1. Confirm that the HDGT (with the RAM® Mount) can connect to the data plug with a reasonable amount of slack on the cable in the chosen final position.
2. Assemble the RAM® Mount and mount the HDGT:
• Connect the RAM adapter to the backside of the HDGT by matching up the T-slot connection and then sliding it into place.
• Loosen the screw on the RAM arm.
• Connect the RAM arm to the adapter and the suction cup. (Leave the screw on the RAM arm loose for the next few steps.)
• Open the suction cup by twisting the top of the base in a counter-clock-wise direction.
• Place the suction cup on the windshield (or dash) and anchor it by twist-ing the top of the base in a clockwise direction.
• Adjust the final position of the HDGT by moving the RAM® arm and the ball connections.
• Tighten the screw on the RAM arm.
• Plug the HDMI cable into the HDMI port on the back of the HDGT.
26
TUNING THE VEHICLE
In order to enjoy the advantages of tuning your engine, like addi-tional horsepower and/or fuel economy, you need to use the Install Tuning feature.
The process is basically the same when you are installing the tune, changing certain settings or uninstalling.
CAUTION!This option actively reprograms the engine computer – if the process is
interrupted because of poor preparation it will cause problems which could prevent you from using the HDGT or even being able to drive your vehicle
for a few days.

27
TUNING THE VEHICLE
IMPORTANT PREPARATION ITEMS (FOR ALL ENGINE TYPES)
• Choose an appropriate time and place to install; Do NOT install if you will need to use the vehicle to get somewhere soon.
• Set aside three to six hours to install the tune. (older Cummins en-gines will need about six hours. Set aside three hours for other brands and newer Cummins engines.)
• Make sure that you have access to a phone and a computer with internet access.
• If you encounter problems during the install, you may need to use a computer with Internet access to get special files from technical support.
• Technical support is open Monday-Friday, 8 a.m.-5 p.m. MST.
• If you decide to install on Friday evening and encounter problems, you might not be able to use your vehicle until you can contact technical support on Monday.
• Do NOT install if you do not have a way to contact tech. support.
• Do NOT install if the trailer is loaded.
• Do NOT install if you are at a dock.
• Do NOT install if the vehicle is in a remote location.
A computer with Internet access is required to complete the installation for Cat engines.
CAUTION!When installing on a Volvo chassis you MUST use the Cummins adapter cable (part # 46510-1) shown on page 21. Volvo is known for having communication
on the bus and that interrupts the installation and sometimes stops it completely. The cable will allow you to bypass the data port connect and plug
in directly into the ECM.
28
TUNING THE VEHICLE
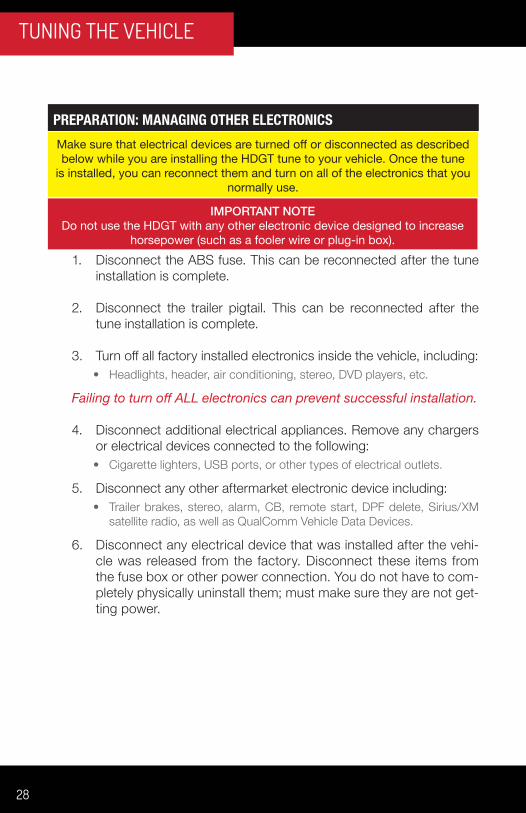
PREPARATION: MANAGING OTHER ELECTRONICS
1. Disconnect the ABS fuse. This can be reconnected after the tune installation is complete.
2. Disconnect the trailer pigtail. This can be reconnected after the tune installation is complete.
3. Turn off all factory installed electronics inside the vehicle, including:• Headlights, header, air conditioning, stereo, DVD players, etc.
Failing to turn off ALL electronics can prevent successful installation.
4. Disconnect additional electrical appliances. Remove any chargers or electrical devices connected to the following:• Cigarette lighters, USB ports, or other types of electrical outlets.
5. Disconnect any other aftermarket electronic device including:• Trailer brakes, stereo, alarm, CB, remote start, DPF delete, Sirius/XM
satellite radio, as well as QualComm Vehicle Data Devices.
6. Disconnect any electrical device that was installed after the vehi-cle was released from the factory. Disconnect these items from the fuse box or other power connection. You do not have to com-pletely physically uninstall them; must make sure they are not get-ting power.
Make sure that electrical devices are turned off or disconnected as described below while you are installing the HDGT tune to your vehicle. Once the tune
is installed, you can reconnect them and turn on all of the electronics that you normally use.
IMPORTANT NOTEDo not use the HDGT with any other electronic device designed to increase
horsepower (such as a fooler wire or plug-in box).

29
TUNING THE VEHICLE
PREPARATION: MAKE SURE THE BATTERY IS CHARGED
Make sure that your batteries are fully charged before beginning any download. It is a good idea to have a battery charger ready to connect to your vehicle if the batteries begin to lose their charge while you are installing the tune.
MAKE SURE THAT THE TUNER IS READY1. Update your HDGT. See pages 9-19 for updating instructions.
2. Updating requires a computer with Internet access.
3. Do install the microSD memory card into the HDGT.
MAKE SURE THAT THE TUNE HAS NOT ALREADY BEEN INSTALLED.1. Go to the Main Menu on the HDGT.
• From the Main Gauge screen, press the top left button.
2. Choose the Show Settings option.• Use the buttons on the right to highlight Show Settings.
• Use the bottom left button to Select the highlighted option.
IMPORTANT NOTE:It is very important that the tuner is not interrupted while it is writing to your
engine computer – if the batteries die and the tune is interrupted it could prevent you from being able to start your vehicle.
Go Back MAIN MENU
UP
DOWNSELECT
Vehicle Diagnostics
Show Settings
Uninstall Device
30
TUNING THE VEHICLE
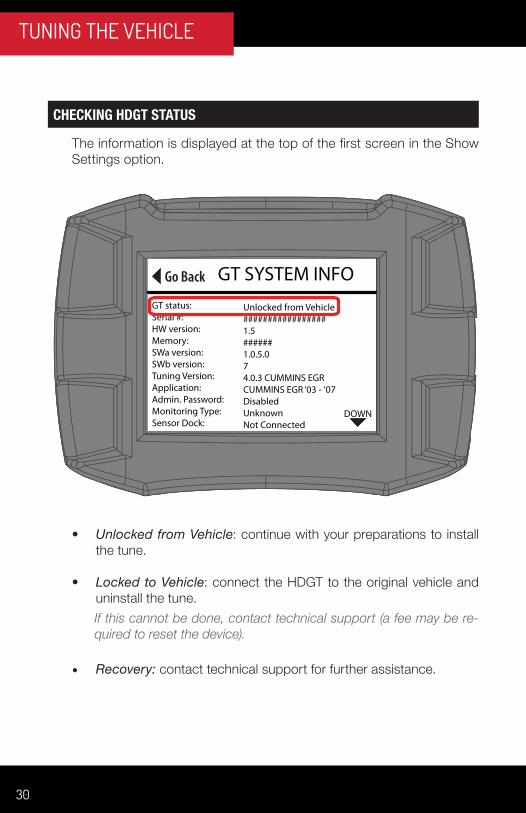
CHECKING HDGT STATUS
The information is displayed at the top of the first screen in the Show Settings option.
• Unlocked from Vehicle: continue with your preparations to install the tune.
• Locked to Vehicle: connect the HDGT to the original vehicle and uninstall the tune.If this cannot be done, contact technical support (a fee may be re-quired to reset the device).
• Recovery: contact technical support for further assistance.
Go Back GT SYSTEM INFOGT status:Serial #:HW version:Memory:SWa version:SWb version:Tuning Version:Application:Admin. Password:Monitoring Type:Sensor Dock:
Unlocked from Vehicle#################1.5######1.0.5.074.0.3 CUMMINS EGRCUMMINS EGR ‘03 - ’07DisabledUnknownNot Connected
DOWN
31
TUNING THE VEHICLE
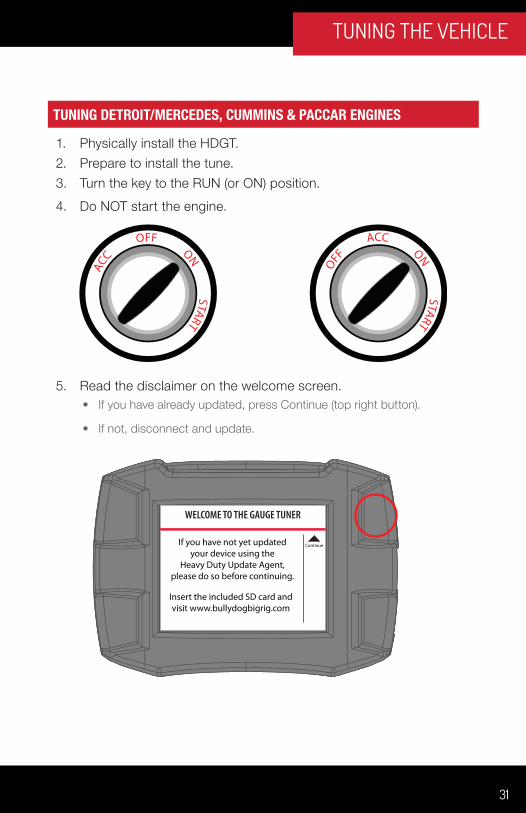
TUNING DETROIT/MERCEDES, CUMMINS & PACCAR ENGINES
1. Physically install the HDGT.2. Prepare to install the tune.3. Turn the key to the RUN (or ON) position.4. Do NOT start the engine.
5. Read the disclaimer on the welcome screen.• If you have already updated, press Continue (top right button).
• If not, disconnect and update.
Continue
Insert the included SD card andvisit www.bullydogbigrig.com
If you have not yet updatedyour device using the
Heavy Duty Update Agent,please do so before continuing.
WELCOME TO THE GAUGE TUNER
32
TUNING THE VEHICLE
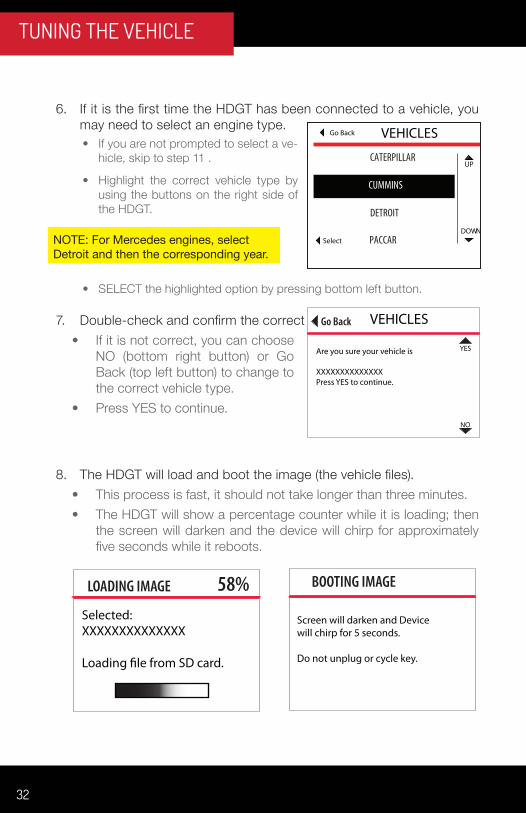
6. If it is the first time the HDGT has been connected to a vehicle, you may need to select an engine type.• If you are not prompted to select a ve-
hicle, skip to step 11 .
• Highlight the correct vehicle type by using the buttons on the right side of the HDGT.
• SELECT the highlighted option by pressing bottom left button.
7. Double-check and confirm the correct vehicle type.• If it is not correct, you can choose
NO (bottom right button) or Go Back (top left button) to change to the correct vehicle type.
• Press YES to continue.
8. The HDGT will load and boot the image (the vehicle files).• This process is fast, it should not take longer than three minutes.• The HDGT will show a percentage counter while it is loading; then
the screen will darken and the device will chirp for approximately five seconds while it reboots.
VEHICLESGo Back
Select
UP
DOWN
CATERPILLAR
CUMMINS
DETROIT
PACCAR
Go Back
NO
YESAre you sure your vehicle is
XXXXXXXXXXXXXXPress YES to continue.
VEHICLES
LOADING IMAGE 58%Selected:XXXXXXXXXXXXXX
Loading �le from SD card.
BOOTING IMAGE
Screen will darken and Devicewill chirp for 5 seconds.
Do not unplug or cycle key.
NOTE: For Mercedes engines, select Detroit and then the corresponding year.
33
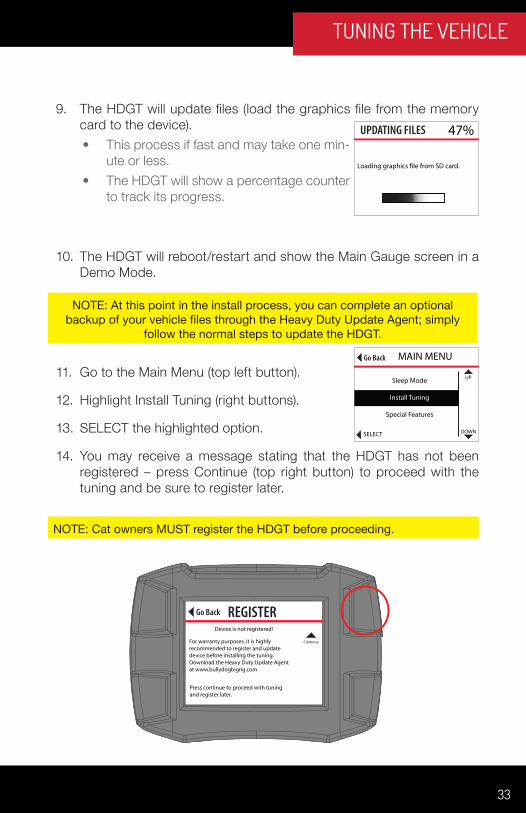
TUNING THE VEHICLE
9. The HDGT will update files (load the graphics file from the memory card to the device).• This process if fast and may take one min-
ute or less.• The HDGT will show a percentage counter
to track its progress.
10. The HDGT will reboot/restart and show the Main Gauge screen in a Demo Mode.
11. Go to the Main Menu (top left button).
12. Highlight Install Tuning (right buttons).
13. SELECT the highlighted option.
14. You may receive a message stating that the HDGT has not been registered – press Continue (top right button) to proceed with the tuning and be sure to register later.
UPDATING FILES 47%
Loading graphics �le from SD card.
NOTE: At this point in the install process, you can complete an optional backup of your vehicle files through the Heavy Duty Update Agent; simply
follow the normal steps to update the HDGT.
Go Back MAIN MENU
UP
DOWNSELECT
Sleep Mode
Install Tuning
Special Features
Go Back REGISTER
Continue
Device is not registered!
For warranty purposes, it is highlyrecommended to register and updatedevice before installing the tuning.Download the Heavy Duty Update Agentat www.bullydogbigrig.com
Press continue to proceed with tuningand register later.
NOTE: Cat owners MUST register the HDGT before proceeding.

34
TUNING THE VEHICLE
15. Verify that the correct vehicle type is selected and press YES to con-tinue (top right button).If the vehicle type is not correct, restart the HDGT by cycling the key (to the OFF and then ON or RUN positions; do NOT start the engine). Then choose Change Vehicle/Engine from the Main Menu to select the correct vehicle type.
CAUTIONGo Back
YESPlease verify vehicle type
Installing on aXXXXXXXXXXX
If this is correct press YES to continue
If not, restart and select the correct vehicle.
16. Read the disclaimer and press the top right button to Agree.If you Disagree, press the top left button; this will end the tune in-stallation. This is the last point where you can safely exit installation.
DISCLAIMERGo Back
agree
disagree
Are you the owner of thisvehicle, have you read the
disclaimer, and do you agreeto all of its terms and conditions?
This is the �nal opportunity to exit the download proceidure by
pressing disagree.
17. Verify that the key is in the RUN (or ON) position and press the top right button to Continue.
PLEASE VERIFY KEYIS IN THE
KEY RUN
RUNPOSITION
PRESS CONTINUE TO PROCEED
Continue
18. The HDGT will prepare to install the tune.
35
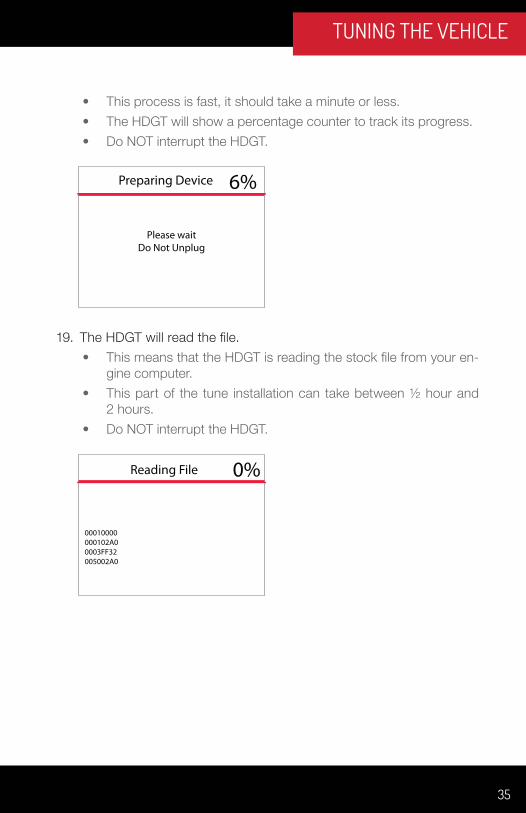
TUNING THE VEHICLE
• This process is fast, it should take a minute or less.• The HDGT will show a percentage counter to track its progress.• Do NOT interrupt the HDGT.
Preparing Device 6%
Please waitDo Not Unplug
19. The HDGT will read the file.• This means that the HDGT is reading the stock file from your en-
gine computer.• This part of the tune installation can take between ½ hour and
2 hours.• Do NOT interrupt the HDGT.
Reading File 0%
00010000000102A00003FF32005002A0
36
TUNING THE VEHICLE
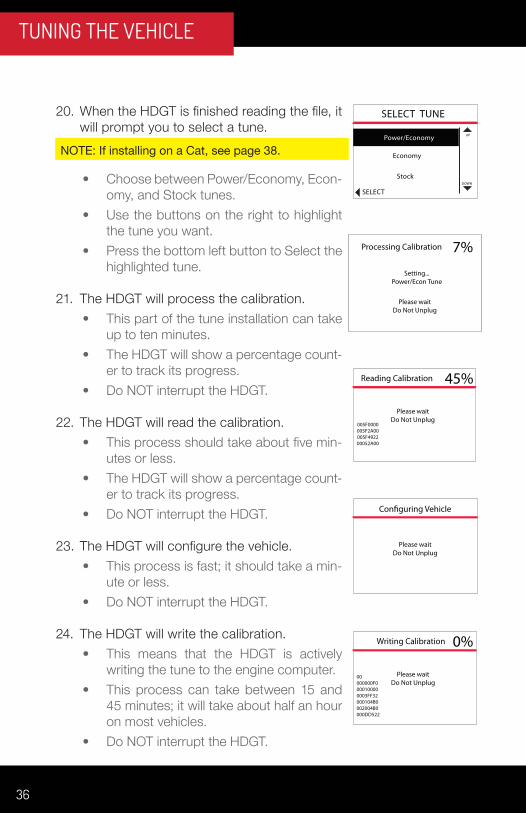
20. When the HDGT is finished reading the file, it will prompt you to select a tune.
• Choose between Power/Economy, Econ-omy, and Stock tunes.
• Use the buttons on the right to highlight the tune you want.
• Press the bottom left button to Select the highlighted tune.
21. The HDGT will process the calibration.• This part of the tune installation can take
up to ten minutes.• The HDGT will show a percentage count-
er to track its progress.• Do NOT interrupt the HDGT.
22. The HDGT will read the calibration.• This process should take about five min-
utes or less.• The HDGT will show a percentage count-
er to track its progress.• Do NOT interrupt the HDGT.
23. The HDGT will configure the vehicle.• This process is fast; it should take a min-
ute or less.• Do NOT interrupt the HDGT.
24. The HDGT will write the calibration.• This means that the HDGT is actively
writing the tune to the engine computer.• This process can take between 15 and
45 minutes; it will take about half an hour on most vehicles.
• Do NOT interrupt the HDGT.
SELECT TUNE
Power/Economy
Economy
Stock
UP
DOWN
SELECT
Processing Calibration 7%Setting...
Power/Econ Tune
Please waitDo Not Unplug
Reading Calibration 45%
Please waitDo Not Unplug
005F0000005F2A00005F492200052A00
Con�guring Vehicle
Please waitDo Not Unplug
Writing Calibration 0%
00000000F0000100000003FF32000104B0002004B0000DD522
Please waitDo Not Unplug
NOTE: If installing on a Cat, see page 38.
37
TUNING THE VEHICLE
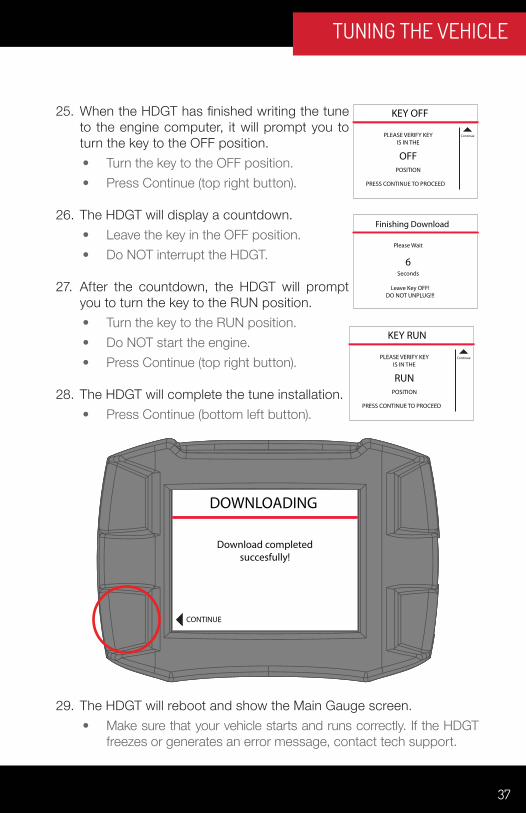
25. When the HDGT has finished writing the tune to the engine computer, it will prompt you to turn the key to the OFF position.• Turn the key to the OFF position.• Press Continue (top right button).
26. The HDGT will display a countdown.• Leave the key in the OFF position.• Do NOT interrupt the HDGT.
27. After the countdown, the HDGT will prompt you to turn the key to the RUN position.• Turn the key to the RUN position.• Do NOT start the engine.• Press Continue (top right button).
28. The HDGT will complete the tune installation.• Press Continue (bottom left button).
29. The HDGT will reboot and show the Main Gauge screen.• Make sure that your vehicle starts and runs correctly. If the HDGT
freezes or generates an error message, contact tech support.
CONTINUE
DOWNLOADING
Download completedsuccesfully!
PLEASE VERIFY KEYIS IN THE
KEY OFF
OFFPOSITION
PRESS CONTINUE TO PROCEED
Continue
Please Wait
Finishing Download
6Seconds
Leave Key OFF!DO NOT UNPLUG!!!
PLEASE VERIFY KEYIS IN THE
KEY RUN
RUNPOSITION
PRESS CONTINUE TO PROCEED
Continue

38
TUNING THE VEHICLE
TUNING CAT® ENGINES: PHASE 1
1. Physically install the HDGT .• Prepare to install the tune.• Disconnect the trailer wire.• Remove ABS/brake fuses.
2. Turn the key to the RUN (or ON) position.• Do NOT start the engine.
3. Read the disclaimer on the welcome screen.• If you have already updated,
press Continue.• If not, disconnect and update.
4. If it is the first time the HDGT has been connected to a vehicle, it may require you to select an en-gine type before proceeing.
• If you are not prompted to select a ve-hicle, skip to step 10.
• Use the buttons on the right to high-light the correct vehicle type.
• Press the bottom left button to SELECT the highlighted vehicle type.
NOTE: In order to provide a basic understanding of the install process, this simplified preview has been provided. It is very important that you have
completed the physical installation, you have completed the preparation steps and you are familiar with the detailed instructions before you attempt
to install the HDGT.
Continue
Insert the included SD card andvisit www.bullydogbigrig.com
If you have not yet updatedyour device using the
Heavy Duty Update Agent,please do so before continuing.
WELCOME TO THE GAUGE TUNER
Go Back
UP
DOWN
VEHICLES
CAT
SELECT
CUMMINS CELECT PLUS ‘97-’01
NOTE: Cat owners MUST register the HDGT before proceeding.
39
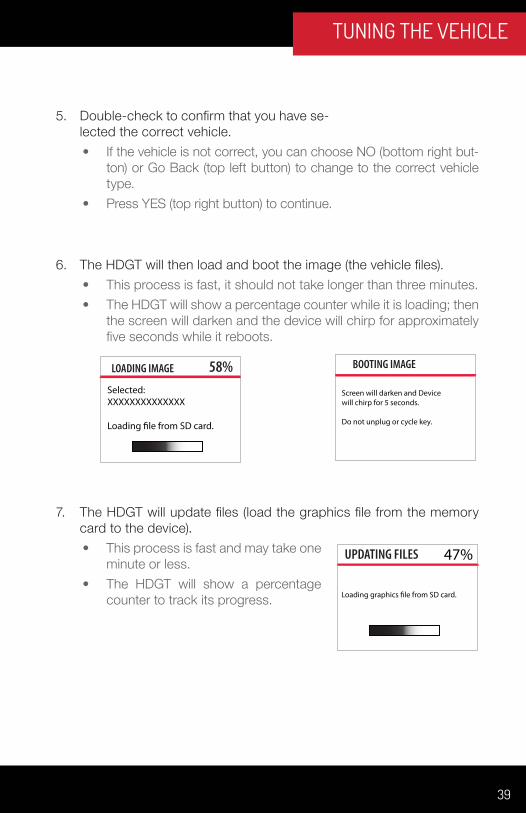
TUNING THE VEHICLE
5. Double-check to confirm that you have se-lected the correct vehicle.• If the vehicle is not correct, you can choose NO (bottom right but-
ton) or Go Back (top left button) to change to the correct vehicle type.
• Press YES (top right button) to continue.
6. The HDGT will then load and boot the image (the vehicle files).• This process is fast, it should not take longer than three minutes.• The HDGT will show a percentage counter while it is loading; then
the screen will darken and the device will chirp for approximately five seconds while it reboots.
7. The HDGT will update files (load the graphics file from the memory card to the device).• This process is fast and may take one
minute or less.• The HDGT will show a percentage
counter to track its progress.
Go Back
NO
YESAre you sure your vehicle is
CATPress YES to continue.
VEHICLES
LOADING IMAGE 58%Selected:XXXXXXXXXXXXXX
Loading �le from SD card.
BOOTING IMAGE
Screen will darken and Devicewill chirp for 5 seconds.
Do not unplug or cycle key.
UPDATING FILES 47%
Loading graphics �le from SD card.
40
TUNING THE VEHICLE
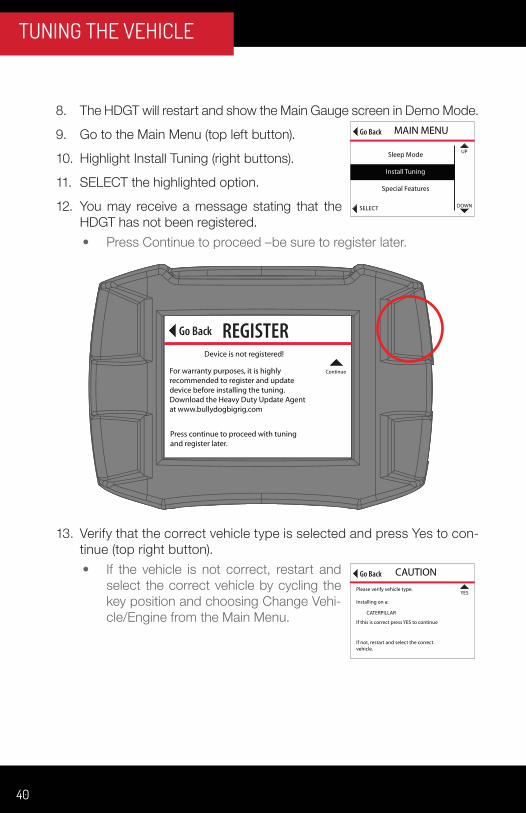
8. The HDGT will restart and show the Main Gauge screen in Demo Mode.
9. Go to the Main Menu (top left button).
10. Highlight Install Tuning (right buttons).
11. SELECT the highlighted option.
12. You may receive a message stating that the HDGT has not been registered.• Press Continue to proceed –be sure to register later.
13. Verify that the correct vehicle type is selected and press Yes to con-tinue (top right button).• If the vehicle is not correct, restart and
select the correct vehicle by cycling the key position and choosing Change Vehi-cle/Engine from the Main Menu.
Go Back MAIN MENU
UP
DOWNSELECT
Sleep Mode
Install Tuning
Special Features
Go Back REGISTER
Continue
Device is not registered!
For warranty purposes, it is highlyrecommended to register and updatedevice before installing the tuning.Download the Heavy Duty Update Agentat www.bullydogbigrig.com
Press continue to proceed with tuningand register later.
Go Back
YES
CAUTIONPlease verify vehicle type.
Installing on a:
CATERPILLAR
If this is correct press YES to continue
If not, restart and select the correctvehicle.
41
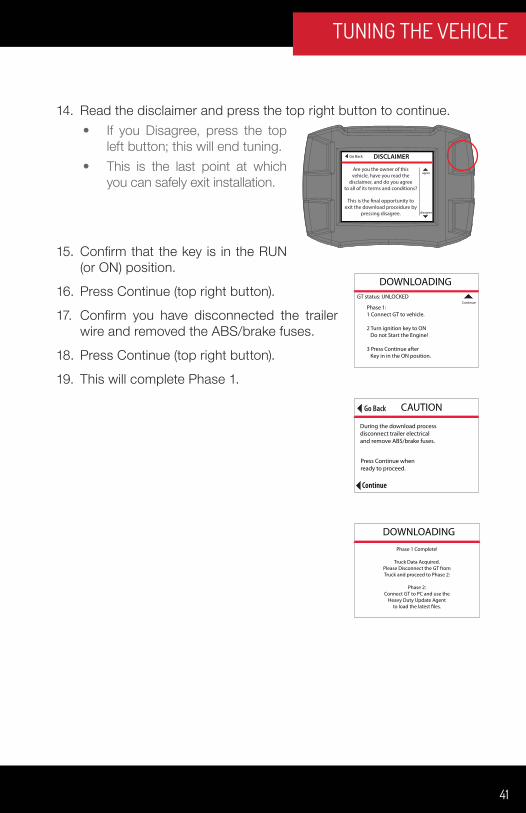
TUNING THE VEHICLE
14. Read the disclaimer and press the top right button to continue.• If you Disagree, press the top
left button; this will end tuning.• This is the last point at which
you can safely exit installation.
15. Confirm that the key is in the RUN (or ON) position.
16. Press Continue (top right button).
17. Confirm you have disconnected the trailer wire and removed the ABS/brake fuses.
18. Press Continue (top right button).
19. This will complete Phase 1.
DISCLAIMERGo Back
agree
disagree
Are you the owner of thisvehicle, have you read the
disclaimer, and do you agreeto all of its terms and conditions?
This is the �nal opportunity to exit the download proceidure by
pressing disagree.
Continue
DOWNLOADINGGT status: UNLOCKED
Phase 1:1 Connect GT to vehicle.
2 Turn ignition key to ON Do not Start the Engine!
3 Press Continue after Key in in the ON position.
Go Back
Continue
CAUTION
During the download processdisconnect trailer electricaland remove ABS/brake fuses.
Press Continue whenready to proceed.
DOWNLOADINGPhase 1 Complete!
Truck Data Acquired.Please Disconnect the GT fromTruck and proceed to Phase 2:
Phase 2:Connect GT to PC and use the
Heavy Duty Update Agentto load the latest �les.
42
TUNING THE VEHICLE
TUNING CAT ENGINES: PHASE 2
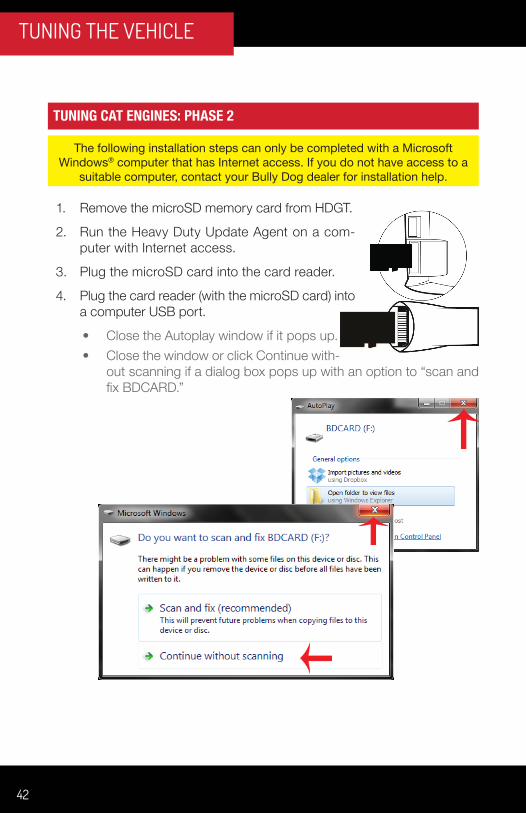
1. Remove the microSD memory card from HDGT.
2. Run the Heavy Duty Update Agent on a com-puter with Internet access.
3. Plug the microSD card into the card reader.
4. Plug the card reader (with the microSD card) into a computer USB port.
• Close the Autoplay window if it pops up.• Close the window or click Continue with-
out scanning if a dialog box pops up with an option to “scan and fix BDCARD.”
The following installation steps can only be completed with a Microsoft Windows® computer that has Internet access. If you do not have access to a
suitable computer, contact your Bully Dog dealer for installation help.

43
TUNING THE VEHICLE
5. The Update Agent should automatically recognize the memory card.
• The Update Agent may prompt you to complete registration; this is required to continue with Phase 2 of the tune installation.
• If the HDGT is already registered, no registration prompt should appear.
6. Click Phase 2: Upload Tuning Files.
7. The Update Agent will read information collected about the vehicle.
44
TUNING THE VEHICLE
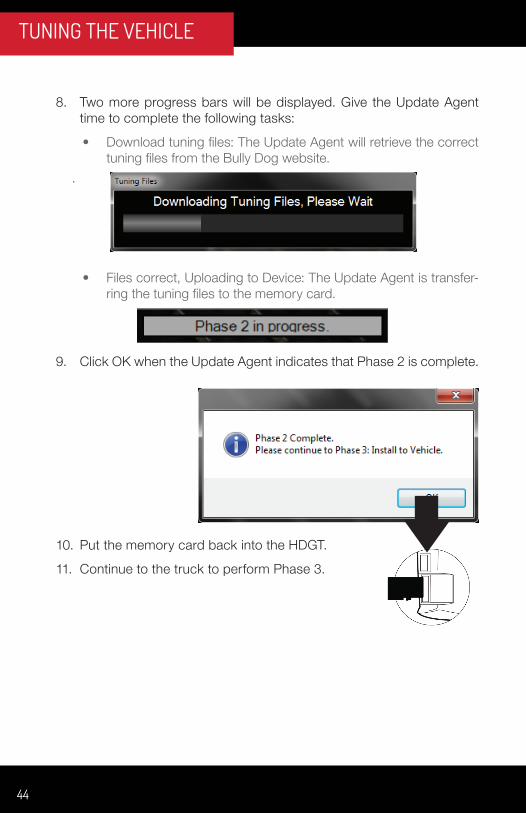
8. Two more progress bars will be displayed. Give the Update Agent time to complete the following tasks:
• Download tuning files: The Update Agent will retrieve the correct tuning files from the Bully Dog website.
.
• Files correct, Uploading to Device: The Update Agent is transfer-ring the tuning files to the memory card.
9. Click OK when the Update Agent indicates that Phase 2 is complete.
10. Put the memory card back into the HDGT.
11. Continue to the truck to perform Phase 3.

45
TUNING THE VEHICLE
TUNING CAT ENGINES: PHASE 3
1. Turn the key to the RUN (or ON) position. Do NOT start the engine.
2. Go to the Main Menu by pressing the top left button.
3. Use the buttons on the right to high-light Install Tuning.
4. Press the bottom left button to SE-LECT the highlighted option.
5. Read the disclaimer & press the top right button to Agree and continue.
• If you Disagree, press the top left button; this will end the tune installation.
• This is the last point at which you can safely exit Phase 3 of the tune installation.
Go Back MAIN MENU
UP
DOWNSELECT
Sleep Mode
Install Tuning
Special Features
DISCLAIMERGo Back
agree
disagree
Are you the owner of thisvehicle, have you read the
disclaimer, and do you agreeto all of its terms and conditions?
This is the �nal opportunity to exit the download proceidure by
pressing disagree.
IMPORTANT NOTE:After this point, it is extremely important that the HDGT and vehicle are not disturbed. If the process is interrupted, the engine computer may need to
be recovered by an authorized Cat Dealer
46
TUNING THE VEHICLE
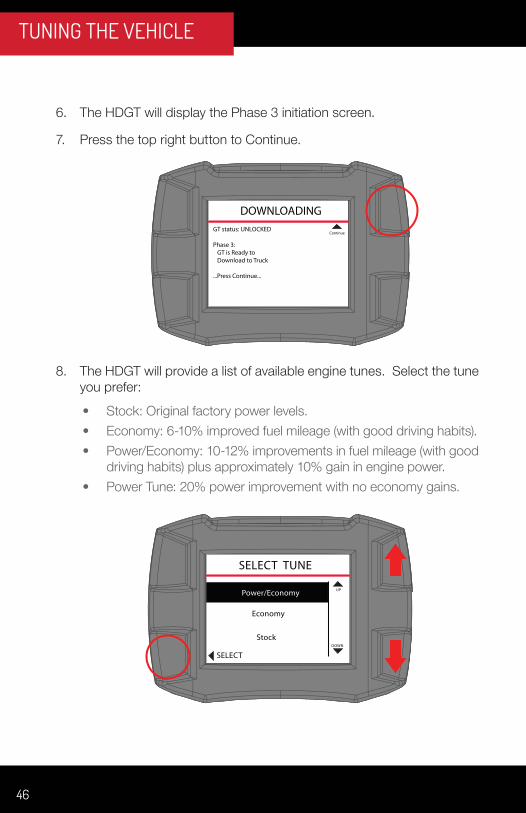
6. The HDGT will display the Phase 3 initiation screen.
7. Press the top right button to Continue.
8. The HDGT will provide a list of available engine tunes. Select the tune you prefer:
• Stock: Original factory power levels.• Economy: 6-10% improved fuel mileage (with good driving habits).• Power/Economy: 10-12% improvements in fuel mileage (with good
driving habits) plus approximately 10% gain in engine power.• Power Tune: 20% power improvement with no economy gains.
IMPORTANT NOTE:After the tune is selected, do not unplug or disturb the HDGT or vehicle in any
way. If the process is interrupted, the engine computer may need to be recovered.
ContinueGT status: UNLOCKED
Phase 3: GT is Ready to Download to Truck
...Press Continue...
DOWNLOADING
SELECT TUNE
Power/Economy
Economy
Stock
UP
DOWN
SELECT
47
TUNING THE VEHICLE
6. The HDGT will display the Phase 3 initiation screen.
7. Press the top right button to Continue.
8. The HDGT will provide a list of available engine tunes. Select the tune you prefer:
• Stock: Original factory power levels.• Economy: 6-10% improved fuel mileage (with good driving habits).• Power/Economy: 10-12% improvements in fuel mileage (with good
driving habits) plus approximately 10% gain in engine power.• Power Tune: 20% power improvement with no economy gains.
IMPORTANT NOTE:After the tune is selected, do not unplug or disturb the HDGT or vehicle in any
way. If the process is interrupted, the engine computer may need to be recovered.
ContinueGT status: UNLOCKED
Phase 3: GT is Ready to Download to Truck
...Press Continue...
DOWNLOADING
SELECT TUNE
Power/Economy
Economy
Stock
UP
DOWN
SELECT
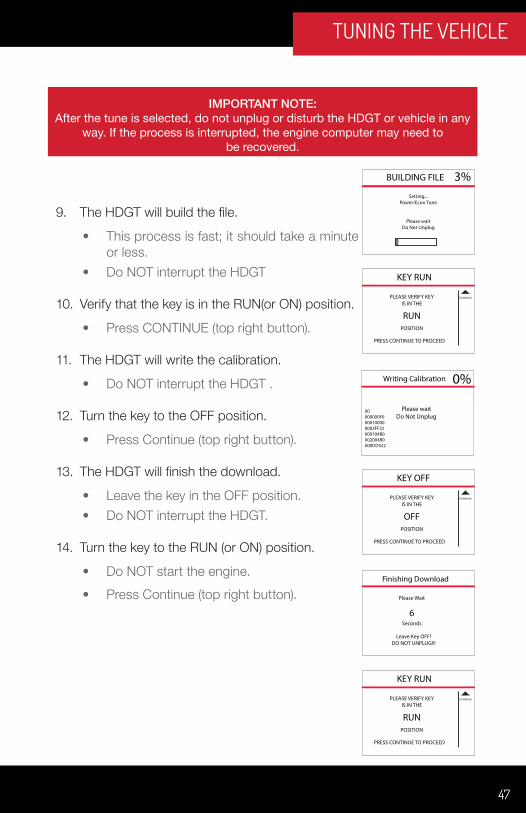
9. The HDGT will build the file.
• This process is fast; it should take a minute or less.
• Do NOT interrupt the HDGT
10. Verify that the key is in the RUN(or ON) position.
• Press CONTINUE (top right button).
11. The HDGT will write the calibration.
• Do NOT interrupt the HDGT .
12. Turn the key to the OFF position.
• Press Continue (top right button).
13. The HDGT will finish the download.
• Leave the key in the OFF position.• Do NOT interrupt the HDGT.
14. Turn the key to the RUN (or ON) position.
• Do NOT start the engine.• Press Continue (top right button).
BUILDING FILE 3%Setting...
Power/Econ Tune
Please waitDo Not Unplug
PLEASE VERIFY KEYIS IN THE
KEY RUN
RUNPOSITION
PRESS CONTINUE TO PROCEED
Continue
Writing Calibration 0%
00000000F0000100000003FF32000104B0002004B0000DD522
Please waitDo Not Unplug
PLEASE VERIFY KEYIS IN THE
KEY OFF
OFFPOSITION
PRESS CONTINUE TO PROCEED
Continue
Please Wait
Finishing Download
6Seconds
Leave Key OFF!DO NOT UNPLUG!!!
PLEASE VERIFY KEYIS IN THE
KEY RUN
RUNPOSITION
PRESS CONTINUE TO PROCEED
Continue
48
TUNING THE VEHICLE
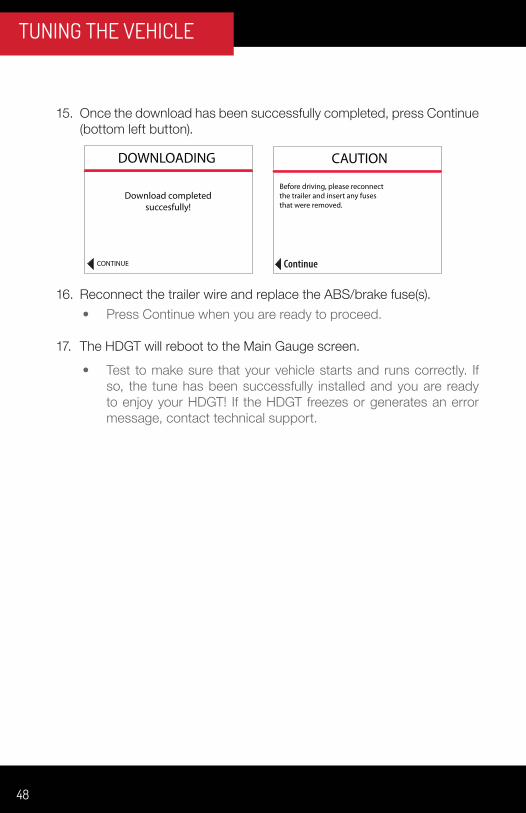
15. Once the download has been successfully completed, press Continue (bottom left button).
CONTINUE
DOWNLOADING
Download completedsuccesfully!
Continue
CAUTION
Before driving, please reconnectthe trailer and insert any fusesthat were removed.
16. Reconnect the trailer wire and replace the ABS/brake fuse(s).• Press Continue when you are ready to proceed.
17. The HDGT will reboot to the Main Gauge screen.
• Test to make sure that your vehicle starts and runs correctly. If so, the tune has been successfully installed and you are ready to enjoy your HDGT! If the HDGT freezes or generates an error message, contact technical support.
49
TUNING THE VEHICLE
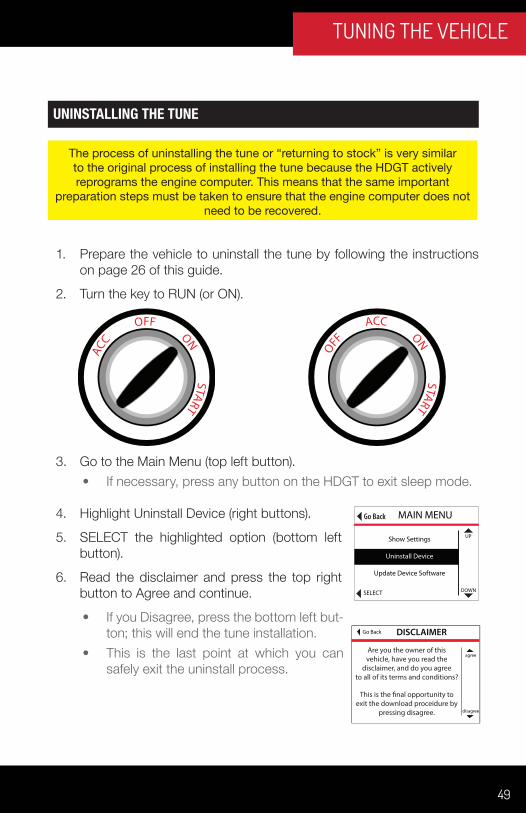
UNINSTALLING THE TUNE
1. Prepare the vehicle to uninstall the tune by following the instructions on page 26 of this guide.
2. Turn the key to RUN (or ON).
3. Go to the Main Menu (top left button).• If necessary, press any button on the HDGT to exit sleep mode.
4. Highlight Uninstall Device (right buttons).
5. SELECT the highlighted option (bottom left button).
6. Read the disclaimer and press the top right button to Agree and continue.
• If you Disagree, press the bottom left but-ton; this will end the tune installation.
• This is the last point at which you can safely exit the uninstall process.
The process of uninstalling the tune or “returning to stock” is very similar to the original process of installing the tune because the HDGT actively reprograms the engine computer. This means that the same important
preparation steps must be taken to ensure that the engine computer does not need to be recovered.
Go Back MAIN MENU
UP
DOWNSELECT
Show Settings
Uninstall Device
Update Device Software
DISCLAIMERGo Back
agree
disagree
Are you the owner of thisvehicle, have you read the
disclaimer, and do you agreeto all of its terms and conditions?
This is the �nal opportunity to exit the download proceidure by
pressing disagree.

50
TUNING THE VEHICLE
7. The HDGT will build the file.
• This process if fast; is should take about one minute.
• The HDGT will show a percentage count-er to track its progress.
• Do NOT interrupt the HDGT.
8. When the HDGT has finished preparing to un-install the tune, it will prompt you to turn the key to the RUN position.
• Turn the key to the RUN (or ON) position.• Press Continue (top right button).
9. The HDGT will connect to the engine comput-er and write the calibration.
• This means that the HDGT is actively writing the tune to the engine computer.
• This process can take between 15 and 45 minutes; it will take about ½ hour on most vehicles.
• Do NOT interrupt the HDGT (see page 26).
10. When the HDGT has finished uninstalling the tune from the engine computer, it will prompt you to turn the key to the OFF position.
• Turn the key to the OFF position.• Press Continue (top right button).
11. The HDGT will display a countdown.
• Leave the key in the OFF position.• Do NOT interrupt the HDGT.
BUILDING FILE 3%Setting...
Power/Econ Tune
Please waitDo Not Unplug
PLEASE VERIFY KEYIS IN THE
KEY RUN
RUNPOSITION
PRESS CONTINUE TO PROCEED
Continue
Writing Calibration 0%
00000000F0000100000003FF32000104B0002004B0000DD522
Please waitDo Not Unplug
PLEASE VERIFY KEYIS IN THE
KEY OFF
OFFPOSITION
PRESS CONTINUE TO PROCEED
Continue
Please Wait
Finishing Download
6Seconds
Leave Key OFF!DO NOT UNPLUG!!!

51
TUNING THE VEHICLE
12. After the countdown, the HDGT will prompt you to turn the key to the RUN position.
• Turn the key to the RUN (or ON) position.• Do NOT start the engine.• Press Continue (top right button).
13. The HDGT will complete the uninstall download.
14. Press Continue.
15. The HDGT will reboot and show the Main Gauge screen.
• Test to make sure that your vehicle runs correctly.• If you vehicle does not start, or generates an error message con-
tact technical support.
CONTINUE
DOWNLOADING
Download completedsuccesfully!
PLEASE VERIFY KEYIS IN THE
KEY RUN
RUNPOSITION
PRESS CONTINUE TO PROCEED
Continue
52
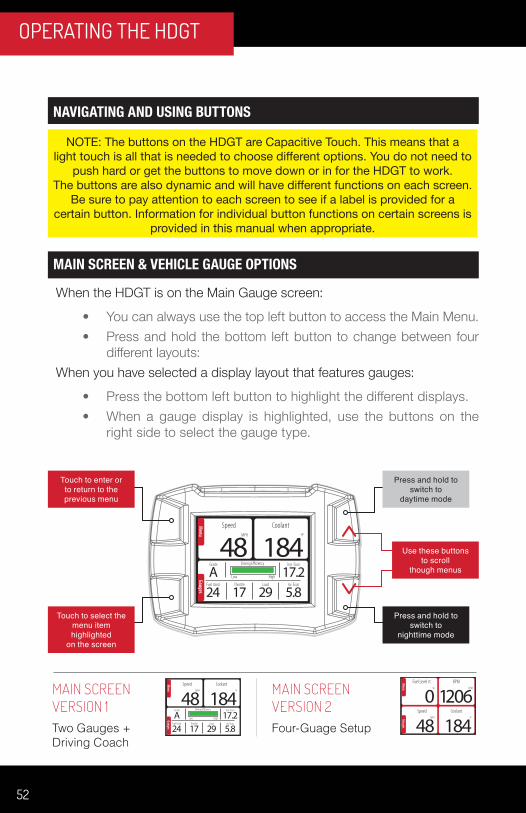
OPERATING THE HDGT
NAVIGATING AND USING BUTTONS
MAIN SCREEN & VEHICLE GAUGE OPTIONS
When the HDGT is on the Main Gauge screen:
• You can always use the top left button to access the Main Menu.• Press and hold the bottom left button to change between four
different layouts:When you have selected a display layout that features gauges:
• Press the bottom left button to highlight the different displays.• When a gauge display is highlighted, use the buttons on the
right side to select the gauge type.
NOTE: The buttons on the HDGT are Capacitive Touch. This means that a light touch is all that is needed to choose different options. You do not need to
push hard or get the buttons to move down or in for the HDGT to work. The buttons are also dynamic and will have different functions on each screen.
Be sure to pay attention to each screen to see if a label is provided for a certain button. Information for individual button functions on certain screens is
provided in this manual when appropriate.
Use these buttons to scroll
though menus
Touch to enter or to return to the previous menu
Touch to select the menu item highlighted
on the screen
Press and hold to switch to
daytime mode
Press and hold to switch to
nighttime mode
MAIN SCREEN VERSION 1Two Gauges + Driving Coach
MAIN SCREEN VERSION 2Four-Guage Setup
53
OPERATING THE HDGT
A list of the available vehicle parameters that the HDGT may be able to display is provided below.
NOTE: The HDGT can only display vehicle parameters that the engine computer broadcasts; therefore, some parameters may not be available
for certain vehicles. In general, newer vehicles will have more parameters available than earlier model vehicles.
VEHICLE PARAMETERS
Pyro 1 (exhaust gas temp in °F or °C)
Pyro 2 (exhaust gas temp in °F or °C)
Speed (MPH or KPH)
Boost (PSI or KPA)
RPM
Coolant (temp in °F or °C)
Throttle Position (0% to 100%)
Intake (temp in °F or °C)
Oil Temp (temp in °F or °C)
Oil Pressure (PSI or KPA)
Trans Temp (temp in °F or °C)
Battery (instant output in volts)
Fuel Pressure (PSI or KPA)
Load (0% to 100%)
Timing (in degrees)
MAF (grams/sec)
Instant Fuel Economy (miles/gal or liters/100 kilometers)
Average Fuel Economy (miles/gal or liters/100 kilometers)
Trip Distance (miles or kilometers)
Trip Fuel (gallons/hour or liters/hour)
Fuel Flow (gallons/hour or liters/hour)
Fuel Level (0% to 100%)

54
OPERATING THE HDGT
THE DRIVING COACH INTERFACE
To effectively benefit the driver and the truck, the Driving Coach must be set up properly. The illustration below shows the Driving Coach Interface that is shown on the Main Gauge screen. All of the parameters displayed on the driving coach are derived from the vehicle sensors and driver behavior. Many of the parameters can also be tracked and organized into a report.
Instant Economy
Average Economy
Driving Coach Grade
Throttle % Engine Load %
Efficiency Meter
Current Fuel Usage
55
OPERATING THE HDGT
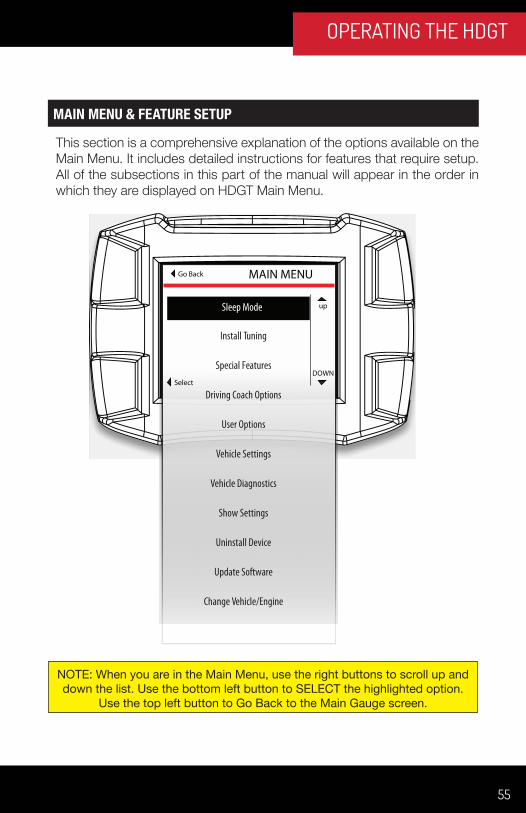
MAIN MENU & FEATURE SETUP
This section is a comprehensive explanation of the options available on the Main Menu. It includes detailed instructions for features that require setup. All of the subsections in this part of the manual will appear in the order in which they are displayed on HDGT Main Menu.
NOTE: When you are in the Main Menu, use the right buttons to scroll up and down the list. Use the bottom left button to SELECT the highlighted option.
Use the top left button to Go Back to the Main Gauge screen.
MAIN MENUGo Back
Select
up
DOWN
Sleep Mode
Install Tuning
Special Features
Driving Coach Options
User Options
Vehicle Settings
Vehicle Diagnostics
Show Settings
Uninstall Device
Update Software
VChange ehicle/Engine

56
OPERATING THE HDGT
MAIN MENU>> SLEEP MODE
The HDGT features a power-saving Sleep Mode; the screen will turn off and the HDGT will not monitor or record any vehicle parameters. The HDGT will enter Sleep Mode if that option is selected from the Main Menu.
There are two ways to exit Sleep Mode:
• If the vehicle is running or the key is in the RUN position: Touch any button.
• If the engine is off: Turn the engine on; the HDGT will automatically wake up when it receives an RPM reading.
MAIN MENU>>INSTALL TUNING
Install the HDGT tune to your vehicle engine.
MAIN MENUGo Back
Select
up
DOWN
Sleep Mode
Install Tuning MAIN MENUGo Back
Select
up
DOWN
Sleep Mode
Install Tuning
Entering Sleep Mode, press any key to resume
IMPORTANT NOTE: This step actively reprograms the engine computer (ECM/ECU); therefore, it is
very important to be fully informed and prepared before tuning the vehicle.
57
OPERATING THE HDGT
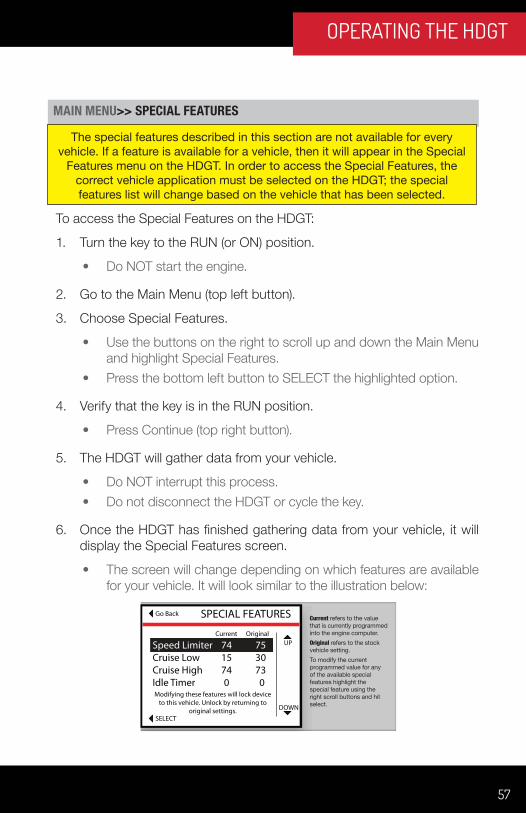
MAIN MENU>> SPECIAL FEATURES
To access the Special Features on the HDGT:
1. Turn the key to the RUN (or ON) position.
• Do NOT start the engine.
2. Go to the Main Menu (top left button).
3. Choose Special Features.
• Use the buttons on the right to scroll up and down the Main Menu and highlight Special Features.
• Press the bottom left button to SELECT the highlighted option.
4. Verify that the key is in the RUN position.
• Press Continue (top right button).
5. The HDGT will gather data from your vehicle.
• Do NOT interrupt this process.• Do not disconnect the HDGT or cycle the key.
6. Once the HDGT has finished gathering data from your vehicle, it will display the Special Features screen.
• The screen will change depending on which features are available for your vehicle. It will look similar to the illustration below:
The special features described in this section are not available for every vehicle. If a feature is available for a vehicle, then it will appear in the Special
Features menu on the HDGT. In order to access the Special Features, the correct vehicle application must be selected on the HDGT; the special features list will change based on the vehicle that has been selected.
SPECIAL FEATURESGo Back
SELECT
UP
DOWN
Current Original
Speed Limiter 74 75Cruise Low 15 30Cruise High 74 73Idle Timer 0 0Modifying these features will lock device
to this vehicle. Unlock by returning to original settings.
Current refers to the value that is currently programmed into the engine computer.Original refers to the stock vehicle setting.To modify the current programmed value for any of the available special features highlight the special feature using the right scroll buttons and hit select.
58
OPERATING THE HDGT
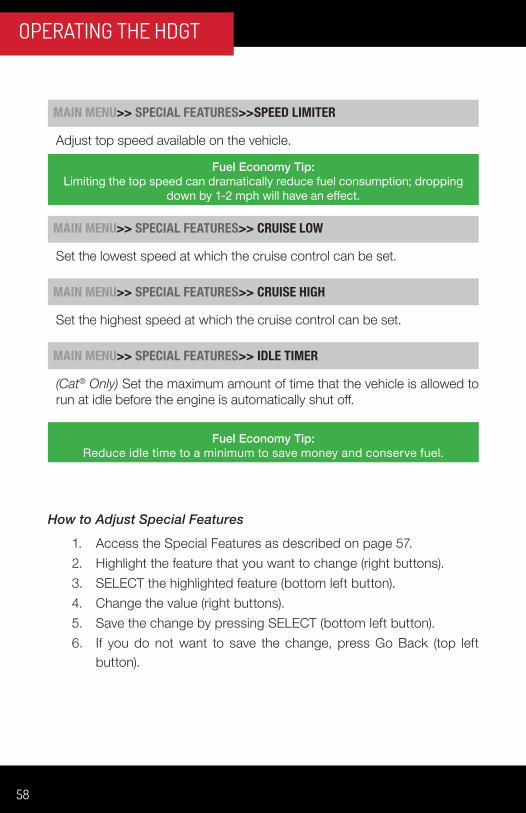
MAIN MENU>> SPECIAL FEATURES>>SPEED LIMITER
Adjust top speed available on the vehicle.
MAIN MENU>> SPECIAL FEATURES>> CRUISE LOW
Set the lowest speed at which the cruise control can be set.
MAIN MENU>> SPECIAL FEATURES>> CRUISE HIGH
Set the highest speed at which the cruise control can be set.
MAIN MENU>> SPECIAL FEATURES>> IDLE TIMER
(Cat® Only) Set the maximum amount of time that the vehicle is allowed to run at idle before the engine is automatically shut off.
How to Adjust Special Features
1. Access the Special Features as described on page 57. 2. Highlight the feature that you want to change (right buttons).3. SELECT the highlighted feature (bottom left button).4. Change the value (right buttons).5. Save the change by pressing SELECT (bottom left button).6. If you do not want to save the change, press Go Back (top left
button).
Fuel Economy Tip:Limiting the top speed can dramatically reduce fuel consumption; dropping
down by 1-2 mph will have an effect.
Fuel Economy Tip: Reduce idle time to a minimum to save money and conserve fuel.
59
OPERATING THE HDGT
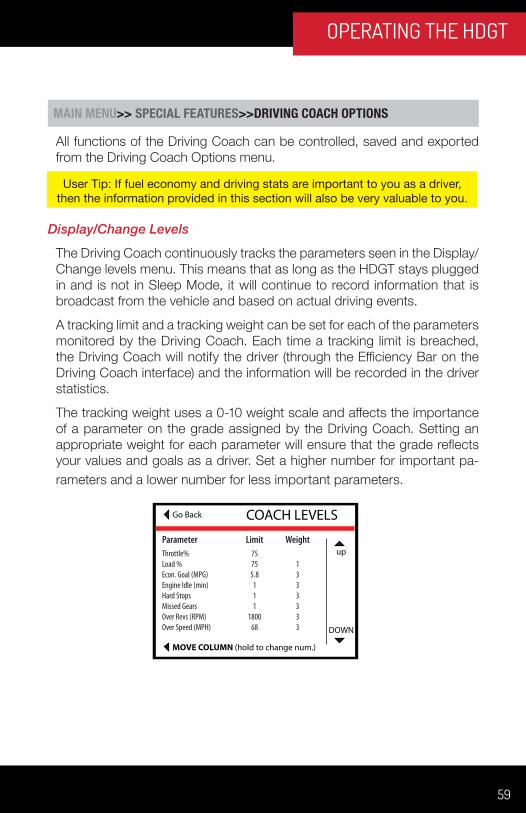
MAIN MENU>> SPECIAL FEATURES>>DRIVING COACH OPTIONS
All functions of the Driving Coach can be controlled, saved and exported from the Driving Coach Options menu.
Display/Change Levels
The Driving Coach continuously tracks the parameters seen in the Display/Change levels menu. This means that as long as the HDGT stays plugged in and is not in Sleep Mode, it will continue to record information that is broadcast from the vehicle and based on actual driving events.
A tracking limit and a tracking weight can be set for each of the parameters monitored by the Driving Coach. Each time a tracking limit is breached, the Driving Coach will notify the driver (through the Efficiency Bar on the Driving Coach interface) and the information will be recorded in the driver statistics.
The tracking weight uses a 0-10 weight scale and affects the importance of a parameter on the grade assigned by the Driving Coach. Setting an appropriate weight for each parameter will ensure that the grade reflects your values and goals as a driver. Set a higher number for important pa-rameters and a lower number for less important parameters.
User Tip: If fuel economy and driving stats are important to you as a driver, then the information provided in this section will also be very valuable to you.
COACH LEVELSGo Back
MOVE COLUMN (hold to change num.)
up
DOWN
Parameter Limit WeightThrottle% 75 Load % 75 1 Econ. Goal (MPG) 5.8 3 Engine Idle (min) 1 3Hard Stops 1 3Missed Gears 1 3 Over Revs (RPM) 1800 3Over Speed (MPH) 68 3
60
OPERATING THE HDGT
Driving Coach Parameter Definitions
Throttle % The position of the fuel pedal shown as a percent scaled from 0-100%.
Load %: The amount of load on the engine shown as a percent scaled from 0-100%. Based on manufacturer programming, one hundred percent indicates that the engine is producing its highest expected level of output.
Instant Econ.: A running average of the instant fuel economy of the vehicle. If a the current setting is 5.8 MPG and the instant fuel economy falls below 5.7 for more than a moment, then the Driving Coach will record the amount of time and deduct accordingly from the driver’s grade. The further below the goal that the average instant economy falls, the faster the Driving Coach will deduct from the driver’s score.
Engine Idle: The amount of time that the engine has run while the vehicle was not in motion.
Hard Stops: Defined and saved by the OEM computer hardware; this option is not available for all vehicles.
Over Rev (RPM): A breach of the maximum desired RPMs.
Over Speed (MPH): A breach of the maximum desired speed.
MAIN MENU>> SPECIAL FEATURES>>DRIVING COACH OPTIONS

61
OPERATING THE HDGT
Changing Driving Coach Levels
1. Highlight Driving Coach Options on the Main Menu (right buttons).
2. SELECT the highlighted option (bottom left button).
3. Highlight Display/Change Levels on the Coach Setup menu (right buttons).
4. SELECT the highlighted option (bottom left button).
5. Highlight the parameter value that you would like to change (right buttons).
6. Change between the Limit and Weight columns by pressing (and releasing) the bottom left button. To enter a new screen and change the highlighted value, hold the bottom left button.
7. Highlight the new value (right buttons).
8. Change the setting (bottom left button).
9. Go Back to the Coach Levels screen (top left button).
Go Back MAIN MENU
UP
DOWNSELECT
Special Features
Driving Coach Options
User Options
Go Back
UP
SELECT
COACH SETUP
Display/Change Levels
Driving Stats
Go Back
UP
DOWNMOVE COLUMN (Hold to change num.)
COACH LEVELS
Parameter Limit WeightThrottle %Load%Instant Econ. (MPG)Engine Idle (min)Hard StopsOver Rev (rpm)Over Speed (MPH)
75755.8
11
180068
2133333
Go Back
UP
DOWNMOVE COLUMN (Hold to change num.)
COACH LEVELS
Parameter Limit WeightThrottle %Load%Instant Econ. (MPG)Engine Idle (min)Hard StopsOver Rev (rpm)Over Speed (MPH)
2133333
Hold
75755.8
11
180068
Go Back
UP
DOWNSELECT
THROTTLE
Selected75 %
Selected Levels72737475767778
MAIN MENU>> SPECIAL FEATURES>>DRIVING COACH OPTIONS
62
OPERATING THE HDGT
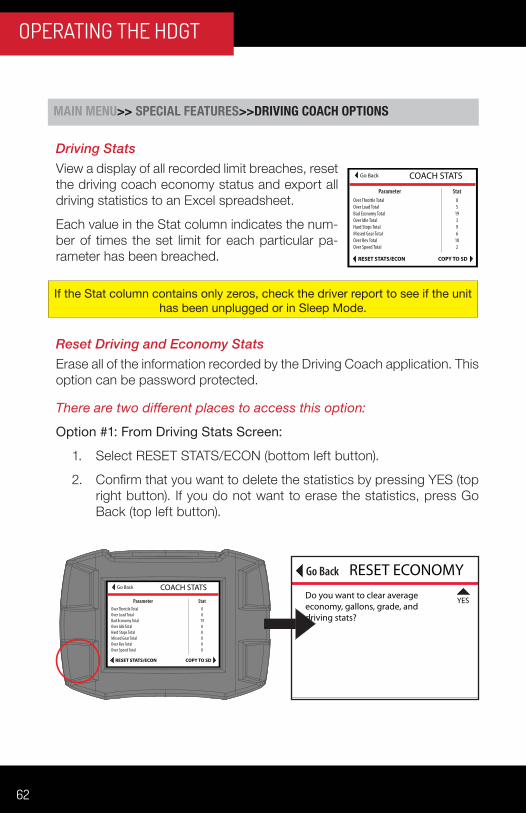
Driving StatsView a display of all recorded limit breaches, reset the driving coach economy status and export all driving statistics to an Excel spreadsheet.
Each value in the Stat column indicates the num-ber of times the set limit for each particular pa-rameter has been breached.
Reset Driving and Economy StatsErase all of the information recorded by the Driving Coach application. This option can be password protected.
There are two different places to access this option:
Option #1: From Driving Stats Screen:
1. Select RESET STATS/ECON (bottom left button).
2. Confirm that you want to delete the statistics by pressing YES (top right button). If you do not want to erase the statistics, press Go Back (top left button).
COACH STATSGo Back
RESET STATS/ECON COPY TO SD
Parameter StatOver Throttle Total 8Over Load Total 5Bad Economy Total 19Over Idle Total 3 Hard Stops Total 9Missed Gear Total 6Over Rev Total 10 Over Speed Total 2
If the Stat column contains only zeros, check the driver report to see if the unit has been unplugged or in Sleep Mode.
COACH STATSGo Back
RESET STATS/ECON COPY TO SD
Parameter StatOver Throttle Total 0Over Load Total 0Bad Economy Total 19Over Idle Total 0 Hard Stops Total 0Missed Gear Total 0Over Rev Total 0 Over Speed Total 0
Go Back
YES
RESET ECONOMYDo you want to clear averageeconomy, gallons, grade, anddriving stats?
MAIN MENU>> SPECIAL FEATURES>>DRIVING COACH OPTIONS

63
OPERATING THE HDGT
Option #2 From the Coach Setup Menu:
1. Highlight Clear/Reset Driving Stats (right buttons).2. SELECT the highlighted option (bottom left button).3. Confirm that you want to delete the statistics by pressing YES (top
right button). If you do not want to erase the statistics, press Go Back (top left button).
Once the reset command is confirmed, the HDGT will reset the saved driv-ing statistics to zero and return automatically to the Driving Stats screen.
Go Back
UP
DOWN
COACH SETUP
SELECT
Driving Stats
Clear/Reset Driving Stats
Calibrate MPGs
Go Back
YES
RESET ECONOMYDo you want to clear averageeconomy, gallons, grade, anddriving stats?
COACH STATSGo Back
RESET STATS/ECON COPY TO SD
Parameter StatOver Throttle Total 0Over Load Total 0Bad Economy Total 0Over Idle Total 0 Hard Stops Total 0Missed Gear Total 0Over Rev Total 0 Over Speed Total 0
RESET ECONOMY
Reset Complete.
MAIN MENU>> SPECIAL FEATURES>>DRIVING COACH OPTIONS
64
OPERATING THE HDGT
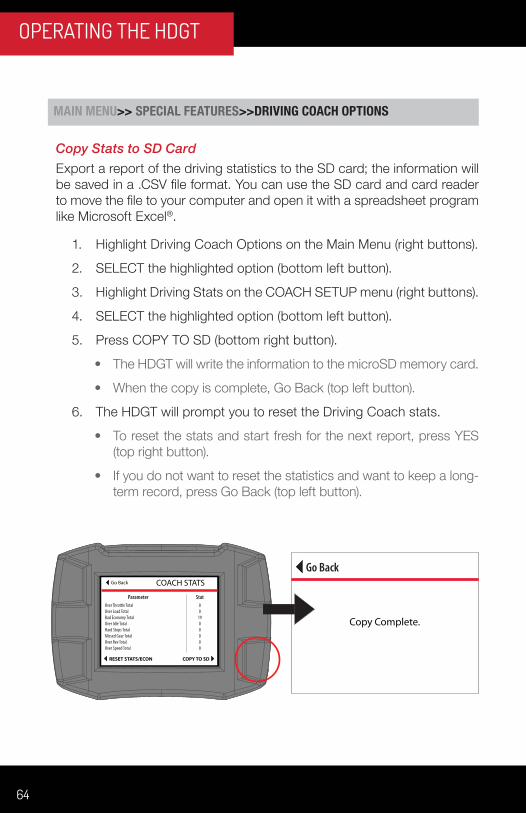
Copy Stats to SD CardExport a report of the driving statistics to the SD card; the information will be saved in a .CSV file format. You can use the SD card and card reader to move the file to your computer and open it with a spreadsheet program like Microsoft Excel®.
1. Highlight Driving Coach Options on the Main Menu (right buttons).
2. SELECT the highlighted option (bottom left button).
3. Highlight Driving Stats on the COACH SETUP menu (right buttons).
4. SELECT the highlighted option (bottom left button).
5. Press COPY TO SD (bottom right button).
• The HDGT will write the information to the microSD memory card.
• When the copy is complete, Go Back (top left button).
6. The HDGT will prompt you to reset the Driving Coach stats.
• To reset the stats and start fresh for the next report, press YES (top right button).
• If you do not want to reset the statistics and want to keep a long-term record, press Go Back (top left button).
COACH STATSGo Back
RESET STATS/ECON COPY TO SD
Parameter StatOver Throttle Total 0Over Load Total 0Bad Economy Total 19Over Idle Total 0 Hard Stops Total 0Missed Gear Total 0Over Rev Total 0 Over Speed Total 0
Go Back
Copy Complete.
MAIN MENU>> SPECIAL FEATURES>>DRIVING COACH OPTIONS
65
OPERATING THE HDGT
MAIN MENU>> SPECIAL FEATURES>>DRIVING COACH OPTIONS
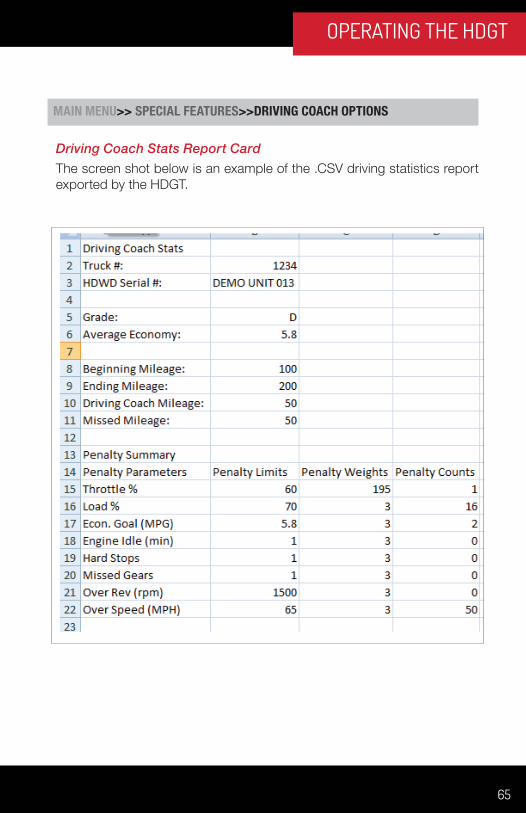
Driving Coach Stats Report CardThe screen shot below is an example of the .CSV driving statistics report exported by the HDGT.

66
OPERATING THE HDGT
Clear/Reset Driving StatsErase all of the information recorded by the Driving Coach application. This option can be password protected.
There are two different places to access this option:
Option #1: From the Coach Setup Menu:
1. Highlight Clear/Reset Driving Stats (right buttons).
2. SELECT the highlighted option (bottom left button).
3. Confirm that you want to delete the statistics by pressing YES (top right button). If you do not want to erase the statistics, press Go Back (top left button).
Option #2: From Driving Stats Screen:
1. Select RESET STATS/ECON (bottom left button).
2. Confirm that you want to delete the statistics by pressing YES (top right button). If you do not want to erase the statistics, press Go Back (top left button).
COACH STATSGo Back
RESET STATS/ECON COPY TO SD
Parameter StatOver Throttle Total 0Over Load Total 0Bad Economy Total 19Over Idle Total 0 Hard Stops Total 0Missed Gear Total 0Over Rev Total 0 Over Speed Total 0
Go Back
YES
RESET ECONOMYDo you want to clear averageeconomy, gallons, grade, anddriving stats?
Go Back
UP
DOWN
COACH SETUP
SELECT
Driving Stats
Clear/Reset Driving Stats
Calibrate MPGs
Go Back
YES
RESET ECONOMYDo you want to clear averageeconomy, gallons, grade, anddriving stats?
MAIN MENU>> SPECIAL FEATURES>>DRIVING COACH OPTIONS
67
OPERATING THE HDGT
MAIN MENU>> SPECIAL FEATURES>>DRIVING COACH OPTIONS
Calibrate MPGsThis option will allow you to adjust the fuel efficiency calculation on the HDGT so that it is as accurate as possible.
Checking Average Fuel EconomyIt is important to check the average fuel economy on your vehicle and on the HDGT at least once every changing season. There are many reasons for this; here is one example:
The fuel delivered to gas stations during the winter contains an average of 1.3% less energy than the fuel delivered in warmer seasons. This means that the same amount of liquid is going into the tank, but it is 1.3% less effective, on average.
There are many similar factors that affect fuel efficiency that cannot be controlled; since it is not possible for the HDGT to sense or adjust for all of the factors, it is important to be able to adjust the fuel economy setting.
1. Fill the gas tank.
2. Clear/Reset Driving Stats.
3. Set the trip odometer to zero.
4. Drive the vehicle for an entire tank (or two).
5. Calculate the average fuel economy (MPGs).
6. Calculate the Percent Difference between the MPGs that you have calculated and the MPGs displayed by the HDGT.
IMPORTANT NOTE: If the speedometer on the vehicle is not accurate, then the odometer and
MPG gauge will also be incorrect.
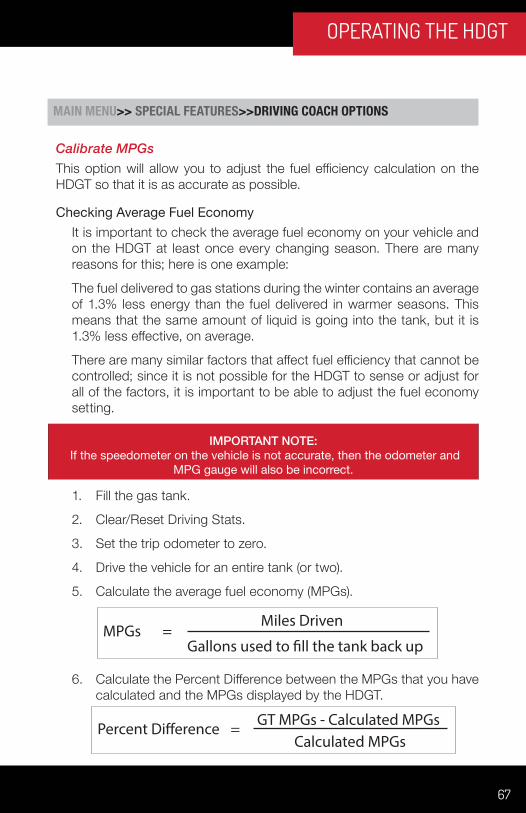
MPGs =Miles Driven
Gallons used to �ll the tank back up
Percent Di�erence = GT MPGs - Calculated MPGsCalculated MPGs
68
OPERATING THE HDGT
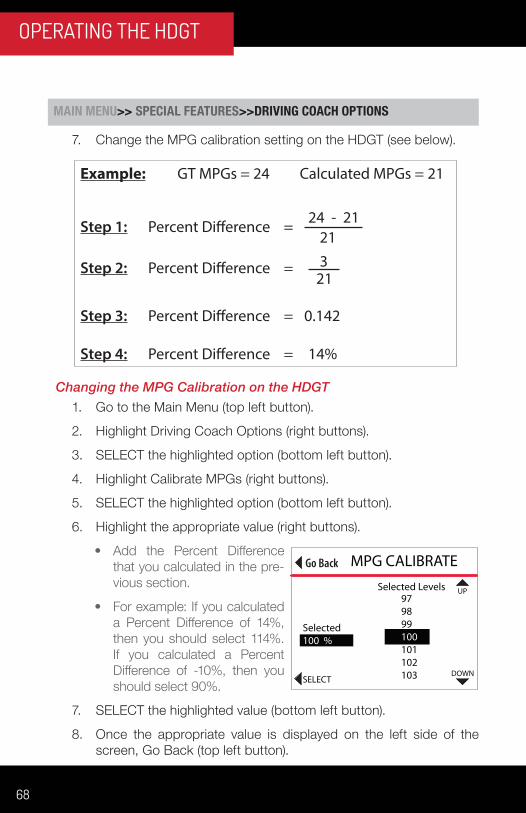
7. Change the MPG calibration setting on the HDGT (see below).
Changing the MPG Calibration on the HDGT1. Go to the Main Menu (top left button).
2. Highlight Driving Coach Options (right buttons).
3. SELECT the highlighted option (bottom left button).
4. Highlight Calibrate MPGs (right buttons).
5. SELECT the highlighted option (bottom left button).
6. Highlight the appropriate value (right buttons).
• Add the Percent Difference that you calculated in the pre-vious section.
• For example: If you calculated a Percent Difference of 14%, then you should select 114%. If you calculated a Percent Difference of -10%, then you should select 90%.
7. SELECT the highlighted value (bottom left button).
8. Once the appropriate value is displayed on the left side of the screen, Go Back (top left button).
Example: GT MPGs = 24 Calculated MPGs = 21
Step 1:
Step 2:
Step 3:
Step 4:
Percent Di�erence =
Percent Di�erence =
Percent Di�erence =
Percent Di�erence =
24 - 21213
21
0.142
14%
Go Back
UP
DOWNSELECT
MPG CALIBRATE
Selected100 %
Selected Levels979899100101102103
MAIN MENU>> SPECIAL FEATURES>>DRIVING COACH OPTIONS
69
OPERATING THE HDGT
MAIN MENU>> SPECIAL FEATURES>>DRIVING COACH OPTIONS
Driving Coach SoundTurn the Driving Coach sounds on or off. The current setting is listed at the top of the screen.
1. Highlight the desired setting (right buttons).
2. SELECT the highlighted setting (bottom left button).
3. To exit without changing the current setting, Go Back (top left button).
Assign Truck NumberSet truck identity numbers. This option is most useful for fleet managers and can be password protected.
1. From the Main Menu (top left button) select Driving Coach Options (right buttons).
2. SELECT the highlighted option (bottom left button) and then Highlight Assign Truck Number (right buttons).
3. SELECT the highlighted option (bottom left button) and enter the truck number.
• Use the buttons on the right to change the digit above the cursor.
• UP (top right button) to scroll through numbers (0-9) and then the alphabet. DOWN (bottom right button): moves backward from current digit.
• MOVE CURSOR (bottom left button). The cursor will only move to the right. If you need to correct a digit, press the button repeatedly until the cursor comes back around.
4. SAVE the number (top left button). The HDGT will automatically go back to the Driving Coach Options menu (COACH SETUP).
Go Back
UP
DOWN
COACH SETUP
SELECT
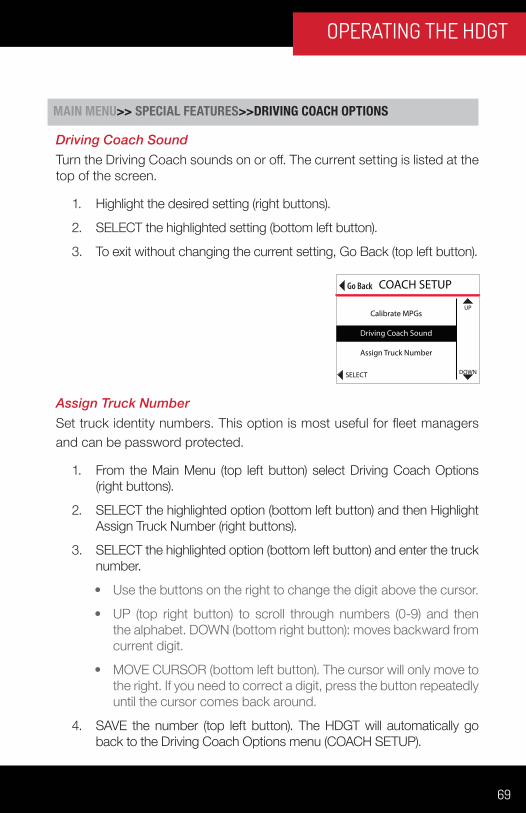
Calibrate MPGs
Driving Coach Sound
Assign Truck Number
70
OPERATING THE HDGT
Adjust BacklightAdjust the brightness of the screen; separate settings are available for day and night modes.
1. Go to the Main Menu (top left button).
2. Highlight User Options (right buttons).
3. SELECT the highlighted option (bottom left button).
4. Highlight Adjust Backlight (right buttons).
5. SELECT the highlighted option (bottom left button).
6. Highlight the theme you wish to adjust (right buttons).
• The screen will display the highlighted mode.• The current backlight setting for the highlighted mode will be dis-
played at the top of the screen.
7. SELECT the highlighted mode (bottom left button).
8. Choose the desired backlight percentage (right buttons).
• The screen brightness will change to demonstrate the backlight percentage option that is displayed.
• To exit, press Go Back (top left button).
9. To set the currently displayed backlight percentage, press SELECT. The HDGT will automatically return to the previous screen.
Go Back
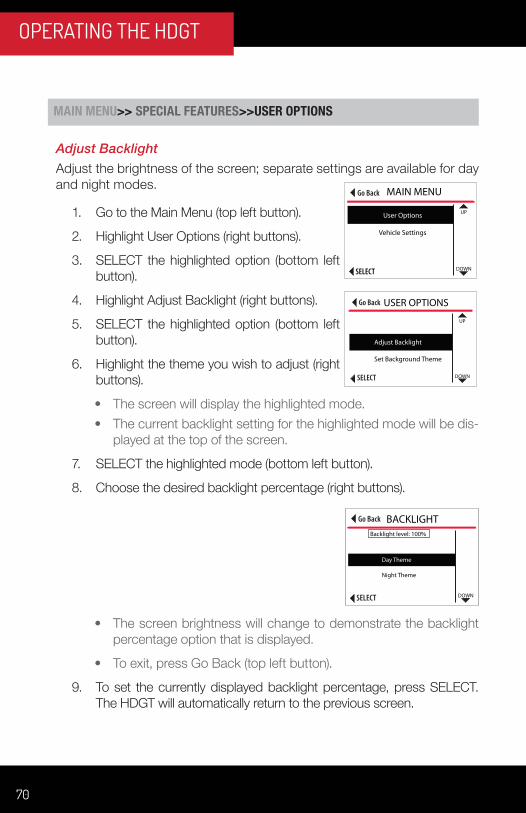
DOWNSELECT
BACKLIGHTBacklight level: 100%
Day Theme
Night Theme
MAIN MENU>> SPECIAL FEATURES>>USER OPTIONS
Go Back
UP
DOWNSELECT
MAIN MENU
User Options
Vehicle Settings
Go Back
UP
DOWNSELECT
USER OPTIONS
Adjust Backlight
Set Background Theme
71
OPERATING THE HDGT
MAIN MENU>> SPECIAL FEATURES>>USER OPTIONS
Set Background ThemeChange the color theme; separate settings are available for day and night modes. Choose from eight preset color themes or create your own cus-tomized color theme.
1. Go to the Main Menu (top left button).
2. Highlight User Options (right buttons).
3. SELECT the highlighted option.
4. Highlight Set Background Theme.
5. SELECT the highlighted option (bottom left button).
6. Highlight the mode you wish to adjust (right buttons).
• The screen will display highlighted mode.• The current color theme for the highlighted mode will be displayed
at the top of the screen.
7. SELECT the highlighted mode (bottom left button).
8. Highlight the desired color theme.
• The screen will display the highlighted color theme.
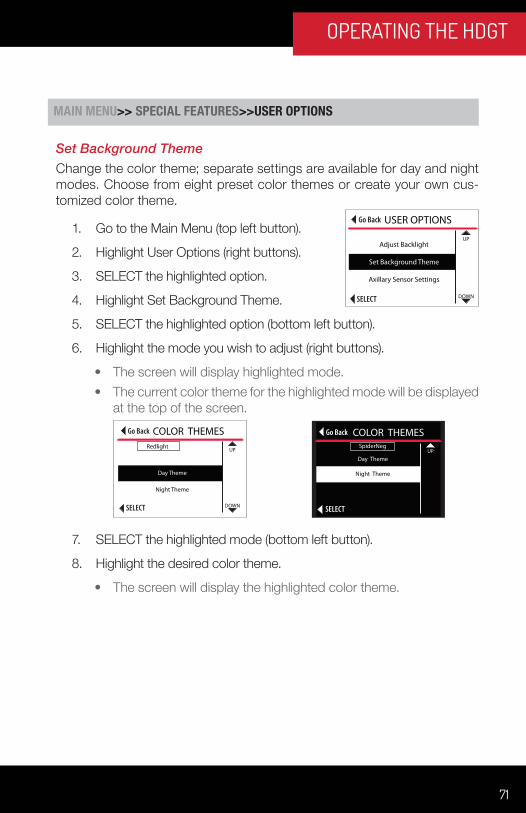
Go Back
UP
DOWNSELECT
USER OPTIONS
Adjust Backlight
Set Background Theme
Axillary Sensor Settings
Go Back
UP
SELECT
COLOR THEMESSpiderNeg
Day Theme
Night Theme
Go Back
UP
DOWNSELECT
COLOR THEMESRedlight
Day Theme
Night Theme
72
OPERATING THE HDGT
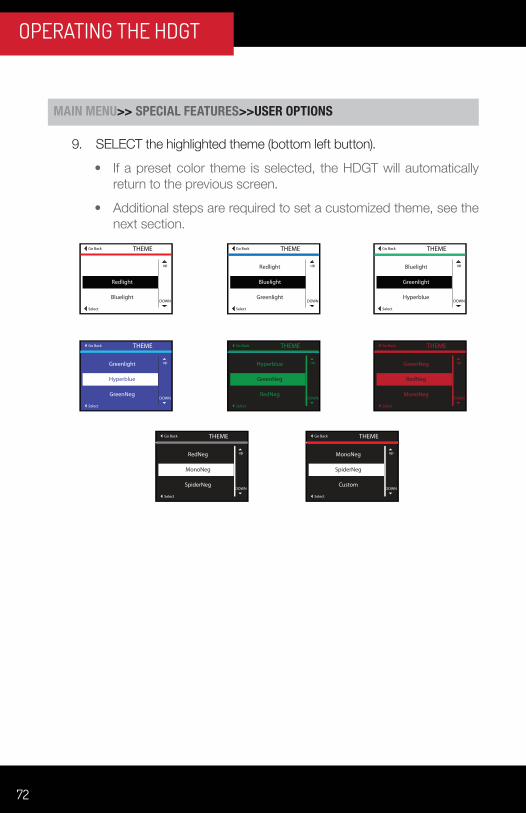
9. SELECT the highlighted theme (bottom left button).
• If a preset color theme is selected, the HDGT will automatically return to the previous screen.
• Additional steps are required to set a customized theme, see the next section.
THEMEGo Back
Select
up
DOWN
Redlight
Bluelight
THEMEGo Back
Select
up
DOWN
Redlight
Bluelight
Greenlight
THEMEGo Back
Select
up
DOWN
Bluelight
Greenlight
Hyperblue
THEMEGo Back
Select
up
DOWN
Greenlight
Hyperblue
GreenNeg
THEMEGo Back
Select
up
DOWN
Hyperblue
GreenNeg
RedNeg
THEMEGo Back
Select
up
DOWN
GreenNeg
RedNeg
MonoNeg
THEMEGo Back
Select
up
DOWN
MonoNeg
SpiderNeg
Custom
THEMEGo Back
Select
up
DOWN
RedNeg
MonoNeg
SpiderNeg
MAIN MENU>> SPECIAL FEATURES>>USER OPTIONS
73
OPERATING THE HDGT
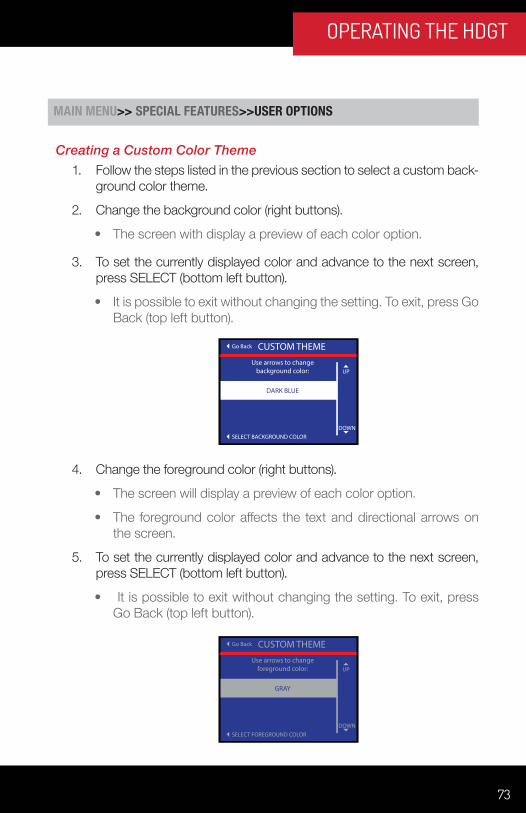
Creating a Custom Color Theme1. Follow the steps listed in the previous section to select a custom back-
ground color theme.
2. Change the background color (right buttons).
• The screen with display a preview of each color option.
3. To set the currently displayed color and advance to the next screen, press SELECT (bottom left button).
• It is possible to exit without changing the setting. To exit, press Go Back (top left button).
4. Change the foreground color (right buttons).
• The screen will display a preview of each color option.
• The foreground color affects the text and directional arrows on the screen.
5. To set the currently displayed color and advance to the next screen, press SELECT (bottom left button).
• It is possible to exit without changing the setting. To exit, press Go Back (top left button).
CUSTOM THEMEGo Back
SELECT BACKGROUND COLOR
UP
DOWN
Use arrows to changebackground color:
DARK BLUE
CUSTOM THEMEGo Back
SELECT FOREGROUND COLOR
UP
DOWN
Use arrows to changeforeground color:
GRAY
MAIN MENU>> SPECIAL FEATURES>>USER OPTIONS

74
OPERATING THE HDGT
6. Change the border color.
• The screen will display a preview of each color option.
7. To set the currently displayed color and advance to the next screen, press SELECT (bottom left button).
• The HDGT will go back to the background color (step 2) and the cycle will continue until you exit the CUSTOM THEME menu.
8. To exit, press Go Back (top left button).
CUSTOM THEMEGo Back
SELECT BORDER COLOR
UP
DOWN
Use arrows to changeborder color:
DARK GRAY
If a color has been selected for one option (background, foreground or border), it will not be available for the other options. For example: If the
background is green, then green will not be displayed for the other options until the background is changed to a different color.
MAIN MENU>> SPECIAL FEATURES>>USER OPTIONS

75
OPERATING THE HDGT
MAIN MENU>> SPECIAL FEATURES>>USER OPTIONS
US/Metric UnitsChoose between U.S. Standard and metric unit systems; every vehicle parameter and all other information displayed by the HDGT will be affected by this setting
1. Go to the Main Menu (top left button).
2. Highlight User Options (right buttons).
3. SELECT the highlighted option.
4. Highlight US/Metric Units (right buttons).
5. SELECT the highlighted option (bottom left button).
6. Highlight the desired unit system (right buttons).
• The current setting will be displayed at the top of the screen.
• It is possible to exit without changing the setting. To exit, press Go Back (top left but-ton).
7. To change the setting to the highlighted option, press SELECT (bottom left button).
8. To exit, press Go Back (top left button).
Go Back
UP
DOWNSELECT
MAIN MENU
User Options
Vehicle Settings
Go Back
UP
DOWNSELECT
USER OPTIONS
Axillary SENSOR Settings
US/Metric Units
Administrator Password
SET UNITSGo Back
SELECTDOWN
US Standard
US Standard
Metric

76
OPERATING THE HDGT
MAIN MENU>> SPECIAL FEATURES>>USER OPTIONS
Administrator PasswordThe HDGT Administrator Password is a four digit code that can consist of numbers, spaces and letters.
1. Go to the Main Menu (top left button).
2. Highlight User Options (right buttons).
3. SELECT the highlighted option.
4. Highlight Administrator Password.
5. SELECT the highlighted option.
6. Press YES to confirm that you want to set a password (bottom left button).
• It is possible to exit without setting a password. To exit, press Go Back.
Password protect the following HDGT functions:
Reset to System Defaults
Install Tuning
Special Features
Assign Truck Number
Change Driving Coach Levels
Reset Driving Coach Stats
Uninstall Device
Change Vehicle
Go Back
UP
DOWNSELECT
USER OPTIONS
US/Metric Units
Administrator Password
Reset to System Default
Go Back
YES
ADMIN PWD
Do you want to passwordprotect this device?
Go Back
UP
DOWNSELECT
MAIN MENU
User Options
Vehicle Settings
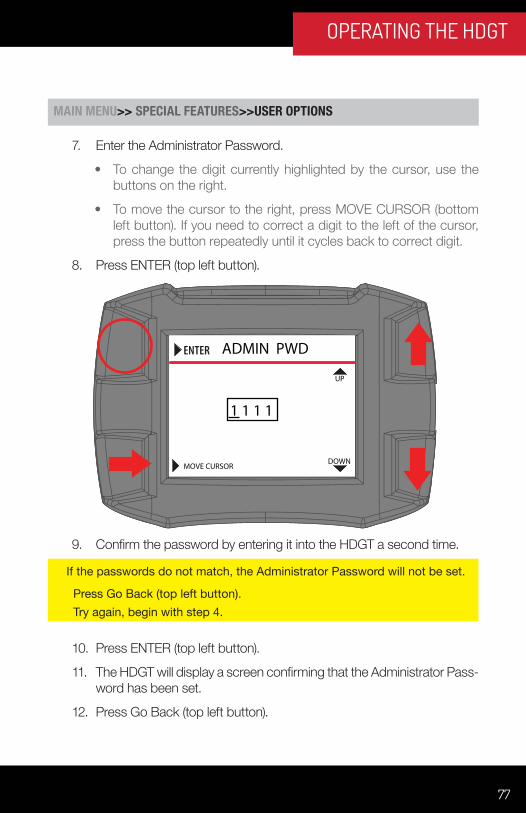
77
OPERATING THE HDGT
MAIN MENU>> SPECIAL FEATURES>>USER OPTIONS
7. Enter the Administrator Password.
• To change the digit currently highlighted by the cursor, use the buttons on the right.
• To move the cursor to the right, press MOVE CURSOR (bottom left button). If you need to correct a digit to the left of the cursor, press the button repeatedly until it cycles back to correct digit.
8. Press ENTER (top left button).
9. Confirm the password by entering it into the HDGT a second time.
10. Press ENTER (top left button).
11. The HDGT will display a screen confirming that the Administrator Pass-word has been set.
12. Press Go Back (top left button).
ENTER
UP
DOWNMOVE CURSOR
ADMIN PWD
1 1 1 1
If the passwords do not match, the Administrator Password will not be set.
Press Go Back (top left button).Try again, begin with step 4.
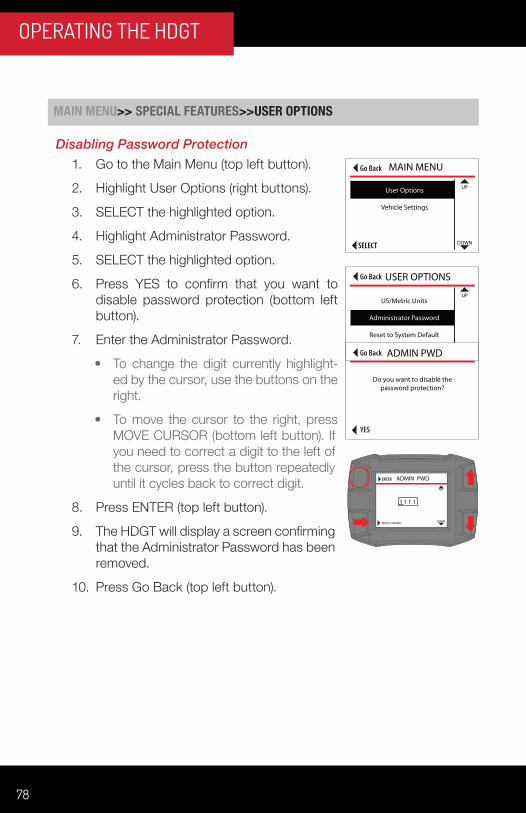
78
OPERATING THE HDGT
MAIN MENU>> SPECIAL FEATURES>>USER OPTIONS
Disabling Password Protection1. Go to the Main Menu (top left button).
2. Highlight User Options (right buttons).
3. SELECT the highlighted option.
4. Highlight Administrator Password.
5. SELECT the highlighted option.
6. Press YES to confirm that you want to disable password protection (bottom left button).
7. Enter the Administrator Password.
• To change the digit currently highlight-ed by the cursor, use the buttons on the right.
• To move the cursor to the right, press MOVE CURSOR (bottom left button). If you need to correct a digit to the left of the cursor, press the button repeatedly until it cycles back to correct digit.
8. Press ENTER (top left button).
9. The HDGT will display a screen confirming that the Administrator Password has been removed.
10. Press Go Back (top left button).
Go Back
UP
DOWNSELECT
MAIN MENU
User Options
Vehicle Settings
Go Back
UP
DOWNSELECT
USER OPTIONS
US/Metric Units
Administrator Password
Reset to System Default
Go Back
YES
ADMIN PWD
Do you want to disable thepassword protection?
ENTER
UP
DOWNMOVE CURSOR
ADMIN PWD
1 1 1 1

79
OPERATING THE HDGT
MAIN MENU>> SPECIAL FEATURES>>USER OPTIONS
Reseting to System Default
1. Go to the Main Menu (top left button).
2. Highlight User Options (right buttons).
3. SELECT the highlighted option.
4. Highlight Reset to System Default.
5. SELECT the highlighted option.
6. Press Yes to confirm the reset.
• It is possible to exit without resetting the HDGT. To exit, press NO (bottom right button) or Go Back (top left button).
• The HDGT will reset and reboot.
IMPORTANT NOTE:The HDGT will remain locked to a vehicle if the Install Tuning or Special
Features options have been used, even if the defaults are reset. To unlock the HDGT, you must go through the Uninstall Device process.
Go Back
UP
DOWNSELECT
MAIN MENU
User Options
Vehicle Settings
Go Back
UP
SELECT
USER OPTIONS
Administrator Password
Reset to System Default
Go Back
UP
DOWN
SYSTEM RESETSelecting YES will resetdevice to original settings.
Are you sure you want to do soat this time? ( for YES)

80
OPERATING THE HDGT
Vehicle Settings allow you to change temperature warning and commu-nication protocol settings.
Set Warning LevelsConfigure the HDGT to provide visual and/or audio warnings for the fol-lowing parameters. Refer to OEM vehicle specifications to determine the values to use when setting safety levels.
Pyro 1 Temperature LevelThe default setting for this option (1250°F) is a starting point and assumes that Pyro 1 is installed in a pre-turbo location.
Pyro 2 Temperature LevelThe default setting for this option is Off because most vehicles do not have two OEM pyrometers.
Engine Coolant Temp LevelThe default setting for this option is 220°F.
Boost LevelBy default option is set to Off.
Maintaining low boost levels will allow for maximum efficiency, and reduce engine stress.
A boost warning will remind you to maintain low boost pressure.
Transmission Temperature LevelThe default setting for this option is Off because many vehicles do not broadcast transmission temperature information.If an OEM transmission tempera-ture option is not available, the HDGT can provide that information through an aftermarket sensor.
Oil Temperature LevelThe default setting for this option is Off because many vehicles do not broadcast oil temperature information.If an OEM oil temperature option is not available, the HDGT can pro-vide that information through an aftermarket sensor.
Speed LimitThis feature does not change the speed limiter; it is simply a speed limit warning.
Use either the same Speed Limit set in the Driving Coach or a slightly lower one to remind the driver to slow down before reaching the speed limit.
MAIN MENU>> SPECIAL FEATURES>>VEHICLE SETTINGS

81
OPERATING THE HDGT
MAIN MENU>> SPECIAL FEATURES>>VEHICLE SETTINGS
Changing Warning Levels1. Go to the Main Menu (top left button).
2. Highlight Vehicle Settings (right buttons).
3. SELECT the highlighted option.
4. Highlight Set Monitoring Levels.
5. SELECT the highlighted option.
6. Highlight the setting that you want to change.
7. SELECT the highlighted option.
8. Highlight the desired setting.
9. SELECT the highlighted value.
10. The current setting will be displayed on the left side of the screen.
11. It is possible to exit without changing the setting. To exit, press Go Back.
Go Back
UP
DOWNSELECT
MAIN MENU
User Options
Vehicle Settings
Vehicle Diagnostics
Go Back
DOWNSELECT
VEHICLE SETTING
Set Warning Levels
Change Monitoring Type
Go Back
UP
DOWNSELECT
WARNING MENU
Pyro 1 Temperature Level
Pyro 2 Temperature Level
Engine Coolant Temp Level
Setting: 1250 °F
Setting: 220 °F
Setting: OFF
Go Back
UP
DOWNSELECT
PYRO 2
SelectedOFF
Selected Levels850900950
1000105011001150
82
OPERATING THE HDGT
Pyrometer CalibrationDetermine the best temperatures to set for warning levels to help prevent engine heat damage.
1. Make sure the vehicle is running at stock horsepower.
• For instructions on checking to see if the HDGT tune is installed, (see page 26).
• If the tune is installed, it will need to be uninstalled (see page 49)..
• A “stock” power level is not the same as uninstalling the tune and can affect the pyrometer calibration results. Make sure to com-pletely uninstall the tune..
2. Put the engine under a 100% work load.
• You want to generate the maximum exhaust gas temperature (EGT) possible under stock engine conditions.
• A good way to achieve a 100% work load is:
- Find a steep hill with a long road and a high speed limit.
- Wait for a hot day.
- Set up a heavy load on your vehicle.
- Haul the load to the top of the hill.
3. Check and record the highest temperature measured by the py-rometer (while under a 100% work load).
• This is the upper limit of the safe temperature for your engine.
• Use this value as the safety defuel and/or warning level.
MAIN MENU>> SPECIAL FEATURES>>VEHICLE SETTINGS
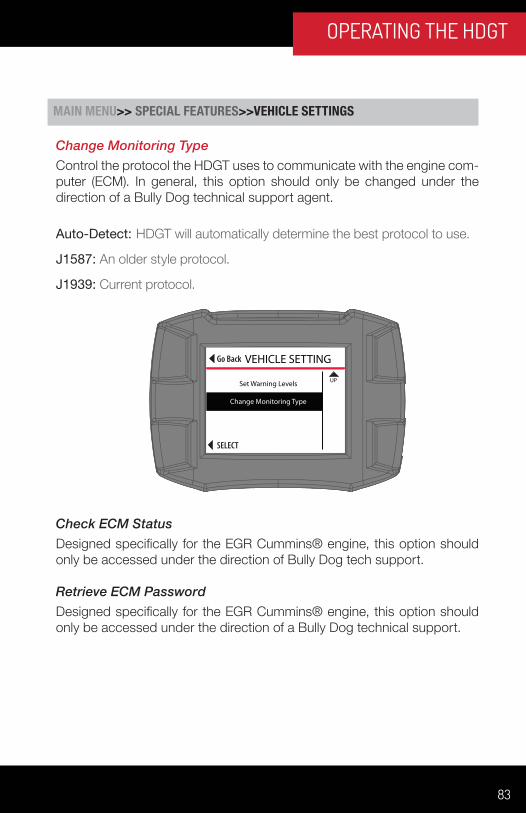
83
OPERATING THE HDGT
MAIN MENU>> SPECIAL FEATURES>>VEHICLE SETTINGS
Change Monitoring TypeControl the protocol the HDGT uses to communicate with the engine com-puter (ECM). In general, this option should only be changed under the direction of a Bully Dog technical support agent.
Auto-Detect: HDGT will automatically determine the best protocol to use.
J1587: An older style protocol.
J1939: Current protocol.
Check ECM StatusDesigned specifically for the EGR Cummins® engine, this option should only be accessed under the direction of Bully Dog tech support.
Retrieve ECM PasswordDesigned specifically for the EGR Cummins® engine, this option should only be accessed under the direction of a Bully Dog technical support.
Go Back
UP
SELECT
VEHICLE SETTING
Set Warning Levels
Change Monitoring Type
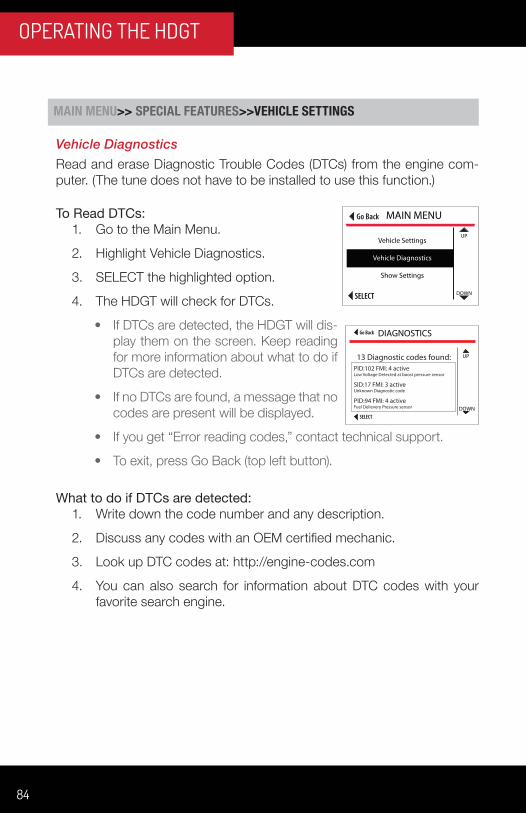
84
OPERATING THE HDGT
MAIN MENU>> SPECIAL FEATURES>>VEHICLE SETTINGS
Vehicle DiagnosticsRead and erase Diagnostic Trouble Codes (DTCs) from the engine com-puter. (The tune does not have to be installed to use this function.)
To Read DTCs:1. Go to the Main Menu.
2. Highlight Vehicle Diagnostics.
3. SELECT the highlighted option.
4. The HDGT will check for DTCs.
• If DTCs are detected, the HDGT will dis-play them on the screen. Keep reading for more information about what to do if DTCs are detected.
• If no DTCs are found, a message that no codes are present will be displayed.
• If you get “Error reading codes,” contact technical support.
• To exit, press Go Back (top left button).
What to do if DTCs are detected:1. Write down the code number and any description.
2. Discuss any codes with an OEM certified mechanic.
3. Look up DTC codes at: http://engine-codes.com
4. You can also search for information about DTC codes with your favorite search engine.
DIAGNOSTICSGo Back
SELECT
UP
DOWN
13 Diagnostic codes found:PID:102 FMI: 4 activeLow Voltage Detected at boost pressure sensor
SID:17 FMI: 3 activeUnknown Diagnostic code
PID:94 FMI: 4 activeFuel Delievery Pressure sensor
Go Back
UP
DOWNSELECT
MAIN MENU
Vehicle Settings
Vehicle Diagnostics
Show Settings

85
OPERATING THE HDGT
MAIN MENU>> SPECIAL FEATURES>>VEHICLE SETTINGS
Show SettingsView HDGT and vehicle information. See page 87 for more information about checking the HDGT status to determine if the unit has been locked to a vehicle.
Uninstall DeviceThe process of uninstalling the HDGT tune from the engine computer.
Update Device SoftwareComplete the update process by transferring files from the microSD mem-ory card to the HDGT.
IMPORTANT NOTE:This step reprograms the engine computer (ECM/ECU); therefore, it is very important to be fully informed and prepared before beginning the process.
IMPORTANT NOTE:Most DTCs indicate a problem with the engine, not the HDGT or the tune.To determine if the HDGT or tune is causing a DTC:
1. Uninstall the tune
2. Drive the vehicle for about one week.If the DTC comes back contact an OEM certified mechanic.If the DTC doesn’t come back, proceed to the next step.
3. Reinstall the tune.Drive the vehicle for about one week.If the DTC comes back while the tune is reinstalled, contact Bully Dog technical support.
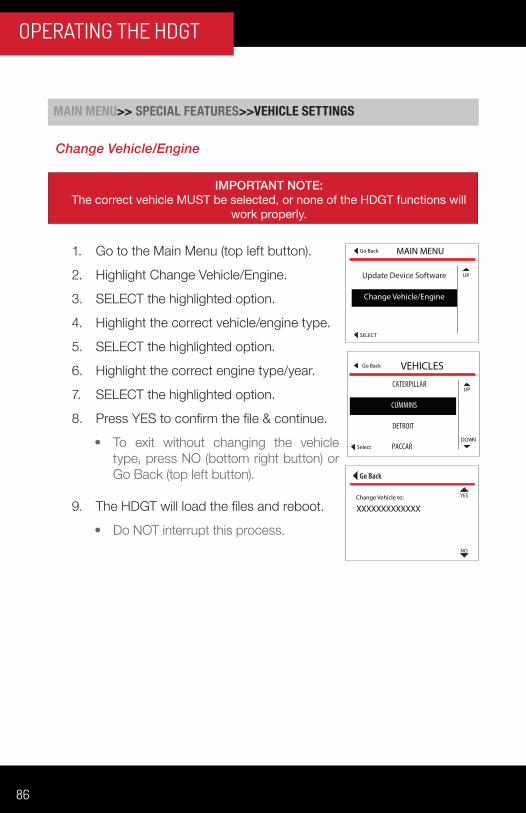
86
OPERATING THE HDGT
Change Vehicle/Engine
1. Go to the Main Menu (top left button).
2. Highlight Change Vehicle/Engine.
3. SELECT the highlighted option.
4. Highlight the correct vehicle/engine type.
5. SELECT the highlighted option.
6. Highlight the correct engine type/year.
7. SELECT the highlighted option.
8. Press YES to confirm the file & continue.
• To exit without changing the vehicle type, press NO (bottom right button) or Go Back (top left button).
9. The HDGT will load the files and reboot.
• Do NOT interrupt this process.
IMPORTANT NOTE: The correct vehicle MUST be selected, or none of the HDGT functions will
work properly.
MAIN MENUGo Back
SELECT
UPUpdate Device Software
Change Vehicle/Engine
VEHICLESGo Back
Select
UP
DOWN
CATERPILLAR
CUMMINS
DETROIT
PACCAR
Go Back
NO
YES
XXXXXXXXXXXXXChange Vehicle to:
MAIN MENU>> SPECIAL FEATURES>>VEHICLE SETTINGS
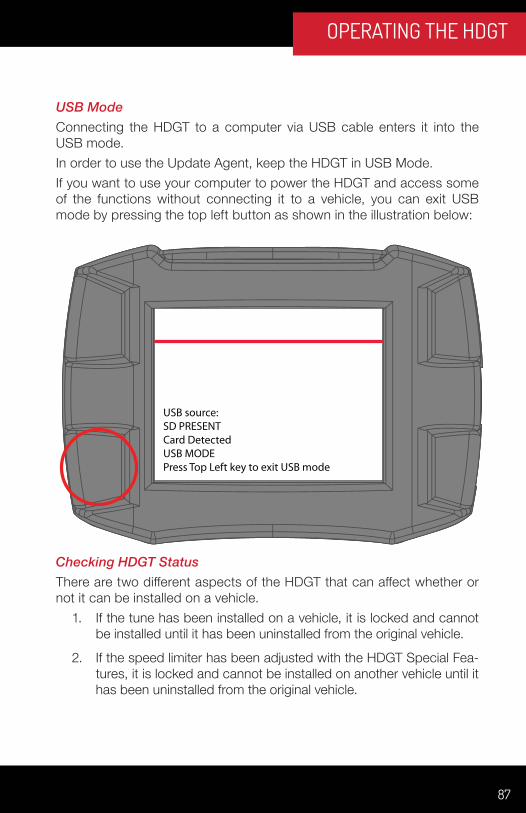
87
OPERATING THE HDGT
USB ModeConnecting the HDGT to a computer via USB cable enters it into the USB mode.In order to use the Update Agent, keep the HDGT in USB Mode.If you want to use your computer to power the HDGT and access some of the functions without connecting it to a vehicle, you can exit USB mode by pressing the top left button as shown in the illustration below:
Checking HDGT StatusThere are two different aspects of the HDGT that can affect whether or not it can be installed on a vehicle.
1. If the tune has been installed on a vehicle, it is locked and cannot be installed until it has been uninstalled from the original vehicle.
2. If the speed limiter has been adjusted with the HDGT Special Fea-tures, it is locked and cannot be installed on another vehicle until it has been uninstalled from the original vehicle.
USB source:SD PRESENTCard DetectedUSB MODEPress Top Left key to exit USB mode

88
MORE INFORMATION
To Check HDGT Status:1. Go to the Main Menu (top
left button).
2. Highlight Show Settings (right buttons).
3. SELECT the highlighted option (bottom left button).
4. The status of the HDGT is listed on the top line of the first screen.
TroubleshootingSD Card Not Recognized
1. Make sure that the microSD memory card is inserted correctly in the HDGT.
2. If it is already installed, remove it and then reinstall it.
3. If the error persist, contact tech support.
Vehicle Does Not Start1. Uninstall the tune.
2. Try to start the vehicle.
3. If the vehicle still does not start, contact technical support.
NOTE: The Show Settings screens will also indicate if the HDGT is locked because the tune has been installed and/or a Special Feature has been used. The screens are different for each vehicle/engine type. To navigate through the Show Settings screens, press UP (top right button) and DOWN (bottom right
button).
Go Back GT SYSTEM INFOGT status:Serial #:HW version:Memory:SWa version:SWb version:Tuning Version:Application:Admin. Password:Monitoring Type:Sensor Dock:
Unlocked from Vehicle#################1.5######1.0.5.074.0.3 CUMMINS EGRCUMMINS EGR ‘03 - ’07DisabledUnknownNot Connected
DOWN

89
MORE INFORMATION
Monitoring Gauges Do Not WorkGo to the Main Menu (top left button).
1. Highlight Vehicle Settings (right buttons).
2. SELECT the highlighted option (bottom left button).
3. Highlight Change Monitoring Type (right buttons).
4. SELECT the highlighted option (bottom left button).
5. Highlight Auto-Detect (right buttons).
• If the HDGT monitoring gauges still do not show vehicle infor-mation, alternately select J1939/250K (for vehciles with the black adapter plug) or J1939 (for vehicles with the green adapter plug) and then choose J1587.
6. If none of the monitoring types work, contact technical support.
Technical SupportTechnical support is open Monday-Friday 8 a.m.-5 p.m., MSTThe phone number to contact the heavy duty technical support team is (940) 783-9915.You should have all of the following items available when contacting tech-nical support:
• Your HDGT tuner• Your vehicle• A computer with Internet access

90
SECTION HEADER HERE
Free Technical Support at: 940-783-9915
WWW.BIGRIG.BULLYDOG.COM


