Embed Size (px)
Citation preview

New York Air Brake CCB Brake System
GE CONTRACT CCB BRAKE EQUIPMENT MAINTENANCE MANUAL
IP-158-C
For the
P42-DC SINGLE MODE LOCOMOTIVE
Operated by
AMTRAK
NOVEMBER 1997
CCB AMTRAK SINGLE MODE CONTRACT LOCOMOTIVE MAINTENANCE MANUAL
Manual: IP-158-C A NOV/97
INSERT LATEST CHANGED PAGES.
DESTROY SUPERSEDED PAGES.
LIST OF EFFECTIVE PAGES
NOTE: The portion of the text effected by the
changes is indicated by a vertical line in the outer margin of the page.
The total number of pages in this Maintenance and Instruction Manual, is 321, consisting of:
PAGE NO.
CHANGE NO. ISSUE
Title 0 January/97 A 0 January/97 B 0 January/97 i through vi 0 January/97 1-1 through 1-91 0 January/97 1-92 (Blank) 0 January/97 2-1 0 January/97 2-2 (Blank) 0 January/97 C.W. 135 2 May/97 C.W. 217 3 June/96 C.W. 218 1 April/94 C.W. 219 2 October/95 C.W. 220 2 October/95 C.W. 221 2 October/95 C.W. 222 2 October/95 C.W. 223 2 October/95 C.W. 224 2 June/96 C.W. 225 2 June/96 C.W. 226 3 June/96 C.W. 228 2 June/96 C.W. 229 2 June/96 C.W. 230 2 June/96 C.W. 232 1 April/94 C.W. 233 4 June/96 C.W. 239 3 November/97 C.W. 242 2 January/97 C.W. 243 3 June/96 C.W. 248 1 March/95 C.W. 249 1 March/95 C.W. 250 1 June/95 C.W. 253 1 August/95 C.W. 256 1 February/97 C.W. 258 2 March/97
ADDITIONAL COPIES OF THIS PUBLICATION MAY BE OBTAINED FROM:
NEW YORK AIR BRAKE CORPORATION The Change No. "0" indicate the Original Issue for Manual A KNORR BRAKE COMPANY The Change No. "1" indicates the Original Issue for C.W. 748 STARBUCK AVENUE WATERTOWN, NY 13601

CCB AMTRAK SINGLE MODE CONTRACT LOCOMOTIVE MAINTENANCE MANUAL
NOV/97 B Manual: IP-158-C
INSERT LATEST CHANGED PAGES.
DESTROY SUPERSEDED PAGES.
LIST OF EFFECTIVE PAGES
NOTE: The portion of the text effected by the
changes is indicated by a vertical line in the outer margin of the page.
The total number of pages in this Maintenance Manual, Vendor Information, is 319, consisting of:
3-1 through 3-3 0 January/97 3-4 (Blank) 0 January/97 4-1 through 4-4 0 January/97 5-1 through 5-32 1 November/97 6-1 through 6-12 0 January/97 NYR - 380 0 January/97 7-1 0 January/97 7-2 (Blank) 0 January/97 P/L 1499 0 January/97 P/D - 1499 0 January/97 W/D - 1499 0 January/97 8-1 through 8-6 0 January/97
ADDITIONAL COPIES OF THIS PUBLICATION MAY BE OBTAINED FROM:
NEW YORK AIR BRAKE CORPORATION The Change No. "0" indicate the Original Issue for Manual A KNORR BRAKE COMPANY The Change No. "1" indicates the Original Issue for C.W. 748 STARBUCK AVENUE WATERTOWN, NEW YORK 13601


CCB AMTRAK SINGLE MODE CONTRACT LOCOMOTIVE MAINTENANCE MANUAL
1-1 JAN/97
CHAPTER 1
OPERATING PROCEDURES 1.1 AIR BRAKE EQUIPMENT The (Computer Controlled Brake) CCB equipment, arranged for single-end, multiple-unit
operation, is used on this locomotive. The principal parts are as follows: 1.1.1 AIR BRAKE EQUIPMENT IN AIR BRAKE COMPARTMENT See Fig. 1-1 for location of equipment in the air brake compartment. See Fig. 1-2 for Brake
Valve Controller handle positions. See Fig. 1-3 for Pneumatic Control Unit Valve locations. See Fig. 1-4 for the Computer Relay Unit component locations.

CCB AMTRAK SINGLE MODE CONTRACT LOCOMOTIVE MAINTENANCE MANUAL
JAN/97 1-2
FIGURE 1-1 PCU/CRU RACK ASSEMBLY

CCB AMTRAK SINGLE MODE CONTRACT LOCOMOTIVE MAINTENANCE MANUAL
1-3 JAN/97
FIGURE 1-2 BRAKE VALVE CONTROLLER

CCB AMTRAK SINGLE MODE CONTRACT LOCOMOTIVE MAINTENANCE MANUAL
JAN/97 1-4
FIGURE 1-3 PNEUMATIC CONTROL UNIT

CCB AMTRAK SINGLE MODE CONTRACT LOCOMOTIVE MAINTENANCE MANUAL
1-5 JAN/97
FIGURE 1-4 COMPUTER RELAY UNIT

CCB AMTRAK SINGLE MODE CONTRACT LOCOMOTIVE MAINTENANCE MANUAL
JAN/97 1-6
1.1.2 BRAKE VALVE (Fig. 1-2) 1.1.2.1 OPERATING - AUTOMATIC HANDLE The brake valve handle operates through six detented control positions: RELEASE, MINIMUM
REDUCTION, SUPPRESSION, FULL SERVICE, HANDLE OFF, and EMERGENCY. The service zone is between minimum reduction and full service positions. An indicating plate is provided indicating the six operating positions.
When charging a train or releasing an Automatic brake application, the automatic Brake Valve
Controller handle must be placed in RELEASE position, which is the position closest to the engineer.
When making a Service brake application, move the automatic Brake Valve Controller handle
away from the engineer against the first detent position of the quadrant. This is a minimum reduction position which will provide a 5-7 psi reduction. If necessary to increase the reduction, move the handle progressively away from the engineer, bearing in mind that the further the handle is moved into the service zone, the greater will be the reduction. The brake valve will self-lap at any point where movement of handle is stopped in the service zone and automatically maintain NORMAL brake pipe leakage.
The second detent position is SUPPRESSION. In this position overspeed control and safety
control penalty applications are suppressed. Full service brake application is obtained by moving the Brake Valve Controller handle to the
FULL SERVICE position against the third position of the quadrant. Brake Cylinder pressure at Full Service is approximately 60 psi.
Self-Lapping over-reductions are possible by moving the handle between the FULL SERVICE
position and HANDLE OFF position. Placing the handle in HANDLE OFF, the fourth detent position reduces equalizing pressure to
zero. B.C. pressure increases to the emergency setting, as BP reduces below 20 psi. An Emergency brake application is obtained by moving the Brake Valve Controller handle to the
extreme rear of the quadrant, which is EMERGENCY position. Brake pipe reduces rapidly to zero psi. Equalizing Reservoir reduces to zero at a slower rate. B.C. pressure increases to the emergency setting of 90 psi.
Bail off of an automatic brake application on the locomotive can be accomplished by lifting the
ring on the Brake Valve Controller handle. The locomotive brake cylinder pressure will be reduced to the value corresponding to the position of the independent handle.
1.1.2.2 OPERATING - INDEPENDENT BRAKE When applying the locomotive independent brake, move the independent handle away from the
engineer (Full Independent application-extreme rear position), and when releasing, move the handle toward the engineer. The brake valve will self-lap at any point in the application zone where handle movement has been stopped.
To make an independent release of an Automatic brake application, lift the ring on the
independent brake handle. The locomotive brake cylinder pressure will be reduced to the value corresponding to the position of the independent handle.

CCB AMTRAK SINGLE MODE CONTRACT LOCOMOTIVE MAINTENANCE MANUAL
1-7 JAN/97
The independent Brake Valve Controller handle should always be in Release position (closest to
the engineer) when the unit is a trailing unit in a multiple-unit consist or is being towed DEAD. 1.1.3 AIR BRAKE SET-UP
LEAD/TRAIL/TEST SELECTOR SWITCH The selector switch is located to the right of the INDEPENDENT HANDLE. The PASS and FRT positions are used when the locomotive is operated as a Lead unit. The PASS position provides a graduated release while the FRT position provides direct release. The TRAIL position is used when the locomotive is operated as a Trail unit in a multiple-unit consist. When making initial terminal brake pipe leakage tests as will be described later, the LEAD/TRAIL SELECTOR SWITCH must be positioned in TEST position, to nullify the pressure maintaining feature. To restore control, handle must be moved to PASS or FRT position. EQUALIZING RESERVOIR ADJUSTMENT The Equalizing Reservoir is preset at the factory and can not be adjusted except by a change in the computer program.
1.1.4 LOSS OF POWER MODE If it is determined that the CCB equipment must be placed in DEAD-IN-TOW and the unit must
be operated in a DEAD-IN-TOW position, open the AB circuit breaker located in the Engine Control Panel.
The CCB system automatically conditions itself for TRAIL operation-NO MANUAL SETUP is
required. The automatic pneumatic back-up control valve, DIT Valve, functions to provide Automatic Service braking. The Pneumatic Control Unit (PCU) provides the pneumatic Emergency Braking.
WARNING: AUTOMATIC SERVICE BRAKING OPERATES IN A DEGRADED MODE.
BRAKE CYLINDER PRESSURE WILL BE LESS THAN IN NORMAL CCB OPERATION FOR A FULL SERVICE BRAKE APPLICATION AND BAIL-OFF MUST BE HELD DEPRESSED FOR 20 SECONDS.
1.1.5 POWER UP PENALTY Whenever the Air Brake circuit breaker is first closed in a LEAD mode, the CCB system applies
a PENALTY service brake for 30 seconds. Equalizing Reservoir reduces to zero and brake pipe reduces to about 10 psi. Place the Brake Valve Controller handle into SUPPRESSION position. The Brake Valve Controller handle must remain in SUPPRESSION position for 10 seconds to reset the system (in addition to the original 30 seconds). Then move the Brake Valve Controller handle to RELEASE position to recharge the brake system. Brake cylinder pressure must reduce to zero psi before the computer regains control of the Brake Cylinders.
CCB AMTRAK SINGLE MODE CONTRACT LOCOMOTIVE MAINTENANCE MANUAL
JAN/97 1-8
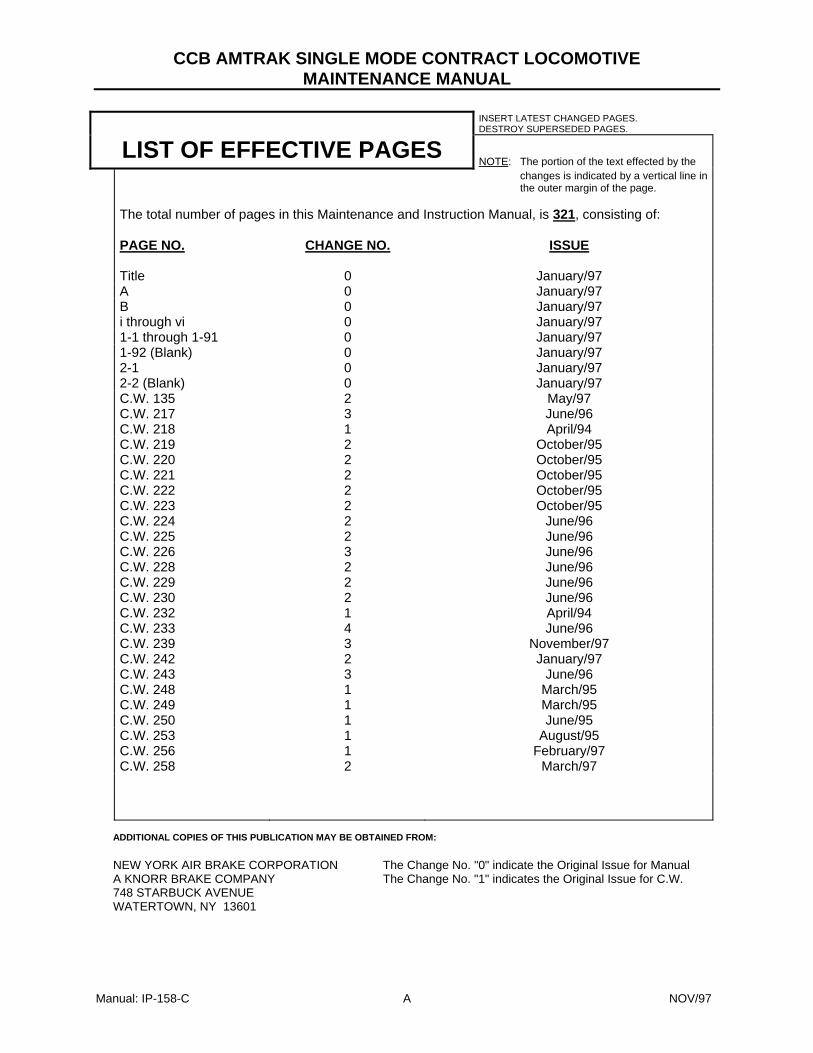
1.2 GENERAL INFORMATION 1.2.1 CCB INTRODUCTION The CCB, Computer Controlled Brake Equipment is a complete microprocessor brake control
system for main line locomotives and switchers. The equipment is fully compatible with 26L brake schedule equipment while providing flexibility and the capability of future expansions. All logic, other than emergency brake initiation, is computer controlled.
Refer to Figure 1-5 The operator commands the computer through the CCB Brake Controller. The brake controller
is mainly electronic and signals the computer as to the position for automatic and independent braking. Lead/Trail and Brake Pipe Cut-Out modes are set up through the four position switch. Regulating Valve setting is factory set by to 110 psi. The only pneumatic valve contained in the brake valve is the mechanically actuated emergency vent valve. The vent valve is open in emergency position.
The Computer interprets the signals of the brake controller and controls the Pneumatic Control
Unit for the actual development of pressure. All control pressures are developed in this manner: brake pipe, independent application and
release pipe, actuating pipe and brake cylinder. The Computer also controls locomotive interface relays to provide power knockout, dynamic
interlock, emergency sanding and blended brake. The voltage conditioning circuitry isolates the locomotive battery supply from the system as well
as providing for extreme power operating characteristics. The DIT Valve is a back-up BC control that operates to provide service automatic brake cylinder
pressure when the Air Brake circuit breaker is open.

CCB AMTRAK SINGLE MODE CONTRACT LOCOMOTIVE MAINTENANCE MANUAL
1-9 JAN/97
FIGURE 1-5 CCB CONFIGURATION

CCB AMTRAK SINGLE MODE CONTRACT LOCOMOTIVE MAINTENANCE MANUAL
JAN/97 1-10
1.2.2 SYSTEM DESCRIPTION
Computer controlled Brake (CCB) equipment is compatible with conventional 26L brake systems in function and operation. Handle positions, locomotive set-up and pressure development flowrates, remain the same. The changes from 26L occur in how the air pressure is controlled and the type of equipment used to control the brakes. Also, the major enhancement is the ability to diagnose problems.
A. System Operating Pressures
M.R. 130-140 E.R. 110 psi B.P. 110 psi B.C. 60 psi Service - Normal (Back-Up System 46-53psi) B.C. 90 psi Emergency (Back-Up System 90psi)
B. Automatic Brake System Features As with 26L brake systems the CCB system controls the locomotive and train brakes through control of trainline brake pipe pressure. Control of brake pipe pressure permits the development of brake cylinder pressure on both locomotive and train. Control of brake pipe pressure is accomplished by control of a smaller volume called Equalizing Reservoir. E.R. pressure is reduced to apply brakes and increased directly to the regulating valve setting to fully release brakes. Brake cylinder pressure develops at a controlled ratio of 2 1/2 times the amount of brake pipe reduction. The CCB system utilizes 2 distinct control circuits to apply and release an automatic brake i.e.: Brake Pipe Control Circuit increases or decreases the brake pipe pressure according to the pressure commanded by ER. Brake Cylinder Control Circuit controls the increase or decrease of brake cylinder pressure commanded by the computer.

CCB AMTRAK SINGLE MODE CONTRACT LOCOMOTIVE MAINTENANCE MANUAL
1-11 JAN/97
NOTE: All pressures are nominal values. Release - E.R. and Brake pipe 110 psi (nominal), BCP = 0 E.R. is adjustable from 73-112 psi. Minimum Service - E.R. and B.P. reduce to 104 psi, BCP = 11 psi Service Zone - 104 psi to 84 psi, E.R./B.P. @110 psi E.R. and B.P. reduce to between 104 and 84 psi (self-lapping) B.C. pressure increases to between 14 and 60. Suppression - E.R. and B.P. 93 psi Full Service - E.R. and B.P. 84 psi, B.C. = 58-62 psi Over Reduction Zone - 84 psi to ≈ 65 psi, ER/BP self-lapping, BC = 60 psi Handle off- 64 psi to zero E.R. reduces to zero
B.P. reduces to 7-13 psi B.C. increases to 90 psi @ 20 psi
Emergency B.P. reduces to 0 psi. E.R. reduces to 0 psi. B.C. increases to 90 psi. Wait 60 seconds to reset. NOTE: Equalizing Reservoir and Brake Pipe are maintained against leakage in all positions above
Handle Off. Ind B.C. = Full Brake position, B.C. = 71-73 psi max (normal) (43-47 psi backup) 20 pipe = 45-48 psi max
FIGURE 1-6 BRAKE VALVE OPERATION/SERVICE APPLICATION VALVE POSITIONS

CCB AMTRAK SINGLE MODE CONTRACT LOCOMOTIVE MAINTENANCE MANUAL
JAN/97 1-12
1.2.3 OPERATION
For the following discussion the Locomotive is considered to be in lead cut-in position. To operate the brake system the air brake circuit breaker must be closed. When power is first applied, the CCB system assumes a penalty brake application mode. Equalizing Reservoir reduces to zero psi and brake pipe pressure if any exists reduces to approximately 10 psi. The operator must move the automatic Brake Valve Controller handle to SUP position to recover the penalty brake application. Approximately 10 to 40 seconds time delay is required to reset depending how soon the brake handle is moved to SUP position. A minimum of 10 seconds will always be required after the handle is in SUP position. This assures that the penalty brake does occur should the breaker be opened then closed or a momentary power loss occurs.
A. RELEASE POSITION Refer to Figure 1-7 When the Automatic Brake Valve Controller handle is placed in Release position, a
frequency is generated by the internal electronic circuitry of the Brake Valve and transmitted to the FOR PCB via a fiber optic cable. This frequency is decoded by the FOR board and sent to the CP (Central Processor) board where the handle position is identified. The computer reads this input and calculates the Equalizing Reservoir pressure for that handle position. The CP commands the EPA-1 board to the level of output pressure required.
The EPA-1 board outputs a PWM signal to the ER Analog Converter that opens the
normally closed supply magnet valve connecting main reservoir supply air to the equalizing reservoir circuit at a controlled rate determined by the computer. The ER transducer (ERT) feeds back a voltage proportional to the ER pressure. When ER pressure reaches the commanded pressure, the EPA-1 de-energizes the supply magnet valve and maintains the pressure level constant through control of the Analog Converter's magnet valves and feedback from the ERT transducer.
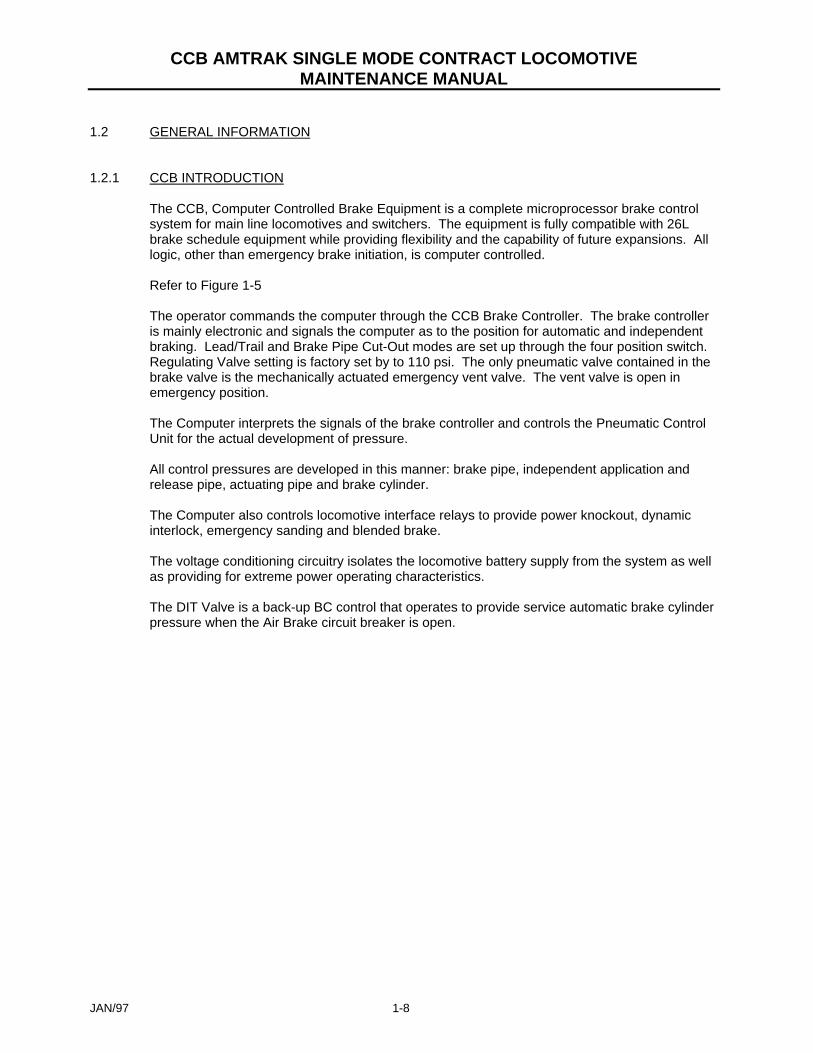
Refer to Figure 1-8 The Equalizing Reservoir pressure pilots the KR-5EO relay which connects main reservoir
supply air to the Brake Pipe Circuit. When Brake Pipe Pressure reaches the pressure dictated by the Equalizing Reservoir, the KR-5EO relay moves to "LAP position.

CCB AMTRAK SINGLE MODE CONTRACT LOCOMOTIVE MAINTENANCE MANUAL
1-13 JAN/97
Refer to Figure 1-9 Main Reservoir air flows thru the open Analog Converter (AW4-ER) Supply Magnet Valve to the Equalizing Reservoir Transducer (ERT) and to the closed Analog converter (AW4-ER) Exhaust Magnet Valve. Air then passes thru the open Equalizing Reservoir Magnet Valve (MVER) to charge Equalizing Reservoir (ER). ER pressure pilots the high capacity Brake Pipe Relay Valve (KR-5EO). The Brake Pipe Relay Valve KR-5EO opens and allows main reservoir air to flow to the normally open Brake Pipe Cut-Off Magnet Valve (MV53) to the pilot port of the Brake Pipe Cut-Off Valve (BPCO). On initial charging (BP=zero psi) the brake pipe cut-off valve is closed. BPCO opens at approximately 25 psi. BP air is able to pass thru the BPCO to the double check valve and on to the PVE as a pilot pressure. BP air also flows to the PVEM and onto the Brake Valve Controller Vent Valve and the Emergency Magnet Valve. BP air flows thru BP Filter to charge BP Trainline. Brake Pipe continues to charge to within 1 psi of Equalizing Reservoir pressure. The KR-5EO Relay Valve is a self-lapping pressure maintaining valve that will maintain brake pipe pressure at the proper operating level in the locomotive consist and train under acceptable leakage conditions similar to the 26C Brake Valve. BP trainline is monitored by the Brake Pipe Transducer (BPT) and Brake Pipe Pressure Switch (PS-BP). The BPT provides a feedback signal to the computer proportional to the pressure of BP trainline. The PS-BP indicates to the computer that there is 25 psi or more of BP, or 22 psi or less of BP.

CCB AMTRAK SINGLE MODE CONTRACT LOCOMOTIVE MAINTENANCE MANUAL
JAN/97 1-14
FIGURE 1-7 ER CONTROL CIRCUIT RELEASE POSITION-LEAD/CUT-IN

CCB AMTRAK SINGLE MODE CONTRACT LOCOMOTIVE MAINTENANCE MANUAL
1-15 JAN/97
FIGURE 1-8 BP CHARGING LEAD/CUT-IN BRAKE VALVE IN RELEASE

CCB AMTRAK SINGLE MODE CONTRACT LOCOMOTIVE MAINTENANCE MANUAL
JAN/97 1-16
FIGURE 1-9 AUTOMATIC RELEASE AND CHARGING - EQUALIZING RESERVOIR AND BRAKE PIPE

CCB AMTRAK SINGLE MODE CONTRACT LOCOMOTIVE MAINTENANCE MANUAL
1-17 JAN/97
B. BRAKE CYLINDER PRESSURE CONTROL
Refer to Figure 1-10
Brake cylinder pressure is directly controlled by the J-1 Relay Valve which in turn is controlled by pressure in the #16 control volume. The #16 control volume is pressurized by a second Analog Converter (identical to the E.R. Converter) controlled by EPA-2 PCB. The brake pipe pressure is monitored by the brake pipe transducer, BPT, which outputs a voltage to the CP board via the ADZ board (Analog to Digital). The computer calculates the brake cylinder pressure based on the level of brake pipe pressure. When brake pipe increases, the CP commands the EPA-2 PCB to put pressure in the brake cylinders. The rate of change for #16 pipe is controlled by an algorithm residing in the computer program which ramps the command to the EPA board up or down at a predetermined rate until the target pressure is commanded. Refer to Figure 1-11 The Analog Converter (AW4-16) Supply Magnet Valve is closed and the AW4-16 Exhaust Magnet Valve is open exhausting the #16 Control Volume from the open Control Pipe Magnet Valve (MV16T) and the pilot port of the J-1 Relay Valve. This exhausting of air allows the J-1 Relay Valve piston to move and vent the brake cylinder air to atmosphere. The supply magnet valve remains closed allowing the #16 control volume to exhaust. With the #16 pipe decreasing, the J-1 Relay Valve exhausts brake cylinder pressure at a rate controlled by the #16 control volume until brake cylinder pressure is zero.

CCB AMTRAK SINGLE MODE CONTRACT LOCOMOTIVE MAINTENANCE MANUAL
JAN/97 1-18
FIGURE 1-10 #16 PIPE CONTROL CIRCUIT RELEASE POSITION

CCB AMTRAK SINGLE MODE CONTRACT LOCOMOTIVE MAINTENANCE MANUAL
1-19 JAN/97
FIGURE 1-11 AUTOMATIC RELEASE BRAKE CYLINDER PRESSURE CONTROL

CCB AMTRAK SINGLE MODE CONTRACT LOCOMOTIVE MAINTENANCE MANUAL
JAN/97 1-20
C. SERVICE APPLICATION - AUTOMATIC
Refer to Figure 1-12 thru 1-14 There are several positions of the Brake Valve Controller handle that control locomotive and train brake applications. When the automatic Brake Valve Controller handle is moved from Release to any of the service positions from Minimum Service to Full Service, Equalizing Reservoir and Brake Pipe will be reduced by an amount proportional to handle movement. In each position of the Automatic Brake Valve a different frequency is generated by the electronic circuitry identifying the level of Equalizing Reservoir pressure commanded. This frequency is transmitted through a fiber optic cable isolated from electrical interference to the Fiber Optic Board (FOR) in the computer rack. As explained in 'RELEASE' the computer reads the FOR, calculates the ER pressure and commands the EPA-1 board to energize the Exhaust Magnet Valve of the ER Analog Converter. The supply magnet valve remains closed. The flow rate of Equalizing Reservoir to exhaust is controlled by the computer by changing the command pressure to the EPA -1 relative to elapsed time. Since the Analog Converter magnet valves are soft seat type, the valves need not be fully open or fully closed. As the pressure approaches the commanded level of pressure, the EPA compares pressure demand with the output voltage of the Equalizing Reservoir Transducer (ERT) located on the Analog Converter. The EPA slowly closes the Supply Magnet Valve until the desired pressure is reached. This action avoids undesired valve chatter and pressure fluctuations normally inherent to digitally controlled systems. Refer to Figure 1-15 ER reduces thru the energized magnet valve (MVER) and the open exhaust magnet of the analog converter (AW4-ER) at a controlled rate. With ER reducing, ER air is removed from the control port of the BP Relay Valve (KR-5EO). The piston in the relay valve moves and BP reduces through exhaust port of the Relay Valve (KR-5EO) at a controlled rate by the relay exhaust choke and the brake pipe volume of the locomotive and train consist. This action is totally pneumatic. When brake pipe pressure is equal or slightly less than Equalizing Reservoir pressure acting on the Relay diaphragm, the valve slowly moves to a 'LAP' position closing the exhaust port. Since the Relay is a maintaining type valve brake pipe pressure will be maintained to the level of Equalizing Reservoir for acceptable train brake leakage conditions. BP pressure also reduces at the DB-10 Control Valve on the Back Up Brake System (DIT). Auxiliary reservoir is unable to reduce through a calibrated charging choke within the valve as fast as BP therefore creating a pressure differential across the valves service piston. The DB-10 moves to APPLY position connecting the Auxiliary Reservoir to the #16 Pipe Volume, through the double check valve to the TV port of the PCU and finally to the MV16T Magnet Valve. At this point flow is terminated. The back up system is always operative and should a failure occur that renders the CCB system unable to apply brakes, the back up system will supply #16 pipe pressure (at a lower value) to the J-1 Relay for development of Brake Cylinder pressure.

CCB AMTRAK SINGLE MODE CONTRACT LOCOMOTIVE MAINTENANCE MANUAL
1-21 JAN/97
FIGURE 1-12 ER CONTROL CIRCUIT MINIMUM SERVICE POSITION- LEAD/CUT-IN

CCB AMTRAK SINGLE MODE CONTRACT LOCOMOTIVE MAINTENANCE MANUAL
JAN/97 1-22
FIGURE 1-13 ER CONTROL CIRCUIT FULL SERVICE POSITION - LEAD/CUT-IN

CCB AMTRAK SINGLE MODE CONTRACT LOCOMOTIVE MAINTENANCE MANUAL
1-23 JAN/97
FIGURE 1-14 ER CONTROL CIRCUIT SERVICE LAP POSITION - LEAD/CUT-IN

CCB AMTRAK SINGLE MODE CONTRACT LOCOMOTIVE MAINTENANCE MANUAL
JAN/97 1-24
FIGURE 1-15 AUTOMATIC SERVICE APPLICATION EQUALIZING RESERVOIR AND
BRAKE PIPE CIRCUITS

CCB AMTRAK SINGLE MODE CONTRACT LOCOMOTIVE MAINTENANCE MANUAL
1-25 JAN/97
D. BRAKE CYLINDER CONTROL - AUTOMATIC
Refer to Figure 1-16 thru 1-18
At the same time the Brake Pipe Transducer (BPT) detects the reduction of brake pipe which is read by the central processor (CP) via the Analog/Digital circuit (AD). The computer calculates the required brake cylinder pressure and commands the #16 Analog Converter via the EPA-2 board the desired rate and pressure level. The EPA-2 board responds by controlling the Analog Converter's magnet valves to developing #16 pipe volume pressure from M.R. supply. In this closed loop system #16 pipe pressure is monitored by the Analog Converter's Transducer (16T). When #16 pressure equals the demand pressure, the EPA-2 board slowly closes the Supply Magnet Valve. Again #16 control pressure will be maintained by the Analog Converter by comparing the 16T Transducer feedback to the EPA2 output. Refer to Figure 1-19 Main Reservoir air flows thru the open supply magnet valve of Analog Converter (AW4-16) thru open magnet valve (MV16T) and to the #16 Reservoir and the pilot port of the high capacity Relay Valve (J-1). The #16 Reservoir air acting on the Relay Valve (J-1) piston moves piston and allows Main Reservoir air to pass thru the Relay Valve and supply air to the Brake Cylinders. Brake cylinder pressure increases until it matches the #16 pipe control pressure. Similar in operating to the KR-5EO relay, the J-1 moves to LAP position closing off the supply of M.R. pressure to the brake cylinders. The application is complete and brake cylinder pressure will be maintained at the level commanded until the Brake Valve Controller handle is again moved. At this point the engineer can make a further reduction by moving the Automatic Brake Valve Controller handle toward Full service position where a 25 psi Brake Pipe reduction is attained and maximum service brake cylinder pressure achieved.
E. SUPPRESSION POSITION This Service position provides for nullification of penalty applications normally created by Safety Control systems and Overspeed control circuits. In this position Brake Pipe is reduced to the level of FULL SERVICE position.

CCB AMTRAK SINGLE MODE CONTRACT LOCOMOTIVE MAINTENANCE MANUAL
JAN/97 1-26
FIGURE 1-16 #16 PIPE CONTROL CIRCUIT MINIMUM SERVICE POSITION

CCB AMTRAK SINGLE MODE CONTRACT LOCOMOTIVE MAINTENANCE MANUAL
1-27 JAN/97
FIGURE 1-17 #16 PIPE CONTROL CIRCUIT FULL SERVICE OR SUPPRESSION POSITION

CCB AMTRAK SINGLE MODE CONTRACT LOCOMOTIVE MAINTENANCE MANUAL
JAN/97 1-28
FIGURE 1-18 #16 PIPE CONTROL CIRCUIT LAP POSITION

CCB AMTRAK SINGLE MODE CONTRACT LOCOMOTIVE MAINTENANCE MANUAL
1-29 JAN/97
FIGURE 1-19 AUTOMATIC APPLICATION BRAKE CYLINDER CONTROL

CCB AMTRAK SINGLE MODE CONTRACT LOCOMOTIVE MAINTENANCE MANUAL
JAN/97 1-30
F. HANDLE OFF POSITION
Refer to Figure 1-20 In 26L Brake Systems this position was used when the locomotive was set-up for TRAIL or DEAD operation. The handle was normally removed. With CCB equipment the handle is not removed. The exhaust magnet valve of Analog Converter (AW4-ER) and Magnet Valve (MVER) are open, venting ER to zero psi. With ER and the pilot port of the Relay Valve (KR-5EO) venting, the Relay Valve Piston moves, reducing BP air. When BP reduces to 10 psi the brake pipe cut-off (BPCO) closes trapping 9-11 psi of brake pipe in trainline and will be shown on the CAB display.

CCB AMTRAK SINGLE MODE CONTRACT LOCOMOTIVE MAINTENANCE MANUAL
1-31 JAN/97
FIGURE 1-20 ER CONTROL CIRCUIT HANDLE OFF POSITION - LEAD/CUT-IN

CCB AMTRAK SINGLE MODE CONTRACT LOCOMOTIVE MAINTENANCE MANUAL
JAN/97 1-32
G. EMERGENCY APPLICATION - EMERGENCY
Refer to Figure 1-21 thru 1-23 An Emergency Application means to apply brakes at a very fast rate and increase the level of braking rate by increasing the brake cylinder pressure level. When the Brake Valve is placed into Emergency position several actions take place to insure an Emergency Application occurs. 1) As with Service braking a frequency is generated that is read by the computer via
the Fiber Optics board. 2) The AE-1 switch opens sending an emergency input signal to the computer via the
SS-8 circuit board.
Both of the above signals tell the computer to energize the Emergency Magnet Valve (MV-EM) via the EPA-2 board and Driver Board (DB-1).
3) In Emergency position the brake valve mechanically opens a vent valve that
exhausts the #21 pipe connected directly to the pilot port on the Pneumatic Emergency Valve providing a backup actuating mechanism should the Emergency Magnet Valve fail to energize.
To insure an Emergency rate of brake reduction brake pipe charging must be suspended. With the handle in Emergency position AE-2 microswitch is closed by a cam movement: This action energizes Brake Pipe Cut-Off Magnet Valve MV53 via FL-1 electrical filter. (Note: The filter provides EMI isolation between Brake Valve and Magnet Valve.).
Refer to Figure 1-24 Equalizing Reservoir reduces to zero at a faster than service rate through the Analog
Converter. This causes the KR-5EO brake pipe relay to open brake pipe to exhaust assuring no rise in brake pipe can occur even if the cut-off valve leaks.
With a brake valve emergency the Analog Converter exhaust magnet valve (AW4-ER), Brake Pipe Cut-Off Magnet Valve (MV53) and Emergency Magnet Valve (MVEM) are commanded to energize. The opening of the analog converter exhaust magnet valve (AW4-ER) allows ER air from the BP relay valve (KR-5EO) and ER to flow thru the open ER magnet valve (MVER) and to open analog converter exhaust magnet valve (AW4-ER), to vent to atmosphere. With BP-CO Magnet Valve (MV53) open, the BP-CO valve pilot port vents, forcing the valve to lose communication between Brake Pipe Relay (KR-5EO) and trainline brake pipe. The opening of the Emergency Magnet Valve (MVEM) vents the pilot port of the high capacity pneumatic valve (PVEM). PVEM vents brake pipe at a rapid rate tripping two Vent Valves located at each end of the locomotive, propagating an emergency brake application through the train.

CCB AMTRAK SINGLE MODE CONTRACT LOCOMOTIVE MAINTENANCE MANUAL
1-33 JAN/97
FIGURE 1-21 BP VENTING - LEAD CUT-IN BRAKE VALVE IN EMERGENCY

CCB AMTRAK SINGLE MODE CONTRACT LOCOMOTIVE MAINTENANCE MANUAL
JAN/97 1-34
FIGURE 1-22 EMERGENCY CIRCUIT - EMERGENCY POSITION

CCB AMTRAK SINGLE MODE CONTRACT LOCOMOTIVE MAINTENANCE MANUAL
1-35 JAN/97
FIGURE 1-23 EMERGENCY CIRCUIT - RELEASE TO H.O.

CCB AMTRAK SINGLE MODE CONTRACT LOCOMOTIVE MAINTENANCE MANUAL
JAN/97 1-36
FIGURE 1-24 ANY EMERGENCY APPLICATION BRAKE PIPE CONTROL

CCB AMTRAK SINGLE MODE CONTRACT LOCOMOTIVE MAINTENANCE MANUAL
1-37 JAN/97
#16 CONTROL CIRCUIT Refer to Figure 1-25 At the same time the Brake Pipe Transducer (BPT) detects the reduction of brake pipe which is read by the central processor (CP) via the Analog/Digital circuit (ADZ). The computer calculates the required brake cylinder pressure and commands to the #16 Analog Converter via the EPA-2 board the desired rate and pressure level. The EPA-2 board responds by controlling the Analog Converter's magnet valves to developing #16 pipe volume pressure from M.R. supply. In this closed loop system #16 pipe pressure is monitored by the Analog Converter's Transducer (16T). When #16 pressure equals the demand pressure, the EPA-2 board slowly closes the Supply Magnet Valve. Again #16 control pressure will be maintained by the Analog Converter by comparing the 16T Transducer feedback to the EPA2 output. Refer to Figure 1-26 Main Reservoir air flows thru the open supply magnet valve of Analog Converter (AW4-16) thru open magnet valve (MV16T) and to the #16 Reservoir and the pilot port of the high capacity Relay Valve (J-1). The #16 Reservoir air acting on the Relay Valve (J-1) piston moves piston and allows Main Reservoir air to pass thru the Relay Valve and supply air to the Brake Cylinders. Brake cylinder pressure increases until it matches the #16 pipe control pressure. Similar in operating to the KR-5EO relay, the J-1 moves to LAP position closing off the supply of M.R. pressure to the brake cylinders. The application is complete and brake cylinder pressure will be maintained at the level commanded until the Brake Valve Controller handle is again moved. With BP vented to zero, air is removed from the pilot port of the PVE valve allowing the PVE to move to its normally open position. Main Reservoir pressure flows through high capacity regulating valve (ELV-set to 90 psi) through PVE double check valve and is held at MV16T. This is the back up system for emergency brake cylinder pressure and is totally pneumatic. Otherwise the primary system (Analog Converter AW4-16) supplies 16 pipe pressure at 90 psi through MV16T to the BC relay. A Brake Valve or Fireman's Emergency Valve emergency application provide immediate power or dynamic brake knock down by deenergization of the cut-off Relay (COR) through the computer program logic. If a train separation occurs, brake pipe vents rapidly to zero causing an emergency brake throughout the train but the COR relay remains energized for 30 seconds after which locomotive power is reduced to IDLE.

CCB AMTRAK SINGLE MODE CONTRACT LOCOMOTIVE MAINTENANCE MANUAL
JAN/97 1-38
FIGURE 1-25 #16 PIPE CONTROL CIRCUIT H.O. OR EMERGENCY POSITION

CCB AMTRAK SINGLE MODE CONTRACT LOCOMOTIVE MAINTENANCE MANUAL
1-39 JAN/97
FIGURE 1-26 EMERGENCY APPLICATION BRAKE CYLINDER CONTROL

CCB AMTRAK SINGLE MODE CONTRACT LOCOMOTIVE MAINTENANCE MANUAL
JAN/97 1-40
H. EMERGENCY APPLICATION - Train Separation or Fireman's Valve
Refer to Figure 1-27 Locomotive power reduces to IDLE when COR deenergizes. This is also the same as the P-32 Locomotives. Brake Pipe is vented rapidly from the firemans valve or separated brake pipe. Both MVEM magnet and MV53 valves are energized when the computer detects an Emergency rate of Brake Pipe reduction via the Brake pipe transducer (BPT). The PVEM emergency vent valve is forced open to assist with venting of brake pipe. Refer to Fig 1-22. The BPCO valve is actuated by MV53 magnet valve to cut-off brake pipe charging.

CCB AMTRAK SINGLE MODE CONTRACT LOCOMOTIVE MAINTENANCE MANUAL
1-41 JAN/97
FIGURE 1-27 EMERGENCY APPLICATION TRAIN SEPARATION / FIREMANS VALVE

CCB AMTRAK SINGLE MODE CONTRACT LOCOMOTIVE MAINTENANCE MANUAL
JAN/97 1-42
I. BLENDED BRAKE FUNCTIONAL DESCRIPTION
This functional description defines the blended brake control system used on present CCB Amtrak Single Mode locomotive project. For this system, blended brake is functional during automatic service and emergency braking. The present blended brake system used on the above mentioned project relies on three interface signals between the CCB micro air brake and the dynamic brake control system. The signals are defined as the AA analog signal, the BB analog signal, and the BBE relay contact. OPERATION Refer to Figure 1-28 and 1-57 NOTE: a3 is the calculated Brake Cylinder Pressure. The CCB system calculates a desired brake call pressure (a3) proportioned to a brake pipe reduction rate. Based on this calculated brake call pressure, the CCB system then simultaneously initiates the development of brake cylinder pressure, as well as, providing an output signal (AA) from the AA PCB to the propulsion system's excitation controller (EXC). The AA signal is proportional to (a3) and is provided to the excitation controller as a brake effort command signal. When the calculated 16 pressure is greater than 11 psi, the CCB system will also close the blended brake enable (BBE) relay contact. The propulsion system sets the mode selection to BRAKE when the BBE signal is energized. Additionally, the BBE signal must be high to allow the propulsion system to respond to the AA signal. The propulsion system will then initiate a dynamic brake command proportional to the AA signal. A dynamic brake feedback or set back pressure signal (BB) is then sent to the CCB system. The CCB system compares the calculated brake call (a3) to the set back signal (BB) from the propulsion system controller. Based on the calculation BC equals a3 minus BB, the CCB system will then adjust the BC output command signal to the pneumatic controls.
2
4
6
8
10
1
5
4
3
120 140 1600
20 40 60 80 10050 60 704010 20 300
80
5.37
2
Dynamic Brake Set Back - PSI -
Brake Call Pressure - PSI -

CCB AMTRAK SINGLE MODE CONTRACT LOCOMOTIVE MAINTENANCE MANUAL
1-43 JAN/97
SIGNAL DESCRIPTION AA Signal The CCB system provides an analog output signal to the Excitation
Controller (EXC) equivalent to the brake call pressure. In conventional 26L systems, this signal would be the actual 16 pipe control pressure. The AA signal is therefore the brake call signal sent to the excitation controller to command the required dynamic brake effort. In bail-off, the brake call pressure is set to zero, resulting in the reduction of dynamic brake and BC pressure to zero.
The AA signal is generated from the AA PCB within the CCB micro computer. The signal is voltage based where 0 to 150 psi is equivalent to 0 to 10 volts out.
BBE Signal The CCB system provides the blended brake enable (BBE) signal to the
propulsion system for brake mode set-up. In addition, the signal is used as validation to prevent the propulsion system from responding to the AA signal unless the BBE signal is high.
The BBE signal is provided via a relay contact closure when the calculated brake call pressure is greater than 11 psi and opens when the calculated brake call pressure is less than 3 psi.
This contact remains open in the back-up mode to prohibit blended brake.
BB Signal The CCB system receives an analog input signal from the Propulsion
System Controller (PSC) equivalent to the dynamic brake effort command. This signal is defined as the brake cylinder set-back pressure (BB). The brake cylinder set-back pressure signal instructs the CCB system on how much pressure must be reduced from the brake call pressure. This results in the given calculation to determine the actual brake cylinder pressure output, BC = a3 - BB.
The set back logic within the CCB will provide a min. of 8 psi BC in order to provide a min. inshot pressure during dynamic braking. For example when c16 = 50 psi and BB = 50 psi, then BC = a3 - BB = 8 psi
The BB signal is received by the BB PCB within the CCB micro computer. The BB signal is also fed back to the PSC to validate that the CCB system has received the signal. The BB signal is voltage based where 0 to 5.37 volts input is equivalent to 0 to 80 psi.
The BB signal received from the propulsion system controller can be interrupted by the blended brake relay (BBR) within the propulsion system. The BBR provides the ability to immediately drop the set-back signal to zero when the dynamic brake drops out or upon detection by propulsion of a system failure.

CCB AMTRAK SINGLE MODE CONTRACT LOCOMOTIVE MAINTENANCE MANUAL
JAN/97 1-44
FIGURE 1-28 BLENDED BRAKE

CCB AMTRAK SINGLE MODE CONTRACT LOCOMOTIVE MAINTENANCE MANUAL
1-45 JAN/97
J. AUTOMATIC APPLICATION - BAIL OFF
Refer to Figure 1-29 thru 1-33 When an automatic brake application is on, lifting the bail off ring on either the automatic
or independent brake handle in any position will direct main reservoir pressure at a rapid rate to the trainline Actuating Pipe (#13 Pipe.)
When actuated, the brake valve automatic or independent handle lift ring closes a
microswitch sending a signal input to the SS-8 PCB. An isolated output is fed by computer (CP) PCB Via the BEA and DB-1 PCB's, that commands MV-13S to energize and MV13E to deenergize. Main Reservoir pressure is directed through MV-13S to the 13-CO cut-off valve. When Main Reservoir exceeds 10 psi, 13-CO cut-off valve opens connecting main reservoir to and through MV-13E Exhaust Valve and filter to the Actuating Pipe where pressure quickly charges to 130-140 psi. This air travels to the TRAILING units with traditional 26L equipment, where the 26F control valve actuating valves are piloted to quickly release the brakes. If the TRAILING UNIT is equipped with CCB equipment, the pressure would be sensed by pressure switch PS-13. Contacts of PS-13 close at 25 psi increasing pressure sending a signal to the computer via the BEA-PCB to release the automatic brake.
On the LEAD UNIT the central processor commands the EPA-2 PCB to release the #16
pipe pressure through the Analog Converter Exhaust magnet valve which in turn drives the J-1 Relay to Release. (Refer to Automatic Brake Release for operation.) As long as the automatic or Independent Brake Valve lift ring is lifted, main reservoir pressure will exist in the Actuating Pipe.
NOTE: If the Bail-Off continues for longer than 180 seconds, the Actuating pipe
will be vented. This prevents tampering with the Bail-Off ring. When the BAIL-RING is released the BAIL-OFF switch opens signaling the computer to
deenergize MV-13S and energize MV-13E. Actuating Pipe quickly vents through the exhaust port of MV-13E to atmosphere. Pressure between MV-13E and 13-CO Cut-Off Valve is vented through 13-CO and MV13S to exhaust. When this pressure reduces to below 7-8 psi 13-CO cut-off Valve closes isolating the Actuating pipe from exhaust. Brake cylinder pressure is not restored.

CCB AMTRAK SINGLE MODE CONTRACT LOCOMOTIVE MAINTENANCE MANUAL
JAN/97 1-46
FIGURE 1-29 AUTOMATIC BAIL OFF - LEAD UNIT - BAIL OFF ACTUATED SERVICE OR EMERGENCY APPLICATION NORMAL POSITION

CCB AMTRAK SINGLE MODE CONTRACT LOCOMOTIVE MAINTENANCE MANUAL
1-47 JAN/97
FIGURE 1-30 AUTOMATIC BAIL-OFF LEAD UNIT - BAIL OFF ACTUATED SERVICE OR EMERGENCY APPLICATION NORMAL POSITION

CCB AMTRAK SINGLE MODE CONTRACT LOCOMOTIVE MAINTENANCE MANUAL
JAN/97 1-48
FIGURE 1-31 AUTOMATIC BAIL OFF ACTUATING PIPE PRESSURIZED - LEAD UNIT

CCB AMTRAK SINGLE MODE CONTRACT LOCOMOTIVE MAINTENANCE MANUAL
1-49 JAN/97
FIGURE 1-32 AUTOMATIC BAIL OFF ACTUATING PIPE VENTED - LEAD UNIT

CCB AMTRAK SINGLE MODE CONTRACT LOCOMOTIVE MAINTENANCE MANUAL
JAN/97 1-50
FIGURE 1-33 BACK UP BAIL OFF - LEAD UNIT

CCB AMTRAK SINGLE MODE CONTRACT LOCOMOTIVE MAINTENANCE MANUAL
1-51 JAN/97
K. TRAIL POSITION - AUTOMATIC BRAKE
Refer to Figure 1-34
As with 26L Brake Equipment, the CCB System responds to changes in Brake Pipe
pressure. Brakes release on pressure increase and apply on pressure decrease. But with CCB equipment, the Brake Pipe Transducer (BPT) reads the Brake Pipe pressure and directs the system to apply or release brake cylinder pressure.
L. TRAIL POSITION - ANY EMERGENCY APPLICATION AND RELEASE
As with Automatic Service Brake operation in TRAIL mode, the Brake Pipe Transducer reads the Brake Pipe pressure rate of drop and determines that an Emergency Application has been made on this Unit.
Brake cylinder pressure develops the same as a LEAD Unit. Release is the same as
LEAD Unit.
M. TRAIL OPERATION - BAIL-OFF
Refer to Figure 1-35 thru 1-37
As a Trailing Unit MV-13E Magnet Valve would be deenergized by the computer. This
allows pressure to increase to the 13-CO pneumatic valve which is normally closed. When pressure reaches 25 psi, PS-13 pressure closes signaling the computer to bail-off the brakes on this unit via the #16 pipe circuit.

CCB AMTRAK SINGLE MODE CONTRACT LOCOMOTIVE MAINTENANCE MANUAL
JAN/97 1-52
FIGURE 1-34 ER RESERVOIR CONTROL CIRCUIT HANDLE OFF POSITION - TRAIL

CCB AMTRAK SINGLE MODE CONTRACT LOCOMOTIVE MAINTENANCE MANUAL
1-53 JAN/97
FIGURE 1-35 AUTOMATIC BAIL OFF - TRAIL UNIT BAIL OFF RELEASE - SERVICE APPLICATION

CCB AMTRAK SINGLE MODE CONTRACT LOCOMOTIVE MAINTENANCE MANUAL
JAN/97 1-54
FIGURE 1-36 AUTOMATIC BAIL OFF - TRAIL UNIT

CCB AMTRAK SINGLE MODE CONTRACT LOCOMOTIVE MAINTENANCE MANUAL
1-55 JAN/97
FIGURE 1-37 AUTOMATIC BAIL OFF - BACK UP TRAIL OPERATION BC CONTROL

CCB AMTRAK SINGLE MODE CONTRACT LOCOMOTIVE MAINTENANCE MANUAL
JAN/97 1-56
N. INDEPENDENT APPLICATION AND RELEASE
Refer to Figures 1-38 thru 1-44
As its name implies, Independent Braking applies and releases locomotive brakes independent of the Automatic Brake. The CCB system uses three high capacity magnet valves to accomplish this. These magnet valves are located on the #20 Block and control pressure to and from the Independent Application and Release Pipe (#20 pipe) only.
Similar to the operation of the Automatic Brake the Independent Brake Handle on the CCB
Brake Valve outputs a frequency to the computer proportional to handle position. The Independent Brake is a closed Loop system similar to the Automatic Brake. Moving the handle between Release position to Maximum brake produces a variable pressure output from 0 to 45 psi in the Independent Application and Release Pipe (#20 pipe). The system is pressure maintaining at all pressure levels.
In Release position the Exhaust Magnet Valve is energized all the time keeping the #20
pipe vented. The Supply and Maintaining Magnet Valves remain deenergized blocking Main Reservoir to #20 pipe. The #20 Block also includes a Limiting Valve set 10 psi above the 20 pipe operating pressure to prevent excessive brake cylinder pressure should a failure occur.
When the Independent Brake Valve Controller handle is moved into Service position a
change of frequency is read by the computer. Pressure level is calculated and the computer commands the Supply Magnet Valve to energize and the Exhaust M.V. to deenergize via the BEA and DB1 PCB's connecting main reservoir supply to the #20 pipe. As the pressure approaches the Demand pressure the Maintaining Magnet Valve energizes connecting a calibrated orifice in series with the Supply Magnet Valve decrease flow rate to the #20 pipe. This prevents undesired cycling of the magnet valves. When #20 pipe pressure equals demand pressure the #20 pipe transducer (20T) feeds back a signal for the computer to deenergize the Supply Magnet Valve and Maintaining Magnet Valve. Should leakage occur in the #20 pipe increasing or decreasing pressure the transducer outputs a voltage the computer to energize or deenergize the appropriate Magnet Valve for pressure level compensation.
The system allows for graduating on or off the levels of #20 pipe pressure by moving the
Brake Valve Controller handle in the appropriate direction. The system responds by controlling the appropriate #20 Block magnet valves.
Simultaneous with the 20 pipe control, the computer reads the level of 20 pipe pressure
via the 20T Transducer and commands the AW4-16 Analog Converter to output a #16 pipe pressure equivalent to 160% of the #20 pipe pressure to the J-1 Relay. The J-1 relay in turn applies this pressure to the brake cylinders.
Upon movement of the Independent handle toward Release position, as #20 pipe is
reduced the 20T Transducer signals the computer to command a release signal to the AW4-16 to reduce pressure in the #16 control volume proportionate to the #20 pipe. In summary the CCB system uses two circuits to control brake cylinder pressure i.e.: the #20 pipe control circuit and the 16 pipe control circuit. The #20 pipe circuit controls Independent Application and Release trainline pipe for control of trailing unit locomotive brakes as well as a signal to control the #16 pipe circuit on the LEAD locomotive

CCB AMTRAK SINGLE MODE CONTRACT LOCOMOTIVE MAINTENANCE MANUAL
1-57 JAN/97
FIGURE 1-38 INDEPENDENT RELEASE - 20 PIPE LEAD UNIT

CCB AMTRAK SINGLE MODE CONTRACT LOCOMOTIVE MAINTENANCE MANUAL
JAN/97 1-58
FIGURE 1-39 INDEPENDENT APPLICATION - 20 PIPE LEAD UNIT - MAX. BRAKE

CCB AMTRAK SINGLE MODE CONTRACT LOCOMOTIVE MAINTENANCE MANUAL
1-59 JAN/97
FIGURE 1-40 INDEPENDENT APPLICATION - 20 PIPE LEAD UNIT - SERVICE ZONE/MAINTAINING WITH 20 PIPE LEAKAGE

CCB AMTRAK SINGLE MODE CONTRACT LOCOMOTIVE MAINTENANCE MANUAL
JAN/97 1-60
FIGURE 1-41 #16 PIPE CONTROL CIRCUIT APPLICATION POSITION/IND

CCB AMTRAK SINGLE MODE CONTRACT LOCOMOTIVE MAINTENANCE MANUAL
1-61 JAN/97
FIGURE 1-42 #16 PIPE CONTROL CIRCUIT RELEASE POSITION/IND

CCB AMTRAK SINGLE MODE CONTRACT LOCOMOTIVE MAINTENANCE MANUAL
JAN/97 1-62
FIGURE 1-43 INDEPENDENT APPLICATION #20 (IND.) PIPE AND BC CONTROL

CCB AMTRAK SINGLE MODE CONTRACT LOCOMOTIVE MAINTENANCE MANUAL
1-63 JAN/97
FIGURE 1-44 INDEPENDENT RELEASE BRAKE CYLINDER CONTROL

CCB AMTRAK SINGLE MODE CONTRACT LOCOMOTIVE MAINTENANCE MANUAL
JAN/97 1-64
O. TRAILING INDEPENDENT BRAKING Refer to Figure 1-46
On a CCB Trailing Locomotive Independent Application and Release Pipe pressure enters
the PCU though the #20 port and pressurizes the #20 core where it is blanked at the normally closed MV-20S and MV20E supply and exhaust magnet valves. The 20T Transducer reads the pressure and inputs the analog signal to the computer via the AD PCB's. The computer commands the AW4-16 Analog Converter to apply and release the brakes identical to the LEAD Unit.
P. LOSS OF POWER OR DEFAULT MODE
Features are incorporated in the CCB system to enhance safety and minimize special
procedures due to fault conditions or power loss.
Q. SERVICE PENALTY DEFAULT Refer to Figure 1-45 and 1-47 Default or penalty Magnet Valve MV-ER will be deenergized by the computer command
when loss of power occurs. Equalizing Reservoir reduces to zero psi at a service rate of reduction. Brake pipe reduces to approximately 10 psi at a service rate.
With no power applied to the computer the AW4-16 Analog Converter is inoperative and
unable to generate #16 pipe control pressure. Magnet valve (MV-16T) will deenergize connecting auxiliary BC Pressure (from the DIT
Valve) to the J-1 Relay Valve via the PVE Valve. As brake pipe reduces the pressure increases in the Auxiliary BC pipe commanding the J-1 Relay Valve to develop more BC pressure. When Brake Pipe pressure reduces below 18 psi the PVE changes state and the pressure of the ELV valve (set to emergency pressure) overrides the pressure from the DIT Valve. This pressure differential will force the double check to move and block off the DIT valve pressure and allow the ELV pressure to command the J-1 relay for emergency brake cylinder pressure. Under this condition dynamic brake is inhibited.
As with any Service brake application the DIT Backup Valve operates to develop #16 pipe
pressure. In this case however, the pressure developed by the ELV Valve is higher and supersedes the backup valve.
A unique Brake Pipe Cut off circuit design provides for suspension of Brake Pipe charging
automatically through the Brake Pipe piloted BP-CO Pneumatic Cut-Off Valve described earlier. No manual cut-out required.
The Independent Application and Release Pipe is bottled up by normally closed magnet
valves on the #20 Block. The Actuating Pipe is automatically exhausted, then bottled by a specially designed circuit
similar to the Brake Pipe Cut-Off circuit. With power off MV-13E Exhaust Magnet Valve is deenergized connecting the #13 pipe to the 13 CO Cut-off valve. If air exits in the Actuating (#13 pipe) pipe when power is lost, pressure is allowed to vent down to the 13-CO setting of 7-8 psi. When 13-CO closes bottling up the Actuating Pipe, the remaining pilot pressure on the 13-CO Valve vents through Magnet Valve MV-13S. The pressure remaining in the Actuating pipe is too low to cause Bail-Off on other locomotives in the Consist.
In summary, this unit is automatically conditioned for TRAIL service with unexpected loss
of power. The Air Brake circuit breaker should be opened if the Unit continues in TRAIL service. There is no other manual operation to be performed.

CCB AMTRAK SINGLE MODE CONTRACT LOCOMOTIVE MAINTENANCE MANUAL
1-65 JAN/97
FIGURE 1-45 SERVICE DEFAULT

CCB AMTRAK SINGLE MODE CONTRACT LOCOMOTIVE MAINTENANCE MANUAL
JAN/97 1-66
FIGURE 1-46 TRAIL POSITION AUTOMATIC BRAKE - INDEPENDENT BRAKE

CCB AMTRAK SINGLE MODE CONTRACT LOCOMOTIVE MAINTENANCE MANUAL
1-67 JAN/97
FIGURE 1-47 SERVICE PENALTY DEFAULT BRAKE PIPE AND BRAKE CYLINDER

CCB AMTRAK SINGLE MODE CONTRACT LOCOMOTIVE MAINTENANCE MANUAL
JAN/97 1-68
R. EMERGENCY APPLICATION BAIL-OFF BACK UP TRAIL OPERATION
Refer to Figure 1-48 In emergency the PVE valve has moved due to brake pipe pressure below nominally 18
psi. In this position the emergency regulating valve is connected directly to the J-1 Relay and cannot be bailed-off as described above. In order to bail off an emergency application, the PVE must be shuttled back to its normal service position. This is accomplished by supplying actuating pipe #13 pressure through a double check valve to the PVE valve. The PVE resets allowing #16 pipe pressure to vent as described under service bail-off. When the independent handle on the lead loco is released from the bail off position the brakes will reapply to the normal emergency pressure.

CCB AMTRAK SINGLE MODE CONTRACT LOCOMOTIVE MAINTENANCE MANUAL
1-69 JAN/97
FIGURE 1-48 EMERGENCY APPLICATION BAIL-OFF BACK UP TRAIL OPERATION

CCB AMTRAK SINGLE MODE CONTRACT LOCOMOTIVE MAINTENANCE MANUAL
JAN/97 1-70
S. INDEPENDENT - BACK UP TRAIL OPERATION
Refer to Figure 1-49
When an Independent Application is made by the LEAD unit, the Independent Application
and Release Pipe (#20 pipe) is pressurized. Air flows to the double check valve on the DIT Valve on the inoperative Trailing Unit through the double check valve of the PVE and on to the MV16T default magnet valve.
With no power to this magnet valve Independent brake pressure flows to the J-1 Relay via
double check valve in the PVE. Main Reservoir is allowed to flow thru the BC Relay (J-1) and buildup brake cylinder pressure to the desired pressure determined by the pilot pressure. Independent brakes are released through the same path back through Independent brake valve or CCB system of the LEAD unit.

CCB AMTRAK SINGLE MODE CONTRACT LOCOMOTIVE MAINTENANCE MANUAL
1-71 JAN/97
FIGURE 1-49 INDEPENDENT APPLICATION - BACK UP TRAIL OPERATION 20 PIPE
AND BC PIPE

CCB AMTRAK SINGLE MODE CONTRACT LOCOMOTIVE MAINTENANCE MANUAL
JAN/97 1-72
T. BACK UP BRAKE SYSTEM (DIT/DEAD-IN-TOW VALVE)
The DIT Valve is always cut-in to the brake system, although not controlling brake cylinder. Each time brake pipe reduces as just described, the DIT valve responds by moving to its Service Position. Auxiliary Reservoir is connected to the #16 control reservoir via calibrated orifice 53D at a service rate of flow. The reservoirs are sized to produce about a 2 1/2 to 1 control volume pressure to brake pipe reduction. If the CCB system is operative MV-16T magnet valve will be energized closing the path between the back-up valve (DIT) and J-1 relay. During Service braking MV-53 magnet valve remains de-energized to supply brake pipe pressure to the BP-CO pneumatic brake pipe cut-off valve. Thus, the high capacity cut-off valve connects the Brake Pipe Relay exhaust to brake pipe trainline permitting application of train brakes.

CCB AMTRAK SINGLE MODE CONTRACT LOCOMOTIVE MAINTENANCE MANUAL
1-73 JAN/97
NOTE: The following tables and diagrams (Figures 1-48 thru 1-64) are various Inputs and Outputs
that interface from the CCB Computer to the locomotive trainline and back to the CCB Computer.
LOCOMOTIVE INPUT/OUTPUT INTERFACE
INPUTS NAME ABBR INPUT BOARDS FUNCTION
ALERTER AL SC1/SS9 Loss of 74VDC causes Penalty Brake ALERTER CUT-OUT ACO SC1/SS9 No alerter penalty high BATTERY NEGATIVE BAN SC1/SC2 74 Vdc Return Reference for SC-1 and SC-2 BATTERY POSITIVE BAP SC1/SS9 + 74 Vdc reference for FVPS pressure
switches BLENDED BRAKE BB SC2/SS9 SUBTRACT 0-80 PSI CAB SIGNAL CUT-OUT
CSCO SC1/SS9 NO CAB SIGNAL PENALTY HIGH
CAB SIGNAL NEGATIVE
CSN SC1/BEA PENALTY LOW
CAB SIGNAL POSITIVE
CSP SC1/BEA IMMEDIATE
COMMUNICATIONS COMM RS422 INTERFACE TO IFC DYNAMIC BRAKE APPLY
DBM SC2/SS9 BG T. L. HIGH
WHEELSLIP BBWS SC2/SS9 BRAKE CYLINDER RELEASE HIGH,
BLENDED BRAKE ONLY

CCB AMTRAK SINGLE MODE CONTRACT LOCOMOTIVE MAINTENANCE MANUAL
JAN/97 1-74
LOCOMOTIVE INPUT/OUTPUT INTERFACE
OUTPUTS NAME ABBR BOARD RELAY FUNCTION
EMERGENCY SAND ES SS9/DB2/ K1 Timed Emergency Sanding-30 SEC-LEAD or
TRAIL IND. BRK. APPLY IBS SS9/DB2/K2 Dynamic Brake Inhibit BRAKE CYLINDER PRESSURE
BCPS SS9/DB2/K3 CLOSED - BC>35 psi OPEN - BC<21 psi
FREIGHT MODE FRT SS9/DB2/K4 CLOSED - Cut out switch in FRT position
and calculate BP volume for more than 30 cars
OPENED - Cut out switch not in FRT position or calculate BP volume for less than 30 cars
CUT-OUT RELAY COR BEA/DB2/K5 Knocks down locomotive power in emergency 30 Sec. time delay in BIT 60 Sec time delay Conductor/ Controller
Emerg. 60 Sec. time delay Lead and Trail SPARE K6 SUPPRESSION SUPP SS9/DB2/K7 CLOSED - CONTROLLER - SUPP-EMERG
OPEN - CONTROLLER - REL-SUPP MIN BRAKE APPLY (STRETCH BRAKING)
MINB SS8/DB2/K8 CLOSED - min brake application only OPENED - brake release or brake application greater than min
BRAKE VALVE CUT-OUT
BVPS SS8/DB2/K9 CLOSED - BV IN 'TEST, PASS, FRT' OPEN - BV IN 'TRAIL AND AIR BRAKE
FAULT SERVICE BRAKE (STRETCH BRAKING)
SERB SS8/DB2/K10 CLOSED - greater than min brake application OPENED - release or min brake application
BLENDING BRAKE ENABLE
BBE EPA2/DB2/K11 AUTO BC COMMAND >11 PSI <3 PSI
AIR BRAKE ALARM VA EPA-2/DB2/K12 Drives AB Fault and Trainline Alarm when
Computer fails BLENDED BRAKE TRANSDUCER
BBT BB 0-150 PSI

CCB AMTRAK SINGLE MODE CONTRACT LOCOMOTIVE MAINTENANCE MANUAL
1-75 JAN/97
FIGURE 1-50 ALERTER INPUT

CCB AMTRAK SINGLE MODE CONTRACT LOCOMOTIVE MAINTENANCE MANUAL
JAN/97 1-76
FIGURE 1-51 CAB SIGNAL CUT-OUT

CCB AMTRAK SINGLE MODE CONTRACT LOCOMOTIVE MAINTENANCE MANUAL
1-77 JAN/97
FIGURE 1-52 CAB SIGNAL INPUT

CCB AMTRAK SINGLE MODE CONTRACT LOCOMOTIVE MAINTENANCE MANUAL
JAN/97 1-78
FIGURE 1-53 TL-21 B6 INPUT

CCB AMTRAK SINGLE MODE CONTRACT LOCOMOTIVE MAINTENANCE MANUAL
1-79 JAN/97
FIGURE 1-54 BLENDED BRAKE WHEELSLIP INPUT

CCB AMTRAK SINGLE MODE CONTRACT LOCOMOTIVE MAINTENANCE MANUAL
JAN/97 1-80
FIGURE 1-55 EMERGENCY SAND OUTPUT

CCB AMTRAK SINGLE MODE CONTRACT LOCOMOTIVE MAINTENANCE MANUAL
1-81 JAN/97
FIGURE 1-56 INDEPENDENT BRAKE APPLY OUTPUT

CCB AMTRAK SINGLE MODE CONTRACT LOCOMOTIVE MAINTENANCE MANUAL
JAN/97 1-82
FIGURE 1-57 BRAKE CYLINDER PRESSURE SWITCH OUTPUT

CCB AMTRAK SINGLE MODE CONTRACT LOCOMOTIVE MAINTENANCE MANUAL
1-83 JAN/97
FIGURE 1-58 FREIGHT MODE OUTPUT

CCB AMTRAK SINGLE MODE CONTRACT LOCOMOTIVE MAINTENANCE MANUAL
JAN/97 1-84
FIGURE 1-59 CUT-OUT RELAY

CCB AMTRAK SINGLE MODE CONTRACT LOCOMOTIVE MAINTENANCE MANUAL
1-85 JAN/97
FIGURE 1-60 SUPPRESSION OUTPUT

CCB AMTRAK SINGLE MODE CONTRACT LOCOMOTIVE MAINTENANCE MANUAL
JAN/97 1-86
FIGURE 1-61 MIN BRAKE APPLY

CCB AMTRAK SINGLE MODE CONTRACT LOCOMOTIVE MAINTENANCE MANUAL
1-87 JAN/97
FIGURE 1-62 BRAKE VALVE CUT-OUT

CCB AMTRAK SINGLE MODE CONTRACT LOCOMOTIVE MAINTENANCE MANUAL
JAN/97 1-88
FIGURE 1-63 SERVICE BRAKE OUTPUT

CCB AMTRAK SINGLE MODE CONTRACT LOCOMOTIVE MAINTENANCE MANUAL
1-89 JAN/97
FIGURE 1-64 BLENDING BRAKE ENABLE

CCB AMTRAK SINGLE MODE CONTRACT LOCOMOTIVE MAINTENANCE MANUAL
JAN/97 1-90
FIGURE 1-65 AIR BRAKE ALARM OUTPUT

CCB AMTRAK SINGLE MODE CONTRACT LOCOMOTIVE MAINTENANCE MANUAL
1-91 JAN/97
FIGURE 1-66 POWER DISTRIBUTION

CCB AMTRAK SINGLE MODE CONTRACT LOCOMOTIVE MAINTENANCE MANUAL
JAN/97 1-92
THIS PAGE LEFT BLANK INTENTIONALLY

CCB AMTRAK SINGLE MODE CONTRACT LOCOMOTIVE MAINTENANCE MANUAL
2-1 JAN/97
CHAPTER 2
COMPONENT DESCRIPTIONS
2.1 COMPONENT DESCRIPTION The following provides information regarding the construction, function and/or other important
features of the major components that make up the CCB/Amtrak Brake System. COMPONENT P/D DES. P/N C.W. NO. J-1 RELAY VALVE ............................................... BC Relay 735690 C.W. 135 PRESSURE TRANSDUCER ............................... MRT, BPT, 774007 C.W. 217 BCT TEST COUPLING ................................................ TPMR, TP 16 772815 C.W. 218 TP 13, TPBC TPBP, TPER TP 20 ANALOG CONVERTER ...................................... AW4-ER, AW4-16 774009 C.W. 219 MAGNET VALVE WMV1-ZEST ........................... MVER, MV13S, 770950 C.W. 220 MV13E, MV16T RELAY VALVE KR-5EO ...................................... BP Relay 770954 C.W. 221 MAGNET VALVE WMV02-ZT .............................. MV53 770952 C.W. 222 CUT-OFF VALVE WKV3000-TS .......................... BPCO 770955 C.W. 223 AIR FILTER LF-19T ............................................. BP FILTER 770956 C.W. 224 20 FILTER 13 FILTER OVERFLOW VALVE ............................................ 13CO 773796 C.W. 225 REDUCING VALVE ASSEMBLY DMV-15 .......... ELV 773864 C.W. 226 DOUBLE CHECK VALVE DRV-7-T ..................... DCV 770960 C.W. 228 EMERGENCY VALVE ASSEMBLY NB11-T ....... PVEM 770961 C.W. 229 MAGNET VALVE WMV01-ZEST ......................... MVEM 770951 C.W. 230 DB-10 SERVICE PORTION ................................. DB10 TV 769140 C.W. 232 20 PIPE PORTION ASSEMBLY .......................... 20CP 770558 C.W. 233 DIT VALVE ........................................................... DIT 772506 C.W. 239 PNEUMATIC CONTROL UNIT ........................... PCU 774478 C.W. 242 DOUBLE CHECK VALVE ................................... PVE 773306 C.W. 243 RESEVOIR ........................................................... AUX, 16 705161 C.W. 248 RESERVOIR ........................................................ 16 PIPE 767134 C.W. 249 PRESSURE SWITCH .......................................... PS-BP. PS-13 772732 C.W. 250 VOLTAGE CONDITIONING UNIT ....................... VCU 773023 C.W. 253 COMPUTER RELAY UNIT .................................. CRU 774474 C.W. 256 EMERGENCY VALVE AND BRAKE VALVE CONTROLLER ........................... 774482 C.W. 258

CCB AMTRAK SINGLE MODE CONTRACT LOCOMOTIVE MAINTENANCE MANUAL
JAN/97 2-2
THIS PAGE LEFT BLANK INTENTIONALLY


CCB AMTRAK SINGLE MODE CONTRACT LOCOMOTIVE MAINTENANCE MANUAL
3-1 JAN/97
CHAPTER 3
PREPARATION FOR MAINTENANCE 3.1 General Information This chapter covers the safety and assembly precautions that must be taken at all times when
performing the work procedures described in Chapter 4 of this Manual. 3.2 Safety Precautions To prevent physical injury or death, all personnel directly or indirectly involved with the
maintenance, repair, overhaul and /or inspection of the equipment described in this Manual must conform to the following:
3.2.1 Observe all AMTRAK rules and regulations. Whenever there is a conflict between the
instructions given below and in this manual, AMTRAK rules and regulations will govern. 3.2.2 When performing any test work on devices or equipment while they are on the vehicle (on
locomotive test, etc.) special precautions must be taken to ensure that vehicle movement will not occur which could result in injury to personnel and/or damage to equipment. Make sure the hand brake is applied and that the wheels are chocked to prevent vehicle from moving.
3.2.3 Dangerous voltages are present throughout the locomotive. Always exercise extreme care
when working in close proximity to electrically-energized apparatus or when making current measurements. To prevent receiving electrical shock when performing electrical tests, hands must be clear of electrical components, contacts and housing, and there must be no bodily contact with the work area. Failure to heed this warning could result in severe injury or death.
Shut off locomotive power and open air brake breaker whenever continuity is to be checked or
when handling equipment connections. When shutting off power by means of knife or switch:
(a) Attach an approved WARNING tag to the open breaker. 3.2.4 De-pressurize air system before loosening connections or components. Before removing any
component from its mountings, the train must be safely parked. To prevent personal injury, all main reservoir, brake supply reservoir, and brake cylinder on the affected locomotive must be vented.
"Bottled" up air under pressure (even though air supply is cut off) may cause gaskets and/or particles of dirt to become airborne and an increase in sound level when any component part is removed from the equipment arrangement. Personal eye and ear protection must be worn and care taken to avoid possible injury when performing any work on these component parts.
3.2.5 The use of an air jet, which must be less than 30 PSIG, to blow parts clean or to blow them dry after being cleaned with a solvent will cause particles of dirt and/or droplets of the cleaning solvent to be airborne. These particles and droplets may cause skin and /or eye irritation. Personal eye protection must be worn to protect the eyes from possible injury. When using an air jet do not direct it toward another person. Improper use of air jet could result in bodily injury.

CCB AMTRAK SIGNAL MODE CONTRACT LOCOMOTIVE MAINTENANCE MANUAL
JAN/97 3-2
3.2.6 If degreasing fluids are used for cleaning purposes, the current local safety regulations plus the
safety precautionary statements of the manufacturer of the cleaning agent must be adhered to. Otherwise, physical harm could result from the inhalation of toxic fumes. Make sure the area is well ventilated when working with materials which produce harmful fumes.
3.2.7 Personal eye protection must be worn when doing any work to protect eyes from possible injury. 3.2.8 When performing maintenance procedures on system components, assemblies may be under a
spring load. Exercise caution during disassembly so that no parts "Fly Out" and cause bodily injury.
3.2.9 Where fasteners removed from the locomotive equipment are not satisfactory for reuse, care
must be taken to select replacements that match the originals. Mismatched or incorrect fasteners can result in equipment damage or malfunction, or possible personal injury.
3.2.10 Follow all WARNING, CAUTIONS, and NOTES found throughout this Manual. If you must use
a work procedure or tool which is not recommended, you must first satisfy yourself that neither your safety, your fellow workers safety, nor that of the equipment will be jeopardized by the method selected.
3.2.11 Appropriate tool selection is required when performing all maintenance operations to avoid
personal injury. 3.2.12 Person(s) having the appropriate job skill level as governed by AMTRAK are required when
performing maintenance and/or operational tasks with the brake system and system components.

CCB AMTRAK SINGLE MODE CONTRACT LOCOMOTIVE MAINTENANCE MANUAL
3-3 JAN/97
3.3 Component Assembly Precautions To prevent accidental damage to or the malfunction of the system components or entire brake
system, the following must be adhered to: 3.3.1 To ensure the correct functioning of each component, use only the manufacturers genuine
spare parts as replacements. 3.3.2 Although the component parts of identical valves are interchangeable, it is generally preferable
to refit serviceable used parts in the valve from which they have been dismantled. When possible, the component parts of each valve should be grouped together after dismantling, cleaning, etc.
3.3.3 The solvent used for cleaning the metal parts MUST be an aliphatic organic solution, such as
mineral spirits or naphtha, that will dissolve oil or grease and that will permit all parts to be cleaned without abrasion.
3.3.4 Many of the component parts have a fine surface finish and must be handled carefully to avoid
accidental damage. A clean well lit work bench is essential. A lino topped wooden work bench provides an ideal working surface. If a metal topped work bench is used, some form of protection must be provided in order to avoid brushing any metal parts which might accidentally strike the bench top.
3.3.5 The work area should be clean. The locomotive equipment must be clean and located in the
assigned maintenance area. 3.3.6 Whenever a valve or system component is removed from a vehicle for any reason, and it is
reinstalled or replaced with a new or repaired and tested component, a stationary vehicle air brake test and an equipment test must be performed to ensure that the component functions properly within the system.
3.3.7 Before a valve or system component is installed on a vehicle, the valve or component must
have successfully passed an approved code of tests for that valve component when such is required.
3.3.8 Appropriate tool selection is required when performing maintenance operations to avoid
unwarranted equipment damage. 3.3.9 When air pressure measurements are to be made for the purpose of pressure level verification
and/or adjustment, an air brake test gauge having an accuracy of ± 1 PSI is required.

CCB AMTRAK SIGNAL MODE CONTRACT LOCOMOTIVE MAINTENANCE MANUAL
JAN/97 3-4
THIS PAGE LEFT BLANK INTENTIONALLY


CCB AMTRAK SINGLE MODE CONTRACT LOCOMOTIVE MAINTENANCE MANUAL
IP-158-C 5-1 NOV/97
CHAPTER 5
ON-LOCOMOTIVE EQUIPMENT CHECKOUT AND ANALYSIS 5.1 General Information
This chapter provides recommendations regarding equipment checkout and analysis to be performed on the CCB/GE/AMTRAK Brake System. Whenever there is a suspected brake problem or degraded brake performance, it is necessary for that locomotive to have an equipment checkout and analysis performed to locate and correct the problem. The following instructions should also be used when normal equipment inspections are performed.
5.2 Functional Testing
The purpose of Chapter 5, Section 5.2, is to functionally check out the Brake equipment.
5.2.1 Code Of Tests For Testing Locomotive Computer Controlled Brake Equipment Subsystem Procedure For GE/AMTRAK (REF. NYT-1315-C) PRELIMINARY Diagrammatic view of the pneumatic arrangement is on Dwg. NYT-1315. NOTE 1: The test procedure and sequence of test of this specification must be followed as
outlined. If, however, it becomes necessary or expedient to deviate from the procedure prescribed, it can only be done after permission is obtained from the Engineering Department.
NOTE 2: The test rack must have successfully passed a monthly leakage test and gage
calibration requirements should be checked before testing any components on it. NOTE 3: All tests performed MUST fall within the parameters of this test document. Any test
that does not fall within these parameters is considered a "Failed" test and must be repaired and re-tested prior to shipment. Any deviations must be addressed by the appropriate Quality Engineer and authorized by NYAB Engineering Department.
5.2.1.1 Required Components FRAME ASSEMBLY includes: A. Voltage Conditioning Unit (VCU) pre-tested to NYT-1264-S B. Pneumatic Control Unit (PCU) pre-tested to NYT-1268-S C. Controller pre-tested to NYT-1314-S D. CRU fully wired to PCU Driver, VCU and PCU

CCB AMTRAK SINGLE MODE CONTRACT LOCOMOTIVE MAINTENANCE MANUAL
NOV/97 5-2 IP-158-C
5.2.1.2 Test Equipment Required:
A. Laptop Computer with RS232 cable. B. PCU Test Gage Rack w/Test Point Adapters C. Wheel Chocks D. Piping and Wiring Diagram - 1499
5.2.1.3 Set Up: A. Connect Test Points of PCU to Test Gage Rack. B. Insure that the locomotive compressor is operative and Main Reservoir is charged. C. Insure that the AB circuit breaker is in the closed position. D. Isolate the locomotive by removing Trainline MU Cable and closing all MU Train end
cocks. E. Place the Automatic and Independent handles to the "Release" position. F. Set the hand brake.
5.2.1.4 USING THE LAPTOP A. Insert CCB PTU Program Disc into the Laptop. B. Connect Laptop Computer to Communication Port of DI board. C. Turn ON the Laptop Computer. D. Select 'LOG ON' and "Enter' (twice). E. Enter "PASSWORD" F. 'Arrow' over and select (from the main menu selection) 'TEST' and "Enter". NOTE: Do NOT turn Laptop OFF or program will have to be re-started. G. After selecting 'TEST' from the main menu selection, subsystems/components of the
CCB can be checked by pressing the appropriate key of the corresponding item you want to test.
The screen will display the following items that you can check: EPA1 - Brake Pipe Control EPA2 - Brake Cylinder Control BEA1 - #20 and #13 Control Circuits SS9 - Relay Interface Unit (RIU) Driver Circuits SS8 - Controller Frequencies For example, select EPA1 and the screen will display options available to you with a corresponding "key" to select for that circuit. Also, the Laptop screen will tell you what "state" a certain valve is in (whether on or off, etc...)

CCB AMTRAK SINGLE MODE CONTRACT LOCOMOTIVE MAINTENANCE MANUAL
IP-158-C 5-3 NOV/97
To perform tests out of the chronological order listed above, select EPA1 (Brake Pipe Control), select 'A' and turn MVER to the 'ON' position, select 'B and C' (MV53 and MVEM) and turn to the 'OFF' position, insure that 5 volts is shown under Voltage and ER and BP are approximately 74 psi before starting any series of tests. Select 'esc' to return to the menu, then make selection.
5.2.1.5 EPA1-BRAKE PIPE CONTROL
"A" corresponds to MVER "B" corresponds to MV53 "C" corresponds to MVEM "D" corresponds to PRESSURE "E" corresponds to VOLTAGE Commence test with MR charged.
A. ER Analog Converter (AW4-ER)
1. Select 'A, B and/or C' on the Laptop keyboard, note that 'ON' or 'OFF" will be
displayed at 'A, B and/or C' on the Laptop screen to indicate that magnet valves state. Select 'A and C' to set MVER and MVEM to the 'OFF' condition and select 'B' and set MV53 to the 'ON' condition.
2. Select 'E' for voltage. Select '5' and 'Enter' and note that 5 volts is displayed on
screen. 3. Select 'E' for voltage. Select '0' and 'Enter' and note that there is a blow at the
exhaust of the AW4-ER. 4. Alternate '5' and 'Enter' and '0' and 'Enter' and assure that AW4-ER is applying and
releasing pressure. 5. Finally, select 'E' for voltage, then select '5' and 'Enter' and note that approximately
5 volts is displayed on the screen (supply magnet of the AW4-ER analog converter is energized).
B. ER Magnet Valve (MVER)
1. Commence test with 'A and C' (MVER and MVEM) 'OFF', 'B' (MV53) 'ON' and 5
volts displayed on the screen. 2. Select 'A' (MVER) and note:
a. 'ON' is displayed under 'A and B' on the screen. b. ER pressure charges at TP-ER Gage to 74 +/- .5 psi.
3. Select 'A' again and note:
a. 'OFF' is displayed under 'A and C' on the screen and 'ON' is displayed under 'B'. b. There is an exhaust at rear of PCU at location of MVER. c. ER pressure reduces at TP-ER Gage to 0 psi.

CCB AMTRAK SINGLE MODE CONTRACT LOCOMOTIVE MAINTENANCE MANUAL
NOV/97 5-4 IP-158-C
4. Select 'A' (MVER) again and note:
a. 'ON' is displayed under 'A and B' on the screen. b. ER pressure charges at TP-ER Gage to 74 +/- .5 psi.
5. Select 'E' for voltage. Select '0' and 'Enter' and note
a. '0' is depicted under Voltage on the screen. b. There is a blow at the exhaust of AW4-ER. c. ER pressure reduces at TP-ER Gage to 0 psi.
6. Select 'E' for voltage. Select '5' and 'Enter' and note:
a. 5 volts is shown on the screen. b. ER pressure charges at TP-ER Gage to 74 psi +/- .5.
C. Brake Pipe Cut-Off (MV53) 1. Commence test with 'C' (MVEM) 'OFF', 'A and B' (MVER and MV53) 'ON' and 5
volts displayed on the screen. 2. Select 'B' (MV53) and note:
a. 'OFF' is displayed under 'B and C' on the screen and 'ON' is displayed under 'A'.
b. BP pressure charges at TP-BP Gage to within +/- 1 psi of ER pressure.
3. Select 'E' for voltage, select '4' and 'Enter' and note:
a. Voltage on laptop screen decreases. b. ER and BP pressures decrease at their respective TP Gage.
4. Repeat for decreasing voltage and note for every corresponding decrease in voltage, ER and BP also decrease.
5. Select 'E', select '5' and 'Enter' and charge ER to 74 +/- .5 psi and BP to +/- 1 psi of
ER.
D. Emergency Magnet Valve (MVEM) 1. Commence test with 'B and C' (MV53 and MVEM) 'OFF', 'A' (MVER) is 'ON' and 5
volts displayed on the screen. 2. Select 'B' (MV53) and note that 'ON' is displayed under 'A and B' on the screen.

CCB AMTRAK SINGLE MODE CONTRACT LOCOMOTIVE MAINTENANCE MANUAL
IP-158-C 5-5 NOV/97
3. Select 'C' (MVEM) and note:
a. 'ON' is displayed under 'C'. b. There is a blow at the rear of the PCU behind the Emergency Pneumatic
Valve (PVEM). c. BP pressure reduces rapidly to less than 15 psi at TP-BP Gage (wait one
minute).
4. Select 'C' (MVEM) and note:
a. 'OFF' is displayed under 'C' on the screen.
5. Select 'B' (MV53) and note:
a. 'OFF' is indicated under 'B and C' on the screen. b. BP pressure increases to +/- 1 psi of ER pressure. c. Note that at completion of this test that 5 volts is shown under Voltage, 'ON'
is displayed under 'A', 'OFF' is displayed under 'B and C' and ER and BP are approximately 74 psi before starting next series of tests.
6. Select 'esc' to return to the menu, then select EPA2 selection.
5.2.1.6 EPA2-BRAKE CYLINDER CONTROL
A. Conditions from Test 1: 'B and C' (MV53 and MVEM) are 'OFF', 'A' (MVER) is 'ON' and 5 volts is displayed on the screen (ER and BP must be charged to approximately 74 psi). "A" corresponds to MV16T "B" corresponds to VA RELAY "C" corresponds to BBE RELAY "D" corresponds to PRESSURE "E" corresponds to VOLTAGE
B. #16 Analog Converter (AW4-16)
Note 'ON' under 'A' on the screen. Select 'E', select '5' and 'Enter' and note that 5 Volts is shown on the screen. Brake Cylinder pressure will charge. Select 'E', select '0' and 'Enter' and note that there is a blow at the exhaust of the AW4-
16. Brake Cylinder pressure will reduce at the J relay. Select 'E', then '5' and 'Enter' and assure that 5 volts is displayed on screen and Brake
Cylinder is charged.

CCB AMTRAK SINGLE MODE CONTRACT LOCOMOTIVE MAINTENANCE MANUAL
NOV/97 5-6 IP-158-C
C. #16 Default Magnet Valve (MV16T)
1. Commence test with 'ON' displayed under 'A', pressure at TP-16 Gage is 74 psi +/-
.5, and BC pressure at TP-BC Gage is approximately 74 psi. 2. Select 'A' again and note:
a. 'OFF' is displayed under 'A' (MV16T) on the screen. b. There is an exhaust of pressure at the DB10 Control Valve #10 Port. c. BC pressure decreases at TP-BC Gage to 0 psi.
3. Select 'A' again and note:
a. 'ON' is displayed under 'A' on the screen. b. 16 pressure at TP-16 Gage is 74 psi +/- .5. c. BC pressure at TP-BC Gage is approximately 74 psi.
4. Select 'E', select '0' volts and 'Enter' and note:
a. '0' is displayed under Voltage on the screen. b. There is a blow at the exhaust of AW4-16. c. BC pressure decreases at TP-BC Gage to 0 psi.
5. Select 'E', select '5' volts and 'Enter' and note:
a. 5 volts is shown on the screen. b. Pressure at TP-16 Gage charges to 74 psi +/- .5. c. BC pressure at TP-BC Gage charges to approximately 74 psi.
6. Select 'E', then '4' volts and 'Enter' and note:
a. Voltage on laptop screen decreases to 4 volts. b. BC pressure at TP-BC Gage decreases. c. Repeat for 3, 2 and 1 volts and note corresponding decrease in voltage and
pressure. d. Select 'E', select '0' volts and 'Enter' and reduce BC pressure to 0 psi.
7. Alternately select 'B' and 'Enter' and note:
a. 'ON' and 'OFF' is displayed under 'B' on the screen. b. Relay K12 (VA) energizes and de-energizes. Finally, leave 'B' in the 'OFF'
condition.

CCB AMTRAK SINGLE MODE CONTRACT LOCOMOTIVE MAINTENANCE MANUAL
IP-158-C 5-7 NOV/97
8. Alternately select 'C' and 'Enter' and note:
a. 'ON' and 'OFF' is displayed under 'C' on the screen. b. Relay K11 (BBE) energizes and de-energizes. Finally, leave 'C' in the 'OFF'
condition.
9. At completion of this test, 0 volts is shown under Voltage, 'ON' is displayed under 'A', 'OFF' is displayed under 'B and C', ER with BP are approximately 74 psi and BC is 0 psi at TP-BC Gage.
10. Select 'esc' to return to Menu selection.
5.2.1.7 BEA1-#20 AND #13 CONTROL CIRCUITS
A. Conditions from Test 2: 'B and C' 'OFF', 'A' (MV16T) is 'ON', 5 volts is displayed on the screen, ER and BP must be charged to approximately 74 psi and BC must be at 0 psi. "A" corresponds to COR RELAY "B" corresponds to MV20M "C" corresponds to MV20R "D" corresponds to MV20A "E" corresponds to MV13E "F" corresponds to MV13S
B. #20 Control Portion 1. Alternately select 'C' (MV20R) and note 'ON' (energized) and 'OFF' (de-energized)
will be displayed on the screen. Leave 'C' (MV20R) in the 'OFF' condition. 2. Select 'D' (MV20A energized) and note:
a. 'ON' is displayed under 'MV20A'. b. Pressure at TP-20 Gage charges rapidly to 55 +/- 1 psi.
3. Select 'D' (MV20A de-de-energized) and note 'OFF' is displayed under 'MV20A' 4. Select 'C' (MV20R energized) and note:
a. 'ON' is displayed under 'MV20R'. b. Pressure at TP-20 Gage reduces rapidly to 0 psi.
5. Allow pressure to fully exhaust to 0 psi, select 'C' (MV20R de-energized), then select 'B' (MV20M energized) and note 'ON' is displayed under 'MV20M'.
6. Select 'D' (MV20A energized) and note:
a. 'ON' is displayed under 'MV20M and MV20A.' b. Pressure at TP-20 Gage commences to charge at a slower rate. c. Allow pressure to charge to at least 30 +/- 1 psi before continuing.

CCB AMTRAK SINGLE MODE CONTRACT LOCOMOTIVE MAINTENANCE MANUAL
NOV/97 5-8 IP-158-C
7. Select 'D' (MV20A de-energized), then select 'C' (MV20R energized) and note:
a. 'ON' is displayed under 'MV20M and MV20R'. b. Pressure reduces slowly at TP-20 Gage.
8. Select 'B' (MV20M de-energized) and note 'ON' is displayed on 'MV20R'. 9. Select 'C' (MV20R de-energized) and note 'OFF' is displayed on 'MV20R'.
10. Alternately select 'A' and note:
a. 'ON' and 'OFF' is displayed under 'A.' b. Relay K5 (COR) energizes and de-energizes.
C. #13 Control 1. 'E' is 'ON' and F' is 'OFF'. 2. Note that PS-13 is 'OFF' (PS13 is Open). 3. Select 'E' (MV13E de-energized) and note:
a. 'OFF' is displayed at 'MV13E'.
4. Select 'F' (MV13S energized) and note: 'ON' is displayed at 'MV13S'. Pressure builds on TP-13 Gage. 'PS13' changes to 'ON' (PS13 closes). 5. Select 'F' (MV13S de-energized) and note: 'OFF' is displayed at 'MV13S'. Pressure reduces at TP-13 Gage, and stabilizes below 13 psi. 'PS13' changes to 'OFF' (PS13 opens). 6. Select 'E' (MV13E energized) and note: 'ON' is displayed at 'MV13E'. TP-13 Gage pressure reduces from previous stabilized pressure to 0 psi. 7. Select 'E' (MV13E de-energized) and note that 'OFF' is displayed at all magnet
valves.

CCB AMTRAK SINGLE MODE CONTRACT LOCOMOTIVE MAINTENANCE MANUAL
IP-158-C 5-9 NOV/97
D. PSBP and BPCO Inputs
1. Note that 'ON' is displayed at 'PSBP' (Closed) and 2. 'OFF' is displayed at 'BPCO' (Open). 3. Note that at completion of Test B, Brake Pipe MUST be charged. 4. Press 'esc' to return to 'Main Menu' selection.
5.2.1.8 SS9-RIU DRIVER CIRCUITS
A. Select 'E' for SS9 Test. 1. Select 'A' and note:
a. 'ON' is displayed at Relay K1 (ES) and is energized. 2. Select 'A' and note:
a. 'OFF' is displayed at K1 (ES) and is de-energized. 3. Select 'B' and note:
a. 'ON' is displayed at Relay K2 (IBS) and is energized. 4. Select 'B' and note:
a. 'OFF' is displayed at K2 (IBS) and is de-energized. 5. Select 'C' and note:
a. 'ON' is displayed at Relay K4 (FRT) and is energized. 6. Select 'C' and note:
a. 'OFF' is displayed at K4 (FRT) and is de-energized. 7. Select 'D' and note:
a. 'ON' is displayed at Relay K3 (BCPS) and is energized. 8. Select 'D' and note:
a. 'OFF' is displayed at K3 (BCPS) and is de-energized. 9. Press 'esc' to return to 'Main Menu' selection.

CCB AMTRAK SINGLE MODE CONTRACT LOCOMOTIVE MAINTENANCE MANUAL
NOV/97 5-10 IP-158-C
5.2.1.9 SS8-CONTROLLER FREQUENCIES
A. Select 'D' for SS8 Test. B. Automatic Brake Digital Inputs
1. Move Automatic handle from 'Release' to 'Emergency' position and note: 'OFF' is displayed at 'AE1'. 2. Place Automatic handle to the 'H.O.' position and note: 'ON' is displayed at 'AE1'. 3. Place Automatic handle to the 'Release' position and note: 'ON' is displayed at 'AR and AE1'.
C. Independent Brake Digital Inputs 1. Move Independent handle from 'Release' into the 'Service' zone (not Maximum)
and note: 'IM and IR' are 'OFF'. 2. Place Independent handle to the 'Release' position and note: 'IR' is 'ON'. 3. Place Independent handle to the 'Maximum' position and note: 'IM' is 'ON'. 4. Lift 'Bail-Off' and note 'BO' is 'ON', release the button and note 'BO' is 'OFF'.
D. CPU CTC - Controller positions: 1. Enter 'esc' twice for Main Menu. 2. Arrow over to 'Monitor' then select 'Enter', then 'F'.
E. INDEPENDENT BRAKE 1. Place Independent handle to 'Release' position and note:
a. 11,100 Hz. Max. and 10,925 Hz. Min. 2. Place Independent handle to 'Maximum' position and note:
a. 3,443 Hz. Max. and 2,943 Hz. Min.

CCB AMTRAK SINGLE MODE CONTRACT LOCOMOTIVE MAINTENANCE MANUAL
IP-158-C 5-11 NOV/97
F. AUTOMATIC BRAKE
1. Place Automatic handle to 'Release' position and note:
a. 11,100 Hz. Max. and 10,925 Hz. Min. 2. Place Automatic handle to 'min.' position and note:
a. 10,300 Hz. Max. and 9,920 Hz. Min. 3. Place Automatic handle to 'SUPP' position and note:
a. 7,706 Hz. Max. and 7,326 Hz. Min. 4. Place Automatic handle to 'F.S.' position and note:
a. 5,976 Hz. Max. and 5,596 Hz. Min. 5. Place Automatic handle to 'H.O.' position and note:
a. 2,806 Hz. Max. and 2,426 Hz. Min. 6. Place Automatic handle to 'EMER' position and note:
a. 1,365 Hz. Max. and 985 Hz. Min. b. Press 'esc' to return to Main Menu.

CCB AMTRAK SINGLE MODE CONTRACT LOCOMOTIVE MAINTENANCE MANUAL
NOV/97 5-12 IP-158-C
5.3 Troubleshooting 5.3.1 General Information
This Section provides information for use in diagnosing and correcting certain troubles which may occur in the CCB/GE/AMTRAK Brake System. Before starting the troubleshooting procedure, perform a thorough visual inspection of the equipment to determine if the symptom is being caused by some obvious defect, such as loose fasteners, damaged components, etc. Otherwise, the troubleshooting procedure must follow a logical sequence which is designed to isolate the trouble to a single component.
NOTE
In all cases, the rules set forth by AMTRAK are to be followed and in those cases where such rules conflict with these recommendations, the Operating Property's instructions are overriding.
When evaluating the condition of a braking arrangement, safety must remain the most important consideration. In the event it becomes necessary to move a locomotive with an obvious equipment malfunction, the integral alternate control arrangement may be utilized or temporary repairs may be arranged to provide for braking of the locomotive. A locomotive with temporary repairs must be operated at restricted speed and must be "shopped" for corrective action at the first terminal point to prevent continued operation under unsafe condition. Inability to readily identify the source of any problem associated with the proper functioning of the equipment arrangement indicates the necessity for repairs which the operator should not perform. Never attempt to remove any detail parts from the equipment arrangement; if repairs to valves or other details are necessary, such repairs must be done at a bench by competent personnel in the shop.
WARNING
WHENEVER ANY DEVICE, PORTION, VALVE OR COMPONENT PART IS REMOVED FROM THE AIR BRAKE EQUIPMENT ARRANGEMENT FOR ANY REASON, AND IT IS REPLACED WITH A NEW OR REPAIRED AND TESTED DEVICE, PORTION, VALVE OR COMPONENT PART, A STANDING OPERATIONAL TEST OF THE TOTAL BRAKE ARRANGEMENT OF THE VEHICLE IS REQUIRED BEFORE PERMITTING THE VEHICLE TO MOVE.
Before operating any locomotive with a suspected malfunction, verify the condition of the equipment arrangement by checking the appropriate operation.

CCB AMTRAK SINGLE MODE CONTRACT LOCOMOTIVE MAINTENANCE MANUAL
IP-158-C 5-13 NOV/97
5.3.2 Troubleshooting Chart
The troubleshooting chart that follows does not list all the symptoms and probable causes; only those most probable. Various combinations of defects are also possible. Experienced personnel should learn to recognize and evaluate all symptoms to effect the appropriate corrective actions.
TROUBLESHOOTING GUIDE ABBREVIATION LEGEND
ABBREVIATION WORD OR PHRASE Appl. Application 20T 20 Pipe Transducer AW4-ER Analog Converter (Equalizing Reservoir) AW4-16 Analog Converter #16 Pipe BC Brake Cylinder BCT Brake Cylinder Transducer BP Brake Pipe BP-CO Brake Pipe Cut-Out Switch BPT Brake Pipe Transducer BV Brake Valve CFM Cubic Feet per Minute CRU Computer Relay Unit DIT Dead In Tow ER Equalizing Reservoir ERG Equalizing Reservoir Gauge EMER Emergency EX. Exhaust FS Full Service IA&R Independent Application and Release MR Main Reservoir MRT Main Reservoir Transducer MV Magnet Valve

CCB AMTRAK SINGLE MODE CONTRACT LOCOMOTIVE MAINTENANCE MANUAL
NOV/97 5-14 IP-158-C
MIN Minimum MVEM Emergency Magnet Valve MVER Equalizing Reservoir Default Magnet Valve MV13E Bail Off Exhaust Magnet Valve MV13S Bail Off Supply Magnet Valve MV16T 16 Pipe Default Magnet Valve MV53 Brake Pipe Cut-Out Magnet Valve PCU Pneumatic Control Unit PS-BP Brake Pipe Pressure Switch PS-13 Actuating Pipe Pressure Switch PVE Emergency Detection Pilot Air Valve PVEM Emergency Pilot Air Valve REL Release SUP Supply TP-BC Test Port - Brake Cylinder TP-BP Brake Pipe Test Fitting TP-ER Equalizing Reservoir Test Fitting TP-MR Main Reservoir Test Fitting TP-13 Actuation Pipe Test Fitting TP-16 16 Pipe Test Fitting TP-20 20 Pipe Test Fitting VCU Voltage Conditioning Unit VDC Volts Direct Current

CCB AMTRAK SINGLE MODE CONTRACT LOCOMOTIVE MAINTENANCE MANUAL
IP-158-C 5-15 NOV/97
TROUBLESHOOTING CHART
SYMPTOM PROBABLE CAUSE CORRECTIVE ACTION #1 (xxxx)
"ROM Fault"
#2 (xxxx)
"RAM Fault" #10 (245E)
Brake Controller Defective "Brake Vlv/FOR - No BV Release"
#11 (245F)
Brake Controller Defective "Brake Vlv/SS1 - No BV Release"
1. Defective "CP" PCB. 1. Defective "CP" PCB. 1. Brake Controller Connection
(BVJ1) Unplugged. 2. Defective Automatic Potentiometer 3. Defective Automatic Potentiometer
Wiring. 4. Defective "FOR" PCB. 5. FO Cable Defective 6. "SS1" Connector Unplugged. 7. Defective "SS1" PCB. 1. Defective Release Switch (Stuck
Open). 2. FO Cable Defective 3. Defective "SS1" PCB.
1. Replace "CP" PCB. 1. Replace "CP" PCB. 1. Check BVJ1 Connector.
2. Perform Automatic Brake Frequency Test (5.2.1.9, F1-6). Replace Brake Controller.
3. Check Brake Valve Controller
Wiring Circuit. 4. Replace "FOR" PCB. 5. Swap FO Cables At Controller
And/Or "FOR" PCB - Does Problem Change To Independent). Replace FO Cable.
6. Check "SS1" Connector. 7. Replace "SS1" PCB. 1. Perform Automatic Brake Digital
Input Test (5.2.1.9 A, B1-3). Replace Brake Controller.
2. Swap FO Cables At Controller
And/Or "FOR" PCB - Does Problem Change To Independent). Replace FO Cable.
3. Replace "SS1" PCB.

CCB AMTRAK SINGLE MODE CONTRACT LOCOMOTIVE MAINTENANCE MANUAL
NOV/97 5-16 IP-158-C
TROUBLESHOOTING CHART
SYMPTOM PROBABLE CAUSE CORRECTIVE ACTION #12 (2460)
Brake Controller Defective "Brake Vlv/SS1 - BV Emer. Error"
#13 (2461)
Brake Controller Defective "Brake Vlv/FOR - Improper Auto"
#14 (2462)
Brake Controller Defective "Brake Vlv/SS1 - No Release Verify"
#15 (2463)
Brake Controller Defective "Brake Vlv/SS1 - No Emer Verify"
1. Defective AE1 Emergency Switch
(Stuck Open). 2. FO Cable Defective 3. Defective "SS1" PCB. 1. Defective Automatic Potentiometer 2. Defective Automatic Potentiometer
Wiring. 3. Defective "FOR" PCB. 4. FO Cable Defective 1. Defective Automatic Release
Switch (Stuck Closed Other Than Release).
2. Defective Automatic Release
Switch Wiring. 3. Defective "SS1" PCB. 1. Defective (AE1) Automatic
Emergency Switch. (Stuck Closed In Emergency).
2. Defective (AE1) Automatic
Emergency Switch Wiring. 3. Defective "SS1" PCB.
1. Perform Automatic Brake
Frequency Test (5.2.1.9 A, B1 - 3). Replace Brake Controller.
2. Swap FO Cables At Controller And/Or "FOR" PCB - Does Problem Change To Independent). Replace FO Cable.
3. Replace "SS1" PCB. 1. Perform Automatic Brake
Frequency Test (5.2.2; H, 4, f thru l). Replace Brake Controller.
2. Check Brake Valve Controller
Wiring Circuit. 3. Replace "FOR" PCB. 4. Swap FO Cables At Controller
And "FOR" PCB - Does Problem Change To Independent). Replace FO Cable.
1. Perform Automatic Brake Digital
Input Test (5.2.1.9 A, B1-3). Replace Brake Controller.
2. Check Brake Valve Controller
Wiring Circuit. 3. Replace "SS1" PCB. 1. Perform Automatic Brake Digital
Input Test (5.2.1.9 A, B1-3). Replace Brake Controller.
2. Check Brake Valve Controller
Wiring Circuit. 3. Replace "SS1" PCB.

CCB AMTRAK SINGLE MODE CONTRACT LOCOMOTIVE MAINTENANCE MANUAL
IP-158-C 5-17 NOV/97
TROUBLESHOOTING CHART
SYMPTOM PROBABLE CAUSE CORRECTIVE ACTION #20 (2468)
Brake Controller Defective "Brake Vlv/FOR - Ind Max From Rel"
#21 (2469)
Brake Controller Defective "Brake Vlv/SS1 - Ind Max Only"
#22 (246A)
Brake Controller Defective "Brake Vlv/SS1 - Ind Max Only"
1. Defective Independent
Potentiometer 2. Defective Automatic Potentiometer
Wiring. 3. Defective "FOR" PCB. 4. FO Cable Defective 5. Brake Controller Connector (BVJ1)
Unplugged. 6. Defective "SS1" PCB. 1. Defective Independent Release
Switch (Closed Other Than Rel). 2. Defective Independent Release
Switch Wiring. 3. Defective "SS1" PCB 1. Defective Independent Max.
Switch (Stuck Closed). 2. Defective Independent Max.
Switch Wiring. 3. Defective "SS1" PCB
1. Perform Independent Brake
Frequency Test (5.2.1.9 E1-2). Replace Brake Controller.
2. Check Brake Valve Controller
Wiring Circuit. 3. Replace "FOR" PCB. 4. Swap FO Cables At Controller
And "FOR" PCB - Does Problem Change To Automatic). Replace FO Cable.
5. Check (BVJ1) Connector. 6. Replace "SS1" PCB. 1. Perform Independent Brake
Digital Input Test (5.2.1.9 C1-4). Replace Brake Controller.
2. Check Brake Controller Wiring
Circuit. 3. Replace "SS1" PCB. 1. Perform Independent Brake
Digital Input Test (5.2.1.9 C1-4). Replace Brake Controller.
2. Check Brake Controller Wiring
Circuit. 3. Replace "SS1" PCB.

CCB AMTRAK SINGLE MODE CONTRACT LOCOMOTIVE MAINTENANCE MANUAL
NOV/97 5-18 IP-158-C
TROUBLESHOOTING CHART
SYMPTOM PROBABLE CAUSE CORRECTIVE ACTION #23 (246B)
Brake Controller Defective "Brake Vlv/FOR - Improper Ind Apply"
#24 (246C)
Brake Controller Defective "Brake Vlv/SS1 - No Bail Off"
#25 (246D)
Brake Controller Defective "Brake Vlv/SS1 - No Max Ind Verify"
1. Defective Independent
Potentiometer 2. Defective Independent
Potentiometer Wiring. 3. Defective "FOR" PCB. 4. FO Cable Defective 1. Defective "BO" Switch (Stuck
Closed). 2. Defective "BO" Switch Wiring. 3. Defective "SS1" PCB 4. Defective "BEA" PCB. 5. Defective "DB1" PCB. 6. Defective K-7 Relay. 1. Defective Independent Max Switch
(IM). (Stuck Open In Max. Position).
2. Defective Independent Max Switch
Wiring. 3. Defective "SS1" PCB.
1. Perform Independent Brake
Frequency Test (5.2.1.9 E1-2). Replace Brake Controller.
2. Check Brake Valve Controller
Wiring Circuit. 3. Replace "FOR" PCB. 4. Swap FO Cables At Controller
And "FOR" PCB - Does Problem Change To Automatic). Replace FO Cable.
1. Perform Independent Brake
Digital Input Test (5.2.1.9 C-4). Replace Brake Controller.
2. Check Brake Controller Wiring
Circuit. 3. Replace "SS1" PCB. 4. Perform BEA Control Circuit
Test (5.2.1.7 C1-7). Replace "BEA" PCB.
5. Replace "DB1" PCB. 6. Replace K-7 Relay. 1. Perform Independent Brake
Digital Input Test (5.2.1.9 C1-4). Replace Brake Controller.
2. Check Brake Valve Controller
Wiring Circuit. 3. Replace "SS1" PCB.

CCB AMTRAK SINGLE MODE CONTRACT LOCOMOTIVE MAINTENANCE MANUAL
IP-158-C 5-19 NOV/97
TROUBLESHOOTING CHART
SYMPTOM PROBABLE CAUSE CORRECTIVE ACTION #26 (246E)
Brake Controller Defective "Brake Vlv/SS1 - No Rel Ind Verify"
#28 (2470)
"AW4-ER/EPA1 - Improper ER PSI"
#30 (2472)
"PS-BP/BEA - Switch Stuck Closed"
1. Defective Independent Release
Switch (Stuck Open In Rel). 2. Defective Independent Release
Switch Wiring. 3. Defective "SS1" PCB 1. Defective ER Analog Converter
Apply Magnet Valve (ERS) Stuck Energized.
2. Defective ER Analog Converter
Exhaust Magnet Valve (ERE) Stuck Energized.
3. Improper Voltage Output From ER
Transducer (ERT). 1. Defective Brake Pipe Pressure
Switch (PS-BP) (Stuck Closed).
1. Perform Independent Brake
Digital Input Test (5.2.1.9 C1-4). Replace Brake Controller.
2. Check Brake Controller Wiring
Circuit. 3. Replace "SS1" PCB. 1. Check Voltage Of ER Analog
Converter Apply Magnet Valve (ERS). Brake Controller Auto Handle In Release, 23±1 volts At 90±1 PSI ER Gage. Brake Controller Auto Handle In Emergency, 0 Volts at 0 PSI ER Gage. Replace Analog Converter If Improper Voltage.
2. Check Voltage Of ER Analog
Converter Exhaust Magnet Valve (ERE) Across A Good Ground And Pin '1'. Brake Controller Auto Handle In Release, 0 volts At 90±1 PSI ER Gage. Brake Controller Auto Handle In Emergency, 23±1 Volts at 0 PSI ER Gage. Replace Analog Converter If Improper Voltage.
3. Check Voltage Of ER
Transducer (2 Volts At 0 PSI ER Gage And 8.21 Volts At 90±1 PSI ER Gage). Replace AW4-ER Analog Converter Transducer (ERT). Replace Analog Converter If Improper Voltage.
1. Check Brake Pipe Pressure
Switch (PS-BP) With The PTU. Go To The Monitor Menu And Pull Down The Brake Pipe Circuit. PS-BP To Be 'ON' With More Than 25±1 PSI BP Pressure And PS-BP To Be 'OFF' With Less Than 22±1 PSI BP Pressure. Replace Brake Pipe Pressure Switch.

CCB AMTRAK SINGLE MODE CONTRACT LOCOMOTIVE MAINTENANCE MANUAL
NOV/97 5-20 IP-158-C
TROUBLESHOOTING CHART
SYMPTOM PROBABLE CAUSE CORRECTIVE ACTION #30 (2472)
"PS-BP/BEA - Switch Stuck Closed" (Cont.)
#31 (2473)
"PS-BP/BEA - Switch Stuck Open"
#32 (2474)
"MV53/DB1/EPA1 - No BP Cut Off"
NOTE: Locomotive To
Be In Cut-Out #34 (2476) "AW4-ER/EPA1 - No ER
Supply"
2. Defective Brake Pipe Pressure
Switch (PS-BP) Wiring. 3. Defective "BEA" PCB. 1. Defective Brake Pipe Pressure
Switch (PS-BP) (Stuck Open). 2. Defective Brake Pipe Pressure
Switch (PS-BP) Wiring. 3. Defective "BEA" PCB. 1. Defective Magnet Valve (MV53)
(Stuck De-energized). 2. Defective Magnet Valve (MV53)
Wiring. 3. Defective BP-CO Switch (Stuck
Open). 4. Defective BP-CO Wiring. 5. Defective "DB1" PCB. 6. Defective "EPA1" PCB. 1. AW4-ER Analog Converter Apply
Magnet Valve (ERS) Connector Unplugged.
2. Check Brake Pipe Pressure
Switch (PS-BP) Wiring Circuit. 3. Replace "BEA" PCB. 1. Check Brake Pipe Pressure
Switch (PS-BP) With The PTU. Go To The Monitor Menu And Pull Down The Brake Pipe Circuit. PS-BP To Be 'ON' With More Than 25±1 PSI BP Pressure And PS-BP To Be 'OFF' With Less Than 22±1 PSI BP Pressure. Replace Brake Pipe Pressure Switch.
2. Check Brake Pipe Pressure
Switch (PS-BP) Wiring Circuit. 3. Replace "BEA" PCB. 1. Perform Brake Pipe Cut-Off
(MV53) Test (5.2.2; D, 4). Replace Magnet Valve (MV53).
2. Check Magnet Valve (MV53)
Wiring Circuit. 3. Check Brake Pipe Pressure
Switch (PS-BP) With The PTU. Go To The Monitor Menu And Pull Down The Brake Pipe Circuit. PS-BP To Be 'ON' With More Than 25±1 PSI BP Pressure And PS-BP To Be 'OFF' With Less Than 22±1 PSI BP Pressure. Replace Brake Pipe Pressure Switch.
4. Check BP-CO Wiring Circuit. 5. Replace "DB1" PCB. 6. Replace "EPA1" PCB. 1. Check AW4-ER Analog
Converter Apply Magnet Valve (ERS) Connector.

CCB AMTRAK SINGLE MODE CONTRACT LOCOMOTIVE MAINTENANCE MANUAL
IP-158-C 5-21 NOV/97
TROUBLESHOOTING CHART
SYMPTOM PROBABLE CAUSE CORRECTIVE ACTION #34 (2476)
"AW4-ER/EPA1 - No ER Supply" (Cont)
#35 (2477)
"MVER/DB1/EPA1 - ER 0 PSI Default"
2. Defective AW4-ER Analog
Converter Apply Magnet Valve (ERS).
3. Defective AW4-ER Analog
Converter Apply Magnet Valve (ERS) Wiring.
4. Defective AW4-ER Analog
Converter ER Transducer (ERT). 5. Defective AW4-ER Analog
Converter ER Transducer (ERT) Wiring.
6. Defective "EPA1" PCB. 1. Defective MVER Magnet Valve
(Stuck De-energized). 2. Defective MVER Magnet Valve
Wiring. 3. Defective MV53 Magnet Valve
(Stuck Energized). 4. Defective MV53 Magnet Valve
Wiring. 5. Defective Brake Controller "AE2"
Switch (Stuck Closed). 6. Defective Brake Controller "AE2"
Switch Wiring. 7. Defective "DB1" PCB. 8. Defective "EPA1" PCB.
2. Perform ER Analog Converter
Test (5.2.1.5 A1-5). Replace AW4-ER Analog Converter Apply Magnet Valve (ERS).
3. Check AW4-ER Analog
Converter Apply Magnet Valve (ERS) Wiring Circuit.
4. Check Voltage Of ER
Transducer Across Pin '1' (BLK) And Pin '3' (WHT) (2 Volts At 0 PSI ER And 8.21±.17 Volts At 90±1 PSI ER). Replace AW4-ER Analog Converter Transducer (ERT).
5. Check AW4-ER Analog
Converter Transducer (ERT) Wiring Circuit.
6. Replace "EPA1" PCB. 1. Perform ER Magnet Valve
(MVER) Test (5.2.1.5 B1-6). Replace MVER Magnet Valve.
2. Check MVER Magnet Valve
Wiring Circuit. 3. Perform Brake Pipe Cut-Off
Magnet Valve Test (5.2.1.5 C1-5). Replace MV53 Magnet Valve.
4. Check MV53 Magnet Valve
Wiring Circuit. 5. Perform Brake Controller Digital
Input Test (5.2.1.9 A, B1-3). 6. Check Brake Controller "AE2"
Switch Wiring Circuit. 7. Replace "DB1" PCB. 8. Replace "EPA1" PCB.

CCB AMTRAK SINGLE MODE CONTRACT LOCOMOTIVE MAINTENANCE MANUAL
NOV/97 5-22 IP-158-C
TROUBLESHOOTING CHART
SYMPTOM PROBABLE CAUSE CORRECTIVE ACTION #36 (2478)
"BP-CO/BEA - No BP-CO Cut Off"
#38 (247A)
"AW4-ER/EPA1 - No ER Exhaust"
#40 (247C)
"AW4-16/EPA2 - No BC Supply"
1. Defective BP-CO Switch (Stuck
Open). 2. Defective BP-CO Wiring. 3. Defective "BEA" PCB. 4. Defective MV53 Magnet Valve
(Stuck De-energized). Fault Occurs In Self-test.
5. Defective MV53 Magnet Valve
Wiring. 1. AW4-ER Analog Converter
Exhaust Magnet Valve (ERE) Connector Unplugged.
2. Defective ER Analog Converter
(AW4-ER) Exhaust Magnet Valve. 3. Defective ER Analog Converter
(AW4-ER) Wiring. 4. Defective "EPA1" PCB. 1. AW4-16 Analog Converter Apply
Magnet Valve (16S) Connector Unplugged.
2. Defective AW4-16 Analog
Converter Apply Magnet Valve (16S).
3. Defective AW4-16 Analog
Converter Apply Magnet Valve (16S) Wiring.
1. Check Brake Pipe Cut Off
Switch (BP-CO) With The PTU. Go To The Monitor Menu And Pull Down The Brake Pipe Circuit. BP-CO To Be 'ON' With More Than 25±1 PSI BP Pressure And BP-CO To Be 'OFF' With Less Than 22±1 PSI BP Pressure. Replace Brake Pipe Cut Off Valve.
2. Check BP-CO Wiring Circuit. 3. Replace "BEA" PCB. 4. Perform Brake Pipe Cut-Off
Magnet Valve Test (5.2.1.5 C1-5). Replace MV53 Magnet
Valve. 5. Check MV53 Magnet Valve
Wiring Circuit. 1. Check AW4-ER Analog
Converter Exhaust Magnet Valve (ERE) Connector .
2. Perform ER Analog Converter
(AW4-ER) Test (5.2.1.5 A1-5). Replace AW4-ER Analog Converter.
3. Check ER Analog Converter
(AW4-ER) Wiring Circuit. 4. Replace "EPA1" PCB. 1. Check AW4-16 Analog
Converter Apply Magnet Valve (16S) Connector.
2. Perform ER Analog Converter
Test (5.2.1.6 A, B). Replace AW4-16 Analog Converter Apply Magnet Valve (16S).
3. Check AW4-16 Analog
Converter Apply Magnet Valve (16S) Wiring Circuit.

CCB AMTRAK SINGLE MODE CONTRACT LOCOMOTIVE MAINTENANCE MANUAL
IP-158-C 5-23 NOV/97
TROUBLESHOOTING CHART
SYMPTOM PROBABLE CAUSE CORRECTIVE ACTION #40 (247C)
"AW4-16/EPA2 - No BC Supply" (Cont)
#41 (247D)
"AW4-16/EPA2 - No BC Exhaust"
#42 (247E)
"MV16T/DB1/EPA2 - Brk Back Up"
4. Defective AW4-16 Analog
Converter 16 Transducer (16T). 5. Defective AW4-16 Analog
Converter 16 Transducer (16T) Wiring.
6. Defective "EPA2" PCB. 1. AW4-16 Analog Converter Exhaust
Magnet Valve (16E) Connector Unplugged.
2. Defective AW4-16 Analog
Converter Exhaust Magnet Valve (16E) (Stuck Closed).
3. Defective AW4-16 Analog
Converter Exhaust Magnet Valve (16E) Wiring.
4. Defective AW4-16 Analog
Converter 16 Transducer (16T). 5. Defective AW4-16 Analog
Converter 16 Transducer (16T) Wiring.
6. Defective "EPA2" PCB. 1. Defective MV16T Magnet Valve
(Stuck De-energized). 2. Defective MV16T Wiring. 3. Defective "DB1" PCB.
4. Check Voltage Of 16
Transducer Across Pin '1' (BLK) And Pin '3' (WHT) (2 Volts At 0 PSI BC And 6.35±.17 Volts At 63±1 PSI BC). Replace AW4-16 Analog Converter Transducer (16T).
5. Check AW4-16 Analog
Converter Transducer (16T) Wiring Circuit.
6. Replace "EPA2" PCB. 1. Check AW4-16 Analog
Converter Exhaust Magnet Valve Connector.
2. Perform #16 Analog Converter
Test (5.2.1.6 A, B). Replace AW4-16 Analog Converter Exhaust Magnet Valve (16E).
3. Check AW4-16 Analog
Converter Exhaust Magnet Valve (16E) Wiring Circuit.
4. Check Voltage Of 16
Transducer Across Pin '1' (BLK) And Pin '3' (WHT) (2 Volts At 0 PSI 16 Gage And 7.38±.17 Volts At 78 PSI At 16 Gage). Replace AW4-16 Analog Converter Transducer (16T).
5. Check AW4-16 Analog
Converter Transducer (16T) Wiring Circuit.
6. Replace "EPA2" PCB. 1. Perform #16 Analog Converter
Test (5.2.1.6 C1-10). Replace MV16T Magnet Valve.
2. Check MV16T Wiring Circuit. 3. Replace "DB1" PCB.

CCB AMTRAK SINGLE MODE CONTRACT LOCOMOTIVE MAINTENANCE MANUAL
NOV/97 5-24 IP-158-C
TROUBLESHOOTING CHART
SYMPTOM PROBABLE CAUSE CORRECTIVE ACTION #42 (247E)
"MV16T/DB1/EPA2 - Brk Back Up" (Cont)
#43 (247F)
"PS-13/BEA - No BC Bail Off"
#44 (2480)
"20CP - Adjust Regulator"
NOTE: Self Test Fault
Only #45 (2481)
"BCCO/SS5 - BC Gage"
NOTE: Self Test Fault
Only
4. Defective "EPA2" PCB. 1. Pressure Switch (PS13) Stuck
Closed. 2. Defective Wiring PS13 Wiring
circuit. 3. Defective "BEA" PCB. 1. Regulating Valve (20CP) Not
Adjusted To 55±1 PSI. 1. BCCO Pressure Switch Connector
Unplugged. 2. Defective BCCO Pressure Switch.
(Stuck Open). 3. Defective BCCO Pressure Switch
Wiring. 4. Defective "SC2" PCB. 5. Defective "SS5" PCB.
4. Replace "EPA2" PCB. 1. Check Bail Off Pressure Switch
(PS-13) With The PTU. Go To The Monitor Menu And Pull Down The #13 Pipe Circuit. PS-13 To Be 'ON' With More Than 25±1 PSI And PS-13 To Be 'OFF' With Less Than 22±1 PSI. Replace Pressure Switch (PS13).
2. Check PS13 Wiring Circuit. 3. Replace "BEA" PCB. 1. a. Set Regulating Valve To
55±1 PSI. b. Replace 20 Pipe Control
Portion. 1. Check BCCO Pressure Switch
Connector. 2. Check BC Pressure Switch
(BCCO) With The PTU. Go To The Monitor Menu And Pull Down The BC Circuit. BCCO To Be 'ON' With More Than 10±1 PSI And BCCO To Be 'OFF' With Less Than 8±1 PSI. Replace Pressure Switch (BCCO).
3. Check BCCO Pressure Switch
Wiring Circuit. 4. Replace "SC2" PCB. 5. Replace "SS5" PCB.

CCB AMTRAK SINGLE MODE CONTRACT LOCOMOTIVE MAINTENANCE MANUAL
IP-158-C 5-25 NOV/97
TROUBLESHOOTING CHART
SYMPTOM PROBABLE CAUSE CORRECTIVE ACTION #46 (2482)
"DB10 - No Back Up Default BC"
NOTE: Self Test Fault Only
#47 (2483)
"PS-13/BEA - No BC Bail Off"
BP < 20 PSI BC < 10 PSI #48 (2484)
"PS13/MV13S/BEA - No Bail Off"
1. Pressure Switch (PS13) Stuck
Open. 2. Defective Wiring PS13 Wiring
circuit. 3. Defective "BEA" PCB. 1. Magnet Valve (MV13S) Connector
Unplugged. 2. Magnet Valve (MV13S) Stuck De-
energized. 3. Defective Magnet Valve (13S)
Wiring. 4. Magnet Valve (MV13E) Stuck
Energized. 5. Pressure Switch (PS 13) Stuck
Open. 6. Defective "DB1" PCB. 7. Defective "BEA" PCB.
1. Check Bail Off Pressure Switch
(PS-13) With The PTU. Go To The Monitor Menu And Pull Down The #13 Pipe Circuit. PS-13 To Be 'ON' With More Than 25 PSI And PS-13 To Be 'OFF' With Less Than 22 PSI. Replace Pressure Switch (PS13).
2. Check PS13 Wiring Circuit. 3. Replace "BEA" PCB. 1. Check Magnet Valve (MV13S)
Connector. 2. Perform #13 Control Circuit
Test (5.2.1.7 C1-7). Replace Magnet Valve (MV13S).
3. Check Magnet Valve (MV13S)
Wiring Circuit. 4. Perform #13 Control Circuit
Test (5.2.1.7 C1-7). Replace Magnet Valve (MV13E).
5. Check Bail Off Pressure Switch
(PS-13) With The PTU. Go To The Monitor Menu And Pull Down The #13 Pipe Circuit. PS-13 To Be 'ON' With More Than 25 PSI And PS-13 To Be 'OFF' With Less Than 22 PSI. Replace Pressure Switch (PS13).
6. Replace "DB1" PCB. 7. Replace "BEA" PCB.

CCB AMTRAK SINGLE MODE CONTRACT LOCOMOTIVE MAINTENANCE MANUAL
NOV/97 5-26 IP-158-C
TROUBLESHOOTING CHART
SYMPTOM PROBABLE CAUSE CORRECTIVE ACTION #49 (2485)
"PS13/MV13E/BEA - Slow Bail Exhaust"
#51 (2487)
"MRT/AD - No MR Trans"
#52 (2488)
"BPT/AD - No BP Trans"
1. Magnet Valve (MV13E) Stuck De-
energized. 2. Defective Magnet Valve (13E)
Wiring. 3. Pressure Switch (PS-13) Stuck
Closed. 4. Defective "DB1" PCB. 5. Defective "BEA" PCB. 6. Defective # 13 Pipe Circuit. 1. MRT Connector Unplugged. 2. Defective MRT 3. Defective MRT Wiring 4. Defective "TJB" PCB. 5. Defective "AD" PCB. 1. BPT Connector Unplugged. 2. Defective BPT
1. Perform #13 Control Portion
Test (5.2.1.7 C1-7). Replace Magnet Valve (MV13E).
2. Check Magnet Valve (MV13E)
Wiring Circuit. 3. Check Bail Off Pressure Switch
(PS-13) With The PTU. Go To The Monitor Menu And Pull Down The #13 Pipe Circuit. PS-13 To Be 'ON' With More Than 25±1 PSI And PS-13 To Be 'OFF' With Less Than 22±1 PSI. Replace Pressure Switch (PS13).
4. Replace "DB1" PCB. 5. Replace "BEA" PCB. 6. Check # 13 Pipe For Blockage.
Check Size Of #13 Exhaust Choke In Manifold, Size is #29D.
1. Check MRT Connector. 2. Check Voltage Of MR
Transducer Across Pin '1' (BLK) And Pin '3' (WHT) (2 Volts At 0 PSI And 10.97±.17 Volts At 130±1 PSI). Replace MRT.
3. Check MRT Wiring Circuit. 4. Replace "TJB" PCB. 5. Replace "AD" PCB. 1. Connect BPT Connector To
BPT. 2. Check Voltage Of BP
Transducer Across Pin '1' (BLK) And Pin '3' (WHT) (2 Volts At 0 PSI And 8.21±.17 Volts At 90±1 PSI). Replace BPT.

CCB AMTRAK SINGLE MODE CONTRACT LOCOMOTIVE MAINTENANCE MANUAL
IP-158-C 5-27 NOV/97
TROUBLESHOOTING CHART
SYMPTOM PROBABLE CAUSE CORRECTIVE ACTION #52 (2488)
"BPT/AD - No BP Trans" (Cont)
#53 (2489)
"FLT/AD - No Flow Trans"
#54 (248A)
"ERT/AD - No ER Trans"
#55 (248B)
"BCT/AD - No BC Trans"
3. Defective BPT Wiring 4. Defective "TJB" PCB. 5. Defective "AD" PCB. 1. FLT Connector Unplugged. 2. Defective FLT 3. Defective FLT Wiring 4. Defective "TJB" PCB. 5. Defective "AD" PCB. 1. ERT Connector Unplugged. 2. Defective ERT 3. Defective ERT Wiring 4. Defective "TJB" PCB. 5. Defective "AD" PCB. 1. BCT Connector Unplugged. 2. Defective BCT 3. Defective BCT Wiring 4. Defective "TJB" PCB. 5. Defective "AD" PCB.
3. Check BPT Wiring Circuit. 4. Replace "TJB" PCB. 5. Replace "AD" PCB. 1. Check FLT Connector. 2. Check Voltage Of FL
Transducer Across Pin '1' (BLK) And Pin '3' (WHT) (2 Volts At 0 PSI And 10.97±.17 Volts At 130±1 PSI). Replace FLT.
3. Check FLT Wiring Circuit. 4. Replace "TJB" PCB. 5. Replace "AD" PCB. 1. Check ERT Connector. 2. Check Voltage Of ER
Transducer Across Pin '1' (BLK) And Pin '3' (WHT) (2 Volts At 0 PSI And 8.21±.17 Volts At 90±1 PSI). Replace ERT.
3. Check ERT Wiring Circuit. 4. Replace "TJB" PCB. 5. Replace "AD" PCB. 1. Check BCT Connector. 2. Check Voltage Of BC
Transducer Across Pin '1' (BLK) And Pin '3' (WHT) (2 Volts At 0 PSI And 7.31±.17 Volts At 77±1 PSI). Replace BCT.
3. Check BCT Wiring Circuit. 4. Replace "TJB" PCB. 5. Replace "AD" PCB.

CCB AMTRAK SINGLE MODE CONTRACT LOCOMOTIVE MAINTENANCE MANUAL
NOV/97 5-28 IP-158-C
TROUBLESHOOTING CHART
SYMPTOM PROBABLE CAUSE CORRECTIVE ACTION #56 (248C)
"16T/AD - No BC Control Trans"
#57 (248D) "20T/AD - No IND Trans"
#60 (2490)
"AD - No Trans" #61 (2491)
"MVEM/EPA1/PVEM - No Elect Emer"
1. 16T Connector Unplugged. 2. Defective 16T 3. Defective 16T Wiring 4. Defective "TJB" PCB. 5. Defective "AD" PCB. 1. 20T Connector Unplugged. 2. Defective 20T 3. Defective 20T Wiring 4. Defective "TJB" PCB. 5. Defective "AD" PCB. 1. Defective "AD" PCB. 1. Defective Magnet Valve (MVEM)
(Stuck Energized). 2. Defective Magnet Valve (MVEM)
Wiring (Open). 3. Defective "DB1" PCB. 4. Defective "EPA1" PCB.
1. Check 16T Connector. 2. Check Voltage Of 16
Transducer Across Pin '1' (BLK) And Pin '3' (WHT) (2 Volts At 0 PSI And 7.31±.17 Volts At 77±1 PSI). Replace 16T.
3. Check 16T Wiring Circuit. 4. Replace "TJB" PCB. 5. Replace "AD" PCB. 1. Check 20T Connector. 2. Check Voltage Of 20
Transducer Across Pin '1' (BLK) And Pin '3' (WHT) (2 Volts At 0 PSI And 5.10±.17 Volts At 45±1 PSI). Replace 20T.
3. Check 20T Wiring Circuit. 4. Replace "TJB" PCB. 5. Replace "AD" PCB. 1. Replace "AD" PCB. 1. Perform EPA Brake Pipe
Control Circuit Test (5.2.1.5 D1-6). Replace Magnet Valve (MVEM).
2. Check Magnet Valve (MVEM)
Wiring Circuit. 3. Replace "DB1" PCB. 4. Replace "EPA1" PCB.

CCB AMTRAK SINGLE MODE CONTRACT LOCOMOTIVE MAINTENANCE MANUAL
IP-158-C 5-29 NOV/97
TROUBLESHOOTING CHART
SYMPTOM PROBABLE CAUSE CORRECTIVE ACTION #62 (2492)
"ELV - Adjustment Required"
#71 (249B)
"SS5 - Continuous Bail Off (BG TL)"
NOTE: Self Test Fault
Only #72 (249C)
"SS5 - No Alerter Input Or Cut-Off"
NOTE: Self Test Fault
Only #76 (24A0)
"20P/DB1/BEA - No Ind Supply"
#77 (24A1)
"20P/DB1/BEA - Ind Supply Open"
NOTE: Speed Is Less Than 10 MPH
1. Reducing Valve (ELV) Not
Adjusted To 80±1 PSI. 1. Trainline Bail Off Stuck Energized. 1. Alerter Malfunction. 1. Magnet Valve (MV20S) Connector
Unplugged. 2. Defective Magnet Valve (MV20S).
(Stuck De-energized). 3. Defective Magnet Valve (MV20S)
Wiring (Open Circuit). 4. Defective "DB1" PCB. 5. Defective "BEA" PCB. 1. Another Locomotive In Consist Is
Also In Lead With Ind Handle In Apply.
2. Magnet Valve (MV20R) Connector
Unplugged.
1. a. Set Regulating Valve To 80
±1 PSI. b. Replace ELV. 1. Check Trainline Bail Off Wiring
Circuit. 1. Check Alerter Wiring Circuit. 1. Check Magnet Valve (MV20S)
Connector. 2. Perform BEA-#20 Pipe Control
Circuit Test (5.2.1.7 A, B1-10). Replace Magnet Valve (MV20S).
3. Check Magnet Valve (MV20S)
Wiring Circuit. 4. Replace "DB1" PCB. 5. Replace "BEA" PCB. 1. Move Other Locomotive Ind
Handle To Release And Place In Trail.
2. Check Magnet Valve (MV20R)
Connector .

CCB AMTRAK SINGLE MODE CONTRACT LOCOMOTIVE MAINTENANCE MANUAL
NOV/97 5-30 IP-158-C
TROUBLESHOOTING CHART
SYMPTOM PROBABLE CAUSE CORRECTIVE ACTION #77 (24A1)
"20P/DB1/BEA - Ind Supply Open" (Cont)
NOTE: Speed Is Less Than 10 MPH #78 (24A2)
"20P/DB1/BEA - No Ind Release"
NOTE: Speed Is Greater Than 10 MPH For This Fault To Be Logged.
3. Defective Magnet Valve (MV20S).
(Stuck Energized). 4. Defective Magnet Valve (MV20S)
Wiring (Shorted Closed). 5. Defective Magnet Valve (MV20R).
(Stuck De-energized). 6. Defective Magnet Valve (MV20R)
Wiring (Open Circuit). 7. Defective "DB1" PCB. 8. Defective "BEA" PCB. 1. Another Locomotive In Consist Is
Also In Lead With Ind Handle In Apply.
2. Magnet Valve (MV20R) Connector
Unplugged. 3. Defective Magnet Valve (MV20S).
(Stuck Energized). 4. Defective Magnet Valve (MV20S)
Wiring (Shorted Closed). 5. Defective Magnet Valve (MV20R).
(Stuck De-energized). 6. Defective Magnet Valve (MV20R)
Wiring (Open Circuit). 7. Defective "DB1" PCB. 8. Defective "BEA" PCB.
3. Perform BEA-#20 Pipe Control
Circuit Test (5.2.1.7 A, B1-10). Replace Magnet Valve (MV20S).
4. Check Magnet Valve (MV20S)
Wiring Circuit. 5. Perform BEA-#20 Pipe Control
Circuit Test (5.2.1.7 A, B1-10). Replace Magnet Valve (20R).
6. Check Magnet Valve (MV20R)
Wiring Circuit. 7. Replace "DB1" PCB. 8. Replace "BEA" PCB. 1. Move Other Locomotive Ind
Handle To Release And Place In Trail.
2. Check Magnet Valve (MV20R)
Connector. 3. Perform BEA-#20 Pipe Control
Circuit Test (5.2.1.7 A, B1-10). Replace Magnet Valve (MV20S).
4. Check Magnet Valve (MV20S)
Wiring Circuit. 5. Perform BEA-#20 Pipe Control
Circuit Test (5.2.1.7 A, B1-10). Replace Magnet Valve (20R).
6. Check Magnet Valve (MV20R)
Wiring Circuit. 7. Replace "DB1" PCB. 8. Replace "BEA" PCB.

CCB AMTRAK SINGLE MODE CONTRACT LOCOMOTIVE MAINTENANCE MANUAL
IP-158-C 5-31 NOV/97
TROUBLESHOOTING CHART
SYMPTOM PROBABLE CAUSE CORRECTIVE ACTION #79 (24A3)
"20P/DB1/BEA - Ind Exhaust Open"
NOTE: Speed Is Greater Than 10 MPH For This Fault To Be Logged. #80 (24A4)
"COMM - No IFC Receive"
#81 (24xx) "COMM - Write Lockup"
#82 (24xx)
"COMM - Read Lockup"
NOTE: The following Faults (90-96) occur during self test. #90 (24AE)
"Brake Vlv Self Test Fault"
#91 (24AF)
"ER Control Self Test Fault"
1. #20 Pipe End Cock Open To
Exhaust. 2. Another Locomotive In Consist Is
Also In Lead With Ind Handle In Release.
3. Defective Magnet Valve (MV20R).
(Stuck Energized). 4. Defective Magnet Valve (MV20R)
Wiring (Shorted Closed). 5. Defective "DB1" PCB. 6. Defective "BEA" PCB. 1. Defective "COMM" PCB. 2. Defective IFC Wiring. 1. Defective "COMM" PCB. 1. Defective "COMM" PCB. 1. Brake Controller Malfunction Or
Defective. 1. ER Control Circuit Malfunction Or
Defective.
1. Close #20 Pipe End Cock. 2. Keep Ind Handle In Release
And Place Other Locomotive In Trail.
3. Perform BEA-#20 Pipe Control
Circuit Test (5.2.1.7 A, B1-10). Replace Magnet Valve (20R).
4. Check Magnet Valve (MV20R)
Wiring Circuit. 5. Replace "DB1" PCB. 6. Replace "BEA" PCB. 1. Replace "COMM" PCB. 2. Check IFC Wiring Circuit. 1. Replace "COMM" PCB. 1. Replace "COMM" PCB. 1. See Symptom # 10, 11,12, 13,
14, 15, 20, 21, 22, 23, 24, 25, 26.
1. See Symptom # 28, 34, 35, 38
and 54.

CCB AMTRAK SINGLE MODE CONTRACT LOCOMOTIVE MAINTENANCE MANUAL
NOV/97 5-32 IP-158-C
TROUBLESHOOTING CHART
SYMPTOM PROBABLE CAUSE CORRECTIVE ACTION #92 (24BO)
"BP Self Test Fault"
#93 (24B1)
"Independent Self Test Fault"
#94 (24B2)
"Bail Off Self Test Fault"
#95 (24B3)
"BC Self Test Fault"
#96 (24B4)
"Locomotive I/O Self Test Fault"
1. Brake Pipe Circuit Malfunction Or
Defective. 1 Independent Circuit Malfunction Or
Defective. 1. Bail Off Circuit Malfunction Or
Defective. 1. Brake Cylinder Circuit Malfunction
Or Defective. 1. Locomotive I/O Circuit Malfunction
Or Defective.
1. See Symptom # 30, 31, 32, 36
and 52. 1. See Symptom # 44, 57, 76, 77,
78 and 79. 1. See Symptom # 43, 47, 48 and
49. 1. See Symptom #40, 41, 42, 45,
46, 55, 56. 61 and 62. 1. See Symptom #71 and 72.


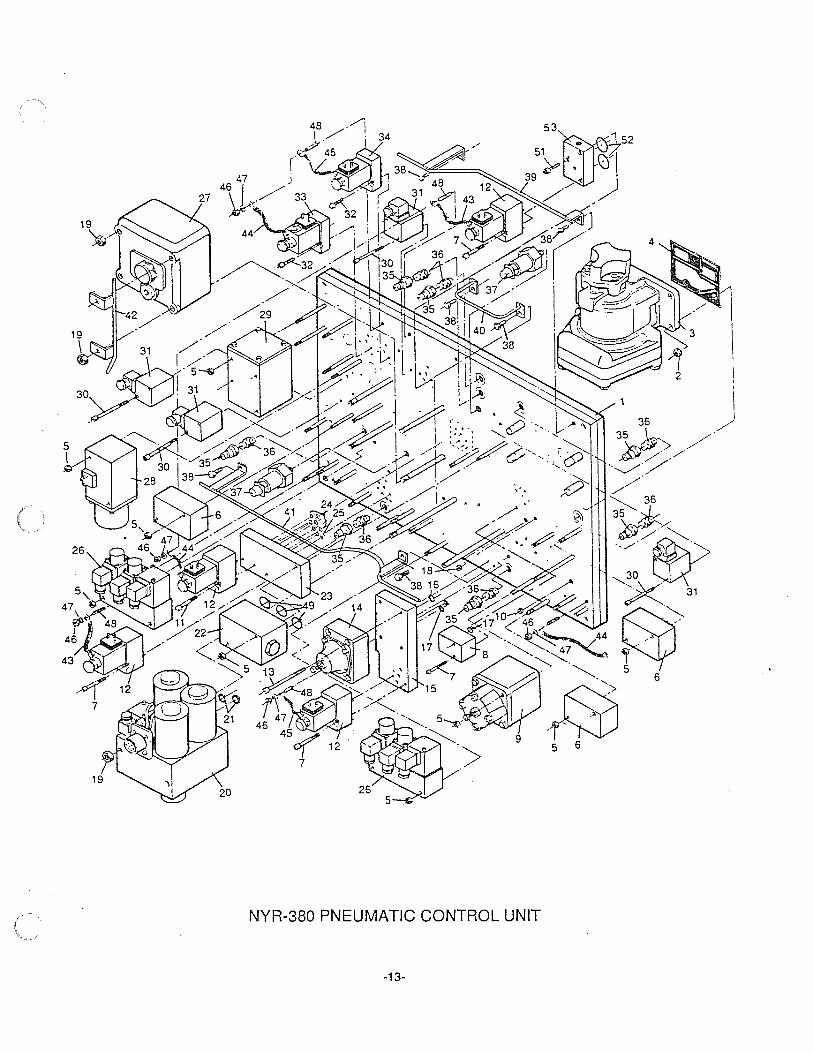


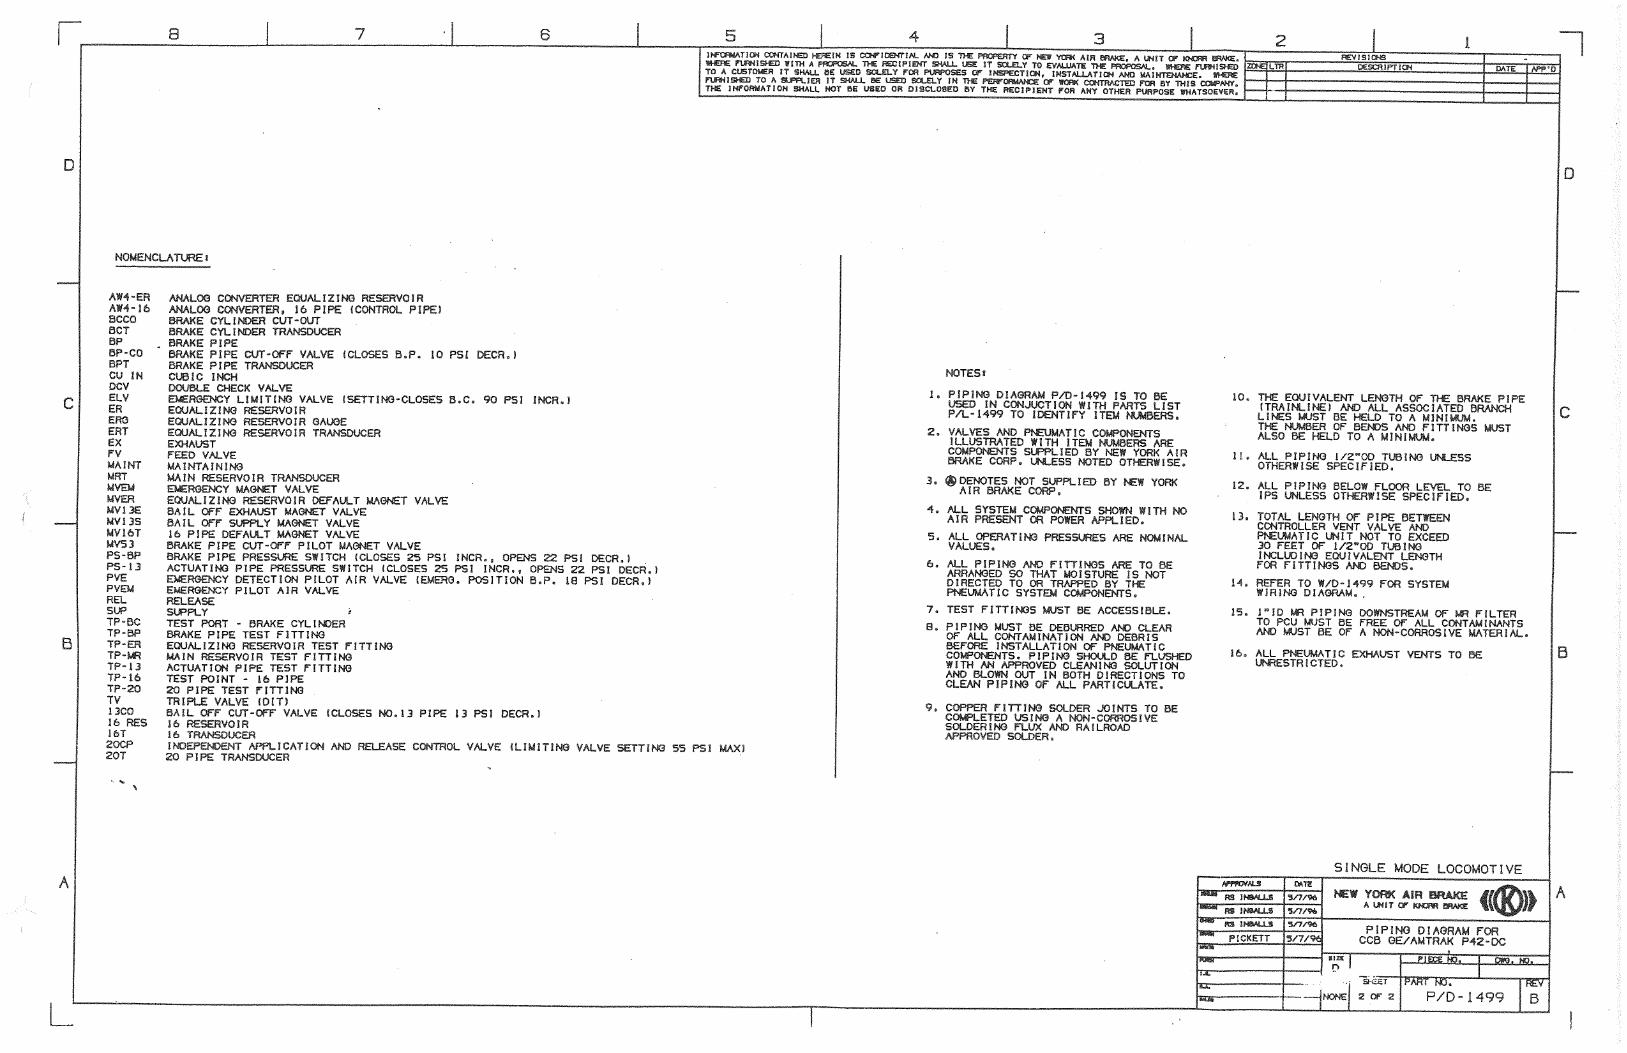


CCB AMTRAK SINGLE MODE CONTRACT LOCOMOTIVE MAINTENANCE MANUAL
IP-158-C 8-1 JAN/97
CHAPTER 8
NYAB/KNORR CCB - GE Fault Codes
8.1 General Information
This Section provides a list of fault codes displayed by the DI Board. NOTE: Some of the fault codes listed on the following pages are not active or in use.

CCB AMTRAK SINGLE MODE CONTRACT LOCOMOTIVE MAINTENANCE MANUAL
JAN/97 8-2 IP-158-C
NYAB/KNORR CCB - Fault Codes
DESCRIPTION MODES NYAB GE ROM ..................................................................... ...................................... Fault 1 ................. 2455 RAM ..................................................................... ...................................... Fault 2 ................. 2456 BRAKE VLV/FOR - NO BV RELEASE ................ PENALTY ...................... Fault 10 ............... 245E BRAKE VLV/SS8- NO BV RELEASE .................. ...................................... Fault 11 ............... 245F BRAKE VLV/SS8 -BV EMER ERROR ................. ALARM .......................... Fault 12 ............... 2460 BRAKE VLV/FOR - IMPROPER AUTO ............... ...................................... Fault 13 ............... 2461 BRAKE VLV/SS8 - NO REL VERIFY ................... ...................................... Fault 14 ............... 2462 BRAKE VLV/SS8 - NO EMER VERIFY ............... ...................................... Fault 15 ............... 2463 BRAKE VLV/FOR - IND MAX FROM REL ........... ...................................... Fault 20 ............... 2468 BRAKE VLV/SS8 - IND MAX ONLY .................... ...................................... Fault 21 ............... 2469 BRAKE VLV/SS8 - IND MAX ONLY .................... ...................................... Fault 22 ............... 246A BRAKE VLV/FOR - IMPROPER IND APP ........... ...................................... Fault 23 ............... 246B BRAKE VLV/SS8 - NO BAIL OFF ........................ ...................................... Fault 24 ............... 246C BRAKE VLV/SS8 - NO MAX IND VERIFY ........... ...................................... Fault 25 ............... 246D BRAKE VLV/SS8 - NO REL IND VERIFY ........... ...................................... Fault 26 ............... 246E AW4-ER/EPAl - IMPROPER ER PSI ................... ...................................... Fault 28 ............... 2470 BRAKE VLV/SS8 - IMPROPER MODE ............... ...................................... Fault 29 ............... 2471 PS-BP/BEA - SWITCH STUCK CLOSED ............ ...................................... Fault 30 ............... 2472 PS-BP/BEA - SWITCH STUCK OPEN ................ ...................................... Fault 31 ............... 2473 MV53/DB1/EPA1 - ER 0 PSI DEFAULT .............. ...................................... Fault 32 ............... 2474 AW4-ER/EPAl - NO ER SUPPLY ........................ PENALTY ...................... Fault 34 ............... 2476 MVER/DB1/EPA1-ER 0 PSI DEFAULT ............... PENALTY ...................... Fault 35 ............... 2477 BP-CO/BEA - NO BP CUT OFF .......................... ...................................... Fault 36 ............... 2478 AW4-ER/EPA1- NO ER EXHAUST ..................... PENALTY ...................... Fault 38 ............... 247A AW4-16/EPA2 - NO BC SUPPLY ........................ BACKUP ....................... Fault 40 ............... 247C AW4-16/EPA2 - NO BC EXHAUST ..................... BACKUP ....................... Fault 41 ............... 247D MV16T/DB1/EPA2 - BRK BACK UP .................... BACKUP ....................... Fault 42 ............... 247E PS-13/BEA - NO BC BAIL OFF ........................... ...................................... Fault 43 ............... 247F 20CP - ADJUST REGULATOR............................ ...................................... Fault 44 ............... 2480 DB1O - NO BACK UP DEFAULT BC .................. ...................................... Fault 46 ............... 2482 PS-13/BEA - NO BC BAIL OFF ........................... ...................................... Fault 47 ............... 2483 PS13/MV13S/BEA - NO BAIL OFF ...................... ...................................... Fault 48 ............... 2484 PS13/MV13E/BEA - SLOW BAIL EXHAUST....... ...................................... Fault 49 ............... 2485 MRT/AD - NO MR TRANS ................................... ...................................... Fault 51 ............... 2487 BPT/AD -NO BP TRANS ...................................... PENALTY & BACKUP .. Fault 52 ............... 2488 ERT/AD - NO ER TRANS .................................... PENALTY ...................... Fault 54 ............... 248A BCT/AD - NO BC TRANS .................................... ...................................... Fault 55 ............... 248B 16T/AD - NO BC CONTROL TRANS .................. BACKUP ....................... Fault 56 ............... 248C

CCB AMTRAK SINGLE MODE CONTRACT LOCOMOTIVE MAINTENANCE MANUAL
IP-158-C 8-3 JAN/97
NYAB/KNORR CCB - Fault Codes
DESCRIPTION MODES NYAB GE 2OT/AD - NO IND TRANS ............................ BACKUP ....................... Fault 57 ............... 248D ADZ - NO TRANS ................................................ PENALTY & BACKUP .. Fault 60 ............... 2490 MVEM/EPAl/PVEM - NO ELECT EMER ............. ...................................... Fault 61 ............... 2491 ELV - ADJUSTMENT REQUIRED ....................... ...................................... Fault 62 ............... 2492 SS9 - CONTINUOUS BAIL OFF (BG TL) ............ ...................................... Fault 71 ............... 249B SS9 - NO ALERTER INPUT OR CUT-OFF ......... ...................................... Fault 72 ............... 249C BEA - NO CAB SIGNAL INPUT OR CUT-OFF.... ...................................... Fault 73 ............... 249D NO BLENDED BRAKE - IMPROPER INPUTS .... ...................................... Fault 74 ............... 249E BB - IFC HIGH BLENDED BRAKE INPUT .......... ...................................... Fault 75 ............... 249F 2OP/DB1/BEA - NO IND SUPPLY ....................... ...................................... Fault 76 ............... 24A0 2OP/DB1/BEA - NO IND RELEASE .................... PENALTY ...................... Fault 78 ............... 24A2 2OP/DB1/BEA - IND EXHAUST OPEN ............... ...................................... Fault 79 ............... 24A3 COMM - NO IFC RECEIVE................................. ...................................... Fault 80 ............... 24A4 RX ........................................................................ ...................................... Fault 81 ............... 24A5 TX ......................................................................... ...................................... Fault 82 ............... 24A6 BRAKE VLV SELF TEST FAULT ........................ ...................................... Fault 90 ............... 24AE ER CONTROL SELF TEST FAULT ..................... ...................................... Fault 91 ............... 24AF BP SELF TEST FAULT ........................................ ...................................... Fault 92 ............... 24B0 INDEPENDENT SELF TEST FAULT ................... ...................................... Fault 93 ............... 24B1 BAIL OFF SELF TEST FAULT............................. ...................................... Fault 94 ............... 24B2 BC SELF TEST FAULT ........................................ ...................................... Fault 95 ............... 24B3 LOCOMOTIVE I/0 SELF TEST FAULT ............... ...................................... Fault 96 ............... 24B4 BRAKE VLV REBUILD CYCLE ........................... ...................................... Fault 101 ............. 24B9 SS8 PCB RECONDITION CYCLE ....................... ...................................... Fault 102 ............. 24BA FOR PCB RECONDITION CYCLE ...................... ...................................... Fault 103 ............. 24BB AW4-ER REBUILD CYCLE.................................. ...................................... Fault 104 ............. 24BC EPA1 PCB RECONDITION CYCLE .................... ...................................... Fault 105 ............. 24BD MVER REBUILD CYCLE ..................................... ...................................... Fault 106 ............. 24BE MV53 REBUILD CYCLE ...................................... ...................................... Fault 108 ............. 24C0 BP-CO REBUILD CYCLE .................................... ...................................... Fault 109 ............. 24C1 BP RELAY REBUILD CYCLE .............................. ...................................... Fault 110 ............. 24C2 PS-BP REPLACEMENT CYCLE ......................... ...................................... Fault 111 ............. 24C3 BP TRANS REPLACEMENT CYCLE .................. ...................................... Fault 112 ............. 24C4 MVEM REBUILD CYCLE ..................................... ...................................... Fault 113 ............. 24C5 PVEM REBUILD CYCLE ..................................... ...................................... Fault 114 ............. 24C6 MR TRANS REPLACEMENT CYCLE ................. ...................................... Fault 115 ............. 24C7 20 PORTION REBUILD CYCLE .......................... ...................................... Fault 116 ............. 24C8 BEA RECONDITION CYCLE ............................... ...................................... Fault 117 ............. 24C9 DB1 PCB RECONDITION CYCLE ...................... ...................................... Fault 118 ............. 24CA MV13S REBUILD CYCLE .................................... ...................................... Fault 119 ............. 24CB MV13E REBUILD CYCLE .................................... ...................................... Fault 120 ............. 24CC

CCB AMTRAK SINGLE MODE CONTRACT LOCOMOTIVE MAINTENANCE MANUAL
JAN/97 8-4 IP-158-C
13-CO REBUILD CYCLE ..................................... ...................................... Fault 121 ............. 24CD PS-13 REPLACEMENT CYCLE .......................... ...................................... Fault 123 ............. 24CF DCV REBUILD CYCLE ........................................ ...................................... Fault 124 ............. 24D0 AW4-16 REBUILD CYCLE ................................... ...................................... Fault 125 ............. 24D1 EPA2 PCB RECONDITION CYCLE .................... ...................................... Fault 126 ............. 24D2 MV16T REBUILD CYCLE .................................... ...................................... Fault 127 ............. 24D3 BC RELAY REBUILD CYCLE .............................. ...................................... Fault 128 ............. 24D4 BC TRANS REPLACEMENT CYCLE .................. ...................................... Fault 129 ............. 24D5 PVE REBUILD CYCLE ........................................ ...................................... Fault 130 ............. 24D6 ELV REBUILD CYCLE ......................................... ...................................... Fault 131 ............. 24D7 BCCO REPLACEMENT CYCLE .......................... ...................................... Fault 132 ............. 24D8 DB 10 PORTION REBUILD CYCLE .................... ...................................... Fault 133 ............. 24D9 SS9 PCB-RECONDITION CYCLE ...................... ...................................... Fault 134 ............. 24DA SC1 PCB - RECONDITION CYCLE .................... ...................................... Fault 135 ............. 24DB SC2 PCB RECONDITION CYCLE ...................... ...................................... Fault 136 ............. 24DC BB/AA PCB RECONDITION CYCLE ................... ...................................... Fault 137 ............. 24DD DB2 PCB - RECONDITION CYCLE VCU REBUILD CYCLE ..................... Fault 138 ............. 24DE VCU REBUILD CYCLE ........................................ ...................................... Fault 139 ............. 24DF SV1 PCB RECONDITION CYCLE ....................... ...................................... Fault 140 ............. 24E0 CP PCB - RECONDITION CYCLE ...................... ...................................... Fault 142 ............. 24E2 DI PCB - RECONDITION CYCLE ........................ ...................................... Fault 143 ............. 24E3 COMM PCB - RECONDITION CYCLE ................ ...................................... Fault 144 ............. 24E4 AD PCB - RECONDITION CYCLE ...................... ...................................... Fault 145 ............. 24E5 BCPS RELAY REPLACEMENT CYCLE ............. ...................................... Fault 146 ............. 24E6 IBS RELAY REPLACEMENT CYCLE ................. ...................................... Fault 147 ............. 24E7 COR RELAY REPLACEMENT CYCLE ............... ...................................... Fault 148 ............. 24E8 BBE RELAY REPLACEMENT CYCLE ................ ...................................... Fault 149 ............. 24E9 BVPS RELAY REPLACEMENT CYCLE .............. ...................................... Fault 150 ............. 24EA SUPP RELAY REPLACEMENT CYCLE ............. ...................................... Fault 151 ............. 24EB ES RELAY REPLACEMENT CYCLE .................. ...................................... Fault 152 ............. 24EC VA RELAY REPLACEMENT CYCLE .................. ...................................... Fault 153 ............. 24ED INVALID FAULT MESSAGE NUMBER ............... ...................................... Fault 154 ............. 24EE

CCB AMTRAK SINGLE MODE CONTRACT LOCOMOTIVE MAINTENANCE MANUAL
IP-158-C 8-5 JAN/97
DIAG SUM MESSAGES
FLAG MESSAGE RECOVERY MESSAGE AIR BRAKE POWER UP PENALTY PLACE HANDLE TO SUPP TO RESET REMAIN IN SUPP FOR 3 SECONDS AIR BRAKE FAULT EMERGENCY PLACE HANDLE TO EMER TO RECOVER KEEP HANDLE IN EMER FOR XX SECONDS TO CLEAR EMER MOVE HANDLE TO REL OPERATOR EMERGENCY KEEP HANDLE IN EMER FOR XX SECONDS TO CLEAR EMER MOVE HANDLE TO REL FIREMAN EMERGENCY PLACE HANDLE TO EMER TO RECOVER KEEP HANDLE IN EMER FOR XX SECONDS TO CLEAR EMER MOVE HANDLE TO REL TRAINLINE EMERGENCY PLACE HANDLE TO EMER TO RECOVER KEEP HANDLE IN EMER FOR XX SECONDS TO CLEAR EMER MOVE HANDLE TO REL AIR BRAKE FAULT PENALTY PLACE HANDLE TO SUPP TO RESET REMAIN IN SUPP FOR 3 SECONDS CAB SIGNAL PENALTY PLACE HANDLE TO SUPP TO RESET REMAIN IN SUP FOR 3 SECONDS ALERTER PENALTY PLACE HANDLE TO SUPP TO RESET REMAIN IN SUPP FOR 3 SECONDS

CCB AMTRAK SINGLE MODE CONTRACT LOCOMOTIVE MAINTENANCE MANUAL
JAN/97 8-6 IP-158-C
OPERATOR MESSAGE
AUTO BRAKE CAN'T RELEASE-TRAIL ONLY NO LEAD OR TRAIL INDEPENDENT-TRAIL ONLY
NO LEAD INDEPENDENT-TRAIL ONLY REDUCED BRAKING-IN BACK-UP MODE
DEAD IN TOW BC-TRAIL ONLY DEFECTIVE INDEPENDENT BRAKE-TRAIL ONLY
NO BP CUTOFF-TRAIL ONLY BRAKE CONTROLLER DEFECTIVE-TRAIL ONLY
BAIL OFF INOPERATIVE-TRAIL ONLY NOTE-NO MAIN RESERVOIR GAGE
INVALID OPERATOR MESSAGE CHECK SET-UP-HOSES AND CONTROLLERS
NOTE-NO BRAKE CYL GAGE DEFECTIVE AIR BRAKE SET-UP SWITCH
INVALID OPERATOR MESSAGE
SELF TEST MESSAGE
IMPROPER SET-UP OR MAY BE USED IN TRAIL MAY BE USED IN TRAIL
IMPROPER SET-UP OR DEAD TRAIL ONLY DEAD TRAIL ONLY
REPLACE DB10 PORTION (ABD MAY BE USED) INVALID SELF TEST MESSAGE NUMBER