Embed Size (px)
Citation preview
Federal Democratic Republic of Ethiopia
Ministry of Public Service and
Human Resources Development
2016
Integrated Civil Service Management Information System (ICSMIS)
HP 1/1/2012
Human Resource Inspection Module
User Guide
Ver. 1.1
CUSTOR COMPUTING PLC
P.O.BOX 80733
TEL 0115519397
Email: [email protected]
ADDIS ABABA, ETHIOPIA
April, 2016

Human Resource Inspection Module Page 1
CONTENTS
1. Introduction ................................................................................................................................... 4
1.1. Modules of ICSMIS .............................................................................................................. 5
1.2. Module Features ................................................................................................................... 6
1.3. Starting to use ICSMIS ........................................................................................................ 6
1.4. The Login page .................................................................................................................... 6
2. Human Resource Activities (Operations) Evaluation ................................................................ 9
2.1. Recruitment .......................................................................................................................... 11
2.1.1. Entering new Recruitment Evaluation Record ........................................................ 11
2.1.2. Editing Existing Recruitment Evaluation Record ..................................................... 15
2.1.3. Approving Recruitment Evaluation Record .............................................................. 16
2.1.4. Deleting Existing Recruitment Evaluation Record ................................................... 17
2.2. Promotion ............................................................................................................................. 17
2.2.1. Entering new Promotion Evaluation Record ........................................................... 18
2.2.2. Editing Existing Promotion Evaluation Record ........................................................ 23
2.2.3. Approving Promotion Evaluation Record ................................................................. 23
2.2.4. Deleting Existing Promotion Evaluation Record ...................................................... 24
2.3. Transfer ................................................................................................................................ 25
2.3.1. Entering new Transfer Evaluation Record............................................................... 25
2.3.2. Editing Existing Transfer Evaluation Record ........................................................... 30
2.3.3. Approving Transfer Evaluation Record .................................................................... 31
2.3.4. Deleting Existing Transfer Evaluation Record ......................................................... 32
2.4. Service Extension ............................................................................................................... 33
2.4.1. Entering new Service Extension Evaluation Record .............................................. 33
2.4.2. Editing Existing Service Extension Evaluation Record ........................................... 36
2.4.3. Approving Service Extension Evaluation Record .................................................... 36
Human Resource Inspection Module Page 2
2.4.4. Deleting Existing Service Extension Evaluation Record ........................................ 37
2.5. Service Termination ............................................................................................................ 38
2.5.1. Entering new Service Termination Evaluation Record ........................................... 38
2.5.2. Editing Existing Service Termination Evaluation Record ....................................... 42
2.5.3. Approving Service Termination Evaluation Record ................................................. 42
2.5.4. Deleting Existing Service Termination Evaluation Record ..................................... 44
2.6. Disciplinary Measures and Grievance handling ............................................................... 44
2.6.1. Entering new Disciplinary Measures and Grievance handling Evaluation Record 45
2.6.2. Editing Existing Disciplinary Measures and Grievance handling Evaluation Record 48
2.6.3. Approving Disciplinary Measures and Grievance handling Evaluation Record .... 49
2.6.4. Deleting Disciplinary Measures and Grievance handling Evaluation Record ....... 50
2.7. Scholarship .......................................................................................................................... 51
2.7.1. Entering new Scholarship Evaluation Record ......................................................... 51
2.7.2. Editing Scholarship Evaluation Record .................................................................... 54
2.7.3. Approving Scholarship Evaluation Record ............................................................... 54
2.7.4. Deleting Scholarship Evaluation Record .................................................................. 56
2.8. Authority Delegation ............................................................................................................ 56
2.8.1. Entering new Authority Delegation Evaluation Record ........................................... 56
2.8.2. Editing Authority Delegation Evaluation Record ..................................................... 59
2.8.3. Approving Authority Delegation Evaluation Record ................................................ 60
2.8.4. Deleting Authority Delegation Evaluation Record ................................................... 61
3. Message Exchange .................................................................................................................... 62
3.1. Entering new Request ........................................................................................................ 63
3.2. Editing Existing request record .......................................................................................... 64
3.3. Approving request record ................................................................................................... 64
3.4. Deleting Existing request record ....................................................................................... 65
Human Resource Inspection Module Page 3
3.5. Entering new Reply ............................................................................................................ 65
3.6. Editing Existing replay for a request ................................................................................ 67
3.7. Approving replay for a request ......................................................................................... 67
3.8. Deleting Existing replay for a request .............................................................................. 68
4. Complaint and Decision ............................................................................................................ 68
4.1. Entering Complaint .............................................................................................................. 68
4.2. Entering new Complaint ..................................................................................................... 69
4.3. Editing Complaint ................................................................................................................ 71
4.4. Deleting Existing Complaint ............................................................................................... 71
4.5. Entering Complaint Decision .............................................................................................. 71
5. Miscellaneous ............................................................................................................................. 75
5.1. Human Resource Activities ................................................................................................ 75
5.1.1. Entering new Human Resource ............................................................................... 75
5.1.2. Displaying Existing Human Resource Activities ...................................................... 76
5.1.3. Searching Existing Human Resource Activities ...................................................... 77
5.1.4. Editing Human Resource .......................................................................................... 78
5.1.5. Deleting Human Resource ........................................................................................ 78
5.2. Human Resource Activities required documents ............................................................. 80
5.2.1. Entering new human resource required documents ............................................... 80
5.2.2. Editing human resource required documents ......................................................... 81
5.2.3. Searching Human Resources Required Document ................................................ 81
5.2.4. Deleting human resource required documents ....................................................... 82
6. Team Management .................................................................................................................... 83
6.1. Entering new Team ............................................................................................................ 84
6.2. Displaying Existing Team ................................................................................................... 85
6.3. Editing existing team .......................................................................................................... 86
6.4. Deleting existing Team ....................................................................................................... 87

Human Resource Inspection Module Page 4
7. Team members .......................................................................................................................... 89
7.1. Assigning Team members ................................................................................................. 89
7.2. Viewing assigned team members ..................................................................................... 91
7.3. Deleting existing team members ....................................................................................... 92
8. Assigning organizations to team .............................................................................................. 94
8.1. Displaying Existing Team Organizations Relationship ..................................................... 96
8.2. Deleting existing organization to team relationship ......................................................... 97
9. Report Management .................................................................................................................. 98
1. INTRODUCTION
Human Resource Inspection Module Page 5
Integrated Civil Service Management Information System (ICSMIS) is a web-
based system developed for the civil servant administration and regulation
functions intended to be implemented in government institutions at the national
level (Federal and Regional). Though it is intended to be deployed at the
national level the first phase deployment will be done at nine government
institutions which includes:
Ministry of Civil Service
Ministry of Education
Ministry of Health
Oromia National Regional State Civil Service and Good Governance
Bureau including one zone and one Woreda
o North Shoa (Oromia) Civil Service and Good Governance Bureau
at Fiche town
o GirarJarsoWoreda Civil Service and Good Governance Bureau
located in Fiche town
Amhara National Regional State Civil Service Bureau including one zone
and one Woreda
o North Shoa (Amhara) Civil Service Bureau at Debrebrhan town
o Angolelanatera Woreda Civil Service Bureau
o
1.1. MODULES OF ICSMIS
The system comprises the following modules:
• Human Resource Management System (Administration Functions)
• Human Resource Study (Organizational Structuring and Job Positions func-
tions)
• Human Resource Inspection Functions (Regulatory Functions)
• Administrative Tribunal Functions (Complaint Handling Functions)
• Human Resource Archives and Records Management (Administrative functions)
Human Resource Inspection Module Page 6
This manual is prepared for users of Human Resource Management mod-
ule/subsystem. Features and instructions how to use each features is given in follow-
ing sections.
1.2. MODULE FEATURES
Inspection Management System is a user-friendly system that is developed to inspect
the organizations’ HR activity. The system provides an easy to retrieve HR activity
data and a report manger that can be used to generate various statistical and
decision-support reports.
The major features of the Inspection Management System are:
Allow accessing HRM records of government institutions through a strict
security right
Allow viewing all necessary documents for inspection purpose
Maintain compliant handling
Generate statistical and decision support reports
1.3. STARTING TO USE ICSMIS
The system administrator will have to inform you on how to use your Internet
Browser to find the correct address for ICSMIS. On starting ICSMIS you will find
yourself at the login page, all users will require to login in with their own username
and password depending on the their role in using the system.
Once the User have login successfully he/she will be taken to the ICSMIS
main browser page where most of the operations on the system are carried
out.
1.4. THE LOGIN PAGE
The login page is the main entry point to the ICSMIS system and all users
will require to login to gain access to the system.
Human Resource Inspection Module Page 7
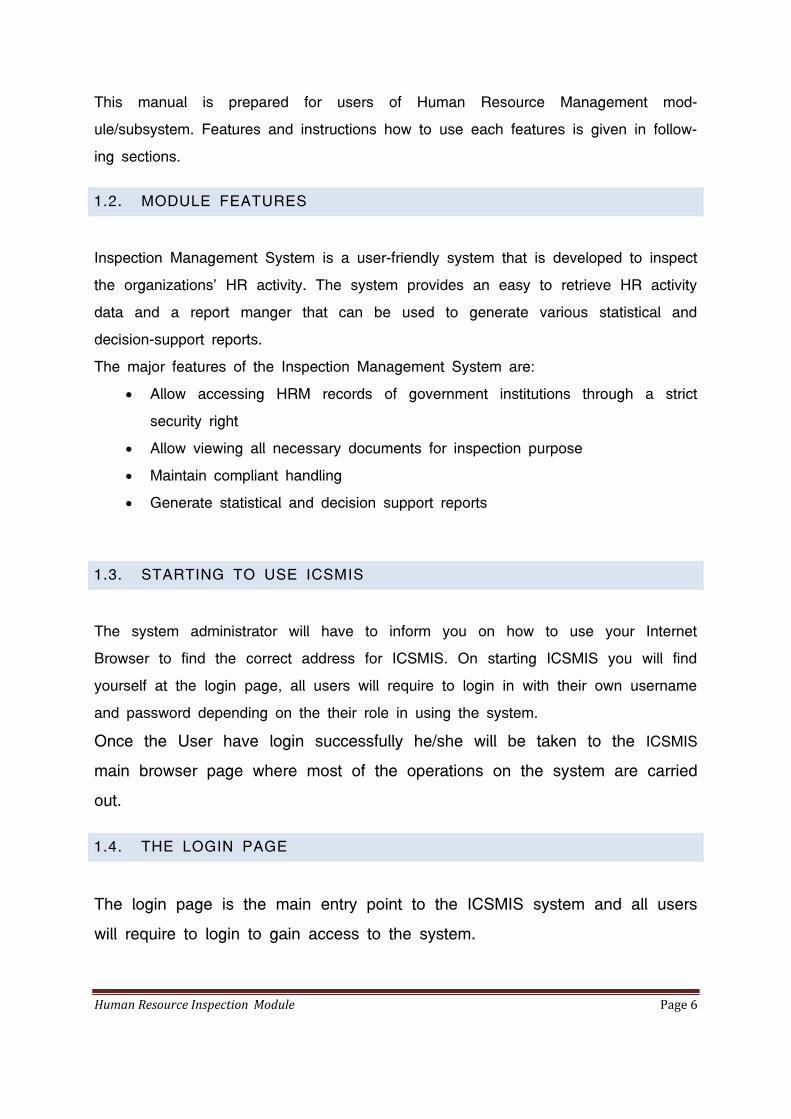
You are presented with two boxes that you are required to fill in. This is your
user name and passwords which your system administrator will have given to
you, when completed press the login button. If your user name and password
are valid, you will then be presented with the main browser page, if not, you
would remain at the log in page and a ‘login failure’ message will be dis-
played on the same page.
Steps to login:
1. Open an Internet Explorer, Mozilla Firefox, or other browser
2. Type http://IP of the Web Server/Inspection in the URL address
The following page will be displayed.
To login: 1. Fill user name and password as follows
2. Click button
Unsuccessful login will display the following page:
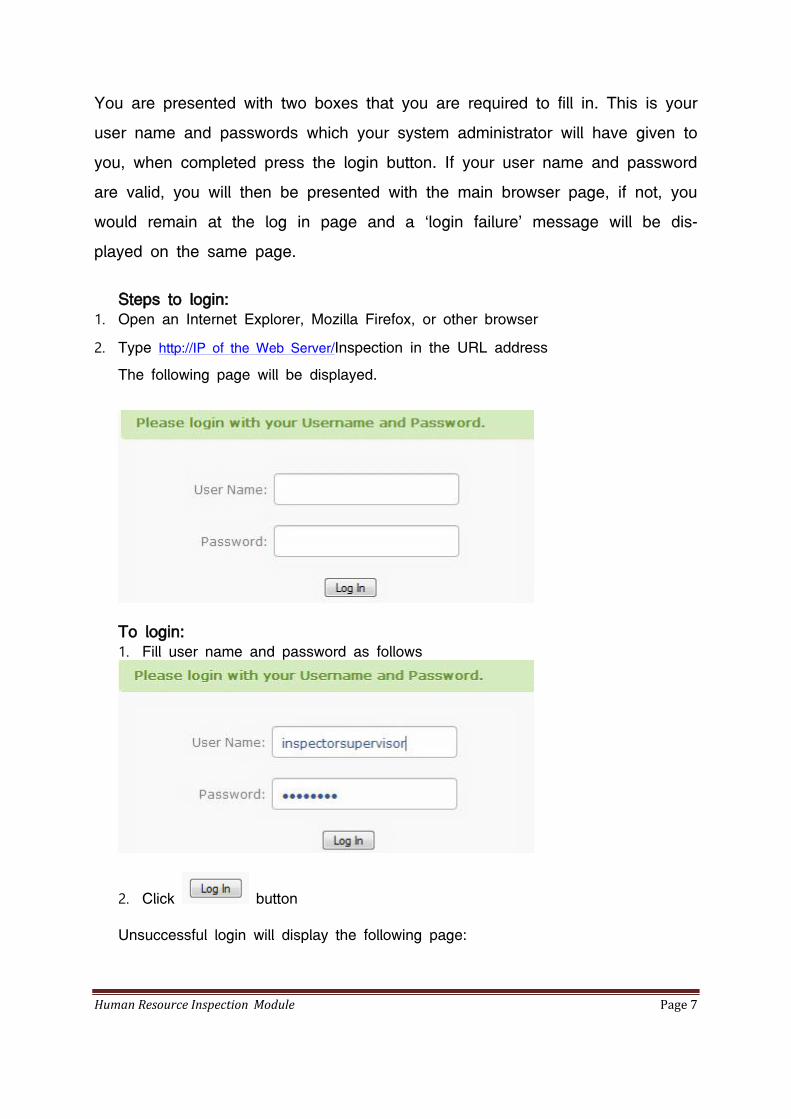
Human Resource Inspection Module Page 8
Note:- The user is not allowed to correct his username and password entry
more than three times. If user is not correctly entered his username and pass-word at the third time, the system locks the user not to logged in. He needs to communicate with the system administrator to get password to use the system. 3. Enter the correct username and password to login.
4. When the login is done successfully, the browser page is displayed by
a browser
The browser page
The Browser page is the screen that most users will see after logging in to
the ICSMIS system and provides a means of using the menus/submenus to
take an action for an activity the user is entitled to use.
Some menus could be displayed disabled for example
as shown above which shows the user logged in is
not entitled to use the feature of the system to be used by the menu.
Human Resource Inspection Module Page 9
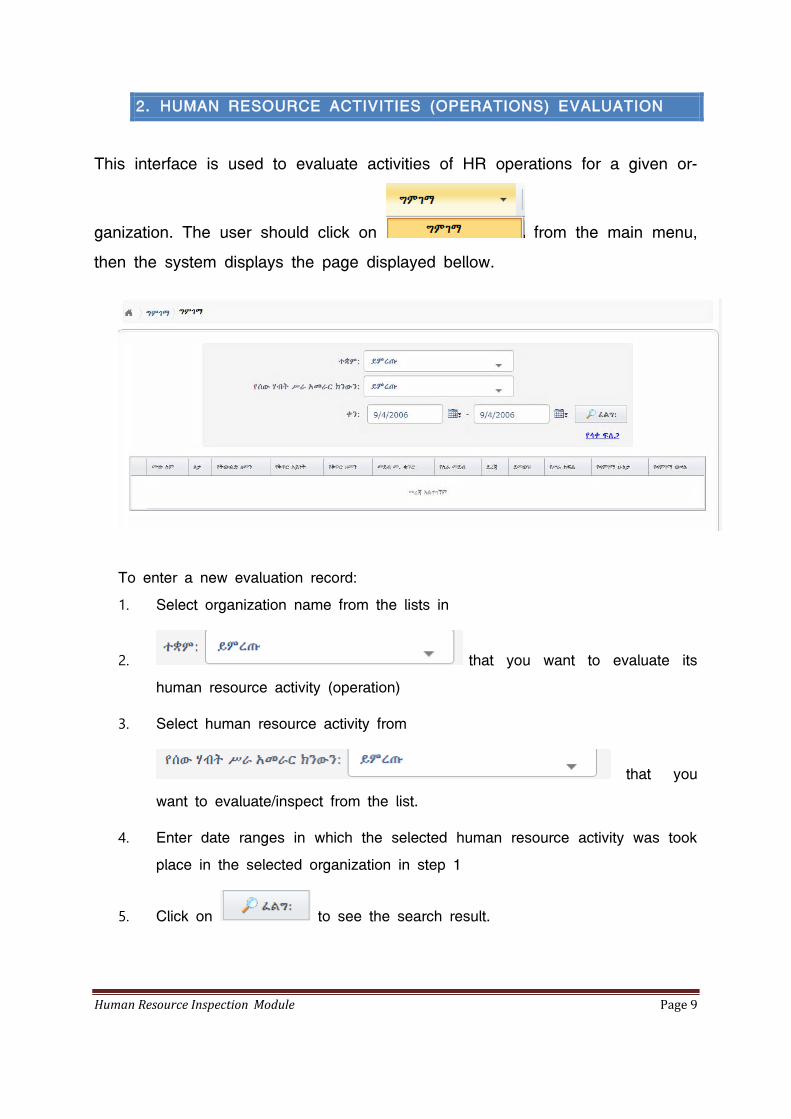
2. HUMAN RESOURCE ACTIVITIES (OPERATIONS) EVALUATION
This interface is used to evaluate activities of HR operations for a given or-
ganization. The user should click on from the main menu,
then the system displays the page displayed bellow.
To enter a new evaluation record:
1. Select organization name from the lists in
2. that you want to evaluate its
human resource activity (operation)
3. Select human resource activity from
that you
want to evaluate/inspect from the list.
4. Enter date ranges in which the selected human resource activity was took
place in the selected organization in step 1
5. Click on to see the search result.
Human Resource Inspection Module Page 10
o If you click on without entering organization name the
system displays the following information
o If you click on without entering specific human resource
activity (operation) the system displays the information shown below.
o The system validates date range values entered. If the dates are inva-
lid, it shows the message shown below.
6. In addition to this searching mechanism the system has another searching
feature – Advanced search
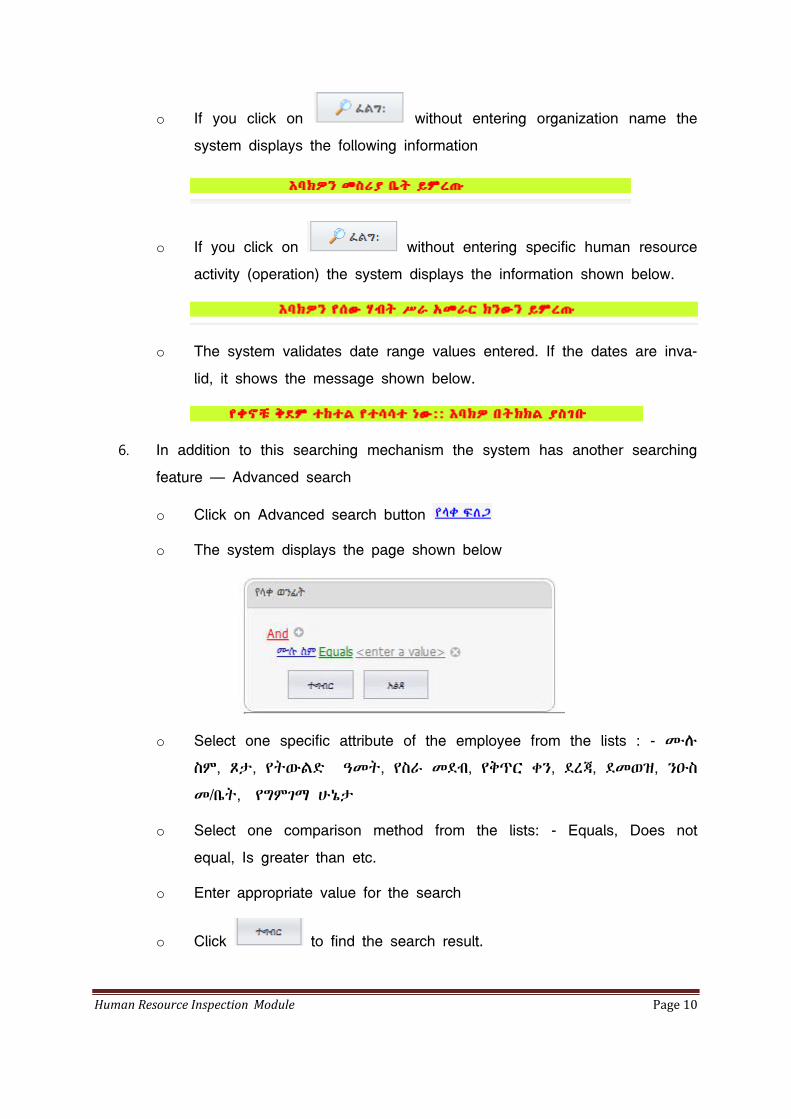
o Click on Advanced search button
o The system displays the page shown below
o Select one specific attribute of the employee from the lists : - ሙሉ
ስም, ጾታ, የትውልድ ዓመት, የስራ መደብ, የቅጥር ቀን, ደረጃ, ደመወዝ, ንዑስ
መ/ቤት, የግምገማ ሁኔታ
o Select one comparison method from the lists: - Equals, Does not
equal, Is greater than etc.
o Enter appropriate value for the search
o Click to find the search result.
Human Resource Inspection Module Page 11
7. The system lists the search results in a table
2.1. RECRUITMENT
2.1.1. ENTERING NEW RECRUITMENT EVALUATION RECORD
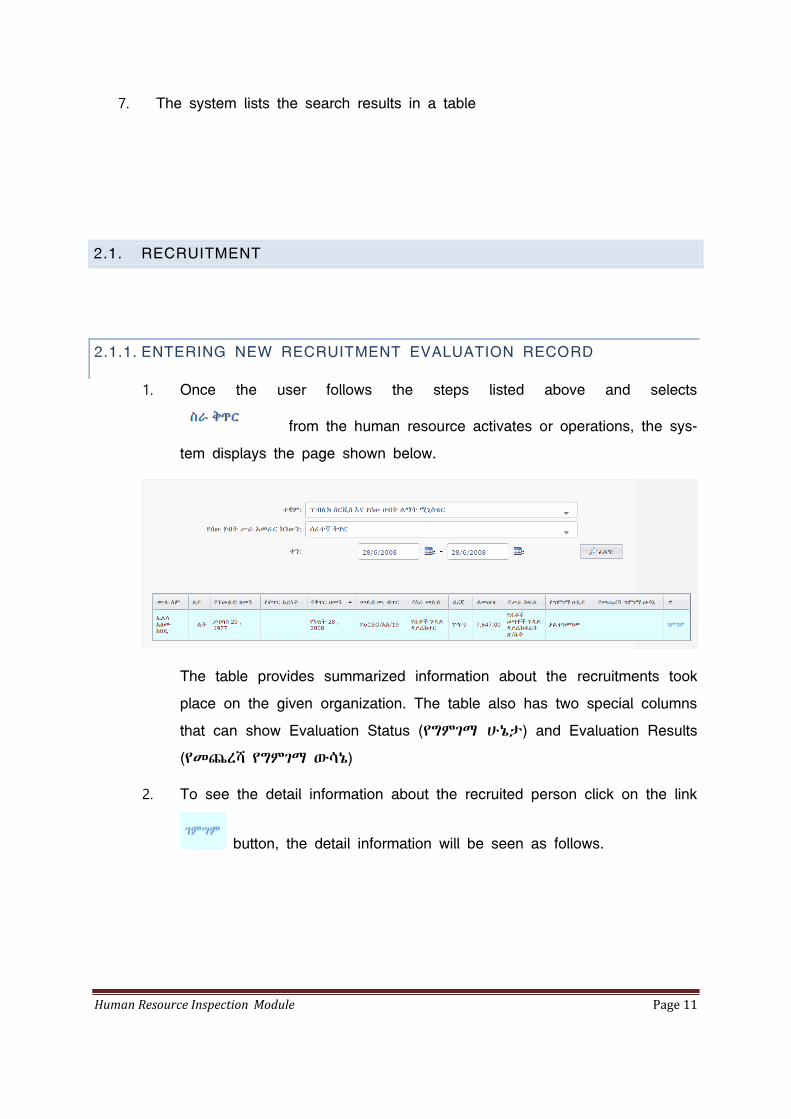
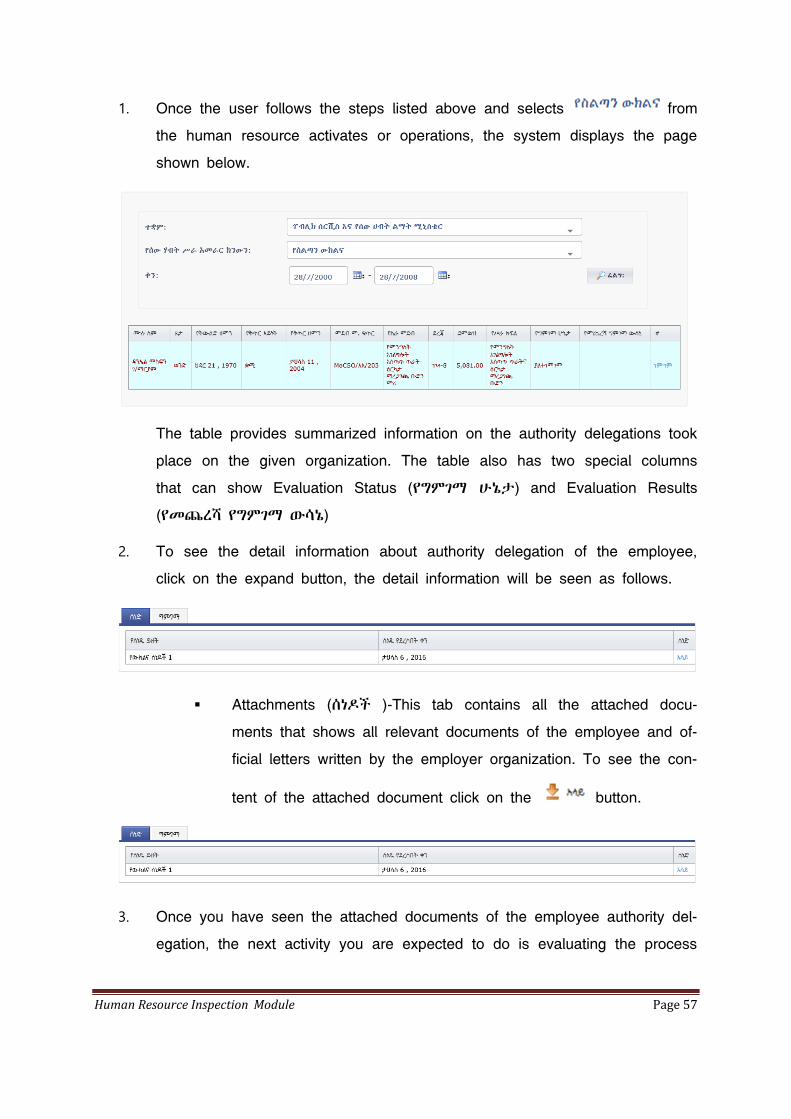
1. Once the user follows the steps listed above and selects
from the human resource activates or operations, the sys-
tem displays the page shown below.
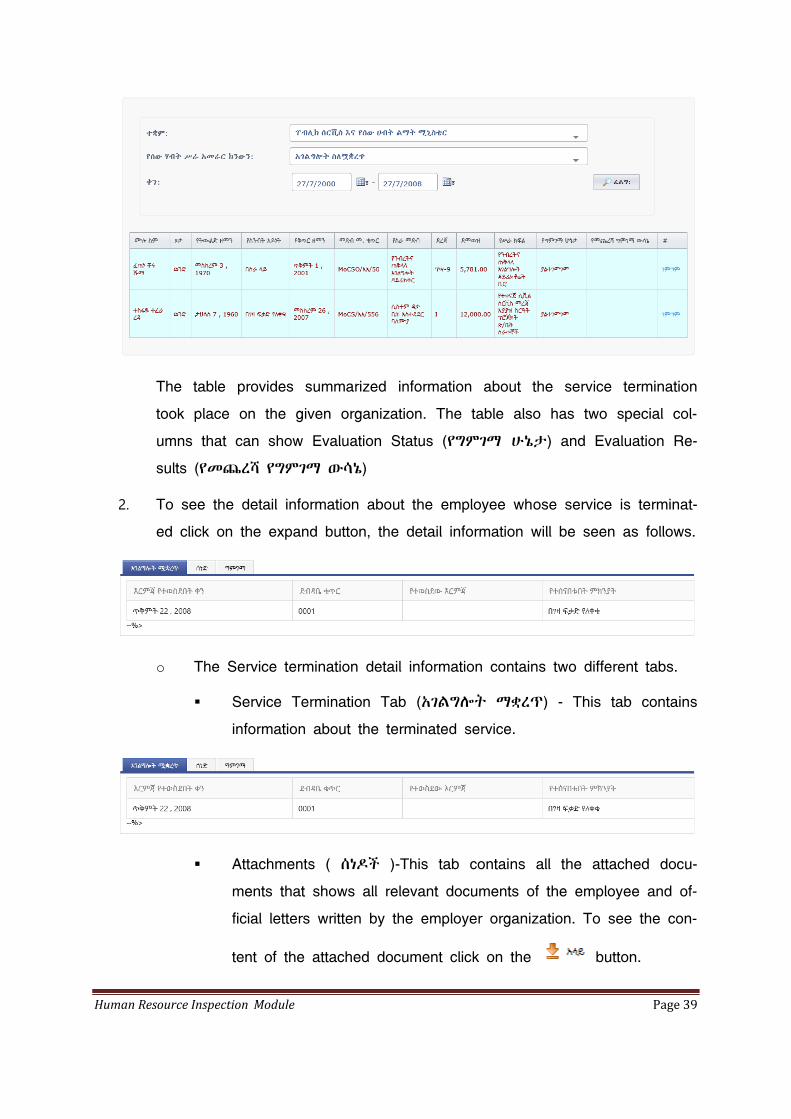
The table provides summarized information about the recruitments took
place on the given organization. The table also has two special columns
that can show Evaluation Status (የግምገማ ሁኔታ) and Evaluation Results
(የመጨረሻ የግምገማ ውሳኔ)
2. To see the detail information about the recruited person click on the link
button, the detail information will be seen as follows.
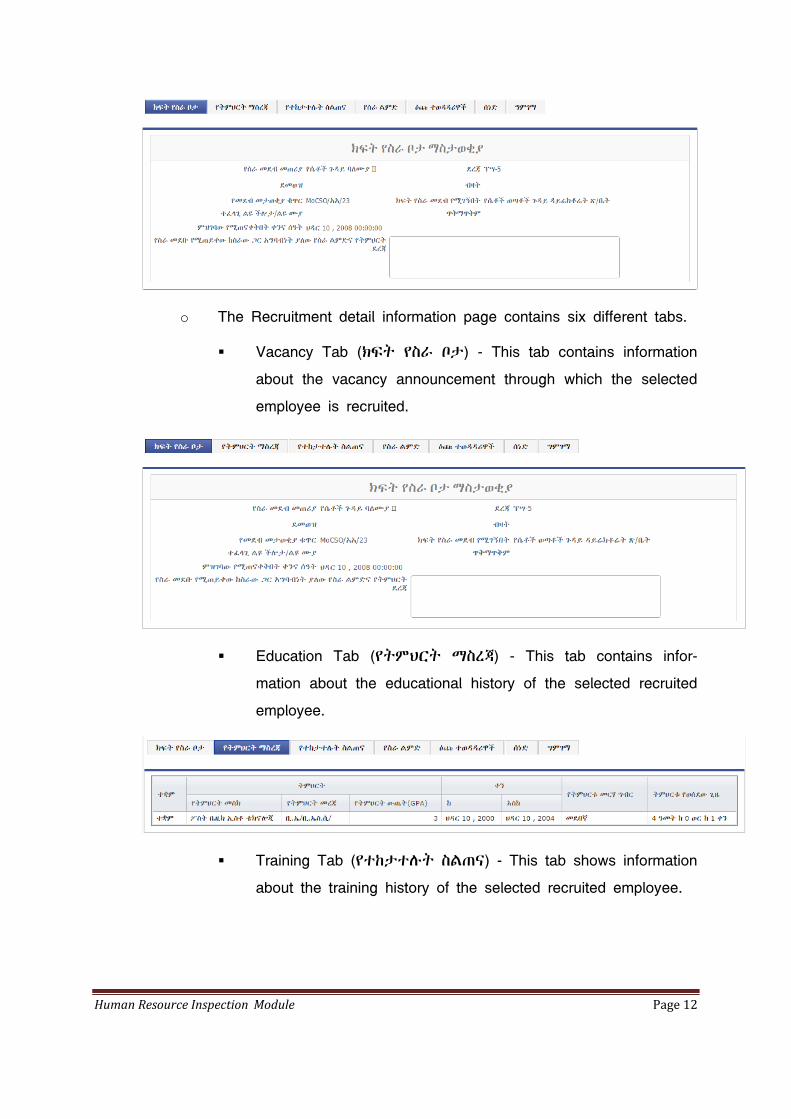
Human Resource Inspection Module Page 12
o The Recruitment detail information page contains six different tabs.
Vacancy Tab (ክፍት የስራ ቦታ) - This tab contains information
about the vacancy announcement through which the selected
employee is recruited.
Education Tab (የትምህርት ማስረጃ) - This tab contains infor-
mation about the educational history of the selected recruited
employee.
Training Tab (የተከታተሉት ስልጠና) - This tab shows information
about the training history of the selected recruited employee.
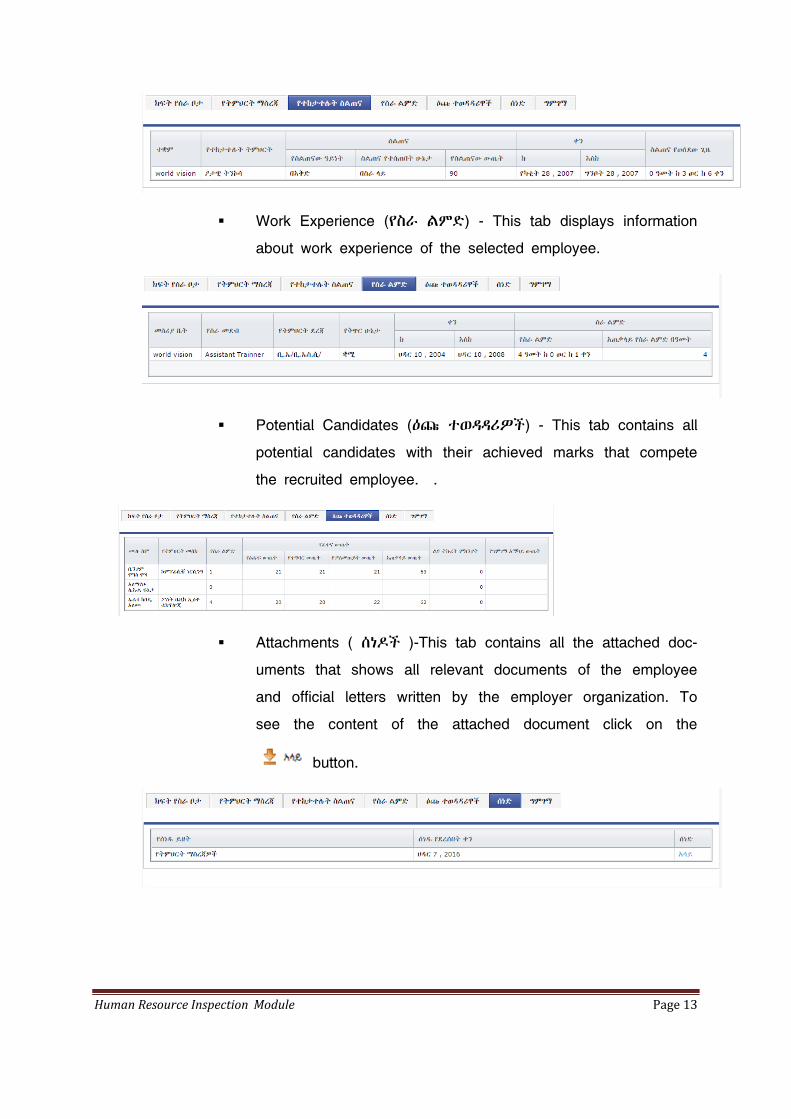
Human Resource Inspection Module Page 13
Work Experience (የስራ ልምድ) - This tab displays information
about work experience of the selected employee.
Potential Candidates (ዕጩ ተወዳዳሪዎች) - This tab contains all
potential candidates with their achieved marks that compete
the recruited employee. .
Attachments ( ሰነዶች )-This tab contains all the attached doc-
uments that shows all relevant documents of the employee
and official letters written by the employer organization. To
see the content of the attached document click on the
button.
Human Resource Inspection Module Page 14
3. Once you have seen summarized information about the recruited em-
ployee, the next activity you are expected to do is evaluating the pro-
cess of recruitment on which the selected employee is recruited. Click
on the tab to open the page that helps to record your evalua-
tion result.
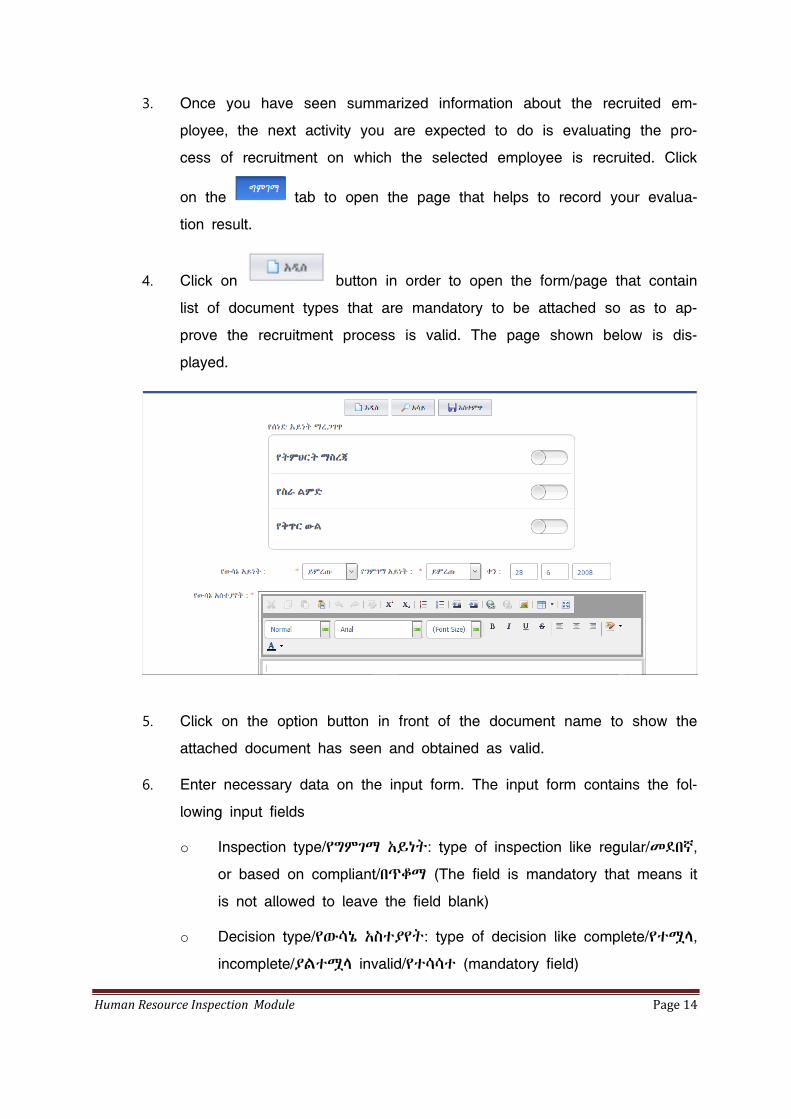
4. Click on button in order to open the form/page that contain
list of document types that are mandatory to be attached so as to ap-
prove the recruitment process is valid. The page shown below is dis-
played.
5. Click on the option button in front of the document name to show the
attached document has seen and obtained as valid.
6. Enter necessary data on the input form. The input form contains the fol-
lowing input fields
o Inspection type/የግምገማ አይነት: type of inspection like regular/መደበኛ,
or based on compliant/በጥቆማ (The field is mandatory that means it
is not allowed to leave the field blank)
o Decision type/የውሳኔ አስተያየት: type of decision like complete/የተሟላ,
incomplete/ያልተሟላ invalid/የተሳሳተ (mandatory field)
Human Resource Inspection Module Page 15
o Decision remark/የውሳኔ አስተያየት: remark on the decision (mandato-
ry field)
o Decision/ቀን - decision date in day month year order.
7. Click on button to permanently save the data into the da-
tabase.
The system is capable of showing all required fields for the user
so that the record is full of information.
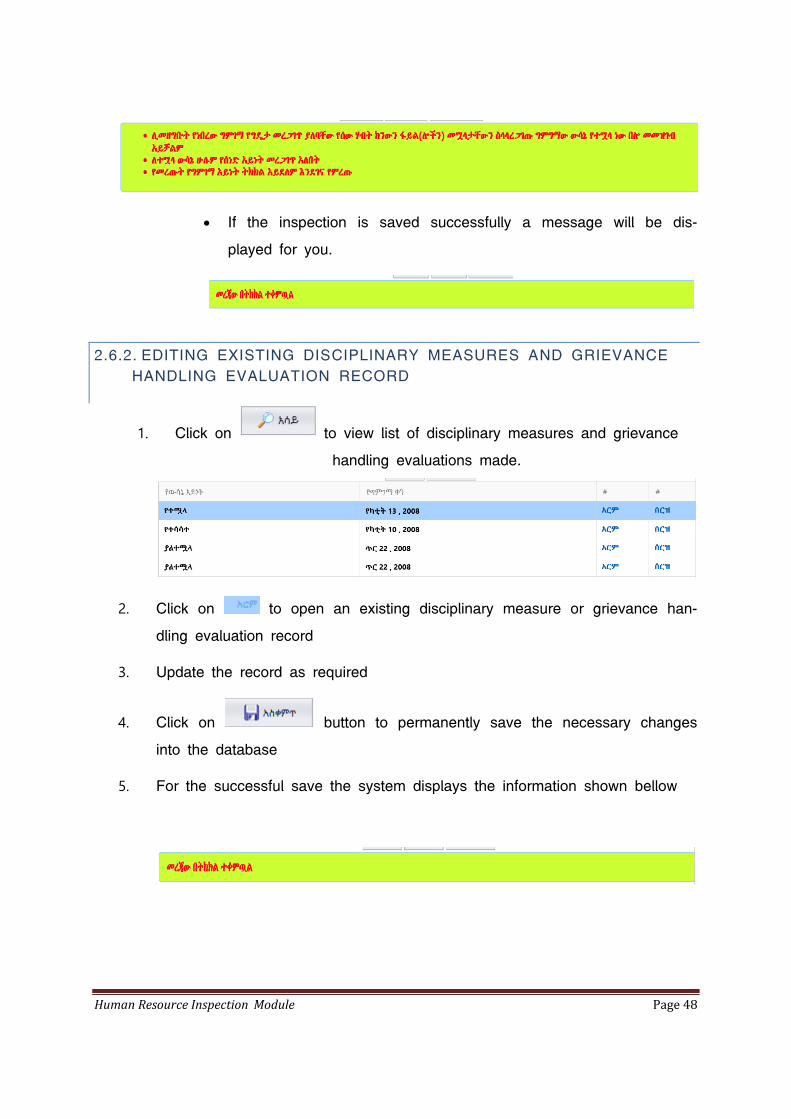
If the inspection is saved successfully a message will be dis-
played for you.
2.1.2. EDITING EXISTING RECRUITMENT EVALUATION RECORD
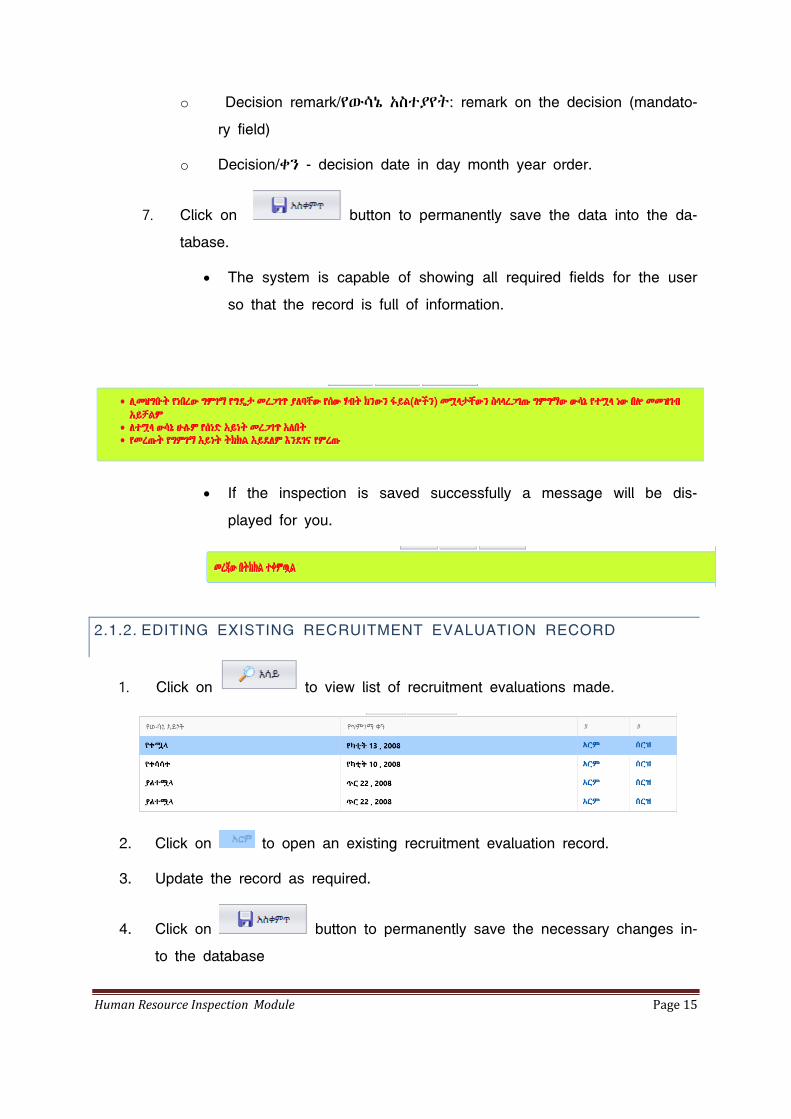
1. Click on to view list of recruitment evaluations made.
2. Click on to open an existing recruitment evaluation record.
3. Update the record as required.
4. Click on button to permanently save the necessary changes in-
to the database
Human Resource Inspection Module Page 16
For successful save the system displays the information shown bellow
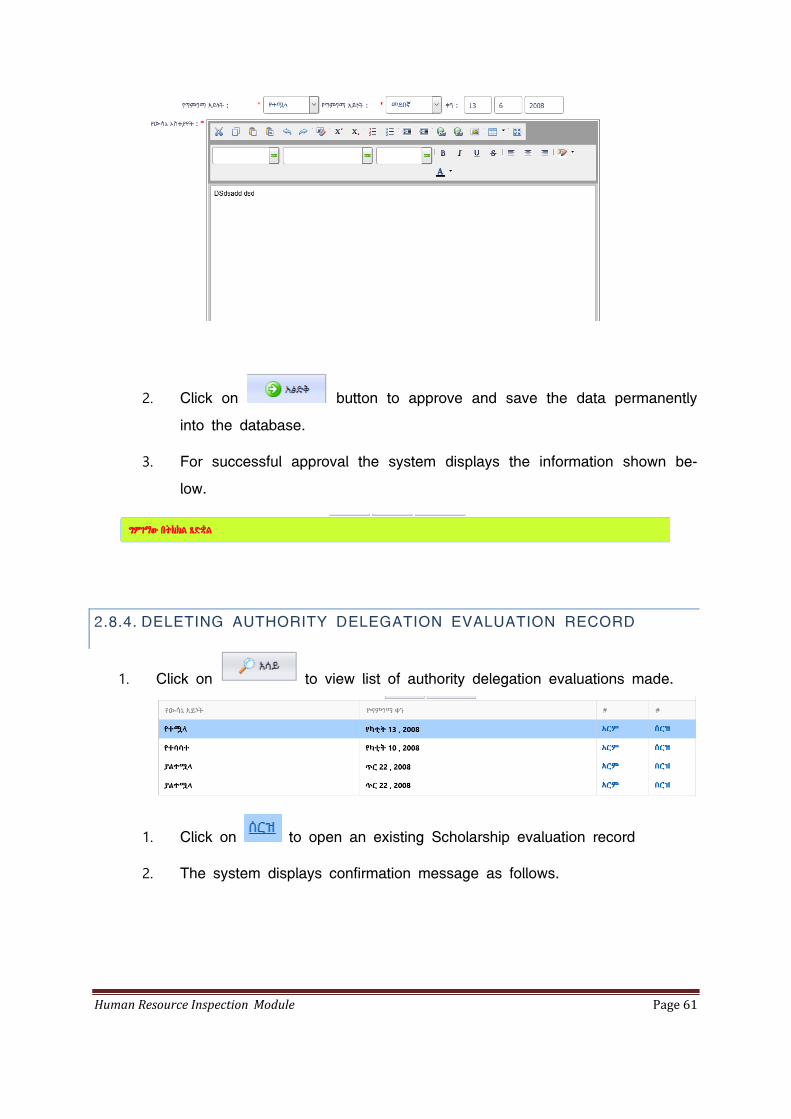
2.1.3. APPROVING RECRUITMENT EVALUATION RECORD
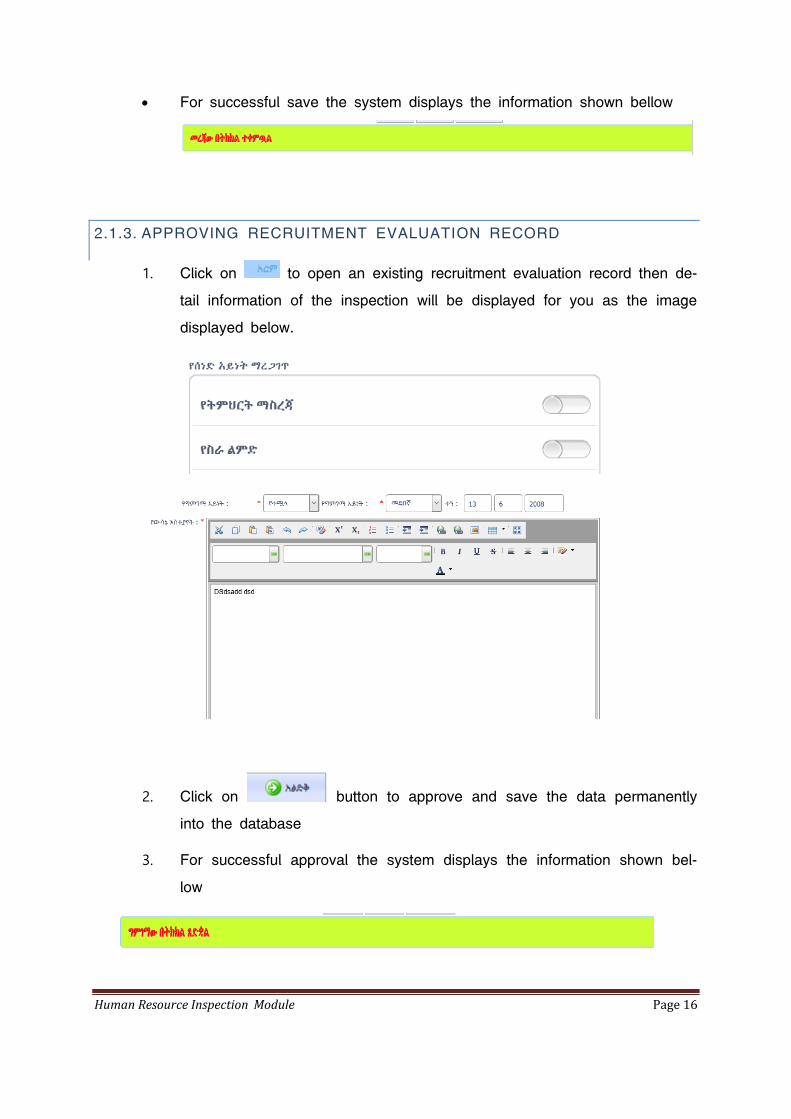
1. Click on to open an existing recruitment evaluation record then de-
tail information of the inspection will be displayed for you as the image
displayed below.
2. Click on button to approve and save the data permanently
into the database
3. For successful approval the system displays the information shown bel-
low
Human Resource Inspection Module Page 17
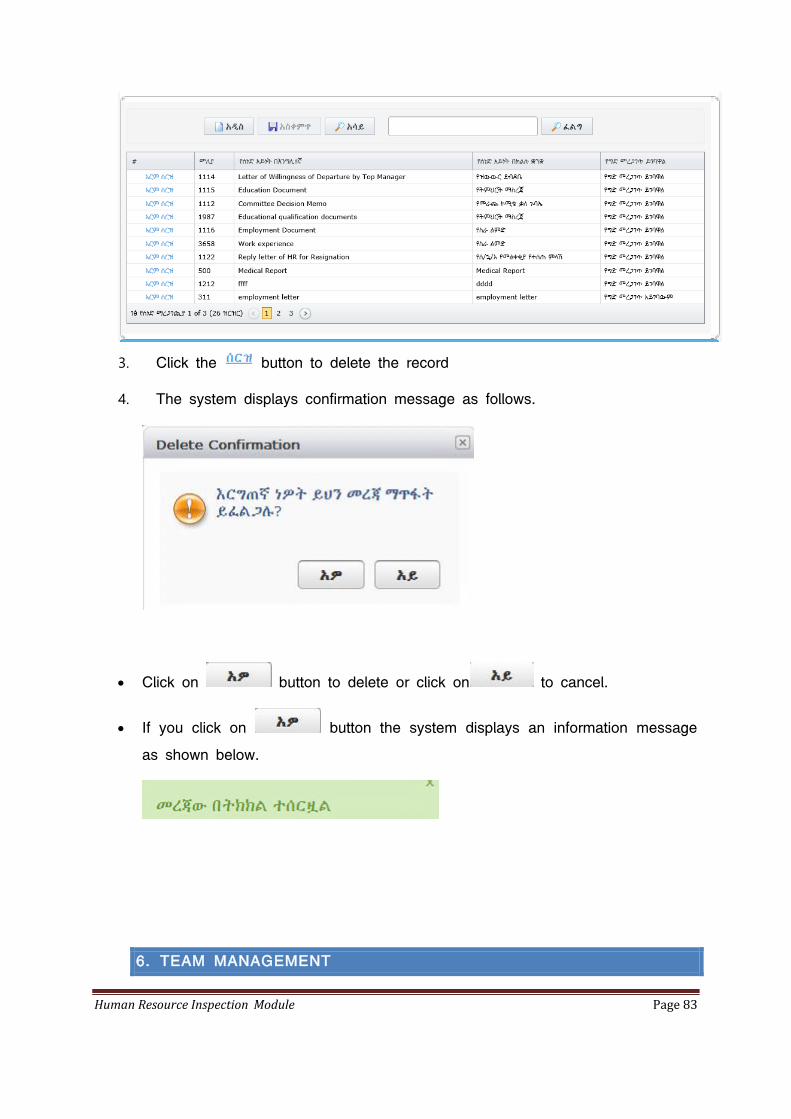
2.1.4. DELETING EXISTING RECRUITMENT EVALUATION RECORD
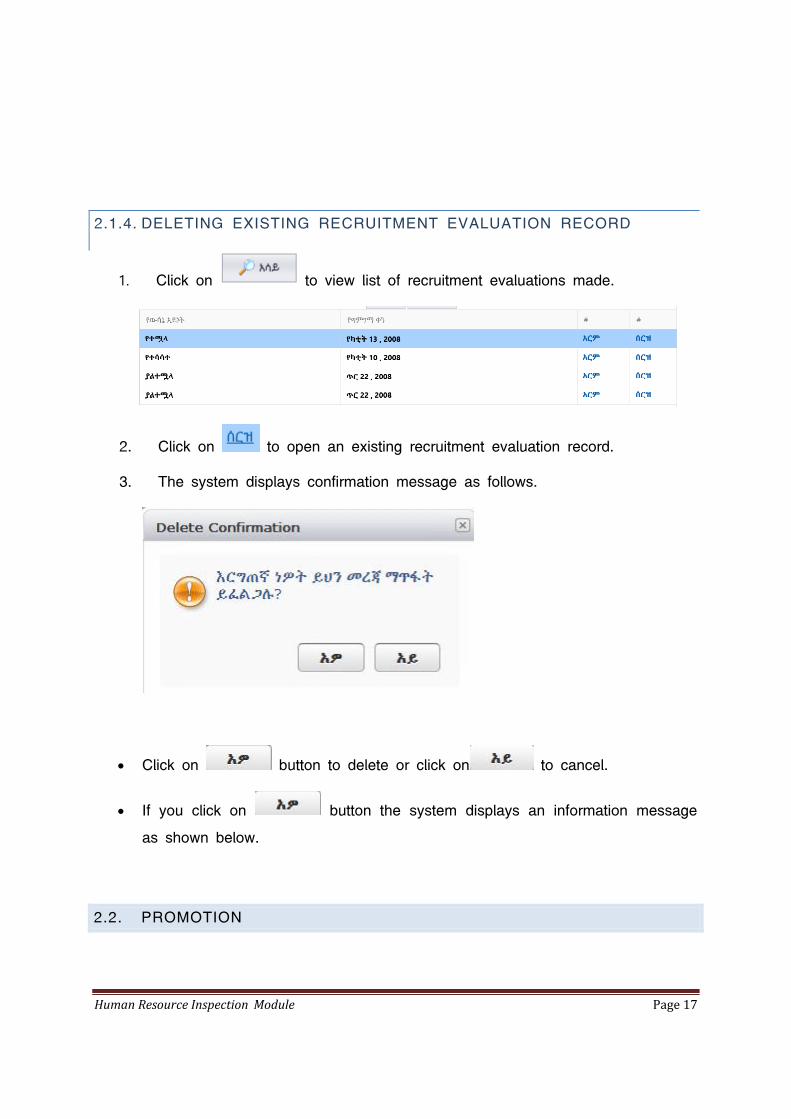
1. Click on to view list of recruitment evaluations made.
2. Click on to open an existing recruitment evaluation record.
3. The system displays confirmation message as follows.
Click on button to delete or click on to cancel.
If you click on button the system displays an information message
as shown below.
2.2. PROMOTION
Human Resource Inspection Module Page 18
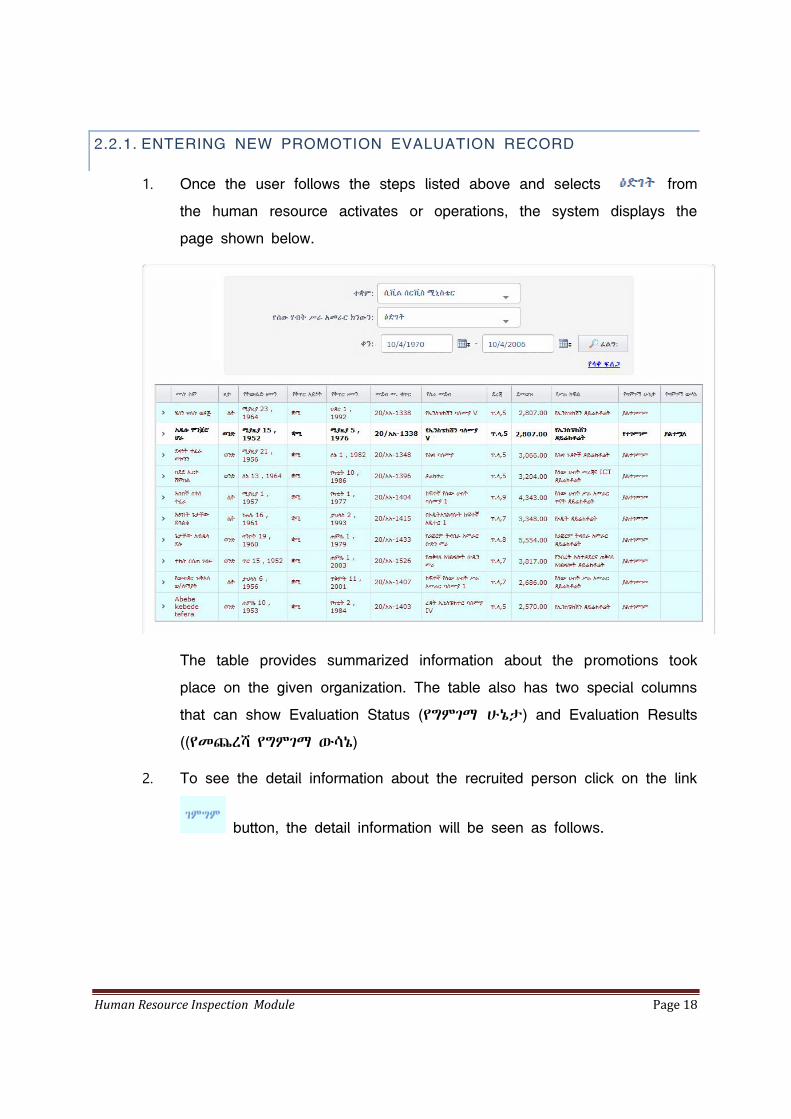
2.2.1. ENTERING NEW PROMOTION EVALUATION RECORD
1. Once the user follows the steps listed above and selects from
the human resource activates or operations, the system displays the
page shown below.
The table provides summarized information about the promotions took
place on the given organization. The table also has two special columns
that can show Evaluation Status (የግምገማ ሁኔታ) and Evaluation Results
((የመጨረሻ የግምገማ ውሳኔ)
2. To see the detail information about the recruited person click on the link
button, the detail information will be seen as follows.
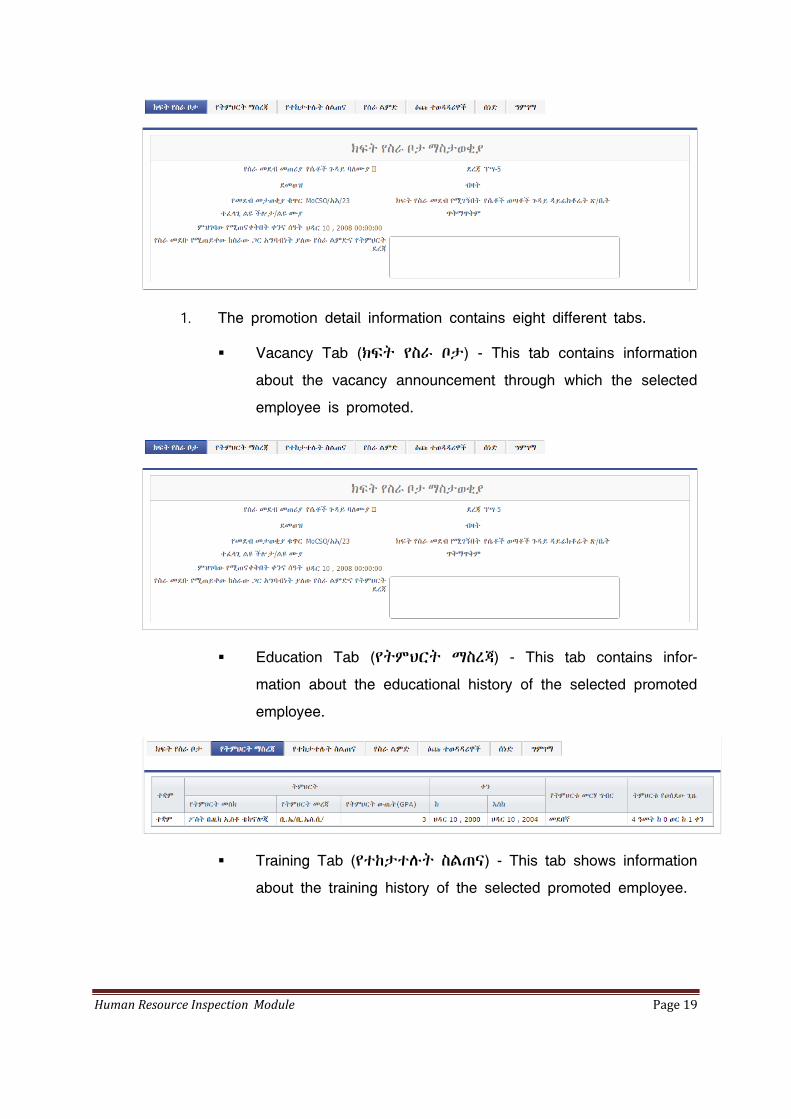
Human Resource Inspection Module Page 19
1. The promotion detail information contains eight different tabs.
Vacancy Tab (ክፍት የስራ ቦታ) - This tab contains information
about the vacancy announcement through which the selected
employee is promoted.
Education Tab (የትምህርት ማስረጃ) - This tab contains infor-
mation about the educational history of the selected promoted
employee.
Training Tab (የተከታተሉት ስልጠና) - This tab shows information
about the training history of the selected promoted employee.
Human Resource Inspection Module Page 20
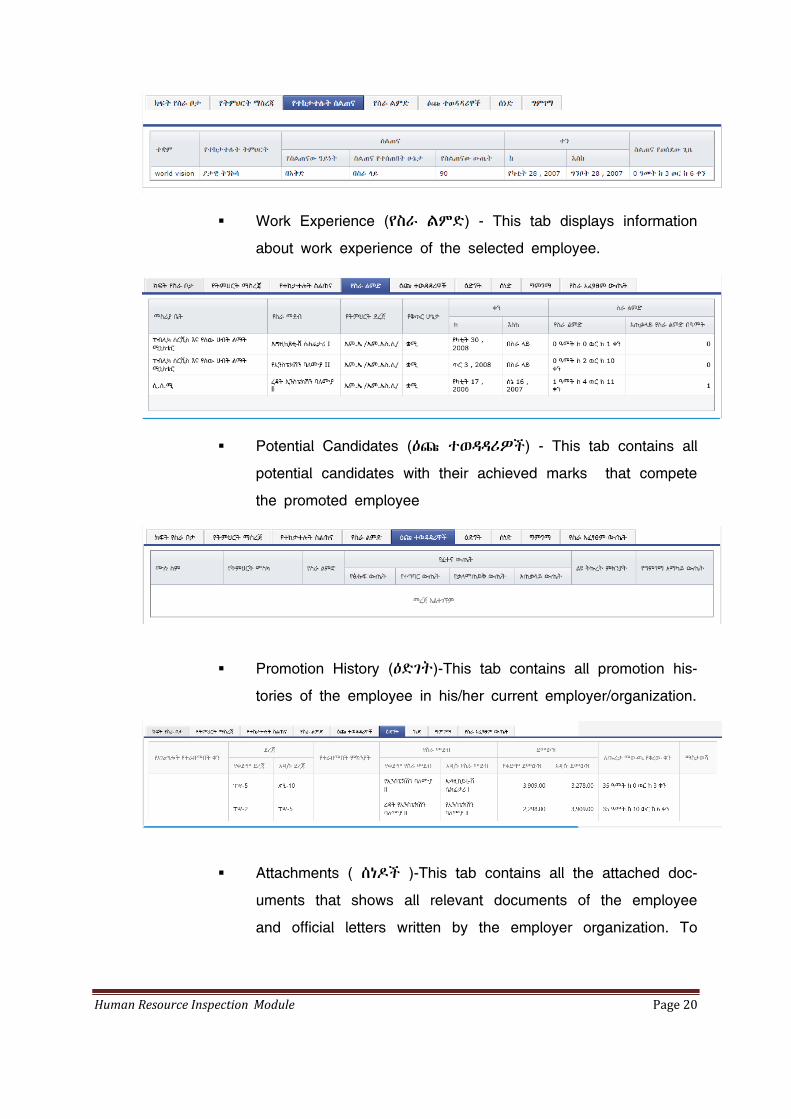
Work Experience (የስራ ልምድ) - This tab displays information
about work experience of the selected employee.
Potential Candidates (ዕጩ ተወዳዳሪዎች) - This tab contains all
potential candidates with their achieved marks that compete
the promoted employee
Promotion History (ዕድገት)-This tab contains all promotion his-
tories of the employee in his/her current employer/organization.
Attachments ( ሰነዶች )-This tab contains all the attached doc-
uments that shows all relevant documents of the employee
and official letters written by the employer organization. To
Human Resource Inspection Module Page 21
see the content of the attached document click on the
button.
Performance appraisal result (የስራ አፈጻጸም አማካኝ ውጤት)-This
tab contains average performance result of the last two recent
periods.
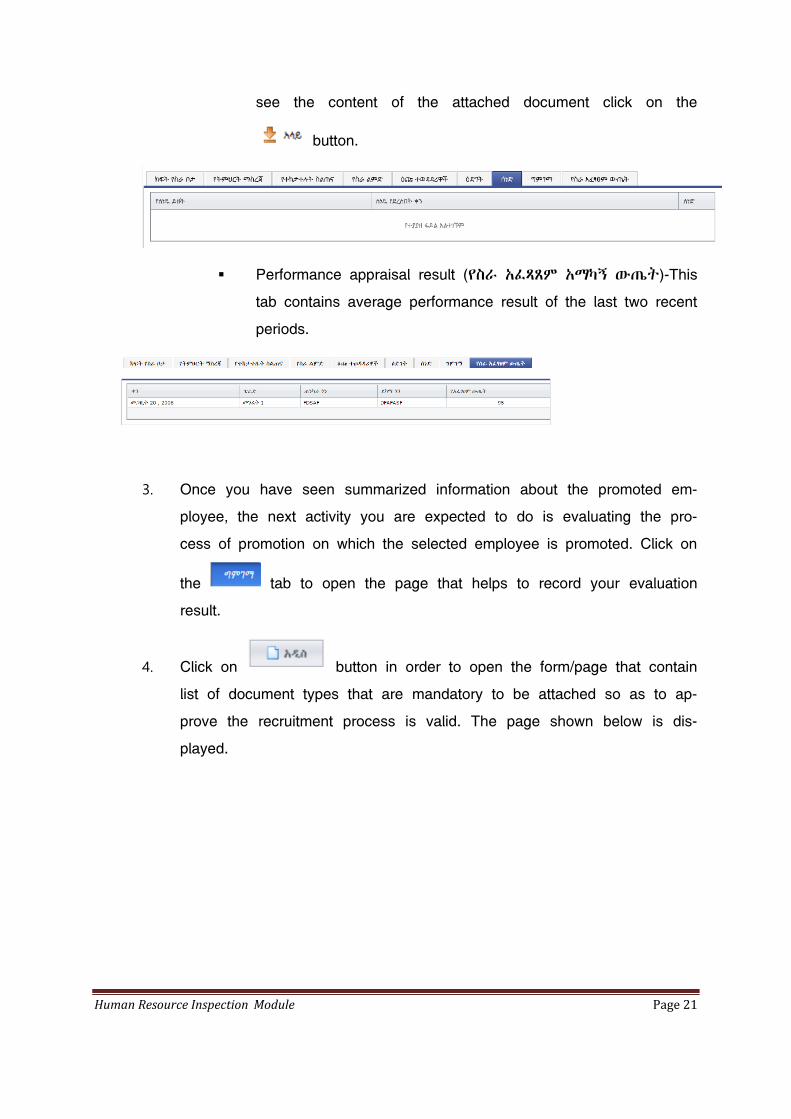
3. Once you have seen summarized information about the promoted em-
ployee, the next activity you are expected to do is evaluating the pro-
cess of promotion on which the selected employee is promoted. Click on
the tab to open the page that helps to record your evaluation
result.
4. Click on button in order to open the form/page that contain
list of document types that are mandatory to be attached so as to ap-
prove the recruitment process is valid. The page shown below is dis-
played.
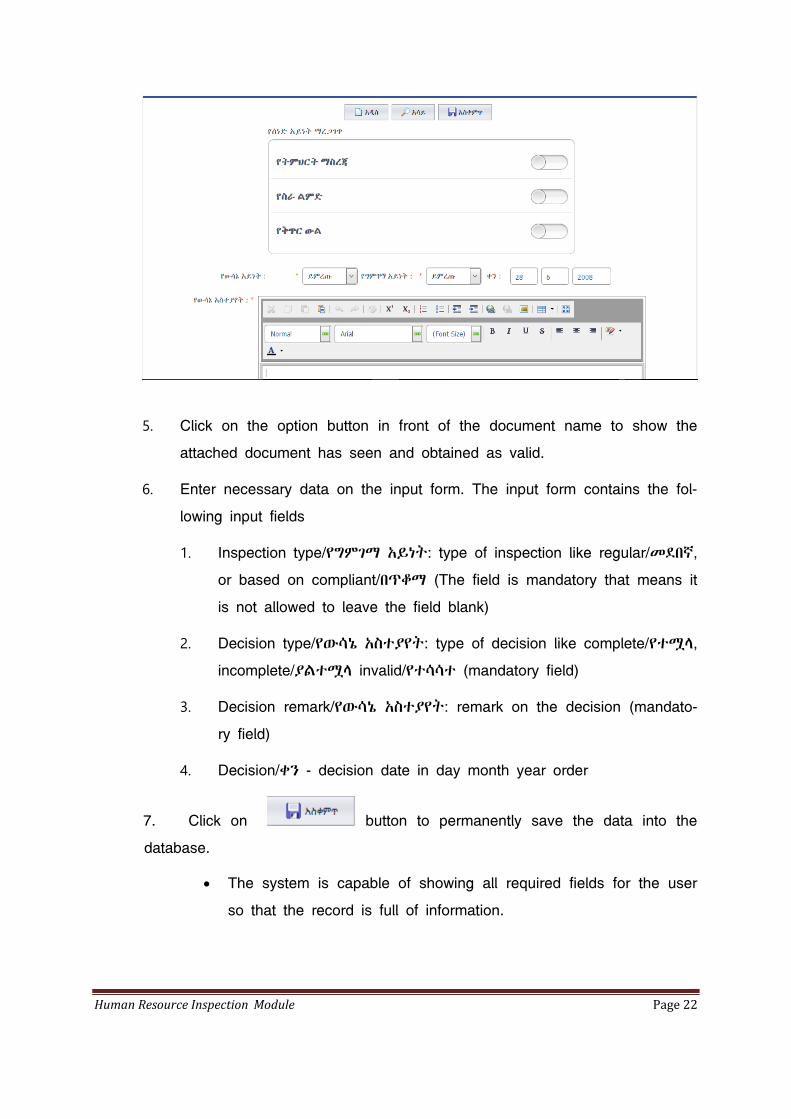
Human Resource Inspection Module Page 22
5. Click on the option button in front of the document name to show the
attached document has seen and obtained as valid.
6. Enter necessary data on the input form. The input form contains the fol-
lowing input fields
1. Inspection type/የግምገማ አይነት: type of inspection like regular/መደበኛ,
or based on compliant/በጥቆማ (The field is mandatory that means it
is not allowed to leave the field blank)
2. Decision type/የውሳኔ አስተያየት: type of decision like complete/የተሟላ,
incomplete/ያልተሟላ invalid/የተሳሳተ (mandatory field)
3. Decision remark/የውሳኔ አስተያየት: remark on the decision (mandato-
ry field)
4. Decision/ቀን - decision date in day month year order
7. Click on button to permanently save the data into the
database.
The system is capable of showing all required fields for the user
so that the record is full of information.
Human Resource Inspection Module Page 23
If the inspection is saved successfully a message will be displayed for you.
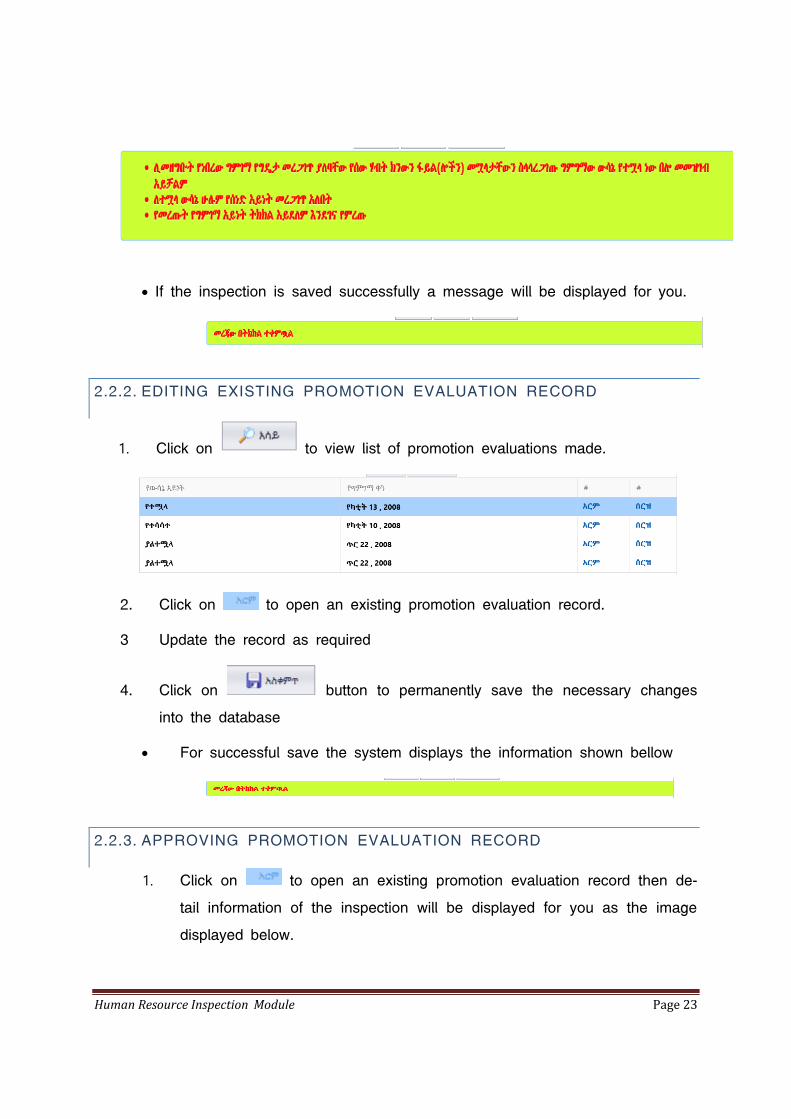
2.2.2. EDITING EXISTING PROMOTION EVALUATION RECORD
1. Click on to view list of promotion evaluations made.
2. Click on to open an existing promotion evaluation record.
3 Update the record as required
4. Click on button to permanently save the necessary changes
into the database
For successful save the system displays the information shown bellow
2.2.3. APPROVING PROMOTION EVALUATION RECORD
1. Click on to open an existing promotion evaluation record then de-
tail information of the inspection will be displayed for you as the image
displayed below.
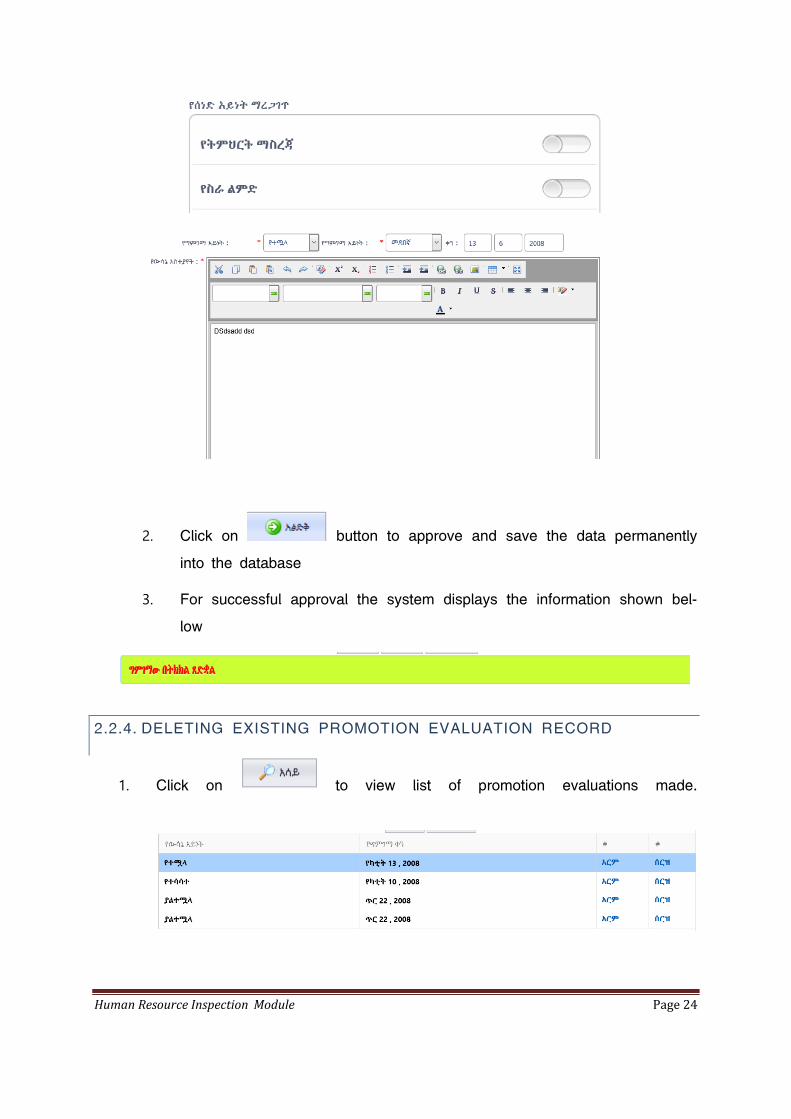
Human Resource Inspection Module Page 24
2. Click on button to approve and save the data permanently
into the database
3. For successful approval the system displays the information shown bel-
low
2.2.4. DELETING EXISTING PROMOTION EVALUATION RECORD
1. Click on to view list of promotion evaluations made.
Human Resource Inspection Module Page 25
2. Click on to open an existing promotion evaluation record
3. The system displays confirmation message as follows.
Click on button to delete or click on to cancel.
If you click on button the system displays an information message
as shown below.
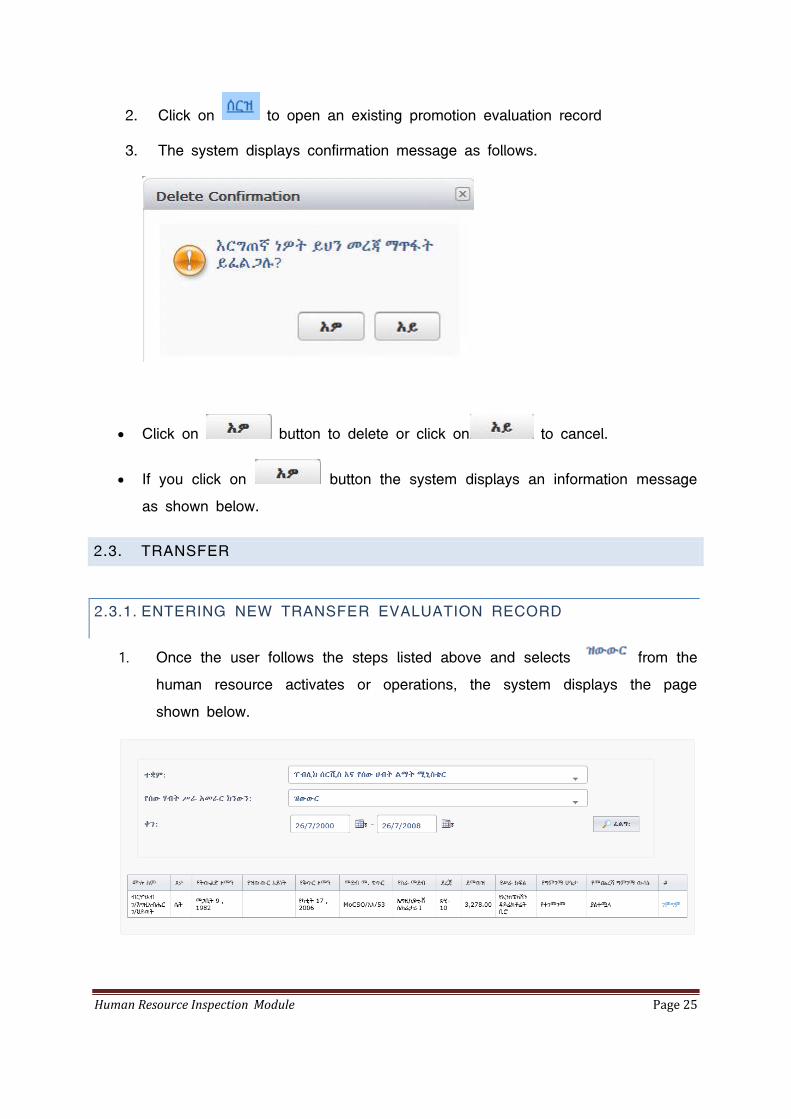
2.3. TRANSFER
2.3.1. ENTERING NEW TRANSFER EVALUATION RECORD
1. Once the user follows the steps listed above and selects from the
human resource activates or operations, the system displays the page
shown below.
Human Resource Inspection Module Page 26
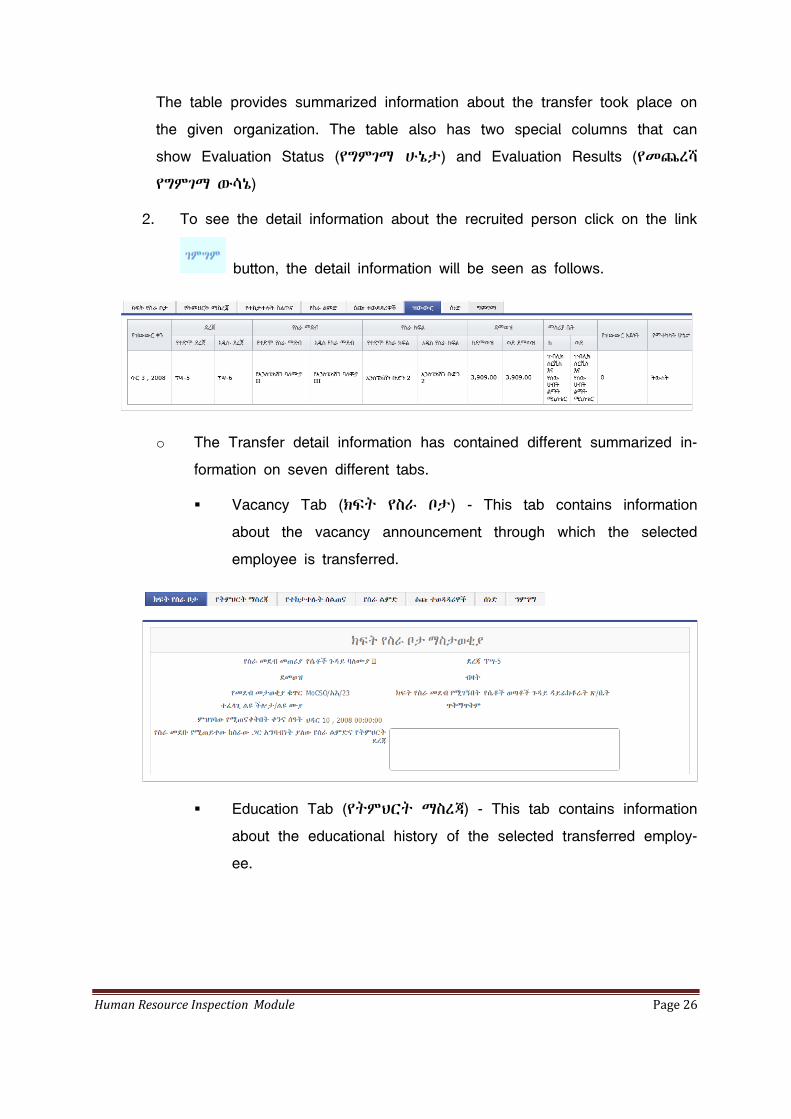
The table provides summarized information about the transfer took place on
the given organization. The table also has two special columns that can
show Evaluation Status (የግምገማ ሁኔታ) and Evaluation Results (የመጨረሻ
የግምገማ ውሳኔ)
2. To see the detail information about the recruited person click on the link
button, the detail information will be seen as follows.
o The Transfer detail information has contained different summarized in-
formation on seven different tabs.
Vacancy Tab (ክፍት የስራ ቦታ) - This tab contains information
about the vacancy announcement through which the selected
employee is transferred.
Education Tab (የትምህርት ማስረጃ) - This tab contains information
about the educational history of the selected transferred employ-
ee.
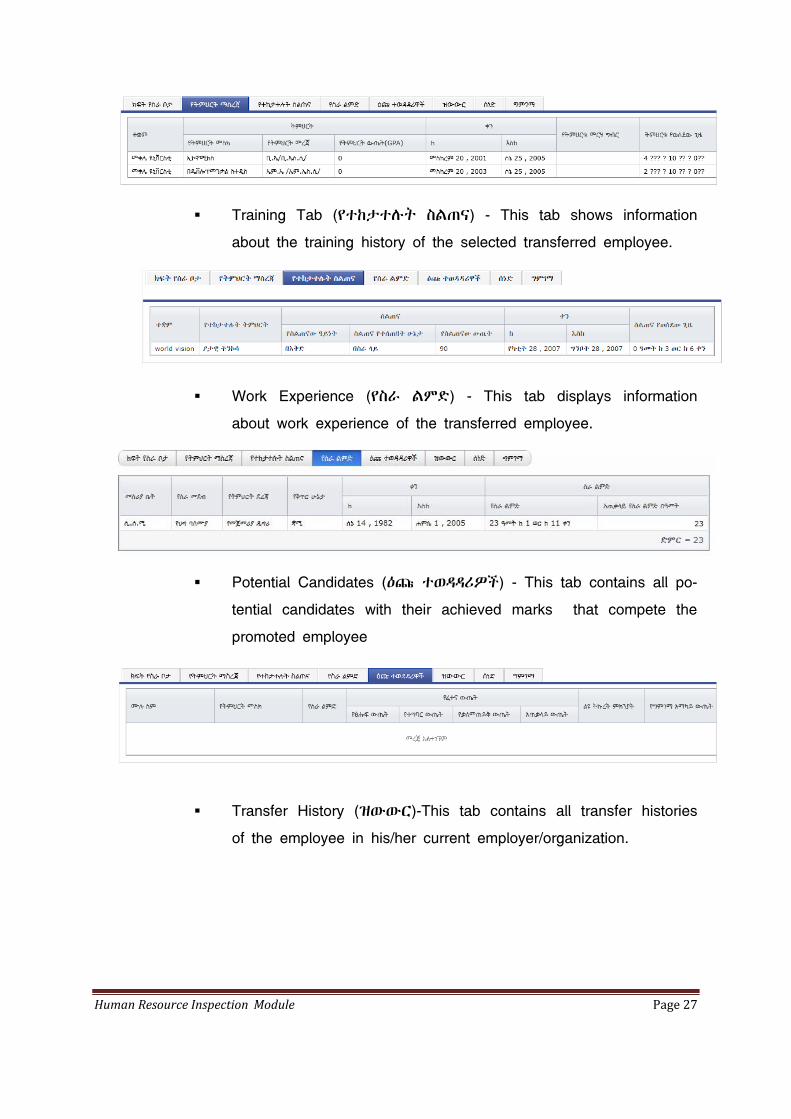
Human Resource Inspection Module Page 27
Training Tab (የተከታተሉት ስልጠና) - This tab shows information
about the training history of the selected transferred employee.
Work Experience (የስራ ልምድ) - This tab displays information
about work experience of the transferred employee.
Potential Candidates (ዕጩ ተወዳዳሪዎች) - This tab contains all po-
tential candidates with their achieved marks that compete the
promoted employee
Transfer History (ዝውውር)-This tab contains all transfer histories
of the employee in his/her current employer/organization.
Human Resource Inspection Module Page 28
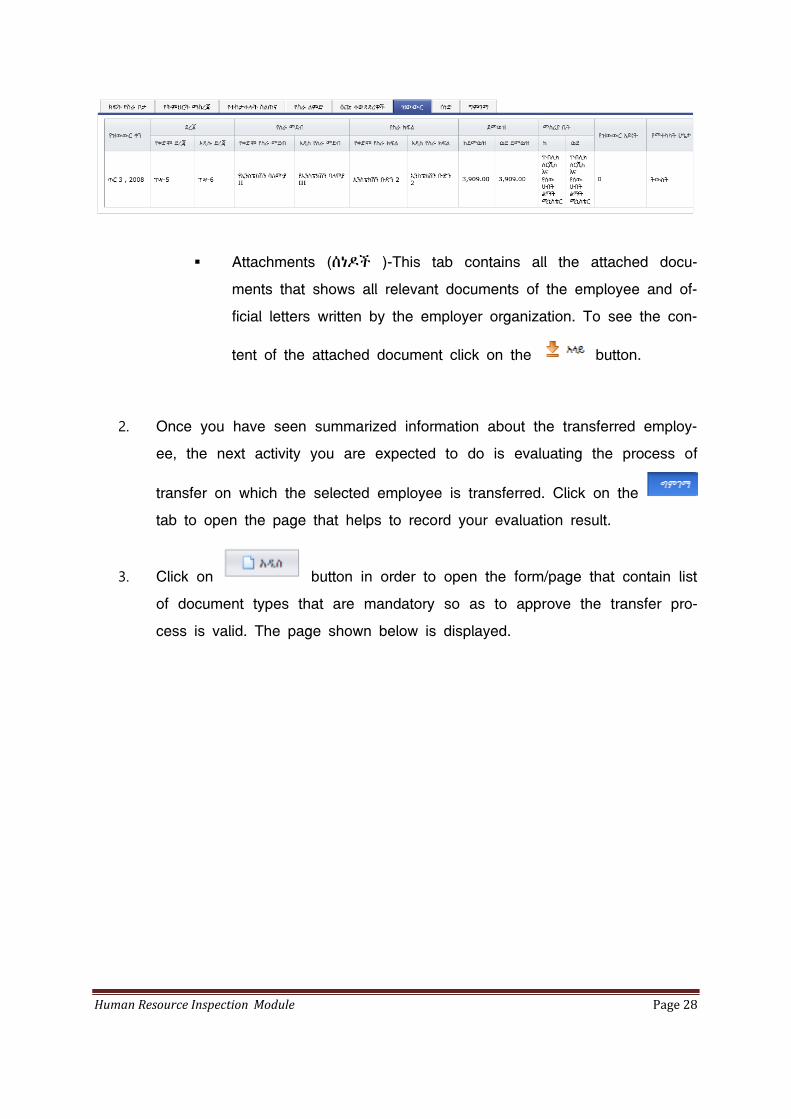
Attachments (ሰነዶች )-This tab contains all the attached docu-
ments that shows all relevant documents of the employee and of-
ficial letters written by the employer organization. To see the con-
tent of the attached document click on the button.
2. Once you have seen summarized information about the transferred employ-
ee, the next activity you are expected to do is evaluating the process of
transfer on which the selected employee is transferred. Click on the
tab to open the page that helps to record your evaluation result.
3. Click on button in order to open the form/page that contain list
of document types that are mandatory so as to approve the transfer pro-
cess is valid. The page shown below is displayed.
Human Resource Inspection Module Page 29
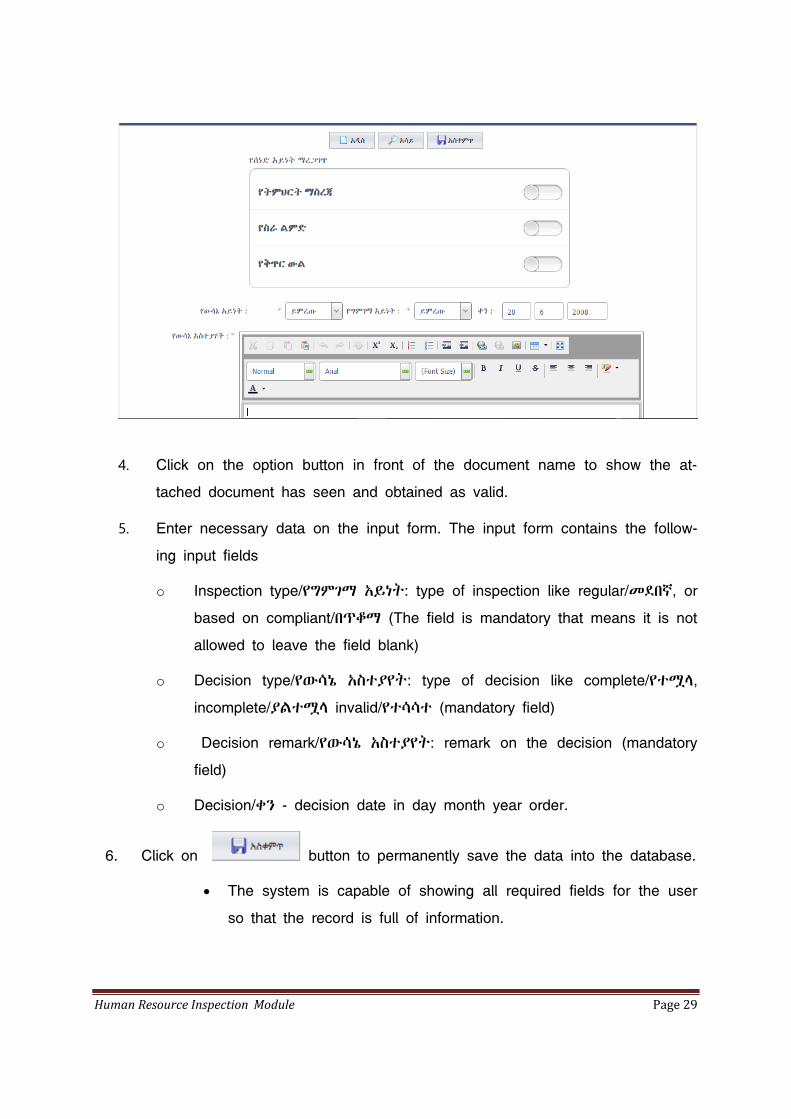
4. Click on the option button in front of the document name to show the at-
tached document has seen and obtained as valid.
5. Enter necessary data on the input form. The input form contains the follow-
ing input fields
o Inspection type/የግምገማ አይነት: type of inspection like regular/መደበኛ, or
based on compliant/በጥቆማ (The field is mandatory that means it is not
allowed to leave the field blank)
o Decision type/የውሳኔ አስተያየት: type of decision like complete/የተሟላ,
incomplete/ያልተሟላ invalid/የተሳሳተ (mandatory field)
o Decision remark/የውሳኔ አስተያየት: remark on the decision (mandatory
field)
o Decision/ቀን - decision date in day month year order.
6. Click on button to permanently save the data into the database.
The system is capable of showing all required fields for the user
so that the record is full of information.

Human Resource Inspection Module Page 30
If the inspection is saved successfully a message will be dis-
played for you.
.
2.3.2. EDITING EXISTING TRANSFER EVALUATION RECORD
1. Click on to view list of transfer evaluations made.
2. Click on to open an existing transfer evaluation record
3. Update the record as required
4. Click on button to permanently save the necessary changes
into the database
5. For the successful save the system displays the information shown bellow
Human Resource Inspection Module Page 31
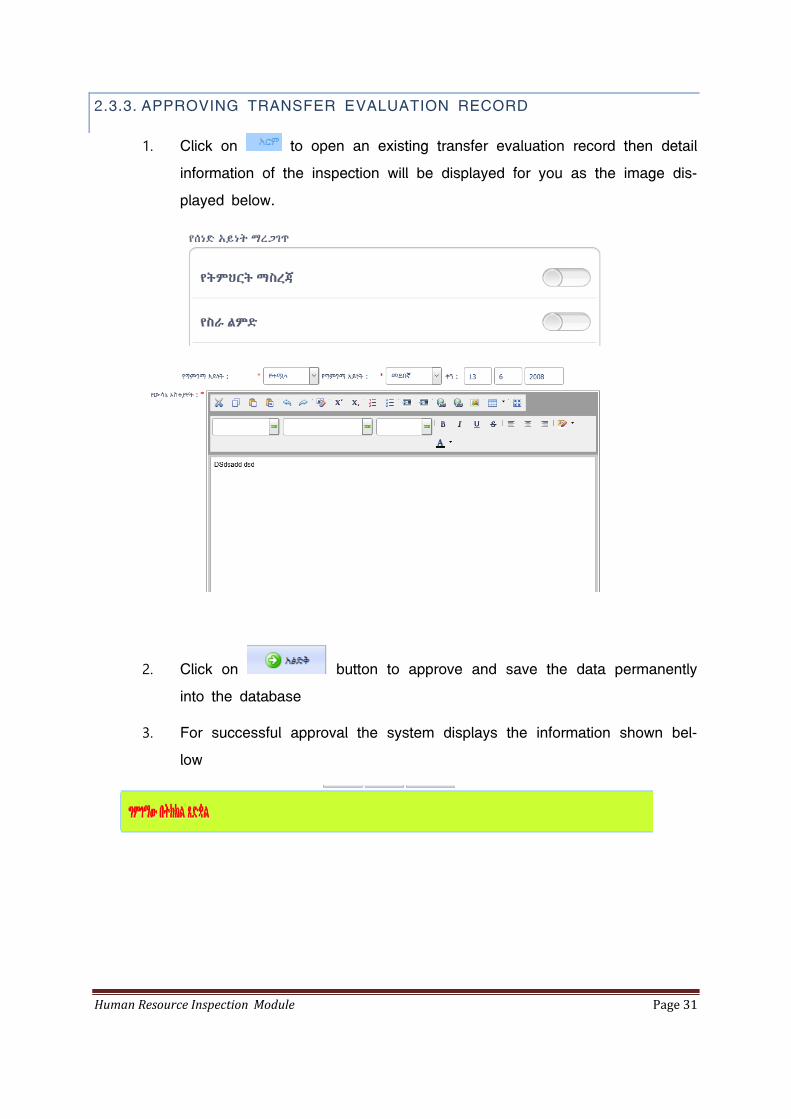
2.3.3. APPROVING TRANSFER EVALUATION RECORD
1. Click on to open an existing transfer evaluation record then detail
information of the inspection will be displayed for you as the image dis-
played below.
2. Click on button to approve and save the data permanently
into the database
3. For successful approval the system displays the information shown bel-
low
Human Resource Inspection Module Page 32
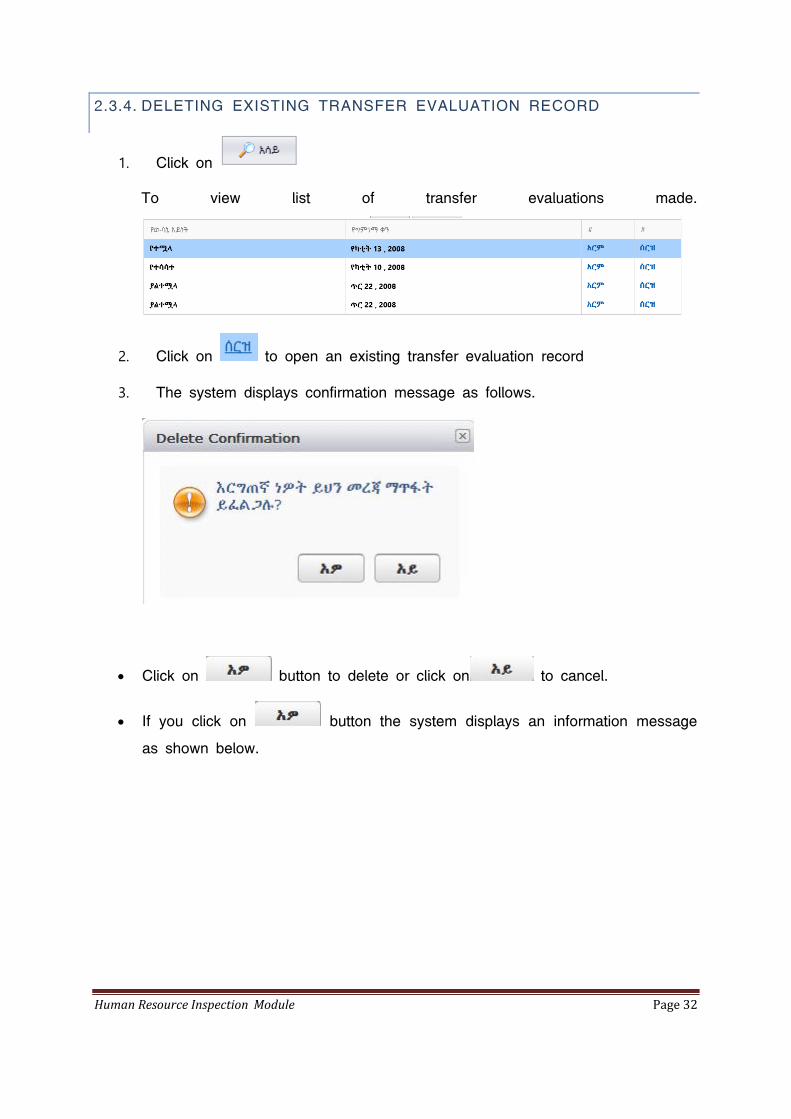
2.3.4. DELETING EXISTING TRANSFER EVALUATION RECORD
1. Click on
To view list of transfer evaluations made.
2. Click on to open an existing transfer evaluation record
3. The system displays confirmation message as follows.
Click on button to delete or click on to cancel.
If you click on button the system displays an information message
as shown below.
Human Resource Inspection Module Page 33
2.4. SERVICE EXTENSION
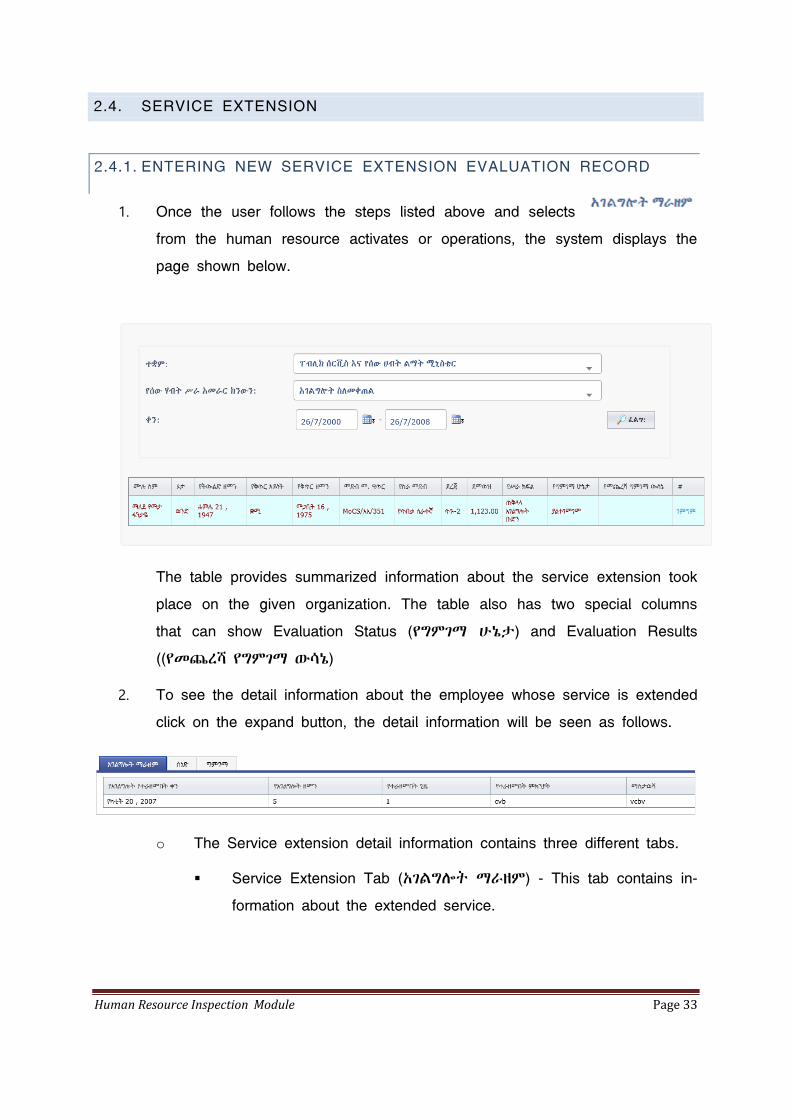
2.4.1. ENTERING NEW SERVICE EXTENSION EVALUATION RECORD
1. Once the user follows the steps listed above and selects
from the human resource activates or operations, the system displays the
page shown below.
The table provides summarized information about the service extension took
place on the given organization. The table also has two special columns
that can show Evaluation Status (የግምገማ ሁኔታ) and Evaluation Results
((የመጨረሻ የግምገማ ውሳኔ)
2. To see the detail information about the employee whose service is extended
click on the expand button, the detail information will be seen as follows.
o The Service extension detail information contains three different tabs.
Service Extension Tab (አገልግሎት ማራዘም) - This tab contains in-
formation about the extended service.
Human Resource Inspection Module Page 34
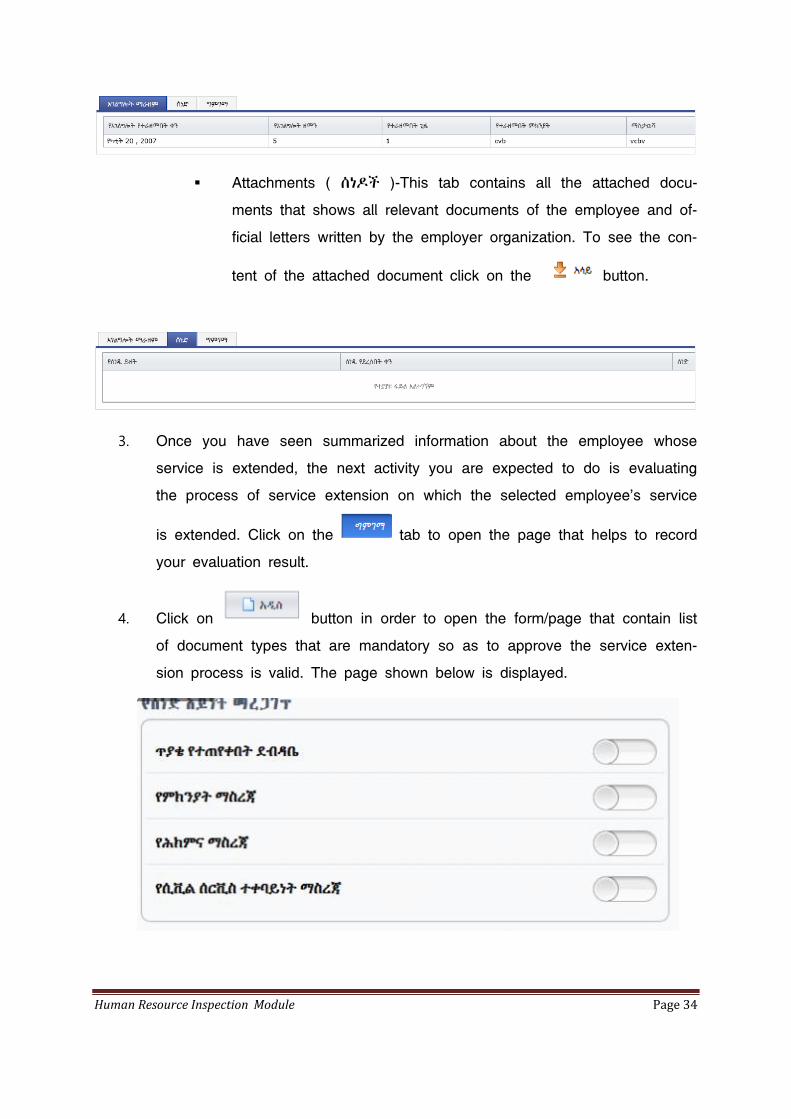
Attachments ( ሰነዶች )-This tab contains all the attached docu-
ments that shows all relevant documents of the employee and of-
ficial letters written by the employer organization. To see the con-
tent of the attached document click on the button.
3. Once you have seen summarized information about the employee whose
service is extended, the next activity you are expected to do is evaluating
the process of service extension on which the selected employee’s service
is extended. Click on the tab to open the page that helps to record
your evaluation result.
4. Click on button in order to open the form/page that contain list
of document types that are mandatory so as to approve the service exten-
sion process is valid. The page shown below is displayed.
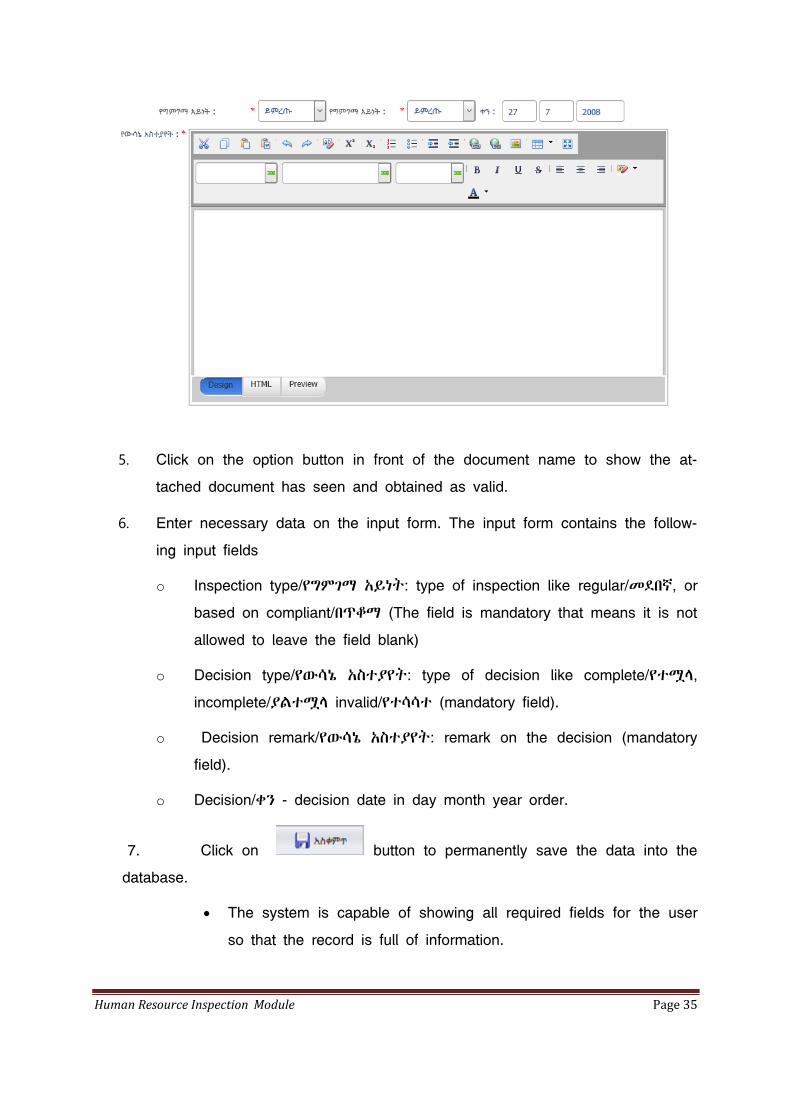
Human Resource Inspection Module Page 35
5. Click on the option button in front of the document name to show the at-
tached document has seen and obtained as valid.
6. Enter necessary data on the input form. The input form contains the follow-
ing input fields
o Inspection type/የግምገማ አይነት: type of inspection like regular/መደበኛ, or
based on compliant/በጥቆማ (The field is mandatory that means it is not
allowed to leave the field blank)
o Decision type/የውሳኔ አስተያየት: type of decision like complete/የተሟላ,
incomplete/ያልተሟላ invalid/የተሳሳተ (mandatory field).
o Decision remark/የውሳኔ አስተያየት: remark on the decision (mandatory
field).
o Decision/ቀን - decision date in day month year order.
7. Click on button to permanently save the data into the
database.
The system is capable of showing all required fields for the user
so that the record is full of information.
Human Resource Inspection Module Page 36
If the inspection is saved successfully a message will be dis-
played for you.
2.4.2. EDITING EXISTING SERVICE EXTENSION EVALUATION RECORD
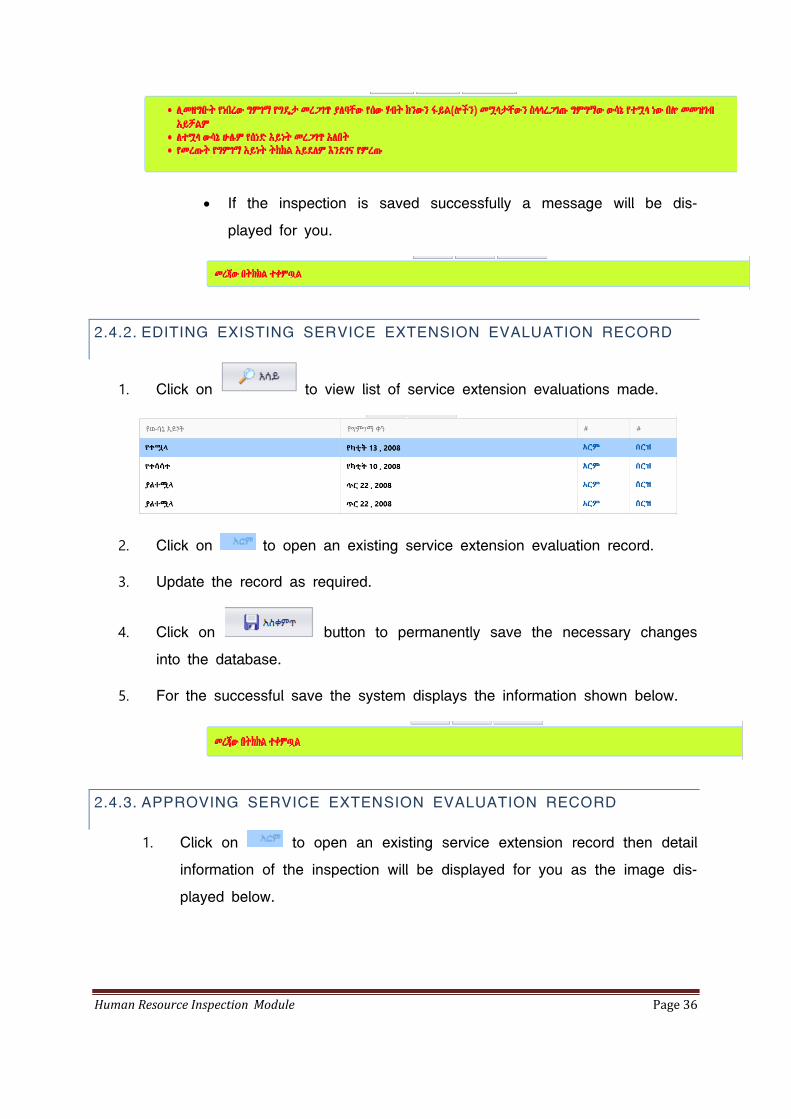
1. Click on to view list of service extension evaluations made.
2. Click on to open an existing service extension evaluation record.
3. Update the record as required.
4. Click on button to permanently save the necessary changes
into the database.
5. For the successful save the system displays the information shown below.
2.4.3. APPROVING SERVICE EXTENSION EVALUATION RECORD
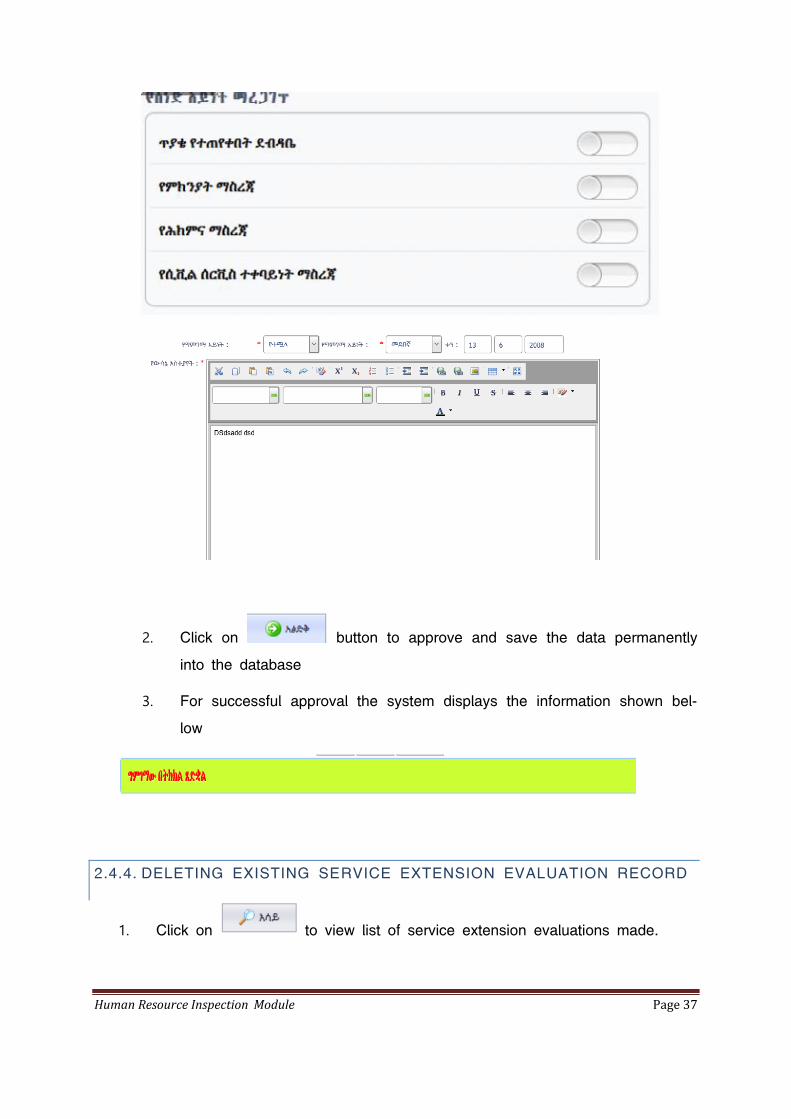
1. Click on to open an existing service extension record then detail
information of the inspection will be displayed for you as the image dis-
played below.
Human Resource Inspection Module Page 37
2. Click on button to approve and save the data permanently
into the database
3. For successful approval the system displays the information shown bel-
low
2.4.4. DELETING EXISTING SERVICE EXTENSION EVALUATION RECORD
1. Click on to view list of service extension evaluations made.
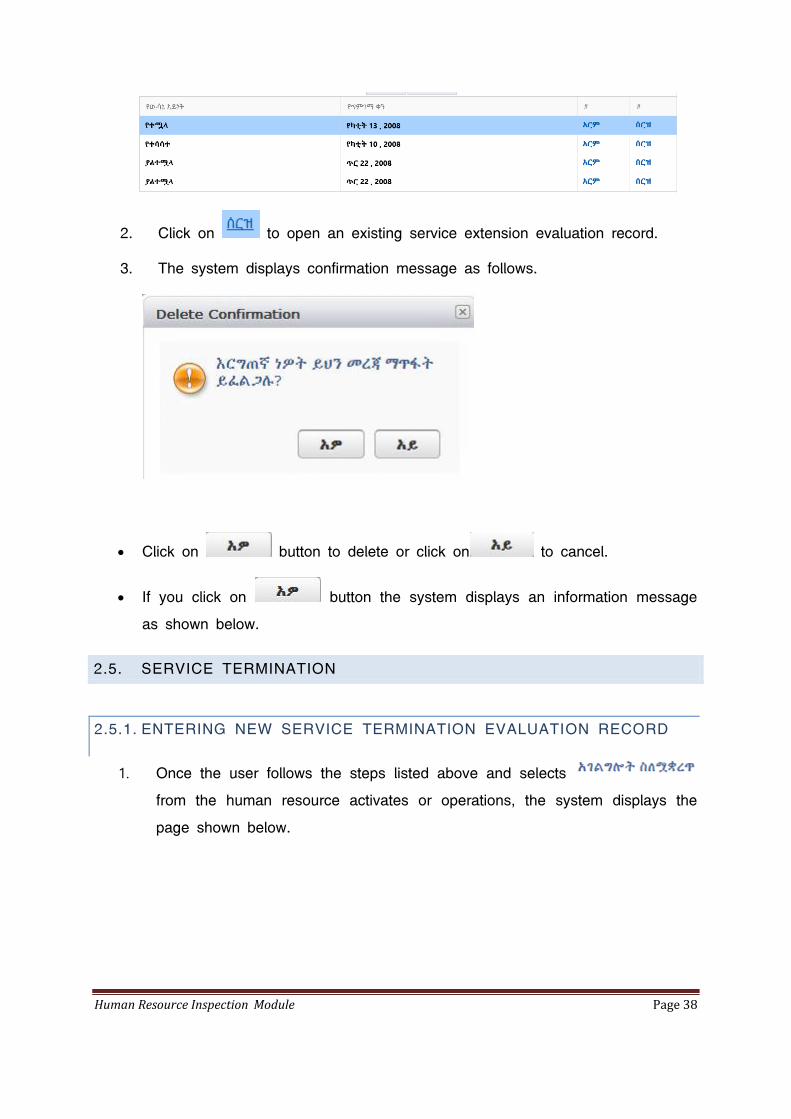
Human Resource Inspection Module Page 38
2. Click on to open an existing service extension evaluation record.
3. The system displays confirmation message as follows.
Click on button to delete or click on to cancel.
If you click on button the system displays an information message
as shown below.
2.5. SERVICE TERMINATION
2.5.1. ENTERING NEW SERVICE TERMINATION EVALUATION RECORD
1. Once the user follows the steps listed above and selects
from the human resource activates or operations, the system displays the
page shown below.
Human Resource Inspection Module Page 39
The table provides summarized information about the service termination
took place on the given organization. The table also has two special col-
umns that can show Evaluation Status (የግምገማ ሁኔታ) and Evaluation Re-
sults (የመጨረሻ የግምገማ ውሳኔ)
2. To see the detail information about the employee whose service is terminat-
ed click on the expand button, the detail information will be seen as follows.
o The Service termination detail information contains two different tabs.
Service Termination Tab (አገልግሎት ማቋረጥ) - This tab contains
information about the terminated service.
Attachments ( ሰነዶች )-This tab contains all the attached docu-
ments that shows all relevant documents of the employee and of-
ficial letters written by the employer organization. To see the con-
tent of the attached document click on the button.
Human Resource Inspection Module Page 40
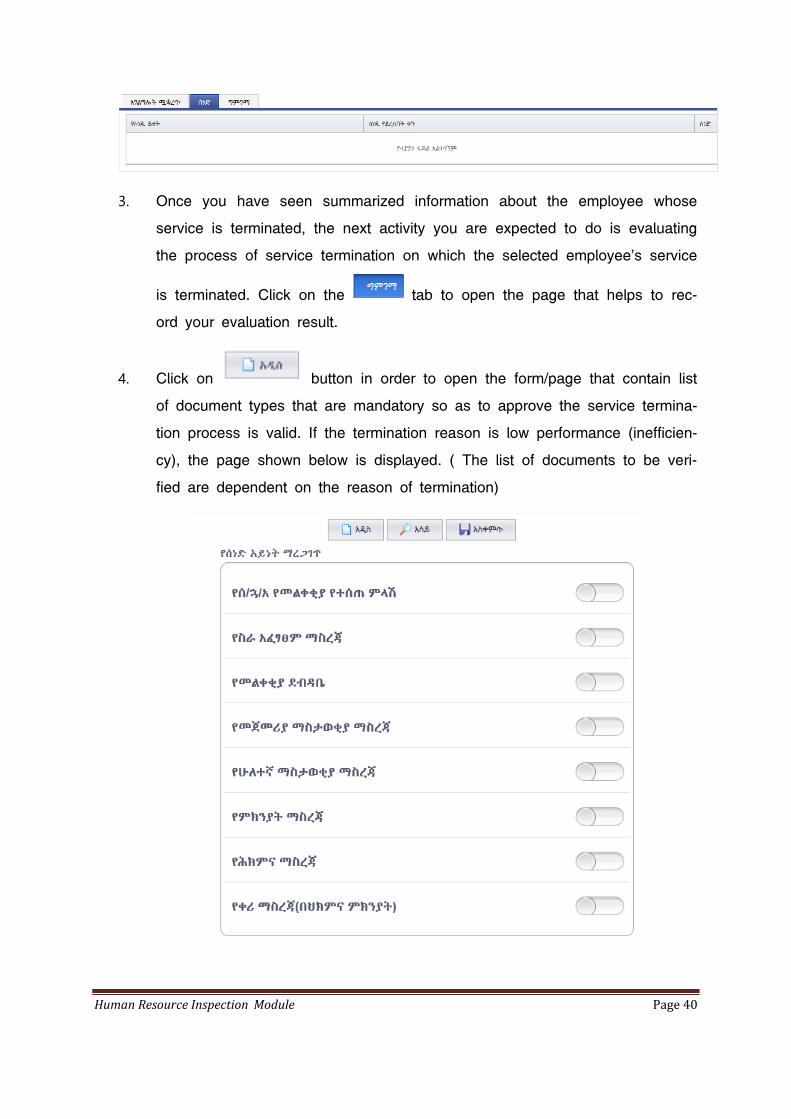
3. Once you have seen summarized information about the employee whose
service is terminated, the next activity you are expected to do is evaluating
the process of service termination on which the selected employee’s service
is terminated. Click on the tab to open the page that helps to rec-
ord your evaluation result.
4. Click on button in order to open the form/page that contain list
of document types that are mandatory so as to approve the service termina-
tion process is valid. If the termination reason is low performance (inefficien-
cy), the page shown below is displayed. ( The list of documents to be veri-
fied are dependent on the reason of termination)
Human Resource Inspection Module Page 41
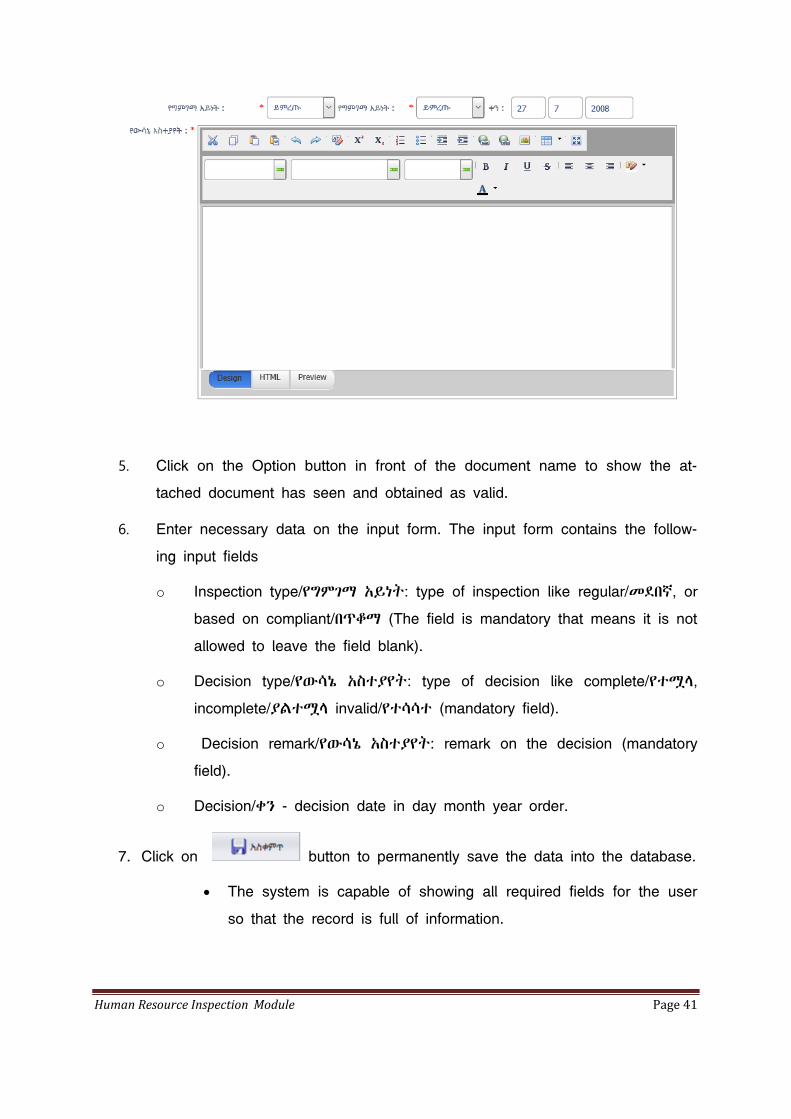
5. Click on the Option button in front of the document name to show the at-
tached document has seen and obtained as valid.
6. Enter necessary data on the input form. The input form contains the follow-
ing input fields
o Inspection type/የግምገማ አይነት: type of inspection like regular/መደበኛ, or
based on compliant/በጥቆማ (The field is mandatory that means it is not
allowed to leave the field blank).
o Decision type/የውሳኔ አስተያየት: type of decision like complete/የተሟላ,
incomplete/ያልተሟላ invalid/የተሳሳተ (mandatory field).
o Decision remark/የውሳኔ አስተያየት: remark on the decision (mandatory
field).
o Decision/ቀን - decision date in day month year order.
7. Click on button to permanently save the data into the database.
The system is capable of showing all required fields for the user
so that the record is full of information.
Human Resource Inspection Module Page 42
If the inspection is saved successfully a message will be dis-
played for you.
2.5.2. EDITING EXISTING SERVICE TERMINATION EVALUATION RECORD
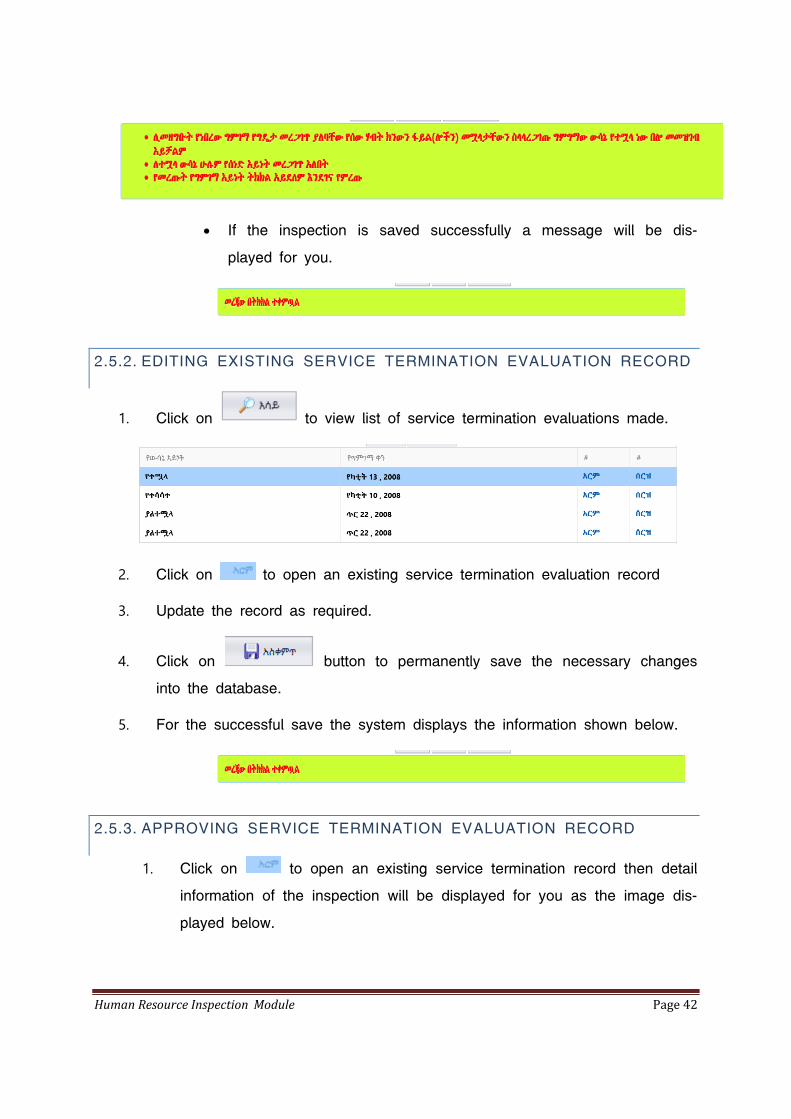
1. Click on to view list of service termination evaluations made.
2. Click on to open an existing service termination evaluation record
3. Update the record as required.
4. Click on button to permanently save the necessary changes
into the database.
5. For the successful save the system displays the information shown below.
2.5.3. APPROVING SERVICE TERMINATION EVALUATION RECORD
1. Click on to open an existing service termination record then detail
information of the inspection will be displayed for you as the image dis-
played below.

Human Resource Inspection Module Page 43
2. Click on button to approve and save the data permanently
into the database
3. For successful approval the system displays the information shown bel-
low
Human Resource Inspection Module Page 44
2.5.4. DELETING EXISTING SERVICE TERMINATION EVALUATION REC-ORD
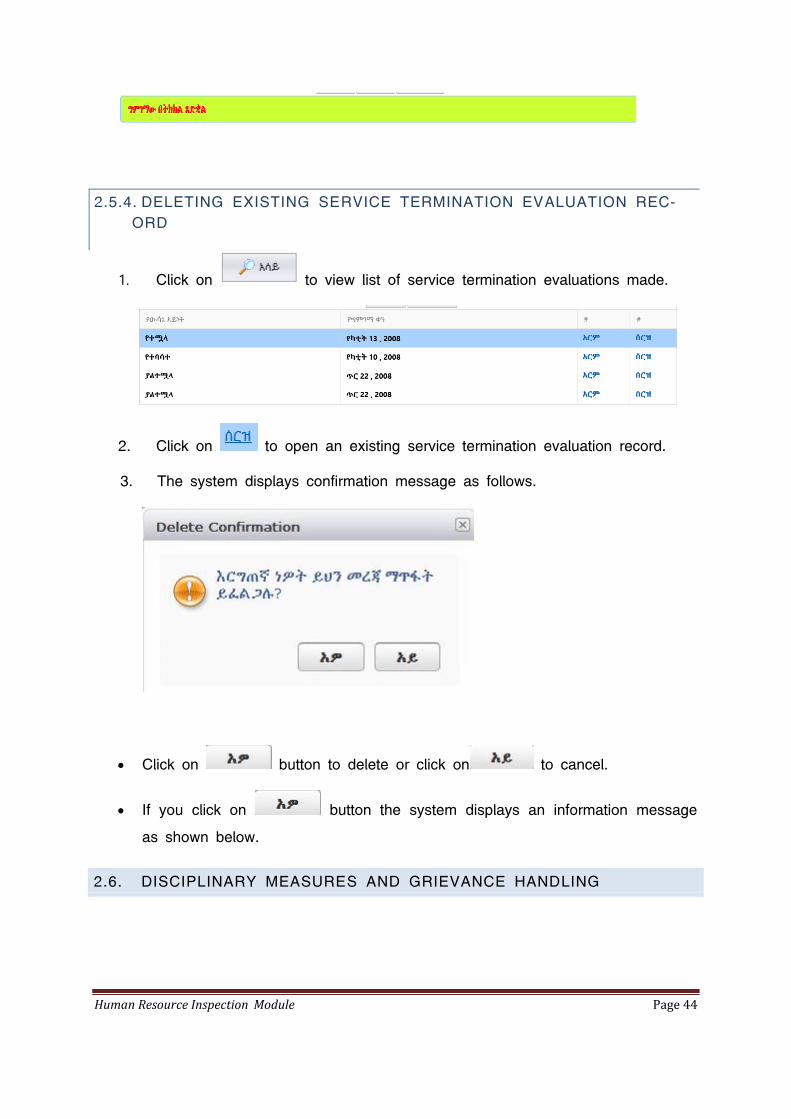
1. Click on to view list of service termination evaluations made.
2. Click on to open an existing service termination evaluation record.
3. The system displays confirmation message as follows.
Click on button to delete or click on to cancel.
If you click on button the system displays an information message
as shown below.
2.6. DISCIPLINARY MEASURES AND GRIEVANCE HANDLING
Human Resource Inspection Module Page 45
2.6.1. ENTERING NEW DISCIPLINARY MEASURES AND GRIEVANCE HANDLING EVALUATION RECORD
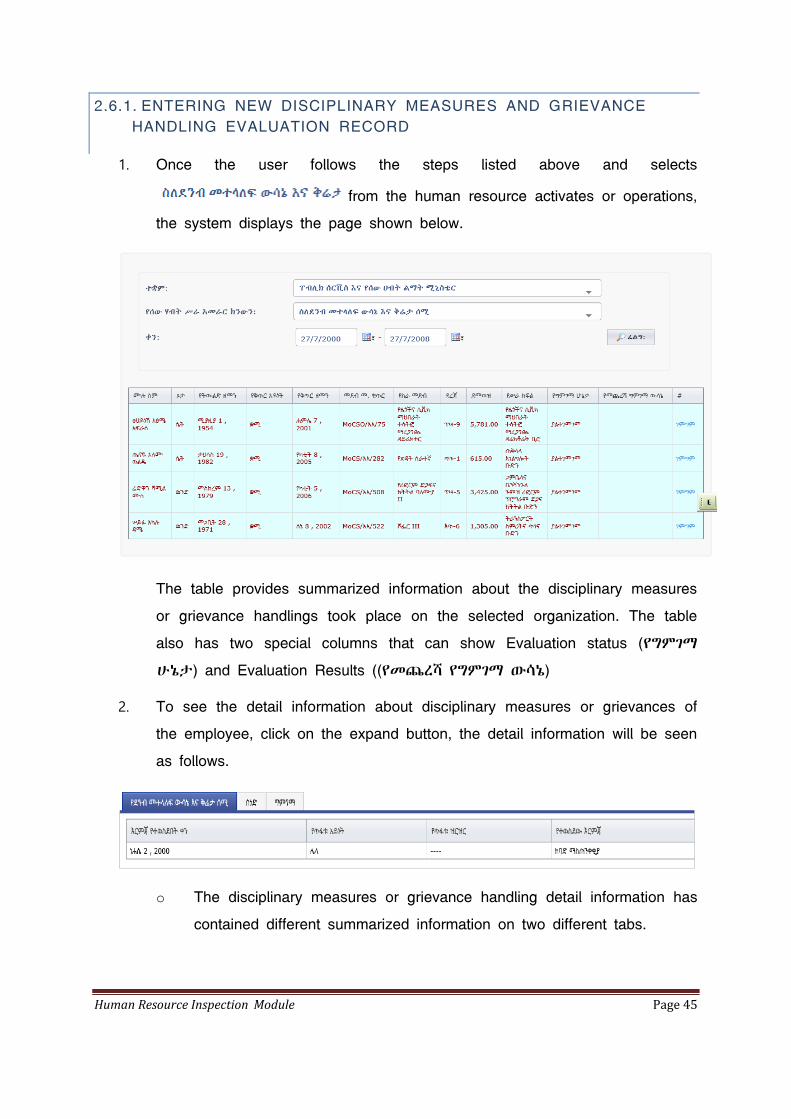
1. Once the user follows the steps listed above and selects
from the human resource activates or operations,
the system displays the page shown below.
The table provides summarized information about the disciplinary measures
or grievance handlings took place on the selected organization. The table
also has two special columns that can show Evaluation status (የግምገማ
ሁኔታ) and Evaluation Results ((የመጨረሻ የግምገማ ውሳኔ)
2. To see the detail information about disciplinary measures or grievances of
the employee, click on the expand button, the detail information will be seen
as follows.
o The disciplinary measures or grievance handling detail information has
contained different summarized information on two different tabs.
Human Resource Inspection Module Page 46
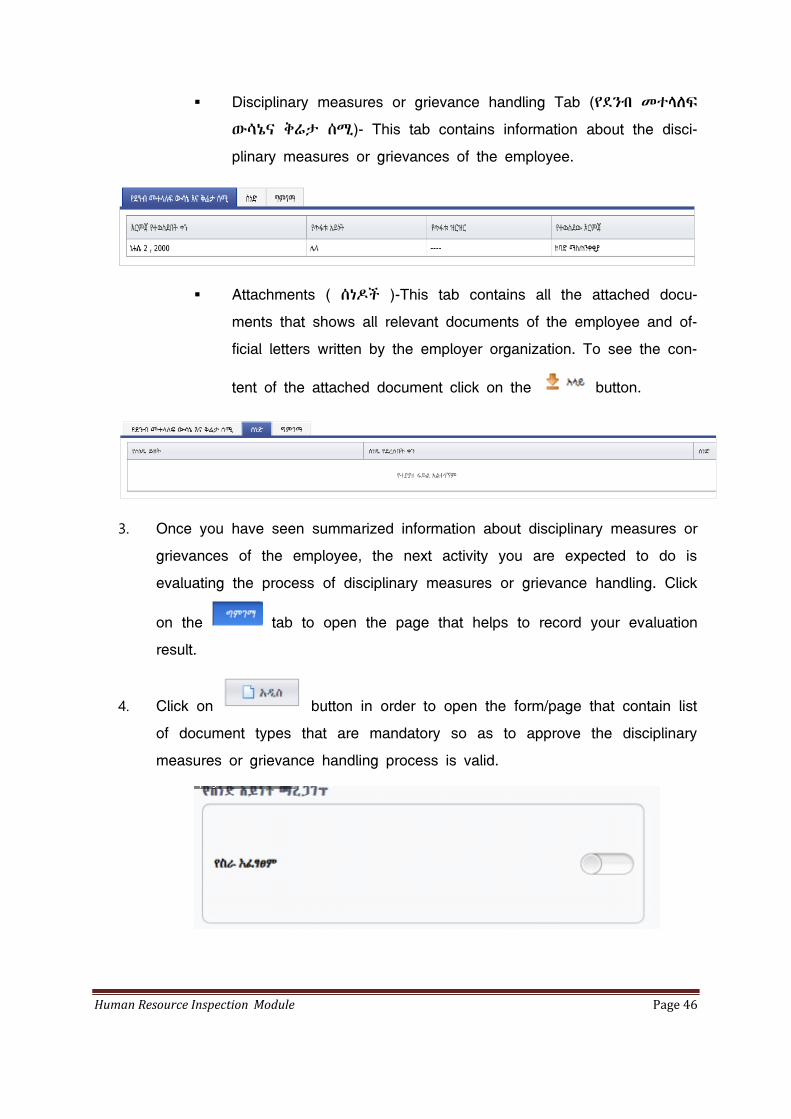
Disciplinary measures or grievance handling Tab (የደንብ መተላለፍ
ውሳኔና ቅሬታ ሰሚ)- This tab contains information about the disci-
plinary measures or grievances of the employee.
Attachments ( ሰነዶች )-This tab contains all the attached docu-
ments that shows all relevant documents of the employee and of-
ficial letters written by the employer organization. To see the con-
tent of the attached document click on the button.
3. Once you have seen summarized information about disciplinary measures or
grievances of the employee, the next activity you are expected to do is
evaluating the process of disciplinary measures or grievance handling. Click
on the tab to open the page that helps to record your evaluation
result.
4. Click on button in order to open the form/page that contain list
of document types that are mandatory so as to approve the disciplinary
measures or grievance handling process is valid.
Human Resource Inspection Module Page 47
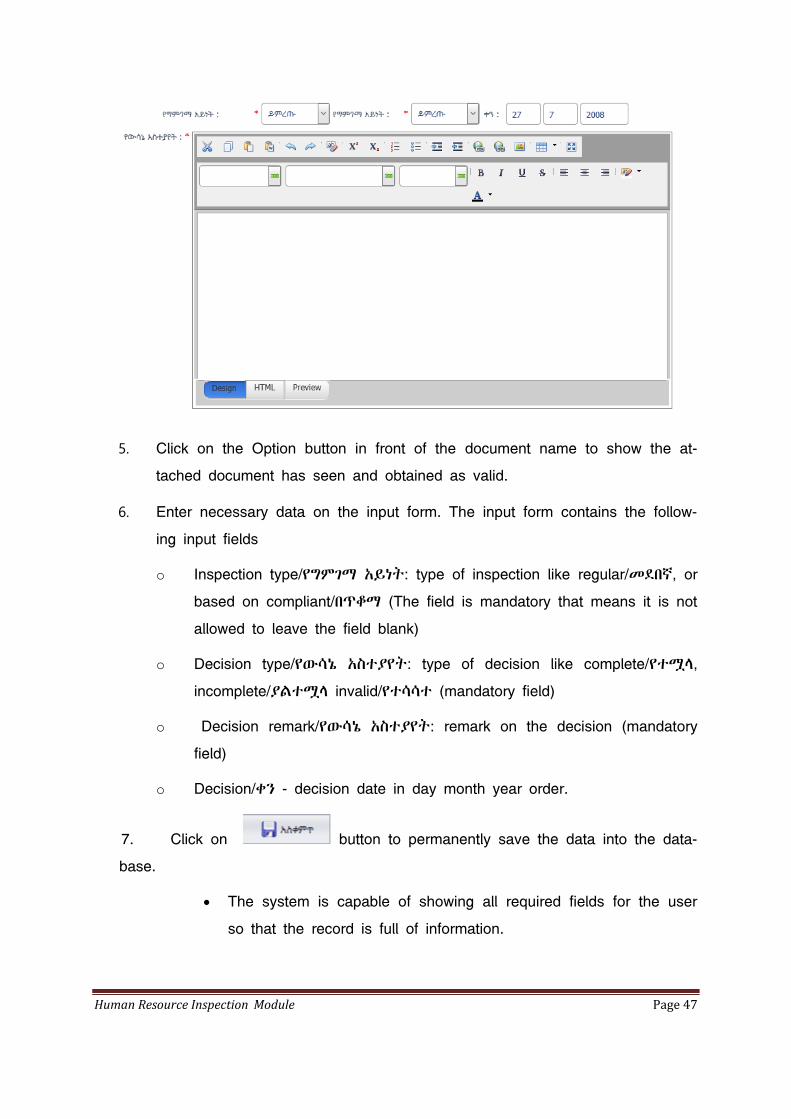
5. Click on the Option button in front of the document name to show the at-
tached document has seen and obtained as valid.
6. Enter necessary data on the input form. The input form contains the follow-
ing input fields
o Inspection type/የግምገማ አይነት: type of inspection like regular/መደበኛ, or
based on compliant/በጥቆማ (The field is mandatory that means it is not
allowed to leave the field blank)
o Decision type/የውሳኔ አስተያየት: type of decision like complete/የተሟላ,
incomplete/ያልተሟላ invalid/የተሳሳተ (mandatory field)
o Decision remark/የውሳኔ አስተያየት: remark on the decision (mandatory
field)
o Decision/ቀን - decision date in day month year order.
7. Click on button to permanently save the data into the data-
base.
The system is capable of showing all required fields for the user
so that the record is full of information.
Human Resource Inspection Module Page 48
If the inspection is saved successfully a message will be dis-
played for you.
2.6.2. EDITING EXISTING DISCIPLINARY MEASURES AND GRIEVANCE HANDLING EVALUATION RECORD
1. Click on to view list of disciplinary measures and grievance
handling evaluations made.
2. Click on to open an existing disciplinary measure or grievance han-
dling evaluation record
3. Update the record as required
4. Click on button to permanently save the necessary changes
into the database
5. For the successful save the system displays the information shown bellow

Human Resource Inspection Module Page 49
2.6.3. APPROVING DISCIPLINARY MEASURES AND GRIEVANCE HAN-DLING EVALUATION RECORD
1. Click on to open an existing disciplinary measures and grievance
handling record then detail information of the inspection will be displayed
for you as the image displayed below.
2. Click on button to approve and save the data permanently
into the database
3. For successful approval the system displays the information shown bel-
low
Human Resource Inspection Module Page 50
2.6.4. DELETING DISCIPLINARY MEASURES AND GRIEVANCE HANDLING EVALUATION RECORD
1. Click on to view list of disciplinary measures and grievance
handling evaluations made.
2. Click on to open an existing disciplinary measures and grievance
handling evaluation record.
3. The system displays confirmation message as follows.
Click on button to delete or click on to cancel.
If you click on button the system displays an information message
as shown below.
Human Resource Inspection Module Page 51
2.7. SCHOLARSHIP
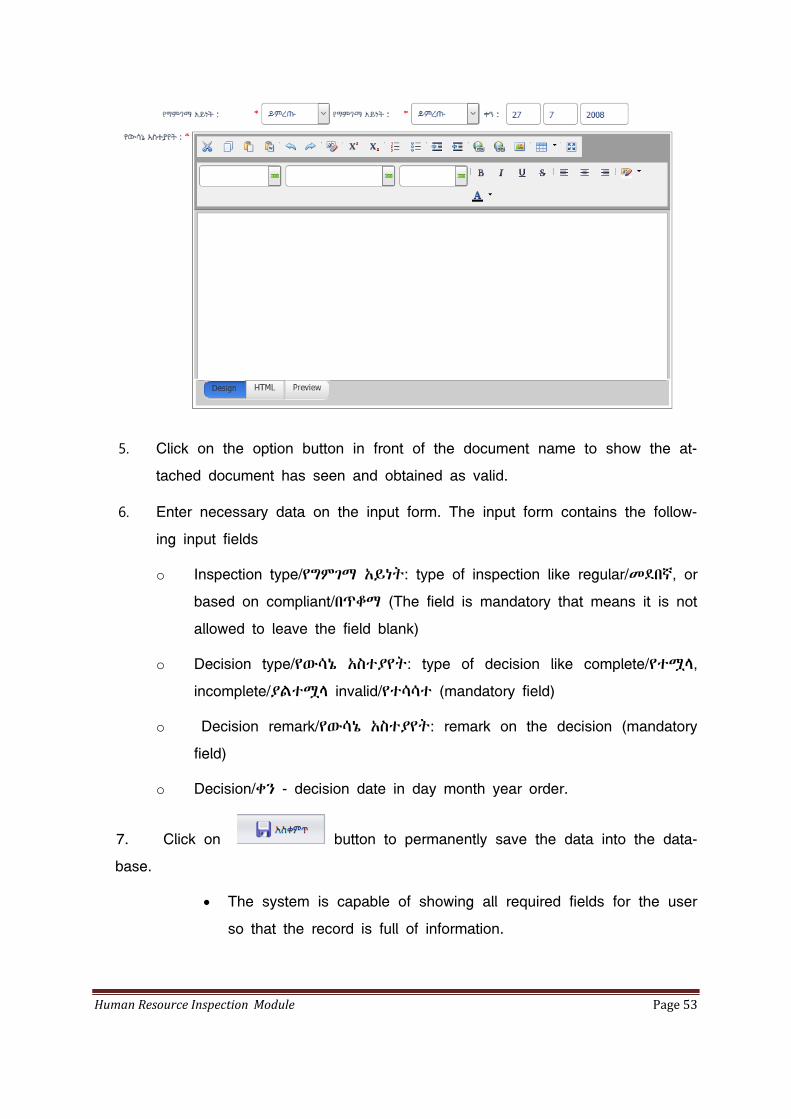
2.7.1. ENTERING NEW SCHOLARSHIP EVALUATION RECORD
1. Once the user follows the steps listed above and selects from
the human resource activates or operations, the system displays the page
shown below.
The table provides summarized information about the scholarships given by
the selected organization. The table also has two special columns that can
show Evaluation status (የግምገማ ሁኔታ) and Evaluation Results (የመጨረሻ
የግምገማ ውሳኔ)
2. To see the detail information about overtime work of the employee, click on
the expand button, the detail information will be seen as follows.
Attachments (ሰነዶች )-This tab contains all the attached docu-
ments that shows all relevant documents of the employee and of-
Human Resource Inspection Module Page 52
ficial letters written by the employer organization. To see the con-
tent of the attached document click on the button.
3. Once you have seen the attached documents of the employee who has ob-
tained scholarship, the next activity you are expected to do is evaluating the
process of scholarship. Click on the tab to open the page that
helps to record your evaluation result.
4. Click on button in order to open the form/page that contain list
of document types that are mandatory so as to approve the scholarship
process is valid.
Human Resource Inspection Module Page 53
5. Click on the option button in front of the document name to show the at-
tached document has seen and obtained as valid.
6. Enter necessary data on the input form. The input form contains the follow-
ing input fields
o Inspection type/የግምገማ አይነት: type of inspection like regular/መደበኛ, or
based on compliant/በጥቆማ (The field is mandatory that means it is not
allowed to leave the field blank)
o Decision type/የውሳኔ አስተያየት: type of decision like complete/የተሟላ,
incomplete/ያልተሟላ invalid/የተሳሳተ (mandatory field)
o Decision remark/የውሳኔ አስተያየት: remark on the decision (mandatory
field)
o Decision/ቀን - decision date in day month year order.
7. Click on button to permanently save the data into the data-
base.
The system is capable of showing all required fields for the user
so that the record is full of information.
Human Resource Inspection Module Page 54
If the inspection is saved successfully a message will be dis-
played for you.
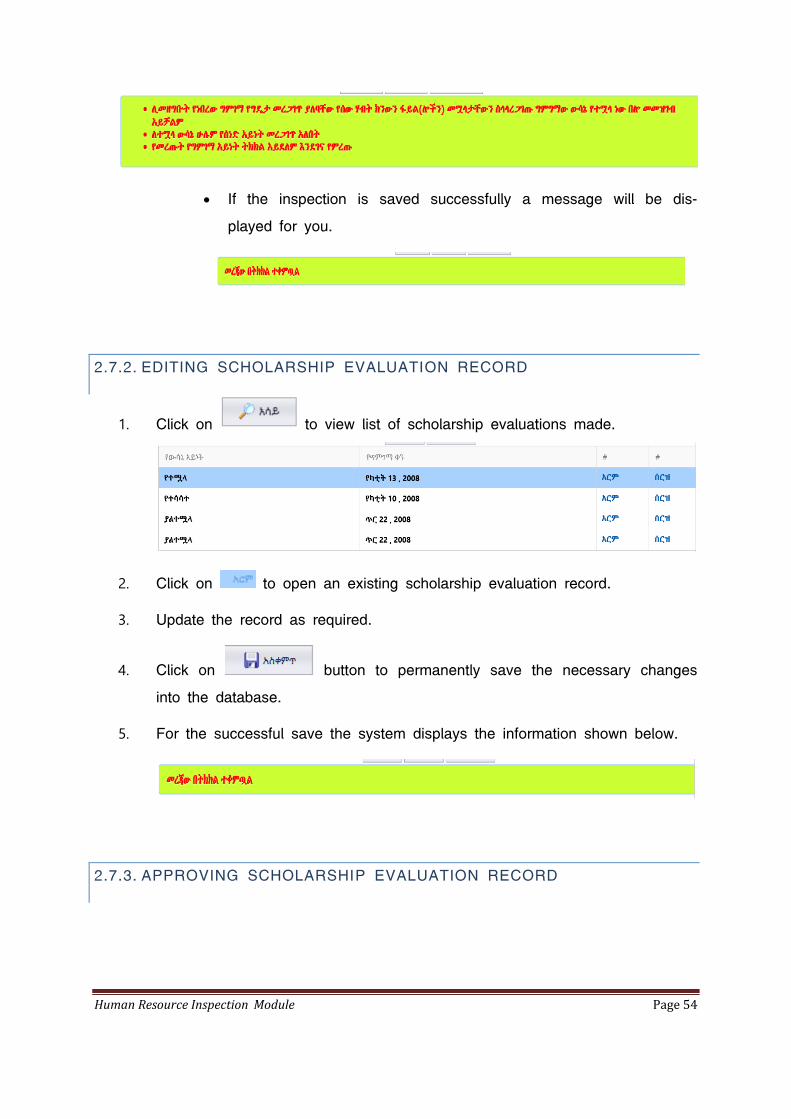
2.7.2. EDITING SCHOLARSHIP EVALUATION RECORD
1. Click on to view list of scholarship evaluations made.
2. Click on to open an existing scholarship evaluation record.
3. Update the record as required.
4. Click on button to permanently save the necessary changes
into the database.
5. For the successful save the system displays the information shown below.
2.7.3. APPROVING SCHOLARSHIP EVALUATION RECORD
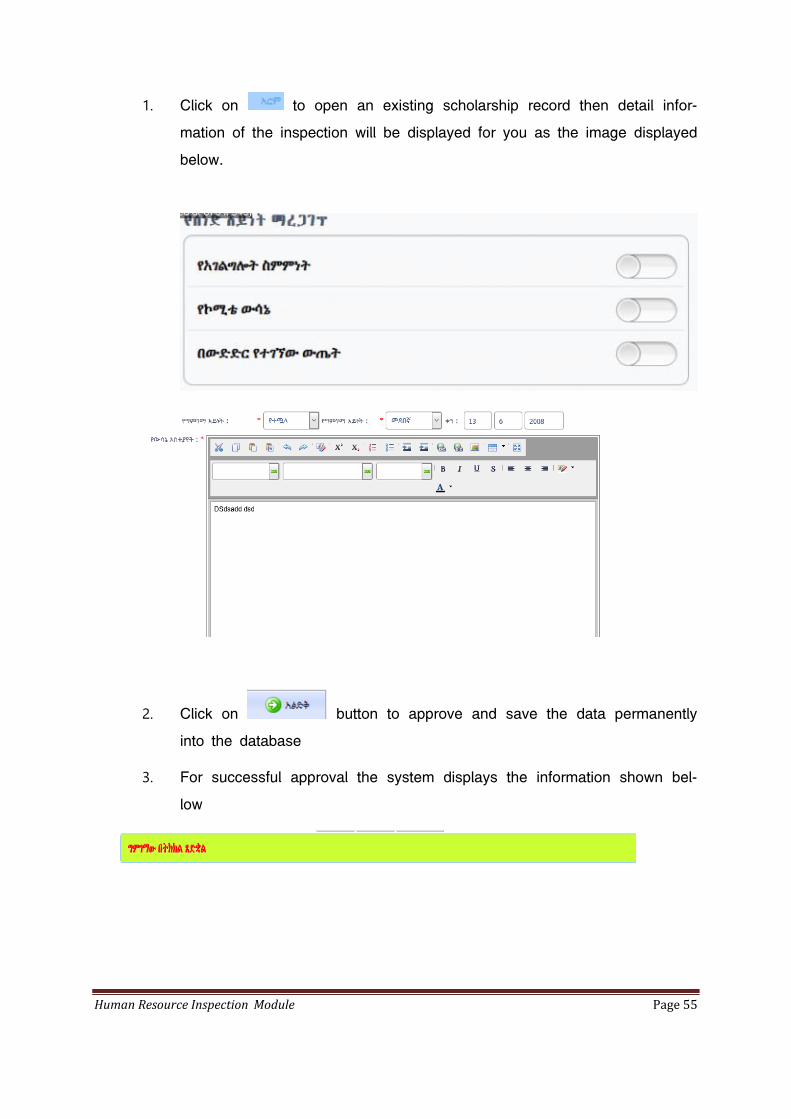
Human Resource Inspection Module Page 55
1. Click on to open an existing scholarship record then detail infor-
mation of the inspection will be displayed for you as the image displayed
below.
2. Click on button to approve and save the data permanently
into the database
3. For successful approval the system displays the information shown bel-
low
Human Resource Inspection Module Page 56
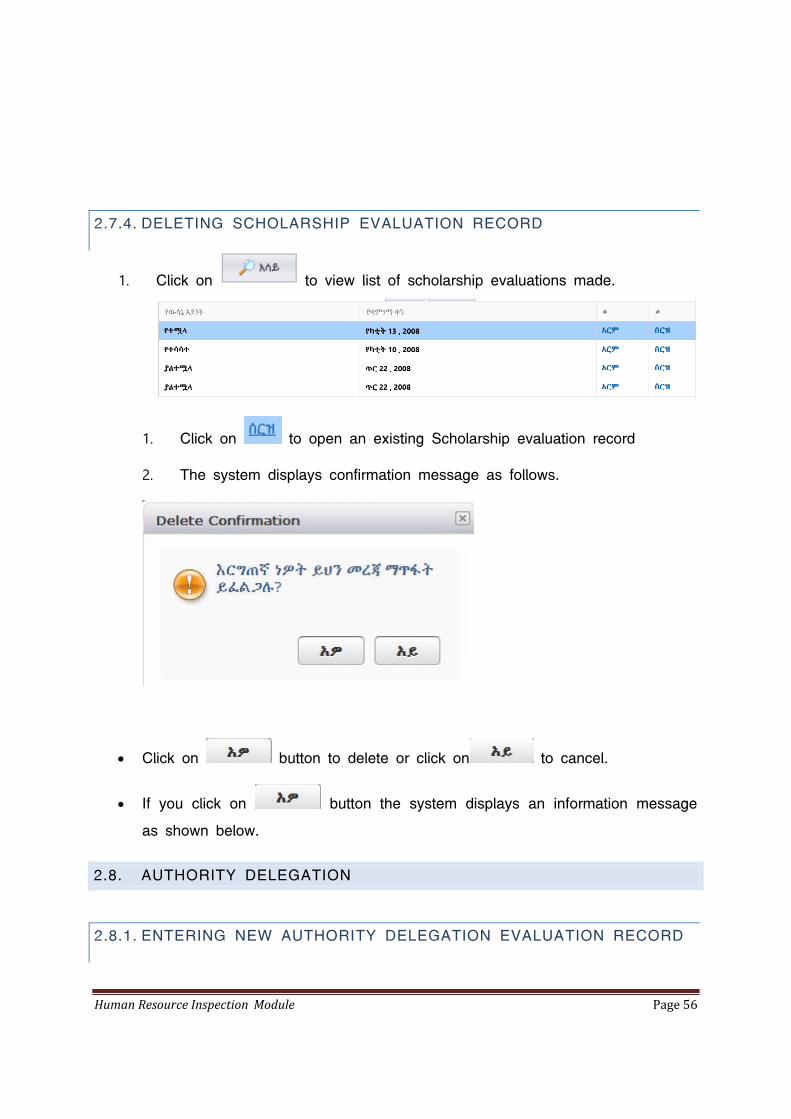
2.7.4. DELETING SCHOLARSHIP EVALUATION RECORD
1. Click on to view list of scholarship evaluations made.
1. Click on to open an existing Scholarship evaluation record
2. The system displays confirmation message as follows.
Click on button to delete or click on to cancel.
If you click on button the system displays an information message
as shown below.
2.8. AUTHORITY DELEGATION
2.8.1. ENTERING NEW AUTHORITY DELEGATION EVALUATION RECORD
Human Resource Inspection Module Page 57
1. Once the user follows the steps listed above and selects from
the human resource activates or operations, the system displays the page
shown below.
The table provides summarized information on the authority delegations took
place on the given organization. The table also has two special columns
that can show Evaluation Status (የግምገማ ሁኔታ) and Evaluation Results
(የመጨረሻ የግምገማ ውሳኔ)
2. To see the detail information about authority delegation of the employee,
click on the expand button, the detail information will be seen as follows.
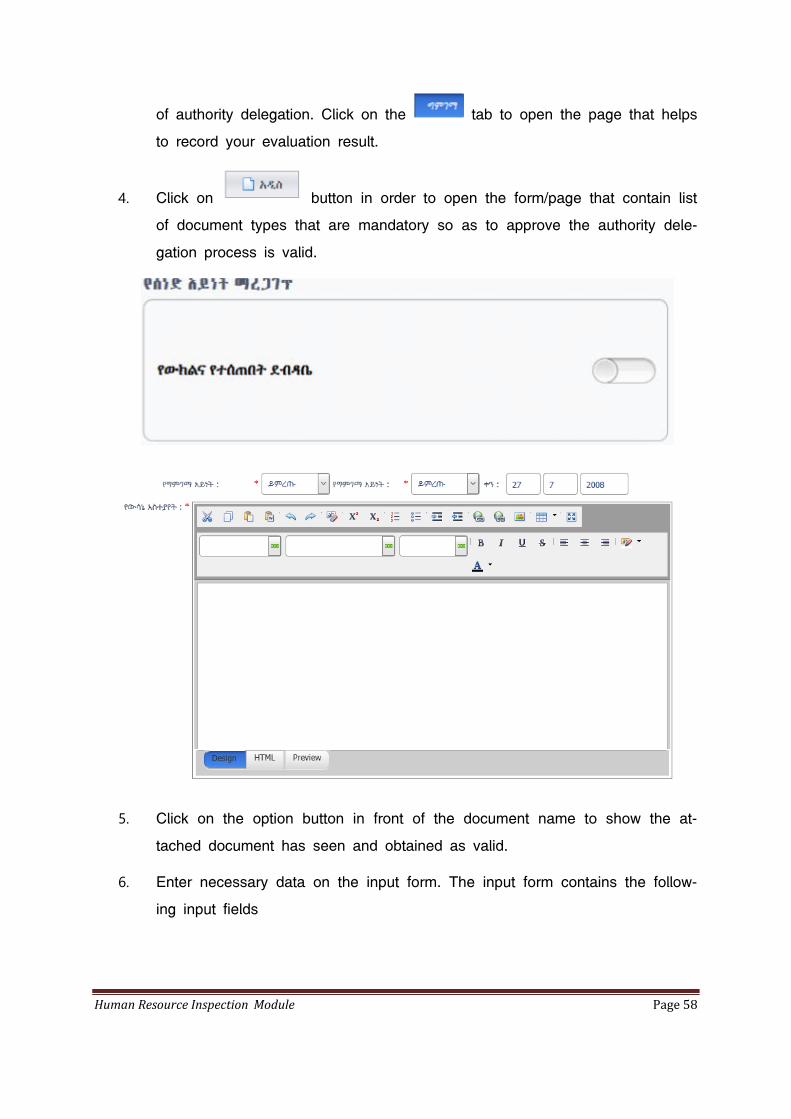
Attachments (ሰነዶች )-This tab contains all the attached docu-
ments that shows all relevant documents of the employee and of-
ficial letters written by the employer organization. To see the con-
tent of the attached document click on the button.
3. Once you have seen the attached documents of the employee authority del-
egation, the next activity you are expected to do is evaluating the process
Human Resource Inspection Module Page 58
of authority delegation. Click on the tab to open the page that helps
to record your evaluation result.
4. Click on button in order to open the form/page that contain list
of document types that are mandatory so as to approve the authority dele-
gation process is valid.
5. Click on the option button in front of the document name to show the at-
tached document has seen and obtained as valid.
6. Enter necessary data on the input form. The input form contains the follow-
ing input fields
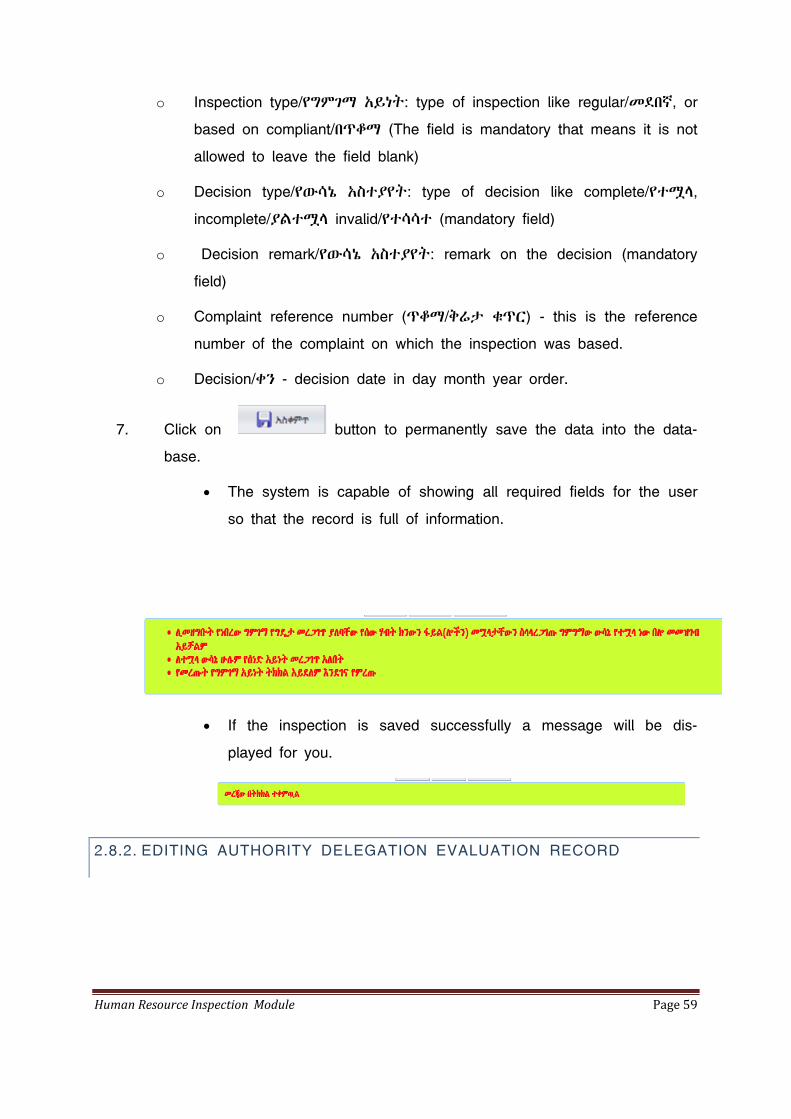
Human Resource Inspection Module Page 59
o Inspection type/የግምገማ አይነት: type of inspection like regular/መደበኛ, or
based on compliant/በጥቆማ (The field is mandatory that means it is not
allowed to leave the field blank)
o Decision type/የውሳኔ አስተያየት: type of decision like complete/የተሟላ,
incomplete/ያልተሟላ invalid/የተሳሳተ (mandatory field)
o Decision remark/የውሳኔ አስተያየት: remark on the decision (mandatory
field)
o Complaint reference number (ጥቆማ/ቅሬታ ቁጥር) - this is the reference
number of the complaint on which the inspection was based.
o Decision/ቀን - decision date in day month year order.
7. Click on button to permanently save the data into the data-
base.
The system is capable of showing all required fields for the user
so that the record is full of information.
If the inspection is saved successfully a message will be dis-
played for you.
2.8.2. EDITING AUTHORITY DELEGATION EVALUATION RECORD
Human Resource Inspection Module Page 60
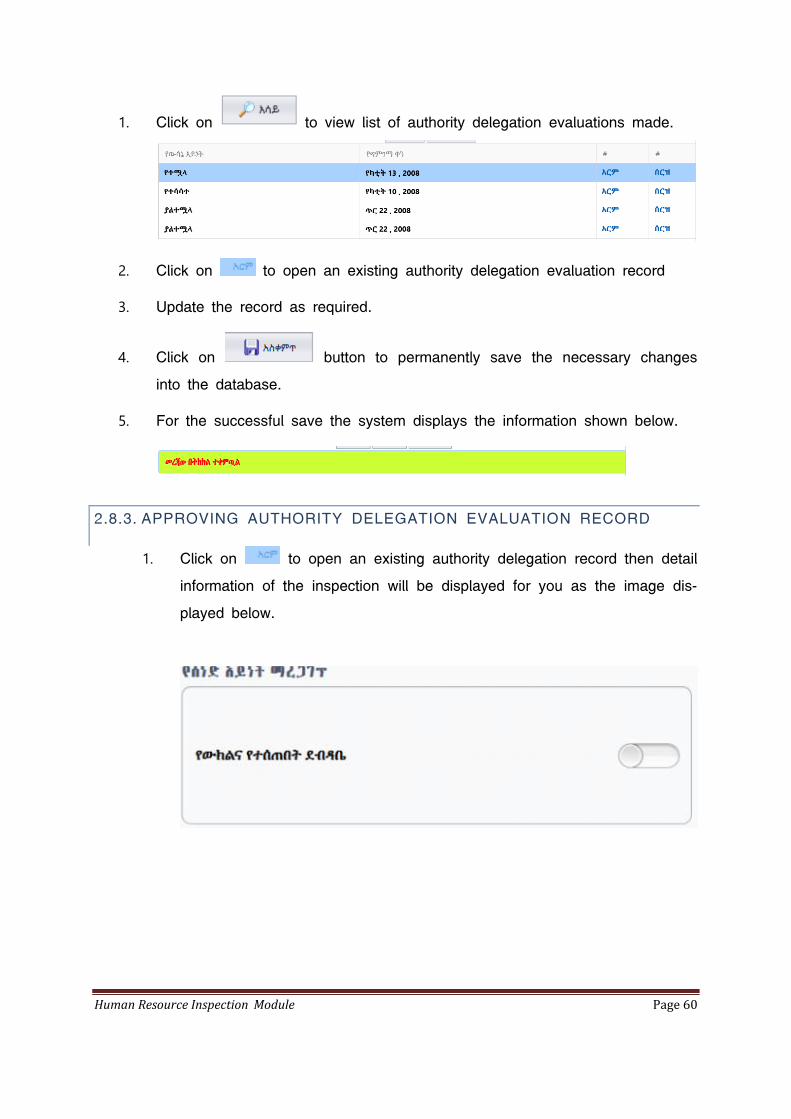
1. Click on to view list of authority delegation evaluations made.
2. Click on to open an existing authority delegation evaluation record
3. Update the record as required.
4. Click on button to permanently save the necessary changes
into the database.
5. For the successful save the system displays the information shown below.
2.8.3. APPROVING AUTHORITY DELEGATION EVALUATION RECORD
1. Click on to open an existing authority delegation record then detail
information of the inspection will be displayed for you as the image dis-
played below.
Human Resource Inspection Module Page 61
2. Click on button to approve and save the data permanently
into the database.
3. For successful approval the system displays the information shown be-
low.
2.8.4. DELETING AUTHORITY DELEGATION EVALUATION RECORD
1. Click on to view list of authority delegation evaluations made.
1. Click on to open an existing Scholarship evaluation record
2. The system displays confirmation message as follows.
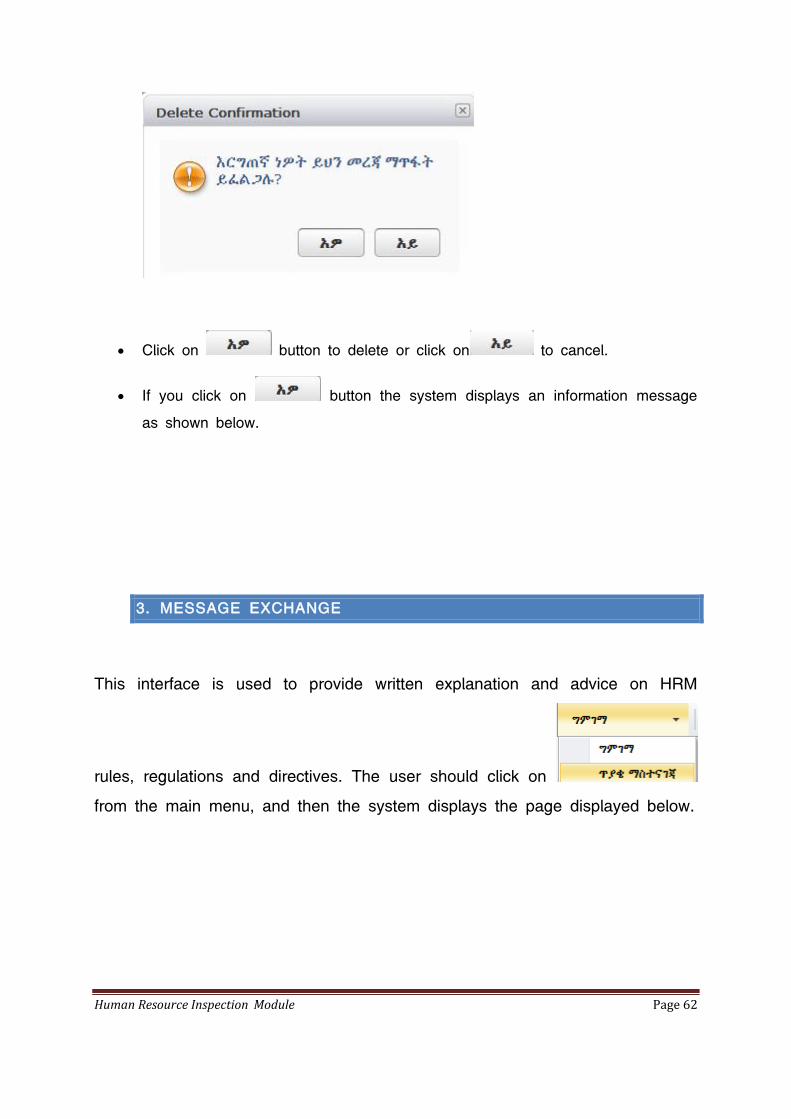
Human Resource Inspection Module Page 62
Click on button to delete or click on to cancel.
If you click on button the system displays an information message
as shown below.
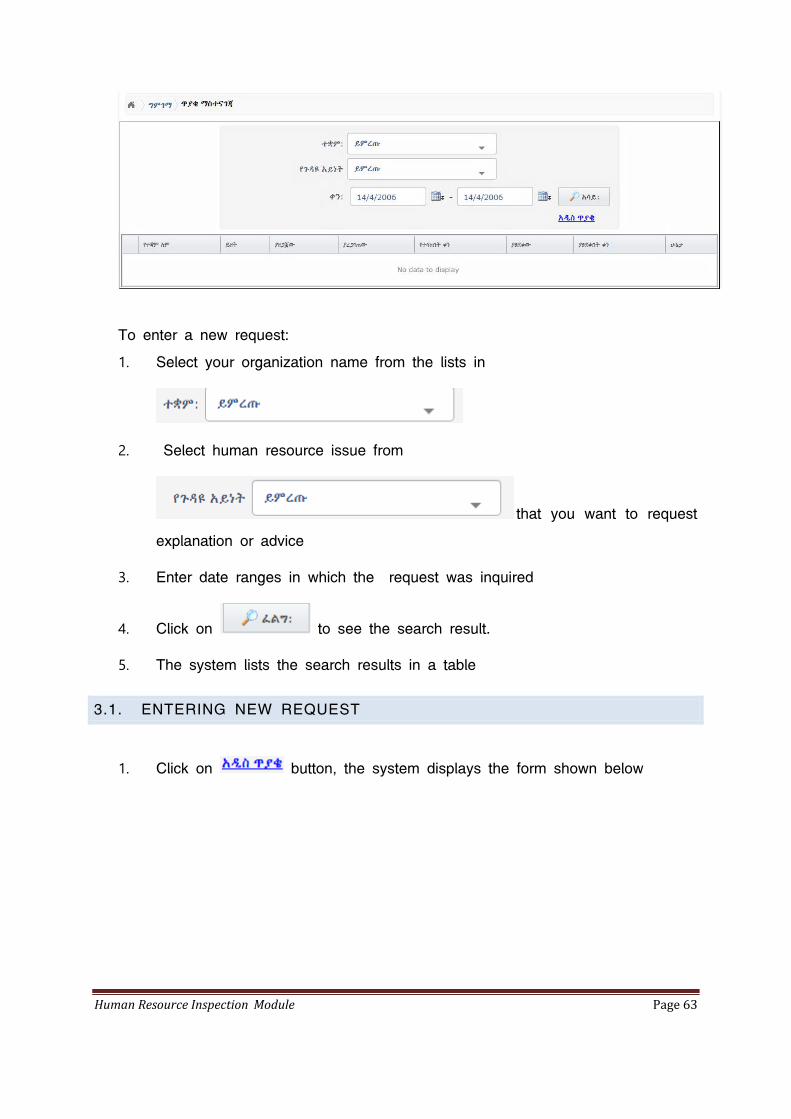
3. MESSAGE EXCHANGE
This interface is used to provide written explanation and advice on HRM
rules, regulations and directives. The user should click on
from the main menu, and then the system displays the page displayed below.
Human Resource Inspection Module Page 63
To enter a new request:
1. Select your organization name from the lists in
2. Select human resource issue from
that you want to request
explanation or advice
3. Enter date ranges in which the request was inquired
4. Click on to see the search result.
5. The system lists the search results in a table
3.1. ENTERING NEW REQUEST
1. Click on button, the system displays the form shown below

Human Resource Inspection Module Page 64
2. Enter the necessary data
3. Save the data by clicking on the button. The system per-
manently saves the data to the database.
3.2. EDITING EXISTING REQUEST RECORD
1. Click on to open an existing request record.
2. Update the record as required.
3. Click on button to permanently save the necessary changes
into the database.
4. For successful save the system displays the information shown below.
3.3. APPROVING REQUEST RECORD
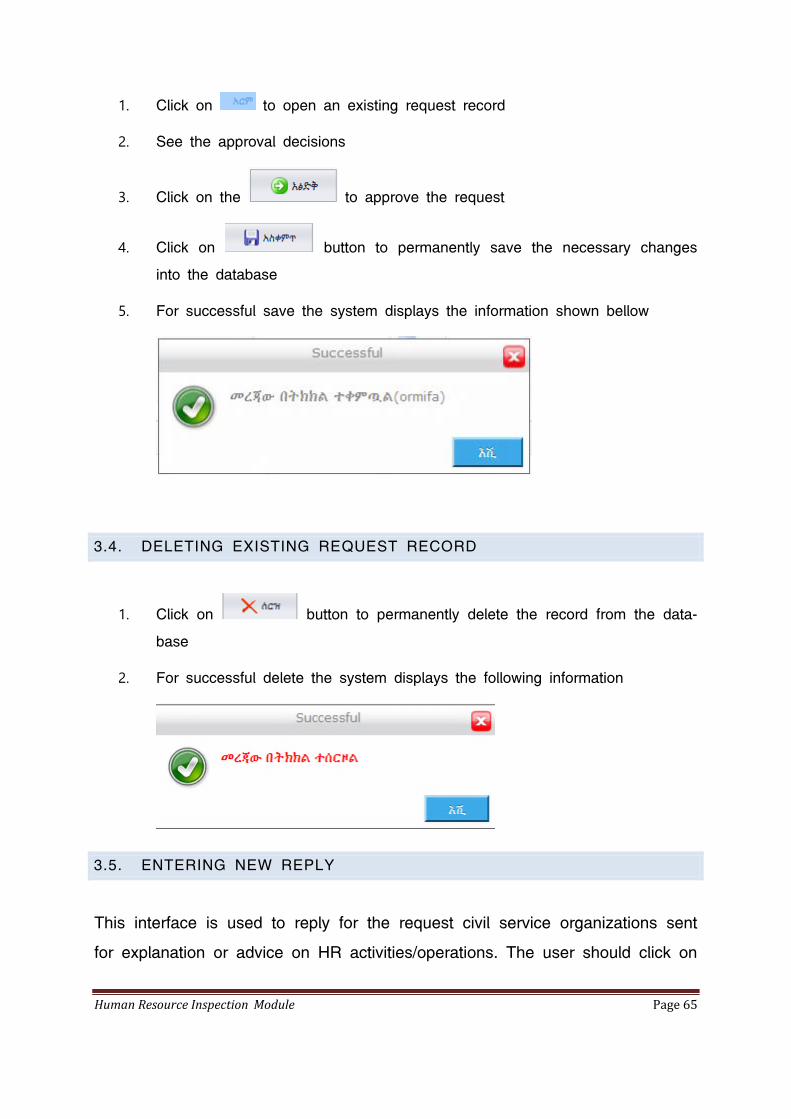
Human Resource Inspection Module Page 65
1. Click on to open an existing request record
2. See the approval decisions
3. Click on the to approve the request
4. Click on button to permanently save the necessary changes
into the database
5. For successful save the system displays the information shown bellow
3.4. DELETING EXISTING REQUEST RECORD
1. Click on button to permanently delete the record from the data-
base
2. For successful delete the system displays the following information
3.5. ENTERING NEW REPLY
This interface is used to reply for the request civil service organizations sent
for explanation or advice on HR activities/operations. The user should click on
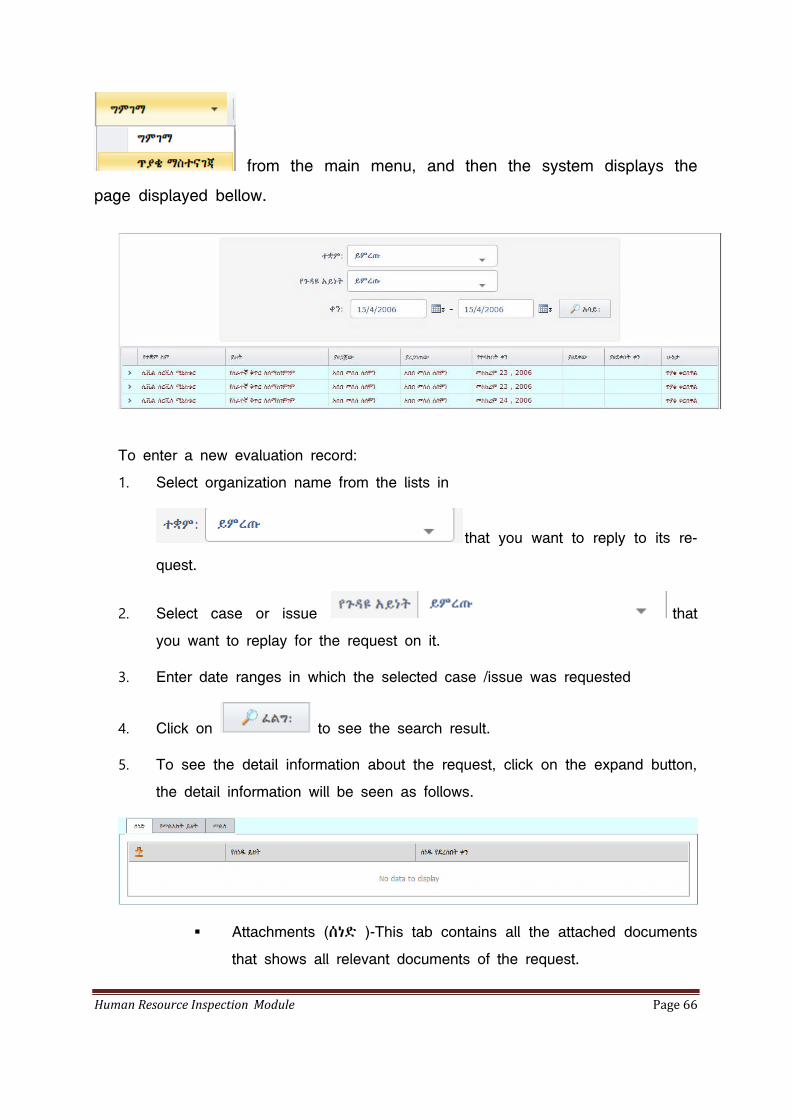
Human Resource Inspection Module Page 66
from the main menu, and then the system displays the
page displayed bellow.
To enter a new evaluation record:
1. Select organization name from the lists in
that you want to reply to its re-
quest.
2. Select case or issue that
you want to replay for the request on it.
3. Enter date ranges in which the selected case /issue was requested
4. Click on to see the search result.
5. To see the detail information about the request, click on the expand button,
the detail information will be seen as follows.
Attachments (ሰነድ )-This tab contains all the attached documents
that shows all relevant documents of the request.
Human Resource Inspection Module Page 67
Content of a request ( የመልዕክት ይዘት )-This tab contains the
content of the request
Replay (መልስ)-This tab contains all the appropriate answers for
the selected request.
6. Click on the replay (መልስ) to provide explanation or advice for the request.
3.6. EDITING EXISTING REPLAY FOR A REQUEST
1. Click on to open an existing replay for a request
2. Update the record as required
3. Click on button to permanently save the necessary changes
into the database
4. For successful save the system displays the information shown bellow
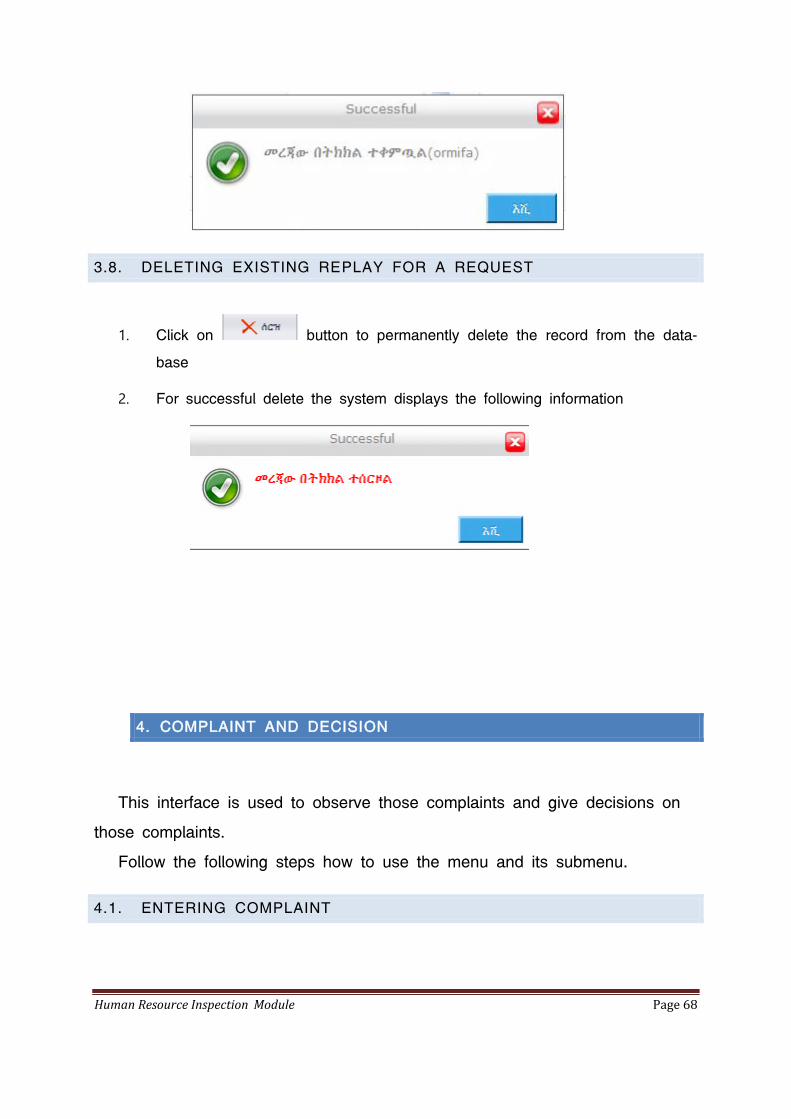
3.7. APPROVING REPLAY FOR A REQUEST
1. Click on to open an existing request record
2. See the approval decisions
3. Click on the to approve the request
4. Click on button to permanently save the necessary changes
into the database
5. For successful save the system displays the information shown bellow
Human Resource Inspection Module Page 68
3.8. DELETING EXISTING REPLAY FOR A REQUEST
1. Click on button to permanently delete the record from the data-
base
2. For successful delete the system displays the following information
4. COMPLAINT AND DECISION
This interface is used to observe those complaints and give decisions on
those complaints.
Follow the following steps how to use the menu and its submenu.
4.1. ENTERING COMPLAINT
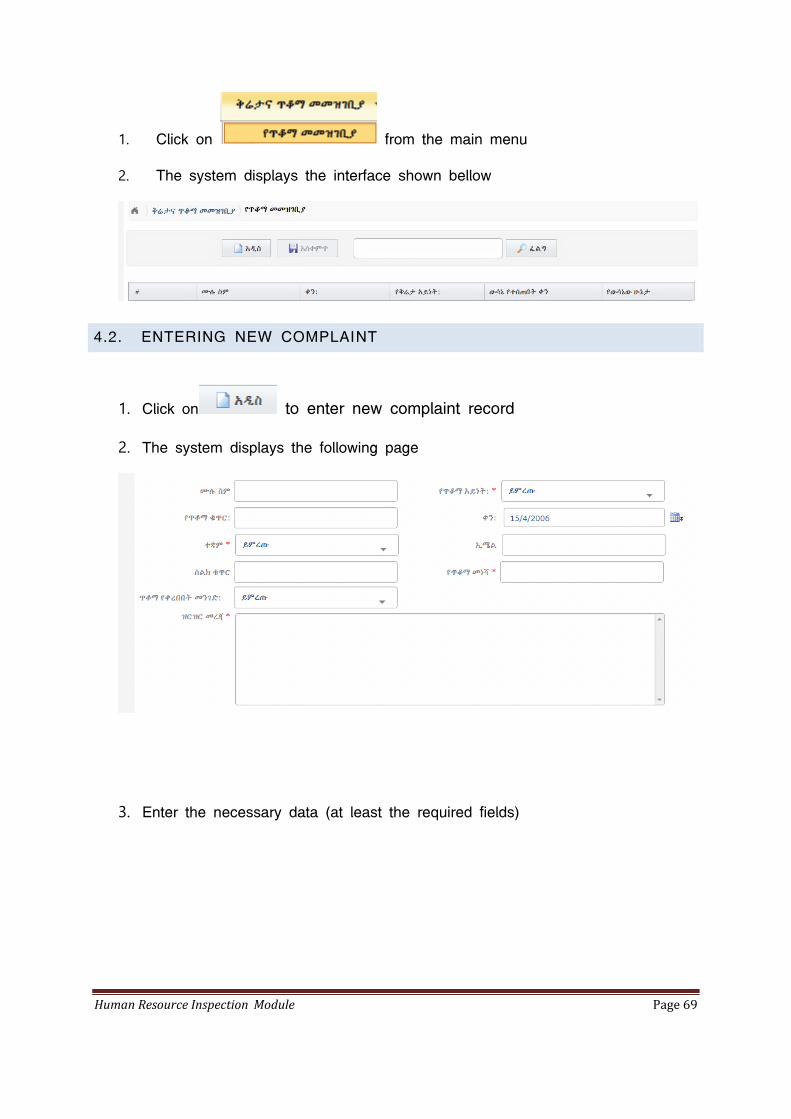
Human Resource Inspection Module Page 69
1. Click on from the main menu
2. The system displays the interface shown bellow
4.2. ENTERING NEW COMPLAINT
1. Click on to enter new complaint record
2. The system displays the following page
3. Enter the necessary data (at least the required fields)
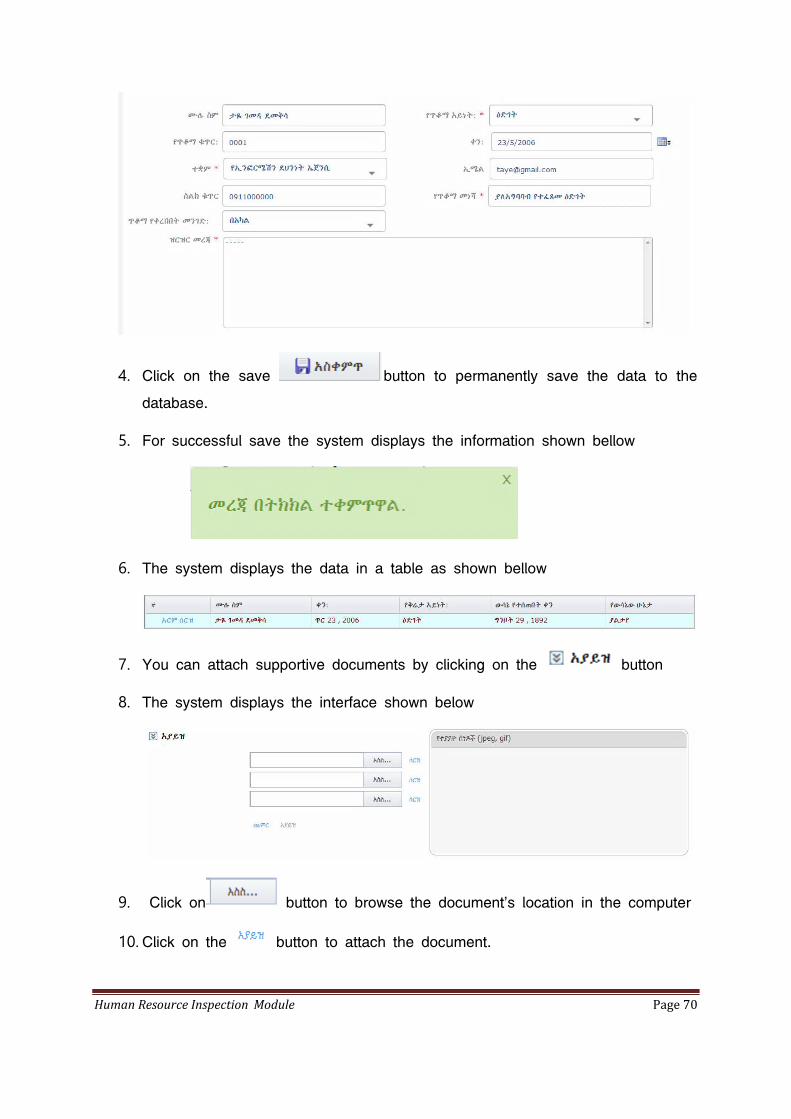
Human Resource Inspection Module Page 70
4. Click on the save button to permanently save the data to the
database.
5. For successful save the system displays the information shown bellow
6. The system displays the data in a table as shown bellow
7. You can attach supportive documents by clicking on the button
8. The system displays the interface shown below
9. Click on button to browse the document’s location in the computer
10. Click on the button to attach the document.
Human Resource Inspection Module Page 71
11. You can use button to delete the attached document permanently from
the database.
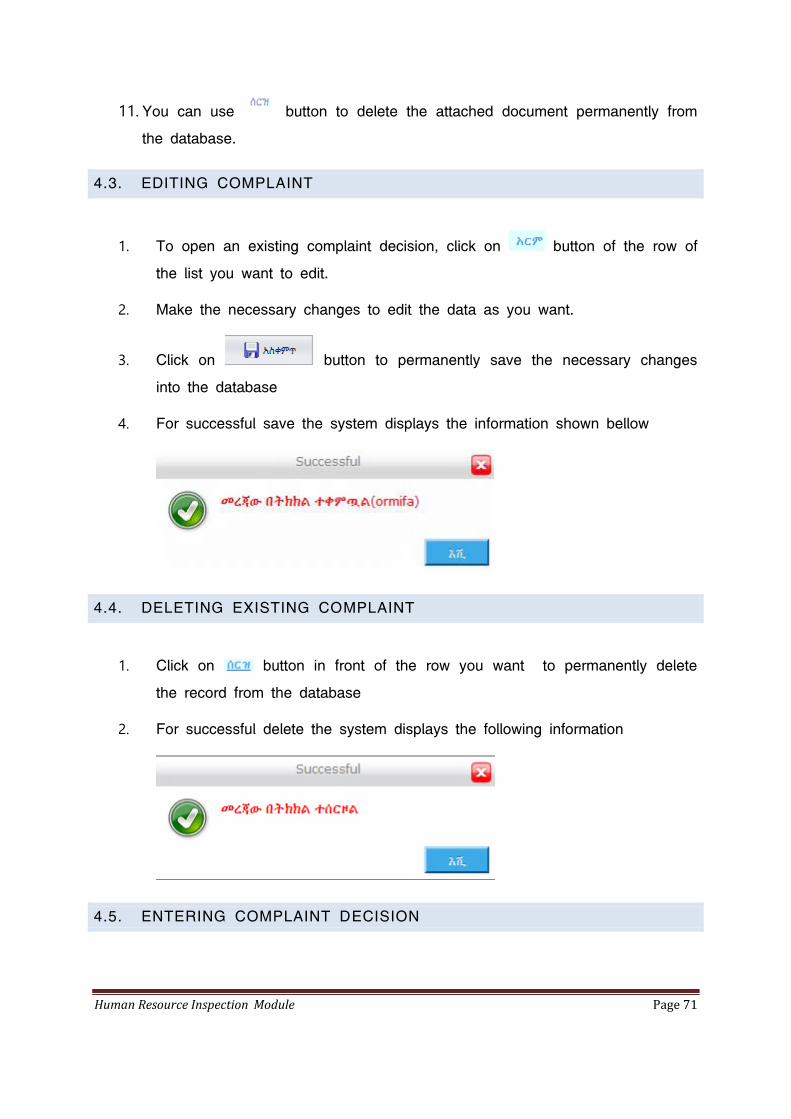
4.3. EDITING COMPLAINT
1. To open an existing complaint decision, click on button of the row of
the list you want to edit.
2. Make the necessary changes to edit the data as you want.
3. Click on button to permanently save the necessary changes
into the database
4. For successful save the system displays the information shown bellow
4.4. DELETING EXISTING COMPLAINT
1. Click on button in front of the row you want to permanently delete
the record from the database
2. For successful delete the system displays the following information
4.5. ENTERING COMPLAINT DECISION
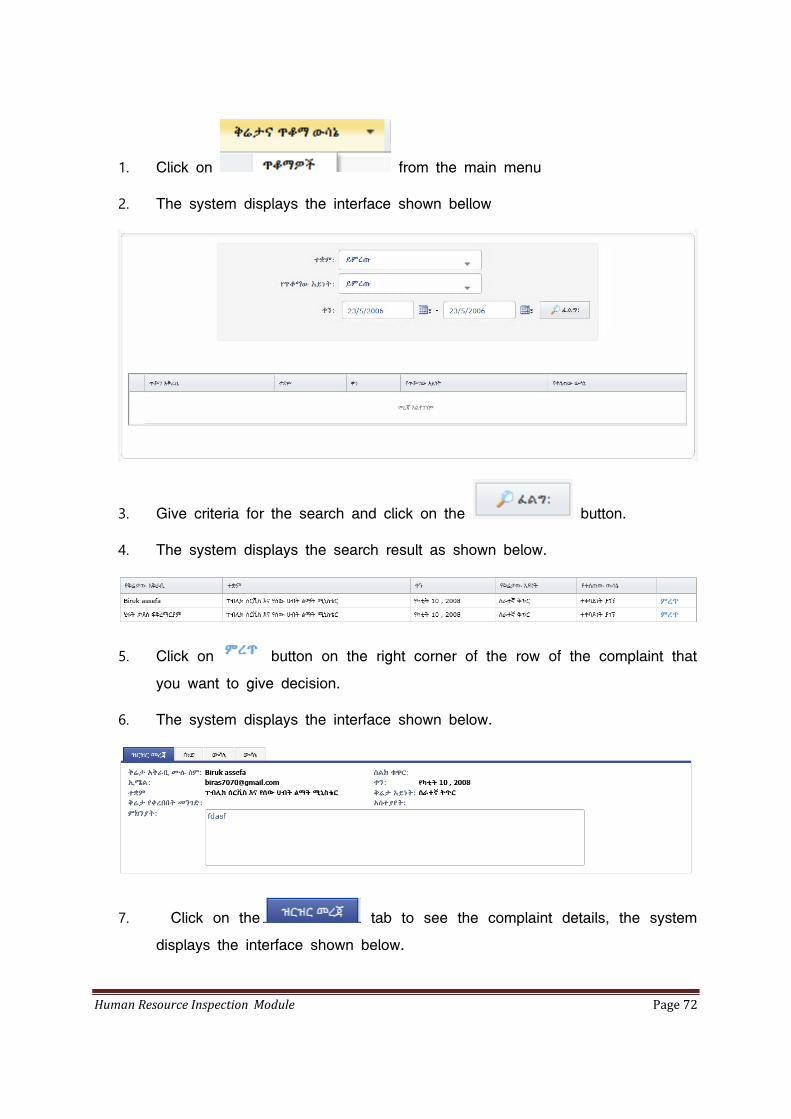
Human Resource Inspection Module Page 72
1. Click on from the main menu
2. The system displays the interface shown bellow
3. Give criteria for the search and click on the button.
4. The system displays the search result as shown below.
5. Click on button on the right corner of the row of the complaint that
you want to give decision.
6. The system displays the interface shown below.
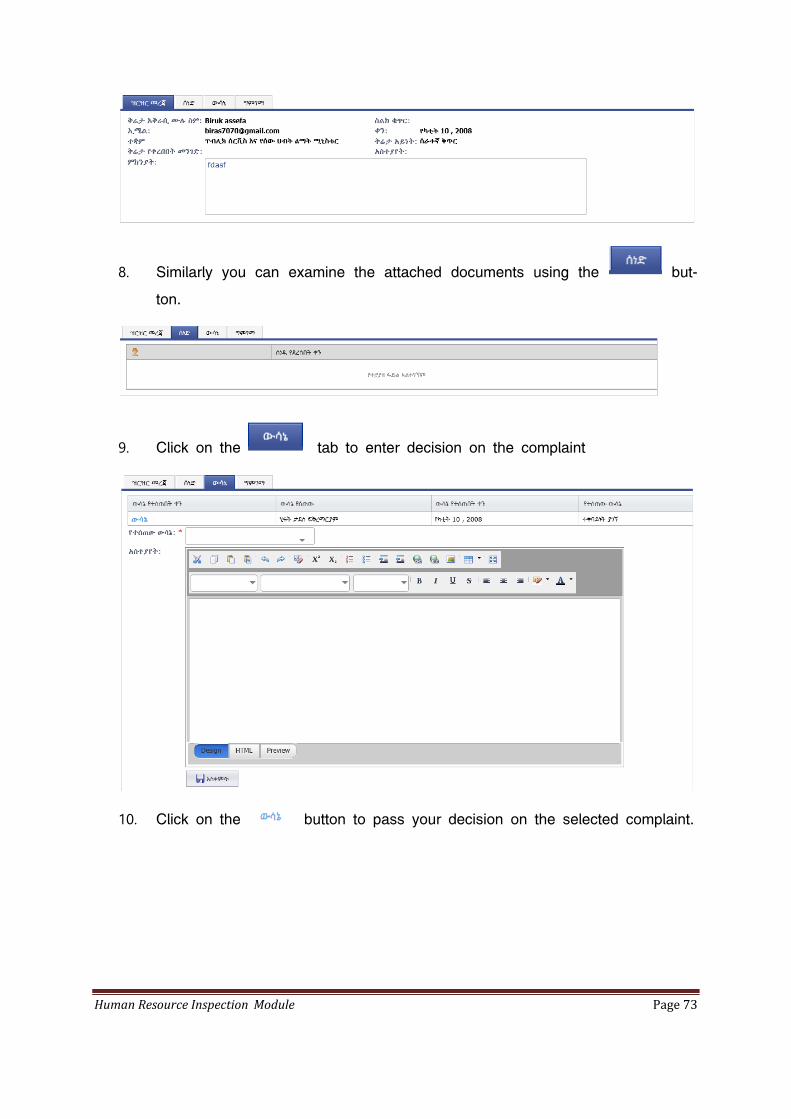
7. Click on the tab to see the complaint details, the system
displays the interface shown below.
Human Resource Inspection Module Page 73
8. Similarly you can examine the attached documents using the but-
ton.
9. Click on the tab to enter decision on the complaint
10. Click on the button to pass your decision on the selected complaint.
Human Resource Inspection Module Page 74
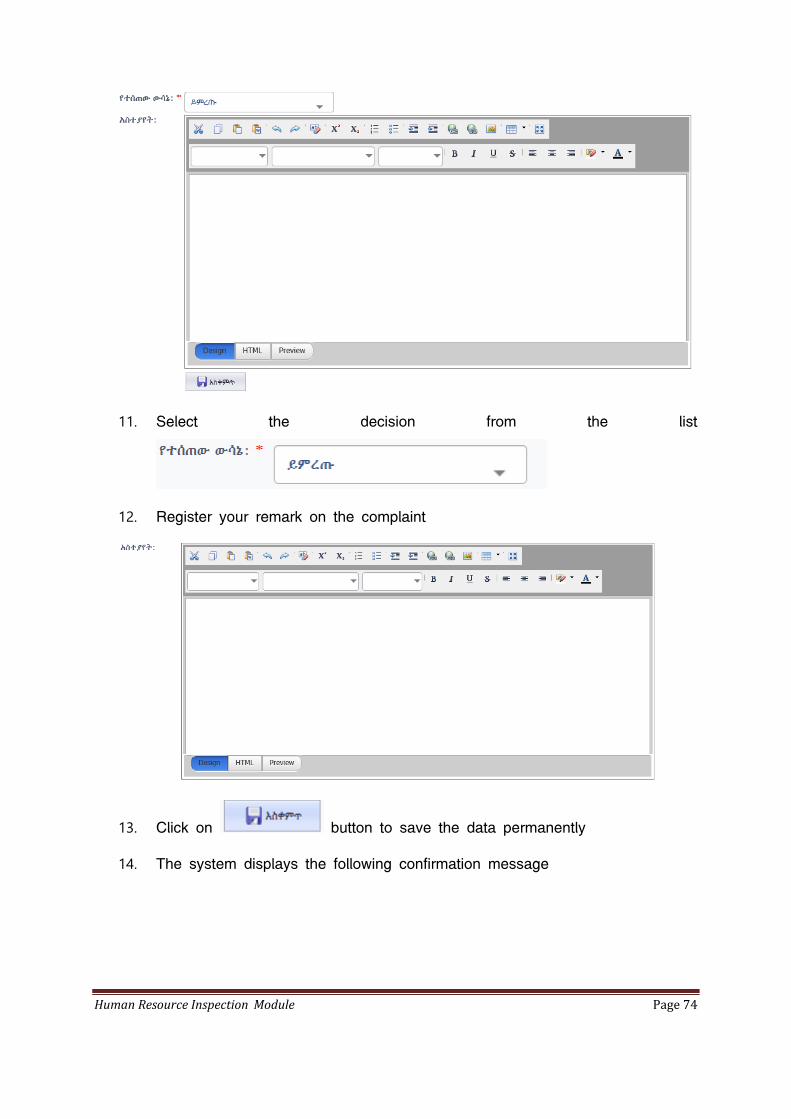
11. Select the decision from the list
12. Register your remark on the complaint
13. Click on button to save the data permanently
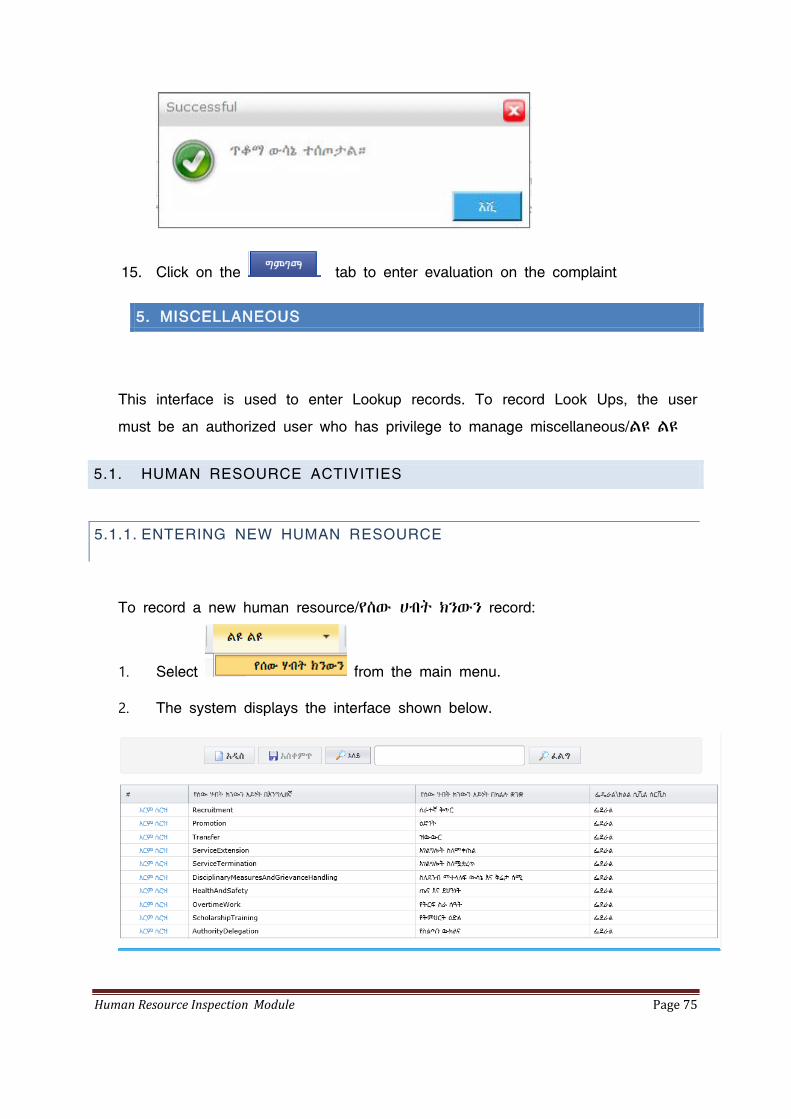
14. The system displays the following confirmation message
Human Resource Inspection Module Page 75
15. Click on the tab to enter evaluation on the complaint
5. MISCELLANEOUS
This interface is used to enter Lookup records. To record Look Ups, the user
must be an authorized user who has privilege to manage miscellaneous/ልዩ ልዩ
5.1. HUMAN RESOURCE ACTIVITIES
5.1.1. ENTERING NEW HUMAN RESOURCE
To record a new human resource/የሰው ሀብት ክንውን record:
1. Select from the main menu.
2. The system displays the interface shown below.
Human Resource Inspection Module Page 76
3. Click the button
4. Enter the necessary data.
5. Click the button to permanently save the data to the data-
base.
6. The newly entered record will be added to the list and the system displays
message as shown below.
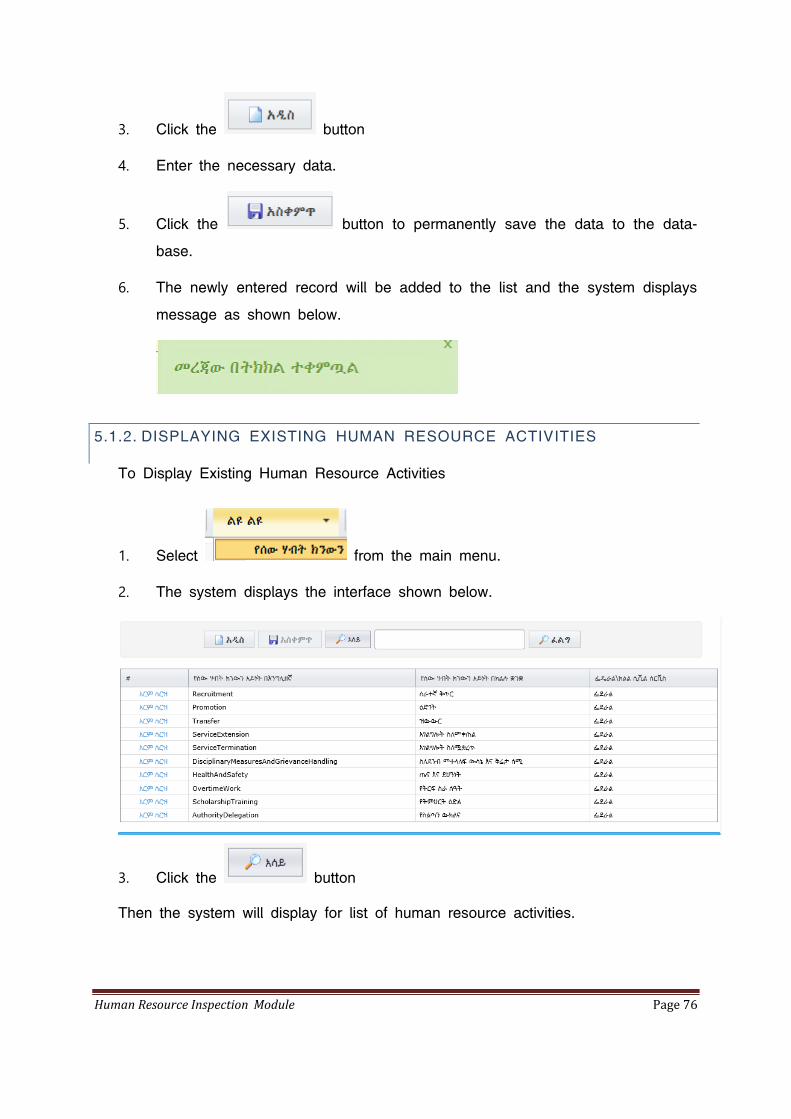
5.1.2. DISPLAYING EXISTING HUMAN RESOURCE ACTIVITIES
To Display Existing Human Resource Activities
1. Select from the main menu.
2. The system displays the interface shown below.
3. Click the button
Then the system will display for list of human resource activities.
Human Resource Inspection Module Page 77
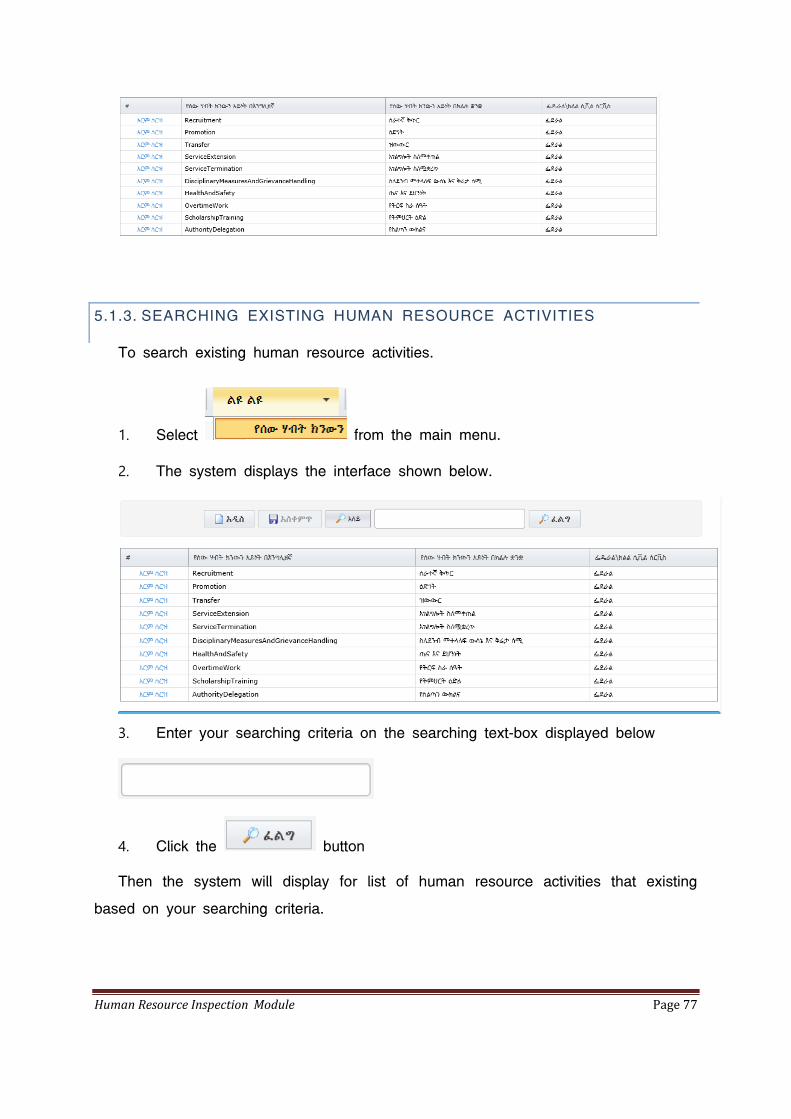
5.1.3. SEARCHING EXISTING HUMAN RESOURCE ACTIVITIES
To search existing human resource activities.
1. Select from the main menu.
2. The system displays the interface shown below.
3. Enter your searching criteria on the searching text-box displayed below
4. Click the button
Then the system will display for list of human resource activities that existing
based on your searching criteria.
Human Resource Inspection Module Page 78
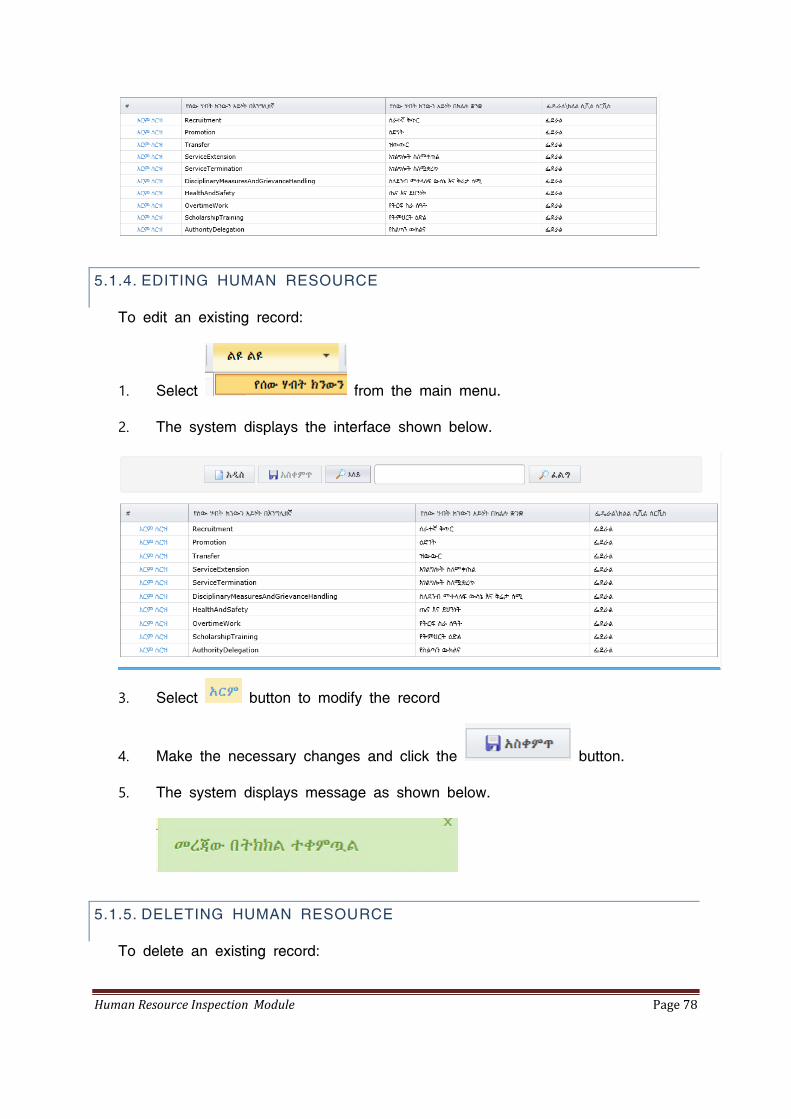
5.1.4. EDITING HUMAN RESOURCE
To edit an existing record:
1. Select from the main menu.
2. The system displays the interface shown below.
3. Select button to modify the record
4. Make the necessary changes and click the button.
5. The system displays message as shown below.
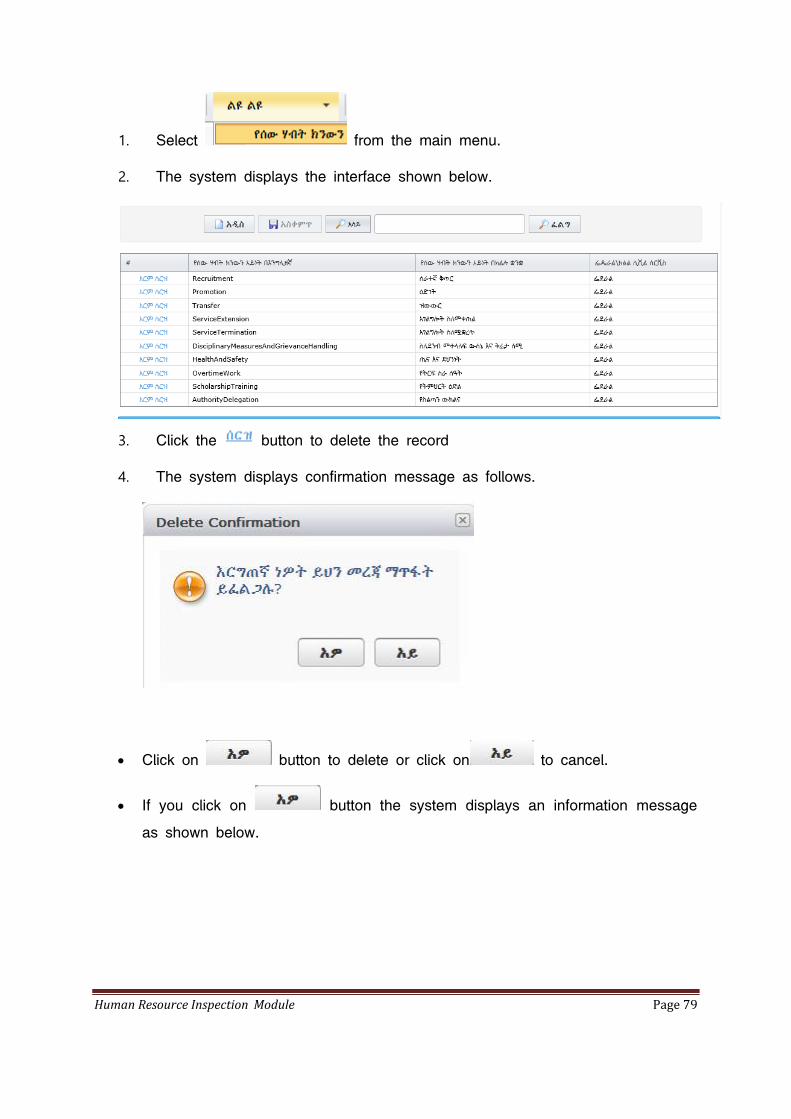
5.1.5. DELETING HUMAN RESOURCE
To delete an existing record:
Human Resource Inspection Module Page 79
1. Select from the main menu.
2. The system displays the interface shown below.
3. Click the button to delete the record
4. The system displays confirmation message as follows.
Click on button to delete or click on to cancel.
If you click on button the system displays an information message
as shown below.

Human Resource Inspection Module Page 80
5.2. HUMAN RESOURCE ACTIVITIES REQUIRED DOCUMENTS
5.2.1. ENTERING NEW HUMAN RESOURCE REQUIRED DOCUMENTS
To record a new human resource required documents/የሰው ሀብት ክንውን ተፈላጊ
ማስረጃዎች record:
1. Select from the main menu.
2. The system displays the interface shown below.
3. Click the button
4. Enter the necessary data.
5. Click the button to permanently save the data to the data-
base.
6. The newly entered record will be added to the list and the system displays
message as shown below.
Human Resource Inspection Module Page 81
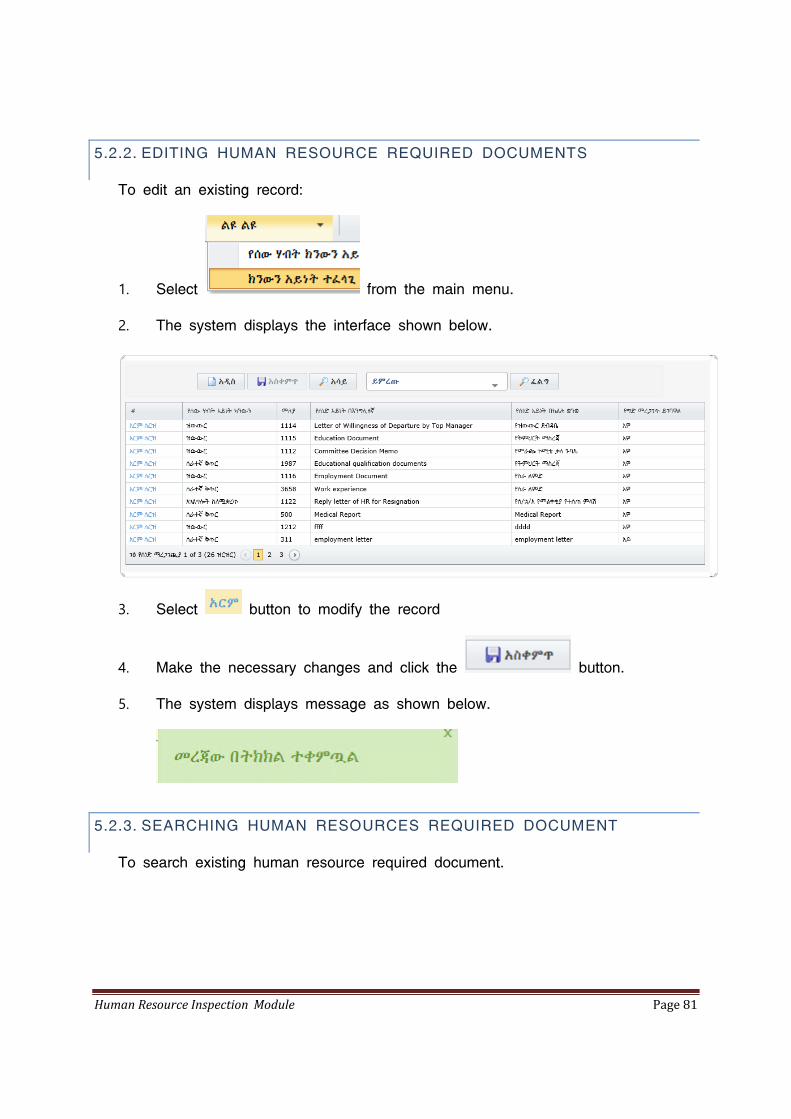
5.2.2. EDITING HUMAN RESOURCE REQUIRED DOCUMENTS
To edit an existing record:
1. Select from the main menu.
2. The system displays the interface shown below.
3. Select button to modify the record
4. Make the necessary changes and click the button.
5. The system displays message as shown below.
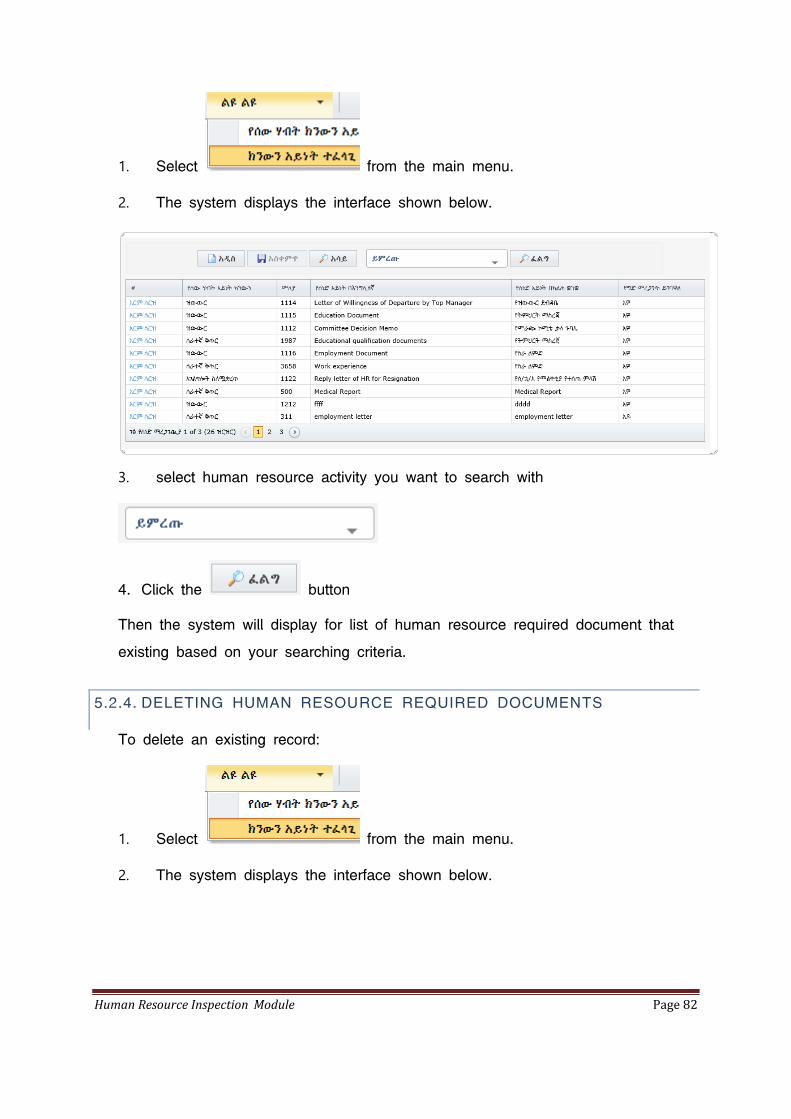
5.2.3. SEARCHING HUMAN RESOURCES REQUIRED DOCUMENT
To search existing human resource required document.
Human Resource Inspection Module Page 82
1. Select from the main menu.
2. The system displays the interface shown below.
3. select human resource activity you want to search with
4. Click the button
Then the system will display for list of human resource required document that
existing based on your searching criteria.
5.2.4. DELETING HUMAN RESOURCE REQUIRED DOCUMENTS
To delete an existing record:
1. Select from the main menu.
2. The system displays the interface shown below.
Human Resource Inspection Module Page 83
3. Click the button to delete the record
4. The system displays confirmation message as follows.
Click on button to delete or click on to cancel.
If you click on button the system displays an information message
as shown below.
6. TEAM MANAGEMENT
Human Resource Inspection Module Page 84
This interface is used to organize and build team members. To record teams and
team members, the user must be an authorized user who has privilege to man-
age miscellaneous/ልዩ ልዩ
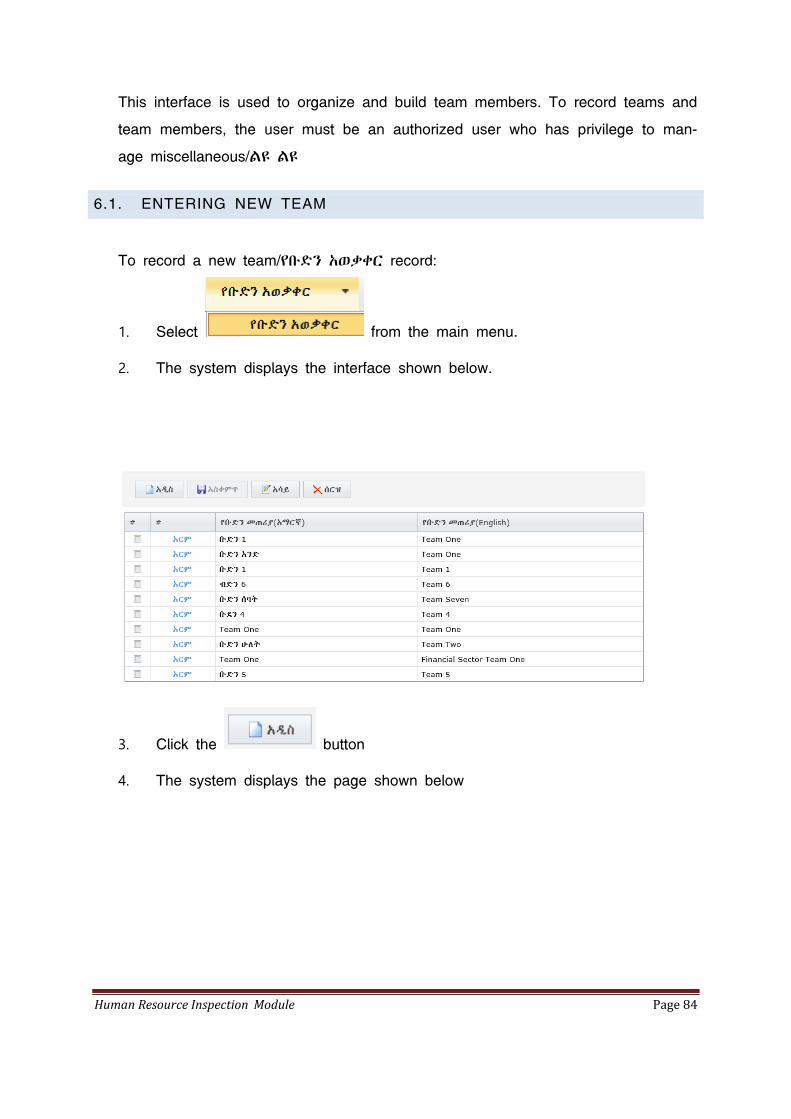
6.1. ENTERING NEW TEAM
To record a new team/የቡድን አወቃቀር record:
1. Select from the main menu.
2. The system displays the interface shown below.
3. Click the button
4. The system displays the page shown below
Human Resource Inspection Module Page 85
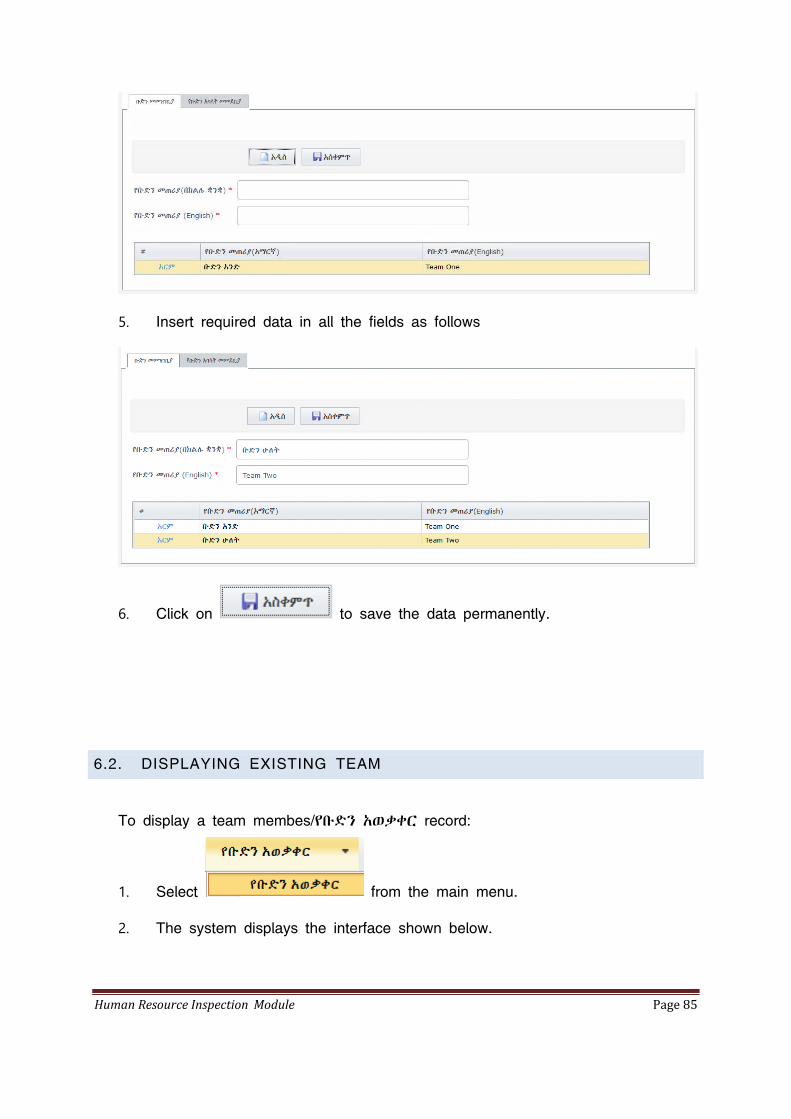
5. Insert required data in all the fields as follows
6. Click on to save the data permanently.
6.2. DISPLAYING EXISTING TEAM
To display a team membes/የቡድን አወቃቀር record:
1. Select from the main menu.
2. The system displays the interface shown below.
Human Resource Inspection Module Page 86
3. Click the button
The system displays the page shown below
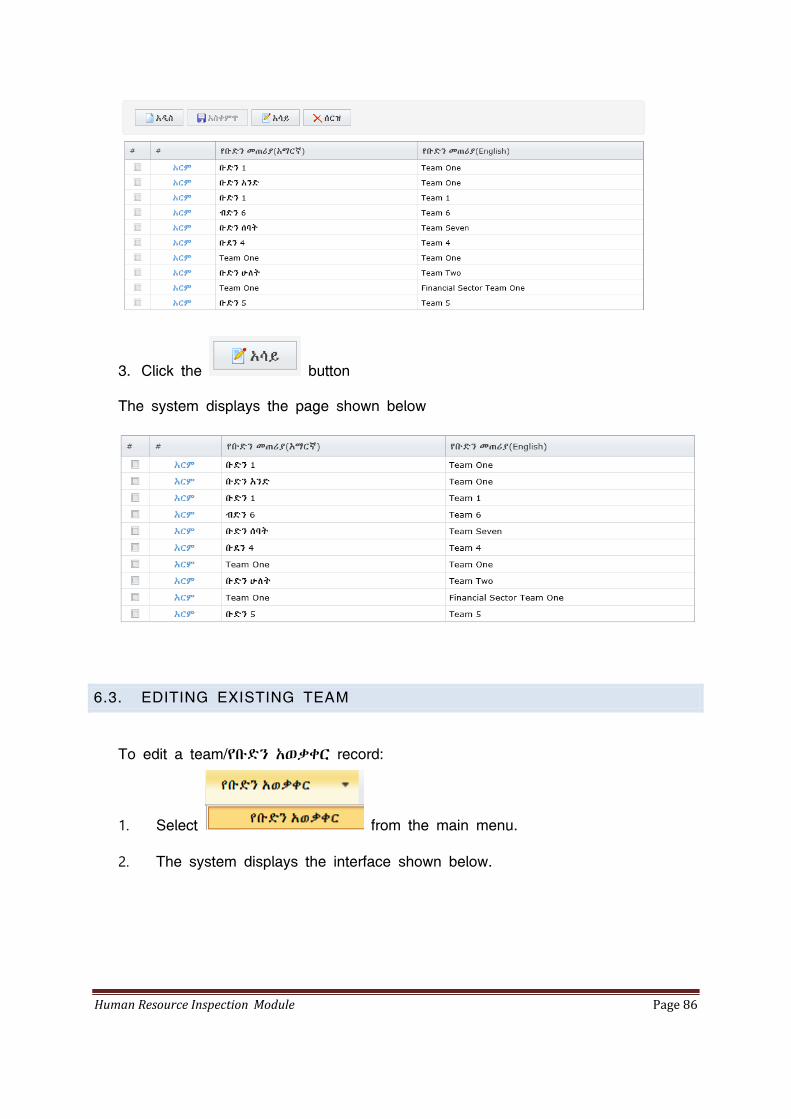
6.3. EDITING EXISTING TEAM
To edit a team/የቡድን አወቃቀር record:
1. Select from the main menu.
2. The system displays the interface shown below.
Human Resource Inspection Module Page 87
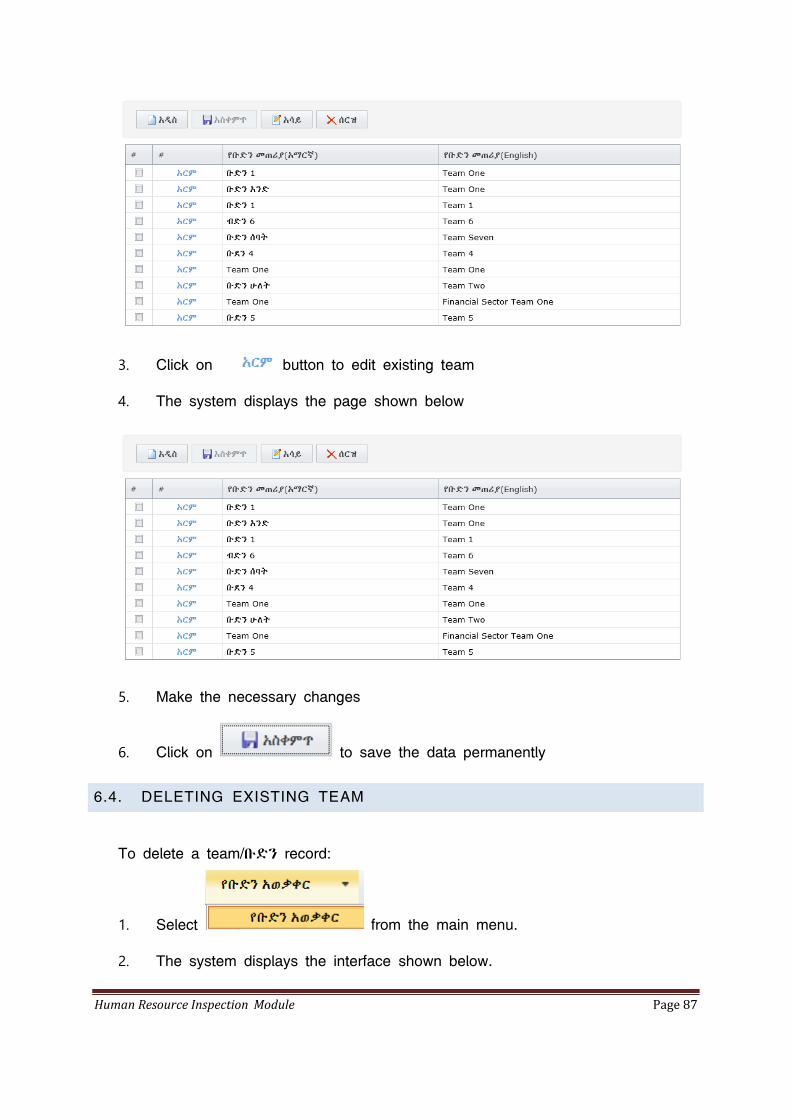
3. Click on button to edit existing team
4. The system displays the page shown below
5. Make the necessary changes
6. Click on to save the data permanently
6.4. DELETING EXISTING TEAM
To delete a team/ቡድን record:
1. Select from the main menu.
2. The system displays the interface shown below.
Human Resource Inspection Module Page 88
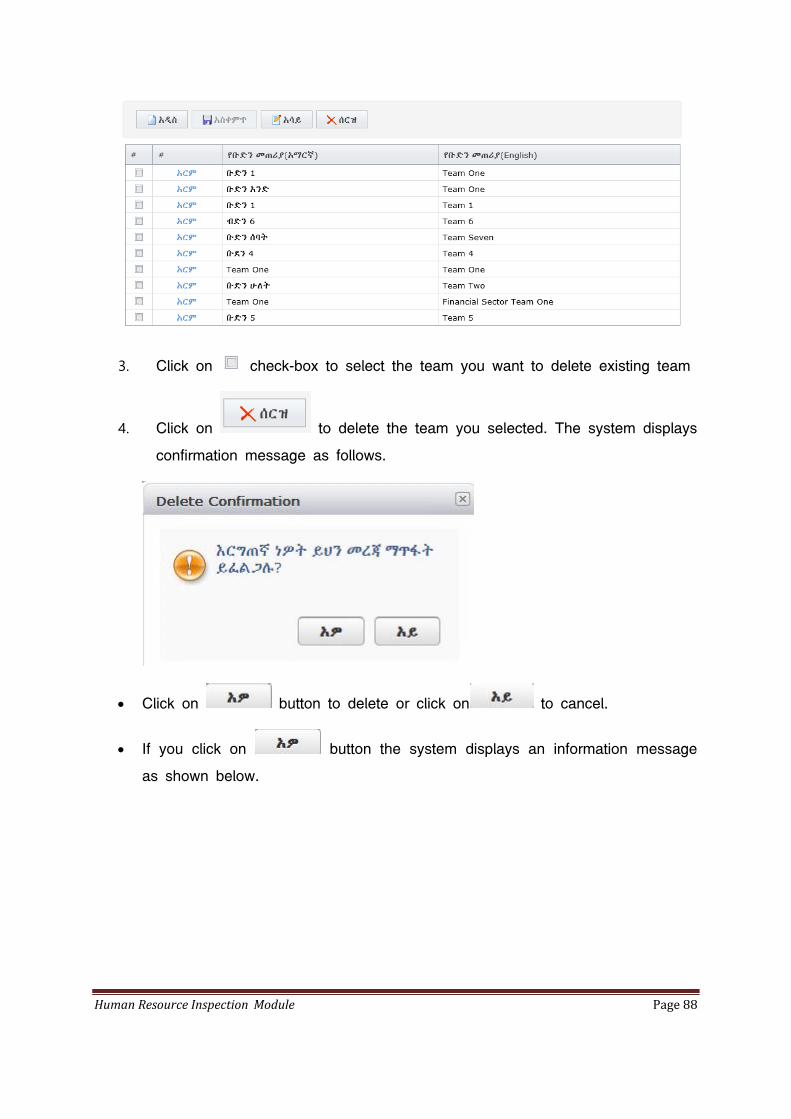
3. Click on check-box to select the team you want to delete existing team
4. Click on to delete the team you selected. The system displays
confirmation message as follows.
Click on button to delete or click on to cancel.
If you click on button the system displays an information message
as shown below.
Human Resource Inspection Module Page 89
7. TEAM MEMBERS
7.1. ASSIGNING TEAM MEMBERS
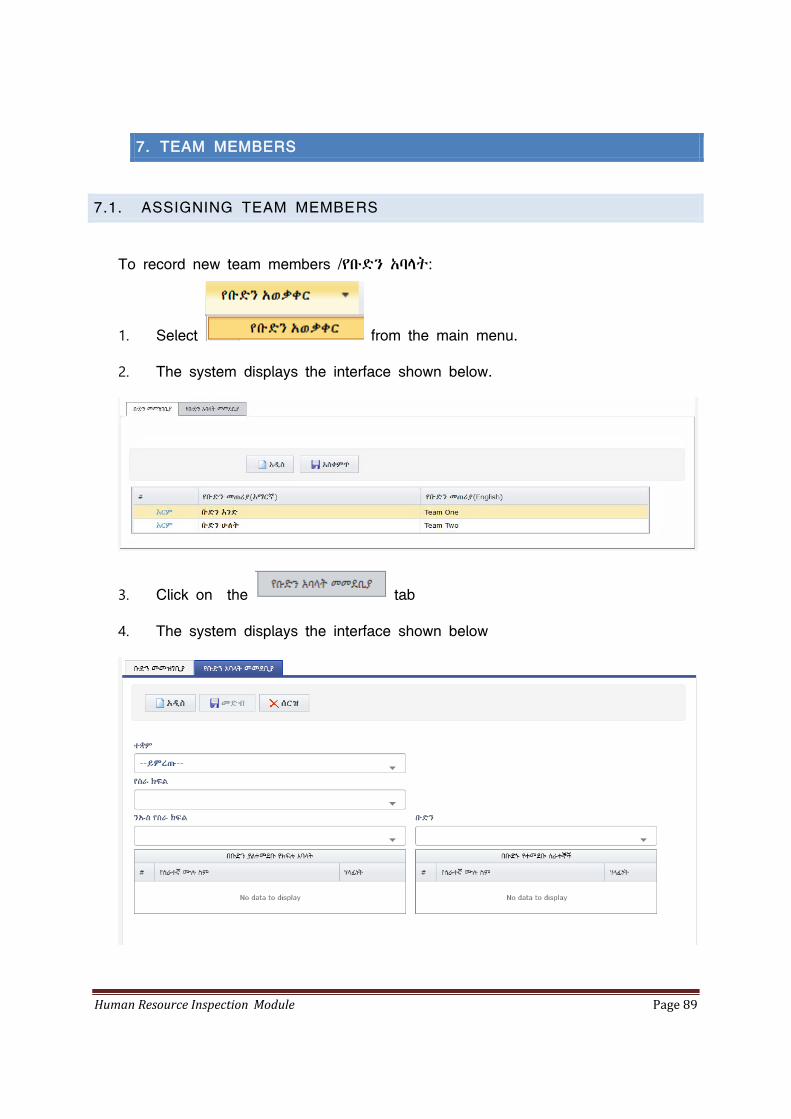
To record new team members /የቡድን አባላት:
1. Select from the main menu.
2. The system displays the interface shown below.
3. Click on the tab
4. The system displays the interface shown below
Human Resource Inspection Module Page 90
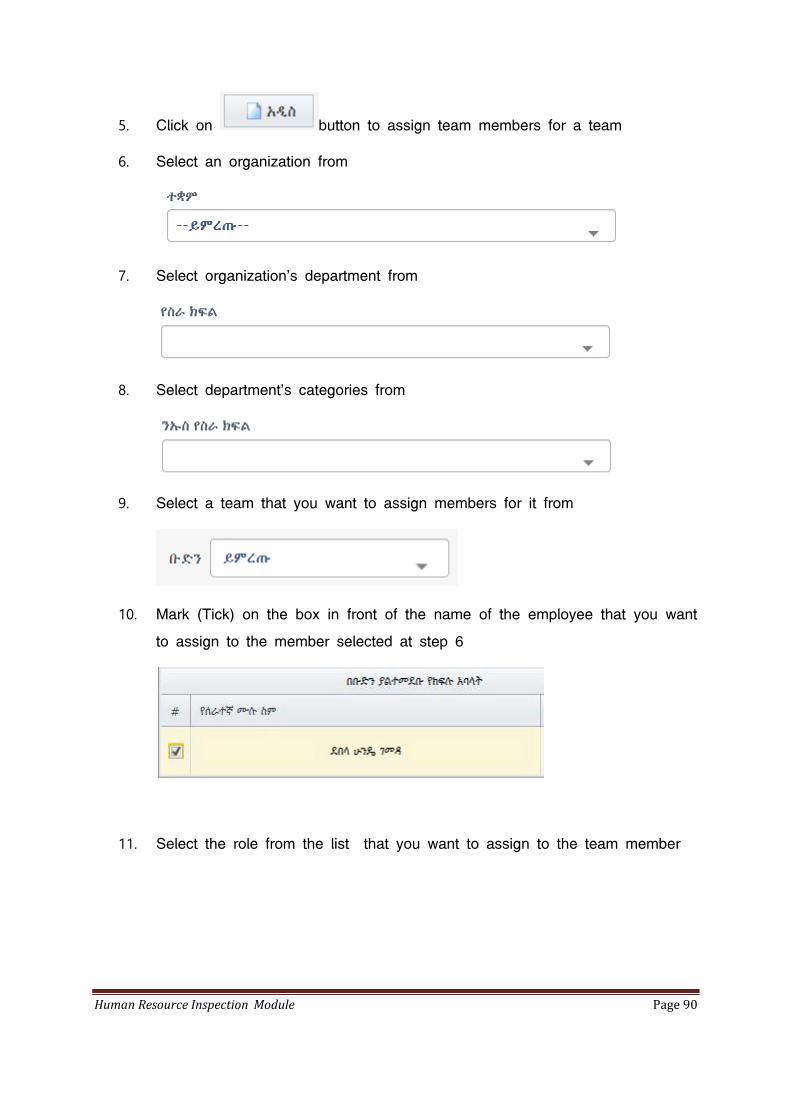
5. Click on button to assign team members for a team
6. Select an organization from
7. Select organization's department from
8. Select department's categories from
9. Select a team that you want to assign members for it from
10. Mark (Tick) on the box in front of the name of the employee that you want
to assign to the member selected at step 6
11. Select the role from the list that you want to assign to the team member
Human Resource Inspection Module Page 91
12. Click on to save the assignment permanently to the data-
base
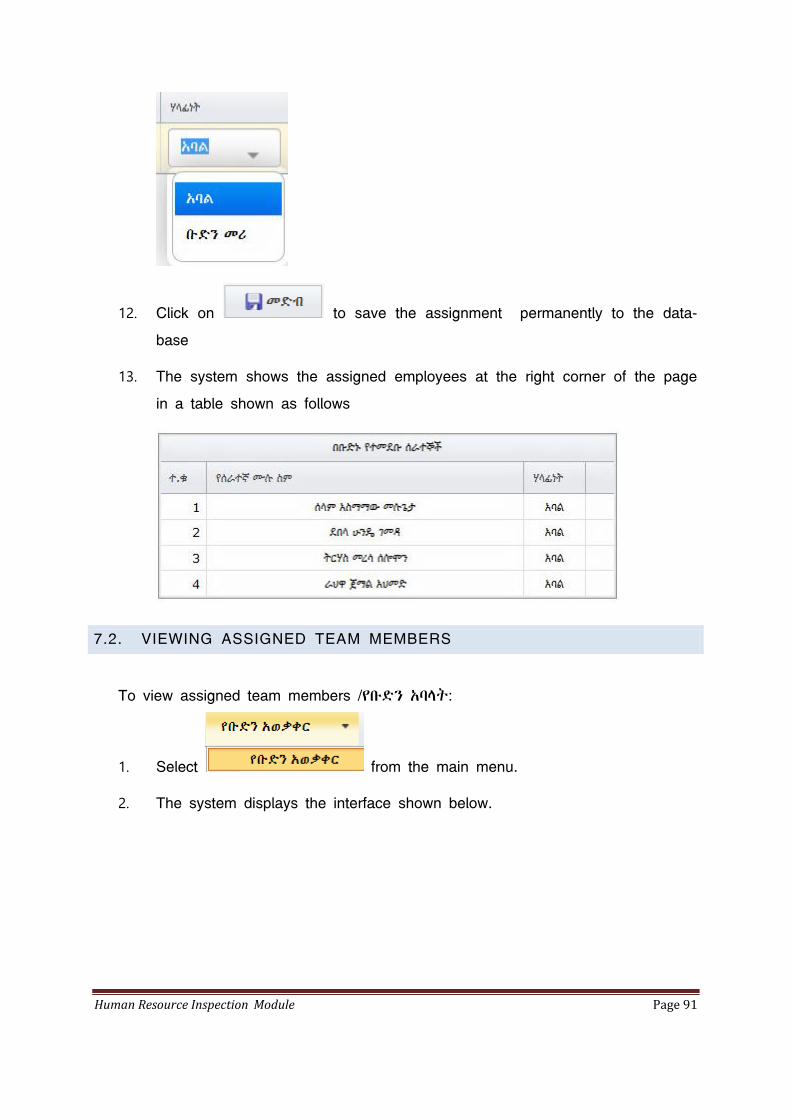
13. The system shows the assigned employees at the right corner of the page
in a table shown as follows
7.2. VIEWING ASSIGNED TEAM MEMBERS
To view assigned team members /የቡድን አባላት:
1. Select from the main menu.
2. The system displays the interface shown below.
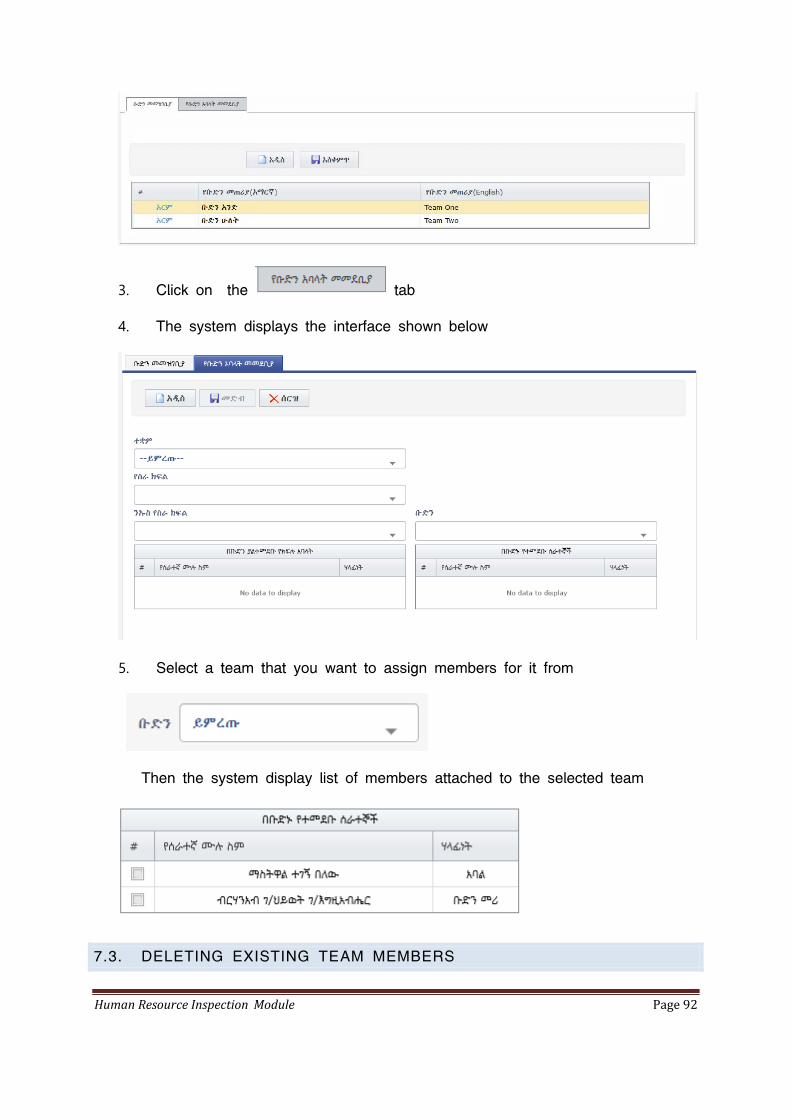
Human Resource Inspection Module Page 92
3. Click on the tab
4. The system displays the interface shown below
5. Select a team that you want to assign members for it from
Then the system display list of members attached to the selected team
7.3. DELETING EXISTING TEAM MEMBERS
Human Resource Inspection Module Page 93
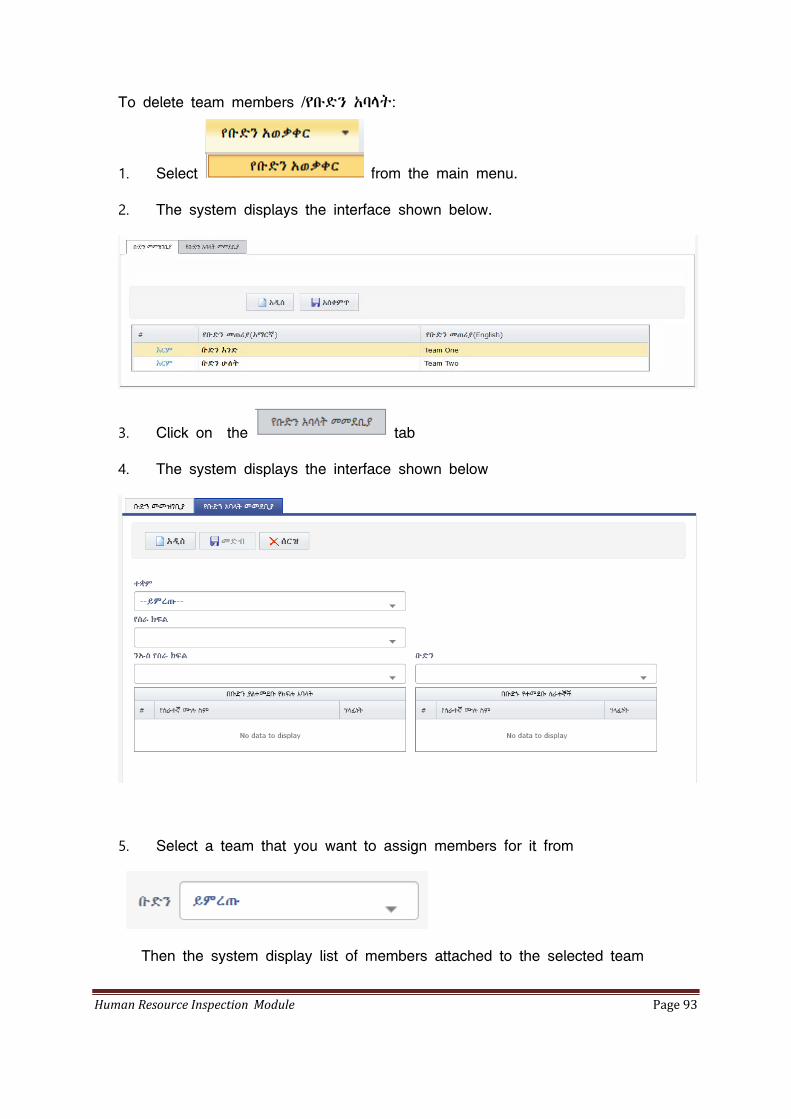
To delete team members /የቡድን አባላት:
1. Select from the main menu.
2. The system displays the interface shown below.
3. Click on the tab
4. The system displays the interface shown below
5. Select a team that you want to assign members for it from
Then the system display list of members attached to the selected team
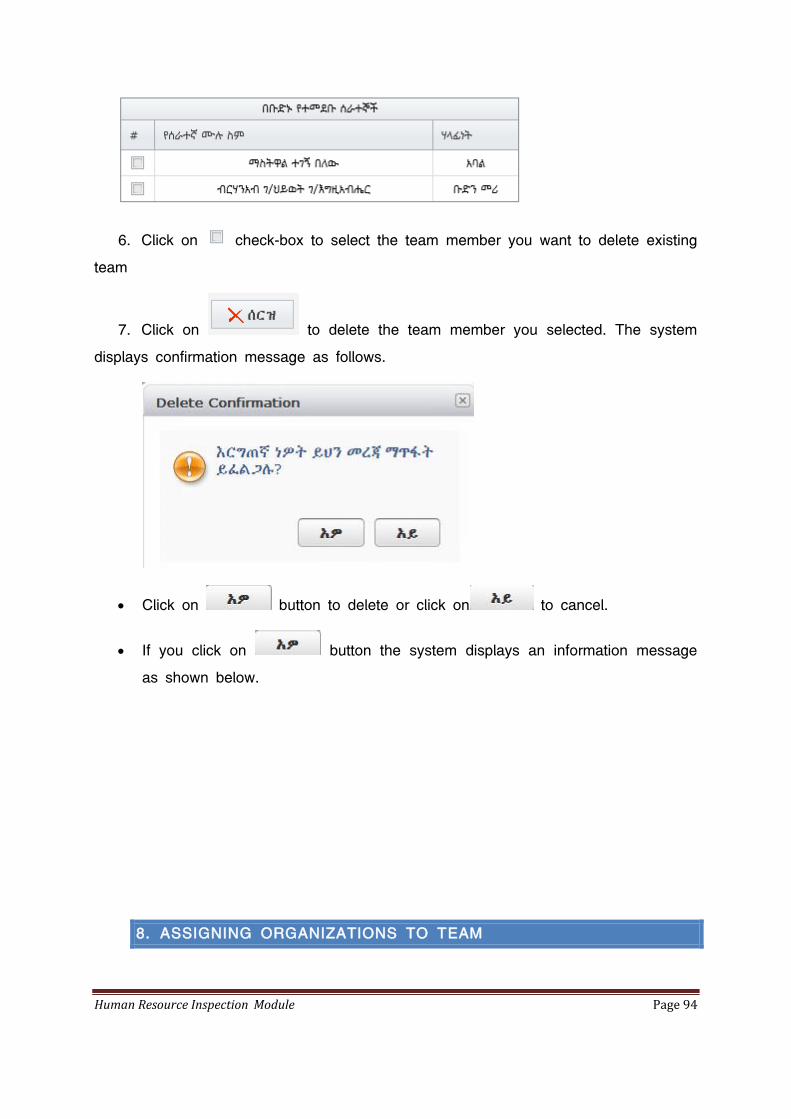
Human Resource Inspection Module Page 94
6. Click on check-box to select the team member you want to delete existing
team
7. Click on to delete the team member you selected. The system
displays confirmation message as follows.
Click on button to delete or click on to cancel.
If you click on button the system displays an information message
as shown below.
8. ASSIGNING ORGANIZATIONS TO TEAM
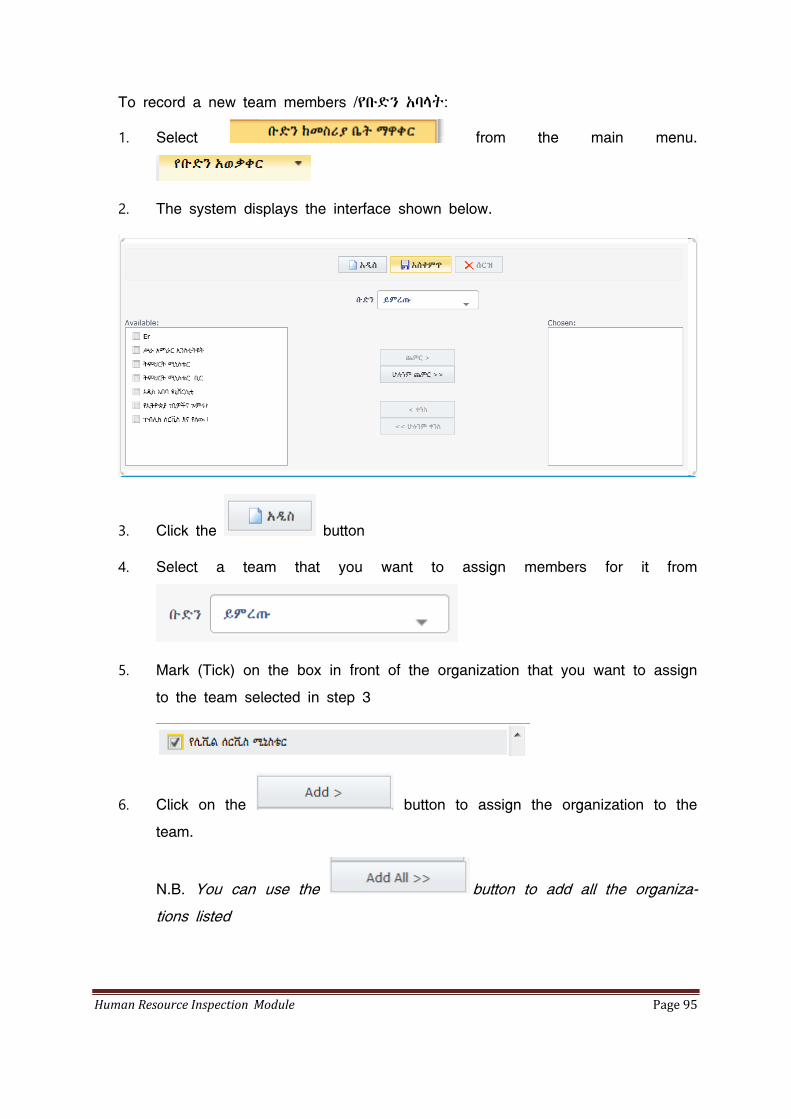
Human Resource Inspection Module Page 95
To record a new team members /የቡድን አባላት:
1. Select from the main menu.
2. The system displays the interface shown below.
3. Click the button
4. Select a team that you want to assign members for it from
5. Mark (Tick) on the box in front of the organization that you want to assign
to the team selected in step 3
6. Click on the button to assign the organization to the
team.
N.B. You can use the button to add all the organiza-
tions listed
Human Resource Inspection Module Page 96
on the left side of the page. The button reverses the
action done on the button. Similarly
reverses the action .
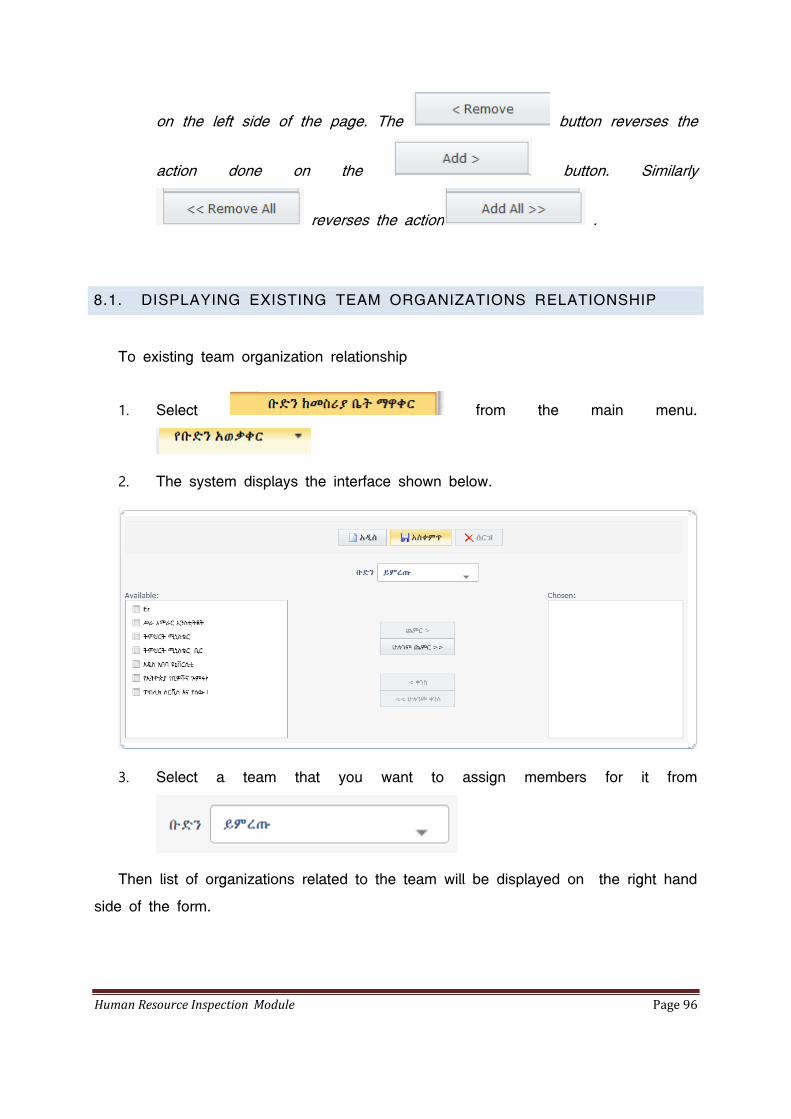
8.1. DISPLAYING EXISTING TEAM ORGANIZATIONS RELATIONSHIP
To existing team organization relationship
1. Select from the main menu.
2. The system displays the interface shown below.
3. Select a team that you want to assign members for it from
Then list of organizations related to the team will be displayed on the right hand
side of the form.

Human Resource Inspection Module Page 97
8.2. DELETING EXISTING ORGANIZATION TO TEAM RELATIONSHIP
To record a new team members /የቡድን አባላት:
1. Select from the main menu.
2. The system displays the interface shown below.
3. Select a team that you want to assign members for it from
Human Resource Inspection Module Page 98
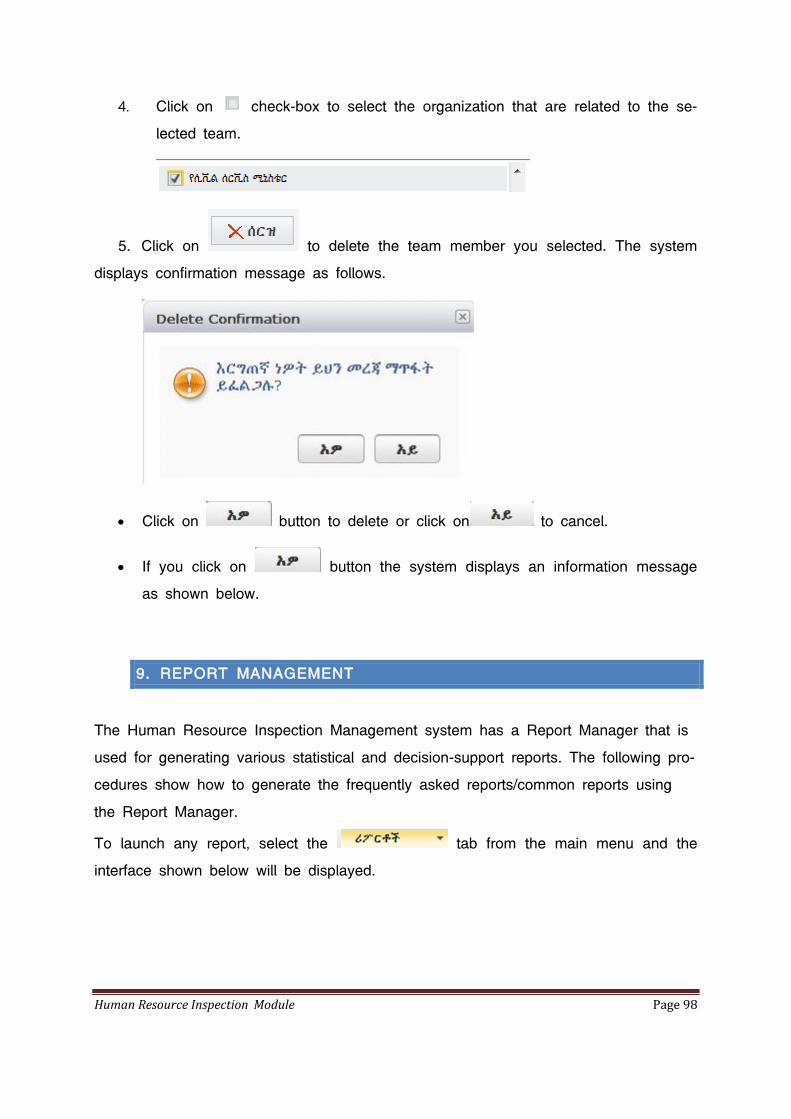
4. Click on check-box to select the organization that are related to the se-
lected team.
5. Click on to delete the team member you selected. The system
displays confirmation message as follows.
Click on button to delete or click on to cancel.
If you click on button the system displays an information message
as shown below.
9. REPORT MANAGEMENT
The Human Resource Inspection Management system has a Report Manager that is
used for generating various statistical and decision-support reports. The following pro-
cedures show how to generate the frequently asked reports/common reports using
the Report Manager.
To launch any report, select the tab from the main menu and the
interface shown below will be displayed.

Human Resource Inspection Module Page 99
To select a particular report, click on the report menu. A list of reports will be dis-
played. Then click the desired sub menu to view the report.
For example, click on from the report menu
The following report generation page will be displayed
If you want to print the report
Click or from the page displayed above. Finally the report will be printed
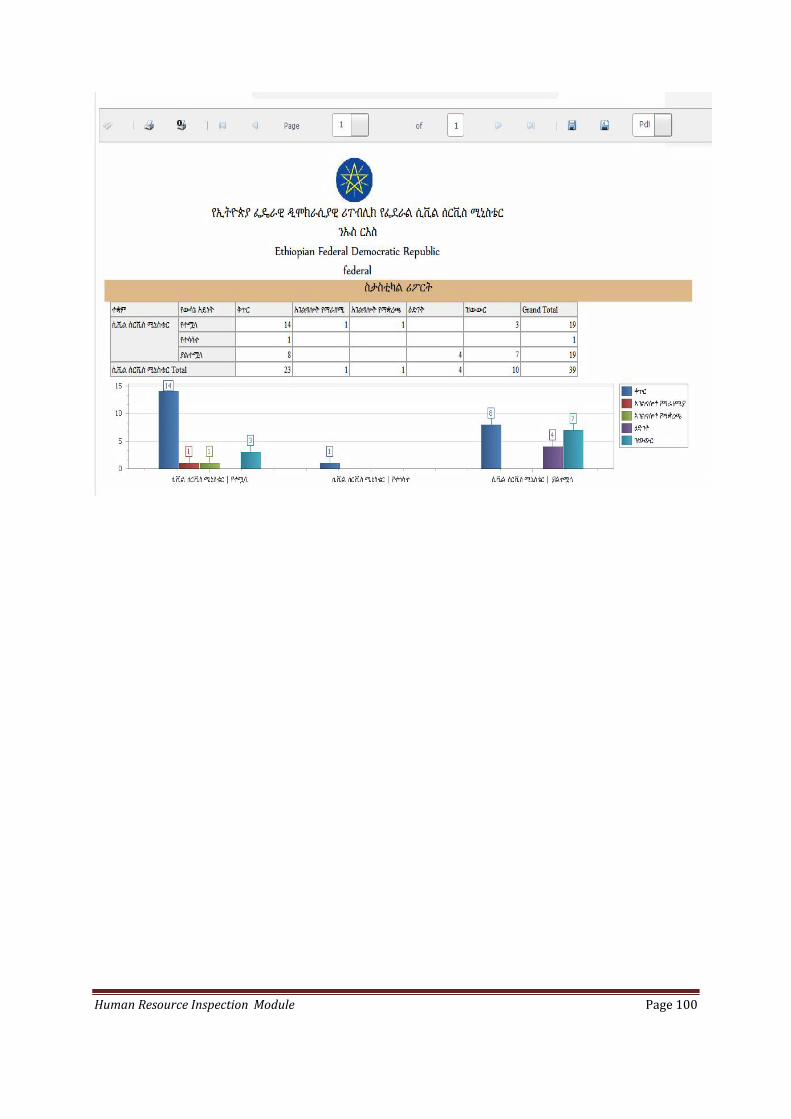
Human Resource Inspection Module Page 100


![[Your title here]](https://img.dokumen.tips/doc/110x75/631eb50d25add517740b2bfe/your-title-here.jpg)


