Embed Size (px)
Citation preview

InteractiveSystem Productivity Facility (ISPF)
Edit and Edit MacrosOS/390 Version 2 Release 10.0
SC28-1312-04
IBM


InteractiveSystem Productivity Facility (ISPF)
Edit and Edit MacrosOS/390 Version 2 Release 10.0
SC28-1312-04
IBM
NoteBefore using this document, read the general information under “Notices” on page 421.
Fifth Edition (September 2000)
This edition applies to ISPF for Version 2 Release 10 of the licensed program OS/390 (program number 5647-A01)and to all subsequent releases and modifications until otherwise indicated in new editions.
Order publications by phone or fax. IBM Software Manufacturing Solutions takes publication orders between 8:30a.m. and 7:00 p.m. eastern standard time (EST). The phone number is (800) 879-2755. The fax number is (800)284-4721.
You can also order publications through your IBM representative or the IBM branch office serving your locality.Publications are not stocked at the address below.
A form for comments appears at the back of this publication. If the form has been removed, and you haveISPF-specific comments, address your comments to:International Business Machines CorporationSoftware ReengineeringDepartment G7IA / Building 503Research Triangle Park, NC 27709-9990
FAX (United States & Canada): 1+800+227-5088IBMLink (United States customers only): CIBMORCF@RALVM17IBM Mail Exchange: [email protected]: [email protected]
If you would like a reply, be sure to include your name, address, telephone number, or FAX number.
Make sure to include the following in your comment or note:Title and order number of this bookPage number or topic related to your comment
The ISPF development team maintains a site on the World-Wide Web. The URL for the site is:http://www.software.ibm.com/ad/ispf
© Copyright International Business Machines Corporation 1984, 2000. All rights reserved.US Government Users Restricted Rights – Use, duplication or disclosure restricted by GSA ADP Schedule Contractwith IBM Corp.
Contents
Figures . . . . . . . . . . . . . . xiii
Preface . . . . . . . . . . . . . . xvAbout This Book . . . . . . . . . . . . xvWho Should Use This Book . . . . . . . . . xv
Summary of Changes . . . . . . . . xviiISPF Product Changes . . . . . . . . . . xviiISPF DM Component Changes . . . . . . . xviiiISPF PDF Component Changes . . . . . . . . xxISPF SCLM Component Changes . . . . . . . xxiISPF Client/Server Component Changes . . . . xxiiISPF User Interface Considerations . . . . . . xxiiISPF Migration Considerations . . . . . . . xxii
ISPF Profiles . . . . . . . . . . . . xxiiiYear 2000 Support for ISPF . . . . . . . xxiii
Elements and Features in OS/390. . . xxv
The ISPF User Interface . . . . . . . xxixSome Terms You Should Know . . . . . . . xxixHow to Navigate in ISPF without Using ActionBars . . . . . . . . . . . . . . . . xxxHow to Navigate in ISPF Using the Action BarInterface . . . . . . . . . . . . . . . xxx
Action Bars . . . . . . . . . . . . . xxxAction Bar Choices . . . . . . . . . . xxxiiiPoint-and-Shoot Text Fields . . . . . . . xxxivFunction Keys . . . . . . . . . . . xxxivSelection Fields . . . . . . . . . . . xxxv
Command Nesting . . . . . . . . . . . xxxvi
Part 1. The ISPF Editor . . . . . . . 1
Chapter 1. Introducing the ISPF Editor . 3What is ISPF? . . . . . . . . . . . . . . 3What the ISPF Editor Does . . . . . . . . . 4How to Use the ISPF Editor . . . . . . . . . 4
Beginning an Edit Session . . . . . . . . . 4Using the ISPF Editor Basic Functions . . . . 14Ending an Edit Session . . . . . . . . . 15
Edit Commands . . . . . . . . . . . . . 16Line Commands . . . . . . . . . . . . 16Primary Commands . . . . . . . . . . 17Edit Commands and PF Key Processing . . . . 17
Edit Macros . . . . . . . . . . . . . . 18Editing Data in Controlled Libraries . . . . . 18Packing Data . . . . . . . . . . . . . 19
Chapter 2. Controlling the EditEnvironment . . . . . . . . . . . . 21What is an Edit Profile? . . . . . . . . . . 21
Using Edit Profile Types . . . . . . . . . 21
Displaying or Defining an Edit Profile . . . . 21Modifying an Edit Profile. . . . . . . . . 23Locking an Edit Profile . . . . . . . . . 23
Edit Modes . . . . . . . . . . . . . . 23Edit Profile Modes . . . . . . . . . . . 24Edit Mode Defaults . . . . . . . . . . . 25
Flagged Lines . . . . . . . . . . . . . 26Changed Lines . . . . . . . . . . . . 27Error Lines . . . . . . . . . . . . . 27Special Lines . . . . . . . . . . . . . 27
Edit Boundaries . . . . . . . . . . . . . 28Initial Macros. . . . . . . . . . . . . . 29Application-Wide Macros. . . . . . . . . . 30Statistics for PDS Members . . . . . . . . . 30
Effect of Stats Mode When Beginning an EditSession . . . . . . . . . . . . . . . 30Effect of Stats Mode When Saving Data . . . . 30
Version and Modification Level Numbers . . . . 31Sequence Numbers . . . . . . . . . . . . 31
Sequence Number Format and ModificationLevel . . . . . . . . . . . . . . . 32Sequence Number Display . . . . . . . . 32Initialization of Number Mode . . . . . . . 33
Enhanced and Language-sensitive Edit Coloring . . 33Language Support . . . . . . . . . . . 34The HILITE Command/Dialog . . . . . . . 38Highlighting Status and the Edit Profile . . . . 45
Edit Recovery . . . . . . . . . . . . . 46
Chapter 3. Managing Data . . . . . . 49Creating and Replacing Data . . . . . . . . 49Copying and Moving Data . . . . . . . . . 50Shifting Data . . . . . . . . . . . . . . 51
Column Shift . . . . . . . . . . . . . 51Data Shift . . . . . . . . . . . . . . 52
Finding, Seeking, Changing, and Excluding Data . . 53Specifying the Search String . . . . . . . . 54Effect of CHANGE Command onColumn-Dependent Data . . . . . . . . . 56Using the CHANGE Command With EBCDICand DBCS Data . . . . . . . . . . . . 57Controlling the Search . . . . . . . . . . 57Qualifying the Search String . . . . . . . . 58Column Limitations . . . . . . . . . . 59Split Screen Limitations . . . . . . . . . 59Excluded Line Limitations . . . . . . . . 59Using the X (Exclude) Line Command with FINDand CHANGE . . . . . . . . . . . . 59Repeating the FIND, CHANGE, and EXCLUDECommands . . . . . . . . . . . . . 60Examples . . . . . . . . . . . . . . 60
Excluding Lines . . . . . . . . . . . . . 63Redisplaying Excluded Lines . . . . . . . 64Redisplaying a Range of Lines . . . . . . . 64
Labels and Line Ranges . . . . . . . . . . 65
© Copyright IBM Corp. 1984, 2000 iii
||||||||||||||||||||
Editor-Assigned Labels . . . . . . . . . 65Specifying a Range . . . . . . . . . . . 66Using Labels and Line Ranges . . . . . . . 66
Word Processing. . . . . . . . . . . . . 67Formatting Paragraphs . . . . . . . . . 67Splitting Lines . . . . . . . . . . . . 68Entering Text (Power Typing) . . . . . . . 69
Using Tabs . . . . . . . . . . . . . . 70Types of Tabs . . . . . . . . . . . . . 70Defining and Controlling Tabs . . . . . . . 71Defining Software Tab Positions . . . . . . 71Defining Hardware Tab Positions . . . . . . 71Using Attribute Bytes . . . . . . . . . . 72
Undoing Edit Interactions . . . . . . . . . 73UNDO Processing . . . . . . . . . . . 74Understanding Differences in SETUNDOProcessing . . . . . . . . . . . . . . 74
Chapter 4. Using Edit Models . . . . . 77What Is an Edit Model? . . . . . . . . . . 77How Models Are Organized . . . . . . . . . 77How to Use Edit Models . . . . . . . . . . 79Adding, Finding, Changing, and Deleting Models 81
Adding Models . . . . . . . . . . . . 81Finding Models . . . . . . . . . . . . 84Changing Models . . . . . . . . . . . 85Deleting Models . . . . . . . . . . . . 85
Part 2. Edit Macros . . . . . . . . 87
Chapter 5. Using Edit Macros . . . . . 89What Are Edit Macros? . . . . . . . . . . 89
Performing Repeated Tasks . . . . . . . . 89Simplifying Complex Tasks . . . . . . . . 91Passing Parameters, and Retrieving andReturning Information . . . . . . . . . . 92
Chapter 6. Creating Edit Macros . . . . 95CLIST and REXX Edit Macros . . . . . . . . 95
Edit Macro Commands and AssignmentStatements. . . . . . . . . . . . . . 96Command Procedure Statements . . . . . . 96ISPF and PDF Dialog Service Requests . . . . 96TSO Commands . . . . . . . . . . . . 97
Program Macros . . . . . . . . . . . . . 97Differences between Program Macros, CLISTs,and REXX EXECs . . . . . . . . . . . 98Passing Parameters in a Program Macro . . . . 98Program Macro Examples . . . . . . . . 99Writing Program Macros . . . . . . . . . 99Running Program Macros . . . . . . . . 102
Using Commands in Edit Macros. . . . . . . 103Naming Edit Macros . . . . . . . . . . 103Variables . . . . . . . . . . . . . . 103Edit Assignment Statements . . . . . . . 104Performing Line Command Functions . . . . 108Parameters . . . . . . . . . . . . . 109Passing Parameters to a Macro . . . . . . 109Using Edit macros in Batch . . . . . . . . 111Edit Macro Messages . . . . . . . . . . 111
Macro Levels . . . . . . . . . . . . 111Labels in Edit Macros. . . . . . . . . . 112Referring to Data Lines . . . . . . . . . 114Referring to Column Positions . . . . . . . 114Defining Macros . . . . . . . . . . . 115Using the PROCESS Command and Operand 116Recovery Macros . . . . . . . . . . . 117
Return Codes from User-Written Edit Macros. . . 118Return Codes from PDF Edit Macro Commands 119Selecting Control for Errors . . . . . . . . . 119
Chapter 7. Testing Edit Macros . . . . 121Handling Errors . . . . . . . . . . . . 121
Edit Command Errors . . . . . . . . . 121Dialog Service Errors . . . . . . . . . . 121
Using CLIST WRITE Statements and REXX SAYStatements . . . . . . . . . . . . . . 122Using CLIST CONTROL and REXX TRACEStatements . . . . . . . . . . . . . . 123Experimenting with Macro Commands . . . . . 124
Chapter 8. Sample Edit Macros . . . . 127TEXT Macro. . . . . . . . . . . . . . 127PFCAN Macro . . . . . . . . . . . . . 129BOX Macro . . . . . . . . . . . . . . 130IMBED Macro . . . . . . . . . . . . . 132ALLMBRS Macro . . . . . . . . . . . . 135FINDCHGS Macro . . . . . . . . . . . 138MASKDATA Macro . . . . . . . . . . . 141
Part 3. Command Reference . . . . 145
Chapter 9. Edit Line Commands . . . 153Rules for Entering Line Commands . . . . . . 153Edit Line Command Notation Conventions . . . 154Line Command Summary . . . . . . . . . 154(—Column Shift Left . . . . . . . . . . . 156
Syntax. . . . . . . . . . . . . . . 156Description . . . . . . . . . . . . . 156Example . . . . . . . . . . . . . . 156
)—Column Shift Right . . . . . . . . . . 157Syntax. . . . . . . . . . . . . . . 158Description . . . . . . . . . . . . . 158Example . . . . . . . . . . . . . . 158
<—Data Shift Left . . . . . . . . . . . . 159Syntax. . . . . . . . . . . . . . . 160Description . . . . . . . . . . . . . 160Example . . . . . . . . . . . . . . 160
>—Data Shift Right . . . . . . . . . . . 162Syntax. . . . . . . . . . . . . . . 162Description . . . . . . . . . . . . . 162Example . . . . . . . . . . . . . . 162
A—Specify an “After” Destination . . . . . . 163Syntax. . . . . . . . . . . . . . . 164Description . . . . . . . . . . . . . 164Example . . . . . . . . . . . . . . 164
B—Specify a “Before” Destination . . . . . . 166Syntax. . . . . . . . . . . . . . . 166Description . . . . . . . . . . . . . 166Example . . . . . . . . . . . . . . 166
iv OS/390 V2R10.0 ISPF Edit and Edit Macros
BOUNDS—Define Boundary Columns . . . . . 168Syntax. . . . . . . . . . . . . . . 168Description . . . . . . . . . . . . . 168Example . . . . . . . . . . . . . . 169
C—Copy Lines . . . . . . . . . . . . . 170Syntax. . . . . . . . . . . . . . . 170Description . . . . . . . . . . . . . 170Example . . . . . . . . . . . . . . 170
COLS—Identify Columns . . . . . . . . . 172Syntax. . . . . . . . . . . . . . . 172Description . . . . . . . . . . . . . 172Example . . . . . . . . . . . . . . 172
D—Delete Lines . . . . . . . . . . . . 173Syntax. . . . . . . . . . . . . . . 173Description . . . . . . . . . . . . . 173Example . . . . . . . . . . . . . . 174
F—Show the First Line . . . . . . . . . . 175Syntax. . . . . . . . . . . . . . . 175Description . . . . . . . . . . . . . 175Example . . . . . . . . . . . . . . 175
I—Insert Lines . . . . . . . . . . . . . 176Syntax. . . . . . . . . . . . . . . 176Description . . . . . . . . . . . . . 176Example . . . . . . . . . . . . . . 177
L—Show the Last Line(s) . . . . . . . . . 178Syntax. . . . . . . . . . . . . . . 178Description . . . . . . . . . . . . . 178Example . . . . . . . . . . . . . . 178
LC—Convert Characters to Lowercase . . . . . 179Syntax. . . . . . . . . . . . . . . 179Description . . . . . . . . . . . . . 179Example . . . . . . . . . . . . . . 180
M—Move Lines . . . . . . . . . . . . 181Syntax. . . . . . . . . . . . . . . 181Description . . . . . . . . . . . . . 181Example . . . . . . . . . . . . . . 182
MASK—Define Masks . . . . . . . . . . 183Syntax. . . . . . . . . . . . . . . 183Description . . . . . . . . . . . . . 183Example . . . . . . . . . . . . . . 184
MD—Make Dataline . . . . . . . . . . . 185Syntax. . . . . . . . . . . . . . . 185Description . . . . . . . . . . . . . 185Example . . . . . . . . . . . . . . 186
O—Overlay Lines . . . . . . . . . . . . 187Syntax. . . . . . . . . . . . . . . 187Description . . . . . . . . . . . . . 187Example . . . . . . . . . . . . . . 188
R—Repeat Lines . . . . . . . . . . . . 189Syntax. . . . . . . . . . . . . . . 190Description . . . . . . . . . . . . . 190Example . . . . . . . . . . . . . . 190
S—Show Lines . . . . . . . . . . . . . 191Syntax. . . . . . . . . . . . . . . 191Description . . . . . . . . . . . . . 191Example . . . . . . . . . . . . . . 191
TABS—Control Tabs . . . . . . . . . . . 193Syntax. . . . . . . . . . . . . . . 193Description . . . . . . . . . . . . . 193Examples . . . . . . . . . . . . . . 193
TE—Text Entry . . . . . . . . . . . . . 194
Syntax. . . . . . . . . . . . . . . 195Description . . . . . . . . . . . . . 195Example . . . . . . . . . . . . . . 195
TF—Text Flow . . . . . . . . . . . . . 198Syntax. . . . . . . . . . . . . . . 198Description . . . . . . . . . . . . . 198Example . . . . . . . . . . . . . . 198
TS—Text Split . . . . . . . . . . . . . 199Syntax. . . . . . . . . . . . . . . 200Description . . . . . . . . . . . . . 200Examples . . . . . . . . . . . . . . 200
UC—Convert Characters to Uppercase . . . . . 201Syntax. . . . . . . . . . . . . . . 201Description . . . . . . . . . . . . . 201Example . . . . . . . . . . . . . . 202
X—Exclude Lines . . . . . . . . . . . . 203Syntax. . . . . . . . . . . . . . . 203Description . . . . . . . . . . . . . 203Example . . . . . . . . . . . . . . 204
Chapter 10. Edit Primary Commands 207Edit Primary Command Notation Conventions . . 207Edit Primary Command Summary . . . . . . 207AUTOLIST—Create a Source Listing Automatically 211
Syntax. . . . . . . . . . . . . . . 212Description . . . . . . . . . . . . . 212Example . . . . . . . . . . . . . . 212
AUTONUM—Number Lines Automatically . . . 213Syntax. . . . . . . . . . . . . . . 213Description . . . . . . . . . . . . . 213Example . . . . . . . . . . . . . . 214
AUTOSAVE—Save Data Automatically . . . . . 215Syntax. . . . . . . . . . . . . . . 215Description . . . . . . . . . . . . . 215Example . . . . . . . . . . . . . . 216
BOUNDS—Control the Edit Boundaries . . . . 216Syntax. . . . . . . . . . . . . . . 216Description . . . . . . . . . . . . . 216Examples . . . . . . . . . . . . . . 217
BUILTIN—Process a Built-In Command . . . . 217Syntax. . . . . . . . . . . . . . . 217Description . . . . . . . . . . . . . 217Example . . . . . . . . . . . . . . 217
BROWSE—Browse from within an Edit Session 218Syntax. . . . . . . . . . . . . . . 218Description . . . . . . . . . . . . . 218Example . . . . . . . . . . . . . . 218
CANCEL—Cancel Edit Changes . . . . . . . 218Syntax. . . . . . . . . . . . . . . 218Description . . . . . . . . . . . . . 219Example . . . . . . . . . . . . . . 219
CAPS—Control Automatic Character Conversion 219Syntax. . . . . . . . . . . . . . . 219Description . . . . . . . . . . . . . 219Example . . . . . . . . . . . . . . 220
CHANGE—Change a Data String . . . . . . 220Syntax. . . . . . . . . . . . . . . 220Description . . . . . . . . . . . . . 221Examples . . . . . . . . . . . . . . 222
COMPARE—Edit Compare . . . . . . . . . 222Command Syntax . . . . . . . . . . . 223
Contents v
Examples . . . . . . . . . . . . . . 224COPY—Copy Data . . . . . . . . . . . 225
Syntax. . . . . . . . . . . . . . . 225Description . . . . . . . . . . . . . 226Example . . . . . . . . . . . . . . 227
CREATE—Create Data . . . . . . . . . . 229Syntax. . . . . . . . . . . . . . . 229Description . . . . . . . . . . . . . 229Example . . . . . . . . . . . . . . 230
CUT—Cut and Save Lines . . . . . . . . . 233Syntax. . . . . . . . . . . . . . . 233Description . . . . . . . . . . . . . 233Example . . . . . . . . . . . . . . 234
DEFINE—Define a Name . . . . . . . . . 234Syntax. . . . . . . . . . . . . . . 234Description . . . . . . . . . . . . . 235Examples . . . . . . . . . . . . . . 235
DELETE—Delete Lines . . . . . . . . . . 236Syntax. . . . . . . . . . . . . . . 236Description . . . . . . . . . . . . . 236Examples . . . . . . . . . . . . . . 236
EDIT—Edit from within an Edit Session . . . . 237Syntax. . . . . . . . . . . . . . . 237Description . . . . . . . . . . . . . 237Example . . . . . . . . . . . . . . 237
EDITSET—Display the Editor Settings Dialog . . 239Syntax. . . . . . . . . . . . . . . 239Description . . . . . . . . . . . . . 239The Edit and View Settings Panel . . . . . 239Example . . . . . . . . . . . . . . 242
END—End the Edit Session . . . . . . . . 243Syntax. . . . . . . . . . . . . . . 243Description . . . . . . . . . . . . . 243Example . . . . . . . . . . . . . . 243
EXCLUDE—Exclude Lines from the Display . . . 244Syntax. . . . . . . . . . . . . . . 244Description . . . . . . . . . . . . . 244Examples . . . . . . . . . . . . . . 245
FIND—Find a Data String . . . . . . . . . 245Syntax. . . . . . . . . . . . . . . 245Description . . . . . . . . . . . . . 246Examples . . . . . . . . . . . . . . 247
FLIP—Reverse Exclude Status of Lines . . . . . 247Syntax. . . . . . . . . . . . . . . 247Description . . . . . . . . . . . . . 247Example . . . . . . . . . . . . . . 248
HEX—Display Hexadecimal Characters . . . . 249Syntax. . . . . . . . . . . . . . . 250Description . . . . . . . . . . . . . 250Examples . . . . . . . . . . . . . . 250
HILITE—Enhanced Edit Coloring . . . . . . 252Syntax. . . . . . . . . . . . . . . 252Description . . . . . . . . . . . . . 255
IMACRO—Specify an Initial Macro . . . . . . 255Syntax. . . . . . . . . . . . . . . 255Examples . . . . . . . . . . . . . . 255
LEVEL—Specify the Modification Level Number 256Syntax. . . . . . . . . . . . . . . 256Description . . . . . . . . . . . . . 256Example . . . . . . . . . . . . . . 256
LOCATE—Locate a Line. . . . . . . . . . 257
Specific Locate Syntax . . . . . . . . . 257Generic Locate Syntax . . . . . . . . . 258Examples . . . . . . . . . . . . . . 258
MODEL—Copy a Model into the Current Data Set 259Model Name Syntax . . . . . . . . . . 259Class Name Syntax . . . . . . . . . . 260Example . . . . . . . . . . . . . . 260
MOVE—Move Data . . . . . . . . . . . 262Syntax. . . . . . . . . . . . . . . 262Description . . . . . . . . . . . . . 263Example . . . . . . . . . . . . . . 263
NONUMBER—Turn Off Number Mode . . . . 266Syntax. . . . . . . . . . . . . . . 266Description . . . . . . . . . . . . . 266Example . . . . . . . . . . . . . . 266
NOTES—Display Model Notes . . . . . . . 266Syntax. . . . . . . . . . . . . . . 266Description . . . . . . . . . . . . . 266Examples . . . . . . . . . . . . . . 266
NULLS—Control Null Spaces . . . . . . . . 267Syntax. . . . . . . . . . . . . . . 267Description . . . . . . . . . . . . . 267Examples . . . . . . . . . . . . . . 267
NUMBER—Generate Sequence Numbers . . . . 268Syntax. . . . . . . . . . . . . . . 268Description . . . . . . . . . . . . . 269Examples . . . . . . . . . . . . . . 269
PACK—Compress Data . . . . . . . . . . 269Syntax. . . . . . . . . . . . . . . 269Examples . . . . . . . . . . . . . . 269
PASTE—Move or Copy Lines from Clipboard . . 269Syntax. . . . . . . . . . . . . . . 270Description . . . . . . . . . . . . . 270Example . . . . . . . . . . . . . . 270
PRESERVE - Enable Saving of Trailing Blanks . . 270Syntax. . . . . . . . . . . . . . . 270Description . . . . . . . . . . . . . 271Examples . . . . . . . . . . . . . . 271
PROFILE—Control and Display Your Profile . . . 271Profile Control Syntax . . . . . . . . . 271Profile Lock Syntax . . . . . . . . . . 272Profile Reset Syntax . . . . . . . . . . 272Description . . . . . . . . . . . . . 272Example . . . . . . . . . . . . . . 273
RCHANGE—Repeat a Change . . . . . . . 274Syntax. . . . . . . . . . . . . . . 274Description . . . . . . . . . . . . . 274
RECOVERY—Control Edit Recovery. . . . . . 275Syntax. . . . . . . . . . . . . . . 275Description . . . . . . . . . . . . . 275
RENUM—Renumber Data Set Lines . . . . . . 276Syntax. . . . . . . . . . . . . . . 276Description . . . . . . . . . . . . . 277Example . . . . . . . . . . . . . . 277
REPLACE—Replace Data . . . . . . . . . 278Syntax. . . . . . . . . . . . . . . 279Description . . . . . . . . . . . . . 279Example . . . . . . . . . . . . . . 280
RESET—Reset the Data Display . . . . . . . 282Syntax. . . . . . . . . . . . . . . 282Description . . . . . . . . . . . . . 283
vi OS/390 V2R10.0 ISPF Edit and Edit Macros
||||||||||
Examples . . . . . . . . . . . . . . 283RFIND—Repeat Find . . . . . . . . . . . 284
Syntax. . . . . . . . . . . . . . . 284RMACRO—Specify a Recovery Macro . . . . . 284
Syntax. . . . . . . . . . . . . . . 284Description . . . . . . . . . . . . . 284Example . . . . . . . . . . . . . . 284
SAVE—Save the Current Data . . . . . . . . 284Syntax. . . . . . . . . . . . . . . 285Description . . . . . . . . . . . . . 285Example . . . . . . . . . . . . . . 285
SETUNDO—Set the UNDO Mode . . . . . . 285Syntax. . . . . . . . . . . . . . . 285Description . . . . . . . . . . . . . 286Example . . . . . . . . . . . . . . 287
SORT—Sort Data . . . . . . . . . . . . 287Syntax. . . . . . . . . . . . . . . 287Description . . . . . . . . . . . . . 288Examples . . . . . . . . . . . . . . 289
STATS—Generate Library Statistics . . . . . . 289Syntax. . . . . . . . . . . . . . . 289Examples . . . . . . . . . . . . . . 289
SUBMIT—Submit Data for Batch Processing . . . 289Syntax. . . . . . . . . . . . . . . 289Description . . . . . . . . . . . . . 290Examples . . . . . . . . . . . . . . 290
TABS—Define Tabs . . . . . . . . . . . 290Syntax. . . . . . . . . . . . . . . 290Example . . . . . . . . . . . . . . 291
UNDO—Reverse Last Edit Interaction . . . . . 292Syntax. . . . . . . . . . . . . . . 292Description . . . . . . . . . . . . . 292Example . . . . . . . . . . . . . . 293
UNNUMBER—Remove Sequence Numbers . . . 294Syntax. . . . . . . . . . . . . . . 295Description . . . . . . . . . . . . . 295Example . . . . . . . . . . . . . . 295
VERSION—Control the Version Number . . . . 296Syntax. . . . . . . . . . . . . . . 296Description . . . . . . . . . . . . . 296Example . . . . . . . . . . . . . . 296
VIEW—View from within an Edit Session . . . . 297Syntax. . . . . . . . . . . . . . . 298Description . . . . . . . . . . . . . 298Example . . . . . . . . . . . . . . 298
Chapter 11. Edit Macro Commandsand Assignment Statements . . . . . 299Edit Macro Command Notation Conventions . . . 299Edit Macro Command Summary . . . . . . . 300AUTOLIST—Set or Query Autolist Mode . . . . 308
Macro Command Syntax . . . . . . . . 308Assignment Statement Syntax . . . . . . . 308Return Codes . . . . . . . . . . . . 308Examples . . . . . . . . . . . . . . 308
AUTONUM—Set or Query Autonum Mode . . . 308Macro Command Syntax . . . . . . . . 309Assignment Statement Syntax . . . . . . . 309Description . . . . . . . . . . . . . 309Return Codes . . . . . . . . . . . . 309Examples . . . . . . . . . . . . . . 309
AUTOSAVE—Set or Query Autosave Mode . . . 310Macro Command Syntax . . . . . . . . 310Assignment Statement Syntax . . . . . . . 310Description . . . . . . . . . . . . . 310Return Codes . . . . . . . . . . . . 311Examples . . . . . . . . . . . . . . 311
BLKSIZE—Query the Block Size . . . . . . . 311Assignment Statement Syntax . . . . . . . 311Return Codes . . . . . . . . . . . . 311Example . . . . . . . . . . . . . . 311
BOUNDS—Set or Query the Edit Boundaries. . . 312Macro Command Syntax . . . . . . . . 312Assignment Statement Syntax . . . . . . . 312Description . . . . . . . . . . . . . 312Return Codes . . . . . . . . . . . . 312Examples . . . . . . . . . . . . . . 313
BROWSE—Browse from within an Edit Session 313Macro Command Syntax . . . . . . . . 313Description . . . . . . . . . . . . . 314Return Codes . . . . . . . . . . . . 314Examples . . . . . . . . . . . . . . 314
BUILTIN—Process a Built-In Command . . . . 314Macro Command Syntax . . . . . . . . 314Description . . . . . . . . . . . . . 314Return Codes . . . . . . . . . . . . 314Examples . . . . . . . . . . . . . . 314
CANCEL—Cancel Edit Changes . . . . . . . 315Macro Command Syntax . . . . . . . . 315Description . . . . . . . . . . . . . 315Return Codes . . . . . . . . . . . . 315Example . . . . . . . . . . . . . . 315
CAPS—Set or Query Caps Mode . . . . . . . 315Macro Command Syntax . . . . . . . . 315Assignment Statement Syntax . . . . . . . 315Description . . . . . . . . . . . . . 316Return Codes . . . . . . . . . . . . 316Examples . . . . . . . . . . . . . . 316
CHANGE—Change a Search String . . . . . . 316Macro Command Syntax . . . . . . . . 316Description . . . . . . . . . . . . . 317Return Codes . . . . . . . . . . . . 318Example . . . . . . . . . . . . . . 318
CHANGE_COUNTS—Query Change Counts. . . 319Assignment Statement Syntax . . . . . . . 319Return Codes . . . . . . . . . . . . 319Examples . . . . . . . . . . . . . . 319
COMPARE—Edit Compare . . . . . . . . . 319Macro Command Syntax . . . . . . . . 320Return Codes . . . . . . . . . . . . 321Compare Examples . . . . . . . . . . 321
COPY—Copy Data . . . . . . . . . . . 322Macro Command Syntax . . . . . . . . 322Return Codes . . . . . . . . . . . . 323Examples . . . . . . . . . . . . . . 323
CREATE—Create a Data Set or a Data Set Member 323Macro Command Syntax . . . . . . . . 323Description . . . . . . . . . . . . . 324Return Codes . . . . . . . . . . . . 324Example . . . . . . . . . . . . . . 324
CTL_LIBRARY—Query Controlled Library Status 324Assignment Statement Syntax . . . . . . . 324
Contents vii
Return Codes . . . . . . . . . . . . 325Example . . . . . . . . . . . . . . 326
CURSOR—Set or Query the Cursor Position . . . 326Assignment Statement Syntax . . . . . . . 326Description . . . . . . . . . . . . . 326Return Codes . . . . . . . . . . . . 327Examples . . . . . . . . . . . . . . 327
CUT—Cut and Save Lines . . . . . . . . . 328Syntax. . . . . . . . . . . . . . . 328Description . . . . . . . . . . . . . 328Return Codes . . . . . . . . . . . . 329Examples . . . . . . . . . . . . . . 329
DATA_CHANGED—Query the Data ChangedStatus . . . . . . . . . . . . . . . . 329
Assignment Statement Syntax . . . . . . . 329Description . . . . . . . . . . . . . 329Return Codes . . . . . . . . . . . . 329Example . . . . . . . . . . . . . . 329
DATA_WIDTH—Query Data Width . . . . . . 330Assignment Statement Syntax . . . . . . . 330Description . . . . . . . . . . . . . 330Return Codes . . . . . . . . . . . . 330Example . . . . . . . . . . . . . . 330
DATAID—Query Data ID . . . . . . . . . 331Assignment Statement Syntax . . . . . . . 331Description . . . . . . . . . . . . . 331Return Codes . . . . . . . . . . . . 331Example . . . . . . . . . . . . . . 331
DATASET—Query the Current and Original DataSet Names . . . . . . . . . . . . . . 331
Assignment Statement Syntax . . . . . . . 331Return Codes . . . . . . . . . . . . 332Example . . . . . . . . . . . . . . 332
DEFINE—Define a Name . . . . . . . . . 332Macro Command Syntax . . . . . . . . 332Description . . . . . . . . . . . . . 333Return Codes . . . . . . . . . . . . 333Examples . . . . . . . . . . . . . . 333
DELETE—Delete Lines . . . . . . . . . . 334Macro Command Syntax . . . . . . . . 334Description . . . . . . . . . . . . . 334Return Codes . . . . . . . . . . . . 334Examples . . . . . . . . . . . . . . 334
DISPLAY_COLS—Query Display Columns . . . 335Assignment Statement Syntax . . . . . . . 335Description . . . . . . . . . . . . . 335Return Codes . . . . . . . . . . . . 335Example . . . . . . . . . . . . . . 335
DISPLAY_LINES—Query Display Lines . . . . 335Assignment Statement Syntax . . . . . . . 336Return Codes . . . . . . . . . . . . 336Example . . . . . . . . . . . . . . 336
DOWN—Scroll Down . . . . . . . . . . 336Macro Command Syntax . . . . . . . . 336Description . . . . . . . . . . . . . 336Return Codes . . . . . . . . . . . . 337Examples . . . . . . . . . . . . . . 337
EDIT—Edit from within an Edit Session . . . . 337Macro Command Syntax . . . . . . . . 337Description . . . . . . . . . . . . . 337Return Codes . . . . . . . . . . . . 338
Example . . . . . . . . . . . . . . 338END—End the Edit Session . . . . . . . . 338
Macro Command Syntax . . . . . . . . 338Description . . . . . . . . . . . . . 338Return Codes . . . . . . . . . . . . 338Example . . . . . . . . . . . . . . 339
EXCLUDE—Exclude Lines from the Display . . . 339Macro Command Syntax . . . . . . . . 339Description . . . . . . . . . . . . . 340Return Codes . . . . . . . . . . . . 340Examples . . . . . . . . . . . . . . 341
EXCLUDE_COUNTS—Query Exclude Counts . . 341Assignment Statement Syntax . . . . . . . 341Return Codes . . . . . . . . . . . . 341Example . . . . . . . . . . . . . . 341
FIND—Find a Search String . . . . . . . . 341Macro Command Syntax . . . . . . . . 341Description . . . . . . . . . . . . . 342Return Codes . . . . . . . . . . . . 343Examples . . . . . . . . . . . . . . 343
FIND_COUNTS—Query Find Counts . . . . . 343Assignment Statement Syntax . . . . . . . 344Return Codes . . . . . . . . . . . . 344Example . . . . . . . . . . . . . . 344
FLIP—Reverse Exclude Status of Lines . . . . . 344Assignment Statement Syntax . . . . . . . 344Return Codes . . . . . . . . . . . . 344Examples . . . . . . . . . . . . . . 344
FLOW_COUNTS—Query Flow Counts . . . . . 345Assignment Statement Syntax . . . . . . . 345Return Codes . . . . . . . . . . . . 345Example . . . . . . . . . . . . . . 345
HEX—Set or Query Hexadecimal Mode . . . . 345Macro Command Syntax . . . . . . . . 345Assignment Statement Syntax . . . . . . . 346Description . . . . . . . . . . . . . 346Return Codes . . . . . . . . . . . . 346Examples . . . . . . . . . . . . . . 346
HILITE—Enhanced Edit Coloring . . . . . . 347Macro Command Syntax . . . . . . . . 347Description . . . . . . . . . . . . . 349Return Codes . . . . . . . . . . . . 349
IMACRO—Set or Query an Initial Macro . . . . 350Macro Command Syntax . . . . . . . . 350Assignment Statement Syntax . . . . . . . 350Return Codes . . . . . . . . . . . . 350Examples . . . . . . . . . . . . . . 350
INSERT—Prepare Display for Data Insertion . . . 351Macro Command Syntax . . . . . . . . 351Description . . . . . . . . . . . . . 351Return Codes . . . . . . . . . . . . 351Example . . . . . . . . . . . . . . 351
LABEL—Set or Query a Line Label . . . . . . 351Assignment Statement Syntax . . . . . . . 351Description . . . . . . . . . . . . . 352Return Codes . . . . . . . . . . . . 352Example . . . . . . . . . . . . . . 352
LEFT—Scroll Left . . . . . . . . . . . . 352Macro Command Syntax . . . . . . . . 352Description . . . . . . . . . . . . . 353Return Codes . . . . . . . . . . . . 353
viii OS/390 V2R10.0 ISPF Edit and Edit Macros
Example . . . . . . . . . . . . . . 353LEVEL—Set or Query the Modification LevelNumber . . . . . . . . . . . . . . . 353
Macro Command Syntax . . . . . . . . 353Assignment Statement Syntax . . . . . . . 354Return Codes . . . . . . . . . . . . 354Examples . . . . . . . . . . . . . . 354
LINE—Set or Query a Line from the Data Set . . 354Assignment Statement Syntax . . . . . . . 354Description . . . . . . . . . . . . . 355Return Codes . . . . . . . . . . . . 355Examples . . . . . . . . . . . . . . 355
LINE_AFTER—Add a Line to the Current Data Set 355Assignment Statement Syntax . . . . . . . 355Description . . . . . . . . . . . . . 356Return Codes . . . . . . . . . . . . 356Examples . . . . . . . . . . . . . . 356
LINE_BEFORE—Add a Line to the Current DataSet . . . . . . . . . . . . . . . . . 357
Assignment Statement Syntax . . . . . . . 357Description . . . . . . . . . . . . . 358Return Codes . . . . . . . . . . . . 358Examples . . . . . . . . . . . . . . 358
LINE_STATUS—Query Source and ChangeInformation for a Line in a Data Set . . . . . . 358
Assignment Statement Syntax . . . . . . . 359Return Codes . . . . . . . . . . . . 359Example . . . . . . . . . . . . . . 359
LINENUM—Query the Line Number of a LabeledLine . . . . . . . . . . . . . . . . 360
Assignment Statement Syntax . . . . . . . 360Return Codes . . . . . . . . . . . . 360Description . . . . . . . . . . . . . 360Examples . . . . . . . . . . . . . . 360
LOCATE—Locate a Line. . . . . . . . . . 360Specific Locate Syntax . . . . . . . . . 360Generic Locate Syntax . . . . . . . . . 361Return Codes . . . . . . . . . . . . 362Examples . . . . . . . . . . . . . . 362
LRECL—Query the Logical Record Length . . . 362Assignment Statement Syntax . . . . . . . 362Description . . . . . . . . . . . . . 363Return Codes . . . . . . . . . . . . 363Example . . . . . . . . . . . . . . 363
MACRO—Identify an Edit Macro . . . . . . 363Macro Command Syntax . . . . . . . . 363Description . . . . . . . . . . . . . 363Return Codes . . . . . . . . . . . . 364Examples . . . . . . . . . . . . . . 364
MACRO_LEVEL—Query the Macro Nesting Level 364Assignment Statement Syntax . . . . . . . 364Description . . . . . . . . . . . . . 364Return Codes . . . . . . . . . . . . 364Example . . . . . . . . . . . . . . 364
MASKLINE—Set or Query the Mask Line . . . . 365Assignment Statement Syntax . . . . . . . 365Description . . . . . . . . . . . . . 365Return Codes . . . . . . . . . . . . 365Examples . . . . . . . . . . . . . . 365
MEMBER—Query the Current Member Name . . 366Assignment Statement Syntax . . . . . . . 366
Return Codes . . . . . . . . . . . . 366Example . . . . . . . . . . . . . . 366
MEND—End a Macro in the Batch Environment 366Macro Command Syntax . . . . . . . . 366Description . . . . . . . . . . . . . 366Return Codes . . . . . . . . . . . . 366Example . . . . . . . . . . . . . . 367
MODEL—Copy a Model into the Current Data Set 367Macro Command Model Name Syntax . . . . 367Macro Command Class Name Syntax . . . . 368Return Codes . . . . . . . . . . . . 368Example . . . . . . . . . . . . . . 368
MOVE— Move a Data Set or a Data Set Member 368Macro Command Syntax . . . . . . . . 368Description . . . . . . . . . . . . . 369Return Codes . . . . . . . . . . . . 369Examples . . . . . . . . . . . . . . 369
NONUMBER—Turn Off Number Mode . . . . 369Syntax. . . . . . . . . . . . . . . 369Description . . . . . . . . . . . . . 369Return Codes . . . . . . . . . . . . 369Example . . . . . . . . . . . . . . 370
NOTES—Set or Query Note Mode . . . . . . 370Macro Command Syntax . . . . . . . . 370Assignment Statement Syntax . . . . . . . 370Return Codes . . . . . . . . . . . . 370Examples . . . . . . . . . . . . . . 370
NULLS—Set or Query Nulls Mode . . . . . . 371Macro Command Syntax . . . . . . . . 371Assignment Statement Syntax . . . . . . . 371Description . . . . . . . . . . . . . 371Return Codes . . . . . . . . . . . . 371Examples . . . . . . . . . . . . . . 372
NUMBER—Set or Query Number Mode . . . . 372Macro Command Syntax . . . . . . . . 372Assignment Statement Syntax . . . . . . . 373Description . . . . . . . . . . . . . 374Return Codes . . . . . . . . . . . . 374Example . . . . . . . . . . . . . . 374
PACK—Set or Query Pack Mode . . . . . . . 374Macro Command Syntax . . . . . . . . 374Assignment Statement Syntax . . . . . . . 375Return Codes . . . . . . . . . . . . 375Example . . . . . . . . . . . . . . 375
PASTE—Move or Copy Lines from Clipboard . . 375Syntax. . . . . . . . . . . . . . . 375Description . . . . . . . . . . . . . 375Return Codes . . . . . . . . . . . . 376Examples . . . . . . . . . . . . . . 376
PRESERVE—Enable Saving of Trailing Blanks . . 376Macro Command Syntax . . . . . . . . 376Assignment Statement Syntax . . . . . . . 376Description . . . . . . . . . . . . . 376Return Codes . . . . . . . . . . . . 377Examples . . . . . . . . . . . . . . 377
PROCESS—Process Line Commands . . . . . 377Macro Command Syntax . . . . . . . . 377Description . . . . . . . . . . . . . 378Return Codes . . . . . . . . . . . . 378Examples . . . . . . . . . . . . . . 378
PROFILE—Set or Query the Current Profile . . . 379
Contents ix
|||||||||
Macro Command Profile Control Syntax . . . 379Macro Command Profile Lock Syntax . . . . 379Macro Command Profile Reset Syntax . . . . 380Assignment Statement Syntax . . . . . . . 380Description . . . . . . . . . . . . . 380Return Codes . . . . . . . . . . . . 380Example . . . . . . . . . . . . . . 380
RANGE_CMD—Query a Command That YouEntered . . . . . . . . . . . . . . . 380
Assignment Statement Syntax . . . . . . . 380Description . . . . . . . . . . . . . 381Return Codes . . . . . . . . . . . . 381Example . . . . . . . . . . . . . . 381
RCHANGE—Repeat a Change . . . . . . . 381Macro Command Syntax . . . . . . . . 381Description . . . . . . . . . . . . . 381Return Codes . . . . . . . . . . . . 381Example . . . . . . . . . . . . . . 382
RECFM—Query the Record Format . . . . . . 382Assignment Statement Syntax . . . . . . . 382Return Codes . . . . . . . . . . . . 382Example . . . . . . . . . . . . . . 382
RECOVERY—Set or Query Recovery Mode . . . 383Macro Command Syntax . . . . . . . . 383Assignment Statement Syntax . . . . . . . 383Return Codes . . . . . . . . . . . . 384Examples . . . . . . . . . . . . . . 384
RENUM—Renumber Data Set Lines . . . . . . 384Macro Command Syntax . . . . . . . . 384Return Codes . . . . . . . . . . . . 385Examples . . . . . . . . . . . . . . 385
REPLACE—Replace a Data Set or Data SetMember . . . . . . . . . . . . . . . 385
Macro Command Syntax . . . . . . . . 385Return Codes . . . . . . . . . . . . 386Example . . . . . . . . . . . . . . 386
RESET—Reset the Data Display . . . . . . . 386Macro Command Syntax . . . . . . . . 386Description . . . . . . . . . . . . . 387Return Codes . . . . . . . . . . . . 387Examples . . . . . . . . . . . . . . 387
RFIND—Repeat Find . . . . . . . . . . . 387Macro Command Syntax . . . . . . . . 388Return Codes . . . . . . . . . . . . 388Example . . . . . . . . . . . . . . 388
RIGHT—Scroll Right . . . . . . . . . . . 388Macro Command Syntax . . . . . . . . 388Description . . . . . . . . . . . . . 388Return Codes . . . . . . . . . . . . 389Example . . . . . . . . . . . . . . 389
RMACRO—Set or Query the Recovery Macro . . 389Macro Command Syntax . . . . . . . . 389Assignment Statement Syntax . . . . . . . 389Return Codes . . . . . . . . . . . . 389Example . . . . . . . . . . . . . . 390
SAVE—Save the Current Data . . . . . . . . 390Macro Command Syntax . . . . . . . . 390Description . . . . . . . . . . . . . 390Return Codes . . . . . . . . . . . . 390Example . . . . . . . . . . . . . . 390
SAVE_LENGTH—Set or Query Length for VariableLength Data . . . . . . . . . . . . . . 390
Assignment Statement Syntax . . . . . . . 391Description . . . . . . . . . . . . . 391Return Codes . . . . . . . . . . . . 391Examples . . . . . . . . . . . . . . 391
SCAN—Set Command Scan Mode . . . . . . 392Macro Command Syntax . . . . . . . . 392Assignment Statement Syntax . . . . . . . 392Return Codes . . . . . . . . . . . . 392Example . . . . . . . . . . . . . . 392
SEEK—Seek a Data String, Positioning the Cursor 393Macro Command Syntax . . . . . . . . 393Description . . . . . . . . . . . . . 394Return Codes . . . . . . . . . . . . 394Examples . . . . . . . . . . . . . . 394
SEEK_COUNTS—Query Seek Counts . . . . . 395Assignment Statement Syntax . . . . . . . 395Return Codes . . . . . . . . . . . . 395Example . . . . . . . . . . . . . . 395
SESSION—Query Session Type . . . . . . . 395Assignment Statement Syntax . . . . . . . 395Return Codes . . . . . . . . . . . . 395
SETUNDO—Set UNDO Mode. . . . . . . . 395Macro Command Syntax . . . . . . . . 395Assignment Statement Syntax . . . . . . . 396Description . . . . . . . . . . . . . 396Return Codes . . . . . . . . . . . . 397Examples . . . . . . . . . . . . . . 397
SHIFT (—Shift Columns Left . . . . . . . . 397Macro Command Syntax . . . . . . . . 397Description . . . . . . . . . . . . . 397Return Codes . . . . . . . . . . . . 397Examples . . . . . . . . . . . . . . 397
SHIFT )—Shift Columns Right. . . . . . . . 398Macro Command Syntax . . . . . . . . 398Description . . . . . . . . . . . . . 398Return Codes . . . . . . . . . . . . 398Examples . . . . . . . . . . . . . . 398
SHIFT <—Shift Data Left . . . . . . . . . 398Macro Command Syntax . . . . . . . . 398Description . . . . . . . . . . . . . 398Return Codes . . . . . . . . . . . . 399Examples . . . . . . . . . . . . . . 399
SHIFT >—Shift Data Right . . . . . . . . . 399Macro Command Syntax . . . . . . . . 399Description . . . . . . . . . . . . . 399Return Codes . . . . . . . . . . . . 399Examples . . . . . . . . . . . . . . 399
SORT—Sort Data . . . . . . . . . . . . 399Macro Command Syntax . . . . . . . . 400Description . . . . . . . . . . . . . 400Return Codes . . . . . . . . . . . . 401Examples . . . . . . . . . . . . . . 401
STATS—Set or Query Stats Mode. . . . . . . 401Macro Command Syntax . . . . . . . . 402Assignment Statement Syntax . . . . . . . 402Return Codes . . . . . . . . . . . . 402Examples . . . . . . . . . . . . . . 402
SUBMIT—Submit Data for Batch Processing . . . 402Macro Command Syntax . . . . . . . . 402
x OS/390 V2R10.0 ISPF Edit and Edit Macros
Description . . . . . . . . . . . . . 403Return Codes . . . . . . . . . . . . 403Examples . . . . . . . . . . . . . . 403
TABS—Set or Query Tabs Mode . . . . . . . 403Macro Command Syntax . . . . . . . . 403Assignment Statement Syntax . . . . . . . 404Return Codes . . . . . . . . . . . . 405Examples . . . . . . . . . . . . . . 405
TABSLINE—Set or Query Tabs Line . . . . . . 405Assignment Statement Syntax . . . . . . . 405Return Codes . . . . . . . . . . . . 405Examples . . . . . . . . . . . . . . 406
TENTER—Set Up Panel for Text Entry . . . . . 406Macro Command Syntax . . . . . . . . 406Description . . . . . . . . . . . . . 406Return Codes . . . . . . . . . . . . 407Example . . . . . . . . . . . . . . 407
TFLOW—Text Flow a Paragraph . . . . . . . 407Macro Command Syntax . . . . . . . . 408Return Codes . . . . . . . . . . . . 408Example . . . . . . . . . . . . . . 408
TSPLIT—Text Split a Line . . . . . . . . . 408Macro Command Syntax . . . . . . . . 408Description . . . . . . . . . . . . . 408Return Codes . . . . . . . . . . . . 408Example . . . . . . . . . . . . . . 409
UNNUMBER—Remove Sequence Numbers . . . 409Macro Command Syntax . . . . . . . . 409Description . . . . . . . . . . . . . 409Return Codes . . . . . . . . . . . . 409Example . . . . . . . . . . . . . . 409
UP—Scroll Up . . . . . . . . . . . . . 409Macro Command Syntax . . . . . . . . 409Description . . . . . . . . . . . . . 410Return Codes . . . . . . . . . . . . 410Examples . . . . . . . . . . . . . . 410
USER_STATE—Save or Restore User State . . . . 410Assignment Statement Syntax . . . . . . . 411Description . . . . . . . . . . . . . 411Return Codes . . . . . . . . . . . . 411Examples . . . . . . . . . . . . . . 411
VERSION—Set or Query Version Number . . . . 411Macro Command Syntax . . . . . . . . 411Assignment Statement Syntax . . . . . . . 412Return Codes . . . . . . . . . . . . 412Examples . . . . . . . . . . . . . . 412
VIEW—View from within an Edit Session . . . . 412Macro Command Syntax . . . . . . . . 412Description . . . . . . . . . . . . . 412Return Codes . . . . . . . . . . . . 412Examples . . . . . . . . . . . . . . 413
VOLUME—Query Volume Information. . . . . 413Assignment Statement Syntax . . . . . . . 413Return Codes . . . . . . . . . . . . 413Examples . . . . . . . . . . . . . . 413
XSTATUS—Set or Query Exclude Status of a Line 413Assignment Statement Syntax . . . . . . . 413Description . . . . . . . . . . . . . 414Return Codes . . . . . . . . . . . . 414Examples . . . . . . . . . . . . . . 414
Part 4. Appendixes . . . . . . . . 415
Appendix A. Abbreviations forCommands and Other Values . . . . 417Edit Line Commands . . . . . . . . . . . 417Edit Primary Commands . . . . . . . . . 417Parameters . . . . . . . . . . . . . . 417Keywords/Operands . . . . . . . . . . . 418Scroll Amounts . . . . . . . . . . . . . 418
Appendix B. Edit-Related SampleMacros . . . . . . . . . . . . . . 419Sample Macros . . . . . . . . . . . . . 419
Notices . . . . . . . . . . . . . . 421Programming Interface Information . . . . . . 422Trademarks . . . . . . . . . . . . . . 422
Index . . . . . . . . . . . . . . . 425
Contents xi

xii OS/390 V2R10.0 ISPF Edit and Edit Macros
Figures
1. Panel with an Action Bar Pull-Down Menu xxxi2. Pop-Up Selected from an Action Bar
Pull-Down . . . . . . . . . . . . xxxii3. Panel with an Action Bar and
Point-and-Shoot Fields . . . . . . . . xxxii4. An Unavailable Choice on a Pull-Down xxxiii5. Edit Entry Panel (ISREDM01) . . . . . . . 56. Creating a New Data Set (ISREDDE2) . . . . 117. Example Primary Edit Panel (ISREDDE2) 118. Edit Profile Display (ISREDDE2) . . . . . 229. HILITE Initial Screen (ISREP1) . . . . . . 40
10. Set Overtype Color panel (ISREP2) . . . . . 4211. Set Find String Color panel (ISREP3) . . . . 4212. Set Cursor Phrase Color panel (ISREP4) 4313. HILITE Specific Language Screens (ISREPC) 4414. HILITE Language Keyword List (ISREPK) 4515. Edit Profile Lines with HILITE . . . . . . 4516. Edit Recovery Panel (ISREDM02) . . . . . 4617. Confirm Replace Panel (ISRERPL2) . . . . 5018. Before FIND Command (ISREDDE2) . . . . 6119. After FIND Command . . . . . . . . . 6120. Before CHANGE Command . . . . . . . 6221. After CHANGE Command . . . . . . . 6222. Before EXCLUDE Command . . . . . . . 6323. After EXCLUDE Command . . . . . . . 6324. Model Classes Panel (ISREMCLS) . . . . . 7825. CLIST Models Panel (ISREMCMD). . . . . 7926. DISPLAY Service Model . . . . . . . . 8027. Sample Block Letter Model . . . . . . . 8128. Panel Models Panel (ISREMPNL) . . . . . 8229. Changed Panel Models Panel (ISREMPNL) 8230. Changed )PROC Section of Panel Models
Panel (ISREMPNL) . . . . . . . . . . 8331. Source Code for Block Letter Model Selection
Panel. . . . . . . . . . . . . . . 8432. DASH Macro . . . . . . . . . . . . 9033. DASH Macro - Before Running . . . . . . 9034. DASH Macro - After Running . . . . . . 9135. TESTDATA Macro . . . . . . . . . . 9136. TESTDATA Macro - Before Running . . . . 9237. TESTDATA Macro - After Running. . . . . 9238. COUNTSTR Macro . . . . . . . . . . 9339. COUNTSTR Macro - Before Running . . . . 9340. COUNTSTR Macro - After Running . . . . 9441. SEPLINE REXX Macro . . . . . . . . 10042. SEPLINE PL/I Macro . . . . . . . . . 10143. SEPLINE COBOL Macro . . . . . . . . 10244. TESTDATA Macro with CLIST WRITE
Statements . . . . . . . . . . . . 12245. Results of TESTDATA Macro with CLIST
WRITE Statements . . . . . . . . . . 12346. TRYIT Macro . . . . . . . . . . . 12447. TRYIT Macro - Before Running . . . . . 12548. TRYIT Macro - After Running . . . . . . 12549. TEXT Macro . . . . . . . . . . . . 12750. TEXT Macro - Before Running . . . . . . 128
51. TEXT Macro - After Running . . . . . . 12952. PFCAN Macro . . . . . . . . . . . 12953. BOX Macro . . . . . . . . . . . . 13054. BOX Macro - Before Running . . . . . . 13255. BOX Macro - After Running . . . . . . 13256. IMBED Macro . . . . . . . . . . . 13357. LIST with Imbed Statements . . . . . . 13558. IMBED Macro - After Running. . . . . . 13559. ALLMBRS Macro . . . . . . . . . . 13660. FINDCHGS Macro . . . . . . . . . . 13861. FINDCHGS Macro - Before Running 14062. FINDCHGS Macro - After Running . . . . 14163. MASKDATA Macro . . . . . . . . . 14264. MASKDATA Macro - Before Running 14365. MASKDATA Macro - After Running . . . . 14466. Before the ( (Column Shift Left) Line
Command . . . . . . . . . . . . 15767. After the ( (Column Shift Left) Line
Command . . . . . . . . . . . . 15768. Before the ) (Column Shift Right) Line
Command . . . . . . . . . . . . 15969. After the ) (Column Shift Right) Line
Command . . . . . . . . . . . . 15970. Before the < (Data Shift Left) Line Command 16171. After the < (Data Shift Left) Line Command 16172. Before the > (Data Shift Right) Line
Command . . . . . . . . . . . . 16373. After the > (Data Shift Right) Line Command 16374. Before the A (After) Line Command . . . . 16575. After the A (After) Line Command . . . . 16576. Before the B (Before) Line Command 16777. After the B (Before) Line Command . . . . 16778. Before the BOUNDS Line Command 16979. After the BOUNDS Line Command . . . . 16980. Before the C (Copy) Line Command . . . . 17181. After the C (Copy) Line Command . . . . 17182. Before the COLS Line Command . . . . . 17283. After the COLS Line Command . . . . . 17384. Before the D (Delete) Line Command 17485. After the D (Delete) Line Command . . . . 17486. Before the F (Show First Line) Line Command 17587. After the F (Show First Line) Line Command 17688. Before the I (Insert) Line Command . . . . 17789. After the I (Insert) Line Command . . . . 17790. Before the L (Show Last Line) Line Command 17891. After the L (Show Last Line) Line Command 17992. Before the LC (Lowercase) Line Command 18093. After the LC (Lowercase) Line Command 18194. Before the M (Move) Line Command 18295. After the M (MOVE) Line Command 18396. Before the MASK Line Command. . . . . 18497. After the MASK Line Command . . . . . 18598. Before the MD (Make Dataline) Line
Command . . . . . . . . . . . . 18699. After the MD (Make Dataline) Line
Command . . . . . . . . . . . . 187
© Copyright IBM Corp. 1984, 2000 xiii
100. Before the O (Overlay) Line Command 189101. After the O (Overlay) Line Command 189102. Before the R (repeat) Line Command 190103. After the R (Repeat) Line Command . . . . 191104. Before the S (Show) Line Command . . . . 192105. After the S (Show) Line Command . . . . 192106. TAB Line Command Example . . . . . . 194107. Before the TE (Text Entry) Line Command 196108. After the TE (Text Entry) Line Command 196109. Sample Text During Text Entry Mode. 197110. Sample Text After Text Entry Mode. . . . . 197111. Before the TF (Text Flow) Line Command 199112. After the TF (Text Flow) Line Command 199113. Before TS (Text Split) Line Command 200114. After TS (Text Split) Line Command . . . . 201115. Before the UC (Uppercase) Line Command 202116. After the UC (Uppercase) Line Command 203117. Before the X (Exclude) Line Command 204118. After the X (Exclude) Line Command 205119. Edit Compare Settings Panel . . . . . . 225120. Member Before Data is Copied. . . . . . 227121. Edit Copy Panel (ISRECPY1) . . . . . . 228122. Data Set to be Copied. . . . . . . . . 228123. Member After Data Has Been Copied 229124. Member Before New Member Is Created 231125. Edit Create Panel (ISRECRA1) . . . . . . 231126. Member After New Member Has Been
Created . . . . . . . . . . . . . 232127. New Member Created . . . . . . . . 232128. EDIT Primary Command Example . . . . 238129. Edit Command Entry Panel (ISREDM03) 238130. Nested Member Editing Example . . . . . 239131. Edit and View Settings Panel (ISREDSET) 240132. EDITSET Primary Command Example 242
133. Edit and View Settings Panel (ISREDSET) 243134. Example of Data Set . . . . . . . . . 248135. Example of Data Set with Excluded Lines 249136. Example of Data Set using FLIP on Excluded
Lines . . . . . . . . . . . . . . 249137. Member With Hexadecimal Mode Off 251138. Hexadecimal Display, Vertical Representation 251139. Hexadecimal Display, Data Representation 252140. Member With Modification Level of 03 256141. Member With Modification Level Reset to 00 257142. Before Model Command . . . . . . . . 261143. REXX Models Panel (ISREMRXC) . . . . . 261144. REXX Model of VGET Service . . . . . . 262145. Member Before Data is Moved. . . . . . 264146. Edit Move Panel (ISREMOV1) . . . . . . 264147. Data Set to be Moved . . . . . . . . . 265148. Member After Data Has Been Moved 265149. Edit Profile Display . . . . . . . . . 274150. Member Before Lines Are Renumbered 278151. Member After Lines Are Renumbered 278152. Member Before Other Member Is Replaced 280153. Edit - Replace Panel (ISRERPL1) . . . . . 281154. Member After the Other Member Has Been
Replaced . . . . . . . . . . . . . 281155. Other Member Replaced . . . . . . . . 282156. SETUNDO STORAGE and RECOVERY OFF 287157. Member Before Lines Are Deleted . . . . 293158. Member After Lines Are Deleted . . . . . 294159. Member After Lines Have Been Restored 294160. Member Before Lines Are Unnumbered 295161. Member After Lines Are Unnumbered 296162. Member Before Version Number is Changed 297163. Member After Version Number is Changed 297
xiv OS/390 V2R10.0 ISPF Edit and Edit Macros
||||
||
Preface
This book describes the ISPF editor and provides conceptual, usage, and referenceinformation for the ISPF edit line, primary, and macro commands.
About This BookThis book contains three parts:v Part 1 introduces and describes how to use the ISPF editor.v Part 2 describes how to use, write and test edit macros. It also provides and
discusses sample CLIST, REXX, and program edit macros.v Part 3 is a reference for the edit line, primary, and macro commands available
for ISPF.
Who Should Use This BookThis book is for application and system programmers who develop programs, andwho use the ISPF editor and edit macro instructions. Users who write edit macrosshould be familiar with coding CLISTs, REXX EXECs, or programs in the MVSenvironment.
© Copyright IBM Corp. 1984, 2000 xv
|

xvi OS/390 V2R10.0 ISPF Edit and Edit Macros
Summary of Changes
OS/390 V2R10.0 ISPF contains the following changes and enhancements:v ISPF Product and Library Changesv ISPF Dialog Manager Component Changesv ISPF PDF Component Changesv ISPF SCLM Component Changesv ISPF Client/Server Component Changes
ISPF Product ChangesChanges to the ZENVIR variable. Characters 1 through 8 contain the product nameand sequence number in the format ISPF x.y, where x.y indicates:v <= 4.2 means the version.release of ISPFv = 4.3 means ISPF for OS/390 release 2v = 4.4 means ISPF 4.2.1 and ISPF for OS/390 release 3v = 4.5 means ISPF for OS/390 Version 2 Release 5.0v = 4.8 means ISPF for OS/390 Version 2 Release 8.0v = 5.0 means ISPF for OS/390 Version 2 Release 10.0
The ZENVIR variable is used by IBM personnel for internal purposes. The x.ynumbers DO NOT directly correlate to an ISPF release number in all cases. Forexample, as shown above, a ZENVIR value of 4.3 DOES NOT mean ISPF Version 4Release 3. NO stand-alone version of ISPF exists above ISPF Version 4 Release 2Modification 1.
The ZOS390RL variable contains the OS/390 release on your system.
The ZISPFOS system variable contains the level of ISPF code that is running aspart of the OS/390 release on your system. This might or might not matchZOS390RL. For this release, the variable contains ISPF for OS/390 Version 2Release 10.0.
New system variables:
ZBDMAXBDISPMAX value
ZBDMXCNTCount of current displays in batch mode session
ZPANELIDName of currently displayed panel
ZSCREENILogical screen data
ZSCREENCCursor position within the logical screen data
The ISRDDN utility is now documented in the ISPF User’s Guide.
© Copyright IBM Corp. 1984, 2000 xvii
|
|
||||||
||
||||||||
|||||
|
||||
|
||
||
||
||
||
|

ISPF DM Component ChangesThe DM component of ISPF includes the following new functions andenhancements:v Additional support for panel process:
– Support added for ″verify data set name with filter, (DSNAMEF)″.– Support added for ″verify data set name with filter with member,
(DSNAMEFM)″.– Support added for ″verify data set name with quotes and parentheses,
(DSNAMEPQ)″.– Support added for ″verify name with filter, (NAMEF)″.– Support added for ″verify specific constants within a variable, (PICTCN,
string)″.– Support added for ″verify international format date, (IDATE)″.– Support added for ″verify standard date, (STDDATE)″.– Support added for ″verify Julian date, (JDATE)″.– Support added for ″verify Julian standard date, (JSTD)″.– Support added for ″verify international time, (ITIME)″.– Support added for ″verify standard time, (STDTIME)″.– Support added for NOJUMP attribute keyword.– Support added to allow INTENS(NON) on LI, LID, VOI and LEF attribute
types.– Update )HELP section processing to support variables for keyword values
and two new keywords MSG(message-name) and PASSTHRU.v Support added for STKADD keyword on LIBDEF service.v New QBASELIB service to query base libraries.v Add Panel Id to CUAATTR utility.v Add support for starting a new screen or application from the ISPF Task List
panel.v Add support for command CMDE which provides ability to expand command
line if more room is required for the command.v Add support to allow ISPF panel exits to be written in REXX.v Add support for ZSCREENI and ZSCREENC variables to retrieve data from the
logical screen at the cursor position.v Add a field to the ISPF configuration table for the default language.v Add fields to the ISPF configuration table to allow customization of the ISPF
temporary data sets.v Add a field to the ISPF configuration table for the default ISPF panel used
when invoking ISPF.v Pass the screen name to the SELECT Service Start and End and DISPLAY
Installation exits.v Update various ISPF messages with additional information. For example, a
better message will be displayed when the user’s profile is out of space, and thedata set name and abend code will be added to the error message displayed as aresult of an abend when opening a data set.
ISPDTLC enhancements:
ISPDTLC changes include new invocation options, new tags, and new tag.attributes as ISPF extensions to the Dialog Tag Language.
General improvements:
xviii OS/390 V2R10.0 ISPF Edit and Edit Macros
||
|||
|
||
||
|
||
|
|
|
|
|
|
|
||
|||||||||||||||||||||||
|
||
|
v A new option has been added to the interactive invocation panel, theDISPLAY(W) option check interval. This option controls the display frequency ofa control panel for the DISPLAY and DISPLAYW options. The control panelchoices are to continue, cancel the DISPLAY(W) option, or change the intervalfor the display of the control panel.
v New tags:– GENERATE– TEXTLINE– TEXTSEG
v Remove obsolete OS/2 DM compatibility and ISPF DTL extension messages forOS/390 V3.
v Add support for Tutorial selection panel ZSEL generation via ACTION tags.v Revise member list processing to behave more like SUPERC by leaving the ″S″
code in the member selection field. Members can be deselected by removing the″S″ before using PF3 to run the requested members.
v REQ70311 - Provide a user cancel/reset for the DISPLAY and DISPLAYWinvoke options. A new panel - ISPCP08 - will display every nn (1 default) panelsto allow the user to cancel or continue the display processing.
v Expand the interactive panel to 16 DTL source files.v Expand the HELP attribute on tags for field level help to support the ISPF
enhancement for MSG(message-ID) and PASSTHRU. HELP values can be: NO,YES, help-panel-name, *message-id, %varname, or *%varname. The ″*″ prefixdefines a message-id.
New or changed tag attributes:
Tag name Attribute update
ATTR Add ATTN
CHECKI Add support for ″VER(&variable, DSNAMEF)″Add support for ″VER(&variable, DSNAMEFM)″Add support for ″VER(&variable, DSNAMEPQ)″Add support for ″VER(&variable, NAMEF)″Add support for ″VER(&variable, PICTCN, ...)″Add support for ″VER(&variable, IDATE)″Add support for ″VER(&variable, STDDATE)″Add support for ″VER(&variable, JDATE)″Add support for ″VER(&variable, JSTD)″Add support for ″VER(&variable, ITIME)″Add support for ″VER(&variable, STDTIME)″
CHOFLD Add ATTRCHAR and CAPSSupport HELP for: YES, *message-id, *%varname
CHOICE Add AUTOSELSupport HELP for: YES, *message-id, *%varname
CMDAREA Add CAPS, NOJUMP, and SCRCAPSSupport HELP for: YES, *message-id, *%varnameSupport SCRVHELP for: YES, *message-id, *%varname
DA Add HELP and SCRCAPSSupport SCRVHELP for: YES, *message-id, *%varname
DTACOL Add VARCLASS, REQUIRED, and CAPS
Summary of Changes xix
|||||
|
|
|
|
||
|
|||
|||
|
||||
|
|||
||
||||||||||||||||||||||
||||
||||
||||||
||||
||
Tag name Attribute update
DTAFLD Add ATTRCHAR, CAPS, and NOJUMPSupport HELP for: YES, *message-id, *%varnameSupport DISPLAY=NO on CUA output fields
FIG Add NOSKIP
GRPHDR Add INDENT
LI Add NOSKIP
LINES Add NOSKIP
LP Add NOSKIP
LSTCOL Add CAPS and DISPLAYSupport HELP for: YES, *message-id, *%varname
LSTFLD Add SCRCAPSSupport HELP for: YES, *message-id, *%varname
MSG Add FORMATSupport HELP =*
MSGMBR Add WIDTH
PANEL Add ERRORCHECK
SELFLD Support TYPE=TUTORSupport HELP for: YES, *message-id, *%varname
XMP Add NOSKIP
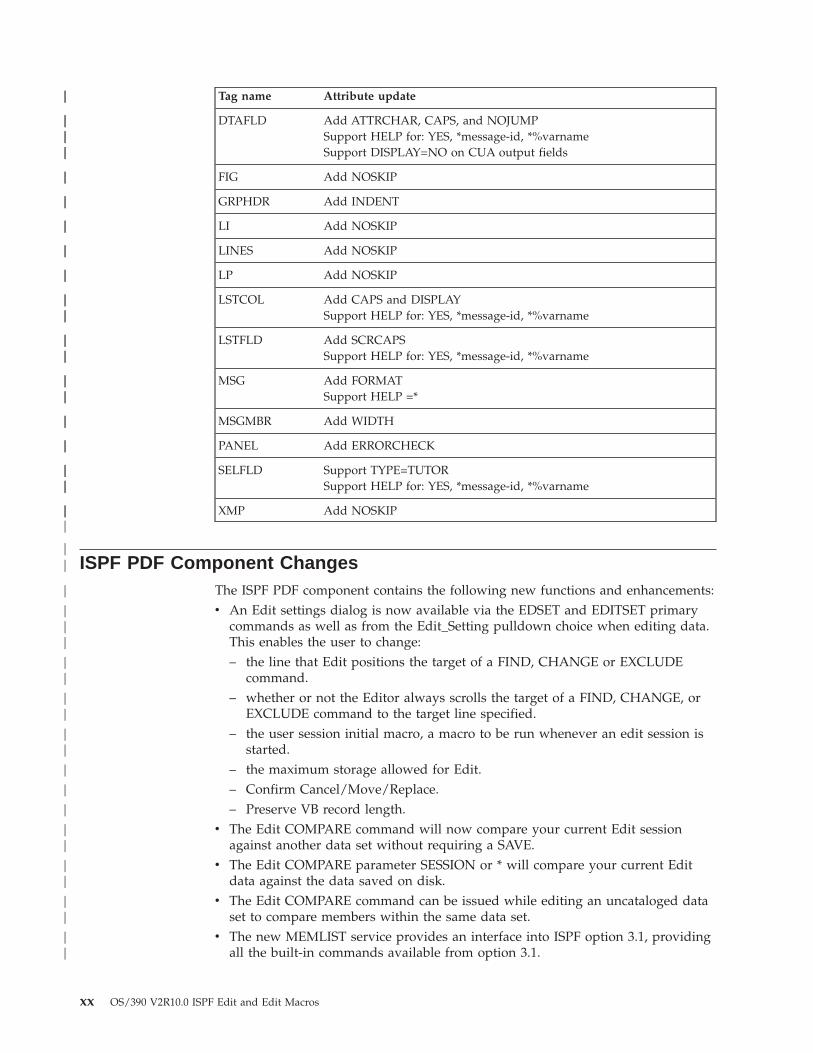
ISPF PDF Component ChangesThe ISPF PDF component contains the following new functions and enhancements:v An Edit settings dialog is now available via the EDSET and EDITSET primary
commands as well as from the Edit_Setting pulldown choice when editing data.This enables the user to change:– the line that Edit positions the target of a FIND, CHANGE or EXCLUDE
command.– whether or not the Editor always scrolls the target of a FIND, CHANGE, or
EXCLUDE command to the target line specified.– the user session initial macro, a macro to be run whenever an edit session is
started.– the maximum storage allowed for Edit.– Confirm Cancel/Move/Replace.– Preserve VB record length.
v The Edit COMPARE command will now compare your current Edit sessionagainst another data set without requiring a SAVE.
v The Edit COMPARE parameter SESSION or * will compare your current Editdata against the data saved on disk.
v The Edit COMPARE command can be issued while editing an uncataloged dataset to compare members within the same data set.
v The new MEMLIST service provides an interface into ISPF option 3.1, providingall the built-in commands available from option 3.1.
xx OS/390 V2R10.0 ISPF Edit and Edit Macros
||
||||||
||
||
||
||
||
||||
||||
||||
||
||
||||
|||
||
|
|||
||
||
||
|
|
|
||
||
||
||
v A new option in the ISPF Configuration Table dialog provides the automaticcreation of a ++USERMOD for the configuration data.
v The new DSINFO service will return information about a specified data set indialog variables.
v The Editor will no longer append a 1 character blank to variable length recordsthat are 8 bytes in length.
v An ISPF Configuration option was added to disallow wildcards in the high levelqualifier of option 3.4.
v The SuperC utility now supports an ALLMEMS option to enable compares of allmembers including alias entries without member selection.
v The primary and secondary quantity for the SuperC LIST and UPDATE data setscan be configured.
v Allow use of the SYSOUT field when doing a local print from option 3.6.v Add an OPTION(DELETE) to the LMMDISP service to delete a member of the
displayed list.v Update the edit macro command DATASET to also return the data set from
which the member being edited was found.v Add a new dialog service called VIIF (View Interface service) which provides
View function for the EDIF environment.v Add an edit macro command LINE_STATUS which indicates whether a line of
data has been changed during the edit session, and if so, how.v Add additional keywords that can be specified in the expiration date field when
creating a data set to indicate permanent retention: 9999, NEVER, NOLIMIT andPERM.
v Add a new option in the ISPF Configuration Table dialog to allow disabling allENQ displays. This option indicates whether or not users should be able to seewho has existing data set ENQs when they press the help key or when they usethe ISRDDN utility.
v The LMINIT service specified with the DDNAME parameter will now handleDDNAMEs with up to 16 concatenated data sets. The DATAID generated by theLMINIT can then be passed to services such as EDIT and BROWSE to processmembers in any of the 16 data sets.
ISPF SCLM Component ChangesThe ISPF SCLM component contains the following new functions andenhancements:v Additional/modified SCLM Services:
– An AUTHCODE service to update authorization codes has been added.– A NEXTGRP service to return the promote target for a given group.– The MIGRATE service will now allow the DATE/TIME of the member to be
set by the caller.– The MIGRATE service will now be supported via the FLMLNK interface.– The MIGRATE service has a new report output and associated specification
on the service call (default is to go to the terminal).– The FLMCMPLB macro has been deleted. Any projects using FLMCMPLB
currently must be recoded to use: FLMSYSLB dsn,INCLS=COMPOOL.v Additional exit points have been added:
– At edit start and when the SPROF command is invoked.– When data is saved (Edit SAVE, Migrate, etc.).
Summary of Changes xxi
||
||
||
||
||
||
|
||
||
||
||
|||
||||
||||
||
||
|
|
|
||
|
||
||
|
|
|
– After the NOTIFY step of a DELETE.– After the VERIFY step of a DELETE.– After the VERIFY step of a BUILD.
v The Versioning Utility will now allow a SuperC COMPARE of versions to bedone.
v The Versioning Utility will capture output members, in addition to editabletypes.
v Workstation commands can now be used from translators running during aPROMOTE in batch mode.
v SCLM will now display dates in 4-character year format.v The NRETRIEV command is now supported for SCLM.v Added the ability to specify separate VERCOUNT values for each group/type
combination.v Additional samples:
– A sample interface into ServiceDesk for OS/390 to show how a changemanagement system can be integrated into SCLM.
– An Edit autoflagger to automatically flag changed lines.– A versioning delete sample.
ISPF Client/Server Component ChangesThe ISPF Client/Server Component enables a panel to be displayed unchanged(except for panels with graphic areas) at a workstation using the native displayfunction of the operating system of the workstation. ISPF manuals call this″running in GUI mode.″
There are no changes to the ISPF Client/Server for this release.
ISPF User Interface ConsiderationsMany changes have been made to the ISPF Version 4 user interface to conform toCUA guidelines. If you prefer to change the interface to look and act more like theVersion 3 interface, you can do the following:v Use the CUAATR command to change the screen colorsv Use the ISPF Settings panel to specify that the TAB or HOME keys position the
cursor to the command line rather than to the first action bar itemv Set the command line to the top of the screen by deselecting Command line at
bottom on the ISPF Settings panelv Set the primary keys to F13–24 by selecting 2 for Primary range on the Tailor
Function Key Definition Display panelv Use the KEYLIST OFF command to turn keylists offv Use the PSCOLOR command to change point-and-shoot fields to blue.v Change the DFLTCOLR field in the PDF configuration table ISRCONFG to
disable action bars and or edit highlighting
ISPF Migration ConsiderationsWhen migrating to OS/390 V2R8.0 or higher for the first time, you must convertyour ISPF customization to the new format. Refer to the section entitled The ISPFConfiguration Table in the ISPF Planning and Customizing manual.
xxii OS/390 V2R10.0 ISPF Edit and Edit Macros
|
|
|
||
||
||
|
|
||
|
||
|
|
||
||||
|
||
|||
|
||
||
||
|
|
||
||
|||
When migrating from one version of ISPF to another, you must be sure toreassemble and re-link the SCLM project definition.
ISPF ProfilesMajor changes were made to the ISPF profiles for ISPF Version 4.2 and OS/390Version 1 Release 1.0 ISPF. The profiles for ISPF Version 3 and the profiles forOS/390 ISPF are not compatible. If you are moving back and forth between anISPF Version 3 system and OS/390 V1R1.0 or higher system, you must run withseparate profiles. Profiles for OS/390 V1R1.0 and higher are compatible with eachother.
Year 2000 Support for ISPFISPF is fully capable of using dates for the year 2000 and beyond. All of yourexisting applications should continue to run (some may need minor changes, asexplained below) when the year 2000 comes. The base support for the year 2000was added to OS/390 Version 1 Release 2.0, but the same level of support isavailable for ISPF Version 3.5, ISPF Version 4, and OS/390 Version 1 Release 1.0 aswell. To get support for the earlier versions, be sure that your system has thecorrect APARs installed. All ISPF APARs that add or correct function relating to theyear 2000 contain the YR2000 identifier in the APAR text. You should search forthese APARs to ensure you have all the function available.
What function is included?v ISPF Dialog variable ZSTDYEAR now correctly shows the year for dates past
1999. Earlier versions always showed the first 2 characters of the year as 19.v A new ISPF dialog variable (ZJ4DATE) is available for Julian dates with a 4–digit
year.v An ISPF Configuration Table field enables PDF to interpret 2 character year
dates as either a 19xx or 20xx date. The default value is 65. Any 2-character yeardate whose year is less than or equal to this value is considered a 20xx date,anything greater than this value is considered 19xx. To see what value has beenset by the ISPF Configuration Table, use the new ZSWIND variable.
v New parameters in the LMMSTATS service (CREATED4 and MODDATE4) forspecifying 4-character year dates. All existing parameters still exist and you cancontinue to use them. If both the 2-character year date parameters (CREATEDand MODDATE) and the 4-character year date parameters (CREATED4 andMODDATE4) are specified, the 2-character versions are used.
v Dialog variables ZLC4DATE and ZLM4DATE have been added.– You can set them before making an LMMREP or LMMADD call. Do this to
specify a 4-character created or last modified date to set in the ISPF statistics.– They are set by LMMFIND, LMMLIST and LMMDISP to the current value of
the created and last modified dates in the ISPF statistics.
What might need to change? Some minor changes to your existing ISPF dialogsmight be necessary, especially in ISPF dialogs that use the Library Access Servicesto manipulate ISPF member statistics.v For those services that accept both 4-character year dates and 2-character year
dates, you can specify one or the other. If you specify both, the 2-character yeardate is used to avoid affecting existing dialogs. When the 2-character year date isused, the configuration table field mentioned above is used to determinewhether the date should be interpreted as 19xx or 20xx.
Summary of Changes xxiii
||
|
||||||
|
|||||||||
|
||
||
|||||
|||||
|
||
||
|||
|||||

v ISPF will not necessarily show 4-character dates in all circumstances but it willprocess them correctly. For example, a member list might only display2-character year dates but will sort those dates in the proper order.
v SCLM stores dates past the year 1999 in a new internal format. If an accountingfile contains dates in this new format, it cannot be processed by a systemwithout year 2000 support. Accounting files without dates past 1999 can beprocessed with or without the year 2000 support.
v No conversion of the LMF control file is necessary.
xxiv OS/390 V2R10.0 ISPF Edit and Edit Macros
|||
||||
|
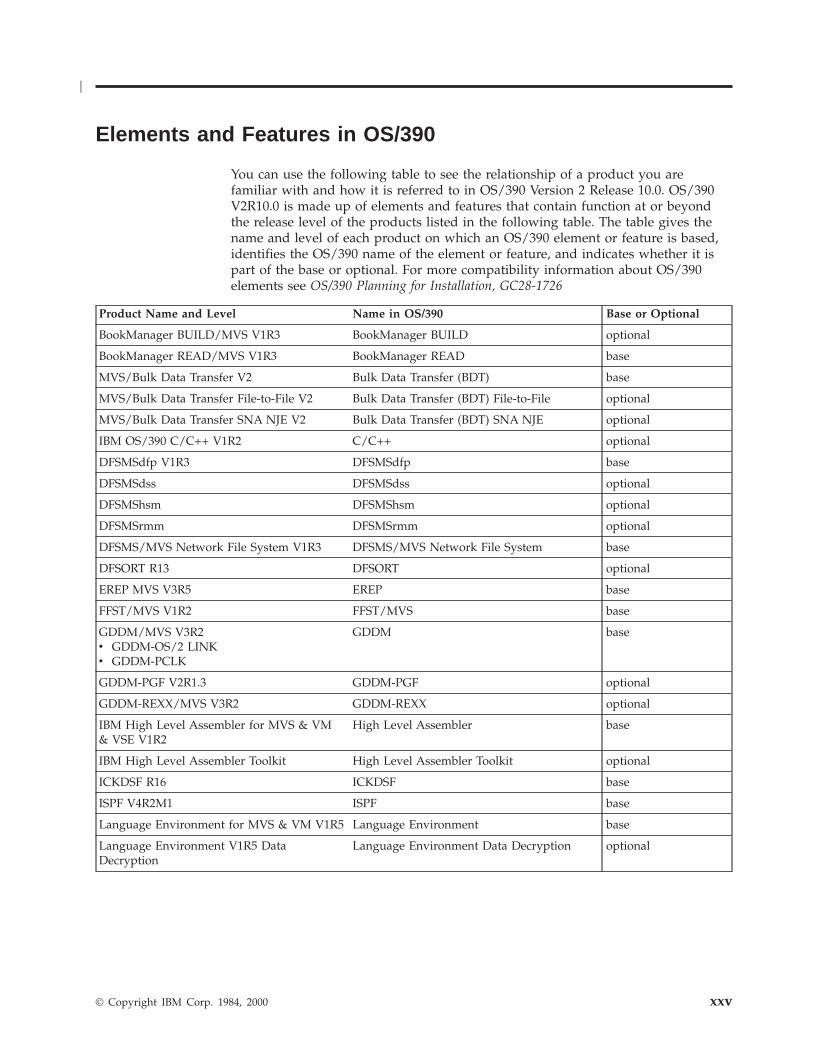
Elements and Features in OS/390
You can use the following table to see the relationship of a product you arefamiliar with and how it is referred to in OS/390 Version 2 Release 10.0. OS/390V2R10.0 is made up of elements and features that contain function at or beyondthe release level of the products listed in the following table. The table gives thename and level of each product on which an OS/390 element or feature is based,identifies the OS/390 name of the element or feature, and indicates whether it ispart of the base or optional. For more compatibility information about OS/390elements see OS/390 Planning for Installation, GC28-1726
Product Name and Level Name in OS/390 Base or Optional
BookManager BUILD/MVS V1R3 BookManager BUILD optional
BookManager READ/MVS V1R3 BookManager READ base
MVS/Bulk Data Transfer V2 Bulk Data Transfer (BDT) base
MVS/Bulk Data Transfer File-to-File V2 Bulk Data Transfer (BDT) File-to-File optional
MVS/Bulk Data Transfer SNA NJE V2 Bulk Data Transfer (BDT) SNA NJE optional
IBM OS/390 C/C++ V1R2 C/C++ optional
DFSMSdfp V1R3 DFSMSdfp base
DFSMSdss DFSMSdss optional
DFSMShsm DFSMShsm optional
DFSMSrmm DFSMSrmm optional
DFSMS/MVS Network File System V1R3 DFSMS/MVS Network File System base
DFSORT R13 DFSORT optional
EREP MVS V3R5 EREP base
FFST/MVS V1R2 FFST/MVS base
GDDM/MVS V3R2v GDDM-OS/2 LINKv GDDM-PCLK
GDDM base
GDDM-PGF V2R1.3 GDDM-PGF optional
GDDM-REXX/MVS V3R2 GDDM-REXX optional
IBM High Level Assembler for MVS & VM& VSE V1R2
High Level Assembler base
IBM High Level Assembler Toolkit High Level Assembler Toolkit optional
ICKDSF R16 ICKDSF base
ISPF V4R2M1 ISPF base
Language Environment for MVS & VM V1R5 Language Environment base
Language Environment V1R5 DataDecryption
Language Environment Data Decryption optional
© Copyright IBM Corp. 1984, 2000 xxv
|
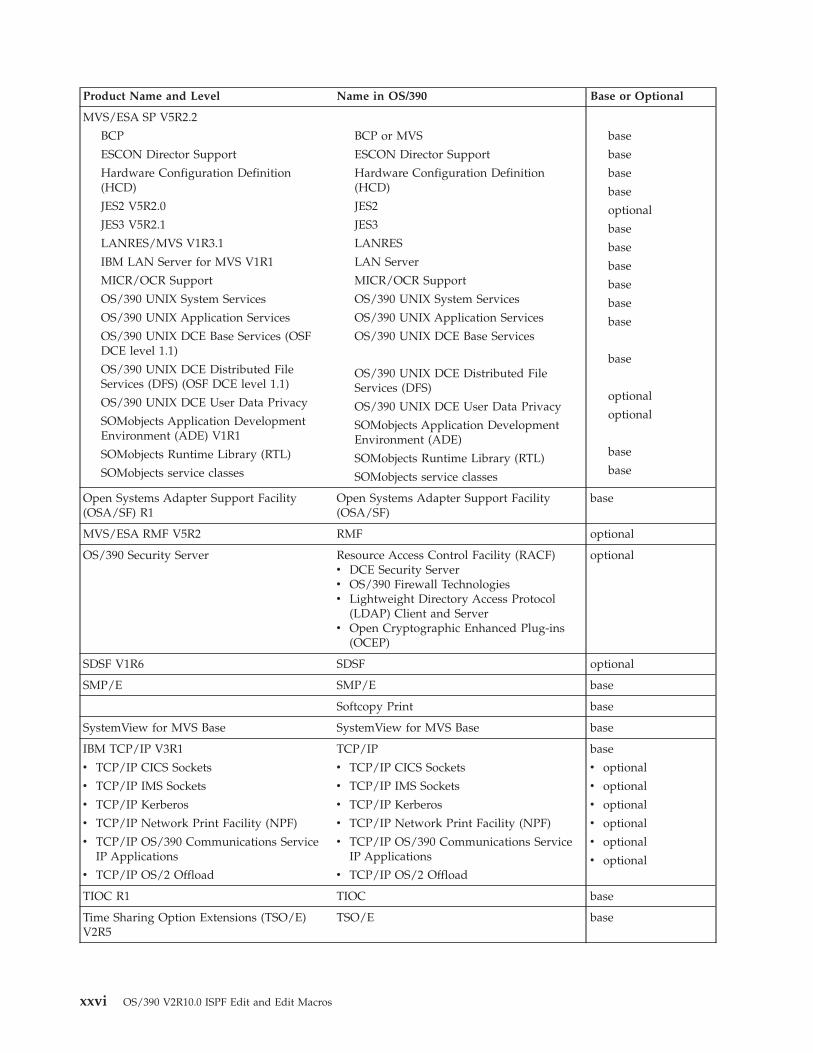
Product Name and Level Name in OS/390 Base or Optional
MVS/ESA SP V5R2.2
BCP
ESCON Director Support
Hardware Configuration Definition(HCD)
JES2 V5R2.0
JES3 V5R2.1
LANRES/MVS V1R3.1
IBM LAN Server for MVS V1R1
MICR/OCR Support
OS/390 UNIX System Services
OS/390 UNIX Application Services
OS/390 UNIX DCE Base Services (OSFDCE level 1.1)
OS/390 UNIX DCE Distributed FileServices (DFS) (OSF DCE level 1.1)
OS/390 UNIX DCE User Data Privacy
SOMobjects Application DevelopmentEnvironment (ADE) V1R1
SOMobjects Runtime Library (RTL)
SOMobjects service classes
BCP or MVS
ESCON Director Support
Hardware Configuration Definition(HCD)
JES2
JES3
LANRES
LAN Server
MICR/OCR Support
OS/390 UNIX System Services
OS/390 UNIX Application Services
OS/390 UNIX DCE Base Services
OS/390 UNIX DCE Distributed FileServices (DFS)
OS/390 UNIX DCE User Data Privacy
SOMobjects Application DevelopmentEnvironment (ADE)
SOMobjects Runtime Library (RTL)
SOMobjects service classes
base
base
base
base
optional
base
base
base
base
base
base
base
optional
optional
base
base
Open Systems Adapter Support Facility(OSA/SF) R1
Open Systems Adapter Support Facility(OSA/SF)
base
MVS/ESA RMF V5R2 RMF optional
OS/390 Security Server Resource Access Control Facility (RACF)v DCE Security Serverv OS/390 Firewall Technologiesv Lightweight Directory Access Protocol
(LDAP) Client and Serverv Open Cryptographic Enhanced Plug-ins
(OCEP)
optional
SDSF V1R6 SDSF optional
SMP/E SMP/E base
Softcopy Print base
SystemView for MVS Base SystemView for MVS Base base
IBM TCP/IP V3R1
v TCP/IP CICS Sockets
v TCP/IP IMS Sockets
v TCP/IP Kerberos
v TCP/IP Network Print Facility (NPF)
v TCP/IP OS/390 Communications ServiceIP Applications
v TCP/IP OS/2 Offload
TCP/IP
v TCP/IP CICS Sockets
v TCP/IP IMS Sockets
v TCP/IP Kerberos
v TCP/IP Network Print Facility (NPF)
v TCP/IP OS/390 Communications ServiceIP Applications
v TCP/IP OS/2 Offload
base
v optional
v optional
v optional
v optional
v optional
v optional
TIOC R1 TIOC base
Time Sharing Option Extensions (TSO/E)V2R5
TSO/E base
xxvi OS/390 V2R10.0 ISPF Edit and Edit Macros

Product Name and Level Name in OS/390 Base or Optional
VisualLift for MVS V1R1.1 v VisualLift Run-Time Environment (RTE)v VisualLift Application Development
Environment (ADE)
v basev optional
VTAM V4R3 with the AnyNet feature VTAM base
3270 PC File Transfer Program V1R1.1 3270 PC File Transfer Program base
Elements and Features in OS/390 xxvii

xxviii OS/390 V2R10.0 ISPF Edit and Edit Macros
The ISPF User Interface
ISPF provides an action bar-driven interface that exploits many of the usabilityfeatures of Common User Access (CUA) interfaces. Refer to Object-Oriented InterfaceDesign: IBM Common User Access Guidelines for additional information.
The panels look different than in Version 3: all screens are in mixed case, and mosthave action bars at the top. These action bars give you a new way to move aroundin the product as well as access to command nesting. Command nesting allowsyou to suspend an activity while you perform a new one rather than having to enda function to perform another function.
This chapter primarily explains the action bar-driven interface and the use ofISPF’s graphical user interface (GUI).
Some Terms You Should KnowThe following terms are used in this book:
action bar. The area at the top of an ISPF panel that contains choices that give you access to actions available onthat panel. When you select an action bar choice, ISPF displays a pull-down menu.
pull-down menu. A list of numbered choices extending from the selection you made on the action bar. The actionbar selection is highlighted; for example, Utilities in Figure 1 on page xxxi appears highlighted on your screen. Youcan select an action either by typing in its number and pressing Enter or by selecting the action with your cursor.ISPF displays the requested panel. If your choice contains an ellipsis (...), ISPF displays a pop-up window. When youexit this panel or pop-up, ISPF closes the pull-down and returns you to the panel from which you made the initialaction bar selection.
ellipsis. Three dots that follow a pull-down choice. When you select a choice that contains an ellipsis, ISPF displaysa pop-up window.
pop-up window. A bordered temporary window that displays over another panel.
modal pop-up window. A type of window that requires you to interact with the panel in the pop-up beforecontinuing. This includes cancelling the window or supplying information requested.
modeless pop-up window. A type of window that allows you to interact with the dialog that produced the pop-upbefore interacting with the pop-up itself.
point-and-shoot text. Text on a screen that is cursor-sensitive. See “Point-and-Shoot Text Fields” on page xxxiv formore information.
push button. A rectangle with text inside. Push buttons are used in windows for actions that occur immediatelywhen the push button is selected (available only when you are running in GUI mode).
function key. In previous releases of ISPF, a programmed function (PF) key. This is a change in terminology only.
select. In conjunction with point-and-shoot text fields and action bar choices, this means moving the cursor to afield and simulating Enter.
mnemonics. Action bar choices can be defined with a underscored letter in the action bar choice text. In host modeyou can access the action bar choice with the ACTIONS command and parameter ’x’, where ’x’ is the underscoredletter in the action bar choice text. In GUI mode you can use a hot key to access a choice on the action bar; that is,you can press the ALT key in combination with the letter that is underscored in the action bar choice text.
© Copyright IBM Corp. 1984, 2000 xxix
How to Navigate in ISPF without Using Action BarsIf you use a non-programmable terminal to access OS/390 V2R10.0 ISPF and youdo not want to take advantage of the command nesting function, you can makeselections the same way you always have: by typing in a selection number andpressing Enter.
How to Navigate in ISPF Using the Action Bar InterfaceMost ISPF panels have action bars at the top; the choices appear on the screen inwhite by default. Many panels also have point-and-shoot text fields, which appearin turquoise by default. The panel shown in Figure 3 on page xxxii has both.
Action BarsAction bars give you another way to move through ISPF. If the cursor is locatedsomewhere on the panel, there are several ways to move it to the action bar:v Use the cursor movement keys to manually place the cursor on an action bar
choice.v Type ACTIONS on the command line and press Enter to move the cursor to the
first action bar choice.v Press F10 (Actions) or the Home key to move the cursor to the first action bar
choice.If mnemonics are defined for action bar choices, you can:– In 3270 mode, on the command line, type ACTIONS and the mnemonic letter
that corresponds to an underscored letter in the action bar choice text. Thisresults in the display of the pull-down menu for that action bar choice.
– In 3270 mode, on the command line enter the mnemonic letter thatcorresponds to an underscored letter in the action bar choice text, and pressthe function key assigned to the ACTIONS command. This results in thedisplay of the pull-down menu for that action bar choice.
– In GUI mode, you can use a hot key to access a choice on an action bar or ona pull-down menu; that is, you can press the ALT key in combination withthe mnemonic letter that is underscored in the choice text to activate the text.
Use the tab key to move the cursor among the action bar choices. If you arerunning in GUI mode, use the right and left cursor keys.
Notes:
1. ISPF does not provide a mouse emulator program. This book uses select inconjunction with point-and-shoot text fields and action bar choices to meanmoving the cursor to a field and simulating Enter.
Note: Some users program their mouse emulators as follows:v Mouse button 1 – to position the cursor to the pointer and simulate
Enterv Mouse button 2 – to simulate F12 (Cancel).
2. If you want the Home key to position the cursor at the first input field on anISPF panel, type SETTINGS on any command line and press Enter to display theISPF Settings panel. Deselect the Tab to action bar choices option.
3. If you are running in GUI mode, the Home key takes you to the beginning ofthe current field.
The ISPF User Interface
xxx OS/390 V2R10.0 ISPF Edit and Edit Macros
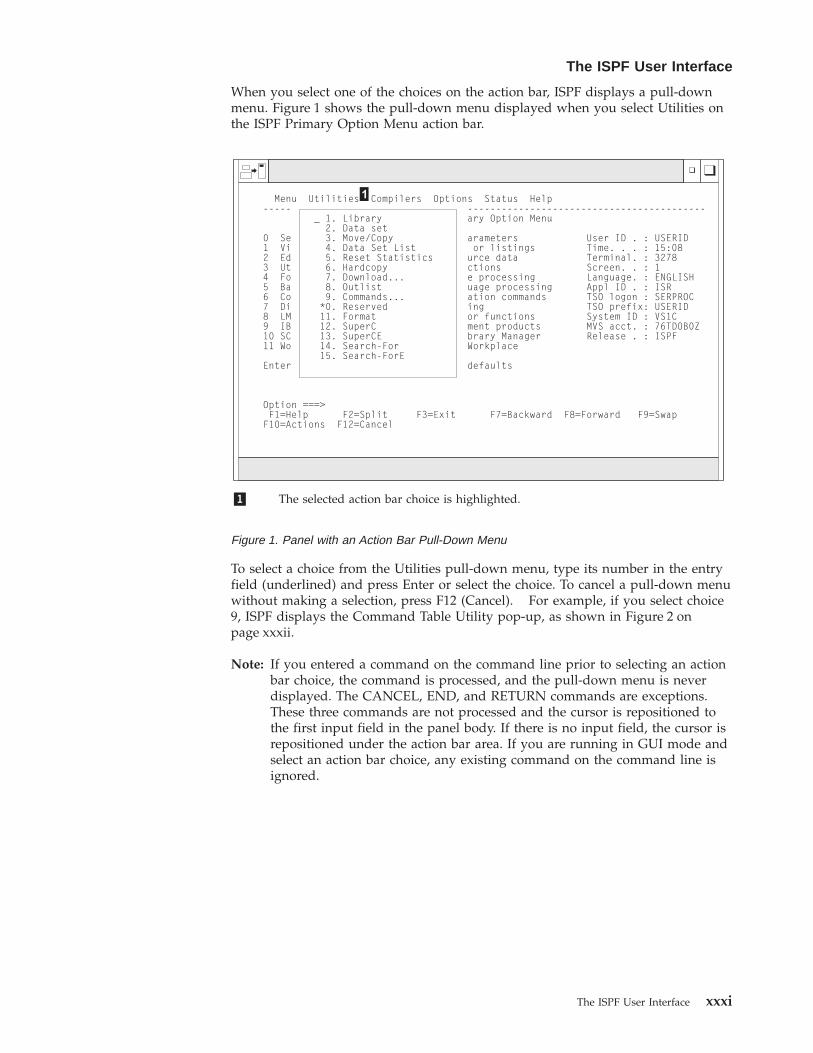
When you select one of the choices on the action bar, ISPF displays a pull-downmenu. Figure 1 shows the pull-down menu displayed when you select Utilities onthe ISPF Primary Option Menu action bar.
To select a choice from the Utilities pull-down menu, type its number in the entryfield (underlined) and press Enter or select the choice. To cancel a pull-down menuwithout making a selection, press F12 (Cancel). For example, if you select choice9, ISPF displays the Command Table Utility pop-up, as shown in Figure 2 onpage xxxii.
Note: If you entered a command on the command line prior to selecting an actionbar choice, the command is processed, and the pull-down menu is neverdisplayed. The CANCEL, END, and RETURN commands are exceptions.These three commands are not processed and the cursor is repositioned tothe first input field in the panel body. If there is no input field, the cursor isrepositioned under the action bar area. If you are running in GUI mode andselect an action bar choice, any existing command on the command line isignored.
«1¬ The selected action bar choice is highlighted.
Figure 1. Panel with an Action Bar Pull-Down Menu
The ISPF User Interface
The ISPF User Interface xxxi
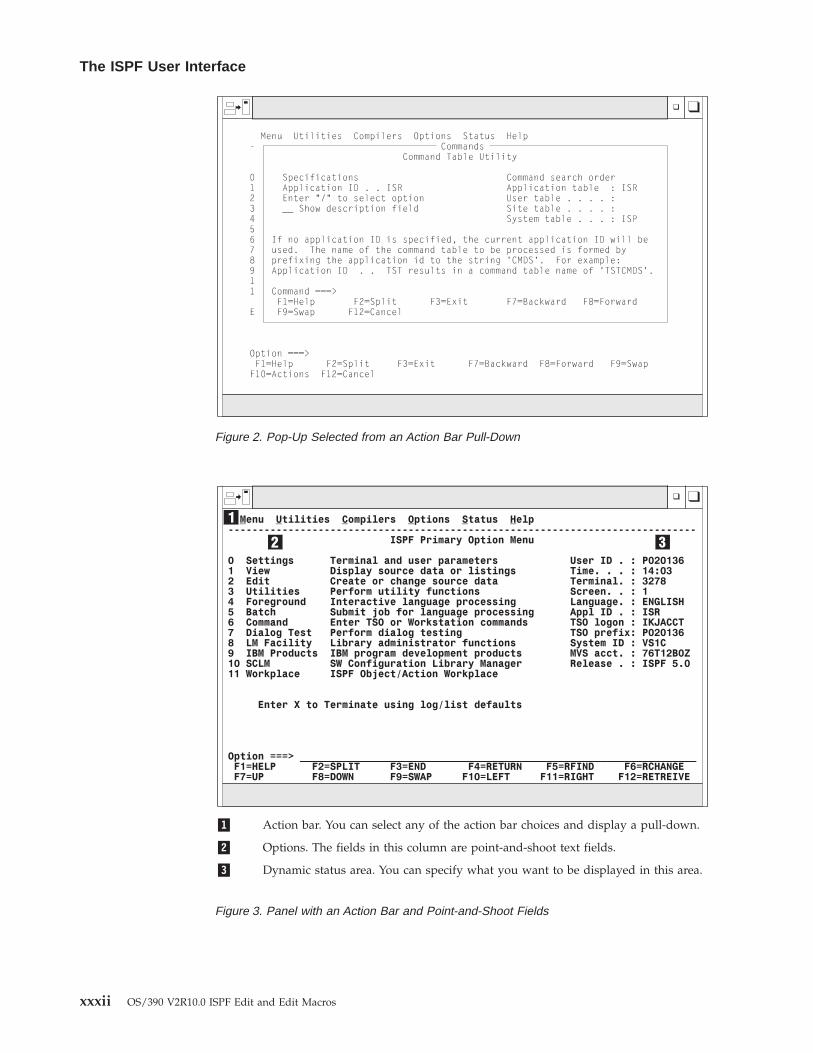
Figure 2. Pop-Up Selected from an Action Bar Pull-Down
«1¬ Action bar. You can select any of the action bar choices and display a pull-down.
«2¬ Options. The fields in this column are point-and-shoot text fields.
«3¬ Dynamic status area. You can specify what you want to be displayed in this area.
Figure 3. Panel with an Action Bar and Point-and-Shoot Fields
The ISPF User Interface
xxxii OS/390 V2R10.0 ISPF Edit and Edit Macros

Action Bar ChoicesThe action bar choices available vary from panel to panel, as do the choicesavailable from their pull-downs. However, Menu and Utilities are basic action barchoices, and the choices on their pull-down menus are always the same.
Menu Action Bar ChoiceThe following choices are available from the Menu pull-down:
Settings Displays the ISPF Settings panel
View Displays the View Entry panel
Edit Displays the Edit Entry panel
ISPF Command Shell Displays the ISPF Command Shell panel
Dialog Test... Displays the Dialog Test Primary Option panel
Other IBM Products... Displays the Additional IBM ProgramDevelopment Products panel
SCLM Displays the SCLM Main Menu
ISPF Workplace Displays the Workplace entry panel
Status Area... Displays the ISPF Status panel
Exit Exits ISPF.
Note: If a choice displays in blue (the default) with an asterisk as the first digit ofthe selection number (if you are running in GUI mode, the choice will begrayed), the choice is unavailable for one of the following reasons:v Recursive entry is not permitted herev The choice is the current state; for example, RefMode is currently set to
Retrieve in Figure 4.
Figure 4. An Unavailable Choice on a Pull-Down
The ISPF User Interface
The ISPF User Interface xxxiii
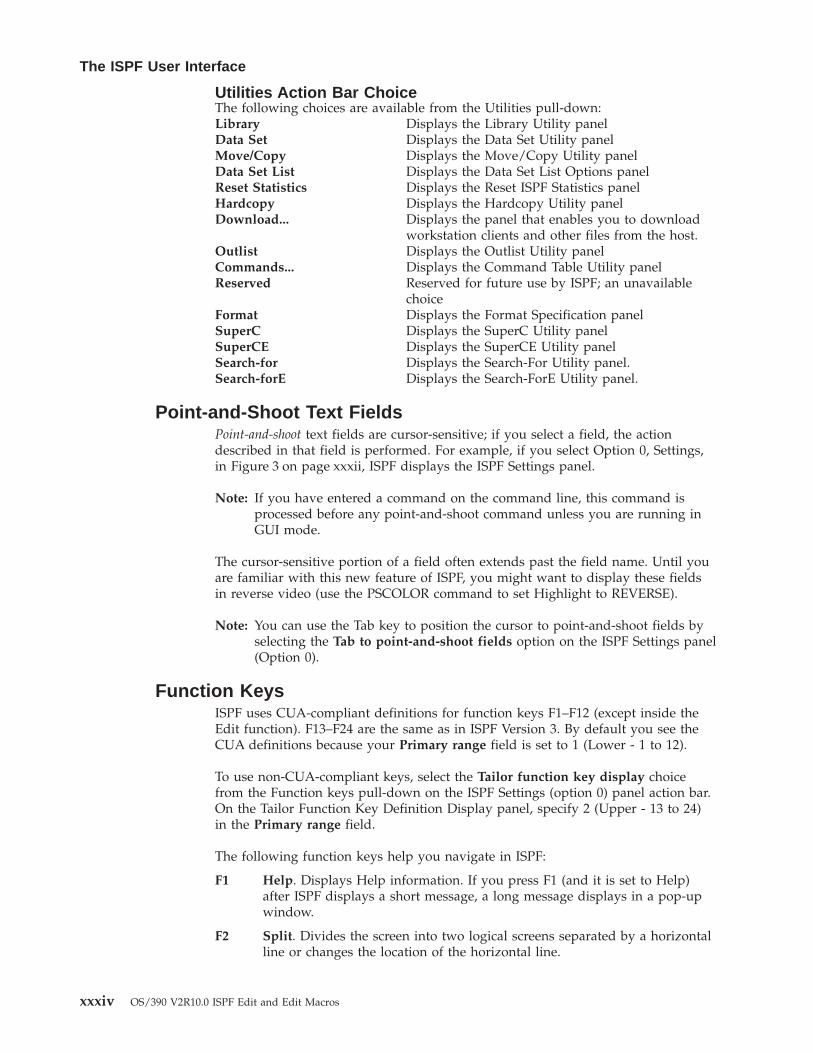
Utilities Action Bar ChoiceThe following choices are available from the Utilities pull-down:Library Displays the Library Utility panelData Set Displays the Data Set Utility panelMove/Copy Displays the Move/Copy Utility panelData Set List Displays the Data Set List Options panelReset Statistics Displays the Reset ISPF Statistics panelHardcopy Displays the Hardcopy Utility panelDownload... Displays the panel that enables you to download
workstation clients and other files from the host.Outlist Displays the Outlist Utility panelCommands... Displays the Command Table Utility panelReserved Reserved for future use by ISPF; an unavailable
choiceFormat Displays the Format Specification panelSuperC Displays the SuperC Utility panelSuperCE Displays the SuperCE Utility panelSearch-for Displays the Search-For Utility panel.Search-forE Displays the Search-ForE Utility panel.
Point-and-Shoot Text FieldsPoint-and-shoot text fields are cursor-sensitive; if you select a field, the actiondescribed in that field is performed. For example, if you select Option 0, Settings,in Figure 3 on page xxxii, ISPF displays the ISPF Settings panel.
Note: If you have entered a command on the command line, this command isprocessed before any point-and-shoot command unless you are running inGUI mode.
The cursor-sensitive portion of a field often extends past the field name. Until youare familiar with this new feature of ISPF, you might want to display these fieldsin reverse video (use the PSCOLOR command to set Highlight to REVERSE).
Note: You can use the Tab key to position the cursor to point-and-shoot fields byselecting the Tab to point-and-shoot fields option on the ISPF Settings panel(Option 0).
Function KeysISPF uses CUA-compliant definitions for function keys F1–F12 (except inside theEdit function). F13–F24 are the same as in ISPF Version 3. By default you see theCUA definitions because your Primary range field is set to 1 (Lower - 1 to 12).
To use non-CUA-compliant keys, select the Tailor function key display choicefrom the Function keys pull-down on the ISPF Settings (option 0) panel action bar.On the Tailor Function Key Definition Display panel, specify 2 (Upper - 13 to 24)in the Primary range field.
The following function keys help you navigate in ISPF:
F1 Help. Displays Help information. If you press F1 (and it is set to Help)after ISPF displays a short message, a long message displays in a pop-upwindow.
F2 Split. Divides the screen into two logical screens separated by a horizontalline or changes the location of the horizontal line.
The ISPF User Interface
xxxiv OS/390 V2R10.0 ISPF Edit and Edit Macros
Note: If you are running in GUI mode, each logical screen displays in aseparate window.
F3 Exit (from a pull-down). Exits the panel underneath a pull-down.
F3 End. Ends the current function.
F7 Backward. Moves the screen up the scroll amount.
F8 Forward. Moves the screen down the scroll amount.
F9 Swap. Moves the cursor to where it was previously positioned on theother logical screen of a split-screen pair.
F10 Actions. Moves the cursor to the action bar. If you press F10 a second time,the cursor moves to the command line.
F12 Cancel. Issues the Cancel command. Use this command to remove apull-down menu if you do not want to make a selection. F12 also movesthe cursor from the action bar to the Option ==> field on the ISPF PrimaryOption Menu. See ISPF Dialog Developer’s Guide and Reference forcursor-positioning rules.
F16 Return. Returns you to the ISPF Primary Option Menu or to the displayfrom which you entered a nested dialog. RETURN is an ISPF systemcommand.
Selection FieldsOS/390 V2R10.0 ISPF uses the following CUA-compliant conventions for selectionfields:
A single period (.)Member lists that use a single period in the selection field recognize only asingle selection. For example, within the Edit function you see this on yourscreen:│EDIT USER1.PRIVATE.TEST ROW 00001 of 00002 ││ Name VV MM Created Changed Size Init Mod ID ││ . MEM1 01.00 94/05/12 94/07/22 40 0 0 USER1 ││ . MEM2 01.00 94/05/12 94/07/22 30 0 0 KEENE │
You can select only one member to edit.
A single underscore (_)Selection fields marked by a single underscore prompt you to use a slash(/) to select the choice. You may use any non-blank character. For example,the Panel display CUA mode field on the ISPF Settings panel has a singleunderscore for the selection field:OptionsEnter "/" to select option_ Command line at bottom_ Panel display CUA mode_ Long message in pop-up
Note: If you are running in GUI mode, this type of selection field displaysas a check box; that is, a square box with associated text thatrepresents a choice. When you select a choice, a check mark (inOS/2) or an X (in Windows) appears in the check box to indicatethat the choice is in effect. You can clear the check box by selectingthe choice again.
An underscored field (____)Member lists or text fields that use underscores in the selection field
The ISPF User Interface
The ISPF User Interface xxxv
recognize multiple selections. For example, from the Display Data Set ListOption panel, you may select multiple members for print, rename, delete,edit, browse, or view processing.
Command NestingCommand nesting allows you to suspend an activity while you perform a new onerather than having to end a function to perform another function. For example, inprevious versions of ISPF, if you are editing a data set and want to allocate anotherdata set, you type =3.2 on the command line and press Enter. ISPF ends your editsession before taking you to the Data Set Utility panel. When you have allocatedthe data set and want to return to your edit session, you type =2 and press Enter;ISPF returns you to the Edit Entry Panel. With OS/390 V2R10.0 ISPF, from youredit session, select the Data set choice from the Utilities pull-down on the Editpanel action bar. ISPF suspends your edit session and displays the Data Set Utilitypanel. When you have allocated the new data set and end the function, OS/390V2R10.0 ISPF returns you directly to your edit session rather than to the Edit EntryPanel.
The ISPF User Interface
xxxvi OS/390 V2R10.0 ISPF Edit and Edit Macros
Part 1. The ISPF Editor
Chapter 1. Introducing the ISPF Editor . . . . . 3What is ISPF? . . . . . . . . . . . . . . 3What the ISPF Editor Does . . . . . . . . . 4How to Use the ISPF Editor . . . . . . . . . 4
Beginning an Edit Session . . . . . . . . . 4Edit Entry Panel Action Bar . . . . . . . 5Edit Entry Panel Fields . . . . . . . . . 7Creating a New Data Set . . . . . . . . 10Editing an Existing Data Set . . . . . . . 11
Using the ISPF Editor Basic Functions . . . . 14Ending an Edit Session . . . . . . . . . 15
Edit Commands . . . . . . . . . . . . . 16Line Commands . . . . . . . . . . . . 16Primary Commands . . . . . . . . . . 17Edit Commands and PF Key Processing . . . . 17
Edit Macros . . . . . . . . . . . . . . 18Editing Data in Controlled Libraries . . . . . 18Packing Data . . . . . . . . . . . . . 19
Chapter 2. Controlling the Edit Environment . . 21What is an Edit Profile? . . . . . . . . . . 21
Using Edit Profile Types . . . . . . . . . 21Displaying or Defining an Edit Profile . . . . 21Modifying an Edit Profile. . . . . . . . . 23Locking an Edit Profile . . . . . . . . . 23
Edit Modes . . . . . . . . . . . . . . 23Edit Profile Modes . . . . . . . . . . . 24Edit Mode Defaults . . . . . . . . . . . 25
Site-wide Edit Profile Initialization. . . . . 25Creating a ZDEFAULT Edit Profile . . . . 26
Flagged Lines . . . . . . . . . . . . . 26Changed Lines . . . . . . . . . . . . 27Error Lines . . . . . . . . . . . . . 27Special Lines . . . . . . . . . . . . . 27
Edit Boundaries . . . . . . . . . . . . . 28Initial Macros. . . . . . . . . . . . . . 29Application-Wide Macros. . . . . . . . . . 30Statistics for PDS Members . . . . . . . . . 30
Effect of Stats Mode When Beginning an EditSession . . . . . . . . . . . . . . . 30Effect of Stats Mode When Saving Data . . . . 30
Version and Modification Level Numbers . . . . 31Sequence Numbers . . . . . . . . . . . . 31
Sequence Number Format and ModificationLevel . . . . . . . . . . . . . . . 32Sequence Number Display . . . . . . . . 32Initialization of Number Mode . . . . . . . 33
Enhanced and Language-sensitive Edit Coloring . . 33Language Support . . . . . . . . . . . 34
Automatic Language Selection . . . . . . 34Language Processing Limitations andIdiosyncracies . . . . . . . . . . . 35
The HILITE Command/Dialog . . . . . . . 38HILITE Operands . . . . . . . . . . 38The HILITE Dialog . . . . . . . . . . 39
Highlighting Status and the Edit Profile . . . . 45
Edit Recovery . . . . . . . . . . . . . 46
Chapter 3. Managing Data . . . . . . . . . 49Creating and Replacing Data . . . . . . . . 49Copying and Moving Data . . . . . . . . . 50Shifting Data . . . . . . . . . . . . . . 51
Column Shift . . . . . . . . . . . . . 51Column Shifting in Lines that Contain DBCSStrings . . . . . . . . . . . . . . 51
Data Shift . . . . . . . . . . . . . . 52Finding, Seeking, Changing, and Excluding Data . . 53
Specifying the Search String . . . . . . . . 54Simple and Delimited Strings . . . . . . 54Character Strings . . . . . . . . . . 55Picture Strings (String-1) . . . . . . . . 55Picture Strings (String-2) . . . . . . . . 56
Effect of CHANGE Command onColumn-Dependent Data . . . . . . . . . 56Using the CHANGE Command With EBCDICand DBCS Data . . . . . . . . . . . . 57Controlling the Search . . . . . . . . . . 57
Extent of the Search . . . . . . . . . 57Starting Point and Direction of the Search . . 57
Qualifying the Search String . . . . . . . . 58Column Limitations . . . . . . . . . . 59Split Screen Limitations . . . . . . . . . 59Excluded Line Limitations . . . . . . . . 59Using the X (Exclude) Line Command with FINDand CHANGE . . . . . . . . . . . . 59Repeating the FIND, CHANGE, and EXCLUDECommands . . . . . . . . . . . . . 60Examples . . . . . . . . . . . . . . 60
FIND Command Example . . . . . . . 60CHANGE Command Example . . . . . . 61EXCLUDE Command Example . . . . . . 62
Excluding Lines . . . . . . . . . . . . . 63Redisplaying Excluded Lines . . . . . . . 64Redisplaying a Range of Lines . . . . . . . 64
Labels and Line Ranges . . . . . . . . . . 65Editor-Assigned Labels . . . . . . . . . 65Specifying a Range . . . . . . . . . . . 66Using Labels and Line Ranges . . . . . . . 66
Word Processing. . . . . . . . . . . . . 67Formatting Paragraphs . . . . . . . . . 67
Using Text Flow on a DBCS Terminal. . . . 68Splitting Lines . . . . . . . . . . . . 68
Splitting Lines Within a DBCS String . . . . 69Entering Text (Power Typing) . . . . . . . 69
Entering Text on a DBCS Terminal. . . . . 70Using Tabs . . . . . . . . . . . . . . 70
Types of Tabs . . . . . . . . . . . . . 70Software and Hardware Tabs . . . . . . 70Logical Tabs . . . . . . . . . . . . 70Effect of TABS Commands on Tab Types . . 70
Defining and Controlling Tabs . . . . . . . 71Defining Software Tab Positions . . . . . . 71
© Copyright IBM Corp. 1984, 2000 1
Defining Hardware Tab Positions . . . . . . 71Limiting the Size of Hardware Tab Columns 72
Using Attribute Bytes . . . . . . . . . . 72Undoing Edit Interactions . . . . . . . . . 73
UNDO Processing . . . . . . . . . . . 74Understanding Differences in SETUNDOProcessing . . . . . . . . . . . . . . 74
Chapter 4. Using Edit Models . . . . . . . . 77What Is an Edit Model? . . . . . . . . . . 77How Models Are Organized . . . . . . . . . 77How to Use Edit Models . . . . . . . . . . 79Adding, Finding, Changing, and Deleting Models 81
Adding Models . . . . . . . . . . . . 81Finding Models . . . . . . . . . . . . 84Changing Models . . . . . . . . . . . 85Deleting Models . . . . . . . . . . . . 85
2 OS/390 V2R10.0 ISPF Edit and Edit Macros
Chapter 1. Introducing the ISPF Editor
This chapter introduces the ISPF Editor. It provides an overview of:v The ISPF editor functionsv A typical edit sessionv Edit commandsv Edit macros.
Note:
Beginning with ISPF Version 4 Release 2, ISPF enables you to more fullyutilize your desktop workstation’s potential by giving you the ability to edithost data on the workstation, and workstation data on the host. ISPF callsthis function distributed editing.
The ISPF Workstation Tool Integration dialog, or tool integrator, is aworkstation customization tool that enables any workstation application touse data from an MVS host system. After setting up the tool integrator, yourworkstation-installed applications can interact with the ISPF View and Editfunctions and services. Data flow goes both ways with the tool integratorconnection. You can work with workstation files on the host or with hostfiles on the workstation.
For more information about distributed editing, refer to the ISPF User’sGuide and the ISPF Services Guide.
What is ISPF?The Interactive System Productivity Facility (ISPF) is a dialog manager thatprovides tools to improve program, dialog, and development productivity andcontrol.
The PDF component of ISPF is an integrated work environment used to developprograms, dialogs, and documents. The PDF component provides anMVS-compatible hierarchical library containing numerous productivity-improvingfunctions. Some examples of these functions are:v ISPF dialog test toolsv Full-screen editor, with a dialog interface called edit macrosv Multiple update access to data setsv Online tutorialsv Data set managementv Customized library controls.
Note: References in this book to library controls apply to LMF. For informationabout using SCLM to control libraries, refer to ISPF Software Configurationand Library Manager (SCLM) Developer’s and Project Manager’s Guide.
This book describes the ISPF editor and its dialog interface. A dialog is a programrunning under ISPF. The interface allows a dialog to access the usual ISPF dialogfunctions and the ISPF editor functions.
© Copyright IBM Corp. 1984, 2000 3
What the ISPF Editor DoesYou can use the ISPF editor to create, display, and change data stored in ISPFlibraries or other partitioned or sequential data sets with the followingcharacteristics:v Record Format (RECFM):
– Fixed or variable (non-spanned)– Blocked or unblocked– With or without printer control characters.
v Logical Record Length (LRECL):– From 10 to 32760, inclusive, for fixed-length records– From 14 to 32756, inclusive, for variable-length records.
Note: For variable-length records, the amount of editable data in each recordis 4 bytes less than the logical record length.
Generally, the editor truncates variable-length lines by removing blanks at the endof each line during a save. If a variable-length line is completely blank and has noline number, a blank is added so that the line length is not zero.
However, with the PRESERVE function, you can save the trailing blanks ofvariable length files. The Preserve VB record length field on the Edit Entry paneland the PRESERVE edit and macro commands enable you to save or truncate theblanks as you prefer.
How to Use the ISPF EditorThis section provides an overview of an edit session and covers:v Beginning an Edit Sessionv Using the ISPF editor Basic Functionsv Ending an Edit Session.
Beginning an Edit SessionTo begin using the ISPF editor, select option 2 on the ISPF Primary Option Menu.PDF then displays the Edit Entry panel ( Figure 5 on page 5).
What the ISPF Editor Does
4 OS/390 V2R10.0 ISPF Edit and Edit Macros
|||
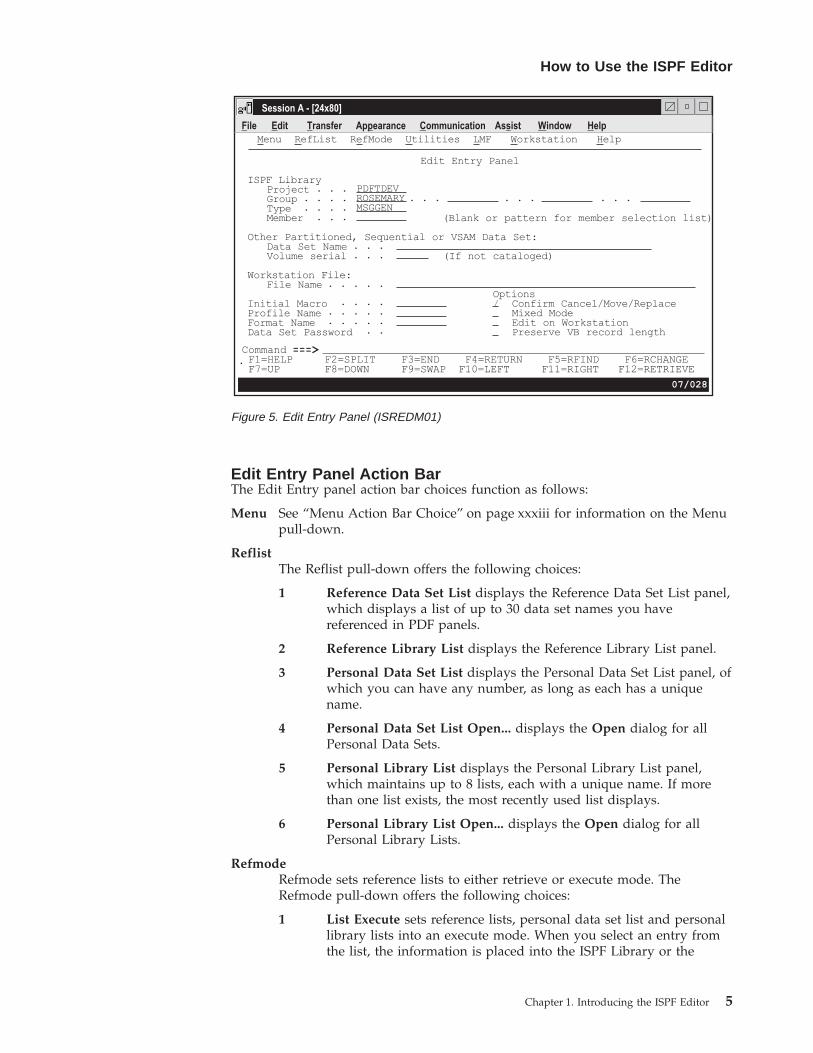
Edit Entry Panel Action BarThe Edit Entry panel action bar choices function as follows:
Menu See “Menu Action Bar Choice” on page xxxiii for information on the Menupull-down.
ReflistThe Reflist pull-down offers the following choices:
1 Reference Data Set List displays the Reference Data Set List panel,which displays a list of up to 30 data set names you havereferenced in PDF panels.
2 Reference Library List displays the Reference Library List panel.
3 Personal Data Set List displays the Personal Data Set List panel, ofwhich you can have any number, as long as each has a uniquename.
4 Personal Data Set List Open... displays the Open dialog for allPersonal Data Sets.
5 Personal Library List displays the Personal Library List panel,which maintains up to 8 lists, each with a unique name. If morethan one list exists, the most recently used list displays.
6 Personal Library List Open... displays the Open dialog for allPersonal Library Lists.
RefmodeRefmode sets reference lists to either retrieve or execute mode. TheRefmode pull-down offers the following choices:
1 List Execute sets reference lists, personal data set list and personallibrary lists into an execute mode. When you select an entry fromthe list, the information is placed into the ISPF Library or the
Figure 5. Edit Entry Panel (ISREDM01)
How to Use the ISPF Editor
Chapter 1. Introducing the ISPF Editor 5
“Other” Data Set Name field and an Enter key is simulated. (Ifthis setting is current, the choice is unavailable.)
2 List Retrieve sets reference lists, personal data set list and personallibrary lists into a retrieve mode. When you select an entry fromthe list, the information is placed into the ISPF Library or the“Other” Data Set Name field, but the Enter key is not simulated.(If this setting is current, the choice is unavailable.)
UtilitiesSee “Utilities Action Bar Choice” on page xxxiv for information on theUtilities pull-down.
LMF If LMF is installed on your system, you can edit-lock a member of acontrolled library that is part of a concatenation sequence, but only if themember does not exist in your private library. Specify one of the followingvalues for LMF:
1 Lock - Never. Tells ISPF not to edit-lock the member and to retainthis value for future Edit sessions.
2 Lock - No. Tells ISPF not to edit-lock the member, but to changethis value to YES for the next Edit session.
3 Lock - Yes. Tells ISPF to edit-lock the member. The member islocked under your user ID.
Edit-locking is important for two reasons:v Keeping other users from accessing that member while you are editing
it.v Promoting the member back to the controlled library when you have
finished editing it. If you do not edit-lock the member, you cannotpromote it.
If you save any changes you made while editing the member, it remainslocked in your private library. The version of the member stored in thecontrolled library remains unchanged until you promote the one in yourprivate library. If you leave Edit without saving the changes, they are lost.
Conditions When LMF Locking Is Ignored
ISPF ignores the 3 (Yes) value if:v The LMF control file (ISRCFIL) is not allocated, which means the LMF
Lock field has no meaning to ISPF.v A member in your private library has the same name as the controlled
library member that you want to edit-lock. Here, you can either rename,move, or delete the private library member.
v The member is controlled by SCLM only.
Conditions When LMF Locking Causes Errors
The following conditions can cause an error if you specify 3 (Yes):v The libraries are not concatenated in the proper sequence.v The library controls are not active.v The member you want to edit-lock is locked with another user’s
user ID.v The member is controlled by both LMF and SCLM.
How to Use the ISPF Editor
6 OS/390 V2R10.0 ISPF Edit and Edit Macros
Even if an error condition keeps you from locking a member, you can stilledit it. Just remember that you cannot promote it back to the controlledlibrary afterwards. ISPF displays a panel that gives you a choice betweenpressing Enter to edit the member or entering the END command if youdecide not to edit.
For information about using the SCLM Edit option to lock data sets ormembers, refer to the ISPF Software Configuration and Library Manager(SCLM) Developer’s and Project Manager’s Guide
WorkstationConfigure ISPF workstation tool integration. For information about theworkstation and ISPF, refer to the OS/390 ISPF User’s Guide.
Help The Help pull-down offers the following choices:v Generalv Types of Data Setsv Edit entry panelv Member selection listv Display screen formatv Scrolling datav Sequence numberingv Display modesv Tabbingv Automatic recoveryv Edit profilesv Edit line commandsv Edit primary commandsv Labels and line rangesv Ending an edit sessionv Appendicesv Index.
Edit Entry Panel FieldsYou can specify a concatenated sequence of up to four ISPF libraries, but thelibraries must have been previously allocated to ISPF with the Data Set utility (3.2).
The fields on this panel are:
ProjectThe common identifier for all ISPF libraries belonging to the sameprogramming project.
Group The identifier for the particular set of ISPF libraries; that is, the level of thelibraries within the library hierarchy.
You can specify a concatenated sequence of up to four existing ISPFlibraries.
The editor searches the ISPF libraries in the designated order to find themember and copies it into working storage. If the editor does not find themember in the library, it creates a new member with the specified name.
When you save the edited member, the editor places or replaces it in thefirst ISPF library in the concatenation sequence, regardless of which libraryit was copied from.
Type The identifier for the type of information in the ISPF library.
MemberThe name of an ISPF library or other partitioned data set member. Leaving
How to Use the ISPF Editor
Chapter 1. Introducing the ISPF Editor 7
this field blank or entering a pattern causes PDF to display a member list.Refer to ISPF User’s Guide if you need information about entering apattern.
Data Set NameAny fully-qualified data set name, such as ‘USERID.SYS1.MACLIB’, or aVSAM data set name. If you include your TSO user prefix (defaults touser ID), you must enclose the data set name in apostrophes. However, ifyou omit the TSO user prefix and apostrophes, your TSO user prefix isautomatically added to the beginning of the data set name.
If you specify a VSAM data set, ISPF checks the configuration table to seeif VSAM support is enabled. If it is, the specified tool is invoked. If VSAMis not supported by the configuration settings, an error message isdisplayed.
Volume SerialA real DASD volume or a virtual volume residing on an IBM 3850 MassStorage System. To access 3850 virtual volumes, you must also haveMOUNT authority, which is acquired through the TSO ACCOUNTcommand.
Workstation File:
If you have made a connection to the workstation, you can also specify aworkstation file name, for example C: \AUTOEXEC.BAT, on the EditEntry Panel. Or you can specify which environment (host or workstation)should be used to edit a data set. With these options, one of four editingsituations can occur:v Edit a host data set on the hostv Edit a host data set on the workstationv Edit a workstation file on the hostv Edit a workstation file on the workstation.
Edit a Host Data Set on the Host
The editor searches the ISPF libraries in the designated order tofind the member and copy it into working storage. If you specifieda nonexistent member of an ISPF library, a new member is createdwith the specified name.
When you save the edited member, the editor places or replaces itin the first ISPF library in the concatenation sequence, regardless ofwhich library it was copied from.
Edit a Host Data Set on the Workstation
The editor searches the ISPF libraries in the designated order tofind the member and copy it into working storage. The data setname is converted to a workstation file name, and that name isappended to the workstation’s current working directory. The hostdata set is transferred to the workstation, and the working file isthen passed to the user’s chosen edit program.
When you finish the edit session, the working file is transferredback to the host and stored in the first ISPF library in theconcatenation sequence.
Edit a Workstation File on the Host
The editor searches the workstation files to find the desired fileand copy it into working storage. The workstation file name is
How to Use the ISPF Editor
8 OS/390 V2R10.0 ISPF Edit and Edit Macros
converted to a host data set name, and, if greater than 44characters, it is truncated to be 44. The workstation file istransferred to the host, where you can edit it.
When you finish the edit session, the working file is transferredback to the workstation and stored.
Edit a Workstation File on the WorkstationThis edit proceeds as it normally does on your workstation.
Initial MacroYou can specify a macro to be processed before you begin editing yoursequential data set or any member of a partitioned data set. This initialmacro allows you to set up a particular editing environment for the Editsession you are beginning. This initial macro overrides any IMACRO valuein your profile.
If you leave the Initial Macro field blank and your edit profile includes aninitial macro specification, the initial macro from your edit profile isprocessed.
If you want to suppress an initial macro in your edit profile, type NONE inthe Initial Macro field. See “Initial Macros” on page 29 and“IMACRO—Specify an Initial Macro” on page 255 for more details.
Profile NameThe name of an edit profile, which you can use to override the default editprofile. See the description in “What is an Edit Profile?” on page 21.
Format NameThe name of a format definition or blank if no format is to be used.
Data Set PasswordThe password for OS password-protected data sets. This is not your RACFpassword.
Confirm Cancel/Move/ReplaceWhen you select this field with a ″/″, a confirmation panel displays whenyou request one of these actions, and the execution of that action wouldresult in data changes being lost or existing data being overwritten.v For MOVE, the confirm panel is displayed if the data to be moved
exists. Otherwise, an error message is displayed.v For REPLACE, the confirm panel is displayed if the data to be replaced
exists. Otherwise, the REPLACE command functions like the editCREATE command, and no confirmation panel is displayed.
v For CANCEL, the confirmation panel is displayed if any data changeshave been made, whether through primary commands, line commands,or typing.
Note: Any commands or data changes pending at the time the CANCELcommand is issued are ignored. Data changes are ″pending″ ifchanges have been made to the displayed edit data, but nointeraction with the host (ENTER, PF key, or command other thanCANCEL) has occurred. If no other changes have been madeduring the edit session up to that point, the confirmation panel isnot displayed.
Mixed ModeWhen you select this field with a ″/″, it specifies that the editor look for
How to Use the ISPF Editor
Chapter 1. Introducing the ISPF Editor 9
shift-out and shift-in delimiters surrounding DBCS data. If you do notselect it, the editor does not look for mixed data.
Edit on WorkstationYou can select this option to use your workstation as the editingenvironment for whichever host data set or workstation file you want toedit.
Preserve VB record lengthYou can select this option to cause the editor to store the original length ofeach record in variable length data sets and when a record is saved, theoriginal record length is used as the minimum length for the record.
Note: Double-Byte Character Set Support
The ISPF editor supports DBCS alphabets in two ways:v Formatted data where DBCS characters are in the column positions
specified in the format definition created with the Format Utility (option3.11)
v Mixed characters delimited with the special shift-out and shift-incharacters.If you are using mixed mode and the record length of a data set is greaterthan 72 bytes, there is a possibility that a DBCS character might encroachon the display boundary.Here, PDF attempts to display the othercharacters by replacing an unpaired DBCS character byte with an SO or SIcharacter. If there is a possibility that the replaced SO or SI character waserased, the line number of the line is highlighted. If you change theposition of the SO and SI characters on the panel, or if you delete the SOand SI characters entirely, the DBCS character on the boundary isremoved to keep the rest of the data intact.
Creating a New Data SetBefore you can edit a new sequential data set, you must allocate space for it. Whenyou specify an empty sequential data set or nonexistent member of a partitioneddata set, the first edit display contains several empty lines between the Top ofData and Bottom of Data message lines ( Figure 6 on page 11). The editor replacesthe quote marks on the left of the panel with sequence numbers when you typeinformation on the lines.
See “Creating and Replacing Data” on page 49 and “Word Processing” on page 67for more information on using the editor to create data.
How to Use the ISPF Editor
10 OS/390 V2R10.0 ISPF Edit and Edit Macros
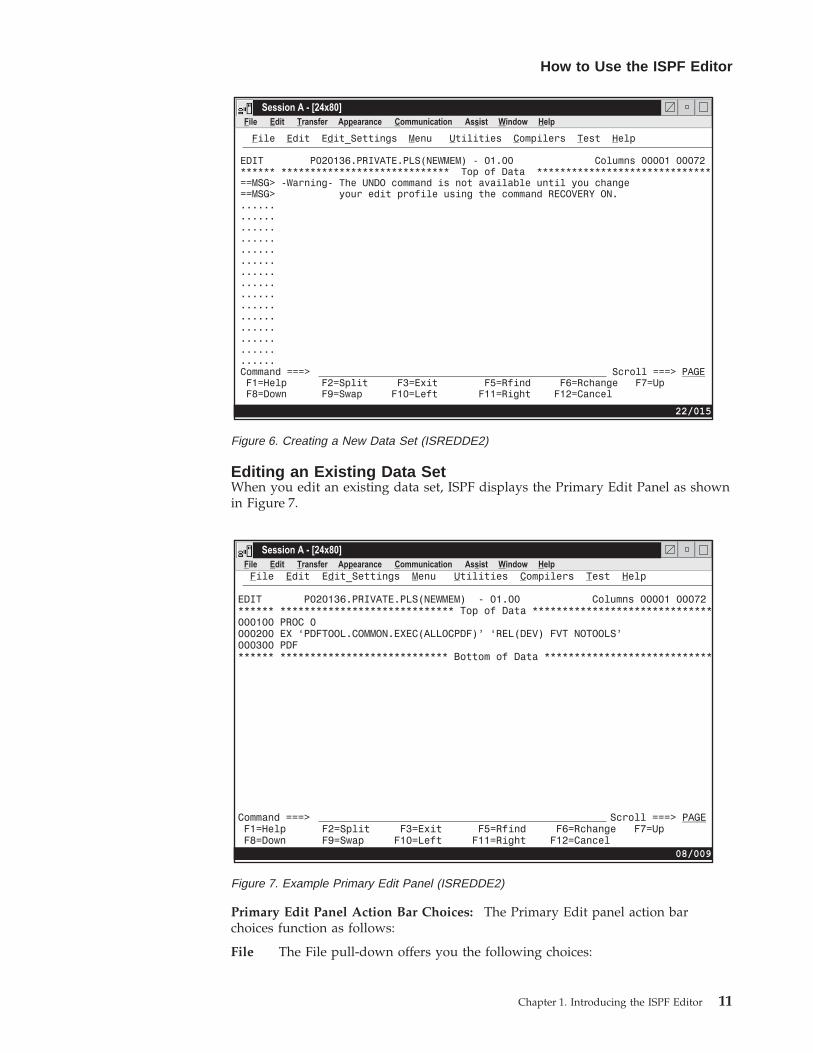
Editing an Existing Data SetWhen you edit an existing data set, ISPF displays the Primary Edit Panel as shownin Figure 7.
Primary Edit Panel Action Bar Choices: The Primary Edit panel action barchoices function as follows:
File The File pull-down offers you the following choices:
Figure 6. Creating a New Data Set (ISREDDE2)
Figure 7. Example Primary Edit Panel (ISREDDE2)
How to Use the ISPF Editor
Chapter 1. Introducing the ISPF Editor 11
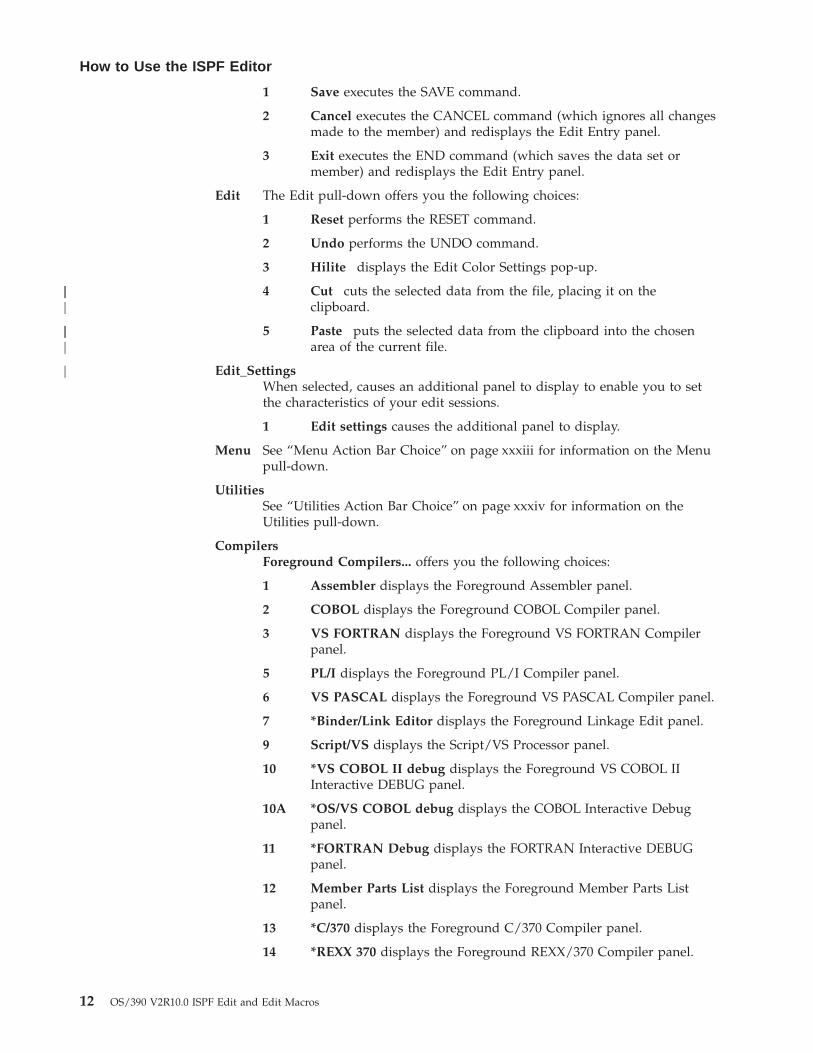
1 Save executes the SAVE command.
2 Cancel executes the CANCEL command (which ignores all changesmade to the member) and redisplays the Edit Entry panel.
3 Exit executes the END command (which saves the data set ormember) and redisplays the Edit Entry panel.
Edit The Edit pull-down offers you the following choices:
1 Reset performs the RESET command.
2 Undo performs the UNDO command.
3 Hilite displays the Edit Color Settings pop-up.
4 Cut cuts the selected data from the file, placing it on theclipboard.
5 Paste puts the selected data from the clipboard into the chosenarea of the current file.
Edit_SettingsWhen selected, causes an additional panel to display to enable you to setthe characteristics of your edit sessions.
1 Edit settings causes the additional panel to display.
Menu See “Menu Action Bar Choice” on page xxxiii for information on the Menupull-down.
UtilitiesSee “Utilities Action Bar Choice” on page xxxiv for information on theUtilities pull-down.
CompilersForeground Compilers... offers you the following choices:
1 Assembler displays the Foreground Assembler panel.
2 COBOL displays the Foreground COBOL Compiler panel.
3 VS FORTRAN displays the Foreground VS FORTRAN Compilerpanel.
5 PL/I displays the Foreground PL/I Compiler panel.
6 VS PASCAL displays the Foreground VS PASCAL Compiler panel.
7 *Binder/Link Editor displays the Foreground Linkage Edit panel.
9 Script/VS displays the Script/VS Processor panel.
10 *VS COBOL II debug displays the Foreground VS COBOL IIInteractive DEBUG panel.
10A *OS/VS COBOL debug displays the COBOL Interactive Debugpanel.
11 *FORTRAN Debug displays the FORTRAN Interactive DEBUGpanel.
12 Member Parts List displays the Foreground Member Parts Listpanel.
13 *C/370 displays the Foreground C/370 Compiler panel.
14 *REXX 370 displays the Foreground REXX/370 Compiler panel.
How to Use the ISPF Editor
12 OS/390 V2R10.0 ISPF Edit and Edit Macros
|||
|||
|

15 *ADA/370 displays the Foreground ADA/370 Compiler panel.
16 *AD/Cycle C/370 displays the Foreground AD/Cycle C/370Compiler panel.
18 ISPDTLC displays the ISPF Dialog Tag Language conversionutility panel.
19 *OS/390 C/C++ displays the C/C++ for MVS/ESA compiler panel,if you have the compiler installed on your system.
Background Compilers... offers you the following choices:
1 Assembler displays the Batch Assembler panel.
2 COBOL displays the Batch COBOL Compiler panel.
3 VS FORTRAN displays the Batch VS FORTRAN Compiler panel.
5 PL/I displays the Batch PL/I Compiler panel.
6 VS PASCAL displays the Batch VS PASCAL Compiler panel.
7 *Binder/Link Editor displays the Batch Linkage Edit panel.
10 *VS COBOL II Debug displays the Batch VS COBOL II InteractiveDebug panel.
12 Member Parts List displays the Batch Member Parts List panel.
13 *C/370 displays the Batch C/370 Compiler panel.
14 *REXX/370 displays the Batch REXX/370 Compiler panel.
15 *ADA/370 displays the Batch ADA/370 Compiler panel.
16 *AD/Cycle C/370 displays the Batch AD/Cycle C/370 Compilerpanel.
18 ISPDTLC displays the ISPF Dialog Tag Language conversionutility panel.
19 *OS/390 C/C++ displays the ESA compiler panel, if you have thecompiler installed on your system.
20 *SOMobjects for MVS displays the SOMobjects for MVS compilerpanel, if you have the compiler installed on your system.
ISPPREP Panel utility displays the PreProcessed Panel Utility.
DTL Compiler displays the ISPF Dialog Tag Language Conversion Utility.
Test The Test pull-down offers you the following choices:
1 Functions... displays the Dialog Test Function/Selection panel.
2 Panels displays the Dialog Test Display panel.
3 Variables... displays the Dialog Test Variables panel.
4 Tables... displays Dialog Test Tables panel.
5 Log displays the ISPF Transaction Log panel.
6 Services... displays the Invoke Dialog Service panel.
7 Traces... displays the Dialog Test Traces panel.
8 Break Points... displays the Dialog Test Breakpoints panel.
9 Dialog Test... displays the Dialog Test Primary Option panel.
How to Use the ISPF Editor
Chapter 1. Introducing the ISPF Editor 13
10 Dialog Test appl ID... displays the Dialog Test Application IDpanel.
Help The Help pull-down offers you the following choices:v Generalv Display screen formatv Scrolling Datav Sequence numberingv Display modesv Tabbingv Automatic recoveryv Edit profilesv Edit line commandsv Edit Primary commandsv Labels and line rangesv Ending an edit sessionv Appendicesv Index.
Editing the Data Set: When the editor displays existing data, each line consists ofa 6-column Line Command field followed by a 72-column data field. The LineCommand fields contain the first 6 digits of the sequence numbers in the data. Ifthe data has no sequence numbers, the Line Command fields contain relativenumbers that start at 1 and are incremented by 1.
Based on your action, the ISPF editor places the cursor in the most useful position.To help you find the cursor, the editor intensifies the Line Command field thatcontains the cursor.
If the data contains characters that cannot be displayed, blanks replace thosecharacters on the panel but not in the data. You cannot type over the blanks. Youcan display and edit undisplayable characters by entering hexadecimal mode or byusing the FIND and CHANGE commands with hexadecimal strings. See“HEX—Display Hexadecimal Characters” on page 249 for information on enteringhexadecimal mode.
Printer control characters, if present, are displayed and are treated as part of thedata. ASA control characters are alphanumeric and you can edit them. Machinecontrol characters, however, cannot be displayed and are replaced on the panelwith blanks.
When you are editing existing data, the selected member or sequential data set isread into virtual storage, where it is updated during edit operations. Use of virtualstorage for editing work space results in high performance, but might require alarge user region. If you use all available storage, an ABEND occurs, and you losethe work space unless recovery mode is on.
Using the ISPF Editor Basic FunctionsThe ISPF editor is similar to many modern word processors.Its basic functions aresimple and can be used immediately:v To alter data, type over the existing material or use the Ins (Insert) and Del
(Delete) keys to add or remove characters.v To view data that is not displayed, use the scroll commands. The following are
PDF default values:
How to Use the ISPF Editor
14 OS/390 V2R10.0 ISPF Edit and Edit Macros
F7/19 Scrolls up. F10/22 Scrolls left.F8/20 Scrolls down. F11/23 Scrolls right.
v To insert a line between existing lines, type I over a number in the LineCommand field and press Enter. The Line Command field is the 6-column rowdisplayed on the left side of the panel when you create or edit a data set. Thenew line is inserted after the one on which you typed the I.
Note: The editor does not distinguish between input mode and edit mode. Usethe I or TE line commands to insert new lines, either between existinglines or at the end of the data.
v To delete a line, type D over the number to the left and press Enter.v To save your work and leave the editor, type END on the command line and
press Enter.
Ending an Edit SessionUsually, you complete your editing session with the END command and, based onthe values in your edit profile, PDF does the following:v If autosave mode is on and you have made changes to the data:
– If both number mode and autonum mode are on, the data is renumbered. Ifnot, the numbers remain unchanged.
– The data is automatically saved. Special temporary lines, such as =PROF>,=MASK>, ==ERR>, ==CHG>, =BNDS>, =TABS>, ==MSG>, =NOTE=, =COLS>, and ======lines are not part of the data and are not saved. However, you can convert=COLS>, ==MSG>, =NOTE=, and ====== lines to data lines and save them as partof the data set by using the MD (make dataline) line command beforeentering END.
– If stats mode is on and the data is a member of an ISPF library or otherpartitioned data set, the statistics are either generated or updated, dependingon whether statistics were previously maintained for the member. If themember is an alias, the alias indicator is turned off.
– If autolist mode is on, a source listing of the data is recorded in the ISPF listdata set for eventual printing.
v If autosave mode is off with the PROMPT operand, a prompting message isdisplayed. You can issue SAVE to save the data or CANCEL to end the editsession without saving the data.
v If autosave mode is off with the NOPROMPT operand, the data is not saved.The result is the same as that which occurs if you enter a CANCEL command.(You can opt to confirm cancelations by selecting that option from the PrimaryEdit panel action bar Confirm choice.)
v PDF returns to the previous panel, which is either a member list or the EditEntry panel. If a member list is displayed, the member you just edited appearsat the top of the list.
You can end editing without saving by using CANCEL.
By default, the editor truncates variable-length lines by removing blanks at the endof each line during a save. If a variable-length line is completely blank and has noline number, a blank is added so that the line length is not zero.
If you select Preserve VB record length on the edit entry panel, or specifyPRESERVE on the edit service, the editor stores the original length of each recordin variable length data sets and when a record is saved, the original record length
How to Use the ISPF Editor
Chapter 1. Introducing the ISPF Editor 15
|||
is used as the minimum length for the record. The minimum line length can bechanged by using the SAVE_LENGTH edit macro command. The editor alwaysincludes a blank at the end of a line if the length of the record is zero.
Because VIEW is a special type of edit session, it is important to note that the useof the REPLACE or CREATE commands from within VIEW always honors thesetting of the Preserve VB record length option on the edit entry panel. Thissetting can be overridden by using the PRESERVE primary command.
Attention:
CANCEL cancels all changes made since the beginning of the edit session or thelast SAVE command, whichever is most recent.
The RETURN command is logically equivalent to the repeated use of the ENDcommand. PDF performs the same actions at the end of the edit session.
When a space ABEND such as D37 occurs, ISPF unallocates the data set so thatyou can swap to another screen or user ID and reallocate the data set. This doesnot occur for data sets that were edited using the DDNAME parameter of theEDIT service.
Edit CommandsYou can use two kinds of commands to control editing operations: line commandsand primary commands.
Line CommandsLine commands affect only a single line or block of lines. You enter line commandsby typing them in the Line Command field on one or more lines and pressingEnter. The Line Command field is usually represented by a column of 6-digitnumbers on the far left side of your display. When you are editing an empty dataset or member, however, the Line Command field contains quotes. This field canalso be used to define labels and to display flags that indicate special lines, such asthe =NOTE= flag, which indicates a note line.
You can use line commands to:v Insert or delete linesv Repeat linesv Rearrange lines or overlay portions of linesv Simplify text entry and formattingv Define an input maskv Shift datav Include or exclude lines from the displayv Control tabs and boundaries for editingv Convert some types of special temporary lines to data lines.
You can enter edit line commands as primary commands on the command line byprefixing them with a colon (:) and placing the cursor on the target line. Forexample, if you enter :D3 on the command line and move your cursor to line 12 ofthe file, the three lines 12, 13, and 14 are deleted from the file. This technique isnormally used for PF key assignments.
See Chapter 3. Managing Data for ways you can use line commands to manipulatedata and Chapter 9. Edit Line Commands for the line command syntax.
How to Use the ISPF Editor
16 OS/390 V2R10.0 ISPF Edit and Edit Macros
Primary CommandsPrimary commands affect the entire data set being edited. You enter primarycommands by typing them on the Command line (Command ===>), usually locatedon line 2, and pressing Enter. Any command entered on the edit command line isfirst intercepted by ISPF. If the command entered is an Edit Primary Command oran Edit Macro, PDF processes the command
You can use primary commands to:v Control your editing environmentv Find a specific linev Find and change a character stringv Combine several members into onev Split a member into two or more membersv Submit data to the job streamv Save the edited data or cancel without savingv Sort datav Delete linesv Access dialog element modelsv Run an edit macro.
You can prefix any primary command with an ampersand to keep the commanddisplayed on the Command line after the command has processed. This techniqueallows you to repeat similar commands without retyping the command. Forexample, if you type:Command ===> &CHANGE ALL ABCD 1234
the command is displayed after the change has been made, which allows you thento change the operands and issue another CHANGE command. You can recallprevious commands with the ISPF RETRIEVE command.
See Chapter 3. Managing Data for some of the ways you can use primarycommands to manipulate data and Chapter 10. Edit Primary Commands for theprimary command syntax.
Edit Commands and PF Key ProcessingIn the Edit function there are some differences between the way ISPF processescommands when they are entered from the command line as compared to whenthey are entered by a combination of the command line and a function (PF) key. Inmost applications, when you press a PF key, ISPF concatenates the contents of thecommand line to the definition of the function key. The result is handled as asingle command by ISPF or by the application.
When you use a PF key defined as a scroll command (UP, DOWN, LEFT, orRIGHT) the system processes the command as follows:v If the concatenation of the scroll command PF key definition and the contents of
the command line does not create a valid scroll command:– If the word after the scroll command PF key definition begins with a numeric
character (0-9), you get a message telling you the scroll amount was not valid.– Otherwise, edit processes the contents of the command line as an edit
command, then processes the scroll command using the default scroll amount.In this case, the processing of the command line contents as an edit commandbypasses the command table, because the command table is used to resolvethe scroll key.
Edit Commands
Chapter 1. Introducing the ISPF Editor 17
v If the concatenation of the scroll command PF key definition and the contents ofthe command line does create a valid scroll command edit scrolls the screen thespecified amount.
If you manually type a scroll command on the command line (you do not use anyPF keys) and it has an operand, the operand is checked for validity. However, inthe case of a scroll operand that is not valid, the operand is not processed as aseparate edit command as it is when used with a PF key.
Edit MacrosEdit macros are primary commands that you write. You can save time andkeystrokes by using macros to perform often-repeated tasks. To run a macro, typeits name and any operands on the Command line, and press Enter. Yourinstallation may have written and documented common macros for your use. Ofcourse, you can also write your own edit macros.
The rules for running a specific macro, and the expected results, depend on theparticular macro. Your installation is responsible for documenting these rules andresults. If you want to write your own macros, read Part 2. Edit Macros andChapter 11. Edit Macro Commands and Assignment Statements.
ISPF enables the installer of the program to specify an edit macro that runs for allusers. If a macro name is specified in the ISPF configuration table, then that macroruns before any macros specified in the users’ profiles, in programs that invokeedit, or on the edit entry panels.
The site-wide macro can be used to alter existing profiles, enforce site-widestandards, track edit usage, deny edit and view of a data set member, or for anyother purposes for which edit macros are designed. Site-wide macros normally endwith a return code of 1 (one) in order to place the cursor on the command line.Site-wide macros must be available to each user in the appropriate data setconcatenation (SYSPROC, STEPLIB, and so forth) or in Linklist or LPA (programmacros only).
A user can also set an application-wide macro if he chooses. See “Application-WideMacros” on page 30 for more information.
The effect of running a macro depends on the implementation of the macro.Results such as cursor positioning, output messages, and so on, may or may notconform to the results that you expect from built-in edit commands.
Editing Data in Controlled LibrariesWhen you edit controlled libraries you may use, as previously assigned, either theLibrary Management Facility (LMF) or the Software Configuration and LibraryManager (SCLM).
If LMF is not active on your system and you attempt to start it, the systemdisplays an error panel. Contact your library administrator, database administrator,or system programmer to correct the problem. The editor allows you to access thedata, but at your own risk. You are not able to promote changes made to thecontrolled libraries when LMF is inactive.
For information about editing libraries that are controlled under LMF, refer to ISPFLibrary Management Facility. For information about editing libraries that are
Edit Commands
18 OS/390 V2R10.0 ISPF Edit and Edit Macros
controlled under SCLM, refer to ISPF Software Configuration and Library Manager(SCLM) Developer’s and Project Manager’s Guide.
Packing DataData can be saved in either packed or standard format. You can control the formatby using the PACK primary command to change the edit profile. The editor readsthe data in and you can edit it the way you normally would. When you end theediting session, the data is packed and stored. See “PACK—Compress Data” onpage 269 and “PACK—Set or Query Pack Mode” on page 374 for more information.
The packed data format has the advantage of saving space. It allows for a moreefficient use of DASD by replacing repeating characters with a sequence thatshows the repetition.
The disadvantage is that space is saved at the expense of additional processingwhen the data is read or written. Also, the data cannot be directly accessed byprograms. You must access the data through PDF dialogs and library accessservices. For example, a packed CLIST or REXX EXEC does not run properlybecause pack mode analysis is not done before passing the CLIST or REXX EXECto the system.
Note: The library access services referred to in this section apply to LMF. Servicesfor SCLM are described in ISPF Software Configuration and Library Manager(SCLM) Developer’s and Project Manager’s Guide
Data that is packed by PDF Version 3 Release 3 or later might not be able to beread by releases prior to PDF Version 2 Release 2.
Edit Macros
Chapter 1. Introducing the ISPF Editor 19

Edit Macros
20 OS/390 V2R10.0 ISPF Edit and Edit Macros
Chapter 2. Controlling the Edit Environment
This chapter describes the editing environment and how you can customize thatenvironment to best suit your needs.
The PDF component defaults control much of the editing environment. However,you can use line and primary commands to change number and statistical fields ona data display panel and to determine how the data appears.
What is an Edit Profile?An edit profile controls your edit session through modes and temporary lines.These modes and lines convert data to uppercase (caps mode), automaticallyrenumber lines of data (autonum mode), or specify the left and right boundariesused by other commands (=BNDS> line).
The library type (the last of the data set name qualifiers), record format (fixed orvariable), or the record length can implicitly specify an edit profile. You can choosean edit profile in three ways:v Issue the PROFILE command with a profile name as parameterv Fill in the Profile field on the Edit Entry panelv Supply a PROFILE keyword and name when calling the EDIT service, such as:
ISPEXEC EDIT PROFILE(name) ...
Using Edit Profile TypesDifferent kinds of data can have several different edit profiles. With this capability,you could set up an edit profile for COBOL programs, a different edit profile formemos, and a third edit profile for test data. Your installation determines howmany different edit profiles are available to you. Typically, 25 edit profiles areavailable.
If you attempt to create more edit profiles than defined by your installation, theleast-used edit profile is deleted first. Locked edit profiles are not deleted unless allyour edit profiles are locked. In that case, the least-used locked edit profile isdeleted first. Again, if you continue to add edit profiles, all of the unlocked editprofiles are deleted before locked edit profiles.
You can control the use of profiles from the Edit Entry panel. If you leave theProfile Name field blank, the profile name defaults to the data set type, which isthe last qualifier in the data set name. If you type a profile name, it overrides thedata set type qualifier. In either case, if a profile of that name currently exists, it isused. If it does not exist, a new profile is defined. The initial contents of the newprofile include the default mode settings, all-blank mask and tabs, and defaultbounds. To eliminate the profile lines from your panel, use the RESET command.
Displaying or Defining an Edit ProfileYou can display none, all, or part of an edit profile by entering the followingcommand:PROFILE [name] [number]
© Copyright IBM Corp. 1984, 2000 21
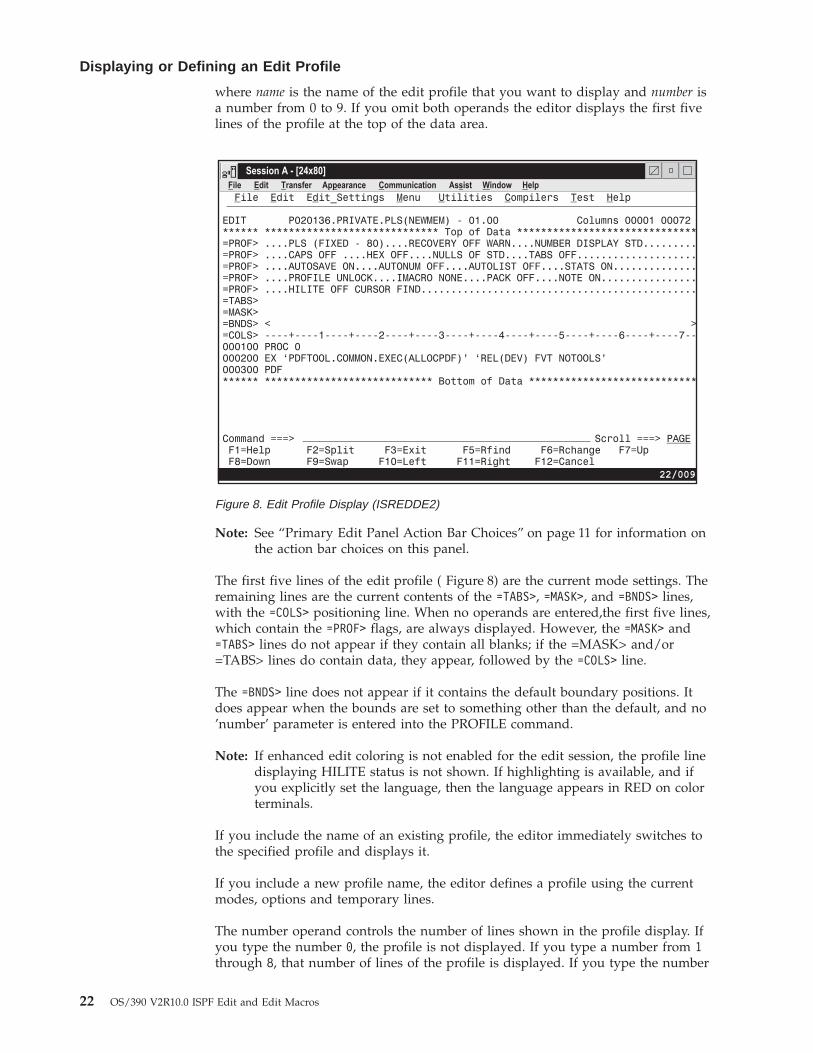
where name is the name of the edit profile that you want to display and number isa number from 0 to 9. If you omit both operands the editor displays the first fivelines of the profile at the top of the data area.
Note: See “Primary Edit Panel Action Bar Choices” on page 11 for information onthe action bar choices on this panel.
The first five lines of the edit profile ( Figure 8) are the current mode settings. Theremaining lines are the current contents of the =TABS>, =MASK>, and =BNDS> lines,with the =COLS> positioning line. When no operands are entered,the first five lines,which contain the =PROF> flags, are always displayed. However, the =MASK> and=TABS> lines do not appear if they contain all blanks; if the =MASK> and/or=TABS> lines do contain data, they appear, followed by the =COLS> line.
The =BNDS> line does not appear if it contains the default boundary positions. Itdoes appear when the bounds are set to something other than the default, and no’number’ parameter is entered into the PROFILE command.
Note: If enhanced edit coloring is not enabled for the edit session, the profile linedisplaying HILITE status is not shown. If highlighting is available, and ifyou explicitly set the language, then the language appears in RED on colorterminals.
If you include the name of an existing profile, the editor immediately switches tothe specified profile and displays it.
If you include a new profile name, the editor defines a profile using the currentmodes, options and temporary lines.
The number operand controls the number of lines shown in the profile display. Ifyou type the number 0, the profile is not displayed. If you type a number from 1through 8, that number of lines of the profile is displayed. If you type the number
Figure 8. Edit Profile Display (ISREDDE2)
Displaying or Defining an Edit Profile
22 OS/390 V2R10.0 ISPF Edit and Edit Macros
9, the complete profile is displayed, even if the =MASK> and =TABS> lines are blankand the =BNDS> line contains the defaults. Since masks are ignored when using aformat name, the ″=MASK>″ line is not displayed by the profile command informatted edit sessions.
Modifying an Edit ProfileYou modify an edit profile by entering commands to set various modes, options,and temporary lines. Whenever you change an edit profile value, PDF saves thevalue (unless the edit profile is locked). The next time you edit data using the editprofile, the data is retrieved and the environment is set up again. This is easierthan it sounds. First, there are defaults for all the modes, and, in most cases, youdo not need to change them. Second, if you decide that you want to change amode, you just enter the appropriate command. The edit profile is automaticallychanged and saved for you. See “Edit Modes” for more information about the editmodes.
Locking an Edit ProfileOnce you have an edit profile exactly the way you want it, you can lock it. To dothis, type PROFILE LOCK and press Enter. The edit profile is saved with all thecurrent modes, options, and temporary lines, and it is marked so that the savedcopy of the edit profile is not changed. Usually, each time you begin an editingsession the edit profile you start with is exactly the way you locked it. Theexceptions are caps, number, stats, and pack, which are made to match the dataand are noted with messages. You can change a mode during an editing session,but if the edit profile is locked, the change affects only the current session; it doesnot affect any later sessions.
If you have locked your current edit profile, you cannot change the initial macroname with IMACRO. For information on IMACRO, see “IMACRO—Specify anInitial Macro” on page 255. For information on the LOCK operand, see“PROFILE—Control and Display Your Profile” on page 271.
Edit ModesThe edit modes control how your edit session operates. To set these modes, use theassociated primary commands. For example, if you are editing a COBOL programthat is in uppercase and you want all your input to be converted to uppercase, setcaps mode on by entering CAPS ON.
The following list summarizes the primary commands you use to display andchange your edit profile. See Chapter 10. Edit Primary Commands for a completedescription and for the operands you can type with the commands.
PROFILEDisplays the current setting of each mode in this list and controls whetherchanges to these settings are saved.
AUTOLISTControls whether a copy of the saved data is automatically stored in theISPF list data set.
AUTONUMControls whether lines of data are automatically renumbered when thedata is saved.
AUTOSAVEControls whether data is saved when you enter END.
Displaying or Defining an Edit Profile
Chapter 2. Controlling the Edit Environment 23
CAPS Controls whether alphabetic characters are stored in uppercase when thedata is saved.
HEX Controls whether data is displayed in hexadecimal format.
HILITEControls the use of enhanced edit color.
IMACRONames an edit macro used at the start of the edit session.
NOTESControls whether tutorial notes are included in an Edit model.
NULLSControls whether blank spaces at the end of a line are written to the panelas blanks or nulls. The difference is that nulls allow you to insert data;blanks do not.
NUMBERControls the generation of sequence numbers in a data set.
PACK Controls whether ISPF packs (compresses) the data when it is saved.
RECOVERYControls the recovery of an edit session following a system failure.
SETUNDOControls the method of saving changes for the UNDO command.
STATSControls whether statistics for a data set are generated.
TABS Controls tab settings for aligning data.
Edit Profile ModesThe data you edit controls four special edit profile modes. These modes are setwhen data is first edited or new data is copied in.
Caps modeThe editor sets caps mode on if it detects that a member to be editedcontains no lowercase characters and sets caps mode off if the memberdoes contain lowercase characters.
Number modeThe editor sets number mode on and changes number options if it detectsthat the data contains valid sequence numbers. It sets number mode off ifthe data does not contain valid sequence numbers.
Pack modeThe editor sets pack mode on if the data being edited was previouslysaved in packed format and sets pack mode off if the data was notpreviously saved in packed format.
Stats modeThe editor sets stats mode on if the member being edited currently hasISPF statistics and sets stats mode off if the member did not previouslyhave ISPF statistics.
The ISPF editor changes the special data modes even if the original edit profile ofthe member edit profile is locked. However, for locked profiles, it does not savethe changes to the profile.
Edit Modes
24 OS/390 V2R10.0 ISPF Edit and Edit Macros
For your convenience, the editor changes the special data modes automatically tocorrespond to the data. This allows you to have a single data set and to use thedefault edit profile, even though some members may contain programs (CAPS ON)while other members contain text (CAPS OFF). Some of the members may havestatistics to be maintained, while other members are stored without statistics. Somemembers may be in packed data format, while others are in standard data format.And finally, and perhaps most important, some members may besequence-numbered, while others are not.
When the editor changes your edit profile to correspond to the data, specialmessage lines appear. If you want to override the change, enter the appropriatecommand. For example, if the editor changes caps mode from on to off because itfinds lowercase characters in the data, you just type CAPS ON and press Enter toreset it.
If you have special requirements, you might not want the editor to change thespecial modes. You may want to have caps mode on, even if the data containslowercase data, or you may want to generate statistics on output, regardless ofwhether the member originally had statistics. If so, you can write an initial macroto specify how the editor is to run these special modes. You would then useIMACRO to associate the initial macro with the edit profile. See “Initial Macros” onpage 29 for more information on initial macros.
Edit Mode DefaultsPDF saves several different edit modes in an edit profile. The user can specify thedesired edit profile on the Edit Entry Panel. If the Profile field is left blank, thedata set type is used as the profile name.
To preinitialize a set of edit profiles for first-time users, do the following:1. Enter PDF.2. Select the Edit option.3. Set the edit profile with the defaults you chose.
For example, to set your “COBOL FIXED 80” profile, edit a member of apartitioned data set that has a RECFM of F or FB, a LRECL of 80, and a typequalifier of COBOL (or enter COBOL as the profile name on the Edit EntryPanel).
ISPF provides two methods for setting defaults for new edit profiles. You can setup a profile called ZDEFAULT in the ISPTLIB concatenation, or you can modifythe edit profile defaults in the ISPF configuration table. IBM strongly recommendsusing the ISPF configuration table method because it is easier to maintain than theZDEFAULT method. The ZDEFAULT method can still be used by individual users.
Site-wide Edit Profile InitializationWhen no ZDEFAULT profile exists in the ISPTLIB concatenation and the user hasno edit profile member in the ISPPROF concatentation, new edit profiles arecreated based on the settings in the ISPF configuration table. Using theconfiguration table, you can change any of the defaults for new edit profiles andyou can override (force) settings for PACK, RECOVERY, RECOVERY WARN,SETUNDO, AUTOSAVE, and IMACRO in existing profiles. When a setting isforced the editor WILL CHANGE the users’ profiles, so be very careful if youoverride the IMACRO setting. IBM recommends that you use the site-wide initialmacro instead of forcing the initial macro in each user’s profile.
Edit Modes
Chapter 2. Controlling the Edit Environment 25
It is helpful to understand when the ZDEFAULT profile is used and where it existsin a user’s concatenations. The ZEDFAULT profile exists as a row of the editprofile table named xxxEDIT, where xxx is the application profile.
If ZDEFAULT exists in the edit profile table in the ISPTLIB concatenation, and theuser has NO edit profile table in the ISPPROF allocation, the ZDEFAULT profile iscopied from ISPTLIB into the user’s edit profile when the user’s edit profile iscreated. Therefore, many of your existing users might already have a ZDEFAULTprofile in their edit profile. Individual users can delete their ZDEFAULT profilesusing the PROFILE RESET command from within an edit session. Doing so allowsthem to use the site-wide configuration for new profiles. You can also use asite-wide edit initial macro to issue a PROFILE RESET for all users. ISPF does notship any edit profiles.
Note: If you use the force settings such as PACK OFF, edit macro commands thatattempt to change forced settings will not receive a failing return code, butthe settings will not change.
Creating a ZDEFAULT Edit ProfileSet up a special edit profile named ZDEFAULT (enter ZDEFAULT as the profilename on the Edit Entry Panel). The ZDEFAULT profile is the one used for theinitial settings whenever a new edit profile is generated, regardless of the RECFMand LRECL values. For example, if you do not have an ASM profile and you editan ASM data set, an ASM profile is generated using ZDEFAULT for the initialsettings. If no ZDEFAULT profile exists, it is automatically generated with thefollowing settings:Modes set on:
CAPS STATS NUMBERModes set off:
RECOVERY HEX NULLS TABS AUTONUM AUTOLIST PACKProfile set to:
UNLOCKIMACRO set to:
NoneSETUNDO set to:
STGHILITE set to:
ON AUTO (CURSOR, FIND, PAREN and LOGIC matching are inactive)
The number of profiles you can establish is described in the configuration table.See “Displaying or Defining an Edit Profile” on page 21 for more details. Whenyou finish, exit PDF. Your entire set of edit profiles is saved in your profile library(referenced by ddname ISPPROF) as the ISREDIT member.
Flagged LinesFlagged lines are lines that contain highlighted flags in the line command area.These lines can be divided into the following categories:v Changed linesv Error linesv Special lines.
The flags in the line command area are not saved when you end an edit session.
Edit Modes
26 OS/390 V2R10.0 ISPF Edit and Edit Macros
Changed Lines==CHG> Shows lines that were changed by a CHANGE or RCHANGE command.
Error Lines==ERR> Shows lines in which PDF finds an error when you enter a line, primary,
or macro command. For example, when you enter a CHANGE command,there is not enough room on the line to make the change.
Special LinesSpecial lines can be divided into two categories:v Edit profile lines (the values associated with these lines are stored in your edit
profile):
=PROF> Contains the settings of the individual edit modes. This line is not savedas part of your data set or member. See “Edit Modes” on page 23 formore information.
=TABS> Defines tab positions. This line is not saved as part of your data set ormember.
=MASK> Can contain data to be inserted into your data set or member when youuse the I (insert) line command. This line is not saved as part of yourdata set or member.
=BNDS> Specifies left and right boundaries that are used by other commands.This line is not saved as part of your data set or member.
=COLS> Identifies the columns in a line.
The column identification line can be saved as part of the data set ormember if you use the MD (make dataline) line command to convert itto a data line.
v Message, note, and information lines:
==MSG> Message lines inform you of changes to the edit profile. These changesare caused by inconsistencies between the data to be edited and the editprofile settings. Message lines also warn you that the UNDO commandis not available when edit recovery is off.
You can insert message lines manually by using an edit macro thatcontains the LINE_AFTER and LINE_BEFORE assignment statements.
Message lines are not saved as part of the data set or member unlessyou use the MD (make dataline) line command to convert them to datalines.
=NOTE= Note lines display information when you insert edit models. However,these lines do not appear if the edit profile is set to NOTE OFF.
You can insert note lines manually by using an edit macro that containsthe LINE_AFTER and LINE_BEFORE assignment statements.
Note lines are not saved as part of the data set or member unless youuse the MD (make dataline) line command to convert them to data lines.
====== Temporary information lines are lines you can add to provide temporaryinformation that is not saved with the data. They can be inserted into anedit session by using an edit macro containing the LINE_AFTER andLINE_BEFORE assignment statements.
Flagged Lines
Chapter 2. Controlling the Edit Environment 27
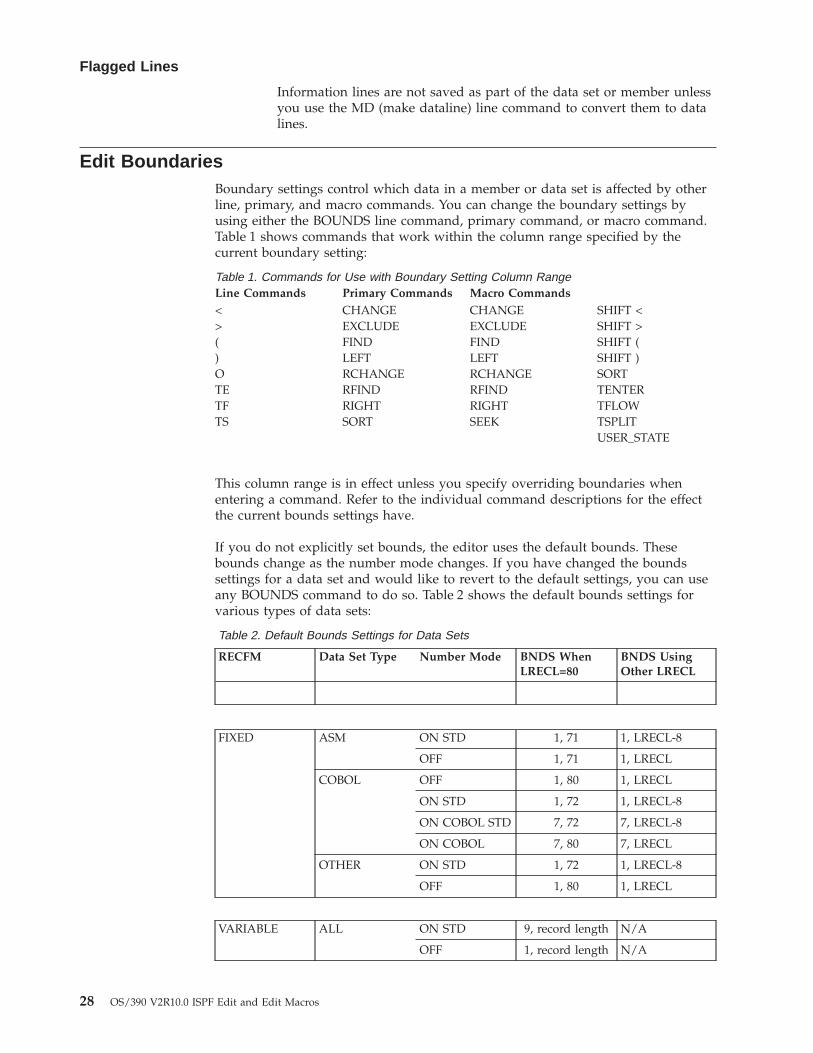
Information lines are not saved as part of the data set or member unlessyou use the MD (make dataline) line command to convert them to datalines.
Edit BoundariesBoundary settings control which data in a member or data set is affected by otherline, primary, and macro commands. You can change the boundary settings byusing either the BOUNDS line command, primary command, or macro command.Table 1 shows commands that work within the column range specified by thecurrent boundary setting:
Table 1. Commands for Use with Boundary Setting Column RangeLine Commands Primary Commands Macro Commands< CHANGE CHANGE SHIFT <> EXCLUDE EXCLUDE SHIFT >( FIND FIND SHIFT () LEFT LEFT SHIFT )O RCHANGE RCHANGE SORTTE RFIND RFIND TENTERTF RIGHT RIGHT TFLOWTS SORT SEEK TSPLIT
USER_STATE
This column range is in effect unless you specify overriding boundaries whenentering a command. Refer to the individual command descriptions for the effectthe current bounds settings have.
If you do not explicitly set bounds, the editor uses the default bounds. Thesebounds change as the number mode changes. If you have changed the boundssettings for a data set and would like to revert to the default settings, you can useany BOUNDS command to do so. Table 2 shows the default bounds settings forvarious types of data sets:
Table 2. Default Bounds Settings for Data Sets
RECFM Data Set Type Number Mode BNDS WhenLRECL=80
BNDS UsingOther LRECL
FIXED ASM ON STD 1, 71 1, LRECL-8
OFF 1, 71 1, LRECL
COBOL OFF 1, 80 1, LRECL
ON STD 1, 72 1, LRECL-8
ON COBOL STD 7, 72 7, LRECL-8
ON COBOL 7, 80 7, LRECL
OTHER ON STD 1, 72 1, LRECL-8
OFF 1, 80 1, LRECL
VARIABLE ALL ON STD 9, record length N/A
OFF 1, record length N/A
Flagged Lines
28 OS/390 V2R10.0 ISPF Edit and Edit Macros
If the default boundaries are in effect, they are automatically adjusted whenevernumber mode is turned on or off. If you have changed the bounds from thedefault settings, they are not affected by the setting of number mode.
If a left or right scroll request would cause the display to be scrolled ’past’ a left orright bound, the scrolling stops at the bound. A subsequent request then causesscrolling beyond the bound.
This scrolling feature is especially useful when you are working with data that hassequence numbers in the left hand columns. It allows left and right scrolling up to(but not past) the bounds so that the sequence numbers are normally excludedfrom the display.
If you specify an invalid value for either the left or right boundary when changingthe current boundary settings, the editor resets the value for that boundary to thedefault. The following constitute invalid boundary values:v A right boundary value that is greater than the logical record length of a
fixed-block file if the file is unnumbered.v A right boundary value that is greater than the logical record length-8 of a
fixed-block file if the file with standard numbers.v A right boundary value that is greater than the logical record length-4 of a
variable-block file.v A left boundary value that is less than or equal to 8 for a variable-block file with
standard numbersv A left boundary value that is less than or equal to 6 for a file that is numbered
with COBOL numbers.
Initial MacrosThe editor runs an initial macro after it reads but before it displays data. Themacro might initialize empty data sets, define program macros, or initializefunction keys.
For example, if you want caps mode on, even if the data contains lowercase data,create an initial macro with a CAPS ON command. The editor first reads the editprofile and the data, then it sets caps mode to correspond to the data. Next, it runsyour initial macro, which overrides the edit profile setting of caps mode.
You can specify an initial macro in one of the following ways:v Store the macro name in the edit profile with the IMACRO command:
Command===> IMACRO INITMAC
See “IMACRO—Specify an Initial Macro” on page 255 for more information onthe IMACRO command.
v Specify the initial macro name on the Edit Entry panel:INITIAL MACRO ===> initmac
v Specify the initial macro name on the EDIT service call:ISPEXEC EDIT DATASET(dsname) MACRO(initmac) ...
Once specified, the initial macro runs at the beginning of each edit session thatuses the profile. It may be overridden by an initial macro typed in the INITIALMACRO field on the Edit Entry panel or specified on the EDIT service call. Youcan type NONE in the INITIAL MACRO field to suppress the initial macro definedin the profile.
Edit Boundaries
Chapter 2. Controlling the Edit Environment 29
If the current profile is locked, the IMACRO command cannot be run.
Remember that commands referencing display values (DISPLAY_COLS,DISPLAY_LINES, DOWN, LEFT, RIGHT, UP, LOCATE) are invalid in an initialmacro because no data has been displayed.
If the initial macro issues either an END or CANCEL command, the member is notdisplayed.
Application-Wide MacrosYou can specify a macro to run at the beginning of your edit sessions by placing avarible called ZUSERMAC in either the shared or profile pool. ZUSERMAC mustcontain the name of the macro and cannot include any operands. ZUSERMACmust not be longer than 8 characters long.
If ZUSERMAC exists in the profile or shared pool, the macro it specifies is runafter the site-wide initial macro, and before the initial macro specified on the editpanel, on EDIT service command, or in the edit profile.
If you want to remove the user application-wide macro, you can issue the VERASEservice to remove ZUSERMAC from the shared or profile pool.
Statistics for PDS MembersIf stats mode is on, PDF creates and maintains statistics for partitioned data setmembers. The following sections explain the effect stats mode has on yourstatistics, first when you are beginning an edit session and then when you aresaving data.
Note: Stats mode is ignored for sequential data sets.
Included in the statistics are version and modification levels. These numbers can beuseful in controlling library members. See “Sequence Number Format andModification Level” on page 32 for a discussion of how the generation of statisticsaffects the format of sequence numbers.
Effect of Stats Mode When Beginning an Edit SessionWhenever a member is retrieved for editing, the ISPF editor checks the setting ofstats mode. PDF does not display any warning messages if the stats mode and themember are consistent. For example:v If the stats mode is on and the member has statisticsv If the stats mode is off and the member does not have statistics.
If the stats mode and the member are not consistent, however, PDF displays awarning message. For example:v If stats mode is on and the member has no statistics, PDF displays a warning
message, but does not change the stats mode.v If stats mode is off and the member has statistics, PDF automatically turns on
stats mode and displays a message indicating the mode change.
Effect of Stats Mode When Saving DataIf stats mode is on when you save the member, PDF updates the statistics, orcreates statistics if the member did not previously have them.
Initial Macros
30 OS/390 V2R10.0 ISPF Edit and Edit Macros
If stats mode is off when you save the member, PDF does not store any statistics;any previous statistics are destroyed.
Stats mode is saved in the edit profile.
Version and Modification Level NumbersTwo of the statistics that the editor creates and maintains for members of ISPFlibraries and partitioned data sets (when stats mode is on) are the version andmodification level numbers. These numbers are displayed in the form VV.MM at thetop of the edit panel following the data set name.
When the editor creates statistics for a new member, the default version andmodification level numbers are 01 and 00, respectively. Otherwise, the values aretaken from the previous statistics stored with the member.
You can change the version number with the VERSION command.
The modification level number appears in the last 2 digits of the line numbers fornew or changed lines to provide a record of activity. The number is automaticallyincremented by one when the first change is made to the data. It can also bechanged explicitly with the LEVEL command. The numbers for both can rangefrom 00 to 99, inclusive. After the modification level number reaches 99, it does notincrement by one to return to level 00.
The editor normally increments the modification level the first time that data ischanged. This incrementing is suppressed if:v You have set the modification level with a LEVEL command before making the
first change.v Statistics did not previously exist, and the editor has set the modification level to
0 for a new member.
If both stats mode and standard sequence number mode are on, the currentmodification level replaces the last two positions of the sequence number for anylines that are changed. At the time the data is saved, it is also stored for any linesthat already are marked with a modification level higher than the currentmodification level. If you type LEVEL 0, press Enter, and then save the data, alllines are reset to level 0. See “LEVEL—Specify the Modification Level Number” onpage 256 for more information.
Sequence NumbersEach line on the panel represents one data record. You can generate and control thenumbering of lines in your data with the following commands:
AUTONUMAutomatically renumbers data whenever it is saved, preserving themodification level record.
NUMBERTurns number mode on or off, and selects the format.
RENUMRenumbers all lines, preserving the modification level number.
Statistics for PDS Members
Chapter 2. Controlling the Edit Environment 31
UNNUMBERTurns off numbering and blanks the sequence number fields on all lines.This deletes all modification level records.
Sequence Number Format and Modification LevelSequence numbers can be generated in the standard sequence field, the COBOLsequence field, or both:v The standard sequence field is the last 8 characters for fixed-length records, or the
first 8 characters for variable-length records, regardless of the programminglanguage.Use NUMBER ON STD to generate sequence numbers in the standardsequence field.For members of partitioned data sets, the format of standard sequence numbersdepends on whether statistics are being generated. If statistics are beinggenerated, standard sequence numbers are 6 digits followed by a 2-digitmodification level number. The level number flag reflects the modification levelof the member when the line was created or last changed. If, for example, asequence number field contains 00040002, the line was added or last changed atmodification level 02. The sequence number is 000400.If stats mode is off, or if you are editing a sequential data set, standard sequencenumbers are 8 digits, right-justified within the field.
v The COBOL sequence field is always the first 6 characters of the data and is validonly for fixed-length records.Use the NUMBER ON COBOL or NUMBER ONSTD COBOL to generate COBOL sequence numbers.Attention:
If number mode is off, make sure the first 6 columns of your data set are blankbefore using either the NUMBER ON COBOL or NUMBER ON STD COBOLcommand. Otherwise, the data in these columns is replaced by the COBOLsequence numbers. If that happens and if edit recovery or SETUNDO is on, youcan use the UNDO command to recover the data. Or, you can use CANCEL atany time to end the edit session without saving the data. COBOL sequencenumbers are always 6 digits and are unaffected by the setting of stats mode.
Sequence numbers usually start at 100 and are incremented by 100. When lines areinserted, the tens or units positions are used. If necessary, one or more succeedinglines are automatically renumbered to keep the sequence numbers in order.
Sequence Number DisplayFor numbered data, the Line Command field displayed to the left of each lineduplicates the sequence number in the data. Normally, the editor automaticallyscrolls left or right to avoid showing the data columns that contain the sequencenumbers. However, you can explicitly scroll left or right to display the sequencenumbers. The DISPLAY operand of the NUMBER and RENUMBER commandsalso causes the editor to display the sequence numbers.
For example, assume that the data has COBOL numbers in columns 1 through 6and the number mode is NUMBER ON COBOL. When the data is displayed, column 7 isthe first column displayed. If you change number mode to NUMBER OFF, the data isscrolled so that column 1 is the first column displayed. If you then change numbermode to NUMBER ON, the data is scrolled back to column 7. But if you changenumber mode to NUMBER ON DISPLAY, the sequence numbers in columns 1 through6 remain displayed. The sequence numbers in columns 1 through 6 become part ofthe data window, but cannot be modified.
Sequence Numbers
32 OS/390 V2R10.0 ISPF Edit and Edit Macros
Initialization of Number ModeWhen you retrieve data for editing, the editor determines whether it containssequence numbers. The editor always examines the standard sequence field. Itexamines the COBOL sequence field if the data set type (the lowest level qualifierin the data set name) is COBOL.
If all lines contain numeric characters in either the standard or COBOL sequencefield positions, or both, and if the numbers are in ascending order, the editorassumes the data is numbered and turns on number mode. Otherwise, the editorturns off number mode.
If the first setting of the number mode differs from the setting in the edit profile, amessage indicating that the editor has changed the mode is displayed. For newmembers or empty sequential data sets, the first setting of number mode isdetermined by the current edit profile. For a new edit profile, the default is NUMBERON for standard sequence fields, and NUMBER ON COBOL if the data set type isCOBOL.
Enhanced and Language-sensitive Edit ColoringThe editor provides language-sensitive coloring as a productivity aid for users whoare editing program source. It is used in a variety of programming languages.Some coloring enhancements are also useful for editing data other than programsource.
Note: Language-sensitive and enhanced coloring of the edit session is onlyavailable when enabled by the installer or the person who maintains theISPF product. For information on enabling the enhanced color functions, seeISPF Planning and Customizing
These enhancements allow programmers to immediately see simple programmingerrors, such as mismatched quotes or parentheses, unclosed comments, andmismatched logical constructs. The language-sensitive component allows you totake advantage of the editor’s coloring capabilities for a number of programminglanguages simultaneously. Enhanced coloring is also a general productivity aid,because it improves your ability to locate text quickly.
The editor provides enhanced highlighting in the following areas:1. Programming language constructs, including the following:v Keywords for each individual languagev Commentsv Quoted strings (using both single and double quotes)v Compiler directives (C, COBOL, PL/I, and PASCAL only)v Special characters that the user chooses.
2. Language-sensitive program logic features, such as logical blocks and IF/ELSElogic.
3. Any strings that match the previous FIND operation or that would be found byan RFIND or RCHANGE request.
4. Default color for the data area in non-program files.5. The phrase containing the cursor in the data area.6. Characters that have been input since the previous Enter or function key entry
was pressed.
Note: Highlighting is not available for edit sessions that involve the following:
Sequence Numbers
Chapter 2. Controlling the Edit Environment 33
v Only CURSOR and FIND highlighting is valid for data sets with recordlengths greater than 255
v Mixed mode edit sessions (normally used when editing DBCS data)v Formatted data.
Language SupportThe following languages are supported for language-sensitive coloring:v Assemblerv BookMasterv Cv COBOLv ISPF Dialog Tag Language (DTL)v ISPF Panels (non-DTL)v ISPF Skeletonsv JCL (Job Control Language)v Pascalv REXXv PL/Iv OTHER, which includes languages that use constructs similar to PL/I, such as
DO, BEGIN, END, SELECT, and so forth. Limited support for CLIST is providedwith the OTHER language. OTHER does not support any compiler directives.
Automatic Language SelectionIf you choose not to set the language explicitly, the editor can automaticallydetermine the language of the part being edited. The language is determined bylooking at the first non-blank string in the file. In cases where ambiguity existsbetween languages, as in the case C and JCL (both may start with //) or PL/I andREXX (both may start with a /* comment), the last qualifier of the data set namemay be used to determine the language. Rules for automatic language recognitionare as follows:
Assembler Asterisk in column 1 or a recognized opcode ofCSECT, DSECT, MACRO, TITLE, START or COPY.
Note: *PROCESS in column 1 is recognized asPL/I.
BookMaster First character is . or : in column 1.
C Any of the following:v First string is #v First string is // and data set type is not .CNTL,
.JCL, or ISPCTLxv First string is /* and data set type is .C.
COBOL First non-blank is a * or / in column 7.
ISPF DTL First non-blank character is <.
ISPF Panel First string is ) in column 1, followed by a panelsection name, or the first string is % in column 1.
ISPF Skeleton ) in column 1 in a file that does not seem to be apanel.
JCL Any of the following:v //anything followed by the word COMMAND,
DD, ELSE, ELSEIF, EXEC, IF, INCLUDE, JCLLIB,
Enhanced Edit Coloring
34 OS/390 V2R10.0 ISPF Edit and Edit Macros
JOB, OUTPUT, PROC, SET, XMIT, or any wordbeginning with the characters ’MSG’
v //* in column 1v // in column 1, and the data set type is .CNTL,
.JCL, or ISPCTLxv Any of the following in column 1:
*$/*JOBPARM/*MESSAGE/*NETACCT/*NOTIFY/*OUTPUT/*PRIORITY/*ROUTE/*SETUP/*SIGNOFF/*SIGNON/*XEQ/*XMIT
PASCAL First string is (*, or the first string is /* and thedata set name ends in .PASCAL.
PL/I First string is % or /* or the first string is*PROCESS in column 1. The use of carriage controlcharacters in column one may cause PL/I detectionto fail. For data sets names with a final qualifierstarting with ″PL″, automatic language detection isretried ignoring column one if the first non-blankcharacters occur in column one, and no languagecan be detected. See REXX, C, and Panel for moreinformation.
REXX First string is a /* comment containing REXX, orthe first string is a /* comment, and the data settype is .EXEC or .REXX.
Other First word is PROC, CONTROL, ISPEXEC, orISREDIT.
HILITE AUTO selects a language based on the first non-blank line, and in somecases, the last qualifier of the data set name.
The PDF component only scans a maximum of 72 bytes of data per line todetermine the language. If the data which would determine the language is pastthe 72nd column, the PDF component may incorrectly determine the language.
Language Processing Limitations and IdiosyncraciesBecause the PDF component does not provide true parsing, the built-in languagescanner does not operate as a syntax checker. Keywords or built-in function namesthat are used as variables, and therefore not used in a language context, will behighlighted as keywords. For example, in context sensitive languages, such asPL/I, the word ’ELSE’ may be used as a variable name. PDF treats ’ELSE’ as akeyword in all cases, both for highlighting and logic determination.
Enhanced Edit Coloring
Chapter 2. Controlling the Edit Environment 35
In addition, the varying implementations and release schedules of the supportedlanguages may result in keyword highlighting that does not reflect the latestversion of the language.
Note: Nested comments are not recognized in any language. When sequencenumbers are in use, the editor only highlights the editable data. Thesequence numbers are shown in the overtype color.
Also, because the language scanners of edit highlighting do not provide trueparsing, when an unmatched end tag is encountered and the LOGIC option isenabled, subsequent end tags might be highlighted as unmatched, even if theyappear to be properly matched.
Recognized Special Symbols: Special characters can be highlighted for eachspecific language. The characters are only highlighted if they are not part ofanother class of constructs such as a comment, a string, or a compiler directive.The default set of characters for each language follows:Assembler −+*/=<>&¬|:,BookMaster &.,!?$C −+*/=<>&¬|:!;¦%?#[] \COBOL .DTL <>()=Panel &Skel &JCL (),|<>¬&=Pascal −+*/=<>&¬|:[]PL/I −+*/=<>&¬|:REXX −+*/=<>&¬|:%\Other −+*/=<>&¬|:
These character sets may be changed by each user using the HILITE dialog.
Assembler: Highlighting is performed only in columns 1 through 72.
Specific keywords are not highlighted. Any word where an opcode would beexpected is highlighted as a keyword.
BookMaster: Only BookMaster tags that begin with a colon (:) are highlighted. Alltags should be terminated by a period, because ISPF highlights up to the nextperiod. Dot control words (.xx) are never highlighted.
The keyword list supplied by the ISPF comprises the tags used to do logicmatching (:xxx/:exxx). Tags that have an optional end tag must have a matchingend tag in the edited data for logical highlighting to work. The LOGIC optionhighlights unmatched end tags (:exxx tags which do not have a corresponding :xxxtag) in reverse video pink.
BookMaster tags are not checked for validity. If you specify a colon (:) as a specialcharacter to highlight, the editor does not recognize BookMaster tags.
C: C++ comments (//) are recognized.
Logical highlighting highlights curly braces ({ and }).
Keywords are case-sensitive in C. Only the lower case versions of keywords arehighlighted.
Enhanced Edit Coloring
36 OS/390 V2R10.0 ISPF Edit and Edit Macros
COBOL: Highlighting is performed only in columns 7 through 72.
Both single quotes (’) and double quotes (″) are treated as unique open and closequote characters, although some COBOL languages only specifies double quotes asstring delimiters. Compiler directives (also called compiler-directing statements) aresupported for IBM SAA AD/Cycle COBOL/370 Version 1.1.
DTL: Only items in tags are highlighted. Any less than sign (<) is assumed tostart a tag. This may cause highlighting errors if the ’<’ symbol appears outside ofa DTL tag.
Panels and Skeletons:
Quoted strings are terminated at the end of a line. For the most part, the PDFcomponent does not parse panels or skeletons. Usually any data on a line thatstarts with a ’)’ in column 1 is highlighted as a keyword.
JCL: Because automatic language determination recognizes C++ comments (//),JCL is recognized only if any of the following conditions is met:v The last qualifier of the data set name is JCL, CNTL, or PROCLIB or ISPCTLx
(where x is any character)v The 2nd non-blank ’word’ of the 1st non-blank line is DD, JOB, EXEC, or PROCv The 2nd non-blank ’word’ of the 1st non-blank line starts with ’MSG’. This is for
JCL with no JOB card, but with MSGLEVEL or MSGCLASS.v The first three characters in the first non-blank line are //*.
Conditional JCL logic (IF/ELSE) is highlighted, but is not supported by the LOGICoption.
When the word DATA appears as the first word in a line or statement, HILITEassumes that this is a DD DATA statement and colors subsequent lines asin-stream data. To avoid this, insure that DATA is not the first word on a line byplacing other keywords before it. For example, instead of coding//DCOBA2 PROC PROG=,// OPTCOB='DYN',// DATA='DATA(24)',// OUT='*',// USER='D0000',
move the operand starting with ″DATA″ to the same line as the previous operand://DCOBA2 PROC PROG=,// OPTCOB='DYN', DATA='DATA(24)',// OUT='*',// USER='D0000',
PL/I: For fixed length record format data sets, column 1 is not scanned after thefirst non-blank line, except to search for *PROCESS statements.
REXX: Logic highlighting does not support a terminating semicolon in the IFexpression, or a semicolon before the THEN or ELSE instructions.
In addition, IF statements which have the THEN keyword on the following linebut do not have a continuation character at the end of the IF expression will causehighlighting errors.
For example, although the following statements are valid in REXX, the ELSEs willbe highlighted as a mismatched ELSEs.
Enhanced Edit Coloring
Chapter 2. Controlling the Edit Environment 37
||||
|||||
|
||||
|
IF a=b; THEN say 'ok'; ELSE; say 'Not OK';IF a=b
THEN say 'ok';ELSE say 'Not OK';
Other: When OTHER is in effect, ISPF tries to determine if the program is aCLIST by checking for a first word of PROC, CONTROL, ISPEXEC or ISREDIT. IfISPF determines that the data being edited is a CLIST, then CLIST commentclosure and continuation rules apply.
The HILITE Command/DialogPDF supports enhanced and language-sensitive coloring in edit through a new editprimary and macro command called HILITE. However, the basic functions ofHILITE cannot be accessed through a dialog that utilizes the GUI interface.
HILITE OperandsON Sets program coloring ON and turns LOGIC off.
OFF Sets coloring OFF, with the exception of cursor highlighting.
LOGICTurns on both IF and DO logic matching. When logic matching is active,only comments are specially colored. All other code, other than logickeywords, is shown in the default color.
IFLOGICTurns on IF/ELSE logic matching.
DOLOGICTurns on DO/END logic matching.
NOLOGICSame as ON.
AUTOAllows PDF to determine the language.
DEFAULTHighlights the data in a single color.
OTHERHighlight the data as a pseudo-PL/I language. Limited CLIST support isalso provided by OTHER.
ASM Highlights the data as Assembler.
BOOKHighlights the data as BookMaster.
C Highlights the data as C.
COBOLHighlights the data as COBOL
DTL Highlights the data as Dialog Tag Language.
JCL Highlights the data as MVS Job Control Language.
PANELHighlights the data as ISPF Panel Language.
PASCALHighlights the data as Pascal.
Enhanced Edit Coloring
38 OS/390 V2R10.0 ISPF Edit and Edit Macros

PLI Highlights the data as PL/I.
REXX Highlights the data as REXX.
SKEL Highlights the data as ISPF Skeleton Language.
RESETResets defaults (AUTO, ON, Find and Cursor on).
CURSORToggles highlighting of the phrase that contains the cursor.
FIND Toggles highlighting FIND strings.
PARENTurns on parenthesis matching. When parenthesis matching is active, onlycomments are specially colored. All other code is displayed in the defaultcolor. Note that extra parenthesis highlighting is always active whenhighlighting is active.
SEARCHFinds the first unmatched END, ELSE, or ). For C language programs thiscommand also finds the first unmatched }. The search for mismatches onlyoccurs for lines above the last displayed line, so you may need to scroll tothe bottom of the file before issuing the HI SEARCH command.
Note: The logic setting affects the search results. For example, if DOLOGICis on, only mismatched ENDs are found. If IFLOGIC is on, onlymismatched ELSEs are found.
DISABLEDTurns off all HILITE features and removes all action bars. This benefitsperformance at the expense of function. Since DISABLED status is notstored in the edit profile, you need to reenter this operand each time youenter the editor.
The HILITE DialogThe HILITE command with no operands displays a dialog that enables you to dothe following:v Specify a specific language to be used for coloring or enable automatic language
detection.v Assign colors for different language elements on a language-by-language basis
or for all languages at once.v Enable or disable logic or parenthesis matching.v Turn FIND coloring on or off and assign the color for FIND highlighting.v Turn cursor coloring on or off and assign the color for cursor phrase
highlighting.v Specify special symbols to be highlighted on a language-by-language basis.v View keyword lists for each language.
Note: Keyword lists and default highlighted symbols for each language aresupplied by IBM. A facility that involves assembly and link editing of aninstallation-modified keyword or symbol list does exist to add or removekeywords. However, IBM does not supply facilities for adding additionallanguages. The keyword and symbol lists, and directions for changingthem are in member ISRPXASM in the IBM-supplied ISPF sample library.
Enhanced Edit Coloring
Chapter 2. Controlling the Edit Environment 39
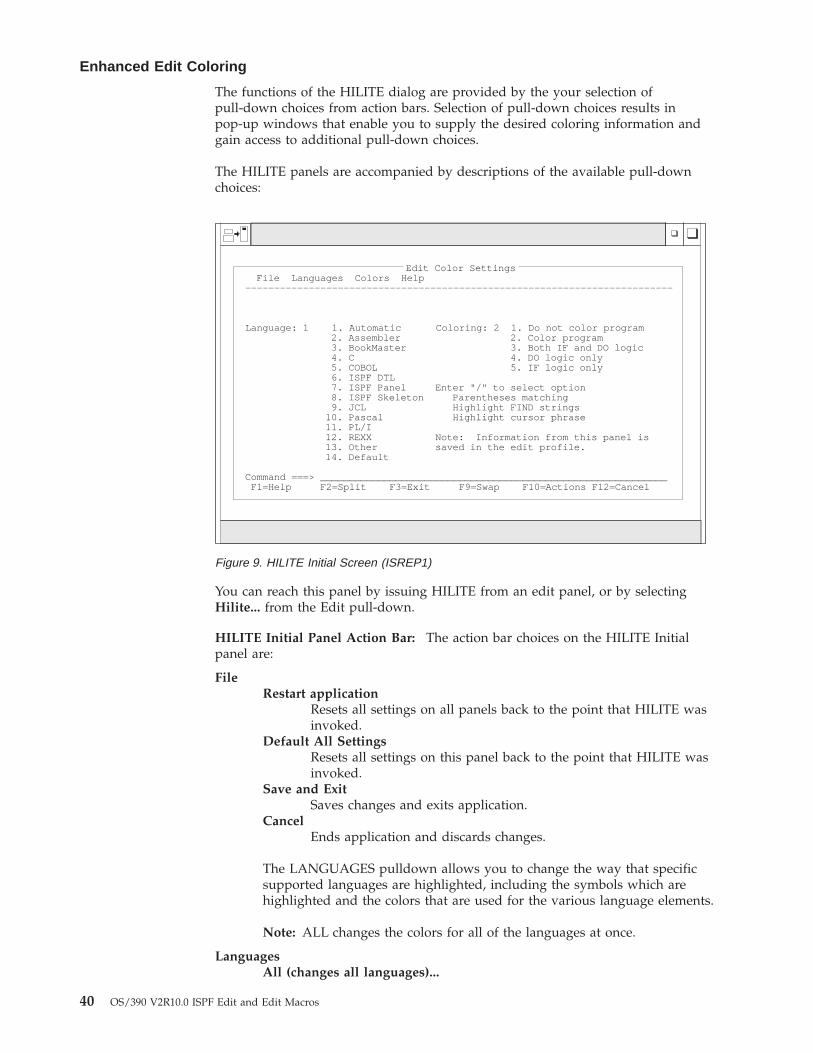
The functions of the HILITE dialog are provided by the your selection ofpull-down choices from action bars. Selection of pull-down choices results inpop-up windows that enable you to supply the desired coloring information andgain access to additional pull-down choices.
The HILITE panels are accompanied by descriptions of the available pull-downchoices:
You can reach this panel by issuing HILITE from an edit panel, or by selectingHilite... from the Edit pull-down.
HILITE Initial Panel Action Bar: The action bar choices on the HILITE Initialpanel are:
FileRestart application
Resets all settings on all panels back to the point that HILITE wasinvoked.
Default All SettingsResets all settings on this panel back to the point that HILITE wasinvoked.
Save and ExitSaves changes and exits application.
CancelEnds application and discards changes.
The LANGUAGES pulldown allows you to change the way that specificsupported languages are highlighted, including the symbols which arehighlighted and the colors that are used for the various language elements.
Note: ALL changes the colors for all of the languages at once.
LanguagesAll (changes all languages)...
Edit Color SettingsFile Languages Colors Help
--------------------------------------------------------------------------
Language: 1 1. Automatic Coloring: 2 1. Do not color program2. Assembler 2. Color program3. BookMaster 3. Both IF and DO logic4. C 4. DO logic only5. COBOL 5. IF logic only6. ISPF DTL7. ISPF Panel Enter "/" to select option8. ISPF Skeleton Parentheses matching9. JCL Highlight FIND strings
10. Pascal Highlight cursor phrase11. PL/I12. REXX Note: Information from this panel is13. Other saved in the edit profile.14. Default
Command ===> ____________________________________________________________F1=Help F2=Split F3=Exit F9=Swap F10=Actions F12=Cancel
Figure 9. HILITE Initial Screen (ISREP1)
Enhanced Edit Coloring
40 OS/390 V2R10.0 ISPF Edit and Edit Macros
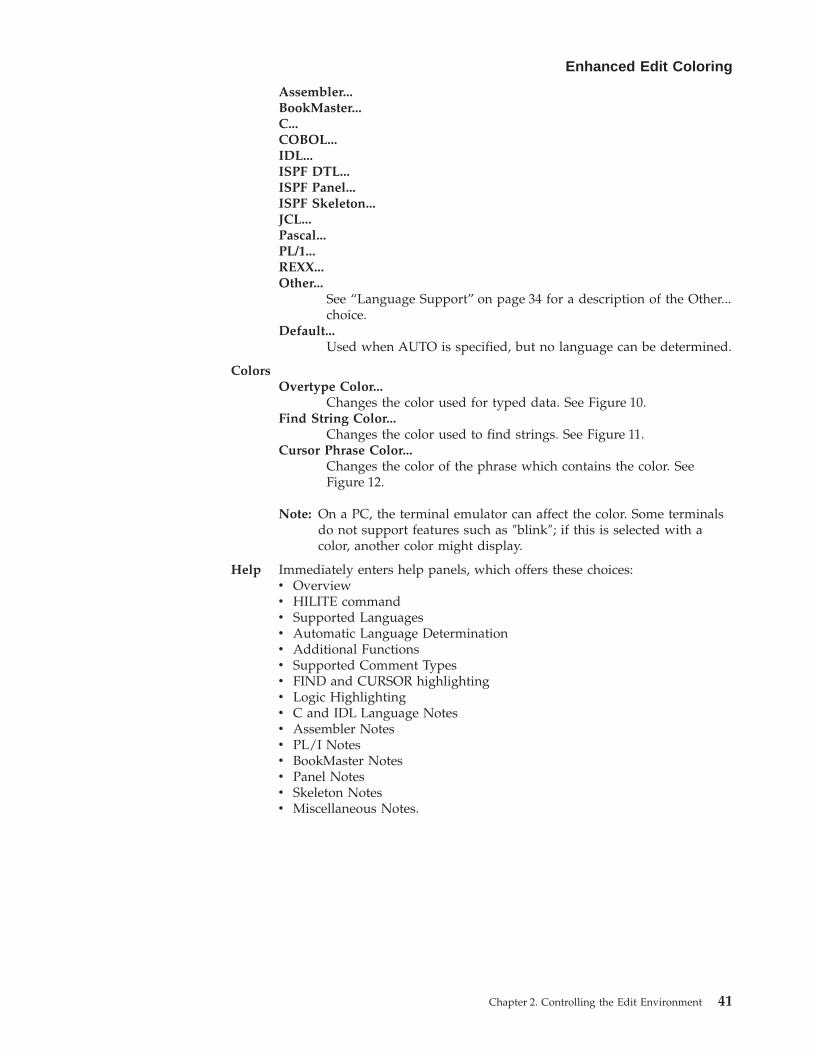
Assembler...BookMaster...C...COBOL...IDL...ISPF DTL...ISPF Panel...ISPF Skeleton...JCL...Pascal...PL/1...REXX...Other...
See “Language Support” on page 34 for a description of the Other...choice.
Default...Used when AUTO is specified, but no language can be determined.
ColorsOvertype Color...
Changes the color used for typed data. See Figure 10.Find String Color...
Changes the color used to find strings. See Figure 11.Cursor Phrase Color...
Changes the color of the phrase which contains the color. SeeFigure 12.
Note: On a PC, the terminal emulator can affect the color. Some terminalsdo not support features such as ″blink″; if this is selected with acolor, another color might display.
Help Immediately enters help panels, which offers these choices:v Overviewv HILITE commandv Supported Languagesv Automatic Language Determinationv Additional Functionsv Supported Comment Typesv FIND and CURSOR highlightingv Logic Highlightingv C and IDL Language Notesv Assembler Notesv PL/I Notesv BookMaster Notesv Panel Notesv Skeleton Notesv Miscellaneous Notes.
Enhanced Edit Coloring
Chapter 2. Controlling the Edit Environment 41
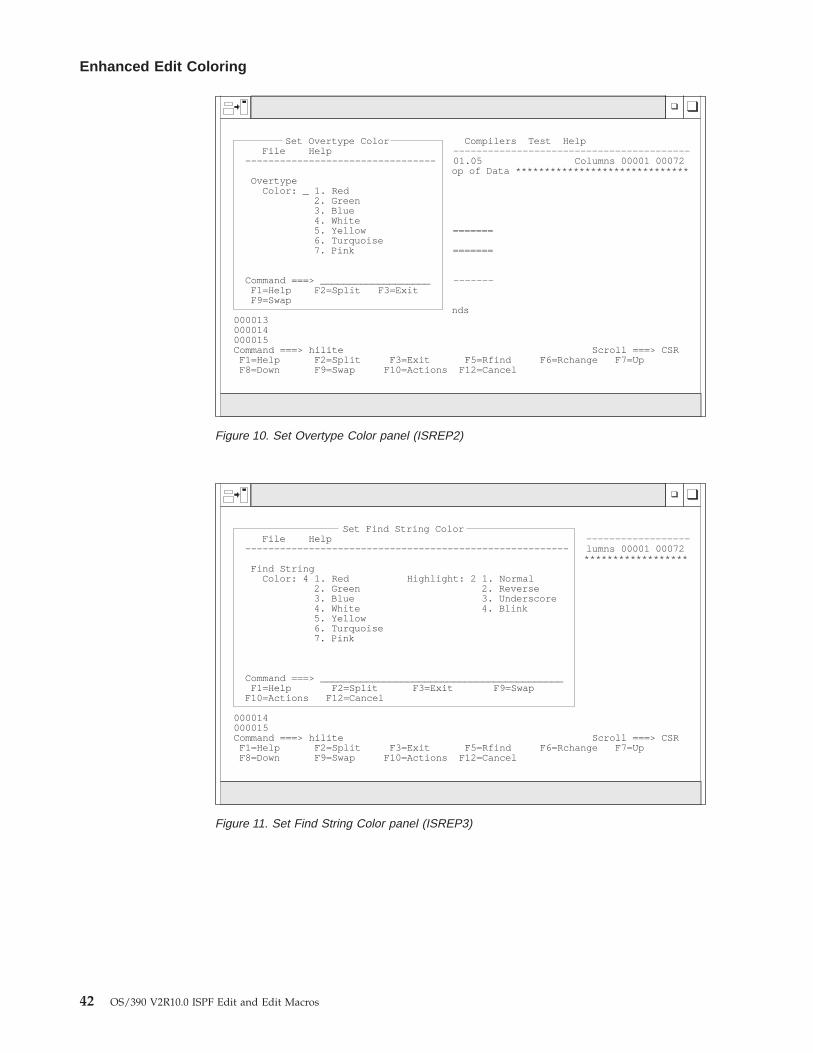
Set Overtype Color Compilers Test HelpFile Help -----------------------------------------
--------------------------------- 01.05 Columns 00001 00072op of Data ******************************
Overtype Color: _ 1. Red
2. Green3. Blue 4. White5. Yellow =======6. Turquoise7. Pink =======
Command ===> ___________________ -------F1=Help F2=Split F3=ExitF9=Swap
nds000013 000014000015 Command ===> hilite Scroll ===> CSR
F1=Help F2=Split F3=Exit F5=Rfind F6=Rchange F7=UpF8=Down F9=Swap F10=Actions F12=Cancel
Figure 10. Set Overtype Color panel (ISREP2)
Set Find String ColorFile Help ------------------
-------------------------------------------------------- lumns 00001 00072******************
Find String Color: 4 1. Red Highlight: 2 1. Normal
2. Green 2. Reverse3. Blue 3. Underscore4. White 4. Blink5. Yellow6. Turquoise7. Pink
Command ===> __________________________________________F1=Help F2=Split F3=Exit F9=Swap
F10=Actions F12=Cancel
000014 000015Command ===> hilite Scroll ===> CSR
F1=Help F2=Split F3=Exit F5=Rfind F6=Rchange F7=UpF8=Down F9=Swap F10=Actions F12=Cancel
Figure 11. Set Find String Color panel (ISREP3)
Enhanced Edit Coloring
42 OS/390 V2R10.0 ISPF Edit and Edit Macros
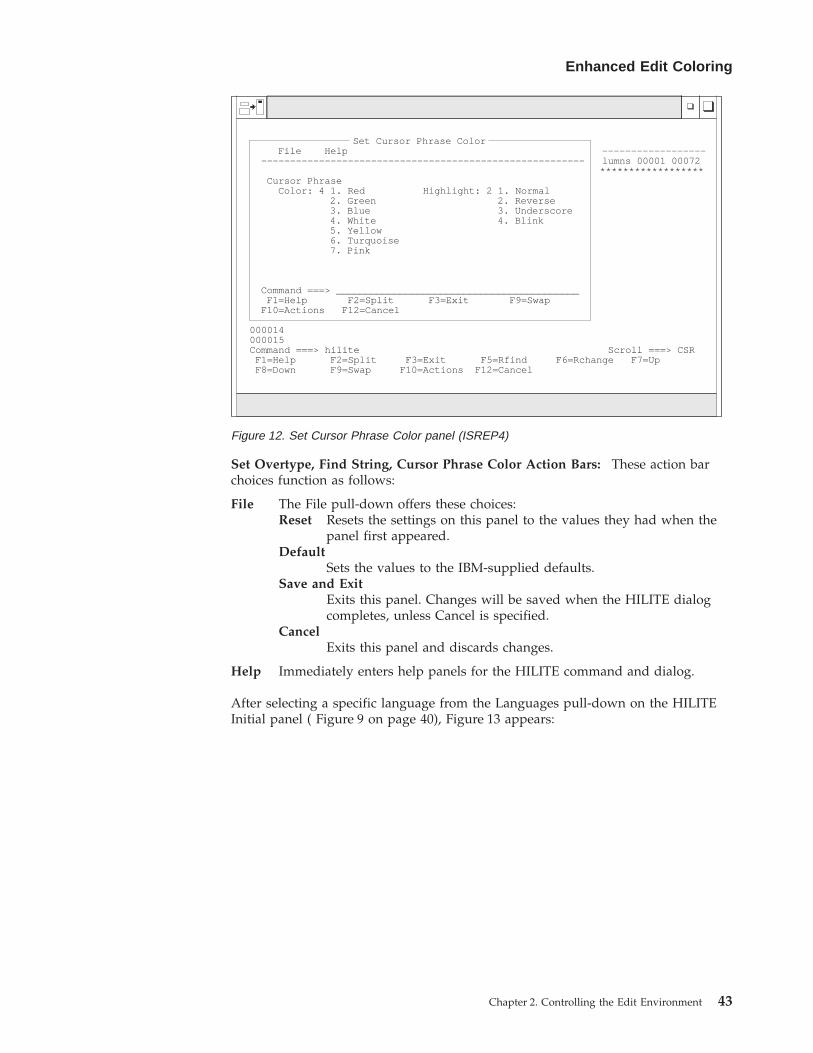
Set Overtype, Find String, Cursor Phrase Color Action Bars: These action barchoices function as follows:
File The File pull-down offers these choices:Reset Resets the settings on this panel to the values they had when the
panel first appeared.Default
Sets the values to the IBM-supplied defaults.Save and Exit
Exits this panel. Changes will be saved when the HILITE dialogcompletes, unless Cancel is specified.
CancelExits this panel and discards changes.
Help Immediately enters help panels for the HILITE command and dialog.
After selecting a specific language from the Languages pull-down on the HILITEInitial panel ( Figure 9 on page 40), Figure 13 appears:
Set Cursor Phrase ColorFile Help ------------------
-------------------------------------------------------- lumns 00001 00072******************
Cursor Phrase Color: 4 1. Red Highlight: 2 1. Normal
2. Green 2. Reverse3. Blue 3. Underscore4. White 4. Blink5. Yellow6. Turquoise7. Pink
Command ===> __________________________________________F1=Help F2=Split F3=Exit F9=Swap
F10=Actions F12=Cancel
000014 000015 Command ===> hilite Scroll ===> CSR
F1=Help F2=Split F3=Exit F5=Rfind F6=Rchange F7=UpF8=Down F9=Swap F10=Actions F12=Cancel
Figure 12. Set Cursor Phrase Color panel (ISREP4)
Enhanced Edit Coloring
Chapter 2. Controlling the Edit Environment 43
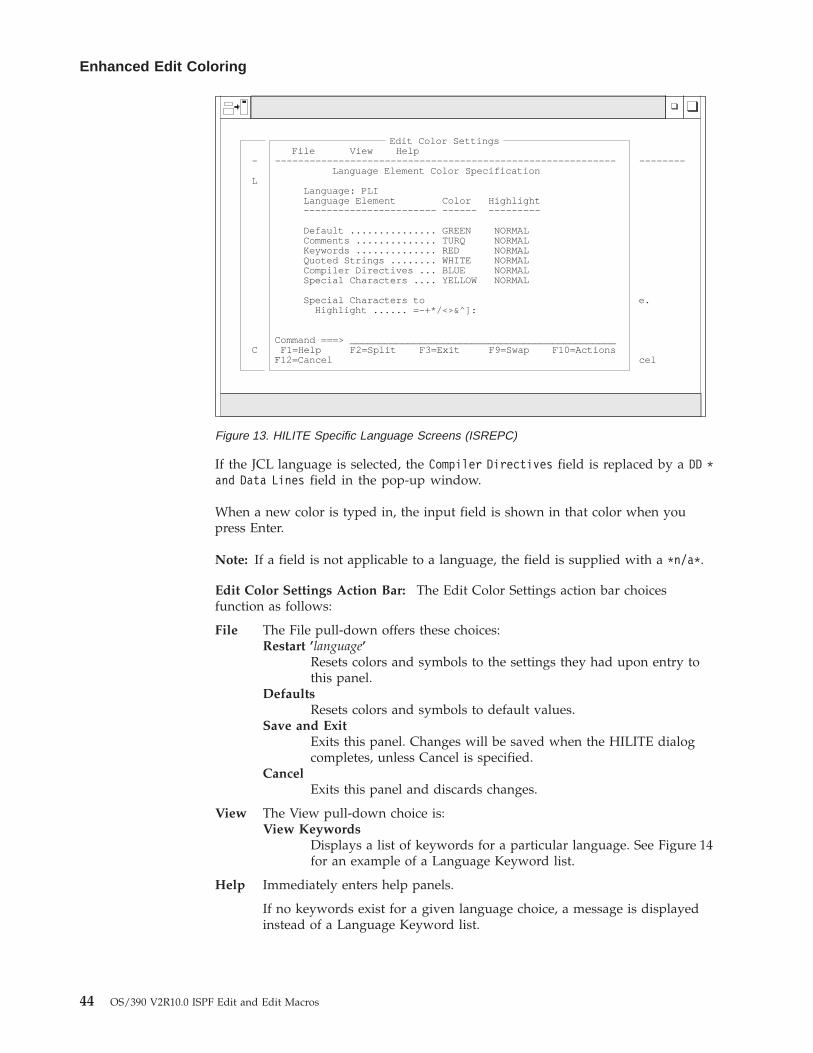
If the JCL language is selected, the Compiler Directives field is replaced by a DD *and Data Lines field in the pop-up window.
When a new color is typed in, the input field is shown in that color when youpress Enter.
Note: If a field is not applicable to a language, the field is supplied with a *n/a*.
Edit Color Settings Action Bar: The Edit Color Settings action bar choicesfunction as follows:
File The File pull-down offers these choices:Restart ’language’
Resets colors and symbols to the settings they had upon entry tothis panel.
DefaultsResets colors and symbols to default values.
Save and ExitExits this panel. Changes will be saved when the HILITE dialogcompletes, unless Cancel is specified.
CancelExits this panel and discards changes.
View The View pull-down choice is:View Keywords
Displays a list of keywords for a particular language. See Figure 14for an example of a Language Keyword list.
Help Immediately enters help panels.
If no keywords exist for a given language choice, a message is displayedinstead of a Language Keyword list.
Edit Color SettingsFile View Help
- ----------------------------------------------------------- --------Language Element Color Specification
LLanguage: PLILanguage Element Color Highlight----------------------- ------ ---------
Default ............... GREEN NORMALComments .............. TURQ NORMALKeywords .............. RED NORMALQuoted Strings ........ WHITE NORMALCompiler Directives ... BLUE NORMALSpecial Characters .... YELLOW NORMAL
Special Characters to e.Highlight ...... =-+*/<>&^]:
Command ===> ______________________________________________ C F1=Help F2=Split F3=Exit F9=Swap F10=Actions
F12=Cancel cel
Figure 13. HILITE Specific Language Screens (ISREPC)
Enhanced Edit Coloring
44 OS/390 V2R10.0 ISPF Edit and Edit Macros
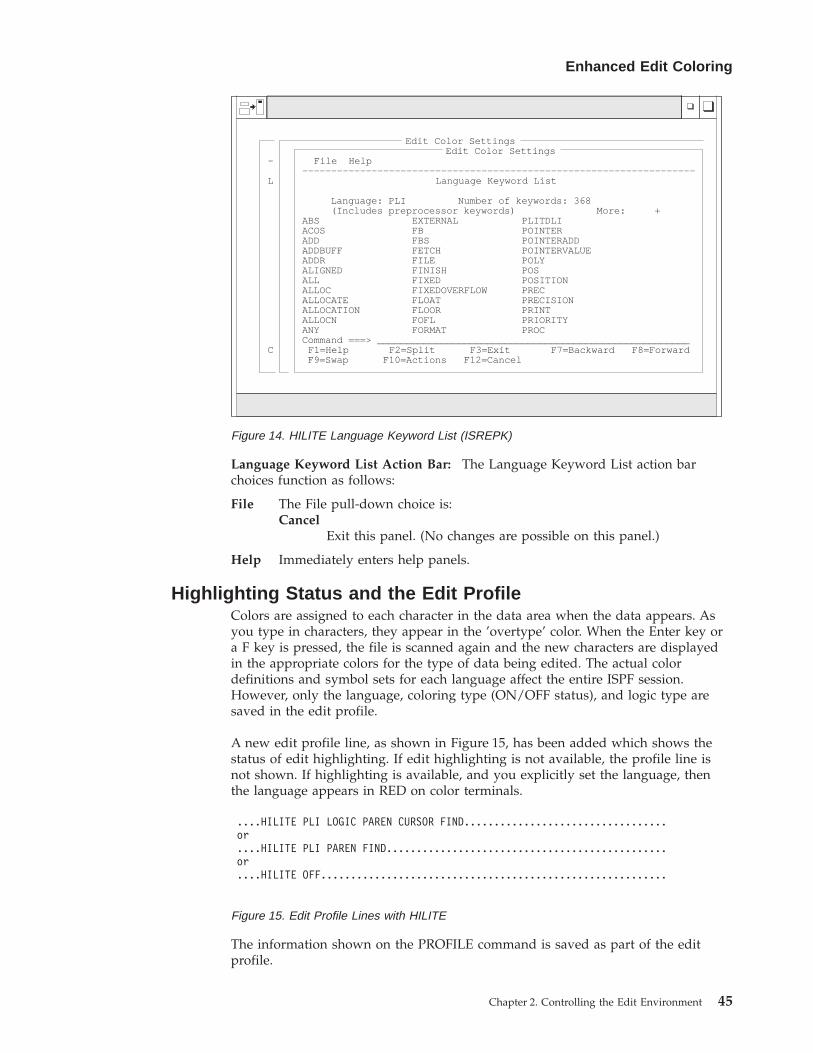
Language Keyword List Action Bar: The Language Keyword List action barchoices function as follows:
File The File pull-down choice is:Cancel
Exit this panel. (No changes are possible on this panel.)
Help Immediately enters help panels.
Highlighting Status and the Edit ProfileColors are assigned to each character in the data area when the data appears. Asyou type in characters, they appear in the ’overtype’ color. When the Enter key ora F key is pressed, the file is scanned again and the new characters are displayedin the appropriate colors for the type of data being edited. The actual colordefinitions and symbol sets for each language affect the entire ISPF session.However, only the language, coloring type (ON/OFF status), and logic type aresaved in the edit profile.
A new edit profile line, as shown in Figure 15, has been added which shows thestatus of edit highlighting. If edit highlighting is not available, the profile line isnot shown. If highlighting is available, and you explicitly set the language, thenthe language appears in RED on color terminals.
The information shown on the PROFILE command is saved as part of the editprofile.
Edit Color SettingsEdit Color Settings
- File Help--------------------------------------------------------------------
L Language Keyword List
Language: PLI Number of keywords: 368(Includes preprocessor keywords) More: +
ABS EXTERNAL PLITDLIACOS FB POINTERADD FBS POINTERADDADDBUFF FETCH POINTERVALUEADDR FILE POLYALIGNED FINISH POSALL FIXED POSITIONALLOC FIXEDOVERFLOW PRECALLOCATE FLOAT PRECISIONALLOCATION FLOOR PRINTALLOCN FOFL PRIORITYANY FORMAT PROCCommand ===> ______________________________________________________
C F1=Help F2=Split F3=Exit F7=Backward F8=ForwardF9=Swap F10=Actions F12=Cancel
Figure 14. HILITE Language Keyword List (ISREPK)
....HILITE PLI LOGIC PAREN CURSOR FIND..................................or....HILITE PLI PAREN FIND...............................................or....HILITE OFF..........................................................
Figure 15. Edit Profile Lines with HILITE
Enhanced Edit Coloring
Chapter 2. Controlling the Edit Environment 45
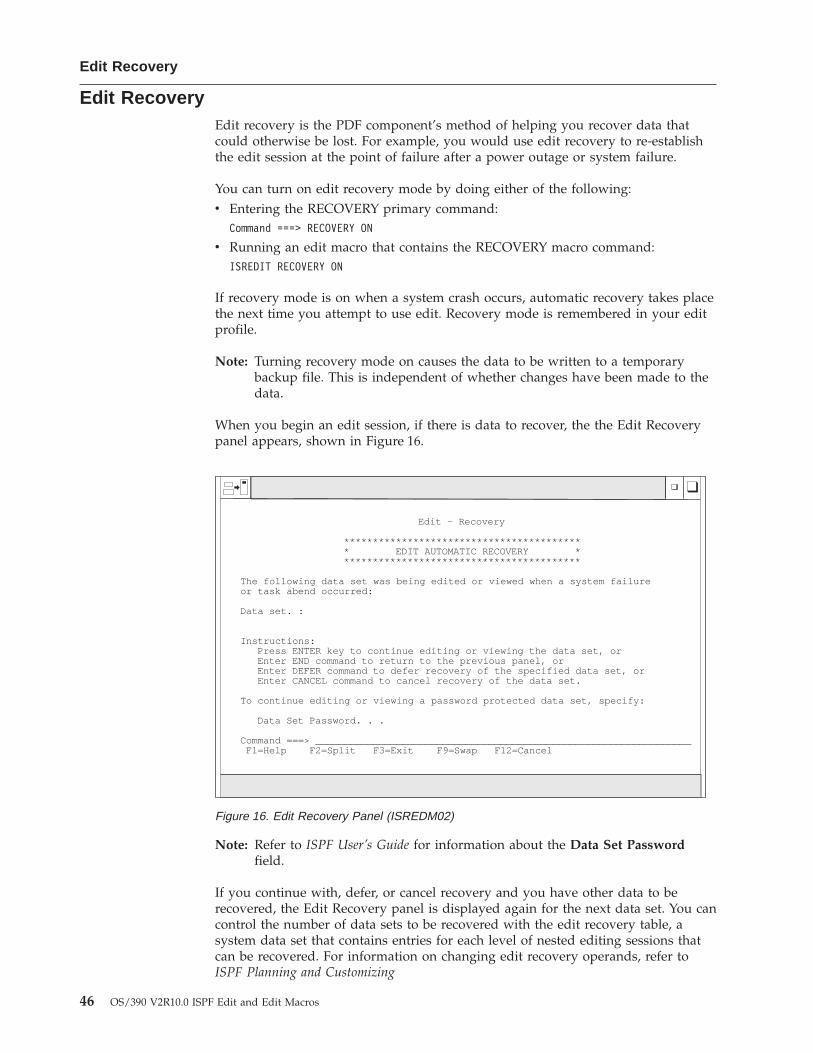
Edit RecoveryEdit recovery is the PDF component’s method of helping you recover data thatcould otherwise be lost. For example, you would use edit recovery to re-establishthe edit session at the point of failure after a power outage or system failure.
You can turn on edit recovery mode by doing either of the following:v Entering the RECOVERY primary command:
Command ===> RECOVERY ON
v Running an edit macro that contains the RECOVERY macro command:ISREDIT RECOVERY ON
If recovery mode is on when a system crash occurs, automatic recovery takes placethe next time you attempt to use edit. Recovery mode is remembered in your editprofile.
Note: Turning recovery mode on causes the data to be written to a temporarybackup file. This is independent of whether changes have been made to thedata.
When you begin an edit session, if there is data to recover, the the Edit Recoverypanel appears, shown in Figure 16.
Note: Refer to ISPF User’s Guide for information about the Data Set Passwordfield.
If you continue with, defer, or cancel recovery and you have other data to berecovered, the Edit Recovery panel is displayed again for the next data set. You cancontrol the number of data sets to be recovered with the edit recovery table, asystem data set that contains entries for each level of nested editing sessions thatcan be recovered. For information on changing edit recovery operands, refer toISPF Planning and Customizing
Edit - Recovery
****************************************** EDIT AUTOMATIC RECOVERY ******************************************
The following data set was being edited or viewed when a system failureor task abend occurred:
Data set. :
Instructions:Press ENTER key to continue editing or viewing the data set, orEnter END command to return to the previous panel, orEnter DEFER command to defer recovery of the specified data set, orEnter CANCEL command to cancel recovery of the data set.
To continue editing or viewing a password protected data set, specify:
Data Set Password. . .
Command ===> _________________________________________________________________F1=Help F2=Split F3=Exit F9=Swap F12=Cancel
Figure 16. Edit Recovery Panel (ISREDM02)
Edit Recovery
46 OS/390 V2R10.0 ISPF Edit and Edit Macros

Note: You cannot recursively edit data while you are in an edit session which isthe result of an edit recovery.
Attention:
If the data set to be recovered was edited by another user before you continuewith edit recovery, the changes made by the other user are lost if you save thedata.
If you press Enter to continue editing the data set, the editor runs a recoverymacro if you had previously specified one by using the RMACRO primary ormacro command. See “Recovery Macros” on page 117 and the descriptions of theRMACRO primary and macro commands for more information.
In spite of edit recovery’s benefit in recovering data, there are times when youmight not want to use it. You might want to turn edit recovery off in the followingsituations:v Operating with recovery mode off eliminates the I/O operations that maintain
the recovery data and can therefore result in improved response time.v Besides recording actual data changes, recovery mode records temporary
changes, such as excluding lines and defining labels. These temporary changesare recorded to allow UNDO to undo other edit interactions besides those thatchange data. Therefore, when edit recovery is on, the recording of both data andtemporary changes affects the amount of DASD space that is used.
You can turn off edit recovery mode by doing either of the following:v Entering the RECOVERY primary command:
Command ===> RECOVERY OFF
v Running an edit macro that contains the RECOVERY macro command:ISREDIT RECOVERY OFF
See Chapter 10. Edit Primary Commands for details on using RECOVERY.
Edit Recovery
Chapter 2. Controlling the Edit Environment 47

Edit Recovery
48 OS/390 V2R10.0 ISPF Edit and Edit Macros

Chapter 3. Managing Data
This chapter gets you started using some of the basic line and primary commandsto manipulate data.
The basic functions of the ISPF editor are similar to those of a word processor. Youcan create, copy, move, search, and replace data, as well as perform several otherword processing functions by using the line and primary commands described inthis chapter.
Creating and Replacing DataUse the CREATE and REPLACE primary commands to specify a member to bewritten from the data being edited. CREATE adds a new member to a partitioneddata set or a new sequential data set. REPLACE rewrites a member or sequentialdata set. The process of creating and replacing data is very similar. However,remember that when you replace data, the original data is deleted and replacedwith the new data.
There are two ways you can use CREATE or REPLACE:1. You can type either CREATE or REPLACE on the Command line, followed by the
name of a member or the name of a data set and member, to be created orreplaced. You can add line labels that show the lines to be copied. If you omitthe labels, you can use the C (copy) or M (move) line commands to specifywhich lines are to be copied or moved. Then press Enter. See “CREATE—CreateData” on page 229 and “REPLACE—Replace Data” on page 278 for thecomplete syntax of the commands.
2. If you omit the member name or data set name and member, and just typeCREATE or REPLACE and specify the lines to be used to create or replace themember, the editor displays a panel requesting the name of the member or dataset you want created or replaced.
If you try to create or replace data that has inconsistent attributes, the Edit -Confirm Create Edit - Confirm Replace panel that warns you of the inconsistencyand gives you an opportunity to cancel the create and replace commands.Figure 17 shows an Edit - Confirm Replace panel that was displayed for a userwho tried to replace a sequential data set with a member of a partitioned data set.
© Copyright IBM Corp. 1984, 2000 49

Copying and Moving DataWhile you are editing, you can copy or move another data set or member into thecurrent data by using the COPY or MOVE primary commands. The process ofmoving and copying data is very similar. However, remember that when youmove data, the original information no longer exists in the member or data set thatit is being moved from.
When moving or copying large data sets, you can reduce the processing timesignificantly by specifying NUMBER OFF before the operation and NUMBER ONafterwards.
This topic explains how to use the COPY and MOVE primary commands. See“C—Copy Lines” on page 170 and “M—Move Lines” on page 181 for informationabout the line commands.
The two ways to perform a move or copy operation are:v You can type either COPY or MOVE, followed by name and either AFTER label or
BEFORE label, where name is the name of the member or data set to be copied ormoved and label is a label that is defined in the line command area. The labelcan be defined by PDF, such as .ZFIRST for the first line of data, or it can be onethat you have defined. If you omit the label, you can use the A (after) or B(before) line command to specify where the information is to go. When youpress Enter, the member is copied or moved. See “COPY—Copy Data” onpage 225 and “MOVE—Move Data” on page 262 for the complete syntax of thecommands.
v If you omit the member name or data set name, and just type the command andthe destination of the operation (using either the AFTER label or BEFORE labeloperand or the A or B line command), the editor displays a panel on which youcan specify the name of the member to be copied or moved. The only differencebetween the Edit Move and Edit Copy panels is that with Copy, you can specifythe number of lines you want copied.
EDIT - Confirm Replace
Data set attributes are inconsistent. Truncation may result inthe right-most portions of some records if replace is performed.
"Target" data set attributes:Data set name. : USERID.PRIVATE.STUFFRecord format. : VARIABLERecord length. : 133
"Current" data set attributes:Data set name. : USERID.PRIVATE.EXEC(PGM1)Record format. : VARIABLERecord length. : 251
Press ENTER key to allow replace with truncation.Enter END command to cancel replace.
Command ===> ___________________________________________________________F1=Help F2=Split F3=Exit F9=Swap F12=Cancel
Figure 17. Confirm Replace Panel (ISRERPL2)
Copying and Moving Data
50 OS/390 V2R10.0 ISPF Edit and Edit Macros
Shifting DataWhen you edit data, the editor automatically shifts characters on a line to the leftor right to accommodate insertions or deletions. This shifting can be either implicitor explicit. Implicit shifts occur when the CHANGE command string-2 length isdifferent from the string-1 length. Explicit shifts occur when you use the followingcommands:v Line commands
( Column Shift Left) Column Shift Right< Data Shift Left> Data Shift Right
v Macro commandsShift ( Column Shift LeftShift ) Column Shift RightShift < Data Shift LeftShift > Data Shift Right
See the descriptions of these commands for the syntax and examples of usage.
Two columns is the default for shift operations. When shifting a block of linesmore or less than the default, enter the amount on the first or last line of the block.If you enter it in both places, the line shifts only if:v Both amounts are the same, orv The amounts differ, but one is the default (2). Here, the lines shift according to
the non-default amount.
If the shift amounts are different and neither amount is the default, an errormessage appears and the shift is not performed.
Shifting occurs within column boundaries. The default boundaries are typically thefirst and last columns in which you can type source code for the particularprogramming language. See “Edit Boundaries” on page 28 for a discussion ofdefault boundaries and the procedures for changing them.
Column ShiftThe simplest kind of shift is a column shift. Column shifting moves all characterswithin the bounds without altering their relative spacing. Characters shifted pastthe bounds are deleted. That is, blanks are inserted at the bound from which thecharacters are being shifted, and the characters are deleted at the opposite bound.So, this shift is called a destructive shift because information shifts within columnboundaries without regard to its contents, and can result in the loss of data withno error being noted.
If the UNDO mode was on before you entered the shift command, you can recoverby using the UNDO command. Otherwise, you can use CANCEL.
Column Shifting in Lines that Contain DBCS StringsThe following rules apply:v If half of a DBCS character is in the shift, it is excluded from the operation; the
shift count is changed automatically.v If a column shift causes a DBCS string and an EBCDIC string to be connected, a
shift-out or shift-in character, as appropriate, is inserted between the strings. Theshift count is changed automatically.
Shifting Data
Chapter 3. Managing Data 51
v If left, right, or both boundaries are set, a DBCS character can cross theboundary. The DBCS character that crosses the boundary is excluded from theoperation, and the shift count is changed automatically.
v If a request to shift an odd number of columns causes an odd-length DBCSstring, the requested shift number is discarded. The shift is processed up to thenext field boundary within the boundary, if any. If no field boundary is found,the line number is replaced with the following intensified warning message:==ERR>. Also, the short message for an incomplete data shifting error isdisplayed.
If you are using the column shifting or data shifting line command while editing aformatted data set, you should note the following points:v The current boundaries are automatically changed during command processing,
and are reset to the original values after processing is complete. Changes are asfollows:– If the left boundary falls on the second byte of a DBCS character in a DBCS
field, the boundary is shifted to the left by 1 byte.– If the right boundary does not fall on the same field as the left boundary, it is
set to point to the last byte of the field that contains the left boundary. If itfalls on the same DBCS field as the left boundary, and it also falls on the firstbyte of a DBCS character, the right boundary is shifted to the right by 1 byte.
v If you use the data shift or column shift line command to shift a DBCS field andyou specify an odd-length shift amount, the shift amount is decreased by one topreserve DBCS data integrity.
v If a shift cannot be completed, it is partially done and the line number isreplaced by the following intensified warning message: ==ERR>. Remove themessage by issuing the RESET primary command, or type over the message ordata on that line.
v If a request to shift an odd number of bytes causes an odd-length DBCS string,the shift volume is decreased by one and the operation is performed. The linenumber is replaced with the following intensified warning message: ==ERR>.
Data ShiftData shifting attempts to shift the body of a program statement without shiftingthe label or comments, and prevents loss of data. This shift is non-destructivebecause it stops before it shifts a non-blank character past the bound. This shift isexplicitly done with the < and > line commands, and the SHIFT < and SHIFT >macro commands. The CHANGE command can cause an implicit shift of the samenature.
For data shift left attempts that exceed the current BOUNDS setting, text stops atthe left bound and PDF marks the shifted lines with ==ERR> flags. If an error occursin an excluded line, you can find the error with LOCATE, and remove the errorflag by using RESET.
Data shifts are designed to work with typical program sources. In doing so, itmakes certain general assumptions about the format of the source code. Forinstance, the editor assumes:v Anything beginning at the left bound is a label and should not be shifted.v If there are two or more consecutive blanks, one can be added or deleted.v Blanks within quotes (' or ") are to be treated as non-blanks.v Source statements appear on the left followed by comments on the right.
Shifting Data
52 OS/390 V2R10.0 ISPF Edit and Edit Macros
v Single blanks are used between source code and comment words. Therefore, theonly strings of multiple blanks appear between the source code and thecomment, and between the comment and its ending delimiter (if there is one). Inthe following example, LABEL and */ are at the left and right bounds,respectively:LABEL: DO I=1 TO 5; /* The comment... */
A=A+B(I); /* The comment... */END;
Keeping the previous assumptions in mind, the editor attempts to move only thesource code statement when shifting data. The label and comments are leftunchanged. However, if necessary, it shifts the comment also.
Although the editor always uses these assumptions, data shifting is notlanguage-sensitive. It only makes generalities about syntax and individual codeentry style.
Finding, Seeking, Changing, and Excluding DataFIND, SEEK, CHANGE, and EXCLUDE allow you to find a specified search string,change one search string to another, or exclude a line containing a specified searchstring. These commands provide powerful editing functions because they operateon a complete data set rather than on a single line.
The characteristics of each command follow:
FIND Causes all lines that it finds to be displayed, and moves the cursor(scrolling if necessary) to the first occurrence of the search string.
SEEK A special form of FIND that can only be used in an edit macro. It isdifferent from FIND in that it does not change the exclude status of thelines found.
CHANGECauses the same effect as FIND, but it also has a second string operand(string-2). During a search, whenever string-1 is found, the editor replacesthat string with string-2. Data to the right is shifted, if necessary.
EXCLUDECauses lines that match the search not to be displayed. These lines remainin the data, however. Unlike FIND and CHANGE, it does not require asearch string if you use the ALL operand. EXCLUDE ALL is often usedwith FIND and CHANGE because they cause excluded lines to beredisplayed. Use RESET to cause all lines to be redisplayed.
The scrolling and positioning of the string can be controlled using the Edit_Settingsaction bar choice or the EDITSET primary command when editing the data. See“EDITSET—Display the Editor Settings Dialog” on page 239 for more information.
The syntax of each command is a variation of that listed below. See the commanddescriptions in Chapter 10. Edit Primary Commands and Chapter 11. Edit MacroCommands and Assignment Statements for the exact syntax.string [range] [NEXT ] [CHARS ] [X ] [col-1] [col-2]]
[ALL ] [PREFIX] [NX][FIRST] [SUFFIX][LAST ] [WORD ][PREV ]
Shifting Data
Chapter 3. Managing Data 53
|||
Specifying the Search StringThe primary control for any search is the search string because it represents thevalue for which you are looking. Two operands, string-1 and string-2, are requiredfor the CHANGE command to specify the new value of the string once it is found.The rules for specifying string-1 and string-2 are the same, except that if you type asingle asterisk for string-2, the previous value is used again.
You can define string-1 and string-2 to be EBCDIC, DBCS, and mixed strings in anycombination. If you delimit a DBCS search string (string-1) with SO and SIcharacters, the SO and SI characters are not used as part of the string. If youspecify a mixed string that contains no EBCDIC characters, the string is treated asa DBCS string; that is, the SO and SI characters are not used as part of the string.
The editor allows you to specify the following kinds of strings:
Simple stringAny series of characters not starting or ending with a quote (' or ") andnot containing any embedded blanks, commas, or asterisks.
Delimited stringAny string enclosed (delimited) by either single quotes ( ’ ) or doublequotes ( ″ ). The beginning and ending delimiters must be the samecharacter.
Hexadecimal stringAny delimited string of valid hexadecimal characters, preceded or followedby the character X, such as X'C27B'.
Character stringAny delimited string of characters, preceded or followed by the characterC, such as C'conditions for'. See “Character Strings” on page 55 for moreinformation.
Picture stringAny delimited string of picture characters, preceded or followed by thecharacter P, such as P'.'. See “Picture Strings (String-1)” on page 55 and“Picture Strings (String-2)” on page 56 for more information.
Note: The Edit FIND, CHANGE, and EXCLUDE commands do not work with asearch argument that contains the command delimiter, even if stringdelimiters are used. You can specify a hexadecimal search string or use ISPFOption 0.1 to change the command delimiter to a different character.
Simple and Delimited StringsIf the string is a simple or delimited string, the characters are treated as being bothupper and lowercase even if caps mode is off. For example, this command:find ALL 'CONDITION NO. 1'
successfully finds the following:CONDITION NO. 1Condition No. 1condition no. 1coNDitION nO. 1
Also, all of the following commands have the same effect:FIND 'Edit Commands'FIND 'EDIT COMMANDS'FIND 'edit commands'
Finding, Seeking, Changing, and Excluding Data
54 OS/390 V2R10.0 ISPF Edit and Edit Macros
You must use delimiters if a string contains imbedded blanks or commas, or if astring is the same as a command or keyword. You delimit strings with quotes,either ' or ". For example, to change the next occurrence of every one to all, type:Command ===> CHANGE 'every one' 'all'
Note: When using a DBCS terminal, if you specify a text string that contains anySO and SI characters, the string is considered a character string.
Character StringsUse a character string in a FIND, CHANGE, or EXCLUDE command if you wantthe search to be satisfied by an exact character-by-character match. Lowercasealphabetic characters match only with lowercase alphabetic characters, anduppercase alphabetic characters match only with uppercase.
For example, FIND C'XYZ' finds the characters XYZ only, not xyz.
Picture Strings (String-1)A picture string in a FIND, CHANGE, or EXCLUDE command allows you tosearch for a particular kind of character without regard for the specific characterinvolved. You can use special characters within the picture string to represent thekind of character to be found, as follows:
String MeaningP'=' Any characterP'¬' Any character that is not a blankP'.' Any character that cannot be displayedP'#' Any numeric character, 0-9P'-' Any non-numeric characterP'@' Any alphabetic character, uppercase or lowercaseP'<' Any lowercase alphabetic characterP'>' Any uppercase alphabetic characterP'$' Any special character, neither alphabetic nor numeric.
If you are using an APL or TEXT keyboard, you can use the following additionalcharacters in a picture string:
P’
’ Any APL-specific or TEXT-specific characterP'_' Any underscored non-blank character.
A picture string can include alphanumeric characters, which represent themselves,mixed with other characters. If the character does not have a special meaning (suchas @ standing for any alphabetic), the character is treated as itself.
When using a DBCS terminal, you cannot specify a DBCS field as the subject of apicture string for the FIND operation.
Picture String Examples:
v To find a string of 3 numeric characters:
FIND P'###'
v To find any 2 characters that are not blanks but are separated by a blank:FIND P'¬ ¬'
Finding, Seeking, Changing, and Excluding Data
Chapter 3. Managing Data 55
v To find any character that cannot be displayed:FIND P'.'
v To find a blank followed by a numeric character:FIND P' #'
v To find a numeric character followed by AB:FIND P'#AB'
v To find the next character in column 72 that is not a blank:FIND P'¬' 72
v To change any characters in columns 73 through 80 to blanks:CHANGE ALL P'=' ' ' 73 80
v To find the next line with a blank in column 1 and a character in column 2 thatis not a blank:FIND P' ¬' 1
When you use the special characters = or . and a character that cannot bedisplayed is found, that character’s hexadecimal representation is used in theconfirmation message that appears in the upper-right corner of the panel. Forexample:FIND P'..'
could result in the message CHARS X'0275' FOUND.
Picture Strings (String-2)In a CHANGE command, string-2 can be a picture string with the following rulesand restrictions:v The length of string-2 must be the same as the length of string-1.v The only valid special characters are =, >, and <.
String MeaningP'=' Equal to the corresponding character in string-1P'>' Converts the corresponding character in string-1 to uppercaseP'<' Converts the corresponding character in string-1 to lowercase.
Picture String Examples:
v To change an alphabetic, alphabetic, numeric, numeric string so that thealphabetic characters become uppercase characters and the numeric charactersare unchanged:CHG P'@@##' P'>>=='
v To change all characters to uppercase:CHG ALL P'<' P'>'
Effect of CHANGE Command on Column-Dependent DataColumn-dependent data is groups of non-blank source data separated by two ormore blanks, such as a table. When you use CHANGE to changecolumn-dependent data, ISPF attempts to maintain positional relationships. Forinstance, if you change a long word to a short word, the editor pads the shortword with blanks. This padding maintains the column position of any data to theright of the change by preventing it from shifting left.
When only one blank separates words, as in most text data, padding does notoccur. Changing a long word to a short word causes data to the right of the changeto shift left.
Finding, Seeking, Changing, and Excluding Data
56 OS/390 V2R10.0 ISPF Edit and Edit Macros

Using the CHANGE Command With EBCDIC and DBCS DataIf you are editing a data set that contains both EBCDIC and DBCS data, youshould note the following rules about CHANGE strings:v The SO and SI characters that delimit the CHANGE string are used as part of
the string only if necessary. If you specify replacement of an EBCDIC string witha DBCS string, they are used. If you specify replacement of a DBCS string withanother DBCS string, they are not used.
v If you specify in a CHANGE string that an SO or SI character be changed toanother character, the result is unpredictable.
v If you specify a CHANGE string that causes a field length of zero and theboundary falls between the SO and SI characters, the SO/SI or SI/SO characterstrings that are next to each other are replaced with a DBCS blank. If theboundary does not fall between the SO and SI characters, the SO/SI or SI/SOcharacters that are next to each other are removed.
v If the lengths of the two strings specified in CHANGE are different, thefollowing occurs:– If string-1 is shorter than string-2, the data to the right of string-1 is shifted to
the left up to some breakpoint. Breakpoints include the border between anEBCDIC field and a DBCS field, a double or single blank, or the rightboundary set by a BOUNDS command.
– If string-1 is longer than string-2, blanks in the record to the right of string-1are used to make room. When blanks in a DBCS field are used, they are usedin units of 2 bytes.
v If a DBCS field crosses the right boundary, CHANGE can cause an odd-lengthDBCS field. If this happens, the right boundary is ignored and the operationtakes place.
Controlling the SearchAfter you specify the search string, you can then specify how much of the datayou want to search, as well as the starting point and direction of the operation.
Extent of the SearchYou can limit the lines to be searched by first assigning a label to the first and lastlines to be searched, and then specifying the labels on the command (rangeoperand).
If you want to limit the search to a single line, assign a label to it, and then specifythe label twice to show the first and last line of the range. For more informationabout labels, see “Labels and Line Ranges” on page 65.
Starting Point and Direction of the SearchTo control the starting point and direction of the search, use one of the followingoperands:
NEXT Starts at the first position after the current cursor location and searchesahead to find the next occurrence of string-1. NEXT is the default.
ALL Starts at the top of the data and searches ahead to find all occurrences ofstring-1. The long verification message, which PDF displays when youenter the HELP command in response to the short verification message,shows the number of occurrences found. If you use this operand withCHANGE, the lines changed are marked with ==CHG> flags, and lines thatcannot be changed are marked with ==ERR> flags. The status of these linescan be used by LOCATE and changed by RESET.
Finding, Seeking, Changing, and Excluding Data
Chapter 3. Managing Data 57
FIRST Starts at the top of the data and searches ahead to find the first occurrenceof string-1.
LAST Starts at the bottom of the data and searches backward to find the lastoccurrence of string-1.
PREV Starts at the current cursor location and searches backward to find theprevious occurrence of string-1.
If you specify NEXT, ALL, or FIRST, the direction of the search is forward. Whenyou press the assigned function keys, the RFIND or RCHANGE commands find orchange the next occurrence of the designated string. If you specify LAST or PREV,the direction of the search is backward. When you specify those operands, theeditor finds or changes the previous occurrence of the string.
The search proceeds until the editor finds one or all occurrences of string-1, or theend of data.
If you omit the ALL operand on the CHANGE command, the editor searches onlyfor the first occurrence of string-1 after the current cursor location. If the cursor isnot in the data area of the panel, the search starts at the beginning of the first linecurrently displayed. Scrolling is performed, if necessary, to bring the string intoview.
After you make the change, the cursor is positioned at the end of the changedstring; a verification message is displayed in the upper right-hand corner of thepanel.
Depending on the direction of the search, if the string is not found between thecurrent cursor location and the end or beginning of data, a message is displayedand an audible alarm, if installed, is sounded.
If string-1 is not found, one of the following actions takes place:v A NO string-1 FOUND message is displayed in the upper right-hand corner of the
panel.v If CHANGE or EXCLUDE was repeated using RFIND or RCHANGE, either a
BOTTOM OF DATA REACHED or a TOP OF DATA REACHED message appears, dependingon the direction of the search. When these messages appear, you can enterRFIND or RCHANGE again to continue the search by wrapping to the top orbottom of the data. If string-1 is still not found, a NO string-1 FOUND message isdisplayed.
Qualifying the Search StringYou can specify additional characteristics of string-1 by using the operands PREFIX,SUFFIX, CHARS, and WORD. You can abbreviate PREFIX, SUFFIX, and CHARS toPRE, SUF, and CHAR, respectively.
CHARSLocates string-1 anywhere the characters match. This is the default.
PREFIXLocates string-1 at the beginning of a word.
SUFFIXLocates string-1 at the end of a word.
Finding, Seeking, Changing, and Excluding Data
58 OS/390 V2R10.0 ISPF Edit and Edit Macros
WORDString-1 is delimited on both sides by blanks or other non-alphanumericcharacters.
In the following example, the editor would find the highlighted strings only:CHARS 'DO' - DO DONT ADO ADOPT 'DO' (DONT)
PREFIX 'DO' - DO DONT ADO ADOPT 'DO' (DONT)
SUFFIX 'DO' - DO DONT ADO ADOPT 'DO' (DONT)
WORD 'DO' - DO DONT ADO ADOPT 'DO' (DONT)
If you do not specify an operand, the default is CHARS.
Column LimitationsThe col-1 and col-2 operands allow you to search only a portion of each line, ratherthan the entire line. These operands, which are numbers separated by a comma orby at least one blank, show the starting and ending columns for the search. Thefollowing rules apply:v If you specify neither col-1 nor col-2, the search continues across all columns
within the current boundary columns.v If you specify col-1, the editor finds the string only if the string starts in the
specified column.v If you specify both col-1 and col-2, the editor finds the string only if it is entirely
within the specified columns.
Split Screen LimitationsWhen string-1 is not found within the data that is displayed on the screen, thesearch operation scrolls the data so that string-1 appears on the second displayedline of the data area. If only one line of data is showing in split screen mode, thedata on the second line (thus, string-1) cannot be seen and the cursor is placed onthe command line.
Excluded Line LimitationsYou can limit the lines to be searched by first using the X or NX operands:X Scan only lines that are excluded from the display.NX Scan only lines that are not excluded from the display.
If you omit these operands, both excluded and nonexcluded lines are searched.When you issue a FIND or CHANGE command that includes searching excludedlines, all lines found are displayed. EXCLUDE can also find labels assigned toexcluded lines.
Using the X (Exclude) Line Command with FIND and CHANGEYou can use the X (exclude) line command with FIND and CHANGE to displayonly those lines containing the search string or those lines that have been changed.For example, if your data set contains 99,999 lines or less, type X99999 in the linecommand area of the first line to exclude all of the lines from the display. Thenenter a CHANGE command, such as:COMMAND ===> CHANGE ALL XYZ ABC
All lines containing search string XYZ are redisplayed with XYZ changed to ABC andwith the cursor at the end of the first string changed.
Finding, Seeking, Changing, and Excluding Data
Chapter 3. Managing Data 59

Similarly, you can enter a FIND command:Command ===> FIND ALL XYZ
Here, all lines containing the search string XYZ are redisplayed with the cursor atthe beginning of the first string found.
Repeating the FIND, CHANGE, and EXCLUDE CommandsThe easiest way to repeat FIND, CHANGE, and EXCLUDE without retyping themis to assign those commands to function keys. The defaults are:F5/17 RFINDF6/18 RCHANGE
The search begins at the cursor. If the cursor has not moved since the last FIND,CHANGE, or EXCLUDE command, the search continues from the string that wasjust found. Instead of retyping string-1, you can type an asterisk to specify that youwant to use the last search string. If you decide to type RCHANGE or RFIND on theCommand line instead of using a function key, position the cursor at the desiredstarting location before pressing Enter.
All three commands share the same string-1. Therefore:Command ===> FIND ABC
followed by:Command ===> CHANGE * XYZ
first shows you where ABC is, and then replaces it with XYZ. However, you cando this more easily by typing:Command ===> CHANGE ABC XYZ
Then press F5/17 to repeat FIND. The editor finds the next occurrence of ABC.You can either press F5/17 to find the next ABC, or F6/18 to change it. Continueto press F5/17 to find remaining occurrences of the string.
The previous value of a search string, specified by an asterisk or by use of RFINDor RCHANGE, is retained until you end your editing session.
Examples
FIND Command ExampleTo find all occurrences of “mimic” in a member such as the one shown inFigure 18, type find all mimic on the Command line.
Finding, Seeking, Changing, and Excluding Data
60 OS/390 V2R10.0 ISPF Edit and Edit Macros
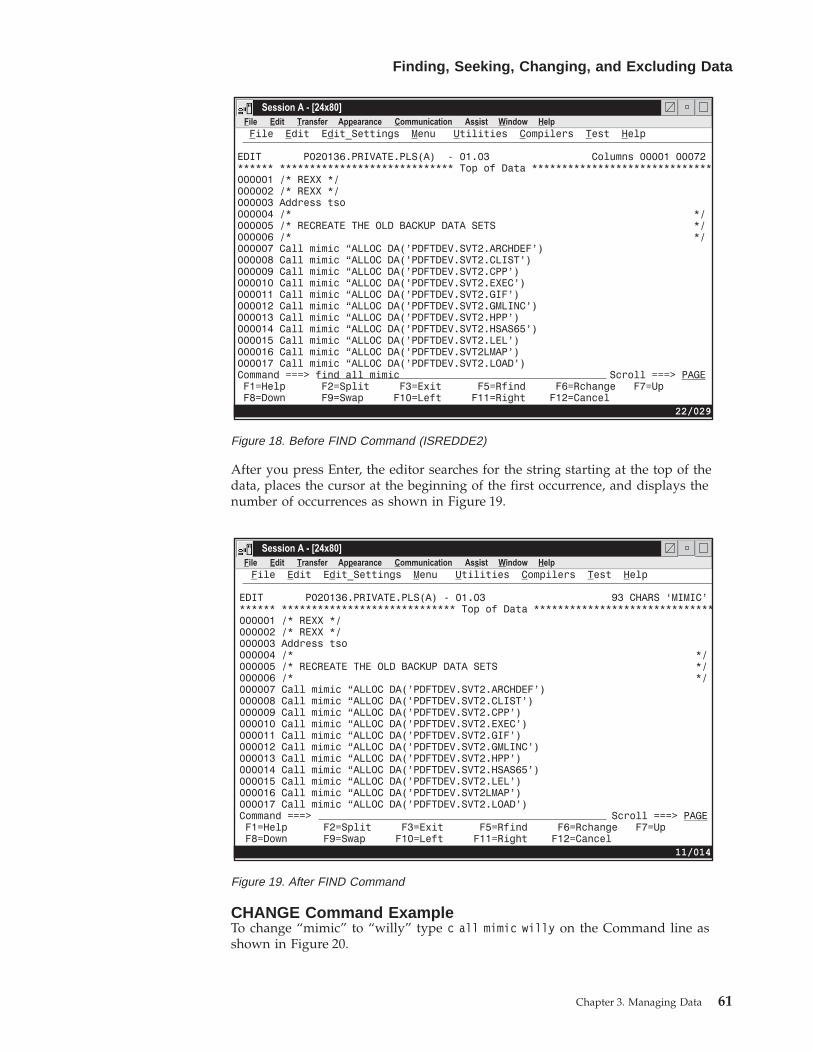
After you press Enter, the editor searches for the string starting at the top of thedata, places the cursor at the beginning of the first occurrence, and displays thenumber of occurrences as shown in Figure 19.
CHANGE Command ExampleTo change “mimic” to “willy” type c all mimic willy on the Command line asshown in Figure 20.
Figure 18. Before FIND Command (ISREDDE2)
Figure 19. After FIND Command
Finding, Seeking, Changing, and Excluding Data
Chapter 3. Managing Data 61
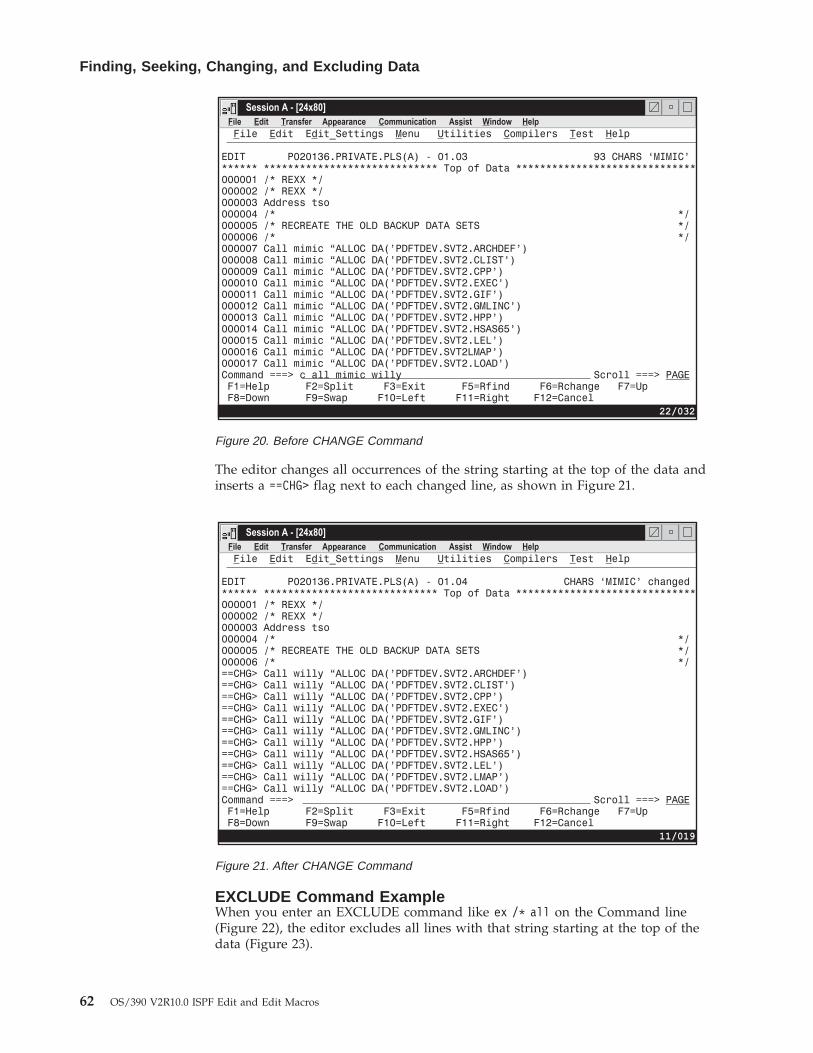
The editor changes all occurrences of the string starting at the top of the data andinserts a ==CHG> flag next to each changed line, as shown in Figure 21.
EXCLUDE Command ExampleWhen you enter an EXCLUDE command like ex /* all on the Command line(Figure 22), the editor excludes all lines with that string starting at the top of thedata (Figure 23).
Figure 20. Before CHANGE Command
Figure 21. After CHANGE Command
Finding, Seeking, Changing, and Excluding Data
62 OS/390 V2R10.0 ISPF Edit and Edit Macros
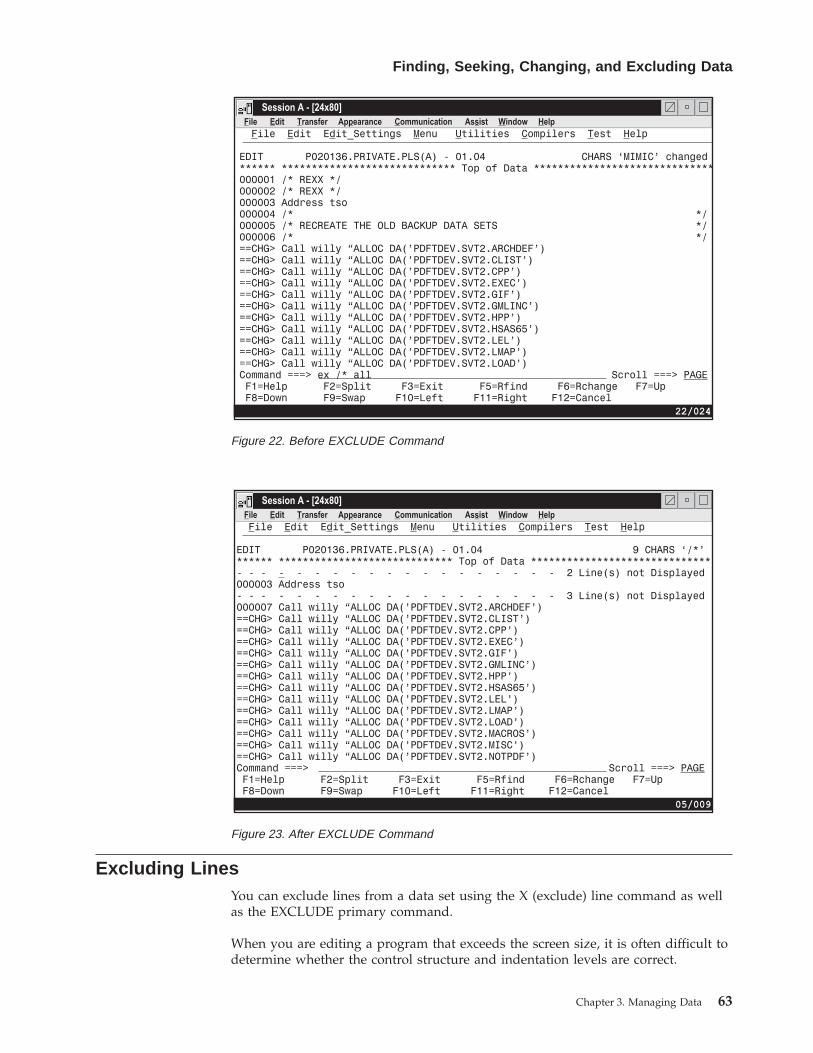
Excluding LinesYou can exclude lines from a data set using the X (exclude) line command as wellas the EXCLUDE primary command.
When you are editing a program that exceeds the screen size, it is often difficult todetermine whether the control structure and indentation levels are correct.
Figure 22. Before EXCLUDE Command
Figure 23. After EXCLUDE Command
Finding, Seeking, Changing, and Excluding Data
Chapter 3. Managing Data 63
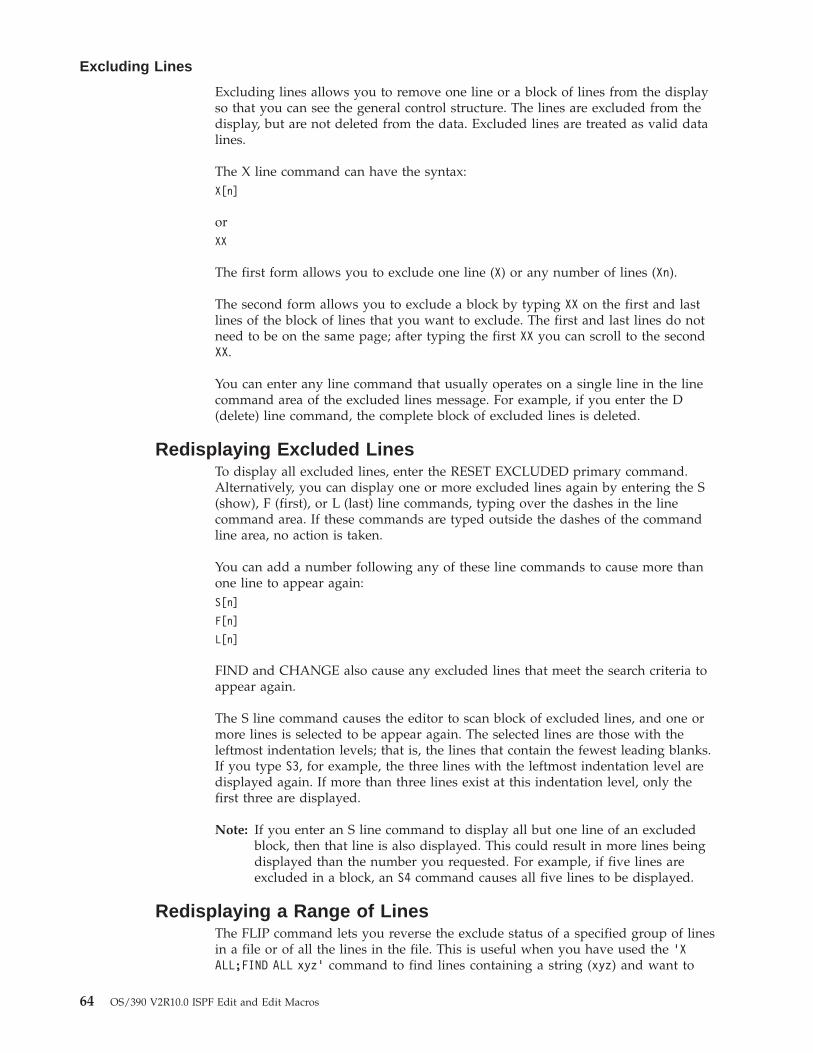
Excluding lines allows you to remove one line or a block of lines from the displayso that you can see the general control structure. The lines are excluded from thedisplay, but are not deleted from the data. Excluded lines are treated as valid datalines.
The X line command can have the syntax:X[n]
orXX
The first form allows you to exclude one line (X) or any number of lines (Xn).
The second form allows you to exclude a block by typing XX on the first and lastlines of the block of lines that you want to exclude. The first and last lines do notneed to be on the same page; after typing the first XX you can scroll to the secondXX.
You can enter any line command that usually operates on a single line in the linecommand area of the excluded lines message. For example, if you enter the D(delete) line command, the complete block of excluded lines is deleted.
Redisplaying Excluded LinesTo display all excluded lines, enter the RESET EXCLUDED primary command.Alternatively, you can display one or more excluded lines again by entering the S(show), F (first), or L (last) line commands, typing over the dashes in the linecommand area. If these commands are typed outside the dashes of the commandline area, no action is taken.
You can add a number following any of these line commands to cause more thanone line to appear again:S[n]
F[n]
L[n]
FIND and CHANGE also cause any excluded lines that meet the search criteria toappear again.
The S line command causes the editor to scan block of excluded lines, and one ormore lines is selected to be appear again. The selected lines are those with theleftmost indentation levels; that is, the lines that contain the fewest leading blanks.If you type S3, for example, the three lines with the leftmost indentation level aredisplayed again. If more than three lines exist at this indentation level, only thefirst three are displayed.
Note: If you enter an S line command to display all but one line of an excludedblock, then that line is also displayed. This could result in more lines beingdisplayed than the number you requested. For example, if five lines areexcluded in a block, an S4 command causes all five lines to be displayed.
Redisplaying a Range of LinesThe FLIP command lets you reverse the exclude status of a specified group of linesin a file or of all the lines in the file. This is useful when you have used the 'XALL;FIND ALL xyz' command to find lines containing a string (xyz) and want to
Excluding Lines
64 OS/390 V2R10.0 ISPF Edit and Edit Macros
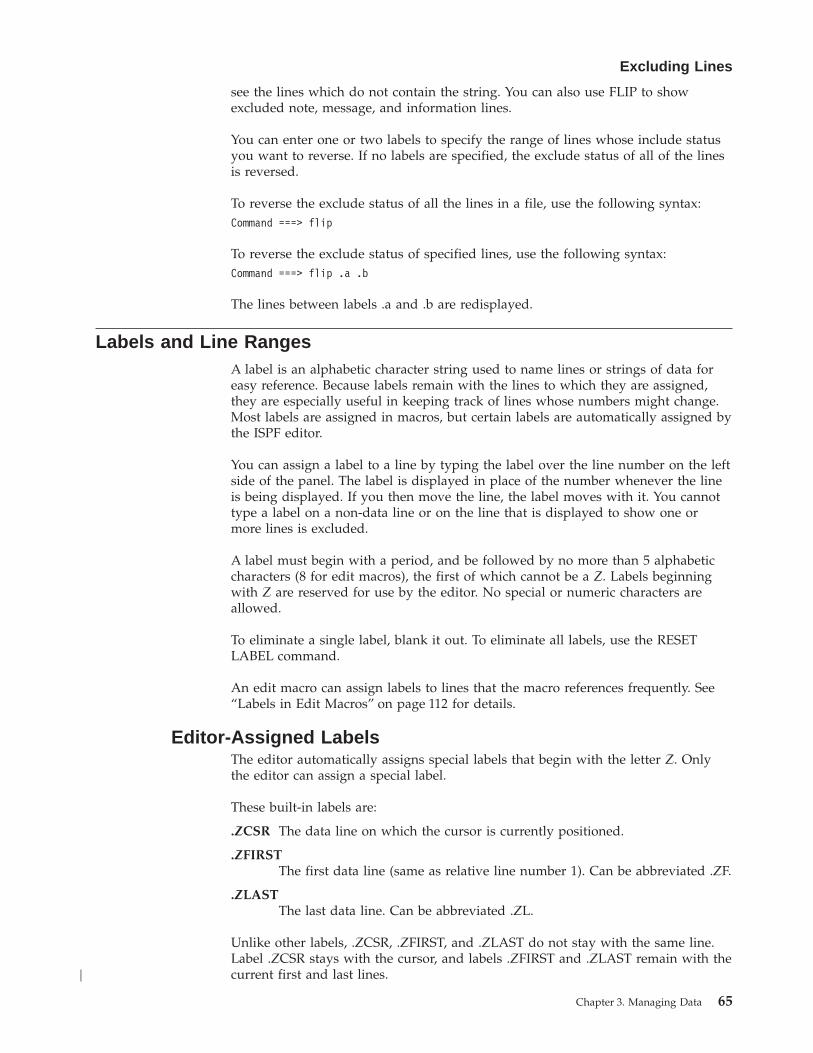
see the lines which do not contain the string. You can also use FLIP to showexcluded note, message, and information lines.
You can enter one or two labels to specify the range of lines whose include statusyou want to reverse. If no labels are specified, the exclude status of all of the linesis reversed.
To reverse the exclude status of all the lines in a file, use the following syntax:Command ===> flip
To reverse the exclude status of specified lines, use the following syntax:Command ===> flip .a .b
The lines between labels .a and .b are redisplayed.
Labels and Line RangesA label is an alphabetic character string used to name lines or strings of data foreasy reference. Because labels remain with the lines to which they are assigned,they are especially useful in keeping track of lines whose numbers might change.Most labels are assigned in macros, but certain labels are automatically assigned bythe ISPF editor.
You can assign a label to a line by typing the label over the line number on the leftside of the panel. The label is displayed in place of the number whenever the lineis being displayed. If you then move the line, the label moves with it. You cannottype a label on a non-data line or on the line that is displayed to show one ormore lines is excluded.
A label must begin with a period, and be followed by no more than 5 alphabeticcharacters (8 for edit macros), the first of which cannot be a Z. Labels beginningwith Z are reserved for use by the editor. No special or numeric characters areallowed.
To eliminate a single label, blank it out. To eliminate all labels, use the RESETLABEL command.
An edit macro can assign labels to lines that the macro references frequently. See“Labels in Edit Macros” on page 112 for details.
Editor-Assigned LabelsThe editor automatically assigns special labels that begin with the letter Z. Onlythe editor can assign a special label.
These built-in labels are:
.ZCSR The data line on which the cursor is currently positioned.
.ZFIRSTThe first data line (same as relative line number 1). Can be abbreviated .ZF.
.ZLASTThe last data line. Can be abbreviated .ZL.
Unlike other labels, .ZCSR, .ZFIRST, and .ZLAST do not stay with the same line.Label .ZCSR stays with the cursor, and labels .ZFIRST and .ZLAST remain with thecurrent first and last lines.
Excluding Lines
Chapter 3. Managing Data 65
|
Note: Labels that are five characters long and begin with the letter ’O’ have specialmeaning to the HILITE feature of the ISPF editor. When a five-characterlabel starting with O, such as .OAAAA, is shown on the screen, thelanguage highlighting features are disabled and the lines with these speciallabels are displayed in blue. This feature is used by the COMPAREcommand.
Specifying a RangeLabels allow you to specify a line or a range of lines on a primary command. Youcan specify two labels to define a range of lines to be processed on the followingcommands:
CHANGE FIND RESETDELETE LOCATE SORTEXCLUDE REPLACE SUBMIT
The range operand is always optional. If you do not specify a range, it defaults to.ZFIRST and .ZLAST. For example, the command:CHANGE ALL 'TEST' 'FINAL'
starts at the first line of the data being edited and scans all lines up to andincluding the last line, changing all occurrences of TEST to FINAL.
However, the command:CHANGE .ZCSR .ZLAST ALL 'TEST' 'FINAL'
specifies a range, and is thus interpreted differently. The command changes onlythe last part of the data.
When you use labels to specify a range, you must always use two labels to definethe first and last lines, inclusively. To process a single line, repeat the label:CHANGE ALL " " "_" .A .A
The command in the previous example is interpreted as, “Change all blanks tounderscores on the .A line”.
The order in which you specify the labels is not important. The editor assumes thatthe line closer to the beginning of the data set is the first line of the range, and theline closer to the end of the data set is the last.
A common error when using a range is to assume that the search begins at the firstcharacter of the line with the first label. Remember, however, that the default isNEXT and that the search starts at the cursor location. Lines outside the range arelogically the same as the TOP OF DATA and BOTTOM OF DATA lines. Use the FIRST,LAST, or PREV operands to ensure that the search begins within the range.
Using Labels and Line RangesThe following examples show the results of using labels to identify ranges of lines.They show that the order of both labels and other operands is not important, andthat you can type both labels and operands in either uppercase or lowercase.v The following command locates the first line flagged ==CHG> between the line
labeled .start and the line with the cursor on it:locate first chg .start .zcsr
Labels and Line Ranges
66 OS/390 V2R10.0 ISPF Edit and Edit Macros
||||||
|
v The following command changes the last occurrence of pre to post between thefirst line and the line marked with the .here label:change last pre post .here .zfirst
v The following command changes all occurrences of pre to post from the .mylabline to the last line of the data set:change pre post all .mylab .zl
v The following command finds the word higher between the .start line and the.end line:find higher word .start .end
Word ProcessingThis section is a general overview of three line commands for word or textprocessing: TF (text flow), TS (text split), and TE (text entry). The editor alsoprovides three corresponding edit macro commands: TFLOW, TSPLIT, andTENTER. For the sake of simplicity, only the line commands are referred to.However, the descriptions apply to the macro commands, as well.
TF, TS, and TE assume that the data is grouped in paragraphs. A paragraph is agroup of lines that begin in the same column. The first line of a paragraph isexcluded from the grouping. The editor interprets any indentation or blank line asrepresenting a new paragraph. It also recognizes word processor control wordsthat are used by the Document Composition Facility as the beginning of aparagraph. These control words begin with a period, a colon, or an ampersand.
If you use text line commands frequently, you can assign both the TS and TFcommands to function keys. Use KEYS to reassign the keys. For example:F10 ===> :TSF11 ===> :TF
Now you can split text by moving the cursor to the desired split point within aline and pressing F10. Having typed the new material, press F11 to restructure thetext from the line containing the cursor to the end of the paragraph.
Formatting ParagraphsThe TF (text flow) line command formats paragraphs. It assumes that the sentencesare roughly in paragraph form with a ragged right margin when it attempts torecognize groupings. TF can be followed by a number (TF72 for example) thatspecifies the desired right side column for the paragraph. If you do not specify anumber, the right side of the panel is used unless you have set bounds differentfrom the default. In that case, the right boundary is used. The editor assumes thatbecause the first line of a paragraph may be at a different indentation level thanthe remainder of the paragraph, the starting column of the second line is the leftside of the paragraph.
When formatting paragraphs, the editor:v Moves text so that each line contains the maximum number of words. TF limits
its activity to within the bounds. Thus, it can be used to flow text within aborder.
v Keeps any blanks between words.v Assumes one blank between the word at the end of a line and the word on the
next line except when the line ends with a period. In that case, the editor insertstwo blanks.
Labels and Line Ranges
Chapter 3. Managing Data 67
The end of the paragraph is denoted by a blank line, a change in indentation, orthe special characters period (.), colon (:), ampersand (&), or left carat (<) in the leftboundary column. These special characters are used as Document CompositionFacility (SCRIPT/VS) control word delimiters.
The restructure operation removes trailing blanks on a line by using words fromthe following line. It does not, however, remove embedded blanks within a line.Accordingly, if one or more words in a line are to be removed, delete the wordsrather than type over them.
The text to be restructured is taken from within the currently-defined columnboundaries. Any text outside the bounds is not included in the restructuring. Therestructured text is also positioned within the current boundaries. If the originaltext was indented from the left boundary, that indentation is preserved.
Using Text Flow on a DBCS TerminalYou can restructure paragraphs containing lines that include DBCS strings basedon the following rules:v If a character in a DBCS string encroaches on the rightmost column position for
the restructured text, the string is divided before that character. An SI characteris added at the end of the line, and an SO character is added at the beginning ofthe new line.
v If the boundaries are defined and a DBCS character is on the boundary, theDBCS character is in the text flow operation. An SO or SI character is added toboth lines to ensure that DBCS character strings remain enclosed with SO and SIcharacters.
v If the mask contains DBCS fields and some of the DBCS fields cross the left,right, or both boundaries, the result may be unpredictable.
v If a DBCS string crosses the left, right, or both boundaries, the result may beunpredictable.
v When a text flow operation causes a field length of zero, the SO/SI or SI/SOcharacter strings that are next to each other are removed.
If you use the TF line command on a line while editing a formatted data set, youshould note that:v The current boundaries are automatically changed during command processing,
and are reset to the original values after processing is complete. Changes are asfollows:– If the left boundary falls on the second byte of a DBCS character in a DBCS
field, the boundary is shifted to the left by 1 byte.– If the right boundary does not fall on the same field as the left boundary, it is
shifted to the last byte of the field that contains the left boundary. If it falls onthe same DBCS field as the left boundary, and it also falls on the first byte ofa DBCS character, the right boundary is shifted to the right by 1 byte.
v If you specify the column number with the TF command, and if the column fallson the first byte of a DBCS character in a DBCS field, the column numberincreases by one.
Splitting LinesThe TS (text split) line command splits a line into two lines. The cursor showswhere the line is to be split. The editor moves the characters to the right of thecursor or to a new line following the original line and aligns the new line with the
Word Processing
68 OS/390 V2R10.0 ISPF Edit and Edit Macros
left side of the paragraph. As mentioned earlier, the left side of a paragraph isdetermined by looking for a pattern in the lines preceding or succeeding aparagraph.
If the line being split is the first line in a paragraph, the new line is aligned withthe rest of the lines in the paragraph. If there are no other lines in the paragraph,the portion of the line to the right of the cursor aligns itself with the first portionof the line.
One or more blank lines are inserted after the line being split, depending on whatyou specify when you enter the TS command. Note that the TSPLIT macrocommand inserts only one blank line.
To rejoin lines, use the TF (text flow) line command. See “Formatting Paragraphs”on page 67 for more information.
Splitting Lines Within a DBCS StringYou can split a line within a DBCS string based on the following rules:v When splitting at a DBCS character, an SI character is added to the end of the
line and an SO character is added at the beginning of the new line.v If the cursor is placed at the SO character, the SO character becomes the first
character to be moved.v If the cursor is placed at the SI character, the character following the SI character
becomes the first character to be moved.v If the mask contains DBCS fields and some of the DBCS fields cross the left,
right, or both column boundaries, the result is unpredictable.
If you use the TS line command while editing a formatted data set, you makespecial considerations for the current boundaries. These boundaries areautomatically changed during command processing, and are reset to the originalvalues after processing is complete. Changes are as follows:v If the left boundary falls on the second byte of a DBCS character in a DBCS
field, the boundary is shifted to the left by 1 byte.v If the right boundary does not fall on the same field as the left boundary, it is
shifted to the last byte of the field that contains the left boundary. If it falls onthe same DBCS field as the left boundary, and it also falls on the first byte of aDBCS character, the right boundary is shifted to the right by 1 byte.
Entering Text (Power Typing)The TE (text entry) line command allows you to power type. When using thiscommand, the display is filled with blank lines. The line number field normally onthe left of the display disappears, so that you can type all of your data as if it wereone continuous line. Because the editor is doing the formatting, you can continuetyping and ignore the wrap around on the display. Any explicit cursor movementis interpreted as your personal formatting and results in embedded blanks.
The editor assumes that you are typing text as paragraphs. If you explicitly movethe cursor down and leave a blank line, the editor assumes that the blank lineshould be there. The text that follows the blank line is consequently a newparagraph. Similarly, if you leave a specified number of blanks between words, theeditor leaves them there. Also, if you tab to the beginning of the next line beforecompleting the current line, the editor does not flow these sentences together.Remember that skipping a line specifies the start of a new paragraph.
Word Processing
Chapter 3. Managing Data 69
Note: You cannot use logical or hardware tabs during text entry.
When you press Enter, the text is flowed in the same manner as the TF (text flow)line command, except that it uses the bounds as the right and left sides of theparagraphs.
Entering Text on a DBCS TerminalIf you are using the TE line command in a formatted data set, you should notethat:v The current boundaries are automatically changed during command processing,
and are reset to the original values after processing is complete. Changes are asfollows:– If the left boundary falls on the second byte of a DBCS character in a DBCS
field, the boundary is shifted to the left by 1 byte.– If the right boundary does not fall on the same field as the left boundary, it is
shifted to the last byte of the field that contains the left boundary. If it falls onthe same DBCS field as the left boundary, and it also falls on the first byte ofa DBCS character, the right boundary is shifted to the right by 1 byte.
v The attribute of the field where the left boundary falls is used for the text inputarea attribute. The new input data is reformatted to fit within the currentboundaries.
Using TabsThis section discusses hardware, software, and logical tabs, defining andcontrolling tabs, defining tab positions, and using attribute bytes.
Types of Tabs
Software and Hardware TabsThe editor uses software and hardware tabs to reposition the cursor within thecurrent display window. You can define tabs with the TABS line command. Useunderscores (_) or hyphens (-) to define software tabs and asterisks (*) to definehardware tabs.
Logical TabsThe editor uses logical tabs to reposition strings of data. You can use TABSprimary and macro commands, and the TABS assignment statement to define aspecial character. The tab character locates the beginning of each string. Editrepositions the strings one space to the right of hardware tab positions.
Notes:
1. You cannot use the command delimiter that you defined on the TerminalCharacteristics panel (option 0.1) as a special tab character.
2. Tabs are not functional when you are using the TE (text entry) line command.
Effect of TABS Commands on Tab TypesIf you are using hardware or logical tabs, the TABS line command must be usedwith one of the other TABS commands or the TABS assignment statement. Forexample, hardware tab positions defined by the TABS line command do not takeeffect until tabs mode is turned on, which the line command cannot do.Conversely, a logical tab character defined with the TABS primary or macrocommand, or the TABS assignment statement, cannot be used to position datastrings horizontally unless hardware tab positions are defined with the TABS linecommand. However, if you are using software tabs, you do not need to turn tabs
Word Processing
70 OS/390 V2R10.0 ISPF Edit and Edit Macros
mode on. The TABS primary and macros commands, and the TABS assignmentstatement, have no effect on software tabs.
Defining and Controlling TabsThree TABS commands help you quickly position the cursor where you want tostart typing. These commands are the TABS line command, primary command, andmacro command. There is also a TABS assignment statement.
You type the TABS line command in the line command area over the line numbers.This command:v Displays the =TABS> (tab-definition) linev Defines tab positions for software, hardware, and logical tabs.
You type the TABS primary command on the Command line. The TABS macrocommand is processed from within an edit macro. The TABS primary and macrocommands can:v Turn tabs mode on and offv Define the logical tab characterv Control the insertion of attribute bytes at hardware tab positions that have been
defined with the TABS line command.
The TABS assignment statement is processed from within an edit macro. It can doeverything that the TABS macro command can do. In addition, the TABSassignment statement can retrieve the setting of tabs mode and place it in avariable.
You can use PROFILE to check the setting of tabs mode and the logical tabcharacter.
Defining Software Tab PositionsIf you display the =TABS> line and type software tab definitions, they take effectimmediately. Each line contains a software tab or a tab field at the designatedcolumn positions. The TABS primary command has no effect on software tabdefinitions.
To define software tab positions:1. Type TABS in the line command area and press Enter.2. Type an underscore (_) or a hyphen (-) at each desired column position on the
=TABS> line.3. Press Enter again to start the tabs.
You can move the cursor from one column position to the next by continuing topress Enter. See “Using Software and Hardware Tabs” on page 193 for an exampleof using software tabs.
Defining Hardware Tab PositionsHardware tab definitions do not take effect until you turn on tabs mode by usingthe TABS primary command. The asterisks define the column positions, but theinsertion of attribute bytes (hardware tabs) or the repositioning of data strings(logical tabs) does not occur unless tabs mode is on.
To define hardware tab positions:1. Type TABS in the line command area and press Enter.
Using Tabs
Chapter 3. Managing Data 71
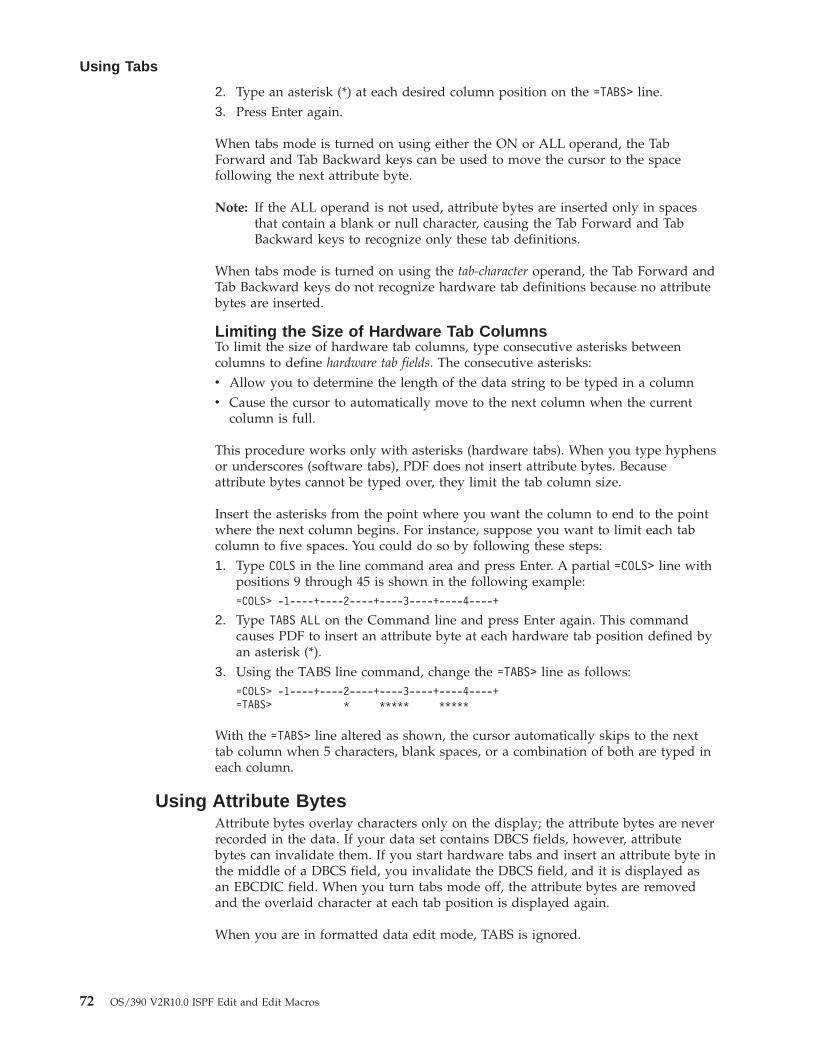
2. Type an asterisk (*) at each desired column position on the =TABS> line.3. Press Enter again.
When tabs mode is turned on using either the ON or ALL operand, the TabForward and Tab Backward keys can be used to move the cursor to the spacefollowing the next attribute byte.
Note: If the ALL operand is not used, attribute bytes are inserted only in spacesthat contain a blank or null character, causing the Tab Forward and TabBackward keys to recognize only these tab definitions.
When tabs mode is turned on using the tab-character operand, the Tab Forward andTab Backward keys do not recognize hardware tab definitions because no attributebytes are inserted.
Limiting the Size of Hardware Tab ColumnsTo limit the size of hardware tab columns, type consecutive asterisks betweencolumns to define hardware tab fields. The consecutive asterisks:v Allow you to determine the length of the data string to be typed in a columnv Cause the cursor to automatically move to the next column when the current
column is full.
This procedure works only with asterisks (hardware tabs). When you type hyphensor underscores (software tabs), PDF does not insert attribute bytes. Becauseattribute bytes cannot be typed over, they limit the tab column size.
Insert the asterisks from the point where you want the column to end to the pointwhere the next column begins. For instance, suppose you want to limit each tabcolumn to five spaces. You could do so by following these steps:1. Type COLS in the line command area and press Enter. A partial =COLS> line with
positions 9 through 45 is shown in the following example:=COLS> -1----+----2----+----3----+----4----+
2. Type TABS ALL on the Command line and press Enter again. This commandcauses PDF to insert an attribute byte at each hardware tab position defined byan asterisk (*).
3. Using the TABS line command, change the =TABS> line as follows:=COLS> -1----+----2----+----3----+----4----+=TABS> * ***** *****
With the =TABS> line altered as shown, the cursor automatically skips to the nexttab column when 5 characters, blank spaces, or a combination of both are typed ineach column.
Using Attribute BytesAttribute bytes overlay characters only on the display; the attribute bytes are neverrecorded in the data. If your data set contains DBCS fields, however, attributebytes can invalidate them. If you start hardware tabs and insert an attribute byte inthe middle of a DBCS field, you invalidate the DBCS field, and it is displayed asan EBCDIC field. When you turn tabs mode off, the attribute bytes are removedand the overlaid character at each tab position is displayed again.
When you are in formatted data edit mode, TABS is ignored.
Using Tabs
72 OS/390 V2R10.0 ISPF Edit and Edit Macros
In tabs mode, you temporarily remove the attribute bytes from a single line. Thereare two ways to do this:v Blank out the entire Line Command field using the Erase EOF key.v Place the cursor directly under one of the attribute bytes and press Enter. When
you press Enter again, the attribute bytes are reinserted.
Undoing Edit InteractionsIf you enter an edit primary, line, or macro command, or type over existing databy mistake, you can restore your data with the UNDO primary command. UNDOhas no operands.
Each time you enter UNDO it undoes one interaction. A single interaction might bea data change and Enter key, a data change and function key, or the invocation ofan edit macro. All changes caused by an edit macro are considered to be oneinteraction. You can continue to undo interactions, one at a time, until you havereversed all changes made back to the beginning of your edit session unless youhave done a save or undo recycled. If you have done a save or if undo recycled,you can only undo interactions back to that point. At that point, if you enterUNDO again, a message informs you that there are no more interactions to undo.
UNDO has certain limitations. Edit interactions that the command does not undoare:v Changes that are made by an initial edit macro or recovery edit macro.v Edit interactions before any data changes are made.v Edit interactions in previous edit sessions.v Reset of changed flags (==CHG>) by use of RESET or by typing over the
command line area.v Changes you make to other data sets or members by using the CREATE,
REPLACE, or MOVE commands. Because UNDO affects only the member ordata set that you are editing, it removes lines from your display if they wereinserted there by MOVE. However, it does not put those lines back into the dataset or member from which they came.
See “UNDO—Reverse Last Edit Interaction” on page 292 for a discussion of UNDOlimitations.
UNDO is reset by SAVE. This means that you can UNDO interactions for thecurrent edit session until you save your data. After the save, you can undo onlyinteractions made following the time you saved your data.
UNDO can be run from data kept in storage or from the recovery file (as inprevious releases) depending on what you specify in the Edit Profile for the datayou are entering. The SETUNDO primary or macro command is used to controlthe profile setting. To use UNDO, you must have either RECOVERY on orSETUNDO on. You can undo only those changes made after RECOVERY orSETUNDO was turned on.
SETUNDO allows you to specify how changes you make during your edit sessionare to be recorded and used by UNDO. You can specify SETUNDO STORAGE orSETUNDO RECOVER. SETUNDO STORAGE specifies UNDO from storage.SETUNDO RECOVERY specifies UNDO from recovery and turns recovery on if it
Using Tabs
Chapter 3. Managing Data 73
is off. See “SETUNDO—Set the UNDO Mode” on page 285 for more details.“Understanding Differences in SETUNDO Processing” explains how theSETUNDO operands differ.
If not enough storage is available to run UNDO from storage but RECOVERY ison, UNDO processing continues to be available by using the recovery file. Thismakes UNDO available for very large files. It also provides users of machines withless storage with the benefit of UNDO for their larger files.
Note: If you have specified RECOVERY OFF and your installation allows UNDOfrom storage, the message that UNDO is unavailable does not display whenyou enter an edit session. If UNDOSIZE = 0, the message appears as before.
The UNDOSIZE specifies the number of kilobytes allowed for saving edittransactions for UNDO and the value is in the configuration table. For moredetails, refer to ISPF Planning and Customizing
If UNDOSIZE is set to zero, all undo documented functions work as in ISPF/PDFVersion 3.3 and previous releases. This means that the Profile lines do not showthe status of SETUNDO, and that warning messages will be shown informing youthat UNDO is unavailable until RECOVERY is turned on.
UNDO ProcessingWhen the storage allocated for changes is exhausted, UNDO recycles itself and putsup the message UNDO RECYCLED. Recycling is the process of saving the currentimage of the file as a new base from which to work. UNDO is then available afterthe next transaction. No transactions made before the recycling can be undone.This is because UNDO saves an image of the original file and keeps an incrementallist of changes to that image.
If there is not enough storage to save the initial image, then UNDO attempts to usethe recovery file for undo processing. If recovery is off or suspended, the messageUNDO SUSPENDED is shown with an alarm, and the profile status line is changed toSETUNDO SUSP. If recovery is available, the message UNDO FROM RECOVERY is shownwith an alarm, and the profile status line is changed to SETUNDO REC. This affectsthe display but does not affect the edit profile values.
To resume SETUNDO STG, enter the SETUNDO primary command. If there is stillnot enough storage to hold the original copy of the file, the recycling procedure isrepeated.
Note: Edit recovery can no longer process edit recovery files created underprevious releases of ISPF/PDF. A panel is displayed, but no other action istaken if an old recovery file is used.
Understanding Differences in SETUNDO ProcessingSETUNDO STORAGE and SETUNDO RECOVERY work essentially the same way;however, there are some important differences. SETUNDO REC is available onlyafter the edit recovery file is initialized, that is, until the first data change is made.Because SETUNDO STG keeps its record of changes in storage, it does not incurthe same performance penalty as using the SETUNDO REC.
SETUNDO STG can start to save editing changes earlier than SETUNDO REC,because even non-data changes, such as setting line labels, adding note lines, andinserting blank lines, cause SETUNDO STG to initialize its record of changes. You
Undoing Edit Interactions
74 OS/390 V2R10.0 ISPF Edit and Edit Macros

can undo these changes using UNDO even if no data changes have been made.When SETUNDO REC is in effect, only changes made after and including the firstchange to edit data can be undone.
UNDO reverses changes made during a single edit transaction. It is important tonote, however, that changes to the profile, such as HEX ON, LEVEL, and CAPS,are not undone separately. A data change followed by one or more profile changesis usually considered a single transaction. For example, if you change the data andthen the profile, and then enter UNDO, the data and profile return to their statusesbefore the data change. Profile changes usually cannot be undone if they are notpreceded by a data change. SETUNDO STG and SETUNDO REC may workslightly differently in this regard. Since SETUNDO STG keeps the record ofchanges in storage, it is not a substitute for recovery. To recover the edit sessionafter a system failure, you must have recovery on during the edit session.SETUNDO STG and RECOVERY ON can be in effect simultaneously, however,after a system crash and a recovery, no transactions can be undone usingSETUNDO STG because the in-storage record will be empty.
If you are running both SETUNDO STG and RECOVERY ON, the UNDOcommand causes the last change to be backed out using the in-storage record ofedit changes, and the recovery data set to be reinitialized. If you issue a SETUNDOREC command, after you use UNDO (from storage), there will be no moretransactions to UNDO since the recovery file has been reinitialized.
Undoing Edit Interactions
Chapter 3. Managing Data 75

Undoing Edit Interactions
76 OS/390 V2R10.0 ISPF Edit and Edit Macros
Chapter 4. Using Edit Models
This chapter describes the PDF component edit models and tells you how to usethem.
What Is an Edit Model?A model is a predefined set of statements for a dialog element that you can includein the data you are editing and then modify to suit your needs. When you enterthe MODEL command, you can select the correct segment for the data type beingedited.
The PDF component is shipped with an initial set of models for panels, messages,skeletons, and command and program processing of ISPF and PDF componentservices. You can add more. There are no models of edit macro commands andassignment statements.
A model has two parts:
Data linesThese are the actual lines that are placed in the data you are editing. Forexample, the data might be a dialog service call or a panel format. You canupdate fields in the source statements by inserting names, parameters, andso forth.
The models also include source statement comments for models of dialogservice calls to document the meanings of the possible return codes fromthe service. The comments are in a valid format for the particular kind ofmodel. These comments give you the information you need to developerror-handling logic for your function. Sometimes they provide parameterdescriptions for other kinds of models.
Notes Notes provide tutorial information about how to complete source codestatements. You can specify whether you want the notes displayed duringthe edit session by using the NOTES command or the NOTES orNONOTES operand on the MODEL command. To remove notes from thepanel, issue RESET. To convert the notes to data so that they can be savedwith your data set, use the MD (make dataline) line command.
How Models Are OrganizedModels are organized and named according to a hierarchy based on the type andversion of the dialog element they represent. Each part of the model’s namecorresponds to a level in the hierarchy.
The first part of the logical name is the model class. There is a model class for eachdata set type qualifier that can store a dialog element. The Model Classes panel,Figure 24 on page 78, lists the classes defined for the models distributed by thePDF component. This panel prompts you when you need to set the desired modelclass, if you do not name the class explicitly.
© Copyright IBM Corp. 1984, 2000 77
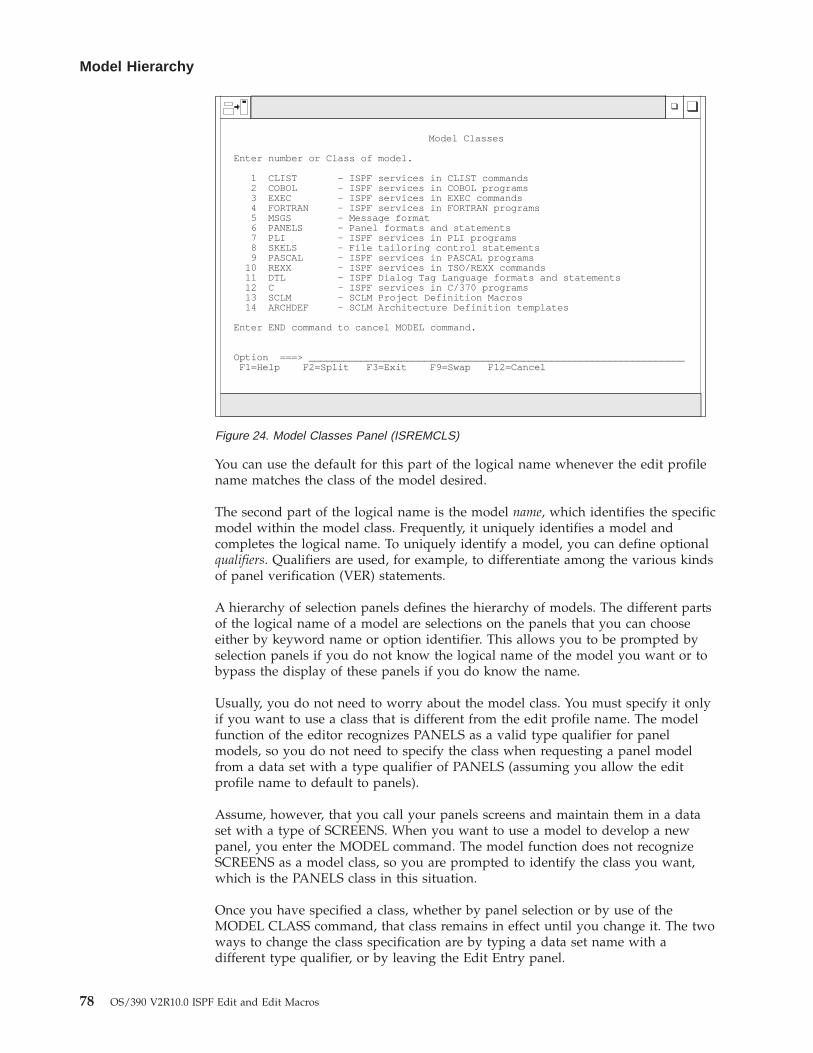
You can use the default for this part of the logical name whenever the edit profilename matches the class of the model desired.
The second part of the logical name is the model name, which identifies the specificmodel within the model class. Frequently, it uniquely identifies a model andcompletes the logical name. To uniquely identify a model, you can define optionalqualifiers. Qualifiers are used, for example, to differentiate among the various kindsof panel verification (VER) statements.
A hierarchy of selection panels defines the hierarchy of models. The different partsof the logical name of a model are selections on the panels that you can chooseeither by keyword name or option identifier. This allows you to be prompted byselection panels if you do not know the logical name of the model you want or tobypass the display of these panels if you do know the name.
Usually, you do not need to worry about the model class. You must specify it onlyif you want to use a class that is different from the edit profile name. The modelfunction of the editor recognizes PANELS as a valid type qualifier for panelmodels, so you do not need to specify the class when requesting a panel modelfrom a data set with a type qualifier of PANELS (assuming you allow the editprofile name to default to panels).
Assume, however, that you call your panels screens and maintain them in a dataset with a type of SCREENS. When you want to use a model to develop a newpanel, you enter the MODEL command. The model function does not recognizeSCREENS as a model class, so you are prompted to identify the class you want,which is the PANELS class in this situation.
Once you have specified a class, whether by panel selection or by use of theMODEL CLASS command, that class remains in effect until you change it. The twoways to change the class specification are by typing a data set name with adifferent type qualifier, or by leaving the Edit Entry panel.
Model Classes
Enter number or Class of model.
1 CLIST - ISPF services in CLIST commands2 COBOL - ISPF services in COBOL programs3 EXEC - ISPF services in EXEC commands4 FORTRAN - ISPF services in FORTRAN programs5 MSGS - Message format6 PANELS - Panel formats and statements7 PLI - ISPF services in PLI programs8 SKELS - File tailoring control statements9 PASCAL - ISPF services in PASCAL programs
10 REXX - ISPF services in TSO/REXX commands11 DTL - ISPF Dialog Tag Language formats and statements12 C - ISPF services in C/370 programs13 SCLM - SCLM Project Definition Macros14 ARCHDEF - SCLM Architecture Definition templates
Enter END command to cancel MODEL command.
Option ===> _________________________________________________________________F1=Help F2=Split F3=Exit F9=Swap F12=Cancel
Figure 24. Model Classes Panel (ISREMCLS)
Model Hierarchy
78 OS/390 V2R10.0 ISPF Edit and Edit Macros
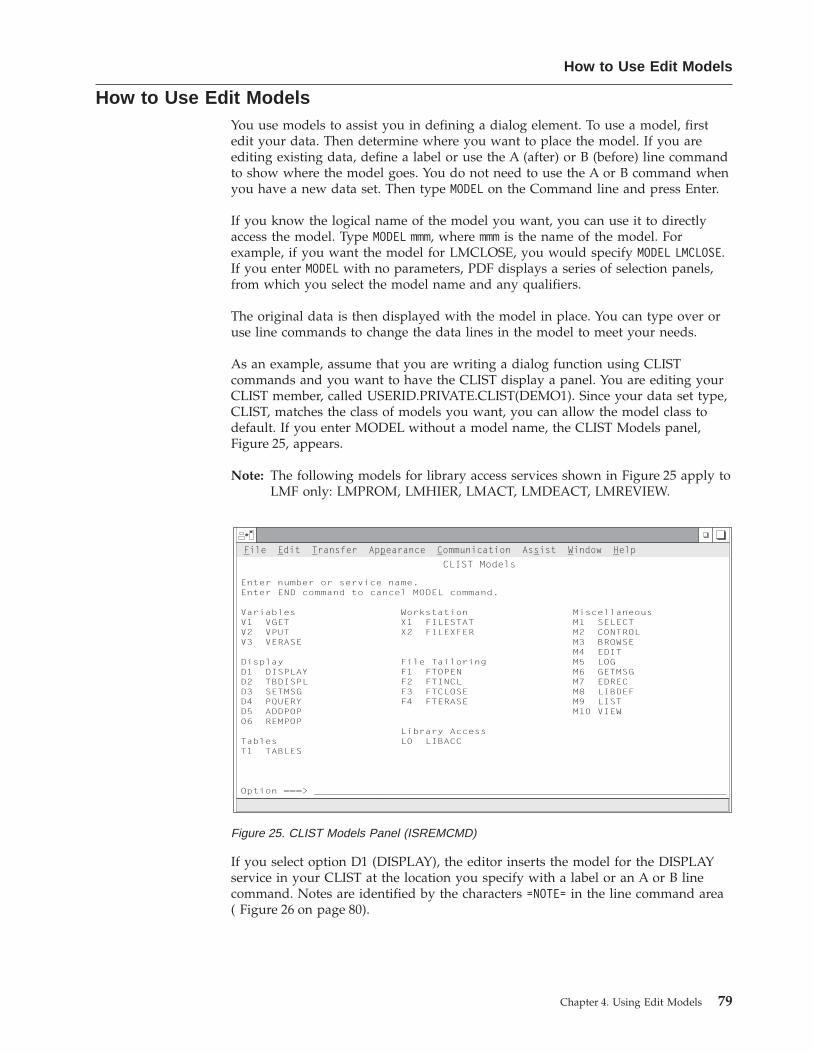
How to Use Edit ModelsYou use models to assist you in defining a dialog element. To use a model, firstedit your data. Then determine where you want to place the model. If you areediting existing data, define a label or use the A (after) or B (before) line commandto show where the model goes. You do not need to use the A or B command whenyou have a new data set. Then type MODEL on the Command line and press Enter.
If you know the logical name of the model you want, you can use it to directlyaccess the model. Type MODEL mmm, where mmm is the name of the model. Forexample, if you want the model for LMCLOSE, you would specify MODEL LMCLOSE.If you enter MODEL with no parameters, PDF displays a series of selection panels,from which you select the model name and any qualifiers.
The original data is then displayed with the model in place. You can type over oruse line commands to change the data lines in the model to meet your needs.
As an example, assume that you are writing a dialog function using CLISTcommands and you want to have the CLIST display a panel. You are editing yourCLIST member, called USERID.PRIVATE.CLIST(DEMO1). Since your data set type,CLIST, matches the class of models you want, you can allow the model class todefault. If you enter MODEL without a model name, the CLIST Models panel,Figure 25, appears.
Note: The following models for library access services shown in Figure 25 apply toLMF only: LMPROM, LMHIER, LMACT, LMDEACT, LMREVIEW.
If you select option D1 (DISPLAY), the editor inserts the model for the DISPLAYservice in your CLIST at the location you specify with a label or an A or B linecommand. Notes are identified by the characters =NOTE= in the line command area( Figure 26 on page 80).
Figure 25. CLIST Models Panel (ISREMCMD)
How to Use Edit Models
Chapter 4. Using Edit Models 79
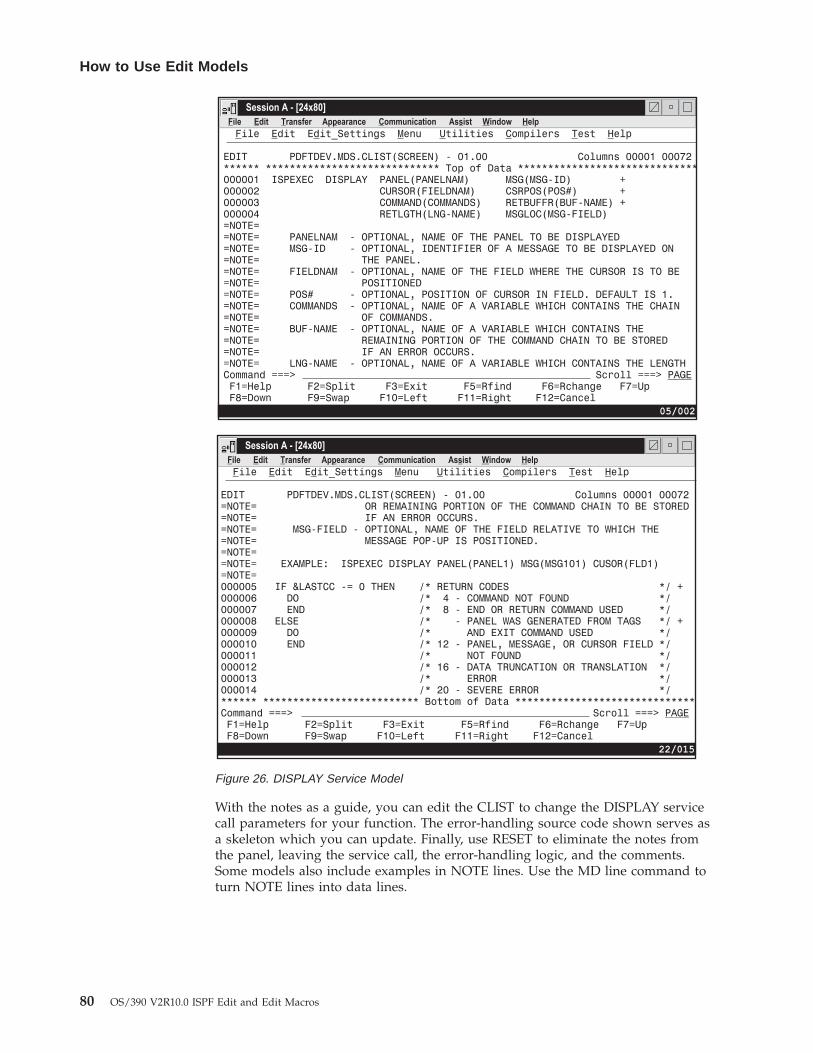
With the notes as a guide, you can edit the CLIST to change the DISPLAY servicecall parameters for your function. The error-handling source code shown serves asa skeleton which you can update. Finally, use RESET to eliminate the notes fromthe panel, leaving the service call, the error-handling logic, and the comments.Some models also include examples in NOTE lines. Use the MD line command toturn NOTE lines into data lines.
Figure 26. DISPLAY Service Model
How to Use Edit Models
80 OS/390 V2R10.0 ISPF Edit and Edit Macros
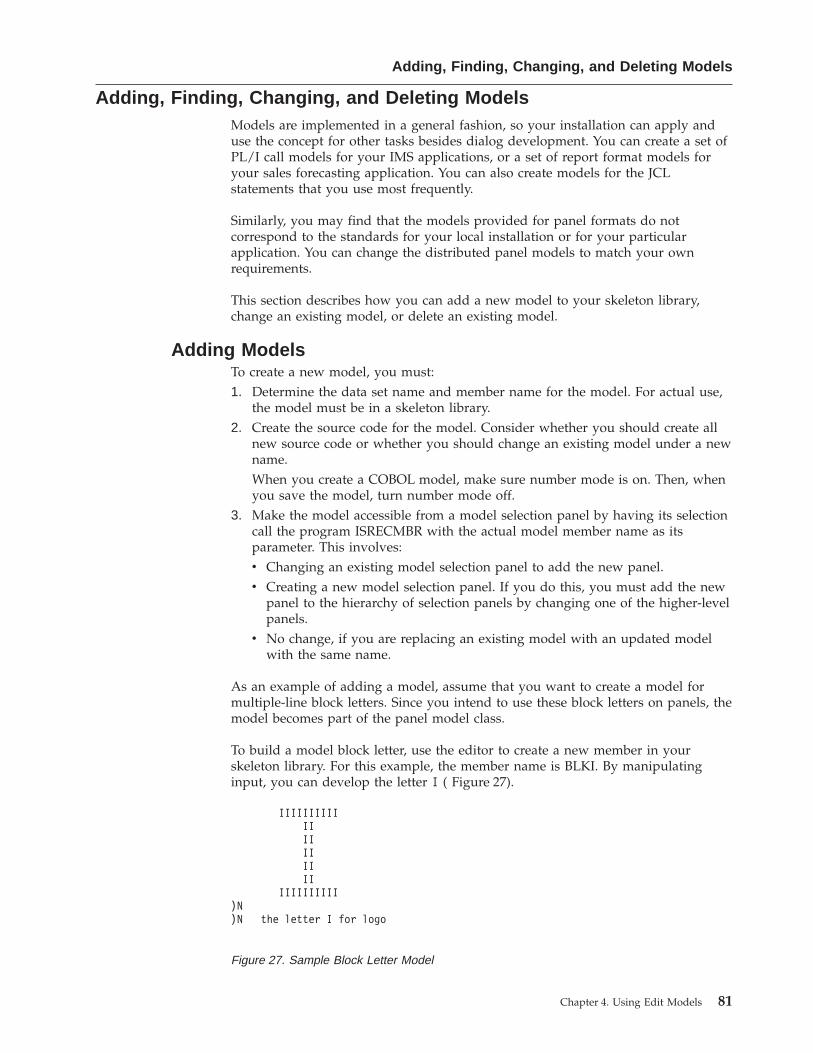
Adding, Finding, Changing, and Deleting ModelsModels are implemented in a general fashion, so your installation can apply anduse the concept for other tasks besides dialog development. You can create a set ofPL/I call models for your IMS applications, or a set of report format models foryour sales forecasting application. You can also create models for the JCLstatements that you use most frequently.
Similarly, you may find that the models provided for panel formats do notcorrespond to the standards for your local installation or for your particularapplication. You can change the distributed panel models to match your ownrequirements.
This section describes how you can add a new model to your skeleton library,change an existing model, or delete an existing model.
Adding ModelsTo create a new model, you must:1. Determine the data set name and member name for the model. For actual use,
the model must be in a skeleton library.2. Create the source code for the model. Consider whether you should create all
new source code or whether you should change an existing model under a newname.When you create a COBOL model, make sure number mode is on. Then, whenyou save the model, turn number mode off.
3. Make the model accessible from a model selection panel by having its selectioncall the program ISRECMBR with the actual model member name as itsparameter. This involves:v Changing an existing model selection panel to add the new panel.v Creating a new model selection panel. If you do this, you must add the new
panel to the hierarchy of selection panels by changing one of the higher-levelpanels.
v No change, if you are replacing an existing model with an updated modelwith the same name.
As an example of adding a model, assume that you want to create a model formultiple-line block letters. Since you intend to use these block letters on panels, themodel becomes part of the panel model class.
To build a model block letter, use the editor to create a new member in yourskeleton library. For this example, the member name is BLKI. By manipulatinginput, you can develop the letter I ( Figure 27).
IIIIIIIIIIIIIIIIIIII
IIIIIIIIII)N)N the letter I for logo
Figure 27. Sample Block Letter Model
Adding, Finding, Changing, and Deleting Models
Chapter 4. Using Edit Models 81
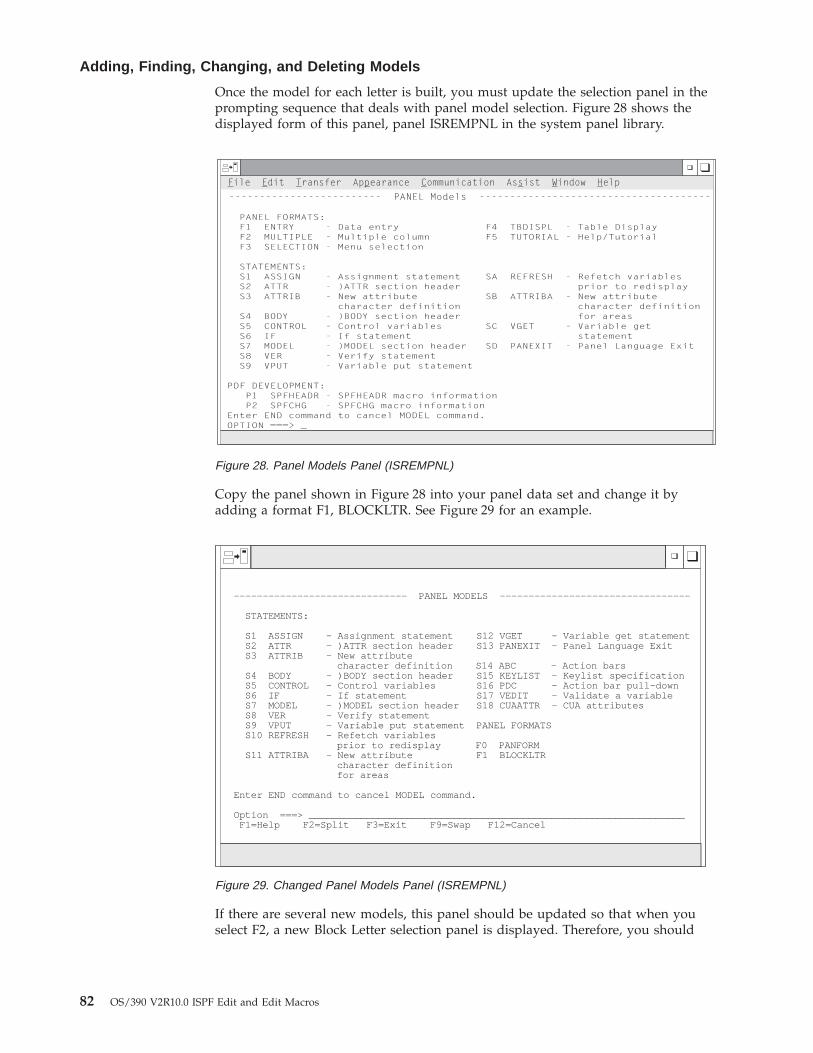
Once the model for each letter is built, you must update the selection panel in theprompting sequence that deals with panel model selection. Figure 28 shows thedisplayed form of this panel, panel ISREMPNL in the system panel library.
Copy the panel shown in Figure 28 into your panel data set and change it byadding a format F1, BLOCKLTR. See Figure 29 for an example.
If there are several new models, this panel should be updated so that when youselect F2, a new Block Letter selection panel is displayed. Therefore, you should
Figure 28. Panel Models Panel (ISREMPNL)
------------------------------ PANEL MODELS ---------------------------------
STATEMENTS:
S1 ASSIGN - Assignment statement S12 VGET - Variable get statementS2 ATTR - )ATTR section header S13 PANEXIT - Panel Language ExitS3 ATTRIB - New attribute
character definition S14 ABC - Action barsS4 BODY - )BODY section header S15 KEYLIST - Keylist specificationS5 CONTROL - Control variables S16 PDC - Action bar pull-downS6 IF - If statement S17 VEDIT - Validate a variableS7 MODEL - )MODEL section header S18 CUAATTR - CUA attributesS8 VER - Verify statementS9 VPUT - Variable put statement PANEL FORMATSS10 REFRESH - Refetch variables
prior to redisplay F0 PANFORMS11 ATTRIBA - New attribute F1 BLOCKLTR
character definitionfor areas
Enter END command to cancel MODEL command.
Option ===> _________________________________________________________________F1=Help F2=Split F3=Exit F9=Swap F12=Cancel
Figure 29. Changed Panel Models Panel (ISREMPNL)
Adding, Finding, Changing, and Deleting Models
82 OS/390 V2R10.0 ISPF Edit and Edit Macros
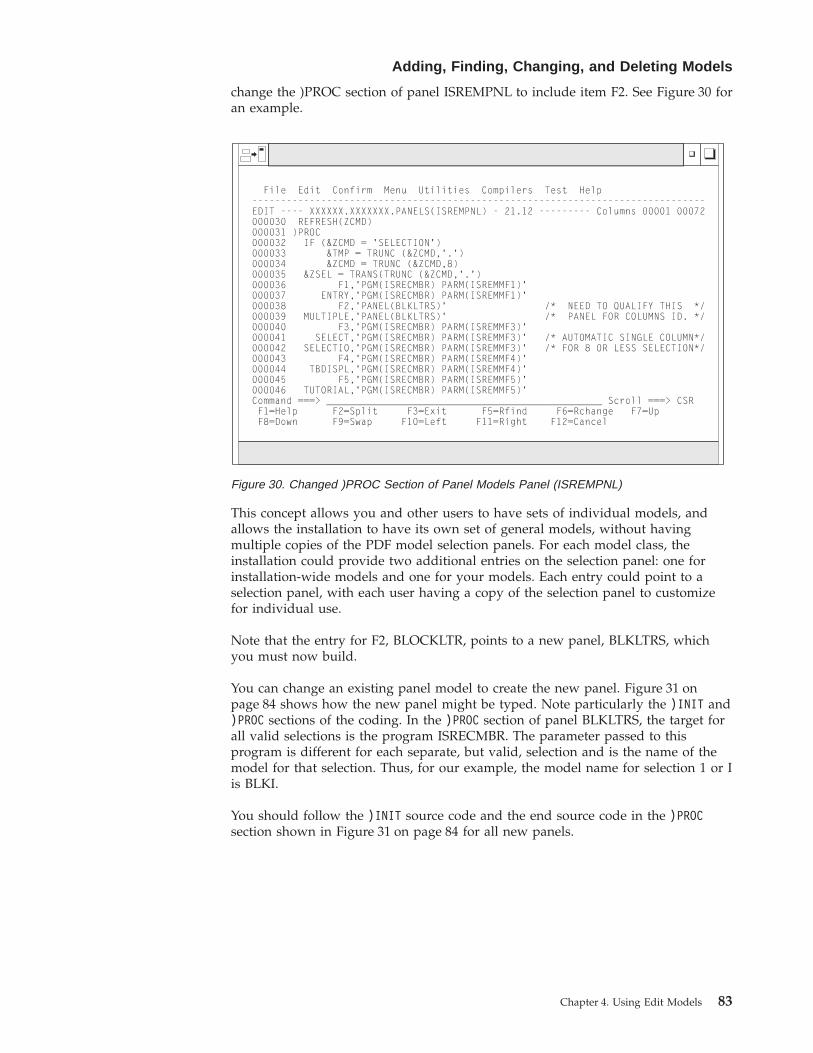
change the )PROC section of panel ISREMPNL to include item F2. See Figure 30 foran example.
This concept allows you and other users to have sets of individual models, andallows the installation to have its own set of general models, without havingmultiple copies of the PDF model selection panels. For each model class, theinstallation could provide two additional entries on the selection panel: one forinstallation-wide models and one for your models. Each entry could point to aselection panel, with each user having a copy of the selection panel to customizefor individual use.
Note that the entry for F2, BLOCKLTR, points to a new panel, BLKLTRS, whichyou must now build.
You can change an existing panel model to create the new panel. Figure 31 onpage 84 shows how the new panel might be typed. Note particularly the )INIT and)PROC sections of the coding. In the )PROC section of panel BLKLTRS, the target forall valid selections is the program ISRECMBR. The parameter passed to thisprogram is different for each separate, but valid, selection and is the name of themodel for that selection. Thus, for our example, the model name for selection 1 or Iis BLKI.
You should follow the )INIT source code and the end source code in the )PROCsection shown in Figure 31 on page 84 for all new panels.
Figure 30. Changed )PROC Section of Panel Models Panel (ISREMPNL)
Adding, Finding, Changing, and Deleting Models
Chapter 4. Using Edit Models 83
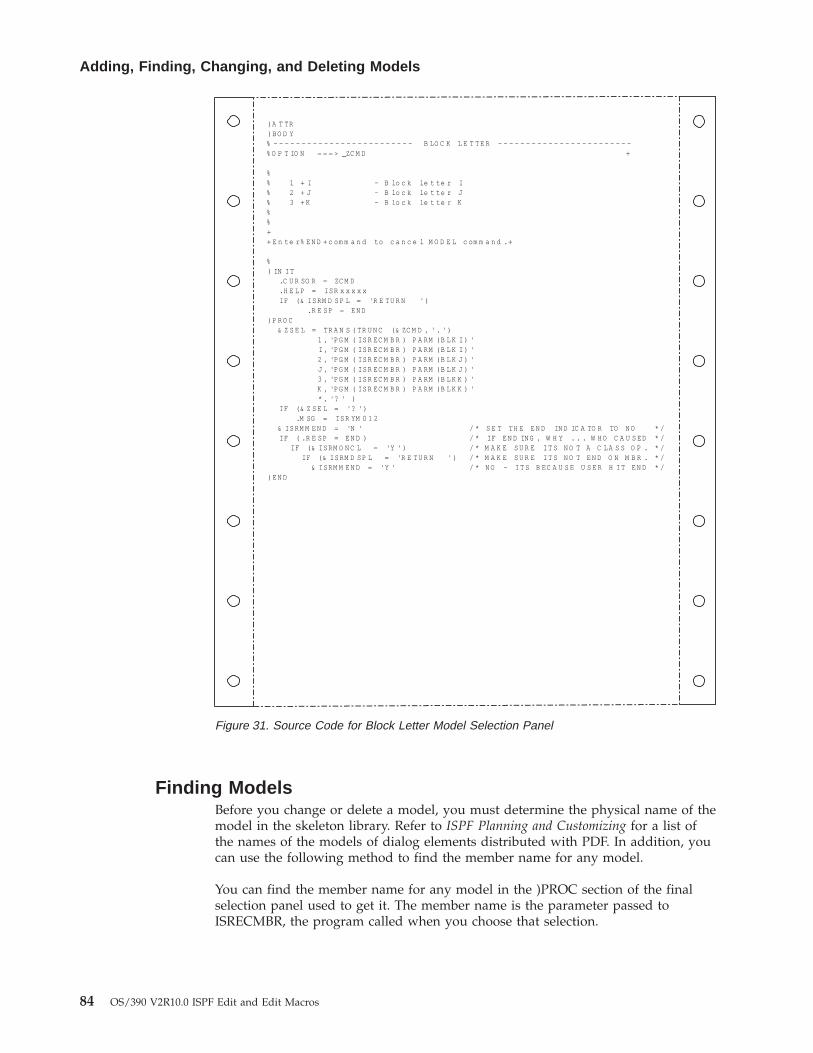
Finding ModelsBefore you change or delete a model, you must determine the physical name of themodel in the skeleton library. Refer to ISPF Planning and Customizing for a list ofthe names of the models of dialog elements distributed with PDF. In addition, youcan use the following method to find the member name for any model.
You can find the member name for any model in the )PROC section of the finalselection panel used to get it. The member name is the parameter passed toISRECMBR, the program called when you choose that selection.
)A T TR)B O D Y% - - - - - - - - - - - - - - - - - - - - - - - - - B LO C K L E T T E R - - - - - - - - - - - - - - - - - - - - - - - -% O P T IO N = = = > _ZC M D +
%% 1 + I - B lo c k le t te r I% 2 + J - B lo c k le t te r J% 3 + K - B lo c k le t te r K%%++ E n te r% E N D + c om m a n d to c a n c e l M O D E L c om m a n d .+
%) IN I T
.C U R SO R = ZC M D
.H E L P = IS R x x x x xIF (& IS RM D S P L = 'R E TU R N ' )
.R E S P = E N D)P R O C
& Z S E L = TR A N S ( TR U N C (& ZC M D , ' . ' )1 , 'PG M ( IS R EC M B R ) P A RM (B L K I ) 'I , 'PG M ( IS R EC M B R ) P A RM (B L K I ) '2 , 'PG M ( IS R EC M B R ) P A RM (B L K J ) 'J , 'PG M ( IS R EC M B R ) P A RM (B L K J ) '3 , 'PG M ( IS R EC M B R ) P A RM (B L K K ) 'K , 'PG M ( IS R EC M B R ) P A RM (B L K K ) '* , '? ' )
IF (& Z S E L = '? ' ).M SG = IS R YM 0 1 2
& IS RM M E N D = 'N ' / * S E T TH E E N D IN D IC A TO R TO N O * /IF ( .R E S P = E N D ) / * IF E N D IN G , W H Y . . . W H O C A U S E D * /
IF (& IS RM O N C L = 'Y ' ) / * M A K E S U R E I T S N O T A C L A S S O P . * /IF (& IS RM D S P L = 'R E TU R N ' ) / * M A K E S U R E I T S N O T E N D O N M B R . * /
& IS RM M E N D = 'Y ' / * N O - I T S B EC A U S E U S E R H I T E N D * /)E N D
Figure 31. Source Code for Block Letter Model Selection Panel
Adding, Finding, Changing, and Deleting Models
84 OS/390 V2R10.0 ISPF Edit and Edit Macros
To determine the name of the model selection panel so that you can look at it tofind the model member name, use the PANELID command when that panel isdisplayed. Then use the Browse or Edit options to look at the member of the panellibrary with that name.
Changing ModelsTo change a model that currently exists, copy the existing model from the skeletondata set into your own data set. Then use the editor to change the model in thesame way you would change any text data set.
Note: Any lines that are to contain notes must have )N in positions 1 and 2,followed by one or more blanks, as shown in the following example.
VARIABLE = VALUE)N VARIABLE - A DIALOG VARIABLE OR A CONTROL VARIABLE.)N VALUE - A LITERAL VALUE CONTAINING: SUBSTITUTABLE)N VARIABLES, A DIALOG VARIABLE, A CONTROL)N VARIABLE, OR AN EXPRESSION CONTAINING A)N BUILT-IN FUNCTION.)N EXAMPLES: &DEPT = 'Z59' &A = &B &C = ' '
When the model is later accessed using MODEL, the lines with )N indicators areflagged with =NOTE= in the line command area ( Figure 26 on page 80).
Deleting ModelsYou can delete models by deleting the references to them. To delete the references,remove the entry referencing the model in both the )BODY and )PROC sections ofthe model selection panel.
Generally, you can leave the model itself in the skeleton library. However, if youare deleting a substantial number of models, you can delete those members fromthe library and then compress it.
Adding, Finding, Changing, and Deleting Models
Chapter 4. Using Edit Models 85

86 OS/390 V2R10.0 ISPF Edit and Edit Macros
Part 2. Edit Macros
Chapter 5. Using Edit Macros . . . . . . . . 89What Are Edit Macros? . . . . . . . . . . 89
Performing Repeated Tasks . . . . . . . . 89Simplifying Complex Tasks . . . . . . . . 91Passing Parameters, and Retrieving andReturning Information . . . . . . . . . . 92
Chapter 6. Creating Edit Macros . . . . . . . 95CLIST and REXX Edit Macros . . . . . . . . 95
Edit Macro Commands and AssignmentStatements. . . . . . . . . . . . . . 96
Using the REXX ADDRESS Instruction . . . 96Command Procedure Statements . . . . . . 96ISPF and PDF Dialog Service Requests . . . . 96TSO Commands . . . . . . . . . . . . 97
Program Macros . . . . . . . . . . . . . 97Differences between Program Macros, CLISTs,and REXX EXECs . . . . . . . . . . . 98Passing Parameters in a Program Macro . . . . 98Program Macro Examples . . . . . . . . 99Writing Program Macros . . . . . . . . . 99Running Program Macros . . . . . . . . 102
Using Commands in Edit Macros. . . . . . . 103Naming Edit Macros . . . . . . . . . . 103Variables . . . . . . . . . . . . . . 103
Variable Substitution . . . . . . . . . 104Character Conversion . . . . . . . . 104
Edit Assignment Statements . . . . . . . 104Value . . . . . . . . . . . . . . 104Keyphrase . . . . . . . . . . . . 105Overlays and Templates . . . . . . . . 106Using Edit Assignment Statements . . . . 106Passing Values . . . . . . . . . . . 107Manipulating Data With Edit AssignmentStatements . . . . . . . . . . . . 107Differences Between Edit, CLIST, and REXXAssignment Statements . . . . . . . . 108
Performing Line Command Functions . . . . 108Parameters . . . . . . . . . . . . . 109Passing Parameters to a Macro . . . . . . 109Using Edit macros in Batch . . . . . . . . 111Edit Macro Messages . . . . . . . . . . 111Macro Levels . . . . . . . . . . . . 111Labels in Edit Macros. . . . . . . . . . 112
Using Labels . . . . . . . . . . . 112Referring to Labels . . . . . . . . . 113Passing Labels . . . . . . . . . . . 114
Referring to Data Lines . . . . . . . . . 114Referring to Column Positions . . . . . . . 114Defining Macros . . . . . . . . . . . 115
Defining an Alias . . . . . . . . . . 115Resetting Definitions . . . . . . . . . 115Replacing Built-In Commands . . . . . . 115Implicit Definitions . . . . . . . . . 116
Using the PROCESS Command and Operand 116
Specifying NOPROCESS in the MacroStatement. . . . . . . . . . . . . 116Specifying a Destination . . . . . . . . 116Specifying a Range . . . . . . . . . 116Example . . . . . . . . . . . . . 117
Recovery Macros . . . . . . . . . . . 117Return Codes from User-Written Edit Macros. . . 118Return Codes from PDF Edit Macro Commands 119Selecting Control for Errors . . . . . . . . . 119
Chapter 7. Testing Edit Macros . . . . . . . 121Handling Errors . . . . . . . . . . . . 121
Edit Command Errors . . . . . . . . . 121Dialog Service Errors . . . . . . . . . . 121
Using CLIST WRITE Statements and REXX SAYStatements . . . . . . . . . . . . . . 122Using CLIST CONTROL and REXX TRACEStatements . . . . . . . . . . . . . . 123Experimenting with Macro Commands . . . . . 124
Chapter 8. Sample Edit Macros . . . . . . . 127TEXT Macro. . . . . . . . . . . . . . 127PFCAN Macro . . . . . . . . . . . . . 129BOX Macro . . . . . . . . . . . . . . 130IMBED Macro . . . . . . . . . . . . . 132ALLMBRS Macro . . . . . . . . . . . . 135FINDCHGS Macro . . . . . . . . . . . 138MASKDATA Macro . . . . . . . . . . . 141
© Copyright IBM Corp. 1984, 2000 87

88 OS/390 V2R10.0 ISPF Edit and Edit Macros
Chapter 5. Using Edit Macros
This chapter documents general-use programming interfaces and associatedguidance information.
This chapter describes edit macros and describes several examples of their use.
What Are Edit Macros?You can use edit macros, which look like ordinary editor commands, to extend andcustomize the editor. You create an edit macro by placing a series of commandsinto a data set or member of a partitioned data set. Then you can run thosecommands as a single macro by typing the defined name in the command line.
Edit macros can be either CLISTs or REXX EXECs written in the CLIST or REXXcommand language, or program macros written in a programming language (suchas FORTRAN, PL/I, or COBOL). This manual uses the CLIST command languagefor most of its examples, with a few examples in REXX. Examples of programmacros are in “Program Macros” on page 97.
Edit macros can also contain edit assignment statements that communicatebetween a macro and the editor. These statements are made up of two parts,keyphrases and values, that are separated by an equal sign. Edit assignmentstatements are described in “Edit Assignment Statements” on page 104.
Edit macros have access to the dialog manager and system services. Because editmacros are CLISTs, or REXX EXECs, programs, they have unlimited possibilities.
Note: All edit macros must have an ISREDIT MACRO statement as the first editcommand. For more information see “Macro Command Syntax” onpage 363.
You can use edit macros to:v Perform repeated tasksv Simplify complex tasksv Pass parametersv Retrieve and return information.
The remainder of this chapter presents examples of these tasks.
Note: To run an edit macro against all members of a PDS you can use a programcontaining a loop that uses a LMMLIST service to obtain the names of PDSmembers. For each member issue an ISPEXEC edit command with the initialmacro keyword. For an example, see Figure 59 on page 136.
Performing Repeated TasksYou can use an edit macro to save keystrokes when you frequently perform a task.A simple example would be using a macro to delete every line that begins with adash (-) in column 1. You could scan the data and manually delete each line, oryou could write a macro that does the same thing much faster. The edit macro in
© Copyright IBM Corp. 1984, 2000 89
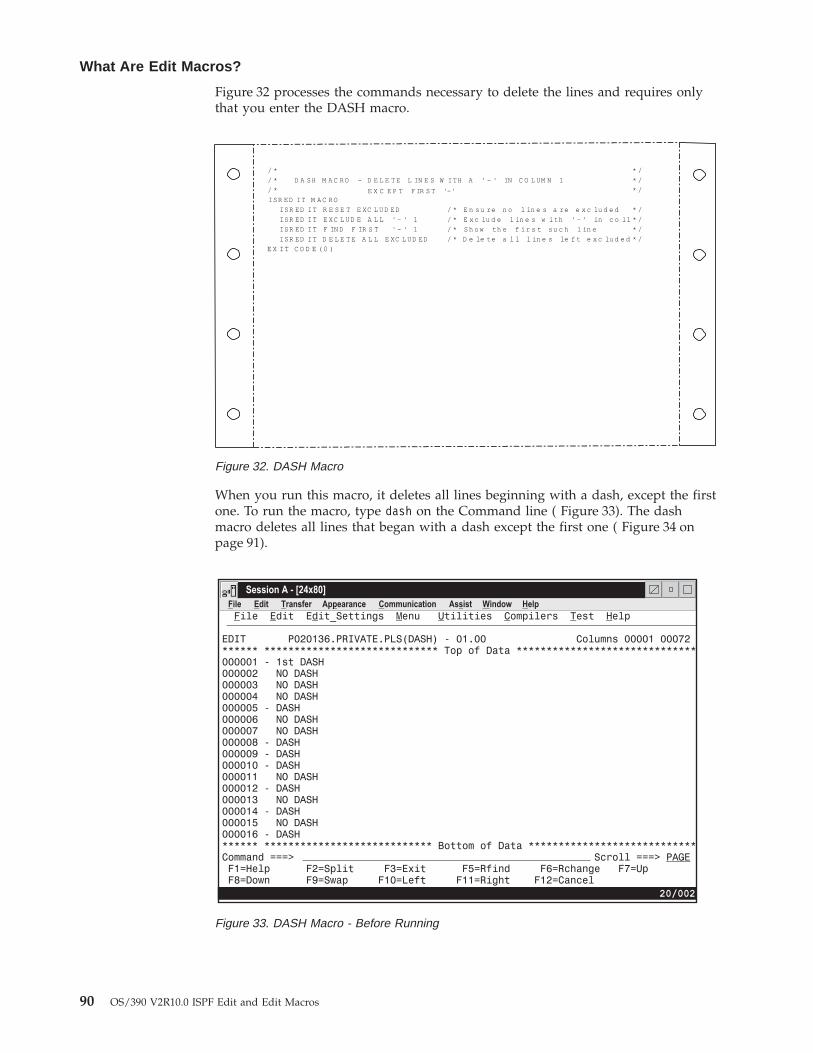
Figure 32 processes the commands necessary to delete the lines and requires onlythat you enter the DASH macro.
When you run this macro, it deletes all lines beginning with a dash, except the firstone. To run the macro, type dash on the Command line ( Figure 33). The dashmacro deletes all lines that began with a dash except the first one ( Figure 34 onpage 91).
/ * * // * D A S H M A C R O - D E L E T E L IN E S W I TH A ' - ' IN C O L UM N 1 * // * * /IS R E D I T M A C R O
IS R E D I T R E S E T E XC L U D E D / * E n su re n o l in e s a re e x c lu d e d * /
IS R E D I T E XC L U D E A L L ' - ' 1 / * E x c lu d e l in e s w i th ' - ' in c o l1 * /IS R E D I T F IN D F IR S T ' - ' 1 / * S h o w th e f i r s t su c h l in e * /IS R E D I T D E L E T E A L L E XC L U D ED / * D e le te a l l l in e s le f t e x c lu d e d * /
E X I T C O D E ( 0 )
E X C E P T F IR S T '-'
Figure 32. DASH Macro
Figure 33. DASH Macro - Before Running
What Are Edit Macros?
90 OS/390 V2R10.0 ISPF Edit and Edit Macros
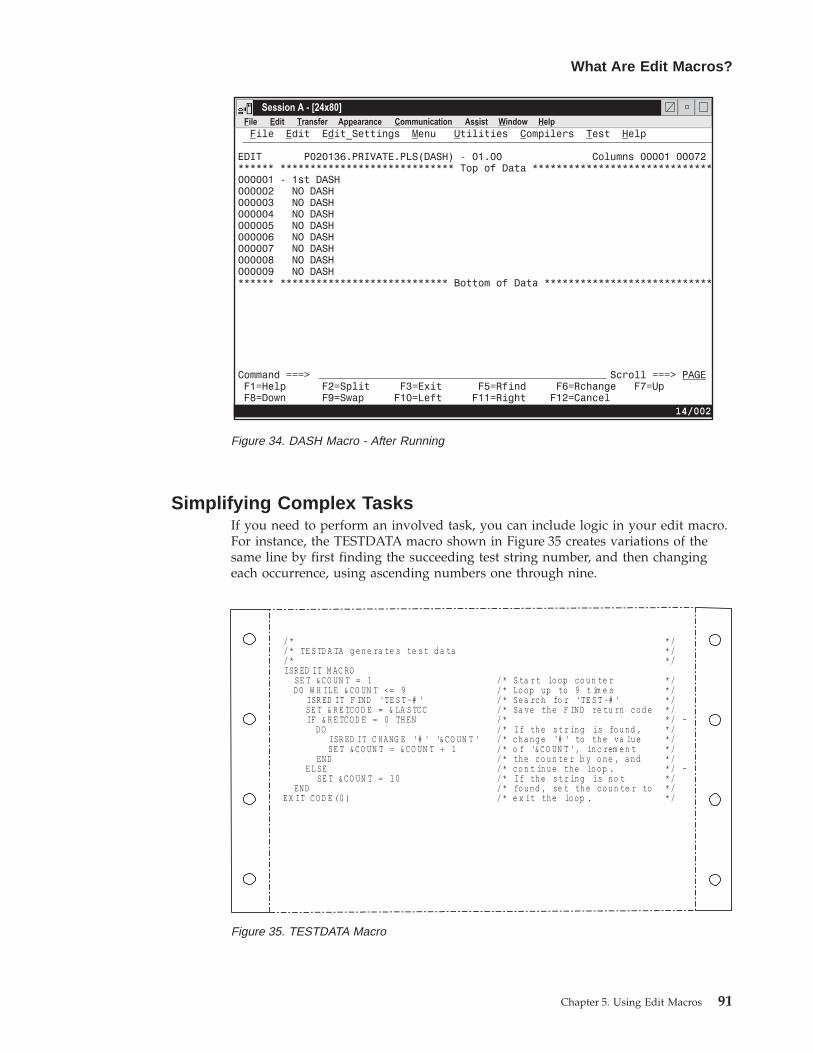
Simplifying Complex TasksIf you need to perform an involved task, you can include logic in your edit macro.For instance, the TESTDATA macro shown in Figure 35 creates variations of thesame line by first finding the succeeding test string number, and then changingeach occurrence, using ascending numbers one through nine.
Figure 34. DASH Macro - After Running
/ * * // * TE S TD A TA g e n e ra te s te s t d a ta * // * * /ISR ED IT M AC RO
SE T &C O UN T = 1 / * S ta r t lo o p c o u n te r * /DO W H IL E & C O UN T < = 9 / * Lo op up to 9 t im e s * /
ISR ED IT F IND 'TE S T -# ' / * Sea rc h fo r 'TE S T -# ' * /SE T & R E TC O D E = & LA S TC C / * Sa ve th e F IND re tu rn c o d e * /IF & R E TC O D E = 0 TH EN / * * / -
DO / * I f th e s t r in g is fo u nd , * /ISR ED IT C H A NG E '# ' '&C O UN T ' / * c ha n g e '# ' to th e va lu e * /SE T &C O UN T = &C O UN T + 1 / * o f '&C O UN T ', in c rem e n t * /
END / * th e c o u n te r b y o n e , a n d * /E L SE / * c o n t in u e th e lo op . * / -
SE T &C O UN T = 1 0 / * I f th e s t r in g is n o t * /END / * fo u nd , se t th e c o u n te r to * /
E X IT C O D E (0 ) / * e x it th e lo o p . * /
Figure 35. TESTDATA Macro
What Are Edit Macros?
Chapter 5. Using Edit Macros 91
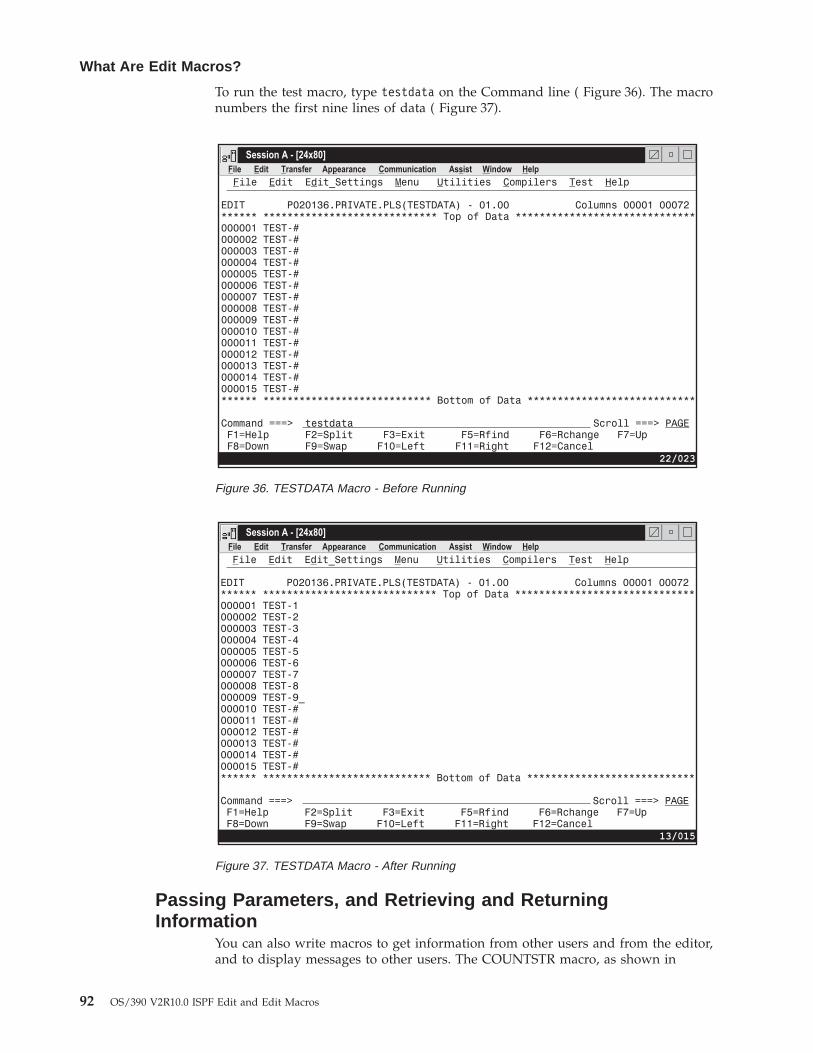
To run the test macro, type testdata on the Command line ( Figure 36). The macronumbers the first nine lines of data ( Figure 37).
Passing Parameters, and Retrieving and ReturningInformation
You can also write macros to get information from other users and from the editor,and to display messages to other users. The COUNTSTR macro, as shown in
Figure 36. TESTDATA Macro - Before Running
Figure 37. TESTDATA Macro - After Running
What Are Edit Macros?
92 OS/390 V2R10.0 ISPF Edit and Edit Macros
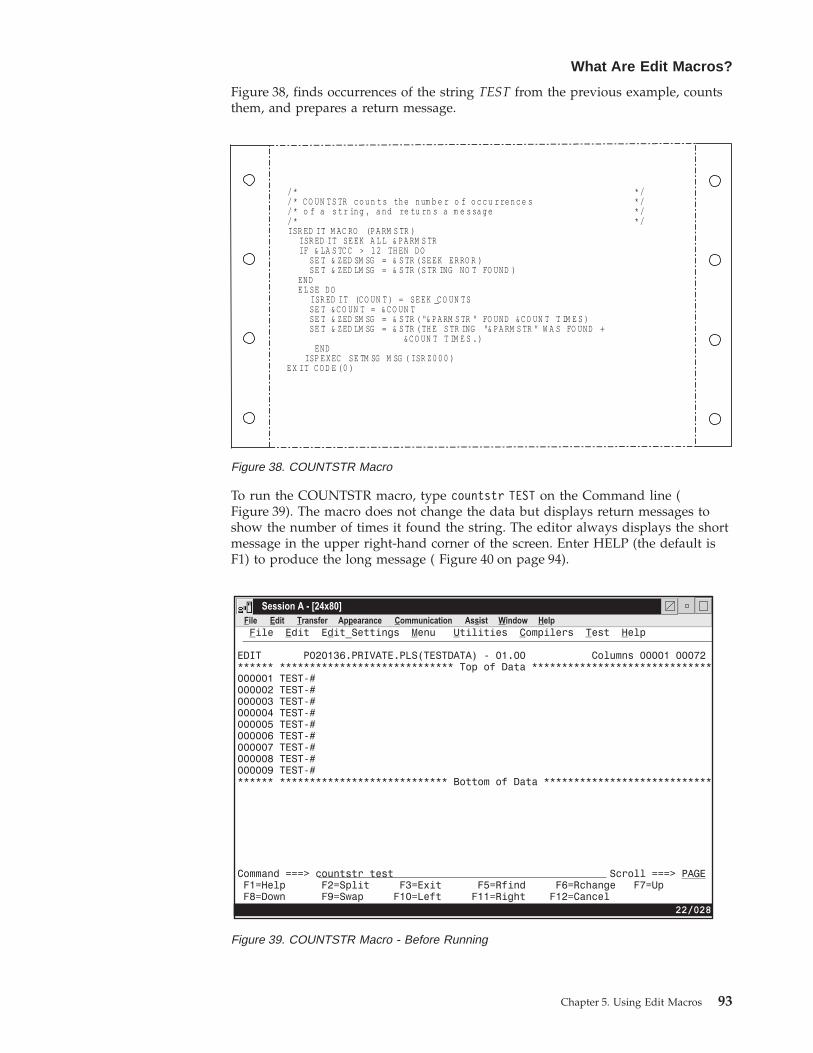
Figure 38, finds occurrences of the string TEST from the previous example, countsthem, and prepares a return message.
To run the COUNTSTR macro, type countstr TEST on the Command line (Figure 39). The macro does not change the data but displays return messages toshow the number of times it found the string. The editor always displays the shortmessage in the upper right-hand corner of the screen. Enter HELP (the default isF1) to produce the long message ( Figure 40 on page 94).
/ * * // * C O UN TS TR c o u n ts th e n um b e r o f o c c u r re n c e s * // * o f a s t r in g , a nd re tu rn s a m e s sa g e * // * * /ISR ED IT M AC RO (P A RM S TR )
ISR ED IT SE EK A L L & PA RM S TRIF & LA S TC C > 1 2 TH EN DO
SE T & ZED SM SG = & S TR (SE EK ER RO R )SE T & ZED LM SG = & S TR (S TR ING NO T FO UND )
ENDE L SE D O
ISR ED IT (C O UN T ) = SE EK _C O UN TSSE T &C O UN T = & C O UN TSE T & ZED SM SG = & S TR ( "& P A RM S TR " FO UND &C O UN T T IM E S )SE T & ZED LM SG = & S TR ( TH E S TR ING "& PA RM S TR " W A S FO UND +
& C O UN T T IM E S . )END
ISP E X EC SE TM SG M SG ( ISR Z0 0 0 )E X IT C O D E (0 )
Figure 38. COUNTSTR Macro
Figure 39. COUNTSTR Macro - Before Running
What Are Edit Macros?
Chapter 5. Using Edit Macros 93
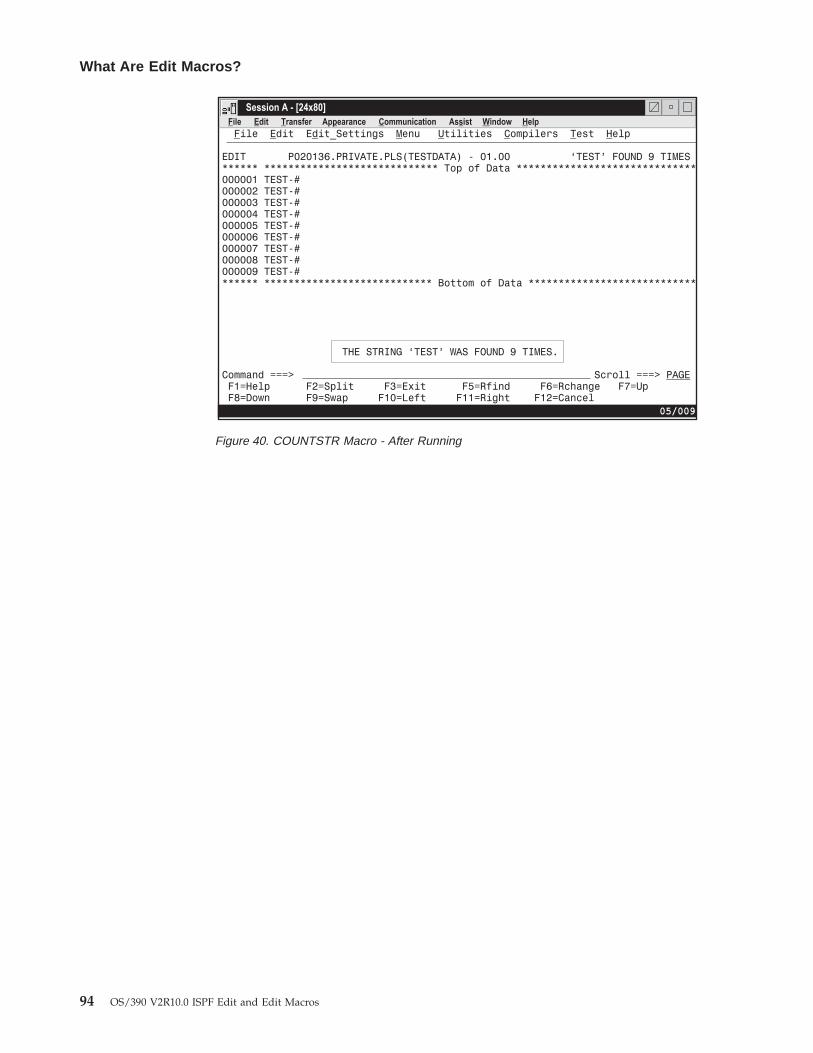
Figure 40. COUNTSTR Macro - After Running
What Are Edit Macros?
94 OS/390 V2R10.0 ISPF Edit and Edit Macros
Chapter 6. Creating Edit Macros
This chapter documents general-use programming interfaces and associatedguidance information.
Edit macros are ISPF dialogs that run in the ISPF editor environment.
CLIST edit macros must be in partitioned data sets in at least one of the followingconcatenations: SYSUPROC, ALTLIB (for data sets activated as CLISTs), orSYSPROC. Data sets in these concatenations can contain either CLIST edit macros,REXX edit macros, or a combination of the two. However, REXX edit macros inthese concatenations must include a REXX comment line (/* REXX */) as the firstline of each edit macro to distinguish them from CLIST edit macros. This commentline can contain other words or characters if necessary, but it must include thestring REXX.
Note: For more information about the ALTLIB concatenation, refer to TSOExtensions Version 2 Command Reference
REXX edit macros must also be in partitioned data sets. Besides the concatenationsin the previous list for CLIST edit macros, REXX edit macros can exist in thefollowing concatenations: SYSUEXEC, ALTLIB (for data sets activated as EXECs),and SYSEXEC. Data sets in these concatenations can contain only REXX EXECs.
For example, if an application activates an application-level library with thefollowing commands:ALTLIB ACTIVATE APPLICATION(EXEC) DA(DS1 DS2 DS3)ALTLIB ACTIVATE APPLICATION(CLIST) DA(DSA DSB DSC)
then data sets DS1, DS2, and DS3 must contain only REXX EXECs. However, datasets DSA, DSB, and DSC can contain either REXX EXECs or CLISTs; if these datasets contain REXX EXECs, the first line of each EXEC must be a REXX commentline.
As in an ISPF dialog, program macros must be made available as load modules ineither the ISPLLIB, STEPLIB, or LINKLST library.
CLIST and REXX Edit MacrosA CLIST edit macro is made up of CLIST statements and a REXX edit macro ismade up of REXX statements. Each statement falls into one of the followingcategories:v Edit macro commandsv CLIST or REXX command procedure statements and commentsv ISPF and PDF dialog service requestsv TSO commands.
All statements are initially processed by the TSO command processor, which scansthem and does symbolic variable substitution. It is important to recognize thedifferent kinds of CLIST and REXX statements listed because:v They are processed by different components of the system.v They have different syntax rules and error handling.v Their descriptions are in different manuals.
© Copyright IBM Corp. 1984, 2000 95
Edit Macro Commands and Assignment StatementsAny statement in an edit macro that begins with ISREDIT is assumed to be an editmacro command or assignment statement. When such a statement is found, theCLIST or REXX command processor does symbolic substitution and then passes itto the editor. The editor processes it, performing any requested functions.Examples of two edit macro commands are:
CLIST Statements REXX Statements
ISREDIT FIND "TEST475"ISREDIT PROCESS
ADDRESS ISPEXEC'ISREDIT FIND TEST475''ISREDIT PROCESS'
Examples of two edit macro assignment statements are:
CLIST Statements REXX Statements
ISREDIT BOUNDS = 1,60ISREDIT (WIDTH) = LRECL
ADDRESS ISPEXEC'ISREDIT BOUNDS = 1,60''ISREDIT (WIDTH) = LRECL'
A description of each edit macro command and assignment statement is inChapter 11. Edit Macro Commands and Assignment Statements.
Using the REXX ADDRESS InstructionIf you have several edit macro commands within a REXX EXEC, you can changethe command environment to the PDF editor with the instruction ADDRESS ISREDIT.All subsequent commands in the EXEC are passed directly to the editor. Thefollowing examples show how you can pass the same edit macro commands usingdifferent environments:
ISPEXEC Environment ISREDIT Environment
ADDRESS ISPEXEC'ISREDIT BOUNDS = 1,60''ISREDIT (WIDTH) = LRECL'
ADDRESS ISREDIT'BOUNDS = 1,60''(WIDTH) = LRECL'
For information on using the REXX ADDRESS instruction, refer to TSO/E Version 2REXX Reference
Command Procedure StatementsCommand procedure statements handle CLIST and REXX variables and controlflow within a CLIST or REXX EXEC. When a command procedure statement isfound, it is processed by the TSO command processor. Some of the commandprocedure statements commonly seen in PDF edit macros are:v Assignment statementsv IF-THEN-ELSE statementsv DO-WHILE-END statementsv EXIT statements.
For a complete list and description of command procedure statements for CLISTand REXX, refer to TSO Extensions CLISTs, TSO/E Version 2 REXX Reference, andTSO/E Version 2 REXX User’s Guide.
ISPF and PDF Dialog Service RequestsAny statement in an edit macro beginning with ISPEXEC is assumed to be an ISPFor PDF component dialog service request. When such a statement is found, the
CLIST and REXX Edit Macros
96 OS/390 V2R10.0 ISPF Edit and Edit Macros
TSO command processor does symbolic substitution. It then passes the commandto the appropriate ISPF or PDF component service to be processed. Some examplesof service requests that might be in a PDF component edit macro are:
CLIST Statements REXX Statements
ISPEXEC SETMSG ...ISPEXEC VPUT ...ISPEXEC DISPLAY ...ISPEXEC EDIT ...ISPEXEC LMINIT ...
ADDRESS ISPEXEC'SETMSG ...''VPUT ...''DISPLAY ...''EDIT ...''LMINIT ...'
For more information on ISPF services, refer to ISPF Services Guide For moreinformation on PDF services, refer to ISPF Examples.
TSO CommandsAny statement that is not recognized as a command procedure statement and doesnot begin with ISPEXEC or ISREDIT is assumed to be a TSO command. TSOcommands can be either CLISTs, REXX EXECs, or programs. When the commandprocessor finds a TSO command, it processes the command. Examples of TSOcommands are:
CLIST Statements REXX Statements
ALLOCATE ...FREE ...DELETE ...RENAME ...
ADDRESS TSO'ALLOCATE ...''FREE ...''DELETE ...''RENAME ...'
For more information on TSO commands, refer to TSO Extensions CommandLanguage Reference
Program MacrosBesides writing edit macros as CLISTs and REXX EXECs, you can also write editmacros in programming languages, just as you write program dialogs. These arecalled program macros.
PDF accepts all languages supported by ISPF. Refer to ISPF Dialog Developer’s Guideand Reference for more information.
There are four basic reasons to write and debug a program macro:v A macro runs faster in a language that can be precompiled than in the CLIST or
REXX interpretive languages. This can be valuable for macros that you runmany times.
v A macro that has to deal with data containing symbols can confuse aninterpretive language processor. Particularly, ampersands in the data can causeproblems.
v A macro that has complex logic can be handled better in a programminglanguage.
v To pass mixed data or strings (those that contain both EBCDIC and DBCScharacters) as parameters, you must use a program macro. Although CLIST doesnot allow mixed data strings, there are edit macro commands and assignmentstatements that allow you to supply data or string operands. The edit macro
CLIST and REXX Edit Macros
Chapter 6. Creating Edit Macros 97
commands and assignment statements that allow you to supply data or stringoperands are:
CHANGE LINE MASKLINEEXCLUDE LINE_AFTER SEEKFIND LINE_BEFORE TABSLINE
Differences between Program Macros, CLISTs, and REXXEXECs
Program macros have special characteristics that you should consider beforecoding:v Variables are not self-defining in program macros, as they are in CLISTs and
REXX EXECs. The VDEFINE, VCOPY, and VREPLACE dialog services must becalled to identify variables looked at or set by the program.
v If you write a REXX EXEC or a program macro that accepts parameter input, themacro must be aware that the input may be in lowercase. Variable values areautomatically converted to uppercase by the CLIST processor.
v Program macros are not implicitly defined, while CLIST and REXX macros are.When you use a command name that is not a built-in or previously-definedprimary command, the editor searches the SYSUEXEC, SYSUPROC, ALTLIB,SYSEXEC, and SYSPROC concatenations (for CLISTs and REXX EXECs) for amember with the same name. If it exists, it is assumed to be a macro.No automatic search is done for program macros. Therefore, there are two waysto tell the editor to run a macro as a program macro. You can precede the namewith an exclamation point (!) if it is less than 8 characters, or you can use theDEFINE command to define the name as a program macro. Program macros aretreated as ISPF dialogs, and must be made available as load modules in eitherthe ISPLLIB, STEPLIB, or LINKLST library.
v Program macros can run without being verified as macros; the MACROstatement can follow calls to dialog services.
v The editor scans edit statements within program macros to do variablesubstitution similar to the CLIST processor. Only one level of substitution isdone. This is the default; use the SCAN assignment statement to prevent it.
Passing Parameters in a Program MacroProgram macros process edit commands by using the ISPLINK or ISPEXECinterface. ISPLNK and ISPEX are the interface names used in FORTRAN andPascal programs. Parameters are passed to the ISREDIT service as follows:
CALL ISPLINK ('ISREDIT',length,buffer)
CALL ISPEXEC (length,'ISREDIT command')
where the following definitions apply:
'ISREDIT'The service name.
length A fullword number indicating the length of the command buffer. When azero length is passed, the maximum buffer length is 255 bytes.
buffer Can contain any edit command that is valid from a macro, typed with thesame syntax used in a CLIST or REXX EXEC.
Program Macros
98 OS/390 V2R10.0 ISPF Edit and Edit Macros
commandAny PDF edit command that is valid from a macro, typed with the samesyntax used in a CLIST or REXX EXEC.
Program Macro ExamplesThe following examples show three different methods of coding a FIND commandfor a program macro. They are typed using PL/I syntax:
CALL ISPLINK ('ISREDIT',LEN0,'¢FIND XYZ¢')CALL ISPLINK ('ISREDIT',LEN8,'FIND XYZ')CALL ISPEXEC (LEN16,'ISREDIT FIND XYZ')
where:
LEN0 A fullword program variable with a value of 0.LEN8 A fullword program variable with a value of 8.LEN16
A fullword program variable with a value of 16.
In each of the previous examples, the remainder of the command is typed as aliteral value.
The first two examples use the ISPLINK syntax. In the ISPLINK call, ISREDIT ispassed as the first parameter and is omitted from the command buffer.
The first example uses a special interface. A zero length can be passed, but onlywhen the command is delimited by a special character. A special character cannotbe an alphanumeric character. If the length is zero and if a valid delimiter is thefirst character in the command buffer, a scan of the command is done to find thenext occurrence of that character. The command length is the number of charactersbetween the two delimiters. Here, the cent sign (¢) is used as a delimiter. When azero length is passed, the maximum buffer length is 255 bytes.
In the second example, an explicit length of 8 is used and the command buffercontains the command without delimiters.
The third example uses the ISPEXEC syntax. This syntax always requires thelength of the command buffer to be passed. The command buffer includes theISREDIT prefix, and is typed the same way as a CLIST or REXX command.
Writing Program MacrosWhen you write a program macro, it can help to first type it as a CLIST or REXXmacro to debug the logic and the command statements. The example that followsis called SEPLINE, a simple macro that separates each line in a set of data with aline of dashes. The REXX syntax is shown in Figure 41 on page 100, the PL/Iprogram is shown in Figure 42 on page 101, and the COBOL program is shown inFigure 43 on page 102. Notice that a VDEFINE is not required for the variableSAVE, which is referenced only by the ISPF editor.
Program Macros
Chapter 6. Creating Edit Macros 99
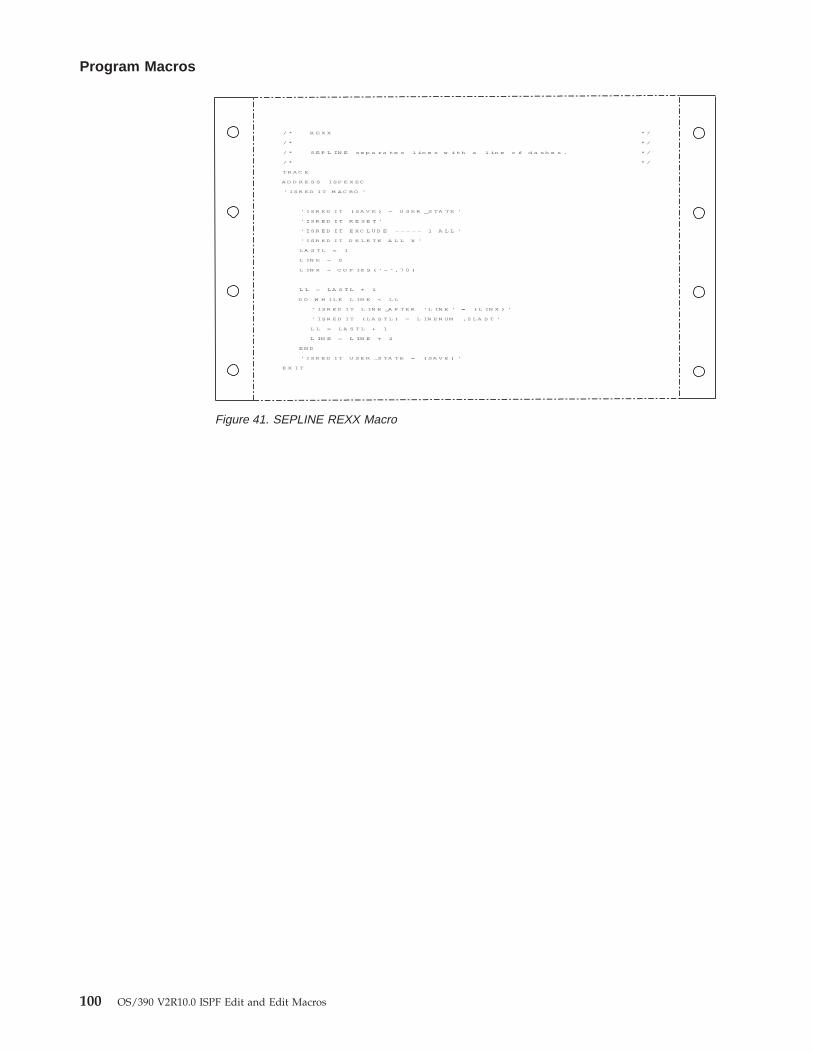
/ * R E X X * /
/ * * /
/ * S E P L IN E se p a ra te s l in e s w i th a l in e o f d a sh e s . * /
/ * * /
TR A C E
A D D R E S S IS P E X EC
' IS R ED I T M A C R O '
' IS R E D I T ( SA V E ) = U S E R _S TA T E '
' IS R E D I T R E S E T '
' IS R E D I T E XC L U D E - - - - - 1 A L L '
' IS R E D I T D E L E T E A L L X '
L A S T L = 1
L IN E = 0
L IN X = C O P IE S ( ' - ' ,7 0 )
L L = L A S T L + 1
D O W H IL E L IN E < L L
' IS R E D I T L IN E _A F T E R 'L IN E ' = ( L IN X ) '
' IS R E D I T ( L A S T L ) = L IN E N UM . Z L A S T '
L L = L A S T L + 1
L IN E = L IN E + 2
E N D
' IS R E D I T U S E R _S TA T E = ( SA V E ) '
E X I T
Figure 41. SEPLINE REXX Macro
Program Macros
100 OS/390 V2R10.0 ISPF Edit and Edit Macros
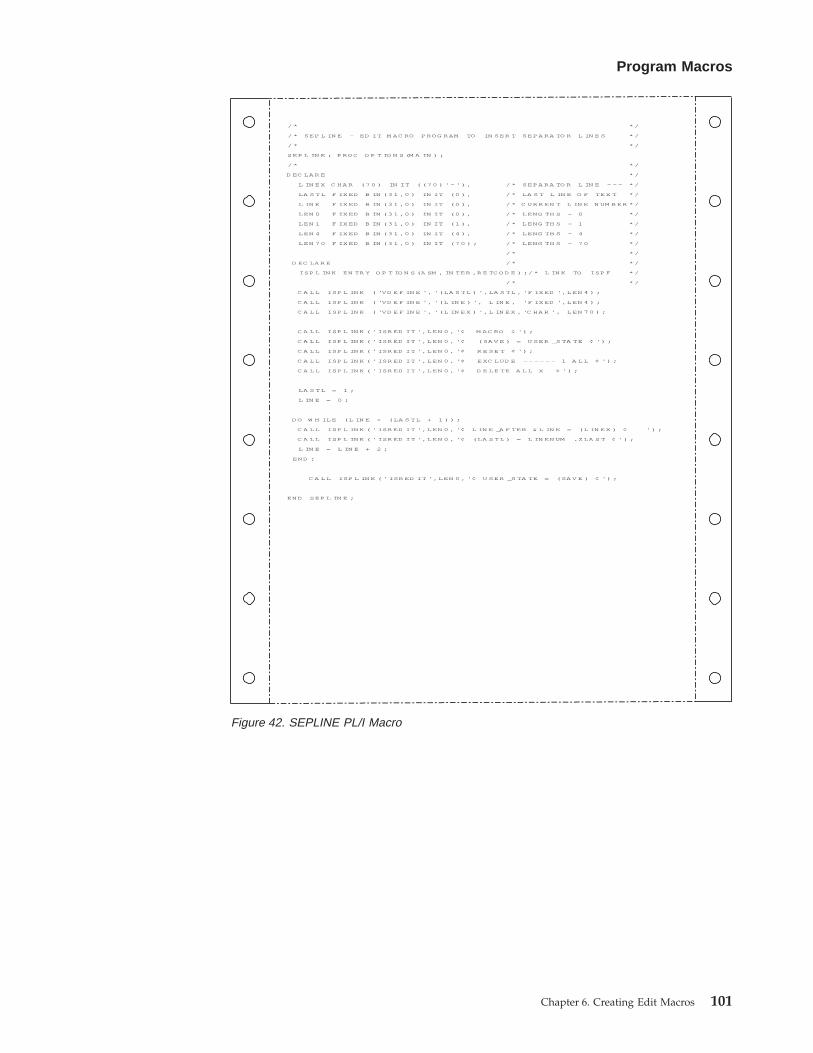
/ * * /
/ * SEP L IN E - ED IT M AC RO P RO G R AM TO IN SER T SEPA R A TO R L IN E S * /
/ * * /
SEP L IN E : P RO C O P T IO N S (M A IN ) ;
/ * * /
D EC LA R E * /
L IN E X C H A R (7 0 ) IN IT ( (7 0 ) ' - ') , / * SEPA R A TO R L IN E - - - * /
LA S TL F IX ED B IN (3 1 ,0 ) IN IT (0 ) , / * LA S T L IN E O F TE X T * /
L IN E F IX ED B IN (3 1 ,0 ) IN IT (0 ) , / * C U R R EN T L IN E N UM B ER * /
L EN 0 F IX ED B IN (3 1 ,0 ) IN IT (0 ) , / * L ENG TH S - 0 * /
L EN 1 F IX ED B IN (3 1 ,0 ) IN IT (1 ) , / * L ENG TH S - 1 * /
L EN 4 F IX ED B IN (3 1 ,0 ) IN IT (4 ) , / * L ENG TH S - 4 * /
L EN 7 0 F IX ED B IN (3 1 ,0 ) IN IT (7 0 ) ; / * L ENG TH S - 7 0 * /
/ * * /
D EC LA R E / * * /
ISP L IN K EN TR Y O P T IO N S (A SM , IN TER ,R E TC O D E ) ;/ * L IN K TO ISP F * /
/ * * /
C A L L ISP L IN K ( 'VD E F IN E ', '(LA S TL ) ',LA S TL , 'F IX ED ',L EN 4 ) ;
C A L L ISP L IN K ( 'VD E F IN E ', '(L IN E ) ', L IN E , 'F IX ED ',L EN 4 ) ;
C A L L ISP L IN K ( 'VD E F IN E ', '(L IN E X ) ',L IN E X , 'C HA R ', L EN 7 0 ) ;
C A L L ISP L IN K ( ' ISR ED IT ',L EN 0 , '¢ M AC RO ¢ ') ;
C A L L ISP L IN K ( ' ISR ED IT ',L EN 0 , '¢ (SA V E ) = U SER _S TA TE ¢ ') ;
C A L L ISP L IN K ( ' ISR ED IT ',L EN 0 , '¢ R E SE T ¢ ') ;
C A L L ISP L IN K ( ' ISR ED IT ',L EN 0 , '¢ E XC LUD E - - - - - - 1 A L L ¢ ') ;
C A L L ISP L IN K ( ' ISR ED IT ',L EN 0 , '¢ D E L E TE A L L X ¢ ') ;
LA S TL = 1 ;
L IN E = 0 ;
D O W H IL E (L IN E < (LA S TL + 1 ) ) ;
C A L L ISP L IN K ( ' ISR ED IT ',L EN 0 , '¢ L IN E _A F TER & L IN E = (L IN E X ) ¢ ') ;
C A L L ISP L IN K ( ' ISR ED IT ',L EN 0 , '¢ (LA S TL ) = L IN EN UM .ZLA S T ¢ ') ;
L IN E = L IN E + 2 ;
END ;
C A L L ISP L IN K ( ' ISR ED IT ',L EN 0 , '¢ U SER _S TA TE = (SA V E ) ¢ ') ;
END SEP L IN E ;
Figure 42. SEPLINE PL/I Macro
Program Macros
Chapter 6. Creating Edit Macros 101
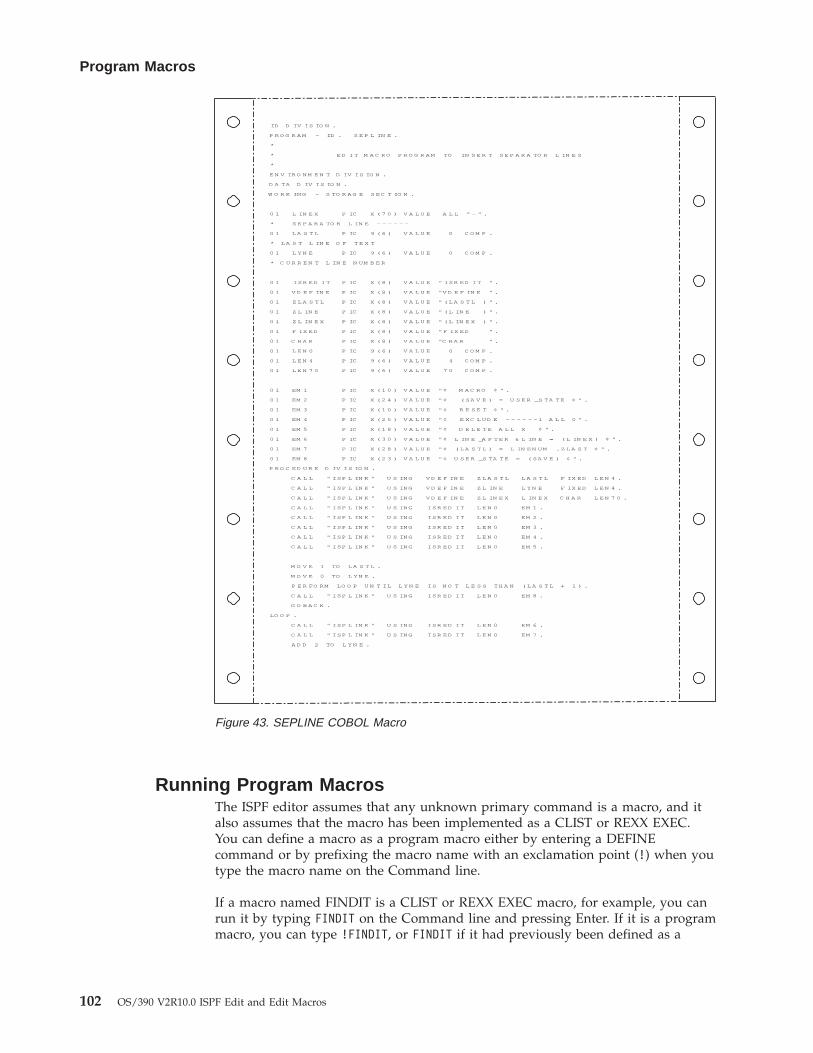
Running Program MacrosThe ISPF editor assumes that any unknown primary command is a macro, and italso assumes that the macro has been implemented as a CLIST or REXX EXEC.You can define a macro as a program macro either by entering a DEFINEcommand or by prefixing the macro name with an exclamation point (!) when youtype the macro name on the Command line.
If a macro named FINDIT is a CLIST or REXX EXEC macro, for example, you canrun it by typing FINDIT on the Command line and pressing Enter. If it is a programmacro, you can type !FINDIT, or FINDIT if it had previously been defined as a
ID D IV IS IO N .
P R O G R A M - ID . S E P L IN E .
*
* ED I T M A C R O P R O G R A M TO IN S E R T S E P A R A TO R L IN E S
*
E N V IR O N M E N T D IV IS IO N .
D A TA D IV IS IO N .
W O R K IN G - S TO R A G E S EC T IO N .
0 1 L IN E X P IC X ( 7 0 ) V A L U E A L L " - " .
* S E P A R A TO R L IN E - - - - - -
0 1 L A S T L P IC 9 ( 6 ) V A L U E 0 C O M P .
* L A S T L IN E O F T E X T
0 1 L Y N E P IC 9 ( 6 ) V A L U E 0 C O M P .
* C U R R E N T L IN E N UM B E R
0 1 IS R E D I T P IC X ( 8 ) V A L U E " IS R ED I T " .
0 1 V D E F IN E P IC X ( 8 ) V A L U E "V D E F IN E " .
0 1 Z L A S T L P IC X ( 8 ) V A L U E " ( L A S T L ) " .
0 1 Z L IN E P IC X ( 8 ) V A L U E " ( L IN E ) " .
0 1 Z L IN E X P IC X ( 8 ) V A L U E " ( L IN E X ) " .
0 1 F IX E D P IC X ( 8 ) V A L U E " F IX ED " .
0 1 C H A R P IC X ( 8 ) V A L U E "C H A R " .
0 1 L E N 0 P IC 9 ( 6 ) V A L U E 0 C O M P .
0 1 L E N 4 P IC 9 ( 6 ) V A L U E 4 C O M P .
0 1 L E N 7 0 P IC 9 ( 6 ) V A L U E 7 0 C O M P .
0 1 EM 1 P IC X ( 1 0 ) V A L U E "¢ M A C R O ¢ " .
0 1 EM 2 P IC X ( 2 4 ) V A L U E "¢ ( SA V E ) = U S E R _S TA T E ¢ " .
0 1 EM 3 P IC X ( 1 0 ) V A L U E "¢ R E S E T ¢ " .
0 1 EM 4 P IC X ( 2 5 ) V A L U E "¢ E XC L U D E - - - - - - 1 A L L 0 " .
0 1 EM 5 P IC X ( 1 8 ) V A L U E "¢ D E L E T E A L L X ¢ " .
0 1 EM 6 P IC X ( 3 0 ) V A L U E "¢ L IN E _A F T E R & L IN E = ( L IN E X ) ¢ " .
0 1 EM 7 P IC X ( 2 8 ) V A L U E "¢ ( L A S T L ) = L IN E N UM . Z L A S T ¢ " .
0 1 EM 8 P IC X ( 2 3 ) V A L U E "¢ U S E R _S TA T E = ( SA V E ) ¢ " .
P R O C ED U R E D IV IS IO N .
C A L L " IS P L IN K " U S IN G V D E F IN E Z L A S T L L A S T L F IX ED L E N 4 .
C A L L " IS P L IN K " U S IN G V D E F IN E Z L IN E L Y N E F IX ED L E N 4 .
C A L L " IS P L IN K " U S IN G V D E F IN E Z L IN E X L IN E X C H A R L E N 7 0 .
C A L L " IS P L IN K " U S IN G IS R ED I T L E N 0 EM 1 .
C A L L " IS P L IN K " U S IN G IS R ED I T L E N 0 EM 2 .
C A L L " IS P L IN K " U S IN G IS R ED I T L E N 0 EM 3 .
C A L L " IS P L IN K " U S IN G IS R ED I T L E N 0 EM 4 .
C A L L " IS P L IN K " U S IN G IS R ED I T L E N 0 EM 5 .
M O V E 1 TO L A S T L .
M O V E 0 TO L Y N E .
P E R FO RM LO O P U N T IL L Y N E IS N O T L E S S TH A N ( L A S T L + 1 ) .
C A L L " IS P L IN K " U S IN G IS R ED I T L E N 0 EM 8 .
G O B A C K .
LO O P .
C A L L " IS P L IN K " U S IN G IS R ED I T L E N 0 EM 6 .
C A L L " IS P L IN K " U S IN G IS R ED I T L E N 0 EM 7 .
A D D 2 TO L Y N E .
Figure 43. SEPLINE COBOL Macro
Program Macros
102 OS/390 V2R10.0 ISPF Edit and Edit Macros
program macro by the DEFINE command. The first time you enter a macro withan exclamation point (!) prefix implicitly defines that macro as a program macro.Thereafter, you can omit the prefix.
To use the DEFINE command to define a program as a macro, type:Command ===> DEFINE name PGM MACRO
and press Enter. The operands can be typed in either order. The following, forexample, is also valid:Command ===> DEFINE name MACRO PGM
Using Commands in Edit MacrosYou can use most primary commands in an edit macro if you precede it withISREDIT. Table 6 on page 300 shows the macro commands available to use. Thereare differences, though, between entering a command on the Command line andprocessing the same command in a macro as one of a series:v When you enter a command on the Command line, the result of the command is
displayed in either an informational or an error message. If you process thesame command in a macro, messages are not displayed, and the lines actuallydisplayed may be different from a command entered on the Command line.
v When you issue a series of commands as a macro, the display does not changewith each command. The lines displayed are the end result of the macrorunning, not the individual commands.
v Some commands have additional operands permitted in a macro that cannot beused interactively.
Besides these differences, there are certain guidelines to remember when creatingedit macros. The following topics apply to CLIST, REXX, and program macros.
Naming Edit MacrosEdit macro names can be any valid CLIST, REXX, or program name. Using theDEFINE ALIAS command, you can assign command names for running the editmacros that are different from the actual name.
When choosing names and aliases, avoid defining names that might conflict withthe DEFINE command operands and their abbreviations. You can do this byimplicitly defining the macros: precede program macros with an exclamation point(!); do not use explicit definitions for CLIST or REXX macros.
VariablesVariables function in edit macros the same way they do in CLISTs and REXXEXECs. The only exceptions are dialog variables—variables that communicate withISPF and the PDF component—which can only have names from 1 to 8 charactersin length. The following presents a brief introduction on using variables; for moredetailed information on variables in CLISTs, refer to TSO Extensions CLISTs. Forinformation on variables in REXX EXECs, refer to TSO/E Version 2 REXX Referenceand TSO/E Version 2 REXX User’s Guide.
When coding macros in CLIST or REXX, remember that all ISREDIT statements areprocessed for variable substitution before the editor sees the statements. Enclosethe variables in parentheses when variable substitution should not occur, such asin cases when ISREDIT statements expect a variable name and not its value. ForCLIST variables, omit the ampersand; for REXX variables, use quotes.
Program Macros
Chapter 6. Creating Edit Macros 103
Variable SubstitutionScan mode controls the automatic replacement of variables in command linespassed to the editor. Use the SCAN assignment statement either to set the currentvalue of scan mode (for variable substitution), or to retrieve the current value ofscan mode and place it in a variable.
When scan mode is on, command lines are scanned for ampersands (&). If anampersand followed by a non-blank character is found, the name following theampersand (ended by a blank or period) is assumed to be a dialog variable name,such as ‘&NAME’. or ‘&NAME’; the value from the variable pool is substituted inthe command for the variable name before the command is processed. The periodafter the variable allows concatenation of the variable value without an interveningblank delimiter. Remember this when using program macros that do not have theCLIST processor to substitute variable values.
Character ConversionA CLIST automatically converts all character strings to uppercase before passingthem to the editor. Therefore, if you want an edit macro command or assignmentstatement that you process from a CLIST to find a character string in lowercase,you must precede the command or statement with the TSO CONTROL ASISstatement. This statement passes lowercase characters to the editor.
Edit Assignment StatementsYou use edit assignment statements to communicate between macros and theeditor. An assignment statement consists of two parts, values and keyphrases, whichare separated by an equal sign. The value segment represents data that is in themacro, and the keyphrase segment represents data in the editor. You can useassignment statements to pass data from the edit macro to the editor, or to transferdata from the editor to the edit macro.
Data is always transferred from the right-hand side of the equal sign in anassignment statement to the left side. Therefore, if the keyphrase is on the right,data known to the editor is put into CLIST or REXX variables on the left. In thissituation, the yyy would be a keyphrase, and the xxx would be the value.
CLIST Statement REXX Statements
ISREDIT xxx = yyyADDRESS ISPEXEC'ISREDIT xxx = yyy'
ValueThe value part of an edit macro assignment statement can be one of the following:v A literal character string can be one of the following:
Simple stringAny series of characters not enclosed within quotes (either ' or "),parentheses, or less-than (<) and greater-than signs (>), and notcontaining any embedded blanks or commas.
Delimited stringAny string starting and ending with a quote (either ' or "), but notcontaining embedded quotes. The delimiting quotes are not consideredto be part of the data.
v A dialog variable name enclosed in parentheses (varname). If the dialog variablename is on the right, the entire contents of the variable are considered part of
Using Commands in Edit Macros
104 OS/390 V2R10.0 ISPF Edit and Edit Macros
the data, including any quotes, apostrophes, blanks, commas, or other specialcharacters. If the dialog variable name is on the left, its content is totallyreplaced.
Notes:
1. In the CLIST environment, the CLIST variable pool and the dialog functionvariable pool are merged. Therefore, variables in parentheses are the same asampersand variables, except that the editor does the symbolic substitutionrather than the CLIST processor.
2. In the REXX environment, the REXX variable pool and the dialog functionvariable pool are also merged. Therefore, quoted variable names inparentheses are the same as unquoted variable names, except that the editordoes the symbolic substitution rather than the REXX processor.
3. In a program macro, you must use the VDEFINE service for any variablesthat are passed to the editor.
KeyphraseA keyphrase is either a single keyword, or a keyword followed by a line numberor label. The keyphrase can be either a single-valued keyphrase or a double-valuedkeyphrase.
Keyphrase Syntax: Single-valued keyphrases can have the following syntax:ISREDIT keyphrase = keyphraseISREDIT keyphrase = valueISREDIT keyphrase = keyphrase + valueISREDIT keyphrase = value + value
Double-valued keyphrases can have the following syntax:ISREDIT (varname,varname) = keyphraseISREDIT keyphrase = value-pair
where value-pair is one of the following:v Two literals, which can be separated by a comma or blank. For examples:
CLIST Statements REXX Statements
ISREDIT CURSOR = 1,40ISREDIT CURSOR = 1 40
ADDRESS ISPEXEC'ISREDIT CURSOR = 1,40''ISREDIT CURSOR = 1 40'
Apostrophes or quotes cannot be used when specifying two numeric values. Allof the following, for example, are incorrect:
CLIST Statements REXX Statements
ISREDIT CURSOR = '1','40'ISREDIT CURSOR = '1,40'
ADDRESS ISPEXEC"ISREDIT CURSOR = '1','40'""ISREDIT CURSOR = '1,40'"
v Two variable names enclosed in parentheses and separated by a comma orblank, where each variable contains a single value:(varname,varname) or (varname varname)
In any edit assignment statement containing a two-valued keyphrase, either of thevariables or values in a pair can be omitted. The general syntax then becomes:
Using Commands in Edit Macros
Chapter 6. Creating Edit Macros 105
ISREDIT (varname) = keyphraseISREDIT keyphrase = single-valueISREDIT (,varname) = keyphraseISREDIT keyphrase = ,single-value
Note: Even though you can use blanks instead of commas to separate pairedvariables or values, you must use a leading comma whenever the firstvariable or value has been omitted.
Overlays and TemplatesThe transfer of information from one side of the equal sign to the other can involvecombining several variables or values. This transfer is called an overlay. When youperform overlays, there are certain guidelines to remember.
When two values (or a keyphrase and a value) are on one side of an equal signand separated by a plus sign (+), only non-blank characters in the value on theright overlay corresponding positions in the value on the left. For example:
CLIST Statements
ISREDIT LINE .ZCSR = LINE + '//'ISREDIT MASKLINE = MASKLINE + <40 '&STR(/*)' 70 '&STR(*/)'>
REXX Statements
ADDRESS ISPEXEC"ISREDIT LINE .ZCSR = LINE + '//'""ISREDIT MASKLINE = MASKLINE + <40 '/*' 70 '*/'>"
The first example causes two slashes to replace the first two column positions ofthe current line (the line containing the cursor). The remainder of the line isunchanged. The second example uses a template to cause columns 40-41 of thecurrent mask line to be replaced with /* and columns 70-71 to be replaced with */.Again, remember that the template replaces the corresponding positions on the leftonly if those left positions are blank. The template shown in the preceding examplehas the form:<col-1 literal-1 col-2 literal-2 ... >
It can be designed with col-1 and col-2 indicating a starting column position, andliteral-1 and literal-2 indicating the data to start in that column. The entire templateis delimited with less-than (<) and greater-than (>) signs. A template can bedesigned by using variable names (enclosed in parentheses) for either col-1, col-2,literal-1, literal-2, or for all four. All of the following forms are valid:<(colvar-1) (datavar-1) (colvar-2) (datavar-2) ... ><(colvar-1,datavar-1) (colvar-2,datavar-2) ... ><(colvar-1) literal-1 col-2 (datavar-2) ... >
Using Edit Assignment StatementsYou can use an assignment statement to pass edit parameters to a macro or toallow a macro to set an edit parameter. If the edit parameter keyphrase is on theright of the assignment statement, the edit parameter is passed to the macro. If theedit parameter keyphrase is on the left of the assignment statement, the editparameter is changed to the value on the right. In the following assignmentstatement, the edit parameter keyphrase is CAPS. The editor assigns the currentCAPS edit mode status (ON or OFF) to the variable CAPMODE.
CLIST Statement REXX Statements
ISREDIT (CAPMODE) = CAPSADDRESS ISPEXEC'ISREDIT (CAPMODE) = CAPS'
Using Commands in Edit Macros
106 OS/390 V2R10.0 ISPF Edit and Edit Macros
In the preceding example statements, the parentheses around CAPMODE indicateto the ISPF editor that the enclosed name is the name of a symbolic variable. If thename happened to be preceded with an ampersand (&), rather than enclosed inparentheses, the CLIST processor would replace the name of the variable with itsactual value, and the editor would not see the name. In a REXX statement, thevariable name must be within quotes so that the name, not the value, is passed.Only names with 8 or fewer characters are allowed by the ISPF editor.
When the editor finds a variable name in parentheses in a position where a valueis required, it substitutes the value assigned to that variable. In the followingexamples the edit macro sets the edit CAPS mode:
CLIST Statements REXX Statements
ISREDIT CAPS = ONISREDIT CAPS = (CAPMODE)ISREDIT CAPS = &CAPMODE
ADDRESS ISPEXEC'ISREDIT CAPS = ON''ISREDIT CAPS = (CAPMODE)''ISREDIT CAPS = 'capmode
The CLIST and REXX command processors replace the variable CAPMODE withits assigned value before the ISPF editor processes the statement. This makes thelast statement equivalent to the first statement; in this case, the variable has a valueof ON.
The second statement differs in that the editor receives the variable name andretrieves its value from the dialog variable pool.
Passing ValuesSome information can best be passed back and forth between the editor and themacro in pairs. The following examples show assignment statements that pass twovalues:
CLIST Statements REXX Statements
ISREDIT (LB,RB) = BOUNDSISREDIT BOUNDS = (LB,RB)
ADDRESS ISPEXEC'ISREDIT (LB,RB) = BOUNDS''ISREDIT BOUNDS = (LB,RB)'
In the first statement, the current left and right boundaries are stored into thevariables LB (LEFTBND) and RB (RIGHTBND). In the second statement, the valuesfrom the variables LB and RB are used to change the current boundaries.
For more information on which edit macro commands take one variable and whichtake two, see Chapter 11. Edit Macro Commands and Assignment Statements.
Manipulating Data With Edit Assignment StatementsYou can use assignment statements to obtain, replace, or add data being edited.
To copy a line, use:
CLIST Statement REXX Statements
ISREDIT LINE_AFTER 5 = LINE 2ADDRESS ISPEXEC'ISREDIT LINE_AFTER 5 = LINE 2'
To copy line 1 from the data set into the variable LINEDATA, use:
CLIST Statement REXX Statements
ISREDIT (LINEDATA) = LINE 1ADDRESS ISPEXEC'ISREDIT (LINEDATA) = LINE 1'
Using Commands in Edit Macros
Chapter 6. Creating Edit Macros 107
To replace the first line in the data set, using the data from the variableLINEDATA, use:
CLIST Statement REXX Statements
ISREDIT LINE 1 = (LINEDATA)ADDRESS ISPEXEC'ISREDIT LINE 1 = (LINEDATA)'
To add a new line after line 1 in the data set using the variable NEWDATA, use:
CLIST Statement REXX Statements
ISREDIT LINE_AFTER 1 = (NEWDATA)ADDRESS ISPEXEC'ISREDIT LINE_AFTER 1 = (NEWDATA)'
Differences Between Edit, CLIST, and REXX AssignmentStatementsNote the following differences between edit, CLIST, and REXX assignmentstatements:v Edit assignment statements are preceded by ISREDIT. CLIST assignment
statements are preceded by SET. If the address isredit command is in effect, editassignment statements within a REXX exec do not need to be preceded byISREDIT.
v In edit assignment statements, a keyphrase must appear on either the left orright side of the equal sign. A keyphrase is either a single keyword, or akeyword followed by a line number or label. See “Keyphrase” on page 105 ifyou need more information.
v When coding edit assignment statements, variable names to be passed to theeditor are enclosed in parentheses so that the PDF component is passed thename of the variable, not its value. Sometimes two variable names may appearwithin the parentheses.
v Arithmetic expressions are not allowed in an edit assignment statement, but incertain cases a plus sign (+) can be used to show partial overlay of a line. See“Overlays and Templates” on page 106 if you need more information.
Performing Line Command FunctionsYou cannot issue line commands directly from an edit macro. For example, youcannot use the M (move) line command within an edit macro.
However, you can perform most of the functions provided by line commands bywriting an edit macro. By using edit assignment statements or by issuing primarycommands, you can perform functions such as move, copy, or repeat. For example,if you want to move a line, you can assign the line to a CLIST or REXX variable,delete the original line using the DELETE command, and assign the variable to anew line in the data.
Some commands can be processed only from within a macro. These commandsprovide functions done with line commands from the keyboard. Table 3 identifiesthe commands, the corresponding line commands, and the functions performed.
Table 3. Edit Macro Commands Corresponding to Line Commands
Edit Macro Statement Corresponding LineCommand
Function
INSERT I Inserts temporary lines
Using Commands in Edit Macros
108 OS/390 V2R10.0 ISPF Edit and Edit Macros
Table 3. Edit Macro Commands Corresponding to Line Commands (continued)
Edit Macro Statement Corresponding LineCommand
Function
SHIFT ( ( Shifts columns left
SHIFT ) ) Shifts columns right
SHIFT < < Shifts data left
SHIFT > > Shifts data right
TENTER TE Starts text entry mode
TFLOW TF Performs text flow
TSPLIT TS Performs text split
For example:
CLIST Statement REXX Statements
ISREDIT TFLOW 1ADDRESS ISPEXEC'ISREDIT TFLOW 1'
causes the paragraph starting on line 1 to be flowed in the same way as a TF (textflow) line command would if entered on the first line.
For more information on line command functions in edit macros, see Chapter 11.Edit Macro Commands and Assignment Statements.
ParametersIf you want to supply information to a macro as parameters, you must identifythese parameters on the ISREDIT MACRO statement by enclosing them inparentheses. For example, if you have the following macro command in an editmacro named FIXIT:
CLIST Statement REXX Statements
ISREDIT MACRO (MEMNAM)ADDRESS ISPEXEC'ISREDIT MACRO (MEMNAM)'
when you enter:Command ====> FIXIT ABCD
the value ABCD is assigned to the variable MEMNAM.
Passing Parameters to a MacroA parameter can be either a simple string or a quoted string. It can be passed byusing the standard method of putting variables into shared and profile pools (useVPUT in dialogs and VGET in initial macros). This method is best suited toparameters passed from one dialog to another, as in an edit macro.
You can enter parameters along with an edit macro name as a primary commandby using the MACRO command. This command allows you to identify the namesof one or more variables to contain any passed parameters.
It is an error to enter parameter values for a macro without parameter variables. Ifyou make this mistake, the editor displays a message. It is not an error if you
Using Commands in Edit Macros
Chapter 6. Creating Edit Macros 109
supply more or fewer parameters than the number of variables that are includedon the MACRO command. When you are writing a macro, check for omissions andthe order of parameters.
Multiple parameters are placed into one or more variables based on the number ofvariables specified in the MACRO command. If you include more than onevariable name, the editor stores the parameters in order (the first parameter in thefirst variable, the second in the second, and so on). Note that assignment tovariables is by position only.
If there are more parameters entered than there are variables available, the editorstores the remaining parameters as 1 character string in the last variable. If youinclude only one variable name on the MACRO command, that variable containsall the parameters entered with the macro name. If there are more variable namesthan parameters, the unused variables are set to nulls.
Multiple parameters are separated by a blank or comma, or a quoted string that isseparated by a blank or comma. Quotes can be single (') or double ("). If you wantyour FIXIT macro to accept two parameters, for example, you can include thefollowing command:
CLIST Statement REXX Statements
ISREDIT MACRO (PARM1,PARM2,REST)ADDRESS ISPEXEC'ISREDIT MACRO (PARM1,PARM2,REST)'
This means that if you enter:Command ====> FIXIT GOOD BAD AND UGLY
variable PARM1 is assigned the value GOOD, PARM2 is assigned the value BAD, andREST is assigned the value AND UGLY.
If the parameters passed were GOOD BAD, variable REST would be null. Also, if theparameters are enclosed in quotation marks, such as:Command ====> FIXIT 'GOOD BAD' 'AND UGLY'
PARM1 would be set to GOOD BAD, PARM2 would be set to AND UGLY, and RESTwould be null.
For another example, see the TRYIT macro ( Figure 46 on page 124). If the MACROstatement contains two variables (ISREDIT MACRO (COMMAND,PARM)), entering:Command ===> TRYIT RESET
sets the variables Command to RESET and PARM to null. Conversely, the followingcommand:Command ===> TRYIT FIND A
sets Command to FIND and PARM to A. To find out what was actually typed on thecommand line, a macro may examine the variable ZEDITCMD, which is in theshared variable pool. ZEDITCMD is a character variable, the length if whichdepends on the length of the command entered. Therefore, you should eitherVDEFINE ZEDITCMD to be sufficiently large to hold the expected command, oruse the VCOPY service to get the length.
Using Commands in Edit Macros
110 OS/390 V2R10.0 ISPF Edit and Edit Macros
Using Edit macros in BatchYou can run PDF edit macros in batch by submitting JCL which allocates all of thenecessary ISPF libraries (refer to ISPF Dialog Developer’s Guide and Reference ), andruns a command which calls the EDIT service with an initial macro. This initialmacro can do anything that can be done by an initial macro in an interactivesession. However, in batch, the macro should end with an ISREDIT END orISREDIT CANCEL statement. These statements insure that no attempt is made todisplay the edit screen in batch.
A simple initial macro to change strings in batch might look like the following:ISREDIT MACROISREDIT CHANGE JANUARY FEBRUARY ALLISREDIT END
Edit Macro MessagesYou can display messages from an edit macro the same way you do from an ISPFdialog.v Use SETMSG, which causes the message to appear on whatever panel is
displayed next.v Use DISPLAY with the MSG keyword. This is useful if the macro displays
panels of its own.
PDF provides three generic messages for use in dialogs where you want togenerate the message text or when you do not want a separate message library.ISRZ000 '&ZEDSMSG' .ALARM = NO .HELP = ISR2MACR'&ZEDLMSG'
ISRZ001 '&ZEDSMSG' .ALARM = YES .HELP = ISR2MACR'&ZEDLMSG'ISRZ002 '&ZERRSM' .ALARM = &ZERRALRM .HELP = &ZERRHM'&ZERRLM'
For example, if you want your macro to sound an alarm, and to issue the shortmessage INVALID PARAMETER and the long message PARAMETER MUST BE 4 DIGITS,use the following statements:
CLIST Statements
SET &ZEDSMSG = &STR(INVALID PARAMETER)SET &ZEDLMSG = &STR(PARAMETER MUST BE 4 DIGITS)ISPEXEC SETMSG MSG(ISRZ001)
REXX Statements
ADDRESS ISPEXECzedsmsg = 'Invalid Parameter'zedlmsg = 'Parameter must be 4 digits''SETMSG MSG(ISRZ001)'
Note: ZEDLMSG only displays when you enter the HELP command.
Macro LevelsEach macro operates on a separate and unique level. A person at the keyboardalways operates at level 0. If that person starts a macro, it operates at level 1; themacro started by a level-1 macro operates at level 2, and so on. The level is thedegree of macro nesting. Edit macros are primary commands; thus, nested macrosare started by prefixing them with ISREDIT.
Using Commands in Edit Macros
Chapter 6. Creating Edit Macros 111
A macro can determine its own level with the following assignment statement:ISREDIT (varname) = MACRO_LEVEL
The current level number is stored in the specified variable. ISPF supports up to255 levels of macro nesting.
Labels in Edit MacrosA label is an alphabetic character string used to name lines. It is especially usefulfor keeping track of a line whose relative line number may change because labelsremain set on a line even when relative line numbers change. The following speciallabels are automatically assigned by the editor. A label must begin with a period (.)and be followed by no more than 8 alphabetic characters, the first of which cannotbe Z. No special characters or numeric characters are allowed.
The special labels that are automatically assigned by the editor all begin with theletter Z. Labels beginning with Z are reserved for editor use only.
The editor-assigned labels are:
.ZCSR The data line on which the cursor is currently positioned.
.ZFIRST The first data line (same as relative line number 1). Can beabbreviated .ZF.
.ZLAST The last data line. Can be abbreviated .ZL.
.ZFRANGE The first line in a range specified by you.
.ZLRANGE The last line in a range specified by you.
.ZDEST The destination line specified by you.
Note: Unlike other labels, .ZCSR, .ZFIRST, and .ZLAST do not stay with the sameline. Label .ZCSR stays with the cursor, and labels .ZFIRST and .ZLASTpoint to the current first and last lines, respectively.
Using LabelsIn a macro, you can assign a label to a line by using the LABEL assignmentstatement. For example:
CLIST Statements REXX Statements
SET &LNUM = 10ISREDIT LABEL &LNUM = .HERE
ADDRESS ISPEXEClnum = 10'ISREDIT LABEL' lnum '= .HERE'
This assigns the label .HERE to the line whose relative line number is contained invariable LNUM (line 10 here). The .HERE label allows the macro to keep track of aline whose relative line number may change. When the macro finishes running, the.HERE label is removed.
Labels can be used as part of a keyphrase instead of a line number. For example:
CLIST Statements REXX Statements
ISREDIT LINE .NEXT = (DATAVAR)ISREDIT LINE_AFTER .XYZ = (DATAVAR)
ADDRESS ISPEXEC'ISREDIT LINE .NEXT = (DATAVAR)''ISREDIT LINE_AFTER .XYZ = (DATAVAR)'
The first example stores new data into the line that currently has the label .NEXT.The second example creates a new line after the line whose label is .XYZ, andstores data into the new line.
Using Commands in Edit Macros
112 OS/390 V2R10.0 ISPF Edit and Edit Macros
A macro can determine if a label exists. Using the LINENUM assignmentstatement, you can obtain the current relative line number of a labeled line. If thelabel does not exist, the return code (&LASTCC for CLIST or RC for REXX) is 8.For example:
CLIST Statements REXX Statements
ISREDIT (LNUM2) = LINENUM .ABCIF &LASTCC = 8 THEN WRITE NO .ABC LABEL
ADDRESS ISPEXEC'ISREDIT (LNUM2) = LINENUM .ABC'IF RC = 8 THEN SAY 'No .ABC label'
This example stores the relative line number of the line with label .ABC intovariable LNUM2 and tests to see if that label did exist.
Labels have a variety of uses. For example, because both the FIND and SEEKcommands position the cursor at the search string after the macro has been started,you may want to assign the data from the line on which the cursor is positioned tothe variable CSRDATA. To do so, use the following statement:
CLIST Statements REXX Statements
ISREDIT FIND 'IT'ISREDIT (CSRDATA) = LINE .ZCSR
ADDRESS ISPEXEC'ISREDIT FIND IT''ISREDIT (CSRDATA) = LINE .ZCSR'
The label .ZCSR names the line in which the cursor is positioned. The .ZCSR label ismoved to a new line when one of the following commands moves the cursor:FIND, CHANGE, SEEK, EXCLUDE, TSPLIT or CURSOR. The labels .ZFIRST and.ZLAST can also move when data is added or deleted.
If you assign a labeled line a new label that is blank, the previous label becomesunassigned (if both labels are at the same level). For example:
CLIST Statement REXX Statements
ISREDIT LABEL .HERE = ' 'ADDRESS ISPEXEC"ISREDIT LABEL .HERE = ' '"
removes the label from the line.
If a label in use is assigned to another line, the label is moved from the originalline to the new line (if the new assignment is at the same level as the original).
Referring to LabelsA nested macro can refer to all labels assigned by higher-level macros and to labelsthat you assign. When a macro assigns labels, they are associated by default withthe assigning macro level. The labels are automatically removed when the macrofinishes running. The labels belong to the level at which they are assigned and canhave the same name as the labels at other levels without any conflict.
When a macro ends, the labels at the current nesting level are deleted. To set alabel for the next higher level, the macro can issue the MACRO_LEVEL assignmentstatement to obtain the current level and decrease the level by 1.
A macro can determine the level of a label with the LABEL assignment statement,as shown in the following syntax:ISREDIT (varname1,varname2) = LABEL lptr
The label assigned to the referenced line is stored in the first variable and its levelis stored in the second variable. If a label is not assigned to the line, a blank isstored in both variables.
Using Commands in Edit Macros
Chapter 6. Creating Edit Macros 113
Passing LabelsYou can create a label at any level above its current level by explicitly stating thelevel:ISREDIT LABEL lptr = label [level]
Here, if the label previously existed at the explicitly specified level, its olddefinition is lost. A label assigned at a higher level remains after the macro endsand is available until the level at which it was assigned ends or the label isexplicitly removed.
If a macro sets a label without indicating a level, or if its value is equal to orgreater than the level at which the macro is running, the label is set at the macrolevel that is currently in control and does not affect any labels set in a higher level.
If a macro queries a label without specifying a level, or uses the label as a linepointer, the search for the label starts at the current macro level and goes up, levelby level, until the label defined closest to the current level is found.
If you specify a level parameter that is outside the currently active levels, it isadjusted as follows: a value less than zero is set to zero; a value greater than thecurrent nesting level is set to the current nesting level. This means that ahigher-level macro cannot set a label at the level of the macro that it is going tostart.
Referring to Data LinesYou can refer to data lines either by a relative line number or by a symbolic label.Note that special lines (MASK lines, TABS lines, COLS lines, BOUNDS lines, MSGlines, and others) are not considered data lines. You cannot assign labels to them,and they do not have relative line numbers. Also, you cannot directly referencethese lines in a macro, even though they are displayed. Excluded lines areregarded as data lines.
Relative line numbers are not affected by sequence numbers in the data, nor arethey affected by the current setting of number mode. The first line of data isalways treated as line number 1, the next line is line number 2, and so on. The TOPOF DATA line is considered line number 0.
When you insert or delete lines, the lines that follow change relative line numbers.If you insert a new line after line 3, for example, it becomes relative line 4 andwhat was relative line 4 becomes relative line 5, and so on. Similarly, if line 7 isdeleted, the line that was relative line 8 becomes relative line 7, and so on.
Referring to Column PositionsColumn positions in edit macros are not the same as they appear on the panel;they refer only to the editable portions of the data. When number mode is on,sequence numbers are not part of the data, and thus are not editable. For example,if NUMBER COBOL ON mode is in effect, the first six positions of each line contain thesequence number. The first data character is in position 7, which is consideredrelative column 1. When number mode is off, the line number portion is editable,so here position 1 becomes column 1 and position 7 becomes column 7. These arenot the column values displayed on the edit panel. This discrepancy can influencethe use of column numbers as parameters from the keyboard. Column numbersmust be converted according to number mode. See “Edit Boundaries” on page 28for the conversions.
Using Commands in Edit Macros
114 OS/390 V2R10.0 ISPF Edit and Edit Macros
If your macro must access the sequence numbers as data, include statements thatsave the current number mode, set number mode off, and then restore the originalnumber mode.
When a macro retrieves the current cursor position, a relative column number ofzero is returned if the cursor is outside the data portion of the line. When a macrosets the cursor column to zero, the cursor is placed in the Line Command field onthe left side of the designated line.
Defining MacrosYou can use DEFINE to give macros names that are different from their data setnames, make aliases for built-in edit commands, identify macros as programmacros, or set a command as disabled. DEFINE commands are usually issued inan initial macro.
For more information, refer to the description of the DEFINE command inChapter 11. Edit Macro Commands and Assignment Statements.
Defining an AliasTo establish an alias or alternate name for a primary command, enter a DEFINEfollowed by the new name, the ALIAS operand, and then the original commandname. For example, the following command:Command ===> DEFINE FILE ALIAS SAVE
establishes FILE as an alias for SAVE, allowing you to enter FILE to save the datacurrently being edited instead of SAVE.
Resetting DefinitionsTo reset the last definition for a command and return the command to its previousstatus, use the DEFINE command with the RESET operand. For example, havingestablished FILE as an alias for SAVE, you can enter:Command ===> DEFINE FILE RESET
to cause FILE to be flagged as an invalid command. When defining a command asDISABLED, you cannot reset the disabled function.
Replacing Built-In CommandsTo replace an existing edit command, with a macro, you also use DEFINE. Forexample:
CLIST Statement REXX Statements
ISREDIT DEFINE FIND ALIAS MYFINDADDRESS ISPEXEC'ISREDIT DEFINE FIND ALIAS MYFIND'
This links the command name to an edit macro.
To use the built-in edit command, precede the command with BUILTIN. Forexample, to process the built-in FIND command, include the following statement:
CLIST Statement REXX Statements
ISREDIT BUILTIN FIND...ADDRESS ISPEXEC'ISREDIT BUILTIN FIND ...'
where the ellipses represent other FIND command operands, such as the searchstring.
Using Commands in Edit Macros
Chapter 6. Creating Edit Macros 115
Implicit DefinitionsWhen you or your macro issue a command unknown to the editor, PDF searchesfor a CLIST or REXX EXEC with that name. If the editor finds the command, it isimplicitly defines it as an edit macro.
Program macros can be implicitly defined by preceding the name of the macrowith an exclamation point (!). Remember that the name must be 7 characters orless, excluding the exclamation point. Program macros are similar to ISPF dialogsin that they must be made available as load modules in either the ISPLLIB,STEPLIB, or LINKLST library. See “Program Macros” on page 97 for moreinformation.
Using the PROCESS Command and OperandThe PROCESS command provides a way to alter the usual sequence of events inan edit macro. It is related to the PROCESS operand on the MACRO command.PROCESS is the default for the MACRO command. PROCESS specifies that displaydata and line commands be processed before another statement is processed. If youspecify NOPROCESS, the editor defers processing the panel data and linecommands until it finds an ISREDIT PROCESS command later in the macro, oruntil the macro ends. You can use PROCESS to create a “before-and-after” effect. Ifyou specify NOPROCESS at the beginning of a macro, edited data appears withoutthe changes made from the keyboard—creating a “before” effect. Once you specifyPROCESS, changes that were made from the keyboard appear—creating an “after”effect.
The syntax of the ISREDIT MACRO statement is:ISREDIT MACRO [(var1[,var2...])] [PROCESS|NOPROCESS]
Specifying NOPROCESS in the Macro StatementNOPROCESS is useful if you want to process statements before the display data orline commands are processed. It enables you to perform initial verification ofparameters or capture lines before they are changed from the panel.
It is also useful if you want to include an ISREDIT PROCESS command to specifywhether the macro expects, and handles, line commands that identify either arange of lines, a destination line, or both. This linking is the method by which theeditor allows a macro command to interact with line commands in the same waythat the built-in MOVE and REPLACE commands do. With the ISREDIT PROCESScommand, the editor can process line commands that you have entered,performing significant error and consistency checking.
Specifying a DestinationIf you include the following process statement in an edit macro:
CLIST Statement REXX Statements
ISREDIT PROCESS DESTADDRESS ISPEXEC'ISREDIT PROCESS DEST'
the macro expects you to specify a destination line. A destination line is alwaysspecified using either A (after) or B (before). The editor sets the dialog variable.ZDEST to the line preceding the destination. However, if neither A nor B isspecified, .ZDEST is set to the last data line. In this situation, a return code showsthat no destination was specified.
Specifying a RangeIf you use the following syntax for a PROCESS macro command in an edit macro:ISREDIT PROCESS RANGE operand
Using Commands in Edit Macros
116 OS/390 V2R10.0 ISPF Edit and Edit Macros
the macro expects to receive a specified range of lines to process. The operandfollowing the RANGE operand identifies either one or two commands that are tobe accepted. For example, the command PROCESS RANGE Q Z allows the linecommands Q or Z (but not both) to be processed with this macro. The linecommands could take any of the following forms:v Q or Z, to specify a single line.v QQ or ZZ, to specify a block of lines. This form is obtained by doubling the last
letter of the single-line command.v Qn or Zn where n is a number that specifies a series of lines.
After the PROCESS command is completed, the dialog variable .ZFRANGE isautomatically set to the first line of the specified range. The dialog variable.ZLRANGE is set to the last line of the specified range. These labels can refer tothe same line. If no range is entered, the range defaults to the entire data set. Inthis situation, a return code shows that no range was specified.
Two line command names can be specified for PROCESS In this situation, use theRANGE_CMD assignment statement to return the value of the command entered.For example, if you issue the following PROCESS command:
CLIST Statement REXX Statements
ISREDIT PROCESS RANGE Z $ADDRESS ISPEXEC'ISREDIT PROCESS RANGE Z $'
The RANGE_CMD assignment statement returns either a Z or a $.
The names of line commands that define the range can be 1 to 6 characters, but ifthe name is 6 characters long, it cannot be used as a block format command bydoubling the last character. The name can contain any alphabetic or specialcharacter except blank, hyphen (-), apostrophe ('), or period (.). It cannot containany numeric characters.
ExampleIn the example that follows, the NOPROCESS operand on the MACRO commanddefers processing of the panel data until the line with the cursor is assigned to avariable. After the PROCESS command, the line contains any changes that youmade.
CLIST Statements REXX Statements
ISREDIT MACRO NOPROCESSISREDIT (BEFORE) = LINE .ZCSRISREDIT PROCESSISREDIT (AFTER) = LINE .ZCSRIF &STR(&BEFORE) = &STR(&AFTER) THEN -
...ELSE -
...
ADDRESS ISPEXEC'ISREDIT MACRO NOPROCESS''ISREDIT (BEFORE) = LINE .ZCSR''ISREDIT PROCESS''ISREDIT (AFTER) = LINE .ZCSR'IF BEFORE = AFTER THEN
...ELSE
...
See “PROCESS—Process Line Commands” on page 377.
Recovery MacrosAfter a system failure, you might want to restore the command definitions andaliases that you were using when the system failed, but you do not want todestroy the profile changes you made during the edit session before the failure.
Using Commands in Edit Macros
Chapter 6. Creating Edit Macros 117
To help to recover after a system failure, you can provide a recovery macro whichcan restore command definitions and aliases while not destroying profile changesmade before the failure. The recovery macro, like an initial macro, runs after thedata has been read but before it is displayed. However, the macro is run wheneverthe recovery data set is being edited.
You can specify a recovery macro:v By entering the RMACRO primary command:
Command ===> RMACRO name
v In your initial macro by using the RMACRO assignment statement:ISREDIT RMACRO = name
where name sets the name of the macro for the edit session. The name operandis used to specify the name of the macro to be run after a data set has beenrecovered.
Note: Recovery macros are only in effect for the duration of a particular Editsession. They must be specified again each time a new member or data setis edited.
Return Codes from User-Written Edit MacrosA macro can issue the following return codes. These return codes affect theCommand line and cursor position on the next display of edit data:
0 Shows normal completion of the macro. The cursor position is left as set bythe macro. The Command line is blanked.
1 Shows normal completion of the macro. The cursor is placed on theCommand line and the line is blanked. Use this return code to make iteasy to enter another macro or edit command on the Command line.
4 and 8Treated by the ISPF editor as return code 0. No special processing is done.
12 and higherError return codes. The cursor is placed on the Command line and themacro command remains. When used with these return codes, the dialogmanager SETMSG service prompts you for an incorrect or omittedparameter.
Any invocation of a disabled macro command issues a return code of 12.See the DEFINE command for more information on disabled commands.
20 and higherIndicate a severe error. The meanings of the severe return codes are:
20 Command syntax error or Dialog service routine error.
24 Macro nesting limit of 255 exceeded (possible endless loop; see theBUILTIN macro command).
28 Command found either preceding the ISREDIT MACRO command,or following the ISREDIT END or ISREDIT CANCEL command.
Each command description in Chapter 11. Edit Macro Commands and AssignmentStatements includes a list of return codes that are possible for the command.Because &LASTCC (CLIST) or RC (REXX) is set for every statement, you musteither test it in the statement immediately following the command that sets it, oryou must save its value in another variable. Use a command such as:
Using Commands in Edit Macros
118 OS/390 V2R10.0 ISPF Edit and Edit Macros
SET &RETCODE = &LASTCC
The variable (&RETCODE or RETCODE) can then be tested anywhere in the macrountil it is changed.
Return Codes from PDF Edit Macro CommandsEvery CLIST edit macro command sets variable &LASTCC with a return code.REXX edit macros set variable RC. The return codes range from 0 to 20.
0 Shows normal completion of the command.
2, 4, and 8Information return codes. They show a special condition that is notnecessarily an error. These return codes can be tested or ignored,depending on the requirements of the macro.
For some cases of RC=8, the ISPF system variables ZERRSM (short errormessage text) and ZERRLM (long error message text) are set. For moreinformation on ZERRSM and ZERRLM, see ISPF Dialog Developer’s Guideand Reference
12 and higherError return codes. Normally an error return code causes the macro to endabnormally and an error panel to appear. The error panel shows the kindof error and lists the statement that caused the error condition.
The ISPF system variables ZERRSM (short error message text) andZERRLM (long error message text) are set for error return codes. For moreinformation on ZERRSM and ZERRLM, see ISPF Dialog Developer’s Guideand Reference
Often, the only two possible return codes are 0 and 20. The CAPS command is anexample of such a command. Any valid form of CAPS issues a return code of 0.
Selecting Control for ErrorsAs explained in “Return Codes from PDF Edit Macro Commands”, every editmacro statement causes variable &LASTCC (CLIST) or RC (REXX) to be set to areturn code. Return codes of 12 or higher are considered errors (except for thePROCESS edit macro command return code of 12), and the default is to endmacros that issue those return codes.
Sometimes you need to handle errors at the time that they occur. The error isexpected and the edit macro logic can handle the problem. If you want to handleall errors that might occur in your macro, you can include the following statement:ISPEXEC CONTROL ERRORS RETURN
If errors occur, control returns to the macro. On the other hand, to return errorhandling to the default mode, include the following:ISPEXEC CONTROL ERRORS CANCEL
If an error occurs, the macro ends.
If you want to do both, you can include any number of ISPEXEC CONTROLstatements in your macro to turn error handling on and off.
Return Codes from User-Written Edit Macros
Chapter 6. Creating Edit Macros 119

Selecting Control for Errors
120 OS/390 V2R10.0 ISPF Edit and Edit Macros
Chapter 7. Testing Edit Macros
This chapter documents general-use programming interfaces and associatedguidance information.
This chapter tells you how to include statements in your edit macros to captureand handle error conditions.
Using the information in the preceding chapters, you should be able to write andrun an edit macro that uses CLIST or REXX logic and processes simple editcommands. However, even an experienced edit macro writer occasionally includesa bug that causes a macro to end abnormally (ABEND), or writes a macro thatdoes not work as expected. When this occurs, you must debug your macro, just asyou would debug any other kind of program you write.
Handling ErrorsThere are two kinds of errors that you may encounter when you debugmacros—edit command errors and dialog service errors. Both kinds of errors arecontrolled by the ISPEXEC CONTROL ERRORS RETURN command. For morespecific information, refer to ISPF User’s Guide
Edit Command ErrorsThe editor detects edit command errors and displays either an edit macro errorpanel with an error message, or a return code. If an edit command error occurs,the macro ends abnormally with the following results:v When you are using the ISPF editor with ISPF test mode off, you return to the
edit session.v If ISPF test mode is on, the PDF component is also in test mode. You can
override the abnormal end and attempt to continue by typing YES on the PDFedit macro error panel and pressing Enter. If ISPEXEC CONTROL ERRORSRETURN has been processed, the error panel does not appear, and the macroautomatically continues.
Dialog Service ErrorsISPF detects dialog service errors and displays a message identifying the error withthe statement which caused the error. If a dialog service error occurs, the editsession ends abnormally with the following results:v When you are using the PDF component with ISPF test mode off, the ISPF
Primary Option Menu is displayed.v If you are using the PDF component with ISPF test mode on, you can override
the abnormal end and attempt to continue by typing YES on the ISPF dialogerror panel and pressing Enter. In either case, if ISPEXEC CONTROL ERRORSRETURN has been processed, no panel appears and the editor sends a returncode instead of ending the dialog.
Note: If you enter ISPF with TEST as an operand, or use Dialog Test (option 7),ISPF remains in test mode until you end the ISPF session.
© Copyright IBM Corp. 1984, 2000 121
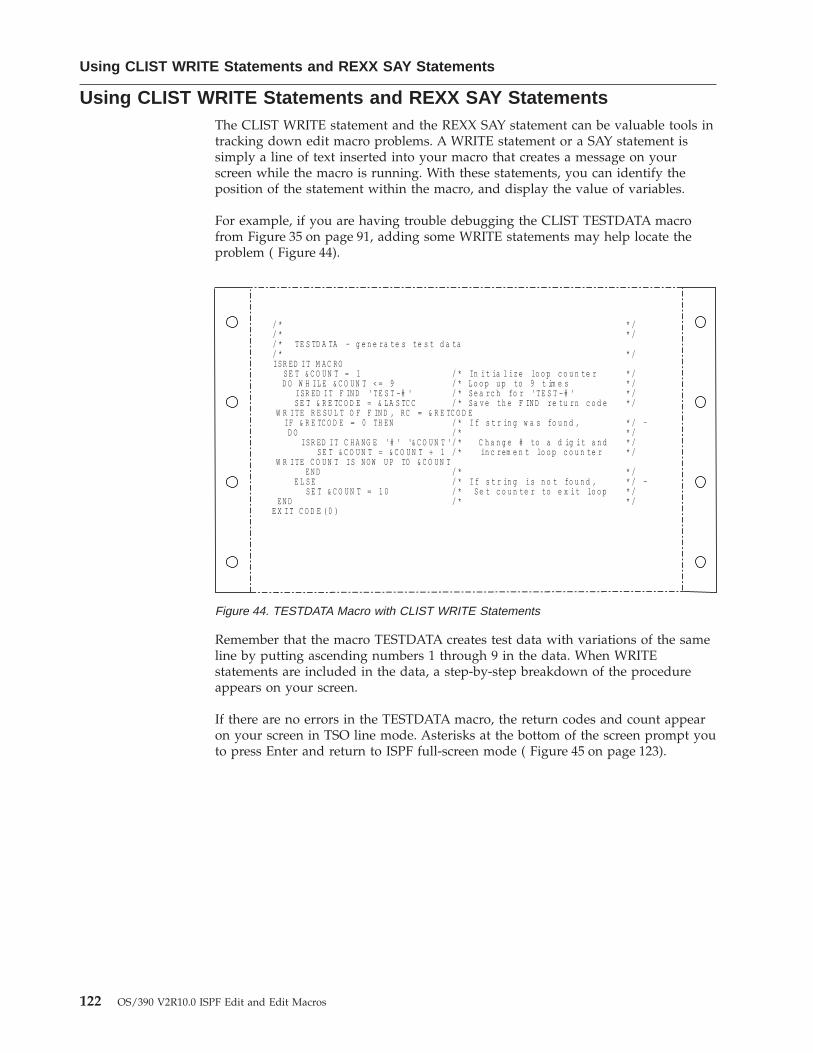
Using CLIST WRITE Statements and REXX SAY StatementsThe CLIST WRITE statement and the REXX SAY statement can be valuable tools intracking down edit macro problems. A WRITE statement or a SAY statement issimply a line of text inserted into your macro that creates a message on yourscreen while the macro is running. With these statements, you can identify theposition of the statement within the macro, and display the value of variables.
For example, if you are having trouble debugging the CLIST TESTDATA macrofrom Figure 35 on page 91, adding some WRITE statements may help locate theproblem ( Figure 44).
Remember that the macro TESTDATA creates test data with variations of the sameline by putting ascending numbers 1 through 9 in the data. When WRITEstatements are included in the data, a step-by-step breakdown of the procedureappears on your screen.
If there are no errors in the TESTDATA macro, the return codes and count appearon your screen in TSO line mode. Asterisks at the bottom of the screen prompt youto press Enter and return to ISPF full-screen mode ( Figure 45 on page 123).
/ * * // * * // * T E S TD A TA - g e n e ra te s te s t d a ta/ * * /IS R E D I T M A C R O
S E T & C O U N T = 1 / * In i t ia l iz e lo o p c o u n te r * /D O W H IL E & C O U N T < = 9 / * L o o p u p to 9 t im e s * /
IS R E D I T F IN D 'T E S T -# ' / * S e a rc h fo r 'T E S T -# ' * /S E T & R E TC O D E = & L A S TC C / * S a v e th e F IN D re tu rn c o d e * /
W R I T E R E S U L T O F F IN D , R C = & R E TC O D EIF & R E TC O D E = 0 TH E N / * I f s t r in g w a s fo u n d , * / -
D O / * * /IS R ED I T C H A N G E '# ' '& C O U N T '/ * C h a n g e # to a d ig i t a n d * /
S E T & C O U N T = & C O U N T + 1 / * in c rem e n t lo o p c o u n te r * /W R I T E C O U N T IS N O W U P TO & C O U N T
E N D / * * /E L S E / * I f s t r in g is n o t fo u n d , * / -
S E T & C O U N T = 1 0 / * S e t c o u n te r to e x i t lo o p * /E N D / * * /
E X I T C O D E ( 0 )
Figure 44. TESTDATA Macro with CLIST WRITE Statements
Using CLIST WRITE Statements and REXX SAY Statements
122 OS/390 V2R10.0 ISPF Edit and Edit Macros
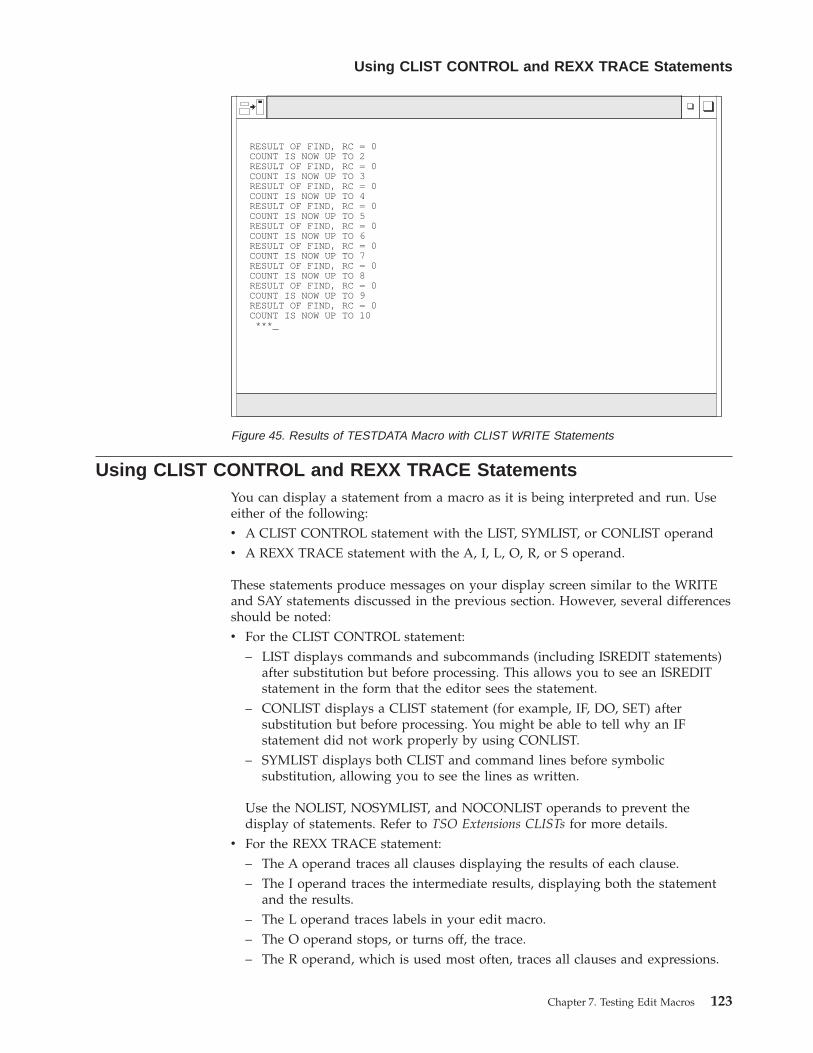
Using CLIST CONTROL and REXX TRACE StatementsYou can display a statement from a macro as it is being interpreted and run. Useeither of the following:v A CLIST CONTROL statement with the LIST, SYMLIST, or CONLIST operandv A REXX TRACE statement with the A, I, L, O, R, or S operand.
These statements produce messages on your display screen similar to the WRITEand SAY statements discussed in the previous section. However, several differencesshould be noted:v For the CLIST CONTROL statement:
– LIST displays commands and subcommands (including ISREDIT statements)after substitution but before processing. This allows you to see an ISREDITstatement in the form that the editor sees the statement.
– CONLIST displays a CLIST statement (for example, IF, DO, SET) aftersubstitution but before processing. You might be able to tell why an IFstatement did not work properly by using CONLIST.
– SYMLIST displays both CLIST and command lines before symbolicsubstitution, allowing you to see the lines as written.
Use the NOLIST, NOSYMLIST, and NOCONLIST operands to prevent thedisplay of statements. Refer to TSO Extensions CLISTs for more details.
v For the REXX TRACE statement:– The A operand traces all clauses displaying the results of each clause.– The I operand traces the intermediate results, displaying both the statement
and the results.– The L operand traces labels in your edit macro.– The O operand stops, or turns off, the trace.– The R operand, which is used most often, traces all clauses and expressions.
RESULT OF FIND, RC = 0COUNT IS NOW UP TO 2RESULT OF FIND, RC = 0COUNT IS NOW UP TO 3RESULT OF FIND, RC = 0COUNT IS NOW UP TO 4RESULT OF FIND, RC = 0COUNT IS NOW UP TO 5RESULT OF FIND, RC = 0COUNT IS NOW UP TO 6RESULT OF FIND, RC = 0COUNT IS NOW UP TO 7RESULT OF FIND, RC = 0COUNT IS NOW UP TO 8RESULT OF FIND, RC = 0COUNT IS NOW UP TO 9RESULT OF FIND, RC = 0COUNT IS NOW UP TO 10
***_
Figure 45. Results of TESTDATA Macro with CLIST WRITE Statements
Using CLIST CONTROL and REXX TRACE Statements
Chapter 7. Testing Edit Macros 123
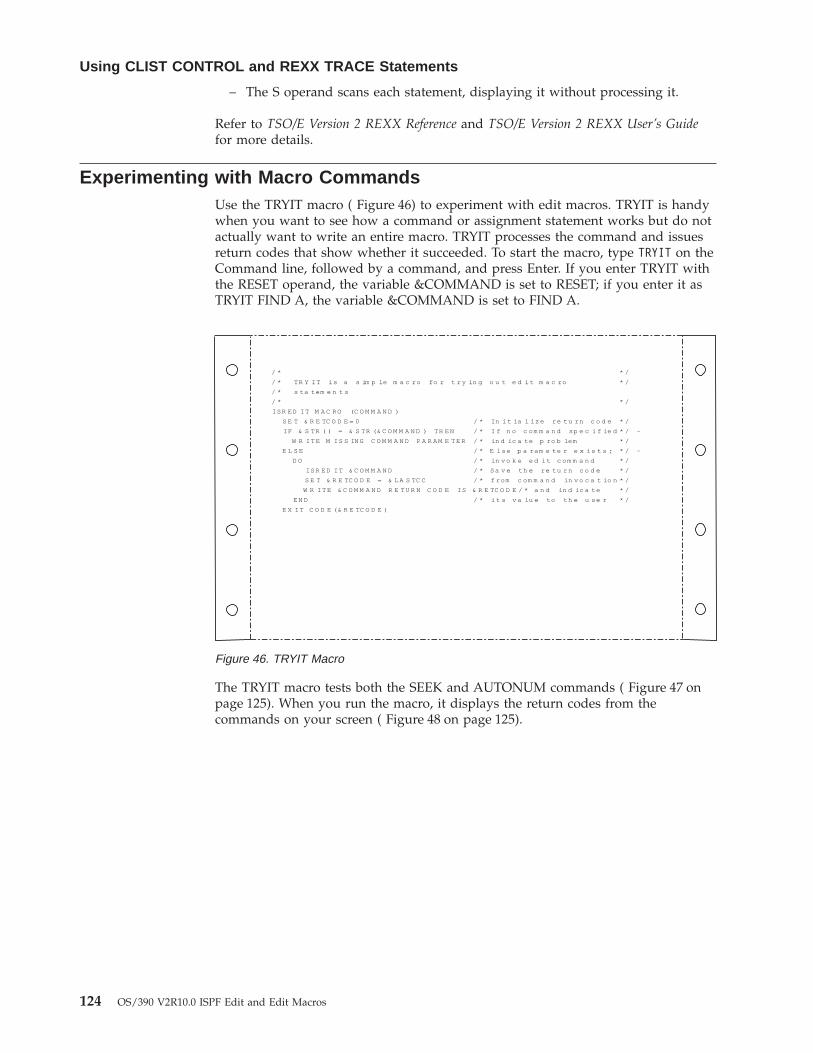
– The S operand scans each statement, displaying it without processing it.
Refer to TSO/E Version 2 REXX Reference and TSO/E Version 2 REXX User’s Guidefor more details.
Experimenting with Macro CommandsUse the TRYIT macro ( Figure 46) to experiment with edit macros. TRYIT is handywhen you want to see how a command or assignment statement works but do notactually want to write an entire macro. TRYIT processes the command and issuesreturn codes that show whether it succeeded. To start the macro, type TRYIT on theCommand line, followed by a command, and press Enter. If you enter TRYIT withthe RESET operand, the variable &COMMAND is set to RESET; if you enter it asTRYIT FIND A, the variable &COMMAND is set to FIND A.
The TRYIT macro tests both the SEEK and AUTONUM commands ( Figure 47 onpage 125). When you run the macro, it displays the return codes from thecommands on your screen ( Figure 48 on page 125).
/ * * /
/ * TR Y I T is a s im p le m a c ro fo r t r y in g o u t e d i t m a c ro * /
/ * s ta tem e n t s
/ * * /
IS R E D I T M A C R O (C O M M A N D )
S E T & R E TC O D E = 0 / * In i t ia l iz e re tu rn c o d e * /
IF & S TR ( ) = & S TR (& C O M M A N D ) TH E N / * I f n o c om m a n d sp e c i f ie d * / -
W R I T E M IS S IN G C O M M A N D P A R A M E T E R / * in d ic a te p ro b lem * /
E L S E / * E l se p a ram e te r e x is t s ; * / -
D O / * in v o k e e d i t c om m a n d * /
IS R E D I T & C O M M A N D / * S a v e th e re tu rn c o d e * /
S E T & R E TC O D E = & L A S TC C / * f rom c om m a n d in v o c a t io n * /
W R I T E & C O M M A N D R E TU R N C O D E IS & R E TC O D E / * a n d in d ic a te * /
E N D / * i t s v a lu e to th e u se r * /
E X I T C O D E (& R E TC O D E )
Figure 46. TRYIT Macro
Using CLIST CONTROL and REXX TRACE Statements
124 OS/390 V2R10.0 ISPF Edit and Edit Macros
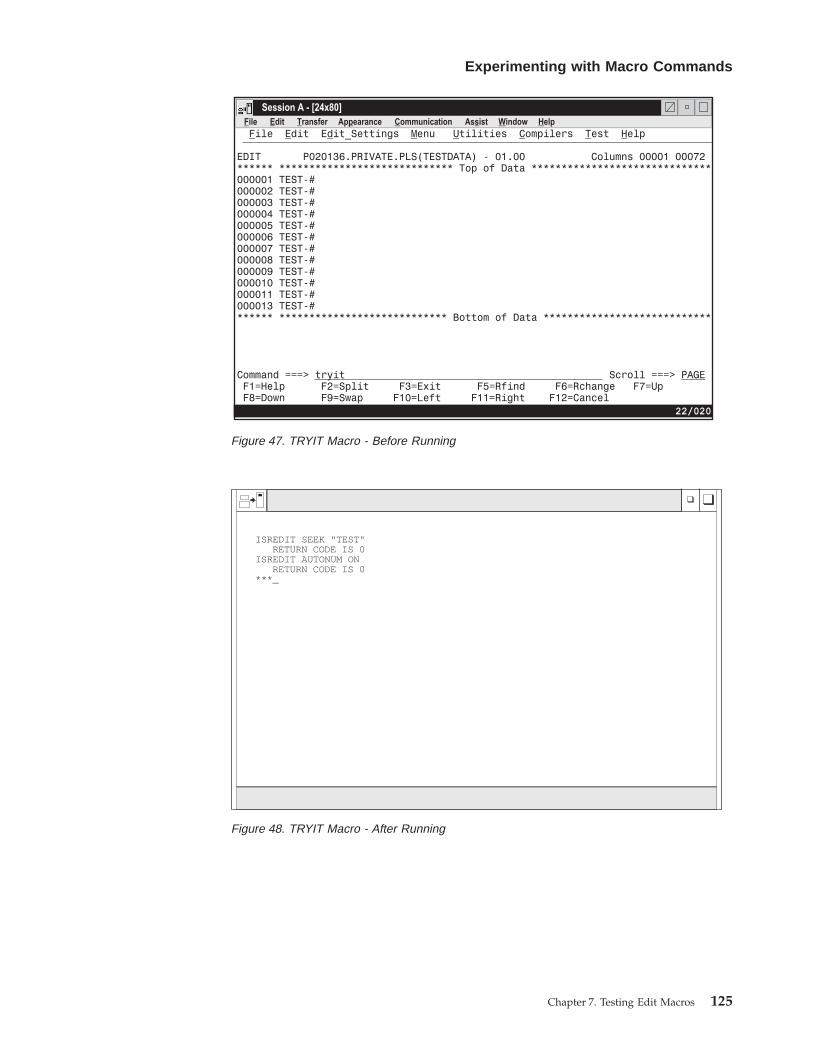
Figure 47. TRYIT Macro - Before Running
ISREDIT SEEK "TEST"RETURN CODE IS 0
ISREDIT AUTONUM ONRETURN CODE IS 0
***_
Figure 48. TRYIT Macro - After Running
Experimenting with Macro Commands
Chapter 7. Testing Edit Macros 125

Experimenting with Macro Commands
126 OS/390 V2R10.0 ISPF Edit and Edit Macros
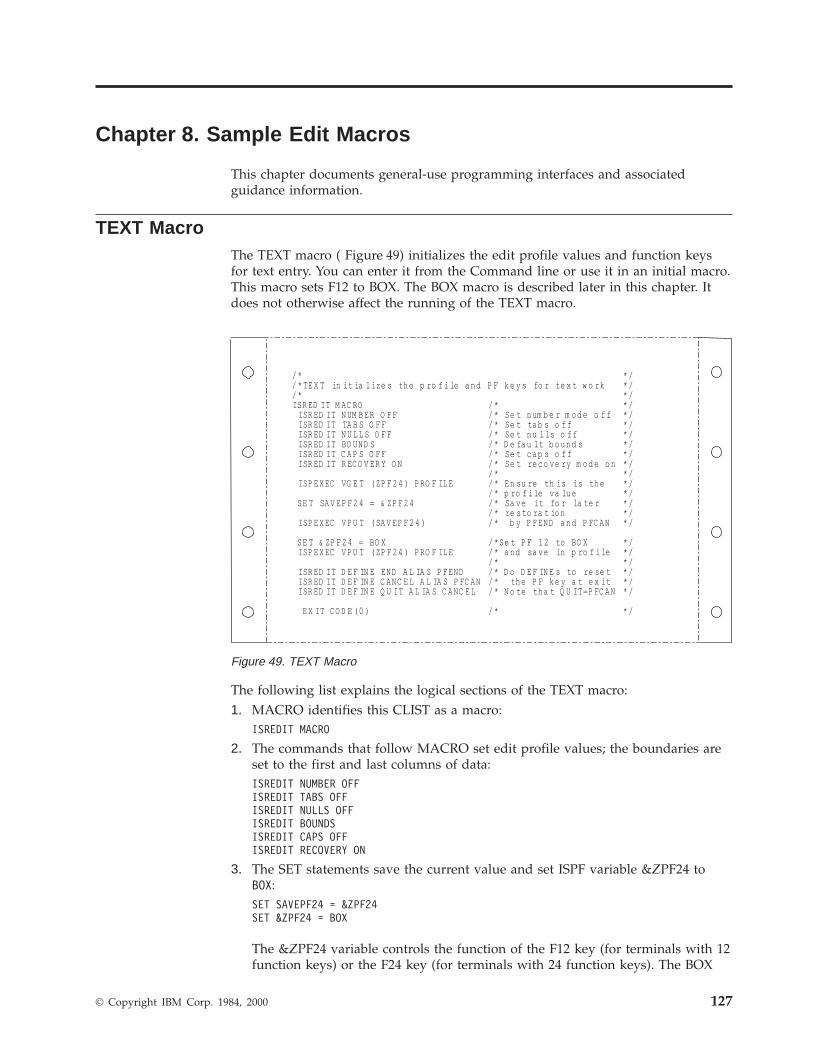
Chapter 8. Sample Edit Macros
This chapter documents general-use programming interfaces and associatedguidance information.
TEXT MacroThe TEXT macro ( Figure 49) initializes the edit profile values and function keysfor text entry. You can enter it from the Command line or use it in an initial macro.This macro sets F12 to BOX. The BOX macro is described later in this chapter. Itdoes not otherwise affect the running of the TEXT macro.
The following list explains the logical sections of the TEXT macro:1. MACRO identifies this CLIST as a macro:
ISREDIT MACRO
2. The commands that follow MACRO set edit profile values; the boundaries areset to the first and last columns of data:ISREDIT NUMBER OFFISREDIT TABS OFFISREDIT NULLS OFFISREDIT BOUNDSISREDIT CAPS OFFISREDIT RECOVERY ON
3. The SET statements save the current value and set ISPF variable &ZPF24 toBOX:SET SAVEPF24 = &ZPF24SET &ZPF24 = BOX
The &ZPF24 variable controls the function of the F12 key (for terminals with 12function keys) or the F24 key (for terminals with 24 function keys). The BOX
/ * * // * TE X T in it ia l ize s th e p ro f i le a n d P F k e y s fo r te x t w o rk * // * * /ISR ED IT M AC RO / * * /
ISR ED IT N UM B ER O F F / * Se t n um b e r m o d e o f f * /ISR ED IT TA B S O F F / * Se t ta b s o f f * /ISR ED IT N U L L S O F F / * Se t n u l ls o f f * /ISR ED IT BO UND S / * D e fa u lt b o u n d s * /ISR ED IT C A P S O F F / * Se t c a p s o f f * /ISR ED IT R EC O V ER Y O N / * Se t re c o ve ry m o d e o n * /
/ * * /ISP E X EC VG E T (ZP F 2 4 ) P RO F IL E / * E n su re th is is th e * /
/ * p ro f i le va lu e * /SE T SA V EP F 2 4 = & ZP F 2 4 / * Sa ve it fo r la te r * /
/ * re s to ra t io n * /ISP E X EC V P U T (SA V EP F 2 4 ) / * b y P FEND a n d P FC A N * /
SE T & ZP F 2 4 = BO X / *Se t P F 1 2 to BO X * /ISP E X EC V P U T (ZP F 2 4 ) P RO F IL E / * a nd sa ve in p ro f i le * /
/ * * /ISR ED IT D E F IN E END A L IA S P FEND / * D o D E F IN E s to re se t * /ISR ED IT D E F IN E C A NC E L A L IA S P FC A N / * th e P F k e y a t e x it * /ISR ED IT D E F IN E Q U IT A L IA S C A NC E L / * N o te th a t Q U IT=P FC A N * /
E X IT C O D E (0 ) / * * /
Figure 49. TEXT Macro
© Copyright IBM Corp. 1984, 2000 127
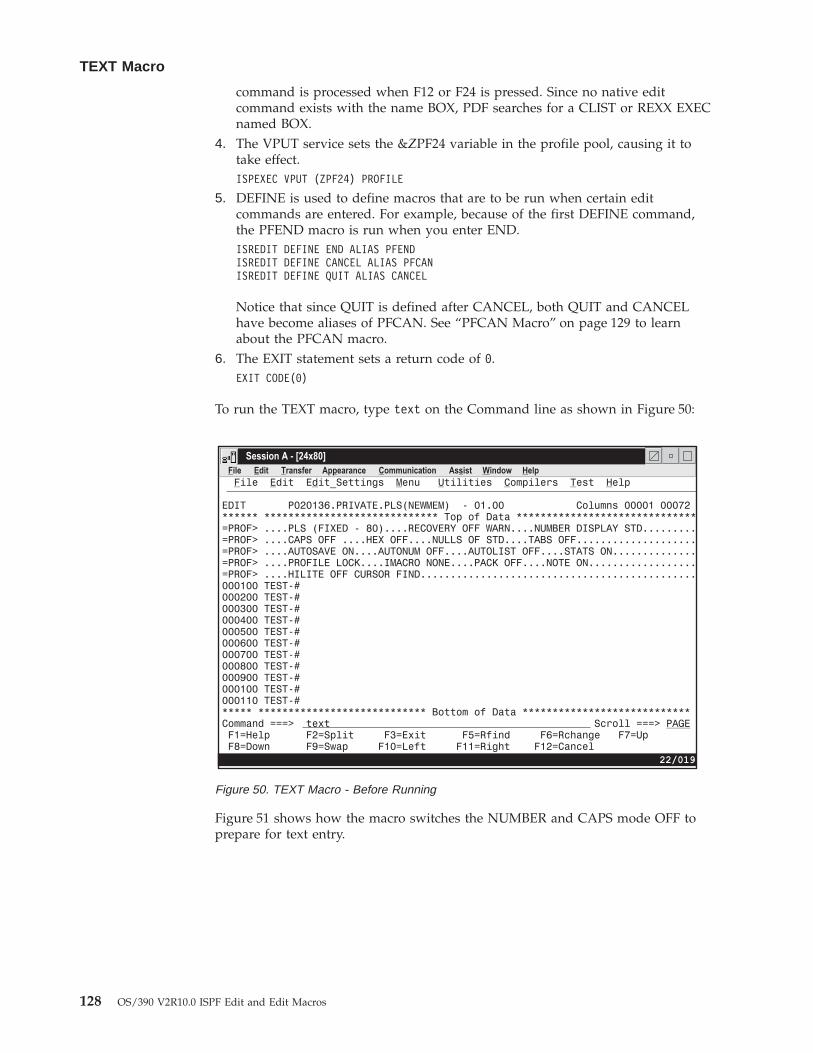
command is processed when F12 or F24 is pressed. Since no native editcommand exists with the name BOX, PDF searches for a CLIST or REXX EXECnamed BOX.
4. The VPUT service sets the &ZPF24 variable in the profile pool, causing it totake effect.ISPEXEC VPUT (ZPF24) PROFILE
5. DEFINE is used to define macros that are to be run when certain editcommands are entered. For example, because of the first DEFINE command,the PFEND macro is run when you enter END.ISREDIT DEFINE END ALIAS PFENDISREDIT DEFINE CANCEL ALIAS PFCANISREDIT DEFINE QUIT ALIAS CANCEL
Notice that since QUIT is defined after CANCEL, both QUIT and CANCELhave become aliases of PFCAN. See “PFCAN Macro” on page 129 to learnabout the PFCAN macro.
6. The EXIT statement sets a return code of 0.EXIT CODE(0)
To run the TEXT macro, type text on the Command line as shown in Figure 50:
Figure 51 shows how the macro switches the NUMBER and CAPS mode OFF toprepare for text entry.
Figure 50. TEXT Macro - Before Running
TEXT Macro
128 OS/390 V2R10.0 ISPF Edit and Edit Macros
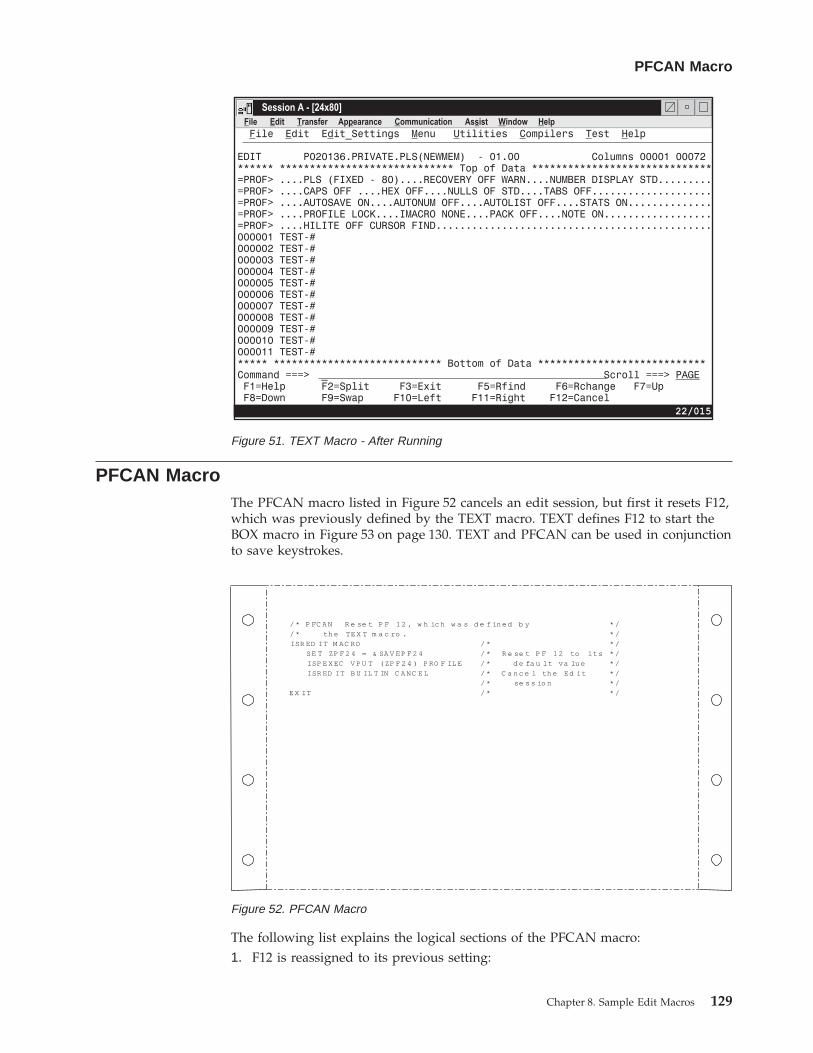
PFCAN MacroThe PFCAN macro listed in Figure 52 cancels an edit session, but first it resets F12,which was previously defined by the TEXT macro. TEXT defines F12 to start theBOX macro in Figure 53 on page 130. TEXT and PFCAN can be used in conjunctionto save keystrokes.
The following list explains the logical sections of the PFCAN macro:1. F12 is reassigned to its previous setting:
Figure 51. TEXT Macro - After Running
/ * P FC A N R e se t P F 1 2 , w h ic h w a s d e f in ed b y * /
/ * th e TE X T m a c ro . * /
ISR ED IT M AC RO / * * /
SE T ZP F 2 4 = & SA V EP F 2 4 / * R e se t P F 1 2 to i ts * /
ISP E X EC V P U T (ZP F 2 4 ) P RO F IL E / * d e fa u lt va lu e * /
ISR ED IT B U IL T IN C A NC E L / * C a n c e l th e Ed it * /
/ * se s s io n * /
E X IT / * * /
Figure 52. PFCAN Macro
PFCAN Macro
Chapter 8. Sample Edit Macros 129
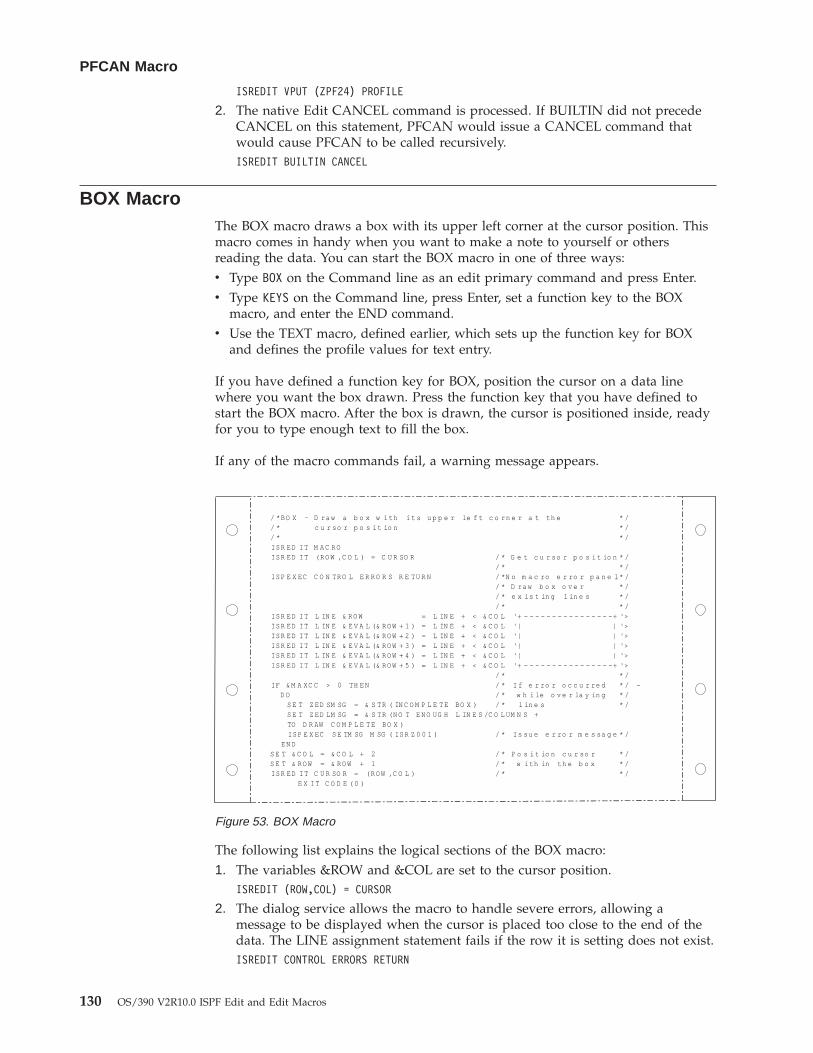
ISREDIT VPUT (ZPF24) PROFILE
2. The native Edit CANCEL command is processed. If BUILTIN did not precedeCANCEL on this statement, PFCAN would issue a CANCEL command thatwould cause PFCAN to be called recursively.ISREDIT BUILTIN CANCEL
BOX MacroThe BOX macro draws a box with its upper left corner at the cursor position. Thismacro comes in handy when you want to make a note to yourself or othersreading the data. You can start the BOX macro in one of three ways:v Type BOX on the Command line as an edit primary command and press Enter.v Type KEYS on the Command line, press Enter, set a function key to the BOX
macro, and enter the END command.v Use the TEXT macro, defined earlier, which sets up the function key for BOX
and defines the profile values for text entry.
If you have defined a function key for BOX, position the cursor on a data linewhere you want the box drawn. Press the function key that you have defined tostart the BOX macro. After the box is drawn, the cursor is positioned inside, readyfor you to type enough text to fill the box.
If any of the macro commands fail, a warning message appears.
The following list explains the logical sections of the BOX macro:1. The variables &ROW and &COL are set to the cursor position.
ISREDIT (ROW,COL) = CURSOR
2. The dialog service allows the macro to handle severe errors, allowing amessage to be displayed when the cursor is placed too close to the end of thedata. The LINE assignment statement fails if the row it is setting does not exist.ISREDIT CONTROL ERRORS RETURN
/ *B O X - D ra w a b o x w i th i t s u p p e r le f t c o rn e r a t th e * // * c u r so r p o s i t io n * // * * /IS R E D I T M A C R OIS R E D I T (R O W ,C O L ) = C U R SO R / * G e t c u r so r p o s i t io n * /
/ * * /IS P E X EC C O N TR O L E R R O R S R E TU R N / *N o m a c ro e r ro r p a n e l * /
/ * D ra w b o x o v e r * // * e x is t in g l in e s * // * * /
IS R E D I T L IN E & R O W = L IN E + < & C O L '+ - - - - - - - - - - - - - - - -+ '>IS R E D I T L IN E & E V A L (& R O W + 1 ) = L IN E + < & C O L '| | '>IS R E D I T L IN E & E V A L (& R O W + 2 ) = L IN E + < & C O L '| | '>IS R E D I T L IN E & E V A L (& R O W + 3 ) = L IN E + < & C O L '| | '>IS R E D I T L IN E & E V A L (& R O W + 4 ) = L IN E + < & C O L '| | '>IS R E D I T L IN E & E V A L (& R O W + 5 ) = L IN E + < & C O L '+ - - - - - - - - - - - - - - - -+ '>
/ * * /IF & M A XC C > 0 TH E N / * I f e r ro r o c c u r re d * / -
D O / * w h i le o v e r la y in g * /S E T Z ED SM SG = & S TR ( IN C O M P L E T E BO X ) / * l in e s * /S E T Z ED LM SG = & S TR (N O T E N O UG H L IN E S /C O L UM N S +TO D R AW C O M P L E T E B O X )IS P E X EC S E TM SG M SG ( IS R Z 0 0 1 ) / * I s su e e r ro r m e s sa g e * /
E N DS E T & C O L = & C O L + 2 / * P o s i t io n c u r so r * /S E T & R O W = & R O W + 1 / * w i th in th e b o x * /IS R E D I T C U R SO R = (R O W ,C O L ) / * * /
E X I T C O D E ( 0 )
Figure 53. BOX Macro
PFCAN Macro
130 OS/390 V2R10.0 ISPF Edit and Edit Macros
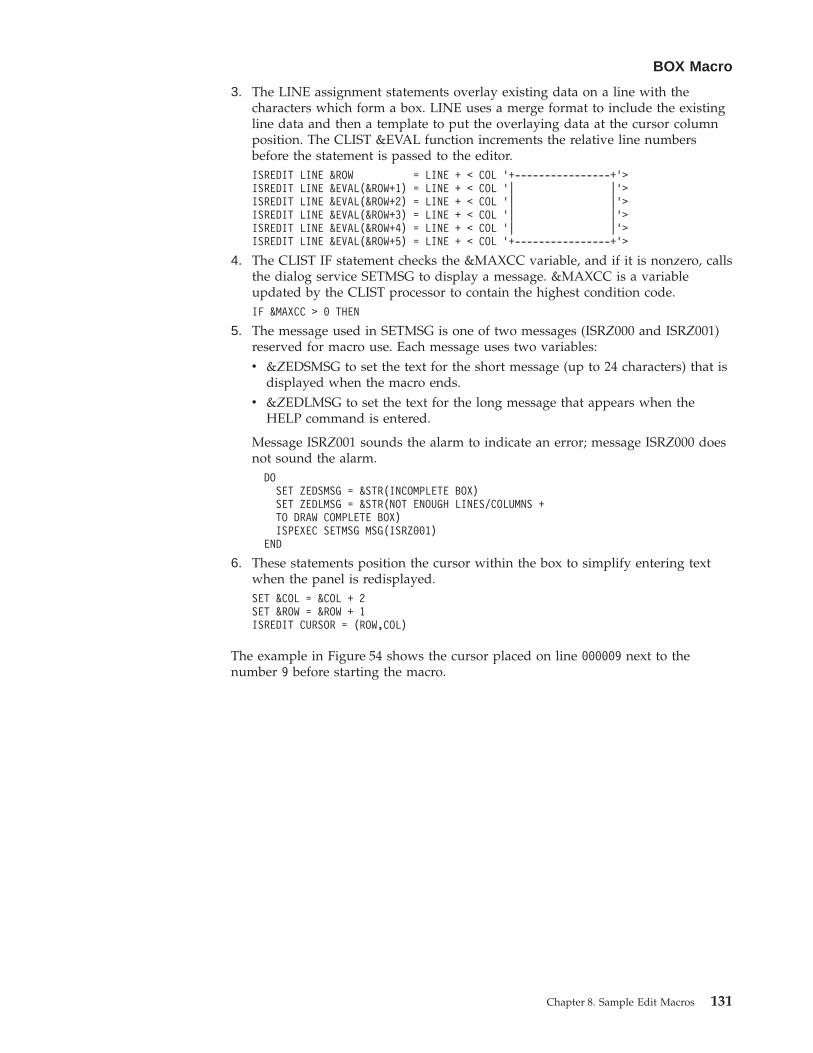
3. The LINE assignment statements overlay existing data on a line with thecharacters which form a box. LINE uses a merge format to include the existingline data and then a template to put the overlaying data at the cursor columnposition. The CLIST &EVAL function increments the relative line numbersbefore the statement is passed to the editor.ISREDIT LINE &ROW = LINE + < COL '+----------------+'>ISREDIT LINE &EVAL(&ROW+1) = LINE + < COL '| |'>ISREDIT LINE &EVAL(&ROW+2) = LINE + < COL '| |'>ISREDIT LINE &EVAL(&ROW+3) = LINE + < COL '| |'>ISREDIT LINE &EVAL(&ROW+4) = LINE + < COL '| |'>ISREDIT LINE &EVAL(&ROW+5) = LINE + < COL '+----------------+'>
4. The CLIST IF statement checks the &MAXCC variable, and if it is nonzero, callsthe dialog service SETMSG to display a message. &MAXCC is a variableupdated by the CLIST processor to contain the highest condition code.IF &MAXCC > 0 THEN
5. The message used in SETMSG is one of two messages (ISRZ000 and ISRZ001)reserved for macro use. Each message uses two variables:v &ZEDSMSG to set the text for the short message (up to 24 characters) that is
displayed when the macro ends.v &ZEDLMSG to set the text for the long message that appears when the
HELP command is entered.
Message ISRZ001 sounds the alarm to indicate an error; message ISRZ000 doesnot sound the alarm.DOSET ZEDSMSG = &STR(INCOMPLETE BOX)SET ZEDLMSG = &STR(NOT ENOUGH LINES/COLUMNS +TO DRAW COMPLETE BOX)ISPEXEC SETMSG MSG(ISRZ001)
END
6. These statements position the cursor within the box to simplify entering textwhen the panel is redisplayed.SET &COL = &COL + 2SET &ROW = &ROW + 1ISREDIT CURSOR = (ROW,COL)
The example in Figure 54 shows the cursor placed on line 000009 next to thenumber 9 before starting the macro.
BOX Macro
Chapter 8. Sample Edit Macros 131
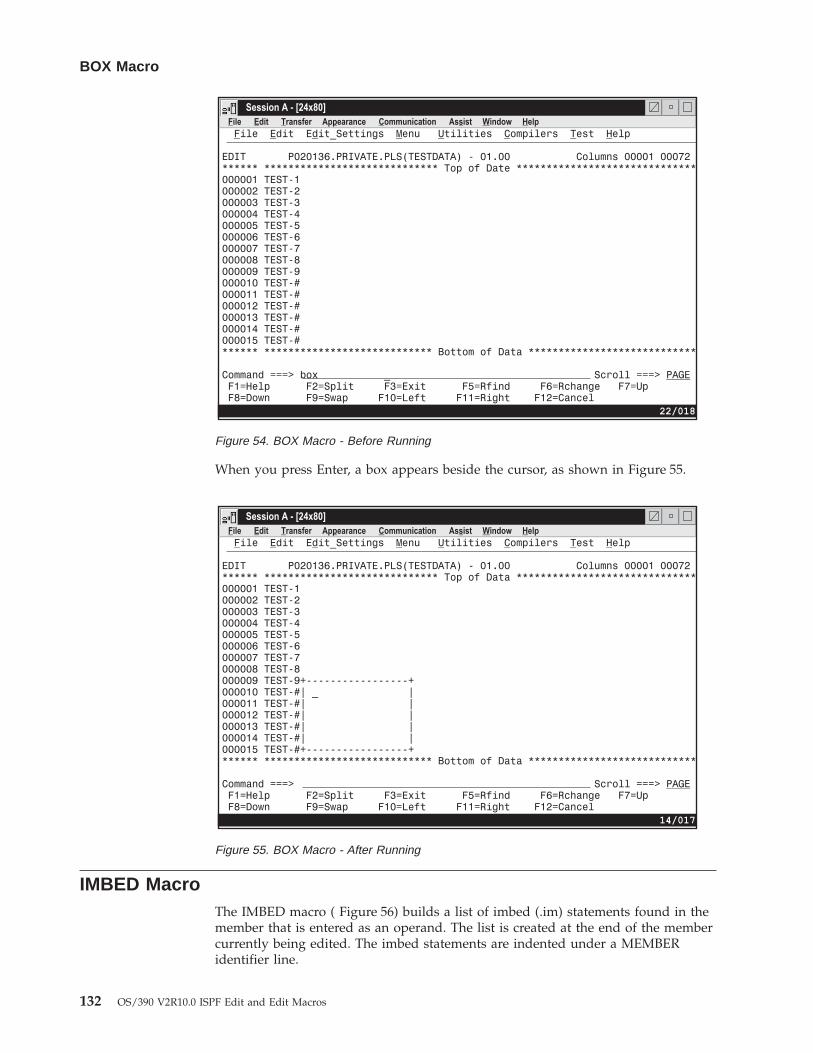
When you press Enter, a box appears beside the cursor, as shown in Figure 55.
IMBED MacroThe IMBED macro ( Figure 56) builds a list of imbed (.im) statements found in themember that is entered as an operand. The list is created at the end of the membercurrently being edited. The imbed statements are indented under a MEMBERidentifier line.
Figure 54. BOX Macro - Before Running
Figure 55. BOX Macro - After Running
BOX Macro
132 OS/390 V2R10.0 ISPF Edit and Edit Macros
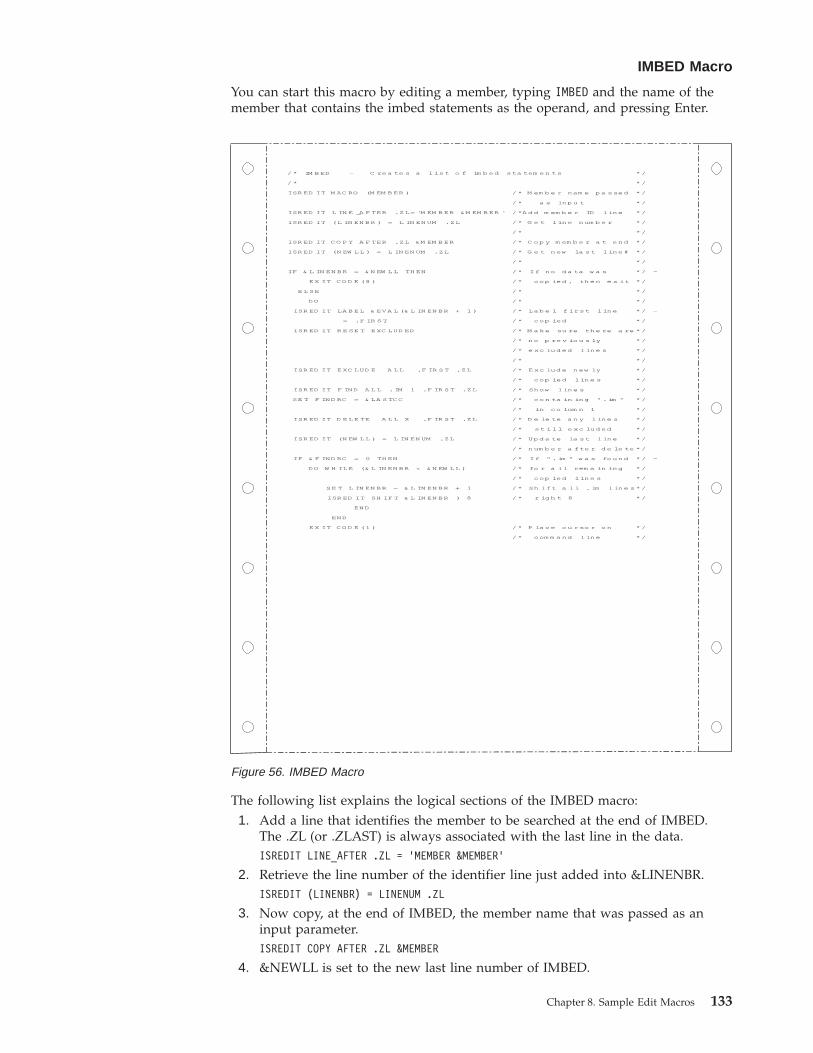
You can start this macro by editing a member, typing IMBED and the name of themember that contains the imbed statements as the operand, and pressing Enter.
The following list explains the logical sections of the IMBED macro:1. Add a line that identifies the member to be searched at the end of IMBED.
The .ZL (or .ZLAST) is always associated with the last line in the data.ISREDIT LINE_AFTER .ZL = 'MEMBER &MEMBER'
2. Retrieve the line number of the identifier line just added into &LINENBR.ISREDIT (LINENBR) = LINENUM .ZL
3. Now copy, at the end of IMBED, the member name that was passed as aninput parameter.ISREDIT COPY AFTER .ZL &MEMBER
4. &NEWLL is set to the new last line number of IMBED.
/ * IM B ED - C re a te s a l is t o f im b e d s ta tem e n ts * /
/ * * /
ISR ED IT M AC RO (M EM B ER ) / * M em b e r nam e p a s se d * /
/ * a s inp u t * /
ISR ED IT L IN E _A F TER .ZL = 'M EM B ER &M EM B ER ' / *A d d m em b e r ID l in e * /
ISR ED IT (L IN EN B R ) = L IN EN UM .ZL / * G e t l in e n um b e r * /
/ * * /
ISR ED IT C O P Y A F TER .ZL &M EM B ER / * C o p y m em b e r a t e n d * /
ISR ED IT (N EW L L ) = L IN EN UM .ZL / * G e t n ew la s t l in e # * /
/ * * /
IF & L IN EN B R = & N EW L L TH EN / * I f n o d a ta w a s * / -
E X IT C O D E (8 ) / * c op ied , th e n e x it * /
E L SE / * * /
DO / * * /
ISR ED IT LA B E L & EV A L (& L IN EN B R + 1 ) / * La b e l f ir s t l in e * / -
= .F IR S T / * c op ied * /
ISR ED IT R E SE T E XC LUD ED / * M a k e su re th e re a re * /
/ * n o p re v io u s ly * /
/ * e xc lu d e d l in e s * /
/ * * /
ISR ED IT E XC LUD E A L L .F IR S T .ZL / * E xc lu d e n ew ly * /
/ * c op ied l in e s * /
ISR ED IT F IND A L L . IM 1 .F IR S T .ZL / * Sh ow l in e s * /
SE T F IND RC = & LA S TC C / * c o n ta in in g " . im " * /
/ * in c o lum n 1 * /
ISR ED IT D E L E TE A L L X .F IR S T .ZL / * D e le te a n y l in e s * /
/ * s t i l l e xc lud ed * /
ISR ED IT (N EW L L ) = L IN EN UM .ZL / * Up d a te la s t l in e * /
/ * n um b e r a f te r d e le te * /
IF & F IND RC = 0 TH EN / * I f " . im " w a s fo u n d * / -
DO W H IL E (& L IN EN B R < & N EW L L ) / * fo r a l l rem a in in g * /
/ * c op ied l in e s * /
SE T L IN EN B R = & L IN EN B R + 1 / * Sh if t a l l . im l in e s * /
ISR ED IT SH IF T & L IN EN B R ) 8 / * r ig h t 8 * /
END
END
E X IT C O D E (1 ) / * P la c e c u r so r o n * /
/ * c om m a n d l in e * /
Figure 56. IMBED Macro
IMBED Macro
Chapter 8. Sample Edit Macros 133
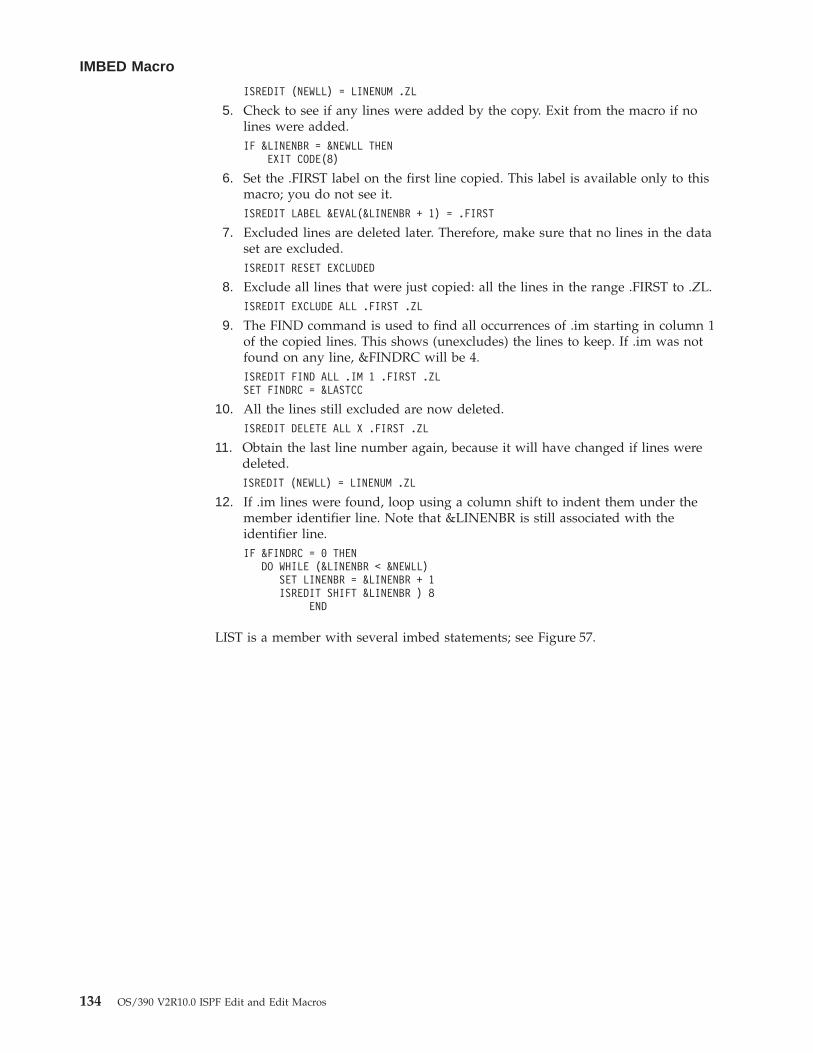
ISREDIT (NEWLL) = LINENUM .ZL
5. Check to see if any lines were added by the copy. Exit from the macro if nolines were added.IF &LINENBR = &NEWLL THEN
EXIT CODE(8)
6. Set the .FIRST label on the first line copied. This label is available only to thismacro; you do not see it.ISREDIT LABEL &EVAL(&LINENBR + 1) = .FIRST
7. Excluded lines are deleted later. Therefore, make sure that no lines in the dataset are excluded.ISREDIT RESET EXCLUDED
8. Exclude all lines that were just copied: all the lines in the range .FIRST to .ZL.ISREDIT EXCLUDE ALL .FIRST .ZL
9. The FIND command is used to find all occurrences of .im starting in column 1of the copied lines. This shows (unexcludes) the lines to keep. If .im was notfound on any line, &FINDRC will be 4.ISREDIT FIND ALL .IM 1 .FIRST .ZLSET FINDRC = &LASTCC
10. All the lines still excluded are now deleted.ISREDIT DELETE ALL X .FIRST .ZL
11. Obtain the last line number again, because it will have changed if lines weredeleted.ISREDIT (NEWLL) = LINENUM .ZL
12. If .im lines were found, loop using a column shift to indent them under themember identifier line. Note that &LINENBR is still associated with theidentifier line.IF &FINDRC = 0 THEN
DO WHILE (&LINENBR < &NEWLL)SET LINENBR = &LINENBR + 1ISREDIT SHIFT &LINENBR ) 8
END
LIST is a member with several imbed statements; see Figure 57.
IMBED Macro
134 OS/390 V2R10.0 ISPF Edit and Edit Macros
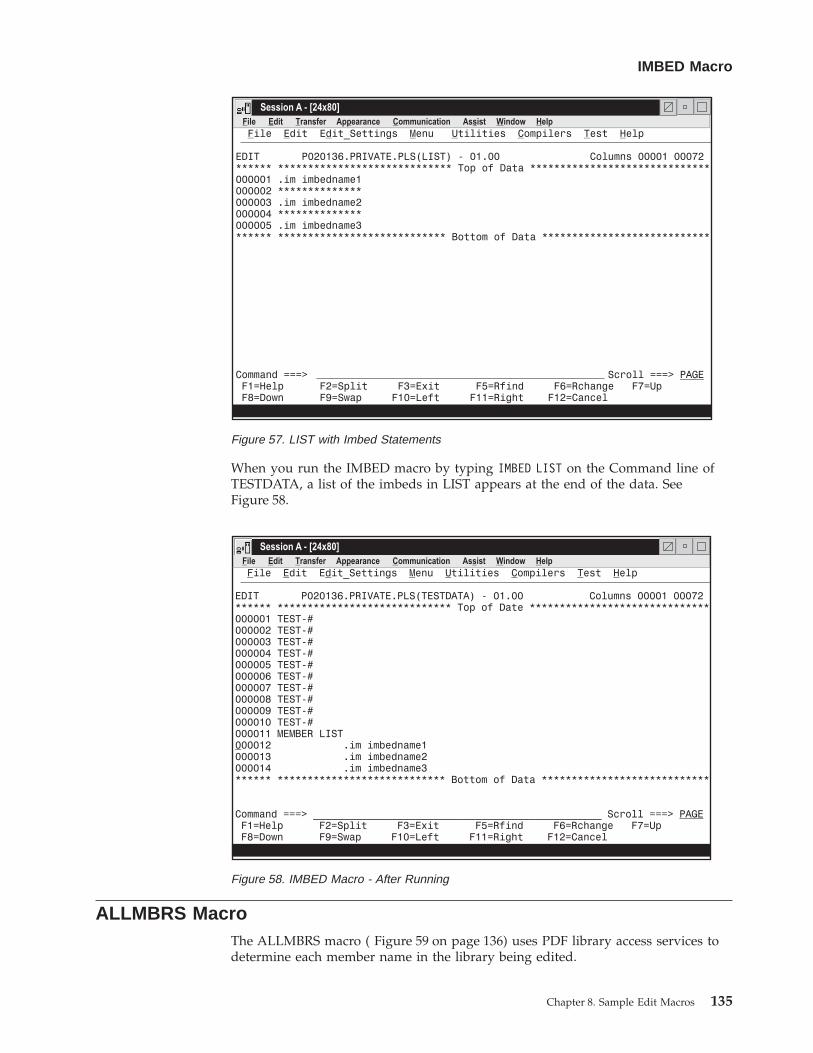
When you run the IMBED macro by typing IMBED LIST on the Command line ofTESTDATA, a list of the imbeds in LIST appears at the end of the data. SeeFigure 58.
ALLMBRS MacroThe ALLMBRS macro ( Figure 59 on page 136) uses PDF library access services todetermine each member name in the library being edited.
Figure 57. LIST with Imbed Statements
Figure 58. IMBED Macro - After Running
IMBED Macro
Chapter 8. Sample Edit Macros 135
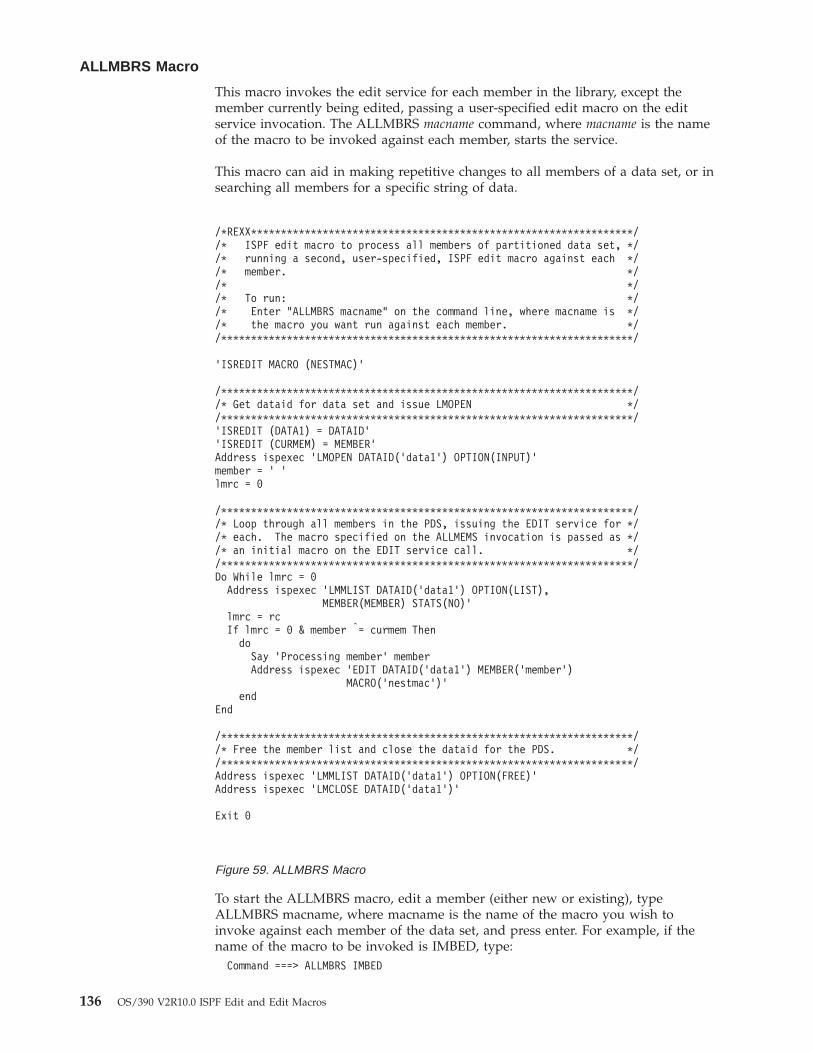
This macro invokes the edit service for each member in the library, except themember currently being edited, passing a user-specified edit macro on the editservice invocation. The ALLMBRS macname command, where macname is the nameof the macro to be invoked against each member, starts the service.
This macro can aid in making repetitive changes to all members of a data set, or insearching all members for a specific string of data.
To start the ALLMBRS macro, edit a member (either new or existing), typeALLMBRS macname, where macname is the name of the macro you wish toinvoke against each member of the data set, and press enter. For example, if thename of the macro to be invoked is IMBED, type:Command ===> ALLMBRS IMBED
/*REXX****************************************************************//* ISPF edit macro to process all members of partitioned data set, *//* running a second, user-specified, ISPF edit macro against each *//* member. *//* *//* To run: *//* Enter "ALLMBRS macname" on the command line, where macname is *//* the macro you want run against each member. *//*********************************************************************/
'ISREDIT MACRO (NESTMAC)'
/*********************************************************************//* Get dataid for data set and issue LMOPEN *//*********************************************************************/'ISREDIT (DATA1) = DATAID''ISREDIT (CURMEM) = MEMBER'Address ispexec 'LMOPEN DATAID('data1') OPTION(INPUT)'member = ' 'lmrc = 0
/*********************************************************************//* Loop through all members in the PDS, issuing the EDIT service for *//* each. The macro specified on the ALLMEMS invocation is passed as *//* an initial macro on the EDIT service call. *//*********************************************************************/Do While lmrc = 0Address ispexec 'LMMLIST DATAID('data1') OPTION(LIST),
MEMBER(MEMBER) STATS(NO)'lmrc = rcIf lmrc = 0 & member |= curmem Then
doSay 'Processing member' memberAddress ispexec 'EDIT DATAID('data1') MEMBER('member')
MACRO('nestmac')'end
End
/*********************************************************************//* Free the member list and close the dataid for the PDS. *//*********************************************************************/Address ispexec 'LMMLIST DATAID('data1') OPTION(FREE)'Address ispexec 'LMCLOSE DATAID('data1')'
Exit 0
Figure 59. ALLMBRS Macro
ALLMBRS Macro
136 OS/390 V2R10.0 ISPF Edit and Edit Macros
The following list explains the logical sections of the ALLMBRS macro:1. The MACRO command identifies NESTMAC as the variable to contain the
name of the macro that is passed on the edit service invocation for eachmember. If no parameter is passed to ALLMBRS, NESTMAC is blank.
ISREDIT MACRO (NESTMAC)
2. The DATAID assignment statement returns a data ID in the variable DATA1.The data ID identifies the concatenation of data sets currently being edited.
ISREDIT (DATA1) = DATAID
3. The name of the member currently being edited is returned in CURMEM.ISREDIT (MEMBER) = CURMEM
4. The data set (or sets) identified by the data ID obtained earlier is opened forinput to allow the LMMLIST service to be called later. No return codechecking is done because it is presumed that if the data set is being edited, itcan be successfully processed by LMOPEN.
Address ispexec 'LMOPEN DATAID('data1') OPTION(INPUT)'
5. The variable to hold the name of the next member to be processed, and thereturn code from the LMMLIST service are initialized.
member = ' 'lmrc = 0
6. The exec loops to process all members returned by LMMLIST. Variable LMRCis set to 4 when the end of the member list is reached, stopping the loop.
Do While lmrc = 0
7. Obtain the next member in the list. If this is the first invocation of LMMLIST,the first member in the list is returned. The member name is returned invariable MEMBER, and variable LMRC is set to the return code fromLMMLIST.
Address ispexec 'LMMLIST DATAID('data1') OPTION(LIST),MEMBER(MEMBER) STATS(NO)'
lmrc = rc
8. If LMMLIST returns a 0, indicating a member name was returned, and if themember returned is not the member currently being edited, the member isprocessed.
If lmrc = 0 Thendo
9. The Rexx SAY statement is used to write line-I/O messages. As the macroprocesses each member, the member name appears on the terminal to keepyou informed about what is happening. An alternative to the SAY statementwould be to display a panel showing the member name after issuing theISPEXEC CONTROL DISPLAY LOCK service.
Say 'Processing member' member
10. The EDIT service is invoked on the member returned by LMMLIST. Themacro specified on invocation of ALLMBRS is passed as an initial macro onthe edit service.
Address ispexec 'EDIT DATAID('data1') MEMBER('member')MACRO('nestmac')'
11. When the LMMLIST service returns a non-zero value, the loop is exited andthe cleanup begins. LMMLIST is called to free the member list, and theLMCLOSE service is called to close the data set or sets associated with thedata ID.
Address ispexec 'LMMLIST DATAID('data1') OPTION(FREE)'Address ispexec 'LMCLOSE DATAID('data1')'
ALLMBRS Macro
Chapter 8. Sample Edit Macros 137
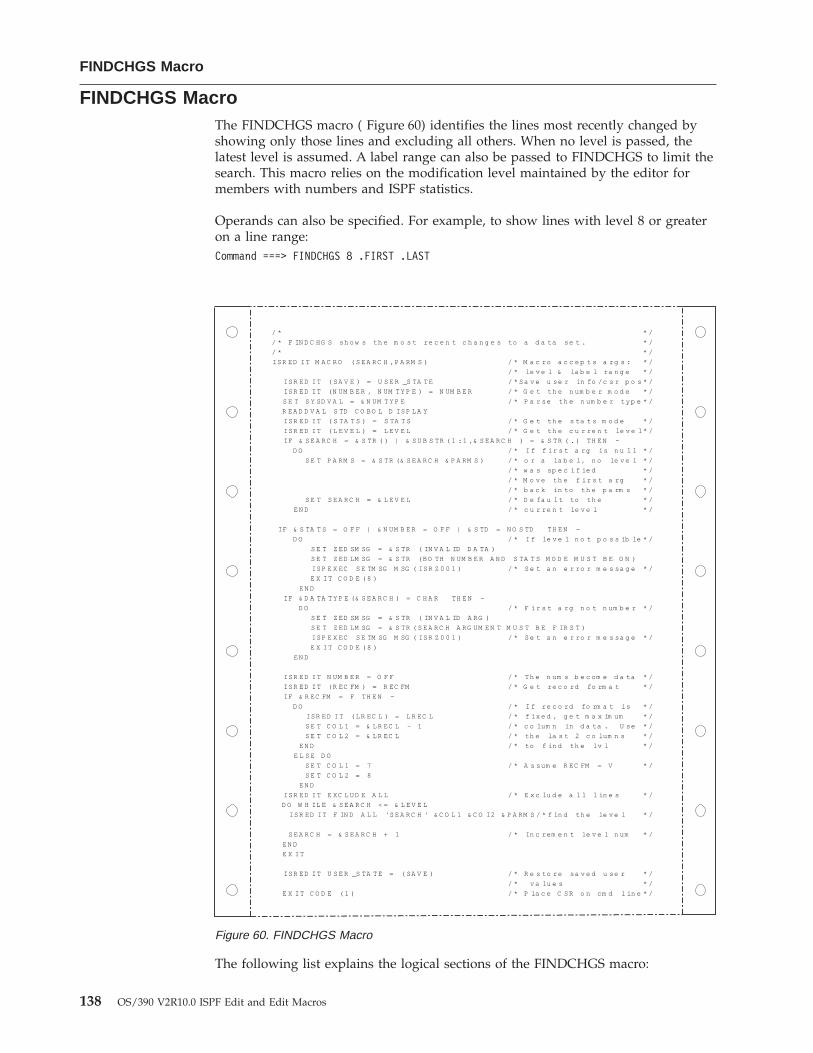
FINDCHGS MacroThe FINDCHGS macro ( Figure 60) identifies the lines most recently changed byshowing only those lines and excluding all others. When no level is passed, thelatest level is assumed. A label range can also be passed to FINDCHGS to limit thesearch. This macro relies on the modification level maintained by the editor formembers with numbers and ISPF statistics.
Operands can also be specified. For example, to show lines with level 8 or greateron a line range:Command ===> FINDCHGS 8 .FIRST .LAST
The following list explains the logical sections of the FINDCHGS macro:
/ * * /
/ * F IN D C HG S sh o w s th e m o s t re c e n t c h a n g e s to a d a ta se t . * /
/ * * /
IS R E D I T M A C R O ( S E A R C H ,P A RM S ) / * M a c ro a c c e p t s a rg s : * /
/ * le v e l & la b e l ra n g e * /
IS R E D I T ( SA V E ) = U S E R _S TA T E / * S a v e u se r in fo /c s r p o s * /
IS R E D I T (N UM B E R , N UM T Y P E ) = N UM B E R / * G e t th e n um b e r m o d e * /
S E T S Y SD V A L = & N UM T Y P E / * P a r se th e n um b e r t y p e * /
R E A D D V A L S TD C O B O L D IS P L A Y
IS R E D I T ( S TA T S ) = S TA T S / * G e t th e s ta t s m o d e * /
IS R E D I T ( L E V E L ) = L E V E L / * G e t th e c u r re n t le v e l * /
IF & S E A R C H = & S TR ( ) | & S U B S TR ( 1 :1 ,& S E A R C H ) = & S TR ( . ) TH E N -
D O / * I f f i r s t a rg is n u l l * /
S E T P A R M S = & S TR (& S E A R C H & P A RM S ) / * o r a la b e l , n o le v e l * /
/ * w a s sp e c i f ie d * /
/ * M o v e th e f i r s t a rg * /
/ * b a c k in to th e p a rm s * /
S E T S E A R C H = & L E V E L / * D e fa u l t to th e * /
E N D / * c u r re n t le v e l * /
IF & S TA T S = O F F | & N UM B E R = O F F | & S TD = N O S TD TH E N -
D O / * I f le v e l n o t p o s s ib le * /
S E T Z ED SM SG = & S TR ( IN V A L ID D A TA )
S E T Z ED LM SG = & S TR (B O TH N UM B E R A N D S TA T S M O D E M U S T B E O N )
IS P E X EC S E TM SG M SG ( IS R Z 0 0 1 ) / * S e t a n e r ro r m e s sa g e * /
E X I T C O D E ( 8 )
E N D
IF & D A TA T Y P E (& S E A R C H ) = C H A R TH E N -
D O / * F i r s t a rg n o t n um b e r * /
S E T Z ED SM SG = & S TR ( IN V A L ID A RG )
S E T Z ED LM SG = & S TR ( S E A R C H A RG UM E N T M U S T B E F IR S T )
IS P E X EC S E TM SG M SG ( IS R Z 0 0 1 ) / * S e t a n e r ro r m e s sa g e * /
E X I T C O D E ( 8 )
E N D
IS R E D I T N UM B E R = O F F / * T h e n um s b e c om e d a ta * /
IS R E D I T (R EC FM ) = R EC FM / * G e t re c o rd fo rm a t * /
IF & R EC FM = F TH E N -
D O / * I f re c o rd fo rm a t is * /
IS R E D I T ( L R EC L ) = L R EC L / * f ix e d , g e t m a x im um * /
S E T C O L 1 = & L R EC L - 1 / * c o lum n in d a ta . U se * /
S E T C O L 2 = & L R EC L / * th e la s t 2 c o lum n s * /
E N D / * to f in d th e lv l * /
E L S E D O
S E T C O L 1 = 7 / * A s sum e R EC FM = V * /
S E T C O L 2 = 8
E N D
IS R E D I T E XC L U D E A L L / * E x c lu d e a l l l in e s * /
D O W H IL E & S E A R C H < = & L E V E L
IS R ED I T F IN D A L L 'S E A R C H ' & C O L 1 & C O I2 & P A RM S / * f in d th e le v e l * /
S E A R C H = & S E A R C H + 1 / * In c rem e n t le v e l n um * /
E N D
E X I T
IS R E D I T U S E R _S TA T E = ( SA V E ) / * R e s to re sa v e d u se r * /
/ * v a lu e s * /
E X I T C O D E ( 1 ) / * P la c e C S R o n cm d l in e * /
Figure 60. FINDCHGS Macro
FINDCHGS Macro
138 OS/390 V2R10.0 ISPF Edit and Edit Macros
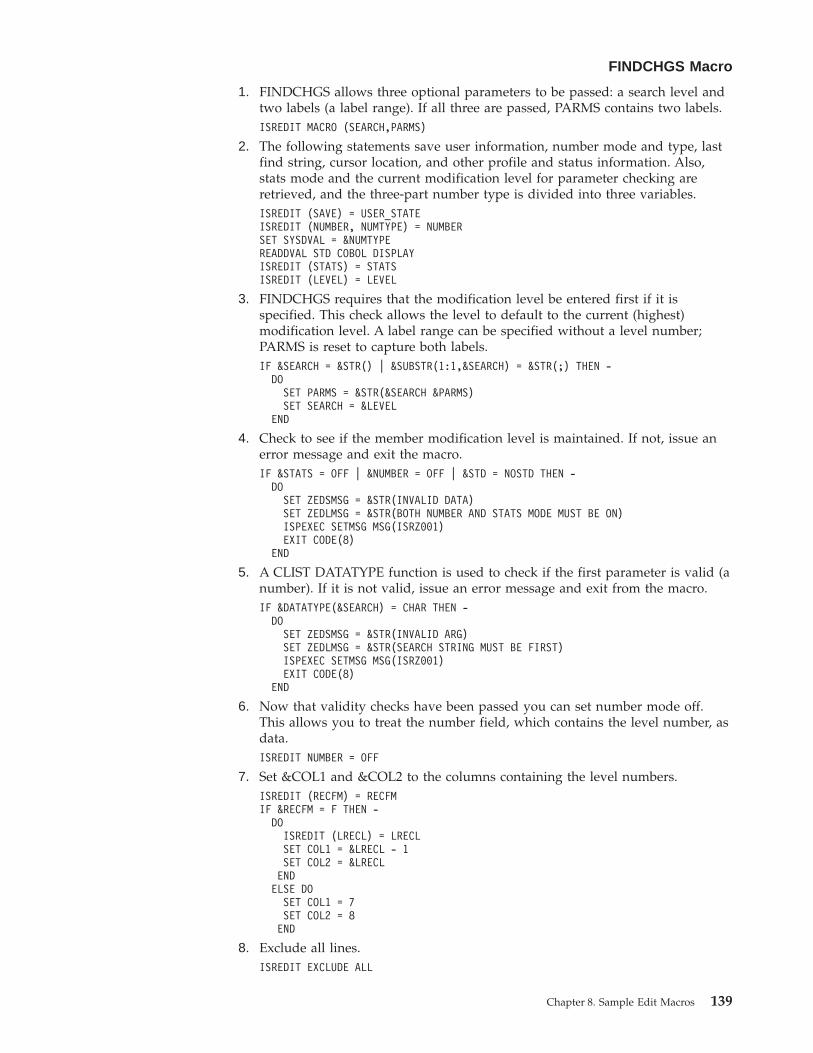
1. FINDCHGS allows three optional parameters to be passed: a search level andtwo labels (a label range). If all three are passed, PARMS contains two labels.ISREDIT MACRO (SEARCH,PARMS)
2. The following statements save user information, number mode and type, lastfind string, cursor location, and other profile and status information. Also,stats mode and the current modification level for parameter checking areretrieved, and the three-part number type is divided into three variables.ISREDIT (SAVE) = USER_STATEISREDIT (NUMBER, NUMTYPE) = NUMBERSET SYSDVAL = &NUMTYPEREADDVAL STD COBOL DISPLAYISREDIT (STATS) = STATSISREDIT (LEVEL) = LEVEL
3. FINDCHGS requires that the modification level be entered first if it isspecified. This check allows the level to default to the current (highest)modification level. A label range can be specified without a level number;PARMS is reset to capture both labels.IF &SEARCH = &STR() | &SUBSTR(1:1,&SEARCH) = &STR(;) THEN -DOSET PARMS = &STR(&SEARCH &PARMS)SET SEARCH = &LEVEL
END
4. Check to see if the member modification level is maintained. If not, issue anerror message and exit the macro.IF &STATS = OFF | &NUMBER = OFF | &STD = NOSTD THEN -DOSET ZEDSMSG = &STR(INVALID DATA)SET ZEDLMSG = &STR(BOTH NUMBER AND STATS MODE MUST BE ON)ISPEXEC SETMSG MSG(ISRZ001)EXIT CODE(8)
END
5. A CLIST DATATYPE function is used to check if the first parameter is valid (anumber). If it is not valid, issue an error message and exit from the macro.IF &DATATYPE(&SEARCH) = CHAR THEN -DOSET ZEDSMSG = &STR(INVALID ARG)SET ZEDLMSG = &STR(SEARCH STRING MUST BE FIRST)ISPEXEC SETMSG MSG(ISRZ001)EXIT CODE(8)
END
6. Now that validity checks have been passed you can set number mode off.This allows you to treat the number field, which contains the level number, asdata.ISREDIT NUMBER = OFF
7. Set &COL1 and &COL2 to the columns containing the level numbers.ISREDIT (RECFM) = RECFMIF &RECFM = F THEN -DOISREDIT (LRECL) = LRECLSET COL1 = &LRECL - 1SET COL2 = &LRECL
ENDELSE DOSET COL1 = 7SET COL2 = 8
END
8. Exclude all lines.ISREDIT EXCLUDE ALL
FINDCHGS Macro
Chapter 8. Sample Edit Macros 139
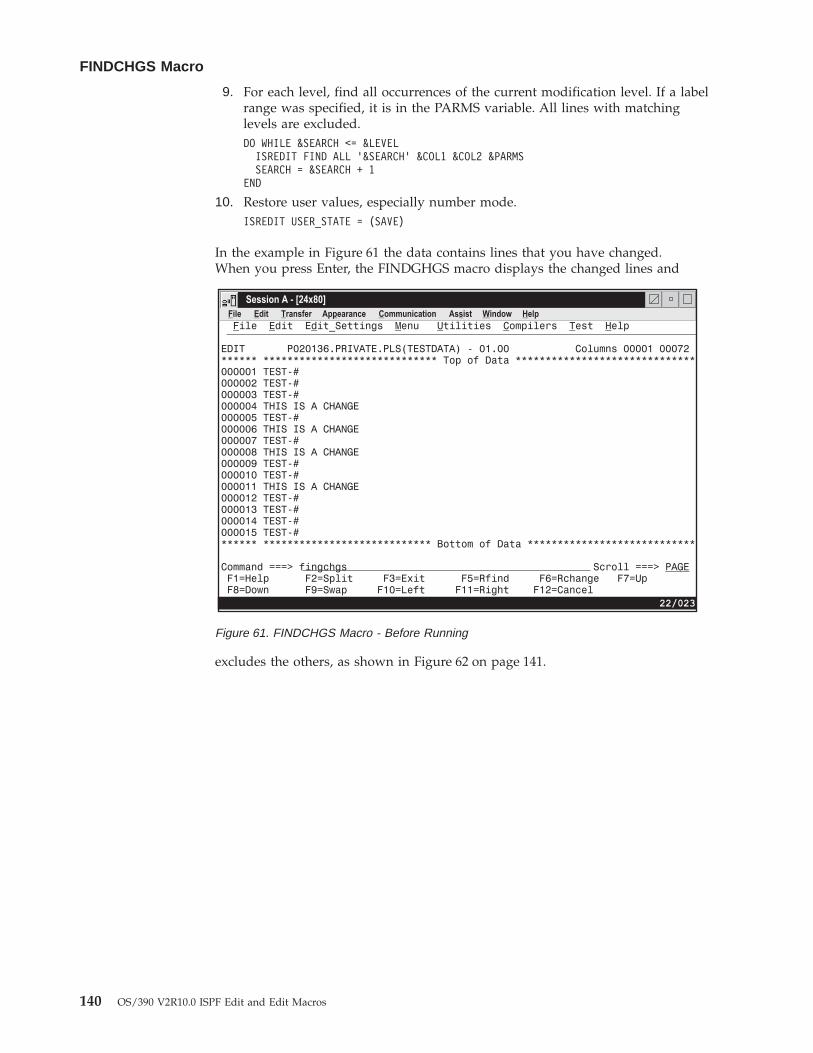
9. For each level, find all occurrences of the current modification level. If a labelrange was specified, it is in the PARMS variable. All lines with matchinglevels are excluded.DO WHILE &SEARCH <= &LEVELISREDIT FIND ALL '&SEARCH' &COL1 &COL2 &PARMSSEARCH = &SEARCH + 1
END
10. Restore user values, especially number mode.ISREDIT USER_STATE = (SAVE)
In the example in Figure 61 the data contains lines that you have changed.When you press Enter, the FINDGHGS macro displays the changed lines and
excludes the others, as shown in Figure 62 on page 141.
Figure 61. FINDCHGS Macro - Before Running
FINDCHGS Macro
140 OS/390 V2R10.0 ISPF Edit and Edit Macros
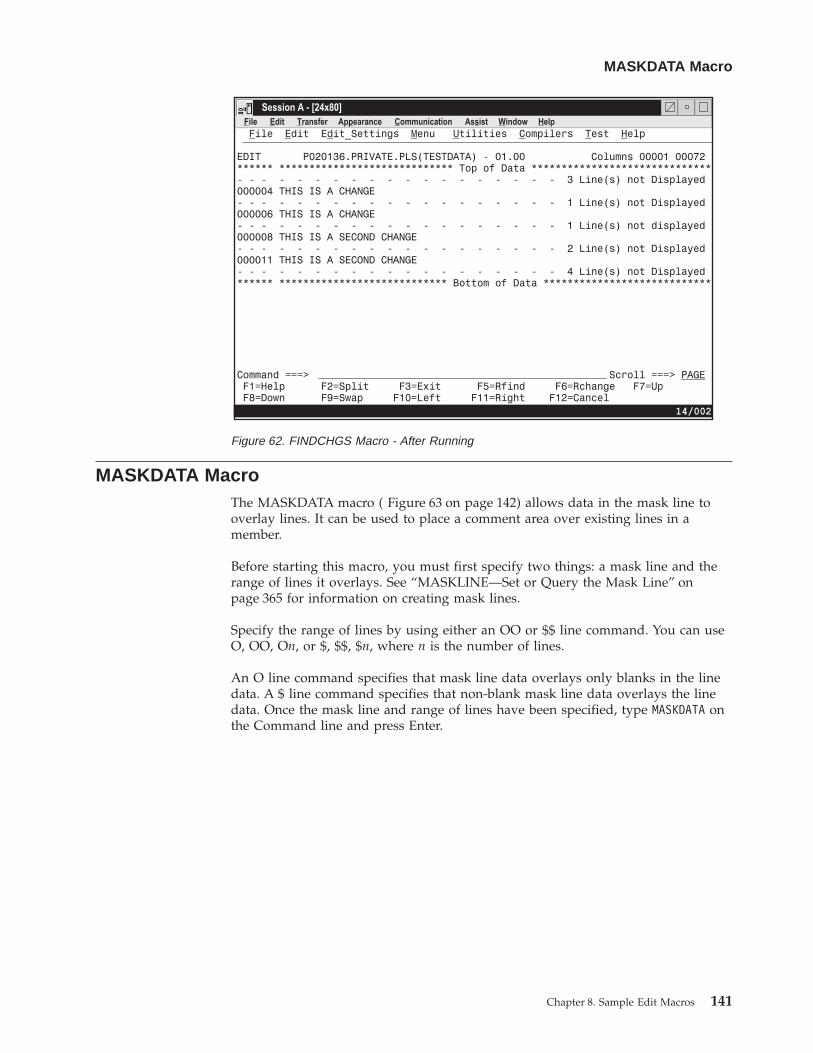
MASKDATA MacroThe MASKDATA macro ( Figure 63 on page 142) allows data in the mask line tooverlay lines. It can be used to place a comment area over existing lines in amember.
Before starting this macro, you must first specify two things: a mask line and therange of lines it overlays. See “MASKLINE—Set or Query the Mask Line” onpage 365 for information on creating mask lines.
Specify the range of lines by using either an OO or $$ line command. You can useO, OO, On, or $, $$, $n, where n is the number of lines.
An O line command specifies that mask line data overlays only blanks in the linedata. A $ line command specifies that non-blank mask line data overlays the linedata. Once the mask line and range of lines have been specified, type MASKDATA onthe Command line and press Enter.
Figure 62. FINDCHGS Macro - After Running
MASKDATA Macro
Chapter 8. Sample Edit Macros 141
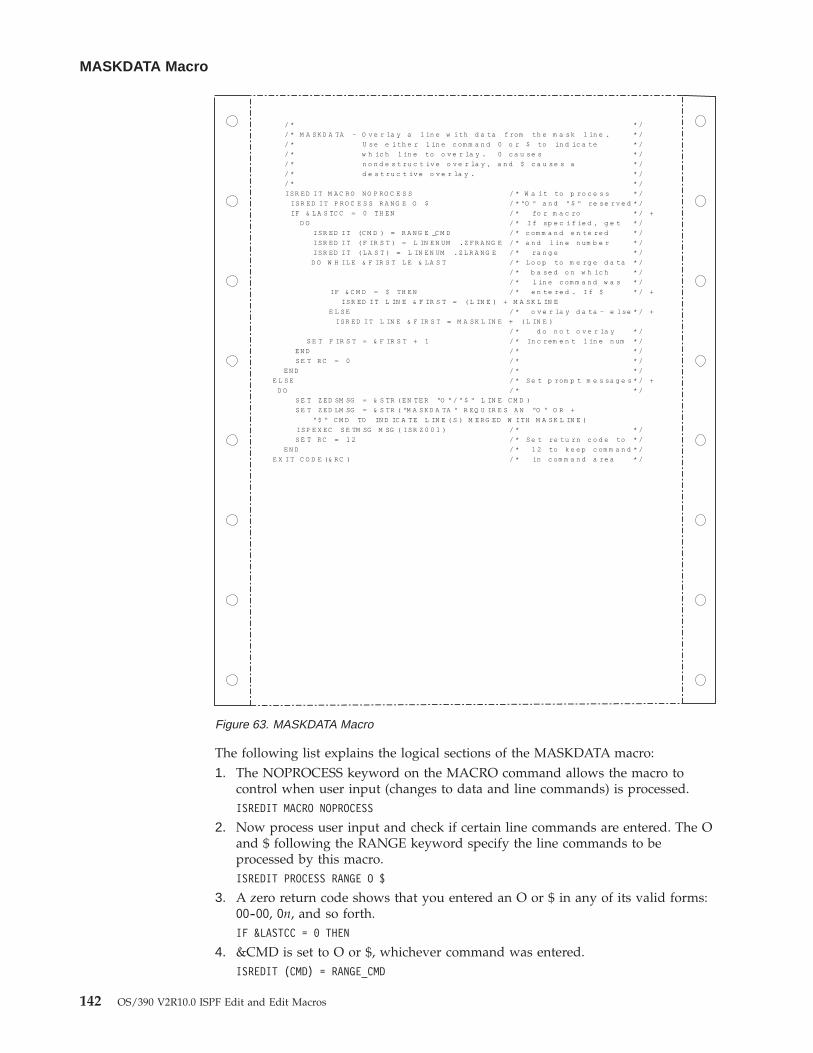
The following list explains the logical sections of the MASKDATA macro:1. The NOPROCESS keyword on the MACRO command allows the macro to
control when user input (changes to data and line commands) is processed.ISREDIT MACRO NOPROCESS
2. Now process user input and check if certain line commands are entered. The Oand $ following the RANGE keyword specify the line commands to beprocessed by this macro.ISREDIT PROCESS RANGE O $
3. A zero return code shows that you entered an O or $ in any of its valid forms:OO-OO, On, and so forth.IF &LASTCC = 0 THEN
4. &CMD is set to O or $, whichever command was entered.ISREDIT (CMD) = RANGE_CMD
/ * * /
/ * M A S K D A TA - O v e r la y a l in e w i th d a ta f rom th e m a s k l in e . * /
/ * U se e i th e r l in e c om m a n d 0 o r $ to in d ic a te * /
/ * w h ic h l in e to o v e r la y . 0 c a u se s * /
/ * n o n d e s t ru c t iv e o v e r la y , a n d $ c a u se s a * /
/ * d e s t ru c t iv e o v e r la y . * /
/ * * /
IS R E D I T M A C R O N O P R O C E S S / * W a i t to p ro c e s s * /
IS R ED I T P R O C E S S R A N G E O $ / * "O " a n d "$ " re se r v e d * /
IF & L A S TC C = 0 TH E N / * fo r m a c ro * / +
D O / * I f sp e c i f ie d , g e t * /
IS R ED I T (C M D ) = R A N G E _C M D / * c om m a n d e n te re d * /
IS R ED I T ( F IR S T ) = L IN E N UM .Z F R A N G E / * a n d l in e n um b e r * /
IS R ED I T ( L A S T ) = L IN E N UM . Z L R A N G E / * ra n g e * /
D O W H IL E & F IR S T L E & L A S T / * L o o p to m e rg e d a ta * /
/ * b a se d o n w h ic h * /
/ * l in e c om m a n d w a s * /
IF & C M D = $ TH E N / * e n te re d . I f $ * / +
IS R ED I T L IN E & F IR S T = ( L IN E ) + M A S K L IN E
E L S E / * o v e r la y d a ta - e l se * / +
IS R ED I T L IN E & F IR S T = M A S K L IN E + ( L IN E )
/ * d o n o t o v e r la y * /
S E T F IR S T = & F IR S T + 1 / * In c rem e n t l in e n um * /
E N D / * * /
S E T R C = 0 / * * /
E N D / * * /
E L S E / * S e t p rom p t m e s sa g e s * / +
D O / * * /
S E T Z E D SM SG = & S TR ( E N T E R "O " / "$ " L IN E C M D )
S E T Z E D LM SG = & S TR ( "M A S K D A TA " R EQ U IR E S A N "O " O R +
"$ " C M D TO IN D IC A T E L IN E ( S ) M E R G ED W I TH M A S K L IN E )
IS P E X EC S E TM SG M SG ( IS R Z 0 0 1 ) / * * /
S E T R C = 1 2 / * S e t re tu rn c o d e to * /
E N D / * 1 2 to k e e p c om m a n d * /
E X I T C O D E (& R C ) / * in c om m a n d a re a * /
Figure 63. MASKDATA Macro
MASKDATA Macro
142 OS/390 V2R10.0 ISPF Edit and Edit Macros
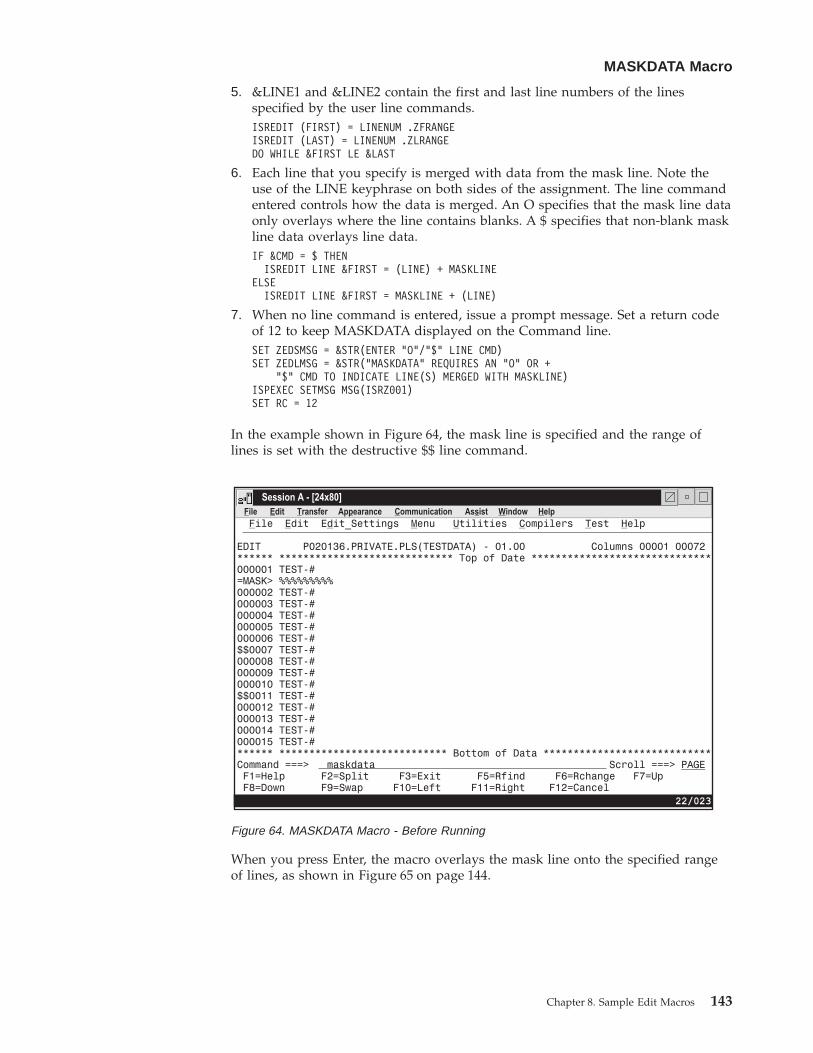
5. &LINE1 and &LINE2 contain the first and last line numbers of the linesspecified by the user line commands.ISREDIT (FIRST) = LINENUM .ZFRANGEISREDIT (LAST) = LINENUM .ZLRANGEDO WHILE &FIRST LE &LAST
6. Each line that you specify is merged with data from the mask line. Note theuse of the LINE keyphrase on both sides of the assignment. The line commandentered controls how the data is merged. An O specifies that the mask line dataonly overlays where the line contains blanks. A $ specifies that non-blank maskline data overlays line data.IF &CMD = $ THENISREDIT LINE &FIRST = (LINE) + MASKLINE
ELSEISREDIT LINE &FIRST = MASKLINE + (LINE)
7. When no line command is entered, issue a prompt message. Set a return codeof 12 to keep MASKDATA displayed on the Command line.SET ZEDSMSG = &STR(ENTER "O"/"$" LINE CMD)SET ZEDLMSG = &STR("MASKDATA" REQUIRES AN "O" OR +
"$" CMD TO INDICATE LINE(S) MERGED WITH MASKLINE)ISPEXEC SETMSG MSG(ISRZ001)SET RC = 12
In the example shown in Figure 64, the mask line is specified and the range oflines is set with the destructive $$ line command.
When you press Enter, the macro overlays the mask line onto the specified rangeof lines, as shown in Figure 65 on page 144.
Figure 64. MASKDATA Macro - Before Running
MASKDATA Macro
Chapter 8. Sample Edit Macros 143
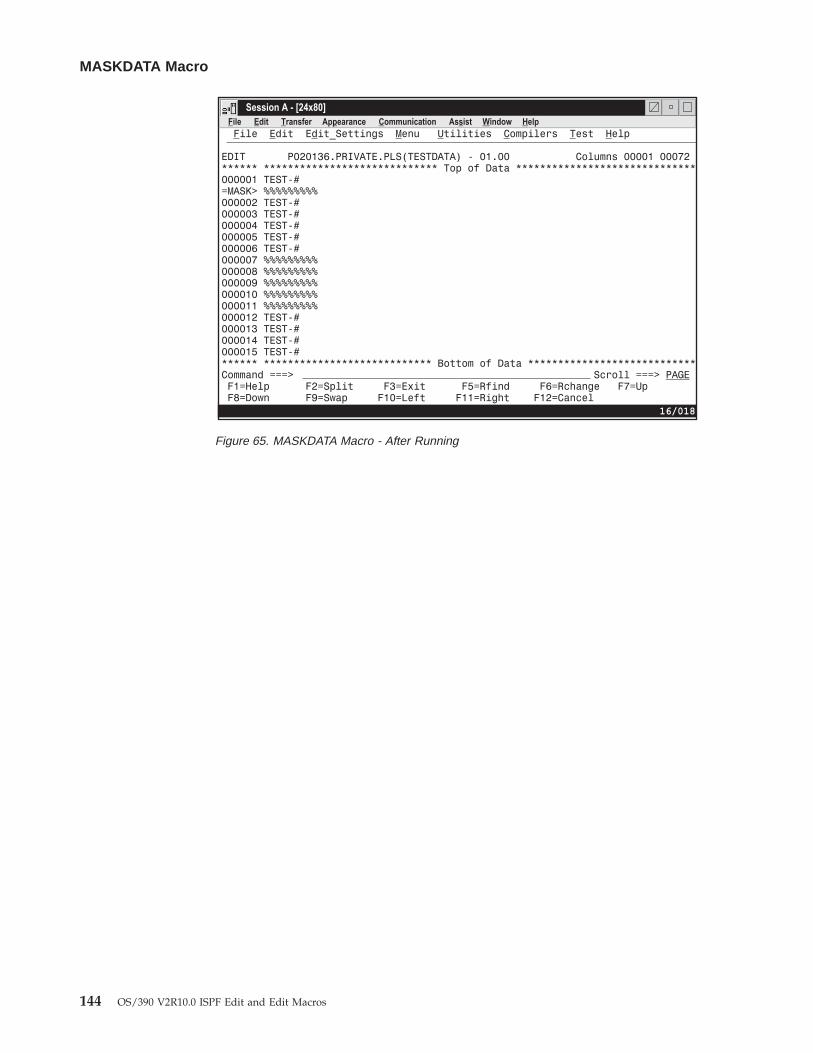
Figure 65. MASKDATA Macro - After Running
MASKDATA Macro
144 OS/390 V2R10.0 ISPF Edit and Edit Macros
Part 3. Command Reference
Chapter 9. Edit Line Commands . . . . . . 153Rules for Entering Line Commands . . . . . . 153Edit Line Command Notation Conventions . . . 154Line Command Summary . . . . . . . . . 154(—Column Shift Left . . . . . . . . . . . 156
Syntax. . . . . . . . . . . . . . . 156Description . . . . . . . . . . . . . 156Example . . . . . . . . . . . . . . 156
)—Column Shift Right . . . . . . . . . . 157Syntax. . . . . . . . . . . . . . . 158Description . . . . . . . . . . . . . 158Example . . . . . . . . . . . . . . 158
<—Data Shift Left . . . . . . . . . . . . 159Syntax. . . . . . . . . . . . . . . 160Description . . . . . . . . . . . . . 160Example . . . . . . . . . . . . . . 160
>—Data Shift Right . . . . . . . . . . . 162Syntax. . . . . . . . . . . . . . . 162Description . . . . . . . . . . . . . 162Example . . . . . . . . . . . . . . 162
A—Specify an “After” Destination . . . . . . 163Syntax. . . . . . . . . . . . . . . 164Description . . . . . . . . . . . . . 164Example . . . . . . . . . . . . . . 164
B—Specify a “Before” Destination . . . . . . 166Syntax. . . . . . . . . . . . . . . 166Description . . . . . . . . . . . . . 166Example . . . . . . . . . . . . . . 166
BOUNDS—Define Boundary Columns . . . . . 168Syntax. . . . . . . . . . . . . . . 168Description . . . . . . . . . . . . . 168Example . . . . . . . . . . . . . . 169
C—Copy Lines . . . . . . . . . . . . . 170Syntax. . . . . . . . . . . . . . . 170Description . . . . . . . . . . . . . 170Example . . . . . . . . . . . . . . 170
COLS—Identify Columns . . . . . . . . . 172Syntax. . . . . . . . . . . . . . . 172Description . . . . . . . . . . . . . 172Example . . . . . . . . . . . . . . 172
D—Delete Lines . . . . . . . . . . . . 173Syntax. . . . . . . . . . . . . . . 173Description . . . . . . . . . . . . . 173Example . . . . . . . . . . . . . . 174
F—Show the First Line . . . . . . . . . . 175Syntax. . . . . . . . . . . . . . . 175Description . . . . . . . . . . . . . 175Example . . . . . . . . . . . . . . 175
I—Insert Lines . . . . . . . . . . . . . 176Syntax. . . . . . . . . . . . . . . 176Description . . . . . . . . . . . . . 176Example . . . . . . . . . . . . . . 177
L—Show the Last Line(s) . . . . . . . . . 178Syntax. . . . . . . . . . . . . . . 178Description . . . . . . . . . . . . . 178Example . . . . . . . . . . . . . . 178
LC—Convert Characters to Lowercase . . . . . 179Syntax. . . . . . . . . . . . . . . 179Description . . . . . . . . . . . . . 179Example . . . . . . . . . . . . . . 180
M—Move Lines . . . . . . . . . . . . 181Syntax. . . . . . . . . . . . . . . 181Description . . . . . . . . . . . . . 181Example . . . . . . . . . . . . . . 182
MASK—Define Masks . . . . . . . . . . 183Syntax. . . . . . . . . . . . . . . 183Description . . . . . . . . . . . . . 183Example . . . . . . . . . . . . . . 184
MD—Make Dataline . . . . . . . . . . . 185Syntax. . . . . . . . . . . . . . . 185Description . . . . . . . . . . . . . 185Example . . . . . . . . . . . . . . 186
O—Overlay Lines . . . . . . . . . . . . 187Syntax. . . . . . . . . . . . . . . 187Description . . . . . . . . . . . . . 187Example . . . . . . . . . . . . . . 188
R—Repeat Lines . . . . . . . . . . . . 189Syntax. . . . . . . . . . . . . . . 190Description . . . . . . . . . . . . . 190Example . . . . . . . . . . . . . . 190
S—Show Lines . . . . . . . . . . . . . 191Syntax. . . . . . . . . . . . . . . 191Description . . . . . . . . . . . . . 191Example . . . . . . . . . . . . . . 191
TABS—Control Tabs . . . . . . . . . . . 193Syntax. . . . . . . . . . . . . . . 193Description . . . . . . . . . . . . . 193Examples . . . . . . . . . . . . . . 193
Using Software and Hardware Tabs . . . . 193Using Software Tab Fields . . . . . . . 194
TE—Text Entry . . . . . . . . . . . . . 194Syntax. . . . . . . . . . . . . . . 195Description . . . . . . . . . . . . . 195Example . . . . . . . . . . . . . . 195
TF—Text Flow . . . . . . . . . . . . . 198Syntax. . . . . . . . . . . . . . . 198Description . . . . . . . . . . . . . 198Example . . . . . . . . . . . . . . 198
TS—Text Split . . . . . . . . . . . . . 199Syntax. . . . . . . . . . . . . . . 200Description . . . . . . . . . . . . . 200Examples . . . . . . . . . . . . . . 200
UC—Convert Characters to Uppercase . . . . . 201Syntax. . . . . . . . . . . . . . . 201Description . . . . . . . . . . . . . 201Example . . . . . . . . . . . . . . 202
X—Exclude Lines . . . . . . . . . . . . 203Syntax. . . . . . . . . . . . . . . 203Description . . . . . . . . . . . . . 203Example . . . . . . . . . . . . . . 204
Chapter 10. Edit Primary Commands . . . . . 207
© Copyright IBM Corp. 1984, 2000 145
Edit Primary Command Notation Conventions . . 207Edit Primary Command Summary . . . . . . 207AUTOLIST—Create a Source Listing Automatically 211
Syntax. . . . . . . . . . . . . . . 212Description . . . . . . . . . . . . . 212Example . . . . . . . . . . . . . . 212
AUTONUM—Number Lines Automatically . . . 213Syntax. . . . . . . . . . . . . . . 213Description . . . . . . . . . . . . . 213Example . . . . . . . . . . . . . . 214
AUTOSAVE—Save Data Automatically . . . . . 215Syntax. . . . . . . . . . . . . . . 215Description . . . . . . . . . . . . . 215Example . . . . . . . . . . . . . . 216
BOUNDS—Control the Edit Boundaries . . . . 216Syntax. . . . . . . . . . . . . . . 216Description . . . . . . . . . . . . . 216Examples . . . . . . . . . . . . . . 217
BUILTIN—Process a Built-In Command . . . . 217Syntax. . . . . . . . . . . . . . . 217Description . . . . . . . . . . . . . 217Example . . . . . . . . . . . . . . 217
BROWSE—Browse from within an Edit Session 218Syntax. . . . . . . . . . . . . . . 218Description . . . . . . . . . . . . . 218Example . . . . . . . . . . . . . . 218
CANCEL—Cancel Edit Changes . . . . . . . 218Syntax. . . . . . . . . . . . . . . 218Description . . . . . . . . . . . . . 219Example . . . . . . . . . . . . . . 219
CAPS—Control Automatic Character Conversion 219Syntax. . . . . . . . . . . . . . . 219Description . . . . . . . . . . . . . 219Example . . . . . . . . . . . . . . 220
CHANGE—Change a Data String . . . . . . 220Syntax. . . . . . . . . . . . . . . 220Description . . . . . . . . . . . . . 221Examples . . . . . . . . . . . . . . 222
COMPARE—Edit Compare . . . . . . . . . 222Command Syntax . . . . . . . . . . . 223Examples . . . . . . . . . . . . . . 224
COPY—Copy Data . . . . . . . . . . . 225Syntax. . . . . . . . . . . . . . . 225Description . . . . . . . . . . . . . 226Example . . . . . . . . . . . . . . 227
CREATE—Create Data . . . . . . . . . . 229Syntax. . . . . . . . . . . . . . . 229Description . . . . . . . . . . . . . 229Example . . . . . . . . . . . . . . 230
CUT—Cut and Save Lines . . . . . . . . . 233Syntax. . . . . . . . . . . . . . . 233Description . . . . . . . . . . . . . 233Example . . . . . . . . . . . . . . 234
DEFINE—Define a Name . . . . . . . . . 234Syntax. . . . . . . . . . . . . . . 234Description . . . . . . . . . . . . . 235
Stacking DEFINE Commands . . . . . . 235Examples . . . . . . . . . . . . . . 235
DELETE—Delete Lines . . . . . . . . . . 236Syntax. . . . . . . . . . . . . . . 236Description . . . . . . . . . . . . . 236
Examples . . . . . . . . . . . . . . 236EDIT—Edit from within an Edit Session . . . . 237
Syntax. . . . . . . . . . . . . . . 237Description . . . . . . . . . . . . . 237Example . . . . . . . . . . . . . . 237
EDITSET—Display the Editor Settings Dialog . . 239Syntax. . . . . . . . . . . . . . . 239Description . . . . . . . . . . . . . 239The Edit and View Settings Panel . . . . . 239Example . . . . . . . . . . . . . . 242
END—End the Edit Session . . . . . . . . 243Syntax. . . . . . . . . . . . . . . 243Description . . . . . . . . . . . . . 243Example . . . . . . . . . . . . . . 243
EXCLUDE—Exclude Lines from the Display . . . 244Syntax. . . . . . . . . . . . . . . 244Description . . . . . . . . . . . . . 244Examples . . . . . . . . . . . . . . 245
FIND—Find a Data String . . . . . . . . . 245Syntax. . . . . . . . . . . . . . . 245Description . . . . . . . . . . . . . 246Examples . . . . . . . . . . . . . . 247
FLIP—Reverse Exclude Status of Lines . . . . . 247Syntax. . . . . . . . . . . . . . . 247Description . . . . . . . . . . . . . 247Example . . . . . . . . . . . . . . 248
HEX—Display Hexadecimal Characters . . . . 249Syntax. . . . . . . . . . . . . . . 250Description . . . . . . . . . . . . . 250Examples . . . . . . . . . . . . . . 250
HILITE—Enhanced Edit Coloring . . . . . . 252Syntax. . . . . . . . . . . . . . . 252Description . . . . . . . . . . . . . 255
IMACRO—Specify an Initial Macro . . . . . . 255Syntax. . . . . . . . . . . . . . . 255Examples . . . . . . . . . . . . . . 255
LEVEL—Specify the Modification Level Number 256Syntax. . . . . . . . . . . . . . . 256Description . . . . . . . . . . . . . 256Example . . . . . . . . . . . . . . 256
LOCATE—Locate a Line. . . . . . . . . . 257Specific Locate Syntax . . . . . . . . . 257Generic Locate Syntax . . . . . . . . . 258Examples . . . . . . . . . . . . . . 258
MODEL—Copy a Model into the Current Data Set 259Model Name Syntax . . . . . . . . . . 259Class Name Syntax . . . . . . . . . . 260Example . . . . . . . . . . . . . . 260
MOVE—Move Data . . . . . . . . . . . 262Syntax. . . . . . . . . . . . . . . 262Description . . . . . . . . . . . . . 263Example . . . . . . . . . . . . . . 263
NONUMBER—Turn Off Number Mode . . . . 266Syntax. . . . . . . . . . . . . . . 266Description . . . . . . . . . . . . . 266Example . . . . . . . . . . . . . . 266
NOTES—Display Model Notes . . . . . . . 266Syntax. . . . . . . . . . . . . . . 266Description . . . . . . . . . . . . . 266Examples . . . . . . . . . . . . . . 266
NULLS—Control Null Spaces . . . . . . . . 267
146 OS/390 V2R10.0 ISPF Edit and Edit Macros
||||||||||
Syntax. . . . . . . . . . . . . . . 267Description . . . . . . . . . . . . . 267Examples . . . . . . . . . . . . . . 267
NUMBER—Generate Sequence Numbers . . . . 268Syntax. . . . . . . . . . . . . . . 268Description . . . . . . . . . . . . . 269Examples . . . . . . . . . . . . . . 269
PACK—Compress Data . . . . . . . . . . 269Syntax. . . . . . . . . . . . . . . 269Examples . . . . . . . . . . . . . . 269
PASTE—Move or Copy Lines from Clipboard . . 269Syntax. . . . . . . . . . . . . . . 270Description . . . . . . . . . . . . . 270Example . . . . . . . . . . . . . . 270
PRESERVE - Enable Saving of Trailing Blanks . . 270Syntax. . . . . . . . . . . . . . . 270Description . . . . . . . . . . . . . 271Examples . . . . . . . . . . . . . . 271
PROFILE—Control and Display Your Profile . . . 271Profile Control Syntax . . . . . . . . . 271Profile Lock Syntax . . . . . . . . . . 272Profile Reset Syntax . . . . . . . . . . 272Description . . . . . . . . . . . . . 272Example . . . . . . . . . . . . . . 273
RCHANGE—Repeat a Change . . . . . . . 274Syntax. . . . . . . . . . . . . . . 274Description . . . . . . . . . . . . . 274
RECOVERY—Control Edit Recovery. . . . . . 275Syntax. . . . . . . . . . . . . . . 275Description . . . . . . . . . . . . . 275
RENUM—Renumber Data Set Lines . . . . . . 276Syntax. . . . . . . . . . . . . . . 276Description . . . . . . . . . . . . . 277Example . . . . . . . . . . . . . . 277
REPLACE—Replace Data . . . . . . . . . 278Syntax. . . . . . . . . . . . . . . 279Description . . . . . . . . . . . . . 279Example . . . . . . . . . . . . . . 280
RESET—Reset the Data Display . . . . . . . 282Syntax. . . . . . . . . . . . . . . 282Description . . . . . . . . . . . . . 283Examples . . . . . . . . . . . . . . 283
RFIND—Repeat Find . . . . . . . . . . . 284Syntax. . . . . . . . . . . . . . . 284
RMACRO—Specify a Recovery Macro . . . . . 284Syntax. . . . . . . . . . . . . . . 284Description . . . . . . . . . . . . . 284Example . . . . . . . . . . . . . . 284
SAVE—Save the Current Data . . . . . . . . 284Syntax. . . . . . . . . . . . . . . 285Description . . . . . . . . . . . . . 285Example . . . . . . . . . . . . . . 285
SETUNDO—Set the UNDO Mode . . . . . . 285Syntax. . . . . . . . . . . . . . . 285Description . . . . . . . . . . . . . 286Example . . . . . . . . . . . . . . 287
SORT—Sort Data . . . . . . . . . . . . 287Syntax. . . . . . . . . . . . . . . 287Description . . . . . . . . . . . . . 288
Sorting Data Without Operands . . . . . 288Limiting the SORT Command . . . . . . 288
Sorting DBCS Data . . . . . . . . . 288Examples . . . . . . . . . . . . . . 289
STATS—Generate Library Statistics . . . . . . 289Syntax. . . . . . . . . . . . . . . 289Examples . . . . . . . . . . . . . . 289
SUBMIT—Submit Data for Batch Processing . . . 289Syntax. . . . . . . . . . . . . . . 289Description . . . . . . . . . . . . . 290Examples . . . . . . . . . . . . . . 290
TABS—Define Tabs . . . . . . . . . . . 290Syntax. . . . . . . . . . . . . . . 290Example . . . . . . . . . . . . . . 291
UNDO—Reverse Last Edit Interaction . . . . . 292Syntax. . . . . . . . . . . . . . . 292Description . . . . . . . . . . . . . 292Example . . . . . . . . . . . . . . 293
UNNUMBER—Remove Sequence Numbers . . . 294Syntax. . . . . . . . . . . . . . . 295Description . . . . . . . . . . . . . 295Example . . . . . . . . . . . . . . 295
VERSION—Control the Version Number . . . . 296Syntax. . . . . . . . . . . . . . . 296Description . . . . . . . . . . . . . 296Example . . . . . . . . . . . . . . 296
VIEW—View from within an Edit Session . . . . 297Syntax. . . . . . . . . . . . . . . 298Description . . . . . . . . . . . . . 298Example . . . . . . . . . . . . . . 298
Chapter 11. Edit Macro Commands andAssignment Statements . . . . . . . . . 299Edit Macro Command Notation Conventions . . . 299Edit Macro Command Summary . . . . . . . 300AUTOLIST—Set or Query Autolist Mode . . . . 308
Macro Command Syntax . . . . . . . . 308Assignment Statement Syntax . . . . . . . 308Return Codes . . . . . . . . . . . . 308Examples . . . . . . . . . . . . . . 308
AUTONUM—Set or Query Autonum Mode . . . 308Macro Command Syntax . . . . . . . . 309Assignment Statement Syntax . . . . . . . 309Description . . . . . . . . . . . . . 309Return Codes . . . . . . . . . . . . 309Examples . . . . . . . . . . . . . . 309
AUTOSAVE—Set or Query Autosave Mode . . . 310Macro Command Syntax . . . . . . . . 310Assignment Statement Syntax . . . . . . . 310Description . . . . . . . . . . . . . 310Return Codes . . . . . . . . . . . . 311Examples . . . . . . . . . . . . . . 311
BLKSIZE—Query the Block Size . . . . . . . 311Assignment Statement Syntax . . . . . . . 311Return Codes . . . . . . . . . . . . 311Example . . . . . . . . . . . . . . 311
BOUNDS—Set or Query the Edit Boundaries. . . 312Macro Command Syntax . . . . . . . . 312Assignment Statement Syntax . . . . . . . 312Description . . . . . . . . . . . . . 312Return Codes . . . . . . . . . . . . 312Examples . . . . . . . . . . . . . . 313
BROWSE—Browse from within an Edit Session 313
Part 3. Command Reference 147
Macro Command Syntax . . . . . . . . 313Description . . . . . . . . . . . . . 314Return Codes . . . . . . . . . . . . 314Examples . . . . . . . . . . . . . . 314
BUILTIN—Process a Built-In Command . . . . 314Macro Command Syntax . . . . . . . . 314Description . . . . . . . . . . . . . 314Return Codes . . . . . . . . . . . . 314Examples . . . . . . . . . . . . . . 314
CANCEL—Cancel Edit Changes . . . . . . . 315Macro Command Syntax . . . . . . . . 315Description . . . . . . . . . . . . . 315Return Codes . . . . . . . . . . . . 315Example . . . . . . . . . . . . . . 315
CAPS—Set or Query Caps Mode . . . . . . . 315Macro Command Syntax . . . . . . . . 315Assignment Statement Syntax . . . . . . . 315Description . . . . . . . . . . . . . 316Return Codes . . . . . . . . . . . . 316Examples . . . . . . . . . . . . . . 316
CHANGE—Change a Search String . . . . . . 316Macro Command Syntax . . . . . . . . 316Description . . . . . . . . . . . . . 317Return Codes . . . . . . . . . . . . 318Example . . . . . . . . . . . . . . 318
CHANGE_COUNTS—Query Change Counts. . . 319Assignment Statement Syntax . . . . . . . 319Return Codes . . . . . . . . . . . . 319Examples . . . . . . . . . . . . . . 319
COMPARE—Edit Compare . . . . . . . . . 319Macro Command Syntax . . . . . . . . 320Return Codes . . . . . . . . . . . . 321Compare Examples . . . . . . . . . . 321
COPY—Copy Data . . . . . . . . . . . 322Macro Command Syntax . . . . . . . . 322Return Codes . . . . . . . . . . . . 323Examples . . . . . . . . . . . . . . 323
CREATE—Create a Data Set or a Data Set Member 323Macro Command Syntax . . . . . . . . 323Description . . . . . . . . . . . . . 324Return Codes . . . . . . . . . . . . 324Example . . . . . . . . . . . . . . 324
CTL_LIBRARY—Query Controlled Library Status 324Assignment Statement Syntax . . . . . . . 324Return Codes . . . . . . . . . . . . 325Example . . . . . . . . . . . . . . 326
CURSOR—Set or Query the Cursor Position . . . 326Assignment Statement Syntax . . . . . . . 326Description . . . . . . . . . . . . . 326Return Codes . . . . . . . . . . . . 327Examples . . . . . . . . . . . . . . 327
CUT—Cut and Save Lines . . . . . . . . . 328Syntax. . . . . . . . . . . . . . . 328Description . . . . . . . . . . . . . 328Return Codes . . . . . . . . . . . . 329Examples . . . . . . . . . . . . . . 329
DATA_CHANGED—Query the Data ChangedStatus . . . . . . . . . . . . . . . . 329
Assignment Statement Syntax . . . . . . . 329Description . . . . . . . . . . . . . 329Return Codes . . . . . . . . . . . . 329
Example . . . . . . . . . . . . . . 329DATA_WIDTH—Query Data Width . . . . . . 330
Assignment Statement Syntax . . . . . . . 330Description . . . . . . . . . . . . . 330Return Codes . . . . . . . . . . . . 330Example . . . . . . . . . . . . . . 330
DATAID—Query Data ID . . . . . . . . . 331Assignment Statement Syntax . . . . . . . 331Description . . . . . . . . . . . . . 331Return Codes . . . . . . . . . . . . 331Example . . . . . . . . . . . . . . 331
DATASET—Query the Current and Original DataSet Names . . . . . . . . . . . . . . 331
Assignment Statement Syntax . . . . . . . 331Return Codes . . . . . . . . . . . . 332Example . . . . . . . . . . . . . . 332
DEFINE—Define a Name . . . . . . . . . 332Macro Command Syntax . . . . . . . . 332Description . . . . . . . . . . . . . 333Return Codes . . . . . . . . . . . . 333Examples . . . . . . . . . . . . . . 333
DELETE—Delete Lines . . . . . . . . . . 334Macro Command Syntax . . . . . . . . 334Description . . . . . . . . . . . . . 334Return Codes . . . . . . . . . . . . 334Examples . . . . . . . . . . . . . . 334
DISPLAY_COLS—Query Display Columns . . . 335Assignment Statement Syntax . . . . . . . 335Description . . . . . . . . . . . . . 335Return Codes . . . . . . . . . . . . 335Example . . . . . . . . . . . . . . 335
DISPLAY_LINES—Query Display Lines . . . . 335Assignment Statement Syntax . . . . . . . 336Return Codes . . . . . . . . . . . . 336Example . . . . . . . . . . . . . . 336
DOWN—Scroll Down . . . . . . . . . . 336Macro Command Syntax . . . . . . . . 336Description . . . . . . . . . . . . . 336Return Codes . . . . . . . . . . . . 337Examples . . . . . . . . . . . . . . 337
EDIT—Edit from within an Edit Session . . . . 337Macro Command Syntax . . . . . . . . 337Description . . . . . . . . . . . . . 337Return Codes . . . . . . . . . . . . 338Example . . . . . . . . . . . . . . 338
END—End the Edit Session . . . . . . . . 338Macro Command Syntax . . . . . . . . 338Description . . . . . . . . . . . . . 338Return Codes . . . . . . . . . . . . 338Example . . . . . . . . . . . . . . 339
EXCLUDE—Exclude Lines from the Display . . . 339Macro Command Syntax . . . . . . . . 339Description . . . . . . . . . . . . . 340Return Codes . . . . . . . . . . . . 340Examples . . . . . . . . . . . . . . 341
EXCLUDE_COUNTS—Query Exclude Counts . . 341Assignment Statement Syntax . . . . . . . 341Return Codes . . . . . . . . . . . . 341Example . . . . . . . . . . . . . . 341
FIND—Find a Search String . . . . . . . . 341Macro Command Syntax . . . . . . . . 341
148 OS/390 V2R10.0 ISPF Edit and Edit Macros
Description . . . . . . . . . . . . . 342Return Codes . . . . . . . . . . . . 343Examples . . . . . . . . . . . . . . 343
FIND_COUNTS—Query Find Counts . . . . . 343Assignment Statement Syntax . . . . . . . 344Return Codes . . . . . . . . . . . . 344Example . . . . . . . . . . . . . . 344
FLIP—Reverse Exclude Status of Lines . . . . . 344Assignment Statement Syntax . . . . . . . 344Return Codes . . . . . . . . . . . . 344Examples . . . . . . . . . . . . . . 344
FLOW_COUNTS—Query Flow Counts . . . . . 345Assignment Statement Syntax . . . . . . . 345Return Codes . . . . . . . . . . . . 345Example . . . . . . . . . . . . . . 345
HEX—Set or Query Hexadecimal Mode . . . . 345Macro Command Syntax . . . . . . . . 345Assignment Statement Syntax . . . . . . . 346Description . . . . . . . . . . . . . 346Return Codes . . . . . . . . . . . . 346Examples . . . . . . . . . . . . . . 346
HILITE—Enhanced Edit Coloring . . . . . . 347Macro Command Syntax . . . . . . . . 347Description . . . . . . . . . . . . . 349Return Codes . . . . . . . . . . . . 349
IMACRO—Set or Query an Initial Macro . . . . 350Macro Command Syntax . . . . . . . . 350Assignment Statement Syntax . . . . . . . 350Return Codes . . . . . . . . . . . . 350Examples . . . . . . . . . . . . . . 350
INSERT—Prepare Display for Data Insertion . . . 351Macro Command Syntax . . . . . . . . 351Description . . . . . . . . . . . . . 351Return Codes . . . . . . . . . . . . 351Example . . . . . . . . . . . . . . 351
LABEL—Set or Query a Line Label . . . . . . 351Assignment Statement Syntax . . . . . . . 351Description . . . . . . . . . . . . . 352Return Codes . . . . . . . . . . . . 352Example . . . . . . . . . . . . . . 352
LEFT—Scroll Left . . . . . . . . . . . . 352Macro Command Syntax . . . . . . . . 352Description . . . . . . . . . . . . . 353Return Codes . . . . . . . . . . . . 353Example . . . . . . . . . . . . . . 353
LEVEL—Set or Query the Modification LevelNumber . . . . . . . . . . . . . . . 353
Macro Command Syntax . . . . . . . . 353Assignment Statement Syntax . . . . . . . 354Return Codes . . . . . . . . . . . . 354Examples . . . . . . . . . . . . . . 354
LINE—Set or Query a Line from the Data Set . . 354Assignment Statement Syntax . . . . . . . 354Description . . . . . . . . . . . . . 355Return Codes . . . . . . . . . . . . 355Examples . . . . . . . . . . . . . . 355
LINE_AFTER—Add a Line to the Current Data Set 355Assignment Statement Syntax . . . . . . . 355Description . . . . . . . . . . . . . 356Return Codes . . . . . . . . . . . . 356Examples . . . . . . . . . . . . . . 356
LINE_BEFORE—Add a Line to the Current DataSet . . . . . . . . . . . . . . . . . 357
Assignment Statement Syntax . . . . . . . 357Description . . . . . . . . . . . . . 358Return Codes . . . . . . . . . . . . 358Examples . . . . . . . . . . . . . . 358
LINE_STATUS—Query Source and ChangeInformation for a Line in a Data Set . . . . . . 358
Assignment Statement Syntax . . . . . . . 359Return Codes . . . . . . . . . . . . 359Example . . . . . . . . . . . . . . 359
LINENUM—Query the Line Number of a LabeledLine . . . . . . . . . . . . . . . . 360
Assignment Statement Syntax . . . . . . . 360Return Codes . . . . . . . . . . . . 360Description . . . . . . . . . . . . . 360Examples . . . . . . . . . . . . . . 360
LOCATE—Locate a Line. . . . . . . . . . 360Specific Locate Syntax . . . . . . . . . 360Generic Locate Syntax . . . . . . . . . 361Return Codes . . . . . . . . . . . . 362Examples . . . . . . . . . . . . . . 362
LRECL—Query the Logical Record Length . . . 362Assignment Statement Syntax . . . . . . . 362Description . . . . . . . . . . . . . 363Return Codes . . . . . . . . . . . . 363Example . . . . . . . . . . . . . . 363
MACRO—Identify an Edit Macro . . . . . . 363Macro Command Syntax . . . . . . . . 363Description . . . . . . . . . . . . . 363Return Codes . . . . . . . . . . . . 364Examples . . . . . . . . . . . . . . 364
MACRO_LEVEL—Query the Macro Nesting Level 364Assignment Statement Syntax . . . . . . . 364Description . . . . . . . . . . . . . 364Return Codes . . . . . . . . . . . . 364Example . . . . . . . . . . . . . . 364
MASKLINE—Set or Query the Mask Line . . . . 365Assignment Statement Syntax . . . . . . . 365Description . . . . . . . . . . . . . 365Return Codes . . . . . . . . . . . . 365Examples . . . . . . . . . . . . . . 365
MEMBER—Query the Current Member Name . . 366Assignment Statement Syntax . . . . . . . 366Return Codes . . . . . . . . . . . . 366Example . . . . . . . . . . . . . . 366
MEND—End a Macro in the Batch Environment 366Macro Command Syntax . . . . . . . . 366Description . . . . . . . . . . . . . 366Return Codes . . . . . . . . . . . . 366Example . . . . . . . . . . . . . . 367
MODEL—Copy a Model into the Current Data Set 367Macro Command Model Name Syntax . . . . 367Macro Command Class Name Syntax . . . . 368Return Codes . . . . . . . . . . . . 368Example . . . . . . . . . . . . . . 368
MOVE— Move a Data Set or a Data Set Member 368Macro Command Syntax . . . . . . . . 368Description . . . . . . . . . . . . . 369Return Codes . . . . . . . . . . . . 369Examples . . . . . . . . . . . . . . 369
Part 3. Command Reference 149
|||||||||
NONUMBER—Turn Off Number Mode . . . . 369Syntax. . . . . . . . . . . . . . . 369Description . . . . . . . . . . . . . 369Return Codes . . . . . . . . . . . . 369Example . . . . . . . . . . . . . . 370
NOTES—Set or Query Note Mode . . . . . . 370Macro Command Syntax . . . . . . . . 370Assignment Statement Syntax . . . . . . . 370Return Codes . . . . . . . . . . . . 370Examples . . . . . . . . . . . . . . 370
NULLS—Set or Query Nulls Mode . . . . . . 371Macro Command Syntax . . . . . . . . 371Assignment Statement Syntax . . . . . . . 371Description . . . . . . . . . . . . . 371Return Codes . . . . . . . . . . . . 371Examples . . . . . . . . . . . . . . 372
NUMBER—Set or Query Number Mode . . . . 372Macro Command Syntax . . . . . . . . 372Assignment Statement Syntax . . . . . . . 373Description . . . . . . . . . . . . . 374Return Codes . . . . . . . . . . . . 374Example . . . . . . . . . . . . . . 374
PACK—Set or Query Pack Mode . . . . . . . 374Macro Command Syntax . . . . . . . . 374Assignment Statement Syntax . . . . . . . 375Return Codes . . . . . . . . . . . . 375Example . . . . . . . . . . . . . . 375
PASTE—Move or Copy Lines from Clipboard . . 375Syntax. . . . . . . . . . . . . . . 375Description . . . . . . . . . . . . . 375Return Codes . . . . . . . . . . . . 376Examples . . . . . . . . . . . . . . 376
PRESERVE—Enable Saving of Trailing Blanks . . 376Macro Command Syntax . . . . . . . . 376Assignment Statement Syntax . . . . . . . 376Description . . . . . . . . . . . . . 376Return Codes . . . . . . . . . . . . 377Examples . . . . . . . . . . . . . . 377
PROCESS—Process Line Commands . . . . . 377Macro Command Syntax . . . . . . . . 377Description . . . . . . . . . . . . . 378Return Codes . . . . . . . . . . . . 378Examples . . . . . . . . . . . . . . 378
PROFILE—Set or Query the Current Profile . . . 379Macro Command Profile Control Syntax . . . 379Macro Command Profile Lock Syntax . . . . 379Macro Command Profile Reset Syntax . . . . 380Assignment Statement Syntax . . . . . . . 380Description . . . . . . . . . . . . . 380Return Codes . . . . . . . . . . . . 380Example . . . . . . . . . . . . . . 380
RANGE_CMD—Query a Command That YouEntered . . . . . . . . . . . . . . . 380
Assignment Statement Syntax . . . . . . . 380Description . . . . . . . . . . . . . 381Return Codes . . . . . . . . . . . . 381Example . . . . . . . . . . . . . . 381
RCHANGE—Repeat a Change . . . . . . . 381Macro Command Syntax . . . . . . . . 381Description . . . . . . . . . . . . . 381Return Codes . . . . . . . . . . . . 381
Example . . . . . . . . . . . . . . 382RECFM—Query the Record Format . . . . . . 382
Assignment Statement Syntax . . . . . . . 382Return Codes . . . . . . . . . . . . 382Example . . . . . . . . . . . . . . 382
RECOVERY—Set or Query Recovery Mode . . . 383Macro Command Syntax . . . . . . . . 383Assignment Statement Syntax . . . . . . . 383Return Codes . . . . . . . . . . . . 384Examples . . . . . . . . . . . . . . 384
RENUM—Renumber Data Set Lines . . . . . . 384Macro Command Syntax . . . . . . . . 384Return Codes . . . . . . . . . . . . 385Examples . . . . . . . . . . . . . . 385
REPLACE—Replace a Data Set or Data SetMember . . . . . . . . . . . . . . . 385
Macro Command Syntax . . . . . . . . 385Return Codes . . . . . . . . . . . . 386Example . . . . . . . . . . . . . . 386
RESET—Reset the Data Display . . . . . . . 386Macro Command Syntax . . . . . . . . 386Description . . . . . . . . . . . . . 387Return Codes . . . . . . . . . . . . 387Examples . . . . . . . . . . . . . . 387
RFIND—Repeat Find . . . . . . . . . . . 387Macro Command Syntax . . . . . . . . 388Return Codes . . . . . . . . . . . . 388Example . . . . . . . . . . . . . . 388
RIGHT—Scroll Right . . . . . . . . . . . 388Macro Command Syntax . . . . . . . . 388Description . . . . . . . . . . . . . 388Return Codes . . . . . . . . . . . . 389Example . . . . . . . . . . . . . . 389
RMACRO—Set or Query the Recovery Macro . . 389Macro Command Syntax . . . . . . . . 389Assignment Statement Syntax . . . . . . . 389Return Codes . . . . . . . . . . . . 389Example . . . . . . . . . . . . . . 390
SAVE—Save the Current Data . . . . . . . . 390Macro Command Syntax . . . . . . . . 390Description . . . . . . . . . . . . . 390Return Codes . . . . . . . . . . . . 390Example . . . . . . . . . . . . . . 390
SAVE_LENGTH—Set or Query Length for VariableLength Data . . . . . . . . . . . . . . 390
Assignment Statement Syntax . . . . . . . 391Description . . . . . . . . . . . . . 391Return Codes . . . . . . . . . . . . 391Examples . . . . . . . . . . . . . . 391
SCAN—Set Command Scan Mode . . . . . . 392Macro Command Syntax . . . . . . . . 392Assignment Statement Syntax . . . . . . . 392Return Codes . . . . . . . . . . . . 392Example . . . . . . . . . . . . . . 392
SEEK—Seek a Data String, Positioning the Cursor 393Macro Command Syntax . . . . . . . . 393Description . . . . . . . . . . . . . 394Return Codes . . . . . . . . . . . . 394Examples . . . . . . . . . . . . . . 394
SEEK_COUNTS—Query Seek Counts . . . . . 395Assignment Statement Syntax . . . . . . . 395
150 OS/390 V2R10.0 ISPF Edit and Edit Macros

Return Codes . . . . . . . . . . . . 395Example . . . . . . . . . . . . . . 395
SESSION—Query Session Type . . . . . . . 395Assignment Statement Syntax . . . . . . . 395Return Codes . . . . . . . . . . . . 395
SETUNDO—Set UNDO Mode. . . . . . . . 395Macro Command Syntax . . . . . . . . 395Assignment Statement Syntax . . . . . . . 396Description . . . . . . . . . . . . . 396Return Codes . . . . . . . . . . . . 397Examples . . . . . . . . . . . . . . 397
SHIFT (—Shift Columns Left . . . . . . . . 397Macro Command Syntax . . . . . . . . 397Description . . . . . . . . . . . . . 397Return Codes . . . . . . . . . . . . 397Examples . . . . . . . . . . . . . . 397
SHIFT )—Shift Columns Right. . . . . . . . 398Macro Command Syntax . . . . . . . . 398Description . . . . . . . . . . . . . 398Return Codes . . . . . . . . . . . . 398Examples . . . . . . . . . . . . . . 398
SHIFT <—Shift Data Left . . . . . . . . . 398Macro Command Syntax . . . . . . . . 398Description . . . . . . . . . . . . . 398Return Codes . . . . . . . . . . . . 399Examples . . . . . . . . . . . . . . 399
SHIFT >—Shift Data Right . . . . . . . . . 399Macro Command Syntax . . . . . . . . 399Description . . . . . . . . . . . . . 399Return Codes . . . . . . . . . . . . 399Examples . . . . . . . . . . . . . . 399
SORT—Sort Data . . . . . . . . . . . . 399Macro Command Syntax . . . . . . . . 400Description . . . . . . . . . . . . . 400
Sorting Data Without Operands . . . . . 400Limiting the SORT Command . . . . . . 401Sorting DBCS Data . . . . . . . . . 401
Return Codes . . . . . . . . . . . . 401Examples . . . . . . . . . . . . . . 401
STATS—Set or Query Stats Mode. . . . . . . 401Macro Command Syntax . . . . . . . . 402Assignment Statement Syntax . . . . . . . 402Return Codes . . . . . . . . . . . . 402Examples . . . . . . . . . . . . . . 402
SUBMIT—Submit Data for Batch Processing . . . 402Macro Command Syntax . . . . . . . . 402Description . . . . . . . . . . . . . 403Return Codes . . . . . . . . . . . . 403Examples . . . . . . . . . . . . . . 403
TABS—Set or Query Tabs Mode . . . . . . . 403Macro Command Syntax . . . . . . . . 403Assignment Statement Syntax . . . . . . . 404Return Codes . . . . . . . . . . . . 405Examples . . . . . . . . . . . . . . 405
TABSLINE—Set or Query Tabs Line . . . . . . 405Assignment Statement Syntax . . . . . . . 405Return Codes . . . . . . . . . . . . 405Examples . . . . . . . . . . . . . . 406
TENTER—Set Up Panel for Text Entry . . . . . 406Macro Command Syntax . . . . . . . . 406Description . . . . . . . . . . . . . 406
Return Codes . . . . . . . . . . . . 407Example . . . . . . . . . . . . . . 407
TFLOW—Text Flow a Paragraph . . . . . . . 407Macro Command Syntax . . . . . . . . 408Return Codes . . . . . . . . . . . . 408Example . . . . . . . . . . . . . . 408
TSPLIT—Text Split a Line . . . . . . . . . 408Macro Command Syntax . . . . . . . . 408Description . . . . . . . . . . . . . 408Return Codes . . . . . . . . . . . . 408Example . . . . . . . . . . . . . . 409
UNNUMBER—Remove Sequence Numbers . . . 409Macro Command Syntax . . . . . . . . 409Description . . . . . . . . . . . . . 409Return Codes . . . . . . . . . . . . 409Example . . . . . . . . . . . . . . 409
UP—Scroll Up . . . . . . . . . . . . . 409Macro Command Syntax . . . . . . . . 409Description . . . . . . . . . . . . . 410Return Codes . . . . . . . . . . . . 410Examples . . . . . . . . . . . . . . 410
USER_STATE—Save or Restore User State . . . . 410Assignment Statement Syntax . . . . . . . 411Description . . . . . . . . . . . . . 411Return Codes . . . . . . . . . . . . 411Examples . . . . . . . . . . . . . . 411
VERSION—Set or Query Version Number . . . . 411Macro Command Syntax . . . . . . . . 411Assignment Statement Syntax . . . . . . . 412Return Codes . . . . . . . . . . . . 412Examples . . . . . . . . . . . . . . 412
VIEW—View from within an Edit Session . . . . 412Macro Command Syntax . . . . . . . . 412Description . . . . . . . . . . . . . 412Return Codes . . . . . . . . . . . . 412Examples . . . . . . . . . . . . . . 413
VOLUME—Query Volume Information. . . . . 413Assignment Statement Syntax . . . . . . . 413Return Codes . . . . . . . . . . . . 413Examples . . . . . . . . . . . . . . 413
XSTATUS—Set or Query Exclude Status of a Line 413Assignment Statement Syntax . . . . . . . 413Description . . . . . . . . . . . . . 414Return Codes . . . . . . . . . . . . 414Examples . . . . . . . . . . . . . . 414
Part 3. Command Reference 151

152 OS/390 V2R10.0 ISPF Edit and Edit Macros
Chapter 9. Edit Line Commands
Edit line commands affect only a single line or block of lines. You enter linecommands by typing over the 6-digit number in the line command area on one ormore lines and pressing Enter. Most command definitions in this book consist ofthe following information:
Syntax A syntax diagram is how you type the command.It includes a description of any required oroptional operands.
Description A description explains the function and operationof the command. This description may also refer toother commands that can be used with thiscommand.
Example An example gives a sample usage of the linecommand.
Rules for Entering Line CommandsEnter a line command by one of the following:v Type the command in the line command area and press Enter.v Place the cursor in the data or line command field and press a function key to
which the command is assigned.
The following rules apply to all line commands:v You can type several line commands and make multiple data changes before you
press Enter. The editor displays an error message if the line command isambiguous. Because the line commands are processed from top to bottom, it ispossible to have one error message appear that masks a later error condition.Only the first error condition found is displayed. After you have corrected thaterror condition, processing can continue and the next error condition, if any, isdisplayed. If you type a line command incorrectly, you can replace it before youpress Enter by retyping it, blanking it out, or entering RESET.
v Generally, you need to type over only the first 1 or 2 characters of the linenumber to enter a line command. Sometimes, however, typing a single charactercan be ambiguous. In the following example, it is unclear whether the intendedline command is R to repeat line 31700, or R3 to repeat the line three times:031600R31700031800
In such cases, the ISPF editor assumes that you have not typed a numberfollowing the line command. If you want to repeat the line three times, you canuse any of the following procedures:– Leave the cursor on the character that immediately follows the R3:
R31700
– Type one or more blanks following the R3:R3 700
– Type one or more blanks following the R but before the number, leaving thecursor on the character that immediately follows the 3:
© Copyright IBM Corp. 1984, 2000 153
R 3700
– Type R3 and press the Erase EOF key to clear the rest of the Line Commandfield, or press the Erase EOF key and then type R3.
v You can type the following line commands on the TOP OF DATA line by typingover the asterisks that appear in its line command field:
I[n] Insert one or n lines ahead of the data.
A[n] Move or copy a line or lines one or n times ahead of the data.
TE[n] Type one or n text lines ahead of the data.v You can type the following line command on the BOTTOM OF DATA line by typing
over the asterisks:
B[n] Move or copy a line or lines one or n times following the data.
Edit Line Command Notation ConventionsThe syntax of the PDF line commands uses the following notation conventions:
UppercaseUppercase commands or operands must be spelled as shown (in eitheruppercase or lowercase). (See “Appendix A. Abbreviations for Commandsand Other Values” on page 417.)
LowercaseLowercase operands are variables; substitute your own values.
UnderscoreUnderscored operands are the system defaults.
Brackets ([ ])Operands in brackets are optional.
Stacked operandsStacked operands show two or more operands from which you can select.If you do not choose any, the default operand is used.
Braces ({ })Braces show two or more operands from which you must select one. .
OR (|)The OR (|) symbol shows two or more operands from which you mustselect one.
Table 4 summarizes line commands.
Line Command SummaryTable 4. Summary of the Line Commands
Command Page Description
([n][2](([n][2]
“(—Column Shift Left” onpage 156
Shifts columns left two positions or the specifiednumber of positions.
)[n][2]))[n][2]
“)—Column Shift Right”on page 157
Shifts columns right two positions or thespecified number of positions.
Rules for Entering Line Commands
154 OS/390 V2R10.0 ISPF Edit and Edit Macros
Table 4. Summary of the Line Commands (continued)
Command Page Description
<[n][2]<<[n][2]
“<—Data Shift Left” onpage 159
Shifts data left two positions or the specifiednumber of positions.
>[n][2]>>[n][2]
“>—Data Shift Right” onpage 162
Shifts data right two positions or the specifiednumber of positions.
A[n] “A—Specify an “After”Destination” on page 163
Identifies the line after which copied, moved, ormodel lines are to be inserted.
B[n] “B—Specify a “Before”Destination” on page 166
Identifies the line before which copied, moved,or model lines are to be inserted.
BOUNDS “BOUNDS—DefineBoundary Columns” on
page 168
Displays the column boundary definition line.
C[n]CC
“C—Copy Lines” onpage 170
Copies one or more lines from one location toanother.
COLS “COLS—IdentifyColumns” on page 172
Displays a position identification line.
D[n]DD
“D—Delete Lines” onpage 173
Deletes one or more lines.
F[n] “F—Show the First Line”on page 175
Redisplays one or more lines at the beginning ofa block of excluded lines.
I[n] “I—Insert Lines” onpage 176
Inserts one or more blank data entry lines.
L[n] “L—Show the LastLine(s)” on page 178
Redisplays one or more lines at the end of ablock of excluded lines.
LC[n]LCCLCLC
“LC—Convert Charactersto Lowercase” on page 179
Converts all uppercase alphabetic characters inone or more lines to lowercase.
M[n]MM
“M—Move Lines” onpage 181
Moves one or more lines from one location toanother.
MASK “MASK—Define Masks”on page 183
Displays the contents of the mask when usedwith the I (insert), TE (text entry), and TS (textsplit) line commands.
MD[n]MDDMDMD
“MD—Make Dataline” onpage 185
Converts one or more ==MSG>, =NOTE=, =COLS>,and ====== (information) lines to data so thatthey can be saved as part of your data set.
O[n]OO
“O—Overlay Lines” onpage 187
Identifies the lines over which data is to bemoved or copied.
R[n]RR[n]
“R—Repeat Lines” onpage 189
Repeats one or more lines.
S[n] “S—Show Lines” onpage 191
Redisplays one or more lines with the leftmostindentation in a block of excluded lines.
TABS “TABS—Control Tabs” onpage 193
Displays the tab definition line.
TE[n] “TE—Text Entry” onpage 194
Inserts blank lines to allow power typing fortext entry.
Line Command Summary
Chapter 9. Edit Line Commands 155
Table 4. Summary of the Line Commands (continued)
Command Page Description
TF[n] “TF—Text Flow” onpage 198
Restructures paragraphs following deletions,insertions, splitting, and so forth.
TS[n] “TS—Text Split” onpage 199
Divides one or more lines so that data can beadded.
UC[n]UCCUCUC
“UC—Convert Charactersto Uppercase” on page 201
Converts all lowercase alphabetic characters inone or more lines to uppercase.
X[n]XX
“X—Exclude Lines” onpage 203
Excludes one or more lines from a panel.
(—Column Shift LeftThe ( (column shift left) line command moves characters on a line to the leftwithout altering their relative spacing. Characters shifted past the currentBOUNDS setting are deleted. See “Shifting Data” on page 51 for more information.
Syntax([n][2](([n][2]
n A number that tells the ISPF editor how many positions to shift. If youomit this operand, the default is 2.
DescriptionTo column shift one line toward the left side of your display:1. Type ( in the line command area of the line to be shifted. Beside the command,
type a number other than 2 if you want to shift the line other than 2 columns.2. Press Enter.
To column shift a block of lines toward the left side of your display:1. Type (( in the line command area of the first line to be shifted. Beside the
command, type a number other than 2 if you want to shift the block of linesother than 2 columns.
2. Type (( in the line command area of the last line to be shifted. You can scroll(or use FIND or LOCATE) between typing the first (( and the second ((, ifnecessary.
3. Press Enter. The lines that contain the two (( commands and all of the linesbetween them are column shifted to the left.
The BOUNDS setting limits column shifting. If you shift columns beyond thecurrent BOUNDS setting, the editor deletes the text beyond the BOUNDS withoutdisplaying a warning message.
ExampleTo shift a group of lines to the left three column positions, specify the number ofcolumns and the range in the line command area, as shown in Figure 66 onpage 157.
Line Command Summary
156 OS/390 V2R10.0 ISPF Edit and Edit Macros
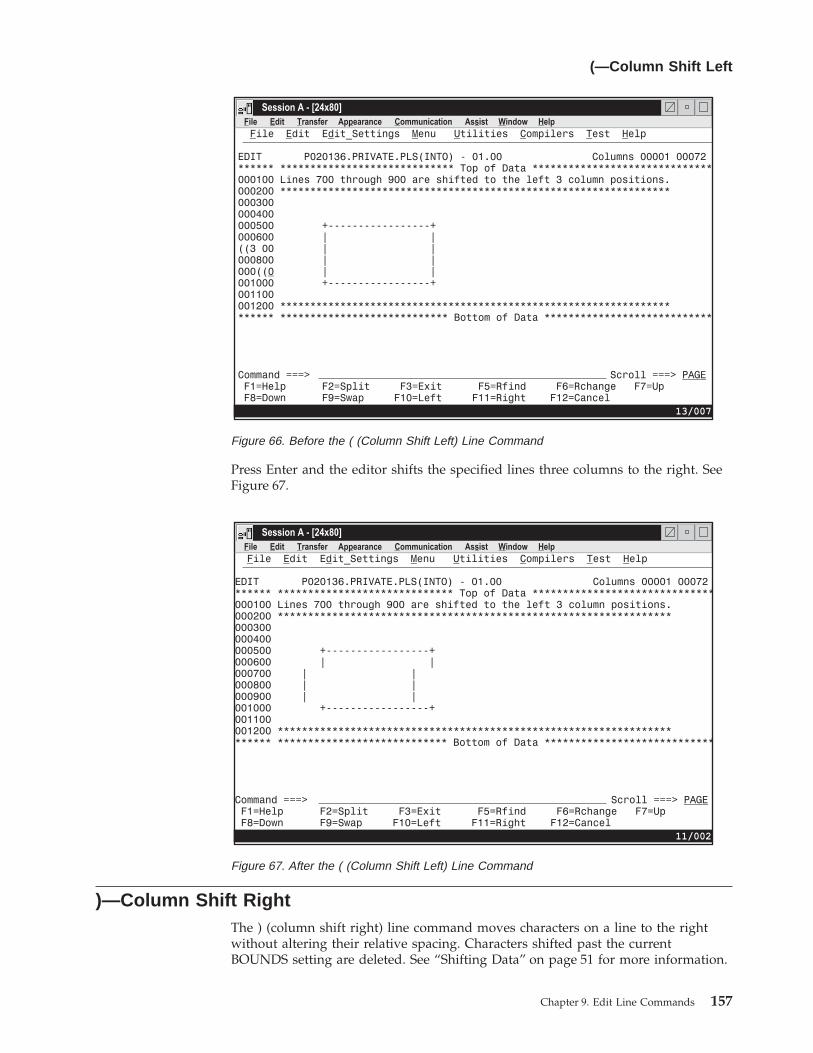
Press Enter and the editor shifts the specified lines three columns to the right. SeeFigure 67.
)—Column Shift RightThe ) (column shift right) line command moves characters on a line to the rightwithout altering their relative spacing. Characters shifted past the currentBOUNDS setting are deleted. See “Shifting Data” on page 51 for more information.
Figure 66. Before the ( (Column Shift Left) Line Command
Figure 67. After the ( (Column Shift Left) Line Command
(—Column Shift Left
Chapter 9. Edit Line Commands 157
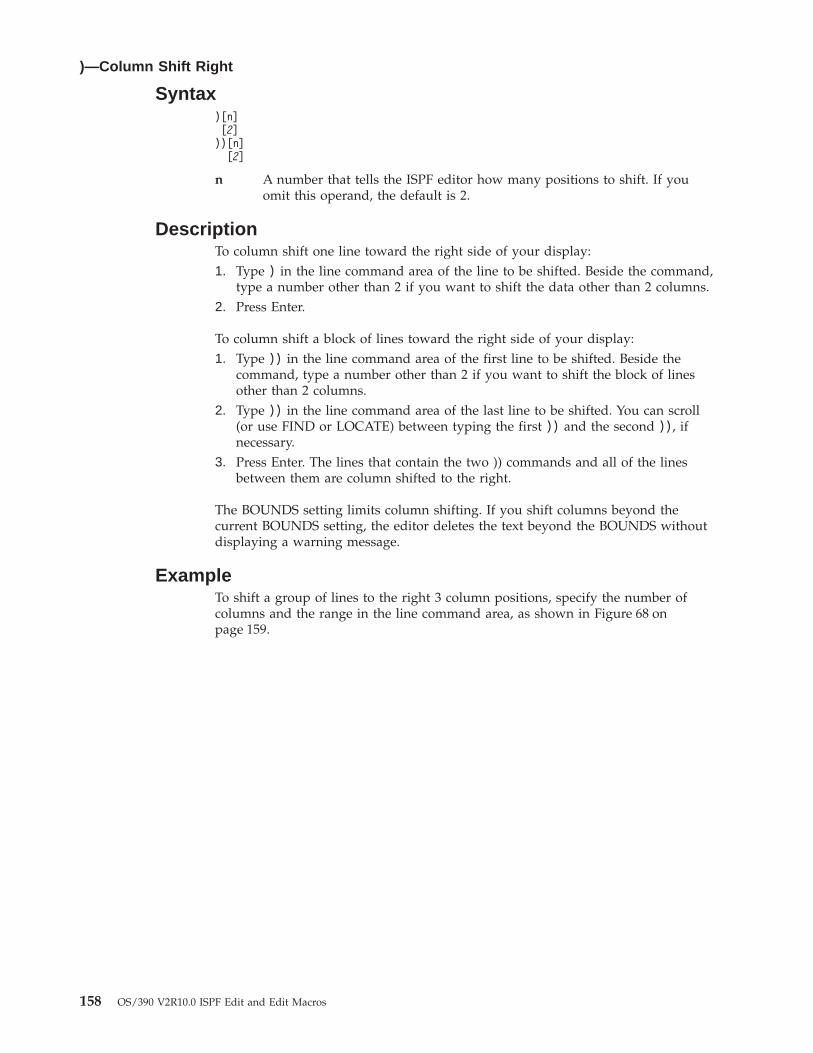
Syntax)[n][2]))[n][2]
n A number that tells the ISPF editor how many positions to shift. If youomit this operand, the default is 2.
DescriptionTo column shift one line toward the right side of your display:1. Type ) in the line command area of the line to be shifted. Beside the command,
type a number other than 2 if you want to shift the data other than 2 columns.2. Press Enter.
To column shift a block of lines toward the right side of your display:1. Type )) in the line command area of the first line to be shifted. Beside the
command, type a number other than 2 if you want to shift the block of linesother than 2 columns.
2. Type )) in the line command area of the last line to be shifted. You can scroll(or use FIND or LOCATE) between typing the first )) and the second )), ifnecessary.
3. Press Enter. The lines that contain the two )) commands and all of the linesbetween them are column shifted to the right.
The BOUNDS setting limits column shifting. If you shift columns beyond thecurrent BOUNDS setting, the editor deletes the text beyond the BOUNDS withoutdisplaying a warning message.
ExampleTo shift a group of lines to the right 3 column positions, specify the number ofcolumns and the range in the line command area, as shown in Figure 68 onpage 159.
)—Column Shift Right
158 OS/390 V2R10.0 ISPF Edit and Edit Macros
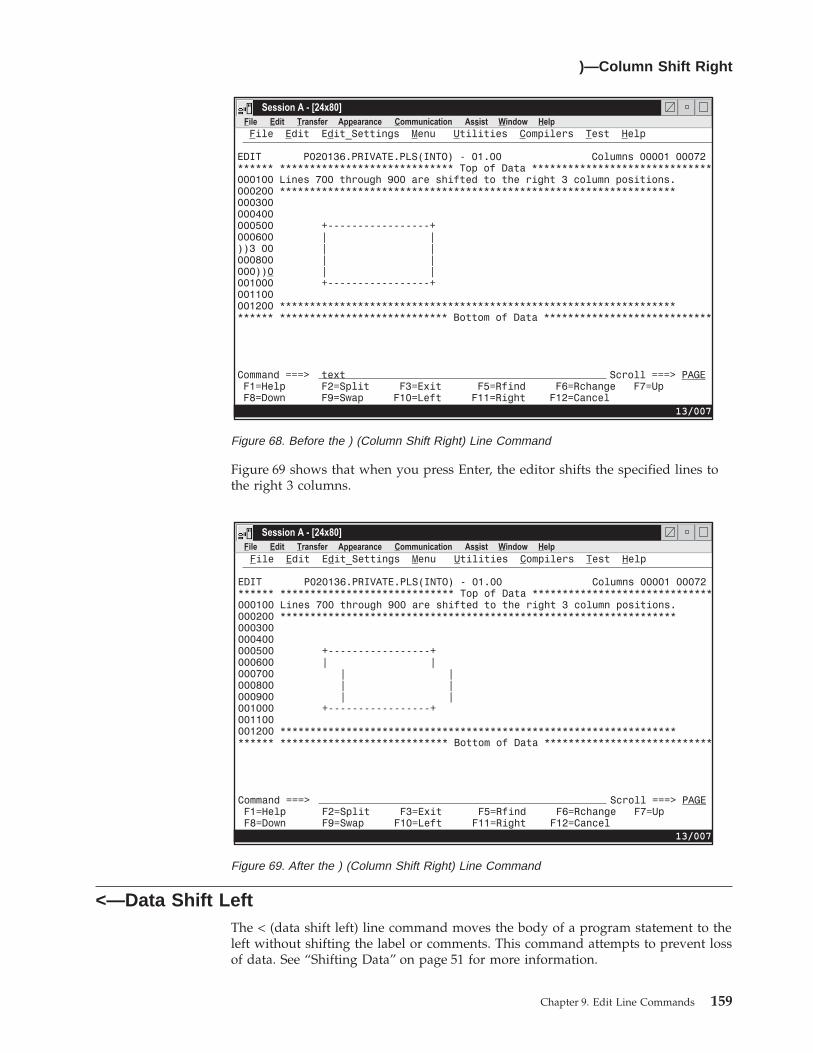
Figure 69 shows that when you press Enter, the editor shifts the specified lines tothe right 3 columns.
<—Data Shift LeftThe < (data shift left) line command moves the body of a program statement to theleft without shifting the label or comments. This command attempts to prevent lossof data. See “Shifting Data” on page 51 for more information.
Figure 68. Before the ) (Column Shift Right) Line Command
Figure 69. After the ) (Column Shift Right) Line Command
)—Column Shift Right
Chapter 9. Edit Line Commands 159
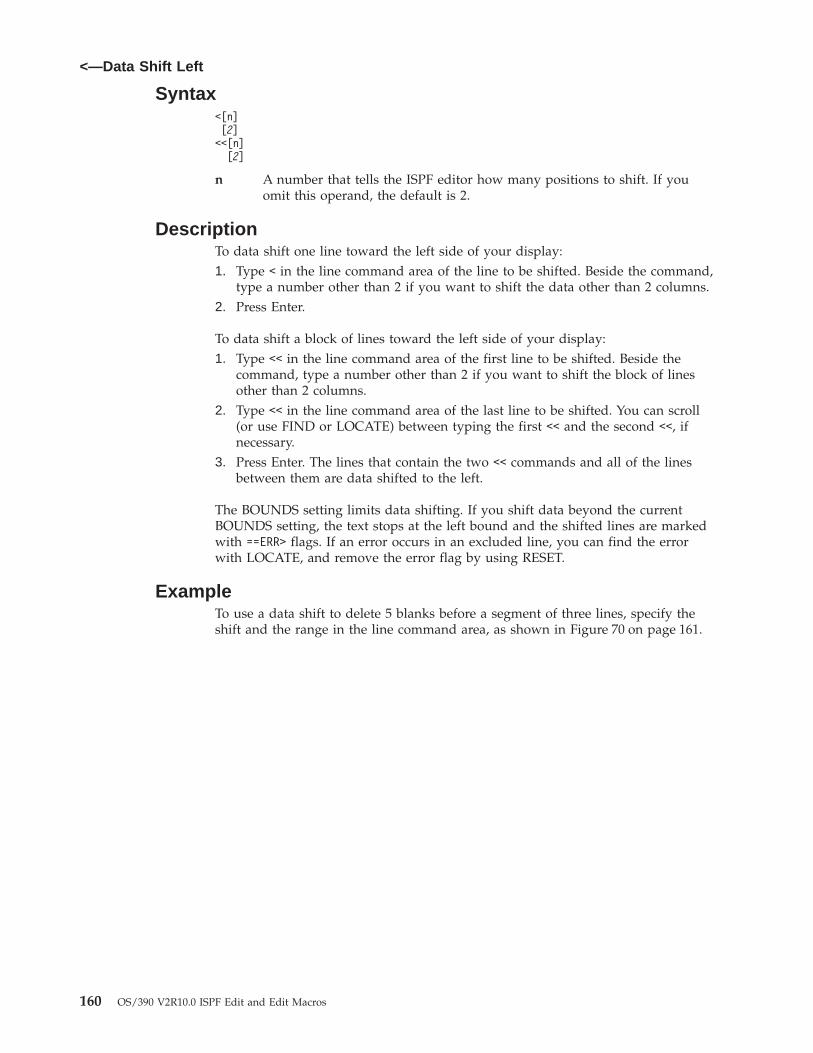
Syntax<[n][2]<<[n][2]
n A number that tells the ISPF editor how many positions to shift. If youomit this operand, the default is 2.
DescriptionTo data shift one line toward the left side of your display:1. Type < in the line command area of the line to be shifted. Beside the command,
type a number other than 2 if you want to shift the data other than 2 columns.2. Press Enter.
To data shift a block of lines toward the left side of your display:1. Type << in the line command area of the first line to be shifted. Beside the
command, type a number other than 2 if you want to shift the block of linesother than 2 columns.
2. Type << in the line command area of the last line to be shifted. You can scroll(or use FIND or LOCATE) between typing the first << and the second <<, ifnecessary.
3. Press Enter. The lines that contain the two << commands and all of the linesbetween them are data shifted to the left.
The BOUNDS setting limits data shifting. If you shift data beyond the currentBOUNDS setting, the text stops at the left bound and the shifted lines are markedwith ==ERR> flags. If an error occurs in an excluded line, you can find the errorwith LOCATE, and remove the error flag by using RESET.
ExampleTo use a data shift to delete 5 blanks before a segment of three lines, specify theshift and the range in the line command area, as shown in Figure 70 on page 161.
<—Data Shift Left
160 OS/390 V2R10.0 ISPF Edit and Edit Macros
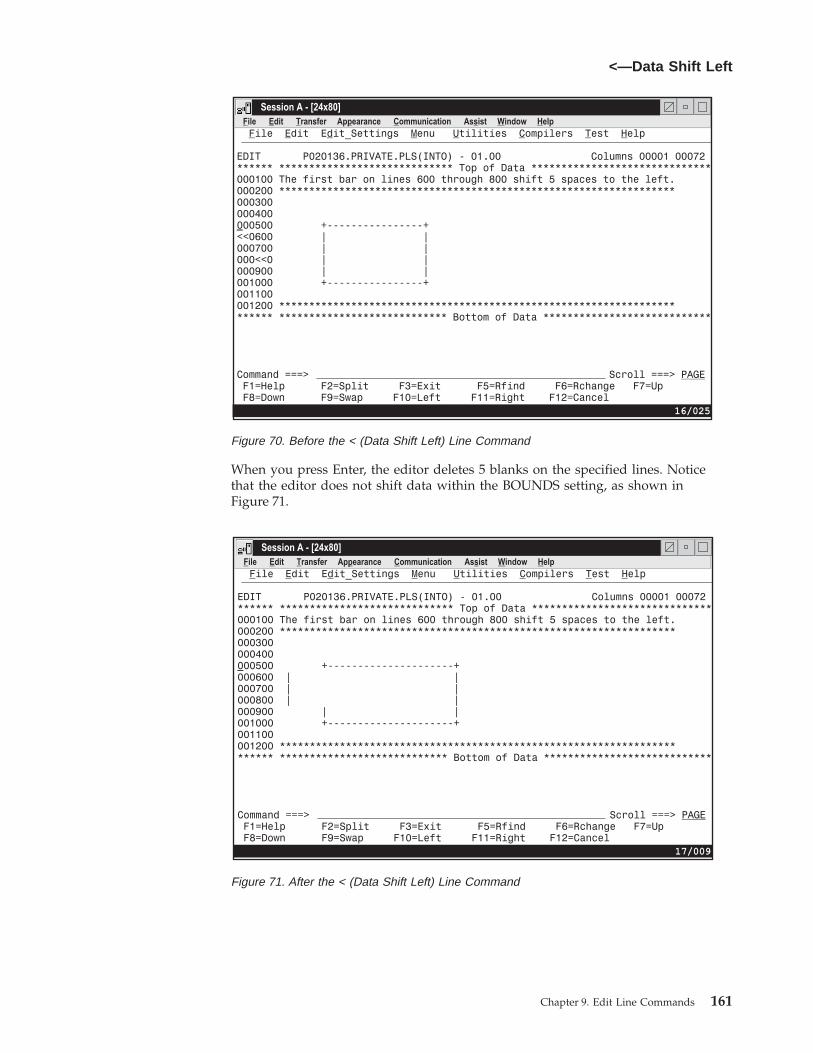
When you press Enter, the editor deletes 5 blanks on the specified lines. Noticethat the editor does not shift data within the BOUNDS setting, as shown inFigure 71.
Figure 70. Before the < (Data Shift Left) Line Command
Figure 71. After the < (Data Shift Left) Line Command
<—Data Shift Left
Chapter 9. Edit Line Commands 161
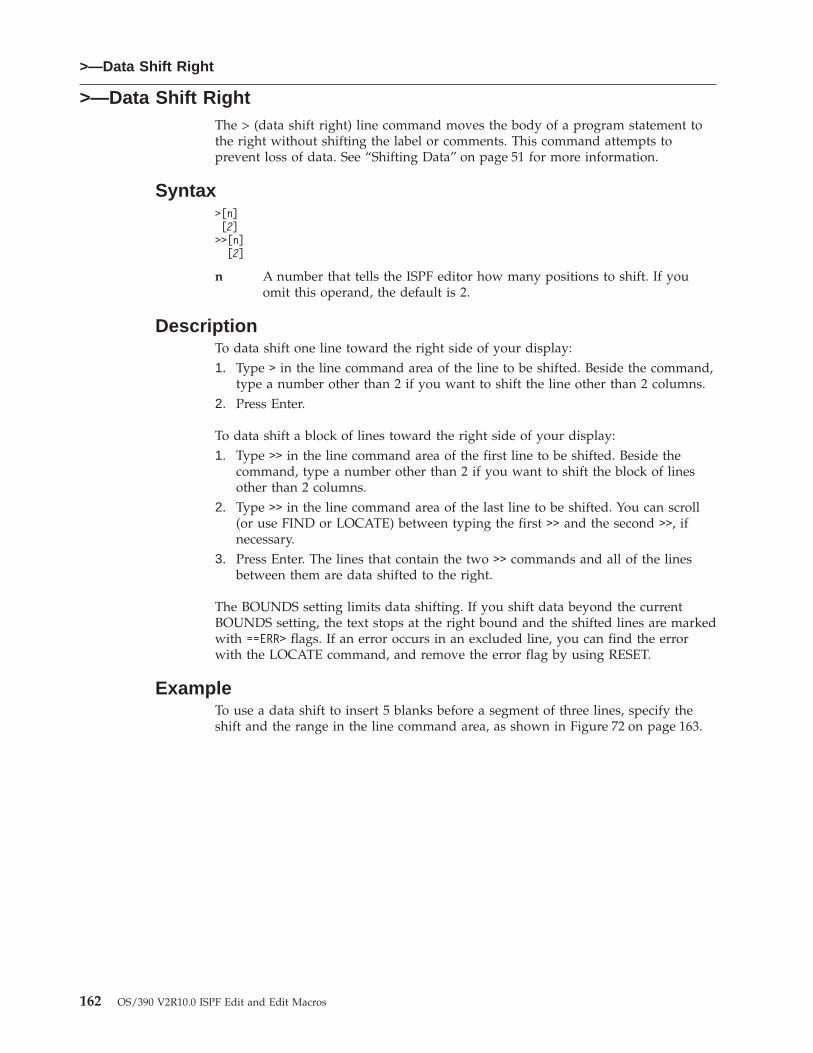
>—Data Shift RightThe > (data shift right) line command moves the body of a program statement tothe right without shifting the label or comments. This command attempts toprevent loss of data. See “Shifting Data” on page 51 for more information.
Syntax>[n][2]>>[n][2]
n A number that tells the ISPF editor how many positions to shift. If youomit this operand, the default is 2.
DescriptionTo data shift one line toward the right side of your display:1. Type > in the line command area of the line to be shifted. Beside the command,
type a number other than 2 if you want to shift the line other than 2 columns.2. Press Enter.
To data shift a block of lines toward the right side of your display:1. Type >> in the line command area of the first line to be shifted. Beside the
command, type a number other than 2 if you want to shift the block of linesother than 2 columns.
2. Type >> in the line command area of the last line to be shifted. You can scroll(or use FIND or LOCATE) between typing the first >> and the second >>, ifnecessary.
3. Press Enter. The lines that contain the two >> commands and all of the linesbetween them are data shifted to the right.
The BOUNDS setting limits data shifting. If you shift data beyond the currentBOUNDS setting, the text stops at the right bound and the shifted lines are markedwith ==ERR> flags. If an error occurs in an excluded line, you can find the errorwith the LOCATE command, and remove the error flag by using RESET.
ExampleTo use a data shift to insert 5 blanks before a segment of three lines, specify theshift and the range in the line command area, as shown in Figure 72 on page 163.
>—Data Shift Right
162 OS/390 V2R10.0 ISPF Edit and Edit Macros
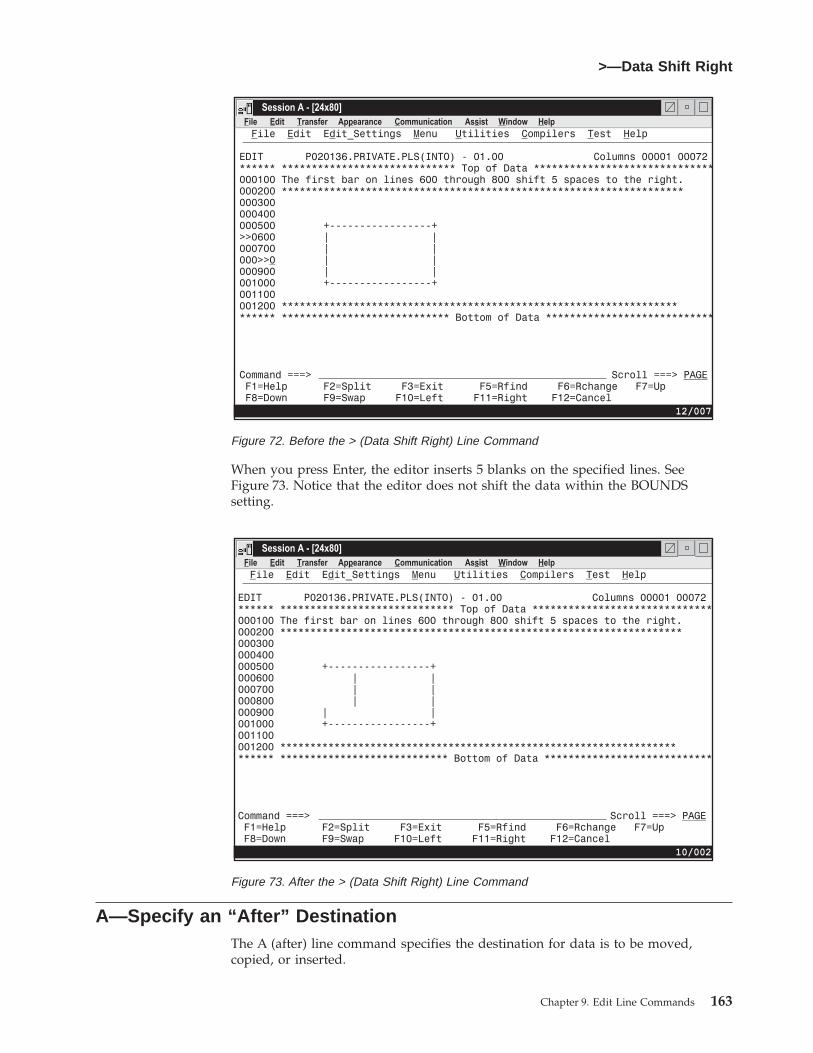
When you press Enter, the editor inserts 5 blanks on the specified lines. SeeFigure 73. Notice that the editor does not shift the data within the BOUNDSsetting.
A—Specify an “After” DestinationThe A (after) line command specifies the destination for data is to be moved,copied, or inserted.
Figure 72. Before the > (Data Shift Right) Line Command
Figure 73. After the > (Data Shift Right) Line Command
>—Data Shift Right
Chapter 9. Edit Line Commands 163
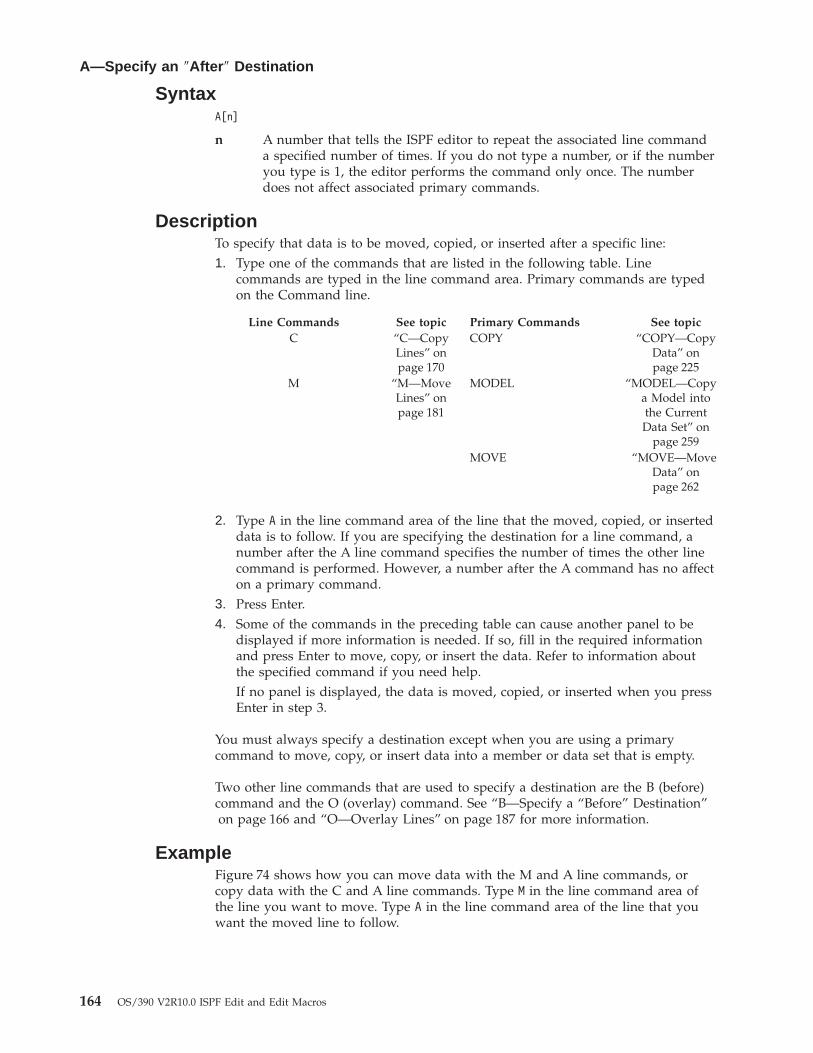
SyntaxA[n]
n A number that tells the ISPF editor to repeat the associated line commanda specified number of times. If you do not type a number, or if the numberyou type is 1, the editor performs the command only once. The numberdoes not affect associated primary commands.
DescriptionTo specify that data is to be moved, copied, or inserted after a specific line:1. Type one of the commands that are listed in the following table. Line
commands are typed in the line command area. Primary commands are typedon the Command line.
Line Commands See topic Primary Commands See topicC “C—Copy
Lines” onpage 170
COPY “COPY—CopyData” onpage 225
M “M—MoveLines” onpage 181
MODEL “MODEL—Copya Model intothe CurrentData Set” on
page 259MOVE “MOVE—Move
Data” onpage 262
2. Type A in the line command area of the line that the moved, copied, or inserteddata is to follow. If you are specifying the destination for a line command, anumber after the A line command specifies the number of times the other linecommand is performed. However, a number after the A command has no affecton a primary command.
3. Press Enter.4. Some of the commands in the preceding table can cause another panel to be
displayed if more information is needed. If so, fill in the required informationand press Enter to move, copy, or insert the data. Refer to information aboutthe specified command if you need help.If no panel is displayed, the data is moved, copied, or inserted when you pressEnter in step 3.
You must always specify a destination except when you are using a primarycommand to move, copy, or insert data into a member or data set that is empty.
Two other line commands that are used to specify a destination are the B (before)command and the O (overlay) command. See “B—Specify a “Before” Destination”on page 166 and “O—Overlay Lines” on page 187 for more information.
ExampleFigure 74 shows how you can move data with the M and A line commands, orcopy data with the C and A line commands. Type M in the line command area ofthe line you want to move. Type A in the line command area of the line that youwant the moved line to follow.
A—Specify an ″After ″ Destination
164 OS/390 V2R10.0 ISPF Edit and Edit Macros

When you press Enter, the line where you typed the M command is moved afterthe line where you typed the A command. See Figure 75.
Note: If you press Enter before specifying where you want the data to go, theeditor displays a MOVE/COPY pending message at the top of the panel. Theline does not move until you specify a destination.
Figure 74. Before the A (After) Line Command
Figure 75. After the A (After) Line Command
A—Specify an ″After ″ Destination
Chapter 9. Edit Line Commands 165
B—Specify a “Before” DestinationThe B (before) line command specifies the destination for data to be moved,copied, or inserted.
SyntaxB[n]
n A number that tells the ISPF editor to repeat the associated line commanda specified number of times. If you do not type a number, or if the numberyou type is 1, the command is not repeated. For associated primarycommands, this number has no effect.
DescriptionTo specify that data is to be moved, copied, or inserted before a specific line:1. Type one of the commands that are listed in the following table. Line
commands are typed in the line command area. Primary commands are typedon the Command line.
Line Commands See topic Primary Commands See topicC “C—Copy
Lines” onpage 170
COPY “COPY—CopyData” onpage 225
M “M—MoveLines” onpage 181
MODEL “MODEL—Copya Model intothe CurrentData Set” on
page 259MOVE “MOVE—Move
Data” onpage 262
2. Type B in the line command area of the line that the moved, copied, or inserteddata is to precede. If you are specifying the destination for a line command, anumber after the B line command to specifies the number of times that theother line command is performed. However, a number that you type after the Bcommand has no effect on a primary command.
3. Press Enter.4. Some of the commands in the preceding table can cause another panel to be
displayed if more information is needed. If so, fill in the required informationand press Enter to move, copy, or insert the data. Refer to information aboutthe specified command if you need help.If no panel is displayed, the data is moved, copied, or inserted when you pressEnter in step 3.
You must always specify a destination except when you are using a primarycommand to move, copy, or insert data into a member or data set that is empty.
Two other line commands that are used to specify a destination are the A (after)command and the O (overlay) command. See “A—Specify an “After” Destination”on page 163 and “O—Overlay Lines” on page 187 for more information.
ExampleFigure 76 on page 167 shows how you can copy data with the C and B linecommands, or move data with the M and B line commands. Type C in the line
B—Specify a ″Before ″ Destination
166 OS/390 V2R10.0 ISPF Edit and Edit Macros
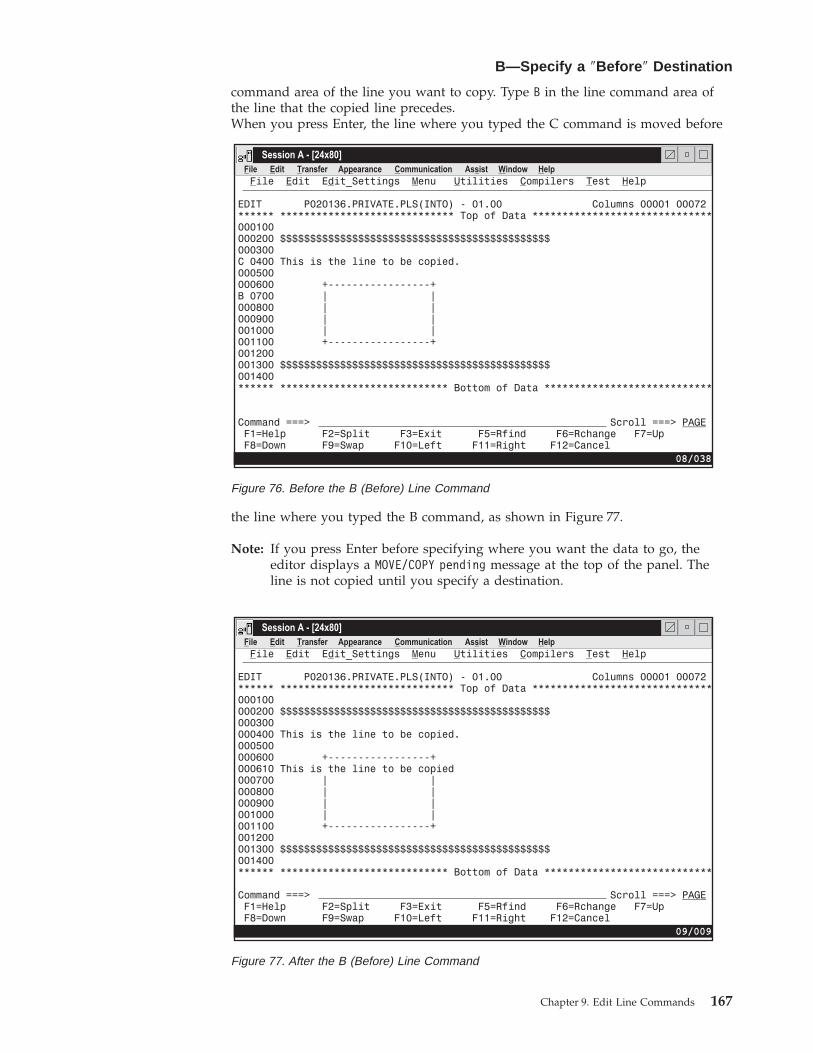
command area of the line you want to copy. Type B in the line command area ofthe line that the copied line precedes.When you press Enter, the line where you typed the C command is moved before
the line where you typed the B command, as shown in Figure 77.
Note: If you press Enter before specifying where you want the data to go, theeditor displays a MOVE/COPY pending message at the top of the panel. Theline is not copied until you specify a destination.
Figure 76. Before the B (Before) Line Command
Figure 77. After the B (Before) Line Command
B—Specify a ″Before ″ Destination
Chapter 9. Edit Line Commands 167
BOUNDS—Define Boundary ColumnsThe BOUNDS line command displays the boundary definition line.
SyntaxBOUNDS
DescriptionThe BOUNDS line command provides an alternative to setting the boundaries withthe BOUNDS primary command or macro command; the effect on the member ordata set is the same. However, if you use both the BOUNDS primary commandand the BOUNDS line command in the same interaction, the line commandoverrides the primary command.
To display the boundary definition (=BNDS>) line:1. Type BOUNDS in the line command area of any unflagged line.2. Press Enter. The boundary definition line is inserted in the data set or member.
To change the BOUNDS settings:1. Delete a < or > character. The < character shows the left BOUNDS setting and
the > character shows the right BOUNDS setting.2. Move the cursor to a different location on the =BNDS> line.
Note: You can use the COLS line command with the BOUNDS line commandto help check and reposition the BOUNDS settings. The COLS linecommand displays the column identification line.
3. Retype the deleted character or characters.
Note: The < character must be typed to the left of the > character.4. Press Enter. The new BOUNDS settings are now in effect.
To revert to the default settings:1. Display the boundary definition line.2. Blank out its contents with the Erase EOF key, the cursor, or the Del (delete)
key.3. Press Enter.
Note: See “Edit Boundaries” on page 28 for a table that shows the defaultbounds settings for various types of data sets.
To remove the boundary definition line from the panel:1. You can either type D in the line command area that contains the =BNDS> flag or
type one of the following on the Command line:v RESET (to reset all flagged lines), orv RESET SPECIAL (to reset only the special lines).
2. Press Enter. The =BNDS> line is removed from the display.
See “Edit Boundaries” on page 28 for more information, including tables that showcommands affected by BOUNDS settings and default bounds settings for varioustypes of data sets.
BOUNDS—Define Boundary Columns
168 OS/390 V2R10.0 ISPF Edit and Edit Macros
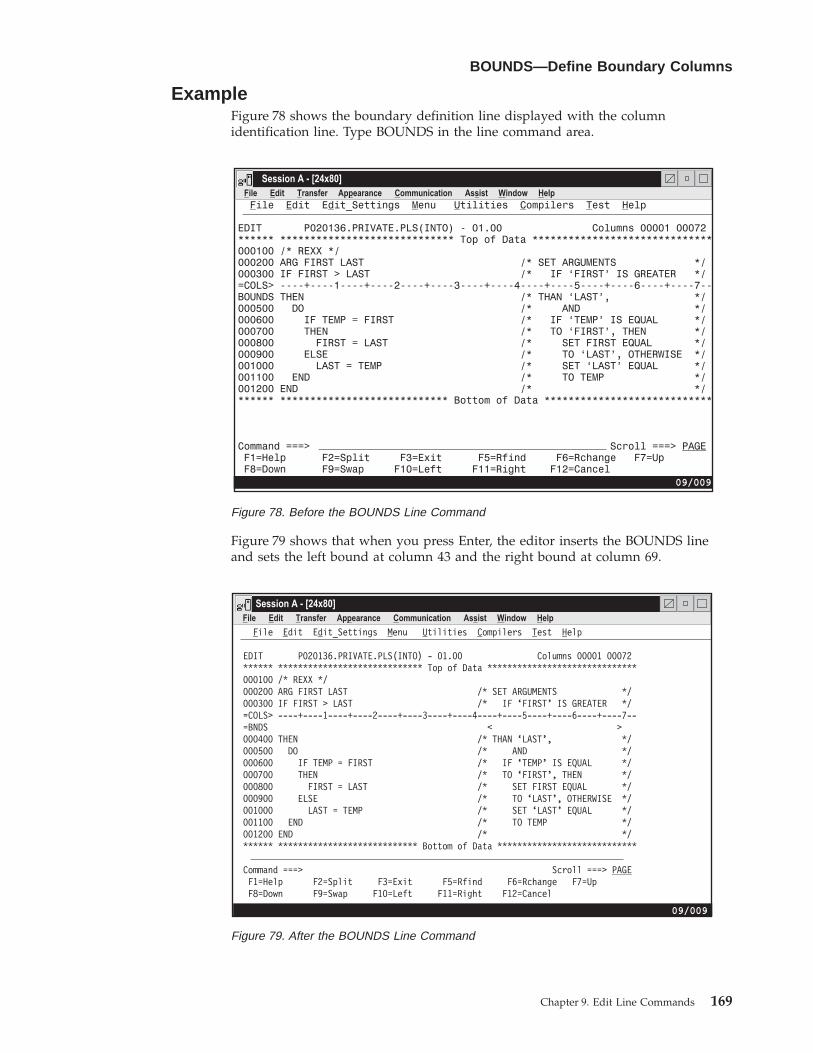
ExampleFigure 78 shows the boundary definition line displayed with the columnidentification line. Type BOUNDS in the line command area.
Figure 79 shows that when you press Enter, the editor inserts the BOUNDS lineand sets the left bound at column 43 and the right bound at column 69.
Figure 78. Before the BOUNDS Line Command
ile dit E it_Settings enu tilities ompilers est elp
EDIT P020136.PRIVATE.PLS(INTO) - 01.00 Columns 00001 00072****** ***************************** Top of Data ******************************000100 /* REXX */
****** **************************** Bottom of Data ****************************
Command ===> Scroll ===>F1=Help F2=Split F3=Exit F5=Rfind F6=Rchange F7=UpF8=Down F9=Swap F10=Left F11=Right F12=Cancel
F E d M U C T H
PAGE
000200 ARG FIRST LAST /* SET ARGUMENTS */000300 IF FIRST > LAST /* IF ‘FIRST’ IS GREATER */=COLS> ----+----1----+----2----+----3----+----4----+----5----+----6----+----7--=BNDS < >000400 THEN /* THAN ‘LAST’, */000500 DO /* AND */000600 IF TEMP = FIRST /* IF ‘TEMP’ IS EQUAL */000700 THEN /* TO ‘FIRST’, THEN */000800 FIRST = LAST /* SET FIRST EQUAL */000900 ELSE /* TO ‘LAST’, OTHERWISE */001000 LAST = TEMP /* SET ‘LAST’ EQUAL */001100 END /* TO TEMP */001200 END /* */
Session A - [24x80]
F E T p C s W Hile dit ransfer Ap earance ommunication As ist indow elp
09/009
Figure 79. After the BOUNDS Line Command
BOUNDS—Define Boundary Columns
Chapter 9. Edit Line Commands 169
C—Copy LinesThe C (copy) line command copies lines from one location to another.
SyntaxC[n]CC
n The number of lines to be copied. If you do not type a number, or if thenumber you type is 1, only the line on which you type C is copied.
DescriptionTo copy one or more lines within the same data set or member:1. Type C in the line command area of the line to be copied. If you also want to
copy one or more lines that immediately follow this line, type a number greaterthan 1 after the C command.
2. Next, specify the destination of the line to be copied by using either the A(after), B (before), or O (overlay) line command.
3. Press Enter. The line or lines are copied to the new location.
To copy a block of lines within the same data set or member:1. Type CC in the line command area of both the first and last lines to be copied.
You can scroll (or use FIND or LOCATE) between typing the first CC and thesecond CC, if necessary.
2. Use the A (after), B (before), or OO (overlay) command to show where thecopied lines are to be placed. Notice that when you use the block form of the Ccommand (CC) to copy and overlay lines, you should also use the block formof the O command (OO).
3. Press Enter. The lines that contain the two CC commands and all of the linesbetween them are copied to the new location.
To copy lines to another data set or member:
Note: To copy lines into an existing data set or member without replacing thatdata set or member, edit the existing data set or member and use the COPYprimary or macro command.
1. Type either CREATE or REPLACE on the Command line.2. Use one of the forms of the C command described previously.3. Press Enter.4. On the next panel that PDF displays, type the name of the data set or member
that you want to create or replace.5. Press Enter. The lines are copied to the data set or member that you specified.
ExampleThe example in Figure 80 shows how to copy data by using the C with the B(Before), A (After), or O (Overlay) line commands. Type C in the line commandarea of the line you want to copy. Type B in the line command area of the line thatyou want the copied line to precede.
C—Copy Lines
170 OS/390 V2R10.0 ISPF Edit and Edit Macros
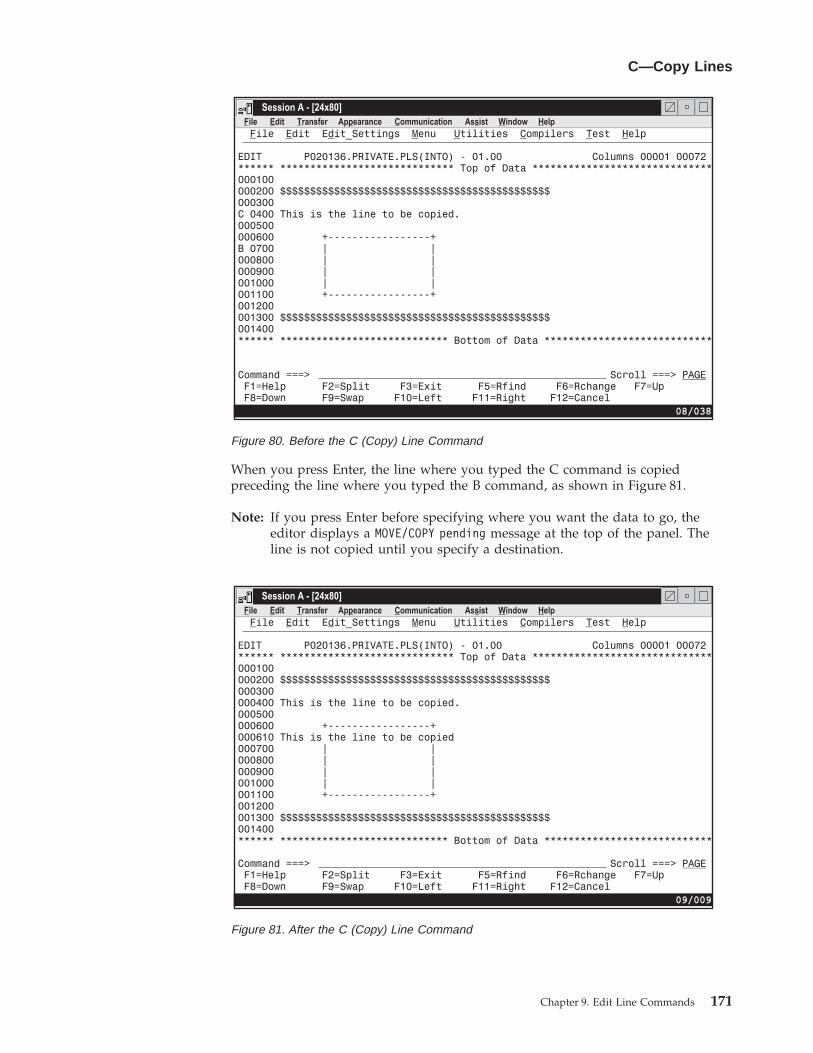
When you press Enter, the line where you typed the C command is copiedpreceding the line where you typed the B command, as shown in Figure 81.
Note: If you press Enter before specifying where you want the data to go, theeditor displays a MOVE/COPY pending message at the top of the panel. Theline is not copied until you specify a destination.
Figure 80. Before the C (Copy) Line Command
Figure 81. After the C (Copy) Line Command
C—Copy Lines
Chapter 9. Edit Line Commands 171
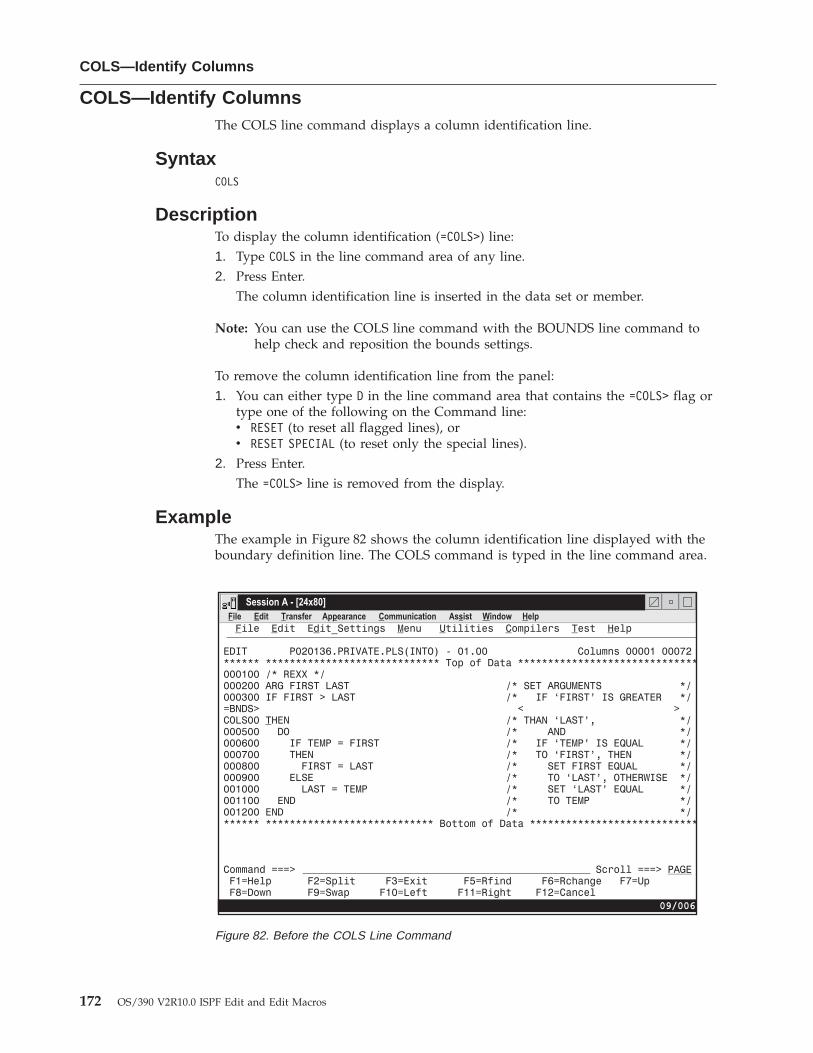
COLS—Identify ColumnsThe COLS line command displays a column identification line.
SyntaxCOLS
DescriptionTo display the column identification (=COLS>) line:1. Type COLS in the line command area of any line.2. Press Enter.
The column identification line is inserted in the data set or member.
Note: You can use the COLS line command with the BOUNDS line command tohelp check and reposition the bounds settings.
To remove the column identification line from the panel:1. You can either type D in the line command area that contains the =COLS> flag or
type one of the following on the Command line:v RESET (to reset all flagged lines), orv RESET SPECIAL (to reset only the special lines).
2. Press Enter.The =COLS> line is removed from the display.
ExampleThe example in Figure 82 shows the column identification line displayed with theboundary definition line. The COLS command is typed in the line command area.
Figure 82. Before the COLS Line Command
COLS—Identify Columns
172 OS/390 V2R10.0 ISPF Edit and Edit Macros
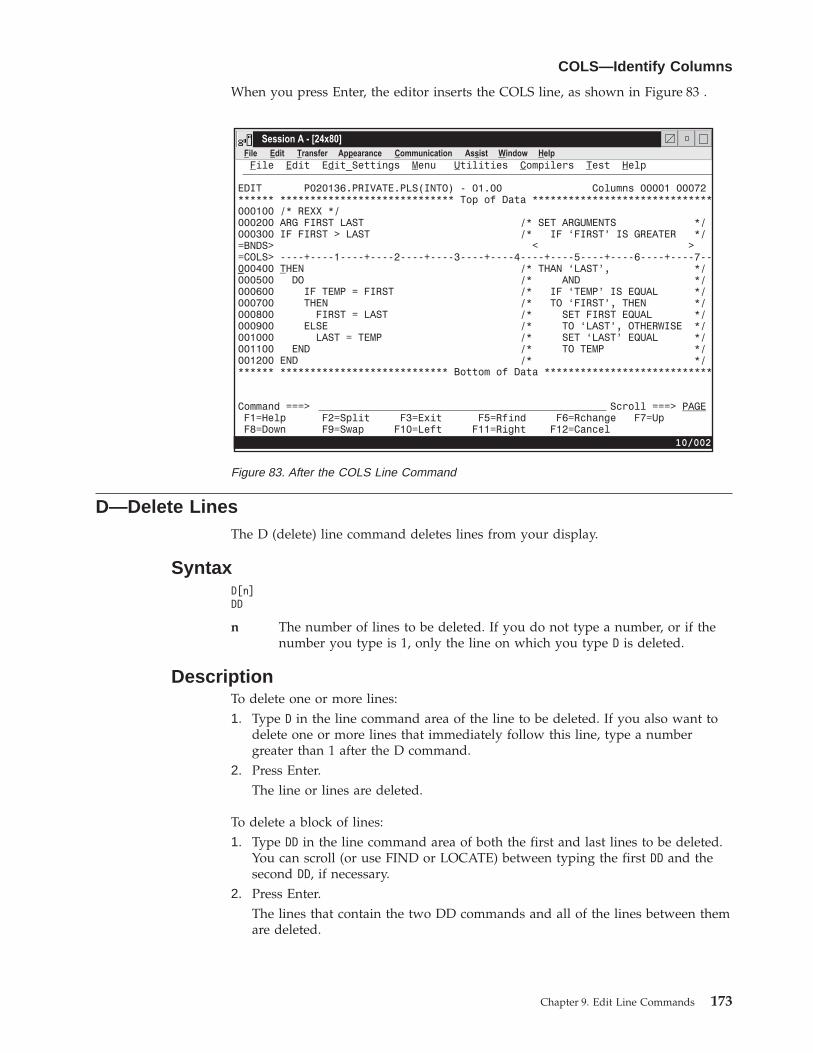
When you press Enter, the editor inserts the COLS line, as shown in Figure 83 .
D—Delete LinesThe D (delete) line command deletes lines from your display.
SyntaxD[n]DD
n The number of lines to be deleted. If you do not type a number, or if thenumber you type is 1, only the line on which you type D is deleted.
DescriptionTo delete one or more lines:1. Type D in the line command area of the line to be deleted. If you also want to
delete one or more lines that immediately follow this line, type a numbergreater than 1 after the D command.
2. Press Enter.The line or lines are deleted.
To delete a block of lines:1. Type DD in the line command area of both the first and last lines to be deleted.
You can scroll (or use FIND or LOCATE) between typing the first DD and thesecond DD, if necessary.
2. Press Enter.The lines that contain the two DD commands and all of the lines between themare deleted.
Figure 83. After the COLS Line Command
COLS—Identify Columns
Chapter 9. Edit Line Commands 173
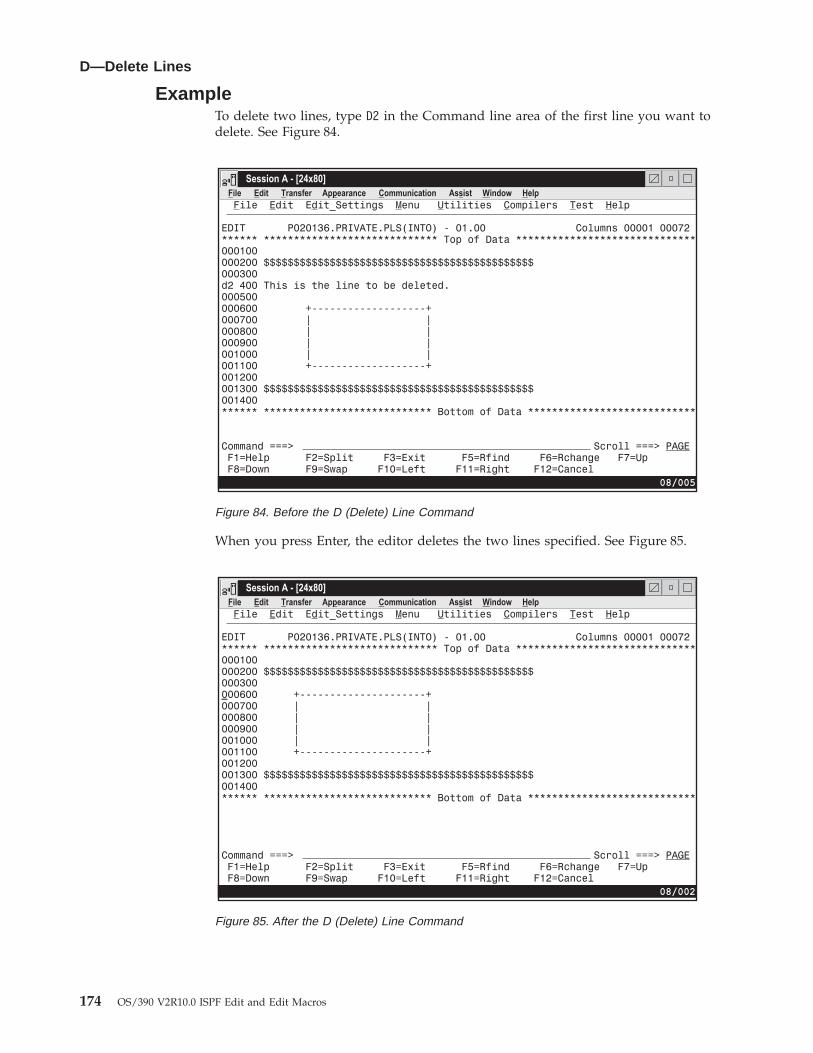
ExampleTo delete two lines, type D2 in the Command line area of the first line you want todelete. See Figure 84.
When you press Enter, the editor deletes the two lines specified. See Figure 85.
Figure 84. Before the D (Delete) Line Command
Figure 85. After the D (Delete) Line Command
D—Delete Lines
174 OS/390 V2R10.0 ISPF Edit and Edit Macros
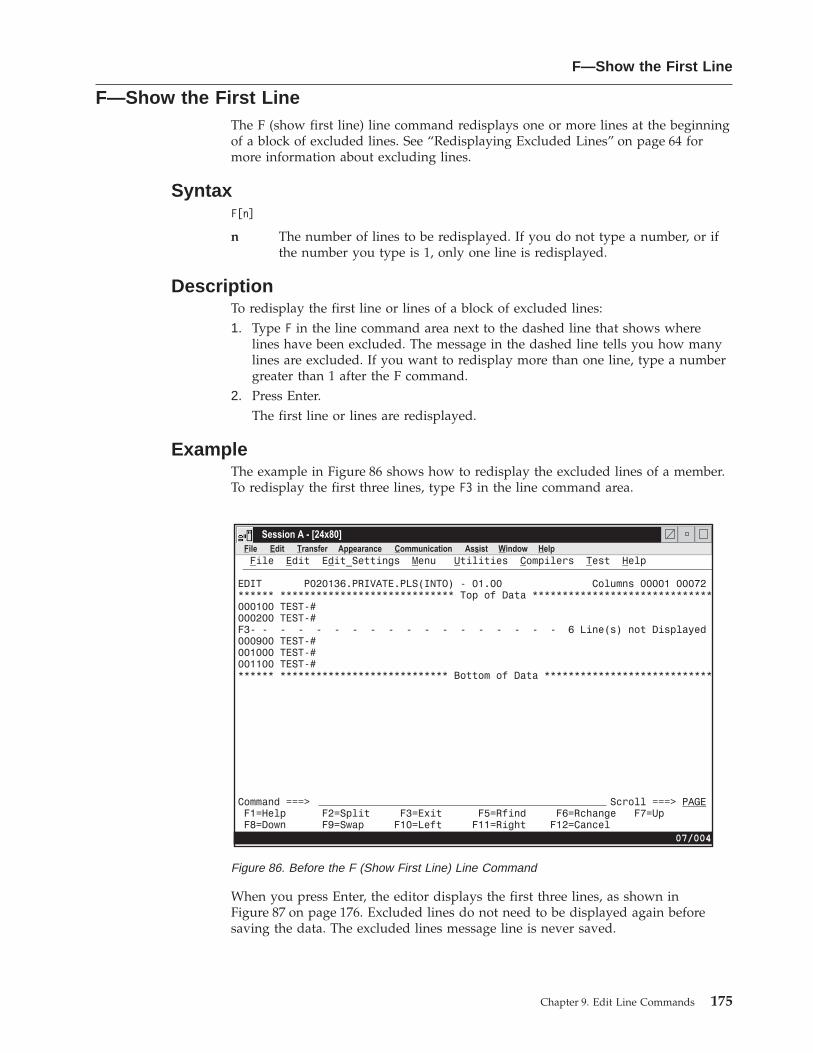
F—Show the First LineThe F (show first line) line command redisplays one or more lines at the beginningof a block of excluded lines. See “Redisplaying Excluded Lines” on page 64 formore information about excluding lines.
SyntaxF[n]
n The number of lines to be redisplayed. If you do not type a number, or ifthe number you type is 1, only one line is redisplayed.
DescriptionTo redisplay the first line or lines of a block of excluded lines:1. Type F in the line command area next to the dashed line that shows where
lines have been excluded. The message in the dashed line tells you how manylines are excluded. If you want to redisplay more than one line, type a numbergreater than 1 after the F command.
2. Press Enter.The first line or lines are redisplayed.
ExampleThe example in Figure 86 shows how to redisplay the excluded lines of a member.To redisplay the first three lines, type F3 in the line command area.
When you press Enter, the editor displays the first three lines, as shown inFigure 87 on page 176. Excluded lines do not need to be displayed again beforesaving the data. The excluded lines message line is never saved.
Figure 86. Before the F (Show First Line) Line Command
F—Show the First Line
Chapter 9. Edit Line Commands 175
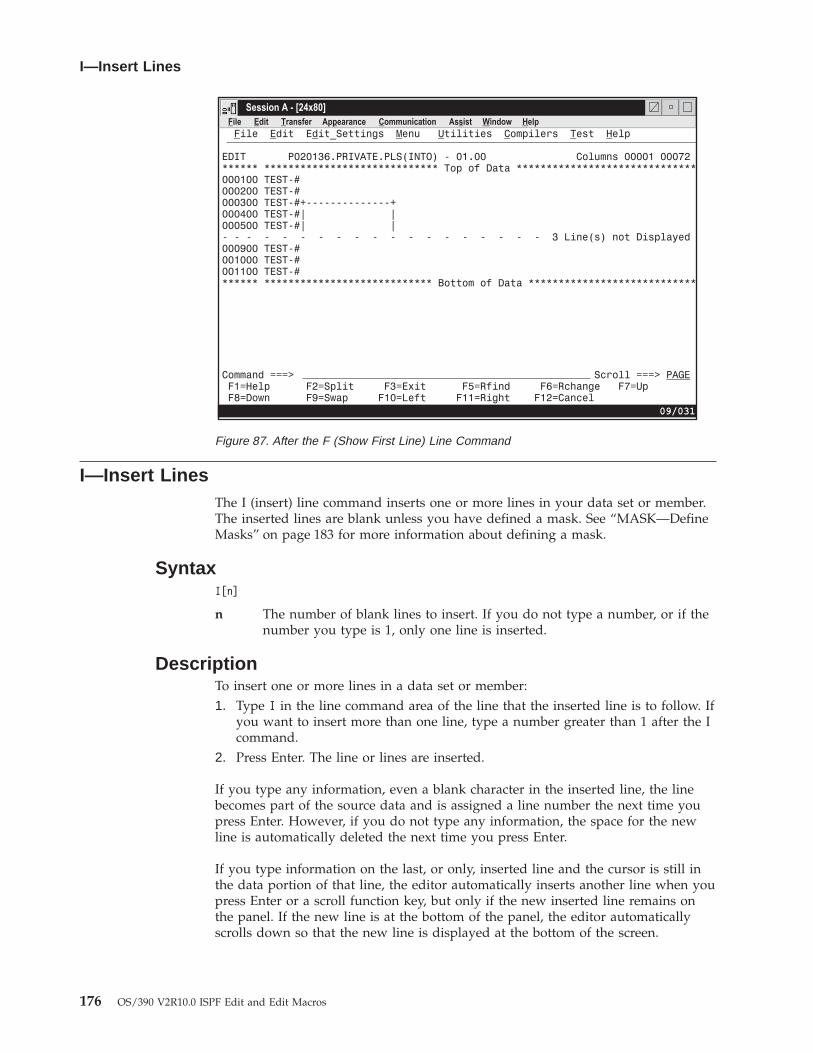
I—Insert LinesThe I (insert) line command inserts one or more lines in your data set or member.The inserted lines are blank unless you have defined a mask. See “MASK—DefineMasks” on page 183 for more information about defining a mask.
SyntaxI[n]
n The number of blank lines to insert. If you do not type a number, or if thenumber you type is 1, only one line is inserted.
DescriptionTo insert one or more lines in a data set or member:1. Type I in the line command area of the line that the inserted line is to follow. If
you want to insert more than one line, type a number greater than 1 after the Icommand.
2. Press Enter. The line or lines are inserted.
If you type any information, even a blank character in the inserted line, the linebecomes part of the source data and is assigned a line number the next time youpress Enter. However, if you do not type any information, the space for the newline is automatically deleted the next time you press Enter.
If you type information on the last, or only, inserted line and the cursor is still inthe data portion of that line, the editor automatically inserts another line when youpress Enter or a scroll function key, but only if the new inserted line remains onthe panel. If the new line is at the bottom of the panel, the editor automaticallyscrolls down so that the new line is displayed at the bottom of the screen.
Figure 87. After the F (Show First Line) Line Command
I—Insert Lines
176 OS/390 V2R10.0 ISPF Edit and Edit Macros
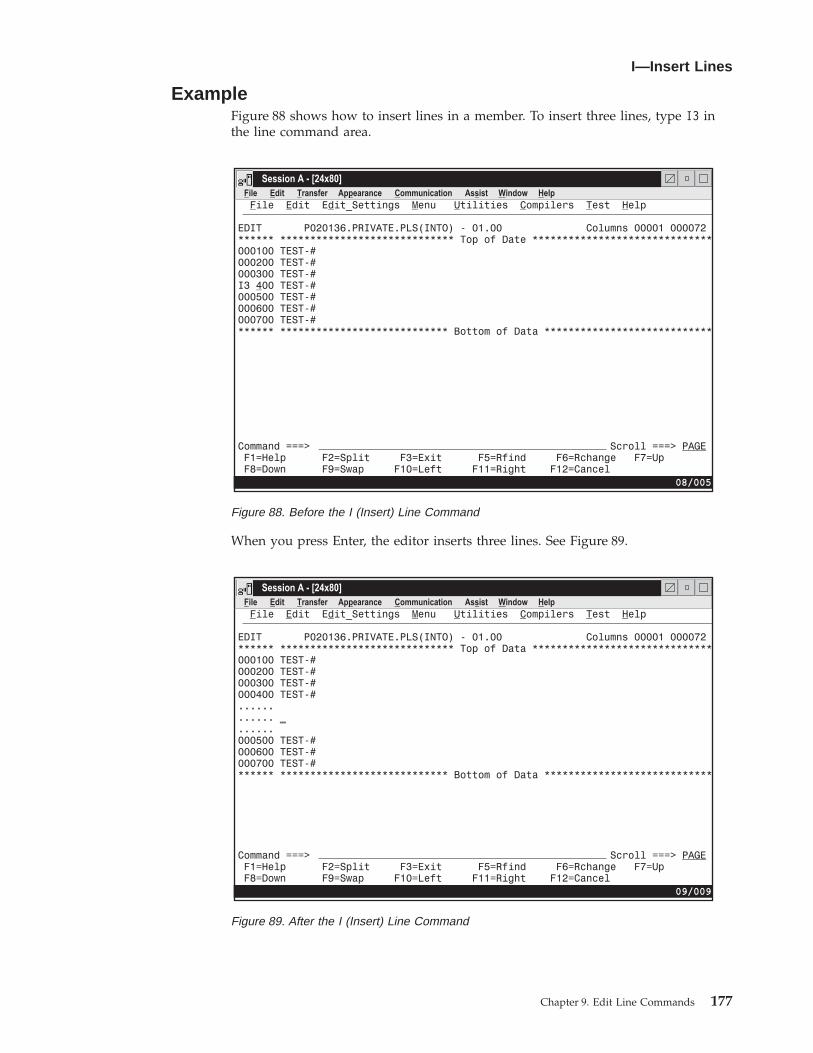
ExampleFigure 88 shows how to insert lines in a member. To insert three lines, type I3 inthe line command area.
When you press Enter, the editor inserts three lines. See Figure 89.
Figure 88. Before the I (Insert) Line Command
Figure 89. After the I (Insert) Line Command
I—Insert Lines
Chapter 9. Edit Line Commands 177
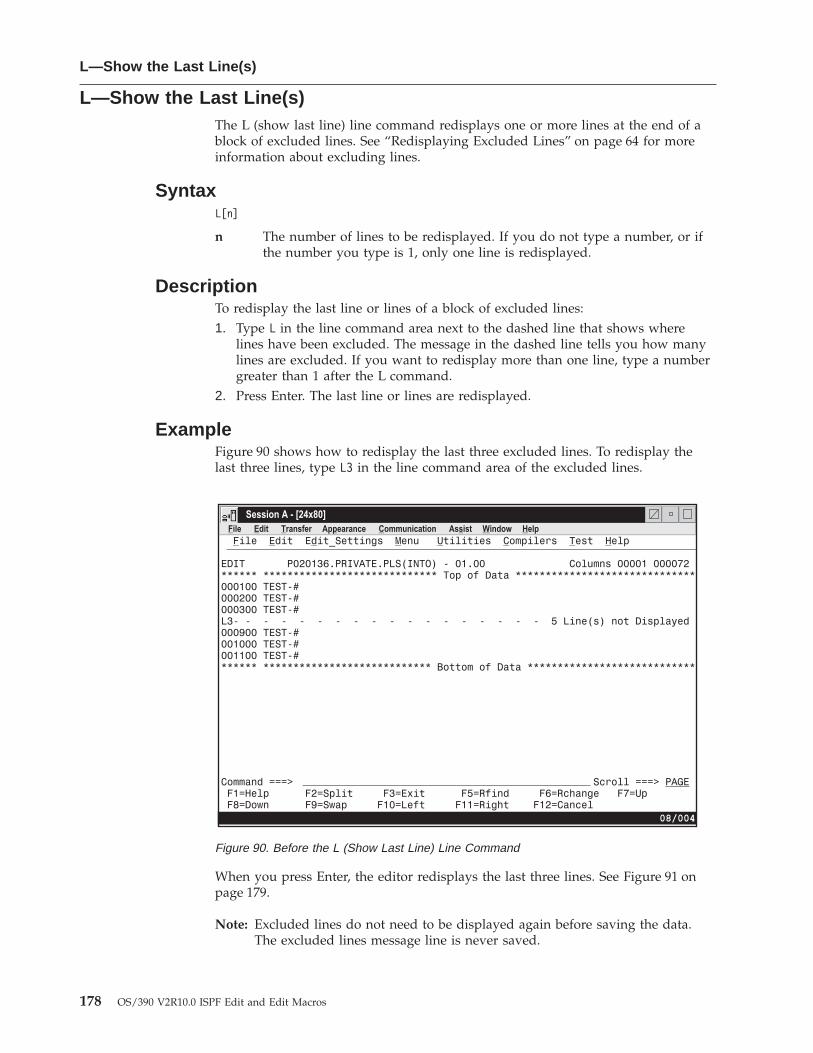
L—Show the Last Line(s)The L (show last line) line command redisplays one or more lines at the end of ablock of excluded lines. See “Redisplaying Excluded Lines” on page 64 for moreinformation about excluding lines.
SyntaxL[n]
n The number of lines to be redisplayed. If you do not type a number, or ifthe number you type is 1, only one line is redisplayed.
DescriptionTo redisplay the last line or lines of a block of excluded lines:1. Type L in the line command area next to the dashed line that shows where
lines have been excluded. The message in the dashed line tells you how manylines are excluded. If you want to redisplay more than one line, type a numbergreater than 1 after the L command.
2. Press Enter. The last line or lines are redisplayed.
ExampleFigure 90 shows how to redisplay the last three excluded lines. To redisplay thelast three lines, type L3 in the line command area of the excluded lines.
When you press Enter, the editor redisplays the last three lines. See Figure 91 onpage 179.
Note: Excluded lines do not need to be displayed again before saving the data.The excluded lines message line is never saved.
Figure 90. Before the L (Show Last Line) Line Command
L—Show the Last Line(s)
178 OS/390 V2R10.0 ISPF Edit and Edit Macros
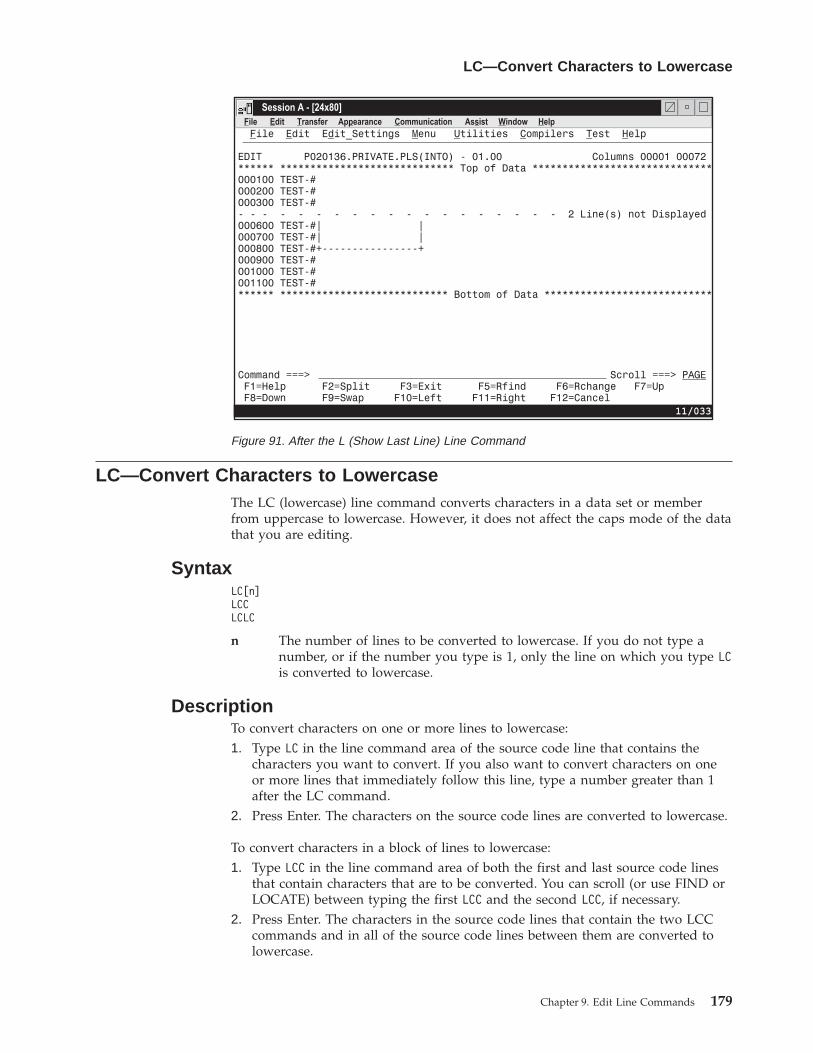
LC—Convert Characters to LowercaseThe LC (lowercase) line command converts characters in a data set or memberfrom uppercase to lowercase. However, it does not affect the caps mode of the datathat you are editing.
SyntaxLC[n]LCCLCLC
n The number of lines to be converted to lowercase. If you do not type anumber, or if the number you type is 1, only the line on which you type LCis converted to lowercase.
DescriptionTo convert characters on one or more lines to lowercase:1. Type LC in the line command area of the source code line that contains the
characters you want to convert. If you also want to convert characters on oneor more lines that immediately follow this line, type a number greater than 1after the LC command.
2. Press Enter. The characters on the source code lines are converted to lowercase.
To convert characters in a block of lines to lowercase:1. Type LCC in the line command area of both the first and last source code lines
that contain characters that are to be converted. You can scroll (or use FIND orLOCATE) between typing the first LCC and the second LCC, if necessary.
2. Press Enter. The characters in the source code lines that contain the two LCCcommands and in all of the source code lines between them are converted tolowercase.
Figure 91. After the L (Show Last Line) Line Command
LC—Convert Characters to Lowercase
Chapter 9. Edit Line Commands 179
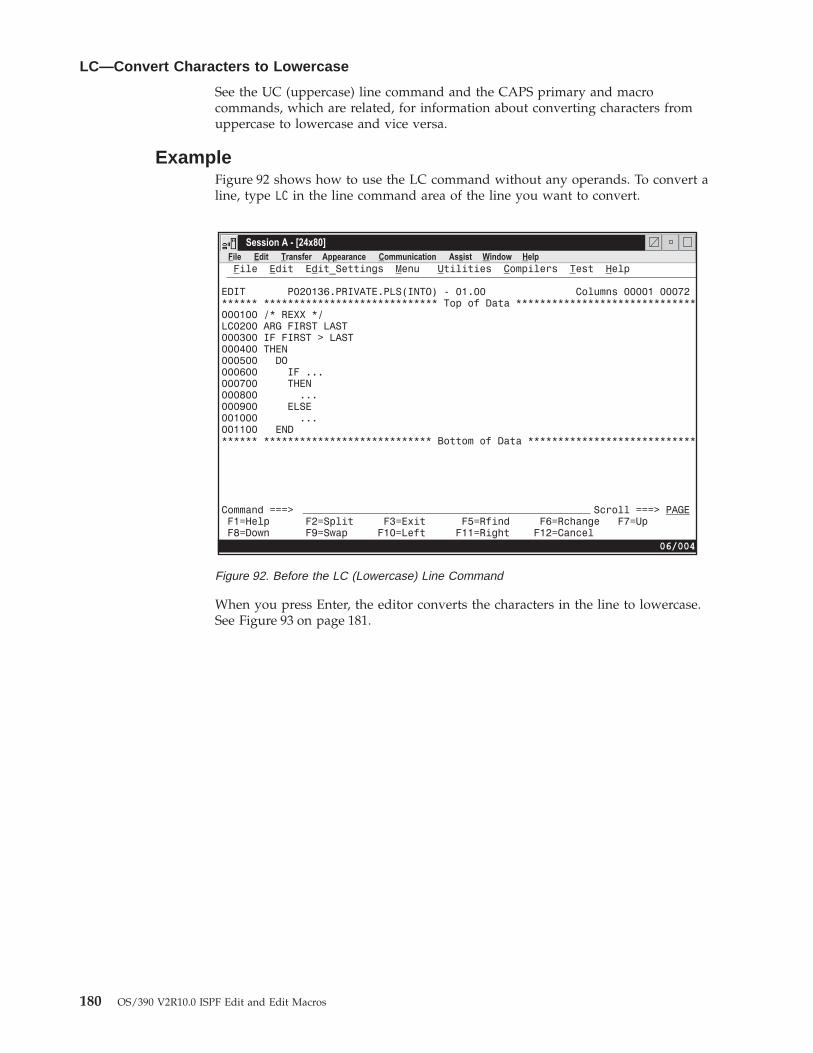
See the UC (uppercase) line command and the CAPS primary and macrocommands, which are related, for information about converting characters fromuppercase to lowercase and vice versa.
ExampleFigure 92 shows how to use the LC command without any operands. To convert aline, type LC in the line command area of the line you want to convert.
When you press Enter, the editor converts the characters in the line to lowercase.See Figure 93 on page 181.
Figure 92. Before the LC (Lowercase) Line Command
LC—Convert Characters to Lowercase
180 OS/390 V2R10.0 ISPF Edit and Edit Macros
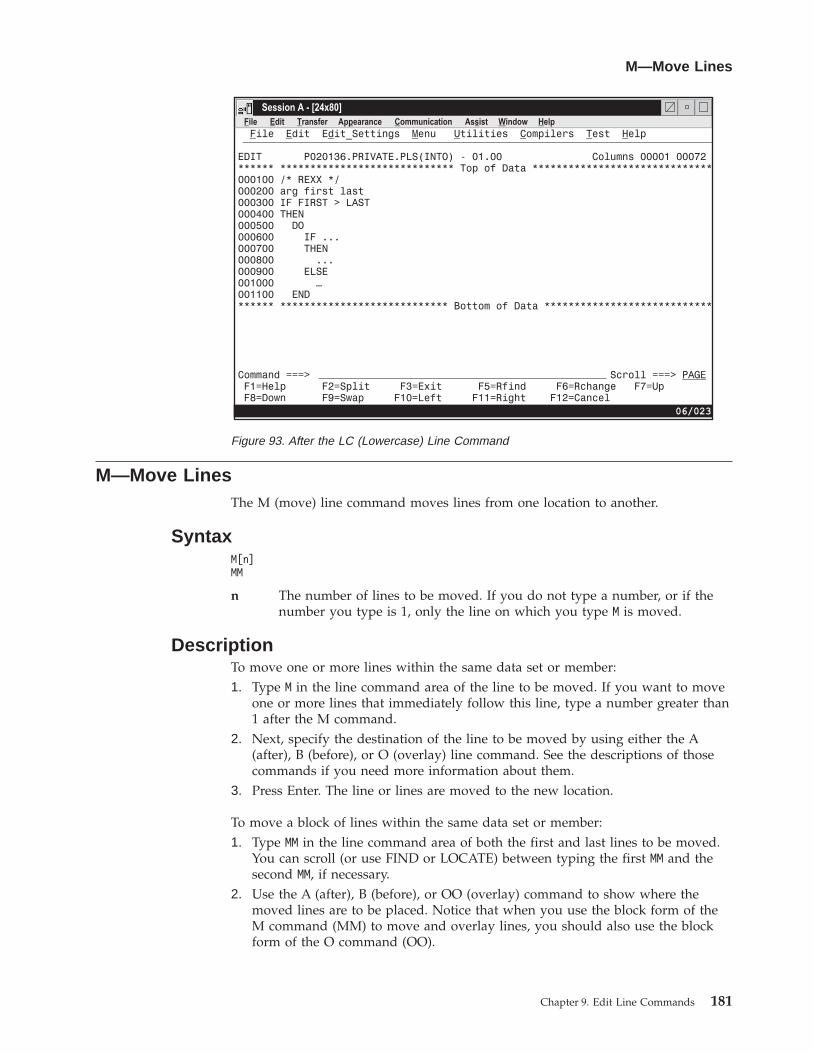
M—Move LinesThe M (move) line command moves lines from one location to another.
SyntaxM[n]MM
n The number of lines to be moved. If you do not type a number, or if thenumber you type is 1, only the line on which you type M is moved.
DescriptionTo move one or more lines within the same data set or member:1. Type M in the line command area of the line to be moved. If you want to move
one or more lines that immediately follow this line, type a number greater than1 after the M command.
2. Next, specify the destination of the line to be moved by using either the A(after), B (before), or O (overlay) line command. See the descriptions of thosecommands if you need more information about them.
3. Press Enter. The line or lines are moved to the new location.
To move a block of lines within the same data set or member:1. Type MM in the line command area of both the first and last lines to be moved.
You can scroll (or use FIND or LOCATE) between typing the first MM and thesecond MM, if necessary.
2. Use the A (after), B (before), or OO (overlay) command to show where themoved lines are to be placed. Notice that when you use the block form of theM command (MM) to move and overlay lines, you should also use the blockform of the O command (OO).
Figure 93. After the LC (Lowercase) Line Command
M—Move Lines
Chapter 9. Edit Line Commands 181
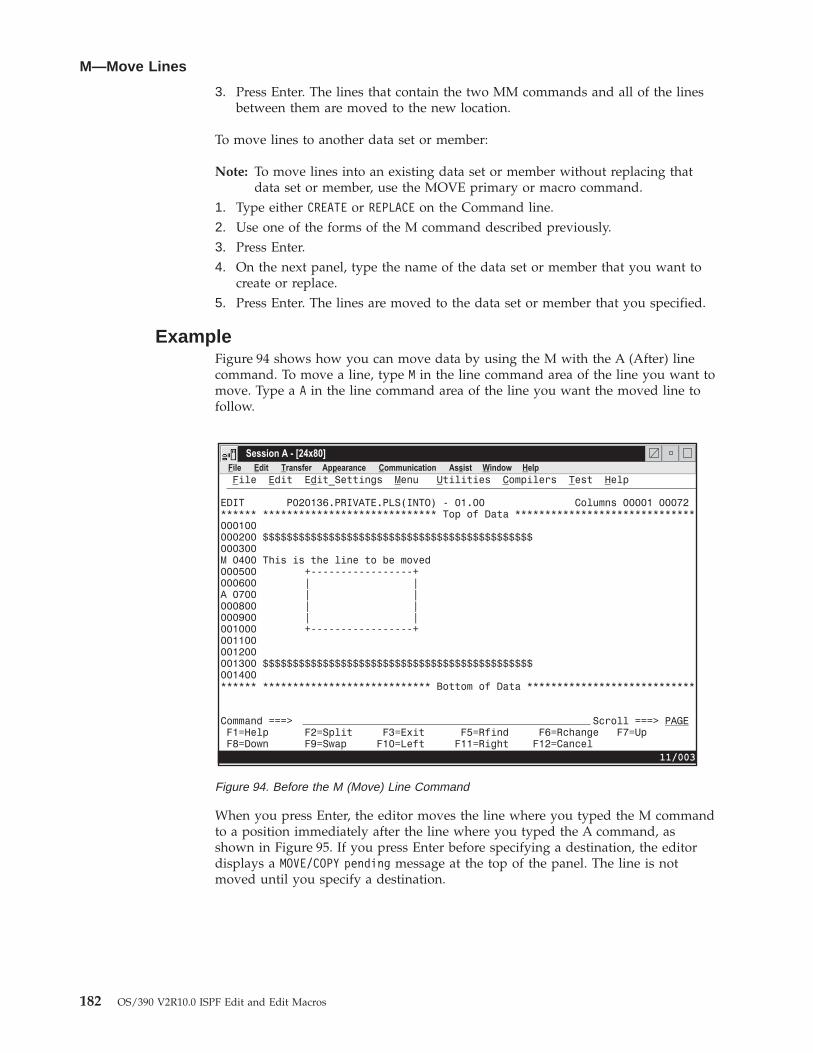
3. Press Enter. The lines that contain the two MM commands and all of the linesbetween them are moved to the new location.
To move lines to another data set or member:
Note: To move lines into an existing data set or member without replacing thatdata set or member, use the MOVE primary or macro command.
1. Type either CREATE or REPLACE on the Command line.2. Use one of the forms of the M command described previously.3. Press Enter.4. On the next panel, type the name of the data set or member that you want to
create or replace.5. Press Enter. The lines are moved to the data set or member that you specified.
ExampleFigure 94 shows how you can move data by using the M with the A (After) linecommand. To move a line, type M in the line command area of the line you want tomove. Type a A in the line command area of the line you want the moved line tofollow.
When you press Enter, the editor moves the line where you typed the M commandto a position immediately after the line where you typed the A command, asshown in Figure 95. If you press Enter before specifying a destination, the editordisplays a MOVE/COPY pending message at the top of the panel. The line is notmoved until you specify a destination.
Figure 94. Before the M (Move) Line Command
M—Move Lines
182 OS/390 V2R10.0 ISPF Edit and Edit Macros
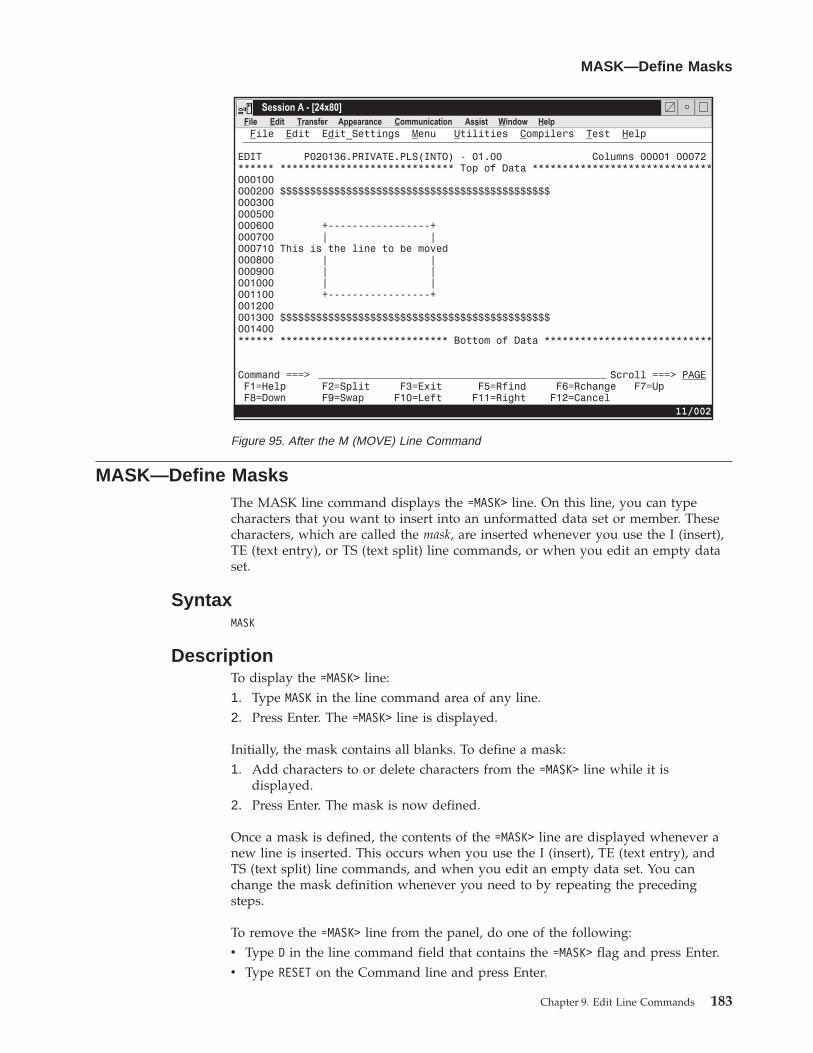
MASK—Define MasksThe MASK line command displays the =MASK> line. On this line, you can typecharacters that you want to insert into an unformatted data set or member. Thesecharacters, which are called the mask, are inserted whenever you use the I (insert),TE (text entry), or TS (text split) line commands, or when you edit an empty dataset.
SyntaxMASK
DescriptionTo display the =MASK> line:1. Type MASK in the line command area of any line.2. Press Enter. The =MASK> line is displayed.
Initially, the mask contains all blanks. To define a mask:1. Add characters to or delete characters from the =MASK> line while it is
displayed.2. Press Enter. The mask is now defined.
Once a mask is defined, the contents of the =MASK> line are displayed whenever anew line is inserted. This occurs when you use the I (insert), TE (text entry), andTS (text split) line commands, and when you edit an empty data set. You canchange the mask definition whenever you need to by repeating the precedingsteps.
To remove the =MASK> line from the panel, do one of the following:v Type D in the line command field that contains the =MASK> flag and press Enter.v Type RESET on the Command line and press Enter.
Figure 95. After the M (MOVE) Line Command
MASK—Define Masks
Chapter 9. Edit Line Commands 183
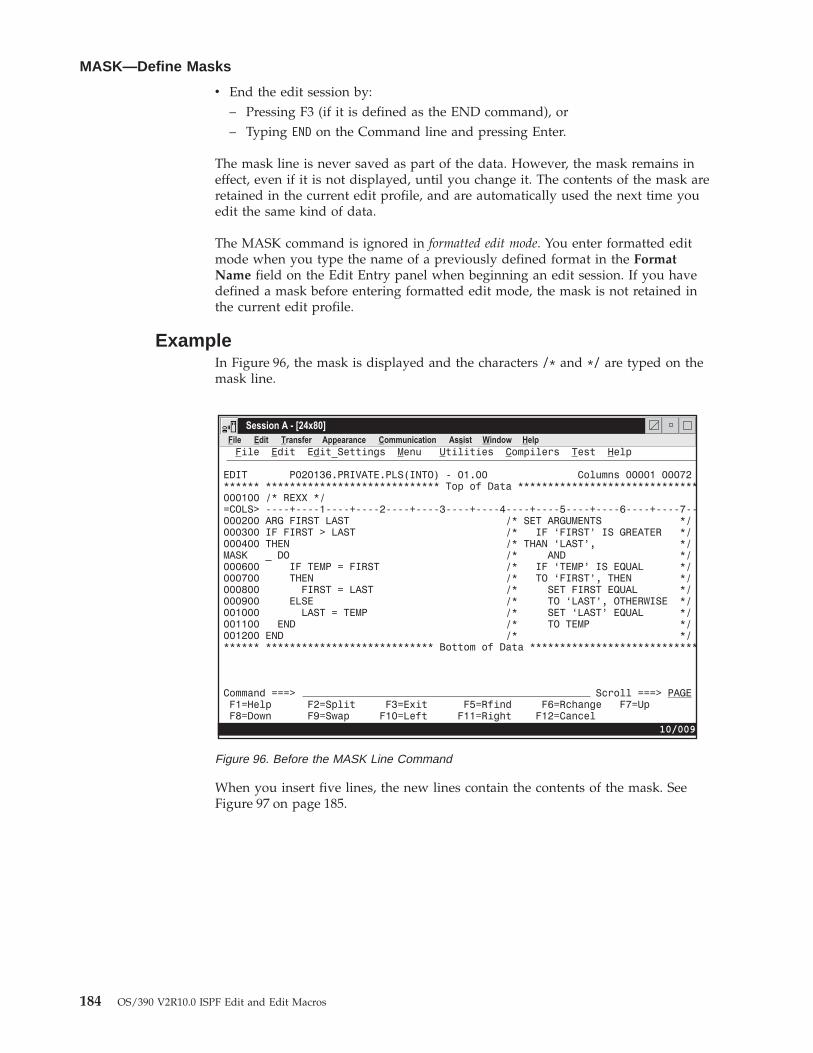
v End the edit session by:– Pressing F3 (if it is defined as the END command), or– Typing END on the Command line and pressing Enter.
The mask line is never saved as part of the data. However, the mask remains ineffect, even if it is not displayed, until you change it. The contents of the mask areretained in the current edit profile, and are automatically used the next time youedit the same kind of data.
The MASK command is ignored in formatted edit mode. You enter formatted editmode when you type the name of a previously defined format in the FormatName field on the Edit Entry panel when beginning an edit session. If you havedefined a mask before entering formatted edit mode, the mask is not retained inthe current edit profile.
ExampleIn Figure 96, the mask is displayed and the characters /* and */ are typed on themask line.
When you insert five lines, the new lines contain the contents of the mask. SeeFigure 97 on page 185.
Figure 96. Before the MASK Line Command
MASK—Define Masks
184 OS/390 V2R10.0 ISPF Edit and Edit Macros
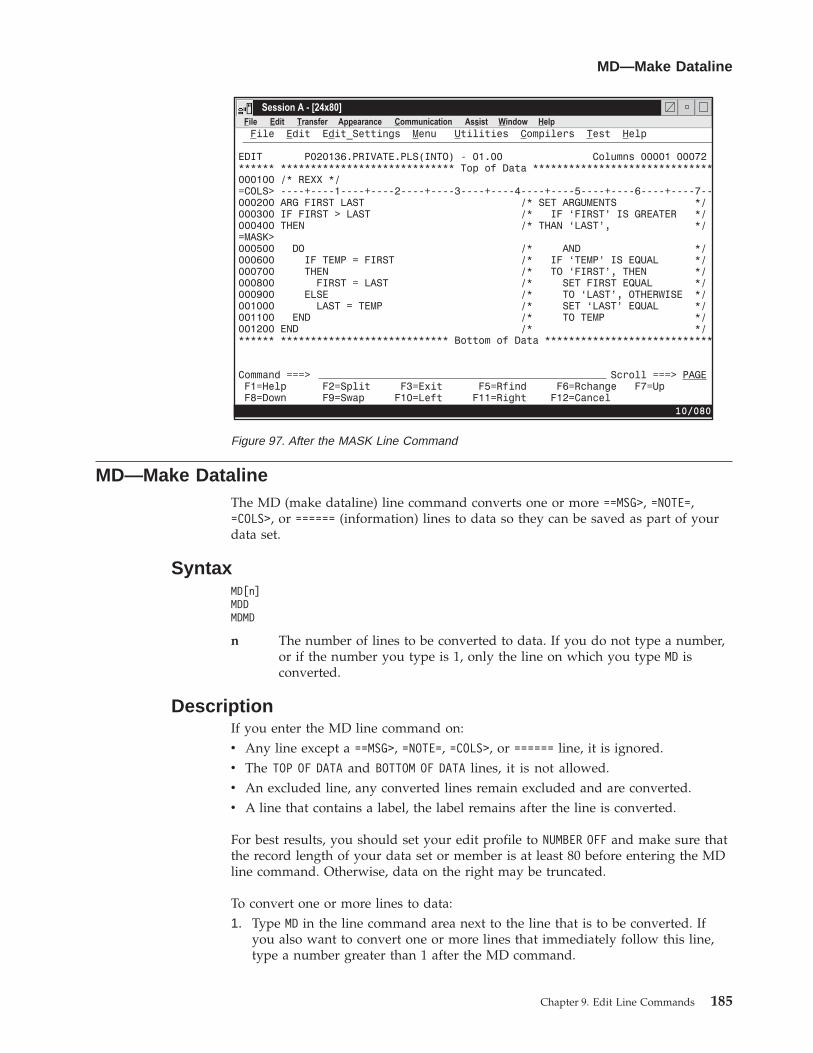
MD—Make DatalineThe MD (make dataline) line command converts one or more ==MSG>, =NOTE=,=COLS>, or ====== (information) lines to data so they can be saved as part of yourdata set.
SyntaxMD[n]MDDMDMD
n The number of lines to be converted to data. If you do not type a number,or if the number you type is 1, only the line on which you type MD isconverted.
DescriptionIf you enter the MD line command on:v Any line except a ==MSG>, =NOTE=, =COLS>, or ====== line, it is ignored.v The TOP OF DATA and BOTTOM OF DATA lines, it is not allowed.v An excluded line, any converted lines remain excluded and are converted.v A line that contains a label, the label remains after the line is converted.
For best results, you should set your edit profile to NUMBER OFF and make sure thatthe record length of your data set or member is at least 80 before entering the MDline command. Otherwise, data on the right may be truncated.
To convert one or more lines to data:1. Type MD in the line command area next to the line that is to be converted. If
you also want to convert one or more lines that immediately follow this line,type a number greater than 1 after the MD command.
Figure 97. After the MASK Line Command
MD—Make Dataline
Chapter 9. Edit Line Commands 185
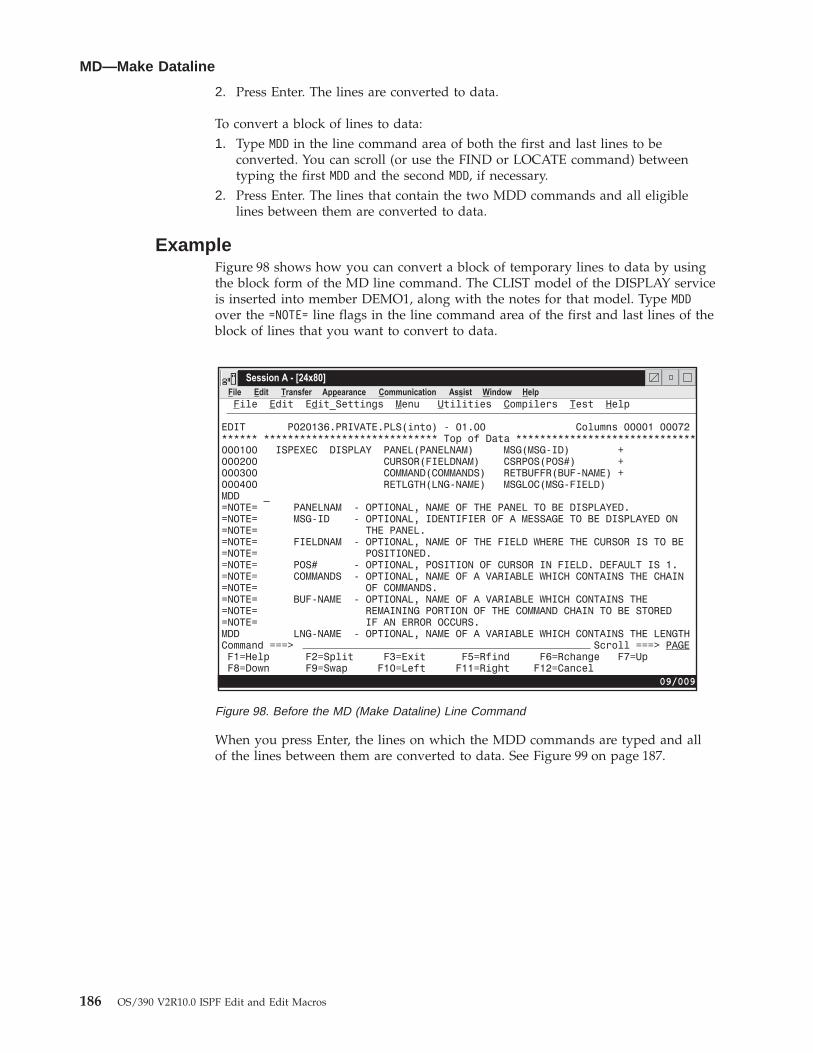
2. Press Enter. The lines are converted to data.
To convert a block of lines to data:1. Type MDD in the line command area of both the first and last lines to be
converted. You can scroll (or use the FIND or LOCATE command) betweentyping the first MDD and the second MDD, if necessary.
2. Press Enter. The lines that contain the two MDD commands and all eligiblelines between them are converted to data.
ExampleFigure 98 shows how you can convert a block of temporary lines to data by usingthe block form of the MD line command. The CLIST model of the DISPLAY serviceis inserted into member DEMO1, along with the notes for that model. Type MDDover the =NOTE= line flags in the line command area of the first and last lines of theblock of lines that you want to convert to data.
When you press Enter, the lines on which the MDD commands are typed and allof the lines between them are converted to data. See Figure 99 on page 187.
Figure 98. Before the MD (Make Dataline) Line Command
MD—Make Dataline
186 OS/390 V2R10.0 ISPF Edit and Edit Macros
O—Overlay LinesThe O (overlay) line command specifies the destination of data that is to be copiedor moved by the C (copy) or M (move) line commands. The data that is copied ormoved overlays blanks in an existing line of data. This allows you to rearrange asingle-column list of items into multiple column, or tabular, format.
SyntaxO[n]OO
n The number of lines to be overlaid. If you do not type a number, or if thenumber you type is 1, only one line is overlaid.
DescriptionTo overlay one or more lines:1. Type either M or C in the line command area of the line that is to be moved or
copied.2. Type O in the line command area of the line that the moved or copied line is to
overlay. You can type a number after the O line command to specify thenumber of times that the M or C line command is to be performed.
3. Press Enter. The data being moved or copied overlays the specified line orlines.
To overlay a block of lines:1. Type either MM or CC in the line command area of the first and last lines of a
block of lines that is to be moved or copied. You can scroll (or use FIND orLOCATE) between typing the first command and the second command, ifnecessary.
Figure 99. After the MD (Make Dataline) Line Command
O—Overlay Lines
Chapter 9. Edit Line Commands 187

2. Type OO in the line command area of the first and last lines that the block oflines being moved or copied is to overlay. Again, you can scroll (or use FINDor LOCATE) between typing the first OO and the second OO, if necessary.
3. Press Enter. The lines that contain the two CC or MM commands and all of thelines between them overlay the lines that contain the two OO commands andall of the lines between them.
Only blank characters in the lines specified with O or OO are overlaid withcorresponding characters from the source lines. Characters that are not blank arenot overlaid. The overlap affects only those characters within the current columnboundaries.
The number of source and receiving lines need not be the same. If there are morereceiving lines, the source lines are repeated until the receiving lines are gone. Ifthere are more source lines than receiving lines, the extra source lines are ignored.The overlay operation involves only data lines. Special lines such as MASK, TABS,BNDS, and COLS are ignored as either source or receiving lines.
Note: There is no special support for DBCS data handling. You are responsible forDBCS data integrity when overlaying lines.
Two other line commands that allow you to specify a destination are the A (after)command and the B (before) command. See “A—Specify an “After” Destination”on page 163 and “B—Specify a “Before” Destination” on page 166 for more
information.
ExampleFigure 100 illustrates the O (overlay) line command. Suppose you were editing alist in a single left-adjusted column and wanted to place portions of the listside-by-side. First, using the ) (column shift right) command, shift a portion of thelist the appropriate amount to the right to overlay in a multiple column format.Type MM in the line command area to mark the beginning and end of the block oflines you want to move. Then type OO in the line command area to mark thedestination of the lines you want to move.
O—Overlay Lines
188 OS/390 V2R10.0 ISPF Edit and Edit Macros
When you press Enter, the editor overlays the lines you marked to move on thedestination block. See Figure 101.
R—Repeat LinesThe R (repeat) line command repeats one or more lines in your data set or memberimmediately after the line on which the R command is entered.
Figure 100. Before the O (Overlay) Line Command
Figure 101. After the O (Overlay) Line Command
O—Overlay Lines
Chapter 9. Edit Line Commands 189
SyntaxR[n]RR[n]
n The number of lines to be repeated. If you do not type a number, or thenumber you type is 1, only the line on which you type R is repeated.
DescriptionTo repeat one or more lines:1. Type R in the line command area of the line that is to be repeated. If you want
to repeat the line more than once, type a number that is greater than 1immediately after the R command.
2. Press Enter. The editor inserts a duplicate copy or copies of the lineimmediately after the line that contains the R command.
To repeat a block of lines:1. Type RR in the line command area of both the first and last lines to be repeated.
You can scroll (or use FIND or LOCATE) between typing the first RR and thesecond RR, if necessary.
2. Press Enter. The lines that contain the two RR commands and all of the linesbetween them are repeated immediately after the line that contains the secondRR command.
Example
When you press Enter, the editor repeats line 000400 five times. See Figure 103 onpage 191.
Figure 102. Before the R (repeat) Line Command
R—Repeat Lines
190 OS/390 V2R10.0 ISPF Edit and Edit Macros
S—Show LinesThe S (show line) line command causes one or more lines in a block of excludedlines to be redisplayed. The redisplayed lines have the leftmost indentation levels;they contain the fewest leading blanks. See “Redisplaying Excluded Lines” onpage 64 for more information about redisplaying excluding lines.
SyntaxS[n]
n The number of lines to be redisplayed. If there are only 2 excluded lines,and you do not type a number, or if the number you type is 1, both linesare redisplayed. If more than 2 lines are excluded, only one line isredisplayed if you do not type a number, or if the number you type is 1.
DescriptionTo redisplay a line or lines of a block of excluded lines:1. Type S in the line command area next to the dashed line that shows where a
line or lines has been excluded. The message in the dashed line tells you howmany lines are excluded.If you want to redisplay more than one line, type a number greater than 1 afterthe S command. If you type S3, for example, the three lines with the leftmostindentation level are displayed again. If more than three lines exist at thisindentation level, only the first three are displayed.
2. Press Enter. The line or lines with the fewest leading blanks are redisplayed.
ExampleFigure 104 shows how to redisplay a member’s excluded lines. To redisplay fourlines, type S4 in the line command area.
Figure 103. After the R (Repeat) Line Command
S—Show Lines
Chapter 9. Edit Line Commands 191
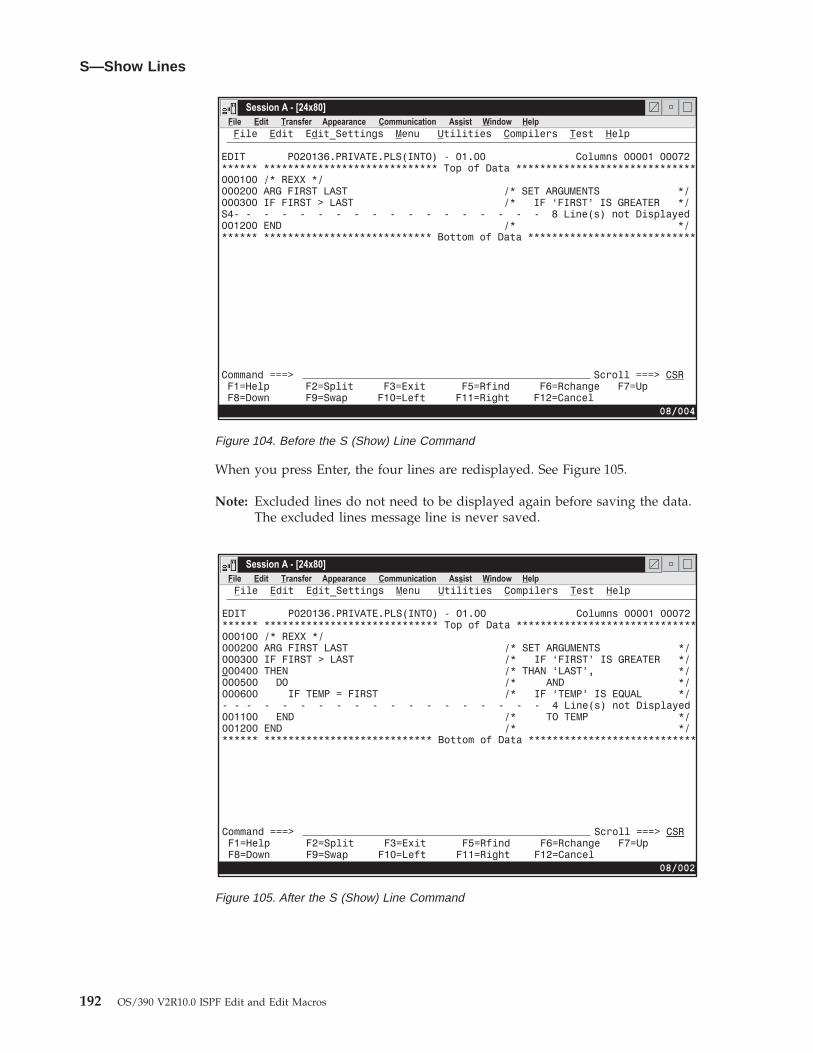
When you press Enter, the four lines are redisplayed. See Figure 105.
Note: Excluded lines do not need to be displayed again before saving the data.The excluded lines message line is never saved.
Figure 104. Before the S (Show) Line Command
Figure 105. After the S (Show) Line Command
S—Show Lines
192 OS/390 V2R10.0 ISPF Edit and Edit Macros
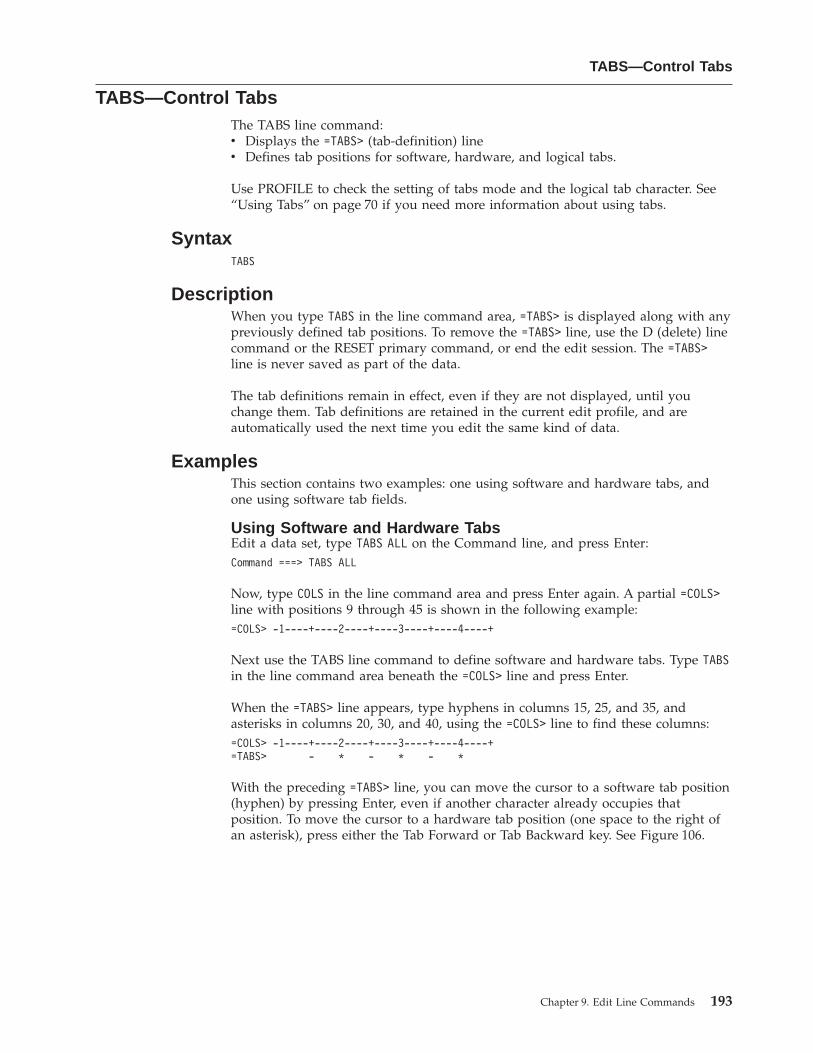
TABS—Control TabsThe TABS line command:v Displays the =TABS> (tab-definition) linev Defines tab positions for software, hardware, and logical tabs.
Use PROFILE to check the setting of tabs mode and the logical tab character. See“Using Tabs” on page 70 if you need more information about using tabs.
SyntaxTABS
DescriptionWhen you type TABS in the line command area, =TABS> is displayed along with anypreviously defined tab positions. To remove the =TABS> line, use the D (delete) linecommand or the RESET primary command, or end the edit session. The =TABS>line is never saved as part of the data.
The tab definitions remain in effect, even if they are not displayed, until youchange them. Tab definitions are retained in the current edit profile, and areautomatically used the next time you edit the same kind of data.
ExamplesThis section contains two examples: one using software and hardware tabs, andone using software tab fields.
Using Software and Hardware TabsEdit a data set, type TABS ALL on the Command line, and press Enter:Command ===> TABS ALL
Now, type COLS in the line command area and press Enter again. A partial =COLS>line with positions 9 through 45 is shown in the following example:=COLS> -1----+----2----+----3----+----4----+
Next use the TABS line command to define software and hardware tabs. Type TABSin the line command area beneath the =COLS> line and press Enter.
When the =TABS> line appears, type hyphens in columns 15, 25, and 35, andasterisks in columns 20, 30, and 40, using the =COLS> line to find these columns:=COLS> -1----+----2----+----3----+----4----+=TABS> - * - * - *
With the preceding =TABS> line, you can move the cursor to a software tab position(hyphen) by pressing Enter, even if another character already occupies thatposition. To move the cursor to a hardware tab position (one space to the right ofan asterisk), press either the Tab Forward or Tab Backward key. See Figure 106.
TABS—Control Tabs
Chapter 9. Edit Line Commands 193
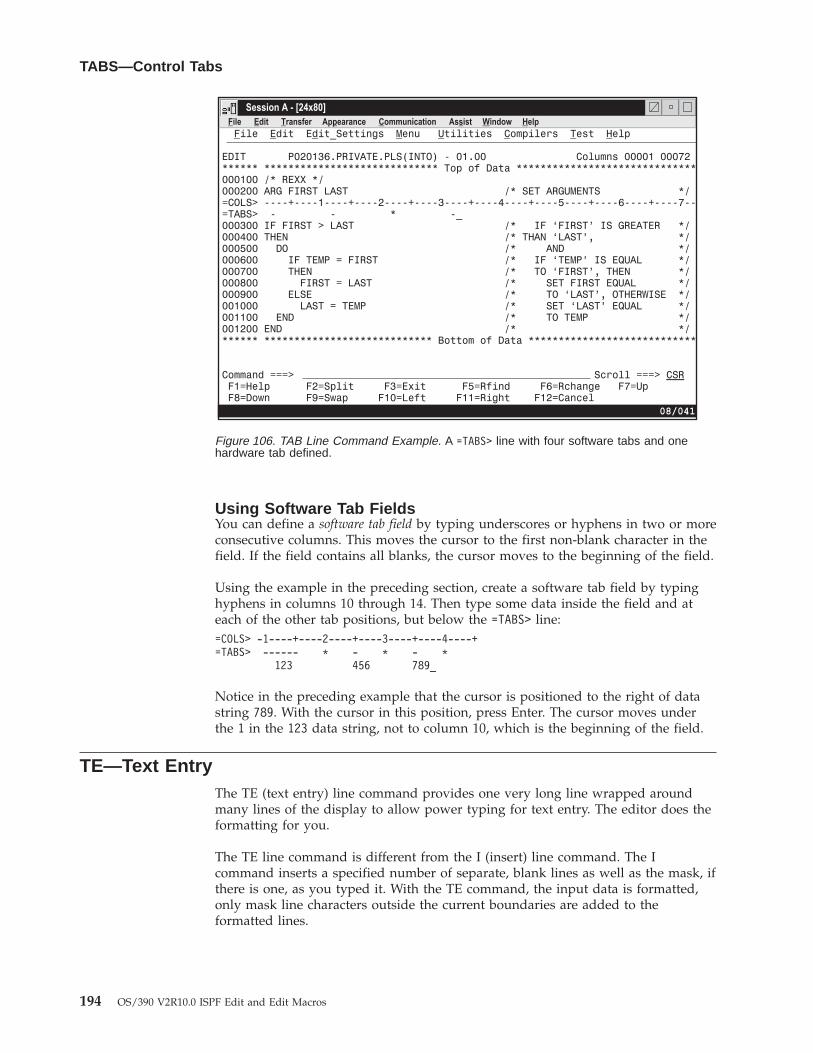
Using Software Tab FieldsYou can define a software tab field by typing underscores or hyphens in two or moreconsecutive columns. This moves the cursor to the first non-blank character in thefield. If the field contains all blanks, the cursor moves to the beginning of the field.
Using the example in the preceding section, create a software tab field by typinghyphens in columns 10 through 14. Then type some data inside the field and ateach of the other tab positions, but below the =TABS> line:=COLS> -1----+----2----+----3----+----4----+=TABS> ------ * - * - *
123 456 789_
Notice in the preceding example that the cursor is positioned to the right of datastring 789. With the cursor in this position, press Enter. The cursor moves underthe 1 in the 123 data string, not to column 10, which is the beginning of the field.
TE—Text EntryThe TE (text entry) line command provides one very long line wrapped aroundmany lines of the display to allow power typing for text entry. The editor does theformatting for you.
The TE line command is different from the I (insert) line command. The Icommand inserts a specified number of separate, blank lines as well as the mask, ifthere is one, as you typed it. With the TE command, the input data is formatted,only mask line characters outside the current boundaries are added to theformatted lines.
Figure 106. TAB Line Command Example. A =TABS> line with four software tabs and onehardware tab defined.
TABS—Control Tabs
194 OS/390 V2R10.0 ISPF Edit and Edit Macros
SyntaxTE[n]
n The number of blank lines to be added. If you do not type a number, thedisplay is filled with blanks from the line following the TE to the bottomof the screen.
DescriptionBefore you enter text entry mode, consider the following:v If you are going to be typing text in paragraph form, make sure caps mode is
off. Otherwise, when you press Enter, your text changes to all caps.v You may want to turn off number mode to prevent sequence numbers from
writing over any of your text.v Make sure the bounds setting is where you want it so that the text will flow
correctly when you end text entry mode.
To enter text entry mode:1. Type TE in the line command area. If you want to specify several blank lines,
type a number greater than 1 immediately after the TE command. If thenumber that you type is greater than the number of lines remaining on thedisplay, the vertical bar that shows where you will run out of room is notdisplayed and the keyboard does not lock at the last character position on thedisplay. You can scroll down to bring the additional blank text entry space intoview.
2. Press Enter. The editor inserts a single continuous blank area for the specifiednumber of lines or to the bottom of the display.
To begin a new paragraph:1. Use the return (Enter), cursor movement, or Tab keys to advance the cursor
enough spaces to leave one blank line on the display.
If there are insufficient blank spaces on the display, the keyboard locks when youtry to type beyond the last character position. A vertical bar (|) is displayed abovethe cursor at the locked position.
To generate more blank spaces:1. Press the Reset key to unlock the keyboard.2. Press Enter.
To end text entry mode:1. Press Enter. The data is flowed together into a paragraph and any embedded
blanks are preserved. The left and right sides of the paragraph are determinedby the current bounds.
See “Word Processing” on page 67 and “Entering Text (Power Typing)” on page 69if you need more information.
ExampleFigure 107 shows how the TE (text entry) command allows you to use powertyping and word wrap to input text. The edit profile is set to NUMBER OFF and CAPSOFF. Also, the left bound is set to 1 and the right bound is set to 72. A new data set
TE—Text Entry
Chapter 9. Edit Line Commands 195
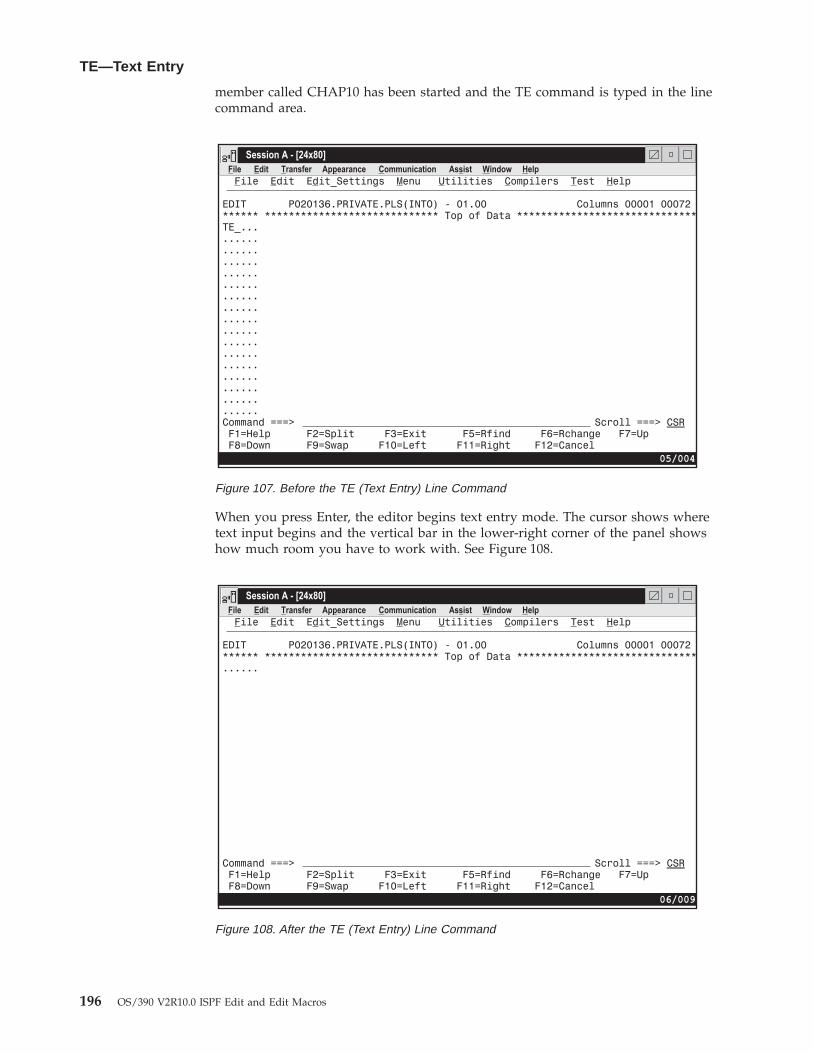
member called CHAP10 has been started and the TE command is typed in the linecommand area.
When you press Enter, the editor begins text entry mode. The cursor shows wheretext input begins and the vertical bar in the lower-right corner of the panel showshow much room you have to work with. See Figure 108.
Figure 107. Before the TE (Text Entry) Line Command
Figure 108. After the TE (Text Entry) Line Command
TE—Text Entry
196 OS/390 V2R10.0 ISPF Edit and Edit Macros
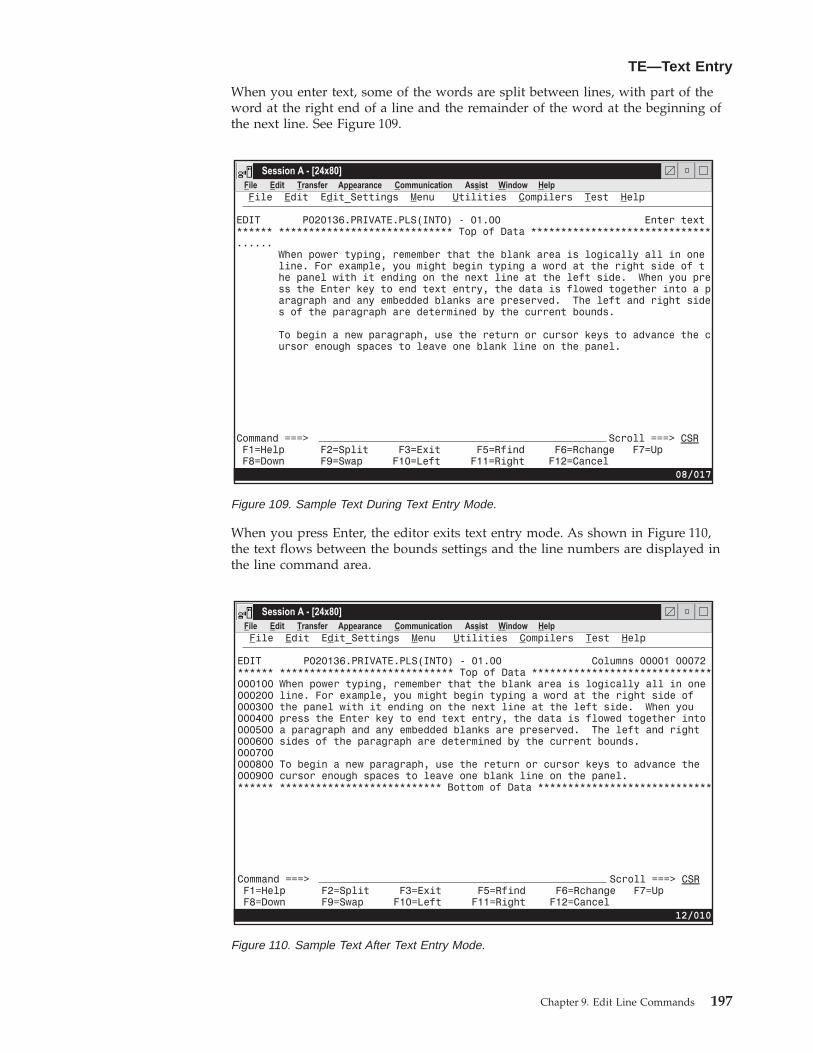
When you enter text, some of the words are split between lines, with part of theword at the right end of a line and the remainder of the word at the beginning ofthe next line. See Figure 109.
When you press Enter, the editor exits text entry mode. As shown in Figure 110,the text flows between the bounds settings and the line numbers are displayed inthe line command area.
Figure 109. Sample Text During Text Entry Mode.
Figure 110. Sample Text After Text Entry Mode.
TE—Text Entry
Chapter 9. Edit Line Commands 197
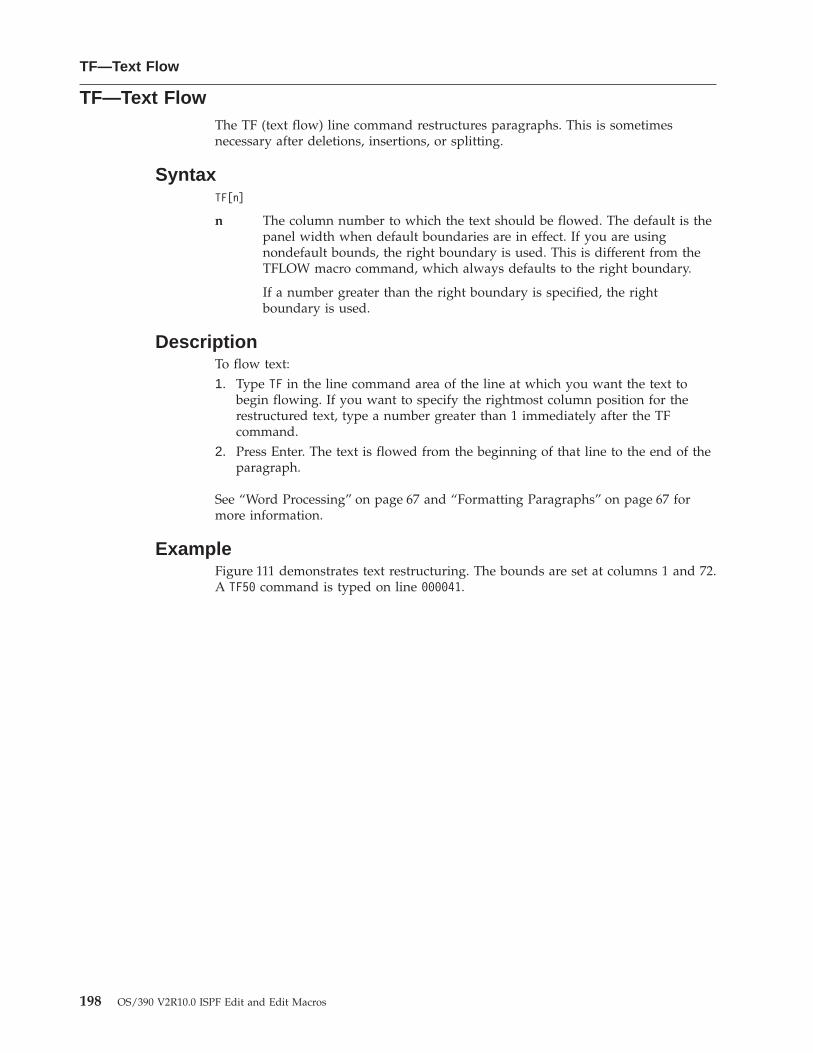
TF—Text FlowThe TF (text flow) line command restructures paragraphs. This is sometimesnecessary after deletions, insertions, or splitting.
SyntaxTF[n]
n The column number to which the text should be flowed. The default is thepanel width when default boundaries are in effect. If you are usingnondefault bounds, the right boundary is used. This is different from theTFLOW macro command, which always defaults to the right boundary.
If a number greater than the right boundary is specified, the rightboundary is used.
DescriptionTo flow text:1. Type TF in the line command area of the line at which you want the text to
begin flowing. If you want to specify the rightmost column position for therestructured text, type a number greater than 1 immediately after the TFcommand.
2. Press Enter. The text is flowed from the beginning of that line to the end of theparagraph.
See “Word Processing” on page 67 and “Formatting Paragraphs” on page 67 formore information.
ExampleFigure 111 demonstrates text restructuring. The bounds are set at columns 1 and 72.A TF50 command is typed on line 000041.
TF—Text Flow
198 OS/390 V2R10.0 ISPF Edit and Edit Macros
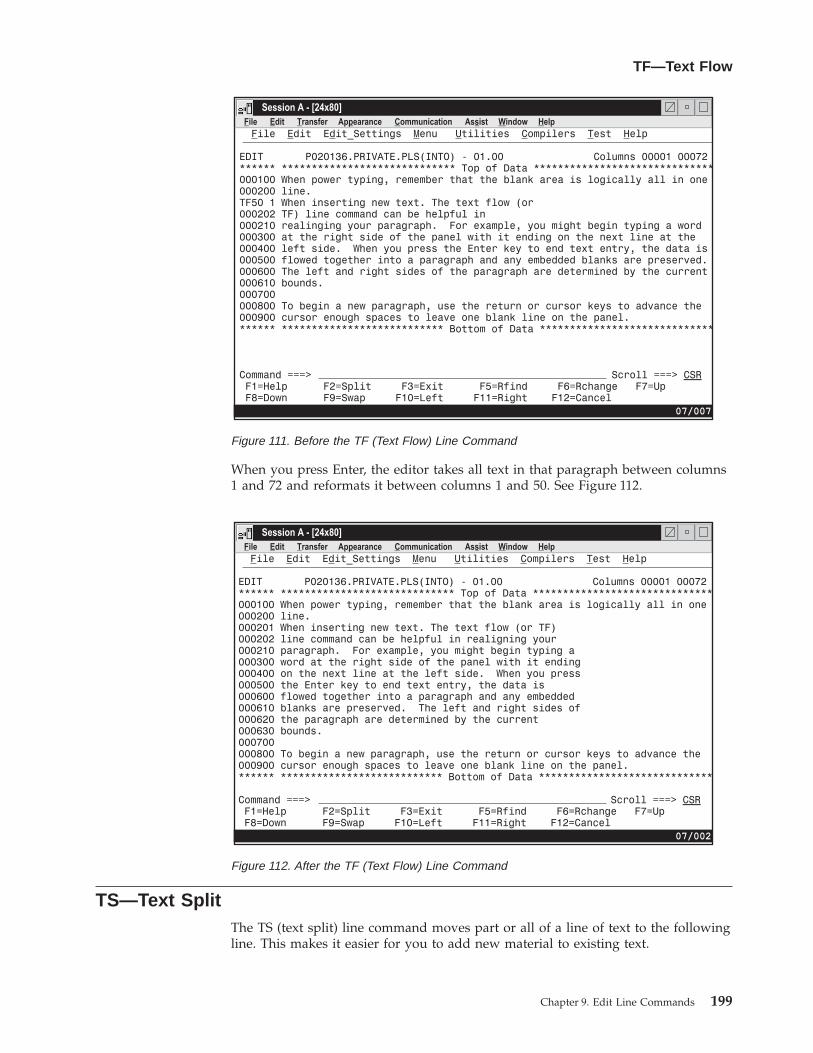
When you press Enter, the editor takes all text in that paragraph between columns1 and 72 and reformats it between columns 1 and 50. See Figure 112.
TS—Text SplitThe TS (text split) line command moves part or all of a line of text to the followingline. This makes it easier for you to add new material to existing text.
Figure 111. Before the TF (Text Flow) Line Command
Figure 112. After the TF (Text Flow) Line Command
TF—Text Flow
Chapter 9. Edit Line Commands 199
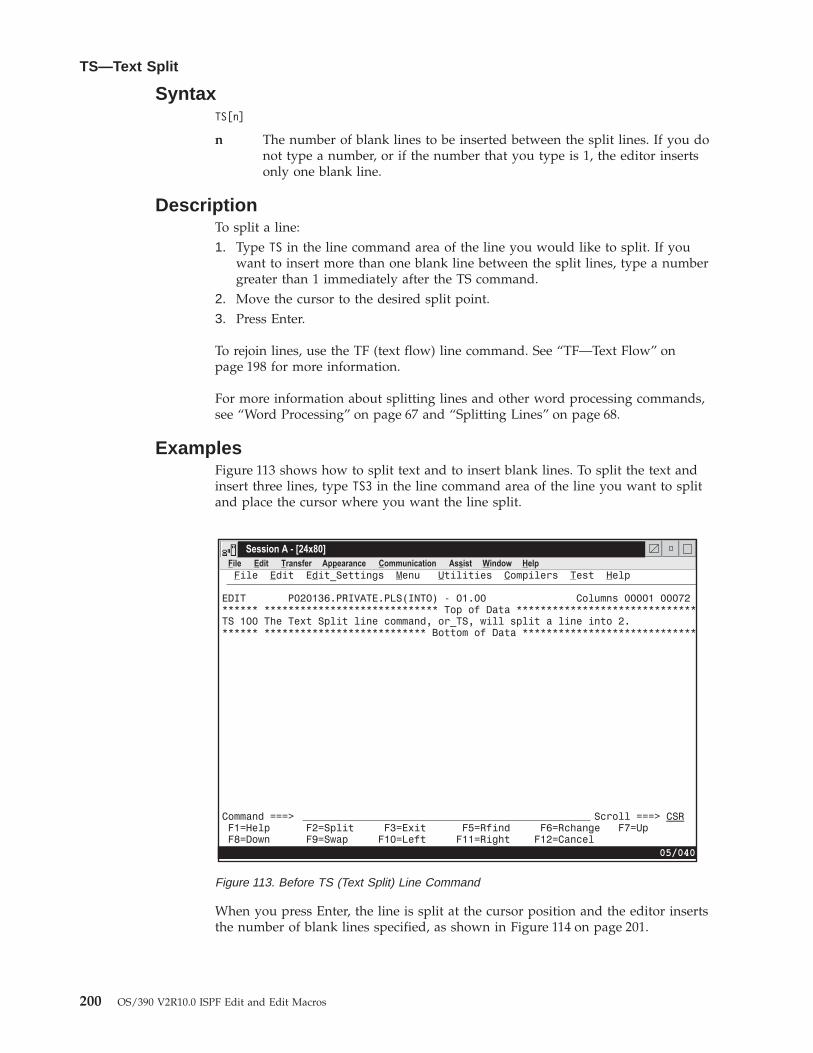
SyntaxTS[n]
n The number of blank lines to be inserted between the split lines. If you donot type a number, or if the number that you type is 1, the editor insertsonly one blank line.
DescriptionTo split a line:1. Type TS in the line command area of the line you would like to split. If you
want to insert more than one blank line between the split lines, type a numbergreater than 1 immediately after the TS command.
2. Move the cursor to the desired split point.3. Press Enter.
To rejoin lines, use the TF (text flow) line command. See “TF—Text Flow” onpage 198 for more information.
For more information about splitting lines and other word processing commands,see “Word Processing” on page 67 and “Splitting Lines” on page 68.
ExamplesFigure 113 shows how to split text and to insert blank lines. To split the text andinsert three lines, type TS3 in the line command area of the line you want to splitand place the cursor where you want the line split.
When you press Enter, the line is split at the cursor position and the editor insertsthe number of blank lines specified, as shown in Figure 114 on page 201.
Figure 113. Before TS (Text Split) Line Command
TS—Text Split
200 OS/390 V2R10.0 ISPF Edit and Edit Macros
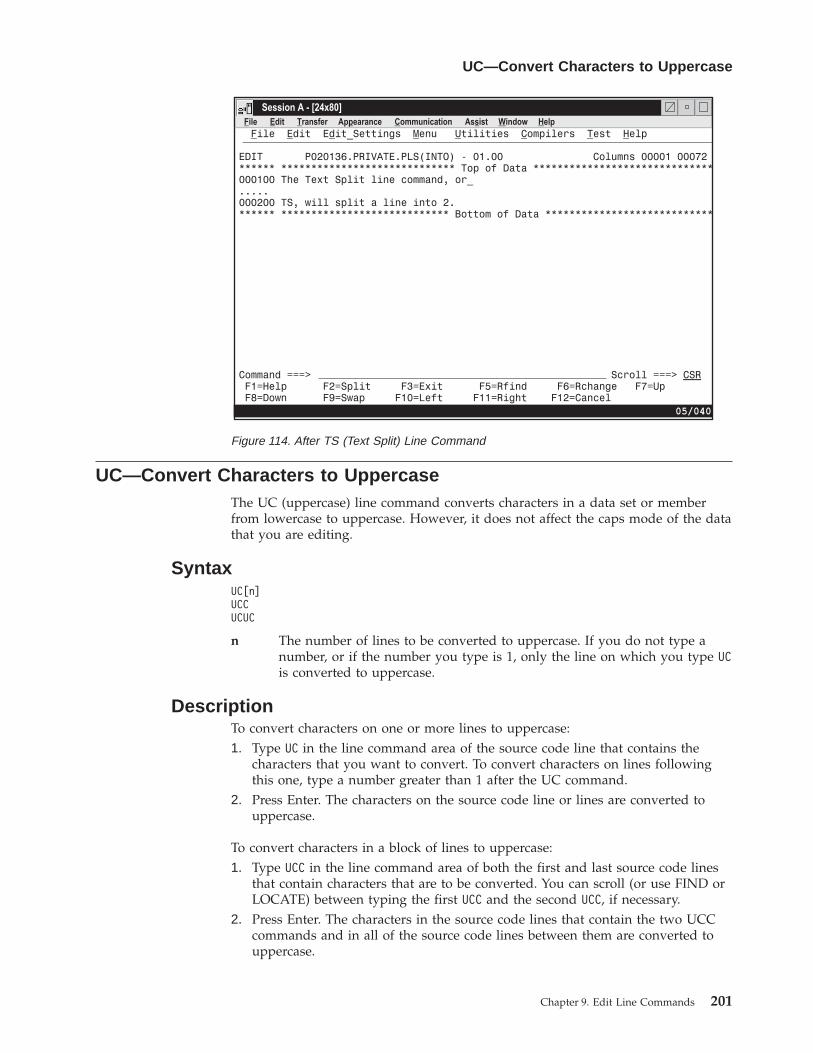
UC—Convert Characters to UppercaseThe UC (uppercase) line command converts characters in a data set or memberfrom lowercase to uppercase. However, it does not affect the caps mode of the datathat you are editing.
SyntaxUC[n]UCCUCUC
n The number of lines to be converted to uppercase. If you do not type anumber, or if the number you type is 1, only the line on which you type UCis converted to uppercase.
DescriptionTo convert characters on one or more lines to uppercase:1. Type UC in the line command area of the source code line that contains the
characters that you want to convert. To convert characters on lines followingthis one, type a number greater than 1 after the UC command.
2. Press Enter. The characters on the source code line or lines are converted touppercase.
To convert characters in a block of lines to uppercase:1. Type UCC in the line command area of both the first and last source code lines
that contain characters that are to be converted. You can scroll (or use FIND orLOCATE) between typing the first UCC and the second UCC, if necessary.
2. Press Enter. The characters in the source code lines that contain the two UCCcommands and in all of the source code lines between them are converted touppercase.
Figure 114. After TS (Text Split) Line Command
UC—Convert Characters to Uppercase
Chapter 9. Edit Line Commands 201
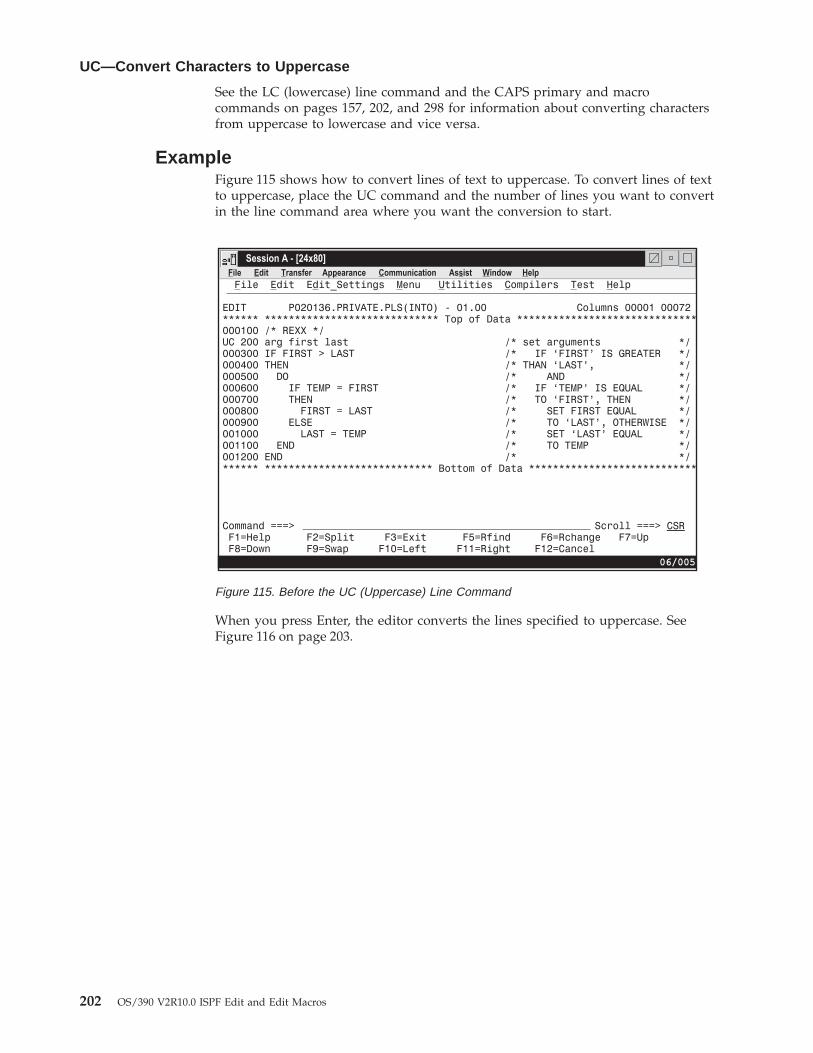
See the LC (lowercase) line command and the CAPS primary and macrocommands on pages 157, 202, and 298 for information about converting charactersfrom uppercase to lowercase and vice versa.
ExampleFigure 115 shows how to convert lines of text to uppercase. To convert lines of textto uppercase, place the UC command and the number of lines you want to convertin the line command area where you want the conversion to start.
When you press Enter, the editor converts the lines specified to uppercase. SeeFigure 116 on page 203.
Figure 115. Before the UC (Uppercase) Line Command
UC—Convert Characters to Uppercase
202 OS/390 V2R10.0 ISPF Edit and Edit Macros
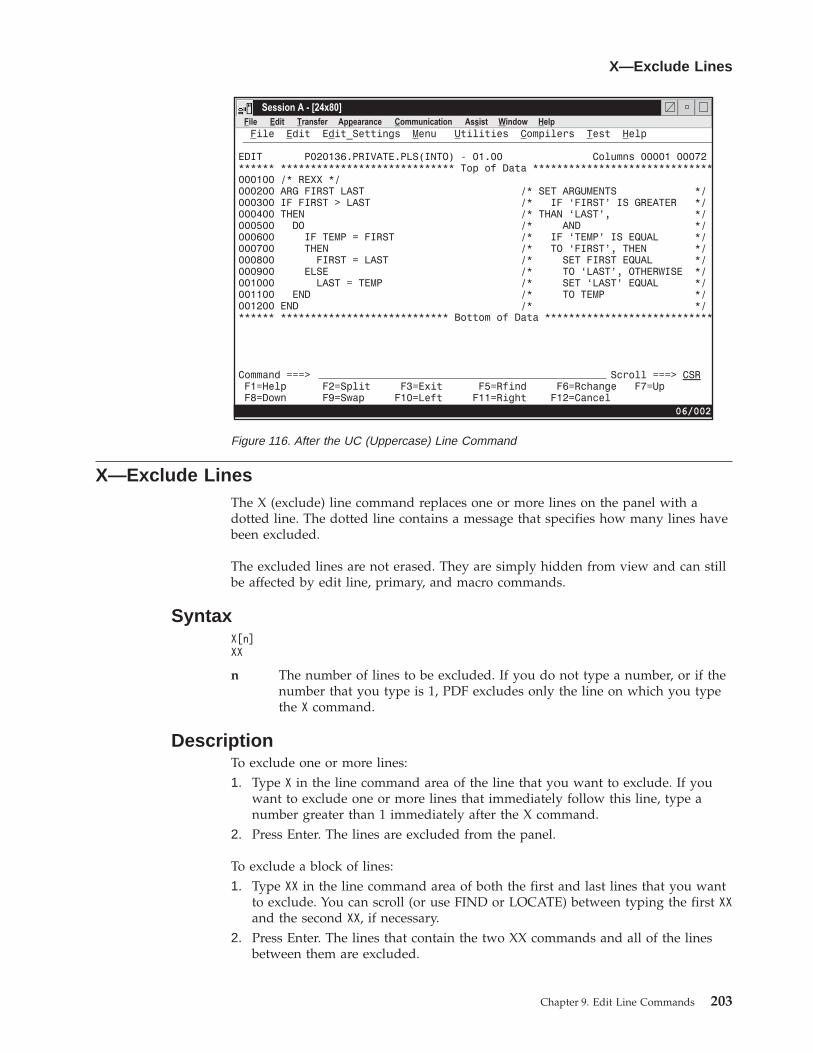
X—Exclude LinesThe X (exclude) line command replaces one or more lines on the panel with adotted line. The dotted line contains a message that specifies how many lines havebeen excluded.
The excluded lines are not erased. They are simply hidden from view and can stillbe affected by edit line, primary, and macro commands.
SyntaxX[n]XX
n The number of lines to be excluded. If you do not type a number, or if thenumber that you type is 1, PDF excludes only the line on which you typethe X command.
DescriptionTo exclude one or more lines:1. Type X in the line command area of the line that you want to exclude. If you
want to exclude one or more lines that immediately follow this line, type anumber greater than 1 immediately after the X command.
2. Press Enter. The lines are excluded from the panel.
To exclude a block of lines:1. Type XX in the line command area of both the first and last lines that you want
to exclude. You can scroll (or use FIND or LOCATE) between typing the first XXand the second XX, if necessary.
2. Press Enter. The lines that contain the two XX commands and all of the linesbetween them are excluded.
Figure 116. After the UC (Uppercase) Line Command
X—Exclude Lines
Chapter 9. Edit Line Commands 203
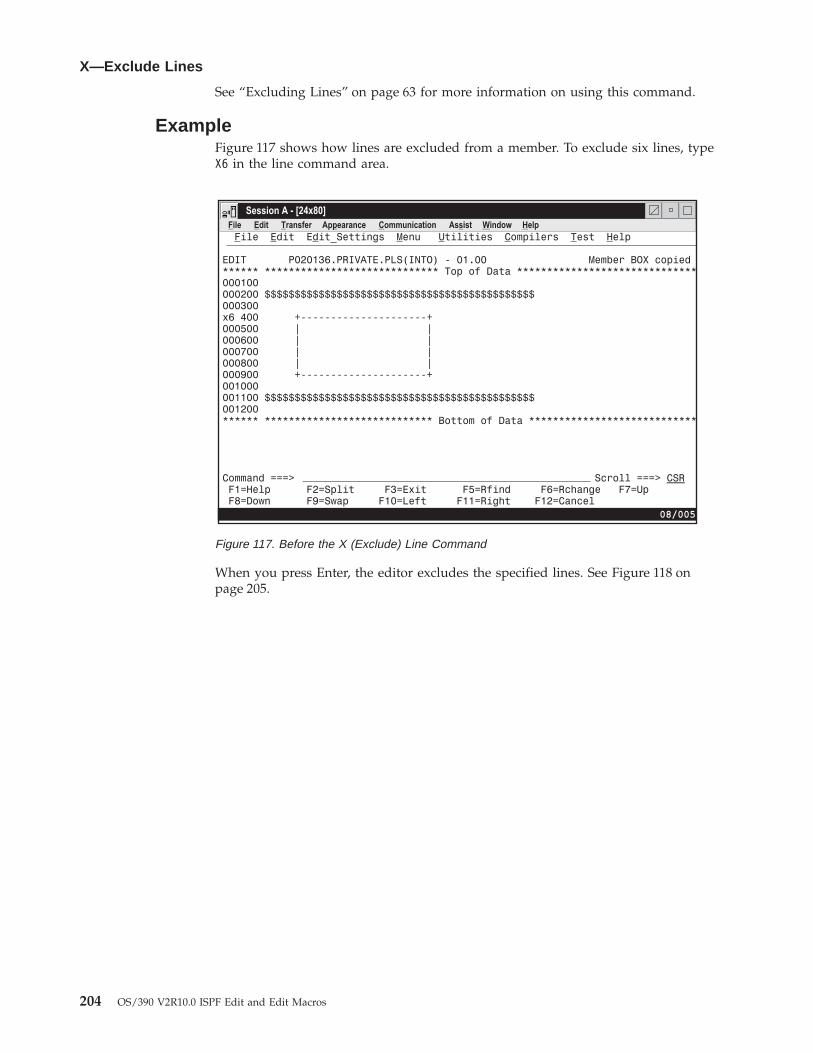
See “Excluding Lines” on page 63 for more information on using this command.
ExampleFigure 117 shows how lines are excluded from a member. To exclude six lines, typeX6 in the line command area.
When you press Enter, the editor excludes the specified lines. See Figure 118 onpage 205.
Figure 117. Before the X (Exclude) Line Command
X—Exclude Lines
204 OS/390 V2R10.0 ISPF Edit and Edit Macros
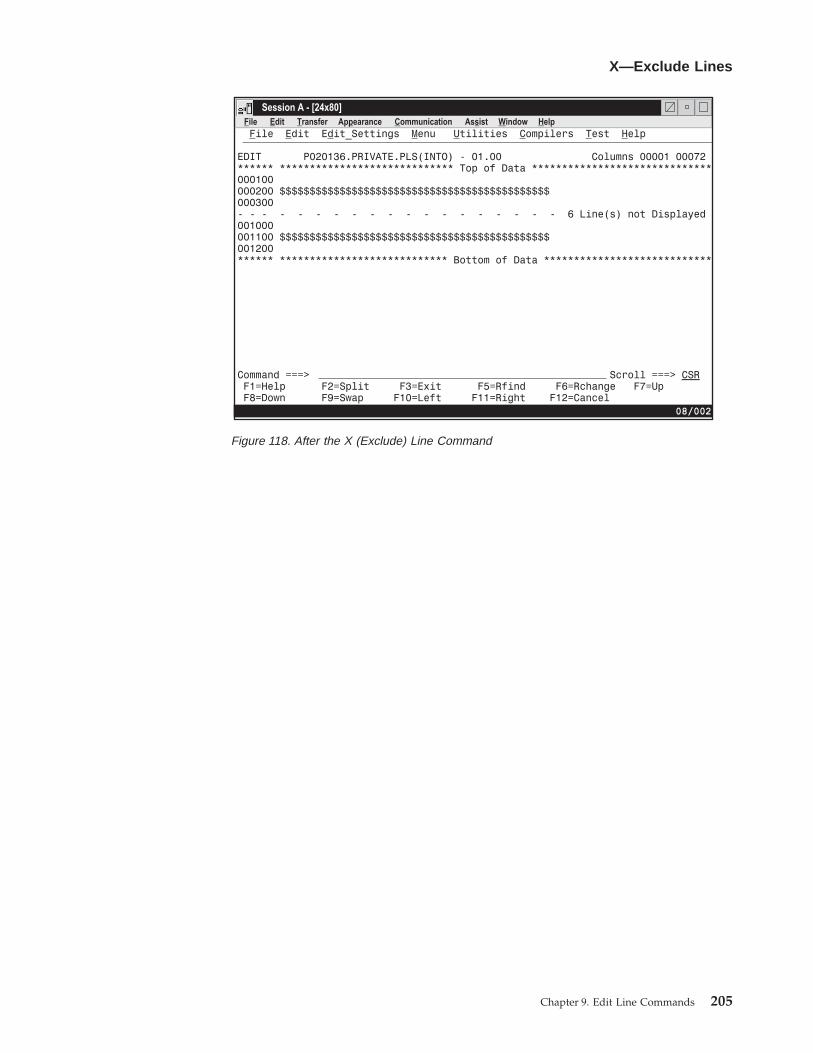
Figure 118. After the X (Exclude) Line Command
X—Exclude Lines
Chapter 9. Edit Line Commands 205

X—Exclude Lines
206 OS/390 V2R10.0 ISPF Edit and Edit Macros
Chapter 10. Edit Primary Commands
Primary commands affect the entire data set being edited, whereas line commandsusually affect only a single line or block of lines. To enter a primary command, doeither of the following:v Type the command on the Command line and press Enterv Press the function key to which the command is assigned.
Most primary commands can be abbreviated. In fact, many can be typed as asingle letter, such as L for LOCATE or F for FIND. For a list of commandabbreviations, see Appendix A. Abbreviations for Commands and Other Values.
Each command description consists of the following information:
SyntaxA syntax diagram for coding the command, including a description of anyrequired or optional operands.
DescriptionA summary of the function and operation of the command. This definitionalso refers to other commands that can be used with this command.
ExampleSample usage of the command.
Edit Primary Command Notation ConventionsThe syntax of the edit primary commands uses the following notation conventions:
UppercaseUppercase commands or operands must be spelled as shown (in eitheruppercase or lowercase).
LowercaseLowercase operands are variables; substitute your own values.
UnderscoreUnderscored operands are the system defaults.
Brackets ([ ])Operands in brackets are optional.
Stacked operandsStacked operands show two or more operands from which you can select.If you do not choose any, the Editor uses the default operand.
Braces ({ })Braces show two or more operands from which you must select one. .
OR (|)The OR (|) symbol shows two or more operands from which you mustselect one.
Edit Primary Command SummaryThe following table summarizes the edit primary commands. See the completedescription of the commands on the referenced page.
© Copyright IBM Corp. 1984, 2000 207
Table 5. Summary of the Primary Commands
Command Syntax topic Description
AUTOLIST [ON ][OFF]
“AUTOLIST—Create a SourceListing Automatically” on
page 211
Controls the automatic printingof data to the ISPF list data set.
AUTONUM [ON ][OFF]
“AUTONUM—Number LinesAutomatically” on page 213
Controls the automaticrenumbering of data when it issaved.
AUTOSAVE [ON ][OFF PROMPT ][OFF NOPROMPT]
“AUTOSAVE—Save DataAutomatically” on page 215
If the data is changed,automatically saves it when youissue an END command.
BOUNDS [left-col right-col] “BOUNDS—Control the EditBoundaries” on page 216
Sets the left and right boundaries.
BROWSE [member] “BROWSE—Browse from withinan Edit Session” on page 218
Browse a data set or memberwithout leaving your current editsession.
BUILTIN cmdname “BUILTIN—Process a Built-InCommand” on page 217
Processes a built-in commandeven if a macro with the samename has been defined.
CANCEL “CANCEL—Cancel EditChanges” on page 218
Ends the edit session withoutsaving any of the changes.
CAPS [ON ][OFF]
“CAPS—Control AutomaticCharacter Conversion” on
page 219
Sets caps mode.
CHANGE string-1 string-2 [range][NEXT ] [CHARS ][X ] [col-1 [col-2]][ALL ][PREFIX] [NX][FIRST] [SUFFIX][LAST ] [WORD ][PREV ]
“CHANGE—Change a DataString” on page 220
Changes a data string intoanother string.
COMPARE {dsname|NEXT|SESSION|*}[{EXCLUDE} {SAVE} {SYSIN}]
“COMPARE—Edit Compare” onpage 222
Compares library member or dataset with the data being edited.
COPY [member] [AFTER label ][(member)][BEFORE label][data set name (member)][linenum range][data set name ]
“COPY—Copy Data” on page 225 Copies a library member or dataset into the data being edited.
CREATE [member] [range](member) [range][data_set(member)] [range][data_set name]
“CREATE—Create Data” onpage 229
Writes the data you are editinginto a library member or data setonly if it does not already exist.
CUT [lptr-range] [DEFAULT | clipboardname][REPLACE] [DISPLAY]
“CUT—Cut and Save Lines” onpage 233
Saves lines to a clipboard for laterretrieval by PASTE command.
DEFINE name {MACRO CMD }{MACRO PGM }{ALIAS name-2}{NOP }{RESET }{DISABLED }
“DEFINE—Define a Name” onpage 234
v Assigns an alias to a macro orbuilt-in command.
v Disables the use of a macro orbuilt-in command.
v Identifies a macro that replacesa built-in command of thesame name.
v Identifies programs that areedit macros.
Edit Primary Command Summary
208 OS/390 V2R10.0 ISPF Edit and Edit Macros
||||||
Table 5. Summary of the Primary Commands (continued)
Command Syntax topic Description
DELETE {ALL X | NX}{range X | NX}{ALL range }
“DELETE—Delete Lines” onpage 236
Deletes lines from the data youare editing.
EDIT [member] “EDIT—Edit from within an EditSession” on page 237
Edits a data set or memberwithout leaving your current editsession (recursive edit).
EDITSETEDSET
“EDITSET—Display the EditorSettings Dialog” on page 239
Causes the Edit Settings panel tobe displayed.
END “END—End the Edit Session” onpage 243
Ends the current edit session.
EXCLUDE string [range] [NEXT ][CHARS ] [col-1 [col-2]]
[ALL ] [PREFIX][FIRST] [SUFFIX][LAST ] [WORD ][PREV ]
“EXCLUDE—Exclude Lines fromthe Display” on page 244
Excludes lines from the panel.
FIND string [range] [NEXT ][CHARS ] [X ] [col-1 [col-2]][ALL ] [PREFIX][NX][FIRST] [SUFFIX][LAST ] [WORD ]
[PREV ]
“FIND—Find a Data String” onpage 245
Finds a data string.
FLIP [label-range] “FLIP—Reverse Exclude Status ofLines” on page 247
Reverses the exclude status of aspecified range of lines in a fileor all the lines in the file.
HEX [ON DATA][ON VERT][OFF ]
“HEX—Display HexadecimalCharacters” on page 249
Specifies whether thehexadecimal form of the datashould be displayed.
HILITE [ON ] [AUTO ][RESET][PAREN][FIND][CURSOR][SEARCH][DISABLED][OFF ] [DEFAULT][LOGIC ] [OTHER ][IFLOGIC] [ASM ][DOLOGIC] [BOOK ][NOLOGIC] [C ]
[COBOL ][DTL ][JCL ][PANEL ][PASCAL ][PLI ][REXX ][SKEL ]
“HILITE—Enhanced EditColoring” on page 252
Highlights, in user-specifiedcolors, numerouslanguage-specific constructs,program logic features, thephrase containing the cursor, andany strings that match theprevious FIND operation or thosethat would be found by anRFIND or RCHANGE request.Can also be used to set defaultcolors for the data area innon-program files and for anycharacters typed since theprevious Enter or function keyentry.
IMACRO {name | NONE} “IMACRO—Specify an InitialMacro” on page 255
Saves the name of an initialmacro in the edit profile.
LEVEL num “LEVEL—Specify theModification Level Number” on
page 256
Sets the modification levelnumber to be kept as part of thePDF library statistics.
Edit Primary Command Summary
Chapter 10. Edit Primary Commands 209
||||||
Table 5. Summary of the Primary Commands (continued)
Command Syntax topic Description
LOCATE {label | line-number}
LOCATE [FIRST] {CHANGE } [range][LAST ] {COMMAND }[NEXT ] {ERROR }[PREV ] {EXCLUDED}
{LABEL }{SPECIAL }
“LOCATE—Locate a Line” onpage 257
Locates a line.
MODEL [model-name [qualifier...]]{AFTER label} [NOTES ]{BEFORE label} [NONOTES]
MODEL [CLASS [class-name]]
“MODEL—Copy a Model intothe Current Data Set” on page 259
Copies a model into the data youare editing or defines the currentmodel class.
MOVE [member] [AFTER label ](member) [BEFORE label ][data set name (member)][data set name]
“MOVE—Move Data” onpage 262
Moves a library member or dataset into the data you are editing.
NONUMBER “NONUMBER—Turn OffNumber Mode” on page 266
Turns off number mode.
NOTES [ON ][OFF]
“NOTES—Display Model Notes”on page 266
Specifies whether the MODELcommand is to display notes.
NULLS [ON STD][ON ALL][OFF ]
“NULLS—Control Null Spaces”on page 267
Controls null spaces.
NUMBER [ON ][STD ] [DISPLAY][OFF] [COBOL ]
[STD COBOL][NOSTD][NOCOBOL][NOSTD NOCOBOL]
“NUMBER—Generate SequenceNumbers” on page 268
Generates sequence numbers.
PACK [ON ][OFF]
“PACK—Compress Data” onpage 269
Specifies whether data is to bestored normally or compressed.
PASTE [clipboardname] [AFTER label ][BEFORE label ] [KEEP]
“PASTE—Move or Copy Linesfrom Clipboard” on page 269
Moves or copies lines from aclipboard into an edit session.
PRESERVE [ON ][OFF]
“PRESERVE - Enable Saving ofTrailing Blanks” on page 270
Specifies whether trailing blanksshould be saved when data isstored.
PROFILE [name] [number]
PROFILE {LOCK | UNLOCK}
PROFILE RESET
“PROFILE—Control and DisplayYour Profile” on page 271
Controls and displays yourprofile.
RCHANGE “RCHANGE—Repeat a Change”on page 274
Repeats the most recentlyprocessed CHANGE command.
RECOVERY [ON | OFF][WARN | NOWARN | SUSP]
“RECOVERY—Control EditRecovery” on page 275
Controls edit recovery.
RENUM [ON ][STD ] [DISPLAY]
[COBOL ][STD COBOL]
“RENUM—Renumber Data SetLines” on page 276
Renumbers data set lines.
Edit Primary Command Summary
210 OS/390 V2R10.0 ISPF Edit and Edit Macros
Table 5. Summary of the Primary Commands (continued)
Command Syntax topic Description
REPLACE [member] [range]REPLACE [data set name (member)] [range]REPLACE [data set (member)] [range]REPLACE [data set] [range]
“REPLACE—Replace Data” onpage 278
Writes the data you are editinginto a library member even if italready exists.
RESET [CHANGE ] [range][COMMAND ][ERROR ][EXCLUDED][FIND ][LABEL ][SPECIAL ]
“RESET—Reset the Data Display”on page 282
Resets the data display.
RFIND “RFIND—Repeat Find” onpage 284
Locates the data string defined bythe most recently processedSEEK, FIND, or CHANGEcommand, or excludes a line thatcontains the data string from theprevious EXCLUDE command.
RMACRO {name | NONE} “RMACRO—Specify a RecoveryMacro” on page 284
Saves the name of a recoverymacro in the edit profile.
SAVE “SAVE—Save the Current Data”on page 284
Saves the current data withoutending the edit session.
SETUNDO [STORAGE | RECOVER ][OFF]
“SETUNDO—Set the UNDOMode” on page 285
Sets the UNDO mode.
SORT [range] [X ][sort-field1 ... sort-field5][NX]
“SORT—Sort Data” on page 287 Puts data in a specified order.
STATS [ON ][OFF]
“STATS—Generate LibraryStatistics” on page 289
Specifies whether PDF librarystatistics are to be created whenthis member is saved.
SUBMIT [range] “SUBMIT—Submit Data for BatchProcessing” on page 289
Submits the data you are editingfor batch processing.
TABS [ON ] [STD][OFF] [ALL]
[tab-character]
“TABS—Define Tabs” on page 290 Defines tab positions forsoftware, hardware, and logicaltabs.
UNDO “UNDO—Reverse Last EditInteraction” on page 292
Removes the data modificationsof a previous interaction.
UNNUMBER “UNNUMBER—RemoveSequence Numbers” on page 294
Removes sequence numbers.
VERSION num “VERSION—Control the VersionNumber” on page 296
Sets the version number to bekept as part of the PDF librarystatistics.
VIEW [member] “VIEW—View from within anEdit Session” on page 297
View a data set or memberwithout leaving your current editsession.
AUTOLIST—Create a Source Listing AutomaticallyThe AUTOLIST primary command sets autolist mode, which controls theautomatic printing of data to the ISPF list data set.
Edit Primary Command Summary
Chapter 10. Edit Primary Commands 211
SyntaxAUTOLIST [ON ]
[OFF]
ON Generates a source listing in the ISPF list data set for eventual printingwhen you end an edit session in which you changed and saved data.
OFF No source listing is generated.
DescriptionAutolist mode is saved in the edit profile. To check the current setting of autolistmode:1. On the Command line, type:
Command ===> PROFILE 3
2. Press Enter. The third line of the edit profile shows the autolist mode setting.
To turn on autolist mode:1. On the Command line, type:
Command ===> AUTOLIST ON
2. Press Enter.
To turn off autolist mode:1. On the Command line, type:
Command ===> AUTOLIST OFF
2. Press Enter.
ExampleThis example shows how to use the AUTOLIST command to save a copy of asource code listing in the ISPF list data set and to print the list data set.1. As you edit a data set, you decide to store a listing of the source code in the
ISPF list data set so that you can print it later. Enter the PROFILE 3 commandto display the first 3 lines of the edit profile. This shows you whether autolistmode is on or off.Command ===> PROFILE 3
2. You can see from the edit profile that autolist mode is off:=PROF> ....PLI (VARIABLE - 72)....RECOVERY ON....NUMBER OFF....................=PROF> ....CAPS OFF....HEX OFF....NULLS OFF....TABS OFF........................=PROF> ....AUTOSAVE ON....AUTONUM OFF....AUTOLIST OFF....STATS ON..............
3. Enter the AUTOLIST ON command to turn on autolist mode:Command ===> AUTOLIST ON
The edit profile changes accordingly:=PROF> ....PLI (VARIABLE - 72)....RECOVERY ON....NUMBER OFF....................=PROF> ....CAPS OFF....HEX OFF....NULLS OFF....TABS OFF........................=PROF> ....AUTOSAVE ON....AUTONUM OFF....AUTOLIST ON....STATS ON...............
4. After editing the data set, save your changes by entering the END command.The changes are saved because, as you can see in the preceding partial editprofile, autosave mode is on.Command ===> END
The PDF component creates an ISPF list data set with the contents of the dataset member that you were editing. The name of the list data set is:
AUTOLIST
212 OS/390 V2R10.0 ISPF Edit and Edit Macros
prefix.user-id.SPFn.LIST
Note: Refer to ISPF User’s Guide for information about list data sets.5. Before leaving the PDF component, use the jump function to go to option 0.2
and check the log/list defaults:Command ===> =0.2
The Log and List Defaults panel shows the current default settings for thehandling of log and list data sets.
6. Because you want to print the list data set, make sure that the PD option isentered in the Process Option field under the List Data Set Default Optionsheading:Process option ===> PD
Note: Also, make sure that the appropriate JCL information is entered at thebottom of the Log and List Defaults panel so that the print job issubmitted.
7. You can now end the session, knowing that the list data set will be printed:Command ===> =X
8. When the session ends, TSO displays a message that says the print job hasbeen submitted.
AUTONUM—Number Lines AutomaticallyThe AUTONUM primary command sets autonum mode, which controls theautomatic renumbering of data when it is saved.
SyntaxAUTONUM [ON ]
[OFF]
ON Turns on automatic renumbering. When number mode is also on, the datais automatically renumbered when it is saved.
OFF Turns off automatic renumbering. Data is not renumbered.
DescriptionWhen number mode is on, the first line of a data set or member is normally linenumber 000100, the second number is 000200, and so forth. However, as lines areinserted and deleted, the increment between line numbers can change.
For example, you might think that when a line is inserted between 000100 and000200, line 000200 would be given the number 000300 and the new line wouldbecome 000200. Instead, the existing lines retain their numbers and the new line isgiven line number 000110.
Therefore, if the original line number increments are important to you, theAUTONUM command renumbers your lines automatically so that the originalincrements are maintained.
Autonum mode is saved in the edit profile. To check the current settings ofnumber mode and autonum mode:1. On the Command line, type:
Command ===> PROFILE 3
AUTOLIST
Chapter 10. Edit Primary Commands 213
2. Press Enter. The first line of the edit profile shows the number mode settingand the third line shows the autonum mode setting.
To turn on autonum mode:1. On the Command line, type:
Command ===> AUTONUM ON
2. Press Enter.
To turn off autonum mode:1. On the Command line, type:
Command ===> AUTONUM OFF
2. Press Enter.
ExampleThis example shows a practical application of AUTONUM command usage. Youhave been editing a data set with number mode on.
Note: If you are editing a data set or member with number mode off and thendecide to turn number mode on, make sure that columns 1 through 6 ofyour data set are blank. Otherwise, the sequence numbers created by theNUMBER command can overlay any of your data in columns 1 through 6.Use either the COLUMN SHIFT or DATA SHIFT line command to indentthe data.
You now want to end the edit session. However, since you had to insert and deletemany lines, your line numbering is no longer uniform. Therefore, you decide touse autonum mode so that the next time you edit this data set the line numberswill be correct.1. First, check the edit profile to see whether autonum mode is already on by
entering the PROFILE 3 command to display the first 3 lines of the edit profile.Command ===> PROFILE 3
2. You can see from the edit profile that autonum mode is off:=PROF> ....PLI (VARIABLE - 72)....RECOVERY ON....NUMBER OFF....................=PROF> ....CAPS OFF....HEX OFF....NULLS OFF....TABS OFF........................=PROF> ....AUTOSAVE ON....AUTONUM OFF....AUTOLIST OFF....STATS ON..............
3. Enter the AUTONUM ON command to turn on autonum mode:Command ===> AUTONUM ON
The edit profile changes accordingly:=PROF> ....PLI (VARIABLE - 72)....RECOVERY ON....NUMBER OFF....................=PROF> ....CAPS OFF....HEX OFF....NULLS OFF....TABS OFF........................=PROF> ....AUTOSAVE ON....AUTONUM ON....AUTOLIST ON....STATS ON................
4. After editing the data set, save your changes by entering the END command.The changes will be saved because, as you can see in the preceding partial editprofile, autosave mode is on.Command ===> END
The PDF component saves the data set that you were editing, along with anychanges. The next time you edit the data set, the line numbers will have theproper increments.
AUTONUM
214 OS/390 V2R10.0 ISPF Edit and Edit Macros
AUTOSAVE—Save Data AutomaticallyThe AUTOSAVE primary command sets autosave mode, which controls whetherchanged data is saved when you enter END.
SyntaxAUTOSAVE [ON ]
[OFF [PROMPT]][OFF NOPROMPT]
ON Turns autosave mode on. When you enter END, any changed data issaved.
OFF PROMPTTurns autosave mode off with the PROMPT operand. You are notified thatchanges have been made and that either the SAVE command (followed byEND) or CANCEL must be used. When you use AUTOSAVE PROMPT byitself, it implies the OFF command.
OFF NOPROMPTTurns autosave mode off with the NOPROMPT operand. You are notnotified and the data is not saved when you issue an END command. ENDbecomes an equivalent to CANCEL. Use the NOPROMPT operand withcaution.
DescriptionData is considered changed if you have operated on it in any way that could causea change. Shifting a blank line or changing a word to the same word does notactually alter the data, but the editor considers this data changed. When you enterSAVE, the editor resets the change status.
Autosave mode, along with the PROMPT operand, is saved in the edit profile. Tocheck the current setting of autosave mode:1. On the Command line, type:
Command ===> PROFILE 3
2. Press Enter. The third line of the edit profile shows the autosave mode setting.
To turn on autosave mode:1. On the Command line, type:
Command ===> AUTOSAVE
Note: This is the equivalent of entering AUTOSAVE ON.2. Press Enter. The next time you enter END, any changes that you made to the
data set or member that you were editing are saved.
To turn off autosave mode:1. On the Command line, type:
Command ===> AUTOSAVE OFF
Note: This is the equivalent of entering AUTOSAVE OFF PROMPT.2. Press Enter. The next time you enter END when a data set or member has been
changed, the editor prompts you to specify whether you want changes to thedata set or member saved (SAVE) or not saved (CANCEL). However, if nochanges have been made to the data set or member, the edit session endswithout a prompt.
AUTOSAVE
Chapter 10. Edit Primary Commands 215
To turn off autosave mode and specify that you do not want to be prompted whendata has changed:1. On the Command line, type:
Command ===> AUTOSAVE OFF NOPROMPT
2. Press Enter. The next time you enter END when a data set or member has beenchanged, the edit session ends without saving your changes, just as if you hadentered CANCEL. You are not prompted to save the changes.
For more information on saving data, see the CANCEL and END primarycommands, and the DATA_CHANGED, CANCEL, and END macro commands.
ExampleThis example shows a practical application of AUTOSAVE usage.1. You have been editing a data set member and now want to end the edit
session. Enter END:Command ===> END
2. The member that you were editing remains with the following message in theupper-right corner:DATA CHANGED-SAVE/CANCEL
This message implies that autosave mode in the edit profile is set to AUTOSAVEOFF PROMPT. You are prompted to enter either SAVE to save your changes, orCANCEL to end the edit session without saving your changes.
You also have the option to change autosave mode in the edit profile toAUTOSAVE ON. By doing so, the next time you enter END, your changes will besaved and the edit session will end.
3. You decide to turn on autosave mode:Command ===> AUTOSAVE ON
4. Then you enter END again to save your changes and end the edit session.Command ===> END
BOUNDS—Control the Edit BoundariesThe BOUNDS primary command sets the left and right boundaries and saves themin the edit profile.
SyntaxBOUNDS [left-col right-col]
left-colThe left boundary column to be set.
right-colThe right boundary column to be set.
You cannot specify the same column for both boundaries. An asterisk (*) can beused to represent the current value of the boundary.
DescriptionThe BOUNDS primary command provides an alternative to setting the boundarieswith the BOUNDS line command or macro command; the effect on the member or
AUTOSAVE
216 OS/390 V2R10.0 ISPF Edit and Edit Macros
data set is the same. However, if you use both the BOUNDS primary commandand the BOUNDS line command in the same interaction, the line commandoverrides the primary command.
To reset the boundaries to the default columns:1. On the Command line, type:
Command ===> BOUNDS
2. Press Enter. The boundaries are reset to the default columns.
See “Edit Boundaries” on page 28 for more information, including tables that showcommands affected by bounds settings and default bounds settings for varioustypes of data sets.
ExamplesTo set the left boundary to 1 and the right boundary to 72, type:Command ===> BOUNDS 1 72
To set the left boundary to 10 and leave the right as is, type:Command ===> BOUNDS 10 *
BUILTIN—Process a Built-In CommandYou can use the BUILTIN primary command with edit macros and the DEFINEcommand to process a built-in edit primary command, even if a macro has beendefined with the same name.
SyntaxBUILTIN cmdname
cmdname The built-in command to be processed.
DescriptionTo process a built-in primary command instead of a command with the same namethat has been defined as an alias:1. On the Command line, type:
Command ===> BUILTIN cmdname
where cmdname is the name of a primary command.2. Press Enter. The edit primary command is processed.
ExampleThis example shows a practical application of BUILTIN command usage.1. You have a macro named MACEND that you have created. You want to run
your MACEND macro instead of the PDF component’s built-in END command.Enter the following:Command ===> DEFINE END ALIAS MACEND
Note: If the END command is issued in your MACEND macro without beingpreceded by the BUILTIN macro command, the MACEND macro wouldbe run again, resulting in a loop.
2. Enter the following to run your MACEND macro:Command ===> END
BOUNDS
Chapter 10. Edit Primary Commands 217
3. To end the edit session without redefining END, use BUILTIN, as follows:Command ===> BUILTIN END
This command issues the PDF component’s built-in END command instead ofyour MACEND macro.
BROWSE—Browse from within an Edit SessionThe BROWSE primary command allows you to browse a sequential data set orpartitioned data set member during your current edit session.
SyntaxBROWSE [member]
memberA member of the ISPF library or other partitioned data set you arecurrently editing. You may enter a member pattern to generate a memberlist.
DescriptionTo browse a data set or member during your current edit session:1. On the Command line, type:
Command ===> BROWSE member
Here, member represents the name of a member of the partitioned data set youare editing. The member operand is optional.
2. Press Enter. If you specified a member name, the current library concatenationsequence finds the member. The member displays for browsing. If you do notspecify a member name, the Browse Command Entry panel, which is similar tothe regular Browse Entry panel, appears. You can enter the name of anysequential or partitioned data set to which you have access. When you pressEnter, the data set or member displays for browsing. The editor suspends yourinitial edit session until the browse session is complete.
3. To exit from the browse session, enter the END command. The current sessionresumes.
ExampleTo browse member YYY of the current library concatenation:1. On the command line, type:
Command ===> BROWSE YYY
2. Press Enter.
CANCEL—Cancel Edit ChangesThe CANCEL primary command ends your edit session without saving any of thechanges you have made.
SyntaxCANCEL
BUILTIN
218 OS/390 V2R10.0 ISPF Edit and Edit Macros
DescriptionCANCEL is especially useful if you have changed the wrong data, or if thechanges themselves are incorrect. To cancel changes to a data set:1. On the Command line, type:
Command ===> CANCEL
2. Press Enter. The edit session ends without saving your changes.
Note: If you issue SAVE and later issue CANCEL, the changes you made beforeissuing SAVE are not canceled.
See the DATA_CHANGED, AUTOSAVE, and END commands for moreinformation about saving data.
CANCEL does not cause automatic recording in the ISPF list data set, regardless ofthe setting of the autolist mode.
ExampleAfter editing the data, you decide that you want the data set the way it was beforeediting. Enter the following:Command ===> CANCEL
The edit session ends with the data set in its original state.
CAPS—Control Automatic Character ConversionThe CAPS primary command sets the caps mode, which controls whetheralphabetic data that you type at the terminal is automatically converted touppercase during the edit session.
SyntaxCAPS [ON ]
[OFF]
ON Turns caps mode on.
OFF Turns caps mode off.
DescriptionThe editor sets the caps mode according to the data in the file retrieved for editing.If caps mode has been on and the data contains lowercase letters, the modeswitches and the editor displays a message indicating the change. Likewise, if capsmode is off and the editor contains all uppercase letters, the mode switches andthe editor displays a message.
Caps mode is saved in the edit profile. To override the automatic setting of capsmode, you can include the CAPS command in an initial macro.
Caps mode is usually on during program development work. When caps mode ison, any alphabetic data that you type, plus any other alphabetic data that alreadyexists on that line, is converted to uppercase when you press Enter or a functionkey.
To set caps mode on:1. On the Command line, type:
CANCEL
Chapter 10. Edit Primary Commands 219
Command ===> CAPS
2. Press Enter. Caps mode is set to on in the edit profile.
Caps mode is usually off when you edit text documentation. When caps mode isset to off, any alphabetic data that you type remains just as you typed it. If youtyped it in uppercase, it stays in uppercase; if you typed it in lowercase, it stays inlowercase. Alphabetic data already typed on a line is not affected. To set capsmode off:1. On the Command line, type:
Command ===> CAPS OFF
2. Press Enter. Caps mode is set to off in the edit profile.
The CAPS command does not apply to DBCS fields in formatted data or to DBCSfields in mixed fields. If you specify CAPS, the DBCS fields remain unchanged.
See the LC (lowercase) and UC (uppercase) line commands and the CAPS macrocommand for more information about changing case.
ExampleThis example shows a practical application of CAPS command usage.1. You are editing a data set that contains all uppercase letters, with caps mode
off. The data you are typing contains both uppercase and lowercase letters, butyou want all of the letters to be uppercase. On the Command line, type:COMMAND ===> CAPS
2. Press Enter.3. Move the cursor back to the line on which you were typing.4. Finish typing the line or type over one or more of the existing letters.5. Press Enter. All of the letters on the line are converted to uppercase.
CHANGE—Change a Data StringThe CHANGE primary command changes one search string into another.
SyntaxCHANGE string-1 string-2 [range] [NEXT ] [CHARS ] [X ] [col-1 [col-2]]
[FIRST] [SUFFIX][LAST ] [WORD ][PREV ]
string-1The search string you want to change.
string-2The string you want to replace string-1.
range Two labels that identify the range of lines the CHANGE command is tosearch.
NEXT Starts at the first position after the current cursor location and searchesahead to find the next occurrence of string-1. NEXT is the default.
ALL Starts at the top of the data and searches ahead to find all occurrences ofstring-1.
FIRST Starts at the top of the data and searches ahead to find the first occurrenceof string-1.
CAPS
220 OS/390 V2R10.0 ISPF Edit and Edit Macros
LAST Starts at the bottom of the data and searches backward to find the lastoccurrence of string-1.
PREV Starts at the current cursor location and searches backward to find theprevious occurrence of string-1.
CHARSLocates string-1 anywhere the characters match. CHARS is the default.
PREFIXLocates string-1 at the beginning of a word.
SUFFIXLocates string-1 at the end of a word.
WORDLocates string-1 when it is delimited on both sides by blanks or othernon-alphanumeric characters.
X Scans only lines that are excluded from the display.
NX Scans only lines that are not excluded from the display.
col-1 and col-2Numbers that identify the columns the CHANGE command is to search.
DescriptionYou can use the CHANGE command with the FIND and EXCLUDE commands tofind a search string, change it, and then exclude the line that contains the stringfrom the panel.
To change the next occurrence of ME to YOU without specifying any otherqualifications:1. On the Command line, type:
Command ===> CHANGE ME YOU
2. Press Enter. This command changes only the next occurrence of the letters ME toYOU. Since no other qualifications were specified, the letters ME can be:v Uppercase or a mixture of uppercase and lowercasev At the beginning of a word (prefix), the end of a word (suffix), or the entire
word (word)v In an excluded line or a nonexcluded linev Anywhere within the current boundaries.
To change the next occurrence of ME to YOU, but only if the letters are uppercase:1. On the Command line, type:
Command ===> CHANGE C'ME' YOU
2. Press Enter. This type of change is called a character string change (note the Cthat precedes the search string) because it changes the next occurrence of theletters ME to YOU only if the letters are found in uppercase. However, since noother qualifications were specified, the change occurs no matter where theletters are found, as outlined in the preceding list.
For more information, including other types of search strings, see “Finding,Seeking, Changing, and Excluding Data” on page 53.
CHANGE
Chapter 10. Edit Primary Commands 221
ExamplesThe following example changes the first plus in the data set to a minus. However,the plus must occur on or between lines labeled .E and .S and it must be the firstcharacter of a word:CHANGE '+' '-' .E .S FIRST PREFIX
The following example changes the last plus in the data set to a minus. However,the plus must occur on or between lines labeled .E and .S; it must be the lastcharacter of a word; and it must be found on an excluded line:CHANGE '+' '-' .E .S LAST SUFFIX X
The following example changes the plus that immediately precedes the cursorposition to a minus. However, the cursor must not be positioned ahead of the lineslabeled .E and .S. Also, the plus must occur on or between the labeled lines; itmust be a stand alone character (not part of any other word); it must be on anonexcluded line; and it must exist within columns 1 and 5:CHANGE '+' '-' .E .S PREV WORD NX 1 5
COMPARE—Edit CompareThe COMPARE command compares the file you are editing with an externalsequential data set or member of a partitioned data set. Lines that exist only in thefile being edited are marked, and lines that exist only in the file being comparedare inserted as information lines in the file being edited. The command operates asa primary command or an edit macro command.
You can use the Delete and Make Data line commands to merge changes betweenfiles that are being compared.
The COMPARE function supports all line lengths, but some SuperC options areignored for line lengths greater than 256 characters long.
When you are editing a cataloged data set, explicit data set names refer tocataloged data sets. However, if you are editing an uncataloged data set, explicitmember names refer to cataloged data sets, but if you specify only a membername, COMPARE searches for the member in the current uncataloged data set. Forexample, if you are editing an uncataloged data set called ″userid.TEMP″, then thecommandCOMPARE TEMP
first looks for member TEMP in the current, uncataloged data set, then looks for acataloged data set named TEMP (TSO prefix rules apply). If it finds data set TEMP,and the data set being edited is a PDS member, then the same named member issearched for in data set TEMP.
Use of COMPARE when editing concatenations that contain uncataloged data setsis not supported and can lead to unpredictable results.
If you have made changes to the data before issuing the COMPARE command, theCOMPARE command uses the current contents of the edit session during thecomparison. Because COMPARE does not require the data to be saved on disk, youcan use the COMPARE command from EDIF, VIIF, or EDIREC sessions. However,COMPARE NEXT and COMPARE SESSION are not supported in EDIF, VIIF, orEDIREC sessions.
CHANGE
222 OS/390 V2R10.0 ISPF Edit and Edit Macros
||||||
|
||||
||
||||||
Command Syntax
no operandThe Edit Compare Settings panel is displayed. This panel enables you tocustomize the comparison by selecting the relevant SuperC options to use.The comparison is always a LINE compare with the options UPDLDEL,NOLISTL, LINECMP, and CKPACKL specified.
The SEQ, NOSEQ, or COBOL keywords are automatically specifieddepending on the NUMBER state in the edit profile. Mixed data can beenabled, and is always assumed to be specified when you are in an editsession with MIXED specified in the profile. Each field in the EditCompare Settings panel has field level help.
Note: When don’t process (DP) options are used, the resulting displayshows DP lines in the current file as unlabeled and does not showDP lines from the comparison file. This can be misleading. Becausecomparisons which ignore parts of the file might show data in onefile and not in the other, use caution when using DP options. Whenyou use options that ignore programming language comments, thedon’t process reformatted lines option is recommended.
dsnameThe name of a member or data set to which the current file is compared.This variable can be specified as a fully qualified data set name (inquotation marks), a partially qualified data set name, or a member name.
If you specify only a member name, it can be preceded by a leftparenthesis symbol. The right parenthesis is allowed but not required. Thecurrent edit session must be of a member of a partitioned data set. Thecurrent edit concatenation is searched for the member to compare.
If you specify only a data set name and the current file is a member of aPDS, then the specified data set is searched for a member of the samename as the member being edited.
NEXT Specifies to do a comparison between the currently edited member and thenext member of the same name found at a higher level of the hierarchy (ornext level of the edit concatenation) than the current member. For example,if the current member is found in the third level of the concatenation, anda like-named member exists at the fourth level, then the third and fourthlevel members are compared. After data is saved in the lowest level,compares are done from that level upward. If you specify dsname, theNEXT keyword cannot be used.
SESSION|*Specifies that you want to compare the changes you have made during theedit session with the copy of the data saved on disk. Use COMPARESESSION or COMPARE * to see the changes you have made to the editdata since the beginning of the edit session or since the last SAVEcommand.
EXCLUDESpecifies that all matching lines in the compared data sets are excludedfrom the display except for a specified number of lines above and belowthe differences. The differences themselves are also shown in the display.The specified number of lines that are shown is set on the Edit Compare
COMPARE {dsname|NEXT|SESSION|*} [{EXCLUDE} {SAVE}{SYSIN}]
COMPARE
Chapter 10. Edit Primary Commands 223
||||||
Settings panel. If you do not respecify the number for this edit session,then whatever was the last number set is still valid. To change thisnumber, issue the COMPARE command with no operand and change theEXCLUDE field on the Edit Compare Settings panel. Valid numbers are 0through 12, inclusive.
You can also use the COMPARE EXCLUDE command at any time toexclude all lines in a file except lines with line labels and information lines,and the lines above and below those lines. When you specify EXCLUDEwithout a data set name or NEXT, no comparison is done. Instead thelabels and information lines that already exist in the file are used toexclude functions.
SAVE Specifies that SuperC (which performs the actual compare function) createa listing. The listing is saved in a data set namedprefix.ISPFEDIT.COMPARE.LIST. The save function is intended fordebugging purposes, but it also provides a way to create a SuperC listing.The listing produced is a Change listing (option CHNGL). No notificationis given regarding successful creation of the listing, and errors allocatingthe listing do not cause the comparison to end.
Note: Because of the way the SuperC comparison is done, the filecurrently being edited is shown in the SuperC listing as the old file,and the file to which the current file is being compared is listed asthe new file. Therefore, insertions refer to lines that are not in thecurrent file, and deletions refer to lines that are only in the currentfile.
SYSINSpecifies not to free the DD name SYSIN before calling SuperC to comparefiles. This enables you to pass SuperC Process Statements to alter thecomparison. No validation is done on the type of SYSIN allocation or thecontents of the data set.
ExamplesTo display the Edit Compare Settings panelCOMPARE
COMPARE
224 OS/390 V2R10.0 ISPF Edit and Edit Macros
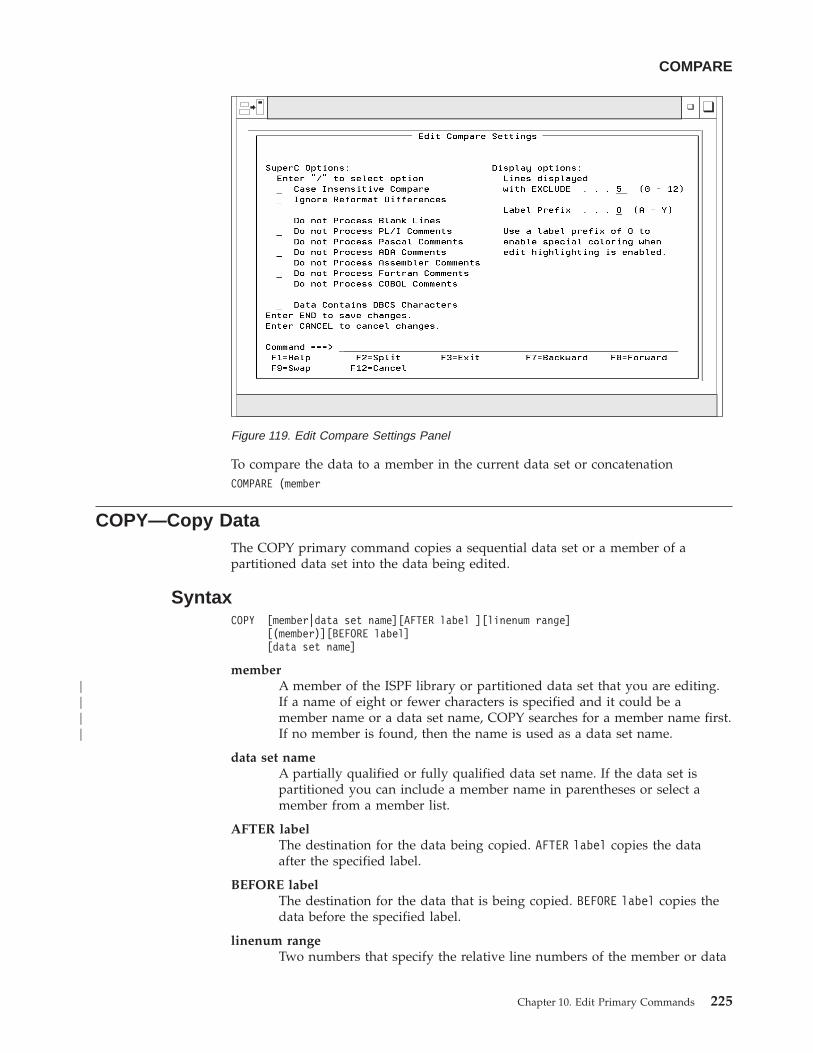
To compare the data to a member in the current data set or concatenationCOMPARE (member
COPY—Copy DataThe COPY primary command copies a sequential data set or a member of apartitioned data set into the data being edited.
SyntaxCOPY [member|data set name][AFTER label ][linenum range]
[(member)][BEFORE label][data set name]
memberA member of the ISPF library or partitioned data set that you are editing.If a name of eight or fewer characters is specified and it could be amember name or a data set name, COPY searches for a member name first.If no member is found, then the name is used as a data set name.
data set nameA partially qualified or fully qualified data set name. If the data set ispartitioned you can include a member name in parentheses or select amember from a member list.
AFTER labelThe destination for the data being copied. AFTER label copies the dataafter the specified label.
BEFORE labelThe destination for the data that is being copied. BEFORE label copies thedata before the specified label.
linenum rangeTwo numbers that specify the relative line numbers of the member or data
Figure 119. Edit Compare Settings Panel
COMPARE
Chapter 10. Edit Primary Commands 225
||||
set to be copied. To specify standard, ISPF, or Cobol line numbers omit themember name or data set name to use the Extended Edit Copy panel.
The label can be either a label that you define or one of the PDF editor-definedlabels, such as .ZF and .ZL.
If you have not defined a label and the ISPF editor-defined labels are notappropriate for your purpose, use the A (after) or B (before) line command tospecify where the data is to be copied.
If the data set or member that you are editing is empty, you do not need to specifya destination for the data being copied.
Note: If the member name or data set name is less than 8 characters and the dataset you are editing is partitioned a like-named member is copied. If alike-named member does not exist the name is considered to be a partiallyqualified data set name.
DescriptionCOPY adds a copy of data that already exists to the data set or member that youare editing. Use MOVE if you want to move data from one data set or member toanother, rather than just copy it.
To copy data into an empty data set or member:1. On the Command line, type:
Command ===> COPY member
The member or data set name operand is optional. If you do not specify thename of a member or of a data set to be copied, the Edit Copy panel appears.Enter the data set or member name on this panel.
Also, if you are copying a member of a partitioned data set, you can specify thenumbers of the first and last lines to be copied, along with the kind of linenumbers (standard, ISPFSTD, COBOL, or relative) on the Edit Copy panel. Thisallows you to copy only part of the data set or member.
Note: When you select ISPFSTD line numbers and the STATS mode is ON, theeditor uses the first 6 digits and ignores the 2 digit modification number.When the STATS mode is OFF, the editor uses all 8 digits.
2. Press Enter. The data is copied.
To copy data into a data set or member that is not empty:1. On the Command line, type:
Command ===> COPY member AFTER | BEFORE label linenum rangeCOPY data set name
The member or data set name operand is optional. You should omit themember name only if you do not know the member name, or if you are goingto copy a sequential data set or a member of a different partitioned data set.
The AFTER label and BEFORE label operands are also optional. However, if thedata set or member that is to receive the copied data is not empty, you mustspecify a destination for the copied data. Therefore, if you do not want to use alabel, you can substitute either the A (after) or B (before) line command as thedestination of the copied data. However, a number indicating that the A or B
COPY
226 OS/390 V2R10.0 ISPF Edit and Edit Macros
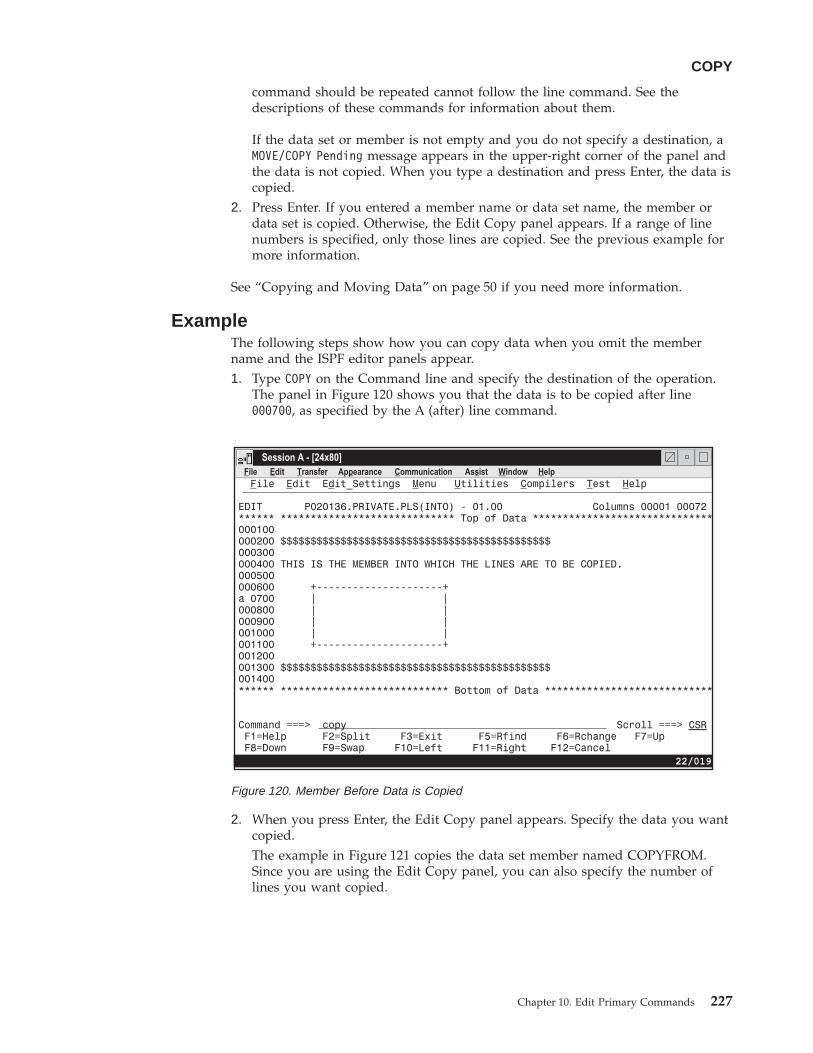
command should be repeated cannot follow the line command. See thedescriptions of these commands for information about them.
If the data set or member is not empty and you do not specify a destination, aMOVE/COPY Pending message appears in the upper-right corner of the panel andthe data is not copied. When you type a destination and press Enter, the data iscopied.
2. Press Enter. If you entered a member name or data set name, the member ordata set is copied. Otherwise, the Edit Copy panel appears. If a range of linenumbers is specified, only those lines are copied. See the previous example formore information.
See “Copying and Moving Data” on page 50 if you need more information.
ExampleThe following steps show how you can copy data when you omit the membername and the ISPF editor panels appear.1. Type COPY on the Command line and specify the destination of the operation.
The panel in Figure 120 shows you that the data is to be copied after line000700, as specified by the A (after) line command.
2. When you press Enter, the Edit Copy panel appears. Specify the data you wantcopied.The example in Figure 121 copies the data set member named COPYFROM.Since you are using the Edit Copy panel, you can also specify the number oflines you want copied.
Figure 120. Member Before Data is Copied
COPY
Chapter 10. Edit Primary Commands 227
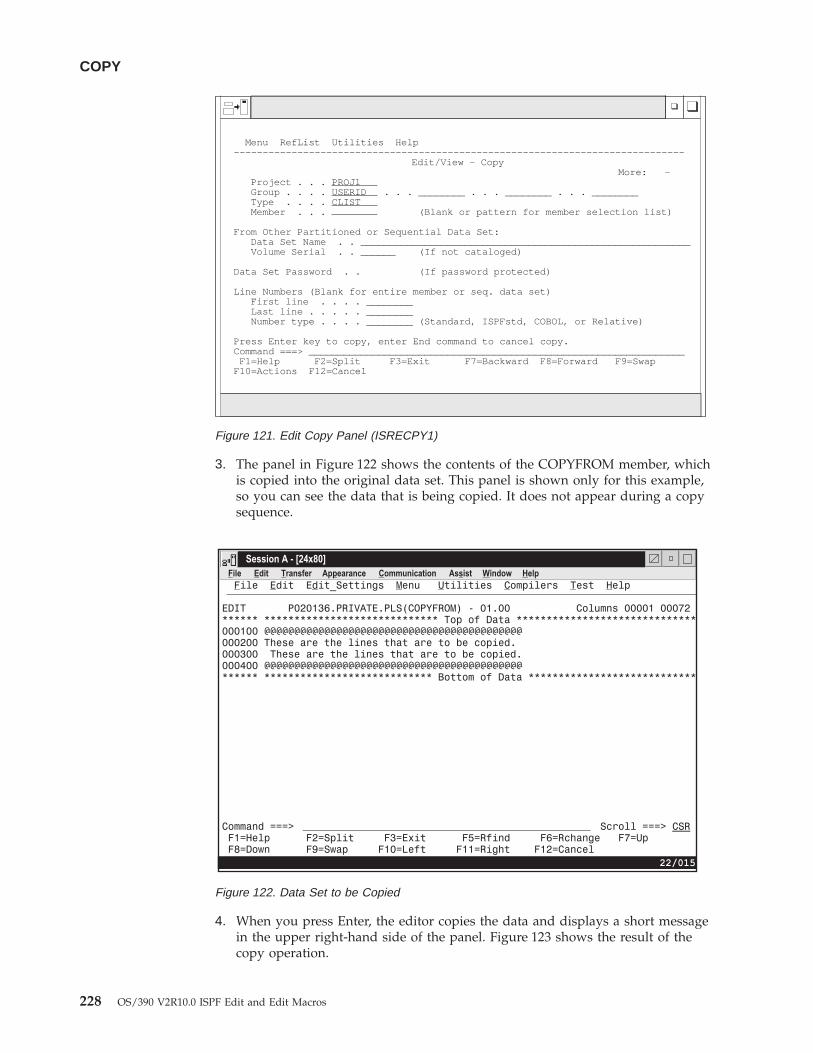
3. The panel in Figure 122 shows the contents of the COPYFROM member, whichis copied into the original data set. This panel is shown only for this example,so you can see the data that is being copied. It does not appear during a copysequence.
4. When you press Enter, the editor copies the data and displays a short messagein the upper right-hand side of the panel. Figure 123 shows the result of thecopy operation.
Menu RefList Utilities Help------------------------------------------------------------------------------
Edit/View - CopyMore: -
Project . . . PROJ1Group . . . . USERID . . . ________ . . . ________ . . . ________Type . . . . CLISTMember . . . (Blank or pattern for member selection list)
From Other Partitioned or Sequential Data Set:Data Set Name . . _________________________________________________________Volume Serial . . ______ (If not cataloged)
Data Set Password . . (If password protected)
Line Numbers (Blank for entire member or seq. data set)First line . . . . ________Last line . . . . . ________Number type . . . . ________ (Standard, ISPFstd, COBOL, or Relative)
Press Enter key to copy, enter End command to cancel copy.Command ===> _________________________________________________________________
F1=Help F2=Split F3=Exit F7=Backward F8=Forward F9=SwapF10=Actions F12=Cancel
Figure 121. Edit Copy Panel (ISRECPY1)
Figure 122. Data Set to be Copied
COPY
228 OS/390 V2R10.0 ISPF Edit and Edit Macros
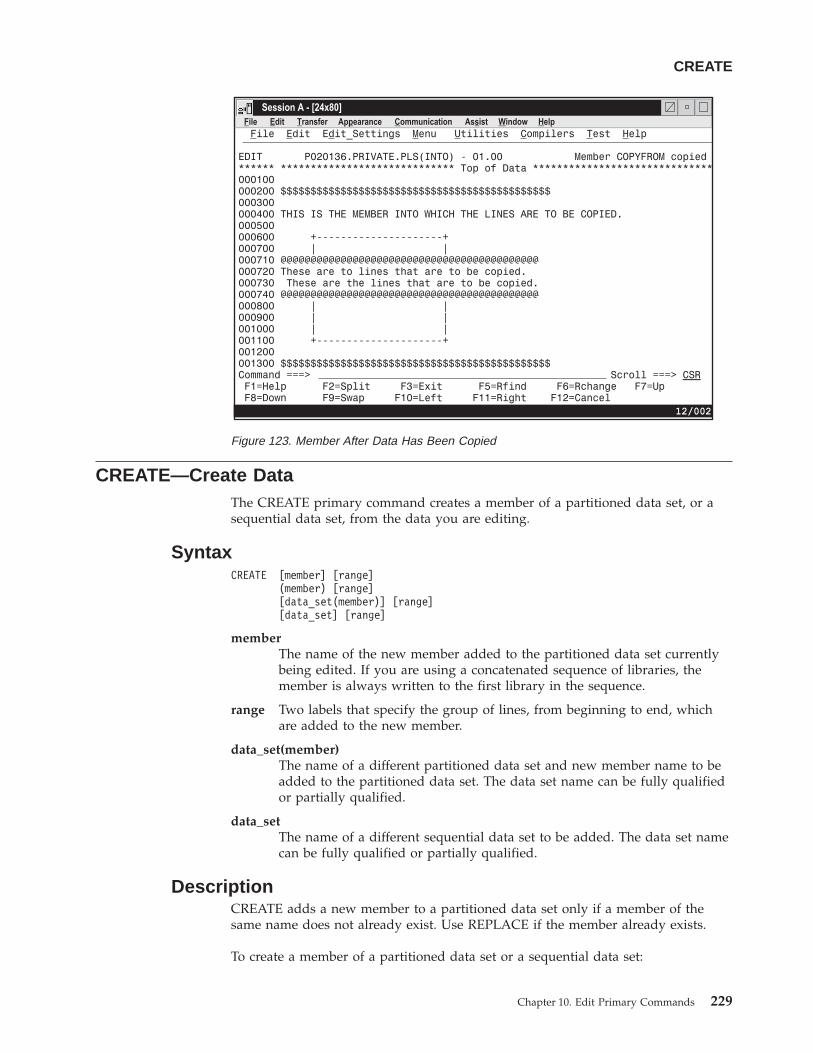
CREATE—Create DataThe CREATE primary command creates a member of a partitioned data set, or asequential data set, from the data you are editing.
SyntaxCREATE [member] [range]
(member) [range][data_set(member)] [range][data_set] [range]
memberThe name of the new member added to the partitioned data set currentlybeing edited. If you are using a concatenated sequence of libraries, themember is always written to the first library in the sequence.
range Two labels that specify the group of lines, from beginning to end, whichare added to the new member.
data_set(member)The name of a different partitioned data set and new member name to beadded to the partitioned data set. The data set name can be fully qualifiedor partially qualified.
data_setThe name of a different sequential data set to be added. The data set namecan be fully qualified or partially qualified.
DescriptionCREATE adds a new member to a partitioned data set only if a member of thesame name does not already exist. Use REPLACE if the member already exists.
To create a member of a partitioned data set or a sequential data set:
Figure 123. Member After Data Has Been Copied
CREATE
Chapter 10. Edit Primary Commands 229
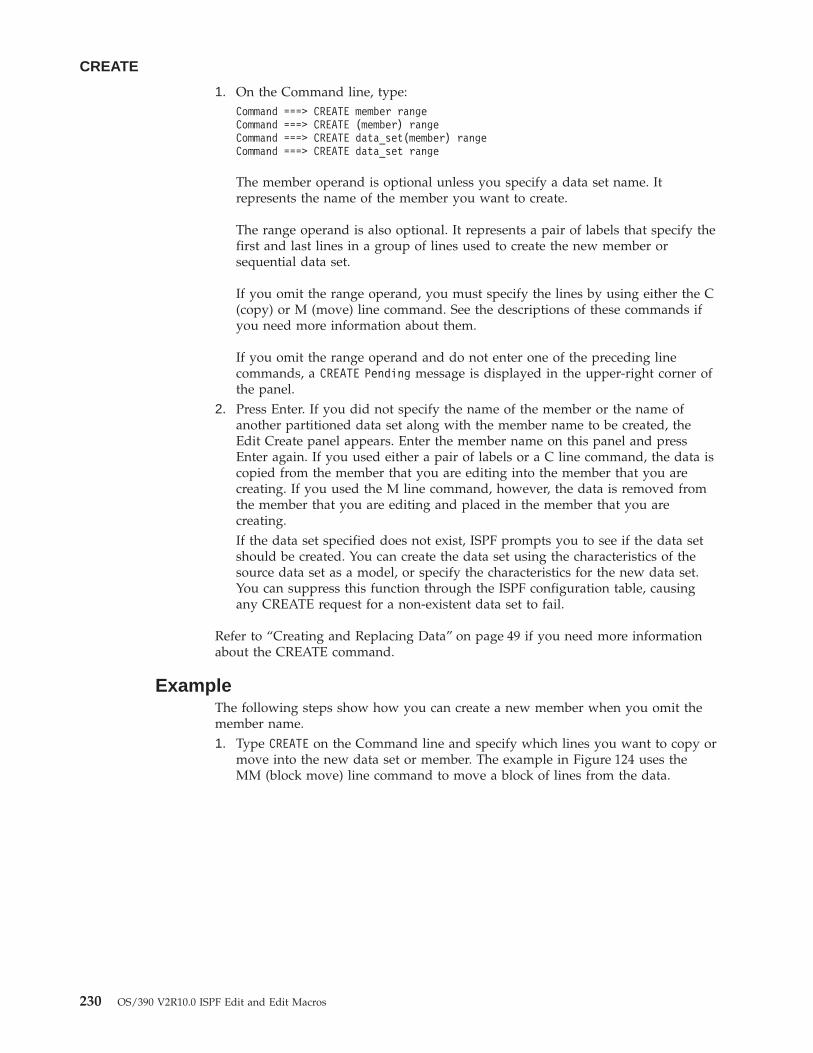
1. On the Command line, type:Command ===> CREATE member rangeCommand ===> CREATE (member) rangeCommand ===> CREATE data_set(member) rangeCommand ===> CREATE data_set range
The member operand is optional unless you specify a data set name. Itrepresents the name of the member you want to create.
The range operand is also optional. It represents a pair of labels that specify thefirst and last lines in a group of lines used to create the new member orsequential data set.
If you omit the range operand, you must specify the lines by using either the C(copy) or M (move) line command. See the descriptions of these commands ifyou need more information about them.
If you omit the range operand and do not enter one of the preceding linecommands, a CREATE Pending message is displayed in the upper-right corner ofthe panel.
2. Press Enter. If you did not specify the name of the member or the name ofanother partitioned data set along with the member name to be created, theEdit Create panel appears. Enter the member name on this panel and pressEnter again. If you used either a pair of labels or a C line command, the data iscopied from the member that you are editing into the member that you arecreating. If you used the M line command, however, the data is removed fromthe member that you are editing and placed in the member that you arecreating.If the data set specified does not exist, ISPF prompts you to see if the data setshould be created. You can create the data set using the characteristics of thesource data set as a model, or specify the characteristics for the new data set.You can suppress this function through the ISPF configuration table, causingany CREATE request for a non-existent data set to fail.
Refer to “Creating and Replacing Data” on page 49 if you need more informationabout the CREATE command.
ExampleThe following steps show how you can create a new member when you omit themember name.1. Type CREATE on the Command line and specify which lines you want to copy or
move into the new data set or member. The example in Figure 124 uses theMM (block move) line command to move a block of lines from the data.
CREATE
230 OS/390 V2R10.0 ISPF Edit and Edit Macros
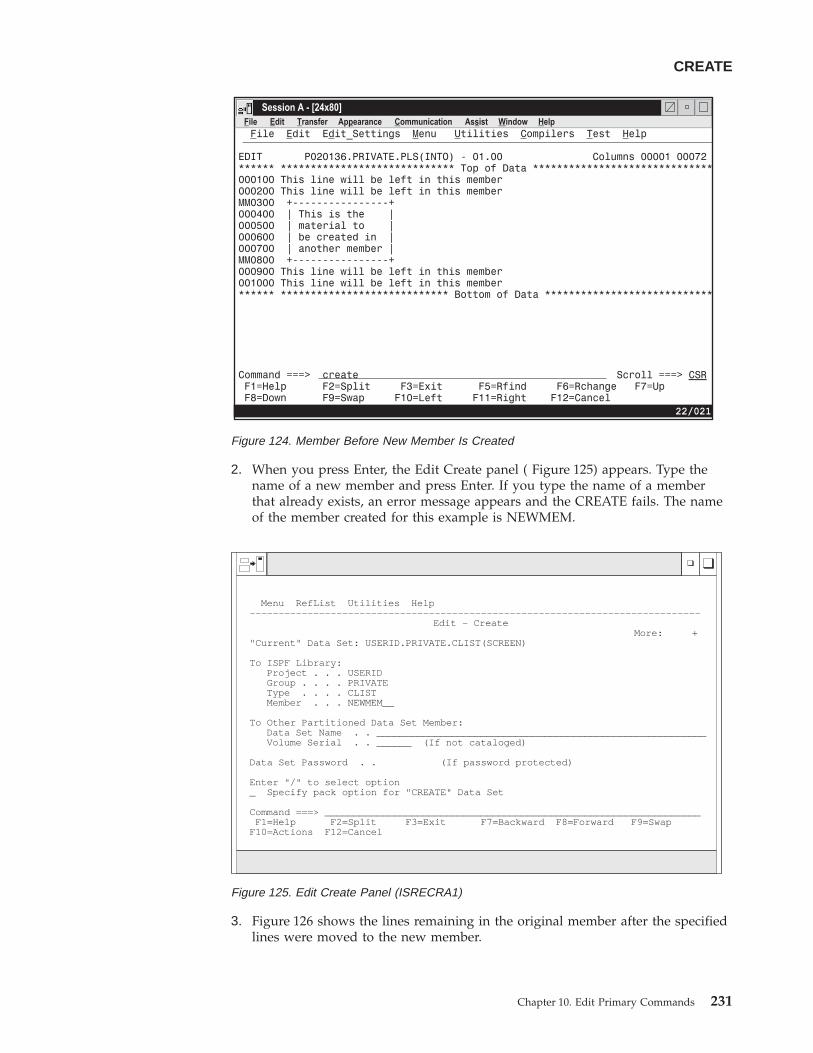
2. When you press Enter, the Edit Create panel ( Figure 125) appears. Type thename of a new member and press Enter. If you type the name of a memberthat already exists, an error message appears and the CREATE fails. The nameof the member created for this example is NEWMEM.
3. Figure 126 shows the lines remaining in the original member after the specifiedlines were moved to the new member.
Figure 124. Member Before New Member Is Created
Menu RefList Utilities Help------------------------------------------------------------------------------
Edit - CreateMore: +
"Current" Data Set: USERID.PRIVATE.CLIST(SCREEN)
To ISPF Library:Project . . . USERIDGroup . . . . PRIVATEType . . . . CLISTMember . . . NEWMEM__
To Other Partitioned Data Set Member:Data Set Name . . _________________________________________________________Volume Serial . . ______ (If not cataloged)
Data Set Password . . (If password protected)
Enter "/" to select option_ Specify pack option for "CREATE" Data Set
Command ===> _________________________________________________________________F1=Help F2=Split F3=Exit F7=Backward F8=Forward F9=Swap
F10=Actions F12=Cancel
Figure 125. Edit Create Panel (ISRECRA1)
CREATE
Chapter 10. Edit Primary Commands 231
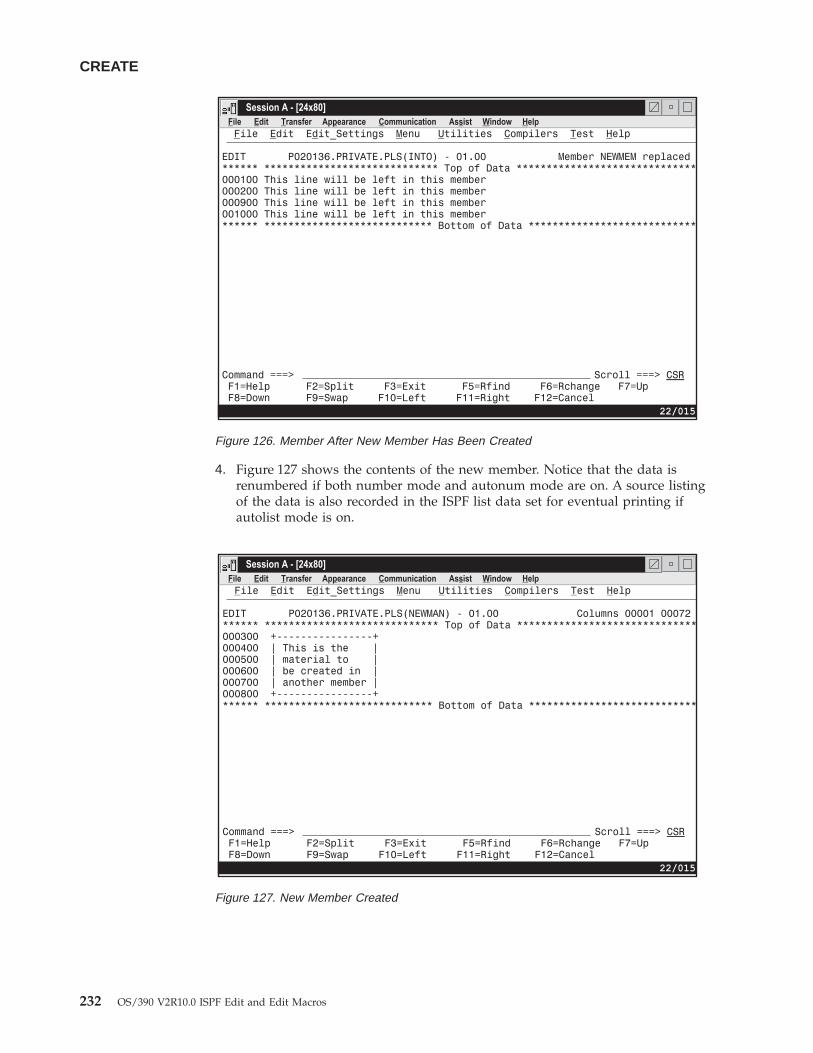
4. Figure 127 shows the contents of the new member. Notice that the data isrenumbered if both number mode and autonum mode are on. A source listingof the data is also recorded in the ISPF list data set for eventual printing ifautolist mode is on.
Figure 126. Member After New Member Has Been Created
Figure 127. New Member Created
CREATE
232 OS/390 V2R10.0 ISPF Edit and Edit Macros
CUT—Cut and Save LinesThe CUT primary command saves lines to one of eleven named clipboards forlater retrieval by the PASTE command. The lines can be appended to lines alreadysaved by a previous CUT command or can replace existing lines in a clipboard..
SyntaxCUT [lptr-range] [DEFAULT | clipboardname]
[REPLACE|APPEND][DISPLAY]
lptr-range Two line pointers that specify the range of lines inthe current member that are to be added to orreplace data in the clipboard. A line pointer can bea label or relative line number. You must specifyboth a starting and ending line pointer.
clipboardname The name of the clipboard to use. If you omit thisparameter, the ISPF default clipboard (namedDEFAULT) is used. You can define up to tenadditional clipboards. The size of the clipboardsand number of clipboards might be limited byinstallation defaults.
REPLACE|APPEND
Specify REPLACE to replace existing data in theclipboard. If you do not specify REPLACE, thelines in the current CUT are added to the end ofthe existing data within the clipboard.
Specify APPEND to add the data to the clipboard.This is the default.
DISPLAY Show a list of existing clipboards. From this listyou can browse, edit, clear, or rename theclipboards.
DescriptionCUT saves copies of lines from an edit session to a clipboard for later retrieval bythe PASTE command. The lines are moved or copied from the session to thenamed clipboard. Lines are specified by either the C (Copy) or M (Move) linecommands, CC or MM block line commands, or label names. If the C or CC linecommands or labels are used to identify the lines, the lines are copied to theclipboard. If the M or MM line commands are used to identify the lines, the linesare copied to the clipboard and deleted from the edit session (in effect, movingthem).
If you specify a clipboard name, lines are copied to that clipboard. If the specifiedclipboard does not yet exist, it is created. ISPF provides a default clipboard namedDEFAULT. You can use up to 10 other clipboards that you define. The definedclipboards exist as long as you are logged on to TSO and are deleted when you logoff.
You can view the contents of clipboards and rename existing clipboards using theDISPLAY keyword of the CUT command. If you specify the DISPLAY, otherkeywords are ignored.
CUT
Chapter 10. Edit Primary Commands 233
|||
|||
|
||||
||
ExampleTo save all the lines in the current file to the default clipboard, appending them tolines already in the clipboard:CUT .ZFIRST .ZLAST
To save all the lines in the current file to a clipboard named USERC1, replacingany lines already in the clipboard:CUT .ZFIRST .ZLAST USERC1 REPLACE
DEFINE—Define a NameThe DEFINE primary command is used to:v Identify a macro that replaces a built-in command of the same namev Identify programs that are edit macrosv Assign an alias to a macro or built-in commandv Make a macro or built-in command inoperablev Reset an inoperable macro or built-in commandv Disable a macro or built-in command.
DEFINE is often used with the BUILTIN command.
SyntaxDEFINE name {MACRO CMD }
{MACRO PGM }{ALIAS name-2}{NOP }{RESET }{DISABLED }
name The name for the command.
MACRO CMDIdentifies the name you are defining as a command language (CLIST orREXX EXEC) macro, which is called in the same way as using the SELECTservice CMD keyword with a percent symbol (%) preceding the command.That means that you can specify only CLISTs or REXX EXECs. Thisoperand is the default.
MACRO PGMIdentifies the name that you are defining as a program (load module)macro.
ALIAS name-2Identifies the name you are defining as an alias of another name, with thesame characteristics. If name-2 is already an alias, the editor replaces itwith the command for which it is an alias. Therefore, it is not possible tohave an alias of an alias.
NOP Makes the name that you are defining and all of its aliases inoperable untilyou reset them with RESET. Therefore, when the name or an alias of thename is called, nothing is processed. NOP is similar to DISABLED, exceptthat disabled names cannot be reset by the RESET operand.
RESETResets the most recent definition of the name that you are defining to thestatus in effect before that definition. For example, RESET makesinoperable names operable again.
CUT
234 OS/390 V2R10.0 ISPF Edit and Edit Macros
DISABLEDDisables the name you are defining and all of its aliases until youcompletely exit the editor and return to the ISPF Primary Option Menu.Therefore, when the name or an alias of the name is entered, nothing isprocessed. A disabled command or macro cannot be restored by the RESEToperand. To disable RESET, use delimiters around 'RESET' to distinguish itfrom the keyword.
DescriptionThe effects of a DEFINE command remain until you either issue DEFINE RESET orexit from the editor. You enter the editor when you select option 2, and you do notexit the editor until you return to the ISPF Primary Option Menu. Therefore, if youedit several members of a partitioned data set, one DEFINE at the beginningaffects them all.
To temporarily override DEFINE, BUILTIN.
Stacking DEFINE CommandsExcept for the DISABLED operand, the DEFINE operations are stacked. The RESEToperand unstacks them. For example:DEFINE A alias FINDDEFINE A alias COPYDEFINE A alias SAVE
stacks three definitions of A. Only the last one is effective. Here, A would bedefined as SAVE.
The following operation:DEFINE A RESET
removes one command from the stack, making the previous command effective. Inthe preceding example, A would now be defined as COPY.
ExamplesTo define the name IJKDOIT as a CLIST or REXX macro, enter:Command ===> DEFINE IJKDOIT MACRO
To define the name SETITUP as a program macro, enter:Command ===> DEFINE SETITUP MACRO PGM
To define the name DOIT as an alias of the macro IJKDOIT, enter:Command ===> DEFINE DOIT ALIAS IJKDOIT
To define the name SAVE to have no effect, enter:Command ===> DEFINE SAVE NOP
To reset the definition of the name SAVE, enter:Command ===> DEFINE SAVE RESET
To define the name FINDIT as disabled, enter:Command ===> DEFINE FINDIT DISABLED
DEFINE
Chapter 10. Edit Primary Commands 235
DELETE—Delete LinesThe DELETE primary command deletes lines from the data you are editing.
SyntaxDELETE {ALL X | NX }
{range X | NX}{ALL range }
ALL Specifies that all selected lines are deleted. The DELETE command, unlikeFIND, CHANGE, and EXCLUDE, does not accept NEXT, FIRST, PREV, orLAST. ALL is required to emphasize that NEXT is not the default.
X | NXRestricts the lines deleted to those that are excluded or not excluded,respectively.
range Two labels that limit the lines deleted to a range within and includingthose labels. The defaults are the editor-defined .ZFIRST and .ZLASTlabels.
DescriptionThere is no DELETE ALL command, as a precaution against error. To delete alllines, do one of the following:v To delete all lines by using the editor-defined labels:
Command ===> DELETE ALL .ZFIRST .ZLAST
v To delete all lines by first resetting any excluded lines to make them notexcluded, and then deleting all lines that are not excluded:Command ===> RESET; DELETE ALL NX
Here are other uses of the DELETE command:v To delete all excluded lines:
Command ===> DELETE ALL X
v To delete all not excluded lines:Command ===> DELETE ALL NX
v To delete all excluded lines within a range:Command ===> DELETE .label1 .label2 X
Here, and in the commands that follow, .label1 and .label2 represent the twolabels that show the range of lines to be deleted.
v To delete all not excluded lines within a range:Command ===> DELETE .label1 .label2 NX
v To delete all lines within a range:Command ===> DELETE .label1 .label2
ExamplesYou can more easily determine which lines to delete in a large data set byexcluding lines that meet some criterion, or by leaving all lines that meet thecriterion nonexcluded. Then, with DELETE you can delete many lines. Forexample, to delete all blank lines in a data set, type the following commands onthe Command line and press Enter after each one:1. First, reset all excluded lines:
RESET X
DELETE
236 OS/390 V2R10.0 ISPF Edit and Edit Macros
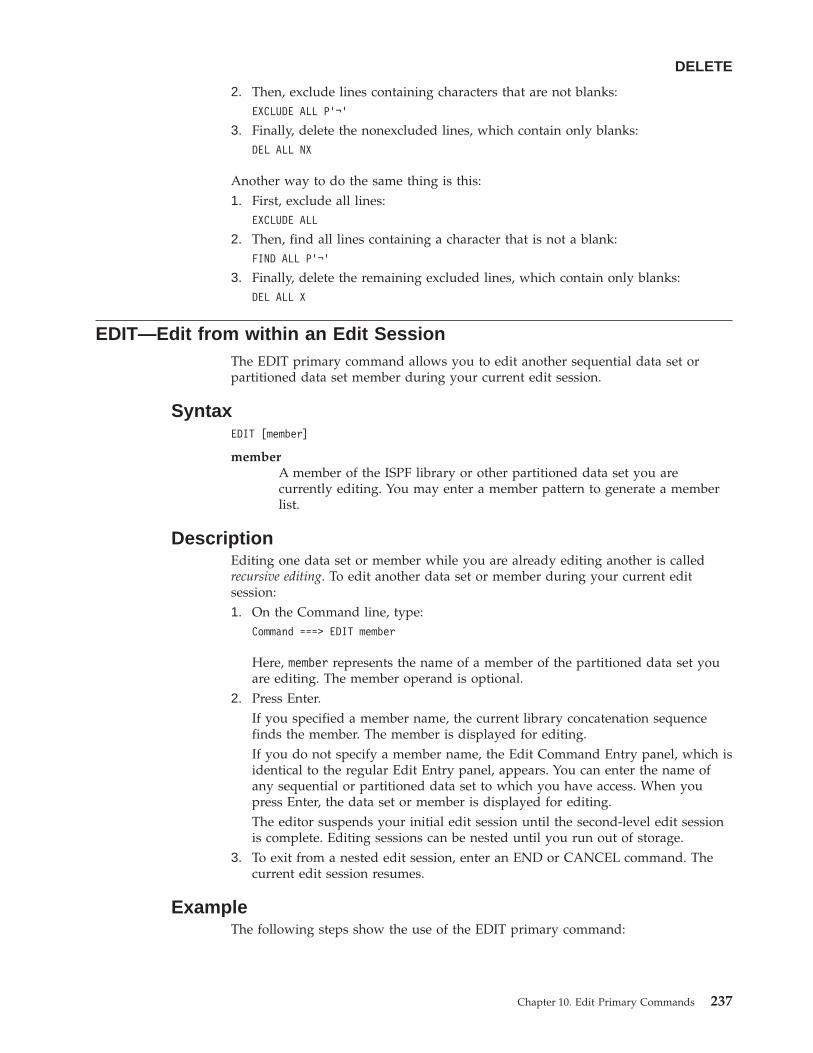
2. Then, exclude lines containing characters that are not blanks:EXCLUDE ALL P'¬'
3. Finally, delete the nonexcluded lines, which contain only blanks:DEL ALL NX
Another way to do the same thing is this:1. First, exclude all lines:
EXCLUDE ALL
2. Then, find all lines containing a character that is not a blank:FIND ALL P'¬'
3. Finally, delete the remaining excluded lines, which contain only blanks:DEL ALL X
EDIT—Edit from within an Edit SessionThe EDIT primary command allows you to edit another sequential data set orpartitioned data set member during your current edit session.
SyntaxEDIT [member]
memberA member of the ISPF library or other partitioned data set you arecurrently editing. You may enter a member pattern to generate a memberlist.
DescriptionEditing one data set or member while you are already editing another is calledrecursive editing. To edit another data set or member during your current editsession:1. On the Command line, type:
Command ===> EDIT member
Here, member represents the name of a member of the partitioned data set youare editing. The member operand is optional.
2. Press Enter.If you specified a member name, the current library concatenation sequencefinds the member. The member is displayed for editing.If you do not specify a member name, the Edit Command Entry panel, which isidentical to the regular Edit Entry panel, appears. You can enter the name ofany sequential or partitioned data set to which you have access. When youpress Enter, the data set or member is displayed for editing.The editor suspends your initial edit session until the second-level edit sessionis complete. Editing sessions can be nested until you run out of storage.
3. To exit from a nested edit session, enter an END or CANCEL command. Thecurrent edit session resumes.
ExampleThe following steps show the use of the EDIT primary command:
DELETE
Chapter 10. Edit Primary Commands 237
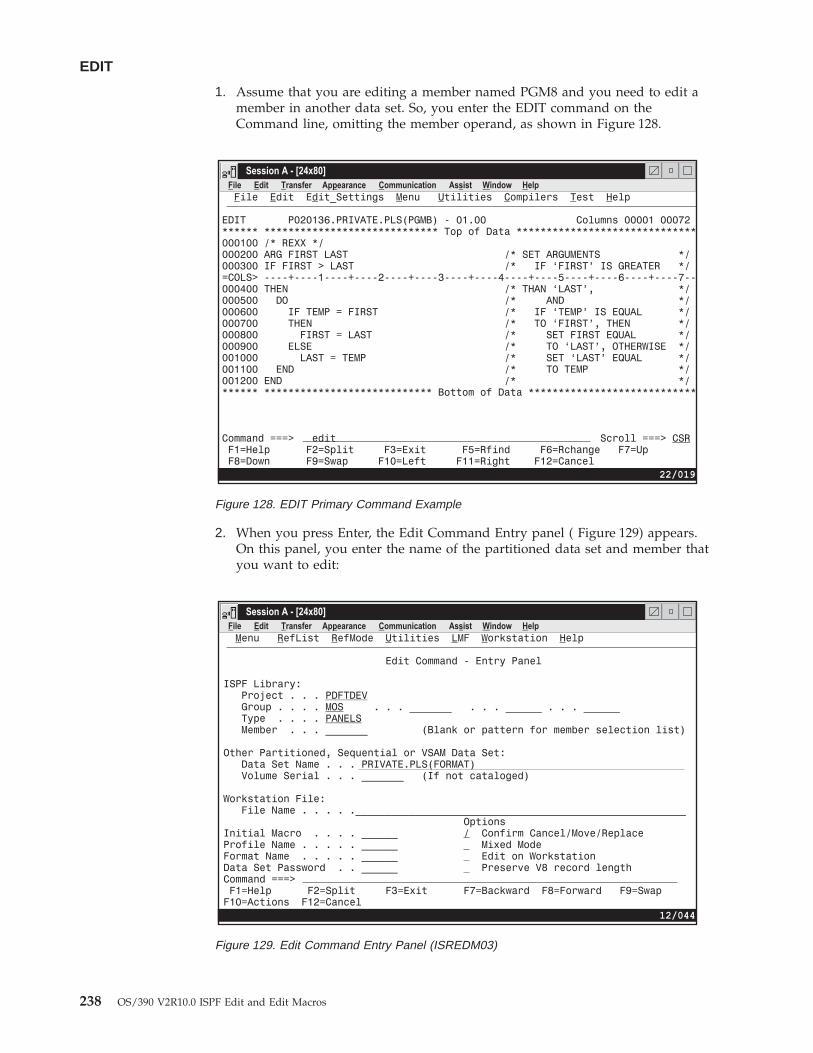
1. Assume that you are editing a member named PGM8 and you need to edit amember in another data set. So, you enter the EDIT command on theCommand line, omitting the member operand, as shown in Figure 128.
2. When you press Enter, the Edit Command Entry panel ( Figure 129) appears.On this panel, you enter the name of the partitioned data set and member thatyou want to edit:
Figure 128. EDIT Primary Command Example
Figure 129. Edit Command Entry Panel (ISREDM03)
EDIT
238 OS/390 V2R10.0 ISPF Edit and Edit Macros
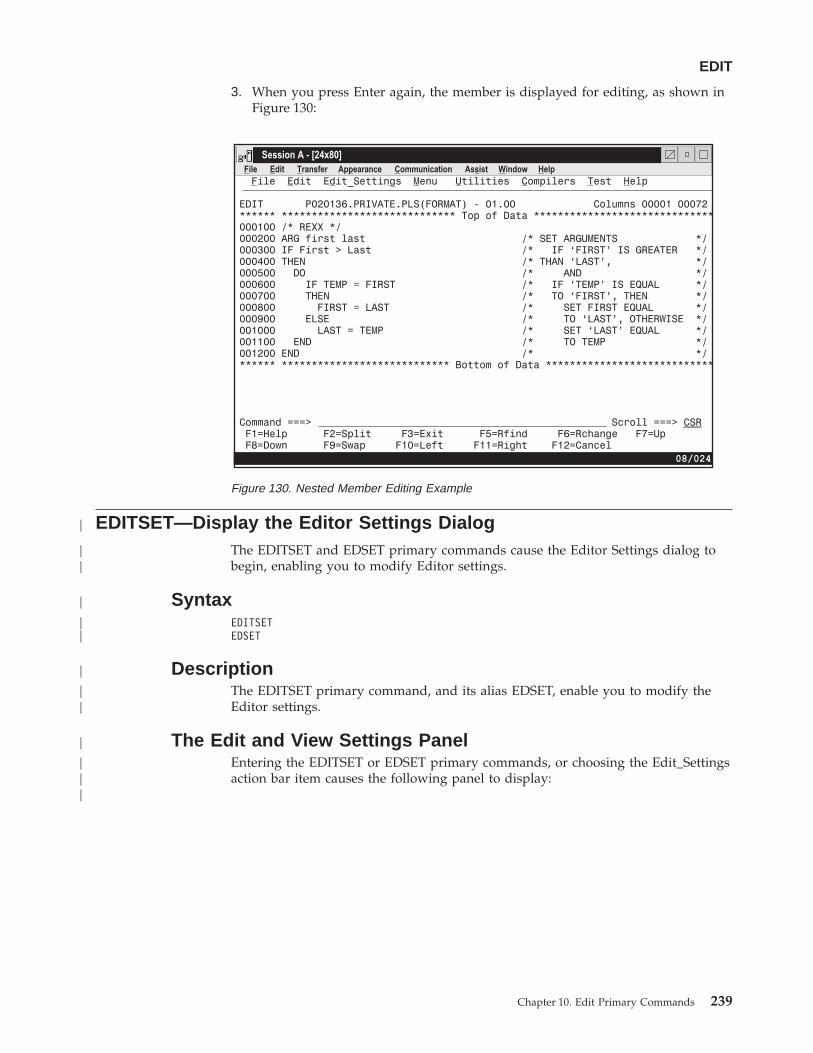
3. When you press Enter again, the member is displayed for editing, as shown inFigure 130:
EDITSET—Display the Editor Settings DialogThe EDITSET and EDSET primary commands cause the Editor Settings dialog tobegin, enabling you to modify Editor settings.
SyntaxEDITSETEDSET
DescriptionThe EDITSET primary command, and its alias EDSET, enable you to modify theEditor settings.
The Edit and View Settings PanelEntering the EDITSET or EDSET primary commands, or choosing the Edit_Settingsaction bar item causes the following panel to display:
Figure 130. Nested Member Editing Example
EDIT
Chapter 10. Edit Primary Commands 239
|
||
|
||
|
||
|
|||

The fields on the panel are as follows:
User session initial macroYou can specify a macro to be run before you begin editing your sequentialdata set or any member of a partitioned data set. This initial macro allowsyou to set up a particular editing environment for the Edit session you arebeginning. This initial macro runs in addition to any IMACRO value inyour profile.
Maximum initial storage allowed for Edit and View
The maximum amount of storage that edit and view use when initiallyloading the data into the edit or view session. This number is in kilobytesand is rounded to the nearest 128 KB value. If you set a limit on the initialamount of storage allowed, and a session requires more than that amount,the data is shown in BROWSE mode instead of edit or view.
A value of zero indicates that the edit session should not impose any limitson initial storage used. If this value is zero and there is not enough storageto load the data, a program error can result.
Target line for found/changed/excluded stringThis indicates the line of the edit data display to which the target line of aFIND, CHANGE, or EXCLUDE command should be positioned. The valuecan be from 1 to 99, the default is 2. If the value specified is greater thanthe last line of the display, the target line is positioned to the last line ofthe display.
Always position found/changed/excluded string to target lineThis determines whether teh editor always poisitions the target line of aFIND, CHANGE, or EXCLUDE command to the target line specified in theTarget line for found/changed/excluded string field, or only position thestring if it is not currently on the display. The default is to only positionthe line if it is not on the current display.
Figure 131. Edit and View Settings Panel (ISREDSET)
EDITSET
240 OS/390 V2R10.0 ISPF Edit and Edit Macros
|
||||||
|
|||||
|||
||||||
||||||

Remove action bars in ISPF edit and view panelsIf this field is checked, the action bars in the edit or view panels are notshown. This field effects only those panels that are shipped by ISPF, andhas no effect on customized edit panels or edit panels shipped by productsother than ISPF.
CUT default
AppendIf data exists on the clipboard, append the new data being cut tothe end of the existing data.
ReplaceIf data exists on the clipboard, replace it with the new data beingcut.
PASTE default
Delete Remove the data from the clipboard after it has been pasted.
Keep Do not remove the data from the clipboard after it has been pasted.This allows for data to be pasted multiple times.
Confirm Cancel/Move/ReplaceWhen you select this field with a ″/″, a confirmation panel displays whenyou request one of these actions, and the execution of that action wouldresult in data changes being lost or existing data being overwritten.v For MOVE, the confirm panel is displayed if the data to be moved
exists. Otherwise, an error message is displayed.v For REPLACE, the confirm panel is displayed if the data to be replaced
exists. Otherwise, the REPLACE command functions like the editCREATE command, and no confirmation panel is displayed.
v For CANCEL, the confirmation panel is displayed if any data changeshave been made, whether through primary commands, line commands,or typing.
Note: Any commands or data changes pending at the time the CANCELcommand is issued are ignored. Data changes are ″pending″ ifchanges have been made to the displayed edit data, but nointeraction with the host (ENTER, PF key, or command other thanCANCEL) has occurred. If no other changes have been madeduring the edit session up to that point, the confirmation panel isnot displayed.
Apply Settings Immediately
Controls whether a change in the setting applies to the current edit session(immediately) or on the next edit session.
Preserve VB record lengthYou can select this option to cause the editor to store the original length ofeach record in variable length data sets and when a record is saved, theoriginal record length is used as the minimum length for the record.
Apply Settings Immediately
Controls whether a change in the setting applies to the current edit session(immediately) or on the next edit session.
EDITSET
Chapter 10. Edit Primary Commands 241
|||||
|
|||
|||
|
||
|||
||||
||
|||
|||
|||||||
|
||
||||
|
||
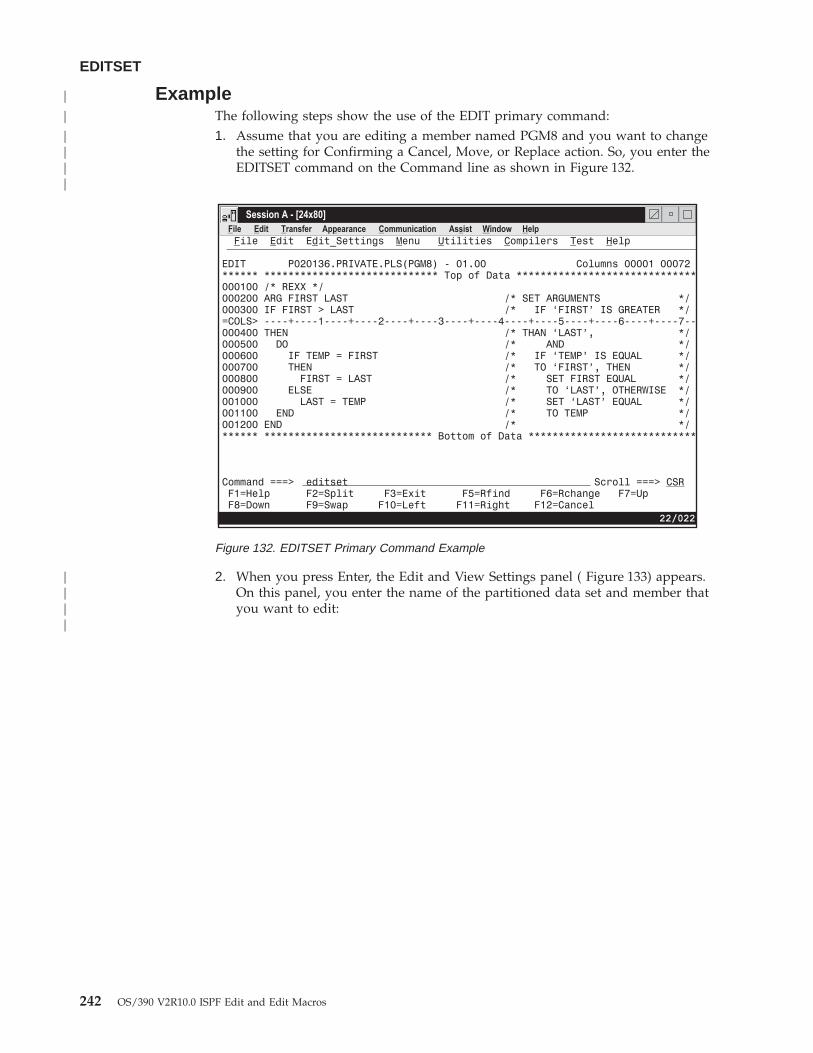
ExampleThe following steps show the use of the EDIT primary command:1. Assume that you are editing a member named PGM8 and you want to change
the setting for Confirming a Cancel, Move, or Replace action. So, you enter theEDITSET command on the Command line as shown in Figure 132.
2. When you press Enter, the Edit and View Settings panel ( Figure 133) appears.On this panel, you enter the name of the partitioned data set and member thatyou want to edit:
Figure 132. EDITSET Primary Command Example
EDITSET
242 OS/390 V2R10.0 ISPF Edit and Edit Macros
|
|
||||
||||
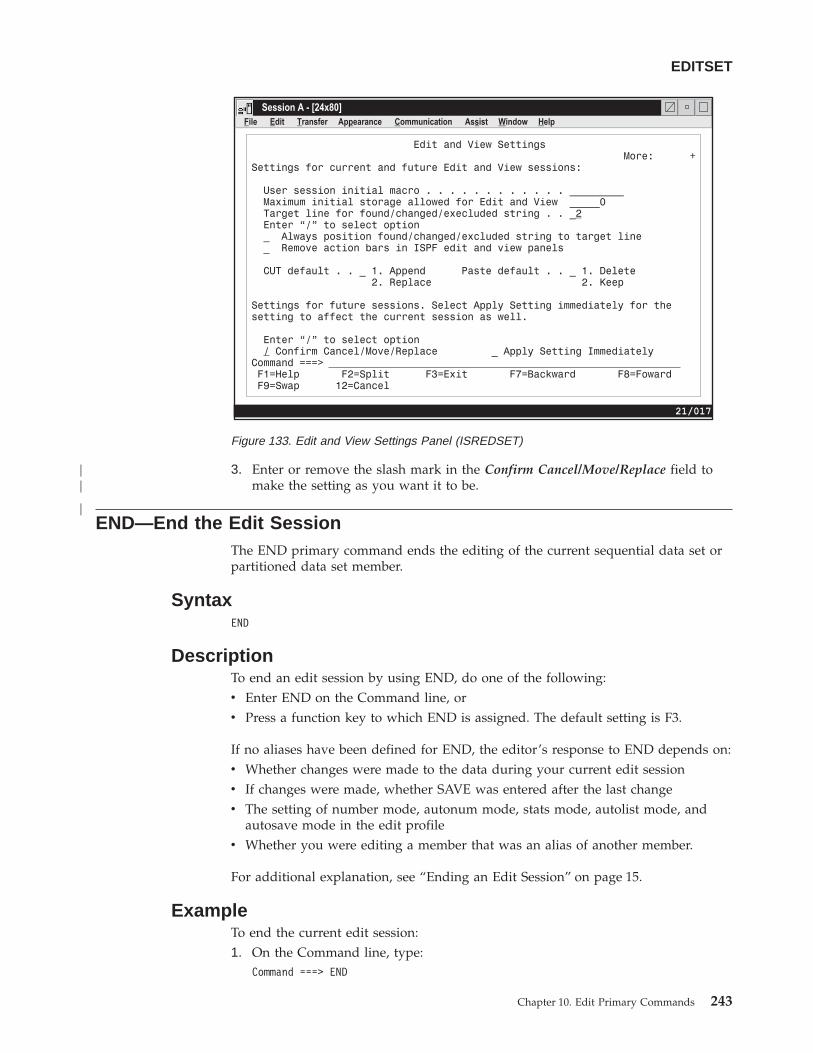
3. Enter or remove the slash mark in the Confirm Cancel/Move/Replace field tomake the setting as you want it to be.
END—End the Edit SessionThe END primary command ends the editing of the current sequential data set orpartitioned data set member.
SyntaxEND
DescriptionTo end an edit session by using END, do one of the following:v Enter END on the Command line, orv Press a function key to which END is assigned. The default setting is F3.
If no aliases have been defined for END, the editor’s response to END depends on:v Whether changes were made to the data during your current edit sessionv If changes were made, whether SAVE was entered after the last changev The setting of number mode, autonum mode, stats mode, autolist mode, and
autosave mode in the edit profilev Whether you were editing a member that was an alias of another member.
For additional explanation, see “Ending an Edit Session” on page 15.
ExampleTo end the current edit session:1. On the Command line, type:
Command ===> END
Figure 133. Edit and View Settings Panel (ISREDSET)
EDITSET
Chapter 10. Edit Primary Commands 243
||
|
2. Press Enter.
EXCLUDE—Exclude Lines from the DisplayThe EXCLUDE primary command hides lines that contain a search string fromview and replaces them with a dashed line. To see the lines again, you enter eitherthe FLIP, RESET or RESET EXCLUDED command.
SyntaxEXCLUDE string [range] [NEXT ] [CHARS ] [col-1 [col-2]]
[ALL ] [PREFIX][FIRST] [SUFFIX][LAST ] [WORD ][PREV ]
string The search string you want to exclude.
range Two labels that identify the lines which the EXCLUDE command is tosearch.
NEXT Starts at the first position after the current cursor location and searchesahead to find the next occurrence of string. NEXT is the default.
ALL Starts at the top of the data and searches ahead to find all occurrences ofstring.
FIRST Starts at the top of the data and searches ahead to find the first occurrenceof string.
LAST Starts at the bottom of the data and searches backward to find the lastoccurrence of string.
PREV Starts at the current cursor location and searches backward to find theprevious occurrence of string.
CHARSLocates string anywhere the characters match. CHARS is the default.
PREFIXLocates string at the beginning of a word.
SUFFIXLocates string at the end of a word.
WORDString is delimited on both sides by blanks or other non-alphanumericcharacters.
col-1 and col-2Numbers that identify the columns the EXCLUDE command is to search.
DescriptionYou can use the EXCLUDE command with the FIND and CHANGE commands tofind a search string, change it, and exclude the line that contains the string fromthe panel.
To exclude the next nonexcluded line that contains the letters ELSE withoutspecifying any other qualifications:1. On the Command line, type:
Command ===> EXCLUDE ELSE
2. Press Enter. Since no other qualifications were specified, the letters ELSE can be:
END
244 OS/390 V2R10.0 ISPF Edit and Edit Macros
v Uppercase or a mixture of uppercase and lowercasev At the beginning of a word (prefix), the end of a word (suffix), or the entire
word (word)v Anywhere within the current boundaries.
To exclude the next line that contains the letters ELSE, but only if the letters areuppercase:1. On the Command line, type:
Command ===> EXCLUDE C'ELSE'
2. Press Enter. This type of exclusion is called a character string exclusion (notethe C that precedes the search string) because it excludes the next line thatcontains the letters ELSE only if the letters are found in uppercase. However,since no other qualifications were specified, the exclusion occurs no matterwhere the letters are found on a nonexcluded line, as outlined in the previouslist.
For more information, including other types of search strings, see “Finding,Seeking, Changing, and Excluding Data” on page 53.
ExamplesThe following example excludes the first nonexcluded line in the data set thatcontains the letters ELSE. However, the letters must occur on or between lineslabeled .E and .S and they must be the first four letters of a word:Command ===> EXCLUDE ELSE .E .S FIRST PREFIX
The following example excludes the last nonexcluded line in the data set thatcontains the letters ELSE. However, the letters must occur on or between lineslabeled .E and .S and they must be the last four letters of a word.Command ===> EXCLUDE ELSE .E .S LAST SUFFIX
The following example excludes the first nonexcluded line that immediatelyprecedes the cursor position and that contains the letters ELSE. However, the cursormust not be positioned ahead of the lines labeled .E and .S. Also, the letters mustoccur on or between lines labeled .E and .S; they must be stand alone characters(not part of any other word); and they must exist within columns 1 and 5:Command ===> EXCLUDE ELSE .E .S PREV WORD 1 5
FIND—Find a Data StringThe FIND primary command locates one or more occurrences of a search string.
SyntaxFIND string [range] [NEXT ] [CHARS ] [X ] [col-1[col-2]]
[ALL ] [PREFIX] [NX][FIRST] [SUFFIX][LAST ] [WORD ][PREV ]
string The search string you want to find.
range Two labels that identify the lines which FIND is to search.
NEXT Starts at the first position after the current cursor location and searchesahead to find the next occurrence of string. NEXT is the default.
EXCLUDE
Chapter 10. Edit Primary Commands 245
ALL Starts at the top of the data and searches ahead to find all occurrences ofstring.
FIRST Starts at the top of the data and searches ahead to find the first occurrenceof string.
LAST Starts at the bottom of the data and searches backward to find the lastoccurrence of string.
PREV Starts at the current cursor location and searches backward to find theprevious occurrence of string.
CHARSLocates string anywhere the characters match. CHARS is the default.
PREFIXLocates string at the beginning of a word.
SUFFIXLocates string at the end of a word.
WORDString is delimited on both sides by blanks or other non-alphanumericcharacters.
X Scans only lines that are excluded from the display.
NX Scans only lines that are not excluded from the display.
col-1 and col-2Numbers that identify the columns the FIND command is to search.
DescriptionYou can use the FIND command with the EXCLUDE and CHANGE commands tofind a search string, change it, and exclude the line that contains the string fromthe panel.
To find the next occurrence of the letters ELSE without specifying any otherqualifications:1. On the Command line, type:
Command ===> FIND ELSE
2. Press Enter. Since no other qualifications were specified, the letters ELSE can be:v Uppercase or a mixture of uppercase and lowercasev At the beginning of a word (prefix), the end of a word (suffix), or the entire
word (word)v In either an excluded or a nonexcluded linev Anywhere within the current boundaries.
To find the next occurrence of the letters ELSE, but only if the letters are uppercase:1. On the Command line, type:
Command ===> FIND C'ELSE'
2. Press Enter. This type of search is called a character string search (note the Cthat precedes the search string) because it finds the next occurrence of theletters ELSE only if the letters are in uppercase. However, since no otherqualifications were specified, the letters can be found anywhere in the data setor member, as outlined in the preceding list.
FIND
246 OS/390 V2R10.0 ISPF Edit and Edit Macros
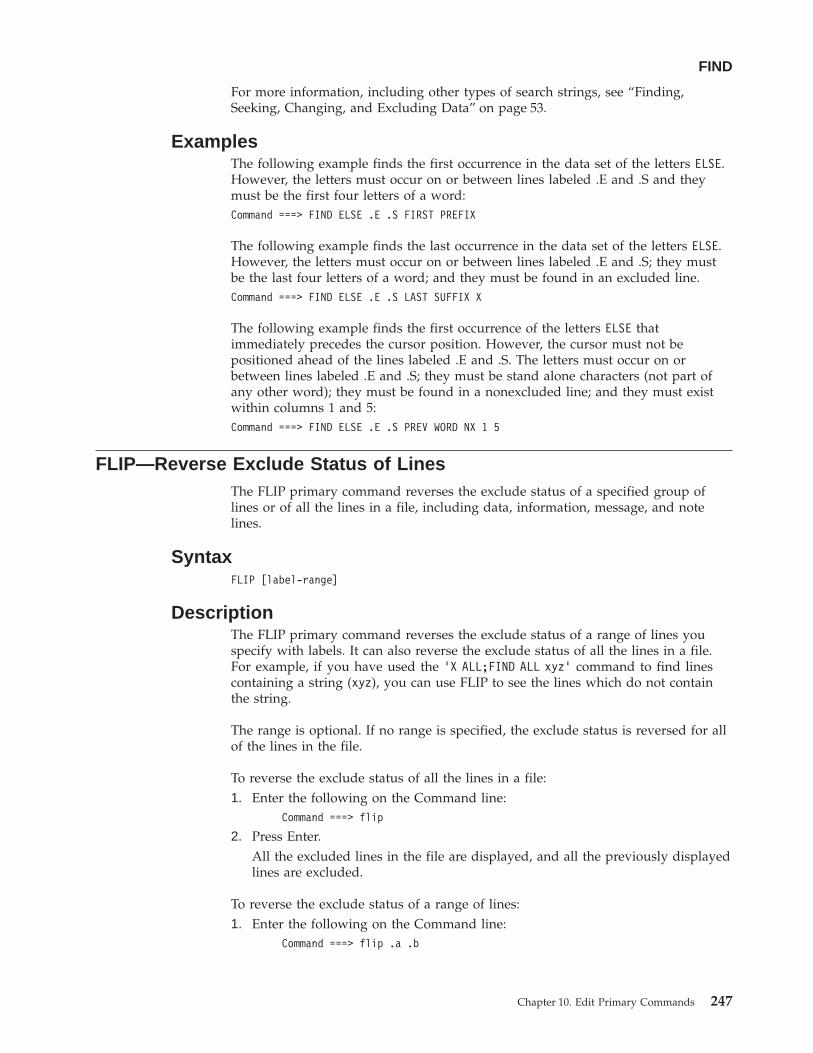
For more information, including other types of search strings, see “Finding,Seeking, Changing, and Excluding Data” on page 53.
ExamplesThe following example finds the first occurrence in the data set of the letters ELSE.However, the letters must occur on or between lines labeled .E and .S and theymust be the first four letters of a word:Command ===> FIND ELSE .E .S FIRST PREFIX
The following example finds the last occurrence in the data set of the letters ELSE.However, the letters must occur on or between lines labeled .E and .S; they mustbe the last four letters of a word; and they must be found in an excluded line.Command ===> FIND ELSE .E .S LAST SUFFIX X
The following example finds the first occurrence of the letters ELSE thatimmediately precedes the cursor position. However, the cursor must not bepositioned ahead of the lines labeled .E and .S. The letters must occur on orbetween lines labeled .E and .S; they must be stand alone characters (not part ofany other word); they must be found in a nonexcluded line; and they must existwithin columns 1 and 5:Command ===> FIND ELSE .E .S PREV WORD NX 1 5
FLIP—Reverse Exclude Status of LinesThe FLIP primary command reverses the exclude status of a specified group oflines or of all the lines in a file, including data, information, message, and notelines.
SyntaxFLIP [label-range]
DescriptionThe FLIP primary command reverses the exclude status of a range of lines youspecify with labels. It can also reverse the exclude status of all the lines in a file.For example, if you have used the 'X ALL;FIND ALL xyz' command to find linescontaining a string (xyz), you can use FLIP to see the lines which do not containthe string.
The range is optional. If no range is specified, the exclude status is reversed for allof the lines in the file.
To reverse the exclude status of all the lines in a file:1. Enter the following on the Command line:
Command ===> flip
2. Press Enter.All the excluded lines in the file are displayed, and all the previously displayedlines are excluded.
To reverse the exclude status of a range of lines:1. Enter the following on the Command line:
Command ===> flip .a .b
FIND
Chapter 10. Edit Primary Commands 247
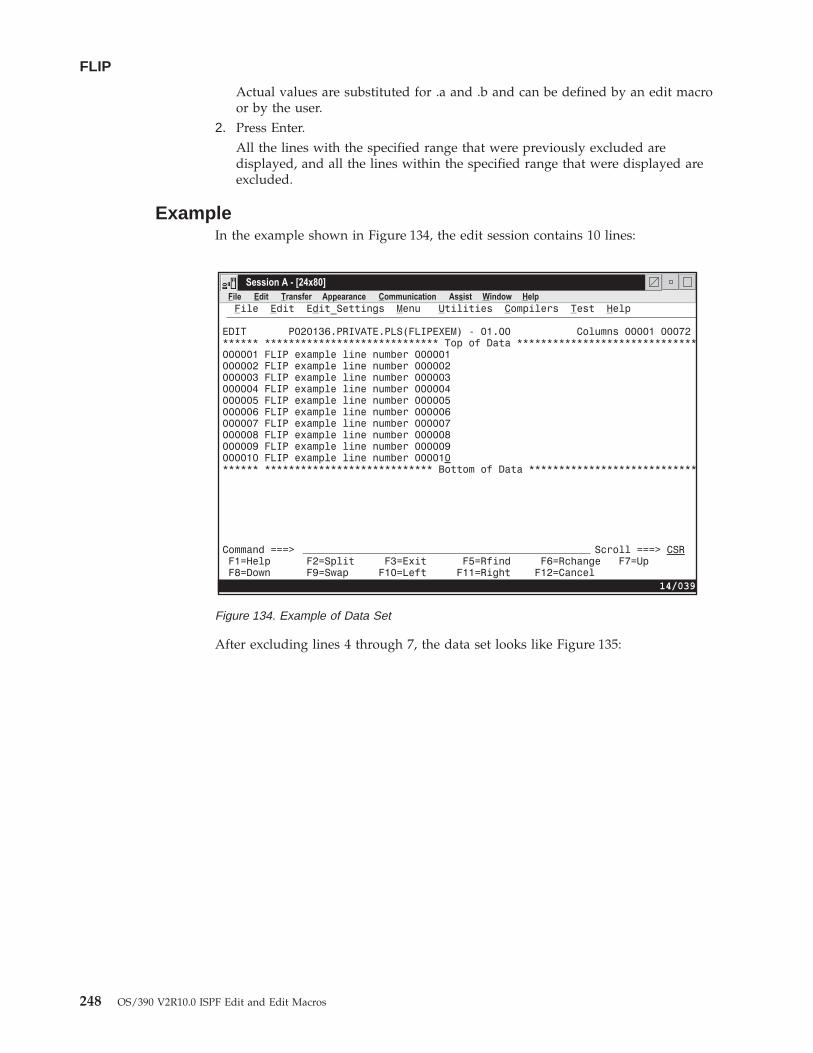
Actual values are substituted for .a and .b and can be defined by an edit macroor by the user.
2. Press Enter.All the lines with the specified range that were previously excluded aredisplayed, and all the lines within the specified range that were displayed areexcluded.
ExampleIn the example shown in Figure 134, the edit session contains 10 lines:
After excluding lines 4 through 7, the data set looks like Figure 135:
Figure 134. Example of Data Set
FLIP
248 OS/390 V2R10.0 ISPF Edit and Edit Macros
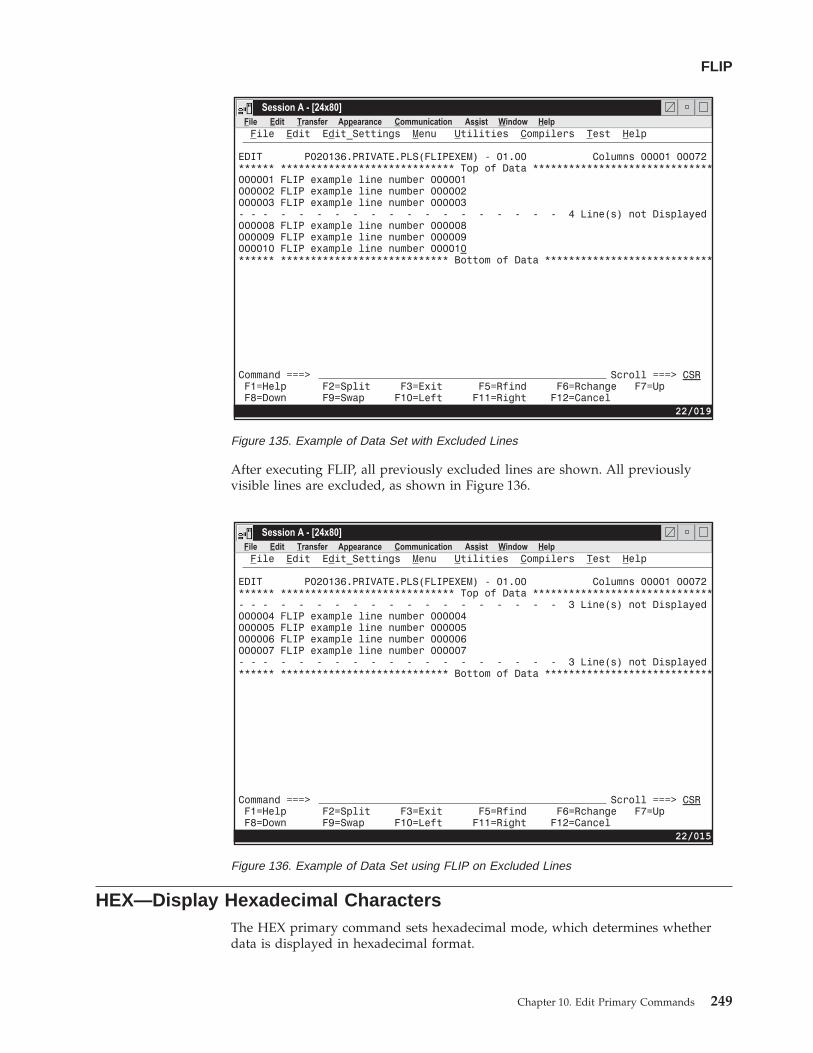
After executing FLIP, all previously excluded lines are shown. All previouslyvisible lines are excluded, as shown in Figure 136.
HEX—Display Hexadecimal CharactersThe HEX primary command sets hexadecimal mode, which determines whetherdata is displayed in hexadecimal format.
Figure 135. Example of Data Set with Excluded Lines
Figure 136. Example of Data Set using FLIP on Excluded Lines
FLIP
Chapter 10. Edit Primary Commands 249
SyntaxHEX [ON VERT]
[ON DATA][OFF ]
ON VERTDisplays the hexadecimal representation of the data vertically (two rowsper byte) under each character.
ON DATADisplays the hexadecimal representation of the data as a string ofhexadecimal characters (two per byte) under the characters.
OFF Does not display hexadecimal representation of the data.
DescriptionThe HEX command determines whether the editor displays hexadecimalrepresentation in a vertical or data string format. See Figure 138 on page 251 andFigure 139 on page 252 for examples of these two formats.
When the editor is operating in hexadecimal mode, three lines are displayed foreach source line. The first line shows the data in standard character form, while thenext two lines show the same data in hexadecimal representation.
Besides normal editing on the first of the three lines, you can change anycharacters by typing over the hexadecimal representations.
You can also use the FIND, CHANGE, and EXCLUDE commands to find, change,or exclude invalid characters or any specific hexadecimal character, regardless ofthe setting of hexadecimal mode. See the discussion of picture strings andhexadecimal strings under “Finding, Seeking, Changing, and Excluding Data” onpage 53.
ExamplesSuppose you are editing the data set member shown in Figure 137:
HEX
250 OS/390 V2R10.0 ISPF Edit and Edit Macros
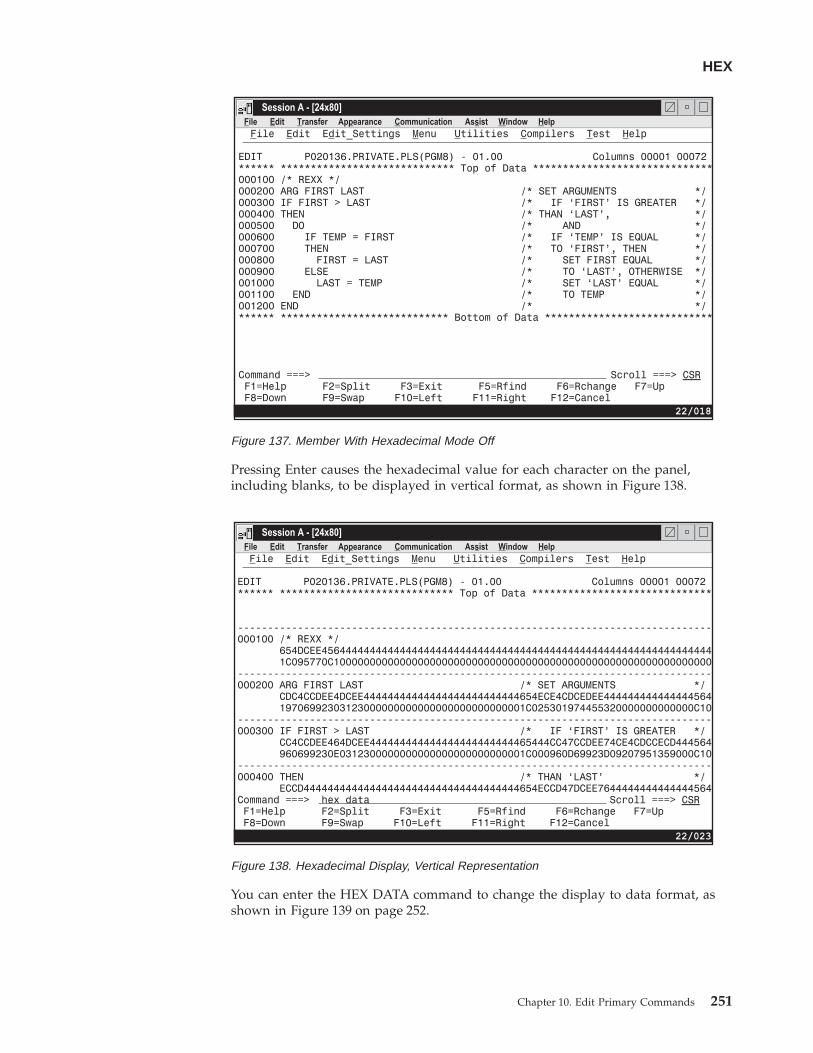
Pressing Enter causes the hexadecimal value for each character on the panel,including blanks, to be displayed in vertical format, as shown in Figure 138.
You can enter the HEX DATA command to change the display to data format, asshown in Figure 139 on page 252.
Figure 137. Member With Hexadecimal Mode Off
Figure 138. Hexadecimal Display, Vertical Representation
HEX
Chapter 10. Edit Primary Commands 251
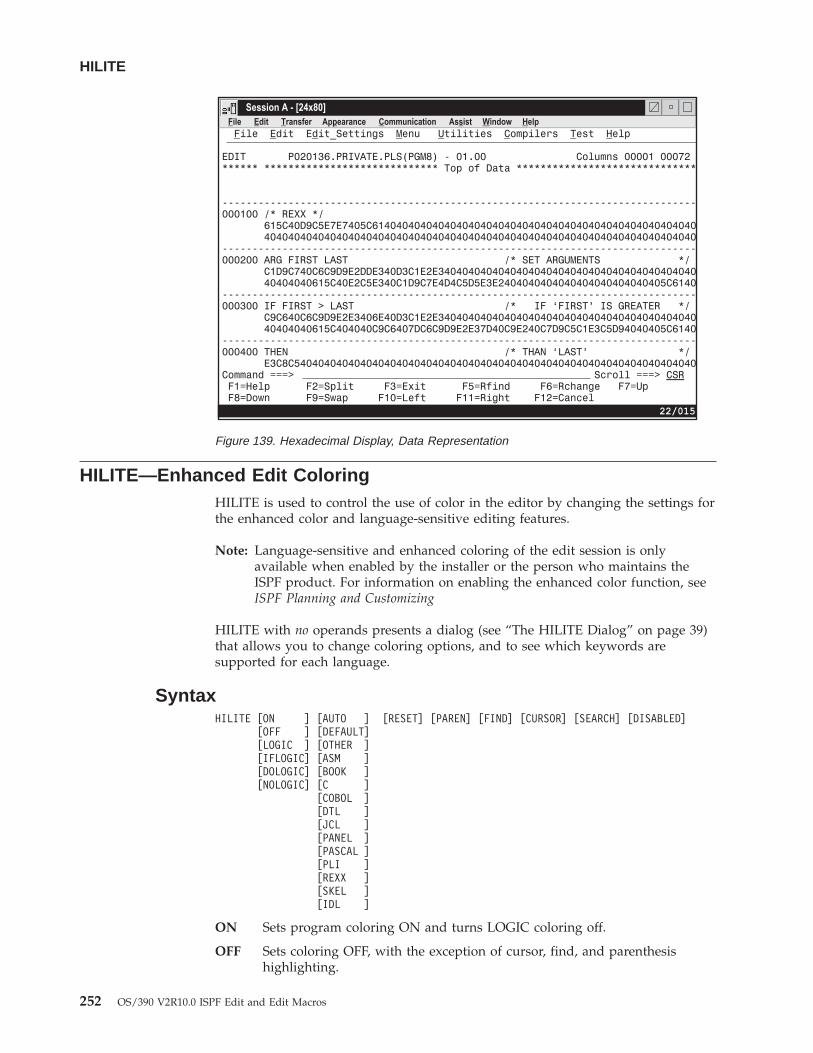
HILITE—Enhanced Edit ColoringHILITE is used to control the use of color in the editor by changing the settings forthe enhanced color and language-sensitive editing features.
Note: Language-sensitive and enhanced coloring of the edit session is onlyavailable when enabled by the installer or the person who maintains theISPF product. For information on enabling the enhanced color function, seeISPF Planning and Customizing
HILITE with no operands presents a dialog (see “The HILITE Dialog” on page 39)that allows you to change coloring options, and to see which keywords aresupported for each language.
SyntaxHILITE [ON ] [AUTO ] [RESET] [PAREN] [FIND] [CURSOR] [SEARCH] [DISABLED]
[OFF ] [DEFAULT][LOGIC ] [OTHER ][IFLOGIC] [ASM ][DOLOGIC] [BOOK ][NOLOGIC] [C ]
[COBOL ][DTL ][JCL ][PANEL ][PASCAL ][PLI ][REXX ][SKEL ][IDL ]
ON Sets program coloring ON and turns LOGIC coloring off.
OFF Sets coloring OFF, with the exception of cursor, find, and parenthesishighlighting.
Figure 139. Hexadecimal Display, Data Representation
HILITE
252 OS/390 V2R10.0 ISPF Edit and Edit Macros
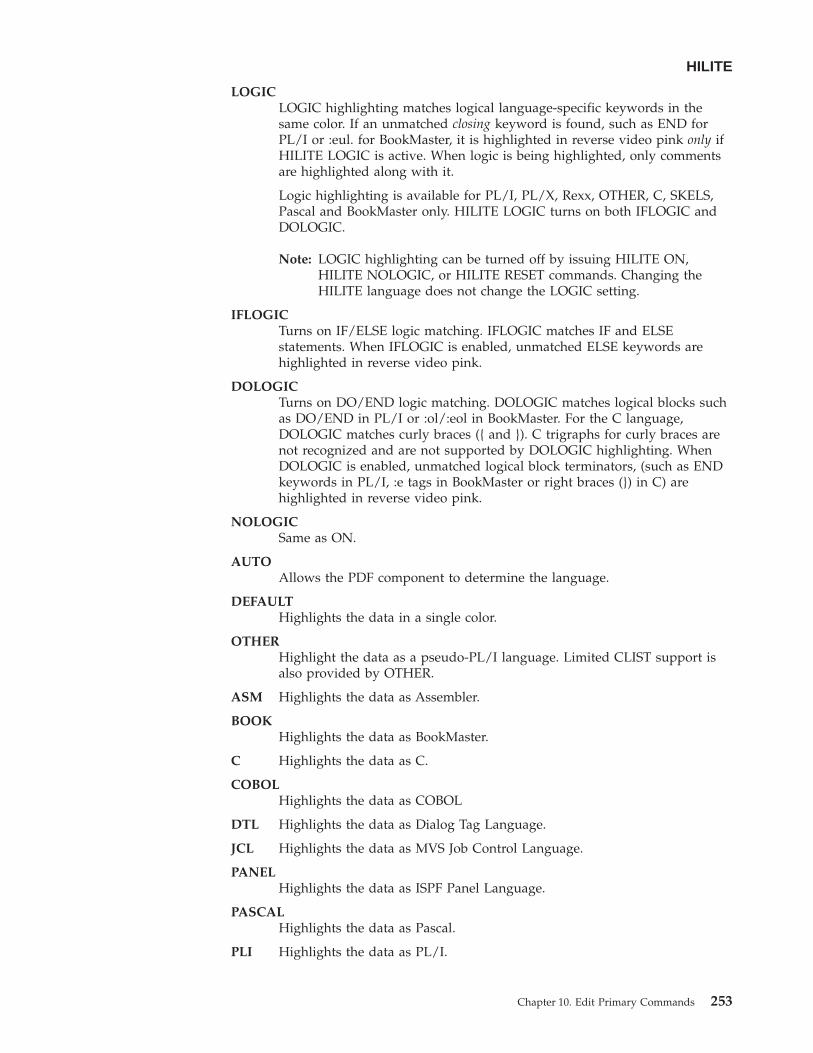
LOGICLOGIC highlighting matches logical language-specific keywords in thesame color. If an unmatched closing keyword is found, such as END forPL/I or :eul. for BookMaster, it is highlighted in reverse video pink only ifHILITE LOGIC is active. When logic is being highlighted, only commentsare highlighted along with it.
Logic highlighting is available for PL/I, PL/X, Rexx, OTHER, C, SKELS,Pascal and BookMaster only. HILITE LOGIC turns on both IFLOGIC andDOLOGIC.
Note: LOGIC highlighting can be turned off by issuing HILITE ON,HILITE NOLOGIC, or HILITE RESET commands. Changing theHILITE language does not change the LOGIC setting.
IFLOGICTurns on IF/ELSE logic matching. IFLOGIC matches IF and ELSEstatements. When IFLOGIC is enabled, unmatched ELSE keywords arehighlighted in reverse video pink.
DOLOGICTurns on DO/END logic matching. DOLOGIC matches logical blocks suchas DO/END in PL/I or :ol/:eol in BookMaster. For the C language,DOLOGIC matches curly braces ({ and }). C trigraphs for curly braces arenot recognized and are not supported by DOLOGIC highlighting. WhenDOLOGIC is enabled, unmatched logical block terminators, (such as ENDkeywords in PL/I, :e tags in BookMaster or right braces (}) in C) arehighlighted in reverse video pink.
NOLOGICSame as ON.
AUTOAllows the PDF component to determine the language.
DEFAULTHighlights the data in a single color.
OTHERHighlight the data as a pseudo-PL/I language. Limited CLIST support isalso provided by OTHER.
ASM Highlights the data as Assembler.
BOOKHighlights the data as BookMaster.
C Highlights the data as C.
COBOLHighlights the data as COBOL
DTL Highlights the data as Dialog Tag Language.
JCL Highlights the data as MVS Job Control Language.
PANELHighlights the data as ISPF Panel Language.
PASCALHighlights the data as Pascal.
PLI Highlights the data as PL/I.
HILITE
Chapter 10. Edit Primary Commands 253
REXX Highlights the data as Rexx.
SKEL Highlights the data as ISPF Skeleton Language.
IDL Highlights the data as IDL.
RESETResets defaults (AUTO, ON, Find and Cursor on).
PARENToggles parenthesis matching. When parenthesis matching is active, onlycomments are specially colored. All other code appears in the default color.Note that extra parenthesis highlighting is always active when highlightingis active.
FIND The HILITE FIND command toggles the highlighting color of any stringthat would be found by an RFIND. The user can select the highlight color.The default is reverse video white.
Only non-picture strings are supported, and the only additional qualifiersrecognized are hex strings (X’...’), character strings (C’...’), text strings(T’...’), WORD, PREFIX and SUFFIX, and boundaries specified in the FINDcommand. Hex strings may be highlighted. but non-displayable charactersare not highlighted. Labels are ignored when FIND strings are highlighted.
Because FIND highlighting is not quite as robust as the FIND commanditself, the editor may highlight more occurrences of the FIND string thanFIND would actually locate. The FIND operand toggles the display ofsearch strings. If HILITE FIND is issued when FIND highlighting is ineffect, FIND hilighting is disabled. Similarly, if FIND highlighting isdisabled, the HILITE FIND command enables it.
Note:
RESET has been enhanced, through the addition of a FIND operand, totemporarily disable the highlighting of FIND strings until the next FIND,RFIND, CHANGE, or RCHANGE command is issued. RESET with theFIND operand (or no operands at all), temporarily disables thehighlighting of FIND strings.
CURSORThe CURSOR operand toggles the highlighting of the phrase that containsthe cursor in a user selectable color. The default is white.
Cursor highlighting in Edit is performed in a manner similar to the way itis done in Browse. The entire phrase from the previous blank to the nextblank is highlighted. The CURSOR operand toggles cursor highlighting. IfHILITE CURSOR is issued when CURSOR highlighting is in effect,CURSOR highlighting is disabled. Similarly, if CURSOR highlighting isdisabled, the HILITE CURSOR command enables it.
SEARCHHILITE SEARCH finds the first unmatched END, ELSE, }, or ) above thelast displayed line on the screen. If a mismatched item is found, the file isscrolled so that the mismatch is at the top of the screen. The search formismatches only occurs for lines above the last displayed line, so you mayneed to scroll to the bottom of the file before issuing the HI SEARCHcommand.
HILITE
254 OS/390 V2R10.0 ISPF Edit and Edit Macros
Search is not available when the DEFAULT language operand is used.Search for language keywords is only supported for languages whichsupported by the logic option.
DISABLEDTurns off all HILITE features and removes all action bars. This benefitsperformance at the expense of function. Since DISABLED status is notstored in the edit profile, you need to reenter this operand each time youenter the editor. When DISABLED is in effect, keylists are unavailable forthat edit session.
DescriptionThe HILITE primary command can be used to highlight, in user-specified colors,numerous language-specific constructs, program logic features, the phrasecontaining the cursor, and any strings that match the previous FIND operation orthose that would be found by an RFIND or RCHANGE request. In addition, whenHILITE is entered with no operands, a dialog appears that allows you to setdefault colors for the data area in non-program files, for any characters typed sincethe previous Enter or PF key entry, and for strings located by FIND.
Both HI and HILIGHT are valid synonyms for HILITE.
Note: Highlighting is not available for edit sessions that involve the following:v Data sets with record lengths greater than 255v Mixed mode edit sessions (normally used when editing DBCS data)v Formatted data.
IMACRO—Specify an Initial MacroThe IMACRO primary command saves the name of an initial macro in the currentedit profile.
See “Initial Macros” on page 29 for more information on creating and using initialmacros.
SyntaxIMACRO {name | NONE}
name The name of the initial macro to be run when you are editing the data settype that matches the current edit profile. This macro is run before anydata appears.
For more information about displaying and defining a profile, see“Displaying or Defining an Edit Profile” on page 21.
NONEIndicates that no macro is to be run at the beginning of each edit session.The edit profile shows a value of NONE is shown in the edit profile whenno initial macro has been specified.
ExamplesTo save STARTUP as the initial macro, type:IMACRO STARTUP
To reset the profile with no initial macro, type:
HILITE
Chapter 10. Edit Primary Commands 255
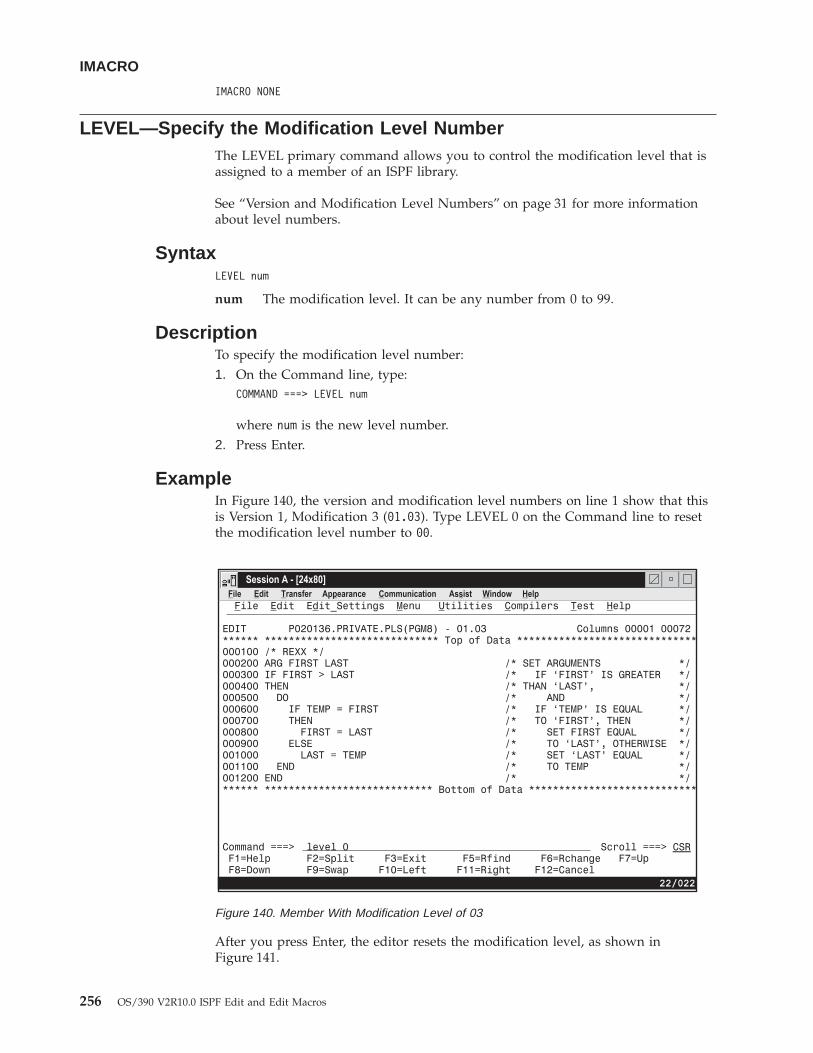
IMACRO NONE
LEVEL—Specify the Modification Level NumberThe LEVEL primary command allows you to control the modification level that isassigned to a member of an ISPF library.
See “Version and Modification Level Numbers” on page 31 for more informationabout level numbers.
SyntaxLEVEL num
num The modification level. It can be any number from 0 to 99.
DescriptionTo specify the modification level number:1. On the Command line, type:
COMMAND ===> LEVEL num
where num is the new level number.2. Press Enter.
ExampleIn Figure 140, the version and modification level numbers on line 1 show that thisis Version 1, Modification 3 (01.03). Type LEVEL 0 on the Command line to resetthe modification level number to 00.
After you press Enter, the editor resets the modification level, as shown inFigure 141.
Figure 140. Member With Modification Level of 03
IMACRO
256 OS/390 V2R10.0 ISPF Edit and Edit Macros
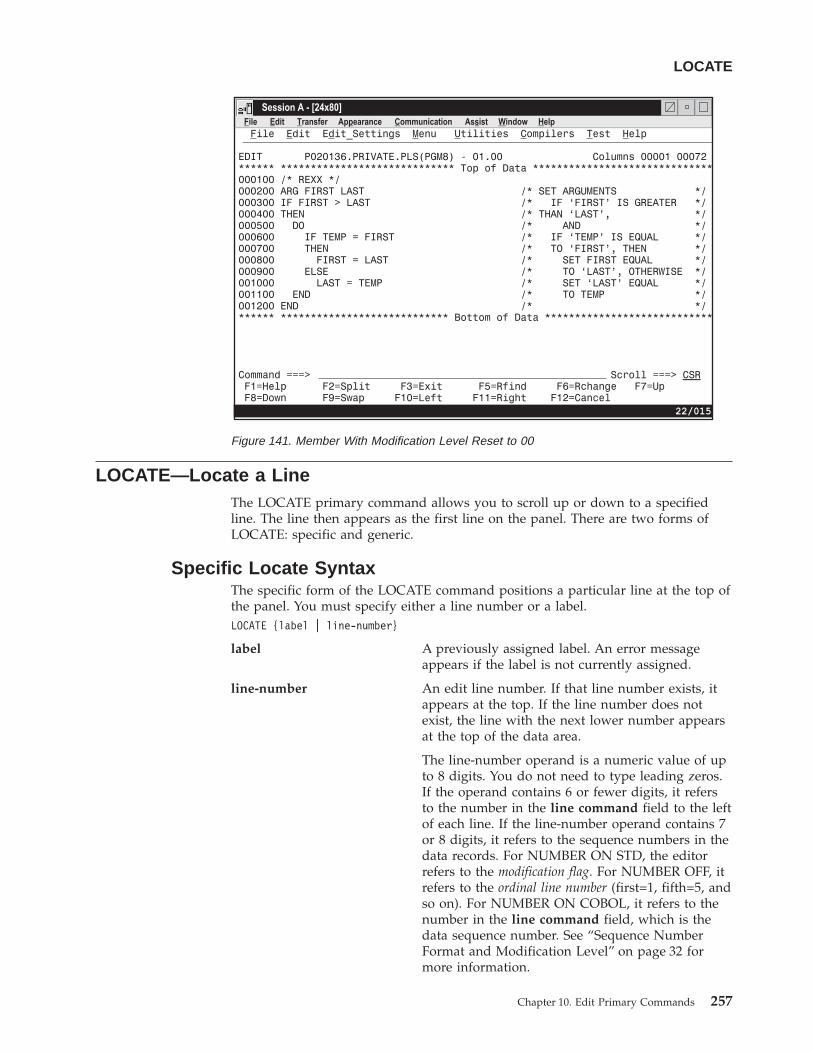
LOCATE—Locate a LineThe LOCATE primary command allows you to scroll up or down to a specifiedline. The line then appears as the first line on the panel. There are two forms ofLOCATE: specific and generic.
Specific Locate SyntaxThe specific form of the LOCATE command positions a particular line at the top ofthe panel. You must specify either a line number or a label.LOCATE {label | line-number}
label A previously assigned label. An error messageappears if the label is not currently assigned.
line-number An edit line number. If that line number exists, itappears at the top. If the line number does notexist, the line with the next lower number appearsat the top of the data area.
The line-number operand is a numeric value of upto 8 digits. You do not need to type leading zeros.If the operand contains 6 or fewer digits, it refersto the number in the line command field to the leftof each line. If the line-number operand contains 7or 8 digits, it refers to the sequence numbers in thedata records. For NUMBER ON STD, the editorrefers to the modification flag. For NUMBER OFF, itrefers to the ordinal line number (first=1, fifth=5, andso on). For NUMBER ON COBOL, it refers to thenumber in the line command field, which is thedata sequence number. See “Sequence NumberFormat and Modification Level” on page 32 formore information.
Figure 141. Member With Modification Level Reset to 00
LOCATE
Chapter 10. Edit Primary Commands 257
Generic Locate SyntaxThe generic LOCATE command positions the panel to the first, last, next, orprevious occurrence of a particular kind of line.LOCATE [FIRST] {CHANGE } [range]
[LAST ] {COMMAND }[NEXT ] {ERROR }[PREV ] {EXCLUDED}
{LABEL }{SPECIAL }{INFOLINE}{MSGLINE }{NOTELINE}
FIRST Searches from the first line, proceeding forward.
LAST Searches from the last line, proceeding backward.
NEXT Searches from the first line of the page displayed, proceeding forward.
PREV Searches from the first line of the page displayed, proceeding backward.
CHANGESearches for a line with a change flag (==CHG>).
COMMANDSearches for a line with a pending line command.
ERRORSearches for a line with an error flag (==ERR>).
EXCLUDEDSearches for an excluded line.
LABELSearches for a line with a label.
SPECIALSearches for a special non-data (temporary) line:v Bounds line flagged as =BNDS>v Column identification lines flagged as =COLS>v Information lines flagged as ======v Mask lines flagged as =MASK>v Message lines flagged as ==MSG>v Note lines flagged as =NOTE=v Profile lines flagged as =PROF>v Tabs line flagged as =TABS>.
INFOLINESearches for information lines flagged with ======
MSGLINESearches for message lines flagged with ==MSG>
NOTELINESearches for note lines flagged with =NOTE=
range Two labels that define the group of lines to be searched.
ExamplesTo find the next special line, type:LOCATE SPE
LOCATE
258 OS/390 V2R10.0 ISPF Edit and Edit Macros
||||||||||
||
||
||
To find the first error line (==ERR>), type:LOCATE ERR FIRST
To find the next line with a label, type:LOC NEXT LABEL
To find the next excluded line between .START and .END, type:LOC X .START .END
To find the first excluded line between .E and .S, type:L FIRST .E .S X
To find the first message line, type:LOCATE FIRST MSGLINE
MODEL—Copy a Model into the Current Data SetThe model name form of the MODEL primary command copies a specified dialogdevelopment model before or after a specified line.
The class name form of the MODEL primary command changes the model classthat the editor uses to determine which model you want. For more information onedit models, see Chapter 4. Using Edit Models.
Model Name SyntaxMODEL [model-name [qualifier...]] {AFTER label} [NOTES ]
{BEFORE label} [NONOTES]
If you omit the model name or a required qualifier, or if there is a validation error,the editor displays a series of selection panels from which you can select thedesired information.
model-nameThe name of the model to be copied, such as VGET for the VGET servicemodel. This operand can also be one of the options listed on a modelselection panel, such as V1 for the VGET service model. Refer to ISPFPlanning and Customizing for a list of models and model names.
qualifierThe name of a model on a secondary model selection panel, such asTBCREATE for the TBCREATE service model. This operand can also be oneof the options listed on a model selection panel, such as G1 for theTBCREATE service model.
For example, a model selection panel allows you to enter T1 to choosetable models. Another model selection panel then appears for choosingtable models, such as G1 for the TBCREATE service model. Therefore, yourMODEL primary command could use either TABLES or T1 as themodel-name operand and either TBCREATE or G1 at the qualifier operand.The simplest way would be to use TBCREATE or G1 as the model-nameoperand and omit the qualifier operand. Refer to ISPF Planning andCustomizing for a list of models and model names.
AFTER labelIdentifies the line after which the model is to be copied. If you have notdefined a label, use the A or B line command to specify the destination.
LOCATE
Chapter 10. Edit Primary Commands 259
|
|
|
The only time this operand or the BEFORE label operand is not required iswhen the data set or member is empty.
BEFORE labelIdentifies the line before which the model is to be copied. If you have notdefined a label, use the A or B line command to specify the destination.The only time this operand or the AFTER label operand is not required iswhen the data set or member is empty.
NOTESOverrides the current edit profile setting for note mode, to include anynotes that are part of the model.
NONOTESOverrides the current edit profile setting for note mode, to exclude anynotes that are part of the model.
Class Name SyntaxMODEL [CLASS [class-name]]
If you omit the class-name, or if there is a validation error, the editor displays aseries of selection panels from which you can select the desired information.
CLASSWhen entered without the optional class-name operand, the editor displaysthe Model Classes panel, from which you can select a model class. Whenentered with the class-name operand, the macro specifies that the currentmodel class is to be replaced by class-name. In both cases, the new classname is used for all models from that point on, until you change themodel class again or end the edit session.
class-nameSpecifies a new class for the current edit session. It must be a name on theModel Classes panel or an allowable abbreviation. The model classcoincides with the type of model, such as REXX, COBOL, or FORTRAN.
ExampleYou are editing a new member named NEWMEM and have not decided whichservice to use first. Figure 142 shows the display screen for NEWMEM. TypeMODEL on the Command line without any operands. Here, the model name formof the MODEL command is used and the A (after) line command is used instead ofthe AFTER operand.
MODEL
260 OS/390 V2R10.0 ISPF Edit and Edit Macros
The data set type is EXEC, so the editor displays the REXX Models panel (Figure 143) when you press Enter. To begin with the VGET service, you type V1 onthe Option line and press Enter.
The editor inserts the VGET service model into the NEWMEM member, as shownin Figure 144. Because the edit profile is set to NOTE ON, the model’s notes are alsoincluded.
Figure 142. Before Model Command
REXX Models
Display Miscellaneous Library AccessD1 DISPLAY M1 SELECT L1 LMCLOSE L16 LMRENAMED2 TBDISPL M2 CONTROL L2 LMERASE L17 LMHIERD3 SETMSG M3 BROWSE L3 LMFREE L18 LMACTD4 PQUERY M4 EDIT L4 LMGET L19 LMDEACTD5 ADDPOP M5 LOG L5 LMINIT L20 LMREVIEWD6 REMPOP M6 GETMSG L6 LMMADD L21 LMMDISP
M7 EDREC L7 LMMDEL L22 LMMOVEFile Tailoring M8 LIBDEF L8 LMMFIND L23 LMCOPYF1 FTOPEN M9 LIST L9 LMMLIST L24 LMCOMPF2 FTINCL M10 VIEW L10 LMMREN L25 LMMSTATSF3 FTCLOSE L11 LMMREP L26 LMPRINTF4 FTERASE Variables L12 LMOPEN L27 LMDINIT
V1 VGET L13 LMPROM L28 LMDLISTTables V2 VPUT L14 LMPUT L29 LMDFREET1 TABLES V3 VERASE L15 LMQUERY L30 LMDDISP
Enter END command to cancel MODEL command.
Option ===> __________________________________________________________________F1=Help F2=Split F3=Exit F9=Swap F12=Cancel
Figure 143. REXX Models Panel (ISREMRXC)
MODEL
Chapter 10. Edit Primary Commands 261
MOVE—Move DataThe MOVE primary command moves a sequential data set or a member of apartitioned data set into the data being edited.
SyntaxMOVE [member] [AFTER label ]
(member) [BEFORE label][data set name]
memberA member of the ISPF library or partitioned data set you are editing.
data set nameA partially qualified or fully qualified data set name. If the data set ispartitioned you can include a member name in parentheses or select amember from a member list.
AFTER labelThe destination of the data that is being moved. AFTER label causes thedata to be moved after the specified label.
BEFORE labelThe destination of the data that is being moved. BEFORE label causes thedata to be moved before the specified label.
The label can be either a label you define or one of the editor-defined labels, suchas .ZF and .ZL. If you have not defined a label and the editor-defined labels arenot appropriate for your purpose, use the A (after) or B (before) line command tospecify the data’s destination.
If the data set or member that you are editing is empty, you do not need to specifya destination for the data being moved.
Figure 144. REXX Model of VGET Service
MOVE
262 OS/390 V2R10.0 ISPF Edit and Edit Macros
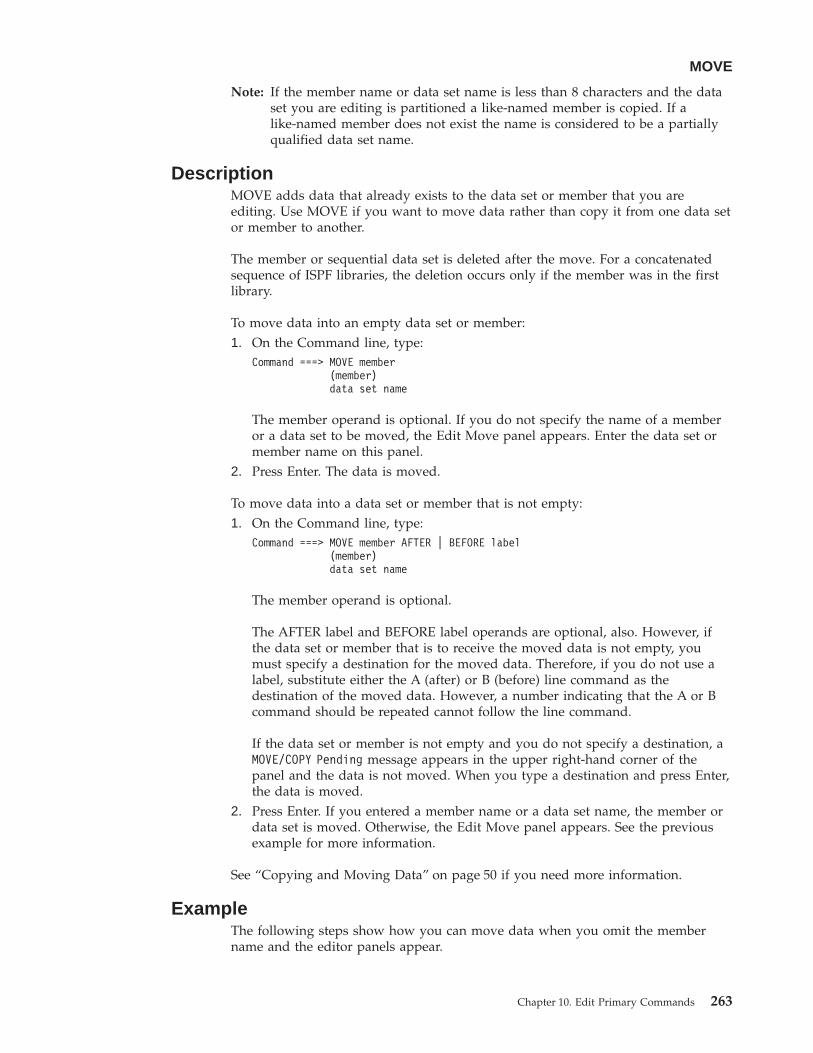
Note: If the member name or data set name is less than 8 characters and the dataset you are editing is partitioned a like-named member is copied. If alike-named member does not exist the name is considered to be a partiallyqualified data set name.
DescriptionMOVE adds data that already exists to the data set or member that you areediting. Use MOVE if you want to move data rather than copy it from one data setor member to another.
The member or sequential data set is deleted after the move. For a concatenatedsequence of ISPF libraries, the deletion occurs only if the member was in the firstlibrary.
To move data into an empty data set or member:1. On the Command line, type:
Command ===> MOVE member(member)data set name
The member operand is optional. If you do not specify the name of a memberor a data set to be moved, the Edit Move panel appears. Enter the data set ormember name on this panel.
2. Press Enter. The data is moved.
To move data into a data set or member that is not empty:1. On the Command line, type:
Command ===> MOVE member AFTER | BEFORE label(member)data set name
The member operand is optional.
The AFTER label and BEFORE label operands are optional, also. However, ifthe data set or member that is to receive the moved data is not empty, youmust specify a destination for the moved data. Therefore, if you do not use alabel, substitute either the A (after) or B (before) line command as thedestination of the moved data. However, a number indicating that the A or Bcommand should be repeated cannot follow the line command.
If the data set or member is not empty and you do not specify a destination, aMOVE/COPY Pending message appears in the upper right-hand corner of thepanel and the data is not moved. When you type a destination and press Enter,the data is moved.
2. Press Enter. If you entered a member name or a data set name, the member ordata set is moved. Otherwise, the Edit Move panel appears. See the previousexample for more information.
See “Copying and Moving Data” on page 50 if you need more information.
ExampleThe following steps show how you can move data when you omit the membername and the editor panels appear.
MOVE
Chapter 10. Edit Primary Commands 263
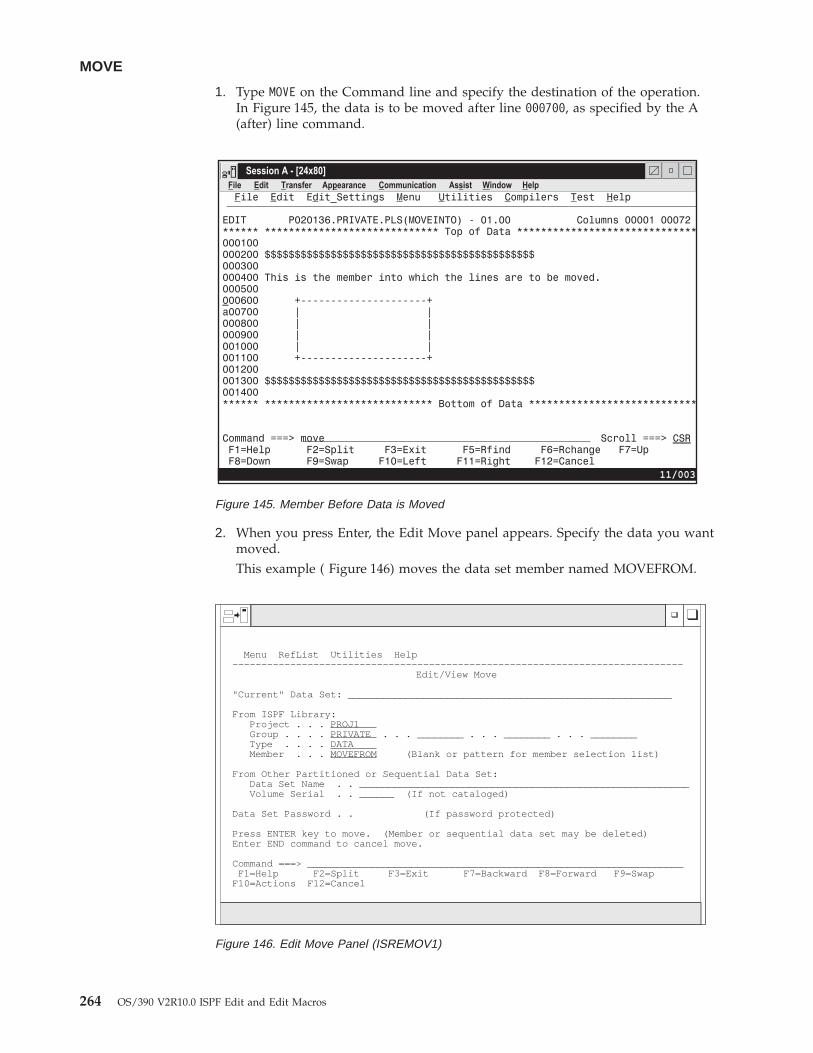
1. Type MOVE on the Command line and specify the destination of the operation.In Figure 145, the data is to be moved after line 000700, as specified by the A(after) line command.
2. When you press Enter, the Edit Move panel appears. Specify the data you wantmoved.This example ( Figure 146) moves the data set member named MOVEFROM.
Figure 145. Member Before Data is Moved
Menu RefList Utilities Help------------------------------------------------------------------------------
Edit/View Move
"Current" Data Set: ________________________________________________________
From ISPF Library:Project . . . PROJ1Group . . . . PRIVATE . . . ________ . . . ________ . . . ________Type . . . . DATAMember . . . MOVEFROM (Blank or pattern for member selection list)
From Other Partitioned or Sequential Data Set:Data Set Name . . _________________________________________________________Volume Serial . . ______ (If not cataloged)
Data Set Password . . (If password protected)
Press ENTER key to move. (Member or sequential data set may be deleted)Enter END command to cancel move.
Command ===> _________________________________________________________________F1=Help F2=Split F3=Exit F7=Backward F8=Forward F9=Swap
F10=Actions F12=Cancel
Figure 146. Edit Move Panel (ISREMOV1)
MOVE
264 OS/390 V2R10.0 ISPF Edit and Edit Macros
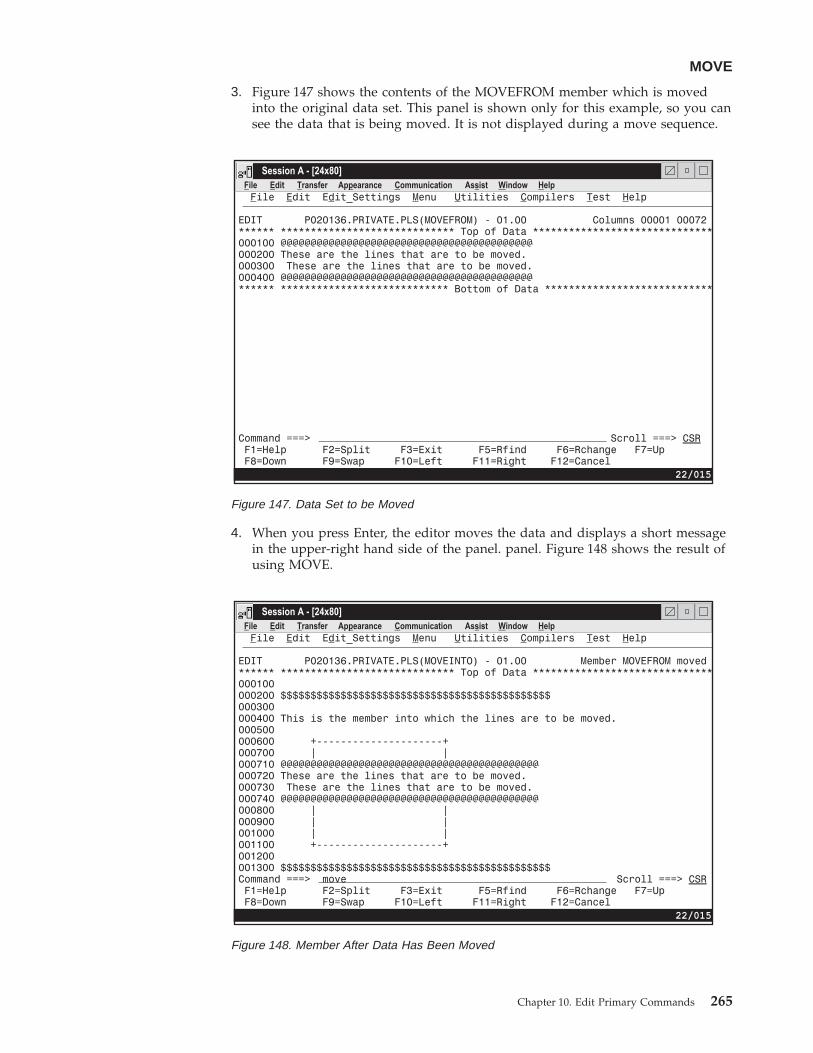
3. Figure 147 shows the contents of the MOVEFROM member which is movedinto the original data set. This panel is shown only for this example, so you cansee the data that is being moved. It is not displayed during a move sequence.
4. When you press Enter, the editor moves the data and displays a short messagein the upper-right hand side of the panel. panel. Figure 148 shows the result ofusing MOVE.
Figure 147. Data Set to be Moved
Figure 148. Member After Data Has Been Moved
MOVE
Chapter 10. Edit Primary Commands 265
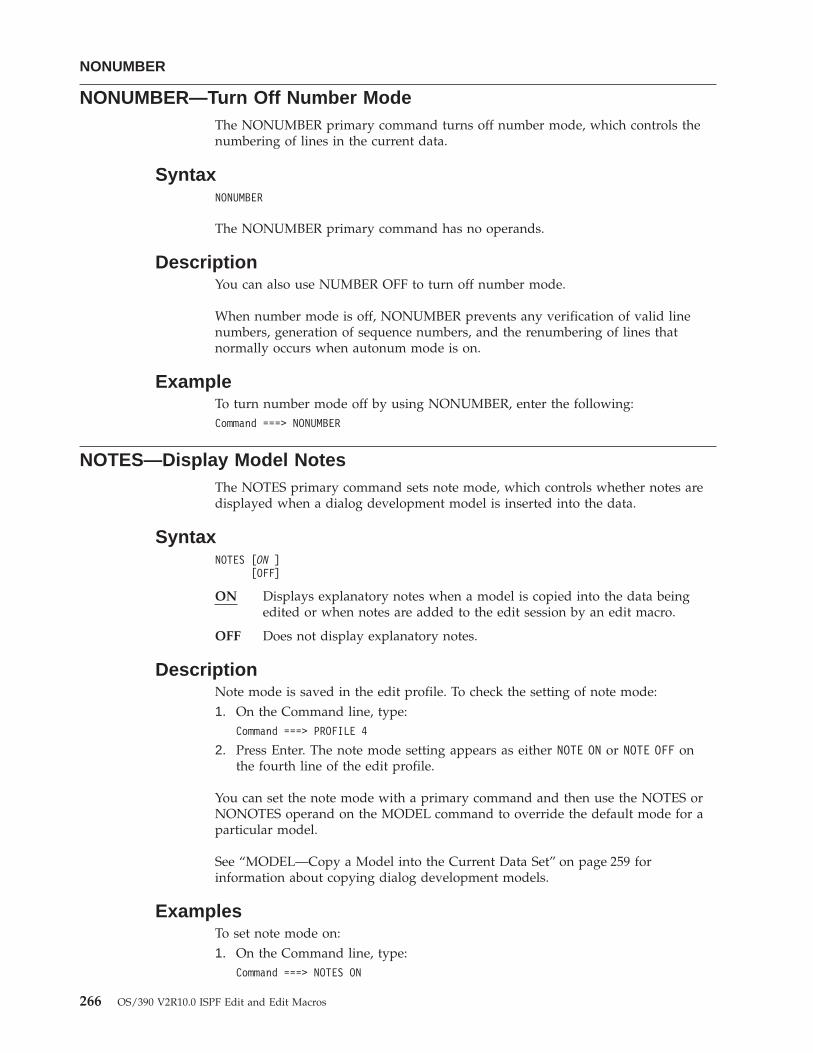
NONUMBER—Turn Off Number ModeThe NONUMBER primary command turns off number mode, which controls thenumbering of lines in the current data.
SyntaxNONUMBER
The NONUMBER primary command has no operands.
DescriptionYou can also use NUMBER OFF to turn off number mode.
When number mode is off, NONUMBER prevents any verification of valid linenumbers, generation of sequence numbers, and the renumbering of lines thatnormally occurs when autonum mode is on.
ExampleTo turn number mode off by using NONUMBER, enter the following:Command ===> NONUMBER
NOTES—Display Model NotesThe NOTES primary command sets note mode, which controls whether notes aredisplayed when a dialog development model is inserted into the data.
SyntaxNOTES [ON ]
[OFF]
ON Displays explanatory notes when a model is copied into the data beingedited or when notes are added to the edit session by an edit macro.
OFF Does not display explanatory notes.
DescriptionNote mode is saved in the edit profile. To check the setting of note mode:1. On the Command line, type:
Command ===> PROFILE 4
2. Press Enter. The note mode setting appears as either NOTE ON or NOTE OFF onthe fourth line of the edit profile.
You can set the note mode with a primary command and then use the NOTES orNONOTES operand on the MODEL command to override the default mode for aparticular model.
See “MODEL—Copy a Model into the Current Data Set” on page 259 forinformation about copying dialog development models.
ExamplesTo set note mode on:1. On the Command line, type:
Command ===> NOTES ON
NONUMBER
266 OS/390 V2R10.0 ISPF Edit and Edit Macros
2. Press Enter. The next time you insert a model, the explanatory notes appearalong with the model.
To set note mode off:1. On the Command line, type:
Command ===> NOTES OFF
2. Press Enter. The next time you insert a model, the explanatory notes are notdisplayed along with the model.
NULLS—Control Null SpacesThe NULLS primary command sets nulls mode, which determines whether trailingspaces in each data field are written to the panel as blanks or nulls.
SyntaxNULLS [ON STD]
[ON ALL][OFF ]
ON STDSpecifies that in fields containing any blank trailing space, the space iswritten as one blank followed by nulls. If the field is entirely empty, it iswritten as all blanks.
ON ALLSpecifies that all trailing blanks and all-blank fields are written as nulls.
OFF Specifies that trailing blanks in each data field are written as blanks.
DescriptionBlank characters (X'40') and null characters (X'00') both appear as blanks. Whenyou use the I (insert) line command, the data entry area appears as blanks forNULLS ON STD and as nulls for NULLS ON ALL.
Trailing nulls simplify use of the Ins (insert) key on the IBM 3270 keyboard. Youcan use this key to insert characters on a line if the line contains trailing nulls.
Besides using the NULLS command, you can create nulls at the end of a line byusing the Erase EOF or Del (delete) key. Null characters are never stored in thedata; they are always converted to blanks.
Note: When you swap screens in split screen mode, the nulls are replaced byspaces until you press an interrupt key, such as Enter, or a function key.
ExamplesTo set nulls mode on with all trailing blanks and all-blank fields written as nulls,enter the following:Command ===> NULLS ON ALL
To set nulls mode on with blank trailing space written as one blank followed bynulls and empty fields written as all blanks, enter the following:Command ===> NULLS ON STD
To set nulls mode off and thus have trailing blanks in each data field, enter thefollowing:
NOTES
Chapter 10. Edit Primary Commands 267
Command ===> NULLS OFF
NUMBER—Generate Sequence NumbersThe NUMBER primary command sets number mode, which controls thenumbering of lines in the current data.
SyntaxNUMBER [ON ] [STD ] [DISPLAY]
[OFF] [COBOL ][STD COBOL][NOSTD][NOCOBOL][NOSTD NOCOBOL]
ON Automatically verifies that all lines have valid numbers in ascendingsequence and renumbers any lines that are either unnumbered or out ofsequence. You can also use RENUM to turn number mode on andrenumber lines.
The editor interprets the STD, COBOL, and DISPLAY operands only whennumber mode is turned on.
OFF Turns number mode off. You can also use NONUMBER to turn numbermode off. If you alter or delete sequence numbers and enter NONUMBERon the Command line at the same time, the editor issues the message Someinput data ignored and discards the data typed over the sequencenumbers. The editor converts the original sequence numbers to data.
STD Numbers the data in the standard sequence field. This is the default for allnon-COBOL data set types.
COBOLNumbers the data in the COBOL field. This is the default for all COBOLdata set types.
STD COBOLNumbers the data in both fields.
If both STD and COBOL numbers are generated, the STD number isdetermined and then used as the COBOL number. This can result inCOBOL numbers that are out of sequence if the COBOL and STD fieldswere not synchronized. Use RENUM to force synchronization.
NOSTDTurns standard number mode off.
NOCOBOLTurns COBOL number mode off.
NOSTD NOCOBOLTurns both the standard number mode and COBOL number mode off.
DISPLAYCauses the width of the data window to include the sequence numberfields. Otherwise, the width of the window does not include the sequencenumber fields. When you display a data set with a logical record length of80 and STD numbering, the sequence numbers are not shown unless youare using a 3278 Model 5 terminal, which displays 132 characters.Automatic left or right scrolling is performed, if required, so that theleftmost column of the data window is the first column displayed.
NULLS
268 OS/390 V2R10.0 ISPF Edit and Edit Macros
DescriptionAttention: If number mode is off, make sure the first 6 columns of your data setare blank before turning COBOL number mode on. Otherwise, the data in thesecolumns is replaced by sequence numbers. If that happens and if edit recovery orSETUNDO is on, you can use the UNDO command to recover the data. You canalso use CANCEL at any time to end the edit session without saving the data.
When number mode is on, NUMBER verifies that all lines have valid numbers inascending sequence. It renumbers any lines that are either unnumbered or out ofsequence, but it does not otherwise change existing numbers.
In number mode, the editor automatically generates sequence numbers in the datafor new lines created when data is copied or inserted. The editor also automaticallyrenumbers the data when it is saved if autonum mode is in effect.
If the number overlays the shift-in (SI) or shift-out (SO) characters, the double-bytecharacters appear incorrectly and results are unpredictable.
ExamplesTo number data in the standard sequence field, enter the following:Command ===> NUMBER ON STD
To number data in both the standard and COBOL fields and include sequencenumbers in the display, enter the following:COMMAND ===> NUMBER ON STD COBOL DISPLAY
PACK—Compress DataThe PACK primary command sets pack mode, which controls whether the data isto be stored in packed format.
The PACK command saves the pack mode setting in the edit profile. See “PackingData” on page 19 for more information about packing data.
SyntaxPACK [ON ]
[OFF]
ON Saves data in packed format.
OFF Saves data in unpacked (standard) format.
ExamplesTo set pack mode on, enter the following:Command ===> PACK ON
To set pack mode off, enter the following:Command ===> PACK OFF
PASTE—Move or Copy Lines from ClipboardThe PASTE primary command moves or copies lines from a clipboard into an editsession.
NUMBER
Chapter 10. Edit Primary Commands 269
SyntaxPASTE [clipboardname] [AFTER label]
[BEFORE label][KEEP|DELETE]
clipboardnameThe name of the clipboard to use. If you omit this parameter, the ISPFdefault clipboard (named DEFAULT) is used. You can define up to tenadditional clipboards. The size of the clipboards and number of clipboardsmight be limited by installation defaults.
BEFORE labelThe destination of the data that is being transferred from the clipboard.BEFORE copies the data before the specified label.
AFTER labelThe destination of the data that is being transferred from the clipboard.AFTER copies the data after the specified label.
KEEP Records are copied and not removed from the clipboard. If you omit thiskeyword, the records are removed from the clipboard.
DELETERemove lines from the clipboard. This is the default. You can change thisdefault within the EDSET primary command.
DescriptionPASTE copies or moves lines from a specified clipboard to the current edit session.If lines in the clipboard are longer than the lines in the edit session, they aretruncated.
The portion of the line that is saved in the clipboard is only the data portion of theline. Line numbers are not saved. If the data was CUT from a data set that hadsequence numbers and is PASTEd into an edit session without sequence numbers,or if it was CUT from a data set without sequence numbers and PASTEd into asession with sequence numbers, some shifting of data is likely to occur.
ExampleTo paste data from the default clipboard to the line after the last line in the editsession:PASTE AFTER .ZLAST
To paste data from the default clipboard to the line after the first line in the editsession, without clearing the contents of the clipboard:PASTE AFTER .ZFIRST KEEP
PRESERVE - Enable Saving of Trailing BlanksThe PRESERVE primary command enables or disables the saving of trailing blanksin the editor. This gives you the ability to override the setting for the Preserve VBrecord length field on the edit entry panel.
SyntaxPRESERVE [ON ]
[OFF]
PASTE
270 OS/390 V2R10.0 ISPF Edit and Edit Macros
|||
|||
ON The editor preserves the record length of the record when the data issaved.
OFF Turns truncation on. ISPF removes trailing blanks when saving variablelength files.
Regardless of the PRESERVE setting, if a line has a length of zero, ISPF saves 1blank.
DescriptionPRESERVE ON causes the editor to save trailing blanks for variable length files.The number of blanks saved for a particular record is determined by one of thefollowing:v the original length of the record when it was read in to the editorv the number of blanks required to pad the record length specified by the
SAVE_LENGTH edit macro commandv the length of the record that was saved on disk during a previous SAVE request
in the same edit session.
PRESERVE OFF causes the editor to truncate trailing blanks. If a line is empty ISPFsaves 1 blank.
Use of the PRESERVE command does not prevent the editor from working on datapast the specified record length. The length set and returned by the PRESERVEcommand is only used when the data is written and does not affect the operationof other edit functions.
ExamplesTo enable the editor to remove trailing blanks when data is saved, enter thefollowing:Command ===> PRESERVE OFF
To save the trailing blanks, enter the following:Command ===> PRESERVE ON
PROFILE—Control and Display Your ProfileThe control form of the PROFILE primary command appears your current editprofile, defines a new edit profile, or switches to a different edit profile.
The lock form of the PROFILE primary command locks or unlocks the current editprofile.
Profile Control SyntaxPROFILE [name] [number]
name The profile name. It can consist of up to 8 alphanumeric characters, thefirst of which must be alphabetic. The edit profile table is searched for anexisting entry with the same name. That profile is then read and used. Ifone is not found, a new entry is created in the profile table.
If you omit this operand, the current edit profile is used.
numberThe number of lines, from 0 through 9, of profile data to be displayed.
PRESERVE
Chapter 10. Edit Primary Commands 271
When you type 0 as the number, no profile data is displayed. When nooperands are entered,the first five lines, which contain the =PROF> flags,always appear. However, the =MASK> and =TABS> lines are not displayed ifthey contain all blanks; if the =MASK> and/or =TABS> lines do containdata, they appears, followed by the =COLS> line.
For more information about displaying and defining a profile, see “Displaying orDefining an Edit Profile” on page 21.
Profile Lock SyntaxPROFILE {LOCK | UNLOCK}
LOCK Specifies that the current values in the profile are saved in the edit profiletable and are not modified until the profile is unlocked. The current copyof the profile can be changed, either because of commands you enter thatmodify profile values (BOUNDS and NUMBER, for example) or because ofdifferences in the data from the current profile settings. However, unlessyou unlock the edit profile, the saved values replace the changes when youend the edit session.
Caps, number, stats, and pack mode are automatically changed to fit thedata. These changes occur when the data is first read or when data iscopied into the data set. Message lines (==MSG>) are inserted in the data setto show you which changes occurred.
Note: To force caps, number, stats, or pack mode to a particular setting,use an initial macro. Be aware, however, that if you set numbermode on, data may be overlaid.
UNLOCKSpecifies that the editor saves changes to profile values.
See “Locking an Edit Profile” on page 23 for more information about locking andunlocking the profile.
Profile Reset SyntaxPROFILE RESET
RESETSpecifies that the ZDEFAULT profile is to be removed and the site-wideconfiguration for new edit profiles is to be used.
See “Locking an Edit Profile” on page 23 for more information about locking andunlocking the profile.
DescriptionTo display the current edit profile:1. On the Command line, type:
Command ===> PROFILE number
2. Press Enter. The current edit profile appears.
To switch edit profiles or define a new edit profile without displaying the newprofile:1. On the Command line, type:
Command ===> PROFILE name 0
PROFILE
272 OS/390 V2R10.0 ISPF Edit and Edit Macros
where name is the name of the edit profile to which you want to switch. Thisalso specifies that no lines are to be displayed. If you want to display the newprofile, you can omit the number or enter a number from 1 to 9.
2. Press Enter. The profile specified by the name operand becomes the active editprofile, but is not displayed if you entered 0. If the profile does not exist, anentry is created for it in the edit profile table, using the values of the currentedit profile.
To lock the current edit profile:1. On the Command line, type:
Command ===> PROFILE LOCK
2. Press Enter. The values in the current edit profile are saved in the edit profiletable. From this point on, any changes you make to the current edit profileaffect only the current edit session. Values that were saved when the currentprofile was locked are used the next time you begin an edit session with thisprofile.
To unlock an edit profile:1. On the Command line, type:
Command ===> PROFILE UNLOCK
2. Press Enter. From this point on, any changes that you make to the current editprofile replace any values that may have been saved for this profile in the editprofile table. Also, these changes are saved when you end the current editsession.
ExampleFigure 149 shows a typical edit profile for a REXX data set. The display resultsfrom entering PROFILE with no operands. The =TABS> and =MASK> lines appearbecause they contained data. If they had been empty, they would not haveappeared.
PROFILE
Chapter 10. Edit Primary Commands 273
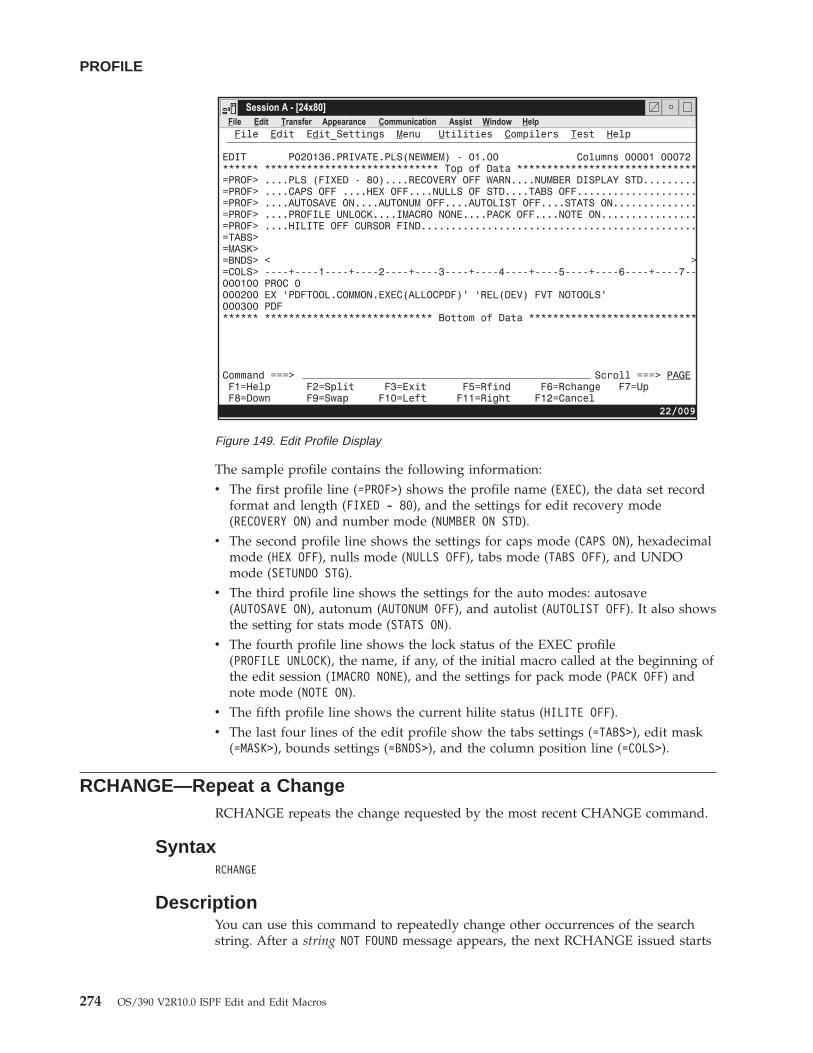
The sample profile contains the following information:v The first profile line (=PROF>) shows the profile name (EXEC), the data set record
format and length (FIXED - 80), and the settings for edit recovery mode(RECOVERY ON) and number mode (NUMBER ON STD).
v The second profile line shows the settings for caps mode (CAPS ON), hexadecimalmode (HEX OFF), nulls mode (NULLS OFF), tabs mode (TABS OFF), and UNDOmode (SETUNDO STG).
v The third profile line shows the settings for the auto modes: autosave(AUTOSAVE ON), autonum (AUTONUM OFF), and autolist (AUTOLIST OFF). It also showsthe setting for stats mode (STATS ON).
v The fourth profile line shows the lock status of the EXEC profile(PROFILE UNLOCK), the name, if any, of the initial macro called at the beginning ofthe edit session (IMACRO NONE), and the settings for pack mode (PACK OFF) andnote mode (NOTE ON).
v The fifth profile line shows the current hilite status (HILITE OFF).v The last four lines of the edit profile show the tabs settings (=TABS>), edit mask
(=MASK>), bounds settings (=BNDS>), and the column position line (=COLS>).
RCHANGE—Repeat a ChangeRCHANGE repeats the change requested by the most recent CHANGE command.
SyntaxRCHANGE
DescriptionYou can use this command to repeatedly change other occurrences of the searchstring. After a string NOT FOUND message appears, the next RCHANGE issued starts
Figure 149. Edit Profile Display
PROFILE
274 OS/390 V2R10.0 ISPF Edit and Edit Macros
at the first line of the current range for a forward search (FIRST or NEXT specified)or the last line of the current range for a backward search (LAST or PREVspecified).
Note: RCHANGE is normally assigned to a program function key, although youcan issue it directly from the Command line.
RECOVERY—Control Edit RecoveryRECOVERY sets edit recovery mode, which allows you to recover data after asystem failure or power outage.
SyntaxRECOVERY [ON | OFF]
[WARN | NOWARN | SUSP]
ON The system creates and updates a recovery data set for each change.
OFF The system does not create and update a recovery data set.
WARNThis operand no longer has a practical function due to a software change.However, the primary command continues to accept the operand forcompatibility reasons.
NOWARNThis operand no longer has a practical function due to a software change.However, the primary command continues to accept the operand forcompatibility reasons.
SUSP This operand functions the same as the ON operand.
Note: When SETUNDO is enabled during installation, both the RECOVERYprimary command and edit macro command continue to accept theNOWARN and WARN keywords for compatibility reasons, but the value isignored. NOWARN will always be in effect.
DescriptionYou cannot edit data recursively while you are in recovery.
Attention:
If the data set to be recovered was edited by another user before edit recovery, thechanges made by the other
See “Undoing Edit Interactions” on page 73 for more information.
To turn on edit recovery mode:1. On the Command line, type:
Command ===> RECOVERY ON
RECOVERY can be abbreviated REC. This command can also ensure that youredit session is not lost due to a system failure.
2. Press Enter. The editor begins recording an audit trail of your interactions.After a system failure, the editor uses that record to reestablish the edit sessionat the time of failure.
RCHANGE
Chapter 10. Edit Primary Commands 275
Note: For edit recovery to work properly, the data set to be recovered, the editrecovery data set, and the edit recovery table all must exist, be cataloged,and be intact. For example, with RECOVERY on, uncataloging a data setand then trying to recover it fails.
To turn off edit recovery mode:1. On the Command line, type:
COMMAND ===> RECOVERY OFF
2. Press Enter. The editor stops recording your interactions. Edit recovery is notavailable following a system failure. When an edit session is recovered, the datais scrolled all the way to the left when the recovery edit session begins.
See “Edit Recovery” on page 46 for more information about edit recovery.
RENUM—Renumber Data Set LinesRENUM immediately turns on number mode and renumbers all lines, startingwith number 100 and incrementing by 100. For members exceeding 10 000, theincrement would be less than 100.
SyntaxRENUM [ON ] [STD ] [DISPLAY]
[COBOL ][STD COBOL]
ON Automatically verifies that all lines have valid numbers in ascendingsequence and renumbers any lines that are either unnumbered or out ofsequence. It also turns number mode on and renumbers lines.
The STD, COBOL, and DISPLAY operands are interpreted only whennumber mode is turned on.
STD Numbers the data in the standard sequence field. This is the default for allnon-COBOL data set types.
COBOLNumbers the data in the COBOL field. This is the default for all COBOLdata set types.
Attention:
If number mode is off, make sure the first 6 columns of your data set areblank before using either the NUMBER ON COBOL or NUMBER ON STDCOBOL command. Otherwise, the data in these columns is replaced by theCOBOL sequence numbers. If that happens and if edit recovery orSETUNDO is on, you can use the UNDO command to recover the data. Or,you can use CANCEL at any time to end the edit session without savingthe data.
STD COBOLNumbers the data in both fields.
If both STD and COBOL numbers are generated, the STD number isdetermined and then used as the COBOL number. This can result inCOBOL numbers that are out of sequence if the COBOL and STD fields arenot synchronized. Use RENUM to synchronize them.
DISPLAYCauses the width of the data window to include the sequence number
RECOVERY
276 OS/390 V2R10.0 ISPF Edit and Edit Macros
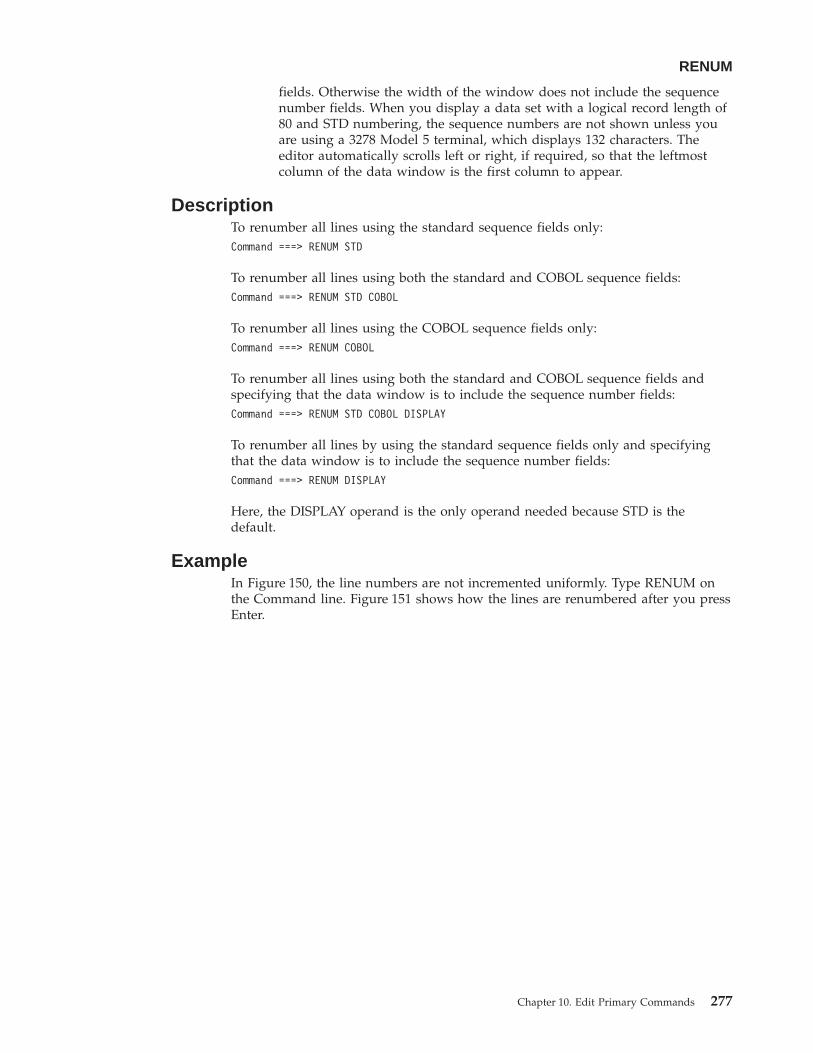
fields. Otherwise the width of the window does not include the sequencenumber fields. When you display a data set with a logical record length of80 and STD numbering, the sequence numbers are not shown unless youare using a 3278 Model 5 terminal, which displays 132 characters. Theeditor automatically scrolls left or right, if required, so that the leftmostcolumn of the data window is the first column to appear.
DescriptionTo renumber all lines using the standard sequence fields only:Command ===> RENUM STD
To renumber all lines using both the standard and COBOL sequence fields:Command ===> RENUM STD COBOL
To renumber all lines using the COBOL sequence fields only:Command ===> RENUM COBOL
To renumber all lines using both the standard and COBOL sequence fields andspecifying that the data window is to include the sequence number fields:Command ===> RENUM STD COBOL DISPLAY
To renumber all lines by using the standard sequence fields only and specifyingthat the data window is to include the sequence number fields:Command ===> RENUM DISPLAY
Here, the DISPLAY operand is the only operand needed because STD is thedefault.
ExampleIn Figure 150, the line numbers are not incremented uniformly. Type RENUM onthe Command line. Figure 151 shows how the lines are renumbered after you pressEnter.
RENUM
Chapter 10. Edit Primary Commands 277
REPLACE—Replace DataThe REPLACE primary command replaces a sequential data set or a member of apartitioned data set with data you are editing. If the member you want to replacedoes not exist, the editor creates it.
Figure 150. Member Before Lines Are Renumbered
Figure 151. Member After Lines Are Renumbered
RENUM
278 OS/390 V2R10.0 ISPF Edit and Edit Macros
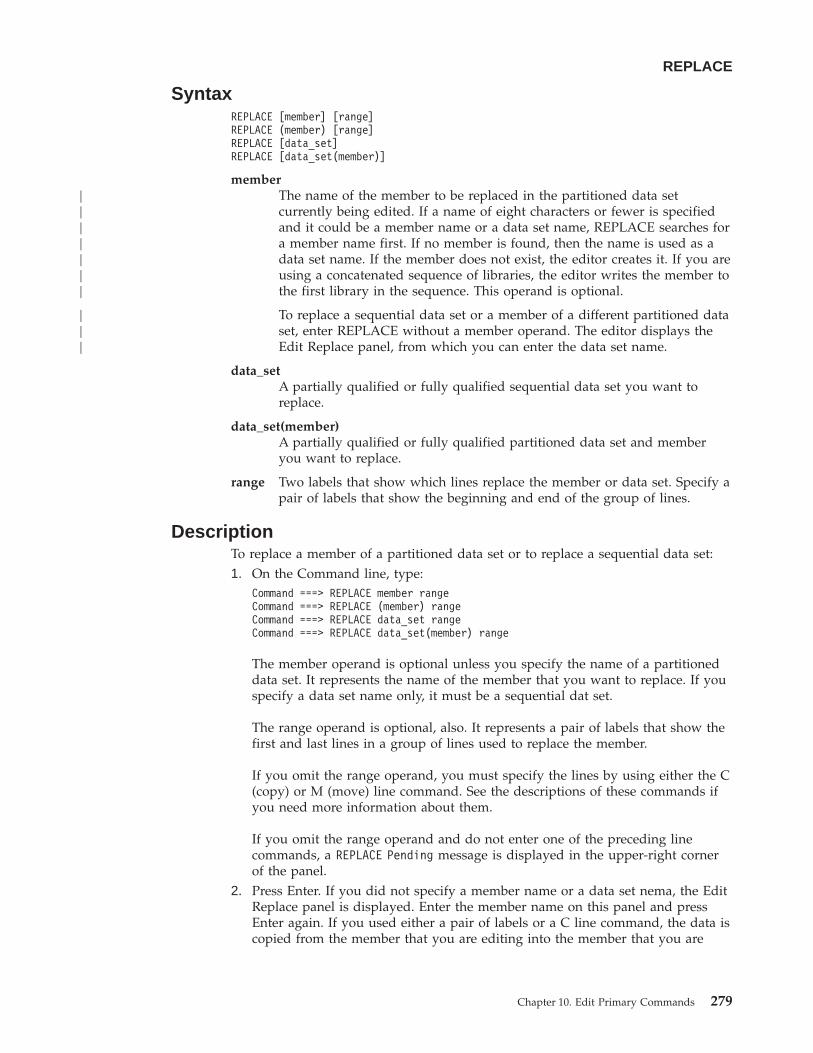
SyntaxREPLACE [member] [range]REPLACE (member) [range]REPLACE [data_set]REPLACE [data_set(member)]
memberThe name of the member to be replaced in the partitioned data setcurrently being edited. If a name of eight characters or fewer is specifiedand it could be a member name or a data set name, REPLACE searches fora member name first. If no member is found, then the name is used as adata set name. If the member does not exist, the editor creates it. If you areusing a concatenated sequence of libraries, the editor writes the member tothe first library in the sequence. This operand is optional.
To replace a sequential data set or a member of a different partitioned dataset, enter REPLACE without a member operand. The editor displays theEdit Replace panel, from which you can enter the data set name.
data_setA partially qualified or fully qualified sequential data set you want toreplace.
data_set(member)A partially qualified or fully qualified partitioned data set and memberyou want to replace.
range Two labels that show which lines replace the member or data set. Specify apair of labels that show the beginning and end of the group of lines.
DescriptionTo replace a member of a partitioned data set or to replace a sequential data set:1. On the Command line, type:
Command ===> REPLACE member rangeCommand ===> REPLACE (member) rangeCommand ===> REPLACE data_set rangeCommand ===> REPLACE data_set(member) range
The member operand is optional unless you specify the name of a partitioneddata set. It represents the name of the member that you want to replace. If youspecify a data set name only, it must be a sequential dat set.
The range operand is optional, also. It represents a pair of labels that show thefirst and last lines in a group of lines used to replace the member.
If you omit the range operand, you must specify the lines by using either the C(copy) or M (move) line command. See the descriptions of these commands ifyou need more information about them.
If you omit the range operand and do not enter one of the preceding linecommands, a REPLACE Pending message is displayed in the upper-right cornerof the panel.
2. Press Enter. If you did not specify a member name or a data set nema, the EditReplace panel is displayed. Enter the member name on this panel and pressEnter again. If you used either a pair of labels or a C line command, the data iscopied from the member that you are editing into the member that you are
REPLACE
Chapter 10. Edit Primary Commands 279
|||||||
|||
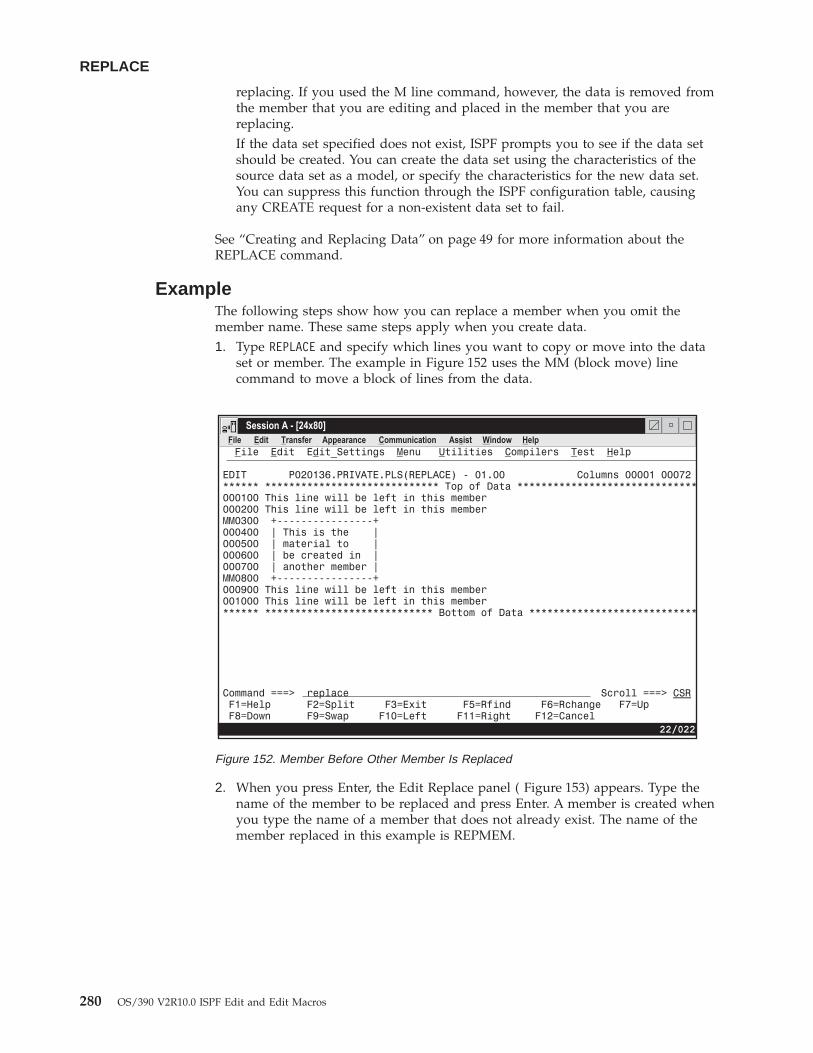
replacing. If you used the M line command, however, the data is removed fromthe member that you are editing and placed in the member that you arereplacing.If the data set specified does not exist, ISPF prompts you to see if the data setshould be created. You can create the data set using the characteristics of thesource data set as a model, or specify the characteristics for the new data set.You can suppress this function through the ISPF configuration table, causingany CREATE request for a non-existent data set to fail.
See “Creating and Replacing Data” on page 49 for more information about theREPLACE command.
ExampleThe following steps show how you can replace a member when you omit themember name. These same steps apply when you create data.1. Type REPLACE and specify which lines you want to copy or move into the data
set or member. The example in Figure 152 uses the MM (block move) linecommand to move a block of lines from the data.
2. When you press Enter, the Edit Replace panel ( Figure 153) appears. Type thename of the member to be replaced and press Enter. A member is created whenyou type the name of a member that does not already exist. The name of themember replaced in this example is REPMEM.
Figure 152. Member Before Other Member Is Replaced
REPLACE
280 OS/390 V2R10.0 ISPF Edit and Edit Macros
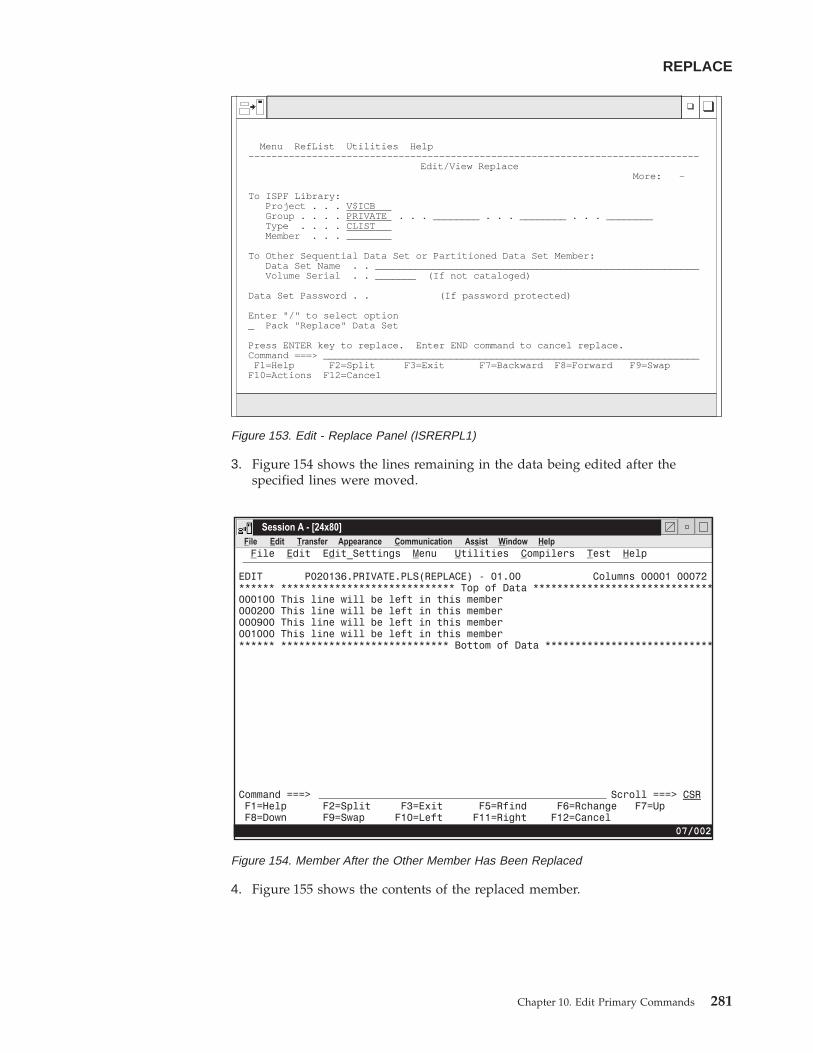
3. Figure 154 shows the lines remaining in the data being edited after thespecified lines were moved.
4. Figure 155 shows the contents of the replaced member.
Menu RefList Utilities Help------------------------------------------------------------------------------
Edit/View ReplaceMore: -
To ISPF Library:Project . . . V$ICBGroup . . . . PRIVATE . . . ________ . . . ________ . . . ________Type . . . . CLISTMember . . .
To Other Sequential Data Set or Partitioned Data Set Member:Data Set Name . . ________________________________________________________Volume Serial . . _______ (If not cataloged)
Data Set Password . . (If password protected)
Enter "/" to select option_ Pack "Replace" Data Set
Press ENTER key to replace. Enter END command to cancel replace.Command ===> _________________________________________________________________
F1=Help F2=Split F3=Exit F7=Backward F8=Forward F9=SwapF10=Actions F12=Cancel
Figure 153. Edit - Replace Panel (ISRERPL1)
Figure 154. Member After the Other Member Has Been Replaced
REPLACE
Chapter 10. Edit Primary Commands 281
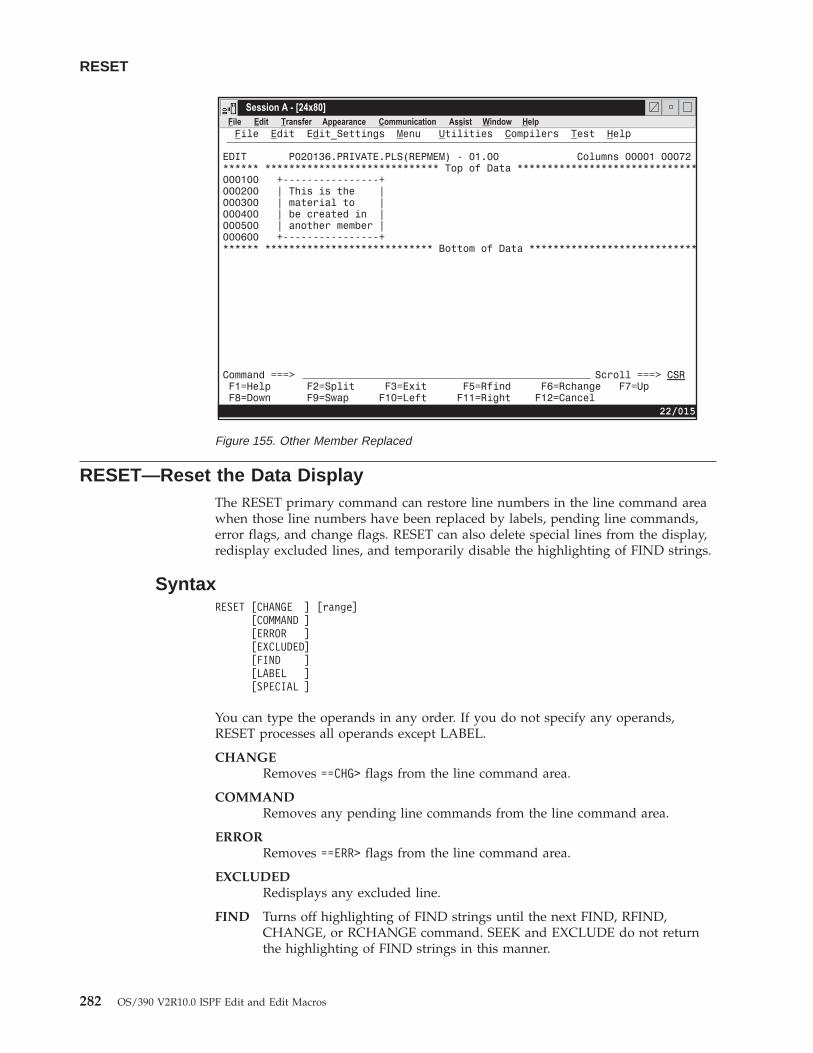
RESET—Reset the Data DisplayThe RESET primary command can restore line numbers in the line command areawhen those line numbers have been replaced by labels, pending line commands,error flags, and change flags. RESET can also delete special lines from the display,redisplay excluded lines, and temporarily disable the highlighting of FIND strings.
SyntaxRESET [CHANGE ] [range]
[COMMAND ][ERROR ][EXCLUDED][FIND ][LABEL ][SPECIAL ]
You can type the operands in any order. If you do not specify any operands,RESET processes all operands except LABEL.
CHANGERemoves ==CHG> flags from the line command area.
COMMANDRemoves any pending line commands from the line command area.
ERRORRemoves ==ERR> flags from the line command area.
EXCLUDEDRedisplays any excluded line.
FIND Turns off highlighting of FIND strings until the next FIND, RFIND,CHANGE, or RCHANGE command. SEEK and EXCLUDE do not returnthe highlighting of FIND strings in this manner.
Figure 155. Other Member Replaced
RESET
282 OS/390 V2R10.0 ISPF Edit and Edit Macros
The resetting of FIND highlighting does not honor the range specified onthe RESET command.
LABELRemoves labels from the line command area.
SPECIALDeletes any temporary line from the panel:v Bounds line flagged as =BNDS>v Column identification lines flagged with =COLS>v Information lines flagged with ======v Mask lines flagged as =MASK>v Message lines flagged as ==MSG>v Note lines flagged with =NOTE=v Profile lines flagged as =PROF>v Tabs line flagged as =TABS>.
range Specifies the range of lines to be reset. The labels can be labels that thePDF component has defined or labels that you have defined. The rangeoperand is useful when you do not want to reset lines in the complete dataset. You can specify the range operand with any other operand on thecommand.
DescriptionRESET scans every line of data. If you want to delete a small number of speciallines, you can get faster response time if you use the D (delete) line command.
ExamplesTo reset all lines except those that contain labels:Command ===> RESET
To reset only the lines that contain labels:Command ===> RESET LABEL
To reset only the lines that contain pending line commands:Command ===> RESET COMMAND
To reset only the lines that contain ==ERR> flags:Command ===> RESET ERROR
To reset only the lines that contain ==CHG> flags:Command ===> RESET CHANGE
To reset only the special (temporary) lines:Command ===> RESET SPECIAL
To reset only the excluded lines:Command ===> RESET EXCLUDED
To reset all lines between and including the .START and .STOP labels, except thosethat contain labels:Command ===> RESET .START .STOP
RESET
Chapter 10. Edit Primary Commands 283
RFIND—Repeat FindRFIND locates the search string defined by the most recent SEEK, FIND, orCHANGE command, or excludes a line containing the search string defined by theprevious EXCLUDE command.
RFIND can be used repeatedly to find other occurrences of the search string. Aftera string NOT FOUND message is displayed, the next RFIND issued starts at the firstline of the current range for a forward search (FIRST or NEXT specified), or thelast line of the current range for a backward search (LAST or PREV specified).
SyntaxRFIND
Note: RFIND is normally assigned to a program function key, although you canissue it directly from the Command line.
RMACRO—Specify a Recovery MacroRMACRO saves the name of a recovery macro in the edit profile.
SyntaxRMACRO {name | NONE}
name The name of the recovery macro to be run. The name can be preceded byan exclamation point (!) to show that it is a program macro.
NONEThe name to prevent a recovery macro from being run.
DescriptionTo specify the name of a recovery macro:1. On the Command line, type:
Command ===> RMACRO name
where name is the name of the recovery macro that you want to run.2. Press Enter.
See “Recovery Macros” on page 117 for more information.
ExampleTo define RESTART as the recovery macro, type:Command ===> RMACRO RESTART
To reset the profile with no recovery macro, type:Command ===> RMACRO NONE
SAVE—Save the Current DataSAVE saves edited data without ending your edit session. Generally, you do notneed to use SAVE if recovery mode is on. See AUTOSAVE, CANCEL, and END formore information about saving data.
RFIND
284 OS/390 V2R10.0 ISPF Edit and Edit Macros

SyntaxSAVE
DescriptionSAVE writes the data to the same data set from which it was retrieved unless youspecified a concatenated sequence of partitioned data sets on the Edit Entry panel.In that case, the data is saved in the first library in the concatenation sequence,regardless of from which library it came. For a sequential data set, the completedata set is rewritten. For a partitioned data set, the member is rewritten with thesame member name. If stats mode is on, the library statistics for the member areautomatically updated.
If both number mode and autonum mode are on, the data is automaticallyrenumbered before it is saved.
If SAVE cannot successfully rewrite the data because of I/O errors or insufficientspace, the system displays a message in the upper-right corner of the panel,accompanied by an audible alarm, if installed. You can then try to save the data inanother data set by taking the following steps:1. Enter CREATE or REPLACE with no operand on the Command line. Use
CREATE only if the destination is a member of a partitioned data set, such asan ISPF library member.
2. Type CC on the first and last data lines to specify that all lines are to be copied.Then press Enter.
3. Fill in the data set and member name of the alternate library on the Edit Createor Edit Replace panel, and press Enter.
When a space ABEND such as D37 occurs, ISPF unallocates the data set so thatyou can swap to another screen or user ID and reallocate the data set. This doesnot occur for data sets that were edited using the DDNAME parameter of theEDIT service.
See “Creating and Replacing Data” on page 49 for more information.
ExampleTo save the data in the data set or member that you are editing:1. On the Command line, type:
Command===> SAVE
2. Press Enter.
SETUNDO—Set the UNDO ModeThe SETUNDO primary command determines whether or not the UNDOcommand is available and how the history of changes should be managed.
Note: The SETUNDO command is ignored if UNDO from storage is not enabledby the installer or person who maintains the ISPF product. For informationon enabling UNDO from storage, see ISPF Planning and Customizing
SyntaxSETUNDO [STORAGE | RECOVER | ON | OFF]
SAVE
Chapter 10. Edit Primary Commands 285
STORAGEEnables the saving of edit changes in storage. If the setting is changed, andthe profile lines are displayed, the profile lines reflect the new value afterthe change (SETUNDO STG).
RECOVEREnables the saving of edit changes through the recovery file only. Ifrecovery is off, it is turned on by this command. If the setting is changedand the profile lines are displayed, the profile lines reflect the new valueafter the change (SETUNDO REC).
ON Enables edit changes to be saved in STORAGE
OFF Disables the saving of edit changes in storage. If SETUNDO OFF isspecified and recovery is on, then a state of SETUNDO RECOVER is setand UNDO is available from the recovery file. All transactions on thestorage UNDO chain are removed, and no changes before SETUNDO OFFcan be undone (unless RECOVERY ON is specified). If the setting ischanged and the profile lines are displayed, the profile lines reflect the newvalue after the change (SETUNDO OFF or SETUNDO REC).
DescriptionSETUNDO allows you to specify how changes you make during your edit sessionare to be recorded and used by the UNDO command. UNDO can be run wheneither SETUNDO or RECOVERY is on. Changes can be recorded in storage, in therecovery file, or in both places. Saving the changes in storage only is the fastestmethod.
To enable recording in storage:1. On the Command line, type either of the following:
Command ===> SETUNDO STORAGEOR
Command ===> SETUNDO
2. Press Enter.
Valid abbreviations for STORAGE are STO, STG, STOR and STORE. SETUNDOmay be abbreviated SETU. The value of ON is accepted to compliment the OFFstate.
To use the recovery file:1. On the Command line, type:
Command ===> SETUNDO RECOVER
2. Press Enter.
If RECOVERY is off, it is turned on by this command. REC is a valid abbreviationfor RECOVER.
To turn off recording and disable the UNDO command, enter:Command ===> SETUNDO OFF
Note: If recovery is on, setting SETUNDO OFF is the same as specifyingSETUNDO REC, and the recovery file is used for UNDO.
SETUNDO
286 OS/390 V2R10.0 ISPF Edit and Edit Macros
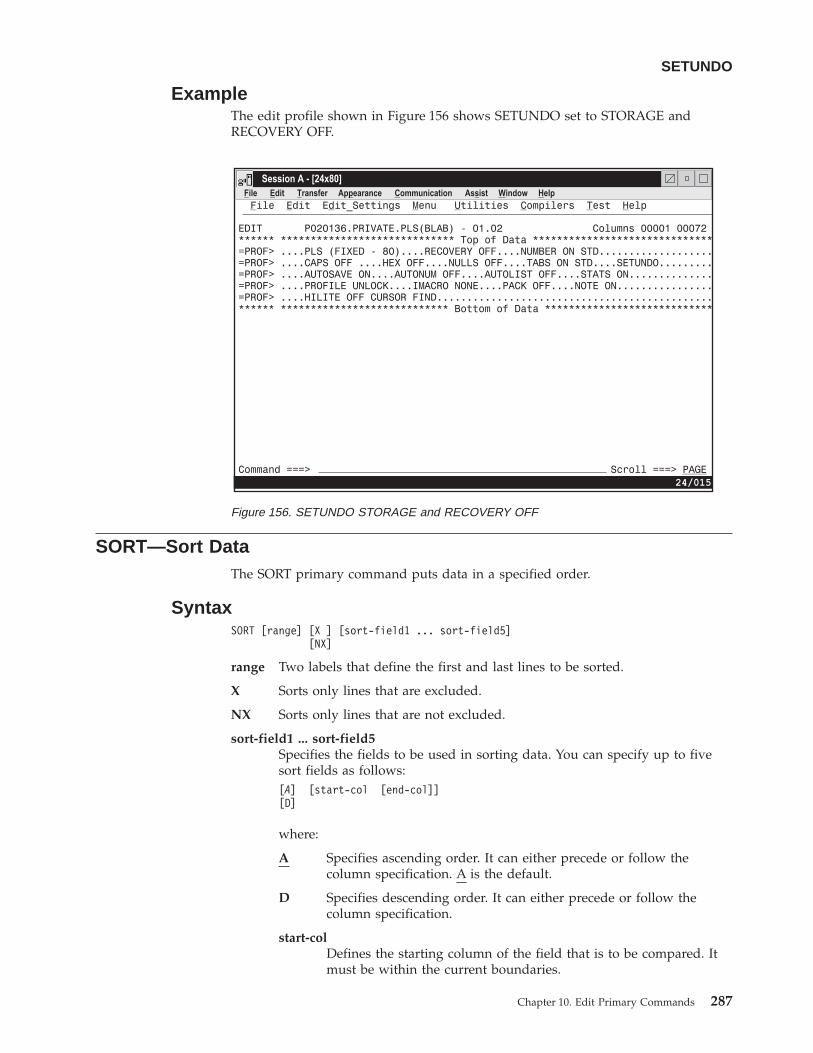
ExampleThe edit profile shown in Figure 156 shows SETUNDO set to STORAGE andRECOVERY OFF.
SORT—Sort DataThe SORT primary command puts data in a specified order.
SyntaxSORT [range] [X ] [sort-field1 ... sort-field5]
[NX]
range Two labels that define the first and last lines to be sorted.
X Sorts only lines that are excluded.
NX Sorts only lines that are not excluded.
sort-field1 ... sort-field5Specifies the fields to be used in sorting data. You can specify up to fivesort fields as follows:[A] [start-col [end-col]][D]
where:
A Specifies ascending order. It can either precede or follow thecolumn specification. A is the default.
D Specifies descending order. It can either precede or follow thecolumn specification.
start-colDefines the starting column of the field that is to be compared. Itmust be within the current boundaries.
Figure 156. SETUNDO STORAGE and RECOVERY OFF
SETUNDO
Chapter 10. Edit Primary Commands 287
end-colDefines the ending column of the field that is to be compared. Itmust be within the current boundaries.
If you specify several fields, you must specify both the starting and endingcolumns of each field. The fields cannot overlap. If you specify A or D forone field, you must specify it for all fields.
DescriptionSORT operates in two different modes, based on the hexadecimal mode status. Ifhexadecimal mode is on, the data is ordered according to its hexadecimalrepresentation. If hexadecimal mode is off, data is sorted in the collating sequencedefined for the national language being used.
Sorting Data Without OperandsFor SORT with no operands, the editor compares the data within the currentboundaries character by character, and then orders it line by line in the propercollating sequence. It ignores data outside the current boundaries during bothoperations. Therefore only the data inside the current boundaries is changed.Labels, excluded lines, line numbers, and change, error, and special line flags areconsidered associated with the data, and therefore point to the same data fieldsafter the sort as they did before the sort.
For example, if you issue a CHANGE ALL that changes the first, third, and sixthlines in a data set, these lines are flagged with the change flag, ==CHG>. If you thenissue a SORT command that results in the former lines 1, 3 and 6 becoming thefirst, second and third lines of the sorted file, the changed line flags would nowexist on the first, second and third lines of the sorted data set.
It is important to properly set the boundaries before issuing SORT. SORT is apowerful tool for editing data that may be formatted in multiple columns. You canset the boundaries, for example, to the first half of a record and sort one column ofdata. Then you can set the boundaries to the last half of the record and sort asecond column of data.
Limiting the SORT CommandSorting is limited to data within the current boundaries. You can specify up to fivesort fields by labelling starting and ending columns. You can also identify eachfield as having data sorted in either ascending or descending order.
Optionally, you can limit sorting to a range of lines by specifying the labels of thefirst and last lines of the range. You can also limit sorting to either excluded ornonexcluded lines.
If you have labels or line ranges that are between the labels or line ranges specifiedwith SORT, you can keep SORT from rearranging them by:v Excluding them before you enter SORTv Using the NX operand to sort only lines that are not excluded.
For more information, see the definition of the NX operand and“EXCLUDE—Exclude Lines from the Display” on page 244.
Sorting DBCS DataWhen sorting data that contains DBCS character strings, you must ensure that noDBCS string crosses the boundaries. Also, all records must have the same format atthe boundaries, although the format of the left and right boundaries can differ.
SORT
288 OS/390 V2R10.0 ISPF Edit and Edit Macros
If a boundary divides a DBCS character, or if all records do not have the sameformat at the boundaries, the result is unpredictable.
ExamplesThe following form of the SORT command sorts in ascending order. Thestart-column is the left boundary and the end-column is the right boundary:SORT
The following form of the SORT command sorts in descending order. Thestart-column is the left boundary and the end-column is the right boundary:SORT D
The following form of the SORT command sorts in ascending order. Thestart-column is column 5 and the end-column is the right boundary:SORT 5
The following form of the SORT command sorts in descending order. Thestart-column is column 5 and the end-column is the right boundary:SORT 5 D
STATS—Generate Library StatisticsThe STATS primary command sets stats mode, which creates and maintainsstatistics for a member of a partitioned data set.
SyntaxSTATS [ON ]
[OFF]
ON Creates or updates library statistics when the data is saved.
OFF Does not create or update library statistics.
See “Statistics for PDS Members” on page 30 for more information.
ExamplesTo set stats mode on:Command ===> STATS ON
To set stats mode off:Command ===> STATS OFF
SUBMIT—Submit Data for Batch ProcessingThe SUBMIT primary command submits the member or data set you are editing(or the part of the member or data set defined by the range of line pointers or theX or NX parameters) to be processed as a batch job.
SyntaxSUBMIT [range] [X]
[NX]
range Two labels that define the first and last lines to be submitted.
X Submits only lines that are excluded from the display.
SORT
Chapter 10. Edit Primary Commands 289
|||
||

NX Submits only lines that are not excluded from the display.
DescriptionThe editor does not supply a job statement when you enter the SUBMIT command.You can supply job statements as part of the data being submitted. When yousupply a job statement, only the job name is logged to the ISPF log data set toensure the protection of sensitive data.
The PDF component uses the TSO SUBMIT command to submit the job.
ExamplesTo submit lines between labels .START and .END as a batch job:Command ===> SUBMIT .START .END
To submit all of the data as a batch job:Command ===> SUBMIT
To submit only non-excluded lines as a batch job:Command ===> SUBMIT NX
TABS—Define TabsThe TABS primary command:v Turns tabs mode on and offv Defines the logical tab characterv Controls the insertion of attribute bytes at hardware tab positions defined with
TABS.
Use PROFILE to check the setting of tabs mode and the logical tab character. See“Using Tabs” on page 70 if you need more information about using tabs.
SyntaxTABS [ON ] [STD]
[OFF] [ALL][tab-character]
ON Turns tabs mode on, which means that logical tabs can be used to break upstrings of data. This is the default operand. If no other operands areincluded, all hardware tab positions (asterisks) that contain a blank or nullcharacter are activated because STD is also a default operand. The TABS ONSTD message appears in the profile display.
OFF Turns tabs mode off, which means that logical tabs cannot be used.Attribute bytes are deleted from all hardware tab positions, causing theTab Forward and Tab Backward keys to ignore hardware tabs defined onthe =TABS> line. Blanked-out characters occupying these positions reappear.The TABS OFF message appears in the profile display.
STD Activates all hardware tab positions (asterisks) that contain a blank or nullcharacter. The editor inserts attribute bytes, which cannot be typed over, atthese positions. STD is the default operand. You can use the Tab Forwardand Tab Backward keys to move the cursor one space to the right of theattribute bytes. The TABS ON STD message appears in the profile display.
ALL Causes an attribute byte to be inserted at all hardware tab positions.
SUBMIT
290 OS/390 V2R10.0 ISPF Edit and Edit Macros
||
|
|
|
Characters occupying these positions are blanked out and the attributebytes cannot be typed over. The Tab Forward and Tab Backward keys canbe used to move the cursor one space to the right of these attribute bytes.The TABS ON ALL message appears in the profile display.
tab-characterDefines a single character that is not a number, letter, or commanddelimiter as the logical tab character. This character is used with hardwaretab definitions. The TABS ON tab-character message appears in the profiledisplay.
You can enclose the character in quotes (' or "), although this is notnecessary unless a quote or a comma (,) is used as the tab character.
The tab-character operand causes the data string that follows the logicaltab character to align itself one space to the right of the first availablehardware tab position when you press Enter. No attribute bytes areinserted.
If no hardware tabs are defined, the editor aligns the data vertically. Ifsoftware tabs are defined, the first data string is aligned under the firstsoftware tab position and the remaining data strings are aligned at the leftboundary. If neither software nor hardware tabs are defined, the editoraligns all the data strings at the left boundary.
With the tab-character operand, the Tab Forward and Tab Backward keysignore hardware tab positions because no attribute bytes are inserted.
You can type the operands in any order, but keep the following rules in mind:v The tab-character and ALL operands cannot be used together, because the
tab-character operand does not allow the PDF component to insert attributebytes at tab positions, while the ALL operand does.
v The TABS primary command has no effect on software tabs. Whenever softwaretabs are defined, you can always use the Enter key to move the cursor to asoftware tab position in the data, even if tabs mode is off. Attribute bytes are notinserted at software tab positions.
ExampleDefine the pound sign (#) as a logical tab character by typing the following andpressing Enter:Command ===> TAB #
Now, enter the COLS line command by typing COLS in the line command area andpressing Enter. A partial =COLS> line with positions 9 through 45 is shown in thefollowing example.
To use the logical tab character you have defined (#), you also need at least onehardware tab. For this example, we will assume that three hardware tabs havealready been defined in columns 20, 30, and 40:=COLS> -1----+----2----+----3----+----4----+=TABS> * * *
If you then type the following information on a line:#$4237#$ 596#$ 81
TABS
Chapter 10. Edit Primary Commands 291
the data $4237 is repositioned after the first tab column, defined by an * in the=TABS line, when you press Enter. The $ 596 is repositioned after the next tabcolumn and so forth, as follows:=COLS> -1----+----2----+----3----+----4----+=TABS> * * *
$4237 $ 596 $ 81
UNDO—Reverse Last Edit InteractionThe UNDO primary command allows you to remove the data modifications of aprevious interaction.
Note: The SETUNDO command is ignored if UNDO from storage is not enabledby the installer or person who maintains the ISPF product. For informationon enabling UNDO from storage, see ISPF Planning and Customizing
SyntaxUNDO
DescriptionEach time you enter UNDO, it reverses edit interactions, one at a time, in the orderin which they have been entered. To use UNDO, you must have either RECOVERYon or SETUNDO on. You can undo only those changes made after RECOVERY orSETUNDO was turned on. SETUNDO and RECOVERY can be specified in youredit profile. You can also use the edit macro command ISREDIT SETUNDO to turnUNDO processing on and off. See “SETUNDO—Set UNDO Mode” on page 395 formore information.
RECOVERY is now optional and is not required to run UNDO. Performanceimproves if the editor is run with SETUNDO STORAGE and RECOVERY OFF. Inthis mode, non-data changes, such as setting line labels, adding note lines, andinserting blank lines, can be undone by UNDO even if no data changes have beenmade. With RECOVERY ON, only changes made after (and including) the firstchange to edit data can be undone.
Note: Changes made by initial edit macros cannot be undone.
See “Understanding Differences in SETUNDO Processing” on page 74 for moreinformation on the differences between SETUNDO RECOVER and SETUNDOSTORAGE processing.
Each time you press Enter, an interaction occurs between you and the PDFcomponent. If you combine line and primary commands in one entry, the PDFcomponent considers this one interaction. Therefore, UNDO would cause all of thecommands to be reversed. The PDF component also considers running edit macrosthat contain a combination of macro commands and assignment statements, whileentering a combination of edit line and primary commands at the same time, asone interaction.
Profile changes, such as HEX ON, LEVEL, and CAPS, cannot be undone separately.Profile changes are associated with the data change that came before them, and canbe undone only when preceded by a data change. The data change and the profilechange are undone at the same time. For example, if you make a change to thedata, change the version number, set caps off, turn hex on, and then enter UNDO,
TABS
292 OS/390 V2R10.0 ISPF Edit and Edit Macros
the version number, caps setting, and hex mode all revert to the way they existedbefore the data change. The data change is also undone.
Note: UNDO is not accepted if any line commands or data changes are alsospecified since it would be unclear what is to be undone.
To undo the last changes:1. Type on the Command line:
Command ===> UNDO
2. Press Enter.
Note: UNDO is reset by SAVE. Once you save your data for the current editsession, you can no longer recover any interactions made before the datawas saved.
Failures in recovery processing due to I/O errors no longer terminate the UNDOfunction if SETUNDO STORAGE is active. When UNDO is processed, the editorscrolls the data all the way to the left.
See “Undoing Edit Interactions” on page 73 for more information.
ExampleYou are editing the member shown in Figure 157 and decide to delete all of thelines. You have type the block form of the D (DELETE) command in the linecommand area.
Figure 158 shows the member after the lines have been deleted. However, youhave changed your mind and want to put the lines back again. Therefore, typeUNDO on the Command line.
Figure 157. Member Before Lines Are Deleted
UNDO
Chapter 10. Edit Primary Commands 293
Figure 159 shows the member after UNDO has been entered and the deleted lineshave been restored.
UNNUMBER—Remove Sequence NumbersThe UNNUMBER primary command sets all sequence fields to blanks, turns offnumber mode, and positions the data so that column 1 is the first columndisplayed.
Figure 158. Member After Lines Are Deleted
Figure 159. Member After Lines Have Been Restored
UNDO
294 OS/390 V2R10.0 ISPF Edit and Edit Macros
SyntaxUNNUMBER
DescriptionUNNUMBER is valid only when number mode is also on. The standard sequencefield, the COBOL sequence field, or both, are blanked out. If you alter or deletesequence numbers and enter UNNUMBER on the Command line at the same time,the editor issues the message Some input data ignored and discards the data youtyped over the sequence numbers.
To set all sequence fields to blanks, turn number mode off, and position the panelso that column 1 is the first column to appear:Command ===> UNNUMBER
ExampleYou are editing the member in Figure 160 and you want to turn off the sequencenumbers. Enter UNNUMBER on the Command line.
Figure 161 shows the member after the sequence numbers have been turned off.
Figure 160. Member Before Lines Are Unnumbered
UNNUMBER
Chapter 10. Edit Primary Commands 295
VERSION—Control the Version NumberThe VERSION primary command allows you to change the version numberassigned to a member of an ISPF library.
SyntaxVERSION num
num The version number. It can be any number from 1 to 99.
DescriptionTo change the version number of the member that you are editing:1. On the Command line, type:
Command ===> VERSION num
where num is the new version number.2. Press Enter.
See “Version and Modification Level Numbers” on page 31, for more informationabout version numbers.
ExampleVersion and modification level numbers are shown on the first line of an edit datadisplay in the format VV.MM, where VV is the version number and MM is themodification level number.
You are editing the member shown in Figure 162 and you want to change theversion number from 01 to 02. Enter VERSION on the Command line.
Figure 161. Member After Lines Are Unnumbered
VERSION
296 OS/390 V2R10.0 ISPF Edit and Edit Macros
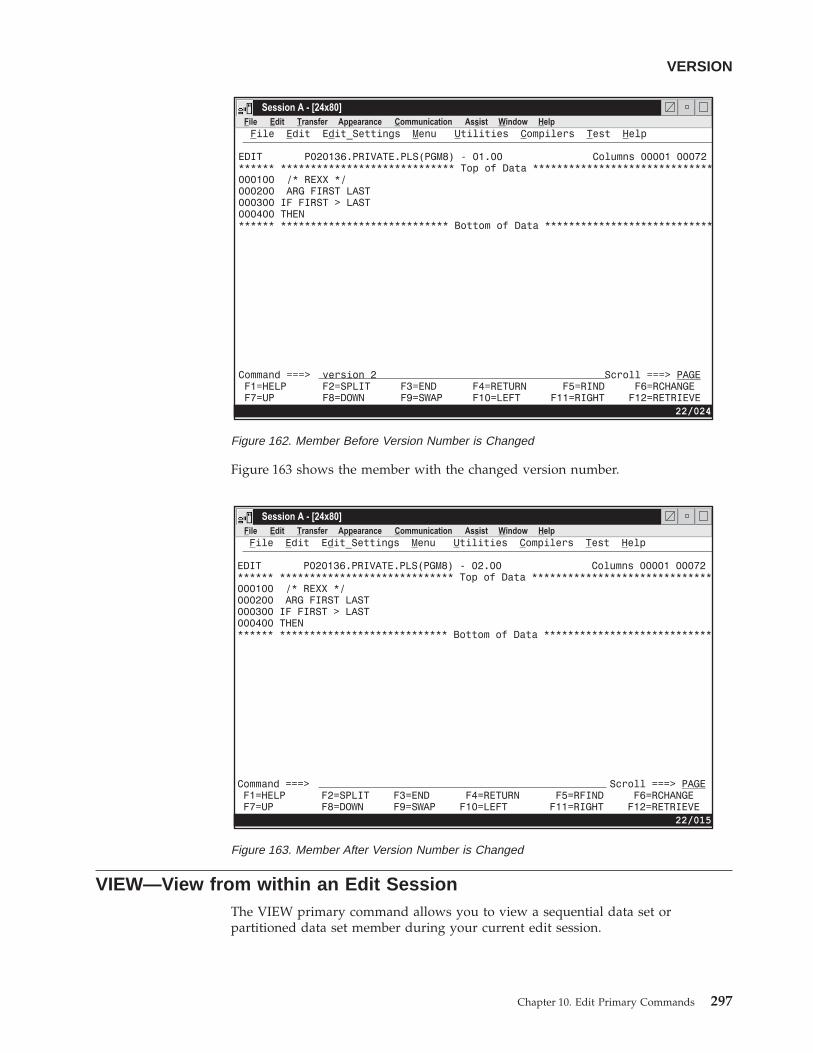
Figure 163 shows the member with the changed version number.
VIEW—View from within an Edit SessionThe VIEW primary command allows you to view a sequential data set orpartitioned data set member during your current edit session.
Figure 162. Member Before Version Number is Changed
Figure 163. Member After Version Number is Changed
VERSION
Chapter 10. Edit Primary Commands 297
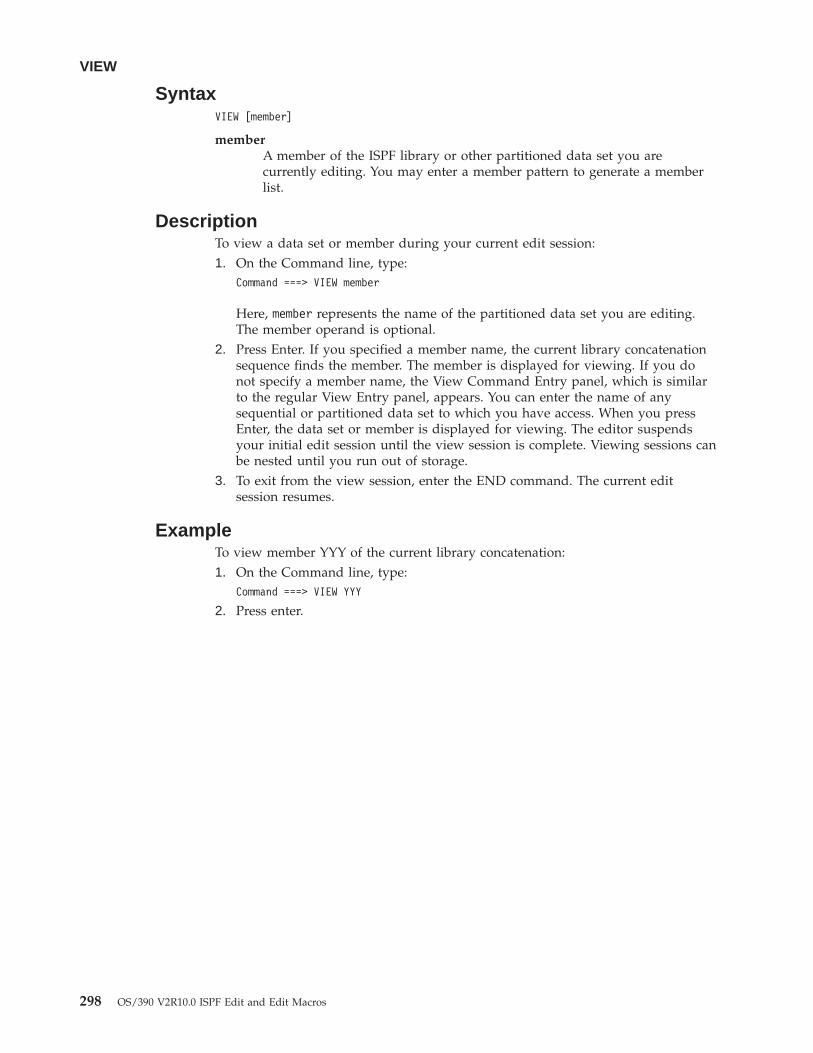
SyntaxVIEW [member]
memberA member of the ISPF library or other partitioned data set you arecurrently editing. You may enter a member pattern to generate a memberlist.
DescriptionTo view a data set or member during your current edit session:1. On the Command line, type:
Command ===> VIEW member
Here, member represents the name of the partitioned data set you are editing.The member operand is optional.
2. Press Enter. If you specified a member name, the current library concatenationsequence finds the member. The member is displayed for viewing. If you donot specify a member name, the View Command Entry panel, which is similarto the regular View Entry panel, appears. You can enter the name of anysequential or partitioned data set to which you have access. When you pressEnter, the data set or member is displayed for viewing. The editor suspendsyour initial edit session until the view session is complete. Viewing sessions canbe nested until you run out of storage.
3. To exit from the view session, enter the END command. The current editsession resumes.
ExampleTo view member YYY of the current library concatenation:1. On the Command line, type:
Command ===> VIEW YYY
2. Press enter.
VIEW
298 OS/390 V2R10.0 ISPF Edit and Edit Macros
Chapter 11. Edit Macro Commands and AssignmentStatements
This chapter documents general-use programming interfaces and associatedguidance information.
This chapter describes the edit macro commands and assignment statementsavailable for the PDF component. Edit macro commands and assignmentstatements must be included in edit macros that you create.
Macro commands and assignment statements cannot be entered individually fromthe edit command line. However, once you have created an edit macro, you canuse the macro just like any other Edit primary command. You can run an editmacro by:v Typing the macro name on the Command line and pressing Enterv Pressing a function key to which the macro has been assigned, if any.
Note: Edit macro commands should not be confused with TSO commands.Although both are programs, edit macros must not be prefixed with theword ’TSO’ when they are invoked.
All edit macros must have an ISREDIT MACRO statement as the first editcommand. For more information see “Macro Command Syntax” on page 363.
Each command description in this book consists of the following information:
SyntaxA syntax diagram for coding the macro command, including a descriptionof any required or optional operands.
DescriptionAn explanation of the function and operation of the command. Thisdescription also refers to other commands that can be used with thiscommand.
Return CodesA description of codes returned by the macro command. For allcommands, a return code of 20 or higher implies a severe error. See“Return Codes from User-Written Edit Macros” on page 118 and “ReturnCodes from PDF Edit Macro Commands” on page 119 for moreinformation.
ExamplesSample usage of the macro command.
Edit Macro Command Notation ConventionsThe descriptions of the syntax of the the PDF component macro commands andassignment statements use the following notation conventions:
UppercaseUppercase commands or operands must be spelled as shown (in eitheruppercase or lowercase).
© Copyright IBM Corp. 1984, 2000 299
LowercaseLowercase operands are variables; substitute your own values.
UnderscoreUnderscored operands are the system defaults.
Brackets ([ ])Operands in brackets are optional.
Stacked operandsStacked operands show two or more operands from which you can select.If you do not choose any, the PDF component uses the default operand.
Braces ({ })Braces show two or more operands from which you must select one.
OR (|)The OR (|) symbol shows two or more operands from which you mustselect one.
Edit Macro Command SummaryThe following table summarizes the edit macro commands. See the completedescription of the commands on the referenced page.
Table 6. Summary of the Macro Commands
Command Syntax page Description
ISREDIT AUTOLIST [ON ][OFF]
ISREDIT (varname) = AUTOLISTISREDIT AUTOLIST = [ON ]
[OFF]
“AUTOLIST—Set or QueryAutolist Mode” on page 308
Sets the current autolist mode orretrieves the value and places itin a variable.
ISREDIT AUTONUM [ON ][OFF]
ISREDIT (varname) = AUTONUMISREDIT AUTONUM = [ON ]
[OFF]
“AUTONUM—Set or QueryAutonum Mode” on page 308
Sets the current autonum modeor retrieves the value and placesit in a variable.
ISREDIT AUTOSAVE [ON ][OFF PROMPT ][OFF NOPROMPT]
ISREDIT (var1,var2) = AUTOSAVEISREDIT AUTOSAVE = [ON ]
[OFF PROMPT ][OFF NOPROMPT]
“AUTOSAVE—Set or QueryAutosave Mode” on page 310
Sets the current autosave mode orretrieves the value and places itin a variable.
ISREDIT (varname) = BLKSIZE “BLKSIZE—Query the BlockSize” on page 311
Returns the block size of the dataset being edited in a specifiedvariable.
ISREDIT BOUNDS [left-col right-col]ISREDIT (var1,var2) = BOUNDSISREDIT BOUNDS = [left-col right-col]
“BOUNDS—Set or Query theEdit Boundaries” on page 312
Sets the left and right boundariesor retrieves the values and placesthem in variables.
ISREDIT BROWSE member “BROWSE—Browse from withinan Edit Session” on page 313
Browses another member in thedata set.
ISREDIT BUILTIN cmdname “BUILTIN—Process a Built-InCommand” on page 314
Processes a built-in commandeven if a macro or macrostatement with the same namehas been defined.
ISREDIT CANCEL “CANCEL—Cancel EditChanges” on page 315
Ends the edit session withoutsaving any changes.
Edit Macro Command Notation Conventions
300 OS/390 V2R10.0 ISPF Edit and Edit Macros
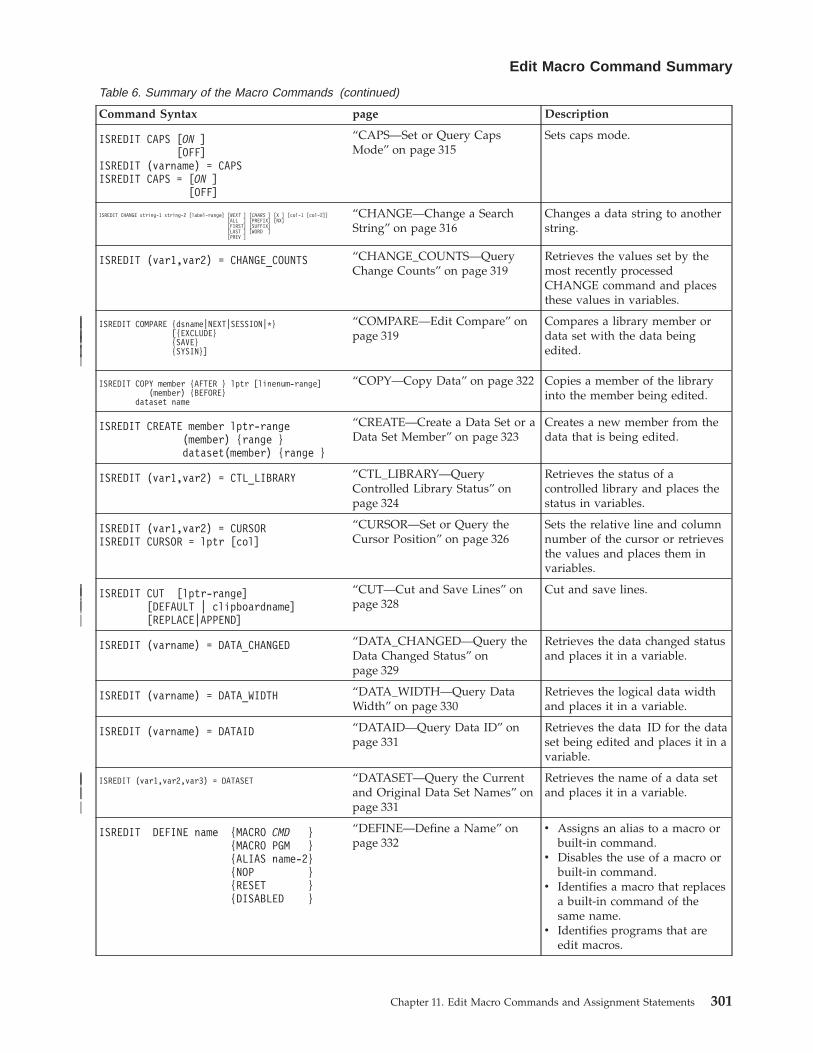
Table 6. Summary of the Macro Commands (continued)
Command Syntax page Description
ISREDIT CAPS [ON ][OFF]
ISREDIT (varname) = CAPSISREDIT CAPS = [ON ]
[OFF]
“CAPS—Set or Query CapsMode” on page 315
Sets caps mode.
ISREDIT CHANGE string-1 string-2 [label-range] [NEXT ] [CHARS ] [X ] [col-1 [col-2]][ALL ] [PREFIX] [NX][FIRST] [SUFFIX][LAST ] [WORD ][PREV ]
“CHANGE—Change a SearchString” on page 316
Changes a data string to anotherstring.
ISREDIT (var1,var2) = CHANGE_COUNTS “CHANGE_COUNTS—QueryChange Counts” on page 319
Retrieves the values set by themost recently processedCHANGE command and placesthese values in variables.
ISREDIT COMPARE {dsname|NEXT|SESSION|*}[{EXCLUDE}{SAVE}{SYSIN}]
“COMPARE—Edit Compare” onpage 319
Compares a library member ordata set with the data beingedited.
ISREDIT COPY member {AFTER } lptr [linenum-range](member) {BEFORE}
dataset name
“COPY—Copy Data” on page 322 Copies a member of the libraryinto the member being edited.
ISREDIT CREATE member lptr-range(member) {range }dataset(member) {range }
“CREATE—Create a Data Set or aData Set Member” on page 323
Creates a new member from thedata that is being edited.
ISREDIT (var1,var2) = CTL_LIBRARY “CTL_LIBRARY—QueryControlled Library Status” onpage 324
Retrieves the status of acontrolled library and places thestatus in variables.
ISREDIT (var1,var2) = CURSORISREDIT CURSOR = lptr [col]
“CURSOR—Set or Query theCursor Position” on page 326
Sets the relative line and columnnumber of the cursor or retrievesthe values and places them invariables.
ISREDIT CUT [lptr-range][DEFAULT | clipboardname][REPLACE|APPEND]
“CUT—Cut and Save Lines” onpage 328
Cut and save lines.
ISREDIT (varname) = DATA_CHANGED “DATA_CHANGED—Query theData Changed Status” onpage 329
Retrieves the data changed statusand places it in a variable.
ISREDIT (varname) = DATA_WIDTH “DATA_WIDTH—Query DataWidth” on page 330
Retrieves the logical data widthand places it in a variable.
ISREDIT (varname) = DATAID “DATAID—Query Data ID” onpage 331
Retrieves the data ID for the dataset being edited and places it in avariable.
ISREDIT (var1,var2,var3) = DATASET “DATASET—Query the Currentand Original Data Set Names” onpage 331
Retrieves the name of a data setand places it in a variable.
ISREDIT DEFINE name {MACRO CMD }{MACRO PGM }{ALIAS name-2}{NOP }{RESET }{DISABLED }
“DEFINE—Define a Name” onpage 332
v Assigns an alias to a macro orbuilt-in command.
v Disables the use of a macro orbuilt-in command.
v Identifies a macro that replacesa built-in command of thesame name.
v Identifies programs that areedit macros.
Edit Macro Command Summary
Chapter 11. Edit Macro Commands and Assignment Statements 301
|||||
|||||
|||
|||
||||
||
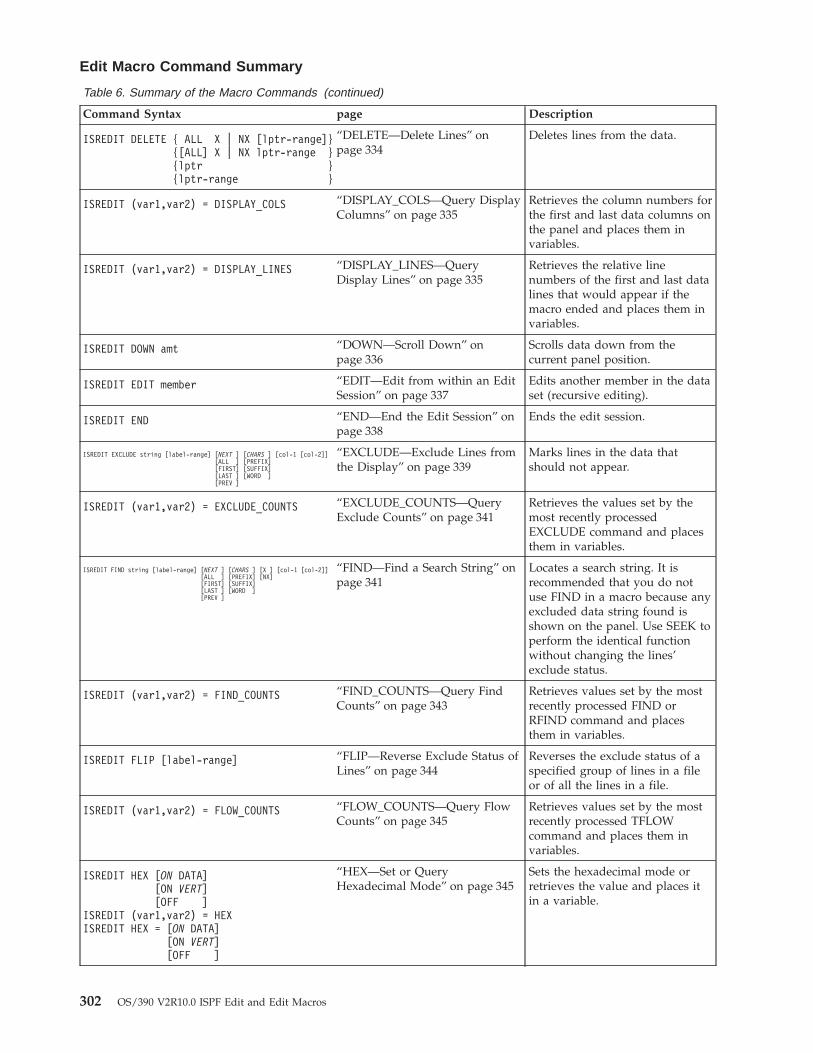
Table 6. Summary of the Macro Commands (continued)
Command Syntax page Description
ISREDIT DELETE { ALL X | NX [lptr-range]}{[ALL] X | NX lptr-range }{lptr }{lptr-range }
“DELETE—Delete Lines” onpage 334
Deletes lines from the data.
ISREDIT (var1,var2) = DISPLAY_COLS “DISPLAY_COLS—Query DisplayColumns” on page 335
Retrieves the column numbers forthe first and last data columns onthe panel and places them invariables.
ISREDIT (var1,var2) = DISPLAY_LINES “DISPLAY_LINES—QueryDisplay Lines” on page 335
Retrieves the relative linenumbers of the first and last datalines that would appear if themacro ended and places them invariables.
ISREDIT DOWN amt “DOWN—Scroll Down” onpage 336
Scrolls data down from thecurrent panel position.
ISREDIT EDIT member “EDIT—Edit from within an EditSession” on page 337
Edits another member in the dataset (recursive editing).
ISREDIT END “END—End the Edit Session” onpage 338
Ends the edit session.
ISREDIT EXCLUDE string [label-range] [NEXT ] [CHARS ] [col-1 [col-2]][ALL ] [PREFIX][FIRST] [SUFFIX][LAST ] [WORD ][PREV ]
“EXCLUDE—Exclude Lines fromthe Display” on page 339
Marks lines in the data thatshould not appear.
ISREDIT (var1,var2) = EXCLUDE_COUNTS “EXCLUDE_COUNTS—QueryExclude Counts” on page 341
Retrieves the values set by themost recently processedEXCLUDE command and placesthem in variables.
ISREDIT FIND string [label-range] [NEXT ] [CHARS ] [X ] [col-1 [col-2]][ALL ] [PREFIX] [NX][FIRST] [SUFFIX][LAST ] [WORD ][PREV ]
“FIND—Find a Search String” onpage 341
Locates a search string. It isrecommended that you do notuse FIND in a macro because anyexcluded data string found isshown on the panel. Use SEEK toperform the identical functionwithout changing the lines’exclude status.
ISREDIT (var1,var2) = FIND_COUNTS “FIND_COUNTS—Query FindCounts” on page 343
Retrieves values set by the mostrecently processed FIND orRFIND command and placesthem in variables.
ISREDIT FLIP [label-range] “FLIP—Reverse Exclude Status ofLines” on page 344
Reverses the exclude status of aspecified group of lines in a fileor of all the lines in a file.
ISREDIT (var1,var2) = FLOW_COUNTS “FLOW_COUNTS—Query FlowCounts” on page 345
Retrieves values set by the mostrecently processed TFLOWcommand and places them invariables.
ISREDIT HEX [ON DATA][ON VERT][OFF ]
ISREDIT (var1,var2) = HEXISREDIT HEX = [ON DATA]
[ON VERT][OFF ]
“HEX—Set or QueryHexadecimal Mode” on page 345
Sets the hexadecimal mode orretrieves the value and places itin a variable.
Edit Macro Command Summary
302 OS/390 V2R10.0 ISPF Edit and Edit Macros
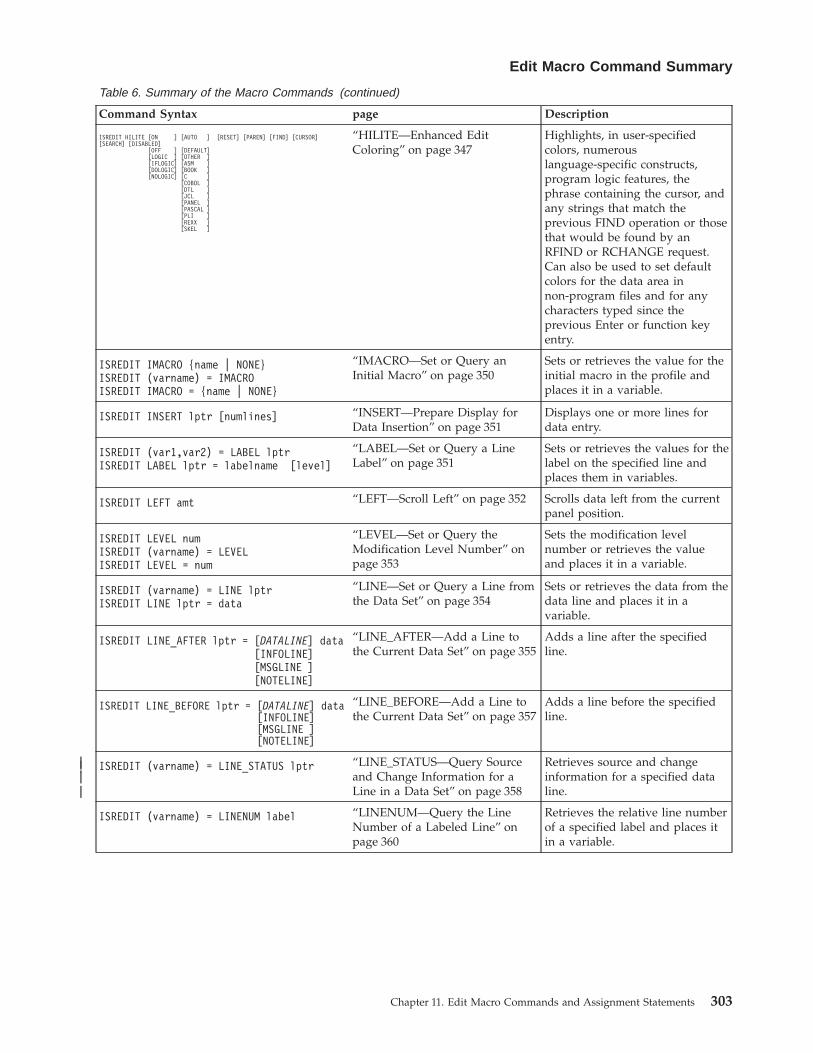
Table 6. Summary of the Macro Commands (continued)
Command Syntax page Description
ISREDIT HILITE [ON ] [AUTO ] [RESET] [PAREN] [FIND] [CURSOR][SEARCH] [DISABLED]
[OFF ] [DEFAULT][LOGIC ] [OTHER ][IFLOGIC] [ASM ][DOLOGIC] [BOOK ][NOLOGIC] [C ]
[COBOL ][DTL ][JCL ][PANEL ][PASCAL ][PLI ][REXX ][SKEL ]
“HILITE—Enhanced EditColoring” on page 347
Highlights, in user-specifiedcolors, numerouslanguage-specific constructs,program logic features, thephrase containing the cursor, andany strings that match theprevious FIND operation or thosethat would be found by anRFIND or RCHANGE request.Can also be used to set defaultcolors for the data area innon-program files and for anycharacters typed since theprevious Enter or function keyentry.
ISREDIT IMACRO {name | NONE}ISREDIT (varname) = IMACROISREDIT IMACRO = {name | NONE}
“IMACRO—Set or Query anInitial Macro” on page 350
Sets or retrieves the value for theinitial macro in the profile andplaces it in a variable.
ISREDIT INSERT lptr [numlines] “INSERT—Prepare Display forData Insertion” on page 351
Displays one or more lines fordata entry.
ISREDIT (var1,var2) = LABEL lptrISREDIT LABEL lptr = labelname [level]
“LABEL—Set or Query a LineLabel” on page 351
Sets or retrieves the values for thelabel on the specified line andplaces them in variables.
ISREDIT LEFT amt “LEFT—Scroll Left” on page 352 Scrolls data left from the currentpanel position.
ISREDIT LEVEL numISREDIT (varname) = LEVELISREDIT LEVEL = num
“LEVEL—Set or Query theModification Level Number” onpage 353
Sets the modification levelnumber or retrieves the valueand places it in a variable.
ISREDIT (varname) = LINE lptrISREDIT LINE lptr = data
“LINE—Set or Query a Line fromthe Data Set” on page 354
Sets or retrieves the data from thedata line and places it in avariable.
ISREDIT LINE_AFTER lptr = [DATALINE] data[INFOLINE][MSGLINE ][NOTELINE]
“LINE_AFTER—Add a Line tothe Current Data Set” on page 355
Adds a line after the specifiedline.
ISREDIT LINE_BEFORE lptr = [DATALINE] data[INFOLINE][MSGLINE ][NOTELINE]
“LINE_BEFORE—Add a Line tothe Current Data Set” on page 357
Adds a line before the specifiedline.
ISREDIT (varname) = LINE_STATUS lptr “LINE_STATUS—Query Sourceand Change Information for aLine in a Data Set” on page 358
Retrieves source and changeinformation for a specified dataline.
ISREDIT (varname) = LINENUM label “LINENUM—Query the LineNumber of a Labeled Line” onpage 360
Retrieves the relative line numberof a specified label and places itin a variable.
Edit Macro Command Summary
Chapter 11. Edit Macro Commands and Assignment Statements 303
||||
|||

Table 6. Summary of the Macro Commands (continued)
Command Syntax page Description
ISREDIT LOCATE lptrISREDIT LOCATE [FIRST] {CHANGE }[lptr-range]
[LAST ] {COMMAND }[NEXT ] {ERROR }[PREV ] {EXCLUDED}
{LABEL }{SPECIAL }{INFOLINE }{MSGLINE}{NOTELINE}
“LOCATE—Locate a Line” onpage 360
Locates a line.
ISREDIT (varname) = LRECL “LRECL—Query the LogicalRecord Length” on page 362
Returns the logical record lengthof the data being edited in avariable.
ISREDIT MACRO [(var1 [,var2,...])] [PROCESS ][NOPROCESS]
“MACRO—Identify an EditMacro” on page 363
Identifies a command as a macro.MACRO is required for allmacros and must be the firstcommand in a CLIST or REXXEXEC macro that is not a CLISTor REXX EXEC statement or thefirst edit command in a programmacro.
ISREDIT (varname) = MACRO_LEVEL “MACRO_LEVEL—Query theMacro Nesting Level” onpage 364
Retrieves the nesting level of themacro being run and places it ina variable.
ISREDIT (varname) = MASKLINEISREDIT MASKLINE = data
“MASKLINE—Set or Query theMask Line” on page 365
Sets or retrieves the value of themask line, which controls thedisplay formatting of input.
ISREDIT (varname) = MEMBER “MEMBER—Query the CurrentMember Name” on page 366
Retrieves the name of the ISPFlibrary member currently beingedited and places it in a variable.
ISREDIT MEND “MEND—End a Macro in theBatch Environment” on page 366
Ends a macro that is running inthe batch environment.
ISREDIT MODEL model-name [qualifier] {AFTER }{BEFORE}
lptr [NOTES][NONOTES]ISREDIT MODEL CLASS class-name
“MODEL—Copy a Model intothe Current Data Set” on page 367
Copies a specified dialogdevelopment model before orafter a specified line.
ISREDIT MOVE member {AFTER } lptr(member){BEFORE}data set namedata.set.name(member)
“MOVE— Move a Data Set or aData Set Member” on page 368
Moves a member of a data setand places it after or before theline specified.
ISREDIT NONUMBER “NONUMBER—Turn OffNumber Mode” on page 369
Turns off number mode.
ISREDIT NOTES [ON ][OFF]
ISREDIT (varname) = NOTESISREDIT NOTES = [ON ]
[OFF]
“NOTES—Set or Query NoteMode” on page 370
Sets the current note mode orretrieves the value and places itin a variable.
ISREDIT NULLS [ON STD][ON ALL][OFF ]
ISREDIT (var1,var2) = NULLSISREDIT NULLS = [ON STD]
[ON ALL][OFF ]
“NULLS—Set or Query NullsMode” on page 371
Sets the current nulls mode orretrieves the value and places itin a variable.
Edit Macro Command Summary
304 OS/390 V2R10.0 ISPF Edit and Edit Macros
|||||||||||
|||
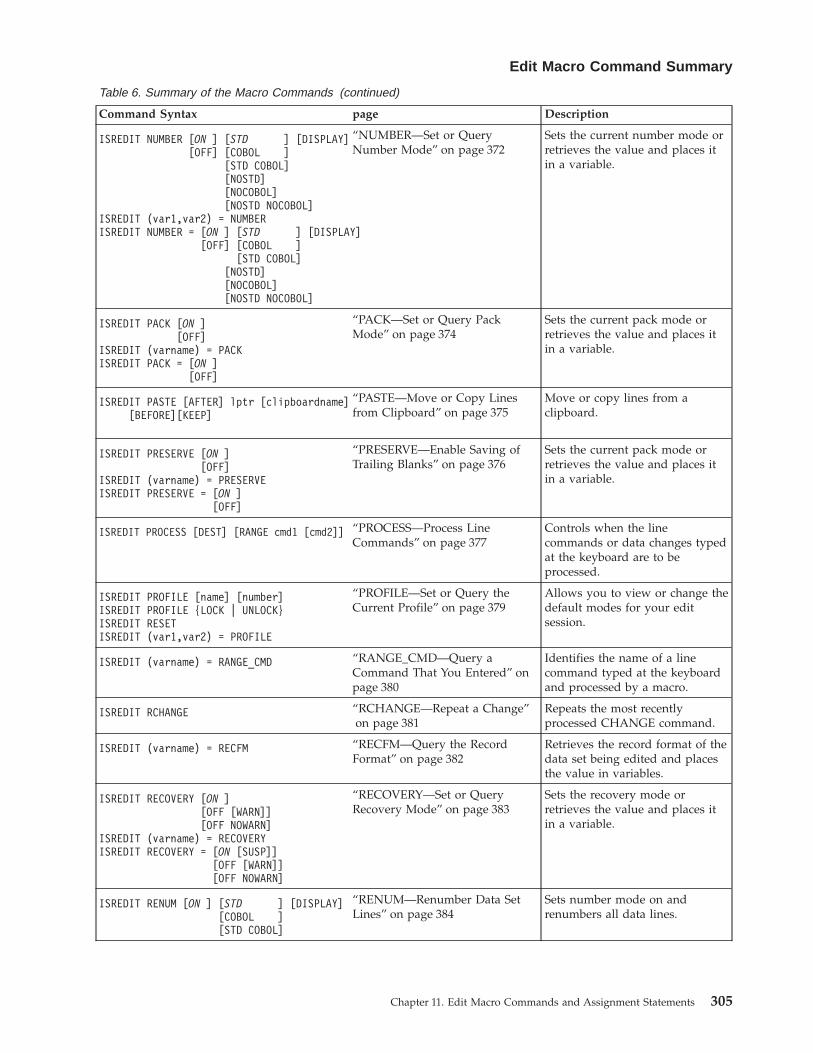
Table 6. Summary of the Macro Commands (continued)
Command Syntax page Description
ISREDIT NUMBER [ON ] [STD ] [DISPLAY][OFF] [COBOL ]
[STD COBOL][NOSTD][NOCOBOL][NOSTD NOCOBOL]
ISREDIT (var1,var2) = NUMBERISREDIT NUMBER = [ON ] [STD ] [DISPLAY]
[OFF] [COBOL ][STD COBOL]
[NOSTD][NOCOBOL][NOSTD NOCOBOL]
“NUMBER—Set or QueryNumber Mode” on page 372
Sets the current number mode orretrieves the value and places itin a variable.
ISREDIT PACK [ON ][OFF]
ISREDIT (varname) = PACKISREDIT PACK = [ON ]
[OFF]
“PACK—Set or Query PackMode” on page 374
Sets the current pack mode orretrieves the value and places itin a variable.
ISREDIT PASTE [AFTER] lptr [clipboardname][BEFORE][KEEP]
“PASTE—Move or Copy Linesfrom Clipboard” on page 375
Move or copy lines from aclipboard.
ISREDIT PRESERVE [ON ][OFF]
ISREDIT (varname) = PRESERVEISREDIT PRESERVE = [ON ]
[OFF]
“PRESERVE—Enable Saving ofTrailing Blanks” on page 376
Sets the current pack mode orretrieves the value and places itin a variable.
ISREDIT PROCESS [DEST] [RANGE cmd1 [cmd2]] “PROCESS—Process LineCommands” on page 377
Controls when the linecommands or data changes typedat the keyboard are to beprocessed.
ISREDIT PROFILE [name] [number]ISREDIT PROFILE {LOCK | UNLOCK}ISREDIT RESETISREDIT (var1,var2) = PROFILE
“PROFILE—Set or Query theCurrent Profile” on page 379
Allows you to view or change thedefault modes for your editsession.
ISREDIT (varname) = RANGE_CMD “RANGE_CMD—Query aCommand That You Entered” onpage 380
Identifies the name of a linecommand typed at the keyboardand processed by a macro.
ISREDIT RCHANGE “RCHANGE—Repeat a Change”on page 381
Repeats the most recentlyprocessed CHANGE command.
ISREDIT (varname) = RECFM “RECFM—Query the RecordFormat” on page 382
Retrieves the record format of thedata set being edited and placesthe value in variables.
ISREDIT RECOVERY [ON ][OFF [WARN]][OFF NOWARN]
ISREDIT (varname) = RECOVERYISREDIT RECOVERY = [ON [SUSP]]
[OFF [WARN]][OFF NOWARN]
“RECOVERY—Set or QueryRecovery Mode” on page 383
Sets the recovery mode orretrieves the value and places itin a variable.
ISREDIT RENUM [ON ] [STD ] [DISPLAY][COBOL ][STD COBOL]
“RENUM—Renumber Data SetLines” on page 384
Sets number mode on andrenumbers all data lines.
Edit Macro Command Summary
Chapter 11. Edit Macro Commands and Assignment Statements 305
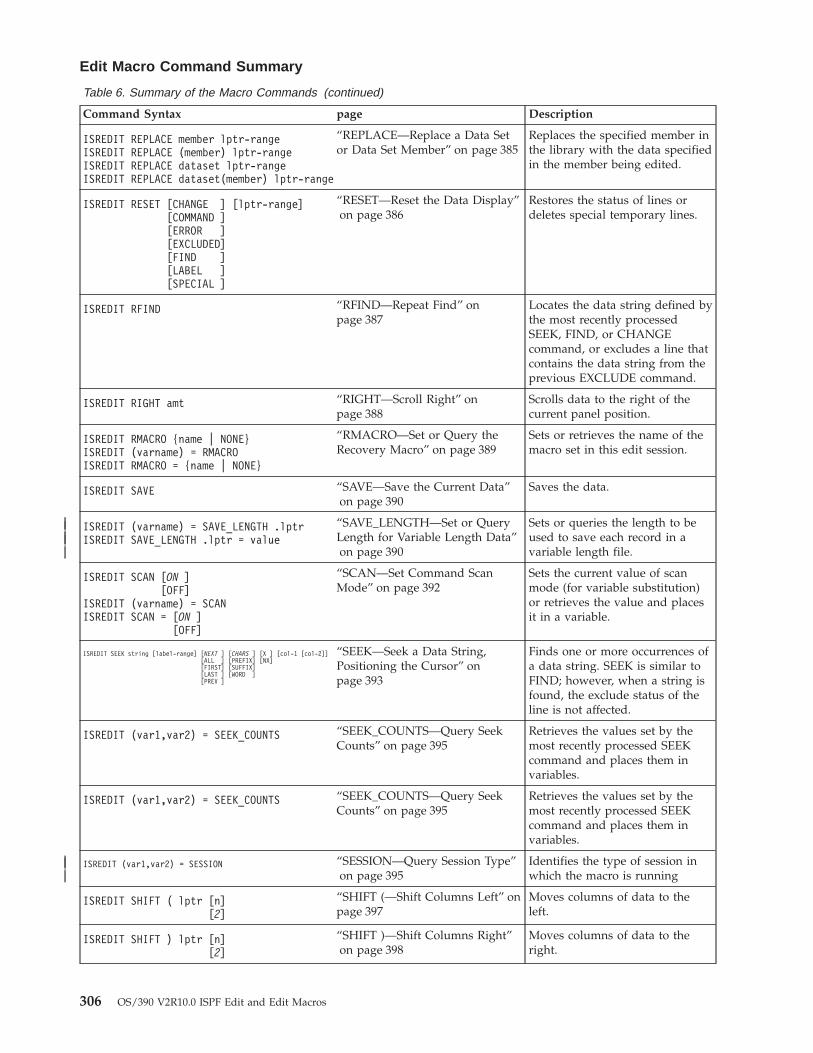
Table 6. Summary of the Macro Commands (continued)
Command Syntax page Description
ISREDIT REPLACE member lptr-rangeISREDIT REPLACE (member) lptr-rangeISREDIT REPLACE dataset lptr-rangeISREDIT REPLACE dataset(member) lptr-range
“REPLACE—Replace a Data Setor Data Set Member” on page 385
Replaces the specified member inthe library with the data specifiedin the member being edited.
ISREDIT RESET [CHANGE ] [lptr-range][COMMAND ][ERROR ][EXCLUDED][FIND ][LABEL ][SPECIAL ]
“RESET—Reset the Data Display”on page 386
Restores the status of lines ordeletes special temporary lines.
ISREDIT RFIND “RFIND—Repeat Find” onpage 387
Locates the data string defined bythe most recently processedSEEK, FIND, or CHANGEcommand, or excludes a line thatcontains the data string from theprevious EXCLUDE command.
ISREDIT RIGHT amt “RIGHT—Scroll Right” onpage 388
Scrolls data to the right of thecurrent panel position.
ISREDIT RMACRO {name | NONE}ISREDIT (varname) = RMACROISREDIT RMACRO = {name | NONE}
“RMACRO—Set or Query theRecovery Macro” on page 389
Sets or retrieves the name of themacro set in this edit session.
ISREDIT SAVE “SAVE—Save the Current Data”on page 390
Saves the data.
ISREDIT (varname) = SAVE_LENGTH .lptrISREDIT SAVE_LENGTH .lptr = value
“SAVE_LENGTH—Set or QueryLength for Variable Length Data”on page 390
Sets or queries the length to beused to save each record in avariable length file.
ISREDIT SCAN [ON ][OFF]
ISREDIT (varname) = SCANISREDIT SCAN = [ON ]
[OFF]
“SCAN—Set Command ScanMode” on page 392
Sets the current value of scanmode (for variable substitution)or retrieves the value and placesit in a variable.
ISREDIT SEEK string [label-range] [NEXT ] [CHARS ] [X ] [col-1 [col-2]][ALL ] [PREFIX] [NX][FIRST] [SUFFIX][LAST ] [WORD ][PREV ]
“SEEK—Seek a Data String,Positioning the Cursor” onpage 393
Finds one or more occurrences ofa data string. SEEK is similar toFIND; however, when a string isfound, the exclude status of theline is not affected.
ISREDIT (var1,var2) = SEEK_COUNTS “SEEK_COUNTS—Query SeekCounts” on page 395
Retrieves the values set by themost recently processed SEEKcommand and places them invariables.
ISREDIT (var1,var2) = SEEK_COUNTS “SEEK_COUNTS—Query SeekCounts” on page 395
Retrieves the values set by themost recently processed SEEKcommand and places them invariables.
ISREDIT (var1,var2) = SESSION “SESSION—Query Session Type”on page 395
Identifies the type of session inwhich the macro is running
ISREDIT SHIFT ( lptr [n][2]
“SHIFT (—Shift Columns Left” onpage 397
Moves columns of data to theleft.
ISREDIT SHIFT ) lptr [n][2]
“SHIFT )—Shift Columns Right”on page 398
Moves columns of data to theright.
Edit Macro Command Summary
306 OS/390 V2R10.0 ISPF Edit and Edit Macros
|||||
|||
|||||
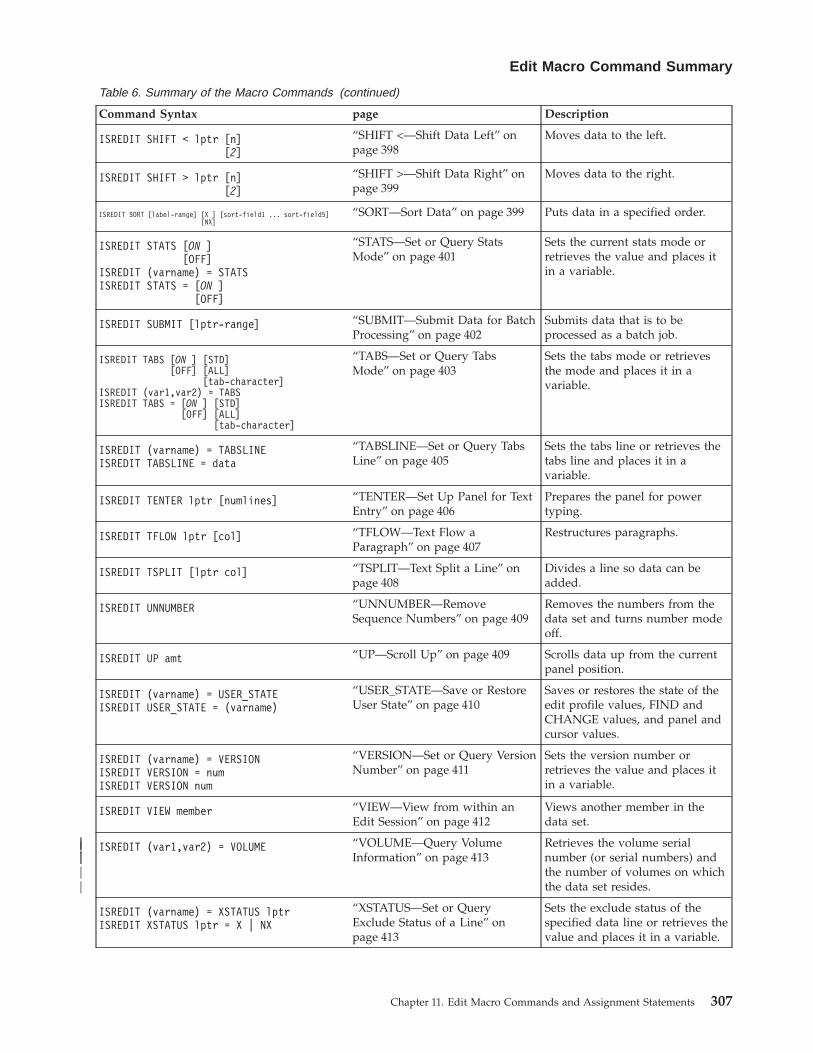
Table 6. Summary of the Macro Commands (continued)
Command Syntax page Description
ISREDIT SHIFT < lptr [n][2]
“SHIFT <—Shift Data Left” onpage 398
Moves data to the left.
ISREDIT SHIFT > lptr [n][2]
“SHIFT >—Shift Data Right” onpage 399
Moves data to the right.
ISREDIT SORT [label-range] [X ] [sort-field1 ... sort-field5][NX]
“SORT—Sort Data” on page 399 Puts data in a specified order.
ISREDIT STATS [ON ][OFF]
ISREDIT (varname) = STATSISREDIT STATS = [ON ]
[OFF]
“STATS—Set or Query StatsMode” on page 401
Sets the current stats mode orretrieves the value and places itin a variable.
ISREDIT SUBMIT [lptr-range] “SUBMIT—Submit Data for BatchProcessing” on page 402
Submits data that is to beprocessed as a batch job.
ISREDIT TABS [ON ] [STD][OFF] [ALL]
[tab-character]ISREDIT (var1,var2) = TABSISREDIT TABS = [ON ] [STD]
[OFF] [ALL][tab-character]
“TABS—Set or Query TabsMode” on page 403
Sets the tabs mode or retrievesthe mode and places it in avariable.
ISREDIT (varname) = TABSLINEISREDIT TABSLINE = data
“TABSLINE—Set or Query TabsLine” on page 405
Sets the tabs line or retrieves thetabs line and places it in avariable.
ISREDIT TENTER lptr [numlines] “TENTER—Set Up Panel for TextEntry” on page 406
Prepares the panel for powertyping.
ISREDIT TFLOW lptr [col] “TFLOW—Text Flow aParagraph” on page 407
Restructures paragraphs.
ISREDIT TSPLIT [lptr col] “TSPLIT—Text Split a Line” onpage 408
Divides a line so data can beadded.
ISREDIT UNNUMBER “UNNUMBER—RemoveSequence Numbers” on page 409
Removes the numbers from thedata set and turns number modeoff.
ISREDIT UP amt “UP—Scroll Up” on page 409 Scrolls data up from the currentpanel position.
ISREDIT (varname) = USER_STATEISREDIT USER_STATE = (varname)
“USER_STATE—Save or RestoreUser State” on page 410
Saves or restores the state of theedit profile values, FIND andCHANGE values, and panel andcursor values.
ISREDIT (varname) = VERSIONISREDIT VERSION = numISREDIT VERSION num
“VERSION—Set or Query VersionNumber” on page 411
Sets the version number orretrieves the value and places itin a variable.
ISREDIT VIEW member “VIEW—View from within anEdit Session” on page 412
Views another member in thedata set.
ISREDIT (var1,var2) = VOLUME “VOLUME—Query VolumeInformation” on page 413
Retrieves the volume serialnumber (or serial numbers) andthe number of volumes on whichthe data set resides.
ISREDIT (varname) = XSTATUS lptrISREDIT XSTATUS lptr = X | NX
“XSTATUS—Set or QueryExclude Status of a Line” onpage 413
Sets the exclude status of thespecified data line or retrieves thevalue and places it in a variable.
Edit Macro Command Summary
Chapter 11. Edit Macro Commands and Assignment Statements 307
|||||||
AUTOLIST—Set or Query Autolist ModeThe AUTOLIST macro command sets autolist mode, which controls the automaticprinting of data to the ISPF list data set.
The AUTOLIST assignment statement either sets autolist mode or retrieves thecurrent setting of autolist mode and places it in a variable.
Autolist mode is saved in the edit profile.
Macro Command SyntaxISREDIT AUTOLIST [ON ]
[OFF]
ON Specifies that when you end an edit session and save changed data, theeditor generates a source listing in the ISPF list data set for eventualprinting.
OFF Does not generate a source listing.
Assignment Statement SyntaxISREDIT (varname) = AUTOLISTISREDIT AUTOLIST = [ON ]
[OFF]
varnameThe name of a variable that contains the setting of autolist mode, eitherON or OFF.
ON Same as macro command syntax.
OFF Same as macro command syntax.
Return CodesThe following return codes can be issued:0 Normal completion20 Severe error.
ExamplesTo turn autolist mode on:ISREDIT AUTOLIST ON
orISREDIT AUTOLIST = ON
To turn autolist mode off:ISREDIT AUTOLIST OFF
orISREDIT AUTOLIST = OFF
AUTONUM—Set or Query Autonum ModeThe AUTONUM macro command sets autonum mode, which controls theautomatic renumbering of data when it is saved.
AUTOLIST
308 OS/390 V2R10.0 ISPF Edit and Edit Macros
The AUTONUM assignment statement either sets autonum mode or retrieves thecurrent setting of autonum mode and places it in a variable.
Macro Command SyntaxISREDIT AUTONUM [ON ]
[OFF]
ON Turns on automatic renumbering. When number mode is also on, the datais automatically renumbered when it is saved.
OFF Turns off automatic renumbering. Data is not renumbered.
Assignment Statement SyntaxISREDIT (varname) = AUTONUMISREDIT AUTONUM = [ON ]
[OFF]
varnameThe name of a variable containing the setting of autonum mode, either ONor OFF.
ON Same as macro command syntax.
OFF Same as macro command syntax.
DescriptionWhen number mode is on, the first line of a data set or member is normally linenumber 000100, the second number is 000200, and so on. However, as lines areinserted and deleted, the increments between line numbers can change.
For example, you might think that when a line is inserted between 000100 and000200, line 000200 would be given the number 000300 and the new line wouldbecome 000200. Instead, the existing lines retain their numbers and the new line isgiven line number 000110.
Therefore, if the original line number increments are important to you, AUTONUMrenumbers your lines automatically so that the original increments are maintained.
Autonum mode is saved in the edit profile.
Return CodesThe following return codes can be issued:0 Normal completion20 Severe error.
ExamplesTo turn autonum mode on:ISREDIT AUTONUM ON
orISREDIT AUTONUM = ON
To turn autonum mode off:ISREDIT AUTONUM OFF
or
AUTONUM
Chapter 11. Edit Macro Commands and Assignment Statements 309
ISREDIT AUTONUM = OFF
AUTOSAVE—Set or Query Autosave ModeThe AUTOSAVE macro command sets autosave mode, which controls whetherchanged data is saved when you issue the END command.
The AUTOSAVE assignment statement either sets autosave mode, or retrieves thecurrent setting of autosave mode and places it in variables.
Macro Command SyntaxISREDIT AUTOSAVE [ON ]
[OFF PROMPT ][OFF NOPROMPT]
ON Turns autosave mode on. When you enter END, any changed data issaved.
OFF PROMPTTurns autosave mode off with the PROMPT operand. You are notified thatchanges have been made and to use either SAVE (followed by END) orCANCEL. If you specify only the PROMPT keyword, OFF is implied.
OFF NOPROMPTTurns autosave mode off with the NOPROMPT operand. You are notnotified and the data is not saved when you issue an END command. ENDbecomes an equivalent to CANCEL. Use the NOPROMPT operand withcaution.
Assignment Statement SyntaxISREDIT (var1,var2) = AUTOSAVEISREDIT AUTOSAVE = [ON ]
[OFF PROMPT ][OFF NOPROMPT]
var1 The name of a variable to contain the setting of autosave mode, either ONor OFF.
var2 The name of a variable to contain the prompt value, PROMPT orNOPROMPT.
ON Same as macro command syntax.
OFF PROMPTSame as macro command syntax.
OFF NOPROMPTSame as macro command syntax.
DescriptionData is considered changed if you have operated on it in any way that could causea change. Shifting a blank line or changing a name to the same name does notactually alter the data, but the editor considers this data changed. When you enterSAVE, the editor resets the change status.
Autosave mode, along with the PROMPT operand, is saved in the edit profile.
See the DATA_CHANGED, CANCEL, and END macro commands, and theCANCEL and END primary commands for more information on saving data.
AUTONUM
310 OS/390 V2R10.0 ISPF Edit and Edit Macros
Return CodesThe following return codes can be issued:0 Normal completion4 OFF NOPROMPT specified20 Severe error.
ExamplesTo turn autosave mode on:ISREDIT AUTOSAVE ON
orISREDIT AUTOSAVE = ON
To turn autosave mode off and have the editor prompt you to use the SAVE orCANCEL command:ISREDIT AUTOSAVE OFF
orISREDIT AUTOSAVE = OFF
To turn autosave mode off and not have the editor prompt you to use SAVE orCANCEL::ISREDIT AUTOSAVE OFF NOPROMPT
orISREDIT AUTOSAVE = OFF NOPROMPT
BLKSIZE—Query the Block SizeThe BLKSIZE assignment statement returns the block size of the data being editedin a specified variable.
Assignment Statement SyntaxISREDIT (varname) = BLKSIZE
varnameThe name of a variable to contain the block size of the data being edited.The block size is a 6-digit value that is left-padded with zeros.
Return CodesThe following return codes can be issued:0 Normal completion12 Syntax Error20 Severe error.
ExampleTo find the block size and continue processing if the block size is greater than 800:ISREDIT (BSIZE) = BLKSIZEIF &BSIZE > 000800 THEN -
...
AUTOSAVE
Chapter 11. Edit Macro Commands and Assignment Statements 311
BOUNDS—Set or Query the Edit BoundariesThe BOUNDS macro command sets the left and right boundaries and saves themin the edit profile.
The BOUNDS assignment statement sets or retrieves the left and right boundariesand places the values in variables.
Macro Command SyntaxISREDIT BOUNDS [left-col right-col]left-col
The left boundary column to be set.right-col
The right boundary column to be set.
Assignment Statement SyntaxISREDIT (var1,var2) = BOUNDSISREDIT BOUNDS = [left-col right-col]var1 A variable containing the left boundary. If the variable is VDEFINEd in
character format, it should be defined with a length of 5. The returnedvalue is left padded with zeros. For compatibility with previous releases ofISPF, A length of 3 or 4 is allowed in cases where no data loss will occur.
var2 A variable containing the right boundary. If the variable is VDEFINEd incharacter format, it should be defined with a length of 5. The returnedvalue is left padded with zeros. For compatibility with previous releases ofISPF/PDF, A length of 3 or 4 is allowed in cases where no data loss willoccur.
left-colSame as macro command syntax.
right-colSame as macro command syntax.
DescriptionThe BOUNDS macro command provides an alternative to setting the boundarieswith the BOUNDS line command or primary command; the effect on the memberor data set is the same.
The column numbers are always data column numbers. Thus, for a variable formatdata set with number mode on, data column 1 is column 9 in the record.
See “Edit Boundaries” on page 28 for more information, including tables that showcommands affected by bounds settings and default bounds settings for varioustypes of data sets.
Return CodesThe following return codes can be issued:0 Normal completion4 Right boundary greater than default, default right boundary used12 Invalid boundaries specified20 Severe error.
BOUNDS
312 OS/390 V2R10.0 ISPF Edit and Edit Macros
ExamplesTo set the boundaries to their default values, type:ISREDIT BOUNDS
To set one boundary while leaving the other value unchanged, type an asterisk (*)for the boundary to be unchanged. For example, to set the left boundary from thevariable &LEFT, and leave the right boundary unchanged, type:ISREDIT BOUNDS &LEFT *
To set the left boundary to 1, leaving the right boundary unchanged:ISREDIT BOUNDS = 1 *
To save the value of the left boundary in the variable &LEFT:ISREDIT (LEFT) = BOUNDS
To save the value of the right boundary in the variable &RIGHT:ISREDIT (,RIGHT) = BOUNDS
To evaluate numbers for bounds when NUMBER COBOL is on, or NUMBER is onfor a variable blocked data set:/* Rexx - Set physical bounds in a macro. Input is 2 column *//* numbers and result is bounds set on that physical column *//* regardless of number setting. Bounds will not be set *//* within line number areas. This sample has minimal *//* error checking. */Address isredit'MACRO (LEFT,RIGHT)' /* Take left and right bounds*/'(NUMBER,COBOL) = NUMBER' /* Get number status */Parse Var cobol . cobol . /* Get just left status */'(RECFM) = RECFM' /* Get record format */'(DW) = DATA_WIDTH' /* Get data width */If left='' Then left = 1 /* Assume col 1 for left */If right='' Then right = dw /* Assume datawidth for right*/shift = 0 /* Assume no left seq numbers*/If cobol='COBOL' Then /* If numbered as cobol */shift = 6 /* Account for sequence num*/
Else If number='ON' & recfm='V' Then /* If numbered variable block*/shift = 8 /* Account for sequence num*/
right = max(1,right - shift) /* Adjust right column */right = min(right,dw) /* Adjust right column */left = max(1,left - shift) /* Adjust left column */left = min(left ,dw) /* Adjust left column */
'BOUNDS 'min(left,right) max(left,right) /* Issue bounds command */'PROFILE'
BROWSE—Browse from within an Edit SessionThe BROWSE macro command allows you to browse a member of the samepartitioned data set during your current edit session.
Macro Command SyntaxISREDIT BROWSE member
memberA member of the library or other partitioned data set you are currentlyediting. You may enter a member pattern to generate a member list.
BOUNDS
Chapter 11. Edit Macro Commands and Assignment Statements 313
DescriptionYour initial edit session is suspended until the browse session is complete.
To exit from the browse session, END or CANCEL must be processed by a macroor entered by you. The current edit session resumes.
For more information on using the BROWSE service, refer to ISPF Services Guide
Return CodesThe following return codes can be issued:0 Normal completion12 Your error (invalid member name, recovery pending)20 Severe error.
ExamplesTo browse the member OLDMEM in your current ISPF library:ISREDIT BROWSE OLDMEM
BUILTIN—Process a Built-In CommandThe BUILTIN macro command is used within an edit macro to process a built-inedit command, even if a macro or macro statement with the same name has beendefined.
Macro Command SyntaxISREDIT BUILTIN cmdname
cmdnameThe built-in command to be processed.
DescriptionIf you create a macro named MACEND and enter a DEFINE END ALIASMACEND command, your MACEND macro runs when you enter END. Withinthe MACEND macro you can perform logic and use a built-in END command toactually end the edit session.
Note that if END is issued in your MACEND macro without being preceded byBUILTIN, the MACEND macro would run again, resulting in an infinite loop.
Return CodesThe following return codes can be issued:n Return code from the built-in command20 Severe error.
ExamplesTo process the built-in END command:ISREDIT BUILTIN END
To process the built-in CHANGE command:ISREDIT BUILTIN CHANGE ALL " " "-"
BROWSE
314 OS/390 V2R10.0 ISPF Edit and Edit Macros
CANCEL—Cancel Edit ChangesThe CANCEL macro command ends your edit session without saving any of thechanges you have made.
Macro Command SyntaxISREDIT CANCEL
DescriptionCANCEL is especially useful if you have changed the wrong data, or if thechanges themselves are incorrect. See the DATA_CHANGED, AUTOSAVE, andEND commands for more information about saving data.
Note: If you issue SAVE and later issue CANCEL, the changes you made beforeissuing SAVE are not canceled.
CANCEL does not cause automatic recording in the ISPF list data set, regardless ofthe setting of the autolist mode.
Return CodesThe following return codes can be issued:0 Normal completion20 Severe error.
ExampleTo cancel the current edit session:ISREDIT CANCEL
CAPS—Set or Query Caps ModeThe CAPS macro command sets caps mode, which controls whether alphabeticdata that you type at the terminal is automatically converted to uppercase duringedit operations.
The CAPS assignment statement either sets caps mode or retrieves the setting ofcaps mode and places it in a variable.
Macro Command SyntaxISREDIT CAPS [ON ]
[OFF]
ON Turns caps mode on.
OFF Turns caps mode off.
Assignment Statement SyntaxISREDIT (varname) = CAPSISREDIT CAPS = [ON ]
[OFF]
varnameThe name of a variable containing the setting of caps mode, either ON orOFF.
ON Same as macro command syntax.
CANCEL
Chapter 11. Edit Macro Commands and Assignment Statements 315
OFF Same as macro command syntax.
DescriptionWhen the editor retrieves data, it sets the caps mode on if the data contains alluppercase letters, or off if the data contains lowercase letters. The editor displays amessage when the caps mode changes.
Caps mode is saved in the edit profile. To override the automatic setting of capsmode, you can include the CAPS command in an initial macro.
Caps mode is normally on for program development work. When caps mode is setto on, any alphabetic data that you type, plus any other alphabetic data thatalready exists on that line, is converted to uppercase when you press Enter or afunction key.
Caps mode is normally off when you edit text documentation. When caps mode isset to off, any alphabetic data that you type remains just as you typed it. If youtyped it in uppercase, it stays in uppercase; if you typed it in lowercase, it stays inlowercase. Also, alphabetic data that is already typed on that line is not affected.
CAPS does not apply to DBCS fields in formatted data or to DBCS fields in mixedfields. If you specify CAPS, the DBCS fields remain unchanged. See the LC(lowercase) and UC (uppercase) line commands and the CAPS primary commandfor more information about changing cases.
Return CodesThe following return codes can be issued:0 Normal completion20 Severe error.
ExamplesTo save the value of caps mode in variable &CAPMODE:ISREDIT (CAPMODE) = CAPS
To turn caps mode OFF:ISREDIT CAPS = OFF
To set the value of caps mode from variable &CAPMODE:ISREDIT CAPS &CAPMODE
CHANGE—Change a Search StringThe CHANGE macro command changes one search string into another.
Macro Command Syntax
string-1The search string you want to change.
ISREDIT CHANGE string-1 string-2 [label-range] [NEXT ] [CHARS ] [X ] [col-1 [col-2]][ALL ] [PREFIX] [NX][FIRST] [SUFFIX][LAST ] [WORD ][PREV ]
CAPS
316 OS/390 V2R10.0 ISPF Edit and Edit Macros
Note: For edit macros written in CLIST, strings that contain an opencomment delimiter (/*) must be placed within the &STR() delimiterssuch as &STR(/*XXX). The maximum allowable length of the stringis 256 bytes. If you are specifying a hex string, the maximum is 128hexadecimal characters.
string-2The string you want to replace string-1. The maximum allowable length ofthe string is 256 bytes. If you are specifying a hex string, the maximum is128 hexadecimal characters.
label-rangeTwo labels that identify the range of lines CHANGE searches. The defaultsare the editor-defined .ZFIRST and .ZLAST labels.
When using a macro that uses NEXT or PREV with a label-range, becareful concerning cursor placement. If the cursor is currently placed belowthe label-range, and the NEXT occurence of a string is requested, theprocess returns a return code of 4 and the string is not found, even if itexists within the label-range.
If the cursor is currently placed above the label-range, and the PREVoccurence of a string is requested, the process returns a return code of 4and the string is not found, even if it exists within the label-range.
NEXT Starts at the first position after the current cursor location and searchesahead to find the next occurrence of string-1. NEXT is the default.
ALL Starts at the top of the data and searches ahead to find all occurrences ofstring-1.
FIRST Starts at the top of the data and searches ahead to find the first occurrenceof string-1.
LAST Starts at the bottom of the data and searches backward to find the lastoccurrence of string-1.
PREV Starts at the current cursor location and searches backward to find theprevious occurrence of string-1.
CHARSLocates string-1 anywhere the characters match. CHARS is the default.
PREFIXLocates string-1 at the beginning of a word.
SUFFIXLocates string-1 at the end of a word.
WORDLocates string-1 when it is delimited on both sides by blanks or othernon-alphanumeric characters.
X Scans only lines that are excluded from the display.
NX Scans only lines that are not excluded from the display.
col-1 and col-2Numbers that identify the columns CHANGE is to search.
DescriptionCHANGE is often used with FIND, EXCLUDE, and SEEK, and theCHANGE_COUNTS assignment statement.
CHANGE
Chapter 11. Edit Macro Commands and Assignment Statements 317
To change the next occurrence of ME to YOU without specifying any otherqualifications, include the following command in an edit macro:ISREDIT CHANGE ME YOU
This command changes only the next occurrence of the letters ME to YOU. Since noother qualifications were specified, the letters ME can be:v Uppercase or a mixture of uppercase and lowercasev At the beginning of a word (prefix), the end of a word (suffix), or the entire
word (word)v In an excluded line or a nonexcluded linev Anywhere within the current boundaries.
To change the next occurrence of ME to YOU, but only if the letters are uppercase:ISREDIT CHANGE C'ME' YOU
This type of change is called a character string change (note the C that precedes thesearch string) because it changes the next occurrence of the letters ME to YOU only ifthe letters are found in uppercase. However, since no other qualifications werespecified, the change occurs no matter where the letters are found, as outlined inthe preceding list.
When you would like to issue CHANGE, but you are unsure of the exclude statusof a line, you can use the XSTATUS assignment statement with SEEK. First, findthe particular line with SEEK. Then, determine the exclude status with theXSTATUS assignment statement. Use CHANGE to change the string; and finally,reset the exclude status with another XSTATUS assignment statement. For example:ISREDIT SEEK ABCDO WHILE &LASTCC=0ISREDIT (X) = XSTATUS .ZCSRISREDIT CHANGE ABC DEF .ZCSR .ZCSRISREDIT XSTATUS .ZCSR = &XISREDIT SEEK ABC
END
For more information, including other types of search strings, see “Finding,Seeking, Changing, and Excluding Data” on page 53.
Return CodesThe following return codes can be issued:
0 Normal completion
4 String not found
8 Change error. String-2 is longer than string-1 and substitution was notperformed on at least one change.
12 Inconsistent parameters. The string to be found does not fit between thespecified columns.
20 Severe error.
ExampleBefore changing the current member name, put it into a variable name such asMEMNAME. To add an identifier to that name, if it is in columns 1 to 10 and lieswithin the first line and the line labeled .XLAB:
CHANGE
318 OS/390 V2R10.0 ISPF Edit and Edit Macros
ISREDIT (MEMNAME) = MEMBERISREDIT CHANGE WORD &MEMNAME "MEMBER:&MEMNAME" 1 10 .ZFIRST .XLAB
CHANGE_COUNTS—Query Change CountsThe CHANGE_COUNTS assignment statement retrieves values set by the mostrecently processed CHANGE command and places these values in variables.
Assignment Statement SyntaxISREDIT (var1,var2) = CHANGE_COUNTS
var1 The name of a variable to contain the number of strings changed. It mustbe an 8-character value that is left-padded with zeros.
var2 The name of a variable to contain the number of strings that could not bechanged. It also must be an 8-character value that is left-padded withzeros.
Return CodesThe following return codes can be issued:0 Normal completion20 Severe error.
ExamplesTo put the number of changes resulting from the most recent CHANGE commandinto the variable &CHGED:ISREDIT (CHGED) = CHANGE_COUNTS
To put the number of change errors into variable &ERRS:ISREDIT (,ERRS) = CHANGE_COUNTS
To put the number of changes and change errors into variables &CHG and &ERR:ISREDIT (CHG,ERR) = CHANGE_COUNTS
COMPARE—Edit CompareThe COMPARE command compares the file you are editing with an externalsequential data set or member of a partitioned data set. Lines that exist only in thefile being edited are marked, and lines that exist only in the file being comparedare inserted as information lines in the file being edited. The command operates asa primary command or an edit macro.
You can use the Delete and Make Data line commands to merge changes betweenfiles that are being compared.
The COMPARE function supports all line lengths, but some SuperC options areignored for line lengths greater than 256 characters long.
When you are editing a cataloged data set, explicit data set names refer tocataloged data sets. However, if you are editing an uncataloged data set, explicitmember names refer to cataloged data sets, but if you specify only a membername, COMPARE searches for the member in the current uncataloged data set. Forexample, if you are editing an uncataloged data set called ″userid.TEMP″, thecommandCOMPARE TEMP
CHANGE
Chapter 11. Edit Macro Commands and Assignment Statements 319
||||||
|
first looks for member TEMP in the current, uncataloged data set, then looks for acataloged data set named TEMP (TSO prefix rules apply). If it finds data set TEMP,and the data set being edited is a PDS member, then the same named member issearched for in data set TEMP.
Use of COMPARE when editing concatenations that contain uncataloged data setsis not supported and can lead to unpredictable results.
If you have made changes to the data before issuing the COMPARE command, theCOMPARE command uses the current contents of the edit session during thecomparison. Because COMPARE does not require the data to be saved on disk, youcan use the COMPARE command from EDIF, VIIF, or EDIREC sessions. However,COMPARE NEXT and COMPARE SESSION are not supported in EDIF, VIIF, orEDIREC sessions.
Macro Command Syntax
dsnameThe name of a member or data set to which the current file is compared.This variable can be specified as a fully qualified data set name (inquotation marks), a partially qualified data set name, or a member name.
If you specify only a member name, it can be preceded by a leftparenthesis symbol. The right parenthesis is allowed but not required. Thecurrent edit session must be of a member of a partitioned data set. Thecurrent edit concatenation is searched for the member to compare.
If you specify only a data set name and the current file is a member of aPDS, then the specified data set is searched for a member of the samename as the member being edited.
NEXT Specifies to do a comparison between the currently edited member and thenext member of the same name found at a higher level of the hierarchy (ornext level of the edit concatenation) than the current member. For example,if the current member is found in the third level of the concatenation, anda like-named member exists at the fourth level, then the third and fourthlevel members are compared. After data is saved in the lowest level,compares are done from that level upward. If you specify dsname, theNEXT keyword cannot be used.
SESSION|*Specifies that you want to compare the changes you have made during theedit session with the copy of the data saved on disk. Use COMPARESESSION or COMPARE * to see the changes you have made to the editdata since the beginning of the edit session or since the last SAVEcommand.
EXCLUDESpecifies that all matching lines in the compared data sets are excludedfrom the display except for a specified number of lines above and belowthe differences. The differences themselves are also shown in the display.The specified number of lines that are shown is set on the Edit CompareSettings panel. If you do not respecify the number for this edit session,then whatever was the last number set is still valid. To change thisnumber, issue the COMPARE command with no operand and change the
ISREDIT COMPARE {dsname|NEXT|SESSION|* } [EXCLUDE][SAVE ] [SYSIN ]
COMPARE
320 OS/390 V2R10.0 ISPF Edit and Edit Macros
||||
||
||||||
||||||
|||||||
EXCLUDE field on the Edit Compare Settings panel. Valid numbers are 0through 12, inclusive. You cannot display the Edit Compare Settings panelfrom a macro.
You can also use the COMPARE EXCLUDE command at any time toexclude all lines in a file except lines with line labels and information lines,and the lines above and below those lines. When you specify EXCLUDEwithout a data set name or NEXT, no comparison is done. Instead thelabels and information lines that already exist in the file are used toexclude functions. See “Compare Examples” for a macro that uses thistechnique.
SAVE Specifies that SuperC (which performs the actual compare function) createa listing. The listing is saved in a data set namedprefix.ISPFEDIT.COMPARE.LIST. The save function is intended fordebugging purposes, but it also provides a way to create a SuperC listing.The listing produced is a Change listing (option CHNGL). No notificationis given regarding successful creation of the listing, and errors allocatingthe listing do not cause the comparison to end.
Note: Because of the way the SuperC comparison is done, the filecurrently being edited is shown in the SuperC listing as the old file,and the file to which the current file is being compared is listed asthe new file. Therefore, insertions refer to lines that are not in thecurrent file, and deletions refer to lines that are only in the currentfile.
SYSINSpecifies not to free the DD name SYSIN before calling SuperC to comparefiles. This enables you to pass SuperC Process Statements to alter thecomparison. No validation is done on the type of SYSIN allocation or thecontents of the data set.
Return CodesThe following return codes can be issued:
0 Normal completion
8 Member or data set not found, or an error opening the member or data setoccurred.
12 No parameters specified, or another parameter error such as not validNEXT or member specification.
20 Severe error. SuperC, allocation, or delta file error occurred.
Compare ExamplesTo compare the current file to another file called X.Y.Z and to save the SuperCoutput file in ISPFEDIT.COMPARE.LIST:
ISREDIT COMPARE X.Y.Z SAVE
To compare the current file to a member in the same partitioned data set, andexclude everything but the context in which changes exist:
ISREDIT COMPARE (memname) EXCLUDE
To find all of the occurrences of a string in a file and exclude lines to show thecontext in which the strings were found, you can use the following macro:
COMPARE
Chapter 11. Edit Macro Commands and Assignment Statements 321
|||
|||||||
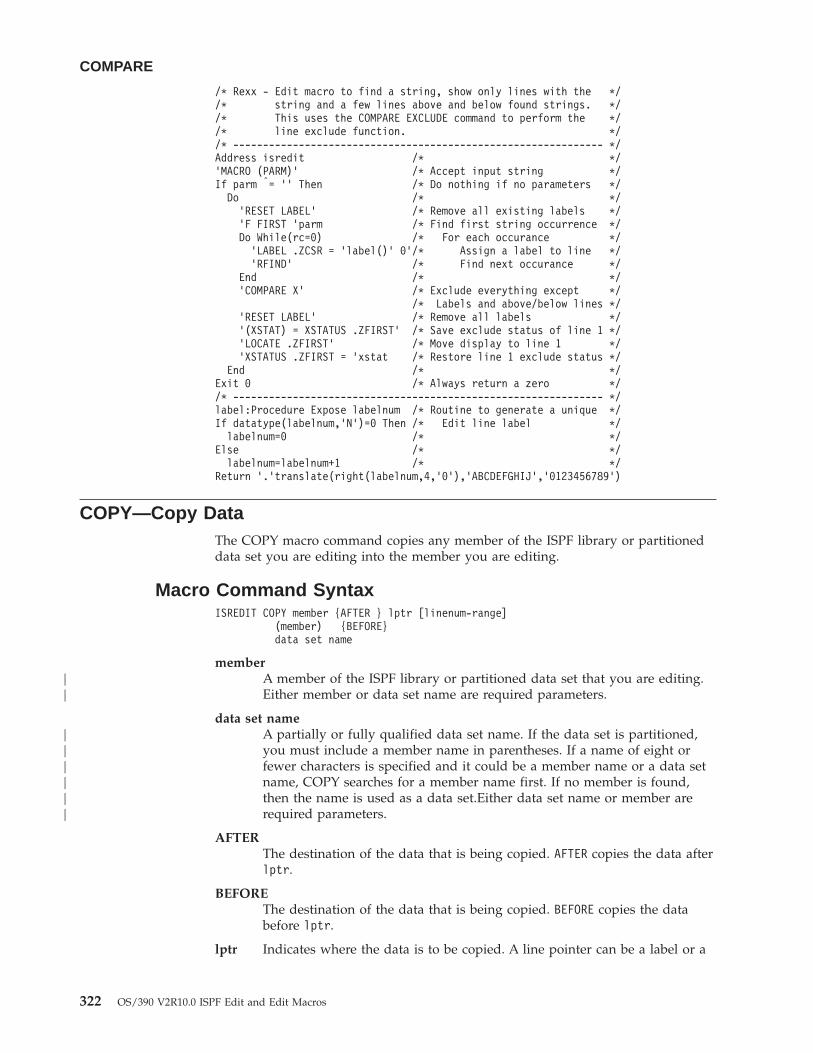
/* Rexx - Edit macro to find a string, show only lines with the *//* string and a few lines above and below found strings. *//* This uses the COMPARE EXCLUDE command to perform the *//* line exclude function. *//* -------------------------------------------------------------- */Address isredit /* */'MACRO (PARM)' /* Accept input string */If parm |= '' Then /* Do nothing if no parameters */
Do /* */'RESET LABEL' /* Remove all existing labels */'F FIRST 'parm /* Find first string occurrence */Do While(rc=0) /* For each occurance */'LABEL .ZCSR = 'label()' 0'/* Assign a label to line */'RFIND' /* Find next occurance */
End /* */'COMPARE X' /* Exclude everything except */
/* Labels and above/below lines */'RESET LABEL' /* Remove all labels */'(XSTAT) = XSTATUS .ZFIRST' /* Save exclude status of line 1 */'LOCATE .ZFIRST' /* Move display to line 1 */'XSTATUS .ZFIRST = 'xstat /* Restore line 1 exclude status */
End /* */Exit 0 /* Always return a zero *//* -------------------------------------------------------------- */label:Procedure Expose labelnum /* Routine to generate a unique */If datatype(labelnum,'N')=0 Then /* Edit line label */labelnum=0 /* */
Else /* */labelnum=labelnum+1 /* */
Return '.'translate(right(labelnum,4,'0'),'ABCDEFGHIJ','0123456789')
COPY—Copy DataThe COPY macro command copies any member of the ISPF library or partitioneddata set you are editing into the member you are editing.
Macro Command SyntaxISREDIT COPY member {AFTER } lptr [linenum-range]
(member) {BEFORE}data set name
memberA member of the ISPF library or partitioned data set that you are editing.Either member or data set name are required parameters.
data set nameA partially or fully qualified data set name. If the data set is partitioned,you must include a member name in parentheses. If a name of eight orfewer characters is specified and it could be a member name or a data setname, COPY searches for a member name first. If no member is found,then the name is used as a data set.Either data set name or member arerequired parameters.
AFTERThe destination of the data that is being copied. AFTER copies the data afterlptr.
BEFOREThe destination of the data that is being copied. BEFORE copies the databefore lptr.
lptr Indicates where the data is to be copied. A line pointer can be a label or a
COMPARE
322 OS/390 V2R10.0 ISPF Edit and Edit Macros
||
||||||
relative line number. If you use a label, the label can be either a label thatyou define or one of the editor-defined labels, such as .ZF or .ZL.
linenum-rangeTwo numbers that specify the line numbers of the member being copied.
Note: If the member name or data set name is less than 8 characters and the dataset you are editing is partitioned a like-named member is copied. If alike-named member does not exist the name is considered to be a partiallyqualified data set name.
Return CodesThe following return codes can be issued:0 Normal completion8 End of data reached before last record read12 Invalid line pointer (lptr); member not found or BLDL error16 End of data reached before first record of specified range was reached20 Syntax error (invalid name, incomplete range), or I/O error.
ExamplesTo copy all of the member MEM1 at the end of the data:ISREDIT COPY MEM1 AFTER .ZLAST
To copy all of data set MOVECOPY.DATA before the first line of data:ISREDIT COPY MOVECOPY.DATA BEFORE .ZFIRST
To copy the first three lines of the member MEM1 before the first line of data:ISREDIT COPY MEM1 BEFORE .ZF 1 3
CREATE—Create a Data Set or a Data Set MemberThe CREATE macro command creates a member of a partitioned data set from thedata you are editing. This command cannot be used to create a sequential data set.Use the Data Set Utility (option 3.2) to allocate a sequential data set.
Macro Command SyntaxISREDIT CREATE member lptr-range
(member) [range]dataset(member) [range]
memberThe name of the new member added to the partitioned data set currentlybeing edited. If you are using a concatenated sequence of libraries, themember is always written to the first library in the sequence.
dataset(member)The name of a different partitioned data set and new member to be addedto the partitioned data set. The data set name can be fully or partiallyqualified.
lptr-rangeTwo line pointers that specify the range of lines used to create the newmember. A line pointer can be a label or a relative line number. Specifyingone line pointer is incorrect.
COPY
Chapter 11. Edit Macro Commands and Assignment Statements 323
DescriptionCREATE adds a member to a partitioned data set only if a member with the samename does not already exist. Use REPLACE if the member already exists.
Return CodesThe following return codes can be issued:0 Normal completion8 Member already exists, member not created12 Invalid line pointer (lptr). The referenced line does not exist in the file.20 Syntax error (invalid name or incomplete lptr range), or I/O error.
ExampleTo create a new 10-line member from the first 10 lines of the member being edited:ISREDIT CREATE MEM1 1 10
CTL_LIBRARY—Query Controlled Library StatusThe CTL_LIBRARY assignment statement retrieves the status of a controlled libraryand places the status in variables. CTL_LIBRARY is used in initial macros to definethe use of controlled library members.
Note: The CTL_LIBRARY assignment statement applies to LMF only. You cannotuse it to query the status of a library that is controlled by SCLM. Refer toISPF/PDF Software Configuration and Library Manager (SCLM) Guide andReference for information about querying the status of libraries that arecontrolled by SCLM.
Assignment Statement SyntaxISREDIT (var1,var2) = CTL_LIBRARY
var1 The name of a variable to contain the lock status of the member.
var2 The name of a variable to contain additional information about the status.
Table 7 summarizes the information contained in var1 and var2. The table entriesare defined following the table.
Table 7. var1 and var2 Contents
var1 var2
OBTAINED User ID that obtained the member
UNAVAILABLE {User ID}{DEACTIVATED}{*LOCKED*}
ERROR blanks
NOCHECK {FIRSTLIB}{blanks}
The value placed in var1 is one of the following:
OBTAINEDSpecifies that the lock has been obtained for the member being edited. Themember was found in a controlled library. If the member is modified and
CREATE
324 OS/390 V2R10.0 ISPF Edit and Edit Macros
saved in your library, the next time this statement is processed, NOCHECKis returned as the lock status. If the member is not saved in your library,the lock for this member is freed.
If OBTAINED is placed in var1, the value of var2 contains your user ID(the user ID that locked the member).
UNAVAILABLESpecifies that the lock could not be obtained for the member being edited.The member was found in a controlled library.
If UNAVAILABLE is placed in var1, indicating the lock is not available, thevalue placed in var2 is one of the following:
User IDThe user ID that has locked the member.
DEACTIVATEDLibrary controls have been deactivated.
*LOCKED*The member is available, but exists in a lower level of the librarystructure that did not precede the library in which the member wasfound in the Edit concatenation sequence. This is called apseudo-lock.
ERRORSpecifies that the library access service was unable to determine whetherthe member was locked because of an error or unusual condition.
blanksIf ERROR is placed in var1, the value of var2 is blanks.
NOCHECKSpecifies that no check was done to determine the status of the member.NOCHECK is returned in the following cases:v NO or NEVER was typed in the Lock field of the Edit - Entry panel.v The member is new.v The member was obtained from the first library in the concatenation
sequence.v An ISRCFIL data set name is not allocated to you.
If NOCHECK is placed in var1, indicating that no checking was done, thevalue placed in var2 is the reason no checking was done (which is one ofthe following):
FIRSTLIBThe member was found in the first library of the concatenationsequence used for editing, or the member is new.
blanksThe data set allocation shows that library management should notbe called; no ISRCFIL DD is allocated or LOCK=NO was specified.
Return CodesThe following return codes can be issued:0 Normal completion20 Severe error.
CTL_LIBRARY
Chapter 11. Edit Macro Commands and Assignment Statements 325
ExampleTo get the control and lock status of the current member:ISREDIT (CSTATUS,LSTATUS) = CTL_LIBRARY
CURSOR—Set or Query the Cursor PositionThe CURSOR assignment statement sets or retrieves the column number of thecursor location within the data and either the relative line number or label. Thesevalues are placed in variables.
Assignment Statement SyntaxISREDIT (var1,var2) = CURSORISREDIT CURSOR = lptr [col]
var1 The name of a variable containing the line number. The line number is a6-digit value that is left-padded with zeros. It is the ordinal number (notthe sequence number) of the line.
var2 The name of a variable containing the data column number. The datacolumn number is a 3-digit number that is left-padded with zeros. If thevariable is VDEFINEd in character format, it should be defined with alength of 5. The returned value is left padded with zeros. For compatibilitywith previous releases of ISPF/PDF, a length of 3 or 4 is allowed in caseswhere no data loss will occur. The columns are numbered starting with 1at the first data column. If the cursor is in the command area, the cursorvalue is column 1 of the first data line on the panel; the value is column 0,if the cursor is in the line command area. When you retrieve the cursorposition in an empty member, the line number and column number areboth set to 0.
lptr The relative line number or label of the line on which the cursor is to belocated. Make sure when you set the cursor to a line number that the linenumber exists.
Note: If you try use a label that has not been assigned, you receive areturn code of 20. To avoid this, use the LINENUM assignmentstatement. When using the LINENUM statement, a return code of 8is issued if the label does not exist.
ISREDIT X = LINENUM .LABEL
col The data column number where the cursor is to be located.
If the column number is beyond the end of the data area when setting thecursor, the cursor is positioned to the next line, which is equivalent to thefirst position of the line command area.
DescriptionThe position of the cursor shows the starting or ending location for the SEEK,FIND, CHANGE, and EXCLUDE commands. It is also used as the text split pointfor TSPLIT. See “Referring to Column Positions” on page 114 for more informationon how the column number is determined.
When you run a macro, the cursor value is the cursor position on the panel at runtime.
CTL_LIBRARY
326 OS/390 V2R10.0 ISPF Edit and Edit Macros
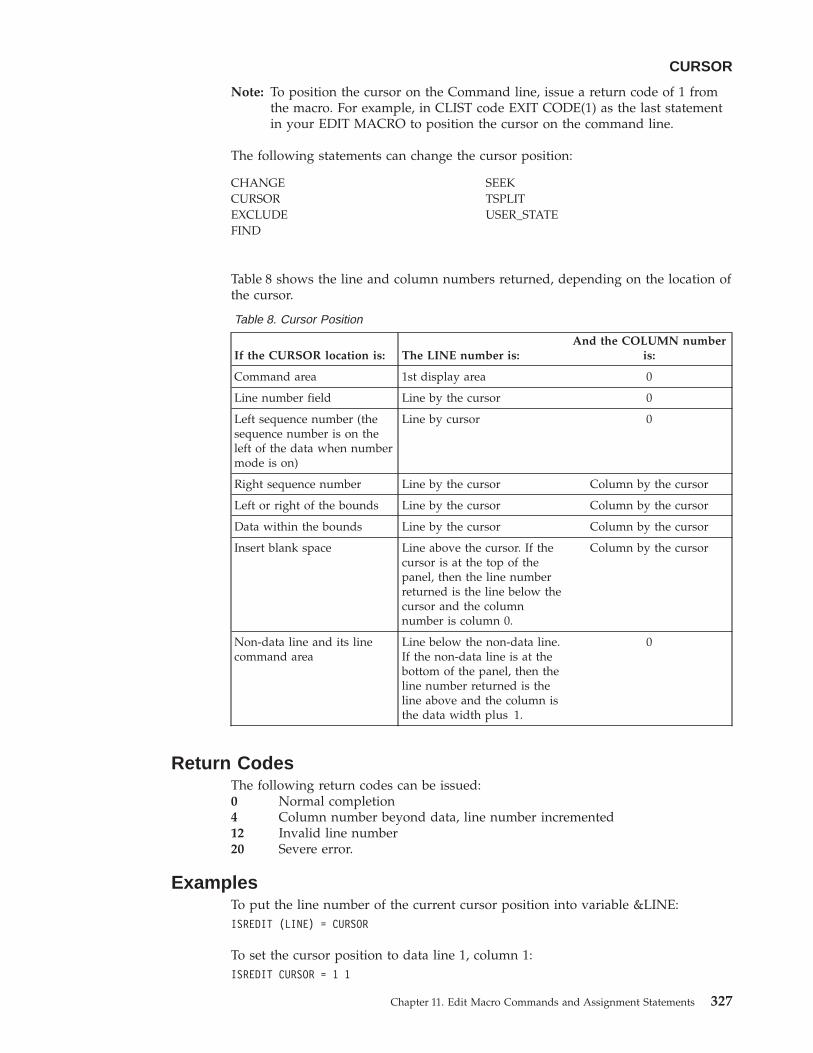
Note: To position the cursor on the Command line, issue a return code of 1 fromthe macro. For example, in CLIST code EXIT CODE(1) as the last statementin your EDIT MACRO to position the cursor on the command line.
The following statements can change the cursor position:
CHANGE SEEKCURSOR TSPLITEXCLUDE USER_STATEFIND
Table 8 shows the line and column numbers returned, depending on the location ofthe cursor.
Table 8. Cursor Position
If the CURSOR location is: The LINE number is:And the COLUMN number
is:
Command area 1st display area 0
Line number field Line by the cursor 0
Left sequence number (thesequence number is on theleft of the data when numbermode is on)
Line by cursor 0
Right sequence number Line by the cursor Column by the cursor
Left or right of the bounds Line by the cursor Column by the cursor
Data within the bounds Line by the cursor Column by the cursor
Insert blank space Line above the cursor. If thecursor is at the top of thepanel, then the line numberreturned is the line below thecursor and the columnnumber is column 0.
Column by the cursor
Non-data line and its linecommand area
Line below the non-data line.If the non-data line is at thebottom of the panel, then theline number returned is theline above and the column isthe data width plus 1.
0
Return CodesThe following return codes can be issued:0 Normal completion4 Column number beyond data, line number incremented12 Invalid line number20 Severe error.
ExamplesTo put the line number of the current cursor position into variable &LINE:ISREDIT (LINE) = CURSOR
To set the cursor position to data line 1, column 1:ISREDIT CURSOR = 1 1
CURSOR
Chapter 11. Edit Macro Commands and Assignment Statements 327
To set the cursor position to column 1 of the last data line:ISREDIT CURSOR = .ZLAST 1
To set the cursor position to the line with the label .LAB, without changing thecolumn position:ISREDIT CURSOR = .LAB
CUT—Cut and Save LinesThe CUT macro command saves lines to one of eleven named clipboards for laterretrieval by the PASTE command. The lines can be appended to lines alreadysaved by a previous CUT command or the lines can replace the existing contentsof a clipboard..
SyntaxISREDIT CUT [lptr-range] [DEFAULT | clipboardname]
[REPLACE|APPEND]
lptr-rangeTwo line pointers that specify the range of lines in the current member thatare to be added to or replace data in the clipboard. A line pointer can be alabel or relative line number. You must specify both a starting and endingline pointer.
clipboardnameThe name of the clipboard to use. If you omit this parameter, the ISPFdefault clipboard (named DEFAULT) is used. You can define up to tenadditional clipboards. The size of the clipboards and number of clipboardsmight be limited by installation defaults.
REPLACE|APPEND
Specify REPLACE to replace existing data in the clipboard. If you do notspecify REPLACE, the lines in the current CUT are added to the end of theexisting data within the clipboard.
If you specify APPEND, you add the data to the clipboard. This is thedefault.
DescriptionCUT saves copies of lines from an edit session to a clipboard for later retrieval bythe PASTE command. The lines are copied from the session to the namedclipboard. Lines are specified by label names on the CUT command. The editmacro CUT command always copies lines to the clipboard and does not deletethem from the edit session.
If you specify a clipboard name, lines are copied to that clipboard. If the specifiedclipboard does not yet exist, it is created. ISPF provides a default clipboard namedDEFAULT. You can use up to 10 other clipboards that you define. The definedclipboards exist as long as you are logged on to TSO and are deleted when you logoff.
You can view the contents of clipboards and rename existing clipboards using theDISPLAY keyword of the CUT command. If you specify the DISPLAY, otherkeywords are ignored.
CURSOR
328 OS/390 V2R10.0 ISPF Edit and Edit Macros
||||
||
|
|||
||
Return CodesThe following return codes can be issued:0 Normal completion12 Parameter error. Insufficient storage, or no more clipboards available.20 Severe error.
ExamplesTo save all the lines in the current file to the default clipboard, appending them tolines already in the clipboard:ISREDIT CUT .ZFIRST .ZLAST
To save all the lines in the current file to a clipboard named USERC1, replacingany lines already in the clipboard:ISREDIT CUT .ZFIRST .ZLAST USERC1 REPLACE
DATA_CHANGED—Query the Data Changed StatusThe DATA_CHANGED assignment statement retrieves the current data-changedstatus and places it in a variable.
Assignment Statement SyntaxISREDIT (varname) = DATA_CHANGED
varnameThe name of a variable containing the data-changed status, either YES orNO. The data-changed status is initially set to NO at the beginning of anedit session, and is reset to NO whenever a save is done. If you changedata on your screen, but issue the END command, the data_changed statusis still NO. When data is changed, or if a command is issued which mighthave changed the data, the changed status is set to YES.
DescriptionThis command returns information about whether the data might have changed.However, it does not specify whether data is saved when the END command isissued. Data can be saved without being changed if there is a change to theversion, number, stats, or pack mode. When DATA_CHANGED returns a value ofNO, an 8 character variable called ZEDSAVE is set to indicate whether the data issaved. ZEDSAVE will contain either ″SAVE ″ or ″NOSAVE″. See AUTOSAVE,CANCEL, SAVE and END for more information about saving data.
Return CodesThe following return codes can be issued:0 Normal completion20 Severe error.
ExampleTo determine whether data has been changed and, if it has, to issue the built-inSAVE command:ISREDIT (CHGST) = DATA_CHANGEDIF &CHGST = YES THEN ISREDIT BUILTIN SAVE
CUT
Chapter 11. Edit Macro Commands and Assignment Statements 329
DATA_WIDTH—Query Data WidthThe DATA_WIDTH assignment statement retrieves the current logical data widthand places it in a variable.
Assignment Statement SyntaxISREDIT (varname) = DATA_WIDTH
varnameThe name of the variable to contain the logical data width. The logical datawidth is a 3-digit value that is left-padded with zeros. If the variable isVDEFINEd in character format, it should be defined with a length of 5.The returned value is left padded with zeros. For compatability withprevious releases of ISPF, a length of 3 or 4 is allowed in cases where nodata loss occurs.
DescriptionThe logical data width is the maximum space, in bytes, that is available for dataonly. It does not include any COBOL or sequence number fields or, forvariable-length records, the 4-byte record descriptor word (RDW).
The value returned by the DATA_WIDTH assignment statement depends on therecord format (fixed or variable) and the setting of number mode, as shown inTable 9. See “NUMBER—Generate Sequence Numbers” on page 268 if you needmore information about number mode.
Table 9. Data Width Return Value
Number Mode Setting Logical Data Width forFixed-Length Records
Logical Data Width forVariable-Length Records
OFF LRECL LRECL - 4
ON STD LRECL - 8 LRECL - 12
ON COB LRECL - 6 N/A 1
ON STD COB LRECL - 14 N/A 1
Use the LRECL assignment statement to get the maximum space, in bytes, that isavailable for data, COBOL number fields, and sequence number fields.
Return CodesThe following return codes can be issued:0 Normal completion12 Invalid command format20 Severe error.
ExampleTo put the data width in variable &MAXCOL and override the boundary settingfor SEEK:ISREDIT (MAXCOL) = DATA_WIDTHISREDIT SEEK 1 &MAXCOL &ARGSTR
1. COBOL numbering is invalid for variable-length records.
DATA_WIDTH
330 OS/390 V2R10.0 ISPF Edit and Edit Macros
DATAID—Query Data IDThe DATAID assignment statement retrieves the data ID for the data set currentlybeing edited and places it in a variable.
Assignment Statement SyntaxISREDIT (varname) = DATAID
varnameThe name of a variable containing the data ID of the data set currentlyallocated for editing.
DescriptionThe data ID is created by the LMINIT service to identify a data set.
If you begin an edit session with a data ID, the data ID is returned when you issuethis command. If you begin an edit session without a data ID, then an LMINITservice obtains a data ID and returns it. On return from a top-level macro, theeditor releases any data ID it has obtained.
For further information about the use of library access services, refer to ISPF User’sGuide
Return CodesThe following return codes can be issued:0 The data ID returned was passed to the editor4 Data ID was generated by and is freed by the editor8 A previously generated data ID was returned20 Severe error.
ExampleTo store the data ID in variable &DID, and then find the member MEM1 of thatdata set by using the LMMFIND library access service:ISREDIT (DID) = DATAIDISPEXEC LMMFIND DATAID(DID) MEMBER(MEM1)IF &LASTCC = 0 THEN ...
DATASET—Query the Current and Original Data Set NamesThe DATASET assignment statement retrieves the following items and places themin selected variables:v the name of the data set into which the data currently being edited will be
storedv the name of the data set from which the data currently being edited originatedv the library concatenation number of the originating data set.
Assignment Statement SyntaxISREDIT (var1,var2,var3) = DATASET
var1 The name of a variable to contain the name of the data set currently beingedited. The data set name is fully qualified without quotation marks (').
var2 The name of a variable to contain the name of the data set where the datacurrently being edited originated from. The data set name is fully qualified
DATAID
Chapter 11. Edit Macro Commands and Assignment Statements 331
without quotation marks ('). If the data currently being edited is new, ablank is returned in this variable. If the original data is deleted, the nameof the data set where the data currently being edited originated from is stillreturned in this variable.
var3 The library concatenation number of the original data set. If the datacurrently being edited is new, zeroes are returned.
Return CodesThe following return codes can be issued:0 Normal completion20 Severe error.
ExampleTo place the name of the data set you are editing and the library concatenationnumber in the variables &CURDSN and &LIBNUM:ISREDIT (CURDSN, ,LIBNUM) = DATASET
DEFINE—Define a NameThe DEFINE macro command is used to:v Identify a macro that replaces a built-in command of the same namev Identify programs that are edit macrosv Assign an alias to a macro or built-in commandv Make a macro or built-in command inoperablev Reset an inoperable macro or built-in commandv Disable a macro or built-in command.
DEFINE is often used with the BUILTIN command.
Macro Command SyntaxISREDIT DEFINE name {MACRO CMD }
{MACRO PGM }{ALIAS name-2}{NOP }{RESET }{DISABLED }
name The name with which you process the command.
MACRO CMDIdentifies the name that you are defining as a command language (CLISTor REXX EXEC) macro, which is called in the same way as using theSELECT service CMD keyword with a percent symbol (%) preceding thecommand. That means that you can specify only CLISTs or REXX EXECs.This operand is the default.
MACRO PGMIdentifies the name that you are defining as a program (load module)macro, which is called by the SELECT PGM service.
ALIAS name-2Identifies the name that you are defining as an alias of another name, withthe same characteristics. If name-2 is already an alias, the editor replaces itwith the command it names. Therefore, it is not possible to have an alias ofan alias.
NOP Makes the name you are defining and all of its aliases inoperable until you
DATASET
332 OS/390 V2R10.0 ISPF Edit and Edit Macros
reset them with the RESET operand. Therefore, when the name or an aliasof the name is called, nothing is processed. NOP is similar to DISABLED,except that disabled names cannot be reset by the RESET operand.
RESETResets the most recent definition of the name that you are defining to thestatus in effect before that definition. For example, RESET makesinoperable names operable again.
DISABLEDMakes the name that you are defining and all of its aliases disabled untilyou end the edit session. Therefore, when the name or an alias of the nameis called, nothing is processed. A disabled command or macro cannot berestored by RESET.
DescriptionThe effects of the DEFINE macro command apply only to the edit session of themember or sequential data set being edited when the macro is run. This effect isdifferent from the DEFINE primary command.
To temporarily override DEFINE, use BUILTIN.
Note: To define RESET as disabled, enclose it in quotes ('RESET'). If you do notuse quotes, the editor interprets RESET as a keyword.
Return CodesThe following return codes can be issued:
0 Normal completion
8 RESET was attempted for a name not currently defined, or DEFINE nameALIAS name-2 requested and name-2 is an NOP
12 DEFINE was attempted for a name not currently defined
20 Severe error (unknown command).
ExamplesTo define the name IJKDOIT as a CLIST or REXX macro:ISREDIT DEFINE IJKDOIT MACRO
To define the name SETITUP as a program macro:ISREDIT DEFINE SETITUP MACRO PGM
To define the name DOIT as an alias of the macro IJKDOIT:ISREDIT DEFINE DOIT ALIAS IJKDOIT
To define the name SAVE to have no effect:ISREDIT DEFINE SAVE NOP
To reset the definition of the name SAVE:ISREDIT DEFINE SAVE RESET
To define the name FINDIT as disabled:ISREDIT DEFINE FINDIT DISABLED
DEFINE
Chapter 11. Edit Macro Commands and Assignment Statements 333
To create and update library statistics when data is saved, first set the stats modeon. Then make it impossible to turn off by defining it as disabled. Note that noneof the commands that are defined as disabled can be called while you are editing amember.ISREDIT MACROISREDIT STATS ONISREDIT DEFINE STATS DISABLED
DELETE—Delete LinesThe DELETE macro command deletes lines from the data you are editing.
Macro Command SyntaxISREDIT DELETE { ALL X | NX [lptr-range]}
{[ALL] X | NX lptr-range }{lptr }{lptr-range }
ALL Specifies that all selected lines are deleted. The DELETE command, unlikeFIND, CHANGE, and EXCLUDE, does not use NEXT, FIRST, PREV, orLAST. ALL is required to emphasize that NEXT is not the default.
X | NXRestricts the lines deleted to those that are excluded or not excluded,respectively.
lptr Specifies that a line pointer must be used to identify a line to be deleted. Aline pointer can be a label or a relative line number.
lptr-rangeSpecifies with two line pointers a range of lines to be deleted. The rangemust consist of two labels or two relative line numbers. When specifying arange, providing only one line pointer is incorrect. The defaults are theeditor-defined .ZFIRST and .ZLAST labels.
DescriptionDELETE can specify a single line or a range of lines. It can limit the lines to bedeleted to all excluded or nonexcluded lines in the data, or to all excluded ornonexcluded lines within a line pointer range.
Return CodesThe following return codes can be issued:0 Normal (lines deleted successfully)4 No lines deleted8 No standard records exist12 Invalid line number20 Severe error.
ExamplesTo delete all nonexcluded lines:ISREDIT DELETE ALL NX
To delete all lines between labels .A and .B with a blank in column 1:ISREDIT RESET X .A .BISREDIT EXCLUDE ALL " " 1 .A .BISREDIT DELETE ALL X .A .B
DEFINE
334 OS/390 V2R10.0 ISPF Edit and Edit Macros
To delete the last line of data in the current data set:ISREDIT DELETE .ZLAST
To delete the first 10 lines of data in the current data set:ISREDIT DELETE 1 10
DISPLAY_COLS—Query Display ColumnsThe DISPLAY_COLS assignment statement retrieves the column numbers of thefirst and last data columns that you are seeing, and places them in variables.
Assignment Statement SyntaxISREDIT (var1,var2) = DISPLAY_COLS
var1 The name of a variable containing the column number of the first datacolumn visible to you. The column number is a 3-digit value that isleft-padded with zeros. If the variable is VDEFINEd in character format, itshould be defined with a length of 5. The returned value is left paddedwith zeros. For compatibility with previous releases of ISPF/PDF, a lengthof 3 or 4 is allowed in cases where no data loss will occur.
var2 The name of a variable containing the column number of the last datacolumn visible to you. The column number is a 3-digit value that isleft-padded with zeros. If the variable is VDEFINEd in character format, itshould be defined with a length of 5. The returned value is left paddedwith zeros. For compatibility with previous releases of ISPF/PDF, a lengthof 3 or 4 is allowed in cases where no data loss will occur.
DescriptionColumns that contain sequence numbers are not considered data columns. Do notuse this assignment statement in initial macros because the columns displayed arenot known until the data first appears. See “Referring to Column Positions” onpage 114 for more information.
Return CodesThe following return codes can be issued:0 Normal completion12 Invalid command format20 Severe error.
ExampleTo put the leftmost and rightmost column values displayed to you in variables&LEFT and &RIGHT:ISREDIT (LEFT,RIGHT) = DISPLAY_COLS
DISPLAY_LINES—Query Display LinesThe DISPLAY_LINES assignment statement retrieves the relative line numbers ofthe first and last data lines that would appear at this point if the macro ended, andplaces them in variables. Other non-data lines might be on the display. Do not usethis assignment statement in an initial macro because the lines displayed are notknown until the data is first displayed.
DELETE
Chapter 11. Edit Macro Commands and Assignment Statements 335
Assignment Statement SyntaxISREDIT (var1,var2) = DISPLAY_LINES
var1 The name of a variable containing the relative line number of either thefirst visible data line or block of excluded lines if the macro ended at thispoint. The relative line number is a 6-digit value that is left-padded withzeros.
var2 The name of a variable containing the relative line number of either thelast visible data line or block of excluded lines. The relative line number isa 6-digit value that is left-padded with zeros.
Return CodesThe following return codes can be issued:0 Normal completion4 No visible data lines8 No existing data lines12 Invalid command format20 Severe error.
ExampleTo place the top and bottom line numbers in variables &TOP and &BOT:ISREDIT (TOP,BOT) = DISPLAY_LINES
DOWN—Scroll DownThe DOWN macro command scrolls data down from the current panel position.
Macro Command SyntaxISREDIT DOWN amtamt The number of lines (0 - 9999) to scroll, or one of the following operands:
MAX Scrolls to the end of data in the specified direction.
HALF Displays the next sequential half panel of data.
PAGE Displays the next sequential full panel of data.
CURSORScrolls until the line on which the cursor is located becomes thefirst data line on the panel.
DATA Scrolls until the last data line on the current panel of data becomesthe first data line on the next panel of data.
DescriptionTo scroll down using the panel position when the macro was first issued, useUSER_STATE assignment statements to save and then restore the panel positionoperands.
When you issue DOWN, the non-data lines on the panel affect the number of linesscrolled. However, if you define a macro named DOWN, it only overrides theDOWN command when used from another macro. DOWN does not change thecursor position and cannot be used in an initial macro.
The actual number of lines appearing on the panel is determined by:v The number of lines excluded from the display
DISPLAY_LINES
336 OS/390 V2R10.0 ISPF Edit and Edit Macros
v The terminal display size and split-panel linev The number of special temporary lines appearing, such as the ==ERR>, ==CHG>,
=COLS>, ======, =PROF>, ==MSG>, =NOTE=, =BNDS>, =TABS> or =MASK> lines.
The first line appearing is determined in one of two ways: (1) a LOCATEcommand can set the line first on the panel, and (2) the first line to appeardepends on whether the cursor was set explicitly by a CURSOR assignmentstatement or implicitly by a SEEK, FIND, CHANGE, or TSPLIT command. Sincethe cursor must be on the panel, the line that is the first line on the panel may bedifferent from the line that was first when you called the macro.
Return CodesThe following return codes can be issued:0 Normal completion2 No more data DOWN4 No visible lines8 No data to display12 Amount not specified20 Severe error.
ExamplesTo scroll down to the end of the data set:ISREDIT DOWN MAX
To display the next half panel of data:ISREDIT DOWN HALF
To display the next full panel of data:ISREDIT DOWN PAGE
To make the line where the cursor is placed the first one on the display:ISREDIT DOWN CURSOR
To display the next page less one line:ISREDIT DOWN DATA
EDIT—Edit from within an Edit SessionThe EDIT macro command allows you to edit a member of the same partitioneddata set during your current edit session.
Macro Command SyntaxISREDIT EDIT member
memberA member of the library or other partitioned data set you are currentlyediting. You may enter a member pattern to generate a member list.
DescriptionEditing one data set or member while you are already editing another is calledrecursive editing. Your initial edit session is suspended until the second-level editsession is complete. Editing sessions can be nested until you run out of storage.
DOWN
Chapter 11. Edit Macro Commands and Assignment Statements 337
To exit from a nested edit session, END or CANCEL must be processed by a macroor entered by you. The current edit session resumes.
The EDIT service call, ISPEXEC EDIT, is an alternate method of recursively startingthe editor. It offers the option of editing another data set and specifying an initialmacro.
For more information on using the EDIT service for recursive editing, refer to ISPFServices Guide
Return CodesThe following return codes can be issued:0 Normal completion, data was saved4 Normal completion, data was not saved12 Your error (invalid member name, recovery pending)14 Member in use20 Severe error.28 No ISREDIT MACRO statement preceded this call, or BROWSE was
substituted because of the size of the member being edited.
ExampleTo recursively edit the member OLDMEM in your current ISPF library:ISREDIT EDIT OLDMEM
END—End the Edit SessionThe END macro command ends the editing of the current sequential data set orpartitioned data set member.
Macro Command SyntaxISREDIT END
DescriptionIf an edit macro contains an ISREDIT END statement, there can be no otherISREDIT or ISPEXEC statements following it. If one of these kinds of statementsdoes follow an ISREDIT END, the edit macro ends with an error when thatstatement occurs. However, any other CLIST, REXX EXEC, or program statementscan follow an ISREDIT END statement and process normally.
If no aliases have been defined for END, the response of the editor to the ENDcommand depends on:v Whether changes were made to the data during your current edit sessionv If changes were made, whether a SAVE command was entered after the last
changev The setting of number mode, autonum mode, stats mode, autolist mode, and
autosave mode in the edit profilev Whether you were editing a member that was an alias of another member.
See “Ending an Edit Session” on page 15 for more information.
Return CodesThe following return codes can be issued:
EDIT
338 OS/390 V2R10.0 ISPF Edit and Edit Macros
0 Normal completion
4 New member saved
12 END not done, AUTOSAVE OFF PROMPT set, or Data not saved(insufficient space)
20 Severe error.
ExampleTo end the current edit session:ISREDIT END
EXCLUDE—Exclude Lines from the DisplayThe EXCLUDE macro command hides lines that contain a search string from view,and replaces them with a dashed line. To see the lines again, you enter either theRESET or RESET EXCLUDED command.
Macro Command SyntaxISREDIT EXCLUDE string [label-range] [NEXT ] [CHARS ] [col-1 [col-2]]
[ALL ] [PREFIX][FIRST] [SUFFIX][LAST ] [WORD ][PREV ]
string The search string you want to exclude.
Note: For edit macros written in CLIST, strings that contain an opencomment delimiter (/*) must be placed within the &STR() delimiterssuch as &STR(/*XXX). The maximum allowable length of the stringis 256 bytes. If you are specifying a hex string, the maximum is 128hexadecimal characters.
label-rangeTwo labels that identify the lines within which the EXCLUDE command isto search. The defaults are the editor-defined .ZFIRST and .ZLAST labels.
When using a macro that uses NEXT or PREV with a label-range, becareful concerning cursor placement. If the cursor is currently placed belowthe label-range, and the NEXT occurence of a string is requested, theprocess returns a return code of 4 and the string is not found, even if itexists within the label-range.
If the cursor is currently placed above the label-range, and the PREVoccurence of a string is requested, the process returns a return code of 4and the string is not found, even if it exists within the label-range.
NEXT Starts at the first position after the current cursor location and searchesahead to find the next occurrence of string. NEXT is the default.
ALL Starts at the top of the data and searches ahead to find all occurrences ofstring.
FIRST Starts at the top of the data and searches ahead to find the first occurrenceof string.
LAST Starts at the bottom of the data and searches backward to find the lastoccurrence of string.
END
Chapter 11. Edit Macro Commands and Assignment Statements 339
PREV Starts at the current cursor location and searches backward to find theprevious occurrence of string.
CHARSLocates string anywhere the characters match. CHARS is the default.
PREFIXLocates string at the beginning of a word.
SUFFIXLocates string at the end of a word.
WORDLocates string when it is delimited on both sides by blanks or othernon-alphanumeric characters.
col-1 and col-2Numbers that identify the columns the EXCLUDE command is to search.
DescriptionYou can use the EXCLUDE command with the FIND and CHANGE commands tofind a search string, change it, and then exclude the line that contains the stringfrom the panel.
To exclude the next nonexcluded line that contains the letters ELSE withoutspecifying any other qualifications, include the following command in an editmacro:ISREDIT EXCLUDE ELSE
Since no other qualifications were specified, the letters ELSE can be:v Uppercase or a mixture of uppercase and lowercasev At the beginning of a word (prefix), the end of a word (suffix), or the entire
word (word)v Anywhere within the current boundaries.
To exclude the next line that contains the letters ELSE, but only if the letters areuppercase, include the following command in an edit macro:ISREDIT EXCLUDE C'ELSE'
This type of exclusion is called a character string exclusion (note the C thatprecedes the search string) because it excludes the next line that contains the lettersELSE only if the letters are found in uppercase. However, since no otherqualifications were specified, the exclusion occurs no matter where the letters arefound on a nonexcluded line, as outlined in the previous list.
For more information, including other types of search strings, see “Finding,Seeking, Changing, and Excluding Data” on page 53.
Return CodesThe following return codes can be issued:0 Normal completion4 String not found8 Lines not excluded12 Inconsistent parameters20 Severe error.
EXCLUDE
340 OS/390 V2R10.0 ISPF Edit and Edit Macros

ExamplesThis example excludes the first nonexcluded line in the data set that contains theletters ELSE. However, the letters must occur on or between lines labeled .E and .Sand they must be the first four letters of a word:ISREDIT EXCLUDE ELSE .E .S FIRST PREFIX
This example excludes the last nonexcluded line in the data set that contains theletters ELSE. However, the letters must occur on or between lines labeled .E and .Sand they must be the last four letters of a word.ISREDIT EXCLUDE ELSE .E .S LAST SUFFIX
This example excludes the first nonexcluded line that immediately precedes thecursor position and that contains the letters ELSE. However, the cursor must not bepositioned ahead of the lines labeled .E and .S. Also, the letters must occur on orbetween the labeled lines; they must be standalone characters (not part of anyother word); and they must exist within columns 1 and 5:ISREDIT EXCLUDE ELSE .E .S PREV WORD 1 5
EXCLUDE_COUNTS—Query Exclude CountsThe EXCLUDE_COUNTS assignment statement retrieves values set by the mostrecently processed EXCLUDE command and places them in variables.
Assignment Statement SyntaxISREDIT (var1,var2) = EXCLUDE_COUNTS
var1 The name of a variable to contain the number of strings found. Thenumber of strings is an 8-digit value that is left-padded with zeros.
var2 The name of a variable to contain the number of lines excluded. Thenumber of lines excluded is an 8-digit value that is left-padded with zeros.
Return CodesThe following return codes can be issued:0 Normal completion12 Invalid command format20 Severe error.
ExampleTo determine the number of lines that contain the word BOX:ISREDIT EXCLUDE ALL BOXISREDIT (,BOXLINES) = EXCLUDE_COUNTS
FIND—Find a Search StringThe FIND macro command locates one or more occurrences of a search string.
Macro Command SyntaxISREDIT FIND string [label-range] [NEXT ] [CHARS ] [X ] [col-1 [col-2]]
[ALL ] [PREFIX] [NX][FIRST] [SUFFIX][LAST ] [WORD ][PREV ]
string The search string you want to find.
EXCLUDE
Chapter 11. Edit Macro Commands and Assignment Statements 341
Note: For edit macros written in CLIST, strings that contain an opencomment delimiter (/*) must be placed within the &STR() delimiterssuch as &STR(/*XXX). The maximum allowable length of the stringis 256 bytes. If you are specifying a hex string, the maximum is 128hexadecimal characters.
label-rangeTwo labels that identify the lines within which the FIND command is tosearch. The defaults are the editor-defined .ZFIRST and .ZLAST labels.
When using a macro that uses NEXT or PREV with a label-range, becareful concerning cursor placement. If the cursor is currently placed belowthe label-range, and the NEXT occurence of a string is requested, theprocess returns a return code of 4 and the string is not found, even if itexists within the label-range.
If the cursor is currently placed above the label-range, and the PREVoccurence of a string is requested, the process returns a return code of 4and the string is not found, even if it exists within the label-range.
NEXT Starts at the first position after the current cursor location and searchesahead to find the next occurrence of string. NEXT is the default.
ALL Starts at the top of the data and searches ahead to find all occurrences ofstring.
FIRST Starts at the top of the data and searches ahead to find the first occurrenceof string.
LAST Starts at the bottom of the data and searches backward to find the lastoccurrence of string.
PREV Starts at the current cursor location and searches backward to find theprevious occurrence of string.
CHARSLocates string anywhere the characters match. CHARS is the default.
PREFIXLocates string at the beginning of a word.
SUFFIXLocates string at the end of a word.
WORDLocates string when it is delimited on both sides by blanks or othernon-alphanumeric characters.
X Scans only lines that are excluded from the display.
NX Scans only lines that are not excluded from the display.
col-1 and col-2Numbers that identify the columns FIND is to search.
DescriptionUse the SEEK macro command instead of FIND if you want to locate a stringwithout changing the exclude status of the line that contains the string.
You can use FIND with the EXCLUDE and CHANGE commands to find a searchstring, change it, and then exclude the line that contains the string from the panel.
FIND
342 OS/390 V2R10.0 ISPF Edit and Edit Macros
To find the next occurrence of the letters ELSE without specifying any otherqualifications, include the following line in an edit macro:ISREDIT FIND ELSE
Since no other qualifications were specified, the letters ELSE can be:v Uppercase or a mixture of uppercase and lowercasev At the beginning of a word (prefix), the end of a word (suffix), or the entire
word (word)v In either an excluded or a nonexcluded linev Anywhere within the current boundaries.
To find the next occurrence of the letters ELSE, but only if the letters are uppercase:ISREDIT FIND C'ELSE'
This type of search is called a character string search (note the C that precedes thesearch string) because it finds the next occurrence of the letters ELSE only if theletters are in uppercase. However, since no other qualifications were specified, theletters can be found anywhere in the data set or member, as outlined in thepreceding list.
For more information, including other types of search strings, see “Finding,Seeking, Changing, and Excluding Data” on page 53.
Return CodesThe following return codes can be issued:0 Normal completion4 String not found12 Syntax error20 Severe error.
ExamplesThe following example finds the first occurrence in the data set of the letters ELSE.However, the letters must occur on or between lines labeled .E and .S and theymust be the first four letters of a word:ISREDIT FIND ELSE .E .S FIRST PREFIX
The following example finds the last occurrence in the data set of the letters ELSE.However, the letters must occur on or between lines labeled .E and .S; they mustbe the last four letters of a word; and they must be found in an excluded line.ISREDIT FIND ELSE .E .S LAST SUFFIX X
The following example finds the first occurrence of the letters ELSE thatimmediately precedes the cursor position. However, the cursor must not bepositioned ahead of the lines labeled .E and .S. Also, the letters must occur on orbetween lines labeled .E and .S; they must be standalone characters (not part ofany other word); they must be found in a nonexcluded line; and they must existwithin columns 1 and 5:ISREDIT FIND ELSE .E .S PREV WORD NX 1 5
FIND_COUNTS—Query Find CountsThe FIND_COUNTS assignment statement retrieves values that were set by themost recently entered FIND or RFIND command, and places these values invariables.
FIND
Chapter 11. Edit Macro Commands and Assignment Statements 343
Assignment Statement SyntaxISREDIT (var1,var2) = FIND_COUNTS
var1 The name of a variable to contain the number of strings found. Thenumber of strings is an 8-digit value that is left-padded with zeros.
var2 The name of a variable to contain the number of lines on which stringswere found. The number of lines on which strings were found is an 8-digitvalue that is left-padded with zeros.
Return CodesThe following return codes can be issued:0 Normal completion12 Invalid command format20 Severe error.
ExampleTo find all occurrences of && in the line labeled .A and loop through and processthem:ISREDIT FIND .A .A && ALLISREDIT (FINDS) = FIND_COUNTSDO WHILE &FINDS > 0...
END
FLIP—Reverse Exclude Status of LinesThe FLIP macro command lets you reverse the exclude status of a specified rangeof lines or of all the lines in a file, including data, information, message, and notelines.
Assignment Statement SyntaxISREDIT FLIP [label-range]
label-rangeTwo labels that identify the lines within which the FLIP command is toreverse the exclude status.
If one label is specified, only that labeled line is reversed. This is optional.
Return CodesThe following return codes can be issued:
0 Successful completion. The excluded status of the requested lines wasreversed.
20 Severe error.
ExamplesThe following are examples of statements using the FLIP commands from an Editmacro. The actual values for .a and .b can be defined by edit macro or by theuser.ISREDIT FLIP /* Flip all lines */ISREDIT FLIP .ZL .ZF /* Flip all lines */ISREDIT FLIP .ZF /* Flip first line in file */ISREDIT FLIP .a .b /* Flip lines between and including .a and .b */ISREDIT FLIP .a /* Flip line labeled .a */
FIND_COUNTS
344 OS/390 V2R10.0 ISPF Edit and Edit Macros
FLOW_COUNTS—Query Flow CountsThe FLOW_COUNTS assignment statement retrieves values that were set by themost recently entered TFLOW command, and places these values in variables.
Assignment Statement SyntaxISREDIT (var1,var2) = FLOW_COUNTS
var1 The name of a variable to contain the number of original lines thatparticipated in the text flow operation. The number of original lines is an8-digit value that is left-padded with zeros.
var2 The name of a variable to contain the number of lines that were generatedby the text flow operation. The number of lines is an 8-digit value that isleft-padded with zeros.
If the value in var1 is larger than the value in var2, the difference is thenumber of lines that were deleted from the current data because of the textflow operation. If the value in var1 is less than the value in var2, thedifference is the number of lines that were added to the current databecause of the text flow operation.
Return CodesThe following return codes can be issued:0 Normal completion20 Severe error.
ExampleTo retrieve the value of the rightmost column displayed, allow a margin of 8 forthe text flow, and then take action if lines were added because of the text flowoperation:ISREDIT (,MAXCOL) = DISPLAY_COLSISREDIT TFLOW .ZCSR &EVAL(MAXCOL - 8)ISREDIT (INLINE,OUTLIN) = FLOW_COUNTSIF &OUTLIN > &INLINE THEN DO...
HEX—Set or Query Hexadecimal ModeThe HEX macro command sets hexadecimal mode, which determines whether dataappears in hexadecimal format.
The HEX assignment statement either sets hexadecimal mode or retrieves thecurrent values of hexadecimal mode, and places them in variables.
Macro Command SyntaxISREDIT HEX [ON DATA]
[ON VERT][OFF ]
ON DATADisplays the hexadecimal representation of the data as a string ofhexadecimal characters (two per byte) under the characters.
ON VERTDisplays the hexadecimal representation of the data vertically (two rowsper byte) under each character.
FLOW_COUNTS
Chapter 11. Edit Macro Commands and Assignment Statements 345
OFF Does not display hexadecimal representation of the data.
Assignment Statement SyntaxISREDIT (var1,var2) = HEXISREDIT HEX = [ON DATA]
[ON VERT][OFF ]
var1 The name of a variable to contain ON or OFF.
var2 The name of a variable to contain DATA, VERT, or blanks.
ON DATASame as macro command syntax.
ON VERTSame as macro command syntax.
OFF Same as macro command syntax.
DescriptionThe HEX macro command and assignment statement determines whether theeditor displays hexadecimal representation in a vertical or data string format.
When the editor is operating in hexadecimal mode, three lines are displayed foreach source line. The first line shows the data in standard character form, while thenext two lines show the same data in hexadecimal representation.
Besides normal editing on the first of the three lines, you can change anycharacters by typing over the hexadecimal representations.
You can also use the FIND, CHANGE, and EXCLUDE commands to find, change,or exclude invalid characters or any specific hexadecimal character, regardless ofthe setting of hexadecimal mode. See the discussion of picture strings andhexadecimal strings under “Finding, Seeking, Changing, and Excluding Data” onpage 53.
Return CodesThe following return codes can be issued:0 Normal completion20 Severe error.
ExamplesTo put the value of hexadecimal mode (on or off) in variable &HEXMODE and toprocess if hexadecimal mode is on:ISREDIT (HEXMODE) = HEXIF &HEXMODE = ON THEN -
...
To turn hexadecimal mode off:ISREDIT HEX OFF
HEX
346 OS/390 V2R10.0 ISPF Edit and Edit Macros
HILITE—Enhanced Edit ColoringHILITE is used to control the use of color in the editor by changing the settings forthe enhanced color and language-sensitive editing features.
The HILITE dialog is not available in the Edit Macro environment.
Note: Language sensitive and enhanced coloring of the edit session is onlyavailable if it is enabled by the installer or person who maintains the ISPFproduct. For information on enabling the enhanced color functions, see ISPFPlanning and Customizing
Macro Command SyntaxISREDIT HILITE [ON ] [AUTO ] [RESET] [PAREN] [FIND] [CURSOR] [SEARCH] [DISABLED]
[OFF ] [DEFAULT][LOGIC ] [OTHER ][IFLOGIC] [ASM ][DOLOGIC] [BOOK ][NOLOGIC] [C ]
[COBOL ][DTL ][JCL ][PANEL ][PASCAL ][PLI ][REXX ][SKEL ][IDL ]
ON Sets program coloring ON and turns LOGIC coloring off.
OFF Sets coloring OFF, with the exception of cursor highlighting.
LOGICLOGIC highlighting matches logical language-specific keywords in thesame color. If an unmatched closing keyword is found, such as END forPL/I or :eul. for BookMaster, it is highlighted in reverse video pink only ifHILITE LOGIC is active. When logic is being highlighted, only commentsare highlighted along with it.
Logic highlighting is available for PL/I, PL/X, Rexx, OTHER, C, SKELS,Pascal and BookMaster only. HILITE LOGIC turns on both IFLOGIC andDOLOGIC.
Note: LOGIC highlighting can be turned off by issuing HILITE ON,HILITE NOLOGIC, or HILITE RESET commands. Changing theHILITE language does not change the LOGIC setting.
IFLOGICTurns on IF/ELSE logic matching. IFLOGIC matches IF and ELSEstatements. When IFLOGIC is enabled, unmatched ELSE keywords arehighlighted in reverse video pink.
DOLOGICTurns on DO/END logic matching. DOLOGIC matches logical blocks suchas DO/END in PL/I or :ol/:eol in BookMaster. For the C language,DOLOGIC matches curly braces ({ and }). C trigraphs for curly braces arenot recognized and are not supported by DOLOGIC highlighting. WhenDOLIGOC is enabled unmatched logical block terminators, (such as ENDkeywords in PL/I, :e tags in BookMaster or right braces (}) in C arehighlighted in reverse video pink.
HILITE
Chapter 11. Edit Macro Commands and Assignment Statements 347

NOLOGICSame as ON.
AUTOAllows ISPF to determine the language.
DEFAULTHighlights the data in a single color.
OTHERHighlight the data as a pseudo-PL/I language.
ASM Highlights the data as Assembler.
BOOKHighlights the data as BookMaster.
C Highlights the data as C.
COBOLHighlights the data as COBOL.
DTL Highlights the data as Dialog Tag Language.
JCL Highlights the data as MVS Job Control Language.
PANELHighlights the data as ISPF Panel Language.
PASCALHighlights the data as Pascal.
PLI Highlights the data as PL/I.
REXX Highlights the data as Rexx.
SKEL Highlights the data as ISPF Skeleton Language.
IDL Highlights the data as IDL.
RESETResets defaults (AUTO, ON, Find and Cursor on).
PARENToggles parenthesis matching. When parenthesis matching is active, onlycomments and quoted strings are specially colored. All other code appearsin the default color. Note that extra parenthesis highlighting is alwaysactive when highlighting is active.
Parentheses within quoted strings and comments are not checked orhighlighted by the parenthesis matching function.
FIND The HILITE FIND command toggles the highlighting color of any stringthat would be found by an RFIND. The user can select the highlight color.The default is reverse video white.
Only non-picture strings are supported, and the only additional qualifiersrecognized are hex strings (X’...’), character strings (C’...’), text strings(T’...’), WORD, PREFIX and SUFFIX, and boundaries specified in the FINDcommand. Hex strings may be highlighted. but non-displayable charactersare not highlighted. Default bounds and labels are ignored when FINDstrings are highlighted.
Because FIND highlighting is not quite as robust at the FIND commanditself, the editor may highlight more occurrences of the FIND string thanFIND would actually locate.
HILITE
348 OS/390 V2R10.0 ISPF Edit and Edit Macros
RESET has been enhanced, through the addition of a FIND operand, totemporarily disable the highlighting of FIND strings until the next FIND,RFIND, CHANGE, or RCHANGE command is issued. RESET with theFIND operand (or no operands at all), temporarily disables thehighlighting of FIND strings.
CURSORThe CURSOR operand toggles the highlighting of the phrase that containsthe cursor in a user-selectable color. The default is white.
Cursor highlighting in Edit is performed in a manner similar to the way itis done in Browse. The entire phrase from the previous blank to the nextblank is highlighted.
SEARCHHILITE SEARCH finds the first unmatched END, ELSE, }, or ) above thelast displayed line on the panel. If a mismatched item is found, the file isscrolled so that the mismatch is at the top of the panel. The search formismatches only occurs for lines above the last displayed line, so you mayneed to scroll to the bottom of the file before issuing the HI SEARCHcommand.
Search is not available for the when the DEFAULT language operand isused.
DISABLEDTurns off all HILITE features and removes all action bars. This benefitsperformance at the expense of function. Since DISABLED status is notstored in the edit profile, you need to reenter this operand each time youenter the editor. If ISREDIT HILITE DISABLED is issued by a macro, anyattempts to restore highlighting within the same macro invocation areignored.
DescriptionThe HILITE macro command can be used to highlight, in user-specified colors,numerous language-specific constructs, program logic features, the phrasecontaining the cursor, and any strings that match the previous FIND operation orthose that would be found by an RFIND or RCHANGE request. In addition, whenHILITE is entered with no operands, a dialog appears that allows you to setdefault colors for the data area in non-program files, for any characters typed sincethe previous Enter or function key entry, and for strings located by the FINDcommand.
Both HI and HILIGHT are valid synonyms for HILITE.
Note: Highlighting is not available for edit sessions that involve the following:v Data sets with record lengths greater than 255v Mixed mode edit sessions (normally used when editing DBCS data)v Formatted data.
If a macro issues HILITE in any of these situations, a return code of 12 isset.
Return CodesThe following return codes can be issued:0 Normal completion.
HILITE
Chapter 11. Edit Macro Commands and Assignment Statements 349
8 Logic or search not supported in the current environment. Invalidlanguage.
12 Hilite dialog is invalid from an edit macro or Hilite not available becauseof the installation defaults or because the edit panel in use is not enabledfor enhanced color.
20 Severe error. Possibly extra parameters.
IMACRO—Set or Query an Initial MacroThe IMACRO macro command saves the name of an initial macro in the currentedit profile.
The IMACRO assignment statement sets or retrieves the value for the initial macroin the current profile, and places it in a variable.
See “Initial Macros” on page 29 for more information on creating and using initialmacros.
Macro Command SyntaxISREDIT IMACRO {name | NONE}
name Identifies the initial macro to be run when editing the data set type thatmatches this profile. This macro is run before any data is displayed.
NONEShows that no macro is to be run at the beginning of each edit session. Theeditor returns a value of NONE when no initial macro has been specified.
Assignment Statement SyntaxISREDIT (varname) = IMACROISREDIT IMACRO = name
varnameThe name of a variable to contain the name of the initial macro.
name Same as macro command syntax.
Return CodesThe following return codes can be issued:0 Normal completion4 IMACRO set not accepted; profile is locked12 Invalid name specified20 Severe error.
ExamplesTo set the initial macro name to ISCRIPT:ISREDIT IMACRO ISCRIPT
To set no initial macro:ISREDIT IMACRO NONE
To store the name of the initial macro in the variable &IMACNAM:ISREDIT (IMACNAM) = IMACRO
HILITE
350 OS/390 V2R10.0 ISPF Edit and Edit Macros
INSERT—Prepare Display for Data InsertionThe INSERT macro command appears for one or more blank lines, and allows youto fill them with data.
Macro Command SyntaxISREDIT INSERT lptr [numlines]
lptr A label or a relative line number that shows which line you want theinserted line or lines to follow.
numlinesThe number of lines to appear for data input; these lines are not saveduntil they contain data. If you do not type a number or if the number youtype is 1, only one data input line appears.
DescriptionUse the INSERT macro command for data input. Inserted lines are initialized withdata from the mask line. However, they are not data lines and cannot be referredto by any macro. Inserted lines are deleted if they do not contain data.
You must specify that the line referenced on INSERT should be displayed;otherwise, you will not see the inserted line. Use LOCATE to position a line at thetop of the display.
Do not use this command for adding lines with specific data; instead, use theLINE_BEFORE and LINE_AFTER assignment statements.
Return CodesThe following return codes can be issued:0 Normal completion12 Invalid line number20 Severe error.
ExampleTo open a 5-line area for data input after the line with the label .POINT, locate.POINT to position it to the top of the display. Then issue INSERT:ISREDIT LOCATE .POINTISREDIT INSERT .POINT 5
LABEL—Set or Query a Line LabelThe LABEL assignment statement sets or retrieves the values for the label on thespecified line and places the values in variables.
Assignment Statement SyntaxISREDIT (var1,var2) = LABEL lptrISREDIT LABEL lptr = labelname [level]
var1 The name of a variable to contain the name of the label.
var2 The name of the variable to contain the nesting level of the label. It mustbe a 3-character value that is left-padded with zeros.
lptr A line pointer identifying the line for which a label must be set orretrieved. A line pointer can be a label or a relative line number.
INSERT
Chapter 11. Edit Macro Commands and Assignment Statements 351
Use the LINENUM assignment statement to obtain the current relative linenumber of a line with a label. See the LOCATE and RESET commanddescriptions, which use labels to specify line ranges.
labelnameThe name of the label. It must begin with a period, followed by 1 to 8alphabetic characters, the first of which must not be Z. No specialcharacters or numeric characters are allowed. If the label is to be level 0, itmust be 5 characters or less. When you want to delete a label, set the labelname to blank (' ').
The LINENUM assignment statement can be used to determine whether alabel exists. For more information, refer to the description of theLINENUM assignment statement later in this chapter.
level The highest nesting level at which this label is visible to you or to a macro.Level 0 is the highest level. Labels at this level are visible to you and to alllevels of nested macros. Level 1 is not visible to you, but it is visible to allmacros, and so on. The level can never exceed the current nesting level.The maximum nesting level is 255. The level number defaults to thecurrent nesting level.
DescriptionA range of labels is particularly useful for commands that operate on a range oflines, such as those in the following list:
CHANGE EXCLUDE LOCATE SEEKCREATE FIND REPLACE SORTDELETE FLIP RESET SUBMIT
Return CodesThe following return codes can be issued:0 Normal completion4 Label name not returned, specified line has no label8 Label set, but an existing label at the same level was deleted12 Line number specified is beyond the end of data20 Severe error.
ExampleTo get the line of data at the cursor, look for the next occurrence of the string inthe variable &ARG, and then label the line if it is found and currently unlabeled:ISREDIT (NAME) = LINE .ZCSRISREDIT FIND &ARGIF &LASTCC = 0 THEN -ISREDIT (LBL,NEST) = LABEL .ZCSR
IF &LBL=&STR() THEN -ISREDIT LABEL .ZCSR = .POINT 0
LEFT—Scroll LeftThe LEFT macro command scrolls data to the left of the current panel position.
Macro Command SyntaxISREDIT LEFT amt
LABEL
352 OS/390 V2R10.0 ISPF Edit and Edit Macros
amt The scroll amount, the number of columns (0 - 9999) to scroll, or one of thefollowing operands:
MAX Displays the first page of data to the left.
HALF Displays the next half-panel of data to the left.
PAGE Displays the next full panel of data to the left.
CURSORScrolls until the column on which the cursor is located becomes thefirst data column on the panel.
DATA Scrolls until the first column on the current panel of data becomesthe last column on the next panel.
DescriptionThe editor stops scrolling when it reaches the current BOUNDS setting. Forexample, if the left bound is position 9 and positions 21 to 92 are displayed,issuing ISREDIT LEFT 20 leaves positions 9 to 80 displayed, not 1 to 72.
To scroll to the left using the panel position when the macro was issued, useUSER_STATE assignment statements to save and then restore the panel positionoperands.
If you define a macro named LEFT, it overrides the LEFT command when usedfrom another macro. LEFT does not change the cursor position and cannot be usedin an initial macro. For further information, see the BOUNDS andDISPLAY_COLUMNS descriptions.
Return CodesThe following return codes can be issued:0 Normal completion4 No visible lines8 No data to display12 Amount not specified20 Severe error.
ExampleTo scroll the display to the left by the number of columns specified in variable&COL:ISREDIT LEFT &COL
LEVEL—Set or Query the Modification Level NumberThe LEVEL macro command allows you to control the modification level that isassigned to a member of an ISPF library.
The LEVEL assignment statement either sets the modification level or retrieves thecurrent modification level and places it in a variable.
See “Version and Modification Level Numbers” on page 31 for more informationabout level numbers.
Macro Command SyntaxISREDIT LEVEL num
LEFT
Chapter 11. Edit Macro Commands and Assignment Statements 353
num The modification level. It can be any number from 0 to 99.
Assignment Statement SyntaxISREDIT (varname) = LEVELISREDIT LEVEL = num
varnameThe name of a variable to contain the modification level. The modificationlevel is a 2-digit value that is left-padded with zeros.
num Same as above.
Return CodesThe following return codes can be issued:0 Normal completion4 Statistics mode is off; the command is ignored12 Invalid value specified20 Severe error.
ExamplesTo reset the modification level to 1:ISREDIT LEVEL = 1
To save the value of the modification level in variable &MODLVL:ISREDIT (MODLVL) = LEVEL
LINE—Set or Query a Line from the Data SetThe LINE assignment statement either sets or retrieves the data from the data linespecified by a line pointer, and places it in a variable.
Assignment Statement SyntaxISREDIT (varname) = LINE lptrISREDIT LINE lptr = data
varnameSpecifies the name of a variable to hold the contents of the specified dataline.
lptr Specifies that a line pointer must be used. A line pointer can be a label or arelative line number.
data Specifies that the following forms can be used:v Simple stringv Delimited stringv Variablev Template (< col,string >)v Merge format (string-1 + string-2, operand + string-2, string-1 + operand)v Operand:
LINE Data from this line is used.LINE lptr
Data from the line with the given line pointer (lptr).MASKLINE
Data from the mask line.
LEVEL
354 OS/390 V2R10.0 ISPF Edit and Edit Macros
TABSLINEData from the tabs line.
DescriptionThe logical data width of the line determines how many characters are retrieved orset. See the description of the DATA_WIDTH command for information ondetermining the current logical data width.
You must specify the line pointer to set or retrieve a line. To set data on a line, youcan use a variety of data formats: (variable), templates, or merging a line withother data. The data on the line is completely overlaid with the data specified onthis command.
Return CodesThe following return codes can be issued:0 Normal completion4 Data truncated (line shorter than data supplied)8 Variable not found12 Invalid line number16 Variable data truncated20 Severe error.
ExamplesTo replace the data on line 7 with data from a variable named NEWDAT:ISREDIT LINE 7 = (NEWDAT)
Note: This syntax is preferred overISREDIT LINE 7 = &NEWDAT
because the variable is not rescanned by either the language processor orISPF.
To set comment delimiters in columns 40 and 70, blanking the rest of the line:ISREDIT LINE 1 = < 40 '&STR(/*)' 70 '&STR(*/)' >
To overlay the first 2 columns of line 2 with //:ISREDIT LINE 2 = LINE + //
To merge mask line data with data from variable &VAR:ISREDIT LINE 3 = MASKLINE + (VAR)
LINE_AFTER—Add a Line to the Current Data SetThe LINE_AFTER assignment statement adds a line after a specified line in thecurrent data set.
Assignment Statement SyntaxISREDIT LINE_AFTER lptr = [DATALINE] data
[INFOLINE][MSGLINE ][NOTELINE]
lptr Specifies that a line pointer must be used to identify the line after whichthe new line is to be inserted. A line pointer of 0 causes the new line to be
LINE
Chapter 11. Edit Macro Commands and Assignment Statements 355
|
|
|
|
||
|
inserted at the beginning of the current data set. The line pointer can beeither a label or a relative line number.
DATALINEThe line inserted is a data line.
INFOLINEThe line inserted is a temporary, non-data line. The line command areashows ====== in high intensity and the data on the line is in high intensity,also. The line can be scrolled left and right and can be as long as thecurrent record length. An information line is protected. Once it has beenadded to the data, it cannot be referenced.
MSGLINEThe line inserted is a temporary, non-data line. The line command areacontains ==MSG> in high intensity and the data on the line is also in highintensity. A message line has a data length of 72 characters, regardless ofthe data width. Once it has been added to the data, it cannot be referenced.
NOTELINEThe line inserted is a temporary, non-data line. The line command areashows =NOTE= in high intensity and the data on the line is in low intensity.A note line has a data length of 72 characters, regardless of the data width.It cannot be referenced after it is added to the data.
data Specifies that the following data formats can be used:v Simple stringv Delimited stringv Variablev Template (< col,string >)v Merge format (string-1 + string-2, operand + string-2, string-1 + operand)v Operand:
LINE Data from the line preceding this line.LINE lptr
Data from the line with the given line pointer (lptr).MASKLINE
Data from the mask line.TABSLINE
Data from the tabs line.
DescriptionThis statement is used for adding lines with specific data. Use the INSERTcommand for data input.
Return CodesThe following return codes can be issued:0 Normal completion4 Data truncated12 Invalid line number20 Severe error.
ExamplesTo add data after line 4 with data from a variable named NEWDAT:ISREDIT LINE_AFTER 4 = (NEWDAT)
LINE_AFTER
356 OS/390 V2R10.0 ISPF Edit and Edit Macros
|
|
Note: This syntax is preferred overISREDIT LINE_AFTER 4 = &NEWDAT
because the variable is not rescanned by either the language processor orISPF.
To put a new line that contains the string:This is the new top line of the data
as the first line of the data set:ISREDIT LINE_AFTER 0 = "This is the new top line of the data"
To put the contents of the line labeled .START on a new line following the linelabeled .END:ISREDIT LINE_AFTER .END = LINE .START
To put the contents of the mask line modified by the variable &DATA after the linewhose number is in variable &N:ISREDIT LINE_AFTER &N = MASKLINE + &DATA
LINE_BEFORE—Add a Line to the Current Data SetThe LINE_BEFORE assignment statement adds a line before a specified line in thecurrent data set.
Assignment Statement SyntaxISREDIT LINE_BEFORE lptr = [DATALINE] data
[INFOLINE][MSGLINE ][NOTELINE]
lptr Specifies that a line pointer must be used to identify the line before whichthe new line is to be inserted. A line pointer of 0 is invalid. The linepointer can be either a label or a relative line number.
DATALINEThe line inserted is a data line.
INFOLINEThe line inserted is a temporary, non-data line. The line command areashows ====== in high intensity and the data on the line is in high intensity,also. The line can be scrolled left and right and can be as long as thecurrent record length. An information line is protected. Once it has beenadded to the data, it cannot be referenced.
MSGLINEThe line inserted is a temporary, non-data line. The line command areacontains ==MSG> in high intensity and the data on the line is also in highintensity. A message line has a data length of 72 characters, regardless ofthe data width. Once it has been added to the data, it cannot be referenced.
NOTELINEThe line inserted is a temporary, non-data line. The line command areashows =NOTE= in high intensity and the data on the line is in low intensity.A note line has a data length of 72 characters, regardless of the data width.It cannot be referenced once it has been added to the data.
data Specifies that the following data formats can be used:
LINE_AFTER
Chapter 11. Edit Macro Commands and Assignment Statements 357
|
|
||
|
v Simple stringv Delimited stringv Variablev Template (< col,string >)v Merge format (string-1 + string-2, operand + string-2, string-1 + operand)v Operand (those allowed follow):
LINE Data from the line following this line.LINE lptr
Data from the line with the given line pointer (lptr).MASKLINE
Data from the mask line.TABSLINE
Data from the tabs line.
DescriptionThe LINE_BEFORE statement is used for adding lines with specific data. UseINSERT for data input.
Return CodesThe following return codes can be issued:0 Normal completion4 Data truncated12 Invalid line number20 Severe error.
ExamplesTo add data before line 4 with data from a variable named NEWDAT:ISREDIT LINE_BEFORE 4 = (NEWDAT)
Note: This syntax is preferred overISREDIT LINE_BEFORE 4 = &NEWDAT
because the variable is not rescanned by either the language processor orISPF.
To put the contents of the line labeled .START on a new line preceding the linelabeled .END:ISREDIT LINE_BEFORE .END = LINE .START
To put the contents of the mask line modified by the variable &DATA before theline whose number is in variable &N:ISREDIT LINE_BEFORE &N = MASKLINE + &DATA
LINE_STATUS—Query Source and Change Information for a Line in aData Set
The LINE_STATUS assignment statement retrieves the source and changeinformation for the data line specified by a line pointer, and places it in a variable.This information indicates how the line was originally added to the data, and howit has been changed during the edit session.
LINE_BEFORE
358 OS/390 V2R10.0 ISPF Edit and Edit Macros
|
|
|
|
||
|
|
|
||||
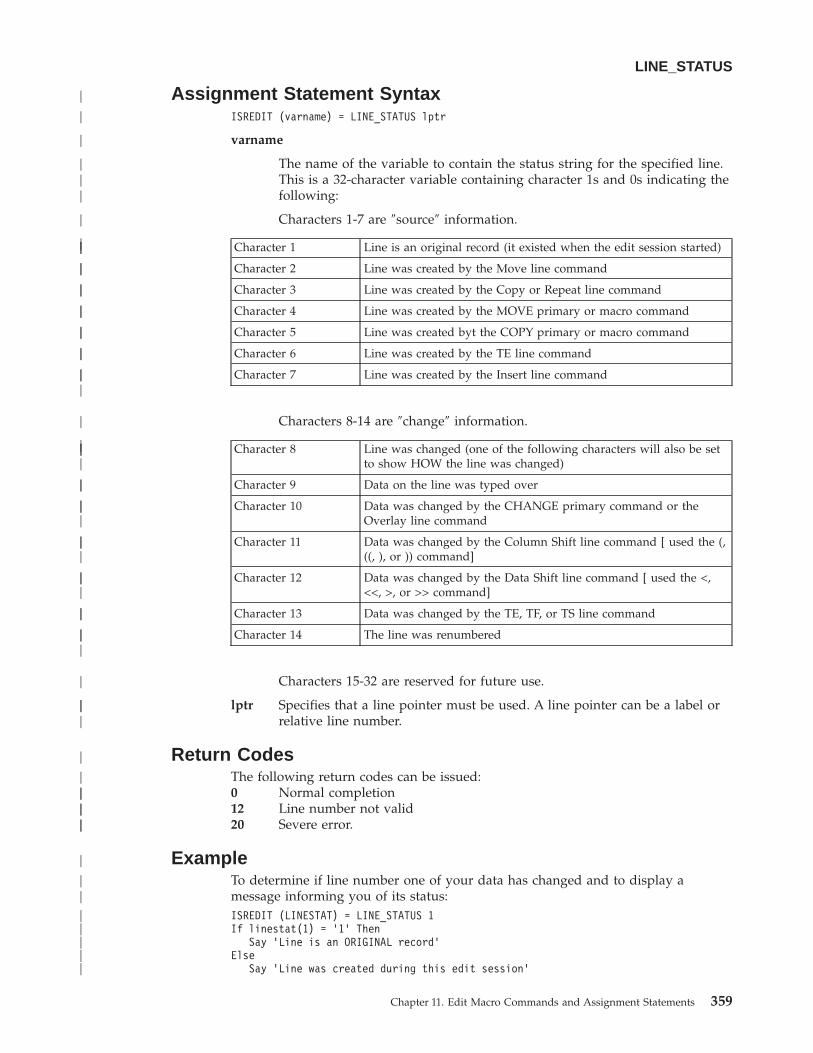
Assignment Statement SyntaxISREDIT (varname) = LINE_STATUS lptr
varname
The name of the variable to contain the status string for the specified line.This is a 32-character variable containing character 1s and 0s indicating thefollowing:
Characters 1-7 are ″source″ information.
Character 1 Line is an original record (it existed when the edit session started)
Character 2 Line was created by the Move line command
Character 3 Line was created by the Copy or Repeat line command
Character 4 Line was created by the MOVE primary or macro command
Character 5 Line was created byt the COPY primary or macro command
Character 6 Line was created by the TE line command
Character 7 Line was created by the Insert line command
Characters 8-14 are ″change″ information.
Character 8 Line was changed (one of the following characters will also be setto show HOW the line was changed)
Character 9 Data on the line was typed over
Character 10 Data was changed by the CHANGE primary command or theOverlay line command
Character 11 Data was changed by the Column Shift line command [ used the (,((, ), or )) command]
Character 12 Data was changed by the Data Shift line command [ used the <,<<, >, or >> command]
Character 13 Data was changed by the TE, TF, or TS line command
Character 14 The line was renumbered
Characters 15-32 are reserved for future use.
lptr Specifies that a line pointer must be used. A line pointer can be a label orrelative line number.
Return CodesThe following return codes can be issued:0 Normal completion12 Line number not valid20 Severe error.
ExampleTo determine if line number one of your data has changed and to display amessage informing you of its status:ISREDIT (LINESTAT) = LINE_STATUS 1If linestat(1) = '1' Then
Say 'Line is an ORIGINAL record'Else
Say 'Line was created during this edit session'
LINE_STATUS
Chapter 11. Edit Macro Commands and Assignment Statements 359
|
|
|
|||
|
|||
||
||
||
||
||
|||
|
||||
||
|||
|||
|||
||
|||
|
|||
|
|||||||
|
||
|||||
If linestat(8) = '1' ThenSay 'Line has been changed'
ElseSay 'Line has not been changed'
LINENUM—Query the Line Number of a Labeled LineThe LINENUM assignment statement retrieves the current relative line number ofa specified label, and places it in a variable.
Assignment Statement SyntaxISREDIT (varname) = LINENUM label
varnameThe name of the variable to contain the line number of the line with thespecified label. The line number is a 6-digit value that is left-padded withzeros.
label The name of the label for the line whose line number is needed.
Return CodesThe following return codes can be issued:0 Normal completion4 Line 0 specified8 Label specified, but not found (variable set to 0)12 Invalid line number20 Severe error.
DescriptionOnce the line number is retrieved and placed in a variable, it can be used inarithmetic operations. Note that line numbers are relative to the position of theline: first=1, second=2, and so on. Therefore, the value returned by the LINENUMassignment statement is not always be correct if lines are added or deleted beforethe line number is obtained.
ExamplesTo determine the number of lines in the data set and set variable &VAR to the lastline number:ISREDIT (VAR) = LINENUM .ZLAST
That number is 0 if there are no lines.
To set variable &NUM to the line number containing the label .MYLAB:ISREDIT (NUM) = LINENUM .MYLAB
LOCATE—Locate a LineThe LOCATE macro command scrolls up or down to a specified line. The line isthen displayed as the first line on the panel. There are two forms of LOCATE,specific and generic.
Specific Locate SyntaxThe specific form of LOCATE positions a particular line at the top of the panel.You must specify either a line number or a label.
LINE_STATUS
360 OS/390 V2R10.0 ISPF Edit and Edit Macros
|||||
|
ISREDIT LOCATE lptr
lptr Specifies that a line pointer must be used for the target. A line pointer canbe a label or a relative line number.
If the line pointer is a label, it must be a label that you have previouslydefined or a editor-defined label, such as .ZFIRST or .ZLAST.
Generic Locate SyntaxThe generic LOCATE command positions the panel to the first, last, next, orprevious occurrence of a particular kind of line.ISREDIT LOCATE [FIRST] {CHANGE } [lptr-range]
[LAST ] {COMMAND }[NEXT ] {ERROR }[PREV ] {EXCLUDED}
{LABEL }{SPECIAL }{INFOLINE}{MSGLINE }{NOTELINE}
FIRST Searches from the first line, proceeding forward.
LAST Searches from the last line, proceeding backward.
NEXT Searches from the first line of the page displayed, proceeding forward.
PREV Searches from the first line of the page displayed, proceeding backward.
CHANGESearches for a line with a change flag (==CHG>).
COMMANDSearches for a line with a pending line command.
ERRORSearches for a line with an error flag (==ERR>).
EXCLUDEDSearches for an excluded line.
LABELSearches for a line with a label.
SPECIALSearches for any special non-data (temporary) line:v Bounds line flagged as =BNDS>v Column identification lines flagged as =COLS>v Information lines flagged as ======v Mask lines flagged as =MASK>v Message lines flagged as ==MSG>v Note lines flagged as =NOTE=v Profile lines flagged as =PROF>v Tabs line flagged as =TABS>.
INFOLINESearches for information lines flagged with ======
MSGLINESearches for message lines flagged with ==MSG>
NOTELINESearches for note lines flagged with =NOTE=
LOCATE
Chapter 11. Edit Macro Commands and Assignment Statements 361
|||||||||
||
||
||
lptr-rangeSpecifies that two line pointers are required to specify a range of lines inwhich to search. A line pointer can be a label or a relative line number.Specifying one line pointer is invalid. The defaults are the editor-defined.ZFIRST and .ZLAST labels.
Note: If you try to locate a line using a label that has not been assigned,you will receive a return code of 20. To avoid this, use theLINENUM assignment statement. When using the LINENUMstatement, a return code of 8 will be issued if the label does notexist.ISREDIT X = LINENUM .LABEL
Return CodesThe following return codes can be issued:0 Normal completion4 Line not located8 Empty member or data set20 Severe error.
ExamplesTo locate the next occurrence of a line with a label:ISREDIT LOCATE NEXT LABEL
To locate the first occurrence of a special (non-data) line:ISREDIT LOCATE FIRST SPECIAL
To locate the last excluded line:ISREDIT LOCATE LAST X
To locate the previous line that contains an unprocessed line command:ISREDIT LOCATE PREV CMD
To locate the first message line:ISREDIT LOCATE FIRST MSGLINE
LRECL—Query the Logical Record LengthThe LRECL assignment statement returns the maximum space, in bytes, availablefor data, COBOL number fields, and sequence number fields.
Assignment Statement SyntaxISREDIT (varname) = LRECL
varnameThe name of a variable to contain the logical record length of the databeing edited. The logical record length is a 3-digit value that is left-paddedwith zeros. If the variable is VDEFINEd in character format, it should bedefined with a length of 5. The returned value is left padded with zeros.For compatibility with previous releases of ISPF/PDF, a length of 3 or 4 isallowed in cases where no data loss occurs.
LOCATE
362 OS/390 V2R10.0 ISPF Edit and Edit Macros
|
|
|
DescriptionThe value returned by the LRECL assignment statement includes the sequencenumber field and, for fixed-length records, the COBOL number field, if thesenumber fields are used. For variable-length records, the value returned by LRECLdoes not include the 4-byte record descriptor word (RDW).
Use the DATA_WIDTH assignment statement to get the maximum space, in bytes,available for data.
Return CodesThe following return codes can be issued:0 Normal completion12 Invalid command format20 Severe error.
ExampleTo check the logical record length of the data and process the data if the logicalrecord length (LRECL) is 80:ISREDIT (RECLEN) = LRECLIF &RECLEN = 80 THEN -
...
MACRO—Identify an Edit MacroThe MACRO macro command identifies a command as a macro.
Macro Command SyntaxISREDIT MACRO [(var1 [,var2,...])] [PROCESS ]
[NOPROCESS]
var1, var2,The names of the variables that contain parameters, if a macro allowsparameters to be specified. Parameters are parsed and placed into thenamed variables in the order in which they are typed. The last variablecontains any remaining parameters. Variables that do not receive aparameter are set to a null string. A parameter is a simple or quoted string,separated by blanks or commas. Quotes can be single (') or double ("), butmust be matched at the beginning and end of the string.
PROCESSImmediately processes all changes and line commands typed at thekeyboard.
NOPROCESSProcesses changes and line commands typed at the keyboard when themacro completes processing or a PROCESS statement is found.NOPROCESS must be used if the macro is to use line commands as inputto its processing.
See “PROCESS—Process Line Commands” on page 377 for moreinformation.
DescriptionThe MACRO macro command is required in all macros. It must be the firstcommand in a CLIST or REXX macro that is not a CLIST or REXX statement.Similarly, it also must be the first edit command in a program macro.
LRECL
Chapter 11. Edit Macro Commands and Assignment Statements 363
Return CodesThe following return codes may be returned:0 Normal completion8 No parameters are permitted for this processing12 Syntax Error20 Severe error.
ExamplesTo begin a macro, first accepting a member name and optionally a line numberrange to be placed in the variable &PARM:ISREDIT MACRO (PARM)ISREDIT COPY AFTER .ZCSR &PARM
To begin a macro, checking parameters before processing panel information, testingfor missing input, excess input, and non-numeric input:ISREDIT MACRO NOPROCESS (COL,X)IF &STR(&COL) = &STR() THEN -ISREDIT (,COL) = DISPLAY_COLS
ELSE -IF &DATATYPE(&COL) = CHAR THEN -GOTO MSG
IF &STR(&X) ¬= &STR() THEN -GOTO MSG
ISREDIT PROCESS
MACRO_LEVEL—Query the Macro Nesting LevelThe MACRO_LEVEL assignment statement retrieves the current nesting level ofthe macro being run, and places the nesting level in a variable.
Assignment Statement SyntaxISREDIT (varname) = MACRO_LEVEL
varnameThe name of a variable to contain the macro nesting level. The nestinglevel is a 3-digit value that is left-padded with zeros.
DescriptionThe nesting level can be any number between 1 (a macro that you start) and 255.MACRO_LEVEL is used to adjust processing based on whether the macro isstarted by you or called by another macro. It is required if labels are to be set forthe starter of this macro. See “LABEL—Set or Query a Line Label” on page 351 formore information.
Return CodesThe following return codes can be issued:0 Normal completion12 Invalid command format20 Severe error.
ExampleTo set the label for the caller of the macro at 1 less than the current level:ISREDIT (NESTLEV) = MACRO_LEVELISREDIT LABEL .ZCSR = .XSTR &EVAL(&NESTLEV -1)
MACRO
364 OS/390 V2R10.0 ISPF Edit and Edit Macros
MASKLINE—Set or Query the Mask LineThe MASKLINE assignment statement sets or retrieves the value of the mask line,which controls the display formatting of your input.
Assignment Statement SyntaxISREDIT (varname) = MASKLINEISREDIT MASKLINE = data
varnameThe name of a variable containing maskline contents.
data Specifies that the following forms can be used:v Simple stringv Delimited stringv Variablev Template (< col,string >)v Merge format (string-1 + string-2, operand + string-2, string-1 + operand)v Operand:
LINE lptrData from the line with the given line pointer (lptr).
MASKLINEData from the mask line.
TABSLINEData from the tabs line.
DescriptionThe MASKLINE assignment statement places the mask line contents in a variableor sets the mask line from a variable. The mask line can contain any characters andserves to initialize inserted lines to the value of the mask line. See the descriptionof templates in “Overlays and Templates” on page 106 for more information on thesetting of a mask line.
Be careful not to destroy a DBCS string in the mask line. If shift-out (SO) orshift-in (SI) characters in a mask line are overlaid through the MASKLINEstatement, the result is unpredictable.
Return CodesThe following return codes can be issued:0 Normal completion4 Data truncated16 Variable data truncated20 Severe error.
ExamplesTo set the mask line to place comment delimiters starting at lines 40 and 70:ISREDIT MASKLINE = <40 '&STR(/*)' 70 '&STR(/*)'>
To set the mask line to blanks:ISREDIT MASKLINE = " "
MASKLINE
Chapter 11. Edit Macro Commands and Assignment Statements 365
MEMBER—Query the Current Member NameThe MEMBER assignment statement retrieves the name of the library membercurrently being edited, and places it in a variable. If a sequential data set is beingedited, the variable is set to blanks.
Assignment Statement SyntaxISREDIT (varname) = MEMBER
varnameThe name of a variable to contain the name of the library membercurrently being edited.
Return CodesThe following return codes can be issued:0 Normal completion12 Invalid command format20 Severe error.
ExampleTo determine if you are editing a library member with a prefix of MIN:ISREDIT (MEMNAME) = MEMBERIF &SUBSTR(1:3,&MEMNAME ) = MIN THEN -
....
MEND—End a Macro in the Batch EnvironmentThe MEND macro command ends a macro that is running in the batchenvironment. It was required for CLISTs that ran in the batch environment usingthe MVS/370 operating system. It is not required for MVS/XA*, but can be used.
Macro Command SyntaxISREDIT MEND
DescriptionMEND must be the last processable instruction before the CLIST EXIT statement. Ifyour macro is not running in the batch environment, or if it is not a CLIST, theMEND command is ignored. Refer to ISPF User’s Guide for more information onrunning batch jobs.
Return CodesThe following return codes can be issued:0 Normal completion20 Severe error.
If you want to have the proper return code when using the MEND command in aCLIST, the value of the &LASTCC variable must be passed as the exit code. Forexample:ISREDIT MENDEXIT CODE(&LASTCC)
MEMBER
366 OS/390 V2R10.0 ISPF Edit and Edit Macros
ExampleTo update the data and save the changes, first set it up as an initial macro in thebatch environment. Then, end that edit session and the macro.ISREDIT MACROISREDIT CHANGE ALL PREFIX BDG BIVISREDIT ENDISREDIT MENDEXIT
MODEL—Copy a Model into the Current Data SetThe model name form of the MODEL macro command copies a specified dialogdevelopment model before or after a specified line.
The class name form of the MODEL macro command changes the model class thatthe editor uses to determine the model you want. For more information on editmodels, see Chapter 4. Using Edit Models.
Macro Command Model Name SyntaxISREDIT MODEL model-name [qualifier] {AFTER } lptr [NOTES ]
{BEFORE} [NONOTES]
model-nameThe name of the model to be copied, such as VGET for the VGET servicemodel. This operand can also be one of the options listed on a modelselection panel, such as V1 for the VGET service model. However, to usethese options with the MODEL macro command, you must already knowwhat they are or else display a model selection panel by using the MODELprimary command. The MODEL macro command does not display modelselection panels. Refer to ISPF Planning and Customizing for a list of modelsand model names.
qualifierThe name of a model on a secondary model selection panel, such asTBCREATE for the TBCREATE service model. This operand can also be oneof the options listed on a model selection panel, such as G1 for theTBCREATE service model.
For example, a model selection panel allows you to enter T1 to choosetable models. It then displays another model selection panel for choosingtable models, such as G1 for the TBCREATE service model. Therefore, yourMODEL macro command could use either TABLES or T1 as the model-nameoperand and either TBCREATE or G1 as the qualifier operand. The simplestway would be to use TBCREATE or G1 as the model-name operand and omitthe qualifier operand.
To use options with the MODEL macro command, you must already knowwhat they are or else display a model selection panel by using the MODELprimary command. The MODEL macro command does not display modelselection panels. Refer to ISPF ISPF Planning and Customizing for a list ofmodels and model names.
AFTERSpecifies that the model is to be copied after the line specified by lptr.
BEFORESpecifies that the model is to be copied before the line specified by lptr.
MEND
Chapter 11. Edit Macro Commands and Assignment Statements 367
lptr A line pointer must be used to specify where the model should be copied.A line pointer can be a label or a relative line number.
NOTESExplanatory notes appear when a model is copied.
NONOTESNo explanatory notes appear.
Macro Command Class Name SyntaxISREDIT MODEL CLASS class-name
CLASSSpecifies that the current model class is to be replaced by class-name. Thenew class name is used for all models from that point on, until you changethe model class again or end the edit session.
class-nameSpecifies the model class for the current edit session. It must be a name onthe Model Classes panel or an allowable abbreviation. The model classcoincides with the type of model, such as REXX, COBOL, or FORTRAN.
Return CodesThe following return codes can be issued:0 Normal completion12 Invalid line pointer (lptr)20 Severe error.
ExampleTo copy the VGET model at the end of the current data:ISREDIT MODEL VGET AFTER .ZL
MOVE— Move a Data Set or a Data Set MemberThe MOVE macro command specifies a member of the partitioned data set beingedited to be moved into the data being edited.
Macro Command SyntaxISREDIT MOVE member {AFTER } lptr
(member){BEFORE}data set namedata.set.name(member)
memberA member of the ISPF library or partitioned data set you are editing.
data set nameA partially or fully qualified data set name. If the data set is partitionedyou must include a member name in parentheses.
AFTERSpecifies that the member is to be moved after the target specified by lptr.
BEFORESpecifies that the member is to be moved before the target specified bylptr.
lptr Identifies the target of the move. A line pointer can be a label or a relative
MODEL
368 OS/390 V2R10.0 ISPF Edit and Edit Macros
line number. If the line pointer is a label, it can be either a label that youdefine or one of the editor-defined labels, such as .ZF and .ZL.
Note: If the member name or data set name is less than 8 characters and the dataset you are editing is partitioned a like-named member is copied. If alike-named member does not exist, the name is considered to be a partiallyqualified data set name.
DescriptionThe member or data set is deleted after the move. For a concatenated sequence ofISPF libraries, the deletion occurs only if the member was in the first library of theconcatenation sequence.
See “Copying and Moving Data” on page 50 if you need more information.
Return CodesThe following return codes can be issued:
0 Normal completion
8 End of data before last record read or the specified data set is in use
12 Invalid line pointer (lptr); member not found or BLDL error
16 End of data before first record read
20 Syntax error (invalid name, incomplete range), or I/O error.
ExamplesTo move the contents of member ABC after the first line in the current data:ISREDIT MOVE ABC AFTER .ZF
To move all of data set MOVECOPY.DATA before the line where the cursor iscurrently positioned:ISREDIT MOVE MOVECOPY.DATA BEFORE .ZCSR
NONUMBER—Turn Off Number ModeThe NONUMBER macro command turns off number mode, which controls thenumbering of lines in the current data.
SyntaxISREDIT NONUMBER
The NONUMBER macro command has no operands.
DescriptionYou can also use the NUMBER OFF macro command to turn off number mode.
When number mode is off, NONUMBER prevents any verification of valid linenumbers, generation of sequence numbers, and the renumbering of lines thatnormally occurs when autonum mode is on.
Return CodesThe following return codes can be issued:
MOVE
Chapter 11. Edit Macro Commands and Assignment Statements 369
0 Normal completion
20 Severe error.
ExampleTo turn number mode off by using the NONUMBER command:ISREDIT NONUMBER
NOTES—Set or Query Note ModeThe NOTES macro command sets note mode, which controls whether notes are toappear when a dialog development model is inserted into the data.
The NOTES assignment statement either sets note mode, or retrieves the setting ofnote mode and places it in a variable.
See “MODEL—Copy a Model into the Current Data Set” on page 259 forinformation about copying dialog development models.
Macro Command SyntaxISREDIT NOTES [ON ]
[OFF]
ON Displays explanatory notes when a model is copied into the data beingedited.
OFF Does not display explanatory notes.
Assignment Statement SyntaxISREDIT (varname) = NOTESISREDIT NOTES = [ON ]
[OFF]
varnameThe name of a variable to contain the value of note mode, either ON orOFF.
ON Same as macro command syntax.
OFF Same as macro command syntax.
Return CodesThe following return codes can be issued:0 Normal completion20 Severe error.
ExamplesTo set note mode off:ISREDIT NOTES = OFF
To store the value of note mode in variable &NOTEMODE:ISREDIT (NOTEMODE) = NOTES
NONUMBER
370 OS/390 V2R10.0 ISPF Edit and Edit Macros
NULLS—Set or Query Nulls ModeThe NULLS macro command sets nulls mode, which determines whether trailingblanks in each data field are written to the panel as blanks or nulls.
The NULLS assignment statement either sets nulls mode or retrieves the setting ofnulls mode and places it in a variable.
Macro Command SyntaxISREDIT NULLS [ON STD]
[ON ALL][OFF ]
ON STDSpecifies that in fields that contain any blank trailing space, the space is tobe written as one blank followed by nulls. If the field is entirely empty, itis written as all blanks.
ON ALLSpecifies that all trailing blanks and all-blank fields are written as nulls.
OFF Specifies that trailing blanks in each data field are written as blanks.
Assignment Statement SyntaxISREDIT (var1,var2) = NULLSISREDIT NULLS = [ON STD]
[ON ALL][OFF ]
var1 The name of a variable to contain either ON or OFF.
var2 The name of a variable to contain ALL, STD, or blanks.
ON STDSame as macro command syntax.
ON ALLSame as macro command syntax.
OFF Same as macro command syntax.
DescriptionThe term data field normally refers to the 72 characters of data on each line. Usinghardware tabs, however, you can split each line into multiple fields. See“TABS—Define Tabs” on page 290 for more details.
Blank characters (X'40') and null characters (X'00') both appear as blanks. Whenyou use the I (insert) line command, the data entry area appears as blanks forNULLS ON STD and as nulls for NULLS ON ALL.
Trailing nulls simplify use of the Ins (insert) key on the IBM 3270 keyboard. Youcan use this key to insert characters on a line if the line contains trailing nulls.
Besides using NULLS, you can create nulls at the end of a line by using the EraseEOF or Del (delete) key. Null characters are never stored in the data; they arealways converted to blanks.
Return CodesThe following return codes can be issued:
NULLS
Chapter 11. Edit Macro Commands and Assignment Statements 371
0 Normal completion20 Severe error.
ExamplesTo set nulls mode on with blank trailing space written as one blank followed bynulls and empty fields written as all blanks:ISREDIT NULLS = ON STD
To set nulls mode off and thus have trailing blanks in each data field:ISREDIT NULLS = OFF
NUMBER—Set or Query Number ModeThe NUMBER macro command sets number mode, which controls the numberingof lines in the current data.
The NUMBER assignment statement either sets number mode, or retrieves thesetting of number mode and places it in variables.
Macro Command SyntaxISREDIT NUMBER [ON ] [STD ] [DISPLAY]
[OFF] [COBOL ][STD COBOL][NOSTD][NOCOBOL][NOSTD NOCOBOL]
ON Automatically verifies that all lines have valid numbers in ascendingsequence and renumbers any lines that are either unnumbered or out ofsequence. You can also use the RENUM command to turn number modeon and renumber lines.
The editor interprets the STD, COBOL, and DISPLAY operands only whennumber mode is turned on.
OFF Turns number mode off. You can also use the NONUMBER command toturn number mode off.
STD Numbers the data in the standard sequence field. This is the default for allnon-COBOL data set types.
COBOLNumbers the data in the COBOL field. This is the default for all COBOLdata set types.
Note: The NUMBER ON COBOL mode is not supported for formatteddata sets.
Attention: If number mode is off, make sure the first 6 columns of yourdata set are blank before using either the NUMBER ON COBOL orNUMBER ON STD COBOL command. Otherwise, the data in thesecolumns is replaced by the COBOL sequence numbers. If that happens andif edit recovery or SETUNDO is on, you can use the UNDO command torecover the data. You can also use CANCEL at any time to end the editsession without saving the data.
STD COBOLNumbers the data in both fields.
NULLS
372 OS/390 V2R10.0 ISPF Edit and Edit Macros
If both STD and COBOL numbers are generated, the STD number isdetermined and then used as the COBOL number. The COBOL numberscan be out of sequence if the COBOL and STD fields were notsynchronized. Use RENUM to force synchronization.
NOSTDTurns standard number mode off.
NOCOBOLTurns COBOL number mode off.
NOSTD NOCOBOLTurns both the standard number mode and COBOL number mode off.
DISPLAYCauses the width of the data window to include the sequence numberfields. Otherwise, the width of the window does not include the sequencenumber fields. When you display a data set with a logical record length of80 and STD numbering, the sequence numbers are not shown unless youare using a 3278 Model 5 terminal, which displays 132 characters.Automatic left or right scrolling is performed, if required, so that theleftmost column of the data window is the first column displayed.
Assignment Statement SyntaxISREDIT (var1,var2) = NUMBERISREDIT NUMBER = [ON ] [STD ] [DISPLAY]
[OFF] [COBOL ][STD COBOL][NOSTD][NOCOBOL][NOSTD NOCOBOL]
var1 The name of a variable to contain either ON or OFF.
var2 The name of a variable to contain one of the eight combinations in thefollowing list:
NOSTD NOCOBOL DISPLAYSTD NOCOBOL DISPLAYNOSTD COBOL DISPLAYSTD COBOL DISPLAY
NOSTD NOCOBOL NODISPLSTD NOCOBOL NODISPLNOSTD COBOL NODISPLSTD COBOL NODISPL
The value STD, COBOL, or DISPLAY can be placed in var2, even whenvar1 is set to off. This allows the macro to save and restore number mode.It also allows the macro to set number mode off, while specifying defaultsto be used when number mode is changed to on.
ON Same as for macro command syntax.
OFF Same as for macro command syntax.
STD Same as for macro command syntax.
COBOLSame as for macro command syntax.
NUMBER
Chapter 11. Edit Macro Commands and Assignment Statements 373
NOSTDTurns standard number mode off.
NOCOBOLTurns COBOL number mode off.
NOSTD NOCOBOLTurns both the standard number mode and COBOL number mode off.
STD COBOLSame as for macro command syntax.
DISPLAYSame as for macro command syntax.
DescriptionWhen number mode is on, NUMBER verifies that all lines have valid numbers inascending sequence. It renumbers any lines that are either unnumbered or out ofsequence, but it does not otherwise change existing numbers.
In number mode, the editor automatically generates sequence numbers in the datafor new lines that are created when data is copied or inserted. The editor alsoautomatically renumbers the data when it is saved if autonum mode is in effect.
If the number overlays the shift-in (SI) or shift-out (SO) characters, the double-bytecharacters are displayed incorrectly and results are unpredictable.
Return CodesThe following return codes can be issued:0 Normal completion20 Severe error.
ExampleTo save the current value of number mode, set number mode off for processing,and then restore the value of number mode:ISREDIT (STAT,VALUE) = NUMBERISREDIT NUMBER OFF
...ISREDIT NUMBER = (STAT VALUE)
PACK—Set or Query Pack ModeThe PACK macro command sets pack mode, which controls whether the data isstored in packed format.
The PACK assignment statement either sets pack mode, or retrieves the setting ofpack mode and places it in a variable.
The PACK command saves the pack mode setting in the edit profile. See “PackingData” on page 19 for more information about packing data.
Macro Command SyntaxISREDIT PACK [ON ]
[OFF]
ON Saves data in packed format.
NUMBER
374 OS/390 V2R10.0 ISPF Edit and Edit Macros
OFF Saves data in unpacked (standard) format.
If you change pack mode, data is written when an END command is issued.
Assignment Statement SyntaxISREDIT (varname) = PACKISREDIT PACK = [ON ]
[OFF]
varnameThe name of a variable to contain the setting of pack mode, either ON orOFF.
ON Same as macro command syntax.
OFF Same as macro command syntax.
Return CodesThe following return codes can be issued:0 Normal completion20 Severe error.
ExampleTo set pack mode off:ISREDIT PACK OFF
PASTE—Move or Copy Lines from ClipboardThe PASTE macro command moves or copies lines from a clipboard into an editsession.
SyntaxISREDIT PASTE [AFTER] lptr [clipboardname]
[BEFORE][KEEP]
clipboardnameThe name of the clipboard to use. If you omit this parameter, the ISPFdefault clipboard (named DEFAULT) is used. You can define up to tenadditional clipboards. The size of the clipboards and number of clipboardsmight be limited by installation defaults.
BEFOREThe destination of the data that is being transferred from the clipboard.BEFORE copies the data before the specified label (lptr).
AFTERThe destination of the data that is being transferred from the clipboard.AFTER copies the data after the specified label (lptr).
KEEP Records are copied and not removed from the clipboard. If you omit thiskeyword, the records are removed from the clipboard.
DescriptionPASTE copies or moves lines from a specified clipboard to the current edit session.If lines in the clipboard are longer than the lines in the edit session, they aretruncated.
PACK
Chapter 11. Edit Macro Commands and Assignment Statements 375
The portion of the line that is saved in the clipboard is only the data portion of theline. Line numbers are not saved. If the data was CUT from a data set that hadsequence numbers and is PASTEd into an edit session without sequence numbers,or if it was CUT from a data set without sequence numbers and PASTEd into asession with sequence numbers, some shifting of data is likely to occur.
Return CodesThe following return codes can be issued:0 Normal completion12 Parameter error. Clipboard is empty or does not exist.20 Severe error.
ExamplesTo paste data from the default clipboard to the line after the last line in the editsession:ISREDIT PASTE AFTER .ZLAST
To paste data from the default clipboard to the line after the first line in the editsession, without clearing the contents of the clipboard:ISREDIT PASTE AFTER .ZFIRST KEEP
PRESERVE—Enable Saving of Trailing BlanksThe PRESERVE macro command enables or disables the saving of trailing blanksin the editor. This enables you to override the setting for the field on the edit entrypanel called Preserve VB record length.
Macro Command SyntaxISREDIT PRESERVE [ON ]
[OFF]
ON The editor saves all trailing blanks in the record.
OFF Turns truncation on. ISPF removes trailing blanks when saving variablelength files. If a line is empty ISPF saves 1 blank.
Assignment Statement SyntaxISREDIT (varname) = PRESERVEISREDIT PRESERVE = [ON | OFF]
varnameThe name of a variable to contain the setting of PRESERVE mode, eitherON or OFF.
ON Same as macro command syntax.
OFF Same as macro command syntax.
DescriptionPRESERVE ON causes the editor to save trailing blanks for variable length files.The number of blanks saved for a particular record is determined by one of thefollowing:v the original record length of the record when it was read in to the editorv the number of blanks required to pad the record length specified by the
SAVE_LENGTH edit macro command
PASTE
376 OS/390 V2R10.0 ISPF Edit and Edit Macros
v the length of the record that was saved on disk during a previous SAVE requestin the same edit session.
PRESERVE OFF causes the editor to truncate trailing blanks. If a line is empty ISPFsaves 1 blank.
Use of the PRESERVE command does not prevent the editor from working on datapast the specified record length. The length set and returned by the PRESERVEcommand is only used when the data is written and does not affect the operationof other edit functions.
Return CodesThe following return codes can be issued:0 Normal completion6 Record format is not variable.16 Error setting variable.20 Severe error.
ExamplesTo save the value of the PRESERVE mode in variable &TRMODE:ISREDIT (TRMODE) = PRESERVE
To enable the editor to remove trailing blanks when the data is saved:ISREDIT PRESERVE OFF
PROCESS—Process Line CommandsThe PROCESS macro command allows the macro to control when line commandsor data changes typed at the keyboard are processed.
Macro Command SyntaxISREDIT PROCESS [DEST] [RANGE cmd1 [cmd2]]
DEST Specifies that the macro can capture an A (after) or a B (before) linecommand that you enter. The .ZDEST label is set to the line preceding theinsertion point. If A or B is not entered, .ZDEST points to the last line inthe data.
RANGEMust be followed by the names of one or two line commands, either ofwhich you can enter. Use the RANGE_CMD assignment statement toreturn the value of the line command entered. This allows the macro todefine and then capture a line command that you enter. It can also modifyits processing based on which of the two commands was entered.
cmd1 and cmd2Specifies one or two line command names, which can be 1 to 6 characters;however, if the name is 6 characters long it cannot be used as a blockformat command (to specify multiple lines) by doubling the last character.The name can contain any alphabetic or special character except blank,hyphen (-), or apostrophe ('). It cannot contain any numeric characters.
The .ZFRANGE label is set to the first line identified by the line commandthat you have entered, and .ZLRANGE is set to the last line. They can refer
PRESERVE
Chapter 11. Edit Macro Commands and Assignment Statements 377
to the same line. If the expected RANGE line command was not entered,.ZFRANGE points to the first line in the data and .ZLRANGE points to thelast line in the data.
DescriptionIf a line is retrieved before the PROCESS macro command is called, changes madeto this line will not be seen. The DEST and RANGE operands allow the macro toidentify the line commands that you can enter as additional input to the macro.
This command cannot be specified without first coding the MACRO commandwith a NOPROCESS operand.
For more information about using the PROCESS command, see “Using thePROCESS Command and Operand” on page 116.
Return CodesThe following return codes can be issued:
0 Normal completion.
4 Range expected by macro, but you did not specify it; defaults set.
8 Destination expected by macro, but you did not specify it; defaults set.
12 Both range and destination expected by macro, but you did not specifythem; defaults set.
16 You entered incomplete or conflicting line commands.
20 Severe error.
Note: ISPF does not consider a return code of 12 from the PROCESS edit macrocommand an error and does not terminate a macro that receives a returncode of 12 from the PROCESS edit macro.
ExamplesTo set up the macro to process the line commands * and # (defined by the macrowriter):ISREDIT MACRO NOPROCESSISPEXEC CONTROL ERRORS RETURNISREDIT PROCESS RANGE * #IF &LASTCC >= 16 THEN EXIT CODE(&LASTCC)ISREDIT (CMD) = RANGE_CMDISREDIT (FIRST) = LINENUM .ZFRANGEISREDIT (LAST) = LINENUM .ZLRANGEIF &STR(&CMD) = &STR(*) THEN -
...
To place data depending on the location of the A (after) or B (before) linecommand:ISREDIT MACRO NOPROCESSISREDIT PROCESS DESTISREDIT LINE_AFTER .ZDEST = "&DATA"
To allow processing of the A and B destination line commands and thespecification of a range by using the * line command (defined by the macro writer):ISREDIT MACRO NOPROCESSISREDIT PROCESS DEST RANGE *
PROCESS
378 OS/390 V2R10.0 ISPF Edit and Edit Macros

See “Using the PROCESS Command and Operand” on page 116.
PROFILE—Set or Query the Current ProfileThe control form of the PROFILE macro command appears your current editprofile, defines a new edit profile, or switches to a different edit profile.
The lock form of the PROFILE macro command locks or unlocks the current editprofile.
The PROFILE assignment statement retrieves the name and lock status of thecurrent edit profile and stores those values in variables.
Macro Command Profile Control SyntaxISREDIT PROFILE [name] [number]
name The profile name. It can consist of up to 8 alphanumeric characters, thefirst of which must be alphabetic. The edit profile table is searched for anexisting entry with the same name. That profile is then read and used. Ifone is not found, a new entry is created in the profile table.
If you omit this operand, the current edit profile is used.
numberThe number of lines, from 0 through 8, of profile data to be displayed.When you type 0 as the number, no profile data is displayed. When youomit the number operand, the profile modes appear; the =MASK> and=TABS> lines are displayed if they contain data, followed by the =COLS> line.
The =BNDS> line does not appear if it contains the default boundarypositions. It does appear when the bounds are set to something other thanthe default, and no ’number’ parameter is entered into the PROFILEcommand.
For more information about displaying and defining a profile, see “Displaying orDefining an Edit Profile” on page 21.
Macro Command Profile Lock SyntaxISREDIT PROFILE {LOCK | UNLOCK}
LOCK Specifies that the current values in the profile are saved in the edit profiletable and are not modified until the profile is unlocked. The current copyof the profile can be changed, either because of commands you enter thatmodify profile values (BOUNDS and NUMBER, for example) or because ofdifferences in the data from the current profile settings. However, unlessyou unlock the edit profile, the saved values replace the changes when youend the edit session.
Caps, number, stats, and pack mode are automatically changed to fit thedata. These changes occur when the data is first read or when data iscopied into the data set. Message lines (==MSG>) are inserted in the data setto show you which changes occurred.
Note: To force caps, number, stats, or pack mode to a particular setting,use an initial macro. Be aware, however, that if you set numbermode on, data may be overlaid.
PROFILE
Chapter 11. Edit Macro Commands and Assignment Statements 379
UNLOCKSpecifies that the editor saves changes to profile values.
See “Locking an Edit Profile” on page 23 for more information about locking andunlocking the profile.
Macro Command Profile Reset SyntaxISREDIT PROFILE RESET
RESETSpecifies that the ZEDFAULT profile is to be removed and the site-wideconfiguration for new edit profiles is to be used.
See “Locking an Edit Profile” on page 23 for more information about locking andunlocking the profile.
Assignment Statement SyntaxISREDIT (var1,var2) = PROFILE
var1 The name of a variable to contain the name of the current edit profile.
var2 The name of a variable to contain the profile status, LOCK or UNLOCK.
DescriptionProfile names cannot be set by an assignment statement. Instead, use PROFILE tochange a profile name, thereby changing the current edit profile and the editprofile values.
Return CodesThe following return codes can be issued:0 Normal completion20 Severe error.
ExampleTo check the lock status of the profile and perform processing if the profile islocked:ISREDIT (,STATUS) = PROFILEIF &STATUS = LOCK THEN -
...
RANGE_CMD—Query a Command That You EnteredThe RANGE_CMD assignment statement identifies the name of a line commandentered from the keyboard and processed by a macro.
Assignment Statement SyntaxISREDIT (varname) = RANGE_CMD
varnameThe name of a variable to contain the line command that you entered.
PROFILE
380 OS/390 V2R10.0 ISPF Edit and Edit Macros
DescriptionThe macro must first issue a PROCESS command to identify all line commands tobe processed by this macro. A particular line command within a range can befound by using the RANGE_CMD. For instance, if the following PROCESScommand is issued by a macro:PROCESS RANGE Q $
The RANGE_CMD statement returns either a Q or a $. If a range such as Q5 isentered, only Q is returned.
Return CodesThe following return codes can be issued:0 Normal completion4 Line command not set8 Line command setting not acceptable20 Severe error.
ExampleTo determine which line command (* or #) you entered and to process the linecommand (defined by the macro writer):ISREDIT MACRO NOPROCESSISREDIT PROCESS RANGE * #ISREDIT (CMD) = RANGE_CMDIF &STR(&CMD) = &STR(*) THEN -
...ELSE IF &STR(&CMD) = &STR(#) THEN -
.....
RCHANGE—Repeat a ChangeThe RCHANGE command repeats the change requested by the most recentCHANGE command.
Macro Command SyntaxISREDIT RCHANGE
DescriptionYou can use this command to repeatedly change other occurrences of the searchstring. After a string NOT FOUND message appears, the next RCHANGE issued startsat the first line of the current range for a forward search (FIRST or NEXT specified)or the last line of the current range for a backward search (LAST or PREVspecified).
Return CodesThe following return codes can be issued:
0 Normal completion
4 String not found
8 Change error (string-2 longer than string-1 and substitution was notperformed on at least one change)
12 Syntax error
20 Severe error.
RANGE_CMD
Chapter 11. Edit Macro Commands and Assignment Statements 381
ExampleTo perform a single-line change and then repeat the change from the top if thestring was not found:ISREDIT CHANGE C'. the' C'. The' 1 8IF &LASTCC = 4 THEN—
ISREDIT RCHANGE
RECFM—Query the Record FormatThe RECFM assignment statement retrieves the record format of the data set beingedited, and places the value in a variable.
Assignment Statement SyntaxISREDIT (var1,var2) = RECFM
var1 The name of a variable to contain the type of record format of the databeing edited, either F or V:
F Fixed-length records.
V Variable-length records.
var2 The name of a variable to contain the remaining record format informationof the data being edited, in the combination of M, A, S, BM, BA, BS, BSM,or BSA:
B Blocked records.
S Standard or spanned records.
M Machine print control character records.
A ASA print control character records.
Return CodesThe following return codes can be issued:0 Normal completion20 Severe error.
ExampleTo place the type of record format in variable RECFM1 and then use either thelogical data width (for a fixed data set) or the right display column (for a variabledata set):ISREDIT (RECFM1) = RECFMIF &RECFM1 = F THEN -ISREDIT (WIDTH) = DATA_WIDTH
ELSE -ISREDIT (,WIDTH) = DISPLAY_COLS
To place the remaining record format information in variable RECFM2:ISREDIT (,RECFM2) = RECFM
To place the type of record format information in variable RECFM1, and theremaining record format information in variable RECFM2:ISREDIT (RECFM1,RECFM2) = RECFM
RCHANGE
382 OS/390 V2R10.0 ISPF Edit and Edit Macros
RECOVERY—Set or Query Recovery ModeThe RECOVERY macro command sets edit recovery mode, which allows you torecover data after a system failure or power outage.
The RECOVERY assignment statement either sets edit recovery mode, or retrievesthe edit recovery mode setting and places it in a variable.
Macro Command SyntaxISREDIT RECOVERY [ON [SUSP]]
[OFF [WARN]][OFF NOWARN]
ON The system creates and updates a recovery data set for each changethereafter.
OFF The system does not create and update a recovery set.
WARNThis operand no longer has a practical function, due to a software change.However, the primary command continues to accept the operand forcompatibility reasons.
NOWARNThis operand no longer has a practical function, due to a software change.However, the primary command continues to accept the operand forcompatibility reasons.
SUSP This operand, when specified with the ON operand has no function. Itallows existing macros which save and restore the recovery state tocontinue working. When SUSP is specified by itself, it functions like theON operand.
See “Edit Recovery” on page 46 for more information about edit recovery.
Assignment Statement SyntaxISREDIT (var1, var2) = RECOVERYISREDIT RECOVERY = [ON [SUSP]]
[OFF [WARN]][OFF NOWARN]
var1 The name of a variable to contain the setting of recovery mode, either ONor OFF.
var2 The name of a variable that contains the warning setting, either WARN,NOWARN (when RECOVERY is OFF), or blank or SUSP (whenRECOVERY is ON).
ON The system creates and updates a recovery data set for each changethereafter.
OFF The system does not create and update a recovery set.
WARNThis operand no longer has a practical function, due to a software change.However, the primary command continues to accept the operand forcompatibility reasons.
RECOVERY
Chapter 11. Edit Macro Commands and Assignment Statements 383
NOWARNThis operand no longer has a practical function, due to a software change.However, the primary command continues to accept the operand forcompatibility reasons.
SUSP This value indicates that recovery is ON, but that it is suspended due to aprevious error.
Return CodesThe following return codes can be issued:0 Normal completion20 Severe error.
ExamplesTo save the value of recovery mode in variable &RECOV:ISREDIT (RECOV) = RECOVERY
To set recovery mode OFF:ISREDIT RECOVERY = OFF
RENUM—Renumber Data Set LinesThe RENUM macro command immediately turns on number mode and renumbersall lines, starting with number 100 and incrementing by 100. For any membersexceeding 10 000 lines, the increment would be less than 100.
Macro Command SyntaxISREDIT RENUM [ON ] [STD ] [DISPLAY]
[COBOL ][STD COBOL]
ON Automatically verifies that all lines have valid numbers in ascendingsequence and renumbers any lines that are either unnumbered or out ofsequence. It also turns number mode on and renumbers lines.
The STD, COBOL, and DISPLAY operands are interpreted only whennumber mode is turned on.
STD Numbers the data in the standard sequence field. This is the default for allnon-COBOL data set types.
COBOLNumbers the data in the COBOL field. This is the default for all COBOLdata set types.
STD COBOLNumbers the data in both fields.
If both STD and COBOL numbers are being generated, the STD number isdetermined and then used as the COBOL number. This can result inCOBOL numbers that are out of sequence if the COBOL and STD fieldswere not synchronized. Use RENUM to force synchronization.
DISPLAYCauses the width of the data window to include the sequence numberfields. Otherwise, the width of the window does not include the sequencenumber fields. When you display a data set with a logical record length of80 and STD numbering, the sequence numbers are not shown unless you
RECOVERY
384 OS/390 V2R10.0 ISPF Edit and Edit Macros
are using a 3278 Model 5 terminal, which displays 132 characters. Theeditor automatically scrolls left or right, if required, so that the leftmostcolumn of the data window is the first column displayed.
Return CodesThe following return codes can be issued:0 Normal completion20 Severe error.
ExamplesTo renumber all data lines with standard numbering:ISREDIT RENUM
ON and STD are the default operands.
To renumber all data lines with standard and COBOL numbering:ISREDIT RENUM STD COBOL
To renumber all data lines with COBOL numbering, bringing the sequencenumbers within the data window:ISREDIT RENUM COBOL DISPLAY
To turn sequence numbers off:ISREDIT RENUM OFF
REPLACE—Replace a Data Set or Data Set MemberThe REPLACE macro command adds or replaces data in a member of thepartitioned data set that you are editing, in a member of another partitioned dataset, or in a sequential data set.
Macro Command SyntaxISREDIT REPLACE member lptr-rangeISREDIT REPLACE (member) lptr-rangeISREDIT REPLACE dataset lptr-rangeISREDIT REPLACE dataset(member) lptr-range
memberThe name of the member to be replaced in the partitioned data setcurrently being edited. If a name of eight or fewer characters is specifiedand it could be a member name or a data set name, REPLACE searches fora membe name first. If no member name is found, then the name is usedas a data set. If the member does not exist, the editor creates it. If you areusing a concatenated sequence of libraries, the member is always writtento the first library in the sequence.
datasetThe name of a sequential data set that is to be replaced. The data set namecan be fully or partially qualified.
dataset(member)The name of a different partitioned data set and member name to bereplaced in the partitioned data set. The data set name can be fully orpartially qualified.
RENUM
Chapter 11. Edit Macro Commands and Assignment Statements 385
|||||||
lptr-rangeTwo line pointers that are required to specify the range of lines in thecurrent member that replace data in the other member. A line pointer canbe a label or a relative line number. Specifying one line pointer is incorrect.
Return CodesThe following return codes can be issued:
0 Normal completion
8 Member in use
12 Invalid line pointer
20 Syntax error (invalid name, incomplete line pointer value), or I/O error.
ExampleTo replace member MEM1 with the first 10 lines of the current data:ISREDIT REPLACE MEM1 1 10
RESET—Reset the Data DisplayThe RESET macro command can restore line numbers in the line command areawhen those line numbers have been replaced by labels, pending line commands,error flags, and change flags. However, to reset any pending line commands, youmust have specified the NOPROCESS operand in the MACRO command. RESETcan also delete special lines from the display, redisplay excluded lines, andtemporarily disable the highlighting of FIND strings.
Macro Command SyntaxISREDIT RESET [CHANGE ] [lptr-range]
[COMMAND ][ERROR ][EXCLUDED][FIND ][LABEL ][SPECIAL ]
You can type the operands in any order. If you do not specify any operands,RESET processes all operands except LABEL.
CHANGERemoves ==CHG> flags from the line command area.
COMMANDRemoves any pending line commands from the line command area.
ERRORRemoves ==ERR> flags from the line command area.
EXCLUDEDRedisplays any excluded line.
FIND Turns off highlighting of FIND strings until the next FIND, RFIND,CHANGE, or RCHANGE command. However, SEEK and EXCLUDE donot return the highlighting of FIND strings in this manner.
RESET with no operands has the same effect on highlighted FIND stringsas RESET FIND.
REPLACE
386 OS/390 V2R10.0 ISPF Edit and Edit Macros
LABELRemoves labels from the line command area.
SPECIALDeletes any temporary line from the panel:v Bounds line flagged as =BNDS>v Column identification lines flagged with =COLS>v Information lines flagged with ======v Mask lines flagged as =MASK>v Message lines flagged as ==MSG>v Note lines flagged with =NOTE=v Profile lines flagged as =PROF>v Tabs line flagged as =TABS>.
lptr-rangeSpecifies that two line pointers are required to specify a range of lines tobe reset. A line pointer can be a label or a relative line number. Specifyingone line pointer is incorrect. The defaults are the editor-defined .ZFIRSTand .ZLAST labels.
DescriptionRESET scans every line of data for conditions to be reset. If you want to delete asmall number of special lines, you can get faster response time if you use the D(delete) line command.
Return CodesThe following return codes can be issued:0 Normal completion20 Severe error.
ExamplesTo remove all change flags from the current data:ISREDIT RESET CHANGE
To remove all error flags from the current data:ISREDIT RESET ERROR
To redisplay all excluded lines between the .START and .STOP labels:ISREDIT RESET EXCLUDED .START .STOP
To remove all labels from the current data between and including the .START and.STOP labels:ISREDIT RESET LABEL .START .STOP
To remove all special lines from the current data between lines 100 and 200:ISREDIT RESET SPECIAL 100 200
RFIND—Repeat FindThe RFIND macro command locates the search string defined by the most recentSEEK, FIND, or CHANGE command, or excludes a line containing the searchstring defined by the previous EXCLUDE command.
The RFIND command can be used repeatedly to find other occurrences of thesearch string. After a string NOT FOUND message appears, the next RFIND issued
RESET
Chapter 11. Edit Macro Commands and Assignment Statements 387
starts at the first line of the current range for a forward search (FIRST or NEXTspecified), or the last line of the current range for a backward search (LAST orPREV specified).
Macro Command SyntaxISREDIT RFIND
Return CodesThe following return codes can be issued:0 Normal completion4 String not found12 Syntax error20 Severe error (string not defined).
ExampleTo find a character string, process it, and then repeat the operation for the rest ofthe data:ISREDIT FIND FIRST C'. the'SET RETCODE = &LASTCC;DO WHILE &RETCODE = 0
...
ISREDIT RFINDSET RETCODE = &LASTCC;
END
RIGHT—Scroll RightThe RIGHT macro command scrolls data to the right of the current panel position.
Macro Command SyntaxISREDIT RIGHT amt
amt The scroll amount, the number of columns (0 - 9999) to scroll, or one of thefollowing operands:
MAX Displays the last panel of data to the right.
HALF Displays the next half-panel of data to the right.
PAGE Displays the next full panel of data to the right.
CURSORScrolls until the column on which the cursor is located becomes thefirst data column on the panel.
DATA Scrolls until the last column on the current panel of data becomesthe first column on the next panel of data.
DescriptionThe editor stops scrolling when it reaches the current BOUNDS setting. Forexample, if the right bound is position 100, and positions 9 to 80 are displayed,issuing ISREDIT RIGHT 100 leaves positions 29 to 100 being displayed, notpositions 109 to 180.
RFIND
388 OS/390 V2R10.0 ISPF Edit and Edit Macros
To scroll to the right using the panel position when the macro was issued, useUSER_STATE assignment statements to save and then restore the panel positionoperands.
If you define a macro named RIGHT, it overrides RIGHT when used from anothermacro, but has no effect for you. RIGHT does not change the cursor position andcannot be used in an initial macro. See “BOUNDS—Set or Query the EditBoundaries” on page 312 and “DISPLAY_COLS—Query Display Columns” onpage 335 for further information.
Return CodesThe following return codes can be issued:0 Normal completion4 No visible lines8 No data to display12 Amount not specified20 Severe error.
ExampleTo scroll the display to the right by the number of columns specified in variable&RCOL:ISREDIT RIGHT &RCOL
RMACRO—Set or Query the Recovery MacroThe RMACRO macro command sets the name of the recovery macro.
The RMACRO assignment statement sets or retrieves the name of the recoverymacro set in this edit session.
See “Recovery Macros” on page 117 for more information.
Macro Command SyntaxISREDIT RMACRO {name | NONE}
name The name of the recovery macro to be run. The name can be preceded byan exclamation point (!) to show that it is a program macro.
NONEThe name to prevent a recovery macro from being run; conversely, a valueof NONE is returned when no recovery macro has been specified.
Assignment Statement SyntaxISREDIT (varname) = RMACROISREDIT RMACRO = {name | NONE}
varnameThe name of a variable to contain the name of the recovery macro.
name Same as macro command syntax.
NONESame as macro command syntax.
Return CodesThe following return codes can be issued:
RIGHT
Chapter 11. Edit Macro Commands and Assignment Statements 389

0 Normal completion12 Invalid name specified20 Severe error.
ExampleTo set the RMACRO name from the variable &RMAC:ISREDIT RMACRO = &RMAC
SAVE—Save the Current DataThe SAVE macro command stores the current data on disk. Generally, you do notneed to use SAVE if recovery mode is on. See the DATA_CHANGED, AUTOSAVE,CANCEL, and END commands for more information about saving data.
Macro Command SyntaxISREDIT SAVE
DescriptionThe SAVE command writes the data to the same data set from which it wasretrieved unless you specified a concatenated sequence of partitioned data sets onthe Edit - Entry panel. In that case, the data is saved in the first library in theconcatenation sequence, regardless of which library it came from. For a sequentialdata set, the complete data set is rewritten. For a partitioned data set, the memberis rewritten with the same member name. If stats mode is on, the library statisticsfor the member are automatically updated.
If both number mode and autonum mode are on, the data is automaticallyrenumbered before it is saved.
Return CodesThe following return codes can be issued:0 Normal completion4 New member saved12 Data not saved; not enough PDS space or directory space20 Severe error.
ExampleTo check autosave mode and, if it is set to OFF, ensure that changes are saved:ISREDIT (VAR) = AUTOSAVEIF &VAR = OFF THEN -
ISREDIT SAVE
SAVE_LENGTH—Set or Query Length for Variable Length DataThe SAVE_LENGTH macro command sets or queries the length to be used to saveeach record in a variable length file. It does not enable you to truncate thenon-blank portion of a record, but it does enable you to extend a record. Whenrecords are written to disk, they are padded on the end with blanks as needed.
SAVE_LENGTH is a macro command only. It cannot be used as an edit primarycommand.
RMACRO
390 OS/390 V2R10.0 ISPF Edit and Edit Macros
Assignment Statement SyntaxISREDIT (varname) = SAVE_LENGTH .lptrISREDIT SAVE_LENGTH .lptr = value
DescriptionYou can use the SAVE_LENGTH macro command to set or query the minimumlength that is used to store an individual record in a variable length data set.
When setting a length, the length is automatically adjusted to include thenon-blank portion of the line.
When retrieving the length, the number returned reflects the line length that isused to save the line if the save is done immediately. The length is the maximumof either: the length of the nonblank portion of the line and the length set by aprevious SAVE_LENGTH request, OR the length of the nonblank portion of theline and the original line length.
You can use the SAVE_LENGTH command in edit macros to define line commandsto prompt the user for final record lengths or to check the record length. You mightalso use it to substitute a visible character for trailing blanks to make editingeasier.
Use of the SAVE_LENGTH command does not prevent the editor from working ondata past the specified record length. The length set and returned by theSAVE_LENGTH command is only used when the data is written and does notaffect the operation of any other edit functions.
Return CodesThe following return codes can be issued:0 Normal completion4 Value supplied on set call was out of range. If the supplied length was too
great, it is adjusted to equal the maximum record length. Otherwise, thelength was adjusted to the length of the nonblank data portion of therecord.
6 Record format is not variable. Any value on an assignment request isignored.
16 Error setting variable.20 Severe error.
ExamplesTo save the number of characters that are saved for the last line in the file whenPRESERVE OFF is active:ISREDIT (NCHARS) = SAVE_LENGTH .ZLAST
To set the minimum line length for the last line in the file and to set PRESERVEON active:ISREDIT SAVE_LENGTH .ZLAST = 74
Another edit macro sample using the SAVE_LENGTH command can be found inthe ISRSETLN member of the ISPF EXEC library.
SAVE_LENGTH
Chapter 11. Edit Macro Commands and Assignment Statements 391
SCAN—Set Command Scan ModeThe SCAN macro command sets scan mode, which controls the automaticreplacement of variables in command lines passed to the editor.
The SCAN assignment statement either sets the value of scan mode (for variablesubstitution), or retrieves the value of scan mode and places it in a variable.
Macro Command SyntaxISREDIT SCAN [ON ]
[OFF]
ON Specifies that the editor automatically replaces variables in command lines.
OFF Specifies that the editor does not automatically replace variables.
If mode is omitted, the default is ON. Scan mode is initialized to ON whena macro is started.
Assignment Statement SyntaxISREDIT (varname) = SCANISREDIT SCAN = [ON ]
[OFF]
varnameThe name of a variable to contain the setting of scan mode, either ON orOFF.
ON Same as macro command syntax.
OFF Same as macro command syntax.
Return CodesThe following return codes can be issued:0 Normal completion20 Severe error.
ExampleTo set a line whose number is in variable &LNUM to:&SYSDATE is a CLIST built-in function
set scan mode off and issue the LINE command with &&SYSDATE as the CLISTfunction name. The CLIST processor strips off the first &, but, because scan modeis off, the editor does not remove the second &:;ISREDIT SCAN OFFISREDIT LINE &LNUM = "&&SYSDATE is a CLIST built-in function"ISREDIT SCAN ON
Because the ISPEXEC call interface for REXX EXECs allows you to specifyparameters as symbolic variables, a single scan always takes place before thesyntax check of a statement. Therefore, the rule of using two ampersands (&)before variable names to avoid substitution of variable names also applies to REXXEXECs.
SCAN
392 OS/390 V2R10.0 ISPF Edit and Edit Macros
SEEK—Seek a Data String, Positioning the CursorThe SEEK macro command finds one or more occurrences of a search stringwithout changing the exclude status of the line.
Macro Command SyntaxISREDIT SEEK string [label-range] [NEXT ] [CHARS ] [X ] [col-1 [col-2]]
[ALL ] [PREFIX] [NX][FIRST] [SUFFIX][LAST ] [WORD ][PREV ]
string The search string you want to find. The maximum allowable length of thestring is 256 bytes. If you are specifying a hex string, the maximum is 128hexadecimal characters.
label-rangeTwo labels that identify the range of lines SEEK is to search. The defaultsare the editor-defined .ZFIRST and .ZLAST labels.
When using a macro that uses NEXT or PREV with a label-range, becareful concerning cursor placement. If the cursor is currently placed belowthe label-range, and the NEXT occurence of a string is requested, theprocess returns a return code of 4 and the string is not found, even if itexists within the label-range.
If the cursor is currently placed above the label-range, and the PREVoccurence of a string is requested, the process returns a return code of 4and the string is not found, even if it exists within the label-range.
NEXT Starts at the first position after the current cursor location and searchesahead to find the next occurrence of string. NEXT is the default.
ALL Starts at the top of the data and searches ahead to find all occurrences ofstring.
FIRST Starts at the top of the data and searches ahead to find the first occurrenceof string.
LAST Starts at the bottom of the data and searches backward to find the lastoccurrence of string.
PREV Starts at the current cursor location and searches backward to find theprevious occurrence of string.
CHARSLocates string anywhere the characters match. CHARS is the default.
PREFIXLocates string at the beginning of a word.
SUFFIXLocates string at the end of a word.
WORDLocates string when it is delimited on both sides by blanks or othernon-alphanumeric characters.
X Scans only lines that are excluded from the display.
NX Scans only lines that are not excluded from the display.
col-1 and col-2Numbers that identify the columns SEEK is to search.
SEEK
Chapter 11. Edit Macro Commands and Assignment Statements 393
DescriptionUse the FIND macro command instead of SEEK if you want to locate a string andchange the exclude status of the line that contains that string at the same time.
You can use SEEK to find a search string, change it with CHANGE, and thenexclude it from the display with EXCLUDE.
To find the next occurrence of the letters ELSE without specifying any otherqualifications, include the following line in an edit macro:ISREDIT SEEK ELSE
Since no other qualifications were specified, the letters ELSE can be:v Uppercase or a mixture of uppercase and lowercasev At the beginning of a word (prefix), the end of a word (suffix), or the entire
word (word)v In either an excluded or a nonexcluded linev Anywhere within the current boundaries.
To find the next occurrence of the letters ELSE, but only if the letters are uppercase:ISREDIT SEEK C'ELSE'
This type of search is called a character string search (note the C that precedes thesearch string) because it finds the next occurrence of the letters ELSE only if theletters are in uppercase. However, since no other qualifications were specified, theletters can be found anywhere in the data set or member, as outlined in thepreceding list.
For more information, including other types of search strings, see “Finding,Seeking, Changing, and Excluding Data” on page 53.
Return CodesThe following return codes can be issued:0 Normal completion4 String not found12 Syntax error20 Severe error.
ExamplesThe following example finds the last occurrence in the data set of the letters ELSE.However, the letters must occur on or between lines labeled .E and .S; they mustbe the last four letters of a word; and they must be found in an excluded line.ISREDIT SEEK ELSE .E .S LAST SUFFIX X
The following example finds the first occurrence of the letters ELSE thatimmediately precedes the cursor position. However, the cursor must not bepositioned ahead of the lines that are labeled .E and .S. Also, the letters must occuron or between lines labeled .E and .S; they must be stand-alone characters (not partof any other word); they must be found in a nonexcluded line; and they must existwithin columns 1 and 5:ISREDIT SEEK ELSE .E .S PREV WORD NX 1 5
SEEK
394 OS/390 V2R10.0 ISPF Edit and Edit Macros
SEEK_COUNTS—Query Seek CountsThe SEEK_COUNTS assignment statement retrieves the values set by the mostrecently entered SEEK command and places them in variables.
Assignment Statement SyntaxISREDIT (var1,var2) = SEEK_COUNTS
var1 The name of a variable to contain the number of strings found. It must bean 8-character value that is left-padded with zeros.
var2 The name of a variable to contain the number of lines on which stringswere found. It must be an 8-character value that is left-padded with zeros.
Return CodesThe following return codes can be issued:0 Normal completion20 Severe error.
ExampleTo seek all lines with a blank in column 1 and store the number of such lines invariable &BLNKS:ISREDIT SEEK ALL " " 1ISREDIT (BLNKS) = SEEK_COUNTS
SESSION—Query Session TypeThe SESSION assignment statement identifies the type of session in which themacro is running, Edit, View, EDIF, or VIIF. It also identifies if SCLM is active ornot.
Assignment Statement SyntaxISREDIT (var1,var2) = SESSION
var1 This variable contains either EDIF, EDIT, VIEW, or VIIF to identify the typeof session.
var2 This variable contains SCLM if SCLM is active, or four asterisks (****) ifSCLM is not active.
Return CodesThe following return codes can be issued:0 Normal completion20 Severe error.
SETUNDO—Set UNDO ModeThe SETUNDO macro command allows the UNDO function to be turned on or offand retrieves the current UNDO status.
Macro Command SyntaxISREDIT SETUNDO [STORAGE]
[RECOVER][ON][OFF]
SEEK_COUNTS
Chapter 11. Edit Macro Commands and Assignment Statements 395
STORAGEEnables edit changes to be saved in storage.
RECOVEREnables edit changes to be saved through the recovery file only. If editrecovery is off, SETUNDO RECOVER turns recovery on.
ON Enables edit changes to be saved in storage.
OFF Disables the saving of edit changes in storage. If edit recovery is available,the undo command uses the edit recovery file.
Assignment Statement SyntaxISREDIT (varname) = SETUNDOISREDIT SETUNDO = [STORAGE]
[RECOVER][ON][OFF]
varnameThe name of a variable containing the setting of the UNDO mode, eitherOFF or RECOVER or STORAGE.
STORAGEEnables edit changes to be saved in storage.
RECOVEREnables edit changes to be saved through the recovery file only. If editrecovery is off, SETUNDO RECOVER turns recovery on.
ON Enables edit changes to be saved in storage.
OFF Disables the saving of edit changes in storage. If edit recovery is available,the undo command uses the edit recovery file.
DescriptionThe SETUNDO macro command enables undo processing. It does not perform theundo function itself. Valid operands are STORAGE, RECOVER, ON, or OFF. If anoperand is not supplied, STORAGE is the default.
If SETUNDO is set on by a macro and was not on already, the UNDO function isenabled for all interactions started from the point SETUNDO was turned on.
Note: Changes are saved on the undo chain after:v SETUNDO STORAGE is specified in a macro, and it was previously OFF or
REC, orv SETUNDO REC is specified in a macro, and it was previously OFF.
It is possible to undo back to a particular point in a macro. This is helpful indebugging edit macros.
Notes:
1. If SETUNDO is disabled through the configuration table, the SETUNDO macrocommand is accepted and returns a zero return code. It does not turn recoveryon.
2. The SETUNDO command is ignored if UNDO from storage is not enabled bythe installer or person who maintains the ISPF product. For information onenabling UNDO from storage, see ISPF Planning and Customizing
SETUNDO
396 OS/390 V2R10.0 ISPF Edit and Edit Macros
Return CodesThe following return codes can be issued:
0 Successful completion. SETUNDO was turned on or off, or status remainsunchanged because UNDO was already on or off.
20 Severe error. Probably a parameter error (something other than STG, REC,or OFF was specified).
ExamplesTo disable the saving of edit changes in storage:ISREDIT SETUNDO OFF
To enable the saving of edit changes in storage:ISREDIT SETUNDO = STORAGE
To store the value of SETUNDO in the variable &SET:ISREDIT (SET) = SETUNDO
SHIFT (—Shift Columns LeftThe SHIFT ( macro command moves characters on a line to the left withoutaltering their relative spacing. Characters shifted past the current BOUNDS settingare deleted. See “Shifting Data” on page 51 for more information.
Macro Command SyntaxISREDIT SHIFT ( lptr [n]
[2]
lptr Specifies that a line pointer must be used. A line pointer can be a label or arelative line number.
n Specifies the number of columns to shift. If this operand is omitted, thedefault is 2 columns.
DescriptionThe SHIFT ( command is limited to shifting columns of data on a single line. Ifyou want to shift columns of data on several lines, each line of data columns mustbe moved individually.
Return CodesThe following return codes can be issued:0 Normal completion12 Invalid line number20 Severe error.
ExamplesTo shift columns of data 10 columns to the left on the line that contains the cursor:ISREDIT SHIFT ( .ZCSR 10
To shift columns of data 2 columns to the left on the line with the label .LAB:ISREDIT SHIFT ( .LAB
SETUNDO
Chapter 11. Edit Macro Commands and Assignment Statements 397
SHIFT )—Shift Columns RightThe SHIFT ) macro command moves characters on a line to the right withoutaltering their relative spacing. Characters shifted past the current BOUNDS settingare deleted. See “Shifting Data” on page 51 for more information.
Macro Command SyntaxISREDIT SHIFT ) lptr [n]
[2]
lptr Specifies that a line pointer must be used. A line pointer can be a label or arelative line number.
n Specifies the number of columns to shift. If this operand is omitted, thedefault is 2 columns.
DescriptionThe SHIFT ) command is limited to shifting columns of data on a single line. Ifyou want to shift columns of data on several lines, each line of data columns mustbe moved individually.
Return CodesThe following return codes can be issued:0 Normal completion12 Invalid line number20 Severe error.
ExamplesTo shift columns of data 4 columns to the right on the line that contains the cursor:ISREDIT SHIFT ) .ZCSR 4
To shift columns of data 2 columns to the right on the line with the label .LAB:ISREDIT SHIFT ) .LAB
SHIFT <—Shift Data LeftThe SHIFT < macro command moves the body of a program statement to the leftwithout shifting the label or comments. This command prevents loss of non-blankcharacters by stopping before shifting non-blank characters past the bound. See“Shifting Data” on page 51 for more information.
Macro Command SyntaxISREDIT SHIFT < lptr [n]
[2]
lptr Specifies that a line pointer must be used. A line pointer can be a label or arelative line number.
n Specifies the number of columns to shift. If this operand is omitted, thedefault is 2 columns.
DescriptionThe SHIFT < command is limited to shifting data on a single line. To shift data onseveral lines, you must shift data on each line individually.
SHIFT )
398 OS/390 V2R10.0 ISPF Edit and Edit Macros
Return CodesThe following return codes can be issued:0 Normal completion12 Invalid line number20 Severe error.
ExamplesTo shift data 4 columns to the left on the line that contains the cursor:ISREDIT SHIFT < .ZCSR 4
To shift data 2 columns to the left on the line with the label .LAB:ISREDIT SHIFT < .LAB
SHIFT >—Shift Data RightThe SHIFT > macro command moves the body of a program statement to the rightwithout shifting the label or comments. This command prevents loss of non-blankcharacters by stopping before shifting non-blank characters past the bound. See“Shifting Data” on page 51 for more information.
Macro Command SyntaxISREDIT SHIFT > lptr [n]
[2]
lptr Specifies that a line pointer must be used. A line pointer can be a label or arelative line number.
n Specifies the number of columns to shift. If this operand is omitted, thedefault is 2 columns.
DescriptionThe SHIFT > command is limited to shifting data on a single line. To shift data onseveral lines, you must shift data on each line individually.
Return CodesThe following return codes can be issued:0 Normal completion12 Invalid line number20 Severe error.
ExamplesTo shift data 4 columns to the right on the line that contains the cursor:ISREDIT SHIFT > .ZCSR 4
To shift data 2 columns to the right on the line with the label .LAB:ISREDIT SHIFT > .LAB
SORT—Sort DataThe SORT macro command puts data in a specified order.
SHIFT <
Chapter 11. Edit Macro Commands and Assignment Statements 399
Macro Command SyntaxISREDIT SORT [label-range] [X ] [sort-field1 ... sort-field5]
[NX]
label-rangeSpecifies that two labels are required to specify a range of lines for the sortoperation; specifying one label is incorrect. The defaults are theeditor-defined .ZFIRST and .ZLAST labels.
X Specifies that only excluded lines are to be sorted.
NX Specifies that only nonexcluded lines are to be sorted.
sort-field1 ... sort-field5Specifies the fields to be used in sorting data. You can specify up to fivesort fields as follows:[A] [start-col [end-col]][D]
where:
A Specifies ascending order. It can either precede or follow thecolumn specification. A is the default.
D Specifies descending order. It can either precede or follow thecolumn specification.
start-colDefines the starting column of the field that is to be compared. Itmust be within the current boundaries.
end-colDefines the ending column of the field that is to be compared. Itmust be within the current boundaries.
If you specify several fields, you must specify both the starting and endingcolumns of each field. The fields cannot overlap. If you specify A or D forone field, you must specify it for all fields.
DescriptionThe SORT command operates in two different modes, based on the hexadecimalmode status. If hexadecimal mode is on, the data is ordered according to itshexadecimal representation. If hexadecimal mode is off, data is sorted in thecollating sequence defined for the national language being used.
Sorting Data Without OperandsFor a SORT command with no operands, the editor compares the data within thecurrent boundaries character by character, and then orders it line by line in theproper collating sequence. It ignores data outside the current boundaries duringboth operations. This means that only the data inside the current boundaries ischanged. Labels, excluded lines, line numbers, and change, error, and special lineflags are considered associated with the data, and therefore points to the same datafields after the sort as they did before the sort.
For example, if you issue a CHANGE ALL command that changes the first, third,and sixth lines in a data set, these lines are flagged with the change flag, ==CHG>. Ifyou then issue a SORT command that results in the former lines 1, 3 and 6becoming the first, second and third lines of the sorted file, the changed line flagswould now exist on the first, second and third lines of the sorted data set.
SORT
400 OS/390 V2R10.0 ISPF Edit and Edit Macros
It is important to properly set the boundaries before issuing the SORT command.SORT is a powerful tool for editing data that may be formatted in multiplecolumns. You can set the boundaries, for example, to the first half of a record andsort one column of data. Then you can set the boundaries to the last half of therecord and sort a second column of data.
Limiting the SORT CommandYou can specify up to five sort fields by labelling starting and ending columns. Youcan identify each field as having data sorted in ascending or descending order.
Optionally, you can limit sorting to a range of lines by specifying the labels of thefirst and last lines of the range. You can also limit sorting to either excluded ornonexcluded lines.
If you have labels or line ranges that are between the labels or line ranges specifiedwith the SORT command, you can keep SORT from rearranging them by:v Excluding them before you enter the SORT commandv Using the NX operand to sort only lines that are not excluded.
See the definition of the NX operand and “EXCLUDE—Exclude Lines from theDisplay” on page 244 for more information.
Sorting DBCS DataWhen sorting data that contains DBCS character strings, you must ensure that noDBCS string crosses the boundaries. Also, all records must have the same format atthe boundaries, although the format of the left and right boundaries can differ.
If a boundary divides a DBCS character, or if all records do not have the sameformat at the boundaries, the result is unpredictable.
Return CodesThe following return codes can be issued:0 Normal completion4 Lines were already in sort order8 No records to sort16 Not enough storage to perform sort20 Severe error.
ExamplesTo sort the data in descending order, using the sort key in columns 15 through 20:ISREDIT SORT D 15 20
To sort all excluded lines in ascending order:ISREDIT SORT X A
STATS—Set or Query Stats ModeThe STATS macro command sets stats mode, which creates and maintains statisticsfor a member of a partitioned data set.
The STATS assignment statement either sets stats mode, or retrieves the setting ofstats mode and places it in a variable.
SORT
Chapter 11. Edit Macro Commands and Assignment Statements 401
Macro Command SyntaxISREDIT STATS [ON ]
[OFF]
ON Creates or updates library statistics when the data is saved.
OFF Does not create or update library statistics.
Assignment Statement SyntaxISREDIT (varname) = STATSISREDIT STATS = [ON ]
[OFF]
varnameThe name of a variable to contain the setting of stats mode, either ON orOFF.
ON Same as macro command syntax.
OFF Same as macro command syntax.
See “Statistics for PDS Members” on page 30 for more information.
Return CodesThe following return codes can be issued:0 Normal completion20 Severe error.
ExamplesTo put the value of stats mode in variable &LIBSTAT:ISREDIT (LIBSTAT) = STATS
To set stats mode on:ISREDIT STATS = ON
To set stats mode off:ISREDIT STATS OFF
To reset stats mode from the mode saved in variable &LIBSTAT:ISREDIT STATS = &LIBSTAT
SUBMIT—Submit Data for Batch ProcessingThe SUBMIT macro command submits the member or data set you are editing (orthe part of the member or data set defined by the range of line pointers or the X orNX parameters) to be processed as a batch job.
Macro Command SyntaxISREDIT SUBMIT [range] [X]
[NX]
range Two labels that define the first and last lines to be submitted. The defaultsare the editor-defined .ZFIRST and .ZLAST labels.
X Submits only lines that are excluded from the display.
NX Submits only lines that are not excluded from the display.
STATS
402 OS/390 V2R10.0 ISPF Edit and Edit Macros
|||
||
|||
||
||
DescriptionThe editor does not supply a job statement when you enter the SUBMIT command.You can supply job statements as part of the data being submitted. When yousupply a job statement, only the job name is logged to the ISPF log data set toensure the protection of sensitive data.
PDF uses TSO SUBMIT to submit the job.
Return CodesThe following return codes can be issued:0 Normal completion20 Severe error (submit failed).
ExamplesTo submit the first 20 lines of the data as a batch job:ISREDIT SUBMIT 1 20
To submit all of the data as a batch job:ISREDIT SUBMIT
To submit only the non-exluded lines as a batch job:ISREDIT SUBMIT NX
TABS—Set or Query Tabs ModeThe TABS macro command:v Turns tabs mode on and offv Defines the logical tab characterv Controls the insertion of attribute bytes at hardware tab positions defined with
the TABS line command.
The TABS assignment statement does everything the macro command can do. Itcan also retrieve the setting of tabs mode and place it in a variable.
Use PROFILE to check the setting of tabs mode and the logical tab character. See“Using Tabs” on page 70 if you need more information about using tabs.
Macro Command SyntaxISREDIT TABS [ON ] [STD]
[ALL][tab-character]
[OFF]
ON Turns tabs mode on, which means that logical tabs can be used to break upstrings of data. This is the default operand. If no other operands areincluded, all hardware tab positions (asterisks) that contain a blank or nullcharacter are activated because STD is also a default operand. The TABS ONSTD message appears in the profile display.
OFF Turns tabs mode off, which means that logical tabs cannot be used.Attribute bytes are deleted from all hardware tab positions, causing theTab Forward and Tab Backward keys to ignore hardware tabs defined onthe =TABS> line. Blanked-out characters occupying these positions reappear.The TABS OFF message appears in the profile display.
SUBMIT
Chapter 11. Edit Macro Commands and Assignment Statements 403
|
|
|
STD Activates all hardware tab positions (asterisks) that contain a blank or nullcharacter. The editor inserts attribute bytes, which cannot be typed over, atthese positions. STD is the default operand. You can use the Tab Forwardand Tab Backward keys to move the cursor one space to the right of theattribute bytes. The TABS ON STD message appears in the profile display.
ALL Causes an attribute byte to be inserted at all hardware tab positions.Characters occupying these positions are blanked out and the attributebytes cannot be typed over. The Tab Forward and Tab Backward keys canbe used to move the cursor one space to the right of these attribute bytes.The TABS ON ALL message appears in the profile display.
tab-characterDefines a single character that is not a number, letter, or commanddelimiter as the logical tab character. This character is used with hardwaretab definitions. The TABS ON tab-character message appears in the profiledisplay.
You can enclose the character in quotes (' or "), although this is notnecessary unless you want to use one of the following as the tab character:= ' " < , ( +
The ampersand (&), left bracket ([), and right bracket (]) should not beused as tab characters at all.
The tab-character operand causes the data string that follows the logicaltab character to align itself one space to the right of the first availablehardware tab position when you press Enter. No attribute bytes areinserted.
If no hardware tabs are defined, the editor aligns the data vertically. Ifsoftware tabs are defined, the first data string is aligned under the firstsoftware tab position and the remaining data strings are aligned at the leftboundary. If neither software nor hardware tabs are defined, the editoraligns all the data strings at the left boundary.
With the tab-character operand, the Tab Forward and Tab Backward keysignore hardware tab positions when the tab-character operand is usedbecause no attribute bytes are inserted.
Assignment Statement SyntaxISREDIT (var1,var2) = TABSISREDIT TABS = [ON ] [STD]
[ALL][tab-character]
[OFF]
var1 The name of a variable to contain the setting of tabs mode, either ON orOFF.
var2 The name of a variable to contain the tab character and either ALL or STD.This variable may be blank.
ON Same as macro command syntax.
OFF Same as macro command syntax.
STD Same as macro command syntax.
ALL Same as macro command syntax.
TABS
404 OS/390 V2R10.0 ISPF Edit and Edit Macros
tab-characterSame as macro command syntax.
Return CodesThe following return codes can be issued:0 Normal completion20 Severe error.
ExamplesTo set the tab character to \ and set the tabs mode ON:ISREDIT TABS ON \
To set the value of tabs mode from variable &TABVAL:ISREDIT TABS = (TABVAL)
TABSLINE—Set or Query Tabs LineThe TABSLINE assignment statement either sets the tabs line, or retrieves the tabsline and places it in a variable.
Assignment Statement SyntaxISREDIT (varname) = TABSLINEISREDIT TABSLINE = data
varnameSpecifies the name of a variable to hold the contents of the current tabsline.
data Specifies the data used to set the tabs line. The only valid tab characters forthis data are blanks, asterisks (*), hyphens (-), and underscores (_). Thefollowing forms can be used:v Simple stringv Delimited stringv Variablev Template (< col,string >)v Merge format (string-1 + string-2, operand + string-2, string-1 + operand)v Operand:
LINE lptrData from the line with the given line pointer (lptr).
MASKLINEData from the mask line.
TABSLINEData from the tabs line.
Return CodesThe following return codes can be issued:0 Normal completion4 Data truncated8 Invalid data detected and ignored20 Severe error (invalid input).
TABS
Chapter 11. Edit Macro Commands and Assignment Statements 405
ExamplesTo store the value of the tabs line in variable &OLDTABS:ISREDIT (OLDTABS) = TABSLINE
To set the tabs line to "*___* *":ISREDIT TABSLINE = "*___* *"
To clear the tabs line:ISREDIT TABSLINE = " "
To set tabs in columns 1 and 35:ISREDIT TABSLINE = <1,*,35,*>
To add a tab in column 36:ISREDIT TABSLINE = TABSLINE + <36,*>
TENTER—Set Up Panel for Text EntryThe TENTER macro command provides one very long line wrapped around ontomany rows of the panel to allow power typing for text entry. The editor does theformatting for you.
The TENTER command is different from the INSERT command in that the INSERTcommand inserts a specified number of separate, blank lines and the mask, if any,just as you typed it. With the TENTER command, however, mask line charactersare applied only to the new lines created when the text is flowed outside theboundaries. Any mask line characters within the bounds are ignored.
Macro Command SyntaxISREDIT TENTER lptr [numlines]
lptr Specifies that a line pointer must be used. A line pointer can be a label or arelative line number.
numlinesSpecifies the number of lines displayed for text entry; these lines are notsaved unless they contain data. If you do not type a number, theremainder of the panel appears for text entry.
DescriptionIt is important to make sure that the line referenced by the line pointer onTENTER appears; otherwise, the text area will not be visible to you. Use LOCATEto find and display the line for you.
Before you enter text entry mode, consider the following:v If you are going to be typing text in paragraph form, such as for a memo or
letter, make sure caps mode is off. Otherwise, when you press Enter, your textwill change to all caps.
v You may want to turn off number mode to prevent sequence numbers fromwriting over any of your text.
v Make sure the bounds setting is where you want it so that the text flowscorrectly when you end text entry mode.
v Once you enter text entry mode, no macros can be run.
TABSLINE
406 OS/390 V2R10.0 ISPF Edit and Edit Macros
To enter text entry mode:1. Include the following command in an edit macro:
ISREDIT TENTER lptr numlines
where lptr is a label or relative line number and numlines is the number ofblank lines that you want to insert. If the number that you type is greater thanthe number of rows remaining on the panel, the vertical bar that indicateswhere you will run out of room does not appear and the keyboard does notlock at the last character position on the panel. When you run the edit macro(see step 2), you can scroll down to bring the additional blank text entry spaceinto view.
2. Run the edit macro. The editor inserts a single continuous blank area for thespecified number of rows or to the bottom of the panel.
To begin a new paragraph:1. Use the return (Enter), cursor movement, or Tab keys to advance the cursor
enough spaces to leave one blank row on the panel.
If there are insufficient blank spaces on the panel, the keyboard locks when you tryto type beyond the last character position. A vertical bar (|) appears above thecursor at the locked position.
To generate more blank spaces:1. Press the Reset key to unlock the keyboard.2. Press Enter.
To end text entry mode:1. Press Enter. The data is flowed together into a paragraph and any embedded
blanks are preserved. The left and right sides of the paragraph are determinedby the current bounds.
See “Word Processing” on page 67 and “Entering Text (Power Typing)” on page 69for more information.
Return CodesThe following return codes can be issued:0 Normal completion12 Invalid line number20 Severe error.
ExampleTo find the last line in the data and set up the display for text entry following thelast line:ISREDIT LOCATE .ZLISREDIT TENTER .ZL
TFLOW—Text Flow a ParagraphThe TFLOW macro command restructures paragraphs. This is sometimes necessaryafter deletions, insertions, splitting, and so forth. See “Word Processing” on page 67and “Formatting Paragraphs” on page 67 for more information.
TENTER
Chapter 11. Edit Macro Commands and Assignment Statements 407
Macro Command SyntaxISREDIT TFLOW lptr [col]
lptr Specifies that a line pointer must be used. A line pointer can be a label or arelative line number.
col Specifies the column to which the text should be flowed. If the columnnumber is omitted, it defaults to the right boundary. This is different fromthe TF (text flow) line command, which defaults to the panel width whendefault boundaries are in effect.
If a number greater than the right boundary is specified, the rightboundary is used.
Return CodesThe following return codes can be issued:0 Normal completion12 Invalid line number20 Severe error.
ExampleTo limit the flow of text, starting at label .PP, to the displayed columns:ISREDIT (,RCOL) = DISPLAY_COLSISREDIT TFLOW .PP &RCOL
TSPLIT—Text Split a LineThe TSPLIT macro command moves part or all of a line of text to the followingline. This makes it easier for you to add new material to existing text.
Macro Command SyntaxISREDIT TSPLIT [lptr col]
lptr Specifies that a line pointer is used to identify the line where the split is tooccur. A line pointer can be a label or a relative line number.
col Specifies the column at which the text is to be split.
If you omit both operands, the split point is assumed to be the current cursorposition.
DescriptionThe TSPLIT macro command is affected by the current setting of the boundaries.For instance, data beyond the right boundary is not moved to the line added byTSPLIT. Data between the split column and the right boundary is moved to a newline. The cursor position is set to the split point.
To rejoin lines, use the TFLOW macro command. See “TFLOW—Text Flow aParagraph” on page 407 for more information.
For more information about splitting lines and other word processing commands,see “Word Processing” on page 67 and “Splitting Lines” on page 68.
Return CodesThe following return codes can be issued:
TFLOW
408 OS/390 V2R10.0 ISPF Edit and Edit Macros

0 Normal completion12 Invalid line number20 Severe error.
ExampleTo split the line labeled .TOP at column 15:ISREDIT (LINENBR) = LINENUM .TOPISREDIT TSPLIT &LINENBR 15
UNNUMBER—Remove Sequence NumbersThe UNNUMBER macro command sets all sequence fields to blanks, turns offnumber mode, and positions the data so that column 1 is the first columndisplayed.
Macro Command SyntaxISREDIT UNNUMBER
DescriptionThe UNNUMBER command is valid only when number mode is also on. Thestandard sequence field, the COBOL sequence field, or both, are blanked out.
Return CodesThe following return codes can be issued:0 Normal completion12 Number mode not on20 Severe error.
ExampleTo set all sequence fields to blanks, turn number mode off, and position the panelso that column 1 is the first column displayed:ISREDIT UNNUMBER
UP—Scroll UpThe UP macro command scrolls data up from the current panel position.
Macro Command SyntaxISREDIT UP amt
amt The scroll amount, the number of lines (0 - 9999) to scroll, or one of thefollowing operands:
MAX Displays the first panel of data.
HALF Displays the previous half-panel of data.
PAGE Displays the previous full panel of data.
CURSORScrolls until the line on which the cursor is located becomes thelast data line on the panel.
DATA Scrolls until the first data line on the current panel becomes thelast data line on the next panel.
TSPLIT
Chapter 11. Edit Macro Commands and Assignment Statements 409

DescriptionTo scroll up using the panel position when the macro was issued, useUSER_STATE assignment statements to save and then restore the panel positionoperands.
When you issue the UP command, the non-data lines on the panel affect thenumber of lines scrolled. However, if you define a macro named UP, it onlyoverrides UP when used from another macro. UP does not change the cursorposition and cannot be used in an initial macro.
The actual number of lines to appear on the panel is determined by:v The number of lines excluded from the panelv The terminal display size and split panel linev The number of special temporary lines displayed, such as the ==ERR>, ==CHG>,
=PROF>, =MASK>, =BNDS>, =TABS>, ==MSG>, =NOTE=, =COLS>, and ====== lines.
The first line displayed is determined in one of two ways: (1) a LOCATE commandcan actually set the line to be first on the panel, or (2) the first line to be displayeddepends on whether the cursor was explicitly set by a CURSOR assignmentstatement or implicitly set by a SEEK, FIND, CHANGE, or TSPLIT command.Since the cursor must be on the panel, the line that is first on the panel may bedifferent from the line that was first when you started the macro.
Return CodesThe following return codes can be issued:0 Normal completion2 No more data UP4 No visible lines8 No data to display12 Amount not specified20 Severe error.
ExamplesTo scroll up to the top of the data set:ISREDIT UP MAX
To display the previous half panel of data:ISREDIT UP HALF
To display the previous full panel of data:ISREDIT UP PAGE
To make the line where the cursor is placed the last one on the display:ISREDIT UP CURSOR
To display the previous page less one line:ISREDIT UP DATA
USER_STATE—Save or Restore User StateThe USER_STATE assignment statement saves or restores the state of edit profilevalues, FIND, CHANGE, SEEK, and EXCLUDE values, and panel and cursorvalues.
UP
410 OS/390 V2R10.0 ISPF Edit and Edit Macros
Assignment Statement SyntaxISREDIT (varname) = USER_STATEISREDIT USER_STATE = (varname)
varnameThe name of a variable to contain your status information.
Note: The information in the variable is saved in an internal format that issubject to change. Dependence on the format can lead to macroerrors.
DescriptionUSER_STATE can be used at the beginning of a macro to save conditions, and atthe end of a macro to restore the conditions that may have changed duringprocessing. Many of the values saved by USER_STATE can be saved and restoredindividually. The USER_STATE assignment statement is a simple way of savingmany values with a single statement.
The following edit modes and values are saved and restored by USER_STATE:
AUTOLIST CURSOR NOTES RECOVERYAUTONUM HEX NULLS STATSAUTOSAVE IMACRO NUMBER TABSBOUNDS MASKLINE PACK TABSLINECAPS MODEL CLASS PROFILE
Return CodesThe following return codes can be issued:0 Normal completion20 Severe error.
ExamplesTo save the user state in variable &STATUS:ISREDIT (STATUS) = USER_STATE
To restore the user state from variable &STATUS:ISREDIT USER_STATE = (STATUS)
VERSION—Set or Query Version NumberThe VERSION macro command allows you to change the version number assignedto a member of an ISPF library.
The VERSION assignment statement either sets the version number, or retrievesthe version number and places it in a variable.
For more information about version numbers, see “Version and Modification LevelNumbers” on page 31.
Macro Command SyntaxISREDIT VERSION num
num The version number. It can be any number from 1 to 99.
USER_STATE
Chapter 11. Edit Macro Commands and Assignment Statements 411
Assignment Statement SyntaxISREDIT (varname) = VERSIONISREDIT VERSION = num
varnameThe name of a variable to contain the version number. The version numberis a 2-digit value that is left-padded with zeros.
num Same as macro command syntax.
Return CodesThe following return codes can be issued:0 Normal completion4 Stats mode is off, the command is ignored12 Invalid value specified (the version must be 1 to 99)20 Severe error.
ExamplesTo save the version number in variable &VERS:ISREDIT (VERS) = VERSION
To set the version number to 1:ISREDIT VERSION 1
To set the version number from variable &VERS:ISREDIT VERSION = &VERS
VIEW—View from within an Edit SessionThe VIEW macro command allows you to view a member of the same partitioneddata set during your current edit session.
Macro Command SyntaxISREDIT VIEW member
memberA member of the library or other partitioned data set you are currentlyediting. You may enter a member pattern to generate a member list.
DescriptionYour initial edit session is suspended until the view session is complete. Editingsessions can be nested until you run out of storage.
To exit from the view session, END or CANCEL must be processed by a macro orentered by you. The current edit session resumes.
The VIEW service call, ISPEXEC VIEW, is an alternate method of starting view. Itoffers the option of viewing another data set and specifying an initial macro.
For more information on using the VIEW service, refer to ISPF Services Guide
Return CodesThe following return codes can be issued:0 Normal completion
VERSION
412 OS/390 V2R10.0 ISPF Edit and Edit Macros
12 Your error (invalid member name, recovery pending)20 Severe error.
ExamplesTo view the member OLDMEM in your current ISPF library:ISREDIT VIEW OLDMEM
VOLUME—Query Volume InformationThe VOLUME assignment statement retrieves the volume serial number (or serialnumbers) and the number of volumes on which the data set resides.
Assignment Statement SyntaxISREDIT (var1,var2) = VOLUME
var1 The name of a variable to contain the serial number of the volume onwhich the data set resides. For a multivolume data set, this will be theserial number of the first volume. The volume serial number is a sixcharacter value.
var2 The name of a variable to contain the number of volumes the data setoccupies. The number of volumes is a two character value.
Return CodesThe following return codes can be issued:0 Normal completion4 The data set is a multivolume data set and the shared pool variable
ZEDMVOL is set to contain all the volume serial numbers of the data set.ZEDMVOL has the length of the number of volumes times six.
20 Severe error.
ExamplesTo retrieve just the volume serial number of the data set:ISREDIT (VOL) = VOLUME
To retrieve just the number of volumes the data set occupies:ISREDIT (,NUMVOL) = VOLUME
To retrieve both the volume serial number and the number of volumes the data setoccupies:ISREDIT (VOL,NUMVOL) = VOLUME
XSTATUS—Set or Query Exclude Status of a LineThe XSTATUS assignment statement either sets the exclude status of the specifieddata line, or retrieves the exclude status of the specified data line and places it in avariable.
Assignment Statement SyntaxISREDIT (varname) = XSTATUS lptrISREDIT XSTATUS lptr = X | NX
varnameThe name of a variable to contain the exclude status, either X or NX.
VIEW
Chapter 11. Edit Macro Commands and Assignment Statements 413
lptr Specifies that a line pointer must be used. A line pointer can be a label or arelative line number.
X Specifies that the specified line is to be excluded.
NX Specifies that the specified line is to be shown (nonexcluded).
DescriptionExclude status determines whether the line is excluded.
If you want to exclude several lines at one time, the EXCLUDE command shouldbe used. Similarly, to show several lines at one time, use the FIND command.
Return CodesThe following return codes can be set:0 Normal completion8 An attempt to set a line status to NX could not be performed. The line has
a pending line command on it. For example, if an excluded line containsan M line command in the line command area, then the MOVE/COPY ISPENDING message is displayed and the lines cannot be shown. The resetcommand can be used to remove your line commands from the linecommand area.
12 Line number is not an existing line.20 Severe error.
ExamplesUse XSTATUS together with SEEK and CHANGE to preserve the exclude status ofa line. For example, to store the exclude status of the line whose number is invariable &N in variable &LINEX:ISREDIT (LINEX) = XSTATUS &N
To exclude line 1:ISREDIT XSTATUS 1 = X
To locate a string and change it, saving and then restoring the exclude status:ISREDIT SEEK &DATAIF &LASTCC = 0 THEN -DOISREDIT (XLINE) = XSTATUS .ZCSRISREDIT CHANGE &DATA &NEWDATA .ZCSR .ZCSRISREDIT XSTATUS .ZCSR = (XLINE)
END
XSTATUS
414 OS/390 V2R10.0 ISPF Edit and Edit Macros

Part 4. Appendixes
© Copyright IBM Corp. 1984, 2000 415

416 OS/390 V2R10.0 ISPF Edit and Edit Macros
Appendix A. Abbreviations for Commands and Other Values
The following list includes the command names and keywords that can beabbreviated, followed by the allowable abbreviations. To improve readability, donot use abbreviations in edit macros. ISPF scans the NUMBER macro as acommand. If you want to define NUMBER as a program macro and use theabbreviated form, define the abbreviations as program macros also.
Edit Line CommandsBOUNDS BOUND BNDS BND BOUCOLS COLLCC LCLCMDD MDMDTABS TABUCC UCUC
Edit Primary CommandsBOUNDS BOUND BNDS BND BOUCANCEL CANCHANGE CHA CHG CCREATE CREDEFINE DEFDELETE DELEXCLUDED EXCLUDE EXC EX XFIND FHILITE HILIGHT HILEVEL LEVLOCATE LOC LMODEL MODNONULLS NONULL NONULNONUMBER NONUMBR NONUMB NONUMNOTABS NOTABNOTES NOTENULLS NULL NULNUMBER NUMB NUMPROFILE PROF PRO PRRECOVERY RECOVER RECOVRY RECVRY RECOV RECVR
RECRENUM RENREPLACE REPL REPRESET RESSETUNDO SETUSUBMIT SUBTABS TABUNNUMBER UNNUMB UNNUM UNNVERSION VERS VER
ParametersParametersAFTER AFTBEFORE BEF
© Copyright IBM Corp. 1984, 2000 417
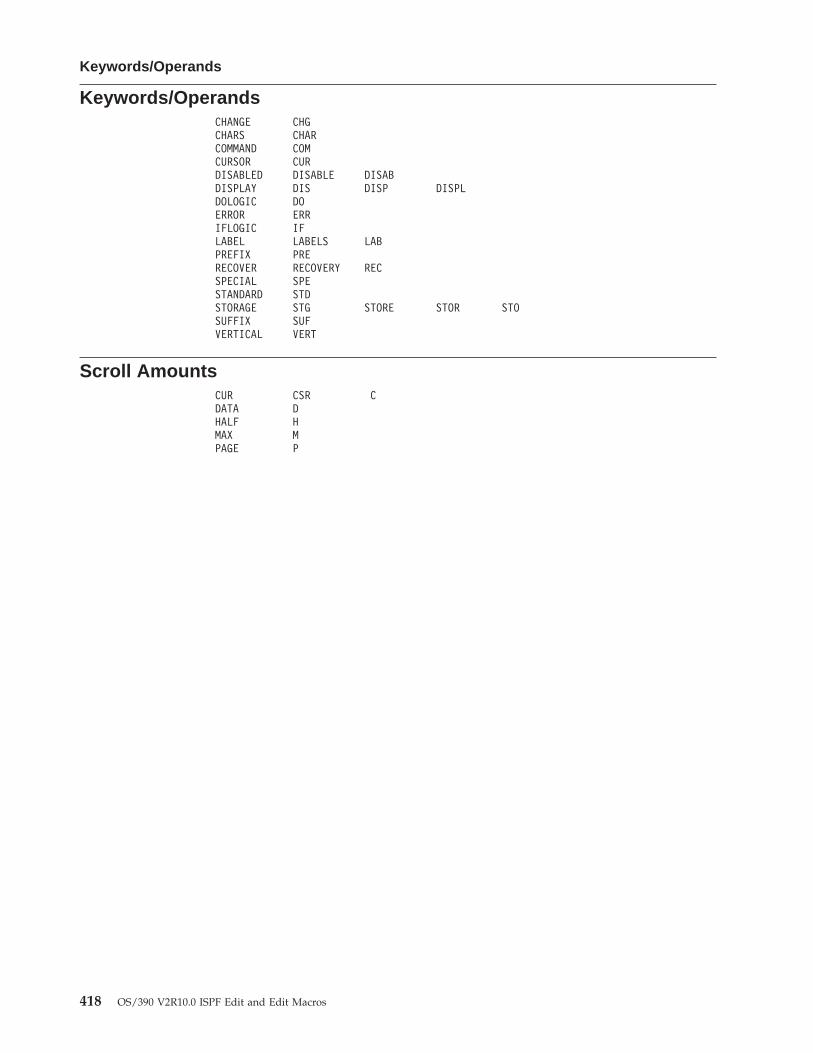
Keywords/OperandsCHANGE CHGCHARS CHARCOMMAND COMCURSOR CURDISABLED DISABLE DISABDISPLAY DIS DISP DISPLDOLOGIC DOERROR ERRIFLOGIC IFLABEL LABELS LABPREFIX PRERECOVER RECOVERY RECSPECIAL SPESTANDARD STDSTORAGE STG STORE STOR STOSUFFIX SUFVERTICAL VERT
Scroll AmountsCUR CSR CDATA DHALF HMAX MPAGE P
Keywords/Operands
418 OS/390 V2R10.0 ISPF Edit and Edit Macros

Appendix B. Edit-Related Sample Macros
The following edit macros are shipped with ISPF in the IBM-supplied ISPFsamples library.
Sample MacrosThese macros can be used in problem resolution.
ISRCUTAn ISPF Edit macro written in REXX that writes lines from a file to theuser’s PROFILE pool for later inclusion by the ISRPASTE macro.
ISRONLYAn ISPF Edit macro written in REXX that combines the ISPF Editcommands EXCLUDE and FIND such that only the lines containing thesearch string are displayed.
ISRPASTEAn ISPF Edit macro written in REXX that writes lines from the user’sPROFILE pool into the current file. This macro is used in conjunction withthe ISRCUT macro.
© Copyright IBM Corp. 1984, 2000 419

Edit-Related Sample Macros
420 OS/390 V2R10.0 ISPF Edit and Edit Macros
Notices
This information was developed for products and services offered in the U.S.A.
IBM may not offer the products, services, or features discussed in this document inother countries. Consult your local IBM representative for information on theproducts and services currently available in your area. Any reference to an IBMproduct, program, or service is not intended to state or imply that only that IBMproduct, program, or service may be used. Any functionally equivalent product,program, or service that does not infringe any IBM intellectual property right maybe used instead. However, it is the user’s responsibility to evaluate and verify theoperation of any non_IBM product, program, or service.
IBM may have patents or pending patent applications covering subject matterdescribed in this document. The furnishing of this document does not give youany license to these patents. You can send license inquiries, in writing, to the IBMDirector of Licensing, IBM Corporation, North Castle Drive, Armonk, NY10504–1785, USA.
For license inquiries regarding double-byte (DBCS) information, contact the IBMIntellectual Property Department in your country or send inquiries in writing to
IBM World Trade Asia CorporationLicensing2-31 Roppongi 3-chome, Minato-kuTokyo 106, Japan
The following paragraph does not apply to the United Kingdom or any othercountry where such provisions are inconsistent with local law:
INTERNATIONAL BUSINESS MACHINES CORPORATION PROVIDES THISPUBLICATION ″AS IS″ WITHOUT WARRANTY OF ANY KIND, EITHEREXPRESS OR IMPLIED, INCLUDING, BUT NOT LIMITED TO, THE IMPLIEDWARRANTIES OR NON-INFRINGEMENT, MERCHANTABILITY OR FITNESSFOR A PARTICULAR PURPOSE. Some states do not allow disclaimer of express orimplied warranties in certain transactions, therefore, this statement may not applyto you.
This information could include technical inaccuracies or typographical errors.Changes are periodically made to the information herein; these changes will beincorporated in new editions of the publication. IBM may make improvementsand/or changes in the product(s) and/or the program(s) described in thispublication at any time without notice.
Any references in this information to non-IBM Web sites are provided forconvenience only and do not in any manner serve as an endorsement of those Websites. The materials at those Web sites are not part of the materials for this IBMproduct and use of those Web sites is at your own risk.
IBM may use or distribute any of the information you supply in any way itbelieves appropriate without incurring any obligation to you.
© Copyright IBM Corp. 1984, 2000 421
Licensees of this program who wish to have information about it for the purposeof enabling: (i) the exchange of information between independently createdprograms and other programs (including this one) and (ii) the mutual use of theinformation which has been exchanged, should contact the IBM Corporation,Department TL3B, 3039 Cornwallis Road, Research Triangle Park, North Carolina,27709–2195, USA. Such information may be available, subject to appropriate termsand conditions, including in some cases, payment of a fee.
The licensed program described in this document and all licensed materialavailable for it are provided by IBM under terms of the IBM Customer Agreement,IBM International Program License Agreement or any equivalent agreementbetween us.
Information concerning non-IBM products was obtained from the suppliers ofthose products, their published announcements or other publicly available sources.IBM has not tested those products and cannot confirm the accuracy ofperformance, compatibility or any other claims related to non-IBM products.Questions on the capabilities of non_IBM products should be addressed to thesuppliers of those products.
If you are viewing this information softcopy, the photographs and colorillustrations may not appear.
Programming Interface InformationThis book primarily documents information that is NOT intended to be used asProgramming Interfaces of ISPF.
TrademarksThe following terms are trademarks of International Business MachinesCorporation in the United States, other countries, or both:
AD/CycleBookManagerC++Common User AccessCUADFSMSdfpDFSMSdssDFSMShsmDFSMSrmmDFSMS/MVSDFSORTESCONFFSTGDDM
IBMLanguage EnvironmentMVSMVS/ESAOS/2OS/390OS/390 Security ServerRACFResource Access Control FacilitySOMobjectsSystem ViewVisualLiftVTAM
Microsoft and Windows are registered trademarks of Microsoft Corporation in theUnited States, other countries, or both.
UNIX is a registered trademark of The Open Group in the United States and othercountries.
422 OS/390 V2R10.0 ISPF Edit and Edit Macros

Other company, product, and service names may be trademarks or service marksof others.
Notices 423

424 OS/390 V2R10.0 ISPF Edit and Edit Macros
Index
Special Characters( (column shift left), line command 156) (column shift right), line command 157! (exclamation point), for implicit edit
macro 116& prefix for edit commands 17> (data shift right), line command 162< (data shift left), line command 159&LASTCC variable 119{ } (one operand required) 154, 207, 299,
300| (OR symbol) 154, 207, 300.ZCSR 65, 112.ZDEST 112, 116.ZFIRST 65, 112.ZFRANGE 112, 117.ZLAST 65, 112.ZLRANGE 112, 117
Numerics3850 virtual volumes, accessing 8
AA (after), line command 163, 164A operand, REXX TRACE statement 123abbreviations for commands and other
values 417ACCOUNT command 9add a data set member 385add data 278adding
a line 176, 355edit macro command 96models 81
alias, assigning 234, 332alias name, defining with edit
macro 115application-wide macros 30assignment statement
AUTOLIST 308AUTONUM 308AUTOSAVE 310BLKSIZE 311BOUNDS 312CAPS 315CHANGE COUNT 319CTL_LIBRARY 324CURSOR 326DATA_CHANGED 329DATA_WIDTH 330DATAID 331DATASET 331description 104DISPLAY_COLS 335DISPLAY_LINES 335EXCLUDE_COUNTS 341FIND_COUNTS 343FLIP 344FLOW_COUNTS 345
assignment statement (continued)HEX 345how to use 106IMACRO 350LABEL 112, 351LEVEL 353LINE 354LINE_AFTER 355LINE_BEFORE 357LINENUM 360LRECL 362MACRO_LEVEL 112, 364MASKLINE 365MEMBER 366notation conventions 299NOTES 370NULLS 371NUMBER 372PACK 374parentheses guidelines 106PROFILE 379RANGE_CMD 117, 380RECFM 382RECOVERY 383reference section 299RMACRO 118, 389SCAN 104, 392SEEK_COUNTS 395STATS 401summary 300TABS 403TABSLINE 405USER_STATE 410VERSION 411XSTATUS 413
attribute bytes, used with tabs 72AUTOLIST
assignment statement 308macro command 308primary command 211
autolist modedefined 23querying the value 308setting the value 211, 308
automatic generation of sourcelisting 211, 308
automatic saving of data 215, 310AUTONUM
assignment statement 308macro command 308primary command 23, 213
autonum mode 23AUTOSAVE
assignment statement 310macro command 310primary command 23, 215
autosave mode, defined 23
BB (before), line command 50, 166batch, ending a macro 366
batch processing, submitting datafor 289, 402
batch processing, using edit macrosin 111
beginning an edit session 4BLKSIZE, assignment statement 311block size, retrieving 311boundaries
controlling 216, 312default 29definition line 29setting 168
BOUNDSassignment statement 312line command 168macro command 312primary command 216
BROWSEmacro command 313primary command 218
built-in commanddisabling 234, 332processing 217
built-in labels 65BUILTIN
macro command 314primary command 217
CC (copy), line command
description 170used with CREATE command 230used with REPLACE command 279
CANCELmacro command 315primary command 218
canceling edit changes 218, 315CAPS
assignment statement 315, 316DBCS data 220macro command 315, 316primary command 23, 219
caps modedefined 23overview 24querying the value 315setting the value 219, 315
CHANGEmacro command
column-dependent data,defined 56
DBCS data 57description 316, 317EBCDIC data 57RCHANGE command 274, 381saving and restoring values 410
primary commandcolumn-dependent data,
defined 56DBCS data 57
© Copyright IBM Corp. 1984, 2000 425

CHANGE (continued)description 53, 220, 221EBCDIC data 57qualifying search strings 58specifying search strings 54
repeating 60change a data string 220, 316change count, retrieving 319CHANGE_COUNTS, assignment
statement 319changed lines 27changing data 53changing models 85character string
changing 220finding 245, 341how to use 55specifying 54
charactersconverting 219, 315converting to lowercase 179converting to uppercase 201displaying hexadecimal 249, 345
CLIST CONTROL statements 123CLIST edit macro statements 89, 95CLIST WRITE statements 122COBOL sequence field, defined 32COLS, line command 172column identification line,
displaying 172column limitations 59column positions, referring to 114column shifting
DBCS data 51destructive 51line command 51
columnsidentifying 172line command 172query display 335shift left 397shift right 398
command, PROFILE RESET 26command, querying 380command names, overriding 115command procedure statements 96command scan mode, setting the
value 392commands, reversing last edit 292Compare, edit command 222, 319compare command 222, 319compare command examples 224compare command return codes 321compare command syntax 223, 320compress data 269, 374CONLIST operand, CLIST CONTROL
statement 123CONTROL, ISPEXEC statement 119control and display your profile 271,
379control edit recovery 275, 383control null spaces 267, 371control version number 296, 411controlled library status, retrieving 324controlling the edit boundaries 216, 312controlling the edit environment 21
controlling the search for a datastring 57
convert characters to lowercase 179converting characters 219, 315converting note lines to data 185COPY
macro command 322primary command
description 225, 226how to use 50
copy a model into the current dataset 259, 367
copying datainto the current data set 50lines of data 170macro command 322primary command 225using edit macro 107
CREATEmacro command 323, 324primary command
description 229how to use 49
creatinga data set member 229, 323data 49new data 10
CTL_LIBRARY, assignmentstatement 324
current member name, querying 366CURSOR, assignment statement 326
positioning cursor on commandline 327
cursor positionquerying the value 326setting the value 326
cursor values, saving and restoring 410Cut and Save Lines 233, 328Cut Macro command 328Cut Primary command 233
DD (delete) line command 173data
adding 278canceling changes 218, 315changing 53, 220, 316column-dependent, defined 56compressing 269, 374controlling the string search 57converting data 201copying 50, 225, 322copying lines 170creating 49creating new 10DBCS considerations 57deleting 236, 334description 221EBCDIC considerations 57editing existing 11excluding 53, 244, 339finding 53, 245, 341inserting 351managing 49moving 50packing 19replacing 49, 278
data (continued)retrieving the changed status 329retrieving the ID 331retrieving the width 330saving automatically 215, 310saving the current 284, 390seek a data string 393shift left 398shift right 399shifting 51, 52sorting 287, 399split a line 408submitting for batch processing 289,
402test flow a paragraph 407
DATA_CHANGED, assignmentstatement 329
data-changed status, retrieving 329data field, defined 371data in controlled libraries, editing 18data lines, referring to 114data modes 24data set
adding a member 385copying a model into 259, 367creating a member 229, 323creating a new 10editing a member 237, 337editing existing 11generating statistics 289, 401moving a member 262, 368password specification 9renumbering lines automatically 276,
384replacing a member 385retrieving the current name 331security 9
DATA_WIDTH, assignmentstatement 330
DATAID, assignment statement 331DATASET, assignment statement 331DBCS data
CHANGE command 57column shifting 51display boundary 10hardware tabs 71, 72SORT command 288, 401TE (text entry) line command 70TF (text flow) 68TS (text split) line command 69
debugging edit macros 121default operands 154, 207, 300DEFINE
edit macro command 98, 115macro command 332primary command 234
define tabs mode 290, 403defining
a name 234, 332an alias for a command 115an edit profile 21
defining macrosimplicit 116overriding command names 115resetting definitions 115scope of definitions 115using an alias 115
426 OS/390 V2R10.0 ISPF Edit and Edit Macros

DELETEmacro command 334primary command 236
deletingedit macro labels 113labels 65lines 173, 236models 85
delimited string 54destination, specifying 116destructive shift, defined 51dialog development models 77dialog service errors, debugging 121dialog service requests 96dialog variable name, defined 104direction of the search 57disabling a command 115disabling a macro or built-in
command 234, 332display and control your profile 271,
379display boundary, DBCS data 10DISPLAY_COLS, assignment
statement 335display columns 335DISPLAY_LINES, assignment
statement 335display model notes 266, 370Display the Edit Settings Panel,
EDITSET 239displaying an edit profile 21displaying hexadecimal characters 249,
345distributed edit 3DOWN, macro command 336duplicating lines 189
EEBCDIC data 57edit
beginning a session 4canceling changes 218, 315column shifting 51command reference section 207command summary 16considerations 18controlling the boundaries 216, 312controlling the environment 21controlling the recovery 275, 383copying data 50creating data 49data display panel 11displaying processed commands 17editing data in controlled libraries 18ending a session 15entry panel 10excluding lines 63introduction to 3, 14line commands 16macro command 18, 337managing data 49models 77modes 23moving data 50number mode 33option 2 4primary command
description 237
edit (continued)primary command (continued)
example 237syntax 237
primary commands, description 17profiles 21recursive 237, 337replacing data 49rules for entering line commands 153selecting the editor 4sequence number display 32sequence number format 32sequence numbers 31shifting columns 51shifting data 51, 52splitting text 67text entry 67text flow 67undisplayable characters 14undoing edit interactions 73word processing 67
Edit - Entry panel 10edit, distributed 3edit a member 237, 337Edit and View Settings Panel 239edit assignment statements
elementskeyphrase 105overlays 106value 104
how to use 106manipulating data 107
Edit command errors, debugging 121edit commands and PF key
processing 17edit compare command 222, 319Edit data display panel 11edit macro
alias name 115ALLMBRS macro 135assignment statements 96, 104BOX macro 130CLIST macro, differences from
program macros 98column positions, referring to 114command procedure statements 96command summary 18commands 96creating 95data lines, referring to 114defining 115definition of 3description 89dialog service requests 96FINDCHGS macro 138identifying 363IMBED macro 132implicit definition using an
exclamation point 116initial macro 29introduction to 89labels
description 112editor-assigned 112passing 114referring to 113using 112
edit macro (continued)levels 111line command functions, how to
perform 108MASKDATA macro 141messages 111naming 103NOPROCESS operand 116parameters 109PFCAN macro 129PROCESS command and
operand 116program macro
description 97differences from CLIST macros 98differences from REXX macros 98parameter passing 98running 102writing 99
recovery macro 117reference section 299replacing built-in edit commands 115resetting a command to previous
status 115return codes 118REXX macro, differences from
program macros 98samples 127testing
CLIST CONTROL statements 123CLIST WRITE statements 122description 121experimenting with edit macro
commands 124return codes 119REXX SAY statements 122REXX TRACE statements 123
TEXT macro 127TSO commands 97using 89variable substitution 104variables 103
Edit mode defaults 25edit processing of PF keys 17edit profile
autolist mode 211autonum mode 213, 308autosave mode 215, 310boundary settings 168caps mode 219control and display 271, 379defaults 25, 26defining 21definition of 21displaying 21initial macro 255, 350lock 271, 379modifying 23naming 21note mode 266nulls mode 267profile name 21recovery macro 284saving and restoring 410specifying 8tabs mode 290types 21
Index 427

Edit Profile Initialization, Site-wide 25edit profile name, definition 21edit profiles, locking 23edit recovery
Edit Recovery panel 46turning off 47turning on 46
edit session, ending 243, 338editing existing data 11editor, ISPF 4editor-assigned labels 65EDITSET 239EDSET 239eliminating labels 65END
macro command 338primary command 243
end a macro 366END command 215end the edit session 243, 338ending an edit session 15enter text 194error codes for severe errors 118error lines 27EXCLUDE
macro command 339primary command
description 53, 244qualifying search strings 58specifying search strings 54
repeating 60EXCLUDE_COUNTS, assignment
statement 341exclude counts, querying the value 341exclude status of a line, set or query 413excluded line limitations 59excluded lines, redisplaying 64excluding a line 63, 203, 339excluding data 53explicit shifts, defined 51extent of a search 57
FF (show first line), line command 175FIND
macro commanddescription 341, 342RFIND command 284, 387saving and restoring values 410when to use instead of SEEK 394
primary commanddescription 53, 245, 246qualifying search strings 58specifying search strings 54
repeating 60FIND_COUNTS, assignment
statement 343find counts, querying the value 343finding a data string 245finding a search string 341finding data 53finding models 84flagged lines
changed lines 27error lines 27special lines 27
FLIPassignment statement 344
FLIP (continued)definition 64macro command 344primary command 247
FLOW_COUNTS, assignmentstatement 345
flow counts, querying the value 345Format Name field 9formatted edit mode, defined 184formatting input 365
Ggenerate sequence numbers 268, 372generating data set statistics 289, 401guidelines for using the editor 18
HHardware Tab field, defined 72hardware tabs
DBCS data 72defining 71description 70fields, how to use 72
HEXassignment statement 345macro command 345primary command 24, 249
hexadecimal charactersdisplaying 249, 345format 24mode 249, 345string 54
HILITEmacro command
description 349how to use 347
primary commanddescription 255how to use 252
HILITE function description 33
II (insert) line command 176I operand, REXX TRACE statement 123identify an edit macro 363identify columns 172IMACRO
assignment statement 350macro command 350primary command 24, 255
implicit macro definition 116implicit shifts, defined 51initial macro, specifying 255, 350initial macros
DEFINE commands used in 115specifying in the EDIT service call 29specifying on the Edit - Entry
panel 29starting 29
Initialization, Site-wide Edit Profile 25INSERT, macro command 351inserting
data 351lines 176
interactive column numbers 114introduction to edit macros 89ISPEXEC 96ISPF, definition 3ISPF list data set 211, 308ISPF Workstation Tool Integration
dialog 3ISRCUT edit macro 419ISREDIT service 98ISREDIT statements 96, 108ISRONLY edit macro 419ISRPASTE edit macro 419
Kkeeping an edit command on the
command line 17keyphrase, defined 105kinds of search strings 54
LL (show last line), line command 178L operand, REXX TRACE statement 123LABEL
assignment statementdescription 351, 352overview 112
querying the value 351setting the value 351
labeled line, querying 360labels
defined 65deleting 65editor-assigned 65eliminating 65in macro commands 65specifying a range 66
labels in edit macrosdeleting 113description 112editor-assigned 112how to use 112levels 111nested macros 113passing 114referring to 113
languages for edit macros 89, 95LC (lowercase), line command 179left
scroll 352shift columns 397shift data 398
LEFTmacro command 352
LEVELassignment statement 353macro command 353primary command 256
level number, specifying 256, 353library status, retrieving 324limiting the SORT command 288, 401LINE
adding 357assignment statement 354querying the number 354querying the value 354
428 OS/390 V2R10.0 ISPF Edit and Edit Macros

LINE (continued)setting the value 354
LINE_AFTER, assignment statement 355LINE_BEFORE, assignment
statement 357Line Command field, resetting 54line command functions in edit
macros 108line command summary 154line commands
( (column shift left) 156) (column shift right) 157> (data shift right) 162< (data shift left) 159A (after) 163B (before) 166BOUNDS 168C (copy) 170COLS 172D (delete) 173description 153F (show first line) 175I (insert) 176L (show last line) 178LC (lowercase) 179M (move) 181MASK 183MD (make dataline) 185notation conventions 154O (overlay) 187R (repeat) 189rules for entering 153S (show line) 64, 191summary 154TABS 193TE (text entry) 67, 69, 194TF (text flow) 67, 198TS (text split) 67, 199UC (uppercase) 201usage 16X (exclude) 59, 63, 203
line labelquerying the value 351setting the value 351
line number, ordinal 257line pointer
COPY macro command 323CREATE macro command 323CURSOR assignment statement 326DELETE macro command 334incomplete 324INSERT macro command 351invalid 323, 369LABEL assignment statement 351LINE_AFTER assignment
statement 355LINE assignment statement 354LINE_BEFORE assignment
statement 357LOCATE macro command 361MASKLINE assignment
statement 365MODEL macro command 368MOVE macro command 368referring to labels 113SHIFT ( macro command 397SHIFT ) macro command 398
line pointer (continued)SHIFT > macro command 399SHIFT < macro command 398SUBMIT macro command 402TABSLINE assignment statement 405TENTER macro command 406TFLOW macro command 408TSPLIT macro command 408XSTATUS assignment statement 414
line pointer rangeCREATE macro command 323DELETE macro command 334LOCATE macro command 362REPLACE macro command 386RESET macro command 387SUBMIT macro command 402
line range 66LINE_STATUS 358LINENUM, assignment statement 360lines
adding 176copying 170deleting 173, 334exclude status 413excluded limitations 59excluding 63, 244, 339inserting 176locating 257, 360moving 181numbering automatically 213overlaying 187query display 335renumbering automatically 276, 384repeating 189show 191show the first 175showing the last 178specifying ranges 65splitting 68, 408
literal character string, defined 104LMF 6LMF lock — errors 6LMF lock ignored 6LOCATE
macro commandgeneric syntax 361specific syntax 360
primary commandgeneric syntax 258specific syntax 257
locate lines 257, 360Lock — Never 6Lock — No 6Lock — Yes 6lock your profile 271, 379locking an edit profile 23logical record length, querying 362logical tabs, description 70lowercase operands 154, 207, 300lptr
COPY macro command 323CURSOR assignment statement 326DELETE macro command 334incomplete 324INSERT macro command 351invalid 323, 369LABEL assignment statement 351
lptr (continued)LINE_AFTER assignment
statement 355LINE assignment statement 354LINE_BEFORE assignment
statement 357LOCATE macro command 361MASKLINE assignment
statement 365MODEL macro command 368MOVE macro command 368referring to labels 113SHIFT ( macro command 397SHIFT ) macro command 398SHIFT > macro command 399SHIFT < macro command 398TABSLINE assignment statement 405TENTER macro command 406TFLOW macro command 408TSPLIT macro command 408XSTATUS assignment statement 414
lptr-rangeCREATE macro command 323DELETE macro command 334LOCATE macro command 362REPLACE macro command 386RESET macro command 387SUBMIT macro command 402
LRECL, assignment statement 362
MM (move), line command
description 181used with CREATE command 230used with REPLACE command 279
macroending in batch 366specifying a recovery 284, 389specifying an initial 255, 350
MACRO, macro command 363Macro Command Profile Reset
Syntax 380macro commands
abbreviations 417assignment statements 104AUTOLIST 308AUTONUM 308AUTOSAVE 310BOUNDS 312BROWSE 313BUILTIN 314CANCEL 315CAPS 315CHANGE 316COPY 322CREATE 323DEFINE 332DELETE 334disabling 234, 332DOWN 336EDIT 337END 338EXCLUDE 339FIND 341FLIP 344HEX 345HILITE 347
Index 429

macro commands (continued)identifying 234, 332IMACRO 350INSERT 351introduction to 89ISRCUT 419ISRONLY 419ISRPASTE 419labels 65LEFT 352LEVEL 353LOCATE 360MACRO 363MEND 366MODEL 367MOVE 368NONUMBER 369notation conventions 299NOTES 370NULLS 371NUMBER 372PACK 374PROCESS 377PROFILE 379RCHANGE 274, 381RECOVERY 383reference section 299RENUM 384REPLACE 385RESET 386RFIND 284, 387RIGHT 388RMACRO 117, 389SAVE 390SCAN 392SEEK 53, 393SETUNDO 395SHIFT ( 397SHIFT ) 398SHIFT > 399SHIFT < 398SORT 399STATS 401SUBMIT 402summary 300TABS 403TENTER 67, 406TFLOW 67, 407TSPLIT 67, 408UNNUMBER 409UP 409usage 18VERSION 411VIEW 412
Macro CommandsCUT 328PASTE 375
macro definitions, resetting 115MACRO_LEVEL, assignment
statement 113, 364macro nesting level
querying 364retrieving 111
managing data 49mask, defined 183MASK, line command 183mask line, set or query 365
MASKLINE, assignment statementdescription 365overlays 106using 106
MD (make dataline), line command 185MEMBER, assignment statement 366member, editing 237, 337member name, querying 366MEND, macro command 366messages, displayed from edit
macros 92, 111mixed data, used with data strings 97Mixed Mode field 9model
adding 81changing 81, 85class, defined 77copying into the current data set 259,
367deleting 81, 85edit, defined 77finding 81, 84hierarchy 77kinds 77locating 84logical name 77macro command 367name, defined 78primary command 259qualifier, defined 78using 79
model notes, displaying 266, 370model selection panels 79modes, edit 23, 24modification flag 257modification level, description 31modification level number,
specifying 256, 353modifying an edit profile 23MOUNT authority 9MOVE
macro command 368primary command 50, 262
move a data set member 262, 368moving a line of data in an edit
macro 108moving data into the current data set 50moving lines 181multiple parameters in an edit
macro 110
Nname, defining 234, 332naming edit macros 103nested macros, starting 111nesting level, querying 364NOCONLIST operand, CLIST CONTROL
statement 123NOLIST operand, CLIST CONTROL
statement 123non-destructive shifting, defined 52NONUMBER
macro command 369primary command 266
NOPROCESS 116normal, defined for stats mode 30
NOSYMLIST operand, CLIST CONTROLstatement 123
notation conventionsline commands 154macro commands 299primary commands 207
note lines, converting to data 185note mode
description of 24querying the value 370setting the value 266, 370
NOTESassignment statement 370macro command 370primary command 24, 266
notes, displaying model 266, 370null spaces, controlling 267, 371NULLS
assignment statement 371macro command 371primary command 24, 267
nulls modedescription of 24querying the value 371setting the value 267, 371
NUMBERassignment statement 372macro command 372primary command
description 24, 268DISPLAY operand 32
number, specifying the modificationlevel 256, 353
number modedefined 24description 24, 268initializing 33setting, edit 31turning off 266, 369used with RENUM command 276,
384numbering lines automatically 213, 308numbers
controlling version 296, 411generating sequence 268, 372modification level 31remove sequence 294, 409sequence 31turning off number mode 266, 369
OO (overlay), line command 187O operand, REXX TRACE statement 123operand notation
lowercase 154, 207, 300OR symbol (|) 207, 300stacked 154, 207, 300underscored defaults 154, 207, 300
ordinal line number 257overlaying lines 187overlays, guidelines on how to
perform 106overriding, built-in edit commands 115
430 OS/390 V2R10.0 ISPF Edit and Edit Macros

PPACK
assignment statement 374macro command 374primary command 24, 269
pack mode 24, 269packing data, edit 19panel
excluding lines 203process the 377resetting the 386set up for text entry 406
panel data, resetting 282panel values, saving and restoring 410panels
Edit data display 11Edit Entry 7, 239edit profile display 22, 273Edit Recovery 46model selection 79
parameters in an edit macro 109passing labels 114passing parameters to an edit macro
description 109multiple 110processing an Edit command 98program macros 98
password protection 9Paste Lines 269, 375Paste Macro command 375Paste Primary command 269PDF, defined 3PF key processing in edit 17PF keys, scroll commands 15picture string 54, 55power typing, defined 69prepare display for data insertion 351Preserve command 270PRESERVE command 16PRESERVE macro 376primary commands
abbreviations 417AUTOLIST 23, 211AUTONUM 23, 213AUTOSAVE 23, 215BOUNDS 216BROWSE 218BUILTIN 217CANCEL 218CAPS 23, 219CHANGE 53, 220COPY 50, 225CREATE 49, 229DEFINE 234DELETE 236displaying after processing 17EDIT 237END 243EXCLUDE 53, 244FIND 53, 245FLIP 64, 247HEX 24, 249HILITE 252IMACRO 24, 255LEVEL 256LOCATE 257MODEL 259
primary commands (continued)MOVE 50, 262NONUMBER 266notation conventions 207NOTES 24, 266NULLS 24, 267NUMBER 24, 268PACK 24, 269PROFILE 23, 271RECOVERY 24, 275reference section 207RENUM 276REPLACE 49, 278RESET 65, 282RMACRO 284SAVE 284SETUNDO 24, 285SORT 287STATS 24, 289SUBMIT 289summary 207TABS 24, 290UNDO 292UNNUMBER 294usage 17VERSION 296VIEW 297
Primary CommandsCUT 233PASTE 269
PROCESS, macro commanddescription 378used with RANGE_CMD assignment
statement 381PROCESS command and operand 116processing built-in commands 217, 314PROFILE
assignment statement 379macro command
description 379profile control syntax 379profile lock syntax 379
primary commanddescription 23, 272display or define a profile 21profile control syntax 271profile lock syntax 272
profile, editautolist mode 211, 367autonum mode 213, 308autosave mode 215, 310boundaries 216boundary settings 168caps mode 219control and display 271, 379defining 21description 21displaying 21initial macro 255, 350lock 271, 379locking 23modifying 23note mode 266nulls mode 267recovery macro 284saving and restoring 410tabs mode 290
profile, edit (continued)types 21
profile defaults 25, 26PROFILE RESET command 26Profile Reset Syntax 272Profile Reset Syntax, Macro
Command 380program macros
defined 97differences from CLISTs 98differences from REXX EXECs 98how to write 99implicit definition 116passing parameters 98running 102
pseudo-lock, defined 325
Qqualifying the search string 58query
a line 354autolist mode 308autonum mode 308autosave mode 310block size 311caps mode 315change count 319command entered 380controlled library status 324current member name 366cursor position 326data-changed status 329data ID 331data set name 331data width 330display columns 335display lines 335edit boundaries 312edit profile 379exclude counts 341exclude status for a line 413find counts 343flow counts 345hexadecimal mode 345initial macro 350line label 351line number 360logical record length 362macro nesting level 364mask line 365modification level number 353note mode 370nulls mode 371number mode 372pack mode 374record format 382recovery mode 383seek counts 395tabs line 405tabs mode 403version number 411
Query Source and Change Informationfor a Line in a Data Set,LINE_STATUS 358
Query Volume Information 413
Index 431

RR (repeat) line command 189R operand, REXX TRACE statement 123range
specifying 116using labels to specify 66
RANGE_CMD, assignment statementdescription 117, 380used with the PROCESS
command 381RC variable 119RCHANGE, macro command
description 274, 381used to repeat CHANGE
command 60RECFM, assignment statement 382record format, query 382recovery
controlling edit 275, 383edit 46macro 117, 284, 389mode 24, 275, 383
RECOVERYassignment statement 383macro command 383primary command 24, 275
recursive editing, defined 237, 337redisplaying excluded lines 64referring to column positions 114referring to data lines 114reformatting a paragraph 198relative line number of cursor, setting or
retrieving 326relative line numbers 114remove sequence numbers 294, 409removing lines 236, 334RENUM
macro command 384primary command 276
RENUMBER primary command,DISPLAY operand 32
renumbering lines automatically 276,384
repeating a change 274, 381repeating a search
RCHANGE command, Edit 60RFIND command, Edit 60
repeating lines 189REPLACE
macro command 385primary command
description 278, 279how to use 49
replace a data set member 385replacing
data 49, 278lines 108
RESETmacro command 386primary command 282
RESET command, PROFILE 26reset the data display 386reset the data panel 282resetting macro definitions 115resetting the Line Command field 54retrieving the change count 319
retrieving the controlled librarystatus 324
retrieving the data-changed status 329retrieving the data ID 331retrieving the data set name 331retrieving the data width 330return codes
&LASTCC variable 1190 to 20 118above 20 118ISPF editor 119RC variable 119
reverse last data change 292REXX edit macro statements 89, 95REXX SAY statements, using to debug
edit macros 122REXX TRACE statements, using to debug
edit macros 123RFIND command
description 284, 387used to repeat FIND and EXCLUDE
commands 60RIGHT
macro command 388scroll 388
RMACROassignment statement
description 389overview 118
macro command 389primary command
description 284overview 118
SS (show line), line command
description 191redisplaying excluded lines 64
S operand, REXX TRACE statement 123sample edit macros 127SAVE
macro command 390primary command 284
save data automatically 215, 310SAVE_LENGTH command 390save the current data 284, 390saving and restoring
CHANGE macro commandvalues 410
cursor and panel values 410edit profile 410FIND macro command values 410
SCANassignment statement 392macro command 392
SCAN assignment statement 104scope of macro definitions 115scroll
down 336left 352right 388up 409using PF keys 15
searchcontrolling 57DBCS search string, delimiting 54
search (continued)extent 57qualifying 58starting point and direction 57
search stringscharacter 54delimited 54finding 341hexadecimal 54picture 54simple 54
security, data set 9SEEK, macro command
description 53, 393, 394when to use instead of FIND 342
seek a data string 393SEEK_COUNTS, assignment
statement 395seek counts, query 395sequence numbers
display 32format 32generating 268, 372initializing 33setting, edit 31
seta line 354autolist mode 308autonum mode 308autosave mode 310caps mode 315command scan mode 392cursor position 326edit boundaries 216, 312edit profile 379exclude status for a line 413hexadecimal mode 249, 345initial macro 350line label 351mask 183mask line 365modification level number 353note mode 266, 370nulls mode 267, 371number mode 372pack mode 374recovery mode 383tabs line 405tabs mode 290, 403version number 411
set UNDO command 285setting the edit boundaries 216, 312SETUNDO
macro command 395primary command 73, 285
SHIFT (, macro command 397SHIFT ), macro command 398SHIFT >, macro command 399SHIFT <, macro command 398shift columns
left 397right 398
shift dataleft 398right 399
432 OS/390 V2R10.0 ISPF Edit and Edit Macros

shifting dataedit
columns 51explicit 51implicit 51
non-destructive 52show lines 191show the first line 175show the last line 178SI characters, delimiting a search 54simple editing 14simple string 54Site-wide Edit Profile Initialization 25site-wide macro 18SO characters, delimiting a search 54software tab field, defined 194software tabs
defining 71description 70fields, how to use 194
SORTmacro command
DBCS data 401description 399, 400limiting 401without operands 400
primary commandDBCS data 288description 287, 288limiting 288without operands 288
sorting data 287, 399source listing, create 211, 308spaces, controlling null 267, 371special lines 27specify a recovery macro 117, 284, 389specifying
an initial macro 18, 29, 255, 350the level number 256, 353
split screen limitations 59splitting a line of text 199splitting lines 68splitting text 67stacked operands 154, 207, 300standard sequence field, defined 32starting point of a search 57statistics
creation and maintenance of 30generating for a data set 289, 401
STATSassignment statement 401macro command 401primary command 24, 289
stats mode 24, 30strings, kinds of search
character 54delimited 54hexadecimal 54picture 54simple 54
SUBMITmacro command 402primary command 289
submit data for batch processing 289,402
SYMLIST operand, CLIST CONTROLstatement 123
Syntax, Macro Command ProfileReset 380
Syntax, Profile Reset 272
TTABS
assignment statement 403controlling and querying 71, 403line command
defining hardware tabs 71defining software tabs 71description 193limiting hardware tab columns 72using software tab fields 194
macro command 403primary command 24, 290
tabs linequerying the value 405setting the value 405
tabs modedescription 24, 71setting the value 290, 403
TABSLINE, assignment statement 405TE (text entry), line command
DBCS data, using a DBCSterminal 70
description 69, 194, 195example 195syntax 195
template (overlay)definition 106how to design 106
TENTER, macro command 406text entry
in word processing 67line command 194setting up the panel 406
text flow 67text flowing a paragraph 198, 407text split a line 408TF (text flow), line command
DBCS data, using a DBCSterminal 68
description 67, 198TFLOW, macro command 407TS (text split), line command
DBCS data 69description 199, 200
TSO commands in edit macros 97TSPLIT, macro command 408turn off number mode 266, 369
UUC (uppercase), line command 201underscored operands 154, 207, 300undisplayable characters 14UNDO
primary command 292SETUNDO requirement 395with SETUNDO macro 285
undoing edit interactionsdescription 292how to use 73UNDO primary command 292
UNDOSIZE 74
UNNUMBERmacro command 409primary command 294
UP, macro command 409uppercase, converting data to 201uppercase commands and operands 154,
207, 299USER_STATE, assignment statement 410using the ISPF editor 3
Vvalue portion of an edit macro
statement 104variable substitution, controlling 104variables in edit macros 103verifying parameters 116VERSION
assignment statement 411macro command 411primary command 296
version numbercontrolling 296, 411description 31
VIEWmacro command 412primary command 297
VOLUME assignment statement 413Volume Information 413
Wwriting program macros 97, 99
XX (exclude), line command
using 59, 63XSTATUS, assignment statement 413
ZZDEFAULT edit profile 26ZEDITCMD variable 110ZEDLMSG 111ZEDSAVE variable 329ZEDSMSG 111ZUSERMAC variable 30
Index 433

434 OS/390 V2R10.0 ISPF Edit and Edit Macros
Readers’ Comments — We’d Like to Hear from You
InteractiveSystem Productivity Facility (ISPF)Edit and Edit MacrosOS/390 Version 2 Release 10.0
Publication No. SC28-1312-04
Overall, how satisfied are you with the information in this book?
Very Satisfied Satisfied Neutral Dissatisfied VeryDissatisfied
Overall satisfaction h h h h h
How satisfied are you that the information in this book is:
Very Satisfied Satisfied Neutral Dissatisfied VeryDissatisfied
Accurate h h h h h
Complete h h h h h
Easy to find h h h h h
Easy to understand h h h h h
Well organized h h h h h
Applicable to your tasks h h h h h
Please tell us how we can improve this book:
Thank you for your responses. May we contact you? h Yes h No
When you send comments to IBM, you grant IBM a nonexclusive right to use or distribute your comments in anyway it believes appropriate without incurring any obligation to you.
Name Address
Company or Organization
Phone No.

Readers’ Comments — We’d Like to Hear from YouSC28-1312-04
SC28-1312-04
IBMRCut or FoldAlong Line
Cut or FoldAlong Line
Fold and Tape Please do not staple Fold and Tape
Fold and Tape Please do not staple Fold and Tape
NO POSTAGENECESSARYIF MAILED IN THEUNITED STATES
BUSINESS REPLY MAILFIRST-CLASS MAIL PERMIT NO. 40 ARMONK, NEW YORK
POSTAGE WILL BE PAID BY ADDRESSEE
IBM CorporationSoftware ReengineeringDepartment G7IA / Bldg 503Research Triangle Park, NC
27709-9990
_ _ _ _ _ _ _ _ _ _ _ _ _ _ _ _ _ _ _ _ _ _ _ _ _ _ _ _ _ _ _ _ _ _ _ _ _ _ _ _ _ _ _ _ _ _ _ _ _ _ _ _ _ _ _ _ _ _ _ _ _ _ _ _ _ _ _ _ _ _ _ _ _ _ _ _ _ _ _ _ _ _ _ _ _ _ _ _ _
_ _ _ _ _ _ _ _ _ _ _ _ _ _ _ _ _ _ _ _ _ _ _ _ _ _ _ _ _ _ _ _ _ _ _ _ _ _ _ _ _ _ _ _ _ _ _ _ _ _ _ _ _ _ _ _ _ _ _ _ _ _ _ _ _ _ _ _ _ _ _ _ _ _ _ _ _ _ _ _ _ _ _ _ _ _ _ _ _
__
__
__
__
__
__
__
__
__
__
__
__
__
__
__
__
__
__
__
__
__
__
__
__
__
__
__
__
__
__
__
__
__
__
__
__
__
__
__
__
__
__
__
__
__
__
__
__
__
_


IBMR
File Number: S370/4300-39Program Number: 5647-A01
Printed in the United States of Americaon recycled paper containing 10%recovered post-consumer fiber.
SC28-1312-04