Embed Size (px)
Citation preview
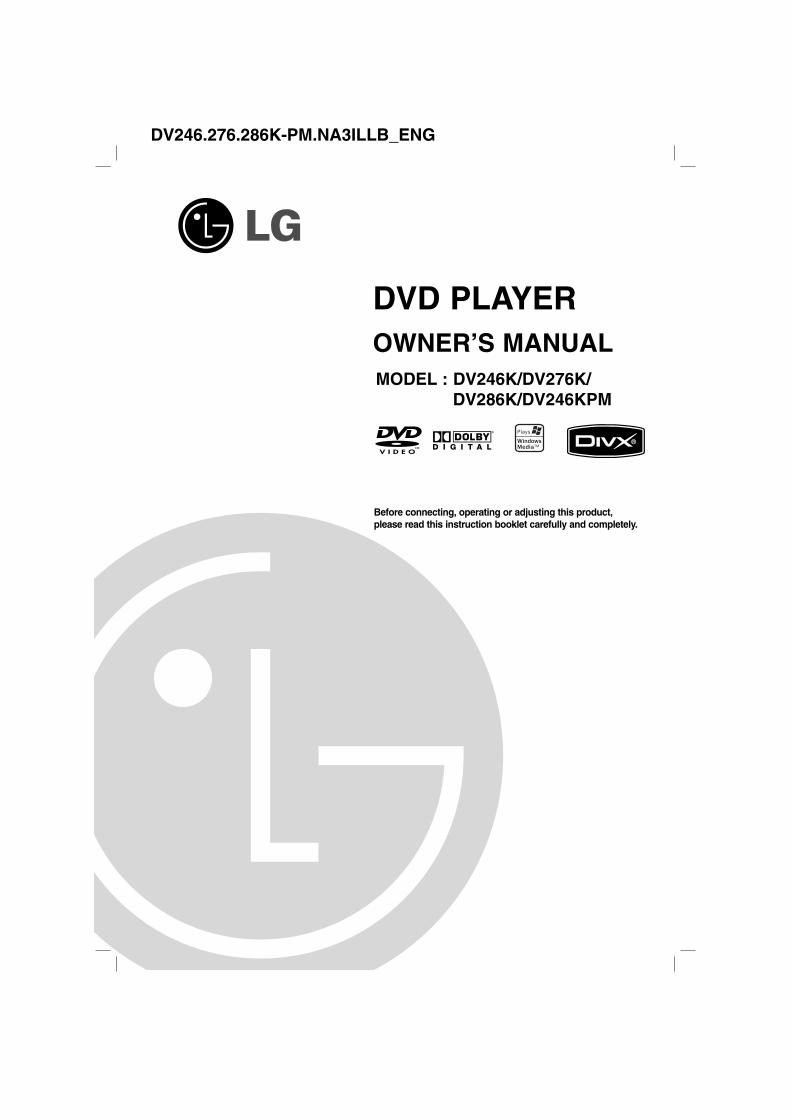
DVD PLAYEROWNER’S MANUALMODEL : DV246K/DV276K/
DV286K/DV246KPM
Before connecting, operating or adjusting this product,please read this instruction booklet carefully and completely.
DV246.276.286K-PM.NA3ILLB_ENG
2
This lightning flash with arrowhead symbol withinan equilateral triangle is intended to alert the userto the presence of uninsulated dangerous voltagewithin the product’s enclosure that may be ofsufficient magnitude to constitute a risk of electricshock to persons.
The exclamation point within an equilateraltriangle is intended to alert the user to thepresence of important operating and maintenance(servicing) instructions in the literatureaccompanying the product.
WARNING: Do not install this equipment in a confined spacesuch as a bookcase or similar unit.
CAUTION:
Do not block any ventilation openings. Install in accordancewith the manufacturer's instructions.
Slots and openings in the cabinet are provided for ventilationand to ensure reliable operation of the product and to protectit from overheating.The openings should be never be blocked by placing theproduct on a bed, sofa, rug or other similar surface.Thisproduct should not be placed in a built-in installation such asa bookcase or rack unless proper ventilation is provided orthe manufacturer's instruction have been adhered to.
CAUTION: This product employs a Laser System.To ensure proper use of this product, please read thisowner’s manual carefully and retain it for future reference.Should the unit require maintenance, contact an authorizedservice center.Performing controls, adjustments, or carrying out proceduresother than those specified herein may result in hazardousradiation exposure.To prevent direct exposure to laser beam, do not try to openthe enclosure. Visible laser radiation when open. DO NOTSTARE INTO BEAM.
CAUTION: The apparatus should not be exposed to water(dripping or splashing) and no objects filled with liquids, suchas vases, should be placed on the apparatus.
CAUTION concerning the Power Cord
Most appliances recommend they be placed upon adedicated circuit;That is, a single outlet circuit which powers only thatappliance and has no additional outlets or branch circuits.Check the specification page of this owner's manual to becertain.
Do not overload wall outlets. Overloaded wall outlets, looseor damaged wall outlets, extension cords, frayed powercords, or damaged or cracked wire insulation are dangerous.Any of these conditions could result in electric shock or fire.Periodically examine the cord of your appliance, and if itsappearance indicates damage or deterioration, unplug it,discontinue use of the appliance, and have the cord replacedwith an exact replacement part by an authorized servicer.
Protect the power cord from physical or mechanical abuse,such as being twisted, kinked, pinched, closed in a door, orwalked upon. Pay particular attention to plugs, wall outlets,and the point where the cord exits the appliance.
To disconnect power from the mains, pull out the mains cordplug. When installing the product, ensure that the plug iseasily accessible.
CAUTIONRISK OF ELECTRIC SHOCK
DO NOT OPEN
WARNING: TO PREVENT FIRE OR ELECTRIC SHOCKHAZARD, DO NOT EXPOSE THIS PRODUCT TO RAINOR MOISTURE.
CAUTION: TO REDUCE THE RISK OF ELECTRIC SHOCK
DO NOT REMOVE COVER (OR BACK)NO USER-SERVICEABLE PARTS INSIDE
REFER SERVICING TO QUALIFIED SERVICE PERSONNEL.
Op
erat
ion
R
efer
ence
Inst
alla
tio
n a
nd
Set
up
Intr
od
uct
ion
3
Introduction . . . . . . . . . . . . . . . . . .4-7
About the Symbol Display . . . . . . . . . . . .4Symbol used in this Manual . . . . . . . . . . . . . .4Notes on Discs . . . . . . . . . . . . . . . . . . . . . . . .4
Handling Discs . . . . . . . . . . . . . . . . . . . . . .4Storing Discs . . . . . . . . . . . . . . . . . . . . . . . .4Cleaning Discs . . . . . . . . . . . . . . . . . . . . . .4
Maintenance and Service . . . . . . . . . . . . . . . .4Types of Playable Discs . . . . . . . . . . . . . . . . .5Regional Code . . . . . . . . . . . . . . . . . . . . . . . .5Front Panel . . . . . . . . . . . . . . . . . . . . . . . . . . .6Remote Control . . . . . . . . . . . . . . . . . . . . . . . .7
Remote Control Operation . . . . . . . . . . . . . .7Remote Control Battery Installation . . . . . . .7
Installation and Setup . . . . . . . . .8-13
Setting up the Player . . . . . . . . . . . . . . . . . . .8DVD Player Connections . . . . . . . . . . . . . . . .8
Video and Audio Connections to Your TV . . .8Audio Connection to Optional Equipment . . .9Displaying Disc Information on-screen . . .10Initial Settings . . . . . . . . . . . . . . . . . . . . . . . .10
General Operation . . . . . . . . . . . . . . . . . . .10LANGUAGE . . . . . . . . . . . . . . . . . . . . . . .11• Menu Language . . . . . . . . . . . . . . . . . . .11• Disc Audio / Subtitle / Menu . . . . . . . . .11DISPLAY . . . . . . . . . . . . . . . . . . . . . . . . . .11• TV Aspect . . . . . . . . . . . . . . . . . . . . . . .11• Display Mode . . . . . . . . . . . . . . . . . . . . .11• Progressive Scan . . . . . . . . . . . . . . . . . .11• TV Output Select . . . . . . . . . . . . . . . . . . .11AUDIO . . . . . . . . . . . . . . . . . . . . . . . . . . .12• Dolby Digital / DTS / MPEG . . . . . . . . . .12• Sample Freq. (Frequency) . . . . . . . . . . . .12• Dynamic Range Control (DRC) . . . . . . .12LOCK (Parental Control) . . . . . . . . . . . . . .12• Rating . . . . . . . . . . . . . . . . . . . . . . . . . .12• Password . . . . . . . . . . . . . . . . . . . . . . . .12• Area Code . . . . . . . . . . . . . . . . . . . . . . .13OTHERS . . . . . . . . . . . . . . . . . . . . . . . . . .13• PBC . . . . . . . . . . . . . . . . . . . . . . . . . . . .13• B.L.E. (Black Level Expansion) . . . . . . .13• DivX(R) VOD . . . . . . . . . . . . . . . . . . . . .13• Score . . . . . . . . . . . . . . . . . . . . . . . . . . .13
Operation . . . . . . . . . . . . . . . . . .14-20
General Features . . . . . . . . . . . . . . . . . . . . .14Additional Features . . . . . . . . . . . . . . . . . . .15Playing an Audio CD or MP3/WMA file . . . . .16Programmed Playback . . . . . . . . . . . . . . . .17
Repeat Programmed Tracks . . . . . . . . . . .17Erasing a Track from Program List . . . . . .17Erasing the Complete Program List . . . . . .17
Playing a DVD VR format Disc . . . . . . . . . . .17Viewing a JPEG file . . . . . . . . . . . . . . . . . . .18
Slide Show . . . . . . . . . . . . . . . . . . . . . . . .18Still Picture . . . . . . . . . . . . . . . . . . . . . . . . .18Moving to another File . . . . . . . . . . . . . . . .18Zoom . . . . . . . . . . . . . . . . . . . . . . . . . . . . .18Rotating the picture . . . . . . . . . . . . . . . . . .18To listen to MP3/WMA music while watching picture . . . . . . . . . . . . . . . . . . . .18
Playing a DivX Movie file . . . . . . . . . . . . . . .19Using the Karaoke Function . . . . . . . . . . . . .20
Reference . . . . . . . . . . . . . . . . . .21-23
Controlling other TVs with the remote control . . . .21Video Mode Setting . . . . . . . . . . . . . . . . . . . . . . .21Language Codes . . . . . . . . . . . . . . . . . . . . . . .22Area Codes . . . . . . . . . . . . . . . . . . . . . . . . . . .22Troubleshooting . . . . . . . . . . . . . . . . . . . . . . .23Specifications . . . . . . . . . . . . . . . . . . . . . . . . .23
Contents
4
To ensure proper use of this product, please read thisowner’s manual carefully and retain it for futurereference.
This manual provides information on the operationand maintenance of your DVD player. Should the unitrequire service, contact an authorized service location.
About the Symbol Display
“ ” may appear on your TV display duringoperation and indicates that the function explained inthis owner’s manual is not available on that specificDVD video disc.
Symbol Used in this ManualNote:
Indicates special notes and operating features.
Tip:
Indicates tips and hints for making the task easier.
A section whose title has one of the following symbolsis applicable only to the disc represented by thesymbol.
All discs listed below
DVD and finalized DVD±R/RW
Video CDs
Audio CDs
MP3 files
WMA files
DivX files
Notes on Discs
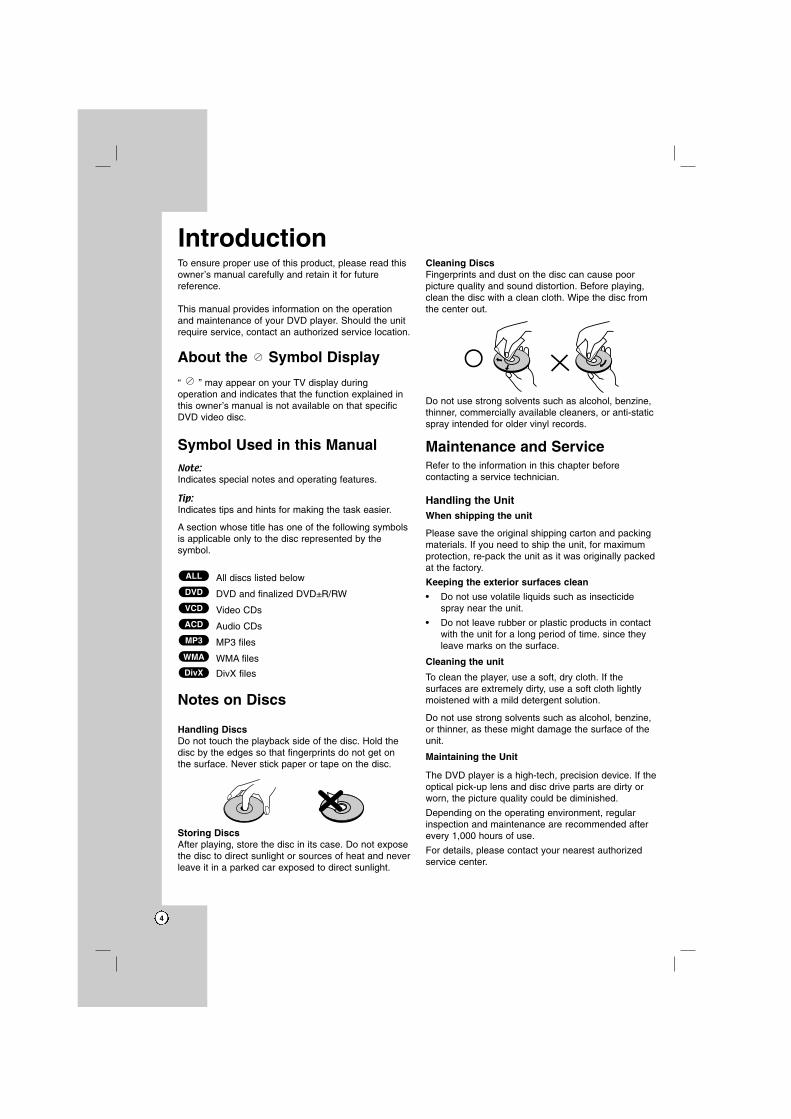
Handling DiscsDo not touch the playback side of the disc. Hold thedisc by the edges so that fingerprints do not get onthe surface. Never stick paper or tape on the disc.
Storing DiscsAfter playing, store the disc in its case. Do not exposethe disc to direct sunlight or sources of heat and neverleave it in a parked car exposed to direct sunlight.
Cleaning DiscsFingerprints and dust on the disc can cause poorpicture quality and sound distortion. Before playing,clean the disc with a clean cloth. Wipe the disc fromthe center out.
Do not use strong solvents such as alcohol, benzine,thinner, commercially available cleaners, or anti-staticspray intended for older vinyl records.
Maintenance and ServiceRefer to the information in this chapter beforecontacting a service technician.
Handling the UnitWhen shipping the unit
Please save the original shipping carton and packingmaterials. If you need to ship the unit, for maximumprotection, re-pack the unit as it was originally packedat the factory.
Keeping the exterior surfaces clean
• Do not use volatile liquids such as insecticidespray near the unit.
• Do not leave rubber or plastic products in contactwith the unit for a long period of time. since theyleave marks on the surface.
Cleaning the unit
To clean the player, use a soft, dry cloth. If thesurfaces are extremely dirty, use a soft cloth lightlymoistened with a mild detergent solution.
Do not use strong solvents such as alcohol, benzine,or thinner, as these might damage the surface of theunit.
Maintaining the Unit
The DVD player is a high-tech, precision device. If theoptical pick-up lens and disc drive parts are dirty orworn, the picture quality could be diminished.
Depending on the operating environment, regularinspection and maintenance are recommended afterevery 1,000 hours of use.
For details, please contact your nearest authorizedservice center.
DivX
WMA
MP3
ACD
VCD
DVD
ALL
Introduction
5
Intr
od
uct
ion
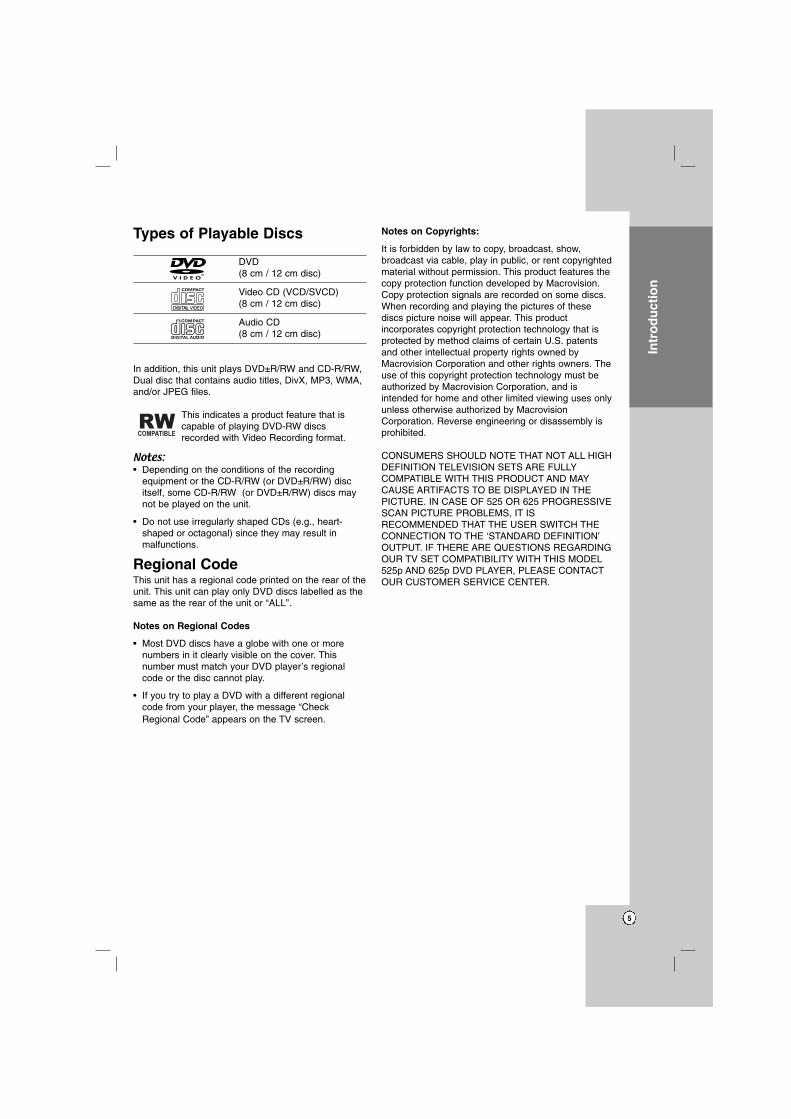
Types of Playable Discs
DVD(8 cm / 12 cm disc)
Video CD (VCD/SVCD) (8 cm / 12 cm disc)
Audio CD (8 cm / 12 cm disc)
In addition, this unit plays DVD±R/RW and CD-R/RW,Dual disc that contains audio titles, DivX, MP3, WMA,and/or JPEG files.
This indicates a product feature that iscapable of playing DVD-RW discsrecorded with Video Recording format.
Notes:• Depending on the conditions of the recording
equipment or the CD-R/RW (or DVD±R/RW) discitself, some CD-R/RW (or DVD±R/RW) discs maynot be played on the unit.
• Do not use irregularly shaped CDs (e.g., heart-shaped or octagonal) since they may result inmalfunctions.
Regional Code This unit has a regional code printed on the rear of theunit. This unit can play only DVD discs labelled as thesame as the rear of the unit or “ALL”.
Notes on Regional Codes
• Most DVD discs have a globe with one or morenumbers in it clearly visible on the cover. Thisnumber must match your DVD player’s regionalcode or the disc cannot play.
• If you try to play a DVD with a different regionalcode from your player, the message “CheckRegional Code” appears on the TV screen.
Notes on Copyrights:
It is forbidden by law to copy, broadcast, show,broadcast via cable, play in public, or rent copyrightedmaterial without permission. This product features thecopy protection function developed by Macrovision.Copy protection signals are recorded on some discs.When recording and playing the pictures of thesediscs picture noise will appear. This productincorporates copyright protection technology that isprotected by method claims of certain U.S. patentsand other intellectual property rights owned byMacrovision Corporation and other rights owners. Theuse of this copyright protection technology must beauthorized by Macrovision Corporation, and isintended for home and other limited viewing uses onlyunless otherwise authorized by MacrovisionCorporation. Reverse engineering or disassembly isprohibited.
CONSUMERS SHOULD NOTE THAT NOT ALL HIGHDEFINITION TELEVISION SETS ARE FULLYCOMPATIBLE WITH THIS PRODUCT AND MAYCAUSE ARTIFACTS TO BE DISPLAYED IN THEPICTURE. IN CASE OF 525 OR 625 PROGRESSIVESCAN PICTURE PROBLEMS, IT ISRECOMMENDED THAT THE USER SWITCH THECONNECTION TO THE ‘STANDARD DEFINITION’OUTPUT. IF THERE ARE QUESTIONS REGARDINGOUR TV SET COMPATIBILITY WITH THIS MODEL525p AND 625p DVD PLAYER, PLEASE CONTACTOUR CUSTOMER SERVICE CENTER.
6
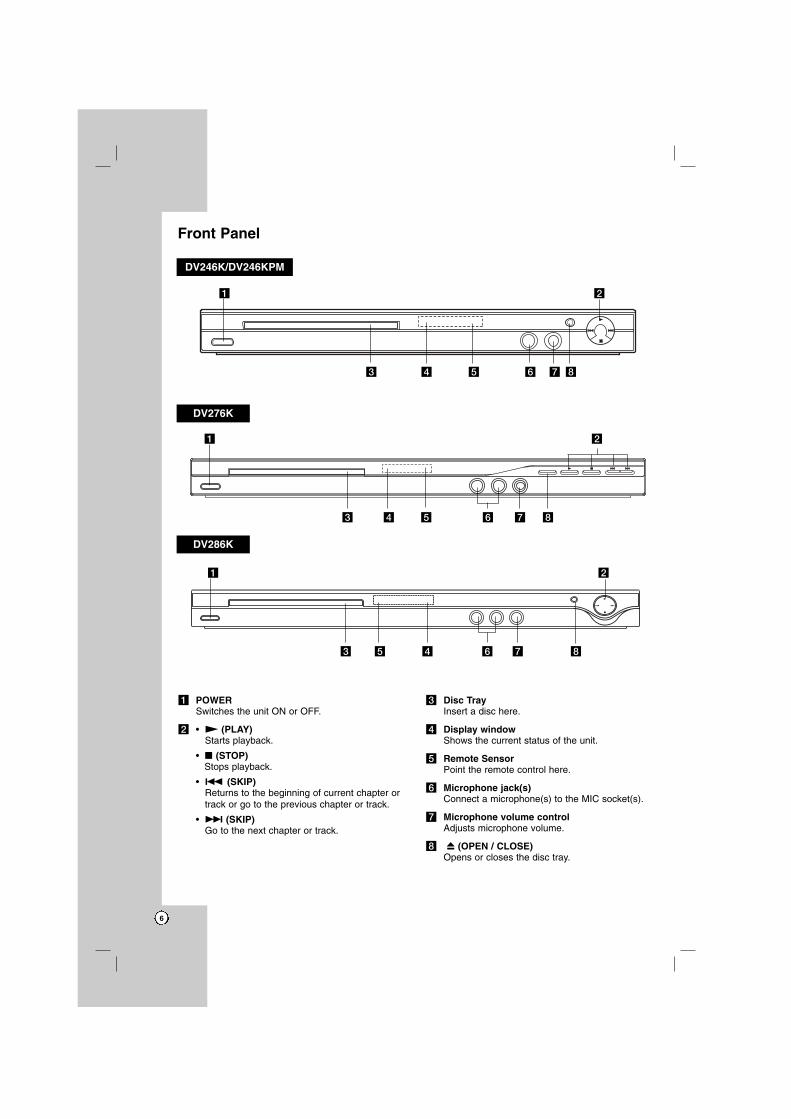
Front Panel
a POWERSwitches the unit ON or OFF.
b • N (PLAY)Starts playback.
• x (STOP)Stops playback.
• . (SKIP)Returns to the beginning of current chapter ortrack or go to the previous chapter or track.
• > (SKIP)Go to the next chapter or track.
c Disc TrayInsert a disc here.
d Display window Shows the current status of the unit.
e Remote SensorPoint the remote control here.
f Microphone jack(s)Connect a microphone(s) to the MIC socket(s).
g Microphone volume controlAdjusts microphone volume.
h Z (OPEN / CLOSE)Opens or closes the disc tray.
a b
c d e f g h
a b
c d e f g h
DV246K/DV246KPM
DV276K
DV286K
a b
c e d f g h
7
Intr
od
uct
ion
Remote Control
Remote Control Operation Point the remote control at the remote sensor andpress the buttons.
Caution:Do not mix old and new batteries and never mixdifferent types of batteries such as standard, alkaline,etc.
Remote Control Battery installationDetach the battery cover on the rear of theremote control, and insert two batteries(size AAA) with 3 and # aligned correctly.
POWERSwitches DVD Player ON or OFF
OPEN/CLOSE (Z)Opens and closes the disc tray.
0-9 numerical buttonsSelects numbered options in a
menu.
CLEARRemoves a track number on the
Program List or a mark on theMarker Search menu.
TV Control ButtonsPOWER: Turns the TV on or off.
AV: Selects the TV’s source.PR/CH +/–: Selects TV’s channel.
VOL +/–: Adjusts TV’s volume.
MARKERMarks any point during playback.
SEARCHDisplays MARKER SEARCH menu.
PROGRAMEnter the program edit mode.
ZOOMEnlarges video image.
REPEATRepeat chapter, track, title, all.
A-BRepeat sequence from point A topoint B.
RANDOMPlays tracks in random order.
KARAOKE (ECHO)Accesses or removes KARAOKE menu.
SCAN (m / M)Search backward or forward.
SKIP (. / >)Go to the next chapter or track.Returns to the beginning of currentchapter or track or go to theprevious chapter or track.
PAUSE / STEP ( X )Pauses playback temporarily/ pressrepeatedly for frame-by-frameplayback.
PLAY (N)Starts playback.
STOP (x)Stops playback.
DVD MENUAccesses menu on a DVD disc.
TITLEDisplays title menu, if available.
b / B / v / V (left/right/up/down)Selects an option in the menu.
ENTERConfirms menu selection.
DISPLAYAccesses On-Screen Display.
RETURN (O)Removes the menu.
Displays the menu of a video CDwith PBC.
AUDIOSelects an audio language or an
audio channel.
SUBTITLESelects a subtitle language.
ANGLESelects a DVD camera angle, if
available.
SETUPAccesses or removes the Setup
menu.
8
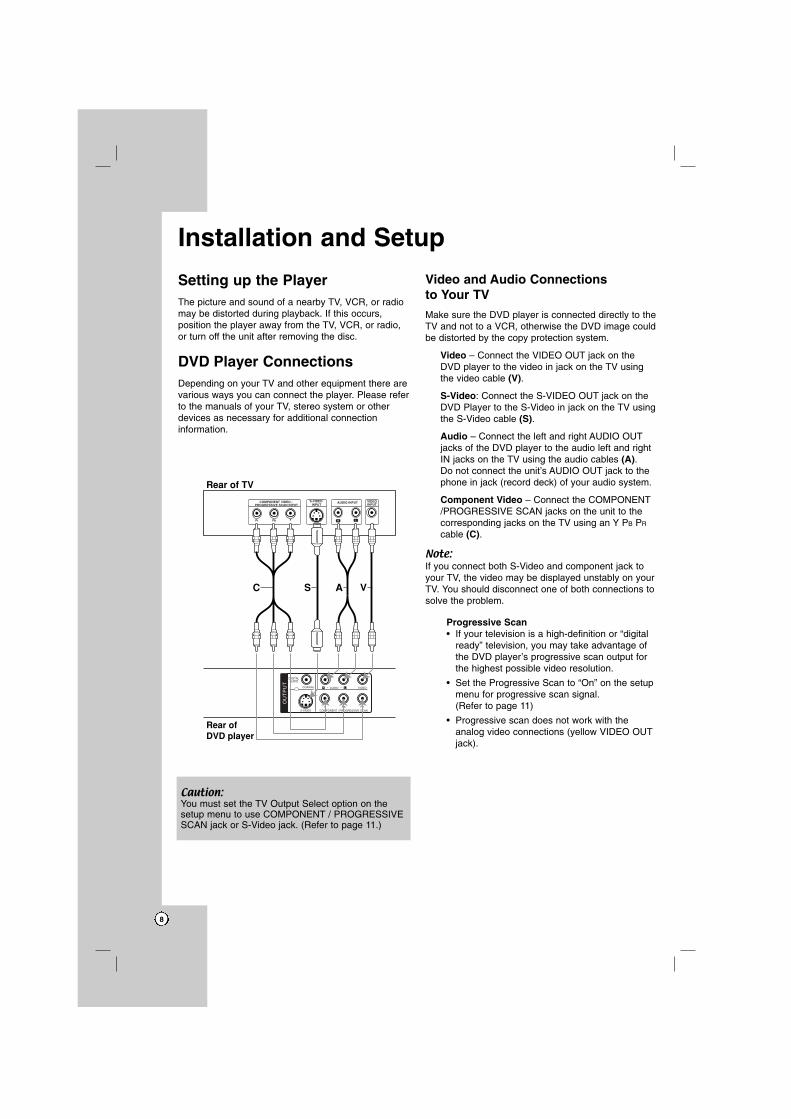
Setting up the PlayerThe picture and sound of a nearby TV, VCR, or radiomay be distorted during playback. If this occurs,position the player away from the TV, VCR, or radio,or turn off the unit after removing the disc.
DVD Player ConnectionsDepending on your TV and other equipment there arevarious ways you can connect the player. Please referto the manuals of your TV, stereo system or otherdevices as necessary for additional connectioninformation.
Video and Audio Connections to Your TV
Make sure the DVD player is connected directly to theTV and not to a VCR, otherwise the DVD image couldbe distorted by the copy protection system.
Video – Connect the VIDEO OUT jack on theDVD player to the video in jack on the TV usingthe video cable (V).
S-Video: Connect the S-VIDEO OUT jack on theDVD Player to the S-Video in jack on the TV usingthe S-Video cable (S).
Audio – Connect the left and right AUDIO OUTjacks of the DVD player to the audio left and rightIN jacks on the TV using the audio cables (A). Do not connect the unit’s AUDIO OUT jack to thephone in jack (record deck) of your audio system.
Component Video – Connect the COMPONENT/PROGRESSIVE SCAN jacks on the unit to thecorresponding jacks on the TV using an Y PB PR
cable (C).
Note:If you connect both S-Video and component jack toyour TV, the video may be displayed unstably on yourTV. You should disconnect one of both connections tosolve the problem.
Progressive Scan • If your television is a high-definition or “digital
ready” television, you may take advantage ofthe DVD player’s progressive scan output forthe highest possible video resolution.
• Set the Progressive Scan to “On” on the setupmenu for progressive scan signal. (Refer to page 11)
• Progressive scan does not work with theanalog video connections (yellow VIDEO OUTjack).
Installation and Setup
Caution:You must set the TV Output Select option on thesetup menu to use COMPONENT / PROGRESSIVESCAN jack or S-Video jack. (Refer to page 11.)
9
Inst
alla
tio
n a
nd
Set
up
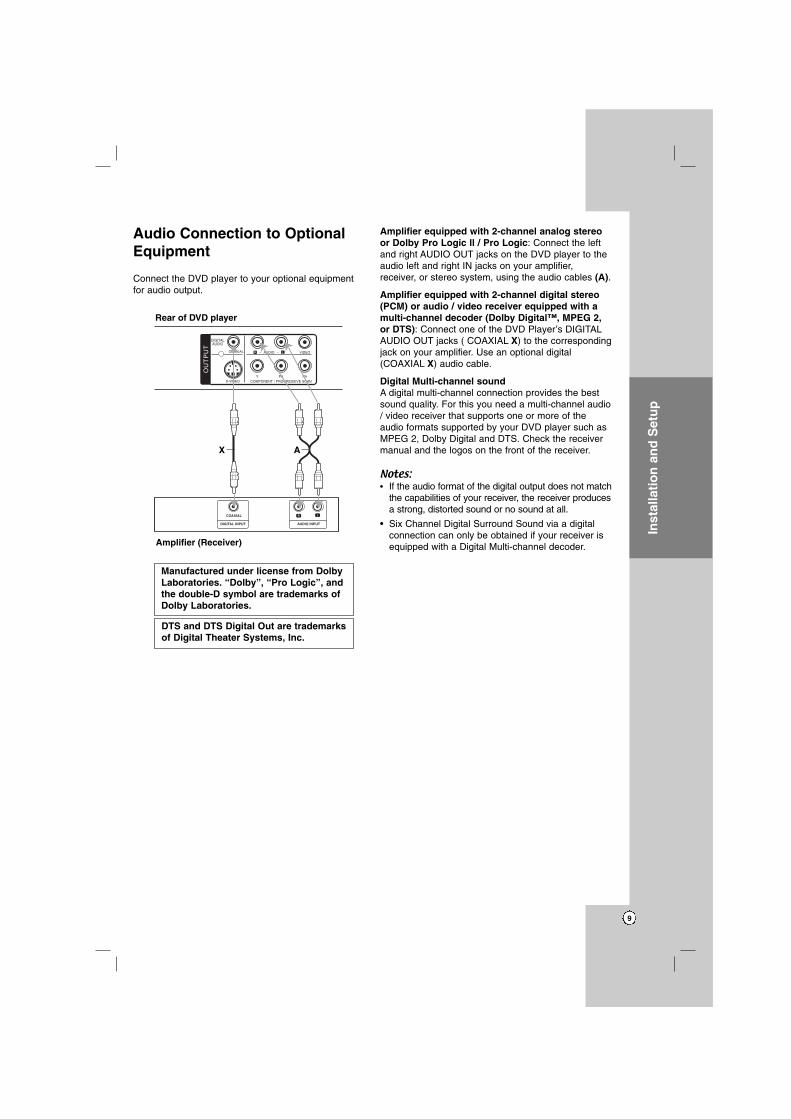
Audio Connection to OptionalEquipment
Connect the DVD player to your optional equipmentfor audio output.
Amplifier equipped with 2-channel analog stereoor Dolby Pro Logic ll / Pro Logic: Connect the leftand right AUDIO OUT jacks on the DVD player to theaudio left and right IN jacks on your amplifier,receiver, or stereo system, using the audio cables (A).
Amplifier equipped with 2-channel digital stereo(PCM) or audio / video receiver equipped with amulti-channel decoder (Dolby Digital™, MPEG 2,or DTS): Connect one of the DVD Player’s DIGITALAUDIO OUT jacks ( COAXIAL X) to the correspondingjack on your amplifier. Use an optional digital(COAXIAL X) audio cable.
Digital Multi-channel soundA digital multi-channel connection provides the bestsound quality. For this you need a multi-channel audio/ video receiver that supports one or more of theaudio formats supported by your DVD player such asMPEG 2, Dolby Digital and DTS. Check the receivermanual and the logos on the front of the receiver.
Notes:• If the audio format of the digital output does not match
the capabilities of your receiver, the receiver producesa strong, distorted sound or no sound at all.
• Six Channel Digital Surround Sound via a digitalconnection can only be obtained if your receiver isequipped with a Digital Multi-channel decoder.
Manufactured under license from DolbyLaboratories. “Dolby”, “Pro Logic”, andthe double-D symbol are trademarks ofDolby Laboratories.
DTS and DTS Digital Out are trademarksof Digital Theater Systems, Inc.
R L
AUDIO INPUTDIGITAL INPUT
COAXIAL
Amplifier (Receiver)
Rear of DVD player
AX
10
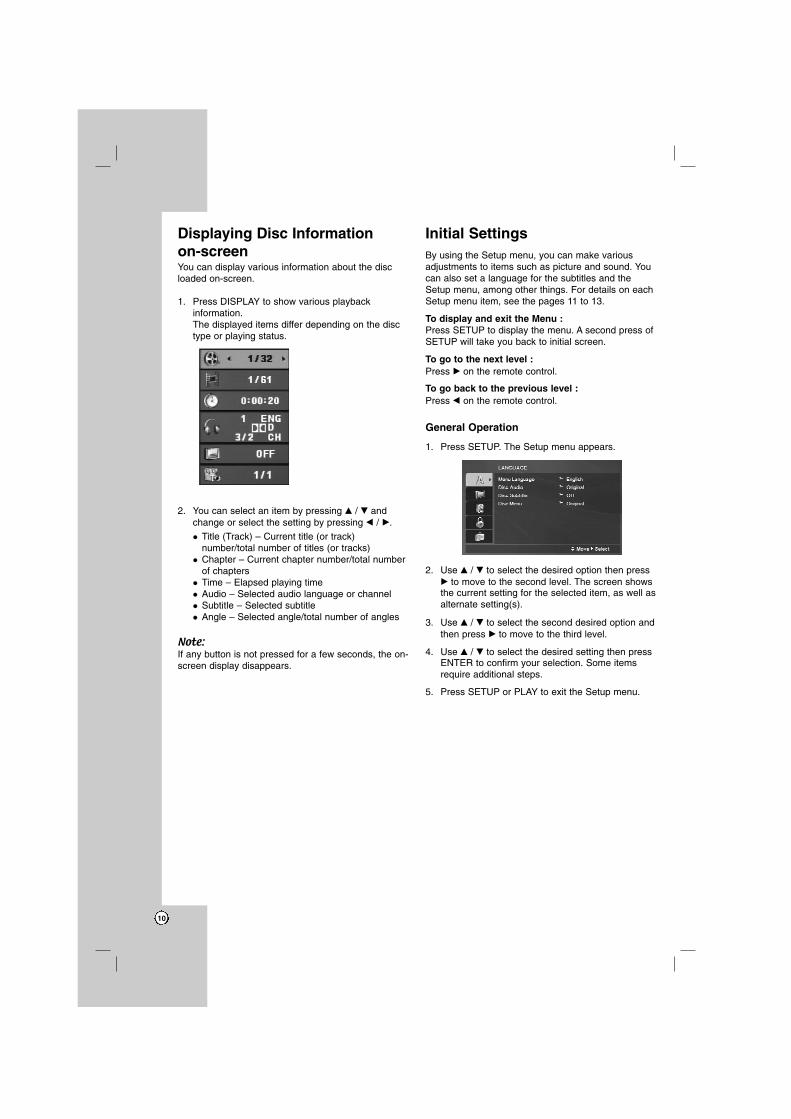
Displaying Disc Information on-screenYou can display various information about the discloaded on-screen.
1. Press DISPLAY to show various playbackinformation.The displayed items differ depending on the disctype or playing status.
2. You can select an item by pressing v / V andchange or select the setting by pressing b / B.
�� Title (Track) – Current title (or track)number/total number of titles (or tracks)
�� Chapter – Current chapter number/total numberof chapters
�� Time – Elapsed playing time �� Audio – Selected audio language or channel �� Subtitle – Selected subtitle �� Angle – Selected angle/total number of angles
Note:If any button is not pressed for a few seconds, the on-screen display disappears.
Initial SettingsBy using the Setup menu, you can make variousadjustments to items such as picture and sound. Youcan also set a language for the subtitles and theSetup menu, among other things. For details on eachSetup menu item, see the pages 11 to 13.
To display and exit the Menu :Press SETUP to display the menu. A second press ofSETUP will take you back to initial screen.
To go to the next level : Press B on the remote control.
To go back to the previous level :Press b on the remote control.
General Operation
1. Press SETUP. The Setup menu appears.
2. Use v / V to select the desired option then pressB to move to the second level. The screen showsthe current setting for the selected item, as well asalternate setting(s).
3. Use v / V to select the second desired option andthen press B to move to the third level.
4. Use v / V to select the desired setting then pressENTER to confirm your selection. Some itemsrequire additional steps.
5. Press SETUP or PLAY to exit the Setup menu.
11
Inst
alla
tio
n a
nd
Set
up
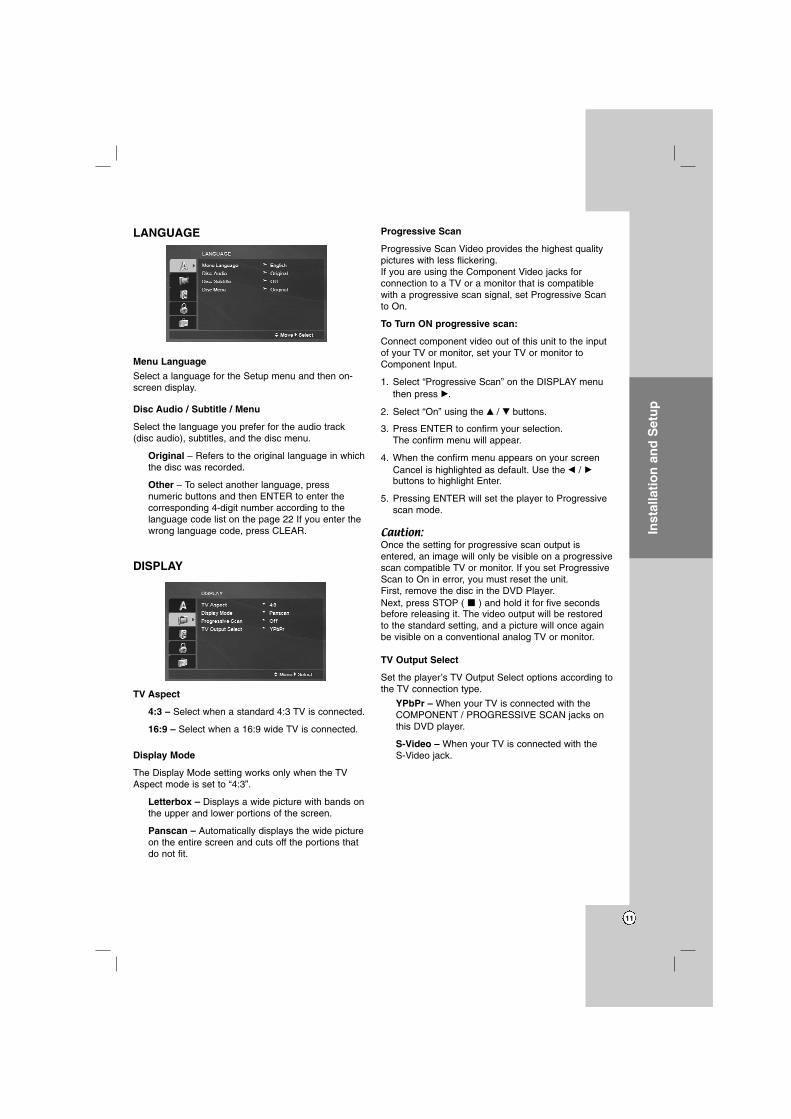
LANGUAGE
Menu Language
Select a language for the Setup menu and then on-screen display.
Disc Audio / Subtitle / Menu
Select the language you prefer for the audio track(disc audio), subtitles, and the disc menu.
Original – Refers to the original language in whichthe disc was recorded.
Other – To select another language, pressnumeric buttons and then ENTER to enter thecorresponding 4-digit number according to thelanguage code list on the page 22 If you enter thewrong language code, press CLEAR.
DISPLAY
TV Aspect
4:3 – Select when a standard 4:3 TV is connected.
16:9 – Select when a 16:9 wide TV is connected.
Display Mode
The Display Mode setting works only when the TVAspect mode is set to “4:3”.
Letterbox – Displays a wide picture with bands onthe upper and lower portions of the screen.
Panscan – Automatically displays the wide pictureon the entire screen and cuts off the portions thatdo not fit.
Progressive Scan
Progressive Scan Video provides the highest qualitypictures with less flickering.If you are using the Component Video jacks forconnection to a TV or a monitor that is compatiblewith a progressive scan signal, set Progressive Scanto On.
To Turn ON progressive scan:
Connect component video out of this unit to the inputof your TV or monitor, set your TV or monitor toComponent Input.
1. Select “Progressive Scan” on the DISPLAY menuthen press B.
2. Select “On” using the v / V buttons.
3. Press ENTER to confirm your selection. The confirm menu will appear.
4. When the confirm menu appears on your screenCancel is highlighted as default. Use the b / B
buttons to highlight Enter.
5. Pressing ENTER will set the player to Progressivescan mode.
Caution:Once the setting for progressive scan output isentered, an image will only be visible on a progressivescan compatible TV or monitor. If you set ProgressiveScan to On in error, you must reset the unit. First, remove the disc in the DVD Player. Next, press STOP ( x ) and hold it for five secondsbefore releasing it. The video output will be restoredto the standard setting, and a picture will once againbe visible on a conventional analog TV or monitor.
TV Output Select
Set the player’s TV Output Select options according tothe TV connection type.
YPbPr – When your TV is connected with theCOMPONENT / PROGRESSIVE SCAN jacks onthis DVD player.
S-Video – When your TV is connected with the S-Video jack.
12
AUDIO
Each DVD disc has a variety of audio output options.Set the player’s AUDIO options according to the typeof audio system you use.
Dolby Digital / DTS / MPEG
Bitstream – Select “Bitstream” if you connect thisDVD player’s DIGITAL OUT jack to an amplifier orother equipment with a Dolby Digital, DTS orMPEG decoder.
PCM (for Dolby Digital / MPEG) – Select whenconnected to a two-channel digital stereo amplifier.DVDs encoded in Dolby Digital or MPEG will beautomatically downmixed to two-channel PCMaudio.
Off (for DTS) – If you select “Off”, the DTS signalis not output through the DIGITAL OUT jack.
Sample Freq. (Frequency)
If your receiver or amplifier is NOT capable ofhandling 96 kHz signals, select 48 kHz. When thischoice is made, this unit automatically converts any96 kHz signals to 48 kHz so your system can decodethem.
If your receiver or amplifier is capable of handling 96kHz signals, select 96 kHz.
Check the documentation for your amplifier to verifyits capabilities.
Dynamic Range Control (DRC)
With the DVD format, you can hear a program’ssoundtrack in the most accurate and realisticpresentation. However, you may wish to compress thedynamic range of the audio output (the differencebetween the loudest sounds and the quietest ones).This allows you to listen to a movie at a lower volumewithout losing clarity of sound. Set DRC to On for thiseffect.
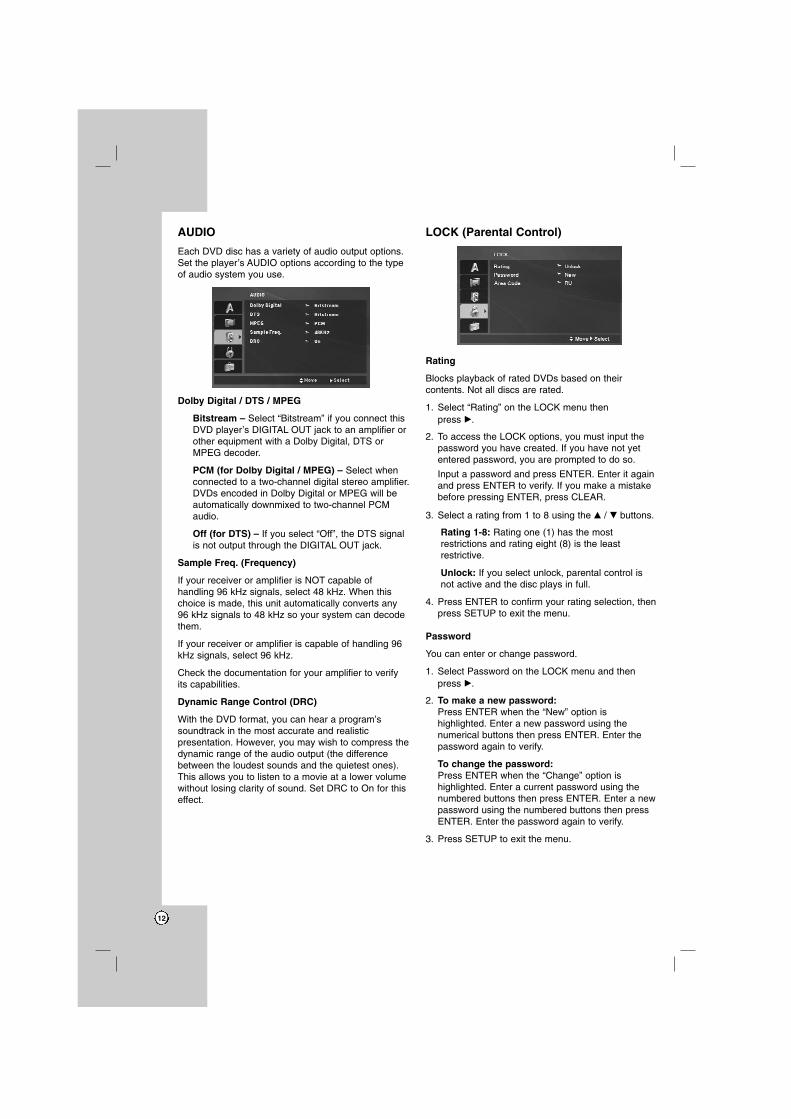
LOCK (Parental Control)
Rating
Blocks playback of rated DVDs based on theircontents. Not all discs are rated.
1. Select “Rating” on the LOCK menu then press B.
2. To access the LOCK options, you must input thepassword you have created. If you have not yetentered password, you are prompted to do so.
Input a password and press ENTER. Enter it againand press ENTER to verify. If you make a mistakebefore pressing ENTER, press CLEAR.
3. Select a rating from 1 to 8 using the v / V buttons.
Rating 1-8: Rating one (1) has the mostrestrictions and rating eight (8) is the leastrestrictive.
Unlock: If you select unlock, parental control isnot active and the disc plays in full.
4. Press ENTER to confirm your rating selection, thenpress SETUP to exit the menu.
Password
You can enter or change password.
1. Select Password on the LOCK menu and thenpress B.
2. To make a new password:Press ENTER when the “New” option ishighlighted. Enter a new password using thenumerical buttons then press ENTER. Enter thepassword again to verify.
To change the password:Press ENTER when the “Change” option ishighlighted. Enter a current password using thenumbered buttons then press ENTER. Enter a newpassword using the numbered buttons then pressENTER. Enter the password again to verify.
3. Press SETUP to exit the menu.
13
Inst
alla
tio
n a
nd
Set
up
If you forget your password
If you forget your password, you can clear it using thefollowing steps:
1. Press SETUP to display the Setup menu.
2. Input the 6-digit number “210499” and the securitycode is cleared.
Area Code
Enter the code of the area whose standards wereused to rate the DVD video disc, based on the list onpage 22.
1. Select “Area Code” on the LOCK menu then press B.
2. Follow the step 2 as shown previous page(Rating).
3. Select the first character using v / V buttons.
4. Press ENTER and select the second characterusing v / V buttons.
5. Press ENTER to confirm your Area code selection.
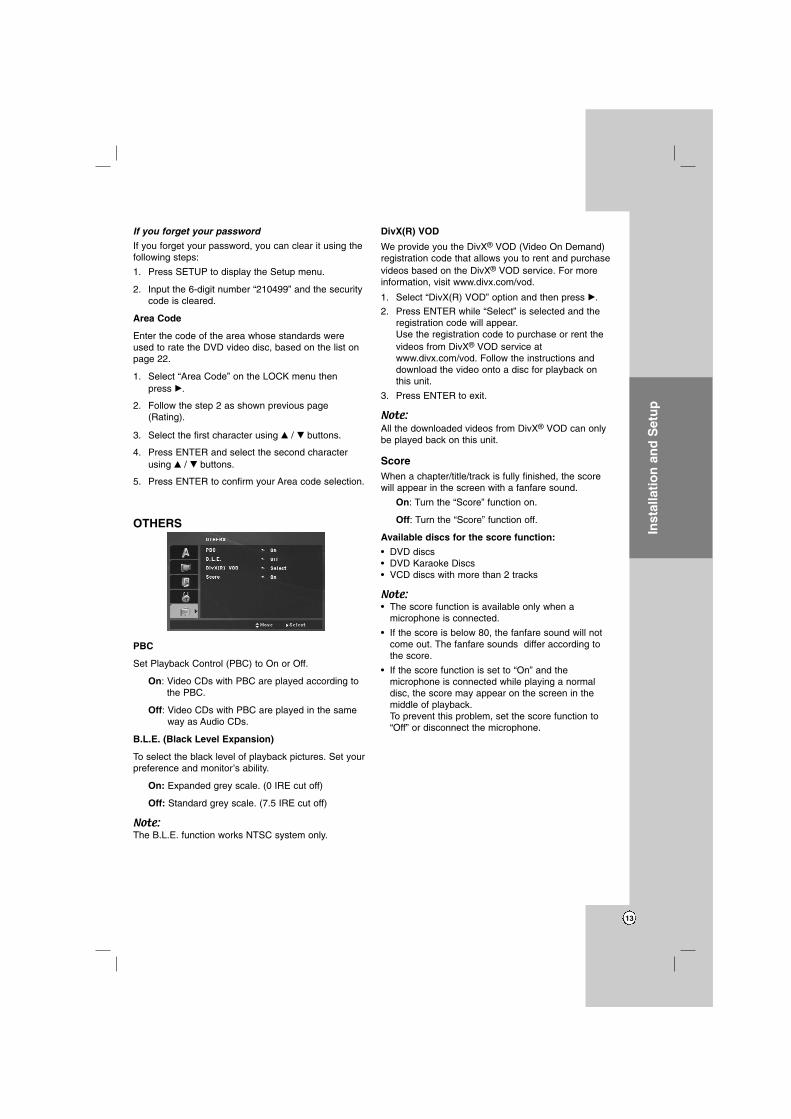
OTHERS
PBC
Set Playback Control (PBC) to On or Off.
On: Video CDs with PBC are played according to the PBC.
Off: Video CDs with PBC are played in the sameway as Audio CDs.
B.L.E. (Black Level Expansion)
To select the black level of playback pictures. Set yourpreference and monitor’s ability.
On: Expanded grey scale. (0 IRE cut off)
Off: Standard grey scale. (7.5 IRE cut off)
Note:The B.L.E. function works NTSC system only.
DivX(R) VOD
We provide you the DivX® VOD (Video On Demand)registration code that allows you to rent and purchasevideos based on the DivX® VOD service. For moreinformation, visit www.divx.com/vod.
1. Select “DivX(R) VOD” option and then press B.
2. Press ENTER while “Select” is selected and theregistration code will appear. Use the registration code to purchase or rent thevideos from DivX® VOD service atwww.divx.com/vod. Follow the instructions anddownload the video onto a disc for playback onthis unit.
3. Press ENTER to exit.
Note:
All the downloaded videos from DivX® VOD can onlybe played back on this unit.
ScoreWhen a chapter/title/track is fully finished, the scorewill appear in the screen with a fanfare sound.
On: Turn the “Score” function on.
Off: Turn the “Score” function off.
Available discs for the score function:
• DVD discs• DVD Karaoke Discs• VCD discs with more than 2 tracks
Note:• The score function is available only when a
microphone is connected.
• If the score is below 80, the fanfare sound will notcome out. The fanfare sounds differ according tothe score.
• If the score function is set to “On” and themicrophone is connected while playing a normaldisc, the score may appear on the screen in themiddle of playback. To prevent this problem, set the score function to“Off” or disconnect the microphone.

14
OperationGeneral features
Buttons Operations
OPEN / CLOSE (Z) Opens or closes the disc tray.
PAUSE/STEP (X) During playback, press X to pause playback.
Press X repeatedly to play Frame-by-Frame.
SKIP (. / >) During playback, press SKIP (. or >) to go to the nextchapter/track or to return to the beginning of the currentchapter/track.
Press SKIP . twice briefly to step back to the previouschapter/track.
SCAN (m / M) During playback, press SCAN (m or M) repeatedly toselect the required scan speed. DVD, DivX disc: 4 steps Video CD, MP3, WMA, Audio CD: 3 steps
While the playback is paused, press SCAN (m or M)repeatedly to play in slow motion (4 steps).
REPEAT During playback, press REPEAT repeatedly to select adesired repeat mode.DVD Video discs: Chapter/Title/OffVideo CD, Audio CD, DivX/MP3/WMA discs: Track/All/Off
A-B Press the A-B button one at a time to select a point A andpoint B and repeats a sequence from point A (Starting point)to point B (End point).
ZOOM During playback or pause mode, press ZOOM to enlargethe video image. (3 steps) You can move through the zoomed picture using b B v V
buttons. Press CLEAR to exit.
RANDOM During playback or in stop mode, press RANDOM forrandom playback.
TITLE If the current DVD title has a menu, the title menu appearson the screen. Otherwise, the disc menu may appears.
DVD MENU The disc menu appears on the screen.
(ANGLE) During playback of DVD disc that contains scenes recordedat different camera angles, press ANGLE repeatedly toselect a desired angle.
(SUBTITLE) During playback, press SUBTITLE repeatedly to select adesired subtitle language.
(AUDIO) During playback, press AUDIO repeatedly to hear a differentaudio language or audio track.
Discs
(forward only)
VCDDivXDVD
DivXDVD
DVD
DVD
DVD
WMA
MP3ACDVCD
DivXVCDDVD
ACD
DivXVCDDVD
ALL
DivXVCD
DVD
ALL
ALL
DivXVCDDVD
ALL
ALL
15
Op
erat
ion
Notes on general features:
• On a Video CD with PBC, you must set PBC to Offon the setup menu to use the repeat function (See“PBC” on page 13).
• If you press SKIP (>) once during Repeat Chapter(Track) playback, the repeat playback cancels.
• Zoom may not work on some DVDs.
• When you are playing a DVD disc that containsscenes recorded at different camera angles, theangle indicator will blink on the TV screen during theoprations as an indication that angle switching ispossible.
• If you press . once within 3 seconds after thechapter/track has started, the playback goes to theprevious chapter/track.
Additional features
Time Search
To start playing at any chosen time on the disc:
1. Press DISPLAY during playback.
2. Press v / V to select the time clock icon and “-:--:--” appears.
3. Use numerical buttons to input the required starttime in hours, minutes, and seconds from left toright. If you enter the wrong numbers, pressCLEAR to remove the numbers you entered. Theninput the correct numbers.
4. Press ENTER to confirm. Playback starts from theselected time.
Marker Search
To enter a Marker
You can start playback from up to nine memorizedpoints. To enter a marker, press MARKER at thedesired point on the disc. The Marker icon appears onthe TV screen briefly. Repeat to enter up to ninemarkers.
To Recall or Clear a Marked Scene
1. During disc playback, press SEARCH. The markersearch menu appears on the screen.
2. Within 9 seconds, press b / B to select a markernumber that you want to recall or clear.
3. Press ENTER and playback starts from the markedscene. Or Press CLEAR and the marker number iserased from the list.
4. You can play any marker by inputting its number onthe marker search menu.
Last Scene Memory
This player memorizes last scene from the last discthat is viewed. The last scene remains in memoryeven if you remove the disc from the player or switchoff the player. If you load a disc that has the scenememorized, the scene is automatically recalled.
Note:This player does not memorize the scene of a disc ifyou switch off the player before commencing to playthe disc.
Screen Saver
The screen saver appears when you leave the DVDplayer in Stop mode for about five minutes. If theScreen Saver is displayed for five minutes, the DVDPlayer automatically turns itself off.
System Select
You must select the appropriate system mode for yourTV system. If NOdSC appears in the display window,press and hold PAUSE/STEP for more than 5 secondsto be able to select a system (PAL, NTSC, or AUTO).
VCD1.1ACDDVD
DivXVCDDVD
DivXVCDDVD
16
Playing an Audio CD orMP3/WMA fileThis unit can play Audio CDs or MP3/WMA files.
MP3/ WMA/ Audio CDOnce you insert an MP3/WMA files recorded media orAudio CD, a menu appears on the TV screen. Press v / V to select a track/file and then press PLAYor ENTER and playback starts. You can use variableplayback functions. Refer to page 14-15.
ID3 TAG When playing a file containing information such as
track titles, you can see the information by pressingDISPLAY.[ Title, Artist, Album, Year, Comment ]
Tips:• Press DVD MENU to move to the next page.
• On a DISC with MP3/WMA, JPEG and MOVIE file,you can switch MUSIC, PHOTO and MOVIE menu.Press TITLE, and MUSIC, PHOTO or MOVIE wordon top of the menu is highlighted.
MP3 / WMA disc compatibility with this player islimited as follows:• Sampling frequency: within 8 - 48 kHz (MP3),
within 32 - 48kHz (WMA)• Bit rate: within 8 - 320kbps (MP3),
32 - 192kbps (WMA)• The player cannot read an MP3/WMA file that has
a file extension other than “.mp3” / “.wma”.• CD-R physical format should be ISO 9660• If you record MP3 / WMA files using software that
cannot create a file system (eg. Direct-CD) it isimpossible to playback MP3 / WMA files. Werecommend that you use Easy-CD Creator, whichcreates an ISO 9660 file system.
• File names should have a maximum of 8 lettersand must incorporate an .mp3 or .wma extension.
• They should not contain special letters such as /? * : “ < > l etc.
• The total number of files on the disc should beless than 650.
• This DVD player requires discs and recordings tomeet certain technical standards in order toachieve optimal playback quality. Pre-recordedDVDs are automatically set to these standards.There are many different types of recordable discformats (including CD-R containing MP3 or WMAfiles) and these require certain pre-existingconditions (see above) to ensure compatibleplayback.
Customers should note that permission isrequired in order to download MP3 / WMA filesand music from the Internet. Our company hasno right to grant such permission. Permissionshould always be sought from the copyrightowner.
17
Op
erat
ion
Programmed Playback The program function enables you to store yourfavorite tracks from any disc in the player memory. A program can contain 30 tracks.
1. Insert an Audio CD or MP3/WMA files recordedmedia. AUDIO CD or MUSIC menu appears.
2. Press PROGRAM. The mark will appear.
Note:Press PROGRAM again to exit the program editmode, then the mark will disappear.
Video CD: Press PROGRAM while playback isstopped. The program menu appears. PressPROGRAM again to exit the menu.
Note:On a Video CD with PBC, you must set PBC to Off onthe setup menu to use the programmed playback(See “PBC” on page 13).
3. Select a track on the “List” and then press ENTERto place the selected track on the “Program” list.Repeat to place additional tracks on the list.
4. Select the track you want to start playing on the“Program” list.
5. Press PLAY or ENTER to start. Playback begins inthe order in which you programmed the tracks.Playback stops after all of the tracks on the“Program” list have played once.
6. To resume normal playback from programmedplayback, select a track on the list and then pressPLAY.
Repeat Programmed Tracks
Press REPEAT to select a desired repeat mode.
• Track: repeats the current track• All: repeats all the tracks on the “Program” list.• Off (No display): does not play repeatedly.
Note:
If you press > once during Repeat Track playback,the repeat playback cancels.
Erasing a Track from “Program” List
1. Use v V b B to select the track that you wish toerase from the Program list.
2. Press CLEAR. Repeat step 1-2 to erase additionaltracks on the list.
Erasing the Complete Program List
Use v V b B to select “Clear All”, then press ENTER.
Note:The programs are also cleared when the power is offor the disc is removed.
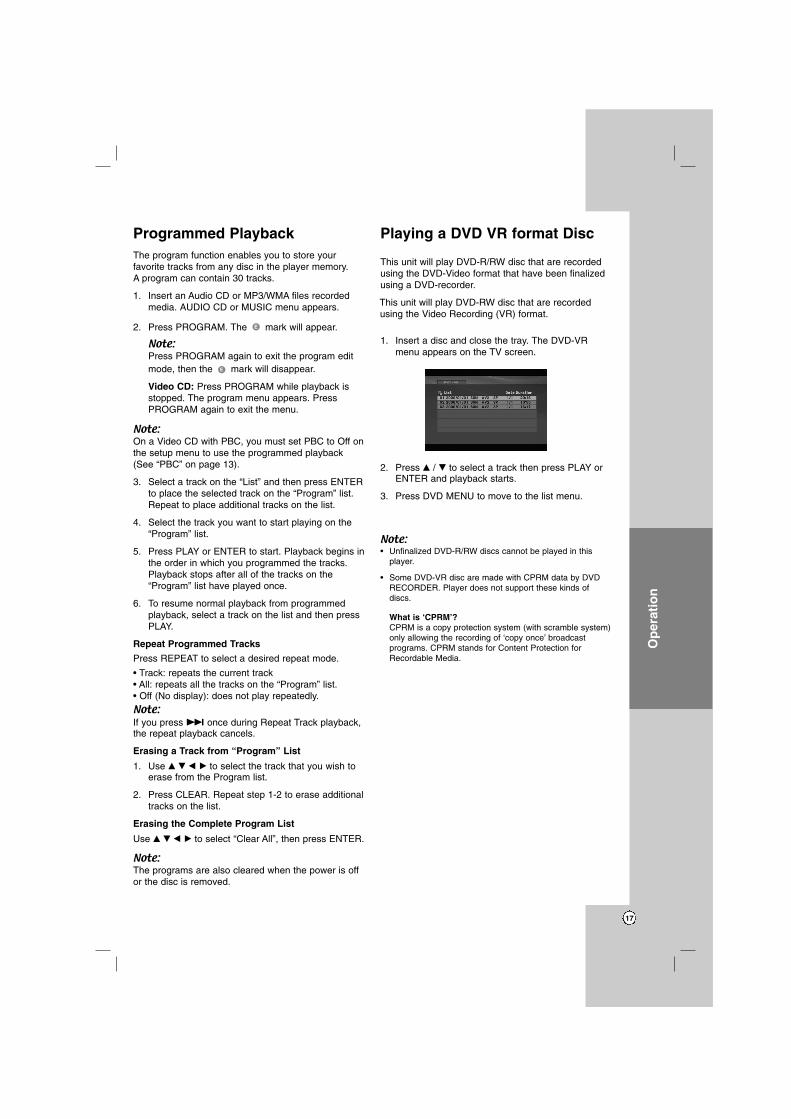
Playing a DVD VR format Disc
This unit will play DVD-R/RW disc that are recordedusing the DVD-Video format that have been finalizedusing a DVD-recorder.
This unit will play DVD-RW disc that are recordedusing the Video Recording (VR) format.
1. Insert a disc and close the tray. The DVD-VRmenu appears on the TV screen.
2. Press v / V to select a track then press PLAY orENTER and playback starts.
3. Press DVD MENU to move to the list menu.
Note:• Unfinalized DVD-R/RW discs cannot be played in this
player.
• Some DVD-VR disc are made with CPRM data by DVDRECORDER. Player does not support these kinds ofdiscs.
What is ‘CPRM’?CPRM is a copy protection system (with scramble system)only allowing the recording of ‘copy once’ broadcastprograms. CPRM stands for Content Protection forRecordable Media.
E
E
18
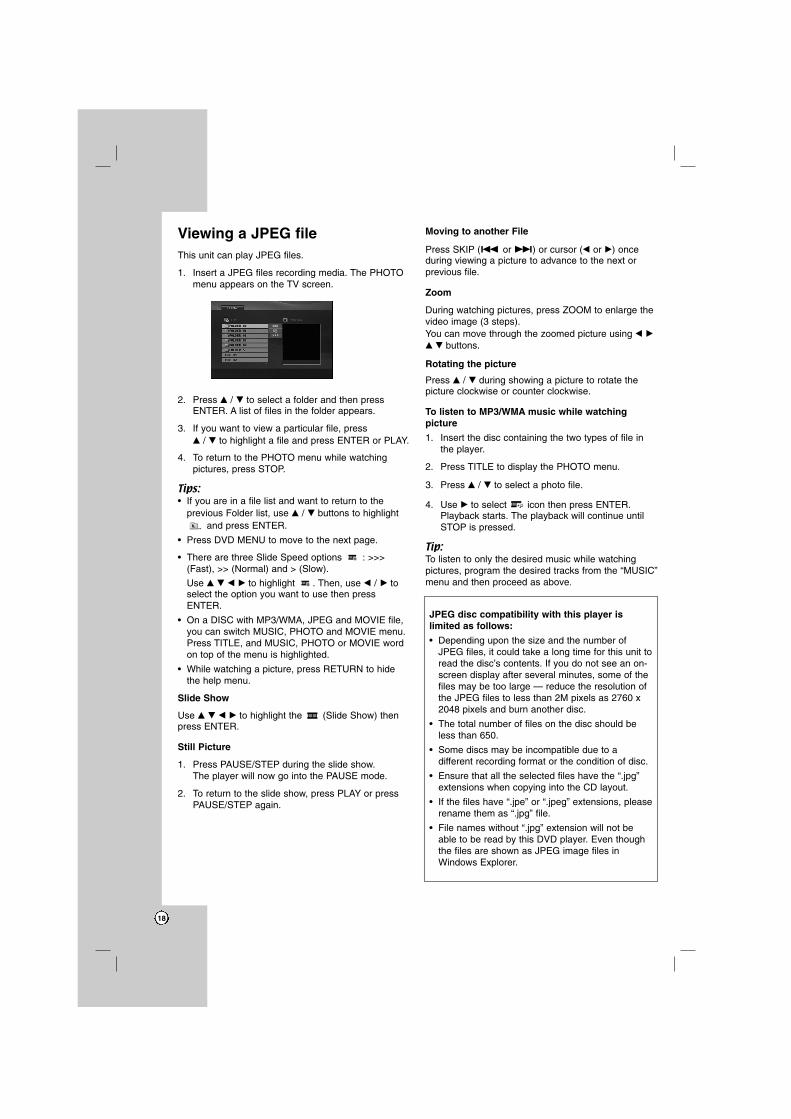
Viewing a JPEG fileThis unit can play JPEG files.
1. Insert a JPEG files recording media. The PHOTOmenu appears on the TV screen.
2. Press v / V to select a folder and then pressENTER. A list of files in the folder appears.
3. If you want to view a particular file, press v / V to highlight a file and press ENTER or PLAY.
4. To return to the PHOTO menu while watchingpictures, press STOP.
Tips:• If you are in a file list and want to return to the
previous Folder list, use v / V buttons to highlightand press ENTER.
• Press DVD MENU to move to the next page.
• There are three Slide Speed options : >>>(Fast), >> (Normal) and > (Slow).
Use v V b B to highlight . Then, use b / B toselect the option you want to use then pressENTER.
• On a DISC with MP3/WMA, JPEG and MOVIE file,you can switch MUSIC, PHOTO and MOVIE menu.Press TITLE, and MUSIC, PHOTO or MOVIE wordon top of the menu is highlighted.
• While watching a picture, press RETURN to hidethe help menu.
Slide Show
Use v V b B to highlight the (Slide Show) thenpress ENTER.
Still Picture
1. Press PAUSE/STEP during the slide show. The player will now go into the PAUSE mode.
2. To return to the slide show, press PLAY or pressPAUSE/STEP again.
Moving to another File
Press SKIP (. or >) or cursor (b or B) onceduring viewing a picture to advance to the next orprevious file.
Zoom
During watching pictures, press ZOOM to enlarge thevideo image (3 steps).You can move through the zoomed picture using b B
v V buttons.
Rotating the picture
Press v / V during showing a picture to rotate thepicture clockwise or counter clockwise.
To listen to MP3/WMA music while watchingpicture
1. Insert the disc containing the two types of file inthe player.
2. Press TITLE to display the PHOTO menu.
3. Press v / V to select a photo file.
4. Use B to select icon then press ENTER.Playback starts. The playback will continue untilSTOP is pressed.
Tip:To listen to only the desired music while watchingpictures, program the desired tracks from the “MUSIC”menu and then proceed as above.
JPEG disc compatibility with this player islimited as follows:
• Depending upon the size and the number ofJPEG files, it could take a long time for this unit toread the disc’s contents. If you do not see an on-screen display after several minutes, some of thefiles may be too large — reduce the resolution ofthe JPEG files to less than 2M pixels as 2760 x2048 pixels and burn another disc.
• The total number of files on the disc should beless than 650.
• Some discs may be incompatible due to adifferent recording format or the condition of disc.
• Ensure that all the selected files have the “.jpg”extensions when copying into the CD layout.
• If the files have “.jpe” or “.jpeg” extensions, pleaserename them as “.jpg” file.
• File names without “.jpg” extension will not beable to be read by this DVD player. Even thoughthe files are shown as JPEG image files inWindows Explorer.
19
Op
erat
ion
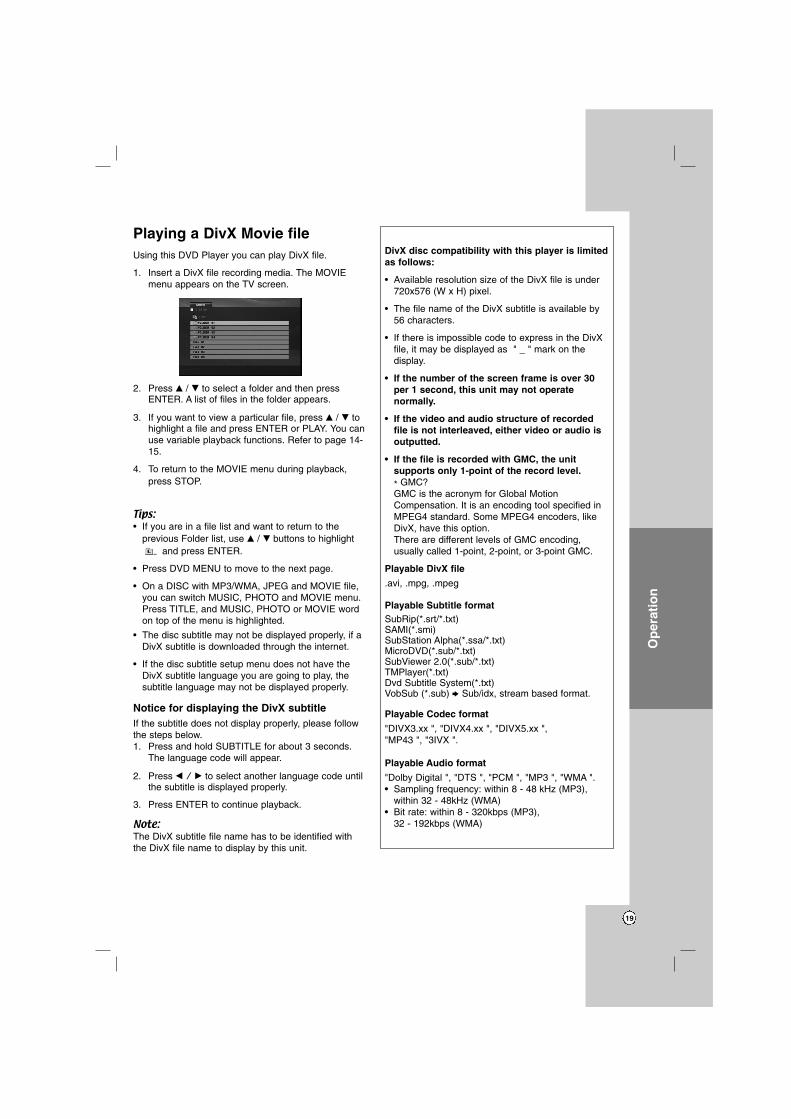
Playing a DivX Movie fileUsing this DVD Player you can play DivX file.
1. Insert a DivX file recording media. The MOVIEmenu appears on the TV screen.
2. Press v / V to select a folder and then pressENTER. A list of files in the folder appears.
3. If you want to view a particular file, press v / V tohighlight a file and press ENTER or PLAY. You canuse variable playback functions. Refer to page 14-15.
4. To return to the MOVIE menu during playback,press STOP.
Tips:• If you are in a file list and want to return to the
previous Folder list, use v / V buttons to highlightand press ENTER.
• Press DVD MENU to move to the next page.
• On a DISC with MP3/WMA, JPEG and MOVIE file,you can switch MUSIC, PHOTO and MOVIE menu.Press TITLE, and MUSIC, PHOTO or MOVIE wordon top of the menu is highlighted.
• The disc subtitle may not be displayed properly, if aDivX subtitle is downloaded through the internet.
• If the disc subtitle setup menu does not have theDivX subtitle language you are going to play, thesubtitle language may not be displayed properly.
Notice for displaying the DivX subtitleIf the subtitle does not display properly, please followthe steps below.1. Press and hold SUBTITLE for about 3 seconds.
The language code will appear.
2. Press b / B to select another language code until the subtitle is displayed properly.
3. Press ENTER to continue playback.
Note:The DivX subtitle file name has to be identified withthe DivX file name to display by this unit.
DivX disc compatibility with this player is limitedas follows:
• Available resolution size of the DivX file is under720x576 (W x H) pixel.
• The file name of the DivX subtitle is available by56 characters.
• If there is impossible code to express in the DivXfile, it may be displayed as " _ " mark on thedisplay.
• If the number of the screen frame is over 30per 1 second, this unit may not operatenormally.
• If the video and audio structure of recordedfile is not interleaved, either video or audio isoutputted.
• If the file is recorded with GMC, the unitsupports only 1-point of the record level.* GMC?GMC is the acronym for Global MotionCompensation. It is an encoding tool specified inMPEG4 standard. Some MPEG4 encoders, likeDivX, have this option.There are different levels of GMC encoding,usually called 1-point, 2-point, or 3-point GMC.
Playable DivX file
.avi, .mpg, .mpeg
Playable Subtitle formatSubRip(*.srt/*.txt)SAMI(*.smi)SubStation Alpha(*.ssa/*.txt)MicroDVD(*.sub/*.txt)SubViewer 2.0(*.sub/*.txt)TMPlayer(*.txt)Dvd Subtitle System(*.txt)VobSub (*.sub) b Sub/idx, stream based format.
Playable Codec format
"DIVX3.xx ", "DIVX4.xx ", "DIVX5.xx ","MP43 ", "3IVX ".
Playable Audio format
"Dolby Digital ", "DTS ", "PCM ", "MP3 ", "WMA ".• Sampling frequency: within 8 - 48 kHz (MP3),
within 32 - 48kHz (WMA)• Bit rate: within 8 - 320kbps (MP3),
32 - 192kbps (WMA)
20
Using the Karaoke Function1. Load a karaoke disc.
2. Set the MIC VOL control to the minimum level toprevent acoustic feedback (e.g. a loud howlingsound) before connecting the microphone.
3. Connect a microphone to MIC socket.
Note:If a microphone is not connected, the karaoke menuwill not appear.
4. Press PLAY to start playback.
5. Adjust MIC VOL control and then sing a song.If you want to set KARAOKE option, follow thesteps 6-8.
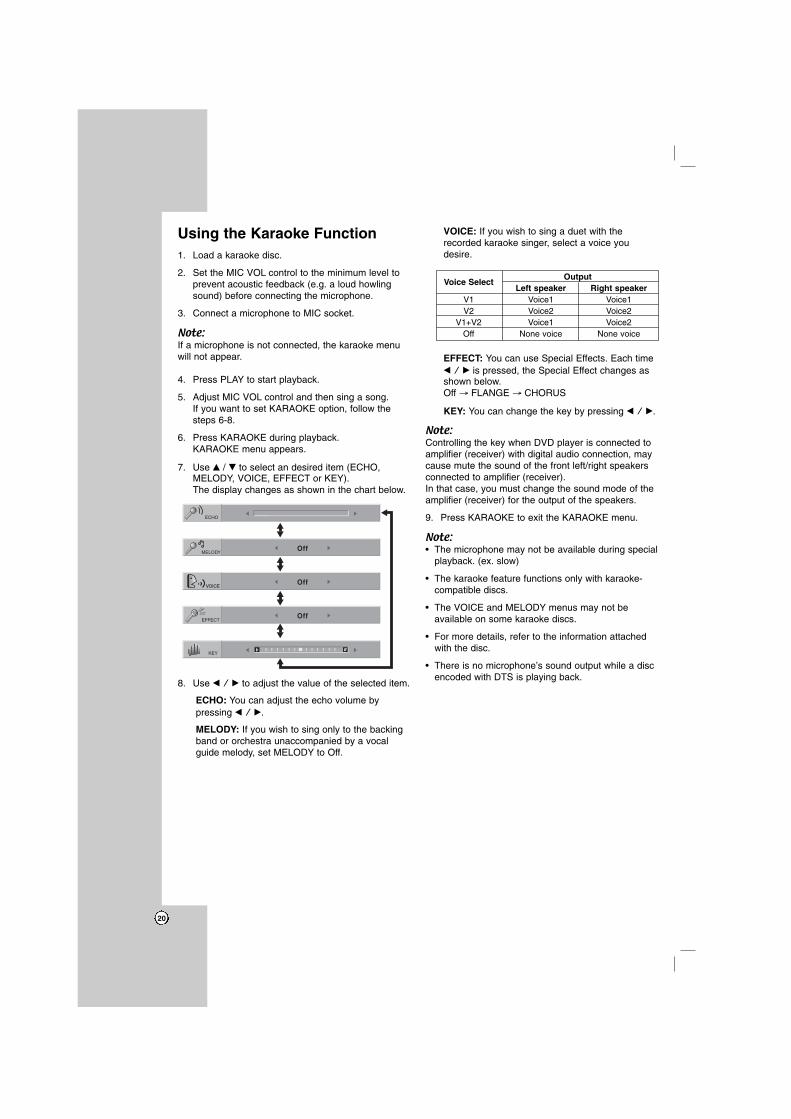
6. Press KARAOKE during playback.KARAOKE menu appears.
7. Use v / V to select an desired item (ECHO,MELODY, VOICE, EFFECT or KEY).The display changes as shown in the chart below.
8. Use b / B to adjust the value of the selected item.
ECHO: You can adjust the echo volume by pressing b / B.
MELODY: If you wish to sing only to the backingband or orchestra unaccompanied by a vocalguide melody, set MELODY to Off.
VOICE: If you wish to sing a duet with therecorded karaoke singer, select a voice youdesire.
EFFECT: You can use Special Effects. Each timeb / B is pressed, the Special Effect changes asshown below.Off → FLANGE → CHORUS
KEY: You can change the key by pressing b / B.
Note:Controlling the key when DVD player is connected toamplifier (receiver) with digital audio connection, maycause mute the sound of the front left/right speakersconnected to amplifier (receiver). In that case, you must change the sound mode of theamplifier (receiver) for the output of the speakers.
9. Press KARAOKE to exit the KARAOKE menu.
Note:• The microphone may not be available during special
playback. (ex. slow)
• The karaoke feature functions only with karaoke-compatible discs.
• The VOICE and MELODY menus may not beavailable on some karaoke discs.
• For more details, refer to the information attachedwith the disc.
• There is no microphone’s sound output while a discencoded with DTS is playing back.
Voice SelectOutput
Left speaker Right speakerV1 Voice1 Voice1V2 Voice2 Voice2
V1+V2 Voice1 Voice2Off None voice None voice
21
Ref
eren
ce
Controlling other TVs with theremote controlYou can control the sound level, input source, andpower switch of your LG TV with the supplied remotecontrol.
You can control the sound level, input source, andpower switch of non-LG TVs as well. If your TV islisted in the table below, set the appropriatemanufacturer code.
1. While holding down TV POWER button, press thenumber buttons to select the manufacturer codefor your TV (see the table below).
2. Release TV POWER button.
Code numbers of controllable TVsIf more than one code number is listed, try enteringthem one at a time until you find the one that workswith your TV.
Manufacturer Code Number
LG / GoldStar 1 (Default), 2
Zenith 1, 3, 4
Samsung 6, 7
Sony 8, 9
Hitachi 4
Notes:• Depending on your TV, some or all buttons may not
function on the TV, even after entering the correctmanufacturer code.
• If you enter a new code number, the code numberpreviously entered will be erased.
• When you replace the batteries of the remote, thecode number you have set may be reset to thedefault setting. Set the appropriate code numberagain.
Video Mode Setting• With certain discs, the playback picture may be
flickering or Dot Crawl is shown on straight lines.That means Vertical interpolation or De-interlace isnot perfectly matched with the disc. In this case, the picture quality may be improved by changing thevideo mode.
• To change the video mode, press and holdDISPLAY about 3 seconds during disc playback.The new video mode number selected is displayedon the TV screen. Check whether the video qualityhas improved. If not, repeat the above procedureuntil picture quality is improved.
• Video mode change sequence: MODE1 → MODE2 → MODE3 → MODE1
• If you turn off the power, the video mode will beback to initial state (MODE1).
Tip: Detailed Descriptions for Video Modes MODE1: The source material of the DVD video (filmmaterial or video material) is determined from discinformation.
MODE2: Suitable for playing film based content orvideo based material recorded by the progressivescan method.MODE3: Suitable for playing video based content withcomparatively little motion.
Note:The video mode setting only works when theProgressive Scan mode is set to “On” in the Setupmenu.
Reference
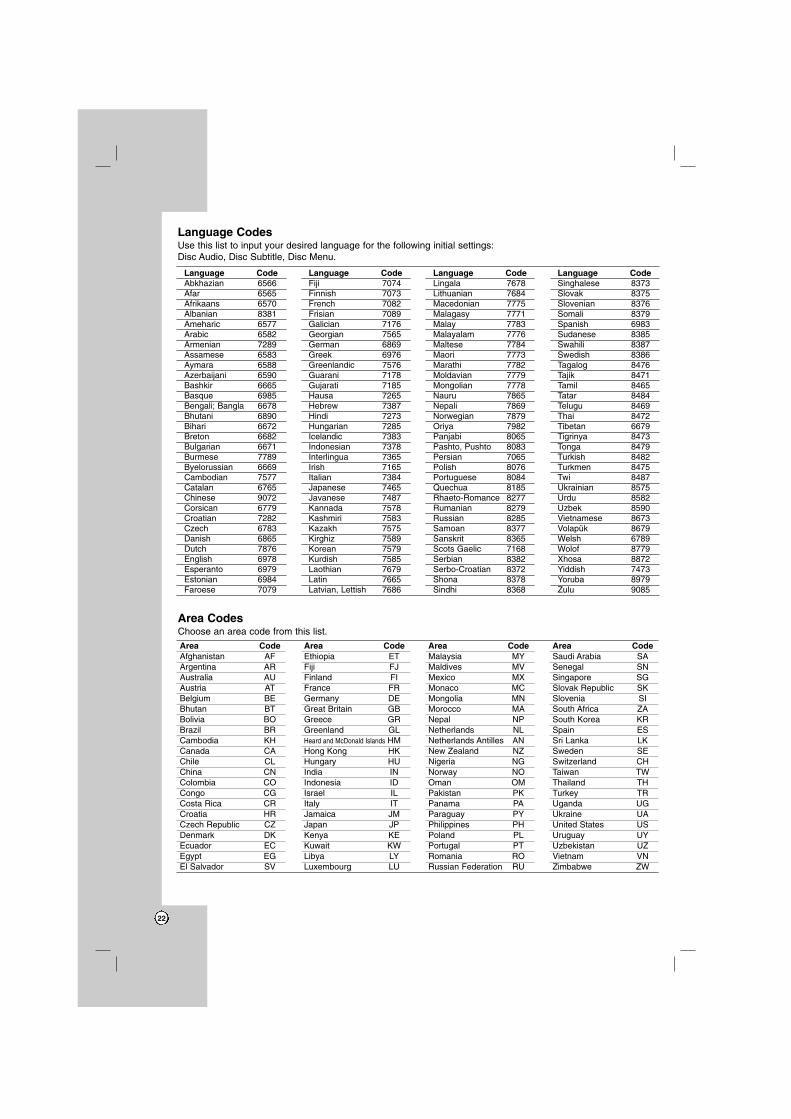
22
Area CodeAfghanistan AFArgentina ARAustralia AUAustria ATBelgium BEBhutan BTBolivia BOBrazil BRCambodia KHCanada CAChile CLChina CNColombia COCongo CGCosta Rica CRCroatia HRCzech Republic CZDenmark DKEcuador ECEgypt EGEl Salvador SV
Area CodeEthiopia ETFiji FJFinland FIFrance FRGermany DEGreat Britain GBGreece GRGreenland GLHeard and McDonald Islands HMHong Kong HKHungary HUIndia INIndonesia IDIsrael ILItaly ITJamaica JMJapan JPKenya KEKuwait KWLibya LYLuxembourg LU
Area CodeMalaysia MYMaldives MVMexico MXMonaco MCMongolia MNMorocco MANepal NPNetherlands NLNetherlands Antilles ANNew Zealand NZNigeria NGNorway NOOman OMPakistan PKPanama PAParaguay PYPhilippines PHPoland PLPortugal PTRomania RORussian Federation RU
Area CodeSaudi Arabia SASenegal SNSingapore SGSlovak Republic SKSlovenia SISouth Africa ZASouth Korea KRSpain ESSri Lanka LKSweden SESwitzerland CHTaiwan TWThailand THTurkey TRUganda UGUkraine UAUnited States USUruguay UYUzbekistan UZVietnam VNZimbabwe ZW
Area Codes Choose an area code from this list.
Language CodeAbkhazian 6566Afar 6565Afrikaans 6570Albanian 8381Ameharic 6577Arabic 6582Armenian 7289Assamese 6583Aymara 6588Azerbaijani 6590Bashkir 6665Basque 6985Bengali; Bangla 6678Bhutani 6890Bihari 6672Breton 6682Bulgarian 6671Burmese 7789Byelorussian 6669Cambodian 7577Catalan 6765Chinese 9072Corsican 6779Croatian 7282Czech 6783Danish 6865Dutch 7876English 6978Esperanto 6979Estonian 6984Faroese 7079
Language CodeFiji 7074Finnish 7073French 7082Frisian 7089Galician 7176Georgian 7565German 6869Greek 6976Greenlandic 7576Guarani 7178Gujarati 7185Hausa 7265Hebrew 7387Hindi 7273Hungarian 7285Icelandic 7383Indonesian 7378Interlingua 7365Irish 7165Italian 7384Japanese 7465Javanese 7487Kannada 7578Kashmiri 7583Kazakh 7575Kirghiz 7589Korean 7579Kurdish 7585Laothian 7679Latin 7665Latvian, Lettish 7686
Language CodeLingala 7678Lithuanian 7684Macedonian 7775Malagasy 7771Malay 7783Malayalam 7776Maltese 7784Maori 7773Marathi 7782Moldavian 7779Mongolian 7778Nauru 7865Nepali 7869Norwegian 7879Oriya 7982Panjabi 8065Pashto, Pushto 8083Persian 7065Polish 8076Portuguese 8084Quechua 8185Rhaeto-Romance 8277Rumanian 8279Russian 8285Samoan 8377Sanskrit 8365Scots Gaelic 7168Serbian 8382Serbo-Croatian 8372Shona 8378Sindhi 8368
Language CodeSinghalese 8373Slovak 8375Slovenian 8376Somali 8379Spanish 6983Sudanese 8385Swahili 8387Swedish 8386Tagalog 8476Tajik 8471Tamil 8465Tatar 8484Telugu 8469Thai 8472Tibetan 6679Tigrinya 8473Tonga 8479Turkish 8482Turkmen 8475Twi 8487Ukrainian 8575Urdu 8582Uzbek 8590Vietnamese 8673Volapük 8679Welsh 6789Wolof 8779Xhosa 8872Yiddish 7473Yoruba 8979Zulu 9085
Language CodesUse this list to input your desired language for the following initial settings: Disc Audio, Disc Subtitle, Disc Menu.
23
Ref
eren
ce
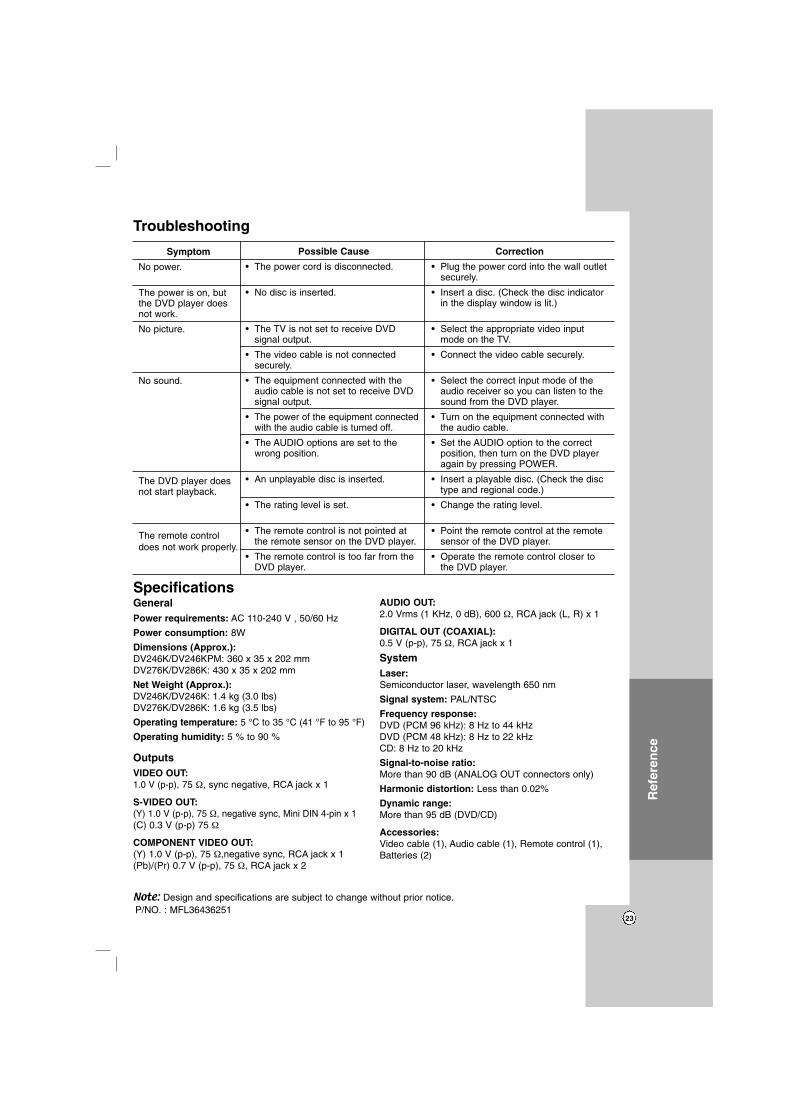
Symptom
No power.
The power is on, butthe DVD player doesnot work.
No picture.
No sound.
The DVD player doesnot start playback.
The remote controldoes not work properly.
Possible Cause
• The power cord is disconnected.
• No disc is inserted.
• The TV is not set to receive DVDsignal output.
• The video cable is not connectedsecurely.
• The equipment connected with theaudio cable is not set to receive DVDsignal output.
• The power of the equipment connectedwith the audio cable is turned off.
• The AUDIO options are set to thewrong position.
• An unplayable disc is inserted.
• The rating level is set.
• The remote control is not pointed atthe remote sensor on the DVD player.
• The remote control is too far from theDVD player.
Correction
• Plug the power cord into the wall outletsecurely.
• Insert a disc. (Check the disc indicatorin the display window is lit.)
• Select the appropriate video inputmode on the TV.
• Connect the video cable securely.
• Select the correct input mode of theaudio receiver so you can listen to thesound from the DVD player.
• Turn on the equipment connected withthe audio cable.
• Set the AUDIO option to the correctposition, then turn on the DVD playeragain by pressing POWER.
• Insert a playable disc. (Check the disctype and regional code.)
• Change the rating level.
• Point the remote control at the remotesensor of the DVD player.
• Operate the remote control closer tothe DVD player.
Troubleshooting
SpecificationsGeneralPower requirements: AC 110-240 V , 50/60 Hz
Power consumption: 8W
Dimensions (Approx.):DV246K/DV246KPM: 360 x 35 x 202 mm DV276K/DV286K: 430 x 35 x 202 mm
Net Weight (Approx.):DV246K/DV246K: 1.4 kg (3.0 lbs)DV276K/DV286K: 1.6 kg (3.5 lbs)
Operating temperature: 5 °C to 35 °C (41 °F to 95 °F)
Operating humidity: 5 % to 90 %
OutputsVIDEO OUT:1.0 V (p-p), 75 Ω, sync negative, RCA jack x 1
S-VIDEO OUT:(Y) 1.0 V (p-p), 75 Ω, negative sync, Mini DIN 4-pin x 1(C) 0.3 V (p-p) 75 Ω
COMPONENT VIDEO OUT:(Y) 1.0 V (p-p), 75 Ω,negative sync, RCA jack x 1 (Pb)/(Pr) 0.7 V (p-p), 75 Ω, RCA jack x 2
AUDIO OUT:2.0 Vrms (1 KHz, 0 dB), 600 Ω, RCA jack (L, R) x 1
DIGITAL OUT (COAXIAL):0.5 V (p-p), 75 Ω, RCA jack x 1
SystemLaser:Semiconductor laser, wavelength 650 nm
Signal system: PAL/NTSC
Frequency response:DVD (PCM 96 kHz): 8 Hz to 44 kHz DVD (PCM 48 kHz): 8 Hz to 22 kHzCD: 8 Hz to 20 kHz
Signal-to-noise ratio:More than 90 dB (ANALOG OUT connectors only)
Harmonic distortion: Less than 0.02%
Dynamic range:More than 95 dB (DVD/CD)
Accessories:Video cable (1), Audio cable (1), Remote control (1), Batteries (2)
Note: Design and specifications are subject to change without prior notice.P/NO. : MFL36436251


