Embed Size (px)
Citation preview

OWNER’S MANUAL
Please read this owner's manual carefully and thoroughly before operating this unit.
MP9889FCR
www.lg.com
LIGHT OVEN “SolarDOM”
MFL34672304
Precautions
2
Precautions to avoid possible exposure to excessive microwave energy.
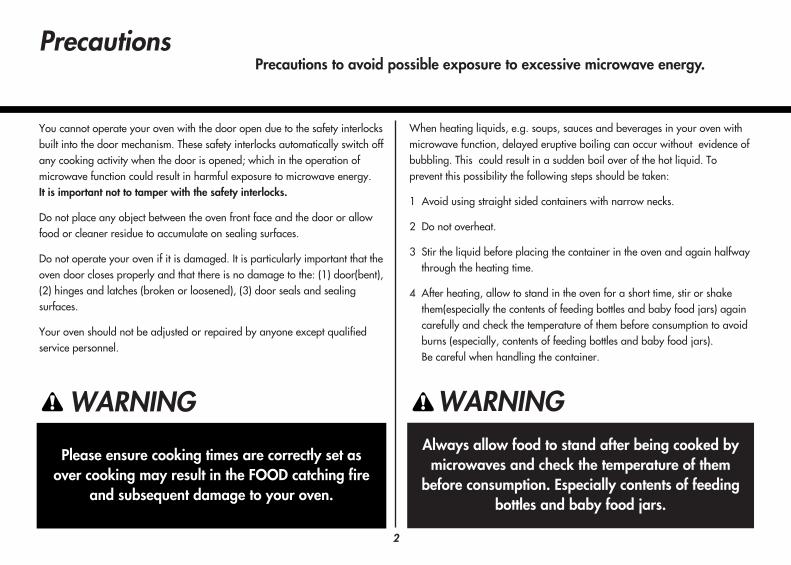
You cannot operate your oven with the door open due to the safety interlocksbuilt into the door mechanism. These safety interlocks automatically switch offany cooking activity when the door is opened; which in the operation ofmicrowave function could result in harmful exposure to microwave energy.It is important not to tamper with the safety interlocks.
Do not place any object between the oven front face and the door or allowfood or cleaner residue to accumulate on sealing surfaces.
Do not operate your oven if it is damaged. It is particularly important that theoven door closes properly and that there is no damage to the: (1) door(bent),(2) hinges and latches (broken or loosened), (3) door seals and sealingsurfaces.
Your oven should not be adjusted or repaired by anyone except qualifiedservice personnel.
WARNING
When heating liquids, e.g. soups, sauces and beverages in your oven withmicrowave function, delayed eruptive boiling can occur without evidence ofbubbling. This could result in a sudden boil over of the hot liquid. Toprevent this possibility the following steps should be taken:
1 Avoid using straight sided containers with narrow necks.
2 Do not overheat.
3 Stir the liquid before placing the container in the oven and again halfwaythrough the heating time.
4 After heating, allow to stand in the oven for a short time, stir or shakethem(especially the contents of feeding bottles and baby food jars) againcarefully and check the temperature of them before consumption to avoidburns (especially, contents of feeding bottles and baby food jars).Be careful when handling the container.
WARNINGAlways allow food to stand after being cooked by
microwaves and check the temperature of thembefore consumption. Especially contents of feeding
bottles and baby food jars.
Please ensure cooking times are correctly set asover cooking may result in the FOOD catching fire
and subsequent damage to your oven.

Contents
How the Microwave Function Works
Microwaves are a form of energy similar to radio and television waves andordinary daylight. Normally, microwaves spread outwards as they travelthrough the atmosphere and disappear without effect. This ovens, however,have a magnetron which is designed to make use of the energy inmicrowaves. Electricity, supplied to the magnetron tube, is used to createdmicrowave energy.
These microwaves enter the cooking area through openings inside the oven.A turntable or tray is located at the bottom of the oven. Microwaves cannotpass through metal walls of the oven, but they can penetrate such materialsas glass, porcelain and paper, the materials out of which microwave-safecooking dishes are constructed.
Microwaves do not heat cookware, though cooking vessels will eventually gethot from the heat generated by the food.
A very safe applianceYour oven, SolarDOM, is one of the safest of all home
appliances. When the door is opened, the ovenautomatically stops producing microwaves. Microwaveenergy is converted completely to heat when it enters
food, leaving no “left over” energy to harm you whenyou eat your food.
Precautions _____________________________________________2Contents ________________________________________________4Unpacking & Installing ____________________________________5 ~ 6Control Panel____________________________________________7Child Lock ______________________________________________8Speed Combi Cooking ____________________________________9 ~ 11Grill Cooking____________________________________________12Convection Cooking ______________________________________13Indian Rasoi_____________________________________________14 ~ 33Nutri Care ______________________________________________34 ~ 45Baker’s Basket ___________________________________________46 ~ 5324 Hours _______________________________________________54 ~ 64Just 4U _________________________________________________65 ~ 73SteamChef ______________________________________________74 ~ 82Utility Corner ___________________________________________83 ~ 86Micro Power Cooking_____________________________________87Micro Power Level________________________________________88Two Stage Cooking_______________________________________89Quick Start______________________________________________90More or Less Cooking_____________________________________91Rotisserie Installation & Cooking ____________________________92 ~ 93Rotisserie Assembly_______________________________________94Important safety instructions Read carefully and keep for future reference __________________95 ~ 96Microwave - safe Utensils__________________________________97Food characteristics & Microwave cooking ___________________98 ~ 99Questions & Answers _____________________________________100Plug Wiring Information/Technical Specifications______________101
4
Unpacking & Installing
5
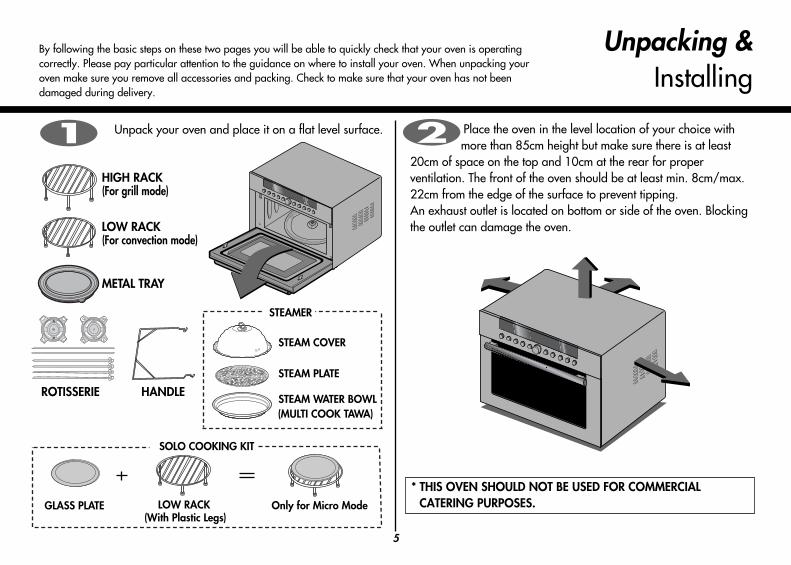
By following the basic steps on these two pages you will be able to quickly check that your oven is operatingcorrectly. Please pay particular attention to the guidance on where to install your oven. When unpacking youroven make sure you remove all accessories and packing. Check to make sure that your oven has not beendamaged during delivery.
Place the oven in the level location of your choice withmore than 85cm height but make sure there is at least
20cm of space on the top and 10cm at the rear for properventilation. The front of the oven should be at least min. 8cm/max.22cm from the edge of the surface to prevent tipping.An exhaust outlet is located on bottom or side of the oven. Blockingthe outlet can damage the oven.
Unpack your oven and place it on a flat level surface.
* THIS OVEN SHOULD NOT BE USED FOR COMMERCIALCATERING PURPOSES.
(MULTI COOK TAWA)
Only for Micro Mode (With Plastic Legs)
LOW RACK
SOLO COOKING KIT
GLASS PLATE
HIGH RACK(For grill mode)
LOW RACK(For convection mode)
METAL TRAY
ROTISSERIE HANDLE
STEAMER
STEAM COVER
STEAM PLATE
STEAM WATER BOWL
6
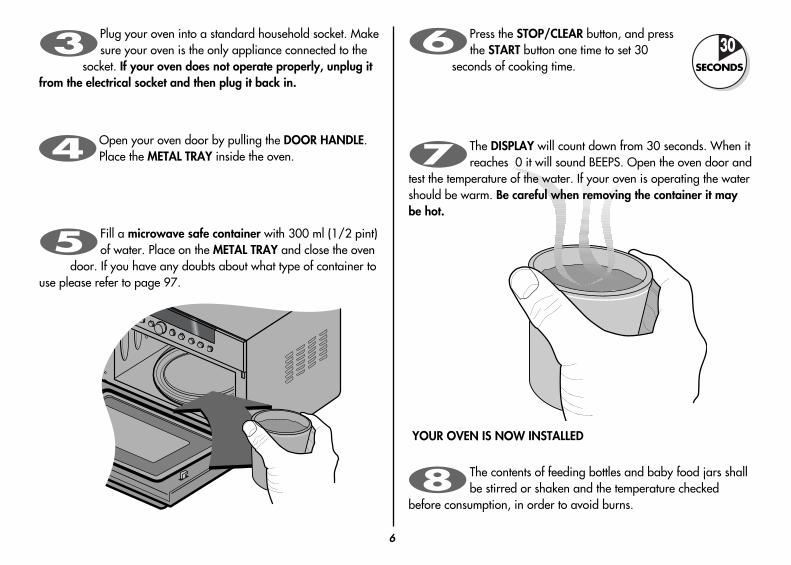
The DISPLAY will count down from 30 seconds. When itreaches 0 it will sound BEEPS. Open the oven door and
test the temperature of the water. If your oven is operating the watershould be warm. Be careful when removing the container it maybe hot.
YOUR OVEN IS NOW INSTALLED
Fill a microwave safe container with 300 ml (1/2 pint)of water. Place on the METAL TRAY and close the oven
door. If you have any doubts about what type of container touse please refer to page 97.
The contents of feeding bottles and baby food jars shallbe stirred or shaken and the temperature checked
before consumption, in order to avoid burns.
Open your oven door by pulling the DOOR HANDLE.Place the METAL TRAY inside the oven.
Plug your oven into a standard household socket. Makesure your oven is the only appliance connected to the
socket. If your oven does not operate properly, unplug itfrom the electrical socket and then plug it back in.
Press the STOP/CLEAR button, and pressthe START button one time to set 30
seconds of cooking time.
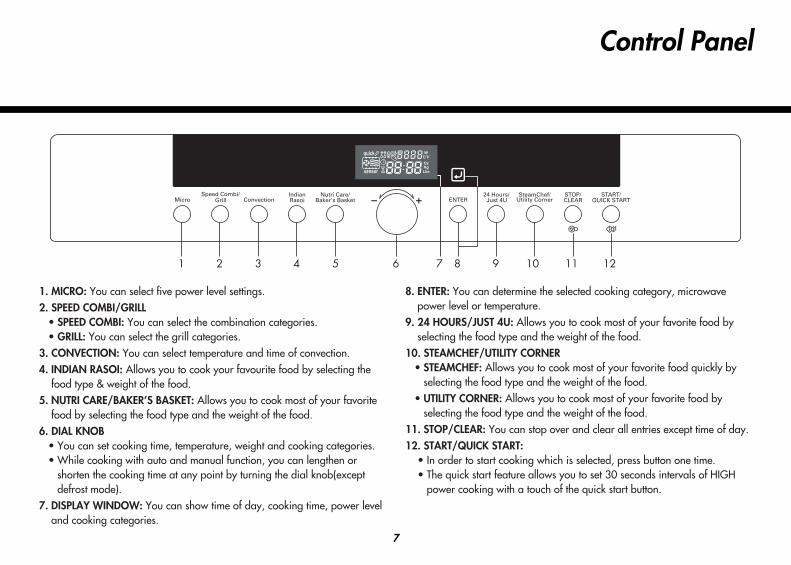
Control Panel
7
1 2 3 4 5 6 7 8 9 10 11 12
1. MICRO: You can select five power level settings. 2. SPEED COMBI/GRILL
• SPEED COMBI: You can select the combination categories.• GRILL: You can select the grill categories.
3. CONVECTION: You can select temperature and time of convection.4. INDIAN RASOI: Allows you to cook your favourite food by selecting the
food type & weight of the food.5. NUTRI CARE/BAKER’S BASKET: Allows you to cook most of your favorite
food by selecting the food type and the weight of the food.6. DIAL KNOB
• You can set cooking time, temperature, weight and cooking categories.• While cooking with auto and manual function, you can lengthen or
shorten the cooking time at any point by turning the dial knob(exceptdefrost mode).
7. DISPLAY WINDOW: You can show time of day, cooking time, power leveland cooking categories.
8. ENTER: You can determine the selected cooking category, microwavepower level or temperature.
9. 24 HOURS/JUST 4U: Allows you to cook most of your favorite food byselecting the food type and the weight of the food.
10. STEAMCHEF/UTILITY CORNER• STEAMCHEF: Allows you to cook most of your favorite food quickly by
selecting the food type and the weight of the food.• UTILITY CORNER: Allows you to cook most of your favorite food by
selecting the food type and the weight of the food.11. STOP/CLEAR: You can stop over and clear all entries except time of day. 12. START/QUICK START:
• In order to start cooking which is selected, press button one time.• The quick start feature allows you to set 30 seconds intervals of HIGH
power cooking with a touch of the quick start button.
8
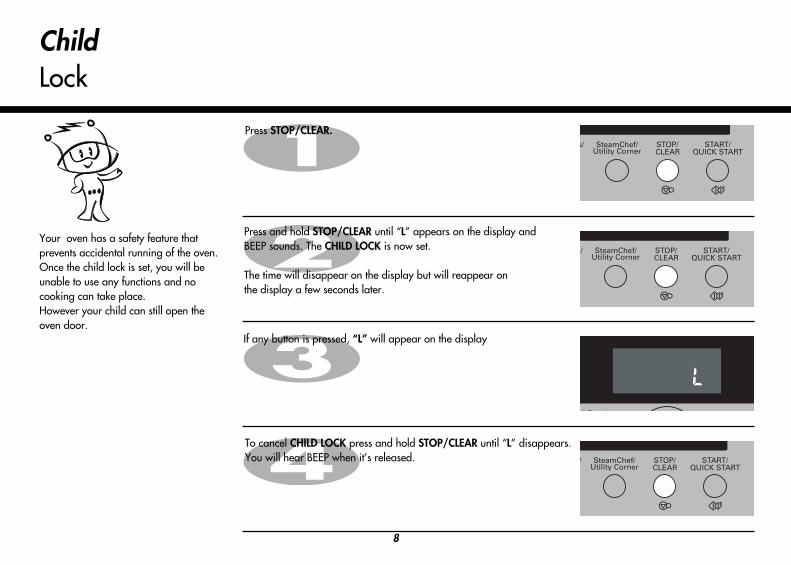
ChildLock
Press and hold STOP/CLEAR until “L” appears on the display and BEEP sounds. The CHILD LOCK is now set.
The time will disappear on the display but will reappear on the display a few seconds later.
If any button is pressed, “L” will appear on the display
To cancel CHILD LOCK press and hold STOP/CLEAR until “L” disappears.You will hear BEEP when it’s released.
Your oven has a safety feature thatprevents accidental running of the oven.Once the child lock is set, you will beunable to use any functions and nocooking can take place. However your child can still open theoven door.
Press STOP/CLEAR.
9
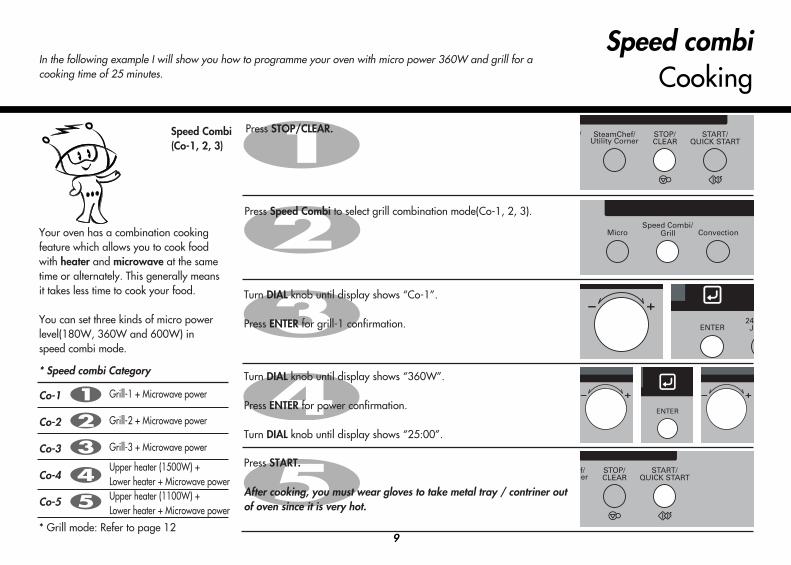
Speed combiCooking
In the following example I will show you how to programme your oven with micro power 360W and grill for acooking time of 25 minutes.
Your oven has a combination cookingfeature which allows you to cook foodwith heater and microwave at the sametime or alternately. This generally meansit takes less time to cook your food.
You can set three kinds of micro powerlevel(180W, 360W and 600W) inspeed combi mode.
Press Speed Combi to select grill combination mode(Co-1, 2, 3).
Press STOP/CLEAR.Speed Combi(Co-1, 2, 3)
Turn DIAL knob until display shows “Co-1”.
Press ENTER for grill-1 confirmation.
Turn DIAL knob until display shows “360W”.
Press ENTER for power confirmation.
Turn DIAL knob until display shows “25:00”.
Press START.
After cooking, you must wear gloves to take metal tray / contriner outof oven since it is very hot.
* Speed combi Category
* Grill mode: Refer to page 12
Co-1
Co-2
Co-3
Co-4
Co-5
Grill-1 + Microwave power
Grill-2 + Microwave power
Grill-3 + Microwave power
Upper heater (1500W) + Lower heater + Microwave powerUpper heater (1100W) + Lower heater + Microwave power
10
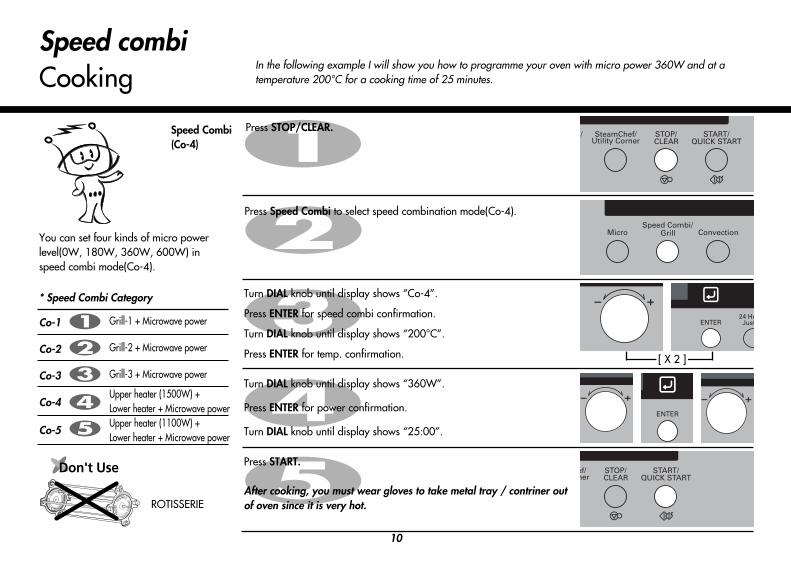
Speed combiCooking
In the following example I will show you how to programme your oven with micro power 360W and at atemperature 200°C for a cooking time of 25 minutes.
Press Speed Combi to select speed combination mode(Co-4).
Press STOP/CLEAR.Speed Combi(Co-4)
Turn DIAL knob until display shows “Co-4”.
Press ENTER for speed combi confirmation.
Turn DIAL knob until display shows “200°C”.
Press ENTER for temp. confirmation.
Turn DIAL knob until display shows “360W”.
Press ENTER for power confirmation.
Turn DIAL knob until display shows “25:00”.
Press START.
After cooking, you must wear gloves to take metal tray / contriner outof oven since it is very hot.
You can set four kinds of micro powerlevel(0W, 180W, 360W, 600W) inspeed combi mode(Co-4).
* Speed Combi Category
Co-1
Co-2
Co-3
Co-4
Co-5
Grill-1 + Microwave power
Grill-2 + Microwave power
Grill-3 + Microwave power
Upper heater (1500W) + Lower heater + Microwave powerUpper heater (1100W) + Lower heater + Microwave power
[ X 2 ]
ROTISSERIE
11
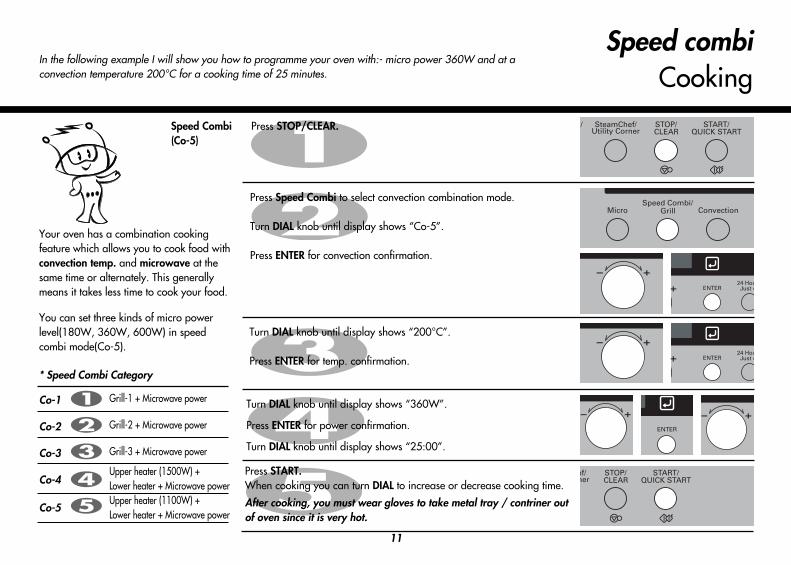
Speed combiCooking
In the following example I will show you how to programme your oven with:- micro power 360W and at aconvection temperature 200°C for a cooking time of 25 minutes.
Your oven has a combination cookingfeature which allows you to cook food withconvection temp. and microwave at thesame time or alternately. This generallymeans it takes less time to cook your food.
Press Speed Combi to select convection combination mode.
Turn DIAL knob until display shows “Co-5”.
Press ENTER for convection confirmation.
Press STOP/CLEAR.Speed Combi(Co-5)
Press START.When cooking you can turn DIAL to increase or decrease cooking time.
After cooking, you must wear gloves to take metal tray / contriner outof oven since it is very hot.
Turn DIAL knob until display shows “360W”.
Press ENTER for power confirmation.
Turn DIAL knob until display shows “25:00”.
Turn DIAL knob until display shows “200°C”.
Press ENTER for temp. confirmation.
You can set three kinds of micro powerlevel(180W, 360W, 600W) in speedcombi mode(Co-5).
* Speed Combi Category
Co-1
Co-2
Co-3
Co-4
Co-5
Grill-1 + Microwave power
Grill-2 + Microwave power
Grill-3 + Microwave power
Upper heater (1500W) + Lower heater + Microwave powerUpper heater (1100W) + Lower heater + Microwave power
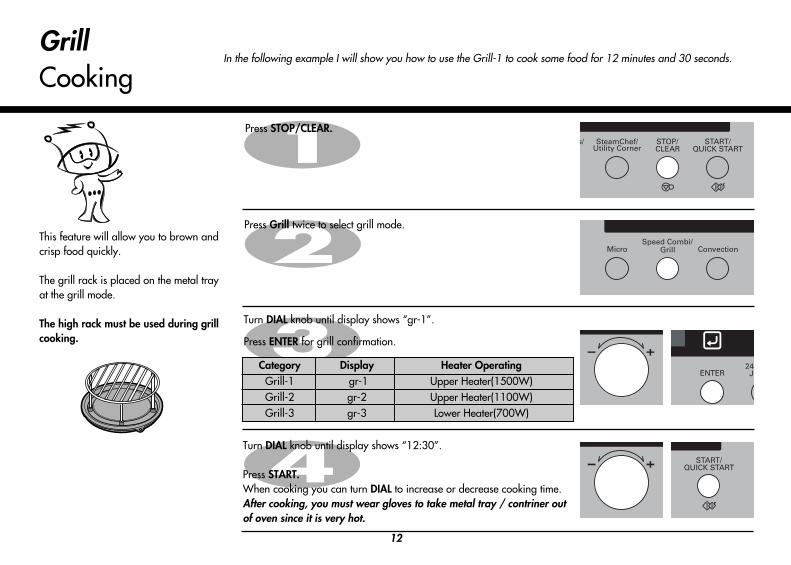
GrillCooking
12
In the following example I will show you how to use the Grill-1 to cook some food for 12 minutes and 30 seconds.
Press STOP/CLEAR.
Press Grill twice to select grill mode.
Turn DIAL knob until display shows “gr-1”.
Press ENTER for grill confirmation.
This feature will allow you to brown andcrisp food quickly.
The grill rack is placed on the metal trayat the grill mode.
The high rack must be used during grillcooking.
Turn DIAL knob until display shows “12:30”.
Press START.When cooking you can turn DIAL to increase or decrease cooking time.After cooking, you must wear gloves to take metal tray / contriner outof oven since it is very hot.
Category Display Heater OperatingGrill-1 gr-1 Upper Heater(1500W)Grill-2 gr-2 Upper Heater(1100W)Grill-3 gr-3 Lower Heater(700W)
13
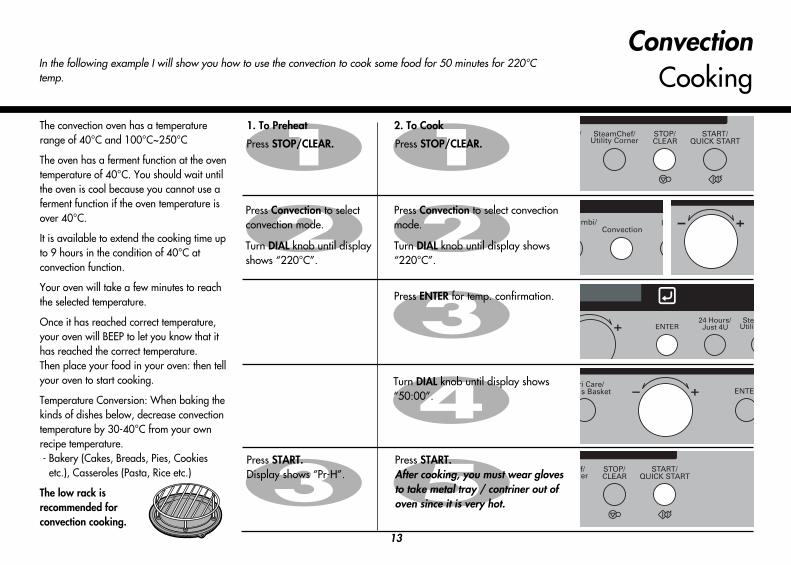
ConvectionCooking
In the following example I will show you how to use the convection to cook some food for 50 minutes for 220°Ctemp.
Press STOP/CLEAR.
1. To Preheat 2. To Cook
Press START.Display shows “Pr-H”.
The convection oven has a temperaturerange of 40°C and 100°C~250°C
The oven has a ferment function at the oventemperature of 40°C. You should wait untilthe oven is cool because you cannot use aferment function if the oven temperature isover 40°C.
It is available to extend the cooking time upto 9 hours in the condition of 40°C atconvection function.
Your oven will take a few minutes to reachthe selected temperature.
Once it has reached correct temperature,your oven will BEEP to let you know that ithas reached the correct temperature.Then place your food in your oven: then tellyour oven to start cooking.
Temperature Conversion: When baking thekinds of dishes below, decrease convectiontemperature by 30-40°C from your ownrecipe temperature.- Bakery (Cakes, Breads, Pies, Cookies
etc.), Casseroles (Pasta, Rice etc.)
The low rack isrecommended forconvection cooking.
Press Convection to selectconvection mode.
Turn DIAL knob until displayshows “220°C”.
Press STOP/CLEAR.
Turn DIAL knob until display shows“50:00”.
Press START.After cooking, you must wear glovesto take metal tray / contriner out ofoven since it is very hot.
Press ENTER for temp. confirmation.
Press Convection to select convectionmode.
Turn DIAL knob until display shows“220°C”.
14
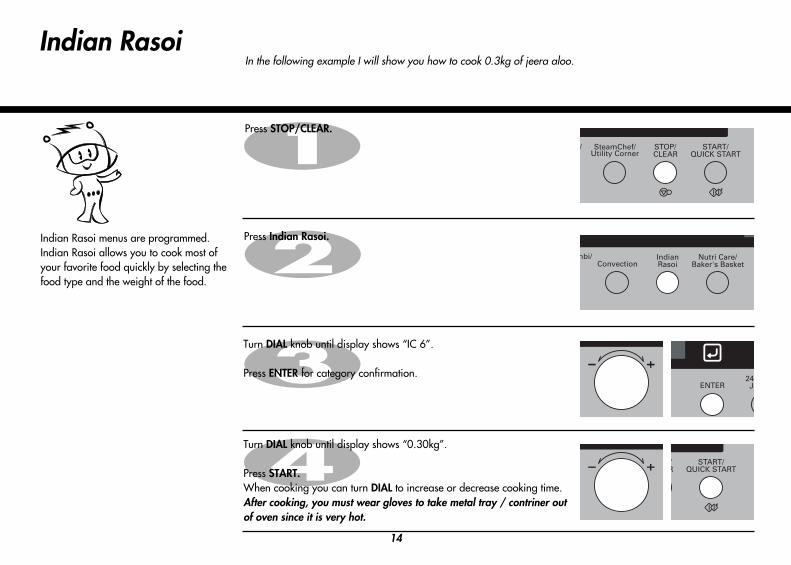
Indian Rasoi In the following example I will show you how to cook 0.3kg of jeera aloo.
Press STOP/CLEAR.
Press Indian Rasoi.
Turn DIAL knob until display shows “IC 6”.
Press ENTER for category confirmation.
Indian Rasoi menus are programmed. Indian Rasoi allows you to cook most ofyour favorite food quickly by selecting thefood type and the weight of the food.
Turn DIAL knob until display shows “0.30kg”.
Press START.When cooking you can turn DIAL to increase or decrease cooking time.After cooking, you must wear gloves to take metal tray / contriner outof oven since it is very hot.
15
Method
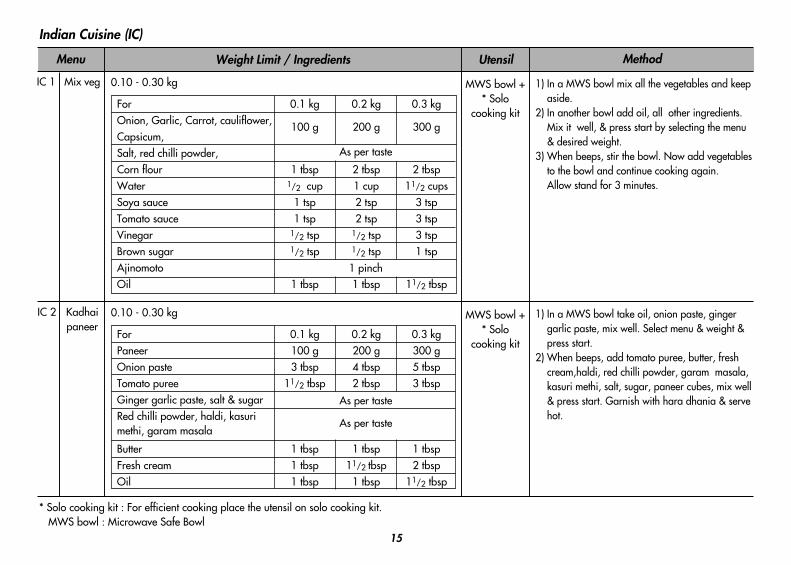
IC 1 Mix veg
Menu Weight Limit / Ingredients
1) In a MWS bowl mix all the vegetables and keepaside.
2) In another bowl add oil, all other ingredients.Mix it well, & press start by selecting the menu& desired weight.
3) When beeps, stir the bowl. Now add vegetablesto the bowl and continue cooking again. Allow stand for 3 minutes.
0.10 - 0.30 kg
0.1 kg
100 g
1 tbsp1/2 cup
1 tsp1 tsp
1/2 tsp1/2 tsp
1 tbsp
0.2 kg
200 g
2 tbsp1 cup2 tsp2 tsp
1/2 tsp1/2 tsp
1 tbsp
0.3 kg
300 g
2 tbsp11/2 cups
3 tsp3 tsp3 tsp1 tsp
11/2 tbsp
As per taste
1 pinch
ForOnion, Garlic, Carrot, cauliflower,Capsicum,Salt, red chilli powder, Corn flourWaterSoya sauceTomato sauceVinegarBrown sugarAjinomotoOil
IC 2
* Solo cooking kit : For efficient cooking place the utensil on solo cooking kit.MWS bowl : Microwave Safe Bowl
Kadhaipaneer
1) In a MWS bowl take oil, onion paste, gingergarlic paste, mix well. Select menu & weight &press start.
2) When beeps, add tomato puree, butter, freshcream,haldi, red chilli powder, garam masala,kasuri methi, salt, sugar, paneer cubes, mix well& press start. Garnish with hara dhania & servehot.
0.10 - 0.30 kg
0.1 kg100 g3 tbsp
11/2 tbsp
1 tbsp1 tbsp1 tbsp
0.2 kg200 g4 tbsp2 tbsp
1 tbsp11/2 tbsp
1 tbsp
0.3 kg300 g5 tbsp3 tbsp
1 tbsp2 tbsp
11/2 tbsp
As per taste
As per taste
ForPaneerOnion pasteTomato pureeGinger garlic paste, salt & sugarRed chilli powder, haldi, kasurimethi, garam masala
ButterFresh creamOil
Indian Cuisine (IC)
MWS bowl +* Solo
cooking kit
MWS bowl +* Solo
cooking kit
Utensil
16
Method
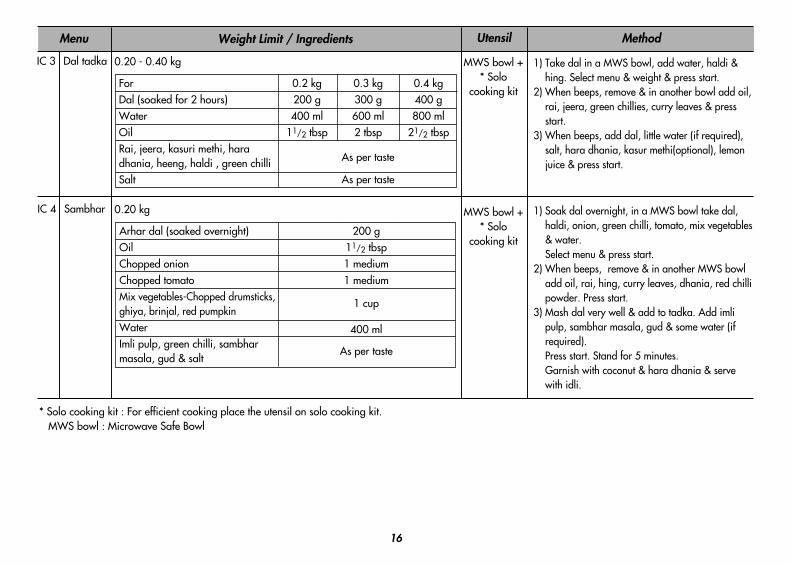
IC 3 Dal tadka
Menu Weight Limit / Ingredients
1) Take dal in a MWS bowl, add water, haldi &hing. Select menu & weight & press start.
2) When beeps, remove & in another bowl add oil,rai, jeera, green chillies, curry leaves & pressstart.
3) When beeps, add dal, little water (if required),salt, hara dhania, kasur methi(optional), lemonjuice & press start.
0.20 - 0.40 kg
0.2 kg200 g400 ml
11/2 tbsp
0.3 kg300 g600 ml2 tbsp
0.4 kg400 g800 ml
21/2 tbsp
As per taste
As per taste
ForDal (soaked for 2 hours)WaterOilRai, jeera, kasuri methi, haradhania, heeng, haldi , green chilliSalt
IC 4 Sambhar 1) Soak dal overnight, in a MWS bowl take dal,haldi, onion, green chilli, tomato, mix vegetables& water. Select menu & press start.
2) When beeps, remove & in another MWS bowladd oil, rai, hing, curry leaves, dhania, red chillipowder. Press start.
3) Mash dal very well & add to tadka. Add imlipulp, sambhar masala, gud & some water (ifrequired). Press start. Stand for 5 minutes. Garnish with coconut & hara dhania & servewith idli.
0.20 kg
200 g11/2 tbsp1 medium1 medium
1 cup
400 ml
As per taste
Arhar dal (soaked overnight)OilChopped onionChopped tomatoMix vegetables-Chopped drumsticks,ghiya, brinjal, red pumpkinWaterImli pulp, green chilli, sambharmasala, gud & salt
MWS bowl +* Solo
cooking kit
MWS bowl +* Solo
cooking kit
Utensil
* Solo cooking kit : For efficient cooking place the utensil on solo cooking kit.MWS bowl : Microwave Safe Bowl
17
Method
IC 5 Dumaloo
Menu Weight Limit / Ingredients
1) In SteamChef put small pricked potatoes withoil (1/2 the amount mentioned per weight) andcover. Select menu & weight and press start.
2) When beeps, in a MWS bowl add oil(remaining half amount) jeera, pepper seeds.cloves, hing, onion paste, ginger garlic paste,tomato puree and press start.
3) When beeps, in the same bowl add the curd,tumeric powder,red chilli powder/deghi mirch,salt, garam masala, saunf powder andpotatoes, press start. Stand for 3 minutes.
Garnish with coriander leaves
Note: Do not use steam plate in step 1
0.10 - 0.30 kg
0.1 kg
100 g
2 tbsp
1 tbsp1 tsp1 tbsp
1/2 cup
0.2 kg
200 g
3 tbsp
11/2 tbsp11/2 tsp2 tbsp1 cup
0.3 kg
300 g
3 tbsp
11/2 tbsp11/2 tsp1 tbsp1 cup
As per taste
For garnishing
ForAloo(small & pricked)OilJeera, pepper seeds, cloves, hingOnion paste,ginger garlic pasteTomato pureeCurdTurmeric powder, red chilli powder/deghi mirch, salt, garam masala,saunf powderCoriander leaves
IC 6 JeeraAloo
1) In a MWS bowl add oil, jeera, salt, dhaniapowder, garam masala, coriander leaves, redchilli powder. Select menu and weight andpress start.
2) When beeps, add potatoes to the bowl andpress start. Squeeze lemon juice & serve.
0.10 - 0.30 kg
0.1 kg100 g
1/2 tbsp1/2 tsp
0.2 kg200 g1 tbsp1 tsp
0.3 kg300 g1 tbsp1 tsp
As per taste
As required
ForPotato(boiled)OilJeeraSaltRed chilli powder, haldi, garammasala dhania powder, corianderleaves
SteamChefwithout
steam plate +MWS bowl
MWS bowl +* Solo
cooking kit
Utensil
* Solo cooking kit : For efficient cooking place the utensil on solo cooking kit.MWS bowl : Microwave Safe Bowl
18
Method
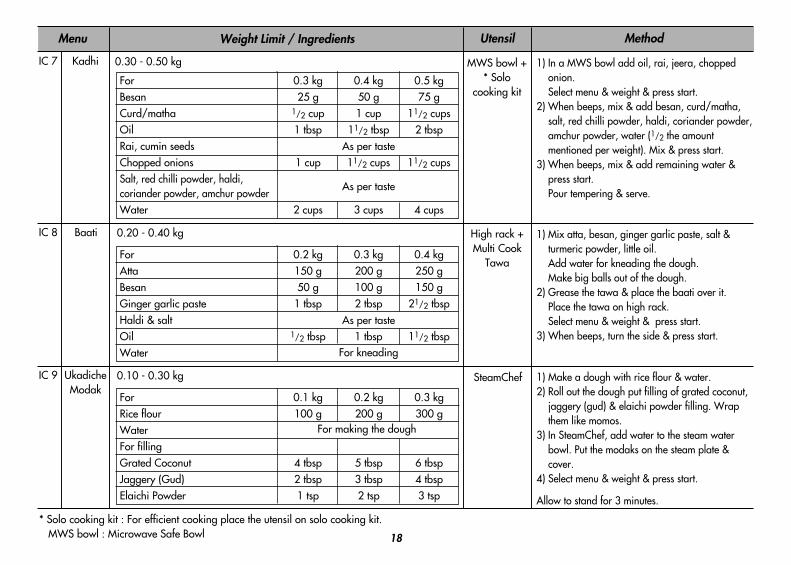
IC 7 Kadhi
Menu Weight Limit / Ingredients
1) In a MWS bowl add oil, rai, jeera, choppedonion. Select menu & weight & press start.
2) When beeps, mix & add besan, curd/matha,salt, red chilli powder, haldi, coriander powder,amchur powder, water (1/2 the amountmentioned per weight). Mix & press start.
3) When beeps, mix & add remaining water &press start. Pour tempering & serve.
0.30 - 0.50 kg
0.3 kg25 g
1/2 cup1 tbsp
1 cup
2 cups
0.4 kg50 g1 cup
11/2 tbsp
11/2 cups
3 cups
0.5 kg75 g
11/2 cups2 tbsp
11/2 cups
4 cups
As per taste
For BesanCurd/mathaOilRai, cumin seedsChopped onionsSalt, red chilli powder, haldi,coriander powder, amchur powderWater
As per taste
IC 8 Baati 1) Mix atta, besan, ginger garlic paste, salt &turmeric powder, little oil. Add water for kneading the dough. Make big balls out of the dough.
2) Grease the tawa & place the baati over it. Place the tawa on high rack. Select menu & weight & press start.
3) When beeps, turn the side & press start.
0.20 - 0.40 kg
0.2 kg150 g50 g
1 tbsp
1/2 tbsp
0.3 kg200 g100 g2 tbsp
1 tbsp
0.4 kg250 g150 g
21/2 tbsp
11/2 tbspFor kneading
ForAttaBesanGinger garlic pasteHaldi & saltOilWater
As per taste
IC 9 UkadicheModak
1) Make a dough with rice flour & water.2) Roll out the dough put filling of grated coconut,
jaggery (gud) & elaichi powder filling. Wrapthem like momos.
3) In SteamChef, add water to the steam waterbowl. Put the modaks on the steam plate &cover.
4) Select menu & weight & press start.
Allow to stand for 3 minutes.
0.10 - 0.30 kg
0.1 kg100 g
4 tbsp2 tbsp1 tsp
0.2 kg200 g
5 tbsp3 tbsp2 tsp
0.3 kg300 g
6 tbsp4 tbsp3 tsp
ForRice flourWaterFor fillingGrated CoconutJaggery (Gud)Elaichi Powder
For making the dough
MWS bowl +* Solo
cooking kit
High rack +Multi Cook
Tawa
SteamChef
Utensil
* Solo cooking kit : For efficient cooking place the utensil on solo cooking kit.MWS bowl : Microwave Safe Bowl
19
Method
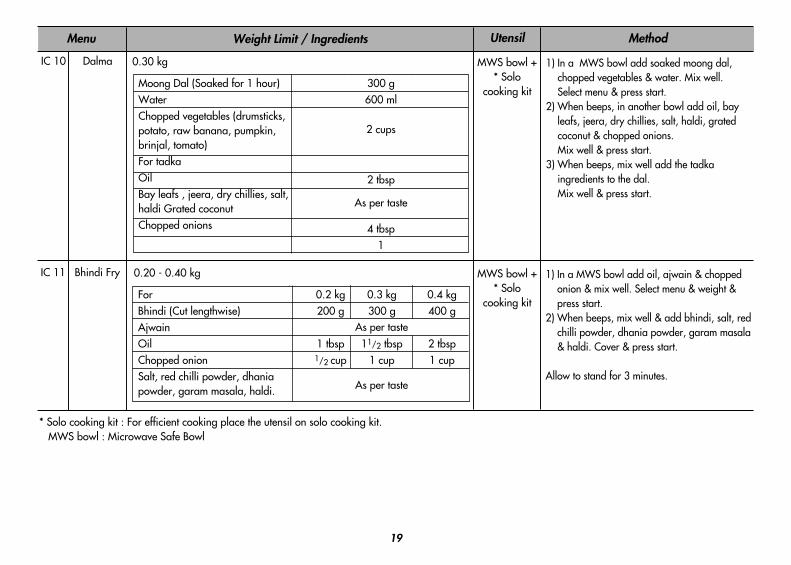
IC 10 Dalma
Menu Weight Limit / Ingredients
1) In a MWS bowl add soaked moong dal,chopped vegetables & water. Mix well. Select menu & press start.
2) When beeps, in another bowl add oil, bayleafs, jeera, dry chillies, salt, haldi, gratedcoconut & chopped onions. Mix well & press start.
3) When beeps, mix well add the tadkaingredients to the dal. Mix well & press start.
0.30 kg
300 g600 ml
2 cups
2 tbsp
As per taste
4 tbsp1
Moong Dal (Soaked for 1 hour)WaterChopped vegetables (drumsticks,potato, raw banana, pumpkin,brinjal, tomato)For tadkaOilBay leafs , jeera, dry chillies, salt, haldi Grated coconutChopped onions
IC 11 Bhindi Fry 1) In a MWS bowl add oil, ajwain & choppedonion & mix well. Select menu & weight &press start.
2) When beeps, mix well & add bhindi, salt, redchilli powder, dhania powder, garam masala& haldi. Cover & press start.
Allow to stand for 3 minutes.
0.20 - 0.40 kg
0.2 kg200 g
1 tbsp1/2 cup
0.3 kg300 g
11/2 tbsp1 cup
0.4 kg400 g
2 tbsp1 cup
ForBhindi (Cut lengthwise)AjwainOilChopped onionSalt, red chilli powder, dhaniapowder, garam masala, haldi.
As per taste
As per taste
* Solo cooking kit : For efficient cooking place the utensil on solo cooking kit.MWS bowl : Microwave Safe Bowl
MWS bowl +* Solo
cooking kit
MWS bowl +* Solo
cooking kit
Utensil
20
Method
IC 12 Panchmel kiSubzi
Menu Weight Limit / Ingredients
1) In a MWS bowl add oil, jeera onion &ginger & green chilli paste. Mix well.
2) Select menu & weight & press start.3) When beeps, mix well & add the chopped
vegetables & little water. Cover & press start.4) When beeps, mix well & add coriander
powder, amchur, haldi & salt. Press start. Allow to stand for 5 minutes.
0.10 - 0.30 kg
0.1 kg
100 g
1/2 tbsp1/2 tsp1/2 cup
1tsp
0.2 kg
200 g
1 tbsp1 tsp
1/2 cup11/2 tsp
0.3 kg
300 g
2 tbsp1 tsp1 cup2 tsp
As per taste
ForChopped vegetables (Gavarfali,chawli, shimla mirch, kheera, gajar)OilJeeraOnionGinger & green chilli pasteCoriander powder, amchur, haldi& salt
IC 13 GujaratiTuvar Dal
1) In a MWS bowl add tuvar dal, salt, hing,turmeric powder, water. Mix well. Select menu & press start.
2) When beeps, remove the dal . 3) In another MWS bowl add oil, mustard
seeds, jeera, finely chopped ginger, slitgreen chillies, curry leaves, chopped onions,red chilli powder. Mix well & press start.
4) When beeps, remove the bowl & add theseingredients to the dal. Add tomato, jaggery& mix well. Press start.
Squeeze lemon juice & serve.
0.30 kg
300 g
600 ml1 tbsp1/2 tsp1/2 tsp1 tbsp
3A few
21
A pinch
As per taste
As per taste
Tuvar dal /Arhar dal (soaked for 2 hours) WaterOilMustard seedsJeeraFinely chopped gingerSlit green chillies Curry leaves.Chopped tomatoChopped onionHingSalt, turmeric powder, red chillipowderJaggery (Gur)
MWS bowl +* Solo
cooking kit
MWS bowl +* Solo
cooking kit
Utensil
* Solo cooking kit : For efficient cooking place the utensil on solo cooking kit.MWS bowl : Microwave Safe Bowl
21
Method
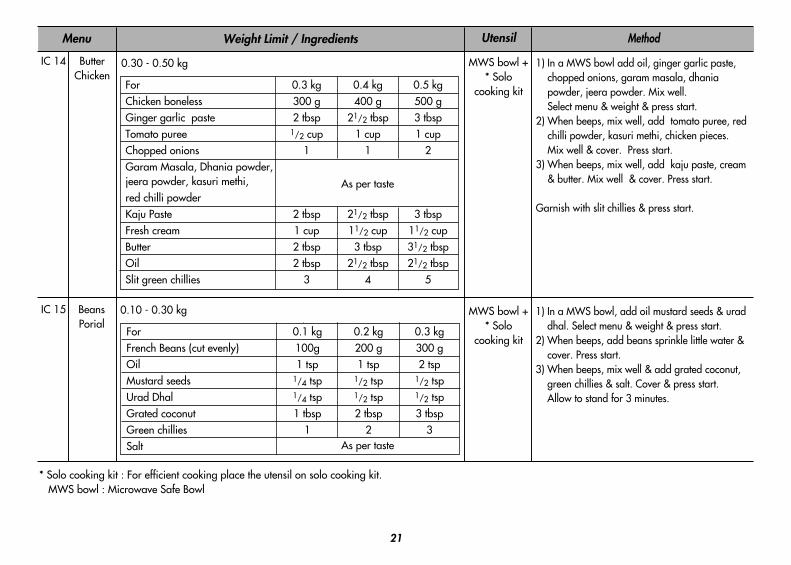
IC 14 ButterChicken
Menu Weight Limit / Ingredients
1) In a MWS bowl add oil, ginger garlic paste,chopped onions, garam masala, dhaniapowder, jeera powder. Mix well. Select menu & weight & press start.
2) When beeps, mix well, add tomato puree, redchilli powder, kasuri methi, chicken pieces. Mix well & cover. Press start.
3) When beeps, mix well, add kaju paste, cream& butter. Mix well & cover. Press start.
Garnish with slit chillies & press start.
IC 15 BeansPorial
1) In a MWS bowl, add oil mustard seeds & uraddhal. Select menu & weight & press start.
2) When beeps, add beans sprinkle little water &cover. Press start.
3) When beeps, mix well & add grated coconut,green chillies & salt. Cover & press start. Allow to stand for 3 minutes.
0.10 - 0.30 kg
0.1 kg100g1 tsp
1/4 tsp1/4 tsp1 tbsp
1
0.2 kg200 g1 tsp
1/2 tsp1/2 tsp2 tbsp
2
0.3 kg300 g2 tsp
1/2 tsp1/2 tsp3 tbsp
3
ForFrench Beans (cut evenly)OilMustard seedsUrad DhalGrated coconutGreen chilliesSalt
0.30 - 0.50 kg
0.3 kg300 g2 tbsp
1/2 cup1
2 tbsp1 cup2 tbsp2 tbsp
3
0.4 kg400 g
21/2 tbsp1 cup
1
21/2 tbsp11/2 cup3 tbsp
21/2 tbsp4
0.5 kg500 g3 tbsp1 cup
2
3 tbsp11/2 cup31/2 tbsp21/2 tbsp
5
ForChicken bonelessGinger garlic pasteTomato pureeChopped onionsGaram Masala, Dhania powder,jeera powder, kasuri methi,red chilli powderKaju PasteFresh creamButterOilSlit green chillies
As per taste
As per taste
MWS bowl +* Solo
cooking kit
MWS bowl +* Solo
cooking kit
Utensil
* Solo cooking kit : For efficient cooking place the utensil on solo cooking kit.MWS bowl : Microwave Safe Bowl
* Solo cooking kit : For efficient cooking place the utensil on solo cooking kit.MWS bowl : Microwave Safe Bowl 22
Method
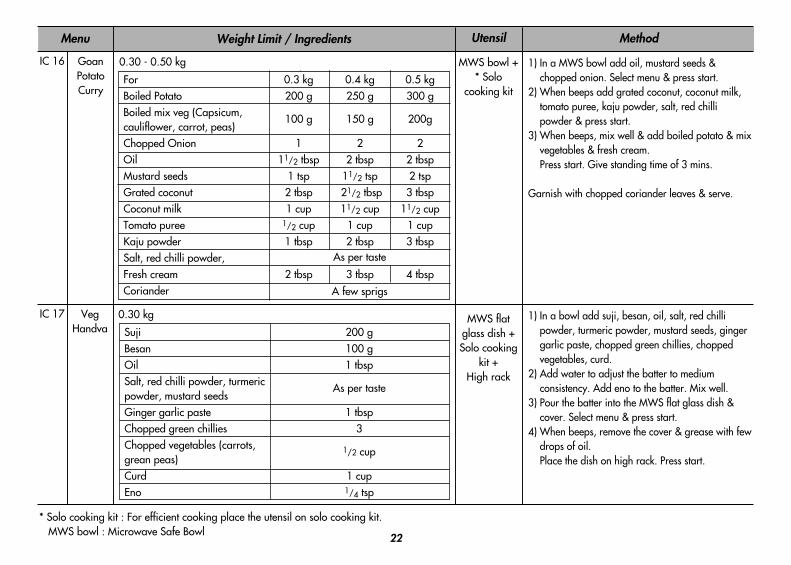
IC 16 GoanPotatoCurry
Menu Weight Limit / Ingredients
1) In a MWS bowl add oil, mustard seeds &chopped onion. Select menu & press start.
2) When beeps add grated coconut, coconut milk,tomato puree, kaju powder, salt, red chillipowder & press start.
3) When beeps, mix well & add boiled potato & mixvegetables & fresh cream. Press start. Give standing time of 3 mins.
Garnish with chopped coriander leaves & serve.
IC 17 VegHandva
1) In a bowl add suji, besan, oil, salt, red chillipowder, turmeric powder, mustard seeds, gingergarlic paste, chopped green chillies, choppedvegetables, curd.
2) Add water to adjust the batter to mediumconsistency. Add eno to the batter. Mix well.
3) Pour the batter into the MWS flat glass dish &cover. Select menu & press start.
4) When beeps, remove the cover & grease with fewdrops of oil. Place the dish on high rack. Press start.
0.30 kg
200 g100 g1 tbsp
As per taste
1 tbsp3
1/2 cup
1 cup1/4 tsp
SujiBesanOilSalt, red chilli powder, turmericpowder, mustard seedsGinger garlic pasteChopped green chilliesChopped vegetables (carrots,grean peas)CurdEno
0.30 - 0.50 kg
0.3 kg200 g
100 g
111/2 tbsp
1 tsp2 tbsp1 cup
1/2 cup1 tbsp
2 tbsp
0.4 kg250 g
150 g
22 tbsp
11/2 tsp21/2 tbsp11/2 cup
1 cup2 tbsp
3 tbsp
0.5 kg300 g
200g
22 tbsp2 tsp3 tbsp
11/2 cup1 cup3 tbsp
4 tbsp
ForBoiled PotatoBoiled mix veg (Capsicum,cauliflower, carrot, peas) Chopped OnionOilMustard seedsGrated coconutCoconut milkTomato pureeKaju powderSalt, red chilli powder, Fresh creamCoriander
As per taste
A few sprigs
MWS bowl +* Solo
cooking kit
MWS flatglass dish +Solo cooking
kit + High rack
Utensil
23
Method
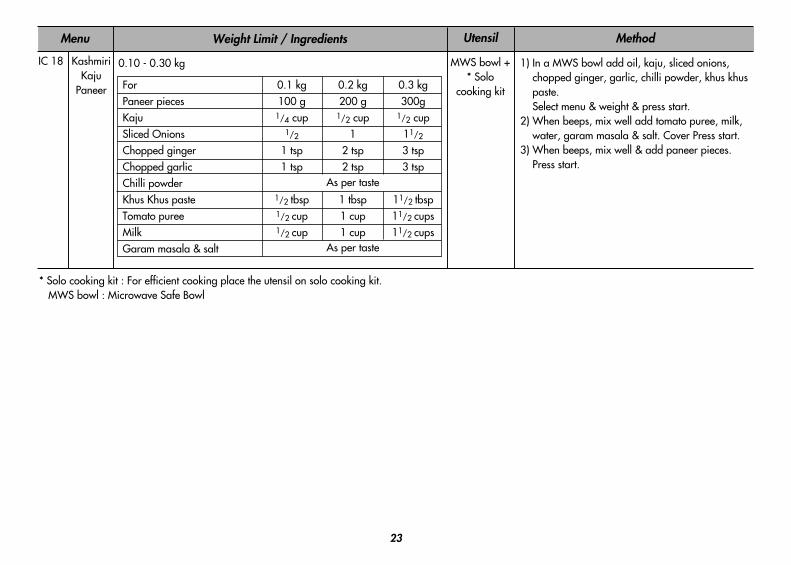
IC 18 KashmiriKaju
Paneer
Menu Weight Limit / Ingredients
1) In a MWS bowl add oil, kaju, sliced onions,chopped ginger, garlic, chilli powder, khus khuspaste. Select menu & weight & press start.
2) When beeps, mix well add tomato puree, milk,water, garam masala & salt. Cover Press start.
3) When beeps, mix well & add paneer pieces.Press start.
0.10 - 0.30 kg
0.1 kg100 g
1/4 cup1/2
1 tsp1 tsp
1/2 tbsp1/2 cup1/2 cup
0.2 kg200 g
1/2 cup1
2 tsp2 tsp
1 tbsp1 cup1 cup
0.3 kg300g
1/2 cup11/2
3 tsp3 tsp
11/2 tbsp11/2 cups11/2 cups
ForPaneer piecesKaju Sliced OnionsChopped gingerChopped garlicChilli powderKhus Khus pasteTomato pureeMilkGaram masala & salt
As per taste
As per taste
MWS bowl +* Solo
cooking kit
Utensil
* Solo cooking kit : For efficient cooking place the utensil on solo cooking kit.MWS bowl : Microwave Safe Bowl
24
Method
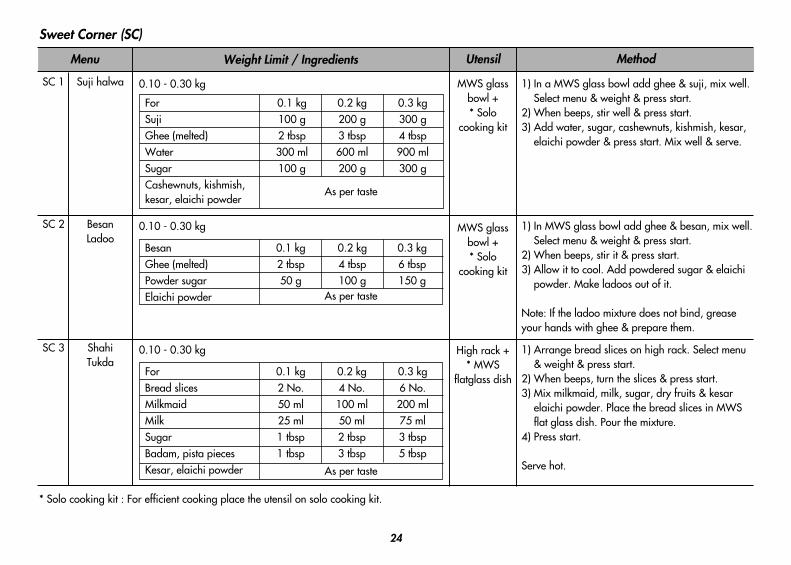
SC 1 Suji halwa
Menu Weight Limit / Ingredients
1) In a MWS glass bowl add ghee & suji, mix well.Select menu & weight & press start.
2) When beeps, stir well & press start.3) Add water, sugar, cashewnuts, kishmish, kesar,
elaichi powder & press start. Mix well & serve.
0.10 - 0.30 kg
0.1 kg100 g2 tbsp300 ml100 g
0.2 kg200 g3 tbsp600 ml200 g
0.3 kg300 g4 tbsp900 ml300 g
ForSujiGhee (melted)WaterSugarCashewnuts, kishmish,kesar, elaichi powder
As per taste
SC 2 BesanLadoo
1) In MWS glass bowl add ghee & besan, mix well.Select menu & weight & press start.
2) When beeps, stir it & press start.3) Allow it to cool. Add powdered sugar & elaichi
powder. Make ladoos out of it.
Note: If the ladoo mixture does not bind, greaseyour hands with ghee & prepare them.
0.10 - 0.30 kg
0.1 kg2 tbsp50 g
0.2 kg4 tbsp100 g
0.3 kg6 tbsp150 g
BesanGhee (melted)Powder sugarElaichi powder As per taste
SC 3 ShahiTukda
1) Arrange bread slices on high rack. Select menu& weight & press start.
2) When beeps, turn the slices & press start.3) Mix milkmaid, milk, sugar, dry fruits & kesar
elaichi powder. Place the bread slices in MWSflat glass dish. Pour the mixture.
4) Press start.
Serve hot.
0.10 - 0.30 kg
0.1 kg2 No.50 ml25 ml1 tbsp1 tbsp
0.2 kg4 No.100 ml50 ml2 tbsp3 tbsp
0.3 kg6 No.200 ml75 ml3 tbsp5 tbsp
ForBread slicesMilkmaidMilkSugarBadam, pista piecesKesar, elaichi powder As per taste
Sweet Corner (SC)
MWS glassbowl +* Solo
cooking kit
MWS glassbowl +* Solo
cooking kit
High rack +* MWS
flatglass dish
Utensil
* Solo cooking kit : For efficient cooking place the utensil on solo cooking kit.
25
Method
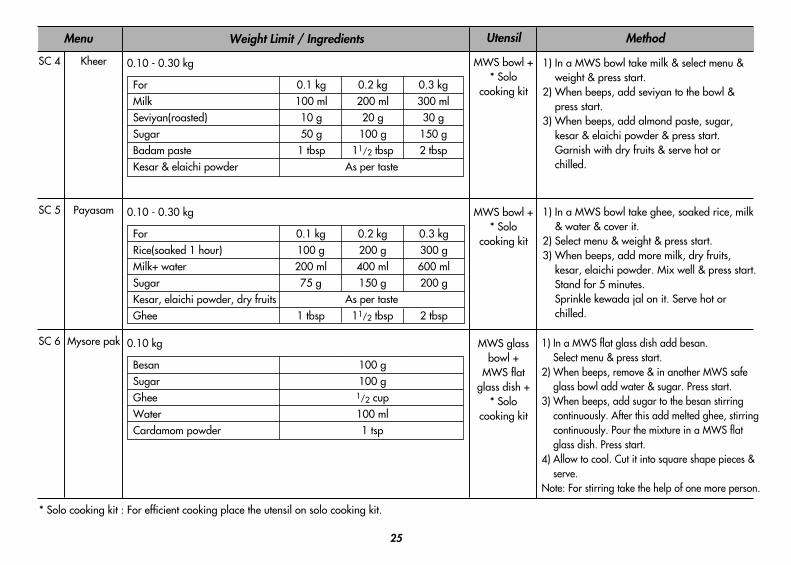
SC 4 Kheer
Menu Weight Limit / Ingredients
1) In a MWS bowl take milk & select menu &weight & press start.
2) When beeps, add seviyan to the bowl &press start.
3) When beeps, add almond paste, sugar,kesar & elaichi powder & press start.Garnish with dry fruits & serve hot orchilled.
0.10 - 0.30 kg
0.1 kg100 ml10 g50 g
1 tbsp
0.2 kg200 ml20 g
100 g11/2 tbsp
0.3 kg300 ml30 g150 g2 tbsp
ForMilkSeviyan(roasted)SugarBadam pasteKesar & elaichi powder As per taste
SC 5 Payasam 1) In a MWS bowl take ghee, soaked rice, milk& water & cover it.
2) Select menu & weight & press start.3) When beeps, add more milk, dry fruits,
kesar, elaichi powder. Mix well & press start. Stand for 5 minutes. Sprinkle kewada jal on it. Serve hot orchilled.
0.10 - 0.30 kg
0.1 kg100 g200 ml75 g
1 tbsp
0.2 kg200 g400 ml150 g
11/2 tbsp
0.3 kg300 g600 ml200 g
2 tbsp
ForRice(soaked 1 hour)Milk+ waterSugarKesar, elaichi powder, dry fruitsGhee
As per taste
SC 6 Mysore pak 1) In a MWS flat glass dish add besan. Select menu & press start.
2) When beeps, remove & in another MWS safeglass bowl add water & sugar. Press start.
3) When beeps, add sugar to the besan stirringcontinuously. After this add melted ghee, stirringcontinuously. Pour the mixture in a MWS flatglass dish. Press start.
4) Allow to cool. Cut it into square shape pieces &serve.
Note: For stirring take the help of one more person.
0.10 kg
100 g100 g
1/2 cup100 ml1 tsp
BesanSugarGheeWaterCardamom powder
MWS bowl +* Solo
cooking kit
MWS bowl +* Solo
cooking kit
MWS glassbowl +
MWS flatglass dish +
* Solocooking kit
Utensil
* Solo cooking kit : For efficient cooking place the utensil on solo cooking kit.
26
Method
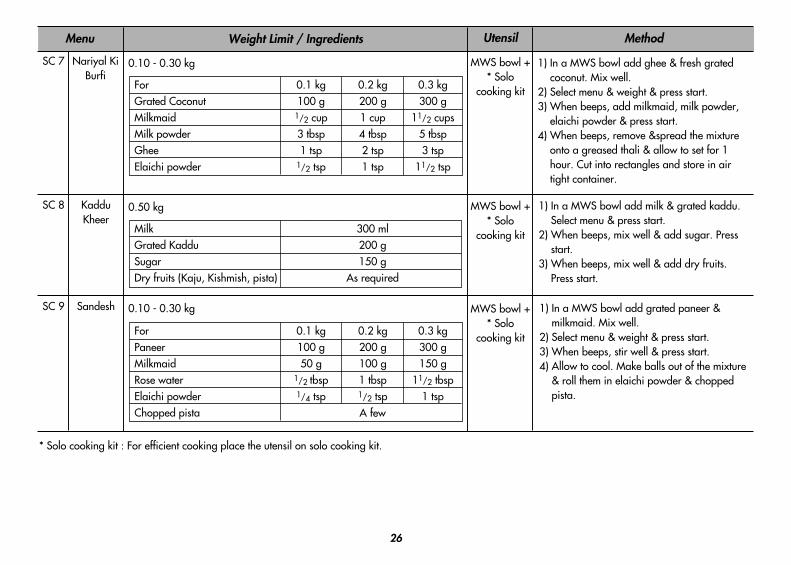
SC 7 Nariyal KiBurfi
Menu Weight Limit / Ingredients
1) In a MWS bowl add ghee & fresh gratedcoconut. Mix well.
2) Select menu & weight & press start.3) When beeps, add milkmaid, milk powder,
elaichi powder & press start.4) When beeps, remove &spread the mixture
onto a greased thali & allow to set for 1hour. Cut into rectangles and store in airtight container.
0.10 - 0.30 kg
0.1 kg100 g
1/2 cup3 tbsp1 tsp
1/2 tsp
0.2 kg200 g1 cup4 tbsp2 tsp1 tsp
0.3 kg300 g
11/2 cups5 tbsp3 tsp
11/2 tsp
ForGrated CoconutMilkmaidMilk powderGheeElaichi powder
SC 8 KadduKheer
1) In a MWS bowl add milk & grated kaddu. Select menu & press start.
2) When beeps, mix well & add sugar. Pressstart.
3) When beeps, mix well & add dry fruits. Press start.
0.50 kg
300 ml200 g150 g
As required
0.1 kg100 g50 g
1/2 tbsp1/4 tsp
0.2 kg200 g100 g1 tbsp1/2 tsp
0.3 kg300 g150 g
11/2 tbsp1 tsp
ForPaneerMilkmaidRose waterElaichi powderChopped pista
MilkGrated KadduSugarDry fruits (Kaju, Kishmish, pista)
SC 9 Sandesh 1) In a MWS bowl add grated paneer &milkmaid. Mix well.
2) Select menu & weight & press start.3) When beeps, stir well & press start.4) Allow to cool. Make balls out of the mixture
& roll them in elaichi powder & choppedpista.
0.10 - 0.30 kg
A few
* Solo cooking kit : For efficient cooking place the utensil on solo cooking kit.
MWS bowl +* Solo
cooking kit
MWS bowl +* Solo
cooking kit
MWS bowl +* Solo
cooking kit
Utensil
27
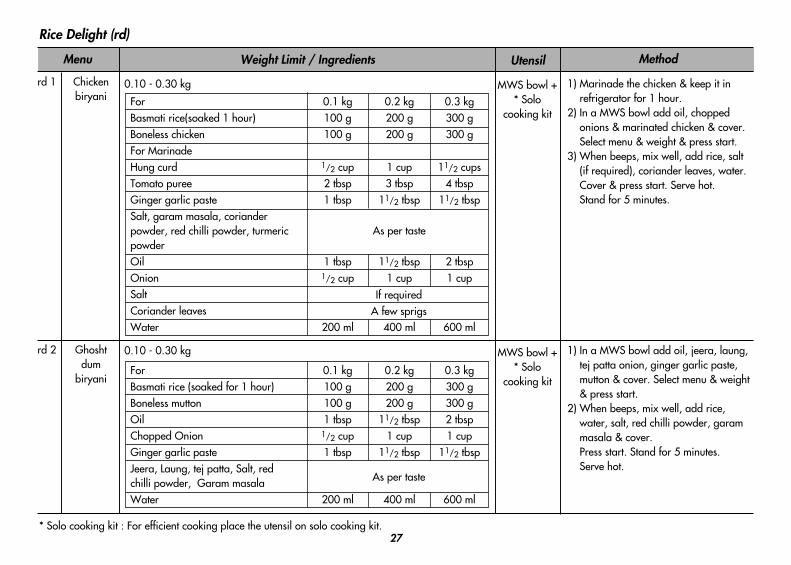
Method
rd 1 Chickenbiryani
Menu Weight Limit / Ingredients
1) Marinade the chicken & keep it inrefrigerator for 1 hour.
2) In a MWS bowl add oil, choppedonions & marinated chicken & cover. Select menu & weight & press start.
3) When beeps, mix well, add rice, salt (if required), coriander leaves, water. Cover & press start. Serve hot. Stand for 5 minutes.
0.10 - 0.30 kg
0.1 kg100 g100 g
1/2 cup2 tbsp1 tbsp
1 tbsp1/2 cup
200 ml
0.2 kg200 g200 g
1 cup3 tbsp
11/2 tbsp
11/2 tbsp1 cup
400 ml
0.3 kg300 g300 g
11/2 cups4 tbsp
11/2 tbsp
2 tbsp1 cup
600 ml
ForBasmati rice(soaked 1 hour) Boneless chickenFor MarinadeHung curdTomato pureeGinger garlic pasteSalt, garam masala, corianderpowder, red chilli powder, turmericpowderOil OnionSaltCoriander leavesWater
0.1 kg100 g100 g1 tbsp
1/2 cup1 tbsp
200 ml
0.2 kg200 g200 g
11/2 tbsp1 cup
11/2 tbsp
400 ml
0.3 kg300 g300 g2 tbsp1 cup
11/2 tbsp
600 ml
ForBasmati rice (soaked for 1 hour)Boneless mutton OilChopped Onion Ginger garlic pasteJeera, Laung, tej patta, Salt, redchilli powder, Garam masalaWater
rd 2 Ghoshtdum
biryani
1) In a MWS bowl add oil, jeera, laung,tej patta onion, ginger garlic paste,mutton & cover. Select menu & weight& press start.
2) When beeps, mix well, add rice,water, salt, red chilli powder, garammasala & cover. Press start. Stand for 5 minutes.Serve hot.
0.10 - 0.30 kg
As per taste
If requiredA few sprigs
As per taste
Rice Delight (rd)
MWS bowl +* Solo
cooking kit
MWS bowl +* Solo
cooking kit
Utensil
* Solo cooking kit : For efficient cooking place the utensil on solo cooking kit.
28
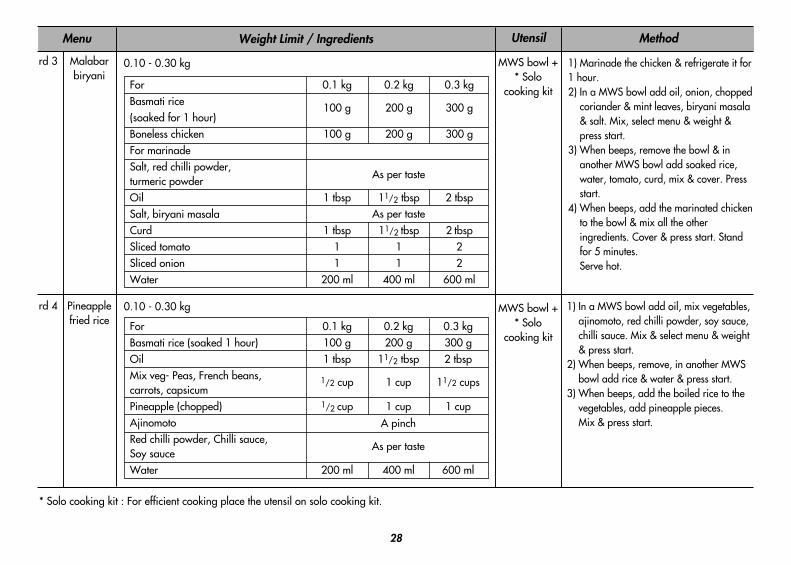
Method
rd 3 Malabarbiryani
Menu Weight Limit / Ingredients
1) Marinade the chicken & refrigerate it for1 hour.2) In a MWS bowl add oil, onion, chopped
coriander & mint leaves, biryani masala& salt. Mix, select menu & weight &press start.
3) When beeps, remove the bowl & inanother MWS bowl add soaked rice,water, tomato, curd, mix & cover. Pressstart.
4) When beeps, add the marinated chickento the bowl & mix all the otheringredients. Cover & press start. Standfor 5 minutes. Serve hot.
0.10 - 0.30 kg
0.1 kg
100 g
100 g
1 tbsp
1 tbsp11
200 ml
0.2 kg
200 g
200 g
11/2 tbsp
11/2 tbsp11
400 ml
0.3 kg
300 g
300 g
2 tbsp
2 tbsp22
600 ml
ForBasmati rice(soaked for 1 hour)Boneless chickenFor marinadeSalt, red chilli powder, turmeric powderOilSalt, biryani masalaCurdSliced tomatoSliced onionWater
0.1 kg100 g1 tbsp
1/2 cup
1/2 cup
200 ml
0.2 kg200 g
11/2 tbsp
1 cup
1 cup
400 ml
0.3 kg300 g2 tbsp
11/2 cups
1 cup
600 ml
ForBasmati rice (soaked 1 hour)OilMix veg- Peas, French beans,carrots, capsicumPineapple (chopped)AjinomotoRed chilli powder, Chilli sauce,Soy sauceWater
rd 4 Pineapplefried rice
1) In a MWS bowl add oil, mix vegetables,ajinomoto, red chilli powder, soy sauce,chilli sauce. Mix & select menu & weight& press start.
2) When beeps, remove, in another MWSbowl add rice & water & press start.
3) When beeps, add the boiled rice to thevegetables, add pineapple pieces. Mix & press start.
0.10 - 0.30 kg
As per taste
As per taste
A pinch
As per taste
MWS bowl +* Solo
cooking kit
MWS bowl +* Solo
cooking kit
Utensil
* Solo cooking kit : For efficient cooking place the utensil on solo cooking kit.
29
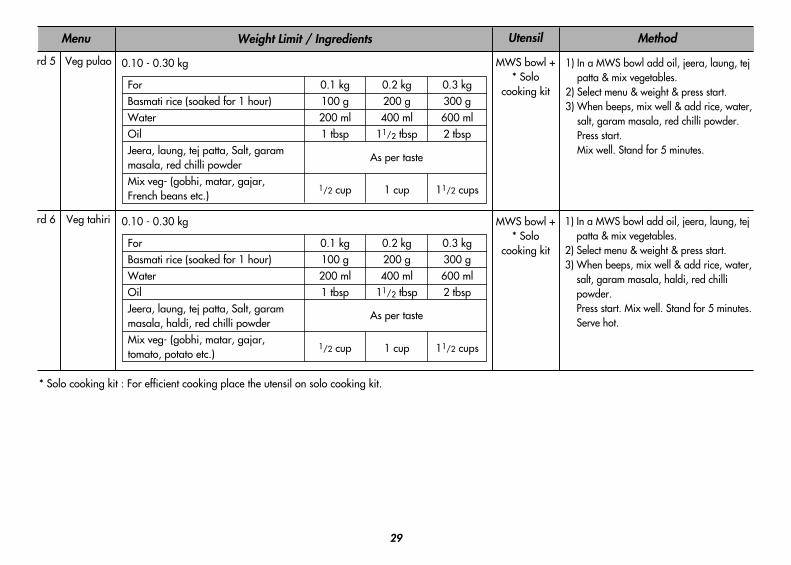
Method
rd 5 Veg pulao
Menu Weight Limit / Ingredients
1) In a MWS bowl add oil, jeera, laung, tejpatta & mix vegetables.
2) Select menu & weight & press start.3) When beeps, mix well & add rice, water,
salt, garam masala, red chilli powder.Press start. Mix well. Stand for 5 minutes.
0.10 - 0.30 kg
0.1 kg100 g200 ml1 tbsp
1/2 cup
0.2 kg200 g400 ml
11/2 tbsp
1 cup
0.3 kg300 g600 ml2 tbsp
11/2 cups
ForBasmati rice (soaked for 1 hour)WaterOilJeera, laung, tej patta, Salt, garammasala, red chilli powderMix veg- (gobhi, matar, gajar,French beans etc.)
As per taste
rd 6 Veg tahiri 1) In a MWS bowl add oil, jeera, laung, tejpatta & mix vegetables.
2) Select menu & weight & press start.3) When beeps, mix well & add rice, water,
salt, garam masala, haldi, red chillipowder. Press start. Mix well. Stand for 5 minutes. Serve hot.
0.10 - 0.30 kg
0.1 kg100 g200 ml1 tbsp
1/2 cup
0.2 kg200 g400 ml
11/2 tbsp
1 cup
0.3 kg300 g600 ml2 tbsp
11/2 cups
ForBasmati rice (soaked for 1 hour)WaterOilJeera, laung, tej patta, Salt, garammasala, haldi, red chilli powderMix veg- (gobhi, matar, gajar,tomato, potato etc.)
As per taste
MWS bowl +* Solo
cooking kit
MWS bowl +* Solo
cooking kit
Utensil
* Solo cooking kit : For efficient cooking place the utensil on solo cooking kit.
30
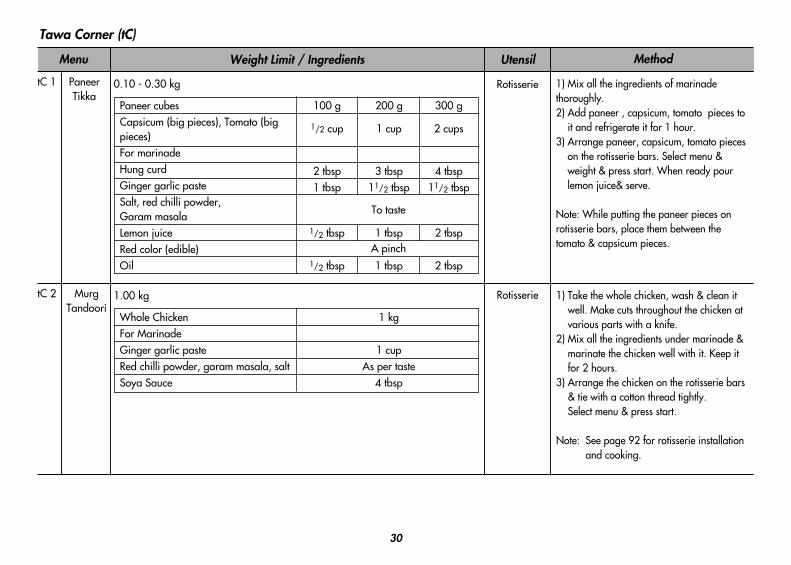
Method
tC 1 PaneerTikka
Menu Weight Limit / Ingredients
1) Mix all the ingredients of marinadethoroughly.2) Add paneer , capsicum, tomato pieces to
it and refrigerate it for 1 hour.3) Arrange paneer, capsicum, tomato pieces
on the rotisserie bars. Select menu &weight & press start. When ready pourlemon juice& serve.
Note: While putting the paneer pieces onrotisserie bars, place them between thetomato & capsicum pieces.
0.10 - 0.30 kg
Tawa Corner (tC)
100 g
1/2 cup
2 tbsp1 tbsp
1/2 tbsp
1/2 tbsp
200 g
1 cup
3 tbsp11/2 tbsp
1 tbsp
1 tbsp
300 g
2 cups
4 tbsp11/2 tbsp
2 tbsp
2 tbsp
Paneer cubes Capsicum (big pieces), Tomato (bigpieces)For marinadeHung curdGinger garlic pasteSalt, red chilli powder, Garam masalaLemon juiceRed color (edible)Oil
A pinch
To taste
tC 2 MurgTandoori
1) Take the whole chicken, wash & clean itwell. Make cuts throughout the chicken atvarious parts with a knife.
2) Mix all the ingredients under marinade &marinate the chicken well with it. Keep itfor 2 hours.
3) Arrange the chicken on the rotisserie bars& tie with a cotton thread tightly.Select menu & press start.
Note: See page 92 for rotisserie installationand cooking.
1.00 kg
1 kg
1 cupAs per taste
4 tbsp
Whole ChickenFor MarinadeGinger garlic pasteRed chilli powder, garam masala, saltSoya Sauce
Rotisserie
Rotisserie
Utensil
31
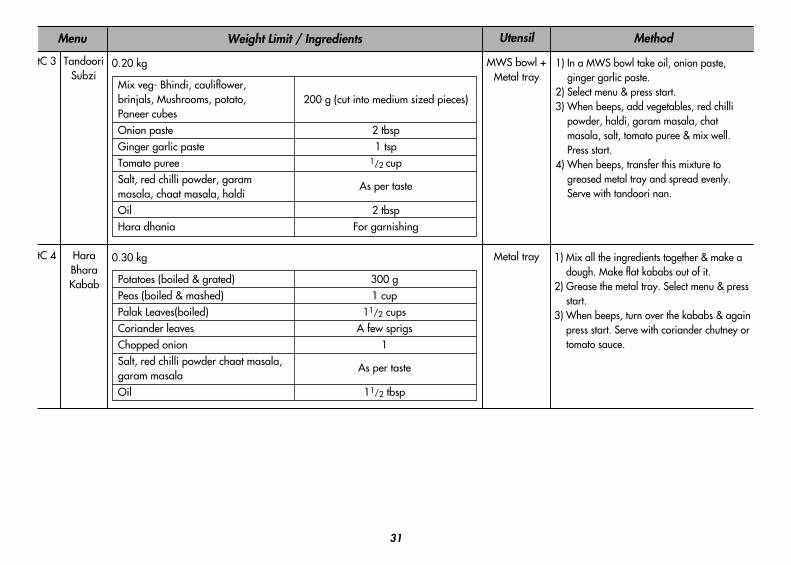
Method
tC 3 TandooriSubzi
Menu Weight Limit / Ingredients
1) In a MWS bowl take oil, onion paste,ginger garlic paste.
2) Select menu & press start.3) When beeps, add vegetables, red chilli
powder, haldi, garam masala, chatmasala, salt, tomato puree & mix well.Press start.
4) When beeps, transfer this mixture togreased metal tray and spread evenly. Serve with tandoori nan.
0.20 kg
200 g (cut into medium sized pieces)
2 tbsp1 tsp
1/2 cup
As per taste
2 tbspFor garnishing
Mix veg- Bhindi, cauliflower,brinjals, Mushrooms, potato, Paneer cubesOnion pasteGinger garlic pasteTomato pureeSalt, red chilli powder, garammasala, chaat masala, haldiOilHara dhania
tC 4 HaraBharaKabab
1) Mix all the ingredients together & make adough. Make flat kababs out of it.
2) Grease the metal tray. Select menu & pressstart.
3) When beeps, turn over the kababs & againpress start. Serve with coriander chutney ortomato sauce.
0.30 kg
300 g1 cup
11/2 cupsA few sprigs
1
As per taste
11/2 tbsp
Potatoes (boiled & grated)Peas (boiled & mashed)Palak Leaves(boiled)Coriander leavesChopped onionSalt, red chilli powder chaat masala,garam masalaOil
MWS bowl +Metal tray
Metal tray
Utensil
32
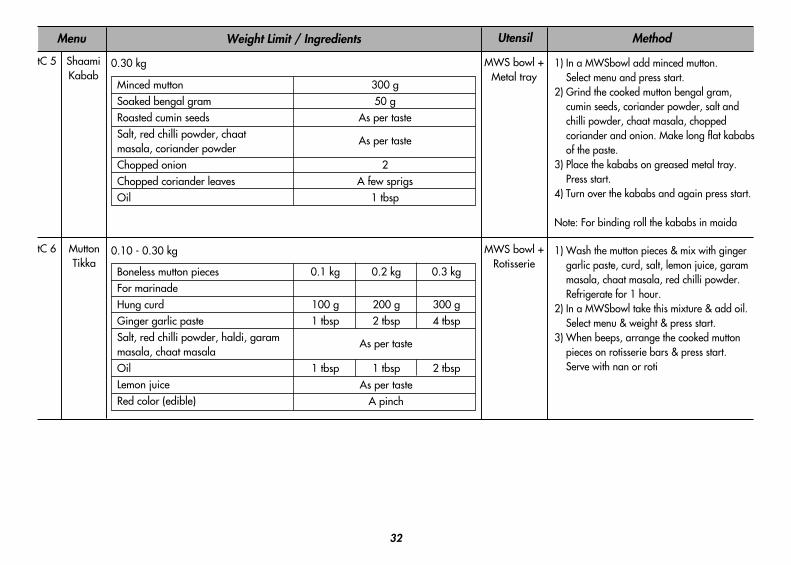
Method
tC 5 ShaamiKabab
Menu Weight Limit / Ingredients
1) In a MWSbowl add minced mutton. Select menu and press start.
2) Grind the cooked mutton bengal gram,cumin seeds, coriander powder, salt andchilli powder, chaat masala, choppedcoriander and onion. Make long flat kababsof the paste.
3) Place the kababs on greased metal tray. Press start.
4) Turn over the kababs and again press start.
Note: For binding roll the kababs in maida
0.30 kg
300 g50 g
As per taste
As per taste
2A few sprigs
1 tbsp
Minced muttonSoaked bengal gramRoasted cumin seedsSalt, red chilli powder, chaatmasala, coriander powderChopped onionChopped coriander leavesOil
tC 6 MuttonTikka
1) Wash the mutton pieces & mix with gingergarlic paste, curd, salt, lemon juice, garammasala, chaat masala, red chilli powder. Refrigerate for 1 hour.
2) In a MWSbowl take this mixture & add oil. Select menu & weight & press start.
3) When beeps, arrange the cooked muttonpieces on rotisserie bars & press start.Serve with nan or roti
0.10 - 0.30 kg
0.1 kg
100 g1 tbsp
1 tbsp
0.2 kg
200 g2 tbsp
1 tbsp
0.3 kg
300 g4 tbsp
2 tbsp
Boneless mutton piecesFor marinadeHung curdGinger garlic pasteSalt, red chilli powder, haldi, garammasala, chaat masalaOilLemon juiceRed color (edible)
As per tasteA pinch
As per taste
MWS bowl +Metal tray
MWS bowl +Rotisserie
Utensil
33
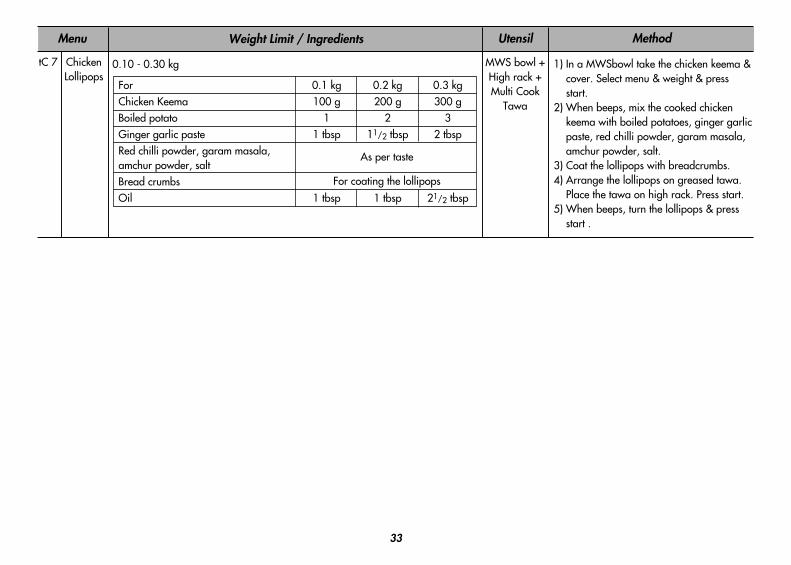
MethodMenu Weight Limit / Ingredients
tC 7 ChickenLollipops
1) In a MWSbowl take the chicken keema &cover. Select menu & weight & pressstart.
2) When beeps, mix the cooked chickenkeema with boiled potatoes, ginger garlicpaste, red chilli powder, garam masala,amchur powder, salt.
3) Coat the lollipops with breadcrumbs.4) Arrange the lollipops on greased tawa.
Place the tawa on high rack. Press start.5) When beeps, turn the lollipops & press
start .
0.10 - 0.30 kg
0.1 kg100 g
11 tbsp
1 tbsp
0.2 kg200 g
211/2 tbsp
1 tbsp
0.3 kg300 g
32 tbsp
21/2 tbsp
ForChicken KeemaBoiled potatoGinger garlic pasteRed chilli powder, garam masala,amchur powder, salt Bread crumbsOil
As per taste
For coating the lollipops
MWS bowl +High rack +Multi Cook
Tawa
Utensil
34
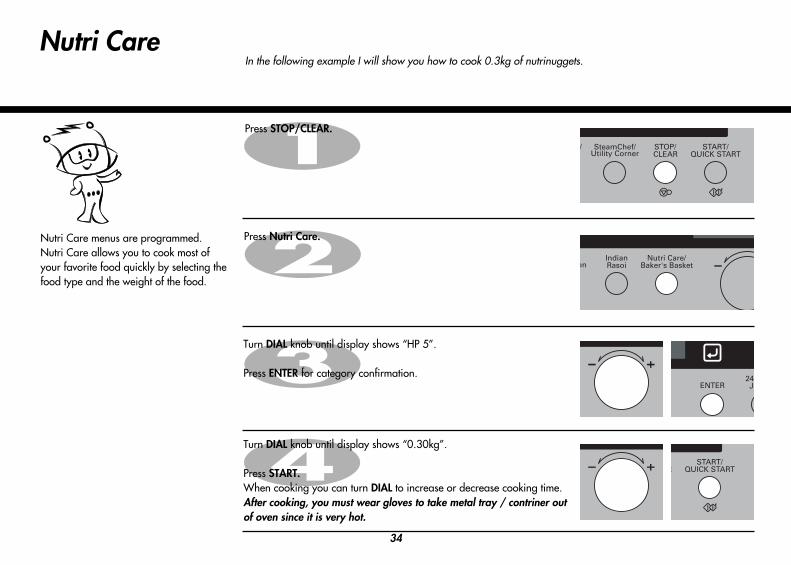
Nutri Care In the following example I will show you how to cook 0.3kg of nutrinuggets.
Press STOP/CLEAR.
Press Nutri Care.
Turn DIAL knob until display shows “HP 5”.
Press ENTER for category confirmation.
Nutri Care menus are programmed. Nutri Care allows you to cook most ofyour favorite food quickly by selecting thefood type and the weight of the food.
Turn DIAL knob until display shows “0.30kg”.
Press START.When cooking you can turn DIAL to increase or decrease cooking time.After cooking, you must wear gloves to take metal tray / contriner outof oven since it is very hot.
35
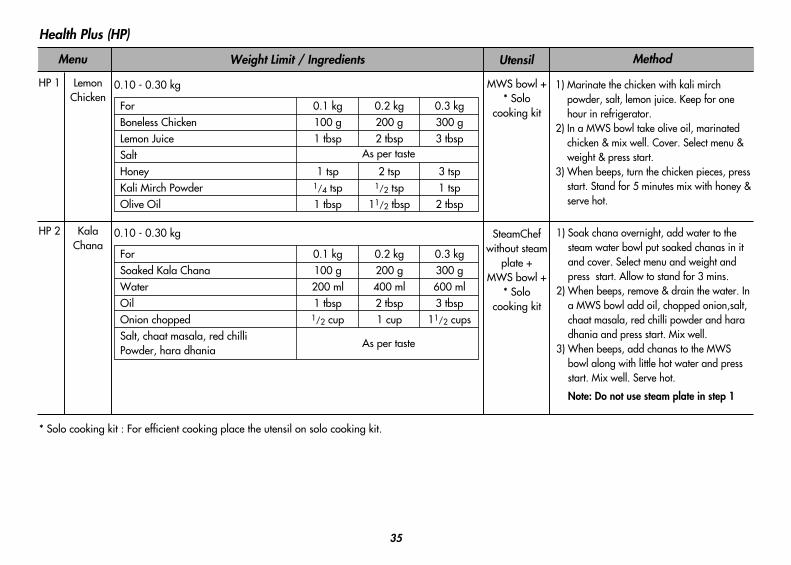
MethodMenu Weight Limit / Ingredients
HP 1 LemonChicken
1) Marinate the chicken with kali mirchpowder, salt, lemon juice. Keep for onehour in refrigerator.
2) In a MWS bowl take olive oil, marinatedchicken & mix well. Cover. Select menu &weight & press start.
3) When beeps, turn the chicken pieces, pressstart. Stand for 5 minutes mix with honey &serve hot.
0.10 - 0.30 kg
Health Plus (HP)
0.1 kg100 g1 tbsp
1 tsp1/4 tsp1 tbsp
0.2 kg200 g2 tbsp
2 tsp1/2 tsp
11/2 tbsp
0.3 kg300 g3 tbsp
3 tsp1 tsp2 tbsp
ForBoneless ChickenLemon JuiceSaltHoneyKali Mirch PowderOlive Oil
As per taste
HP 2 KalaChana
1) Soak chana overnight, add water to thesteam water bowl put soaked chanas in itand cover. Select menu and weight andpress start. Allow to stand for 3 mins.
2) When beeps, remove & drain the water. Ina MWS bowl add oil, chopped onion,salt,chaat masala, red chilli powder and haradhania and press start. Mix well.
3) When beeps, add chanas to the MWSbowl along with little hot water and pressstart. Mix well. Serve hot.
Note: Do not use steam plate in step 1
0.10 - 0.30 kg
0.1 kg100 g200 ml1 tbsp
1/2 cup
0.2 kg200 g400 ml2 tbsp1 cup
0.3 kg300 g600 ml3 tbsp
11/2 cups
ForSoaked Kala ChanaWaterOilOnion choppedSalt, chaat masala, red chilliPowder, hara dhania
As per taste
MWS bowl +* Solo
cooking kit
SteamChefwithout steam
plate + MWS bowl +
* Solocooking kit
Utensil
* Solo cooking kit : For efficient cooking place the utensil on solo cooking kit.
36
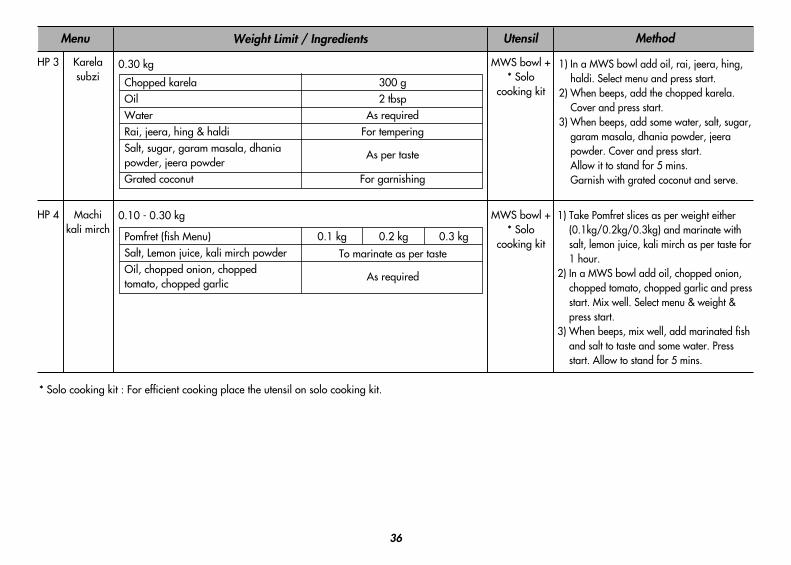
MethodMenu Weight Limit / Ingredients
HP 3 Karelasubzi
1) In a MWS bowl add oil, rai, jeera, hing,haldi. Select menu and press start.
2) When beeps, add the chopped karela.Cover and press start.
3) When beeps, add some water, salt, sugar,garam masala, dhania powder, jeerapowder. Cover and press start.Allow it to stand for 5 mins. Garnish with grated coconut and serve.
0.30 kg
300 g2 tbsp
As requiredFor tempering
As per taste
For garnishing
Chopped karelaOilWaterRai, jeera, hing & haldiSalt, sugar, garam masala, dhaniapowder, jeera powderGrated coconut
HP 4 Machikali mirch
1) Take Pomfret slices as per weight either(0.1kg/0.2kg/0.3kg) and marinate withsalt, lemon juice, kali mirch as per taste for1 hour.
2) In a MWS bowl add oil, chopped onion,chopped tomato, chopped garlic and pressstart. Mix well. Select menu & weight &press start.
3) When beeps, mix well, add marinated fishand salt to taste and some water. Pressstart. Allow to stand for 5 mins.
0.10 - 0.30 kg
0.1 kg 0.2 kg 0.3 kgPomfret (fish Menu)Salt, Lemon juice, kali mirch powderOil, chopped onion, choppedtomato, chopped garlic
To marinate as per taste
As required
* Solo cooking kit : For efficient cooking place the utensil on solo cooking kit.
MWS bowl +* Solo
cooking kit
MWS bowl +* Solo
cooking kit
Utensil
37
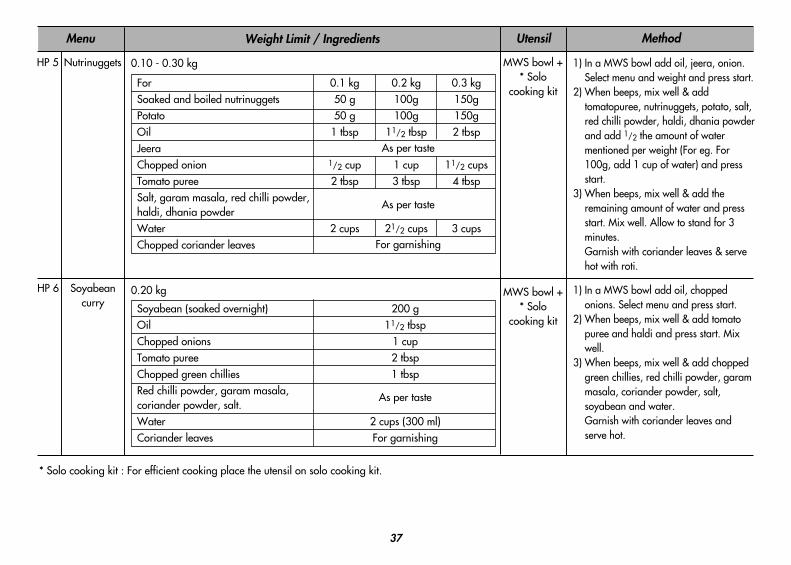
MethodMenu Weight Limit / Ingredients
HP 5 Nutrinuggets 1) In a MWS bowl add oil, jeera, onion.Select menu and weight and press start.
2) When beeps, mix well & addtomatopuree, nutrinuggets, potato, salt,red chilli powder, haldi, dhania powderand add 1/2 the amount of watermentioned per weight (For eg. For100g, add 1 cup of water) and pressstart.
3) When beeps, mix well & add theremaining amount of water and pressstart. Mix well. Allow to stand for 3minutes.Garnish with coriander leaves & servehot with roti.
0.10 - 0.30 kg
0.1 kg50 g50 g
1 tbsp
1/2 cup2 tbsp
2 cups
0.2 kg100g100g
11/2 tbsp
1 cup3 tbsp
21/2 cups
0.3 kg150g150g2 tbsp
11/2 cups4 tbsp
3 cups
ForSoaked and boiled nutrinuggetsPotatoOilJeeraChopped onionTomato pureeSalt, garam masala, red chilli powder,haldi, dhania powder WaterChopped coriander leaves
As per taste
As per taste
For garnishing
HP 6 Soyabeancurry
1) In a MWS bowl add oil, choppedonions. Select menu and press start.
2) When beeps, mix well & add tomatopuree and haldi and press start. Mixwell.
3) When beeps, mix well & add choppedgreen chillies, red chilli powder, garammasala, coriander powder, salt,soyabean and water.Garnish with coriander leaves andserve hot.
0.20 kg
200 g11/2 tbsp
1 cup2 tbsp1 tbsp
As per taste
2 cups (300 ml)For garnishing
Soyabean (soaked overnight)OilChopped onionsTomato pureeChopped green chillies Red chilli powder, garam masala,coriander powder, salt.WaterCoriander leaves
* Solo cooking kit : For efficient cooking place the utensil on solo cooking kit.
MWS bowl +* Solo
cooking kit
MWS bowl +* Solo
cooking kit
Utensil
38
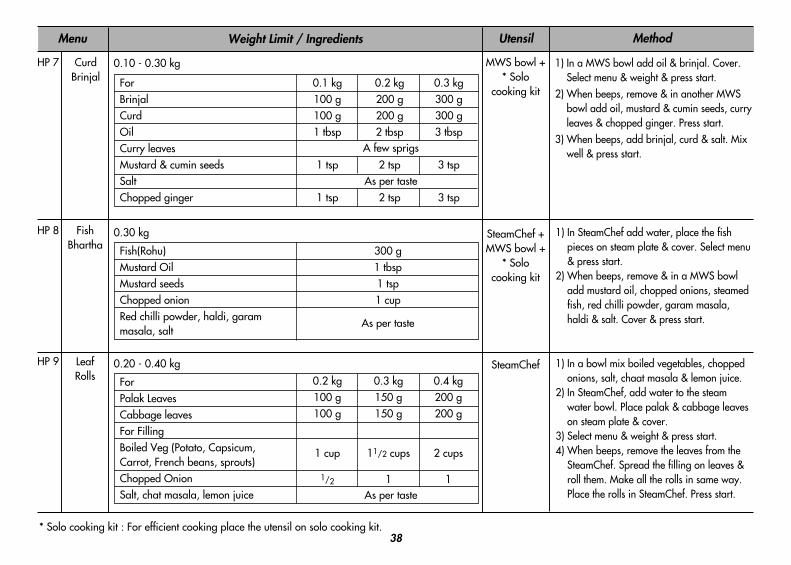
MethodMenu Weight Limit / Ingredients
HP 7 CurdBrinjal
1) In a MWS bowl add oil & brinjal. Cover.Select menu & weight & press start.
2) When beeps, remove & in another MWSbowl add oil, mustard & cumin seeds, curryleaves & chopped ginger. Press start.
3) When beeps, add brinjal, curd & salt. Mixwell & press start.
0.10 - 0.30 kg
0.1 kg100 g100 g1 tbsp
1 tsp
1 tsp
0.2 kg200 g200 g2 tbsp
2 tsp
2 tsp
0.3 kg300 g300 g3 tbsp
3 tsp
3 tsp
ForBrinjalCurdOilCurry leavesMustard & cumin seedsSaltChopped ginger
A few sprigs
As per taste
HP 8 FishBhartha
1) In SteamChef add water, place the fishpieces on steam plate & cover. Select menu& press start.
2) When beeps, remove & in a MWS bowladd mustard oil, chopped onions, steamedfish, red chilli powder, garam masala,haldi & salt. Cover & press start.
0.30 kg
300 g1 tbsp1 tsp1 cup
As per taste
Fish(Rohu)Mustard OilMustard seedsChopped onionRed chilli powder, haldi, garammasala, salt
HP 9 LeafRolls
1) In a bowl mix boiled vegetables, choppedonions, salt, chaat masala & lemon juice.
2) In SteamChef, add water to the steamwater bowl. Place palak & cabbage leaveson steam plate & cover.
3) Select menu & weight & press start.4) When beeps, remove the leaves from the
SteamChef. Spread the filling on leaves &roll them. Make all the rolls in same way. Place the rolls in SteamChef. Press start.
0.20 - 0.40 kg
ForPalak LeavesCabbage leavesFor Filling Boiled Veg (Potato, Capsicum,Carrot, French beans, sprouts)Chopped OnionSalt, chat masala, lemon juice
0.2 kg100 g100 g
1 cup
1/2
0.3 kg150 g150 g
11/2 cups
1
0.4 kg200 g200 g
2 cups
1As per taste
MWS bowl +* Solo
cooking kit
SteamChef +MWS bowl +
* Solocooking kit
SteamChef
Utensil
* Solo cooking kit : For efficient cooking place the utensil on solo cooking kit.

39
MethodMenu Weight Limit / Ingredients
So 1 Chickenshorba
1) In a MWS glass bowl add chicken pieces,chopped garlic and 2 cups of water. Select menuand press start.
2) When beeps, remove & strain stock. In anotherMWS glass bowl add oil, cumin seeds andmaida and press start.
3) When beeps, add the chicken stock, salt, pepperand press start. Garnish with fresh cream andserve hot.
0.30 kg
Soup (So)
0.3 kg1/2 tbsp
1 tspAs per taste
2 tbsp2 cups
For garnishing
Boneless ChickenOilChopped garlicSalt & pepper powder MaidaWaterFresh cream
0.3 kg1/2 tbsp1 tbsp
As per taste
2 cupsFor garnishing
Chopped TomatoOilGinger garlic pasteJeera, bay leaf, salt, garam masala,sugarWaterCoriander leaves
So 2 TamatarShorba
1) In a MWS glass bowl add tomatoes cut intoquarters with some water. Select menu and pressstart.
2) When beeps, grind and strain the whole stockand add 2 cups water.
3) In another MWS glass bowl add oil, gingergarlic paste, jeera, bay leaf and press start.
4) When beeps, mix well & add the strained stock,season with salt, garam masala and press start.Add sugar if very sour. Garnish with corianderleaves and serve hot.
0.30 kg
200 g2 cups1 tbsp2 tbsp
As per taste
Sweet CornWaterOilCorn flour Salt, sugar and kali mirch, choppedonion and green chilli.
So 3 Sweet cornSoup
1) Grind sweet corn with some water. Put in MWSglass bowl along with 2 cups water. Select menu& press start. Strain the stock.
2) When beeps, remove & in another MWS glassbowl add oil, green chilli and onion. Press start.
3) When beeps, add the stock in it. Mix corn flourwith 1/2 cup water and add to the stock.
4) Add salt, sugar, kali mirch and press start. Serve hot.
0.30 kg
MWS glassbowl + * Solo
cooking kit
MWS glassbowl + * Solo
cooking kit
MWS glassbowl + * Solo
cooking kit
Utensil
* Solo cooking kit : For efficient cooking place the utensil on solo cooking kit.
40
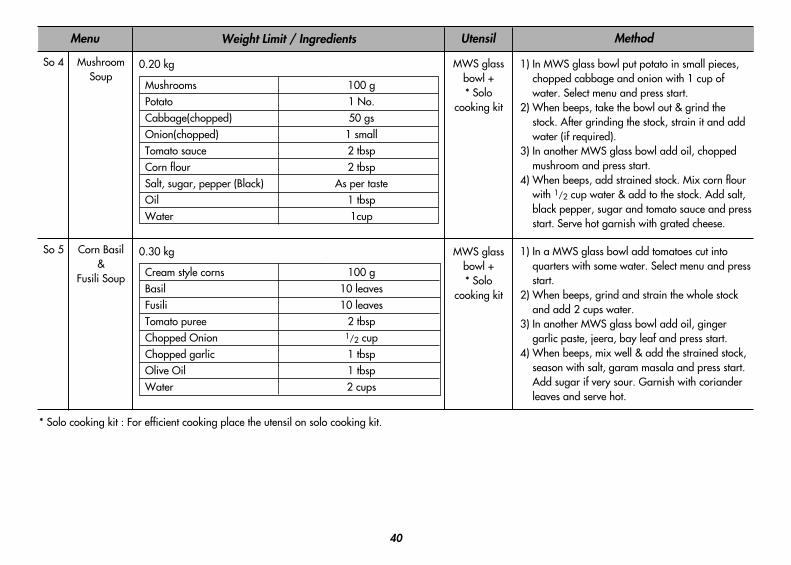
MethodMenu Weight Limit / Ingredients
So 4 MushroomSoup
1) In MWS glass bowl put potato in small pieces,chopped cabbage and onion with 1 cup ofwater. Select menu and press start.
2) When beeps, take the bowl out & grind thestock. After grinding the stock, strain it and addwater (if required).
3) In another MWS glass bowl add oil, choppedmushroom and press start.
4) When beeps, add strained stock. Mix corn flourwith 1/2 cup water & add to the stock. Add salt,black pepper, sugar and tomato sauce and pressstart. Serve hot garnish with grated cheese.
0.20 kg
100 g1 No.50 gs
1 small2 tbsp2 tbsp
As per taste1 tbsp1cup
MushroomsPotato Cabbage(chopped)Onion(chopped)Tomato sauceCorn flourSalt, sugar, pepper (Black) OilWater
100 g10 leaves10 leaves
2 tbsp1/2 cup1 tbsp1 tbsp2 cups
Cream style cornsBasilFusiliTomato pureeChopped OnionChopped garlic Olive OilWater
So 5 Corn Basil&
Fusili Soup
1) In a MWS glass bowl add tomatoes cut intoquarters with some water. Select menu and pressstart.
2) When beeps, grind and strain the whole stockand add 2 cups water.
3) In another MWS glass bowl add oil, gingergarlic paste, jeera, bay leaf and press start.
4) When beeps, mix well & add the strained stock,season with salt, garam masala and press start.Add sugar if very sour. Garnish with corianderleaves and serve hot.
0.30 kg
MWS glassbowl + * Solo
cooking kit
MWS glassbowl + * Solo
cooking kit
Utensil
* Solo cooking kit : For efficient cooking place the utensil on solo cooking kit.
41
MethodMenu Weight Limit / Ingredients
So 6 Rasam 1) In a MWS bowl add chopped tomato & water.Select menu & press start.
2) When beeps, remove & cool. Grind & strain it.3) In a MWS bowl add oil, coriander seeds, cumin
seeds, cinnamon, hing, chopped garlic, greenchillies, salt & jaggery & strained tomato stock.Press start.
4) When beeps, add water (if required) & tamarindpulp. Press start. Garnish with coriander & curryleaves & serve.
0.30 kg
300 g50 g
As per taste23
For garnishing2-3 flakes
As per taste
2 cups
TomatoTamarind pulpSalt & JaggeryGreen chilliesChopped OnionsCoriander & curry leavesChopped garlicCoriander seeds Cumin seedsCinnamon HingWater
So 7 ChickenTortillaSoup
1) In MWS glass bowl put add water & chickenpieces. Keep it in microwave. Select menu & press start.
2) When beeps, remove. 3) In another MWS glass bowl add oil & ginger
garlic paste. Press start. 4) When beeps, add chicken stock, salt, pepper
powder, green chilli. Press start & serve with tortilla pieces.
0.30 kg
200 g1 tsp
2 cupsAs per taste
1 tbsp10-15 No.
Chicken Pieces Ginger garlic pasteWaterSalt, pepper powder, green chilliesOilTortilla pieces
MWS bowl +* Solo
cooking kit
MWS glassbowl + * Solo
cooking kit
Utensil
* Solo cooking kit : For efficient cooking place the utensil on solo cooking kit.
42
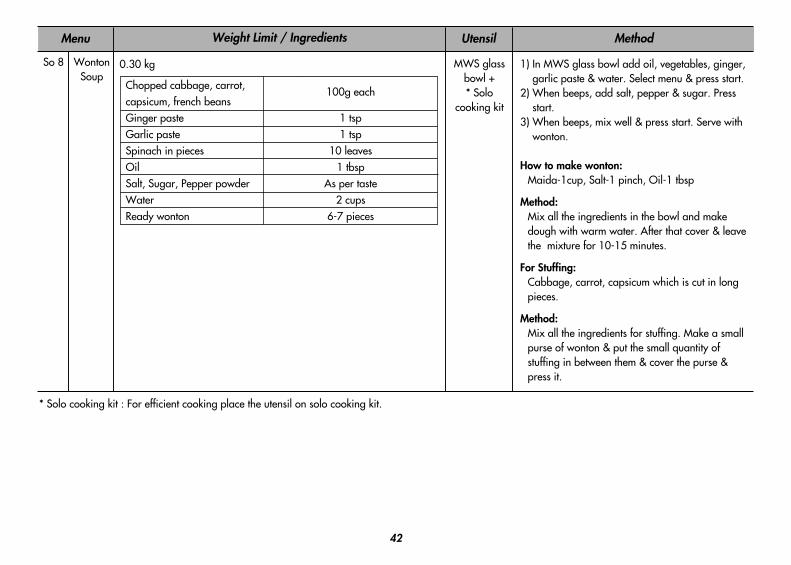
MethodMenu Weight Limit / Ingredients
So 8 WontonSoup
1) In MWS glass bowl add oil, vegetables, ginger,garlic paste & water. Select menu & press start.
2) When beeps, add salt, pepper & sugar. Pressstart.
3) When beeps, mix well & press start. Serve withwonton.
How to make wonton:Maida-1cup, Salt-1 pinch, Oil-1 tbsp
Method:Mix all the ingredients in the bowl and makedough with warm water. After that cover & leavethe mixture for 10-15 minutes.
For Stuffing:Cabbage, carrot, capsicum which is cut in longpieces.
Method:Mix all the ingredients for stuffing. Make a smallpurse of wonton & put the small quantity ofstuffing in between them & cover the purse &press it.
0.30 kg
100g each
1 tsp1 tsp
10 leaves1 tbsp
As per taste2 cups
6-7 pieces
Chopped cabbage, carrot,capsicum, french beansGinger pasteGarlic pasteSpinach in piecesOilSalt, Sugar, Pepper powderWaterReady wonton
MWS glassbowl + * Solo
cooking kit
Utensil
* Solo cooking kit : For efficient cooking place the utensil on solo cooking kit.
43
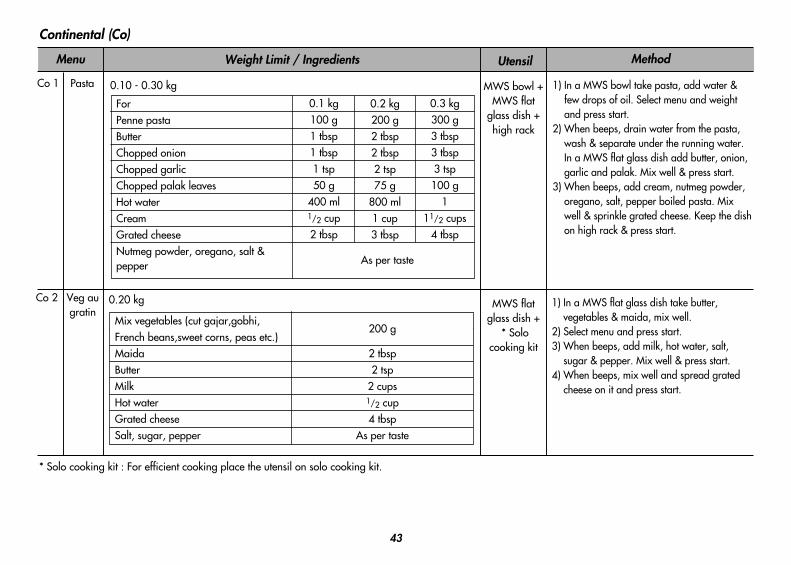
MethodMenu Weight Limit / Ingredients
Co 1 Pasta 1) In a MWS bowl take pasta, add water &few drops of oil. Select menu and weightand press start.
2) When beeps, drain water from the pasta,wash & separate under the running water.In a MWS flat glass dish add butter, onion,garlic and palak. Mix well & press start.
3) When beeps, add cream, nutmeg powder,oregano, salt, pepper boiled pasta. Mixwell & sprinkle grated cheese. Keep the dishon high rack & press start.
1) In a MWS flat glass dish take butter,vegetables & maida, mix well.
2) Select menu and press start.3) When beeps, add milk, hot water, salt,
sugar & pepper. Mix well & press start.4) When beeps, mix well and spread grated
cheese on it and press start.
0.10 - 0.30 kg
ForPenne pastaButterChopped onionChopped garlicChopped palak leavesHot waterCream Grated cheeseNutmeg powder, oregano, salt &pepper
0.1 kg100 g1 tbsp1 tbsp1 tsp50 g
400 ml1/2 cup2 tbsp
0.2 kg200 g2 tbsp2 tbsp2 tsp75 g
800 ml1 cup3 tbsp
0.3 kg300 g3 tbsp3 tbsp3 tsp100 g
111/2 cups
4 tbsp
As per taste
Continental (Co)
Co 2 Veg augratin
0.20 kg
200 g
2 tbsp2 tsp
2 cups1/2 cup4 tbsp
As per taste
Mix vegetables (cut gajar,gobhi,French beans,sweet corns, peas etc.)Maida ButterMilkHot waterGrated cheeseSalt, sugar, pepper
MWS bowl +MWS flat
glass dish +high rack
MWS flatglass dish +
* Solocooking kit
Utensil
* Solo cooking kit : For efficient cooking place the utensil on solo cooking kit.

44
MethodMenu Weight Limit / Ingredients
Co 3 Bakedmushrooms
1) In MWS flat glass dish put all theingredients except cheese, mix well.
2) Select menu and weight press start.3) When beeps, keep on high rack. Spread
grated cheese on the top of the mixtureand press start.
1) Except lasagne and cheese add all theingredients in MWS flat glass dish. Select menu and press start.
2) When beeps, in same dish arrangelasagne sheets in the bottom. Thenspread vegetable mixture on it and makelayers of sheets and vegetable mixture.
3) When beeps, spread the grated cheeseand press start.
0.10 - 0.30 kg
ForMushroomsWhite sauceCheese (grated), salt, pepper
0.1 kg50 g50 g
0.2 kg100 g100 g
0.3 kg150 g150 g
As per taste
Co 4 PotatoDumpling
0.30 kg
150 g1 cup
1/2 cup
2 cups
2 tbspAs per taste
4 tbsp
Lasagne sheets (cooked)White saucePizza sauceMix veg (boiled)- Egg plant, zucchini,broccoli, Mushrooms, sweet corns.OilOregano, salt & pepperGrated cheese
1) Mix all the ingredients together formaking dough for dumplings. Make 9-10 balls out of the dough.
2) In the SteamChef, add water to the steamwater bowl, place the dumplings on thesteam plate and cover. Select menu andpress start.
3) When beeps, take out the dumplingsfrom the SteamChef and allow them tocool.
4) In a MWS flat glass dish add butter andput the dumplings in it and press start.
Co 5 Lasaneya
0.30 kg
3-4 tbsp100 g75 g
As per taste1 cup
1 tbsp each4 tbsp
MaidaBoiled & grated potatoGrated paneerSalt, pepper, nutmeg powderFinely chopped spinachButter & finely chopped garlicPizza sauce
MWS flatglass dish +high rack
SteamChef +MWS Flatglass dish
MWS flatglass dish +
* Solocooking kit
Utensil
* Solo cooking kit : For efficient cooking place the utensil on solo cooking kit.
45
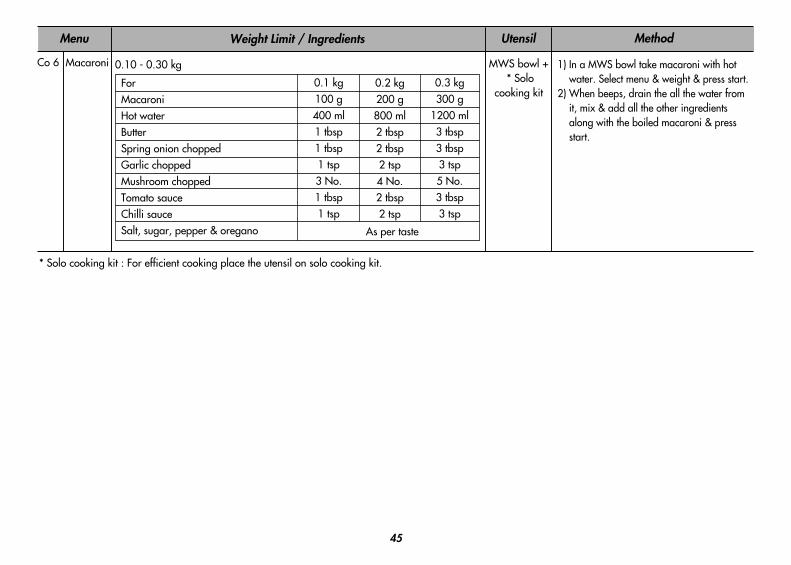
MethodMenu Weight Limit / Ingredients
Co 6 Macaroni 1) In a MWS bowl take macaroni with hotwater. Select menu & weight & press start.
2) When beeps, drain the all the water fromit, mix & add all the other ingredientsalong with the boiled macaroni & pressstart.
0.10 - 0.30 kg
ForMacaroniHot waterButterSpring onion choppedGarlic choppedMushroom choppedTomato sauceChilli sauceSalt, sugar, pepper & oregano
0.1 kg100 g400 ml1 tbsp1 tbsp1 tsp3 No.1 tbsp1 tsp
0.2 kg200 g800 ml2 tbsp2 tbsp2 tsp4 No.2 tbsp2 tsp
0.3 kg300 g
1200 ml3 tbsp3 tbsp3 tsp5 No.3 tbsp3 tsp
As per taste
MWS bowl +* Solo
cooking kit
Utensil
* Solo cooking kit : For efficient cooking place the utensil on solo cooking kit.
46
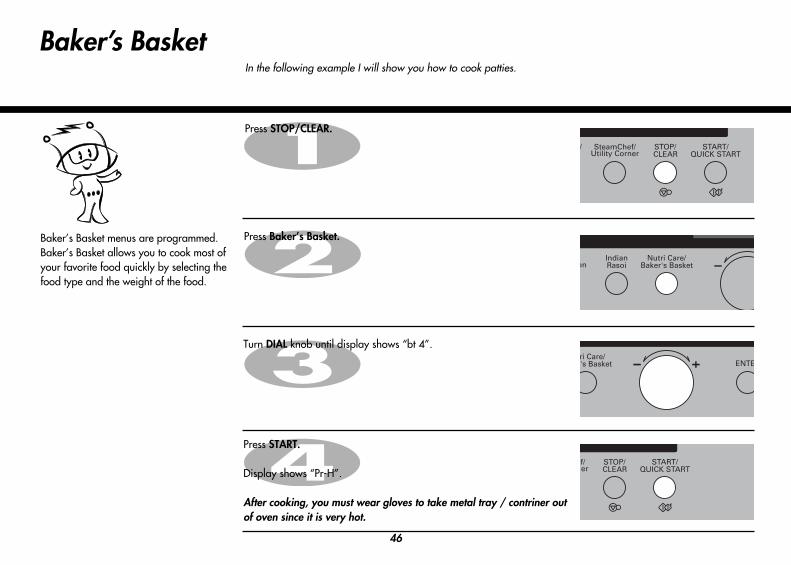
Baker’s Basket In the following example I will show you how to cook patties.
Press STOP/CLEAR.
Press Baker’s Basket.
Turn DIAL knob until display shows “bt 4”.
Baker’s Basket menus are programmed. Baker’s Basket allows you to cook most ofyour favorite food quickly by selecting thefood type and the weight of the food.
Press START.
Display shows “Pr-H”.
After cooking, you must wear gloves to take metal tray / contriner outof oven since it is very hot.
47
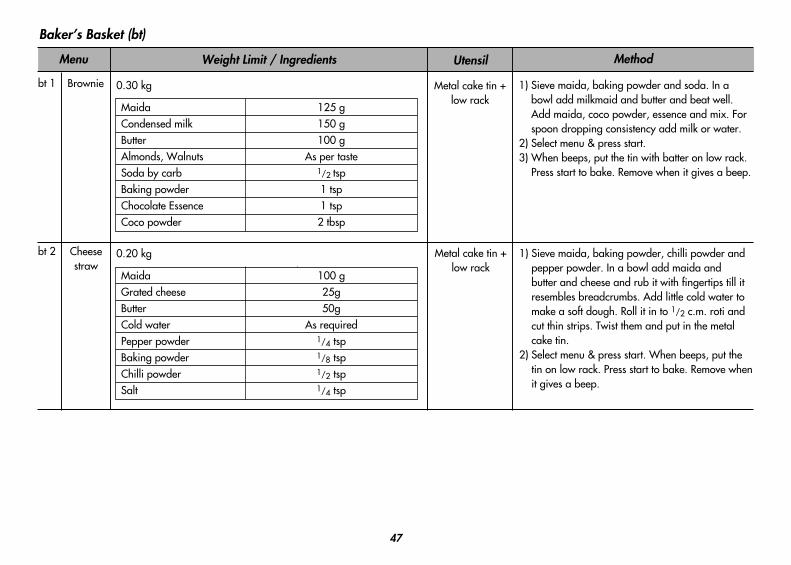
MethodMenu Weight Limit / Ingredients
bt 1 Brownie 1) Sieve maida, baking powder and soda. In abowl add milkmaid and butter and beat well.Add maida, coco powder, essence and mix. Forspoon dropping consistency add milk or water.
2) Select menu & press start. 3) When beeps, put the tin with batter on low rack.
Press start to bake. Remove when it gives a beep.
0.30 kg
Baker’s Basket (bt)
125 g150 g100 g
As per taste1/2 tsp1 tsp1 tsp2 tbsp
Maida Condensed milkButterAlmonds, WalnutsSoda by carbBaking powderChocolate EssenceCoco powder
100 g25g50g
As required1/4 tsp1/8 tsp1/2 tsp1/4 tsp
Maida Grated cheeseButterCold waterPepper powderBaking powderChilli powderSalt
bt 2 Cheesestraw
1) Sieve maida, baking powder, chilli powder andpepper powder. In a bowl add maida andbutter and cheese and rub it with fingertips till itresembles breadcrumbs. Add little cold water tomake a soft dough. Roll it in to 1/2 c.m. roti andcut thin strips. Twist them and put in the metalcake tin.
2) Select menu & press start. When beeps, put thetin on low rack. Press start to bake. Remove whenit gives a beep.
0.20 kg
Metal cake tin +low rack
Metal cake tin +low rack
Utensil
48
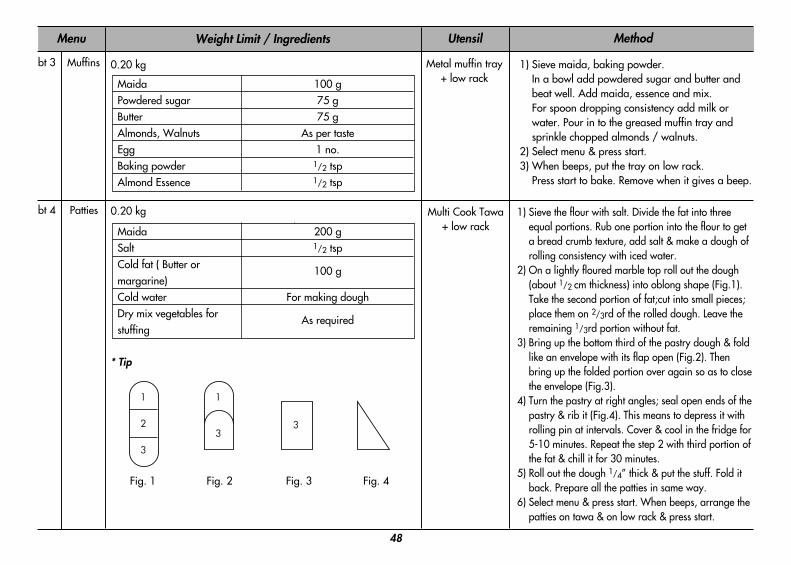
MethodMenu Weight Limit / Ingredients
bt 3 Muffins 1) Sieve maida, baking powder. In a bowl add powdered sugar and butter andbeat well. Add maida, essence and mix. For spoon dropping consistency add milk orwater. Pour in to the greased muffin tray andsprinkle chopped almonds / walnuts.
2) Select menu & press start. 3) When beeps, put the tray on low rack.
Press start to bake. Remove when it gives a beep.
0.20 kg
bt 4 Patties 1) Sieve the flour with salt. Divide the fat into threeequal portions. Rub one portion into the flour to geta bread crumb texture, add salt & make a dough ofrolling consistency with iced water.
2) On a lightly floured marble top roll out the dough(about 1/2 cm thickness) into oblong shape (Fig.1).Take the second portion of fat;cut into small pieces;place them on 2/3rd of the rolled dough. Leave theremaining 1/3rd portion without fat.
3) Bring up the bottom third of the pastry dough & foldlike an envelope with its flap open (Fig.2). Thenbring up the folded portion over again so as to closethe envelope (Fig.3).
4) Turn the pastry at right angles; seal open ends of thepastry & rib it (Fig.4). This means to depress it withrolling pin at intervals. Cover & cool in the fridge for5-10 minutes. Repeat the step 2 with third portion ofthe fat & chill it for 30 minutes.
5) Roll out the dough 1/4” thick & put the stuff. Fold itback. Prepare all the patties in same way.
6) Select menu & press start. When beeps, arrange thepatties on tawa & on low rack & press start.
0.20 kg
* Tip
1
2
3
1
33
Fig. 1 Fig. 2 Fig. 3 Fig. 4
Metal muffin tray+ low rack
Multi Cook Tawa+ low rack
Utensil
100 g75 g75 g
As per taste1 no.
1/2 tsp1/2 tsp
Maida Powdered sugarButterAlmonds, WalnutsEggBaking powderAlmond Essence
200 g1/2 tsp
100 g
For making dough
As required
Maida SaltCold fat ( Butter ormargarine)Cold waterDry mix vegetables forstuffing
49
MethodMenu Weight Limit / Ingredients
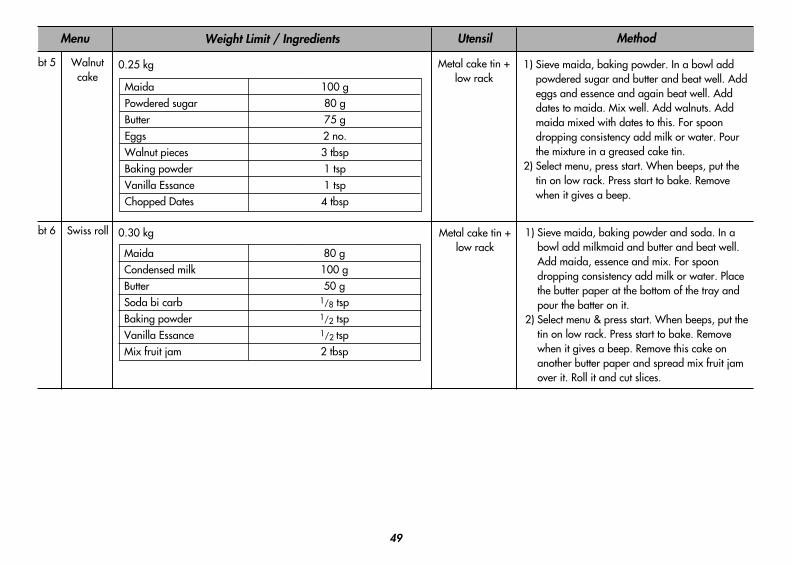
bt 5 Walnutcake
1) Sieve maida, baking powder. In a bowl addpowdered sugar and butter and beat well. Addeggs and essence and again beat well. Adddates to maida. Mix well. Add walnuts. Addmaida mixed with dates to this. For spoondropping consistency add milk or water. Pourthe mixture in a greased cake tin.
2) Select menu, press start. When beeps, put thetin on low rack. Press start to bake. Removewhen it gives a beep.
0.25 kg
bt 6 Swiss roll 1) Sieve maida, baking powder and soda. In abowl add milkmaid and butter and beat well.Add maida, essence and mix. For spoondropping consistency add milk or water. Placethe butter paper at the bottom of the tray andpour the batter on it.
2) Select menu & press start. When beeps, put thetin on low rack. Press start to bake. Removewhen it gives a beep. Remove this cake onanother butter paper and spread mix fruit jamover it. Roll it and cut slices.
0.30 kg
Metal cake tin +low rack
Metal cake tin +low rack
Utensil
100 g80 g75 g2 no.3 tbsp1 tsp1 tsp4 tbsp
Maida Powdered sugarButterEggsWalnut piecesBaking powderVanilla EssanceChopped Dates
80 g100 g50 g
1/8 tsp1/2 tsp1/2 tsp2 tbsp
Maida Condensed milkButterSoda bi carbBaking powderVanilla EssanceMix fruit jam
50
MethodMenu Weight Limit / Ingredients
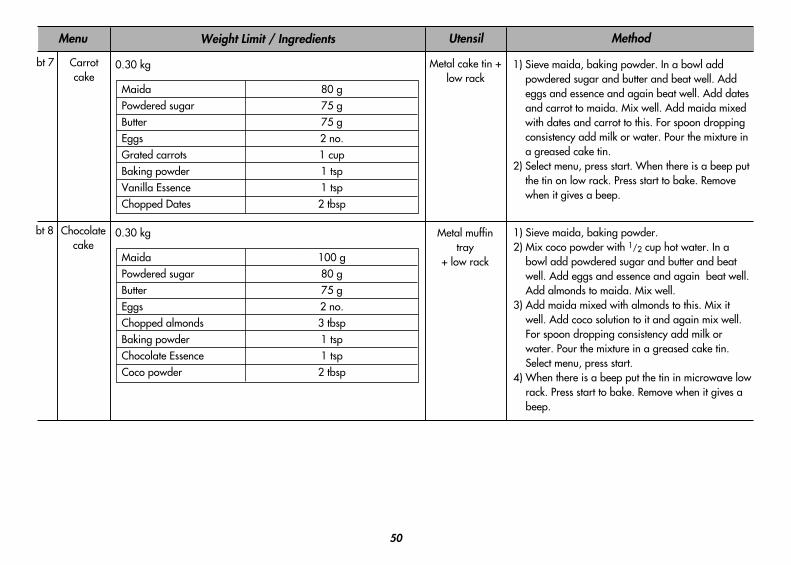
bt 7 Carrotcake
1) Sieve maida, baking powder. In a bowl addpowdered sugar and butter and beat well. Addeggs and essence and again beat well. Add datesand carrot to maida. Mix well. Add maida mixedwith dates and carrot to this. For spoon droppingconsistency add milk or water. Pour the mixture ina greased cake tin.
2) Select menu, press start. When there is a beep putthe tin on low rack. Press start to bake. Removewhen it gives a beep.
0.30 kg
bt 8 Chocolatecake
1) Sieve maida, baking powder. 2) Mix coco powder with 1/2 cup hot water. In a
bowl add powdered sugar and butter and beatwell. Add eggs and essence and again beat well.Add almonds to maida. Mix well.
3) Add maida mixed with almonds to this. Mix itwell. Add coco solution to it and again mix well.For spoon dropping consistency add milk orwater. Pour the mixture in a greased cake tin.Select menu, press start.
4) When there is a beep put the tin in microwave lowrack. Press start to bake. Remove when it gives abeep.
0.30 kg
Metal cake tin +low rack
Metal muffintray
+ low rack
Utensil
80 g75 g75 g2 no.1 cup1 tsp1 tsp2 tbsp
Maida Powdered sugarButterEggsGrated carrotsBaking powderVanilla EssenceChopped Dates
100 g80 g75 g2 no.3 tbsp1 tsp1 tsp2 tbsp
Maida Powdered sugarButterEggsChopped almondsBaking powderChocolate EssenceCoco powder
51
MethodMenu Weight Limit / Ingredients
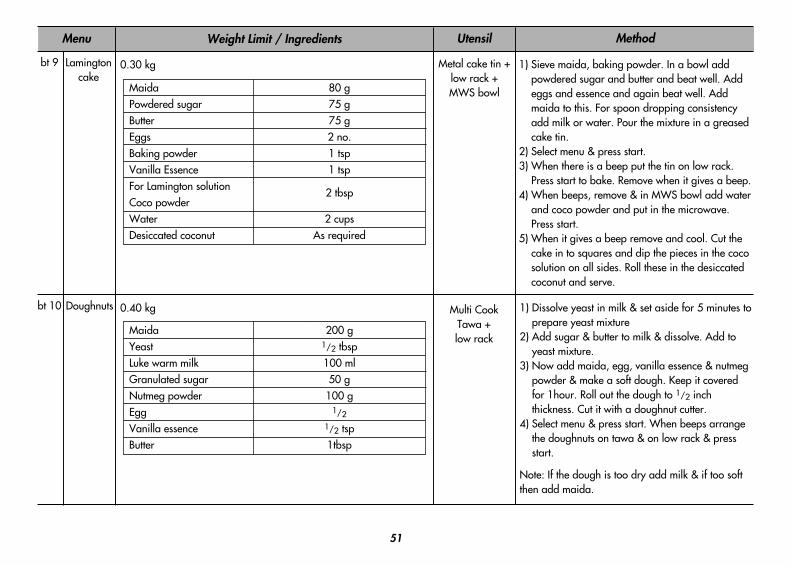
bt 9 Lamingtoncake
1) Sieve maida, baking powder. In a bowl addpowdered sugar and butter and beat well. Addeggs and essence and again beat well. Addmaida to this. For spoon dropping consistencyadd milk or water. Pour the mixture in a greasedcake tin.
2) Select menu & press start. 3) When there is a beep put the tin on low rack.
Press start to bake. Remove when it gives a beep.4) When beeps, remove & in MWS bowl add water
and coco powder and put in the microwave.Press start.
5) When it gives a beep remove and cool. Cut thecake in to squares and dip the pieces in the cocosolution on all sides. Roll these in the desiccatedcoconut and serve.
0.30 kg
bt 10 Doughnuts 1) Dissolve yeast in milk & set aside for 5 minutes toprepare yeast mixture
2) Add sugar & butter to milk & dissolve. Add toyeast mixture.
3) Now add maida, egg, vanilla essence & nutmegpowder & make a soft dough. Keep it coveredfor 1hour. Roll out the dough to 1/2 inchthickness. Cut it with a doughnut cutter.
4) Select menu & press start. When beeps arrangethe doughnuts on tawa & on low rack & pressstart.
Note: If the dough is too dry add milk & if too softthen add maida.
0.40 kg
Metal cake tin +low rack +MWS bowl
Multi CookTawa +low rack
Utensil
80 g75 g75 g2 no.1 tsp1 tsp
2 tbsp
2 cupsAs required
Maida Powdered sugarButterEggsBaking powder Vanilla Essence For Lamington solution Coco powder Water Desiccated coconut
200 g1/2 tbsp100 ml50 g100 g
1/21/2 tsp1tbsp
MaidaYeastLuke warm milkGranulated sugarNutmeg powderEgg Vanilla essenceButter
52
MethodMenu Weight Limit / Ingredients
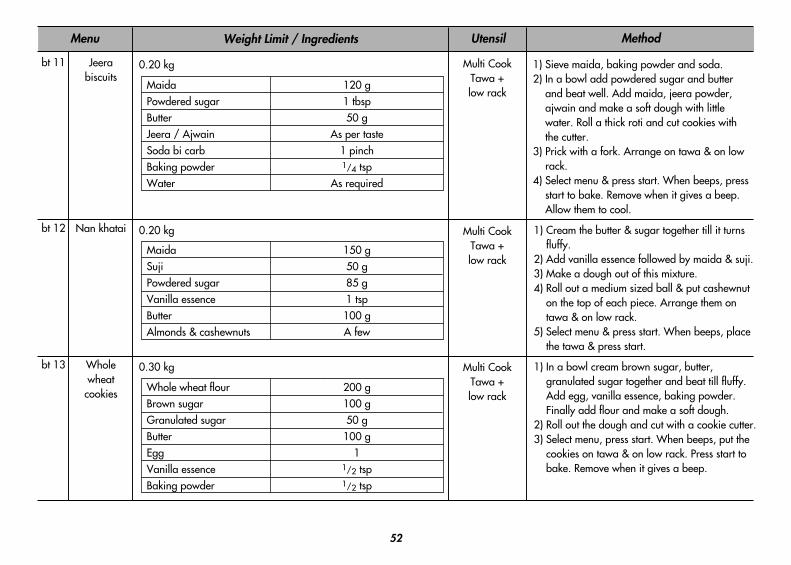
bt 11 Jeerabiscuits
1) Sieve maida, baking powder and soda.2) In a bowl add powdered sugar and butter
and beat well. Add maida, jeera powder,ajwain and make a soft dough with littlewater. Roll a thick roti and cut cookies withthe cutter.
3) Prick with a fork. Arrange on tawa & on lowrack.
4) Select menu & press start. When beeps, pressstart to bake. Remove when it gives a beep.Allow them to cool.
0.20 kg
bt 12 Nan khatai 1) Cream the butter & sugar together till it turnsfluffy.
2) Add vanilla essence followed by maida & suji.3) Make a dough out of this mixture.4) Roll out a medium sized ball & put cashewnut
on the top of each piece. Arrange them ontawa & on low rack.
5) Select menu & press start. When beeps, placethe tawa & press start.
0.20 kg
bt 13 Wholewheat
cookies
1) In a bowl cream brown sugar, butter,granulated sugar together and beat till fluffy.Add egg, vanilla essence, baking powder.Finally add flour and make a soft dough.
2) Roll out the dough and cut with a cookie cutter.3) Select menu, press start. When beeps, put the
cookies on tawa & on low rack. Press start tobake. Remove when it gives a beep.
0.30 kg
120 g1 tbsp50 g
As per taste1 pinch1/4 tsp
As required
Maida Powdered sugarButterJeera / AjwainSoda bi carbBaking powderWater
150 g50 g85 g1 tsp100 gA few
MaidaSujiPowdered sugarVanilla essenceButter Almonds & cashewnuts
200 g100 g50 g100 g
11/2 tsp1/2 tsp
Whole wheat flourBrown sugarGranulated sugarButter Egg Vanilla essenceBaking powder
Multi CookTawa +low rack
Multi CookTawa +low rack
Multi CookTawa +low rack
Utensil
53
MethodMenu Weight Limit / Ingredients
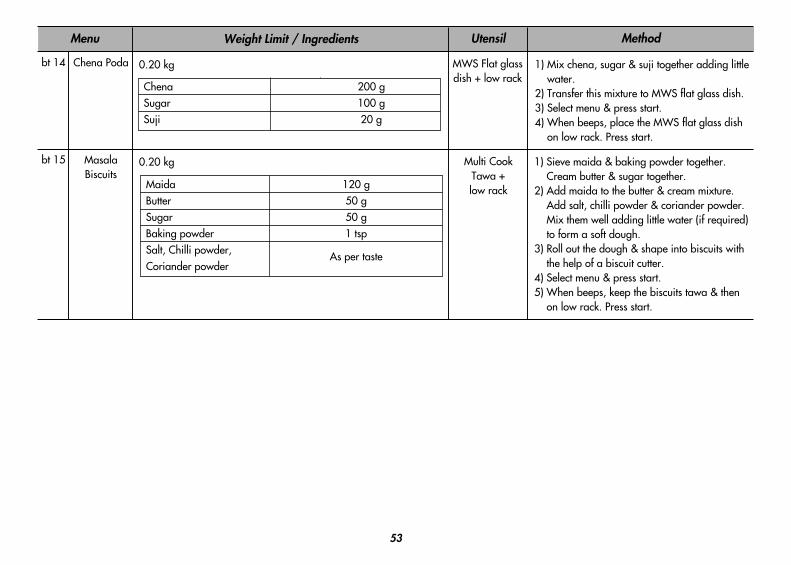
bt 14 Chena Poda 1) Mix chena, sugar & suji together adding littlewater.
2) Transfer this mixture to MWS flat glass dish.3) Select menu & press start.4) When beeps, place the MWS flat glass dish
on low rack. Press start.
0.20 kg
200 g100 g20 g
ChenaSugarSuji
bt 15 MasalaBiscuits
1) Sieve maida & baking powder together. Cream butter & sugar together.
2) Add maida to the butter & cream mixture.Add salt, chilli powder & coriander powder.Mix them well adding little water (if required)to form a soft dough.
3) Roll out the dough & shape into biscuits withthe help of a biscuit cutter.
4) Select menu & press start.5) When beeps, keep the biscuits tawa & then
on low rack. Press start.
0.20 kg
120 g50 g50 g1 tsp
As per taste
MaidaButterSugarBaking powderSalt, Chilli powder,Coriander powder
MWS Flat glassdish + low rack
Multi CookTawa + low rack
Utensil
54
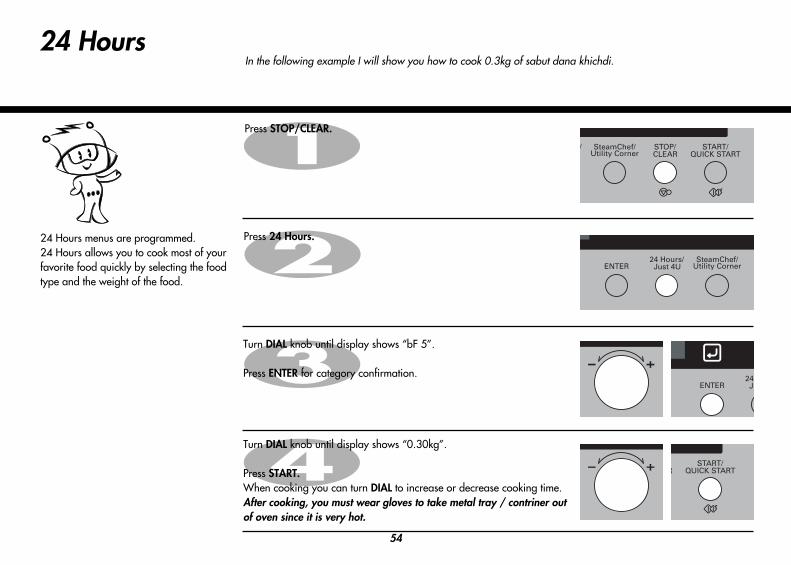
24 Hours In the following example I will show you how to cook 0.3kg of sabut dana khichdi.
Press STOP/CLEAR.
Press 24 Hours.
Turn DIAL knob until display shows “bF 5”.
Press ENTER for category confirmation.
24 Hours menus are programmed. 24 Hours allows you to cook most of yourfavorite food quickly by selecting the foodtype and the weight of the food.
Turn DIAL knob until display shows “0.30kg”.
Press START.When cooking you can turn DIAL to increase or decrease cooking time.After cooking, you must wear gloves to take metal tray / contriner outof oven since it is very hot.
55
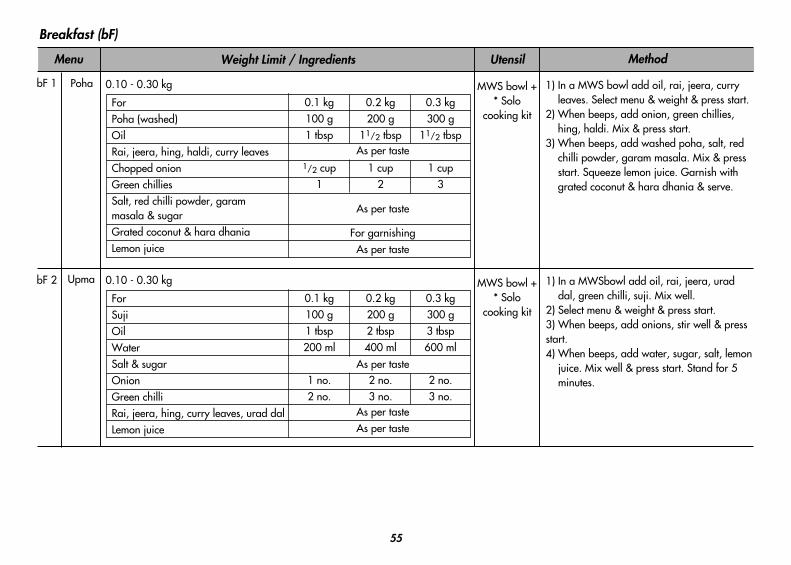
MethodMenu Weight Limit / Ingredients
bF 1 Poha 1) In a MWS bowl add oil, rai, jeera, curryleaves. Select menu & weight & press start.
2) When beeps, add onion, green chillies,hing, haldi. Mix & press start.
3) When beeps, add washed poha, salt, redchilli powder, garam masala. Mix & pressstart. Squeeze lemon juice. Garnish withgrated coconut & hara dhania & serve.
Breakfast (bF)
bF 2
0.10 - 0.30 kg
ForPoha (washed)OilRai, jeera, hing, haldi, curry leavesChopped onionGreen chilliesSalt, red chilli powder, garammasala & sugarGrated coconut & hara dhaniaLemon juice
0.1 kg100 g1 tbsp
1/2 cup1
0.2 kg200 g
11/2 tbsp
1 cup2
0.3 kg300 g
11/2 tbsp
1 cup3
As per taste
For garnishingAs per taste
Upma 1) In a MWSbowl add oil, rai, jeera, uraddal, green chilli, suji. Mix well.
2) Select menu & weight & press start.3) When beeps, add onions, stir well & pressstart.4) When beeps, add water, sugar, salt, lemon
juice. Mix well & press start. Stand for 5minutes.
0.10 - 0.30 kg
ForSujiOilWaterSalt & sugarOnionGreen chilliRai, jeera, hing, curry leaves, urad dalLemon juice
0.1 kg100 g1 tbsp200 ml
1 no.2 no.
0.2 kg200 g2 tbsp400 ml
2 no.3 no.
0.3 kg300 g3 tbsp600 ml
2 no.3 no.
As per taste
As per taste
As per tasteAs per taste
MWS bowl +* Solo
cooking kit
MWS bowl +* Solo
cooking kit
Utensil
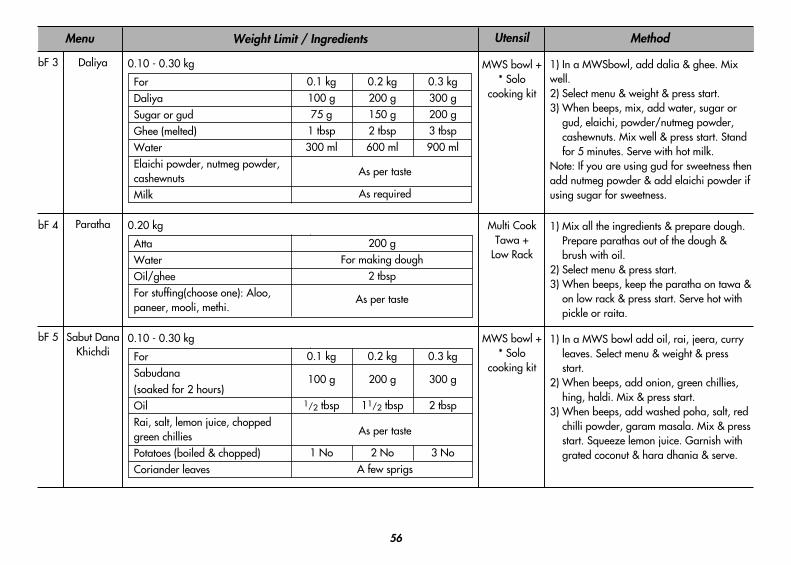
56
MethodMenu Weight Limit / Ingredients
bF 3 Daliya 1) In a MWSbowl, add dalia & ghee. Mixwell.2) Select menu & weight & press start.3) When beeps, mix, add water, sugar or
gud, elaichi, powder/nutmeg powder,cashewnuts. Mix well & press start. Standfor 5 minutes. Serve with hot milk.
Note: If you are using gud for sweetness thenadd nutmeg powder & add elaichi powder ifusing sugar for sweetness.
bF 4
0.10 - 0.30 kg
ForDaliyaSugar or gudGhee (melted)WaterElaichi powder, nutmeg powder,cashewnutsMilk
0.1 kg100 g75 g
1 tbsp300 ml
0.2 kg200 g150 g2 tbsp600 ml
0.3 kg300 g200 g3 tbsp900 ml
As per taste
As required
bF 5 Sabut DanaKhichdi
1) In a MWS bowl add oil, rai, jeera, curryleaves. Select menu & weight & pressstart.
2) When beeps, add onion, green chillies,hing, haldi. Mix & press start.
3) When beeps, add washed poha, salt, redchilli powder, garam masala. Mix & pressstart. Squeeze lemon juice. Garnish withgrated coconut & hara dhania & serve.
0.10 - 0.30 kg
ForSabudana (soaked for 2 hours)OilRai, salt, lemon juice, choppedgreen chilliesPotatoes (boiled & chopped)Coriander leaves
0.1 kg
100 g
1/2 tbsp
1 No
0.2 kg
200 g
11/2 tbsp
2 No
0.3 kg
300 g
2 tbsp
3 NoA few sprigs
As per taste
Paratha 1) Mix all the ingredients & prepare dough.Prepare parathas out of the dough &brush with oil.
2) Select menu & press start.3) When beeps, keep the paratha on tawa &
on low rack & press start. Serve hot withpickle or raita.
0.20 kg
AttaWaterOil/gheeFor stuffing(choose one): Aloo,paneer, mooli, methi.
200 gFor making dough
2 tbsp
As per taste
MWS bowl +* Solo
cooking kit
Multi CookTawa +
Low Rack
MWS bowl +* Solo
cooking kit
Utensil
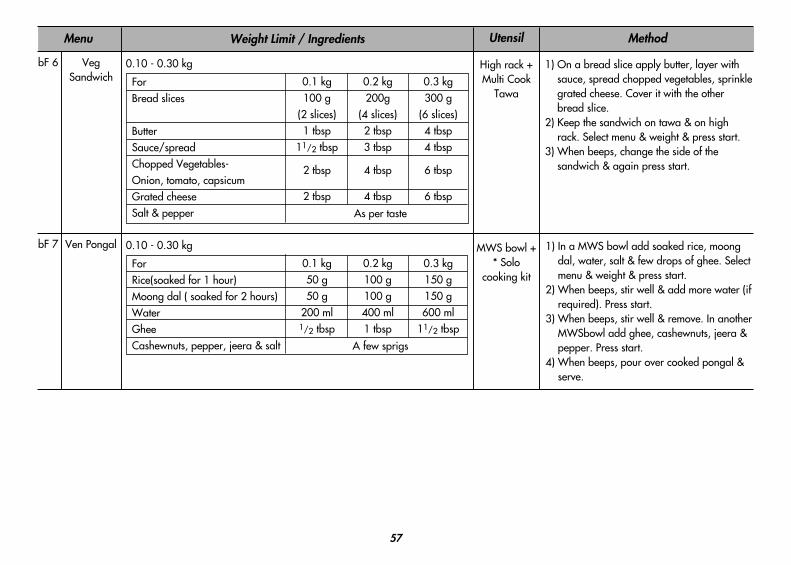
57
MethodMenu Weight Limit / Ingredients
bF 6 VegSandwich
1) On a bread slice apply butter, layer withsauce, spread chopped vegetables, sprinklegrated cheese. Cover it with the otherbread slice.
2) Keep the sandwich on tawa & on highrack. Select menu & weight & press start.
3) When beeps, change the side of thesandwich & again press start.
0.10 - 0.30 kg
ForBread slices
ButterSauce/spreadChopped Vegetables-Onion, tomato, capsicumGrated cheeseSalt & pepper
0.1 kg100 g
(2 slices)1 tbsp
11/2 tbsp
2 tbsp
2 tbsp
0.2 kg200g
(4 slices)2 tbsp3 tbsp
4 tbsp
4 tbsp
0.3 kg300 g
(6 slices)4 tbsp4 tbsp
6 tbsp
6 tbsp
As per taste
bF 7 Ven Pongal 1) In a MWS bowl add soaked rice, moongdal, water, salt & few drops of ghee. Selectmenu & weight & press start.
2) When beeps, stir well & add more water (ifrequired). Press start.
3) When beeps, stir well & remove. In anotherMWSbowl add ghee, cashewnuts, jeera &pepper. Press start.
4) When beeps, pour over cooked pongal &serve.
0.10 - 0.30 kg
ForRice(soaked for 1 hour)Moong dal ( soaked for 2 hours)WaterGheeCashewnuts, pepper, jeera & salt
0.1 kg50 g50 g
200 ml1/2 tbsp
0.2 kg100 g100 g400 ml1 tbsp
0.3 kg150 g150 g600 ml
11/2 tbsp
A few sprigs
High rack +Multi Cook
Tawa
MWS bowl +* Solo
cooking kit
Utensil
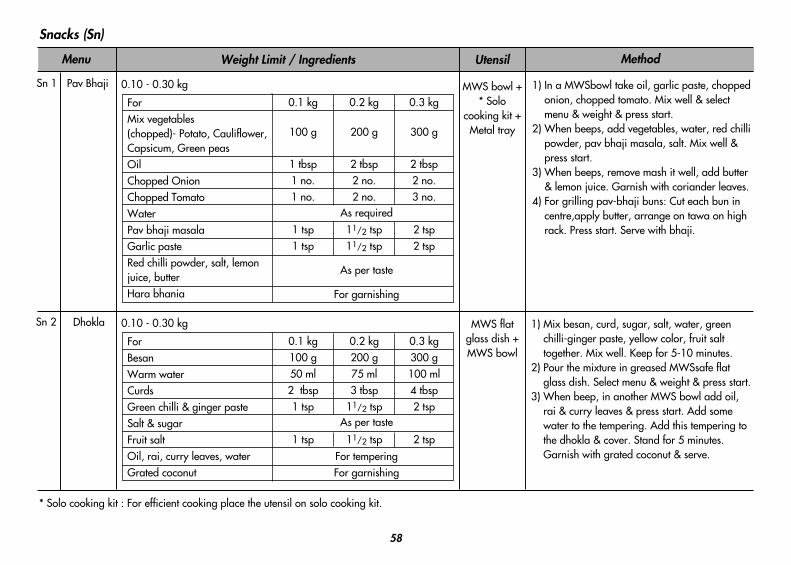
58
MethodMenu Weight Limit / Ingredients
Sn 1 Pav Bhaji 1) In a MWSbowl take oil, garlic paste, choppedonion, chopped tomato. Mix well & selectmenu & weight & press start.
2) When beeps, add vegetables, water, red chillipowder, pav bhaji masala, salt. Mix well &press start.
3) When beeps, remove mash it well, add butter& lemon juice. Garnish with coriander leaves.
4) For grilling pav-bhaji buns: Cut each bun incentre,apply butter, arrange on tawa on highrack. Press start. Serve with bhaji.
Snacks (Sn)
0.10 - 0.30 kg
ForMix vegetables(chopped)- Potato, Cauliflower,Capsicum, Green peasOilChopped OnionChopped TomatoWaterPav bhaji masalaGarlic pasteRed chilli powder, salt, lemonjuice, butterHara bhania
0.1 kg
100 g
1 tbsp1 no.1 no.
1 tsp1 tsp
0.2 kg
200 g
2 tbsp2 no.2 no.
11/2 tsp11/2 tsp
0.3 kg
300 g
2 tbsp2 no.3 no.
2 tsp2 tsp
As required
As per taste
For garnishing
Sn 2 Dhokla
* Solo cooking kit : For efficient cooking place the utensil on solo cooking kit.
0.10 - 0.30 kg
ForBesan Warm waterCurdsGreen chilli & ginger pasteSalt & sugarFruit saltOil, rai, curry leaves, waterGrated coconut
0.1 kg100 g50 ml2 tbsp1 tsp
1 tsp
0.2 kg200 g75 ml3 tbsp
11/2 tsp
11/2 tsp
0.3 kg300 g100 ml4 tbsp2 tsp
2 tspFor temperingFor garnishing
As per taste
1) Mix besan, curd, sugar, salt, water, greenchilli-ginger paste, yellow color, fruit salttogether. Mix well. Keep for 5-10 minutes.
2) Pour the mixture in greased MWSsafe flatglass dish. Select menu & weight & press start.
3) When beep, in another MWS bowl add oil,rai & curry leaves & press start. Add somewater to the tempering. Add this tempering tothe dhokla & cover. Stand for 5 minutes.Garnish with grated coconut & serve.
MWS bowl +* Solo
cooking kit +Metal tray
MWS flatglass dish +MWS bowl
Utensil
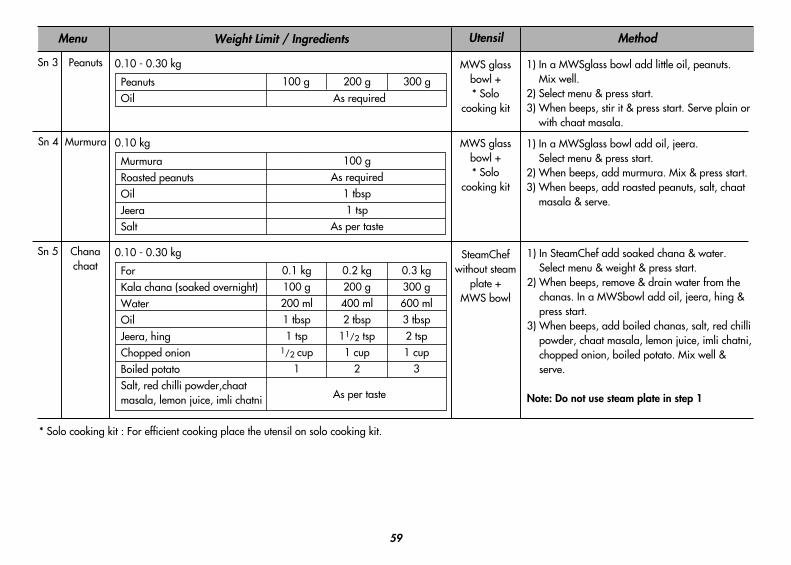
59
MethodMenu Weight Limit / Ingredients
Sn 3 Peanuts 1) In a MWSglass bowl add little oil, peanuts. Mix well.
2) Select menu & press start.3) When beeps, stir it & press start. Serve plain or
with chaat masala.
0.10 - 0.30 kg
PeanutsOil
100 g 200 g 300 gAs required
Sn 5 Chanachaat
1) In SteamChef add soaked chana & water.Select menu & weight & press start.
2) When beeps, remove & drain water from thechanas. In a MWSbowl add oil, jeera, hing &press start.
3) When beeps, add boiled chanas, salt, red chillipowder, chaat masala, lemon juice, imli chatni,chopped onion, boiled potato. Mix well &serve.
Note: Do not use steam plate in step 1
0.10 - 0.30 kg
ForKala chana (soaked overnight)WaterOilJeera, hingChopped onionBoiled potatoSalt, red chilli powder,chaatmasala, lemon juice, imli chatni
0.1 kg100 g200 ml1 tbsp1 tsp
1/2 cup1
0.2 kg200 g400 ml2 tbsp
11/2 tsp1 cup
2
0.3 kg300 g600 ml3 tbsp2 tsp1 cup
3
Sn 4 Murmura 0.10 kg
MurmuraRoasted peanutsOilJeeraSalt
100 gAs required
1 tbsp1 tsp
As per taste
1) In a MWSglass bowl add oil, jeera. Select menu & press start.
2) When beeps, add murmura. Mix & press start.3) When beeps, add roasted peanuts, salt, chaat
masala & serve.
As per taste
MWS glassbowl +* Solo
cooking kit
MWS glassbowl +* Solo
cooking kit
SteamChefwithout steam
plate +MWS bowl
Utensil
* Solo cooking kit : For efficient cooking place the utensil on solo cooking kit.
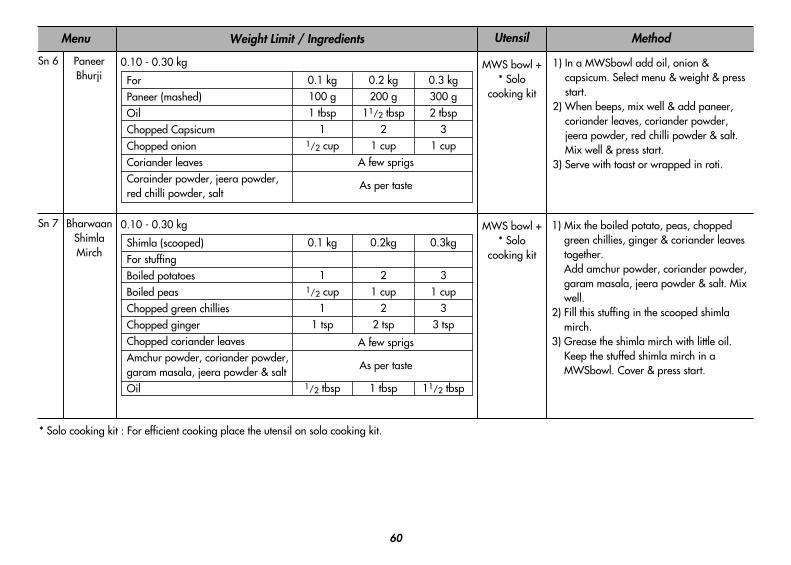
60
MethodMenu Weight Limit / Ingredients
Sn 6 PaneerBhurji
1) In a MWSbowl add oil, onion &capsicum. Select menu & weight & pressstart.
2) When beeps, mix well & add paneer,coriander leaves, coriander powder,jeera powder, red chilli powder & salt.Mix well & press start.
3) Serve with toast or wrapped in roti.
0.10 - 0.30 kg
For Paneer (mashed)OilChopped CapsicumChopped onionCoriander leavesCorainder powder, jeera powder,red chilli powder, salt
0.1 kg100 g1 tbsp
11/2 cup
0.2 kg200 g
11/2 tbsp2
1 cup
0.3 kg300 g2 tbsp
31 cup
A few sprigs
As per taste
Sn 7 BharwaanShimlaMirch
1) Mix the boiled potato, peas, choppedgreen chillies, ginger & coriander leavestogether. Add amchur powder, coriander powder,garam masala, jeera powder & salt. Mixwell.
2) Fill this stuffing in the scooped shimlamirch.
3) Grease the shimla mirch with little oil.Keep the stuffed shimla mirch in aMWSbowl. Cover & press start.
0.10 - 0.30 kg
Shimla (scooped)For stuffingBoiled potatoesBoiled peasChopped green chilliesChopped gingerChopped coriander leavesAmchur powder, coriander powder,garam masala, jeera powder & saltOil
0.1 kg
11/2 cup
11 tsp
1/2 tbsp
0.2kg
21 cup
22 tsp
1 tbsp
0.3kg
31 cup
33 tsp
11/2 tbsp
A few sprigs
As per taste
MWS bowl +* Solo
cooking kit
MWS bowl +* Solo
cooking kit
Utensil
* Solo cooking kit : For efficient cooking place the utensil on solo cooking kit.
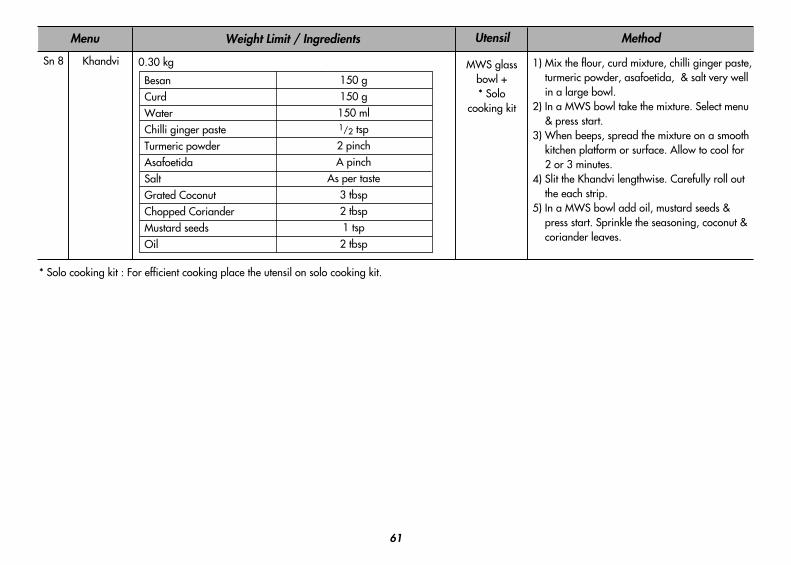
61
MethodMenu Weight Limit / Ingredients
Sn 8 Khandvi 1) Mix the flour, curd mixture, chilli ginger paste,turmeric powder, asafoetida, & salt very wellin a large bowl.
2) In a MWS bowl take the mixture. Select menu& press start.
3) When beeps, spread the mixture on a smoothkitchen platform or surface. Allow to cool for2 or 3 minutes.
4) Slit the Khandvi lengthwise. Carefully roll outthe each strip.
5) In a MWS bowl add oil, mustard seeds &press start. Sprinkle the seasoning, coconut &coriander leaves.
0.30 kg
BesanCurdWaterChilli ginger pasteTurmeric powderAsafoetidaSaltGrated CoconutChopped CorianderMustard seedsOil
150 g150 g150 ml1/2 tsp2 pinchA pinch
As per taste3 tbsp2 tbsp1 tsp2 tbsp
MWS glassbowl +* Solo
cooking kit
Utensil
* Solo cooking kit : For efficient cooking place the utensil on solo cooking kit.
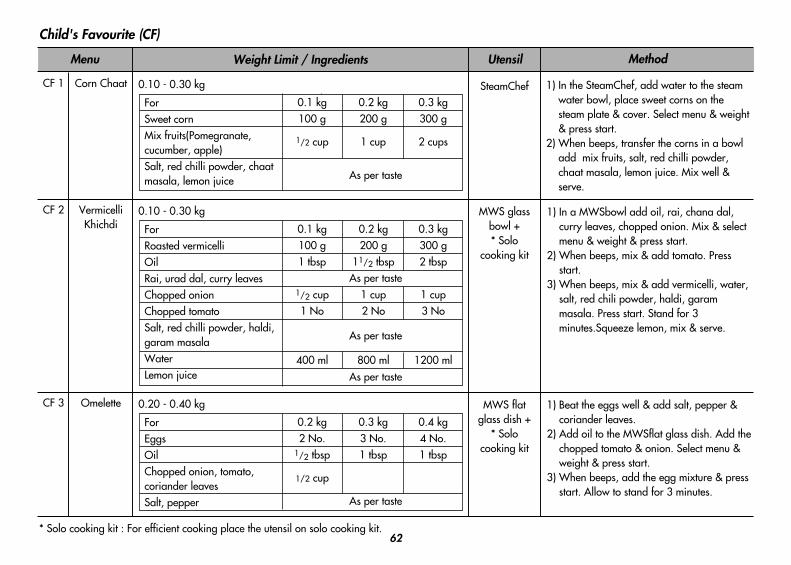
62
MethodMenu Weight Limit / Ingredients
CF 1 Corn Chaat 1) In the SteamChef, add water to the steamwater bowl, place sweet corns on thesteam plate & cover. Select menu & weight& press start.
2) When beeps, transfer the corns in a bowladd mix fruits, salt, red chilli powder,chaat masala, lemon juice. Mix well &serve.
Child's Favourite (CF)
0.10 - 0.30 kg
ForSweet cornMix fruits(Pomegranate,cucumber, apple)Salt, red chilli powder, chaatmasala, lemon juice
0.1 kg100 g
1/2 cup
0.2 kg200 g
1 cup
0.3 kg300 g
2 cups
As per taste
CF 3 Omelette 1) Beat the eggs well & add salt, pepper &coriander leaves.
2) Add oil to the MWSflat glass dish. Add thechopped tomato & onion. Select menu &weight & press start.
3) When beeps, add the egg mixture & pressstart. Allow to stand for 3 minutes.
0.20 - 0.40 kg
ForEggsOilChopped onion, tomato,coriander leavesSalt, pepper
0.2 kg2 No.
1/2 tbsp
1/2 cup
0.3 kg3 No.1 tbsp
0.4 kg4 No.1 tbsp
As per taste
CF 2 VermicelliKhichdi
0.10 - 0.30 kg
ForRoasted vermicelliOilRai, urad dal, curry leavesChopped onionChopped tomatoSalt, red chilli powder, haldi,garam masalaWaterLemon juice
0.1 kg100 g1 tbsp
1/2 cup1 No
400 ml
0.2 kg200 g
11/2 tbsp
1 cup2 No
800 ml
0.3 kg300 g2 tbsp
1 cup3 No
1200 ml
As per taste
As per taste
As per taste
1) In a MWSbowl add oil, rai, chana dal,curry leaves, chopped onion. Mix & selectmenu & weight & press start.
2) When beeps, mix & add tomato. Pressstart.
3) When beeps, mix & add vermicelli, water,salt, red chili powder, haldi, garammasala. Press start. Stand for 3minutes.Squeeze lemon, mix & serve.
SteamChef
MWS glassbowl +* Solo
cooking kit
MWS flatglass dish +
* Solocooking kit
Utensil
* Solo cooking kit : For efficient cooking place the utensil on solo cooking kit.
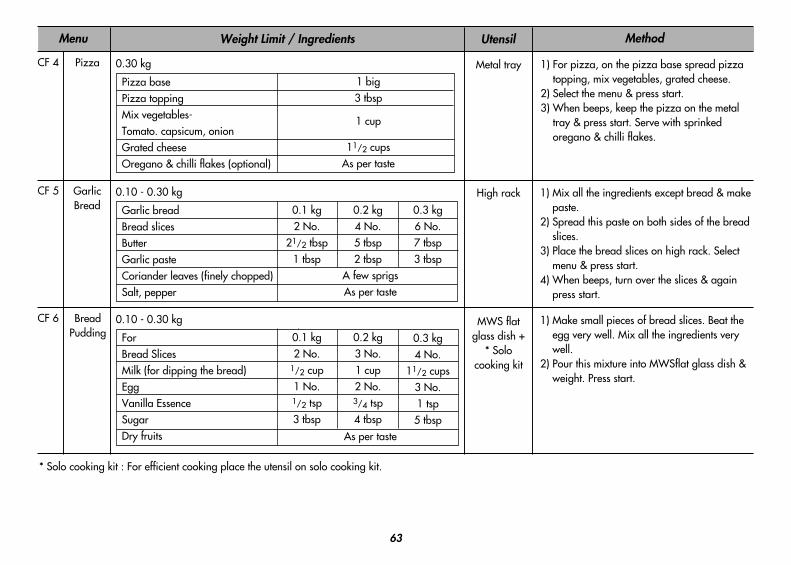
63
MethodMenu Weight Limit / Ingredients
CF 4 Pizza 1) For pizza, on the pizza base spread pizzatopping, mix vegetables, grated cheese.
2) Select the menu & press start.3) When beeps, keep the pizza on the metal
tray & press start. Serve with sprinkedoregano & chilli flakes.
0.30 kg
Pizza basePizza toppingMix vegetables-Tomato. capsicum, onionGrated cheeseOregano & chilli flakes (optional)
1 big3 tbsp
1 cup
11/2 cupsAs per taste
CF 5 GarlicBread
1) Mix all the ingredients except bread & makepaste.
2) Spread this paste on both sides of the breadslices.
3) Place the bread slices on high rack. Selectmenu & press start.
4) When beeps, turn over the slices & againpress start.
0.10 - 0.30 kg
Garlic breadBread slicesButterGarlic pasteCoriander leaves (finely chopped)Salt, pepper
0.1 kg2 No.
21/2 tbsp1 tbsp
0.2 kg4 No.5 tbsp2 tbsp
0.3 kg6 No.7 tbsp3 tbsp
A few sprigsAs per taste
CF 6 BreadPudding
1) Make small pieces of bread slices. Beat theegg very well. Mix all the ingredients verywell.
2) Pour this mixture into MWSflat glass dish &weight. Press start.
0.10 - 0.30 kg
ForBread SlicesMilk (for dipping the bread)EggVanilla EssenceSugarDry fruits
0.1 kg2 No.
1/2 cup1 No.1/2 tsp3 tbsp
0.2 kg3 No.1 cup2 No.3/4 tsp4 tbsp
0.3 kg4 No.
11/2 cups3 No.1 tsp5 tbsp
As per taste
Metal tray
High rack
MWS flatglass dish +
* Solocooking kit
Utensil
* Solo cooking kit : For efficient cooking place the utensil on solo cooking kit.

64
MethodMenu Weight Limit / Ingredients
CF 7 CheesyNachos
1) In a MWSflat glass dish add nachos, choppedonion, tomato, pizza sauce & grated cheese. Select menu & weight & press start.
0.10 - 0.30 kg
ForNachosGrated cheesePizza sauceChopped onion , tomato
0.1 kg100 g
1/2 cup4 tbsp1 cup
0.2 kg200 g1 cup5 tbsp
11/2 cups
0.3 kg300 g1 cup6 tbsp2 cups
MWS flatglass dish +
* Solocooking kit
Utensil
* Solo cooking kit : For efficient cooking place the utensil on solo cooking kit.
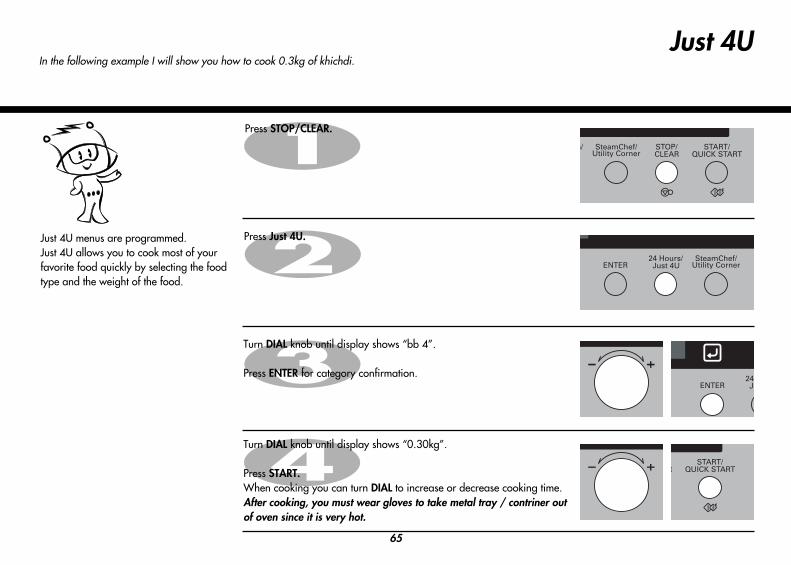
65
Just 4U In the following example I will show you how to cook 0.3kg of khichdi.
Press STOP/CLEAR.
Press Just 4U.
Turn DIAL knob until display shows “bb 4”.
Press ENTER for category confirmation.
Just 4U menus are programmed. Just 4U allows you to cook most of yourfavorite food quickly by selecting the foodtype and the weight of the food.
Turn DIAL knob until display shows “0.30kg”.
Press START.When cooking you can turn DIAL to increase or decrease cooking time.After cooking, you must wear gloves to take metal tray / contriner outof oven since it is very hot.
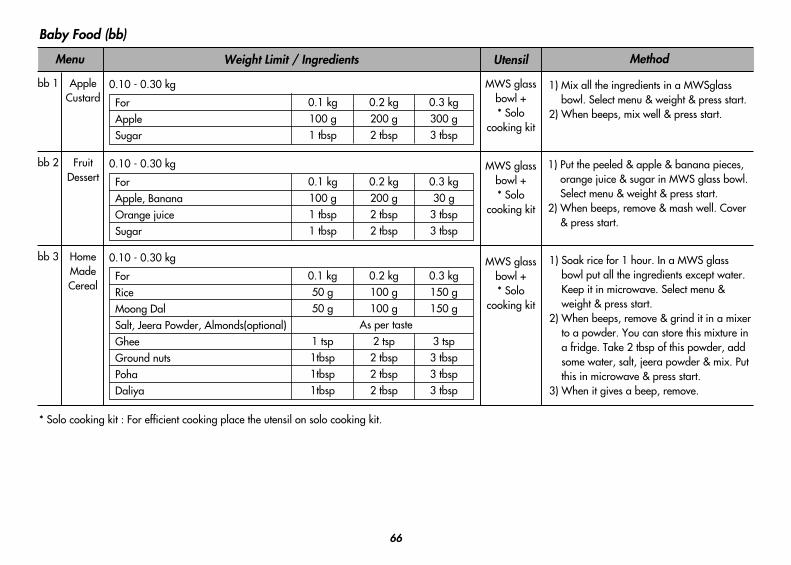
66
MethodMenu Weight Limit / Ingredients
bb 1 AppleCustard
1) Mix all the ingredients in a MWSglassbowl. Select menu & weight & press start.
2) When beeps, mix well & press start.
Baby Food (bb)
0.10 - 0.30 kg
ForAppleSugar
0.1 kg100 g1 tbsp
0.2 kg200 g2 tbsp
0.3 kg300 g3 tbsp
bb 2 FruitDessert
1) Put the peeled & apple & banana pieces,orange juice & sugar in MWS glass bowl.Select menu & weight & press start.
2) When beeps, remove & mash well. Cover& press start.
0.10 - 0.30 kg
ForApple, BananaOrange juiceSugar
0.1 kg100 g1 tbsp1 tbsp
0.2 kg200 g2 tbsp2 tbsp
0.3 kg30 g
3 tbsp3 tbsp
bb 3 HomeMadeCereal
1) Soak rice for 1 hour. In a MWS glassbowl put all the ingredients except water.Keep it in microwave. Select menu &weight & press start.
2) When beeps, remove & grind it in a mixerto a powder. You can store this mixture ina fridge. Take 2 tbsp of this powder, addsome water, salt, jeera powder & mix. Putthis in microwave & press start.
3) When it gives a beep, remove.
0.10 - 0.30 kg
ForRiceMoong DalSalt, Jeera Powder, Almonds(optional)GheeGround nutsPohaDaliya
0.1 kg50 g50 g
1 tsp1tbsp1tbsp1tbsp
0.2 kg100 g100 g
2 tsp2 tbsp2 tbsp2 tbsp
0.3 kg150 g150 g
3 tsp3 tbsp3 tbsp3 tbsp
As per taste
MWS glassbowl +* Solo
cooking kit
MWS glassbowl +* Solo
cooking kit
MWS glassbowl +* Solo
cooking kit
Utensil
* Solo cooking kit : For efficient cooking place the utensil on solo cooking kit.
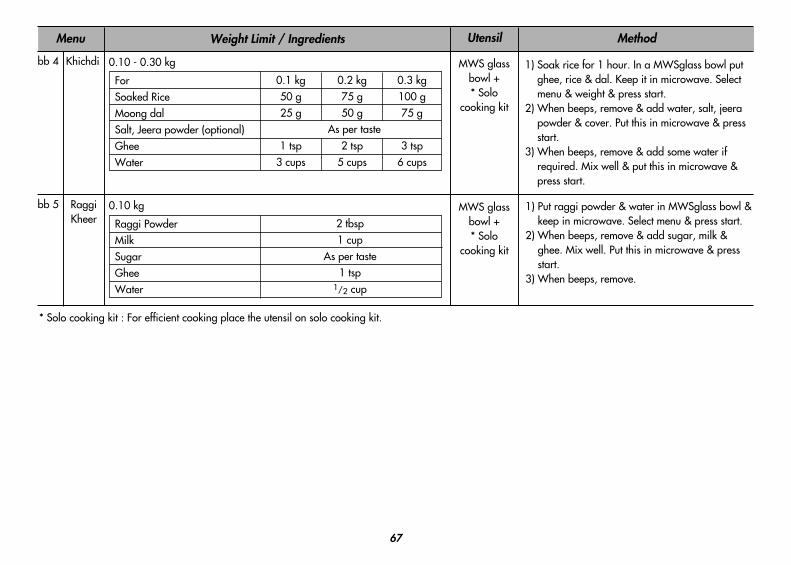
67
MethodMenu Weight Limit / Ingredients
bb 5 RaggiKheer
1) Put raggi powder & water in MWSglass bowl &keep in microwave. Select menu & press start.
2) When beeps, remove & add sugar, milk &ghee. Mix well. Put this in microwave & pressstart.
3) When beeps, remove.
0.10 kg
Raggi PowderMilkSugarGheeWater
2 tbsp1 cup
As per taste1 tsp
1/2 cup
bb 4 Khichdi 1) Soak rice for 1 hour. In a MWSglass bowl putghee, rice & dal. Keep it in microwave. Selectmenu & weight & press start.
2) When beeps, remove & add water, salt, jeerapowder & cover. Put this in microwave & pressstart.
3) When beeps, remove & add some water ifrequired. Mix well & put this in microwave &press start.
0.10 - 0.30 kg
ForSoaked RiceMoong dalSalt, Jeera powder (optional)GheeWater
0.1 kg50 g25 g
1 tsp3 cups
0.2 kg75 g50 g
2 tsp5 cups
0.3 kg100 g75 g
3 tsp6 cups
As per taste
MWS glassbowl +* Solo
cooking kit
MWS glassbowl +* Solo
cooking kit
Utensil
* Solo cooking kit : For efficient cooking place the utensil on solo cooking kit.
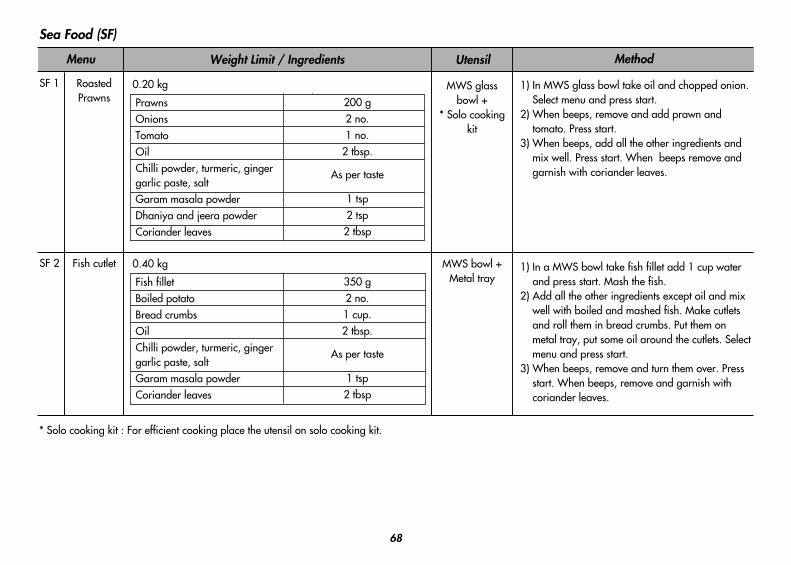
68
MethodMenu Weight Limit / Ingredients
SF 1 RoastedPrawns
1) In MWS glass bowl take oil and chopped onion.Select menu and press start.
2) When beeps, remove and add prawn andtomato. Press start.
3) When beeps, add all the other ingredients andmix well. Press start. When beeps remove andgarnish with coriander leaves.
Sea Food (SF)
0.20 kg
PrawnsOnionsTomatoOilChilli powder, turmeric, gingergarlic paste, saltGaram masala powderDhaniya and jeera powderCoriander leaves
200 g2 no.1 no.
2 tbsp.
As per taste
1 tsp2 tsp2 tbsp
0.40 kg
Fish filletBoiled potatoBread crumbsOilChilli powder, turmeric, gingergarlic paste, saltGaram masala powderCoriander leaves
350 g2 no.1 cup.2 tbsp.
As per taste
1 tsp2 tbsp
SF 2 Fish cutlet 1) In a MWS bowl take fish fillet add 1 cup waterand press start. Mash the fish.
2) Add all the other ingredients except oil and mixwell with boiled and mashed fish. Make cutletsand roll them in bread crumbs. Put them onmetal tray, put some oil around the cutlets. Selectmenu and press start.
3) When beeps, remove and turn them over. Pressstart. When beeps, remove and garnish withcoriander leaves.
MWS glassbowl +
* Solo cookingkit
MWS bowl +Metal tray
Utensil
* Solo cooking kit : For efficient cooking place the utensil on solo cooking kit.
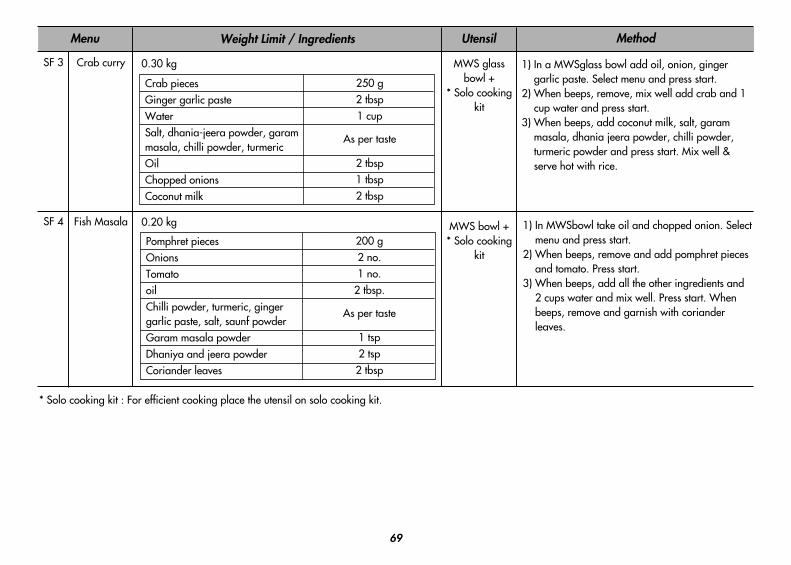
69
MethodMenu Weight Limit / Ingredients
SF 3 Crab curry 1) In a MWSglass bowl add oil, onion, gingergarlic paste. Select menu and press start.
2) When beeps, remove, mix well add crab and 1cup water and press start.
3) When beeps, add coconut milk, salt, garammasala, dhania jeera powder, chilli powder,turmeric powder and press start. Mix well &serve hot with rice.
0.30 kg
0.20 kgSF 4 Fish Masala 1) In MWSbowl take oil and chopped onion. Selectmenu and press start.
2) When beeps, remove and add pomphret piecesand tomato. Press start.
3) When beeps, add all the other ingredients and2 cups water and mix well. Press start. Whenbeeps, remove and garnish with corianderleaves.
Crab piecesGinger garlic pasteWaterSalt, dhania-jeera powder, garammasala, chilli powder, turmericOilChopped onionsCoconut milk
250 g2 tbsp1 cup
As per taste
2 tbsp1 tbsp2 tbsp
Pomphret piecesOnionsTomatooilChilli powder, turmeric, gingergarlic paste, salt, saunf powderGaram masala powderDhaniya and jeera powderCoriander leaves
200 g2 no.1 no.
2 tbsp.
As per taste
1 tsp2 tsp2 tbsp
MWS glassbowl +
* Solo cookingkit
MWS bowl +* Solo cooking
kit
Utensil
* Solo cooking kit : For efficient cooking place the utensil on solo cooking kit.
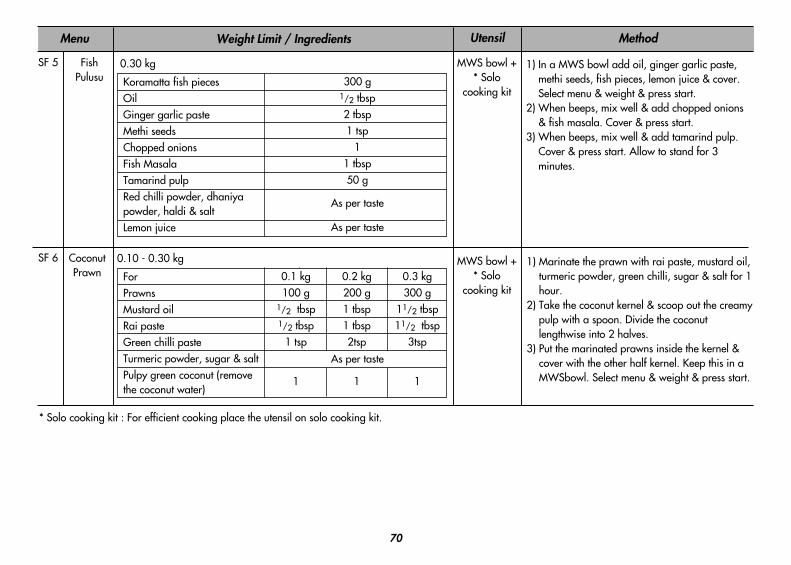
70
MethodMenu Weight Limit / Ingredients
SF 5 FishPulusu
1) In a MWS bowl add oil, ginger garlic paste,methi seeds, fish pieces, lemon juice & cover.Select menu & weight & press start.
2) When beeps, mix well & add chopped onions& fish masala. Cover & press start.
3) When beeps, mix well & add tamarind pulp.Cover & press start. Allow to stand for 3minutes.
0.30 kg
Koramatta fish piecesOilGinger garlic pasteMethi seedsChopped onionsFish MasalaTamarind pulpRed chilli powder, dhaniyapowder, haldi & saltLemon juice
300 g1/2 tbsp2 tbsp1 tsp
11 tbsp50 g
As per taste
As per taste
0.10 - 0.30 kg
ForPrawnsMustard oilRai pasteGreen chilli pasteTurmeric powder, sugar & saltPulpy green coconut (removethe coconut water)
0.1 kg100 g
1/2 tbsp1/2 tbsp
1 tsp
1
0.2 kg200 g1 tbsp1 tbsp2tsp
1
0.3 kg300 g
11/2 tbsp11/2 tbsp
3tsp
1
SF 6 CoconutPrawn
1) Marinate the prawn with rai paste, mustard oil,turmeric powder, green chilli, sugar & salt for 1hour.
2) Take the coconut kernel & scoop out the creamypulp with a spoon. Divide the coconutlengthwise into 2 halves.
3) Put the marinated prawns inside the kernel &cover with the other half kernel. Keep this in aMWSbowl. Select menu & weight & press start.
As per taste
MWS bowl +* Solo
cooking kit
MWS bowl +* Solo
cooking kit
Utensil
* Solo cooking kit : For efficient cooking place the utensil on solo cooking kit.
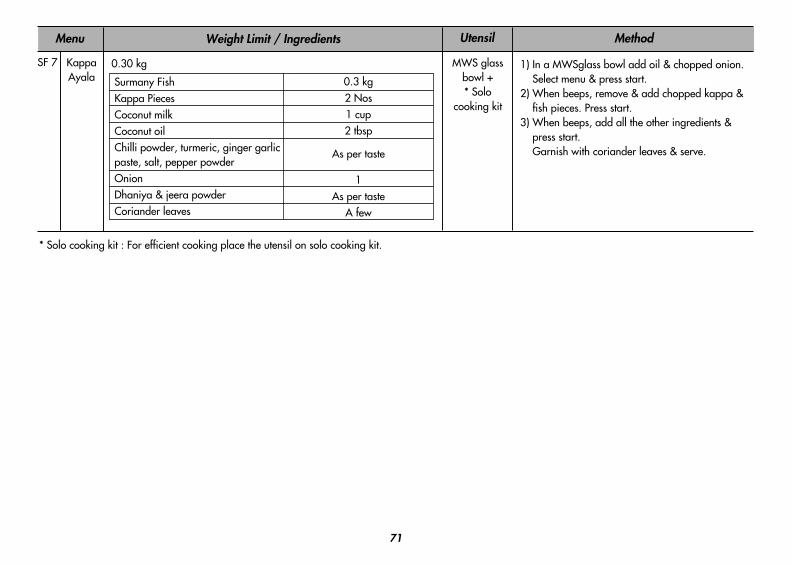
71
MethodMenu Weight Limit / Ingredients
SF 7 KappaAyala
1) In a MWSglass bowl add oil & chopped onion.Select menu & press start.
2) When beeps, remove & add chopped kappa &fish pieces. Press start.
3) When beeps, add all the other ingredients &press start. Garnish with coriander leaves & serve.
0.30 kg
Surmany FishKappa PiecesCoconut milkCoconut oilChilli powder, turmeric, ginger garlicpaste, salt, pepper powderOnionDhaniya & jeera powderCoriander leaves
0.3 kg2 Nos1 cup2 tbsp
As per taste
1As per taste
A few
MWS glassbowl +* Solo
cooking kit
Utensil
* Solo cooking kit : For efficient cooking place the utensil on solo cooking kit.
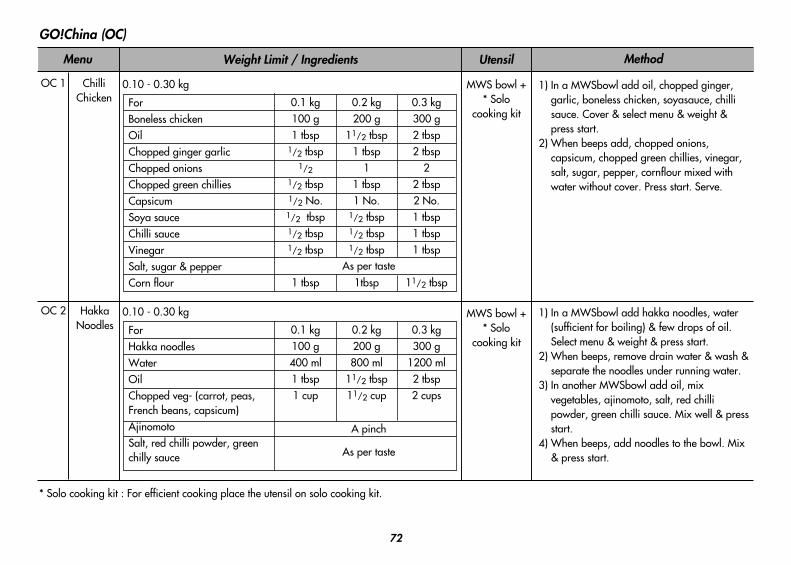
72
MethodMenu Weight Limit / Ingredients
OC 1 ChilliChicken
1) In a MWSbowl add oil, chopped ginger,garlic, boneless chicken, soyasauce, chillisauce. Cover & select menu & weight &press start.
2) When beeps add, chopped onions,capsicum, chopped green chillies, vinegar,salt, sugar, pepper, cornflour mixed withwater without cover. Press start. Serve.
GO!China (OC)
0.10 - 0.30 kg
ForBoneless chickenOilChopped ginger garlicChopped onionsChopped green chilliesCapsicumSoya sauceChilli sauceVinegarSalt, sugar & pepperCorn flour
0.1 kg100 g1 tbsp
1/2 tbsp1/2
1/2 tbsp1/2 No.1/2 tbsp1/2 tbsp1/2 tbsp
1 tbsp
0.2 kg200 g
11/2 tbsp1 tbsp
11 tbsp1 No.
1/2 tbsp1/2 tbsp1/2 tbsp
1tbsp
0.3 kg300 g2 tbsp2 tbsp
22 tbsp2 No.1 tbsp1 tbsp1 tbsp
11/2 tbspAs per taste
OC 2 HakkaNoodles
1) In a MWSbowl add hakka noodles, water(sufficient for boiling) & few drops of oil.Select menu & weight & press start.
2) When beeps, remove drain water & wash &separate the noodles under running water.
3) In another MWSbowl add oil, mixvegetables, ajinomoto, salt, red chillipowder, green chilli sauce. Mix well & pressstart.
4) When beeps, add noodles to the bowl. Mix& press start.
0.10 - 0.30 kg
ForHakka noodlesWaterOilChopped veg- (carrot, peas,French beans, capsicum)AjinomotoSalt, red chilli powder, greenchilly sauce
0.1 kg100 g400 ml1 tbsp1 cup
0.2 kg200 g800 ml
11/2 tbsp11/2 cup
0.3 kg300 g
1200 ml2 tbsp2 cups
A pinch
As per taste
MWS bowl +* Solo
cooking kit
MWS bowl +* Solo
cooking kit
Utensil
* Solo cooking kit : For efficient cooking place the utensil on solo cooking kit.
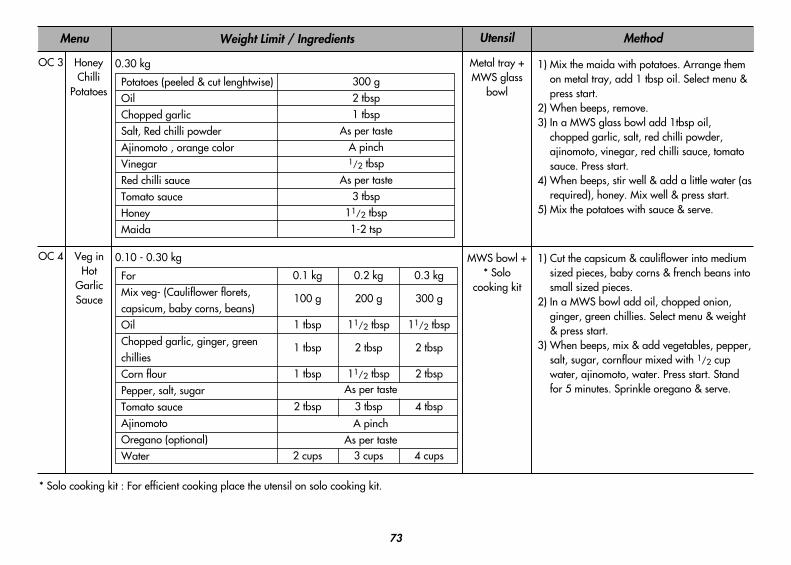
73
MethodMenu Weight Limit / Ingredients
OC 3 HoneyChilli
Potatoes
1) Mix the maida with potatoes. Arrange themon metal tray, add 1 tbsp oil. Select menu &press start.
2) When beeps, remove. 3) In a MWS glass bowl add 1tbsp oil,
chopped garlic, salt, red chilli powder,ajinomoto, vinegar, red chilli sauce, tomatosauce. Press start.
4) When beeps, stir well & add a little water (asrequired), honey. Mix well & press start.
5) Mix the potatoes with sauce & serve.
0.30 kg
Potatoes (peeled & cut lenghtwise)Oil Chopped garlicSalt, Red chilli powderAjinomoto , orange colorVinegarRed chilli sauceTomato sauceHoneyMaida
300 g2 tbsp1 tbsp
As per tasteA pinch1/2 tbsp
As per taste3 tbsp
11/2 tbsp1-2 tsp
OC 4 Veg inHot
GarlicSauce
1) Cut the capsicum & cauliflower into mediumsized pieces, baby corns & french beans intosmall sized pieces.
2) In a MWS bowl add oil, chopped onion,ginger, green chillies. Select menu & weight& press start.
3) When beeps, mix & add vegetables, pepper,salt, sugar, cornflour mixed with 1/2 cupwater, ajinomoto, water. Press start. Standfor 5 minutes. Sprinkle oregano & serve.
0.10 - 0.30 kg
ForMix veg- (Cauliflower florets,capsicum, baby corns, beans)OilChopped garlic, ginger, greenchilliesCorn flourPepper, salt, sugarTomato sauceAjinomotoOregano (optional)Water
0.1 kg
100 g
1 tbsp
1 tbsp
1 tbsp
2 tbsp
2 cups
0.2 kg
200 g
11/2 tbsp
2 tbsp
11/2 tbsp
3 tbsp
3 cups
0.3 kg
300 g
11/2 tbsp
2 tbsp
2 tbsp
4 tbsp
4 cups
As per taste
A pinchAs per taste
* Solo cooking kit : For efficient cooking place the utensil on solo cooking kit.
Metal tray +MWS glass
bowl
MWS bowl +* Solo
cooking kit
Utensil

74
SteamChefIn the following example I will show you how to cook 0.3 kg of sweet corn.
Press STOP/CLEAR.
Press SteamChef once.
Turn DIAL knob until display shows “St 6”.
Press ENTER for category confirmation.
This feature allows you steamed cook.
CAUTION:1. Always use oven gloves when removing a
STEAMER from the oven. It’s very hot.2. Do not put a hot STEAMER on a glass table
or a place easy to be melted after cooking.Always make sure to use a pad or tray.
3. When you use this Steamer, pour at least200ml water before use. If the amount ofwater is less than 200ml, it may causeincomplete cooking, or may cause a fire orfatal damage to the product.
4. Be careful when you move the STEAMERwith water.
5. When you use the STEAMER, the steam coverand steam water bowl should be setperfectly right. The eggs or the chestnutwould be exploding without setting thesteam cover and steam water bowl.
6. Never use this Steamer with a product ofdifferent model. It may cause a fire or fataldamage to the product.
Turn DIAL knob until display shows “0.30kg”.
Press START.When cooking you can turn DIAL to increase or decrease cooking time.
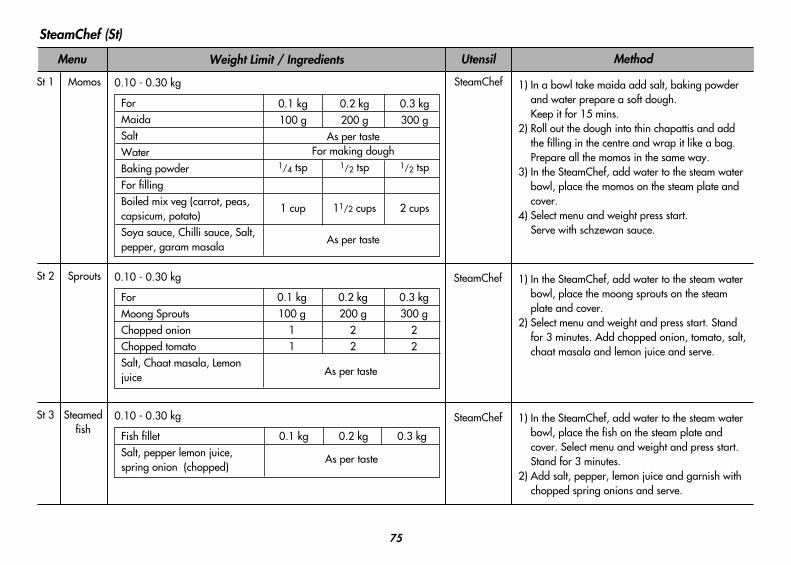
75
Method
St 1 Momos SteamChef
SteamChef
SteamChef
0.10 - 0.30 kg
SteamChef (St)
ForMaidaSaltWaterBaking powderFor fillingBoiled mix veg (carrot, peas,capsicum, potato)Soya sauce, Chilli sauce, Salt,pepper, garam masala
1) In a bowl take maida add salt, baking powderand water prepare a soft dough. Keep it for 15 mins.
2) Roll out the dough into thin chapattis and addthe filling in the centre and wrap it like a bag.Prepare all the momos in the same way.
3) In the SteamChef, add water to the steam waterbowl, place the momos on the steam plate andcover.
4) Select menu and weight press start. Serve with schzewan sauce.
0.1 kg 0.2 kg 0.3 kg100 g 200 g 300 g
As per tasteFor making dough
1/4 tsp 1/2 tsp 1/2 tsp
1 cup 11/2 cups 2 cups
As per taste
Menu UtensilWeight Limit / Ingredients
St 2 Sprouts 0.10 - 0.30 kg
ForMoong SproutsChopped onionChopped tomatoSalt, Chaat masala, Lemonjuice
1) In the SteamChef, add water to the steam waterbowl, place the moong sprouts on the steamplate and cover.
2) Select menu and weight and press start. Standfor 3 minutes. Add chopped onion, tomato, salt,chaat masala and lemon juice and serve.
0.1 kg100 g
11
0.2 kg200 g
22
0.3 kg300 g
22
St 3 Steamedfish
0.10 - 0.30 kg
Fish filletSalt, pepper lemon juice, spring onion (chopped)
1) In the SteamChef, add water to the steam waterbowl, place the fish on the steam plate andcover. Select menu and weight and press start.Stand for 3 minutes.
2) Add salt, pepper, lemon juice and garnish withchopped spring onions and serve.
0.1 kg 0.2 kg 0.3 kg
As per taste
As per taste
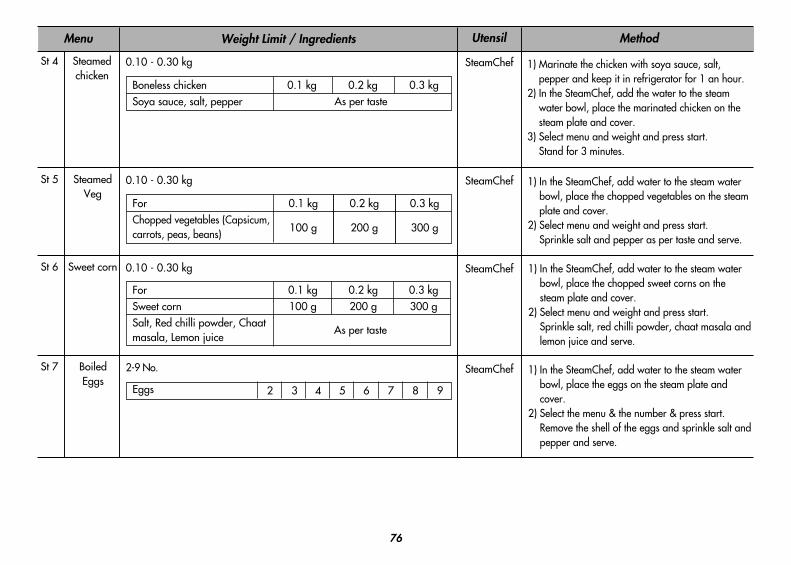
76
Method
St 4 Steamedchicken
0.10 - 0.30 kg 1) Marinate the chicken with soya sauce, salt,pepper and keep it in refrigerator for 1 an hour.
2) In the SteamChef, add the water to the steamwater bowl, place the marinated chicken on thesteam plate and cover.
3) Select menu and weight and press start. Stand for 3 minutes.
Menu Weight Limit / Ingredients
1) In the SteamChef, add water to the steam waterbowl, place the chopped vegetables on the steamplate and cover.
2) Select menu and weight and press start. Sprinkle salt and pepper as per taste and serve.
St 6 Sweet corn 0.10 - 0.30 kg
Boneless chickenSoya sauce, salt, pepper
1) In the SteamChef, add water to the steam waterbowl, place the chopped sweet corns on thesteam plate and cover.
2) Select menu and weight and press start. Sprinkle salt, red chilli powder, chaat masala andlemon juice and serve.
0.1 kg 0.2 kg 0.3 kgAs per taste
St 7 BoiledEggs
2-9 No. 1) In the SteamChef, add water to the steam waterbowl, place the eggs on the steam plate andcover.
2) Select the menu & the number & press start.Remove the shell of the eggs and sprinkle salt andpepper and serve.
Eggs 98765432
St 5 SteamedVeg
0.10 - 0.30 kg
ForChopped vegetables (Capsicum,carrots, peas, beans)
0.1 kg
100 g
0.2 kg
200 g
0.3 kg
300 g
ForSweet cornSalt, Red chilli powder, Chaatmasala, Lemon juice
0.1 kg100 g
0.2 kg200 g
0.3 kg300 g
As per taste
SteamChef
SteamChef
SteamChef
SteamChef
Utensil
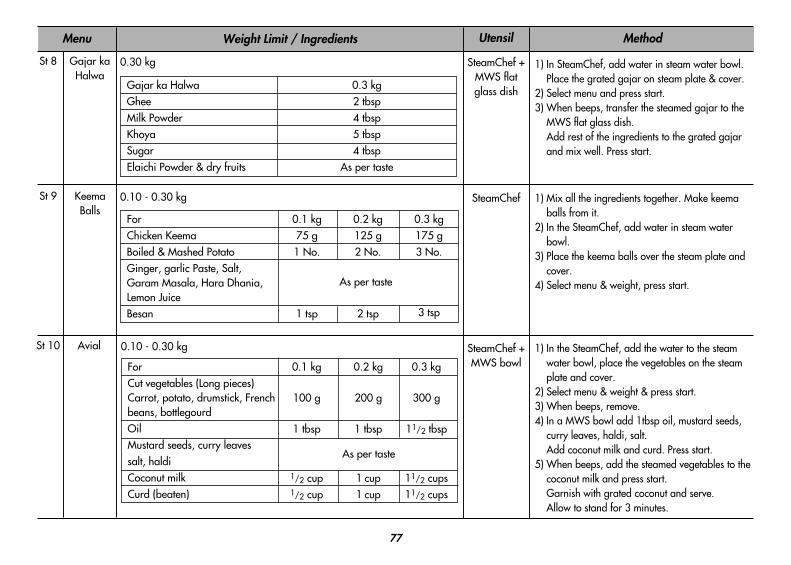
77
Method
St 8 Gajar kaHalwa
0.30 kg 1) In SteamChef, add water in steam water bowl.Place the grated gajar on steam plate & cover.
2) Select menu and press start.3) When beeps, transfer the steamed gajar to the
MWS flat glass dish. Add rest of the ingredients to the grated gajarand mix well. Press start.
Menu Weight Limit / Ingredients
St 9 KeemaBalls
0.10 - 0.30 kg
Gajar ka HalwaGheeMilk PowderKhoyaSugarElaichi Powder & dry fruits
1) Mix all the ingredients together. Make keemaballs from it.
2) In the SteamChef, add water in steam waterbowl.
3) Place the keema balls over the steam plate andcover.
4) Select menu & weight, press start.
0.3 kg2 tbsp4 tbsp5 tbsp4 tbsp
As per taste
St 10 Avial 1) In the SteamChef, add the water to the steamwater bowl, place the vegetables on the steamplate and cover.
2) Select menu & weight & press start.3) When beeps, remove.4) In a MWS bowl add 1tbsp oil, mustard seeds,
curry leaves, haldi, salt. Add coconut milk and curd. Press start.
5) When beeps, add the steamed vegetables to thecoconut milk and press start. Garnish with grated coconut and serve.Allow to stand for 3 minutes.
ForChicken KeemaBoiled & Mashed PotatoGinger, garlic Paste, Salt,Garam Masala, Hara Dhania,Lemon JuiceBesan
0.1 kg75 g1 No.
1 tsp
0.2 kg125 g2 No.
2 tsp
0.3 kg175 g3 No.
3 tsp
As per taste
0.10 - 0.30 kg
ForCut vegetables (Long pieces)Carrot, potato, drumstick, Frenchbeans, bottlegourdOilMustard seeds, curry leavessalt, haldiCoconut milkCurd (beaten)
0.1 kg 0.2 kg 0.3 kg
100 g 200 g 300 g
1 tbsp 1 tbsp 11/2 tbsp
As per taste
1/2 cup 1 cup 11/2 cups1/2 cup 1 cup 11/2 cups
SteamChef +MWS flatglass dish
SteamChef
SteamChef +MWS bowl
Utensil
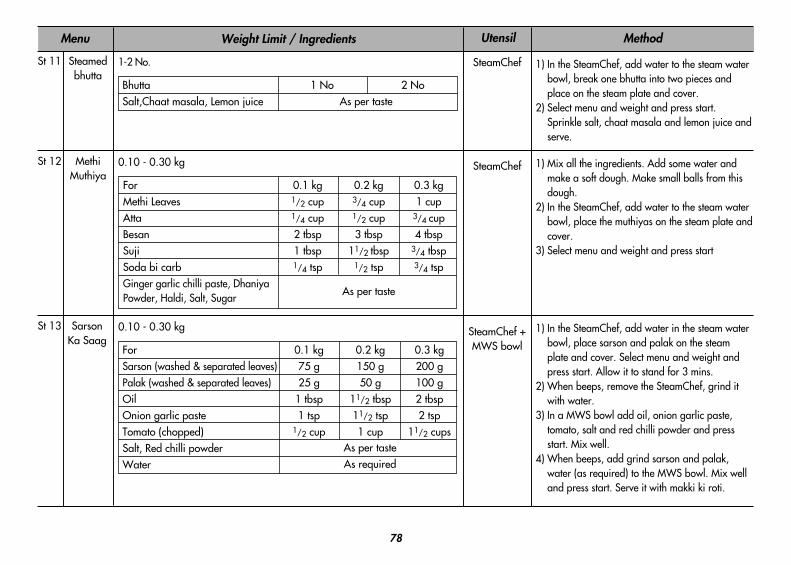
78
Method
St 11 Steamedbhutta
1-2 No. 1) In the SteamChef, add water to the steam waterbowl, break one bhutta into two pieces andplace on the steam plate and cover.
2) Select menu and weight and press start.Sprinkle salt, chaat masala and lemon juice andserve.
Menu Weight Limit / Ingredients
1) Mix all the ingredients. Add some water andmake a soft dough. Make small balls from thisdough.
2) In the SteamChef, add water to the steam waterbowl, place the muthiyas on the steam plate andcover.
3) Select menu and weight and press start
BhuttaSalt,Chaat masala, Lemon juice
1 No 2 NoAs per taste
St 12 MethiMuthiya
0.10 - 0.30 kg
ForMethi LeavesAttaBesanSujiSoda bi carbGinger garlic chilli paste, DhaniyaPowder, Haldi, Salt, Sugar
0.1 kg1/2 cup1/4 cup2 tbsp1 tbsp1/4 tsp
0.2 kg3/4 cup1/2 cup3 tbsp
11/2 tbsp1/2 tsp
0.3 kg1 cup
3/4 cup4 tbsp
3/4 tbsp3/4 tsp
As per taste
1) In the SteamChef, add water in the steam waterbowl, place sarson and palak on the steamplate and cover. Select menu and weight andpress start. Allow it to stand for 3 mins.
2) When beeps, remove the SteamChef, grind itwith water.
3) In a MWS bowl add oil, onion garlic paste,tomato, salt and red chilli powder and pressstart. Mix well.
4) When beeps, add grind sarson and palak,water (as required) to the MWS bowl. Mix welland press start. Serve it with makki ki roti.
St 13 SarsonKa Saag
0.10 - 0.30 kg
ForSarson (washed & separated leaves)Palak (washed & separated leaves)OilOnion garlic pasteTomato (chopped)Salt, Red chilli powderWater
0.1 kg75 g25 g
1 tbsp1 tsp
1/2 cup
0.2 kg150 g50 g
11/2 tbsp11/2 tsp1 cup
0.3 kg200 g100 g2 tbsp2 tsp
11/2 cupsAs per tasteAs required
SteamChef
SteamChef
SteamChef +MWS bowl
Utensil
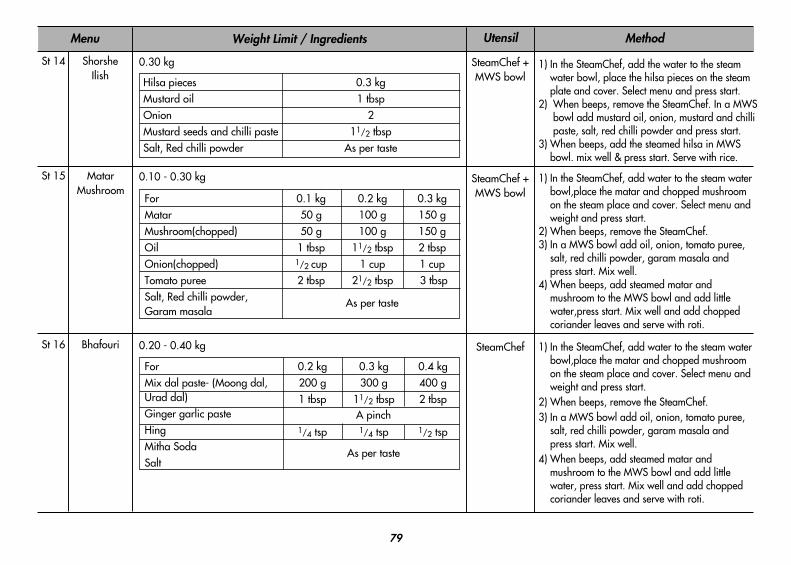
79
Method
St 14 ShorsheIlish
0.30 kg 1) In the SteamChef, add the water to the steamwater bowl, place the hilsa pieces on the steamplate and cover. Select menu and press start.
2) When beeps, remove the SteamChef. In a MWSbowl add mustard oil, onion, mustard and chillipaste, salt, red chilli powder and press start.
3) When beeps, add the steamed hilsa in MWSbowl. mix well & press start. Serve with rice.
Menu Weight Limit / Ingredients
Hilsa piecesMustard oilOnionMustard seeds and chilli pasteSalt, Red chilli powder
0.3 kg1 tbsp
211/2 tbsp
As per taste
1) In the SteamChef, add water to the steam waterbowl,place the matar and chopped mushroomon the steam place and cover. Select menu andweight and press start.
2) When beeps, remove the SteamChef. 3) In a MWS bowl add oil, onion, tomato puree,
salt, red chilli powder, garam masala andpress start. Mix well.
4) When beeps, add steamed matar andmushroom to the MWS bowl and add littlewater,press start. Mix well and add choppedcoriander leaves and serve with roti.
St 15 MatarMushroom
0.10 - 0.30 kg
ForMatarMushroom(chopped)OilOnion(chopped)Tomato pureeSalt, Red chilli powder,Garam masala
0.1 kg50 g50 g
1 tbsp1/2 cup2 tbsp
0.2 kg100 g100 g
11/2 tbsp1 cup
21/2 tbsp
0.3 kg150 g150 g2 tbsp1 cup3 tbsp
As per taste
1) In the SteamChef, add water to the steam waterbowl,place the matar and chopped mushroomon the steam place and cover. Select menu andweight and press start.
2) When beeps, remove the SteamChef. 3) In a MWS bowl add oil, onion, tomato puree,
salt, red chilli powder, garam masala andpress start. Mix well.
4) When beeps, add steamed matar andmushroom to the MWS bowl and add littlewater, press start. Mix well and add choppedcoriander leaves and serve with roti.
St 16 Bhafouri 0.20 - 0.40 kg
ForMix dal paste- (Moong dal,Urad dal)Ginger garlic pasteHingMitha SodaSalt
0.2 kg200 g1 tbsp
1/4 tsp
0.3 kg300 g
11/2 tbsp
1/4 tsp
0.4 kg400 g2 tbsp
1/2 tsp
As per taste
A pinch
SteamChef +MWS bowl
SteamChef +MWS bowl
SteamChef
Utensil
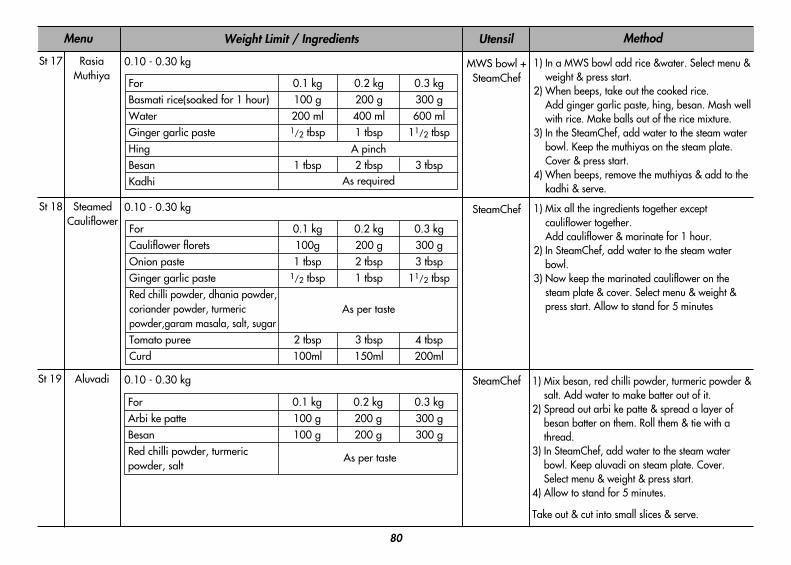
80
Method
St 17 RasiaMuthiya
Menu Weight Limit / Ingredients
1) In a MWS bowl add rice &water. Select menu &weight & press start.
2) When beeps, take out the cooked rice. Add ginger garlic paste, hing, besan. Mash wellwith rice. Make balls out of the rice mixture.
3) In the SteamChef, add water to the steam waterbowl. Keep the muthiyas on the steam plate.Cover & press start.
4) When beeps, remove the muthiyas & add to thekadhi & serve.
0.10 - 0.30 kg
For Basmati rice(soaked for 1 hour) WaterGinger garlic pasteHing BesanKadhi
0.1 kg100 g200 ml1/2 tbsp
1 tbsp
0.2 kg200 g400 ml1 tbsp
2 tbsp
0.3 kg300 g600 ml
11/2 tbsp
3 tbspAs required
A pinch
St 18 SteamedCauliflower
1) Mix all the ingredients together exceptcauliflower together. Add cauliflower & marinate for 1 hour.
2) In SteamChef, add water to the steam waterbowl.
3) Now keep the marinated cauliflower on thesteam plate & cover. Select menu & weight &press start. Allow to stand for 5 minutes
0.10 - 0.30 kg
ForCauliflower floretsOnion pasteGinger garlic pasteRed chilli powder, dhania powder,coriander powder, turmericpowder,garam masala, salt, sugarTomato pureeCurd
0.1 kg100g1 tbsp
1/2 tbsp
2 tbsp100ml
0.2 kg200 g2 tbsp1 tbsp
3 tbsp150ml
0.3 kg300 g3 tbsp
11/2 tbsp
4 tbsp200ml
As per taste
St 19 Aluvadi 0.10 - 0.30 kg 1) Mix besan, red chilli powder, turmeric powder &salt. Add water to make batter out of it.
2) Spread out arbi ke patte & spread a layer ofbesan batter on them. Roll them & tie with athread.
3) In SteamChef, add water to the steam waterbowl. Keep aluvadi on steam plate. Cover. Select menu & weight & press start.
4) Allow to stand for 5 minutes.
Take out & cut into small slices & serve.
ForArbi ke patteBesanRed chilli powder, turmericpowder, salt
0.1 kg100 g100 g
0.2 kg200 g200 g
0.3 kg300 g300 g
As per taste
MWS bowl +SteamChef
SteamChef
SteamChef
Utensil
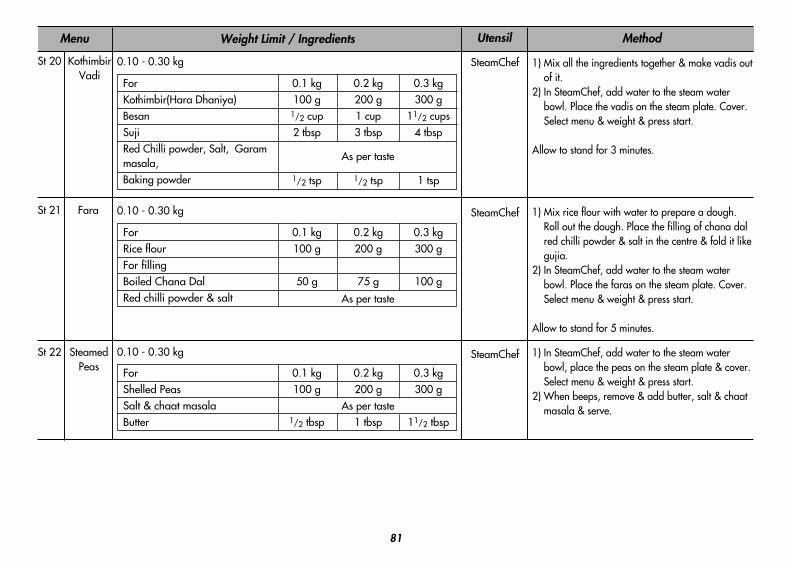
81
Method
St 20 KothimbirVadi
Menu Weight Limit / Ingredients
1) Mix all the ingredients together & make vadis outof it.
2) In SteamChef, add water to the steam waterbowl. Place the vadis on the steam plate. Cover.Select menu & weight & press start.
Allow to stand for 3 minutes.
0.10 - 0.30 kg
0.1 kg100 g
1/2 cup2 tbsp
1/2 tsp
0.2 kg200 g1 cup3 tbsp
1/2 tsp
0.3 kg300 g
11/2 cups4 tbsp
1 tsp
As per taste
ForKothimbir(Hara Dhaniya)BesanSujiRed Chilli powder, Salt, Garammasala, Baking powder
St 21 Fara 1) Mix rice flour with water to prepare a dough.Roll out the dough. Place the filling of chana dalred chilli powder & salt in the centre & fold it likegujia.
2) In SteamChef, add water to the steam waterbowl. Place the faras on the steam plate. Cover.Select menu & weight & press start.
Allow to stand for 5 minutes.
0.10 - 0.30 kg
0.1 kg100 g
50 g
0.2 kg200 g
75 g
0.3 kg300 g
100 g
For Rice flourFor fillingBoiled Chana DalRed chilli powder & salt As per taste
St 22 SteamedPeas
1) In SteamChef, add water to the steam waterbowl, place the peas on the steam plate & cover.Select menu & weight & press start.
2) When beeps, remove & add butter, salt & chaatmasala & serve.
0.10 - 0.30 kg
0.1 kg100 g
1/2 tbsp
0.2 kg200 g
1 tbsp
0.3 kg300 g
11/2 tbsp
For Shelled PeasSalt & chaat masalaButter
As per taste
SteamChef
SteamChef
SteamChef
Utensil
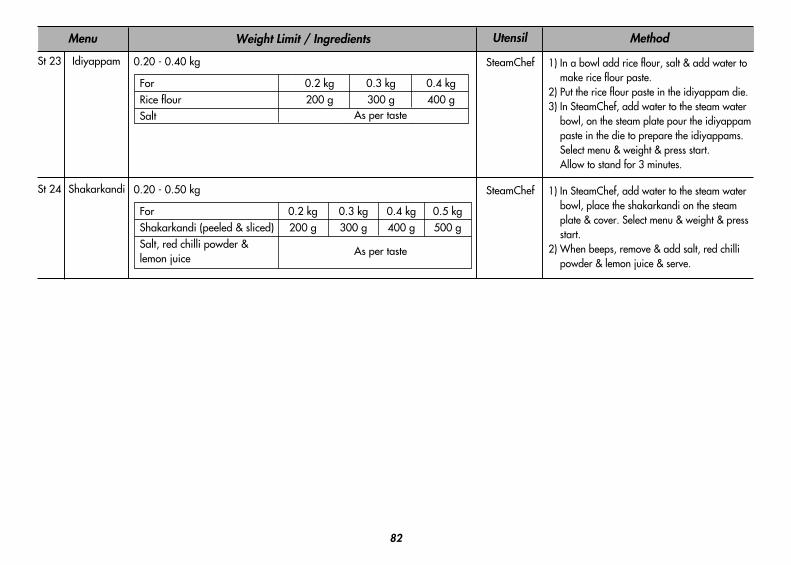
82
Method
St 23 Idiyappam
Menu Weight Limit / Ingredients
1) In a bowl add rice flour, salt & add water tomake rice flour paste.
2) Put the rice flour paste in the idiyappam die.3) In SteamChef, add water to the steam water
bowl, on the steam plate pour the idiyappampaste in the die to prepare the idiyappams.Select menu & weight & press start. Allow to stand for 3 minutes.
0.20 - 0.40 kg
0.2 kg200 g
0.3 kg300 g
0.4 kg400 g
As per taste
For Rice flourSalt
St 24 Shakarkandi 1) In SteamChef, add water to the steam waterbowl, place the shakarkandi on the steamplate & cover. Select menu & weight & pressstart.
2) When beeps, remove & add salt, red chillipowder & lemon juice & serve.
0.20 - 0.50 kg
0.2 kg200 g
0.3 kg300 g
0.4 kg400 g
0.5 kg500 g
As per taste
For Shakarkandi (peeled & sliced)Salt, red chilli powder &lemon juice
SteamChef
SteamChef
Utensil

83
Utility Corner In the following example I will show you how to cook 0.3kg of defrost veg.
Press STOP/CLEAR.
Press Utility Corner.
Turn DIAL knob until display shows “UC 3”.
Press ENTER for category confirmation.
Utility Corner menus are programmed. Utility Corner allows you to cook most ofyour favorite food quickly by selecting thefood type and the weight of the food.
Turn DIAL knob until display shows “0.30kg”.
Press START.When cooking you can turn DIAL to increase or decrease cooking time.After cooking, you must wear gloves to take metal tray / contriner outof oven since it is very hot.

84
MethodMenu Weight Limit / Ingredients
bC 1 BodyMassage oil
1) In a MWS glass bowl put all the ingredients.Select menu & press start. Remove when it givesbeep. Keep for 2 hours. Strain & store in a glassjar.
Body Care (bC)
0.20 kg
GarlicAjwain ClovesAlmondsMustard Oil
10 pods1/2 tsp2-3 No.3-4 No.1 cup
MWS glassbowl
Utensil
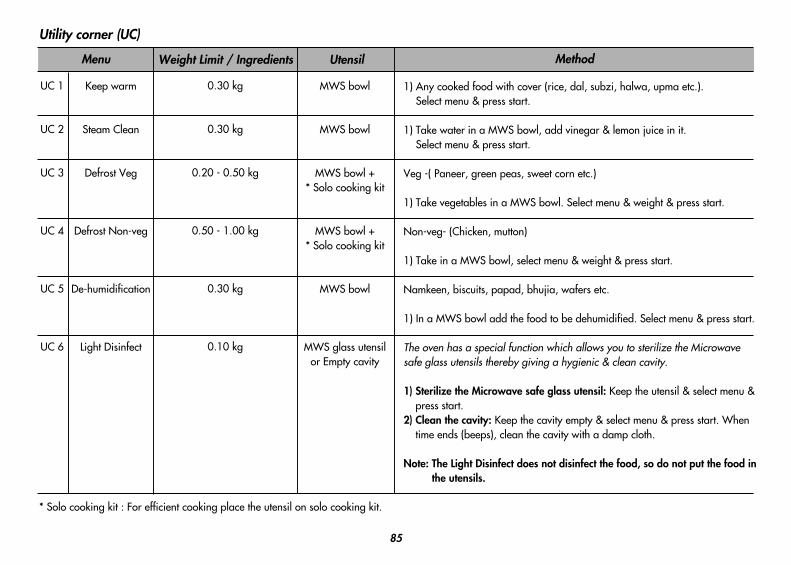
85
MethodMenu Weight Limit / Ingredients
UC 1
UC 2
UC 3
UC 4
UC 5
UC 6
Keep warm
Steam Clean
Defrost Veg
Defrost Non-veg
De-humidification
Light Disinfect
1) Any cooked food with cover (rice, dal, subzi, halwa, upma etc.). Select menu & press start.
1) Take water in a MWS bowl, add vinegar & lemon juice in it. Select menu & press start.
Veg -( Paneer, green peas, sweet corn etc.)
1) Take vegetables in a MWS bowl. Select menu & weight & press start.
Non-veg- (Chicken, mutton)
1) Take in a MWS bowl, select menu & weight & press start.
Namkeen, biscuits, papad, bhujia, wafers etc.
1) In a MWS bowl add the food to be dehumidified. Select menu & press start.
The oven has a special function which allows you to sterilize the Microwavesafe glass utensils thereby giving a hygienic & clean cavity.
1) Sterilize the Microwave safe glass utensil: Keep the utensil & select menu &press start.
2) Clean the cavity: Keep the cavity empty & select menu & press start. Whentime ends (beeps), clean the cavity with a damp cloth.
Note: The Light Disinfect does not disinfect the food, so do not put the food inthe utensils.
Utility corner (UC)
0.30 kg
0.30 kg
0.20 - 0.50 kg
0.50 - 1.00 kg
0.30 kg
0.10 kg
MWS bowl
MWS bowl
MWS bowl +* Solo cooking kit
MWS bowl +* Solo cooking kit
MWS bowl
MWS glass utensilor Empty cavity
Utensil
* Solo cooking kit : For efficient cooking place the utensil on solo cooking kit.
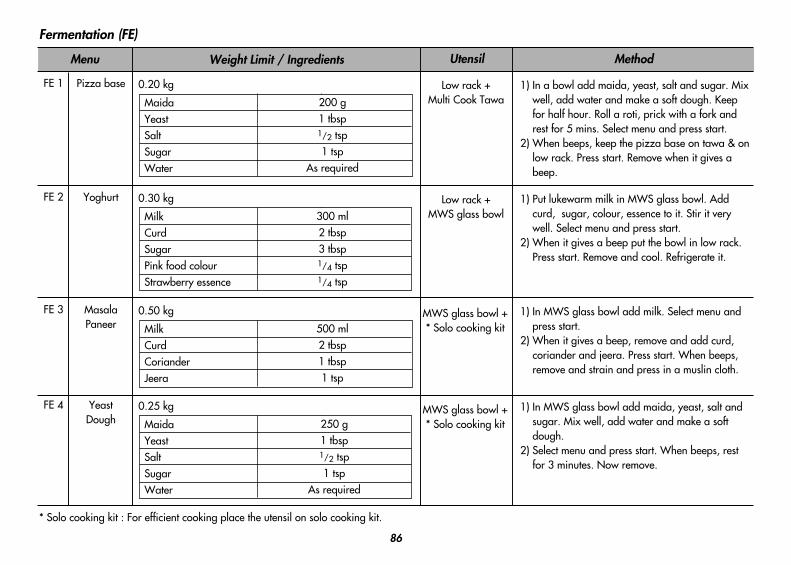
86
MethodMenu Weight Limit / Ingredients
FE 1 Pizza base 1) In a bowl add maida, yeast, salt and sugar. Mixwell, add water and make a soft dough. Keepfor half hour. Roll a roti, prick with a fork andrest for 5 mins. Select menu and press start.
2) When beeps, keep the pizza base on tawa & onlow rack. Press start. Remove when it gives abeep.
Fermentation (FE)
0.20 kg
MaidaYeastSaltSugarWater
200 g1 tbsp1/2 tsp1 tsp
As required
FE 2 Yoghurt 1) Put lukewarm milk in MWS glass bowl. Addcurd, sugar, colour, essence to it. Stir it verywell. Select menu and press start.
2) When it gives a beep put the bowl in low rack.Press start. Remove and cool. Refrigerate it.
0.30 kg
MilkCurdSugarPink food colourStrawberry essence
300 ml2 tbsp3 tbsp1/4 tsp1/4 tsp
FE 3 MasalaPaneer
1) In MWS glass bowl add milk. Select menu andpress start.
2) When it gives a beep, remove and add curd,coriander and jeera. Press start. When beeps,remove and strain and press in a muslin cloth.
0.50 kg
MilkCurdCorianderJeera
500 ml2 tbsp1 tbsp1 tsp
FE 4 YeastDough
1) In MWS glass bowl add maida, yeast, salt andsugar. Mix well, add water and make a softdough.
2) Select menu and press start. When beeps, restfor 3 minutes. Now remove.
0.25 kg
MaidaYeastSaltSugarWater
250 g1 tbsp1/2 tsp1 tsp
As required
Low rack +Multi Cook Tawa
Low rack +MWS glass bowl
MWS glass bowl +* Solo cooking kit
MWS glass bowl +* Solo cooking kit
Utensil
* Solo cooking kit : For efficient cooking place the utensil on solo cooking kit.
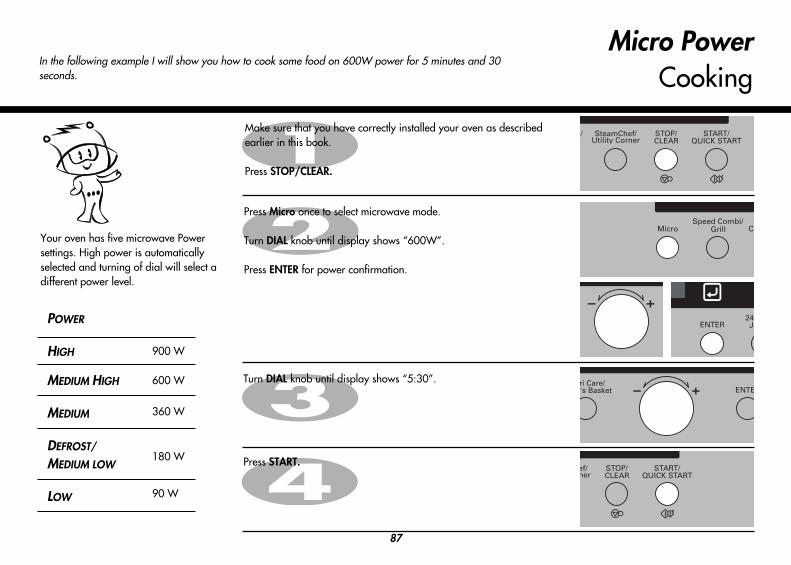
87
Micro PowerCooking
In the following example I will show you how to cook some food on 600W power for 5 minutes and 30seconds.
Make sure that you have correctly installed your oven as describedearlier in this book.
Press STOP/CLEAR.
Press Micro once to select microwave mode.
Turn DIAL knob until display shows “600W”.
Press ENTER for power confirmation.
Turn DIAL knob until display shows “5:30”.
Your oven has five microwave Powersettings. High power is automaticallyselected and turning of dial will select adifferent power level.
POWER
HIGH
MEDIUM HIGH
MEDIUM
DEFROST/
MEDIUM LOW
LOW
Press START.
900 W
600 W
360 W
180 W
90 W
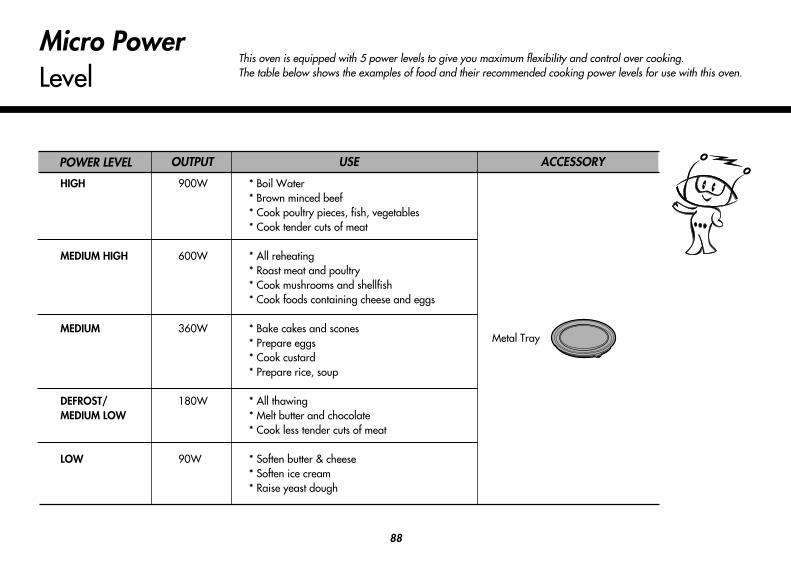
88
Micro Power Level
This oven is equipped with 5 power levels to give you maximum flexibility and control over cooking. The table below shows the examples of food and their recommended cooking power levels for use with this oven.
POWER LEVEL
HIGH 900W * Boil Water* Brown minced beef* Cook poultry pieces, fish, vegetables* Cook tender cuts of meat
MEDIUM HIGH 600W * All reheating* Roast meat and poultry* Cook mushrooms and shellfish* Cook foods containing cheese and eggs
MEDIUM 360W * Bake cakes and scones* Prepare eggs* Cook custard* Prepare rice, soup
DEFROST/ 180W * All thawingMEDIUM LOW * Melt butter and chocolate
* Cook less tender cuts of meat
LOW 90W * Soften butter & cheese* Soften ice cream* Raise yeast dough
OUTPUT USE ACCESSORY
Metal Tray

89
Two stageCooking
In the following example I will show you how to cook some food in two stages. The first stages will cook yourfood for 11 minutes on HIGH(900W); the second will cook for 35 minutes on 360W.
Press STOP/CLEAR.
Set the power and the cooking time for stage1.
Press Micro once to select microwave mode.
Turn DIAL knob until display shows “900W”.
Press ENTER for power confirmation.
Turn DIAL knob until display shows “11:00”.
Set the power and the cooking time for stage2.
Press Micro once to select microwave mode.
Turn DIAL knob until display shows “360W”.
Press ENTER for power confirmation.
Turn DIAL knob until display shows “35:00”.
Press START.
When cooking you can turn DIAL to increase or decrease cooking time.
During two stage cooking the oven doorcan be opened and food checked. Closethe oven door and press START and thecooking stage will continue.
At the end of stage1, BEEP sounds andstage 2 commences.
Should you wish to clear the programmepress STOP/CLEAR twice.
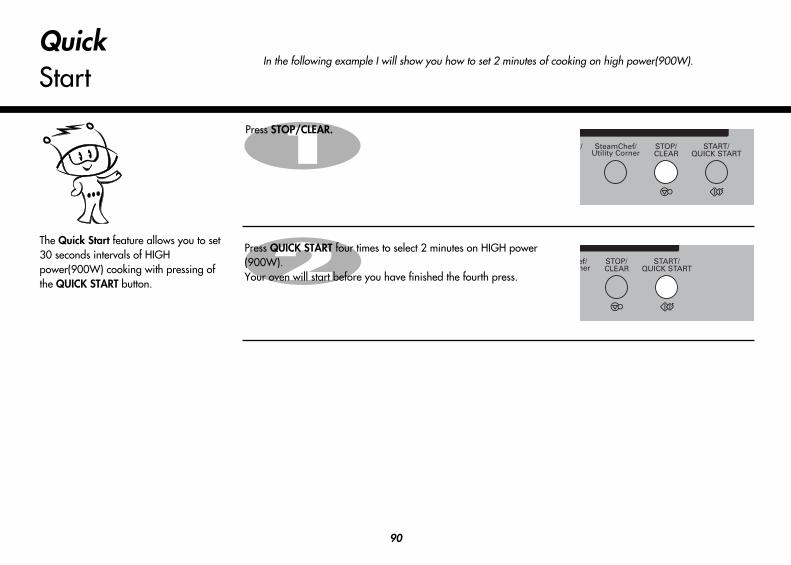
90
QuickStart
In the following example I will show you how to set 2 minutes of cooking on high power(900W).
Press STOP/CLEAR.
Press QUICK START four times to select 2 minutes on HIGH power(900W).Your oven will start before you have finished the fourth press.
The Quick Start feature allows you to set30 seconds intervals of HIGHpower(900W) cooking with pressing ofthe QUICK START button.
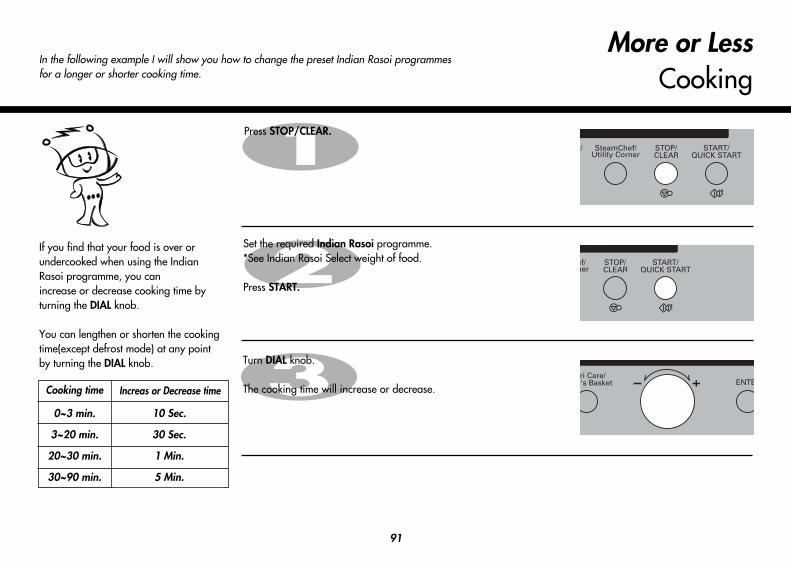
91
More or Less Cooking
In the following example I will show you how to change the preset Indian Rasoi programmesfor a longer or shorter cooking time.
If you find that your food is over orundercooked when using the IndianRasoi programme, you canincrease or decrease cooking time byturning the DIAL knob.
You can lengthen or shorten the cookingtime(except defrost mode) at any pointby turning the DIAL knob. Turn DIAL knob.
The cooking time will increase or decrease.
Press STOP/CLEAR.
Set the required Indian Rasoi programme.*See Indian Rasoi Select weight of food.
Press START.
Cooking time
0~3 min.
3~20 min.
20~30 min.
30~90 min.
10 Sec.
30 Sec.
1 Min.
5 Min.
Increas or Decrease time
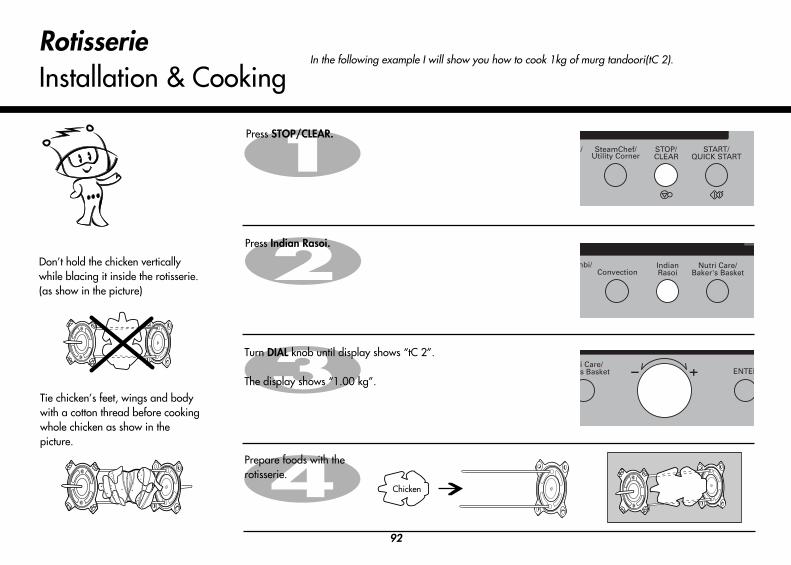
92
RotisserieInstallation & Cooking
In the following example I will show you how to cook 1kg of murg tandoori(tC 2).
Press STOP/CLEAR.
Don’t hold the chicken verticallywhile blacing it inside the rotisserie.(as show in the picture)
Press Indian Rasoi.
Turn DIAL knob until display shows “tC 2”.
The display shows “1.00 kg”.
Prepare foods with therotisserie.
Tie chicken’s feet, wings and bodywith a cotton thread before cookingwhole chicken as show in thepicture.
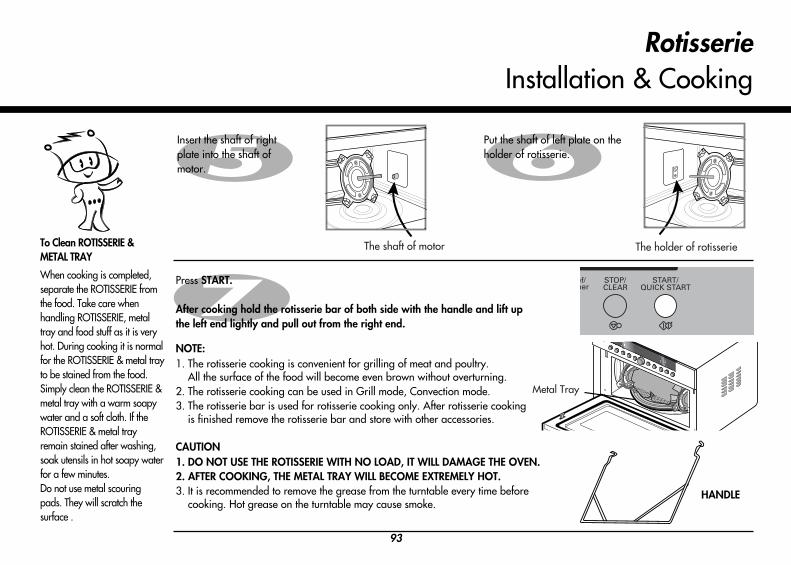
93
RotisserieInstallation & Cooking
Insert the shaft of rightplate into the shaft ofmotor.
Put the shaft of left plate on theholder of rotisserie.
Press START.
After cooking hold the rotisserie bar of both side with the handle and lift upthe left end lightly and pull out from the right end.
To Clean ROTISSERIE & METAL TRAY
When cooking is completed,separate the ROTISSERIE fromthe food. Take care whenhandling ROTISSERIE, metaltray and food stuff as it is veryhot. During cooking it is normalfor the ROTISSERIE & metal trayto be stained from the food.Simply clean the ROTISSERIE &metal tray with a warm soapywater and a soft cloth. If theROTISSERIE & metal trayremain stained after washing,soak utensils in hot soapy waterfor a few minutes. Do not use metal scouringpads. They will scratch thesurface .
HANDLE
NOTE:1. The rotisserie cooking is convenient for grilling of meat and poultry.
All the surface of the food will become even brown without overturning.2. The rotisserie cooking can be used in Grill mode, Convection mode.3. The rotisserie bar is used for rotisserie cooking only. After rotisserie cooking
is finished remove the rotisserie bar and store with other accessories.
CAUTION1. DO NOT USE THE ROTISSERIE WITH NO LOAD, IT WILL DAMAGE THE OVEN.2. AFTER COOKING, THE METAL TRAY WILL BECOME EXTREMELY HOT.3. It is recommended to remove the grease from the turntable every time before
cooking. Hot grease on the turntable may cause smoke.
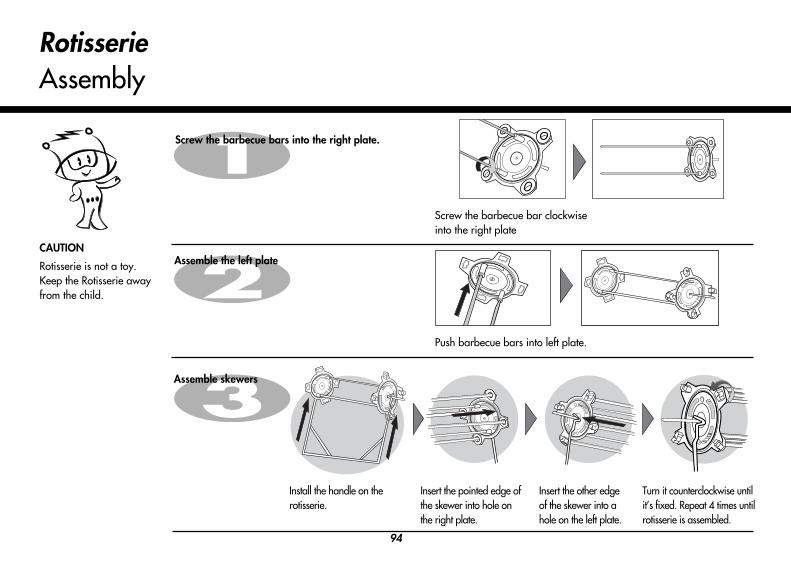
94
RotisserieAssembly
Screw the barbecue bars into the right plate.
Assemble the left plate
Push barbecue bars into left plate.
Screw the barbecue bar clockwiseinto the right plate
Assemble skewers
Insert the pointed edge ofthe skewer into hole onthe right plate.
Install the handle on therotisserie.
Insert the other edge of the skewer into a hole on the left plate.
Turn it counterclockwise untilit’s fixed. Repeat 4 times untilrotisserie is assembled.
CAUTION
Rotisserie is not a toy.Keep the Rotisserie awayfrom the child.

95
12 Before cooking, pierce the skin of potatoes, apples or any such fruit orvegetable.
13 Do not cook eggs in their shell. Pressure will build up inside the egg whichwill burst.
14 Do not attempt deep fat frying in your oven.15 Remove the plastic wrapping from food before cooking or defrosting.
Note though that in some cases food should be covered with plastic film,for heating or cooking.
16 If the oven door or door seals are damaged, the oven must not beoperated until it has been repaired by a qualified service technician.
17 If smoke is observed, switch off or disconnect the oven from the powersupply and keep the oven door closed in order to stifle any flames.
18 When food is heated or cooked in disposable containers of plastic, paperor other combustible materials, check the oven frequently due to thepossibility of the food container is deteriorating.
19 Only allow children to use the oven without supervision when adequateinstructions have been given so that the child is able to use the oven in asafe way and understands the hazards of improper use.
20 Liquids or other foods must not be heated in sealed containers since theyare liable to explode.
21 Do not operate the oven, if the door seals and adjacent parts of themicrowave oven are faulty, until the oven has been repaired by a qualifiedservice technician.
22 Check the utensils are suitable for use in microwave ovens before use.23 Do not touch the oven door, outer cabinet, rear cabinet, oven cavity,
accessories and dishes during grill mode, convection mode and auto cookoperations, unless wearing thick oven gloves, as they will become hot.Before clearing make sure they are not hot.
1 Do not attempt to tamper with, or make any adjustments or repairs to thedoor, control panel, safety interlock switches or any other part of the oven.It is hazardous for anyone to carry out any service or repair operationwhich involves the removal of any cover which gives protection againstexposure to microwave energy. Repairs should only be undertaken by aqualified service technician.
2 Do not operate the oven when empty. It is best to leave a glass of water inthe oven when not in use. The water will safely absorb all microwaveenergy, if the oven is accidentally started.
3 Do not use the oven for the purpose of dehumidification. It can be the causeof serious damage of safety. (ex. Operating the microwave oven with thewet newspapers, clothes, toys, pet or portable electric devices, etc.)
4 Do not cook food wrapped in paper towels, unless your cook book containsinstructions, for the food you are cooking.
5 Do not use newspaper in place of paper towels for cooking.6 Do not use wooden containers. They may heat-up and char. Do not use
ceramic containers which have metallic (e.g. gold or silver) inlays. Alwaysremove metal twist ties. Metal objects in the oven may arc, which can causeserious damage.
7 Do not operate the oven with a kitchen towel, a napkin or any otherobstruction between the door and the front edges of the oven, which maycause microwave energy leakage.
8 Do not use recycled paper products since they may contain impurities whichmay cause sparks and/or fires when used in cooking.
9 Do not rinse the turntable by placing it in water just after cooking. This maycause breakage or damage.
10 Small amounts of food require shorter cooking or heating time. If normaltimes are allowed they may overheat and burn.
11 Be certain to place the oven so the front of the door is 8 cm or morebehind the edge of the surface on which it is placed, to avoid accidentaltipping of the appliance.
Important safety instructionsRead carefully and keep for future reference
WARNINGPlease ensure cooking times are correctlyset as over cooking may result in FIRE andsubsequent DAMAGE to the OVEN.

96
Important safety instructionsRead carefully and keep for future reference
37 This connection may be achieved by having the plug accessible or byincorporation a switch in the fixed wiring in accordance with the wiringrules.
38 Do not use harsh abrasive cleaners or sharp metal scrapers to clean theoven door glass since they can scratch the surface, which may result inshattering of the glass.
24 Only use utensils that are suitable for use in microwave ovens.
25 When heating food in plastic or paper containers, keep an eye on theoven due to the possibility of ignition.
26 If smoke is observed, switch off or unplug the appliance and keep thedoor closed in order to stifle any flames.
27 Microwave heating of beverages can result in delayed eruptive boiling,therefore care must be taken when handing the container.
28 The contents of feeding bottles and baby food jars shall be stirred orshaken and the temperature checked before consumption, in order toavoid burns.
29 Eggs in their shell and whole hard-boiled eggs should not be heated inmicrowave ovens since they may explode, even after microwave heatinghas ended.
30 Details for cleaning door seals, cavities and adjacent parts.
31 The oven should be cleaned regularly and any food deposits removed.
32 Failure to maintain the oven in a clean condition could lead todeterioration of the surface that could adversely affect the life of theappliance and possibly result in a hazardous situation.
33 Only use the temperature probe recommended for this oven (forappliances having a facility to use a temperature-sensing probe).
34 If heating elements are provided, during use the appliance becomes hot.Care should be taken to avoid touching heating elements inside the oven.
35 The appliance is not intended for use by young children or infirm personswithout supervision.
36 The microwave oven must be operated with the decorative door open.
WARNING: If the door or door seals are damaged, the oven must not beoperated until it has been repaired by a competent person.
WARNING: It is hazardous for anyone other than a competent person tocarry out any service or repair operation that involves theremoval of a cover which gives protection against exposureto microwave energy.
WARNING: Liquids and other foods must not be heated in sealed containers since they are liable to explode.
WARNING: Only allow children to use the oven without supervisionwhen adequate instructions have been given so that thechild is able to use the oven in a safe way and understandsthe hazards of improper use.
WARNING: Accessible parts may become hot during use. Youngchildren should be kept away.
WARNING: This appliance is not intended for use by persons (includingchildren) with reduced physical, sensory or mentalcapabilities, or lack of experience and knowledge, unlessthey have been given supervision or instruction concerninguse of the appliance by a person responsible for their safety.
97
Microwave-safeUtensils
Never use metal or metal trimmed utensils in using microwave functionMicrowaves cannot penetrate metal. They will bounce off any metal object inthe oven and cause arcing, an alarming phenomenon that resembleslightning. Most heat resistant non metallic cooking utensils are safe for use inyour oven. However, some may contain materials that render them unsuitableas microwave cookware. If you have any doubts about a particular utensil,there’s a simple way to find out if it can be used in using microwave function. Place the utensil in question next to a glass bowl filled with water in usingmicrowave function. Microwave at power HIGH for 1 minute. If the waterheats up but the utensi l remains cool to the touch, the utensi l ismicrowave~safe. However, if the water does not change temperature but theutensil becomes warm, microwaves are being absorbed by the utensil and it isnot safe for use in using microwave function. You probably have many itemson hand in your kitchen right now that can be used as cooking equipment inusing microwave function. Just read through the following checklist.
Dinner platesMany kinds of dinner-ware are microwave-safe. If in doubt consult themanufacturer’s literature or perform the microwave test.
GlasswareGlassware that is heat-resistant is microwave-safe. This would include allbrands of oven tempered glass cookware. However, do not use delicateglassware, such as tumblers or wine glasses, as these might shatter as the foodwarms.
Plastic storage containersThese can be used to hold foods that are to be quickly reheated. However,they should not be used to hold foods that will need considerable time in theoven as hot foods will eventually warp or melt plastic containers.
PaperPaper plates and containers are convenient and safe to use in usingmicrowave function, provided that the cooking time is short and foods to becooked are low in fat and moisture. Paper towels are also very useful forwrapping foods and for lining baking trays in which greasy foods such asbacon are cooked. In general, avoid coloured paper products as thecolour may run. Some recycled paper products may contain impuritieswhich could cause arcing or fires when used in using microwave function.
Plastic cooking bagsProvided they are made specially for cooking, cooking bags aremicrowave safe. However, be sure to make a slit in the bag so that steamcan escape. Never use ordinary plastic bags for cooking in usingmicrowave function, as they will melt and rupture.
Plastic microwave cookwareA variety of shapes and sizes of microwave cookware are available. Forthe most part, you can probably use items you already have on handrather than investing in new kitchen equipment.
Pottery, stoneware and ceramicContainers made of these materials are usually fine for use in usingmicrowave function, but they should be tested to be sure.
CAUTIONSome items with high lead or iron content are not suitable for cookingutensils.Utensils should be checked to ensure that they are suitable for use inusing microwave function.
98
Food characteristics &Microwave cooking
Keeping an eye on thingsThe recipes in the book have been formulated with great care, but your success inpreparing them depends on how much attention you pay to the food as it cooks.Always watch your food while it cooks. Your microwave function is equipped with alight that turns on automatically when the oven is in operation so that you can seeinside and check the progress of your food. Directions given in recipes to elevate,stir, and the like should be thought of as the minimum steps recommended. If thefood seems to be cooking unevenly, simply make the necessary adjustments youthink appropriate to correct the problem.
Factors affecting microwave cooking timesMany factors affect cooking times. The temperature of ingredients used in a recipemakes a big difference in cooking times. For example, a cake made with ice-coldbutter, milk, and eggs will take considerably longer to bake than one made withingredients that are at room temperature. All of the recipes in this book give arange of cooking times. In general, you will find that the food remains under-cooked at the lower end of the time range, and you may sometimes want to cookyour food beyond the maximum time given, according to personal preference. Thegoverning philosophy of this book is that it is best for a recipe to be conservative ingiving cooking times. While overcooked food is ruined for good. Some of therecipes, particularly those for bread, cake, and custards, recommend that food beremoved from the oven when they are slightly undercooked. This is not a mistake.When allowed to stand, usually covered, these foods will continue to cook outsideof the oven as the heat trapped within the outer portions of the food graduallytravels inward. If the food is left in the oven until it is cooked all the way through,the outer portions will become overcooked or even burnt. You will becomeincreasingly skilful in estimating both cooking and standing times for various foods.
Density of foodLight, porous food such as cakes and breads cook more quickly than heavy, densefoods such as roasts and casseroles. You must take care when microwaving porousfood that the outer edges do not become dry and brittle.
Height of foodThe upper portion of tall food, particularly roasts, will cook more quickly than thelower portion. Therefore, it is wise to turn tall food during cooking, sometimesseveral times.
Moisture content of foodSince the heat generated from microwaves tends to evaporate moisture, relatively dry foodsuch as roasts and some vegetables should either be sprinkled with water prior to cookingor covered to retain moisture.
Bone and fat content of foodBones conduct heat and fat cooks more quickly than meat. Care must be taken whencooking bony or fatty cuts of meat that they do not cook unevenly and do not becomeovercooked.
Quantity of foodThe number of microwaves in your oven remains constant regardless of how much food isbeing cooked. Therefore, the more food you place in the oven, the longer the cooking time.Remember to decrease cooking times by at least one third when halving a recipe.
Shape of foodMicrowaves penetrate only about 2.cm into food, the interior portion of thick foods arecooked as the heat generated on the outside travels inward. Only the outer edge of food incooked by microwave energy; the rest is cooked by conduction. The worst possible shapefor a food that is to be microwaved is a thick square. The corners will burn long before thecentre is even warm . Round thin foods and ring shaped foods cook successfully in themicrowave.
CoveringA cover traps heat and steam which causes food to cook more quickly. Use a lid ormicrowave cling film with a corner folded back to prevent splitting.
BrowningMeats and poultry that are cooked fifteen minutes or longer will brown lightly in their ownfat. Food that are cooked for a shorter period of time may be brushed with a browningsauce such as worcestershire sauce, soy sauce or barbecue sauce to achieve an appetizingcolour. Since relatively small amounts of browning sauces are added to food the originalflavour of the recipe is not altered.
Covering with greaseproof paperGreaseproofing effectively prevents spattering and helps food retain some heat. But becauseit makes a looser cover than a lid or clingfilm, it allows the food to dry out slightly.
Arranging and spacingIndividual foods such as baked potatoes, small cakes and hors d’oeuvres will heat moreevenly if placed in the oven an equal distance apart, preferably in a circular pattern. Neverstack foods on top of one another.

99
Food characteristics &Microwave cooking
StirringStirring is one of the most important of all microwaving techniques. In conventionalcooking, food is stirred for the purpose of blending. Microwaved food, however, is stirredin order to spread and redistribute heat. Always stir from the outside towards the centreas the outside of the food heats first.
Turning overLarge, tall foods such as roasts and whole chickens should be turned so that the top andbottom will cook evenly. It is also a good idea to turn cut up chicken and chops.
Placing thicker portions facing outwardsSince microwaves are attracted to the outside portion of food, it makes sense to placethicker portions of meat, poultry and fish to the outer edge of the baking dish. This way,thicker portions will receive the most microwave energy and the food will cook evenly.
ShieldingStrips of aluminium foil (which block microwaves) can be placed over the corners oredges of square and rectangular foods to prevent those portions from overcooking. Neveruse too much foil and make sure the foil is secured to the dish or it may cause ‘arcing’ inthe oven.
ElevatingThick or dense foods can be elevated so that microwaves can be absorbed by theunderside and centre of the foods.
PiercingFoods enclosed in a shell, skin or membrane are likely to burst in the oven unless they arepierced prior to cooking. Such foods include yolks and whites of eggs, clams and oystersand whole vegetables and fruits.
Testing if cookedFood cooks so quickly in a oven, it is necessary to test it frequently. Some foods are left inthe microwave until completely cooked, but most foods, including meats and poultry, areremoved from the oven while still slightly undercooked and allowed to finish cookingduring standing time. The internal temperature of foods will rise between 5˚F (3˚C) and15˚F (8˚C) during standing time.
Standing timeFoods are often allowed to stand for 3 to 10 minutes after being removed from the oven.Usually the foods are covered during standing time to retain heat unless they aresupposed to be dry in texture (some cakes and biscuits, for example). Standing allowsfoods to finish cooking and also helps flavour blend and develop.
To Clean Your Oven1 Keep the inside of the oven clean
Food spatters or spilled liquids stick to oven walls and between seal and doorsurface. It is best to wipe up spillovers with a damp cloth right away. Crumbsand spillovers will absorb microwave energy and lengthen cooking times. Usea damp cloth to wipe out crumbs that fall between the door and the frame. Itis important to keep this area clean to assure a tight seal. Remove greasyspatters with a soapy cloth then rinse and dry. Do not use harsh detergent orabrasive cleaners. The metal tray can be washed by hand or in thedishwasher.
2 Keep the outside of the oven cleanClean the outside of your oven with soap and water then with clean water anddry with a soft cloth or paper towel. To prevent damage to the operating partsinside the oven, the water should not be allowed to seep into the ventilationopenings. To clean control panel, open the door to prevent oven fromaccidentally starting, and wipe a damp cloth followed immediately by a drycloth. Press Stop/Clear after cleaning.
3 If steam accumulates inside or around the outside of the oven door, wipe thepanels with a soft cloth. This may occur when the oven is operated under highhumidity conditions and in no way indicates a malfunction of the unit.
4 The door and door seals should be kept clean. Use only warm, soapy water,rinse then dry thoroughly.DO NOT USE ABRASIVE MATERIALS, SUCH AS CLEANING POWDERS ORSTEEL AND PLASTIC PADS.Metal parts will be easier to maintain if wiped frequently with a damp cloth.
5 Do not use any steam cleaner.
100
Questions &Answers
Q What’s wrong when the oven light will not glow?A There may be several reasons why the oven light will not glow.
Light bulb has blownRelay is failed
Q Does microwave energy pass through the viewing screen in the door?A No. The holes, or ports, are made to allow light to pass; they do not let
microwave energy through.
Q Why does the beep tone sound when a button on the Control Panel istouched?
A The beep tone sounds to assure that the setting is being properly entered.
Q Will the microwave function be damaged if it operates empty?A Yes Never run it empty or without the metal tray.
Q Why do eggs sometimes pop?A When baking, frying, or poaching eggs, the yolk may pop due to steam
build up inside the yolk membrane. To prevent this, simply pierce the yolkbefore cooking. Never microwave eggs in the shell.
Q Why is standing time recommended after microwave cooking is over?A After microwave cooking is finished, food keeps on cooking during
standing time. This standing time finishes cooking evenly throughout thefood. The amount of standing time depends on the density of the food.
Q Is it possible to cook popcorn in this oven?A Yes, if using one of the two methods described
below1 Popcorn-popping utensils designed specifically for microwave cooking.2 Prepackaged commercial microwave popcorn that contains specific
times and power outputs needed for an acceptable final product.
FOLLOW EXACT DIRECTIONS GIVEN BY EACH MANUFACTURER FORTHEIR POPCORN PRODUCT. DO NOT LEAVE THE OVEN UNATTENDEDWHILE THE CORN IS BEING POPPED. IF CORN FAILS TO POP AFTERTHE SUGGESTED TIMES, DISCONTINUE COOKING. OVERCOOKINGCOULD RESULT IN THE CORN CATCHING FIRE.
CAUTIONNEVER USE A BROWN PAPER BAG FOR POPPING CORN. NEVERATTEMPT TO POP LEFTOVER KERNELS.
Q Why doesn’t my oven always cook as fast as the cooking guide says?A Check your cooking guide again to make sure you’ve followed directions
correctly, and to see what might cause variations in cooking time.Cooking guide times and heat settings are suggestions, chosen to helpprevent overcooking, the most common problem in getting used to a thisoven. Variations in the size, shape, weight and dimensions of the foodrequire longer cooking time. Use your own judgement along with thecooking guide suggestions to test food condition, lust as you would dowith a conventional cooker.

101
Plug wiring information/Technical Specifications
Technical Specification
The wires in this mains lead are colored in accordance with thefollowing codesBLACK ~ NeutralRED ~ LiveGREEN & YELLOW ~ Earth
As the colours of the wires in the mains lead of this appliance maynot correspond with the coloured markings identifying the terminalsin your plug proceed as follows:
The wire which is colored BLACK must be connected to the terminalwhich is marked with the letter N or Colored BLACK.
The wire which is colored RED must be connected to the terminalwhich is marked with the letter L or colored RED.
The wire which is colored GREEN & YELLOW or GREEN must beconnected to the terminal which is marked with the letter E or .
If the supply cord is damaged, it must be replaced by themanufacturer or its service agent or a similarly qualified person inorder to avoid a hazard;
WARNINGThis appliance must be earthed
LG Electronics India Pvt LtdSurajpur-Kasna Road, Greater Noida, INDIA
Name & address of importer
MP9889FCR
Power Input
Output
Microwave Frequency
Outside Dimension
Microwave
Grill
Combination
Convection
Power
Consumption
230 V~ 50 Hz
900 W (IEC60705 rating standard)
2450 MHz
527 mm(W) X 392 mm(H) X 480 mm(D)
1650 watt
max. 1600 watt
max. 2350 watt
2300 watt
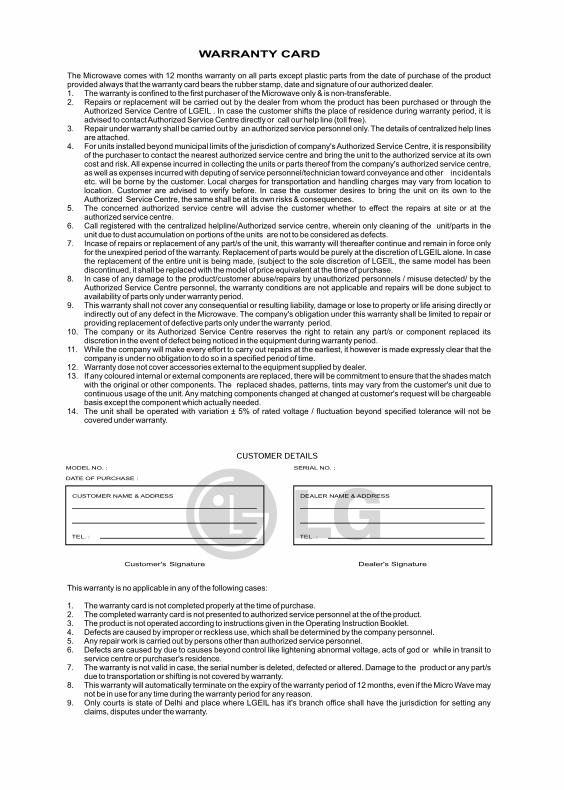


Memo

Memo

Memo

Memo

Printed in Korea


