Embed Size (px)
Citation preview
For the most recent version of this manual check our website. https://heatsail.com/usa/technical-specifications-documentation/
Do not throw discard this manual, as it contains your device’s serial number.
D O M E ® P E N D A N T M A N U A L

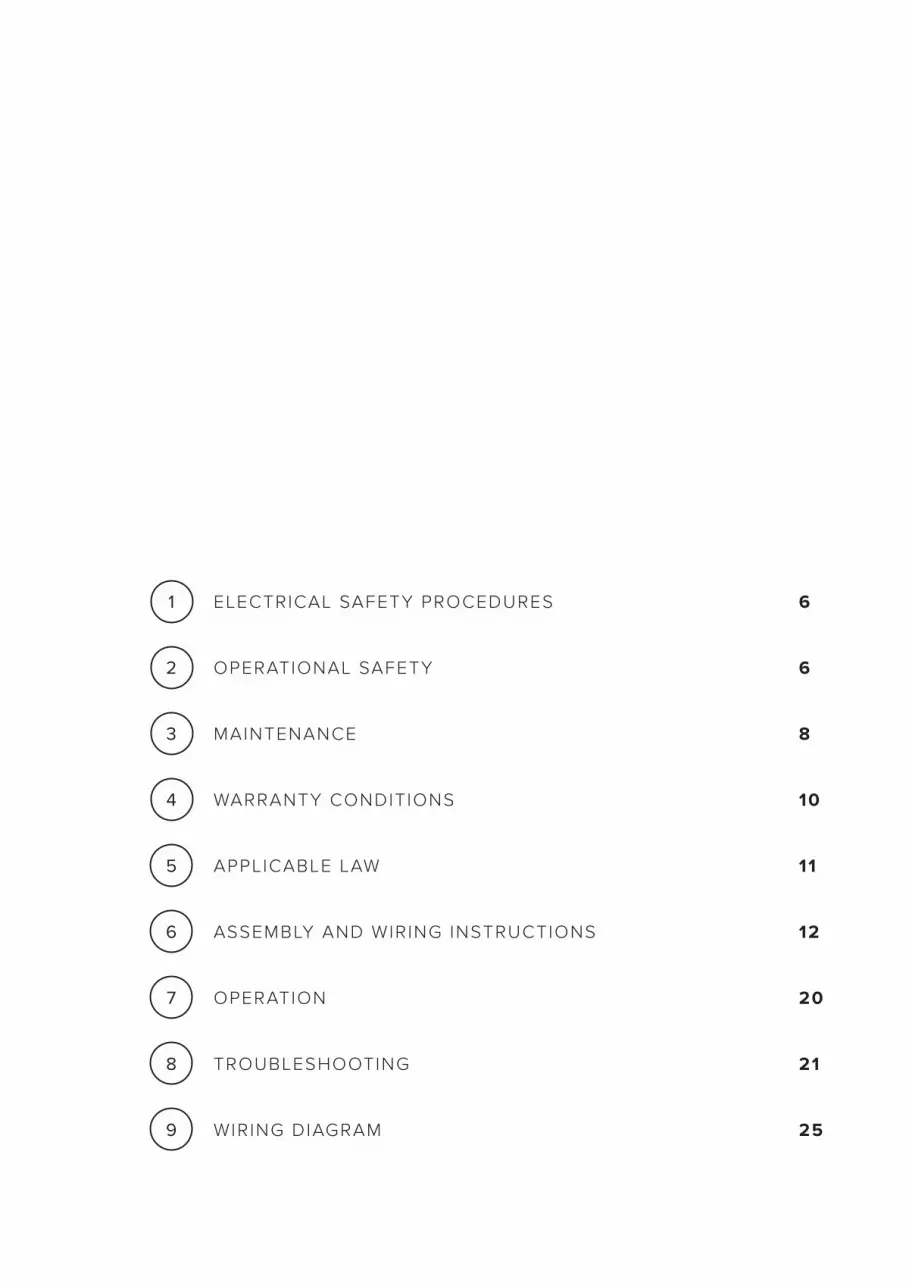
ELECTRICAL SAFETY PROCEDURES
OPERATIONAL SAFETY
MAINTENANCE
WARRANTY CONDITIONS
APPLICABLE LAW
ASSEMBLY AND WIRING INSTRUCTIONS
OPERATION
TROUBLESHOOTING
WIRING DIAGRAM
6
6
8
10
11
12
20
21
25
1
2
3
4
5
6
7
8
9

4 Heatsail DOME® PENDANT
Thank you for your purchase!
This user manual is necessary for the operation of the DOME®
Pendant and must always be kept by the user or by the
authorized responsible person.
Please read through this user manual carefully. It contains
essential information regarding the safety, operation, cleaning
and maintenance of the DOME Pendant. Heatsail will not
be held responsible for injury and/or damage to people,
animals and subjects resulting from noncompliance with the
instructions in this user manual.
Heatsail reserves the right to make changes to the product,
technical features and user manual at any time and without
the need for prior notice.
If you decide to sell the DOME Pendant, transfer it to another
user or leave it behind when moving, this manual must be
made available to the new user.
We would like to wish you plenty of warm and pleasant
evenings with our DOME Pendant!
The HEATSAIL team
5User manual
User manual
Operating, maintenance and installation guide.
Attention
Please read through these instructions carefully before using your DOME
Pendant.
Do not discard this manual, as it contains your device’s serial number.
6 Heatsail DOME® PENDANT
1. Electrical safety procedures & requirements
The use of the DOME Pendant requires an electrical installation with re-
liable safety grounding. The installation’s electrical safety can only be
guaranteed if the device has been correctly connected to a grounding
(earthing) system built in accordance with the safety instructions. A prelim-
inary inspection is absolutely essential. In the event of any uncertainty, a
careful inspection must be made by a qualifed and authorized technician.
Heatsail will not be
held responsible for injury and/or damage resulting from an ungrounded
installation.
The installation of the DOME Pedant’s electrical components requires
a main connection of 240V-60Hz (16 amp fuse and appropriate RCD):
the connection must be properly implemented in accordance with the
applicable IEC-CEI standards.
Please note: This product must by installed by a licensed electrician
and the power supply connection should be in accordance with the
requirements of NFPA 70 and OSHA Regulations 29 CFR 1910.304(b)(2)
Statutory and other local regulations may apply.
Before carrying out any maintenance or other work, the power supply
must be disconnected by a licensed electrician. Use Lock-out/Tagout pro-
cedures to ensure that the power can’t be switched on again accidentally.
Adapters, power strips and extension cords may not be used for the
DOME Pendant’s electrical supply. A switch must be installed between the
DOME Pendant and the fuse box at all times. Noncompliance with these
instructions may compromise the safety of the device. Heatsail will not be
held liable for any damage resulting from these issues
7User manual
2. Operational Safety
A minimum clear height of 71 inches (1.80 meters) must be observed for the
DOME Pendant, measured between the ground and bottom of the lowest
heating element at the time of installation
Children near the product must be under adult supervision when it’s in
use. This product is not intended to be operated by children, or to be
played with. The DOME Pendant must be kept out of reach of anyone
incapable of assessing the risks which can arise from the (improper) use
of electrical equipment.
Do not use the DOME Pendant in small rooms when occupied by persons
not capable of leaving the room on their own, unless constant supervision
is provided
CAUTION: The DOME Pendant can create extremely high tempera-
tures and can cause burns. The DOME Pendant should never be
touched once it has been switched on.
Particular attention should be paid when children and vulnerable per-
sons are present.
The DOME Pendant will remain hot for a considerable period of time after
it has been switched off. Do not touch the DOME Pendant for a period of
40 minutes after it has been switched off.
Caution should be exercised at all times. The grill does not offer protection
against the heat.
The DOME Pendant must never be used when the glass is damaged.
The DOME Pendant may not be used with a timer or any device that can
automatically switch on the heating, as there is a risk of fre if the DOME
Pendant has been incorrectly positioned or if items have been placed
within the minimum safe operating distance.
Never use the DOME Pendant in the immediate vicinity of a bath, jacuzzi,
shower or swimming pool.

8 Heatsail DOME® PENDANT
To reduce the risk of fre, keep textiles, curtains and any other flammable
material a minimum distance of 40 inches (1 meter) from the DOME Pendant.
Never cover your DOME Pendant without disconnecting power to the unit.
The DOME Pendant must never be touched with bare, wet or damp body
parts.
The DOME Pendant is constructed of six high radiance ceramic heating
elements mounted on a reflective plate. The full operating temperature
will be reached within 30 minutes.
Please note: there is no noticeable glow in theinfrared area.
Never use the DOME Pendant to light anything. The ceramic elements are
fragile and must be handled with care. The same also applies to the glass
casing.
Always ensure that the DOME Pendant is securily fixed and installed.
Always keep the DOME Pendant free of snow. The DOME Pendant is
not allowed for use in greenhouses or construction sites.
Heatsail will not be held responsible for damage resulting from
noncompliance with the instructions regarding use and maintenance.
3. Maintenance
3.1 Cleaning
Your DOME must be cleaned on a monthly basis.
The electrical supply must be disconnected via the installation’s breaker
switch before cleaning activities can commence. Cleaning may only be
done with a soft, dry cloth. Do not use any abrasive cloths. Do not use
detergents. Using a high pressure and/or steam cleaner is prohibited.
Cleaning is only permitted once the DOME Pendant has completely
cooled down.
Noncompliance with these rules may compromise the safety of the device.
Heatsail will not be held responsible for damage resulting from noncompli-
ance with the cleaning instructions.

9User manual
3.2. Replacing the lamp
Your DOME Pendant is supplied with an R7S 240V/120 watt (78mm)
halogen bulb as standard. The maximum permitted output power of the
bulb is 120 watts.
The electrical supply must be disconnected via the installation’s breaker
switch before the bulb can be replaced.
You can replace the bulb by carefully sliding the glass upwards. Use a
tool (like a screwdriver) to hold up the glass. The bulb is held in place by
a spring. Remove the bulb by frst pushing it to the left or right and thereby
releasing it from its socket. Then replace the bulb and reverse previous
steps.
Please note: Be careful never to touch the halogen bulb with bare fngers,
as oils from skin will signifcantly reduce bulb life.
3.3. Inspection
The DOME Pendant must be subjected to an annual inspection.
The user is not authorized to carry out his own inspections and repairs.
Inspection of the DOME must exclusively be carried out by qualified and
authorized technicians, in accordance with Heatsail’s applicable standards
and regulations. “Qualified technicians” are understood to mean: qualified
electricians who are familiar with the applicable electrical laws and
regulations in accordance with the requirements of NFPA 70 and OSHA
Regulations 29 CFR 1910.304(b)(2).
The electrical supply must be disconnected via the installation’s main
breaker or by disconnecting the plug before any work can be carried out.
All repairs must be requested via an authorized distributor of Heatsail
products. A repair is only valid when original parts have been used.
Upon written approval by Heatsail, the entire control panel should be
returned in case of a defective cable.
Heatsail will not be held responsible for damage resulting from
noncompliance with the maintenance instructions.
10 Heatsail DOME® PENDANT
4. Warranty conditions
4.1. Warranty
Your DOME Pendant comes with a two year, limited warranty. The original
invoice will serve as your proof of purchase. This warranty does not affect
the buyer’s rights by virtue of the national legislation regarding the sale of
consumer goods.
This warranty is only valid if the DOME Pendant’s installation and
maintenance have been carried out in accordance with the applicable
standards, regulations, installation instructions, use, cleaning and
maintenance of the product by qualifed individuals who satisfy the legal
requirements.
The warranty term will commence from the date the goods were delivered.
Any defective goods will be reviewed by an authorized Heatsail distributor.
Once Heatsail has deemed a fault as a warranty situation, the Heatsail
unit(s) will be brought to a local distributor for repair and returned in a
timely manner.
Heatsail and its distributors will not award any compensation for any direct
or indirect damage resulting from, or relating to, using the product.
The replaced parts will be under warranty for the remainder of the warranty
period from the date the goods are delivered.
4.2. Warranty exclusions
• The conditions for activating the warranty were not met.
• The parts appear to be defective as a result of negligence or
inappropriate use or incorrect maintenance.
• The installation has not been carried out in accordance with the legal
standards and not in accordance with the instructions provided in the
user manual.
• Any damage caused as a result of weather conditions, chemical and
electrochemical reactions, improper use, natural disasters, electrical
discharge, fire, a defective electrical installation, modifcations or
mishandling to packaging, the handle and the electrical wiring.
• Any damage caused by defective electrical system, changes in or
damage to gaskets, the handle and the electrical wiring.
• All damage caused by transportation.
11User manual
We recommend you thoroughly check the goods upon receipt, allowing
you to immediately notify the seller of any possible damage and to record
any such damage on the transport document and the courier’s copy.
For example:
• Physical damage after the installation, including glass breakage, and
scratches on the DOME and accessories.
• Suspicious tampering with the DOME and/or other causes which can’t
be attributed to the product’s manufacture.
• The use of non-original replacement parts.
• Damage caused through normal wear and tear.
4.3. What to do in the event of a fault?
In case of a fault, you must contact an authorized distributor immediately
(no later than two months after the fault was first identifed) for a repair or
replacement. The warranty can only be initiated after written permission
has been granted.
Heatsail declines any form of liability for any possible damage and/or in-
jury which has been either directly or indirectly caused to people, animals
or objects as a result of noncompliance with the instructions in the user
manual and which specifcally concern the warnings in relation to the in-
stallation, use and maintenance of the device.
5. Applicable law - competent court
The general terms and conditions and the agreement are governed
by Belgian law. The courts of the judicial district of Antwerp shall have
exclusive jurisdiction to settle any dispute arising from the agreement
12 Heatsail DOME® PENDANT
6. Assembly and wiring instructions
Open the box and follow these instruction guidelines for a quick installation.
You’ll fnd this inside:
1x DOME hood 1x remote control
1x assortment of stems 4x universal screw and anchors
4x M6 set black screws 1x manual
4x M6 set gray screws 1x suspension bracket
4x M6 buttonheat screws 1x ceiling rose/medallion
with electronics module
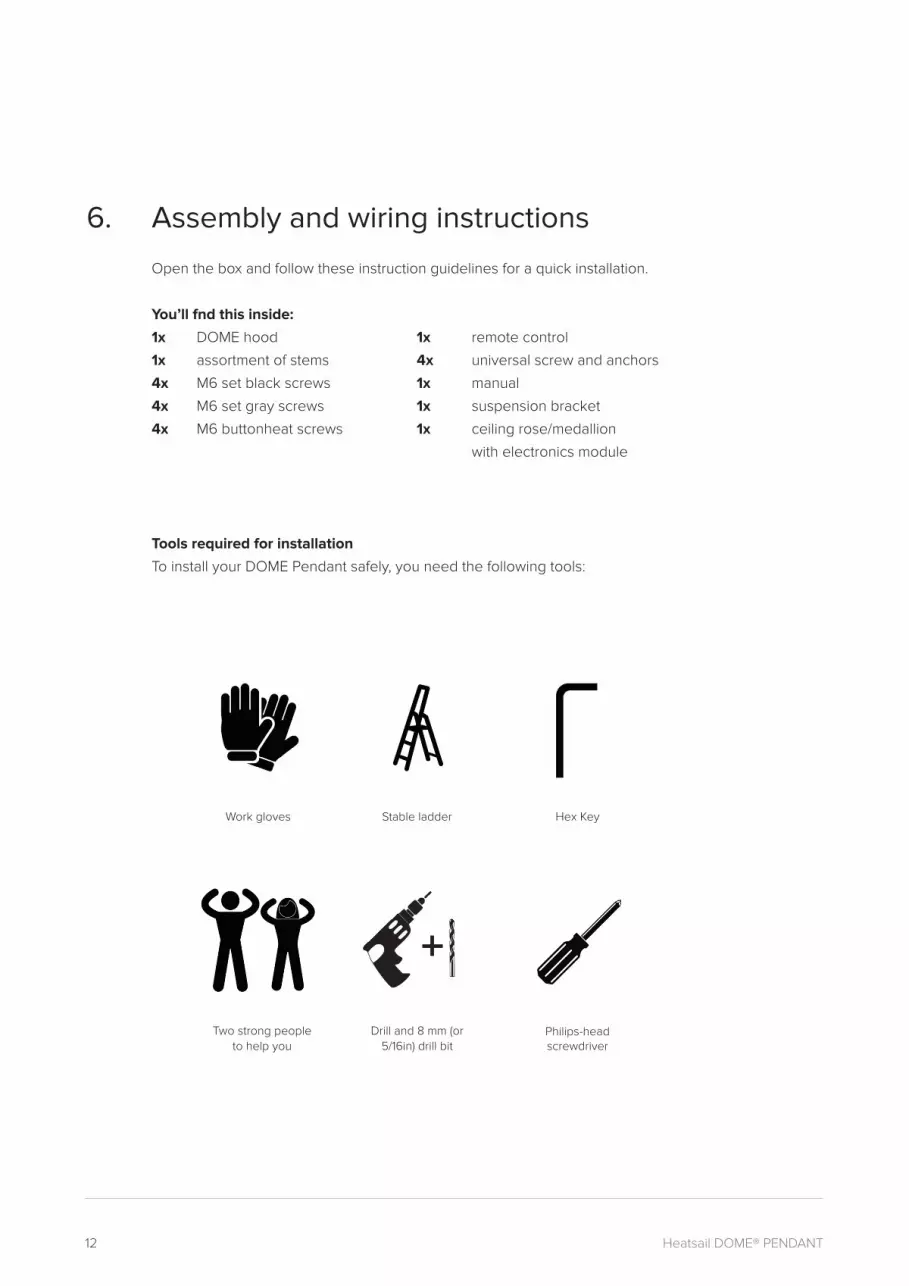
Tools required for installation
To install your DOME Pendant safely, you need the following tools:
Work gloves Stable ladder
Two strong people to help you
Drill and 8 mm (or 5/16in) drill bit
12 Heatsail DOME®
NL
6. Visuele installatie- en aansluitings- schema’s
Open de doos en volg deze aanwijzingen voor een snelle installatie.
In de doos vindt u het volgende:
1x DOME®
1x stang
2x tweedelige beugels
4x M6 x 12mm stelschroef
2x M6 x 20mm stelschroef
4x schroef 5.5 x 38 mm
4x schroef 4.2 x 13 mm
Benodigdheden:
Om uw DOME® veilig te installeren, hebt u het volgende gereedschap
nodig:
Beschermde werkhanddschoenen
Een stabiele ladder
Kruisschroevendraaier
2 sterke mensen om je te helpen
1x afstandbediening
1x plafondkap met electronicamodule
4x
universele plug
1x
gebruikshandleiding
1x
template voor boorgaten
Een boormachine en 8 mm boor
Metaalzaag
Philips-head screwdriver
Hex Key
13User manual
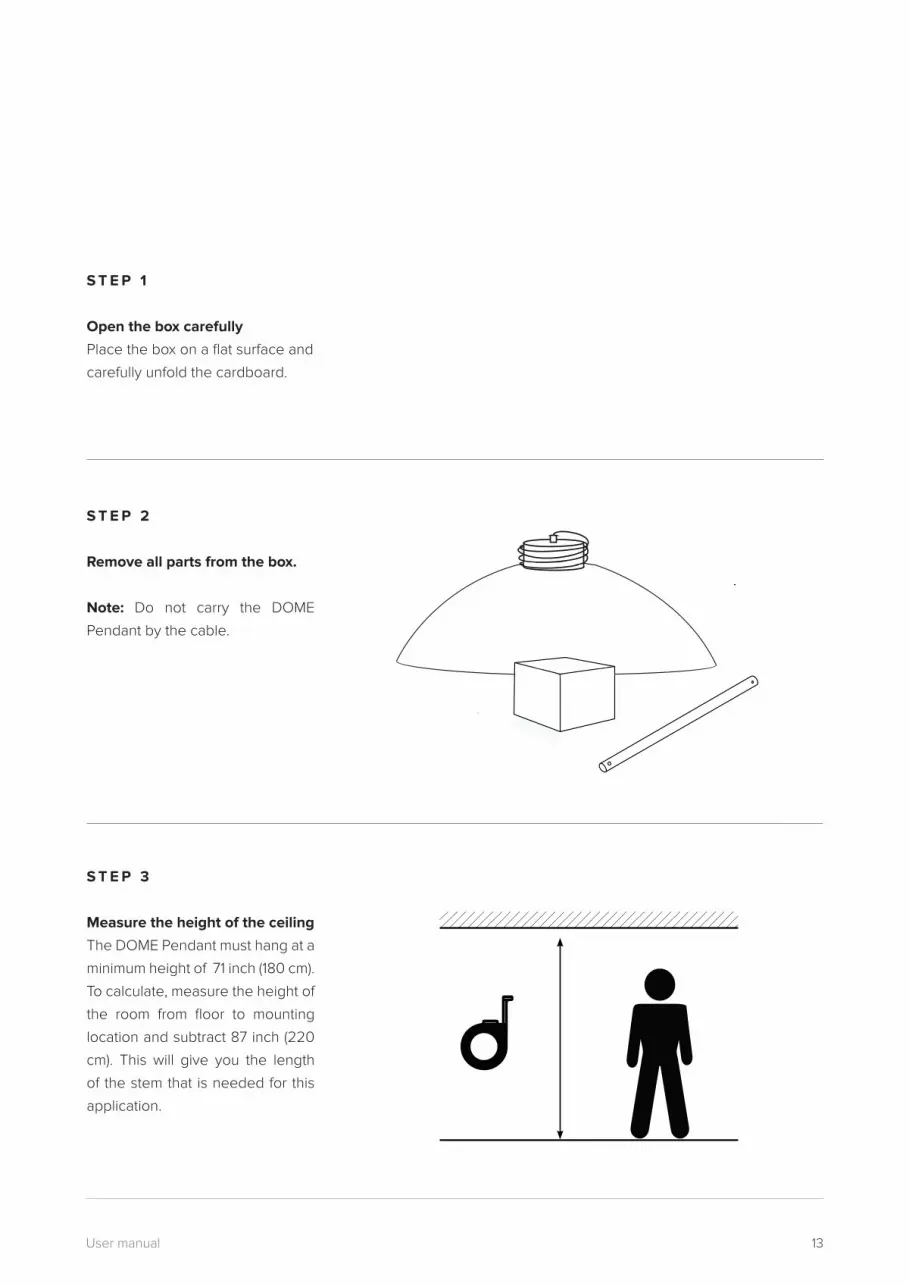
S T E P 1
Open the box carefully
Place the box on a flat surface and
carefully unfold the cardboard.
S T E P 2
Remove all parts from the box.
Note: Do not carry the DOME
Pendant by the cable.
13Handleiding
NL
Open uw doos voorzichtig
Plaats uw doos op een vlakke
ondergrond en scheur voorzichtig
het karton los.
Haal alle onderdelen uit de doos
Til de DOME® nooit op aan de
kabel.
S TA P 1
Meet de hoogte van het plafond
De DOME ® moet hangen op een
minimumhoogte van 180 cm
(tot 195 cm). Neem de gemeten
hoogte, verminder met 223 cm.
De BEEM® hangt zo op 180 cm.
S T E P 3
Measure the height of the ceiling
The DOME Pendant must hang at a
minimum height of 71 inch (180 cm).
To calculate, measure the height of
the room from floor to mounting
location and subtract 87 inch (220
cm). This will give you the length
of the stem that is needed for this
application.
14 Heatsail DOME® PENDANT
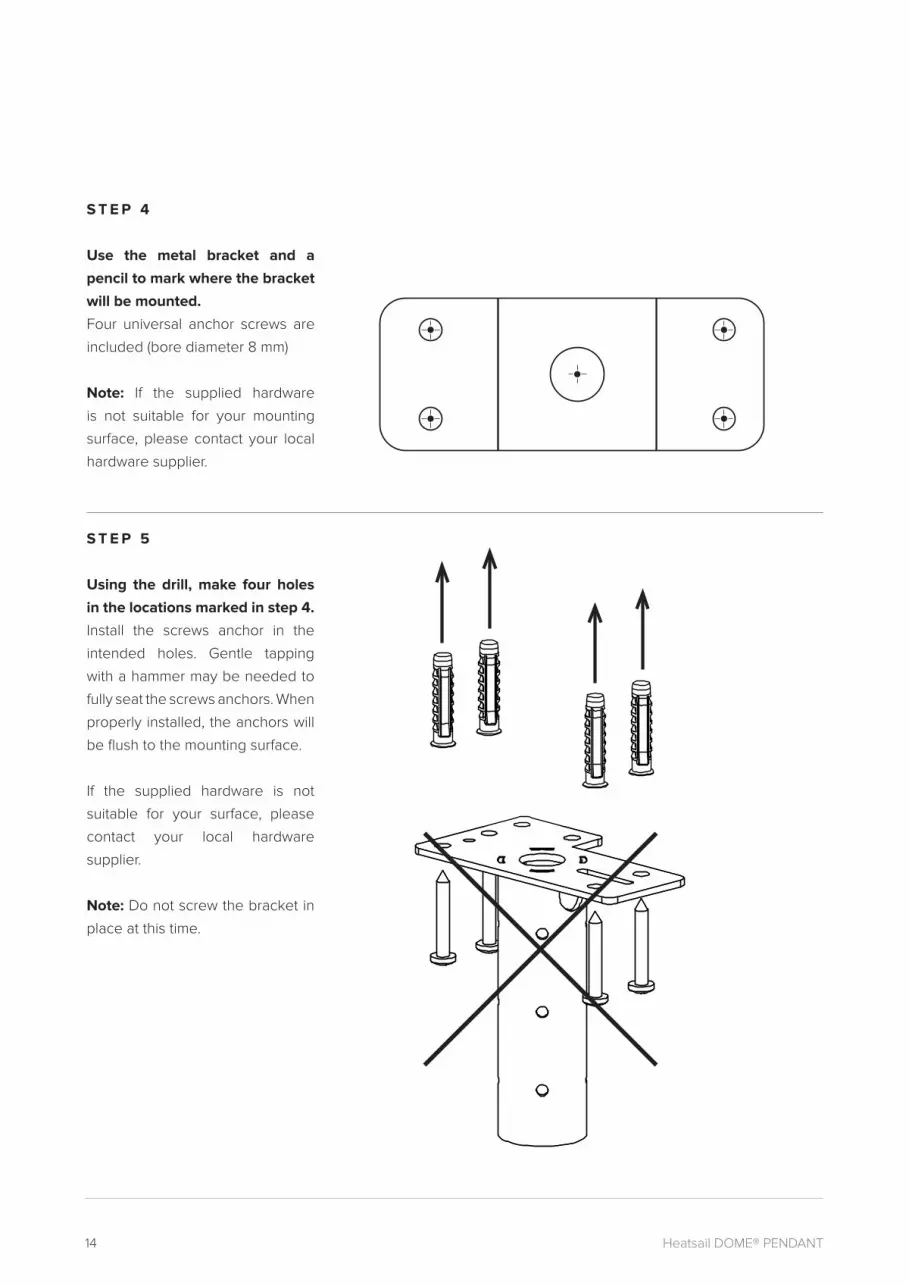
S T E P 4
Use the metal bracket and a
pencil to mark where the bracket
will be mounted.
Four universal anchor screws are
included (bore diameter 8 mm)
Note: If the supplied hardware
is not suitable for your mounting
surface, please contact your local
hardware supplier.
14 Heatsail DOME®
NL
Gebruik de template om de
gaten te boren waar de beugels
aan gemonteerd worden
4 universele pluggen zijn
bijgeleverd (boordiameter 8 mm)
Deze zijn niet geschikt voor alle
oppervlakten!
S TA P 2 993 mm
Installeer de pluggen
S T E P 5
Using the drill, make four holes
in the locations marked in step 4.
Install the screws anchor in the
intended holes. Gentle tapping
with a hammer may be needed to
fully seat the screws anchors. When
properly installed, the anchors will
be flush to the mounting surface.
If the supplied hardware is not
suitable for your surface, please
contact your local hardware
supplier.
Note: Do not screw the bracket in
place at this time.

15User manual
S T E P 7
Using the four universal screws
or other hardware appropriate
for mounting surface, install the
mounting bracket and ceiling
rose/medallion as shown.
Note: ceiling rose/medallion will
come furnished with the required
electrical wiring componentry.
S T E P 6
Using the drill, make four
corresponding holes to those
used for the ceiling mount
bracket (see step 4) in the ceiling
rose/medallion. Number 1 on the
diagram.
Note: Use drill size suitable for the
mounting hardware use.
Next, drill one large hole in the
middle of the ceiling rose for the
wiring extending from the ceiling.
Number 2 on the diagram.
1.
2.
1.
1.
1.
1.
2.
16 Heatsail DOME® PENDANT
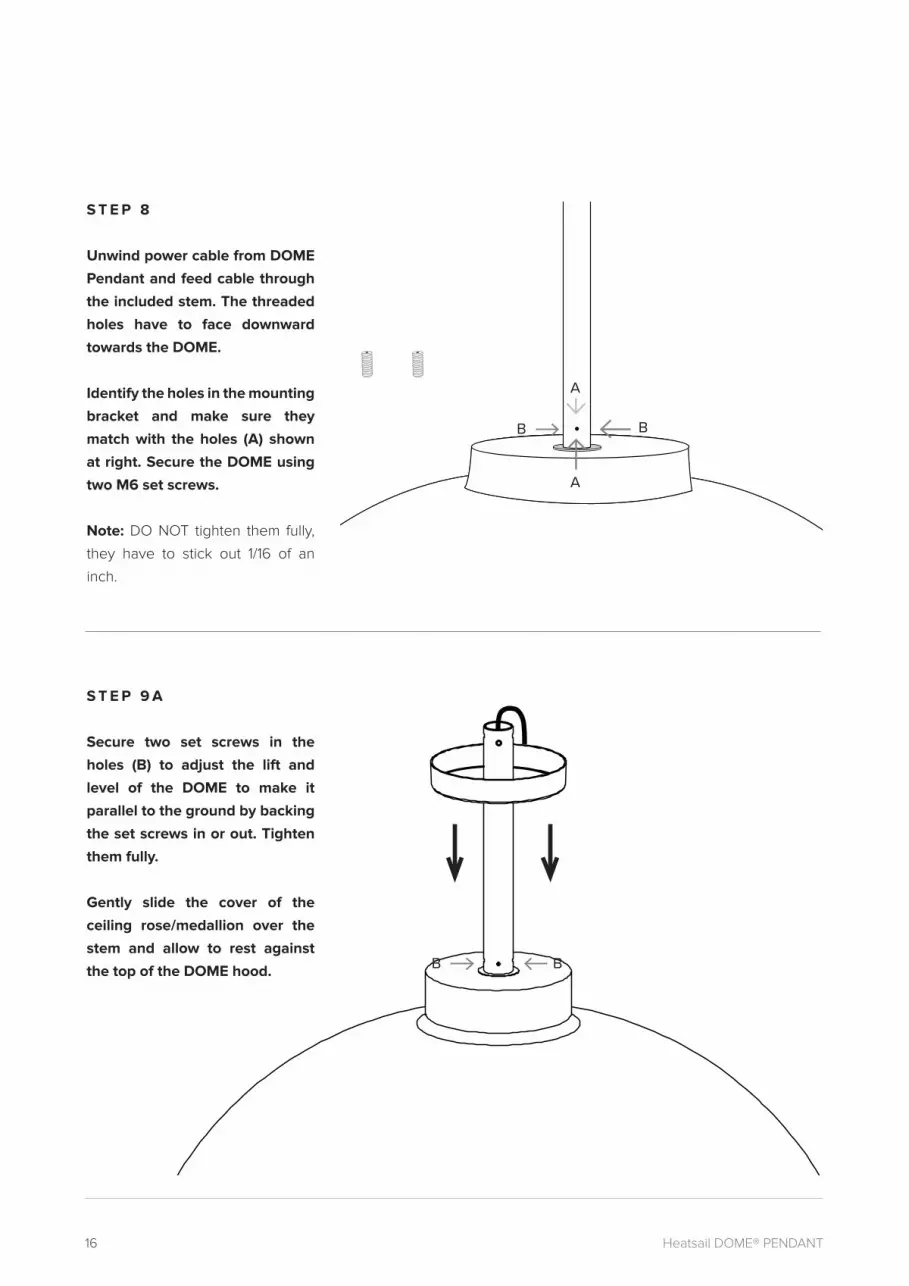
S T E P 8
Unwind power cable from DOME
Pendant and feed cable through
the included stem. The threaded
holes have to face downward
towards the DOME.
Identify the holes in the mounting
bracket and make sure they
match with the holes (A) shown
at right. Secure the DOME using
two M6 set screws.
Note: DO NOT tighten them fully,
they have to stick out 1/16 of an
inch.
S T E P 9 A
Secure two set screws in the
holes (B) to adjust the lift and
level of the DOME to make it
parallel to the ground by backing
the set screws in or out. Tighten
them fully.
Gently slide the cover of the
ceiling rose/medallion over the
stem and allow to rest against
the top of the DOME hood.
B B
A
A
B B
17User manual
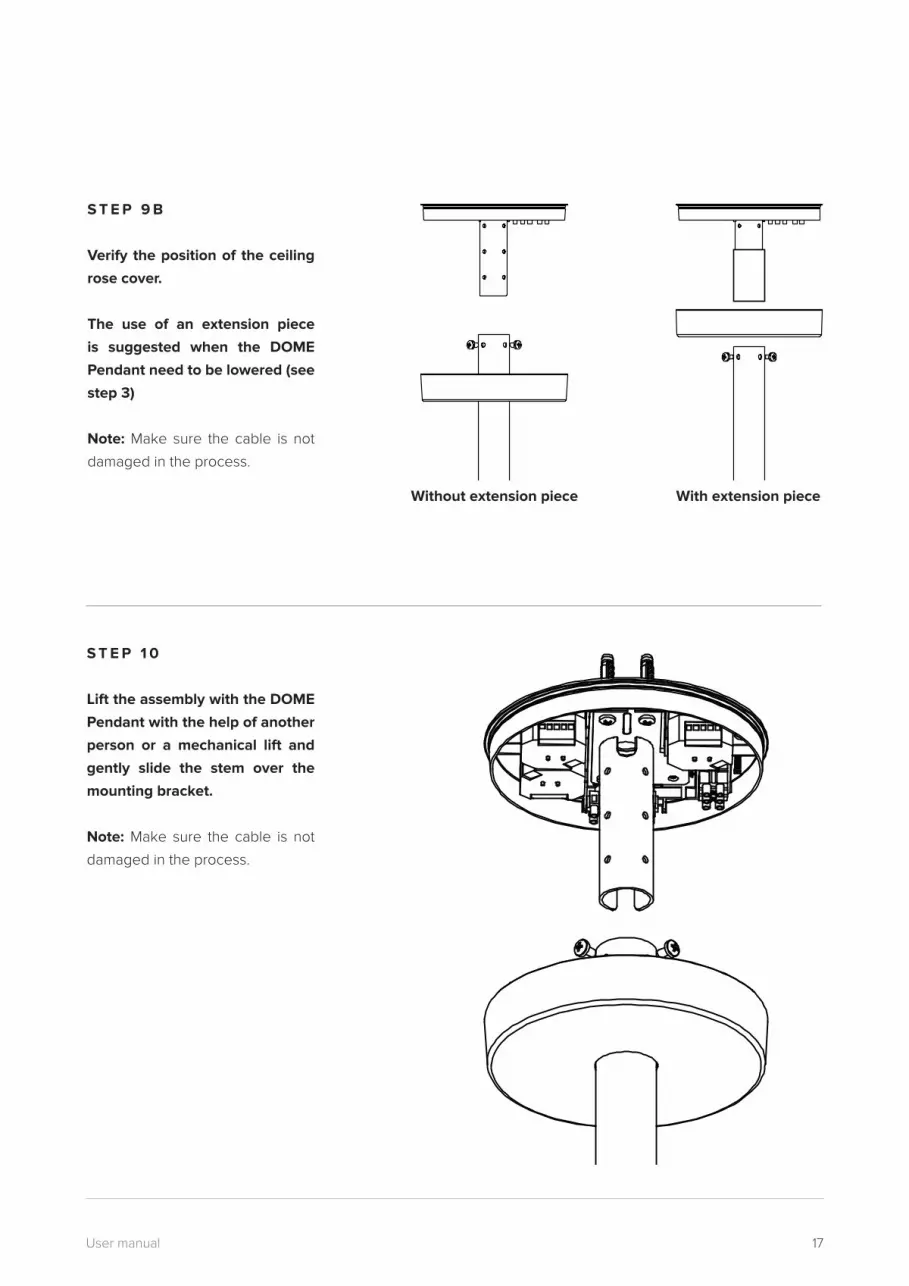
S T E P 1 0
Lift the assembly with the DOME
Pendant with the help of another
person or a mechanical lift and
gently slide the stem over the
mounting bracket.
Note: Make sure the cable is not
damaged in the process.
S T E P 9 B
Verify the position of the ceiling
rose cover.
The use of an extension piece
is suggested when the DOME
Pendant need to be lowered (see
step 3)
Note: Make sure the cable is not
damaged in the process.
Without extension piece With extension piece
18 Heatsail DOME® PENDANT
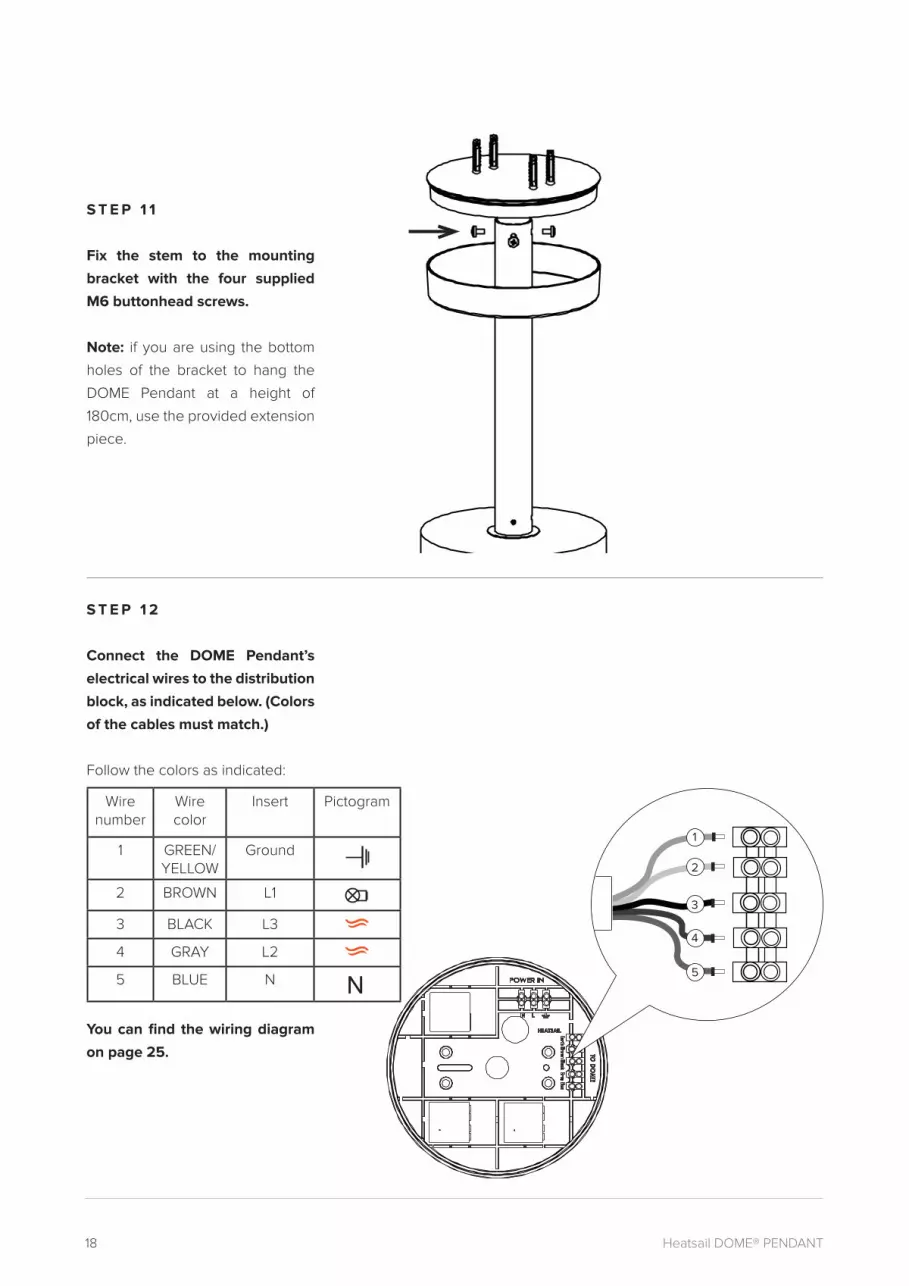
S T E P 1 2
Connect the DOME Pendant’s
electrical wires to the distribution
block, as indicated below. (Colors
of the cables must match.)
Follow the colors as indicated:
17Handleiding
NL
Monteer de beugel samen met
de plafonddoos
Sluit de electriciteitskabel van deDome aan
Volg de kleuren zoals aangegeven in
de behuizing
S TA P 6
1
2
3
4
5
1 AA - 2 Bruin - 3 Zwart - 4 Grijs - 5 Blauw
S T E P 1 1
Fix the stem to the mounting
bracket with the four supplied
M6 buttonhead screws.
Note: if you are using the bottom
holes of the bracket to hang the
DOME Pendant at a height of
180cm, use the provided extension
piece.
Wire number
Wire color
Insert Pictogram
1 GREEN/ YELLOW
Ground
N
To D
ome
2 BROWN L1
N
To D
ome
3 BLACK L3N
To Dome
4 GRAY L2N
To Dome
5 BLUE N N
To D
ome
You can find the wiring diagram
on page 25.
19User manual
18 Heatsail DOME®
NL
Sluit de inkomendestroomkabel aan
Schuif de cover naar bovenen schroef de sluitring aan
S TA P 7
1 2 31 Blauw - 2 Bruin - 3 AA 1 2 3
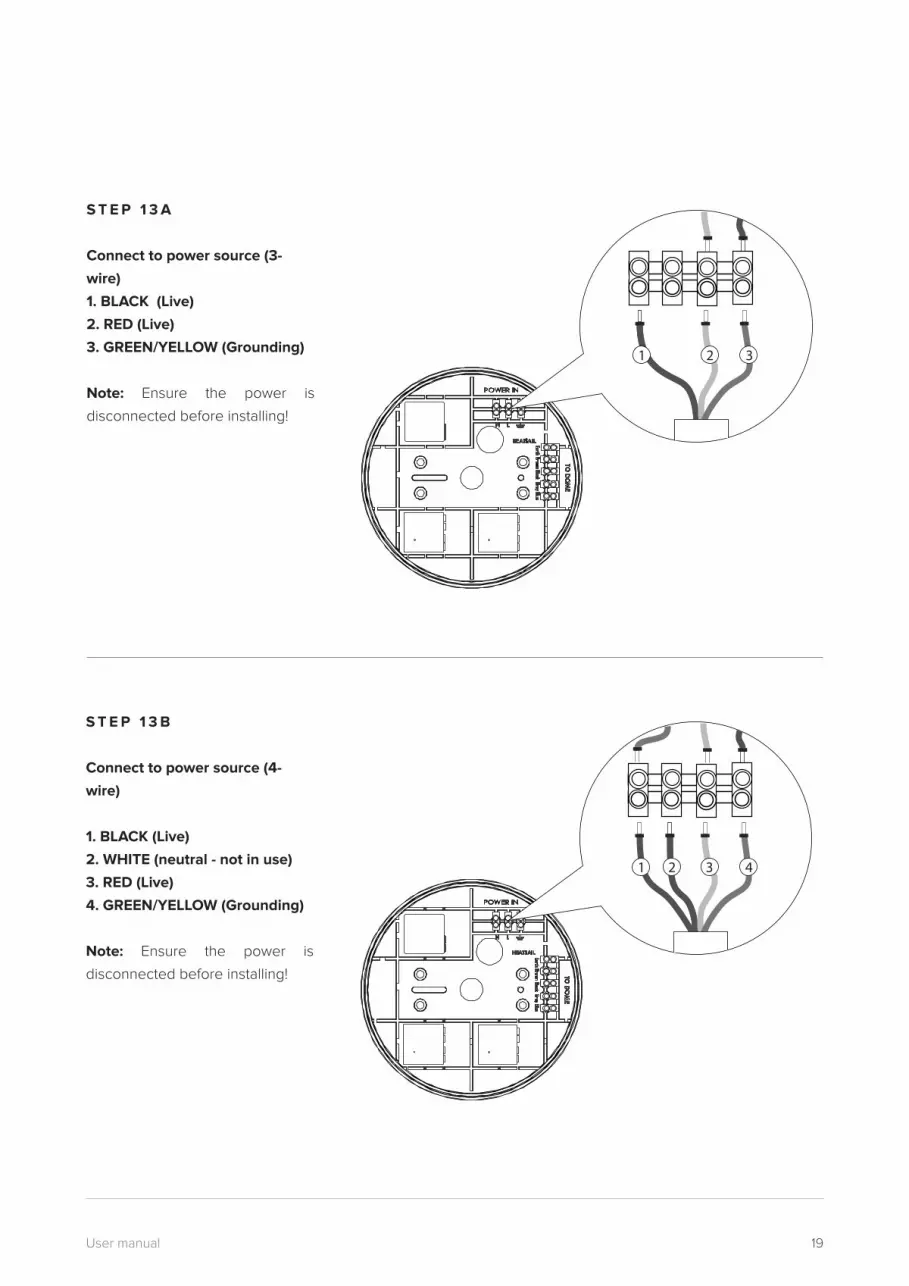
S T E P 1 3 A
Connect to power source (3-
wire)
1. BLACK (Live)
2. RED (Live)
3. GREEN/YELLOW (Grounding)
Note: Ensure the power is
disconnected before installing!
S T E P 1 3 B
Connect to power source (4-
wire)
1. BLACK (Live)
2. WHITE (neutral - not in use)
3. RED (Live)
4. GREEN/YELLOW (Grounding)
Note: Ensure the power is
disconnected before installing!
18 Heatsail DOME®
NL
Sluit de inkomendestroomkabel aan
Schuif de cover naar bovenen schroef de sluitring aan
S TA P 7
1 2 31 Blauw - 2 Bruin - 3 AA 1 2 3 4

20 Heatsail DOME® PENDANT
S T E P 1 5
Cut away the three elastic bands
and remove them entirely.
Note: Two of them are found
behind the glass. Carefully lift up
the glass to expose the bands.
S T E P 1 6
Look up and identify the
protective plate, remove by
cutting the three zip ties. Ensure
that all decals on the bottom of
the plate and heating element
are removed, if present.
Enjoy your brand new DOME
Pendant.
S T E P 1 4
Slide the cover upward and fix
into place on the ceiling rose with
the small screws.
21User manual
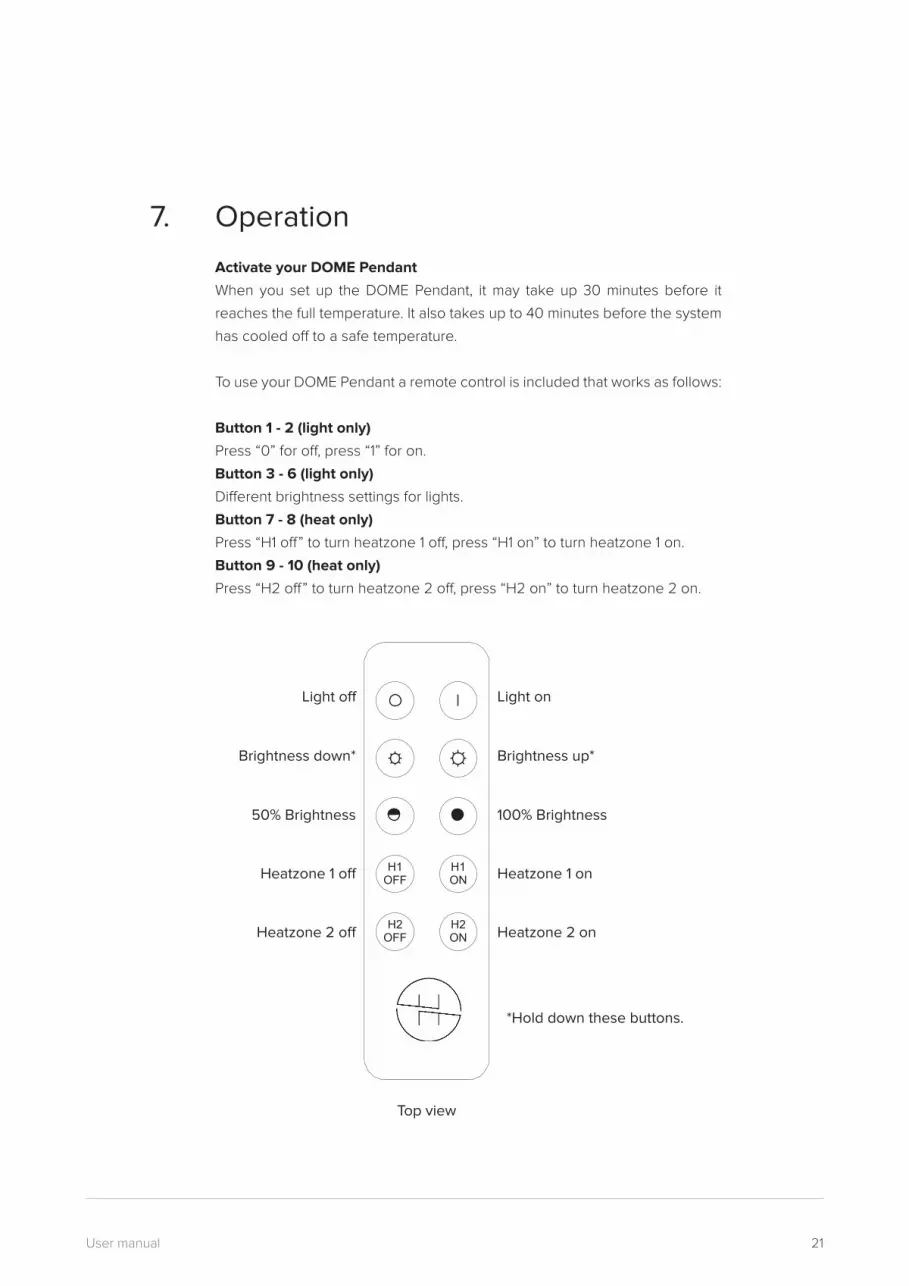
7. Operation
Activate your DOME Pendant
When you set up the DOME Pendant, it may take up 30 minutes before it
reaches the full temperature. It also takes up to 40 minutes before the system
has cooled off to a safe temperature.
To use your DOME Pendant a remote control is included that works as follows:
Button 1 - 2 (light only)
Press “0” for off, press “1” for on.
Button 3 - 6 (light only)
Different brightness settings for lights.
Button 7 - 8 (heat only)
Press “H1 off” to turn heatzone 1 off, press “H1 on” to turn heatzone 1 on.
Button 9 - 10 (heat only)
Press “H2 off” to turn heatzone 2 off, press “H2 on” to turn heatzone 2 on.
Light onLight off
Brightness down* Brightness up*
Heatzone 1 on
50% Brightness
Heatzone 1 off
100% Brightness
Heatzone 2 off Heatzone 2 on
Top view
*Hold down these buttons.
Front side
H1OFF
H1ON
H2OFF
H2ON
22 Heatsail DOME® PENDANT
8. Troubleshooting
The electrical supply must be disconnected via the installation’s main
breaker before any work can be carried out.
The light does not work
Switch off power. Lift the glass of the the DOME upwards. Insert a rigid item
(like a screwdriver) underneath the glass to keep it up. You can now access
the halogen bulb. Verify it is well-seated and not broken. If you need to
replace the bulb, replace it with a standard R7S 78mm, 240V/120W bulb)
Note: Always use a cloth or gloves to replace the bulb, touching it with
bare hands shortens the life considerably.
If the light is good, see next page for reprogramming the remote control.
If this does not resolve your issue, verify that the blue and brown wires are
properly inserted into the connection block. Refer to step 12
No heat
None of the heating elements work. Check if the DOME Pendant is switched
on. Verify blue, brown, black and gray wires are properly connected see
wiring diagram page 26. Bypass the switches and connect the DOME on
the powersoucre. If the elements work reprogram the remote see page
24.
The heating only work partially
Verify blue, black and gray wires are properly connected see wiring
diagram page 25.
Nothing works
Verify all wires are properly inserted in the connector block
(see step 12 and step 13). You can find the wiring diagram on page 25.
Verify that the circuit breaker switch is turned on and has not been tripped.
Close the control box and retry.
If still not working, please contact your dealer.
23User manual
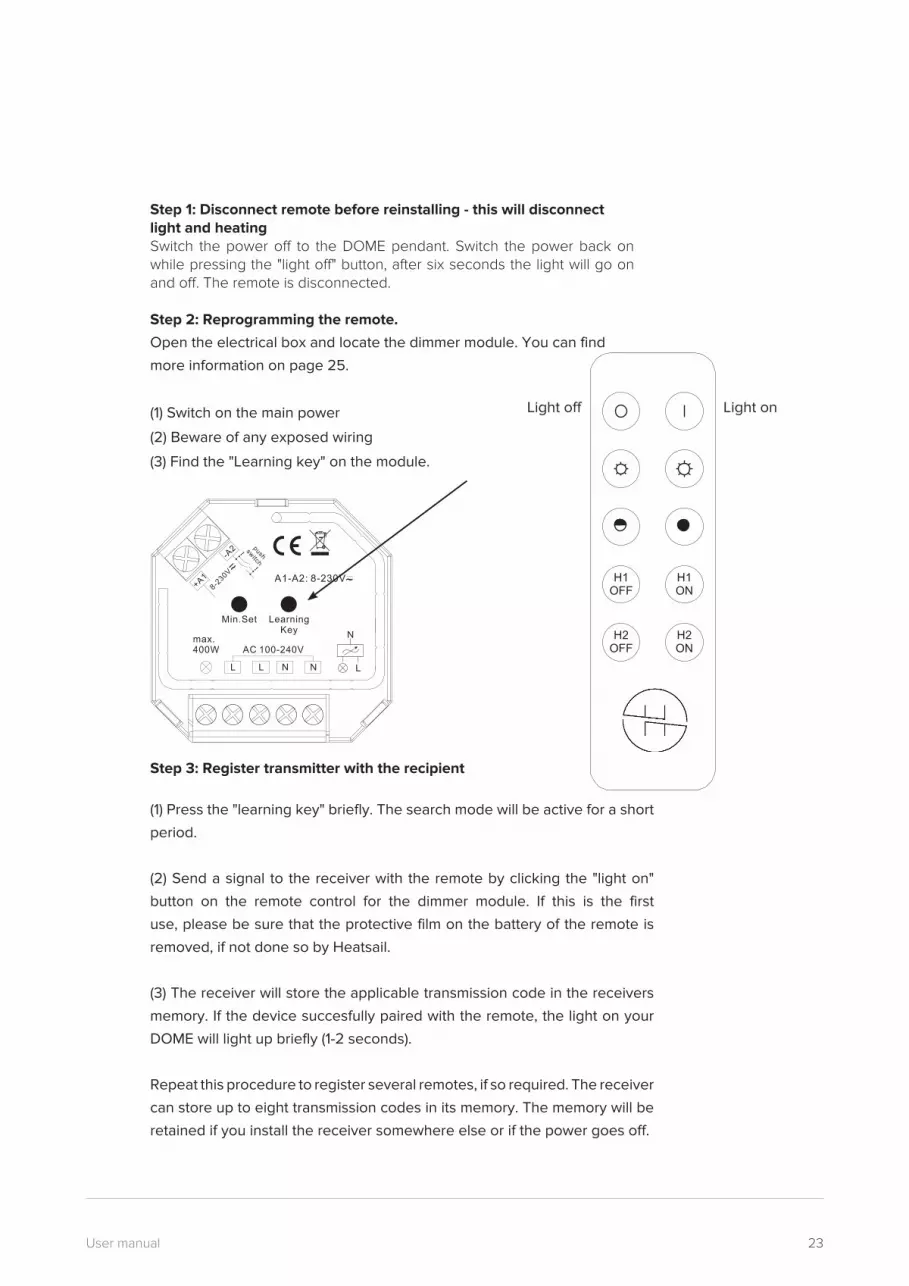
Step 1: Disconnect remote before reinstalling - this will disconnect light and heatingSwitch the power off to the DOME pendant. Switch the power back on while pressing the "light off" button, after six seconds the light will go on and off. The remote is disconnected.
Step 2: Reprogramming the remote.
Open the electrical box and locate the dimmer module. You can find
more information on page 25.
(1) Switch on the main power
(2) Beware of any exposed wiring
(3) Find the "Learning key" on the module.
push
switch
Min.Set LearningKey
LL NN
max.400W
L
N
A1-A2: 8-230V
AC 100-240V
Step 3: Register transmitter with the recipient
(1) Press the "learning key" briefly. The search mode will be active for a short
period.
(2) Send a signal to the receiver with the remote by clicking the "light on"
button on the remote control for the dimmer module. If this is the first
use, please be sure that the protective film on the battery of the remote is
removed, if not done so by Heatsail.
(3) The receiver will store the applicable transmission code in the receivers
memory. If the device succesfully paired with the remote, the light on your
DOME will light up briefly (1-2 seconds).
Repeat this procedure to register several remotes, if so required. The receiver
can store up to eight transmission codes in its memory. The memory will be
retained if you install the receiver somewhere else or if the power goes off.
Light on
Front side
H1OFF
H1ON
H2OFF
H2ON
Light off
24 Heatsail DOME® PENDANT
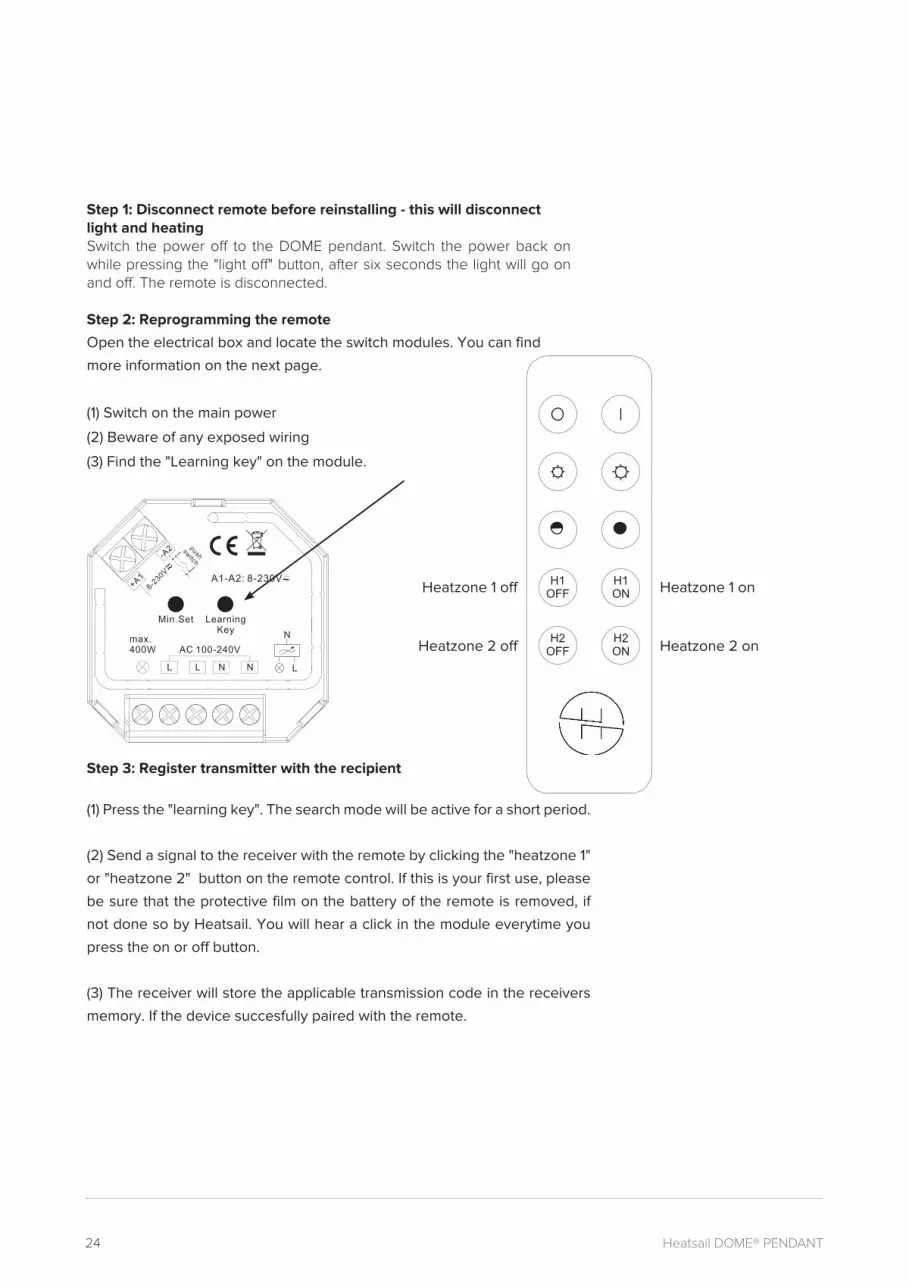
Step 1: Disconnect remote before reinstalling - this will disconnect light and heatingSwitch the power off to the DOME pendant. Switch the power back on while pressing the "light off" button, after six seconds the light will go on and off. The remote is disconnected.
Step 2: Reprogramming the remote
Open the electrical box and locate the switch modules. You can find
more information on the next page.
(1) Switch on the main power
(2) Beware of any exposed wiring
(3) Find the "Learning key" on the module.
push
switch
Min.Set LearningKey
LL NN
max.400W
L
N
A1-A2: 8-230V
AC 100-240V
Step 3: Register transmitter with the recipient
(1) Press the "learning key". The search mode will be active for a short period.
(2) Send a signal to the receiver with the remote by clicking the "heatzone 1"
or "heatzone 2" button on the remote control. If this is your first use, please
be sure that the protective film on the battery of the remote is removed, if
not done so by Heatsail. You will hear a click in the module everytime you
press the on or off button.
(3) The receiver will store the applicable transmission code in the receivers
memory. If the device succesfully paired with the remote.
Heatzone 1 on
Heatzone 2 on
Front side
H1OFF
H1ON
H2OFF
H2ON
Heatzone 1 off
Heatzone 2 off
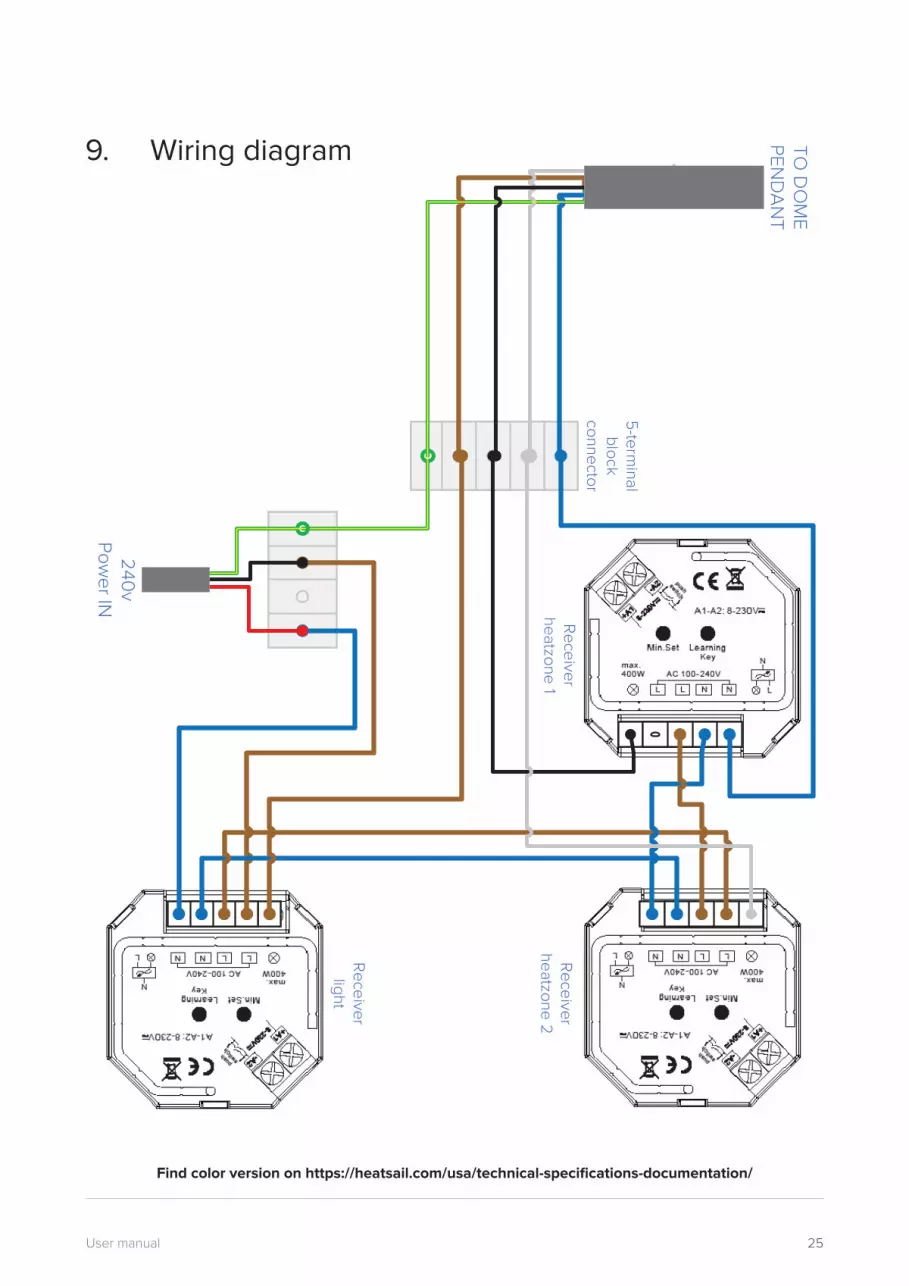
25User manual
TO D
OM
E PEN
DA
NT
5-terminal
block connector
240
v Pow
er IN
Receiver
heatzone 1R
eceiverheatzone 2
Receiverlight
Find color version on https://heatsail.com/usa/technical-specifications-documentation/
9. Wiring diagram


DOME® TIMELESS LIGHTING
WITH HEATING FOR YOUR GARDEN OR TERRACE
RUSTPROOF & WEATHERPROOF
LOW ENERGY USAGEZERO CO2 EMISSION
MINIMAL MAINTENANCE

Corporate Headquarters
HEATSAIL NV
Prins Boudewijnlaan 7 Unit A 082550 KontichBelgium
+32 3 502 99 [email protected]
S E R I A L N U M B E R
U.S. Office
HEATSAIL NV
10440 N Central Expresway, Suite 800Dallas, Texas 75231United States
+1 214 808 [email protected]/usa


