Embed Size (px)
Citation preview

Data Distribution and Management User Guide
Jeppesen55 Inverness Drive East
Englewood, Colorado 80112-5498
This document supports:• Data Distribution and Management Application Service Provider (DDM ASP),
version 6.0.2.8• Content Delivery Agent for the Desktop (CDAD), version 5.2.0.27• Content Delivery Agent for Boeing Class 1 (CDAB), version 5.2.0.28• Content Delivery Agent for the Flight Bag (CDAF), part number JEP40-
DMEP-0012• Content Delivery Agent for Jeppesen (CDAJ), version 6.0• Content Delivery Agent for LoadStar (CDAL), version 5.2.0.27
Jeppesen, All Rights Reserved May, 2014
Document ID: DDM_6.0.2.8_ASP_UGRevision 5.2

Copyright © 2014 Jeppesen, All rights reserved.
Except as otherwise provided and authorized in a written agreement between both Jeppesen and your company, Jeppesen's copyrighted information and materials may not be processed, reformatted, reproduced, stored in a retrieval system, or transmitted in whole or in part, in any form or by any means, whether electrical, mechanical, photocopying, recording or otherwise, without prior written permission of Jeppesen.
Microsoft, Windows XP, Windows Vista and Internet Explorer are either registered trademarks or trademarks of Microsoft Corporation in the United States and/or other countries.
Product or brand names may be trademarks or registered trademarks of their respective owners.

Contents
Figures ix
Tables xv
Chapter 1: Introduction 1New Features . . . . . . . . . . . . . . . . . . . . . . . . . . . . . . . . . . . . . . . . . . . . . . . . . . . . . . . . . . 2
Support for Versioned Content . . . . . . . . . . . . . . . . . . . . . . . . . . . . . . . . . . . . . . . . . 2Standard Reports . . . . . . . . . . . . . . . . . . . . . . . . . . . . . . . . . . . . . . . . . . . . . . . . . . . . 3Auto-Archive and Auto-Delete . . . . . . . . . . . . . . . . . . . . . . . . . . . . . . . . . . . . . . . . . 4Archiving Performance Improvements . . . . . . . . . . . . . . . . . . . . . . . . . . . . . . . . . . . 4Content Management . . . . . . . . . . . . . . . . . . . . . . . . . . . . . . . . . . . . . . . . . . . . . . . . . 5Find Delivery Status . . . . . . . . . . . . . . . . . . . . . . . . . . . . . . . . . . . . . . . . . . . . . . . . . . 5Delivery Status . . . . . . . . . . . . . . . . . . . . . . . . . . . . . . . . . . . . . . . . . . . . . . . . . . . . . . 5Streamlined Approval Process . . . . . . . . . . . . . . . . . . . . . . . . . . . . . . . . . . . . . . . . . . 5Disk Space Usage . . . . . . . . . . . . . . . . . . . . . . . . . . . . . . . . . . . . . . . . . . . . . . . . . . . . 6Enhanced Filters . . . . . . . . . . . . . . . . . . . . . . . . . . . . . . . . . . . . . . . . . . . . . . . . . . . . . 6Enhanced Email Rules . . . . . . . . . . . . . . . . . . . . . . . . . . . . . . . . . . . . . . . . . . . . . . . . 7New CDAF Version . . . . . . . . . . . . . . . . . . . . . . . . . . . . . . . . . . . . . . . . . . . . . . . . . . 8Intended Audience . . . . . . . . . . . . . . . . . . . . . . . . . . . . . . . . . . . . . . . . . . . . . . . . . . . 9
How this Guide is Organized . . . . . . . . . . . . . . . . . . . . . . . . . . . . . . . . . . . . . . . . . . . . 10Conventions . . . . . . . . . . . . . . . . . . . . . . . . . . . . . . . . . . . . . . . . . . . . . . . . . . . . . . . . . . 12Additional References . . . . . . . . . . . . . . . . . . . . . . . . . . . . . . . . . . . . . . . . . . . . . . . . . 13Product Support . . . . . . . . . . . . . . . . . . . . . . . . . . . . . . . . . . . . . . . . . . . . . . . . . . . . . . 14
Chapter 2: About DDM 15What is DDM? . . . . . . . . . . . . . . . . . . . . . . . . . . . . . . . . . . . . . . . . . . . . . . . . . . . . . . . 16

Contents
DD
ii
Understanding the Package Delivery Process . . . . . . . . . . . . . . . . . . . . . . . . . . . . . . 17Understanding the DDM Server . . . . . . . . . . . . . . . . . . . . . . . . . . . . . . . . . . . . . . . . 18Understanding Checkpoints . . . . . . . . . . . . . . . . . . . . . . . . . . . . . . . . . . . . . . . . . . . 19Understanding Content Delivery Agents . . . . . . . . . . . . . . . . . . . . . . . . . . . . . . . . . 19Understanding Recipients . . . . . . . . . . . . . . . . . . . . . . . . . . . . . . . . . . . . . . . . . . . . . 28
Understanding the DDM Roles and Associated Functions . . . . . . . . . . . . . . . . . . . . 30Understanding the Types of Data Available . . . . . . . . . . . . . . . . . . . . . . . . . . . . . . . . 33Understanding Task Processing in DDM . . . . . . . . . . . . . . . . . . . . . . . . . . . . . . . . . . 34Viewing the Package Status in DDM . . . . . . . . . . . . . . . . . . . . . . . . . . . . . . . . . . . . . . 36Understanding DDM Reporting . . . . . . . . . . . . . . . . . . . . . . . . . . . . . . . . . . . . . . . . . 39Understanding DDM Filtering . . . . . . . . . . . . . . . . . . . . . . . . . . . . . . . . . . . . . . . . . . . 40Understanding Event Types . . . . . . . . . . . . . . . . . . . . . . . . . . . . . . . . . . . . . . . . . . . . . 41Understanding the DDM Archival Process . . . . . . . . . . . . . . . . . . . . . . . . . . . . . . . . . 42
Understanding the Archive Process . . . . . . . . . . . . . . . . . . . . . . . . . . . . . . . . . . . . . 42Understanding the Unarchive Process . . . . . . . . . . . . . . . . . . . . . . . . . . . . . . . . . . . 42Understanding the archive.zip File Generated during an Archive . . . . . . . . . . . . . . 43Deleting a Package or Recipient . . . . . . . . . . . . . . . . . . . . . . . . . . . . . . . . . . . . . . . . 43
Understanding Wrapping Types . . . . . . . . . . . . . . . . . . . . . . . . . . . . . . . . . . . . . . . . . 44BOM Format . . . . . . . . . . . . . . . . . . . . . . . . . . . . . . . . . . . . . . . . . . . . . . . . . . . . . . . 45
Understanding Loadable Software Airplane Parts . . . . . . . . . . . . . . . . . . . . . . . . . . 47
Chapter 3: Getting Started 51Overview . . . . . . . . . . . . . . . . . . . . . . . . . . . . . . . . . . . . . . . . . . . . . . . . . . . . . . . . . . . . 52Logging On to DDM . . . . . . . . . . . . . . . . . . . . . . . . . . . . . . . . . . . . . . . . . . . . . . . . . . . 53Understanding the DDM Application . . . . . . . . . . . . . . . . . . . . . . . . . . . . . . . . . . . . . 56Understanding the DDM Home Page . . . . . . . . . . . . . . . . . . . . . . . . . . . . . . . . . . . . . 59Understanding the Navigation Menu . . . . . . . . . . . . . . . . . . . . . . . . . . . . . . . . . . . . . 61Sorting Data in a Table . . . . . . . . . . . . . . . . . . . . . . . . . . . . . . . . . . . . . . . . . . . . . . . . . 66Navigating Through Multiple Rows of Table Data . . . . . . . . . . . . . . . . . . . . . . . . . . 67Running Filters . . . . . . . . . . . . . . . . . . . . . . . . . . . . . . . . . . . . . . . . . . . . . . . . . . . . . . . 68Setting Up DDM . . . . . . . . . . . . . . . . . . . . . . . . . . . . . . . . . . . . . . . . . . . . . . . . . . . . . . 69Setting Up the DDM Review Process . . . . . . . . . . . . . . . . . . . . . . . . . . . . . . . . . . . . . 70
Determining Review Process Requirements . . . . . . . . . . . . . . . . . . . . . . . . . . . . . . 70Preparing for and Creating Checkpoints . . . . . . . . . . . . . . . . . . . . . . . . . . . . . . . . . 71Adding Checkpoints to the Delivery Process . . . . . . . . . . . . . . . . . . . . . . . . . . . . . . 73
Getting Help . . . . . . . . . . . . . . . . . . . . . . . . . . . . . . . . . . . . . . . . . . . . . . . . . . . . . . . . . . 74Exiting DDM . . . . . . . . . . . . . . . . . . . . . . . . . . . . . . . . . . . . . . . . . . . . . . . . . . . . . . . . . 75
M ASP User Guide May, 2014© 2014 Jeppesen

Contents
Ma© 2
Chapter 4: Managing Packages 77Overview . . . . . . . . . . . . . . . . . . . . . . . . . . . . . . . . . . . . . . . . . . . . . . . . . . . . . . . . . . . . 78Process . . . . . . . . . . . . . . . . . . . . . . . . . . . . . . . . . . . . . . . . . . . . . . . . . . . . . . . . . . . . . . 79Naming a Package . . . . . . . . . . . . . . . . . . . . . . . . . . . . . . . . . . . . . . . . . . . . . . . . . . . . 82Publishing a Package . . . . . . . . . . . . . . . . . . . . . . . . . . . . . . . . . . . . . . . . . . . . . . . . . . 83Uploading a Package . . . . . . . . . . . . . . . . . . . . . . . . . . . . . . . . . . . . . . . . . . . . . . . . . . 88Delivering Packages . . . . . . . . . . . . . . . . . . . . . . . . . . . . . . . . . . . . . . . . . . . . . . . . . . . 89
Assigning and Unassigning Recipients . . . . . . . . . . . . . . . . . . . . . . . . . . . . . . . . . . 90Editing Package Delivery Properties . . . . . . . . . . . . . . . . . . . . . . . . . . . . . . . . . . . . 93Assigning Recipient Groups . . . . . . . . . . . . . . . . . . . . . . . . . . . . . . . . . . . . . . . . . . 96Assigning Review Devices . . . . . . . . . . . . . . . . . . . . . . . . . . . . . . . . . . . . . . . . . . . 99Assigning Consumer Companies . . . . . . . . . . . . . . . . . . . . . . . . . . . . . . . . . . . . . . 100Confirming Package Association . . . . . . . . . . . . . . . . . . . . . . . . . . . . . . . . . . . . . . 102
Viewing Packages Available for Delivery . . . . . . . . . . . . . . . . . . . . . . . . . . . . . . . . . 103Viewing Package Properties . . . . . . . . . . . . . . . . . . . . . . . . . . . . . . . . . . . . . . . . . . . 104Viewing Parts . . . . . . . . . . . . . . . . . . . . . . . . . . . . . . . . . . . . . . . . . . . . . . . . . . . . . . . 109Changing a Package Review Status . . . . . . . . . . . . . . . . . . . . . . . . . . . . . . . . . . . . . 110Removing Parts from the Delivery Staging Area . . . . . . . . . . . . . . . . . . . . . . . . . . 111
Chapter 5: Approving and Rejecting Packages 115Overview . . . . . . . . . . . . . . . . . . . . . . . . . . . . . . . . . . . . . . . . . . . . . . . . . . . . . . . . . . . 116Approving Package Content . . . . . . . . . . . . . . . . . . . . . . . . . . . . . . . . . . . . . . . . . . . 118Rejecting Package Content . . . . . . . . . . . . . . . . . . . . . . . . . . . . . . . . . . . . . . . . . . . . 119Viewing a Certificate of Conformity . . . . . . . . . . . . . . . . . . . . . . . . . . . . . . . . . . . . . 120Adding Reviewer Comments Without Changing Status . . . . . . . . . . . . . . . . . . . . . 121
Chapter 6: Finding Content Delivery Status 123Overview . . . . . . . . . . . . . . . . . . . . . . . . . . . . . . . . . . . . . . . . . . . . . . . . . . . . . . . . . . . 124Finding Content Delivery Status by Part . . . . . . . . . . . . . . . . . . . . . . . . . . . . . . . . . 125Finding Content Delivery Status by Package . . . . . . . . . . . . . . . . . . . . . . . . . . . . . . 127Finding Content Delivery Status by Version ID . . . . . . . . . . . . . . . . . . . . . . . . . . . 129
Chapter 7: Archiving and Deleting Packages 131Overview . . . . . . . . . . . . . . . . . . . . . . . . . . . . . . . . . . . . . . . . . . . . . . . . . . . . . . . . . . . 132Archiving Packages . . . . . . . . . . . . . . . . . . . . . . . . . . . . . . . . . . . . . . . . . . . . . . . . . . 133Unarchiving a Package . . . . . . . . . . . . . . . . . . . . . . . . . . . . . . . . . . . . . . . . . . . . . . . . 136Deleting an Archived Package . . . . . . . . . . . . . . . . . . . . . . . . . . . . . . . . . . . . . . . . . . 138Automatically Archiving and Deleting Packages . . . . . . . . . . . . . . . . . . . . . . . . . . 139
y, 2014 DDM ASP User Guide014 Jeppesen
iii

Contents
DD
iv
Downloading an archive.zip File for an Archived Package . . . . . . . . . . . . . . . . . . 141Deleting an Archive zip File for a Package . . . . . . . . . . . . . . . . . . . . . . . . . . . . . . . . 143
Chapter 8: Managing Recipients 145Overview . . . . . . . . . . . . . . . . . . . . . . . . . . . . . . . . . . . . . . . . . . . . . . . . . . . . . . . . . . . 146Process . . . . . . . . . . . . . . . . . . . . . . . . . . . . . . . . . . . . . . . . . . . . . . . . . . . . . . . . . . . . . 148Understanding DDM Functions Used to Manage a Recipient . . . . . . . . . . . . . . . . 151Naming Recipients . . . . . . . . . . . . . . . . . . . . . . . . . . . . . . . . . . . . . . . . . . . . . . . . . . . 152Assigning Packages to Recipients . . . . . . . . . . . . . . . . . . . . . . . . . . . . . . . . . . . . . . . 153Creating Recipients . . . . . . . . . . . . . . . . . . . . . . . . . . . . . . . . . . . . . . . . . . . . . . . . . . . 154
Creating a Basic or Tail Recipient . . . . . . . . . . . . . . . . . . . . . . . . . . . . . . . . . . . . . 154Creating a Proxy Recipient . . . . . . . . . . . . . . . . . . . . . . . . . . . . . . . . . . . . . . . . . . . 168
Viewing Properties and Packages for a Recipient . . . . . . . . . . . . . . . . . . . . . . . . . . 172Editing Properties and Packages for Recipients . . . . . . . . . . . . . . . . . . . . . . . . . . . 176Unregistering a Recipient . . . . . . . . . . . . . . . . . . . . . . . . . . . . . . . . . . . . . . . . . . . . . . 181Manage Registration Credentials . . . . . . . . . . . . . . . . . . . . . . . . . . . . . . . . . . . . . . . 182
Generate Registration Credentials . . . . . . . . . . . . . . . . . . . . . . . . . . . . . . . . . . . . . 182View Registration Credentials . . . . . . . . . . . . . . . . . . . . . . . . . . . . . . . . . . . . . . . . 183
Archiving a Recipient . . . . . . . . . . . . . . . . . . . . . . . . . . . . . . . . . . . . . . . . . . . . . . . . . 185Unarchiving a Recipient . . . . . . . . . . . . . . . . . . . . . . . . . . . . . . . . . . . . . . . . . . . . . . 188Deleting a Recipient . . . . . . . . . . . . . . . . . . . . . . . . . . . . . . . . . . . . . . . . . . . . . . . . . . 189Downloading a Zip File for an Archived Recipient . . . . . . . . . . . . . . . . . . . . . . . . . 190Deleting an archive.zip File for a Recipient . . . . . . . . . . . . . . . . . . . . . . . . . . . . . . . 191
Chapter 9: Managing Recipient Groups 193Overview . . . . . . . . . . . . . . . . . . . . . . . . . . . . . . . . . . . . . . . . . . . . . . . . . . . . . . . . . . . 194Process . . . . . . . . . . . . . . . . . . . . . . . . . . . . . . . . . . . . . . . . . . . . . . . . . . . . . . . . . . . . . 195Understanding DDM Functions Used to Manage a Recipient Group . . . . . . . . . . 198Creating Recipient Groups . . . . . . . . . . . . . . . . . . . . . . . . . . . . . . . . . . . . . . . . . . . . . 199
Naming Recipient Groups . . . . . . . . . . . . . . . . . . . . . . . . . . . . . . . . . . . . . . . . . . . 200Assigning Packages and Checkpoints to Recipient Groups . . . . . . . . . . . . . . . . . . 200
Viewing Recipients Associated with a Recipient Group . . . . . . . . . . . . . . . . . . . . . 201Editing Recipient Groups . . . . . . . . . . . . . . . . . . . . . . . . . . . . . . . . . . . . . . . . . . . . . . 203Deleting a Recipient Group . . . . . . . . . . . . . . . . . . . . . . . . . . . . . . . . . . . . . . . . . . . . 205
Chapter 10: Managing Review Groups 207Overview . . . . . . . . . . . . . . . . . . . . . . . . . . . . . . . . . . . . . . . . . . . . . . . . . . . . . . . . . . . 208Process . . . . . . . . . . . . . . . . . . . . . . . . . . . . . . . . . . . . . . . . . . . . . . . . . . . . . . . . . . . . . 210
M ASP User Guide May, 2014© 2014 Jeppesen

Contents
Ma© 2
Naming a Review Group . . . . . . . . . . . . . . . . . . . . . . . . . . . . . . . . . . . . . . . . . . . . . . 213Creating a Review Group . . . . . . . . . . . . . . . . . . . . . . . . . . . . . . . . . . . . . . . . . . . . . 214Viewing a Review Group . . . . . . . . . . . . . . . . . . . . . . . . . . . . . . . . . . . . . . . . . . . . . . 217Editing a Review Group . . . . . . . . . . . . . . . . . . . . . . . . . . . . . . . . . . . . . . . . . . . . . . . 218
Editing a Review Group for which No Reviews are Pending . . . . . . . . . . . . . . . . 218Editing a Review Group for which Reviews are Pending . . . . . . . . . . . . . . . . . . . 220
Deleting a Review Group . . . . . . . . . . . . . . . . . . . . . . . . . . . . . . . . . . . . . . . . . . . . . . 221Deleting a Review Group Not Assigned to a Pending Package Review . . . . . . . . 221Deleting a Review Group Assigned to a Pending Package Review . . . . . . . . . . . 221
Chapter 11: Managing Review Devices 223Overview . . . . . . . . . . . . . . . . . . . . . . . . . . . . . . . . . . . . . . . . . . . . . . . . . . . . . . . . . . . 224Process . . . . . . . . . . . . . . . . . . . . . . . . . . . . . . . . . . . . . . . . . . . . . . . . . . . . . . . . . . . . . 226Creating a Review Device . . . . . . . . . . . . . . . . . . . . . . . . . . . . . . . . . . . . . . . . . . . . . 229Viewing a Review Device . . . . . . . . . . . . . . . . . . . . . . . . . . . . . . . . . . . . . . . . . . . . . . 232Editing a Review Device . . . . . . . . . . . . . . . . . . . . . . . . . . . . . . . . . . . . . . . . . . . . . . . 234Deleting a Review Device . . . . . . . . . . . . . . . . . . . . . . . . . . . . . . . . . . . . . . . . . . . . . . 238
Chapter 12: Managing Checkpoints 239Overview . . . . . . . . . . . . . . . . . . . . . . . . . . . . . . . . . . . . . . . . . . . . . . . . . . . . . . . . . . . 240Process . . . . . . . . . . . . . . . . . . . . . . . . . . . . . . . . . . . . . . . . . . . . . . . . . . . . . . . . . . . . . 242Naming a Checkpoint . . . . . . . . . . . . . . . . . . . . . . . . . . . . . . . . . . . . . . . . . . . . . . . . . 245Creating a Checkpoint . . . . . . . . . . . . . . . . . . . . . . . . . . . . . . . . . . . . . . . . . . . . . . . . 246Viewing a Checkpoint . . . . . . . . . . . . . . . . . . . . . . . . . . . . . . . . . . . . . . . . . . . . . . . . 249Editing a Checkpoint . . . . . . . . . . . . . . . . . . . . . . . . . . . . . . . . . . . . . . . . . . . . . . . . . 250Deleting a Checkpoint . . . . . . . . . . . . . . . . . . . . . . . . . . . . . . . . . . . . . . . . . . . . . . . . 252
Deleting a Checkpoint with No Package Reviews Pending . . . . . . . . . . . . . . . . . 252Deleting a Checkpoint with Package Reviews Pending . . . . . . . . . . . . . . . . . . . . 252
Chapter 13: Managing Content Types 255Overview . . . . . . . . . . . . . . . . . . . . . . . . . . . . . . . . . . . . . . . . . . . . . . . . . . . . . . . . . . . 256Naming a Content Type . . . . . . . . . . . . . . . . . . . . . . . . . . . . . . . . . . . . . . . . . . . . . . . 258Creating a Content Type . . . . . . . . . . . . . . . . . . . . . . . . . . . . . . . . . . . . . . . . . . . . . . 259Viewing a Content Type . . . . . . . . . . . . . . . . . . . . . . . . . . . . . . . . . . . . . . . . . . . . . . . 262Editing a Content Type . . . . . . . . . . . . . . . . . . . . . . . . . . . . . . . . . . . . . . . . . . . . . . . 264Deleting a Content Type . . . . . . . . . . . . . . . . . . . . . . . . . . . . . . . . . . . . . . . . . . . . . . . 265Setting the Default Delivery Priority for a Content Type . . . . . . . . . . . . . . . . . . . . 267Defining Auto-Archive and Auto-Delete Rules . . . . . . . . . . . . . . . . . . . . . . . . . . . . 268
y, 2014 DDM ASP User Guide014 Jeppesen
v

Contents
DD
vi
Assigning the Default Checkpoint to a Content Type . . . . . . . . . . . . . . . . . . . . . . . 270Assigning Recipient Groups to a Content Type . . . . . . . . . . . . . . . . . . . . . . . . . . . . 271
Chapter 14: Managing EFB Certificates 273Overview . . . . . . . . . . . . . . . . . . . . . . . . . . . . . . . . . . . . . . . . . . . . . . . . . . . . . . . . . . . 274Process . . . . . . . . . . . . . . . . . . . . . . . . . . . . . . . . . . . . . . . . . . . . . . . . . . . . . . . . . . . . . 275Viewing Available Certificates . . . . . . . . . . . . . . . . . . . . . . . . . . . . . . . . . . . . . . . . . . 278Uploading a Certificate . . . . . . . . . . . . . . . . . . . . . . . . . . . . . . . . . . . . . . . . . . . . . . . . 279Deleting a Certificate . . . . . . . . . . . . . . . . . . . . . . . . . . . . . . . . . . . . . . . . . . . . . . . . . 281
Chapter 15: Managing Email Rules 283Overview . . . . . . . . . . . . . . . . . . . . . . . . . . . . . . . . . . . . . . . . . . . . . . . . . . . . . . . . . . . 284Process . . . . . . . . . . . . . . . . . . . . . . . . . . . . . . . . . . . . . . . . . . . . . . . . . . . . . . . . . . . . . 286Naming an Email Rule . . . . . . . . . . . . . . . . . . . . . . . . . . . . . . . . . . . . . . . . . . . . . . . . 289Creating an Email Rule . . . . . . . . . . . . . . . . . . . . . . . . . . . . . . . . . . . . . . . . . . . . . . . 290Copying an Email Rule . . . . . . . . . . . . . . . . . . . . . . . . . . . . . . . . . . . . . . . . . . . . . . . . 295Viewing the Settings for an Email Rule . . . . . . . . . . . . . . . . . . . . . . . . . . . . . . . . . . 298Editing the Settings for an Email Rule . . . . . . . . . . . . . . . . . . . . . . . . . . . . . . . . . . . 299Deleting an Email Rule . . . . . . . . . . . . . . . . . . . . . . . . . . . . . . . . . . . . . . . . . . . . . . . . 301Creating Email Rules for Specific Events . . . . . . . . . . . . . . . . . . . . . . . . . . . . . . . . . 302
Creating All Recipient Parts Loaded Emails . . . . . . . . . . . . . . . . . . . . . . . . . . . . . 302Creating All Recipient Parts Staged or Loaded Emails . . . . . . . . . . . . . . . . . . . . . 302Creating Disk Space Usage Warning Emails . . . . . . . . . . . . . . . . . . . . . . . . . . . . . 303Creating Package Archive Warning Emails . . . . . . . . . . . . . . . . . . . . . . . . . . . . . . 304Creating Package Archived Emails . . . . . . . . . . . . . . . . . . . . . . . . . . . . . . . . . . . . 304Creating Package Available for Delivery Emails . . . . . . . . . . . . . . . . . . . . . . . . . . 305Creating Package Content Approved at Checkpoint Emails . . . . . . . . . . . . . . . . . 306Creating Package Content Approved by Reviewer Emails . . . . . . . . . . . . . . . . . . 306Creating Package Content Auto Approved Emails . . . . . . . . . . . . . . . . . . . . . . . . 307Creating Package Content Rejected Emails . . . . . . . . . . . . . . . . . . . . . . . . . . . . . . 307Creating Package Content Review Required Emails . . . . . . . . . . . . . . . . . . . . . . . 308Creating Package Delete Warning Emails . . . . . . . . . . . . . . . . . . . . . . . . . . . . . . . 309Creating Package Deleted Emails . . . . . . . . . . . . . . . . . . . . . . . . . . . . . . . . . . . . . . 309Creating Package Delivered Successfully Emails . . . . . . . . . . . . . . . . . . . . . . . . . 310Creating Part Removal Failed Emails . . . . . . . . . . . . . . . . . . . . . . . . . . . . . . . . . . 310Creating Part Removal Requested Emails . . . . . . . . . . . . . . . . . . . . . . . . . . . . . . . 311Creating Part Removed Successfully Emails . . . . . . . . . . . . . . . . . . . . . . . . . . . . . 312Creating Part Staged Successfully Emails . . . . . . . . . . . . . . . . . . . . . . . . . . . . . . . 312Creating Part Staging Failed Emails . . . . . . . . . . . . . . . . . . . . . . . . . . . . . . . . . . . . 313Creating Publication Completed Emails . . . . . . . . . . . . . . . . . . . . . . . . . . . . . . . . . 313
M ASP User Guide May, 2014© 2014 Jeppesen

Contents
Ma© 2
Creating Publication Not Completed Emails . . . . . . . . . . . . . . . . . . . . . . . . . . . . . 314Creating Recipient Reported Change Emails . . . . . . . . . . . . . . . . . . . . . . . . . . . . . 314Creating Recipient-Package Association Rejected Emails . . . . . . . . . . . . . . . . . . 315Creating Review Device-Package Association Rejected Emails . . . . . . . . . . . . . . 316
Chapter 16: Managing Filters 319Overview . . . . . . . . . . . . . . . . . . . . . . . . . . . . . . . . . . . . . . . . . . . . . . . . . . . . . . . . . . . 320Process . . . . . . . . . . . . . . . . . . . . . . . . . . . . . . . . . . . . . . . . . . . . . . . . . . . . . . . . . . . . . 322Understanding Filter Types . . . . . . . . . . . . . . . . . . . . . . . . . . . . . . . . . . . . . . . . . . . . 325Naming a Filter . . . . . . . . . . . . . . . . . . . . . . . . . . . . . . . . . . . . . . . . . . . . . . . . . . . . . . 327Creating a Filter . . . . . . . . . . . . . . . . . . . . . . . . . . . . . . . . . . . . . . . . . . . . . . . . . . . . . 328
Operators Used When Configuring Filters . . . . . . . . . . . . . . . . . . . . . . . . . . . . . . 333Previewing Filters . . . . . . . . . . . . . . . . . . . . . . . . . . . . . . . . . . . . . . . . . . . . . . . . . . . . 335Editing a Filter . . . . . . . . . . . . . . . . . . . . . . . . . . . . . . . . . . . . . . . . . . . . . . . . . . . . . . 336Setting Default Filters . . . . . . . . . . . . . . . . . . . . . . . . . . . . . . . . . . . . . . . . . . . . . . . . 339Deleting a Filter . . . . . . . . . . . . . . . . . . . . . . . . . . . . . . . . . . . . . . . . . . . . . . . . . . . . . 341
Chapter 17: Managing LRUs 343Overview . . . . . . . . . . . . . . . . . . . . . . . . . . . . . . . . . . . . . . . . . . . . . . . . . . . . . . . . . . . 344Process . . . . . . . . . . . . . . . . . . . . . . . . . . . . . . . . . . . . . . . . . . . . . . . . . . . . . . . . . . . . . 347Creating an LRU . . . . . . . . . . . . . . . . . . . . . . . . . . . . . . . . . . . . . . . . . . . . . . . . . . . . 350Editing an LRU . . . . . . . . . . . . . . . . . . . . . . . . . . . . . . . . . . . . . . . . . . . . . . . . . . . . . . 352Deleting an LRU . . . . . . . . . . . . . . . . . . . . . . . . . . . . . . . . . . . . . . . . . . . . . . . . . . . . . 353
Chapter 18: Managing Reports 355Overview . . . . . . . . . . . . . . . . . . . . . . . . . . . . . . . . . . . . . . . . . . . . . . . . . . . . . . . . . . . 356Managing Standard Reports . . . . . . . . . . . . . . . . . . . . . . . . . . . . . . . . . . . . . . . . . . . 358
Viewing Standard Reports . . . . . . . . . . . . . . . . . . . . . . . . . . . . . . . . . . . . . . . . . . . 359Exporting Reports . . . . . . . . . . . . . . . . . . . . . . . . . . . . . . . . . . . . . . . . . . . . . . . . . 364
Managing Configurable Reports . . . . . . . . . . . . . . . . . . . . . . . . . . . . . . . . . . . . . . . . 366Naming a Report . . . . . . . . . . . . . . . . . . . . . . . . . . . . . . . . . . . . . . . . . . . . . . . . . . 370Creating a Configurable Report . . . . . . . . . . . . . . . . . . . . . . . . . . . . . . . . . . . . . . 371Editing a Configurable Report . . . . . . . . . . . . . . . . . . . . . . . . . . . . . . . . . . . . . . . 375Running a Configurable Report . . . . . . . . . . . . . . . . . . . . . . . . . . . . . . . . . . . . . . 377Exporting a Configurable Report to Excel . . . . . . . . . . . . . . . . . . . . . . . . . . . . . . . 379Deleting a Configurable Report . . . . . . . . . . . . . . . . . . . . . . . . . . . . . . . . . . . . . . . 380
Chapter 19: Managing Tail Engines 381Overview . . . . . . . . . . . . . . . . . . . . . . . . . . . . . . . . . . . . . . . . . . . . . . . . . . . . . . . . . . . 382
y, 2014 DDM ASP User Guide014 Jeppesen
vii

Contents
DD
vi
Process . . . . . . . . . . . . . . . . . . . . . . . . . . . . . . . . . . . . . . . . . . . . . . . . . . . . . . . . . . . . . 383Naming a Tail Engine . . . . . . . . . . . . . . . . . . . . . . . . . . . . . . . . . . . . . . . . . . . . . . . . . 386Creating a Tail Engine . . . . . . . . . . . . . . . . . . . . . . . . . . . . . . . . . . . . . . . . . . . . . . . . 387Editing a Tail Engine . . . . . . . . . . . . . . . . . . . . . . . . . . . . . . . . . . . . . . . . . . . . . . . . . 388Deleting a Tail Engine . . . . . . . . . . . . . . . . . . . . . . . . . . . . . . . . . . . . . . . . . . . . . . . . . 389
Deleting a Tail Engine with no Associated Recipient or Review Device . . . . . . . 389Deleting a Tail Engine with an Associated Recipient or Review Device . . . . . . . 389
Chapter 20: Managing Tail Models 391Overview . . . . . . . . . . . . . . . . . . . . . . . . . . . . . . . . . . . . . . . . . . . . . . . . . . . . . . . . . . . 392Process . . . . . . . . . . . . . . . . . . . . . . . . . . . . . . . . . . . . . . . . . . . . . . . . . . . . . . . . . . . . . 393Naming a Tail Model . . . . . . . . . . . . . . . . . . . . . . . . . . . . . . . . . . . . . . . . . . . . . . . . . 396Creating a Tail Model . . . . . . . . . . . . . . . . . . . . . . . . . . . . . . . . . . . . . . . . . . . . . . . . . 397Editing a Tail Model . . . . . . . . . . . . . . . . . . . . . . . . . . . . . . . . . . . . . . . . . . . . . . . . . . 399Deleting a Tail Model . . . . . . . . . . . . . . . . . . . . . . . . . . . . . . . . . . . . . . . . . . . . . . . . . 400
Deleting a Tail Model with No Associated Recipient or Review Device . . . . . . . 400Deleting a Tail Model with Associated Recipient or Review Device . . . . . . . . . . 400
Chapter 21: Troubleshooting 403
Glossary 451
Appendix A: EFB Legacy Process 469
Index 471
M ASP User Guide May, 2014© 2014 Jeppesen
ii

Figures
Figure 2.1. Package Delivery Process in DDM . . . . . . . . . . . . . . . . . . . . . . . . . . . . . 18Figure 2.2. CDAD Process Diagram . . . . . . . . . . . . . . . . . . . . . . . . . . . . . . . . . . . . . 21Figure 2.3. CDAB Process Diagram . . . . . . . . . . . . . . . . . . . . . . . . . . . . . . . . . . . . . . 23Figure 2.4. CDAF Process Diagram . . . . . . . . . . . . . . . . . . . . . . . . . . . . . . . . . . . . . 25Figure 2.5. CDAJ Process Diagram . . . . . . . . . . . . . . . . . . . . . . . . . . . . . . . . . . . . . . 26Figure 2.6. CDAL Process Diagram . . . . . . . . . . . . . . . . . . . . . . . . . . . . . . . . . . . . . 28Figure 3.1. Jeppesen Welcome page . . . . . . . . . . . . . . . . . . . . . . . . . . . . . . . . . . . . . . 54Figure 3.2. DDM Home page . . . . . . . . . . . . . . . . . . . . . . . . . . . . . . . . . . . . . . . . . . . 55Figure 3.3. Conventions on DDM pages . . . . . . . . . . . . . . . . . . . . . . . . . . . . . . . . . . 57Figure 3.4. Return to link on the View Published Package page . . . . . . . . . . . . . . . . 58Figure 3.5. DDM Home page . . . . . . . . . . . . . . . . . . . . . . . . . . . . . . . . . . . . . . . . . . . 59Figure 3.6. Deliver Packages graphic - detailed information . . . . . . . . . . . . . . . . . . . 60Figure 3.7. Navigation menu . . . . . . . . . . . . . . . . . . . . . . . . . . . . . . . . . . . . . . . . . . . 61Figure 3.8. Sample column sorted in ascending order . . . . . . . . . . . . . . . . . . . . . . . . 66Figure 3.9. Page links . . . . . . . . . . . . . . . . . . . . . . . . . . . . . . . . . . . . . . . . . . . . . . . . . 67Figure 3.10. Filters . . . . . . . . . . . . . . . . . . . . . . . . . . . . . . . . . . . . . . . . . . . . . . . . . . . . 68Figure 4.1. Areas Affected by Functions used to Manage Packages . . . . . . . . . . . . . 80Figure 4.2. Manage Packages page . . . . . . . . . . . . . . . . . . . . . . . . . . . . . . . . . . . . . . . 83Figure 4.3. Publish a Package page . . . . . . . . . . . . . . . . . . . . . . . . . . . . . . . . . . . . . . 84Figure 4.4. Define Properties tab . . . . . . . . . . . . . . . . . . . . . . . . . . . . . . . . . . . . . . . . 85Figure 4.5. Publish To tab . . . . . . . . . . . . . . . . . . . . . . . . . . . . . . . . . . . . . . . . . . . . . 87Figure 4.6. Manage Packages page . . . . . . . . . . . . . . . . . . . . . . . . . . . . . . . . . . . . . . . 89Figure 4.7. Assign Recipients tab on the Edit Package page . . . . . . . . . . . . . . . . . . . 91Figure 4.8. Compatibility icons . . . . . . . . . . . . . . . . . . . . . . . . . . . . . . . . . . . . . . . . . 92

Figures
DD
x
Figure 4.9. Edit Properties tab on the Edit Package page . . . . . . . . . . . . . . . . . . . . . . 94Figure 4.10. Assign Recipient Groups tab on the Edit Package page . . . . . . . . . . . . . . 97Figure 4.11. Assign Review Devices tab on the Edit Package page . . . . . . . . . . . . . . . 99Figure 4.12. Assign Consumers tab on the Edit Package page . . . . . . . . . . . . . . . . . . 101Figure 4.13. Confirm Package Associates page . . . . . . . . . . . . . . . . . . . . . . . . . . . . . 102Figure 4.14. Packages Available for Delivery list . . . . . . . . . . . . . . . . . . . . . . . . . . . . 103Figure 4.15. View Assigned Recipients tab on the View Package page . . . . . . . . . . . 105Figure 4.16. View Assigned Groups Tab on the View Package Page . . . . . . . . . . . . 106Figure 4.17. View Assigned Review Devices tab on the View Package page . . . . . . 106Figure 4.18. View Assigned Consumers tab on the View Package page . . . . . . . . . . 107Figure 4.19. View Properties tab on the View Package page . . . . . . . . . . . . . . . . . . . 108Figure 4.20. View Part page . . . . . . . . . . . . . . . . . . . . . . . . . . . . . . . . . . . . . . . . . . . . 109Figure 4.21. Remove Parts from Staging page . . . . . . . . . . . . . . . . . . . . . . . . . . . . . . 112Figure 4.22. Remove Parts tab on the Remove Parts from Staging page . . . . . . . . . . 113Figure 4.23. View Properties Tab on the Remove Parts from Staging page . . . . . . . . 114Figure 5.1. Package Checkpoints page . . . . . . . . . . . . . . . . . . . . . . . . . . . . . . . . . . . 117Figure 6.1. Find Part Delivery Status page . . . . . . . . . . . . . . . . . . . . . . . . . . . . . . . . 125Figure 6.2. Part Delivery Status page . . . . . . . . . . . . . . . . . . . . . . . . . . . . . . . . . . . . 126Figure 6.3. Find Package Delivery Status page . . . . . . . . . . . . . . . . . . . . . . . . . . . . . 127Figure 6.4. Package Delivery Status page . . . . . . . . . . . . . . . . . . . . . . . . . . . . . . . . . 128Figure 6.5. Find Version Delivery Status page . . . . . . . . . . . . . . . . . . . . . . . . . . . . . 129Figure 6.6. Version Delivery Status page . . . . . . . . . . . . . . . . . . . . . . . . . . . . . . . . . 130Figure 7.1. Archive Packages tab on the Archive Packages page . . . . . . . . . . . . . . . 134Figure 7.2. Unarchive/Delete Packages tab on the Archive Packages page . . . . . . . 136Figure 7.3. Manage Files tab on the Archive Packages page . . . . . . . . . . . . . . . . . . 141Figure 8.1. Manage Recipients page . . . . . . . . . . . . . . . . . . . . . . . . . . . . . . . . . . . . . 147Figure 8.2. Areas Affected by the Manage Recipients Function . . . . . . . . . . . . . . . 149Figure 8.3. Create Recipient page (Step 1: Select Recipient Type) . . . . . . . . . . . . . 155Figure 8.4. Define Properties tab on the Create Recipient - Tail page (Step 2: Define
Recipient Properties) . . . . . . . . . . . . . . . . . . . . . . . . . . . . . . . . . . . . 156Figure 8.5. Assign Recipient Groups tab . . . . . . . . . . . . . . . . . . . . . . . . . . . . . . . . . 158Figure 8.6. Create Recipient - Proxy page (Step 2: Define Recipient Properties) . . 169Figure 8.7. Create Recipient - Proxy page (Step 2: Define Recipient Properties)
Assign Tails tab . . . . . . . . . . . . . . . . . . . . . . . . . . . . . . . . . . . . . . . . 170Figure 8.8. View Recipient - Tail page: View Assigned Packages tab . . . . . . . . . . . 173Figure 8.9. View Recipient - Tail page: View Properties tab . . . . . . . . . . . . . . . . . . 174Figure 8.10. View Recipient - Tail page: View Assigned Group tab . . . . . . . . . . . . . 175Figure 8.11. Edit Recipient - Tail page: Assign Packages tab . . . . . . . . . . . . . . . . . . 177
M ASP User Guide May, 2014© 2014 Jeppesen

Figures
Ma© 2
Figure 8.12. Edit Recipient - Tail page: Edit Properties tab . . . . . . . . . . . . . . . . . . . . 179Figure 8.13. Edit Recipient - Tail page: Assign Recipient Groups tab . . . . . . . . . . . 180Figure 8.14. View Registration Credentials page . . . . . . . . . . . . . . . . . . . . . . . . . . . . 183Figure 8.15. Archive Recipients tab on the Archive Recipients page . . . . . . . . . . . . 186Figure 8.16. Unarchive/Delete Recipients tab on the Archive Recipients page . . . . . 188Figure 8.17. Manage Files tab on the Archive Recipients page . . . . . . . . . . . . . . . . . 190Figure 9.1. Manage Recipient Groups page . . . . . . . . . . . . . . . . . . . . . . . . . . . . . . . 194Figure 9.2. Areas affected by the Manage Recipient Groups function . . . . . . . . . . . 196Figure 9.3. Create Recipient Group page . . . . . . . . . . . . . . . . . . . . . . . . . . . . . . . . 199Figure 9.4. View Recipient Group page . . . . . . . . . . . . . . . . . . . . . . . . . . . . . . . . . . 201Figure 9.5. Edit Recipient Group page . . . . . . . . . . . . . . . . . . . . . . . . . . . . . . . . . . . 203Figure 10.1. Manage Review Groups page . . . . . . . . . . . . . . . . . . . . . . . . . . . . . . . . . 209Figure 10.2. Areas affected by the Manage Review Group function . . . . . . . . . . . . . 211Figure 10.3. Create Review Group page . . . . . . . . . . . . . . . . . . . . . . . . . . . . . . . . . . . 215Figure 10.4. View Review Group page . . . . . . . . . . . . . . . . . . . . . . . . . . . . . . . . . . . 217Figure 10.5. Edit Review Group page . . . . . . . . . . . . . . . . . . . . . . . . . . . . . . . . . . . . 219Figure 10.6. Delete Review Group page . . . . . . . . . . . . . . . . . . . . . . . . . . . . . . . . . . . 222Figure 11.1. Manage Review Devices page . . . . . . . . . . . . . . . . . . . . . . . . . . . . . . . . 225Figure 11.2. Areas Affected by the Manage Review Devices Function . . . . . . . . . . . 227Figure 11.3. Create Review Device page (Step 1: Select Review Device Type) . . . . 229Figure 11.4. Define Properties tab on the Create Review Device - Tail Page (Step 2: Define
Review Device Properties) . . . . . . . . . . . . . . . . . . . . . . . . . . . . . . . 230Figure 11.5. View Assigned Packages tab on the View Review Device - Tail page 232Figure 11.6. View Properties tab on the View Review Device - Tail page . . . . . . . . 233Figure 11.7. Edit Review Device - Assign Packages tab . . . . . . . . . . . . . . . . . . . . . . 235Figure 11.8. Edit Review Device - Edit Properties tab . . . . . . . . . . . . . . . . . . . . . . . . 237Figure 12.1. Manage Checkpoints page . . . . . . . . . . . . . . . . . . . . . . . . . . . . . . . . . . . 241Figure 12.2. Areas affected by the Manage Checkpoints function . . . . . . . . . . . . . . . 243Figure 12.3. Create Checkpoint page . . . . . . . . . . . . . . . . . . . . . . . . . . . . . . . . . . . . . 247Figure 12.4. View Checkpoint page . . . . . . . . . . . . . . . . . . . . . . . . . . . . . . . . . . . . . . 249Figure 12.5. Edit Checkpoint page . . . . . . . . . . . . . . . . . . . . . . . . . . . . . . . . . . . . . . . 251Figure 12.6. Delete Checkpoint page . . . . . . . . . . . . . . . . . . . . . . . . . . . . . . . . . . . . . 253Figure 13.1. Manage Content Types page . . . . . . . . . . . . . . . . . . . . . . . . . . . . . . . . . 257Figure 13.2. Create Content Type page . . . . . . . . . . . . . . . . . . . . . . . . . . . . . . . . . . . 260Figure 13.3. View Content Type page . . . . . . . . . . . . . . . . . . . . . . . . . . . . . . . . . . . . 262Figure 13.4. Edit Content Type page . . . . . . . . . . . . . . . . . . . . . . . . . . . . . . . . . . . . . 264Figure 13.5. Delete Content Type page . . . . . . . . . . . . . . . . . . . . . . . . . . . . . . . . . . . 266Figure 14.1. Areas related to the Manage EFB Certificates function . . . . . . . . . . . . . 276
y, 2014 DDM ASP User Guide014 Jeppesen
xi

Figures
DD
xi
Figure 14.2. Manage EFB Static Certificates page . . . . . . . . . . . . . . . . . . . . . . . . . . . 278Figure 14.3. Upload EFB Static Certificate page . . . . . . . . . . . . . . . . . . . . . . . . . . . . 279Figure 15.1. Manage Email Rules page . . . . . . . . . . . . . . . . . . . . . . . . . . . . . . . . . . . 285Figure 15.2. Areas Affected by the Manage Email Rules Function . . . . . . . . . . . . . . 287Figure 15.3. Create Email Rule page (Step 1: Select Email Rule Event) . . . . . . . . . . 291Figure 15.4. Create Email Rule page (Step 2: Define Properties) . . . . . . . . . . . . . . . 292Figure 15.5. To Groups tab on the Create Email Rules - Assign Emails page (Step 3: Assign
Emails) . . . . . . . . . . . . . . . . . . . . . . . . . . . . . . . . . . . . . . . . . . . . . . . 293Figure 15.6. To Users tab on the Create Email Rules - Assign Emails page (Step 3: Assign
Emails) . . . . . . . . . . . . . . . . . . . . . . . . . . . . . . . . . . . . . . . . . . . . . . . 294Figure 15.7. To Groups Tab on the Create Email Rules - Assign Emails Page (Step 3: Assign
Emails) . . . . . . . . . . . . . . . . . . . . . . . . . . . . . . . . . . . . . . . . . . . . . . . 296Figure 15.8. View Email Rule page . . . . . . . . . . . . . . . . . . . . . . . . . . . . . . . . . . . . . . 298Figure 15.9. Edit Email Rule page (Step 1: Edit Properties) . . . . . . . . . . . . . . . . . . . 299Figure 15.10. To Groups Tab on the Edit Email Rules - Assign Emails Page (Step 2: Assign
Emails) . . . . . . . . . . . . . . . . . . . . . . . . . . . . . . . . . . . . . . . . . . . . . . . 300Figure 16.1. Manage Filters page . . . . . . . . . . . . . . . . . . . . . . . . . . . . . . . . . . . . . . . . 321Figure 16.2. Areas Related to the Manage Filters function . . . . . . . . . . . . . . . . . . . . . 323Figure 16.3. Create Filter page (Step 1: Select Filter Type) . . . . . . . . . . . . . . . . . . . . 329Figure 16.4. Create Filter page (Step 2: Create Query) . . . . . . . . . . . . . . . . . . . . . . . . 330Figure 16.5. Filter fields . . . . . . . . . . . . . . . . . . . . . . . . . . . . . . . . . . . . . . . . . . . . . . . 330Figure 16.6. Create Filter page (Step 3: Select Fields & Finish) . . . . . . . . . . . . . . . . 332Figure 16.7. Preview Filter page . . . . . . . . . . . . . . . . . . . . . . . . . . . . . . . . . . . . . . . . . 335Figure 16.8. Edit Filter page (Step 1: Edit Query) . . . . . . . . . . . . . . . . . . . . . . . . . . . 336Figure 16.9. Edit Filter page (Step 2: Edit Fields & Finish) . . . . . . . . . . . . . . . . . . . . 337Figure 16.10. Set Defaults tab on the Manage Filters page . . . . . . . . . . . . . . . . . . . . . 339Figure 17.1. Manage LRUs page . . . . . . . . . . . . . . . . . . . . . . . . . . . . . . . . . . . . . . . . . 346Figure 17.2. Areas related to the Manage LRUs function . . . . . . . . . . . . . . . . . . . . . 348Figure 17.3. Create LRU page . . . . . . . . . . . . . . . . . . . . . . . . . . . . . . . . . . . . . . . . . . . 350Figure 17.4. Edit LRU page . . . . . . . . . . . . . . . . . . . . . . . . . . . . . . . . . . . . . . . . . . . . 352Figure 18.1. Manage Reports page . . . . . . . . . . . . . . . . . . . . . . . . . . . . . . . . . . . . . . . 357Figure 18.2. Manage Standard Reports page . . . . . . . . . . . . . . . . . . . . . . . . . . . . . . . 359Figure 18.3. Page controls in the standard reports . . . . . . . . . . . . . . . . . . . . . . . . . . . 360Figure 18.4. Breadcrumbs in the standard reports . . . . . . . . . . . . . . . . . . . . . . . . . . . . 360Figure 18.5. Input Controls dialog box . . . . . . . . . . . . . . . . . . . . . . . . . . . . . . . . . . . . 361Figure 18.6. Definitions section . . . . . . . . . . . . . . . . . . . . . . . . . . . . . . . . . . . . . . . . . 361Figure 18.7. Create Report page - select report type . . . . . . . . . . . . . . . . . . . . . . . . . 372Figure 18.8. Create Report page - create query . . . . . . . . . . . . . . . . . . . . . . . . . . . . . 373Figure 18.9. Create Report page - select fields and finish . . . . . . . . . . . . . . . . . . . . . 374
M ASP User Guide May, 2014© 2014 Jeppesen
i

Figures
Ma© 2
Figure 18.10. Edit Report page - edit query . . . . . . . . . . . . . . . . . . . . . . . . . . . . . . . . . 376Figure 18.11. Edit Report page - edit fields and finish . . . . . . . . . . . . . . . . . . . . . . . . . 377Figure 18.12. Run Report page . . . . . . . . . . . . . . . . . . . . . . . . . . . . . . . . . . . . . . . . . . . 378Figure 19.1. Manage Tail Engines page . . . . . . . . . . . . . . . . . . . . . . . . . . . . . . . . . . . 382Figure 19.2. Areas affected by the Manage Tail Engines function . . . . . . . . . . . . . . 384Figure 19.3. Create Tail Engine page . . . . . . . . . . . . . . . . . . . . . . . . . . . . . . . . . . . . 387Figure 19.4. Edit Tail Engine page . . . . . . . . . . . . . . . . . . . . . . . . . . . . . . . . . . . . . . 388Figure 19.5. Delete Tail Engine page . . . . . . . . . . . . . . . . . . . . . . . . . . . . . . . . . . . . 390Figure 20.1. Manage Tail Models page . . . . . . . . . . . . . . . . . . . . . . . . . . . . . . . . . . . 392Figure 20.2. Areas affected by the Manage Tail Models function . . . . . . . . . . . . . . . 394Figure 20.3. Create Tail Model page . . . . . . . . . . . . . . . . . . . . . . . . . . . . . . . . . . . . . 397Figure 20.4. Edit Tail Model page . . . . . . . . . . . . . . . . . . . . . . . . . . . . . . . . . . . . . . . 399Figure 20.5. Delete Tail Model page . . . . . . . . . . . . . . . . . . . . . . . . . . . . . . . . . . . . . 401Figure A.1. EFB Legacy Process . . . . . . . . . . . . . . . . . . . . . . . . . . . . . . . . . . . . . . . . 470
y, 2014 DDM ASP User Guide014 Jeppesen
xiii

Figures
DD
xi
M ASP User Guide May, 2014© 2014 Jeppesen
v

Tables
Table 1-1: Document Chapters . . . . . . . . . . . . . . . . . . . . . . . . . . . . . . . . . . . . . . . . . 10Table 1-2: Conventions . . . . . . . . . . . . . . . . . . . . . . . . . . . . . . . . . . . . . . . . . . . . . . . 12Table 2-1: CDAs . . . . . . . . . . . . . . . . . . . . . . . . . . . . . . . . . . . . . . . . . . . . . . . . . . . . 19Table 2-2: Recipient Types . . . . . . . . . . . . . . . . . . . . . . . . . . . . . . . . . . . . . . . . . . . . 29Table 2-3: DDM Roles and Permissions . . . . . . . . . . . . . . . . . . . . . . . . . . . . . . . . . . 30Table 2-4: Applications and Corresponding EFB Data . . . . . . . . . . . . . . . . . . . . . . . 33Table 2-5: Task Processing in DDM . . . . . . . . . . . . . . . . . . . . . . . . . . . . . . . . . . . . . 34Table 2-6: Delivery Statuses for Packages and Parts . . . . . . . . . . . . . . . . . . . . . . . . . 36Table 2-7: LSAP Definitions . . . . . . . . . . . . . . . . . . . . . . . . . . . . . . . . . . . . . . . . . . . 47Table 2-8: Description of Configuration Files . . . . . . . . . . . . . . . . . . . . . . . . . . . . . . 47Table 3-1: Functions in the DDM Navigation Menu . . . . . . . . . . . . . . . . . . . . . . . . . 61Table 4-1: DDM Functions that Support Publishing and Managing Packages . . . . . 78Table 4-2: Editable Fields on the Edit Properties Tab . . . . . . . . . . . . . . . . . . . . . . . . 95Table 8-1: Recipient Types . . . . . . . . . . . . . . . . . . . . . . . . . . . . . . . . . . . . . . . . . . . 146Table 8-2: DDM Functions that Support Creating and Managing Recipients . . . . . 151Table 8-3: Prerequisite Information Needed to Create a Recipient . . . . . . . . . . . . . 154Table 8-4: Combinations of Tail Models and Tail Engines
for the OPT CAM . . . . . . . . . . . . . . . . . . . . . . . . . . . . . . . . . . . . . . 159Table 8-5: Understanding Registration Credentials . . . . . . . . . . . . . . . . . . . . . . . . . 182Table 9-1: DDM Functions that Support Creating and Managing Recipient Groups 198Table 11-1: Understanding Registration Credentials . . . . . . . . . . . . . . . . . . . . . . . . . 224Table 16-1: Description of Filter Types . . . . . . . . . . . . . . . . . . . . . . . . . . . . . . . . . . . 325Table 16-2: Filter Operators . . . . . . . . . . . . . . . . . . . . . . . . . . . . . . . . . . . . . . . . . . . . 333Table 17-1: Available LRUs . . . . . . . . . . . . . . . . . . . . . . . . . . . . . . . . . . . . . . . . . . . 345

Tables
DD
xv
Table 18-1: Recipient Snapshot Report Fields . . . . . . . . . . . . . . . . . . . . . . . . . . . . . . 368Table 21-1: Errors that Appear in Pop-up Windows . . . . . . . . . . . . . . . . . . . . . . . . . 404Table 21-2: Error Messages in DDM . . . . . . . . . . . . . . . . . . . . . . . . . . . . . . . . . . . . . 408
M ASP User Guide May, 2014© 2014 Jeppesen
i

CHAPTER 1
Introduction
The DDM ASP User Guide describes the key tasks performed by airline administration personnel who use Data Distribution and Management (DDM) Application Service Provider (ASP) to manage the secure delivery of content to recipients.
This chapter contains the following topics:
• New Features
• How this Guide is Organized
• How this Guide is Organized
• Additional References
• Product Support

IntroductionNew Features
DD
2
New FeaturesDDM version 6.0.2.8 includes the following features and enhancements:
• Support for Versioned Content
• Standard Reports
• Auto-Archive and Auto-Delete
• Archiving Performance Improvements
• Content Management
• Find Delivery Status
• Delivery Status
• Streamlined Approval Process
• Disk Space Usage
• Enhanced Filters
• Enhanced Email Rules
• New CDAF Version
Support for Versioned Content
DDM now supports versioned content, which is also known as Application Data Enhanced Load (ADEL) content. Versioned content includes ADEL-enabled, frequently updated application data that can be loaded onto an ADEL-enabled EFB by the flight crew, bypassing the need for mechanics to manually load the data. Versioned content enables airlines to reduce the effort and cost of wireless staging and loading of frequently changing EFB data by reducing wireless bandwidth usage and mechanic work load.
Versioned content includes the following LSAPs:
• Terminal Charts data
• Airport Moving Map data
• EFB Document Browser (EDB) documents and its application configuration file
• Onboard Performance Tool (OPT) databases and its application configuration file
M ASP User Guide May, 2014© 2014 Jeppesen

IntroductionNew Features
Ma© 2
Versioned content uses delta sets to ensure that regardless of the LSAP version an airplane reports, the LSAP can be updated to the latest version using less bandwidth than the entire LSAP. After a new version of an LSAP is assigned and approved for delivery to an airplane, DDM identifies the differences between the version on the airplane and the new version assigned to it. Using that information, DDM creates a delta set that contains the changes between the versions. The versions do not need to be sequential. For example, DDM will create delta sets between versions 2 and 5 as well as 1 and 2. DDM transfers the delta set necessary to upgrade the onboard content to the latest version. CDAF installed on the airplane’s EFB then applies the delta set and creates an LSAP that matches the new version assigned in DDM. Flight crews are prompted to load the updated data.
When working with versioned content, DDM can provide more insight, both through reports and delivery status, into the parts assigned to, staged, and loaded on an ADEL-enabled EFB.
DDM generates delta sets for versioned content packaged only as an ARINC 665 media set and intended for delivery to Boeing ADEL-enabled EFBs with CDAF JEP42-DMEP-0010 or later installed. If CDAF is installed on an EFB that is not ADEL-enabled and it receives versioned content, the content will be treated as non-versioned content and processed accordingly. If versioned content is sent to an EFB running a version of CDAF earlier than JEP42-DMEP-0010, the content will be treated as non-versioned content.
The OPT application takes advantage of the effectivity capabilities of versioned content. You can assign to an airplane OPT databases and application configuration files with versions that become effective in the future. When the versions become effective, the flight crew is prompted to load the updated parts.
Before assigning a new version of content, users should unassign the version currently loaded on the airplane.
Standard Reports
DDM 6.0.2.8 ASP includes a new collection of standard reports that you can use to stay current on the configuration of the tails in your fleet. The standard reports provide more sophisticated layouts than the existing DDM reports as well as more exporting options, including to pdf, Excel, Word, and Flash. Unlike the existing configurable reports, you do not need to build standard reports; you simply select a report and run it.
Although all customers can use them, standard reports were designed to provide key insight to customers using versioned content under the ADEL concept. Using these reports, you can track the status of each part assigned to an airplane on both EUs.
y, 2014 DDM ASP User Guide014 Jeppesen
3

IntroductionNew Features
DD
4
Auto-Archive and Auto-Delete
The automatic archive and delete functions (auto-archive and auto-delete) work together to provide a way to automatically archive and delete packages based on the start delivery date and content type of the package. DDM calculates an expected archive date on which it will automatically archive the package. After automatically archiving the package, DDM calculates an expected delete date on which it will automatically delete the archived package. DDM performs the auto-archive and auto-delete functions at midnight UTC (00:00:00Z).
DDM calculates the expected archive date by comparing the Package Duration value of the package’s content type (which is a configurable number of days) to the Start Delivery Date value of the package. You can view the Expected Archive Date on the Archive Packages and View Package pages. On the expected archive date, DDM automatically archives the package.
DDM calculates the expected delete date by comparing the Time to Delete value of the package’s content type (which is a configurable number of days) to the Expected Archive Date value of the package. You can view the Expected Delete Date on the Archive Packages and View Package pages. On the expected delete date, DDM automatically deletes the package.
To set up auto-archive and auto-delete, you must set the Package Duration and Time to Delete values of each content type that you want to automatically archive and delete.
To help users stay informed about the auto-archive and auto-delete process, DDM 6.0.2.8 includes the following new event types, which you can use to create email rules:
• Package Archive Warning
• Package Archived
• Package Delete Warning
• Package Deleted
Archiving Performance Improvements
In DDM 6.0.2.8, you can now perform other tasks while DDM archives files. In earlier versions, archiving a large package, many packages, or a package with an extensive history took a long time and users could not continue to use the application while DDM processed the package.
M ASP User Guide May, 2014© 2014 Jeppesen

IntroductionNew Features
Ma© 2
Content Management
To support both legacy and versioned content, the Package Management function has been renamed Content Management. In addition, the Deliver Packages and Publish Packages functions are now combined under the Manage Packages function.
Users who are assigned the Content Manager role will now click Manage Packages to view, edit, and deliver packages.
Users who are assigned the Content Publisher role will now click Manage Packages to publish packages.
Find Delivery Status
The Find Part and Find Package functions are now organized under the Find Delivery Status function. In addition to viewing the delivery status of a part or package, you can also search for versioned content by Version ID.
Delivery Status
The Delivery Status information on the View Package, Edit Package, View Recipient, and Edit Recipient pages now includes more information about the status of the parts in the package. After DDM delivers a part to CDAF, the Delivery Status column will indicate the status of each part on both left and right EUs, including whether the part is staged or loaded.
DDM 6.0.2.8 includes several other enhancements to help you view delivery status, including the standard reports and Find Delivery Status functions.
Streamlined Approval Process
Earlier versions of DDM included the ability to approve a package using recipient checkpoints. DDM no longer includes recipient checkpoints. All checkpoints are now associated with packages. This change affects the following areas in DDM:
• DDM no longer includes Pending Delivery review report types.
y, 2014 DDM ASP User Guide014 Jeppesen
5

IntroductionNew Features
DD
6
• The Approve/Reject Package function no longer includes functionality for approving packages at recipient checkpoints.
• The View Recipient page no longer includes a Recipient Checkpoint Status column.
• You can no longer assign a recipient checkpoint to packages on the View or Edit Recipient pages.
• The Delete Checkpoint page no longer includes a Recipient Checkpoints section.
• DDM no longer supports email rules based on Package Delivery type events.
Disk Space Usage
DDM 6.0.2.8 functionality enables Jeppesen to better manage and monitor disk space usage by allocating a certain amount of storage space for each company. After Jeppesen allocates your company’s disk space, DDM monitors your usage daily. When the sum of your active and archived packages reaches or exceeds 80 percent of your allocation, DDM triggers the Disk Space Usage Warning event. If you create an email rule based on this event, DDM will notify you when you exceed your allotted disk space. The email will be sent every day until the disk space usage falls below 80 percent.
Enhanced Filters
The Manage Filters functions are enhanced in DDM 6.0.2.8 with new default filters and the consolidation of delivered and published package filters.
DDM 6.0.2.8 includes the following new default Packages and Recipients filters:
• Active Packages, which enables you to display only active packages
• Expired Packages, which enables you to display only expired packages
• Search Packages by Name, which enables you to search for all or part of a package name
• Search Recipients by Name, which enables you to search for all or part of a recipient name
M ASP User Guide May, 2014© 2014 Jeppesen

IntroductionNew Features
Ma© 2
The Edit Recipient page also includes the following default filters, which are available from the View list:
• Selected Packages, which enables you to display only the packages that you already selected
• Compatible Packages, which enables you to display only the packages that DDM identifies as compatible with the recipient
Enhanced Email RulesThe Manage Email Rules function is enhanced in DDM 6.0.2.8 to support improvements to DDM archiving, disk space usage, and the removal of recipient checkpoints.
To help manage the auto-archive and auto-delete processes, DDM 6.0.2.8 includes the following new event types that you can use to create email rules:
Package Archive Warning
This event type can be used to create an email rule that notifies the specified recipients before DDM automatically archives a package. When you create the email rule, you specify the number of days before the package is scheduled to be archived that you want email recipients to receive the warning email.
Package Archived Each time a package is archived, whether automatically or manually, DDM generates the Package Archived event. Use this event to create an email rule to notify email recipients when DDM archives a package.
Package Delete Warning
This event type can be used to create an email rule that notifies the specified recipients before DDM automatically deletes a package. When you create the email rule, you specify the number of days before the package is scheduled to be deleted that you want email recipients to receive the warning email.
Package Deleted Each time a package is deleted, whether automatically or manually, DDM generates the Package Archived event. Use this event to create an email rule to notify email recipients when DDM deletes a package.
y, 2014 DDM ASP User Guide014 Jeppesen
7

IntroductionNew Features
DD
8
If Jeppesen allocates your disk space, you can use the Disk Space Usage Warning event type to create an email rule that notifies email recipients that your company has reached 80% of the maximum configured allocation.
Because Recipient Checkpoints no longer exist, the following event types and their related email rules have been removed in DDM 6.0.2.8:
• Package Delivery Approved at Checkpoint
• Package Delivery Approved by Reviewer
• Package Delivery Auto Approved
• Package Delivery Review Rejected
• Package Delivery Review Required
New CDAF Version
The Content Delivery Agent for the Electronic Flight Bag (CDAF) application has been updated to version JEP40-DMEP-0012 to support DDM 6.0.2.8 ASP.
The new version of CDAF includes the following key features:
• CDAF can be enabled to receive, stage, and report status of versioned content (ADEL-enabled).
• CDAF provides synchronization between the left and right EUs.
• CDAF writes log files to both EUs.
• CDAF automatically deletes parts in the staging area under the following conditions:
– When you unassign the package containing the part in DDM
– When legacy parts are loaded
– When versioned content is loaded and activated on both EUs
• CDAF writes faults to the EFB that can be interpreted using the Fault Isolation Manual.
On ADEL-enabled EFBs, CDAF identifies a package to be uploaded based on a comparison between the current configuration on the airplane and the specified configuration in DDM. If CDAF identifies any difference, it retrieves, if possible, a delta set instead of a complete new
M ASP User Guide May, 2014© 2014 Jeppesen

IntroductionNew Features
Ma© 2
part. The delta set contains only the changes calculated between LSAP versions. After retrieving a delta set, CDAF reconstructs the part in the airborne staging area. CDAF then deletes the delta set from its local repository.
Intended Audience
The DDM ASP User Guide is primarily for airline employees who use DDM to:
• Publish and deliver content to recipients.
• Set up and manage the content delivery network within DDM.
• Send content from DDM to client applications.
• Generate reports to monitor package delivery.
Refer to “Understanding the DDM Roles and Associated Functions” on page 30 for information about the user roles assigned in DDM.
y, 2014 DDM ASP User Guide014 Jeppesen
9

IntroductionHow this Guide is Organized
DD
10
How this Guide is OrganizedThe DDM ASP User Guide is organized into chapters that provide information about related tasks you can perform in DDM. The following table lists the chapters and provides a brief description of their contents.
Table 1-1 Document Chapters
Chapter Description
Chapter 1, “Introduction.” Identifies who will use this document, explains its organization and conventions, and describes where to find related information and product support.
Chapter 2, “About DDM.” Provides an overview of DDM and the package distribution process. Explains the functions available in DDM, roles, event types, and page conventions. Explains how to sort data, navigate through lists, and use the navigation menu. Describes task processing, checkpoints, recipients, and the review process. Provides a definition of formats for packages and loadable software airplane parts (LSAPs). Explains reporting and filtering. Describes the DDM archival process. Describes the DDM clients (CDAF, CDAD, CDAB, CDAJ and CDAL).
Chapter 3, “Getting Started.” Explains how to start, set up, and exit DDM.
Chapter 4, “Managing Packages.” Describes publishing, uploading delivering, and viewing packages; viewing parts in a package; changing package review status; and removing parts from the staging area.\ Describes how to search for, archive, unarchive, and delete a package. Explains how to download an archive.zip file of an archived package.
Chapter 5, “Approving and Rejecting Packages.”
Describes how to approve or reject a package.
Chapter 6, “Finding Content Delivery Status.”
Describes how to find the delivery status of content in DDM to discover possible reasons why the specified content might not have been delivered to the specified recipient or review device.
Chapter 7, “Archiving and Deleting Packages.”
Describes how to archive, unarchive, and delete a package and how to download an archive.zip file of an archived package.
Chapter 8, “Managing Recipients.”
Describes how to create, view, edit, and delete a recipient in DDM. Explains how to archive, unarchive, and delete a recipient. Explains how to load an archive.zip file for an archived recipient.
Chapter 9, “Managing Recipient Groups.”
Describes how to create, view, edit, and delete a recipient group.
Chapter 10, “Managing Review Groups.”
Describes how to create, view, edit, and delete a review group in DDM.
Chapter 11, “Managing Review Devices.”
Describes how to create, view, edit, and delete a review device in DDM. Also explains how to convert a recipient into a review device.
M ASP User Guide May, 2014© 2014 Jeppesen

IntroductionHow this Guide is Organized
Ma© 2
Chapter 12, “Managing Checkpoints.”
Explains how to create, view edit, and delete a checkpoint in DDM.
Chapter 14, “Managing EFB Certificates.”
Describes how to convert and upload a certificate to DDM.
Chapter 13, “Managing Content Types.”
Describes how to create, view, edit, and delete a content type in DDM.
Chapter 15, “Managing Email Rules.”
Describes how to create, view, edit, and delete an email rule in DDM.
Chapter 16, “Managing Filters.” Explains how to create, view, edit, and delete a filter in DDM. Also describes how to set default filters.
Chapter 17, “Managing LRUs.” Explains how to create, edit, and delete an LRU in DDM.
Chapter 18, “Managing Reports.” Describes how to generate, view, and print reports. Also explains how to export a report to an Excel spreadsheet.
Chapter 19, “Managing Tail Engines.”
Describes how to create, edit, and delete a tail engine in DDM.
Chapter 20, “Managing Tail Models.”
Describes how to create, edit, and delete a tail model in DDM.
Chapter 21, “Troubleshooting.” Lists and describes every error message that you may encounter while using DDMASP. Also provides feasible resolutions for each issue.
Chapter 22, “Glossary.” Describes the terms and acronyms used in this guide.
Appendix A, “EFB Legacy Process.”
Describes the Boeing EFB Legacy Process, where you can wirelessly deliver customer parts and Jeppesen data to a Boeing 787.
Table 1-1 Document Chapters (continued)
Chapter Description
y, 2014 DDM ASP User Guide014 Jeppesen
11

IntroductionConventions
DD
12
ConventionsAs you read this material it is important to understand the conventions described in the following table.
Table 1-2 Conventions
Convention Description
Bold Text This convention represents the proper name of buttons, fields, and tabs.
Courier Font For filenames, directories, server names, variables, etc.
Bold Courier Indicates that the reader must type the text exactly as shown.
< > This convention represents a variable, with the variable name displaying between the brackets; for example, <package name>.
Keyboard keys in ALL CAPS
The names of keyboard keys are presented in all capital letters (e.g, ENTER and CTRL).
M ASP User Guide May, 2014© 2014 Jeppesen

IntroductionAdditional References
Ma© 2
Additional ReferencesJeppesen offers detailed, task-oriented documentation to DDM customers. The documentation suite for DDM includes the following documents:
• DDM Online Help
• Content Delivery Agent for the Desktop (CDAD) User Guide
• Content Delivery Agent for Boeing (CDAB) User Guide
• Content Delivery Agent for Jeppesen (CDAJ) User Guide
• Content Delivery Agent for the LoadStar (CDAL) User Guide
y, 2014 DDM ASP User Guide014 Jeppesen
13

IntroductionProduct Support
DD
14
Product SupportYou can contact the Jeppesen 24/7 Global Technical Support Services at:
Western Hemisphere
• 1-800-538-7526 (Toll Free)
• 303-328-6830 (US Local)
Eastern Hemisphere
• +44-1293-842406 (UK)
• +49-6102-508450 (Frankfurt, DE)
Pacific Basin • 1-800-256-181 (Toll Free)
• +61-731-248-250 (Brisbane)
Email Email: [email protected]
Tell Us What You ThinkTake a short survey to evaluate our user documentation. Thank you for helping us improve our documents.
Documentation Survey
M ASP User Guide May, 2014© 2014 Jeppesen

CHAPTER 2
About DDM
This chapter provides a brief description of DDM and its associated functions.
This chapter contains the following topics:
• What is DDM?
• Understanding the Package Delivery Process
• Understanding the DDM Roles and Associated Functions
• Understanding the Types of Data Available
• Understanding Task Processing in DDM
• Viewing the Package Status in DDM
• Understanding DDM Reporting
• Understanding DDM Filtering
• Understanding Event Types
• Understanding the DDM Archival Process
• Understanding Wrapping Types
• Understanding Loadable Software Airplane Parts

About DDMWhat is DDM?
DD
16
What is DDM?DDM is a web-based application that enables you to manage the distribution and delivery of data, configuration files, and software, collectively referred to as content, used on board an aircraft. DDM defines the expected configuration of an EFB. Content published to DDM and subsequently delivered to aircraft is transferred in a zip file called a package. For example, you might deliver a package of terminal charts to an aircraft equipped with a Class 3 EFB. Using DDM, you can also set up checkpoints and track the delivery of a package.
DDM consists of several functions that you can use to set up package delivery and publishing, as well as manage the delivery network. The DDM administrator assigns DDM users to one or more roles that provide access to the appropriate DDM functions. Refer to “Understanding the DDM Roles and Associated Functions” on page 30 in this chapter for more information.
M ASP User Guide May, 2014© 2014 Jeppesen

About DDMUnderstanding the Package Delivery Process
Ma© 2
Understanding the Package Delivery Process The package delivery process that describes the progress of a package from publication to DDM to final delivery to the aircraft or other recipient. Figure 2.1 illustrates the package delivery process. The numbered steps in the figure represent the following tasks and functions:
An external source publishes a package to the DDM server.
The DDM user assigns delivery properties to the package.
The DDM user associates the package with checkpoints, recipients, and recipient groups.
The DDM server passes the package through applicable checkpoints.
The user receives the package from the DDM server. (If there are no reviewers assigned to the package, the package is autoapproved.)
The user reviews the contents of the package. If other reviewers must verify the contents before delivery, the package returns to .
The DDM server transfers the approved package to the CDA installed on a recipient.
The recipient returns a status regarding the transferred parts.
y, 2014 DDM ASP User Guide014 Jeppesen
17

About DDMUnderstanding the Package Delivery Process
DD
18
Understanding the DDM Server
The DDM server resides at Jeppesen’s operations center. Users publish package data from their browser to the DDM server. The DDM server receives the package and, if applicable, notifies any checkpoints of pending reviews and sends the package to any assigned review devices. Packages that require approval must be reviewed and approved before being sent to a CDA.
Figure 2.1. Package Delivery Process in DDM
M ASP User Guide May, 2014© 2014 Jeppesen

About DDMUnderstanding the Package Delivery Process
Ma© 2
Understanding Checkpoints
A checkpoint is an inspection step in the sequential DDM workflow that consists of individual Reviewers or Review Groups and, if necessary, the dedicated computer (review device) that they use to load and evaluate packages. After you define checkpoints, you can assign them to content types or individual packages. Assign checkpoints to content types to ensure that all packages of the specified content type are routed to the same checkpoint.
Using the review device assigned to a package checkpoint, reviewers receive packages using a CDA, such as CDAD, and review the contents. Reviewers then use DDM to either reject or approve the package content. Only after the package content is approved by reviewers at checkpoints can the package be delivered to recipients.
To ensure that the individual responsible for reviewing package content is notified about content that needs review, you can create an email rule. Refer to “Understanding Event Types” on page 41 for more information about the events in DDM that generate automatic emails.
Understanding Content Delivery Agents
Content Delivery Agents (CDAs) are applications that download and process packages from the DDM server. An airline may use any combination of CDAs. The CDAs are installed on the devices noted in the following table.
Table 2-1 CDAs
CDA Installed on
Content Delivery Agent for the Desktop (CDAD) Desktop PC or laptop
Content Delivery Agent for the Flight Bag (CDAF) Boeing Class 3 or Class 2 Electronic Flight Bag (EFB)
Content Delivery Agent for Jeppesen (CDAJ) Class 1 or 2 Jeppesen Electronic Flight Bag (EFB)
Content Delivery Agent for LoadStar (CDAL) Portable Maintenance Access Terminal (PMAT), server PC, or desktop PC running the LoadStar application
Content Delivery Agent for Boeing Class 1 (CDAB) Class 1 Boeing Electronic Flight Bag (EFB)
y, 2014 DDM ASP User Guide014 Jeppesen
19

About DDMUnderstanding the Package Delivery Process
DD
20
Understanding CDAD
The Content Delivery Agent for Desktop (CDAD) is installed on your local desktop PC. CDAD can connect directly to the DDM server via an HTTP connection or to a proxy server to gain access to the Internet and communicate with the DDM server. CDAD is commonly used on a review device associated with a checkpoint.
When CDAD is open, it polls DDM for packages at configurable intervals (every thirty minutes by default). To keep the polling service active, keep the CDAD interface open or minimized.
When CDAD finds a package on DDM that meets the download criteria, CDAD retrieves the package. When CDAD retrieves a package from DDM, it communicates a status back to DDM so that the Content Manager and Recipient Manager can view the delivery status of the package on the DDM server. CDAD also displays the delivery status of the package on the Packages tab. You cannot change this status in DDM or CDAD.
In addition to retrieving published packages from DDM, CDAD also logs and displays messages associated with the packages being received from the DDM server.
M ASP User Guide May, 2014© 2014 Jeppesen

About DDMUnderstanding the Package Delivery Process
Ma© 2
Figure 2.2 illustrates the CDAD process, depicting CDAD as both a review device and a recipient.
Understanding CDAB
The Content Delivery Agent for Boeing Class 1 (CDAB) is installed on a Boeing Class 1 Electronic Flight Bag (EFB) device. CDAB can connect directly to the DDM server via an HTTP connection or to a proxy server to gain access to the Internet and communicate with the DDM server. CDAB downloads packages from DDM and prepares them to be loaded on a Boeing Class 1 EFB device.
Figure 2.2. CDAD Process Diagram
y, 2014 DDM ASP User Guide014 Jeppesen
21

About DDMUnderstanding the Package Delivery Process
DD
22
CDAB receives ARINC 665 media sets and non-ARINC 665 packages from the DDM server, unzips the package, and places the contents in the ExpandedPackages directory. If the files in the ExpandedPackages directory are not ARINC 665 files, CDAB creates a new directory with the same name as the package in the user-configured DDM Content directory, and then moves the files there. If the ExpandedPackages directory contains ARINC 665 parts, CDAB delivers them to the staging area. Once extracted, a mechanic loads the valid parts on an EFB from the staging area. After loading, CDAB updates the status of the package to Complete, and deletes from the staging area temporary files and parts that are not included in any packages on the DDM server. Airline personnel can manually remove the parts in the staging area that are loaded onto the EFB.
When CDAB is open, it polls DDM for packages at configurable intervals (every sixty minutes by default). To keep the polling service active, keep the CDAB interface open or minimized. When CDAB finds a package on DDM that meets the download criteria, CDAB retrieves the package. When CDAB retrieves a packages from DDM, it communicates a status back to DDM, so that the Content Manager and Recipient Manager can view the delivery status of the package on the DDM server. CDAB also displays the delivery status of the package on the Packages tab. Refer to the CDAB User’s Guide for more information about CDAB.
M ASP User Guide May, 2014© 2014 Jeppesen

About DDMUnderstanding the Package Delivery Process
Ma© 2
Figure 2.3 illustrates the CDAB process, depicting CDAB as both a review device and a recipient.
Figure 2.3. CDAB Process Diagram
y, 2014 DDM ASP User Guide014 Jeppesen
23

About DDMUnderstanding the Package Delivery Process
DD
24
Understanding CDAF
CDAF is installed on Class 3 Boeing EFBs that are enabled for a Terminal Wireless LAN Unit (TWLU) and on Class 2 Boeing EFBs using TWLU, cellular, or other wireless connectivity. CDAF runs in the background and does not have a user interface. It is loaded onto the EFB as a Loadable Software Airplane Part (LSAP). CDAF interacts with other software installed on the EFB and with DDM to request, receive, and manage parts.
CDAF receives packages from the DDM server that are wrapped in ARINC 665 format. Only those packages whose parts are not already loaded on the EFB are loaded. CDAF reports the parts and their staging status. Within the staging area, CDAF extracts all parts from the package, deletes the unnecessary parts, stages the parts that are needed, and changes the part statuses to Complete. CDAF then extracts those parts in an effort to prepare the parts for loading onto the EFB. Parts with a status of Processing cannot be loaded. Once extracted, a mechanic loads the valid parts on an EFB from the staging area. CDAF automatically removes parts from the staging area after they are loaded. Airline personnel can also manually remove the parts in the staging area or use DDM to remove the parts.
If CDAF is enabled to receive versioned content that is loadable by the flight crew (ADEL-enabled), it places the content in the staging area and notifies the flight crew. Once the content is loaded by the flight crew and activated, CDAF automatically removes it from the staging area.
CDAF only connects with DDM when the airplane on which the EFB resides is on the ground. This is indicated by Weight on Wheels (WOW) and an established wireless connection. If the link is not available, CDAF will not communicate with DDM.
CDAF communicates to DDM which parts are staged and loaded on an EFB. This information displays in the Recipient Snapshot report. For more information, refer to Chapter 18, “Managing Reports.”
M ASP User Guide May, 2014© 2014 Jeppesen

About DDMUnderstanding the Package Delivery Process
Ma© 2
Figure 2.4 illustrates the CDAF process.
Understanding CDAJ
Packages intended for delivery to a Class 1 and 2 Jeppesen EFB must pass through CDAJ for delivery. CDAJ processes both Bill of Material (BOM) packages and ARINC 665 packages (media sets). For BOM packages, CDAJ interacts with the Jeppesen Update Manager (JUM) before the Data Loader loads the parts on the EFB. For ARINC 665 packages, CDAJ communicates directly with the Jeppesen EFB data loader.
To process BOM packages, CDAJ polls the DDM server for packages and communicates to JUM that packages are available for delivery. JUM confers with the Jeppesen EFB data loader to determine what parts it requires and relays the required parts to CDAJ. CDAJ downloads
Figure 2.4. CDAF Process Diagram
y, 2014 DDM ASP User Guide014 Jeppesen
25

About DDMUnderstanding the Package Delivery Process
DD
26
the relevant Bill of Material (BOM) packages from the DDM server and stages them in the default directory. JUM then retrieves and processes the packages, stages the parts, and sends the parts to the Jeppesen EFB data loader.
To process ARINC 665 media sets, CDAJ polls the DDM server for packages and retrieves packages that meet the download criteria. CDAJ then parses the ARINC 665 media sets and makes the parts available to the Jeppesen EFB data loader.
After CDAJ retrieves a published package from DDM, CDAJ communicates a status back to DDM that enables the user to view the delivery status of the published package. CDAJ logs and displays this same package delivery status on the Packages tab. The user cannot change this status in either DDM or CDAJ.
Figure 2.5 illustrates how a package is published to DDM, reviewed, received in CDAJ, passed to the JUM, and delivered to the EFB.
Figure 2.5. CDAJ Process Diagram
M ASP User Guide May, 2014© 2014 Jeppesen

About DDMUnderstanding the Package Delivery Process
Ma© 2
Understanding CDAL
When you publish a package in DDM and all checkpoints approve that package, it is ready for delivery to all assigned recipients. If the package is intended for delivery to a Class 3 EFB that receives data via a PMAT or other device using LoadStar,1 CDAL can download the package and automatically install it in LoadStar for delivery to all intended recipients, typically tails.
CDAL can reside on a workstation, PMAT, or other device that is connected to the Internet and running the LoadStar application programming interface. LoadStar enables you to manage and track the configuration of all loadable software on a recipient.
When CDAL is open, it constantly polls DDM for packages. To keep the polling service active, keep the CDAL interface open or minimized. When CDAL finds packages that meet the download criteria, CDAL retrieves them and stages 665-wrapped parts in the LoadStar library for a Proxy recipient. LoadStar then loads the parts onto the EFB. When CDAL receives a published package from DDM, it communicates a status back to DDM, so that you can view the status of your package on the Deliver Packages page in DDM. CDAL also displays the delivery status of the package. You cannot change this status.
In addition to retrieving published packages from DDM, CDAL also logs and displays messages associated with packages being loaded and provides information about which tails and parts are associated with a package. Refer to the CDAL User’s Guide for more information.
1. LoadStar is an external application from Teledyne Controls.
y, 2014 DDM ASP User Guide014 Jeppesen
27

About DDMUnderstanding the Package Delivery Process
DD
28
Figure 2.6 illustrates how CDAL receives a published package, installs on the PMAT, and uploads to the EFBs.
Understanding Recipients
A recipient is an entity that receives packages. The system defines recipients with a set of metadata.
A CDA installed on a recipient receives packages from the DDM server and performs one of the following tasks, depending on the type of CDA:
Figure 2.6. CDAL Process Diagram
M ASP User Guide May, 2014© 2014 Jeppesen

About DDMUnderstanding the Package Delivery Process
Ma© 2
• Installs the packages on a Class 3 EFB when running CDAF
• Installs the packages in LoadStar when running CDAL
• Downloads the packages to a specific directory when running CDAD
• Installs the packages on a Class 1 or 2 Jeppesen EFB when running CDAJ
• Installs the packages on a Class 1 or 2 Boeing EFB when running CDAB
DDM enables the Recipient Manager and Airline Manager roles to manage three types of recipients: Tail, Proxy, and Basic. The following table defines these recipient types.
Table 2-2 Recipient Types
Recipient Type Description
Tail A recipient directly associated with an aircraft, such as a Boeing EFB Class 3 device. This recipient type can use CDAF to send packages to the Class 3 EFB or CDAJ to send packages to the Class 1 or 2 Jeppesen EFB. This is the only recipient type that is compatible with LRUs.
Proxy A recipient used to deliver content to other Tail recipients. This recipient type uses CDAL to send packages to LoadStar, which is installed on the recipient. This recipient type can also use CDAJ to send packages to the Class 1 or 2 Jeppesen EFB.
Basic A recipient that is not a Tail, Server, or Proxy, and includes EFB Class 1 or 2, as well as general purpose devices. This recipient type uses CDAD to send packages to the desktop.
y, 2014 DDM ASP User Guide014 Jeppesen
29

About DDMUnderstanding the DDM Roles and Associated Functions
DD
30
Understanding the DDM Roles and Associated FunctionsAs a DDM user, you are assigned one or more roles that enable you to use specific DDM functions. Your assigned roles also determine the fields that display on the DDM pages.
The following table describes the different DDM roles that can be assigned to users and the available functions per role. DDM roles display down the left side of the table; DDM functions display across the top of the table.
Table 2-3 DDM Roles and Permissions
DDM Roles
Con
tent
Pu
blis
her
Con
tent
M
anag
er
Rec
ipie
nt
Man
ager
R
evie
w
Man
ager
Rev
iew
er
Airl
ine
Man
ager
Arc
hive
r
Syst
emA
dmin
istr
ator
Permissions
Content Management
Manage Packages X X X X
Approve/Reject Package X X
Find Delivery Status X X X X X
Archive Packages X X
Recipient Management
Manage Recipients X X X
Archive Recipients X X
Manage Recipient Groups X X X
Review Management
Manage Review Groups X X X
Manage Review Devices X X X X
Manage Checkpoints X X X
M ASP User Guide May, 2014© 2014 Jeppesen

About DDMUnderstanding the DDM Roles and Associated Functions
Ma© 2
In addition to the role permissions shown above, the following permissions must be set to access functions from within several DDM pages:
• To access the Assign Packages tab on the Manage Recipients page, you must be assigned the Recipient Manager and Content Manager roles.
• If you are assigned the Content Manager and Recipient Manager roles, you will have access to a set of links on both the Edit Multiple Packages and Edit Multiple Recipients pages; these links enable you to toggle back and forth between these two pages.
• If you are assigned the Recipient Manager role, but not the Content Manager role, the links between the Edit Multiple Packages and Edit Multiple Recipients pages do not display.
• To remove parts from staging, you must be assigned the Content Manager role only.
Administration
Manage Content Types X X X
Manage EFB Certificates X X
Manage Email Rules X X
Manage Filters X X X X X X X
Manage LRUs X X X
Manage Reports X X X X X X X X
Manage Tail Engines X X X
Manage Tail Models X X X
Table 2-3 DDM Roles and Permissions (continued)
DDM Roles
Con
tent
Pu
blis
her
Con
tent
M
anag
er
Rec
ipie
nt
Man
ager
R
evie
w
Man
ager
Rev
iew
er
Airl
ine
Man
ager
Arc
hive
r
Syst
emA
dmin
istr
ator
Permissions
y, 2014 DDM ASP User Guide014 Jeppesen
31

About DDMUnderstanding the DDM Roles and Associated Functions
DD
32
The Airline Manager has access to all functions except those related to approving/rejecting a package and archiving. All permissions are lost if the connection between the DDM server and the LDAP or Active Directory server is lost.
M ASP User Guide May, 2014© 2014 Jeppesen

About DDMUnderstanding the Types of Data Available
Ma© 2
Understanding the Types of Data AvailableThe EFB is a piece of hardware (either portable or in the cockpit) on which data is installed. Using the EFB, a pilot can obtain data that can assist them during flight operations. The types of data that display on the EFB depend on the installed applications.
The following table describes the EFB applications and corresponding data. All of these applications, their data, and configuration files can be delivered and staged on the EFB via DDM.
Table 2-4 Applications and Corresponding EFB Data
Application Data
Airport Moving Maps Airport maps that help orient flight crews as to their location at a particular airport
EFB Document Browser Important documents such as flight operations
Performance Performance data for real-time calculations of takeoff and landing information
Terminal Charts Terminal charts, including airport, airspace, departure, arrival, and approach charts, as well as NOTAMs
Video Video files such as CAT configuration files or updates to video software
y, 2014 DDM ASP User Guide014 Jeppesen
33

About DDMUnderstanding Task Processing in DDM
DD
34
Understanding Task Processing in DDMMany of the tasks you can perform in DDM depend on whether other tasks have already been performed. The following table lists the tasks that must be completed before performing other tasks.
Table 2-5 Task Processing in DDM
In order to... You must first...
Publish a package • Create a content type
Deliver a package • Publish a package
Optionally, you may want to:• Create a checkpoint (to assign at the time of delivery) • Create a recipient (to assign at the time of delivery) • Create a review device (to assign at the time of delivery)
Approve or reject a package • Publish a package• Create a checkpoint
Find delivery status • Publish a package
Optionally, you may want to:• Create a package filter (to narrow search results) • Create a recipient filter (to narrow search results)
Archive a package (automatically) •• Set the Package Duration value on the content type• Create a Package Archive Warning email rule• Create a Package Archived email rule
Delete a package (automatically) • Set the Time to Delete value on the content type• Create a Package Delete Warning email rule• Create a Package Deleted email rule
Archive a package (manually) •• Unassign all recipients associated with the package
Delete a package (manually) • Archive a package
Load an archived package file to a desktop or other media
• Archive a package
M ASP User Guide May, 2014© 2014 Jeppesen

About DDMUnderstanding Task Processing in DDM
Ma© 2
Create a recipient • Create a tail model (if creating a Tail recipient)• Create a tail engine (if creating a Tail recipient)• Create a company (if creating a Server recipient)
Optionally, you may want to:• Create a review device, basic or tail only (to assign when creating
the recipient)• Create a review group (to assign when creating the recipient)• Create LRUs that can be assigned to Tail recipients• Create a checkpoint (to assign when creating the recipient)• Publish a package (to assign when creating the recipient)
Archive a recipient • Unassign all packages associated with the recipient
Delete a recipient • Archive a recipient
Load an archived recipient file onto a desktop or other media
• Archive a recipient
Create a review device • Publish a package• Create a tail model • Create a tail engine
Optionally, you may want to:• Create LRUs that can be assigned to Tail review device• Create a recipient (to assign when creating the review device)
Create a company • Create a content type
Create an email rule • Create a content type (for certain email rules)• Create recipients (for certain email rules)
Optionally, you may want to:• Create an email rule (to create from an existing email rule)
Table 2-5 Task Processing in DDM (continued)
In order to... You must first...
y, 2014 DDM ASP User Guide014 Jeppesen
35

About DDMViewing the Package Status in DDM
DD
36
Viewing the Package Status in DDMWhen you publish a package in DDM, the DDM server delivers the package to the CDA. While receiving a package, the CDAs communicate a status back to DDM so that you can determine the delivery status of your published package. You cannot change this status. This delivery status displays in the Delivery Status column on the following pages:
• Edit Package page
– Assign Recipients tab
– Assign Review Devices tab
• Edit Recipient page
– Assign Packages tab
• Edit Review Device page
– Assign Packages tab
• View Package page
– View Assigned Recipients tab
– View Assigned Review Devices tab
• View Recipient page
– View Assigned Packages tab
• View Review Devices page
– View Assigned Packages tab
The following table describes the delivery statuses that can display on these pages/tabs.
Table 2-6 Delivery Statuses for Packages and Parts
Status Description
Not active until <date/timestamp>
A package with BOM, Crate, or None wrapping type has not been delivered to a recipientoran ARINC 665 package has not been delivered to a CDA incapable of reporting its configuration to DDM recipient.andIts start delivery date is in the future.
M ASP User Guide May, 2014© 2014 Jeppesen

About DDMViewing the Package Status in DDM
Ma© 2
Expired on <date/timestamp> A package with BOM, Crate, or None wrapping type has not been delivered to a recipientoran ARINC 665 package has not been delivered to a CDA incapable of reporting its configuration to DDM recipient.andIts stop delivery date is in the past.
Available as of <date/timestamp>
A package with BOM, Crate, or None wrapping type has not been delivered to a recipientoran ARINC 665 package has not been delivered to a CDA incapable of reporting its configuration to DDM recipient.
Error as of <date/timestamp> A package with BOM, Crate, or None wrapping type has not been delivered to a recipientoran ARINC 665 package has not been delivered to a CDA incapable of reporting its configuration to DDM recipient.
% Delivered as of <date/timestamp>
A package with BOM, Crate, or None wrapping type has not been delivered to a recipientoran ARINC 665 package has not been delivered to a CDA incapable of reporting its configuration to DDM recipient.
Delivered successfully as of <date/timestamp>
A package has been delivered to a recipient.
Not active until <date> A part has not been delivered to recipient and the start delivery date is in the future.
Expired on <date> A part has not been delivered to recipient and the stop delivery date is in the past.
Available as of <date/timestamp>
A part has not been delivered to recipient and the part has not been reported by the CDA.
Error as of <date/timestamp> A part has not been delivered to recipient and the part has not been reported by the CDA.
% Delivered as of <date/timestamp>
A part has not been delivered to recipient and the part has not been reported by the CDA.
Error as of <date/timestamp> for the package
All parts in the package have the same error, such as LRU mismatch and the parts have not been reported by the CDA.
Delivered successfully as of <date/timestamp>
A part has been delivered via DDM to CDAs capable of reporting their configurations to DDM and the parts have not been reported by the CDA.
Table 2-6 Delivery Statuses for Packages and Parts (continued)
Status Description
y, 2014 DDM ASP User Guide014 Jeppesen
37

About DDMViewing the Package Status in DDM
DD
38
Staging processing as of <date/timestamp>
A part has been delivered via DDM to CDAs capable of reporting their configurations to DDM and the part has been reported by the CDA as in the process of staging.
Stage failed as of <date/timestamp>
A part has been delivered via DDM to CDAs capable of reporting their configurations to DDM and the part has been reported by the CDA as failed to stage.
Staged as of <date/timestamp> A part has been delivered via DDM to CDAs capable of reporting their configurations to DDM and the part has been reported by the CDA as staged.
Pending TMME A part has been delivered via DDM or by a mechanic to CDAs capable of reporting their configurations to DDM and the ADEL part has been reported by the CDA as not part of the current TMME.
Pending dependency (LR) as of <date/timestamp>
A part has been delivered via DDM or by a mechanic to CDAs capable of reporting their configurations to DDM and the ADEL part has been reported by the CDA as missing one or more dependent parts.
Pending date (LR) as of <date/timestamp>
A part has been delivered via DDM or by a mechanic to CDAs capable of reporting their configurations to DDM and the ADEL part has been reported by the CDA as not yet reached its effective date yet.
Pending pilot (LR) as of <date/timestamp>
A part has been delivered via DDM or by a mechanic to CDAs capable of reporting their configurations to DDM and the ADEL part has been reported by the CDA as pending pilot load.
Replaced A part has been delivered via DDM or by a mechanic to CDAs capable of reporting their configurations to DDM and the part has been reported by the CDA as originally loaded on the EFB by a mechanic during Load Mode, but it has been replaced by an ADEL-eligible part that was delivered wirelessly.
Error (LR) as of <date/timestamp>
A part has been delivered via DDM or by a mechanic to CDAs capable of reporting their configurations to DDM and the part has been reported by the CDA as failed to load.
Copying as of <date/timestamp> A part has been delivered via DDM or by a mechanic to CDAs capable of reporting their configurations to DDM and the part has been reported by the CDA as is in the process of being copied from one partition to the repository.
Loaded (LR) as of <date/timestamp>
A part has been delivered via DDM or by a mechanic to CDAs capable of reporting their configurations to DDM and the part has been reported by the CDA as loaded.
Delivered successfully as of <date/timestamp> for the package
All parts in the package were delivered via DDM or mechanic.
Table 2-6 Delivery Statuses for Packages and Parts (continued)
Status Description
M ASP User Guide May, 2014© 2014 Jeppesen

About DDMUnderstanding DDM Reporting
Ma© 2
Understanding DDM ReportingDDM provides a robust reporting capability that enables you to create and run configurable reports to analyze data and track the review process and content delivery. DDM also provides standard reports intended to keep you up-to-date on the configuration of the tails in your fleet. All roles can manage and generate reports.
Using DDM, you can create and save simple and complex queries that generate precise reports. Or, you can use one of the many standard reports provided by the system. One of the configurable reports that you may find most useful is the Recipient Snapshot report; it shows a Tail’s configuration. You can customize this report, and all configurable reports, by filtering and displaying fields to show what parts have been staged and loaded to a particular Tail.
You can view a DDM report on your computer screen, print a report, save a report, and export report content. You can also view and edit pre-defined configurable reports.
For information about the configurable and standard reports available in DDM and the process for generating and managing reports, refer to Chapter 18, “Managing Reports.”
y, 2014 DDM ASP User Guide014 Jeppesen
39

About DDMUnderstanding DDM Filtering
DD
40
Understanding DDM FilteringFilters enable you to control what information displays on certain pages in DDM that display lists of packages, recipients, and reports. The Manage Filters function enables you to create and manage filters to control the display of packages and recipients. You can also choose default filters that will override the default display whenever you view a page that uses package or recipient filters.
The following roles can create and manage filters:
• Content Publisher
• Content Manager
• Recipient Manager
• Review Manager
• Airline Manager
• Archiver
DDM enables you to create recipient and package filters. In addition, DDM provides a default report filter, which you cannot modify. The report filter enables you to determine what types of customizable reports DDM displays when viewing current reports.
You can create a report in DDM based on the fields and conditions set up for an existing filter. You can also create filters based in reports. This process can provide you with a robust reporting solution not available through conventional filtering and reporting.
For additional information, refer to Chapter 16, “Managing Filters.”
M ASP User Guide May, 2014© 2014 Jeppesen

About DDMUnderstanding Event Types
Ma© 2
Understanding Event TypesAn event type is a specific category of predefined events that occur in DDM. Event types are used for auditing purposes and form the basis of email rules, which define the individuals and groups who should receive emails when an event occurs in DDM.
For more information about creating email rules based on event types, see Chapter 15, “Managing Email Rules.”
y, 2014 DDM ASP User Guide014 Jeppesen
41

About DDMUnderstanding the DDM Archival Process
DD
42
Understanding the DDM Archival ProcessDDM enables a user assigned the Archiver role to archive, unarchive, delete a package and recipients, and load an archive.zip file to the desktop, CD, or other media type.
The following subsections outline the processes for archiving and deleting packages and recipients. For information about archiving and deleting packages, refer to Chapter 7, “Archiving and Deleting Packages.” For information about archiving and deleting recipients, refer to Chapter 8, “Managing Recipients.”
Understanding the Archive Process
The purpose of archiving a package or recipient is to make efficient use of the available disk space by removing unused package content or recipients from the server. You cannot select Archived packages for delivery to recipients, and Archived recipients cannot receive packages. After the DDM Administrator configures the application for archiving, you can archive packages that are assigned the Active and Expired status. After you archive a package, the package status changes from Active or Expired to Archived. You can also archive recipients that are assigned the Active status. After you archive the recipient, the recipient status changes from Active to Archived.
Understanding the Unarchive Process
If necessary, you can unarchive a package or recipient that was previously archived. When you unarchive a package or recipient, DDM retrieves the archived file from the location on the server where the archived file was stored. After unarchiving a package, the package status changes to the status previously assigned to the package prior to archiving. After unarchiving a recipient, the recipient status changes to Active. The archive process removes all associations to checkpoints, packages, and recipients. You will need to re-establish these associations if you unarchive a package or recipient.
If you unassociate a recipient from a package prior to archiving that package, you will need to re-create the package-to-recipient association. If you unassociate a package from a recipient prior to archiving that recipient, you will need to re-assign the package.
M ASP User Guide May, 2014© 2014 Jeppesen

About DDMUnderstanding the DDM Archival Process
Ma© 2
Understanding the archive.zip File Generated during an Archive
When you archive a package or recipient, DDM creates an archive.zip file that provides an audit trail for the package or recipient. This .zip file contains the package itself to support unarchiving a package. This audit trail contains the complete audit history for the package or recipient, including publication, review, approval, and anything else done to the package while it was in DDM. You can delete the .zip file or download the file to your computer.
Deleting a Package or Recipient
DDM does not delete archived packages or recipients from the database when you perform an archive, but you can manually delete packages and recipients that have been archived. You should only delete an archived package or recipient if you are certain that the package or recipient is no longer needed in DDM. Once deleted, an archived package or recipient cannot be unarchived and cannot be retrieved at a future date.
y, 2014 DDM ASP User Guide014 Jeppesen
43

About DDMUnderstanding Wrapping Types
DD
44
Understanding Wrapping TypesPrior to publishing to DDM, parts are assembled in specific package formats, referred to as wrapping types in DDM. DDM recognizes the following wrapping types, each of which is associated with a certain EFB class or aircraft type:
BOM (Bill of Material)
Class 1 and Class 2 Jeppesen EFB recipients. See “BOM Format” on page 45 for more information about how to format BOM packages.
BEDS Crate Intended for delivery to Class 3 Boeing recipients on 787 and 747-8 airframes. At this time DDM does not deliver BEDS crates directly to EFBs on these airframes.
ARINC 665 (Media Set)
Class 3 Boeing EFB recipients on airframes other than 787 or 747-8 and Jeppesen Class 1 and Class 2 Jeppesen EFB recipients.
None When you are sending a package to CDAD. The package must, however, be zipped prior to publishing to DDM.
M ASP User Guide May, 2014© 2014 Jeppesen

About DDMUnderstanding Wrapping Types
Ma© 2
BOM Format
BOM packages that are published in DDM must adhere to a specific XML format. The following conventions represent the BOM.dtd package format:
DDM imposes the following constraints on the values contained in the BOM.dtd:
• package id (interpreted by DDM as Package Name) cannot be longer than 25 characters
– name (interpreted by DDM as Package Name) cannot be longer than 25 characters
– description (interpreted in DDM as Package Description) cannot be longer than 256 characters
– stopDeliveryDate (interpreted in DDM as Recommended Do Not Deliver After) must be in the format dd-mmm-yyyy and represent a date in the future
– replacementFor (interpreted in DDM as Replaces Package Name) cannot be longer than 25 characters
• part id (interpreted in DDM as Part Number) cannot be longer than 16 characters
• type
<?xml version='1.0' encoding='UTF-8'?>
<!ELEMENT BillOfMaterials (package)> <!ELEMENT package (metadata, parts?)> <!ATTLIST package id CDATA #REQUIRED > <!ELEMENT metadata (name, description,
stopDeliveryDate, replacementFor?)> <!ELEMENT name (#PCDATA)> <!ELEMENT description (#PCDATA)> <!ELEMENT stopDeliveryDate (#PCDATA)> <!ELEMENT replacementFor (#PCDATA)> <!ELEMENT parts (part*)> <!ELEMENT part (type, data?)> <!ATTLIST part id CDATA #REQUIRED > <!ELEMENT type (#PCDATA)> <!ELEMENT data (#PCDATA)>
y, 2014 DDM ASP User Guide014 Jeppesen
45

About DDMUnderstanding Wrapping Types
DD
46
• data
M ASP User Guide May, 2014© 2014 Jeppesen

About DDMUnderstanding Loadable Software Airplane Parts
Ma© 2
Understanding Loadable Software Airplane PartsA Loadable Software Airplane Part (LSAP) is a component that is delivered to and stored on an airplane to become part of the airplane’s configuration. An LSAP can consist of a configuration file, data file, or application. The following table describes the various types of LSAPs.
One or more LSAPs can be packaged and delivered simultaneously to an airplane using a package or media set. Packages and media sets can contain identical types of LSAPs; there are no restrictions to what types of LSAPs can be contained on a package or media set. The difference between a package and media set is that a package is always delivered electronically to an airplane; a media set is delivered using a type of physical media or electronically.
The Boeing EFB Class 3 uses ARINC 665-2 compliant part numbering for its LSAPs. Typically, you will build parts using configuration files to ensure that a part published to DDM is appropriately ARINC 665-wrapped. The following table describes the application configuration files.
Table 2-7 LSAP Definitions
LSAP Definition
Configuration File Describes how a component should be configured on an airplane. Configuration files determine the behavior of a system. A configuration file is generally created in Configuration Administration Tool (CAT).
Data File Consists of data being loaded to an airplane. A data file defines the data in a system.
Application Represents a functional application that runs on a system within an airplane. Applications are created by the application’s author and converted into a LSAP, then packaged independently. Typically, they use the configuration file and data file LSAPs types loaded separately.
Table 2-8 Description of Configuration Files
Application Configuration File Description
Airport Moving Map AM CUSTOMER CONFIG A configuration file that is created using the CAT Airport Maps module
y, 2014 DDM ASP User Guide014 Jeppesen
47

About DDMUnderstanding Loadable Software Airplane Parts
DD
48
System Layout Files SUPPLIER CONFIG Configuration files created and installed by the manufacturer that define the type certification for the aircraft as it is delivered from Boeing. These parts are relatively small and unchanging and relate to the safety and airworthiness of the aircraft.
PART 25 LINUX Configuration files created by the manufacturer for the Linux OS for each aircraft in the group for which configuration files are built.
PART 25 WINDOWS Configuration files created by the manufacturer for the Windows OS for each aircraft in the group for which configuration files are built.
ADC CUSTOMER CONFIG The Application Dispatch Controller (ADC) customer configuration file that helps define how the EFB appears when it is activated. This file is created for all aircraft.
PART 121 LINUX A configuration file created for each aircraft in the group for which configuration files are built.
PART 121 WINDOWS A configuration file created for each aircraft in the group for which configuration files are built.
EFB Document Browser
EDOCS APPCONFIG A configuration file that is created in CAT using the EFB Document Browser module.
EDOCS SETCONFIG A dataset configuration file that is created using the CAT EFB Document Browser module.
Electronic Logbook 46 TLB CCFG UMS A configuration file that is created using the CAT ELB module when releasing a configuration to the EFB.
46 CLB CUST CFG UMS A configuration file that is created using the CAT ELB module when releasing a configuration to RPM.
Fault Identification 46 TLB FAULT ID DB A configuration file that is created using the CAT FID module when releasing a configuration to the EFB.
46 CLB FAULT ID DB A configuration file that is created using the CAT FID module when releasing a configuration to RPM.
Table 2-8 Description of Configuration Files (continued)
Application Configuration File Description
M ASP User Guide May, 2014© 2014 Jeppesen

About DDMUnderstanding Loadable Software Airplane Parts
Ma© 2
Performance GRP PERF PERF The takeoff and landing performance database file
GRP PERF POLICY The policy database file containing performance calculations and data presentation
GRP PERF AIRPORT The airport database file containing airport and runway characteristics
GRP PERF DDG The database file containing the settings and corrections required for applying performance penalties resulting from selected MEL and CDL items
GRP PERF CONFIG The file containing application configuration information, such as directory paths, interface layout, and print formatting
Terminal Chart TERM CHARTS CUST CONFIG
A configuration file that is created using the CAT TermCharts module
Table 2-8 Description of Configuration Files (continued)
Application Configuration File Description
y, 2014 DDM ASP User Guide014 Jeppesen
49

About DDMUnderstanding Loadable Software Airplane Parts
DD
50
M ASP User Guide May, 2014© 2014 Jeppesen

CHAPTER 3
Getting Started
This chapter describes how to access DDM, describes the interface elements of the applications, and provides steps for common procedures.
This chapter contains the following topics:
• Overview
• Logging On to DDM
• Understanding the DDM Application
• Understanding the DDM Home Page
• Understanding the Navigation Menu
• Sorting Data in a Table
• Navigating Through Multiple Rows of Table Data
• Running Filters
• Setting Up DDM
• Setting Up the DDM Review Process
• Getting Help
• Exiting DDM

Getting StartedOverview
DD
52
OverviewDDM is a web-based application that you can access from a browser window. To use DDM, you need to set up the application for proper use. The process of setting up DDM involves specifying information about:
• Aircraft (as explained in Chapter 20, “Managing Tail Models.” and Chapter 19, “Managing Tail Engines.”)
• Recipients (as explained in Chapter 8, “Managing Recipients.”)
• Review process (as explained in Chapter 10, “Managing Review Groups.” and Chapter 11, “Managing Review Devices.”)
• Checkpoints (as explained in Chapter 12, “Managing Checkpoints.”)
• Content types (as explained in Chapter 13, “Managing Content Types.”)
M ASP User Guide May, 2014© 2014 Jeppesen

Getting StartedLogging On to DDM
Ma© 2
Logging On to DDMTo log on to DDM, the DDM application must already be configured, the DDM server must be connected to the user administration tool, and the user profiles must be defined. If the connection between the DDM server and the user administration tool fails, contact your DDM System Administrator to correct the administrative credentials set during installation.
To log on to DDM1. Open your browser and access the following URL:
http://jeppesen.com
The Jeppesen.com Login page appears.
2. Click Login.
3. In the Username box, type your user name.
4. In the Password box, type your password.
NOTE Contact your DDM System Administrator if you need help with your user name or password.
y, 2014 DDM ASP User Guide014 Jeppesen
53

Getting StartedLogging On to DDM
DD
54
5. Click Login.
The Jeppesen Welcome page displays, similar to the following:
6. Click the Launch DDM link.
The DDM Administration Tool (DDM Home) page is displayed. [Figure 3.2]
NOTE The information displayed on this page depends on your assigned role. You may or may not see all of the information that is displayed.
Figure 3.1. Jeppesen Welcome page
M ASP User Guide May, 2014© 2014 Jeppesen

Getting StartedLogging On to DDM
Ma© 2
7. Click the menu links located in the navigation menu to access the DDM functions assigned to your role.
NOTE Refer to “Understanding the DDM Roles and Associated Functions” on page 30 for information about the DDM functions assigned to your role.
Figure 3.2. DDM Home page
y, 2014 DDM ASP User Guide014 Jeppesen
55

Getting StartedUnderstanding the DDM Application
DD
56
Understanding the DDM ApplicationDDM is a web-based application that enables you to perform many functions and tasks related to transferring data to aircraft. When using the application, you should use only the elements included in the application, not the buttons on your browser. If you use your browser’s Back, Forward, or Refresh buttons, you will experience unpredictable results.
NOTE Where applicable, the User Guide includes the few exceptions when you can use your browser controls. For example, some DDM pages, such as the View Package page, are read-only and display constantly updated information. Instructions in the User Guide direct you to click the browser’s Refresh button to see delivery status updates.
DDM includes the following elements and conventions:
• Welcome text indicates the name of the user who is currently logged in, the airline, and the airline’s three-letter company code.
• Home link displays the DDM Home page.
• Exit link closes DDM and closes the browser window.
• Help link provides access to DDM online help.
• About link provides you with information about the current version.
• Required fields are marked with an asterisk (*).
• Sortable columns are displayed as white underlined text headings.
• Links that take you to another page or tab are displayed in red underlined text.
• The Navigation menu provides access to authorized DDM functions.
• Scrollbars enable you to view all data on a page.
• Buttons enable you to navigate and perform tasks.
• Check boxes enable you to select one or more items.
• Option buttons allow you to select one item only from a list of two or more items.
• Tabs group similar information together.
M ASP User Guide May, 2014© 2014 Jeppesen

Getting StartedUnderstanding the DDM Application
Ma© 2
• Drop-down lists provide alphabetical or alphanumeric lists of available selections that exist in DDM.
IMPORTANT Do not use your browser’s navigation controls, including the Back and Forward buttons or shortcut keys, when working in DDM. Browser navigation controls can produce unexpected results.
Figure 3.3 illustrates many of these conventions.
Figure 3.3. Conventions on DDM pages
To assist in navigation, DDM includes “Return to...” links to enable you to navigate to the previous page. Use these links instead of your browser’s Back button. Figure 3.4 illustrates the “Return to...” link.
y, 2014 DDM ASP User Guide014 Jeppesen
57

Getting StartedUnderstanding the DDM Application
DD
58
Figure 3.4. Return to link on the View Published Package page
M ASP User Guide May, 2014© 2014 Jeppesen

Getting StartedUnderstanding the DDM Home Page
Ma© 2
Understanding the DDM Home PageThe DDM Home page is the first page displayed after you start DDM. This page displays graphics that represent the primary processes required to publish a package in DDM. You can access this page by clicking the Home link in the top-left corner of any page. Figure 3.5 illustrates the DDM Home page.
Figure 3.5. DDM Home page
Each graphic on the DDM Home page is a hyperlink that, when clicked, provides detailed information about the corresponding process. For example, clicking the Deliver graphic expands the graphic to display details about setting up DDM. Figure 3.6 illustrates this example.
y, 2014 DDM ASP User Guide014 Jeppesen
59

Getting StartedUnderstanding the DDM Home Page
DD
60
Figure 3.6. Deliver Packages graphic - detailed information
M ASP User Guide May, 2014© 2014 Jeppesen

Getting StartedUnderstanding the Navigation Menu
Ma© 2
Understanding the Navigation Menu DDM contains a navigation menu that provides access to the functions available for the role that you are signed in as. The navigation menu is displayed along the left edge of all pages in DDM. Figure 3.7 illustrates an example of the navigation menu.
The following table describes the functions in the navigation menu.
Figure 3.7. Navigation menu
Table 3-1 Functions in the DDM Navigation Menu
Function/Option Role Description
Content Management
y, 2014 DDM ASP User Guide014 Jeppesen
61

Getting StartedUnderstanding the Navigation Menu
DD
62
Manage Packages • Content Publisher• Content Manager• Airline Manager• System Administrator
• Load a package on the DDM server
• Define the properties of a package, including the recipients and review devices to which the package will be delivered
• Make a package available for use only within a specific airline or for use by many airlines
• Assign recipients and reviewers for package delivery
• Add comments to a package• Assign a checkpoint to the
package• Assign start and stop delivery
dates• View package delivery status
Approve/Reject Package Reviewer Approve or reject a package before it is delivered
Find Delivery Status • Recipient Manager• Reviewer• Airline Manager• System Administrator
• Find out whether content has been delivered to a recipient
• Determine the reason why content was not delivered
Archive Packages • Archiver• System Administrator
• Archive a package on the DDM server
• Unarchive a package from the DDM server
• Delete a package that was archived on the DDM server
• Retrieve an archive.zip file for an archived package
Table 3-1 Functions in the DDM Navigation Menu (continued)
Function/Option Role Description
M ASP User Guide May, 2014© 2014 Jeppesen

Getting StartedUnderstanding the Navigation Menu
Ma© 2
Recipient Management
Manage Recipients • Recipient Manager• Airline Manager• System Administrator
• Create a recipient• Edit an existing recipient• View information about an
existing recipient• Unregister a recipient • Delete a recipient
Archive Recipients • Archiver• System Administrator
• Archive a recipient on the DDM server
• Unarchive a recipient from the DDM server
• Delete a recipient that was archived on the DDM server
• Retrieve an archive.zip file for an archived recipient
Manage Recipient Groups • Recipient Manager• Airline Manager• System Administrator
• Create a recipient group• Edit an existing recipient
group• View information about an
existing recipient group• Delete a recipient group
Review Management
Manage Review Groups • Review Manager• Airline Manager• System Administrator
• Create a review group and assign one or more reviewers to groups
• Define the approval criteria for each group
• Edit review group assignments
• View information about a review group
• Delete a review group
Manage Review Devices • Recipient Manager• Review Manager• Airline Manager• System Administrator
Create and manage which computers are used to review and approve packages before they are delivered to recipients
Table 3-1 Functions in the DDM Navigation Menu (continued)
Function/Option Role Description
y, 2014 DDM ASP User Guide014 Jeppesen
63

Getting StartedUnderstanding the Navigation Menu
DD
64
Manage Checkpoints • Review Manager• Airline Manager• System Administrator
Create and manage inspection points at which reviewers and review devices are required to review and either approve or reject a package prior to delivery
Create and manage inspection points at which reviewers and review devices are required to review and either approve or reject a package prior to delivery
Administration
Manage Content Types • Content Publisher• Content Manager• Airline Manager• System Administrator
Create and manage content types to help organize and describe packages before they are delivered to recipients
Manage EFB Certificates • Airline Manager• System Administrator
Upload static identity certificates from the EFB to the DDM database
Manage Email Rules • Airline Manager• System Administrator
Create and manage rules that define when emails are sent for certain events and who should receive those emails
Manage Filters • Content Publisher• Content Manager• Recipient Manager• Review Manager• Reviewer• Airline Manager• Archiver• System Administrator
Create and manage filter rules by specifying the filtering values that are available when viewing information about recipients and packages
Manage LRUs • Recipient Manager• Airline Manager• System Administrator
Create and manage LRUs for defining tail recipients and review devices of type tail
Table 3-1 Functions in the DDM Navigation Menu (continued)
Function/Option Role Description
M ASP User Guide May, 2014© 2014 Jeppesen

Getting StartedUnderstanding the Navigation Menu
Ma© 2
Manage Reports • Content Publisher• Content Manager• Recipient Manager• Review Manager• Reviewer• Airline Manager• Archiver• System Administrator• Reports Reader
• Generate and print reports• Export reports to Excel
spreadsheet• Delete reports• View reports (the Reports
Reader role can only view reports)
Manage Tail Engines • Recipient Manager• Airline Manager• System Administrator
Create and manage tail engines for creating tail recipients
Manage Tail Models • Recipient Manager• Airline Manager• System Administrator
Create and manage major models and minor models for creating tail recipients
Table 3-1 Functions in the DDM Navigation Menu (continued)
Function/Option Role Description
y, 2014 DDM ASP User Guide014 Jeppesen
65

Getting StartedSorting Data in a Table
DD
66
Sorting Data in a TableUnderlined column headings indicate that you can sort the content of those columns in ascending or descending order. DDM indicates which column is being used to sort data by displaying a small white arrow in the column header. An arrow pointing up indicates ascending order (A, B, C or 1, 2, 3); an arrow pointing down indicates descending order (C, B, A or 3, 2, 1). Alphabetical data takes priority over numerical data. Figure 3.8 illustrates a sample page where the table is being sorted by the Package Name column.
To toggle between ascending and descending display order, click the column header. When you click a column header, the position of the white arrow changes to the opposite position. To sort table data using a different column, click the associated column header.
Figure 3.8. Sample column sorted in ascending order
Column sorted in ascending order
M ASP User Guide May, 2014© 2014 Jeppesen

Getting StartedNavigating Through Multiple Rows of Table Data
Ma© 2
Navigating Through Multiple Rows of Table DataWhile using DDM, you may encounter tables containing multiple rows of data that display beyond the bottom of the page. Thus, you may need to navigate through the rows of data to see all of the information available. DDM displays multiple rows of table data using multiple pages of data. The bottom of the table contains links that enable you to select a specific page, the previous page, or the next page. [Figure 3.9]
Figure 3.9. Page links
y, 2014 DDM ASP User Guide014 Jeppesen
67

Getting StartedRunning Filters
DD
68
Running FiltersDDM provides filters throughout the application that you can use to manage the information that displays. To run a filter, select the filters that you want to use from the list.
Figure 3.10. Filters
Along with each filter list, DDM provides a Run Again button. Click Run Again to refresh the information displayed by the current filter.
In addition to refreshing the displayed information, Run Again also allows you to enter a new value for filters with prompts. For example, if you run a recipient filter that contains a prompt so you can search for recipients that include certain letters, click Run Again to enter a new value.
NOTE The filters available are created using the Manage Filters function. Refer to Chapter 16, “Managing Filters.” for information about creating or changing a filter.
Filters
M ASP User Guide May, 2014© 2014 Jeppesen

Getting StartedSetting Up DDM
Ma© 2
Setting Up DDMSetting up DDM involves creating basic elements that enable you to deliver packages to recipients. The following list outlines the recommended order in which to set up DDM for maximum efficiency:
1. Prepare to create recipients and review devices as follows:
• Create new tail models (see Chapter 20, “Managing Tail Models.”)
• Create new tail engines (see Chapter 19, “Managing Tail Engines.”)
2. Set up your review process as follows:
• Create review groups (see Chapter 10, “Managing Review Groups.”)
• Create review devices (see Chapter 11, “Managing Review Devices.”)
• Create checkpoints (see Chapter 12, “Managing Checkpoints.”)
3. Prepare for the delivery process as follows:
• Create recipients (see Chapter 8, “Managing Recipients.”)
• Create content types (see Chapter 13, “Managing Content Types.”)
After completing these tasks, you are ready to publish and deliver packages.
y, 2014 DDM ASP User Guide014 Jeppesen
69

Getting StartedSetting Up the DDM Review Process
DD
70
Setting Up the DDM Review ProcessTo set up a customized review process in DDM, you must complete the following steps:
1. Determine your business requirements for reviewing content delivered using DDM.
2. Prepare for and create review groups, review devices, and checkpoints based on these requirements.
3. Install the CDA on at least one review device.
4. Prepare for and create content types, including association with any checkpoints.
5. Determine business requirements for reviewing delivery of approved content to certain recipients.
6. Prepare for and create corresponding review groups and recipient checkpoints based on these requirements.
7. Create recipients, including association with checkpoints.
Determining Review Process RequirementsBefore you create checkpoints and assign them to the package delivery process, carefully consider your business requirements for reviewing content that will be delivered using DDM. Some questions to consider are:
• Who will you receive content from? Does all of the content you receive come from internal company resources, or are there outside companies publishing content as well?
• What do you know about the QA processes the content goes through before it reaches your DDM server? Do you trust the quality and validity of the content?
• If you want to review content before delivering it to recipients, what are you reviewing it for? Are you looking for certificates showing compliance with industry standards? Do you want to load content onto a machine and thoroughly examine it before delivering it to the rest of the company?
• How do your reviewers need to be organized and assigned to checkpoints? Do you have one group of people that can review content for the entire company? Do different types of content require different groups of people to
M ASP User Guide May, 2014© 2014 Jeppesen

Getting StartedSetting Up the DDM Review Process
Ma© 2
review the content? Is there a specific group of people for every tail in your fleet that should be responsible for reviewing all content before it is loaded to those tails?
Questions such as these should help you determine the following about your review process requirements:
• At what level you need to implement checkpoints (the package level, recipient level, both levels, or neither level).
• How checkpoints should be organized in terms of the people who need to review content at each checkpoint. That is, whether or not you need one or two general checkpoints that can approve all of the incoming content, or if the reviewers need to be organized into many different checkpoints based on different content types and/or recipients.
Preparing for and Creating CheckpointsAfter determining your requirements for the overall review process, the Airline Manager role should create the checkpoints that will be used in the review process. Checkpoints consist of three basic elements:
• A unique, user-defined name that reflects the purpose of the checkpoint
• A list of reviewers or review groups who are responsible for approving or rejecting content that comes through the checkpoint
• A list of review devices to which the content should be delivered so that reviewers can examine the content and make a judgement on its validity
Creating a checkpoint often requires some preparation. A typical process for preparing for and creating a checkpoint would proceed as follows:
1. Create review groups, if necessary.
You can organize the reviewers into review groups. Review groups are logical groupings of reviewers that are governed by an approval rule which may be one of the following:
• All reviewers in a group must approve content before it is delivered.
y, 2014 DDM ASP User Guide014 Jeppesen
71

Getting StartedSetting Up the DDM Review Process
DD
72
• Any one reviewer in a group must approve content before it is delivered.
Review groups are an optional convenience mechanism and are not required. However, they provide a great deal of control and flexibility when encountered with situations such as:
• A company has three managers in charge of content management. At least one of these managers must approve every package that comes through the system. Create a review group with these three managers, and give the group an “any one” rule. This group can then be inserted into all checkpoints.
• A company has a set of five senior engineers in charge of content delivered to their 777 tails. Each engineer must review and approve content before it is loaded to any 777. Create a review group with these five users and give the group an “all” rule. This group can then be inserted into all recipient checkpoints that are assigned to 777 tails.
2. Create review devices, if necessary.
For this checkpoint, will the reviewers need to send the content packages to a computer in order to examine and validate them? If so, create a review device for every machine that needs to load the content for review purposes. Some examples of review devices include:
• A reviewer’s laptop loaded with EFB Class 1 software that reviews content for all EFB Class 1 recipients in the company.
• A desktop computer situated in a computer lab that is shared by multiple reviewers. All content needing review is sent to this machine, and reviewers can take a look at the content when the machine is available.
• A test airplane or airplane simulator equipped with an EFB Class 3 device that receives all content packages before they are delivered to other tails. Content is installed and reviewed on this plane, then delivered to other tails once it is approved.
Review devices can be:
• Tails
• Proxy devices which are used to deliver content to other recipients (such as a Portable Data Loader)
• Basic devices such as laptops, desktops, and so forth
M ASP User Guide May, 2014© 2014 Jeppesen

Getting StartedSetting Up the DDM Review Process
Ma© 2
3. Create the new checkpoint.
After creating the necessary review groups and review devices, you can create the actual checkpoint within DDM.
Adding Checkpoints to the Delivery ProcessAfter creating checkpoints, you can assign them to any new or existing recipients and packages in DDM. You can also assign them to content types.
Adding CheckpointsWhen new content is published to the company, the company can assign a checkpoint to that content package. Checkpoints can also be assigned to content types. In this case, the type of content in the package determines a default checkpoint that will be automatically assigned to the package. After a checkpoint is assigned to a package, the package must clear the checkpoint before it is delivered to any recipients.
Assigning Content TypesWhen you publish a package, you are required to assign a content type to the package. A content type describes the contents of a package, enabling you to better organize packages before they are delivered to recipients or consumer companies. Packages cannot be published unless they are assigned a content type.
When you create a content type, you can specify the associated checkpoint. Thus, whenever you assign a content type to a package, the associated checkpoint, if any, is also assigned.
If necessary, you can change an automatically assigned checkpoint (based on content type) to any other checkpoint. See “Editing a Checkpoint” on page 250 for more information.
y, 2014 DDM ASP User Guide014 Jeppesen
73

Getting StartedGetting Help
DD
74
Getting HelpIn addition to this document, DDM includes online help which is available from within the application. Click the Help link at the top of the Navigation menu to access the DDM Online Help. Once open, use the Contents to browse for a topic, use the Index to locate topics based on key words, or use the Search function to find a topic.
M ASP User Guide May, 2014© 2014 Jeppesen

Getting StartedExiting DDM
Ma© 2
Exiting DDMTo exit DDM, click the Exit link at the top of the Navigation menu.
y, 2014 DDM ASP User Guide014 Jeppesen
75

Getting StartedExiting DDM
DD
76
M ASP User Guide May, 2014© 2014 Jeppesen

CHAPTER 4
Managing Packages
Packages are zipped files that contain parts for delivery to a recipient or recipient group. This chapter describes how to manage packages in DDM including procedures for publishing, uploading delivering, and viewing packages; viewing parts in a package; changing package review status; and removing parts from the staging area.
This chapter contains the following topics:
• Overview
• Naming a Package
• Publishing a Package
• Uploading a Package
• Delivering Packages
• Viewing Packages Available for Delivery
• Viewing Package Properties
• Viewing Parts
• Changing a Package Review Status
• Removing Parts from the Delivery Staging Area

Managing PackagesOverview
DD
78
OverviewA package is a zipped file that contains data that has been successfully processed and imported into DDM for delivery to a recipient or recipient group. Packages contain individual product components and other auxiliary components that support the receiving class of EFBs. Some examples of package content are data, software, and configuration files.
DDM provides the functions described in the following table that support the process of managing packages. The functions available to you depend on your assigned role.
Table 4-1 DDM Functions that Support Publishing and Managing Packages
Function Description
Manage Packages • Load a package onto the DDM server• Edit the properties for a published package• Assign delivery properties for a package such as delivery dates,
recipients, and review devices• Remove parts from staging
M ASP User Guide May, 2014© 2014 Jeppesen

Managing PackagesProcess
Ma© 2
ProcessFigure 4.1 illustrates the areas in the package delivery process affected by the functions used
y, 2014 DDM ASP User Guide014 Jeppesen
79

Managing PackagesProcess
DD
80
to manage packages.
Figure 4.1. Areas Affected by Functions used to Manage Packages
M ASP User Guide May, 2014© 2014 Jeppesen

Managing PackagesProcess
Ma© 2
The numbered steps in Figure 4.1 represent the following tasks and functions:
A publisher uploads a package onto the DDM server from an external source.
A publisher assigns package properties to the package such as the package name, content type, and recommended start and end dates for delivery.
The content manager or recipient manager assigns a recipient, recipient group, or review device; checkpoint; and start delivery date to a package.
As the package moves through the delivery process the DDM server identifies whether it has been assigned a checkpoint. If not, the package remains idle on the server until a checkpoint is assigned or the package is archived. If it has, the package progresses to .
The DDM server identifies whether the package has been assigned a reviewer. If not, the package is automatically approved (AutoApprove) and progresses to . If it has, the package proceeds to step .
The DDM server sends an email to the associated reviewer. The reviewer uses the Approve/Reject Package function to either approve or reject the package. If approved, the package progresses to . If the package must be reviewed by another reviewer, the package returns to . If rejected, the package delivery process ends.
The DDM server delivers an approved package to the assigned recipient using the Deliver Packages function.
The recipient returns a status of package delivery to the DDM server.
y, 2014 DDM ASP User Guide014 Jeppesen
81

Managing PackagesNaming a Package
DD
82
Naming a PackageDDM only uses package names that are all upper-case characters. If you publish a package using lower-case characters in the package name, DDM converts the lower-case characters to upper-case.
DDM does not allow users in the same company to publish multiple packages using duplicate package names. In addition, users in the same company cannot publish a package more than one time and use the same package name. Archived packages cannot be deleted and republished using the original package name. Names used for packages cannot be reused.
BOM packages, BEDS Crates, and ARINC 665-wrapped packages carry the package name inside the file. These package names are preserved in DDM as read only. The publisher cannot modify the names of wrapped packages at any time during the publication process.
Unwrapped packages can be named in DDM during publishing. For convenience, DDM prepopulates the package name on the Publish a Package page based on the zip file name. If necessary, the publisher can modify the names of unwrapped packages before completing the publication process, but the package names cannot contain the following characters: & / \ ? % * < > : | “ or exceed 128 characters.
M ASP User Guide May, 2014© 2014 Jeppesen

Managing PackagesPublishing a Package
Ma© 2
Publishing a PackagePublishing packages involves uploading a zip file to the DDM server. For example, when Jeppesen sends application data to subscribers, Jeppesen publishes the application data. Publication merely uploads a file onto the DDM server; it does not specify delivery information. Companies that receive the published content can assign recipient information at a later time.
Users assigned the Content Publisher and Airline Manager roles can publish packages. Before you publish a package, you must create the appropriate content type for the package. Refer to “Creating a Content Type” on page 259 for more information.
To publish a package1. In the Content Management section in the navigation menu, click Manage
Packages.
DDM displays the Manage Packages page. [Figure 4.2]
Figure 4.2. Manage Packages page
y, 2014 DDM ASP User Guide014 Jeppesen
83

Managing PackagesPublishing a Package
DD
84
2. Click Publish a Package.
DDM displays the Publish a Package page. [Figure 4.3]
NOTE If the virus scanner function is not enabled, a message displays as shown in the sample page above. This message will not interfere with publishing a package. Contact your DDM System Administrator for more information.
3. To select the package to publish, use one of the following methods:
• Select a previously uploaded file:
From the Select Uploaded File drop-down list, select a package that has already been loaded onto the DDM server
• Select a new file that was not previously uploaded:
In the Find New File field, type the path where the package resides, or;
Click Browse, select the file to load, and then click Open.
NOTE When you select a package to publish, the package must be in .zip file format.
Figure 4.3. Publish a Package page
M ASP User Guide May, 2014© 2014 Jeppesen

Managing PackagesPublishing a Package
Ma© 2
4. Click Continue.
NOTE DDM performs a virus scan on the package. The size of the package determines how long the scan will take.
DDM Displays the Define Properties tab. [Figure 4.4]
NOTE If the package contains no wrapping type, you can edit the Package Name box. For unwrapped packages, this field defaults to the name of the zip file being published; for wrapped packages, the Package Name field is set inside the zip file and is read-only. See “Naming a Package” on page 82 for more information.
5. (optional) Type a description of the package in the Description field.
6. From the Content Type drop-down list, select a package content type. This field is required. If the selected content type has associated checkpoints, they will be automatically associated with the package.
Figure 4.4. Define Properties tab
y, 2014 DDM ASP User Guide014 Jeppesen
85

Managing PackagesPublishing a Package
DD
86
7. If applicable, type the name of the package that this package replaces in the Replaces Package field. The default in this field is NONE. This field is required.
NOTE For a BOM package, the Replaces Package field is specified in the BOM.xml file and is display only.
8. In the Recommended Start Delivery field, select the date when the package will be available for delivery. The date specified must be equal to or greater than the current date. The default in this field is the current date. The format for this field is DD-MMM-YYYY.
IMPORTANT When entering any date value, use the calendar icon ( ). Entering the date manually in the text field may cause errors.
9. In the Recommended Do Not Deliver After field, type the date after which to the package will not be delivered through DDM. The date specified here must occur after the date specified in the Recommended Start Delivery field. The format for this field is DD-MMM-YYYY.
NOTE For a BOM-wrapped package, the Recommended Do Not Deliver After field is pre-populated with the date specified in the BOM.xml file.
M ASP User Guide May, 2014© 2014 Jeppesen

Managing PackagesPublishing a Package
Ma© 2
10. Click on the Publish To tab.
DDM displays the Publish To tab. [Figure 4.5]
This tab lists all of the companies to which the publisher can publish the package. At the very least, this page lists the publishing company itself. When the content type for this package is selected, this tab shows all of the companies that share this content type.
11. Select the check box for the company or companies to which you want to publish the package.
12. Click one of the following buttons:
– Publish Now to immediately publish the package.
– Publish Later to save the package on the DDM server, so that you can define its properties later by selecting it using the Select Uploaded File option; clicking this button does not publish the package.
– Cancel and Remove File to cancel the process and not save the file to the DDM server.
Figure 4.5. Publish To tab
y, 2014 DDM ASP User Guide014 Jeppesen
87

Managing PackagesUploading a Package
DD
88
Uploading a PackageYou can upload a package without publishing it. DDM stores packages that you upload so you can publish them later.
To upload a package1. In the Content Management section in the navigation menu, click Manage
Packages.
DDM displays the Manage Packages page. [Figure 4.2]
2. Click Publish a Package.
DDM displays the Publish a Package page. [Figure 4.3]
3. In the Find New File field, type the path where the package resides, or;
Click Browse, select the file to load, and then click Open.
NOTE When you select a package to publish, the package must be in .zip file format.
4. Click Continue.
DDM Displays the Define Properties tab. [Figure 4.4]
5. Click Publish Later to save the package on the DDM server
DDM saves the package so that you can define its properties later.
M ASP User Guide May, 2014© 2014 Jeppesen

Managing PackagesDelivering Packages
Ma© 2
Delivering PackagesUsers assigned the Content Manager, Content Publisher and Airline Manager roles can use the Manage Packages function to define the properties that DDM uses to deliver packages. [Figure 4.6]
TIP DDM displays the packages most recently published at the beginning of the Packages Available for Delivery list.
Setting up the delivery properties involves specifying whether the package should be reviewed, who should perform the review, and who should receive the package. The process can involve any of the following steps:
• Assigning and Unassigning Recipients
• Editing Package Delivery Properties, including the package’s checkpoint, delivery priority and start and stop delivery dates
Figure 4.6. Manage Packages page
y, 2014 DDM ASP User Guide014 Jeppesen
89

Managing PackagesDelivering Packages
DD
90
• Assigning Recipient Groups
• Assigning Review Devices
• Assigning Consumer Companies
Some delivery properties, such as the delivery priority, default checkpoint, and associated recipient groups are defined by the package’s content type. Others, such as the start and end delivery dates are set by the package’s publisher. However, you can edit many of the delivery properties of the package and assign recipients, recipient groups, review devices, and other companies (consumers) to receive the package.
Assigning and Unassigning RecipientsUse the Assign Recipients tab on the Edit Package page to assign recipients to and unassign recipients from the package. [Figure 4.8]
Unassigning a recipient from a package prevents the recipient from downloading the package. If your company is using versioned content, you should unassign earlier versions of a package before unassigning later versions. This prevents CDAF from downloading earlier versions after later versions are loaded on the aircraft. In these cases, CDAF will not attempt to load the earlier version.
M ASP User Guide May, 2014© 2014 Jeppesen

Managing PackagesDelivering Packages
Ma© 2
You can view more information about a recipient by clicking the link in the Recipient Name column.
Figure 4.7. Assign Recipients tab on the Edit Package page
y, 2014 DDM ASP User Guide014 Jeppesen
91

Managing PackagesDelivering Packages
DD
92
Icons displayed in the Select column provide warnings about the compatibility of the package with the recipient. [Figure 4.8] If the package is not compatible with the recipient, you cannot select it. Point to or click on any warning icon to see detailed information about the compatibility issue.
To assign recipients to a package1. In the Content Management section in the navigation menu, click Manage
Packages.
DDM displays the Manage Packages page. [Figure 4.6]
TIP Manage the packages that display in the Packages Available for Delivery list by selecting a filter from the Packages Filters drop-down list.
2. Click the Edit link corresponding to the package that you want to edit.
DDM displays the Edit Package page. [Figure 4.7]
3. If necessary, go to the View drop-down list, and select a filtering option. You can filter by any of the following:
– Compatible Tail—Displays only those recipients DDM identifies as compatible.
– Selected Recipients—Displays only the recipients you select. If you do not select any recipients, the list will display no results.
TIP When using the Selected Recipients filter, you can click Run Again to remove from the list any recipients that you deselected.
– Any Recipients Filter already created on your DDM server.
Figure 4.8. Compatibility icons
M ASP User Guide May, 2014© 2014 Jeppesen

Managing PackagesDelivering Packages
Ma© 2
– The members of any Recipient Groups created on your DDM server. These entries are preceded by the word Group.
4. Select the recipients to associate with the package you are editing:
– In the Select column, select the check box for each recipient to associate with the package.
– Use the selection functions (Select Page, Deselect Page, Select All Pages, and Deselect All Pages) to toggle the selection of all displayed and all filtered recipients.
NOTE If the consumer company that corresponds to the recipient does not include the same content type as the package, the check box for that recipient will be disabled.
CAUTION When assigning recipients, make sure they match the associated packages. Otherwise, you may send a part to the wrong airplane.
5. Optionally, unassociate a package with a recipient by clearing the corresponding check box.
6. Click Save Changes.
NOTE If any of the selected recipients are potentially incompatible, DDM displays the Confirm Package Association page. Review the recipients listed her and confirm the associations. See “Confirming Package Association” on page 102 for more information.
Editing Package Delivery PropertiesYou define package delivery properties on the Edit Properties tab on the Edit Package page. Several of the default values are defined elsewhere, either by the content type or by properties entered during the publication process.
y, 2014 DDM ASP User Guide014 Jeppesen
93

Managing PackagesDelivering Packages
DD
94
View the parts in the package by clicking the link s that display in the Parts in Package field. For more information, see “Viewing Parts” on page 109.
NOTE If you change the package’s checkpoint, DDM restarts the review process.
Figure 4.9. Edit Properties tab on the Edit Package page
M ASP User Guide May, 2014© 2014 Jeppesen

Managing PackagesDelivering Packages
Ma© 2
To edit package delivery properties1. In the Content Management section in the navigation menu, click Manage
Packages.
DDM displays the Manage Packages page. [Figure 4.6]
TIP Reduce the number of packages that display in the Packages Available for Delivery list by selecting a filter from the Packages Filters drop-down list.
2. Click the Edit link corresponding to the package that you want to edit.
DDM displays the Edit Package page. [Figure 4.7]
3. Click the Edit Properties tab.
DDM displays the Edit Properties tab. [Figure 4.9]
4. Complete the fields as described in the following table.
Table 4-2 Editable Fields on the Edit Properties Tab
Field Description and Instructions
Description Type a description of the package.Any values already displayed in this field were added during the publishing process.
Delivery Priority The priority by which packages are sent to a specific recipient. Packages with a Delivery Priority of 1 are the highest priority, and those with a value of 9 are the lowest priority. If two packages have the same priority, DDM delivers the smaller package first.The default delivery priority is based on the Content Type of the packageTo override the default Delivery Priority value for the package, select a priority (1-9) from the drop-down list.
Recommended Start Delivery
The date that the publisher recommends when the package should be available for delivery. This field also provides the default date for the Start Delivery field.This field is intended for use by the publishers of content. If you need to change the date, click the calendar icon and select a date.
Recommended Do Not Deliver After
The date that the publisher recommends when the package should on longer be available for delivery. This field also provides the default date for the Do Not Deliver After field.This field is intended for use by the publishers of content. If you need to change the date, click the calendar icon and select a date.
NOTE For a BOM-wrapped package, the Recommended Do Not Deliver After field is pre-populated with the date specified in the BOM.xml file.
y, 2014 DDM ASP User Guide014 Jeppesen
95

Managing PackagesDelivering Packages
DD
96
5. Click Save Changes.
Assigning Recipient GroupsUse the Assign Recipient Groups tab on the Edit Package page to assign recipient groups to the package. [Figure 4.10] You can view more information about a recipient group by clicking the link in the Group Name column.
Package Checkpoint
An inspection points where reviewers use the assigned review device to load, review, and approve packages before delivery to recipients. Checkpoints consist of reviewers (individual or groups) and the review device that those reviewers will use to view content. The default package checkpoint is based on the Content Type of the packageTo override the default Package Checkpoint assigned to the package, select a checkpoint from the drop-down list.
NOTE Changing the selected package checkpoint will restart the review process, voiding all previous reviews and approvals.
Start Delivery The date when the package will be available for delivery. The default value is the Recommended Start Delivery value set by the publisher.To change the date, click the calendar icon and select a date or type the date in dd-MMM-yyyy format.
Do Not Deliver After
The date when the package will no longer be available for delivery. The default value is the Recommended Do Not Deliver After value set by the publisher.To change the date, click the calendar icon and select a date or type the date in dd-MMM-yyyy format.
Add Comment Type comments about the package delivery in the Add Comments field.
Table 4-2 Editable Fields on the Edit Properties Tab (continued)
Field Description and Instructions
M ASP User Guide May, 2014© 2014 Jeppesen

Managing PackagesDelivering Packages
Ma© 2
DDM does not retain the selected state of the check box after you select a recipient group and save the package. Also, if the package’s content type is associated with a recipient group, that group is still selectable on this tab. To confirm the members of a recipient group are assigned to a package, click the Assign Recipients tab and select the group from the View filter.
To assign recipient groups to packages1. In the Content Management section in the navigation menu, click Manage
Packages.
DDM displays the Manage Packages page. [Figure 4.6]
TIP Reduce the number of packages that display in the Packages Available for Delivery list by selecting a filter from the Packages Filters drop-down list.
2. Click the Edit link corresponding to the package that you want to edit.
DDM displays the Edit Package page. [Figure 4.7]
3. Click the Assign Recipient Groups tab.
DDM displays the Assign Recipient Groups tab. [Figure 4.10]
Figure 4.10. Assign Recipient Groups tab on the Edit Package page
y, 2014 DDM ASP User Guide014 Jeppesen
97

Managing PackagesDelivering Packages
DD
98
4. Select the check box next to the recipient groups to which you want to assign the package.
NOTE Use the selection functions (Select Page or Deselect Page) to toggle the selection of all displayed recipient groups.
5. Click Save Changes.
NOTE If any of the selected recipients are potentially incompatible, DDM displays the Confirm Package Association page. Review the recipients listed her and confirm the associations. See “Confirming Package Association” on page 102 for more information.
M ASP User Guide May, 2014© 2014 Jeppesen

Managing PackagesDelivering Packages
Ma© 2
Assigning Review DevicesUse the Assign Review Devices tab on the Edit Package page to assign review devices to the package. [Figure 4.11] When you assign review devices on the Edit Package page, DDM immediately assigns the packages to the review device, bypassing any checkpoints. You can view more information about a review device by clicking the link in the Review Device Name column.
NOTE Recommended delivery dates do not apply to review devices. Review devices can receive packages independent of start and stop delivery dates.
IMPORTANT To be considered compatible with a package, Tail type review devices must be listed in the package’s metadata.
Figure 4.11. Assign Review Devices tab on the Edit Package page
y, 2014 DDM ASP User Guide014 Jeppesen
99

Managing PackagesDelivering Packages
DD
10
To assign review devices to packages1. In the Content Management section in the navigation menu, click Manage
Packages.
DDM displays the Manage Packages page. [Figure 4.6]
TIP Reduce the number of packages that display in the Packages Available for Delivery list by selecting a filter from the Packages Filters drop-down list.
2. Click the Edit link corresponding to the package that you want to edit.
DDM displays the Edit Package page. [Figure 4.7]
3. Click the Assign Recipient Groups tab.
DDM displays the Assign Review Devices tab. [Figure 4.11]
4. Select the check box next to the review devices to which you want to assign the package.
NOTE Use the selection functions (Select Page or Deselect Page) to toggle the selection of all displayed review devices.
5. Click Save Changes.
Assigning Consumer CompaniesYou assign consumer companies to the package on the Assign Consumers tab on the Edit Package page. [Figure 4.12]
NOTE Consumer companies are also referred to as server recipients on the View Recipient and Edit Recipient pages.
M ASP User Guide May, 2014© 2014 Jeppesen
0

Managing PackagesDelivering Packages
Ma© 2
To assign consumer companies to packages1. In the Content Management section in the navigation menu, click Manage
Packages.
DDM displays the Manage Packages page. [Figure 4.6]
TIP Reduce the number of packages that display in the Packages Available for Delivery list by selecting a filter from the Packages Filters drop-down list.
2. Click the Edit link corresponding to the package that you want to edit.
DDM displays the Edit Package page. [Figure 4.7]
3. Click the Assign Consumers tab.
DDM displays the Assign Consumers tab. [Figure 4.12]
4. Select the check box next to the companies to which you want to assign the package.
5. Click Save Changes.
Figure 4.12. Assign Consumers tab on the Edit Package page
y, 2014 DDM ASP User Guide014 Jeppesen
101

Managing PackagesDelivering Packages
DD
10
Confirming Package AssociationWhen you associate recipients that may be incompatible with a package, DDM displays the Confirm Package Association page. The Confirm Package Association page displays a list of potentially incompatible recipients and the reasons why DDM identified them as potentially incompatible.
To confirm package associations1. Review the lis of recipients on the Confirm Package Association page.
2. Clear the check box corresponding to any recipient that you no longer want to associate with the package.
3. After ensuring that you still want to deliver packages to the selected recipients, click Confirm.
Figure 4.13. Confirm Package Associates page
M ASP User Guide May, 2014© 2014 Jeppesen
2

Managing PackagesViewing Packages Available for Delivery
Ma© 2
Viewing Packages Available for DeliveryThe Manage Packages page displays the list of packages that are available for delivery. [Figure 4.14]
You can click any column heading to sort the data in the list. The Packages Available for Delivery list provides links to edit packages, view packages, and see details about the checkpoint status.
The following table lists and describes the columns in the Packages Available for Delivery list.
Figure 4.14. Packages Available for Delivery list
Packages Available for Delivery list
y, 2014 DDM ASP User Guide014 Jeppesen
103

Managing PackagesViewing Package Properties
DD
10
Viewing Package PropertiesUsers assigned the Content Manager, Content Publisher, and Airline Manager roles can use the Manage Packages function to view properties that have been assigned to a published package.
Once displayed, you can use the View Package page to review information about the package. Users with the appropriate privileges can also click the Edit Package button to access the Edit Package page.
NOTE Several other roles can access the View Package page from DDM pages to which they have access. In these cases, package names display red and underlined, indicating a link that, when clicked, displays delivery properties for the selected package. If you click the package name, the resulting page will most often display a “Return to...” link that enables you to return to the previous page. Jeppesen recommends using this “Return to...” link instead of using the browser’s Back button.
The View Package page includes the following tabs:
• View Properties, which includes information about the package including the package’s checkpoint, delivery priority, and start and stop delivery dates
• Assigned Recipients, which is used to see which recipients are assigned to the package
• View Assigned Groups, which is used to see which recipient groups are assigned to the package
• View Assigned Review Devices, which is used to see which review devices are assigned to the package
• View Assigned Consumers, which is used to see which companies are assigned to the package
To view the delivery properties for a package1. In the Content Management section in the navigation menu, click Manage
Packages.
The Manage Packages page appears. [Figure 4.6]
M ASP User Guide May, 2014© 2014 Jeppesen
4

Managing PackagesViewing Package Properties
Ma© 2
2. If necessary, click the Packages Filter field and select a filtering option.
The data at the bottom of the page changes to match the selected filter. Click Run Again to refresh the list (see “Running Filters” on page 68 for more information on the Run Again function).
NOTE The filters available in the Packages Filter field are created using the Manage Filters function. Refer to “Creating a Filter” on page 328 for information about creating or changing a filter.
TIP When using the Selected Recipients filter, you can click Run Again to remove from the list any recipients that you deselected.
3. In the Package Name column, click the name of the package you want to view.
DDM displays the View Assigned Recipients tab on the View Package page. [Figure 4.15]
4. Review the information.
Figure 4.15. View Assigned Recipients tab on the View Package page
y, 2014 DDM ASP User Guide014 Jeppesen
105

Managing PackagesViewing Package Properties
DD
10
5. Click the View Assigned Groups tab.
DDM displays the View Assigned Groups tab. [Figure 4.16]
6. Click the View Assigned Review Devices tab.
DDM displays the View Assigned Review Devices tab. [Figure 4.17]
7. Review the information.
8. Click the View Assigned Consumers tab.
Figure 4.16. View Assigned Groups Tab on the View Package Page
Figure 4.17. View Assigned Review Devices tab on the View Package page
M ASP User Guide May, 2014© 2014 Jeppesen
6

Managing PackagesViewing Package Properties
Ma© 2
9. DDM displays the View Assigned Consumers tab. [Figure 4.18]
NOTE Consumer companies are also referred to as server recipients on the View Recipient and Edit Recipient pages.
Figure 4.18. View Assigned Consumers tab on the View Package page
y, 2014 DDM ASP User Guide014 Jeppesen
107

Managing PackagesViewing Package Properties
DD
10
10. Click the View Properties tab.
DDM displays the View Properties tab. [Figure 4.19]
11. Review the information on the View Properties tab.
12. View the parts in the package by clicking the link s that display in the Parts in Package field. For more information, see “Viewing Parts” on page 109.
13. Click Edit Package to edit the package. See “Editing Package Delivery Properties” on page 93 for details.
Figure 4.19. View Properties tab on the View Package page
M ASP User Guide May, 2014© 2014 Jeppesen
8

Managing PackagesViewing Parts
Ma© 2
Viewing PartsYou can view details about parts in a package by clicking the part name link displayed in the Parts in Package field on the following pages:
• View Package
• Edit Package
• View Part
If the part’s metadata includes values in the corresponding elements, DDM displays the information on the View Part page. [Figure 4.20]
Figure 4.20. View Part page
y, 2014 DDM ASP User Guide014 Jeppesen
109

Managing PackagesChanging a Package Review Status
DD
11
Changing a Package Review StatusUsers assigned the Airline Manager or Content Manager role can change the review status for a package that has already been approved or rejected. For example, you may need to change a Rejected status for a package to Approved by unassigning the current checkpoint and assigning a checkpoint without reviewers so that the package is automatically approved.
To change a review status for a package1. In the Content Management section in the navigation menu, click Manage
Packages.
DDM displays the Manage Packages page. [Figure 4.6]
2. If necessary, click the Packages Filter field and select a filtering option.
The data at the bottom of the page changes to match the selected filter.
NOTE The filters available in the Packages Filter field are created using the Manage Filters function.
3. Click the Edit link next to the package whose status you want to change.
The Edit Package page displays the Assign Recipients tab. [Figure 4.7]
4. Click the Edit Properties tab.
5. From the Package Checkpoint drop-down list, select another checkpoint or None.
6. Click Save Changes.
The Deliver Packages page redisplays. The status for the package changes to one of the following:
Pending if the new checkpoint has reviewers.
Approved if the new checkpoint does not have reviewers
No Checkpoint Assigned if None was selected
Each time a different checkpoint is assigned to a package, the package status becomes either “Approved” if the checkpoint has no associated reviewers, or “Pending”. If the status becomes “Pending”, the package review process has to begin again according to the new checkpoint.
M ASP User Guide May, 2014© 2014 Jeppesen
0

Managing PackagesRemoving Parts from the Delivery Staging Area
Ma© 2
Removing Parts from the Delivery Staging AreaThe staging area is a location on the EFB into which parts from a package are temporarily placed before being installed on the Class 3 EFB recipient. The staging area is used by any Class 3 EFB recipients that are Terminal Wireless LAN Unit-enabled (TWLU).
Occasionally, the staging area may need to be cleaned out. The Remove Parts from Staging option enables users assigned the Content Manager and Airline Manager roles to identify which parts are in the staging area and to remove one or more parts on a specific tail to keep the staging area from becoming cluttered. Parts do not display in the staging area unless a package is published. The Remove Parts from Staging option is available in the Deliver Packages function.
Removing parts from the staging area does not remove the parts from the EFB, nor does removal affect associated packages in DDM. Parts that are selected for removal are not removed until CDAF connects to DDM. DDM shows only actually reported parts and recipient components (LRUs).
NOTE To remove the part, make sure that the package to which the part belongs has been unassigned from its recipient. See “Editing Package Delivery Properties” on page 93.
NOTE If you are fully uninstalling a part from the EFB and already removed it from the EFB load area, first unassign packages with this part from the recipient, then remove the part from the EFB. This action ensures that a removed part in a package is not re-delivered to a recipient.
To remove parts from the staging area1. In the Content Management section in the navigation menu, click Manage
Packages.
DDM displays the Deliver Packages page. [Figure 4.6]
y, 2014 DDM ASP User Guide014 Jeppesen
111

Managing PackagesRemoving Parts from the Delivery Staging Area
DD
11
2. Click Remove Parts from Staging.
DDM displays the Remove Parts from Staging page. [Figure 4.21]
Figure 4.21. Remove Parts from Staging page
M ASP User Guide May, 2014© 2014 Jeppesen
2

Managing PackagesRemoving Parts from the Delivery Staging Area
Ma© 2
3. In the Remove Parts from Staging column, click the Remove Parts link associated with the recipient for which you want to remove parts.
DDM displays the Remove Parts tab. [Figure 4.22]
4. In the Select to Remove column, click the check box for each part that you want to remove from the staging area.
5. Click Save Changes.
If CDAF has not yet confirmed the deletion, DDM displays a trash can icon to indicate that removal of the part is in progress.
If CDAF has already confirmed the deletion occurred, or after CDAF reports configuration of the staging area (and the part is already removed), DDM removes the part from the Remove Parts tab.
Figure 4.22. Remove Parts tab on the Remove Parts from Staging page
y, 2014 DDM ASP User Guide014 Jeppesen
113

Managing PackagesRemoving Parts from the Delivery Staging Area
DD
11
6. (optional) Click the View Properties tab.
DDM displays the View Properties tab. [Figure 4.23]
Figure 4.23. View Properties Tab on the Remove Parts from Staging page
M ASP User Guide May, 2014© 2014 Jeppesen
4

CHAPTER 5
Approving and Rejecting Packages
Before packages can be delivered to recipients they must be approved at checkpoints. DDM enables individual reviewers or groups of reviewers to use review devices to inspect the contents of a package and approve or reject it for delivery.
This chapter contains the following topics:
• Overview
• Approving Package Content
• Rejecting Package Content
• Viewing a Certificate of Conformity
• Adding Reviewer Comments Without Changing Status

Approving and Rejecting PackagesOverview
DD
11
OverviewPackages can be manually assigned a checkpoint with reviewers or can be automatically assigned to a checkpoint based on content type. Packages assigned to checkpoints must be reviewed and either approved or rejected. Users assigned the Reviewer role can approve or reject package content at the checkpoint.
A package assigned a checkpoint is assigned Pending status and sent to the associated review devices for review. Only approved packages can be sent to the assigned recipients, not rejected or pending packages.
The typical review process is:
1. A package is assigned a checkpoint that contains reviewers.
2. A reviewer assigned to that checkpoint receives an email notification that a package is available for review, if an email rule is created. See “Creating Email Rules for Specific Events” on page 302 for more information about creating this type of email.
3. The reviewer logs into DDM and views a list of the packages needing content review on the Package Checkpoints page.
4. When a package is received by the review device, the reviewer verifies that the package content is correct and can be delivered to a recipient or recipient group.
5. From the Package Checkpoints page, the reviewer returns to DDM and either approves or rejects the package.
The Package Checkpoints page displays the packages that are currently available for review and approval. [Figure 5.1]
From this page, you can perform the following tasks:
• View package properties.
• View the Certificate of Conformity (COC) for the package if available.
NOTE The COC is used only for 665 compliant packages intended for a Boeing EFB.
• Add comments to a package.
M ASP User Guide May, 2014© 2014 Jeppesen
6

Approving and Rejecting PackagesOverview
Ma© 2
• Approve or reject a package.
Figure 5.1. Package Checkpoints page
y, 2014 DDM ASP User Guide014 Jeppesen
117

Approving and Rejecting PackagesApproving Package Content
DD
11
Approving Package ContentAfter reviewing the contents of a package and determining that the package is correct and can be delivered to a recipient or recipient group, you can approve the package.
To approve the contents of a package for delivery1. In the Content Management section in the navigation menu, click
Approve/Reject Package.
The Package Checkpoints page appears. [Figure 5.1]
2. Locate the package to approve.
3. Click Approve.
4. (optional) Type comments about your review in the Comment field.
5. Click Submit Changes.
NOTE If necessary, you can approve multiple packages and click Submit Changes to submit all of the packages at the same time.
M ASP User Guide May, 2014© 2014 Jeppesen
8

Approving and Rejecting PackagesRejecting Package Content
Ma© 2
Rejecting Package ContentAfter reviewing the contents of a package and determining that the package is not correct and cannot be delivered to a recipient or recipient group, you can reject the package.
To reject the contents of a package1. In the Content Management section in the navigation menu, click
Approve/Reject Package.
DDM displays the Package Checkpoints page. [Figure 5.1]
2. Locate the package to reject.
3. Click Reject.
4. Type the reason for the rejection in the Comment field. This field is required when you reject a package.
5. Click Submit Changes.
NOTE If necessary, you can reject multiple packages and click Submit Changes to submit all of the packages at the same time.
y, 2014 DDM ASP User Guide014 Jeppesen
119

Approving and Rejecting PackagesViewing a Certificate of Conformity
DD
12
Viewing a Certificate of ConformityReviewers can link directly to a COC document associated with a checkpoint from the Package Checkpoints page. COC documents are in PDF forma and you must have Adobe Reader installed to view them. Not all parts have a COC. When DDM cannot identify which PDF file is a COC, it shows a link to all PDF files inside the part. If there are no PDF files, DDM displays the message “No COC found” for the part.
To view a COC for a package checkpoint1. In the Content Management section in the navigation menu, click Package
Checkpoints.
The Package Checkpoints page appears. [Figure 5.1]
2. Click the associated COC link.
The PDF document opens in Adobe Reader.
M ASP User Guide May, 2014© 2014 Jeppesen
0

Approving and Rejecting PackagesAdding Reviewer Comments Without Changing Status
Ma© 2
Adding Reviewer Comments Without Changing StatusDDM enables you to add comments to a package without updating the status. The comments are visible to any users who view the package on the Package Checkpoints, View Package, and Edit package pages.
To add Reviewer comments to a package without changing the status1. In the Content Management section in the navigation menu, click
Approve/Reject Package.
The Package Checkpoints page appears. [Figure 5.1]
2. Locate the package to which you want to enter a Reviewer comment.
3. Type comments about the package in the Comment field.
4. Click Submit Changes.
y, 2014 DDM ASP User Guide014 Jeppesen
121

Approving and Rejecting PackagesAdding Reviewer Comments Without Changing Status
DD
12
M ASP User Guide May, 2014© 2014 Jeppesen
2

CHAPTER 6
Finding Content Delivery Status
The Find Delivery Status function enables you to view the delivery status of content and identify the possible reasons why DDM did not deliver it to a particular recipient or review device. You can search for the delivery status of content by part number, package, or version ID.
This chapter contains the following topics:
• Overview
• Finding Content Delivery Status by Part
• Finding Content Delivery Status by Package
• Finding Content Delivery Status by Version ID

Finding Content Delivery StatusOverview
DD
12
OverviewWhen you search for content—by part, package, or version ID— DDM performs a series of checks that determine why delivery has not occurred and provides instructions for fixing the issue. If DDM cannot identify a reason, DDM provides additional steps that you can take to find a reason on your own. Users assigned the Content Manager, Recipient Manager, Reviewer, or Airline Manager roles can search for content.
Use the Find Part Delivery Status, Find Package Delivery Status, or Find Version ID Delivery Status pages to find content. To reduce the number of recipients to include in the your delivery status search, you can use a Recipient filter. Using a recipient filter also removes review devices from the list of recipients. Refer to “Creating a Filter” on page 328 for information about creating a filter.
After you select the content and the recipient, DDM displays results that can include the following information:
• Links to the associated packages and parts
• Reasons why the package was not delivered, including:
– Compatibility issues
– Package errors
– Recipient and review device errors
– Delivery and review status
• Troubleshooting tips that include actions you can take to address the reason why the part was not delivered
NOTE You can also view a list of parts included in a specific package on the View Package and View Published Package pages to help determine why specific parts were not delivered. Refer to “Viewing Packages Available for Delivery” on page 103 for information about viewing package delivery status.
M ASP User Guide May, 2014© 2014 Jeppesen
4

Finding Content Delivery StatusFinding Content Delivery Status by Part
Ma© 2
Finding Content Delivery Status by PartUse the Find Part Delivery Status page to view the delivery status of a part to a particular recipient.
To find content by part1. In the Content Management section in the navigation menu, click by Part.
DDM displays the Find Part Delivery Status page. [Figure 6.1]
2. (optional) From the Recipient Filter drop-down list, select a recipient filter.
DDM renames the Recipient (or Review Device) drop-down list to Recipient and includes only the recipients that match the selected filter. Click Run Again to refresh the list (see “Running Filters” on page 68 for more information on the Run Again function).
NOTE The filters available in the Recipient Filter field are created using the Manage Filters function. Refer to “Creating a Filter” on page 328 for information about creating or changing a filter.
3. From the Part drop-down list, select the part number you want to find.
4. From the Recipient (or Review Device) drop-down list, select the name of the recipient that is scheduled to receive the part.
Figure 6.1. Find Part Delivery Status page
y, 2014 DDM ASP User Guide014 Jeppesen
125

Finding Content Delivery StatusFinding Content Delivery Status by Part
DD
12
5. Click Find Delivery Status.
DDM displays the Part Delivery Status page which includes information about each package in which the part is included. [Figure 6.2]
6. Review the information.
NOTE If DDM cannot identify a delivery problem, the Part Delivery Status page displays troubleshooting information.
7. Click any of the links on the page to investigate further.
Figure 6.2. Part Delivery Status page
M ASP User Guide May, 2014© 2014 Jeppesen
6

Finding Content Delivery StatusFinding Content Delivery Status by Package
Ma© 2
Finding Content Delivery Status by PackageUse the Find Package Delivery Status page to view the delivery status of a package to a particular recipient.
To find content by package1. In the Content Management section in the navigation menu, click by
Package.
DDM displays the Find Package Delivery Status page. [Figure 6.1]
2. (optional) From the Recipient Filter or Packages Filter drop-down lists, select a filter.
Click Run Again to refresh the list (see “Running Filters” on page 68 for more information on the Run Again function).
NOTE The filters available in the Recipient Filter field are created using the Manage Filters function. Refer to “Creating a Filter” on page 328 for information about creating or changing a filter.
3. From the package drop-down list, select the package you want to find.
Figure 6.3. Find Package Delivery Status page
y, 2014 DDM ASP User Guide014 Jeppesen
127

Finding Content Delivery StatusFinding Content Delivery Status by Package
DD
12
4. From the Recipient (or Review Device) drop-down list, select the name of the recipient that is scheduled to receive the package.
5. Click Find Package.
DDM displays the Package Delivery Status page which includes information about. [Figure 6.2]
6. Review the information.
NOTE If DDM cannot identify a delivery problem, the Package Delivery Status page displays troubleshooting information.
7. Click any of the links on the page to investigate further.
Figure 6.4. Package Delivery Status page
M ASP User Guide May, 2014© 2014 Jeppesen
8

Finding Content Delivery StatusFinding Content Delivery Status by Version ID
Ma© 2
Finding Content Delivery Status by Version IDUse the Find Version Delivery Status page to view the delivery status of versioned content to a particular recipient.
To find content by Version ID1. In the Content Management section in the navigation menu, click by
Version ID.
DDM displays the Find Version Delivery Status page. [Figure 6.5]
2. (optional) From the Recipient Filter drop-down list, select a recipient filter.
DDM renames the Recipient (or Review Device) drop-down list to Recipient and includes only the recipients that match the selected filter. Click Run Again to refresh the list (see “Running Filters” on page 68 for more information on the Run Again function).
NOTE The filters available in the Recipient Filter field are created using the Manage Filters function. Refer to “Creating a Filter” on page 328 for information about creating or changing a filter.
3. From the Version ID drop-down list, select the versioned content you want to find.
Figure 6.5. Find Version Delivery Status page
y, 2014 DDM ASP User Guide014 Jeppesen
129

Finding Content Delivery StatusFinding Content Delivery Status by Version ID
DD
13
4. From the Recipient (or Review Device) drop-down list, select the name of the recipient that is scheduled to receive the content.
5. Click Find Delivery Status.
The Version Delivery Status page appears. [Figure 6.6]
6. Review the information.
7. Click any of the links on the page to investigate further.
Figure 6.6. Version Delivery Status page
M ASP User Guide May, 2014© 2014 Jeppesen
0

CHAPTER 7
Archiving and Deleting Packages
DDM’s archive and delete functions enables users to manage the disk space of the DDM server. These functions can be set up to work automatically or you can perform them manually. When a package is no longer being used or no longer needs to be available for use, you can archive it so it can no longer be associated with a recipient. After archiving a package, you can download the archive zip file and then delete the packages from the DDM server to release disk space.
This chapter contains the following topics:
• Overview
• Archiving Packages
• Unarchiving a Package
• Deleting an Archived Package
• Automatically Archiving and Deleting Packages
• Downloading an archive.zip File for an Archived Package
• Deleting an Archive zip File for a Package

Archiving and Deleting PackagesOverview
DD
13
OverviewDDM’s Archive Packages function enables you to manually or automatically archive and delete packages. Archiving prepares packages for permanent deletion by making them no longer available to be associated with a recipient or checkpoint. You can download zip file containing the archived packages. Deleting permanently removes packages from DDM, including the archive zip files store on the server, freeing up space in DDM. On the Archive Packages you can manually archive, unarchive, and delete packages and also download or delete the archived zip files.
Archiving a package makes it no longer available to be associated with a recipient or checkpoint. This helps to clear the Packages Available for Delivery list on the Manage Packages page. It also provides a safeguard between the action of identifying content eligible for deletion (archival) and actually deleting the content (deletion). Once archived, a package is available to be deleted from the server. In addition, archived and deleted package names cannot be reused when publishing new packages.
M ASP User Guide May, 2014© 2014 Jeppesen
2

Archiving and Deleting PackagesArchiving Packages
Ma© 2
Archiving PackagesDDM’s Archive Packages function enables you to prepare unused packages to be deleted from the server. Once archived, DDM removes the package from the Packages Available for Delivery list, making it no longer available to be associated with a recipient. DDM also unassociates the package with any recipients or checkpoints. The package is still available to the server and can be unarchived if it needs to be delivered again.
When DDM archives a package, it saves the package, along with an XML file containing the audit history of the package, in a zip file named <package name>.pkg_archive.zip. DDM stores this zip file in a pre-defined location. The audit history in the XML file contains information about the package, including publication details, delivery information, recipient associations, and events generated by the package. After archiving, you can click the Manage Files tab and download or delete files from the archiving location. Deleting the zip files using the Manage Files tab does not delete the archived package.
The Archiver role can manually archive a package. In addition to manually archiving and deleting packages, you can set up DDM to automatically archive and delete packages. For more information, see “Automatically Archiving and Deleting Packages” on page 139.
y, 2014 DDM ASP User Guide014 Jeppesen
133

Archiving and Deleting PackagesArchiving Packages
DD
13
To manually archive a package1. In the Content Management section in the navigation menu, click Archive
Packages.
The Archive Packages page displays the Archive Packages tab. [Figure 7.1]
TIP If the Packages Available to Archive list contains multiple pages, select a filter from the Packages Filter drop-down list. Click Run Again to refresh the list (see “Running Filters” on page 68 for more information on the Run Again function).
Figure 7.1. Archive Packages tab on the Archive Packages page
M ASP User Guide May, 2014© 2014 Jeppesen
4

Archiving and Deleting PackagesArchiving Packages
Ma© 2
2. Select one or more check boxes in the Select column of the Packages Available to Archive list to specify the packages you want to archive.
NOTE If the Packages Available to Archive list contains multiple pages, DDM retains the check boxes you select as you move between pages.
3. Optionally, type comments about the package being archived in the Comments field.
4. Click Archive Package(s).
5. Click OK on the message DDM displays.
DDM archives the selected package.
y, 2014 DDM ASP User Guide014 Jeppesen
135
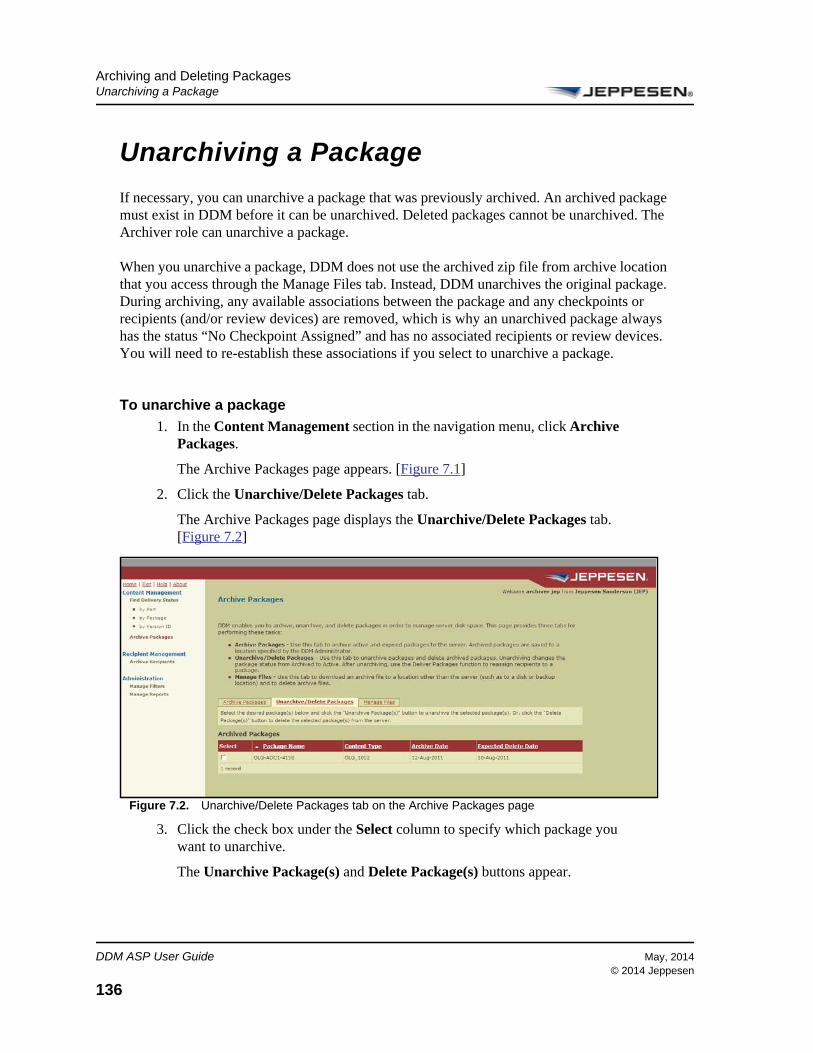
Archiving and Deleting PackagesUnarchiving a Package
DD
13
Unarchiving a PackageIf necessary, you can unarchive a package that was previously archived. An archived package must exist in DDM before it can be unarchived. Deleted packages cannot be unarchived. The Archiver role can unarchive a package.
When you unarchive a package, DDM does not use the archived zip file from archive location that you access through the Manage Files tab. Instead, DDM unarchives the original package. During archiving, any available associations between the package and any checkpoints or recipients (and/or review devices) are removed, which is why an unarchived package always has the status “No Checkpoint Assigned” and has no associated recipients or review devices. You will need to re-establish these associations if you select to unarchive a package.
To unarchive a package1. In the Content Management section in the navigation menu, click Archive
Packages.
The Archive Packages page appears. [Figure 7.1]
2. Click the Unarchive/Delete Packages tab.
The Archive Packages page displays the Unarchive/Delete Packages tab. [Figure 7.2]
Figure 7.2. Unarchive/Delete Packages tab on the Archive Packages page
3. Click the check box under the Select column to specify which package you want to unarchive.
The Unarchive Package(s) and Delete Package(s) buttons appear.
M ASP User Guide May, 2014© 2014 Jeppesen
6

Archiving and Deleting PackagesUnarchiving a Package
Ma© 2
4. When finished, click Unarchive Package(s).
DDM unarchives the selected package.
TIP If you unarchive a package that was previously delivered to a recipient, reset the Package Checkpoint to AutoApprove, and then reassign the package to the same recipient, the status of the package will remain “Available as of...”
y, 2014 DDM ASP User Guide014 Jeppesen
137

Archiving and Deleting PackagesDeleting an Archived Package
DD
13
Deleting an Archived PackageDDM does not delete archived packages from the system when you perform an archive. To reclaim server space, you must delete the package and the archive zip file from the server. When you delete a package, DDM automatically deletes the archive zip file from the archive location accessible through the Manage Files tab. You can delete only the archive zip file without deleting the archived package from the system. Refer to “Deleting an Archive zip File for a Package” on page 143 for information about deleting an archive.zip file.
You can only delete a package that has been archived. Once deleted, a package cannot be unarchived and cannot be retrieved at a future date; the package is completely removed from the server. The Archiver role can delete a package.
To delete an archived package1. In the Content Management section in the navigation menu, click Archive
Packages.
The Archive Packages page appears. [Figure 7.1]
2. Click the Unarchive/Delete Packages tab.
The Unarchive/Delete Packages tab on the Archive Packages page appears. [Figure 7.2]
3. Click the check box under the Select column to specify which package you want to delete.
The Unarchive Package(s) and Delete Package(s) buttons display.
4. When finished, click Delete Package(s).
DDM deletes the selected package and all package information from the system. The package name remains in the system to prevent reuse of the package name. The package itself is removed from the content repository.
M ASP User Guide May, 2014© 2014 Jeppesen
8

Archiving and Deleting PackagesAutomatically Archiving and Deleting Packages
Ma© 2
Automatically Archiving and Deleting PackagesDDM enables you to automatically archive and delete packages based on the delivery date, archive date, and content type of the package. DDM calculates an Expected Archive Date when it will automatically archive the package. After automatically archiving the package, DDM calculates an Expected Delete Date when it will automatically delete the archive package. You can set up DDM to take advantage of auto-archive only, auto-delete only, or both of these features. Even after automating the process, you can still manually archive and delete packages.
DDM calculates the Expected Archive Date by comparing the Package Duration of the package’s content type, which is a configurable number of days, to the Start Delivery date of the package. If you did not set the Start Delivery date, DDM uses the Recommended Start Delivery date set by the publisher. At midnight UTC (00:00:00Z) on the Expected Archive Date, DDM automatically archives the package unless you already manually archived it.
DDM calculates the Expected Delete Date by comparing the Time to Delete of the package’s content type, which is a configurable number of days, to the Archive Date of the package. At midnight At midnight UTC (00:00:00Z) on the Expected Delete Date, DDM automatically deletes the package and archived zip file, unless you already manually deleted it.
You can view the Expected Archive Date on the Archive Packages page’s Archive Packages tab and the View Package page’s View Properties tab. You can view the Expected Delete Date on the Archive Packages page’s Unarchive/Delete Packages tab and the View Package page’s View Properties tab.
Even if you do not set the Expected Archive Date or Expected Delete Date, the publisher of the package may have. You can override the publisher’s values, but if you do not enter a value, the package will be archived and deleted according to the publisher’s settings.
To set up automatic archive and delete, you must define an archive location and set the Package Duration and Time to Delete values of each Content Type in your system. To further automate the process, you can create email rules that notify you before DDM archives or deletes packages and after DDM actually archives or deletes packages. Create these email rules using the following events:
• Package Archive Warning
• Package Archived
• Package Delete Warning
• Package Deleted
y, 2014 DDM ASP User Guide014 Jeppesen
139

Archiving and Deleting PackagesAutomatically Archiving and Deleting Packages
DD
14
For more information about setting up your auto-archive and auto-delete process, see the following topics:
• “Defining Auto-Archive and Auto-Delete Rules” on page 268
• “Viewing Package Properties” on page 104
• “Creating an Email Rule” on page 290
M ASP User Guide May, 2014© 2014 Jeppesen
0

Archiving and Deleting PackagesDownloading an archive.zip File for an Archived Package
Ma© 2
Downloading an archive.zip File for an Archived PackageWhen DDM archives a package, it saves the package, along with an XML file containing the audit history of the package, in a zip file named <package name>.pkg_archive.zip. DDM stores this zip file in a pre-defined location accessible through the Manage Files tab. The audit history in the XML file contains information about the package, including publication details, delivery information, recipient associations, and events generated by the package. After archiving, you can click the Manage Files tab and download or delete files from the archiving location. The Archiver role can download an archive.zip file for offline storage.
To download an archive.zip file1. In the Content Management section in the navigation menu, click Archive
Packages.
The Archive Packages page appears. [Figure 7.1]
2. Click the Manage Files tab.
The Archive Packages page displays the Manage Files tab. [Figure 7.3]
Figure 7.3. Manage Files tab on the Archive Packages page
y, 2014 DDM ASP User Guide014 Jeppesen
141

Archiving and Deleting PackagesDownloading an archive.zip File for an Archived Package
DD
14
3. Under the Download column, click the Download link that corresponds to the archive.zip file that you want to download.
DDM prompts you to select a location to which to download the file.
4. Select a download location.
DDM downloads the selected file. At this time, DDM does not provide the facilities to read and reconstruct information from this file. If necessary, use a standard unzipping tool and an application that reads XML to access the archived data.
M ASP User Guide May, 2014© 2014 Jeppesen
2

Archiving and Deleting PackagesDeleting an Archive zip File for a Package
Ma© 2
Deleting an Archive zip File for a PackageArchiving a package does not reclaim disk space by itself. To reclaim disk space, you must delete the package and the archive zip file from the server. Refer to “Deleting an Archived Package” on page 138 for information about deleting a package.
Deleting an archive zip file removes the archived file of a package from the archive location; it does not delete the package from the system. It is quite possible that a package can be archived, then unarchived to become fully operational again. In this case, the archive.zip file for the package still resides in the archive location and can be downloaded and/or deleted from there without any affect on the package itself.
The process of archiving a package creates an archive.zip file, therefore you can only delete an archive.zip file of a package that has been archived. Once deleted, the file cannot be retrieved at a future date; the file is completely removed from the archive location. Thus, Jeppesen recommends downloading the archive.zip file so that the package and its history is not lost. Refer to “Downloading an archive.zip File for an Archived Package” on page 141 for more information. The Archiver role can delete an archive.zip file of an archived package.
To delete an archive.zip file for an archived package1. In the Content Management section in the navigation menu, click Archive
Packages.
The Archive Packages page appears. [Figure 7.1]
2. Click the Manage Files tab.
The Archive Packages page displays the Manage Files tab. [Figure 7.3]
3. Click the check box under the Select column to specify which file you want to delete.
The Delete File(s) button displays above the grid.
4. When finished, click Delete File(s).
DDM deletes the selected file from the archive location.
y, 2014 DDM ASP User Guide014 Jeppesen
143

Archiving and Deleting PackagesDeleting an Archive zip File for a Package
DD
14
M ASP User Guide May, 2014© 2014 Jeppesen
4

CHAPTER 8
Managing Recipients
This chapter contains the following topics:
• Overview
• Understanding DDM Functions Used to Manage a Recipient
• Naming Recipients
• Assigning Packages to Recipients
• Creating Recipients
• Viewing Properties and Packages for a Recipient
• Editing Properties and Packages for Recipients
• Unregistering a Recipient
• Manage Registration Credentials
• Archiving a Recipient
• Unarchiving a Recipient
• Deleting a Recipient
• Downloading a Zip File for an Archived Recipient
• Deleting an archive.zip File for a Recipient

Managing RecipientsOverview
DD
14
OverviewA recipient is a computer on which a CDA is installed that receives packages from DDM. Recipients are defined using a set of metadata provided by the system.
DDM enables the Recipient Manager and Airline Manager roles to create and manage four types of recipients: Tail, Proxy, Server, and Basic. The following table defines these recipient types.
The list of LRUs reported by CDAF may be different from the list of LRUs assigned to the Tail recipient. DDM indicates any differences on the View Recipient, Edit Package - Assign Recipient, View Package - Assigned Recipients, Edit Package - Assign Review Device, View Package - Assigned Review Devices pages:
• if an LRU is assigned to the recipient, but not reported by CDAF, it is marked as “Not Installed”
• if an LRU is reported by CDAF, but not assigned to the recipient, it is marked as “Not Expected”
• if an LRU is assigned, but CDAF did not yet contact the DDM server, it is marked as “Not Confirmed”
Table 8-1 Recipient Types
Recipient Type Description
Tail A recipient directly associated with an aircraft, such as an EFB Class 3 device. This recipient type can use CDAF to send packages to the Class 3 EFB or CDAJ to send packages to the Class 1 or 2 EFB. This is the only type of recipient that can be used with LRUs.Refer to the User’s Guides for CDAJ and CDAF.
Proxy A computer used to deliver content to other recipients, typically Tails. This recipient type typically uses CDAL to download packages and install parts in LoadStar. Refer to the CDAL User’s Guide for more information about CDAL and LoadStar.
Server A computer used to deliver (or receive) content to (or from) another DDM server. Server recipients are managed exclusively by Jeppesen.
Basic A recipient that is not a Tail, Server, or Proxy, and includes Jeppesen EFB Class 1 or 2 and Boeing Class 1 EFB, as well as general purpose devices. This recipient type uses CDAD to download packages from DDM to the desktop or CDAB to download packages to the Boeing Class 1 EFB.Refer to the CDAD User’s Guide or CDAB User’s Guide for more information about CDAD and CDAB.
M ASP User Guide May, 2014© 2014 Jeppesen
6

Managing RecipientsOverview
Ma© 2
You can associate any package with a Basic recipient. If that Basic recipient was registered as a CDAF client, packages associated with it must be of the same type of LRU that CDAF is reporting. If not, DDM generates a delivery error.
This means that Tail recipients can have LRUs marked by the above labels, but recipients of type Basic, Proxy, and Server can have LRUs only reported “Not Assigned” if they represent CDAF. On the Manage Recipients and View Recipient pages, DDM shows both assigned and reported LRUs, but only if there is a difference. DDM denotes the mismatches in red.
Figure 8.1 illustrates the Manage Recipients page. From this page, you can create recipients, view recipient properties, edit recipients, unregister recipients, and manage registration credentials.
Figure 8.1. Manage Recipients page
y, 2014 DDM ASP User Guide014 Jeppesen
147

Managing RecipientsProcess
DD
14
ProcessFigure 8.2 illustrates the areas in the package delivery process where recipients are managed.
M ASP User Guide May, 2014© 2014 Jeppesen
8

Managing RecipientsProcess
Ma© 2
Figure 8.2. Areas Affected by the Manage Recipients Function
y, 2014 DDM ASP User Guide014 Jeppesen
149

Managing RecipientsProcess
DD
15
The numbered steps in Figure 8.2 represent the following tasks and functions:
: A user creates, edits, views, and unregisters a recipient using the Manage Recipients function.
: A user associates a package with a recipient.
: A user archives, unarchives, and deletes a recipient using the Archive Recipients function.
: The DDM server delivers a package to the recipients and receives delivery statuses from the recipients.
M ASP User Guide May, 2014© 2014 Jeppesen
0

Managing RecipientsUnderstanding DDM Functions Used to Manage a Recipient
Ma© 2
Understanding DDM Functions Used to Manage a RecipientDDM provides the functions described in the following table that support the process of creating and managing recipients. The functions available to you depend on your assigned role.
Table 8-2 DDM Functions that Support Creating and Managing Recipients
Function DDM Role Description
Manage Recipients
Recipient Manager • Create a recipient in DDM• Edit recipient and assign/unassign packages to a recipient • View properties and packages assigned to a recipient• Unregister a recipient• Delete a recipient
Archive Recipients
Archiver • Archive and unarchive a recipient• Delete an archived recipient• Download an archive .zip file of an archived recipient• Delete an archive .zip file of an archived recipient
y, 2014 DDM ASP User Guide014 Jeppesen
151

Managing RecipientsNaming Recipients
DD
15
Naming RecipientsUse all upper-case characters when you name a recipient. If you create a recipient using lower-case characters in the name, DDM converts the lower-case characters to upper-case.
DDM does not allow you to create multiple recipients using duplicate names. Like packages, archived recipients become unaccessible (except on the Archive Recipients page). Unlike packages, names of deleted recipients or recipient groups can be reused.
M ASP User Guide May, 2014© 2014 Jeppesen
2

Managing RecipientsAssigning Packages to Recipients
Ma© 2
Assigning Packages to RecipientsYou can assign a package to a recipient if you have the appropriate role. A package can be assigned to a recipient, or a recipient can be assigned to a package; both operations yield the same result. Refer to Chapter 4, “Managing Packages.” for more information.
y, 2014 DDM ASP User Guide014 Jeppesen
153

Managing RecipientsCreating Recipients
DD
15
Creating RecipientsThe Recipient Manager and Airline Manager roles can create a new recipient. You can create a new Basic, Tail, or Proxy recipient.
Prior to creating a recipient, you must have created the appropriate information in DDM in order to assign parameters to the recipient. The following table outlines the information that must exist in DDM prior to creating each type of recipient.
Creating a Basic or Tail Recipient
To create a new Basic or Tail recipient1. In the Recipient Management section in the navigation menu, click
Manage Recipients.
The Manage Recipients page appears. [Figure 8.1]
Table 8-3 Prerequisite Information Needed to Create a Recipient
Recipient Type Prerequisites
Tail • LRU
NOTE DDM considers a package without a specified LRU to be potentially incompatible with any recipient of type Tail. If you assign such a package to any recipient of type Tail, DDM displays a warning.
• Tail model for recipient (required)• Tail engine (required)• Package to associate with the recipient (optional)
Proxy • Tail recipient to associate with the Proxy recipient being created (optional)• Description (optional)
Basic • Recipient name (required)• Package to associate with the recipient (optional)
M ASP User Guide May, 2014© 2014 Jeppesen
4

Managing RecipientsCreating Recipients
Ma© 2
2. Click Create Recipient.
Step 1 on the Create Recipient page appears. [Figure 8.3]
3. From the drop-down list, select either Basic or Tail.
NOTE Your selection determines what fields display on the remaining Create Recipient pages.
Figure 8.3. Create Recipient page (Step 1: Select Recipient Type)
y, 2014 DDM ASP User Guide014 Jeppesen
155

Managing RecipientsCreating Recipients
DD
15
4. Click Continue.
Step 2 of the Create Recipient page displays the Define Properties tab. [Figure 8.4]
5. Type the name of the recipient in the Recipient Name field. This field is required.
NOTE If you are creating a Tail recipient, the Recipient Name only allows up to ten characters.
NOTE Although you can type both upper and lowercase letters in the Recipient Name field, DDM converts the recipient name to all upper-case letters. See “Naming Recipients” on page 152 for more information.
6. Verify that the Define Properties tab displays; if necessary, click the Define Properties tab.
7. Type a description of the recipient in the Description field.
Figure 8.4. Define Properties tab on the Create Recipient - Tail page (Step 2: Define Recipient Properties)
M ASP User Guide May, 2014© 2014 Jeppesen
6

Managing RecipientsCreating Recipients
Ma© 2
8. From the associated drop-down list in the LRUs field, select the types of LRUs installed on the tail for which you are creating the Tail recipient. This field is required.
NOTE The LRUs field only displays if you are creating a Tail recipient. The LRUs must have already been created using the Manage LRUs function in order to display in this field. For information about creating an LRU “Creating an LRU” on page 350
9. From the Model drop-down list, select the manufacturer’s model name associated with the tail. This field is required.
NOTE The Model field only displays if you are creating a Tail recipient. The model must have already been created using the Manage Tail Models function in order to display in this field. Refer to “Creating a Tail Model” on page 397
10. From the Engine Name drop-down list, select the engine type associated with the tail. This field is required.
NOTE The Engine Name field only displays if you are creating a Tail recipient. The tail engine must have already been created using the Manage Tail Engines function in order to display in this field. Refer to “Creating a Tail Engine” on page 387 for information about creating a tail engine.
y, 2014 DDM ASP User Guide014 Jeppesen
157

Managing RecipientsCreating Recipients
DD
15
11. Optionally, assign the recipient to a recipient group:
a Click the Assign Recipient Groups tab.
The Assign Recipient Groups tab displays all recipient groups in the system.
b Select the check box next to the recipient groups to which you want to assign the recipient.
• Click Select Page to select all of the displayed groups.• Click Deselect Page to clear all selections.
12. Click Save Recipient.
DDM saves the new recipient.
Figure 8.5. Assign Recipient Groups tab
M ASP User Guide May, 2014© 2014 Jeppesen
8

Managing RecipientsCreating Recipients
Ma© 2
Creating a Recipient for the Performance CAM
For DDM to work with the Onboard Performance Tool (OPT) module in CAT, you must adhere to specific rules when creating a recipient. In Step 1: Select Recipient Types, you must create a recipient of type Tail when selecting from Tail, Proxy, or Basic. In Step 2: Define Recipient Properties, when you select the Model and Engine Name from the respective drop-down lists, the models and engine names must correspond as shown in the following table.
Table 8-4 Combinations of Tail Models and Tail Engines for the OPT CAM
Tail Models Tail Engines
707-300 JT3D-3B IC
717-200 BR700-715A1-30
717-200 BR700-715C1-30
727-100 JT8D-7
727-100 JT8D-9
727-200 JT8D-15
727-200 JT8D-17R
727-200 JT8D-17R/A1
727-200 JT8D-7
727-200 JT8D-9
737-100 JT8D-9
737-200 ADV JT8D-9
737-200 BSC JT8D-17
737-200 BSC JT8D-7
737-200 BSC JT8D-9
737-200ADV JT8D-9
737-200ADV JT8D-15
737-200ADV JT8D-17
737-200B JT8D-15
737-200BSC JT8D-7
737-200BSC JT8D-9
737-200BSC JT8D-15
737-200BSC JT8D-17
y, 2014 DDM ASP User Guide014 Jeppesen
159

Managing RecipientsCreating Recipients
DD
16
737-300 CFM56-3-B1
737-300 CFM56-3B-2
737-300 CFM(18.5K)
737-300 CFM56-3-B1
737-300 CFM56-3B-2
737-400 CFM56-3-B1
737-400 CFM56-3B-2
737-400 CFM56-3C-1
737-500 CFM(18.5K)
737-500 CFM(20K)
737-600 CFM56-7B20
737-600 CFM56-7B20-2
737-600 CFM56-7B22
737-600 CFM56-7B22-2
737-700 CFM56-7B20
737-700 CFM56-7B20-2
737-700 CFM56-7B22
737-700 CFM56-7B24
737-700 CFM56-7B24-2
737-700 CFM56-7B26
737-700 CFM56-7B27-B3
737-700C CFM56-7B24
737-700C CFM56-7B26
737-800 CFM56-7B24
737-800 CFM56-7B24-2
737-800 CFM56-7B26
737-800 CFM56-7B26-2
737-800 CFM56-7B27
737-800 CFM56-7B27-B1
Table 8-4 Combinations of Tail Models and Tail Engines for the OPT CAM (continued)
Tail Models Tail Engines
M ASP User Guide May, 2014© 2014 Jeppesen
0

Managing RecipientsCreating Recipients
Ma© 2
737-800 CFM56-7B27-B3
737-800W CFM56-7B26
737-800W CFM56-7B27-2
737-900 CFM56-7B24
737-900 CFM56-7B26
737-900ER CFM56-7B26
737-900ER CFM56-7B26-3
747-100 JT9D-7 DRY
747-100 JT9D-7 WET
747-100 JT9D-3A
747-100/-200 JT9D-7 DRY
747-100/-200 JT9D-7A DRY
747-200 27Q_27F
747-200 27Q_27J
747-200 37Q_1MIS
747-200 524C2@B2-4%
747-200 524D4@B2
747-200 CF6-50E
747-200 CF6-50E-10%
747-200 CF6-50E2
747-200 CF6-50E2@50E-10%
747-200 JT9D-7 DRY
747-200 JT9D-7 WET
747-200 JT9D-70A
747-200 JT9D-7F WET
747-200 JT9D-7Q
747-200 JT9D-7Q3
747-200 JT9D-7R4G2
747-200 RB211-524B2
Table 8-4 Combinations of Tail Models and Tail Engines for the OPT CAM (continued)
Tail Models Tail Engines
y, 2014 DDM ASP User Guide014 Jeppesen
161

Managing RecipientsCreating Recipients
DD
16
747-200 RB211-D4/X
747-200 524B2@B2-4%
747-200 524D4@B2-10%
747-200 JT9D-70A
747-200 RB211-524B2
747-200 RB211-524C2
747-200 RB211-524D4
747-200 RB211-524D4X
747-200/-300 JT9D-7J
747-200/-300 RB211-524C2
747-300 27Q_27F
747-300 27Q_27J
747-300 37Q_1MIS
747-300 524C2@B2-4%
747-300 524D4@B2
747-300 CF6-50E
747-300 CF6-50E-10%
747-300 CF6-50E2
747-300 CF6-50E2@50E-10%
747-300 CF6-80C2B1
747-300 JT9D-7F WET
747-300 JT9D-7J
747-300 JT9D-7Q
747-300 JT9D-7Q3
747-300 JT9D-7R4G2
747-300 RB211-524B2
747-300 RB211-D4/X
747-300 524B2@B2-4%
747-300 524D4@B2-10%
Table 8-4 Combinations of Tail Models and Tail Engines for the OPT CAM (continued)
Tail Models Tail Engines
M ASP User Guide May, 2014© 2014 Jeppesen
2

Managing RecipientsCreating Recipients
Ma© 2
747-300 RB211-524C2
747-400 CF6-80C2B1F
747-400 CF6-80C2B5F
747-400 PW4056
747-400 RB211-524G2
747-400 RB211-524H2
747-400F CF6-80C2B1F
747-400F CF6-80C2B5F
747-400F PW4062
747-400F PW4062A
747-400F RB211-524H2
747-400F RB211-524G
747-400F PW4056
747-400F RB211-524H2
747-400HMSF CF6-80C2B1F
747SP RB211-524D4
747SP ALT 1
747SP JT9D-7A DRY
747SP JT9D-7F DRY
747SP JT9D-7J
747SP RB211-524C2
757-200 PW2040
757-200 PW2037
757-200 RB211-535C
757-200 RB211-535E4
757-200 RB211-535E4B
757-200 RB211-535E4-B
757-300 PW2037
757-300 PW2040
Table 8-4 Combinations of Tail Models and Tail Engines for the OPT CAM (continued)
Tail Models Tail Engines
y, 2014 DDM ASP User Guide014 Jeppesen
163

Managing RecipientsCreating Recipients
DD
16
757-300 PW2043
757-300 RB211-535E4
757-300 RB211-535E4-B
757-300 RB211-535E4-C
767-200 CF6-80C2B2
767-200 CF6-80C2B6F
767-200 CF6-80C2B7F
767-200 PW4052
767-200 PW4060
767-200 CF6-80A
767-200 CF6-80A2
767-200 CF6-80C2B2F
767-200 CF6-80C2B4
767-200 CF6-80C2B4F
767-200 CF6-80C2B6
767-200 JT9D-7R4D
767-200 JT9D-7R4E
767-200 JT9D-7R4E4
767-200 PW4056
767-200 PW4060C
767-300 CF6-80A2
767-300 CF6-80C2B4
767-300 CF6-80C2B6F
767-300 CF6-80C2B7
767-300 CF6-80C2B7F
767-300 PW4052
767-300 PW4060
767-300 PW4062
767-300 CF6-80C2B2
Table 8-4 Combinations of Tail Models and Tail Engines for the OPT CAM (continued)
Tail Models Tail Engines
M ASP User Guide May, 2014© 2014 Jeppesen
4

Managing RecipientsCreating Recipients
Ma© 2
767-300 CF6-80C2B2F
767-300 CF6-80C2B4
767-300 CF6-80C2B4F
767-300 CF6-80C2B6F
767-300 JT9D-7R4D
767-300 PW4056
767-300ER CF6-80C2B7
767-300ER CF6-80C2B7F
767-300ER PW4060
767-300ER PW4062
767-300ER RB211-524H
767-300IF JT9D-7R4D
767-400 CF6-80C2B8F
767-400ER CF6-80C2B8F
777-200 GE90-76B
777-200 GE90-77B
777-200 GE90-85B
777-200 GE90-90B
777-200 GE90-94B
777-200 PW4074
777-200 PW4077
777-200 PW4084
777-200 PW4084D
777-200 PW4090
777-200 PW4090-3
777-200 TRENT875
777-200 TRENT877
777-200 TRENT884
777-200 TRENT892
Table 8-4 Combinations of Tail Models and Tail Engines for the OPT CAM (continued)
Tail Models Tail Engines
y, 2014 DDM ASP User Guide014 Jeppesen
165

Managing RecipientsCreating Recipients
DD
16
777-200 TRENT895
777-200LR GE90-110B1L
777-200LR GE90-115BL
777-300 PW4090
777-300 PW4098
777-300 TRENT884
777-300 TRENT884B
777-300 TRENT892
777-300ER GE90-115B
777-300ER GE90-115BL
787-8 TR1000-A
B717-200 BR715_A1-30
B717-200 BR715_C1-30
DC-10-10 CF6-6D
DC-10-10 CF6-6D1
DC-10-10 CF6-6D1A
DC-10-30 CF6-50A
DC-10-30 CF6-50C
DC-10-30 CF6-50C2
DC-10-30 CF6-50C2
DC-10-30 CF6-50C2B
DC-10-40 JT9D-59A
DC-10-40 JT9D-59A
DC-8-63 JT3D-7
DC-9-10 JT8D-7
DC-9-20 JT8D-11
DC-9-30 JT8D-11
DC-9-30 JT8D-15
DC-9-30 JT8D-17
Table 8-4 Combinations of Tail Models and Tail Engines for the OPT CAM (continued)
Tail Models Tail Engines
M ASP User Guide May, 2014© 2014 Jeppesen
6

Managing RecipientsCreating Recipients
Ma© 2
DC-9-30 JT8D-7
DC-9-30 JT8D-9
DC-9-34 JT8D-15
DC-9-34 JT8D-17
DC-9-34 JT8D-9
DC-9-40 JT8D-11
DC-9-40 JT8D-15
DC-9-40 JT8D-9
DC-9-50 JT8D-15
DC-9-50 JT8D-17
MD-11 CF6-80C2D1F
MD-11 PW4460
MD-11 PW4462
MD-11_A-1 CF6-80C2D1F
MD-11_A-1 PW4060
MD-11_A-1 PW4460
MD-11_A-1 PW4462
MD-11_Basic CF6-80C2D1F
MD-11_Basic PW4460
MD-11_Basic PW4462
MD-80 JT8D-217
MD-80 JT8D-217
MD-80 JT8D-217A&C
MD-80 JT8D-217A&C
MD-80 JT8D-219
MD-80 JT8D-219
MD-87 JT8D-217A&C
MD-87 JT8D-217A&C
MD-87 JT8D-219
Table 8-4 Combinations of Tail Models and Tail Engines for the OPT CAM (continued)
Tail Models Tail Engines
y, 2014 DDM ASP User Guide014 Jeppesen
167

Managing RecipientsCreating Recipients
DD
16
Creating a Proxy Recipient
To create a new Proxy recipient1. In the Recipient Management section in the navigation menu, click
Manage Recipients.
The Manage Recipients page appears. [Figure 8.1]
2. Click Create Recipient.
Step 1 on the Create Recipient page appears. [Figure 8.3]
MD-87 JT8D-219
MD-90 V2525
MD-90 V2525-D5
MD-90 V2528
MD-90 V2528-D5
Table 8-4 Combinations of Tail Models and Tail Engines for the OPT CAM (continued)
Tail Models Tail Engines
M ASP User Guide May, 2014© 2014 Jeppesen
8

Managing RecipientsCreating Recipients
Ma© 2
3. From the drop-down list, select Proxy.
Step 2 on the Create Recipient - Proxy page appears. [Figure 8.6]
4. In the Recipient Name field, type the name of the recipient. This field is required.
NOTE Although you can type both upper and lowercase letters in the Recipient Name field, DDM converts the recipient name to all upper-case letters. See “Naming Recipients” on page 152 for more information.
5. In the Description field, type a description of the recipient.
Figure 8.6. Create Recipient - Proxy page (Step 2: Define Recipient Properties)
y, 2014 DDM ASP User Guide014 Jeppesen
169

Managing RecipientsCreating Recipients
DD
17
6. Click the Assign Tails tab.
The Assign Tails tab displays the tails to which you can assign the recipient. [Figure 8.7]
7. Select each Tail recipient to receive packages via this Proxy:
– In the Select column, click the check box for each tail recipient to associate with this recipient.
– Use the selection functions (Select Page, Deselect Page, Select All Pages, and Deselect All Pages) to toggle the selection of all displayed and all filtered packages.
NOTE A Proxy recipient cannot be linked with another Proxy recipient.
Figure 8.7. Create Recipient - Proxy page (Step 2: Define Recipient Properties)Assign Tails tab
M ASP User Guide May, 2014© 2014 Jeppesen
0

Managing RecipientsCreating Recipients
Ma© 2
8. Click Save Recipient.
DDM saves the new recipient.
y, 2014 DDM ASP User Guide014 Jeppesen
171

Managing RecipientsViewing Properties and Packages for a Recipient
DD
17
Viewing Properties and Packages for a RecipientThe Recipient Manager and Airline Manager roles can use the Manage Recipients function to view properties and packages assigned to a recipient. You can also view the status of a package’s delivery to a recipient.
To view properties and packages for a recipient1. In the Recipient Management section in the navigation menu, click
Manage Recipients.
The Manage Recipients page appears. [Figure 8.1]
2. If necessary, go to the Recipient Filter drop-down list, and select a filtering option.
NOTE The filters available in the Recipient Filter field are created using the Manage Filters function. Refer to “Managing Filters” on page 319 for information about creating or changing a filter.
M ASP User Guide May, 2014© 2014 Jeppesen
2

Managing RecipientsViewing Properties and Packages for a Recipient
Ma© 2
3. Click the name of the recipient that you want to view in the Recipient Name column.
The View Recipient page appears. If you selected to view information for a Basic, Tail, or Server recipient, the page displays tabs. [Figure 8.8] You can toggle between tabs.
TIP Click Refresh on your browser to update the list and the information in the Delivery Status column.
NOTE The View Assigned Packages tab only displays if you are viewing a Tail, Basic, or Server recipient.
Figure 8.8. View Recipient - Tail page: View Assigned Packages tab
y, 2014 DDM ASP User Guide014 Jeppesen
173

Managing RecipientsViewing Properties and Packages for a Recipient
DD
17
4. View the properties of the recipient by clicking the View Properties tab.
The View Recipient page displays the View Properties tab. [Figure 8.9]
NOTE DDM appends the type of recipient to the page title. The fields that display depend on the type of recipient selected.
5. Review the information.
Figure 8.9. View Recipient - Tail page: View Properties tab
M ASP User Guide May, 2014© 2014 Jeppesen
4

Managing RecipientsViewing Properties and Packages for a Recipient
Ma© 2
6. View the groups to which the recipient belongs by clicking the View Assigned Groups tab.
The View Recipient page displays the View Assigned Groups tab. [Figure 8.10]
7. Review the information.
Figure 8.10. View Recipient - Tail page: View Assigned Group tab
y, 2014 DDM ASP User Guide014 Jeppesen
175

Managing RecipientsEditing Properties and Packages for Recipients
DD
17
Editing Properties and Packages for RecipientsThe Recipient Manager and Airline Manager roles can use the Manage Recipients function to edit properties, packages, and groups for a recipient.
To edit properties and package assignments for a recipient1. In the Recipient Management section in the navigation menu, click
Manage Recipients.
The Manage Recipients page appears. [Figure 8.1]
2. If necessary, go to the View drop-down list, and select a recipient filter or recipient group to reduce the number of recipients displayed on the page.
The data on the page changes to match the selected filter.
NOTE The filters available in the Recipient Filter field are created using the Manage Filters function. Refer to Chapter 16, “Managing Filters.” for information about creating or changing a filter.
M ASP User Guide May, 2014© 2014 Jeppesen
6

Managing RecipientsEditing Properties and Packages for Recipients
Ma© 2
3. Click the Edit link next to the name of the recipient you want to edit.
The Edit Recipient page displays the Assign Packages tab. In Figure 8.11, a Tail recipient is being edited, therefore the Edit Recipient - Tail page appears.
NOTE You can toggle between the Edit Properties, Assign Packages, and Assign Recipient Groups tabs without losing data, but to save your changes you must click Save Changes when you are finished editing.
Figure 8.11. Edit Recipient - Tail page: Assign Packages tab
y, 2014 DDM ASP User Guide014 Jeppesen
177

Managing RecipientsEditing Properties and Packages for Recipients
DD
17
4. If necessary, go to the View drop-down list, select to filter by selected packages or package filter.
The data on the Assign Packages tab changes to match the selected filter.
NOTE The filters available in the View field are created using the Manage Filters function. Refer to “Managing Filters” on page 319 for information about creating or changing a filter.
5. Select the packages to associate with the recipient you are editing:
CAUTION When selecting new packages, make sure they match the Model and Engine Name associated with the existing recipient. Otherwise, you may send a part to the wrong airplane.
– Copy package associations from an existing recipient and overwrite any existing associations: Select the recipient from which to copy package associations from the Copy Packages Association from drop-down list.
– Copy package associations from an existing recipient and add the selected packages to existing associations: Select the recipient from which to copy package associations from the Add Packages Association from drop-down list.
– In the Select column, click the check box for each package to associate with this recipient.
– Use the selection functions (Select Page, Deselect Page, Select All Pages, and Deselect All Pages) to toggle the selection of all displayed and all filtered packages.
NOTE Icons displayed in the Select column provide warnings about the compatibility of the package with the recipient. If the package is not compatible with the recipient, you cannot select it. Point to or click on any warning icon to see detailed information about the compatibility issue.
M ASP User Guide May, 2014© 2014 Jeppesen
8

Managing RecipientsEditing Properties and Packages for Recipients
Ma© 2
6. Click the Edit Properties tab.
The Edit Recipient-Tail page displays the Edit Properties tab. [Figure 8.12]
7. Make the appropriate changes. For field definitions, refer to “Creating Recipients” on page 154.
CAUTION When selecting a new Model or Engine Name, make sure they match the packages associated with the existing recipient. Otherwise, you may send a part to the wrong airplane.
Figure 8.12. Edit Recipient - Tail page: Edit Properties tab
y, 2014 DDM ASP User Guide014 Jeppesen
179

Managing RecipientsEditing Properties and Packages for Recipients
DD
18
8. Click the Assign Recipient Groups tab.
The Edit Recipient-Tail page displays the Assign Recipient Groups tab. [Figure 8.13]
9. Select the recipient groups to which the recipient belongs using the check boxes or selection functions (Select Page or Deselect Page).
10. Click Save Changes.
DDM saves the recipient.
Figure 8.13. Edit Recipient - Tail page: Assign Recipient Groups tab
M ASP User Guide May, 2014© 2014 Jeppesen
0

Managing RecipientsUnregistering a Recipient
Ma© 2
Unregistering a RecipientIf a CDA is no longer needed, it must be unregistered via the CDA user interface and the DDM server interface. The Recipient Manager and Airline Manager roles can unregister a recipient.
To unregister a recipient from the DDM server1. In the Recipient Management section in the navigation menu, click
Manage Recipients.
The Manage Recipients page appears. [Figure 8.1]
2. In the Current Recipients list, locate the recipient that you want to unregister.
3. Click the corresponding Unregister link in the Registration column.
A confirmation message displays.
4. Click OK.
DDM unregisters the recipient.
y, 2014 DDM ASP User Guide014 Jeppesen
181

Managing RecipientsManage Registration Credentials
DD
18
Manage Registration CredentialsFrom the Manage Recipients page, you can generate new registration credentials for a recipient and view the existing registration credentials for a recipient. The airline must generate and forward registration credentials for a particular recipient to their supplier companies, so the supplier companies can register their recipient on the airline’s DDM server. From the Manage Recipients page, you can access information about the registration credentials associated with a particular recipient. The following table explains how registration status and registration credentials are related in the Current Recipients table.
Generate Registration CredentialsUse the Manage Recipients page to generate registration credentials for a CDA.
Table 8-5 Understanding Registration Credentials
Registration Status Explanation
Registered Boeing Credentials appears in the Registration column if the recipient has Boeing Credentials. This status indicates that the Tail recipient has been registered with a CDAF using Boeing Credentials. You cannot view, print, or revoke the Boeing Credentials for the CDAF recipient via DDM.
Not Registered The Generate Registration Credentials link only appears in the Registration column if the recipient has a status of “Not Registered.” The Generate Registration Credentials link indicates that the CDA user has not yet registered as a recipient nor have registration credentials been created in DDM. You can click this link to generate or revoke registration credentials, but the CDA must still be registered in order for DDM and the CDA to communicate.If DDM encountered an error during registration, this column displays Error as of <date> Generate Registration Credentials.
Not Registered The View Registration Credentials link only appears in the Registration column if the recipient has a status of “Not Registered.” The View Registration Credentials link indicates that registration credentials were generated in DDM, but the CDA user has not yet registered as a recipient. You can click this link to view and print the generated registration credentials.If DDM encountered an error during registration, this column displays Error as of <date> Generate Registration Credentials.
Registered Unregister appears in the Registration column if the recipient has a status of “Registered.” This status indicates that registration credentials no longer reside in DDM, because the CDA user has registered as a recipient. At this point, you can no longer view, print, or revoke the registration credentials for the CDA recipient via DDM.
M ASP User Guide May, 2014© 2014 Jeppesen
2

Managing RecipientsManage Registration Credentials
Ma© 2
To generate registration credentials for a recipient1. In the navigation menu, click Manage Recipients.
The Manage Recipients page appears. [Figure 8.1]
2. From the Registration column, click the Generate Registration Credentials link associated with the recipient for which you would like to generate credentials.
NOTE The Generate Registration Credentials link only appears if the registration status for the corresponding recipient is “Not Registered.”
The View Registration Credentials page appears. [Figure 8.14]
Figure 8.14. View Registration Credentials page
3. (optional) Click Revoke if you generated the registration credentials in error.
4. Click the Return to Manage Recipients link to return to the Manage Recipients page.
The recipient appears in the Current Recipients table with a View Registration Credentials link in the Registration column.
View Registration CredentialsUse the Manage Recipients page to generate registration credentials for a CDA.
y, 2014 DDM ASP User Guide014 Jeppesen
183

Managing RecipientsManage Registration Credentials
DD
18
To view registration credentials for a recipient1. In the navigation menu, click Manage Recipients.
The Manage Recipients page appears. [Figure 8.1]
2. From the Registration column, click the View Registration Credentials link associated with the recipient for which you would like to view credentials.
NOTE The View Registration Credentials link only appears if the registration status for the corresponding recipient is “Registered.”
The View Registration Credentials page appears. [Figure 8.14]
3. (optional) Click Print to print a copy of the recipient's registration credentials.
A Windows print dialog appears.
4. Select the printer options and click OK.
5. Click the Return to Manage Recipients link to return to the Manage Recipients page.
The recipient appears in the Current Recipients table with no change in status or registration credentials.
M ASP User Guide May, 2014© 2014 Jeppesen
4

Managing RecipientsArchiving a Recipient
Ma© 2
Archiving a RecipientThe purpose of archiving recipients is to remove unused recipients from the server so that disk space is used as efficiently as possible. The Archiver role can archive a recipient.
When you archive a recipient, DDM generates an archive.zip file. DDM prepends the name of the recipient to the zip file name, for example RECIP123.rec_archive.zip. The archive.zip file contains information about the recipient at the time it was archived and the recipient audit history within DDM, including package associations. To free server disk space, this file can be downloaded to your computer and removed from the DDM server using the Manage Files tab.
The archive process removes all associations to packages. You will need to re-establish these associations if you select to unarchive a recipient.
DDM does not delete archived recipients from the system when you perform an archive. If necessary, you can delete recipients that are archived using the Unarchive/Delete Recipients tab. Once deleted, a recipient cannot be unarchived.
Archived recipients are not available to receive packages. Unlike deleted packages, deleted recipient names can be reused when creating new recipients.
y, 2014 DDM ASP User Guide014 Jeppesen
185

Managing RecipientsArchiving a Recipient
DD
18
To archive a recipient1. Under Recipient Management in the navigation menu, click Archive
Recipients.
The Archive Recipients page displays the Archive Recipients tab. [Figure 8.15]
2. If necessary, go to the Recipient Filter drop-down list, and select a filter.
The data on the page changes to match the selected filter.
NOTE The filters available in the Recipient Filter field are created using the Manage Filters function. See “Managing Filters” on page 319 for information about creating or changing a filter.
3. Click the corresponding check box under the Select column to specify which recipient you want to archive.
DDM displays the Archive Recipient(s) button above and below the list.
4. When finished, click Archive Recipient(s).
Figure 8.15. Archive Recipients tab on the Archive Recipients page
M ASP User Guide May, 2014© 2014 Jeppesen
6

Managing RecipientsArchiving a Recipient
Ma© 2
5. On the confirmation message, click OK.
DDM archives all selected recipients.
y, 2014 DDM ASP User Guide014 Jeppesen
187

Managing RecipientsUnarchiving a Recipient
DD
18
Unarchiving a Recipient If necessary, you can unarchive a recipient that was previously archived. Deleted recipients cannot be unarchived. The Archiver role can unarchive a recipient.
Because the archive process removes all associations to packages, you will need to re-establish these associations if you select to unarchive.
To unarchive a recipient1. In the Recipient Management section in the navigation menu, click
Archive Recipients.
The Archive Recipients page displays the Archive Recipients tab. [Figure 8.15]
2. Click the Unarchive/Delete Recipients tab.
The Archive Recipients page displays the Unarchive/Delete Recipients tab. [Figure 8.16]
3. Click the corresponding check boxes under the Select column to specify which recipient you want to unarchive.
DDM displays the Unarchive Recipient(s) and Delete Recipient(s) buttons above and below the list.
4. When finished, click Unarchive Recipient(s).
DDM unarchives the selected recipient.
Figure 8.16. Unarchive/Delete Recipients tab on the Archive Recipients page
M ASP User Guide May, 2014© 2014 Jeppesen
8

Managing RecipientsDeleting a Recipient
Ma© 2
Deleting a Recipient DDM does not delete archived recipients from the system when you perform an archive. To reclaim space, you must delete the recipient; to reclaim disk space, you must delete the archive.zip file from the server. Refer to “Deleting an archive.zip File for a Recipient” on page 191 for information about deleting an archive.zip file.
You can only delete a recipient that has been archived. Once deleted, a recipient cannot be unarchived and cannot be retrieved at a future date; the recipient is completely removed from the server. The Archiver role can delete a recipient.
To delete a recipient1. In the Recipient Management section in the navigation menu, click
Archive Recipients.
The Archive Recipients page displays the Archive Recipients tab. [Figure 8.15]
2. Click the Unarchive/Delete Recipients tab.
The Archive Recipients page displays the Unarchive/Delete Recipients tab. [Figure 8.16]
3. Click the corresponding check boxes under the Select column to specify which recipient you want to delete.
DDM displays the Unarchive Recipient(s) and Delete Recipient(s) buttons above and below the list.
4. When finished, click Delete Recipients.
DDM deletes the selected recipient.
y, 2014 DDM ASP User Guide014 Jeppesen
189

Managing RecipientsDownloading a Zip File for an Archived Recipient
DD
19
Downloading a Zip File for an Archived RecipientIf necessary, you can download an archive.zip file containing information about an archived recipient to your computer. The archive.zip file contains information about the recipient at the time it was archived and its audit history in DDM. The Archiver role can download an archive.zip file for an archived recipient.
To download an archive.zip file1. In the Recipient Management section in the navigation menu, click
Archive Recipients.
The Archive Recipients page displays the Archive Recipients tab. [Figure 8.15]
2. Click the Manage Files tab.
The Archive Recipients page displays the Manage Files tab. [Figure 8.17]
3. Click the Download link under the Download File column for the file you want to download.
DDM prompts you to select a location to which to download the file.
4. Select a location.
DDM downloads the selected file.
Figure 8.17. Manage Files tab on the Archive Recipients page
M ASP User Guide May, 2014© 2014 Jeppesen
0

Managing RecipientsDeleting an archive.zip File for a Recipient
Ma© 2
Deleting an archive.zip File for a RecipientDDM does not delete archived recipients from the system when you perform an archive. To reclaim space, you must delete the recipient and the archive.zip file from the server. Refer to “Deleting a Recipient” on page 189 for information about deleting a recipient.
Deleting an archive.zip file removes the archived file of a recipient from the server; it does not delete the recipient from the database. It is quite possible that a recipient can be archived, then unarchived to become fully operational again. In this case, the archive.zip file for the recipient still resides in the archive location and can be downloaded and/or deleted from there without any affect on the recipient itself. The process of archiving a recipient creates an archive.zip file, therefore you can only delete an archive.zip file for a recipient that has been archived. Once deleted, the file cannot be retrieved at a future date; the file is completely removed from the server. Thus, Jeppesen recommends downloading the archive .zip file so that the recipient and its history is not lost. The Archiver role can delete an archive.zip file for an archived recipient.
To delete an archived file1. In the Recipient Management section in the navigation menu, click
Archive Recipients.
The Archive Recipients page displays the Archive Recipients tab. [Figure 8.15]
2. Click the Manage Files tab.
The Archive Recipients page displays the Manage Files tab. [Figure 8.17]
3. Click the corresponding check boxes under the Select column to specify which archived files you want to delete.
DDM displays the Delete File(s) button above and below the list.
4. When finished, click Delete File(s).
DDM deletes the selected file.
y, 2014 DDM ASP User Guide014 Jeppesen
191

Managing RecipientsDeleting an archive.zip File for a Recipient
DD
19
M ASP User Guide May, 2014© 2014 Jeppesen
2

CHAPTER 9
Managing Recipient Groups
This chapter contains the following topics:
• Overview
• Understanding DDM Functions Used to Manage a Recipient Group
• Creating Recipient Groups
• Viewing Recipients Associated with a Recipient Group
• Editing Recipient Groups
• Deleting a Recipient Group

Managing Recipient GroupsOverview
DD
19
OverviewRecipient groups enable airlines to organize and manage fleets based on similarities in load configuration. By combining similarly configured basic and tail recipients into the same recipient group, you can more efficiently manage package-recipient associations. Recipient groups help to reduce the cost of operations for fleets of 20 or more aircraft by reducing the level of effort required to efficiently manage large fleets.
Figure 9.1 illustrates the Manage Recipient Groups page. From this page, you can create, view, edit, or delete recipient groups.
Figure 9.1. Manage Recipient Groups page
M ASP User Guide May, 2014© 2014 Jeppesen
4

Managing Recipient GroupsProcess
Ma© 2
ProcessFigure 9.2 illustrates the areas in the package delivery process where recipient groups are managed.
y, 2014 DDM ASP User Guide014 Jeppesen
195

Managing Recipient GroupsProcess
DD
19
Figure 9.2. Areas affected by the Manage Recipient Groups function
M ASP User Guide May, 2014© 2014 Jeppesen
6

Managing Recipient GroupsProcess
Ma© 2
The numbered steps in Figure 9.2 represent the following tasks and functions:
1 - A user creates, edits, views, or unregisters a recipient group using the Manage Recipient Groups function.
2 - A user associates a package with a recipient group.
3 - The DDM server delivers a package to the recipients within the recipient group and receives delivery statuses from the recipients.
y, 2014 DDM ASP User Guide014 Jeppesen
197

Managing Recipient GroupsUnderstanding DDM Functions Used to Manage a Recipient Group
DD
19
Understanding DDM Functions Used to Manage a Recipient GroupDDM provides the functions described in the following table that support the process of creating and managing recipient groups. The functions available to you depend on your assigned role.
Table 9-1 DDM Functions that Support Creating and Managing Recipient Groups
Function DDM Role Description
Manage Recipient Groups
• Recipient Manager
• Airline Manager
• Create a recipient group• Edit an existing recipient group• View information about an existing recipient group• Delete a recipient group
M ASP User Guide May, 2014© 2014 Jeppesen
8

Managing Recipient GroupsCreating Recipient Groups
Ma© 2
Creating Recipient GroupsUsers assigned the Recipient Manager and Airline Manager roles can create a new recipient group.
To create a new recipient group1. In the Recipient Management section in the navigation menu, click
Manage Recipient Groups.
The Manage Recipient Groups page appears. [Figure 9.1]
2. Click Create Group.
The Create Recipient Group page appears. [Figure 9.3]
3. Type the name of the group in the Recipient Group Name box. This box is required.
4. Type a description of the recipient group in the Description box.
Figure 9.3. Create Recipient Group page
y, 2014 DDM ASP User Guide014 Jeppesen
199

Managing Recipient GroupsCreating Recipient Groups
DD
20
5. From the Associate Recipients list, select the recipients to include in the recipient group:
• In the Select column, select the check box for each recipient you want to include with the recipient group.
• Use the selection functions (Select Page, Deselect Page, Select All Pages, and Deselect All Pages) to toggle the selection of recipients.
6. Click Save Recipient Group.
DDM saves the new recipient group and displays the Manage Recipient Groups page.
Naming Recipient GroupsUse all uppercase characters when you name a recipient group. If you create a recipient group using lowercase characters in the name, DDM converts the lowercase characters to uppercase.
DDM does not allow you to create multiple recipient groups using duplicate names.
Assigning Packages and Checkpoints to Recipient GroupsYou can assign a package to a recipient group if you have the appropriate role. For more information, refer to Chapter 4, “Managing Packages.”
You can also assign a recipient group to a checkpoint after you create the recipient group. For more information, refer to Chapter 12, “Managing Checkpoints.”
M ASP User Guide May, 2014© 2014 Jeppesen
0

Managing Recipient GroupsViewing Recipients Associated with a Recipient Group
Ma© 2
Viewing Recipients Associated with a Recipient GroupUsers assigned the Recipient Manager and Airline Manager roles can use the Manage Recipient Groups function to view the recipients associated with a recipient group, as well as the package delivery status.
To view the recipients associated with a recipient group1. In the Recipient Management section in the navigation menu, click
Manage Recipient Groups.
The Manage Recipient Groups page appears. [Figure 9.1]
2. In the Group Name column, click the name of the recipient group that you want to view.
The View Recipient Group page appears. [Figure 9.4]
3. Review the information and perform additional tasks, including the following:
• View the properties of any recipient by clicking the recipient name. The View Recipient page is displayed. See “Viewing Properties and Packages for a Recipient” on page 172 for more information.
Figure 9.4. View Recipient Group page
y, 2014 DDM ASP User Guide014 Jeppesen
201

Managing Recipient GroupsViewing Recipients Associated with a Recipient Group
DD
20
• Perform recipient registration functions by clicking the links (such as Unregister or Generate Registration Credentials) in the Registration column. See “Unregistering a Recipient” on page 181 or “Manage Registration Credentials” on page 182 for more information.
4. Click Edit Recipient Group to make changes to the group, if necessary. See “Editing Recipient Groups” on page 203 for more information.
M ASP User Guide May, 2014© 2014 Jeppesen
2

Managing Recipient GroupsEditing Recipient Groups
Ma© 2
Editing Recipient GroupsThe Recipient Manager and Airline Manager roles can use the Manage Recipient Groups function to edit the name, description, and recipients associated with a recipient group.
To edit a recipient group1. In the Recipient Management section in the navigation menu, click
Manage Recipient Groups.
The Manage Recipient Groups page appears. [Figure 9.1]
2. Click the Edit link next to the name of the recipient group you want to edit.
The Edit Recipient Group page is displayed. [Figure 9.5]
3. Type the name of the recipient group in the Recipient Group Name box.
4. Type the description of the recipient group in the Description box.
5. Use Select Page, Deselect Page, Select All Pages, or Deselect All Pages to specify the selection of recipients.
Figure 9.5. Edit Recipient Group page
y, 2014 DDM ASP User Guide014 Jeppesen
203

Managing Recipient GroupsEditing Recipient Groups
DD
20
6. In the Select column, select or clear the check boxes to specify which recipients to include in the recipient group.
7. Click Save Changes.
DDM saves the recipient group and displays the Manage Recipient Groups page.
M ASP User Guide May, 2014© 2014 Jeppesen
4

Managing Recipient GroupsDeleting a Recipient Group
Ma© 2
Deleting a Recipient GroupUsers assigned the Recipient Manager and Airline Manager roles can use the Manage Recipient Groups function to delete a recipient group.
NOTE When you delete a recipient group, DDM does not delete the associated recipients.
To delete a recipient group1. In the Recipient Management section in the navigation menu, click
Manage Recipient Groups.
The Manage Recipient Groups page appears. [Figure 9.1]
2. Click the Delete link next to the name of the recipient group you want to delete.
DDM displays a confirmation message.
3. Click OK.
DDM deletes the recipient group and displays the Manage Recipient Groups page.
y, 2014 DDM ASP User Guide014 Jeppesen
205

Managing Recipient GroupsDeleting a Recipient Group
DD
20
M ASP User Guide May, 2014© 2014 Jeppesen
6

CHAPTER 10
Managing Review Groups
This chapter contains the following topics:
• Overview
• Naming a Review Group
• Creating a Review Group
• Viewing a Review Group
• Editing a Review Group
• Deleting a Review Group

Managing Review GroupsOverview
DD
20
OverviewIf your company sets up a process for reviewing packages before delivery to recipients, part of that process involves establishing review groups. Users assigned the Review Manager and Airline Manager roles can use the Manage Review Groups function to create and manage a review group.
A review group is a logical grouping of one or more reviewers who are responsible for reviewing package content as part of a checkpoint ensuring that each package requiring approval is reviewed and approved for delivery. An approval rule exists for each review group that requires one of the following:
• All reviewers in the review group must approve a package for delivery.
• Any one reviewer in the review group can approve a package for delivery.
Review groups provide control and flexibility for various situations.
TIP If you encounter degraded performance on the Manage Review Groups, Create Review Group, View Review Group, Edit Review Group, or Delete Review Group pages, contact your DDM system administrator.
Figure 10.1 illustrates the Manage Review Groups page. From this page, you can create, edit, view, or delete a review group.
M ASP User Guide May, 2014© 2014 Jeppesen
8

Managing Review GroupsOverview
Ma© 2
Figure 10.1. Manage Review Groups page
y, 2014 DDM ASP User Guide014 Jeppesen
209

Managing Review GroupsProcess
DD
21
ProcessFigure 10.2 illustrates the areas in the package delivery process affected by the Manage Review Groups function.
M ASP User Guide May, 2014© 2014 Jeppesen
0

Managing Review GroupsProcess
Ma© 2
Figure 10.2. Areas affected by the Manage Review Group function
y, 2014 DDM ASP User Guide014 Jeppesen
211

Managing Review GroupsProcess
DD
21
The numbered steps in Figure 10.2 represent the following tasks and functions:
1 - The user creates, edits, views, or deletes a review group using the Manage Review Groups function.
2 - The user assigns a review group to a checkpoint using the Manage Checkpoints function.
M ASP User Guide May, 2014© 2014 Jeppesen
2

Managing Review GroupsNaming a Review Group
Ma© 2
Naming a Review GroupReview group names can be alphabetical (both uppercase and lowercase), numerical, or a combination of both. Because DDM recognizes both uppercase and lowercase letters, it is possible the same name could be created more than one time with variations in case. For example:
• RG_001
• Rg_001
• rG_001
• rg_001
As shown above, a variation in review group names could lead to confusion when creating or editing a review group. To avoid duplicate names, Jeppesen recommends that you use all uppercase letters when naming a review group.
y, 2014 DDM ASP User Guide014 Jeppesen
213

Managing Review GroupsCreating a Review Group
DD
21
Creating a Review GroupYou can assign a review group when you create a new checkpoint or at a later time. To assign a review group when you create a checkpoint, you must first create the review group. Users assigned the Review Manager and Airline Manager roles can create a review group.
To create a review group1. In the Review Management section in the navigation menu, click Manage
Review Groups.
The Manage Review Groups page appears. [Figure 10.1]
M ASP User Guide May, 2014© 2014 Jeppesen
4

Managing Review GroupsCreating a Review Group
Ma© 2
2. Click Create Review Group.
The Create Review Group page appears. [Figure 10.3]
NOTE If your database contains a large amount of data, response time may be slow and the Create Review Group page may take a few seconds to appear. To avoid a possible error, do not click Create Review Group more than one time.
3. In the Review Group Name box, type a name for the review group. This box is required.
4. In the Description box, type a description of the review group.
5. In the Apply an Approval Rule section, select the approval rule option for this review group to indicate whether:
• All reviewers associated with this group must approve a package.
• Any one reviewer associated with this group is needed to approve a package.
Figure 10.3. Create Review Group page
y, 2014 DDM ASP User Guide014 Jeppesen
215

Managing Review GroupsCreating a Review Group
DD
21
6. In the Available Reviewers list, select the names to add to this review group.
TIP To select multiple consecutive names, press and hold the SHIFT key, and then click the names in the sequence. To select multiple nonconsecutive names, press and hold the CTRL key, and then click the names individually.
7. Click Add to move the selected names to the Reviewers in Group list.
NOTE To remove names from the Reviewers in Group list, select the names, click Remove, and then save the group again.
8. Click Save Review Group.
DDM saves the new review group.
M ASP User Guide May, 2014© 2014 Jeppesen
6

Managing Review GroupsViewing a Review Group
Ma© 2
Viewing a Review GroupUsers signed the Review Manager and Airline Manager roles can view information about a review group.
To view a review group1. In the Review Management section in the navigation menu, click Manage
Review Groups.
The Manage Review Groups page appears. [Figure 10.1]
2. In the Review Group Name column, click the review group that you want to view.
The View Review Group page appears. [Figure 10.4]
3. Review the information.
Figure 10.4. View Review Group page
y, 2014 DDM ASP User Guide014 Jeppesen
217

Managing Review GroupsEditing a Review Group
DD
21
Editing a Review GroupUsers assigned the Review Manager and Airline Manager roles can edit information for a review group. When editing a review group, you can change the review group name and description, assigned approval rule, and assigned reviewers.
The steps to edit a review group depend on whether the group is associated with a pending package review.
You cannot edit a review group if it is associated with any archived package or recipient. In this case, the package or recipient must be either unarchived or deleted before the associated review group can be edited.
Editing a Review Group for which No Reviews are Pending
To edit a review group for which no reviews are pending1. In the Review Management section in the navigation menu, click Manage
Review Groups.
The Manage Review Groups page appears. [Figure 10.1]
M ASP User Guide May, 2014© 2014 Jeppesen
8

Managing Review GroupsEditing a Review Group
Ma© 2
2. Click the Edit link next to the name of the review group you want to edit.
The Edit Review Group page appears. [Figure 10.5]
3. Make the appropriate changes. For field definitions, see “Creating a Review Group” on page 214.
4. Click Save Changes.
DDM saves the changes made to the review group.
Figure 10.5. Edit Review Group page
y, 2014 DDM ASP User Guide014 Jeppesen
219

Managing Review GroupsEditing a Review Group
DD
22
Editing a Review Group for which Reviews are Pending
To edit a review group for which reviews are pending1. In the Review Management section in the navigation menu, click Manage
Review Groups.
The Manage Review Groups page appears. [Figure 10.1]
2. Click the Edit link next to the name of the review group you want to edit.
The Edit Review Group page appears. [Figure 10.5]
3. Make the appropriate changes. For field definitions, see “Creating a Review Group” on page 214.
4. Click Save Changes.
A confirmation message appears.
5. Click OK.
DDM displays a confirmation message. Packages included in the confirmation message are immediately approved.
M ASP User Guide May, 2014© 2014 Jeppesen
0

Managing Review GroupsDeleting a Review Group
Ma© 2
Deleting a Review GroupUsers assigned the Review Manager and Airline Manager roles can delete a review group. The steps to delete a review group depend on whether the group is associated with a pending package review.
Deleting a Review Group Not Assigned to a Pending Package ReviewIf a review group is not assigned to a pending package review, you can use the Manage Review Groups page to delete it.
To delete a review group that is not assigned to a pending package review1. In the Review Management section in the navigation menu, click Manage
Review Groups.
The Manage Review Groups page appears. [Figure 10.1]
2. Click the Delete link next to the name of the review group you want to delete.
A confirmation message appears.
3. Click OK.
DDM deletes the selected review group.
Deleting a Review Group Assigned to a Pending Package ReviewWhen you attempt to delete a review group associated with a pending package review, DDM automatically changes the status of the review to Approved. Before changing the status, you are prompted to approve the status change and continue the deletion process. Which boxes are displayed on the Delete Review Group page depends on the type of checkpoint associated with the review group (recipient or package).
To delete a review group associated with a pending package review1. In the Review Management section in the navigation menu, click Manage
Review Groups.
The Manage Review Groups page appears. [Figure 10.1]
y, 2014 DDM ASP User Guide014 Jeppesen
221

Managing Review GroupsDeleting a Review Group
DD
22
2. Click the Delete link next to the name of the review group you want to delete.
The Delete Review Group page appears. [Figure 10.6] Which boxes are displayed on this page depends on the type of associated checkpoint. For a package checkpoint, the Delete Review Group page appears.
3. To continue to delete the selected review group, click Delete Review Group.
DDM deletes the selected review group.
Figure 10.6. Delete Review Group page
M ASP User Guide May, 2014© 2014 Jeppesen
2

CHAPTER 11
Managing Review Devices
This chapter contains the following topics:
• Overview
• Creating a Review Device
• Viewing a Review Device
• Editing a Review Device
• Deleting a Review Device

Managing Review DevicesOverview
DD
22
OverviewIf your company sets up a review process for delivering packages, part of that process involves establishing review devices. A review device is a computer that is used during the review process to specifically receive, review, and approve packages before they are delivered to recipients or recipient groups. Review devices are inserted into checkpoints when appropriate.
Review devices in DDM are classified as one of two types as explained in the following table.
NOTE Recommended delivery dates do not apply to review devices. Review devices can receive packages independent of start and stop delivery dates.
The Recipient Manager, Review Manager and Airline Manager roles can use the Manage Review Devices function to create and manage review devices.
From the Manage Review Devices page, you can generate new registration credentials for a review device and view the existing registration credentials for a review device. The airline must generate and forward registration credentials for a particular recipient to their supplier companies, so the supplier companies can register their recipient on the airline’s DDM server. From the Manage Review Devices page, you can access information about the registration credentials associated with a particular recipient. The following table explains how registration status and registration credentials are related in the Current Review Devices table.
Table 11-1 Understanding Registration Credentials
Type Example
Tail A device to which packages are sent that are intended for tail recipients. Packages are reviewed on this device, approved in DDM, and then delivered to those tail recipients.
NOTE To be considered compatible with a package, tail type Review Devices must be listed in the package’s metadata.
Basic A device that is not a tail, such as a desktop computer, located in a computer lab, that is used by one or more reviewers.
Registration Status Explanation
Registered Boeing Credentials appears in the Registration column if the recipient has Boeing Credentials. This status indicates that the Tail recipient has been registered with a CDAF using Boeing Credentials. You cannot view, print, or revoke the Boeing Credentials for the CDAF recipient via DDM.
M ASP User Guide May, 2014© 2014 Jeppesen
4

Managing Review DevicesOverview
Ma© 2
Figure 11.1 illustrates the Manage Review Devices page. From this page, you can create, edit, view, or delete a review device.
Figure 11.1. Manage Review Devices page
Not Registered The Generate Registration Credentials link only appears in the Registration column if the recipient has a status of “Not Registered.” The Generate Registration Credentials link indicates that the CDA user has not yet registered as a recipient nor have registration credentials been created in DDM. You can click this link to generate or revoke registration credentials, but the CDA must still be registered in order for DDM and the CDA to communicate.If DDM encountered an error during registration, this column displays Error as of <date> Generate Registration Credentials.
Not Registered The View Registration Credentials link only appears in the Registration column if the recipient has a status of “Not Registered.” The View Registration Credentials link indicates that registration credentials were generated in DDM, but the CDA user has not yet registered as a recipient. You can click this link to view and print the generated registration credentials.If DDM encountered an error during registration, this column displays Error as of <date> Generate Registration Credentials.
Registered Unregister appears in the Registration column if the recipient has a status of “Registered.” This status indicates that registration credentials no longer reside in DDM, because the CDA user has registered as a recipient. At this point, you can no longer view, print, or revoke the registration credentials for the CDA recipient via DDM.
Registration Status Explanation
y, 2014 DDM ASP User Guide014 Jeppesen
225

Managing Review DevicesProcess
DD
22
ProcessFigure 11.2 illustrates the areas in the package delivery process affected by the Manage Review Devices function.
M ASP User Guide May, 2014© 2014 Jeppesen
6

Managing Review DevicesProcess
Ma© 2
Figure 11.2. Areas Affected by the Manage Review Devices Function
y, 2014 DDM ASP User Guide014 Jeppesen
227

Managing Review DevicesProcess
DD
22
The numbered steps in Figure 11.2 represent the following tasks and functions:
: The user creates, edits, views, and deletes a tail engine using the Manage Tail Engines function.
: The user creates, edits, views, and deletes a tail model using the Manage Tail Models function.
: The user assigns a tail model and tail engine to a recipient, recipient group, or review device using the Manage Recipients or Manage Review Devices functions.
: The user assigns a review device to a checkpoint using the Manage Checkpoints function.
M ASP User Guide May, 2014© 2014 Jeppesen
8

Managing Review DevicesCreating a Review Device
Ma© 2
Creating a Review DeviceThe Recipient Manager, Review Manager and Airline Manager roles can create two types of review devices: Tail or Basic. You can create new review devices or converting an existing recipient into a review device. The corresponding review device (or recipient) must be created and assigned to a package in order to deliver a package.
Prior to creating a review device, you must have created the appropriate tail model and tail engine. Refer to “Creating a Tail Model” on page 397 and Chapter 19, “Managing Tail Engines.” for more information.
You can assign a package to a review device either when you create a new review device or anytime thereafter. To assign a package when you create a review device, it must first be published. Refer to “Viewing Packages Available for Delivery” on page 103 for more information.
You can also assign a review device when you create a new checkpoint or anytime thereafter. To assign a review device when you create a checkpoint, you must first create the review device.
To create a new review device1. In the Review Management section in the navigation menu, click Manage
Review Devices.
The Manage Review Devices page appears. [Figure 11.1]
2. Click Create Review Device.
Step 1 on the Create Review Device page appears. [Figure 11.3]
Figure 11.3. Create Review Device page (Step 1: Select Review Device Type)
y, 2014 DDM ASP User Guide014 Jeppesen
229

Managing Review DevicesCreating a Review Device
DD
23
3. From the Create a New Review Device of Type drop-down list, select a review device type.
NOTE Your selection determines what information displays on the following Create Review Device pages.
4. Click Continue.
Step 2 on the Create Review Device page displays the Define Properties tab. [Figure 11.4]
5. Type the name of the review device in the Review Device Name field. This field is required.
6. Type a description of the review device in the Description field.
Figure 11.4. Define Properties tab on the Create Review Device - Tail Page (Step 2: Define Review Device Properties)
M ASP User Guide May, 2014© 2014 Jeppesen
0

Managing Review DevicesCreating a Review Device
Ma© 2
7. From the associated drop-down list in the LRUs field, select the types of LRUs installed on the tail for which you are creating the Tail review device. This field is required.
NOTE The LRUs field only displays if you are creating a review device for a Tail recipient. The LRUs must have already been created using the Manage LRUs function in order to display in this field. Refer to “Creating an LRU” on page 350 for information about creating an LRU.
8. From the Model drop-down list, select the manufacturer’s model name associated with the tail. This field is required.
NOTE The Model field only displays if you are creating a Tail review device. The model must have already been created for your company. Refer to Chapter 20, “Managing Tail Models.” for information about creating a tail model.
9. From the Engine Name drop-down list, select the engine type associated with the tail. This field is required.
NOTE The Engine Name field only displays if you are creating a Tail review device. The engine name must have already been created for your company. Refer to “Creating a Tail Engine” on page 387 for information about creating a tail engine.
10. Click Save Review Device.
DDM saves the new review device and displays the Manage Review Devices page.
y, 2014 DDM ASP User Guide014 Jeppesen
231

Managing Review DevicesViewing a Review Device
DD
23
Viewing a Review DeviceThe Recipient Manager, Review Manager and Airline Manager roles can view properties and packages that are assigned to a selected review device.
To view the properties and packages for a review device1. In the Review Management section in the navigation menu, click Manage
Review Devices.
The Manage Review Devices page appears. [Figure 11.1]
2. In the Review Device Name column, click the name of the device that you want to view.
The View Review Device page displays the View Assigned Packages tab. [Figure 11.5]
3. Review the information.
Figure 11.5. View Assigned Packages tab on the View Review Device - Tail page
M ASP User Guide May, 2014© 2014 Jeppesen
2

Managing Review DevicesViewing a Review Device
Ma© 2
4. Click the View Properties tab.
The View Review Device page displays the View Properties tab. [Figure 11.6] The fields that display on the page are based on the selected review device type.
5. Review the information on the View Properties tab.
Figure 11.6. View Properties tab on the View Review Device - Tail page
y, 2014 DDM ASP User Guide014 Jeppesen
233

Managing Review DevicesEditing a Review Device
DD
23
Editing a Review DeviceThe Recipient Manager, Review Manager and Airline Manager roles can edit which properties and packages are assigned to a review device.
To edit the properties for a review device1. In the Review Management section in the navigation menu, click Manage
Review Devices.
The Manage Review Devices page appears. [Figure 11.1]
M ASP User Guide May, 2014© 2014 Jeppesen
4

Managing Review DevicesEditing a Review Device
Ma© 2
2. Click the Edit link next to the name of the review device that you want to edit.
The Edit Review Device page displays the Assign Packages tab. [Figure 11.7] The fields that display on the page are based on the selected review device type.
Figure 11.7. Edit Review Device - Assign Packages tab
y, 2014 DDM ASP User Guide014 Jeppesen
235

Managing Review DevicesEditing a Review Device
DD
23
3. If necessary, go to the Packages Filter drop-down list, and select a filtering option.
The data on the page changes to match the selected filter.
NOTE The filters available in the Packages Filter field are created using the Manage Filters function. For information about creating or changing a filter, refer to “Managing Filters” on page 319
4. Select the packages to assign to the review device you are editing:
– In the Select column, click the check box for each package to assign to this review device.
– Use the selection functions (Select Page, Deselect Page, Select All Pages, and Deselect All Pages) to toggle the selection of all displayed and all filtered packages.
– Copy package associations from an existing recipient and overwrite any existing associations: Select the recipient from which to copy package associations from the Copy Packages Association from drop-down list.
– Copy package associations from an existing recipient and add the selected packages to existing associations: Select the recipient from which to copy package associations from the Add Packages Association from drop-down list.
M ASP User Guide May, 2014© 2014 Jeppesen
6

Managing Review DevicesEditing a Review Device
Ma© 2
5. Click the Edit Properties tab.
The Edit Review Device page displays the Edit Properties tab. [Figure 11.8] The fields that display on the page are based on the selected review device type.
6. Make the appropriate changes.
7. Click Save Changes.
DDM saves the review device.
Figure 11.8. Edit Review Device - Edit Properties tab
y, 2014 DDM ASP User Guide014 Jeppesen
237

Managing Review DevicesDeleting a Review Device
DD
23
Deleting a Review DeviceThe Recipient Manager, Review Manager and Airline Manager roles can delete a review device.
To delete a review device1. In the Review Management section in the navigation menu, click Manage
Review Devices.
The Manage Review Devices page appears. [Figure 11.1]
2. Click the Delete link for the name of the review device that you want to delete.
A confirmation window appears.
3. Click OK.
DDM deletes the selected review device.
M ASP User Guide May, 2014© 2014 Jeppesen
8

CHAPTER 12
Managing Checkpoints
This chapter contains the following topics:
• Overview
• Naming a Checkpoint
• Creating a Checkpoint
• Viewing a Checkpoint
• Editing a Checkpoint
• Deleting a Checkpoint

Managing CheckpointsOverview
DD
24
OverviewA checkpoint is an inspection point in DDM where reviewers and groups use the assigned review device to load, review, and approve packages before delivery to recipients. Checkpoints can either consist of reviewers (individual or groups) and the review device those reviewers will use, or they can be empty, with no reviewers or review devices assigned.
Checkpoints are composed of three basic elements:
• A unique name
• A list of reviewers and review groups responsible for approving or rejecting packages
• A list of review devices used by reviewers to load and examine packages
When you create a new content type or recipient or deliver a published package, you can assign a checkpoint, but you must first create that checkpoint in DDM.
After creating a checkpoint, you can easily assign it to any new or existing content types or packages. DDM enables you to insert one or more checkpoints into the delivery process for a package. Users assigned the Review Manager and Airline Manager roles can use the Manage Checkpoints function to create and manage checkpoints.
If a checkpoint requires a review, any assigned packages must be reviewed and then either rejected or approved before being sent to a recipient. The individual reviewer or review group associated with the package content type is responsible for performing the review and then either rejecting or approving the package. A package needs to go through the checkpoint and be approved only once before delivery. If a checkpoint is empty, any assigned packages are autoapproved.
TIP If you encounter degraded performance on the Manage Checkpoints, Create Checkpoint, View Checkpoint, Edit Checkpoint, or Delete Checkpoint page, contact your DDM System Administrator.
Refer to “Setting Up the DDM Review Process” on page 70 for basic information about preparing for and creating checkpoints as part of the review process.
M ASP User Guide May, 2014© 2014 Jeppesen
0

Managing CheckpointsOverview
Ma© 2
Figure 12.1 illustrates the Manage Checkpoints page. From this page, you can create, view, edit, or delete a checkpoint.
Figure 12.1. Manage Checkpoints page
y, 2014 DDM ASP User Guide014 Jeppesen
241

Managing CheckpointsProcess
DD
24
ProcessFigure 12.2 illustrates the areas in the package delivery process affected by the Manage Checkpoints function.
M ASP User Guide May, 2014© 2014 Jeppesen
2

Managing CheckpointsProcess
Ma© 2
o
Figure 12.2. Areas affected by the Manage Checkpoints function
y, 2014 DDM ASP User Guide014 Jeppesen
243

Managing CheckpointsProcess
DD
24
The numbered steps in Figure 12.2 represent the following tasks and functions:
1 - The user creates, edits, views, or deletes a review group using the Manage Review Groups function.
or
1 - The user creates, edits, views, or deletes a review device using the Manage Review Devices function.
2 - The user creates, edits, views, and deletes a checkpoint using the Manage Checkpoints function.
3 - The user creates, edits, views, and deletes a content type using the Manage Content Types function.
4 - The user assigns a checkpoint to a recipient using the Manage Recipients function.
5 - The DDM server notifies reviewers about packages ready for review using the Manage Email Rules function.
M ASP User Guide May, 2014© 2014 Jeppesen
4

Managing CheckpointsNaming a Checkpoint
Ma© 2
Naming a CheckpointCheckpoint names can be alphabetical (both uppercase and lowercase), numerical, or a combination of both. Because DDM recognizes both uppercase and lowercase letters, it is possible the same name could be created more than one time with varying case. For example, you could create the following variations of the same checkpoint name:
• CP_001
• Cp_001
• cP_001
• cp_001
As shown above, a variation in checkpoint names could lead to confusion when creating or editing a checkpoint. To avoid duplication of names, Jeppesen recommends you use all uppercase letters when naming a checkpoint.
y, 2014 DDM ASP User Guide014 Jeppesen
245

Managing CheckpointsCreating a Checkpoint
DD
24
Creating a CheckpointUsers assigned the Review Manager and Airline Manager roles can create a checkpoint. After creating a checkpoint, you can assign them to any new or existing package or content type in DDM.
If you want to assign a review group when you create a new checkpoint, you must first create the review group. Refer to “Creating a Review Group” on page 214 for information about creating a review group.
If you want to assign a review device when you create a new checkpoint, you must first create the review device. Refer to “Creating a Review Device” on page 229 for information about creating a review device.
To create a checkpoint1. In the Review Management section in the navigation menu, click Manage
Checkpoints.
The Manage Checkpoints page appears. [Figure 12.1]
M ASP User Guide May, 2014© 2014 Jeppesen
6

Managing CheckpointsCreating a Checkpoint
Ma© 2
2. On the Manage Checkpoints page, click Create Checkpoint.
The Create Checkpoint page appears. [Figure 12.3]
NOTE If your database contains a large amount of data, response time may be slow, and the Create Checkpoint page may take a few seconds to appear. To avoid a possible error, do not click Create Checkpoint more than one time.
3. In the Checkpoint Name box, type a name for the checkpoint.
TIP Type a checkpoint name that reflects the purpose of the checkpoint.
Figure 12.3. Create Checkpoint page
y, 2014 DDM ASP User Guide014 Jeppesen
247

Managing CheckpointsCreating a Checkpoint
DD
24
4. In the Available Reviewers & Groups list, click the names to associate with this checkpoint.
TIP To select multiple consecutive names, press and hold the SHIFT key and then click the names. To select multiple nonconsecutive names, press and hold the CTRL key and then click the names.
5. Click Add.
The selected names are displayed in the Reviewers & Groups in Checkpoint list.
NOTE To remove names from the Reviewers & Groups in Checkpoint list, click the necessary names and click Remove.
6. In the Available Review Devices list, select the device to associate with this checkpoint.
TIP To select multiple consecutive names, press and hold the SHIFT key and then click the names. To select multiple nonconsecutive names, press and hold the CTRL key and then click the names.
IMPORTANT If the review device you select is a tail type, the tail must be listed in the package’s metadata. If it is not listed, DDM will not associate the package with the review device.
7. Click Add.
The selected names are displayed in the Review Devices in Checkpoint list.
NOTE To remove a names from the Review Devices in Checkpoint list, click the necessary names and then click Remove.
8. Click Save Checkpoint.
DDM saves the new checkpoint.
M ASP User Guide May, 2014© 2014 Jeppesen
8

Managing CheckpointsViewing a Checkpoint
Ma© 2
Viewing a CheckpointUsers assigned the Content Review Manager and Airline Manager roles can view information about a checkpoint.
To view a checkpoint1. In the Review Management section in the navigation menu, click Manage
Checkpoints.
The Manage Checkpoints page appears. [Figure 12.1]
2. In the Checkpoint Name column on the Manage Checkpoints page, click the name of the checkpoint you want to view.
The View Checkpoint page appears. [Figure 12.4]
3. Review the checkpoint information.
Figure 12.4. View Checkpoint page
y, 2014 DDM ASP User Guide014 Jeppesen
249

Managing CheckpointsEditing a Checkpoint
DD
25
Editing a CheckpointUsers assigned the Content Review Manager and Airline Manager roles can edit information about a checkpoint. When editing a checkpoint, you can change the checkpoint name, assigned groups, and assigned devices.
You cannot edit a checkpoint if it is associated with an archived package. In this case, you must either unarchived or delete the package before you can edit the associated checkpoint.
To edit a checkpoint1. In the Review Management section in the navigation menu, click the
Manage Checkpoints.
The Manage Checkpoints page appears. [Figure 12.1]
M ASP User Guide May, 2014© 2014 Jeppesen
0

Managing CheckpointsEditing a Checkpoint
Ma© 2
2. On the Manage Checkpoints page, click the link next to the name of the checkpoint you want to edit.
The Edit Checkpoint page appears. [Figure 12.5]
3. On the Edit Checkpoint page, make the appropriate changes. For field definitions, see “Creating a Checkpoint” on page 246.
4. Click Save Changes.
If any packages will be immediately approved based on these changes, a confirmation message appears.
5. Review the information, and then click Save Changes.
NOTE If you do not want the packages that are displayed to be approved immediately, click Cancel.
Figure 12.5. Edit Checkpoint page
y, 2014 DDM ASP User Guide014 Jeppesen
251

Managing CheckpointsDeleting a Checkpoint
DD
25
Deleting a CheckpointUsers assigned the Review Manager and Airline Manager roles can delete a checkpoint. The steps you follow to delete a checkpoint depend on whether any packages to which the checkpoint is assigned need to be reviewed.
Deleting a Checkpoint with No Package Reviews PendingUse the Manage Checkpoints page to delete checkpoints that have no pending package reviews.
To delete a checkpoint for which no assigned package reviews are pending1. In the Review Management section in the navigation menu, click Manage
Checkpoints.
The Manage Checkpoints page appears. [Figure 12.1]
2. Click the Delete link for the checkpoint you want to delete.
A confirmation message appears.
3. Click OK to proceed with the deletion.
DDM deletes the selected checkpoint.
Deleting a Checkpoint with Package Reviews PendingIf you try to delete a checkpoint that has unapproved packages assigned to it, DDM displays a page where you can reassign the packages to a new checkpoint.
To delete a checkpoint for which assigned package reviews are pending1. In the Review Management section in the navigation menu, click Manage
Checkpoints.
The Manage Checkpoints page appears. [Figure 12.1]
2. Click the Delete link for the checkpoint you want to delete.
A confirmation message appears.
M ASP User Guide May, 2014© 2014 Jeppesen
2

Managing CheckpointsDeleting a Checkpoint
Ma© 2
3. Click OK to proceed with the deletion.
The Delete Checkpoint page appears. [Figure 12.6]
4. To reassign a package checkpoint, go to the New Package Checkpoint list, and select a new package checkpoint.
5. Click Delete Checkpoint.
DDM deletes the selected checkpoint.
Figure 12.6. Delete Checkpoint page
y, 2014 DDM ASP User Guide014 Jeppesen
253

Managing CheckpointsDeleting a Checkpoint
DD
25
M ASP User Guide May, 2014© 2014 Jeppesen
4

CHAPTER 13
Managing Content Types
This chapter contains the following topics:
• Overview
• Naming a Content Type
• Creating a Content Type
• Viewing a Content Type
• Editing a Content Type
• Deleting a Content Type

Managing Content TypesOverview
DD
25
OverviewContent types describe the contents of a package, enabling you to better organize packages before delivery to recipients or partner companies. Packages cannot be published unless they are assigned a content type.
Content types support an automated workflow by ensuring that all content assigned a particular content type has the same default delivery priority, auto-archive and delete rules, default checkpoint, and recipient groups. Thus, whenever a package is published to DDM, the checkpoint or recipient group defined for the content type, if any, is also assigned.
Users assigned the Content Manager and Airline Manager roles can use the Manage Content Types function to create and manage content types.
To successfully publish or receive a package, the content type assigned to the package must exist on the servers of both partner companies. If the content type does not exist on both servers, a delivery error occurs.
Using the Manage Content Types function, you can perform the following tasks:
• Create a content type
• View a content type
• Edit a content type
• Delete a content type
• Set the default delivery priority for a content type
• Define auto-archive and auto-delete rules
• Assign the default checkpoint to a content type
• Assign recipient groups to a content type
Figure 13.1 illustrates the Manage Content Types page. From this page, you can create, edit, view, or delete a content type.
M ASP User Guide May, 2014© 2014 Jeppesen
6

Managing Content TypesOverview
Ma© 2
Figure 13.1. Manage Content Types page
y, 2014 DDM ASP User Guide014 Jeppesen
257

Managing Content TypesNaming a Content Type
DD
25
Naming a Content TypeContent type names can be alphabetical (both upper- and lower-case), numerical, or a combination of both. Because DDM recognizes both upper- and lower-case letters, it is possible that the same name could be created more than one time with varying case. For example, you could create the following variations of the same content type name:
• CT_001
• Ct_001
• cT_001
• ct_001
As shown above, a variation in content type names could lead to confusion when creating or editing a content type, assigning a content type to a package, or when publishing a package between servers. To avoid duplication of names, Jeppesen recommends that you use all upper-case letters when naming a content type.
M ASP User Guide May, 2014© 2014 Jeppesen
8

Managing Content TypesCreating a Content Type
Ma© 2
Creating a Content TypeUsers assigned the Content Manager and Airline Manager roles can create a content type. When you create a content type, enter a name and description, identify delivery priority and automatic archive and delete information, and assign a default checkpoint and recipient groups.
If you want to assign a checkpoint or recipient group when you create a new content type, you must first create it. Refer to Chapter 12, “Managing Checkpoints.” or Chapter 9, “Managing Recipient Groups.”for more information.
NOTE For CAT users, a content type is required in CAT to send a media set to DDM for publishing.
To create a content type1. In the Administration section in the navigation menu, click Manage
Content Types.
DDM displays the Manage Content Types page. [Figure 13.1]
2. Click Create Content Type.
DDM displays the Create Content Type page. [Figure 13.2]
y, 2014 DDM ASP User Guide014 Jeppesen
259

Managing Content TypesCreating a Content Type
DD
26
Figure 13.2. Create Content Type page
3. Type the name for the new content type in the Content Type Name field. This field is required.
4. Type a description of the content type in the Description field.
5. Select a value from the Delivery Priority drop-down list to set the default delivery priority for all packages that are assigned this Content Type.
NOTE You can override the default delivery priority by editing the Delivery Priority of the package on the Edit Package page.
6. In the Package Duration field, enter a value from 1-99,999 to indicate the number of days before DDM automatically archives the package.
7. In the Time To Delete field, enter a value from 1-99,999 to indicate the number of days after the package has been archived before DDM automatically deletes the package.
M ASP User Guide May, 2014© 2014 Jeppesen
0

Managing Content TypesCreating a Content Type
Ma© 2
8. If necessary, select a checkpoint to assign to the content type from the Default Checkpoint drop-down list.
9. Optionally, assign recipient groups by clicking the name of the recipient groups in the Available Recipient Groups list, and then clicking Add.
DDM displays the recipient group(s) you selected in the Selected Recipient Groups list.
TIP To select more than one recipient group at a time, press and hold the Ctrl key while clicking the names of recipient groups.
10. Click Save Content Type.
DDM saves the content type.
y, 2014 DDM ASP User Guide014 Jeppesen
261

Managing Content TypesViewing a Content Type
DD
26
Viewing a Content TypeUsers assigned the Content Manager and Airline Manager roles can view information associated with a content type.
To view information for a content type1. In the Administration section in the navigation menu, click Manage
Content Types.
The Manage Content Types page appears. [Figure 13.1]
2. Click the link in the Content Type Name column for the content type you want to view.
The View Content Type page appears. [Figure 13.3]
Figure 13.3. View Content Type page
M ASP User Guide May, 2014© 2014 Jeppesen
2

Managing Content TypesViewing a Content Type
Ma© 2
3. Review the information.
y, 2014 DDM ASP User Guide014 Jeppesen
263

Managing Content TypesEditing a Content Type
DD
26
Editing a Content TypeUsers assigned the Content Manager and Airline Manager roles can edit a content type. The information that you can edit depends on the content type.
To edit a content type1. In the Administration section in the navigation menu, click Manage
Content Types.
The Manage Content Types page appears. [Figure 13.1]
2. Click the Edit link next to the content type that you want to edit.
The Edit Content Type page appears. [Figure 13.4]
3. Make changes to the fields as needed. For field definitions, see “Creating a Content Type” on page 259.
4. Click Save Changes.
DDM saves the content type.
Figure 13.4. Edit Content Type page
M ASP User Guide May, 2014© 2014 Jeppesen
4

Managing Content TypesDeleting a Content Type
Ma© 2
Deleting a Content TypeUsers assigned the Content Manager and Airline Manager roles can delete a content type. The steps that you follow to delete a content type depend on whether the content type has a dependency, such as an assigned package.
To delete a content type1. In the Administration section in the navigation menu, click Manage
Content Types.
The Manage Content Types page appears. [Figure 13.1]
2. Click the appropriate Delete link next to the name of the content type you want to delete.
A confirmation message appears.
y, 2014 DDM ASP User Guide014 Jeppesen
265

Managing Content TypesDeleting a Content Type
DD
26
3. Click OK.
DDM deletes the content type if there are no dependencies. If dependencies exist, DDM displays the Delete Content Type. [Figure 13.5]
4. For each dependency, go to the Content Type drop-down list, and select a new content type.
5. When you finish reassigning content types, click Delete Content Type.
DDM deletes the selected content type.
Figure 13.5. Delete Content Type page
M ASP User Guide May, 2014© 2014 Jeppesen
6

Managing Content TypesSetting the Default Delivery Priority for a Content Type
Ma© 2
Setting the Default Delivery Priority for a Content TypeDelivery Priority indicates the priority by which packages are sent to a specific recipient. Packages with a Delivery Priority of 1 are the highest priority, and those with a value of 9 are the lowest priority. If two packages have the same priority, DDM delivers the smaller package first.
The Delivery Priority that you set on a content type is the default priority for all packages assigned that content type. You can override the default delivery priority by editing the Delivery Priority of the package on the Edit Package page.
You can set the Delivery Priority when you create or edit a content type.
To set the default Delivery Priority for a content type1. In the Administration option in the navigation menu, click Manage
Content Types.
DDM displays the Manage Content Types page. [Figure 13.1]
2. Click Create Content Type or click the Edit link next to the content type that you want to edit.
DDM displays the Create Content Type page. [Figure 13.2]
3. Select a value from the Delivery Priority drop-down list to set the default delivery priority for all packages that are assigned this Content Type.
4. Click Save Content Type.
y, 2014 DDM ASP User Guide014 Jeppesen
267

Managing Content TypesDefining Auto-Archive and Auto-Delete Rules
DD
26
Defining Auto-Archive and Auto-Delete RulesAuto-archive and auto-delete provide a way to automatically archive and delete packages based on the delivery date, archive date, and content type of the package. DDM calculates an Expected Archive Date when it will automatically archive the package. After automatically archiving the package, DDM calculates an Expected Delete Date when it will automatically delete the archive package. You can set up DDM to take advantage of auto-archive only, auto-delete only, or both of these features. Even after automating the process, you can still manually archive and delete packages.
To set up auto-archive and auto-delete, you must define an archive location and set the Package Duration and Time to Delete values of each Content Type in your system. To further automate the process, you can create email rules that notify you before DDM archives or deletes packages and after DDM actually archives or deletes packages. Create these email rules using the following events:
• Package Archive Warning
• Package Archived
• Package Delete Warning
• Package Deleted
For more information about setting up your auto-archive and auto-delete process and viewing information about it, see the following topics:
• “Automatically Archiving and Deleting Packages” on page 139
• “Deleting an Archived Package” on page 138
• “Viewing Package Properties” on page 104
• “Creating Package Archive Warning Emails” on page 304
• “Creating Package Archived Emails” on page 304
• “Creating Package Delete Warning Emails” on page 309
• “Creating Package Deleted Emails” on page 309
To define the Auto-archive and Auto-delete rules1. In the Administration option in the navigation menu, click Manage
Content Types.
DDM displays the Manage Content Types page. [Figure 13.1]
M ASP User Guide May, 2014© 2014 Jeppesen
8

Managing Content TypesDefining Auto-Archive and Auto-Delete Rules
Ma© 2
2. Click Create Content Type or click the Edit link next to the content type that you want to edit.
DDM displays the Create Content Type page. [Figure 13.2]
3. In the Package Duration field, enter a value from 1-99,999 to indicate the number of days before DDM automatically archives the package.
4. In the Time To Delete field, enter a value from 1-99,999 to indicate the number of days after the package has been archived before DDM automatically deletes the package.
5. Click Save Content Type.
y, 2014 DDM ASP User Guide014 Jeppesen
269

Managing Content TypesAssigning the Default Checkpoint to a Content Type
DD
27
Assigning the Default Checkpoint to a Content TypeYou can assign a default checkpoint to a content type to ensure that all packages of the same type pass through the same checkpoint.
To assign a default checkpoint1. In the Administration section in the navigation menu, click Manage
Content Types.
DDM displays the Manage Content Types page. [Figure 13.1]
2. Click the Edit link next to the content type to which you want to assign a default checkpoint.
DDM displays the Edit Content Type page. [Figure 13.4]
3. From the Default Checkpoint drop-down list, select the checkpoint that you want to be the default for the content type.
4. Click Save Content Type.
DDM saves the content type.
M ASP User Guide May, 2014© 2014 Jeppesen
0

Managing Content TypesAssigning Recipient Groups to a Content Type
Ma© 2
Assigning Recipient Groups to a Content TypeYou can assign recipient groups to a content type to ensure that all members of the group receive the same types of packages.
To create a content type1. In the Administration section in the navigation menu, click Manage
Content Types.
DDM displays the Manage Content Types page. [Figure 13.1]
2. Click the Edit link next to the content type to which you want to assign a default checkpoint.
DDM displays the Edit Content Type page. [Figure 13.4]
3. Assign the recipient groups that you want to be automatically associated with the content type:
– Click the name of the recipient group(s) in the Available Recipient Groups list, and then click Add. DDM displays the recipient group(s) you selected in the Selected Recipient Groups list.
TIP To select more than one recipient group at a time, press and hold the Ctrl key while clicking the names of recipient groups.
4. Click Save Content Type.
DDM saves the content type.
y, 2014 DDM ASP User Guide014 Jeppesen
271

Managing Content TypesAssigning Recipient Groups to a Content Type
DD
27
M ASP User Guide May, 2014© 2014 Jeppesen
2

CHAPTER 14
Managing EFB Certificates
This chapter contains the following topics:
• Overview
• Viewing Available Certificates
• Uploading a Certificate
• Deleting a Certificate

Managing EFB CertificatesOverview
DD
27
OverviewThe Manage EFB Static Certificates functionality allows you to upload a static identity certificate from the Certificate Authority of the Boeing ePlane Ground Support System to the DDM Server. This certificate ensures secure transmission of trusted content is being conducted between the EFB and the DDM Server via CDAF. DDM uses this certificate to validate the EFB when CDAF makes web service calls. If DDM is unable to authenticate the EFB request using its static identity certificate, then it does not permit communication.
IMPORTANT This chapter assumes that the static identity certificate has already been generated and installed on the EFB per the Boeing e-Plane Ground Support System Public Key Infrastructure (PKI) Installation and Administration Guide, D6-83459-1.
Because the static identity certificate expires after one year, you must load a new certificate from the EFB Certificate Authority (CA) laptop to the DDM Server annually. DDM recognizes both old and new certificates, so you should convert and upload the new certificates to the DDM Server as soon as you receive them, without concern that overlapping expiration dates will conflict and cause errors. If the certificate expires on the DDM Server, the DDM Server and CDAF will not be able to establish a connection.
NOTE Jeppesen recommends refreshing the static identity certificate on the DDM server in accordance with Boeing’s suggested refresh time frames.
Before you can upload a static identity certificate, you must first export the static identity certificate from the EFB CA laptop to a server that has access to both the Internet and the DDM server. Once you have exported the certificate, you can upload it to the DDM database. For instructions on exporting the static identity certificate, refer to the Boeing e-Plane Ground Support System Public Key Infrastructure (PKI) Installation and Administration Guide, D6-83459-1. After exporting the certificate file, navigate to the Manage EFB Static Certificates page and upload the certificate to DDM.
Using the Manage EFB Static Certificates function, you can perform the following tasks:
• Upload an EFB static identity certificate
• View available EFB static certificates
• Delete EFB static certificates
M ASP User Guide May, 2014© 2014 Jeppesen
4

Managing EFB CertificatesProcess
Ma© 2
ProcessFigure 14.1 illustrates the areas in the package delivery process that are related to the Manage EFB Static Certificates function.
y, 2014 DDM ASP User Guide014 Jeppesen
275

Managing EFB CertificatesProcess
DD
27
Figure 14.1. Areas related to the Manage EFB Certificates function
M ASP User Guide May, 2014© 2014 Jeppesen
6

Managing EFB CertificatesProcess
Ma© 2
The numbered steps in Figure 14.1 represent the following tasks and functions:
1 - The user exports the .cer certificate from the EFB CA laptop.
2 - The user browses for the new certificate using the Manage EFB Static Certificates function.
3 - The user uploads the new certificate using the Manage EFB Static Certificates function.
y, 2014 DDM ASP User Guide014 Jeppesen
277

Managing EFB CertificatesViewing Available Certificates
DD
27
Viewing Available CertificatesUsers assigned the Airline Manager or System Administrator role can use the Manage EFB Static Certificates page to view information about available certificates, including the subject, the name of the issuer, and valid dates.
To view available certificates1. In the Administration section in the navigation menu, click Manage EFB
Certificates.
The Manage EFB Static Certificates page appears. [Figure 14.2]
2. Review the information.
Figure 14.2. Manage EFB Static Certificates page
M ASP User Guide May, 2014© 2014 Jeppesen
8

Managing EFB CertificatesUploading a Certificate
Ma© 2
Uploading a CertificateUsers assigned the Airline Manager or System Administrator role can upload a certificate. When you upload a certificate, you first browse for the new certificate, and then upload it to the DDM database.
To upload a certificate1. In the Administration section in the navigation menu, click Manage EFB
Certificates.
The Manage EFB Static Certificates page appears. [Figure 14.2]
2. Click Upload Certificate.
The Upload EFB Static Certificate page appears. [Figure 14.3].
3. Click Browse.
A Choose file dialog box opens.
4. Browse to the static identity certificate file you want to upload.
This file is probably named EFBStaticIdentityCert.cer
5. Click Open.
The Choose file dialog box closes, and the path to the certificate is displayed in the box on the Upload EFB Static Certificate page.
Figure 14.3. Upload EFB Static Certificate page
y, 2014 DDM ASP User Guide014 Jeppesen
279

Managing EFB CertificatesUploading a Certificate
DD
28
6. Click Upload.
DDM uploads the certificate.
M ASP User Guide May, 2014© 2014 Jeppesen
0

Managing EFB CertificatesDeleting a Certificate
Ma© 2
Deleting a CertificateUsers assigned the Airline Manager or System Administrator role can delete a certificate.
To delete a certificate1. In the Administration section in the navigation menu, click Manage EFB
Certificates.
The Manage EFB Static Certificates page appears. [Figure 14.2]
2. In the Delete column corresponding to the certificate you want to remove, click the Delete link.
3. Respond to the confirmation message.
y, 2014 DDM ASP User Guide014 Jeppesen
281

Managing EFB CertificatesDeleting a Certificate
DD
28
M ASP User Guide May, 2014© 2014 Jeppesen
2

CHAPTER 15
Managing Email Rules
This chapter contains the following topics:
• Overview
• Naming an Email Rule
• Creating an Email Rule
• Viewing the Settings for an Email Rule
• Editing the Settings for an Email Rule
• Deleting an Email Rule
• Creating Email Rules for Specific Events

Managing Email RulesOverview
DD
28
OverviewEmail rules are used to notify specified email recipients when a certain event occurs. Events are organized in categories of predefined event types. Events are used for auditing purposes and form the basis of email rules. Refer to “Creating Email Rules for Specific Events” on page 302 for information about the event types in DDM and how to create email rules based on them.
Some types of email rules enable you to specify recipients or content types that trigger the email rule if a certain event occurs in relation to them. For example, the email rule for event “Package Content Approved at Checkpoint” enables you to specify content types. If you select the “Terminal Charts” content type, this email rule is triggered only when packages assigned content type “Terminal Charts” are approved by the associated checkpoint.
Each email generated and sent by DDM has the following structure:
• To: The recipients specified by the Airline Manager on the To Groups or To Users tab of the Create Email Rules - Assign Emails page.
• From: Each email is from “DDM Notification.”
• Subject: The event type that automatically generates the email.
• Message: The prologue, body, and epilogue together form the email message:
– Prologue: The prologue is the first line of the email message that explains the event that occurred in DDM that generated the message.
– Body: The body of each email is autogenerated based on the event type.
– Epilogue: The epilogue for all email messages instructs you who to contact with any questions and reminds you not to reply to the automatically generated message.
DDM cannot generate and send emails unless the email server has been configured correctly. The DDM System Administrator is responsible for setting the email server address and configuring the email settings.
Users assigned the Airline Manager or System Administrator roles can use the Manage Email Rules function to perform the following tasks to create and manage an email rule:
• Create an email rule
• View an email rule
M ASP User Guide May, 2014© 2014 Jeppesen
4

Managing Email RulesOverview
Ma© 2
• Edit an email rule
• Delete an email rule
TIP If you encounter degraded performance on the Manage Email Rules, Create Email Rule, View Email Rule, or Edit Email Rule page, contact your DDM System Administrator.
Figure 15.1 illustrates the Manage Email Rules page. From this page, you can create, view, edit, and delete an email rule.
Figure 15.1. Manage Email Rules page
y, 2014 DDM ASP User Guide014 Jeppesen
285

Managing Email RulesProcess
DD
28
ProcessFigure 15.2 illustrates the areas in the package delivery process that are affected by the Manage Email Rules function.
M ASP User Guide May, 2014© 2014 Jeppesen
6

Managing Email RulesProcess
Ma© 2
Figure 15.2. Areas Affected by the Manage Email Rules Function
y, 2014 DDM ASP User Guide014 Jeppesen
287

Managing Email RulesProcess
DD
28
The numbered steps in Figure 15.2 represent the following tasks:
The user creates, edits, views, or deletes an email rule using the Manage Email Rules function.
The DDM server sends an email notification stating that a package is invalid.
The DDM server sends an email notification stating that a publication was completed.
The DDM server sends an email notification stating that the package content was autoapproved.
The DDM server sends an email notification stating that a review of package content is required.
The DDM server sends an email notification stating that a package was rejected.
The DDM server sends an email notification stating that a package was approved.
The DDM server sends an email notification stating that a part was successfully staged.
The DDM server sends an email notification stating that a part failed to stage.
The DDM server sends an email notification stating that a part was installed on LoadStar.
The DDM server sends an email notification stating that a part failed to install on LoadStar.
The DDM server sends an email notification stating that a part removal was requested.
The DDM server sends an email notification stating that a part removal was successful.
The DDM server sends an email notification stating that a part removal failed.
M ASP User Guide May, 2014© 2014 Jeppesen
8

Managing Email RulesNaming an Email Rule
Ma© 2
Naming an Email RuleEmail rule names can be alphabetical (both upper- and lower-case), numerical, or a combination of both. Because DDM recognizes both upper- and lower-case letters, it is possible that the same name could be created more than one time with varying case. For example, you could create the following variations of the same email rule name:
• ER_001
• eR_001
• Er_001
• er_001
As shown above, a variation in email rule names could lead to confusion when creating or editing an email rule. To avoid duplication of names, Jeppesen recommends that you use all upper-case letters when naming an email rule.
y, 2014 DDM ASP User Guide014 Jeppesen
289

Managing Email RulesCreating an Email Rule
DD
29
Creating an Email RuleUsers assigned the Airline Manager or System Administrator roles can create an email rule. When creating an email rule, you select an event type, specify a name for the email rule, associate recipient or content types with the rule, and select the users and user groups that will receive an email when the selected event type occurs.
You should create an email rule if you want DDM to automatically generate and send an email to a user or group of users when an event occurs in DDM. The user groups and individual users that you can assign to an email rule correspond to the groups defined by the DDM System Administrator on the Active Directory or LDAP server. In addition, you can manually enter any email without retrieving the user groups or individual users from the Active Directory or LDAP server.
You can create an email rule based on an existing email rule. To perform this task, the email rule that you want to copy must already exist in DDM.
NOTE Prior to creating an email rule, the DDM System Administrator must have specified the Help Desk email address and server URL, as well as turned the email settings on. Contact your DDM System Administrator if you receive any error messages stating that these tasks have not been performed.
To create an email rule1. In the Administration section in the navigation menu, click Manage Email
Rules.
The Manage Email Rules page appears. [Figure 15.1]
M ASP User Guide May, 2014© 2014 Jeppesen
0

Managing Email RulesCreating an Email Rule
Ma© 2
2. Click Create Email Rule.
DDM displays the Create Email Rule page. [Figure 15.3]
3. Click New Email Rule for Event, then select the event from the drop-down list.
To create an email rule based on an existing email rule, see “Copying an Email Rule” on page 295.
Figure 15.3. Create Email Rule page (Step 1: Select Email Rule Event)
y, 2014 DDM ASP User Guide014 Jeppesen
291

Managing Email RulesCreating an Email Rule
DD
29
4. Click Continue.
The Create Email Rule page displays Step 2: Define Properties. [Figure 15.4]
NOTE The fields that display for Step 2 on the Create Email Rule page depend on the event selected. See “Creating Email Rules for Specific Events” on page 302 for details on completing the Step 2 on the Create Email Rule page for each event.
5. Type a name for the email rule in the Email Rule Name field. This field is required.
TIP The email rule name will be used for the subject of the email, so you should try to make it as informative as possible.
6. If the For Recipient(s) or For Content Type(s) option buttons display, identify the recipients or content types to associate with the email rule using one of the following methods:
– Click All to select all recipients or content types and proceed to Step 7.
Figure 15.4. Create Email Rule page (Step 2: Define Properties)
M ASP User Guide May, 2014© 2014 Jeppesen
2

Managing Email RulesCreating an Email Rule
Ma© 2
– Click Selected and select the recipient or content type from the list. If necessary, press and hold the SHIFT key to select multiple consecutive names; press and hold the CTRL key to select multiple non-consecutive names.
7. Click Continue.
The Create Email Rule page displays Step 3: Assign Emails on the To Groups tab. [Figure 15.5]
8. Use the To Groups tab to specify the email groups who will receive the email notification:
– Click TO to specify the groups to include in the To field of the email.
– Click CC to specify the groups to include in the CC field of the email.
NOTE The User Generating Event group is available for all event types. The Reviewers in Assigned Checkpoint group is available only for the Package Content Review Required emails.
Figure 15.5. To Groups tab on the Create Email Rules - Assign Emails page (Step 3: Assign Emails)
y, 2014 DDM ASP User Guide014 Jeppesen
293

Managing Email RulesCreating an Email Rule
DD
29
9. Click the To Users tab to specify the individual users who will receive the email notification: [Figure 15.6]
10. Specify email recipients:
a Type the recipient’s name in the First Name and Last Name fields. b Type the recipient’s email address in the required Email Address field. c Click Add.
NOTE To browse for a recipient’s name, click Get from Directory and select a recipient. Click Add to Users when finished.
The name of the user displays at the bottom of the tab and is automatically selected as a TO receiver. If necessary, you can change the recipient’s notification to None or CC.
11. Click Save Email Rule.
DDM saves the email rule.
NOTE You can toggle between the To Groups and To Users tabs without losing data if you do not navigate off of the page. Click Save Email Rule when you are finished creating the email rule.
Figure 15.6. To Users tab on the Create Email Rules - Assign Emails page (Step 3: Assign Emails)
M ASP User Guide May, 2014© 2014 Jeppesen
4

Managing Email RulesCopying an Email Rule
Ma© 2
Copying an Email RuleYou can create a new email rule by copying an existing rule. The Airline Manager or System Administrator role can copy an email rule.
To copy an email rule1. In the Administration section in the navigation menu, click Manage Email
Rules.
The Manage Email Rules page appears. [Figure 15.1]
2. Click Create Email Rule.
Step 1 on the Create Email Rule page appears. [Figure 15.3]
3. Click Based on Existing Email Rule.
4. Select the email rule that you want to copy from the drop-down list.
NOTE The drop-down list for the Based on Existing Email Rule radio button will not contain any options if there are no existing email rules.
5. Click Continue.
Step 2 on the Create Email Rule page displays fields for defining event type properties. [Figure 15.4]
NOTE The fields that display for Step 2 on the Create Email Rule page depend on the event selected.
6. Type a name for the email rule in the Email Rule Name field. This field is required.
TIP The email rule name will be used for the subject of the email, so you should try to make it as informative as possible.
7. If the For Recipient’s option buttons display:
– Click All to select all recipients and proceed to Step 7.
– Click Selected and select the recipient from the list. If necessary, press and hold the SHIFT key to select multiple consecutive names; press and hold the CTRL key to select multiple non-consecutive names.
y, 2014 DDM ASP User Guide014 Jeppesen
295

Managing Email RulesCopying an Email Rule
DD
29
8. If the For Content Types option buttons display:
– Click All to select all content types and proceed to Step 7.
– Click Selected and select the content type from the list. If necessary, press and hold the SHIFT key to select multiple consecutive content types; press and hold the CTRL key to select multiple non-consecutive content types.
9. Click Continue.
The Create Email Rules - Assign Emails page displays the To Groups tab. [Figure 15.5]
10. Using one or both of the following methods, specify who should receive email notification when the event for the rule is triggered:
– To specify which user groups should receive email notification when the event for the rule is triggered, click None, TO, and/or CC on the To Groups tab.
NOTE The “User Generating Event” group is available for all event types. The “Reviewers in Assigned Checkpoint” group is available only for the “Package Content Review Required” and “Package Delivery Review Required” content types.
Figure 15.7. To Groups Tab on the Create Email Rules - Assign Emails Page (Step 3: Assign Emails)
M ASP User Guide May, 2014© 2014 Jeppesen
6

Managing Email RulesCopying an Email Rule
Ma© 2
– To specify an individual user name as an email recipient, click the To Users tab. The To Users tab appears. [Figure 15.6]
– Perform the following steps:
• Type the recipient’s name in the First Name and Last Name fields.• Type the recipient’s email address in the Email Address field. The Email
Address field is required. • Click Add when finished.
NOTE To browse for a recipient’s name, click Get from Directory and select a recipient. Click Add to Users when finished.
The name of the user displays at the bottom of the tab and is automatically selected as a TO receiver. If necessary, you can change the recipient’s notification to None or CC.
11. Click Save Email Rule.
DDM saves the email rule.
NOTE You can toggle between the To Groups and To Users tabs without losing data if you do not navigate off of the page. Click Save Email Rule when you are finished creating the email rule.
y, 2014 DDM ASP User Guide014 Jeppesen
297

Managing Email RulesViewing the Settings for an Email Rule
DD
29
Viewing the Settings for an Email RuleThe Airline Manager or System Administrator role can view settings for an email rule.
To view settings for an email rule1. In the Administration section in the navigation menu, click Manage Email
Rules.
The Manage Email Rules page appears. [Figure 15.1]
2. In the Email Rule Name column, click the name of the email rule that you want to view.
The View Email Rule page appears. [Figure 15.8]
3. Review the information.
Figure 15.8. View Email Rule page
M ASP User Guide May, 2014© 2014 Jeppesen
8

Managing Email RulesEditing the Settings for an Email Rule
Ma© 2
Editing the Settings for an Email RuleIf necessary, you can change an email rule name, the associated recipient or content type, and who should receive an email if the event type occurs in DDM. You cannot change the event type assigned to an email rule; to do this, you must delete the email rule and create a new rule with the relevant event type. Users assigned the Airline Manager or System Administrator role can edit email rule settings.
To edit the information that has been set up for an email rule1. In the Administration section in the navigation menu, click Manage Email
Rules.
The Manage Email Rules page appears. [Figure 15.1]
2. Click the Edit link next to the email rule that you want to edit.
DDM displays the Edit Email Rule page. [Figure 15.9]
3. Make changes to the email rule name, recipients, or content types. For field definitions, refer to “Creating an Email Rule” on page 290.
Figure 15.9. Edit Email Rule page (Step 1: Edit Properties)
y, 2014 DDM ASP User Guide014 Jeppesen
299

Managing Email RulesEditing the Settings for an Email Rule
DD
30
4. Click Continue.
DDM displays the Edit Email Rules - Assign Emails page. [Figure 15.10]
5. Make changes to the email rule assignment using the To Groups and To Users tabs. For field definitions, refer to “Creating an Email Rule” on page 290.
6. Click Save Email Rule.
DDM saves changes made to the email rule.
Figure 15.10. To Groups Tab on the Edit Email Rules - Assign Emails Page (Step 2: Assign Emails)
M ASP User Guide May, 2014© 2014 Jeppesen
0

Managing Email RulesDeleting an Email Rule
Ma© 2
Deleting an Email RuleIf necessary, you can delete an email rule. This process permanently deletes email rules. You should delete an email rule if you no longer want a user or group of users to receive email notification when the associated event occurs in DDM. When you delete an email rule, DDM stops sending emails (when the event occurs) to any users or groups. Users assigned the Airline Manager or System Administrator role can delete an email rule.
To temporarily suspend all email rules, the DDM System Administrator can disable the email settings on the Configure Email page.
To delete an email rule1. In the Administration section in the navigation menu, click Manage Email
Rules.
The Manage Email Rules page appears. [Figure 15.1]
2. Click the Delete link for the email rule that you want to delete.
A confirmation message displays if the email rule can be deleted successfully.
3. Click OK.
DDM deletes the email rule.
y, 2014 DDM ASP User Guide014 Jeppesen
301

Managing Email RulesCreating Email Rules for Specific Events
DD
30
Creating Email Rules for Specific EventsFor each event type that can be used to create an email rule, this section provides a brief description and procedures to create an email rule based on an event. The procedures provide event-specific information that supplements the steps in “Creating an Email Rule” on page 290, which you can consult if you need more detailed instructions.
Creating All Recipient Parts Loaded EmailsWhen a CDA loads the parts assigned to it, it generates the All Recipient Parts Loaded event. Use this event to create an email rule that notifies the addressee that all parts assigned to the CDA are loaded.
The email will include a list of the loaded parts. If a part is manually removed from the loading area on the EFB, associated emails are not resent.
To create an All Recipient Parts Loaded email rule1. Select All Recipient Parts Loaded from the New Email Rule for Event
drop-down list.
2. Click Continue.
3. Type the name in the Email Rule Name field.
4. Select the recipients that you want to trigger the event.
5. Click Continue.
6. Select the email groups or individual users who you want to receive the email. See for “Creating an Email Rule” on page 290 detailed instructions on selecting email recipients
7. Click Save Email Rule.
Creating All Recipient Parts Staged or Loaded EmailsWhen a CDA loads or stages the parts assigned to it, it generates the All Recipient Parts Staged or Loaded event. Use this event to create an email rule that notifies the addressee that all parts assigned to the CDA are loaded or staged.
The email will include a list of the loaded and staged parts. If a part is manually removed from the loading area or staging area on the EFB, associated emails are not resent.
M ASP User Guide May, 2014© 2014 Jeppesen
2

Managing Email RulesCreating Email Rules for Specific Events
Ma© 2
To create an All Recipient Parts Staged or Loaded email1. Select All Recipient Parts Staged or Loaded from the New Email Rule
for Event drop-down list.
2. Click Continue.
3. Type the name in the Email Rule Name field.
4. Select the recipients that you want to trigger the event:
5. Click Continue.
6. Select the email groups or individual users who you want to receive the email. See for “Creating an Email Rule” on page 290 detailed instructions on selecting email recipients
7. Click Save Email Rule.
Creating Disk Space Usage Warning Emails
When disk space used by a company in DDM reaches 80% of the maximum configured value, DDM generates the Disk Space Usage Warning event. Use this event to create an email rule notifying the addressee that the condition exists. The email is sent daily.
The maximum disk space is configured by your system administrator. Disk space includes the total size of all active packages (e.g., packages published to the company or packages published by the company but that do not have a consumer company) and archived packages.
NOTE The Disk Space Usage Warning event type is available only if your system administrator configured a disk space allocation for your company.
To create a Disk Space Usage Warning email1. Select Disk Space Usage Warning from the New Email Rule for Event
drop-down list.
2. Click Continue.
3. Type the name in the Email Rule Name field.
4. Select the recipients that you want to trigger the event:
5. Click Continue.
y, 2014 DDM ASP User Guide014 Jeppesen
303
Managing Email RulesCreating Email Rules for Specific Events
DD
30
6. Select the email groups or individual users who you want to receive the email. See for “Creating an Email Rule” on page 290 detailed instructions on selecting email recipients
7. Click Save Email Rule.
Creating Package Archive Warning EmailsIf you have set up automatic package archival, you can create an email rule that notifies the specified email recipients prior to DDM automatically archiving a package. When you create the email rule, you specify the number of days before the package is scheduled to be archived that you want to receive the warning email.
To create a Package Archive Warning email1. Select Package Archive Warning from the New Email Rule for Event
drop-down list.
2. Click Continue.
3. Type the name in the Email Rule Name field.
4. Enter the number of days prior to the package’s Expected Archive Date that you want to receive the email.
5. Select the content types that you want to trigger the event:
6. Click Continue.
7. Select the email groups or individual users who you want to receive the email. See for “Creating an Email Rule” on page 290 detailed instructions on selecting email recipients
8. Click Save Email Rule.
Creating Package Archived EmailsEach time DDM archives a package, whether automatically or a user manually archives it, DDM generates the Package Archived event. Use this event to create an email rule to notify you when DDM archives a package.
To create a Package Archived email1. Select Package Archived from the New Email Rule for Event drop-down
list.
M ASP User Guide May, 2014© 2014 Jeppesen
4

Managing Email RulesCreating Email Rules for Specific Events
Ma© 2
2. Click Continue.
3. Type the name in the Email Rule Name field.
4. Select the content types that you want to trigger the event:
5. Click Continue.
6. Select the email groups or individual users who you want to receive the email. See for “Creating an Email Rule” on page 290 detailed instructions on selecting email recipients
7. Click Save Email Rule.
Creating Package Available for Delivery EmailsEach time a package is published to your company, DDM generates the Package Available for Delivery event. Use this event to create an email rule to notify you that a package is available.
NOTE Do not use emails based on the Publication Completed event type for notification that a package is available. The Publication Completed event type is intended for publishers of packages, not companies receiving the package.
To create a Package Available for Delivery email1. Select Package Available for Delivery from the New Email Rule for
Event drop-down list.
2. Click Continue.
3. Type the name in the Email Rule Name field.
4. Select the content types that you want to trigger the event:
5. Click Continue.
6. Select the email groups or individual users who you want to receive the email. See for “Creating an Email Rule” on page 290 detailed instructions on selecting email recipients
7. Click Save Email Rule.
y, 2014 DDM ASP User Guide014 Jeppesen
305

Managing Email RulesCreating Email Rules for Specific Events
DD
30
Creating Package Content Approved at Checkpoint EmailsWhen the last required reviewer approves package content at checkpoint, DDM generates the Package Content Approved at Checkpoint event. Use this event to create a notification email that all assigned reviewers and review groups have reviewed and approved a package. This event indicates that the package content review process was completed at the checkpoint.
To create a Package Content Approved at Checkpoint email1. Select Package Content Approved at Checkpoint from the New Email
Rule for Event drop-down list.
2. Click Continue.
3. Type the name in the Email Rule Name field.
4. Select the content types that you want to trigger the event:
5. Click Continue.
6. Select the email groups or individual users who you want to receive the email. See for “Creating an Email Rule” on page 290 detailed instructions on selecting email recipients
7. Click Save Email Rule.
Creating Package Content Approved by Reviewer EmailsWhen a reviewer approves package content, DDM generates the Package Content Approved by Reviewer event. Use this event to create a notification email for a reviewer so they receive an email every time another reviewer or review group reviews and approves a package. The reviewers know that the package review process has been completed when the “Remaining Reviewers” field displays “___.”
To create a Package Content Approved by Reviewer email1. Select Package Content Approved by Reviewer from the New Email
Rule for Event drop-down list.
2. Click Continue.
3. Type the name in the Email Rule Name field.
4. Select the content types that you want to trigger the event:
M ASP User Guide May, 2014© 2014 Jeppesen
6

Managing Email RulesCreating Email Rules for Specific Events
Ma© 2
5. Click Continue.
6. Select the email groups or individual users who you want to receive the email. See for “Creating an Email Rule” on page 290 detailed instructions on selecting email recipients
7. Click Save Email Rule.
Creating Package Content Auto Approved EmailsWhen DDM automatically approves package content because a checkpoint contains no reviewers, it generates the Package Content Auto Approved event. Use this event to create a notification email that a package was automatically approved.
To create a Package Content Auto Approved email1. Select Package Content Auto Approved from the New Email Rule for
Event drop-down list.
2. Click Continue.
3. Type the name in the Email Rule Name field.
4. Select the content types that you want to trigger the event:
5. Click Continue.
6. Select the email groups or individual users who you want to receive the email. See for “Creating an Email Rule” on page 290 detailed instructions on selecting email recipients
7. Click Save Email Rule.
Creating Package Content Rejected EmailsWhen a reviewer rejects package content, DDM generates the Package Content Rejected event. Use this event to create a notification email for a reviewer so they receive an email every time another reviewer or review group rejects a package. The reviewers know that the package review process has stopped, and the package was rejected as soon as they receive this message.
To create a Package Content Rejected email1. Select Package Content Rejected from the New Email Rule for Event
drop-down list.
y, 2014 DDM ASP User Guide014 Jeppesen
307

Managing Email RulesCreating Email Rules for Specific Events
DD
30
2. Click Continue.
3. Type the name in the Email Rule Name field.
4. Select the content types that you want to trigger the event:
5. Click Continue.
6. Select the email groups or individual users who you want to receive the email. See for “Creating an Email Rule” on page 290 detailed instructions on selecting email recipients
7. Click Save Email Rule.
Creating Package Content Review Required EmailsWhen DDM sends content to a checkpoint with at least one reviewer, review group, or review device, it generates the Package Content Review Required event. Use this event to create a notification email for all reviewers so they know they must review a package.
In addition, DDM provides the “Reviewers in Assigned Checkpoints” groups for assignment to the following two event types:
• Package Content Review Required
• Package Delivery Review Required
When the “Reviewers in Assigned Checkpoints” group is assigned, all reviewers in the checkpoint receive an email notification for these two events.
To create a Package Content Review Required email1. Select Package Content Rejected from the New Email Rule for Event
drop-down list.
2. Click Continue.
3. Type the name in the Email Rule Name field.
4. Click Continue.
5. Select the email groups or individual users who you want to receive the email. See for “Creating an Email Rule” on page 290 detailed instructions on selecting email recipients
6. Click Save Email Rule.
M ASP User Guide May, 2014© 2014 Jeppesen
8

Managing Email RulesCreating Email Rules for Specific Events
Ma© 2
Creating Package Delete Warning EmailsIf you have set up automatic package deletion, you can create an email rule that notifies the specified email recipients prior to DDM automatically deleting a package. When you create the email rule, you specify the number of days before the package is scheduled to be deleted that you want to receive the warning email.
To create a Package Delete Warning email1. Select Package Delete Warning from the New Email Rule for Event
drop-down list.
2. Click Continue.
3. Type the name in the Email Rule Name field.
4. In the Days Before Auto-Deleting field, enter the number of days prior to the package’s Expected Delete Date that you want to receive the email.
5. Select the content types that you want to trigger the event:
6. Click Continue.
7. Select the email groups or individual users who you want to receive the email. See for “Creating an Email Rule” on page 290 detailed instructions on selecting email recipients
8. Click Save Email Rule.
Creating Package Deleted EmailsEach time DDM deletes a package, whether automatically or a user manually deletes it, DDM generates the Package Deleted event. Use this event to create an email rule to notify you when DDM deletes a package.
To create a Package Deleted email1. Select Package Deleted from the New Email Rule for Event drop-down
list.
2. Click Continue.
3. Type the name in the Email Rule Name field.
4. Select the content types that you want to trigger the event:
5. Click Continue.
y, 2014 DDM ASP User Guide014 Jeppesen
309

Managing Email RulesCreating Email Rules for Specific Events
DD
31
6. Select the email groups or individual users who you want to receive the email. See for “Creating an Email Rule” on page 290 detailed instructions on selecting email recipients
7. Click Save Email Rule.
Creating Package Delivered Successfully EmailsWhen DDM successfully delivers packages to a CDA and the CDA post-processed the parts, the CDA generates the Package Delivered Successfully event. Only CDAB, CDAD, CDAJ, and CDAL generate this event. Use this event to create a notification email for successful package delivery.
NOTE For CDAF recipients, use email rules based on the Part Staged Successfully event.
To create a Package Delivered Successfully email1. Select Package Delivered Successfully from the New Email Rule for
Event drop-down list.
2. Click Continue.
3. Type the name in the Email Rule Name field.
4. Select the recipients that you want to trigger the event:
5. Click Continue.
6. Select the email groups or individual users who you want to receive the email. See for “Creating an Email Rule” on page 290 detailed instructions on selecting email recipients
7. Click Save Email Rule.
Creating Part Removal Failed EmailsWhen a CDAF recipient does not remove a part from the EFB staging area, it generates the Part Removal Failed event. Use this event to create a notification email when a CDAF recipient fails to remove a part.
M ASP User Guide May, 2014© 2014 Jeppesen
0

Managing Email RulesCreating Email Rules for Specific Events
Ma© 2
To create a Part Removal Failed email1. Select Part Removal Failed from the New Email Rule for Event drop-
down list.
2. Click Continue.
3. Type the name in the Email Rule Name field.
4. Select the recipients that you want to trigger the event:
5. Click Continue.
6. Select the email groups or individual users who you want to receive the email. See for “Creating an Email Rule” on page 290 detailed instructions on selecting email recipients
7. Click Save Email Rule.
Creating Part Removal Requested EmailsWhen DDM sends CDAF a request to remove a part from the EFB staging area, it generates the Part Removal Requested event. Use this event to create a notification email when someone attempts to remove parts from an EFB.
To create a Part Removal Requested email1. Select Part Removal Requested from the New Email Rule for Event
drop-down list.
2. Click Continue.
3. Type the name in the Email Rule Name field.
4. Select the recipients that you want to trigger the event:
5. Click Continue.
6. Select the email groups or individual users who you want to receive the email. See for “Creating an Email Rule” on page 290 detailed instructions on selecting email recipients
7. Click Save Email Rule.
y, 2014 DDM ASP User Guide014 Jeppesen
311

Managing Email RulesCreating Email Rules for Specific Events
DD
31
Creating Part Removed Successfully EmailsWhen a CDAF recipient successfully removes a part from the EFB staging area, it generates the Part Removed Successfully event. Use this event to create a notification email when CDAF removes parts from the EFB staging area.
To create a Part Removed Successfully email1. Select Part Removed Successfully from the New Email Rule for Event
drop-down list.
2. Click Continue.
3. Type the name in the Email Rule Name field.
4. Select the recipients that you want to trigger the event:
5. Click Continue.
6. Select the email groups or individual users who you want to receive the email. See for “Creating an Email Rule” on page 290 detailed instructions on selecting email recipients
7. Click Save Email Rule.
Creating Part Staged Successfully EmailsWhen a CDAF recipient successfully stages a part to the EFB staging area, it generates the Part Staged Successfully event. Use this event to create a notification email when parts on one or more CDAF recipients are successfully staged.
To create a Part Staged Successfully email1. Select Part Staged Successfully from the New Email Rule for Event drop-
down list.
2. Click Continue.
3. Type the name in the Email Rule Name field.
4. Select the recipients that you want to trigger the event:
5. Click Continue.
6. Select the email groups or individual users who you want to receive the email. See for “Creating an Email Rule” on page 290 detailed instructions on selecting email recipients
7. Click Save Email Rule.
M ASP User Guide May, 2014© 2014 Jeppesen
2

Managing Email RulesCreating Email Rules for Specific Events
Ma© 2
Creating Part Staging Failed EmailsWhen a CDAF recipient does not successfully stage a part to the EFB staging area, it generates the Part Staging Failed event. Use this event to create a notification email when parts on one or more CDAF recipients fail to stage successfully.
To create a Part Staging Failed email1. Select Part Staging Failed from the New Email Rule for Event drop-down
list.
2. Click Continue.
3. Type the name in the Email Rule Name field.
4. Select the recipients that you want to trigger the event:
5. Click Continue.
6. Select the email groups or individual users who you want to receive the email. See for “Creating an Email Rule” on page 290 detailed instructions on selecting email recipients
7. Click Save Email Rule.
Creating Publication Completed EmailsWhen DDM successfully publishes a package, it generates the Publication Completed event. Use this event to create a notification email for publishers to notify them that DDM successfully published a package. Do not use emails for this event to be notified that a package is available. Use emails based on the Package Available for Delivery event instead.
To create a Publication Completed email1. Select Publication Completed from the New Email Rule for Event drop-
down list.
2. Click Continue.
3. Type the name in the Email Rule Name field.
4. Select the content types that you want to trigger the event:
5. Click Continue.
6. Select the email groups or individual users who you want to receive the email. See for “Creating an Email Rule” on page 290 detailed instructions on selecting email recipients
y, 2014 DDM ASP User Guide014 Jeppesen
313

Managing Email RulesCreating Email Rules for Specific Events
DD
31
7. Click Save Email Rule.
Creating Publication Not Completed EmailsWhen DDM fails to publish a package, it generates the Publication Not Completed event. Use this event to create a notification email for publishers to notify them that DDM did not successfully publish a package.
To create a Publication Not Completed email1. Select Publication Not Completed from the New Email Rule for Event
drop-down list.
2. Click Continue.
3. Type the name in the Email Rule Name field.
4. Select the content types that you want to trigger the event:
5. Click Continue.
6. Select the email groups or individual users who you want to receive the email. See for “Creating an Email Rule” on page 290 detailed instructions on selecting email recipients
7. Click Save Email Rule.
Creating Recipient Reported Change EmailsWhen the list of staged or loaded parts on a CDA changes from what DDM originally sent to the recipient, the CDA generates the Recipient Reported Change event. Use this event to create a notification email that indicates that the list of parts has changed and includes a list of the parts on the EFB.
To create a Recipient Reported Change email1. Select Recipient Reported Change from the New Email Rule for Event
drop-down list.
2. Click Continue.
3. Type the name in the Email Rule Name field.
4. Select the recipients that you want to trigger the event:
5. Click Continue.
M ASP User Guide May, 2014© 2014 Jeppesen
4

Managing Email RulesCreating Email Rules for Specific Events
Ma© 2
6. Select the email groups or individual users who you want to receive the email. See for “Creating an Email Rule” on page 290 detailed instructions on selecting email recipients
7. Click Save Email Rule.
Creating Recipient-Package Association Rejected Emails
When a CDA rejects a package based on recipient-package associations, it generates the Recipient-Package Association Rejected event. DDM responds by generating instructions for the CDA. Use this event to create a notification email that describes why the CDA rejected the package.
Depending on the reason why the package was rejected, the email message may include any of the following in the body text:
• The package <name> will not be delivered to recipient <name>, because it is built for LRU type <name> which is not in the list of the LRUs, reported by the recipient <name>.
• The package <name> will not be delivered to recipient <name>, because the tail <number> is not in the list of package targets {names}.
• Package <name> will not be delivered to recipient <name>, because it has LRU type <name> which is restricted for delivery.
• Content type <name> not found on <company code> DDM server.
• CDA of recipient <name> requires packages of wrapping type BOM only, while package <name> has wrapping type <name>
• The package <name> is rejected by recipient <name>, because the bill of materials XML file is not found in the package.
• The package <name> delivery to recipient <name> failed because of the error in delivered file block calculations. Contact your DDM Administrator for help.
• The package <name> delivery to recipient <name> failed because file <name> not found in the content repository. Contact your DDM Administrator for help.
• CDA of recipient <name> requires packages of wrapping type ARINC 665 compliant only, while package <name> has wrapping type <name>.
y, 2014 DDM ASP User Guide014 Jeppesen
315

Managing Email RulesCreating Email Rules for Specific Events
DD
31
• The package <name> will not be delivered to recipient <name>, because of some undefined error. Please, contact your DDM Administrator for help.
• The package <name> delivery to recipient <name> failed because of the server error. Contact your DDM Administrator for help.
• The package <name> will not be delivered to recipient <name>, because it does not have LRU type specified.
NOTE DDM also displays the reason why packages are rejected by CDAs on the Part Delivery Status and Version Delivery Status pages. DDM also displays these error messages when you click the Error link on the Edit Package, View Package, Edit Recipient, and View Recipient pages.
To create a Recipient-Package Association Rejected email1. Select Recipient-Package Association Rejected from the New Email Rule
for Event drop-down list.
2. Click Continue.
3. Type the name in the Email Rule Name field.
4. Select the recipients that you want to trigger the event:
5. Click Continue.
6. Select the email groups or individual users who you want to receive the email. See for “Creating an Email Rule” on page 290 detailed instructions on selecting email recipients
7. Click Save Email Rule.
Creating Review Device-Package Association Rejected Emails
When a review device rejects a package based on recipient-package associations, it generates the Review Device-Package Association Rejected event. DDM responds by generating instructions for the review device. Use this event to create a notification email that describes why the review device rejected the package.
M ASP User Guide May, 2014© 2014 Jeppesen
6

Managing Email RulesCreating Email Rules for Specific Events
Ma© 2
Depending on the reason why the package was rejected, the email message may include any of the following in the body text:
• The package <name> will not be delivered to review device <name>, because it has LRU type <name> which is restricted for delivery.
• The package <name> will not be delivered to review device <name>, because it is built for LRU type <name> which is not in the list of the LRUs, reported by the review device <name>.
• CDA of review device <name> requires packages of wrapping type BOM only, while package <name> has wrapping type <name>.
• The package <name> is rejected by review device <name>, because the bill of materials XML file is not found in the package.
• The package <name> delivery to review device <name> failed because of the error in delivered file block calculations. Contact your DDM Administrator for help.
• The package {name} delivery to review device {name} failed because file {name} not be found in the content repository. Contact your DDM Administrator for help.
NOTE DDM also displays the reason why packages are rejected by review devices on the Part Delivery Status and Version Delivery Status pages. DDM also displays these error messages when you click the Error link on the Edit Package, View Package, Edit Recipient, and View Recipient pages.
To create a Review Device-Package Association Rejected email1. Select Review Device-Package Association Rejected from the New Email
Rule for Event drop-down list.
2. Click Continue.
3. Type the name in the Email Rule Name field.
4. Select the recipients that you want to trigger the event:
5. Click Continue.
6. Select the email groups or individual users who you want to receive the email. See for “Creating an Email Rule” on page 290 detailed instructions on selecting email recipients
7. Click Save Email Rule.
y, 2014 DDM ASP User Guide014 Jeppesen
317

Managing Email RulesCreating Email Rules for Specific Events
DD
31
M ASP User Guide May, 2014© 2014 Jeppesen
8

CHAPTER 16
Managing Filters
This chapter contains the following topics:
• Overview
• Understanding Filter Types
• Naming a Filter
• Creating a Filter
• Previewing Filters
• Editing a Filter
• Setting Default Filters
• Deleting a Filter

Managing FiltersOverview
DD
32
OverviewFilters enable you to control what information displays on certain pages in DDM that display lists of packages or recipients. Using the Manage Filters function, you can perform the following tasks:
• Create a filter
• Preview the results of a filter
• Edit a filter
• Set default filters
• Delete a filter
You can create entirely new filters or use existing reports and filters as templates to create variations of existing queries. When creating a filter, you specify which values to include which columns DDM displays when you run the filter.
For example, you could create a Packages filter that includes the Publish Date field. For the Publish Date field, you could define a “between” condition that instructs the filter to only display those packages published between two specific dates. Thus, if you selected this filter on any page that displays a Packages Filter field, DDM would only display those packages that were published between the dates specified in the filter.
DDM includes the following default filters, which you cannot edit or delete:
• Active Packages
• Expired Packages
• Search Packages by Name
• Search Recipients by Name
The following roles can create and manage filters:
• Content Publisher
• Content Manager
• Recipient Manager
• Review Manager
• Airline Manager
• Archiver
M ASP User Guide May, 2014© 2014 Jeppesen
0

Managing FiltersOverview
Ma© 2
Figure 16.1 illustrates the Manage Filters page. From this page, you can create a filter, preview the results of a filter, edit a filter, set default filters, and delete a filter. The Manage Filters page displays the Packages tab by default.
Figure 16.1. Manage Filters page
y, 2014 DDM ASP User Guide014 Jeppesen
321

Managing FiltersProcess
DD
32
ProcessFigure 16.2 illustrates the areas in the package delivery process that are related to the Manage Filters function.
M ASP User Guide May, 2014© 2014 Jeppesen
2

Managing FiltersProcess
Ma© 2
Figure 16.2. Areas Related to the Manage Filters function
y, 2014 DDM ASP User Guide014 Jeppesen
323

Managing FiltersProcess
DD
32
The numbered steps in Figure 16.2 represent the following tasks and functions:
The user creates, edits, views, or deletes a filter using the Manage Filters function.
The user applies a Recipients filter when using the Manage Recipients, Manage Packages, Find Delivery Status, and Archive Recipients functions.
The user applies a Packages filter when using the Manage Packages, Find Delivery Status, and Archive Packages functions.
M ASP User Guide May, 2014© 2014 Jeppesen
4

Managing FiltersUnderstanding Filter Types
Ma© 2
Understanding Filter TypesThe following table describes the types of filters available in DDM.
Table 16-1 Description of Filter Types
Filter Type Description
Recipient Enables you to select which recipients will display on a page.The following pages in DDM enable you to filter the recipient information that displays on the page:
• Edit Package Assign Recipients tab• Find Part Delivery Status• Find Package Delivery Status• Find Version Delivery Status• Archive Recipients• Manage Recipients
When defining a Recipient filter, you can create queries that pertain to the following fields:
• CDA Type • CDA Version• Engine Name• Major Model • Minor Model • Recipient Description • Recipient Name• Recipient Type
y, 2014 DDM ASP User Guide014 Jeppesen
325

Managing FiltersUnderstanding Filter Types
DD
32
Packages Enables you to select which packages will display on a page.The following pages in DDM enable you to filter the package information that displays on a page:
• Find Package Delivery Status • Manage Packages• Edit Recipient (Assign Packages tab) • Archive Packages• Edit Review Device
When defining a Packages filter, you can set up queries that pertain to the following fields:
• Checkpoint• Content Type• Do Not Deliver After Date • Package Description• Package Name• Publish Date• Published By • Recommended Do Not Deliver After Date • Recommended Start Delivery Date • Wrapping Type
Report The Report Type Filter that displays on the Manage Reports page enables you to select a filter that displays certain types of reports. The filter types specified in this field are predefined in DDM and cannot be modified. Also, you cannot create new report type filters.
System System filters are not in the list of filters on the Manage Filters page. The system filters appear in the View drop-down list on the Edit Recipient page. The system filters include the following:
• Selected Packages, which enables you to display only the packages that you already selected.
• Compatible Packages, which enables you to display on those packages that DDM identifies as compatible with the recipient.
Table 16-1 Description of Filter Types (continued)
Filter Type Description
M ASP User Guide May, 2014© 2014 Jeppesen
6

Managing FiltersNaming a Filter
Ma© 2
Naming a FilterFilter names can be alphabetical (both upper- and lower-case), numerical, or a combination of both. Because DDM recognizes both upper- and lower-case letters, it is possible that the same name could be created more than one time with varying case. For example, you could create the following variations of the same filter name:
• FL_001
• Fl_001
• fL_001
• fl_001
As shown above, a variation in filter names could lead to confusion when creating or editing a filter. To avoid duplication of names, Jeppesen recommends that you use all upper-case letters when naming a filter.
y, 2014 DDM ASP User Guide014 Jeppesen
327

Managing FiltersCreating a Filter
DD
32
Creating a FilterYou can create a new filter from scratch or use an existing filter or report as a template. When creating a filter, you create queries for specific fields associated with packages and recipient. You can specify values for the queries or create filters that prompt the user to enter a value when they run the filter. This section describes how to create a new filter and a filter based on an existing filter or report.
Users assigned any of the following roles can create a filter:
• Content Publisher
• Content Manager
• Recipient Manager
• Review Manager
• Airline Manager
• Archiver
To create a filter1. In the Administration section in the navigation menu, click Manage
Filters.
The Manage Filters page appears. [Figure 16.1]
M ASP User Guide May, 2014© 2014 Jeppesen
8

Managing FiltersCreating a Filter
Ma© 2
2. On the Manage Filters page, click Create Filter.
The Create Filter page displays Step 1: Select Filter Type. [Figure 16.3]
3. Select the related option button and then a value from one of the following drop-down lists:
• New Filter of Type. Select the type of filter, either Packages or Recipients.
• Based on Existing Filter. Select an existing filter to create a new filter based on its settings.
• Based on Existing Report. Select an existing report to create a new filter based on its settings.
NOTE Which fields and text are displayed for Step 2: Create a Query and Step 3: Select Fields & Finish depend on the selected filter type.
Figure 16.3. Create Filter page (Step 1: Select Filter Type)
y, 2014 DDM ASP User Guide014 Jeppesen
329

Managing FiltersCreating a Filter
DD
33
4. Click Continue.
The Create Filter page displays Step 2: Create Query. [Figure 16.4]
5. From the Add Field drop-down list, select the field you want to add to the filter.
6. Click Add.
The selected field displays in the table at the bottom of the page. The columns in the table enable you to set the associated condition and value for the query. [Figure 16.5]
Figure 16.4. Create Filter page (Step 2: Create Query)
Figure 16.5. Filter fields
M ASP User Guide May, 2014© 2014 Jeppesen
0

Managing FiltersCreating a Filter
Ma© 2
7. From the associated drop-down list under the Condition column, select the operators to apply to the value being defined for this field. For more information on the operators available when creating filters, see “Operators Used When Configuring Filters” on page 333.
8. Do one of the following tasks to either specify a value for the filter or indicate that the user is prompted to enter a value:
– To specify a value: In the Value column, type or select the information to use with the condition being defined for this field.
IMPORTANT When entering any date value, use the calendar icon ( ). Entering the date manually in the text field may cause errors.
or
– To prompt the user running the filter: Select the Prompt check box.
9. Repeat Step 5 through Step 8 for each field for this filter.
10. If you added more than one field, from the Match drop-down list, select one of the following:
– All to retrieve information that matches all of the fields, conditions, and values that you defined.
– Any to retrieve information that matches any of the fields, conditions, and values that you defined.
y, 2014 DDM ASP User Guide014 Jeppesen
331

Managing FiltersCreating a Filter
DD
33
11. Click Continue.
The Create Filter page displays Step 3: Select Fields & Finish. [Figure 16.6]
12. In the Available Fields list, select the fields that will display on the page when the filter is run.
TIP To select multiple consecutive fields, press and hold the SHIFT key and click the fields. To select multiple non-consecutive fields, press and hold the CTRL key and click the fields.
TIP Be sure to add the “name” field to the Fields to Display list so that you can identify the name of the item being filtered.
13. Click Add.
The selected fields move to the Fields to Display list.
NOTE To remove a field from the Fields to Display list, click the field and click the Remove link under the Remove table column.
Figure 16.6. Create Filter page (Step 3: Select Fields & Finish)
M ASP User Guide May, 2014© 2014 Jeppesen
2

Managing FiltersCreating a Filter
Ma© 2
14. To rearrange the order in which the columns of records retrieved for each field display, highlight the field you want to move in the Fields to Display list and click Up or Dn. You can only move one field at a time.
NOTE The field (column) at the top of the list displays on the farthest left on each page that uses the filter.
15. (optional) From the Default Sort By drop-down list, select a default sort order.
16. To save the filter as a specific name, click the Save Filter As check box and type a filter name in the corresponding Save Filter As field.
17. To display a preview with the filter parameters created, click the Preview Filter check box.
NOTE After previewing, return to the filter creation process by clicking either the Step 1: Edit Query or Step 2: Edit Fields & Finish links.
18. Click Finish.
DDM saves the new filter if the Save Filter As check box is checked, and displays a preview of the filter if the Preview Filter check box is checked.
Operators Used When Configuring FiltersThe operators listed in this section can be used when creating filters in DDM. The specific options listed depends on whether the field you add to the filter is a text or date field.
Table 16-2 Filter Operators
Type Operator Description
Text Contains Indicates that the filter will find any package or recipient if any part of the field matches the value specified.
Does Not Contain
Indicates that the filter will find any package or recipients if the value specified does not appear anywhere in the field.
Equals Indicates that the filter will find any package or recipient if the field exactly matches the value specified.
Not Equals Indicates that the filter will find any package or recipient if the value specified does not exactly match the field.
y, 2014 DDM ASP User Guide014 Jeppesen
333

Managing FiltersCreating a Filter
DD
33
Date Between Indicates that the filter will find any package or recipients if the date of the field falls between the dates specified.
Not Between Indicates that the filter will find any package or recipients if the date of the field falls outside of the dates specified.
Previous Indicates that the filter will find any package or recipients if the date of the field is the specified number of days, months, weeks, or years before today’s date.
Next Indicates that the filter will find any package or recipients if the date of the field is the specified number of days, months, weeks, or years after today’s date.
Table 16-2 Filter Operators (continued)
Type Operator Description
M ASP User Guide May, 2014© 2014 Jeppesen
4

Managing FiltersPreviewing Filters
Ma© 2
Previewing FiltersUsers assigned any of the following roles can preview the results of a filter:
• Content Publisher
• Content Manager
• Recipient Manager
• Review Manager
• Airline Manager
• Archiver
To preview information for a filter1. In the Administration section in the navigation menu, click Manage
Filters.
The Manage Filters page appears. [Figure 16.1]
2. Click the tab that corresponds to the type of filter you want to preview.
3. In the Filter Name column, click the name of the filter you want to preview.
The Preview Filter page appears. [Figure 16.7]
Figure 16.7. Preview Filter page
y, 2014 DDM ASP User Guide014 Jeppesen
335

Managing FiltersEditing a Filter
DD
33
Editing a FilterIf necessary, you can edit the query and display features that have been set up for a filter. Users assigned any of the following roles can edit settings for an existing filter:
• Content Publisher
• Content Manager
• Recipient Manager
• Review Manager
• Airline Manager
• Archiver
To edit a filter1. In the Administration section in the navigation menu, click Manage
Filters.
The Manage Filters page appears. [Figure 16.1]
2. Click the tab to select the type of filter you want to edit.
3. Click the Edit link next to the filter you want to edit.
The Edit Filter page appears. [Figure 16.8]
Figure 16.8. Edit Filter page (Step 1: Edit Query)
M ASP User Guide May, 2014© 2014 Jeppesen
6

Managing FiltersEditing a Filter
Ma© 2
4. Make any necessary changes to the fields, conditions, and values that define the filter. For field definitions, refer to “Creating a Filter” on page 328.
IMPORTANT When entering any date value, use the calendar icon ( ). Entering the date manually in the text field may cause errors.
5. Click Continue.
The Edit Filter page displays Step 2: Edit Fields & Finish. [Figure 16.9]
6. Make any necessary changes to the fields to display, the default sort order, and the filter name. For field definitions, refer to “Creating a Filter” on page 328.
7. To save the filter as a specific name, click the Save Filter As check box and type a filter name in the corresponding Save Filter As field.
NOTE If you change the name, DDM does not create a copy, but instead renames the existing filter.
Figure 16.9. Edit Filter page (Step 2: Edit Fields & Finish)
y, 2014 DDM ASP User Guide014 Jeppesen
337

Managing FiltersEditing a Filter
DD
33
8. To display a preview with the filter parameters created, click the Preview Filter check box.
9. Click Finish.
DDM saves the filter if the Save Filter As check box is checked, and displays a preview of the filter if the Preview Filter check box is checked.
M ASP User Guide May, 2014© 2014 Jeppesen
8

Managing FiltersSetting Default Filters
Ma© 2
Setting Default FiltersThis function enables you to select the filter to use by default on the pages that are associated with the Manage Recipients and Manage Packages functions. Users assigned any of the following roles can set defaults for a filter:
• Content Publisher
• Content Manager
• Recipient Manager
• Review Manager
• Airline Manager
• Archiver
To set default filters1. In the Administration section in the navigation menu, click Manage
Filters.
The Manage Filters page appears. [Figure 16.1]
2. Click the Set Defaults tab.
The Set Defaults tab appears. [Figure 16.10]
Figure 16.10. Set Defaults tab on the Manage Filters page
y, 2014 DDM ASP User Guide014 Jeppesen
339

Managing FiltersSetting Default Filters
DD
34
3. To set a default recipient filter, select a filter from the Recipients drop-down list.
4. To set a default packages filter, select a filter from the Packages drop-down list.
5. Click Save Defaults.
M ASP User Guide May, 2014© 2014 Jeppesen
0

Managing FiltersDeleting a Filter
Ma© 2
Deleting a FilterThis function enables you to permanently delete a selected filter. Deleted filters cannot be recovered. Users assigned any of the following roles can delete a filter:
• Content Publisher
• Content Manager
• Recipient Manager
• Review Manager
• Airline Manager
• Archiver
To delete a filter, perform the following tasks1. In the Administration section in the navigation menu, click Manage
Filters.
The Manage Filters page appears. [Figure 16.1]
2. Click the corresponding tab for the type of filter you want to delete.
3. Click the Delete link for the filter you want to delete.
A confirmation message appears.
4. Click OK.
DDM deletes the selected filter.
y, 2014 DDM ASP User Guide014 Jeppesen
341

Managing FiltersDeleting a Filter
DD
34
M ASP User Guide May, 2014© 2014 Jeppesen
2

CHAPTER 17
Managing LRUs
This chapter contains the following topics:
• Overview
• Creating an LRU
• Editing an LRU
• Deleting an LRU

Managing LRUsOverview
DD
34
OverviewWhen you create an LRU, you must select an LRU type so that DDM can determine which LRU should receive the content on a particular airplane. You may also designate an LRU version to help you distinguish among the different devices you have in your fleet. LRUs can be assigned only to Tail recipients. The list of LRUs available for you to assign to Tail recipients has been customized to match your current fleet. Based on this list, you can create multiple LRUs of the same type, but with different versions.
Using the Manage LRUs function, you can perform the following tasks:
• Create an LRU
• Edit an LRU
• Delete an LRU
The following roles can create and manage LRUs:
• Recipient Manager
• Airline Manager
• System Administrator
IMPORTANT If your company has EFBs only, the Manage LRUs functionality will not be available to you. LRU information is displayed throughout DDM only if you have multiple LRUs in your fleet.
When you create an LRU, you must select an LRU type, and you may designate an LRU version. DDM uses the LRU type, not the LRU version, to determine which LRU should receive the content on a particular airplane. The version is there to help you distinguish among the different devices in your fleet. Your fleet may have multiple EFBs running on several different block points and multiple NFS running on more than one version of the same application. While you can enter anything in the version box, Jeppesen recommends entering the version of the application that resides on the LRU. For an EFB, you might enter “Class 3, BP 3.3,” for example. For an NFS, you might enter “2.1.”
M ASP User Guide May, 2014© 2014 Jeppesen
4

Managing LRUsOverview
Ma© 2
Currently, there are three possible LRU types available in DDM as explained in the following table.
IMPORTANT An LRU is required for packages of wrapping types ARINC 665 and ARINC 665 Airbus.
All CDAs except CDAF can receive packages containing any LRU type. CDAF is the only CDA that can deliver to a specific LRU. LRU types assigned to a recipient may not always match the LRU types reported by CDAF. As a result, LRUs may be expected by the DDM server, but not reported by CDAF, while others might be reported by CDAF, but not expected by the DDM server. DDM indicates any mismatches on the Manage Recipients and View Recipient pages.
Table 17-1 Available LRUs
Type Example
EFB The EFB is the device responsible for communicating with the ground, retrieving the appropriate media sets containing parts destined for the EFB or NFS, and reporting the configuration of the airplane.
NFS(NAT Seattle NFS)
The NFS is networked through the airplane's LAN, so it connects to other devices, including the EFB. The NFS hosts certain cabin-oriented applications that are not permitted on the EFB, but the NFS lacks a user interface and can be used only via the network. The NFS is maintained under the Loadable Software Airplane Part (LSAP) mechanism like the EFB.DDM supports NFS hardware manufactured by NAT Seattle and Teledyne.
NFS-ONS(Teledyne NFS)
y, 2014 DDM ASP User Guide014 Jeppesen
345

Managing LRUsOverview
DD
34
Figure 17.1 illustrates the Manage LRUs page. From this page, you can create, edit, or delete an LRU.
Figure 17.1. Manage LRUs page
M ASP User Guide May, 2014© 2014 Jeppesen
6

Managing LRUsProcess
Ma© 2
ProcessFigure 17.2 illustrates the areas in the package delivery process that are related to the Manage LRUs function.
y, 2014 DDM ASP User Guide014 Jeppesen
347

Managing LRUsProcess
DD
34
Figure 17.2. Areas related to the Manage LRUs function
M ASP User Guide May, 2014© 2014 Jeppesen
8

Managing LRUsProcess
Ma© 2
The numbered steps in Figure 17.2 represent the following tasks and functions:
1 - The user creates, edits, or deletes an LRU using the Manage LRUs function.
2 - The user creates a Tail recipient and selects an LRU type using the Manage Recipients function.
3 - The user creates a review device of type Tail and selects an LRU type using the Manage Review Devices function.
y, 2014 DDM ASP User Guide014 Jeppesen
349

Managing LRUsCreating an LRU
DD
35
Creating an LRUUsers assigned any of the following roles can create an LRU:
• Recipient Manager
• Airline Manager
To create an LRU1. In the Administration section in the navigation menu, click Manage
LRUs.
The Manage LRUs page appears. [Figure 17.1]
2. On the Manage LRUs page, click Create LRU.
The Create LRU page appears. [Figure 17.3]
3. From the LRU Type list, select the LRU type associated with the device installed on the airplane.
4. In the LRU Version box, you may enter the version of the application installed on the LRU you are creating.
This box has a limit of 30 characters.
Figure 17.3. Create LRU page
M ASP User Guide May, 2014© 2014 Jeppesen
0

Managing LRUsCreating an LRU
Ma© 2
5. Click Save LRU.
DDM displays a success message and the new LRU on the Manage LRUs page.
y, 2014 DDM ASP User Guide014 Jeppesen
351

Managing LRUsEditing an LRU
DD
35
Editing an LRUIf necessary, you can edit the version associated with an LRU. Users assigned any of the following roles can edit an existing LRU:
• Recipient Manager
• Airline Manager
• System Administrator
To edit an LRU1. In the Administration section in the navigation menu, click Manage
LRUs.
The Manage LRUs page appears. [Figure 17.1]
2. Click the Edit link next to the LRU you want to edit.
The Edit LRU page appears. [Figure 17.4]
3. Make the necessary changes in the LRU Version box.
4. Click Save Changes.
DDM displays a success message and the modified LRU on the Manage LRUs page.
Figure 17.4. Edit LRU page
M ASP User Guide May, 2014© 2014 Jeppesen
2

Managing LRUsDeleting an LRU
Ma© 2
Deleting an LRUThis function enables you to permanently delete a selected LRU. If you delete an LRU, DDM removes it from every Tail recipient associated with your company. Users assigned any of the following roles can delete an LRU:
• Recipient Manager
• Airline Manager
• System Administrator
To delete an LRU1. In the Administration section in the navigation menu, click Manage
LRUs.
The Manage LRUs page appears. [Figure 17.1]
2. Click the Delete link for the LRU you want to delete.
A confirmation message is displayed.
3. Click OK.
DDM deletes the selected LRU and removes it from all associated Tail recipients.
y, 2014 DDM ASP User Guide014 Jeppesen
353

Managing LRUsDeleting an LRU
DD
35
M ASP User Guide May, 2014© 2014 Jeppesen
4

CHAPTER 18
Managing Reports
This chapter contains the following topics:
• Overview
• Managing Standard Reports
• Managing Configurable Reports

Managing ReportsOverview
DD
35
OverviewThe Manage Reports function provides flexibility for viewing, creating, and running reports. DDM provides configurable reports, which you can use to view, create, and edit reports in various categories. DDM also provides standard reports that are intended to keep you up to date on the configuration of the tails in your fleet.
DDM’s configurable reports provides robust query and display capabilities that enable you to define the information to be displayed in a customized report. You can create a report to run one time or save it for future use. DDM displays configurable reports on screen and also enables you to print and export reports to a Microsoft Excel file.
DDM’s standard reports help you track the tail configurations in your fleet. You do not need to build the standard reports, like you do with the configurable reports, and they provide more sophisticated layouts. The standard reports also provide more exporting options, including to PDF, Excel, Word, and Flash. You can run standard reports only for tail type recipients that have CDAF installed.
The following roles can manage and generate reports:
• Content Publisher
• Content Manager
• Recipient Manager
• Review Manager
• Reviewer
• Airline Manager
• Archiver
M ASP User Guide May, 2014© 2014 Jeppesen
6

Managing ReportsOverview
Ma© 2
Figure 18.1 illustrates the Manage Reports page. From this page, you can create, edit, run, export, and delete reports.
Figure 18.1. Manage Reports page
y, 2014 DDM ASP User Guide014 Jeppesen
357

Managing ReportsManaging Standard Reports
DD
35
Managing Standard ReportsStandard reports enable you to stay up to date on the configuration of the tails in your fleet. Use standard reports to see the configuration of tail type recipients that have CDAF installed. Standard reports provide simple layouts that you can view in DDM or export to PDF, Excel, Word, Flash, and other formats.
DDM includes the following standard reports:
Tail Configurations
Provides a pie chart to quickly determine the percentage of tails in your fleet that are considered in or out of configuration. Out-of- configuration tails are those that report a different list of loaded content than what is assigned and approved in DDM.
Tails Out of Configuration
• View by Tail—Enables you to select a tail that is listed as out of configuration, and see the parts assigned and the status of the part on each LRU.
• View All—Provides a list of all tails in your fleet that are out of configuration, shows the parts assigned to the tails, and indicates the status on each LRU.
Exceptions for Tail Enables you to select a tail that is listed as out of configuration, and see the parts that were not processed as expected as well as the status of the part on each LRU.
Compare Left and Right EU for Tail
Enables you to select a tail and compare the content that has been loaded on the left and right EUs to see mismatches in load status.
Content ID Status for Fleet
Enables you to select a part and view a pie chart to see the status of the content as it relates to the recipients to which it has been assigned. By clicking the chart, you can access a detailed report.
Content Status for Tail
Enables you to select a tail and view the status of all content assigned and approved for it.
Communications for Fleet
Enables you to view the last time that each tail in your fleet made wireless contact with the ground. You can use this report to determine if the content on a tail is current.
M ASP User Guide May, 2014© 2014 Jeppesen
8

Managing ReportsManaging Standard Reports
Ma© 2
Viewing Standard ReportsAccess each standard report on the Manage Standard Reports page. When you view reports, DDM enables you to navigate through reports using page controls at the bottom of the report and breadcrumbs at the top of the report.
To view standard reports1. In the Administration section in the navigation menu, click Manage
Reports.
DDM displays the Manage Reports page. [Figure 18.1]
2. Click Manage Standard Reports.
DDM displays the Manage Standard Reports page. [Figure 18.2]
3. Click the report that you want to run.
Figure 18.2. Manage Standard Reports page
y, 2014 DDM ASP User Guide014 Jeppesen
359

Managing ReportsManaging Standard Reports
DD
36
4. Use the page controls at the bottom of the page to navigate through reports that have more than one page of data. [Figure 18.3]
5. Use the breadcrumbs at the top of the report to navigate within the standard reports. [Figure 18.4]
Using Report OptionsThe Options button appears on standard report pages when definitions are available for the content of the page or when you can perform a search for a specific tail or part. If you display definitions, they will appear on the printed or exported copy.
Figure 18.3. Page controls in the standard reports
Figure 18.4. Breadcrumbs in the standard reports
M ASP User Guide May, 2014© 2014 Jeppesen
0

Managing ReportsManaging Standard Reports
Ma© 2
To display definitions1. Click Options.
DDM displays the Input Controls dialog box. [Figure 18.5]
2. Click yes, and then click OK.
DDM displays the definitions of items in the report. [Figure 18.6]
i
Figure 18.5. Input Controls dialog box
Figure 18.6. Definitions section
y, 2014 DDM ASP User Guide014 Jeppesen
361

Managing ReportsManaging Standard Reports
DD
36
To search for tails or parts1. Click Options.
2. In the Enter tail name/part number to search for field, type all or part of the tail name or part number.
3. Click OK.
Viewing Specific ReportsEach report provides different ways to interact with it and different options. For example, you can click data in a pie chart to see more information.
To view the Tail Configurations report1. From the Manage Standard Reports page, click Tail Configurations.
DDM displays the Tail Configurations report.
2. Click a section of the pie chart to view more detailed information about a specific tail.
3. Click the tail that you want to view.
To view the Tail Out of Configuration > View by Tail report1. From the Manage Standard Reports page, click View by Tail.
DDM displays a list of tails that are out of configuration.
2. Click the name of a tail that you want to view.
DDM displays the Out of Configuration report for the selected tail.
3. Click Options to display help text.
See “Using Report Options” on page 360 for more information about using standard report options.
To view the Tails Out of Configuration > View All report1. From the Manage Standard Reports page, click View All.
DDM displays the Tails Out of Configuration report.
2. Click Options to display help text or search for a specific tail.
See “Using Report Options” on page 360 for more information about using standard report options.
M ASP User Guide May, 2014© 2014 Jeppesen
2

Managing ReportsManaging Standard Reports
Ma© 2
To view the Exceptions for Tail report1. From the Manage Standard Reports page, click Exceptions for Tail.
DDM displays a list of tails that are out of configuration.
2. Click the name of a tail that you want to view.
DDM displays the Exceptions report for the selected tail.
3. Click Options to display help text.
See “Using Report Options” on page 360 for more information about using standard report options.
To view the Compare Left and Right EU for Tail report1. From the Manage Standard Reports page, click Compare Left and Right
EU for Tail.
DDM displays a list of tails.
2. Click the name of a tail you that want to view.
DDM displays the Compare Left and Right EU report for the selected tail.
3. Click Options to display help text.
See “Using Report Options” on page 360 for more information about using standard report options.
To view the Content ID Status for Fleet report1. From the Manage Standard Reports page, click Content ID Status for
Fleet.
DDM displays a list of parts by content identification number.
NOTE Click Options to search for specific parts by content identification number. See “Using Report Options” on page 360 for more information about using standard report options.
2. Click the content identification number of the content you want to view.
DDM displays the Content ID Status report for the selected part.
3. Click a section of the pie chart to view more detailed information about the reported status.
DDM displays the Content ID by Status report.
y, 2014 DDM ASP User Guide014 Jeppesen
363

Managing ReportsManaging Standard Reports
DD
36
4. Click Options to display help text.
See “Using Report Options” on page 360 for more information about using standard report options.
To view the Content Status for Tail report1. From the Manage Standard Reports page, click Content Status for Tail.
DDM displays a list of tails.
2. Click the name of a tail that you want to view.
DDM displays the Content Status report for the selected tail.
3. Click Options to display help text.
See “Using Report Options” on page 360 for more information about using standard report options.
To view the Communications for Fleet report1. From the Manage Standard Reports page, click Communications for Fleet.
DDM displays a list of tails and the date they most recently contacted the ground.
NOTE Click Options to search for specific tails. See “Using Report Options” on page 360 for more information about using standard report options.
2. Click the name of a tail to view the status of the content assigned to the tail.
DDM displays the Content Status report for the selected tail.
3. Click Options to display help text.
See “Using Report Options” on page 360 for more information about using standard report options.
Exporting ReportsDDM enables you to export standard reports in a variety of formats to save on your computer. To view an exported report, you must have the appropriate software installed on your computer. You can export standard reports in the following formats:
M ASP User Guide May, 2014© 2014 Jeppesen
4

Managing ReportsManaging Standard Reports
Ma© 2
PDF Portable Document Format, which can be viewed in Adobe Reader or other PDF reader software.
Excel and XLSX Microsoft Excel 2003 (.xls) and 2007 (.xlsx) format which can be viewed in Microsoft Excel 2003 or later.
CSV Comma-separated values format, which can be viewed in various applications including Microsoft Excel and OpenOffice.org CALC.
DOCX Microsoft Word 2007 format, which can be viewed in Microsoft Word 2007.
RTF Rich text format, which can be viewed in various applications including Microsoft Word and OpenOffice.org Writer.
Flash Adobe Flash, which can be viewed with Adobe Flash Player.
ODT OpenDocument Text format, which can be viewed in OpenOffice.org Writer.
ODS OpenDocument Spreadsheet format, which can be viewed in OpenOffice.org CALC.
To export a standard report1. With any standard report displayed, click Export.
2. Select a format.
3. Open or save the report on your computer or network.
y, 2014 DDM ASP User Guide014 Jeppesen
365

Managing ReportsManaging Configurable Reports
DD
36
Managing Configurable ReportsDDM provides several types of configurable reports for you to use when analyzing and tracking data. You can create several different types of configurable reports, based on the information you want to view. Once you create a report, you can run it one time or save it for future use. Once saved, you can edit reports or delete them if you no longer need them. Configurable reports support export to Excel.
DDM includes the following configurable report types:
Packages Enables you to generate a report containing information about packages that have been published by you or another company. Archived packages do not display on this report. You can customize this report by filtering on or displaying any of the following package properties:
• Checkpoint
• Content Type
• Delivered Date
• Do Not Deliver After Date
• Package Description
• Package Name
• Publish Date
• Published By
• Recommended Do Not Deliver After Date
• Recommended Start Delivery Date
• Start Delivery Date
• Wrapping Type
Events Enables you to generate a report that displays the events that have occurred for a package. You can customize this report by filtering on or displaying any of the following properties:
• Company name
• Date/Time. The date and time the event occurred
• Event. The name and type of event
M ASP User Guide May, 2014© 2014 Jeppesen
6

Managing ReportsManaging Configurable Reports
Ma© 2
• Package/Part. The name of package or part affected by event
• User/Recipient. The name of user or recipient invoking event
Pending Content Review
Enables you to generate a report that shows which packages are pending content review, the assigned checkpoints and review groups, and the reviewer status. You can customize this report by filtering on or displaying any of the following properties:
• Checkpoint
• Package Name
Recipient Packages Status
Enables you to generate a report that shows package content and delivery review statuses. You can customize this report by filtering on or displaying any of the following properties:
• Content Type
• Delivery Status
• Package Description
• Package Name
• Package Wrapping Type
• Part Number
• Published Date
• Publisher
• Recipient Description. The description of the recipient receiving the package
• Recipient EFB version
• Recipient Name
• Recipient Type
• Replaces Content
• Start Date
• Stop Date
y, 2014 DDM ASP User Guide014 Jeppesen
367

Managing ReportsManaging Configurable Reports
DD
36
Recipient Snapshot
Enables you to generate a report that shows a Tail’s configuration. You can customize this report by filtering on or displaying any of the fields in the following table:
Table 18-1 Recipient Snapshot Report Fields
Field Description
Application Slot The application slot is associated with a bezel button on the EFB display unit. In the report, application numbered slot indicates the final destination on the Linux loads.
NOTE Windows does not have application slots.
Last Contact The date and time when the recipient delivered the data displayed in the report.
Load Description Description of the part or type of data.
Load Destination Path to the load.cnf file; an indication of the location of the part location on the EFB; not accessible to the user.
Load OS Operating system (Linux or Windows) used to load the parts or packages.
Load Part Number 665 part number that is installed on the electronic unit (EU).
Load Status Status of the part number load; indicates whether the part has been loaded on the EU and is ready for use. Status can be one of the following:
• GOOD: the part was successfully loaded on the EU.
• BAD: the part was staged, but the load was not successful.
Load Unit Name Indicates whether a part or a package was loaded on the left or right EU.
Package Name The name associated with a specific media set that has been through the DDM content packaging process and successfully imported into DDM for delivery.If there is no package in DDM with a part number, the column is blank. This could occur because the part number was not delivered via DDM, or it was delivered and then archived.
Part Number A unique identifier assigned to an LSAP by each manufacturer of content. If this field is blank, DDM does not have the part in its media set, or DDM does not have the media set.
M ASP User Guide May, 2014© 2014 Jeppesen
8

Managing ReportsManaging Configurable Reports
Ma© 2
Recipients Enables you to generate a report that shows general information about existing recipients. Archived recipients are not displayed on this report. You can customize this report by filtering on or displaying any of the following properties:
• Checkpoint
Recipient Name The name associated with a specific computer that is the final consumer of packages delivered through DDM.
Stage* Load Status Indicates the result of placing the part in the staging area before loading. Status can be one of the following:
• PASSED - indicates the part was successfully loaded to the left and right EUs.
• FAILED LEFT - indicates the part failed to load to the left EU.
• FAILED RIGHT - indicates the part failed to load to the right EU.
• FAILED BOTH - indicates the part failed to load to both the left and right EU.
• NOT_LOADED - indicates the part has not been loaded to either the left or right EU.
Stage* Part Number Unique identifier assigned to an LSAP by each content manufacturer. If this field is blank, DDM does not have the part in its media set, or DDM does not have the media set.
Stage* Path Storage location on the EFB for staged parts; not accessible to the user.
Stage* Status Status of the staging process can be one of the following:
• PROCESSING• COMPLETE
Stage* Timestamp Last date and time the Stage database file (stage.db) was received from the EFB. This time is the same for all parts an a given tail, since all parts will be given the time of the last time the stage.db was received from the EFB.
* If any of the Stage fields are blank, the part is currently not staged.
Table 18-1 Recipient Snapshot Report Fields (continued)
Field Description
y, 2014 DDM ASP User Guide014 Jeppesen
369

Managing ReportsManaging Configurable Reports
DD
37
• Engine Name
• Major Model
• Minor Model
• Recipient Description
• Recipient Name
• Recipient Type
Review Devices Enables you to generate a report that shows general information about existing recipients. You can customize this report by filtering on or displaying any of the following properties:
• Review Device Description
• Review Device Name
• Review Device Type
Naming a ReportReport names can be alphabetical (both uppercase and lowercase), numerical, or a combination of both. Because DDM recognizes both uppercase and lowercase letters, it is possible the same name could be created more than one time with varying case. For example, you could create the following variations of the same report name:
• RP_001
• Rp_001
• rP_001
• rp_001
As shown above, a variation in report names could lead to confusion when creating or editing a report. To avoid duplication of names, Jeppesen recommends you use all uppercase letters when naming a report.
M ASP User Guide May, 2014© 2014 Jeppesen
0

Managing ReportsManaging Configurable Reports
Ma© 2
Creating a Configurable Report When you create a report, you can select to save the report for future use and run the report. If necessary, you can create a query that defines the information that will display in the report, as well as define the way the information displays. The following users can create a report:
• Content Publisher
• Content Manager
• Recipient Manager
• Review Manager
• Reviewer
• Airline Manager
• Archiver
If necessary, you can create a new report based on an existing DDM report.
You can also create a report in DDM based on the fields and conditions set up for an existing filter. You can then export the report results into Microsoft Excel and manipulate the report columns and resulting data. This process can provide you with a robust reporting solution not available through conventional filtering and reporting. For information about creating a filter, refer to Chapter 16, “Managing Filters.”
To create a report1. In the Administration section in the navigation menu, click Manage
Reports.
The Manage Reports page appears. [Figure 18.1]
y, 2014 DDM ASP User Guide014 Jeppesen
371

Managing ReportsManaging Configurable Reports
DD
37
2. Click Create Report.
The Create Report page appears [Figure 18.7]
3. Select the appropriate report type using one of the following methods:
• Click New Report of Type, and then select a report type from the associated list.
• Click Based on Existing Report, and then select a report type from the associated list (if any exist).
• Click Based on Existing Filter, and then select a filter type from the associated list (if any exist).
NOTE The information displayed on all subsequent report pages depends on the report type option you select.
Figure 18.7. Create Report page - select report type
M ASP User Guide May, 2014© 2014 Jeppesen
2

Managing ReportsManaging Configurable Reports
Ma© 2
4. Click Continue.
The Create Report page appears. [Figure 18.8]
5. From the Add Field list, select the field you want to add.
6. Click Add.
The field is displayed in the lower section of the page.
7. From the associated Condition list, select the condition type to apply to the selected field.
8. In the Value field, type or select the information to use with the selected condition.
9. If you want to display a prompt for the values in this report each time the report is run, select the Prompt check box.
10. Repeat steps 5 through 9 for each field you want to include in the query for the report.
11. From the Match list, select one of the following options:
• All to retrieve information that matches all of the fields, conditions, and values you defined
• Any to retrieve information that matches any of the fields, conditions, and values you defined
Figure 18.8. Create Report page - create query
y, 2014 DDM ASP User Guide014 Jeppesen
373

Managing ReportsManaging Configurable Reports
DD
37
12. Click Continue.
The Create Report page appears. [Figure 18.9]
13. In the Available Fields list, select the fields to display on the report. The selected fields will be displayed as a column in the report.
TIP To select multiple consecutive fields, press and hold the SHIFT key and then click the fields. To select multiple nonconsecutive fields, press and hold the CTRL key and then click the fields.
14. Click Add.
The selected fields moves to the Fields to Display list.
15. Repeat Step 13 and Step 14 for each field to add to this report.
NOTE Be sure to add the Name field to the Fields to Display list.
NOTE To remove a field from the Fields to Display list, click the fields and then click Remove.
Figure 18.9. Create Report page - select fields and finish
M ASP User Guide May, 2014© 2014 Jeppesen
4

Managing ReportsManaging Configurable Reports
Ma© 2
16. To rearrange the order in which the fields are displayed on the report, click the field you want to move in the Fields to Display list and then click Up or Dn. You can move only one field at a time.
NOTE The field at the top of the list represents the first column on the report.
17. (optional) From the Default Sort By list, select a default sort order.
18. To save the report, click the Save Report As check box and then type a name for the report in the corresponding Save Report As box.
19. To immediately run the report, click the Run Report check box.
20. Click Finish.
DDM runs and/or saves the report depending on the check boxes you selected in steps 18 and 19.
21. If you ran the report, you can now perform the following tasks from the report page:
• Click Export to Excel to open the report contents in Microsoft Excel.
• Click Print to display the report results in a printable format and print the results.
If you did not run the report, DDM displays a success message on the Manage Reports page.
Editing a Configurable Report DDM enables you to edit the query defined in a saved report and to display features that were set up for the report. The following users can edit a saved report:
• Content Publisher
• Content Manager
• Recipient Manager
• Review Manager
• Reviewer
• Airline Manager
• Archiver
y, 2014 DDM ASP User Guide014 Jeppesen
375

Managing ReportsManaging Configurable Reports
DD
37
To edit the settings for a saved report1. In the Administration section in the navigation menu, click Manage
Reports.
The Manage Reports page appears. [Figure 18.1]
2. To filter the reports displayed on the Manage Reports page, go to the Report Type Filter list, and then select a filtering option.
NOTE The filters available in the Report Type Filter box are standard filters in DDM. You cannot modify these filters.
3. Click the Edit link next to the name of the report you want to edit.
Step 1 on the Edit Report page appears. [Figure 18.10]
4. Make the necessary changes to the report query. For field definitions and help on editing the query values, refer to “Creating a Configurable Report” on page 371.
Figure 18.10. Edit Report page - edit query
M ASP User Guide May, 2014© 2014 Jeppesen
6

Managing ReportsManaging Configurable Reports
Ma© 2
5. Click Continue.
The Edit Report page appears. [Figure 18.11]
6. Make the appropriate changes. For field definitions and help on editing the fields in the report, refer to “Creating a Configurable Report” on page 371.
7. To save your changes to the report, click the Save Report as check box and then specify a report name in the corresponding box.
8. To display the report on your screen, click Run Report.
9. Click Finish.
DDM saves the report.
Running a Configurable Report DDM enables you to access and run a saved report. After running a report, you can view or print the report, or export it to Microsoft Excel. The following users can run a report:
• Content Publisher
• Content Manager
Figure 18.11. Edit Report page - edit fields and finish
y, 2014 DDM ASP User Guide014 Jeppesen
377

Managing ReportsManaging Configurable Reports
DD
37
• Recipient Manager
• Review Manager
• Reviewer
• Airline Manager
• Archiver
To run a saved report1. In the Administration section in the navigation menu, click Manage
Reports.
The Manage Reports page appears. [Figure 18.1]
2. To filter the reports displayed on the Manage Reports page, select a filtering option from the Report Type Filter list.
NOTE The filters available in the Report Type Filter box are standard filters in DDM. You cannot modify these filters.
3. In the Report Name column, click the name of the report you want to run.
4. If the report query was not set up to prompt for values, the report results are displayed. Proceed to step 6.
If the report query was set up to prompt for values in the report, the Run Report page appears. [Figure 18.12]
Figure 18.12. Run Report page
M ASP User Guide May, 2014© 2014 Jeppesen
8

Managing ReportsManaging Configurable Reports
Ma© 2
5. Specify values for the report query as needed. For field definitions and help on entering report values, see “Creating a Configurable Report” on page 371.
6. Click Run Report.
The report results are displayed.
7. If you wish, perform the following tasks:
• Click Export to Excel to open the report contents in Microsoft Excel.
• Click Print to display the report results in a printable format, and print the results.
Exporting a Configurable Report to ExcelIf necessary, you can export report results to a Microsoft Excel spreadsheet. The following users can export the results of a report to Excel:
• Content Publisher
• Content Manager
• Recipient Manager
• Review Manager
• Reviewer
• Airline Manager
• Archiver
To run and export a report to an Excel spreadsheet1. In the Administration section in the navigation menu, click Manage
Reports.
The Manage Reports page appears. [Figure 18.1]
2. To filter the reports displayed on the Manage Reports page, select a filtering option from the Report Type Filter list.
NOTE The filters available in the Report Type Filter box are standard filters in DDM. You cannot modify these filters.
y, 2014 DDM ASP User Guide014 Jeppesen
379

Managing ReportsManaging Configurable Reports
DD
38
3. Under the Export to Excel column, click the Export link for the report.
A Windows File Download dialog box appears.
4. Click Open.
DDM runs the report, opens Microsoft Excel, and then displays the Excel file.
Deleting a Configurable ReportDDM enables you to delete a saved report. The following users can delete a filter:
• Content Publisher
• Content Manager
• Recipient Manager
• Review Manager
• Reviewer
• Airline Manager
• Archiver
To delete a saved report1. In the Administration section in the navigation menu, click Manage
Reports
The Manage Reports page appears. [Figure 18.1]
2. To filter the reports displayed on the Manage Reports page, select a filtering option from the Report Type Filter list.
NOTE The filters available in the Report Type Filter box are standard filters in DDM. You cannot modify these filters.
3. In the table displayed, locate the report you want to delete.
4. Click the Delete link for the report to be deleted.
A confirmation message appears.
5. Click OK.
DDM deletes the report and displays a confirmation message.
M ASP User Guide May, 2014© 2014 Jeppesen
0

CHAPTER 19
Managing Tail Engines
This chapter contains the following topics:
• Overview
• Naming a Tail Engine
• Creating a Tail Engine
• Editing a Tail Engine
• Deleting a Tail Engine

Managing Tail EnginesOverview
DD
38
OverviewUsers assigned the Recipient Manager and Airline Manager roles can use the Manage Tail Engines function to create and manage a unique set of tail engines to create tail recipients. A tail engine is an engine model on an aircraft.
Figure 19.1 illustrates the Manage Tail Engines page. From this page, you can create, edit, view, or delete a tail engine.
Figure 19.1. Manage Tail Engines page
M ASP User Guide May, 2014© 2014 Jeppesen
2

Managing Tail EnginesProcess
Ma© 2
ProcessFigure 19.2 illustrates the areas in the package delivery process that are affected by the Manage Tail Engines function.
y, 2014 DDM ASP User Guide014 Jeppesen
383

Managing Tail EnginesProcess
DD
38
Figure 19.2. Areas affected by the Manage Tail Engines function
M ASP User Guide May, 2014© 2014 Jeppesen
4

Managing Tail EnginesProcess
Ma© 2
The numbered steps in Figure 19.2 represent the following tasks and functions:
1 - The user creates, edits, views, or deletes a tail engine using the Manage Tail Engines function.
2 - The user assigns a tail engine to a recipient using the Manage Recipients function.
3 - The user assigns a tail engine to a review device using the Manage Review Devices function.
y, 2014 DDM ASP User Guide014 Jeppesen
385

Managing Tail EnginesNaming a Tail Engine
DD
38
Naming a Tail EngineTail engine names can be alphabetical (both uppercase and lowercase), numerical, or a combination of both. Because DDM recognizes both uppercase and lowercase letters, it is possible that the same name could be created more than one time with varying case. For example, you could create the following variations of the same name:
• EN_01
• En_01
• eN_01
• en_01
As shown, a variation in tail engine names could lead to confusion when creating or editing a tail engine. To avoid duplication of names, Jeppesen recommends that you use all uppercase letters when naming a tail engine.
M ASP User Guide May, 2014© 2014 Jeppesen
6

Managing Tail EnginesCreating a Tail Engine
Ma© 2
Creating a Tail EnginePrior to creating a review device or recipient, you must first create a tail engine. Users assigned the Recipient Manager and Airline Manager roles can create a tail engine.
IMPORTANT For DDM to work with the Onboard Performance Tool (OPT) module in CAT, you must adhere to the rules for creating tail engines, as explained in the table in “Creating a Recipient for the Performance CAM” on page 159.
To create a tail engine1. In the Administration section in the navigation menu, click Manage Tail
Engines.
The Manage Tail Engines page appears. [Figure 19.1]
2. Click Create Tail Engine.
The Create Tail Engine page appears. [Figure 19.3]
3. In the Tail Engine Name box, type a name for the engine. This box is required.
4. Click Save Tail Engine.
DDM creates the new tail engine.
Figure 19.3. Create Tail Engine page
y, 2014 DDM ASP User Guide014 Jeppesen
387

Managing Tail EnginesEditing a Tail Engine
DD
38
Editing a Tail EngineUsers assigned the Recipient Manager and Airline Manager roles can edit information about a tail engine.
To edit a tail engine1. In the Administration section in the navigation menu, click Manage Tail
Engines.
The Manage Tail Engines page appears. [Figure 19.1]
2. Click the Edit link next to the name of the tail engine you want to edit.
The Edit Tail Engine page appears. [Figure 19.4]
3. Type a new name in the Tail Engine Name box. This box is required.
4. Click Save Changes.
DDM saves the tail engine changes.
Figure 19.4. Edit Tail Engine page
M ASP User Guide May, 2014© 2014 Jeppesen
8

Managing Tail EnginesDeleting a Tail Engine
Ma© 2
Deleting a Tail EngineUsers assigned the Recipient Manager and Airline Manager roles can delete a tail engine. The steps you follow to delete a tail engine depend on whether the engine is assigned to a recipient or review device. If it is, you must assign the recipient or review device to a new tail engine.
Deleting a Tail Engine with no Associated Recipient or Review Device
To delete a tail engine with no associated recipient or review device1. In the Administration section in the navigation menu, click Manage Tail
Engines.
The Manage Tail Engines page appears. [Figure 19.1]
2. Click the Delete link next to the name of the tail engine you want to delete.
A confirmation message is displayed.
3. Click OK.
DDM deletes the selected tail engine.
Deleting a Tail Engine with an Associated Recipient or Review Device
To delete a tail engine with an associated recipient or review device1. In the Administration section in the navigation menu, click Manage Tail
Engines.
The Manage Tail Engines page appears. [Figure 19.1]
2. Click the Delete link next to the name of the tail engine you want to delete.
A confirmation message appears.
y, 2014 DDM ASP User Guide014 Jeppesen
389

Managing Tail EnginesDeleting a Tail Engine
DD
39
3. Click OK.
The Delete Tail Engine page appears. [Figure 19.5]
4. From the Tail Engine list, choose another tail engine.
NOTE If you do not select a tail engine from the list, DDM defaults to the first tail engine in the list.
5. Click Delete Tail Engine.
DDM deletes the selected tail engine and displays a confirmation message on the Manage Tail Engines page.
Figure 19.5. Delete Tail Engine page
M ASP User Guide May, 2014© 2014 Jeppesen
0

CHAPTER 20
Managing Tail Models
This chapter contains the following topics:
• Overview
• Naming a Tail Model
• Creating a Tail Model
• Editing a Tail Model
• Deleting a Tail Model

Managing Tail ModelsOverview
DD
39
OverviewA tail model is comprised of a major model and a minor model. The first set of characters in a tail model represents the major model; the last set of characters represents the minor model.For example, in tail model number 777-200, the “777” is the major model, and “200” is the minor model.
When you create a tail model, DDM requires you to specify the major model, but not the minor model. Although major and minor models are managed separately when you create, edit, or delete tail models, they are displayed in DDM together in read-only format to represent the tail model.
Users assigned the Recipient and Airline Manager roles can use the Manage Tail Models function to create and manage a unique set of major and minor tail models to create tail recipients.
Figure 20.1 illustrates the Manage Tail Models page. From this page, you can create, edit, view, or delete a tail model.
Figure 20.1. Manage Tail Models page
M ASP User Guide May, 2014© 2014 Jeppesen
2

Managing Tail ModelsProcess
Ma© 2
ProcessFigure 20.2 illustrates the areas in the package delivery process that are affected by the
y, 2014 DDM ASP User Guide014 Jeppesen
393

Managing Tail ModelsProcess
DD
39
Manage Tail Models function.
Figure 20.2. Areas affected by the Manage Tail Models function
M ASP User Guide May, 2014© 2014 Jeppesen
4

Managing Tail ModelsProcess
Ma© 2
The three numbered steps in Figure 20.2 represent the following tasks and functions:
1 - The user creates, edits, views, and deletes a tail model using the Manage Tail Models function.
2 - The user assigns a tail model to a recipient using the Manage Recipients function.
3 - The user assigns a tail model to a review device using the Manage Review Devices function.
y, 2014 DDM ASP User Guide014 Jeppesen
395

Managing Tail ModelsNaming a Tail Model
DD
39
Naming a Tail ModelTail model names can be alphabetical (both uppercase and lowercase), numerical, or a combination of both. Because DDM recognizes both uppercase and lowercase letters, it is possible that the same name could be created more than one time with varying case. For example, you could create the following variations of the same name:
• 20AC
• 20aC
• 20Ac
• 20ac
As shown, a variation in tail model names could lead to confusion when creating or editing a tail model. To avoid duplication of names, Jeppesen recommends that you use all uppercase letters when naming a tail model.
M ASP User Guide May, 2014© 2014 Jeppesen
6

Managing Tail ModelsCreating a Tail Model
Ma© 2
Creating a Tail ModelPrior to creating a review device or recipient, you must first create a tail model. Users assigned the Recipient Manager and Airline Manager roles can create a tail model.
IMPORTANT For DDM to work with the Onboard Performance Tool (OPT) module in CAT, you must adhere to specific rules when creating tail models. The tail models you create must correspond with the tail models listed in the table in “Creating a Recipient for the Performance CAM” on page 159.
To create a tail model1. In the Administration section on the navigation menu, click Manage Tail
Models.
The Manage Tail Models page appears. [Figure 20.1 on page 392]
2. Click Create Tail Model.
The Create Tail Model page appears. [Figure 20.3]
3. In the Major Model section, do one of the following:
• From the Select Existing list, select a major model.
Figure 20.3. Create Tail Model page
y, 2014 DDM ASP User Guide014 Jeppesen
397

Managing Tail ModelsCreating a Tail Model
DD
39
• In the Create New field, type a name for the major model.
NOTE Although you can type both uppercase and lowercase letters in the Create New box, Jeppesen recommends you use all uppercase letters. Refer to “Naming a Tail Model” on page 396 in this chapter for more information.
4. In the Minor Model section, do one of the following:
• From the Select Existing list, select a minor model.
• In the Create New box, type a name for the minor model.
NOTE The Major Model box is required; the Minor Model box is optional.
5. Click Save Tail Model.
DDM saves the tail model.
M ASP User Guide May, 2014© 2014 Jeppesen
8

Managing Tail ModelsEditing a Tail Model
Ma© 2
Editing a Tail ModelThe Recipient Manager and Airline Manager roles can edit the information for a tail model. When editing a tail model, you can change the major model and minor model names.
To edit a tail model1. In the Administration section in the navigation area, click Manage Tail
Models.
The Manage Tail Models page appears. [Figure 20.1 on page 392]
2. Click the Edit link next to the name of the major model you want to edit.
The Edit Tail Model page appears. [Figure 20.4]
3. Make the appropriate changes. Refer to “Creating a Tail Model” on page 397 for field descriptions.
4. Click Save Changes.
DDM saves the tail model.
Figure 20.4. Edit Tail Model page
y, 2014 DDM ASP User Guide014 Jeppesen
399

Managing Tail ModelsDeleting a Tail Model
DD
40
Deleting a Tail ModelThe Recipient Manager and Airline Manager roles can edit the information for a tail model. The steps you follow to delete a tail model depend on whether the model is assigned to a recipient or review device. If so, the recipient and/or review device must be assigned to a new model.
Deleting a Tail Model with No Associated Recipient or Review Device
To delete a tail model that has no associated recipient or review device1. In the Administration section in the navigation area, click Manage Tail
Models.
The Manage Tail Models page appears. [Figure 20.1 on page 392]
2. Click the Delete link for the tail model you want to delete.
A confirmation window appears.
3. Click OK.
DDM deletes the selected tail model and displays a confirmation message.
Deleting a Tail Model with Associated Recipient or Review Device
To delete a tail model that has an associated recipient or review device1. In the Administration section in the navigation area, click Manage Tail
Models.
The Manage Tail Models page appears. [Figure 20.1 on page 392]
2. Click the Delete link for the tail model you want to delete.
A confirmation window appears.
M ASP User Guide May, 2014© 2014 Jeppesen
0

Managing Tail ModelsDeleting a Tail Model
Ma© 2
3. Click OK.
The Delete Tail Model page appears. [Figure 20.5]
4. From the Tail Model list, choose another tail model to which to assign the recipient or review device.
NOTE If you do not select a tail model from the list, DDM defaults to the first tail model in the list.
5. Click Delete Tail Model.
DDM deletes the selected tail model and displays a confirmation message.
Figure 20.5. Delete Tail Model page
y, 2014 DDM ASP User Guide014 Jeppesen
401

Managing Tail ModelsDeleting a Tail Model
DD
40
M ASP User Guide May, 2014© 2014 Jeppesen
2

CHAPTER 21
Troubleshooting
This chapter describes the error messages that DDM might display in pop-up windows when you click the Error link on the following tabs from the Manage Recipients and the Manage Review Devices pages.
Manage Recipients page:
• Edit Package -Assign Recipients tab
• View Package - Assigned Recipients tab
• Edit Recipient - Assign Packages tab
• View Recipient - Assigned Packages tab
Manage Review Devices page:
• Edit Package - Assign Review Devices tab
• View Package - Assigned Review Devices tab
• Edit Review Device - Assign Packages tab
• View Review Devices - Assigned Packages tab
DDM displays the same messages on the Version Delivery Status and the Part Delivery Status pages when you try to determine why a package or part has not been delivered. To safeguard the security of the system, DDM does not send these errors in emails.

Troubleshooting
DD
40
page..roxy
on-kages
Table 21-1 Errors that Appear in Pop-up Windows
Error Description Resolution
CDAL is trying to register as {recipient type}, while CDAL is restricted to be a Proxy only.
This message appears on the following pages:
• Manage Recipients • Version Delivery Status• Part Delivery Status
The following DDM roles can encounter and resolve this problem:
• Recipient Manager• Airline Manager
1. Go to the Manage Recipients 2. Select recipient of type Proxy3. Enter a unique name for the P
recipient.4. Click the check box for each n
Proxy recipient to receive pacfrom this Proxy
5. Click Save.
See server error in the application log file gt.log.
This message appears on the following pages:
• Manage Recipients • Manage Review Devices• Version Delivery Status• Part Delivery Status
The following DDM roles can encounter this problem:
• Recipient Manager• Review Manager• Airline Manager
Contact your DDM System Administrator.
M ASP User Guide May, 2014© 2014 Jeppesen
4

Troubleshooting
Ma© 2
arty n to
word t you.
page.ion ient
The certificate is not set or set incorrectly.
This message appears on the following pages:
• Manage Recipients • Edit Package -Assign Recipients tab• View Package - Assigned
Recipients tab• Edit Recipient - Assign Packages
tab• View Recipient - Assigned
Packages tab• Manage Review Devices• Edit Package - Assign Review
Devices tab• View Package - Assigned Review
Devices tab• Edit Review Device - Assign
Packages tab• View Review Devices - Assigned
Packages tab• Version Delivery Status• Part Delivery Status
The following DDM roles can encounter this problem:
• Recipient Manager• Review Manager• Airline Manager
This error is generated by a third-ptool. In DDM, there is no resolutiothis error.
The recipient {name} has failed registration, because of incorrect userName/password. You can also generate userName/password via the link in the Registration column on Manage Recipients page.
When registering a recipient, you entered an incorrect user name and/or password.This message appears on the following pages:
• Manage Recipients • Version Delivery Status• Part Delivery Status
The following DDM roles can encounter and resolve this problem:
• Recipient Manager• Airline Manager
1. Check the user name and passthat the supplier company sen
2. Re-enter the user name and password.
or1. Go to the Manage Recipients 2. Click the Generate Registrat
Credentials link for the recipyou are trying to register.
Table 21-1 Errors that Appear in Pop-up Windows
Error Description Resolution
y, 2014 DDM ASP User Guide014 Jeppesen
405

Troubleshooting
DD
40
page.
y and
The recipient {name} has failed registration, because of some undefined error. Please, contact your DDM Administrator for help.
This message appears if DDM encounters a new condition that it has not yet identified.This message appears on the following pages:
• Manage Recipients • Version Delivery Status• Part Delivery Status
The following DDM roles can encounter this problem:
• Recipient Manager• Airline Manager
Contact your DDM System Administrator.
The recipient {name} tries to register from a computer, where another recipient is already registered. DDM does not allow two CDAs to be registered with the same DDM Server, if they are installed on the same computer.
If a CDA is no longer needed, it must be unregistered via the CDA user interface and the DDM server interface. This message appears on the following pages:
• Manage Recipients • Version Delivery Status• Part Delivery Status
The following DDM roles can encounter this problem:
• Recipient Manager• Airline Manager• System Administrator
The following DDM roles can resolve this problem:
• Airline Manager
1. Go to the Manage Recipients 2. Click the Unregister link to
unregister the corresponding recipient.
3. Click OK.4. Contact your supplier compan
instruct them to unregister theunused CDA.
Table 21-1 Errors that Appear in Pop-up Windows
Error Description Resolution
M ASP User Guide May, 2014© 2014 Jeppesen
6

Troubleshooting
Ma© 2
word t you.
vices
ion w er.
The review device {name} has failed registration, because of incorrect userName/password. You can also generate userName/password via the link in the Registration column on Manage Review Devices page.
This message appears on the following pages:
• Manage Review Devices• Version Delivery Status• Part Delivery Status
The following DDM roles can encounter and resolve this problem:
• Recipient Manager• Review Manager• Airline Manager
1. Check the user name and passthat the supplier company sen
2. Re-enter the user name and password.
or1. Go to the Manage Review De
page.2. Click the Generate Registrat
Credentials link for the reviedevice you are trying to regist
The review device {name} has failed registration, because of some undefined error. Please, contact your DDM Administrator for help.
This message appears if DDM encounters a new condition that it has not yet identified.This message appears on the following pages:
• Manage Review Devices• Version Delivery Status• Part Delivery Status
The following DDM roles can encounter and resolve this problem:
• Recipient Manager• Review Manager• Airline Manager
Contact your DDM System Administrator.
Table 21-1 Errors that Appear in Pop-up Windows
Error Description Resolution
y, 2014 DDM ASP User Guide014 Jeppesen
407

Troubleshooting
DD
40
page.
eview
y and
log
tom
ixed
ssage. box,
The following table lists and describes every error message that you may encounter while using DDM. It also provides feasible resolutions for each issue.
The review device {name} tries to register from a computer, where another recipient is already registered. DDM does not allow two CDAs to be registered with the same DDM Server, if they are installed on the same computer.
This message appears on the following pages:
• Manage Review Devices• Version Delivery Status• Part Delivery Status
The following DDM roles can encounter this problem:
• Recipient Manager• Review Manager• Airline Manager• System Administrator
The following DDM roles can resolve this problem:
• Airline Manager
1. Go to the Manage Recipients 2. Click the Unregister link to
unregister the corresponding rdevice.
3. Click OK.4. Contact your supplier compan
instruct them to unregister theunused CDA.
Table 21-2 Error Messages in DDM
Error Description Resolution
This page contains both secure and nonsecure items. Do you want to display the nonsecure items?
Your browser’s security settings are set to prompt you to display mixed content.
1. Open the Internet Options diabox (select Tools > Internet Options).
2. Click the Security tab.3. Select Internet (the default
selection), and then click CusLevel.
4. Scroll down to the Display mcontent setting (under the Miscellaneous category).
5. Select Disable.6. Click OK.7. Click Yes on the Warning me8. On the Internet Options dialog
click OK.
<any non-unique name> already exists. Please try another one.
You are attempting to create something with a name that already exists in DDM.
Enter a new name.
Table 21-1 Errors that Appear in Pop-up Windows
Error Description Resolution
M ASP User Guide May, 2014© 2014 Jeppesen
8

Troubleshooting
Ma© 2
page.
ert a
type a
page.
type a field used
his ies
vices
.
page, vice has ve or evice.
pe.
ng the so
A Recipient with the name {name} already exists. DDM does not allow duplicate names within the list of recipients, archived or not, and review devices. Please try another one.
You are attempting to create a recipient and have entered a recipient name that already exists. This message displays on the Create Recipient and Edit Recipient pages.
1. Go to the Manage Recipients 2. Click Create Recipient.3. Create a new recipient or conv
review device.4. Click Continue.5. In the Recipient Name field,
unique name.6. Click Save Recipient.
A recipient with the name <existing name> already exists. DDM does not allow duplicate names within the list of recipients and review devices. Please try another one.
You are attempting to create a recipient using a name that is already assigned to an existing recipient or review device. This message displays on the Create Recipient page.
1. Go to the Manage Recipients 2. Click Create Recipient.3. Select a Recipient Type.4. Click Continue.5. On the Create Recipient page,
name in the Recipient Name that is unique and has not beenfor another active or archivedrecipient or review device. (Tfield is on the Define Properttab.)
6. Click Save Recipient.
A review device with the name <existing name> already exists. DDM does not allow duplicate names within the list of recipients and review devices. Please try another one.
You are attempting to create a review device using a name that is already assigned to an existing recipient or review device. This message displays on the Create Review Device page.
1. Go to the Manage Review Depage.
2. Click Create Review Device.3. Select a Review Device Type4. Click Continue.5. On the Create Review Device
type a name in the Review DeName field that is unique andnot been used for another actiarchived recipient or review d(This field is on the Define Properties tab.)
6. Click Save Review Device Ty
An error was encountered when reading the bill of materials XML.
The bill of materials XML file that you are trying to publish does not comply with the BOM.dtd specification.
The person responsible for publishiBOM package must change the filethat it complies with the BOM.dtd specification.
Table 21-2 Error Messages in DDM (continued)
Error Description Resolution
y, 2014 DDM ASP User Guide014 Jeppesen
409

Troubleshooting
DD
41
pes
eld,
ion
es
pting
wn u
sue, ou ivities ur last
d the
ontact
is
to the
At least one Content Type is required to publish.
This message appears when the user tries to publish a package, and there are no content types in the system. This message appears on the Manage Packages page.
To resolve the problem:1. Go to the Manage Content Ty
page.2. Click Create Content Type.3. In the Content Type Name fi
enter a valid content type.4. (optional) Fill in the Descript
field.5. (optional) Select a Default
Checkpoint.6. Click Save Content Type.
To reattempt publishing:1. Return to the Manage Packag
page.2. Click Publish a Package.3. Select the file you were attem
to publish.4. In the Content Type drop-do
list, select the content type yocreated.
AttentionYour transaction may not have been completed. Please review the results.If the transaction was not completed, you may try again or consult with your DDM Administrator for assistance.
DDM may have encountered a minor issue or a severe error.This message can appear on any page within DDM.This error message can be encountered by any and all DDM roles.
Depending on the severity of the isyou can return to the page where ywere working and resume their actwith no loss of data. Verify that yoaction was saved.
If your last action was not saved, resubmit the transaction you were performing when DDM encountereproblem.
If DDM re-displays the message, cyour DDM System Administrator.
Cannot associate recipient <name> with package <name> because content type <name> is not associated with company <name>.
You are not able to assign a Server recipient to the selected package, because the content type associated with the package is not also associated with the selected company. This message displays on the Edit Recipient, Edit Package, and Publish a Package pages.
Perform the following steps:1. Determine what content type
assigned to the company. 2. Assign the same content type
corresponding package.3. Attempt to assign the Server
recipient to the correspondingpackage.
Table 21-2 Error Messages in DDM (continued)
Error Description Resolution
M ASP User Guide May, 2014© 2014 Jeppesen
0

Troubleshooting
Ma© 2
s
e, e in
s
type a nt
kage:
. plain
cted.
ld ber of
Checkpoint <name> already exists. Please try another one.
You are attempting to create a checkpoint and have specified a checkpoint name that already exists. This message displays on the Create Checkpoint and Edit Checkpoint pages.
To create a new checkpoint:1. Go to the Manage Checkpoint
page.2. Click Create Checkpoint.3. On the Create Checkpoint pag
type a unique checkpoint namthe Checkpoint Name field.
4. Click Save Checkpoint.To edit an existing checkpoint:
1. Go to the Manage Checkpointpage.
2. Click the Edit link for the Checkpoint that you want to modify.
3. On the Edit Checkpoint page, unique name in the CheckpoiName field.
4. Click Save Changes.
Comment is required for rejected package {name}.
The user must provide comments for the package they are attempting to reject on the Approve/Reject Package: Package Checkpoints page.
1. Go to the Approve/Reject PacPackage Checkpoints page.
2. Select the Reject radio button3. In the Comments field of the
Package you are reviewing, exwhy the package is being reje
4. Click Submit Changes.
Comments field should not exceed 125 characters, while currently it is <number of characters entered> characters long.
You have entered text in a field that has a limited character length. The text has exceeded that limit.
Edit your comments, so that the fiedoes not exceed the maximum numallowed characters.
Table 21-2 Error Messages in DDM (continued)
Error Description Resolution
y, 2014 DDM ASP User Guide014 Jeppesen
411

Troubleshooting
DD
41
pes
age, tent
pes
ntent ., type
Type
ectory ontact ne if
le.
Content type <name> already exists. Please try another one.
You are attempting to create a content type and have specified a content type name that already exists. This message displays on the Create Content Type page and the Edit Content Type page.
To create a new content type:1. Go to the Manage Content Ty
page.2. Click Create Content Type.3. On the Create Content Type p
type a unique name in the ConType Name field.
4. Click Save Content Type.To edit an existing content type:
1. Go to the Manage Content Typage.
2. Click the Edit link for the CoType that you want to modify
3. On the Edit Content Type pagea unique name in the ContentName field.
4. Click Save Changes.
DDM is unable to retrieve data from the directory server.
If there is a problem with the network connection at any time, the user will receive this message when attempting to perform an activity on one of the following pages:
• Manage Checkpoints• View/Edit Checkpoint• Package Checkpoint Status• Create/Edit Email Rule—Assign
Groups• Manage Review Groups• View/Edit Review Group• Configure Roles
The following DDM roles can encounter this problem:
• Review Manager• Airline Manager
This problem cannot be resolved by a user from within DDM.
If there is no response from the dirservice, such as Active Directory, ca network administrator to determithere is a network problem, or the directory server is down, for examp
Table 21-2 Error Messages in DDM (continued)
Error Description Resolution
M ASP User Guide May, 2014© 2014 Jeppesen
2

Troubleshooting
Ma© 2
age.kage h the
ck the
view iate
tatus ne the t be .
vices
ipient h the
ge, tab.ckage h this
page on d to
ile -
age.
ify.e a
y field ield.
Device <name> is not assigned to package <name>.
You are attempting to locate content using the Find Delivery Status function, but the selected content and recipient or review device are not associated with the content’s package other.
To edit a package:1. Go to the Manage Packages p2. Click the Edit link for the pac
that you want to associate witreview device.
3. On the Edit Package page, cliAssign Review Devices tab.
4. Click the check box for the ReDevice that you want to assocwith this package.
5. Click Save Changes.6. Return to the Find Delivery S
page and reattempt to determireason why the content cannodelivered to the review device
To edit a review device:1. Go to the Manage Review De
page.2. Click the Edit link for the rec
that you want to associate witpackage.
3. On the Edit Review Device paclick on the Assign Packages
4. Click the check box for the Pathat you want to associate witReview Device.
5. Click Save Changes.Return to the Find Delivery Status and reattempt to determine the reaswhy the content cannot be deliverethe review device.
Do Not Deliver After date {date entered} must be in format DD-MMM-YYYY.
The date format specified for the BOM.XML file being published is incorrect.
Whoever created the BOM.XML fmust specify the date format as DDMMM-YYYY.
Do Not Deliver After date must be on or after Start Delivery date.
You have entered a date in the Do Not Deliver After field that occurs before the date specified in the Start Delivery field. This message displays on the Edit Package page.
1. Go to the Manage Packages p2. Click on the Edit link of the
Package that you want to mod3. On the Edit Package page, typ
date that occurs after the date specified in the Start Deliverin the Do Not Deliver After f
4. Click Save Changes.
Table 21-2 Error Messages in DDM (continued)
Error Description Resolution
y, 2014 DDM ASP User Guide014 Jeppesen
413

Troubleshooting
DD
41
s
, type ule
s
ail
type a le
Email rule <name> already exists. Please try another one.
You are attempting to create an email rule and have entered an email rule name that already exists. This message displays on the Create Email Rule page and the Edit Email Rule page.
To create a new email rule:1. Go to the Manage Email Rule
page.2. Click Create Email Rule.3. Select an Email Rule Event.4. Click Continue.5. On the Create Email Rule page
a unique name in the Email RName field.
6. Click Continue.To edit an existing email rule:
1. Go to the Manage Email Rulepage.
2. Click the Edit link for the EmRule that you want to modify.
3. On the Edit Email Rule page, unique name in the Email RuName field.
4. Click Continue.
File processing was aborted due to a system error.
An unexpected condition happened during publishing.
Contact your DDM System Administrator.
Table 21-2 Error Messages in DDM (continued)
Error Description Resolution
M ASP User Guide May, 2014© 2014 Jeppesen
4

Troubleshooting
Ma© 2
.
e a r As
.r you
r As
Filter <name> already exists. Please try another one.
You are attempting to create a filter type and have entered a filter name that already exists. This message displays on the Create Filter page and the Edit Filter page.
To create a new filter:1. Go to the Manage Filters page2. Click Create Filter.3. Select a Filter Type.4. Click Continue.5. Create a Query.6. Click Continue.7. On the Create Filter page, typ
unique name in the Save Filtefield.
8. Click Finish.To edit an existing filter:
1. Go to the Manage Filters page2. Click the Edit link of the Filte
want to modify.3. Edit the Query if necessary.4. Click Continue.5. On the Edit Filter page, type a
unique name in the Save Filtefield.
6. Click Finish.
Table 21-2 Error Messages in DDM (continued)
Error Description Resolution
y, 2014 DDM ASP User Guide014 Jeppesen
415

Troubleshooting
DD
41
.
k the enter
x to esults
.r you
the
Filter eters
x to esults
Filter not saved or run. You are attempting to create a filter, but have not selected to save or preview the filter. This message displays on the Create Filter page and the Edit Filter page.
To create a filter:1. Go to the Manage Filters page2. Click Create Filter.3. Select a Filter Type.4. Click Continue.5. Create a Query.6. Click Continue.7. On the Create Filter page, clic
Save Filter As check box anda filter name to save the filter parameters.
and/orClick the Preview Filter check bogenerate the filter and display the ron your screen.
8. Click Finish.To edit the filter:
1. Go to the Manage Filters page2. Click the Edit link of the Filte
want to modify.3. Edit the Query if necessary.4. Click Continue.5. On the Edit Filter page, click
Save Filter As check box.6. Type a filter name in the Save
As field to save the filter paramand/orClick the Preview Filter check bogenerate the filter and display the ron your screen.
7. Click Finish.
If this problem persists, please notify your DDM System Administrator.
An error has occurred in DDM. Contact your DDM System Administrator.
Invalid archive directory location. Please verify that the directory exists and is writeable.
The path that you specified for use during the archive does not exist or is protected and cannot be written to. This message displays on both the Archive Package page and Archive Recipient page.
Contact your DDM System Administrator.
Table 21-2 Error Messages in DDM (continued)
Error Description Resolution
M ASP User Guide May, 2014© 2014 Jeppesen
6

Troubleshooting
Ma© 2
.
w kages
n list,
t the
.er that
n list,
t the
Invalid date specified. Please re-enter the start date.(continued)
(continued) To create a filter:1. Go to the Manage Filters page2. Click Create Filter.3. Click the option button for Ne
Filter of Type and select Pacfrom the drop-down list.
4. Click Continue.5. From the Add Field drop-dow
select Recommended Start Delivery Date.
6. Click Add.7. Use the calendar icon to selec
date.8. Click Continue.
To edit a filter:1. Go to the Manage Filters page2. Click the Edit link for the filt
you want to modify.3. From the Add Field drop-dow
select Start Delivery Date.4. Click Add.5. Use the calendar icon to selec
date.6. Click Continue.
Table 21-2 Error Messages in DDM (continued)
Error Description Resolution
y, 2014 DDM ASP User Guide014 Jeppesen
417

Troubleshooting
DD
41
e.
w
list.
n list,
t the
e.ort
n list,
t the
Invalid date specified. Please re-enter the start date.(continued)
(continued) To create a report:1. Go to the Manage Reports pag2. Click Create Report.3. Click the option button for Ne
Report of Type and select Packages from the drop-down
4. Click Continue.5. From the Add Field drop-dow
select Start Delivery Date.6. Click Add.7. Use the calendar icon to selec
date.8. Click Continue.
To edit a report:1. Go to the Manage Reports pag2. Click the Edit link for the rep
that you want to modify.3. From the Add Field drop-dow
select Start Delivery Date.4. Click Add.5. Use the calendar icon to selec
date.6. Click Continue.
Table 21-2 Error Messages in DDM (continued)
Error Description Resolution
M ASP User Guide May, 2014© 2014 Jeppesen
8

Troubleshooting
Ma© 2
age.kage
the ate in
age.
page, valid d.
age.kage
es enter ery
Invalid date specified. Please re-enter the start date.
The user has specified a date which is out of supported range or is invalid for some other reason in the Start Delivery Date field. This message appears on the following pages:
• Edit Package• Edit Multiple Packages• Edit Published Packages• Create Filter• Edit Filter• Create Report• Edit Report
To edit a package:1. Go to the Manage Packages p2. Click the Edit link for the pac
you want to modify.3. On the Edit Package page, use
calendar icon to enter a valid dthe Start Delivery field.
4. Click Save Changes.To edit multiple packages:
1. Go to the Manage Packages p2. Click Edit Multiple.3. Select package from Select
Package drop-down list.4. On the Edit Multiple Packages
use the calendar icon to enter adate in the Start Delivery fiel
5. Click Save Changes.To edit published packages:
1. Go to the Manage Packages p2. Click the Edit link for the pac
you want to modify.3. On the Edit Published Packag
page, use the calendar icon toa valid date in the Start Delivfield.
4. Click Save Changes.
Table 21-2 Error Messages in DDM (continued)
Error Description Resolution
y, 2014 DDM ASP User Guide014 Jeppesen
419

Troubleshooting
DD
42
age.kage
the ate in
age.
page, valid
d.
age.kage
es enter ery
s
, type
gines
tail
Invalid date specified. Please re-enter the stop date.
You specified an invalid date in a stop delivery date field. This message displays on the Publish a Package, Edit Published Package, and Edit Package pages.
To edit a package:1. Go to the Manage Packages p2. Click the Edit link for the pac
you want to modify.3. On the Edit Package page, use
calendar icon to enter a valid dthe Stop Delivery field.
4. Click Save Changes.To edit multiple packages:
1. Go to the Manage Packages p2. Click Edit Multiple.3. Select package from Select
Package drop-down list.4. On the Edit Multiple Packages
use the calendar icon to enter adate in the Stop Delivery fiel
5. Click Save Changes.To edit published packages:
1. Go to the Manage Packages p2. Click the Edit link for the pac
you want to modify.3. On the Edit Published Packag
page, use the calendar icon toa valid date in the Stop Delivfield.
4. Click Save Changes.
Last tail engine cannot be deleted if tails exist.
The user is attempting to delete the only tail engine that exists, but this tail engine is assigned to a recipient. The system requires the user to reassign a tail engine to the recipient, but in this case, the user cannot reassign a tail engine, because there are no other tail engines in the system. This message displays on the Manage Tail Engines page.
1. Go to the Manage Tail Enginepage.
2. Click Create Tail Engine.3. In the Tail Engine Name field
a new tail engine name.4. Click Save Tail Engine.5. Go back to the Manage Tail En
page.6. Click the Delete link for the
corresponding tail engine.7. Reassign the recipients to the
engine that you just created.
Table 21-2 Error Messages in DDM (continued)
Error Description Resolution
M ASP User Guide May, 2014© 2014 Jeppesen
0

Troubleshooting
Ma© 2
s page.
pe a ng a nal.)
odels
tail
ail
sts,
s page.click tton., type ny eate
odel
s page.model
type a y eate
odel
Last tail model cannot be deleted if tails exist.
The user is attempting to delete the only tail model that exists, but this tail model is assigned to a recipient. The system requires the user to reassign a tail model to the recipient, but in this case, the user cannot reassign a tail model, because there are no other tail models in the system. This message appears on the Manage Tail Models page.
1. Go to the Manage Tail Model2. Click Create Tail Model 3. In the or Create New field, ty
new major tail model. (Creatinew minor tail model is optio
4. Click Save Tail Model.5. Go back to the Manage Tail M
page.6. Click the Delete link for the
corresponding tail model.7. Reassign the recipients to the
model that you just created.
LRUs is required field. Please select at least one LRU.
You are attempting to create a recipient of type Tail without first specifying at least one LRU. This message appears on the Create Recipient - Tail page
1. Go to the Create Recipient - Tpage.
2. From the LRUs drop-down liselect at least one LRU.
3. Click Save Recipient.
Major Model must contain only alphanumeric characters.
You are attempting to create or edit a tail model and have entered a major model number that includes special characters. This message displays on the Create Tail Model page and the Edit Tail Model page.
To create a tail model:1. Go to the Manage Tail Model2. Edit an existing tail model or
on the Create Tail Model bu3. On the Create Tail Model page
a major model name without aspecial characters in the or CrNew field under the Major Msection.
4. Click Save Tail Model.To edit a tail model:
1. Go to the Manage Tail Model2. Click the Edit link for the tail
that you want to modify.3. On the Edit Tail Model page,
major model name without anspecial characters in the or CrNew field under the Major Msection.
4. Click Save Changes.
Table 21-2 Error Messages in DDM (continued)
Error Description Resolution
y, 2014 DDM ASP User Guide014 Jeppesen
421

Troubleshooting
DD
42
.
s page.click tton., type
any eate
odel
s page.model
type a y eate
odel
Media set {name} contains not supported HWID {name}.
DDM rejects packages with conflicting hardware IDs and LRU IDs in the metadata. DDM also rejects a package if two LSAPs in the same package have different hardware IDs or different LRUs. Since the package is the basic unit of delivery and management within DDM, the entire package must be rejected if any LSAP contained therein fails these checks.This message displays on the Publish a Package page.
This is no resolution to this problemDDM cannot accept this package.
Minor Model must contain only alphanumeric characters.
You are attempting to create or edit a tail model have entered a minor model number that includes special characters. This message displays on the Create Tail Model page and the Edit Tail Model page.
To create a tail model:1. Go to the Manage Tail Model2. Edit an existing tail model or
on the Create Tail Model bu3. On the Create Tail Model page
a minor model name without special characters in the or CrNew field under the Major Msection.
4. Click Save Tail Model.To edit a tail model:
1. Go to the Manage Tail Model2. Click the Edit link for the tail
that you want to modify.3. On the Edit Tail Model page,
minor model name without anspecial characters in the or CrNew field under the Major Msection.
4. Click Save Changes.
Table 21-2 Error Messages in DDM (continued)
Error Description Resolution
M ASP User Guide May, 2014© 2014 Jeppesen
2

Troubleshooting
Ma© 2
s
e elete.e, use
n to ges ned to
oints ng
More packages and/or recipients are assigned to checkpoint {name}. Please review again.
The user is attempting to delete a checkpoint to which one or more packages and/or recipients are assigned and is in the process of reassigning the packages and/or recipients. However, while reassigning, another user has assigned a new package and/or recipient to the checkpoint the first user is trying to delete. This message appears on the Manage Checkpoints page.
1. Go to the Manage Checkpointpage.
2. Click on the Delete link for thcheckpoint that you want to d
3. On the Delete Checkpoint pagthe drop-down lists to reassiganother checkpoint any packaand/or recipients that are assigthe checkpoint being deleted.
4. Click Save Changes.5. Return to the Manage Checkp
page to delete the correspondicheckpoint.
Table 21-2 Error Messages in DDM (continued)
Error Description Resolution
y, 2014 DDM ASP User Guide014 Jeppesen
423

Troubleshooting
DD
42
e.
lect a
eld, rop-d
lect y.e
ed.
.
ct a
eld, rop-d
lect y.e
d.
No columns have been selected for display.
The user is attempting to run or save a report or a filter, but has not selected any columns to display in the report or the filter. This message appears on the Create Report page and the Create Filter page.
To run or save a report:1. Go to the Manage Reports pag2. Click Create Report.3. On the Create Report page, se
report type.4. Click Continue.5. (optional) In the Add Field fi
select fields to add from the ddown list and click on the Adbutton.
6. Click Continue.7. In the Available Fields list, se
one or more columns to displa8. Click Add to move them to th
Fields to Display list. 9. Save or run the report as need
To run or save a filter:1. Go to the Manage Filters page2. Click Create Filter.3. On the Create Filter page, sele
filter type.4. Click Continue.5. (optional) In the Add Field fi
select fields to add from the ddown list and click on the Adbutton.
6. Click Continue.7. In the Available Fields list, se
one or more columns to displa8. Click Add to move them to th
Fields to Display list. 9. Save or run the filter as neede
Table 21-2 Error Messages in DDM (continued)
Error Description Resolution
M ASP User Guide May, 2014© 2014 Jeppesen
4

Troubleshooting
Ma© 2
.
k New pe
e.
ck the ct a
e.
ick ct a
.
k New pe
age.
e, ckage or
No filters exist in Based on Existing Filter selection.
The user has attempted to create a new filter or report by clicking on the radio button for “Based on Existing Filter,” but there are no existing filters in the system. This message appears on the Create Filter page and the Create Report page.
To run or save a filter:1. Go to the Manage Filters page2. Click Create Filter.3. On the Create Filter page, clic
Filter of Type and select a tyfrom the drop-down list.
4. Click Continue.To run or save a report:
1. Go to the Manage Reports pag2. Click Create Report.3. On the Create Report page, cli
New Report of Type and seletype from the drop-down list.
4. Click Continue.
No reports exist in Based on Existing Report selection.
The user has attempted to create a new report by clicking on the radio button for “Based on Existing Report,” but there are no existing reports in the system. This message appears on the Create Report page and the Create Filter page.
To run or save a report:1. Go to the Manage Reports pag2. Click Create Report.3. On the Create Report page, cl
New Report of Type and seletype from the drop-down list.
4. Click Continue.To run or save a filter:
1. Go to the Manage Filters page2. Click Create Filter.3. On the Create Filter page, clic
Filter of Type and select a tyfrom the drop-down list.
4. Click Continue.
Package {name} was already published by company {code}. Please rename your package and try again.
The user tried to publish a package or cancel publishing of a package, while another user from another company was also publishing a package with the same name. Since DDM does not allow duplicate names, one user got the success message, while the other user got this message. This message appears on the Publish a Package page.
1. Go to the Manage Packages p2. Click Publish a Package.3. On the Publish a Package pag
enter a unique name for the pathat you want to publish in theFind New File field.
4. Click Continue.
Table 21-2 Error Messages in DDM (continued)
Error Description Resolution
y, 2014 DDM ASP User Guide014 Jeppesen
425

Troubleshooting
DD
42
age.
e,
d File
e that New
age.kage
e hat it
.
age.
e, edit not of
h
ust
Package {name} was already published by your company. Please rename your package and try again.
A user tried to publish a package or cancel publishing of a package, while another user from the same company was also publishing a package with the same name. Since DDM does not allow duplicate package names, one user got the success message, while the other user got this message. This message appears on the Publish a Package page.
1. Go to the Manage Packages p2. Click Publish a Package.3. On the Publish a Package pag
choose a different package to publish in the Select Uploadefield.
orEnter a unique name for the packagyou want to publish in the or FindFile field.
4. Click Continue.
Package Description field should not exceed 1024 characters, while currently it is <number of characters entered> characters long.(continued)
1. Go to the Manage Packages p2. Click the Edit link for the pac
you want to modify.3. On the Edit Published Packag
page, edit the Description so tdoes not exceed the maximumnumber of allowed characters
4. Click Save Changes.To modify the BOM.XML file:Whoever created the BOM.XML package must provide a shorter description.
Package Description field should not exceed 1024 characters, while currently it is <number of characters entered> characters long.
You have entered text in a field that has a limited character length. The text has exceeded that limit. This message can also indicate that the description for a BOM package exceeds the field limit.
To modify the description:1. Go to the Manage Packages p2. Click Publish a Package.3. Select a file to publish.4. Click Continue.5. On the Publish a Package pag
the Description so that it doesexceed the maximum numberallowed characters.
6. Click Publish Now or PublisLater.
Package ID field should not exceed 128 characters, while currently it is <number of characters entered> characters long.
The ID for a BOM package exceeds the field limit.
Whoever created the BOM.XML mprovide a package ID that does notexceed 128 characters.
Table 21-2 Error Messages in DDM (continued)
Error Description Resolution
M ASP User Guide May, 2014© 2014 Jeppesen
6

Troubleshooting
Ma© 2
age.
e, edit es not of
h
ile ge
.
ntact
.
,
Package Name field should not exceed 128 characters, while currently it is <number of characters entered> characters long.
The package name exceeds the field limit.
You can modify the name of an unwrapped package, but you cannot modify the name of a wrapped package (for example, ARINC, BEDS Crate, or BOM).
Package names cannot contain the following characters: & / \ ? % * < > : | “
To modify the name:1. Go to the Manage Packages p2. Click Publish a Package.3. Select a file to publish.4. Click Continue.5. On the Publish a Package pag
the Package Name so that it doexceed the maximum numberallowed characters.
6. Click Publish Now or PublisLater.
To modify the BOM.XML file:Whoever created the BOM.XML fmust change the BOM.XML packaname so that it does not exceed 128characters.A 50-character limit applies to the ARINC 665 type.
Packages {names} could not be archived. Contact your DDM System Administrator.
The user has attempted to archive several packages. This message appears on the Archive Packages page.
The Archiver can:• Change permissions for the
specified archived location.• Check to see if the disk is full
If this does not resolve the error, coyour DDM System Administrator.
Packages {names} could not be deleted. Contact your DDM System Administrator.
The packages that the user is trying to delete cannot be deleted. This message appears on the Delete Packages page.
The Archiver can:• Change permissions for the
specified archived location.• Check to see if the disk is full
If this does not resolve the errorcontact your DDM System Administrator.
Packages {names} could not be unarchived. Contact your DDM System Administrator.
The packages that the user is trying to unarchive cannot be unarchived. This message appears on the Unarchive Packages page.
Contact your DDM System Administrator.
Table 21-2 Error Messages in DDM (continued)
Error Description Resolution
y, 2014 DDM ASP User Guide014 Jeppesen
427

Troubleshooting
DD
42
.
s page.
e, tail ew rform
s page.model
either odel or tail h
oups
eview
Part {name} contains not supported HWID {name}.
DDM rejects packages with conflicting hardware IDs and LRU IDs in the metadata. DDM also rejects a package if two LSAPs in the same package have different hardware IDs or different LRUs. Since the package is the basic unit of delivery and management within DDM, the entire package must be rejected if any LSAP contained therein fails these checks.This message displays on the Publish a Package page.The following roles can encounter this error:
• Content Publisher• Airline Manager• System Administrator
This is no resolution to this problemDDM cannot accept this package.
Please choose either an existing minor tail model or a new minor tail model. You may not select both.
You are attempting to select an existing minor tail model as well as specify a new minor tail model on the Create Tail Model page.
To create a major tail model:1. Go to the Manage Tail Model2. Click Create Tail Model.3. On the Create Tail Model pag
either select an existing majormodel or type the name of a nmajor tail model, but do not peboth actions.
4. Click Save Tail Model.To edit a major tail model:
1. Go to the Manage Tail Model2. Click the Edit link for the tail
that you want to modify.3. On the Edit Tail Model page,
select an existing major tail mor type the name of a new majmodel, but do not perform botactions.
4. Click Save Changes.
Recently the Review Group {name} was associated with more checkpoints. Please review again.
While the user was confirming deletion of the group, another user associated the group with another checkpoint. This message appears on the Manage Review Groups page.
1. Go to the Manage Review Grpage.
2. Click the Delete link for the rgroup that you want to delete.
Table 21-2 Error Messages in DDM (continued)
Error Description Resolution
M ASP User Guide May, 2014© 2014 Jeppesen
8

Troubleshooting
Ma© 2
age.kage h the
ck the
ociate
tatus
t.
page.ipient h the
ick on
ckage h this
tatus
t.
Recipient <name> is not assigned to package <name>.
You are attempting to locate content using the Find Delivery Status function, but the selected content and recipient or review device are not associated with the content’s package other.
To edit a package:1. Go to the Manage Packages p2. Click the Edit link for the pac
that you want to associate witrecipient.
3. On the Edit Package page, cliAssign Recipients tab.
4. Click the check box for the Recipient that you want to asswith this package.
5. Click Save Changes.6. Return to the Find Delivery S
page.7. Reattempt to locate the conten
To edit a recipient:1. Go to the Manage Recipients 2. Click the Edit link for the rec
that you want to associate witpackage.
3. On the Edit Recipient page, clthe Assign Packages tab.
4. Click the check box for the Pathat you want to associate witRecipient.
5. Click Save Changes.6. Return to the Find Delivery S
page.7. Reattempt to locate the conten
Table 21-2 Error Messages in DDM (continued)
Error Description Resolution
y, 2014 DDM ASP User Guide014 Jeppesen
429

Troubleshooting
DD
43
page.e
check hat
page.
s. s the
Recipient <name> that you are trying to modify was removed from the system or archived by another user.
Another user has removed or archived a recipient record, while you were attempting to perform a task for that recipient.
To unarchive a recipient:1. Go to the Archive Recipients 2. Click on the Unarchive/Delet
Recipient tab.3. Review the page to see if the
recipient was archived.4. If the recipient was archived,
the Select box for the record tyou want to unarchive.
5. Click Unarchive Recipient.To recreate a recipient:
1. Go to the Manage Recipients 2. Click Create Recipient.3. Select the Recipient Type.4. Click Continue.5. Define the Recipient Propertie
You can use the same name aoriginal recipient, if required.
6. Click Save Recipient.
Table 21-2 Error Messages in DDM (continued)
Error Description Resolution
M ASP User Guide May, 2014© 2014 Jeppesen
0

Troubleshooting
Ma© 2
page.
edit not of
page.
lect
ts hat it
.
page.ipient
it the of
.
,
Recipient description should not exceed 1024 characters, while currently it is <number of characters entered> characters long.
You have entered text in a field that has a limited character length. The text has exceeded that limit. This message appears on the Create Recipient, the Edit Multiple Recipients, and the Edit Recipient pages.
1. Go to the Manage Recipients 2. Click Create Recipient.3. Select a recipient type.4. Click Continue.5. On the Create Recipient page,
the Description so that it doesexceed the maximum numberallowed characters.
6. Click Save Recipient.or
1. Go to the Manage Recipients 2. Click Edit Multiple.3. Select a recipient from the Se
Recipient drop-down list.4. On the Edit Multiple Recipien
page, edit the Description so tdoes not exceed the maximumnumber of allowed characters
5. Click Save Changes.or
1. Go to the Manage Recipients 2. Click the Edit link for the Rec
you want to modify.3. On the Edit Recipient page, ed
Description so that it does notexceed the maximum numberallowed characters.
4. Click Save Changes.
Recipient name.xml cannot be created. Contact your DDM System Administrator.
The user has attempted to archive or delete a recipient.
Contact your DDM System Administrator.
Recipients {names} could not be archived. Contact your DDM System Administrator.
The user has attempted to archive multiple recipients. This message appears on the Archive Recipient page.
The Archiver can:• Change permissions for the
specified archived location.• Check to see if the disk is full
If this does not resolve the errorcontact your DDM System Administrator.
Table 21-2 Error Messages in DDM (continued)
Error Description Resolution
y, 2014 DDM ASP User Guide014 Jeppesen
431

Troubleshooting
DD
43
ns for the
ntact
ns for the
ntact
age.
, type he ded
h
age.
e n or
er
Recipients <names> could not be deleted. Contact your DDM administrator.
The recipient you are trying to delete cannot be deleted.
The Archiver can change permissiothe specified archived location andfiles archived there.
If this does not resolve the error, coyour DDM System Administrator.
Recipients <names> could not be unarchived. Contact your DDM administrator.
The recipient you are trying to unarchive cannot be unarchived.
The Archiver can change permissiothe specified archived location andfiles archived there.
If this does not resolve the error, coyour DDM System Administrator.
Recommended Do Not Deliver After date must be on or after <current date>.
You have entered a date in the Recommended Do Not Deliver After field that occurs before the current date. This message displays on the Publish a Package and Edit Published Package page.
To modify the package:1. Go to the Manage Packages p2. Click Publish a Package.3. Select a package to publish.4. Click Continue.5. On the Publish a Package page
a date that occurs on or after tcurrent date in the RecommenDo Not Deliver After field.
6. Click Publish Now or PublisLater.
Recommended Do Not Deliver After date must be on or after <current date>.
1. Go to the Manage Packages p2. Click on the Edit link for the
package you want to modify.3. On the Edit Published Packag
page, type a date that occurs oafter the current date in the Recommended Do Not DelivAfter field.
4. Click Save Changes.
To modify the BOM.XML file:Modify the stopDeliveryDate in BOM.XML.
Table 21-2 Error Messages in DDM (continued)
Error Description Resolution
M ASP User Guide May, 2014© 2014 Jeppesen
2

Troubleshooting
Ma© 2
age.
, type he ded
h
age.kage
e n or
er
age.
e, edit that m
.h
t does fy
Recommended Do Not Deliver After date must be on or after Recommended Start Delivery date.
You have entered a date in the Recommended Do Not Deliver After field that occurs before the date in the Recommended Start Delivery field. This message displays on the Publish a Package, and Edit Published Package pages.
1. Go to the Manage Packages p2. Click Publish a Package.3. Select a package to publish.4. Click Continue.5. On the Publish a Package page
a date that occurs on or after tcurrent date in the RecommenDo Not Deliver After field.
6. Click Publish Now or PublisLater.
or1. Go to the Manage Packages p2. Click the Edit link for the pac
you want to modify.3. On the Edit Published Packag
page, type a date that occurs oafter the current date in the Recommended Do Not DelivAfter field.
4. Click Save Changes.
Replaces Package field should not exceed 128 characters, while currently it is <number of characters entered> characters long.
The name of the package being replaced by the BOM package exceeds the field limit. This message appears on the Publish a Package page.
To modify the name:1. Go to the Manage Packages p2. Click Publish a Package.3. Select a file to publish.4. Click Continue.5. On the Publish a Package pag
the Replaces Package name soit does not exceed the maximunumber of allowed characters
6. Click Publish Now or PublisLater.
To modify the BOM.XML file:Shorten the package name, so that inot exceed 128 characters, or modireplacementFor in BOM.XML.
Table 21-2 Error Messages in DDM (continued)
Error Description Resolution
y, 2014 DDM ASP User Guide014 Jeppesen
433

Troubleshooting
DD
43
e.
k on
ve
on
e.
pe a rt As ters
check een.
e.report
a rt As ters
check een.
Report <name> already exists. Please try another one.
The user is attempting to create a report and has entered a report name that already exists. This message appears on the Create Report page.
To create a new report:1. Go to the Manage Reports pag2. Click Create Report.3. Select a report type.4. Click Continue.5. (optional) Add Fields and clic
the Continue button.6. Type a unique name in the Sa
Report As field.7. Complete the remaining fields
the Create Report page.8. Click Finish.
Report not saved or run. You are attempting to generate a report but have not selected to save or run the report. This message displays on the Create Report and Edit Report pages.
To create a report:1. Go to the Manage Reports pag2. Click Create Report.3. Select a report type.4. Click Continue.5. Create a Query.6. Click Continue.7. On the Create Report page, ty
report name in the Save Repofield to save the report parameand/or click the Run Report box to generate the report anddisplay the results on your scr
8. Click Finish.To edit a report:
1. Go to the Manage Reports pag2. Click on the Edit link for the
that you want to modify.3. Edit the Query.4. Click Continue.5. On the Edit Report page, type
report name in the Save Repofield to save the report parameand/or click the Run Report box to generate the report anddisplay the results on your scr
6. Click Finish.
Table 21-2 Error Messages in DDM (continued)
Error Description Resolution
M ASP User Guide May, 2014© 2014 Jeppesen
4

Troubleshooting
Ma© 2
oups
page, iew
on e.
oups
to
ge, iew
g up
p.
Review group <name> already exists. Please try another one.
You are attempting to create a review group and have entered a review group name that already exists. This message displays on the Create Review Group and Edit Review Group pages.
To create a new review group:1. Go to the Manage Review Gr
page.2. Click Create Review Group.3. On the Create Review Group
type a unique name in the RevGroup Name field.
4. Complete the remaining fieldsthe Create Review Group pag
5. Save the new review group.To edit an existing review group:
1. Go to the Manage Review Grpage.
2. Click on the Edit link for the Review Group that you want modify.
3. On the Edit Review Group patype a unique name in the RevGroup Name field.
4. Make changes to the remaininfields on the Edit Review Gropage, if necessary.
5. Save the changed review grou
Table 21-2 Error Messages in DDM (continued)
Error Description Resolution
y, 2014 DDM ASP User Guide014 Jeppesen
435

Troubleshooting
DD
43
oups
page, does ber of
oups
view
ge, does ber of
age.
e, e
age.
e,
.
de by es, as
Review Group Description field should not exceed 125 characters, while currently it is <number of characters entered> characters long.
You have entered text in a field that has a limited character length. The text has exceeded that limit. This message appears on the Create Review Group page and the Edit Review Group page.
To create a new review group:1. Go to the Manage Review Gr
page.2. Click Create Review Group.3. On the Create Review Group
edit the Description so that it not exceed the maximum numallowed characters.
4. Click Save Review Group.To edit an existing review group:
1. Go to the Manage Review Grpage.
2. Click the Edit link for the ReGroup you want to modify.
3. On the Edit Review Group paedit the Description so that it not exceed the maximum numallowed characters.
4. Click Save Changes.
Select one only. You are attempting to load an existing file and find a new file to publish. DDM does not allow you to perform both of these tasks simultaneously. This message displays on the Publish a Package page.
1. Go to the Manage Packages p2. Click Publish a Package.3. On the Publish a Package pag
click the Select Uploaded Fildrop-down list.
4. Select a package.5. Click Continue.
or1. Go to the Manage Packages p2. Click Publish a Package.3. On the Publish a Package pag
click Browse.4. Locate the package to publish5. Click Continue.
6.
Sorry, your changes were not saved due to edits made by {user name}.
Two users are attempting to make changes to the same information in DDM. This message appears anywhere an edit can be made.
The user should review changes mathe other user and adjust their changneeded.
Table 21-2 Error Messages in DDM (continued)
Error Description Resolution
M ASP User Guide May, 2014© 2014 Jeppesen
6

Troubleshooting
Ma© 2
s
e, l
s
Tail fy.type a ne
s page.
, type te l field field
s page.Tail
type a New is
eld is
Tail engine <name> already exists. Please try another one.
You have entered a tail engine name that matches an existing tail engine name. This message displays on the Create Tail Engine page and the Edit Tail Engine page.
To create a new tail engine:1. Go to the Manage Tail Engine
page.2. Click Create Tail Engine.3. On the Create Tail Engine pag
type a unique name in the TaiEngine Name field.
4. Click Save Tail Engine.To edit an existing tail engine:
1. Go to the Manage Tail Enginepage.
2. Click on the Edit link for the Engine that you want to modi
3. On the Edit Tail Engine page, unique name in the Tail EngiName field.
4. Click Save Changes.
Tail model <name> already exists. Please try another one.
You are attempting to create a tail model and have entered a tail model name that already exists. This message displays on the Create Tail Model page and the Edit Tail Model page.
To create a new tail model:1. Go to the Manage Tail Model2. Click Create Tail Model.3. On the Create Tail Model page
a unique name in the or CreaNew field. (The Major Modeis required; the Minor Modelis optional.)
4. Click Save Tail Model.To edit an existing tail model:
1. Go to the Manage Tail Model2. Click on the Edit link for the
Model you want to modify.3. On the Edit Tail Model page,
unique name in the or Createfield. (The Major Model fieldrequired; the Minor Model fioptional.)
4. Click Save Changes.
Table 21-2 Error Messages in DDM (continued)
Error Description Resolution
y, 2014 DDM ASP User Guide014 Jeppesen
437

Troubleshooting
DD
43
s
e,
s
type a point
t
age.kage
oved,
tatus
The Archive Location field is empty or contains invalid data.
The user is attempting to archive a package or recipient, an archive location on the server has not been specified. This message appears on the Archive Packages page and the Archive Recipients page.
Contact your DDM System Administrator.
The Checkpoint Name field is empty or contains invalid data.
The user has not specified a checkpoint name on the Create Checkpoint page or Edit Checkpoint page.
To create a checkpoint:1. Go to the Manage Checkpoint
page.2. Click Create Checkpoint.3. On the Create Checkpoint pag
type a checkpoint name in theCheckpoint Name field.
4. Click Save Checkpoint.To edit a checkpoint:
1. Go to the Manage Checkpointpage.
2. Click on the Edit link of the Checkpoint that you want to modify.
3. On the Edit Checkpoint page, checkpoint name in the CheckName field.
4. Click Save Changes.
The Comment field is empty or contains invalid data.
You clicked the Save Comments button, but did not specify any comments on the Package Checkpoints page
•
To modify the Package CheckpoinStatus page:
1. Go to the Manage Packages p2. Click the Edit link for the pac
that you want to modify.3. Click on the status link (Appr
Rejected, or Pending) next to Package Checkpoint Status.
4. On the Package Checkpoint Spage, type a comment in the Comment field.
5. Click Save Comment.6.
Table 21-2 Error Messages in DDM (continued)
Error Description Resolution
M ASP User Guide May, 2014© 2014 Jeppesen
8

Troubleshooting
Ma© 2
age >
down ent
h
pes
age, e
:ge .
rus
f you
s
, type in the
The Content Type field is required. Please select from the drop-down menu.
You are attempting to publish a package, but you have not assigned a content type to the package. This message appears on the Publish a Package page.
1. Go to the Publish a Package pDefine Properties tab.
2. From the Content Type drop-list, select an appropriate conttype for the package.
3. Click Publish Now or PublisLater.
The Content Type Name field is empty or contains invalid data.
You are attempting to create a content type, but have not specified a content type name, which is required. This error displays on the Create Content Type page.
1. Go to the Manage Content Typage.
2. Click Create Content Type.3. On the Create Content Type p
type a content type name in thContent Type Name field.
4. Click Save Content Type.
The DDM virus scanner is not enabled. DDM will not perform a virus scan.
The DDM System Administrator has set DDM to not perform a virus scan. The file being published will not be scanned by DDM for viruses.
Perform one of the following steps• Continue to publish the packa
without scanning it for virusesor
• Contact your DDM System Administrator to enable the viscanner.
The email notification settings are not activated, therefore no emails will be sent. Contact your DDM administrator to change this setting.
The email setting for the system is not activated.
Contact your DDM administrator ifeel that the email setting should beactivated.
The Email Rule Name field is empty or contains invalid data.
The user is attempting to create a new email rule, but has not specified an email rule name on the Create Email Rule page.
1. Go to the Manage Email Rulepage.
2. Click Create Email Rule.3. Select an Email Rule Event.4. Click Continue.5. On the Create Email Rule page
a name for the new email ruleEmail Rule Name field.
6. Click Continue.
Table 21-2 Error Messages in DDM (continued)
Error Description Resolution
y, 2014 DDM ASP User Guide014 Jeppesen
439

Troubleshooting
DD
44
page.
w Tail
page, e on the
page.l dify.age, e on the
The Engine Name field is required. Please select from the drop-down menu.
You have not selected a tail engine name on the following pages:
• Create Recipient - Tail• Edit Recipient - Tail
To create a tail recipient:1. Go to the Manage Recipients 2. Click Create Recipient.3. Click the option button for Ne
Recipient of Type and select from the drop-down list.
4. Click Continue.5. On the Create Recipient - Tail
select an engine name from thEngine Name drop-down list Define Properties tab.
6. Click Save Recipient.To edit a tail recipient:
1. Go to the Manage Recipients 2. Click the Edit link for the Tai
Recipient that you want to mo3. On the Edit Recipient - Tail p
select an engine name from thEngine Name drop-down list Edit Properties tab.
4. Click Save Changes.
The file <name> you are trying to publish cannot be uploaded and published. The server may have performed a virus scan on this file and removed it because of a detected virus. Consult your DDM System Administrator for further information.
DDM is unable to locate the file you are trying to locate. The DDM System Administrator has disabled DDM from performing a virus scan; however, the server may have performed a virus scan and detected a virus. Because the server may have detected a virus, the file is unavailable.
Contact your DDM System Administrator.
Table 21-2 Error Messages in DDM (continued)
Error Description Resolution
M ASP User Guide May, 2014© 2014 Jeppesen
0

Troubleshooting
Ma© 2
pes
age, ype ntent ckage..
nt
e delete.ontent
ved
.
wn
The Last Content Type cannot be deleted if there are associated packages.
The user is attempting to delete the only content type that exists, and packages are assigned to the content type. The system requires the user to assign another content type to these packages, but in this case, the user cannot reassign packages, because there are no other content types in the system. This message displays on the Manage Content Types page.
1. Go to the Manage Content Typage.
2. Click Create Content Type.3. On the Create Content Type p
enter a name in the Content TName field to create a new cotype to which to assign the pa
4. (optional) Enter a Description5. (optional) Enter a Default
Checkpoint.6. Click Save Content Type.7. Go back to the Manage Conte
Types page.8. Click on the Delete link for th
content type that you want to 9. Reassign the package to the c
type that you created.
The list of potentially approved packages has changed.
While you were reviewing the list of potentially approved packages, another user made changes that altered this list. This message appears on the Confirm Checkpoint Changes page and the Confirm Review Group Changes page.
Refresh the list of potentially appropackages and continue or cancel.
The LRU Type field is required. Please select from the drop-down menu.
You are attempting to create an LRU, but you have not selected an LRU type. This error displays on the Create LRU page.
1. Go to the Manage LRUs page2. Click Create LRU.3. From the LRU Type drop-do
list, select an LRU type.4. Click Save LRU.
Table 21-2 Error Messages in DDM (continued)
Error Description Resolution
y, 2014 DDM ASP User Guide014 Jeppesen
441

Troubleshooting
DD
44
s page.
select field,
the or
s page.Tail y.select field,
the or
page.
and n list.
page, l
page.l dify.age, drop-
es tab.
The Major Model field is empty or contains invalid data.
The user has not selected a major model on the Create Tail Model page or Edit Tail Model page.
To create a tail model:1. Go to the Manage Tail Model2. Click Create Tail Model..3. In the Major Model section,
a model in the Select Existingortype a name for the major model in Create New field.
4. Click Save Tail Model.To edit a tail model:
1. Go to the Manage Tail Model2. Click on the Edit link for the
Model that you want to modif3. In the Major Model section,
a model in the Select Existingortype a name for the major model in Create New field.
4. Click Save Changes.
The Model field is required. Please select from the drop-down menu.
The user is attempting to create or edit a tail recipient, but has not selected a model on the following pages:
• Create Recipient - Tail• Edit Recipient - Tail
To create a tail recipient:1. Go to the Manage Recipients 2. Click Create Recipient.3. Click New Recipient of Type
select Tail from the drop-dow4. Click Continue.5. On the Create Recipient - Tail
select a model from the Modedrop-down list on the Define Properties tab.
6. Click Save Recipient.To edit a tail recipient:
1. Go to the Manage Recipients 2. Click the Edit link for the Tai
Recipient that you want to mo3. On the Edit Recipient - Tail p
select an LRU from the LRUsdown list on the Edit Properti
4. Click Save Changes.
Table 21-2 Error Messages in DDM (continued)
Error Description Resolution
M ASP User Guide May, 2014© 2014 Jeppesen
2

Troubleshooting
Ma© 2
oups
page,
page.
type a the efine
on
kage:
ge
s e
age.
int.oll oint ab.t
point.
The Name field is empty or contains invalid data.
The user is attempting to create a review group, but has not specified a review group name on the Create Review Group page.
1. Go to the Manage Review Grpage.
2. Click Create Review Group.3. On the Create Review Group
specify a name in the ReviewGroup Name field.
4. Click Save Review Group.
The Name field is empty or contains invalid data.
The user is attempting to create a new recipient, but has not specified a recipient name on the Create Recipient page.
1. Go to the Manage Recipients 2. Click Create Recipient.3. Select a Recipient Type.4. Click Continue.5. On the Create Recipient page,
name for the new recipient in Recipient Name field on the DProperties tab.
6. Complete the remaining fieldsthe page.
7. Click Save Recipient.
8.
The package delivery review status for this recipient is Pending.
The content is awaiting approval for delivery. The user can click on the Pending status link to see who did not review delivery yet. This message appears on the Version Delivery Status and Part Delivery Status pages.
1. Go to the Approve/Reject PacPackage Checkpoints page.
2. On the Approve/Reject Packapage, select the Approve or Rejected radio button for the Package.
3. Enter Comments. (This field irequired if you are rejecting thpackage.)
4. Click Submit Changes.
The package has review status No Checkpoint Assigned.
No checkpoint has been assigned to the package for content review. This message appears on the Version Delivery Status and Part Delivery Status pages.
1. Go to the Manage Packages p2. Click on the Edit link of the
package that needs a checkpo3. On the Edit Package page, scr
down to the Package Checkpfield on the Edit Properties t
4. From the Package Checkpoindrop-down list, select a check
5. Click Save Changes.
Table 21-2 Error Messages in DDM (continued)
Error Description Resolution
y, 2014 DDM ASP User Guide014 Jeppesen
443

Troubleshooting
DD
44
kage:
ge
s e
age.nding
ick on tus
tatus t yet
iew
age.
ify.ck on
ipient
sign ssign
The package has review status Pending.
Package contents are awaiting review. This message appears on the Find Delivery Status page.
If you are the reviewer:1. Go to the Approve/Reject Pac
Package Checkpoints page.2. On the Approve/Reject Packa
page, select the Approve or Rejected radio button for the Package.
3. Enter Comments. (This field irequired if you are rejecting thpackage.)
4. Click Submit Changes.If you are not the reviewer:
1. Go to the Manage Packages p2. Click on the package that is pe
review.3. On the View Package page, cl
the Package Checkpoint Stalink.
4. On the Package Checkpoint Spage, check to see who has noreviewed the package.
The package has review status Rejected.
Package contents have been rejected. This message appears on the Find Delivery Status page.
No action is required unless the revprocess needs to be restarted.
To restart the review process:1. Go to the Manage Packages p2. Click on the Edit link of the
package that you want to mod3. On the Edit Package page, cli
the Assign Recipients tab.4. Click the check box of the rec
that you want to assign.5. Click Save Changes.
You can also use these steps to reasthe current checkpoint. From the ARecipients tab, select the current recipient and save the changes.
Table 21-2 Error Messages in DDM (continued)
Error Description Resolution
M ASP User Guide May, 2014© 2014 Jeppesen
4

Troubleshooting
Ma© 2
age.
, type e
h
page.
type a the efine
on
age.
at ed Do
h
age.
t ed Do
The Package Name field is empty or contains invalid data.
The user is attempting to publish a package with wrapping type “None,” but the Package Name field on the Publish a Package page is empty.
Package names cannot contain the following characters: & / \ ? % * < > : | “
1. Go to the Manage Packages p2. Click Publish a Package.3. Select a File to publish.4. Click Continue.5. On the Publish a Package page
the name of the package beingpublished in the Package Namfield.
6. Click Publish Now or PublisLater.
The Recipient Name field is empty or contains invalid data.
The user is attempting to create a new recipient, but has not specified a recipient name on the Create Recipient page.
1. Go to the Manage Recipients 2. Click Create Recipient.3. Select a Recipient Type.4. Click Continue.5. On the Create Recipient page,
name for the new recipient in Recipient Name field on the DProperties tab.
6. Complete the remaining fieldsthe page.
7. Click Save Recipient.
The Recommended Start Delivery field is empty or contains invalid data.
The Recommended Start Delivery field is empty, or the date specified is either invalid or does not occur before the Recommended Do Not Deliver After field. This message displays on the Publish a Package, and Edit Published Package pages.
1. Go to the Manage Packages p2. Click Publish a Package.3. Select a package to publish.4. Click Continue.5. In the Recommended Start
Delivery field, enter a date thoccurs before the RecommendNot Deliver After date.
6. Click Publish Now or PublisLater.
or1. Go to the Manage Packages p2. Click on the Edit link for the
package you want to modify.3. In the Recommended Start
Delivery field, type a date thaoccurs before the RecommendNot Deliver After date.
4. Click Save Changes.
Table 21-2 Error Messages in DDM (continued)
Error Description Resolution
y, 2014 DDM ASP User Guide014 Jeppesen
445

Troubleshooting
DD
44
.
r as
e.
pe a
age.kage
e a y
age.
page,
The Save Filter as field is empty or contains invalid data.
The user is attempting to create a new filter, but has not specified a filter name in the Save Filter as field on the Create Filter page.
1. Go to the Manage Filters page2. Click Create Filter.3. Select a Filter Type.4. Click Continue.5. Create a Query.6. Click Continue.7. Type a name in the Save Filte
field.8. Click Finish.
The Save Report as field is empty or contains invalid data.
The user has not specified a report name in the Save Report as field on the Create Report page.
1. Go to the Manage Reports pag2. Click Create Report.3. Select a Report Type.4. Click Continue.5. Create a Query.6. Click Continue.7. On the Create Report page, ty
valid report name in the SaveReport as field.
8. Click Finish.
The Start Delivery Date field is empty or contains invalid data.
The Start Delivery Date field is empty, or the date specified is either invalid or does not occur before the Do Not Deliver After field. This message displays on the Edit Package and Edit Multiple Packages pages.
To edit a package:1. Go to the Manage Packages p2. Click the Edit link for the pac
that you want to modify.3. On the Edit Package page, typ
valid date in the Start Deliverfield.
4. Click Save Changes.To edit multiple packages:
1. Go to the Manage Packages p2. Click Edit Multiple.3. On the Edit Multiple Packages
type a valid date in the Start Delivery field.
4. Click Save Changes.
Table 21-2 Error Messages in DDM (continued)
Error Description Resolution
M ASP User Guide May, 2014© 2014 Jeppesen
6

Troubleshooting
Ma© 2
s
e, ail
s
Tail fy. enter gine
The Tail Engine Name field is empty or contains invalid data.
The user has not specified a tail engine name on the following pages:
• Create Tail Engine• Edit Tail Engine
To create a tail engine:1. Go to the Manage Tail Engine
page.2. Click Create Tail Engine.3. On the Create Tail Engine pag
enter an engine name in the TEngine Name field.
4. Click Save Tail Engine.To edit a tail engine:
1. Go to the Manage Tail Enginepage.
2. Click on the Edit link for the Engine that you want to modi
3. On the Edit Tail Engine page,an engine name in the Tail EnName field.
4. Click Save Changes.
The virus scanner returned error {code}.
The DDM System Administrator is testing settings on the Configure Virus Scanner screen.orA user is attempting to publish a package, and the virus scanning software has returned an error code as a result of scanning the package for viruses.
Contact your DDM System Administrator.
Table 21-2 Error Messages in DDM (continued)
Error Description Resolution
y, 2014 DDM ASP User Guide014 Jeppesen
447

Troubleshooting
DD
44
ay that
orrect
nner
ill not irus,
owing age.the owing age.
y ge s
w
t the
s
kage
oups
The virus scanner returned unknown code {error code}
The user is attempting to publish a package or test the virus codes, and the virus scanning software has returned a code that is not specified in DDM.
The DDM System Administrator mhave virus scanning documentationthey can reference to identify the ccodes.To modify codes:
1. Go to the Configure Virus Scapage.
2. Add a code to one of the threefields:
Virus Not Found Codes: DDM wrecognize the code as an error or vallowing the user to publish their package.Virus Found Codes: DDM will recognize the code as a virus, disallthe user from publishing their packError Code: DDM will recognize code as a virus scanner error, disallthe user from publishing their pack
3. Click Save.
There are no package deliveries needing to be reviewed.
There are no packages assigned for your review.
If the user feels this is an error, theshould review the Recipient PackaStatus report to see if the package iassigned to them for review.
The user can also contact the RevieManager, Airline Manager, or DDMSystem Administrator to verify thacheckpoints are set up correctly.To verify checkpoints:
1. Go to the Manage Checkpointpage.
2. Click the Edit link for the pacthat you want to verify.
3. On the Edit Checkpoint page,modify the Reviewers and Grand the Review Devices as necessary.
4. Click Save Changes.
Table 21-2 Error Messages in DDM (continued)
Error Description Resolution
M ASP User Guide May, 2014© 2014 Jeppesen
8

Troubleshooting
Ma© 2
s
e, ne
s page.
e, inor
hould e e the file.
blish
There is no expected upload directory {directory entered} to hold the package file.
The user tried to upload a package via the Publish a Package screen or the Web service publish interface, but there is no directory to hold the package.
Contact your DDM System Administrator.
User package was rejected and removed due to a system error when trying to process the zip file {file name}.
The user tried to upload a package, but the content directory is not set correctly.
Contact your DDM System Administrator.
We’re sorry, your session has timed out. Please log in again.
Your current login has expired. Log back into DDM.
You cannot create a tail because no engines exist. Go to Manage Tail Engines to create one or more engines.
The user is attempting to create a tail, but no tail engines have been created. This message appears on the Create Tail Engine page.
1. Go to the Manage Tail Enginepage.
2. Click Create Tail Engine.3. On the Create Tail Engine pag
enter a name in the Tail EngiName field.
4. Click Save Tail Engine.
You cannot create a tail because no models exist. Go to Manage Tail Models to create one or more models.
The user is attempting to create a tail, but no tail models have been created. This message appears on the Create Tail Model page.
1. Go to the Manage Tail Model2. Click Create Tail Model 3. On the Create Tail Model pag
create one or more major or mtail models.
4. Click Save Tail Model.
Your package was rejected and removed because of the following error(s) encountered when reading the bill of materials XML:{message(s)}
The BOM.XML file that the user is trying to publish contains data that exceeds the character limit or violates other constraints as described in the messages.
Whoever created the BOM.XML smodify the package according to thmessages listed in the email and usformats defined in the BOM.DTD
The user should then attempt to puthe file again.
Table 21-2 Error Messages in DDM (continued)
Error Description Resolution
y, 2014 DDM ASP User Guide014 Jeppesen
449

Troubleshooting
DD
45
nner
he
virus, ield or
hen a
file ser is stem
file ser is stem
want
age.
file
Your package was rejected and removed because it failed the virus check with code {x}.
DDM has performed a virus check on a package and a code returned from the virus check matches a code specified on the Configure Virus Scanner page.
1. Go to the Configure Virus Scapage.
2. Review the virus scanner documentation to verify that tcode specified indicates the presence of a virus.
3. If the code does not indicate amove the code to the correct fdelete it entirely.
4. Click Save.5. If the code indicates a virus, t
virus exists.
Your package was rejected and removed due to a system error when trying to expand the file {file name}.
During file expansion, a system error occurred.
The user should try publishing the again. If this problem persists, the uinstructed to contact their DDM SyAdministrator.
Your package was rejected due to a system error.
During file expansion, a system error occurred.
The user should try publishing the again. If this problem persists, the uinstructed to contact their DDM SyAdministrator.
Your package was removed because file <name> is incorrectly named: the extension must be .zip.
You are attempting to publish a package that is not in zipped format. This message occurs on the Publish a Package page.
1. Reformat the package that youto publish as a .zip file.
2. Go to the Manage Packages p3. Click Publish a Package.4. Click Browse and reselect the
that you want to publish.5. Click Continue.
Table 21-2 Error Messages in DDM (continued)
Error Description Resolution
M ASP User Guide May, 2014© 2014 Jeppesen
0

Glossary
This glossary defines the terms and acronyms used in the DDM documentation.
ACARS — See Aircraft Communications Addressing and Reporting System.
ADEL — See Application Data Enhanced Load (ADEL).
AEEC — See Airlines Electronic Engineering Committee (AEEC).
AEG — See Aircraft Evaluation Group (AEG).
Aeronautical Radio, Inc. (ARINC) — An organization that sets avionics, communications, and other technical standards for the global air transportation industry and represents the aviation industry in international forums. ARINC also develops and operates communications and information processing systems. Owned by US-based scheduled airlines, air transport companies, aircraft manufacturers, and non-US airlines.
AIR — See Aircraft Certification Service.
Aircraft Certification Service (AIR) — An FAA service that issues airworthiness certificates to an aircraft providing FAA authorization to operate that aircraft.

Glossary
Us
45
Aircraft Communications Addressing and Reporting System (ACARS) — A digital data link system that allows airline flight operations departments to communicate with the various aircraft in their fleet via VHF radio.
Aircraft Evaluation Group (AEG) — An FAA office that coordinates and assists with aircraft certification and continued airworthiness programs.1
airline administrator — An airline support person that administers functions for the airline through the Jeppesen Ground Tools Portal.
Airlines Electronic Engineering Committee (AEEC) — An international body of airline representatives. Leads the development of technical standards for airborne electronic equipment including avionics and in-flight entertainment equipment used in commercial, military, and business aviation.
Airport Moving Maps CAM (AMM CAM) — A Content Application Module (CAM) in CAT that allows users to define display features for the EFB AMM airborne application and control access to charts.
Application Data Enhanced Load (ADEL) — A set of software functions implemented on multiple air and ground systems that: 1) transfers the role of loading frequently changing application data to the flight crew, rather than requiring line maintenance or a Class 3 EFB Administrator; 2) enhances the delivery of frequently changing read-only application data from the back-office to the EFB, and; 3) provides additional reporting to airline maintenance engineering.
AMM CAM — See Airport Moving Maps CAM (AMM CAM).
ARINC — See Aeronautical Radio, Inc. (ARINC).
1. http://www.faa.gov/about/office_org/field_offices/aeg/
er Guide May, 2014© 2014 Jeppesen
2

Glossary
Ma© 2
ARINC standards — Hardware and software standards created by Aeronautical Radio, Incorporated. There are three classes of ARINC standards:
• ARINC Characteristics - Define the form, fit, function, and interfaces of avionics equipment. There are two series of ARINC Characteristics. The ARINC 700 series defines digitalizations, while the ARINC 500 series defines older, analog avionics.
• ARINC Specifications - Principally used to define either the physical packaging or mounting of avionics equipment, data, communication standards, or a high-level computer language.
• ARINC Reports - Provide guidelines or general information found by the airlines to be good practices, often related to avionics maintenance and support.
DDM adheres to the following ARINC standards:
• ARINC Report 665-1 (January 2001) and 665-2 (August 2002)Loadable Software Standards. Aircraft industry standards for loadable software parts and software transport media. Describes the common principles and rules to be applied to any part of a data load system to ensure compatibility and inter-operability. Includes part numbering, content, labeling, and formatting of loadable software parts and software transport media.
• ARINC Report 665-3 (May 2002)Electronic Distribution of Software. Describes the common principles and rules to be applied when transferring software (typically Field Loadable Software) between organizations. These principles and rules are intended to ensure compatibility and inter operability, including file naming, content, labeling, compression, encryption, authentication, and formatting packages containing software and definitions of software transport media.
autoapproved package — A package that is assigned a checkpoint that has no assigned reviewers or review devices. Autoapproved packages are automatically approved by the DDM server for delivery to a recipient.
available bandwidth — The percentage of the available network bandwidth that can be configured for the DDM clients to use when receiving and publishing package data.
y, 2014 User Guide014 Jeppesen
453

Glossary
Us
45
basic recipient — Those recipients that are not tails or proxies and include EFB Class 1 or 2, as well as general purpose devices.
BEDS Crate — A logical container of one or more LSAPs. Facilitates the delivery of related LSAPs as a single set to a 787 or 747-8 airframe only.
Bill of Material (BOM) — A file that lists all parts included with a content package published and delivered through DDM for EFB Class 1 and Class 2 recipients that do not require the ARINC 665 package format. Not used for EFB Class 3.
blockpoint — A release of a group of software and hardware versions. In the EFB context, blockpoints apply principally to the operating systems and the CDA versions.
BOM — See Bill of Material (BOM).
business rule — A statement that defines or constrains some aspect or behavior of a process based on pre-determined conditions or activities. May be modified to reflect changes in the process or functional requirements.
CAM — See Content Application Module (CAM).
CAT — See Configuration Administration Tool (CAT).
CAT administrator — An airline support person who uses CAT to administer EFB-specific functions for the airline.
CDA — See Content Delivery Agent (CDA).
CDAB — See Content Delivery Agent for Boeing Class 1 (CDAB).
CDAD — See Content Delivery Agent for Desktop (CDAD).
er Guide May, 2014© 2014 Jeppesen
4

Glossary
Ma© 2
CDAF — See Content Delivery Agent for the Flight Bag (CDAF).
CDAJ — See Content Delivery Agent for Jeppesen (CDAJ).
CDAL — See Content Delivery Agent for LoadStar (CDAL).
Certificate of Conformity (COC) — A document that certifies that the delivered parts or materials delivered were produced according to established manufacturing and quality management standards. This document also certifies that the parts or materials are new and in airworthy condition. This certificate is provided and signed by the parts manufacturer or content supplier.
checkpoint — Inspection points where reviewers or groups use the assigned review device to load, review, and approve packages before delivery to recipients. Checkpoints consist of reviewers (individual or groups) and the review device. Checkpoints can be assigned to a package for content review.
Client — See Content Delivery Agent (CDA).
COC — See Certificate of Conformity (COC).
Configuration Administration Tool (CAT) — A web-based administration tool used to configure and manage applications on an EFB during initial installation on an airplane and during service. CAT incorporates the required administrative functionality for each individual EFB application, provides airline customers with the ability to create custom EFB configuration files, and modify or update fleet management databases for the EFB.
Consumer Company — A company that is receiving a published package from a supplier company.
Content — The data contained in a package. DDM can deliver numerous types of content including delta sets, LSAPs, Terminal Charts, Electronic Documents (in several formats), Performance Databases, Flight Management Computer (FMC) Navigation Databases, Airport Maps, configuration files, and application software.
y, 2014 User Guide014 Jeppesen
455

Glossary
Us
45
Content Application Module (CAM) — Applications or modules that plug in to the overall CAT framework. CAMs create and manage read-only application data.
content delivery — The function of delivering a complete package of content from providers or suppliers to a recipient, with some possible period of latency between delivery of content and its actual use.
Content Delivery Agent (CDA) — A DDM client application installed on a recipient that downloads a package from the DDM server and processes it. CDAs include CDAB, CDAD, CDAF, CDAJ, and CDAL.
Content Delivery Agent for Boeing Class 1 (CDAB) — An application installed on a Boeing Class 1 EFB device through which a package is received. CDAB downloads packages from DDM and prepares them to be loaded on a Boeing Class 1 EFB device.
Content Delivery Agent for Desktop (CDAD) — An application that allows you to receive packages on your local hard drive.
Content Delivery Agent for the Flight Bag (CDAF) — A ground system application installed on a Class 2 or 3 Boeing EFB that is enabled for a Terminal Wireless LAN Unit (TWLU). CDAF has no user interface, but it does have its own part number and version number on the EFB. CDAF retrieves content from DDM, extracts the content, stages the LSAPs, and updates the necessary on-board databases. For ADEL, CDAF manages the delta sets and parts it retrieves from DDM and loads the application data on the EFB, while keeping the left and right EUs synchronized.
Content Delivery Agent for Jeppesen (CDAJ) — An application through which a package is received if that package is intended for delivery to a Jeppesen Class 1 or 2 EFB.
Content Delivery Agent for LoadStar (CDAL) — An application through which a package is received if that package is intended for delivery to a Class 3 EFB through LoadStar.
content — Data items that may be packages of any wrapping type (including none), delta sets, LSAPs, and ADCIs. Content is uniquely defined by title, version, and type.
er Guide May, 2014© 2014 Jeppesen
6

Glossary
Ma© 2
Content Identification — See part number.
content package properties — Metadata that describes the characteristics of the packages submitted into DDM, for example, effective/expiration dates and begin/end delivery dates.
content packaging process — Actions performed on a deliverable data set that provides or enhances its security, compactness, conformance to applicable standards, or inter connectivity with other content packages before, during, and after delivery.
content provider — Companies that provide content for DDM publication and delivery. Content providers may be Jeppesen, Boeing, or other third parties.
content publishing — The method that a content provider will use to introduce appropriate content into DDM for delivery to recipients that are entitled to that content. Includes defining content metadata and content package attributes.
content type — A description of a package that enables you to more efficiently organize packages before they are delivered to recipients. When you create a content type, you can specify the associated checkpoint.
Coordinated Universal Time (UTC) — A high-precision atomic time standard that replaced Greenwich Mean Time (GMT) as the basis for legal civil time on Earth.1
Crate — See BEDS Crate.
customer — Organization or company (airline or non-airline) that is a registered user of DDM and has access to DDM services. Based on their subscription, customers have access to data, applications, and functionality associated with Ground Systems.
1. http://en.wikipedia.org/wiki/Coordinated_Universal_Time
y, 2014 User Guide014 Jeppesen
457

Glossary
Us
45
Data Distribution and Management (DDM) — A web-based tool that enables you to manage distribution and delivery of data and software used on board an aircraft. For example, you might deliver a package of terminal charts to an aircraft (recipient) equipped with a Class 3 EFB. Using DDM, you can also set up checkpoints and track the delivery of a package.
DDM — See Data Distribution and Management (DDM).
DDM administrator — Personnel who perform all system, user, account, and general administration of DDM.
Delivery Priority — The priority by which packages are sent to a specific recipient. Packages with a Delivery Priority of 1 are the highest priority, and those with a value of 9 are the lowest priority. If two packages have the same priority, DDM delivers the smaller package first.
delta set — The difference in content between two versions of the same part. DDM creates delta sets to update all reported versions of content with the new version.
Display Unit (DU) — The part of the EFB system with which flight crew interacts to control EFB applications. All EFB Class 3 systems consist of two separate units - an Electronic Unit (EU) and a DU. The pilots do not interact directly with the EU.
DU — See Display Unit (DU).
EFB — See Electronic Flight Bag (EFB).
email rule — A rule that defines when emails are sent and who receives them. Email rules are based on specific events; that is, when an event occurs, DDM automatically generates and sends an email notification. For example, an email rule for “Package Approved” can define who receives email notification after a package is reviewed and approved. Emails can be sent to user groups, individual users, and other email addresses.
er Guide May, 2014© 2014 Jeppesen
8

Glossary
Ma© 2
Electronic Flight Bag (EFB) — A device or set of devices installed on the airplane or carried onto the airplane for use by the pilot before, during, or after a flight. EFBs are divided into three classes by the Federal Aviation Administration (FAA). Class 1, 2, and 3 are described from an operational use perspective:
Class 1
• Are generally commercial-off-the-shelf (COTS)-based computer systems used for aircraft operations
• Are portable
• Employ a device not permanently attached to an aircraft
• Do not draw electricity from the airplane
• Must be stowed for take-off and landing
• Are considered to be Portable Electronic Devices
• Are not required to go through an administrative control process for aircraft use (if using only Type A applications)
Class 2
• Are generally COTS-based computer systems used for aircraft operations
• Are portable
• Employ a device connected to an aircraft via a mounting cradle during normal operations
• May draw electricity from the airplane
• May be used during all phases of flight
• Are required to go through an administrative control process to add, remove, or use in the aircraft
• Are considered to be Portable Electronic Devices
• Require evaluation and certification approval from AIR for system power, data connectivity, and mounting devices
Class 3
• Are specialized computer systems used for aircraft operations
y, 2014 User Guide014 Jeppesen
459

Glossary
Us
46
• Are non-portable
• Are permanently installed device on an aircraft
• Draw electricity from the airplane
• May be used during all phases of flight
• May be replaced only by a certified maintenance technician if the device fails
Class 3 EFBs require AIR approval, except for user modifiable software that may be used to host Type A and B applications. Class 3 EFB system certification requirements enable additional applications and functions.
Electronic Unit (EU) — The processing unit of an EFB Class 3 system. All EFB Class 3 systems consist of 2 separate units - an EU and a Display Unit (DU). The pilots interact directly with the DU which resides in the cockpit. The EU is usually installed with all the other electronic subsystems within the cockpit.
EU — See Electronic Unit (EU).
event — A specific, predefined task that the system performs and logs in response to a state change or when a user completes a task. Depending on the DDM configuration, an event may be used to generate an email notification if an email rule exists based on the event’s type.
event type — A category of event that may be used to create an email rule when specific events of the same type occur in DDM.
FAA — See Federal Aviation Administration (FAA).
Federal Aviation Administration (FAA) — An agency of the United States Department of Transportation with authority to regulate and oversee all aspects of civil aviation in the U.S.1
1. http://www.babylon.com/definition/FAA/All
er Guide May, 2014© 2014 Jeppesen
0

Glossary
Ma© 2
filter — A setting that enables you to control and limit the information displayed in the DDM drop-down lists and on DDM pages. When you use a filter, DDM displays only the information that matches the selection criteria defined for that filter.
Flight Management Computer (FMC) — Used by the pilot to provide real-time navigation information and other pertinent flight information. Also used to calculate a variety of critical data for flight planning. The FMC is a core component of a complete Flight Management System (FMS) installed on an aircraft.
Flight Management System (FMS) — A collection of several avionics components installed on an aircraft that work together to assist the pilot in flying the aircraft.
FMC — See Flight Management Computer (FMC).
FMS — See Flight Management System (FMS).
Line Replaceable Unit (LRU) — An essential support item which is removed and replaced at the field level to restore the end item to an operational ready condition. LRUs speed up repair, because they can be replaced quickly, restoring the overall system to service. They also reduce the cost, and increase the quality of the system, by spreading development costs of the type of unit over different models of vehicles.1
Loadable Software Airplane Part (LSAP) — An individual data component that is delivered to and stored on an airplane to become part of the airplane’s configuration. An LSAP can consist of a configuration file, data file, or application. Also referred to as a Loadable Software Part (LSP).
LoadStar — Software configuration management tool made by Demo Systems, LLC. Used in conjunction with the PMAT 2000 for loading content into EFB Class 3 devices.
LRU — See Line Replaceable Unit (LRU).
LSAP — See Loadable Software Airplane Part (LSAP).
1. http://en.wikipedia.org/wiki/Line-replaceable_unit
y, 2014 User Guide014 Jeppesen
461

Glossary
Us
46
LSP — See Loadable Software Airplane Part (LSAP).
media set — A logical container of one or more LSAPs. Media sets are required for delivery to recipients that are serviced by LoadStar using a portable data loader. Facilitates the delivery of related LSAPs as a single set to any airframe other than a 787 airframe.
package — A data set that has been through the DDM content packaging process and has been successfully published to DDM for delivery. The set includes individual product components and other auxiliary components necessary for the class of target EFB receiving the package.
package checkpoint — A checkpoint inserted into the review process to approve content delivery. After a checkpoint is assigned to a package, the package must clear that checkpoint before it is delivered to any recipients.
part number — A unique identifier assigned to a data set by each manufacturer of content. The LSAP number conforms to ARINC 665 specifications in the format of MMMCC-SSSS-SSSS, where MMM represents the 3-character manufacturer code, CC represents the 2-digit checksum number, and SSSS-SSSS represents the unique supplier product identifier. A part number may be used once and assigned to only one unique product or package.
The Boeing Class 3 EFB uses ARINC 665-2 compliant part numbering for its LSAPs. Please note that DDM also accepts and delivers ARINC 665-3 LSAPs for NFSONS content.
PDL — See Portable Data Loader (PDL).
PMAT — See Portable Maintenance Access Terminal (PMAT).
Portable Data Loader (PDL) — A device used to send software and data to equipment on an aircraft.
Portable Maintenance Access Terminal (PMAT) — The PMAT 2000 is the brand name from DemoSystems, LLC, for a PDL in the form of a ruggedized laptop that interfaces with an aircraft for data loading and connectivity. It is used to load data onto the EFB.
er Guide May, 2014© 2014 Jeppesen
2

Glossary
Ma© 2
Proxy Recipient — Those recipients used to deliver content to other recipients, such as a portable data loader (PDL).
publishing — See content publishing.
publishing URL — The URL to which packages from a publishing company are published. This URL resides on the consumer company’s server.
recipient — A device or tail that is the final consumer of content delivered through DDM. Also, a PMAT that acts as a proxy recipient for multiple tails.
review device — A computer that is used during the review process to specifically load and review packages before they are delivered to recipients. Review devices are inserted into checkpoints when appropriate.
Review Group — A logical grouping of one or more reviewers that are responsible for reviewing content. The review group reviews content as part of a checkpoint to ensure that a package requiring approval is reviewed and approved for release.
Review Policy — A policy assigned to content to determine how many QA reviewers must approve content before it is considered approved and available for general distribution to recipients. There are two review policy codes:
• ANDThis review policy code indicates that all reviewers assigned to the content must grant approval before it can be made available.
• ORThis review policy indicates that only one of the reviewers out of all the reviewers assigned to the content needs to grant approval before it can be made available.
staging — The function that makes uploaded content available to a PDL or an EFB for installation and inclusion in an airplane’s active configuration.
y, 2014 User Guide014 Jeppesen
463

Glossary
Us
46
staging area — The partition of the hard disk on the PDL or the EFB that is used for the temporary placement of data that is to be used by the data load function to move data to the application area. The staging area on the EFB is accessible to both the Linux and Windows partitions.
supplier company — A company that is publishing a package externally to a consumer company.
tail — A specific aircraft within an airline’s fleet identified by a unique tail number. Properties of a tail include the major model, minor model, and engine type for the aircraft
tail engine — An engine model on an aircraft.
tail model — An aircraft identifying number that consists of a major model and a minor model. The major model represents the first set of characters that comprise a tail model; the minor model represents the last set of characters comprising a tail model. Characters can be alphabetical, numerical, or a combination of both. For example, in tail model number 777-200, the “777” is the major model, and “200” is the minor model.
tail number — A unique identifier assigned to a specific aircraft.
tail recipient — Those recipients directly associated with an aircraft, such as an EFB Class 3 device.
Terminal Wireless LAN Unit (TWLU) — Installed airplane equipment that provides a wireless radio for airport terminal area radio frequency communications. The TWLU scope includes physical system installation (antenna, wiring, and structural provisions), the equipment itself, and the EFB software necessary to operate the TWLU.
TWLU — See Terminal Wireless LAN Unit (TWLU).
er Guide May, 2014© 2014 Jeppesen
4

Glossary
Ma© 2
Type A Software Application — May be hosted on any of the hardware classes; requires Flight Standards District Office (FSDO)/PI approval; does not require an AIR design approval.
Type B Software Application — May be hosted on any of the hardware classes; requires FSDO/PI approval; requires Aircraft Evaluation Group (AEG) evaluation at the FAA; does not require an AIR design approval.
user — A person who accesses a system to manage or view digital content, manage system access, manage users, generate reports, and perform other functions available through the system.
versioned content — Content that includes ADEL-enabled, frequently updated application data that can be loaded onto an ADEL-enabled EFB by the flight crew, bypassing the need for mechanics to manually load the data.
UTC — See Coordinated Universal Time (UTC).
Weight on Wheels (WOW) — An indication that the landing gear (or wheels) of an aircraft has detected weight and therefore is no longer airborne. Occurs when an aircraft touches down on the runway or anytime the aircraft is on the ground. WOW can then be used to start or end processes on the aircraft.
WOW — See Weight on Wheels (WOW).
wrapped part — A part that has been zipped for delivery to a recipient.
wrapper — A method of zipping content for delivery to a recipient.
wrapping type — Prior to publishing to DDM, parts are assembled in A specific package formats in which parts are assembled. DDM recognizes specific wrapping types, each of which is associated with a certain EFB class or aircraft type. The wrapping types include BOM (Bill of Material), BEDS Crate, Media Set, and None.
y, 2014 User Guide014 Jeppesen
465

Glossary
Us
46
er Guide May, 2014© 2014 Jeppesen
6


Glossary
User Guide May, 2014© 2014 Jeppesen
468

APPENDIX A
EFB Legacy Process
According to a Boeing directive, the only way to wirelessly deliver customer parts and Jeppesen data to a Boeing 787 is by packaging them in a crate and delivering them through Boeing’s LSAP Librarian (LSAPL) system. However, Boeing has granted an exemption to customers with fleets containing the Boeing 787 and other Boeing models, such as the Boeing 777, for Part 121 parts used on an EFB. This exemption, the Boeing EFB Legacy Process, enables DDM to wirelessly deliver EFB parts that are packaged in media sets to all Boeing aircraft models with Boeing EFBs. The EFB exemption covers only EFB parts and not parts intended for other LRUs.
DDM customers do not need to take additional steps to use the EFB exemption. After you acquire a Boeing 787, simply create a new recipient as you would for any tail.
In case wireless delivery fails, Jeppesen recommends that you load all parts in the LSAPL system. For information on loading parts in the LSAPL system, refer to Boeing's LSAPL documentation.
Figure A.1 shows the delivery of crates and media sets via the EFB exemption.

EFB Legacy Process
Us
47
Figure A.1. EFB Legacy Process
er Guide May, 2014© 2014 Jeppesen
0

Index
AAbout link
description of 56example of 57
ACARS, definition of 452ADC CUSTOMER CONFIG
configuration file 48Additional references 13ADEL 24ADEL, definition of 452Administrator guide
intended audience 9organization of 10
Adobe PDF, exporting a standard report to 365
AEEC, definition of 452AEG, definition of 452AIR, definition of 451Airline Administrator, definition of 452Airport Moving Maps, configuration file
47Airport Moving Maps, description of 33AM CUSTOMER CONFIG configuration
file 47AMM
configuration file 47description of 33
Angle brackets, understanding 12Application Data Enhanced Load
See ADELApplication Dispatch Controller
configuration file 48Application File LSAP 47Applications
Airport Moving Map 47EFB Document Browser 48Performance 49System Layout Files 48Terminal Chart 49
Approve/Reject Packages functiondescription of 62
Approved package, changing the status for 110
Approving a package 118Archive Packages function, description of
62Archive Packages tab on the Archive
Packages page 134Archive Recipients function, description of
63, 151Archive Recipients tab on the Archive
Recipients page 186archive.zip files
archiving a recipient 185deleting for a package 143deleting for a recipient 191downloading for an archived package
141

Index
Us
47
downloading for an archived recipient 190
Archived packagesdeleting 138deleting an archive.zip file for 143downloading an archive.zip file for 141
Archived recipientsdeleting 189deleting an archive.zip file for 191downloading an archive.zip file for 190
Archivingand deleting a package 43and deleting a recipient 43and package status 42and XML files 43packages, overview of 132, 133recipients, overview of 185understanding the process 42
ARINC 665-2, and recipient EFB class 44ARINC 665-3 462ARINC standards, definition of 453ARINC, definition of 451Assign Packages tab
roles needed to access 31Association between roles and functions
30Asterisks, description of 56Autoapproved package, definition of 453Available bandwidth, definition of 453
BBasic recipient
creating 154definition of 454description of 29, 146prerequisites to creating 154
Basic review device, description of 224, 345
Bill of Materialsand recipient EFB class 44definition of 454
Bold text, understanding 12BOM
and recipient EFB class 44definition of 454
XML format for 45Brackets, understanding 12Business rule, definition of 454Buttons
description of 56example of 57
CCAT Administrator, definition of 454CAT Airport Maps, configuration files 47,
48CAT Application Module, definition of
456CAT, definition of 455CDA
overview of 19understanding 19
CDA, definition of 456CDAB
understanding 21CDAB, definition of 456CDAD 21, 23
definition of 456installation device 19understanding 20
CDAF 25definition of 456installation device 19understanding 24
CDAJinstallation device 19understanding 25
CDAL 28definition of 456installation device 19understanding 27
Certificate of Conformitydefinition of 455viewing 120
Changinga checkpoint 250a content type 264a package review status 110a rconfigurable eport 375a review device 234
er Guide May, 2014© 2014 Jeppesen
2

Index
Ma© 2
a review group 218a review group with pending reviews
220a review group, no pending reviews
218a tail model 399email rules 299tail engines 388
Checkboxesdescription of 56example of 57
Checkpoints 19adding to the delivery process 73assigning to a recipient 153assigning to a recipient group 200creating 246definition of 455deleting 252deleting when no reviews are pending
252deleting when reviews are pending 252editing 250naming 245overview of 240preparing for 71process diagram for managing 243viewing 249
Client. See CDAClosing DDM 75COC
definition of 455viewing 120
Cockpitand Airport Moving Maps 33and EFB Document Browser 33and Performance data 33and Terminal Charts 33and Video data 33
Cockpit, types of available data 33Columns, sample of sorted data 66Comments 121Common Administration Tool, definition
of 455configurable DDM configurable reports
understanding 366configurable reports
creating 371deleting 380
editing 375Events 366Events, description of 366naming 370Packages 366Packages, description of 366Pending Content Review 367Pending Content Review, description of
367Recipient Packages Status 367Recipient Packages Status, description
of 367Recipient Snapshot 368Recipient Snapshot, description of 368Recipients 369Recipients, description of 369Review Devices 370Review Devices, description of 370running a saved report 377
Configuration File LSAP 47Configuration files
ADC CUSTOMER CONFIG 48Airport Moving Map 47AM CUSTOMER CONFIG 47Application Dispatch Controller 48created using CAT Airport Maps 47,
48EDOCS APPCONFIG 48EDOCS SETCONFIG 48EFB Document Browser 48GRP PERF AIRPORT 49GRP PERF CONFIG 49GRP PERF DDG 49GRP PERF PERF 49GRP PERF POLICY 49PART 121 LINUX 48PART 121 WINDOWS 48PART 25 LINUX 48PART 25 WINDOWS 48Performance 49SUPPLIER CONFIG 48System Layout Files 48TERM CHARTS CUST CONFIG 49Terminal Chart 49
Consumer companydefinition of 455
Contacting the GSCC 14Content
y, 2014 User Guide014 Jeppesen
473

Index
Us
47
approving 118Content Delivery Agent for Boeing
understanding 21Content Delivery Agent for Boeing Class
1, definition of 456Content Delivery Agent for Jeppesen
installation device 19understanding 25
Content Delivery Agent for LoadStardefinition of 456installation device 19understanding 27
Content Delivery Agent for the Desktopdefinition of 456installation device 19understanding 20
Content Delivery Agent for the Flight Bagdefinition of 456installation device 19understanding 24
Content Delivery Agent, definition of 456Content Delivery Agent. See CDAContent delivery, definition of 456Content package properties, definition of
457Content packaging process, definition of
457Content provider, definition of 457Content type
creating 259, 279deleting 265editing 264naming 258overview of 256, 274process diagram for managing 276viewing 262
Content, definition of 455Contents of this guide 10Conventions
About link, description of 56bold text 12bracket usage 12buttons, description of 56checkboxes, description of 56diagram of 57examples of 57Exit link, description of 56Home link, description of 56
italicized text 12keyboard strokes 12live links, description of 56Navigation menu, description of 56overview of in this guide 12radio buttons, description of 56required fields, description of 56scrollbars, description of 56sortable columns, description of 56tabs, description of 56Welcome text, description of 56
Cratedefinition of 457
Create Checkpoint page 247Create Content Type page 260Create Email Rule page
step 1, select email rule event 291step 2, define properties 292
Create Filter pagestep 1 329step 2 330step 3 332
Create Recipient Group 199Create Recipient page
step 1, select recipient type 155Create Recipient-Proxy page
step 2, define recipient properties 169, 170
Create Recipient-Tail pagestep 2, define recipient properties 156,
158Create Report page
step 1, select report type 372step 2, create query 373step 3, select fields and finish 374
Create Review Device pagestep 1, select review device type 229
Create Review Device-Tail pageDefine Properties tab 230step 2, define review device properties
230Create Review Group page 215Create Tail Engine page 387Creating
a Basic recipient 154a Basic recipient, prerequisites to 154a checkpoint 71, 246a configurable report 371
er Guide May, 2014© 2014 Jeppesen
4

Index
Ma© 2
a content type 259, 279a filter 328, 350a Proxy recipient 168a Proxy recipient, prerequisites to 154a recipient 154a recipient group 199a recipient, prerequisites to 154a review device 229a review device, prerequisites for 229a review group 214a tail engine 387a tail model 397a Tail recipient 154a Tail recipient, prerequisites to 154an email rule 290, 295an email rule, prerequisites to 290
CSV, exporting a standard report to 365
DData
Airport Moving Maps, description of 33
available types, understanding 33EFB Document Browser, description of
33navigating through, in rows 67Performance, description of 33sample of, sorted in a column 66sorting in a table 66Terminal Charts, description of 33Video, description of 33
Data File LSAP 47DDM 15
archiving in, understanding 42association between roles and functions
30description of functions 61documentation suite 13exiting 75overview of 16package delivery process 18preparing to use 69sample page conventions 57setting up 69setting up the review process 70
starting 53task processing overview 34unarchiving in, understanding 42understanding CDA 19understanding reporting in 39understanding the Home page 59understanding the server 18viewing a package delivery status in 36
DDM Home pageexample of 59graphics on 60understanding 59
DDM introduction 1Define Properties tab
on the Create Recipient-Proxy page 169, 170
on the Create Recipient-Tail page 156, 158
on the Create Review Device-Tail page 230
Definitionof Packages filter type 326of Recipient filter type 325
Delete Checkpoint page 253Delete Content Type page 266Delete Review Group page 222Delete Tail Engine page 390Deleting
a checkpoint 252a checkpoint with no reviews pending
252a checkpoint with reviews pending 252a configurable report 380a content type 265a review device 238a review group 221a review group with pending reviews
221a review group, no pending reviews
221a tail engine 389a tail engine with associated recipients
389a tail engine with associated review
devices 389a tail engine with no recipient 389a tail engine with no review device 389a tail model 400
y, 2014 User Guide014 Jeppesen
475

Index
Us
47
a tail model with associated recipients 400
a tail model with associated review devices 400
a tail model with no recipients 400a tail model with no review devices 400an archive.zip file for a package 143an archive.zip file for a recipient 191an archived package 138an archived recipient 189an email rule 301
Delivered Packages tab 321Delivery Priority 95, 260, 267, 458Delivery process
adding checkpoints to 73diagram of 18understanding 17
Delivery propertiesviewing for a package 104
Delivery statusdescription of 36viewing for a package 36
Descriptionof a Basic recipient 146of a Proxy recipient 146of a Server recipient 146of a Tail recipient 146of About link 56of Airport Moving Maps 33of Approve/Reject Packages function
62of Archive Packages function 62of Archive Recipients function 63, 151of Basic recipients 29of Basic review device 224, 345of buttons 56of checkboxes 56of EFB Document Browser 33of Events configurable report 366of Exit link 56of Find Delivery Status function 62of Home link 56of live links 56of Manage Certificates function 64of Manage Checkpoints function 64of Manage Content Types function 64of Manage Email Rules function 64of Manage Filters function 64
of Manage LRUs function 64of Manage Recipient Groups function
198of Manage Recipients function 63, 151of Manage Reports function 65of Manage Review Devices function 63of Manage Review Groups function 63of Manage Tail Models function 65of Navigation menu 56of package statuses 36of Packages configurable report 366of Pending Content Review
configurable report 367of Performance data 33of Proxy recipients 29of Publish Packages function 62, 78of radio buttons 56of Recipient Packages Status
configurable report 367of Recipient Snapshot configurable
report 368of recipient types 29of Recipients configurable report 369of required fields 56of Review Devices configurable report
370of scrollbars 56of sortable columns 56of tabs 56of Tail recipients 29of Tail review device 224, 345of Terminal Charts 33of Video data 33of Welcome text 56
Desktop client, installation of CDAD 19Document Browser
configuration file 48description of 33
Downloadingan archive.zip file for an archived
package 141an archive.zip file for an archived
recipient 190
er Guide May, 2014© 2014 Jeppesen
6

Index
Ma© 2
EEdit Checkpoint page 251Edit Content Type page 264Edit Email Rule page
step 1, edit properties 299step 2, assign emails 300
Edit Filter pagestep 1 336step 2 337
Edit Report pagestep 1, edit query 376step 2, edit fields and finish 377
Edit Review Group page 219Edit Tail Engine page 388Editing
a checkpoint 250a configurable report 375a content type 264a package review status 110a review device 234a review group 218a review group with pending reviews
220a review group, no pending reviews
218a tail engine 388a tail model 399email rules 299
EDOCS APPCONFIG configuration file 48
EDOCS SETCONFIG configuration file 48
EFBand Airport Moving Maps 33and ARINC 665-2 package format 44and available data on 33and Bill of Materials package format 44and BOM package format 44and Document Browser 33and Performance data 33and Terminal Charts 33and Video data 33Document Browser, configuration file
48EFB class 33
and ARINC 665-2 44
Email rulescreating 290, 295deleting 301editing 299naming 289overview of 284prerequisites to creating 290viewing settings for 298
Error messages, troubleshooting 403Event types
understanding 41Events configurable report, description of
366Examples of package content 78Excel, exporting a report to 379Excel, exporting a standard report to 365Exit link
description of 56example of 57
Exiting DDM 75Exporting a report to Excel 379Exporting a standard report to CSV 365Exporting a standard report to Excel 365Exporting a standard report to Open Office
365Exporting a standard report to PDF 365Exporting a standard report to RTF 365Exporting a standard report to Word 365
FFilters
creating 328, 350naming 327overview of 320, 344Packages, definition of 326Recipient, definition of 325understanding 40understanding types of 325
Find a Package Results page 126, 128, 130
Find Delivery Status function, description of 62
Flight Bagand available data on 33installation of CDAF client 19
y, 2014 User Guide014 Jeppesen
477

Index
Us
47
FunctionsApprove/Reject Packages, description
of 62Archive Packages, description of 62Archive Recipients, description of 63,
151areas affected by Manage Email Rules
287description of 61Find Delivery Status, description of 62for managing a recipient group,
understanding 198for managing a recipient, understanding
151Manage Certificates, description of 64Manage Checkpoints, description of 64Manage Content Types, description of
64Manage Email Rules, description of 64Manage Filters, description of 64Manage LRUs, description of 64Manage Recipient Groups, description
of 198Manage Recipients, description of 63,
151Manage Reports, description of 65Manage Review Devices, description of
63Manage Review Groups, description of
63Manage Tail Models, description of 65Publish Packages 62Publish Packages, description of 78understanding role access to 30
GGenerating, a saved configurable report
377Getting help 14, 74Graphic links on the DDM Home page 60GRP PERF AIRPORT configuration file
49GRP PERF CONFIG configuration file 49GRP PERF DDG configuration file 49GRP PERF PERF configuration file 49
GRP PERF POLICY configuration file 49GSCC, contacting 14
HHelp link
example of 57Help, using 74Home link
description of 56example of 57location of 57
Home pageaccessing 59example of 55graphic links on 60understanding 59
IInstallation device
for CDAD 19for CDAF 19for CDAJ 19for CDAL 19
Intended audience 9Introduction to DDM 1
JJUM
and CDAJ client installation 19installation of CDAJ client 19
KKeystrokes, understanding 12
LLaptop client, installation of CDAD 19
er Guide May, 2014© 2014 Jeppesen
8

Index
Ma© 2
Live linksdescription of 56example of 57
Loadable Software Airplane Part, understanding 47
Loadable Software Part, understanding 47Logging on to DDM 53LSAPs
Application File 47Configuration File 47Data File 47understanding 47
LSPsApplication File 47Configuration File 47Data File 47understanding 47
MManage Certificates function, description
of 64Manage Checkpoints function, description
of 64Manage Checkpoints page 241Manage Content Types function,
description of 64Manage Content Types page 257, 279Manage Email Rules function
areas affected by 287description of 64
Manage Email Rules page 285Manage Files tab on the Archive Packages
page 141Manage Files tab on the Archive
Recipients page 190Manage Filters function
areas affected 323, 348description of 64
Manage Filters page 321, 339Manage LRUs function, description of 64Manage Recipient Groups function,
description of 198Manage Recipient Groups page 194Manage Recipients function, description of
63, 151
Manage Recipients page 83, 147Manage Reports function, description of
65Manage Reports page 357Manage Review Devices function,
description of 63Manage Review Devices page 225Manage Review Groups function,
description of 63Manage Review Groups page 209Manage Tail Models function, description
of 65Menu
overview of 61understanding 61
Microsoft Excel, exporting a report to 379Microsoft Excel, exporting a standard
report to 365Microsoft Word, exporting a standard
report to 365Modifying
a checkpoint 250a configurable report 375a content type 264a package review status 110a review device 234a review group 218a review group with pending reviews
220a review group, no pending reviews
218a tail model 399email rules 299tail engines 388
More information 13
NNaming
a checkpoint 245a configurable report 370a filter 327a package 82a recipient 152a recipient group 200a review group 213
y, 2014 User Guide014 Jeppesen
479

Index
Us
48
a tail engine 386a tail model 396an email rule 289content types 258
Navigation menuApprove/Reject Packages function,
description of 62Archive Packages function, description
of 62Archive Recipients function,
description of 63description of 56description of functions in 61example of 57Find Delivery Status function,
description of 62Manage Certificates function,
description of 64Manage Checkpoints function,
description of 64Manage Content Types function,
description of 64Manage Email Rules function,
description of 64Manage Filters function, description of
64Manage LRUs function, description of
64Manage Recipients function,
description of 63Manage Reports function, description of
65Manage Review Devices function,
description of 63Manage Review Groups function,
description of 63Manage Tail Models function,
description of 65Publish Packages function, description
of 62understanding 61
OOnline Help, using 74
Open Office, exporting a standard report to 365
Organization of this guide 10Overview
of adding checkpoints to the delivery process 73
of Airport Moving Maps 33of archiving in DDM 42of Basic recipients 29of CDA 19of CDAB 21of CDAD 20of CDAF 24of CDAJ 25of CDAL 27of checkpoints 19, 240of Content Delivery Agent for Boeing
21of Content Delivery Agent for Jeppesen
25of Content Delivery Agent for LoadStar
27of Content Delivery Agent for the
Desktop 20of Content Delivery Agent for the Flight
Bag 24of content types 256, 274of DDM 16of DDM reports 39of DDM roles 30of DDM server 18of DDM task processing 34of EFB Document Browser 33of email rules 284of event types 41of filtering 40of filters 320, 344of LSAPs 47of LSPs 47of package delivery statuses 36of packages 78of Performance data 33of Proxy recipients 29of recipient groups 194of recipients 28, 146of reports 356of review devices 224of review groups 208
er Guide May, 2014© 2014 Jeppesen
0

Index
Ma© 2
of setting up DDM 69of setting up the review process 70of tail engines 382of tail models 392of Tail recipients 29of Terminal Charts 33of the DDM Home page 59of the Navigation menu 61of types of available data 33of unarchiving in DDM 42of Video data 33of XML files 43types of recipients 29
PPackage checkpoint
adding 73Package delivery
viewing properties for 104Packages
and BOM format 44approving 118archived, deleting 138archived, downloading an archive.zip
file for 141archiving, overview of 132, 133ARINC 665-2 format 44assigning to a recipient 153assigning to a recipient group 200changing a review status for 110deleting an archive.zip file for 143deleting archived 43delivery process diagram 18description of statuses for delivered 36example of 78naming 82overview of 78process diagram for managing 80publishing 83rejecting 119status after unarchiving 42statuses that can be archived 42understanding the delivery process 17viewing a delivery status for 36viewing delivery properties for 104
viewing for a recipient 172viewing for a recipient group 201
packagespublishinh 83
Packages configurable report, description of 366
Packages filter, definition of 326Page example 335
Archive Packages, Archive Packages tab 134
Archive Packages, Manage Files tab 141
Archive Packages, Unarchive/Delete Packages tab 136
Archive Recipients, Archive Recipients tab 186
Archive Recipients, Manage Files tab 190
Archive Recipients, Unarchive/Delete Recipients tab 188
Create Checkpoint 247Create Content Type 260Create Email Rule, step 1 291Create Email Rule, step 2 292Create Filter, step 1 329Create Filter, step 2 330Create Filter, step 3 332Create Recipient, step 1 155Create Recipient-Proxy, step 2 169,
170Create Recipient-Tail, step 2 156, 158Create Report, step 1 372Create Report, step 2 373Create Report, step 3 374Create Review Device, step 1 229Create Review Device-Tail, step 2 230Create Review Group 215Create Tail Engine 387DDM Home 55DDM Home page 59Delete Checkpoint 253Delete Content Type 266Delete Review Group 222Delete Tail Engine 390Edit Checkpoint 251Edit Content Type 264Edit Email, step 1 299Edit Email, step 2 300
y, 2014 User Guide014 Jeppesen
481

Index
Us
48
Edit Filter, step 1 336Edit Filter, step 2 337Edit Report, step 1 376Edit Report, step 2 377Edit Review Group 219Edit Tail Engine 388Find a Package Results 126, 128, 130Manage Checkpoints 241Manage Content Types 257, 279Manage Email Rules 285Manage Filters page 321, 339Manage Recipient Groups 194Manage Recipients 83, 147Manage Reports 357Manage Review Devices 225Manage Review Groups 209Publish a Package 84Publish a Package, Define Properties tab
85Publish a Package,Publish To tab 87Remove Parts from Staging 112Remove Parts from Staging, Remove
Parts tab 113Remove Parts from Staging, View
Properties tab 114Run Report 378View Checkpoint 249View Content Type 262View Email Rule 298View Package, View Assigned
Recipients tab 105View Package, View Assigned Review
Devices tab 106View Package, View Properties tab 108View Recipient-Tail, View Assigned
Packages tab 175View Recipient-Tail, View Properties
tab 173, 174View Review Device-Tail 232, 233View Review Group 217
PART 121 LINUX configuration file 48PART 121 WINDOWS configuration file
48PART 25 LINUX configuration file 48PART 25 WINDOWS configuration file
48Parts
removing from staging and associated role 31
removing from the staging area 111PDF, exporting a standard report to 365Pending Content Review configurable
report, description of 367Pending reviews, and deleting a checkpoint
252Performance
configuration file 49Performance configuration file 49Performance data, description of 33PMAT
and CDAL client installation 19installation of CDAL client 19
Preparing to create checkpoints 71Preparing to use DDM 69Prerequisites
to creating a Basic recipient 154to creating a Proxy recipient 154to creating a recipient 154to creating a review device 229to creating a Tail recipient 154to publishing a package 83
Preview Filter page 335Process diagram
CDAD 21, 23CDAF 25CDAL 28functions used to manage checkpoints
243functions used to manage content types
276functions used to manage packages 80functions used to manage recipient
groups 196functions used to manage recipients
149functions used to manage review
devices 227functions used to manage review groups
211functions used to manage tail engines
384Manage Email Rules function 287package delivery in DDM 18
process diagram 21, 23, 25, 28
er Guide May, 2014© 2014 Jeppesen
2

Index
Ma© 2
Process for delivery packages, understanding 17
Product support 14product support 14Proxy recipient
creating 168description of 146prerequisites to creating 154
Proxy recipient, description of 29publish 83Publish Packages function
description of 78Publish Packages function, description of
62Published package
approving 118prerequisites to publishing 83rejecting 119
Publishinga package 83a package, prerequisites 83
RRadio buttons
description of 56Recipient filter, definition of 325Recipient groups
assigning a checkpoint to 200assigning a package to 200creating 199editing packages for 203editing properties for 203naming 200overview of 194process diagram for managing 196understanding associated functions 198viewing packages for 201viewing properties for 201
Recipient Packages Status configurable report, description of 367
Recipient Snapshot configurable report, description of 368
Recipientsarchived, deleting 189
archived, downloading an archive.zip file for 190
archiving, overview of 185assigning a checkpoint to 153assigning a package to 153Basic, description of 29, 146creating 154creating, Basic 154creating, Proxy 168creating, Tail 154deleting a tail engine with associated
recipients 389deleting a tail engine with no recipient
389deleting a tail model with associated
recipients 400deleting a tail model with no recipients
400deleting an archive.zip file for 191deleting archived 43editing packages for 176editing properties for 176naming 152overview of 146prerequisites to creating 154process diagram for managing 149Proxy, description of 29, 146Server, description of 146Tail, description of 29, 146types of 29, 146understanding 28understanding associated functions 151Unregistering 181viewing packages for 172viewing properties for 172
Recipients configurable report, description of 369
Red underlined text, description of 56References, additional 13Rejected package, changing the status for
110Rejecting a package 119Remove Parts from Staging page
primary page 112Remove Parts tab 113View Properties tab 114
Remove parts from staging, required role 31
y, 2014 User Guide014 Jeppesen
483

Index
Us
48
Remove Parts tab 113Removing
a checkpoint 252a checkpoint when no reviews are
pending 252a checkpoint when reviews are pending
252a configurable report 380a content type 265a review device 238a review group 221a review group with pending reviews
221a review group, no pending reviews
221a tail engine 389a tail engine with associated recipients
389a tail engine with associated review
devices 389a tail engine with no recipient 389a tail engine with no review device 389a tail model 400a tail model with associated recipients
400a tail model with associated review
devices 400a tail model with no recipients 400a tail model with no review devices 400an archive.zip file for a package 143an archive.zip file for a recipient 191an archived package 138an archived recipient 189an email rule 301stages parts 111
Reportsconfigurable in DDM, understanding
366exporting to Excel 379overview of 356standard in DDM, understanding 358understanding 39
Required fielddescription of 56example of 57
Requirementsfor setting up the review process 70
Review devices
creating 229deleting 238deleting a tail engine with associated
review devices 389deleting a tail engine with no review
device 389deleting a tail model with associated
review devices 400deleting a tail model with no review
devices 400editing 234overview of 224prerequisites to creating 229process diagram for managing 227types of 345viewing 232
Review Devices configurable report, description of 370
Review groupscreating 214deleting 221deleting, no pending reviews 221deleting, with pending reviews 221editing 218editing, no pending reviews 218editing, with pending reviews 220naming 213overview of 208process diagram for managing 211viewing 217
Reviewschanging a status 110deleting a checkpoint when no reviews
are pending 252deleting a checkpoint when reviews are
pending 252deleting a review group with no pending
reviews 221deleting a review group with pending
reviews 221determining process requirements 70editing a review group with no pending
reviews 218editing a review group with pending
reviews 220typical review process 116understanding the process to set up 70
Roles
er Guide May, 2014© 2014 Jeppesen
4

Index
Ma© 2
and removing parts from staging 31understanding available functions 30
Rows of data in a table, navigating in 67RTF, exporting a standard report to 365Run Report page 378Running
a saved configurable report 377
SSample
review process 116tail model number 392
Scrollbarsdescription of 56example of 57
Scrollingthrough multiple rows of data 67
Serverunderstanding 18
Server recipientdescription of 146
Set Defaults tab 339Setting up
DDM, overview of 69the DDM review process 70
Settingsfor an email rule, viewing 298for email rules, editing 299
Sortable columndescription of 56example of 57
Sortingdata in a table 66sample of data sorted in a column 66
Spreadsheets, exporting a report to 379Spreadsheets, exporting a standard report
to 365Staged parts
removing 111Staging area
removing parts from 111standard DDM reports
understanding 358standard reports
exporting to CSV 365
exporting to Excel 365exporting to Open Office 365exporting to PDF 365exporting to RTF 365exporting to Word 365
Starting DDM 53Statuses
changing for a reviewed package 110description for delivered packages 36for packages, Active 42for packages, Expired 42for unarchived packages 42viewing for a package 36
SUPPLIER CONFIG configuration file 48Support 14System Layout Files, configuration file 48
TTables
navigating through rows of data 67sample of sorted column data 66sorting data in 66
TabsArchive Packages on the Archive
Packages page 134Archive Recipients on the Archive
Recipients page 186Assign Packages and access to 31Define Properties, Create Recipient-
Proxy page 169, 170Define Properties, Create Recipient-Tail
page 156, 158Define Properties, Create Review
Device-Tail page 230Delivered Packages on Manage Filters
page 321description of 56example of 57Manage Files on the Archive Packages
page 141Manage Files on the Archive Recipients
page 190Remove Parts on the Remove Parts from
Staging page 113
y, 2014 User Guide014 Jeppesen
485

Index
Us
48
Set Defaults on the Manage Filters page 339
To Groups tab on Edit Email Rules page 300
Unarchive/Delete Packages on the Archive Packages page 136
Unarchive/Delete Recipients on the Archive Recipients page 188
View Assigned Packages, View Recipient-Tail page 175
View Assigned Packages, View Review Device-Tail page 232
View Assigned Recipients on the View Package page 105
View Assigned Review Devices on the View Package page 106
View Properties on the Remove Parts from Staging page 114
View Properties on the View Package page 108
View Properties, View Recipient-Tail page 173, 174
View Properties, View Review Device-Tail page 233
Tail enginescreating 387deleting 389deleting, with associated recipients 389deleting, with associated review devices
389deleting, with no recipient 389deleting, with no review device 389editing 388naming 386overview of 382process diagram for managing 384
Tail modelscreating 397deleting 400deleting, with associated recipients 400deleting, with associated review devices
400deleting, with no recipients 400deleting, with no review devices 400editing 399naming 396overview of 392
Tail recipient
creating 154description of 29, 146prerequisites to creating 154
Tail review device, description of 224, 345
Tasks, overview of prerequisites 34Technical support 14TERM CHARTS CUST CONFIG
configuration file 49Terminal Chart
configuration file 49description of 33
To Groups tabon the Edit Email Rules page 300
Troubleshooting error messages 403Types of data, understanding 33Types of filters
Packages, defined 326Recipients, defined 325understanding 325
Types of recipientsdescription of 146
Types of recipients, description of 29Types of review devices 345
Basic 224, 345Tail 224, 345
UUnarchive/Delete Packages tab on the
Archive Packages page 136Unarchive/Delete Recipients tab on the
Archive Recipients page 188Unarchiving
and package status 42understanding the process 42
Underlined column text, description of 56Understanding
Airport Moving Maps 33angle brackets 12association of functions to roles 30Basic recipients 29bold text 12CDA 19CDAB 21CDAD 20
er Guide May, 2014© 2014 Jeppesen
6

Index
Ma© 2
CDAF 24CDAJ 25CDAL 27checkpoints 19, 240Content Delivery Agent for Boeing 21Content Delivery Agent for Jeppesen
25Content Delivery Agent for LoadStar
27Content Delivery Agent for the Desktop
20Content Delivery Agent for the Flight
Bag 24content types 256, 274DDM 16DDM configurable reports 366DDM reporting 39DDM roles 30DDM standard reports 358DDM task processing 34deleting archived packages 43deleting archived recipients 43EFB Document Browser 33email rules 284event types 41filtering 40functions used to manage a recipient
151functions used to manage a recipient
group 198how to add checkpoints to the delivery
process 73how to prepare for creating checkpoints
71how to set up DDM 69how to set up the review process 70keystrokes 12LSAPs 47LSPs 47package delivery statuses 36Performance data 33Proxy recipients 29recipient types 29recipients 28reports 356review devices 224review groups 208tail engines 382
tail models 392Tail recipients 29Terminal Charts 33the DDM archival process 42the DDM archive process 42the DDM Home page 59the DDM server 18the DDM unarchive process 42the Navigation menu 61the package delivery process 17types of available data 33types of filters 325Video data 33XML files 43
understanding 19Unregistering a recipient 181User guide, conventions used in 12
Vversioned content 24, 90
definition 465finding delivery status 129
Video data, description of 33View Assigned Packages tab
on the View Recipient-Tail page 175View Review Device-Tail page 232
View Assigned Recipients tabon the View Package page 105
View Assigned Review Devices tabon the View Package page 106
View Checkpoint page 249View Content Type page 262View Email Rule page 298View Package page
View Assigned Recipients tab 105View Assigned Review Devices tab
106View Properties tab 108
View Properties tab 114on the View Package page 108on the View Recipient-Tail page 173,
174View Review Device-Tail page 233
View Recipient-Tail pageView Assigned Packages tab 175
y, 2014 User Guide014 Jeppesen
487

Index
Us
48
View Properties tab 173, 174View Review Device-Tail page
View Assigned Packages tab 232View Properties tab 233
View Review Group page 217Viewing
a Certificate of Conformity 120a checkpoint 249a COC 120a content type 262a review device 232a review group 217package delivery properties 104package delivery status in DDM 36settings for email rules 298
WWelcome text
description of 56example of 57
What is DDM? 16Who should use this guide 9Word, exporting a standard report to 365
XXML files
format for 45understanding 43
er Guide May, 2014© 2014 Jeppesen
8